owner's manual - led lcd tv - GSCS CDN B2C Service. - LG
385
P/NO : MFL59166621 (1006-REV01) www.lg.com OWNER’S MANUAL LED LCD TV Please read this manual carefully before operating your set and retain it for future reference. 47LX9500 55LX9500
-
Upload
khangminh22 -
Category
Documents
-
view
0 -
download
0
Transcript of owner's manual - led lcd tv - GSCS CDN B2C Service. - LG

P/NO : MFL59166621 (1006-REV01) www.lg.com
OWNER’S MANUAL
LED LCD TV
Please read this manual carefully before operatingyour set and retain it for future reference.
47LX950055LX9500

2
WARNING / CAUTION
The lightning flash with arrowhead
symbol, within an equilateral trian-
gle, is intended to alert the user to
the presence of uninsulated “dan-
gerous voltage” within the product’s enclo-
sure that may be of sufficient magnitude to
constitute a risk of electric shock to persons.
The exclamation point within an equi-
lateral triangle is intended to alert
the user to the presence of important oper-
ating and maintenance (servicing) instruc-
tions in the literature accompanying the
appliance.
TO REDUCE THE RISK OF ELECTRIC
SHOCK DO NOT REMOVE COVER (OR
BACK). NO USER SERVICEABLE PARTS
INSIDE. REFER TO QUALIFIED SERVICE
PERSONNEL.

3
SAFETY INSTRUCTIONS
IMPORTANT SAFETY INSTRUCTIONS
Read these instructions.
Keep these instructions.
Heed all warnings.
Follow all instructions.
1 Do not use this apparatus near water.
2 Clean only with dry cloth.
3 Do not block any ventilation openings. Install in accordance with the ma nufacturer’s instruc-tions.
4 Do not install near any heat sources such as
radiators, heat registers, stoves, or other appa-
ratus (including amplifiers) that produce heat.
5 Protect the power cord from being walked
on or pinched particularly at plugs, conve-
nience receptacles, and the point where
they exit from the apparatus.
6 Only use attachments/accessories speci-
fied by the manufacturer.
7 Use only with the cart, stand, tripod, bracket,
or table specified by the manufacturer, or
sold with the apparatus. When a cart is
used, use caution when moving the cart/
apparatus combination to avoid injury from
tip-over.
8 Unplug this apparatus during lighting
storms or when unused for long periods
of time.
9 Refer all servicing to qualified service per-sonnel. Servicing is required when the apparatus has been damaged in any way, such as power-supply cord or plug is dam-aged, liquid has been spilled or objects have fallen into the apparatus, the appara-tus has been exposed to rain or moisture, does not operate normally, or has been dropped.

4
SAFETY INSTRUCTIONS
10 Never touch this apparatus or antenna during a thunder or lighting storm.
11 When mounting a TV on the wall, make sure not to install the TV by the hanging power and signal cables on the back of the TV.
12 Do not allow an impact shock or any objects to fall into the product, and do not drop onto the screen with something.
13 CAUTION concerning the Power Cord:
It is recommend that appliances be placed upon a dedicated circuit; that is, a single outlet circuit which powers only that appli-ance and has no additional outlets or branch circuits. Check the specification page of this owner's manual to be certain.
Do not connect too many appliances to the same AC power outlet as this could result in fire or electric shock.
Do not overload wall outlets. Overloaded wall outlets, loose or damaged wall outlets, exten-sion cords, frayed power cords, or damaged or cracked wire insulation are dangerous . Any of these conditions could result in electric shock or fire. Periodically examine the cord of your appliance, and if its appearance indicates damage or deterioration, unplug it, discon-tinue use of the appliance, and have the cord replaced with an exact replacement part by an authorized servicer. Protect the power cord from physical or mechanical abuse, such as being twisted, kinked, pinched, closed in a door, or walked upon. Pay particular attention to plugs, wall outlets, and the point where the cord exits the appliance.
Do not make the TV with the power cord plugged in. Do not use a damaged or loose power cord. Be sure do grasp the plug when unplugging the power cord. Do not pull on the power cord to unplug the TV.
14 WARNING - To reduce the risk of fire or electri-cal shock, do not expose this product to rain, moisture or other liquids. Do not touch the TV with wet hands. Do not install this product near flammable objects such as gasoline or candles or expose the TV to direct air conditioning.
15 Do not expose to dripping or splashing and do not place objects filled with liquids, such as vases, cups, etc. on or over the appara-tus (e.g. on shelves above the unit).
16 GROUNDING
Ensure that you connect the earth ground wire to prevent possible electric shock (i.e. a TV with a three-prong grounded AC plug must be connected to a three-prong ground-ed AC outlet). If grounding methods are not possible, have a qualified electrician install a separate circuit breaker.
Do not try to ground the unit by connecting it to telephone wires, lightening rods, or gas pipes.
Power
Supply
Short-circuit
Breaker
17 DISCONNECTING DEVICE FROM MAINS
Mains plug is the disconnecting device. The plug must remain readily operable.
18 As long as this unit is connected to the AC wall outlet, it is not disconnected from the AC power source even if you turn off this unit by SWITCH.
19 Cleaning
When cleaning, unplug the power cord and scrub gently with a soft cloth to prevent scratching. Do not spray water or other liq-uids directly on the TV as electric shock may occur. Do not clean with chemicals such as alcohol, thinners or benzene.
20 Moving
Make sure the product is turned off, unplugged and all cables have been removed. It may take 2 or more people to carry larger TVs. Do not press against or put stress on the front panel of the TV.
21 Ventilation
Install your TV where there is proper ventila-tion. Do not install in a confined space such as a bookcase. Do not cover the product with cloth or other materials (e.g.) plastic while plugged in. Do not install in exces-sively dusty places.

5
22 Take care not to touch the ventilation open-ings. When watching the TV for a long period, the ventilation openings may become hot.
23 If you smell smoke or other odors coming from the TV or hear strange sounds, unplug the power cord contact an authorized service center.
24 Do not press strongly upon the panel with hand or sharp object such as nail, pencil or pen, or make a scratch on it.
25 Keep the product away from direct sunlight.
26 For LCD TV
If the TV feels cold to the touch, there may be a small “flicker” when it is turned on. This is normal, there is nothing wrong with TV.
Some minute dot defects may be visible on the screen, appearing as tiny red, green, or blue spots. However, they have no adverse effect on the monitor’s performance.
Avoid touching the LCD screen or holding your finger(s) against it for long periods of time. Doing so may produce some temporary dis-tortion effects on the screen.
27 Viewing 3D ImagingWhen viewing 3D imaging, watch the TV from an effective viewing angle and with-in the appropriate distance. If you exceed this viewing angle or distance, you may not be able to view the 3D imaging. Further-more, the 3D imaging may not display if it is viewed while you are lying down.If you watch the 3D imaging too closely or for a long period of time, it may harm your eyesight.Watching the TV or playing video games that incorporate 3D imaging with the 3D glasses for a long period of time can cause drowsiness, headaches or fatigue to you and/or your eyes. If you have a headache, or otherwise feel fatigued or drowsy, stop watching the TV and take a rest.Pregnant woman, seniors, persons with heart problems or persons who experience frequent drowsiness should refrain from watching 3D TV.Some 3D imaging may cause you to duck or dodge the image displayed in the video. Therefore, it is best if you do not watch 3D TV near fragile objects or near any objects that can be knocked over easily. Please prevent children under the age of 5 from watching 3D TV. It may affect their vi-sion development.
Warning for photosensitization seizure: Some viewers may experience a seizure
or epilepsy when exposed to certain fac-tors, including fl ashing lights or images in TV or video games. If you or anybody from your family has a history of epilepsy or seizure, please consult with your doc-tor before watching 3D TV.
Also certain symptoms can occur in un-specifi ed conditions without any previ-ous history. If you experience any of the following symptoms, immediately stop watching the 3D imaging and consult a doctor: dizziness or lightheadedness, vi-sual transition or altered vision, visual or facial instability, such as eye or muscle twitching, unconscious action, convulsion, loss of conscience, confusion or disorien-tation, loss of directional sense, cramps, or nausea. Parents should monitor their children, including teenagers, for these symptoms as they may be more sensitive to the effects of watching 3D TV.
Risk of photosensitization seizure can be reduced with the following actions.
- Take frequent breaks from watching 3D TV.
- For those who have vision that is differ-ent in each eye, they should watch the TV after taking vision correction mea-sures.
- Watch the TV so that your eyes are on the same level as the 3D screen and refrain from sitting too closely to the TV
- Do not watch the 3D imaging when tired or sick, and avoid watching the 3D imaging for a long period of time.
- Do not wear the 3D glasses for any oth-er purpose than viewing 3D imaging on a 3D TV.
- Some viewers may feel disoriented after watching 3D TV. Therefore, after you watch 3D TV, take a moment to regain aware-ness of your situation before moving.
ON DISPOSAL
(Only Hg lamp used LCD TV)
The fluorescent lamp used in this product con-
tains a small amount of mercury. Do not
dispose of this product with general house-
hold waste. Disposal of this product must be
carried out in accordance to the regulations of
your local authority.

6
CONTENTS
WARNING / CAUTION ............................2
SAFETY INSTRUCTIONS ........................3
FEATURE OF THIS TV ............................. 8
PREPARATION
Accessories .............................................................9
Optional Extras ....................................................10
Front Panel Information ..................................... 11
Back Panel Information ..................................... 12
Stand Instructions ........................................................14
VESA Wall Mounting ......................................... 16
Cable Management ...........................................18
Desktop Pedestal Installation .......................... 19
Swivel Stand ......................................................... 19
Kensington Security System ..........................20
Securing the TV to the wall to prevent falling
when the TV is used on a stand ....................21
Antenna or Cable Connection .......................22
EXTERNAL EQUIPMENT SETUP
HD Receiver setup .............................................23
DVD SETUP .........................................................26
VCR SETUP .........................................................29
Other A/V Source Setup ..................................31
USB Connection ................................................32
Headphone Setup ..................................................32
Audio out Connection ......................................33
External Equipment WIreless Connection
(Optional Extras) .................................................34
PC Setup ..............................................................35
Network Setup ....................................................42
WATCHING TV / CHANNEL CONTROL
Remote Control Functions ..............................50
Magic Motion Remote Control Functions...52
Turning on the TV ..............................................55
Channel Selection..............................................55
Volume Adjustment ..........................................55
Initial setting ........................................................56
On-Screen Menus Selection ..........................58
Quick menu .........................................................60
Home menu .........................................................61
Customer Support
- Software Update .............................................62
- Picture Test/Sound Test ................................63
- Product/Service Info. .....................................64
- Network Test .....................................................64
Simple Manual ....................................................65
Channel Setup
- Auto Scan (Auto Tuning) ..............................66
- Add/Delete Channel (Manual Tuning) ..... 67
- Channel Editing ...............................................68
Channel List ........................................................69
Favorite Channel Setup .................................... 70
Scan Option ......................................................... 71
System Color ....................................................... 72
Channel Brief Information ............................... 73
EPG (Electronic Program Guide)................... 75
Input List .............................................................. 78
Input Label ........................................................... 79
Mode Setting ..................................................... 80
Demo mode .........................................................81
Reset to Factory Default (Initial Setting) .....82
AV Mode ...............................................................83
Game/Schedule .................................................84
SIMPLINK .............................................................88
TIME MACHINE
Precautions when using the USB Device ...90
Time Machine (Pause & Replay of Live TV) ...91
Recording .............................................................95
Schedule ...............................................................98
Recorded TV .......................................................99
3D VIDEO
3D Video ............................................................. 103

7
MY MEDIA
Entry Mode ........................................................ 106
Connection Method .........................................107
Movie list .............................................................. 112
Photo list .............................................................. 119
Music list ............................................................. 125
DivX Registration Code .................................. 130
Deactivation ........................................................ 131
NETWORK
Legal Notice ...................................................... 132
NETCAST
Netcast Menu .................................................... 133
Emol ..................................................................... 134
UOL ..................................................................... 135
Terra TV ............................................................... 136
Bazuca ..................................................................137
Accuweather ...................................................... 138
PICASA ............................................................... 139
YOUTUBE ........................................................... 140
PICTURE CONTROL
Picture Size (Aspect Ratio) Control ............ 142
Picture Wizard ................................................... 144
Energy Saving ............................................ 146
Preset Picture Settings (Picture Mode) ......147
Manual Picture Adjustment - User Mode 148
Picture Improvement Technology
(Advanced Contorl) ......................................... 149
Expert Picture Control .................................... 150
Picture Reset ..................................................... 153
TruMotion .......................................................... 154
LED Local Dimming ...................................... 155
Power Indicator .............................................. 155
SOUND & LANGUAGE CONTROL
Auto Volume ...................................................... 156
Clear Voice II ......................................................157
Balance ............................................................... 158
Preset Sound Settings (Sound Mode) ...... 159
Sound Setting Adjustment - User Mode . 160
Audio Reset .........................................................161
Digital Audio Out ...............................................161
TV Speakers On/Off Setup .......................... 162
Stereo/SAP Broadcast Setup ...................... 163
Audio Language ............................................. 164
On-Screen Menus Language Selection ... 165
Caption Mode
- Analog Broadcasting System Captions . 166
- Digital Broadcasting System Captions ....167
TIME SETTING
Clock Setting
- Auto Clock Setup ......................................... 168
- Manual Clock Setup .................................... 169
Auto On/Off Time Setting .............................170
Sleep Timer Setting ..........................................171
PARENTAL CONTROL / RATINGS
Set Password & Lock System .......................172
Channel Blocking ..............................................175
Movie Rating ......................................................176
External Input Blocking ...................................177
Key Lock ..............................................................178
APPENDIX
Troubleshooting .................................................179
Maintenance ...................................................... 182
Product Specifications ................................... 182
IR Codes ............................................................. 183
External Control Through RS-232C .......... 184
Open Source Software Notice ..................... 190

8
FEATURE OF THIS TV
Manufactured under license from Dolby Laboratories. “Dolby “and the double-D symbol are trademarks of Dolby Laboratories.
HDMI, the HDMI logo and High-Definition Multimedia Interface are trademarks or registered trade-marks of HDMI Licensing LLC."
IMPORTANT INFORMATION TO PREVENT “IMAGE BURN / BURN-IN” ON YOUR TV SCREEN
When a fixed image (e.g. logos, screen menus, video game, and computer display) is displayed on the TV for an extended period, it can become permanently imprinted on the screen. This phenomenon is known as “image burn” or “burn-in.” Image burn is not covered under the man-ufacturer’s warranty.
In order to prevent image burn, avoid displaying a fixed image on your TV screen for a prolonged period (2 or more hours for LCD, 1 or more hours for Plasma).
Image burn can also occur on the letter-boxed areas of your TV if you use the 4:3 aspect ratio setting for an extended period.
ABOUT DIVX VIDEO: DivX® is a digital video format created by DivX,Inc. This is an official DivX Certified device that plays DivX video. Visit www.divx.com for more information and software tools to convert your files into DivX video.
ABOUT DIVX VIDEO-ON-DEMAND: This DivX Certified® device must be registered in order to play DivX Video-on-Demand (VOD) content. To gener-ate the registration code, locate the DivX VOD section in the device setup menu. Go to vod.divx.com with this
code to complete the registration pro-cess and learn more about DivX VOD.
“DivX Certified to play DivX video up to HD 1080p, including premium con-tent”
“Pat. 7,295,673; 7,460,688;7,519,274”

9
PR
EP
AR
AT
ION
ACCESSORIES
PREPARATION
Ensure that the following accessories are included with your TV. If an accessory is missing, please con-
tact the dealer where you purchased the TV.
The accessories included may differ from the images below.
Option Extras
* Wipe spots on the exterior only
with the polishing cloth.
* Do not wipe roughly when remov-
ing stain. Excessive pressure may
cause scratch or discoloration.Polishing Cloth
Not included with all models
D-sub 15 pin Cable
When using the VGA (D-sub 15
pin cable) PC connection, the
user must use shielded signal
interface cables with ferrite cores
to maintain standards compli-
ance.
1.5V 1.5V
Owner’s Manual Nero MediaHome 4
Essentials CD
Remote Control,
Batteries (AAA)
(Some models)
RF Adapter (Some models)You must connect it to the
antenna wire after fixing in
Antenna Input. This adapter is
for supplied in Argentina.
1.5V 1.5V
Motion Remote Control,
Strap,
Batteries (AA) (Some models)
Cable Holder
(Refer to p.18)
Component gender cable,
AV gender cable
Screws for stand assembly(Refer to P.14)
x 4 x 4
x 2 x 2
(M4 x 12) (M4 x 22)
Stand Rear Cover 3D Glasses

PREPARATION
PR
EP
AR
AT
ION
10
OPTIONAL EXTRAS
Optional extras can be changed or modified for quality improvement without any notification.
Contact your dealer for buying these items.
This device only works with compatible LG LED LCD TV.
Wireless Media Box
(AN-WL100W)
Wireless LAN for Broadband/
DLNA Adaptor
(AN-WF100)

11
PR
EP
AR
AT
ION
SPEAKER
Emitter
It is the part equipped with
the emitter exchanging sig-
nal with 3D glasses.
Please be careful not to
block the screen with objects
or people while watching a
3D Video.
Remote Control Sensor
Intelligent Sensor
Adjusts picture according to
the surrounding conditions
CH
VOL
ENTER
INPUT
MENU
CHANNEL ( , ) Buttons
VOLUME (-, +)
Buttons
ENTER Button
INPUT Button
MENU Button
POWER Button
Power/Standby Indicator
(Can be adjusted using the Power Indicator
in the OPTION menu. p.155)
Image shown may differ from your TV.
FRONT PANEL INFORMATION

PREPARATION
PR
EP
AR
AT
ION
12
12
ANTENNAIN
RGB IN (PC)
LAN
WIRELESSCONTROL
(RGB/DVI) OPTICAL DIGITAL
/DVI IN
2
3
1
VIDEO AUDIOL(MONO) R
VIDEO AUDIO
COM
PONENT IN
AV IN 1
Y PB PR L R
AUDIO IN AUDIO OUT
2
1CABLE
IN
RS-232C IN(CONTROL&SERVICE)
ꔡ
1 2 3 4
5
6
8 79
*A 0.39 inches (10 mm)
COM
PONE
NT IN
3AU
DIO
/ Y
PB
PR
IN 4
H/P
USB
IN 1
USB
IN 2
AV IN
2VI
DEO
/ AU
DIO
Tim
e M
achi
neRe
ady10
8
11
2
6
CAUTION
For HDMI IN 4 and USB IN 1, 2
For an optimal connection,
HDMI cables and USB
devices should have bezels
less than 0.39 inches (10
mm) thick.
BACK PANEL INFORMATION
Image shown may differ from your TV.
COM
PONE
NT IN
3AU
DIO
/ Y
PB
PR
IN 4
H/P
USB
IN 1
USB
IN 2
AV IN
2VI
DEO
/ AU
DIO
10
8
11
2
6
*For Brazil
*Other country
Used for Time Machine feature.

13
PR
EP
AR
AT
ION
1 LAN
Network connection for AccuWeather, Picasa, YouTube, etc.
Also used for photo and music files on local
network.
2 HDMI/DVI IN, HDMI IN
Digital Connection.
Supports HD video and Digital audio. Doesn’t support 480i.
Accepts DVI video using an adapter or HDMI
to DVI cable (not included).
3 RGB IN (PC)
Analog PC Connection. Uses a D-sub 15 pin cable (VGA cable).
AUDIO IN (RGB/DVI)
1/8” (0.32 cm) headphone jack for analog PC audio input.
4 RS-232C IN (CONTROL & SERVICE) PORT
Used by third party devices.
This port is used for service or Hotel mode.
5 OPTICAL DIGITAL AUDIO OUT
Digital optical audio output for use with amps and home theater systems.
Note: In standby mode, this port doesn’t work.
6 AV (Audio/Video) IN
Analog composite connection. Supports stan-
dard definition video only (480i).
7 ANTENNA IN, CABLE IN
Connect over-the air signals to this jack.
Connect cable signals to this jack.
8 COMPONENT IN
Analog Connection.
Supports HD.
Uses a red, green, and blue cable for video &
red and white for audio.
9 WIRELESS CONTROL
Connect the Wireless Dongle to the TV to control the external input devices connected to Media Box wirelessly.
10 USB INPUT
Used for viewing photos, movies and listen-ing to MP3s.
11 HEADPHONE INPUT
0.32 cm (1/8 inch) headphone jack
Impedance 16 Ω , Maximum audio out 15 mW
12 Power Cord Socket
For operation with AC power.
Caution: Never attempt to operate the TV on DC power.

PREPARATION
PR
EP
AR
AT
ION
14
STAND INSTRUCTIONS
Image shown may differ from your TV.
INSTALLATION
! NOTE
When assembling the desk type stand,
make sure the screws are fully tightened (If
not tightened fully, the TV can tilt forward
after the product installation). Do not over
tighten.
2 Assemble the parts of the STAND
BODY with the STAND BASE of the
TV.
At this time, tighten the screws that
hold the STAND BODY on.
1 Carefully place the TV screen side down on
a cushioned surface to protect the screen
from damage.
4 Assemble the part of the STAND
REAR COVER with the TV.
3 Install the 4 screws into the holes shown.
M4 x 22
M4 x 12
STAND BODY
STAND BASE
STAND REAR
COVER

15
PR
EP
AR
AT
IONDETACHMENT
1 Carefully place the TV screen side down on
a cushioned surface to protect the screen
from damage.
3 Remove the screws that hold the stand on.
2 Detach the STAND REAR COVER from TV.
4 Detach the stand from TV.

PREPARATION
PR
EP
AR
AT
ION
16
VESA WALL MOUNTING
Install your wall mount on a solid wall perpendicular to the floor. When attaching to other building mate-
rials, please contact your nearest installer.
If installed on a ceiling or slanted wall, it may fall and result in severe personal injury.
We recommend that you use an LG brand wall mount when mounting the TV to a wall.
LG recommends that wall mounting be performed by a qualified professional installer.
Model
VESA (A * B)A
BStandard
ScrewQuantity
Wall Mounting Bracket
(sold separately)
47LX9500 200 * 200 M6 4
LSW200B, LSW200BG,LSW200BX, LSW200BXG
55LX9500 400 * 400 M6 4
LSW400B, LSW400BG, DSW400BG

17
PR
EP
AR
AT
ION
CAUTION
Do not install your wall mount kit while your TV is turned on. It may result in personal injury due to
electric shock.
! NOTE
Screw length needed depends on the wall
mount used. For further information, refer to
the instructions included with the mount.
Standard dimensions for wall mount kits are
shown in the table.
When purchasing our wall mount kit, a detailed
installation manual and all parts necessary for
assembly are provided.
Do not use screws longer than the standard
dimension, as they may cause damage to the
inside to the TV.
For wall mounts that do not comply with the
VESA standard screw specifications, the length
of the screws may differ depending on their
specifications.
Do not use screws that do not comply with the
VESA standard screw specifications.
Do not use fasten the screws too strongly, this
may damage the TV or cause the TV to a fall,
leading to personal injury. LG is not liable for
these kinds of accidents.
LG is not liable for TV damage or personal
injury when a non-VESA or non specified wall
mount is used or the consumer fails to follow
the TV installation instructions.

PREPARATION
PR
EP
AR
AT
ION
18
CABLE MANAGEMENT Image shown may differ from your TV.
CABLE HOLDER
CABLE HOLDER
2 After connecting the cables as necessary,
install the CABLE HOLDER as shown
and bundle the cables.
1Secure the power cord with the CABLE
HOLDER on the TV back cover.
It will help prevent the power cable from
being removed by accident.

19
PR
EP
AR
AT
ION
DESKTOP PEDESTAL INSTALLATION
SWIVEL STANDAfter installing the TV, you can adjust the TV set manually to the left or right direction by 20 º to suit
your viewing position.
Image shown may differ from your TV.
For proper ventilation, allow a clearance of 10.1 cm (4 inch) on all four sides from the wall.
10.1 cm (4 inch)
10.1 cm (4 inch)
10.1 cm (4 inch)
10.1 cm (4 inch)
CAUTION
Ensure adequate ventilation by following the clearance recommendations.
Do not mount near or above any type of heat source.

PREPARATION
PR
EP
AR
AT
ION
20
KENSINGTON SECURITY SYSTEM This feature is not available for all models.
- The TV is equipped with a Kensington Security System con-
nector on the back panel. Connect the Kensington Security
System cable as shown below.
- For the detailed installation and use of the Kensington Security
System, refer to the user’s guide provided with the Kensington
Security System.
For further information, contact http://www.kensington.com,
the internet homepage of the Kensington company. Kensington
sells security systems for expensive electronic equipment such
as notebook PCs and LCD projectors.
NOTE: The Kensington Security System is an optional accessory.

21
PR
EP
AR
AT
ION
SECURING THE TV TO THE WALL TO PREVENT FALLING WHEN THE TV IS USED ON A STAND
We recommend that you set up the TV close to a wall so it cannot fall over if pushed backwards.
Additionally, we recommend that the TV be attached to a wall so it cannot be pulled in a forward
direction, potentially causing injury or damaging the product.
Caution: Please make sure that children don’t climb on or hang from the TV.
Insert the eye-bolts (or TV brackets and bolts) to tighten the product to the wall as shown in the
picture.
* If your product has the bolts in the eye-bolts position before inserting the eye-bolts, loosen the
bolts.
* Insert the eye-bolts or TV brackets/bolts and tighten them securely in the upper holes.
Secure the wall brackets with the bolts (sold separately) to the wall. Match the height of the bracket
that is mounted on the wall to the holes in the product.
Ensure the eye-bolts or brackets are tightened securely.
Use a sturdy rope (sold separately) to tie the product. It is safer to tie the
rope so it becomes horizontal between the wall and the product.
You should purchase necessary components to prevent the TV from tipping over (when not using a
wall mount).
Image shown may differ from your TV.
! NOTE
Use a platform or cabinet strong enough and large enough to support the size and weight of
the TV.
To use the TV safely make sure that the height of the bracket on the wall and the one on the TV are
the same.

PREPARATION
PR
EP
AR
AT
ION
22
ANTENNA OR CABLE CONNECTION
To prevent damage do not connect to the power outlet until all connections are made between the
devices.
Image shown may differ from your TV.
1. Antenna (Analog or Digital)
Wall Antenna Socket or Outdoor Antenna without a Cable Box
Connections.
For optimum picture quality, adjust antenna direction if needed.
2. Cable
Wall
Antenna
Socket
Outdoor
Antenna
(VHF, UHF)
Cable TV
Wall Jack
Multi-family Dwellings/Apartments
(Connect to wall antenna socket)
RF Coaxial Wire (75 Ω)
RF Coaxial Wire (75 Ω)
Single-family Dwellings /Houses
(Connect to wall jack for outdoor antenna)
Be careful not to bend the copper wire
when connecting the antenna.
Copper Wire
To improve the picture quality in a poor signal area, please purchase a signal amplifier and install properly.
If the antenna needs to be split for two TV’s, install a 2-Way Signal Splitter.
If the antenna is not installed properly, contact your dealer for assistance.
ANTENNA IN CABLE IN
ANTENNA IN CABLE IN

23
EX
TE
RN
AL
EQ
UIP
ME
NT
SE
TU
P
HD RECEIVER SETUP
To prevent the equipment damage, never plug in any power cords until you have finished connecting all equipment.
Image shown may differ from your TV.
Y, CB/PB, CR/PR
1. How to connect
1 Connect the video outputs (Y, PB, PR) of the
digital set-top box to the COMPONENT IN
VIDEO 1, 2, or 3 jacks on the TV. Match the jack
colors (Y = green, PB = blue, and PR = red).
2 Connect the audio output of the digital set-top
box to the COMPONENT IN AUDIO 1, 2, or 3
jacks on the TV.
2. How to use Turn on the digital set-top box.
(Refer to the owner’s manual for the digital set-top
box operation.)
Select the Component1, Component2, or
Component3 input source on the TV using the
INPUT button on the remote control.
Component Connection
This TV can receive digital over-the-air/digital cable signals without an external digital set-top box.
However, if you do receive digital signals from a digital set-top box or other digital external device, refer
to the figure as shown below.
Resolution Horizontal Frequency(KHz)
Vertical Frequency(Hz)
720x480i15.73 59.94
15.73 60.00
720x480p31.47 59.94
31.50 60.00
720x576i 15.625* 50.00*
720x576p 31.25* 50.00*
1280x720p
37.50* 50.00*
44.96 59.94
45.00 60.00
1920x1080i
28.125* 50.00*
33.72 59.94
33.75 60.00
1920x1080p
26.97 23.976
27.00 24.00
33.71 29.97
33.75 30.00
56.25* 50.00*
67.432 59.94
67.50 60.00
EXTERNAL EQUIPMENT SETUP
RGB IN (PC)
(RGB/DVI)
RS-232C IN(CONTROL&SERVICE)
OPTICALDIGITAL
/DVI IN
2
3
1
VIDEO AUDIOL(MONO) R AV IN 1AUDIO IN AUDIO OUT
VIDEO AUDIO
COM
PONENT IN
Y PB PR L R2
1
Y L RPB PR
1 2
*Except Brazil

EXTERNAL EQUIPMENT SETUP
EX
TE
RN
AL
EQ
UIP
ME
NT
SE
TU
P
24
YLR PBPR
AUDI
O /
Y P
B P
RIN
4H/
PUS
B IN
1US
B IN
2
AV IN
2VI
DEO
/ AU
DIOCO
MPO
NENT
IN3
1
2
DVI to HDMI Connection
1. How to connect
1 Connect the DVI output of the digital set-top
box to the HDMI/DVI IN 1, 2, or 3 jack on the
TV.
2 Connect the digital set-top box audio output to
the AUDIO IN (RGB/DVI) jack on the TV.
2. How to use Turn on the digital set-top box.
(Refer to the owner’s manual for the digital set-
top box.)
Select the HDMI1, HDMI2, or HDMI3 input source
on the TV using the INPUT button on the remote
control.
! NOTE
A DVI to HDMI cable or adapter is required for this con-
nection. DVI doesn't support audio, so a separate audio
connection is necessary.
L RDVI OUTPUTAUDIO
RGB IN (PC)
LAN
WIRELESSCONTROL
RS-232C IN(CONTROL&SERVICE)
VIDEO AUDIOL(MONO) R
VIDEO AUDIO
COM
PONENT IN
AV IN 1
Y PB PR L R
AUDIO OUT
2
1
/DVI IN
2
3
1
(RGB/DVI)
AUDIO IN
OPTICAL DIGITAL
ꔡ
1
2

25
EX
TE
RN
AL
EQ
UIP
ME
NT
SE
TU
P
HDMI Connection
1. How to connect
1 Connect the digital set-top box to HDMI/DVI IN
1, 2, 3 or 4 jack on the TV.
2 No separate audio connection is necessary.
HDMI supports both audio and video.
2. How to use Turn on the digital set-top box.
(Refer to the owner’s manual for the digital set-
top box.)
Select the HDMI1, HDMI2, HDMI3, or HDMI4 input
source on the TV using the INPUT button on the
remote control.
! NOTE
If an HDMI cable doesn’t support High Speed HDMI,
it can cause flickers or no screen display. In this case
use the latest cables that support High Speed HDMI.
HDMI Audio Supported Format: Dolby Digital, PCM
HDMI-DTV
Resolution Horizontal Frequency(KHz)
Vertical Frequency(Hz)
720x480p31.47 59.94
31.50 60.00
720x576p 31.25* 50.00*
1280x720p
37.50* 50.00*
44.96 59.94
45.00 60.00
1920x1080i
28.125* 50.00*
33.72 59.94
33.75 60.00
1920x1080p
26.97 23.976
27.00 24.00
33.71 29.97
33.75 30.00
56.25 50.00*
67.432 59.94
67.50 60.00
HDMI OUTPUT
RGB IN (PC)
LAN
WIRELESSCONTROL
(RGB/DVI)VIDEO L(MONO
VIDEO A
AUDIO IN AUDIO OUT
2
1
/DVI IN
2
3
1
Y PB PR L
OPTICAL DIGITAL
RS-232(CONTROL&S
ꔡ
1
*Except Brazil

EXTERNAL EQUIPMENT SETUP
EX
TE
RN
AL
EQ
UIP
ME
NT
SE
TU
P
26
DVD SETUP
RGB IN (PC)
SL
(RGB/DVI)
RS-232C IN(CONTROL&SERVICE)
OPTICALDIGITAL
/DVI IN
2
3
1
VIDEO AUDIOL(MONO) R AV IN 1AUDIO IN AUDIO OUT
VIDEO AUDIO
COM
PONENT IN
Y PB PR L R2
1
Y L RPB PR
1 2
YLR PBPR
AUDI
O /
Y P
B P
RIN
4H/
PUS
B IN
1US
B IN
2
AV IN
2VI
DEO
/ AU
DIOCO
MPO
NENT
IN3
1
2
Component Input ports
To get better picture quality, connect a DVD player
to the component input ports as shown below.
Component ports on
the TV
Y PB PR
Video output ports
on DVD player
Y PB PR
Y B-Y R-Y
Y Cb Cr
Y Pb Pr
1. How to connect
1 Connect the video outputs (Y, PB, PR) of the
DVD to the COMPONENT IN VIDEO 1, 2, or 3
jacks on the TV.
Match the jack colors (Y = green, PB = blue, and
PR = red).
2 Connect the audio outputs of the DVD to the
COMPONENT IN AUDIO 1, 2, or 3 jacks on the
TV.
2. How to use Turn on the DVD player, insert a DVD.
Select the Component1, Component2, or
Component3 input source on the TV using the
INPUT button on the remote control.
Refer to the DVD player’s manual for operating
instructions.
Component Connection

27
EX
TE
RN
AL
EQ
UIP
ME
NT
SE
TU
P
Composite (RCA) Connection
1. How to connect
1 Connect the AUDIO/VIDEO jacks between TV
and DVD. Match the jack colors (Video = yellow,
Audio Left = white, and Audio Right = red)
2. How to use Turn on the DVD player, insert a DVD.
Select the AV1 or AV2 input source on the TV
using the INPUT button on the remote control.
Refer to the DVD player's manual for operating
instructions.
RGB IN (PC)
SL
(RGB/DVI)
/DVI IN
2
3
1
VIDEO AUDIO
COM
PONENT IN
AUDIO IN AUDIO OUT
2
1
VIDEO AUDIOL(MONO) R AV IN 1
Y PB PR L R
OPTICAL DIGITAL
RS-232C IN(CONTROL&SERVICE)
L RVIDEOAUDIO
1
L RVIDEOAUDIO
AUDI
O /
Y P
B P
RIN
4H/
PUS
B IN
1US
B IN
2
VIDE
O /
AUDI
OCOM
PONE
NT IN
3
AV IN
2

EXTERNAL EQUIPMENT SETUP
EX
TE
RN
AL
EQ
UIP
ME
NT
SE
TU
P
28
HDMI Connection
1. How to connect
1 Connect the HDMI output of the DVD to the
HDMI/DVI IN 1, 2, 3 or 4 jack on the TV.
2 No separate audio connection is necessary.
HDMI supports both audio and video.
2. How to use Select the HDMI1, HDMI2, HDMI3, or HDMI4 input
source on the TV using the INPUT button on the
remote control.
Refer to the DVD player's manual for operating
instructions.
! NOTE
If an HDMI cable doesn’t support High Speed HDMI,
it can cause flickers or no screen display. In this case
use the latest cables that support High Speed HDMI.
HDMI Audio Supported Format: Dolby Digital, PCM
HDMI OUTPUT
RGB IN (PC)
LAN
WIRELESSCONTROL
(RGB/DVI)VIDEO AUDIOL(MONO) R
VIDEO AUDIO
COM
PONENT IN
AV IN 1AUDIO IN AUDIO OUT
2
1
/DVI IN
2
3
1
Y PB PR L R
OPTICAL DIGITAL
RS-232C IN(CONTROL&SERVICE)
ꔡ
1

29
EX
TE
RN
AL
EQ
UIP
ME
NT
SE
TU
P
VCR SETUP
Antenna Connection
ANTENNAIN
CABLEIN
L RS-VIDEO VIDEOAUDIO
OUTPUTSWITCH
ANT IN
ANT OUT
Wall Jack
Antenna
1. How to connect
1 Connect the RF antenna out socket
of the VCR to the ANTENNA/CABLE
IN socket on the TV.
2 Connect the antenna cable to the RF
antenna in socket of the VCR.
2. How to use Set VCR output switch to 3 or 4 and
then tune TV to the same channel num-
ber.
Insert a video tape into the VCR and
press PLAY on the VCR (Refer to the
VCR owner’s manual).
1
2

EXTERNAL EQUIPMENT SETUP
EX
TE
RN
AL
EQ
UIP
ME
NT
SE
TU
P
30
Composite (RCA) Connection
1. How to connect
1 Connect the AUDIO/VIDEO jacks between TV
and VCR. Match the jack colors (Video = yellow,
Audio Left = white, and Audio Right = red)
2. How to use Insert a video tape into the VCR and press PLAY
on the VCR. (Refer to the VCR owner’s manual.)
Select the AV1 or AV2 input source on the TV
using the INPUT button on the remote control.
! NOTE
If you have a mono VCR, connect the audio cable
from the VCR to the AUDIO L/MONO jack of the TV.
S-VIDEO
OUTPUTSWITCH
ANT IN
ANT OUT
RGB IN (PC)
SSOL
(RGB/DVI)
/DVI IN
2
3
1
VIDEO AUDIO
COM
PONENT IN
AUDIO IN AUDIO OUT
2
1
VIDEO AUDIOL(MONO) R AV IN 1
Y PB PR L R
OPTICAL DIGITAL
RS-232C IN(CONTROL&SERVICE)
L RVIDEOAUDIO
1
S-VIDEO
OUTPUTSWITCH
ANT IN
ANT OUT
L RVIDEOAUDIO
AUDI
O /
Y P
B P
RIN
4H/
PUS
B IN
1US
B IN
2
VIDE
O /
AUDI
OCOM
PONE
NT IN
3
AV IN
2

31
EX
TE
RN
AL
EQ
UIP
ME
NT
SE
TU
P
OTHER A/V SOURCE SETUP
1. How to connect
1 Connect the AUDIO/VIDEO jacks
between TV and external equipment.
Match the jack colors.
(Video = yellow, Audio Left = white, and
Audio Right = red)
2. How to use Select the AV1 or AV2 input source on
the TV using the INPUT button on the
remote control.
Operate the corresponding external
equipment.
RGB IN (PC)
SSOL
(RGB/DVI)
/DVI IN
2
3
1
VIDEO AUDIO
COM
PONENT IN
AUDIO IN AUDIO OUT
2
1
VIDEO AUDIOL(MONO) R AV IN 1
Y PB PR L R
OPTICAL DIGITAL
RS-232C IN(CONTROL&SERVICE)
L RVIDEOAUDIO
Camcorder
Video Game Set

EXTERNAL EQUIPMENT SETUP
EX
TE
RN
AL
EQ
UIP
ME
NT
SE
TU
P
32
USB CONNECTION
HEADPHONE SETUP
1. How to connect
1 Connect the USB device to the USB
IN or USB IN 1/2 jack on the side of
TV.
2. How to use After connecting the USB IN jack, you
use the USB function. ( p.107)
You can listen to the sound through the headphone.
1. How to connect
1 Plug the headphone into the head-
phone socket.
2 To adjust the headphone volume,
press the VOL +/- button. If you
press the MUTE button, the sound
from the headphone is switched off.
! NOTE
AUDIO menu options are disabled when connecting a
headphone. When changing AV MODE with a headphone con-
nected, the change is applied to video but not to audio. Optical Digital Audio Out is not available when con-
necting a headphone.
COM
PONE
NT IN
3AU
DIO
/ Y
PB
PR
IN 4
H/P
USB
IN 1
USB
IN 2
AV IN
2VI
DEO
/ AU
DIO
Tim
e M
achi
neRe
ady
Memory Key
or
H/P

33
EX
TE
RN
AL
EQ
UIP
ME
NT
SE
TU
P
AUDIO OUT CONNECTION
Send the TV’s audio to external audio equipment via the Audio Output port.
If you want to enjoy digital broadcasting through 5.1-channel speakers, connect the OPTICAL DIGITAL
AUDIO OUT terminal on the back of TV to a Home Theater (or amp).
! NOTE
When connecting with external audio equipment, such
as amplifiers or speakers, you can turn the TV speakers
off in the menu. ( p.162)
CAUTION
Do not look into the optical output port. Looking at
the laser beam may damage your vision.
Audio with ACP (Audio Copy Protection) function may
block digital audio output.
1. How to connect
1 Connect one end of the optical cable to the
TV port of OPTICAL DIGITAL AUDIO OUT.
2 Connect the other end of the optical cable to
the digital audio input on the audio equip-
ment.
3 Set the “TV Speaker option - Off” in the
AUDIO menu. ( p.162). See the external audio
equipment instruction manual for operation.
G ( C)
LESSTROL
(RGB/DVI)
/DVI IN
2
3
1
VIDEO AUDIOL(MONO) R
VIDEO AUDIO
COM
PONENT IN
AV IN 1AUDIO IN
2
1
AUDIO OUT
Y PB PR L R
OPTICAL DIGITAL
CONTROL&SERVICE
1
2

EXTERNAL EQUIPMENT SETUP
EX
TE
RN
AL
EQ
UIP
ME
NT
SE
TU
P
34
EXTERNAL EQUIPMENT WIRELESS CONNECTION (OPTIONAL EXTRAS)
LG TVs with a Wireless Control port support the LG Wireless Media Box), which is sold separately.
When you connect the wireless ready dongle (included with the media box) to the TV, external devices
can be connected to the LG Wireless Media Box and video and audio will be sent to the TV wirelessly.
RGB IN (PC)
LAN(RGB/DVI)
VIDE
VIDEO
AUDIO IN AUDIO OUT
2
1
WIRELESSCONTROL
OUTWIRELESSCONTROL
/DVI IN
2
3
1
Y PB PR
OPTICAL DIGITAL
R
ꔡ
1. How to connect
1 Connect the WIRELESS CONTROL jack of the Wireless Ready Dongle to the WIRELESS
CONTROL jack on the TV.
2 Connect HDMI OUT jack of the Wireless Ready Dongle to the HDMI IN jack on the TV.
2. How to use Select the desired input source on the TV using the INPUT button on the remote control.
Refer to the Wireless Media Box manual for operating instructions.
! NOTE
When using the external device connected to the Wireless Media Box, some functions of the TV
menu may not work.

35
EX
TE
RN
AL
EQ
UIP
ME
NT
SE
TU
P
PC SETUP
This TV provides Plug and Play capability, meaning that the PC adjusts automatically to the TV's set-
tings.
1. How to connect
1 Connect the VGA output of the PC to the
RGB IN (PC) jack on the TV.
2 Connect PC audio output to the AUDIO IN (RGB/DVI) jack on the TV.
2. How to use Turn on the PC and the TV.
Select the RGB-PC input source on the TV using
the INPUT button on the remote control.
VGA (D-Sub 15 Pin) Connection
LAN
WIRELESSCONTROL
/DVI IN
2
3
1
VIDEO AUDIOL(MONO) R
VIDEO AUDIO
COM
PONENT IN
AV IN 1AUDIO OUT
2
1
RGB IN (PC)
RGB OUTPUTAUDIO
(RGB/DVI)
AUDIO IN
Y PB PR L R
OPTICAL DIGITAL
RS-232C INCONTROL&SERVICE
ꔡ
12

EXTERNAL EQUIPMENT SETUP
EX
TE
RN
AL
EQ
UIP
ME
NT
SE
TU
P
36
DVI to HDMI Connection
1. How to connect
1 Connect the DVI output of the PC to the HDMI/
DVI IN 1, 2, or 3 jack on the TV.
2 Connect the PC audio output to the AUDIO IN
(RGB/DVI) jack on the TV.
2. How to use Turn on the PC and the TV.
Select the HDMI1, HDMI2, or HDMI3 input source
on the TV using the INPUT button on the remote
control.
DVI OUTPUT AUDIO
RGB IN (PC)
LAN
WIRELESSCONTROL
VIDEO AUL(MONO)
VIDEO AUDI
AUDIO OUT
2
1
/DVI IN
2
3
1
(RGB/DVI)
AUDIO IN
Y PB PR L
OPTICAL DIGITAL
RS-232C ICONTROL&SERV
ꔡ
1 2

37
EX
TE
RN
AL
EQ
UIP
ME
NT
SE
TU
P
Supported Display Specifications (RGB-PC, HDMI-PC)
! NOTE
To get the the best picture quality, adjust the PC graphics card to 1920x1080.
Depending on the graphics card, DOS mode may not work if a HDMI to DVI Cable is in use.
In PC mode, there may be noise associated with the resolution, vertical pattern, contrast or bright-
ness. If noise is present, change the PC output to another resolution, change the refresh rate to
another rate or adjust the brightness and contrast on the PICTURE menu until the picture is clear.
Avoid keeping a fixed image on the screen for a long period of time. The fixed image may become
permanently imprinted on the screen.
The synchronization input form for Horizontal and Vertical frequencies is separate.
Depending on the graphics card, some resolution settings may not allow the image to be posi-
tioned on the screen properly.
When selecting HDMI-PC, set the “Input Label - PC” in the OPTION menu.
Resolution Horizontal Frequency(KHz)
Vertical Frequency(Hz)
640x350 31.468 70.09
720x400 31.469 70.08
640x480 31.469 59.94
800x600 37.879 60.31
1024x768 48.363 60.00
1280x768 47.776 59.87
1360x768 47.712 60.015
1280x1024 63.981 60.02
1600x1200 75.00 60.00
1920x1080 67.50 60.00

EXTERNAL EQUIPMENT SETUP
EX
TE
RN
AL
EQ
UIP
ME
NT
SE
TU
P
38
Screen Setup for PC mode
You can choose the resolution in RGB-PC mode.
The Position, Phase, and Size can also be adjusted.
You can choose this option only when the PC resolution is set to 1024X768, 1280X768 or 1360X768.
Selecting Resolution
1MENU Select PICTURE.
2ENTER Select Screen (RGB-PC).
3ENTER Select Resolution.
4ENTER Select the desired resolution.
5ENTER

39
EX
TE
RN
AL
EQ
UIP
ME
NT
SE
TU
P
Automatically adjusts picture position and minimizes image instability. After adjustment, if the image
is still not correct, try using the manual settings or a different resolution or refresh rate on the PC.
Auto Configure
1MENU Select PICTURE.
2ENTER Select Screen (RGB-PC).
3ENTER Select Auto Config..
4ENTER Select Yes.
5ENTER Start Auto Configuration.
If the position of the image is still not
correct, try Auto adjustment again.
If picture needs to be adjusted again
after Auto adjustment in RGB-PC,
you can adjust the Position, Size or
Phase.

EXTERNAL EQUIPMENT SETUP
EX
TE
RN
AL
EQ
UIP
ME
NT
SE
TU
P
40
If the picture is not clear after auto adjustment or if text is shaking, adjust the picture phase manually.
This feature operates only in RGB-PC mode.
Adjustment for screen Position, Size, and Phase
1MENU Select PICTURE.
2ENTER Select Screen (RGB-PC).
3ENTER Select Position, Size, or Phase.
4ENTER Make appropriate adjustments.
5ENTER
Position: This function is to adjust
picture to left/right and up/down as
you prefer.
Size: This function is to minimize any
vertical bars or stripes visible on the
screen background. And the horizon-
tal screen size will also change.
Phase: This function allows you to
remove any horizontal noise and
clear or sharpen the image of char-
acters.

41
EX
TE
RN
AL
EQ
UIP
ME
NT
SE
TU
P
Returns Position, Size, and Phase to the default initial settings.
This feature operates only in RGB-PC mode.
Screen Reset (Reset to original initial values)
1MENU Select PICTURE.
2ENTER Select Screen (RGB-PC).
3ENTER Select Reset.
4ENTER Select Yes.
5ENTER Start Reset.

EXTERNAL EQUIPMENT SETUP
EX
TE
RN
AL
EQ
UIP
ME
NT
SE
TU
P
42
RGB IN (PC)
WIRELESSCONTROL
(RGB/DVI)
/DVI IN
2
3
1
VIDEO AUDIOL(MONO) R
VIDEO AUDIO
COM
PONENT IN
AV IN 1AUDIO IN
2
1
AUDIO OUT
Y PB PR L R
OPTICAL DIGITAL
RS-232C INCONTROL&SERVICE
ꔡ
LAN
Broadband modem
Broadband modem
Router
Broadband Service
Broadband Service
NETWORK SETUP
This TV can be connected to a local area network (LAN) via the LAN port. After making the physical
connection, the TV needs to be set up for network communication.
CAUTION
Do not connect a modular phone cable to the LAN port.
Since there are various connection methods, please follow the specifications of your telecommu-
nication carrier or internet service provider.
1. How to connect
1 Connect the LAN port of the Modem or Router to the LAN port on the TV.
2. How to use Select “Network Setting” in the NETWORK menu.
After connecting the LAN port, use the NETCAST menu.
Wired Network Connection
1

43
EX
TE
RN
AL
EQ
UIP
ME
NT
SE
TU
P
This feature requires an always-on broadband internet connection.
You do not need to connect to a PC to use this function.
If Network Setting is not working, check your network conditions. Check the LAN cable and make sure your router has DHCP turned on if you wish to use the Auto Setting.
If the Network Setting is not com-pleted, network may not operate nor-mally.
IP Auto Setting: Select it if there is a DHCP server on the local area net-work (LAN) via wired connection, the TV will automatically be allocated an IP address. If you’re using a broad-band router or broadband modem that has a DHCP (Dynamic Host Configuration Protocol) server func-tion. The IP address will automati-cally be determined.
IP Manual Setting: Select it if there is no DHCP server on the network and you want to set the IP address manu-ally.
Wired Network Setup
1MENU Select NETWORK.
2ENTER Select Network Setting.
3ENTER Select Wired.
4ENTER
If you already set Network Setting:
Select Resetting. The new connection
settings resets the current network
settings.
5ENTER
Select IP Auto Setting or IP Manual
Setting.
1 2 ABC 3 DEF
4 GHI 5 JKL 6MNO
7PQRS 8 TUV
09WXYZ
When Selecting IP Manual Setting:
IP addresses will need to be input
manually.
6ENTER Select Enter.
If wired and wireless networks are both available, wired is the preferred method.
After making a physical connection, a small number of home networks may require the TV network settings to be adjusted.
For detail information, contact your internet provider or router manual.
IP Auto Setting
If you already set the
Network Setting
IP Manual Setting
Appeared when wired and
wireless are simultaneously
connected.

EXTERNAL EQUIPMENT SETUP
EX
TE
RN
AL
EQ
UIP
ME
NT
SE
TU
P
44
! NOTE
For more information about NETCAST setup and troubleshooting, visit http://lgknowledge-base.com. Search for NETCAST. Use a standard LAN cable with this TV. Cat5 or better with a RJ45 connector. Many network connection problems during set up can often be fixed by re-setting the router or modem. After connecting the player to the home network, quickly power off and/or dis-connect the power cable of the home network router or cable modem. Then power on and/or connect the power cable again. Depending on the internet service provider (ISP), the number of devices that can receive internet service may be limited by the appli-cable terms of service. For details, contact your ISP. LG is not responsible for any malfunction of the TV and/or the internet connection feature due to communication errors/malfunctions associated with your broadband internet con-nection, or other connected equipment. LG is not responsible for problems within your internet connection. Some content available through the network connection may not be compatible with the TV. If you have questions about such content, please contact the producer of the content. You may experience undesired results if the network connection speed does not meet the requirements of the content being accessed. Some internet connection operations may not be possible due to certain restrictions set by the Internet service provider (ISP) supplying your broadband Internet connection. Any fees charged by an ISP including, without limitation, connection charges are your respon-sibility. A 10 Base-T or 100 Base-TX LAN port is required for connection to this TV. If your inter-net service does not allow for such a connec-tion, you will not be able to connect the TV. A DSL modem is required to use DSL service and a cable modem is required to use cable modem service. Depending on the access method of and subscriber agreement with your ISP, you may not be able to use the inter-net connection feature contained in this TV or you may be limited to the number of devices you can connect at the same time. (If your ISP limits subscription to one device, this TV may not be allowed to connect when a PC is already connected.) The use of a “Router” may not be allowed or its usage may be limited depending on the policies and restrictions of your ISP. For details, contact your ISP directly.
The wireless network operates at 2.4 GHz radio frequencies that are also used by other household devices such as cordless tele-phone, Bluetooth® devices, microwave oven, and can be affected by interference from them. It can be interrupted by the device using 5Ghz radio frequencies. It is same device with LG wireless media box, cordless telephone, other Wi-Fi device. It may decrease the service speed using Wireless network by surrounding wireless con-dition. Turn off all unused network equipment in your local home network. Some devices may gen-erate network traffic. In some instances, placing the access point or wireless router higher up away from the floor may improve the reception. The reception quality over wireless depends on many factors such as type of the access point, distance between the TV and access point, and the location of the TV. When connecting internet through the wired/wireless sharing machine, it may interrupt the connection because of the use limitation and confirmation of service company. To connect wireless AP, an AP that supports the wireless connection is necessary, and the wireless connection function of the AP needs to be activated. Please enquire to the AP sup-plier for the possibility of AP wireless connec-tions. Please verify the security settings of AP SSID for wireless AP connection, and enquire to the AP supplier for the AP SSID security settings. The TV can become slower or malfunction with wrong settings of network equipments (wired/wireless router, hub, etc). Please install correctly by referring to the manual of the equipment, and set the network. When AP is set to include 802.11 n, and if Encryption is designated as WEP(64/128bit) or WPA(TKIP/AES), the connection may not be possible. There may be different connec-tion methods according to the AP manufac-turers.

45
EX
TE
RN
AL
EQ
UIP
ME
NT
SE
TU
P
IN 4
AV IN 2
VIDE
OAU
DIOL(M
ONO)
RH/
PUS
B IN
1US
B IN
2
The LG Wireless LAN for Broadband/DLNA Adaptor, which is sold separately, allows the TV to connect
to a wireless lan network.
The network configuration and connection method may vary depending on the equipment in use and
the network environment. Refer to the setup instructions supplied with your access point or wireless
router for detailed connection steps and network settings.
1. How to connect
1 Connect the “LG Wireless LAN for Broadband/DLNA Adaptor (sold separately)” to the USB
IN or USB IN 1 /2 port on the TV.
2. How to use Select “Network Setting” in the NETWORK menu.
After connecting, you can use the NETCAST menu.
Wireless Network Connection
! NOTE
For enjoying pictures, music, or video stored in the PC using the router, the use of wired port in
the router is recommended.
When the wireless port of the router is used, there may be restrictions for some functions.
i.e)

EXTERNAL EQUIPMENT SETUP
EX
TE
RN
AL
EQ
UIP
ME
NT
SE
TU
P
46
Setting up the AP (Access Point) or the wireless router is required before connecting the TV to the
network.
Wireless Network Setup
6ENTER
Scan the all available AP (Access
Point) or wireless routers within range
and display them as a list.
7ENTER
Select an AP (Access Point) or
wireless router on the list.
(If your AP is locked, insert the
security key of AP).
81 2 ABC 3 DEF
4 GHI 5 JKL 6MNO
7PQRS 8 TUV
09WXYZ
ENTER Input the security key of AP.
1MENU Select NETWORK.
2ENTER Select Network Setting.
3ENTER Select Wireless.
4ENTER
If you already set Network
Setting: Select Resetting.
The new connection settings
resets the current network set-
tings.
5ENTER Select Setting from the AP list.
9 Repeat step 4-5 on P.43.
If your AP is locked
If you already set the
Network Setting
Appeared when wired and wireless
are simultaneously connected.

47
EX
TE
RN
AL
EQ
UIP
ME
NT
SE
TU
P
If you want to connect the AP (Access Point) or router with PIN, use this feature.
If your access point or wireless router that supports PIN or WPS (Wi-Fi Protected Setup), it’s available
to use your access point or wireless router within 120 counts. You do not need to know the access
point name (SSID: Service Set Identifier) and security code of your access point or wireless router.
When a security code is already set
PIN (Personal Identification Number)
Simple setting (WPS-button mode)
PIN number is the unique 8 digit number
of the dongle.
2 Connect the acccess point with PIN
mode.
4ENTER Select Connect.
RED
1 Repeat step 1-6 on P.46.
3 You can see the Network ID and Security Key
on your TV screen.
Enter the PIN number to your device.
1 Repeat step 1-4 on P.46. 3ENTER Select Connect.
2ENTER
Select Simple setting (WPS-
button mode).
5 Repeat step 4-5 on P.43.
4 Repeat step 4-5 on P43.

EXTERNAL EQUIPMENT SETUP
EX
TE
RN
AL
EQ
UIP
ME
NT
SE
TU
P
48
This is the method of communicating directly with the machine to communicate without AP.
This is the same as connecting two PCs with a cross cable.
AD-hoc Mode
1 Repeat step 1-3 on P.46.
2ENTER
Select Setting AD-hoc net-
work.
3ENTER ENTER Select Enter.
4ENTER
Select Connect to connect Ad-hoc
network.
You can see the Network ID and
Security Key on your TV screen.
Enter this Network ID and Security
Key to your device.
If a network may not operate,
change the setting information
using the RED button.
5ENTER Insert the IP address.
6ENTER
Network setting is completed.
Select Close.
PC SettingInternet Protocol(TCP/IP) of PC needs to be set manually.IP address, Subnet Mask, and default Gateway can be set with your own discretion.i.e) IP address: 192.168.0.1 / Subnet Mask: 255.255.255.0 / default Gateway: 192.168.0.10
TV Setting Verify IP address and gateway of PC.Input Gateway address of PC to IP Address, and IP Address of PC to Gateway, and select Enter.i.e) IP address: 192.168.0.10 / Subnet Mask: 255.255.255.0 / default Gateway: 192.168.0.1
Example of the PC setting that supports a wireless network
1. Find a wireless network device in your PC.
2. Select LGTV10 that appears in the list. (Select the same name as the network ID that appears on your TV screen.)
3. Type 1111111111 in the Inserting the security key dialog.
(Type the security key that appears on your TV screen.)

49
EX
TE
RN
AL
EQ
UIP
ME
NT
SE
TU
P
1MENU Select NETWORK.
2ENTER Select Network Status.
3ENTER Check the newtwork status.
Network Status
Setting: Return to the network set-
ting menu or wireless network setting
type menu.
Test: Test the current network status
after setting the network.
Close: Return to the previous menu.
Wired Connection
Wireless Connection

WATCHING TV / CHANNEL CONTROL
WA
TC
HIN
G T
V / C
HA
NN
EL
CO
NT
RO
L
50
REMOTE CONTROL FUNCTIONSWhen using the remote control, aim it at the remote control sensor on the TV.
The remote control may differ from the images below.
WATCHING TV / CHANNEL CONTROL
Q.VIEW
ENERGY
CHVOL
1 2 ABC 3 DEF
4 GHI 5 JKL 6MNO
7PQRS 8 TUV
0 Q.VIEW
9WXYZ
PAGE
SAVING
TVAV MODE INPUT
FAV
3D
MUTE
BACK EXITGUIDE
ENTER
MARKLIST
DELETE
CHAR/NUM
MENU Q.MENU
Q.VIEW
ENERGY
CHVOL
1 2 ABC 3 DEF
4 GHI 5 JKL 6MNO
7PQRS 8 TUV
0 Q.VIEW
9WXYZ
PAGE
SAVING
TVAV MODE INPUT
FAV
MUTE
BACK GUIDE EXIT
ENTER
MARKLIST
DELETE
CHAR/NUM
MENU Q.MENU
3D
L/R SELECT
POWER Turns the TV on from standby or off to
standby.
ENERGY SAVING Adjusts the Energy Saving setting. p.146
AV MODE Toggles through preset Video and
Audio modes. p.83
INPUT Rotates through inputs.
Also switches the TV on from standby.
TV Returns to the last TV channel.
NUMBER button
- (DASH) Used to enter a program number for
multiple program channels such as 5-1,
5-2, etc.
LIST Displays the channel table.
Q.VIEW Tunes to the last channel viewed.
VOLUME UP/DOWN
Adjusts the volume.
FAV Set up desired favorite channels list.
MARK Select the input to apply the Picture
Wizard settings.
Use to mark or unmark a photo/music/
movie.
3D Used for viewing the 3D video. p.105
CHAR/NUM, DELETE
Used to edit program title in REC.LIST
and schedule list.
MUTE Switches the sound on or off.
CHANNELUP/DOWN
Changes the channel.
PAGEUP/DOWN
Moves from one full set of screen infor-
mation to the next one.

51
WA
TC
HIN
G T
V / C
HA
NN
EL
CO
NT
RO
L
Open the battery compartment cover on the back side
and install the batteries matching correct polarity.
Install two 1.5V AAA batteries. Don’t mix old or used
batteries with new ones.
Close cover.
Installing Batteries
MUTE
BACK EXITGUIDE
ENTER
MENU Q.MENU
INFOLIVE TV RATIO
REC
L/R SELECT
MUTE
BACK GUIDE EXIT
ENTER
DELETE
MENU Q.MENU
L/R SELECT
RATIO INFO
MENU Displays the main menu or clears all
on-screen displays and return to TV
viewing.
NETCAST Select the desired NETCAST menu
source p.133
Q.MENU Opens the list of Quick Menu options.
p.60
THUMBSTICK(Up/Down/LeftRight/ENTER)
Navigates the on-screen menus and
adjusts the system settings to your
preference.
BACK Allows the user to move return one step
in an interactive application or other
user interaction function.
GUIDE Displays the program event according
to time scheduler. p.75
EXIT Clears all on-screen displays and return
to TV viewing.
COLOR BUTTON
Access special functions in some menus.
L/R SELECT Used for viewing the 3D video. p.105
LIVE TV Return to the LIVE TV.
INFO Displays the information of watching
program. p.74
RATIO Changes the aspect ratio. p.142
TIME MACHINE,USB, SMPLINKControl buttons
• Controls Time Machine and MY MEDIA
menu (Movie List, Photo List, Music
List).
• Controls the SIMPLINK compatible devices.
REC Used to adjust Timemachine mode.
SIMPLINK See a list of AV devices connected to TV.
When you toggle this button, the SIMPLINK
menu appears at the screen. p.88

WATCHING TV / CHANNEL CONTROL
WA
TC
HIN
G T
V / C
HA
NN
EL
CO
NT
RO
L
52
The Magic Motion Remote Control communicates with your TV by using a 2.4 GHz bandwidth radio
frequency (RF). Output: 1 dBm or lower
Maximum Communication Distance: 10 m (30 ft) in an open space
Bandwidth: 2.4 GHz (2.4035 GHz - 2.4783 GHz)
Transfer Rate: 250 kbps
When the message "Magic motion remote control battery is low. Change the battery." is displayed, replace the battery.
Open the battery compartment cover on the back side and install the batteries matching correct polarity.
Install two 1.5V AA batteries. Don’t mix old or used batteries with new ones.
Close cover.
Installing Batteries
RF Specification of the Magic Motion Remote Control
ENTER
VOL
MUTE
CH
MAGIC MOTION REMOTE CONTROL FUNCTIONS
Pointer Receiver Blinks the light when operating.
POWER Turns the TV on from standby or off to standby.
ENTER/HOME
Menu Button
Activates the pointer.
VOLUME UP/DOWN
Adjusts the volume.
CHANNELUP/DOWN
Changes the channel.
MUTE Switches the sound on or off.

53
WA
TC
HIN
G T
V / C
HA
NN
EL
CO
NT
RO
L
Magic Motion Remote Control Registration
How to use Magic Motion Remote Control
Precautions to Take when Using the Magic Motion Remote Control
The Magic Motion Remote Control operates by pairing with your TV.
Register the Magic Motion Remote Control after purchasing the TV.
ENTER
How to register the Magic Motion Remote Control
To register the Remote Control, press the ENTER button on the
Remote Control while aiming it at your TV.
MUTE
How to Re-register the Magic Motion Remote Control after
Registration Failure
Reset the remote control by pressing and holding both the
ENTER and MUTE buttons for 5 seconds. (Once the reset is
complete, the light on the Pointer RF Receiver blinks.) Then
repeat the above procedure to register the remote control.
1ENTER
Press this button if there is no pointer on your TV screen. The pointer will then appear on the
screen.
If the pointer has not been used for a certain period of time, it will disappear.
2 You can move the pointer by aiming the Pointer Receiver of the remote
control at your TV then move it left, right, up or down.
If the pointer does not work properly after clicking the ENTER button, leave
the remote control for 10 seconds then use it again.
Use the remote control within the maximum commu-nication distance (10 m). Using the remote control beyond this distance, or with an object obstructing it, may cause a communication failure.
A communication failure may occur due to nearby devices. Electrical devices such as a microwave oven or wireless LAN product may cause interference, as this will use the same bandwidth (2.4 GHz) as the Magic Motion Remote Control.
The Magic Motion Remote Control may be damaged or may malfunction if it is dropped or receives a heavy impact.
When playing a game using the Magic Motion Remote Control, hold it securely by wrapping its strap around your wrist and adjusting the length with the adjustable ring.
Take care not to bump into nearby furniture or other people when using the Magic Motion Remote Control.
Manufacturer and installer cannot provide service related to human safety as the applicable wireless device has possibility of electric wave interference.

WATCHING TV / CHANNEL CONTROL
WA
TC
HIN
G T
V / C
HA
NN
EL
CO
NT
RO
L
54
Pointer Menu Options
1ENTER ENTER Select Home Menu.
2ENTER Select Pointer.
3ENTER Make appropriate adjustments.
4ENTER Select Exit.
Speed: Changed the pointer speed.
Shape: Select the pointer shape.
Size: Changes the pointer size.
Alignment: When Alignment is On,
you can easily align the remote con-
trol's direction with the pointer on
your TV screen by shaking the remote
control left and right. Then, the point-
er automatically moves to the center
of the screen.
TV Guide
30Today

55
WA
TC
HIN
G T
V / C
HA
NN
EL
CO
NT
RO
L
TURNING ON THE TV
CHANNEL SELECTION
VOLUME ADJUSTMENTAdjust the volume to suit your personal preference.
1 First, connect power cord correctly.
At this moment, the TV switches to standby mode.
In standby mode to turn TV on, press the / I, INPUT, CH ( or ) button on the TV or press
the POWER, INPUT, CH ( or ), Number (0~9) button on the remote control.
2 Select the viewing source by using the INPUT button on the remote control.
3 When finished using the TV, press the POWER button on the remote control. The TV reverts
to standby mode.
! NOTE
If you intend to be away on vacation, disconnect the power plug from the wall power outlet.
If you do not complete the Initial setting, it will appear whenever the TV is switched on until the
Initial setting procedure is completed.
1 Press the CH ( or ) or NUMBER buttons to select a channel number.
1 Press the VOL (+ or -) button to adjust the volume.
2 If you want to switch the sound off, press the MUTE button.
3 You can cancel the Mute function by pressing the MUTE or VOL (+ or -) button.

WATCHING TV / CHANNEL CONTROL
WA
TC
HIN
G T
V / C
HA
NN
EL
CO
NT
RO
L
56
Step1. Selecting Language
Step2. Mode setting
INITIAL SETTING
This Function guides the user to easily set the essential items for viewing the TV for the first time
when purchasing the TV. It will be displayed on the screen when turning the TV on for the first time. It
can also be activated from the user menus.
Default selection is “Home Use”. We recommend setting the TV to “Home Use” mode for the best picture in your home environment.
“Store Demo” Mode is only intended for use in retail environments. Customers can adjust the “Picture menu - Picture mode” manually while inspecting the TV, but the TV will automatically return to preset in-store mode after 5 minutes.
“Store Demo” Mode is an optimal setting for displaying at stores. “Store Demo” mode initializes the TV to set the image quality.
1ENTER Select Menu Language.
1ENTER Select Home Use.

57
WA
TC
HIN
G T
V / C
HA
NN
EL
CO
NT
RO
L
Step4. Time Zone (Depending on models)
Step5. Auto Tuning
Step3. Power Indicator
This function is disable in “Step2. Mode
Setting - Store Demo”.
1ENTER Select On or Off.
1ENTER Select Time Zone option.
2ENTER Select Daylight Saving option.
1ENTER
Check your antenna connec-
tion and start Auto Tuning.
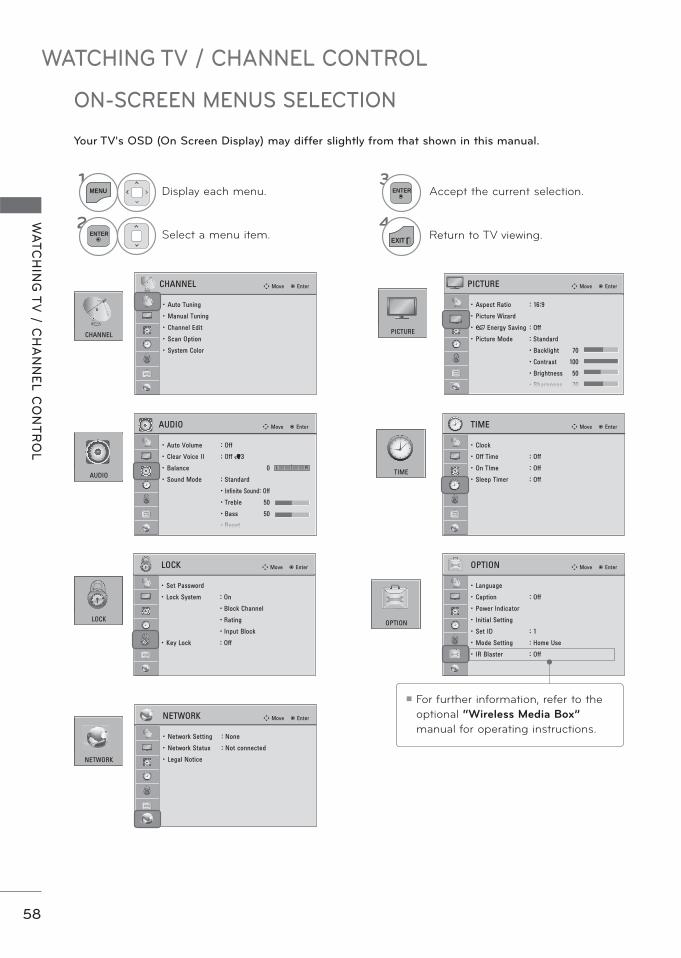
WATCHING TV / CHANNEL CONTROL
WA
TC
HIN
G T
V / C
HA
NN
EL
CO
NT
RO
L
58
ON-SCREEN MENUS SELECTION
Your TV's OSD (On Screen Display) may differ slightly from that shown in this manual.
1MENU Display each menu.
2ENTER Select a menu item.
3ENTER Accept the current selection.
4EXIT Return to TV viewing.
For further information, refer to the
optional “Wireless Media Box”
manual for operating instructions.

59
WA
TC
HIN
G T
V / C
HA
NN
EL
CO
NT
RO
L
i.e)
30Today

WATCHING TV / CHANNEL CONTROL
WA
TC
HIN
G T
V / C
HA
NN
EL
CO
NT
RO
L
60
Aspect Ratio: Selects your desired picture format.
Picture Mode: Selects the desired preset picture setting.
Sound Mode: Selects the desired preset sound setting.
Multi Audio: Changes the audio language (Digital signal).
SAP: Selects MTS sound (Analog signal).
Sleep Timer: Select the amount of time before your TV turns off automatically.
Del/Add: Select channel you want to add or delete.
Caption: Select on or off.
USB Device: Select “Eject” in order to eject a USB device.
QUICK MENU
Your TV's OSD (On Screen Display) may differ slightly from what is shown in this manual.
Q.Menu (Quick Menu) is a menu of features which users might use frequently.
A
1ENTER ENTER Select Quick Menu.
2ENTER Select a menu item.
3ENTER Select Close.
Quick Menu can be selected either by
pressing the Q.MENU button on a
standard remote control, or by select-
ing on the Home Menu screen.

61
WA
TC
HIN
G T
V / C
HA
NN
EL
CO
NT
RO
L
HOME MENUYour TV's OSD (On Screen Display) may differ slightly from that shown in this manual.
1ENTER ENTER Select Home Menu.
2ENTER Select a menu item.
TV Guide
A program view or recording of a program can be scheduled while watching the
Broadcasting Information.
Select the desired input source.
Select NETCAST menu option and enjoy Online Service.
Used for viewing photos, watching movies and listening to MP3s.
30Today
Allows you to enjoy the games installed on the TV or set the schedule.
Used to adjust Timemachine
mode (For Brazil).
Q.Menu (Quick Menu) is a menu
of features which users might use
frequently (Except Brazil).
Q.Menu (Quick Menu) is a menu of features which users might use frequently (For
Brazil).
You can easily and effectively access the TV information by viewing a simple manu-
al on the TV.
Set up the Magic Motion Remote Control setting.
Close the Home menu.
TV Guide
30Today

WATCHING TV / CHANNEL CONTROL
WA
TC
HIN
G T
V / C
HA
NN
EL
CO
NT
RO
L
62
CUSTOMER SUPPORT
You can update the TV with the latest software to enhance the product operation and/or add new fea-
tures.
You can update the software by connecting the TV directly to the software update server.
The Software Update function may not work properly depending on your internet environment. In this
case, you can obtain the latest software from the authorized LG Electronics Service Center then update
your TV.
Software Update
1MENU Select Customer Support.
2ENTER Select Software Update.
3ENTER
Select Check Update Version to check
the newest version.
When selecting “Software Update-On”
- If the TV is connected to the internet
and it finds a software update on the
LG server, the update popup menu will
appear automatically.
- If the updated digital software informa-
tion is transmitted, the update popup
menu will appear automatically.
RED The software downloading time will vary depending on the software size and network conditions.
During the software update proce-dure, do not turn off the TV or dis-connect AC power, or disconnect the LAN cable.
After software update, you can con-firm the update software version at software Update menu.
When update is completed, the TV will restart automatically in 5 sec-onds.
The TV functions may be improved or changed by software update.
The available time or functionality of NetCast menu may be depends on your ISP network conditions.
When an update is completed, some CHANNEL, PICTURE, and AUDIO menu settings may need resetting.
This TV cannot be updated to previ-ous software version.
Use the “Check Update Version” but-ton to update the latest software on the Network server manually.
When there is a new software update when you open NetCast, you will not be able to use NetCast without updating the software.
You cannot open NetCast while the software is being updated.

63
WA
TC
HIN
G T
V / C
HA
NN
EL
CO
NT
RO
L
Picture Test/Sound Test
This function is a customer support function that can execute picture and sound tests.
1MENU Select Customer Support.
2ENTER Select Picture Test or Sound Test.
3ENTER Select Yes.
4BACK Return to the previous menu.
EXIT Return to TV viewing.
RED

WATCHING TV / CHANNEL CONTROL
WA
TC
HIN
G T
V / C
HA
NN
EL
CO
NT
RO
L
64
Product/Service Info.
This function shows support and product information.
Customer Service Center can differ by country.
1MENU Select Customer Support.
2ENTER
Select Product/Service Info..
You can check the various
product/Service infomation
based on your model.
3BACK Return to the previous menu.
EXIT Return to TV viewing.
RED
Network Test
Check the newtwork status.
1MENU Select Customer Support.
2ENTER Select Network Test.
3ENTER Check the newtwork status.
RED

65
WA
TC
HIN
G T
V / C
HA
NN
EL
CO
NT
RO
L
SIMPLE MANUAL
You can easily and effectively access the TV information by viewing a simple manual on the TV.
During the Simple Manual operation, audio will be muted.
1ENTER ENTER Select Home Menu.
2ENTER Select Simple Manual.
3ENTER
Select the part of the manual you
would like to see.
4ENTER Select Exit.
RED: Go to the Index page.
BLUE: Play the Simple Manual auto-
matically or manually.

WATCHING TV / CHANNEL CONTROL
WA
TC
HIN
G T
V / C
HA
NN
EL
CO
NT
RO
L
66
CHANNEL SETUP
Auto Scan (Auto Tuning)
Automatically finds all channels available through antenna or cable inputs, and stores them in memory
on the channel list.
Run this function if you change your residence or move the TV.
Auto Tuning memorizes only the channels available at the time.
1MENU Select CHANNEL.
2ENTER Select Auto Tuning.
3ENTER Select Start.
4ENTER Run Auto tuning.
5BACK Return to the previous menu.
EXIT Return to TV viewing.
The TV will ask for a password if
parental control has been activated
(LOCK Menu). Use the password you
set up in the LOCK Menu to allow a
channel search.
The maximum number of channels
the TV can store is 500.
Found channels are grouped in the
order of DTV, TV, and Cable TV.

67
WA
TC
HIN
G T
V / C
HA
NN
EL
CO
NT
RO
L
Add/Delete Channel (Manual Tuning)
When selecting DTV input signal in Manual Tuning, you can view the on-screen signal strength moni-
tor to see the quality of the signal being received.
1MENU Select CHANNEL.
2ENTER Select Manual Tuning.
3ENTER Select DTV, TV, or Cable TV.
4 Select channel you want to
add or delete.
5ENTER Select Add or Delete.
6BACK Return to the previous menu.
EXIT Return to TV viewing.
The TV will ask for a password if
parental control has been activated
(LOCK Menu). Use the password you
set up in the LOCK Menu to allow a
channel search.
The maximum number of channels
the TV can store is 500.
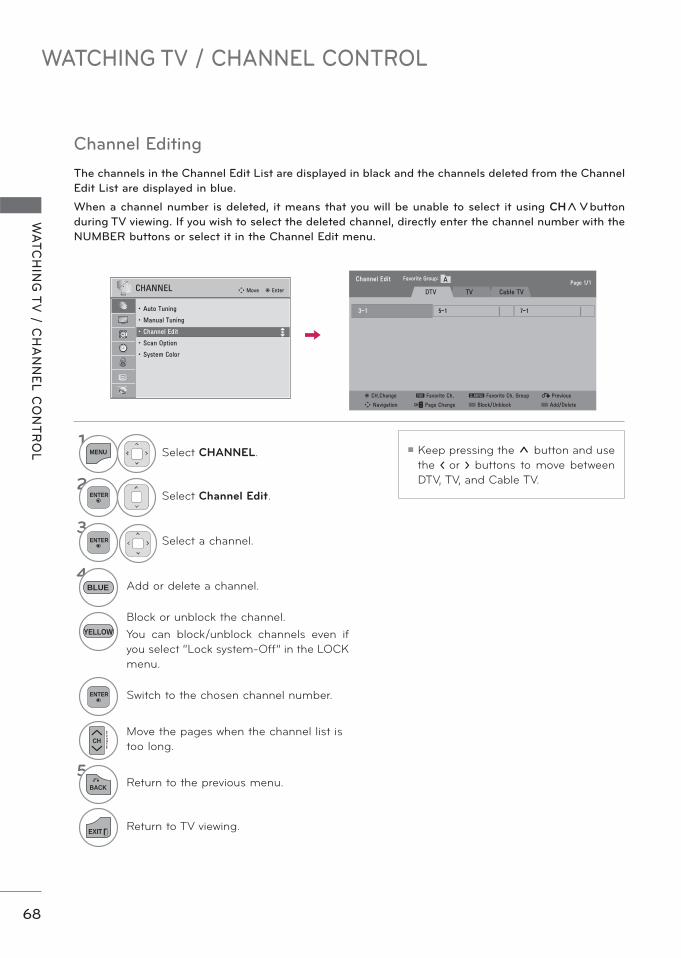
WATCHING TV / CHANNEL CONTROL
WA
TC
HIN
G T
V / C
HA
NN
EL
CO
NT
RO
L
68
Channel Editing
The channels in the Channel Edit List are displayed in black and the channels deleted from the Channel
Edit List are displayed in blue.
When a channel number is deleted, it means that you will be unable to select it using CH button
during TV viewing. If you wish to select the deleted channel, directly enter the channel number with the
NUMBER buttons or select it in the Channel Edit menu.
Keep pressing the button and use
the or buttons to move between
DTV, TV, and Cable TV.
1MENU Select CHANNEL.
2ENTER Select Channel Edit.
3ENTER Select a channel.
4Add or delete a channel.
Block or unblock the channel.
You can block/unblock channels even if
you select “Lock system-Off” in the LOCK
menu.
ENTER Switch to the chosen channel number.
CHPAGE
Move the pages when the channel list is
too long.
5BACK Return to the previous menu.
EXIT Return to TV viewing.
BLUE
YELLOW
5-13-1 7-1

69
WA
TC
HIN
G T
V / C
HA
NN
EL
CO
NT
RO
L
CHANNEL LIST
1ENTER ENTER Select Channel List.
2ENTER Select a channel you want to switch.
BLUETune to the “CHANNEL menu -
Channel Edit”.
3ENTER Select Exit.
You can check which channels are stored in the memory by displaying the channel list.
DTV
DTV
This padlock is displayed
when the channel is locked
with parental control.

WATCHING TV / CHANNEL CONTROL
WA
TC
HIN
G T
V / C
HA
NN
EL
CO
NT
RO
L
70
1ENTER ENTER Select Channel List.
2ENTER Select Favorite List.
3ENTER
Select your desired favorite channel
group from A to D.
4ENTER Select your desired channel.
5ENTER
Select Ch.Reg to register or cancel
the current channel in favorite chan-
nel list.
6ENTER Select Exit.
FAVORITE CHANNEL SETUP
Favorite Channels are a convenient feature that lets you quickly select channels of your choice without
waiting for the TV to select all the in-between channels.
DTV
DTV
You can also setup Favorite List in
the CHANNEL menu - Channel Edit.
DTV
DTV

WA
TC
HIN
G T
V / C
HA
NN
EL
CO
NT
RO
L
71
SCAN OPTION
*This feature is not available for all models.
Whether to search all channels or the first channel of virtual channels is switched with CH button
when one or more virtual channels exist at one physical channel.
1MENU Select CHANNEL.
2ENTER Select Scan Option.
3ENTER
Select Primary Channel or
All Channels.
4BACK Return to the previous menu.
EXIT Return to TV viewing.
Primary Channel: Only scan the first
channel of virtual channels.
All Channels: Scan full channel.
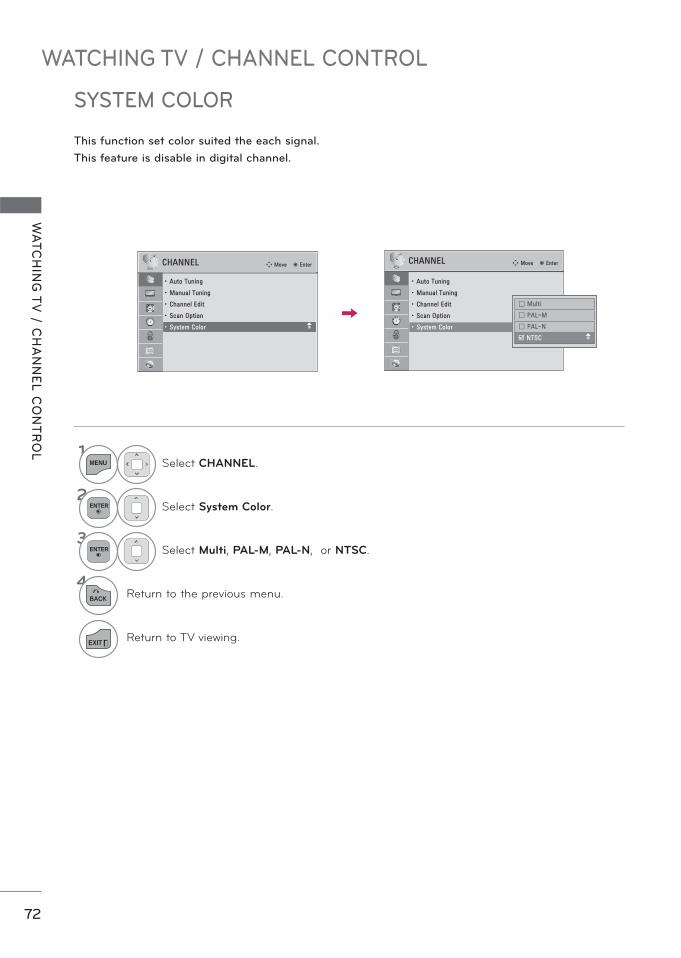
WATCHING TV / CHANNEL CONTROL
WA
TC
HIN
G T
V / C
HA
NN
EL
CO
NT
RO
L
72
SYSTEM COLOR
This function set color suited the each signal.
This feature is disable in digital channel.
1MENU Select CHANNEL.
2ENTER Select System Color.
3ENTER Select Multi, PAL-M, PAL-N, or NTSC.
4BACK Return to the previous menu.
EXIT Return to TV viewing.

73
WA
TC
HIN
G T
V / C
HA
NN
EL
CO
NT
RO
L
CHANNEL BRIEF INFORMATION
6 3 11 4 5 2
1ENTER Show the Brief Info on the screen.
2ENTER Return to TV viewing.
1 Program title
2 Day, Month, Year,
Present time
3 Program start time
4 Program progress
bar
5 Program finish
time
6 Banner information
Your TV's OSD (On Screen Display) may differ slightly from that shown in this manual.
Multilingual : The program contains two or more audio servic-
es. Use the Q.MENU menu to select wanted Audio.
Caption : The program contains one or more caption services.
Use the Q.MENU menu to select wanted Closed caption.
Dolby Digital: The program contains a Dolby Digital audio
signal in TV and HDMI input source.
The original aspect ratio of the video is 4:3
The original aspect ratio of the video is 16:9 (wide)
480i
480p
720p
1080i
1080p
The video resolution is 720x480i
The video resolution is 720x480p
The video resolution is 1280x720p
The video resolution is 1920x1080i
The video resolution is 1920x1080p
Description
Refer to the LOCK menu.

WATCHING TV / CHANNEL CONTROL
WA
TC
HIN
G T
V / C
HA
NN
EL
CO
NT
RO
L
74
Channel Program Reservation
1GUIDEINFO
Show the current channel program
Information on the screen.
2Select a next channel program information
3 ENTER ENTER Select the desired menu
option.
4EXIT Return to TV viewing.
1GUIDEINFO Shows current channel information
2Shows next channel information.
3Show other channel’s program information

75
WA
TC
HIN
G T
V / C
HA
NN
EL
CO
NT
RO
L
EPG (ELECTRONIC PROGRAM GUIDE)(IN DIGITAL MODE)
GUIDE Display the Program Guide.
Select the desired program.
This system has an Electronic Program Guide (EPG) to help your navigation through all the possible
viewing options.
The EPG supplies information such as program listings, start and end times for all available services.
In addition, detailed information about the program is often available in the EPG (the availability and
amount of these program details will vary, depending on the particular broadcaster).
This function can be used only when the EPG information is broadcast by broadcasting companies.
The EPG displays the program details for next 8 days.
Program Guide
ALLFri, May. 7
May. 7, 2010 10:07 PM
10:00 PM 11:00 PM
ꘂ Favorite
ꔅ Mode ꔅ Date ꔅ Manual Timer ꔅ Schedule List
꘍ Information ꔉ Watch/Schedule ꕉ Exit
5-1 Globo HD
5-2 CCTV-1
7-1 CCTV-2
9-2 BTV-1
9-3 CETV-1
DTV
DTV
DTV
DTV
DTV
Racing News
Racing Newsꔖ DTV 5-1 Globo HD May. 7, 2010 9:30 PM ~ 10:15 PM
Antigues Roadshow Kungskonsumente
No Info TV2: FARMEN No Information
No Information
The Drum
Fashion Essentials

WATCHING TV / CHANNEL CONTROL
WA
TC
HIN
G T
V / C
HA
NN
EL
CO
NT
RO
L
76
Detailed Information Box
30Today
TV Guide
Program Guide
ALLFri, May. 7
May. 7, 2010 10:07 PM
10:00 PM 11:00 PM
5-1 Globo HD
5-2 CCTV-1
7-1 CCTV-2
9-2 BTV-1
9-3 CETV-1
DTV
DTV
DTV
DTV
DTV
Racing News
Racing Newsꔖ DTV 5-1 Globo HD May. 7, 2010 9:30 PM ~ 10:15 PM
Antigues Roadshow Kungskonsumente
No Info TV2: FARMEN No Information
No Information
The Drum
Fashion Essentials
1ENTER ENTER Select Home Menu.
2ENTER Select GUIDE.
3Select the desired program.
1ENTER ENTER Select Home Menu.
2ENTER Select GUIDE.
3ENTER Select the desired program.
4ENTER Select the desired menu option.
1 2 3 4 5
6
1 Favorite : Change favorite mode.
2 Mode : Change EPG mode.
3 Date : Enter Date setting mode.
4 Manual Timer : Enter Manual Timer
mode.
5 Schedule List : Enter Schedule List
mode.
6 Exit : Switch off EPG

77
WA
TC
HIN
G T
V / C
HA
NN
EL
CO
NT
RO
L
Manual Timer
Sets a start or end time for recording, and sets only a start time for the reminder with the end time
grayed out.
Schedule List
If you’ve created a schedule list, a scheduled program is displayed at the scheduled time even when
you are watching a different program at the time.
Manual Timer
Fri, May 7, 2010 10:07 PM
ꔂ Move
ꔅ Program Guide ꔅ Schedule List
ꔉ Enter ꕉ Exit
Select the data to schedule.
Free Space 100GBꔪ 79h 03m ꔫ 31h 37m
Sun. Mon. Tue. Wed. Thu. Fri. Sat.
No schedule list
Fri, May 7, 2010
Schedule List
Fri, May 7, 2010 10:07 PM
Free Space 100GBꔪ 33h 03m ꔫ 13h 37m
Sun Mon Tue Wed Thu Fri Sat
•
ꔎ
ꔎ Record (Once)DTV 11-1Nov/13/2009(Thu)5:12 PM ~ 6:02 PM
ꔎ
Start date Start time Title Repeat
04/08 (sun) 23:15 PM TV2: Farmen Sat,Sun
04/02 (Mon) 12:45 AM Racing News Mon
1ENTER ENTER Select Home Menu.
2ENTER Select GUIDE.
3ENTER Select Manual Timer.
4ENTER Select the date to schedule.
5ENTER Select the repeat option to schedule.
6ENTER Select your desired Option.
7ENTER Select Exit.
1ENTER ENTER Select Home Menu.
2ENTER Select GUIDE.
3ENTER Select Schedule List.
4ENTER Select the Schedule List to modify.
5ENTER Select the desired feature.
6ENTER Select Exit.

WATCHING TV / CHANNEL CONTROL
WA
TC
HIN
G T
V / C
HA
NN
EL
CO
NT
RO
L
78
When new external device is connected, this popup
menu is displayed automatically.
If selecting Yes, you can select input source that you
want to appreciate.
But, when selecting “SIMPLINK - On”, popup menu for
HDMI input will not be displayed.
INPUT LIST
Only these input signals which are connected to a TV can be activated and selected.
Disconnected inputs are inactive
(grayed out)
TV Guide
30Today
1ENTER ENTER Select Home Menu.
2ENTER Select INPUT.
3ENTER Select the desired input source.
4ENTER Select Exit.
TV: Select it to watch over-the-air,
cable and digital cable broadcasts.
USB: Select it to use movie, photo, or
music files.
AV: Select them to watch a VCR or
other external equipment.
Component: Select them to watch
DVD or a Digital set-top box.
RGB-PC: Select it to view PC input.
HDMI: Select them to watch high
definition devices.
i.e)

79
WA
TC
HIN
G T
V / C
HA
NN
EL
CO
NT
RO
L
INPUT LABEL
This indicates which device is connected to which input port.
1ENTER ENTER Select Home Menu.
2ENTER Select INPUT.
3ENTER Select Input Label.
4ENTER
Select the desired input source and
then select to choose the input
label.
5ENTER Select Exit.
You can also select the Input label
using the BLUE button on the TV
remote control.
i.e)
TV Guide
30Today

WATCHING TV / CHANNEL CONTROL
WA
TC
HIN
G T
V / C
HA
NN
EL
CO
NT
RO
L
80
MODE SETTING
Default selection is “Home Use”. We recommend setting the TV to “Home Use” mode for the best picture in your home environment.
“Store Demo” Mode is only intended
for use in retail environments.
Customers can adjust the “Picture
menu - Picture mode” manually while
inspecting the TV, but the TV will
automatically return to preset in-
store mode after 5 minutes.
“Store Demo” Mode is an optimal
setting for displaying at stores. “Store
Demo” mode initializes the TV to set
the image quality.
1MENU Select OPTION.
2ENTER Select Mode Setting.
3ENTER Select Home Use.
4BACK Return to the previous menu.
EXIT Return to TV viewing.

81
WA
TC
HIN
G T
V / C
HA
NN
EL
CO
NT
RO
L
DEMO MODE
Displays a slide show to explain the various feature of this TV.
1MENU Select OPTION.
2ENTER Select Mode Setting.
3ENTER Select Store Demo.
4ENTER Select On.
5EXIT
Return to TV viewing.
After a while, Demo Mode. starts.
If you want to stop the demo, press any
button (Except VOL +, - and MUTE button).

WATCHING TV / CHANNEL CONTROL
WA
TC
HIN
G T
V / C
HA
NN
EL
CO
NT
RO
L
82
RESET TO FACTORY DEFAULT (INITIAL SETTING)
This function resets the TV to factory default and erases all stored channels.
When selecting “Lock System - On” in the LOCK menu, the message to enter the password appears.
If you forget your password, press “0-3-2-5” on the remote control.
1MENU Select OPTION.
2ENTER Select Initial Setting.
3ENTER Select Yes.
4ENTER
TV turns off automatically and start
factory reset.

83
WA
TC
HIN
G T
V / C
HA
NN
EL
CO
NT
RO
L
AV MODE
AV Mode toggles through preset Video and Audio settings.
If you select “Cinema” in AV mode,
Cinema will be selected both for
“PICTURE menu - Picture Mode”
and “AUDIO menu - Sound Mode”
respectively.
If you select “Off” in AV mode, the
“Picture Mode” and “Sound Mode”
return to previous selected value.
Off: Disables the AV MODE.
Cinema: Optimizes video and audio
for watching movies.
Sport: Optimizes video and audio for
watching sports events.
Game: Optimizes video and audio for
playing games.
Press the AV MODE button repeat-
edly to select your desired menu
option.
1ENTER ENTER Select Screen Remote.
2ENTER Select AV MODE.
3ENTER
Select AV MODE repeatedly to select
your desired menu option.

WATCHING TV / CHANNEL CONTROL
WA
TC
HIN
G T
V / C
HA
NN
EL
CO
NT
RO
L
84
GAME/SCHEDULE
This function operates only if the current time has been set.
TV Guide
1ENTER ENTER Select Home Menu.
2ENTER Select GAME/SCHEDULE.
3ENTER Select WORLD TIME.
4ENTER
Select a desired city.
You can check the world time.
5ENTER Select Exit.
30Today
World Time
The day light saving is not shown at
the world clock.

85
WA
TC
HIN
G T
V / C
HA
NN
EL
CO
NT
RO
L
This function operates only if the current time has been set.
Schedule
1ENTER ENTER Select Home Menu.
2ENTER Select GAME/SCHEDULE.
3ENTER Select Schedule.
4ENTER
Select a desired date.
You can check the schedule.
Sun.
Jul. 4Lunar May 23
Mon. Tue. Wed. Thu. Fri. Sat.
TV Guide
30Today

WATCHING TV / CHANNEL CONTROL
WA
TC
HIN
G T
V / C
HA
NN
EL
CO
NT
RO
L
86
5ENTER Select the desired menu option.
6ENTER The icon is displayed.
7ENTER Select List View to use schedule.
8ENTER Select Exit.
Sun.
Jul. 4Lunar May 23
Mon. Tue. Wed. Thu. Fri. Sat.
Schedule Registration
Sun, Jul. 4 Lunar 5.23
Father Birthday
Repeat Solar/Lunar Notice D-day
Norepeat
Solar The dayAdd a D-Day
i.e)
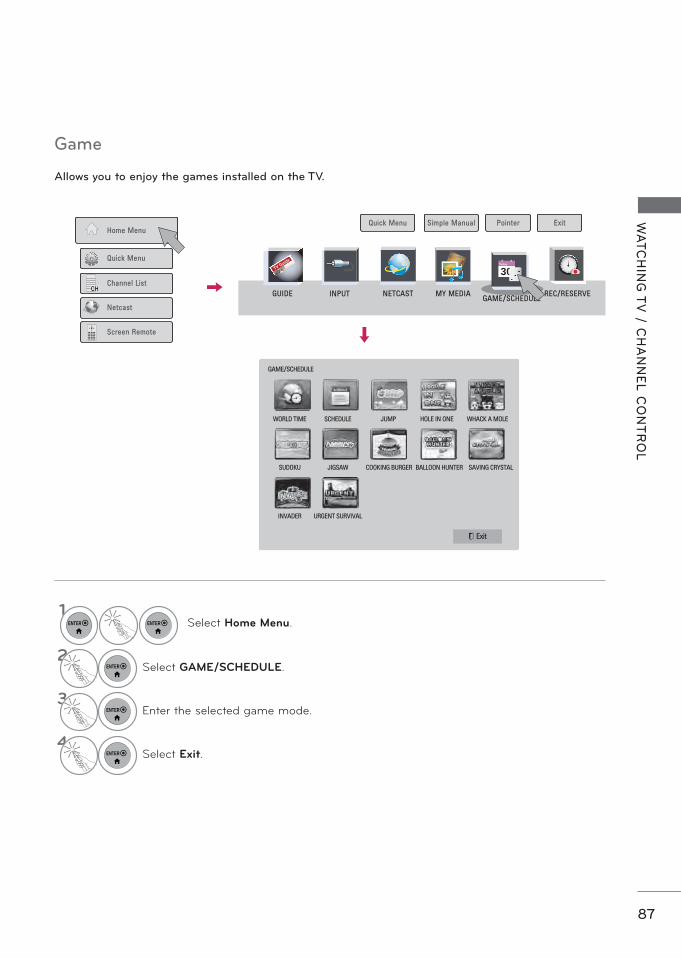
87
WA
TC
HIN
G T
V / C
HA
NN
EL
CO
NT
RO
L
Allows you to enjoy the games installed on the TV.
1ENTER ENTER Select Home Menu.
2ENTER Select GAME/SCHEDULE.
3ENTER Enter the selected game mode.
4ENTER Select Exit.
Game
TV Guide
30Today

WATCHING TV / CHANNEL CONTROL
WA
TC
HIN
G T
V / C
HA
NN
EL
CO
NT
RO
L
88
SIMPLINK
SIMPLINK allows you to control and play other AV devices connected with HDMI cable without addi-
tional cables and settings. This TV may work with devices with HDMI-CEC support, but only devices
with the logo are fully supported.
SIMPLINK can be turned on and off in the user menus.
1Display SIMPLINK menu.
2Select On.
3ENTER Select the desired device.
4ENTER Control connected AV devices.
1 TV viewing: Switch to the previous TV
channel regardless of the current
mode.
2 DISC playback: Select and play discs.
When multiple discs are available, the
disc devices are conveniently displayed
at the bottom of the screen.
3 VCR playback: Control the connected
VCR.
4 HDD Recordings playback: Control
recordings stored in HDD.
5 Audio Out to Home Theater speaker/
Audio Out to TV: Select Home Theater
speaker or TV speaker for Audio Out.
When no device is con-nected (displayed in gray)
Selected Device
When a device is conect-ed (displayed in bright color)
1
2
3
4
5

89
WA
TC
HIN
G T
V / C
HA
NN
EL
CO
NT
RO
L
SIMPLINK Functions Direct Play: Direct Play: After connecting AV devices to the TV, you can directly control the devices and play media After connecting AV devices to the TV, you can directly control the devices and play media
without additional settings.without additional settings.
Select AV device: Select AV device: Enables you to select one of the AV devices connected to the TV.Enables you to select one of the AV devices connected to the TV.
Disc playback: Disc playback: Control connected AV devices by pressing the Control connected AV devices by pressing the , ENTER, , ENTER, , , , , , , and and but- but-
tons. tons.
Power off all devices: Power off all devices: When you power off the TV, all connected devices are turned off.When you power off the TV, all connected devices are turned off.
Switch audio-out: Switch audio-out: Offers an easy way to switch audio-out.Offers an easy way to switch audio-out.
Sync Power on: Sync Power on: When the equipment with Simplink function connected HDMI terminal starts to play, When the equipment with Simplink function connected HDMI terminal starts to play,
The TV will automatically turn on.The TV will automatically turn on.
Note: To operate SIMPLINK, an High Speed HDMI cable with *CEC function should be used. (*CEC: Note: To operate SIMPLINK, an High Speed HDMI cable with *CEC function should be used. (*CEC:
Consumer Electronics Control).Consumer Electronics Control).
(A device, which is connected to the TV through a HDMI cable but does not support SIMPLINK, does (A device, which is connected to the TV through a HDMI cable but does not support SIMPLINK, does
not provide this function)not provide this function)
! NOTE
Connect the HDMI/DVI IN or HDMI IN terminal of the TV to the rear terminal (HDMI terminal) of
the SIMPLINK device with the HDMI cable.
When you switch the Input source with the INPUT button on the remote control, the SIMPLINK
device will stop.
When you select a device with home theater functionality, the sound output automatically switches
to the home theater speakers and the TV speakers are turned off.
If a connected SIMPLINK home theater system doesn’t play the audio from the TV, connect the
DIGITAL AUDIO OUT terminal on the back of the TV to the DIGITAL AUDIO IN terminal on the
back of the SIMPLINK device with an OPTICAL cable.

TIME MACHINE
TIM
E M
AC
HIN
E
90
PRECAUTIONS WHEN USING THE USB DEVICE
Only a USB storage device is recognizable.
If the USB storage device is connected
through a USB hub, the device is not recog-
nizable.
A USB storage device using an automatic
recognition program may not be recognized.
A USB storage device which uses its own
driver may not be recognized.
In case of several paritions or a card reader,
up to four memory cards are concurrently
recognizable.
The recognition speed of a USB storage
device may depend on each device.
Please do not turn off the TV or unplug the
USB device when the connected USB stor-
age device is working. When such device is
suddenly separated or unplugged, the stored
files or the USB storage device may be dam-
aged.
Only use a USB storage device which has
normal music files, image files or movie files.
Please use only a USB storage device which
was formatted as a FAT16, FAT32 or NTFS
file system provided with the Windows oper-
ating system. In case of a storage device
formatted as a different utility program which
is not supported by Windows, it may not be
recognized.
Please connect power to a USB storage
device which requires an external power sup-
ply. If not, the device may not be recognized.
Please connect a USB storage device with
cable is offered by USB maker. If connected
with cable is not offered by USB maker or an
excessively long cable, the device may not be
recognized.
Some USB storage devices may not be sup-
ported or operate properly.
The TV will display up to 128 characters of a
files name.
Please backup important files because data
on USB device may be damaged. Data man-
agement is consumer's responsibility and as
a result, the manufacturer does not cover
data damage.
The recommended capacity is 1TB or less for
a USB HDD and 40GB or over for USB
memory.
Any device with more than the recommend-
ed capacity may not work properly.
Playing a movie via a USB connection that
doesn’t support high speed may not work
properly.
USB storage devices below USB 2.0 are
supported as well. But they may not work
properly in the movie list.
Please maintain the stability of external HDD
by using the HDD benchmarking tool in
order to guarantee smooth action of HDD.
The HDD benchmarking tools is checking
the performance of HDD that is read/write
rate, access time, stability. It will be able to
search at website and use easily it after
download the HDD benchmarking tool.
TIME MACHINE (For Brazil)

91
TIM
E M
AC
HIN
E
TIME MACHINE (PAUSE & REPLAY OF LIVE TV)
This function allows the unit to automatically record live TV and make it available for viewing at any time.
With the Time Machine turned on, you may pause and rewind normal TV viewing at any time without missing any of the live broadcast.
Time Machine and Recording functions may not work if the signal strength is weak.
This function is only operated after initializating USB Device.
1 Connect the USB device to the USB IN or USB IN1/
TimeMachine Ready jacks on the side of TV.
2 To use the USB device (over 40 GB) for Timemachine,
execute USB Device Initialization.
It initializes the HDD connected to the USB as disk mode
for Timemachine.
It is activated only when the USB HDD available for
Timemachine is connected.
When USB Device Initialization is executed, all the data
stored in the USB device is deleted.
While performing USB Device Initialization, do not
remove the USB device. It may cause error on the TV and
the storage device.
USB device Initialization
When initialization is completed, a
popup notice of completion is dis-
played and the connected USB HDD
is available for Timemachine.
Depending on the capacity of the
USB device, the initialization time
may vary.
The initialized USB device is not rec-
ognized by the PC.
When a USB device of less than 40
GB is connected, the USB Device
Initialization is not activated.
Supported maximum external HDD
size for back-up is up to 1TB.
i.e)
T IN
3B P
RUS
B IN
1US
B IN
2
Tim
e M
achi
neR
eady
1ENTER ENTER
Select Home Menu-REC/
RESERVE.
2ENTER
Select OK to initialize the USB
device.
3ENTER Select OK.
4ENTER Select On or Off.

TIME MACHINE
TIM
E M
AC
HIN
E
92
USB Device Reinitialization during using Time Machine
Time Machine Mode is available in
DTV mode.
Time Machine Mode change during using Time Machine
1ENTER ENTER
Select Home Menu-REC/
RESERVE.
2ENTER Select Option.
3ENTER
Select Time Machine Mode - On or
Off.
4ENTER Select Close.
1ENTER ENTER
Select Home Menu-REC/
RESERVE.
2ENTER Select USB Device Initlaization.
3ENTER Select Close.

93
TIM
E M
AC
HIN
E
Time Machine Progress
The ‘Progress Bar’?
This function indicates what Time
Machine reviewing is possible, a cur-
rent on-screen and live broadcasting
position.
1 Preview
2 Current Status while using the
Time Machine
3 Current operating function while
using the Time Machine
4 Current location and progress time
in playback
5 Total progress time of the Time
Machine
After selecting Time Machine Mode-On, press the
ENTER button.
As soon as Time Machine starts, a progress bar
indicating the current recording status is displayed
in the bottom of the screen.
It Press the BACK button to hide the ‘Progress Bar’
or press the ENTER button to display the 'Progress
Bar'.
This function is preserved even change a program
on progressing the Time Machine.
PlaybackFast forwardRewindPauseDirect view +Direct view -By one screen Slow playback
! NOTE
In order to save hard-disk space, nothing is saved when there is no signal.
Time Machine can be used for maximum of 2 hours.
You can’t do the channel change or input conversion on recording.
When turning power on, it may take up to a maximum of 3 minutes to initialize the HDD.
Recording or playing the recorded program may not initiate for a copy-protected program.
Instant recording time is set to 3 hours and supported maximum time is up to 5 hours.
1
32 54

TIME MACHINE
TIM
E M
AC
HIN
E
94
Playback during the Time Machine
During the Time Machine play, the following options are available.
During playback,
repeatedly, press the REW ( ) or FF ( ) button to speed up.
Every time you press the button, the search speed will increase by stage (up to 5
stages).
During playback, press the Pause( ) button.
Pause screen is displayed.
Every time you press the Pause( ) button from the pause screen, it will move screen
by screen ( ).
Press the Pause( ) button and then use the FF ( ) button for slow motion ( ).
When you move the cursor using the Time Machine (< , >) button during playback,
and then press the ENTER button, the screen will directly play at the
applicable screen where the cursor is located. ( , )
To view the current live broadcast during playback.

95
TIM
E M
AC
HIN
E
RECORDING
Use this function when you cannot watch the desired program due to being out.
Start/Stop record
Start record
Stop record
Rec
You can record the channel you are watching for three hours.
1 When watching the program, select it you wish to record.
3ENTER
Select Recording Stop to stop the
recording.
4ENTER Select Yes to stop the recording.
2ENTER
Select Recording Starts to start the
recording.

TIME MACHINE
TIM
E M
AC
HIN
E
96
Modify recording end time
You can shorten or extend the recording time.
! NOTE
When recording, if the available storage space is not sufficient, the recording will automatically
Stop.
Recordings of less than 10 seconds will not be saved.
To save disk space while recording broadcasts, no data will be saved if there is no signal.
The recording function will not initiate for a copy-protected program.
The displayed time may differ slightly from the actual time.
When there is no signal or a film source is being viewed, the displayed time may differ slightly
from the actual time.
1ENTER
During recording ,
Select the Recording end
time modify.
2ENTER
Set the Recording End Time.
Then, select Enter.

97
TIM
E M
AC
HIN
E
Manual record
This function is easy to register to reserved recording. Timer recording is set.
Manual Timer
Fri, May 7, 2010 10:07 PMSelect the data to schedule.
Free Space 100GBꔪ 79h 03m ꔫ 31h 37m
Sun. Mon. Tue. Wed. Thu. Fri. Sat.
No schedule list
Fri, May 7, 2010
! NOTE
Recording is not possible with copy-protect-ed programs.
When a poor quality external source is record-ed the quality of the recording will not be optimal.
Manual Recording available time is maximum 5 hours and minimum 2 minutes.
When broadcasting station send the wrong time information, reserved recording may be failed.
If different channels are set for the same time for on time and reserved recording, this TV is powered on to the reserved recording chan-nel.
If you turn off the power during the recording, the program being recorded may not be saved. Therefore it is good to press the STOP ( ) button and check the reserved/recorded list, and then turn off the power. Recording cannot be reserved for a period
less than 10 seconds. Because the title and time of the program for Record/Remind is based on the information transmitted from the broadcasting station, they may be different than the actual ones depending on the situation of the broadcasting station.
Recording time may differ depending on resolution of input signal or USB HDD capacity.
When it is time for the reserved recording to start and the power of the TV is turned off, the TV will turn on the power of the part required for the recording and proceed to the reservation.
When it is time for the reserved recording to start and the Immediate recording is in progress, the recording of the program cur-rently being recorded will be stopped and saved, and then proceed to the reserved recording.
If the TV is unplugged once or turn off, the reserved recording will not work.
1ENTER
Select the Select Recording
date, time, channel.
2ENTER Select a date.
3ENTER Select Repeat Option.
4ENTER
Select Type, Start Time, End
Time, Channel.
5ENTER Select a Close.

TIME MACHINE
TIM
E M
AC
HIN
E
98
SCHEDULE
Schedule List
Schedule List Initialization
This function is used to show scheduled recordings. You can store up to 30 programs.
This function is to reset the schedule list.
Schedule List
Fri, May 7, 2010 10:07 PM
Free Space 100GBꔪ 33h 03m ꔫ 13h 37m
Sun Mon Tue Wed Thu Fri Sat
•
ꔎ
ꔎ Record (Once)DTV 11-1Nov/13/2009(Thu)5:12 PM ~ 6:02 PM
ꔎ
Start date Start time Title Repeat
04/08 (sun) 23:15 PM TV2: Farmen Sat,Sun
04/02 (Mon) 12:45 AM Racing News Mon
Modify: Edit the contents of Start date/Start time/End time/Title/
Repeat. You must press the BACK button to save the edited contents.
This feature is disable in reserved
reminding.
Delete: Delete the selected item in the list.
Delete all: Delete all items in the list.
Close: Close the pop-up menu.
1ENTER Select the Schedule List.
2ENTER
Select a desired program in
the schedule list.
3ENTER
Select the desired Popup
menu.
1ENTER ENTER
Select Home Menu-REC/
RESERVE.
2ENTER Select Option.
3ENTER
Select Schedule List
Initialization.
4ENTER
Select OK.
Start the Schedule List
Initialization.

99
TIM
E M
AC
HIN
E
RECORDED TV
Recorded TV List
You can view the recorded program list at a glance.
The recorded program stored in the USB device can be played.
! NOTE
If there is a bad sector in the disk, part or all of the items of the Recording list can be deleted.
Maximum number of recordings within the Recording list is 200. When the number of recordings
in the Recording list is 200, you cannot record any more.
When the full duration of the recording is played back, the screen will stay in the stopped condition
for 10 seconds and then automatically end the playback.
The recording can be played back even during the recording/reserved recording.
During the playback of the recording, the hard disk can generate a certain level of noise.
This noise is irrelevant from the performance and reliability of the product and is normal
for a hard drive to have a certain level of noise.
DeleteDelete the selected recorded
programs.
Rename Edit recorded program title.
Thumbnail
List
Thumbnail List: A method
to view in 5 large program.
Simple List: A method to
view in simple list.
Mark Mode Enter Mark Mode.
1ENTER Select the Recorded TV.
2ENTER Select a recorded program.

TIME MACHINE
TIM
E M
AC
HIN
E
100
1Select a desired recorded program.
2FAVMARK
CHAR/NUMMark your desired recorded program.
3BLUE Play the marked recorded program.
Mark Mode
RED Delete Marked: Delete the
marked recorded programs.
GREEN Mark All: Mark all recorded pro-
grams in the list.
YELLOWUnmark All: Change marked
recorded programs to unmarked
recorded programs.
BLUE
Play Marked: Play the first
selected file. Once recorded
programs finishes playing, the
next selected one will be played
automatically.

101
TIM
E M
AC
HIN
E
Playing Recorded programs
Play on previous playtime: Resumes
playing at the previously stopped point.
Play from the start: Playback of
selected recorded programs.
You can play a selected program from the recorded list.
1 Play a recorded program.
When you press the ENTER button during the playback, the information of the recorded program
you are current watching will be displayed at the top of the screen and a progress bar showing the
current status of the playback at the bottom of the screen. (Playback status is displayed as follows.)
To remove the progress bar, press the ENTER button.
1 Preview
2 Current Status
3 Current operating function
4 Current playback progress time of the recorded content
5 Total playback time of the recorded content
Playback
Fast forward
Rewind
Pause
Direct view +
Direct view -
By one screen
Slow playback
(Blue) Start repeat interval
(Yellow) Start clip-edit interval
(Blue) End repeat interval
(Yellow) End clip-edit interval
Repeating interval
1
32 54

TIME MACHINE
TIM
E M
AC
HIN
E
102
During playback,
repeatedly, press the REW ( ) or FF ( ) button to speed up.
Every time you press the button, the search speed will increase by stage (up to 5
stages).
GREEN Recorded TV: Return to the Recorded TV List.
YELLOW
Clip-Edit:
Press the YELLOW button at the starting point where you want to set the Interval
clip-edit and press it again at the ending point. To save, select Yes.
The start of the Interval clip-edit is displayed as and end of the Interval clip-edit
as in the recording progress bar at the bottom of the screen. Start and end of
the Interval clip-edit can be set both in forward and reverse direction.
Interval shorter than 10 seconds cannot be save.
BLUE
Repeat:
Press the BLUE button at the starting point where you want to set the Interval
repeat and press it again at the ending point. To cancel the playback for the interval
repeat, press the BLUE button one more time.
The start of the Interval repeat is displayed as and end of the Interval repeat as
in the recording progress bar at the bottom of the screen. Start and end of the
Interval repeat can be set both in forward and reverse direction.
Interval shorter than 10 seconds cannot be set.
When the Interval repeat is canceled, it will return to normal playback from the end
point of the interval.
During playback, press the Pause( ) button.
Pause screen is displayed.
Every time you press the Pause( ) button from the pause screen, it will move screen
by screen ( ).
Press the Pause( ) button and then use the FF ( ) button for slow motion ( ).
If you don’t press any button 10 minutes after the pause, it will return to the playback.
ENTER
When you move the cursor using the Time Machine (< , >) button during playback,
and then press the ENTER button, the screen will directly play at the applicable screen
where the cursor is located. ( , )
To view the current live broadcast, press the LIVE TV button during playback.
11 131 52 4

103
3D
IMA
GIN
G
3D IMAGING
This TV can display in 3D via 3D broadcasting or when the TV is connected to a compatible device, such as a Blu-ray 3D Player. You need such a device to watch the TV in 3D. The 3D TV displays two separate pictures formatted for each eye. The viewer needs to wear 3D glasses in order to see these images in 3D format.
3D TECHNOLOGY
Viewing 3D Imaging
WARNING
When viewing 3D imaging, watch the TV from an effective viewing angle and within the appro-priate distance. If you exceed this viewing angle or distance, you may not be able to view the 3D imaging. Furthermore, the 3D imaging may not display if it is viewed while you are lying down.If you watch the 3D imaging too closely or for a long period of time, it may harm your eyesight.Watching the TV or playing video games that incorporate 3D imaging with the 3D glasses for a long period of time can cause drowsiness, headaches or fatigue to you and/or your eyes. If you have a headache, or otherwise feel fatigued or drowsy, stop watching the TV and take a rest.Pregnant woman, seniors, persons with heart problems or persons who experience frequent drowsiness should refrain from watching 3D TV.Some 3D imaging may cause you to duck or dodge the image displayed in the video. There-fore, it is best if you do not watch 3D TV near fragile objects or near any objects that can be knocked over easily. Please prevent children under the age of 5 from watching 3D TV. It may affect their vision devel-opment.Warning for photosensitization seizure:
Some viewers may experience a seizure or epi-lepsy when exposed to certain factors, including fl ashing lights or images in TV or video games. If you or anybody from your family has a history of epilepsy or seizure, please consult with your doctor before watching 3D TV.
Also certain symptoms can occur in unspeci-fi ed conditions without any previous history. If you experience any of the following symptoms, immediately stop watching the 3D imaging and consult a doctor: dizziness or lightheadedness, visual transition or altered vision, visual or facial instability, such as eye or muscle twitching, un-conscious action, convulsion, loss of conscience, confusion or disorientation, loss of directional sense, cramps, or nausea. Parents should mon-itor their children, including teenagers, for these symptoms as they may be more sensitive to the effects of watching 3D TV.
Risk of photosensitization seizure can be re-duced with the following actions.
- Take frequent breaks from watching 3D TV. - For those who have vision that is different in
each eye, they should watch the TV after tak-ing vision correction measures.
- Watch the TV so that your eyes are on the same level as the 3D screen and refrain from sitting too closely to the TV
- Do not watch the 3D imaging when tired or sick, and avoid watching the 3D imaging for a long period of time.
- Do not wear the 3D glasses for any other pur-pose than viewing 3D imaging on a 3D TV.
- Some viewers may feel disoriented after watching 3D TV. Therefore, after you watch 3D TV, take a moment to regain awareness of your situation before moving.
To watch the TV in 3D, you must put on your 3D glasses. For best results, you should wear LG Brand 3D glasses. The 3D imaging may not display properly when using another brand of 3D glasses. Please see the 3D glasses manual for instructions on how to use the 3D glasses.After powering on the TV, a few seconds may be needed for your TV to calibrate. It may take a moment for you to see the 3D imaging if you look away from the TV and then revert your eyes back to the 3D program.The TV may fl icker slightly if the 3D imaging is
displayed under 3 wavelength lamp fl uorescent light (50 Hz - 60 Hz) or around windows dis-playing natural light. In such instances, it is rec-ommended to turn the lights low and/or block the sun light with a curtain.If there is an obstacle between the TV and the 3D glasses, the 3D imaging may not display properly.Do not use the TV in close proximity to other electronic equipments and IR equipments.In Analog TV, 3D Imaging does not work.
! NOTE

3D IMAGING
3D
IMA
GIN
G
104
When using 3D Glasses
3D glasses are sold separately. Refer to the 3D glasses manual for operating instructions.
Do not use the 3D glasses to replace your corrective glasses, sunglasses or protective goggles.
Do not store the 3D glasses in hot or cold locations.
Do not drop objects onto the 3D glasses. Do not drop or bend the glasses.
Since the lenses of the 3D glasses are easily scratched, make sure to clean only with a soft cloth.
Shake off any dust before using the cloth since the glasses are easily scratched.
CAUTION
TV
6060
7 m
2 m 2 m
3D Imaging viewing range
Viewing
Distance2 m - 7 m
(6.5 ft - 22.9 ft)
Viewing Angle
120º (When the viewing distance is 2 m (6.5 ft))
TV size, viewing angle & other circumstances may change the
viewing distance and the angle of view.
1 Play the video produced in 3D.
Refer to the following for the supported imaging.
WATCHING 3D IMAGING
Signal ResolutionHorizontal
Frequency (kHz)
Vertical
Frequency (Hz)Playable 3D video format
HDMI
Input
720p 1280x720 45.00
60
Top & Bottom, Side by Side
HDMI (V. 1.4 with HDMI 3D)
Frame Packing
1080i
1920X1080
33.75 Top & Bottom, Side by Side
1080p
67.50
Top & Bottom, Side by Side,
Checker Board
Single Frame Sequential
27.00 24
Top & Bottom, Side by Side,
Checker Board
HDMI (V. 1.4 with HDMI 3D)
Frame Packing
33.75 30Top & Bottom, Side by Side
Checker Board
USB
Input1080p 1920X1080 33.75 30
Top & Bottom, Side by Side
Checker Board
Signal Playable 3D video format
DTV 720p, 1080p Top & Bottom, Side by Side
Media contents and a player need to support HDMI (V. 1.4 with HDMI 3D) Frame Packing to play in 3D.
Video, which is input as HDMI (V. 1.4 with HDMI 3D) Frame Packing format, is switched into the 3D screen
automatically.

105
3D
IMA
GIN
G
To turn on 3D Mode, select this icon.
Top & Bottom Side by Side Checker Board Frame Sequential
23D ENTER
After selecting the shape as shown in the screen on TV,
wear the 3D glasses.
or3ENTER L/R SELECT Select Setting Left/Right.
4ENTER
Select Left/Right or Right/
Left.
Select the screen with 3D
video with better visibility.
53D
The 3D imaging mode is changed
to the 2D imaging mode.
! NOTE
If you select 3D mode, "Power indicator" is turned off automatically. While watching 3D imaging, you cannot adjust video/audio settings using the menu. Some menus may not work while watching the TV in 3D.You can only choose "Standard Cinema Game" with the AV MODE button on remote control. AV Mode is set as Standard while playing in 3D.The 3D imaging mode is disabled automatically when switching DTV channels.The screen may not be displayed properly if you view 2D DTV images in 3D imaging mode.
3D effect can be seen when 3D Mode is selected appropriately for the 3D input signal supplied to the TV. For *mpo files (3D camera files), the 3D imaging mode is enabled automatically. Energy Saving is disabled while playing in 3D. To enable the 3D imaging mode, you can also press the ENTER button on the Magic Motion remote control.
NOTES FOR VIEWING 3D IMAGE WITH 3D BROADCASTING (* In Analog TV, 3D Imaging does not work.)
When switching the 2D image display to the 3D image display with the 3D button on the remote control, the overlapped image may be displayed.
Disable the 3D imaging mode with the 3D button. The 3D imaging mode is disabled automatically if you change the channel.
If the screen is divided into left/right or top/bottom when you change the channel
This channel supports the 3D imaging mode. Select the 3D imaging type displayed on the screen by pressing the 3D button on the remote control.
If your eyes are soaring or the screen looks blurry while viewing 3D images
Press the L/R SELECT button on the remote con-trol and select L/R or R/L, which you find better for viewing 3D images.

MY MEDIA
MY
ME
DIA
106
ENTRY MODE
The My Media menu will open automatically when you insert a USB drive. My Media can also be
accessed by choosing My Media in the user menu.
After choosing the desired type of media, choose a device to open files from. The options are: USB
device or DLNA.
MY MEDIA
When removing the USB device
Select the USB Device menu before
removing the USB device.
This TV can view JPG image files, HD DivX
files and play MP3 audio files.
1ENTER ENTER Select Home Menu.
2ENTER Select MY MEDIA.
3ENTER
Select Movie List, Photo List or
Music List.
4ENTER Select the desired device.
1ENTER ENTER Select Quick Menu.
2ENTER Select USB device.
3ENTER Select Eject.
Search other network device.BLUE
TV Guide
30Today

107
MY
ME
DIA
CONNECTION METHOD
USB Connection
Connect the USB device to the USB IN jack on the TV.1
i.e)
Precautions when using the USB device
Only a USB storage device is recognizable.
Connecting a USB storage device through a USB hub is not supported.
A USB storage device which uses its own driver may not be recognized.
The recognition speed of a USB storage device may depend on each device.
Please do not turn off the TV or unplug the USB device when the connected USB storage device
is working. When such device is suddenly separated or unplugged, the stored files or the USB
storage device may be damaged.
Only use a USB storage device which has normal music files, image files, or movie files.
Please use only a USB storage device which was formatted as a FAT 32 or NTFS file system pro-
vided with the Windows operating system. Others may not be recognized.
Some USB storage devices require a power adapter. The power adapter must be connected in
order to be seen by the TV.
If a device is not recognized by the TV, try a different cable. Excessively long cables are not sup-
ported.
Some USB storage devices may not be supported or operate properly.
Please backup important files because data on USB device could be damaged. Data management
is consumer's responsibility and as a result, the manufacturer does not cover data damage.
If your USB memory device has multiple partitions, or if you use a USB multi-card reader, you can
use up to 4 partitions or USB memory devices.
File alignment method of USB storage device is similar to Window XP and file names can be up
to 100 English characters.
The recommended capacity is 1 TB or less for a USB external hard disk and 32 GB or less for USB
memory.
If a USB external hard disk with a “Energy Saving” function doesn’t work, turn the hard disk off and
on again to make it work properly. Refer to the user manual of the USB external hard disk.
USB storage devices below USB 2.0 are supported as well. But they may not work properly in the
movie list.
Maximum of 999 folders or files can be recognized under one folder.
If there are too many folders and files in one folder, it may not operate properly.
IN 4
USB
IN 1
Memory Key

MY MEDIA
MY
ME
DIA
108
DLNA
About DLNA
This TV is a DLNA Certified digital media product.
It can display and play movie, photo and music content from your DLNA server.
The Digital Living Network Alliance (DLNA) is a cross-industry organization of consumer electronics,
computing industry and mobile device companies. Digital Living provides consumers with easy sharing
of digital media through a wired or wireless network in the home.
The DLNA certification logo makes it easy to find products that comply with the DLNA Interoperability
Guidelines. This unit complies with DLNA Interoperability Guidelines v1.5. When a PC running DLNA
server software or other DLNA compatible device is connected to this TV, some setting changes of
software or other devices may be required. Please refer to the operating instructions for the software or
device for more information.
! NOTE
The supplied Nero MediaHome 4 Essentials CD-ROM is a customized software edition only for
sharing files and folders to this TV.
The supplied Nero MediaHome 4 Essentials software does not support following functions:
Transcoding, Remote UI, TV control, Internet services and Apple iTunes
This manual explains operations with the English version of Nero MediaHome 4 Essentials as
examples. Follow the explanation referring to the actual operations of your language version.
If there are too many folders and files in one folder, it may not operate properly.
For the DLNA option, use the Nero MediaHome programme that is provided with the TV. However, we
cannot guarantee that third party program will work perfectly.
You can select a channel while viewing the small preview channel list on your TV screen.
Check your network settings when the DLNA option does not work properly.
If there is an abnormal operation or an error occurs in Nero Media Home, the DLNA option may
not work properly. In this case, exit Nero Media Home and restart the programme. You can down-
load the latest version of Nero Media Home by clicking the question mark at the bottom-left of
the program.
When the network is unstable, the device may be slower or may need to load during playback.
When playing a video in DLNA mode, the Multi Audio and Closed Caption features are not supported.
When selecting Full Screen in DLNA mode, the ratio of the outputted screen may differ from the
original.
When more than one TV is connected to a single server in DLNA mode, a file may not play properly,
depending on the server performance.
If the play time information is not provided by the server, it is displayed as "--:--:--."
When using Movie List, DRM files in the DLNA server cannot be played.
DLNA operation may not work properly according to the AP manufacturers.

109
MY
ME
DIA
Installing Nero MediaHome 4 Essentials
Nero MediaHome 4 Essentials is easy to use DLNA server software for Windows.
Requirement PC system before you install Nero MediaHome 4 Essentials
Windows® XP (Service Pack 2 or higher), Windows Vista® (no Service Pack required), Windows® XP
Media Center Edition 2005 (Service Pack 2 or higher), Windows Server® 2003
Windows Vista® 64-bit edition (application runs in 32-bit mode)
Hard drive space: 200 MB hard drive space for a typical installation of Nero MediaHome stand-
alone
1.2 GHz Intel® Pentium® III or AMD Sempron™ 2200+ processors
Memory: 256 MB RAM
Graphics card with at least 32 MB video memory, minimum resolution of 800 x 600 pixels, and
16-bit color settings
Windows® Internet Explorer® 6.0 or higher
DirectX® 9.0c revision 30 (August 2006) or higher
Network environment: 100 Mb Ethernet, WLAN (IEEE 802.11b/g/n)
1 Start up your computer, and insert the Nero MediaHome 4 Essentials CD-ROM into your compu-
ter’s CD-ROM drive.
An installation wizard will walk you through the quick and uncomplicated installation process.
2 Close all Microsoft Windows programs and exit any anti-virus software that may be running.
3 Insert the Nero MediaHome 4 Essentials CD-ROM into your computer’s CD-ROM drive.
4 Click Nero MediaHome 4 Essentials. The installation is prepared and the installation wizard appears.
5 Click the Next button to display the serial number input screen.
Click Next to go to the next step.
6 If you accept all conditions, click I accept the License Conditions check box and click Next.
Installation is not possible without this agreement.
7 Click Typical and click Next. The installation process is started.
8 If you want to take part in the anonymous collection of data, select the check box and click the
Next button.
9 Click the Exit button to complete the installation.

MY MEDIA
MY
ME
DIA
110
Sharing files and folders
After installing Nero MediaHome, you must add folders you wish to share.
1 Double-click the Nero MediaHome 4 Essentials icon on the desktop.
2 Click Network icon on the left and define your network name in the Network name field. The
Network name you enter will be recognized by your TV.
3 Click Shares icon on the left.
4 Click Local Folders tab on the Shared screen.
5 Click Add icon to open the Browse Folder window.
6 Select the folder containing the files you want to share. The selected folder is added to the list of
shared folders.
7 Click Start Server icon to start the server.
! NOTE
If the shared folders or files are not displayed on the TV, click the folder on the Local Folders
tab and click Rescan Folder at the More button.
Visit www.nero.com for more information and software tools.

111
MY
ME
DIA
Playing back shared contents
You can display and play movie, photo and music content stored on your computer or other DLNA
media servers.
1 Start the server on your computer or other device that connected on your home network.
2MENU Select MY MEDIA.
3ENTER Select Movie List, Photo List or Music List.
4ENTER
Select the DLNA.
Depending on the media server, this TV may need to get the permission from
the server.
If you want to re-scan available media server, press blue color button.
! NOTE
To play the file on the media server, the TV and the media server must be connected to the
same access point.
Because the compatibility and available playback functions on the MY MEDIA menu are tested
on the bundle DLNA server (Nero MediaHome 4 Essentials) environment, file requirements and
playback functions on the MY MEDIA may differ depending on media servers.
The file requirements on this page are not always compatible. There may have some restrictions
by file features and media server’s ability.
Even the files that are not supported can be displayed in photo thumbnail or music thumbnail.
Movie thumbnail is not supported in DLNA Movie.
If there is an unplayable music file in the MY MEDIA menu, the TV will skip the file and play next
file.
The file information indicated on the screen may not always correct for music and movie files in
MY MEDIA menu
This TV only supports movie subtitle files supplied by Nero MediaHome 4.
The subtitle file name and movie file name have to be the same and located at the same folder.
If subtitle files have been added after a directory has been indexed already, the user has to
remove and re-add the folder to the list of shares.
The playback and operating quality of the MY MEDIA function may be affected by your home
network condition.
The files from removable media such as USB drive, DVD-drive etc. on your media server may
not share properly.
When playing the Media through DLNA connection, it does not support the DivX file play which
is protected by DRM.
Up to 200 folders in one folder and 999 including folders and files can be recognized.
If there are too many folders and files in one folder, it may not operate properly.
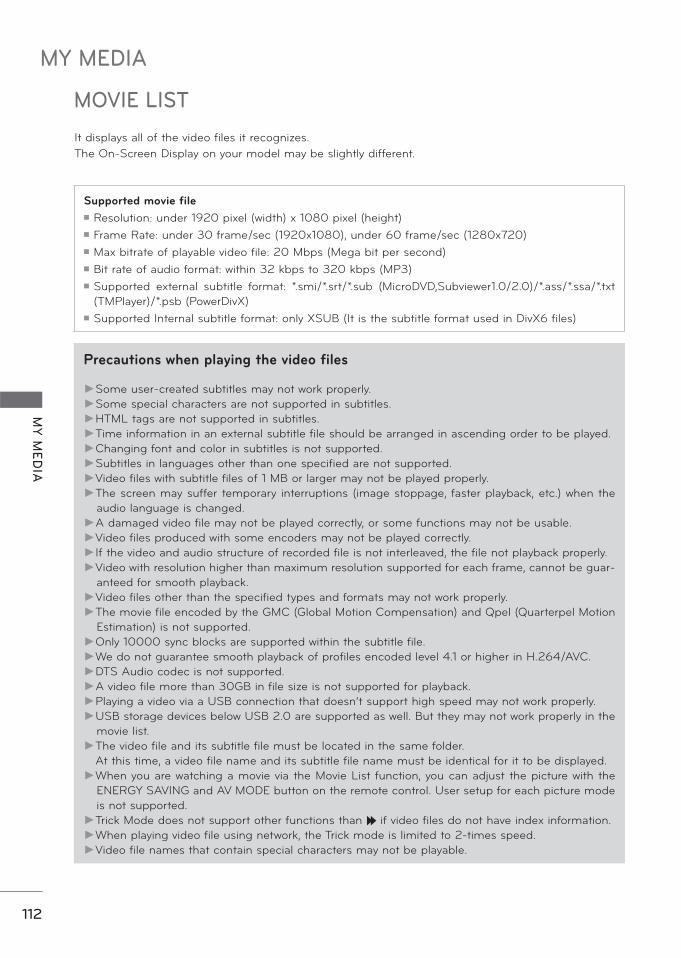
MY MEDIA
MY
ME
DIA
112
MOVIE LIST
It displays all of the video files it recognizes.
The On-Screen Display on your model may be slightly different.
Precautions when playing the video files
Some user-created subtitles may not work properly.
Some special characters are not supported in subtitles.
HTML tags are not supported in subtitles.
Time information in an external subtitle file should be arranged in ascending order to be played.
Changing font and color in subtitles is not supported.
Subtitles in languages other than one specified are not supported.
Video files with subtitle files of 1 MB or larger may not be played properly.
The screen may suffer temporary interruptions (image stoppage, faster playback, etc.) when the
audio language is changed.
A damaged video file may not be played correctly, or some functions may not be usable.
Video files produced with some encoders may not be played correctly.
If the video and audio structure of recorded file is not interleaved, the file not playback properly.
Video with resolution higher than maximum resolution supported for each frame, cannot be guar-
anteed for smooth playback.
Video files other than the specified types and formats may not work properly.
The movie file encoded by the GMC (Global Motion Compensation) and Qpel (Quarterpel Motion
Estimation) is not supported.
Only 10000 sync blocks are supported within the subtitle file.
We do not guarantee smooth playback of profiles encoded level 4.1 or higher in H.264/AVC.
DTS Audio codec is not supported.
A video file more than 30GB in file size is not supported for playback.
Playing a video via a USB connection that doesn’t support high speed may not work properly.
USB storage devices below USB 2.0 are supported as well. But they may not work properly in the
movie list.
The video file and its subtitle file must be located in the same folder.
At this time, a video file name and its subtitle file name must be identical for it to be displayed.
When you are watching a movie via the Movie List function, you can adjust the picture with the
ENERGY SAVING and AV MODE button on the remote control. User setup for each picture mode
is not supported.
Trick Mode does not support other functions than if video files do not have index information.
When playing video file using network, the Trick mode is limited to 2-times speed.
Video file names that contain special characters may not be playable.
Supported movie file
Resolution: under 1920 pixel (width) x 1080 pixel (height)
Frame Rate: under 30 frame/sec (1920x1080), under 60 frame/sec (1280x720)
Max bitrate of playable video file: 20 Mbps (Mega bit per second)
Bit rate of audio format: within 32 kbps to 320 kbps (MP3)
Supported external subtitle format: *.smi/*.srt/*.sub (MicroDVD,Subviewer1.0/2.0)/*.ass/*.ssa/*.txt
(TMPlayer)/*.psb (PowerDivX)
Supported Internal subtitle format: only XSUB (It is the subtitle format used in DivX6 files)

113
MY
ME
DIA
Supported Video Formats
File Extensions
Audio/
VideoCodec Profile/Level Support Explanation
.asf
.wmv
Video
VC-1 Advanced ProfileAdvanced Profile@Level 3
(e.g. 720p60, 1080i60, 1080p30) Only streams compliant to SMPTE 421M VC-1
standard are supported.VC-1 Simple and Main ProfilesSimple Profile@Medium Level (e.g. CIF, QVGA)
Main Profile@High Level (e.g. 1080p30)
AudioWMA Standard
WMA 9 Professional
.divx
.avi
Video
DivX3.11
Global motion compen-sation or quarterpel
motion estimation does not supported. Streams using this syntax are not
supported.
DivX4
DivX5
DivX6Advanced Simple Profile
(e.g. 720p/1080i)
XViD
H.264 / AVC
Main Profile@ Level 4.1
High Profile@ Level 4.1
(e.g. 720p60, 1080i60, 1080p30)
Audio
MPEG-1 Layer I, II
MPEG-1 Layer III (MP3)
Dolby Digital
.mp4
.m4a
VideoH.264 / AVC
Main Profile@ Level 4.1
High Profile@ Level 4.1
(e.g. 720p60, 1080i60, 1080p30)
Global motion compen-sation or quarterpel
motion estimation does not supported. Streams using this syntax are not
supported.
MPEG-4 Part 2 Advanced Simple Profile (e.g. 720p/1080i)
Audio and
.mkv
Video H.264 / AVC
Main Profile@ Level 4.1
High Profile@ Level 4.1
(e.g. 720p60, 1080i60, 1080p30)
Most of the MKV con-tent available is encod-ed by the open source
x264 codec.
Audio-LC and
Dolby Digital
.ts
.trp
.tp
Video
H.264 / AVC
Main Profile@ Level 4.1
High Profile@ Level 4.1
(e.g. 720p60, 1080i60, 1080p30)
MPEG-2 Main Profile@High Level(e.g. 720p60, 1080i60)
VC-1
Simple Profile@Medium Level
(e.g. CIF, QVGA)
Main Profile@High Level
(e.g. 1080p30)
Advanced Profile@Level3
(e.g. 720p60, 1080i60, 1080p30)
Only streams compliant to SMPTE 421M VC-1
standard are supported.
Audio
MPEG-1 Layer I, II
MPEG-1 Layer III (MP3)
Dolby Digital
.vob
VideoMPEG-1
MPEG-2 Main Profile@High Level (e.g. 720p60, 1080i60)
Audio
Dolby Digital
MPEG-1 Layer I, II
DVD-LPCM
.mpg Video MPEG-1 Main Profile@High Level (e.g. 720p60, 1080i60) Only streams compliant configured properly for
TS, PS or ESAudio MPEG-1 Layer I, II

MY MEDIA
MY
ME
DIA
114
1 Moves to upper level folder
2 Current page/Total pages
3 Current page/ total pages of
contents
4 Contents under the folder
focused on 1
5 Change to a different input.
6 Move to Photo List or Music
List.
7 Changes the number or
thumbnails displayed at a time.
8 Allows you to mark certain files.
9 Return to TV viewing.
Screen Components
1
3
4
2
Abnormal files are
displayed using this
graphic.
Non-supported files
are displayed using
this graphic.
1ENTER ENTER Select Home Menu.
2ENTER Select MY MEDIA.
3ENTER Select Movie List.
5 6 7 8 9

115
MY
ME
DIA
When one or more movie files are
marked, the marked movies will be
played in sequence.
1ENTER
Select the target folder
or drive.
2ENTER Select Mark Mode.
3ENTER
Select the desired
movie title.
4ENTER
Select Play Marked.
Play the marked movie
file.
It displays the current
movie status progress
bar on the bottom of
the screen.
Movie Selection
Mark Mode
Play
Marked
Play the first selected file. Once a movie
finishes playing, the next selected one will
be played automatically.
Mark All Mark all files in the folder.
Unmark
AllDeselect all marked files.
Exit Mark
ModeEnter or exit the Mark Mode.
1ENTER
Select the target folder
or drive.
2ENTER
Select the desired
movie title.
3ENTER Play the movie file.

MY MEDIA
MY
ME
DIA
116
Playing the Movie
! NOTE
When replaying a video file after stop-
ping, you can play from where it stopped
automatically. If you select “Yes” when playing the
same file after the video file has been
stopped, it will restart where it stopped
previously. If continuous series files exist within the
folder, the next file will automatically be
played. But, this excludes cases when
the Repeat function of Movie List Option
is turned “On” (Refer to page 117) or
when set as Marked Play.
1ENTER Show the Option menu.
2ENTER Select the desired menu option.
1 2 3 4
1 Stop playback.
Return to normal playback.
Paused playback. If no buttons
are pressed on the remote control
for 10 minutes after pausing, the
TV returns to the playback state.
Select the required speed:
x2, x4, x8, x16, x32 (backward/for-
ward).
2 Increase or decrease the bright-
ness of your screen.
3 Hide the menu on screen. To see
the menu again, press ENTER
button.
4 Return to the previous menu.

117
MY
ME
DIA
Subtitle Language Group Supported Language
Latin1 English, Spanish, Portuguese
Set Video Play Menu Options
Code Page
Picture Size: Selects your desired picture format for videos.
Full Mode: Files are played in full screen mode regardless of the aspect ratio of video.
Original Mode: Files are played according to the aspect ratio of video.
Audio Language: Changes the Language Group of the audio for video files. Files with a single audio track cannot be selected.
Subtitle Language: The subtitles can be turned on or off.
Language: Activated for SMI subtitles and can select the language within the subtitle.
Code Page: Subtitle font selection. When set to default, contents are displayed in the language set in "Option - Language - Menu Language."
Sync: When the video is not synchro-nized with the captions, it can be adjusted by 0.5 second.
Position: Move the location of the subtitles.
Size: Changes the subtitle font size. Repeat: Turn on/off repeat function of movie playback. When turned on, the file within the folder will be played back repeatedly. When turned off, if the next file name is similar to the previous file, it can be played sequen-tially.
1ENTER Select the desired menu option.
2ENTER Make appropriate adjustments.

MY MEDIA
MY
ME
DIA
118
* Image shown may differ from your TV.
Set Video Menu Options
1ENTER
Make appropriate adjustments.
Then, select Close.
Set Audio Menu Options Set 3D video Menu Options
1ENTER
Make appropriate adjustments.
Then, select Close.
For more information, see the 3D Imaging sec-
tion in the Owner's Manual.

119
MY
ME
DIA
The On-Screen Display on your model may be slightly different.
PHOTO LIST
Screen Components
1 Moves to upper level folder2 Current page/Total pages3 Current page/total pages of
contents 4 Contents under the folder
focused on 1
5 Change to a different input.6 Move to Music List or Movie
List.7 Changes the number or
thumbnails displayed at a time.8 Allows you to mark certain files.9 Return to TV viewing.
Supported photo file: *.JPG Baseline: 64 pixel (width) x 64 pixel (height) to 15360 pixel (width) x 8640 pixel (height) Progressive: 64 pixel (width) x 64 pixel (height) to 1920 pixel (width) x 1440 pixel (height) You can play JPEG files only. Non-supported files are displayed in the form of predefined icon. An error message occurs for corrupted files or file formats that cannot be played. Corrupted image files may not be displayed properly. It may take some time to view high-resolution images in full screen.
1ENTER ENTER Select Home Menu.
2ENTER Select MY MEDIA.
3ENTER Select Photo List.
1
3
2
4
Abnormal files are
displayed using this
graphic.
Non-supported files
are displayed using
this graphic.
5 6 7 8 9
File
ExtensionsItem Profile
2D
jpeg
jpg
jpe
supproted file formatSOF0: baselineSOF1: Extend SequentialSOF2: Progressive
photo sizeMin: 64 x 64Max - Normal Type: 15360 (W) x 8640 (H) Progressive Type: 1920 (W) x 1440 (H)
3D mpo
supproted file format mpo
photo size
4:3 size: 3648 x 2736 2592 x 1944 2048 x 15363:2 size: 3648 x 2432

MY MEDIA
MY
ME
DIA
120
Photo Selection
When one or more photos are
marked, you can view individual pho-
tos or a slide show of the marked
photos. If no photos are marked, you
can view all photos individually or all
photos in the folder in a slide show.
Mark Mode
1ENTER
Select the target folder
or drive.
2ENTER Select Mark Mode.
3ENTER
Select the desired
photo files.
4ENTER
Select View Marked.
View the marked photo
files.
View
MarkedDisplay the selected photo.
Mark All Mark all photos on the screen.
Unmark
AllDeselect all marked photos.
Exit Mark
ModeEnter or exit the Mark Mode.
1ENTER
Select the target folder
or drive.
2ENTER
Select the desired pho-
tos.
3ENTER Photo file is displayed.

121
MY
ME
DIA
Full Screen Menu
More operations are available in full screen mode.
The aspect ratio of a photo may change the size
of the photo displayed on the screen in full size.
1Select the target folder or drive.
2ENTER Select the desired photos.
3ENTER
The selected photo is displayed in full
size.

MY MEDIA
MY
ME
DIA
122
Slideshow: Selected photos are displayed during the slide show. If no photo is selected, all photos
in the current folder are displayed during slide show.
Set the time interval of the slide show in Option-Set Photo View. menu (Refer to p. 123).
You can adjust Option by using the Q.MENU button on the remote control.
BGM (Background Music): Listen to music while viewing photos in full size.
Set the BGM device and album in Option-Set Photo View. menu (Refer to p. 123).
You can adjust Option by using the Q.MENU button on the remote control.
(Rotate): Rotate photos.
Rotates the photo 90 °, 180 °, 270 °, 360 ° clockwise.
Photos cannot be rotated if its width is greater than the available supported resolution height.
/ : View the photo in full mode or original mode.
(Energy Saving): Increase the brightness of your screen by using ENERGY SAVING button.
Option: Set values for Slide Speed and BGM (Refer to p.123).
You cannot change BGM while BGM is playing.
You can only select the MP3 folder saved on the device that currently displays the photo.
Hide: Hide the menu on the full-sized screen.
To see the menu again on the full-sized screen, press ENTER button to display.
Exit: Move to the previous menu screen.
4ENTER
Select the Slideshow,
BGM, (Rotate), / ,
(Energy Saving), Option, or Hide.

123
MY
ME
DIA
Using the Photo List Function
Set Photo View Menu Options
1ENTER Show the Option menu.
2ENTER Select the desired menu option.
1ENTER Select Slide Speed or BGM.
2ENTER Make appropriate adjustments.
! NOTE
You cannot select the Option in 3D
imaging mode.
If you want to listen to BGM (background
music) while viewing *mpo image files,
play a *jpg file and set the BGM folder in
"Option - Set Photo View." Then, you
can select and listen to BGM when view-
ing *mpo files.

MY MEDIA
MY
ME
DIA
124
* Image shown may differ from your TV.
Set Video Menu Options
1ENTER Make appropriate adjustments. Then, select Close.
Set Audio Menu Options
1ENTER
Make appropriate adjustments.
Then, select Close.
Set 3D video Menu Options
For more information, see the 3D Imaging sec-
tion in the Owner's Manual.

125
MY
ME
DIA
MUSIC LISTThis TV cannot play back copy-protected files.
The On-Screen Display on your model may be slightly different.
Supported Music File: *.MP3
Bit rate range: 32 Kbps - 320 Kbps
• Sampling rate MPEG1 Layer3: 32 kHz, 44.1 kHz, 48 kHz
• Sampling rate MPEG2 Layer3: 16 kHz, 22.05 kHz, 24 kHz
Screen Components
1 Preview: If any album jacket for
the file (Album Art Image)
exists, this picture is displayed.
2 Moves to upper level folder
3 Current page/Total pages
4 Current page/total pages of
contents
5 Contents under the folder
focused on 2
6 Change to a different input.
7 Move to Movie List or Photo
List.
8 Changes the number or
thumbnails displayed at a time.
9 Allows you to mark certain files.
10 Return to TV viewing.
Abnormal files are
displayed using this
graphic.
Non-supported files
are displayed using
this graphic.
1ENTER ENTER Select Home Menu.
2ENTER Select MY MEDIA.
3ENTER Select Music List.
4
3
5
1
2
6 7 8 9 10

MY MEDIA
MY
ME
DIA
126
Music Selection
Mark Mode
Play
Marked
Play the selected songs. Once a song
finishes playing, the next selected one
will be played automatically.
Mark All Mark all songs in the folder.
Unmark
AllDeselect all marked song.
Exit Mark
ModeEnter or exit the Mark Mode.
1ENTER
Select the target folder
or drive.
2ENTER Select Mark Mode.
3ENTER
Select the desired
music file.
4ENTER
Select Play Marked.
Play the marked music
file.
1ENTER
Select the target folder
or drive.
2ENTER
Select the desired
music file.
3ENTER Music files are played.

127
MY
ME
DIA
Using the Music List Function
! NOTE
You can listen to the music only within
the device currently played.
1ENTER Show the Option menu.
2ENTER Select Set Audio Play. or Set Audio..
1 2 3 4 5
1 Stop playback.
Return to normal playback.
Paused playback.
Select the previous or next
song.
2 Play with Photo: Start playing the
selected songs and then move to
the Photo List.
3 Increase or decrease the bright-
ness of your screen
4 Hide the menu on screen.
5 Move to the previous menu
screen.

MY MEDIA
MY
ME
DIA
128
Set Audio Play Menu Options
Set Audio Menu Options
1ENTER
Make appropriate adjustments.
Then, select Close.
1ENTER
Make appropriate adjustments.
Then, select Close.

129
MY
ME
DIA
! NOTE
A damaged or corrupted music does not play but displays 00:00 in playtime. Music files with copy-protection will not play. Press ENTER or button to stop the screen saver.
If you don't press any buttons for a while, the play information box
will float across the screen. This prevents screen pixel damage due
to a fixed image remaining on the screen for a extended period of
time.

MY MEDIA
MY
ME
DIA
130
DIVX REGISTRATION CODE
Using the registration number, movies can be rented or purchased at www.divx.com/vod.
Only DivX files matched with the registration code of the purchased TV are playable.
! NOTE
When loading, some buttons may not work. If you use the DivX registration code of another device, the rented or purchased DivX file cannot
be played. Therefore always use the DivX registration code assigned to this product. The video or audio of a file converted based on a standard other than the DivX codec standard
may be corrupted or unable to be played. The DRM/*.tp/*.trp file in DLNA server is not played when Movie List is in operation.
1MENU Select MY MEDIA.
2ENTER Select DivX Option.
3Select DivX Reg. Code.
4ENTER Display Divx Reg. Code.
BLUE

131
MY
ME
DIA
DEACTIVATION
The purpose of deactivation is to allow deactivation of devices for users who have activated all the
available devices through the web server and are blocked from activating more devices. DivX VOD
allows the consumer to activate up to 6 devices under one account.
Delete the existing authentication information to receive a new DivX user authentication for TV. Once
this function is executed, a DivX user authentication is required again to see DivX DRM files.
1MENU Select MY MEDIA.
2ENTER Select DivX Option.
3Select Deactivation.
4ENTER Select Yes.
5ENTER Display Deactivation.
BLUE

NETWORK
NE
TW
OR
K
132
NETWORK
LEGAL NOTICE
1MENU Select NETWORK.
2ENTER Select Legal Notice.
3ENTER Check Legal notice.
4EXIT Return to TV viewing.
IMPORTANT NOTICE RELATING TO NETWORK SERVICEAll content and services accessible through this device belong to third parties and are protected by copyright, patent, trademark and/or other intellectual property laws. Such content and ser-vices are provided solely for your personal non-commercial use. You may not use any content or services in a manner that has not been autho-rized by the content owner or service provider. Without limiting the foregoing, unless expressly authorized by the applicable content owner or service provider, you may not copy, upload, post, transmit, translate, sell, modify, create derivative works, or distribute in any manner or medium any content or services displayed through this device.YOU EXPRESSLY ACKNOWLEDGE AND AGREE THAT THE DEVICE AND ALL THIRD PARTY CONTENT AND SERVICES ARE PROVIDED "AS IS" WITHOUT WARRANTY OF ANY KIND, EITHER EXPRESS OR IMPLIED. LG ELECTRONICS EXPRESSLY DISCLAIMS ALL WARRANTIES AND CONDITIONS WITH RESPECT TO ANY CONTENT AND SERVICES, EITHER EXPRESS OR, IMPLIED, INCLUDING BUT NOT LIMITED TO, WARRANTIES OF MERCHANTABILITY, OF SATISFACTORY QUALITY, FITNESS FOR A PARTICULAR PURPOSE, AND NON-INFRINGEMENT OF THIRD PARTY RIGHTS. LG DOES NOT GUARANTEE THE ACCURACY, VALIDITY, TIMELINESS, LEGALITY, OR COMPLETENESS OF ANY CONTENT OR SERVICE MADE AVAILABLE THROUGH THIS DEVICE AND DOES NOT WARRANT THAT THE DEVICE OR SERVICES WILL MEET YOUR REQUIREMENTS,
OR THAT OPERATION OF THE DEVICE OR SERVICES WILL BE UNINTERRUPTED OR ERROR-FREE. UNDER NO CIRCUMSTANCES, INCLUDING NEGLIGENCE, SHALL LG BE LIABLE, WHETHER IN CONTRACT OR TORT, FOR ANY DIRECT, INDIRECT, INCIDENTAL, SPECIAL OR CONSEQUENTIAL DAMAGES, OR ANY OTHER DAMAGES ARISING OUT OF, ANY INFORMATION CONTAINED IN, OR ANY CONTENT OR SERVICE ACCESSED BY YOU OR ANY THIRD PARTY, EVEN IF ADVISED OF THE POSSIBILITY OF SUCH DAMAGES.Third party services may be changed, suspend-ed, removed, terminated or interrupted, or access may be disabled at any time, without notice, and LG makes no representation or warranty that any content or service will remain available for any period of time. Content and services are trans-mitted by third parties by means of networks and transmission facilities over which LG has no con-trol. LG may impose limits on the use of or access to certain services or content, in any case and without notice or liability. LG expressly dis-claims any responsibility or liability for any change, interruption, disabling, removal of or suspension of any content or service made avail-able through this device.LG is neither responsible nor liable for customer service related to the content and services. Any question or request for service relating to the content or services should be made directly to the respective content and service providers.

133
NE
TC
AS
T
NETCAST
NETCAST MENU
These services are provided by separate Content Provider.
Please visit the content providers web site for specific information on their services. (But, some content
manual maybe not provide depending on Content Provider).
* NETCAST menu source can differ by country.
! NOTE
The videos list searched from the TV may different with the list searched from a web browser on
PC.
The settings of this TV do not affect the YouTube’s playback quality.
To view the owner’s manual that provided by the Content Provider, visit our website at http://www.
lg.com.
For service that requires log in, join the applicable service on the website using the PC and log in
through the TV to enjoy various additional functionalities.
When you set the city you want with Setup by pressing the red button, the background of NetCast
will be set to the weather of the selected city.
For Plasma TV: If there is no user action 2 minutes following freezing image or video on screen,
the screensaver will activate itself preventing fixed image remaining on screen.
To select Weather of area, press the
RED button.
1ENTER ENTER Select NetCast.
2ENTER
Select NETCAST menu option.
Enjoy Online Service.

NETCAST
NE
TC
AS
T
134
EMOL
You can use a various emol contents.
Screen Components
1 emol menu
2 Title article display
Navigate the desired article.
ENTERThe selected article is displayed.
Return to Netcast menu.
EXIT Return to TV viewing.
If you want to more information, visit
www.emol.com
This web site may be changed with-
out prior notice.
1 2

135
NE
TC
AS
T
UOL
You can use a various UOL contents.
Screen Components
1 UOL menu
2 Title article display
1
2
Navigate the desired article.
ENTERThe selected article is displayed.
Return to Netcast menu.
EXIT Return to TV viewing.
If you want to more information, visit
www.uol.com.br.
This web site may be changed with-
out prior notice.

NETCAST
NE
TC
AS
T
136
TERRA TV
You can use a various terratv contents.
Screen Components
1 terratv menu
2 Videos list
1
2
Navigate the desired video.
ENTERThe selected video is displayed.
Return to Netcast menu.
EXIT Return to TV viewing.
If you want to more information, visit
http://terratv.terra.com.
This web site may be changed with-
out prior notice.

137
NE
TC
AS
T
BAZUCA
You can watch movies from bazuca streamed over the internet to your TV.
Screen Components
1 bazuca menu
2 Movie poster1 2
Navigate the desired video.
ENTERThe selected video is displayed.
Return to Netcast menu.
EXIT Return to TV viewing.
If you want to more information, visit
http://www.bazuca.com.
This web site may be changed with-
out prior notice.

NETCAST
NE
TC
AS
T
138
Service menu
Home: The weather of selected city is displayed.
Favorite City: Frequently checked cities can be registered to check the weather.
NOTE
By default, New York, London and Paris are registered and the user can add/delete cities from
Favorite City.
LG is not responsible for the accuracy of the weather forecast.
Applicable weather information can differ from the actual weather depending on the information
provided by Accuweather.
ACCUWEATHERAccuweather is the program to view the weather of the city the user wants.
1 AccuWeather menu
2 Weather list by city
Screen Components
RED Change between Celsius and Fahrenheit.
Move the focus to the menu you want.
ENTERSelect the focused menu.
Return to Netcast menu.
EXIT Return to TV viewing.
1
2

139
NE
TC
AS
T
PICASA
Picasa is an application from Google that appreciates digital image files.
Screen Components
1 Picasa menu
2 Photo list
1
2
Navigate the desired photos.
ENTERThe selected photo file is displayed.
Return to Netcast menu.
EXIT Return to TV viewing.
Home: The featured photos list will be displayed.
Friends: You can register users with the pictures you want as friends. You can add up to 10 friends.
Search: The keypad/keyboard menu will be displayed.
My Photos: You can view the pictures uploaded to the Web. This function can only be used when you sign
in.
Sign in (Sign Out): Displays the keypad/keyboard menu to sign in or returns to the sign-out status.
Picasa menu

NETCAST
NE
TC
AS
T
140
YOUTUBE
YouTube is a video sharing website where users can upload, view, and share video clips.
Screen Components
1 YouTube menu
2 Videos list
1
RED Set the option menu.
Return to Netcast menu.
EXIT Return to TV viewing.
2
NOTE
When you press the Q.menu button while the Youtube video is playing in full mode, you can set the
video options.
The playback of YouTube’s videos may be paused, stopped or buffering occurring often depending
on your broadband speed.
We recommend a minimum connection speed of 1.5 Mbps. For the best playback condition, a
connection speed of 4.0 Mbps is required. Sometimes your broadband speed varies based on your
ISP’s network conditions. Contact your ISP if you have problems maintaining a fast connection that
is reliable, or if you want to increase your connection speed. Many ISPs offer a variety of broadband
speed options.

141
NE
TC
AS
T
Home: You can watch the popular video in real time.
Featured: The featured videos list will be displayed.
Popular: The best rated videos list from YouTube server will be displayed.
Most Viewed: The most viewed videos list will be displayed.
Search: The keypad/keyboard menu will be displayed.
History: The videos list that you previously played will be displayed. Maximum of 20 videos can be stored.
Favorites: In sign-in status, this menu will be displayed the videos list that is arranged in the YouTube
server with your account (Some videos may not appear on the Favorites list, even if the videos are
arranged in the server).
Sign in (Sign Out): Displays the keypad/keyboard menu to sign in or returns to the sign-out status.
YouTube menu
Stops the video and displays related videos list.
Pause the video while it is playing.
Play the selected video.
Skip the playback forward or backward.
RED Set the option menu.
Return to Netcast menu.
EXIT Return to TV viewing.
Using the remote control
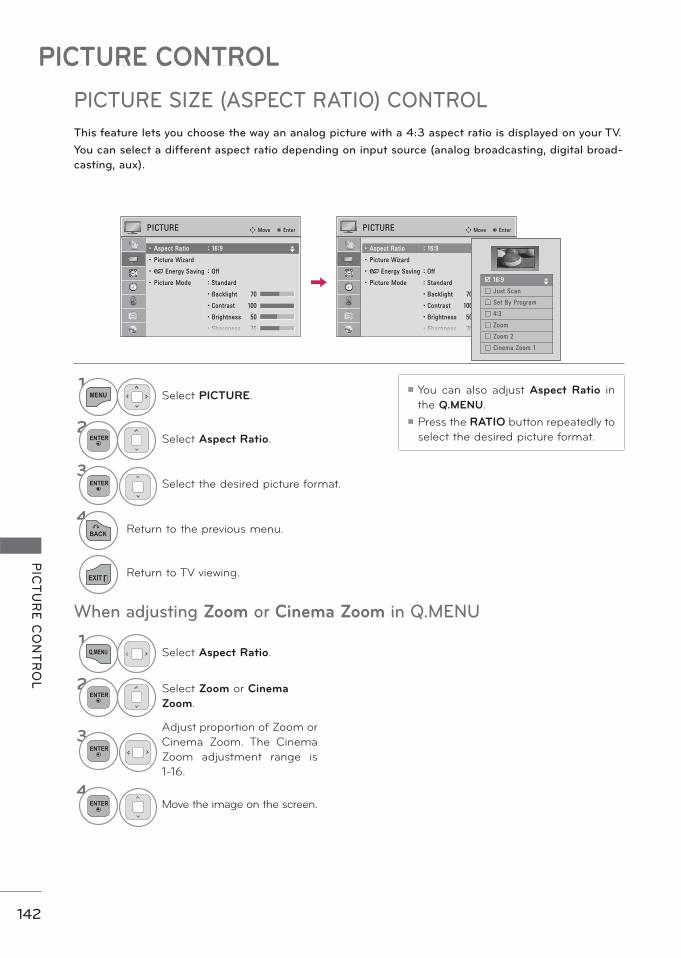
PICTURE CONTROL
PIC
TU
RE
CO
NT
RO
L
142
PICTURE SIZE (ASPECT RATIO) CONTROL
PICTURE CONTROL
This feature lets you choose the way an analog picture with a 4:3 aspect ratio is displayed on your TV.
You can select a different aspect ratio depending on input source (analog broadcasting, digital broad-
casting, aux).
1MENU Select PICTURE.
2ENTER Select Aspect Ratio.
3ENTER Select the desired picture format.
4BACK Return to the previous menu.
EXIT Return to TV viewing.
You can also adjust Aspect Ratio in
the Q.MENU.
Press the RATIO button repeatedly to
select the desired picture format.
1Q.MENU Select Aspect Ratio.
2ENTER
Select Zoom or Cinema
Zoom.
3ENTER
Adjust proportion of Zoom or
Cinema Zoom. The Cinema
Zoom adjustment range is
1-16.
4ENTER Move the image on the screen.
When adjusting Zoom or Cinema Zoom in Q.MENU

P
ICT
UR
E C
ON
TR
OL
143
16:9
Adjust the picture horizontally, in a linear
proportion to fill the entire screen.
Just Scan
Normally the edges of video signals are
cropped 1-2%. Just Scan turns off this
cropping and shows the complete video.
Notes: If there is noise on the edges of the
original signal, it will be visible when Just Scan
is activated.
Just Scan operates only in DTV/Component/
HDMI-DTV/DVI-DTV (720p/1080i/1080p)
input source.
Set By Program
Selects the proper picture proportion to
match the source’s image.
4:3
Choose 4:3 when you want to view a picture
with an original 4:3 aspect ratio.
Zoom
Choose Zoom when you want to view the
picture without any alteration. However, the
top and bottom portions of the picture will
be cropped.
Zoom 2
With this function, when the SD screen is
sent to the HD with black at the left side and
the right side, this screen can be extended
to be fully displayed with no black area.
It is enabled only at the DTV HD broadcast-
ing (It is the reference for displaying ‘HD’ at
the channel banner if the height is greater
than 480).
Cinema Zoom
Choose Cinema Zoom when you want to
enlarge the picture in correct proportion.
This enlarges an image with cinemascope
aspect ratio (2.35:1) without distortion.
Note: When enlarging or reducing the pic-
ture, the image may become distorted.
(4:3 4:3)
(16:9 16:9)

PICTURE CONTROL
PIC
TU
RE
CO
NT
RO
L
144
PICTURE WIZARD
This feature lets you adjust the picture quality of the original image. Use this to calibrate the screen
quality by adjusting the Black and White Level etc. You can calibrate the screen quality by easily follow-
ing each step. When you adjust the image to Low, Recommended or High, you can see the example of
the changes you made.
1MENU Select PICTURE.
2ENTER ENTER
Select Picture
Wizard.
3ENTER Adjust Picture Wizard.
4ENTER
Adjust Standard/
Preferred.
5ENTER Adjust Black Level.
6ENTER Adjust White Level.
7ENTER Adjust Tint.
If you select Preferred, OSD (On Screen
Display) differ from that shown in this manual.

P
ICT
UR
E C
ON
TR
OL
145
9ENTER
Adjust Horizontal
Sharpness.
10ENTER
Adjust Vertical
Sharpness.
8ENTER Adjust Color.
12FAVMARK
CHAR/NUM
Select input source to
apply the settings.
13ENTER Save.
14ENTER Finish the Picture Wizard.
If you stop the Picture Wizard before the
final step, the changes will not be saved to
the TV.
Once the Picture Wizard sets the picture
quality, Energy Saving is changed to Off automatically.
To reset changes made by Picture Wizard,
operate Picture Reset when Picture Mode
is on Expert1.
i.e)
11ENTER Adjust Backlight.

PICTURE CONTROL
PIC
TU
RE
CO
NT
RO
L
146
ENERGY SAVING
It reduces the TV’s power consumption.
You can increase the brightness of your screen by adjusting the Energy Saving level or by adjusting the
Picture Mode.
1MENU Select PICTURE.
2ENTER Select Energy Saving.
3ENTER Select your desired options.
4BACK Return to the previous menu.
EXIT Return to TV viewing.
When selecting Screen off, the
screen will turn off after 3 seconds.
Pressing any button of the remote
controller will turn on the screen
again.
If you adjust “Energy Saving-Auto,
Maximum”, Backlight option will not
work.
When selecting “Energy Saving -
Off, Minimum, or Medium, you can
adjust Backlight feature.
When selecting Auto, Backlight is
automatically adjusted through
Intelligent Sensor according to the
surrounding conditions.
When selecting Off, Energy Saving is
not used.
Press the ENERGY SAVING button
repeatedly to select the appropriate
Energy Saving.

P
ICT
UR
E C
ON
TR
OL
147
PRESET PICTURE SETTINGS (PICTURE MODE)
There are factory presets for picture settings available in the user menus. You can use a preset,
change each setting manually, or use the Intelligent Sensor.
1MENU Select PICTURE.
2ENTER Select Picture Mode.
3ENTER Select your desired options.
4BACK Return to the previous menu.
EXIT Return to TV viewing.
Vivid, Standard, Cinema, Sport, and Game
Settings are preset for the optimum picture
quality at the factory.
Vivid: This is the mode to maximize the effect
of the video in the retail store. Strengthen the
contrast, brightness, color and sharpness for
vivid picture.
Standard: This is the mode to realize optimum
viewing condition for the general user.
Cinema: This mode optimizes video for watch-
ing movies.
Sport: This is the video mode to emphasize
dynamic video and primary color (e.g, white,
uniform, grass, sky blue etc.) by realizing the
optimal screen for sports.
Game: This is the mode to realize fast response
speed in a fast gaming screen.
Expert: This is the mode to adjust the video
in detail for video quality expert and general
user.
You can also adjust Picture Mode in the
Q.MENU.
When selecting Intelligent Sensor, Energy
Saving is changed to Auto automatically.
When selecting Intelligent Sensor, it changes
Backlight, contrast, brightness, sharpness, color
and tint automatically.
Intelligent Sensor: The most suitable picture is
automatically adjusted according to the sur-
rounding conditions.

PICTURE CONTROL
PIC
TU
RE
CO
NT
RO
L
148
MANUAL PICTURE ADJUSTMENT - USER MODE
Adjust the picture appearance to suit your preference and viewing situations.
1MENU Select PICTURE.
2ENTER Select Picture Mode.
3ENTER Select your desired menu option.
4ENTER
Select Backlight, Contrast, Brightness,
Sharpness, Color, Tint, Color Temp., or
Advanced Control.
5ENTER Make appropriate adjustments.
6BACK Return to the previous menu.
EXIT Return to TV viewing.
Backlight: This function adjusts the
brightness of the backlight behind
the LCD screen. Adjusting the back-
light is recommended when setting
the brightness of the TV. When
decreasing the backlight, the bright-
ness of the black becomes darker
without any loss in video signal and
the power consumption is reduced.
Backlight can only be adjusted in "
Energy Saving - Off, Minimum, or
Medium".
Contrast: Increase or decrease the
gradient of the video signal. You may
use Contrast when the bright part of
the picture is saturated.
Brightness: Adjusts the base level of
the signal in the picture. You may use
Brightness when the dark part of the
picture is saturated.
Sharpness: Adjusts the level of crisp-
ness in the edges between the light
and dark areas of the picture. The
lower the level, the softer the image.
Color: Adjusts intensity of all colors.
Tint: Adjusts the balance between
red and green levels.
Color Temp.: Set to warm to enhance hotter colors such as red, or set to cool to enhance cooler colors such as blue.

P
ICT
UR
E C
ON
TR
OL
149
PICTURE IMPROVEMENT TECHNOLOGY (ADVANCED CONTORL)
Advanced Control allows you to adjust some of the advanced features of your LG display.
To reset to the factory default after making adjustments to each input source, execute the Picture
Reset function for each Picture Mode.
1MENU Select PICTURE.
2ENTER Select Advanced Control.
3ENTER Select your desired options.
4Make appropriate adjustments.
5BACK Return to the previous menu.
EXIT Return to TV viewing.

PICTURE CONTROL
PIC
TU
RE
CO
NT
RO
L
150
EXPERT PICTURE CONTROL
Expert1 and Expert2 provide even more advanced picture settings for users. Typical used by
professionals for calibrating the TV.
1MENU Select PICTURE.
2ENTER Select Picture Mode.
3ENTER Select Expert1 or Expert2.
4ENTER Select Expert Control.
5ENTER Select your desired menu option.
6Make appropriate adjustments.
7BACK Return to the previous menu.
EXIT Return to TV viewing.

P
ICT
UR
E C
ON
TR
OL
151
Dynamic Contrast Adjusts the contrast to keep it at the best level according to the brightness of the screen. The picture is improved by making bright parts brighter and dark parts darker.
Dynamic Color Adjusts screen colors so that they look livelier, richer and clearer. This fea-ture enhances hue, saturation and luminance so that red, blue, and green look more vivid.
Skin Color It detects the skin area of video and adjusts it to express a natural skin color.
Noise Reduction Reduces screen noise without compromising video quality.
Digital Noise
Reduction Removes noise caused by compressing video.
Gamma
You can adjust brightness of dark areas and middle gray level areas of the picture.
Low : Make brighter and middle gray level areas of the picture brighter.Medium : Express original picture levels.High: Make dark and middle gray level areas of the picture darker.
Black Level
Low: The reflection of the screen gets darker.High: The reflection of the screen gets brighter.
Set black level of the screen to proper level. This function is available in the following modes: AV (NTSC-M), HDMI or Component.
Clear White Make the white area of screen brighter and more white.
Eye Care
Adjust the brightness of the screen to prevent the screen from being too bright. Dims extremely bright pictures.
This feature is enabled in “Picture Mode-Standard, Sports, Game”.
Real Cinema
or
Film Mode
Makes video clips recorded in film look more natural by eliminating judder effect.
DVD and Blu-ray movies are filmed at 24 frames per second (fps). With LG Real Cinema, every frame is consistently processed 5 times in 1/24 of a second producing 120 fps with TruMotion or 2 times in 1/24 of a second producing 48 fps without TruMotion, thus totally eliminating the judder effect.
This function can also work when TruMotion is off.
Color Gamut
Advanced Control Standard: Displays standard set of colors.Wide: Increase number of colors used.
Maximize the utilization of colors to increase color quality.
Expert Control Displays color domain of the signal.
Standard: Displays standard set of colors.Wide: Increase number of colors used. EBU: Mode to display EBU standard color area.SMPTE: Mode to display SMPTE standard color area.BT709: Mode to display BT709 standard color area.
*This feature is not available for all models.

PICTURE CONTROL
PIC
TU
RE
CO
NT
RO
L
152
Edge Enhancer Show clearer and distinctive yet natural edges in the video.
xvYCC
This produces richer colors.
This feature represents rich color as much as conventional video signal.
This function is enabled in "Picture mode - Cinema, Expert" when a xvYCC signal is inputted through HDMI.
Color Filter This function filters specific colors in the video.
You can use the RGB filter to set color saturation and hue accurately.
Expert Pattern
This is a pattern used for expert adjustment.
This function is enabled in "Picture mode - Expert" when you watch DTV.
Color Temperature
Adjusts the overall color of the screen by changing the white baseline. a. Gamma : Select 1.9, 2.2, 2.4b. Method : 2 Points- Pattern: Inner, Outer- Red/Green/Blue Contrast, Red/Green/Blue Brightness: The adjustment range is -50 - +50.c. Method : 10 Point IRE- Pattern: Inner, Outer- IRE (Institute of Radio Engineers) is the unit to display the size of the video
signal and can be set among 10, 20, 30 - 100. You can adjust Red, Green or Blue according to each setting.
- Luminance: This function displays calculated luminance value for 2.2 gamma. You can input luminance value you want at 100 IRE, then the target luminance value for 2.2 gamma is displayed at every 10 steps from 10 IRE to 90 IRE.
- Red/Green/Blue: The adjustment range is -50 - +50.d. Apply to all inputs
Color Management
System
A tool used by the experts to make adjustments by using the test patterns, this does not affect other colors but can be used to selectively adjust the 6 color areas (Red/Green/Blue/Cyan/Mgt/Yellow).
Color difference may not be distinctive even when you make the adjust-ments for the general video.
Adjusts Red/Green/Blue/Yellow/Cyan, Magenta.
- Red/Green/Blue/Yellow/Cyan/Magenta Color: The adjustment range is -30 - +30.
- Red/Green/Blue/Yellow/Cyan/Magenta Tint: The adjustment range is -30 - +30.
- This feature is disabled in RGB-PC and HDMI-PC mode.

P
ICT
UR
E C
ON
TR
OL
153
PICTURE RESET
Settings of the selected picture modes return to the default factory settings.
1MENU Select PICTURE.
2ENTER Select Picture Reset.
3ENTER Select Yes.
4ENTER Initialize the adjusted value.
EXIT Return to TV viewing.

PICTURE CONTROL
PIC
TU
RE
CO
NT
RO
L
154
TRUMOTION
Advance video technology that provides clearer, smoother images, even during fast action scenes cre-
ating a more stable structure for a crisper picture.
1MENU Select PICTURE.
2ENTER Select TruMotion.
3ENTER Select Low, High, User, or Off.
4ENTER Select Judder or Blur.
5Make appropriate adjustments.
6BACK Return to the previous menu.
EXIT Return to TV viewing.
Adjustment for TruMotion (Judder and Blur) with selecting User
Off: Turn off TruMotion operation.
Low: Provides smooth picture move-
ment. Use this setting for standard
use.
High: Provides smoother picture
movement.
Judder: Adjusts noise of the screen.
Blur: Adjusts after-image of the screen.
TruMotion works with all inputs except
PC mode.
If you enable "TruMotion", noise may
appear on the screen. If this occurs,
set "TruMotion" to "Off".
If you select "Picture Mode-Game"
set "TruMotion" to "Off".

P
ICT
UR
E C
ON
TR
OL
155
LED LOCAL DIMMING
After analyzing the signal of the input video by areas of the screen, it adjusts the backlight to improve
the contrast ratio. This feature is disabled in “Picture Mode-Game”.
1MENU Select PICTURE.
2ENTER Select LED Local Dimming.
3ENTER Select On or Off.
4BACK Return to the previous menu.
EXIT Return to TV viewing.
POWER INDICATORAdjust the power/standby indicator light on the front of the TV.
Standby Light: Determines whether
to set the indicator light on the front
of the TV to On or Off in standby
mode.
Power Light: Determines whether to
set the indicator light on the front of
the TV to On or Off when the power
turns on.
1MENU Select OPTION.
2ENTER Select Power Indicator.
3ENTER Select Standby Light or Power Light.
4Select your desired options.
5BACK Return to the previous menu.
EXIT Return to TV viewing.

SOUND & LANGUAGE CONTROL
SO
UN
D &
LA
NG
UA
GE
CO
NT
RO
L
156
AUTO VOLUME
SOUND & LANGUAGE CONTROL
Auto Volume makes sure that the volume level remains consistent whether you are watching a com-
mercial or a regular TV program.
Because each broadcasting station has its own signal conditions, volume adjustment may be needed
every time the channel is changed. This feature allows users to enjoy stable volume levels by making
automatic adjustments for each program.
1MENU Select AUDIO.
2ENTER Select Auto Volume.
3ENTER Select On or Off.
4BACK Return to the previous menu.
EXIT Return to TV viewing.

S
OU
ND
& L
AN
GU
AG
E C
ON
TR
OL
157
CLEAR VOICE II
By differentiating the human sound range from others, it improves the sound quality of voices.
1MENU Select AUDIO.
2ENTER Select Clear Voice II.
3ENTER Select On or Off.
4Select Level.
5Make appropriate adjustments.
6BACK Return to the previous menu.
EXIT Return to TV viewing.
Adjustment for Clear Voice Level with selecting On

SOUND & LANGUAGE CONTROL
SO
UN
D &
LA
NG
UA
GE
CO
NT
RO
L
158
BALANCE
Adjust the left/right sound of speaker to suit your taste and room situations.
1MENU Select AUDIO.
2ENTER Select Balance.
3ENTER Make appropriate adjustments.
4BACK Return to the previous menu.
EXIT Return to TV viewing.

S
OU
ND
& L
AN
GU
AG
E C
ON
TR
OL
159
PRESET SOUND SETTINGS (SOUND MODE)
Sound Mode lets you enjoy the best sound without any special adjustment using factory presets.
1MENU Select AUDIO.
2ENTER Select Sound Mode.
3ENTER
Select Standard, Music, Cinema,
Sport, or Game.
4BACK Return to the previous menu.
EXIT Return to TV viewing.
Standard, Music, Cinema, Sport, and
Game are preset for optimum sound
quality at the factory.
You can also adjust Sound Mode in
the Q.MENU.
Standard: Offers standard-quality
sound.
Music: Optimizes sound for listening
to music.
Cinema: Optimizes sound for watch-
ing movies.
Sport: Optimizes sound for watching
sports events.
Game: Optimizes sound for playing
games.

SOUND & LANGUAGE CONTROL
SO
UN
D &
LA
NG
UA
GE
CO
NT
RO
L
160
SOUND SETTING ADJUSTMENT - USER MODE
Adjust the sound to suit your taste and room situations.
1MENU Select AUDIO.
2ENTER Select Sound Mode.
3ENTER
Select Standard, Music, Cinema,
Sport, or Game.
4ENTER Select Infinite Sound, Treble, or Bass.
5ENTER Make appropriate adjustments.
6BACK Return to the previous menu.
EXIT Return to TV viewing.
If sound quality or volume is not at
the level you want, it is recommended
to use a separate home theater sys-
tem or amp to cope with different
user environments.
If you select “Clear Voice II-On”, the
Infinite Sound feature will not oper-
ate.
Infinite Sound: Infinite Sound is a
patented LG technology that solves
the problem of playing 5.1 multi-
channel content over two speakers.

SO
UN
D &
LA
NG
UA
GE
CO
NT
RO
L
161
AUDIO RESETSettings of the selected Sound Mode return to the default factory settings.
DIGITAL AUDIO OUTThis function is setting the Dolby digital/PCM to connect the audio outputs.
If you select “Digital Audio Out - Auto” when Dolby digital is available, SPDIF (Sony Philips Digital
InterFace) output will be Dolby Digital.
If you select “Digital Audio Out - Auto” when Dolby digital is not available, SPDIF output will be PCM
(Pulsecode modulation).
1MENU Select AUDIO.
2ENTER Select Digital Audio Out.
3ENTER Select Auto or PCM.
4BACK Return to the previous menu.
EXIT Return to TV viewing.
Item Audio InputDigital Audio
output
Auto
(Speaker On)
MPEG
DD
PCM
DD
PCM
Auto
(Speaker Off)
MPEG
DD
PCM
DD
DD
PCM PCM PCM
To set “SPDIF OUT - Dolby Digital” in DTV input
signal, select “Digital Audio Out - Auto” and “TV
Speaker - Off”.
1MENU Select AUDIO.
2ENTER Select Reset.
3ENTER Select Yes.
4ENTER Initialize the adjusted value.
EXIT Return to TV viewing.

SOUND & LANGUAGE CONTROL
SO
UN
D &
LA
NG
UA
GE
CO
NT
RO
L
162
TV SPEAKERS ON/OFF SETUP
1MENU Select AUDIO.
2ENTER Select TV Speaker.
3ENTER Select On or Off.
4BACK Return to the previous menu.
EXIT Return to TV viewing.
If you wish to use an external Hi-Fi system, turn off the TV’s internal speakers.

S
OU
ND
& L
AN
GU
AG
E C
ON
TR
OL
163
STEREO/SAP BROADCAST SETUP
On analog signals, this TV can receive MTS stereo programs and any SAP (Secondary Audio
Program) that accompanies the stereo program if the station transmits an additional sound signal.
Mono sound is automatically used if the broadcast is only in Mono.
Analog TV Digital TV
1Q.MENU Select SAP.
2ENTER
Select Mono, Stereo, or
SAP.
3EXIT Return to TV viewing.
1Q.MENU Select Multi Audio.
2ENTER Select other languages.
3EXIT Return to TV viewing.
A

SOUND & LANGUAGE CONTROL
SO
UN
D &
LA
NG
UA
GE
CO
NT
RO
L
164
AUDIO LANGUAGE
This feature operates only in DTV mode.
1MENU Select OPTION.
2ENTER Select Language.
3ENTER Select Audio Language.
4Select your desired language.
5BACK Return to the previous menu.
EXIT Return to TV viewing.

S
OU
ND
& L
AN
GU
AG
E C
ON
TR
OL
165
ON-SCREEN MENUS LANGUAGE SELECTION
The menus can be shown on the screen in the selected language.
1MENU Select OPTION.
2ENTER Select Language.
3ENTER Select Menu Language.
4 Select your desired language.
From this point on, the on-screen menus
will be shown in the selected language.
5BACK Return to the previous menu.
EXIT Return to TV viewing.

SOUND & LANGUAGE CONTROL
SO
UN
D &
LA
NG
UA
GE
CO
NT
RO
L
166
CAPTION MODE
Analog Broadcasting System Captions
Captions are provided to help the hearing impaired watch TV. Select a caption mode for displaying
captioning information if provided on a program. Analog caption displays information at any position
on the screen and is usually the program's dialog. Caption/Text, if provided by the broadcaster, would
be available for both digital and analog channels on the Antenna/Cable. This TV is programmed to
memorize the caption/text mode which was last set when you turned the power off. This function is
only available when Caption Mode is set On.
1MENU Select OPTION.
2ENTER Select Caption.
3ENTER Select Mode-On.
4Select Analog.
5Select CC1-2 or Text1-2.
6BACK Return to the previous menu.
EXIT Return to TV viewing.
CC
The term for the words that scroll
across the bottom of the TV screen;
usually the audio portion of the pro-
gram provided for the hearing
impaired.
Text
The term for the words that appear in
a large black frame and almost cover
the entire screen; usually messages
provided by the broadcaster.

S
OU
ND
& L
AN
GU
AG
E C
ON
TR
OL
167
Digital Broadcasting System Captions
Choose the language you want the DTV Captions to appear in.
Other Languages can be chosen for digital sources only if they are included on the program.
This function in only available when Caption Mode is set On.
1MENU Select OPTION.
2ENTER Select Caption.
3ENTER Select Mode-On.
4Select Digital.
5Select your desired language.
6BACK Return to the previous menu.
EXIT Return to TV viewing.

TIME SETTING
TIM
E S
ET
TIN
G
168
CLOCK SETTING
TIME SETTING
Auto Clock Setup
The time is set automatically from a digital channel signal.
The digital channel signal includes information for the current time provided by the broadcasting sta-
tion.
Set the clock manually if the current time is set incorrectly by the auto clock function.
1MENU Select TIME.
2ENTER Select Clock.
3ENTER Select Auto.
4Select your viewing area time zone.
5Select Auto, Off, or On (depending
on whether or not your viewing area
observes Daylight Saving time).
(Depending on models)
6BACK Return to the previous menu.
EXIT Return to TV viewing.
Depending on models

169
TIM
E S
ET
TIN
G
Manual Clock Setup
If the current time setting is wrong, reset the clock manually.
1MENU Select TIME.
2ENTER Select Clock.
3ENTER Select Manual.
4 Select the Year, Month, Date, Hour, or Minute
option.
5 Set the Year, Month, Date, Hour, or Minute
option.
6BACK Return to the previous menu.
EXIT Return to TV viewing.
Depending on models

TIME SETTING
TIM
E S
ET
TIN
G
170
AUTO ON/OFF TIME SETTING
This function operates only if the current time has been set.
The Off Time function overrides the On Time function if they are both set to the same time.
The TV must be in standby mode for the On Time to work.
If you do not press any button within 2 hours after the TV turns on with the On Time function, the TV
will automatically revert to standby mode.
To cancel On/Off Time function, select
Off.
Only for On Time function
1MENU Select TIME.
2ENTER Select Off Time or On Time.
3ENTER Select Repeat.
4 Select Off, Once, Daily, Mon.~Fri.,
Mon.~Sat., Sat.~ Sun., or Sun..
5Select and set Hour or Minute.
6BACK Return to the previous menu.
EXIT Return to TV viewing.
1Select Input.
2Select the desired input source.
3 When Selecting TV:
set the channel at turn-on.
4Adjust to sound level at turn-on.

171
TIM
E S
ET
TIN
G
SLEEP TIMER SETTING
The Sleep Timer turns the TV off at the preset time.
Note that this setting is cleared when the TV is turned off.
1MENU Select TIME.
2ENTER Select Sleep Timer.
3ENTER Make appropriate adjustments.
4BACK Return to the previous menu.
EXIT Return to TV viewing.
To cancel the Sleep Timer, select Off.
You can also adjust Sleep Timer in
the Q.MENU.

PARENTAL CONTROL / RATINGS
PA
RE
NTA
L C
ON
TR
OL
/ RA
TIN
G
172
PARENTAL CONTROL / RATINGS
Parental Control can be used to block specific channels, ratings and other viewing sources.
The Parental Control Function (V-Chip) is used to block program viewing based on the ratings sent by
the broadcasting station. The default setting is to allow all programs to be viewed. Viewing can be
blocked by choosing the type of the program and the categories. It is also possible to block all pro-
gram viewing for a time period. To use this function, the following must be done :
1. Set ratings and categories to be blocked.
2. Specify a password
Set up blocking schemes to block specific channels, ratings, and external viewing sources.
A password is required to gain access to this menu.
Setting up Your Password
SET PASSWORD & LOCK SYSTEM
1MENU ENTER Select LOCK.
21 2 ABC 3 DEF
4 GHI 5 JKL 6 MNO
7PQRS 8 TUV
09 WXYZ
Input the password.
Enter the password as requested.
The TV is set up with the initial
password “0-0-0-0”.
If you forget your password, press “0-3-2-5” on the remote control.

173
PA
RE
NTA
L C
ON
TR
OL
/ RA
TIN
G
Change the password by inputting a new password twice.
Set Password
1MENU ENTER Select LOCK.
21 2 ABC 3 DEF
4 GHI 5 JKL 6 MNO
7PQRS 8 TUV
09 WXYZ
Input the password.
3Select Set Password.
4ENTER
1 2 ABC 3 DEF
4 GHI 5 JKL 6 MNO
7PQRS 8 TUV
09 WXYZ
Choose any 4 digits for your new
password.
As soon as the 4 digits are entered,
re-enter the same 4 digits on the
Confirm.
5BACK Return to the previous menu.
EXIT Return to TV viewing.
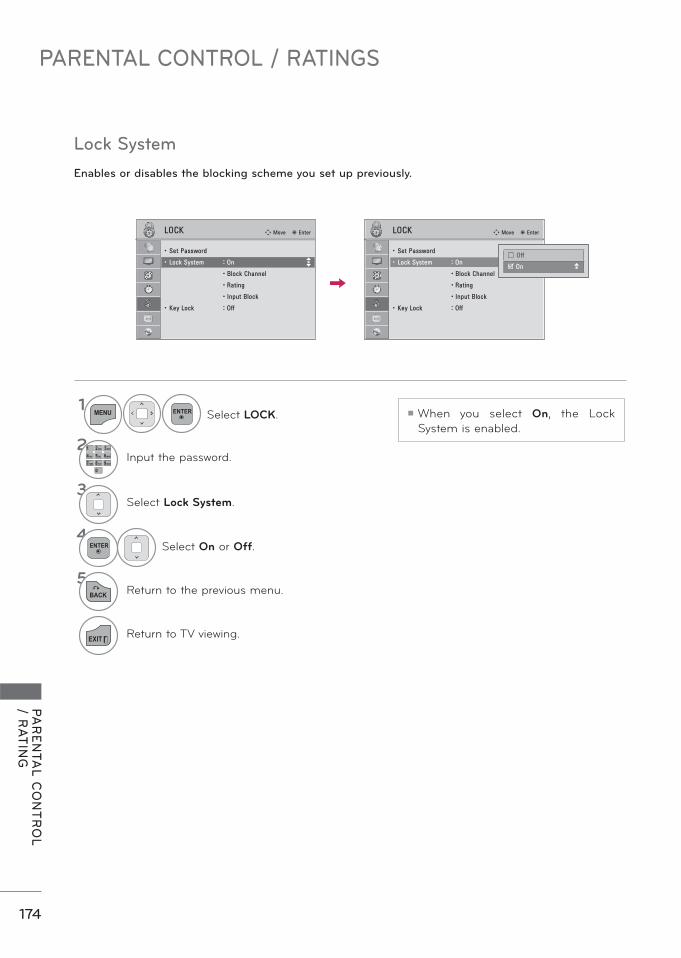
PARENTAL CONTROL / RATINGS
PA
RE
NTA
L C
ON
TR
OL
/ RA
TIN
G
174
Enables or disables the blocking scheme you set up previously.
Lock System
1MENU ENTER Select LOCK.
21 2 ABC 3 DEF
4 GHI 5 JKL 6 MNO
7PQRS 8 TUV
09 WXYZ
Input the password.
3Select Lock System.
4ENTER Select On or Off.
5BACK Return to the previous menu.
EXIT Return to TV viewing.
When you select On, the Lock
System is enabled.

175
PA
RE
NTA
L C
ON
TR
OL
/ RA
TIN
G
CHANNEL BLOCKING
Blocks any channels that you do not want to watch or that you do not want your children to watch.
If a channel is locked, enter the
password to unlock it temporarily.
1MENU ENTER Select LOCK.
21 2 ABC 3 DEF
4 GHI 5 JKL 6 MNO
7PQRS 8 TUV
09 WXYZ
Input the password.
3Select Block Channel.
4ENTER Select a channel to block or unblock.
5Block or unblock a channel.
6BACK Return to the previous menu.
EXIT Return to TV viewing.
YELLOW
5-13-1 7-1

PARENTAL CONTROL / RATINGS
PA
RE
NTA
L C
ON
TR
OL
/ RA
TIN
G
176
MOVIE RATING
Blocks movies according to the movie ratings limits specified, so children cannot view certain movies.
You can set the ratings limit by blocking out all the movies with the ratings above a specified level.
Keep in mind that the movie ratings limit only applies to movies shown on TV, not TV programs, such
as soap operas.
1MENU ENTER Select LOCK.
21 2 ABC 3 DEF
4 GHI 5 JKL 6 MNO
7PQRS 8 TUV
09 WXYZ
Input the password.
3Select Rating.
4ENTER Select desired option.
5BACK Return to the previous menu.
EXIT Return to TV viewing.

177
PA
RE
NTA
L C
ON
TR
OL
/ RA
TIN
G
EXTERNAL INPUT BLOCKING
Enables you to block an input.
1MENU ENTER Select LOCK.
21 2 ABC 3 DEF
4 GHI 5 JKL 6 MNO
7PQRS 8 TUV
09 WXYZ
Input the password.
3Select Input Block.
4ENTER Select input source.
5Select On or Off.
6BACK Return to the previous menu.
EXIT Return to TV viewing.
ie)
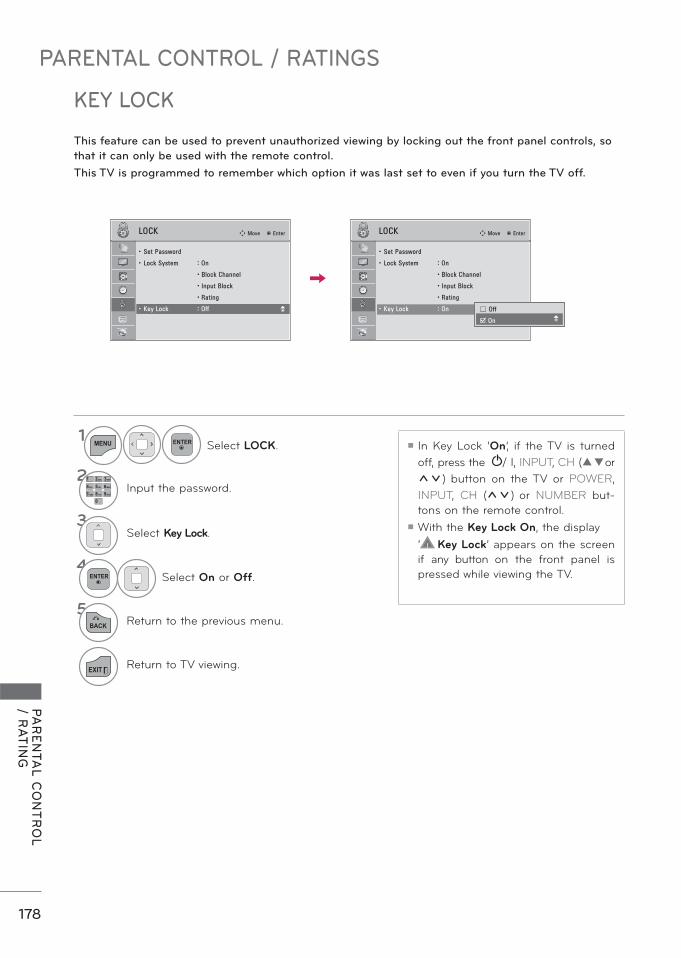
PARENTAL CONTROL / RATINGS
PA
RE
NTA
L C
ON
TR
OL
/ RA
TIN
G
178
KEY LOCK
This feature can be used to prevent unauthorized viewing by locking out the front panel controls, so
that it can only be used with the remote control.
This TV is programmed to remember which option it was last set to even if you turn the TV off.
In Key Lock ‘On’, if the TV is turned
off, press the / I, INPUT, CH ( or
) button on the TV or POWER,
INPUT, CH ( ) or NUMBER but-
tons on the remote control.
With the Key Lock On, the display
‘ Key Lock’ appears on the screen
if any button on the front panel is
pressed while viewing the TV.
1MENU ENTER Select LOCK.
21 2 ABC 3 DEF
4 GHI 5 JKL 6 MNO
7PQRS 8 TUV
09 WXYZ
Input the password.
3Select Key Lock.
4ENTER Select On or Off.
5BACK Return to the previous menu.
EXIT Return to TV viewing.

179
AP
PE
ND
IX
APPENDIX
Abnormal Operation
The remote control
doesn’t work
Check to see if there is any object between the product and the remote
control causing obstruction. Ensure you are pointing the remote control
directly at the TV.
Ensure that the batteries are installed with correct polarity (+ to +, - to -).
Ensure that the correct remote operating mode is set: TV, VCR etc.
Install new batteries.
TV turns off suddenly
Is the sleep timer set?
Check the power control settings. Power interrupted.
If there is no signal, the TV turns off automatically in 15 minutes.
Video Problems
No picture &No sound
Check whether the product is turned on.
Try another channel. The problem may be with the broadcast.
Is the power cord inserted into wall power outlet?
Check your antenna direction and/or location.
Test the wall power outlet, plug another product’s power cord into the
outlet where the product’s power cord was plugged in.
Picture appears slowly
after switching on
This is normal, the image is muted during the product startup process.
Please contact your service center, if the picture has not appeared after
five minutes.
No or poor color or
poor picture
Adjust Color in menu option.
Keep a sufficient distance between the product and the VCR.
Try another channel. The problem may be with the broadcast.
Are the video cables installed properly?
Activate any function to restore the brightness of the picture.
Horizontal/vertical bars
or picture shaking
Check for local interference such as an electrical appliance or power
tool.
Poor reception on
some channels
Station or cable product experiencing problems, tune to another station.
Station signal is weak, reorient antenna to receive weaker station.
Check for sources of possible interference.
Lines or streaks in pic-
tures Check antenna (Change the direction of the antenna).
No picture when con-
necting HDMI
If the HDMI cables don’t support High Speed HDMI, it can cause flickers
or no screen display. In this case use the latest cables that support High
Speed HDMI
*This feature is not available for all models.
TROUBLESHOOTING

180
APPENDIX
AP
PE
ND
IX
Audio Problems
No output from one
of the speakers Adjust Balance in menu option.
Unusual sound from
inside the product
A change in ambient humidity or temperature may result in an unusual
noise when the product is turned on or off and does not indicate a fault
with the product.
No sound
when connecting
HDMI/USB
Check High Speed HDMI cable.
Check USB cable over version 2.0.
Use normal MP3 file.
PC Mode Problems
The signal is out of
range
Adjust resolution, horizontal frequency, or vertical frequency on the PC.
Check the input source.
Vertical bar or stripe
on
background &
Horizontal Noise &
Incorrect position
Activate the Auto configure feature or adjust size, phase, or H/V position.
(Option)
Screen color is unsta-
ble or single color
Check the signal cable.
Reinstall the PC video card.
When connecting the
HDMI cable to the PC,
there is no audio.
Check the manual for the video card in the PC to see if it supports
HDMI audio and how to set it up properly.
*This feature is not available for all models.

181
AP
PE
ND
IX
Movie List Problems
The file does not
appear on the Movie
List.
Check whether the extension is supported.
Message is displayed
saying “This file is
invalid” or the audio is
working normally but
the video is not work-
ing normally.
Check whether the file is playing normally on a PC. (Check whether the
file is damaged.)
Check whether the resolution is supported.
Check whether the video/audio codec is supported.
Check whether the frame rate is supported.
Message is displayed
saying “Unsupported
Audio” or the video is
working normally but
the audio is not work-
ing normally.
Check whether the file is playing normally on a PC. (Check whether the
file is damaged.)
Check whether the audio codec is supported.
Check whether the bit rate is supported.
Check whether the sample rate is supported.
Subtitle is not working.
Check whether the file is playing normally on a PC. (Check whether the
file is damaged.)
Check whether the video file and subtitle file name are the same.
Check whether the video file and subtitle file are located in the same
folder.
Check whether the subtitle file is supported.
Check whether the language is supported. (When you open the subtitle
file in Memo Pad, you can check the language of the subtitle file.)

182
APPENDIX
AP
PE
ND
IX
MAINTENANCEEarly malfunctions can be prevented. Careful and regular cleaning can extend the amount of time you
can enjoy your new TV.
Caution: Be sure to turn the power off and unplug the power cord before you begin any cleaning.
Cleaning the Screen
Here’s a great way to keep the dust off your screen for a while. Wet a soft cloth in a mixture of
lukewarm water and a little fabric softener or dish washing detergent. Wring the cloth until it’s
almost dry, and then use it to wipe the screen.
Make sure the excess water is off the screen, and then let it air-dry before you turn on your TV.
Cleaning the Cabinet
To remove dirt or dust, wipe the cabinet with a soft, dry, lint-free cloth.
Please be sure not to use a wet cloth.
Extended Absence
2
1
CAUTION
If you expect to leave your TV dormant for a long time (such as a vacation), it’s a good idea to
unplug the power cord to protect against possible damage from lightning or power surges.
PRODUCT SPECIFICATIONS
Power requirement AC 100-240V ~ 50/60Hz
Television System NTSC, PAL-M/N, SBTVD
Program Coverage VHF 2-13, UHF 14-69, CATV 1-135
External Antenna Impedance 75 Ω
Environment
condition
Operating Temperature 0 °C - 40 °C (32 °F - 104°F)
Operating Humidity Less than 80%
Storage Temperature -20 °C - 60 °C (-4 °F - 140°F)
Storage Humidity Less than 85%
The specifications shown above may be changed without prior notice for quality improvement.
MODELS47LX9500
(47LX9500-SA)55LX9500
(55LX9500-SA)
Dimensions
(Width x
Height
x Depth)
With stand 1085.9 mm x 710.6 mm x 255.0 mm
(42.7 inch x 27.9 inch x 10.0 inch)
1255.8 mm x 805.0 mm x 255.0 mm
(49.4 inch x 31.6 inch x 10.0 inch)
Without stand 1085.9 mm x 654.2 mm x 31.6 mm
(42.7 inch x 25.7 inch x 1.2 inch)
1255.8 mm x 749.6 mm x 31.6 mm
(49.4 inch x 29.5 inch x 1.2 inch)
Weight With stand 26.7 kg (58.8 lbs) 32.7 kg (72.0 lbs)
Without stand 22.1 kg (48.7 lbs) 28.1 kg (61.9 lbs)

183
AP
PE
ND
IX
IR CODES
Code (Hexa)
Function Note Code (Hexa)
Function Note
08 Remote control Button D6 TV Discrete IR Code
(Power On/Off) (TV Input Selection)
45 Q.MENU Remote control Button C4 POWER ON Discrete IR Code
43 MENU Remote control Button (Only Power On)
0B INPUT Remote control Button C5 POWER OFF Discrete IR Code
10-19 Number Key
0-9
Remote control Button (Only Power Off)
4C - (Dash)/LIST Remote control Button 5A AV1 Discrete IR Code
1A Q.VIEW Remote control Button (AV1 Input Selection)
09 MUTE/DELETE Remote control Button D0 AV2 Discrete IR Code
02 VOL + Remote control Button (AV2 Input Selection)
03 VOL - Remote control Button BF COMPONENT1 Discrete IR Code
00 CH Remote control Button (Component1 Input Selection)
01 CH Remote control Button D4 COMPONENT2 Discrete IR Code
1E FAV/MARK Remote control Button (Component2 Input Selection)
40 Remote control Button D5 RGB-PC Discrete IR Code
41 Remote control Button (RGB-PC Input Selection)
07 Remote control Button CE HDMI1 Discrete IR Code
06 Remote control Button (HDMI1 Input Selection)
44 ENTER Remote c ontrol Button CC HDMI2 Discrete IR Code
28 BACK Remote control Button (HDMI2 Input Selection)
79 RATIO Remote control Button E9 HDMI3 Discrete IR Code
9E LIVE TV Remote control Button (HDMI3 Input Selection)
95 ENERGY SAVING Remote control Button DA HDMI4 Discrete IR Code
7E SIMPLINK Remote control Button (HDMI4 Input Selection)
AA INFO Remote control Button 76 Ratio 4:3 Discrete IR Code
30 AV MODE Remote control Button (Only 4:3 Mode)
0F TV Remote control Button 77 Ratio 16:9 Discrete IR Code
59 NETCAST Remote control Button (Only 16:9 Mode)
5B EXIT Remote control Button AF Ratio Zoom Discrete IR Code
72 RED Remote control Button (Only Zoom Mode)
71 GREEN Remote control Button B1 Remote control Button
63 YELLOW Remote control Button B0 Remote control Button
61 BLUE, L/R SELECT Remote control Button BA Remote control Button
BD REC Remote control Button 8F Remote control Button
AB GUIDE Remote control Button 8E Remote control Button
DC 3D Remote Control Button
*This feature is not available for all models.

184
APPENDIX
AP
PE
ND
IX
EXTERNAL CONTROL THROUGH RS-232CThe RS-232C port allows you connect the RS-232C input jack to an external control device (such as
a computer or an A/V control system) to control the TV’s functions externally.
Note: RS-232C on this unit is intended to be used with third party RS-232C control hardware and
software.
The instructions below are provided to help with programming software or to test functionality using
telenet software.
Type of Connector; D-Sub 9-Pin Male Communication Parameters
Baud rate : 9600 bps (UART)
Data length : 8 bits
Parity : None
Stop bit : 1 bit
Communication code : ASCII code
Use a crossed (reverse) cable.
! NOTE
This product has command echo back in
the RS-232C Command.
No. Pin Name
1
2
3
4
5
6
7
8
9
No connection
RXD (Receive data)
TXD (Transmit data)
DTR (DTE side ready)
GND
DSR (DCE side ready)
RTS (Ready to send)
CTS (Clear to send)
No Connection
1
6
5
9

185
AP
PE
ND
IX
RS-232C Configurations
Use this function to specify a TV ID number.
Refer to ‘Real Data Mapping’.
Set ID
PC TV
RXD 2 3 TXD
TXD 3 2 RXD
GND 5 5 GND
DTR 4 6 DSR
DSR 6 4 DTR
RTS 7 8 CTS
CTS 8 7 RTS
D-Sub 9 D-Sub 9
PC TV
RXD 2 3 TXD
TXD 3 2 RXD
GND 5 5 GND
DTR 4 6 DTR
DSR 6 4 DSR
RTS 7 7 RTS
CTS 8 8 CTS
D-Sub 9 D-Sub 9
7-Wire Configuration(Serial female-female NULL modem cable)
3-Wire Configurations(Not standard)
1MENU Select OPTION.
2ENTER Select Set ID.
3ENTER
Choose the desired TV ID number.
The adjustment range of Set ID is 1~
99.
4BACK Return to the previous menu.
EXIT Return to TV viewing.
Real data mapping
0 Step 0
A Step 10 (Set ID 10)
F Step 15 (Set ID 15)
10 Step 16 (Set ID 16)
63 Step 99 (Set ID 99)
64 Step 100

186
APPENDIX
AP
PE
ND
IX
Command Reference List COMMAND1 COMMAND2 DATA
(Hexadecimal)
01. Power k a 00 - 01
02. Input Select x b P.187
03. Aspect Ratio k c P.187
04. Screen Mute k d 00 - 01
05. Volume Mute k e 00 - 01
06. Volume Control
k f 00 - 64
07. Contrast k g 00 - 64
08. Brightness k h 00 - 64
09. Color k i 00 - 64
10. Tint k j 00 - 64
11. Sharpness k k 00 - 64
12. OSD Select k l 00 - 01
13. Remote Control Lock Mode
k m 00 - 01
14. Treble k r 00 - 64
15. Bass k s 00 - 64
16. Balance k t 00 - 64
17. Color Temperature
x u 00 - 64
18. Energy Saving j q P.188
19. Auto Configuration
j u P.188
21. Channel Add/Del
m b 00 - 01
22. Key m c P.189
23. Backlight m g 00 - 64
Transmission / Receiving ProtocolTransmission
[Command1][Command2][ ][Set ID][ ][Data][Cr]
[Command 1] : First command to control the set. (j, k, m or x)
[Command 2] : Second command to control the set.
[Set ID] : You can adjust the set ID to choose desired TV ID number in Setup menu. Adjustment range is 1-99. When selecting Set ID ‘0’, every connected the TV is con-trolled. Set ID is indicated as decimal (1-99) on menu and as Hexa decimal (0x0 - 0x63) on transmission /receiving proto-col.
[DATA] : To transmit the command data.
T ransmit the ‘FF’ data to read status of command.
[Cr] : Carriage Return
ASCII code ‘0x0D’
[ ] : ASCII code ‘space (0x20)’
* In this model, TV will not send the status during the standby mode.
OK Acknowledgement
[Command2][ ][Set ID][ ][OK][Data][x]
The TV transmits ACK (acknowledgement) based on this format when receiving normal data. At this time, if the data is data read mode, it indicates pres-ent status data. If the data is data write mode, it returns the data of the PC computer.
* In this model, TV will not send the status during the standby mode.
* Data Format
[Command 2] : Use as command.
[Set ID] : Use the small character, if set ID is 10, it will send the ‘0’, ‘a’.
[DATA] : Use the small character, if data is 0 x ab, it will send the ‘a’, ‘b’.
[OK] : Use the large character.
Error Acknowledgement
[Command2][ ][Set ID][ ][NG][Data][x]
The TV transmits ACK (acknowledgement) based on this format when receiving abnormal data from non-viable functions or communication errors.
Data1: Illegal Code
Data2: Not supported function
Data3: Wait more time
* In this model, TV will not send the status during the standby mode.
* Data Format
[Command 2] : Use as command.
[Set ID] : Use the small character, if set ID is 10, it will send the ‘0’, ‘a’.
[DATA] : Use the small character, if data is 0 x ab, it will send the ‘a’, ‘b’.
[NG] : Use the large character
COMMAND1 COMMAND2 DATA00
(Hexadecimal)
DATA01
(Hexadecimal)
20. Channel Tuning
m a physical program high
major program low
DATA02
(Hexadecimal)
DATA03
(Hexadecimal)
DATA04
(Hexadecimal)
DATA05
(Hexadecimal)
major low minor high
minor low attribute

187
AP
PE
ND
IX
01. Power (Command: k a)
To control Power On/Off of the TV.
Transmission [k][a][ ][Set ID][ ][Data][Cr]
Data 00: Power Off Data 01: Power On
Acknowledgement [a][ ][Set ID][ ][OK/NG][Data][x]
* In a like manner, if other functions transmit ‘FF’ data based on this format, Acknowledgement data feed-back presents status about each function.
* Note: In this model, TV will send the Acknowledge after power on processing completion.
There might be a time delay between command and acknowledge.
02. Input Select (Command: x b)
To select input source for TV.
Transmission [x][b][ ][Set ID][ ][Data][Cr]
Data 00: DTV (Antenna)
Data 10: Analog (Antenna) Data 11: Analog (Cable)
Data 20: AV1 Data 21: AV 2
Data 40: Component1 Data 41: Component 2
Data 60: RGB-PC Data 90: HDMI1
Data 91: HDMI2 Data 92: HDMI3
Data 93: HDMI4
Acknowledgement [b][ ][Set ID][ ][OK/NG][Data][x]
* Use the feature depending on your model.
03. Aspect Ratio (Command: k c)
To adjust the screen format.
Transmission [k][c][ ][Set ID][ ][Data][Cr]
Data 01: 4:3 Data 09: Just scan
Data 02: 16:9 Data 10: Cinema Zoom1
Data 04: Zoom
Data 05: Zoom2 Data 1F: Cinema Zoom16
Data 06: Set by program
Acknowledgement [c][ ][Set ID][ ][OK/NG][Data][x]
04. Screen Mute (Command: k d)
To select screen mute on/off.
Transmission [k][d][ ][Set ID][ ][Data][Cr]
Data 00: Screen mute off (Picture on), Video-out Mute off
Data 01: Screen mute on (Picture off)
Data 10: Video-out Mute on
Acknowledgement [d][ ][Set ID][ ][OK/NG][Data][x]
* In case of Video-out Mute on only, TV will display On Screen Display (OSD). But, in case of screen mute on, TV will not display On Screen Display (OSD).
05. Volume Mute (Command: k e)
To control volume mute on/off.
You can also adjust mute using the MUTE button on remote control.
Transmission [k][e][ ][Set ID][ ][Data][Cr]
Data 00: Volume mute on (Volume off)
Data 01: Volume mute off (Volume on)
Acknowledgement [e][ ][Set ID][ ][OK/NG][Data][x]
06. Volume Control (Command: k f)
To adjust volume.
You can also adjust volume with the volume buttons on remote control.
Transmission [k][f][ ][Set ID][ ][Data][Cr]
Data Min: 00 - Max: 64 (*transmit by Hexadecimal code)
*Refer to ‘Real data mapping’.
Acknowledgement [f][ ][Set ID][ ][OK/NG][Data][x]
07. Contrast (Command: k g)
To adjust screen contrast.
You can also adjust contrast in the PICTURE menu.
Transmission [k][g][ ][Set ID][ ][Data][Cr]
Data Min: 00 - Max: 64 (*transmit by Hexadecimal code)
*Refer to ‘Real data mapping’.
Acknowledgement [g][ ][Set ID][ ][OK/NG][Data][x]
08. Brightness (Command: k h)
To adjust screen brightness.
You can also adjust brightness in the PICTURE menu.
Transmission [k][h][ ][Set ID][ ][Data][Cr]
Data Min: 00 - Max: 64 (*transmit by Hexadecimal code)
*Refer to ‘Real data mapping’.
Acknowledgement [h][ ][Set ID][ ][OK/NG][Data][x]
09. Color (Command: k i)
To adjust screen color.
You can also adjust color in the PICTURE menu.
Transmission [k][i][ ][Set ID][ ][Data][Cr]
Data Min: 00 - Max: 64 (*transmit by Hexadecimal code)
*Refer to ‘Real data mapping’.
Acknowledgement [i][ ][Set ID][ ][OK/NG][Data][x]
10. Tint (Command: k j)
To adjust screen tint.
You can also adjust tint in the PICTURE menu.
Transmission [k][j][ ][Set ID][ ][Data][Cr]
Data Red: 00 - Green: 64 (*transmit by Hexadecimal code)
*Refer to ‘Real data mapping’.
Acknowledgement [ j ][ ][Set ID][ ][OK/NG][Data][x]

188
APPENDIX
AP
PE
ND
IX
11. Sharpness (Command: k k)
To adjust screen sharpness.
You can also adjust sharpness in the Picture menu.
Transmission [k][k][ ][Set ID][ ][Data][Cr]
Data Min: 00 - Max: 64 (*transmit by Hexadecimal code)
*Refer to ‘Real data mapping’.
Acknowledgement [k][ ][Set ID][ ][OK/NG][Data][x]
12. OSD Select (Command: k l)
To select OSD (On Screen Display) on/off.
Transmission [k][l][ ][Set ID][ ][Data][Cr]
Data 00: OSD off Data 01: OSD on
Acknowledgement [l][ ][Set ID][ ][OK/NG][Data][x]
13. Remote Control Lock Mode (Command: k m)
To lock the remote control and the front panel con-trols on the set.
Transmission [k][m][ ][Set ID][ ][Data][Cr]
Data 00: Lock off Data 01: Lock on
Acknowledgement [m][ ][Set ID][ ][OK/NG][Data][x]
If you’re not using the remote control and front panel controls on the TV, use this mode. When main power is on/off, remote control lock is released.
If Key Lock is on in the standby mode, TV will not turn on by POWER button of remote control and on the TV.
14. Treble (Command: k r)
To adjust treble.
You can also adjust treble in the Audio menu.
Transmission [k][r][ ][Set ID][ ][Data][Cr]
Data Min: 00 - Max: 64 (*transmit by Hexadecimal code)
*Refer to ‘Real data mapping’.
Acknowledgement [r][ ][Set ID][ ][OK/NG][Data][x]
15. Bass (Command: k s)
To adjust bass.
You can also adjust bass in the Audio menu.
Transmission [k][s][ ][Set ID][ ][Data][Cr]
Data Min: 00 - Max: 64 (*transmit by Hexadecimal code)
*Refer to ‘Real data mapping’.
Acknowledgement [s][ ][Set ID][ ][OK/NG][Data][x]
16. Balance (Command: k t)
To adjust balance.
You can also adjust balance in the Audio menu.
Transmission [k][t][ ][Set ID][ ][Data][Cr]
Data Min: 00 - Max: 64 (*transmit by Hexadecimal code)
*Refer to ‘Real data mapping’.
Acknowledgement [t][ ][Set ID][ ][OK/NG][Data][x]
17. Color Temperature (Command: x u)
To adjust color temperature.
You can also adjust color temperature in the Picture menu.
Transmission [x][u][ ][Set ID][ ][Data][Cr]
Data Min: 00 - Max: 64 (*transmit by Hexadecimal code)
*Refer to ‘Real data mapping’.
Acknowledgement [u][ ][Set ID][ ][OK/NG][Data][x]
18. Energy Saving (Command: j q)
To control the energy saving function.
Transmission [ j ][q][ ][Set ID][ ][Data][Cr]
Data 00: Off Data 01: Minimum
Data 02: Medium Data 03: Maximum
Data 04: Auto (depending on model)
Data 05: Screen off
Acknowledgement [q][ ][Set ID][ ][OK/NG][Data][x]
19. Auto Configuration (Command: j u)
To adjust picture position and minimize image shak-ing automatically. Auto configuration only works in RGB-PC mode.
Transmission [ j ][u][ ][Set ID][ ][Data][Cr]
Data 01: To set
Acknowledgement [u][ ][Set ID][ ][OK/NG][Data][x]
20. Channel Tuning (Command: m a)
To tune channel to following physical/major/minor number.
Transmission [m][a][ ][Set ID][ ][Data00][ ][Data01]
[ ][Data02][ ][Data03][ ][Data04][ ][Data05][Cr]
Digital channels have a Physical, Major, and Minor channel number. The Physical number is the actual digital channel number, the Major is the number that the channel should be mapped to, and the Minor is the sub-channel. Since the tuner automatically maps the channel to the Major number, the Physical num-ber is not required when sending a command.
Data 00: Physical Channel Number
Analog air: 01~69, Analog cable: 01~135
DTV air: 01~69
Data 01 & 02: Major Channel Number
Data 01: High byte Data 02: Low byte
Two bytes are available for the Major and Minor, normally only the second byte is used.
Data 03 & 04: Minor Channel Number
Not needed for NTSC.

189
AP
PE
ND
IX
Data5:
The table above lists the binary code which must be converted to Hexadecimal before sending. For exam-ple: The binary code to tune the sub source to an NTSC cable channel is “1000 0001”, which translates to “81” in Hex.
* 7th bit : For which source do you want to change the channel.
* 6th bit: Use a two part or one part channel. Most cases just use 0 since it’s ignored when using NTSC.
* 5th bit: Use 0 with NTSC since it can only use the physical channel number. Normally use 1 for ATSC since most times it doesn’t matter what the physical number is.
* 4th bit: Set to 0.
* 3-0 bits: Choose signal type.
* Tune Command Examples:
1. Tune to the analog (NTSC) cable channel 35.
Data 00 = Physical of 35 = 23
Data 01 & 02 = No Major = 00 00
Data 03 & 04 = No Minor = 00 00
Data 05 = 0000 0001 in binary = 01
Total = ma 00 23 00 00 00 00 01
2. Tune to the digital local channel 30-3.
Data 00 = Don’t know Physical = 00
Data 01 & 02 = Major is 30 = 00 1E
Data 03 & 04 = Minor is 3 = 00 03
Data 05 = 0010 0010 in binary = 22
Total = ma 00 00 00 1E 00 03 22
Acknowledgement[a][ ][Set ID][ ][OK][Data00][Data01] [Data02][Data03][Data04][x][a][ ][Set ID][ ][NG][Data00][x]
21. Channel Add/Del (Command: m b)
To add and delete the channels.
Transmission [m][b][ ][Set ID][ ][Data][Cr]
Data 00: Channel Delete Data 01: Channel Add
Acknowledgement [b][ ][Set ID][ ][OK/NG][Data][x]
22. Key (Command: m c)
To send IR remote control code.
Transmission [m][c][ ][Set ID][ ][Data][Cr]
See page 183.
Acknowledgement [c][ ][Set ID][ ][OK/NG][Data][x]
When TV is in the standby mode, TV will turn on by POWER button of remote control only.
23. Backlight (Command: m g)
To adjust screen backlight.
Transmission [m][g][ ][Set ID][ ][Data][Cr]
Data Min:00 ~ Max:64 (*transmit by Hexadecimal code)
*Refer to ‘Real data mapping’.
Acknowledgement [g][ ][Set ID][ ][OK/NG][Data][x]
7Main/Sub
Picture
6
Two/One Part Channel
5
Using Physical Channel
4
Reserved
3 2 1 0 Step
0 Main 0 Two 0 Use x 0 0 0 0 NTSC Air
1 Sub 1 One 1 No Use x 0 0 0 1 NTSC Cable
x 0 0 1 0 ATSC Air
x 0 0 1 1 ATSC Cable_std
x 0 1 0 0 ATSC Cable_hrc
x 0 1 0 1 ATSC Cable_irc
x 0 1 1 0 ATSC cable_auto
x 0 1 1 1 Reserved
x x x x x ...
x 1 1 1 1 Reserved

190
APPENDIX
AP
PE
ND
IX
OPEN SOURCE SOFTWARE NOTICE
The following GPL executables and LGPL, MPL libraries used in this product are subject to the GPL2.0/
LGPL2.1/MPL1.1 License Agreements:
GPL EXECUTABLES:
Linux kernel 2.6, busybox, e2fsprogs, jfsutils, lzo, msdl-1.1, mtd-utils, ntpclient, procps, udhcpc
LGPL LIBRARIES:
Atk, cairo, directFB, ffmpeg, glib, GnuTLS, gtk+, iconv, libintl, libgcrypt, libgpg-error, libsoup, libusb, pango,
uClibc, webkit
MPL LIBRARIES:
Nanox, spidermonkey
LG Electronics offers to provide source code to you on CD-ROM for a charge covering the cost of performing
such distribution, such as the cost of media, shipping and handling upon e-mail request to LG Electronics :
This offer is valid for a period of three (3) years from the date of the distribution of this product by LG
Electronics
You can obtain a copy of the GPL, LGPL, MPL licenses on the CD-ROM provided with this product.
Also you can obtain the translation of GPL, LGPL licenses from
http://www.gnu.org/licenses/old-licenses/gpl-2.0-translations.html,
http://www.gnu.org/licenses/old-licenses/lgpl-2.1-translations.html.
This product includes other open source software.
boost C++: software developed by http://www.boost.org distributed under the Boost Software License,
Version 1.0
c-ares : copyright © 1998 by the Massachusetts Institute of Technology
expat:
- copyright © 1998, 1999, 2000 Thai Open Source Software Center Ltd and Clark Cooper
- copyright © 2001-2007 Expat maintainers.
fontconfig: copyright © 2001, 2003 Keith Packard
freetype: copyright © 2003 The FreeType Project (www.freetype.org).
ICU: copyright © 1995-2008 International Business Machines Corporation and others.
libcurl: copyright © 1996 - 2008, Daniel Stenberg.
libjpeg: This software is based in part on the work of the Independent JPEG Group copyright © 1991 –
1998, Thomas G. Lane.
libmng: copyright © 2000-2007 Gerard Juyn, Glenn Randers-Pehrson
libpng: copyright © 1998-2008 Glenn Randers-Pehrson
libupnp: copyright © 2000-2003 Intel Corporation
libxml2 : copyright © 1998-2003 Daniel Veillard
libxslt: copyright © 2001-2002 Daniel Veillard
lua interpreter: copyright © 1994–2008 Lua.org, PUC-Rio
md5: copyright © 1991-2, RSA Data Security, Inc

191
AP
PE
ND
IX
openSSL:
- cryptographic software written by Eric Young.
- software written by Tim Hudson.
- software developed by the OpenSSL Project for use in the OpenSSL Toolkit. (http://www.openssl.org)
pixman:
- copyright © 1987, 1988, 1989, 1998 The Open Group
- copyright © 1987, 1988, 1989 Digital Equipment Corporation
- copyright © 1999, 2004, 2008 Keith Packard
- copyright © 2000 SuSE, Inc.
- copyright © 2000 Keith Packard, member of The XFree86 Project, Inc.
- copyright © 2004, 2005, 2007, 2008 Red Hat, Inc.
- copyright © 2004 Nicholas Miell
- copyright © 2005 Lars Knoll & Zack Rusin, Trolltech
- copyright © 2005 Trolltech AS
- copyright © 2007 Luca Barbato
- copyright © 2008 Aaron Plattner, NVIDIA Corporation
- copyright © 2008 Rodrigo Kumpera
- copyright © 2008 André Tupinambá
- copyright © 2008 Mozilla Corporation
- copyright © 2008 Frederic Plourde
portmap: copyright © 1983,1991 The Regents of the University of California.
tiff: copyright © 1987, 1993, 1994 The Regents of the University of California.
tinyxml: copyright © 2000-2006 Lee Thomason
xyssl:
- Copyright © 2006-2008 Christophe Devine
- Copyright © 2009 Paul Bakker
zlib: copyright © 1995-2005 Jean-loup Gailly and Mark Adler
All rights reserved.
Permission is hereby granted, free of charge, to any person obtaining a copy of this software and associated
documentation files (the "Software"), to deal in the Software without restriction, including without limitation
the rights to use, copy, modify, merge, publish, distribute, sublicense, and/or sell copies of the Software, and
to permit persons to whom the Software is furnished to do so, subject to the following conditions:
THE SOFTWARE IS PROVIDED "AS IS", WITHOUT WARRANTY OF ANY KIND, EXPRESS OR IMPLIED,
INCLUDING BUT NOT LIMITED TO THE WARRANTIES OF MERCHANTABILITY, FITNESS FOR A
PARTICULAR PURPOSE AND NONINFRINGEMENT. IN NO EVENT SHALL THE AUTHORS OR COPYRIGHT
HOLDERS BE LIABLE FOR ANY CLAIM, DAMAGES OR OTHER LIABILITY, WHETHER IN AN ACTION OF
CONTRACT, TORT OR OTHERWISE, ARISING FROM, OUT OF OR IN CONNECTION WITH THE SOFTWARE
OR THE USE OR OTHER DEALINGS IN THE SOFTWARE.

P/NO : MFL59166621 (1006-REV01) www.lg.com
OWNER’S MANUAL
LED LCD TV
Please read this manual carefully before operatingyour set and retain it for future reference.
The model and serial number of the TV is located on the back and one side of the TV. Record it below should you ever need service.
MODEL
SERIAL
47LX950055LX9500

www.lg.com
MANUAL DE USUARIO
TELEVISOR LCD CON LED
Lea atentamente este manual antes de poner en marcha su equipo y guárdelo para futuras consultas.
El número de modelo y serie del televisor se encuentra en la parte posterior y en un lateral deltelevisor respectivamente.Anótelo a continuación para tenerlo disponible encaso de necesitar asistencia.
MODELO
SERIE
47LX950055LX9500

2
ADVERTENCIA / PRECAUCIÓN
ADVERTENCIA / PRECAUCION RIESGO DE CHOQUE ELECTRICO
NO ABRIR
El símbolo de descarga dentro del
triangulo equilátero, señala al usu-
ario la presencia de voltaje peligro-
so sin aislamiento en el interior del
aparato de tal intensidad que podría presen-
tar riesgo de descarga eléctrica.
El símbolo de admiración dentro
del triangulo equilátero, indica al
usuario que el manual que acom-
paña a este aparato contiene instrucciones
referentes a su funcionamiento y manten-
imiento.
PARA REDUCIR EL RIESGO DE
DESCARGA ELECTRICA NO RETIRE LA
CUBIERTA NI LA PARTE POSTERIOR DE
ESTE APARATO.
ADVERTENCIA/PRECAUCION
PARA REDUCIR EL RIESGO DE INCENDIO O
DESCARGA ELECTRICA, NO EXPONGA EL
TELEVISOR A LA LLUVIA O HUMEDAD.

3
ADVERTENCIA
INSTRUCCIONES DE SEGURIDAD IMPORTANTES
Lea estas instrucciones.
Guarde estas instrucciones..
Tenga en cuenta todas las advertencias.
Siga todas las instrucciones.
1 No utilice este producto cerca del agua.
2 Límpielo sólo con un paño seco.
3 No bloquee las aberturas de ventilación. Instale siguiendo las instrucciones del fabricante.
4 No lo coloque cerca de fuentes de calor, como radia-dores, rejillas de aire caliente, estufas u otros apara-tos (incluidos los amplificadores) que emitan calor.
5 Proteja el cable de alimentación para que no lo pisen ni aplasten, especialmente en las clavijas, las tomas y el punto de salida del aparato.
6 Utilice únicamente acoplamientos y acceso-rios especificados por el fabricante.
7 Utilícelo sólo con el estante fijo o con rue-das, trípode, soporte o mesa especificados por el fabricante o con el accesorio sumin-istrado con el aparato. Si utiliza un carrito, tenga cuidado al moverlo junto con el aparato para evitar lesiones en caso de que éste se caiga.
8 Desenchufe este producto en caso de no utilizarlo durante un largo periodo de tiempo.
Desenchufe este equipo durante tormen-tas con aparato eléctrico o si no piensa usarlo durante largos períodos de tiempo.
9 Sólo el personal calificado puede encar-garse del servicio técnico. La asistencia téc-nica es necesaria si el aparato presenta algún daño, como por ejemplo, si el cable o la clavija de alimentación están dañados, si se derrama líquido o se introducen objetos dentro del aparato, si el aparato ha estado expuesto a la lluvia o humedad, si no opera correctamente o si se ha caído.

4
ADVERTENCIA
10 No toque el aparato o la antena durante una tormenta eléctrica.
11 Cuando monte el televisor en la pared, asegúrese de no colgar el televisor en cables eléctricos y de señal de la parte trasera..
12 No golpee el producto ni permita que le caigan objetos encima ni en la pantalla.
13 PRECAUCIÓN en cuanto al cable de alimen-tación: Se recomienda colocar la mayoría de los aparatos en un circuito dedicado. Es decir, un circuito de salida única que alimenta sólo a ese aparato y que no tiene tomas o circui-tos adicionales.
Compruebe la página de especificaciones de este manual del propietario para estar seguro.
No conecte demasiados electrodomésticos a
la misma toma de pared de corriente alterna ya que hacerlo podría suponer riesgo de incendio o choque eléctrico.
No sobrecargue las tomas de pared. Las tomas de pared sobrecargadas, sueltas o dañadas, los alargadores, los cables de ali-mentación deshilachados o el aislante agri-etado de los cables podrían resultar peligro-sos. Cualquiera de estas condiciones podría provocar un incendio o una descarga eléctri-ca. Examine periódicamente el cable de su aparato y si parece dañado o deteriorado, desenchúfelo, deje de usarlo y solicite al cen-tro de servicio técnico autorizado que lo sus-tituyan por un nuevo equivalente. Proteja el cable de alimentación de daños físicos o mecánicos y evite doblarlo, aplastarlo, pelliz-carlo o pisarlo con una puerta o caminar sobre él. Ponga especial atención en los enchufes, tomas de pared y el punto por donde el cable sale del aparato.
No utilice cables de alimentación dañados o mal conectados. No tire del cable de alimen-tación para desenchufar la TV. Asegúrese de desenchufar el cable de alimentación sujetan-do el enchufe.
14 ADVERTENCIA - A fin de reducir el riesgo de incendio o choque eléctrico, no exponga este aparato a la lluvia, humedad u otros líquidos. No toque la TV con las manos mojadas. No instale este producto cerca de objetos inflamables como gasolina o velas, ni exponga la TV al flujo directo de aparatos de aire acondicionado.
15 No exponga este aparato a goteos o salpica-duras, ni coloque sobre él objetos que con-tengan líquidos, como floreros, tazas, etc. (por ejemplo en estantes sobre la unidad).
16 TOMA A TIERRAAsegúrese de conectar el cable de toma a tierra para evitar posibles descargas eléctri-cas.( es decir, que una TV con un enchufe de tres polos, debe conectarse a una toma de pared con tres polos). Si no es posible la puesta a tierra, contacte con un electricista calificado para que instale un interruptor automático independiente.No intente conectar la unidad a tierra mediante cables telefónicos, pararrayos o tuberías de gas.
Alimentación
Interruptor
diferencial
17 DESCONECTAR EL DISPOSITIVO DE LA REDEste dispositivo se desconecta desen-chufándolo del cable de red. El enchufe debe contar con un acceso sin obstáculos.
18 Mientras esta unidad esté conectada a untomacorriente de CA se desconectará de dicha fuente aunque apague la unidad mediante el INTERRUPTOR DE PRENDIDO.
19 LimpiezaAntes de iniciar labores de limpieza, desen-chufe el cable de alimentación y limpie cuidadosamente la unidad con un paño suave para evitar arañazos superficiales. No rocíe directamente agua vaporizada u otros líquidos sobre la TV para evitar posibles choques eléctricos. No limpie la unidad con productos químicos como alcoholes, disol-ventes o benceno..
20 TransporteAsegúrese de que el producto esté apagado, desenchufado y que todos los cables hayan sido desconectados. Harán falta dos o más personas para transportar TVs de gran tamaño.No someta el panel frontal de la TV a pre-siones o esfuerzos excesivos.
21 VentilaciónInstale su TV en un lugar que disponga de ventilación apropiada. No la instale en espacios cerrados como, por ejemplo, una estantería. No cubra el producto con paños u otros materiales, como plásticos, mien-tras esté enchufada. No instale la unidad en lugares con exceso de polvo.

5
DISPOSICIÓN (Sólo lámpara de Hg utilizada en TV LCD)Lámpara fluorescente usada en este producto contiene una cantidad mínima de mercurio. No disponga este producto con basura normal de la casa. Disposición de este producto debe ser manejado de acuerdo a la autoridad local de su provincia.
22 Tener cuidado de no tocar las aberturas de ventilación. Al ver la televisión durante un largo período, las aberturas de ventilación pueden calentarse.
23 Si percibe olor a quemado o de cualquier otro tipo, o detecta sonidos extraños procedentes de su TV, desenchufe el cable de alimentación y contacte con el servicio técnico autorizado.
24 No presione en exceso el panel con sus manos u objetos afilados, como tornillos, lápices o bolígrafos, y evite rayarlo.
25 Mantenga el producto lejos de la luz directa del sol.
26 Para la Televisor LCD con LED/ Televisor LCDSi siente la TV fría al tocar, puede que haya un pequeño “flicker” cuando se ha encendido.Esto es normal, no hay nada malo con la TV.Unos pocos defectos de puntos pueden ser visibles en la pantalla, apareciendo en un color rojo, verde o azul. Pero ellos no tienen ningún efecto equivocado para la función del monitor.Evitese a tocar la pantalla LCD o agarrarla con su(s) dedo(s) por un periodo largo de tiempo.Si lo hace, eso puede provocar una distorción temporal en la pantalla.
27 Ver imágenes en 3DAl ver imágenes en 3D, vea la TV desde un ángulo de visión efectiva y dentro de una distancia apropiada. Si se excede del ángulo o la distancia de visión, es posible que no pueda ver las imágenes en 3D. Asimismo, si se encuentra recostado, es posible que no pueda ver las imágenes en 3D.Si mira imágenes en 3D a una distancia demasiado corta durante un período pro-longado, es posible que dañe su vista.Mirar TV o jugar un juego de video que in-cluye imágenes en 3D con los anteojos 3D durante un período prolongado puede cau-sar somnolencia, dolores de cabeza o fatiga a usted y a sus ojos. Si sufre de dolor de cabeza o se siente fatigado o somnoliento en alguna forma, deje de mirar TV y des-canse.Las mujeres embarazadas, las personas de edad avanzada, las personas con prob-lemas cardíacos o con somnolencia fre-cuente no deben mirar TV en 3D.Algunas imágenes en 3D del video pueden confundirse con la realidad y generar reac-ciones en los espectadores. Por lo tanto, se recomienda no mirar TV en 3D cerca de objetos frágiles o de cualquier objeto que pueda volcarse con facilidad.Evite que los niños menores de 5 años mi-ren TV en 3D. Puede afectar el desarrollo de la visión.
Advertencia sobre convulsiones por foto-sensibilidad:
Algunos espectadores pueden experi-mentar convulsiones o epilepsia cuando están expuestos a determinados facto-res, entre los que se incluyen luces inter-mitentes, imágenes de TV o juegos de video. Si usted o algún miembro de su familia tiene antecedentes de epilepsia o convulsiones, consulte con su médico antes de ver TV en 3D.
También es posible que se produzcan determinados síntomas en situaciones no especifi cadas sin antecedentes pre-vios. Si experimenta alguno de los sínto-mas que se mencionan a continuación, deje de mirar imágenes en 3D de inme-diato y consulte a un médico: mareos, aturdimiento, transición visual o visión al-terada, inestabilidad visual o facial, como espasmos musculares u oculares, accio-nes inconscientes, convulsiones, pérdida de conocimiento, confusión o desorient-ación, pérdida del sentido de la dirección, calambres o náuseas. Los padres deben controlar estos síntomas en sus hijos, in-cluidos adolescentes, dado que pueden ser más sensibles a los efectos de mirar TV en 3D.
Los riesgos de las convulsiones por fo-tosensibilidad pueden reducirse con las siguientes medidas.
- Tome descansos frecuentes mientras ve la TV en 3D.
- Las personas que padecen una diferen-cia de visión en los ojos deben mirar la TV después de implementar las medi-das de corrección de la visión necesar-ias.
- Mire la TV en una posición en la que los ojos queden al mismo nivel que la pantalla 3D y evite sentarse demasiado cerca de la TV.
- No mire imágenes en 3D si está cansa-do o enfermo, y evite mirar imágenes en 3D durante períodos prolongados.
- Sólo use anteojos 3D para ver imá-genes en una TV en 3D.
- Algunos espectadores pueden sentirse desorientados luego de ver TV en 3D. Por lo tanto, después de ver TV en 3D, tómese un momento para recobrar el conocimiento de la situación antes de moverse.

6
CONTENIDO
ADVERTENCIA / PRECAUCIÓN .........2
ADVERTENCIA ..............................................3
FUNCIONES DE ESTE TV ...................... 8
PREPARACIÓN
Accesorios ...............................................................9
Opciones adicionales .........................................10
Información del panel frontal ........................... 11
Información del panel posterior ..................... 12
Instrucciones ...................................................................14
Montaje para la pared VESA ........................... 16
Organizador de cables ......................................18
Instalación de un pedestal de escritorio ...... 19
Soporte del eslabon giratorio .......................... 19
Sistema de seguridad Kensington ...............20
Fijación de la TV a la pared para evitar que se
caiga cuando esté instalada sobre un soporte
tipo pedestal .........................................................21
Conexión de la Antena o cable .....................22
CONEXIONES DE EQUIPO EXTERNO
Instalación del HDSTB .....................................23
Instalación del DVD ...........................................26
Instalación del VCR ...........................................29
Configuración de otra fuente de A/V...........31
Conexión USB ....................................................32
Configuración del Audífono ..............................32
Conexión de salida de Audio .........................33
Conexión inalámbrica ca de equipo externo
(opciones adicionales) ......................................34
Instalación de la PC ..........................................35
Configuración de red ........................................42
VER LA TV / CONTROL DE CANAL
Funciones de los botones del control remoto 50
Funciones del control remoto de movimiento
mágico ...................................................................52
Encendido del TV ..............................................55
Ajuste del Canal .................................................55
Ajuste del volumen ...........................................55
Configuración Inicial .........................................56
Selección y ajuste del menú pantalla ..........58
Quick Menu (menú rápido).............................60
Menú de casa ......................................................61
Asistencia al cliente
- Act. Software ....................................................62
- Prueba de imagen/Prueba de sonido .....63
- Inform. producto/servicio .............................64
- Prueba de red ..................................................64
Manual Simple ....................................................65
Búsqueda de canales
- Escaneo atomático (Sintonización automática) ...66
- Agregar/Eliminar los Canales (Sintonización
Manual) .............................................................. 67
- Edición de Canal .............................................68
Lista de canales .................................................69
Configuración de los canales favoritos........ 70
Opción de búsqueda ......................................... 71
Sistema de color ................................................ 72
Info. Breve ............................................................ 73
EPG (Guí electrónica de programas) ........... 75
Lista de entradas ............................................... 78
Etiqueta de entrada........................................... 79
Configuración de modo .................................. 80
Modo Demo .........................................................81
Restaurar valores de fábrica (Configuracion
Inicial) ....................................................................82
Modo AV ...............................................................83
Juego/Agenda....................................................84
SIMPLINK .............................................................88
MÁQUINA DEL TIEMPO
Precauciones al usar el dispositivo USB ....90
Màquina del tiempo (pausar y volver a reproducir
TV en vivo) .............................................................91
Grabación .............................................................95
Programación ......................................................98
TV grabada ..........................................................99
VÍDEO EN 3D
Vídeo en 3D ...................................................... 103

7
MIS MEDIOS
Modos de entrada ........................................... 106
Método de conexión ........................................107
Lista de películas .............................................. 112
Lista de fotos ..................................................... 119
Lista de música ................................................ 125
Código de registro del DivX ......................... 130
Desactivación ..................................................... 131
RED
Aviso legal .......................................................... 132
NETCAST
Menú Netcast .................................................... 133
Emol ..................................................................... 134
UOL ..................................................................... 135
Terra TV ............................................................... 136
Bazuca ..................................................................137
Accuweather ...................................................... 138
PICASA ............................................................... 139
YOUTUBE ........................................................... 140
CONTROL DE IMAGEN
Tamaño de la imagen (Aspecto de Pantalla) 142
Asistente de imagen ........................................ 144
Ahorro de energía ........................................... 146
Ajustes de la imagen prestablecida (Modo ima-
gen) .......................................................................147
Control manual de imagen - Modo usuario .... 148
Tecnología de Mejora de la Imagen (Control
Avanzado)........................................................... 149
Control experto de imagen........................... 150
Restablecimiento de la imagen ................... 153
TruMotion .......................................................... 154
Atenuación local LED .................................... 155
Indicador de poder ....................................... 155
CONTROL DE SONIDO Y DE IDIOMA
Volumen automático ....................................... 156
Voz Clara II ..........................................................157
Ajuste de Balance ............................................ 158
Ajuste de sonido preestablecido (Modo de
audio) ................................................................... 159
Ajuste de sonido - Modo usuario ............... 160
Reajuste de audio ..............................................161
Salida de audio digital ......................................161
Disposición de bocinas de TV ..................... 162
Disfrute de la transmisión Estéreo/SAP .. 163
Idioma del audio ............................................ 164
Selección del lenguaje en la pantalla ....... 165
Subtítulos
- Sistemas de texto oculto de programas
analógicos ....................................................... 166
- Sistemas de texto oculto de programas digitales .167
CONFIGURACIÓN HORARIA
Programacion del reloj
- Configuración Auto del Reloj .................... 168
- Configuración Manual del Reloj ............... 169
Ajustes de Encendido / Apagado Automático
del temporizador ...............................................170
Configuración del temporizador de apagado
automático ...........................................................171
CONTROL PATERNO /CLASIFICACIONES
Establecer contraseña y bloqueo del sistema ..172
Bloqueo de canales ..........................................175
Clasificación ........................................................176
Bloqueo de entrada externa ..........................177
Bloqueo de teclas .............................................178
APÉNDICE
Lista de verificación de problemas..............179
Mantenimiento .................................................. 182
Especificaciones del producto ..................... 182
Códigos de IR ................................................... 183
Configuración de dispositivo externo del control ..... 184
Aviso sobre software de código abierto ... 190

8
FUNCIONES DE ESTE TV
Fabricado bajo licencia de Dolby Laboratories.
“Dolby “y el símbolo de la doble-D son marcas comerciales de Dolby Laboratories.
HDMI, tel logotipo HDMI y el inter-faz multimedia de alta definición son marcas comerciales o registra-das de HDMI Licensing LLC.
ACERCA DE VÍDEO EN DIVX: DivX® es un formato de vídeo digital cre-ado por DivX, Inc.Este es un dis-positivo con certificado oficial DivX que reproduce vídeo DivX.Visite www.divx.com para obtener más información y herramientas de software para convertir sus archivos en vídeos DivX.ACERCA DE VÍDEO EN DIVX “ONDEMAND”: Este dis-positivo DivX Certified ® debe reg-istrarse para reproducir contenido DivX Video-on-Demand (VOD).Para generar el código de registro, localice la sección DivX VOD en el menú de configuración del dis-positivoVaya a vod.divx.com con este código para completar el pro-ceso de registro y aprender más acerca de DivX VOD.“Certificado DivX para reproducir vídeos DivX de hasta HD 1080p, incluyendo contenido premium” “Pat. 7,295,673; 7,460,688;7,519,274”
INFORMACIÓN IMPORTANTE PARA EVITAR EL EFECTO “DEGRADACIÓN DE LA IMAGEN POR SOBRE EXPOSICION / QUEMADO” EN LA PANTALLA DE SU TELEVISOR
Al visualizar una imagen fija (Ej.: logotipos, menús de pantalla, videojuegos e imágenes proce-dentes de computadoras) en el televisor durante un período de tiempo prolongado, dicha imagen puede quedar impresa permanentemente sobre la pantalla. Este fenómeno se conoce como “degradación de la imagen por sobreexposición” o “quemado”. Problema que no está cubierto por la garantía del fabricante.
A fin de evitar la degradación de la imagen por sobreexposición, no permita la visualización de imágenes fijas en su pantalla durante un período de tiempo prolongado (2 horas o más para una pantalla LCD, 1 hora o más para pantallas de plasma).
El efecto de degradación de imagen por sobreexposición también puede producirse en las zonas de bandas del formato letter-box (apaisado) de su televisor si usa el ajuste de formato de pantalla en 4:3 duran-te un período de tiempo prolongado..

9
PR
EP
AR
AC
IÓN
ACCESORIOS
PREPARACIÓN
Asegurese de que los siguientes accesorios estén incluidos con su TV. Si algún accesorio no está inclu-
ido, favor de contactar al distribuidor del producto en el lugar donde realizó la compra.
Los accesorios que se incluyen pueden ser diferentes a los de las imágenes a continuación.
1,5Vcc 1,5Vcc
Manual de Usuario Nero MediaHome 4
Essentials CD
Control Remoto,
Baterías (AAA)
(Algunos modelos)
Adaptor RF (Algunos modelos)Debe conectarlo al cable de antena tras
la fijación en la entrada de antena. Este
adaptador es suministrado únicamente
en Argentina.
Opciones Extras (Adicionales)
* Solo limpie las manchas exteriores con un
paño.
* No limpie con demasiada fuerza para
intentar quitar las manchas. Tenga cuida-
do, ya que si limpia con demasiada fuerza
podría rayar o decolorar la superficie
Paño de limpieza
No incluido en todos los modelos
Cable D-sub de 15 terminales
Cuando utilice la conexión VGA
(cable D-sub de 15 pins) para la
PC, el usuario debe usar cables de
interfaz de señal recubiertos
(cable D-sub de 15 clavijas) con
núcleos de ferrita para mantener
el cumplimiento estándar del pro-
ducto.
1,5Vcc 1,5Vcc
Control remoto de movimiento,
Correa,
Baterías (AA) (Algunos modelos)
Sujetacables
(Refiérase a la p.18)
Cable componente genérico,
cable AV genérico
para la base ensamblada(Refiérase a la p.14)
x 4 x 4
x 2 x 2
(M4 x 12) (M4 x 22)
Cubierta posterior de la base Anteojos 3D

PREPARACIÓN
PR
EP
AR
AC
IÓN
10
OPCIONES ADICIONALES
Las opciones adicionales pueden cambiarse o modificarse para mejorar la calidad sin ninguna notifi-
cación. Póngase en contacto con su distribuidor para comprar estos elementos.
Este dispositivo sólo es compatible con LG LED LCD TV.
Caja multimedia inalámbrica
(AN-WL100W)
LAN inalámbrica para adaptador
de banda ancha /DLNA
(AN-WF100)

11
PR
EP
AR
AC
IÓN
ALTOPARLANTE
Emisor
Es la parte que contiene la
señal de intercambio del
emisor con los anteojos
3D.
Asegúrese de que la pan-
talla no esté bloqueada por
objetos o personas cuando
mire un vídeo en 3D.
Sensor de Control Remoto
Sensor inteligente
Ajusta la imagen según las
condiciones del entorno.
CH
VOL
ENTER
INPUT
MENU
Botones de
CANAL ( , )
Botones de VOLUMEN (-, +)
Botón ENTER
Botón INPUT
Botón MENU
Botón POWER
Indicador de Encendido/Standby
(El Indicador de Poder puede ajustarse en el
menú OPCIÓN. p.155)
Es probable que esta vista no coincida con su TV.
INFORMACIÓN DEL PANEL FRONTAL

PREPARACIÓN
PR
EP
AR
AC
IÓN
12
INFORMACIÓN DEL PANEL POSTERIOR
Es probable que esta vista no coincida con su TV.
12
ANTENNA IN
RGB IN (PC)
LAN
WIRELESSCONTROL
(RGB/DVI) OPTICAL DIGITAL
/DVI IN
2
3
1
VIDEO AUDIOL(MONO) R
VIDEO AUDIO
COM
PONENT IN
AV IN 1
Y PB PR L R
AUDIO IN AUDIO OUT
2
1CABLE
IN
RS-232C IN(CONTROL&SERVICE)
ꔡ
1 2 3 4
5
6
8 79
*A 10 mm (0,39 pulgadas)
COM
PONE
NT IN
3AU
DIO
/ Y
PB
PR
IN 4
H/P
USB
IN 1
USB
IN 2
AV IN
2VI
DEO
/ AU
DIO
Tim
e M
achi
neRe
ady10
8
11
2
6
PRECAUCIÓN
Para HDMI IN 4 y USB IN 1, 2
Para una conexión óptima, los
cables HDMI y dispositivos USB
deben tener biseles menos de
10 mm (0,39 pulgadas) de
espesor.
COM
PONE
NT IN
3AU
DIO
/ Y
PB
PR
IN 4
H/P
USB
IN 1
USB
IN 2
AV IN
2VI
DEO
/ AU
DIO
10
8
11
2
6
*Para Brasil
*Excepto Brasil
Se utiliza para ajustar el modo de Timemachine

13
PR
EP
AR
AC
IÓN
1 LAN
Conexión de red para AccuWeather, Picasa, YouTube, etc.
También se utiliza para archivos de vídeo,
fotografía y música en una red local.
2 HDMI/DVI IN, HDMI IN
Conexión digital.
Compatible con video HD y audio digital. No
es compatible con 480 entrelazado.
Acepta video DVI con un adaptador o un
cable de HDMI a DVI (no incluido).
3 RGB IN (PC)
Conexión análoga a la PC. Utilice un cable
D-sub de 15 pins (cable VGA).
AUDIO IN (RGB/DVI)
Enchufe de auriculares 0,32 cm (1/8 pulgadas)
para la entrada de audio análoga de la PC.
4 RS-232C IN (SERVICE ONLY), SERVICE ONLY
Este puerto se usa para mantenimiento y
reparación.
5 OPTICAL DIGITAL AUDIO OUT
Salida óptica de audio digital para usar con
amplificadores y sistemas de cine en casa.
Nota: En el modo de espera, este puerto no
funciona.
6 AV (Audio/Video) IN
Conexión análoga compuesta. Compatible
solo con una definición de video estándar
(480 entrelazado).
7 ANTENNA IN, CABLE IN
Conecte las señales de la transmisión/ cables
de señal a este puerto.
8 COMPONENT IN
Conexión análoga.
Compatible con HD.
Utiliza un cable rojo, verde y azul para video y
uno rojo y blanco para audio.
9 WIRELESS CONTROL
Conecte el dispositivo inalámbrico a la TV
para controlar dispositivos externos conecta-
dos al dispositivo multimedia de forma ina-
lámbrica.
10 USB INPUT
Úselo para ver fotografías, películas y escuchar
música en MP3.
11 HEADPHONE
Conexión de auriculares de 0,32 cm (1/8”)
Impedancia 16 Ω , Salida de audio máxima 15 mW
12 Socket del Cordón de Alimentación
Esta TV funciona con alimentación de corri-
ente alterna (ca)
Cuidado: Nunca aplique voltaje de corriente
continua (cc) a esta TV.

PREPARACIÓN
PR
EP
AR
AC
IÓN
14
INSTRUCCIONES
La imagen puede ser diferente a la de su televisor.
INSTALACIÓN
2 Monte las piezas del SOPORTE DEL
CONJUNTO con la BASE DEL
SOPORTE del televisor.
En este momento, apriete los tornillos
que sujetan el SOPORTE DEL
CONJUNTO.
1 Coloque con cuidado la pantalla de la TV
sobre una superficie acolchada que la pro-
teja de posibles daños.
4 Monte la partes de la CUBIERTA
POSTERIOR DE LA BASE con la TV.
3Coloque los 4 tornillos en los orificios
mostrados.
! NOTA
Al realizar un montaje de sobremesa,
compruebe que los tornillos estén apreta-
dos correctamente. (De no ser así, el pro-
ducto podría inclinarse hacia delante tras
su instalación). Si, por el contrario, apretara
los tornillos en exceso, podría deformarse
por abrasión en el área de apriete del
mismo. No sobreapriete los tornillos.
M4 x 22
M4 x 12
SOPORTE DEL
CONJUNTO
BASE DEL
SOPORTE
CUBIERTA
POSTERIOR
DE LA BASE

15
PR
EP
AR
AC
IÓNSEPARACIÓN
1 Coloque con cuidado la pantalla de la TV
sobre una superficie acolchada que la proteja
de posibles daños.
3 Retire los tornillos que sujetan la base.
2Desmonte la CUBIERTA PORTERIOR DE
LA BASE de la TV.
4 Separar el soporte del televisor.

PREPARACIÓN
PR
EP
AR
AC
IÓN
16
MONTAJE PARA LA PARED VESA
Realice la instalación mural sobre una pared sólida, perpendicular al suelo. Al montar sobre otros mate-
riales de construcción, por favor, póngase en contacto con su instalador más cercano.
En instalaciones del techo o sobre paredes inclinadas, la unidad puede caer y provocar graves daños
personales.
Le recomendamos que utilice un soporte de montaje de pared de la marca LG, cuando ud. ponga la
TV en la pared.
LG recomienda que el montaje de pared lo realice un instalador profesional calificado.
Modelos
VESA (A * B)A
B
Tornillo
estándarCantidad
Soporte para instalación en pared
(de venta por separado)
47LX9500 200 * 200 M6 4
LSW200B, LSW200BG,LSW200BX, LSW200BXG
55LX9500 400 * 400 M6 4
LSW400B, LSW400BG, DSW400BG
17
PR
EP
AR
AC
IÓN
PRECAUCIÓN
No instale su equipo de montaje mural mientras la TV está encendida. Eso podría provocar lesio-
nes personales por choques eléctricos.
! NOTA
La longitud de los tornillos necesarios varía en
función de la pared en la que se realice el
montaje.
Para obtener más información, consulte las
instrucciones incluidas con el equipo de mon-
taje.
Las dimensiones estándar para el equipo de
montaje mural se muestran en la tabla.
Al adquirir nuestro equipo de montaje mural,
le será suministrado un manual de instruccio-
nes detallado y todas las piezas necesarias
para la instalación.
No utilice tornillos más largos que los de
dimensión estándar mostrados, ya que podría
dañar el interior de la TV.
Para montajes murales que no cumplan con
las especificaciones para tornillos del estándar
VESA, la longitud de estos puede diferir
dependiendo de sus especificaciones.
No utilice tornillos que no cumplan con las
especificaciones relativas a los mismos del
estándar VESA.
No apriete los tornillos en exceso, ya que
podría dañar la TV o provocar que cayera pro-
vocando daños personales. LG no se hace
responsable de este tipo de accidentes.
LG no se hace responsable por los daños oca-
sionados en la TV o las lesiones personales
producidas cuando no se utilice un equipo de
montaje que cumpla con el estándar VESA o
se monte sobre un muro que no haya sido
especificado o si el cliente no sigue las
instrucciones de instalación de la TV.

PREPARACIÓN
PR
EP
AR
AC
IÓN
18
ORGANIZADOR DE CABLES La imagen puede ser diferente a la de su televisor.
2 Tras conectar los cables necesarios,
instale el SUJETACABLES como se indi-
ca para agruparlos.
1Fije el cable de alimentación con la
ABRAZADERA DE CABLES de la cubierta
posterior de la TV.
Ayudará a evitar que el cable de aliment-
ación se desenchufe accidentalmente.
ORGANIZADOR DE CABLES
ORGANIZADOR DE CABLES

19
PR
EP
AR
AC
IÓN
INSTALACIÓN DE UN PEDESTAL DE ESCRITORIO
SOPORTE DEL ESLABON GIRATORIODespues de instalar la TV, puede ajustar el TV manualmente 20 grados a la izquierda y derecha para
satisfacer su angulo de vision.
La imagen puede ser diferente a la de su televisor.
Para conseguir una ventilación adecuada, deje un espacio de 10,1 cm de separación entre la pared y
los costados del televisor.
10,1 cm
10,1 cm
10,1 cm
10,1 cm
CUIDADO
Asegure la ventilación adecuada dejando el espacio recomendado.
No instale la unidad próxima o sobre ninguna fuente de calor.

PREPARACIÓN
PR
EP
AR
AC
IÓN
20
SISTEMA DE SEGURIDAD KENSINGTON Esta característica no se encuentra disponible para todos los
modelos.
- El televisor tiene instalado un conector de Sistema de seguri-
dad Kensington en el panel posterior. Conecte el cable de
Sistema de seguridad Kensington como se indica a continu-
ación.
- Para obtener información detallada sobre la instalación y uso
del Sistema de seguridad Kensington, consulte la guía del usu-
ario que se incluye con este sistema.
Para obtener información adicional, visite http://www.kensing-
ton.com, la página Web de Kensington. Esta empresa vende
sistemas de seguridad para equipos electrónicos de alto costo,
como PC portátiles y proyectores LCD.
NOTA: El Sistema de seguridad Kensington es un accesorio
opcional.

21
PR
EP
AR
AC
IÓN
FIJACIÓN DE LA TV A LA PARED PARA EVITAR QUE SE CAIGA CUANDO ESTÉ INSTALADA SOBRE UN SOPORTE TIPO PEDESTAL
Instalelo cerca de la pared así el producto no se cae cuando esté presionado hacia atrás.
Las instrucciones mostradas a continuación son más seguras para instalar el producto en la pared
así no se caerá cuando el producto esté presionado hacia enfrente. Esto protegerá el producto y la
gente de la caida hacia enfrente. También prevendrá el producto del daño causado por la caida.
Cuidado:Favor de estar seguro de que los niños no se suban ni se cuelguen del producto.
Use los soportes y los tornillos para fijar el producto en la pared como se muestra.
* Si el producto tiene los tornillos en el lugar de los tornillosde ojo antes de insertar estos últimos,
afloje los tornillos.
Asegúrese de los soportes con los tornillos (De venta por separado) en la pared que estén ajustados
firmemente.
Para usar el producto seguramente asegúrese de que la altura de los soportes montados en la pared
sea la misma que la del producto.
Asegúrese de que los tornillos de ojo o soportes estén apretados en forma segura.
Use un cordón fuerte (De venta por separado) para ajustar el producto.
Es más seguro usar un cordón, así se quedará horizontalmente entre la
pared y el producto.
Debe adquirir los componentes necesarios para prevenir que el televisor vuelque (cuando no se use
el montaje de pared).
La imagen puede ser diferente a la de su televisor.
! NOTA
Utilice una plataforma o armario suficientemente fuerte y grande para soportar el tamaño y el
peso de la TV.
Para utilizar la TV con seguridad, asegúrese que la altura los soportes están a la misma altura en la
pared y en el aparato de televisión..

PREPARACIÓN
PR
EP
AR
AC
IÓN
22
CONEXIÓN DE LA ANTENA O CABLE
Para prevenir daños, no conecte a la corriente hasta que estén instaladas todas las conexiones entre
los dispositivos.
La imagen puede ser diferente a la de su televisor.
1. Antena (analógica o digital)
Toma de entrada de pared o antena exterior sin conexiones a caja de cables.
Para lograr la mejor calidad de imagen, ajuste la posición de la antena si fuera
necesario.
En áreas de señal deficiente, puede obtener una mejor calidad en la imagen si instala un ampli-ficador de señal.
Si está siendo utilizada una antena para dos unidades, use un divisor de señal para conectarse.
El cable y el convertidor de antena no son proporcionados con el producto.
ANTENNA IN CABLE IN
ANTENNA IN CABLE IN
2. Cable
Enchufe
de antena
de la pared
Antena de
exterior
(VHF, UHF)
Puerto de TV de Cable en la pared
Viviendas/Apartamentos
(Conectar al enchufe de antena en la pared)
Cable Coaxial RF (75 Ω)
Cable Coaxial RF (75 Ω)
Casa privada
(Conectar a un enchufe de pared de la
antena exterior) Asegúrese de no doblar el cable de
cobre cuando conecte la antena.
Alambre debronce

23
CO
NE
XIO
NE
S D
E E
QU
IPO
EX
TE
RN
O
INSTALACIÓN DEL HDSTB
Para evitar daños en el equipo, no enchufe ningún cable de alimentación hasta haber finalizado la conexión completa de todo el equipo.
La imagen puede ser diferente a la de su televisor.
Y, CB/PB, CR/PR
1. Cómo conectar
1 Conecte las salidas de video (Y, PB, PR) del
decodificador digital a los puertos de
COMPONENT IN VIDEO 1, 2 o 3 en la unidad.
Haga coincidir los colores de los conectores
(Y = Verde, PB = Azul, PR = Rojo).
2 Conecte la salida de audio del docodificador
digital a los puertos de COMPONENT IN
AUDIO 1, 2 o 3 jen la unidad
2. Cómo usar Encienda el Set-top box digital.
(Refiérase al manual de usuario del Set-top box
digital.)
Seleccione la fuente de entrada del Componente1,
Componente2 o Componente3 en el televisor con
el botón de INPUT en el control remoto.
Conexión de componentes
Este TV puede recibir señales de la transmisión digital/cable sin una caja sintonizadora externa. Pero
si ud. recibe señales digitales desde una caja sintonizadora u otro dispositivo externo digital, refiérase
a las siguientes figuras.
CONEXIONES DE EQUIPO EXTERNO
RGB IN (PC)
(RGB/DVI)
RS-232C IN(CONTROL&SERVICE)
OPTICALDIGITAL
/DVI IN
2
3
1
VIDEO AUDIOL(MONO) R AV IN 1AUDIO IN AUDIO OUT
VIDEO AUDIO
COM
PONENT IN
Y PB PR L R2
1
Y L RPB PR
1 2
Resolución Frecuencia Horizontal (kHz)
Frecuencia Vertical (Hz)
720 x 480 entrelazado
15,73 59,94
15,73 60,00
720 x 480 progresivo
31,47 59,94
31,50 60,00
720 x 576 entrelazado
15,625* 50,00*
720 x 576 progresivo
31,25* 50,00*
1 280 x 720 progresivo
37,50* 50,00*
44,96 59,94
45,00 60,00
1 920 x 1 080 entrelazado
28,125* 50,00*
33,72 59,94
33,75 60,00
1 920 x 1 080 progresivo
26,97 23,976
27,00 24,00
33,71 29,97
33,75 30,00
56,25* 50,00*
67,432 59,94
67,50 60,00
*Excepto Brasil

CONEXIONES DE EQUIPO EXTERNO
CO
NE
XIO
NE
S D
E E
QU
IPO
EX
TE
RN
O
24
YLR PBPR
AUDI
O /
Y P
B P
RIN
4H/
PUS
B IN
1US
B IN
2
AV IN
2VI
DEO
/ AU
DIOCO
MPO
NENT
IN3
1
2
Conexión de DVI a HDMI
1. Cómo conectar
1 Conecte la salida de DVI del decodificador
digital al puerto de HDMI/DVI IN 1, 2, o 3 en la
unidad.
2 Conecte las salidas de audio del decodificador
al puerto de AUDIO IN (RGB/DVI) en la unidad.
2. Cómo usar Encienda el decodificador digital.
(Refiérase al manual de usuario del decodificador
digital.)
Seleccione la fuente de entrada del HDMI1, HDMI2,
o HDMI3 en el televisor con el botón de INPUT en
el control remoto.
! NOTA
Se precisa un cable o adaptador de DVI a HDMI para
realizar esta conexión. El DVI no es compatible con el
audio, por ello, se necesita una conexión de audio por
separado.
L RDVI OUTPUTAUDIO
RGB IN (PC)
LAN
WIRELESSCONTROL
RS-232C IN(CONTROL&SERVICE)
VIDEO AUDIOL(MONO) R
VIDEO AUDIO
COM
PONENT IN
AV IN 1
Y PB PR L R
AUDIO OUT
2
1
/DVI IN
2
3
1
(RGB/DVI)
AUDIO IN
OPTICAL DIGITAL
ꔡ
1
2

25
CO
NE
XIO
NE
S D
E E
QU
IPO
EX
TE
RN
O
Conexión HDMI
1. Cómo conectar
1 Conecte la salida HDMI del decodificador de
señales digitales al conector HDMI/DVI IN 1, 2,
3 o 4 en el televisor.
2 No se necesita conexión de audio por separado.
HDMI admite audio y video.
2. Cómo usar Encienda el decodificador digital.
(Refiérase al manual de usuario del decodificador
digital.)
Seleccione la fuente de entrada del HDMI1, HDMI2,
HDMI3 o HDMI4 en el televisor con el botón de
INPUT en el control remoto.
! NOTA
Si un cable HDMI no admite HDMI de alta velocidad, puede provocar parpadeos o no mostrar la imagen. Si este es el caso, utilice cables recientes que admitan HDMI de alta velocidad. Formato de audio HDMI admitido: Dolby Digital, PCM
HDMI-DTV
HDMI OUTPUT
RGB IN (PC)
LAN
WIRELESSCONTROL
(RGB/DVI)VIDEO L(MONO
VIDEO A
AUDIO IN AUDIO OUT
2
1
/DVI IN
2
3
1
Y PB PR L
OPTICAL DIGITAL
RS-232(CONTROL&S
ꔡ
1
Resolución Frecuencia Horizontal (kHz)
Frecuencia Vertical (Hz)
720 x 480
progresivo
31,47 59,94
31,50 60,00
720 x 576
progresivo31,25* 50,00*
1 280 x 720
progresivo
37,50* 50,00*
44,96 59,94
45,00 60,00
1 920 x 1 080 entrelazado
28,125* 50,00*
33,72 59,94
33,75 60,00
1 920 x 1 080 progresivo
26,97 23,976
27,00 24,00
33,71 29,97
33,75 30,00
56,25 50,00*
67,432 59,94
67,50 60,00
*Excepto Brasil

CONEXIONES DE EQUIPO EXTERNO
CO
NE
XIO
NE
S D
E E
QU
IPO
EX
TE
RN
O
26
INSTALACIÓN DEL DVD
RGB IN (PC)
SL
(RGB/DVI)
RS-232C IN(CONTROL&SERVICE)
OPTICALDIGITAL
/DVI IN
2
3
1
VIDEO AUDIOL(MONO) R AV IN 1AUDIO IN AUDIO OUT
VIDEO AUDIO
COM
PONENT IN
Y PB PR L R2
1
Y L RPB PR
1 2
YLR PBPR
AUDI
O /
Y P
B P
RIN
4H/
PUS
B IN
1US
B IN
2
AV IN
2VI
DEO
/ AU
DIOCO
MPO
NENT
IN3
1
2
Puertos de la Entrada de Componente
Puede obtener una mejor calidad de imagen si
conecta el reproductor de DVD a los puertos de la
entrada del componente como la imagen mostrada.
Puertos de
Componente en la TV
Y PB PR
Puertos de la salida
del reproductor de
DVD
Y PB PR
Y B-Y R-Y
Y Cb Cr
Y Pb Pr
1. Cómo conectar
1Conecte las salidas de video (Y, PB, PR) del
DVD a los puertos de COMPONENT IN VIDEO
1, 2 o 3 en la unidad.
Haga coincidir los colores de los conectores (Y
= Verde, PB = Azul, PR = Rojo).
2 Conecte las salidas de audio del DVD a los
puertos de COMPONENT IN AUDIO 1, 2 o 3
en la unidad.
2. Cómo usar Encienda el reproductor de DVD, inserte un DVD.
Seleccione la fuente de entrada del Componente1,
Componente2 o Componente3 en el televisor con
el botón de INPUT en el control remoto.
Refiérase al manual de usuario del reproductor de
DVD para seguir las instrucciones.
Conexión de componentes

27
CO
NE
XIO
NE
S D
E E
QU
IPO
EX
TE
RN
O
Conexión compuesta (RCA)
1. Cómo conectar
1 Conecte las salidas de AUDIO/VIDEO entre la
TV y el DVD. Coincida los colores de salidas
(Video = amarillo, Audio izquierdo = blanco,
Audio derecho = rojo).
2. Cómo usar Encienda el reproductor de DVD, inserte un DVD..
Seleccione la fuente de entrada del AV1 o AV2 en
el televisor con el botón de INPUT en el control
remoto.
Refiérase al manual de usuario del reproductor de
DVD para seguir las instrucciones.
RGB IN (PC)
SL
(RGB/DVI)
/DVI IN
2
3
1
VIDEO AUDIO
COM
PONENT IN
AUDIO IN AUDIO OUT
2
1
VIDEO AUDIOL(MONO) R AV IN 1
Y PB PR L R
OPTICAL DIGITAL
RS-232C IN(CONTROL&SERVICE)
L RVIDEOAUDIO
1
L RVIDEOAUDIO
AUDI
O /
Y P
B P
RIN
4H/
PUS
B IN
1US
B IN
2
VIDE
O /
AUDI
OCOM
PONE
NT IN
3
AV IN
2

CONEXIONES DE EQUIPO EXTERNO
CO
NE
XIO
NE
S D
E E
QU
IPO
EX
TE
RN
O
28
Conexión HDMI
1. Cómo conectar
1 Conecte la salida de HDMI del DVD al puerto
de HDMI/DVI IN 1, 2, 3 o 4 en la unidad.
2 No se necesita conexión de audio por separado.
HDMI admite audio y video.
2. Cómo usar Seleccione la fuente de entrada del HDMI1, HDMI2,
HDMI3, o HDMI4 en el televisor con el botón de
INPUT en el control remoto.
Refiérase al manual de usuario del reproductor de
DVD para seguir las instrucciones.
! NOTA
Si un cable HDMI no admite HDMI de alta velocidad,
puede provocar parpadeos o no mostrar la imagen. Si
este es el caso, utilice cables recientes que admitan
HDMI de alta velocidad.
Formato de audio HDMI admitido: Dolby Digital, PCM
HDMI OUTPUT
RGB IN (PC)
LAN
WIRELESSCONTROL
(RGB/DVI)VIDEO AUDIOL(MONO) R
VIDEO AUDIO
COM
PONENT IN
AV IN 1AUDIO IN AUDIO OUT
2
1
/DVI IN
2
3
1
Y PB PR L R
OPTICAL DIGITAL
RS-232C IN(CONTROL&SERVICE)
ꔡ
1

29
CO
NE
XIO
NE
S D
E E
QU
IPO
EX
TE
RN
O
INSTALACIÓN DEL VCR
Conexión de la antena
ANTENNA IN
CABLEIN
L RS-VIDEO VIDEOAUDIO
OUTPUTSWITCH
ANT IN
ANT OUT
Conector de pared
Antena
1. Cómo conectar
1 Conecte el conector de la antena
exterior de RF del VCR al conector
de la ANTENNA/CABLE IN del tele-
visor.
2 Conecte el cable de antena al puerto
de la antena RF del VCR.
2. Cómo usar Ponga el interruptor de salida del VCR
en 3 ó 4 y luego sintonice el televisor en
el mismo número de canal.
Inserte una cinta de video en el VCR y
presione el botón AUDIO PLAY del VCR
(Vea el manual de usuario del VCR).
1
2

CONEXIONES DE EQUIPO EXTERNO
CO
NE
XIO
NE
S D
E E
QU
IPO
EX
TE
RN
O
30
S-VIDEO
OUTPUTSWITCH
ANT IN
ANT OUT
RGB IN (PC)
SSOL
(RGB/DVI)
/DVI IN
2
3
1
VIDEO AUDIO
COM
PONENT IN
AUDIO IN AUDIO OUT
2
1
VIDEO AUDIOL(MONO) R AV IN 1
Y PB PR L R
OPTICAL DIGITAL
RS-232C IN(CONTROL&SERVICE)
L RVIDEOAUDIO
1
S-VIDEO
OUTPUTSWITCH
ANT IN
ANT OUT
L RVIDEOAUDIO
AUDI
O /
Y P
B P
RIN
4H/
PUS
B IN
1US
B IN
2
VIDE
O /
AUDI
OCOM
PONE
NT IN
3
AV IN
2
Conexión compuesta (RCA)
1. Cómo conectar
1 Conecte las salidas de AUDIO/VIDEO entre la
TV y el VCR. Coincida los colores de salidas
(Video = amarillo, Audio izquierdo = blanco,
Audio derecho = rojo).
2. Cómo usar Inserte una cinta de video en el VCR y presione el
botón PLAY del VCR. (Vea el manual de usuario
del VCR).
Seleccione la fuente de entrada del AV1 o AV2 en
el televisor con el botón de INPUT en el control
remoto.
! NOTA
Si ud. tiene un VCR monofónico, conecte el cable de
audio de VCR al puerto AUDIO L/MONO de la unidad.

31
CO
NE
XIO
NE
S D
E E
QU
IPO
EX
TE
RN
O
CONFIGURACIÓN DE OTRA FUENTE DE A/V
RGB IN (PC)
SSOL
(RGB/DVI)
/DVI IN
2
3
1
VIDEO AUDIO
COM
PONENT IN
AUDIO IN AUDIO OUT
2
1
VIDEO AUDIOL(MONO) R AV IN 1
Y PB PR L R
OPTICAL DIGITAL
RS-232C IN(CONTROL&SERVICE)
L RVIDEOAUDIO
Grabadora de video
Unidad de video juego
1. Cómo conectar
1 Conecte los puertos de AUDIO/VIDEO
entre la TV y un equipo externo.
Coincida los colores de puertos
(Video = amarillo, Audio izquierdo =
blanco, Audio derecho = rojo)
2. Cómo usar Seleccione la fuente de entrada del AV1
o AV2 en el televisor con el botón de
INPUT en el control remoto.
Opere el equipo externo correspondiente.
Refiérase a la guía de la operación de
equipo externo..

CONEXIONES DE EQUIPO EXTERNO
CO
NE
XIO
NE
S D
E E
QU
IPO
EX
TE
RN
O
32
CONEXIÓN USB
CONFIGURACIÓN DEL AUDÍFONO
1. Cómo conectar
1 Conecte el dispositivo USB a los
conectores USB IN o USB IN 1/2 en
el televisor.
2. Cómo usar Una vez conectados los conectores
USB IN use la función USB. ( p.107)
Puede escuchar el sonido por los auriculares.
COM
PONE
NT IN
3AU
DIO
/ Y
PB
PR
IN 4
H/P
USB
IN 1
USB
IN 2
AV IN
2VI
DEO
/ AU
DIO
Memory Key
o
H/P
1. Cómo conectar
1 Conecte los auriculares en la conex-
ión correspondiente.
2 Para ajustar el volumen de los auric-
ulares, pulse el botón VOL +/-. Si
pulsa el botón MUTE, se desactivará
el sonido de los auriculares.
! NOTA
Las opciones del menú AUDIO se desactivarán al
conectar los auriculares. Al cambiar el MODO AV con unosauriculares conecta-
dos, el cambio se aplicará al vídeo, pero no al audio. La Salida Óptica de Audio Digital no está disponible
cuando se conecte unos auriculares.

33
CO
NE
XIO
NE
S D
E E
QU
IPO
EX
TE
RN
O
G ( C)
LESSTROL
(RGB/DVI)
/DVI IN
2
3
1
VIDEO AUDIOL(MONO) R
VIDEO AUDIO
COM
PONENT IN
AV IN 1AUDIO IN
2
1
AUDIO OUT
Y PB PR L R
OPTICAL DIGITAL
CONTROL&SERVICE
1
2
CONEXIÓN DE SALIDA DE AUDIO
Conecte el cable de audio de TV al equipo de audio externo (sistema de estéreo) por el puerto de Salida
Optica de Audio.
Si desea disfrutar de emisiones digitales a través de los altoparlantes con sonido 5.1ch, conecte la toma
OPTICAL DIGITAL AUDIO OUT a la parte posterior del televisor a un sistema de cine en casa (o a un
amplificador).
! NOTA
Cuando conecte equipos de audio externos, como
amplificadores o bocinas, puede apagar los altoparlan-
tes del televisor desde el menú ( p.162).
PRECAUCIÓN
No mire dentro del puerto de salida óptica. Mirar el
rayo láser puede dañar su vista.
El audio con la función ACP (protección anticopia de
audio) podrían bloquear la salida de audio digital.
1. Cómo conectar
1 Conecte una salida del cable OPTICAL al
puerto de TV óptico de la OPTICAL DIGITAL
AUDIO OUT.
2 Conecte otro extremo de cable óptico a la
entrada de audio digital óptico en el equipo de
audio.
3 Ajuste la “Bocinas de TV - Apagado” en el
menú AUDIO ( p.162). Cuando se conecta a un
equipo de audio externo como amplificadores
o bocinas por favor apague las bocinas de TV.

CONEXIONES DE EQUIPO EXTERNO
CO
NE
XIO
NE
S D
E E
QU
IPO
EX
TE
RN
O
34
CONEXIÓN INALÁMBRICA DE EQUIPO EXTERNO (OPCIONES ADICIONALES)
Las TV LG con un puerto de control inalámbrico admiten el dispositivo multimedia inalámbrico LG,
vendido por separado. Cuando conecte el dispositivo inalámbrico, (incluido en la unidad multimedia)
a la TV, los dispositivos externos podrán conectarse a la unidad multimedia inalámbrica LG y el vídeo
y el audio se enviarán a la TV de forma inalámbrica.
RGB IN (PC)
LAN(RGB/DVI)
VIDE
VIDEO
AUDIO IN AUDIO OUT
2
1
WIRELESSCONTROL
OUTWIRELESSCONTROL
/DVI IN
2
3
1
Y PB PR
OPTICAL DIGITAL
R
ꔡ
! NOTA
Cuando se usa el dispositivo externo conectado a la caja multimedia inalámbrica, es posible que
algunas funciones del menú del televisor no funcionen.
1. Cómo conectar
1 Conecte la conexión WIRELESS CONTROL del dispositivo inalámbrico a la conexión
WIRELESS CONTROL de la TV.
2 Conecte la conexión HDMI OUT del dispositivo inalámbrico a la conexión HDMI IN de la
TV.
2. Cómo usar Seleccione la fuente de entrada que desee utilizar en la TV utilizando el botón INPUT del
mando a distancia.
Consulte el manual de la unidad multimedia inalámbrica para conocer las instrucciones de func-
ionamiento.

35
CO
NE
XIO
NE
S D
E E
QU
IPO
EX
TE
RN
O
INSTALACIÓN DE LA PC
Esta TV proporciona la capacidad de Plug and Play, significa que la PC se ajusta automáticamente
por las programaciones de la TV.
LAN
WIRELESSCONTROL
/DVI IN
2
3
1
VIDEO AUDIOL(MONO) R
VIDEO AUDIO
COM
PONENT IN
AV IN 1AUDIO OUT
2
1
RGB IN (PC)
RGB OUTPUTAUDIO
(RGB/DVI)
AUDIO IN
Y PB PR L R
OPTICAL DIGITAL
RS-232C INCONTROL&SERVICE
ꔡ
12
1. Cómo conectar
1 Conecte la salida de VGA de la PC al puerto
de RGB IN (PC) en la unidad.
2 Conecte las salidas de audio de la PC al puer-
to de AUDIO IN (RGB/DVI) en la unidad.
2. Cómo usar Encienda la PC y la unidad
Seleccione la fuente de entrada del RGB-PC en
el televisor con el botón de INPUT en el control
remoto.
Conexión VGA (D-Sub de 15 pins)

CONEXIONES DE EQUIPO EXTERNO
CO
NE
XIO
NE
S D
E E
QU
IPO
EX
TE
RN
O
36
DVI OUTPUT AUDIO
RGB IN (PC)
LAN
WIRELESSCONTROL
VIDEO AUL(MONO)
VIDEO AUDI
AUDIO OUT
2
1
/DVI IN
2
3
1
(RGB/DVI)
AUDIO IN
Y PB PR L
OPTICAL DIGITAL
RS-232C ICONTROL&SERV
ꔡ
1 2
Conexión de DVI a HDMI
1. Cómo conectar
1 Conecte la salida de DVI de la PC al puerto de
HDMI/DVI IN 1, 2, o 3 en la unidad.
2 Conecte las salidas de audio de la PC al puerto
de AUDIO IN (RGB/DVI) en la unidad.
2. Cómo usar Encienda la PC y la unidad.
Seleccione la fuente de entrada del HDMI1, HDMI2,
o HDMI3 en el televisor con el botón de INPUT en
el control remoto.

37
CO
NE
XIO
NE
S D
E E
QU
IPO
EX
TE
RN
O
Resolución de Despliegue (RGB-PC, HDMI-PC)
! NOTA
Nosotros le recomendamos que use 1 920 x 1 080 para el modo PC, esto le ofrecerá la mejor
calidad de imagen.
Dependiendo de la tarjeta gráfica, el modo DOS puede no funcionar si utiliza un cable HDMI a
DVI.
En el modo PC, podría verse ruido asociado con la resolución, un diseño vertical, contraste o
brillo. Si observa ruidos, cambie la salida de la PC a otra resolución, cambie la tasa de actual-
ización a otra tasa o ajuste el brillo y el contraste en el menú de IMAGEN hasta que la imagen se
vea clara.
Evite mantener una imagen fija en pantalla durante largos periodos de tiempo. La imagen fija
podría grabarse permanentemente en pantalla.
Las formas de la entrada de sincronización para la frecuencia horizontal y vertical están separadas.
Según la tarjeta de gráficos que posea, algunas resoluciones podrían no posicionarse adecuada-
mente en la pantalla.
Al escoger HDMI-PC, Ajuste la “Etiqueta de entrada - PC” en el menú OPCIÓN.
Resolución Frecuencia Horizontal (kHz)
Frecuencia Vertical (Hz)
640 x 350 31,468 70,09
720 x 400 31,469 70,08
640 x 480 31,469 59,94
800 x 600 37,879 60,31
1 024 x 768 48,363 60,00
1 280 x 768 47,776 59,87
1 360 x 768 47,712 60,015
1 280 x 1 024 63,981 60,02
1 600 x 1 200 75,00 60,00
1 920 x 1 080 67,50 60,00
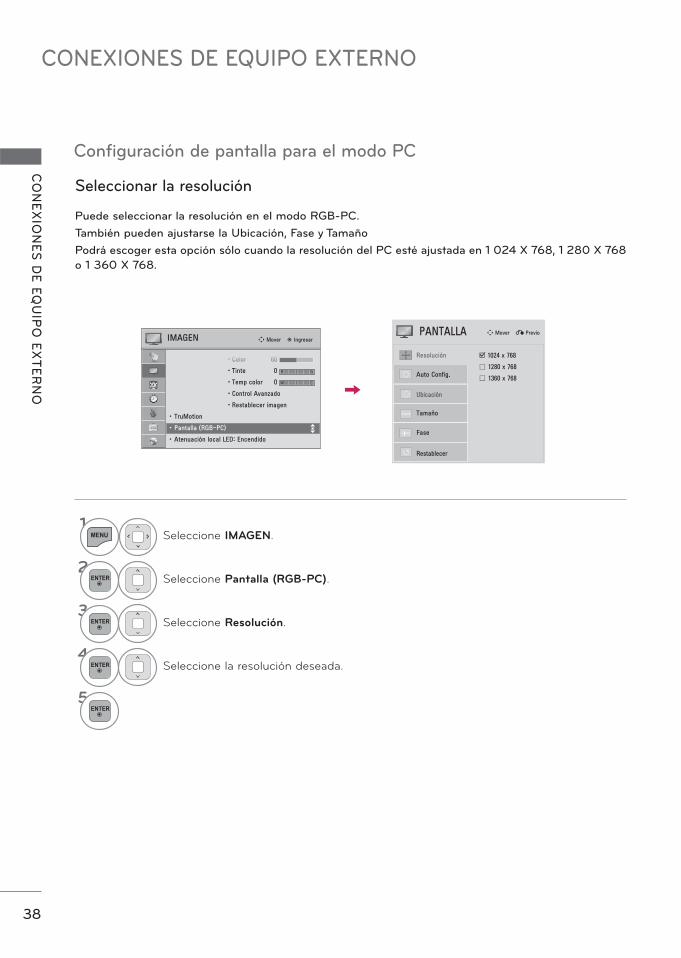
CONEXIONES DE EQUIPO EXTERNO
CO
NE
XIO
NE
S D
E E
QU
IPO
EX
TE
RN
O
38
Configuración de pantalla para el modo PC
Puede seleccionar la resolución en el modo RGB-PC.
También pueden ajustarse la Ubicación, Fase y Tamaño
Podrá escoger esta opción sólo cuando la resolución del PC esté ajustada en 1 024 X 768, 1 280 X 768
o 1 360 X 768.
Seleccionar la resolución
1MENU Seleccione IMAGEN.
2ENTER Seleccione Pantalla (RGB-PC).
3ENTER Seleccione Resolución.
4ENTER Seleccione la resolución deseada.
5ENTER

39
CO
NE
XIO
NE
S D
E E
QU
IPO
EX
TE
RN
O
Ajusta automáticamente la posición de la imagen y minimiza la inestabilidad de la imagen. Luego del
ajuste, si la imagen aún no es adecuada, intente usar los ajustes manuales o una resolución diferente o
actualice la tasa de la PC.
Auto Configure
1MENU Seleccione IMAGEN.
2ENTER Seleccione Pantalla (RGB-PC).
3ENTER Seleccione Auto Config..
4ENTER Seleccione Sí.
5ENTER
Si la posición de la imagen aún no es
la adecuada, intente auto ajustar
nuevamente.
Si la imagen debe ajustarse nueva-
mente luego del auto ajuste en RGB-
PC, puede ajustar la Ubicación,
Tamaño o Fase.

CONEXIONES DE EQUIPO EXTERNO
CO
NE
XIO
NE
S D
E E
QU
IPO
EX
TE
RN
O
40
Si la imagen no está clara tras el ajuste automático o si el texto parpadea, ajuste manualmente la fase
de la imagen.
Esta característica solo opera en modo RGB-PC.
Ajuste para la Ubicación, Tamaño y Fase de la pantalla
1MENU Seleccione IMAGEN.
2ENTER Seleccione Pantalla (RGB-PC).
3ENTER
Seleccione Ubicación, Tamaño o
Fase.
4ENTER Realice los ajustes adecuados.
5ENTER
Ubicación: Esta función es para aju-
star la imagen a la izquierda/derecha
y arriba/abajo a su preferencia.
Tamaño: Esta función es para mini-
mizar cualquier barra vertical o rayas
visibles en el fondo de pantalla. Y
también cambiará el tamaño de pan-
talla.
Fase: Esta función le deja remover
cualquier ruido horizontal y hace
clara o nitida la imagen de carac-
teres.

41
CO
NE
XIO
NE
S D
E E
QU
IPO
EX
TE
RN
O
Restaura los ajustes de Ubicación, Tamaño y Fase a los predeterminados de fábrica.
Esta característica solo opera en modo RGB-PC.
Reajustar la pantalla (Regreso a los valores originales de la fábrica)
1MENU Seleccione IMAGEN.
2ENTER Seleccione Pantalla (RGB-PC).
3ENTER Seleccione Restablecer.
4ENTER Seleccione Sí.
5ENTER

CONEXIONES DE EQUIPO EXTERNO
CO
NE
XIO
NE
S D
E E
QU
IPO
EX
TE
RN
O
42
RGB IN (PC)
WIRELESSCONTROL
(RGB/DVI)
/DVI IN
2
3
1
VIDEO AUDIOL(MONO) R
VIDEO AUDIO
COM
PONENT IN
AV IN 1AUDIO IN
2
1
AUDIO OUT
Y PB PR L R
OPTICAL DIGITAL
RS-232C INCONTROL&SERVICE
ꔡ
LAN
Módem de banda ancha
Módem de banda ancha
Enrutador
Servicio de banda ancha
Servicio de banda ancha
CONFIGURACIÓN DE RED
Esta TV puede conectarse a una red de área local (LAN) mediante el puerto LAN. Tras realizar la con-
exión física, es necesario configurar la TV para la comunicación por red.
Conexión de red por cable
1
PRECAUCIÓN
No conecte un cable de teléfono modular al Puerto LAN
Dado que hay varios métodos de conexión, siga las especificaciones del proveedor de Internet o
de servicio.
1. Cómo conectar
1 Conecte el puerto LAN del módem o enrutador al puerto LAN de la TV.
2. Cómo usar Seleccione “Configuración de Red” (Configuración de red) en el menú RED.
Tras conectar el puerto LAN, utilice el menú NETCAST.

43
CO
NE
XIO
NE
S D
E E
QU
IPO
EX
TE
RN
O
Esta función requiere una conexión a Internet de banda ancha de conexión permanente.
No es necesario conectar a un PC para utilizar esta función.
Si la configuración de red no funciona,compruebe las condiciones de la red. Compruebe el cable LAN y asegúrese de que el enrutador tiene la opción DHCP activadas si desea utilizar la configuración automática.
Si no se configura la red completa-mente, la red podría no funcionar con normalidad.
Configuración automática de IP: Seleccione esta opción si la red local incluye un servidor DHCP mediante una conexión por cable, esta unidad recibirá una dirección IP automática-mente. Si utiliza un enrutador o módem de banda ancha con función DHCP (Dynamic Host Configuration Protocol) (Protocolo de Configuración de Host Dinámica). La dirección IP se configurará automáticamente.
Configuración manual de IP: Seleccione esta opción si no hay ningún servidor DHCP en la red y desea configurar las direcciones IP manualmente.
Configuración de red por cable
1MENU Seleccione RED.
2ENTER Seleccione Configuración de red.
3ENTER Seleccione Alámbrica.
4ENTER
Si ya ha configurado las opciones de
red: Seleccione Restaurar. La nueva
configuración de conexión sustituirá a
la configuración de red actual.
5ENTER
Seleccione Configuración automática
de IP o Configuración manual de IP.
1 2 ABC 3 DEF
4 GHI 5 JKL 6 MNO
7PQRS 8 TUV
09 WXYZ
Al seleccionar la configuración man-
ual de IP: será necesario introducir
las direcciones IP manualmente.
6ENTER Seleccione Enter.
Auto Config. de IP
Si ya ha configurado las
opciones de red
Config. Manual de IP
Si hay disponible una red inalámbrica y por cable, es preferible utilizar la red por cable. Tras realizar la conexión física, en un pequeño número de redes domésticas puede ser necesario ajustar la configu-ración de red. Para obtener una información más detallada,póngase en contacto con su proveedor de Internet o lea el manual del enrutador.
Aparece cuando se esta-
blecen conexiones ina-
lámbricas y por cable en
forma simultánea.

CONEXIONES DE EQUIPO EXTERNO
CO
NE
XIO
NE
S D
E E
QU
IPO
EX
TE
RN
O
44
! NOTA
Para obtener más información y solución de problemas de la configuración NETCAST, visite nuestra base de datos de información en http://lgknowledgebase.com y busque NETCAST. Utilice un cable LAN estándar para la TV. Cat5 o mejor con un conector RJ45. Muchos problemas de red causados durante la configuración pueden solucionarse a menu-do reconfigurando el enrutador o el módem.Tras conectar la unidad a la red doméstica, encienda y apáguela rápidamente o desco-necte el cable de alimentación del enrutador o módem por cable de la red doméstica. A continuación, vuelva a encender o conectar el cable de alimentación.Dependiendo del proveedor de Internet (ISP), el número de dispositivos que pueden recibir conexión a Internet puede estar limitado por los términos del contrato de servicio. Para obtener más detalles, contacte a su ISPLG no es responsable de ninguna avería de la TV o la conexión de Internet causado por errores o averías de comunicación asociados con la conexión de banda ancha o con otro equipo conectado. LG no es responsable de los problemas que tenga lugar con la conexión a Internet. Algún contenido disponible mediante la con-exión de red puede no ser compatible con la TV. Si tiene alguna pregunta acerca de este contenido, póngase en contacto con el pro-ductor del contenido. Puede que experimente resultados no desea-dos si la velocidad de la conexión de red no cumple con los requisitos del contenido al que se está accediendo.Puede que algunas operaciones de conexión a Internet no se puedan reducir debido a cier-tas restricciones configuradas por el prov-eedor de servicio (ISP) que le suministra la conexión de banda ancha. Cualquier cobro por parte del ISP incluyendo, sin limitaciones, los gastos de conexión son su responsabilidad. Es necesario un puerto de LAN A10 Base-T o 100 Base-TX para la conexión de la TV Si el servicio de Internet no permite esta conexión, no podrá conectar la TV. ]Es necesario un módem DSL para utilizar el servicio DSL y un módem por cable para uti-lizar el servicio por cable módem. Dependiendo del método de acceso y del acuerdo de suscripción con su ISP, podría no ser capaz de utilizar la función de conexión a Internet inclu-ida en la unidad o podría tener limitaciones al número de dispositivos que pueden conec-tarse simultáneamente. (Si el ISP limita la suscripción a un dispositivo, la TV podría no conectarse si ya hay conectado un PC.)
La utilización de un “Enrutador” podría no permitirse o tener el uso limitado dependien-do de las políticas y restricciones del ISP. Para obtener una información detallada, póngase en contacto directamente con su ISP. La red inalámbrica funciona a frecuencias de radio de 2.4GHz que también son utilizadas por otros dispositivos domésticos como los teléfonos inalámbricos, dispositivos Bluetooth®, hornos microondas y pueden verse afectadas por estas. Puede verse interrumpida por la máquina utilizando frecuencias de radio de 5Ghz. Es la misma máquina que la unidad multimedia inalámbrica, teléfono inalámbrico y otros dispositivos Wi-Fi de LG. Apague el equipo que no vaya a utilizar en lared doméstica. Algunas dispositivos pueden generar tráfico de red. En algunas ocasiones, colocar el punto de acceso o el enrutador inalámbrico a una mayor altura puede mejorar la recepción.Para conectar un PA (punto de acceso) ina-lámbrico, es necesario un PA que admita con-exión inalámbrica; a su vez, debe activarse la función de conexión inalámbrica del PA. Si tiene preguntas sobre las conexiones inalám-bricas de PA, póngase en contacto con el proveedor de PA.Compruebe la configuración de seguridad del SSID del PA (punto de acceso) para la conex-ión inalámbrica del PA. Póngase en contacto con el proveedor de PA para obtener infor-mación sobre la configuración de seguridad del SSID del PA.Si configura los equipos de red (enrutador inalámbrico/por cable, hub, etc.) en forma incorrecta, el televisor puede funcionar mal o en forma lenta. Realice una instalación cor-recta; para ello, consulte el manual del equipo y establezca la red. Cuando un PA está configurado para incluir 802.11 n y si el Cifrado está designado como WEP (64/128 bits) o WPA (TKIP/AES), no se podrá realizar la conexión. Es posible que existan diferentes métodos de conexión según el fabricante del PA.

45
CO
NE
XIO
NE
S D
E E
QU
IPO
EX
TE
RN
O
! NOTA
Al usar el enrutador, se recomienda el uso de un puerto por cable para disfrutar de las fotos, la
música o los videos almacenados en la PC.
Cuando se usa el puerto inalámbrico del enrutador, es posible que algunas funciones estén
restringidas.
IN 4
AV IN 2
VIDE
OAU
DIOL(M
ONO)
RH/
PUS
B IN
1US
B IN
2
El adaptador LG Wireless LAN for Broadband/DLNA Adaptor, que se vende de forma separada, permite
a la TV conectarse a una red inalámbrica. La configuración de red y el método de conexión pueden
variar dependiendo del equipo utilizado y el entorno de red. Consulte las instrucciones de configuración
suministradas con el punto de acceso o el enrutador inalámbrico para conocer en detalle los pasos de
conexión y la configuración de red.
1. Cómo conectar
1 Conecte el “LG Wireless LAN for Broadband/DLNA Adaptor (vendido por separado)” al
puerto USB IN o USB IN 1 /2 de la TV.
2. Cómo usar Seleccione “Configuración de Red” (Configuración de red) en el menú RED.
Tras la conexión, podrá utilizar el menú NETCAST.
Conexión de red inalámbrica
Ej.)

CONEXIONES DE EQUIPO EXTERNO
CO
NE
XIO
NE
S D
E E
QU
IPO
EX
TE
RN
O
46
Antes de conectar el reproductor a la red es necesario configurar el punto de acceso (PA) o el enruta-
dor inalámbrico.
Configuración de red inalámbrica
6ENTER
Explora todos los PA (puntos de
acceso) o enrutadores inalámbricos
disponibles dentro del rango y los
muestra en una lista.
7ENTER
Seleccione un PA (Punto de
Acceso) o enrutador inalám-
brico de la lista. (Si el PA está
bloqueado, introduzca la clave
de seguridad del PA).
81 2 ABC 3 DEF
4 GHI 5 JKL 6 MNO
7PQRS 8 TUV
09 WXYZ
ENTER Introduzca el SSID del PA.
1MENU Seleccione RED.
2ENTER
Seleccione Configuración de
red.
3ENTER Seleccione Inalámbrica.
4ENTER
Si ya ha configurado las opcio-
nes de red: Seleccione
Restaurar. La nueva configura-
ción de conexión sustituirá a la
configuración de red actual.
5ENTER
Seleccione Configuración
desde la lista de AP.
9 Repita los pasos 4-5 de la página 43.
Si el PA está bloqueado
Si ya ha configurado las
opciones de red
Aparece cuando se establecen conexiones
inalámbricas y por cable en forma simultánea.

47
CO
NE
XIO
NE
S D
E E
QU
IPO
EX
TE
RN
O
Si desea conectar el PA (Punto de Acceso) o el enrutador con el PIN, utilice esta función.
Si el punto de acceso o el enrutador inalámbrico admite PIN o WPS (Wi-Fi Protected Setup), está disponible para utilizar el punto de acceso o enrutador inalámbrico en un rango de 120 puntos No es necesario que conozca el nombre del punto de acceso (SSID: Identificador de conjunto de servicio) y el código de seguridad de su punto de acceso o enrutador inalámbrico.
Cuando se haya configurado un código de seguridad
PIN (Número de Identificación Personal)
Configuración sencilla (modo botón WPS)
El número PIN es un número de 8 dígitos
exclusivo para el dispositivo.
2 Conecte el punto de acceso con el
modo PIN.
4ENTER Seleccione Conectar.
ROJO
1 Repita los pasos 1-6 de la página 46.
3 Puede ver la ID de red y la clave de seguri-
dad en la pantalla de la TV. Introduzca el
número PIN en el dispositivo.
1 Repita los pasos 1-4 de la página 46. 3ENTER Seleccione Conectar.
2ENTER
Seleccione Configuración
sencilla (modo botón WPS).
5 Repita los pasos 4-5 de la página 43.
4 Repita los pasos 4-5 de la página 43.

CONEXIONES DE EQUIPO EXTERNO
CO
NE
XIO
NE
S D
E E
QU
IPO
EX
TE
RN
O
48
Este es el método de comunicación directo con la máquina para comunicarse sin PA.
Es lo mismo que conectar dos PC con un cable cruzado.
Modo Ad-hoc
1 Repita los pasos 1-3 de la página 46.
2ENTER
Seleccione Configuración de
red Ad-hoc.
3ENTER ENTER Seleccione Ingresar.
4ENTER
Seleccione Conectar para
conectar una red Ad-hoc.
Puede ver la ID de red y la clave de
seguridad en la pantalla de la TV.
Introduzca la ID de red y la clave de
seguridad del dispositivo.
Si tiene problemas con el funciona-
miento de la red, cambie la infor-
mación de configuración utilizando
el botón ROJO.
5ENTER Introduzca la dirección IP.
6ENTER
Se ha completado la config-
uración de red.
Seleccione Cerrar.
Configuración de la PCEl protocolo de Internet (TCP/IP) de la PC debe establecerse manualmente.Establezca la dirección IP, la máscara de subred y el gateway predeterminado según su propio crite-rio.i.e) Dirección de IP: 192.168.0.1 / Máscara de Sub Red: 255.255.255.0 / gateway predeterminado: 192.168.0.10
Configuración del televisor Compruebe la dirección IP y el gateway de la PC.Introduzca la dirección del gateway de la PC en la dirección IP y la dirección IP de la PC en el gate-way, a continuación, seleccione Ingresar.i.e) Dirección de IP: 192.168.0.10 / Máscara de Sub Red: 255.255.255.0 / gateway predetermi-nado: 192.168.0.1
Ejemplo de configuración de PC que soporta una red ina-lámbrica
1. Busque un dispositivo de red inalámbrica en su PC.
2. Seleccione LGTV10 que apa-rece en la lista (Seleccione el mismo nombre que el ID de red que aparece en la pantalla de TV.)
3. Escriba 1111111111 en el cuadro de diálogo, Inserte la clave de seguridad.
(Escriba la clave de seguridad que aparece en la pantalla de TV.)

49
CO
NE
XIO
NE
S D
E E
QU
IPO
EX
TE
RN
O
1MENU Seleccione RED.
2ENTER Seleccione Estado de red.
3ENTER Compruebe el estado de la red.
Estado de red
Ajuste: Regresa al menú de configu-
ración de red o el menú de tipo de
configuración de red inalámbrica.
Probar: Prueba el estado de red
actual tras configurarla.
Cerrar: Regresa al menú anterior.
Conexión por cable
Conexión por cable

VER LA TV / CONTROL DE CANAL
VE
R L
A T
V / C
ON
TR
OL
DE
CA
NA
L
50
FUNCIONES DE LOS BOTONES DEL CONTROL REMOTOCuando use el control remoto dirija el sensor del control remoto hacia panel frontal de la TV.
Los control remoto que se pueden ser diferentes a los de las imágenes a continuación.
VER LA TV / CONTROL DE CANAL
Q.VIEW
ENERGY
CHVOL
1 2 ABC 3 DEF
4 GHI 5 JKL 6 MNO
7PQRS 8 TUV
0 Q.VIEW
9 WXYZ
PAGE
SAVING
TVAV MODE INPUT
FAV
3D
MUTE
BACK EXITGUIDE
ENTER
MARKLIST
DELETE
CHAR/NUM
MENU Q.MENU
Q.VIEW
ENERGY
CHVOL
1 2 ABC 3 DEF
4 GHI 5 JKL 6 MNO
7PQRS 8 TUV
0 Q.VIEW
9 WXYZ
PAGE
SAVING
TVAV MODE INPUT
FAV
MUTE
BACK GUIDE EXIT
ENTER
MARKLIST
DELETE
CHAR/NUM
MENU Q.MENU
3D
L/R SELECT
POWER Prende el televisor desde el modo de
espera o lo apaga poniéndolo en dicho
modo
ENERGY SAVING Ajusta la función Ahorro de energía.
p.146
AV MODE Conmuta entre modos preestablecidos
de video y audio. p.83
INPUT Alterna entre las entradas.
También prende el televisor desde el
modo de espera.
TV Represa a la visualización normal de la
TV desde cualquier modo.
Botones Numerados
— (GUIÓN) Entra al número de canales multiples
de programa como 2 - 1, 2 - 2, etc.
LIST Muestra la lista de canales.
Q.VIEW Regresa al último canal visto.
VOLUMEN SUBIR/BAJAR
Ajusta el volumen.
FAV Se desplaza a través de los canales
programados favoritos.
MARK Escoja la entrada para aplicar los ajust-
es del Asistente de imagen.
Utilizar para marcar o desmarcar una
foto/música/películas.
3D Se usa para ver vídeos en 3D. p.105
CHAR/NUM, DELETE
Permite editar el título del programa
en la LISTA GRAB. y la lista de pro-
gramaciones.
MUTE Enciende y apaga el sonido.
CANALARRIBA/ABAJO
Cambia el canal.
PAGINAARRIBA/ABAJO
Se mueve de un conjunto de infor-
mación en pantalla al siguiente.

51
VE
R L
A T
V / C
ON
TR
OL
DE
CA
NA
L
Abra la tapa del compartimiento de las baterías en la
parte posterior e instale las baterías con la polaridad cor-
recta. Instale dos baterías de 1,5 Vcc tipo AAA. No mezcle las
baterías nuevas con las usadas.
Cierre la tapa.
Colocando las Baterías
MUTE
BACK EXITGUIDE
ENTER
MENU Q.MENU
INFOLIVE TV RATIO
REC
L/R SELECT
MUTE
BACK GUIDE EXIT
ENTER
DELETE
MENU Q.MENU
L/R SELECT
RATIO INFO
MENU Muestra el menú principal o cierra todas
las visualizaciones en pantalla y regresa
a ver la imagen del televisor.
NETCAST Selecciona la fuente del menú NETCAST
que desee. p.133
Q.MENU Abre la lista de opciones del menú
rápido. p.60
THUMBSTICK(Arriba/Abajo/
Izquierda/Derecha
/ENTER)
Le permite navegar a través de los
menús en la pantalla y ajustar el siste-
ma de acuerdo a sus preferencias.
BACK Permite al usuario desplazarse un paso
hacia atrás en una aplicación interactiva o
en otras funciones interactivas.
GUIDE Muestra el evento de programa según
la hora programada. p.75
EXIT Cierra todas las visualizaciones en pan-
talla y regresa a ver la imagen del televisor.
BOTONES DE COLOR
Acceden a las funciones especiales de
algunos menús.
L/R SELECT Se usa para ver vídeos en 3D. p.105
LIVE TV Regresar a LIVE TV.
INFO Muestra la información del programa
que se está viendo actualmente. p.74
RATIO Selecciona su formato de imagen
deseado. p.142
BotonesUSB, SMPLINK
• Controla menú MIS MEDIOS (Lista de
películas, Lista de fotos, Lista de
música)
• Controla los dispositivos compatibles
con la función SIMPLINK.
REC Se utiliza para ajustar el modo de
Timemachine
SIMPLINK Consulte una lista de dispositivos AV
conectados al televisor. Al alternar este
botón, aparece el menú SIMPLINK en
la pantalla. p.88

VER LA TV / CONTROL DE CANAL
VE
R L
A T
V / C
ON
TR
OL
DE
CA
NA
L
52
Cuando el Mensaje “Batería baja en el control remoto Magic Motion, Cambie la batería.” se muestra, remplace las baterias.
Abra la tapa del compartimiento de las baterías en la parte pos-terior e instale las baterías con la polaridad correcta.
Instale dos baterías de 1,5 Vcc tipo AA. No mezcle las baterías nuevas con las usadas.
Cierre la tapa.
Colocando las Baterías
ENTER
VOL
MUTE
CH
FUNCIONES DEL CONTROL REMOTO DE MOVIMIENTO MÁGICO
Receptor del
puntero
Parpadea cuando está en funcionamiento.
POWER Prende el televisor desde el modo de espera o lo
apaga poniéndolo en dicho modo
Botón de menú
ENTER/HOME
Aparece el puntero.
VOLUMEN SUBIR/BAJAR
Ajusta el volumen.
CANALARRIBA/ABAJO
Cambia el canal.
MUTE Enciende y apaga el sonido.
El Control remoto de movimiento mágico se comunica con la TV mediante una radiofrecuencia (RF) de
ancho de banda de 2,4 GHz. Salida: 1 dBm o inferior
Distancia de comunicación máxima: 10 m (30 pies) en un espacio abierto
Ancho de banda: 2,4 GHz (2,4035 GHz - 2,4783 GHz)
Índice de transferencia: 250 kbps
Especificaciones de RF del Control remoto de movimiento mágico

53
VE
R L
A T
V / C
ON
TR
OL
DE
CA
NA
L
Registro del Control remoto de movimiento mágico
Cómo usar el Control remoto de movimiento mágico
Precauciones al usar el Control remoto de movimiento mágico
El Control remoto de movimiento mágico funciona al emparejarlo con la TV.
Registre el Control remoto de movimiento mágico después de adquirir la TV.
ENTER
Cómo registrar el Control remoto de movimiento mágico
Para registrar el control remoto, presione el botón ENTER del
control remoto apuntando a su TV.
MUTECómo volver a registrar el control remoto mágico después de
un error de registro
Restablezca el control remoto al mantener presionados los
botones ENTER y MUTE durante 5 segundos. (Una vez resta-
blecido, parpadeará la luz en el recibidor del punto RF).
Luego, repita el procedimiento anterior para registrar el control
remoto.
1ENTER
Presione este botón si no aparece el puntero en la pantalla de la TV. El puntero aparecerá en
la pantalla.
El puntero desaparecerá si no se usó por un determinado tiempo.
2 Puede mover el puntero; para ello, apunte el recibidor del puntero del con-
trol remoto a su TV, luego, muévalo a la izquierda, derecha, arriba o abajo.
Si el puntero no funciona correctamente después de hacer clic en el botón
ENTER, deje el control remoto durante 10 segundos y, luego, vuelva a
usarlo.
Use el control remoto dentro de una distancia de comu-nicación máxima (10 m). El uso del control remoto fuera de esta distancia o el uso con un objeto que obstruya puede causar un error en la comunicación.
Puede producirse un error de comunicación debido a los dispositivos cercanos. Los dispositivos eléctricos como hornos microondas o productos LAN inalámbri-cos pueden causar interferencia, dado que usarán el mismo ancho de banda (2,4 GHz) que el Control remo-to de movimiento mágico.
El Control remoto de movimiento mágico puede dañarse o funcionar incorrectamente si se cayó o recibió un golpe fuerte.
Cuando juega un juego con el Control remoto de mov-imiento mágico, sujételo con firmeza; para ello, coloque la correa alrededor de su muñeca y ajuste la longitud con el aro ajustable.
Al usar el Control remoto de movimiento mágico, tenga cuidado de no golpearlo con los muebles que estén cerca o con otras personas.
El Fabricante y el instalador no puede proporcionar ser-vicios relacionados con la seguridad humana como el dispositivo inalámbrico de aplicación, tiene la posibili-dad de interferencia de ondas eléctricas.

VER LA TV / CONTROL DE CANAL
VE
R L
A T
V / C
ON
TR
OL
DE
CA
NA
L
54
Menu Puntero
1ENTER ENTER Seleccione Menú de Casa.
2ENTER Seleccione Puntero.
3ENTER Realice los ajustes adecuados.
4ENTER Seleccione Salir.
TV Guide
30Today
Velocidad: Cambia la velocidad del
puntero.
Forma: Selecciona la forma del puntero.
Tamaño: Cambia el tamaño del puntero.
Alineac.: Cuando el Alineador
Automático del Cursor está activo, se
puede alinear fácilmente la direc-
ción del control remoto dirigiendo
el puntero a la pantalla del TV y
moviendo el control remoto rápida-
mente entre la derecha y la izqui-
erda, haciendo que el puntero se
mueva al centro de la pantalla.

55
VE
R L
A T
V / C
ON
TR
OL
DE
CA
NA
L
ENCENDIDO DEL TV
AJUSTE DEL CANAL
AJUSTE DEL VOLUMENAjuste el volumen según su preferencia personal.
1 Primero conecte el cable de alimentación correctamente.
En este momento, el TV cambia al modo en espera.
En el modo de espera para encender el TV, presione los botones / I, INPUT, CH ( o )
en el TV o presione / I, INPUT, CH ( o ), números (0-9) del control remoto.
2 Seleccione la fuente de visualización utilizando el botón INPUT en el control remoto.
3 Cuando deje de usar la TV, presione el botón POWER en el control remoto. El televisor
vuelve al modo apagado.
! NOTA
Si usted va a estar ausente en vacaciones, desconecte el TV del tomacorriente.
Si no completa los ajustes iniciales, estos aparecerán cada vez que prenda el televisor hasta que
complete dicho proceso.
1 Presione el botón CH ( o ) o de NUMBER para seleccionar un número del canal.
1 Presione el botón VOL (+ o -) para ajustar el volumen.
2 Si ud. quiere apagar el sonido, presione el botón MUTE.
3 Ud. puede cancelar esta función presionando el botónMUTE o VOL (+ o -).

VER LA TV / CONTROL DE CANAL
VE
R L
A T
V / C
ON
TR
OL
DE
CA
NA
L
56
Paso1. Selección de idioma
Paso2. Configuración de Modo
CONFIGURACIÓN INICIAL
Esta función guía al usuario para que pueda configurar fácilmente los elementos escenciales para ver
el televisor por primera vez cuando lo adquiere. Se visualizará en la pantalla cuando encienda el tele-
visor por primera vez. También puede activarse desde los menús del usuario.
La selección preestablecida es “Usar en Casa ”. Recomendamos el establecimiento de la televisón a modo “Usar en Casa ” para la mejor imágen en su entorno familiar.
“Demo de Tienda” Modo sólo destinado para su utilización en entornos de venta al por menor. Los clientes pueden ajustar el “menú Modo imagen” manualmente mientras que la inspección de la televisión, pero la televisión regresará automáticamente a la preestablecida en almacén después de 5 minutos.
El modo “Demo de Tienda” proporciona un ajuste óptimo para la visualización de la unidad en establecimientos de venta al por menor. El modo “Demo de Tienda” inicia la TV para ajustar la calidad de la imagen.
1ENTER Seleccione Idioma del menú.
1ENTER Seleccione Usar en Casa.

57
VE
R L
A T
V / C
ON
TR
OL
DE
CA
NA
L
Paso 4. Zona horaria (según los modelos)
Paso 5. Sintonización automática
Paso 3. Indicador de Poder
Esta función está desactivada en “Paso2.
Configuración de Demo de Tienda”.
1ENTER
Seleccione Encendido o
Apagado.
1ENTER Seleccione Zona horaria.
2ENTER Seleccione Horario de verano.
1ENTER
Verifique su conexión de ante-
na y ejecute la función
Sintonización automática.

VER LA TV / CONTROL DE CANAL
VE
R L
A T
V / C
ON
TR
OL
DE
CA
NA
L
58
Para obtener más información, con-sulte la sección “Caja Multimedia” del manual de instrucciones.
SELECCIÓN Y AJUSTE DEL MENÚ PANTALLA
El OSD (On Screen Display, Despliegue En la Pantalla) de su TV puede ser un poco diferente que este
manual.
1MENU Visualizar todos los menús.
2ENTER
Seleccione un elemento del
menú.
3ENTER Acepte la selección actual.
4EXIT Regresar a la pantalla del televisor.

59
VE
R L
A T
V / C
ON
TR
OL
DE
CA
NA
L
Ej.)
30Today

VER LA TV / CONTROL DE CANAL
VE
R L
A T
V / C
ON
TR
OL
DE
CA
NA
L
60
Aspecto de pantalla: Selecciona el formato de imagen que desee.
Modo imagen: Selecciona modos de imagen predeterminadas de fábrica en función de las condicio-
nes de observación.
Modo de audio: Selecciona modos de sonido predeterminados de fábrica para los diferentes tipos
de programa.
Multi Audio: Cambia el lenguaje de audio (señal digital).
SAP: Seleccione sonido MTS (Señal Analoga).
Temporizador: Seleccione el plazo de tiempo antes de que su TV se apague automáticamente.
Borr/Agr: Seleccione el canal que desee agregar o eliminar
Subtítulo: Seleccione encendido o apagado.
Dispositivo USB: Seleccione “Expulsar” para expulsar el dispositivo USB.
QUICK MENU (MENÚ RÁPIDO)
Los menús de visualización en pantalla de su TV pueden diferir ligeramente de las ilustraciones mostra-
das en este manual.
El menú rápido (Q.Menu) es un menú destinado a las funciones que el usuario utiliza con más frecuencia.
A
1ENTER ENTER Seleccione Menú Rápido.
2ENTER
Seleccione el canal al que desea
cambiar.
3ENTER Seleccione Close.
Menú Rápido puede seleccionarse al
presionar el botón Q.MENU en el
control remoto estándar o al selecci-
onar la pantalla Menú de Casa.

61
VE
R L
A T
V / C
ON
TR
OL
DE
CA
NA
L
MENÚ DE CASAEl OSD (On Screen Display, Despliegue En la Pantalla) de su TV puede ser un poco diferente que este manual.
1ENTER ENTER Seleccione Menú de Casa.
2ENTER Seleccione un elemento del menú.
TV Guide
Una vista del programa o la grabación de un programa puede ser programado
mientras se ve la Información de Radiodifusión
Seleccione la fuente de entrada deseada.
Seleccione la opción de menú NETCAST y disfrute Servicio en Linea
Úselo para ver fotografías, películas y escuchar música en MP3.
30Today
Le permite disfrutar de juegos instalados en la TV o establecer la program
Se utiliza para ajustar el modo de
Timemachine (Para Brasil).
El menú rápido (Q.Menu) es un
menú destinado a las funciones que
el usuario utiliza con más frecuencia.
(Excepto Brasil).
El menú rápido (Q.Menu) es un menú destinado a las funciones que el usuario utiliza con
más frecuencia (Para Brasil).
Podrá acceder fácil y eficazmente a la información del televisor visualizando un
manual simple en el propio aparato.
Establece la configuración del Control remoto de movimiento mágico.
Cierre el menú Inicio.
TV Guide
30Today

VER LA TV / CONTROL DE CANAL
VE
R L
A T
V / C
ON
TR
OL
DE
CA
NA
L
62
1MENU Seleccione Asistencia al cliente.
2ENTER Seleccione Act. Software.
3ENTER
Seleccione Revisar Versión de
Actualización para comprobar la versión
más reciente.
Al seleccionar “Act. Software: Encendido”
- Si el televisor está conectado a Internet
y encuentra una actualización de soft-
ware en el servidor de LG, aparecerá
automáticamente un menú emergente
de actualización.
- Si se transmite la información del soft-
ware digital actualizada, el menú emer-
gente de actualización aparecerá
automáticamente.
ROJO El tiempo de descarga del software variará dependiendo del tamaño del software y las condiciones de red.
Durante el procedimiento de actual-ización de software, no apague ni desenchufe la TV ni desconecte el cable LAN.
Tras la actualización de software, podrá confirmar la actualización de software en el menú Software Update (Actualización de software).
Una vez completada la actualización, la TV se reiniciará automáticamente en 5 segundos.
Las funciones de la TV pueden mejo-rarse o cambiarse mediante la actu-alización de software.
El tiempo o funcionalidad disponible menú NetCast puede depender de condiciones de red de su ISP.
Cuando se haya completado la actu-alización, puede ser necesario ajustar la configuración del menú CANAL, IMAGEN y AUDIO.
Esta TV no se puede actualizar a ver-siones anteriores de software
Utilice el botón Comprobar versión de actualización para actualizar a la versión de software más reciente del servidor de red de forma manual.
Si existe una nueva actualización de software cuando abre NetCast, no podrá usar NetCast a menos que actualice el software.
No puede abrir NetCast mientras se está actualizando el software.
ASISTENCIA AL CLIENTE
Act. Software
Puede actualizar la unidad utilizando el software más reciente para mejorar el funcionamiento del pro-
ducto o añadir nuevas funciones. Puede actualizar el software conectando directamente la TV al servi-
dor de actualización de software. La función de actualización de software podría no funcionar correcta-
mente dependiendo del entorno de red. En este caso, puede obtener la versión más reciente del soft-
ware del Centro de atención al cliente de LG Electronics y, a continuación, actualice la TV.

63
VE
R L
A T
V / C
ON
TR
OL
DE
CA
NA
L
Prueba de imagen/Prueba de sonido
Esta función supone un apoyo al cliente que puede ejecutar pruebas de imagen y sonido.
1MENU Seleccione Asistencia al cliente.
2ENTER
Seleccione Prueba de imagen o
Prueba de sonido.
3ENTER Seleccione Sí.
4BACK Regresar al menú anterior.
EXIT Regresar a la pantalla del televisor.
ROJO

VER LA TV / CONTROL DE CANAL
VE
R L
A T
V / C
ON
TR
OL
DE
CA
NA
L
64
Inform. producto/servicio
Esta función muestra información del soporte y el producto.
El Centro de Atención al Cliente puede variar dependiendo del país.
1MENU Seleccione Asistencia al cliente.
2ENTER
Seleccione Inform. producto/servicio.
Puede comprobar la información de
producto/servicio según el modelo.
3BACK Regresar al menú anterior.
EXIT Regresar a la pantalla del televisor.
ROJO
Prueba de red
Compruebe el estado de la red.
1MENU Seleccione Asistencia al cliente.
2ENTER Seleccione Prueba de red.
3ENTER Compruebe el estado de la red.
ROJO

65
VE
R L
A T
V / C
ON
TR
OL
DE
CA
NA
L
MANUAL SIMPLE
Podrá acceder fácil y eficazmente a la información del televisor visualizando un manual simple en el
propio aparato.
Mientras se muestra el manual simple, el audio permanecerá desactivado.
1ENTER ENTER Seleccione Menú de Casa.
2ENTER Seleccione Manual Simple.
3ENTER
Escoja la sección del manual que
desea examinar.
4ENTER Seleccione Salir.
ROJO: Va a la página Índice.
AZUL: Reproduce el Manual simple
de forma automática o manual.

VER LA TV / CONTROL DE CANAL
VE
R L
A T
V / C
ON
TR
OL
DE
CA
NA
L
66
BÚSQUEDA DE CANALES
Escaneo atomático (Sintonización automática)
Busca automaticamente todos los canales disponibles por las entradas de antena o cable y los guarda
en la memoria de la lista de canales.
Ejecute esta función si cambia de vivienda o cambia el emplazamiento del televisor.
La función de sintonización automática memoriza sólo los canales que están disponibles en este
momento.
1MENU Seleccione CANAL.
2ENTER
Seleccione Sintonización
automática.
3ENTER Seleccione Iniciar.
4ENTER Ejecutar la Sintonización automática.
5BACK Regresar al menú anterior.
EXIT Regresar a la pantalla del televisor.
El televisor solicitará una contraseña
si el control parental ha sido activado
(menú de BLOQUEAR). Use la con-
traseña establecida en el menú de
BLOQUEAR para permitir una
búsqueda de canal.
Al establecer la sintonización
automática o manual, el número
máximo de canales que podrá guar-
dar es de 500.
Esto está sujeto a cambios dependi-
endo de las condiciones de la señal
de emisión.
Memoriza todos los canales dis-
ponibles en el siguiente orden: DTV,
TV y Cable TV.

67
VE
R L
A T
V / C
ON
TR
OL
DE
CA
NA
L
Agregar/Eliminar los Canales (Sintonización Manual)
Si selecciona señal de entrada DTV, puede visualizar el monitor de intensidad de la señal en la pantalla
para ver la calidad de la señal que se recibe.
1MENU Seleccione CANAL.
2ENTER
Seleccione Sintonización
manual.
3ENTER
Seleccione DTV, TV o Cable
TV.
4 Seleccione el canal que
desee agregar o borrar.
5ENTER
Seleccione Agregar o
Borrar.
6BACK Regresar al menú anterior.
EXIT Regresar a la pantalla del televisor.
El televisor solicitará una contraseña
si el control parental ha sido activado
(menú de BLOQUEAR). Use la con-
traseña establecida en el menú de
BLOQUEAR para permitir una
búsqueda de canal.
Al establecer la sintonización
automática o manual, el número
máximo de canales que podrá guar-
dar es de 500.

VER LA TV / CONTROL DE CANAL
VE
R L
A T
V / C
ON
TR
OL
DE
CA
NA
L
68
Edición de Canal
Los canales de la Lista de edición de Canales aparecen en negro y los canales eliminados de la lista
aparecen en azul.
Al omitir un número de canal, no podrá escogerlo mediante el botón CH durante la visualización del
televisor.
Si desea escoger el programa omitido, introduzca directamente su número mediante los botones
NUMÉRICOS o escójalo en el menú Edición de Canales.
5-13-1 7-1
Mantenga presionado el botón y
use los botones o para despla-
zarse entre DTV, TV y Cable TV.
1MENU Seleccione CANAL.
2ENTER Seleccione Edición del canal.
3ENTER Seleccione un canal.
4Agregar o Borrar el canal.
Bloquea o desbloquea el canal.
Puede bloquear/desbloquear los canales
incluso si selecciona “Sist. de Bloqueo-
Apagado” en el menú BLOQUEO.
ENTER Cambie al número de canal escogido.
CHPAGE
Mover las paginas en la lista de canales
cuando la lista es demasiado larga.
5BACK Regresar al menú anterior.
EXIT Regresar a la pantalla del televisor.
AZUL
AMARILLO

69
VE
R L
A T
V / C
ON
TR
OL
DE
CA
NA
L
LISTA DE CANALES
Podrá examinar los programas almacenados en la memoria visualizando la lista de canales.
1ENTER ENTER Seleccione Lista de canales.
2ENTER
Seleccione el canal al que desea
cambiar.
AZULVaya al menú “CANAL - Edición de
Canales”.
3ENTER Seleccione Salir.
DTV
DTV
Este candado se indica
cuando el canal está blo-
queado mediante el con-
trol parental.

VER LA TV / CONTROL DE CANAL
VE
R L
A T
V / C
ON
TR
OL
DE
CA
NA
L
70
CONFIGURACIÓN DE LOS CANALES FAVORITOS
La lista de Canales favoritos es una función muy cómoda que le permitirá cambiar rápidamente entre
sus canales preferidos sin tener que esperar a que el televisor sintonice todos los canales intermedios.
1ENTER ENTER Seleccione Lista de canales.
2ENTER Seleccione Lista de favoritos.
3ENTER
Seleccione el grupo de canales que
desee de A a D.
4ENTER Escoja el canal que prefiera
5ENTER
Seleccione Reg. Ca. para registrar o
cancelar el registro del canal actual
en la lista de canales favoritos.
6ENTER Seleccione Salir.
DTV
DTV
También puede configurar la Lista de
favoritos en el menú CANAL -
Edición de Canales.
DTV
DTV

VE
R L
A T
V / C
ON
TR
OL
DE
CA
NA
L
71
OPCIÓN DE BÚSQUEDA
*Esta característica no se encuentra disponible para todos los modelos.
Cuando existen uno o más canales virtuales en un canal físico, se utiliza el botón CH para alter-
nar entre buscar todos los canales o el primer canal de los canales virtuales.
1MENU Seleccione CANAL.
2ENTER
Seleccione Opción de
búsqueda.
3ENTER
Seleccione Canal primario o
Todos los canales.
4BACK Regresar al menú anterior.
EXIT Regresar a la pantalla del televisor.
Canal primario: permite buscar sola-
mente el primer canal de los canales
virtuales.
Todos los canales: permite buscar los
canales en forma completa.

VER LA TV / CONTROL DE CANAL
VE
R L
A T
V / C
ON
TR
OL
DE
CA
NA
L
72
SISTEMA DE COLOR
Esta función permite establecer el color que le corresponde a cada señal.
Esta función se encuentra deshabilitada en el canal digital.
1MENU Seleccione CANAL.
2ENTER Seleccione Sistema de color.
3ENTER
Seleccione Multi, PAL-M, PAL-N o
NTSC.
4BACK Regresar al menú anterior.
EXIT Regresar a la pantalla del televisor.

73
VE
R L
A T
V / C
ON
TR
OL
DE
CA
NA
L
INFO. BREVE
6 3 11 4 5 2
1ENTER Mostrar la Información breve en pantalla.
2ENTER Regresar a la pantalla del televisor.
1 Titulo de programa
2 Día de semana,
Mes, Año, Hora
actual
3 Hora de inicio de
programa
4 Barra de progreso
de programa
5 Hora de termino de
Programa
6 Información de
estandarte
La información breve muestra la información de la pantalla actual.
Multilingüe : El programa contiene dos o más canales de
audio disponibles. Use el menú Q.MENU para escoger la
pista de audio que desee.
Subtítulo : El programa contiene subtítulos disponibles en
uno o más idiomas. Use el menú Q.MENU para escoger los
subtítulos que desee.
Dolby Digital: El programa contiene señal Dolby digital de
entrada en la televisión y la fuente de entrada HDMI.
El formato de imagen original del video es 4:3.
El formato de imagen original del video es 16:9.
480i
480p
720p
1080i
1080p
La resolución de video es de 720 x 480 entrelazado
La resolución de video es de 720 x 480 progresivo
La resolución de video es de 1 280 x 720 progresivo
La resolución de video es de 1 920 x 1 080 entrelazado
La resolución de video es de 1 920 x 1 080 progresivo
Descripción
Referente al menú de BLOQUEAR

VER LA TV / CONTROL DE CANAL
VE
R L
A T
V / C
ON
TR
OL
DE
CA
NA
L
74
Reserva de programas de canal
1GUIDEINFO
Consulte la información en pantalla del pro-
grama de canal actual.
2 Seleccione la información del siguiente pro-
grama de canal.
3 ENTER ENTER Selecciona la opción de
menú deseada.
4EXIT Regresar a la pantalla del televisor.
1INFO
Muestra en pantalla la información de programa
del canal actual.
2 Muestra la información del programa del canal
anterior o siguiente
3EXIT Regresar al menú anterior.

75
VE
R L
A T
V / C
ON
TR
OL
DE
CA
NA
L
EPG (GUÍA ELECTRÓNICA DE PROGRAMAS)(EN MODO DIGITAL)
GUIDE Vaya a la Guía de programación.
Seleccione el programa deseado.
Este sistema posee una Guía electrónica de programas (EPG) para ayudarlo a navegar por todas las
opciones de visualización posibles.
La EPG proporciona información como listas de programas o las horas de inicio y fin de todos los
servicios disponibles. Además, la EPG generalmente contiene información detallada sobre el pro-
grama (la disponibilidad y el volumen de información varía según la transmisora).
Esta función se puede utilizar sólo cuando las compañías de transmisión envían la información de
EPG.
La EPG muestra los detalles del programa para los siguientes 8 días.
Guía de Progamación
TODOVie, May. 7
May. 7, 2010 10:07 PM
10:00 PM 11:00 PM
ꘂ Favorito
ꔅ Modo ꔅ Fecha ꔅ Programación ꔅ Lista de programaciones
꘍ Información ꔉ Ver/Programar ꕉ Salir
5-1 Globo HD
5-2 CCTV-1
7-1 CCTV-2
9-2 BTV-1
9-3 CETV-1
DTV
DTV
DTV
DTV
DTV
Racing News
Racing Newsꔖ DTV 5-1 Globo HD May. 7, 2010 9:30 PM ~ 10:15 PM
Antigues Roadshow Kungskonsumente
No Info TV2: FARMEN Sin información
Sin información
The Drum
Fashion Essentials
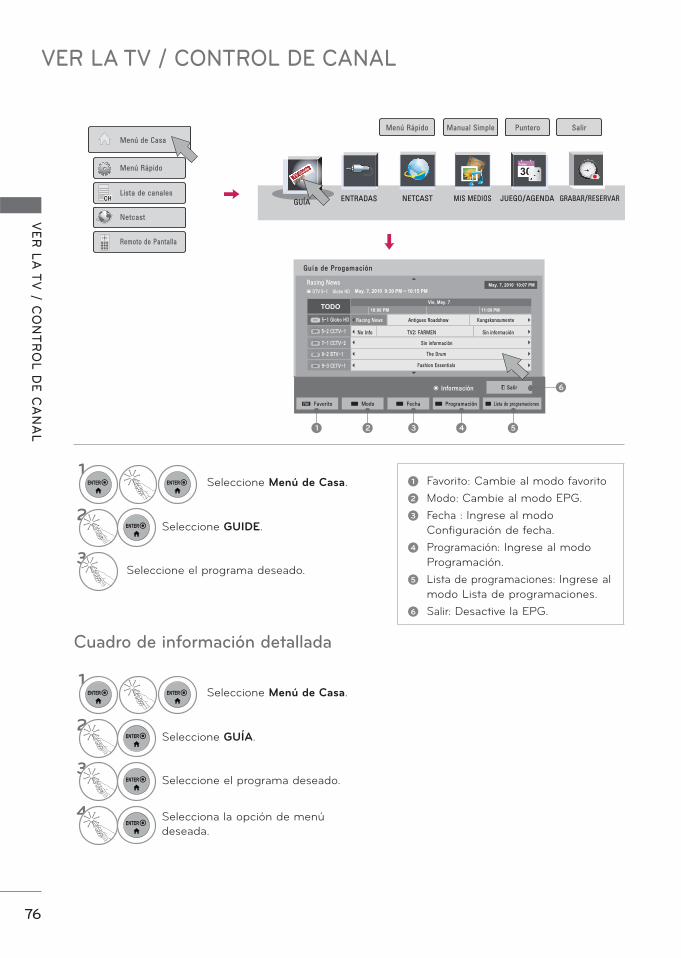
VER LA TV / CONTROL DE CANAL
VE
R L
A T
V / C
ON
TR
OL
DE
CA
NA
L
76
Cuadro de información detallada
30Today
TV Guide
Guía de Progamación
TODOVie, May. 7
May. 7, 2010 10:07 PM
10:00 PM 11:00 PM
5-1 Globo HD
5-2 CCTV-1
7-1 CCTV-2
9-2 BTV-1
9-3 CETV-1
DTV
DTV
DTV
DTV
DTV
Racing News
Racing Newsꔖ DTV 5-1 Globo HD May. 7, 2010 9:30 PM ~ 10:15 PM
Antigues Roadshow Kungskonsumente
No Info TV2: FARMEN Sin información
Sin información
The Drum
Fashion Essentials
1ENTER ENTER Seleccione Menú de Casa.
2ENTER Seleccione GUIDE.
3Seleccione el programa deseado.
1ENTER ENTER Seleccione Menú de Casa.
2ENTER Seleccione GUÍA.
3ENTER Seleccione el programa deseado.
4ENTER
Selecciona la opción de menú
deseada.
1 2 3 4 5
6
1 Favorito: Cambie al modo favorito
2 Modo: Cambie al modo EPG.
3 Fecha : Ingrese al modo
Configuración de fecha.
4 Programación: Ingrese al modo
Programación.
5 Lista de programaciones: Ingrese al
modo Lista de programaciones.
6 Salir: Desactive la EPG.

77
VE
R L
A T
V / C
ON
TR
OL
DE
CA
NA
L
Programación
Lista de programaciones
Cuando se crea una lista de programaciones, aparece el programa estipulado a la hora programada
incluso si en ese momento está mirando un programa diferente.
1ENTER ENTER Seleccione Menú de Casa.
2ENTER Seleccione GUÍA.
3ENTER Seleccione Programación.
4ENTER Seleccione una fecha.
5ENTER Seleccione la opción que desee.
6ENTER Seleccione la opción que desee.
7ENTER Seleccione Salir.
1ENTER ENTER Seleccione Menú de Casa.
2ENTER Seleccione GUÍA.
3ENTER Seleccione Lista de programaciones.
4ENTER Seleccione la opción que desee.
5ENTER Seleccione la opción que desee.
6ENTER Seleccione Salir.
Programación
Vie, May 7, 2010 10:07 PMSeleccionar la fecha de programación.
Espacio libre 100GBꔪ 79h 03m ꔫ 31h 37m
Dom Lun Mar Mié Jue Vie Sáb
Ninguna lista de programaciones
Vie, May 7, 2010
Lista de programaciones
Vie, May 7, 2010 10:07 PM
Espacio libre 100GBꔪ 33h 03m ꔫ 13h 37m
Dom Lun Mar Mié Jue Vie Sáb
•
ꔎ
ꔎ Grabar (Una vez)DTV 11-1Nov/13/2009(Jue)5:12 PM ~ 6:02 PM
ꔎ
Fecha de inicio Hora inicio Título Repetir
04/08 (sun) 23:15 PM TV2: Farmen Sáb,Dom
04/02 (Mon) 12:45 AM Racing News Lun

VER LA TV / CONTROL DE CANAL
VE
R L
A T
V / C
ON
TR
OL
DE
CA
NA
L
78
LISTA DE ENTRADAS
Solo estas señales de entrada que están conectadas a un televisor pueden activarse y seleccionarse.
Cuando se encuentra conectado un dispositivo externo,
este menú emergente se visualiza automáticamente.
Si selecciona Sí, puede seleccionar la fuente de entrada
que desee percibir.
Pero, si selecciona “SIMPLINK - Encendido”, en modo
HDMI, este menú emergente podría no visualizarse.
TV Guide
30Today
Las entradas desconectadas
están inactivas (se indican en
gris)
Ej.)
1ENTER ENTER Seleccione Menú de Casa.
2ENTER Seleccione ENTRADAS.
3ENTER
Seleccione la fuente de entrada
deseada.
4ENTER Seleccione Salir.
TV: Selecciónelo para mirar estacio-
nes de aire, cable y digitales.
USB: selecciónelo para usar archivos
de película, fotos o música.
AV: Selecciónelo para mirar una
video casetera u otro equipo externo.
Componente: Selecciónelos para
mirar un DVD o un decodificador
digital.
RGB-PC: Selecciónelo para ver la
PC.
HDMI: Selecciónelo para ver en dis-
positivos de alta definición.

79
VE
R L
A T
V / C
ON
TR
OL
DE
CA
NA
L
ETIQUETA DE ENTRADA
Esto indica qué dispositivo está conectado a cada puerto de entrada.
1ENTER ENTER Seleccione Menú de Casa.
2ENTER Seleccione ENTRADAS.
3ENTER Seleccione Etiqueta de entrada.
4ENTER
Seleccione la fuente de entrada
deseada y, luego, seleccione para elegir la etiqueta de entrada.
5ENTER Seleccione Salir.
También puede seleccionar la
Etiqueta de entrada con el botón
AZUL del control remoto de la TV.
Ej.)
TV Guide
30Today

VER LA TV / CONTROL DE CANAL
VE
R L
A T
V / C
ON
TR
OL
DE
CA
NA
L
80
CONFIGURACIÓN DE MODO
La selección preestablecida es “Usar en Casa”. Recomendamos el establecimiento de la televisón a modo “Usar en Casa” para la mejor imágen en su entorno familiar.
“Demo de Tienda” Modo sólo desti-
nado para su utilización en entornos
de venta al por menor. Los clientes
pueden ajustar el “menú IMAGEN -
Modo imagen” manualmente mien-
tras que la inspección de la televisión,
pero la televisión regresará automáti-
camente a la preestablecida en
almacén después de 5 minutos.
“Demo de Tienda” proporciona un
ajuste óptimo para la visualización de
la unidad en establecimientos de
venta al por menor. El modo “Demo
de Tienda” inicia la TV para ajustar la
calidad de la imagen.
1MENU Seleccione OPCIÓN.
2ENTER
Seleccione Configuración de
modo.
3ENTER Seleccione Usar en Casa.
4BACK Regresar al menú anterior.
EXIT Regresar a la pantalla del televisor.

81
VE
R L
A T
V / C
ON
TR
OL
DE
CA
NA
L
MODO DEMO. (MODO DE DEMOSTRACIÓN)
Visualice el pase de diapositivas que explica distintas funciones de este televisor.
1MENU Seleccione OPCIÓN.
2ENTER Seleccione Configuración de modo.
3ENTER Seleccione Demo de Tienda.
4ENTER Seleccione Encendido.
5EXIT
Regresar al menú anterior.
Tras un breve período de tiempo, comenzará el,
Modo Demo..
Si desea detener la demostración, pulse
cualquier botón (Excepto botón VOL +, - y
MUTE).

VER LA TV / CONTROL DE CANAL
VE
R L
A T
V / C
ON
TR
OL
DE
CA
NA
L
82
RESTAURAR VALORES DE FÁBRICA (CONFIGURACION INICIAL)
Esta función reinicia la TV a los valores predeterminados de fábrica y elimina todos los canales guardados.
Al seleccionar “Sist. de Bloqueo - Encendido”, aparecerá un mensaje pidiéndole que introduzca la con-traseña.
Si olvida su contraseña, pulse “0-3-2-5” en el control remoto.
1MENU Seleccione OPCIÓN.
2ENTER
Seleccione Configuración
Inicial.
3ENTER Seleccione Sí.
4ENTER
La TV se apaga automáticamente y
comienza a restaurar los valores de
fábrica.

83
VE
R L
A T
V / C
ON
TR
OL
DE
CA
NA
L
MODO AV
El Modo AV cambia entre los ajustes de video y audio.
Si selecciona “Cine” en modo AV, el
Cine se seleccionará para el “menú
IMAGEN - Modo imagen” para el
“menú AUDIO - Modo de audio”
respectivamente.
Si selecciona “Apagado” en modo
AV, el “Modo imagen” y el “Modo de
audio” volverán a tener el valor selec-
cionado anteriormente.
Apagado: Desactiva el MODO AV.
Cine: optimiza video y audio para
disfrutar películas.
Deporte: Optimiza video y audio para
disfrutar de eventos deportivos.
Juego: Optimiza video y audio para
jugar a videojuegos.
Presione repetidamente el botón AV
MODE para seleccionar el modo que
desee.
1ENTER ENTER
Seleccione Remoto de
Pantalla.
2ENTER Seleccione AV MODE.
3ENTER
Seleccione AV MODE varias veces
para seleccionar la opción de menú
deseada.

VER LA TV / CONTROL DE CANAL
VE
R L
A T
V / C
ON
TR
OL
DE
CA
NA
L
84
JUEGO/AGENDA
El temporizador apagado cambia la unidad automáticamente al modo de espera en el tiempo prefijo.
TV Guide
1ENTER ENTER Seleccione Menú de Casa.
2ENTER Seleccione JUEGO/AGENDA.
3ENTER Seleccione HORA MUNDIAL.
4ENTER
Selecciona la ciudad que desea.
Permite ver la hora de todo el
mundo.
5ENTER Seleccione Salir.
30Today
HORA MUNDIAL
En el reloj mundial, no aparece el
horario de verano.

85
VE
R L
A T
V / C
ON
TR
OL
DE
CA
NA
L
Programación
1ENTER ENTER Seleccione Menú de Casa.
2ENTER Seleccione JUEGO/AGENDA.
3ENTER Seleccione PROGRAMACIÓN.
4ENTER
Selecciona una fecha deseada.
Permite ver la programación.
Dom
2010 7 JULIO
Jul 4Lunar May 23
Lun Mar Mié Jue Vie Sáb
TV Guide
30Today

VER LA TV / CONTROL DE CANAL
VE
R L
A T
V / C
ON
TR
OL
DE
CA
NA
L
86
5ENTER
Selecciona la opción de menú
deseada.
6ENTER Se muestra el ícono.
7ENTER
Seleccione Vista de lista para usar la
programación.
8ENTER Seleccione Salir.
Registro de programación
Dom, Jul 4 Lunar 5.23
Father Birthday
Repetir Solar/Lunar Aviso Día D
Norepetir
Solar El díaAñadir un
día D
Dom
2010 7 JULIO
Jul 4Lunar May 23
Lun Mar Mié Jue Vie Sáb

87
VE
R L
A T
V / C
ON
TR
OL
DE
CA
NA
L
Le permite disfrutar de los juegos instalados en la TV.
1ENTER ENTER Seleccione Menú de Casa.
2ENTER Seleccione JUEGO/AGENDA.
3ENTER
Entre en el modo de juego seleccio-
nado.
4ENTER Seleccione Salir.
Juego
TV Guide
30Today

VER LA TV / CONTROL DE CANAL
VE
R L
A T
V / C
ON
TR
OL
DE
CA
NA
L
88
SIMPLINK
La función SIMPLINK le permite controlar y leer dispositivos AV conectados mediante cable HDMI sin
ningún otro cable ni ajuste adicional. Este televisor podría funcionar con dispositivos compatibles con
HDMI-CEC, pero sólo serán completamente compatibles con dispositivos distinguidos con el logotipo
.
SIMPLINK puede activarse y desactivarse desde los menús de usuario.
1Visualizar el menú SIMPLINK.
2Seleccione Encendido.
3ENTER Seleccione el dispositivo deseado.
4ENTER Controle los dispositivos AV conectados.
1 Visualización del televisor: Cambie al
canal del televisor anterior, sin importar
el modo actual.
2 Reproducción de DISC (Disco):
Seleccione y reproduzca los discos.
Cuando existan varios discos dis-
ponibles, los títulos de los discos apa-
recerán en la parte inferior de la pan-
talla.
3 Reproducción de VCR: Reproduzca y
controle el VCR conectado.
4 Reproducción de grabaciones HDD:
Reproduzca y controle las grabaciones
almacenadas en HDD.
5 Salida de audio a bocina HT/ Sal ida de
audio a televisor: Seleccione parlante
HT o parlante TV para salida de audio.
Cuando no hay un dis-positivo conectado (apa-rece en gris)Dispositivo seleccionado
Cuando hay un dispositivo esta conectado (Muestra un color brillante)
1
2
3
4
5

89
VE
R L
A T
V / C
ON
TR
OL
DE
CA
NA
L
Funciones de SIMPLINK Reproducción directa: Luego de conectar los dispositivos AV al televisor, puede controlar directamente
los dispositivos y medios de reproducción sin ninguna configuración adicional.
Seleccione dispositivo AV: Le permite seleccionar uno de los dispositivos conectados al televisor y
reproducirlo.
Reproducción del disco: Controle los dispositivos AV conectados presionando los botones ,
ENTER, , , , y .
Apague todos los dispositivos: Para que está función aplique, todos los dispositivos conectados al televi-
sor deben de estar detenidos
Desconecte el audio: Ofrece una forma fácil de desactivar el audio.
Sync Power on: Al iniciar la lectura en un equipo conectado a la toma HDMI que disponga de función
Simplink, el televisor se prenderá automáticamente.
Nota:Para activar el enlace simple, debe usarse un cable HDMI de alta velocidad con función *CEC.
(*CEC, del inglés, Consumer Electronics Control).
(Un dispositivo, el cual se conecta al televisor a través del cable HDMI pero no es compatible con
Simplink, no proporciona esta función )
! NOTA
Conecte la terminal HDMI/DVI IN o HDMI IN del televisor a la terminal posterior (salida HDMI) del
dispositivo SIMPLINK con el cable HDMI.
Al encender la fuente de Entrada con el botón INPUT en el control remoto, se desactivará el dis-
positivo SIMPLINK.
Al escoger un dispositivo que disponga de la función de cine en casa, la salida de sonido cambiará
automáticamente a los altoparlantes del sistema de cine en casa, desactivándose los del televisor.
Si un sistema de home theater SIMPLINK no se reproduce en el audio del televisor, conecte la
terminal de SALIDA DE AUDIO DIGITAL a la parte posterior del televisor a la terminal de
ENTRADA DE AUDIO DIGITAL en la parte posterior del dispositivo SIMPLINK con un cable
ÓPTICO.

MÁQUINA DEL TIEMPO
MÁ
QU
INA
DE
L T
IEM
PO
90
PRECAUCIONES AL USAR EL DISPOSITIVO USB
Sólo se puede reconocer un dispositivo de
almacenamiento USB.
Si el dispositivo de almacenamiento USB
está conectado a través de un concentrador
de puertos USB, el dispositivo no se podrá
reconocer.
Es posible que no se pueda reconocer un
dispositivo de almacenamiento USB que
utiliza un programa de reconocimiento
automático.
Es posible que no se pueda reconocer un
dispositivo de almacenamiento USB que
utiliza un controlador propio.
Si existen varias particiones o un lector de
tarjetas, se pueden reconocer hasta cuatro
tarjetas de memoria en forma simultánea.
La velocidad de reconocimiento de un dis-
positivo de almacenamiento USB depende
de cada dispositivo.
No apague la TV ni desconecte el dispositivo
USB cuando el dispositivo de almace-
namiento USB conectado está en ejecución.
Cuando este tipo de dispositivos se separan
o desconectan repentinamente, los archivos
almacenados o el dispositivo de almace-
namiento USB pueden resultar dañados.
Utilice sólo un dispositivo de almacenamien-
to USB que contenga archivos normales de
música, imagen o películas.
Utilice solamente dispositivos de almace-
namiento USB formateados como un siste-
ma de archivos FAT16, FAT32 o NTFS sumi-
nistrado con el sistema operativo Windows.
Si se utiliza un dispositivo de almacenamien-
to formateado como un programa de utili-
dad diferente que no es compatible con
Windows, es posible que dicho dispositivo
no se pueda reconocer.
Si se utiliza un dispositivo de almacenamien-
to USB que requiere una fuente de aliment-
ación externa, conecte el dispositivo a la ali-
mentación. De lo contrario, es posible que el
dispositivo no se pueda reconocer.
Conecte el dispositivo de almacenamiento
USB con el cable que proporciona el fabri-
cante. Si lo conecta con un cable diferente al
del fabricante o un cable excesivamente
largo, es posible que el dispositivo no se
pueda reconocer.
Es posible que algunos dispositivos de alma-
cenamiento USB no sean compatibles o no
funcionen correctamente.
La TV muestra hasta 128 caracteres del
nombre de un archivo.
Realice copias de respaldo de los archivos
importantes ya que los datos del dispositivo
USB pueden dañarse. La administración de
datos es responsabilidad del cliente; por
consiguiente, el fabricante no se hace
responsable de daños en los datos.
La capacidad recomendada es 1 TB o menos
para un disco duro USB y 40 GB o más para
una memoria USB.
Es posible que cualquier otro dispositivo con
más capacidad que la recomendada no fun-
cione correctamente.
Es posible que la reproducción de una
película no se realice correctamente si se
utiliza una conexión USB que no admite alta
velocidad.
Los dispositivos de almacenamiento USB
por debajo de 2.0 USB también son com-
patibles. Pero es posible que no funcionen
correctamente en la lista de películas.
Mantenga la estabilidad del disco duro
externo mediante la herramienta de evalu-
ación comparativa del disco duro con el fin
de garantizar el funcionamiento eficaz del
disco duro.
Las herramientas de evaluación comparativa
del disco duro verifican el rendimiento del
disco duro, lo que incluye velocidad de lec-
tura/escritura, tiempo de acceso, estabilidad.
Una vez descargada la herramienta de eval-
uación comparativa del disco duro, es fácil
realizar búsquedas en el sitio web y aprender
a utilizarla.
MÁQUINA DEL TIEMPO (Para Brasil)

91
MÁ
QU
INA
DE
L T
IEM
PO
MÁQUINA DEL TIEMPO (PAUSAR Y VOLVER A REPRODUCIR TV EN VIVO)
Esta función permite a la unidad grabar en forma automática programas de TV en vivo para verlos en cualquier momento.
Cuando la función Máquina del tiempo está activada, puede pausar y rebobinar la programación normal de la TV en cualquier momento sin perderse nada de live broadcast.
Es posible que los recursos Máquina del tiempo y Grabación no funcionen cuando la potencia de la señal es débil.
Estas funciones se pueden usar solamente después de inicializar el dispositivo USB.
1 Conecte el dispositivo USB a las tomas USB IN o USB
IN1/TimeMachine Ready ubicadas en el lateral de la TV.
2 Para usar el dispositivo USB (de más de 40 GB) con la
función Máquina del tiempo, ejecute Inicialización de dis-
positivo de almacenamiento USB.
Inicializa el disco duro conectado al dispositivo USB
como modo de disco para la función Máquina del tiempo.
Se activa únicamente al conectar el disco duro USB dis-
ponible para la función Máquina del tiempo.
Cuando se ejecuta la Inicialización de dispositivo de
almacenamiento USB, se borran todos los datos almace-
nados en el dispositivo USB.
Durante la ejecución de la Inicialización de dispositivo de
almacenamiento USB, no extraiga el dispositivo USB.
Esto puede producir un error en la TV y el dispositivo de
almacenamiento.
Inicialización del dispositivo de almacenamiento USB
Cuando finaliza la inicialización, apa-rece un aviso emergente de final-ización y el disco duro USB conecta-do queda disponible para la función Máquina del tiempo.El tiempo de inicialización varía según la capacidad del dispositivo USB.La PC no reconoce el dispositivo USB inicializado.Cuando se conecta un dispositivo USB de menos de 40 GB, la inicial-ización del dispositivo de almace-namiento USB no se activa.El tamaño del disco duro externo admitido para realizar la copia de respaldo es 1 TB como máximo.
i.e)
T N
3
R N
N
Tie
ai
eR
eady
1ENTER ENTER
Seleccione Menú de Casa-
GRABAR/RESERVAR.
2ENTER
Seleccione OK para inicializar el dis-
positivo USB.
3ENTER Seleccione OK.
4ENTER Seleccione Encendido o Apagado.

MÁQUINA DEL TIEMPO
MÁ
QU
INA
DE
L T
IEM
PO
92
Reinicialización del dispositivo de almacenamiento USB durante el uso de la función Máquina del tiempo
El modo Máquina del tiempo se
encuentra disponible en el modo
DTV.
Cambio al modo Máquina del tiempo durante el uso de la función Máquina del tiempo
1ENTER ENTER
Seleccione Menú de Casa-
GRABAR/RESERVAR.
2ENTER Seleccione Opción.
3ENTER
Seleccione Modo Máquina del Tiem-
po - Encendido o Apagado.
4ENTER Seleccione Cerrar.
1ENTER ENTER
Seleccione Menú de Casa-
GRABAR/RESERVAR.
2ENTER
Seleccione Inicialización de disposi-
tivo de almacenamiento USB.
3ENTER Seleccione Cerrar.

93
MÁ
QU
INA
DE
L T
IEM
PO
Progreso de la Máquina del tiempo
¿Qué es la "Barra de progreso"?
Esta función indica qué segmento
de la Máquina del tiempo se puede
revisar y posee dos posiciones: actu-
almente en pantalla y live broadcast.
1 Vista previa
2 Estado durante el uso de la
Máquina del tiempo
3 Función en ejecución durante el
uso de la Máquina del tiempo
4 Ubicación actual y tiempo de pro-
greso de la reproducción
5 Tiempo de progreso total de la
Máquina del tiempo
Después de seleccionar Modo Máquina del tiempo -
Encendido, presione el botón ENTER.
En cuanto se inicia la Máquina del tiempo, aparece
una barra de progreso que indica el estado de la
grabación en la parte inferior de la pantalla.
Presione el botón BACK para ocultar la "Barra de
progreso" o presione el botón ENTER para mostrar
la "Barra de progreso".
Esta función permanece activa incluso si se cambia
de programa con la Máquina del tiempo en eje-
cución.
Reproducir
Adelantar
Rebobinar
Pausa
Visión directa +
Visión directa -
Una pantalla a la vez
Reproducir lentamente
! NOTA
Para ahorrar espacio en el disco duro, no se guarda ningún elemento cuando no hay señal.
La Máquina del tiempo puede usarse durante 2 horas como máximo.
No se puede cambiar de canal o de entrada durante la grabación.
Al encender la unidad, el disco duro puede demorar hasta 3 minutos en inicializarse.
Es posible que no se inicie la grabación o reproducción de un programa grabado si el programa
está protegido contra copia.
El tiempo de grabación instantánea está establecido en 3 horas y el tiempo máximo admitido es
5 horas.
1
32 54

MÁQUINA DEL TIEMPO
MÁ
QU
INA
DE
L T
IEM
PO
94
Reproducción durante el uso de la Máquina del tiempo
Durante la reproducción de la Máquina del tiempo, se encuentran disponibles las siguientes opciones.
Durante la reproducción,
presione varias veces el botón REW (REBOBINAR) ( ) o FF (ADELANTAR) ( ) para
aumentar la velocidad.
Cada vez que presione el botón, la velocidad de búsqueda aumentará por etapa
(hasta 5 etapas).
Durante la reproducción, presione el botón Pausa (
Aparecerá la pantalla de pausa.
Cada vez que presione el botón Pausa en la pantalla de pausa, la reproducción
se desarrollará pantalla por pantalla
Presione el botón Pausa y, a continuación, use el botón FF (ADELANTAR)
para avanzar en cámara lenta
Al mover el cursor con el botón de la Máquina del tiempo (< , >) durante la reproduc-
ción y presionar el botón INGRESAR, la pantalla reproducirá directamente la pantalla
en la que se encuentra el cursor. (
Para ver el live broadcast actual, presione el botón TV EN VIVO durante la reproducción.

95
MÁ
QU
INA
DE
L T
IEM
PO
GRABACIÓN
Use esta función cuando no pueda mirar el programa que desee por no estar en su casa.
Iniciar/Parar la grabación
Iniciar la grabación
Parar la grabación
Re
Puede grabar el canal que está usted viendo hasta por tres horas.
1 Seleccione el programa que está mirando si desea grabarlo.
3ENTER
Seleccione Parar la grabación para
detener la grabación.
4ENTER Seleccione Sí.
2ENTER
Seleccione Comienza la grabación
para inicie la grabación.

MÁQUINA DEL TIEMPO
MÁ
QU
INA
DE
L T
IEM
PO
96
Modificación de la hora de finalización de la grabación
Puede reducir o ampliar el tiempo de grabación.
! NOTA
Durante la grabación, si el espacio de almacenamiento disponible es insuficiente, la grabación se
detendrá automáticamente.
Las grabaciones de menos de 10 segundos de duración no se guardarán.
Para ahorrar espacio en el disco durante la grabación de transmisiones, no se guardan datos
cuando no haya señal.
La función de grabación no se inicia si el programa está protegido contra copia.
La hora que se muestra en pantalla puede ser levemente diferente a la hora actual.
Cuando no hay señal o se está viendo una película de su origen, la hora que se muestra en pan-
talla puede ser levemente diferente a la hora actual.
1ENTER
Durante la grabación, selec-
cione Modificar hora de fin
de la grabación.
2ENTER
Establezca la hora de final-
ización de la grabación y
seleccione Ingresar.

97
MÁ
QU
INA
DE
L T
IEM
PO
Grabación manualEsta función permite registrar fácilmente la grabación reservada.
Se ha establecido el temporizador de grabación.
! NOTA
La grabación no se puede realizar en los pro-gramas protegidos contra copia.
Cuando se graba una fuente externa de mala calidad, la calidad de la grabación no es óptima.
El tiempo de grabación manual disponible es 5 horas como máximo y 2 minutos como mínimo.
Si la estación de transmisión envía infor-mación de fecha y hora incorrecta, es posible que se produzcan errores en la grabación reservada.
Si se establecen canales diferentes a la misma hora para la grabación programada y la reser-vada, la TV se enciende en el canal de la grabación reservada.
Si apaga la unidad durante la grabación, es posible que el programa que está grabando no se guarde. Por lo tanto, se recomienda pre-sionar el botón STOP ( ) y revisar la lista reservada/grabada antes de apagar la unidad.
No se puede reservar la grabación por un periodo menor a 10 segundos.
Como la hora y el título del programa para la función Grabar/Recordar se basa en la información que se transmite desde la estación de transmisión, esta información puede ser diferente a la hora y el título reales. Todo depende de la situación de la estación de transmisión.
La hora de la grabación puede variar en fun-ción de la resolución de la señal de entrada o la capacidad del disco duro USB.
Si llega la hora de iniciar la grabación reser-vada y la TV se encuentra apagada, la TV enciende el componente necesario para real-izar la grabación y continúa con el proceso de reserva.
Si llega la hora de iniciar la grabación reser-vada y la grabación inmediata se encuentra en curso, se detiene y se guarda la grabación del programa que se está grabando en ese momento, y se procede a ejecutar la gra-bación reservada.
Si la TV se encuentra desconectada o apaga-da, la grabación reservada no se puede eje-cutar.
1ENTER
Elija Seleccionar fecha, hora
y canal de grabación.
2ENTER Seleccione una fecha.
3ENTER
Seleccione Opción de
repetición.
4ENTER
Seleccione Tipo, Hora inicio,
Hora final, Canal.
5ENTER Seleccione Cerrar.
Programación
Vie ay 0 0 0 0 Seleccionar la fecha de programación.
Espacio libre 100GBꔪ 79h 03m ꔫ 31h 37m
Dom Lun Mar Mié Jue Vie Sáb
Ninguna lista de programaciones
Vie, May 7, 2010

MÁQUINA DEL TIEMPO
MÁ
QU
INA
DE
L T
IEM
PO
98
PROGRAMACIÓNLista de programacionesEsta función se utiliza para ver las grabaciones programadas.
Es posible guardar hasta 30 programas.
Modificar: permite editar el conteni-do de Fecha de inicio/Hora inicio/Hora final/Título/Repetición. Debe presionar el botón BACK para guar-dar el contenido editado.
Esta función está deshabilitada para la grabación por temporizador reservada. Borrar: permite borrar el elemento seleccionado de la lista.
Borrar todo: permite borrar todos los elementos de la lista.
Cerrar: permite cerrar el menú emer-gente.
Inicializando la lista programada
Esta función se utiliza para restablecer la lista de programaciones.
1ENTER
Seleccione la Lista de pro-
gramaciones.
2ENTER
Seleccione el programa
deseado de la lista de pro-
gramaciones.
3ENTER
Seleccione el menú emer-
gente deseado.
1ENTER ENTER
Seleccione Menú de Casa-
GRABAR/RESERVAR.
2ENTER Seleccione Opción.
3ENTER
Seleccione Inicializando la
Lista Programada.
4ENTER
Seleccione OK.
Ejecute la inicialización de la
lista programada.
Lista de programaciones
Vie ay 0 0 0 0
Espacio libre 100GBꔪ 33h 03m ꔫ 13h 37m
Dom Lun Mar Mié Jue Vie Sáb
•
ꔎ
ꔎ Grabar (Una vez)DTV 11-1Nov/13/2009(Jue)5:12 PM ~ 6:02 PM
ꔎ
Fecha de inicio Hora inicio Título Repetir
04/08 (sun) 23:15 PM TV2: Farmen Sáb,Dom
04/02 (Mon) 12:45 AM Racing News Lun

99
MÁ
QU
INA
DE
L T
IEM
PO
TV GRABADA
Lista de TV grabada
Es posible ver un resumen de la lista de programas grabados.
También es posible reproducir el programa grabado que se ha almacenado en el dispositivo USB.
! NOTA
Si una porción del disco está dañada, es posible que una parte o la totalidad de los elementos de
la lista de grabación se borre.
El número máximo de grabaciones que la lista de grabación puede incluir es 200. Cuando el
número de grabaciones de la lista de grabación llega a 200, no se pueden realizar más graba-
ciones.
Cuando se reproduce la toda la grabación, la pantalla permanece detenida por 10 segundos y, a
continuación, la reproducción finaliza automáticamente.
La grabación puede reproducirse incluso durante la ejecución de la grabación reservada.
Durante la reproducción de la grabación, el disco duro puede generar cierto nivel de ruido.
Este ruido no está relacionado con el rendimiento y la confiabilidad del producto. Además, es nor-mal que un disco duro genere cierto nivel de ruido.
ROJO
Borrar: permite borrar los
programas grabados selecci-
onados.
VERDE
Cambiar nombre: permite
editar el título del programa
grabado.
AMARILLO
Lista de miniaturas: propor-
ciona un método para ver 5
programas extensos.
Lista simple: proporciona un
método para ver una lista
simple.
VR Permite ingresar al Modo
marcar.
1ENTER Seleccione TV grabada.
2ENTER
Seleccione un programa
grabado.

MÁQUINA DEL TIEMPO
MÁ
QU
INA
DE
L T
IEM
PO
100
1 Seleccione el programa grabado que
desee.
2V
R
R NMarque el programa grabado deseado.
3BLUE
Reproduzca el programa grabado que ha
marcado.
Modo marcar
ROJO
Marcado para eliminación: per-
mite borrar los programas
grabados que se han marcado.
VERDE
Marcar todo: permite marcar
todos los programas grabados
de la lista.
AMARILLO
Desmarcar todo: permite cam-
biar el estado de los programas
grabados de marcados a no
marcados.
AZUL
Repr. marcados: permite repro-
ducir el primer archivo seleccio-
nado. Una vez que finaliza la
reproducción de un programa
grabado, se reproduce
automáticamente el siguiente
programa seleccionado.

101
MÁ
QU
INA
DE
L T
IEM
PO
Reproducción de programas grabados
Reanudar reproducción (temp.): per-
mite reanudar la reproducción en el
punto en el que se detuvo anterior-
mente. Reproducción normal (temp.): per-
mite reproducir los programas graba-
dos seleccionados.
Es posible reproducir un programa seleccionado de la lista de programas grabados.
1 Reproducción de un programa grabado.
Cuando se presiona el botón ENTER durante la reproducción, se muestra en la parte superior de
la pantalla la información sobre el programa grabado que se está mirando en ese momento y
aparece una barra de progreso en la parte inferior de la pantalla que muestra el estado actual de
la reproducción. (El estado de la reproducción se muestra de la siguiente manera).
Para quitar la barra de progreso, presione el botón ENTER.
1 Vista previa
2 Estado actual
3 Función en ejecución
4 Tiempo de progreso de la reproducción actual del contenido grabado
5 Tiempo de reproducción total del contenido grabado
Reproducir
Adelantar
Rebobinar
Pausa
Visión directa +
Visión directa -
Una pantalla a la vez
Reproducir lentamente
(Azul) Iniciar intervalo de repetición
(Amarillo) Iniciar intervalo de edición de
clip
(Azul) Finalizar intervalo de repetición
(Amarillo) Finalizar intervalo de edición
de clip
Intervalo de repetición
1
32 54

MÁQUINA DEL TIEMPO
MÁ
QU
INA
DE
L T
IEM
PO
102
Durante la reproducción,
presione varias veces el botón REW (REBOBINAR) ( ) o FF (ADELANTAR) ) para
aumentar la velocidad.
Cada vez que presione el botón, la velocidad de búsqueda aumentará por etapa
(hasta 5 etapas).
VERDE TV grabada: permite regresar a la lista de TV grabada.
AMARILLO
Edición de clip:
Presione el botón AMARILLO en el punto de inicio en el que desea establecer el
intervalo de edición de clip y presione este botón nuevamente en el punto de fin.
Para guardar esta configuración, seleccione Sí.
El inicio del intervalo de edición de clip se muestra como y el fin de dicho
intervalo se muestra como en la barra de progreso de la grabación ubicada en
la parte inferior de la pantalla. El inicio y el fin del intervalo de edición de clip se
pueden establecer hacia adelante o hacia atrás.
Los intervalos de menos de 10 segundos no se pueden guardar.
AZUL
Repetir:
Presione el botón AZUL en el punto de inicio en el que desea establecer el interva-
lo de repetición y presione este botón nuevamente en el punto de fin. Para cancelar
la reproducción del intervalo de repetición, presione el botón AZUL una vez más.
El inicio del intervalo de repetición se muestra como y el fin se muestra como
en la barra de progreso de la grabación ubicada en la parte inferior de la pan-
talla. El inicio y el final del intervalo de repetición se pueden establecer hacia adel-
ante o hacia atrás.
No se pueden establecer intervalos de menos de 10 segundos.
Cuando se cancela el intervalo de repetición, se reanuda la reproducción normal
desde el punto de fin del intervalo.
Durante la reproducción, presione el botón Pausa ( ).
Aparecerá la pantalla de pausa.
Cada vez que presione el botón Pausa ( ) en la pantalla de pausa, la reproducción
se desarrollará pantalla por pantalla ( ).
Presione el botón Pausa ( ) y, a continuación, use el botón FF (ADELANTAR) ( )
para avanzar en cámara lenta ( ).
Si no presiona ningún botón durante los 10 minutos posteriores a la activación de
la pausa, se reanuda la reproducción.
ENTER
Cuando mueve el cursor con el botón Máquina del tiempo (< , >) durante la reproduc-
ción y, a continuación, presiona el botón ENTER, se reproduce directamente la pan-
talla donde está ubicado el cursor. (
Para ver el live broadcast actual, presione el botón LIVE TV durante la reproducción.
11 131 52 4

103
IMA
GE
N E
N 3
D
IMAGEN EN 3D
La television puede mostrar en 3D via transmision de 3D o cuando el televisor se encuentra conectado a un dispositivo compatible, como puede ser un repruductor Blu-ray 3D. Tu puedes seleccionar el sis-positivo en el que se quiera ver la television en 3D. La television en 3D muestra dos imagenes separa-das formateadas por cada ojo. La persona que quiera ver necesitara usar los lentes 3D para poder ver las imagenes en formato 3D.
TECNOLOGIA 3D
Ver imágenes en 3D
ADVERTENCIA
Al ver imágenes en 3D, vea la TV desde un án-gulo de visión efectiva y dentro de una distancia apropiada. Si se excede del ángulo o la distan-cia de visión, es posible que no pueda ver las imágenes en 3D. Asimismo, si se encuentra re-costado, es posible que no pueda ver las imá-genes en 3D.Si mira imágenes en 3D a una distancia de-masiado corta durante un período prolongado, es posible que dañe su vista.Mirar TV o jugar un juego de video que incluye imágenes en 3D con los anteojos 3D durante un período prolongado puede causar somno-lencia, dolores de cabeza o fatiga a usted y a sus ojos. Si sufre de dolor de cabeza o se siente fatigado o somnoliento en alguna forma, deje de mirar TV y descanse.Las mujeres embarazadas, las personas de edad avanzada, las personas con problemas cardíacos o con somnolencia frecuente no de-ben mirar TV en 3D.Algunas imágenes en 3D del video pueden confundirse con la realidad y generar reaccio-nes en los espectadores. Por lo tanto, se re-comienda no mirar TV en 3D cerca de objetos frágiles o de cualquier objeto que pueda vol-carse con facilidad.Evite que los niños menores de 5 años miren TV en 3D. Puede afectar el desarrollo de la visión.Advertencia sobre convulsiones por fotosensi-bilidad:
Algunos espectadores pueden experimentar convulsiones o epilepsia cuando están expues-tos a determinados factores, entre los que se incluyen luces intermitentes, imágenes de TV o juegos de video. Si usted o algún miembro de su familia tiene antecedentes de epilepsia o convulsiones, consulte con su médico antes de ver TV en 3D.
También es posible que se produzcan determi-nados síntomas en situaciones no especifi ca-das sin antecedentes previos. Si experimenta alguno de los síntomas que se mencionan a continuación, deje de mirar imágenes en 3D de inmediato y consulte a un médico: mareos, aturdimiento, transición visual o visión alterada, inestabilidad visual o facial, como espasmos musculares u oculares, acciones inconscientes, convulsiones, pérdida de conocimiento, con-fusión o desorientación, pérdida del sentido de la dirección, calambres o náuseas. Los padres deben controlar estos síntomas en sus hijos, incluidos adolescentes, dado que pueden ser más sensibles a los efectos de mirar TV en 3D.
Los riesgos de las convulsiones por fotosensibi-lidad pueden reducirse con las siguientes me-didas.
- Tome descansos frecuentes mientras ve la TV en 3D.
- Las personas que padecen una diferencia de visión en los ojos deben mirar la TV después de implementar las medidas de corrección de la visión necesarias.
- Mire la TV en una posición en la que los ojos queden al mismo nivel que la pantalla 3D y evite sentarse demasiado cerca de la TV.
- No mire imágenes en 3D si está cansado o enfermo, y evite mirar imágenes en 3D du-rante períodos prolongados.
- Sólo use anteojos 3D para ver imágenes en una TV en 3D.
- Algunos espectadores pueden sentirse desorientados luego de ver TV en 3D. Por lo tanto, después de ver TV en 3D, tómese un momento para recobrar el conocimiento de la situación antes de moverse.
Para ver TV en 3D, debe ponerse los anteojos 3D. Para obtener mejores resultados, debe usar anteojos 3D de la marca LG. Las imágenes en 3D no se ven correctamente al usar otra marca de anteojos 3D. Consulte el manual de los an-teojos 3D para obtener instrucciones acerca de cómo usar los anteojos 3D.Luego de encender la TV, se necesitan algunos segundos para que se calibre la TV. Si retira la vista de la TV y luego vuelve a fi jar los ojos en el programa 3D, es posible que necesite un tiempo para ver las imágenes en 3D.La TV puede parpadear levemente si las imá-genes en 3D se muestran en un ambiente con
lámparas de tres longitudes de onda de luz fl uorescente (de 50 Hz a 60 Hz) o alrededor de ventanas que proyectan luz natural. En tales circunstancias, se recomienda bajar las luces o bloquear la luz solar con una cortina.Si hay un obstáculo entre la TV y los anteojos 3D, las imágenes en 3D no se mostrarán cor-rectamente.No use la TV cerca de otros electrodomésticos o equipos infrarrojos.En las TV análogas, las imágenes en 3D no fun-cionan.
! NOTA

IMAGEN EN 3D
IMA
GE
N E
N 3
D
104
Rango de vision de imagen en 3D
El tamaño de la TV, el ángulo de visión y otras circunstancias pueden
cambiar la distancia de visión y el ángulo de vista.
2 2 Distancia de
visión2 m - 7 m
(6,5 ft - 22,9 ft)
Ángulo de visión
120º, cuando la distancia de visión es de 2 m (6,5 ft))
Cuando se esta usando los lentes 3D
Los anteojos 3D se venden por separado. Consulte el manual de los anteojos 3D para ver las in-strucciones de funcionamiento.No use los anteojos 3D para reemplazar los anteojos comunes, anteojos de sol o anteojos de pro-tección. No guarde los anteojos 3D en lugares calientes o fríos.No aplique la fuerza en los anteojos 3D ni los deje caer.Dado que los cristales (película polarizada) de los anteojos 3D son sensibles a rasguños, siempre use un paño suave y limpio para limpiar el producto. Remover cualquier suciedad antes de usar la tela para evitar que los lentes 3D se rayen al momento de limpiarlos.
Precaución
VIENDO IMAGEN EN 3D1 Ver el video reproducido en 3D.
Referir a lo siguiente para la imegen mostrada.
Señal ResoluciónHorizontal
Frecuencia (kHz)
Frecuencia
vertical (Hz)
Formato de vídeo en 3D
reproducible
Entrada
HDMI
720
progresivo1 280 x 720 45,00
60,00
Arriba y abajo, Lado a lado
Frame Packing HDMI (V. 1,4
con HDMI 3D)
1080
entrelazado
1 920 x 1 080
33,75 Arriba y abajo, Lado a lado
1080
progresivo
67,50
Arriba y abajo, Lado a lado,
Damero
Único secuencial de marco
27,00 24,00
Arriba y abajo, Lado a lado,
Damero
Frame Packing HDMI (V. 1,4
con HDMI 3D)
33,75 30,00Arriba y abajo, Lado a lado
Damero
Entrada
USB
1080
progresivo1 920 x 1 080 33,75 30,00
Arriba y abajo, Lado a lado
Damero
SeñalFormato de vídeo en 3D
reproducible
DTV 720 progresivo, 1080 progresivo Arriba y abajo, Lado a lado
Los contenidos multimedia y el reproductor deben admitir Frame Packing HDMI (V. 1.4 con HDMI 3D) para reproducir imágenes estereográfi cas con formato Frame Packing.El vídeo, que ingresa con formato Frame Packing HDMI (V. 1.4 con HDMI 3D), se transfi ere automáticamente a la pantalla estereográfi ca.

105
IMA
GE
N E
N 3
D
Para encender el Modo 3D, seleccione este ícono.
Arriba y abajo Lado a lado Tablero de ajedrez Secuencial de marco
23 ENTER
Después de seleccionar la forma, como se indica en la
pantalla de la TV, colóquese los anteojos 3D.
o3ENTER R E E T Seleccione Configurar
izquierda/derecha.
53
La imagen en modo 3Des cambia-
da a modo 2D.
4ENTER
Seleccione Izquierda/dere-cha o Derecha/izquierda.Seleccione la pantalla con vídeo en 3D que tenga mejor visibilidad.
! NOTA
Si usted selecciona el modo 3D, “Indicador de Poder” se apagara automáticamente. Mientras estas viendo imagen en 3D, no s epodra ajustar Video/Audio usando el menu. Algunos menus no funcionaran mientras se este viendo la television en modo 3D.Solo puede seleccionar Estándar Película Juegos con el botón AV MODE del control remoto.AV Mode is set as Standard while playing in 3D. El modo AV se selecciona como standard mien-tras se muestra la imagen en el modo 3D. La seleccion de television en 3D se cambiara cuando se seleccione el modo de canales DTV. La pantalla no se vera vien si se ven imagenes DTV en 2D si se tiene encendido el modo de ima-gen en 3D.El efecto 3D se puede ser visto cuando el modo 3D es seleccionado apropiadamente para la entrada de señal en 3D subministrada al televisor. Para archivos *mpo (Archivos de camara en 3D), el modo de imagen en 3D es abilitado automati-camente. Ahorro de energía permanece deshabilitada con en 3D. Para abilitar el modo de imagen en 3D, tu puedes presionar al boton ENTER en el control remo-to magic control.
NOTAS PARA VER IMÁGENES EN 3D CON DIFUSIÓN EN 3D (* En las TV análogas, las imágenes en 3D
no funcionan.)
Al cambiar la visualización de imagen en 2D a imagen en 3D con el botón 3D del control remoto, la imagen aparece superpuesta.
Deshabilite el modo de imagen en 3D con el botón 3D. El modo de imagen en 3D se deshabilita au-
tomáticamente al cambiar de canal.
Si la pantalla se divide en izquierda/derecha o arriba/abajo al cambiar de canal:
Este canal admite el modo de imagen en 3D. Se-leccione el tipo de imagen en 3D que aparece en la pantalla. Para ello, presione el botón 3D del control remoto.
Si los ojos están cansados o ve la pantalla borrosa al mirar imágenes en 3D
Presione el botón L/R SELECT del control remoto y seleccione Izquierda/Derecha o Derecha/Izqui-erda, lo que considere mejor para ver las imá-genes en 3D.

MIS MEDIOS
MIS
ME
DIO
S
106
MODOS DE ENTRADA
El menú MIS MEDIOS se abrirá automáticamente cuando inserte una unidad USB. También puede
ingresar seleccionando MIS MEDIOS en el menú de usuario.Tras elegir el tipo de medio que desee, elija
un dispositivo para poder abrir archivos. Las opciones son: Dispositivo USB, CIFS (Archivos comparti-
dos de Windows) o DLNA.
MIS MEDIOS
La TV puede mostrar archivos de imagen
JPG, archivos DivX HD y reproducir archivos
de audio MP3.
TV Guide
30Today
1ENTER ENTER Seleccione Menú de Casa.
2ENTER Seleccione MIS MEDIOS.
3ENTER
Seleccione Lista de películas, Lista
de fotos o Lista de música.
4ENTER Seleccione el dispositivo deseado.
Cuando desconecte el dispositivo USB
Seleccione el menú Dispos USB antes de
desconectar el dispositivo USB.
1ENTER ENTER
Seleccione Menú
Rápido.
2ENTER Seleccione Dispos USB.
3ENTER Seleccione Expulsar.
Buscar otros dispositivos de red.AZUL

107
MIS
ME
DIO
S
MÉTODO DE CONEXIÓN
Conexión USB
Conecte el dispositivo USB al conector USB a un lado de la TV1Ej)
IN
N
e o y ey
Conexión del dispositivo USB
Sólo se puede reconocer un dispositivo de almacenamiento USB.
No se admite la conexión de un dispositivo de almacenamiento USB a través de un concentrador USB
Es posible que no se reconozca un dispositivo de almacenamiento USB mediante el programa de reconocimiento automático.
La velocidad de reconocimiento de un dispositivo de almacenamiento USB dependerá de cada dispositivo.
No apague el televisor ni desconecte el dispositivo USB cuando el dispositivo de almacenamien-to USB conectado esté funcionando. Al separar o desenchufar repentinamente dicho dispositivo, se pueden dañar los archivos almacenados o el dispositivo de almacenamiento USB.
Únicamente utilice un dispositivo USB de almacenamiento el cual contiene archivos normales de música o imágenes.
Use sólo un dispositivo de almacenamiento USB formateado como sistema de archivo FAT 32 o NTFS, incluido con el sistema operativo Windows. El resto podrían no ser reconocidos.
Algunos dispositivos de almacenamiento USB requieren adaptador de corriente. El adaptador de corriente debe conectarse para que el televisor pueda reconocerlo.
Si un dispositivo no es reconocido por el televisor, pruebe con un cable diferente. No se admiten cables de excesiva longitud.
Algunos dispositivos de almacenamiento USB podrían no ser compatibles o no funcionar adec-uadamente.
Realice copias de seguridad de sus archivos importantes, ya que los datos almacenados en el dispositivo USB podrían resultar dañados. La gestión de datos es responsabilidad del cliente, y en consecuencia, el fabricante no cubre en garantía los daños en los datos guardados en el pro-ducto.
Si su memoria USB tiene múltiples particiones, o si utiliza un lector de memoria multipuerto, puede utilizar hasta 4 particiones o una memoria USB.
El método de alineación del dispositivo USB de almacenaje es similar al de Windows XP y los nombres de archivos pueden reconocer hasta 100 caracteres ingleses.
La capacidad recomendada para un disco duro externo USB es de 1TB o menos y para una memoria clave USB es de 32 GB o menos.
Si un disco duro externo USB con “Ahorro de energía” no funciona, apague el disco duro y enci-enda de nuevo para que funcione. Consulte el manual de usuario para la aplicación de un disco duro externo USB.
Dispositivos de almacenamiento USB a continuación USB 2.0 son compatibles, así. Pero puede
que no funcionen correctamente en la lista de películas.
Se puede reconocer un máximo de 999 carpetas o archivos en una sola carpeta.
Si hay demasiadas carpetas y archivos en una sola carpeta, es posible que no funcione correcta-
mente.

MIS MEDIOS
MIS
ME
DIO
S
108
DLNA
Acerca de DLNA
Esta TV es un producto de medios digitales certificado por DLNA.
Puede mostrar y reproducir películas, fotos y contenido musical de su servidor DLNA.
La DLNA (The Digital Living Network Alliance) es una organización del sector de productos electrónic-
os de usuario, la
industria informática y empresas de dispositivos móviles. Digital Living proporciona a los consumidores
un medio para compartir fácilmente medios digitales a través de una red por cable o inalámbrica
doméstica. El logotipo de certificado DLNA facilita encontrar productos que cumplan con las Directrices
de interoperabilidad DLNA. Esta unidad cumple con las directrices de interoperabilidad DLNA v1.5.
Cuando un PC que ejecute software de servidor DLNA o cualquier otro dispositivo compatible con
DLNA se conecta a esta TV, puede ser necesario cambiar la configuración del software o de otros dis-
positivos.Consulte las instrucciones de funcionamiento del software o el dispositivo para obtener más
información.
! NOTA
El CD-ROM de Nero MediaHome 4 Essentials incluido es una edición de software personalizada
solo para compartir archivos y carpetas con la unidad.
El software Nero MediaHome 4 Essentials incluido no permite las siguientes funciones: Transcoding,
interfaz de usuario remota, control de TV, servicios de Internet y Apple iTunes
Este manual explica las operaciones con ejemplos de la versión en ingles de Nero MediaHome 4
Essentials.
Si hay demasiadas carpetas y archivos en una carpeta, es posible que no funcione correctamente.
Para la opción DLNA, use el programa Nero MediaHome que se proporciona con la TV. Sin
embargo, no podemos garantizar que programas de otros fabricantes funcionen correctamente.
Puede seleccionar un canal mientras ve la pequeña vista previa de lista de canales en pantalla de
la TV.
Compruebe la configuración de red si la opción DLNA no funciona correctamente.
Si existe un funcionamiento anormal o se produce un error en Nero Media Home, es posible que
la opción DLNA no funcione correctamente. En este caso, cierre Nero Media Home y reinicie el
programa. Puede descargar la última versión de Nero Media Home; para ello, haga clic en el signo
de pregunta en la parte inferior izquierda del programa.
Si la red está inestable, es posible que el dispositivo esté lento o que el archivo deba cargarse
durante la reproducción.
Si reproduce un vídeo en modo DLNA, no se admiten las funciones Multiaudio y Subtítulos.
Al seleccionar Pantalla completa en modo DLNA, la relación de la pantalla puede diferir de la
original.
Cuando más de una TV está conectada a un único servidor en modo DLNA, es posible que no se
pueda reproducir un archivo correctamente, según el rendimiento del servidor.
Si el servidor no proporciona la información de tiempo de reproducción, aparece como "--:--:--."
Al usar la Lista de películas, los archivos DRM en el servidor DLNA no puede reproducirse.
Según los fabricantes de PA, es posible que la función DLNA no funcione correctamente.

109
MIS
ME
DIO
S1 Encienda el equipo e inserte el CD-ROM Nero MediaHome 4 Essentials en la unidad de CD del
equipo. Un asistente de instalación le conducirá por el proceso de instalación de forma rápida y
sencilla.
2 Cierre todos los programas de Microsoft Windows y cierre los programas antivirus que haya en
funcionamiento.
3 Inserte el CD-ROM de Nero MediaHome 4 Essentials en la unidad de CD del equipo.
4 Haga clic en Nero MediaHome 4 Essentials. Se preparará la instalación y aparecerá el asistente de
instalación.
5 Haga clic en el botón Next (Siguiente) para mostrar el número de serie en la pantalla de entrada.
Haga clic en Next (Siguiente) para ir al paso siguiente.
6 Si acepta todas las condiciones, haga clic en la casilla I accept the License Conditions (Acepto las
condiciones de la licencia) y haga clic en Next (Siguiente). La instalación no podrá realizarse sin
aceptar este acuerdo.
7 Haga clic en Typical (Típica) y en Next (Siguiente). Se iniciará el proceso de instalación.
8 Si desea tomar parte en la recogida anónima de datos, seleccione la casilla y haga clic en el botón
Next (Siguiente).
9 Haga clic en el botón Salir (Salir) para completar la instalación.
Instalación de Nero MediaHome 4 Essentials
Nero MediaHome 4 Essentials es un sencillo software de servidor DLNA para Windows.
Requisitos del PC antes de instalar Nero MediaHome 4 Essentials
Windows® XP (Service Pack 2 o superior), Windows Vista® (no es necesario Service Pack), Windows®
XP Media Center Edition 2005 (Service Pack 2 o superior), Windows Server® 2003
Windows Vista® 64-bit edition (la aplicación funcionará en modo 32 bits)
Espacio de disco duro: 200 MB de espacio de disco duro sólo para una instalación típica de Nero
MediaHome
Procesadores 1.2 GHz Intel® Pentium® III o AMD Sempron™ 2200+
Memoria: 256 MB RAM
Una tarjeta gráfica con al menos 32 MB de memoria de vídeo, con una resolución mínima de 800
x 600 píxeles y una configuración de color de 16 bits
Windows® Internet Explorer® 6.0 o superior
DirectX® 9.0c revisión 30 (Agosto 2006) o superior
Entorno de red: 100 Mb Ethernet, WLAN (IEEE 802.11b/g/n)

MIS MEDIOS
MIS
ME
DIO
S
110
Compartir archivos y carpetas
Tras instalar Nero MediaHome, debe añadir las carpetas que desea compartir.
1 Haga doble clic en el icono Nero MediaHome 4 Essentials del escritorio.
2 Haga clic en el icono Network (Red) de la izquierda y defina el nombre de red en el campo Network
name (Nombre de red). El nombre de red que introduzca se reconocerá como la TV.
3 Haga clic en el icono Shares (Compartir) de la izquierda.
4 4 Haga clic en la ficha Local Folders (Carpetas locales) de la pantalla Shared (Archivos comparti-
dos).
5 Haga clic en el icono Add (Agregar) en la ventana Browse Folder (Examinar).
6 Seleccione la carpeta que contenga los archivos que desea compartir La carpeta seleccionada se
añadirá a la lista de carpetas compartidas.
7 Haga clic en el icono Start Server (Iniciar servidor) para iniciarlo.
! NOTA
Si las carpetas o archivos compartidos no se muestran en la TV, haga clic en la carpeta de la
pestaña Local Folders (Carpetas locales) y haga clic en Rescan Folder (Actualizar carpeta) en el
botón More (Más).
Visite www.nero.com para obtener más información y herramientas de software.

111
MIS
ME
DIO
S
Reproducción de contenido compartido
Puede ver y reproducir contenido de películas, fotografías y música guardado en el equipo o en otro
servidor multimedia DLNA.
1 Inicie el servidor en el equipo o en otro dispositivo conectado a la red doméstica.
2EN Seleccione MIS MEDIOS.
3ENTER Seleccione Lista de películas, Lista de fotos o Lista de música.
4ENTER
Seleccione the DLNA.
Dependiendo del servidor multimedia, puede ser necesario que la TV obtenga
permiso del servidor.
Si desea volver a explorar los servidores disponibles, pulse el botón de color azul.
! NOTA
Para reproducir el archivo en el servidor multimedia, la TV y el servidor deben conectarse al
mismo punto de acceso.
Ya que la compatibilidad y las funciones de reproducción disponibles en el menú MIS MEDIOS
se prueban en un entorno de servidor DLNA (Nero MediaHome 4 Essentials), los requisitos para
la función de reproducción de archivos del menú MIS MEDIOS pueden ser diferentes dependi-
endo de los servidores de medios.
Los requisitos de archivo de esta página no son siempre compatibles. Puede haber algunas
restricciones en las funciones de archivo y la capacidad del servidor de medios.
Se pueden ver en miniatura incluso los archivos de foto o de música no admitidos.
En el modo de película DLNA no se admite la función de miniatura de película.
Si hay un archivo de música no reproducible en el menú MIS MEDIOS, la unidad saltará el
archivo y reproducirá el siguiente.
La información de archivo indicada en la pantalla puede no siempre ser correcta para los archi-
vos de música y película del menú MIS MEDIOS.
La TV admite solamente archivos de subtítulo de película proporcionados por Nero MediaHome 4.
El nombre del archivo de subtítulos y el de la película deben ser idénticos y estar situados en la
misma carpeta.
Si se han añadido archivos de subtítulo tras indexar un directorio, el usuario deberá eliminar y
volver a añadir la carpeta a la lista de objetos compartidos.
La calidad de reproducción y funcionamiento de la función MIS MEDIOS puede verse afectada
por la condición de la red doméstica.
Los archivos de un dispositivo extraíble como una unidad USB o una unidad DVD del servidor
de medios podrían no compartirse correctamente.
Al reproducir medios a través de la conexión DLNA, no se admite la reproducción de archivos
DivX, la cual está protegida por DRM.
Se pueden reconocer hasta 200 carpetas en una sola carpeta y 999 archivos o carpetas.
Si hay demasiadas carpetas y archivos en una sola carpeta, es posible que no funcione correcta-
mente.

MIS MEDIOS
MIS
ME
DIO
S
112
LISTA DE PELÍCULAS
Se muestra todos los archivos de vídeo que reconoce.
El On-Screen Display en su modelo puede ser ligeramente diferente.
Precauciones al reproducir archivos de vídeo
Algunos subtítulos creados por usuario podrían no funcionar correctamente.Algunos caracteres especiales no son compatibles con el sistema de subtítulos.Las etiquetas HTMS no son compatibles con el sistema de subtítulos.La información relativa al tiempo en un archivo de subtítulos externo, debe organizarse en orden ascendente para su lectura.Cambio de fuente y color en los subtítulos no es compatibleSubtítulos en otros idiomas de un determinado, no son compatibles.Los archivos de vídeo con archivos de subtítulos de 1 MB o más puede que no se reproduzcan correctamente.La pantalla podría sufrir interrupciones temporales (paralización de la imagen, lectura más rápida, etc.) al cambiar el idioma de audio.Un archivo de película dañado podría no leerse correctamente o impedir el uso de ciertas funcio-nes del lector.Los archivos de películas creados con ciertos codificadores podrían no leerse correctamente.Si la estructura de vídeo y audio del archivo grabado no es intercalada, el archivo no se reproduce correctamente. No puede garantizarse una lectura uniforme para los contenidos de video con una resolución por fotograma superior al máximo admitido.Los archivos de películas con tipo y formato distintos a los especificados, podrían no funcionar correctamente.El codificador de archivos de video de GMC (Global Motion Compensation) y Qpel (Quarterpel Motion Estimation) no es compatible.Sólo 10 000 de los bloques de sincronización se puede apoyar en el archivo de subtítulos.No se garantiza la lectura uniforme de imágenes codificadas con nivel 4.1 ó superior en H.264.El códec de audio DTS no es compatibleUn archivo de película con un tamaño superior a 30 GB es incompatible y no podrá leerse. .Al leer un video a través de una conexión USB no compatible con transmisión de datos de alta velocidad, podría no funcionar correctamente.Los dispositivos de almacenamiento USB de versión inferior a USB 2.0, también son compatibles. Pero podrían no funcionar correctamente en la lista de películas.Los archivos de video y subtítulos deben estar localizados en la misma carpeta. En este momen-to, el nombre de un archivo de película y el de su archivo de subtítulos deben ser idénticos para que puedan mostrarse. Al disfrutar de una película mediante la función Lista de películas, podrá ajustar la imagen medi-ante los botones de ENERGY SAVING y AV MODE del control remoto. Los ajustes de usuario no funcionan para cada modo de imagen.Trick Mode no es compatible con otras funciones que si los archivos de vídeo no tienen infor-mación de índicesAl reproducir archivos de video mediante la red, el modo Rebobinar/Adelantar es dos veces más rápido.Los nombres de archivo de vídeo que contienen caracteres especiales no se pueden reproducir.
Archivo de película admitido Resolution (Resolución): abajo de 1 920 píxeles (ancho) x 1 080 píxeles (alto) Velocidad de fotogramas: bajo 30 fotogramas/seg (1 920 x1 080), bajo 60fotogramas/seg (1 280 x 720) Velocidad de bits máxima del archivo de película que puede leerse: 20 Mb/s (mega bits por segundo)
Velocidad de bits del formato de audio: entre 32 y 320 kb/s (MP3)
Formato de subtítulos admitido: *.smi, *.srt, *.sub (MicroDVD, SubViewer1.0/2.0), *.ass, *.ssa, *.txt
(TMPlayer), *.psb(PowerDivx) Formato de interno externo admitido: sólo, XSUB (es el formato de subtítulo utilizado en archivos DivX6)

113
MIS
ME
DIO
S
Archivos Formatos de Video
Extensión de archivo
Audio/
VideoCodec Soporte de Perfil/Nivel Explicación
.asf
.wmv
Video
Perfil VC-1 avanzadoPerfil @Level 3 avanzado
(e.g. 720p60, 1080i60, 1080p30)Sólo admite los canales
compatibles con el estándar SMPTE 421M
VC-1.Perfiles VC-1 Simple y principalPerfil simple a nivel medio (ej. CIF, QVGA)Perfil
principal a nivel alto (e.g. 1080p30)
AudioEstándar WMA
WMA 9 Profesional
.divx
.avi
Video
DivX3.11
No se admite la com-pensación de mov-
imiento global o la esti-mación de movimiento
quarterpel.
DivX4
DivX5
DivX6Perfil simple avanzado
(e.g. 720p/1080i)
XViD
H.264 / AVC
Perfil principal a nivel 4.1
Perfil alto a nivel 4.1
(e.g. 720p60, 1080i60, 1080p30)
Audio
MPEG-1 Layer I, II
MPEG-1 Layer III (MP3)
Dolby Digital
.mp4
.m4a
VideoH.264 / AVC
Perfil principal a nivel 4.1
Perfil alto a nivel 4.1
(e.g. 720p60, 1080i60, 1080p30)
No se admite la com-pensación de mov-
imiento global o la esti-mación de movimiento
quarterpel.No se admiten los canales que
utilicen esta sintaxis.
MPEG-4 Part 2 Perfil simple avanzado (e.g. 720p/1080i)
Audio -LC and
.mkv
Video H.264 / AVC
Perfil principal a nivel 4.1
Perfil alto a nivel 4.1
(e.g. 720p60, 1080i60, 1080p30)
La mayoría del conteni-do MKV disponible está codificado por el códec x264 de código abierto.
Audio-LC and
Dolby Digital
.ts
.trp
.tp
Video
H.264 / AVC
Perfil principal a nivel 4.1
Perfil alto a nivel 4.1
(e.g. 720p60, 1080i60, 1080p30)
MPEG-2 Perfil principal a nivel alto(e.g. 720p60, 1080i60)
VC-1
Perfil simple a nivel medio
(ej. CIF, QVGA)
Perfil principal a nivel alto
(e.g. 1080p30)
Perfil avanzado@Level3
(e.g. 720p60, 1080i60, 1080p30)
Sólo admite los canales compatibles con el
estándar SMPTE 421M VC-1..
Audio
MPEG-1 Layer I, II
MPEG-1 Layer III (MP3)
Dolby Digital
-LC and
.vob
VideoMPEG-1
MPEG-2 Perfil principal a nivel alto(e.g. 720p60, 1080i60)
Audio
Dolby Digital
MPEG-1 Layer I, II
DVD-LPCM
.mpg Video MPEG-1 Main Profile@High Level (e.g. 720p60, 1080i60) Sólo admite los canales compatibles con el TS,
PS or ESAudio MPEG-1 Layer I, II

MIS MEDIOS
MIS
ME
DIO
S
114
1 Se desplaza a la carpeta del nivel
superior.
2 Página actual/Total de páginas
5 Página actual/páginas totales de
contenido
4 Contenidos centrados bajo la
carpeta 1
5 Cambiar a una entrada dife-
rente.
6 Mover a Lista de fotos o Lista
de música.
7 Cambia el número de las min-
iaturas mostradas simultánea-
mente.
8 Permite marcar ciertos archivos.
9 Regresar a la pantalla del televisor.
Componentes de la pantalla
Los archivos atípicos
se muestran con
este gráfico.
Los archivos no
admitidos se
muestran con este
gráfico.
1ENTER ENTER Seleccione Menú de Casa.
2ENTER Seleccione MIS MEDIOS.
3ENTER Seleccione Lista de películas.
1
3
4
2
5 6 7 8 9

115
MIS
ME
DIO
S
Cuando uno o más archivos de pelicula
esten marcados, la películamarcada se
reproducirá en secuencia.
Selección de películas
Modo Marca
Repr.mar-
cados
Reproduce el primer archivo selecciona-
do. Una vez finaliza la lectura de una
película, se iniciará automáticamente la
lectura de la siguiente escogida.
Marcar
todoMarcar todas las películas de la carpeta.
Desmarcar
todo
Deseleccionar todos los archivos de mar-
cado
Salir del
modo
marcar
Entra o sale del modo de marcado.
1ENTER
Seleccione la carpeta o
el disco de destino
2ENTER
Seleccione Modo mar-
car.
3ENTER
Seleccione el título de
la película deseada
4ENTER
Seleccione Repr.marca-
dos.
Reproduce el archivo
de película marcado.
Muestra la barra de
estado de la película
actual en la parte infe-
rior de la pantalla.
1ENTER
Seleccione la carpeta o
el disco de destino
2ENTER
Seleccione todas las
películas.
3ENTER
Reproduce el archivo de
película.

MIS MEDIOS
MIS
ME
DIO
S
116
Lectura de una película
! NOTA
Al reproducir un archivo de vídeo tras
detenerlo, puede reproducirlo automáti-
camente donde lo detuvo. Si selecciona “Sí” al reproducir el mismo
archivo una vez detenido el vídeo,
comenzará de nuevo donde se detuvo. Si hay en una carpeta una serie de
archivos continuos, el siguiente archivo
se reproducirá automáticamente. Pero
esto excluye casos donde la función
Repetir de Lista de películas Option
(Opciones de lista de películas) se activa
(Consulte la página 117) o cuando se
configura como una reproducción mar-
cada.
1ENTER Muestra el menú de opciones.
2ENTER
Selecciona la opción de menú
deseada.
1 2 3 4
1 Detener reproduccion
Regresa a la reproducción normal.
Pausar reproduccion. Si no se
pulsa ningún botón en el control
remoto durante 10 minutos tras
una pausa, la TV regresará al esta-
do de reproducción.
Seleccione la velocidad
requerida: x2, x8, x16, x32 (atrás /
adelante),
2 Aumenta o disminuye el brillo de
la pantalla.
3 Oculta el menú en pantalla. Para
ver el menú de nuevo, pulse el
botón ENTER.
4 Regresar al menú anterior.

117
MIS
ME
DIO
S
Configuración de las opciones del menú Establecer reproducción de vídeo.
Tamaño de imagen: Escoja el tamaño original o completo.
Modo Completo: Los archivos se reproducen en modo de pantalla completa, independientemente de la relación de aspecto del vídeo.
Modo Original: Los archivos se repro-ducen de acuerdo con la relación de aspecto del vídeo.
Lenguaje de Audio: Cambia el grupo de idioma del audio de los archivos de vídeo. Los archivos con una única pista de audio no puede ser selecci-onado.
Idioma subtítulo: Los subtítulos pueden activarse o desactivarse. Ante dos o más opciones de subtítu-los, podrá escoger uno de ellos.
Lenguaje: Activado para subtítulos SMI y puede seleccionar el idioma del subtítulo.
Página de código: Selección de fuente del subtítulo. Los contenidos se muestran en el idioma seleccio-nado en "Opción - Lengua - Idioma del menú."
Sinc: Cuando el video no está sin-cronizado con los subtítulos, éstos pueden ajustarse por unidades de 0,5 segundos.
Ubicación: Desplace el emplaza-miento de los subtítulos.
Tamaño: Cambia el tamaño de la fuente del subtítulo.
Repetir Activa o desactiva la función de repetición de la reproducción de películas. Al activarse, el archivo de la carpeta se reproducirá repetidam-ente. Al apagarse, si el siguiente nombre de archivo es similar al ante-rior, se puede reproducir en forma secuencial.
Código de página
1ENTER
Selecciona la opción de menú
deseada.
2ENTER Hacer los ajustes apropiados
Idioma de los subtítulos grupo Soporte de idioma
Latin1 Inglés, Español, Portugués

MIS MEDIOS
MIS
ME
DIO
S
118
Configuración de las opciones del menú Establecer vídeo.
Configuración de las opciones del
menú Establecer audio.
* La imagen que se muestra puede ser diferente a la TV.
1ENTER
Hacer los ajustes apropiados y
luego seleccione Cerrar.
1ENTER
Hacer los ajustes apropiados y
luego seleccione Cerrar.
Configuración de las opciones del menú Régler la vidéo 3D
Para mas informacion, ver la seccion de imagen
en 3D en el manual de usuario

119
MIS
ME
DIO
S
La visualización en la pantalla de su modelo puede variar levemente.
LISTA DE FOTOS
Archivo de foto compatible: *.JPG Baseline (Línea base) : 64 píxeles (ancho) x 64 píxeles (alto) a 15.360 píxeles (ancho) x 8640 píxeles (alto)
Progressive (Progresiva) : 64 píxeles (ancho) x 64 píxeles (alto) a 1920 píxeles (ancho) x 1440 píxeles (alto)
Sólo puede ejecutar archivos JPG. Los archivos no admitidos se mostrarán con un icono no predefinido. Un mensaje de error aparece cuando los archivos estan dañados o formatos de archivo que no se pueden reproducir.Archivos de imagen dañados no se mostraran correctamente.Puede tomar algún tiempo para ver imágenes de alta resolución en pantalla completa.
Componentes de la pantalla
1 Muévase a la carpeta de nivel superior.
2 Página actual/Total de páginas3 Página actual/páginas totales de
contenido4 El contenido de la carpeta se
concentra en 1
5 Cambiar a una entrada dife-rente.
6 Muévase a Lista de Música o Lista de películas.
7 Cambia el número de las minia-turas mostradas simultánea-mente.
8 Permite marcar ciertos archivos.9 Regresar a la pantalla del televisor.
Los archivos atípicos se muestran con
este gráfico.
Los archivos no admitidos se muestran
con este gráfico.
1ENTER ENTER
Seleccione
Menú de
Casa.
2ENTER
Seleccione MIS
MEDIOS.
3ENTER
Seleccione Lista de
fotos.
1
3
2
4
5 6 7 8 9
Extensiones
de archivoElemento Perfil
2D
jpeg
jpg
jpe
formato de archivo admitidoSOF0: InicioSOF1: Extender secuencialSOF2: Progresivo
tamaño de fotoMín: 64 x 64Máx., tipo normal: 15360 (Ancho) x 8640 (Alt.) Tipo progresivo: 1920 (Ancho) x 1440 (Alt.)
3D mpo
formato de archivo admitido mpo
tamaño de foto
Tamaño de 4:3: 3,648 x 2,736 2,592 x 1,944 2,048 x 1,536Tamaño de 3:2: 3,648 x 2,432

MIS MEDIOS
MIS
ME
DIO
S
120
Selección de fotos
Cuando se marca una o más fotos,
se pueden ver las fotos en forma
individual o una presentación de las
fotos marcadas. Si no se marca nin-
guna foto, se pueden ver todas las
fotos en forma individual o todas las
fotos en la 4 Seleccione el menú
emergente carpeta, como present-
ación.
Modo de Marca
1ENTER
Seleccione la carpeta o
el disco de destino.
2ENTER
Seleccione Modo mar-
car.
3ENTER
Seleccione las fotos
deseadas.
4ENTER
Seleccione Ver marca-
dos.
Visualiza los archivos
de fotografía marcados.
1ENTER
Seleccione la carpeta o
el disco de destino.
2ENTER
Seleccione las fotos
deseadas.
3ENTER
Se mostrará el archivo de foto-
grafía.
Ver marcados Muestra el elemento seleccionado.
Marcar todo Marca todas las fotos de la pantalla.
Desmarcar
todo
Cancele la selección de las fotos mar-
cadas.
Salir del modo
marcarEntra o sale del modo de marcado.

121
MIS
ME
DIO
S
Menú de pantalla completa
Se encuentran disponibles más funciones en el modo de pantalla completa.
La relación de aspecto de una foto puede cambiar
el tamaño de la foto exhibida en pantalla completa.
1 Seleccione la carpeta o el disco de
destino.
2ENTER Seleccione las fotos deseadas.
3ENTER
La foto seleccionada se visualiza en
el modo de pantalla completa.

MIS MEDIOS
MIS
ME
DIO
S
122
Presentación: Las fotos seleccionadas se visualizan durante la presentación de diapositivas. Si no
se selecciona ninguna foto, todas las fotos en la carpeta actual se visualizan durante la present-
ación de diapositivas.
Defina el intervalo de tiempo de la presentación en Opción-Establecer visualización de fotos. menu
(Refiérase a la p.123).
Puede ajustar la opción usando el botón Q.MENU del control remoto.
BGM (Música de fondo): Escuche música mientras ve las fotos en tamaño completo.
Defina el dispositivo BGM y álbum en Opción-Establecer visualización de fotos. menu (Refiérase
a la p.123)
Puede ajustar la opción usando el botón Q.MENU del control remoto.
(Girar): Girar fotos. Gira la foto 90°, 180°, 270°, 360° en el sentido de las agujas del reloj.
No podrá girarse cuando el ancho de la foto sea mayor que la altura de resolución admitida..
/ : Ver la foto en modo de pantalla completa o en modo original.
(Ahorro de energía): Aumenta el brillo de la pantalla usando el botón ENERGY SAVING.
Opción: Establecer valores de la velocidad de diapositivas y carpeta de música (Refiérase a la
p.113)
Usted no puede cambiar la carpeta de música mientras se está reproduciendo BGM
Sólo puede seleccionar la carpeta MP3 guardada en el dispositivo que muestra la foto actual.
Ocultar: Oculte el menú en la pantalla de tamaño completo. Para ver nuevamente el menú en
pantalla completa, presione el botón ENTER.
Salir: Retrocede a la pantalla de menú anterior.
4 ENTER
Seleccione Presentación, BGM,
(Girar), Borrar, / , (Ahorro
de energía), Opción o Ocultar.

123
MIS
ME
DIO
S
Utilización de la función Lista de fotos
Configura las opciones del menú Establecer visualización de fotos.
1ENTER Seleccione la Opción de menu
2ENTER
Selecciona la opción de menú
deseada.
1ENTER Seleccione la Opción de menu
2ENTER Realice los ajustes adecuados.
! NOTA
Tu no puedes seleccionar la Opción de
modo de imagen en 3D.
Si quieres escuchar la musica de fondo
mientras estas viendo imagenes en
archivos *mpo, escuchar un archivo *jpg
y selecciona la carpeta BGM en ''Opción-
Establecer visualización de fotos'' despu-
es, tu puedes seleccionar y escuchar la
musica de fondo viendo archivos *mpo.

MIS MEDIOS
MIS
ME
DIO
S
124
Configuración de las opciones del menú Establecer vídeo.
* La imagen que se muestra puede ser diferente a la TV.
1ENTER
Hacer los ajustes apropiados y
luego seleccione Cerrar.
Configuración de las opciones
del menú Establecer audio.
1ENTER
Hacer los ajustes apropiados y
luego seleccione Cerrar.
Configuración de las opciones del menú Régler la vidéo 3D
Para mas informacion, ver la seccion de imagen
en 3D en el manual de usuario.

125
MIS
ME
DIO
S
LISTA DE MÚSICAEste televisor no puede reproducir archivos protegidos contra copia.
La visualización en la pantalla de su modelo puede variar levemente.
Archivos de música compatibles: *.MP3
Frecuencia de tasa binaria 32kb/s - 320kb/s
• Frecuencia de muestreo MPEG1 capa3: 32 kHz, 44,1 kHz, 48 kHz
• Frecuencia de muestreo MPEG2 capa3: 16 kHz, 22,05 kHz, 24 kHz
1
Componentes de la pantalla
1 Previsualizar: si el álbum tiene
una portada, se visualizará.
2 Se mueve a la carpeta de nivel
superior.
3 Página actual/Total de páginas
4 Página actual/Total de páginas
se concentra
5 El contenido de la carpeta se
concentra en 2
6 Cambiar a una entrada diferente.
7 Muévase a Lista de películas o
Lista de fotos.
8 Cambia el número de las miniatu-
ras mostradas simultáneamente.
9 Permite marcar ciertos archivos.
10 Regresar a la pantalla del televisor.
Los archivos atípicos
se muestran con
este gráfico.
Los archivos no
admitidos se
muestran con este
gráfico.
1ENTER ENTER Seleccione Menú de Casa.
2ENTER Seleccione MIS MEDIOS.
3ENTER Seleccione Lista de música.
4
3
5
1
2
6 7 8 9 10

MIS MEDIOS
MIS
ME
DIO
S
126
Selección de música y menú emergente
Cuando uno o más archivos de músi-
ca estén marcados, la música mar-
cada se reproducirá en secuencia.
Modo de marcado
1ENTER
Seleccione la carpeta o
el disco de destino.
2ENTER
Seleccione Modo mar-
car.
3ENTER
Seleccione la música
deseada del archivo
4ENTER
Seleccione Reproducir
Marcado.
Reproduce el archivo
de música marcado.
1ENTER
Seleccione la carpeta o
el disco de destino.
2ENTER
Seleccione la música
deseada del archivo
3ENTER
Se reproducen los archivos de
música.
Reproducir
Marcado
Reproduzca la música seleccionada.
Una vez que finaliza la reproducción
de una canción, la siguiente cancion
sera reproducirá automáticamente.
Marcar todasMarcar todas las canciones en la car-
peta.
Desmarcar
todo
Cancele la selección de todas las
canciones.
Salir del modo
marcarEntra o sale del modo de marcado.

127
MIS
ME
DIO
S
Utilización de la función Lista de películas (Lista de películas)
! NOTA
Sólo puede escuchar música del disposi-
tivo desde el que se está reproduciendo.
1 2 3 4 5
1ENTER Visualice la Opción menu.
2ENTER
Seleccione Establecer reproducción
de audio. o Establecer audio.
1 Detener reproduccion
Regresa a la reproducción nor-
mal.
Pausar reproduccion.
Selecciona la canción anterior
o siguiente.
2 Reproducir con foto: Comienza a
reproducir las canciones seleccio-
nadas y, a continuación, pasa a la
lista de fotografías.
3 Aumenta o disminuye el brillo de la
pantalla.
4 Oculta el menú en pantalla.
5 Visualice a la pantalla de menú
anterior.

MIS MEDIOS
MIS
ME
DIO
S
128
Configuración de las opciones del menú Establecer reproducción de audio.
Configuración de las opciones del menú Establecer audio.
1ENTER
Hacer los ajustes apropiados y
luego seleccione Cerrar.
1ENTER
Hacer los ajustes apropiados y
luego seleccione Cerrar.

129
MIS
ME
DIO
S
! NOTA
Un archivo de música dañado o alterado muestra 00:00 como el tiempo de reproducción. Los archivos de música protegidos contra copia no se reproducirán. Presione el botón ENTER o para desactivar el protector de pantalla.
Si no pulsa ningún botón durante unos instantes, el cuadro de
información de reproducción flotará en la pantalla. Esto evitará
daños en los píxeles de la pantalla causados por una imagen fija
durante un largo periodo de tiempo.

MIS MEDIOS
MIS
ME
DIO
S
130
CÓDIGO DE REGISTRO DEL DIVX
Usando el número de registro, es posible alquilar o comprar películas en www.divx.com/vod.
Únicamente son legibles los archivos DivX correspondientes con el código de registro del televisor
adquirido)
1EN Seleccione MIS MEDIOS.
2ENTER Seleccione DivX opciónes.
3Seleccione Cód. Reg. DivX.
4ENTER Visualizar el Cód. Reg. DivX.
AZUL
! NOTA
Al cargar, algunos botones pueden no funcionar. Si usa el código de registro DivX de otro dispositivo, el archivo DivX alquilado o adquirido no
podrá leerse. Por lo tanto, use siempre el código de registro DivX asignado a este producto. El video o audio de un archivo convertido mediante un estándar distinto al del códec del for-
mato DivX, podría estar corrupto o no poder leerse. El archivo DRM/*.tp/*.trp en el servidor DLNA no se reproduce cuando la Lista de películas está en funcionamiento.

131
MIS
ME
DIO
S
DESACTIVACIÓN
El objetivo de la función es permitir la desactivación de dispositivos a usuarios que hayan activado
todos los dispositivos disponibles a través del servidor web y tengan restringida la activación de más
dispositivos. El sistema DivX VOD permite al cliente activar hasta 6 dispositivos por cuenta.
Elimine la información de autentificación actual para recibir una autentificación de usuario nueva de
DivX para el televisor. Una vez ejecutada esta función, se requerirá de nuevo una autentificación de
usuario DivX para ver archivos DRM DivX.
1EN Seleccione MIS MEDIOS.
2ENTER Seleccione DivX opciónes.
3Seleccione Desactivacion.
4ENTER Seleccione Sí.
5ENTER Visualizar el Desactivacion.
AZUL

RED
RE
D
132
RED
AVISO LEGAL
1MENU Seleccione RED.
2ENTER Seleccione Aviso legal.
3ENTER Compruebe los avisos legales.
4EXIT Regresar a la pantalla del televisor.
AVISO IMPORTANTE RELACIONADO CON LOS SERVICIOS DE RED
Todos los contenidos y servicios accesibles mediante éste dispositivo pertenecen a terceros y están protegidos por leyes de copyright, pat-entes, marcas comerciales u otras leyes de propiedad intelectual. Dichos contenidos y servi-cios se ofrecen exclusivamente para uso per-sonal no comercial. El usuario no podrá utilizar los contenidos ni los servicios de ninguna forma que no esté autorizada por el propietario de los contenidos o el proveedor de servicios. Sin per-juicio de lo anterior y salvo que cuente con autor-ización expresa del propietario de los contenidos o del proveedor de servicios, el usuario no podrá copiar, cargar, publicar, transmitir, traducir, vend-er, modificar, crear trabajos derivados o distribuir de forma o en medio alguno ninguno de los contenidos o servicios disponibles a través de este dispositivo.EL USUARIO ADMITE Y ACEPTA EXPLÍCITAMENTE QUE EL DISPOSITIVO Y TODOS LOS CONTENIDOS Y SERVICIOS DE TERCEROS SE FACILITAN 'TAL CUAL' SIN GARANTÍA DE NINGUNA CLASE, YA SEA DE FORMA EXPRESA O IMPLÍCITA. LG ELECTRONICS RENUNCIA EXPLÍCITAMENTE A TODAS LAS GARANTÍAS Y CONDICIONES EN LO QUE CONCIERNE A CONTENIDOS Y SERVICIOS, YA SEA DE FORMA EXPRESA O IMPLÍCITA, INCLUIDAS ENTRE OTRAS, LAS GARANTÍAS DE COMERCIABILIDAD, CALIDAD SATISFACTORIA, IDONEIDAD PARA UN FIN EN PARTICULAR Y NO INFRACCIÓN DE LOS DERECHOS DE TERCEROS. LG NO GARANTIZA LA EXACTITUD, VALIDEZ, PUNTUALIDAD, LEGALIDAD O INTEGRIDAD DE LOS CONTENIDOS O SERVICIOS DISPONIBLES A TRAVÉS DE ESTE DISPOSITIVO Y NO GARANTIZA QUE EL DISPOSITIVO NI LOS SERVICIOS CUMPLAN LOS REQUISITOS DEL USUARIO, NI QUE EL FUNCIONAMIENTO DEL
DISPOSITIVO O LOS SERVICIOS SE REALICEN DE FORMA CONTINUADA O QUE NO TENGAN ERRORES. BAJO NINGUNA CIRCUNSTANCIA, INCLUIDA LA NEGLIGENCIA, SERÁ LG RESPONSABLE, YA SEA POR CONTRATO O RESPONSABILIDAD EXTRACONTRACTUAL, DE LOS DAÑOS DIRECTOS, INDIRECTOS, FORTUITOS, ESPECIALES O DERIVADOS, O CUALQUIER OTRO DAÑO ORIGINADO POR CUALQUIER INFORMACIÓN CONTENIDA EN EL DISPOSITIVO O POR CUALQUIER CONTENIDO O SERVICIO AL QUE ACCEDA EL USUARIO O UN TERCERO, AUNQUE SE HAYA ADVERTIDO DE LA POSIBILIDAD DE TALES DAÑOS.Los servicios de terceros podrán ser modifica-dos, suspendidos, eliminados, finalizados o inter-rumpidos, y se podrá inhabilitar su acceso en cualquier momento y sin previo aviso. LG no ofrece ninguna garantía o representación de que los contenidos o servicios permanezcan dis-ponibles durante un periodo de tiempo concreto. Los contenidos y servicios se transmiten a través de terceros mediante redes o instalaciones de transmisión sobre las que LG no posee ningún control. LG puede limitar el uso o acceso a determinados servicios o contenidos, en cualqui-er caso y sin previo aviso ni responsabilidad. LG renuncia explícitamente a cualquier responsabi-lidad por las modificaciones, interrupciones, des-activación, eliminación o suspensión de los con-tenidos o servicios disponibles a través de este dispositivo. LG tampoco será responsable de los servicios de atención al cliente relacionados con los conteni-dos y servicios. Toda pregunta o solicitud de servicio relacionada con los contenidos o servi-cios se deberá realizar directamente a los respec-tivos proveedores de contenidos y servicios.

133
NE
TC
AS
T
NETCAST
MENÚ NETCAST
Estos servicios son proporcionados por un proveedor de contenido independiente.
Visite el sitio web de los proveedores de contenido para obtener información específica sobre sus ser-
vicios. (Algunos proveedores de contenido no proporcionan manuales de contenido).
El menú NetCast puede ser diferente dependiendo del país.
Para seleccionar el clima de la zona,
presione el botón ROJO.
! NOTA
La lista de videos buscada en la TV puede ser diferente a la lista buscada en un explorador web
de la PC.
La configuración de esta TV no afecta la calidad de reproducción de YouTube.
Para ver el manual del propietario que el proveedor de contenido proporciona, visite nuestro sitio
web en http://www.lg.com.
Para utilizar servicios que requieren iniciar una sesión, regístrese en el sitio web del servicio cor-
respondiente con la PC e inicie sesión a través de la TV para disfrutar diversas funciones adicio-
nales.
Al presionar el botón rojo para establecer la ciudad que desea, el fondo de NetCast se establece
de acuerdo con el clima de la ciudad seleccionada.
Para TV de plasma: si después de congelar la imagen o el video en pantalla el usuario no realiza
ninguna acción durante 2 minutos, se activa automáticamente el protector de pantalla para evitar
que la imagen fija permanezca en la pantalla.
1ENTER ENTER Seleccione NetCast.
2ENTER
Seleccione la opción de menú
NETCAST. Disfrute Servicio en
Linea

NETCAST
NE
TC
AS
T
134
EMOL
Es posible usar diversos contenidos de EMOL.
Componentes en pantalla
1 Menú Emol
2 Pantalla de títulos de artículos
Permite navegar hasta el artículo deseado.
ENTERPermite ver el artículo deseado.
Permite regresar al menú de Netcast.
EXITPermite regresar al modo de visualización
de la TV.
Si desea obtener más información,
visite www.emol.com.
1 2

135
NE
TC
AS
T
UOL
Es posible usar diversos contenidos de UOL.
Componentes en pantalla
1 Menú UOL
2 Pantalla de títulos de artículos
1
2
Permite navegar hasta el artículo deseado.
ENTERPermite ver el artículo deseado.
Permite regresar al menú de Netcast.
EXITPermite regresar al modo de visualización
de la TV.
Si desea obtener más información,
visite www.uol.com.br.

NETCAST
NE
TC
AS
T
136
TERRA TV
Es posible usar diversos contenidos de Terra TV.
Componentes en pantalla
1 Menú Terra TV
2 Lista de videos
1
2
Permite navegar hasta el video deseado.
ENTERPermite ver el video deseado.
Permite regresar al menú de Netcast.
EXIT Permite regresar al modo de visualización
de la TV.
Si desea obtener más información,
visite http://terratv.terra.com.

137
NE
TC
AS
T
1 Menú Bazuca
2 Afiche de películas1 2
BAZUCA
Es posible mirar películas de Bazuca transmitidas por Internet en la TV.
Componentes en pantalla
Permite navegar hasta el video deseado.
ENTERPermite ver el video deseado.
Permite regresar al menú de Netcast.
EXITPermite regresar al modo de visualización
de la TV.
Si desea obtener más información,
visite http://www.bazuca.com.

NETCAST
NE
TC
AS
T
138
Menú de servicios
Inicio: muestra el clima de la ciudad seleccionada.
Ciudad favorita: permite registrar las ciudades buscadas con frecuencia para consultar el clima.
NOTA
De forma predeterminada, las ciudades registradas son Nueva York, Londres y París pero el usuario
puede agregar o borrar ciudades desde la opción Ciudad favorita.
LG no se hace responsable por la precisión del pronóstico del tiempo.
La información meteorológica correspondiente puede ser diferente al clima real según la infor-
mación que Accuweather proporciona.
ACCUWEATHERAccuweather es un programa que se utiliza para ver el clima de la ciudad que el usuario desee.
1 Menú AccuWeather
2 Lista del clima por ciudad
Componentes en pantalla
ROJO Permite alternar entre Celsius y Fahrenheit.
Permite mover el foco al menú deseado.
ENTERPermite seleccionar el menú enfocado.
Permite regresar al menú de Netcast.
EXITPermite regresar al modo de visualización
de la TV.
1
2

139
NE
TC
AS
T
PICASA
Picasa es una aplicación de Google que permite apreciar archivos de imagen digitales.
Componentes en pantalla
1 Menú Picasa
2 Lista de fotos
1
2
Navegar por las fotos que desees.
ENTER Se mostrará el archivo de la foto seleccio-
nada.
Regresa al menú de Netcast.
EXIT Regresar a la pantalla del televisor.
Inicio: Se mostrará la lista de fotos ofrecidas.
Amigos: Junto a las fotografías puede registrar como amigos a los usuarios que desee.
Buscar: Se mostrará el menú de teclado.
Mis fotos: Puede ver las imágenes cargadas en la web.
Inicio de sesión (Cierre de sesión): Muestra el menú de teclado para iniciar la sesión o regresa al
estado de sesión cerrada.
Menú Picasa

NETCAST
NE
TC
AS
T
140
YOUTUBE
YouTube es un sitio web para compartir vídeo donde los usuarios pueden cargar, ver y compartir clips
de vídeo.
Componentes de la pantalla
1 Menú de YouTube
2 Lista de vídeos
1
ROJO Configura el menú de opciones.
Regresa al menú de Netcast.
EXIT Volver a la visualizacion de TV
2
NOTA
Cuando presiona el botón Q.Menu mientras el video de YouTube se reproduce en modo comple-
to, puede establecer las opciones de video.
La reproducción de vídeos de YouTube puede pausarse, detenerse o esperar mientras se des-
carga dependiendo de la velocidad de la conexión de banda ancha. Recomendamos una veloci-
dad mínima de conexión de 1.5 Mbps.Para obtener la mejor condición de reproducción, es nec-
esaria una velocidad de conexión de 4.0 Mbps.A veces, su velocidad de banda ancha variará
dependiendo de las condiciones de red de su ISP.Póngase en contacto con su ISP si tiene prob-
lemas manteniendo una conexión rápida fiable o si desea aumentar la velocidad de su conexión.
Muchos ISP ofrecen varias opciones de velocidad de banda ancha.

141
NE
TC
AS
T
Inicio: permite ver videos populares en tiempo real.
Ofrecidos: Se mostrará la lista de videos ofrecidos.
Popular: Se mostrará la lista de los videos mejor calificados del servidor YouTube.
Más vistos: Se mostrará la lista de los vídeos más vistos.
Buscar: Se mostrará el menú de teclado.
Historial Se mostrará la lista de vídeos reproducidos anteriormente. Se pueden guardar un máximo de
20 vídeos.
Favoritos: En el estado de inicio de sesión, este menú mostrará los vídeos dispuestos en el servidor de
YouTube con su cuenta (Algunos vídeos pueden no aparecer en la lista Favoritos, incluso si los vídeos se
encuentran en el servidor).
Inicio de sesión (Cierre de sesión): Muestra el menú de teclado para iniciar la sesión o regresa al estado
de sesión cerrada.
Menú de YouTube
Uso del control remoto
Detiene el vídeo y muestra la lista de vídeos relacionados.
Pausa el vídeo durante su reproducción.
Reproduce el vídeo seleccionado.
Avanza o retrocede la reproducción.
ROJO Configura el menú de opciones.
Regresa al menú de Netcast.
EXIT Regresar a la pantalla del televisor.

CONTROL DE IMAGEN
CO
NT
RO
L D
E IM
AG
EN
142
TAMAÑO DE LA IMAGEN (ASPECTO DE PANTALLA)
CONTROL DE IMAGEN
Esta función le permite elegir de una imagen analoga una relación de aspecto 4:3 mostrada en la TV.
Podrá escoger una relación de aspecto diferente dependiendo de la fuente de entrada (emisión
analógica, emisión digital, aux., etc.).
1MENU Seleccione IMAGEN.
2ENTER Seleccione Relación de Aspecto.
3ENTER
Seleccione el formato de imagen
deseado.
4BACK Regresar al menú anterior.
EXIT Regresar a la pantalla del televisor.
Tambien ud. puede hacer el cambio
de Aspecto de pantalla con el menu
Q. MENÚ.
Presione el botón RATIO repetidam-
ente para seleccionar el formato de
la imagen deseado.
1Q.MENU Seleccione Aspecto de pantalla.
2ENTER Seleccione Zoom o Zoom cine.
3ENTER
Ajuste el Zoom a proporción
Zoom cine. El rango de Cinema
zoom es 1-16
4ENTER Mueva la imagen en la pantalla.
Al ajustar las opciones de Zoom o Cinema Zoom (Zoom de cine) en Q.MENU

C
ON
TR
OL
DE
IMA
GE
N
143
16:9
Seleccione cuando desea ajustar la imagen
horizontalmente, en una proporción lineal
para llenar la pantalla completa.
Sólo búsqueda
Normalmente los bordes de las señales de
video quedan recortadas un 1-2%. El modo
Sólo búsqueda desactiva este recorte y
muestra el video completo. Notas: Si hubiera
ruido en los bordes de la señal original,
serán visibles cuando el modo Sólo búsque-
da esté activado. Esta función sólo se opera
en los modos de DTV/Componente/HDMI-
DTV/DVI-DTV (720 progresivo/1 080
entrelazado/1 080 progresivo).
Por Programa
Selecciona la proporción de imagen adec-
uada para que corresponda con la imagen
fuente.
4:3
La selección siguiente le dejará ver una ima-
gen con la proporción original de aspecto
4:3.
Zoom
Seleccione cuando desea ver la imagen sin-
ninguna alteración. Sin embargo, las porcio-
nes superior e inferior de la imagen serán
cortadas.
Zoom 2
Con esta función, cuando la pantalla SD se
reproduce en HD con áreas negras en el
lateral izquierdo y derecho, es posible
expandirla por completo para que no apa-
rezcan áreas en negro.
Está habilitada solo en la transmisión HD
DTV (es la referencia para mostrar "HD" en el
título del canal si la altura es superior a 480).
Zoom cine
Seleccione Zoom cine cuando desee ampli-
ar la imagen en la proporción correcta.
Esta función amplía una imagen hasta
obtener una relación de aspecto de cinema-
scope (2.35:1) sin distorsión.
Nota: La imagen puede verse distorsionada
al ampliarla o reducirla.
(4:3 4:3)
(16:9 16:9)

CONTROL DE IMAGEN
CO
NT
RO
L D
E IM
AG
EN
144
ASISTENTE DE IMAGEN
Esta función le permitirá ajustar la calidad de imagen de la imagen original.
Úsela para calibrar la calidad en pantalla ajustando el nivel de negro y blanco, etc. Podrá calibrar la
calidad en pantalla siguiendo unos sencillos pasos.
Cuando usted ajusta la imagen a Bajo, Recomendado o Alto, Usted puede ver el ejemplo del cambio
que hizo.
1MENU Seleccione IMAGEN.
2ENTER ENTER
Seleccione Asistente
de imagen.
3ENTER Ajuste el Asistente de imagen.
4ENTER Ajuste Estándar/Preferido.
5ENTER Ajuste el Nivel Negro.
6ENTER
Ajuste el Nivel de
blanco.
7ENTER Ajuste el Tinte.
Si selecciona Preferido, el OSD (menú en
pantalla) puede ser diferente del mostrado en
el manual.

C
ON
TR
OL
DE
IMA
GE
N
145
9ENTER
Ajuste el Nitidez hori-
zontal.
10ENTER Ajuste el Nitidez vertical.
11ENTER Ajuste el Luz de Fondo.
8ENTER Ajuste el Color.
12FAVMARK
Escoja una fuente de
entrada para aplicar
los ajustes.
13ENTER Guardar.
14ENTER
Finalice el Asistente de
imagen.
Si detiene los ajustes antes del paso final, dichos cambios no quedarán aplicados en el televisor.
Una vez que el Asistente de imagen ajusta la calidad de imagen, la función Ahorro de energía cambia automáticamente a modo Apagado.
Para restaurar los cambios realizados por el Asistente de imagen, utilice la opción Restablecer imagen cuando el modo de imagen se encuentre en Experto1.
Ej.)

CONTROL DE IMAGEN
CO
NT
RO
L D
E IM
AG
EN
146
AHORRO DE ENERGÍA
Reduce el consumo de energía del televisor.
Puede incrementar el brillo de su pantalla ajustando el nivel Ahorro de Energía o Modo imagen.
1MENU Seleccione IMAGEN.
2ENTER Ahorro de energía.
3ENTER Seleccione sus opciones deseadas.
4BACK Regresar al menú anterior.
EXIT Regresar a la pantalla del televisor.
Al escoger Apagado de Pantalla, el
televisor se apagará pasados 3
segundos. Si se presiona cualquier
botón del control remoto se encend-
erá la pantalla nuevamente.
Si ajusta “Ahorro de energía-
Automático, Máximo”, la función Luz
de fondo no funcionará.
Al seleccionar “Ahorro de energía -
Apagado, Mínimo o Medio, puede
ajustar la función Luz de fondo.
Al escoger Automático, la Luz de
fondo se ajustará automáticamente
mediante el Sensor Inteligente según
las condiciones del entorno.
Al seleccionar Apagado, el Ahorro de
energía no se usa.
Presione el botón de ENERGY
SAVING repetitivamente para selec-
cionar la configuración apropiada
para el ahorro de energía.

C
ON
TR
OL
DE
IMA
GE
N
147
AJUSTES DE LA IMAGEN PRESTABLECIDA (MODO IMAGEN)
Hay configuraciones predeterminadas de fábrica disponibles en los menús del usuario. Puede usar
una configuración predeterminada, cambiar cada configuración manualmente o utilizar el sensor
inteligente.
1MENU Seleccione IMAGEN.
2ENTER Seleccione Modo imagen.
3ENTER Seleccione sus opciones deseadas.
4BACK Regresar al menú anterior.
EXIT Regresar al menú anterior.
Los ajustes Vivo, Estándar, Natural, Cine, Deporte y Juego son preestablecidos en fábri-ca para lograr la mejor calidad de imagen.
Vivo: este es el modo para maximizar el efecto del video en el expositor de la tienda. Intensifica el contraste, brillo, color y la nitidez para ofrec-er imágenes vivas
Estándar: este es el modo con el que se obtienen condiciones óptimas de visualización para el usuario general.
Cine: este modo optimiza el video para disfru-tar películas.
Deporte: este es el modo de video para enfati-zar el video dinámico y los colores primarios (ej.: blanco, uniforme, césped, azul del cielo, etc.) obteniendo el ajuste óptimo de la pantalla para disfrutar los deportes.
Juego: este es el modo para obtener velocidad de respuesta rápida en una pantalla rápida de videojuego.
Experto: este es el modo para ajustar el video de forma pormenorizada para expertos en calidad de video y usuarios generales.
También ud. puede hacer la Modo imagen con el menú Q. MENÚ.
Cuando selecciona Sensor inteligente, Ahorro de energía se cambia a Automático.
Cuando selecciona Sensor inteligente, cambia luz de fondo, contraste, brillo, nitidez, color y tinte de forma automática.
Sensor inteligente: La imagen más adecuada se ajusta automáticamente según las condicio-nes que rodean

CONTROL DE IMAGEN
CO
NT
RO
L D
E IM
AG
EN
148
CONTROL MANUAL DE IMAGEN - MODO USUARIO
Ajuste la apariencia de la imagen según sus preferencias y situaciones de visualización.
1MENU Seleccione IMAGEN.
2ENTER Seleccione Modo imagen.
3ENTER Seleccione sus opciones deseadas.
4ENTER
Seleccione Luz de Fondo, el Contraste,
Brillo, Nitidez, Color, Tinte, Temp
color, o Control Avanzado.
5ENTER Realice los ajustes adecuados.
6BACK Regresar al menú anterior.
EXIT Regresar a la pantalla del televisor.
Luz de Fondo: esta función ajusta el brillo del panel LCD para controlar la luminosidad de la pantalla. Se reco-mienda modificar la luz de fondo al ajustar el brillo del aparato. Al dis-minuir la luz de fondo, el brillo de los negros se vuelve más oscuro sin pér-didas en la señal de video y el con-sumo eléctrico se reduce.
Luz de Fondo solo puede ajustarse
en "Ahorro de energía: Apagado,
Mínimo o Medio".
Contraste: aumenta o disminuye el gradiente de la señal de video. Podría usar el mando de contraste cuando las partes brillantes de la imagen queden saturadas.
Brillo: Ajuste el nivel base de la señal en la imagen. Puede usar brillo cuan-do la oscuridad de la imagen este saturada.
Nitidez: ajusta el nivel de nitidez de los bordes entre las zonas de imagen iluminadas y oscuras. Cuanto más bajo sea el nivel, más suave la ima-gen.
Color: ajusta la intensidad de todos los colores.
Tinte: ajusta el balance entre niveles de rojo y verde.
Temp color: Ajuste en cálido para mejorar los colores de gama más cálida como el rojo o en frío para dar a la imagen un tono más azulado.

C
ON
TR
OL
DE
IMA
GE
N
149
TECNOLOGÍA DE MEJORA DE LA IMAGEN (CONTROL AVANZADO)
El control avanzado le permite realizar ajustes en las funciones avanzadas de la pantalla LG.
Para reiniciar a los ajustes preestablecidos de fábrica tras realizar ajustes para cada fuente de entra-
da, ejecute el Restablecer imagen para cada Modo imagen.
1MENU Seleccione IMAGEN.
2ENTER Seleccione Control Avanzado.
3ENTER Seleccione sus opciones deseadas.
4Realice los ajustes adecuados.
5BACK Regresar al menú anterior.
EXIT Regresar a la pantalla del televisor.

CONTROL DE IMAGEN
CO
NT
RO
L D
E IM
AG
EN
150
CONTROL EXPERTO DE IMAGEN
El modo Experto1 y xperto2 proporciona más opciones de configuración avanzada para los
usuarios. Normalmente es utilizado por profesionales para calibrar la TV.
1MENU Seleccione IMAGEN.
2ENTER Seleccione Modo imagen.
3ENTER Seleccione Experto1 o Experto2.
4ENTER Seleccione Control de Experto.
5ENTER
Seleccione su opción del menú
deseada.
6Realice los ajustes adecuados.
7BACK Regresar al menú anterior.
EXIT Regresar a la pantalla del televisor.

C
ON
TR
OL
DE
IMA
GE
N
151
* Esta característica no se encuentra disponible para todos los modelos.
Contraste Dinámico Ajusta el contraste para mantenerlo en el nivel óptimo dependiendo del brillo de la pantalla. La resolución de la graduación mejora haciendo más brillantes las partes brillantes y más oscuras, las oscuras.
Color Dinámico Ajusta los colores en pantalla para que aparezcan vivos y limpios. Esta función mejora el tono, saturación e iluminación de forma que rojos, azules, y verdes parezcan más vivos.
Color de carátula Detecta la zona de piel del vídeo y la ajusta para mostrar un color de piel natural
Reducción de ruido Reduce el ruido en pantalla sin afectar la calidad de video.
Reducción digital de
ruido Elimina el ruido causado por la compresión de vídeo.
Gamma
Puede ajustar el brillo de la zona oscura y la zona del nivel de gris de la imagen.
Bajo: ilumina la zona de nivel oscuro y gris de la imagen.Medio: graduación rápida de la imagen original.Alto: oscurece la zona de nivel oscuro y gris de la imagen.
Nivel Negro
Bajo: La reflexión de pantalla se pone más obscura.Alto: La reflexión de pantalla se pone más clara.Automático: Cuando advierta el nivel negro en la pantalla, se establecerá en alto o bajo automáticamente.
Ajuste el nivel de negro de la pantalla al nivel adecuado. Esta función permite escoger “Bajo” o “Alto” en el siguiente modo: AV (NTSC-M), HDMI o por componentes.
Clear White Aclara y hace más brillantes las zonas blancas de la imagen.
Protección Visual
Ajuste el brillo de la pantalla para evitar el brillo excesivo de la misma. Atenúa imágenes muy brillantes.
Esta función se activa en "Modo imagen -Estándar, Deportes, Juego”.
Cine real
o
Modo película
Hace que los videoclips grabados en la película parezcan más naturales mediante la eliminación de efecto “judder”.
Las películas en DVD y Blu-ray están filmadas a 24 fotogramas por segundo. Con LG Real Cinema, cada fotograma es procesado sistemáti-camente 5 veces cada 1/24 de segundo, generando 120 f/s con TruMotion ó 2 veces cada 1/24 de segundo, generando 48 f/s sin TruMotion, elimi-nando así por completo el efecto de imagen desdoblada.
Rango de color
Control AvanzadoEstándar: Muestra el área de los colores estándar.Ancho: modo para usar y ajustar la zona de color de la pantalla.
Maximice el uso del color para incrementar la calidad.
Control de Experto Muestra el dominio de color de la señal.
Estándar: Muestra el área de los colores estándar.Ancho: modo para usar y ajustar la zona de color de la pantalla.EBU: Modo para mostrar EBU área de color estándar.SMPTE: Modo de pantalla estándar SMPTE área de color.BT709: Modo de pantalla BT709 área de color estándar.
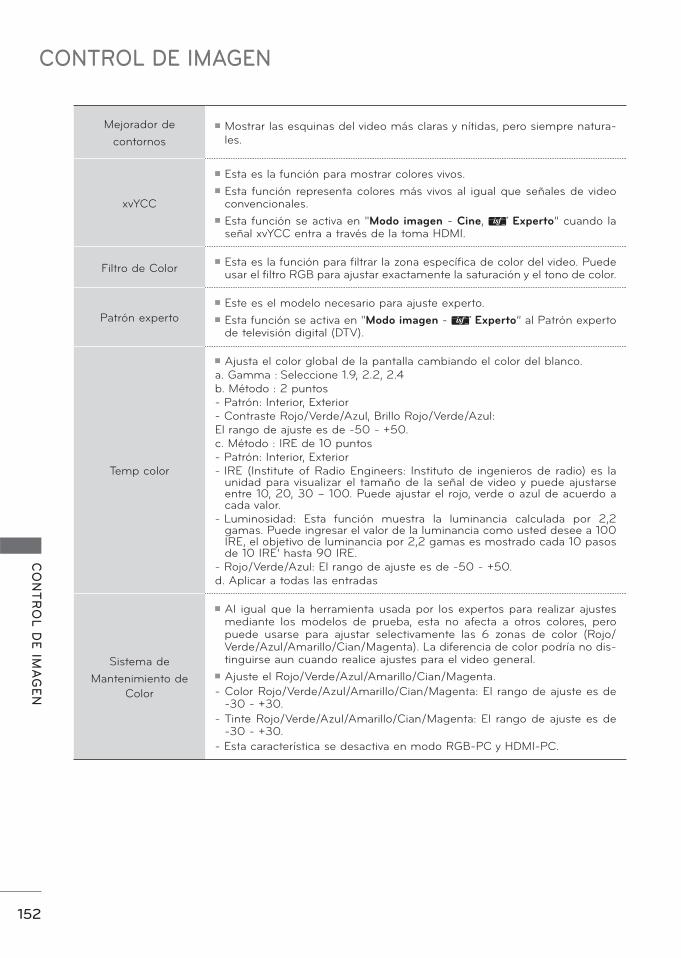
CONTROL DE IMAGEN
CO
NT
RO
L D
E IM
AG
EN
152
Mejorador de
contornos
Mostrar las esquinas del video más claras y nítidas, pero siempre natura-les.
xvYCC
Esta es la función para mostrar colores vivos.
Esta función representa colores más vivos al igual que señales de video convencionales.
Esta función se activa en "Modo imagen - Cine, Experto” cuando la señal xvYCC entra a través de la toma HDMI.
Filtro de Color Esta es la función para filtrar la zona específica de color del video. Puede usar el filtro RGB para ajustar exactamente la saturación y el tono de color.
Patrón experto
Este es el modelo necesario para ajuste experto.
Esta función se activa en "Modo imagen - Experto” al Patrón experto de televisión digital (DTV).
Temp color
Ajusta el color global de la pantalla cambiando el color del blanco. a. Gamma : Seleccione 1.9, 2.2, 2.4b. Método : 2 puntos- Patrón: Interior, Exterior- Contraste Rojo/Verde/Azul, Brillo Rojo/Verde/Azul:El rango de ajuste es de -50 - +50.c. Método : IRE de 10 puntos - Patrón: Interior, Exterior- IRE (Institute of Radio Engineers: Instituto de ingenieros de radio) es la
unidad para visualizar el tamaño de la señal de video y puede ajustarse entre 10, 20, 30 – 100. Puede ajustar el rojo, verde o azul de acuerdo a cada valor.
- Luminosidad: Esta función muestra la luminancia calculada por 2,2 gamas. Puede ingresar el valor de la luminancia como usted desee a 100 IRE, el objetivo de luminancia por 2,2 gamas es mostrado cada 10 pasos de 10 IRE’ hasta 90 IRE.
- Rojo/Verde/Azul: El rango de ajuste es de -50 - +50.d. Aplicar a todas las entradas
Sistema de
Mantenimiento de
Color
Al igual que la herramienta usada por los expertos para realizar ajustes mediante los modelos de prueba, esta no afecta a otros colores, pero puede usarse para ajustar selectivamente las 6 zonas de color (Rojo/Verde/Azul/Amarillo/Cian/Magenta). La diferencia de color podría no dis-tinguirse aun cuando realice ajustes para el video general.
Ajuste el Rojo/Verde/Azul/Amarillo/Cian/Magenta.
- Color Rojo/Verde/Azul/Amarillo/Cian/Magenta: El rango de ajuste es de -30 - +30.
- Tinte Rojo/Verde/Azul/Amarillo/Cian/Magenta: El rango de ajuste es de -30 - +30.
- Esta característica se desactiva en modo RGB-PC y HDMI-PC.

C
ON
TR
OL
DE
IMA
GE
N
153
RESTABLECIMIENTO DE LA IMAGEN
Las configuraciones de los modos de pantalla seleccionados vuelven a las configuraciones predeter-
minadas de fábrica.
1MENU Seleccione IMAGEN.
2ENTER Seleccione Restablecer imagen.
3ENTER Seleccione Sí.
4ENTER Inicialice el valor ajustado.
EXIT Regresar a la pantalla del televisor.

CONTROL DE IMAGEN
CO
NT
RO
L D
E IM
AG
EN
154
TRUMOTION
Tecnología de vídeo avanzada que proporciona unas imágenes más claras y suaves, incluso durante
escenas de acción rápida, creando una estructura más estable para una imagen más nítida.
Apagado: apagar TruMotion.
Bajo: proporciona movimientos de
película regulares.
Alto: proporciona movimientos de
película más regulares.
Judder: Ajusta el ruido de la pantalla.
Blur: Ajusta la post-imagen de la
pantalla.
TruMotion funciona con todos los
tipos de entrada, excepto los del
modo PC.
Si activa TruMotion, podría aparecer
ruido en la pantalla. Si esto sucede,
desactive TruMotion.
Si selecciona "Modo de imagen:
Juego" establezca "TruMotion" en
"Apagado".
1MENU Seleccione IMAGEN.
2ENTER Seleccione TruMotion.
3ENTER
Seleccione Bajo, Alto, Usuario o
Apagado.
4ENTER Seleccione Judder o Blur.
5Realice los ajustes adecuados.
6BACK Regresar al menú anterior.
EXIT Regresar a la pantalla del televisor.
Ajuste de TruMotion (Judder y Blur) al seleccionar un usuario

C
ON
TR
OL
DE
IMA
GE
N
155
ATENUACIÓN LOCAL LED Tras analizar la señal de video de entrada por áreas de la pantalla, ajusta la retroiluminación para
mejorar el contraste. Esta función permanece deshabilitada con la opción “Modo imagen - Juego” y
modo PC.
1MENU Seleccione IMAGEN.
2ENTER Seleccione Atenuación local LED.
3ENTER Seleccione Encendido o Apagado.
4BACK Regresar al menú anterior.
EXIT Regresar a la pantalla del televisor.
INDICADOR DE PODER
Ajuste el indicador luminoso de prendido/modo de espera de la parte frontal del televisor.
1MENU Seleccione OPCIÓN.
2ENTER Seleccione Indicador de Poder.
3ENTER
Seleccione Luz de Apagado o
Luz de Encendido.
4Seleccione sus opciones deseadas.
5BACK Regresar al menú anterior.
EXIT Regresar a la pantalla del televisor.
Luz de Apagado: establece si ajustar el
indicador luminoso de la parte frontal del
televisor para que esté Encendido o Apagado
cuando la unidad se encuentra en el modo
de espera.
Luz de Encendido: establece si ajustar el
indicador luminoso de la parte frontal del
televisor para que esté Encendido o Apagado
cuando la unidad está encendida.

CONTROL DE SONIDO Y DE IDIOMA
CO
NT
RO
L D
E S
ON
IDO
Y D
E ID
IOM
A
156
CONTROL DE SONIDO Y DE IDIOMA
VOLUMEN AUTOMÁTICO
Volumen automático le asegura que el nivel de volumen permanece constante si está viendo anuncios
o un programa de televisión. Debido a que la señal de cada cadena de televisión dispone de caracter-
ísticas propias, podría ser preciso ajustar el volumen cada vez que cambie de canal. Esta función per-
mite a los usuarios disfrutar de niveles uniformes de volumen realizándose ajustes automáticos para
cada canal.
1MENU Seleccione AUDIO.
2ENTER Seleccione Volumen automático.
3ENTER Seleccione Encendido o Apagado.
4BACK Regresar al menú anterior.
EXIT Regresar a la pantalla del televisor.

C
ON
TR
OL
DE
SO
NID
O Y
DE
IDIO
MA
157
VOZ CLARA II
Como diferencia el registro de sonidos de los otros, logra que la calidad de sonido de las voces sea
mejor
1MENU Seleccione AUDIO.
2ENTER Seleccione Voz Clara II.
3ENTER Seleccione Encendido o Apagado.
4Seleccione Nivel.
5Realice los ajustes adecuados.
6BACK Regresar al menú anterior.
EXIT Regresar a la pantalla del televisor.
Ajuste del nivel de la función Voz Clara II con la selección Encendido

CONTROL DE SONIDO Y DE IDIOMA
CO
NT
RO
L D
E S
ON
IDO
Y D
E ID
IOM
A
158
AJUSTE DE BALANCE
Puede ajustar el balance de sonido de las bocinas a los niveles que desea ud.
1MENU Seleccione AUDIO.
2ENTER Seleccione Balance.
3ENTER Realice los ajustes adecuados.
4BACK Regresar al menú anterior.
EXIT Regresar a la pantalla del televisor.

C
ON
TR
OL
DE
SO
NID
O Y
DE
IDIO
MA
159
AJUSTES DE SONIDO PREESTABLECIDOS (MODO DE AUDIO)Modo de audio le permite disfrutar del mejor sonido sin ningún ajuste especial porque la televisión
configura las opciones de sonido apropiadas según el contenido del programa.
1MENU Seleccione AUDIO.
2ENTER Seleccione Modo de audio.
3ENTER
Seleccione Estándar, Música,
Cine, Deporte o Juego.
4BACK Regresar al menú anterior.
EXIT Regresar a la pantalla del televisor.
Estándar, Música, Cine, Deporte,
Juego son prefijados para la buena
calidad de sonido en la fabrica.
También ud. puede hacer el cambio
a Modo de audio en el menú Q.
MENÚ.
Estándar: ofrece sonido de calidad
estándar.
Música: optimiza el sonido para
escuchar música.
Cine: optimiza el sonido para disfru-
tar películas.
Deporte: optimiza el sonido para dis-
frutar eventos deportivos.
Juego: optimiza el sonido para jugar
con videojuegos.

CONTROL DE SONIDO Y DE IDIOMA
CO
NT
RO
L D
E S
ON
IDO
Y D
E ID
IOM
A
160
AJUSTE DE SONIDO - MODO USUARIO
Usted puede ajustar sonidos agudos y bajos a los niveles de su preferencia.
1MENU Seleccione AUDIO.
2ENTER Seleccione Modo de audio
3ENTER
Seleccione Estándar, Música,
Cine, Deporte o Juego.
4ENTER
Seleccione Sonido Infinito, Agudos o
Graves.
5ENTER Realice los ajustes adecuados.
6BACK Regresar al menú anterior.
EXIT Regresar a la pantalla del televisor.
Si la calidad del sonido o volumen
no es el nivel que usted desea, le
recomendamos que use por separa-
do un sistema de teatro en casa o un
amplificador para distintos entornos
de usuario.
Si selecciona “Voz Clara II -
Encendido”, La caracteristica Infinite
Sound no funciona
. Sonido Infinito: Infinite Sound es
una tecnología de procesamiento de
sonido propiedad de LG que logra un
sonido envolvente 5.1 con sólo dos
altavoces frontales.

CO
NT
RO
L D
E S
ON
IDO
Y D
E ID
IOM
A
161
REAJUSTE DE AUDIOLas configuraciones de los modos de sonido seleccionados vuelven a las configuraciones predetermi-
nadas de fábrica.
SALIDA DE AUDIO DIGITALEsta función permite configurar Dolby Digital/PCM para conectar salidas de audio.
Si se selecciona "Salida de audio digital - Automático" cuando Dolby Digital está disponible, la salida
SPDIF (Formato de interfaz digital Sony/Philips) es Dolby Digital.
Si se selecciona "Salida de audio digital - Automático" cuando Dolby Digital no está disponible, la
salida SPDIF es PCM (Modulación por impulsos codificados).
1MENU Seleccione AUDIO.
2ENTER Seleccione Salida de audio digital.
3ENTER Seleccione Automático o PCM.
4BACK Regresar al menú anterior.
EXIT Regresar a la pantalla del televisor.
1MENU Seleccione AUDIO.
2ENTER Seleccione Restablecer.
3ENTER Seleccione Sí.
4ENTER Inicialice el valor ajustado.
EXIT Regresar a la pantalla del televisor.
ElementoEntrada de
audioSalida de audio
digital
Automático
(Parlantes
encendidos)
MPEG
DD
PCM
DD
PCM
Automático
(Parlantes
apagados)
MPEG
DD
PCM
DD
DD
PCM PCM PCM
Para establecer "SALIDA SPDIF - Dolby Digital"
en la señal de entrada DTV, seleccione "Salida de
audio digital - Automático" y "Parlantes de TV -
Apagado".
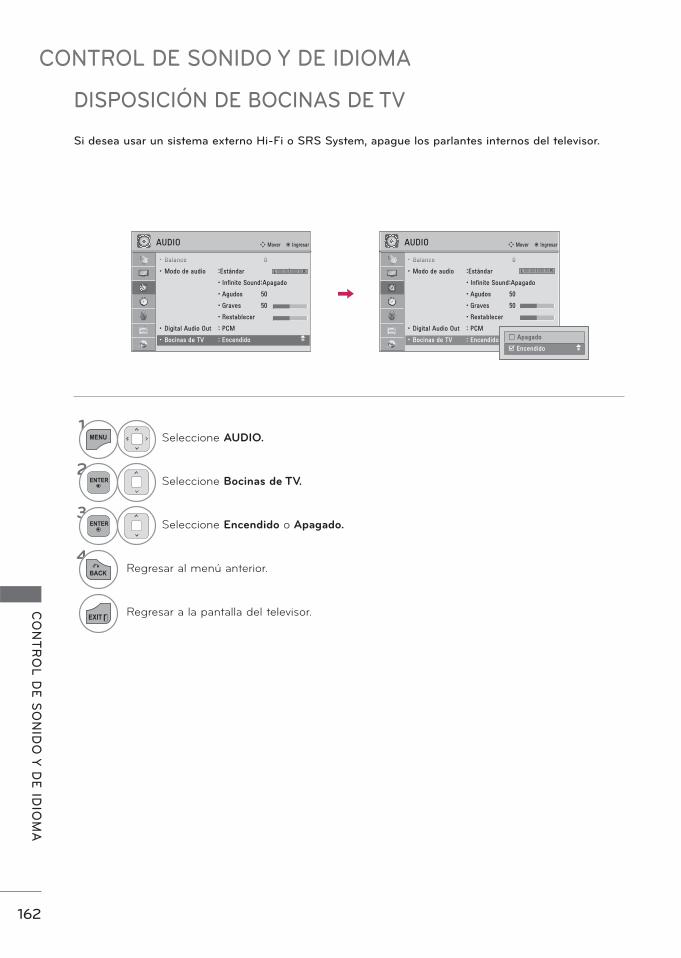
CONTROL DE SONIDO Y DE IDIOMA
CO
NT
RO
L D
E S
ON
IDO
Y D
E ID
IOM
A
162
DISPOSICIÓN DE BOCINAS DE TV
Si desea usar un sistema externo Hi-Fi o SRS System, apague los parlantes internos del televisor.
1MENU Seleccione AUDIO.
2ENTER Seleccione Bocinas de TV.
3ENTER Seleccione Encendido o Apagado.
4BACK Regresar al menú anterior.
EXIT Regresar a la pantalla del televisor.

C
ON
TR
OL
DE
SO
NID
O Y
DE
IDIO
MA
163
DISFRUTE DE LA TRANSMISIÓN ESTÉREO/SAP
Solo para análogos: este televisor puede recibir programas de estéreo MTS y de cualquier SAP (pro-
grama de audio secundario) que acompañe el programa de estéreo si la estación transmite una señal
de sonido adicional. El sonido mono se utiliza automáticamente si se transmite solo en mono.
Televisor análogo Televisor digital
1Q.MENU Seleccione SAP.
2ENTER
Seleccione MONO,
ESTÉREO o SAP.
3EXIT Regresar a la pantalla del televisor.
1Q.MENU Seleccione Multi Audio.
2ENTER Seleccione otro idioma.
3EXIT Regresar a la pantalla del televisor
A

CONTROL DE SONIDO Y DE IDIOMA
CO
NT
RO
L D
E S
ON
IDO
Y D
E ID
IOM
A
164
IDIOMA DEL AUDIO
Esta función opera sólo en modo DTV.
1MENU Seleccione OPCIÓN.
2ENTER Seleccione Lenguaje
3ENTER Seleccione Lenguaje de Audio.
4Seleccione su idioma deseado.
5BACK Regresar al menú anterior.
EXIT Regresar a la pantalla del televisor.

C
ON
TR
OL
DE
SO
NID
O Y
DE
IDIO
MA
165
SELECCIÓN DEL LENGUAJE EN LA PANTALLA
Los menus pueden ser mostrados en la pantalla en el idioma inicial seleccionado.
1MENU Seleccione OPCIÓN.
2ENTER Seleccione Language
3ENTER Seleccione Idioma del menú (Language).
4 Seleccione su idioma deseado.
De aquí en adelante la exhibición en la pantalla
aparecerá en el idioma seleccionado.
5BACK Regresar al menú anterior.
EXIT Regresar a la pantalla del televisor.

CONTROL DE SONIDO Y DE IDIOMA
CO
NT
RO
L D
E S
ON
IDO
Y D
E ID
IOM
A
166
SUBTÍTULOS
Sistemas de texto oculto de programas analógicos
Se debe proporcionar subtítulos para ayudar a ver TV a las personas que no escuchan. Seleccione un
modo de subtitulado para visualizar la información de subtitulado si el programa lo proporciona. El
subtitulado análogo visualiza información en cualquier posición de la pantalla y se trata generalmente
del cuadro de diálogo del programa. El subtitulado o el texto, si la estación los proporciona, serían
aconsejables para los canales digitales o análogos de la antena o cable. Este televisor está programa-
do para memorizar el modo de subtitulado o texto que fue configurado la última vez que apagó el
equipo. Esta función sólo está disponible cuando Modo Subtítulos está definido en Encendido.
1MENU Seleccione OPCIÓN.
2ENTER Seleccione Subtítulo.
3ENTER Seleccione Modo-Encendido.
4Seleccione Análogo.
5Seleccione Subtít.1 - 4, Texto1 - 4.
6BACK Regresar al menú anterior.
EXIT Regresar a la pantalla del televisor.
SUBTÍTULO
Término que se utiliza para las pal-
abras que aparecen en la parte infe-
rior de la pantalla de la televisión; Se
trata normalmente de las partes de
audio del programa que se propor-
cionan para las personas con defi-
ciencias auditivas.
TEXTO
Término que se utiliza para las pal-
abras que aparecen en un gran
marco negro y que cubren casi toda
la pantalla; Se trata normalmente de
los mensajes proporcionados por el
proveedor del programa.

C
ON
TR
OL
DE
SO
NID
O Y
DE
IDIO
MA
167
Sistemas de texto oculto de programas digitales
Seleccione el idioma en el que desea que aparezcan los textos ocultos de DTV.
Sólo podrán escogerse otros idiomas para las fuentes digitales si están incluidos en el programa.
Esta función sólo está disponible cuando Modo Subtítulos está definido en Encendido.
1MENU Seleccione OPCIÓN.
2ENTER Seleccione Subtítulo.
3ENTER Seleccione Modo-Encendido.
4Seleccione Digital.
5Seleccione su idioma deseado.
6BACK Regresar al menú anterior.
EXIT Regresar a la pantalla del televisor.

CONFIGURACIÓN HORARIA
CO
NF
IGU
RA
CIÓ
N H
OR
AR
IA
168
PROGRAMACION DEL RELOJ
CONFIGURACIÓN HORARIA
Configuración Auto del Reloj
1MENU Seleccione HORA.
2ENTER Seleccione Reloj.
3ENTER Seleccione Automático.
4 Seleccione la zona horaria de su área
de recepcion.
5Seleccione Automático, Apagado,
Encendido, dependiendo de si su
región hace o no uso del Horario de
verano (según los modelos).
6BACK Regresar al menú anterior.
EXIT Regresar a la pantalla del televisor.
El tiempo se selecciona automáticamente desde una señal de canal digital.
La señal del canal digital incluye información de la hora actual proporcionada por la emisora que
transmite.
Si la hora actual es incorrecta, puede ajustar manualmente el reloj mediante la función de reloj
automático.
según los modelos

169
CO
NF
IGU
RA
CIÓ
N H
OR
AR
IA
Configuración Manual del Reloj
Si la hora actual programada esta equivocada, restablezca el reloj manualmente.
1MENU Seleccione HORA.
2ENTER Seleccione Reloj.
3ENTER Seleccione Manual.
4 Seleccione bien el año, el mes, la fecha, la
hora o el minuto
5 Ajustar bien el año, el mes, la fecha, la hora
o el minuto
6BACK Regresar al menú anterior.
EXIT Regresar a la pantalla del televisor.
según los modelos

CONFIGURACIÓN HORARIA
CO
NF
IGU
RA
CIÓ
N H
OR
AR
IA
170
AJUSTES DE ENCENDIDO/ APAGADOAUTOMÁTICO DEL TEMPORIZADOR
El temporizador apagado cambia la unidad automáticamente al modo de espera en el tiempo prefijo.
La función de apagado se invalida en la función de encendido si ambos están configurados para el
mismo tiempo. La unidad debe estar en el modo de espera para que funcione el temporizador encen-
dido.
Después de dos horas de que está cambiada la unidad por la función de encendido, se cambiará al
modo de espera automáticamente si no haya presionado ningún botón.
Para cancelar la función de Hora de
Apagado /Hora de Encendido, seleccionar
Apagado.
Sólo para la función Hora de Encendido
1MENU Seleccione HORA.
2ENTER
Seleccione Hora de Apagado o
Hora de Encendido.
3ENTER Seleccione Repetir.
4 Seleccione Apagado, Una vez,
Diariamente, De Lun. - Vie., Lun.-Sáb.,
Sáb.-Dom. o Domingo.
5 Seleccione y ajustar Hora o
Minuto.
6BACK Regresar al menú anterior.
EXIT Regresar a la pantalla del televisor.
1Seleccione Entrada.
2 Seleccione la fuente de entrada
deseada.
3 Si selecciona TV:
Seleccione el canal que
desea.
4Regresar al menú previo.

171
CO
NF
IGU
RA
CIÓ
N H
OR
AR
IA
CONFIGURACIÓN DEL TEMPORIZADORDE APAGADO AUTOMÁTICOLa Hora del Apagador para Dormir apaga el TV después de un tiempo prefijado.
Si apaga el TV después de haber programado la hora del Apagador para dormir, el ajuste se borrará.
1MENU Seleccione HORA.
2ENTER Seleccione Temporizador.
3ENTER Realice los ajustes adecuados..
4BACK Regresar al menú anterior.
EXIT Regresar a la pantalla del televisor.
Para cancelar Temporizador, selecci-
one Apagado.
También ud. puede hacer la
Temporizador con el menú Q. MENÚ.

CONTROL PATERNO / CLASIFICACIONES
CO
NT
RO
L P
AT
ER
NO
/ CL
AS
IFIC
AC
ION
ES
172
CONTROL PATERNO /CLASIFICACIONES
Es posible utilizar el control paterno para bloquear los canales específicos, las clasificaciones y otras
fuentes de visualización.
La función del control paterno (V-Chip) se utiliza para bloquear la visualización de un programa que
se basa en las clasificaciones enviadas por la emisora. La configuración por defecto permite ver todos
los programas. Es posible bloquear la visualización según el tipo de programa y las categorías que se
quieran bloquear. También es posible bloquear la visualización de todos los programas durante un
período de tiempo. Para utilizar esta función, debe hacer lo siguiente:
1. Configure las clasificaciones y las categorías que desee bloquear.
2. Especifique una contraseña.
Le deja configurar el esquema de bloqueo para bloquear unos canales especificados, clasificación y
fuentes de vista. Una contraseña es requerida para acceder a este menú si el sistema de bloqueo está
activado.
Configuración de su Contraseña
ESTABLECER CONTRASEÑA Y BLOQUEO DEL SISTEMA
1MENU ENTER Seleccione
BLOQUEAR.
21 2 ABC 3 DEF
4 GHI 5 JKL 6 MNO
7PQRS 8 TUV
09 WXYZ
Meter la contraseña
Entre la contraseña requerida.
La TV está configurada con la con-
traseña inicial “0-0-0-0”
Si usted olvida su contraseña, pre-sione "0-3-2-5" en el control remoto

173
CO
NT
RO
L P
AT
ER
NO
/ CL
AS
IFIC
AC
ION
ES
Cambie la contraseña introduciendo dos veces una nueva.
Establecer Contraseña
1MENU ENTER Seleccione BLOQUEAR.
21 2 ABC 3 DEF
4 GHI 5 JKL 6 MNO
7PQRS 8 TUV
09 WXYZ
Meter la contraseña.
3Seleccione Fijar Contraseña.
4ENTER
1 2 ABC 3 DEF
4 GHI 5 JKL 6 MNO
7PQRS 8 TUV
09 WXYZ
Escoja 4 dígitos para su Nueva con-
traseña e introdúzcalos.
Después de introducir los 4 dígitos,
vuelva a hacerlo en el campo
Confirmar.
5BACK Regresar al menú anterior.
EXIT Regresar a la pantalla del televisor.

CONTROL PATERNO / CLASIFICACIONES
CO
NT
RO
L P
AT
ER
NO
/ CL
AS
IFIC
AC
ION
ES
174
Activa o desactiva el estado de bloqueo establecido con anterioridad.
Bloqueo Del Sistema
1MENU ENTER Seleccione BLOQUEAR.
21 2 ABC 3 DEF
4 GHI 5 JKL 6 MNO
7PQRS 8 TUV
09 WXYZ
Meter la contraseña.
3Seleccione Sist. de Bloqueo.
4ENTER Seleccione Encendido o Apagado.
5BACK Regresar al menú anterior.
EXIT Regresar a la pantalla del televisor.
Al seleccionarlo, activara el Bloqueo
del sistema.

175
CO
NT
RO
L P
AT
ER
NO
/ CL
AS
IFIC
AC
ION
ES
BLOQUEO DE CANALES
Bloquea cualquier canal que no desee visualizar o que no desea que sus hijos puedan ver.
Si el canal esta bloqueado, ponga la
contraseña para desbloquear tem-
poralmente.
1MENU ENTER Seleccione BLOQUEAR.
21 2 ABC 3 DEF
4 GHI 5 JKL 6 MNO
7PQRS 8 TUV
09 WXYZ
Meter la contraseña.
3Seleccione Bloquear Canales.
4ENTER
Seleccione un canal para
bloquear o desbloquear.
5Bloquear o desbloquear un canal.
6BACK Regresar al menú anterior.
EXIT Regresar a la pantalla del televisor.
AMARILLO
5-13-1 7-1

CONTROL PATERNO / CLASIFICACIONES
CO
NT
RO
L P
AT
ER
NO
/ CL
AS
IFIC
AC
ION
ES
176
CLASIFICACIÓN
Bloquea películas conforme a los límites de clasificación especificados, de tal forma que los niños no
puedan ver ciertas películas. Puede configurar este límite para que bloquee todas las películas cuya
clasificación sea superior a un nivel especificado. Tenga presente que este límite sólo será aplicable a
las películas que aparezcan en TV, no a los propios programas de TV, como series de TV.
1MENU ENTER Seleccione BLOQUEAR.
21 2 ABC 3 DEF
4 GHI 5 JKL 6 MNO
7PQRS 8 TUV
09 WXYZ
Meter la contraseña.
3Seleccione Clasificación.
4ENTER Seleccione la opción deseada.
5BACK Regresar al menú anterior.
EXIT Regresar a la pantalla del televisor.

177
CO
NT
RO
L P
AT
ER
NO
/ CL
AS
IFIC
AC
ION
ES
BLOQUEO DE ENTRADA EXTERNA
Le permite bloquear una entrada.
1MENU ENTER Seleccione BLOQUEAR.
21 2 ABC 3 DEF
4 GHI 5 JKL 6 MNO
7PQRS 8 TUV
09 WXYZ
Meter la contraseña.
3Seleccione Bloqueo de entradas.
4ENTER Seleccione una fuente.
5Seleccione Apagado o Encendido
6BACK Regresar al menú anterior.
EXIT Regresar a la pantalla del televisor.
Ej)

CONTROL PATERNO / CLASIFICACIONES
CO
NT
RO
L P
AT
ER
NO
/ CL
AS
IFIC
AC
ION
ES
178
BLOQUEO DE TECLAS
Esta función puede usarse para prevenir visualizaciones no autorizadas bloqueando los controles del
panel frontal, por lo que sólo puede usarse con el control remoto. Este televisor está programado para
recordar la última opción definida, incluso si apaga el televisor.
1MENU ENTER Seleccione BLOQUEAR.
21 2 ABC 3 DEF
4 GHI 5 JKL 6 MNO
7PQRS 8 TUV
09 WXYZ
Meter la contraseña.
3Seleccione Bloqueo de entradas.
4ENTER Seleccione Apagado o Encendido
5BACK Regresar al menú anterior.
EXIT Regresar a la pantalla del televisor.
En Bloqueado Encendido, si la uni-
dad está apagada, presione el botón
/ I, INPUT, CH ( ) de la unidad
o los botones de POWER, INPUT, CH
( ) o números del control remoto.
Con Bloqueo de Teclas Encendido,
se aparecerá ‘ Bloqueo de Teclas’
en la pantalla si cualquier botón del
panel frontal ha presionado cuando
mira la unidad.

179
AP
ÉN
DIC
E
APÉNDICE
LISTA DE VERIFICACIÓN DE PROBLEMAS
Funcionamiento anómalo
El control remoto no
funciona
Verifique para ver si hay algún objeto entre el producto y el control remoto
causando la obstrucción. Asegúrese de apuntar el control remoto directa-
mente al televisor. Están puestas las baterías con la polaridad correcta
(+con + y -con -)?
Está correcta la configuración del modo remoto de la operación: TV, VCR
etc.?
Ponga nuevas baterías.
La TV se apaga
repentinamente
Está configurado el tiempo para dormir?
Verifique las configuraciones de control de la potencia. La potencia
interrumpida.
El Televisor se apagará automáticamente en 15 minutos en caso de
que no haya señal.
Problemas de video Verifique
No imagen
No sonido
Verifique si el producto está encendido.
Intente otro canal. El problema puede ser con la transmisión.
Está metido el cordón de alimentación dentro del tomacorriente de la pared?
Verifique la dirección y/o la ubicación de su antena.
Pruebe el tomacorriente, enchufe un cordón de alimentación de otro
producto en el tomacorriente donde estaba enchufado el cordón de ali-
mentación del producto.
La imagen aparece
lentamente después
de enceder la TV
Es normal, la imagen es muda durante el proceso de inicio del produc-
to. Favor de contactar a su centro de servicio, si la imagen no aparece
cinco minutos después.
Color o imagen defici-
ente, o No color
Ajuste Color en la opción del menú.
Mantenga una distancia suficiente entre el producto y el VCR.
Intente otro canal. El problema puede ser con la transmisión.
Están instalados apropiadamente los cables de video?
Active cualquier función para restablecer el brillo de la imagen.
Barra horizontal/vertical
o imagen temblante
Verifique la interferencia local como aparatos eléctricos o herramientas
de potencia.
Recepción pobre en
algunos canales
Estación o cable con problemas experimentales, sintonice a otra estación.
Si la señal de estación es débil, reubique la antena para recibir estación más debil.
Verifique las fuentes de la interferencia posible.
Lineas o rayas en las
imagenes Verifique la antena (Cambie la dirección de la antena).
No hay recepción de
imagen al conectar la
toma HDMI
Si un cable HDMI no admite HDMI de alta velocidad, puede provocar
parpadeos o no mostrar la imagen. Si este es el caso, utilice cables
recientes que admitan HDMI de alta velocidad.
* Esta característica no se encuentra dis-ponible para todos los modelos.

180
APÉNDICE
AP
ÉN
DIC
E
Problemas de audio
No salida de una de
las bocinas Ajuste el Balance en la opción del menú.
Sonido raro desde
interior del producto
Un cambio en la ambiente de humedad o temperatura puede causar
un sonido raro cuando enciende o apaga el producto y esto no significa
la falla delproducto.
No hay sonido al
conectar tomas HDMI/
USB
Compruebe el cable HDMI de alta velocidad.
Verifique que el cable USB admite la versión 2,0.
Lea archivos MP3 normales.
Problemas del modo PC
La señal está fuera del
rango (Formato no
válido)
Ajuste la resolución, la frecuencia horizontal o vertical.
Verifique la fuente de la entrada.
Barra o raya vertical en
el fondo, ruido hori-
zontal y posicion
incorrecta
Ponga a trabajar auto-configuración o ajuste el reloj, la fase o la posición
H/V. (opción)
El color de pantalla es
inestable o color único Verifique el cable de señal. Reinstale la tarjeta de video de la PC.
Al conectar el cable
HDMI al PC, no se
transmitirá el audio.
Examine el manual de la tarjeta gráfica del PC para chequear si ésta
admiteaudio HDMI y como ajustarla correctamente.
* Esta característica no se encuentra
disponible para todos los modelos.

181
AP
ÉN
DIC
E
Problemas de la lista de películas
El archivo no aparece
en la lista de películas. Revisar si su extensión está admitida.
Se indica el mensaje
“Este archivo no es
váldo” o el audio fun-
ciona con normalidad
pero el video no lo
hace.
Revise si el archivo se lee con normalidad en el PC. (Chequee si el archi-
vo está dañado).
Revise si su resolución está admitida.
Revise si el códec de video/audio está admitido.
Revise si la velocidad de imagen está admitida.
Se indica el mensaje
“Audio no compatible”
o el video funciona
con normalidad pero
el audio no lo hace..
Revise si el archivo se lee con normalidad en el PC. (Chequee si el
archivo está dañado).
Revise si el códec de audio está admitido.
Revise si la velocidad de bits está admitida.
Revise si la frecuencia de muestreo está admitida.
Los subtítulos no fun-
cionan.
Revise si el archivo se lee con normalidad en el PC. (Chequee si el
archivo está dañado).
Revise si el archivo de video y el de subtítulos tienen el mismo nombre.
Revise si el archivo de video y el de subtítulos están situados en la
misma carpeta.
Revisar si el archivo de subtítulos está admitido.
Revisar si el idioma está admitido. (Al abrir el archivo de subtítulos en el
Bloc de notas, podrá chequear el idioma del archivo de subtítulos).

182
APÉNDICE
AP
ÉN
DIC
E
MANTENIMIENTO
ESPECIFICACIONES DEL PRODUCTO
Potencia requerida AC 100-240V ~ 50/60Hz
Sistema de la TV NTSC, PAL-M/N, SBTVD
Cobertura de programas VHF 2-13, UHF 14-69, CATV 1-135
Impedancia de Antena Externa 75 Ω
Condición
de ambiente
Temp.de operación 0 °C - 40 °C (32 °F - 104°F)
Humedad de operación Menor que 80%
Temp.para almacenar -20 °C - 60 °C (-4 °F - 140°F)
Humedad para almacenar Menor que 85%
Las especificaciones mostradas arriba se pueden cambiar sin previo aviso para la mejora de calidad.
Las malfunciones anticipadas pueden ser prevenidas. La limpieza regular y cuidadosa puede extender
la suma de tiempo que ud. va a tener su nueva TV. Asegurese apagar la TV y desenchufar el cordón
de alimentación antes de empezar cualquier tipo de limpieza.
Limpiando la pantalla
Aqui hay una buena manera para mantener su pantalla limpia por un tiempo. Moje una tela
suave en una mezcla de agua tibia con un poco de suavizante de ropa, o detergente de platos.
Escurra la tela hasta que esté casi seca, luego limpie la pantalla con ella.
Asegurese que no haya exceso de agua por la pantalla, luego dejela secar por el aire antes de
encender su TV.
Limpiando el gabinete
Para remover la suciedad o polvo, limpie el gabinete con una tela suave, seca y sin pelusa.
Favor de asegurarse no usar una tela mojada.
Ausencia Extendida
2
1
PRECAUCIÓN
Si ud. espera dejar su TV por un tiempo largo (como las vacaciones), será buena idea desench-
ufar el cordón de alimentación para proteger la TV contra el daño posible por alguna descarga
electrica.
MODELOS47LX9500
(47LX9500-SA)55LX9500
(55LX9500-SA)
Dimensiones
(Ancho x Altura x Profundidad)
incluyendo la base 1 085,9 mm x 710,6 mm x 255,0 mm
(42,7 pulgadas x 27,9 pulgadas x 10,0 pulgadas)
1 255,8 mm x 805,0 mm x 255,0 mm
(49,4 pulgadas x 31,6 pulgadas x 10,0 pulgadas)
excluyendo la base 1085,9 mm x 654,2 mm x 31,6 mm
(42,7 pulgadas x 25,7 pulgadas x 1,2 pulgadas)
1 255,8 mm x 749,6 mm x 31,6 mm
(49,4 pulgadas x 29,5 pulgadas x 1,2 pulgadas)
Peso incluyendo la base 26,7 kg (58,8 libras) 32,7 kg (72,0 libras)
excluyendo la base 22,1 kg (48,7 libras) 28,1 kg (61,9 libras)

183
AP
ÉN
DIC
E
CÓDIGOS DE IR
Código (Hexa)
Función Nota Código (Hexa)
Función Nota
08 Botón control Remoto D6 TV Código discreto IR
(Encendido/apagado) (TV de entrada)
45 Q.MENU Botón control Remoto C4 POWER ON Código discreto IR
43 MENU Botón control Remoto (Sólo encendido)
0B INPUT Botón control Remoto C5 POWER OFF Código discreto IR
10-19 Tedas de números 0-9 Botón control Remoto (Sólo apagado)
4C - (Guión)/LIST Botón control Remoto 5A AV1 Código discreto IR
1A Q.VIEW Botón control Remoto (AV1 de entrada)
09 MUTE/DELETE Botón control Remoto D0 AV2 Código discreto IR
02 VOL + Botón control Remoto (AV2 de entrada)
03 VOL - Botón control Remoto BF COMPONENT1 Código discreto IR
00 CH Botón control Remoto (Componente1 de entrada)
01 CH Botón control Remoto D4 COMPONENT2 Código discreto IR
1E FAV/MARK Botón control Remoto (Componente2 de entrada)
40 Botón control Remoto D5 RGB-PC Código discreto IR
41 Botón control Remoto (RGB-PC de entrada)
07 Botón control Remoto CE HDMI1 Código discreto IR
06 Botón control Remoto (HDMI1 de entrada)
44 ENTER Botón control Remoto CC HDMI2 Código discreto IR
28 BACK Botón control Remoto (HDMI2 de entrada)
79 RATIO Botón control Remoto E9 HDMI3 Código discreto IR
9E LIVE TV Botón control Remoto (HDMI3 de entrada)
95 ENERGY SAVING Botón control Remoto DA HDMI4 Código discreto IR
7E SIMPLINK Botón control Remoto (HDMI4 de entrada)
AA INFO Botón control Remoto 76 Ratio 4:3 Código discreto IR
30 AV MODE Botón control Remoto (Sólo modo 4:3)
0F TV Botón control Remoto 77 Ratio 16:9 Código discreto IR
59 NETCAST Botón control Remoto (Sólo modo 16:9)
5B EXIT Botón control Remoto AF Ratio Zoom Código discreto IR
72 RED Botón control Remoto (Sólo modo Zoom)
71 GREEN Botón control Remoto B1 Botón control Remoto
63 YELLOW Botón control Remoto B0 Botón control Remoto
61 BLUE, L/R SELECT Botón control Remoto BA Botón control Remoto
BD REC Botón control Remoto 8F Botón control Remoto
AB GUIDE Botón control Remoto 8E Botón control Remoto
DC 3D Botón control Remoto
* Esta característica no se encuentra disponible para todos los modelos.

184
APÉNDICE
AP
ÉN
DIC
E
CONFIGURACIÓN DE DISPOSITIVO EXTERNO DEL CONTROLEl puerto RS-232 permite conectar el conector de entrada RS-232C a un dispositivo de control exter-
no (como una computadora o un sistema de control de A/V) para controlar en forma externa las fun-
ciones deltelevisor.
Nota: El RS-232 de esta unidad está diseñado para ser utilizado con hardware y software de control
de RS- 232 de terceros. Las instrucciones que aparecen a continuación se entregan para servir de
ayuda con el software de programación o para probar la funcionalidad del uso de software telenet.
Tipo del Conector; Macho D-Sub 9-Pines Comunicación de los Parametros
Velocidad de banda : 9 600 b/s (UART)
Longitud de datos : 8 bits
Paridad : No se aplica
Bit de detención : 1 bit
Código de comunicación : Código ASCII
Use un cable cruzado (reverso).
! NOTA
Este producto posee resonancia de coman-
do en el Comando RS-232C.
No. Pin Name
1
2
3
4
5
6
7
8
9
No conexión
RXD (Recepción de datos)
TXD (Transmisión de datos)
DTR (Lado DTE listo)
GND
DSR (Lado DCE listo)
RTS (Listo para enviar)
CTS (Aprobado para enviar)
No Conexión
1
6
5
9

185
AP
ÉN
DIC
E
Configuraciones de RS-232C
Use esta función para especificar un número de ID de la unidad.
Refiérase a “Mapeo de datos reales”.
Configuración de ID
PC TV
RXD 2 3 TXD
TXD 3 2 RXD
GND 5 5 GND
DTR 4 6 DSR
DSR 6 4 DTR
RTS 7 8 CTS
CTS 8 7 RTS
D-Sub 9 D-Sub 9
PC TV
RXD 2 3 TXD
TXD 3 2 RXD
GND 5 5 GND
DTR 4 6 DTR
DSR 6 4 DSR
RTS 7 7 RTS
CTS 8 8 CTS
D-Sub 9 D-Sub 9
Configuración de 7-Cables(Cable de módem NULL hembra-hembra serial )
Configuración de 3-Cables(No estándar)
1MENU Seleccione OPCIÓN.
2ENTER Seleccione ID del Televisor.
3ENTER
Seleccione el número deseado de
ID del monitor. Rango de ajuste de
ID del Televisor 1 - 99.
4BACK Regresar al menú anterior.
EXIT Regresar a la pantalla del televisor.
Mapeo de datos reales
0 Paso 0
A Paso 10 (ID del Televisor 10)
F Paso 15 (ID del Televisor 15)
10 Paso 16 (ID del Televisor 16)
63 Paso 99 (ID del Televisor 99)
64 Paso 100

186
APÉNDICE
AP
ÉN
DIC
E
Lista de Referencia de los ComandosCOMANDO 1 COMANDO 2 DATO
(Hexadecimal)
01. Alimentación k a 00 - 01
02. Selección de entrada
x b P.187
03. Aspecto de pantalla
k c P.187
04. Modo Pantalla k d 00 - 01
05. Silenciador de volumen
k e 00 - 01
06. Control de volumen
k f 00 - 64
07. Contraste k g 00 - 64
08. Brillo k h 00 - 64
09. Color k i 00 - 64
10. Tinte k j 00 - 64
11. Nitidez k k 00 - 64
12. Selección de OSD
k l 00 - 01
13. Modo blo-queado de control remoto
k m 00 - 01
14. Agudos k r 00 - 64
15. Graves k s 00 - 64
16. Balance k t 00 - 64
17. Temperatura de Color
x u 00 - 64
18. Ahorro de energía
j q P.188
19. Auto Configuración
j u P.188
21. Agr./Eli. de canal
m b 00 - 01
22. Botones m c P.189
23. Luz de fondo m g 00 - 64
Protocolo de Transmisión /RecepciónTransmissión
[Comando1][Comando2][ ][ID del Televisor][ ][Dato][Cr]
[Comando 1] : Primer comando para controlar la TV.(j,k,m o x)
[Comando 2] : Segundo comando para controlar la TV.
[ID del Televisor]: Ud. puede ajustar la ID de unidad-para seleccionar el número deseado de ID de la TV en el menú Especial. Rango de ajuste es de 1 a 99. Cuando seleccione la ID de unidad ‘0 ’,cada TV conectada será controlada. ID de unidad está indicado en decimal (1 - 99)en el menú en Hexadecimal (0x0 - 0x63) en la transmisión/recibi-endo el protocolo.
[DATO] : Para transmitir los datos de comando.
Transmite el dato ‘FF ’a leer estados de
comando [Cr] : Retorno Código ASCII como
‘0x0D’
[ ] : Código ASCII como ‘espacio (0x20)’
* En este modelo, el televisor no enviará el estado durante el modo apagado.
Reconocimiento de OKReconocimiento de OK
[Comando2][ ][Set ID][ ][OK][Data][x][Comando2][ ][Set ID][ ][OK][Data][x]
La TV transmite ACK (reconocimiento)basando en este formato cuando recibe un dato normal. En este momento,si el dato está en el modo de leer, esto indica el estado de dato actual. Si el dato está en el modo de escribir, esto regresa los datos de la com-putadora.
* En este modelo, el televisor no enviará el estado durante el modo apagado.
* Formato de datos [Comando 2] : Use como comando.
[ID del Televisor] : Use el carácter pequeño, si la ID
definida es 10, enviará ‘0’,’a’
[DATO] : Use el carácter pequeño, si los datos son 0 x
ab, enviará ‘a’, ‘b’.
[OK] : Use el carácter grande
Reconocimiento de NGReconocimiento de NG
[Comando2][ ][ID del Televisor][ ][NG][Dato][x]
La TV transmite ACK (reconocimiento)basando en este formato cuando recibe un dato anormal de funciones no-viable o errores de comunicación.
Dato1: Código ilegal.
Dato2: Función no soportada.
Dato3: Esperar más tiempo.
* En este modelo, el televisor no enviará el estado
durante el modo apagado.
* Formato de datos
[Comando 2] : Use como comando.
[ID del Televisor] : Use el carácter pequeño, si la ID
definida es 10, enviará ‘0’,’a’
[DATO] : Use el carácter pequeño, si los datos son
0xab, enviará ‘a’, ‘b’.
[NG] : Use el carácter grande
COMANDO1 COMANDO2 DATO 00
(Hexadecimal)
DATO 01 (Hexadecimal)
20 Sintonización de canales
m a Programa físicoalto
Programa mayor bajo
DATO 02
(Hexadecimal)
DATO 03
(Hexadecimal)
DATO 04
(Hexadecimal)
DATO 05
(Hexadecimal)
mayor bajo
menor alto
menor bajo
atributo

187
AP
ÉN
DIC
E
01. Alimentación (Comando: k a)
Para controlar la potencia Encendida/Apagada de la TV.
Transmisión [k][a][ ][ID del Televisor][ ][Data][Cr]
Dato 00 : Apagado Dato 01 : Encendido
Reconocimiento [a][ ][ID del Televisor][ ][OK/NG][Dato][x]
* Si otras funciones transmiten datos ‘FF’ basados en
este formato, el reconocimiento de retroalimentación
de datos, presenta un estado acerca de cada función.
* En este modelo, el televisor enviará la Información después
de la finalización del procesamiento de encendido.
Es posible que exista un retraso entre el comando y la
información.
02. Selección de entrada (Comando: x b) (según los modelos)
Para seleccionar la fuente de entrada para la TV.
Transmisión [x][b][ ][ID del Televisor][ ][Dato][Cr]
Dato 00: DTV (Antena)
Dato 10: Análogo (Antena) Dato 11: Análogo (Cable)
Dato 20: AV1 Dato 21: AV2
Dato 40: Componente 1 Dato 41: Componente 2
Dato 60: RGB-PC Dato 90: HDMI1
Dato 91: HDMI2 Dato 92: HDMI3
Dato 93: HDMI4
Reconocimiento [b][ ][ID del Televisor][ ][OK/NG][Dato][x]
03. Aspecto de pantalla (Comando: k c)
Para ajustar el formato de la pantalla.
Transmisión [k][c][ ][ID del Televisor][ ][Dato][Cr]
Dato 01: 4:3 09: Sólo búsqueda
02: 16:9 10: Zoom cine1
04: Zoom
05: Zoom2
06: Por Programa 1F: Zoom cine16
Reconocimiento [c][ ][ID del Televisor][ ][OK/NG][Dato][x]
04. Modo Pantalla (Comando: k d)
Para seleccionar modo de pantalla encendido/apagado.
Transmisión [k][d][ ][ID del Televisor][ ][Dato][Cr]
Dato 00: Modo apagado de pantalla
(Imagen encendida) Video-out Mute off
Dato 01: Modo encendido de pantalla (Imagen apagada)
Dato 10: Video-out Mute on
Reconocimiento [d][ ][ID del Televisor][ ][OK/NG][Dato][x]
* Sólo en el caso de que la función Silencio de la salida
de video esté activada, el televisor mostrará la visualización
en pantalla (OSD) Pero en el caso de que la
función Silencio de la salida de video esté desactivada,
el televisor no mostrará la visualización en pantalla (OSD).
05. Silenciador de volumen (Comando: k e)
Para controlar el encendido/apagado del silenciador de
volumen, También puede ajustar el silenciador utilizando
el botón MUTE en el control remoto.
Transmisión [k][e][ ][ID del Televisor][ ][Dato][Cr]
Dato 00: Encendido del silenciador de volumen (Sin volumen)
Dato 01: Apagado del silenciador de volumen (Con volumen)
Reconocimiento [e][ ][ID del Televisor][ ][OK/NG][Dato][x]
06. Control de volumen (Comando: k f)
Para ajustar el volumen.
También puede ajustar el volumen con los botones de
volumen en el control remoto.
Transmisión [k][f][ ][ID del Televisor][ ][Dato][Cr]
Dato Min: 00 - Max: 64 (*transmitir por código hexadecimal)
Véase ‘Mapeo de datos reales’.
Reconocimiento [f][ ][ID del Televisor][ ][OK/NG][Dato][x]
07. Contraste (Comando: k g)
Para ajustar el contraste de la pantalla.
También puede ajustar el contraste en el menú Imagen.
Transmisión [k][g][ ][ID del Televisor][ ][Dato][Cr]
Dato Min: 00 - Max: 64 (*transmitir por código hexadecimal)
Véase ‘Mapeo de datos reales’.
Reconocimiento [g][ ][ID del Televisor][ ][OK/NG][Dato][x]
08. Brillo (Comando: k h)
Para ajustar el brillo de la pantalla.
También puede ajustar el brillo en el menú Imagen.
Transmisión [k][h][ ][ID del Televisor][ ][Dato][Cr]
Dato Min: 00 - Max: 64 (*transmitir por código hexadecimal)
Véase ‘Mapeo de datos reales’.
Reconocimiento [h][ ][ID del Televisor][ ][OK/NG][Dato][x]
09. Color (Comando: k i)
Para ajustar el color de pantalla.
También puede ajustar el brillo en el menú Imagen.
Transmisión [k][i][ ][ID del Televisor][ ][Dato][Cr]
Dato Min: 00 - Max: 64 (*transmitir por código hexadecimal)
Véase ‘Mapeo de datos reales’.
Reconocimiento [i][ ][ID del Televisor][ ][OK/NG][Dato][x]
10. Tinte (Comando: k j)
Para ajustar el tinte de la pantalla.
Ud. puede ajustar el tinte en el menú Imagen.
Transmisión [k][j][ ][ID del Televisor][ ][Dato][Cr]
Dato Rojo : 00 - Verde : 64(*transmitir por código hexadecimal)
Véase ‘Mapeo de datos reales’.
Reconocimiento [j][ ][ID del Televisor][ ][OK/NG][Dato][x]

188
APÉNDICE
AP
ÉN
DIC
E
11. Nitidez (Comando: k k)
Para ajustar la nitidez de la pantalla.
También puede ajustar la nitidez en el menú Imagen.
Transmisión [k][k][ ][ID del Televisor][ ][Dato][Cr]
Dato Min: 00 - Max: 64 (*transmitir por código hexadecimal)
Véase ‘Mapeo de datos reales’.
Reconocimiento [k][ ][ID del Televisor][ ][OK/NG][Dato][x]
12. Selección de OSD (Comando: k l)
Para seleccionar OSD (On Screen Display) encendido/apagado.
Transmisión [k][l][ ][ID del Televisor][ ][Dato][Cr]
Dato 00: Apagado de OSD, 01: Encendido de OSD
Reconocimiento [l][ ][ID del Televisor][ ][OK/NG][Dato][x]
13. Modo de bloqueo de control remoto
(Comando: k m)
Para bloquear los mandos del panel frontal en el monitor
y en el mando a distancia.
Transmisión [k][m][ ][ID del Televisor][ ][Dato][Cr]
Dato 00: Bloquear Apagado, 01: Bloquear Encendido
Reconocimiento [m][ ][ID del Televisor][ ][OK/NG][Dato][x]
* Si ud. no está usando el control remoto y tam-poco los controles del panel frontal en la unidad, use este modo. Cuando la potencia principal enciende y apaga, el bloqueo de control remoto será liberado.
* Si el Bloqueo de teclas está en el modo de espera, el televisor no se prenderá mediante el botón de POWER del control remoto ni del propio televisor.
14. Agudos (Comando: k r)
Para ajustar los agudos.
También puede ajustar los agudos en el menú audio.
Transmisión [k][r][ ][ID del Televisor][ ][Dato][Cr]
Dato Min : 00 - Max : 64 (*transmitir por código hexadecimal)
Véase ‘Mapeo de datos reales’.
Reconocimiento [r][ ][ID del Televisor][ ][OK/NG][Dato][x]
15. Graves (Comando: k s)
Para ajustar los graves.
También puede ajustar los graves en el menú audio.
Transmisión [k][s][ ][ID del Televisor][ ][Dato][Cr]
Dato Min : 00 - Max : 64 (*transmitir por código hexadecimal)
Véase ‘Mapeo de datos reales’.
Reconocimiento [s][ ][ID del Televisor][ ][OK/NG][Dato][x]
16. Balance (Comando: k t)
Para ajustar el balance.
También puede ajustar el balance en el menú audio.
Transmisión [k][t][ ][ID del Televisor][ ][Dato][Cr]
Dato Min : 00 - Max : 64 (*transmitir por código hexadecimal)
Véase ‘Mapeo de datos reales’.
Reconocimiento [t][ ][ID del Televisor][ ][OK/NG][Dato][x]
17. Temperatura de Color (Comando: k u)
Para ajustar la temperatura de color.
También puede ajustar la temperatura de color en el
Menú Imagen.
Transmisión [k][u][ ][ID del Televisor][ ][Dato][Cr]
Dato 00: Medio 01: Frio 02: Cálido
Reconocimiento [u][ ][ID del Televisor][ ][OK/NG][Dato][x]
18. Ahorro de energía (Comando: j q)
Control de la función de Ahorro de Energía.
Transmisión [ j ][q][ ][ID del Televisor][ ][Dato][Cr]
Dato 00: Apagado Dato 01: Mínimo
Dato 02: Medio Dato 03: Máximo
Dato 04: Automático (dependiendo de los modelos)
Dato 05: Apagado de Pantalla
Reconocimiento [q][ ][ID del Televisor][ ][OK/NG][Dato][x]
19. Auto Configuración (Comando: j u)
Ajustar la posición de la imagen y reducir el temblor de la imagen en forma automática. La auto configu-ración sólo funciona con RGB-PC.
Transmisión [j][u][ ][ID del Televisor][ ][Dato][Cr]
Dato 01: Para configurar
Reconocimiento [u][ ][ID del Televisor][ ][OK/NG][Dato][x]
20. Sintonización de canales (Comando: m a)
Para sintonizar los canales en el siguiente número
físico/mayor/menor.
Transmisión [m][a][ ][ID del Televisor][ ][Dato00][ ][Dato01]
[ ][Dato02][ ][Dato03][ ][Dato04][ ][Dato05][Cr]
Los canales digitales poseen un número de canal Físico, Mayor y Menor. El número Físico es el número de canal digital real, el Mayor es el número al cual el canal se debe asociar y el Menor es el subcanal. Dado que el sintonizador ATSC automáticamente asocia el canal al número Mayor, el número Físico no se requiere.
Dato 00: Número de canal físico
NTSC aéreo: 02 - 45, NTSC cable: 01, 0E - 7D
ATSC aéreo: 01 - 45, ATSC cable: 01 - 87
Dato 01 & 02: Mayor número de canal
Dato 01: Bytes altos Dato 02: Bytes bajos
Se encuentran disponibles dos bytes para el Mayor y
Menor, y normalmente sólo se usa el segundo byte.
Dato 03 & 04: Número de canal menor
No se necesita para NTSC.

189
AP
ÉN
DIC
E
Dato 05:
En la tabla anterior aparece el código binario que se debe convertir a Hexadecimal antes del envío. Por ejemplo: El código binario para sintonizar la sub-fuente en un canal de cable NTSC es “1000 0001”, el cual se traduce a “81” en Hex.
* 7° bit: Para qué fuente desea cambiar el canal.
* 6° bit: Use un canal de dos partes o de una parte. En la mayoría de los casos use simplemente 0, ya que se ignora cuando se utiliza NTSC.
* 5° bit: Use 0 con NTSC, ya que sólo puede utilizar el número de canal físico. Normalmente use 1 para ATSC, ya que la mayoría de las veces no importa cuál sea el número físico.
* 4° bit: Ajuste en 0.
* Bits 3-0: Elija el tipo de señal.
* Ejemplos de comando de sintonización:
1. Sintonice en canal de cable análogo (NTSC) 35
Dato 00 = Físico de 35 = 23
Dato 01 & 02 = Sin Mayor = 00 00
Dato 03 & 04 = Sin Menor = 00 00
Dato 05 = 0000 0001 en binario = 01
Total = ma 00 23 00 00 00 00 01
2. Sintonice en el canal local digital (ATSC) 30 - 3
Dato 00 = No se conoce el Físico = 00
Dato 01 & 02 = Mayor es 30 = 00 1E
Dato 03 & 04 = Menor es 3 = 00 03
Dato 05 = 0010 0010 en binario = 22
Total = ma 00 00 00 1E 00 03 22
21. Agr./Eli. de canal (Comando: m b)
Para agregar y eliminar canales.
Transmisión [m][b][ ][ID del Televisor][ ][Dato][Cr]
Dato 00: Borrar programa Dato 01: Memorizar programa
Reconocimiento [b][ ][ID del Televisor][ ][OK/NG][Dato][x]
22. Botones (Comando: m c)
Para mandar el código de botón remotó IR.
Transmisión [m][c][ ][ID del Televisor][ ][Dato][Cr]
Vea la página 183.
Reconocimiento [c][ ][ID del Televisor][ ][OK/NG][Dato][x]
Cuando el televisor se encuentra en modo de espera, éste sólo podrá prenderse mediante el botón POWER del control remoto.
23. Luz de fondo (Comando: m g)
Para ajustar la luz trasera de la pantalla.
Transmisión [m][g][ ][ID del Televisor][ ][Dato][Cr]
Dato Min:0 - Máx:64(*transmitir por código hexadecimal)
Véase ‘Mapeo de datos reales’.
Reconocimiento [g][ ][ID del Televisor][ ][OK/NG][Dato][x]
7Imagen principal/
secundaria
6
Canal de
dos/una parte
5
Uso de canal
físico
4
Reservado
3 2 1 0 Step
0 Principal 0 Dos 0 Uso x 0 0 0 0 NTSC Air
1 Secundaria 1 Uno 1 Sin uso x 0 0 0 1 NTSC Cable
x 0 0 1 0 ATSC Air
x 0 0 1 1 ATSC Cable_std
x 0 1 0 0 ATSC Cable_hrc
x 0 1 0 1 ATSC Cable_irc
x 0 1 1 0 ATSC cable_auto
x 0 1 1 1 Reservado
x x x x x ...
x 1 1 1 1 Reservado

190
APÉNDICE
AP
ÉN
DIC
E
AVISO SOBRE SOFTWARE DE CÓDIGO ABIERTO
Los siguientes ejecutables GPL y bibliotecas LGPL, MPL utilizados en este producto están sujetos a contratos
de licencia GPL2.0/LGPL2.1/MPL1.1:
GPL EXECUTABLES:
Linux kernel 2.6, busybox, e2fsprogs, jfsutils, lzo, msdl-1.1, mtd-utils, ntpclient, procps, udhcpc
LGPL LIBRARIES:
Atk, cairo, directFB, ffmpeg, glib, GnuTLS, gtk+, iconv, libintl, libgcrypt, libgpg-error, libsoup, libusb, pango,
uClibc, webkit
MPL LIBRARIES:
Nanox, spidermonkey
LG Electronics le ofrece un código fuente en CD-ROM por un precio que cubre el costo de realizar dicha
distribución, tal como el costo del soporte, el envío y el manejo si envía una petición por e-mail a LG
Electronics: [email protected]
Esta oferta es válida por un periodo de tres (3) años a partir de la fecha de distribución de este producto por
parte de LG Electronics.
Así mismo, podrá encontrar la traducción de las licencias GPL, LGPL en la dirección
http://www.gnu.org/licenses/old-licenses/gpl-2.0-translations.html,
http://www.gnu.org/licenses/old-licenses/lgpl-2.1-translations.html.
Este producto incluye software de fuente abierta
boost C++: software developed by http://www.boost.org distributed under the Boost Software License,
Version 1.0
c-ares : copyright © 1998 by the Massachusetts Institute of Technology
expat:
- copyright © 1998, 1999, 2000 Thai Open Source Software Center Ltd and Clark Cooper
- copyright © 2001-2007 Expat maintainers.
fontconfig: copyright © 2001, 2003 Keith Packard
freetype: copyright © 2003 The FreeType Project (www.freetype.org).
ICU: copyright © 1995-2008 International Business Machines Corporation and others.
libcurl: copyright © 1996 - 2008, Daniel Stenberg.
libjpeg: This software is based in part on the work of the Independent JPEG Group copyright © 1991 –
1998, Thomas G. Lane.
libmng: copyright © 2000-2007 Gerard Juyn, Glenn Randers-Pehrson
libpng: copyright © 1998-2008 Glenn Randers-Pehrson
libupnp: copyright © 2000-2003 Intel Corporation
libxml2 : copyright © 1998-2003 Daniel Veillard
libxslt: copyright © 2001-2002 Daniel Veillard
lua interpreter: copyright © 1994–2008 Lua.org, PUC-Rio
md5: copyright © 1991-2, RSA Data Security, Inc

191
AP
ÉN
DIC
E
openSSL:
- cryptographic software written by Eric Young.
- software written by Tim Hudson.
- software developed by the OpenSSL Project for use in the OpenSSL Toolkit. (http://www.openssl.org)
pixman:
- copyright © 1987, 1988, 1989, 1998 The Open Group
- copyright © 1987, 1988, 1989 Digital Equipment Corporation
- copyright © 1999, 2004, 2008 Keith Packard
- copyright © 2000 SuSE, Inc.
- copyright © 2000 Keith Packard, member of The XFree86 Project, Inc.
- copyright © 2004, 2005, 2007, 2008 Red Hat, Inc.
- copyright © 2004 Nicholas Miell
- copyright © 2005 Lars Knoll & Zack Rusin, Trolltech
- copyright © 2005 Trolltech AS
- copyright © 2007 Luca Barbato
- copyright © 2008 Aaron Plattner, NVIDIA Corporation
- copyright © 2008 Rodrigo Kumpera
- copyright © 2008 André Tupinambá
- copyright © 2008 Mozilla Corporation
- copyright © 2008 Frederic Plourde
portmap: copyright © 1983,1991 The Regents of the University of California.
tiff: copyright © 1987, 1993, 1994 The Regents of the University of California.
tinyxml: copyright © 2000-2006 Lee Thomason
xyssl:
- Copyright © 2006-2008 Christophe Devine
- Copyright © 2009 Paul Bakker
zlib: copyright © 1995-2005 Jean-loup Gailly and Mark Adler
Por este documento se concede permiso, gratuito, a cualquier persona a obtener una copia de este software
y los archivos de documentación asociados (el "Software"), para manipular el software sin restricciones,
incluyendo, pero no limitándose al derecho de utilización, copia, modificación, fusionar, publicar, distribuir,
conceder licencias o vender copias del Software y a permitir a estas personas que reciben el Software a hac-
erlo, sometiéndose a las siguientes condiciones:
EL SOFTWARE SE SUMINISTRA "TAL CUAL", SIN NINGÚN TIPO DE GARANTÍA, EXPRESA O IMPLÍCITA,
INCLUYENDO PERO NO LIMITADO A LAS GARANTÍAS DE COMERCIALIZACIÓN, IDONEIDAD PARA UN
PROPÓSITO PARTICULAR Y NO INFRACCIÓN. EN NINGÚN CASO, LOS TITULARES DE DERECHOS DE
AUTOR O AUTORES SERÁN RESPONSABLES DE NINGUNA RECLAMACIÓN, DAÑO U OTRAS
RESPONSABILIDADES, YA SEA EN UNA ACCIÓN DE CONTRATO, AGRAVIO O CUALQUIER OTRA FORMA,
QUE SURJAN DE, DE O EN CONEXION CON EL SOFTWARE O DEL USO O DE OTROS TRATOS EN EL
SOFTWARE.

NOTE
ENG
Some video codecs listed in the manual may not be supported, depending on the region (country).
POR
Alguns codecs de vídeo listados no manual podem não ser suportados, dependendo da região (país).
POL
Niektóre kodeki wideo wymienione w instrukcji mogą nie być obsługiwane, w zależności od regionu (kraju).
SPA
Algunos códecs de vídeo que figuran en el manual pueden no ser compatibles, dependiendo de la región (país).
THA

El número de modelo y serie del televisor se encuentra en la parte posterior y en un lateral deltelevisor respectivamente.Anótelo a continuación para tenerlo disponible encaso de necesitar asistencia.
MODELO
SERIE