
Oracle Eloqua Segments User Guide
61
Oracle Eloqua Segments User Guide ©2022 Oracle Corporation. All rights reserved 16-Jun-2022
-
Upload
khangminh22 -
Category
Documents
-
view
3 -
download
0
Transcript of Oracle Eloqua Segments User Guide

Oracle Eloqua Segments
User Guide
©2022 Oracle Corporation. All rights reserved 16-Jun-2022
©2022 Oracle Corporation. All rights reserved 2 of 61
Contents
Segments 4
Additional resources 7
Creating segments 8
Adding individual contacts to segments 11
Good to know 11
Adding contacts to segments using filter criteria 16
Good to know 16
Uploading contacts directly to segments 22
Adding shared filters and shared lists to segments 27
Good to know 27
Creating contact lists from a segment 32
Flattening a segment filter 32
Merging, intersecting, or trimming segment filters and lists 33
Examples 35
Flattening segment filters 35
Merging segment criteria 35
Intersecting segment criteria 36
Trimming segment criteria 37
Excluding segment criteria 39
Sharing filters and lists 41
Good to know 41
Viewing segment contacts 48
Exporting segment contacts 50
Tracking segment members in campaigns or programs 52

©2022 Oracle Corporation. All rights reserved 3 of 61
Viewing segment members in campaigns and programs 54
Viewing the segment members that entered a campaign or program 55
Customizing segment permissions 58
Deleting segments 60

©2022 Oracle Corporation. All rights reserved 4 of 61
Segments
Segments are groups of contacts generated based on filter criteria and contact lists.
Segments can filter contacts based on criteria like whether or not they receive a
newspaper, whether or not they registered for a conference, or whether or not they
visited a landing page.
Segments are used to feed email distribution in campaigns. They allow you to specify
which contacts are included, and then to customize the subsequent actions for those
contacts:
Examples
Segments can be very general, like "Email Opened," or very specific, like "Arborists
who live in Minnesota." Create segments that are appropriate for your company's
needs.
In most cases, it is more efficient to create small, targeted segments that you can
combine together to reach the entire audience. Creating large, complex segments that

©2022 Oracle Corporation. All rights reserved 5 of 61
are only appropriate for a single campaign is more time-consuming, and prevents you
from being able to reuse common segments in future campaigns. As always, your
business needs should determine how you create your segments.
Take the academy courses on segmentation to learn beginner to advanced
segmentation skills.
Consider the following examples of segments:
Example 1: Segment organized by job title
In this example, you want to create a segment that includes only executives that you
consider to be decision-makers among your contacts. Based on your product
knowledge, you know that the primary purchase decision-makers are the CEO, the
CTO, the CIO, and the CMO, along with SVPs, EVPs, and VPs for these functions. When
you create your segment, you can then filter based on those job titles. The following
example includes all C-level executive:
Example 2: Segment organized by sales territory
It is relatively easy to create a segment by sales territory if every one of your territories
corresponds to a single field value, such as a specific state, city, county, or zip code.
For sales territories that are harder to define, such as territories that cover multiple
states, or portions of different states, you can use multiple selection criteria to capture
the whole area.
©2022 Oracle Corporation. All rights reserved 6 of 61
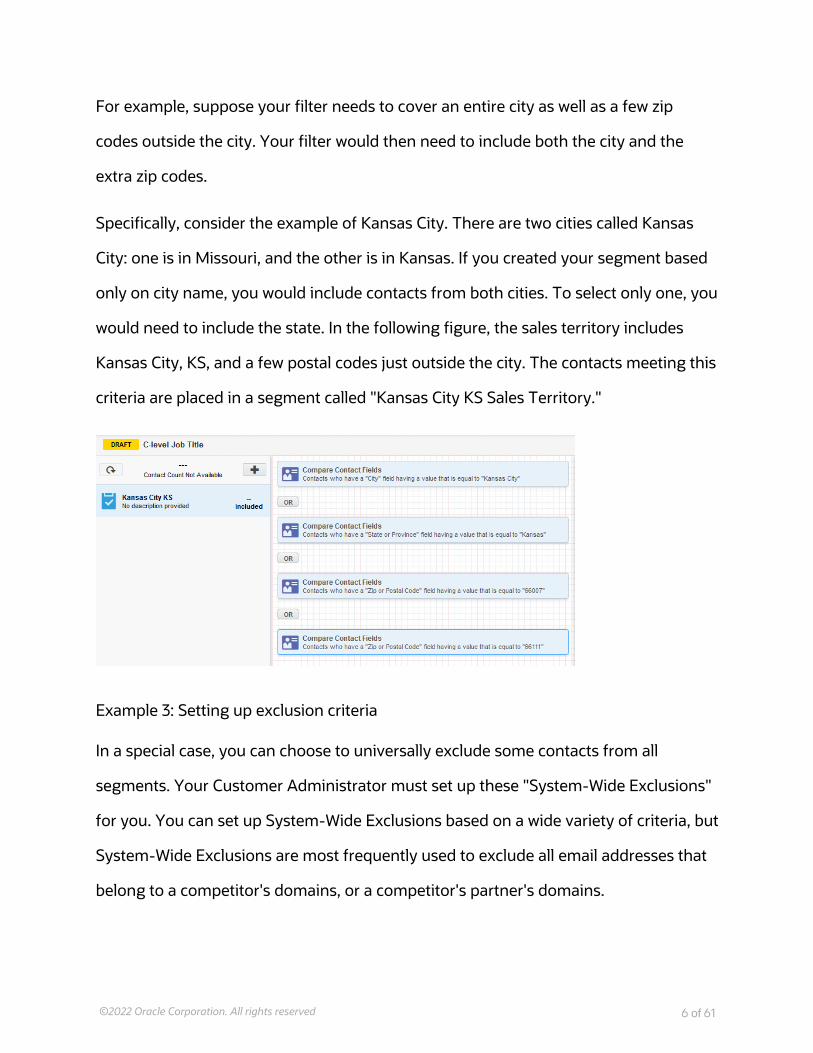
For example, suppose your filter needs to cover an entire city as well as a few zip
codes outside the city. Your filter would then need to include both the city and the
extra zip codes.
Specifically, consider the example of Kansas City. There are two cities called Kansas
City: one is in Missouri, and the other is in Kansas. If you created your segment based
only on city name, you would include contacts from both cities. To select only one, you
would need to include the state. In the following figure, the sales territory includes
Kansas City, KS, and a few postal codes just outside the city. The contacts meeting this
criteria are placed in a segment called "Kansas City KS Sales Territory."
Example 3: Setting up exclusion criteria
In a special case, you can choose to universally exclude some contacts from all
segments. Your Customer Administrator must set up these "System-Wide Exclusions"
for you. You can set up System-Wide Exclusions based on a wide variety of criteria, but
System-Wide Exclusions are most frequently used to exclude all email addresses that
belong to a competitor's domains, or a competitor's partner's domains.

©2022 Oracle Corporation. All rights reserved 7 of 61
Additional resources
Oracle University: Modern Marketing: Revenue Performance Management Series
Oracle University: Eloqua 10: Advanced Segmentation

©2022 Oracle Corporation. All rights reserved 8 of 61
Creating segments
Segments are groups of contacts that grouped together based on criteria you specify.
A segment may be a list of contacts you provide, or it may be more dynamic based on
implicit or explicit information about the contact. After you create a segment it can be
used throughout Oracle Eloqua.
To create a new segment:
1. Navigate to Audience , then click Segments.
2. Click Create a Segment.
3. Click Blank Segment or a template, then click Choose.
4. To build your segment, in the left pane, click Add . Then click one of the following
options.
l Filter criteria: Filter contacts based on implicit or explicit data about the contact. For example, filter
for a hot lead score or engaged contacts. Or filter based on contact or account fields. Filters are a
powerful component of segmentation and you can include multiple filters to make sure you reach
your target audience.

©2022 Oracle Corporation. All rights reserved 9 of 61
Z Important: Filtering on activities only searches from up to 1 year of historical records
(except Subscription and Bounceback, which search up to 10 years). For example, if you set
up an activity-based filter criterion of before 5/15/2019, the actual period of search is
between 5/14/2018 and 5/14/2019. Additionally, the filter cannot search more than 2 years
from the current date. For example, if today's date is 3/18/2019, and you set up an activity-
based filter criterion of before 4/22/2007, the filter will search between 3/18/2017 and
3/18/2018. That is, if you set the filter criterion to search further than two years from the
current date, the filter will instead search two years back from the current date.
l Individual contacts: Add individual contacts from your database.
l Uploading contacts: Upload contacts from an upload file.
l Shared filter or shared list: Use a shared filter or list available to you.
¤ Tip: You can rearrange segment elements by dragging and dropping.
5. Choose any additional options:
l To exclude contacts from the segment, see Excluding segment criteria
l To combine segment criteria, see Creating contact lists from a segment, or some example
scenarios.
l To share a segments filters or lists, see Sharing filters and lists

©2022 Oracle Corporation. All rights reserved 10 of 61
6. Click Save.
After you save the segment, Oracle Eloqua calculates the number of contacts in the
segment. You can click Refresh to see the latest totals.
¤ Tip: The more criteria you add, the longer it can take to refresh the segment
totals. Each criterion must be evaluated against the entire contact database. So,
the fewer criteria, the faster the segment totals can be returned.
When a segment is added to a campaign or to a program, the segment becomes
Active and you cannot delete it. From a campaign canvas or program canvas, users
can also see how many contacts the segment includes. However, the totals shown on
the canvas might not be the same as the totals you see for the segment itself. See
Tracking segment members in campaigns or programs for more information.
You can change an Active segment, but changes you make can impact active
campaigns or programs.

©2022 Oracle Corporation. All rights reserved 11 of 61
Adding individual contacts to segments
You can select individual contacts to a segment. This is ideal when you want to ensure
that you include a specific contact in your segment.
Good to know
l Existing Oracle Eloqua customers can have the option to enable Segment Configuration for
TimeZone. This feature evaluates date/time field filters in the executing user's timezone.
Previously, all filtering was based on Eastern Standard Time (UTC -5:00).
l To enable Segment Configuration for TimeZone, log a service request with My Oracle
Support. Once you enable this feature, it cannot be reversed.
l Newly provisioned Oracle Eloqua instances will have Segment Configuration for TimeZone
enabled by default.
l Filter operators are divided into two categories: Static Operators (before, after, on or before,
on or after, on, within) and Dynamic Operators (dynamically equal to, dynamically before,
dynamically after, dynamically on or before, dynamically on or after, within the last, within
the next).
l If Segment Configuration for TimeZone is enabled, Static Operators will use the filter
creator's time zone to convert criteria and store it in the database. Segment filter execution
is based on these database values, which are already converted into Eastern Standard Time
(EST). No Conversion is done during execution.

©2022 Oracle Corporation. All rights reserved 12 of 61
-Example: A contact's DateCreated operator is before 2021-04-03. If the user who
created the filter is from Australian Eastern Standard Time (AEST), Oracle Eloqua
converts the date entered from 2021-04-03 12:00:00 AM in AEST to 2021-04-02
9:00:00 AM in EST to store in the database. When executing the filter, the segment
finds all contacts with the created date before 2021-04-02 9:00:00 in EST.
l If Segment Configuration for TimeZone is enabled, Dynamic Operators will use the
executing user’s time zone to calculate results.
-Example: A contact's DateCreated operator is dynamically equal to "today". If a
user executing the filter is from AEST and "today" in AEST is 2021-04-22 5:00 AM,
Oracle Eloqua finds all contacts with the created date 2021-04-22 in AEST, which is

©2022 Oracle Corporation. All rights reserved 13 of 61
from 2021-04-21 10:00 AM to 2021-04-22 9:59:59 AM in EST. Conversion is done
during filter execution with the executing user's time zone.
To add an individual contact to a segment:
1. Navigate to Audience , then click Segments.
2. Open an existing segment, or create a new one.
3. Click Add in the left pane, then click Individual Contacts .
4. Click Add in the right pane.

©2022 Oracle Corporation. All rights reserved 14 of 61
5. Search for the contacts you want to add.
6. Click the contact name in the search results, then click Add Contacts.
The contact is now listed in the contact editor.
¤ Tip: If you have the right Contact Interface Access setting, you can right-click on
the contact then click Open Contact to see contact details.
7. To give the criterion a descriptive name or brief description, in the left pane, double-click the
name or description. This will help you easily identify the segment's criteria.
8. Click Save.

©2022 Oracle Corporation. All rights reserved 15 of 61
Click the icon in the left pane to add more contacts using filter criteria, an upload
file, or by choosing individual contacts.

©2022 Oracle Corporation. All rights reserved 16 of 61
Adding contacts to segments using filtercriteria
You can use filter criteria to dynamically build your segment. For example, you can
build a segment based on contact fields, lead score, digital body language, and so on.
Good to know
l Existing Oracle Eloqua customers can have the option to enable Segment Configuration for
TimeZone. This feature evaluates date/time field filters in the executing user's timezone.
Previously, all filtering was based on Eastern Standard Time (UTC -5:00).
l To enable Segment Configuration for TimeZone, log a service request with My Oracle
Support. Once you enable this feature, it cannot be reversed.
l Newly provisioned Oracle Eloqua instances will have Segment Configuration for TimeZone
enabled by default.
l Filter operators are divided into two categories: Static Operators (before, after, on or before,
on or after, on, within) and Dynamic Operators (dynamically equal to, dynamically before,
dynamically after, dynamically on or before, dynamically on or after, within the last, within
the next).
l If Segment Configuration for TimeZone is enabled, Static Operators will use the filter
creator's time zone to convert criteria and store it in the database. Segment filter execution
is based on these database values, which are already converted into Eastern Standard Time
(EST). No Conversion is done during execution.

©2022 Oracle Corporation. All rights reserved 17 of 61
-Example: A contact's DateCreated operator is before 2021-04-03. If the user who
created the filter is from Australian Eastern Standard Time (AEST), Oracle Eloqua
converts the date entered from 2021-04-03 12:00:00 AM in AEST to 2021-04-02
9:00:00 AM in EST to store in the database. When executing the filter, the segment
finds all contacts with the created date before 2021-04-02 9:00:00 in EST.
l If Segment Configuration for TimeZone is enabled, Dynamic Operators will use the
executing user’s time zone to calculate results.
-Example: A contact's DateCreated operator is dynamically equal to "today". If a
user executing the filter is from AEST and "today" in AEST is 2021-04-22 5:00 AM,
Oracle Eloqua finds all contacts with the created date 2021-04-22 in AEST, which is

©2022 Oracle Corporation. All rights reserved 18 of 61
from 2021-04-21 10:00 AM to 2021-04-22 9:59:59 AM in EST. Conversion is done
during filter execution with the executing user's time zone.
To add contacts using filter criteria:
1. Navigate to Audience , then click Segments.
2. Open an existing segment, or create a new one.
3. Click Add in the left pane, then click Filter Criteria . A list of filter criteria opens on the
right pane.
4. In the right pane, double-click the filter criteria you want to add to the segment.
5. Double-click the criteria you added to configure it. Click outside the window to close it.

©2022 Oracle Corporation. All rights reserved 19 of 61
Z Important: Filtering on activities only searches from up to 1 year of historical
records (except Subscription and Bounceback, which search up to 10 years). For
example, if you set up an activity-based filter criterion of before 5/15/2019, the actual
period of search is between 5/14/2018 and 5/14/2019. Additionally, the filter cannot
search more than 2 years from the current date. For example, if today's date is
3/18/2019, and you set up an activity-based filter criterion of before 4/22/2007, the
filter will search between 3/18/2017 and 3/18/2018. That is, if you set the filter
criterion to search further than two years from the current date, the filter will instead
search two years back from the current date.
Some filter criteria can be configured to use a list as part of the comparison. For example, to
filter on a list of countries or based on a couple of sales reps. To build a list for one time use,
you can use a quicklist. To be able to reuse the list throughout Oracle Eloqua, use a picklist.
Quicklists are great for short lists that are only intended for one time use. But if you want to
build a long list or reuse the list, it is best to use a picklist. See Creating picklists for more
information.
6. Add additional filter criteria as needed. When you add filter criteria, you join the filters using
a Boolean AND or OR comparison. To switch between AND or OR, click the operator label on

©2022 Oracle Corporation. All rights reserved 20 of 61
the canvas.
When you use the AND operator, all filter criteria must be met in order to be included. In the
example above, the segment would include only contacts whose salesperson is Michael
Gruber and who have also opened an email within the time frame specified.
When you use an OR operator, any of the filter criteria could be met in order to be included.
So, in the same example above, the segment would include contacts whose salesperson is
Michael or if they opened an email.
7. To give your filter a descriptive name or brief description, in the left pane, double-click the
filter name or description. This will help you easily identify the segment's criteria.
8. Click Save.
¤ Tip: If you want to view the contacts in a Filter Criteria, but it's been more
than 24 hours since the segment was last calculated, click to refresh the

©2022 Oracle Corporation. All rights reserved 21 of 61
segment first. You can then view the filter's contacts in your segment by right-
clicking the Filter Criteria then clicking View Contacts...
After you finish: If you want to share the filter, see Sharing filters and lists

©2022 Oracle Corporation. All rights reserved 22 of 61
Uploading contacts directly to segments
You can use an upload file to add contacts to a segment. Any new contacts are
automatically added to your contact database. Depending on how your configure the
upload wizard, any existing contact records could be updated with new information
you provide in the upload file.
Before you begin:
l Create your upload file (.txt, .csv, .xls, .xlsx). The upload file should only contain the contacts
that you want to add or update.
l Separate contact fields in a .csv or .txt file using a comma (,), pipe (|), or semi-colon (;).
l The first row of the file must be column headings. Oracle Eloqua will attempt to map the
headings to existing contact fields.
l Make sure that you can map the data in your upload file to contact fields in Oracle Eloqua.
Use similar naming conventions in your upload file to make this mapping easier.
l Make sure that contacts in your upload file have a unique identifier (such as an email
address).
To upload contacts to a segment:
1. Navigate to Audience , then click Segments.
2. Open an existing segment, or create a new one.

©2022 Oracle Corporation. All rights reserved 23 of 61
3. Click Add in the left pane, then click Upload Contacts .
4. Click and browse to the upload file.
The upload wizard continues to step 2.

©2022 Oracle Corporation. All rights reserved 24 of 61
5. Verify the contents of the file on the Review tab and click Next Step.
6. Complete the Map Fields window.
l Make sure you map all the data in your upload file to the applicable contact field.
l Make sure that you select when you want the contact fields to update using the All Fields Update
Type drop-down list. For example, update the field if it is blank or not blank. Using Set to default
will use the default configuration for each field. If a specific field should be updated differently
than the rest, you can double-click the field and configure the update type for that specific field.

©2022 Oracle Corporation. All rights reserved 25 of 61
7. Click Next Step.
8. Complete the final step of the wizard and click Finish.
9. To give your criteria a descriptive name or brief description, in the left pane, double-click the
filter name or description. This will help you easily identify the segment's criteria.
Click the icon in the left pane to add more contacts using filter criteria, an upload
file, or by choosing individual contacts.

©2022 Oracle Corporation. All rights reserved 26 of 61
Troubleshooting
If your accounts didn't upload as expected see this troubleshooting information.

©2022 Oracle Corporation. All rights reserved 27 of 61
Adding shared filters and shared lists tosegments
You can also add contacts to your segments using Shared Filters and Shared Lists, this
allows you to pick from a list of saved common resources. You can view the available
shared filters and lists by selecting Tools from the Audience menu.
Good to know
l Existing Oracle Eloqua customers can have the option to enable Segment Configuration for
TimeZone. This feature evaluates date/time field filters in the executing user's timezone.
Previously, all filtering was based on Eastern Standard Time (UTC -5:00).
l To enable Segment Configuration for TimeZone, log a service request with My Oracle
Support. Once you enable this feature, it cannot be reversed.
l Newly provisioned Oracle Eloqua instances will have Segment Configuration for TimeZone
enabled by default.
l Filter operators are divided into two categories: Static Operators (before, after, on or before,
on or after, on, within) and Dynamic Operators (dynamically equal to, dynamically before,
dynamically after, dynamically on or before, dynamically on or after, within the last, within
the next).
l If Segment Configuration for TimeZone is enabled, Static Operators will use the filter
creator's time zone to convert criteria and store it in the database. Segment filter execution
is based on these database values, which are already converted into Eastern Standard Time
(EST). No Conversion is done during execution.

©2022 Oracle Corporation. All rights reserved 28 of 61
-Example: A contact's DateCreated operator is before 2021-04-03. If the user who
created the filter is from Australian Eastern Standard Time (AEST), Oracle Eloqua
converts the date entered from 2021-04-03 12:00:00 AM in AEST to 2021-04-02
9:00:00 AM in EST to store in the database. When executing the filter, the segment
finds all contacts with the created date before 2021-04-02 9:00:00 in EST.
l If Segment Configuration for TimeZone is enabled, Dynamic Operators will use the
executing user’s time zone to calculate results.
-Example: A contact's DateCreated operator is dynamically equal to "today". If a
user executing the filter is from AEST and "today" in AEST is 2021-04-22 5:00 AM,
Oracle Eloqua finds all contacts with the created date 2021-04-22 in AEST, which is

©2022 Oracle Corporation. All rights reserved 29 of 61
from 2021-04-21 10:00 AM to 2021-04-22 9:59:59 AM in EST. Conversion is done
during filter execution with the executing user's time zone.
To add a shared filter to a segment:
1. Navigate to Audience , then click Segments.
2. Open an existing segment, or create a new one.
3. Click on the left pane, then click Shared Filter .
4. Click the filter you want in the Shared Filter Chooser, then click Choose.
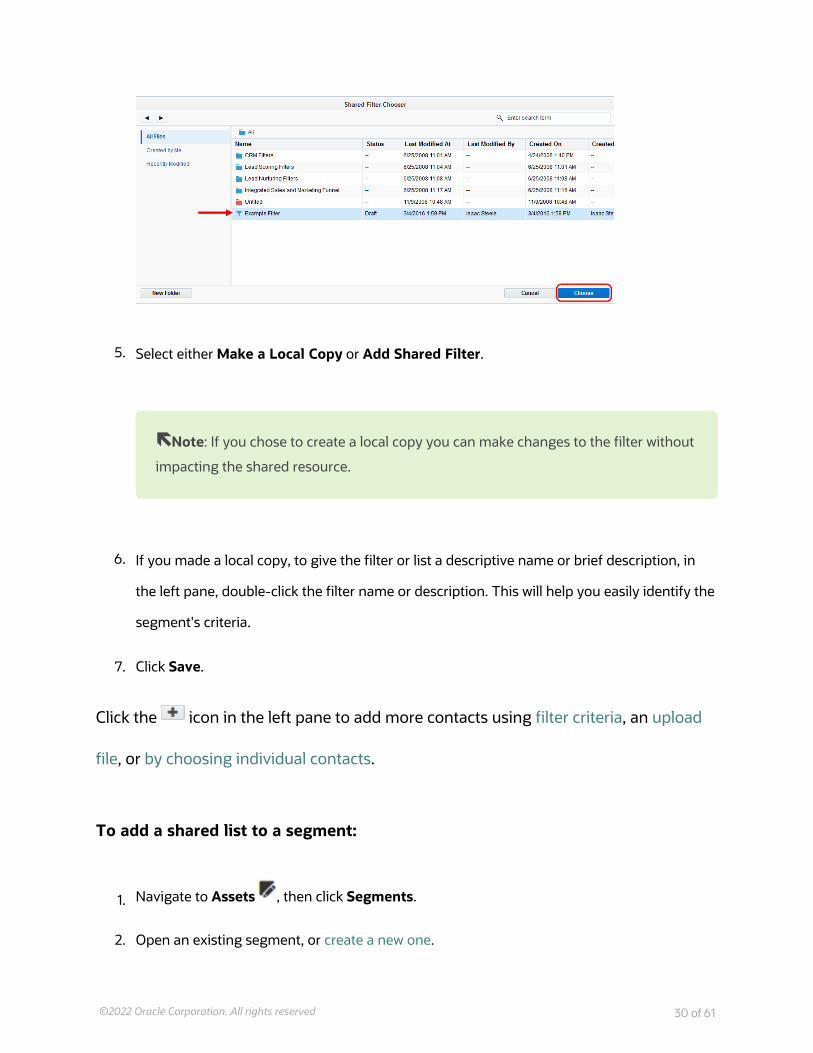
©2022 Oracle Corporation. All rights reserved 30 of 61
5. Select either Make a Local Copy or Add Shared Filter.
ëNote: If you chose to create a local copy you can make changes to the filter without
impacting the shared resource.
6. If you made a local copy, to give the filter or list a descriptive name or brief description, in
the left pane, double-click the filter name or description. This will help you easily identify the
segment's criteria.
7. Click Save.
Click the icon in the left pane to add more contacts using filter criteria, an upload
file, or by choosing individual contacts.
To add a shared list to a segment:
1. Navigate to Assets , then click Segments.
2. Open an existing segment, or create a new one.
©2022 Oracle Corporation. All rights reserved 31 of 61
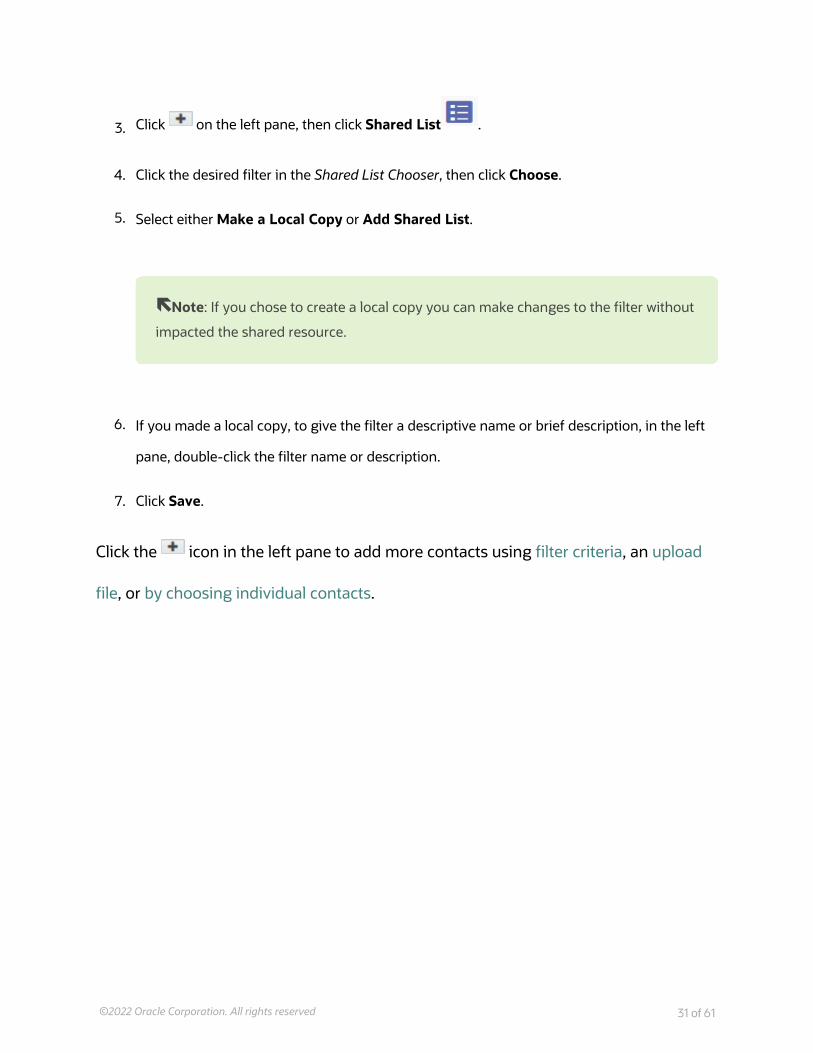
3. Click on the left pane, then click Shared List .
4. Click the desired filter in the Shared List Chooser, then click Choose.
5. Select either Make a Local Copy or Add Shared List.
ëNote: If you chose to create a local copy you can make changes to the filter without
impacted the shared resource.
6. If you made a local copy, to give the filter a descriptive name or brief description, in the left
pane, double-click the filter name or description.
7. Click Save.
Click the icon in the left pane to add more contacts using filter criteria, an upload
file, or by choosing individual contacts.

©2022 Oracle Corporation. All rights reserved 32 of 61
Creating contact lists from a segment
With Oracle Eloqua, you can create a static contact list using a segment's filters or lists.
You can then share the contact list so that others can use it across Oracle Eloqua, or
export it so that you can use the list in some other way. Here are some examples of
how you can create contact lists from a segment.
You can use the following options to create a new contact list from a segment's filters
and lists:
l Flattening a segment filter
l Merging, intersecting, or trimming segment filters and lists
Flattening a segment filter
You can create a contact list from a single filter by flattening it. The new contact list
contains all of the contacts that met the filter criteria at the time that the filter was
flattened. View an example scenario.
If you want to combine multiple filters to create a contact list, you must merge,
intersect, or trim the filters.
To flatten a segment filter:
1. Navigate to Audience , then click Segments.
2. Open an existing segment, or create a new one.

©2022 Oracle Corporation. All rights reserved 33 of 61
3. Right-click the segment filter that you want to flatten, then click Flatten.
The filter is converted to a contact list.
4. Give the new contact a descriptive name or description by double-clicking it.
5. You can then share the list or export it.
Merging, intersecting, or trimming segment filters andlists
You can create a new contact list by combining a segment's filters and lists. When you
do this, you use one of the following options to determine how the final contact list
should be generated:
l Merge: Combine all the contacts from the selected filters and lists into a new contact list. Any
duplicates are removed from the final list. This is useful for eliminating repeats or crossover
between multiple filters and lists. View an example scenario.
l Intersect: Combine all the contacts from the selected filters and lists and only keep the
common contacts. View an example scenario.

©2022 Oracle Corporation. All rights reserved 34 of 61
l Trim: Combine all the contacts from the selected filters and lists and only keep the contacts
unique to one of the selected filters or lists. View an example scenario.
Before you begin:
All the filters and lists that you want to combine must be a part of the same segment.
If they are in different segments, add them into a new segment so that you can merge,
intersect or trim the filters and lists.
To merge, intersect, or trim segment criteria:
1. Navigate to Audience , then click Segments.
2. Open an existing segment, or create a new one.
3. Using standard keyboard shortcuts, select each filter or list you want to include in the merge,
intersect, or trim.
4. Right-click the components, then click one of the following options:
l Merge: A contact list containing all of the contacts from the merged filters and lists is created.
l Intersect: A contact list containing the contacts that were common to all criteria is created.
l Trim: Select one of the filters or lists from the drop-down list as a target in which to trim from. A
contact list containing the contacts that are unique to the specified criteria is created.
The selected filters and lists are combined into a new contact list. The original filters or lists
remain unaffected.
5. Give the new contact a descriptive name or description by double-clicking it.
6. You can then share the list or export it.

©2022 Oracle Corporation. All rights reserved 35 of 61
Examples
Flattening segment filters
You have a segment designed to include only non-English speaking contacts from
Chicago. You want to include this segment in a campaign and but don't want to
include any new contacts. You can convert this filter to a contact list by flattening it. As
a contact list, this segment will no longer add new contacts.
Merging segment criteria
Your organization is broadening its market and needs to set up a contact list of non-
English speaking contacts in Chicago and New York. In your segment, you have the
flattened list of non-English speaking contacts from Chicago, and a filter that detects
contacts who speak any language other than English in New York.

©2022 Oracle Corporation. All rights reserved 36 of 61
You now need to combine these cities into a single contact list. By merging the two
criteria, you can create a contact list with all contacts from the filter and the existing
list. Any duplicates are removed.
Intersecting segment criteria
Your organization now needs to create a contact list for contacts who work for Apple
or Oracle, in the list of non-English speaking contacts from Chicago and New York you
created earlier. Create a filter for the two companies and use the intersect operation
with the contact list to determine which contacts are in both criteria. This method is
especially effective if you have more companies you need to check for, as you can
reuse the location criteria.

©2022 Oracle Corporation. All rights reserved 37 of 61
Trimming segment criteria
You instead need to create a contact list for non-English speaking contacts who do not
work for Apple or Oracle, in Chicago and New York. With the previously created filter
and list, use the trim operation to determine which contacts are uniquely in the
location filter. This will provide you with a contact list of those contacts not employed
by Apple or Oracle, in Chicago and New York.

©2022 Oracle Corporation. All rights reserved 38 of 61

©2022 Oracle Corporation. All rights reserved 39 of 61
Excluding segment criteria
When you add a contact list or segment filter to a segment, the contacts in that list are
included in the segment by default. However, you can also use contact lists and
segment filters to exclude contacts.
-Example: You could choose to exclude people who opened an email in the
last week from a segment that focuses on re-engagement. Or, you might want to
exclude contacts who work for one of your competitors.
Using the segment editor, you can easily toggle filters and lists to specify inclusion or
exclusion. You can view excluded contacts in the contact viewer.
Z Important: Filtering on activities only searches from up to 1 year of historical
records (except Subscription and Bounceback, which search up to 10 years). For
example, if you set up an activity-based filter criterion of before 5/15/2019, the
actual period of search is between 5/14/2018 and 5/14/2019. Additionally, the
filter cannot search more than 2 years from the current date. For example, if
today's date is 3/18/2019, and you set up an activity-based filter criterion of
before 4/22/2007, the filter will search between 3/18/2017 and 3/18/2018. That

©2022 Oracle Corporation. All rights reserved 40 of 61
is, if you set the filter criterion to search further than two years from the current
date, the filter will instead search two years back from the current date.
To exclude the contacts in a segment filter or list:
1. Navigate to Audience , then click Segments.
2. Open an existing segment, or create a new one.
3. In the left pane, right-click the segment criteria, then click Switch to Exclude.
The segment or list indicates how many contacts are now excluded.
4. Click Save.

©2022 Oracle Corporation. All rights reserved 41 of 61
Sharing filters and lists
Sharing a filter or list makes it available to other users in Oracle Eloqua. Shared filters
and lists can easily be combined and reused to build the target segments you need for
your marketing campaigns.
Good to know
l Existing Oracle Eloqua customers can have the option to enable Segment Configuration for
TimeZone. This feature evaluates date/time field filters in the executing user's timezone.
Previously, all filtering was based on Eastern Standard Time (UTC -5:00).
l To enable Segment Configuration for TimeZone, log a service request with My Oracle
Support. Once you enable this feature, it cannot be reversed.
l Newly provisioned Oracle Eloqua instances will have Segment Configuration for TimeZone
enabled by default.
l Filter operators are divided into two categories: Static Operators (before, after, on or before,
on or after, on, within) and Dynamic Operators (dynamically equal to, dynamically before,
dynamically after, dynamically on or before, dynamically on or after, within the last, within
the next).
l If Segment Configuration for TimeZone is enabled, Static Operators will use the filter
creator's time zone to convert criteria and store it in the database. Segment filter execution
is based on these database values, which are already converted into Eastern Standard Time
(EST). No Conversion is done during execution.

©2022 Oracle Corporation. All rights reserved 42 of 61
-Example: A contact's DateCreated operator is before 2021-04-03. If the user who
created the filter is from Australian Eastern Standard Time (AEST), Oracle Eloqua
converts the date entered from 2021-04-03 12:00:00 AM in AEST to 2021-04-02
9:00:00 AM in EST to store in the database. When executing the filter, the segment
finds all contacts with the created date before 2021-04-02 9:00:00 in EST.
l If Segment Configuration for TimeZone is enabled, Dynamic Operators will use the
executing user’s time zone to calculate results.
-Example: A contact's DateCreated operator is dynamically equal to "today". If a
user executing the filter is from AEST and "today" in AEST is 2021-04-22 5:00 AM,
Oracle Eloqua finds all contacts with the created date 2021-04-22 in AEST, which is

©2022 Oracle Corporation. All rights reserved 43 of 61
from 2021-04-21 10:00 AM to 2021-04-22 9:59:59 AM in EST. Conversion is done
during filter execution with the executing user's time zone.
To share a list:
1. Navigate to Audience , then click Segments.
2. Open an existing segment, or create a new one. Make sure you save the segment before
trying to share a list.

©2022 Oracle Corporation. All rights reserved 44 of 61
3. In the left pane, right-click the list that you want to share, then click Share.
4. Select an option from the Create Shared List dialog:
a. Continue Using Local List: Oracle Eloqua creates a shared list where it copies the members from
your local list. You will continue working in your local list. This operation is asynchronous; you will
receive an email once the operation is complete. These lists can be used in programs and
campaigns.
b. Use New Shared List: Oracle Eloqua marks your list as shared. You will now be working within the
shared list.
©2022 Oracle Corporation. All rights reserved 45 of 61
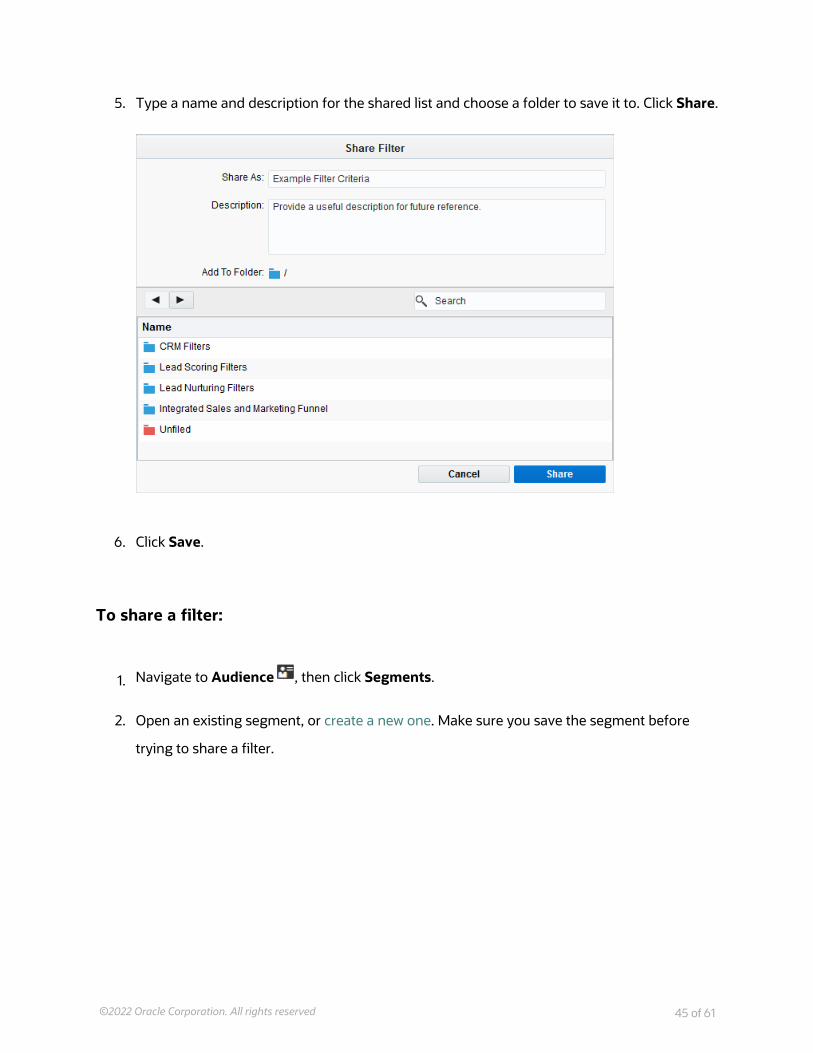
5. Type a name and description for the shared list and choose a folder to save it to. Click Share.
6. Click Save.
To share a filter:
1. Navigate to Audience , then click Segments.
2. Open an existing segment, or create a new one. Make sure you save the segment before
trying to share a filter.

©2022 Oracle Corporation. All rights reserved 46 of 61
3. In the left pane, right-click the filter that you want to share, then click Share.
4. Type a name and description for the shared filter and choose a folder to save it to. Click
Share.

©2022 Oracle Corporation. All rights reserved 47 of 61
5. After you share the filter, you are prompted to update the segment to use the new shared
item or continue to use the original one. Choose an option and then click Save.

©2022 Oracle Corporation. All rights reserved 48 of 61
Viewing segment contacts
You can view the list of contacts that are included and excluded in your segment.
ëNote: Oracle Eloqua prompts you to refresh the segment if it has been more
than 24 hours since refreshing the segment.
To view the contacts in a segment:
1. Navigate to Audience , then click Segments.
2. Open an existing segment, or create a new one.
3. Click View Contacts.
The View Segment Members window opens. There are three tabs in this window:
l All: This is the default tab, it lists all contacts that meet the segment's criteria.
l Included: This tab lists all contacts that are included by a segment's criteria.
l Excluded: This tab lists all contacts that are excluded by a segment's criteria.

©2022 Oracle Corporation. All rights reserved 49 of 61
-Example: Consider a segment that includes all contacts from Canada and excludes
a small list of Canadian contacts: Charlotte Brown, Maxim Engel, Adela Kolodziej, and
Huyen To. When viewing the segment contacts, the All tab would show the final
results of the segment (that is, all contacts from Canada except for Charlotte, Maxim,
Adela, and Huyen). The Included tab would show all the contacts from Canada
(including Charlotte, Maxim, Adela, and Huyen). The Excluded tab would show the
excluded contacts (Charlotte, Maxim, Adela, and Huyen).
4. Choose any additional options:
l To filter the results, use the Search field or select a Contact View.
l To export the segment contacts, click Export. See Exporting segment contacts for more
information.
You can also view segment members in a campaign or program. See Viewing segment
members in campaigns and programs for more information.

©2022 Oracle Corporation. All rights reserved 50 of 61
Exporting segment contacts
You can export segment contacts to an export file that you can download. For
example, you could use the export to later update contacts in bulk or download the
export file for use by other systems at your organization.
¤ Tip: To schedule an export or to store the export file on an SSH File Transfer
Protocol (SFTP) server, you can use the data export tool. See Exporting contacts
or accounts for more information.
To export a segment:
1. Navigate to Audience , then click Segments.
2. Create a segment with the contacts that you want to export.
3. Click View Contacts.
The View Segment Members window opens.
ëNote: You are prompted to refresh the segment if more than 24 hours has passed
since the last time the segment was evaluated.

©2022 Oracle Corporation. All rights reserved 51 of 61
4. If applicable, change the Contact View to ensure you are exporting the contact fields you
want.
5. Click Export.
6. Configure the export window and click Export.
A link to download the export data will be sent to the specified email address. The export is
available from that link for 14 days.

©2022 Oracle Corporation. All rights reserved 52 of 61
Tracking segment members in campaignsor programs
From the program canvas or campaign canvas, you can view the contacts that entered
a campaign or program from a segment or view all the contacts that entered the
campaign or program from a segment.
When a campaign or program is in theDraft or Scheduled state, you can see thenumber of contacts that are currently inthat segment.
The number of contacts is taken from the
latest successful calculation of the
segment's count by the same user. The
segment's count recalculation can be
triggered either explicitly by pressing
Refresh Count or saving the segment. If a
segment is used in campaign or program,
ensure the segment is saved and the new
count displayed after any changes to
segment structure. Otherwise the number
of contacts displayed on campaign or
program can be outdated (for example,
showing the number before the changes).
Before you activate a campaign or

©2022 Oracle Corporation. All rights reserved 53 of 61
program, this segment count can change
if the number of contacts in the segment
changes.
l To see the latest contact count, refresh
the canvas or open it again.
When a campaign or program is Activeyou can see how many segmentmembers have entered the segment stepso far. This number is different than thetotal segment count you saw earlier in theDraft state. As more contacts flow fromthe segment through the workflow, thesegment count changes.
l To see the latest contact count, refresh
the canvas or open it again.
l To view details about the contacts that
entered the step, double-click the
segment count link. See Viewing the
segment members that entered a
campaign or program for more
information.
When a campaign is Active and contactsbegin moving through the campaign orprogram workflow, you can see thenumber of contacts that are resting orbeing processed in each step. The countchanges in real-time as contacts movethrough the step.
l To see the latest contact count, refresh
the canvas or open it again.

©2022 Oracle Corporation. All rights reserved 54 of 61
l To view details about the contacts in the
step, double-click the contact count. See
Viewing the step members report for
more information.
Viewing segment members in campaigns and programs
While your campaign or program is in a DRAFT state, you can view the contacts that
are included in or excluded from a segment.
To view segment members in a campaign or program:
1. Open a campaign or program.
2. Double-click the contact count on the step.
The View Segment Members window opens, and displays a list of contacts currently in the
segment.

©2022 Oracle Corporation. All rights reserved 55 of 61
There are two tabs in the report:
l Included: Contacts in this list can enter the campaign or program.
l Excluded: Contacts in this list cannot enter the campaign or program from this segment.
3. To download the report to a .csv or Microsoft Excel file, click Export. A link to the export file
is emailed.
After the campaign or program is active, and contacts begin to move from the
segment into subsequent steps, you will not be able to open this report. You can use
the segment members step entry report to view the contacts that have entered the
step so far.
Viewing the segment members that entered a campaignor program
If contacts enter your campaign or program through a segment, you can view the
segment members that entered so far. The report details information about the

©2022 Oracle Corporation. All rights reserved 56 of 61
contact and how they entered the campaign.
Z Important: You can only report on the last three months of campaign or
program data. You can only view the report for ACTIVE campaigns. You can use
operations reports or Insight for more information about a completed campaign.
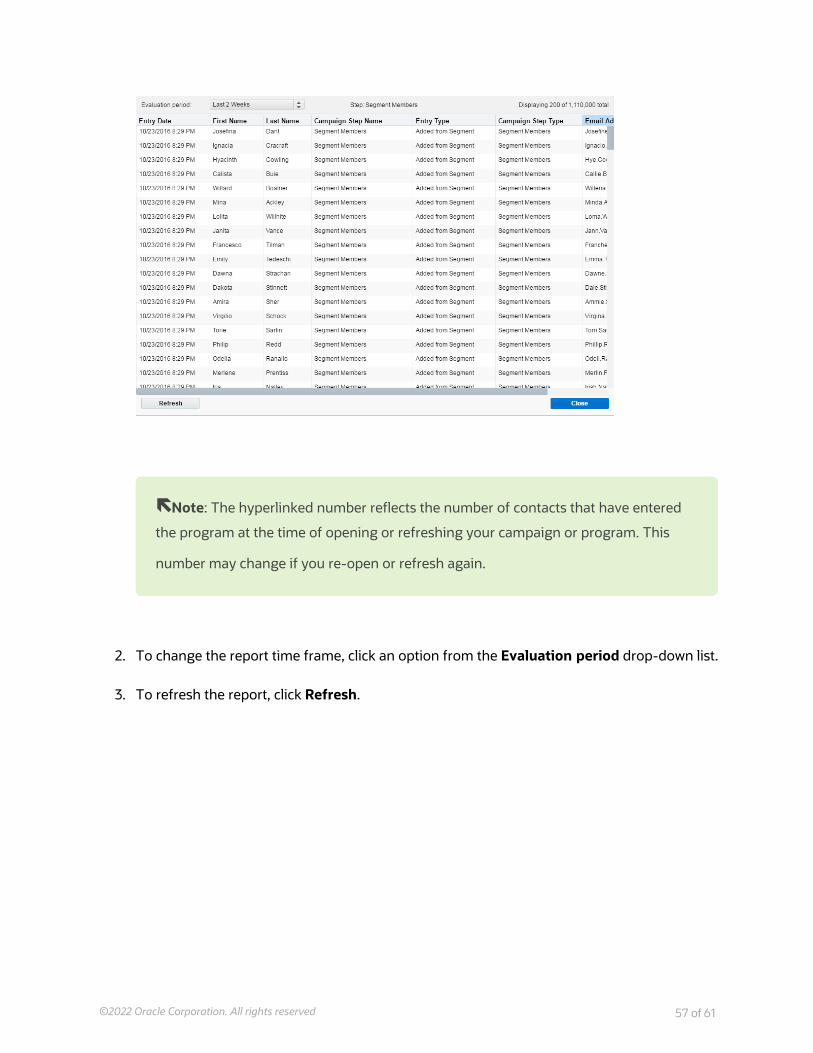
To view the Segment Members report:
1. In the campaign canvas or program canvas, double-click the link in the segment step.
The report opens.
©2022 Oracle Corporation. All rights reserved 57 of 61
ëNote: The hyperlinked number reflects the number of contacts that have entered
the program at the time of opening or refreshing your campaign or program. This
number may change if you re-open or refresh again.
2. To change the report time frame, click an option from the Evaluation period drop-down list.
3. To refresh the report, click Refresh.

©2022 Oracle Corporation. All rights reserved 58 of 61
Customizing segment permissions
After creating a segment, the creator has full permission to the segment. The creator
or an administrator can customize who can view, edit, or delete an individual segment.
Customizing the segment permissions does not change the permissions of any shared
filters or lists in the segment. Shared filters and lists have their own permissions.
ëNote: Administrators set default asset permissions. Customizing a segment's
permissions override those defaults.
You can specify the following access:
l View: Allows the user or group to search for and open the asset.
l Edit: Allows the user or group to change the asset.
l Delete: Allows the user or group to delete the asset.
l Set Security: Allows the user or group to control access to the asset.
To customize segment permissions:
1. Navigate to Audience , then click Segments.
2. Open an existing segment.

©2022 Oracle Corporation. All rights reserved 59 of 61
3. Click Actions, then click Permissions.
4. Do one of the following:
l To add a user or user group to the list, click Add .
l To remove a user or user group, click the user or group and click Delete .
5. Select the check boxes to set the permissions for the user or user group.
6. Click Save.

©2022 Oracle Corporation. All rights reserved 60 of 61
Deleting segments
You must resolve all dependencies before you can delete a segment. A dependency is
created when the segment is used by another area of Oracle Eloqua like a campaign,
segment, program, and so on.
Deleting a segment will not delete any shared filters or lists. Quicklists are deleted
when you delete a segment.
To view dependencies:
1. Navigate to Audience , then click Segments.
2. Open the segment.
3. Click Actions, then click View Dependencies.
Oracle Eloqua displays the dependencies.

©2022 Oracle Corporation. All rights reserved 61 of 61
4. To view the dependency, double-click it in the list.
To delete a segment:
1. Navigate to Audience , then click Segments.
2. Locate the segment you want to delete.
3. Right-click the segment and click Delete.