
Operators Manual HLT 280 Heavy Lift Transport
54
Operators Manual HLT 280 Heavy Lift Transport 80-886 (4/2008) Printed in USA
-
Upload
khangminh22 -
Category
Documents
-
view
0 -
download
0
Transcript of Operators Manual HLT 280 Heavy Lift Transport

Operators Manual
HLT 280
Heavy LiftTransport
80-886 (4/2008) Printed in USA


Operators Manual
Section 1 Safety
Safety Information ......................................................................... 1Operation Warnings ....................................................................... 2Maintenance Warnings .................................................................. 2
Section 2 Specifi cations
Physical Dimensions ..................................................................... 7
Section 3 Operator Instructions
Machine Start and Stop Procedures ............................................. 8Operator Troubleshooting .............................................................. 9Operator Controls .......................................................................... 11Raise or Lower Machine ................................................................ 12Weight Load System ..................................................................... 13Powerview Display Module ............................................................ 16
Section 4 Maintenance and Lubrication
Preventive Maintenance ................................................................ 35Maintenance Schedule Summary ................................................. 38Maintenance and Lubrication Checkpoints .................................... 39Maintenance and Lubrication Instructions ..................................... 40Daily Service Check List ................................................................ 43Service Maintenance Check List ................................................... 44Lubricants and Capacities ............................................................. 47

Intentionally Blank

1
Section 1 - Safety Information
Important Safety Information
Most accidents involving product operation, maintenance and repair are caused by failure to observe basic safety rules or precautions. An accident can often be avoided by recognizing potentially hazardous situations before an accident occurs. A person must be alert to potential hazards. This person should also have the necessary training, skills and tools to perform these functions properly. Management should ensure that only qualifi ed properly trained and equipped personnel operate and maintain this equipment.
Read and understand all safety precautions and warnings before operating or performing lubrication, maintenance and repair on this product.
Safety Is Your Business
Why? Because SAFETY, based on knowledge, technical skill, and years of experience has been carefully built into your HLT Transporter. Time, money and effort have been invested in making your machine a safe product. The dividend from this investment is YOUR PERSONAL SAFETY.
However, it must be realized that no power-driven equipment can be any safer than the person behind the controls. If you don’t operate and maintain your machine safely, our efforts will have been in vain.
The safety instructions and warnings, as documented in this manual and shipped with the machine, provide the most reliable procedures for the safe operation and maintenance of your machine. It’s your responsibility to see that they are carried out.
Precaution Warnings
The following terms defi ne the various precautions and no-tices in this manual:
Note: Whenever information exists that requires additional emphasis beyond the standard text, the term “NOTE” is used.
Important: Whenever information exists that re-quires special attention to procedures or to ensure proper operation of the equipment or to prevent its possible failure, the term “IMPORTANT” is used.
Caution: Whenever potential damage to equip-ment exists, requiring correct procedures for prevention, the term “Caution” is used.
Warning: Whenever potential personal injury or death situations exist, requiring correct proce-dures or practices for prevention, this “WARN-ING” symbol is used.
This safety alert symbol indicates important safety messages in this manual. When you see this symbol, carefully read the message that fol-lows and be alert to the possibility of personal injury or death.
Allied Systems cannot anticipate every possible circumstance that might involve a potential hazard. The warnings in this publication are therefore not all inclusive. If a tool, procedure, work method or operating technique not specifi cally recom-mended by Allied Systems is used, you must satisfy yourself that it is safe for you and others. You should also ensure that the product will not be damaged or made unsafe by the op-eration, lubrication, maintenance or repair procedures you choose.

2
Operation Warnings
You must be trained in the operation of this machine. Be extremely careful if you do not normally operate this machine. Re-orient yourself to the machine before starting, and then proceed slowly. However, you must not operate without hav-ing received proper training.
Know your company’s yard rules. Follow specifi c loading directions and procedures. The methods outlined in this manual provide a basis for safe operation. Because of spe-cial conditions, your company’s handling procedures may be somewhat different from those shown in this manual.
Always face the ladder when going up and down • ladders. Use both hands.
Never jump on or off the machine.•
All walking surfaces (steps, ladders, etc.) must be free • of ice, grease, oil, or other materials that could cause or contribute to a slip or fall.
The only person required on the machine is the opera-• tor. Never allow anyone to ride on the machine or its attachments.
Do not operate this machine if you know of malfunctions, • missing parts, and/or misadjustments. These situations can cause or contribute to an accident or damage to the machine. Stop the machine immediately if problems arise after starting.
All electrical cables and connectors must be in good • condition. Use caution in wet weather to avoid danger from electric shock. The hydraulic tank and/or engine block heater must be properly grounded.
Do not operate the machine before disconnecting hydrau-• lic tank or engine block heaters. Do not start the engine if the key has been tagged with a “DO NOT START” or “RED” tag.
Never operate any of the cab controls from anywhere • other than the operator’s seat.
Sound the horn to alert personnel in the area before • starting the engine, and make sure everyone is clear. Be sure that all controls are in neutral before starting the engine.
Be aware that several people can stand in the engine • compartment, completely out of sight of the operator.
Be accurate in load placement. It’s important to know • what the load will do when moving.
Lower or remove the load before leaving the cab or shut-• ting down the engine.
Electical energy under high voltage can discharge to • ground through the machine without direct contact with the machine’s structure. Minimum clearances from ener-gized power lines or other power sources must be main-tained. If electrical energy does discharge through the machine, remain In The Cab. Do Not Permit Anyone To Come Into Contact With The Machine’s Structure.
Maintenance Warnings
Maintenance, lubrication and repair of this machine can be dangerous unless performed properly. Each person must satisfy himself that he has the necessary skills and informa-tion, proper tools and equipment, and that his work method is safe, correct, and meets his own company’s requirements.
Perform all maintenance unless otherwise specifi ed as fol-lows:
Vehicle supported on certifi ed safety stands at the four 1. corners.
The engine is stopped. 2.
The start switch key is off and the key is removed. 3.
Note: Please be advised that the following Safety Procedures are intended to compliment the established regulations of your Corporate Safety Committee.
General Warnings
Do not attempt to make adjustments, or perform mainte-• nance or service unless you are authorized and qualifi ed to do so.
Unless specifi ed in this manual, never attempt mainte-• nance or lubrication procedures while the machine is moving or the engine is running.
Before performing maintenance or service under the • machine, move the machine to a level surface, engage the parking brake and stop the engine.
Remove the ignition key and attach a “DO NOT OPER-• ATE” or similar warning tag to start switch or controls be-fore servicing or repairing the machine. Refer to OSHA’s Lockout/Tagout standard for detailed procedures.
Block the tires to keep the machine from rolling.•
Perform all maintenance and lubrication procedures with •

3
the machine on level ground, parked away from traffi c lanes.
If necessary, support components with appropriate • safety stands. Never stand under a component that is supported only by the hydraulics. Make sure it is resting on its mechanical stops.
Engine exhaust fumes can cause death. If it is neces-• sary to run the engine in an enclosed space, remove the exhaust fumes from the area with an exhaust pipe extension. Use ventilation fans and open shop doors to provide adequate ventilation.
Use extreme caution when using compressed air to blow • parts dry. The pressure should not exceed 30 psi (208 kPa). Never use air to blow yourself off. Air pressure penetrating your skin can be fatal.
When using pressure air for cleaning, wear a protective • face shield and protective clothing.
Maximum air pressure from the nozzle must be less than • 205 kPa (30 psi) for cleaning purposes.
Do not enter fuel or hydraulic tanks without proper safety • equipment. Check your local government regulations for confi ned space entry requirements.
Keep the machine, especially the deck, walkways and • steps, free of foreign material, such as debris, oil, tools and other items which are not part of the machine.
Secure all loose items such as lunch boxes, tools and • other items which are not part of the machine.
Know the hand signals and who gives them. Accept • signals from one person only.
Put maintenance fl uids in approved container only. Never • put maintenance fl uids into glass containers.
Report all needed repairs. •
Do not allow unauthorized personnel on the machine. •
Make sure that all clamps, guards and heat shields are • installed correctly to prevent vibration, rubbing against other parts and excessive heat during operation.
Always have the supplied fi re extinguisher on the machine • and know how to use it. Inspect and have it serviced as recommended on its instruction plate.
Crushing or Cutting Prevention
Never attempt adjustments while the machine is moving • or the engine is running unless otherwise specifi ed.
Support vehicle properly when working beneath it. Do not • depend on hydraulic cylinders to hold vehicle up. Vehicle can lower if a manual control is moved, or if a hydraulic line breaks.
WARNING : Drive shaft spins at engine speed when engine is running regardless of transmis-sion gear selection.
Where there are steering linkages, the clearance in the • linkage area will increase or decrease with movement of the steering. Stay clear of all rotating and moving parts.
Keep objects away from moving fan blades. They will • throw or cut any object or tool that falls or is pushed into them.
Do not use a kinked or frayed wire rope cable. Wear • gloves when handling the wire rope cable.
Retainer pins or bolts, when struck with force, can fl y out • and injure nearby persons.
Chips or other debris can fl y off objects when struck. • Make sure no one can be injured by fl ying debris before striking any object.
Wear protective glasses when striking a retainer pin or • bolt to avoid injury to your eyes.
Do not attempt to lift the machine with the tow eyes on • the front and rear of the vehicle. These are for towing only. Consult Allied Systems for lifting instructions.
Wear a hard hat, protective glasses and other protective • equipment as required by job conditions.
Keep hands, feet, long hair and clothing away from power-• driven parts. Do not wear loose fi tting clothing or jewelry while performing maintenance and lubrication.
Make certain all protective guards and covers are secured • in place on the machine.
Never rely on the hydraulic system to support any part of • the machine during maintenance or lubrication.
Warning: Do Not Park on Grade. If one has to park on grade Chock Wheels.

4
Burn Prevention
Use caution when working around hot oils. Always al-• low lubricating and hydraulic oil to cool before draining. Burns can be severe.
Diesel fuel and hydraulic oil are fl ammable. Do not smoke • when checking levels or fi lling tanks. Keep open fl ames and sparks away from the machine.
Never overfi ll the fuel or hydraulic tanks. Any overfl ow • could cause a fi re. Immediately repair any hydraulic or fuel leaks and clean up any spills.
DO NOT remove the radiator cap when the engine is • hot. The coolant will be under pressure and can fl ash to steam with explosive force, causing severe burns. To prevent burns, remove the radiator cap only when the engine is cool.
At operating temperature, the hydraulic tank is hot and • can be under pressure.
Relieve all pressure in air, oil, fuel or cooling systems • before any lines, fi ttings or related items are disconnected or removed.
Before disconnecting hydraulic lines, be sure to lower all • loads and relieve all hydraulic pressure. The load could fall on you, or escaping hydraulic oil could cause severe personal injury.
Batteries produce explosive gases. Keep sparks, fl ame • and cigarettes away. Ventilate when charging or using in an enclosed space. Always shield your eyes when working near batteries. When removing battery cables, always turn the battery disconnect switches OFF fi rst, then disconnect the (-) negative cable. When installing a battery, always connect the (+) positive cable fi rst. This procedure will help to prevent a spark which could cause an explosion.
Before making adjustments on the engine or electrical • system, disconnect the battery. An electrical spark could cause a fi re, explosion or severe burns.
Batteries contain sulfuric acid which can cause severe • burns. Avoid contact with skin, eyes or clothing.
Fire or Explosion Prevention
All fuels, most lubricants and some coolant mixtures are • fl ammable. Do not smoke while refueling or in a refueling area. Do not smoke in areas where batteries are charged, or where fl ammable materials are stored.
Keep the machine free of oil, grease and trash accumula-• tions. Regular steam cleaning is recommended for fi re
prevention and general safety.
Batteries in parallel may be located in separate compart-• ments. See the “Starting the Engine Section” in this guide for specifi c instructions.
WARNING: If boosting is required, be aware that improper jumper cable connections can cause an explosion resulting in personal injury. When using jumper cables always connect posi-tive (+) cable to positive (+) terminal of battery and negative (-) cable from external source to starter negative (-) terminal. ( lf not equipped with starter negative terminal, connect to en-gine block.) Diesel fuel and hydraulic oil are fl ammable. Never smoke while handling fuel or working on the fuel system. The fumes in an empty fuel container are explosive. Never cut or weld on fuel lines, tanks, or containers. Keep open fl ames and sparks away from the machine.
Avoiding Fire and Explosion Hazards
Keep the machine free of oil, grease, chips, and trash • accumulations. Regular pressure washing and/or steam cleaning is recommended for fi re prevention and general safety. Use an approved solvent to clean machine parts. Never use gasoline or diesel fuel.
Remove any debris from the operator’s compartment • after each work shift.
Inspect the driveshaft and brakes for debris and • remove as necessary.
Never overfi ll the fuel or hydraulic tanks. Any overfl ow • could cause a fi re. Immediately repair any hydraulic or fuel leaks and clean up any spills.
Shut off the engine and electrical equipment while fi ll-• ing the fuel tank. Use extra caution when fueling a hot engine. Always ground the fuel nozzle against the fi ller neck to avoid sparks.
Handle all solvents and dry chemicals according to pro-• cedures identifi ed on manufacturer’s containers. Work in a well-ventilated area. Make sure you know where fi re extinguishers are kept and how to use them.
Avoid spilling fuel. If a spill occurs, wipe it up immedi-• ately.

5
Always ensure that excess grease and oil accumulation, • including spillage, is cleaned up immediately.
Inspect the machine daily for potential fi re hazards and • make any necessary repairs immediately.
Maintain the engine cooling system to avoid overheat-• ing.
Check all the electrical wiring and connections for de-• fects, and repair or replace as necessary. Keep battery terminals clean and tight.
Never perform welding operations until the entire ma-• chine has undergone a thorough cleaning. In addition, cover rubber hoses and have at least a fi re extinguisher at hand.
Hydraulic fl uid is fl ammable. Do not weld on or near • pipes, tubes, or hoses that are fi lled with fl uid.
Store fl ammable starting aids in a cool, well ventilated • location.
Remember, there is always a risk of fi re.•
Fire Fighting Equipment
All Transpoters built after November 1, 2004 are supplied with a hand held fi re extinguisher. If your unit is not so equiped, Allied Systems Company recommends that an appropriately rated fi re extinguisher be installed. A 20 pound ABC rated extinguisher is the minimum size recommended. Install it within easy reach of the operator in a position that protects it from damage. Use only a “quick release” type of mount.
Keep your fi re extinguisher(s) and fi re suppression sys-• tem, if so equiped, fully charged and in good working or-der. Know how to use them. Allied Systems recommends that you, upon receiving your machine, contact your local authorized service center for your fi re suppression system. Have your systems fully checked and verifi ed before putting your machine into service.
Read and understand the instructions printed on the • canister and learn how to operate them. Learn how to remove the canisters from their mounting brackets in the shortest amount of time.
Service the extinguisher and the fi re suppression system • according to the manufacturer’s specifi cations. Service after every use, no matter how short a time, and never operate the machine without both in full working order.
Fire prevention features provided by the manufactur-• ers should be maintained in operational condition and should be used to suppliment the operator’s fi re preven-
tion efforts. In no case should the features be used or assumed as replacement for diligent operator efforts at preventing fi res.
POISON DANGER CAUSES SEVERE BURNS Batteries contain sulfuric acid. Avoid contact with skin, eyes or clothing. Antidote: EXTERNAL - Flush with water. INTER-NAL - Drink large quantities water or milk. Follow with milk of magnesia, beaten egg or vegetable oil. Call physician immediately. EYES: Flush with water for 15 minutes and get prompt medical attention. Batteries produce explosive gases. Keep sparks, fl ame, cigarettes away. Ventilate when charging or using in enclosed space. Always wear eye protection when working near batteries
Clean and tighten all electrical connections. Check daily • for loose or frayed electrical wires. Have all loose or frayed electrical wires tightened, repaired or replaced before operating the machine.
Keep all fuels and lubricants stored in properly marked • containers and away from all unauthorized persons.
Store all oily rags or other fl ammable material in a protec-• tive container, in a safe place.
Remove all fl ammable materials such as fuel, oil and • other debris before they accumulate on the machine.
Lines, Tubes, Hoses and Cylinders
Do not bend or strike high pressure lines. Do not install • bent or damaged lines, tubes or hoses.
Repair any loose or damaged fuel and oil lines, tubes • and hoses. Leaks can cause fi res.
Do not weld or fl ame cut on pipes or tubes that contain fl ammable fl uids. Clean them thoroughly with nonfl ammable solvent before welding or fl ame cutting on them. Inspect all lines, tubes and hoses carefully. Use a piece of cardboard to check for leaks. Do not use your bare hands to check for leaks. Tighten all connections to the recommended torque. Replace if any of the following conditions are found:
End fi ttings damaged, displaced or leaking. 1.
Outer hose covering chafed or cut and wire reinforcing 2. exposed.
Outer hose covering ballooning locally.3.
Evidence of kinking or crushing of the fl exible part of 4. the hose.

6
This vehicle may be equipped with an Extreme Service Elevating Cylinder (ESC). This cylinder is equipped with an internal accumulator which is charged through an external valve. Consult the service manual for detailed instructions and procedures.
WARNING: HIGH PRESSURE CYLINDER Do not remove any parts until all pressure has been relieved to avoid possible personal injury. See Maintenance Section for charging and ad-justment procedures.
Fire Suppression
Do not panic!•
Stop the machine and turn off the engine in the clearest • area available.
Lower the vehicle.•
If your machine is equiped with a fi re suppression system, • and that system has not automatically been activated, manually activate the system.
Take the extinguisher and proceed to the source of the • fi re calmly.
Though the manufacturer’s instructions may vary, nor-• mally aim at the base of the fi re.
Even when the fi re seems to be out, stand by with the • extinguisher until the fi re area is dead cool. Check this by removing any panels and looking for hot spots.
Locate the cause of the fi re and correct it before restart-• ing the machine.
Have your local authorized service center for your fi re • suppession system thoroughly inspect the entire machine and recharge or replace the extinguishers and fi re sup-pression system before returning to work.

7
Section 2 - Specifi cations
Physical Dimensions A. Overall Length 674 1/4” (56’-2 1/4”) B. Width Deck 115 11/16” (9’-7 11/16”) C. Width Overall 132” (11’-0”) D. Overall Height Elevated 162” (13’-6”) E. Platform Length 562” (46’-10”) F. Platform Lowered 70” (5’-10”) G. Platform Ride Height 80” (6’-8”) H. Platform Travel 20” (1’-8”) I. Turning Radius Inner 186” (15’-6”) J. Turning Radius Outer 492” (41’-0”)
Weights Gross Vehicle Weight 690,000 Lbs. 345 Tons Payload Capacity (including pallet) 560,000 Lbs. 280 Tons Tare Weight 130,000 Lbs. 65 Tons Axle Line Loaded 86,250 Lbs. 43.13 Tons Tire Loading/Tire 21,563 Lbs. 10.78 Tons
B C
I
J
E
D
A
F,G,H

8
Machine Start and Stop Procedures
Engine Pre-Start
Make sure the engine oil and coolant levels have been 1. checked before attempting to start the engine.
Sit in your normal operating position and adjust the seat 2. for your personal comfort.
Check for emergency/parking brake engagement: Pull 3. knob to set the spring applied axle mounted spring brakes. This brake will apply automatically when air pres-sure drops below 60 psi.
Check for neutral: Place the shift lever quadrant. 4.
Give warning that you are going to start the engine. 5. Remember, there is ample space within the engine, transmission, and driveline compartments for several men, and you cannot see them from the cab. Be sure the area around the unit is clear of all personnel and obstructions.
Turn the key switch to the “ON” position. The emergency 6. brake light and circuit lights should come on.
Engine Start-up
Turn the key switch to the start position. 1.
NOTE: If engine does not start within 30 seconds, allow the starter to cool for two minutes before re engage-ment.
When the engine starts, let it idle. Do not accelerate. 2. Remember, high RPM and full load conditions on cold oil can severely damage the engine, transmission and hydraulic system.
Section 3 - Operator Instructions
If a rise in oil pressure of the engine or transmission is 3. NOT observed within FIVE seconds, or a rise in air pres-sure is not seen in TEN seconds, shut down the engine and have maintenance check it out.
Warm the engine at idle until the air pressure reaches 4. at least 60 psi, then recheck that the transmission is in neutral and the parking brake applied. Continue to warm the engine at 1000 RPM until the engine temp reaches at least 130°F, and the air pressure rises to 120 psi.
Observe the gauges for proper readings and operation; 5. also, check the operation of all safety equipment and accessories.
Select gear speed, release parking brake and press ac-6. celerator for movement.
Engine Shut-Down
Lower throttle to idle speed, and let the engine idle for 1. a minimum of (5) minutes in order to normalize internal engine temperatures.
Meanwhile, place all controls in neutral and set the 2. emergency brake.
To stop the CUMMINS or CATERPILLAR engine, turn the 3. key switch to “OFF” position. DO NOT use the compres-sion release as an engine shutdown device. Stopping the engine in this manner will result in extensive wear to the valve mechanism.

9
Operator Troubleshooting
The following tables list the most common problems that may be encountered by operators. If the problem cannot be solved using the corrective actions listed in this table, notify maintenance personnel.
Engine *
Symptom Probable Cause Corrective Action
Engine turns over but fails to start
Emergency shutdown control pulled out Push control in
Fuel tank empty Fill tank
Fuel shutoff valve at tank closed Open valve
Fuel fi lter blocked Replace fi lter
Engine fails to turn over Battery disconnect switches open Close switches
Transmission not in neutral Place lever in neutral
Battery low Have charging system checked
Battery terminals corroded or loose Clean and tighten terminals
Engine runs unsteadily and power output low
Insuffi cient fuel supply Clean fuel strainers, replace fi lter, fi ll tank, tighten fuel lines
Contaminated fuel Drain tank and lines, clean strainers, replace fuel
Wrong fuel Drain tank and fi ll with proper fuel
Air intake restricted Remove restriction
Exhaust smokes badly Too much oil in sump Drain to proper level
Air intake restricted Remove restriction
Engine overheats Radiator fi ns restricted Clean fi ns
Low coolant level Check coolant level, fi ll as needed
Engine oil pressure low Low oil level Check oil level
Oil leaks Tighten connections
Contaminated oil Change oil and fi lters
Transmission Converter *
Symptom Probable Cause Corrective Action
Transmission or converter overheats
Low oil level Fill to proper level
Oil cooler restricted Remove restriction
Lack of power Low engine rpm at converter stall Have engine checked (governor)
* Also refer to the manufacturer’s Operation and Maintenance Manual for additional information.

10
Hydraulic System
Symptom Probable Cause Corrective Action
No response to controls Closed tank shutoff valve Open valve
Low oil level Fill tank to proper level
Sluggish operation or response to controls
Hydraulic oil cold Allow adequate warm-up time
Low oil level Fill tank to proper level
Suction leak Correct suction leak
Plugged tank breather Replace breather
Restriction in circuit Remove restriction, check fi lters
Pump speed too slow Check engine speed
Excessive noise Cavitation Eliminate restriction in suction lineReplace tank breather
Aeration due to insuffi cient oil Fill tank to proper levelCorrect suction leak
Tubing vibrating Tighten mounting clamps
Hydraulic system overheating
Low oil level Fill tank to proper level
Operating over pressure reliefs Correct operating procedure
Air and Brake Systems
Symptom Probable Cause Corrective Action
Loss of braking effi ciency Air in hydraulic brake system Check fl uid, bleed system
Low air system pressure Allow system pressure to build
Brakes won’t release Low air system pressure Allow system pressure to build
Electrical System
Symptom Probable Cause Corrective Action
Engine fails to turn over Battery disconnect switch(es) open Close switch(es)
Neutral start switch open Place transmission shift lever in neutral
Battery low Have start/charge system tested
Battery terminals corroded or loose Clean and tighten terminals
Other connections loose Tighten connections
Voltmeter indicates discharge
Alternator drive belt slipping Tighten or replace belt
Loose or corroded battery connections Clean and tighten terminals

11
Operator Controls
Become thoroughly familiar with the location and use of all instruments and controls before operating this machine. Check all instruments immediately upon starting, again after reaching operating temperatures, and at frequent intervals
during operation to assure proper care through prompt detec-tion of irregularities. If any of the instruments do not register properly, stop the engine, and have the problem corrected as soon as practical.
1................................................Gauge, Aux Oil Pressure 2..............................Gauge, Aux Oil Temperature (280 F) 3................................................. Gauge, Voltmeter (24 V) 4.......................................... Gauge, Engine Oil; Pressure 5...............................Gauge, Engine Coolint Temperature 6........................................................ Gauge, Tachometer 7.............................................Powerview Display Module 8.......................................................Left Turn Led, Green 9......................................................High Beam Led, Blue10.................................................... Right Turn Led, Green11......................................................... MD3 IQAN Display12......................................................... Gauge, Fuel Level13.......................................................... Park Brake Switch14........................................Gauge, Hydraulic Temperature15.........................................Parking Brake Light Led, Red16.................................................................Alarm, Audible17..................................................Warning Light Led, Red
18.........................................................Switch, Front Wiper19.........................................................Switch, Rear Wiper20..............................................Switch, Washer On/Off/On21...........................................................Switch, Mirror Left 22......................................................Switch, Mirror Heater23.........................................................Switch, Mirror Right24................................................................ Ignition Switch25..........................................................Switch, Head Light26..........................................................Switch, Cab Lights27................................................... Switch, Platform Lights28.....................................................................Switch, Fan29............................................................... Dimmer Switch30.............................................................................. Blank 31.........................................Return Filter Bypass Warning32......................................Steering Filter Bypass Warning33............................................Hoist Filter Bypass Warning34......................................... Brake Filter Bypass Warning
Figure 1 - Dashboard Controls
24
1 2 64 53 141612
27 29 3118
138 9 10 15 17
20 21 22 2325 302826
11
32 33 3419
7

12
1........................................................Seat Adjust Track Set2........................................................Arm Adjust Track Set3...........................................................................Seat Belt4.......................................... Rake Angle Adjustment Knob
5...................................................... Arm Adjustment Knob6.....................................................Back Adjustment Knob7.............................................Ride Adjustment - Firm/Soft8...................................................................... Seat Height9.................................................. Seat Swivel Push-button10..................................................... Elevate/Lower Switch11..............................................Transmission Shift Control
Figure 2 - Seat Controls

13
Raise or Lower Machine
Use the Elevate/Lower Switch (Item 10, previous page) to raise or lower the vehicle. To set the vehicle’s height to its middle position, raise it to its full height, then lower it ap-proximately halfway.
CAUTION: The vehicle MUST be set to its ap-proximate middle position for normal operation. Failure to properly set the vehicle’s height may cause severe equipment damage.
Figure 3 - MD3 IQAN Display
Weight Load System
The MD3 IQAN Display on the instrument panel (see Figure 3) is used to monitor and calibrate the weight load system. This system reads and displays the weight of the load on the machine, and the height of the vehicle.
Main Display Screen
The Main Display Screen (see Figure 4) shows the quadrant weights, the total weight of the load on the machine, the travel condition, and any overweight warnings. The machine must be either raised or lowered as necessary if the Main Display Screen does not indicate “OK TO TRAVEL”.
From the Main Display Screen, the operator may either ac-cess the System Menu (see Figure 5), or the Main Calibration Screen (see Figure 7).
Figure 4-Main Display Screen
System Menu Screen
To access the System Menu, press the Menu Button. The System Menu contains four options: F1 – Adjust F2 – Measure F3 – Preferences F4 – InfoFollow on-screen instructions for each option. Press the “Exit” button to return to the Main Display Screen.
FUNCTIONBUTTONS EXIT OR RETURN
BUTTON
MENU BUTTON
DOWN ARROW
OK BUTTON(MENU SELECTEDIS HIGHLIGHTED)
UP ARROWMD3 IQAN DISPLAY
Figure 5 - System Menu Screen (access anytime)
Adjust Menu Screen
The Adjust Menu Screen (see Figure 6), accessed from the System Menu Screen, may be used to adjust warning levels, and the display style of the Main Display Screen. Follow on-screen instructions. Press the “Exit” button to return to the System Menu Screen.

14
Calibration Loaded Screen
Use the Calibration Loaded Screen (see Figure 8) to set the fully loaded state of the machine. Use a load of known weight that is as close to the maximum capacity of the machine as possible, and distribute the weight on the bed as evenly as possible.
This calibration will not work if the Height Indicator is not green. Raise or lower the machine as necessary.
Use the Up and Down Arrow buttons to set the weight of the load. When the correct weight is shown on the screen, press the “OK” button, or F3, to save the loaded set point and return to the Main Calibration Screen. Press F4 or the “Exit” button to return to the Main Calibration Screen without saving.
Figure 8 - Calibrate Loaded Screen
Calibration Unloaded Screen
Use the Calibration Unload Screen (see Figure 9) to set the unloaded state of the machine. Make certain the bed is empty for this calibration.
This calibration will not work if the Height Indicator is not green. Raise or lower the machine as necessary.
When the bed is completely empty, press the “OK” button, or F3, to save the unloaded set point and return to the Main Calibration Screen. Press F4 or the “Exit” button to return to the Main Calibration Screen without saving.
Figure 6 - Adjust Menu Screen
Main Calibration Screen
To access the Main Calibration Screen (see Figure 7), from the Main Display Screen, press and hold the “OK” Button for 5 seconds. The Main Calibration Screen contains menu options for creating a custom calibration for the weight load system. The menu options are: F1 – Calibrate Loaded F2 – Calibrate Unloaded F3 – Calibrate Height F4 – Restore System Defaults
Follow on-screen instructions for each option. Press the “Exit” button to return to the Main Display Screen.
Figure 7 - Main Calibration Screen

15
Calibrate Height Menu
Use the Calibrate Height Screen (see Figure 10) to set the calibration for the deck upper and lower limits. The menu options are: F2 - Upper Limit F3 - Lower Limit F4 - Done / Exit
Figure 11 - Upper Limit Screen
Lower Limit
Use the Lower Limit option ( see Figure 12) to set the minimum height of the deck. Lower the deck to it’s lowest height and press F3 to set, or press F4 to exit and return to the calibra-tion height menu without saving.
Figure 9 - Calibrate Unloaded Screen
Figure 10 - Calibrate Height Menu Screen
Upper Limit
Use the Upper Limit option (see Figure 11) to set the maxi-mum raised height of deck. Raise the deck to its maximum height, and press F3 to set, or press F4 to exit and return to the calibration height menu without saving.
Figure 12 - Lower Limit Screen
Restore Defaults
Use the Restore Defaults option to return the machines cali-bration to the factory preset.
IMPORTANT: Restoring the factory defaults will erase the current calibration, which cannot be restored once erased.

16
Powerview Display Module
GeneralYour Heavy Lift Transporter is equiped with a Powerview display module, a multifunctional tool that enables you to view many different engine or transmission parameters and service codes. The system allows you to accurately monitor the modern electronic engine and transmission installed on your Transporter. The PowerView includes a graphical backlit LCD screen. It has excellent contrast and viewing from all angles. Back lighting can be controlled via menu or external dimmer potentiometer. The display can show either a single parameter or a quadrant display showing four parameters simultaneously. Diagnostic capabilities include fault codes with text translation for the most common fault conditions. The Powerview has four buttons using self-calibrating charge transfer activation technology, which eliminates the concern for pushbutton wear and failure. In addition, operators can navigate the display with ease.
Display ParametersThe following are some of the engine and transmission param-eters displayed by the PowerView in English or Metric units, as well as in Spanish, French, or German (when applicable, consult engine or transmission manufacturer for SAE J1939 supported parameters):
Engine RPM•
Engine Hours•
Machine Hours•
System Voltage•
% Engine Load at the current RPM•
Coolant Temperature•
Oil Pressure•
Fuel Economy•
Throttle Position•
Engine Manifold Air Temperature•
Current Fuel Consumption•
Transmission Oil Pressure•
Transmission Oil Temperature•
Transmission Gear Position•
Active Service Codes•
Stored Service Codes (when supported)•
Set Units for display (English or Metric)•
Engine Confi guration Parameters•
AmberWarning LED
Menu Key Enter Key
Bezel
Red ShutdownDerate LED
Left Arrow Key (Scroll Up) Right Arrow Key (Scroll Down)
Display
Fig. 13 Powerview Faceplate Features
Keypad FunctionsThe keypad on the PowerView is a capacitive touch sens-ing system. There are no mechanical switches to wear or stick, and the technology has been time proven in many ap-plications. It operates in extreme temperatures, with gloves, through ice, snow, mud, grease, etc., and it allows complete sealing of the front of the PowerView. The ‘key is touched’ feedback is provided by fl ashing the screen. The keys on the keypad perform the following functions:
Menu Key » - The Menu Key is touched to either enter or exit the menu screens.
Left Arrow » - The Left Arrow Key is touched to scroll through the screen either moving the parameter selection toward the left or upward.
Right Arrow » - The Right Arrow Key is touched to scroll through the screen either moving the parameter selection toward the right or downward.
Enter Key » - The Enter Key (also known as Enter Button) is touched to select the parameter that is highlighted on the screen.

17
Main Menu NavigationStarting at the single or four engine parameter display, 1. touch “Menu”.
98%LOAD@RPM
14.2BAT VOLT
57 PSIOIL PRES
1000 RPMENG RPM
ENG RPM
1800 RPMCOOL TEMP
0 1500 3000
The fi rst seven items of the “Main Menu” will be displayed. 2. Touching the “Arrow Buttons” will scroll through the menu selection. g
LANGUAGESSTORED CODESENGINE CONFSETUP 1-UP DISPLAYSETUP 4-UP DISPLAYSELECT UNITS
GO TO 1-UP DISPLAY
Touching the right arrow button will scroll down to reveal 3. the last items of “Main Menu” screen highlighting the next item down.
ADJUST CONTRASTUTILITIES
ADJUST BACKLIGHT
Touch the “Arrows” to scroll to the desired menu item 4. or touch “Menu” to exit the Main menu and return to the engine parameter display.
98%LOAD@RPM
14.2BAT VOLT
57 PSIOIL PRES
1000 RPMENG RPM
LANGUAGESSTORED CODESENGINE CONFSETUP 1-UP DISPLAY SETUP 4-UP DISPLAY SELECT UNITS
GO TO 1-UP DISPLAY
Selecting a LanguageStarting at the main menu display use the “Arrows” to 1. scroll to the”Language” menu and once highlighted touch the “Enter” button.
GO TO 1-UP DISPLAYLANGUAGESSTORED CODESENGINE CONFSETUP 1-UP DISPLAYSETUP 4-UP DISPLAYSELECT UNITS
LANGUAGES
The language choices will be displayed. Use the “Arrow” 2. buttons to scroll through the selections and touch “Enter” to make a selection.
ESPAÑOLFRANÇAISDEUTSCH
ENGLISH ❋
Now that you have selected the language, touch the 3. “Menu” button to return to the main menu display.

18
Stored Fault CodesStarting at the single or the four engine parameter display 1. touch the “Menu button”.
98%LOAD@RPM
14.2BAT VOLT
57 PSIOIL PRES
1000 RPMENG RPM
1800 RPMCOOL TEMP
0 1500 3000
ENG RPM
The main menu will pop up on the display. Use the “Arrow 2. Buttons” to scroll through the menu until the Stored Fault Codes is highlighted.
GO TO 1-UP DISPLAYSTORED CODESENGINE CONFGSETUP 1-UP DISPLAYSETUP 4-UP DISPLAYSELECT UNITSADJUST BACKLIGHT
STORED CODES
Once the “Stored Fault Codes” menu item has been high-3. lighted, touch the “Enter Button” to view the “Stored Fault Codes” (when applicable, consult engine or transmission manufacturer for SAE J1939 supported parameters).
GO TO 1-UP DISPLAYSTORED CODESENGINE CONFGSETUP 1-UP DISPLAYSETUP 4-UP DISPLAYSELECT UNITSADJUST BACKLIGHT
STORED CODES
If the word “MORE” appears above the “Arrow Buttons” 4. there are more stored fault codes that may be viewed. Use the “Arrow Buttons” to scroll to the next Stored Di-agnostic Code.
1 of x
SPN110 FMI10
MORE HIDE
HIGH COOLANT TEMP▼
▼
Touch the “Menu Button” to return to the main menu.5.
1 of x
SPN110 FMI10
MORE HIDE
HIGH COOLANT TEMP
▼
▼Touch the “Menu Button” to exit the Main menu and return 6. to the engine parameter display.
98%LOAD@RPM
14.2BAT VOLT
57 PSIOIL PRES
1000 RPMENG RPM
STORED CODESENGINE CONFGSETUP 1-UP DISPLAY SETUP 4-UP DISPLAY SELECT UNITSADJUST BACKLIGHT
GO TO 1-UP DISPLAY

19
Engine Confi guration DataStarting at the single or four engine parameter display 1. touch the”Menu Button”.
98%LOAD@RPM
14.2BAT VOLT
57 PSIOIL PRES
1000 RPMENG RPM
1800 RPMCOOL TEMP
0 1500 3000
ENG RPM
The main menu will pop up on the display. Use the “Ar-2. row Buttons”to scroll through the menu until the “Engine Confi guration” is highlighted.
GO TO 1-UP DISPLAYSTORED CODESENGINE CONFGSETUP 1-UP DISPLAYSETUP 4-UP DISPLAYSELECT UNITSADJUST BACKLIGHT
ENGINE CONFG
Once the “Engine Confi guration” menu item has been 3. highlightedtouch the “Enter Button” to view the engine confi guration data.
GO TO 1-UP DISPLAYSTORED CODESENGINE CONFGSETUP 1-UP DISPLAYSETUP 4-UP DISPLAYSELECT UNITSADJUST BACKLIGHT
ENGINE CONFG
Use the “Arrow Buttons” to scroll through the engine 4. confi guration data. g g
ENGINE SPEED PT 1
1000 RPMMORE
▼
▼
Touch the “Menu Button” to return to the main menu.5.
ENGINE SPEED PT 1
1000 RPMMORE
▼
▼
Touch the “Menu Button” to exit the Main menu and return 6. to the engine parameter display.
98%LOAD@RPM
14.2BAT VOLT
57 PSIOIL PRES
1000 RPMENG RPM
GO TO 1-UP DISPLAYSTORED CODESENGINE CONFGSETUP 1-UP DISPLAY SETUP 4-UP DISPLAY SELECT UNITSADJUST BACKLIGHT
ENGINE CONFG

20
Faults and Warnings - Auxiliary Gage FaultDuring normal operation the single or four parameter 1. screen will be displayed.
98%LOAD@RPM
14.2BAT VOLT
57 PSIOIL PRES
1000 RPMENG RPM
1800 RPMCOOL TEMP
0 1500 3000
ENG RPM
The PVA Series of auxiliary gages can be attached to the 2. PowerView. These auxiliary gages communicate with the Modbus master PowerView via a daisy-chained RS-485 port. If at any time during system initialization or normal operation an auxiliary gage should fail, the single or four parameter screen will be replaced with the “MLink Gage Fault” message.
1 of x
HIDE
GAGE NOT RESPONDINGENGINE OIL PRESSURE
To acknowledge and “Hide” the fault and return to the 3. single or four parameter display, touch the “Enter But-ton”.
1 of x
HIDE
ENGINE OIL PRESSUREGAGE NOT RESPONDING
The display will return to the single or four parameter 4. screen.
Indicates Auxiliary Gage Fault
. Indicates Fault Warning
Indicates Derate or Shutdown Condition Fault
98%LOAD@RPM
14.2BAT VOLT
57 PSIOIL PRES
1000 RPMENG RPM
!
!
1800 RPMCOOL TEMP
0 1500 3000
ENG RPM
!
!!
!
!
Touching the “Enter Button” will redisplay the hidden fault. 5. Touching the “Enter Button” once again will hide the fault and return the screen to the single or four parameter dis-play. NOTE: The fault can only be cleared by correcting the cause of the fault condition.
1 of x
HIDE
ENGINE OIL PRESSUREGAGE NOT RESPONDING

21
Active Fault CodesDuring normal operation the single or four parameter 1. screen will bedisplayed.
98%LOAD@RPM
14.2BAT VOLT
57 PSIOIL PRES
1000 RPMENG RPM
1800 RPMCOOL TEMP
0 1500 3000
ENG RPM
When the PowerView receives a fault code from an en-2. gine control unit the single or four parameter screen will be replaced with the “ActiveFault Codes” message. g
1 of x WARNING
SPN110 FMI0
MORE HIDE
HIGH COOLANT TEMP
▼
▼
If the word “MORE” appears above the “Arrow Buttons” 3. there are more active fault codes that may be viewed. Use the “Arrow Buttons” to scroll to the next “Active Fault Code”.
1 of x
SPN110 FMI0
MORE HIDE
HIGH COOLANT TEMP
▼
▼
To acknowledge and “Hide” the fault and return to the 4. single or four parameter display touch the “Enter But-ton”.
1 of x
SPN110 FMI0
MORE HIDE
HIGH COOLANT TEMP
▼
The display will return to the single or four parameter 5. display, but the display will contain the “Active Fault” warning icon. Touching the “Enter Button” will redisplay the hidden fault.
98%LOAD@RPM
14.2BAT VOLT
57 PSIOIL PRES
1000 RPMENG RPM
!! !
1800 RPMCOOL TEMP
0 1500 3000
ENG RPM
!
Touching the “Enter Button” once again will hide the fault 6. and return the screen to the single or four parameter display.
1 of x WARNING
SPN110 FMI0
MORE HIDE
HIGH COOLANT TEMP
The Single or Four parameter screen will display the 7. fault icon until the fault condition is corrected. NOTE: Ignoring active fault codes could result in severe engine damage.
98%LOAD@RPM
14.2BAT VOLT
57 PSIOIL PRES
1000 RPMENG RPM
STORED CODESENGINE CONFGSETUP 1-UP DISPLAY SETUP 4-UP DISPLAY SELECT UNITSADJUST BACKLIGHT
GO TO 1-UP DISPLAY
!
!

22
Shutdown CodesDuring normal operation the single or four parameter 1. screen will be displayed.
98%LOAD@RPM
14.2BAT VOLT
57 PSIOIL PRES
1000 RPMENG RPM
1800 RPMCOOL TEMP
0 1500 3000
ENG RPM
When the PowerView receives a severe fault code from 2. an engine control unit the single or four parameter screen will be replaced with the “Shutdown!” message.
HIGH COOLANT TEMP
1 of x SHUTDOWNSPN110 FMI0
MORE HIDE
To acknowledge and “Hide” the fault and return to the 3. single or four parameter display touch the “Enter But-ton”.
HIGH COOLANT TEMP
1 of x SHUTDOWNSPN110 FM10
MORE HIDE
The display will return to the single or four parameter 4. display, but the display will contain the “Shut Down” icon. Touching the “Enter Button” will redisplay the hid-den fault.
98%LOAD & RPM
14.2BAT VOLT
57 PSIOIL PRES
1000 RPMENG RPM
!1800 RPM
COOL TEMP
0 1500 3000
ENG RPM
!
!
Touching the “Enter Button” once again will hide the fault 5. and return the screen to the single or four parameter display.
HIGH COOLANT TEMP
1 of x SHUTDOWNSPN110 FM10
MORE HIDE
The Single or Four parameter screen will display the 6. fault icon until the fault condition is corrected. NOTE: Ignoring active fault codes could result in severe engine damage.
98%LOAD & RPM
14.2BAT VOLT
57 PSIOIL PRES
1000 RPMENG RPM
! !1800 RPM
COOL TEMP
0 1500 3000
ENG RPM
!
!

23
Back Light AdjustmentStarting at the single or four engine parameter display 1. touch the”Menu Button”.
98%LOAD@RPM
14.2BAT VOLT
57 PSIOIL PRES
1000 RPMENG RPM
1800 RPMCOOL TEMP
0 1500 3000
ENG RPM
The main menu will pop up on the display. Use the “Ar-2. row Buttons” to scroll through the menu until the “Adjust Backlight” is highlighted.
GO TO 1-UP DISPLAYSTORED CODESENGINE CONFGSETUP 1-UP DISPLAYSETUP 4-UP DISPLAYSELECT UNITSADJUST BACKLIGHTADJUST BACKLIGHT
Once the “Adjust Backlight” menu item has been high-3. lighted touch the “Enter Button” to activate the “Adjust Backlight” function.
ADJUST BACKLIGHT
GO TO 1-UP DISPLAYSTORED CODESENGINE CONFGSETUP 1-UP DISPLAYSETUP 4-UP DISPLAYSELECT UNITS
Use the “Arrow Buttons” to select the desired backlight 4. intensity.
ADJUST BACKLIGHT
Touch the “Menu Button” to return to the main menu.5.
ADJUST BACKLIGHT
Touch the “Menu Button” to exit the Main menu and return 6. to the engine parameter display.
98%LOAD@RPM
14.2BAT VOLT
57 PSIOIL PRES
1000 RPMENG RPM
STORED CODESENGINE CONFGSETUP 1-UP DISPLAY SETUP 4-UP DISPLAY SELECT UNITSADJUST BACKLIGHT
GO TO 1-UP DISPLAY

24
Contrast AdjustmentStarting at the single or four engine parameter display, 1. touch the “Menu Button”.
98%LOAD@RPM
14.2BAT VOLT
57 PSIOIL PRES
1000 RPMENG RPM
1800 RPMCOOL TEMP
0 1500 3000
ENG RPM
The main menu will pop up on the display. Use the “Arrow 2. Buttons” to scroll through the menu until “Adjust Contrast” is highlighted.
STORED CODESENGINE CONFGSETUP 1-UP DISPLAYSETUP 4-UP DISPLAYSELECT UNITSADJUST BACKLIGHT
GO TO 1-UP DISPLAY
Once the “Adjust Contrast” menu item has been high-3. lighted touch the “Enter Button” to activate the “Adjust Contrast” function.
STORED CODESENGINE CONFGSETUP 1-UP DISPLAYSETUP 4-UP DISPLAYSELECT UNITSADJUST BACKLIGHTADJUST CONTRAST
Use the “Arrow Buttons” to select the desired contrast 4. intensity.
ADJUST CONTRAST
Touch the “Menu Button” to return to the main menu.5.
ADJUST CONTRAST
Touch the “Menu Button” to exit the Main menu and return 6. to the engine parameter display.
98%LOAD@RPM
14.2BAT VOLT
57 PSIOIL PRES
1000 RPMENG RPM
STORED CODESENGINE CONFGSETUP 1-UP DISPLAY SETUP 4-UP DISPLAY SELECT UNITSADJUST BACKLIGHT
GO TO 1-UP DISPLAY

25
Select UnitsStarting at the single or four engine parameter display 1. touch the”Menu Button”.
98%LOAD@RPM
14.2BAT VOLT
57 PSIOIL PRES
1000 RPMENG RPM
1800 RPMCOOL TEMP
0 1500 3000
ENG RPM
The main menu will pop up on the display. Use the arrow 2. buttons to scroll through the menu until the “Select Units” is highlighted.
GO TO 1-UP DISPLAYSTORED CODESENGINE CONFGSETUP 1-UP DISPLAYSETUP 4-UP DISPLAYSELECT UNITSDADJUST BACKLIGHTSELECT UNITS
Once the “Select Units” menu item has been highlighted 3. touch the”Enter Button” to access the “Select Units” function.
GO TO 1-UP DISPLAYSTORED CODESENGINE CONFGSETUP 1-UP DISPLAYSETUP 4-UP DISPLAYSELECT UNITSDADJUST BACKLIGHTSELECT UNITS
Use the arrows to highlight the desired units. “English” 4. for Imperial units i.e. PSI, ºF or Metric kPa, Metric Bar for IS units i.e. kPa, Bar, ºC.
METRIC KPA METRIC BAR
ENGLISH
Touch the “Enter Button” to select the highlighted units.5.
METRIC KPA METRIC BAR
ENGLISH
Touch the “Menu Button” to return to the “Main Menu”. 6.
METRIC KPA METRIC BAR
ENGLISH ❉
Touch the “Menu Button” to exit the Main menu and 7. return to the engine parameter display.
98%LOAD@RPM
14.2BAT VOLT
57 PSIOIL PRES
1000 RPMENG RPM
STORED CODESENGINE CONFGSETUP 1-UP DISPLAY SETUP 4-UP DISPLAY SELECT UNITSADJUST BACKLIGHT
GO TO 1-UP DISPLAY

26
Setup 1-Up DisplayStarting at the single engine parameter display, touch 1. the “Menu Button”.
98%LOAD@RPM
14.2BAT VOLT
57 PSIOIL PRES
1000 RPMENG RPM
ENG RPM
1800 RPMCOOL TEMP
0 1500 3000
The main menu will pop up on the display. Use the “Ar-2. row Buttons” to scroll through the menu until the “Setup 1-up Display” is highlighted.
GO TO 1-UP DISPLAYSTORED CODESENGINE CONFGSETUP 1-UP DISPLAYSETUP 4-UP DISPLAYSELECT UNITSDADJUST BACKLIGHT
SETUP 1-UP DISPLAY
Once the “Setup 1-up Display” menu item has been 3. highlighted touch the “Enter Button” to access the “Setup 1-up Display” function.
GO TO 1-UP DISPLAYSTORED CODESENGINE CONFGSETUP 1-UP DISPLAYSETUP 4-UP DISPLAYSELECT UNITSDADJUST BACKLIGHT
SETUP 1-UP DISPLAY
Three options are available for modifi cation of the 1-Up 4. display.
Use Defaultsa) – This option contains a set of engine parameters: Engine Hours, Engine RPM, System Voltage, Battery Voltage, % Engine Load at Current RPM, Coolant Temperature, Oil Pressure.Custom Setupb) – This option allows for the modifi ca-tion of what parameter, the number of parameters, and the order in which the parameters are being displayed.Automatic Scanc) – Selecting the scan function will cause the 1-Up Display to scroll through the selected set of parameters one at a time, momentarily paus-ing at each.
Use Defaults5. - To select “Use Defaults” use the arrow buttons to scroll to and highlight “Use Defaults” in the menu display..
USE DEFAULTSCUSTOM SETUPAUTOMATIC SCAN OFF
USE DEFAULTS
Touch the “Enter Button” to activate the “Use Defaults” 6. function.
USE DEFAULTSCUSTOM SETUPAUTOMATIC SCAN OFF
USE DEFAULTS

27
Setup 1-Up Display (Cont)A message indicating the “Single Engine” parameter 7. display parameters are reset to the factory defaults will be displayed, then the display will return to the “Custom Setup” menu.
RESTORED TODEFAULTS
Custom Setup8. - To perform a custom setup of the 1-Up Display, use the arrow buttons to scroll to and highlight “Custom Setup” on the display.g g p
USE DEFAULTSCUSTOM SETUPAUTOMATIC SCAN OFFCUSTOM SETUP
Touching the “Enter Button” will display a list of engine 9. parameters.
USE DEFAULTSCUSTOM SETUPAUTOMATIC SCAN OFFCUSTOM SETUP
Use the “Arrow Buttons” to scroll to and highlight a se-10. lected parameter (parameter with a # symbol to right of it). y g )
This number indicatesthe order of display forthe parameters andthat the parameter isselected for display.
USE DEFAULTS PERCENT LOAD AT CURRENT RPM 3ENGINE OIL PRESSURE 2ENGINE COOLANT TEMPERATURE
ENGINE SPEED 1
Touch the “Enter Button” to deselect the selected pa-11. rameter removing it from the list of parameters being displayed on the 1-up display.
USE DEFAULTS PERCENT LOAD AT CURRENT RPM 3ENGINE OIL PRESSURE 2ENGINE COOLANT TEMPERATURE
ENGINE SPEED 1
Use the “Arrow Buttons” to scroll and highlight the desired 12. parameter that has not been selected for display.
ENGINE SPEEDPERCENT LOAD AT CURRENT RPM 2ENGINE OIL PRESSURE 1ENGINE COOLANT TEMP
Note that the numbersnow indicate the neworder of display forthe parameters.
Touch the “Enter button” to select the highlighted pa-13. rameter for inclusion in the Single Engine Parameter Display.
ENGINE SPEED PERCENT LOAD AT CURRENT RPM 2ENGINE OIL PRESSURE 1
ENGINE COOLANT TEMP 3

28
Setup 1-Up Display (Cont)Continue to scroll and select additional parameters for 14. the custom 1-Up Display. Touch the “Menu button” at any time to return to the “Custom Setup” menu.
Automatic Scan15. - Selecting the scan function will cause the 1-Up Display to scroll through the selected set of parameters one at a time. Use the “Arrow Buttons” to scroll to the “Automatic Scan” function.
USE DEFAULTSCUSTOM SETUPAUTOMATIC SCAN OFFAUTOMATIC SCAN OFF
Touching the “Enter Button” toggles the “Automatic Scan” 16. function on.
USE DEFAULTSCUSTOM SETUPAUTOMATIC SCAN OFFAUTOMATIC SCAN ON
Touching the “Enter Button” again toggles the “Automatic 17. Scan” function off.
USE DEFAULTSCUSTOM SETUPAUTOMATIC SCAN OFFAUTOMATIC SCAN OFF
Once the “Use Defaults”, “Custom Setup” and “Automatic 18. Scan” functions have been set, touch the “Menu Button” to return to the main menu.
USE DEFAULTSCUSTOM SETUPAUTOMATIC SCAN OFFAUTOMATIC SCAN ON
Touch the “Menu Button” to exit the Main menu and return 19. to the engine parameter display.
1800 RPMCOOL TEMP
0 1500 3000
ENG RPM
STORED CODESENGINE CONFGSETUP 1-UP DISPLAY SETUP 4-UP DISPLAY SELECT UNITSADJUST BACKLIGHT
GO TO 1-UP DISPLAY

29
Setup 4-Up DisplayFrom the single or four engine parameter display touch 1. the “Menu Button”.
98%LOAD@RPM
14.2BAT VOLT
57 PSIOIL PRES
1000 RPMENG RPM
ENG RPM
1800 RPMCOOL TEMP
0 1500 3000
The main menu will pop up on the display. Use the “Arrow 2. Buttons” to scroll through the menu until the “Setup 4-Up Display” is highlighted.
GO TO 1-UP DISPLAYSTORED CODESENGINE CONFGSETUP 1-UP DISPLAYSETUP 4-UP DISPLAYSELECT UNITSADJUST BACKLIGHT
SETUP 4-UP DISPLAY
Once the “Setup 4-Up Display” menu item has been 3. highlighted touch the “Enter Button” to activate the “Setup 4-Up Display” menu.
GO TO 1-UP DISPLAYSTORED CODESENGINE CONFGSETUP 1-UP DISPLAYSETUP 4-UP DISPLAYSELECT UNITSADJUST BACKLIGHT
SETUP 4-UP DISPLAY
Touch the “Enter Button” to activate the “Use Defaults” 4. function. This action will reset the unit to the factory default.
USE DEFAULTSCUSTOM SETUPUSE DEFAULTS
The “Use Defaults”screen will be displayed during the 5. reseting period then will automatically return to the “Setup 4-Up Display” menu.
RESTORED TODEFAULTS
Select the “4-Up Custom Setup” from the “4-Up Setup” 6. menu.
USE DEFAULTSCUSTOM SETUPCUSTOM SETUP
The quadrent with the backlit parameter value is the 7. current selected parameter. Use the “Arrow Buttons” to highlight the parameter value in the quadrant you wish to place a new parameter.
125°F 1000 RPMCOOL TEMP ENG RPM
14.2 57 PSIBAT VOLT OIL PRESP
14.2

30
Setup 4-Up Display (Cont)Touch the “Enter Button” and a list of parameters will 8. appear.
125°F 1000 RPMCOOL TEMP ENG RPM
14.2 57 PSIBAT VOLT OIL PRESP
14.2
The parameter that is highlighted is the selected param-9. eter for the screen. Use the “Arrow Buttons” to highlight the new parameter to be placed in the quadrent selected in the previous screen.
ENGINE SPEED 3ENGINE HOURS ENGINE COOLANT TEMPERATURE 1BATTERY POTENTIALENGINE OIL TEMPERATUREENGINE OIL PRESSURE 4ENGINE OIL TEMPERATURE 2
The number to the right of theparameter indicates the quadrantin which it is displayed.1. = Upper Left Quadrent2. = Lower Left Quadrent3. = Upper Right Quadrent4.= Lower Right Quadrent
Touch the “Enter Button” to change the selected param-10. eter in the quadrant to the new parameter.
ENGINE SPEED 3ENGINE HOURS ENGINE COOLANT TEMPERATURE 1BATTERY POTENTIAL 2ENGINE OIL TEMPERATUREENGINE OIL PRESSURE 4ENGINE OIL TEMPERATURE
Use the “Menu Button” to return to the “4-UP Custom 11. Setup” screen.
ENGINE SPEED 3ENGINE HOURS ENGINE COOLANT TEMPERATURE 1BATTERY POTENTIALENGINE OIL TEMPERATURE 2 ENGINE OIL PRESSURE 4ENGINE OIL TEMPERATURE 2
The parameter in the selected quadrent has changed to 12. the parameter selected in the previous screen.
125°F ØRPMCOOL TEMP ENG RPM
143°F 57 PSIOIL TEMP OIL PRESP
1000 RPM
Repeat the parameter selection process until all spaces 13. are fi lled.
Touch the “Menu Button” to return to the main menu.14.
125°F ØRPMCOOL TEMP ENG RPM
143°F 57 PSIOIL TEMP OIL PRESP
1000 RPM
Touch the “Menu Button” to exit the Main menu and return 15. to the engine parameter display.
125%COOL TEMP
143°FOIL TEMP
57 PSIOIL PRES
1000 RPMENG RPM
GO TO 1-UP DISPLAY STORED CODESENGINE CONFGSETUP 1-UP DISPLAY SETUP 4-UP DISPLAY SELECT UNITSADJUST BACKLIGHT
SETUP 4-UP DISPLAY

31
Utilities (Information and troubleshooting)Starting at the single or four engine parameter display, 1. touch the “Menu button”.
98%LOAD@RPM
14.2BAT VOLT
57 PSIOIL PRES
1000 RPMENG RPM
ENG RPM
1800 RPMCOOL TEMP
0 1500 3000
The main menu will be displayed. Use the “Arrow but-2. tons” to scroll through the menu until the “Utilities” is highlighted.
STORED CODESENGINE CONFGSETUP 1-UP DISPLAYSETUP 4-UP DISPLAYSELECT UNITSADJUST BACKLIGHTUTILITIES
Once the “Utilities” menu item has been highlighted, touch 3. the “Enter Button” to activate the “Utilities” functions.
STORED CODESENGINE CONFGSETUP 1-UP DISPLAYSETUP 4-UP DISPLAYSELECT UNITSADJUST BACKLIGHTUTILITIES
Touch “Select” to enter the “Gage Data” display. When 4. “Gage Data” is selected the PowerView will communicate with the analog gages at a fi xed rate of 38.4k Baud, 8 data bits, no parity check, 1 stop bits, half duplex.
GAGE DATAREMOVE ALL GAGESSOFTWARE VERSIONMODBUS SETUPFAULT CONVERSIONDEMO MODE ON
GAGE DATA
Use the “Arrow buttons” to scroll through the items or 5. touch “Menu” to return to the “Utilities” menu.
ENGINE OIL PRESSUREADDRESS: 20SOFTWARE REVISION #:ERRORS: NONE
1 of x
Touch “Menu Button” to return to the “Utilities” menu.6.
ENGINE OIL PRESSUREADDRESS: 20SOFTWARE REVISION #:ERRORS: NONE
1 of x

32
Utilities (Information and troubleshooting, cont)Use the “Arrows” to highlight “Remove All Gages”. Touch 7. “Select” to clear gage data from memory. It takes a mo-ment to clear all gages.
CLEARING GAGESPLEASE WAIT
When the gage data has cleared, the display automati-8. cally returns to the “Utilities” menu. Scroll to “Software Version”. Touch “Select” to view the software version currently in the PowerView.
SOFTWAREVERSION
MURPHY: X.XX
Touch “Menu” to return to “Utilities”. Highlight “Fault 9. Conversion” using the “Arrows”. Touch “Select” to enter the Fault convertion menu.
GAGE DATAREMOVE ALL GAGESSOFTWARE VERSIONFAULT CONVERSION FAULT CONVERSION
Use the “Arrows” to scroll and highlight the version then 10. touch “Select” and an asterisks appears to the right of the selection.
NOTE: There are four (4) different methods for converting fault codes. The PowerView always looks for J1939 Version 4 and can be set to use one of the 3 other J1939 versions. Most engine ECU’s use Version 4, therefore in most cases adjustment of this menu option will not be required.Upon receiving an unrecognizable fault, change to a different J1939 Version. If the fault SPN does not change when the version is changed, the ECU generating the fault is using Fault Conver-sion method 4. If the SPN number does change but is still unrecognizable, try changing to another J1939 Version not yet used and continue to check the SPN number.
J1939 VERSION 1J1939 VERSION 2J1939 VERSION 3J1939 VERSION 4
J1939 VERSION 1 *
Touch the “Menu” button to return to “Utilities” menu. 11. Touch the “Menu” button again to to return to the “Main” menu.
STORED CODESENGINE CONFGSETUP 1-UP DISPLAYSETUP 4-UP DISPLAYSELECT UNITSADJUST BACKLIGHTUTILITIES

33
MODBUS SetupStarting at the single or four engine parameter display, 1. touch the “Menu button”.
98%LOAD@RPM
14.2BAT VOLT
57 PSIOIL PRES
1000 RPMENG RPM
ENG RPM
1800 RPMCOOL TEMP
0 1500 3000
The main menu will be displayed. Use the “Arrow but-2. tons” to scroll through the menu until the “Utilities” is highlighted, then touch “Enter”.
STORED CODESENGINE CONFGSETUP 1-UP DISPLAYSETUP 4-UP DISPLAYSELECT UNITSADJUST BACKLIGHTUTILITIES
Once in the “Utilities” menu use the “Arrows” to scroll 3. through the menu until the “Modbus Setup” menu is highlighted, then touch “Enter”.
GAGE DATAREMOVE ALL GAGESSOFTWARE VERSIONMODBUS SETUPFAULT CONVERSIONMODBUS SETUP
Use the “Arrows” to scroll down to and highlight either the 4. “Slave Active or Master Active” modes. Touch the “Enter” button to toggle between master and slave.
USE FACTORY DEFAULTSERIAL PORT SETUPSOFTWARE VERSIONSLAVE ADDRESS SETUPMASTER ACTIVEMASTER ACTIVE
Use the “Arrows” to scroll to the “Serial Port” menu to 5. highlight it, then touch “Enter”.
USE FACTORY DEFAULTSERIAL PORT SETUPSOFTWARE VERSIONSLAVE ADDRESS SETUPMASTER ACTIVE
SERIAL PORT SETUP
Use the “Arrow” button to scroll to each selection to con-6. fi gure the MODBUS values for your application.
BAUD RATEPARITYDATA BITSSTOP BITS
PARITY
When fi nished, touch “Menu” to return to the previous 7. screen.
34
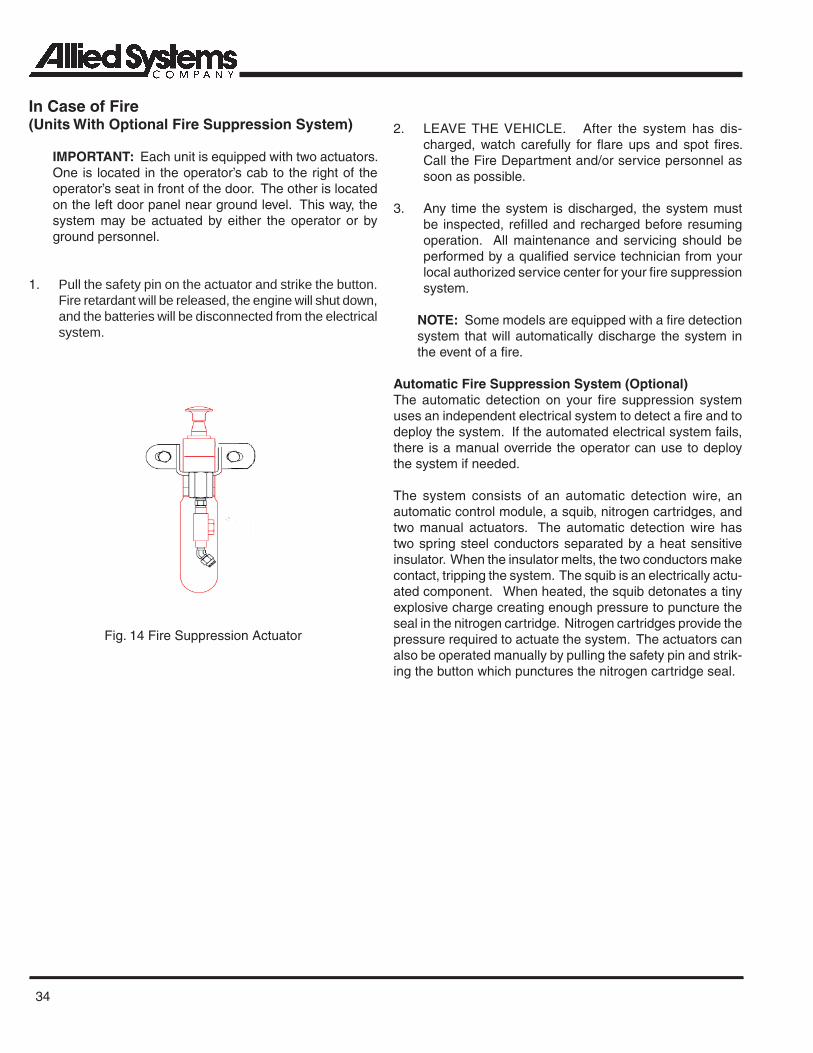
In Case of Fire (Units With Optional Fire Suppression System)
IMPORTANT: Each unit is equipped with two actuators. One is located in the operator’s cab to the right of the operator’s seat in front of the door. The other is located on the left door panel near ground level. This way, the system may be actuated by either the operator or by ground personnel.
1. Pull the safety pin on the actuator and strike the button. Fire retardant will be released, the engine will shut down, and the batteries will be disconnected from the electrical system.
Fig. 14 Fire Suppression Actuator
2. LEAVE THE VEHICLE. After the system has dis-charged, watch carefully for fl are ups and spot fi res. Call the Fire Department and/or service personnel as soon as possible.
3. Any time the system is discharged, the system must be inspected, refi lled and recharged before resuming operation. All maintenance and servicing should be performed by a qualifi ed service technician from your local authorized service center for your fi re suppression system.
NOTE: Some models are equipped with a fi re detection system that will automatically discharge the system in the event of a fi re.
Automatic Fire Suppression System (Optional)The automatic detection on your fi re suppression system uses an independent electrical system to detect a fi re and to deploy the system. If the automated electrical system fails, there is a manual override the operator can use to deploy the system if needed.
The system consists of an automatic detection wire, an automatic control module, a squib, nitrogen cartridges, and two manual actuators. The automatic detection wire has two spring steel conductors separated by a heat sensitive insulator. When the insulator melts, the two conductors make contact, tripping the system. The squib is an electrically actu-ated component. When heated, the squib detonates a tiny explosive charge creating enough pressure to puncture the seal in the nitrogen cartridge. Nitrogen cartridges provide the pressure required to actuate the system. The actuators can also be operated manually by pulling the safety pin and strik-ing the button which punctures the nitrogen cartridge seal.

35
Section 4 - Maintenance & Lubrication
A machine that receives regular care from its operators and mechanics generally rewards them with decreased downtime and greater reliability. With the help of the information in this section, you should be able to maintain your Heavy Lift Transporter at top operating effi ciency. The maintenance and lubrication procedures given here can be performed with a minimum of shop tools.
Safety Precautions
Before performing any maintenance or lubrication, review the following safety precautions. They’re included for your protection.
1. Read This Manual.
Be sure you understand the procedures outlined in this manual before attempting to carry them out. Pay particular attention to any safety warnings presented. If you have any questions, don’t hesitate to ask your Allied Representative.
2. Perform Maintenance on Level Ground.
The machine should be on level ground and clear of traf-fi c lanes whenever possible. The parking brake should be set and the wheels blocked.
3. Remove Load.
The machine should be unloaded, with the unit down.
Never rely on the hydraulics to support any part of the machine during maintenance or lubrication. If necessary, support components with appropriate safety stands. NEVER stand under a component that is supported only by the hydraulics. Make sure it is resting on its mechanical stops or safety stands.
4. Stop the Engine
Before performing any maintenance or lubrica-tion, remove the key from the switch, or tag the key switch ”DO NOT START”, to ensure that the engine is not inadvertently started.
Preventive Maintenance
Preventive maintenance is a system that is designed to detect problem areas and prevent equipment failure before trouble can develop to a critical point. The system is based on a series of maintenance checks and servicing points. To be effective, a preventive maintenance program demands strict adherence to a planned schedule of maintenance.
Benefi ts of Preventive Maintenance
Time spent making the required periodic checks is a real investment in working equipment and effi cient use of man hours. Valuable benefi ts can be realized, all of which mean savings in time and resources.
Preventive Maintenance
Promotes Safety - properly maintained equipment is • better able to operate within its design specifi cations and react positively to the operators control.
Improves Equipment Availability - by minimizing the • chances of breakdown.
Reduces Unexpected Downtime - crash repairs are • expensive and detract from normal scheduled mainte-nance.
Reduces Equipment Abuse - provides the ability to predict • component life and helps avoid operating equipment to destruction, by replacing parts before they fail.
Allows Planning of Daily Production - by knowing the • condition of available equipment.
Allows Planning of Maintenance Man Hours - by dis-• tribution of duties and necessary lead time for parts ordering.
Provides Complete History of Equipment - based on • performance, frequency and type of repairs and actual man hours expended on maintenance.

36
Establishing a Preventive Maintenance Pro-gram
The key to an effective preventive maintenance program is diligence in following a maintenance schedule set at regular planned intervals. Such intervals should be made compat-ible with the nature of operation of the equipment and with the capabilities of the maintenance facility. In any event, the intervals and inspection requirements must be planned, regular, and consistent.
This program proposes the following basic schedule which is based on intervals generally used and accepted.
Specifi c maintenance should be completed using the follow-ing intervals:
10 hours (each shift or daily)• 50 hours (weekly)• 250 hours (monthly)• 500 hours (quarterly)• 1000 hours (semi-annually)• 2000 hours (annually)•
Each successive schedule (e.g. weekly, monthly, quarterly, etc) builds on the former and is accumulative in nature. For example, when performing monthly maintenance, the me-chanic will fi rst take note of the shift maintenance reports and remedy any discrepancy; then comply with the shift and weekly maintenance, and in addition will perform the checks specifi ed in the monthly schedule.
Maintenance Record Keeping
The importance of good record keeping cannot be overem-phasized. Each scheduled maintenance form should be checked off as the inspections and service is performed. Quantities of replenished lubricants should be recorded, as well as hydraulic pressure readings. All discrepancies should be recorded whether remedied or pending. Opera-tors and mechanics should sign off forms and return them to the maintenance supervisor for approval and retention in an equipment unit fi le.
Accurately recorded maintenance forms will give the mainte-nance personnel an overall view of how particular equipment is holding up under normal operating conditions. Good re-cords, and the ease by which they can be reviewed also en-able maintenance personnel to identify and evaluate problem areas and allow adjustment in the maintenance scheduling for their particular operation.
Shift Maintenance
Shift maintenance is where preventive maintenance begins. The operator normally completes this inspection. It consists of the routine servicing and lubrication of the machine’s major systems. On a daily basis, the operator is in a position to identify, remedy and/or record potential problem areas and is able to quickly recognize any change in the performance of his machine. The comments he records on the shift main-tenance report become a valuable tool to the maintenance department, and is an important ingredient to the overall success of a preventive maintenance program.
Shift Maintenance Checklist
A recommended checklist is given here as an aid in develop-ing a practical shift maintenance program if one has not been developed by your company. A shift maintenance report, based on this checklist, should be used to report defects found when making maintenance checks at the beginning of each shift.
Your company may have a different reporting method, how-ever, it is usually a requirement that this form be fi lled out at the end of each shift. Accurate shift maintenance reports can help your company anticipate maintenance problems and take action to prevent costly failures.

37
Scheduled Maintenance
Periodic scheduled maintenance is intended to be performed in a complete maintenance facility by trained mechanics. The timely scheduling and completion of these periodic inspec-tions by the maintenance department will determine the length of downtime of a particular machine. Therefore, maintenance scheduling becomes a critical factor in the effective use of man hours and the availability of serviceable equipment.
Scheduled Maintenance Checklist
Actual operating environment governs the maintenance schedule. Some checks should be performed more often under severe conditions, such as heavy dust, extreme tem-peratures or extremely heavy loads.
These maintenance checklists are designed to be used as a guide until adequate experience is obtained in establishing a schedule to meet your specifi c needs.
A detailed list of component checks is provided with a sug-gested schedule basis given in hours of operation, or calendar time.
The engine manufacturer’s operation and maintenance manual should be consulted for additional engine related checks and/or details.
A maintenance schedule should be established using these checklists as a guide. The result will be a maintenance pro-gram to fi t your specifi c operation.
Using the Checklist
Although specifi c maintenance is identifi ed in these check-lists, location and procedure references are not provided in the columns.
Scheduled maintenance is normally carried out by trained mechanics, who are knowledgeable of the equipment systems and component locations. Scheduled maintenance proce-dures can be found by referring to the appropriate section of the service manual.
Scheduled Oil Sampling
Use scheduled oil sampling (SOS) to monitor machine condi-tion and maintenance requirements. Oil samples from engine, transmission, axles, and hydraulic system should be taken when the oil is hot and well mixed to ensure an accurate analysis. Contact your Allied Representative for complete information and assistance in establishing a scheduled oil sampling analysis program for your equipment.

38
Mai
nte
nan
ce S
ched
ule
Su
mm
ary
Co
mp
on
ent
24 H
ou
rs50
Ho
urs
150
Ho
urs
250
Ho
urs
500
Ho
urs
1000
Ho
urs
1500
Ho
urs
2500
Ho
urs
5000
Ho
urs
6000
Ho
urs
En
gin
e:
QS
X-1
5*
Che
ck o
pera
tors
rep
ort.
* C
heck
leve
ls (
oil/c
oola
nt)
if m
ake-
up c
oola
nt is
req
uire
d,
DC
A4
conc
entr
atio
n m
ust b
e ch
ecke
d.
* V
isua
lly in
spec
t eng
ine
for
dam
age,
leak
s, lo
ose
or
fray
ed b
elts
and
list
en fo
r un
usua
l noi
ses.
* D
rain
wat
er/s
edim
ent f
rom
fu
el ta
nks
and
fuel
fi lte
rs.
* C
heck
/Cle
an a
ir cl
eane
r, pr
ecle
aner
and
dus
t pan
.
* C
heck
air
clea
ner
pipi
ng,
hose
s, a
nd
clam
ps.
* C
heck
re
stric
tion
indi
cato
r.
* C
lean
/Cha
nge
air
clea
ner
elem
ent
* D
rain
* C
hang
e en
gine
oil
* C
hang
e fi l
ters
:O
il fu
ll fl o
wO
il B
y-P
ass
Fue
l fi lt
erW
ater
Filt
er
* C
lean
/Cha
nge
cran
kcas
e br
eath
er
* A
ir C
ompr
esso
r ai
r fi l
ter
* O
il S
ampl
e
* A
djus
t va
lves
and
inje
ctor
s
* R
epla
ce h
oses
as
requ
ired
* C
heck
Bat
terie
s
* S
team
Cle
an e
ngin
e
* T
ight
en m
ount
ing
bolts
* C
heck
turb
o-ch
arge
r m
ount
ing
bolts
* C
lean
and
fl u
sh c
oolin
g sy
stem
* C
lean
and
ca
libra
te
inje
ctor
s an
d fu
el p
ump
* In
spec
t: Tu
rbo-
char
ger
Vib
ratio
n da
mpe
r A
ir C
ompr
esso
rFa
n H
ubId
ler
Pul
ley
Wat
er P
ump
Tran
smis
sio
n
and
To
rqu
e C
onv
erte
r:
Dan
a 60
00 &
80
00
* C
heck
oil
leve
l with
eng
ine
runn
ing
at id
le &
oil
tem
pera
ture
at
180
- 20
0°F
(65
-93°
C)
* C
hang
e oi
l fi l
ter
* D
rain
and
refi
ll s
yste
m. D
rain
with
oil
tem
pera
ture
at 1
80-2
00°F
(63
-93°
C)
Dri
ve A
xles
: D
ana
42T
112
* Lu
be d
rive
shaf
t
* A
djus
t bra
kes
* C
heck
le
vels
* O
il sa
mpl
e*
Dra
in a
nd r
efi ll
sys
tem
Hyd
rau
lics:
* C
heck
fl ui
d le
vels
* In
spec
t for
leak
s
* C
heck
PD
I vis
ual i
ndic
ator
s an
d te
mpe
ratu
re g
auge
* R
epla
ce b
reat
her
elem
ent
* O
il sa
mpl
e if
last
test
was
abo
ve
requ
ired
clea
nlin
ess
leve
ls
* O
il sa
mpl
e*
Rep
lace
oil
fi lte
r el
emen
ts*
Che
ck a
nd r
ecor
d pr
essu
re s
ettin
gs*
Dra
in h
ydra
ulic
fl ui
d ta
nk,
clea
n ta
nk a
nd r
epla
ce fl
uid
Ch
assi
s:*
Dai
ly in
spec
tion
- pe
r ch
art
New
Veh
icle
Adj
ustm
ents
:
* B
rake
cal
iper
s*
Whe
el b
earin
gs*
Axl
e pi
vot
* W
heel
nut
s at
2 h
ours
and
eve
ry 5
0 ho
urs
* Lu
bric
ate
and
insp
ect
per
char
t
* Lu
bric
ate
engi
ne
acce
ss d
oors
* In
spec
t st
eerin
glin
kage
and
id
lers
* In
spec
t kn
ee jo
ints
* R
e to
rque
axl
e co
nnec
tion
driv
e pi
n*
Lubr
icat
e st
eerin
g co
lum
n U
-join
t and
sl
ip
* C
heck
ac
cum
ulat
or
char
ge
* In
spec
t /
Ser
vice
kne
e jo
ints
* In
spec
t an
d se
rvic
e st
eerin
g ax
les
* In
spec
t st
eerin
g id
lers
* R
epla
ce
stee
ring
idle
r be
arin
gs

39
Maintenance and Lubrication Checkpoints
Checkpoint Interval Checkpoint Interval1 Engine Oil Filter Daily 16 Hydraulic Oil Level sight gauge Daily
2 Engine Oil Level Dipstick Daily 17 Hydraulic tank breather Every 150 Hours
3 Fuel level gauge/sight gauge Daily 18 Hydraulic return fi lter gauge Daily
4 Engine air cleaner (restriction/leaks) Daily 19 Hydraulic pressure fi lters Every 1000 Hours
5 Engine pre-cleaner Daily 20 Lubrication points Every 250 Hours
6 Condition of wheels and tires Daily 21 Cooling system (level, leaks) Daily
7 Transmission fi lter Every 500 Hours 22Gauges and indicators (acceptable read-ings)
Daily
8 Transmission oil level Daily 23 Driveline lube points Every 50 Hours
9 Steering idler pivot lube points Every 250 Hours 24 Brake calipers (pads, disks, and lines) Every 250 Hours
10 Air/hydraulic brake actuator fl uid level Daily 25 Differential oil level (2 places) Every 250 Hours
11 Engine belts (condition and tension) Daily 26 Planetary axle housing oil level (4 places) Every 250 Hours
12 Batteries Every 250 Hours 27Drive axles - slack adjuster and cam bushing lube points
Every 250 Hours
13 Engine Fuel Filters Every 250 Hours 28Engine, deck and frame access door hinges (10 places)
Every 500 Hours
14 Engine Fuel Tank Daily 29 Steering column u-joints and slip (6 places) Every 2500 Hours

40
Inspection, Maintenance and Lubrication Instructions
Drivetrain/Engine
For complete service, maintenance, trouble shooting and warranty information for the drivetrain components consult the manufactures handbook included in the Service Manual.
Suspension - General
Proper maintenance and lubrication at regular intervals will assure good performance optimizing the service life of each component. Lubrication, service intervals and service life will vary depending on usage and road conditions
lt is recommended that grease points be lubricated every 250 hours unless indicated otherwise. This equates to twice monthly.
Elevating individual axles can be accomplished by lowering machine - turning cylinder ball valve to the closed position - elevating machine.
Tires should be kept within 1 inch (25mm) diameter of each other within any axle set.
Suspension - New Units
When new axles are placed in service, it is important that wheel nuts are checked and tightened after the fi rst 2 hours of operation.
Wheel bearing temperature should be checked after fi ve hours of continuous operation, by placing your hand on the outside of the wheel hub. A comparison between hubs should be equal. If a hub is found to be considerably warmer than the rest, the wheel bearings should be inspected for proper pre-load and lubricant.
Knee joint connection houses journal bearings and should be inspected after 24 hours of operation. Inspect and lubricate following the procedure described later in this section.
The lower arm axle connection should be re torqued after 24 hours of operation to approximately 400 lb/ft or until the axle cannot be rotated over lower arm trunnion. Elevate the axle to do this - axle must be parallel to the deck, i.e. neutral position, BEFORE torquing.
Steer Suspension
Warning: Support vehicle properly when work-ing beneath it. Do not depend on hydraulic cylinders to hold vehicle up. Vehicle can lower if a manual control is moved or if a hydraulic line breaks
Wheel bearings and hubs should be cleaned and repacked at 5,000 hour intervals or yearly. Inspect brake lining wear indicator pins on Steering and Drive Axles. (See Page 41)
Bearings should be repacked with wheel bearing grease suitable for prevailing temperatures. ( see Lubrication Spec Table page 47-48) In packing bearings, the lubricant must be packed carefully between the rollers, by hand or with a packer, and must not be just spread on the outside. Care must be exercised to see that dirt, grit, lint, or other contaminants do not get into the bearings.
Remove all old grease from inside hub and wash with clean-ing solvent (mineral spirits), and dry thoroughly. Inspect cups for wear, pits or scratches; if any of this is evident, replace the cups. Fill the space in the hub between the two bearing cups with grease.
Remove all old grease from the axle spindle with cleaning solvent (mineral spirits). After drying, spread a thin coat of grease over spindle.
When reassembling, care should be taken to see that the inner bearing is properly seated. Slide the hub and rotor as-sembly onto axle spindle and push into position. Be sure to support it properly so as to avoid damaging spindle threads. Install outer bearing, spindle nuts, and hub cap.
To adjust bearings, tighten the spindle nut and turn hub and rotor assembly to assure proper seating of bearings. The bearings should be adjusted in accordance with procedure listed below:
Assemble1. bearings, new seal, and hub, on axle spin-dle.
Install inner bearing adjustment nut on spindle with dowel 2. facing out.

41
Tighten to 50 lb/ft torque (68 N. M) while rotating hub 3. back and forth.
Back off adjusting nut: 1/34. turn (120 degrees).
Install nut retainer (perforated washer) reverse retainer, 5. if necessary to engage dowel adjusting nut.
Install jam nut and tighten to 350 lb/ft. (475 N. M). 6.
Install hub cap gasket and hub cap. 7.
Brake Friction Disc Lining Wear Check Proce-dure Steering Axles
At regular intervals, depending on usage and road conditions, it is necessary to check brake lining wear indicator pins.
The brake must be applied before making the wear indicator check!
1. Clean thoroughly the area around the wear indicator.
2. Push wear indicator pin against the reaction plate.
3. When the wear indicator pin is fl ush with the indicator nut face or raised casting surface the friction and lining disc must be replaced. (See Figure: 15 and 16)
Figure: 15 Indicator Pin, Steering Axles
Figure: 16 Indicator Pin Shown Flush
Brake Friction Disc Lining Wear Check Proce-dure Drive Axles
Depending on usage and road conditions, it is necessary to check brake lining wear indicator pins. The brake must be applied before making the wear indicator check! 1. Clean thoroughly the area around the wear indicator.
2. Remove cap.
3. Push wear indicator pin in against reaction plate.
4. When the wear indicator pin becomes fl ush with the spot-faced casting surface, the friction discs must be inspected (see Figure 17 and 18).
5. The wear pin in fi gure 18 has no factory set standout. Inspect discs when wear pin becomes fl ush with the spotface.
6. Replace cap and torque to 25 Ft. - Lbs. [27-34 Nm] as required.
Figure: 17 Indicator Pin, Drive Axles
Figure: 18 Indicator Pin Shown Flush
Turntable Bearing
Bearing should be lubricated every 250 hours. There are six lube points located around the inside circumference.

42
Elevating Cylinder Bearings should be lubricated every 250 hours. There are two lube points, one each at the upper and lower bearings.
Knee Joint Knee joint journal bearings should be lubricated every 250 hours. There are two lube points - inside and outside at the knee joint.
The journal bearings should be inspected for wear every 2500 hours. Relieve weight from axles. Elevate axle and push lower arm side to side or with a fore - aft rocking motion of the tires feel for any play between the turntable and the lower arm.
Axle Connection
The axle connection should be checked and adjusted as required every 1000 hours. The axle connection is non lu-bricated. It functions by the defl ection of the compressed polyurethane bushing.
The lower arm axle connection should be torqued to approxi-mately 400 lb/ft or until the axle cannot be rotated over lower arm trunnion. Elevate axle to do this - axle must be parallel to the deck, i.e. neutral position, BEFORE torquing.
Drive Suspension
General
The drive axles and suspension are housed within an isolated module. The connection between the main frame and the drive module is accomplished by means of four steel encased rubber bushings, coupling with a standard axle hanger ar-rangement.
The axle connection is non lubricated. To inspect bushings place a tapered end bar between the main frame and drive frame close to the hanger-bushing arrangement and pry down to see if play exists. Visually inspect for collapsed or extruded rubber or wear/defects in the hanger.
Elevating Cylinder Bearings should be lubricated every 250 hours. There are 2 lube points - upper and lower bearings.
Knee Joint
Knee joint journal bearings should be lubricated every 250 hours. There are two lube points - inside and outside at the knee joint.
The journal bearings should be inspected for wear every 2500 hours. Relieve weight from axles. Elevate axle and push lower arm side to side or with a fore - aft rocking motion of the tires feel for any play between the turntable and the lower arm.
Axle Connection
Bearings should be lubricated every 250 hours. There are 2 lube points - upper and lower bearings. The axle connection should be checked and adjusted as required every 1000 hours. The axle connection is non lu-bricated. It functions by the defl ection of the compressed polyurethane bushing.
Torque Arms
The torque arm tapered ball sockets are permanently sealed and do not require additional lubrication. With brakes applied and engine running, (approx. 1000 rpm) put the machine into forward then reverse gear. Watch for movement or play within the ball socket and within the taper of the mounting bracket. Replace worn parts. Before dismantling torque arm, measure the length center to center. Reassemble to the same length.
Drive AxlesSee Clark-Hurth service manuals included in the Service Manual.
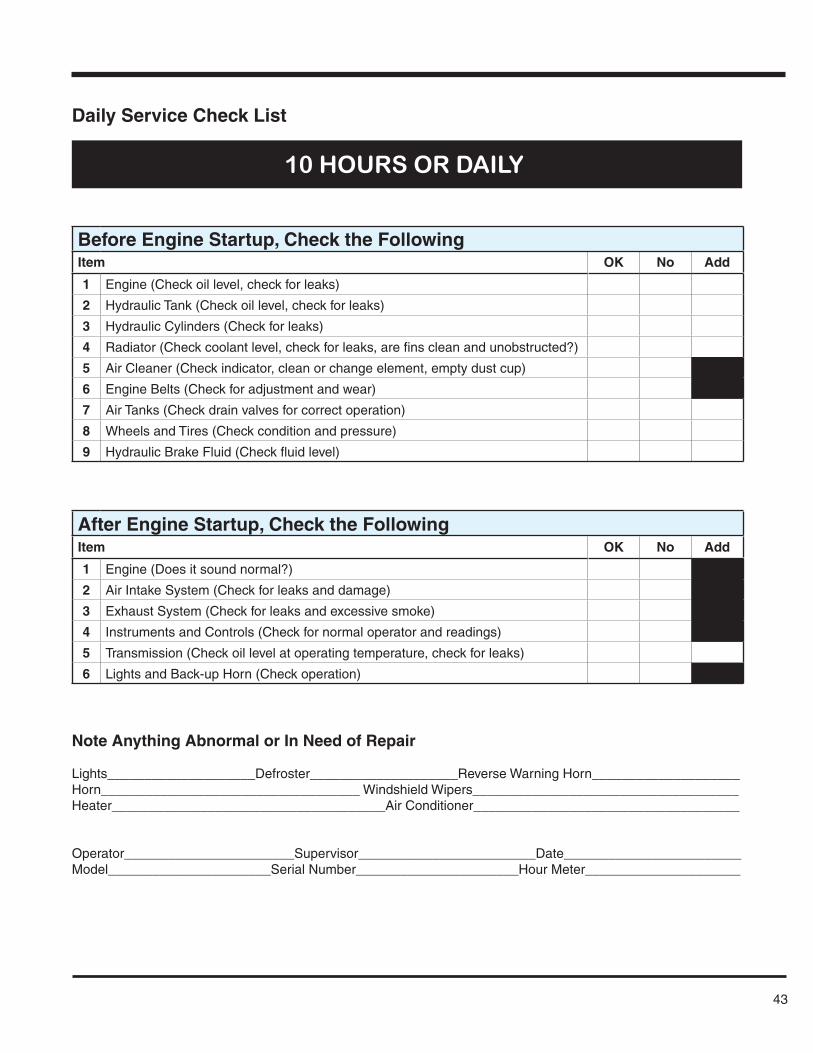
43
Daily Service Check List
10 HOURS OR DAILY
Before Engine Startup, Check the FollowingItem OK No Add
1 Engine (Check oil level, check for leaks)
2 Hydraulic Tank (Check oil level, check for leaks)
3 Hydraulic Cylinders (Check for leaks)
4 Radiator (Check coolant level, check for leaks, are fi ns clean and unobstructed?)
5 Air Cleaner (Check indicator, clean or change element, empty dust cup)
6 Engine Belts (Check for adjustment and wear)
7 Air Tanks (Check drain valves for correct operation)
8 Wheels and Tires (Check condition and pressure)
9 Hydraulic Brake Fluid (Check fl uid level)
After Engine Startup, Check the FollowingItem OK No Add
1 Engine (Does it sound normal?)
2 Air Intake System (Check for leaks and damage)
3 Exhaust System (Check for leaks and excessive smoke)
4 Instruments and Controls (Check for normal operator and readings)
5 Transmission (Check oil level at operating temperature, check for leaks)
6 Lights and Back-up Horn (Check operation)
Note Anything Abnormal or In Need of Repair
Lights____________________Defroster____________________Reverse Warning Horn____________________ Horn___________________________________ Windshield Wipers____________________________________ Heater_____________________________________Air Conditioner____________________________________
Operator_______________________Supervisor________________________Date________________________ Model______________________Serial Number______________________Hour Meter_____________________

44
Service Maintenance Check Lists
50 HOURS OR WEEKLY
1 Repeat previous intervals OK___________ NO___________
2 Lubricate drive shaft OK___________ NO___________
3 Check for fl uid leaks - (oil, fuel and water) OK___________ Repair________
4 Check brakes for adjustment and wear OK___________ Repair________
5 Check wheel lug nuts and studs mechanically OK___________ Repair________
6 Record engine RPM High__________ Stall__________
250 HOURS OR MONTHLY
1 Repeat previous intervals OK___________ NO___________
2 Lubricate service points per lube chart OK___________ NO___________
3 Take engine oil sample for analysis* OK___________ NO___________
4 Change engine oil and fi lter* OK___________ NO___________
5 Check axle differential oil level OK___________ Add__________
6 Check axle planetary oil level OK___________ Add__________
7 Change cooling system fi lter OK___________ NO___________
8 Check all hydraulic pressures and record OK___________ NO___________
9 Check fi re suppression actuator OK___________ Repair________
10 Check brake lining wear indicator pins OK___________ Repair________
11 Check and adjust the parking brake OK___________ NO___________
12 Check battery electrolyte level OK___________ Add__________
* Normal drain period and fi lter change intervals are for average environmental and duty-cycle conditions. Severe or sustained high operating temperatures or very dusty atmospheric conditions will cause accelerated deterioration and contamination. Change intervals should be adjusted according to the results of oil sampling analysis. Consult your Wagner dealer for as-sistance in establishing an oil sampling program for your equipment.

45
Service Maintenance Check Lists
500 HOURS OR QUARTERLY
1 Repeat previous intervals OK___________ NO___________
2 Take samples from transmission, axles, and hydraulic system for analysis* OK___________ NO___________
3 Drain and refi ll transmission, change fi lter* OK___________ NO___________
4 Service fuel fi lters* OK___________ NO___________
5 Service hydraulic fi lters* OK___________ NO___________
6 Lubricate engine and frame access doors OK___________ NO___________
7 Inspect steering linkage and idlers OK___________ Repair________
8 Inspect brake system and components OK___________ Repair________
1000 HOURS OR SEMI-ANNUALLY
1 Repeat previous intervals OK___________ NO___________
2 Change hydraulic oil and fi lters * OK___________ NO___________
3 Clean and fl ush cooling system OK___________ NO___________
4 Check pins and bushings for wear OK___________ Repair________
2500 HOURS OR ANNUALLY
1 Repeat previous intervals OK___________ NO___________
2 Drain, fl ush and refi ll differentials * OK___________ NO___________
3 Drain, fl ush and refi ll planetaries * OK___________ NO___________
4 Check and recharge accumulators, record pressure OK___________ NO___________
5Replace hoses as required, steam clean engine, tighten mounting bolts and turbocharger mounting bolts
OK___________ Repair________
6 Drain hydraulic tank, fl ush tank and refi ll OK___________ NO___________
7 Lubricate steering column OK___________ NO___________
8 Inspect knee joints OK___________ Repair________
* Normal drain period and fi lter change intervals are for average environmental and duty-cycle conditions. Severe or sustained high operating temperatures or very dusty atmospheric conditions will cause accelerated deterioration and contamination. Change intervals should be adjusted according to the results of oil sampling analysis. Consult your Wagner dealer for as-sistance in establishing an oil sampling program for your equipment.

46
Service Maintenance Check Lists
5000 HOURS
1 Repeat previous intervals OK___________ NO___________
2 Drain hydraulic fl uid tank, fl ush tank, and replace fl uid OK___________ ADD__________
3 Inspect and service steer axles OK___________ ADD__________
4 Inspect steering idlers OK___________ Repair________
6000 HOURS
1 Repeat previous intervals OK___________ NO___________
2 Clean and calibrate injectors and fuel pump OK___________ NO___________
3Inspect - turbocharge, vibration damper, air compressor, fan hub, idler pulley, water pump
OK___________ NO___________
4 Replace steering idler bearings OK___________ NO___________

47
Lubricants and Capacities
System and Tank Capacities
Engine Crankcase .............................................................................................................10.2 U.S. Gallon (38.76 liters) Cooling System .................................................................................................................12 U.S. Gallon (45.6 liters)Transmission/Converter .....................................................................................................19 U.S Gallon (72.2 liters)Axle - Differential - Rear ....................................................................................................4.375 U.S Gallon (16.625 liters)Axle - Differential - Front ....................................................................................................4.375 U.S Gallon (16.625 liters)Axle - Planetary Hubs (each) ............................................................................................2 U.S Gallon (7.6 liters)Hydraulic Tank ...................................................................................................................150 U.S. Gallon (570 liters)Fuel Tank ...........................................................................................................................130 U.S. Gallon (494 liters)Flow Divider Gearbox ........................................................................................................1 U.S. Gallon (3.8 liters)
Recommended Lubricant Specifi cations Table
EnginePrevailing Ambient Temperature Fluid to be UsedCummins MIL-L-2104D
-13°F (-25°C) to 95°F (35°C) 14°F (-10°C) and above 32°F (0°C) and above
SAE 10W-30SAE 15W-40SAE 20W-40
Detroit Diesel MIL-L-46152E
32°F (0°C) and below32°F (0°C) and above
SAE 30SAE 40
Note: Multi-Grade oils are not recommended forDetroit Diesel Engines
Caterpillar MIL-L-2104D
-13°F (-25°C) to 50°F (10°C)-4°F (-20°C) to 104°F (40°C)5°F (-15°C) and above
SAE 5W-20SAE 10W-30SAE 15W-40
Transmission/Converter Hydraulic SystemPrevailing Ambient Temperature Fluid to be Used
MIL-L-2104E
30°F (-1°C) and above-10°F (-23°C) and above-30°F (-34°C) and above-65°F (-55°C) to 0°F (-18°C)
All
SAE 30 Transmission FluidSAE 10W Transmission FluidMobel 424 Transmission FluidMIL-L-46167
Grade 10
TYPE C-2 - C-3
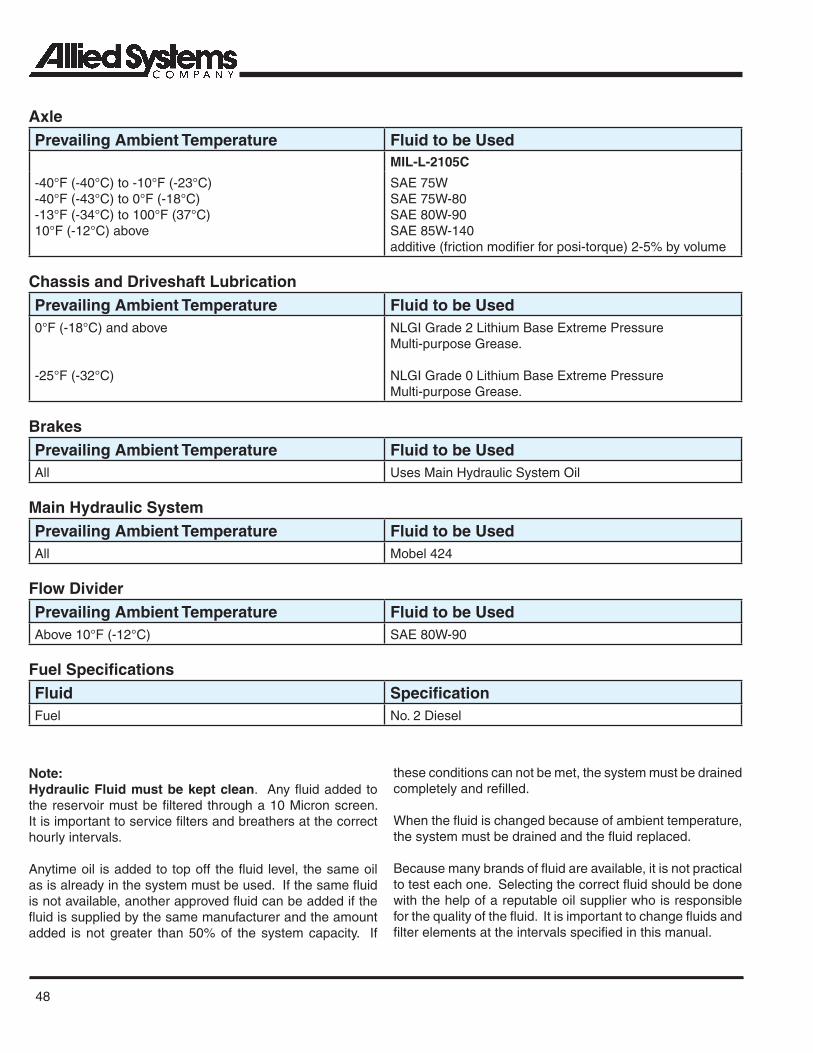
48
AxlePrevailing Ambient Temperature Fluid to be Used
MIL-L-2105C
-40°F (-40°C) to -10°F (-23°C)-40°F (-43°C) to 0°F (-18°C)-13°F (-34°C) to 100°F (37°C)10°F (-12°C) above
SAE 75WSAE 75W-80SAE 80W-90SAE 85W-140additive (friction modifi er for posi-torque) 2-5% by volume
Chassis and Driveshaft LubricationPrevailing Ambient Temperature Fluid to be Used0°F (-18°C) and above
-25°F (-32°C)
NLGI Grade 2 Lithium Base Extreme PressureMulti-purpose Grease.
NLGI Grade 0 Lithium Base Extreme PressureMulti-purpose Grease.
BrakesPrevailing Ambient Temperature Fluid to be UsedAll Uses Main Hydraulic System Oil
Main Hydraulic SystemPrevailing Ambient Temperature Fluid to be UsedAll Mobel 424
Flow DividerPrevailing Ambient Temperature Fluid to be UsedAbove 10°F (-12°C) SAE 80W-90
Fuel Specifi cationsFluid Specifi cationFuel No. 2 Diesel
Note:Hydraulic Fluid must be kept clean. Any fl uid added to the reservoir must be fi ltered through a 10 Micron screen. It is important to service fi lters and breathers at the correct hourly intervals.
Anytime oil is added to top off the fl uid level, the same oil as is already in the system must be used. If the same fl uid is not available, another approved fl uid can be added if the fl uid is supplied by the same manufacturer and the amount added is not greater than 50% of the system capacity. If
these conditions can not be met, the system must be drained completely and refi lled.
When the fl uid is changed because of ambient temperature, the system must be drained and the fl uid replaced.
Because many brands of fl uid are available, it is not practical to test each one. Selecting the correct fl uid should be done with the help of a reputable oil supplier who is responsible for the quality of the fl uid. It is important to change fl uids and fi lter elements at the intervals specifi ed in this manual.

49
Steps for checking and fi lling the Hydraulic Tank
1. Lower the Machine to its lowest position. 2. Shut down the machine and allow it to cool. The hydraulic
oil must be cool to obtain an accurate level reading.
3. Open the engine compartment access door on the left side of the machine, under the cab.
4. Check the hydraulic oil level on the sight gauge on the hydraulic tank. The oil level should be between the “Full Cold” mark and the “Low” mark indicated on the tank.
5. If the oil level is at the “Low” mark, add 12.5 gallons of approved hydraulic oil (See Figure 19) to return the oil level to the “Full Cold” mark. Fill the tank at the fi ll valve located on the left side of the tank.
6. Note that the oil level will raise when the machine is warmed up, and may be above the “Full Cold” mark.
Figure: 19 Hydraulic Site Gage Location

50
NOTES
________________________________________________________________________________________________
________________________________________________________________________________________________
________________________________________________________________________________________________
________________________________________________________________________________________________
________________________________________________________________________________________________
________________________________________________________________________________________________
________________________________________________________________________________________________
________________________________________________________________________________________________
________________________________________________________________________________________________
________________________________________________________________________________________________
________________________________________________________________________________________________
________________________________________________________________________________________________
________________________________________________________________________________________________
________________________________________________________________________________________________
________________________________________________________________________________________________
________________________________________________________________________________________________
________________________________________________________________________________________________
________________________________________________________________________________________________
________________________________________________________________________________________________
________________________________________________________________________________________________
________________________________________________________________________________________________
________________________________________________________________________________________________
________________________________________________________________________________________________
________________________________________________________________________________________________
________________________________________________________________________________________________
________________________________________________________________________________________________
________________________________________________________________________________________________
________________________________________________________________________________________________
________________________________________________________________________________________________