OPCS-4 and ICD-10 eVersion User Guide - NHS Digital
46
Copyright © 2017 Health and Social Care Information Centre. The Health and Social Care Information Centre is a non-departmental body created by statute, also known as NHS Digital. OPCS-4 and ICD-10 eVersion User Guide Published January 2017
-
Upload
khangminh22 -
Category
Documents
-
view
2 -
download
0
Transcript of OPCS-4 and ICD-10 eVersion User Guide - NHS Digital

Copyright © 2017 Health and Social Care Information Centre. The Health and Social Care Information Centre is a non-departmental body created by statute, also known as NHS Digital.
OPCS-4 and ICD-10 eVersion User Guide
Published January 2017

OPCS-4 and ICD-10 eVersion User Guide V1.7 24/01/2017
Copyright © 2017 Health and Social Care Information Centre. 2
Contents
Glossary 4
1 Introduction to the OPCS-4 and ICD10 eVersion User Guide 5
1.1 Purpose of document 5
1.2 Background 5
1.3 Maintenance and release 5
1.4 Differences between ICD and OPCS-4 eViewer functionality 5
1.5 ICD-10 content and specific Coding Clinic changes – Red notes 6
1.6 National Clinical Coding Standards 7
1.7 Overview of the eVersion User Guide 7
1.8 Accurate clinical coding 7
2 Vital things to remember when using the eVersion 8
3 Getting started 10
4 Setting your window split 11
5 Setting your font size 12
6 Why you must always scroll up 13
7 Setting your preferences 14
8 Always-on-top 15
9 Sync tree with page button 16
10 Introducing the icons 17
11 Find eVersion in system tray 17
12 Using Search function to find a tentative code 18
12.1 OPCS-4 and ICD-10 default search 19
13 More about searching 20
13.1 Searching for terms using the filter 20
13.2 Copy results of search into document 21
13.3 Searching your notes 22
13.4 Hints for successful searching 22
14 Links between indexes 23
14.1 Links between Alphabetical index entries – OPCS-4 23
14.2 Links between Alphabetical index entries – ICD-10 24
15 Adding Notes to the eVersion 25

OPCS-4 and ICD-10 eVersion User Guide V1.7 24/01/2017
Copyright © 2017 Health and Social Care Information Centre. 3
15.1 Notes editor 25
15.2 More on shared and private notes 25
16 How to add a note 26
16.1 Adding links to documents 27
16.2 How to create a link to a website 27
17 How to amend and delete a note 28
18 How to export a note to share it 29
18.1 How to create a backup export file 31
19 How can I read my notes in a single document 31
20 How to import a note 32
20.1 Reviewing new notes before import 34
20.2 Reviewing conflicts between notes before import 35
20.3 Reviewing deleted notes before import 36
20.4 How to undo an import 37
20.5 How to delete or replace a Note 37
21 Transfer notes between eVersions 38
21.1 How to transfer my notes 38
22 Email or copy content 39
22.1 Snipping Tool 40
22.2 Print screen 40
23 Book Manager 41
Annex A Using special symbols and words in searches 43
A.1 Wildcards 43
A.2 Using AND, NOT and OR 44
A.3 Searching for a term in your notes 45
A.4 Searching all notes 46
OPCS-4 and ICD-10 eVersion User Guide V1.7 24/01/2017
Copyright © 2017 Health and Social Care Information Centre. 4
Glossary
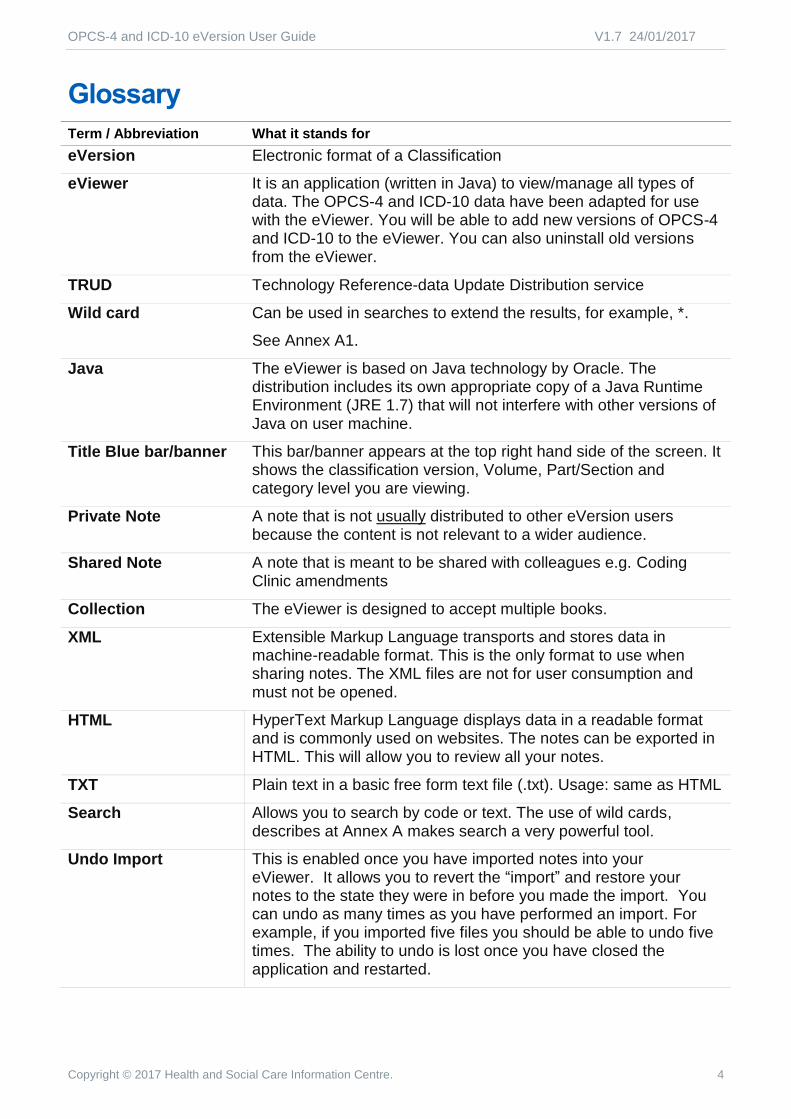
Term / Abbreviation What it stands for
eVersion Electronic format of a Classification
eViewer It is an application (written in Java) to view/manage all types of data. The OPCS-4 and ICD-10 data have been adapted for use with the eViewer. You will be able to add new versions of OPCS-4 and ICD-10 to the eViewer. You can also uninstall old versions from the eViewer.
TRUD Technology Reference-data Update Distribution service
Wild card Can be used in searches to extend the results, for example, *.
See Annex A1.
Java The eViewer is based on Java technology by Oracle. The distribution includes its own appropriate copy of a Java Runtime Environment (JRE 1.7) that will not interfere with other versions of Java on user machine.
Title Blue bar/banner This bar/banner appears at the top right hand side of the screen. It shows the classification version, Volume, Part/Section and category level you are viewing.
Private Note A note that is not usually distributed to other eVersion users because the content is not relevant to a wider audience.
Shared Note A note that is meant to be shared with colleagues e.g. Coding Clinic amendments
Collection The eViewer is designed to accept multiple books.
XML Extensible Markup Language transports and stores data in machine-readable format. This is the only format to use when sharing notes. The XML files are not for user consumption and must not be opened.
HTML HyperText Markup Language displays data in a readable format and is commonly used on websites. The notes can be exported in HTML. This will allow you to review all your notes.
TXT Plain text in a basic free form text file (.txt). Usage: same as HTML
Search Allows you to search by code or text. The use of wild cards, describes at Annex A makes search a very powerful tool.
Undo Import This is enabled once you have imported notes into your eViewer. It allows you to revert the “import” and restore your notes to the state they were in before you made the import. You can undo as many times as you have performed an import. For example, if you imported five files you should be able to undo five times. The ability to undo is lost once you have closed the application and restarted.

OPCS-4 and ICD-10 eVersion User Guide V1.7 24/01/2017
Copyright © 2017 Health and Social Care Information Centre. 5
1 Introduction to the OPCS-4 and ICD10 eVersion User Guide
1.1 Purpose of document This user guide provides instructions on how to use the OPCS-4 and ICD-10 eVersions.
1.2 Background The OPCS-4 and ICD-10 eVersions are electronic formats of the aforementioned classifications which are fundamental information standards. Healthcare providers must use them to classify NHS activity as stated in the NHS Data Model and Dictionary.
OPCS-4 and ICD-10 are available to buy in book format from the publishers - The Stationery Office (TSO).
1.3 Maintenance and release The Clinical Classifications Service has responsibility for maintaining and issuing the classifications, including the eVersions. The eViewer accommodates both OPCS-4 and ICD-10.
The eVersions continue to be a replica of the printed books (with notes added for NHS errata changes – see 1.5), so clinical coders can be confident that the full detail of the classifications are present.
If you identify any errors in the ICD-10 content (eVersion or paper), please notify us at [email protected].
The eVersions are distributed via the Technology Reference-Data Update Distribution (TRUD) service which provides a mechanism to license and distribute reference data to registered users. For information about TRUD visit website: https://isd.hscic.gov.uk/trud3/user/guest/group/0/home
1.4 Differences between ICD and OPCS-4 eViewer functionality
The functionality available in OPCS-4 has on the whole been replicated in the ICD10 eVersion. Differences between ICD-10 and OPCS-4 eVersions are indicated in the appropriate sections of this user guide.
Pay particular attention to:
Section 15: Adding notes to the eVersion – this section contains an important note on transferring notes from Volume 3 Alphabetical Index of the ICD-10 eVersion.
Section 22: Email or copy content – this section contains an important note on formatting and the omission of “see” and “see also” when copying/emailing from the ICD-10 eVersion.
OPCS-4 and ICD-10 eVersion User Guide V1.7 24/01/2017
Copyright © 2017 Health and Social Care Information Centre. 6
1.5 ICD-10 content and specific Coding Clinic changes – Red notes
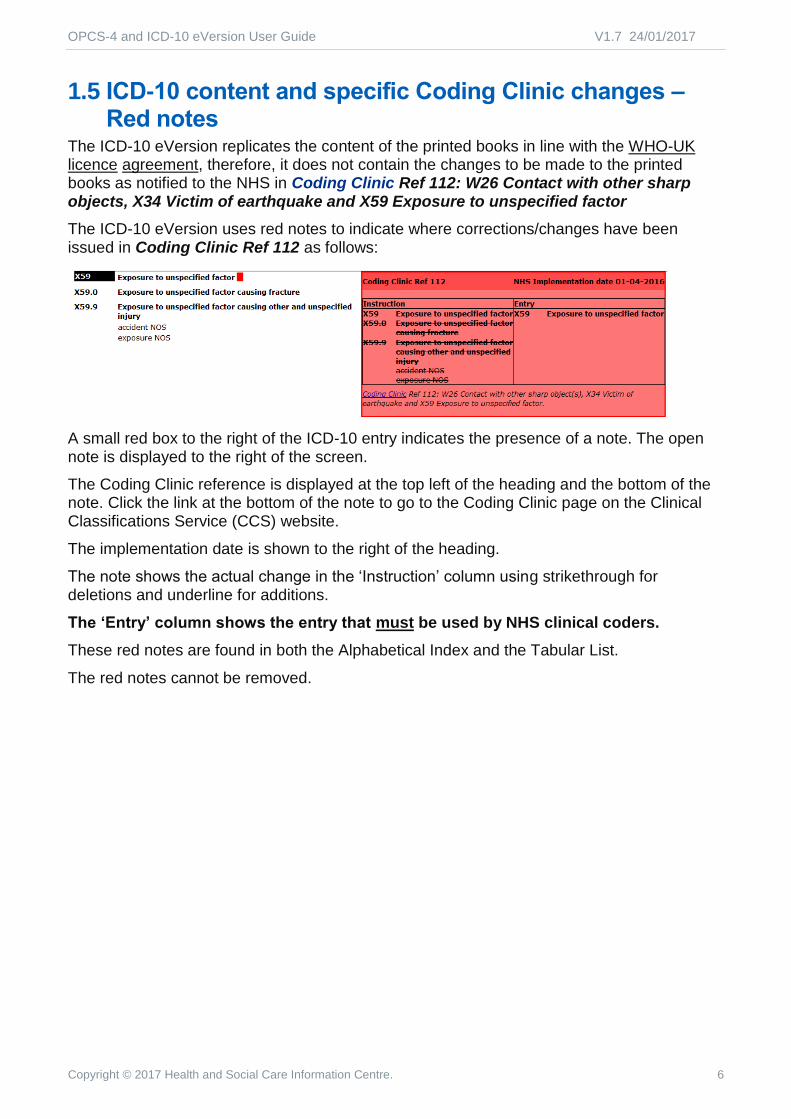
The ICD-10 eVersion replicates the content of the printed books in line with the WHO-UK licence agreement, therefore, it does not contain the changes to be made to the printed books as notified to the NHS in Coding Clinic Ref 112: W26 Contact with other sharp objects, X34 Victim of earthquake and X59 Exposure to unspecified factor
The ICD-10 eVersion uses red notes to indicate where corrections/changes have been issued in Coding Clinic Ref 112 as follows:
A small red box to the right of the ICD-10 entry indicates the presence of a note. The open note is displayed to the right of the screen.
The Coding Clinic reference is displayed at the top left of the heading and the bottom of the note. Click the link at the bottom of the note to go to the Coding Clinic page on the Clinical Classifications Service (CCS) website.
The implementation date is shown to the right of the heading.
The note shows the actual change in the ‘Instruction’ column using strikethrough for deletions and underline for additions.
The ‘Entry’ column shows the entry that must be used by NHS clinical coders.
These red notes are found in both the Alphabetical Index and the Tabular List.
The red notes cannot be removed.

OPCS-4 and ICD-10 eVersion User Guide V1.7 24/01/2017
Copyright © 2017 Health and Social Care Information Centre. 7
1.6 National Clinical Coding Standards The National Clinical Coding Standards ICD-10 and OPCS-4 reference books can be added to the eViewer via the Book Manager, see section 23.
A PDF viewer (e.g. Adobe Acrobat Viewer) is needed to view the reference books. Contact your IT Department if you require assistance with installation.
1.7 Overview of the eVersion User Guide The eVersion User Guide tells you all you need to know to start using the eVersion, but it is
not a step-by-step instruction manual for each function as navigation by clicking the links is
intuitive and the menus that drive the features, such as create note, are self-explanatory.
(NB: These instructions use illustrations based on PCs running Microsoft (MS) Windows 7.
Therefore, your screens may look different if you are running different versions of MS
Windows. Additionally, the screens prints are not an exact replica in all instances. If you
experience any technical difficulties refer in the first instance to your local organisation’s IT
support for additional guidance.)
1.8 Accurate clinical coding Please be very aware that the accuracy of clinical coding depends on the application of
the four step coding process and the clinical coding standards. This applies equally to users
of the eVersions and the books.
OPCS-4 and ICD-10 eVersion User Guide V1.7 24/01/2017
Copyright © 2017 Health and Social Care Information Centre. 8
2 Vital things to remember when using the eVersion
Remember that OPCS-4 and ICD-10 three character category lists/sections are included for completeness. Use the four character subcategory sections for coding.
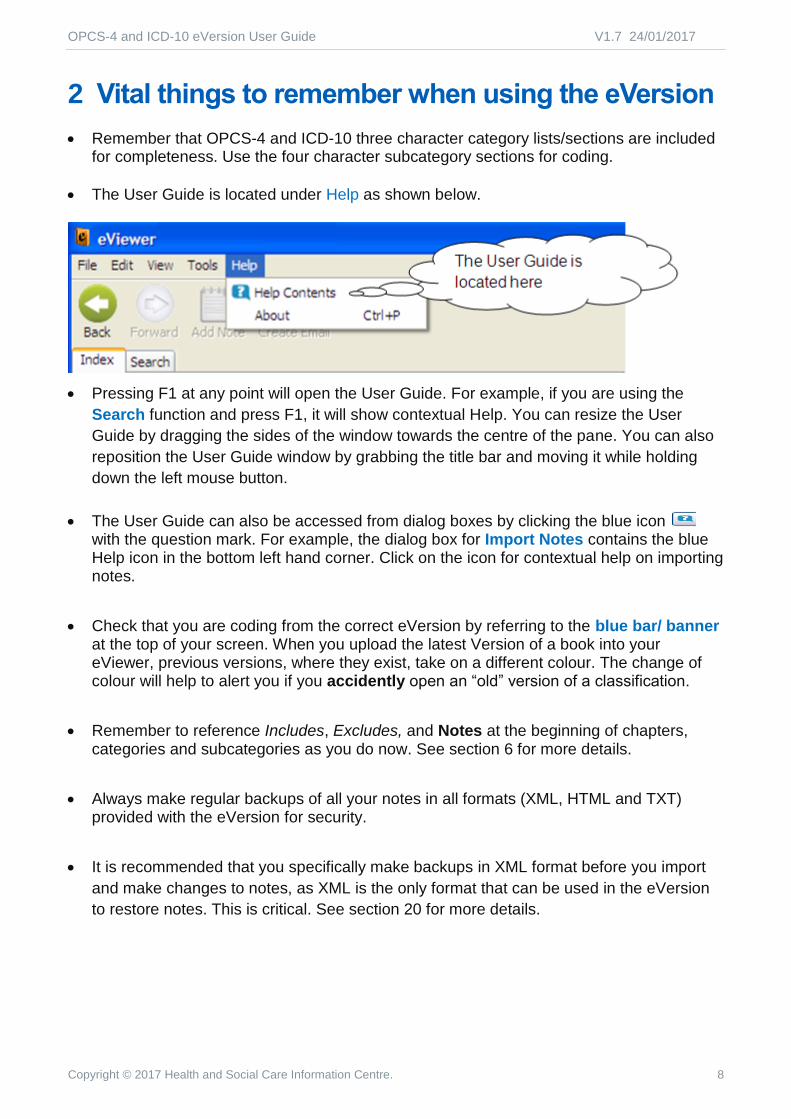
The User Guide is located under Help as shown below.
Pressing F1 at any point will open the User Guide. For example, if you are using the
Search function and press F1, it will show contextual Help. You can resize the User
Guide by dragging the sides of the window towards the centre of the pane. You can also
reposition the User Guide window by grabbing the title bar and moving it while holding
down the left mouse button.
The User Guide can also be accessed from dialog boxes by clicking the blue icon with the question mark. For example, the dialog box for Import Notes contains the blue Help icon in the bottom left hand corner. Click on the icon for contextual help on importing notes.
Check that you are coding from the correct eVersion by referring to the blue bar/ banner at the top of your screen. When you upload the latest Version of a book into your eViewer, previous versions, where they exist, take on a different colour. The change of colour will help to alert you if you accidently open an “old” version of a classification.
Remember to reference Includes, Excludes, and Notes at the beginning of chapters, categories and subcategories as you do now. See section 6 for more details.
Always make regular backups of all your notes in all formats (XML, HTML and TXT) provided with the eVersion for security.
It is recommended that you specifically make backups in XML format before you import
and make changes to notes, as XML is the only format that can be used in the eVersion
to restore notes. This is critical. See section 20 for more details.
OPCS-4 and ICD-10 eVersion User Guide V1.7 24/01/2017
Copyright © 2017 Health and Social Care Information Centre. 9
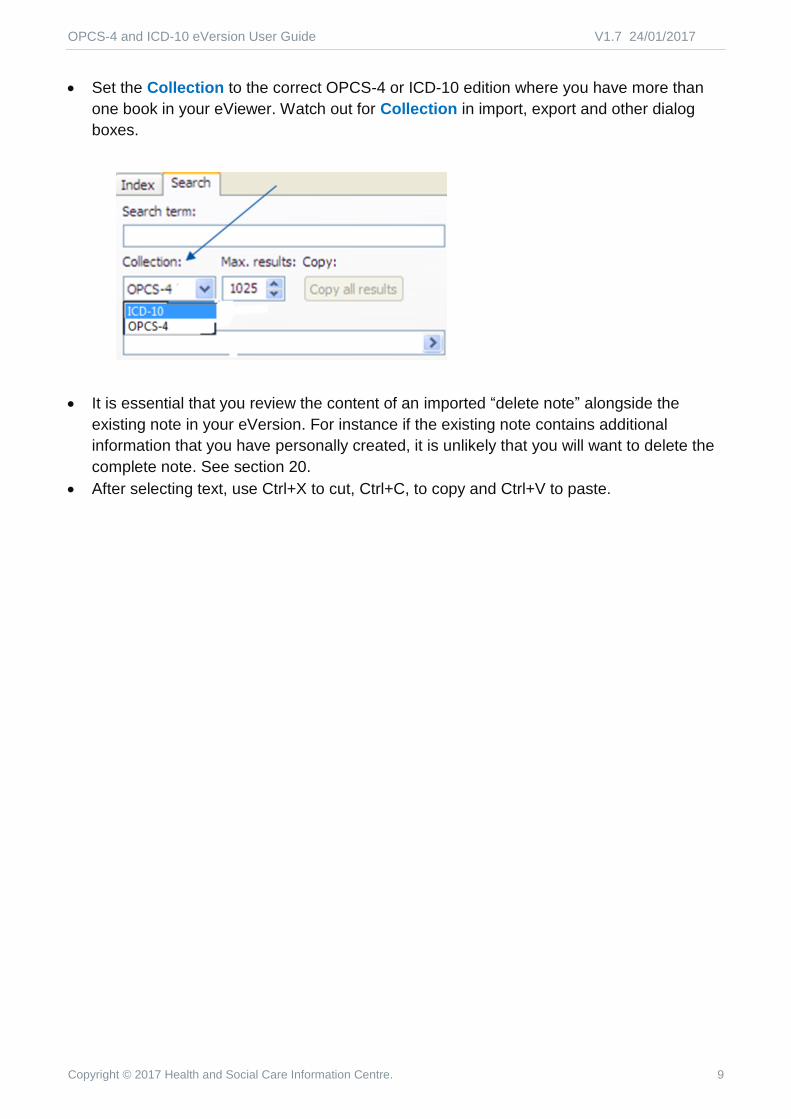
Set the Collection to the correct OPCS-4 or ICD-10 edition where you have more than
one book in your eViewer. Watch out for Collection in import, export and other dialog
boxes.
It is essential that you review the content of an imported “delete note” alongside the
existing note in your eVersion. For instance if the existing note contains additional
information that you have personally created, it is unlikely that you will want to delete the
complete note. See section 20.
After selecting text, use Ctrl+X to cut, Ctrl+C, to copy and Ctrl+V to paste.

OPCS-4 and ICD-10 eVersion User Guide V1.7 24/01/2017
Copyright © 2017 Health and Social Care Information Centre. 10
3 Getting started
Click the Start button at the bottom left hand corner of the computer screen and click on the eViewer icon to start the application*. You are presented with a split view window with the navigation tree in the left pane and the books, installed on your machine, in the right pane, as shown below:
* If eViewer icon was not created during installation, navigate to the eViewer folder and click
on the eViewer icon. To create desktop shortcut and/or pin to the menu: open eViewer menu Tools - Preferences.
Initially the tree is closed as seen above.
Click on each triangle icon until the tree is fully expanded as indicated by the book icon . Now, just go ahead and try out the links. The blue bar/ banner at the top of the screen tells you where you are in the book.

OPCS-4 and ICD-10 eVersion User Guide V1.7 24/01/2017
Copyright © 2017 Health and Social Care Information Centre. 11
4 Setting your window split
You can resize the eVersion by hovering over the vertical line that separates the panes until
the cursor becomes a double-headed arrow and then dragging the line to change the size
of the display areas.

OPCS-4 and ICD-10 eVersion User Guide V1.7 24/01/2017
Copyright © 2017 Health and Social Care Information Centre. 12
5 Setting your font size
To change the default font size go to the menu bar and click Tools. See screen print:
Index Text Size changes the tree Index font on the left hand side of the screen
Book Text Size changes the font size of Volumes I and II (OPCS-4) and Volumes 1
and 3 (ICD-10) on the right hand side of the screen.
Your favourite settings are retained, so you will not have to reset them when you re-open the
application.

OPCS-4 and ICD-10 eVersion User Guide V1.7 24/01/2017
Copyright © 2017 Health and Social Care Information Centre. 13
6 Why you must always scroll up
You will notice as you navigate the eVersion that clicking on a link will take you to the top of the page as shown in the example below:
As a coder, you will be aware that there may be important information about the code underneath the 3-digit category or at the beginning of the chapter etc. This information is out of view in the eVersion, because the top of the screen is used to indicate the result of the search.
Therefore, it is essential that you scroll up, using the arrow, to check for additional information about code usage. See screen print below:
You must continue to check instructions at the beginning of the chapter and elsewhere as you do now.

OPCS-4 and ICD-10 eVersion User Guide V1.7 24/01/2017
Copyright © 2017 Health and Social Care Information Centre. 14
7 Setting your preferences
The application can remember your window position, last book position - page you had open and position on page.
Click on Tools in the menu bar – see below:
Click on Preferences to display the box below:
Check or uncheck the boxes based on your preferred way of working.
Remember last book position will be particularly useful when you move to a new version of OPCS-4 or ICD10, because it will take you back to your last book position when you re-open the application.
Preferences also enable you to Create desktop shortcut and Pin application to Start menu.

OPCS-4 and ICD-10 eVersion User Guide V1.7 24/01/2017
Copyright © 2017 Health and Social Care Information Centre. 15
8 Always-on-top
Always-on-top allow the eVersion to rest on top of other programs on your desktop.
Click on View in the menu bar and on Always on top to set this mode.
Before: After:
Click to turn off mode.
Tips
Resize your eVersion by dragging the borders of the eViewer window. This will allow you to work with another application on your computer screen, for example, the PAS. See http://www.microsoft.com/resources/documentation/windows/xp/all/proddocs/en-us/win_tray_window_resize.mspx?mfr=true for more detailed instructions, as required.

OPCS-4 and ICD-10 eVersion User Guide V1.7 24/01/2017
Copyright © 2017 Health and Social Care Information Centre. 16
9 Sync tree with page button
In the OPCS-4 eVersion the button on the navigation tree allows the user to disconnect the tree index on the left from the page on the right. This stops the tree following your movements through the pages.
When the button label shows , the highlighted position in the navigation tree follows the position of the page as the user scrolls. See below:
When the button label shows , the tree in the left pane will not follow navigation through the page(s). See below:
Tips
Clicking the button toggles between the states Sync and Ind.
The eViewer remembers your current Sync tree with page setting when you close the application
ICD-10
This functionality is currently unavailable in ICD-10 i.e. the navigation tree does not follow the position of the page as the user scrolls. Pressing the button in the ICD-10 eVersion will have no effect.

OPCS-4 and ICD-10 eVersion User Guide V1.7 24/01/2017
Copyright © 2017 Health and Social Care Information Centre. 17
10 Introducing the icons
In the top left-hand corner of the eVersion screen, you will find four icons. They are
designed to work like tools you commonly use, such as Microsoft office.
The Back and Forward icons take you to the last place(s) you actually clicked. Click
this button on the tool bar if you want to move back to your previous position /
volume.
Click this button if you want to move forwards to where you were before you clicked
the button
The Add Note icon is used to add a note to a code. You can also create a link to a
document, such as the Coding Clinic. (See section 16).
The Create Email icon allows you to email an extract of the eVersion to another
coder or clinician using your email program. (See section 22).
11 Find eVersion in system tray
When you minimise the eVersion, the icon appears in the system tray at the bottom of
screen near the clock. The box below will appear on your screen to confirm that it is still
running in the background and not closed down.
Tip
If you cannot find your eViewer and you have not closed the application, check for the miniature eViewer icon in the system tray.
You can opt out of this
message by ticking the
“Don’t display this
message again” box.
OPCS-4 and ICD-10 eVersion User Guide V1.7 24/01/2017
Copyright © 2017 Health and Social Care Information Centre. 18
12 Using Search function to find a tentative code
The search function should be used as a starting point to the four step coding process.
Coders should avoid going straight from the search results directly to the Tabular List without
first ensuring they have checked the index thoroughly and found the correct tentative code.
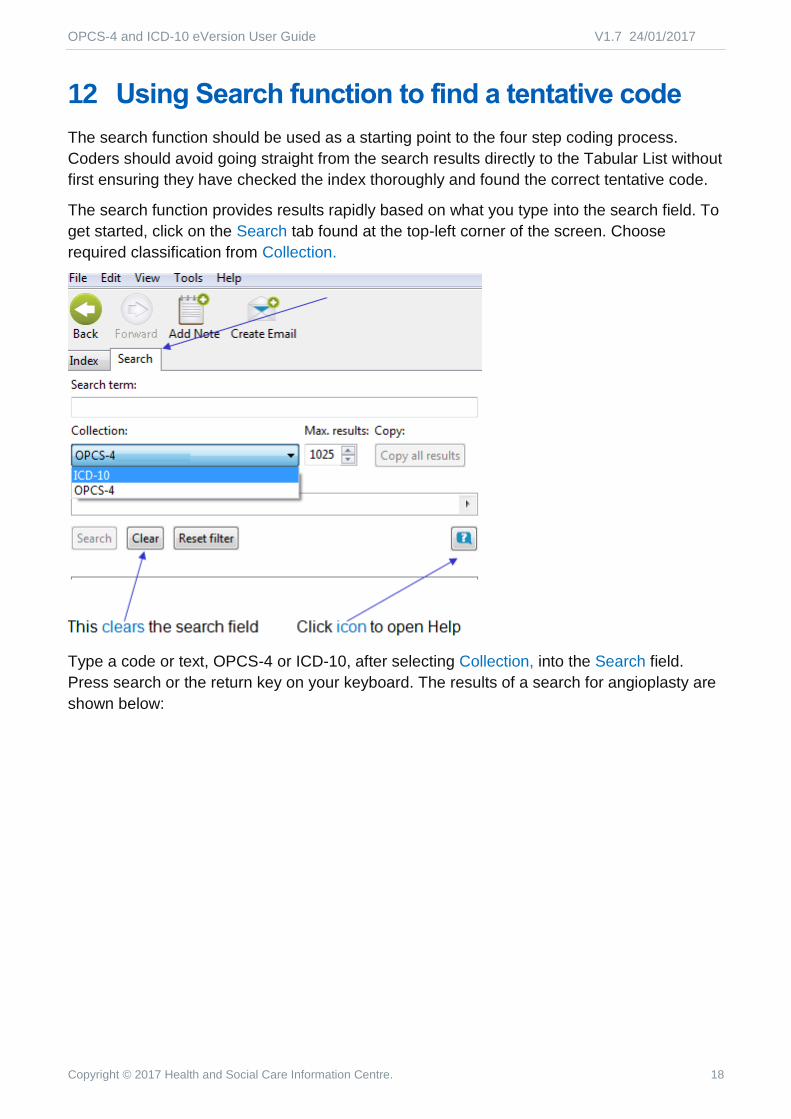
The search function provides results rapidly based on what you type into the search field. To
get started, click on the Search tab found at the top-left corner of the screen. Choose
required classification from Collection.
Type a code or text, OPCS-4 or ICD-10, after selecting Collection, into the Search field.
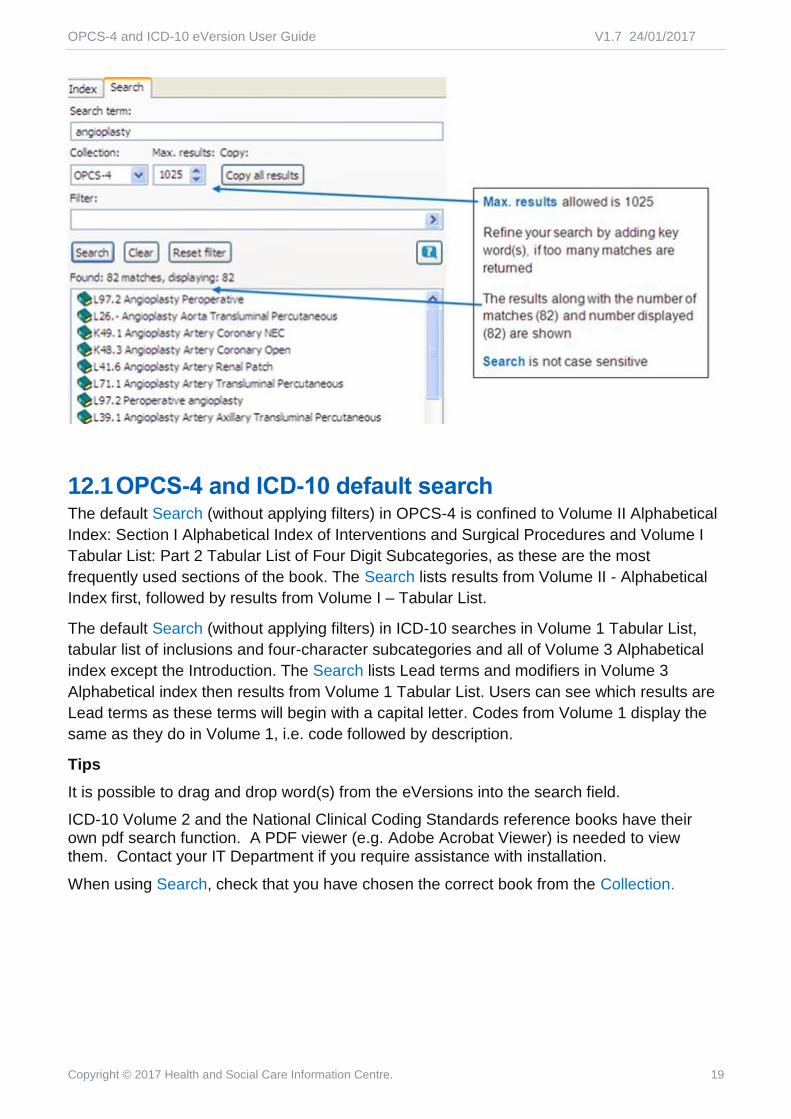
Press search or the return key on your keyboard. The results of a search for angioplasty are
shown below:
OPCS-4 and ICD-10 eVersion User Guide V1.7 24/01/2017
Copyright © 2017 Health and Social Care Information Centre. 19
12.1 OPCS-4 and ICD-10 default search The default Search (without applying filters) in OPCS-4 is confined to Volume II Alphabetical
Index: Section I Alphabetical Index of Interventions and Surgical Procedures and Volume I
Tabular List: Part 2 Tabular List of Four Digit Subcategories, as these are the most
frequently used sections of the book. The Search lists results from Volume II - Alphabetical
Index first, followed by results from Volume I – Tabular List.
The default Search (without applying filters) in ICD-10 searches in Volume 1 Tabular List,
tabular list of inclusions and four-character subcategories and all of Volume 3 Alphabetical
index except the Introduction. The Search lists Lead terms and modifiers in Volume 3
Alphabetical index then results from Volume 1 Tabular List. Users can see which results are
Lead terms as these terms will begin with a capital letter. Codes from Volume 1 display the
same as they do in Volume 1, i.e. code followed by description.
Tips
It is possible to drag and drop word(s) from the eVersions into the search field.
ICD-10 Volume 2 and the National Clinical Coding Standards reference books have their own pdf search function. A PDF viewer (e.g. Adobe Acrobat Viewer) is needed to view them. Contact your IT Department if you require assistance with installation.
When using Search, check that you have chosen the correct book from the Collection.

OPCS-4 and ICD-10 eVersion User Guide V1.7 24/01/2017
Copyright © 2017 Health and Social Care Information Centre. 20
13 More about searching
13.1 Searching for terms using the filter Applying filters allows you to search specific sections of the classification, for example, you
can search the Alphabetical index only. In OPCS-4 you can perform a search of the sections
that are not included in the default Search such as the Introduction and the Alphabetical
Index of Surgical Eponyms. Click the arrowhead in the filter field. The dropdown menu
appears. Click on to choose the desired section. Enter the search term or drag and drop a
term from the book
OPCS-4 filter
ICD-10 filter
Click here to clear filter
OPCS-4 and ICD-10 eVersion User Guide V1.7 24/01/2017
Copyright © 2017 Health and Social Care Information Centre. 21
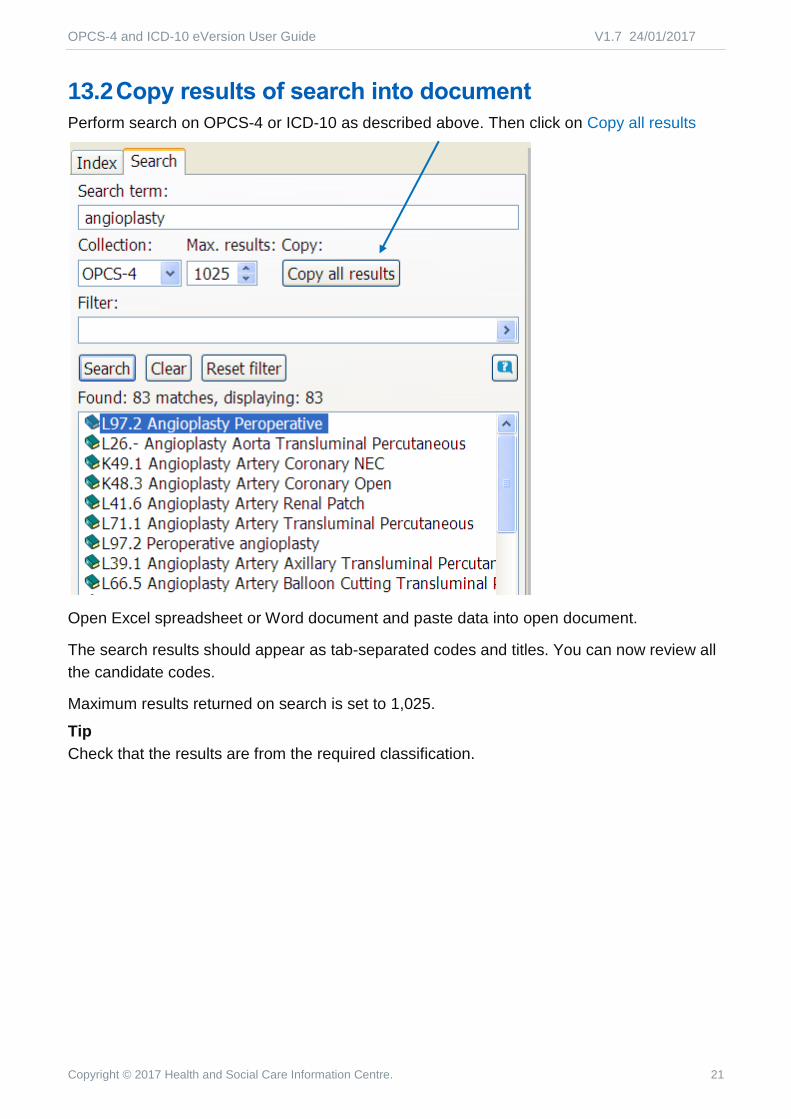
13.2 Copy results of search into document
Perform search on OPCS-4 or ICD-10 as described above. Then click on Copy all results
Open Excel spreadsheet or Word document and paste data into open document.
The search results should appear as tab-separated codes and titles. You can now review all
the candidate codes.
Maximum results returned on search is set to 1,025.
Tip
Check that the results are from the required classification.

OPCS-4 and ICD-10 eVersion User Guide V1.7 24/01/2017
Copyright © 2017 Health and Social Care Information Centre. 22
13.3 Searching your notes Notes are also included in search results as seen below:
See Annex A for advanced searching know-how
13.4 Hints for successful searching Listed below are some hints for successful searching:
Clear does NOT reset the filter to default – use the Reset filter.
The default filter is applied each time you start the eVersion.
To begin another search, press the clear button. Alternatively, you can enter another
search in the Search term box by just deleting the previous search and pressing
return.
Use the default Search described in section 12 (above) unless you want to search a specific section of the classifications.
o The OPCS-4 default Search (without applying filters) is confined to Volume II - Alphabetical Index - Section I Alphabetical Index of Interventions and Surgical Procedures and Volume I - Tabular List - Part 2 Tabular List of Four Digit Subcategories.
o The ICD-10 default Search (without applying filters) searches Volume 1 Tabular List, tabular list of inclusions and four-character subcategories and all of Volume 3 Alphabetical index except the Introduction. The default Search lists Lead terms and modifiers in Volume 3 Alphabetical index then results from Volume 1 Tabular List.
The eVersion has been set to display 1,025 search results.
The return of a large number of matches for a search term, such as destruction,
suggests that you should add a qualifier(s) to the term, for example, destruction AND
nerve. This combination will return more manageable results. See Annex A2 for more
information about the use of “AND”.
Check that you have selected the correct book from Collection.
Use quotation marks (“ ”) around two or more words. This ensures that the words will
be searched for as a whole and not picked apart by the search function. For example,
typing heart lungs without quotation marks could potentially retrieve all items that
mention heart, all items that mention lungs, as well as all items about heart lungs. This
could lead to irrelevant results. For best results, use quotes. For example: "heart
lungs".

OPCS-4 and ICD-10 eVersion User Guide V1.7 24/01/2017
Copyright © 2017 Health and Social Care Information Centre. 23
14 Links between indexes
14.1 Links between Alphabetical index entries – OPCS-4 There are no links between index entries in the OPCS-4 eVersion, i.e. See and See also
references do not contain active links in the right hand pane. Use drag and drop as
described in the screen print below or return to the index to look up the term.
OPCS-4 and ICD-10 eVersion User Guide V1.7 24/01/2017
Copyright © 2017 Health and Social Care Information Centre. 24
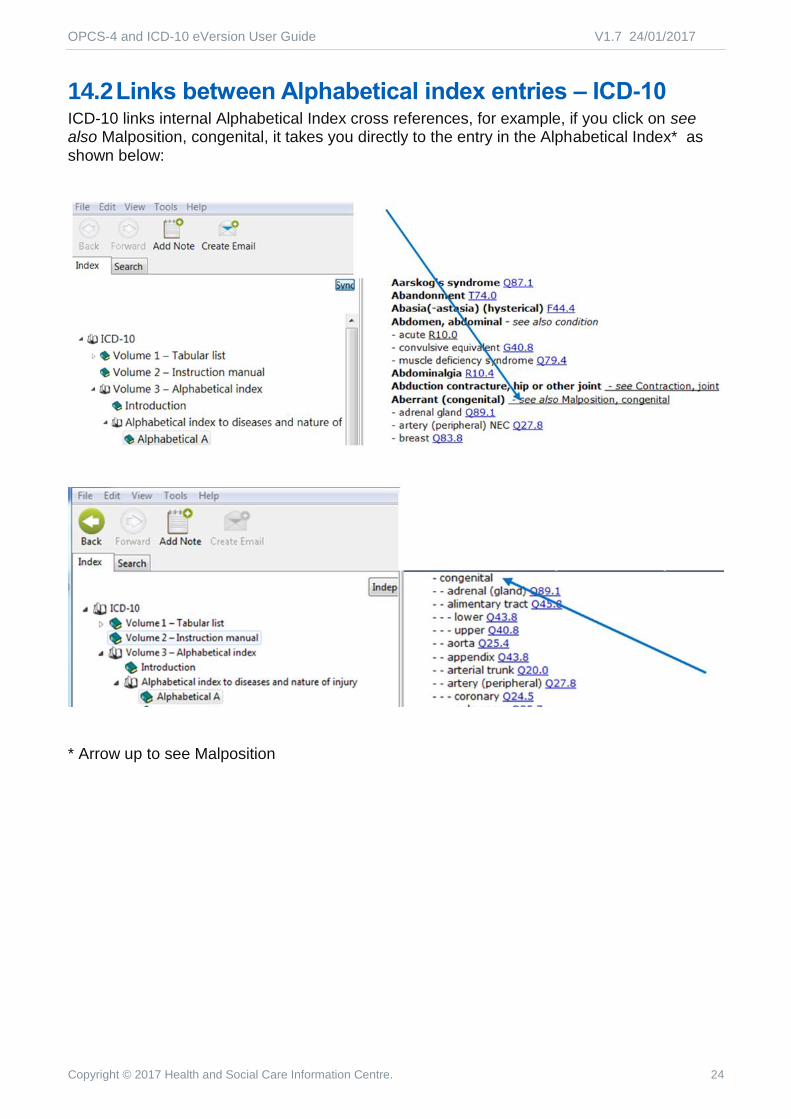
14.2 Links between Alphabetical index entries – ICD-10 ICD-10 links internal Alphabetical Index cross references, for example, if you click on see also Malposition, congenital, it takes you directly to the entry in the Alphabetical Index* as shown below:
* Arrow up to see Malposition

OPCS-4 and ICD-10 eVersion User Guide V1.7 24/01/2017
Copyright © 2017 Health and Social Care Information Centre. 25
15 Adding Notes to the eVersion
The eVersion allows you to create electronic notes and to share them with other eVersion users. You can import* notes from a previous eVersion into a new eVersion, thus saving valuable time. There are two types of notes: shared and private. Both shared and private notes may be exported.
Shared notes: may be used by the clinical coding manager to pass on important local information to all coders within a trust. It is recommended that shared notes be discussed and agreed with the prospective recipients before circulation. This will keep the management of notes simple and avoid the need to delete or amend notes.
Private notes: are personal to the user, but may be useful to another coder working in a similar clinical domain.
*Important note:
It cannot be guaranteed that notes exported from the 5th Edition to a later Edition of the ICD-10 Alphabetical Index (Volume 3) will be imported to the same location because unique identifiers may change between releases. Inter-version (ICD-10 5th Edition to ICD-10 5th Edition) import of notes is not affected.
15.1 Notes editor Notes support formatted text, including bullet / numbered lists, text and background colouring as shown in the Add note toolbar below:
15.2 More on shared and private notes Shared notes and private notes cannot be re-designated once created. If you want to change
a private note to a shared note, you will need to delete the private note and create it as a
shared note. When you create a note, it will automatically default to Private unless you
explicitly select Shared from the dropdown box (see above)
Each code is allowed a single note. The note is pinned next to the code. The single
code/note works well. However, conflict arises when a code (e.g. A01.1) in your eVersion

OPCS-4 and ICD-10 eVersion User Guide V1.7 24/01/2017
Copyright © 2017 Health and Social Care Information Centre. 26
already has a note and your colleague sends you another note for that code (A01.1) to
import into your eVersion.
This necessitates careful management by everyone and it is explored in more detail in the
sections below. This is crucial when you come to delete a note that contains a mixture of
information sourced from different eVersion users.
16 How to add a note
First, find the code, select it by holding down the left mouse button, and then choose one of
the following:
click the green Add Note icon on the top left hand corner of the eVersion
go to Tools and choose Add Note from the drop down menu
press Ctrl+N
A new dialog box below appears:
Check if the code is the one you wanted in the Assign note to box.
In OPCS-4 the down arrow on the right of the Assign note to box may be used to choose a
different code or to see where the code sits within the OPCS-4 classification structure.
Next to this is the Note Type option. Click on the down arrow and choose Private or
Shared. Now that you have decided on Note Type, proceed to add text. Press the OK box
at the bottom right hand corner when finished. Click cancel if you wish to discard the note.
Once you have saved the note, a note icon will appear beside the code on the eVersion
page.
Hover over a note to read the contents without opening it.
After selecting text use Ctrl+X to cut, Ctrl+C to copy and Ctrl+V to paste.
Important note
In order to add a note, you need to highlight the text by selecting it, if nothing is selected the note will be added to the top of the page.
Opens help

OPCS-4 and ICD-10 eVersion User Guide V1.7 24/01/2017
Copyright © 2017 Health and Social Care Information Centre. 27
16.1 Adding links to documents To create a link to a document open a note and click on the link icon. The Insert link dialog box opens. Click on the browse button. See below:
This opens your directory of folders and files. Find the required file. Click it. Enter name of file in Text to display field. Click OK. Hyperlinks can only be opened by hovering over the closed note and clicking the link.
16.2 How to create a link to a website To create a link to a website open a note and click on the link icon. The Insert link dialog box opens. Insert (Ctrl+V) the web address into the URL field, for example,
https://isd.hscic.gov.uk/trud3/user/guest/group/0/home. Complete the text to display field if you do not want to show the full URL. Click OK.
Tips
Remember hyperlinks can only be opened from the pop-up note. Links are not active in the editor.
This is a pop-up note with two hyperlinks to the same website, the first displays the full URL, the second hyperlinks to the URL from the word TRUD:
The Target field in the Insert link dialog box is set to None and is not relevant to the current implementation of links in the eViewer.
Remember to complete the Text to display field.

OPCS-4 and ICD-10 eVersion User Guide V1.7 24/01/2017
Copyright © 2017 Health and Social Care Information Centre. 28
17 How to amend and delete a note
You can open and edit a note at any time by right clicking on the note icon. The following
menu opens:
When the View/Modify Note dialog box opens, modify the text and click save.
The Details tab displays information on the creation and editing of that particular note.
To delete a note, open the View/Modify Note dialog box as described above. Press the
Delete Note button and then the Close button. A warning box will ask “Are you sure you
want to delete this note”.
You can also delete a note from here:

OPCS-4 and ICD-10 eVersion User Guide V1.7 24/01/2017
Copyright © 2017 Health and Social Care Information Centre. 29
18 How to export a note to share it
To export notes created in your eVersion go to file menu and choose export notes or press
Ctrl E.
The Export notes dialog box will open. Select Collection, for example, OPCS-4.8. Then
select format. To export notes for importing into another eVersion you must always choose
the format XML. Do not open XML files. Click on Browse.
The Save as dialog box opens. Choose a folder and then create a file name [e.g. OPCS-
4.x, short description and date] for the notes you are about to export. Click Save

OPCS-4 and ICD-10 eVersion User Guide V1.7 24/01/2017
Copyright © 2017 Health and Social Care Information Centre. 30
You are returned to the Export notes dialog box.
Now choose whether you want to export all notes from the eVersion or you can filter your
selection by date or changed since last export.
Once you are happy with your settings, press ok to proceed with the export. When the export
is complete, the data are saved to the location selected by you. If you elected to export
Private notes, you will be prompted to verify selection.
If you are creating a backup file of your notes then you should ensure your export includes
both Shared and Private notes. However, if you are intending to circulate shared notes only
you may wish to revisit the export filter settings and choose note type “Shared”.
You are now ready to send your XML export file. Find the folder where you saved it; send to
email recipient(s) as an attachment.
The email recipient saves the notes to a location on their computer in readiness to import
into their eVersion, see section 20.
If you find that the XML file is blocked because it is not a permitted email attachment, copy
the export file to a network share drive that all the eVersion users can access and email the
link to them. They can import directly from the network share drive.

OPCS-4 and ICD-10 eVersion User Guide V1.7 24/01/2017
Copyright © 2017 Health and Social Care Information Centre. 31
18.1 How to create a backup export file Follow the instructions outlined above for exporting notes and remember to use:
XML format
Include Shared and Private notes
It is important to make and store backups regularly. Specifically make backups in XML
format before you import notes or make any major changes to notes. XML is the only format
that can be used to restore notes.
19 How can I read my notes in a single document
If you want to export notes to view them outside of the eVersion you can chose either HTML
(which displays the notes as a web page with formatting) or plain text. This is a basic
freeform text file (.txt). Use it to search for a specific note. The extract file shows the notes in
the order they appear in the eVersion.
Follow the guidance described in the previous section, but choose HTML or TXT instead of
XML format.
See Annex A3: “Searching for a term in your notes” and Annex A4: “Searching all notes” for other ways to view your notes
Warning: notes created against formatted and other areas of text (i.e. tables, indents etc) are not exported. You can also view your notes by searching ‘type:note’ (without the inverted commas). This will display a list of your notes, clicking on them will display their location in the book and allow you to access the note.

OPCS-4 and ICD-10 eVersion User Guide V1.7 24/01/2017
Copyright © 2017 Health and Social Care Information Centre. 32
20 How to import a note
On receipt of notes for import, verify the source (trusted colleague) and file format. Then store it on your computer. The file must be XML as this is the only format that will import notes into your eVersion.
To import notes from another eVersion, go to the file menu, click import notes, or use Ctrl +I. The Import dialog box will open. Select Collection by clicking on the down arrow. Click the Browse button.
The Open dialog box appears, see below.
Select the .xml file you previously stored on your computer. Double click the file.
The Import dialog box re-appears. Click import.

OPCS-4 and ICD-10 eVersion User Guide V1.7 24/01/2017
Copyright © 2017 Health and Social Care Information Centre. 33
The Review Results before Importing dialog box opens. The three tabs at the top of the
box show new notes, conflicts between incoming and exiting notes and deleted notes.

OPCS-4 and ICD-10 eVersion User Guide V1.7 24/01/2017
Copyright © 2017 Health and Social Care Information Centre. 34
20.1 Reviewing new notes before import
Click a code in the New tab for Preview of incoming note. You may choose: Import note
or Do not import note by clicking the bar at the bottom of the pane. The status of the note
changes to reflect your decision.
You can cancel the import operation at this point and your existing notes will not be affected.
To complete the process of importing notes to the eVersion press the Proceed to Import
button.

OPCS-4 and ICD-10 eVersion User Guide V1.7 24/01/2017
Copyright © 2017 Health and Social Care Information Centre. 35
20.2 Reviewing conflicts between notes before import Click a code in the Conflicts tab and review the contents of the new note against your note,
known as the original note. Press Accept New Note to replace your note. Press Accept
Original Note to retain your note.
Right click on the New Note pane if you wish to add the content of the new note to your
existing (original) note. Copy the content of the New Note and paste into the Original Note
pane. Check that the contents are as you intended and then click Save.
The state Manually Merged is displayed under status.
You can cancel the import operation at this point and your existing notes will not be affected.
To complete the process of importing notes to the eVersion press the Proceed to Import
button.
OPCS-4 and ICD-10 eVersion User Guide V1.7 24/01/2017
Copyright © 2017 Health and Social Care Information Centre. 36
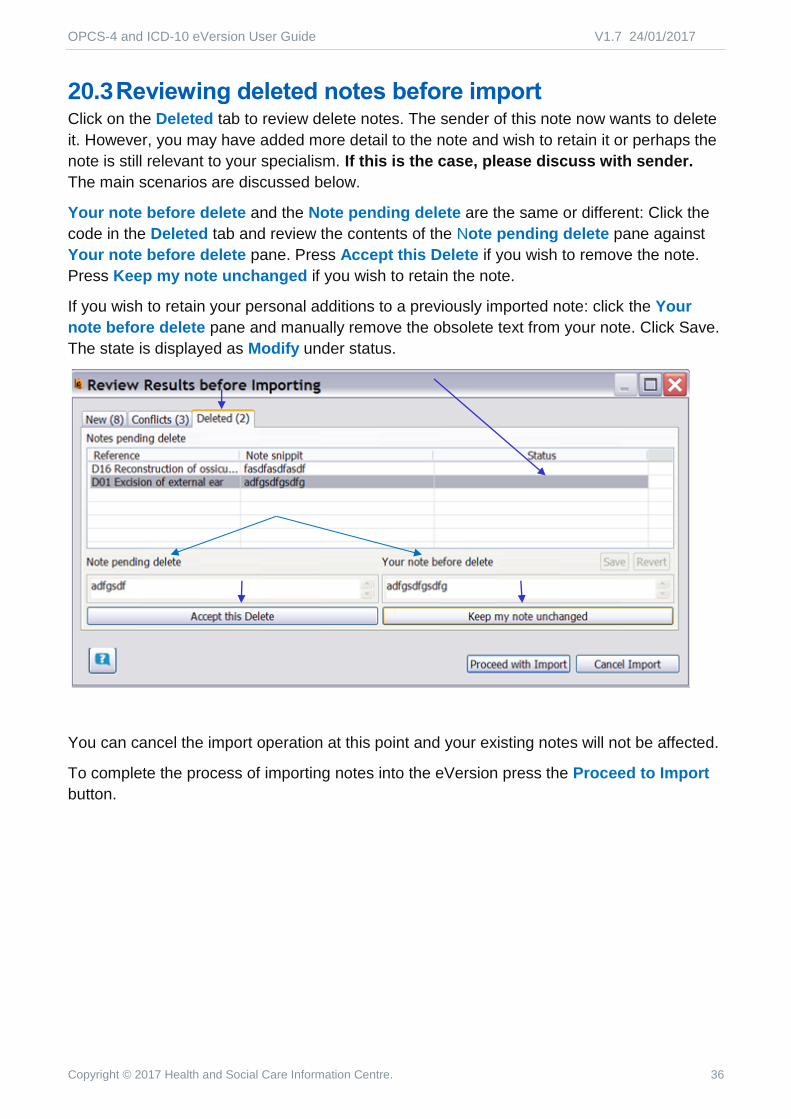
20.3 Reviewing deleted notes before import Click on the Deleted tab to review delete notes. The sender of this note now wants to delete
it. However, you may have added more detail to the note and wish to retain it or perhaps the
note is still relevant to your specialism. If this is the case, please discuss with sender.
The main scenarios are discussed below.
Your note before delete and the Note pending delete are the same or different: Click the
code in the Deleted tab and review the contents of the Note pending delete pane against
Your note before delete pane. Press Accept this Delete if you wish to remove the note.
Press Keep my note unchanged if you wish to retain the note.
If you wish to retain your personal additions to a previously imported note: click the Your
note before delete pane and manually remove the obsolete text from your note. Click Save.
The state is displayed as Modify under status.
You can cancel the import operation at this point and your existing notes will not be affected.
To complete the process of importing notes into the eVersion press the Proceed to Import
button.

OPCS-4 and ICD-10 eVersion User Guide V1.7 24/01/2017
Copyright © 2017 Health and Social Care Information Centre. 37
20.4 How to undo an import You can always undo the import by pressing Ctrl + U or choosing Undo Import from the
Edit menu in the top left hand corner. However, if you exit the eVersion application after
importing notes, you will not be able to perform the undo operation when you reload the
application.
20.5 How to delete or replace a Note The owner of an Exported note (whether shared or private) may wish to withdraw it or
replace it because it is no longer relevant by deleting the note from their eversion as
described in section 17.
To update other eVersion users, the author of the note, must send an xml file containing the
deleted/amended note.

OPCS-4 and ICD-10 eVersion User Guide V1.7 24/01/2017
Copyright © 2017 Health and Social Care Information Centre. 38
21 Transfer notes between eVersions
The eViewer supports the transfer of notes between previous and updated releases of OPCS-4 and *ICD-10 eVersions of the same type (e.g. between OPCS-4.7 and OPCS-4.8).
Before you start the transfer, please read sections 18, 19, 20 and 21 about exporting and importing notes.
It is recommended that you review your notes to ensure that they follow the latest coding standards and guidance. Section 19 tells you how to read all your notes in a single document. The Review Results before importing dialog box (section 20.1) allows you to accept or reject the import of notes into the updated classification (i.e. if transferring notes from OPCS-4.7 to OPCS-4.8).
*Important note:
It cannot be guaranteed that notes exported from the 5th Edition to a later Edition of the ICD-10 Alphabetical Index (Volume 3) will be imported to the same location because unique identifiers may change between releases. Inter-version (ICD-10 5th Edition to ICD-10 5th Edition) import of notes is not affected.
21.1 How to transfer my notes Make a backup in XML format before you start, because XML is the only format that can be used in the eVersion to restore notes.
If you created notes in the previous version of the classification (e.g. OPCS-4.7), use Export Notes and Import Notes functionality to transfer them to the updated version of the classification (e.g. OPCS-4.8).
Open the eVersion and go to the File menu and choose Export Notes. Follow the instructions at Section 20. Make sure you set Collection to the previous version of the classification (e.g. OPCS-4.7) and choose the XML format and tick the All Notes button on the Export Notes dialog box.
Then return to File menu and choose Import Notes. Follow the instructions at Section 20. Set the Collection to the updated version of the classification (e.g. OPCS-4.8). You will receive the following warning:
Proceed with import. All the notes you have chosen to move into the updated version of the classification (e.g. OPCS-4.8) should now be displayed in the updated version of the classification.

OPCS-4 and ICD-10 eVersion User Guide V1.7 24/01/2017
Copyright © 2017 Health and Social Care Information Centre. 39
22 Email or copy content
You can email most material from the eVersion to a colleague by first selecting the text by
highlighting it in the right hand pane of the eVersion.
You have a number of options - either right click your mouse to choose the Create Email
function, or use Ctrl +M or click the create mail icon in the top left hand corner of the
eVersion.
Your email client* will open with the extract of the eVersion in the text box leaving you to
complete the message and email addresses.
Shared and private notes are not transmitted in email. Copy and paste your notes if required for non eVersion users.
*Email works with Microsoft Outlook only - not outlook express or other email clients.
You can also copy most content from the eVersion and paste it into another programme by first selecting the text by highlighting it in the right hand pane of the eVersion. You can then either right click your mouse to choose the Copy Text function, or use Ctrl + C, then paste the copied content into another programme.
Important note:
Formatting may be lost when copying or emailing content from the ICD-10 eVersion. You must check and amend, where necessary, the formatting of the pasted text against the original format displayed in the eVersion.
Warning: when copying or emailing from the ICD-10 Alphabetical Index ‘see’ and ‘see also’ are not copied.
You may wish to use the Windows 7 snipping tool or a screen print to take an un-editable but exact copy of the content you require rather than use the integrated copy and email functions.

OPCS-4 and ICD-10 eVersion User Guide V1.7 24/01/2017
Copyright © 2017 Health and Social Care Information Centre. 40
22.1 Snipping Tool
Click on the Start Find snipping tool by using Search if you cannot locate it. Click on the tool. The following dialog box will appear. Follow the instructions.
The following pane appears which provides a number of functions including email:
See also http://windows.microsoft.com/en-gb/windows/use-snipping-tool-capture-screen-shots#1TC=windows-7
22.2 Print screen If you do not have the snipping tool you can use the print screen function by pressing the PrtScn button on your keyboard. Press Alt+PrtScn to print only the window you have selected. You can then either e-mail the full screen print or paste it into another program such as paint and tailor the image. See also http://windows.microsoft.com/en-gb/windows/take-screen-capture-print-screen#take-screen-capture-print-screen=windows-7

OPCS-4 and ICD-10 eVersion User Guide V1.7 24/01/2017
Copyright © 2017 Health and Social Care Information Centre. 41
23 Book Manager
The Book Manager is used to upload books to your eViewer. You will find it under Tools.
See below:
Click on Find Books to locate the relevant OPCS-4 or ICD10 eVersion saved on computer drive. See tips below for additional information.
The yellow star indicates that a new book has been found. Check the Enabled box if you want to add it to your eViewer.
Unpicking the Enabled box will remove the book from the eViewer.
The Book Manager has been enhanced to upload the ICD-10 and OPCS-4 National Clinical Coding Standards (NCCS) reference books which are available from TRUD.

OPCS-4 and ICD-10 eVersion User Guide V1.7 24/01/2017
Copyright © 2017 Health and Social Care Information Centre. 42
The appearance of your eViewer will depend on the books you have uploaded. The eViewer below has the ICD-10 5th Edition, OPCS-4.7 and OPCS-4.8 and the National Clinical Coding Standards reference books pdfs. Earlier users will also have OPCS-4.6.
Tips
If you cannot see Find Books button resize the dialog box by dragging the sides of the window towards the centre of the pane.
Checking the Enabled box enables / disables books and restarts the User Interface with the selected/unselected books.

OPCS-4 and ICD-10 eVersion User Guide V1.7 24/01/2017
Copyright © 2017 Health and Social Care Information Centre. 43
Annex A Using special symbols and words in searches
A.1 Wildcards
The search facility allows you to look for partial words or words with missing letters using the * and ? respectively. See screen prints. These symbols are referred to as wildcards and can be very handy when you are unsure of the spelling or unwilling to type the whole word. In general to perform a multiple character wildcard search, use the asterisk, for example angio*. It will return matches for any word that starts with angio. This combined with AND/OR/NOT (see A.2) can provide a powerful search – for example angio* NOT tran* will omit the K51.1 result from the search results (below).
Use a ‘?’ for a single character wildcard – for example angi?plasty where the ‘?’ represents the missing letter. Please note you cannot place your wildcard at the start of a word – for example *plasty is invalid and will result in an error message.
If you are really unsure of the spelling you can perform a ‘fuzzy’ search. By using the ‘~’ symbol (next to the apostrophe and @ key) you can ask the search engine to make a best guess of what you are looking for. For example angiaplasu~ will return Angioplasty matches amongst others. You cannot use a ~ in conjunction with the * and ? symbols.

OPCS-4 and ICD-10 eVersion User Guide V1.7 24/01/2017
Copyright © 2017 Health and Social Care Information Centre. 44
A.2 Using AND, NOT and OR
You can also perform more specific searches by using AND, NOT and OR. Upper case must be used.
Use AND/OR to refine your search to include more than one term.
NOT is useful if you want to exclude a word that is making your results less useful.

OPCS-4 and ICD-10 eVersion User Guide V1.7 24/01/2017
Copyright © 2017 Health and Social Care Information Centre. 45
A.3 Searching for a term in your notes
You can search the notes you have added to your OPCS-4 or ICD-10 eVersion by entering the following:
type:note AND search term
Remember:
The colon follows type
note is singular, not notes
AND must be in upper case
Finally, the word must exist in your note! Testing is present in the F10.8 note

OPCS-4 and ICD-10 eVersion User Guide V1.7 24/01/2017
Copyright © 2017 Health and Social Care Information Centre. 46
A.4 Searching all notes
Use the notation (type: note) if you want to see a list of notes. Remember that the results will vary depending on whether you use the default search (see section 12) or apply the filter (see section 13).
Note
This site http://lucene.apache.org/java/3_0_2/queryparsersyntax.html provides additional information on searching. It will be of interest to those users who have a particular interest in refining their search technique.