OMNeT++ User Manual - CiteSeerX
243
OMNeT++ Discrete Event Simulation System Version 2.3b1 User Manual by András Varga Last updated: February 11, 2003
-
Upload
khangminh22 -
Category
Documents
-
view
2 -
download
0
Transcript of OMNeT++ User Manual - CiteSeerX
OMNeT++Discrete Event Simulation System
Version 2.3b1
User Manual
by András Varga
Last updated: February 11, 2003

OMNeT++ Manual –
Document History
Date Author Change2003/01 AV Added chapter about message subclassing; revised chapter
about running the simulation and incorporated new Cmdenvoptions; added new distributions and clarified many details inNED expr. handling section
Summer 2002 UlrichKaage
Converted from Word to LaTeX
2002/03/18 AV Documented new ini file options about Envir plugins2002/01/24 AV Refinements on the Parsec chapter2001/10/23 AV Updated to reflect changes since 2.1 release (see in-
clude/ChangeLog)
iii

OMNeT++ Manual –
iv
OMNeT++ Manual – CONTENTS
Contents
1 Introduction 11.1 What is OMNeT++? . . . . . . . . . . . . . . . . . . . . . . . . . . . . . . . . . . . 1
1.2 Where is OMNeT++ in the world of simulation tools? . . . . . . . . . . . . . . . 2
1.3 Organization of this manual . . . . . . . . . . . . . . . . . . . . . . . . . . . . . . 3
1.4 History . . . . . . . . . . . . . . . . . . . . . . . . . . . . . . . . . . . . . . . . . . 4
1.5 Authors . . . . . . . . . . . . . . . . . . . . . . . . . . . . . . . . . . . . . . . . . . 5
2 Overview 72.1 Modeling concepts . . . . . . . . . . . . . . . . . . . . . . . . . . . . . . . . . . . . 7
2.1.1 Hierarchical modules . . . . . . . . . . . . . . . . . . . . . . . . . . . . . . 7
2.1.2 Module types . . . . . . . . . . . . . . . . . . . . . . . . . . . . . . . . . . . 8
2.1.3 Messages, gates, links . . . . . . . . . . . . . . . . . . . . . . . . . . . . . 8
2.1.4 Link characteristics . . . . . . . . . . . . . . . . . . . . . . . . . . . . . . . 9
2.1.5 Parameters . . . . . . . . . . . . . . . . . . . . . . . . . . . . . . . . . . . . 10
2.1.6 Topology description method . . . . . . . . . . . . . . . . . . . . . . . . . . 11
2.2 Programming the algorithms . . . . . . . . . . . . . . . . . . . . . . . . . . . . . 11
2.2.1 Creating simple modules . . . . . . . . . . . . . . . . . . . . . . . . . . . . 11
2.2.2 Object mechanisms . . . . . . . . . . . . . . . . . . . . . . . . . . . . . . . 12
2.2.3 Derive new classes . . . . . . . . . . . . . . . . . . . . . . . . . . . . . . . 12
2.2.4 Self-describing objects to ease debugging . . . . . . . . . . . . . . . . . . 12
2.3 Using OMNeT++ . . . . . . . . . . . . . . . . . . . . . . . . . . . . . . . . . . . . . 12
2.3.1 Building and running simulations . . . . . . . . . . . . . . . . . . . . . . 12
2.3.2 What is what in the directories . . . . . . . . . . . . . . . . . . . . . . . . 14
3 An Example: The Nim Game 173.1 Topology . . . . . . . . . . . . . . . . . . . . . . . . . . . . . . . . . . . . . . . . . 17
3.2 Simple modules . . . . . . . . . . . . . . . . . . . . . . . . . . . . . . . . . . . . . 19
3.3 Running the simulation . . . . . . . . . . . . . . . . . . . . . . . . . . . . . . . . 22
3.4 Other examples . . . . . . . . . . . . . . . . . . . . . . . . . . . . . . . . . . . . . 24
4 The NED Language 25
v
OMNeT++ Manual – CONTENTS
4.1 NED overview . . . . . . . . . . . . . . . . . . . . . . . . . . . . . . . . . . . . . . 25
4.1.1 Components of a NED description . . . . . . . . . . . . . . . . . . . . . . 25
4.1.2 Reserved words . . . . . . . . . . . . . . . . . . . . . . . . . . . . . . . . . 25
4.1.3 Case sensitivity . . . . . . . . . . . . . . . . . . . . . . . . . . . . . . . . . 26
4.2 The import statement . . . . . . . . . . . . . . . . . . . . . . . . . . . . . . . . . . 26
4.3 Channel definitions . . . . . . . . . . . . . . . . . . . . . . . . . . . . . . . . . . . 26
4.4 Simple module definitions . . . . . . . . . . . . . . . . . . . . . . . . . . . . . . . 26
4.4.1 Simple module parameters . . . . . . . . . . . . . . . . . . . . . . . . . . 27
4.4.2 Simple module gates . . . . . . . . . . . . . . . . . . . . . . . . . . . . . . 27
4.5 Compound module definitions . . . . . . . . . . . . . . . . . . . . . . . . . . . . . 28
4.5.1 Compound module parameters . . . . . . . . . . . . . . . . . . . . . . . . 28
4.5.2 Compound module gates . . . . . . . . . . . . . . . . . . . . . . . . . . . . 29
4.5.3 Submodules . . . . . . . . . . . . . . . . . . . . . . . . . . . . . . . . . . . 29
4.5.4 Connections . . . . . . . . . . . . . . . . . . . . . . . . . . . . . . . . . . . 33
4.6 Parameterized compound modules . . . . . . . . . . . . . . . . . . . . . . . . . . 35
4.6.1 Examples . . . . . . . . . . . . . . . . . . . . . . . . . . . . . . . . . . . . . 35
4.6.2 Using const with parameterized topologies . . . . . . . . . . . . . . . . . 38
4.6.3 Design patterns for compound modules . . . . . . . . . . . . . . . . . . . 38
4.6.4 Topology templates . . . . . . . . . . . . . . . . . . . . . . . . . . . . . . . 39
4.7 Network definition . . . . . . . . . . . . . . . . . . . . . . . . . . . . . . . . . . . 41
4.8 Support for parallel execution . . . . . . . . . . . . . . . . . . . . . . . . . . . . . 41
4.8.1 Extensions to the compound module and system definitions . . . . . . . 41
4.8.2 Conditional ’on’ sections . . . . . . . . . . . . . . . . . . . . . . . . . . . . 42
4.9 Expressions . . . . . . . . . . . . . . . . . . . . . . . . . . . . . . . . . . . . . . . 43
4.9.1 Referencing other parameters . . . . . . . . . . . . . . . . . . . . . . . . . 43
4.9.2 Operators . . . . . . . . . . . . . . . . . . . . . . . . . . . . . . . . . . . . . 43
4.9.3 The sizeof() and index operators . . . . . . . . . . . . . . . . . . . . . 44
4.9.4 Prompt text and default value . . . . . . . . . . . . . . . . . . . . . . . . . 44
4.9.5 Time constants . . . . . . . . . . . . . . . . . . . . . . . . . . . . . . . . . 44
4.9.6 Functions . . . . . . . . . . . . . . . . . . . . . . . . . . . . . . . . . . . . . 45
4.9.7 Random values . . . . . . . . . . . . . . . . . . . . . . . . . . . . . . . . . 45
4.9.8 Defining new functions . . . . . . . . . . . . . . . . . . . . . . . . . . . . . 46
4.10 Display strings . . . . . . . . . . . . . . . . . . . . . . . . . . . . . . . . . . . . . . 47
4.11 GNED – Graphical NED Editor . . . . . . . . . . . . . . . . . . . . . . . . . . . . 50
5 Simple Modules 535.1 Simulation concepts . . . . . . . . . . . . . . . . . . . . . . . . . . . . . . . . . . . 53
5.1.1 Discrete Event Simulation . . . . . . . . . . . . . . . . . . . . . . . . . . . 53
5.1.2 The event loop . . . . . . . . . . . . . . . . . . . . . . . . . . . . . . . . . . 54
5.1.3 Simple modules in OMNeT++ . . . . . . . . . . . . . . . . . . . . . . . . . 54
vi
OMNeT++ Manual – CONTENTS
5.1.4 Events in OMNeT++ . . . . . . . . . . . . . . . . . . . . . . . . . . . . . . 55
5.1.5 FES implementation . . . . . . . . . . . . . . . . . . . . . . . . . . . . . . 56
5.2 Defining simple module types . . . . . . . . . . . . . . . . . . . . . . . . . . . . . 56
5.2.1 Overview . . . . . . . . . . . . . . . . . . . . . . . . . . . . . . . . . . . . . 56
5.2.2 The module declaration . . . . . . . . . . . . . . . . . . . . . . . . . . . . 57
5.2.3 Several modules, single NED interface . . . . . . . . . . . . . . . . . . . . 58
5.2.4 The class declaration . . . . . . . . . . . . . . . . . . . . . . . . . . . . . . 58
5.2.5 Decomposing activity()/handleMessage() and inheritance . . . . . . . . . 60
5.3 Adding functionality to cSimpleModule . . . . . . . . . . . . . . . . . . . . . . . 61
5.3.1 activity() . . . . . . . . . . . . . . . . . . . . . . . . . . . . . . . . . . . . . 61
5.3.2 handleMessage() . . . . . . . . . . . . . . . . . . . . . . . . . . . . . . . . 65
5.3.3 initialize() and finish() . . . . . . . . . . . . . . . . . . . . . . . . . . . . . 70
5.4 Finite State Machines in OMNeT++ . . . . . . . . . . . . . . . . . . . . . . . . . 72
5.5 Message transmission modeling . . . . . . . . . . . . . . . . . . . . . . . . . . . . 75
5.6 Coding conventions . . . . . . . . . . . . . . . . . . . . . . . . . . . . . . . . . . . 77
5.7 Component libraries . . . . . . . . . . . . . . . . . . . . . . . . . . . . . . . . . . 78
5.7.1 Simple module libraries . . . . . . . . . . . . . . . . . . . . . . . . . . . . 78
5.7.2 Compound module NED source libraries . . . . . . . . . . . . . . . . . . . 79
5.7.3 Precompiled compound module libraries . . . . . . . . . . . . . . . . . . . 79
5.8 Some simulation techniques . . . . . . . . . . . . . . . . . . . . . . . . . . . . . . 80
5.8.1 Modeling computer networks . . . . . . . . . . . . . . . . . . . . . . . . . 80
5.8.2 Modeling multiprocessor systems . . . . . . . . . . . . . . . . . . . . . . . 81
5.8.3 Parameter tuning . . . . . . . . . . . . . . . . . . . . . . . . . . . . . . . . 81
5.8.4 Multiple experiments within one simulation run . . . . . . . . . . . . . . 81
5.8.5 Dynamic topology optimization . . . . . . . . . . . . . . . . . . . . . . . . 82
6 The Simulation Library 836.1 Class library conventions . . . . . . . . . . . . . . . . . . . . . . . . . . . . . . . . 83
6.2 Utilities . . . . . . . . . . . . . . . . . . . . . . . . . . . . . . . . . . . . . . . . . . 86
6.3 Messages and packets . . . . . . . . . . . . . . . . . . . . . . . . . . . . . . . . . 87
6.3.1 The cMessage class . . . . . . . . . . . . . . . . . . . . . . . . . . . . . . . 87
6.3.2 Message encapsulation . . . . . . . . . . . . . . . . . . . . . . . . . . . . . 88
6.3.3 Information about the last sending . . . . . . . . . . . . . . . . . . . . . . 89
6.3.4 Context pointer . . . . . . . . . . . . . . . . . . . . . . . . . . . . . . . . . 90
6.3.5 The cPacket class . . . . . . . . . . . . . . . . . . . . . . . . . . . . . . . . 90
6.3.6 Attaching parameters and objects . . . . . . . . . . . . . . . . . . . . . . 91
6.4 Sending and receiving messages . . . . . . . . . . . . . . . . . . . . . . . . . . . 92
6.4.1 Sending messages . . . . . . . . . . . . . . . . . . . . . . . . . . . . . . . . 92
6.4.2 Delayed sending . . . . . . . . . . . . . . . . . . . . . . . . . . . . . . . . . 92
6.4.3 Direct message sending . . . . . . . . . . . . . . . . . . . . . . . . . . . . 93
vii
OMNeT++ Manual – CONTENTS
6.4.4 Receiving messages . . . . . . . . . . . . . . . . . . . . . . . . . . . . . . . 93
6.4.5 The wait() function . . . . . . . . . . . . . . . . . . . . . . . . . . . . . . . 95
6.4.6 Self-messages . . . . . . . . . . . . . . . . . . . . . . . . . . . . . . . . . . 95
6.4.7 Querying the state of an output gate . . . . . . . . . . . . . . . . . . . . . 96
6.4.8 Stopping the simulation . . . . . . . . . . . . . . . . . . . . . . . . . . . . 97
6.5 Accessing module parameters and gates . . . . . . . . . . . . . . . . . . . . . . . 97
6.5.1 Module parameters . . . . . . . . . . . . . . . . . . . . . . . . . . . . . . . 97
6.5.2 Gates and links . . . . . . . . . . . . . . . . . . . . . . . . . . . . . . . . . 98
6.6 Walking the module hierarchy . . . . . . . . . . . . . . . . . . . . . . . . . . . . . 100
6.7 Dynamic module creation . . . . . . . . . . . . . . . . . . . . . . . . . . . . . . . 102
6.8 Routing support: cTopology . . . . . . . . . . . . . . . . . . . . . . . . . . . . . . 104
6.8.1 Overview . . . . . . . . . . . . . . . . . . . . . . . . . . . . . . . . . . . . . 104
6.8.2 Basic usage . . . . . . . . . . . . . . . . . . . . . . . . . . . . . . . . . . . . 105
6.8.3 Shortest paths . . . . . . . . . . . . . . . . . . . . . . . . . . . . . . . . . . 106
6.9 Generating random numbers . . . . . . . . . . . . . . . . . . . . . . . . . . . . . 108
6.9.1 Random number generators . . . . . . . . . . . . . . . . . . . . . . . . . . 108
6.9.2 Random variates . . . . . . . . . . . . . . . . . . . . . . . . . . . . . . . . 109
6.9.3 Random numbers from histograms . . . . . . . . . . . . . . . . . . . . . . 110
6.10 Container classes . . . . . . . . . . . . . . . . . . . . . . . . . . . . . . . . . . . . 111
6.10.1 Queue class: cQueue . . . . . . . . . . . . . . . . . . . . . . . . . . . . . . 111
6.10.2 Expandable array: cArray . . . . . . . . . . . . . . . . . . . . . . . . . . . 112
6.11 Non-object container classes . . . . . . . . . . . . . . . . . . . . . . . . . . . . . . 113
6.12 The parameter class: cPar . . . . . . . . . . . . . . . . . . . . . . . . . . . . . . . 114
6.12.1 Basic usage . . . . . . . . . . . . . . . . . . . . . . . . . . . . . . . . . . . . 114
6.12.2 Random number generation through cPar . . . . . . . . . . . . . . . . . . 115
6.12.3 Storing object and non-object pointers in cPar . . . . . . . . . . . . . . . 115
6.12.4 Reverse Polish expressions . . . . . . . . . . . . . . . . . . . . . . . . . . . 116
6.12.5 Using redirection . . . . . . . . . . . . . . . . . . . . . . . . . . . . . . . . 117
6.12.6 Type characters . . . . . . . . . . . . . . . . . . . . . . . . . . . . . . . . . 118
6.12.7 Summary . . . . . . . . . . . . . . . . . . . . . . . . . . . . . . . . . . . . . 118
6.13 Statistics and distribution estimation . . . . . . . . . . . . . . . . . . . . . . . . 120
6.13.1 cStatistic and descendants . . . . . . . . . . . . . . . . . . . . . . . . . . 120
6.13.2 Distribution estimation . . . . . . . . . . . . . . . . . . . . . . . . . . . . . 120
6.13.3 The k-split algorithm . . . . . . . . . . . . . . . . . . . . . . . . . . . . . . 124
6.13.4 Transient detection and result accuracy . . . . . . . . . . . . . . . . . . . 126
6.14 Recording simulation results . . . . . . . . . . . . . . . . . . . . . . . . . . . . . 127
6.14.1 Output vectors: cOutVector . . . . . . . . . . . . . . . . . . . . . . . . . . 127
6.14.2 Output scalars . . . . . . . . . . . . . . . . . . . . . . . . . . . . . . . . . . 128
6.15 Deriving new classes . . . . . . . . . . . . . . . . . . . . . . . . . . . . . . . . . . 128
6.16 Tracing and debugging aids . . . . . . . . . . . . . . . . . . . . . . . . . . . . . . 130
viii
OMNeT++ Manual – CONTENTS
6.16.1 Displaying information about module activity . . . . . . . . . . . . . . . 130
6.16.2 Watches . . . . . . . . . . . . . . . . . . . . . . . . . . . . . . . . . . . . . . 130
6.16.3 Snapshots . . . . . . . . . . . . . . . . . . . . . . . . . . . . . . . . . . . . 131
6.16.4 Breakpoints . . . . . . . . . . . . . . . . . . . . . . . . . . . . . . . . . . . 135
6.16.5 Disabling warnings . . . . . . . . . . . . . . . . . . . . . . . . . . . . . . . 135
6.16.6 Getting coroutine stack usage . . . . . . . . . . . . . . . . . . . . . . . . . 136
6.17 Changing the network graphics at run-time . . . . . . . . . . . . . . . . . . . . . 136
6.17.1 Setting display strings . . . . . . . . . . . . . . . . . . . . . . . . . . . . . 136
6.17.2 The cDisplayStringParser class . . . . . . . . . . . . . . . . . . . . . . . . 137
6.18 Tips for speeding up the simulation . . . . . . . . . . . . . . . . . . . . . . . . . . 137
6.18.1 Using shared objects . . . . . . . . . . . . . . . . . . . . . . . . . . . . . . 138
6.19 Building large networks . . . . . . . . . . . . . . . . . . . . . . . . . . . . . . . . 139
6.19.1 Generating NED files . . . . . . . . . . . . . . . . . . . . . . . . . . . . . . 139
6.19.2 Building the network from C++ code . . . . . . . . . . . . . . . . . . . . . 139
7 Message Definitions 1417.1 Motivation . . . . . . . . . . . . . . . . . . . . . . . . . . . . . . . . . . . . . . . . 141
7.2 The first message class . . . . . . . . . . . . . . . . . . . . . . . . . . . . . . . . . 143
7.3 Features . . . . . . . . . . . . . . . . . . . . . . . . . . . . . . . . . . . . . . . . . 143
7.3.1 Declaring enums . . . . . . . . . . . . . . . . . . . . . . . . . . . . . . . . 144
7.3.2 Message declarations . . . . . . . . . . . . . . . . . . . . . . . . . . . . . . 144
7.3.3 Inheritance, composition . . . . . . . . . . . . . . . . . . . . . . . . . . . . 147
7.3.4 Using existing C++ types . . . . . . . . . . . . . . . . . . . . . . . . . . . . 149
7.3.5 Customizing the generated class . . . . . . . . . . . . . . . . . . . . . . . 150
7.4 Summary . . . . . . . . . . . . . . . . . . . . . . . . . . . . . . . . . . . . . . . . . 152
7.5 Example . . . . . . . . . . . . . . . . . . . . . . . . . . . . . . . . . . . . . . . . . 154
8 Building Simulation Programs 1558.1 Overview . . . . . . . . . . . . . . . . . . . . . . . . . . . . . . . . . . . . . . . . . 155
8.2 Using Unix and gcc . . . . . . . . . . . . . . . . . . . . . . . . . . . . . . . . . . . 157
8.2.1 Installation . . . . . . . . . . . . . . . . . . . . . . . . . . . . . . . . . . . . 157
8.2.2 Building simulation models . . . . . . . . . . . . . . . . . . . . . . . . . . 157
8.2.3 Multi-directory models . . . . . . . . . . . . . . . . . . . . . . . . . . . . . 158
8.2.4 Static vs shared OMNeT++ system libraries . . . . . . . . . . . . . . . . . 159
8.3 Using Windows and Microsoft Visual C++ . . . . . . . . . . . . . . . . . . . . . . 159
8.3.1 Installation . . . . . . . . . . . . . . . . . . . . . . . . . . . . . . . . . . . . 159
8.3.2 Building simulation models . . . . . . . . . . . . . . . . . . . . . . . . . . 159
9 Running The Simulation 1619.1 User interfaces . . . . . . . . . . . . . . . . . . . . . . . . . . . . . . . . . . . . . . 161
9.2 The configuration file: omnetpp.ini . . . . . . . . . . . . . . . . . . . . . . . . . . 161
ix
OMNeT++ Manual – CONTENTS
9.2.1 An example . . . . . . . . . . . . . . . . . . . . . . . . . . . . . . . . . . . 161
9.2.2 The concept of simulation runs . . . . . . . . . . . . . . . . . . . . . . . . 163
9.2.3 Sections and entries . . . . . . . . . . . . . . . . . . . . . . . . . . . . . . 163
9.2.4 File inclusion . . . . . . . . . . . . . . . . . . . . . . . . . . . . . . . . . . 163
9.2.5 The [General] section . . . . . . . . . . . . . . . . . . . . . . . . . . . . . . 164
9.3 Cmdenv: the command-line interface . . . . . . . . . . . . . . . . . . . . . . . . . 165
9.3.1 Command-line switches . . . . . . . . . . . . . . . . . . . . . . . . . . . . 165
9.3.2 Cmdenv ini file options . . . . . . . . . . . . . . . . . . . . . . . . . . . . . 166
9.4 Tkenv: the graphical user interface . . . . . . . . . . . . . . . . . . . . . . . . . . 168
9.4.1 Command-line switches . . . . . . . . . . . . . . . . . . . . . . . . . . . . 168
9.4.2 Tkenv ini file settings . . . . . . . . . . . . . . . . . . . . . . . . . . . . . . 169
9.4.3 Using the graphical environment . . . . . . . . . . . . . . . . . . . . . . . 169
9.4.4 In Memoriam. . . . . . . . . . . . . . . . . . . . . . . . . . . . . . . . . . . . 170
9.5 More about omnetpp.ini . . . . . . . . . . . . . . . . . . . . . . . . . . . . . . . . 171
9.5.1 The [Slaves] section . . . . . . . . . . . . . . . . . . . . . . . . . . . . . . . 171
9.5.2 Module parameters in the configuration file . . . . . . . . . . . . . . . . . 171
9.5.3 Configuring output vectors . . . . . . . . . . . . . . . . . . . . . . . . . . . 171
9.5.4 Display strings . . . . . . . . . . . . . . . . . . . . . . . . . . . . . . . . . 172
9.5.5 Specifying seed values . . . . . . . . . . . . . . . . . . . . . . . . . . . . . 173
9.6 Choosing good seed values: the seedtool utility . . . . . . . . . . . . . . . . . . . 173
9.7 Repeating or iterating simulation runs . . . . . . . . . . . . . . . . . . . . . . . . 174
9.8 Typical problems . . . . . . . . . . . . . . . . . . . . . . . . . . . . . . . . . . . . 176
9.8.1 Stack problems . . . . . . . . . . . . . . . . . . . . . . . . . . . . . . . . . 176
9.8.2 Memory allocation problems . . . . . . . . . . . . . . . . . . . . . . . . . . 177
10 Analyzing Simulation Results 17910.1 Plotting output vectors with Plove . . . . . . . . . . . . . . . . . . . . . . . . . . 179
10.1.1 Plove features . . . . . . . . . . . . . . . . . . . . . . . . . . . . . . . . . . 179
10.1.2 Usage . . . . . . . . . . . . . . . . . . . . . . . . . . . . . . . . . . . . . . . 179
10.1.3 Writing filters . . . . . . . . . . . . . . . . . . . . . . . . . . . . . . . . . . 180
10.2 Format of output vector files . . . . . . . . . . . . . . . . . . . . . . . . . . . . . . 181
10.3 Working without Plove . . . . . . . . . . . . . . . . . . . . . . . . . . . . . . . . . 181
10.3.1 Extracting vectors from the file . . . . . . . . . . . . . . . . . . . . . . . . 181
10.3.2 Using splitvec . . . . . . . . . . . . . . . . . . . . . . . . . . . . . . . . . . 182
10.3.3 Visualization under Unix . . . . . . . . . . . . . . . . . . . . . . . . . . . 182
11 Parallel Execution 18511.1 OMNeT++ support for parallel execution . . . . . . . . . . . . . . . . . . . . . . . 185
11.1.1 Introduction to Parallel Discrete Event Simulation . . . . . . . . . . . . 185
11.1.2 OMNeT++ support for parallel simulation . . . . . . . . . . . . . . . . . . 186
x
OMNeT++ Manual – CONTENTS
11.1.3 Syncpoints . . . . . . . . . . . . . . . . . . . . . . . . . . . . . . . . . . . . 186
11.2 Configuring a simulation for parallel execution . . . . . . . . . . . . . . . . . . . 187
11.2.1 Configuring OMNeT++ . . . . . . . . . . . . . . . . . . . . . . . . . . . . . 187
11.2.2 Setting up PVM . . . . . . . . . . . . . . . . . . . . . . . . . . . . . . . . . 188
11.2.3 Setting up MPI . . . . . . . . . . . . . . . . . . . . . . . . . . . . . . . . . 190
11.3 Statistical synchronization . . . . . . . . . . . . . . . . . . . . . . . . . . . . . . . 190
11.3.1 The description of the Statistical Synchronization Method (SSM) . . . . 190
11.3.2 Using SSM in OMNeT++ . . . . . . . . . . . . . . . . . . . . . . . . . . . . 190
12 The Design of OMNeT++ 19112.1 Structure of an OMNeT++ executable . . . . . . . . . . . . . . . . . . . . . . . . 191
12.2 Embedding OMNeT++ . . . . . . . . . . . . . . . . . . . . . . . . . . . . . . . . . 192
12.3 The simulation kernel . . . . . . . . . . . . . . . . . . . . . . . . . . . . . . . . . 192
12.3.1 The central object: cSimulation simulation . . . . . . . . . . . . . . . . . 192
12.3.2 Module classes . . . . . . . . . . . . . . . . . . . . . . . . . . . . . . . . . . 192
12.3.3 Global registration lists . . . . . . . . . . . . . . . . . . . . . . . . . . . . 193
12.3.4 The coroutine package . . . . . . . . . . . . . . . . . . . . . . . . . . . . . 194
12.3.5 Object ownership/contains relationships . . . . . . . . . . . . . . . . . . . 194
12.4 The user interface . . . . . . . . . . . . . . . . . . . . . . . . . . . . . . . . . . . . 195
12.4.1 The main() function . . . . . . . . . . . . . . . . . . . . . . . . . . . . . . . 195
12.4.2 The cEnvir interface . . . . . . . . . . . . . . . . . . . . . . . . . . . . . . 195
12.4.3 Implementation of the user interface: simulation applications . . . . . . 195
A OPNET and OMNeT++ 197A.1 Comparison of OPNET and OMNeT++ . . . . . . . . . . . . . . . . . . . . . . . . 197
A.2 Quick reference for OPNET users . . . . . . . . . . . . . . . . . . . . . . . . . . . 201
B PARSEC and OMNeT++ 209B.1 What is PARSEC? . . . . . . . . . . . . . . . . . . . . . . . . . . . . . . . . . . . . 209
B.2 What is inside the PARSEC package? . . . . . . . . . . . . . . . . . . . . . . . . 209
B.3 PARSEC vs. the OMNeT++ simulation kernel . . . . . . . . . . . . . . . . . . . . 210
B.4 Feature summary . . . . . . . . . . . . . . . . . . . . . . . . . . . . . . . . . . . . 214
B.5 Correspondence between PARSEC and OMNeT++ . . . . . . . . . . . . . . . . . 215
C NED Language Grammar 217
D References 221
Index 223
xi

OMNeT++ Manual – CONTENTS
xii
OMNeT++ Manual – Introduction
Chapter 1
Introduction
1.1 What is OMNeT++?
OMNeT++ is an object-oriented modular discrete event simulator. The name itself stands forObjective Modular Network Testbed in C++. OMNeT++ has its distant roots in OMNeT, asimulator written in Object Pascal by dr. György Pongor.
The simulator can be used for modeling:
• communication protocols
• computer networks and traffic modeling
• multi-processor and distributed systems
• administrative systems
• . . . any other system where the discrete event approach is suitable.
An OMNeT++ model consists of hierarchically nested modules. The depth of module nestingis not limited, which allows the user to reflect the logical structure of the actual system inthe model structure. Modules communicate with message passing. Messages can containarbitrarily complex data structures. Modules can send messages either directly to theirdestination or along a predefined path, through gates and connections.
Modules can have parameters which are used for three main purposes: to customize modulebehaviour; to create flexible model topologies (where parameters can specify the number ofmodules, connection structure etc); and for module communication, as shared variables.
Modules at the lowest level of the module hierarchy are to be provided by the user, and theycontain the algorithms in the model. During simulation execution, simple modules appearto run in parallel, since they are implemented as coroutines (sometimes termed lightweightprocesses). To write simple modules, the user does not need to learn a new programminglanguage, but he/she is assumed to have some knowledge of C++ programming.
OMNeT++ simulations can feature different user interfaces for different purposes: debug-ging, demonstration and batch execution. Advanced user interfaces make the inside ofthe model visible to the user, allow him/her to start/stop simulation execution and to in-tervene by changing variables/objects inside the model. This is very important in the devel-opment/debugging phase of the simulation project. User interfaces also facilitate demonstra-tion of how a model works.
1
OMNeT++ Manual – Introduction
The simulator as well as user interfaces and tools are portable: they are known to work onWindows and on several Unix flavours, using various C++ compilers.
OMNeT++ has been extended to execute the simulation in parallel. Any kind of synchro-nization mechanism can be used. One suitable synchronization mechanism is the statisticalsynchronization, for which OMNeT++ provides explicit support.
OMNeT++ Home Page on the Web:
http://www.hit.bme.hu/phd/vargaa/omnetpp.htm
1.2 Where is OMNeT++ in the world of simulation tools?
There are numerous network simulation tools on the market today, both commercial andnon-commercial. In this section I will try to give an overview by picking some of the mostimportant or most representative ones in both categories and comparing them to OMNeT++:PARSEC, SMURPH, NS, Ptolemy, NetSim++, C++SIM, CLASS as non-commercial, and OP-NET, COMNET III as commercial tools. (The OMNeT++ Home Page contains a list of Websites with collections of references to network simulation tools where the reader can get amore complete list.) In the commercial category, OPNET is widely held to be the state of theart in network simulation. OMNeT++ is targeted at roughly the same segment of networksimulation as OPNET.
Seven issues are examined to get an overview about the network simulation tools:
Detail Level. Does the simulation tool have the necessary power to express details in themodel? In other words, can the user implement arbitrary new building blocks like in OM-NeT++ or he is confined to the predefined blocks implemented by the supplier? Some toolslike COMNET III are not programmable by the user to this extent therefore they cannot becompared to OMNeT++. Specialized network simulation tools like NS (for IP) and CLASS(for ATM) also rather fall into this category.
Available Models. What protocol models are readily available for the simulation tool? Onthis point, non-commercial simulation tools cannot compete with some commercial ones (es-pecially OPNET) which have a large selection of ready-made protocol models. OMNeT++ isno exception.
Defining Network Topology. How does the simulation tool support defining the networktopology? Is it possible to create some form of hierarchy (nesting) or only ”flat” topologies aresupported? Network simulation tools naturally share the property that a model (network)consists of ”nodes” (blocks, entities, modules, etc.) connected by ”links” (channels, connec-tions, etc.). Many commercial simulators have graphical editors to define the network; how-ever, this is only a good solution if there is an alternative form of topology description (e.g.text file) which allows one to generate the topology by program. OPNET follows a uniqueway: the network topology is stored in a proprietary binary file format which can be gen-erated (and read) by the graphical editor and C programs linked against a special library.On the other hand, most non-commercial simulation tools do not provide explicit supportfor topology description: one must program a ”driver entity” which will boot the model bycreating the necessary nodes and interconnecting them (PARSEC, SMURPH, NS). Finally, alarge part of the tools that do support explicit topology description supports only flat topolo-gies (CLASS). OMNeT++ probably uses the most flexible method: it has a human-readabletextual topology description format (the NED language) which is easy to create with anytext-processing tool (perl , awk, etc.), and the same format is used by the graphical editor.It is also possible to create a ”driver entity” to build a network at run-time by program.OMNeT++ also supports submodule nesting.
Programming Model. What is the programming model supported by the simulation en-
2
OMNeT++ Manual – Introduction
vironment? Network simulators typically use either thread/coroutine-based programming(such as activity() in OMNeT++), or FSMs built upon a handleMessage() -like func-tion. For example, OPNET, SMURPH and NetSim++ use FSMs (with underlying handleMes-sage()), PARSEC and C++SIM use threads. OMNeT++ supports both programming models;the author does not know of another simulation tool that does so.
Debugging and Tracing Support. What debugging or tracing facilities does the simula-tion tool offer? Simulation programs are infamous for long debugging periods. C++-basedsimulation tools rarely offer much more than printf() -style debugging; often the simula-tion kernel is also capable of dumping selected debug information on the standard output.Animation is also often supported, either off-line (record&playback) or in some client-serverarchitecture, where the simulation program is the ”server” and it can be viewed using the”client”. Off-line animation naturally lacks interactivity and is therefore little use in de-bugging. The client-server solution typically has limited power because the simulation andthe viewer run as independent operating system processes, and the viewer has limited ac-cess to the simulation program’s internals and/or it does not have enough control over thecourse of simulation execution. OPNET has a very good support for command-line debuggingand provides both off-line and client-server style animation. NetSim++ and Ptolemy use theclient-server method of animation. OMNeT++ goes a different way by linking the GUI librarywith the debugging/tracing capability into the simulation executable. This architecture en-ables the GUI to be very powerful: every user-created object is visible (and modifiable) in theGUI via inspector windows and the user has tight control over the execution. To the author’sbest knowledge, the tracing feature OMNeT++ provides is unique among the C++-based sim-ulation tools.
Performance. What performance can be expected from the simulation? Simulation programstypically run for several hours. Probably the most important factor is the programming lan-guage; almost all network simulation tools are C/C++-based. Performance is a particularlyinteresting issue with OMNeT++ since the GUI debugging/tracing support involves some ex-tra overhead in the simulation library. However, in a reported case, an OMNeT++ simulationwas only 1.3 slower than its counterpart implemented in plain C (i.e. one containing verylittle administration overhead), which is a very good showing. A similar result was reportedin a performance comparison with a PARSEC simulation.
Source Availability. Is the simulation library available in source? This is a trivial questionbut it immediately becomes important if one wants to examine or teach the internal workingsof a simulation kernel, or one runs into trouble because some function in the simulationlibrary has a bug and/or it is not documented well enough. In general it can be said that non-commercial tools (like OMNeT++) are open-source and commercial ones are not. This is alsotrue for OPNET: the source for simulation kernel is not available (although the ready-madeprotocol models come with sources).
In conclusion, it can be said that OMNeT++ has enough features to make it a good alternativeto most network simulation tools, and it has a strong potential to become one of the mostwidely used network simulation packages in academic and research environments. The mostserious shortcoming is the lack of available protocol models, but since this is mostly due to thefact that it is a relatively new simulation tool, with the help of the OMNeT++ user communitythe situation is likely to become much better in the future.
1.3 Organization of this manual
The manual is organized around the following topics:
• The Chapters 1, 2 and 3 contain introductory material: some overview and an examplesimulation.
3
OMNeT++ Manual – Introduction
• The second group of Chapters, 4, 5 and 6 are the programming guide. They presentthe NED language, the simulation concepts and their implementation in OMNeT++,explain how to write simple modules and describe the class library.
• The following chapters, 8, 9 and 10 deal with practical issues like building and runningsimulations and analyzing results, and present the tools OMNeT++ has to support thesetasks.
• Chapter 11 is devoted to the support for distributed execution.
• Finally, Chapter 12 explains the architecture and the internals of OMNeT++. Thischapter will be useful to those who want to extend the capabilities of the simulator orwant to embed it into a larger application.
• The first two Appendices, A and B, contain a comparison of OMNeT++ and two otherimportant and well-known simulation tools, OPNET and PARSEC.
• Appendice C provides a reference of the NED language.
1.4 History
The development of OMNeT++ started as a semester’s programming assignment at the Tech-nical University of Budapest (BME) in 1992. The assignment (“creation of an object-orienteddiscrete event simulation system in C++”) was handed out by Prof. Dr György Pongor, andtwo students signed up: Ákos Kun and András Varga. The basis for the design was Mr.Pongor’s existing simulation software written in Pascal, named OMNeT.
At that time, we wrote the code under Borland C++ 3.1. The idea of multiple runtime en-vironments (a significant addition to the original OMNeT design) was there from the firstmoment; naturally, we used Turbo Vision (Borland’s then successful character-based GUI)for the first ‘graphical’ user interface. In 1992, we submitted a paper about OMNeT++ tothe student’s annual university conference (named “TDK”) and won first prize in the “Soft-ware” section. Later we also won 1st prize in the national “TDK”. Then the idea came to portOMNeT++ to Unix (first for AIX on an RS/6000 with 16MB (!) RAM, later Linux), until alldevelopment was done in Linux and BC3.1 could no longer be supported.
Well, here’s a brief list of events since then – maybe one time I’ll make up my mind to enhancethem to a whole story. . .
1994: XEnv (a GUI in pure MOTIF, superceded by Tkenv by now) was written as diplomawork
1994: used OPNET for several simulation projects. OPNET features (and flaws) gave lots ofideas how to continue with OMNeT++.
1995: initial version of nedc was written by a group of exchange students from Delft
1996: initial version of PVM support was programmed by Zoltan Vass as diploma work
1997: started working on Tkenv
1997 Dec: added GNED
1997 Sept: web site set up, first public release
1997 Feb-1998 Sept: simulation projects for a small company in Hungary. We used a versionof OMNeT++.
1998 March: added Plove
1998 June: animation implemented in GNED
4
OMNeT++ Manual – Introduction
1998 Sept-1999 May: work at MeTechnology (later Brokat) in Leipzig
2000 Jan: MSVC porting
2000 Sept: contributed model repository set up
2000: IP-suite created in Karlsruhe
2001 June: the CVS is hosted in Karlsruhe
. . .
1.5 Authors
OMNeT++ has been developed mostly by András Varga at the Technical University of Bu-dapest, Department of Telecommunications (BME-HIT).
András Varga BME-HIT, [email protected]
Since leaving the university in 1998, I’ve been doing the development in my free time.
Several people have worked for shorter periods (1..3 months) on different topics within OM-NeT++. Credit for organizing this goes to Dr. György Pongor (BME-HIT, [email protected]),my advisor at the University. Here is a more-or-less complete list of people:
Old NED compiler, 1992-93:Ákos Kun BME
JAR compiler (now called NEDC), sample simulations; summer 1995:Jan Heijmans TU DelftAlex Paalvast TU DelftRobert van der Leij TU Delft
New feaures, testing, new examples; fall 1995:Maurits André TU Delft, [email protected] van Montfort TU Delft, [email protected] van de Weerd TU Delft, [email protected]
JAR (NEDC) support for distributed execution:Gábor Lencse BME-HIT, [email protected]
PVM support (as final project), spring 1996:Zoltán Vass BME-HIT
P2, k-split algorithms and more, from fall 1996:Babak Fakhamzadeh TU Delft
We have to mention Dr. Leon Rothkranz from the Technical University of Delft whose workmade it possible for the Delft students to come to Budapest in 1995.
Several bugfixes and valuable suggestions for improvements came from the user communityof OMNeT++. It would be impossible to mention everyone here, and the list is constantlygrowing – instead, the README file contains acknowledgements to those I can remember.
Since the summer of 2001, the OMNeT++ sources are kept in the CVS server at the Uni-versity of Karlsruhe. Credit for setting up and maintaining the CVS server goes to UlrichKaage.
The starting point of this manual was the 1995 report of Jan Heijmans, Alex Paalvast andRobert van der Leij.
5
OMNeT++ Manual – Introduction
6
OMNeT++ Manual – Overview
Chapter 2
Overview
2.1 Modeling concepts
OMNeT++ provides efficient tools for the user to describe the structure of the actual system.Some of the main features are:
• hierarchically nested modules
• modules are instances of module types
• modules communicate with messages through channels
• flexible module parameters
• topology description language
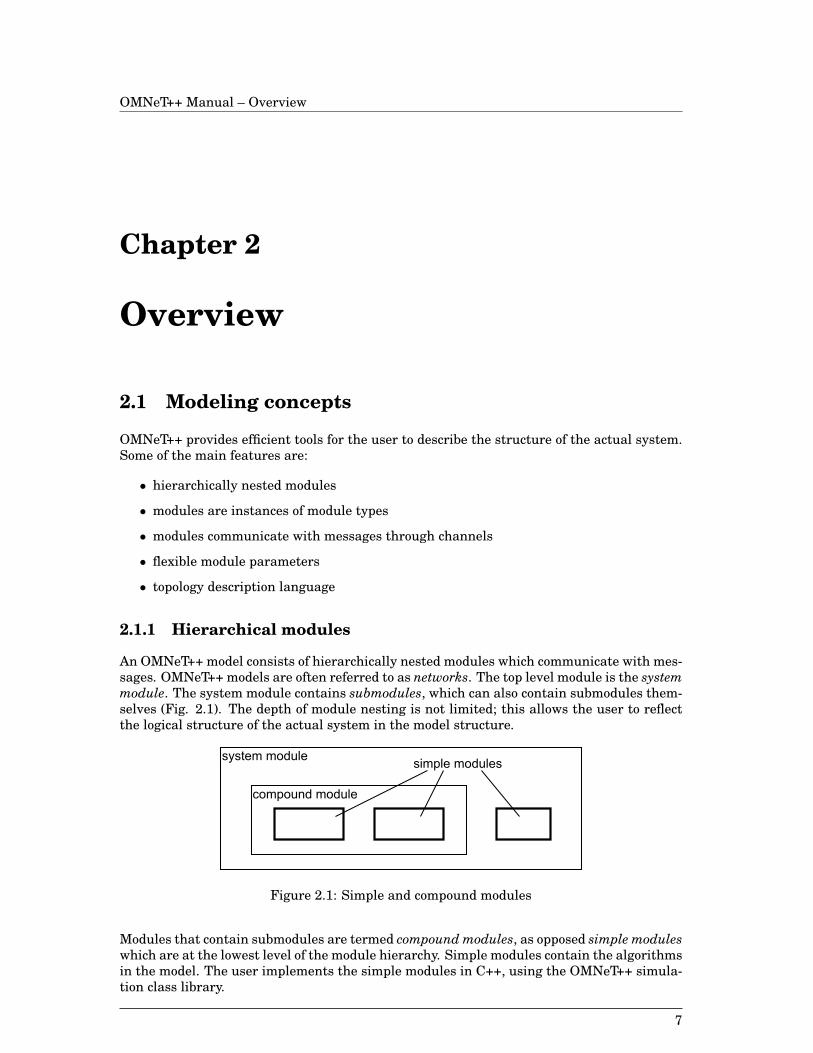
2.1.1 Hierarchical modules
An OMNeT++ model consists of hierarchically nested modules which communicate with mes-sages. OMNeT++ models are often referred to as networks. The top level module is the systemmodule. The system module contains submodules, which can also contain submodules them-selves (Fig. 2.1). The depth of module nesting is not limited; this allows the user to reflectthe logical structure of the actual system in the model structure.
Figure 2.1: Simple and compound modules
Modules that contain submodules are termed compound modules, as opposed simple moduleswhich are at the lowest level of the module hierarchy. Simple modules contain the algorithmsin the model. The user implements the simple modules in C++, using the OMNeT++ simula-tion class library.
7
OMNeT++ Manual – Overview
2.1.2 Module types
Both simple and compound modules are instances of module types. While describing themodel, the user defines module types; instances of these module types serve as componentsfor more complex module types. Finally, the user creates the system module as an instance ofa previously defined module type; all modules of the network are instantiated as submodulesand sub-submodules of the system module.
When a module type is used as a building block, there is no distinction whether it is a simpleor a compound module. This allows the user to split a simple module into several simplemodules embedded into a compound module, or vica versa, aggregate the functionality of acompound module into a single simple module, without affecting existing users of the moduletype.
Module types can be stored in files separately from the place of their actual usage. Thismeans that the user can group existing module types and create component libraries. Thisfeature will be discussed later, in Chapter 9.
2.1.3 Messages, gates, links
Modules communicate by exchanging messages. In an actual simulation, messages can rep-resent frames or packets in a computer network, jobs or customers in a queuing networkor other types of mobile entities. Messages can contain arbitrarily complex data structures.Simple modules can send messages either directly to their destination or along a predefinedpath, through gates and connections.
The “local simulation time” of a module advances when the module receives a message. Themessage can arrive from another module or from the same module (self-messages are used toimplement timers).
Gatesindexgate are the input and output interfaces of modules; messages are sent out throughoutput gates and arrive through input gates.
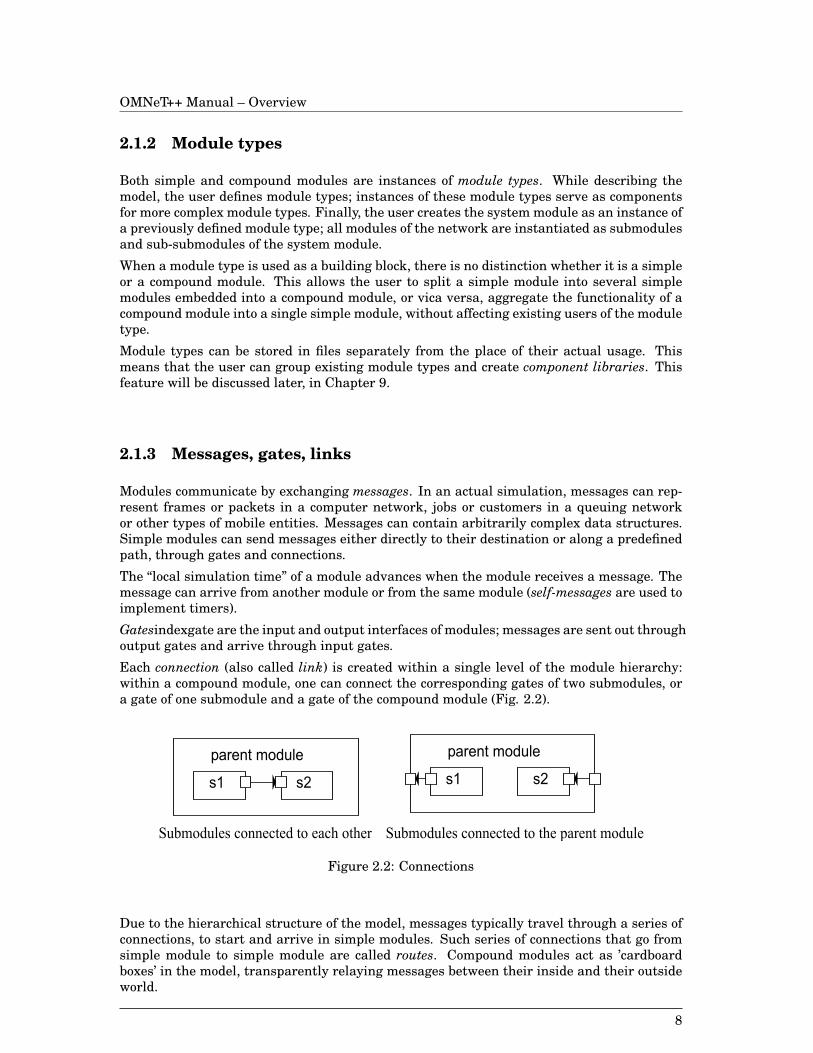
Each connection (also called link) is created within a single level of the module hierarchy:within a compound module, one can connect the corresponding gates of two submodules, ora gate of one submodule and a gate of the compound module (Fig. 2.2).
Figure 2.2: Connections
Due to the hierarchical structure of the model, messages typically travel through a series ofconnections, to start and arrive in simple modules. Such series of connections that go fromsimple module to simple module are called routes. Compound modules act as ’cardboardboxes’ in the model, transparently relaying messages between their inside and their outsideworld.
8
OMNeT++ Manual – Overview
2.1.4 Link characteristics
Connections can be assigned three parameters which facilitate the modeling of communica-tion networks, but can be useful for other models too:
• propagation delay (sec)
• bit error rate (errors/bit)
• data rate (bits/sec)
Each of these parameters is optional. One can specify link parameters individually for eachconnection, or define link types (also called channel types) once and use them throughout thewhole model.
The propagation delay is the amount of time the arrival of the message is delayed by whenit travels through the channel. Propagation delay is specified in seconds.
The bit error rate has influence on the transmission of messages through the channel. Thebit error rate is the probability that a bit is incorrectly transmitted. Thus, the probabilitythat a message of n bits length is transferred correctly is:
P (sent message received properly) = (1− ber)nwhere ber = bit error rate and n = number of bits in message.
The message has an error flag which is set in case of transmission errors.
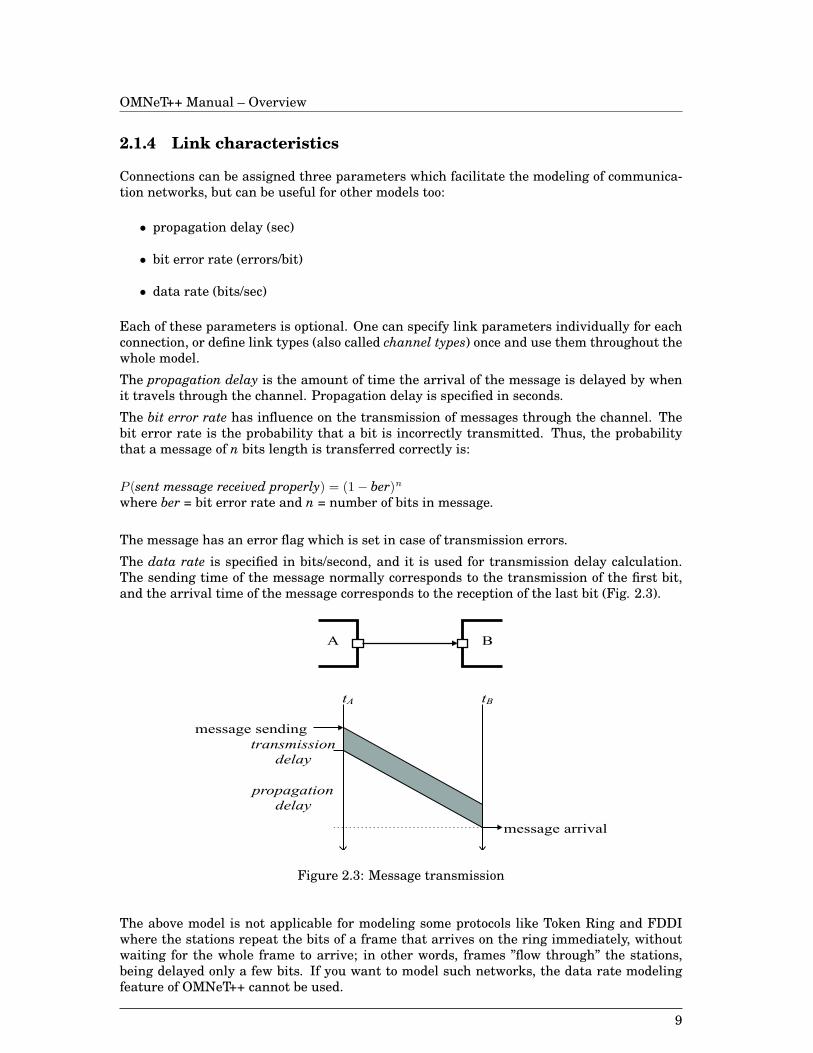
The data rate is specified in bits/second, and it is used for transmission delay calculation.The sending time of the message normally corresponds to the transmission of the first bit,and the arrival time of the message corresponds to the reception of the last bit (Fig. 2.3).
Figure 2.3: Message transmission
The above model is not applicable for modeling some protocols like Token Ring and FDDIwhere the stations repeat the bits of a frame that arrives on the ring immediately, withoutwaiting for the whole frame to arrive; in other words, frames ”flow through” the stations,being delayed only a few bits. If you want to model such networks, the data rate modelingfeature of OMNeT++ cannot be used.
9

OMNeT++ Manual – Overview
If a message travels along a route, through successive links and compound modules, themodel behaves as if each module waited until the last bit of the message arrives and onlystart its transmission then (Fig. 2.4).
Figure 2.4: Message sending over multiple channels
Since the above effect is usually not the desired one, typically you will want to assign datarate to only one connection in the route.
2.1.5 Parameters
Modules can have parameters. Parameters are used for three purposes:
1. to parameterize module topology
2. to customize simple module behaviour
3. for module communication, as shared variables
Parameters can take string, numeric or pointer values; numeric values include expressionsusing other parameters and calling C functions, random variables from different distribu-tions, and values input interactively by the user.
Numeric-valued parameters can be used to construct topologies in a flexible way. Within acompound module, parameters can define the number of submodules, number of gates, andthe way the internal connections are made.
Compound modules can pass parameters or expressions of parameters to their submodules.Parameter passing can be done by value or by reference.
During simulation execution, if a module changes the value of a parameter taken by refer-ence, the changed value propagates to other modules. This effect can be used to tune themodel or as a second means of module communication. Pointer-valued parameters can beused to implement shared memory.
10
OMNeT++ Manual – Overview
2.1.6 Topology description method
The user defines the structure of the model in NED language descriptions (Network Descrip-tion).The NED language will be discussed in detail in Chapter 4.
2.2 Programming the algorithms
The simple modules of a model contain the algorithms as C++ functions. The full flexibilityand power of the programming language can be used, supported by the OMNeT++ simulationclass library.
OMNeT++ supports a process-style description method for describing activities. During sim-ulation execution, simple module functions appear to run in parallel, because they are imple-mented as coroutines (also termed lightweight processes). Coroutines were chosen becausethey allow an intuitive description of the algorithm and they can also serve as a good basisfor implementing other description methods like state-transition diagrams or Petri nets.
OMNeT++ has a consistent object-oriented design. One can freely use OOP concepts (inheri-tance, polymorphism etc) to extend the functionality of the simulator.
Elements of the simulation (messages, modules, queues etc.) are represented as objects.These classes are part of the simulation class library:
• modules, gates, connections etc.
• parameters
• messages
• container classes (e.g. queue, array)
• data collection classes
• statistic and distribution estimation classes (histograms, P 2 algorithm for calculatingquantiles etc.)
• transient detection and result accuracy detection classes
The objects are designed so that they can efficiently work together, creating a powerful frame-work for simulation programming.
2.2.1 Creating simple modules
Each simple module type is implemented with a C++ class. Simple module classes are de-rived from a simple module base class, by redefining the virtual function that contains thealgorithm. The user can add other member functions to the class to split up a complex algo-rithm; he can also add data members to the class.
It is also possible to derive new simple module classes from existing ones. For example,if one wants to experiment with retransmission timeout schemes in a transport protocol,he can implement the protocol in one class, create a virtual function for the retransmissionalgorithm and then derive a family of classes that implement concrete schemes. This conceptis further supported by the fact that in the network description, actual module types can beparameters.
11
OMNeT++ Manual – Overview
2.2.2 Object mechanisms
The use of smart container classes allows the user to build aggregate data structures. Forexample, one can add any number of objects to a message object as parameters. Since theadded objects can contain further objects, complex data structures can be built.
There is an efficient ownership mechanism built in. The user can specify an owner for eachobject; then, the owner object will have the responsibility of destroying that object. Mostof the time, the ownership mechanism works transparently; ownership only needs to beexplicitly managed when the user wants to do something non-typical.
The forEach mechanism allows one to enumerate the objects inside a container object in auniform way and do some operation on them. This feature which makes it possible to handlemany objects together. (The forEach feature is extensively used by the user interfaces withdebugging capability and the snapshot mechanism; see later.)
2.2.3 Derive new classes
It most cases, the functionality offered by the OMNeT++ classes is enough for the user. But ifit is needed, one can derive new classes from the existing ones or create entirely new classes.For flexibility, several member functions are declared virtual. When the user creates newclasses, certain rules need to be kept so that the object can fully work together with otherobjects.
2.2.4 Self-describing objects to ease debugging
The class library is designed so that objects can give textual information about themselves.This makes it possible to peek into a running simulation program: through an appropriateuser interface, one can examine (and modify) the internal data structures of a running sim-ulation. This feature helps the user to get some insight what is happening inside the modeland get hands-on experience.
A unique feature called snapshot allows the user to dump the contents of the simulationmodel or a part of it into a text file. The file will contain textual reports about every object;this can be of invaluable help at times of debugging. Ordinary variables can also be made toappear in the snapshot file. Snapshot creations can be scheduled from within the simulationprogram or done from the user interface.
2.3 Using OMNeT++
2.3.1 Building and running simulations
This section gives some idea how to work with OMNeT++ in practice: issues like model files,compiling and running simulations are discussed.
An OMNeT++ model consists of the following parts:
• NED language topology description(s) which describe the module structure with pa-rameters, gates etc. They are files with .ned suffix. NED files can be written with anytext editor or using the GNED graphical editor.
• Simple modules sources. They are C++ files, with .h /.cc suffix.
The simulation system provides the following components:
12
OMNeT++ Manual – Overview
• Simulation kernel. This contains the code that manages the simulation and the simu-lation class library. It is written in C++, compiled and put together to form a library (afile with .a or .lib extension)
• User interfaces . OMNeT++ user interfaces are used with simulation execution, to fa-cilitate debugging, demonstration, or batch execution of simulations. There are severaluser interfaces, written in C++, compiled and put together into libraries (.a or .libfiles).
Simulation programs are built from the above components. First, the NED files are compiledinto C++ source code, using the NEDC compiler which is part of OMNeT++. Then all C++sources are compiled and linked with the simulation kernel and a user interface to form asimulation executable.
Running the simulation and analyzing the resultsThe simulation executable is a standalone program1; thus, it can be run on other machineswithout OMNeT++ or the model files being present. When the program is started, it readsin a configuration file (usually called omnetpp.ini ); it contains settings that control howthe simulation is run, values for model parameters, etc. The configuration file can also pre-scribe several simulation runs; in the simplest case, they will be executed by the simulationprogram one after another.
The output of the simulation is written into data files: output vector files, output scalar files ,and possibly the user’s own output files. OMNeT++ provides a GUI tool named Plove to viewand plot the contents of output vector files. But it is not expected that someone will processthe result files using OMNeT++ alone: output files are text files in a format which (maybe af-ter some preprocessing using sed , awk or perl ) can be read into math packages like Matlabor its free equivalent Octave, or imported into spreadsheets like Excel. All these external pro-grams have rich functionality for statistical analysis and visualization, and OMNeT++ doesnot try to duplicate their efforts. This manual briefly describes some data plotting programsand how to use them with OMNeT++.
User interfacesThe primary purpose of user interfaces is to make the inside of the model visible to theuser, to start/stop simulation execution, and possibly allow the user intervene by changingvariables/objects inside the model. This is very important in the development/debuggingphase of the simulation project. Just as important, a hands-on experience allows the user toget a ’feel’ about the model’s behaviour. A nice graphical user interface can also be used todemonstrate how the model works internally.
The same simulation model can be executed with different user interfaces, without anychange in the model files themselves. The user would test and debug the simulation witha powerful graphical user interface, and finally run it with a simple and fast user interfacethat supports batch execution.
Component librariesModule types can be stored in files separately from the place of their actual usage. Thismeans that the user can group existing module types and create component libraries.
Universal standalone simulation programsA simulation executable can store several independent models that use the same set of sim-ple modules. The user can specify in the configuration file which model he/she wants torun. This allows one to build one large executable that contains several simulation models,and distribute it as a standalone simulation tool. The flexibility of the topology descriptionlanguage also supports this approach.
1as long as it is linked statically
13
OMNeT++ Manual – Overview
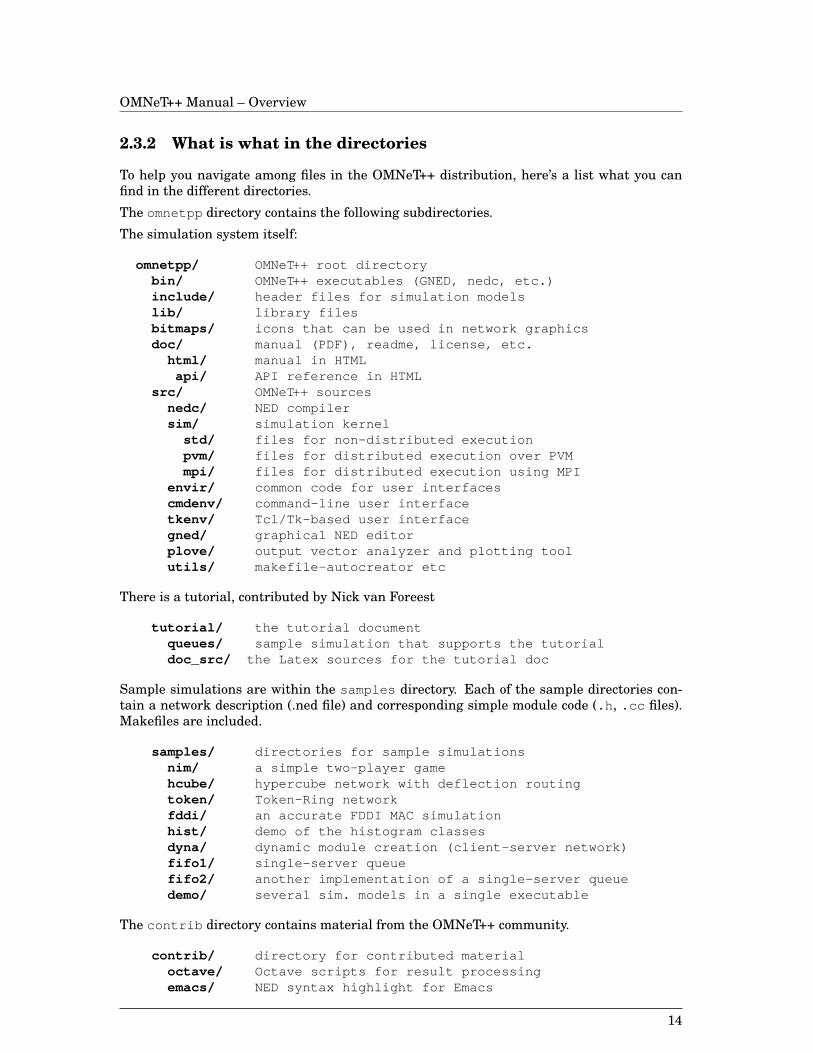
2.3.2 What is what in the directories
To help you navigate among files in the OMNeT++ distribution, here’s a list what you canfind in the different directories.
The omnetpp directory contains the following subdirectories.
The simulation system itself:
omnetpp/ OMNeT++ root directorybin/ OMNeT++ executables (GNED, nedc, etc.)include/ header files for simulation modelslib/ library filesbitmaps/ icons that can be used in network graphicsdoc/ manual (PDF), readme, license, etc.
html/ manual in HTMLapi/ API reference in HTML
src/ OMNeT++ sourcesnedc/ NED compilersim/ simulation kernel
std/ files for non-distributed executionpvm/ files for distributed execution over PVMmpi/ files for distributed execution using MPI
envir/ common code for user interfacescmdenv/ command-line user interfacetkenv/ Tcl/Tk-based user interfacegned/ graphical NED editorplove/ output vector analyzer and plotting toolutils/ makefile-autocreator etc
There is a tutorial, contributed by Nick van Foreest
tutorial/ the tutorial documentqueues/ sample simulation that supports the tutorialdoc_src/ the Latex sources for the tutorial doc
Sample simulations are within the samples directory. Each of the sample directories con-tain a network description (.ned file) and corresponding simple module code (.h , .cc files).Makefiles are included.
samples/ directories for sample simulationsnim/ a simple two-player gamehcube/ hypercube network with deflection routingtoken/ Token-Ring networkfddi/ an accurate FDDI MAC simulationhist/ demo of the histogram classesdyna/ dynamic module creation (client-server network)fifo1/ single-server queuefifo2/ another implementation of a single-server queuedemo/ several sim. models in a single executable
The contrib directory contains material from the OMNeT++ community.
contrib/ directory for contributed materialoctave/ Octave scripts for result processingemacs/ NED syntax highlight for Emacs
14

OMNeT++ Manual – Overview
You may also find additional directories like msvc/ , which contains integration componentsfor Microsoft Visual C++, etc.
15

OMNeT++ Manual – Overview
16

OMNeT++ Manual – An Example: The Nim Game
Chapter 3
An Example: The Nim Game
This chapter contains a full example program that can give you some basic idea of usingthe simulator. An enhanced version of the Nim example can be found among the sampleprograms.
Nim is an ancient game with two players and a bunch of sticks. The players take turns,removing 1, 2, 3 or 4 sticks from the heap of sticks at each turn. The one who takes the laststick is the loser.
Of course, building a model of the Nim game is not much of a simulation project, but it nicelydemonstrates the modeling approach used by OMNeT++.
Describing the model consists of two phases:
• topology description
• defining the operation of components
3.1 Topology
The game can be modelled in OMNeT++ as a network with three modules: the ”game” (amanager module) and two players. The modules will communicate by exchanging messages.The ”game” module keeps the current number of tokens and organizes the game; in eachturn, the player modules receives the number of tokens from the Game module and sendsback its move.
Figure 3.1: Module structure for the Nim game.
Player1 , Player2 and Gameare simple modules (e.g. they have no submodules.) Each
17
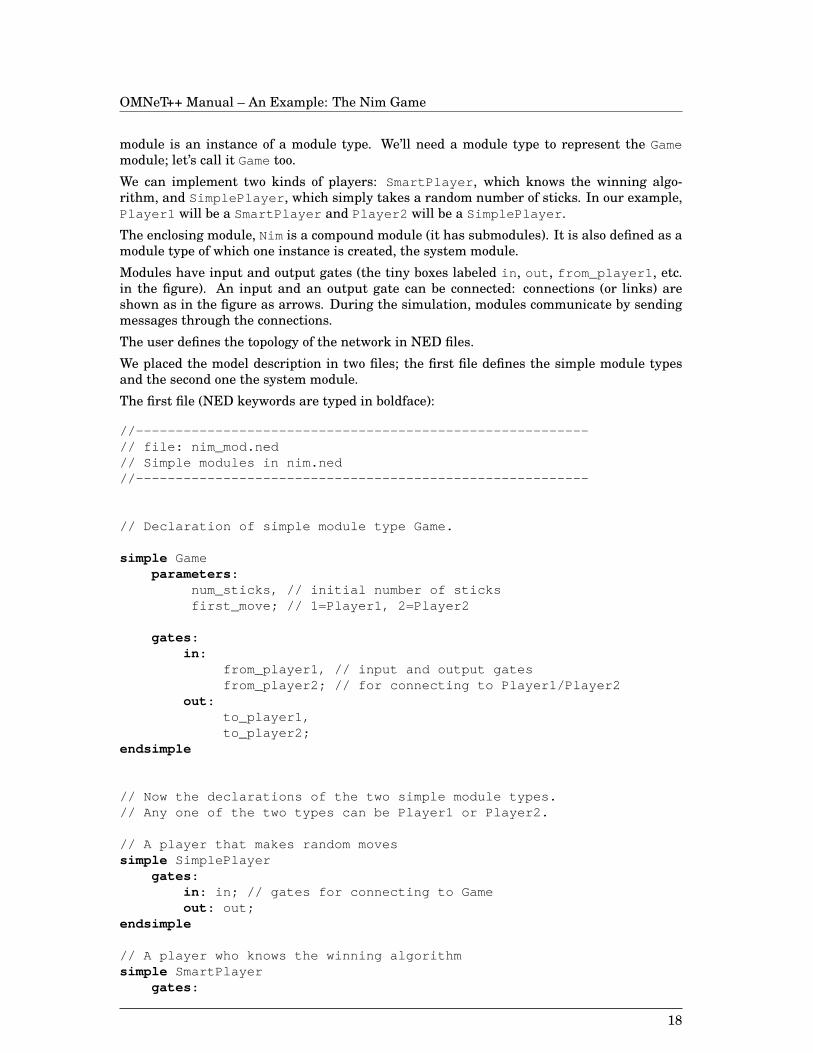
OMNeT++ Manual – An Example: The Nim Game
module is an instance of a module type. We’ll need a module type to represent the Gamemodule; let’s call it Gametoo.
We can implement two kinds of players: SmartPlayer , which knows the winning algo-rithm, and SimplePlayer , which simply takes a random number of sticks. In our example,Player1 will be a SmartPlayer and Player2 will be a SimplePlayer .
The enclosing module, Nim is a compound module (it has submodules). It is also defined as amodule type of which one instance is created, the system module.
Modules have input and output gates (the tiny boxes labeled in , out , from_player1 , etc.in the figure). An input and an output gate can be connected: connections (or links) areshown as in the figure as arrows. During the simulation, modules communicate by sendingmessages through the connections.
The user defines the topology of the network in NED files.
We placed the model description in two files; the first file defines the simple module typesand the second one the system module.
The first file (NED keywords are typed in boldface):
//---------------------------------------------------------// file: nim_mod.ned// Simple modules in nim.ned//---------------------------------------------------------
// Declaration of simple module type Game.
simple Gameparameters :
num_sticks, // initial number of sticksfirst_move; // 1=Player1, 2=Player2
gates :in :
from_player1, // input and output gatesfrom_player2; // for connecting to Player1/Player2
out :to_player1,to_player2;
endsimple
// Now the declarations of the two simple module types.// Any one of the two types can be Player1 or Player2.
// A player that makes random movessimple SimplePlayer
gates :in : in; // gates for connecting to Gameout : out;
endsimple
// A player who knows the winning algorithmsimple SmartPlayer
gates :
18

OMNeT++ Manual – An Example: The Nim Game
in : in; // gates for connecting to Gameout : out;
endsimple
The second file:
//-------------------------------------------------------------// file: nim.ned// Nim compound module + system module//-------------------------------------------------------------
import "nim_mod";
module Nimsubmodules :
game: Gameparameters :
num_sticks = intuniform(21, 31),first_move = intuniform(1, 2);
player1: SmartPlayer;player2: SimplePlayer;
connections :player1.out --> game.from_player1,player1.in <-- game.to_player1,player2.out --> game.from_player2,player2.in <-- game.to_player2;
endmodule
// system module creationnetwork
nim: Nimendnetwork
3.2 Simple modules
The module types SmartPlayer , SimplePlayer and Gameare implemented in C++, usingthe OMNeT++ library classes and functions.
Each simple module type is derived from the C++ class cSimpleModule , with its activ-ity() member function redefined. The activity() functions of all simple modules in thenetwork are executed as coroutines, so they appear as if they were running in parallel. Mes-sages are instances of the class cMessage .
We present here the C++ sources of the SmartPlayer and Gamemodule types.
The SmartPlayer first introduces himself by sending its name to the Gamemodule. Then itenters an infinite loop; with each iteration, it receives a message from Gamewith the numberof sticks left, it calculates its move and sends back a message containing the move.
Here’s the source:
#include <stdio.h>#include <string.h>#include <time.h>
19
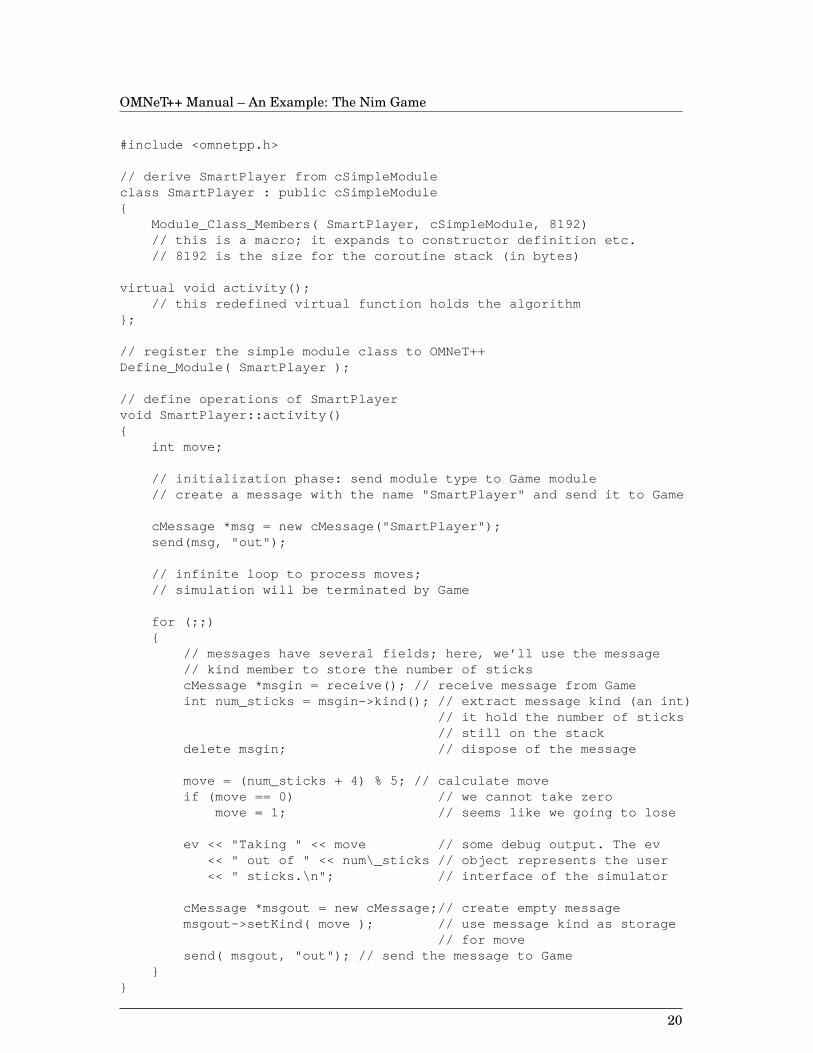
OMNeT++ Manual – An Example: The Nim Game
#include <omnetpp.h>
// derive SmartPlayer from cSimpleModuleclass SmartPlayer : public cSimpleModule{
Module_Class_Members( SmartPlayer, cSimpleModule, 8192)// this is a macro; it expands to constructor definition etc.// 8192 is the size for the coroutine stack (in bytes)
virtual void activity();// this redefined virtual function holds the algorithm
};
// register the simple module class to OMNeT++Define_Module( SmartPlayer );
// define operations of SmartPlayervoid SmartPlayer::activity(){
int move;
// initialization phase: send module type to Game module// create a message with the name "SmartPlayer" and send it to Game
cMessage *msg = new cMessage("SmartPlayer");send(msg, "out");
// infinite loop to process moves;// simulation will be terminated by Game
for (;;){
// messages have several fields; here, we’ll use the message// kind member to store the number of stickscMessage *msgin = receive(); // receive message from Gameint num_sticks = msgin->kind(); // extract message kind (an int)
// it hold the number of sticks// still on the stack
delete msgin; // dispose of the message
move = (num_sticks + 4) % 5; // calculate moveif (move == 0) // we cannot take zero
move = 1; // seems like we going to lose
ev << "Taking " << move // some debug output. The ev<< " out of " << num\_sticks // object represents the user<< " sticks.\n"; // interface of the simulator
cMessage *msgout = new cMessage;// create empty messagemsgout->setKind( move ); // use message kind as storage
// for movesend( msgout, "out"); // send the message to Game
}}
20
OMNeT++ Manual – An Example: The Nim Game
The Gamemodule first waits for a message from both players and extracts the message namesthat are also the players’ names. Then it enters a loop, with the player_to_move variablealternating between 1 and 2. With each iteration, it sends out a message with the currentnumber of sticks to the corresponding player and gets back the number of sticks taken by thatplayer. When the sticks are out, the module announces the winner and ends the simulation.
The source:
//-------------------------------------------------------------// file: game.cc// (part of NIM - an OMNeT++ demo simulation)//-------------------------------------------------------------
#include <stdio.h>#include <string.h>
#include <omnetpp.h>
// derive Game from cSimpleModuleclass Game : public cSimpleModule{
Module_Class_Members(Game,cSimpleModule,8192)// this is a macro; it expands to constructor definition etc.// 8192 is the size for the coroutine stack (in bytes)
virtual void activity();// this redefined virtual function holds the algorithm
};
// register the simple module class to OMNeT++Define_Module( Game );
// operation of Game:void Game::activity(){
// strings to store player names; player[0] is unusedchar player[3][32];
// read parameter valuesint num_sticks = par("num_sticks");int player_to_move = par("first_move");
// waiting for players to tell their namesfor (int i=0; i<2; i++){
cMessage *msg = receive();if (msg->arrivedOn("from_player1"))
strcpy( player[1], msg->name());else
strcpy( player[2], msg->name());delete msg;
}
// ev represents the user interface of the simulator
21
OMNeT++ Manual – An Example: The Nim Game
ev << "Let the game begin!\n";ev << "Player 1: " << player[1] << " Player 2: " << player[2]
<< "\n\n";
do{
ev << "Sticks left: " << num_sticks << "\n";ev << "Player " << player_to_move << " ("
<< player[player_to_move] << ") to move.\n";
cMessage *msg = new cMessage("", num_sticks);// num\_sticks will be the msg kind
if (player_to_move == 1)send(msg, "to_player1");
elsesend(msg, "to_player2");
msg = receive();int sticks_taken = msg->kind();delete msg;
num_sticks -= sticks_taken;
ev << "Player " << player_to_move << " ("<< player[player_to_move] << ") took "<< sticks_taken << " stick(s).\n";
player_to_move = 3 - player_to_move;}while (num_sticks>0);
ev << "\nPlayer " << player_to_move << " ("<< player[player_to_move] << ") won!\n";
endSimulation();}
3.3 Running the simulation
Once the source files are ready, one needs to compile and link them into a simulation exe-cutable. One can specify the user interface to be linked.
Before running the simulation, one can put parameter values and all sorts of other settingsinto an initialization file that will be read when the simulation program starts:
## file: omnetpp.ini#
[General]network = nimrandom-seed = 3
22
OMNeT++ Manual – An Example: The Nim Game
ini-warnings = false
[Cmdenv]express-mode = no
Suppose we link the Nim simulation with the command line user interface. We get theexecutable nim (nim.exe under Windows). When we run it, we’ll get the following screenoutput:
% ./nim
Or:
C:\OMNeT++\samples\nim> nim
OMNeT++ Discrete Event Simulation (C) 1992-2003 Andras VargaSee the license for distribution terms and warranty disclaimerSetting up Cmdenv (command-line user interface)...
Preparing for Run #1...Setting up network ‘nim’...Running simulation...
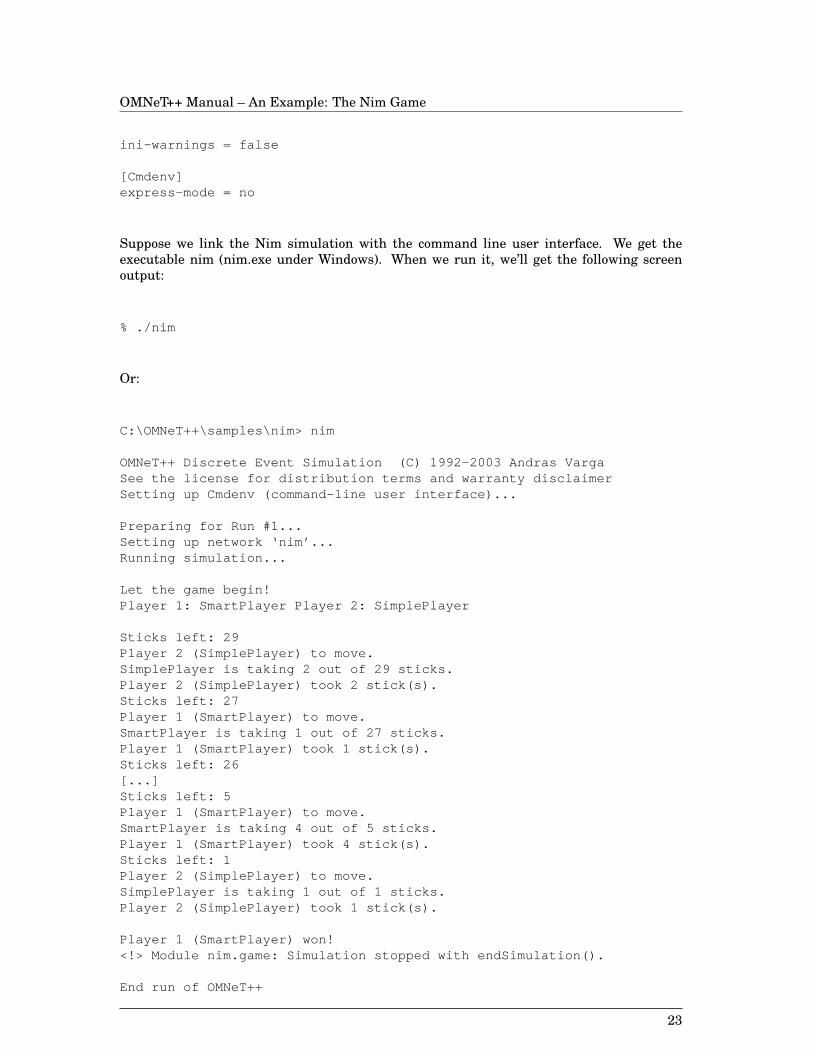
Let the game begin!Player 1: SmartPlayer Player 2: SimplePlayer
Sticks left: 29Player 2 (SimplePlayer) to move.SimplePlayer is taking 2 out of 29 sticks.Player 2 (SimplePlayer) took 2 stick(s).Sticks left: 27Player 1 (SmartPlayer) to move.SmartPlayer is taking 1 out of 27 sticks.Player 1 (SmartPlayer) took 1 stick(s).Sticks left: 26[...]Sticks left: 5Player 1 (SmartPlayer) to move.SmartPlayer is taking 4 out of 5 sticks.Player 1 (SmartPlayer) took 4 stick(s).Sticks left: 1Player 2 (SimplePlayer) to move.SimplePlayer is taking 1 out of 1 sticks.Player 2 (SimplePlayer) took 1 stick(s).
Player 1 (SmartPlayer) won!<!> Module nim.game: Simulation stopped with endSimulation().
End run of OMNeT++
23
OMNeT++ Manual – An Example: The Nim Game
3.4 Other examples
An enhanced version of the Nim example can be found among the sample programs. It addsa third, interactive player and derives specific player types from a Player abstract class. Italso adds the possibility that actual types for player1 and player2 can be specified in theini file or interactively entered by the user at the beginning of the simulation.
Nim does not show very much of how complex algorithms like communication protocols canbe implemented in OMNeT++. To have an idea about that, look at the Token Ring example.It is also extensively commented, though you may need to peep into the user manual to fullyunderstand it. The Dyna simulation models a simple client-server network and demonstratesdynamic module creation. The FDDI example is an accurate FDDI MAC simulation whichwas written on the basis of the ANSI standard.
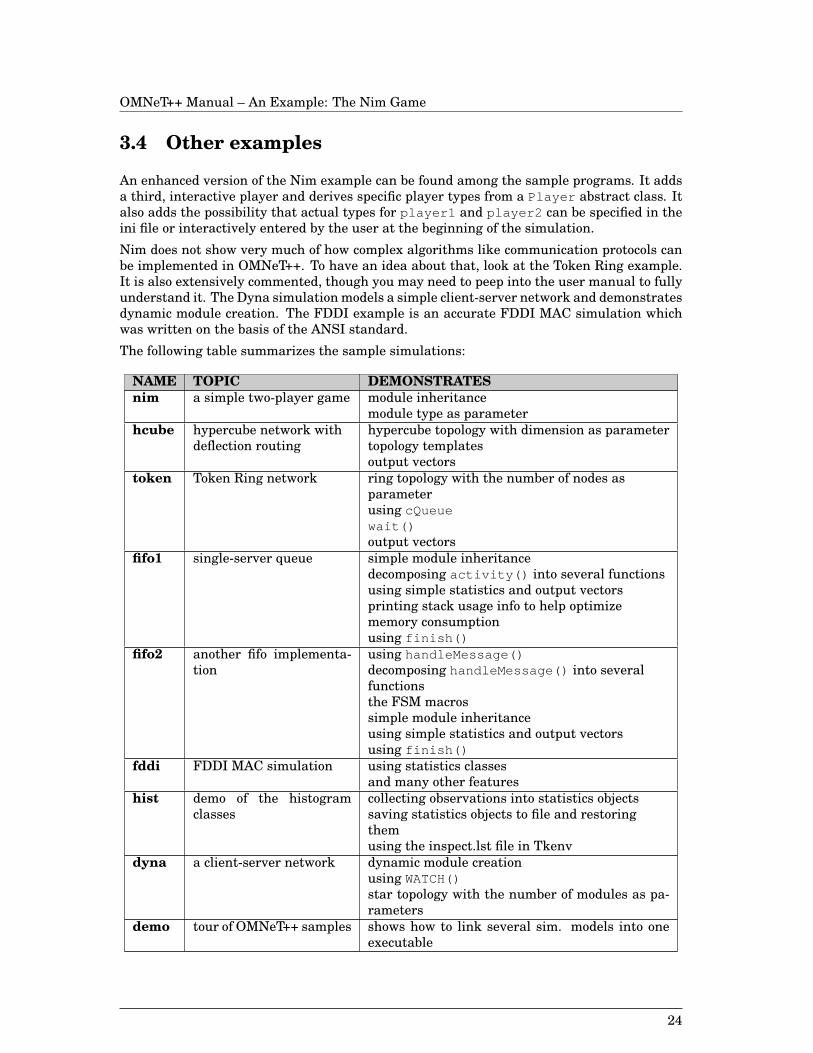
The following table summarizes the sample simulations:
NAME TOPIC DEMONSTRATESnim a simple two-player game module inheritance
module type as parameterhcube hypercube network with
deflection routinghypercube topology with dimension as parametertopology templatesoutput vectors
token Token Ring network ring topology with the number of nodes asparameterusing cQueuewait()output vectors
fifo1 single-server queue simple module inheritancedecomposing activity() into several functionsusing simple statistics and output vectorsprinting stack usage info to help optimizememory consumptionusing finish()
fifo2 another fifo implementa-tion
using handleMessage()decomposing handleMessage() into severalfunctionsthe FSM macrossimple module inheritanceusing simple statistics and output vectorsusing finish()
fddi FDDI MAC simulation using statistics classesand many other features
hist demo of the histogramclasses
collecting observations into statistics objectssaving statistics objects to file and restoringthemusing the inspect.lst file in Tkenv
dyna a client-server network dynamic module creationusing WATCH()star topology with the number of modules as pa-rameters
demo tour of OMNeT++ samples shows how to link several sim. models into oneexecutable
24
OMNeT++ Manual – The NED Language
Chapter 4
The NED Language
4.1 NED overview
The description of model topology is given in the NED language. The NED language supportsmodular description of a network. This means that a network description consists of a num-ber of component descriptions (channels, simple/compound module types). The channels,simple modules and compound modules of one network description can be used in anothernetwork description. As a consequence, the NED language makes it possible for the user tobuild his own libraries of network descriptions.
Files containing network descriptions generally have a .ned suffix. Network descriptions arenot used directly: they are translated into C++ code by the NEDC compiler, then compiledby the C++ compiler and linked into the simulation executable.
The EBNF description of the language can be found in Appendix C.
4.1.1 Components of a NED description
A NED description can contain the following components, in arbitrary number or order:
• import statements
• channel definitions
• simple and compound module declarations
• system module declarations
The rest of this chapter discusses each of these types in detail.
4.1.2 Reserved words
The writer of the network description has to take care that no reserved words are used fornames. The reserved words of the NED language are:
import include channel endchannel simple endsimple module endmoduleerror delay datarate const parameters gates submodules connectionsgatesizes on if machines for do endfor network endnetwork nocheckref ancestor true false like input numeric string bool char
25
OMNeT++ Manual – The NED Language
4.1.3 Case sensitivity
The network description and all identifiers in it are case sensitive.
4.2 The import statement
Example:
import "tkn_mod", "tkn2_mod";
The import statement (the include keyword is also recognized for backwards compatibil-ity) is used to import declarations from other network description files. After importing anetwork description, one can use the components (channels, simple/compound module types)defined in it.
From the imported files, only the declaration information is used, but no C++ code is gener-ated. The consequence is that one has to compile and link each network description, not onlythe top-level ones.
The user can specify the name of the files with or without the .ned extension. One can alsoinclude a path in the filenames, or better, use the NEDC compiler’s -I <path> command-line option to name the directories where the imported files reside.
4.3 Channel definitions
A channel definition specifies a connection type of given characteristics. The channel namecan be used later in the NED description to create connections with these parameters.
Example:
channel DialUpConnectiondelay normal (0.004, 0.0018)error 0.00001datarate 14400
endchannel
Any of the delay , error and datarate parameters are optional and they can appear in anyorder. The values are NED expressions. This means that they can be constants (integer orreal), random values from various distributions, etc.
4.4 Simple module definitions
Simple modules are the basic building blocks for other (compound) modules. A simple moduleis defined by declaring its parameters and gates.
Example:
simple SomeNameForModuleparameters :
//...gates :
//...endsimple
26
OMNeT++ Manual – The NED Language
4.4.1 Simple module parameters
Parameters are variables that belong to a module. Simple module parameters can be queriedand used by simple module algorithms. For example, a parameter called num_of_messagescan be used by a module called MsgSource to determine how many messages it has to gen-erate.
Parameters are declared by listing their names in the parameters: section of a module de-scription. The parameter type can optionally be specified as numeric , numeric const (orsimply const ), bool , string , or anytype .
Example:
simple MsgSourceparameters :
interarrival_time,num_of_messages : const,address : string ;
gates : //...endsimple
If the parameter type is omitted, numeric is assumed. Practically, this means that you onlyneed to explicitly specify the type for string, bool or char-valued parameters.
Note that the actual parameter values are given later, when the module is used as a buildingblock of a compound module type or as a system module.
When the user writes the word const before the parameter, it is converted to constant; thatis, the parameter’s value is replaced by its evaluation. This can be important when theoriginal value was a random number or an expression. One is advised to write out the constkeyword for each parameter that should be constant.
Beware when using const and by-reference parameter passing (ref modifier, see later) atthe same time. Converting the parameter to constant can affect other modules and causeerrors that are difficult to discover.
4.4.2 Simple module gates
Gates are the connection points of modules. The starting and ending points of the connectionsbetween modules are gates. OMNeT++ supports simplex (one-directional) connections, sothere are two kinds of gates: input and output. Messages are sent through output gates andreceived through input gates.
Gates are identified with their names. Gate vectors are supported: a gate vector contains anumber of single gates.
Gates are declared by listing their names in the gates: section of a module description. Anempty bracket pair [] denotes a gate vector. Elements of the vector are numbered startingwith zero.
Examples:
simple DataLinkparameters : //..gates :
in : from_port, from_higher_layer;out : to_port, to_higher_layer;
endsimple
27
OMNeT++ Manual – The NED Language
simple RoutingModuleparameters : //...gates :
in : output[];out : input[];
endsimple
The sizes of gate vectors are given later, when the module is used as a building block of acompound module type. Thus, every instance of the module can have gate vectors of differentsizes.
4.5 Compound module definitions
Compound modules are modules that are composed of one or more submodules. Compoundmodules, like a simple modules, can have parameters and gates, so a compound moduledefinition looks similar to a simple module definition, except that it also has sections tospecify the submodules and connections within the module.
Submodules can either be simple or compound modules, they are equivalent.
Example:
module SomeNameForCompoundModuleparameters :
//...gates :
//...submodules :
//...connections :
//...endmodule
Any of the above sections (parameters, gates, submodules, connections) is optional.
4.5.1 Compound module parameters
Parameters are declared in the same way as with simple modules. Please refer to Section4.4.1, ”Simple module parameters”.
Example:
module Routerparameters :
rte_processing_delay, rte_buffersize,num_of_ports : const ;
gates : //...submodules : //...connections ://...
endmodule
Compound module parameters can be used in two ways:
28
OMNeT++ Manual – The NED Language
• used in expressions for submodule parameter values
• used in defining the internal topology of the network
For example, a parameter called num_of_ports can be used to construct a router modulewith the number of ports as a parameter.
4.5.2 Compound module gates
Gates have the same role and are declared in the same way as with simple modules. Pleaserefer to Section 4.4.2, ”Simple module gates”.
Example:
module Routerparameters : //...gates :
in : input_port[];out : output_port[];
submodules : //...connections : //...
endmodule
4.5.3 Submodules
Submodules are defined in the submodules: section of a module description. For eachsubmodule, there are sections to define the actual values to be passed to its parameters andthe sizes of its gate vectors.
Example:
module NameForCompoundModuleparameters : //...gates : //...submodules :
SubModuleName: TypeOfSubModuleparameters :
//...gatesizes :
//...SecondSubModuleName: TypeOfSecondSubModule
//...connections : //...
endmodule
In a submodule definition, one has to supply the name of a previously defined module as thetype and a module name. The description of the module type can occur in the same NED fileor an imported NED file.
Module vector as submoduleIt is possible to create an array of submodules (a module vector). This is done with anexpression between brackets right behind the module type name. The expression can referto module parameters. A zero value as module count is also allowed.
Example:
29
OMNeT++ Manual – The NED Language
module BigCompoundparameters :
num_of_submods: const ;submodules :
Submod1: Node[3]//...
Submod2: Node[num_of_submods]//...
Submod3: Node[(num_of_submods+1)/2]//...
endmodule
Module type as parameterInstead of supplying a concrete module type, one can leave it as a parameter. At the sametime, to let the NED compiler know what parameters and gates that module has, the userhas to supply the name of an existing module type. This is done with the like phrase.
Example:
module CompoundModuleparameters :
node_type : string ;gates : //...submodules :
theNode: node_type like GeneralNodeparameters :
buffer = 10;connections : //...
endmodule
The above example means that the type of the submodule theNode is not known in advance;it will be taken from the node_type parameter of CompoundModule which must be a string(for example, ”SwitchingNode”). The module type called GeneralNode must have appearedearlier in the NED files; its declaration will be used to check whether theNode ’s parametersand gates exist and are used correctly. The node_type parameter will probably be given aninput value somewhere higher in the module hierarchy so that the actual module type canbe specified in the ini file or entered interactively.
The GeneralNode module type does not need to be implemented in C++, because no instanceof it is created; it is merely used to check the correctness of the NED file.
On the other hand, the actual module type that will be substituted (i.e. SwitchingNode inour case) does not need to be declared in the NED files.
The like phrase enables the user to create families of modules that serve similar purposesand implement the same interface (they have the same gates and parameters) and to usethem interchangeably in NED files. This scheme directly parallels with the concept of poly-morphism used in object-oriented programming.
Submodule parametersRight after the declaration, the values for the parameters of the declared submodules can bespecified.
Example:
module ManyParametersparameters :
30
OMNeT++ Manual – The NED Language
par1, par2, switch;submodules :
Submod1: Nodeparameters :
p1 = 10,p2 = par1+par2,p3 = switch==0 ? par1 : par2;
//...endmodule
Expressions are mostly C-style, and they can contain parameters of the compound modulebeing defined. A separate section is dedicated to expressions. Here, only the modes of pa-rameter passing are discussed.
The default parameter passing method is by value. However, the user can write ref orancestor before the parameter name. Writing ref means that the parameter is not passedby value, but by reference. This means that instead of the value of the parameter the addressof the parameter is passed.
Writing ancestor before the parameter name means that the parameter will be searchedupwards, among the parameters of all future enclosing modules of the current module. Thisreference cannot be resolved or checked by the NEDC compiler; it can only be done at run-time, when the whole network has been built up. The parameter which is found first is used;if no such parameter can be found in any of the enclosing modules, the system will give anerror during runtime.
The ancestor and ref modifiers are independent, they can be used together.
For example:
simple sub_subparameters :
s_s_par1, s_s_par2;endmodule sub_sub
module subparameters :
s_par;submodules :
child: sub_subparameters :
s_s_par1 = ref s_par,s_s_par2 = ref ancestor m_par2;
endmodule sub
module modparameters :
m_par1, m_par2;submodules :
child: subparameters :
s_par = m_par1;endmodule mod
Again, note that the network description compiler can check for the existence of ordinary
31
OMNeT++ Manual – The NED Language
parameters but not for ancestor parameters (it cannot predict in what modules the currentmodule will be embedded in an actual network description). Parameters taken by referencecan be used as a second means of module communication, because during simulation exe-cution, if a module changes the value of a parameter taken be reference, the changed valuepropagates to other modules. ref parameters can also be used to implement shared memory(see in Chapter 5).
Submodule gate sizesThe sizes of gate vectors are defined with the gatesizes: keyword. Gate vector sizes canbe given as constants, parameters or expressions.
An example:
simple SimpleTypegates :
in : inputs[]; out : outputs[];endsimplemodule SomeCompound parameters :
num: const ;submodules :
Submod1: SimpleTypegatesizes :
inputs[10], outputs[num];//...
endmodule
Conditional parameter and gatesize sectionsMultiple parameters: and gatesizes: sections can exist in a submodule definition and each ofthem can be tagged with conditions.
For example:
module Serialparameters : count: const ;submodules :
node : Node [count]parameters :
position = "middle";parameters if index==0:
position = "beginning";parameters if index==count-1:
position = "end";gatesizes :
in[2], out[2];gatesizes if index==0 || index==count-1:
in[1], in[1];connections :
//...endmodule
If the conditions are not disjoint and a parameter value or a gate size is defined twice, thelast definition will take effect, overwriting the former ones. Thus, values intended as defaultsshould appear in the first sections.
32
OMNeT++ Manual – The NED Language
4.5.4 Connections
The compound module definition specifies how the gates of the compound module and itsimmediate sub-modules are connected. The NED language does not permit connections thatcross the boundaries of a compound module without using the gates of that module. Onlypoint-to-point connections are supported.
In summary:
1. The gate of a submodule or enclosing module gate can be connected to another submod-ule or enclosing module gate
2. Gate direction must be observed (e.g. you cannot connect two submodule output gates)
Connections are specified in the connections: section of a compound module definition. Itlists the connections, separated by semicolons.
Example:
module SomeCompoundparameters : //...gates : //...submodules : //...connections :
node1.output --> node2.input;node1.input <-- node2.output;//...
endmodule
Each connection can be:
• direct (that is, no delay, bit error rate or data rate), can use a named channel, or achannel given with delay, error and data rate values;
• single or multiple (loop) connection;
• conditional or non-conditional.
These connection types are described in the following sections.
Single connections and channelsThe source gate can be an output gate of a submodule or an input gate of the compoundmodule, and the destination gate can be an input gate of a submodule or an output gate ofthe compound module.
If the user does not specify a channel, the connection will have no propagation delay, notransmission delay and no bit errors:
Sender.outgate --> Receiver.ingate;
The arrow can point either left-to-right or right-to-left.
The user can also specify a channel by its name:
Sender.outgate --> Dialup14400 --> Receiver.ingate;
In this case, the NED sources must contain the definition of the channel.
One can also specify the channel parameters directly:
33
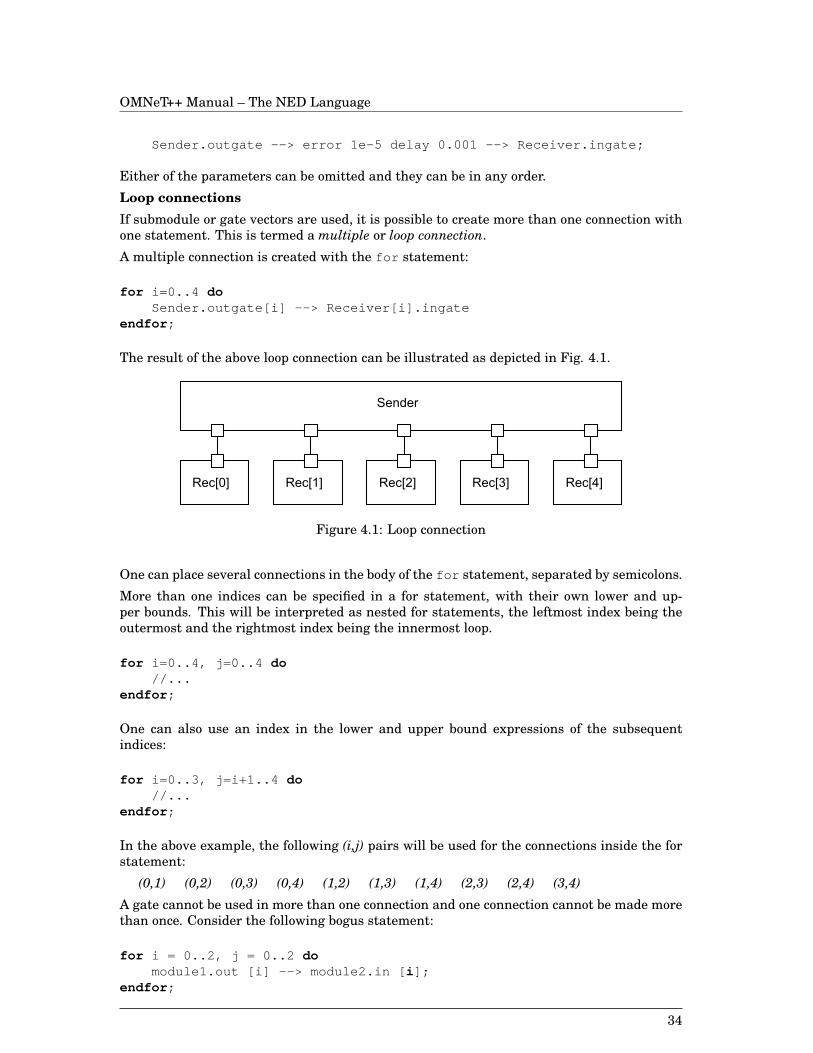
OMNeT++ Manual – The NED Language
Sender.outgate --> error 1e-5 delay 0.001 --> Receiver.ingate;
Either of the parameters can be omitted and they can be in any order.
Loop connectionsIf submodule or gate vectors are used, it is possible to create more than one connection withone statement. This is termed a multiple or loop connection.
A multiple connection is created with the for statement:
for i=0..4 doSender.outgate[i] --> Receiver[i].ingate
endfor ;
The result of the above loop connection can be illustrated as depicted in Fig. 4.1.
Figure 4.1: Loop connection
One can place several connections in the body of the for statement, separated by semicolons.
More than one indices can be specified in a for statement, with their own lower and up-per bounds. This will be interpreted as nested for statements, the leftmost index being theoutermost and the rightmost index being the innermost loop.
for i=0..4, j=0..4 do//...
endfor ;
One can also use an index in the lower and upper bound expressions of the subsequentindices:
for i=0..3, j=i+1..4 do//...
endfor ;
In the above example, the following (i,j) pairs will be used for the connections inside the forstatement:
(0,1) (0,2) (0,3) (0,4) (1,2) (1,3) (1,4) (2,3) (2,4) (3,4)
A gate cannot be used in more than one connection and one connection cannot be made morethan once. Consider the following bogus statement:
for i = 0..2, j = 0..2 domodule1.out [i] --> module2.in [ i ];
endfor ;
34
OMNeT++ Manual – The NED Language
It will cause a runtime error: each connection is made twice, as the index variable j is notused in the connection. In general, every connection inside a loop should use all the indexvariables at both sides of the connection.
Conditional connectionsConnections can be conditional. This is a conditional connection:
for i=0..n doSender.outgate[i] --> Receiver[i].ingate if i%2==0;
endfor ;
This way we connected every second gate.
The nocheck modifierConditional connections are especially useful with random numbers when they can createrandom connections. Here, a problem can be that by default, the simulation program checksif all gates are connected. You can turn off this check by using the nocheck modifier .
This example generates a random subgraph of a full graph:
module Stochasticparameters : //..gates : //..submodules : //..connections nocheck :
for i=0..9 doSender.outgate[i] --> Receiver[i].ingate
if uniform(0,1)<0.3;endfor ;
endmodule
When using nocheck , it is the simple modules’ responsibility not to send messages on gatesthat are not connected.
4.6 Parameterized compound modules
With the help of conditional parameter and gatesize blocks and conditional connections, onecan create complex topologies.
4.6.1 Examples
Example 1: RouterThe following example contains a router module with the number of ports taken as param-eter. The compound module is built using three module types: Application, RoutingModule,DataLink. We assume that their definition is in a separate NED file which we will import.
import "modules";module Router
parameters :rte_processing_delay, rte_buffersize,num_of_ports: const ;
gates :
35
OMNeT++ Manual – The NED Language
in : input_ports[];out : output_ports[];
submodules :local_user: Application;routing: RoutingModule
parameters :processing_delay = rte_processing_delay,buffersize = rte_buffersize;
gatesizes :input[num_of_ports+1],output[num_of_ports+1];
port_if: DataLink[num_of_ports]parameters :
retry_count = 5,window_size = 2;
connections :for i=0..num_of_ports-1 do
routing.output[i] --> port_if[i].from_higher_layer;routing.input[i] <-- port_if[i].to_higher_layer;port_if[i].to_port --> output_ports[i];port_if[i].from_port <-- input_ports[i];
endfor ;routing.output[num_of_ports] --> local_user.input;routing.input[num_of_ports] <-- local_user.output;
endmodule
Example 2: ChainFor example, one can create a chain of modules like this:
module Serialparameters : count: const ;submodules :
node : Node [count]gatesizes :
in[2], out[2];gatesizes if index==0 || index==count-1:
in[1], out[1];connections :
for i = 0..count-2 donode[i].out[i!=0 ? 1 : 0] --> node[i+1].in[0];node[i].in[i!=0 ? 1 : 0] <-- node[i+1].out[0];
endfor ;endmodule
Example 3: Binary TreeOne can use conditional connections to build a binary tree. The following NED code loopsthrough all possible node pairs, and creates the connections needed for a binary tree.
simple BinaryTreeNodegates :
in : fromupper;out : downleft;out : downright;
36
OMNeT++ Manual – The NED Language
endsimple
module BinaryTreeparameters :
height: const ;submodules :
node: BinaryTreeNode [ 2^height-1 ];connections nocheck :
for i = 0..2^height-2, j = 0..2^height-2 donode[i].downleft --> node[j].fromupper if j==2*i+1;node[i].downright --> node[j].fromupper if j==2*i+2;
endfor ;endmodule
Note that not each gate of the modules will be connected. By default, an unconnected gateproduces a run-time error message when the simulation is started, but this error message isturned off here with the nocheck modifier. Consequently, it is the simple modules’ responsi-bility not to send on a gate which is not leading anywhere.
An alert reader might notice that there is a better alternative to the above code. Each nodeexcept the ones at the lowest level of the tree has to be connected to exactly two nodes, so wecan use a single loop to create the connections.
module BinaryTree2parameters :
height: const ;submodules :
node: BinaryTreeNode [ 2^height-1 ];connections nocheck :
for i=0..2^(height-1)-2 donode[i].downleft --> node[2*i+1].fromupper;node[i].downright --> node[2*i+2].fromupper;
endfor ;endmodule
Example 4: Random graphConditional connections can also be used to generate random topologies. The following codegenerates a random subgraph of a full graph:
module RandomGraphparameters :
count: const ,connectedness; // 0.0<x<1.0
submodules :node: Node [count];
gatesizes : in [count], out [count];connections nocheck :
for i=0..count-1, j=0..count-1 donode[i].out[j] --> node[j].in[i]
if i!=j && uniform(0,1)<connectedness;endfor ;
endmodule
Note the use of the nocheck modifier here too, to turn off error messages given by the net-work setup code for unconnected gates.
37

OMNeT++ Manual – The NED Language
4.6.2 Using const with parameterized topologies
Since parameter values can be used in defining the internal topology of the module, theconst modifier has a significant role. Consider the following example:
simple Senderparameters :
num_of_outgates;gates :
out : outgate[num_of_outgates];endsimple Sender
simple Receivergates :
in : ingate;endsimple Receiver
module Network;parameters :
num_of_mods: const ;submodules :
sender: Senderparameters :
num_of_outgates = num_of_mods ;receiver: Receiver [ num_of_mods ]
connections :for i=1.. num_of_mods do
sender.outgate[i] --> receiver[i].ingateendfor ;
endmodule
network net: Networkparameters :
num_of_mods = normal (5,2);endnetwork
If parameter num_of_mods wasn’t const, the following would happen:normal(5,2) would be substituted for the num_of_mods. There are three places where anevaluation of num_of_mods (that is, normal (5,2)) is done (they are typed in italics in theexample). It is likely that these evaluations would not result in the same value, and con-sequently, the gate vector sizes would not match each other and the end value of the forstatement. Thus, the loop connection would not be created properly.
Using const for the parameter num_of_mods prevents this from happening: an evaluationof normal(5,2) is substituted for num_of_mods and an equal number of gates are created.
4.6.3 Design patterns for compound modules
Several approaches can be used when you want to create complex topologies which have aregular structure; three of them are described below.
’Subgraph of a Full Graph’This pattern takes a subset of the connections of a full graph. A condition is used to ”carveout” the necessary interconnection from the full graph:
38
OMNeT++ Manual – The NED Language
for i=0..N-1, j=0..N-1 donode[i].out[...] --> node[j].in[...] if condition(i,j);
endfor;
The RandomGraph compound module (presented earlier) is an example of this pattern, butthe pattern can generate any graph where an appropriate condition(i,j) can be formulated.For example, when generating a tree structure, the condition would return whether node j isa child of node i or vica versa.
Though this pattern is very general, its usage can be prohibitive if the N number of nodesis high and the graph is sparse (it has much fewer connections that N2 ). The following twopatterns do not suffer from this drawback.
’Connections of Each Node’The pattern loops through all nodes and creates the necessary connections for each one. Itcan be generalized like this:
for i=0..Nnodes, j=0..Nconns(i)-1 donode[i].out[j] --> node[rightNodeIndex(i,j)].in[j];
endfor;
The Hypercube compound module (to be presented later) is a clear example of this approach.BinaryTree can also be regarded as an example of this pattern where the inner j loop isunrolled.
The applicability of this pattern depends on how easily the rightNodeIndex(i,j) function canbe formulated.
’Enumerate All Connections’A third pattern is to list all connections within a loop:
for i=0..Nconnections-1 donode[leftNodeIndex(i)].out[...] --> node[rightNodeIndex(i)].in[...];
endfor;
The pattern can be used if leftNodeIndex(i) and rightNodeIndex(i) mapping functions can besufficiently formulated.
The Serial module is an example of this approach where the mapping functions are extremelysimple: leftNodeIndex(i)=i and rightNodeIndex(i)=i+1. The pattern can also be used to createa random subset of a full graph with a fixed number of connections.
In the case of irregular structures where none of the above patterns can be employed, theuser can resort to specifying constant submodule/gate vector sizes and explicitly listing allconnections, like he/she would do it in most existing simulators.
4.6.4 Topology templates
OverviewTopology templates are nothing more than compound modules where one or more submoduletypes are left as parameters (using the like phrase of the NED language). You can writesuch modules which implement mesh, hypercube, butterfly, perfect shuffle or other topolo-gies, and you can use them wherever needed in you simulations. With topology templates,you can reuse interconnection structure.
An example: hypercube
39
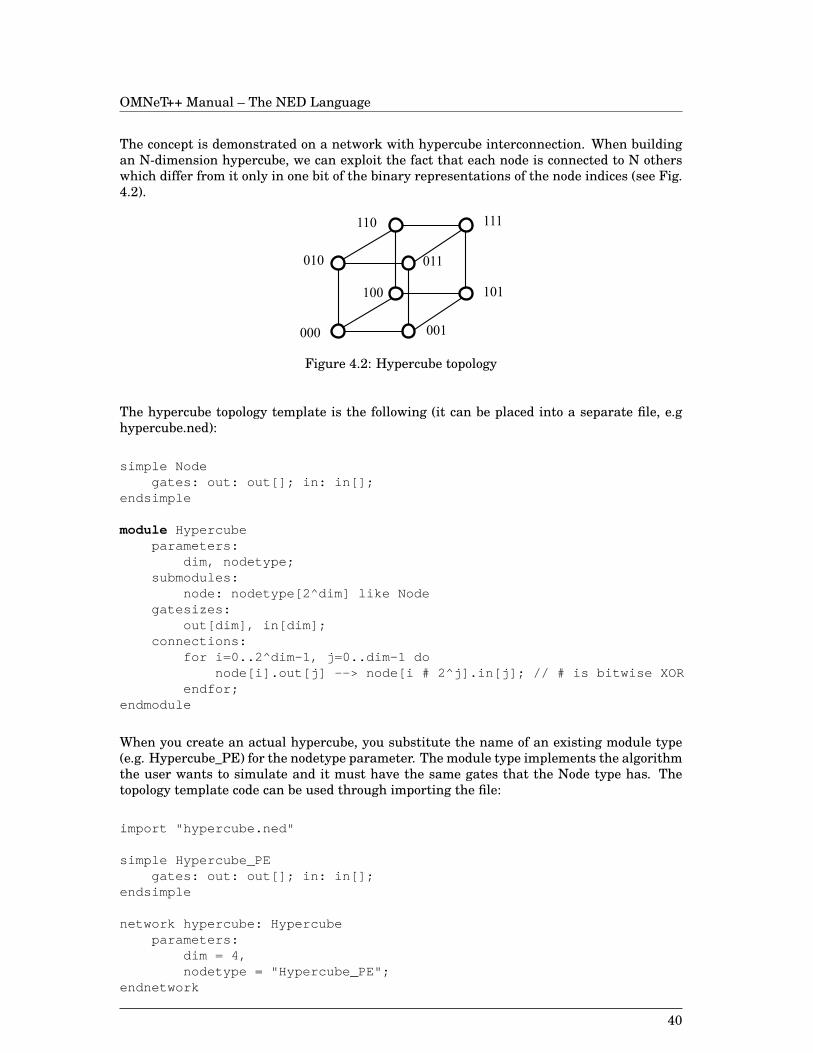
OMNeT++ Manual – The NED Language
The concept is demonstrated on a network with hypercube interconnection. When buildingan N-dimension hypercube, we can exploit the fact that each node is connected to N otherswhich differ from it only in one bit of the binary representations of the node indices (see Fig.4.2).
Figure 4.2: Hypercube topology
The hypercube topology template is the following (it can be placed into a separate file, e.ghypercube.ned):
simple Nodegates: out: out[]; in: in[];
endsimple
module Hypercubeparameters:
dim, nodetype;submodules:
node: nodetype[2^dim] like Nodegatesizes:
out[dim], in[dim];connections:
for i=0..2^dim-1, j=0..dim-1 donode[i].out[j] --> node[i # 2^j].in[j]; // # is bitwise XOR
endfor;endmodule
When you create an actual hypercube, you substitute the name of an existing module type(e.g. Hypercube_PE) for the nodetype parameter. The module type implements the algorithmthe user wants to simulate and it must have the same gates that the Node type has. Thetopology template code can be used through importing the file:
import "hypercube.ned"
simple Hypercube_PEgates: out: out[]; in: in[];
endsimple
network hypercube: Hypercubeparameters:
dim = 4,nodetype = "Hypercube_PE";
endnetwork
40
OMNeT++ Manual – The NED Language
If you put the nodetype parameter to the ini file, you can use the same simulation modelto test e.g. several routing algorithms in a hypercube, each algorithm implemented with adifferent simple module type – you just have to supply different values to nodetype, such as”WormholeRoutingNode”, ”DeflectionRoutingNode”, etc.
4.7 Network definition
A network definition (or system module definition) specifies the system module. Its syntax isvery similar to a submodule declaration. The system definition starts with keyword networkand ends with endnetwork .
An example:
network modelledNetwork: SomeModuleparameters :
par1=10,par2=normal(100,20);
endnetwork
Here, SomeModule is the name of a compound or a simple module type.
There can be several system definitions in a network description, each one defines a differentnetwork. The simulation program built with such a network description is able to run any ofthem; the desired one can be specified in the config file (see later).
4.8 Support for parallel execution
OMNeT++simulations can be executed in parallel. This means that different parts of themodel execute on different hosts or processors. (We’ll use the term ”host” or ”machine” in thissense.) The unit of granularity is the simple module: one simple module always executes ona single processor.
Parallel execution is also supported by NED: the language provides an elegant way of specify-ing execution hosts for different modules. We’ll discuss this feature in the following sections.
4.8.1 Extensions to the compound module and system definitions
To support the segmentation of the model for execution of different modules, the compoundmodule definition was extended with the machines: and the on: keywords.
Example:
module SomeNameForCompoundModulemachines : host1, host2, host3, host4;parameters : //...gates : //...submodules :
submodule1 : submodtype1on: host1;
submodule2 : submodtype2on: host2, host3;
submodule3 : submodtype1
41

OMNeT++ Manual – The NED Language
on: host4;connections : //...
endmodule
The machines: section lists formal host names which are used in the on: lists of the sub-modules.
In the example, the second submodule is itself a compound module that can be further sub-divided to run on two separate hosts, so its definition must have a machines: section withtwo parameters. You do not have to propagate host names down to simple module level: youcan stop at a compound module which executes on a single host. In other words, a compoundmodule with no machines: section is equivalent to one with one machine parameter.
Of course, you can give the same value to several machine parameters, as to submodule1’sin the following example. In this case, the whole compound module will be placed on a singlehost, as if it never had machine parameters at all.
module AnotherCompoundModulemachines : host1, host2;parameters : //...gates : //...submodules :
submodule1 : submodtype1on: host1, host1, host1;
//...connections : //...
endmodule
Host names propagate up to network definition level. Extension to the network definition:
network distVector: DistVectoron: machine1, machine2, machine3;
endnetwork
The on: parameters of the network definition can be actual host names, or alternatively,they can be symbolic names that are mapped to actual host names in the config file.
4.8.2 Conditional ’on’ sections
Similarly to the parameters: and gatesizes: section, multiple on: sections can exist for thesubmodules if they are tagged with if phrases.
This makes it possible to control the module distribution with parameters. You can even putdifferent parts of a module vector on different machines using the index operator (see laterin Section 4.9, Expressions).
Example:
module DistVectormachines : host1, host2, host3;submodules :
node : Node [count]on if index<count*.33: host1;on if index>=count*.33 && index<count*.66: host2;on if index>=count*.66: host3;
42
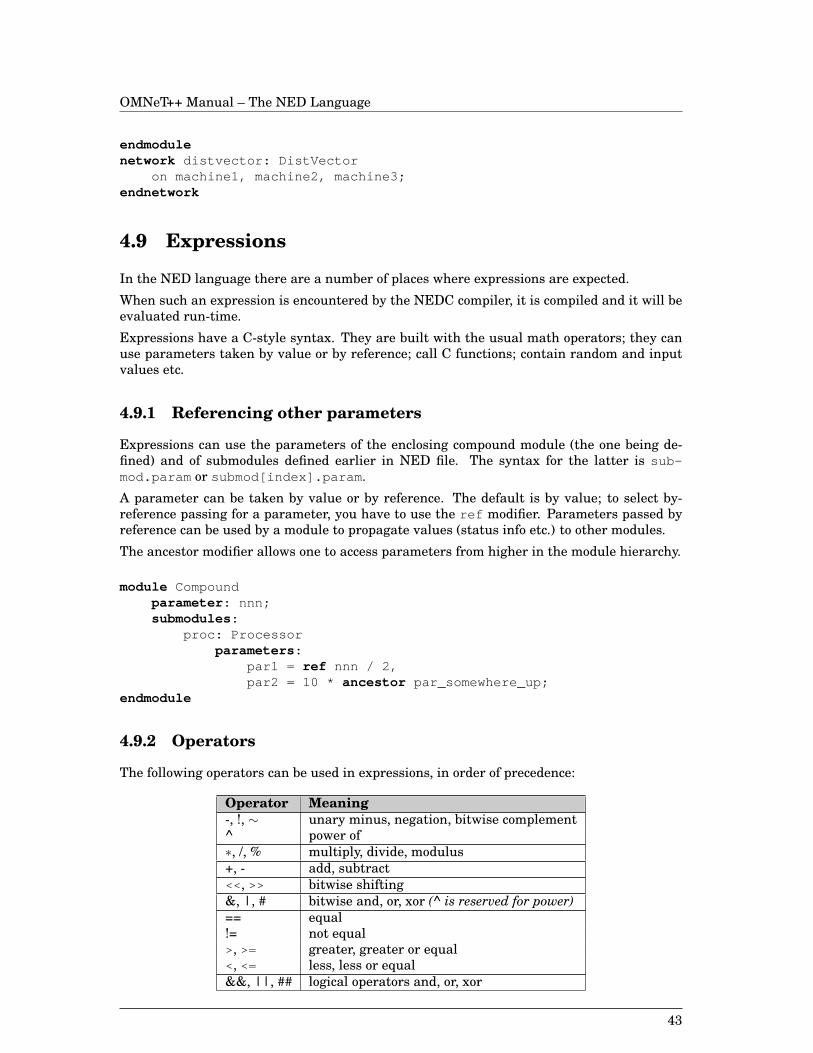
OMNeT++ Manual – The NED Language
endmodulenetwork distvector: DistVector
on machine1, machine2, machine3;endnetwork
4.9 Expressions
In the NED language there are a number of places where expressions are expected.
When such an expression is encountered by the NEDC compiler, it is compiled and it will beevaluated run-time.
Expressions have a C-style syntax. They are built with the usual math operators; they canuse parameters taken by value or by reference; call C functions; contain random and inputvalues etc.
4.9.1 Referencing other parameters
Expressions can use the parameters of the enclosing compound module (the one being de-fined) and of submodules defined earlier in NED file. The syntax for the latter is sub-mod.param or submod[index].param .
A parameter can be taken by value or by reference. The default is by value; to select by-reference passing for a parameter, you have to use the ref modifier. Parameters passed byreference can be used by a module to propagate values (status info etc.) to other modules.
The ancestor modifier allows one to access parameters from higher in the module hierarchy.
module Compoundparameter : nnn;submodules :
proc: Processorparameters :
par1 = ref nnn / 2,par2 = 10 * ancestor par_somewhere_up;
endmodule
4.9.2 Operators
The following operators can be used in expressions, in order of precedence:
Operator Meaning-, !, ∼ unary minus, negation, bitwise complement^ power of∗, /, % multiply, divide, modulus+, - add, subtract<<, >> bitwise shifting&, |, # bitwise and, or, xor (^ is reserved for power)== equal!= not equal>, >= greater, greater or equal<, <= less, less or equal&&, ||, ## logical operators and, or, xor
43
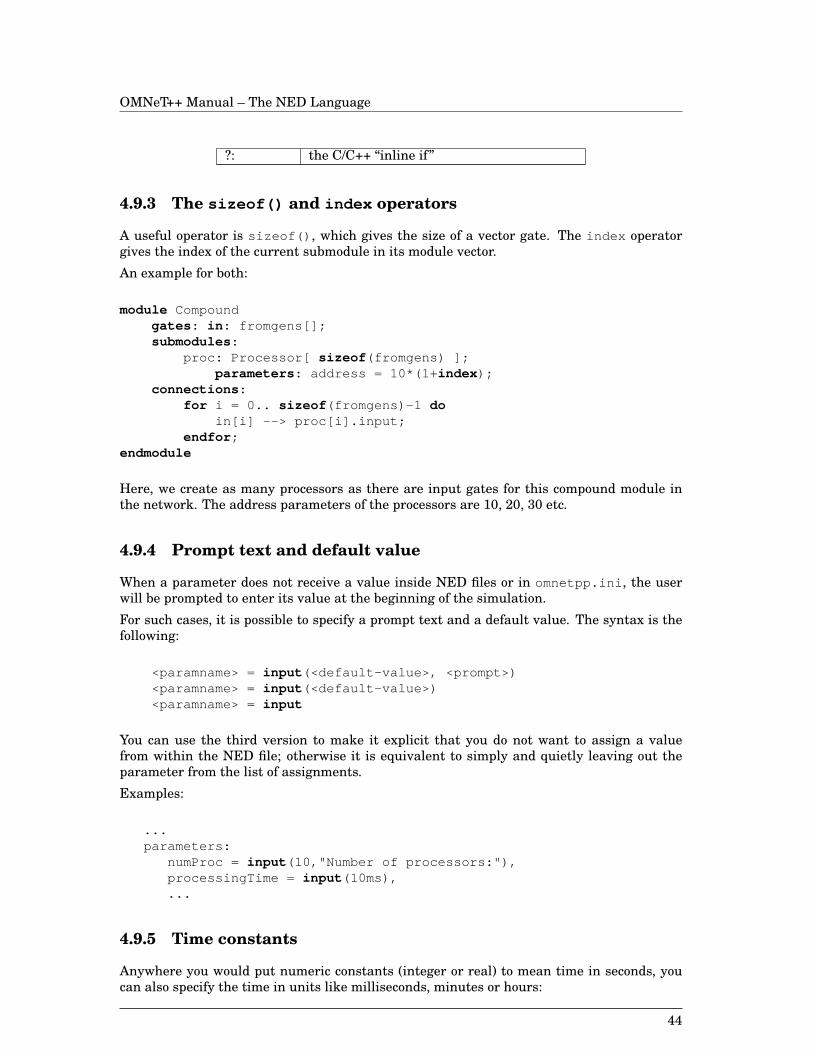
OMNeT++ Manual – The NED Language
?: the C/C++ “inline if”
4.9.3 The sizeof() and index operators
A useful operator is sizeof() , which gives the size of a vector gate. The index operatorgives the index of the current submodule in its module vector.
An example for both:
module Compoundgates : in : fromgens[];submodules :
proc: Processor[ sizeof (fromgens) ];parameters : address = 10*(1+ index );
connections :for i = 0.. sizeof (fromgens)-1 do
in[i] --> proc[i].input;endfor ;
endmodule
Here, we create as many processors as there are input gates for this compound module inthe network. The address parameters of the processors are 10, 20, 30 etc.
4.9.4 Prompt text and default value
When a parameter does not receive a value inside NED files or in omnetpp.ini , the userwill be prompted to enter its value at the beginning of the simulation.
For such cases, it is possible to specify a prompt text and a default value. The syntax is thefollowing:
<paramname> = input ( <default-value> , <prompt> )<paramname> = input ( <default-value> )<paramname> = input
You can use the third version to make it explicit that you do not want to assign a valuefrom within the NED file; otherwise it is equivalent to simply and quietly leaving out theparameter from the list of assignments.
Examples:
...parameters:
numProc = input (10,"Number of processors:"),processingTime = input (10ms),...
4.9.5 Time constants
Anywhere you would put numeric constants (integer or real) to mean time in seconds, youcan also specify the time in units like milliseconds, minutes or hours:
44
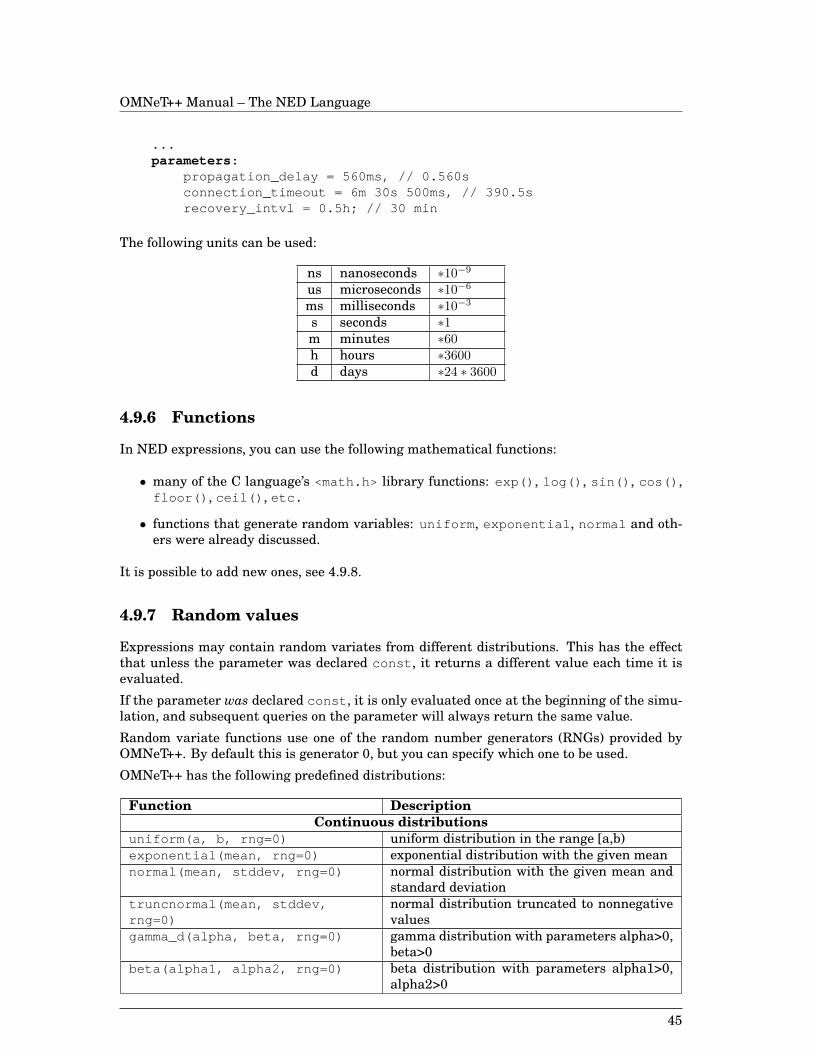
OMNeT++ Manual – The NED Language
...parameters :
propagation_delay = 560ms, // 0.560sconnection_timeout = 6m 30s 500ms, // 390.5srecovery_intvl = 0.5h; // 30 min
The following units can be used:
ns nanoseconds ∗10−9
us microseconds ∗10−6
ms milliseconds ∗10−3
s seconds ∗1m minutes ∗60h hours ∗3600d days ∗24 ∗ 3600
4.9.6 Functions
In NED expressions, you can use the following mathematical functions:
• many of the C language’s <math.h> library functions: exp() , log() , sin() , cos() ,floor() , ceil() , etc.
• functions that generate random variables: uniform , exponential , normal and oth-ers were already discussed.
It is possible to add new ones, see 4.9.8.
4.9.7 Random values
Expressions may contain random variates from different distributions. This has the effectthat unless the parameter was declared const , it returns a different value each time it isevaluated.
If the parameter was declared const , it is only evaluated once at the beginning of the simu-lation, and subsequent queries on the parameter will always return the same value.
Random variate functions use one of the random number generators (RNGs) provided byOMNeT++. By default this is generator 0, but you can specify which one to be used.
OMNeT++ has the following predefined distributions:
Function DescriptionContinuous distributions
uniform(a, b, rng=0 ) uniform distribution in the range [a,b)exponential(mean, rng=0 ) exponential distribution with the given meannormal(mean, stddev, rng=0 ) normal distribution with the given mean and
standard deviationtruncnormal(mean, stddev,rng=0 )
normal distribution truncated to nonnegativevalues
gamma_d(alpha, beta, rng=0 ) gamma distribution with parameters alpha>0,beta>0
beta(alpha1, alpha2, rng=0 ) beta distribution with parameters alpha1>0,alpha2>0
45

OMNeT++ Manual – The NED Language
erlang_k(k, mean, rng=0 ) Erlang distribution with k>0 phases and thegiven mean
chi_square(k, rng=0 ) chi-square distribution with k>0 degrees offreedom
student_t(i, rng=0 ) student-t distribution with i>0 degrees of free-dom
cauchy(a, b, rng=0 ) Cauchy distribution with parameters a,bwhere b>0
triang(a, b, c, rng=0 ) triangular distribution with parametersa<=b<=c, a!=c
lognormal(m, s, rng=0) lognormal distribution with mean m and vari-ance s>0
weibull(a, b, rng=0 ) Weibull distribution with parameters a>0, b>0pareto_shifted(a, b, c, rng=0 ) generalized Pareto distribution with parame-
ters a, b and shift cDiscrete distributions
intuniform(a, b, rng=0 ) uniform integer from a..bbernoulli(p, rng=0 ) result of a Bernoulli trial with probability
0<=p<=1 (1 with probability p and 0 with prob-ability (1-p))
binomial(n, p, rng=0 ) binomial distribution with parameters n>=0and 0<=p<=1
geometric(p, rng=0 ) geometric distribution with parameter0<=p<=1
negbinomial(n, p, rng=0 ) binomial distribution with parameters n>0and 0<=p<=1
poisson(lambda, rng=0 ) Poisson distribution with parameter lambda
If you do not specify the optional rng argument, the functions will use random numbergenerator 0.
Examples:
intuniform(0,10)/10 // one of: 0, 0.1, 0.2, ..., 0.9, 1exponential(5) // exponential with mean=5 (thus parameter=0.2)2+truncnormal(5,3) // normal distr with mean 7 truncated to >=2 values
The above distributions are implemented with C functions, and you can easily add new ones(see section 4.9.8). Your distributions will be treated in the same way as the built-in ones.
4.9.8 Defining new functions
To use user-defined functions, one has to code the function in C++. The C++ function musttake 0, 1, 2, 3, or 4 arguments of type double and return a double. The function must beregistered in one of the C++ files with the Define_Function() macro.
An example function (the following code must appear in one of the C++ sources):
#include <omnetpp.h>
double average(double a, double b){
46
OMNeT++ Manual – The NED Language
return (a+b)/2;}
Define_Function(average, 2);
The number 2 means that the average() function has 2 arguments. After this, the aver-age() function can be used in NED files:
module Compoundparameter : a,b;submodules :
proc: Processorparameters : av = average(a,b);
endmodule
If your function takes parameters that are int or long or some other type which is notdouble , you can create wrapper function that takes all doubles and does the conversion. Inthis case you have to register the wrapper function with the Define_Function2() macrowhich allows a function to be registered with a name different from the name of the functionthat implements it. You can do the same if the return value differs from double .
#include <omnetpp.h>
long factorial(int k){
...}
static double _wrap_factorial(double k){
return factorial((int)k);}
Define_Function2(factorial, _wrap_factorial, 1);
4.10 Display strings
Display strings specify the arrangement and appearance of modules in graphical user inter-faces (currently only Tkenv): they control how the objects (compound modules, their submod-ules and connections) are displayed. Display strings occur in NED description’s display:phrases.
The display string format is a semicolon-separated list of tags. Each tag consists of a key(usually one letter), an equal sign and a comma-separated list of parameters, like:
"p=100,100;b=60,10,rect;o=blue,black,2"
Parameters may be omitted also at the end and also inside the parameter list, like:
"p=100,100;b=,,rect;o=blue,black"
Module/submodule parameters can be included with the $name notation:
47
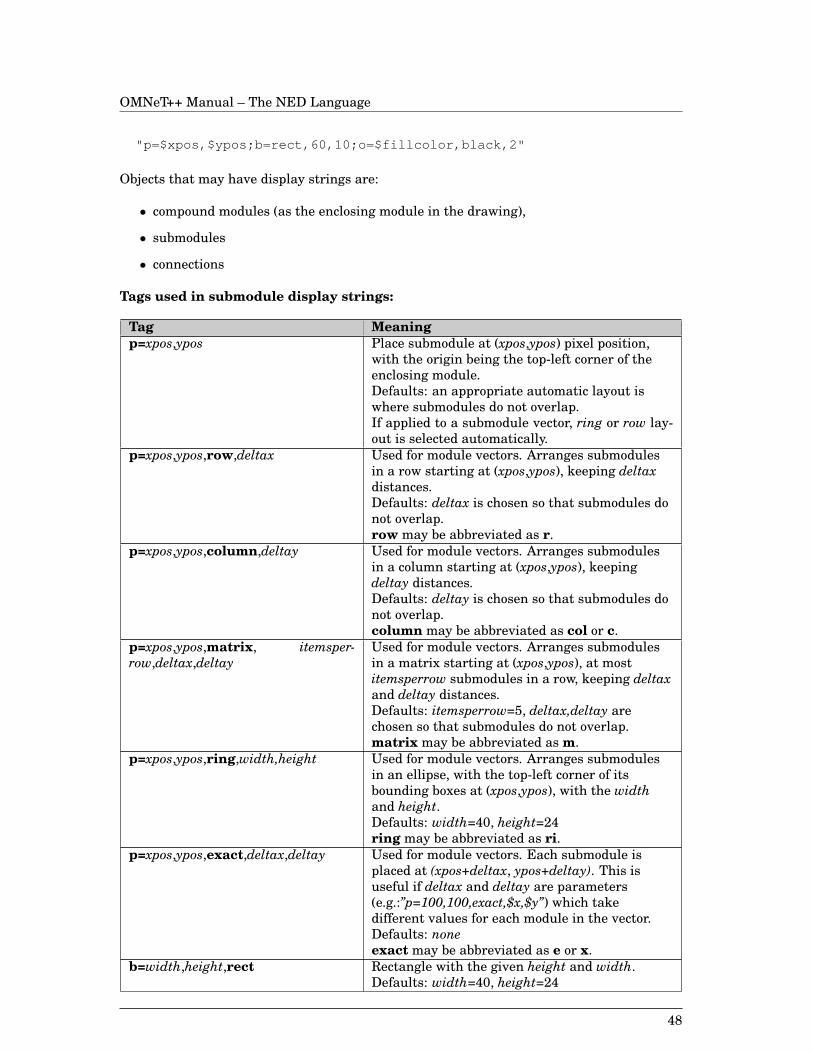
OMNeT++ Manual – The NED Language
"p=$xpos,$ypos;b=rect,60,10;o=$fillcolor,black,2"
Objects that may have display strings are:
• compound modules (as the enclosing module in the drawing),
• submodules
• connections
Tags used in submodule display strings:
Tag Meaningp=xpos,ypos Place submodule at (xpos,ypos) pixel position,
with the origin being the top-left corner of theenclosing module.Defaults: an appropriate automatic layout iswhere submodules do not overlap.If applied to a submodule vector, ring or row lay-out is selected automatically.
p=xpos,ypos,row,deltax Used for module vectors. Arranges submodulesin a row starting at (xpos,ypos), keeping deltaxdistances.Defaults: deltax is chosen so that submodules donot overlap.row may be abbreviated as r.
p=xpos,ypos,column,deltay Used for module vectors. Arranges submodulesin a column starting at (xpos,ypos), keepingdeltay distances.Defaults: deltay is chosen so that submodules donot overlap.column may be abbreviated as col or c.
p=xpos,ypos,matrix, itemsper-row,deltax,deltay
Used for module vectors. Arranges submodulesin a matrix starting at (xpos,ypos), at mostitemsperrow submodules in a row, keeping deltaxand deltay distances.Defaults: itemsperrow=5, deltax,deltay arechosen so that submodules do not overlap.matrix may be abbreviated as m.
p=xpos,ypos,ring,width,height Used for module vectors. Arranges submodulesin an ellipse, with the top-left corner of itsbounding boxes at (xpos,ypos), with the widthand height.Defaults: width=40, height=24ring may be abbreviated as ri.
p=xpos,ypos,exact,deltax,deltay Used for module vectors. Each submodule isplaced at (xpos+deltax, ypos+deltay). This isuseful if deltax and deltay are parameters(e.g.:”p=100,100,exact,$x,$y”) which takedifferent values for each module in the vector.Defaults: noneexact may be abbreviated as e or x.
b=width,height,rect Rectangle with the given height and width.Defaults: width=40, height=24
48
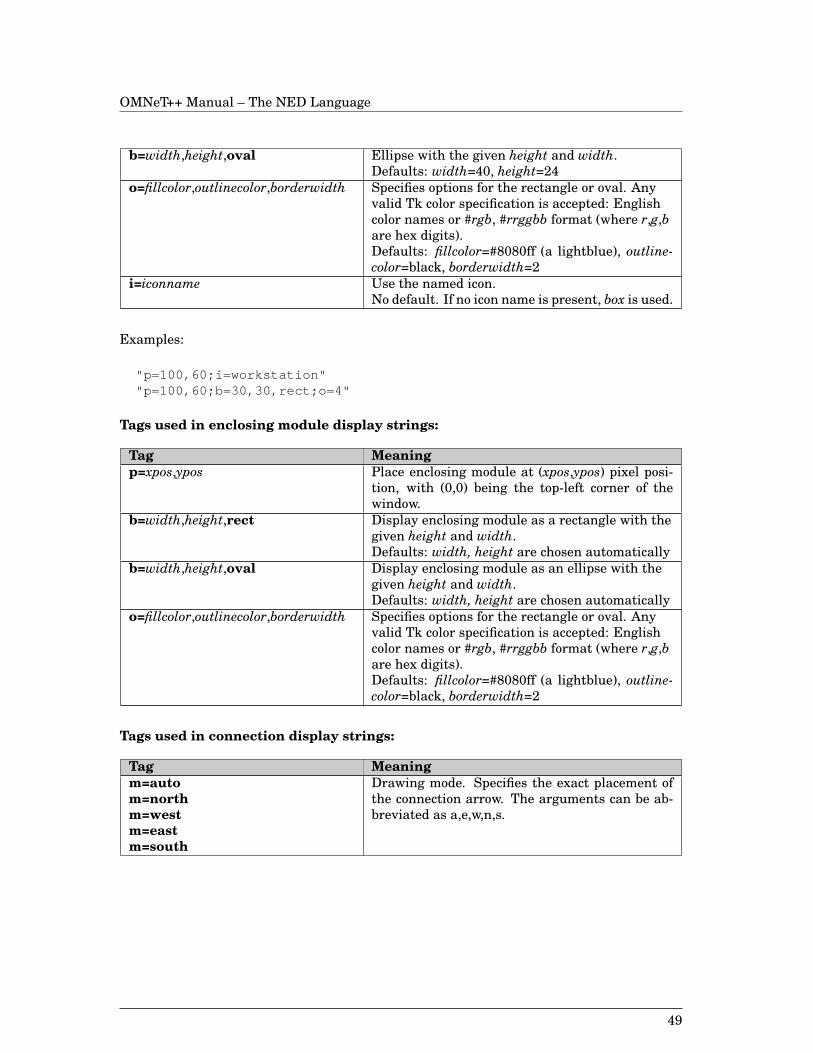
OMNeT++ Manual – The NED Language
b=width,height,oval Ellipse with the given height and width.Defaults: width=40, height=24
o=fillcolor,outlinecolor,borderwidth Specifies options for the rectangle or oval. Anyvalid Tk color specification is accepted: Englishcolor names or #rgb, #rrggbb format (where r,g,bare hex digits).Defaults: fillcolor=#8080ff (a lightblue), outline-color=black, borderwidth=2
i=iconname Use the named icon.No default. If no icon name is present, box is used.
Examples:
"p=100,60;i=workstation""p=100,60;b=30,30,rect;o=4"
Tags used in enclosing module display strings:
Tag Meaningp=xpos,ypos Place enclosing module at (xpos,ypos) pixel posi-
tion, with (0,0) being the top-left corner of thewindow.
b=width,height,rect Display enclosing module as a rectangle with thegiven height and width.Defaults: width, height are chosen automatically
b=width,height,oval Display enclosing module as an ellipse with thegiven height and width.Defaults: width, height are chosen automatically
o=fillcolor,outlinecolor,borderwidth Specifies options for the rectangle or oval. Anyvalid Tk color specification is accepted: Englishcolor names or #rgb, #rrggbb format (where r,g,bare hex digits).Defaults: fillcolor=#8080ff (a lightblue), outline-color=black, borderwidth=2
Tags used in connection display strings:
Tag Meaningm=autom=northm=westm=eastm=south
Drawing mode. Specifies the exact placement ofthe connection arrow. The arguments can be ab-breviated as a,e,w,n,s.
49
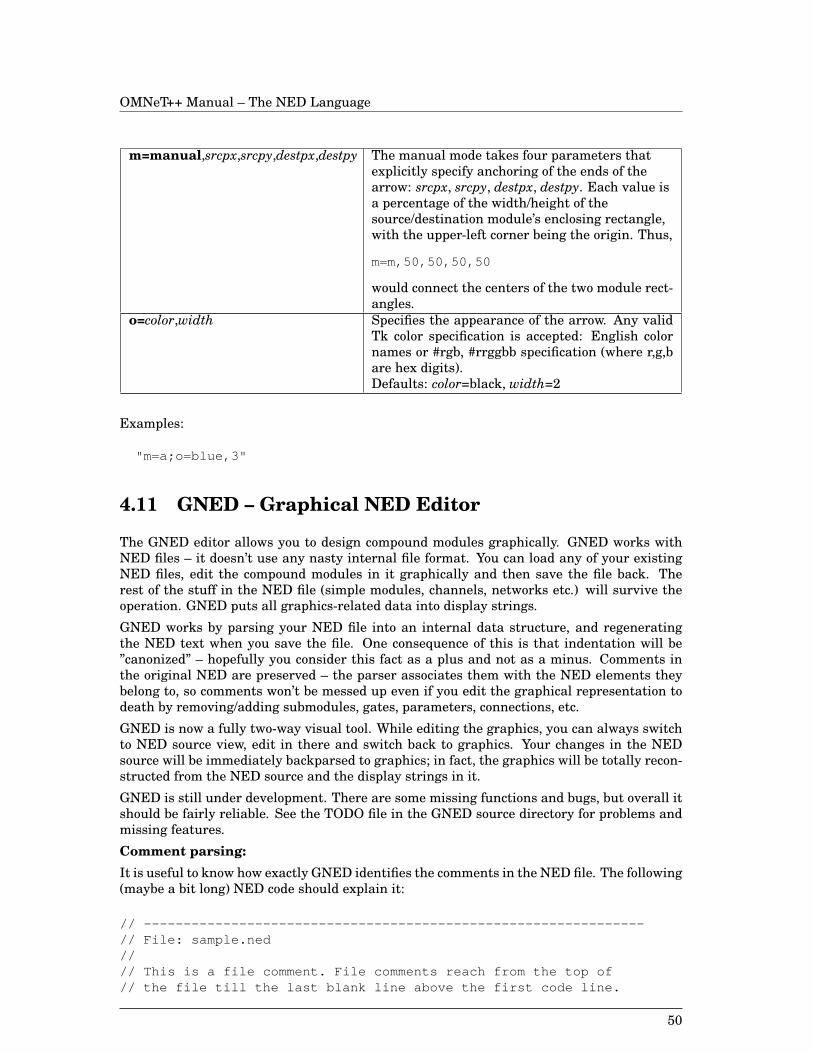
OMNeT++ Manual – The NED Language
m=manual,srcpx,srcpy,destpx,destpy The manual mode takes four parameters thatexplicitly specify anchoring of the ends of thearrow: srcpx, srcpy, destpx, destpy. Each value isa percentage of the width/height of thesource/destination module’s enclosing rectangle,with the upper-left corner being the origin. Thus,
m=m,50,50,50,50
would connect the centers of the two module rect-angles.
o=color,width Specifies the appearance of the arrow. Any validTk color specification is accepted: English colornames or #rgb, #rrggbb specification (where r,g,bare hex digits).Defaults: color=black, width=2
Examples:
"m=a;o=blue,3"
4.11 GNED – Graphical NED Editor
The GNED editor allows you to design compound modules graphically. GNED works withNED files – it doesn’t use any nasty internal file format. You can load any of your existingNED files, edit the compound modules in it graphically and then save the file back. Therest of the stuff in the NED file (simple modules, channels, networks etc.) will survive theoperation. GNED puts all graphics-related data into display strings.
GNED works by parsing your NED file into an internal data structure, and regeneratingthe NED text when you save the file. One consequence of this is that indentation will be”canonized” – hopefully you consider this fact as a plus and not as a minus. Comments inthe original NED are preserved – the parser associates them with the NED elements theybelong to, so comments won’t be messed up even if you edit the graphical representation todeath by removing/adding submodules, gates, parameters, connections, etc.
GNED is now a fully two-way visual tool. While editing the graphics, you can always switchto NED source view, edit in there and switch back to graphics. Your changes in the NEDsource will be immediately backparsed to graphics; in fact, the graphics will be totally recon-structed from the NED source and the display strings in it.
GNED is still under development. There are some missing functions and bugs, but overall itshould be fairly reliable. See the TODO file in the GNED source directory for problems andmissing features.
Comment parsing:It is useful to know how exactly GNED identifies the comments in the NED file. The following(maybe a bit long) NED code should explain it:
// ---------------------------------------------------------------// File: sample.ned//// This is a file comment. File comments reach from the top of// the file till the last blank line above the first code line.
50
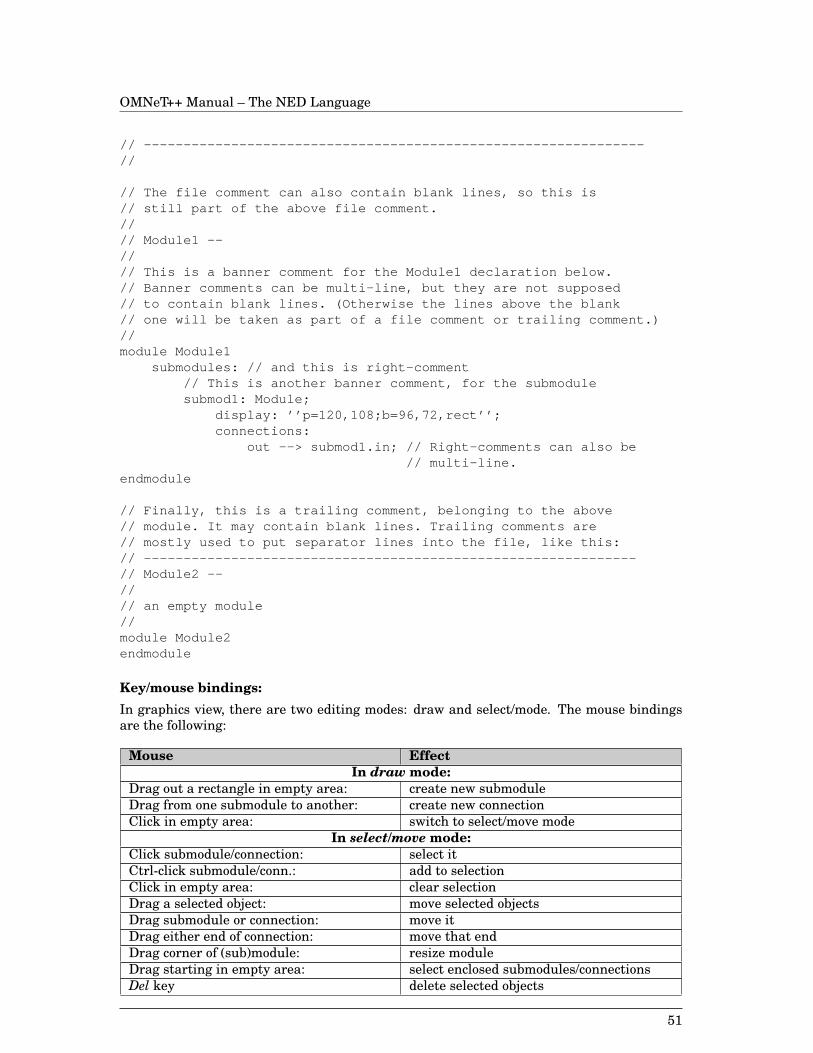
OMNeT++ Manual – The NED Language
// ---------------------------------------------------------------//
// The file comment can also contain blank lines, so this is// still part of the above file comment.//// Module1 --//// This is a banner comment for the Module1 declaration below.// Banner comments can be multi-line, but they are not supposed// to contain blank lines. (Otherwise the lines above the blank// one will be taken as part of a file comment or trailing comment.)//module Module1
submodules: // and this is right-comment// This is another banner comment, for the submodulesubmod1: Module;
display: ’’p=120,108;b=96,72,rect’’;connections:
out --> submod1.in; // Right-comments can also be// multi-line.
endmodule
// Finally, this is a trailing comment, belonging to the above// module. It may contain blank lines. Trailing comments are// mostly used to put separator lines into the file, like this:// --------------------------------------------------------------// Module2 --//// an empty module//module Module2endmodule
Key/mouse bindings:In graphics view, there are two editing modes: draw and select/mode. The mouse bindingsare the following:
Mouse EffectIn draw mode:
Drag out a rectangle in empty area: create new submoduleDrag from one submodule to another: create new connectionClick in empty area: switch to select/move mode
In select/move mode:Click submodule/connection: select itCtrl-click submodule/conn.: add to selectionClick in empty area: clear selectionDrag a selected object: move selected objectsDrag submodule or connection: move itDrag either end of connection: move that endDrag corner of (sub)module: resize moduleDrag starting in empty area: select enclosed submodules/connectionsDel key delete selected objects
51
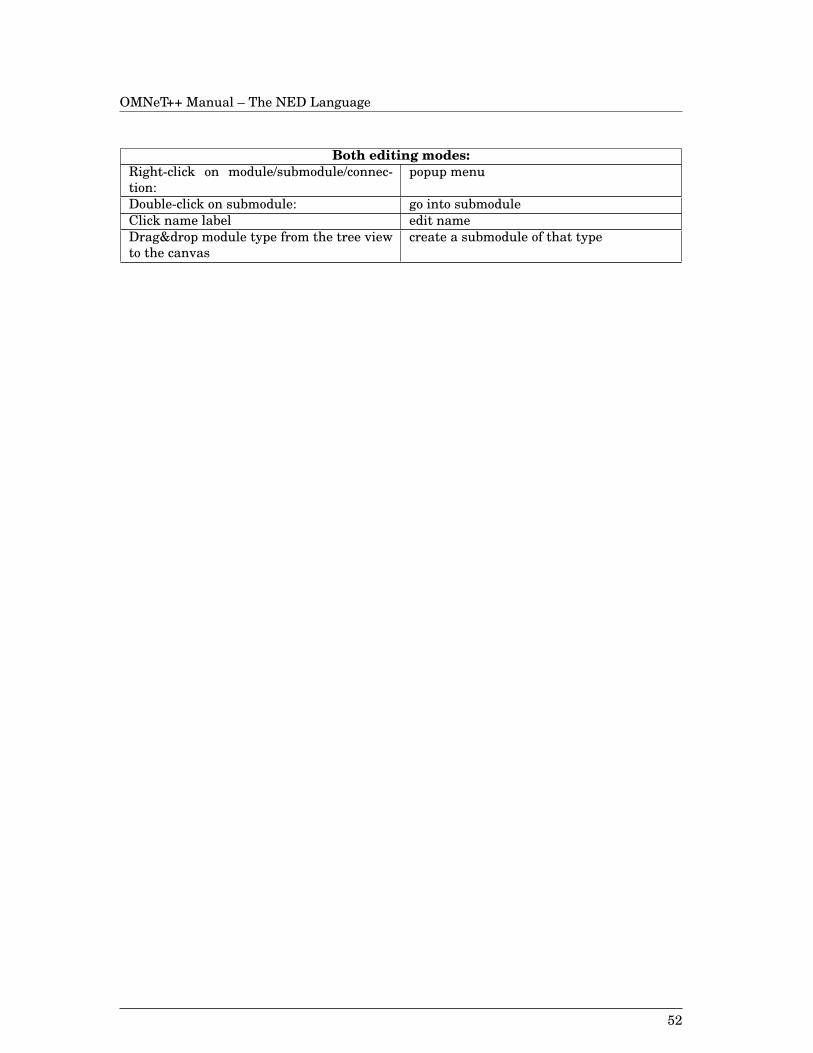
OMNeT++ Manual – The NED Language
Both editing modes:Right-click on module/submodule/connec-tion:
popup menu
Double-click on submodule: go into submoduleClick name label edit nameDrag&drop module type from the tree viewto the canvas
create a submodule of that type
52
OMNeT++ Manual – Simple Modules
Chapter 5
Simple Modules
The activities of simple modules are implemented by the user. The algorithms are pro-grammed in C++, using the OMNeT++ class library. The following sections contain a shortintroduction to discrete event simulation in general, how its concepts are implemented inOMNeT++, and gives an overview and practical advice on how to design and code simplemodules.
5.1 Simulation concepts
This section contains a very brief introduction into how Discrete Event Simulation (DES)works, in order to introduce terms we’ll use when explaining OMNeT++ concepts and imple-mentation. If you’re familiar with DES, you can skip this section.
5.1.1 Discrete Event Simulation
A Discrete Event System is a system where state changes (events) happen at discrete pointsof time, and events take zero time to happen. It is assumed that nothing (i.e. nothing inter-esting) happens between two consecutive events, that is, no state change takes place in thesystem between the events (in contrast to continuous systems where state changes are con-tinuous). Those systems that can be viewed as Discrete Event Systems can be modeled usingDiscrete Event Simulation. (Continuous systems are modelled using differential equationsand suchlike.)
For example, computer networks are usually viewed as discrete event systems. Some of theevents are:
• start of a packet transmission
• end of a packet transmission
• expiry of a retransmission timeout
This implies that between two events such as ”start of a packet transmission” and ”end of apacket transmission”, nothing interesting happens. That is, the packet’s state remains ”beingtransmitted”. Note that the definition of events and states always depends on the intent andpurposes of the person doing the modeling. If we were interested in the transmission ofindividual bits, we would have included something like ”start of bit transmission” and ”endof bit transmission” among our events.
53
OMNeT++ Manual – Simple Modules
The time when events occur is often called event timestamp; with OMNeT++ we’ll say ar-rival time (because in the class library, the word ”timestamp” is reserved for a user-settableattribute in the event class). Time within the model is often called simulation time, modeltime or virtual time as opposed to real time or CPU time or which refers to how long thesimulation program has been running or how much CPU time it has consumed.
5.1.2 The event loop
Discrete event simulations maintain a set of future events, in a data structure often calledFES (Future Event Set). Such simulators usually work according to the following pseu-docode:
initialize -- this includes building the model andinserting initial events to FES
while (FES not empty and simulation not yet complete){
retrieve first event from FESt:= timestamp of this eventprocess event(processing may insert new events in FES or delete existing ones)
}finish simulation (write statistical results, etc.)
The first, initialization step usually builds the data structures representing the simulationmodel, calls any user-defined initialization code, and inserts initial events into the FES toensure that the simulation can start. Initialization strategy can be quite different from onesimulator to another.
The subsequent loop consumes events from the FES and processes them. Events are pro-cessed in strict timestamp order in order to maintain causality, that is, to ensure that noevent may have an effect on earlier events.
Processing an event involves calls to user-supplied code. For example, using the computernetwork simulation example, processing a ”timeout expired” event may consist of re-sendinga copy of the network packet, updating the retry count, scheduling another ”timeout” event,and so on. The user code may also remove events from the FES, for example when cancellingtimeouts.
Simulation stops when there are no more events left (this happens rarely in practice), orwhen it isn’t necessary for the simulation to run further because the model time or the CPUtime has reached a given limit, or because the statistics have reached the desired accuracy.At this time, before the program exits, the simulation programmer will typically want torecord statistics into output files.
5.1.3 Simple modules in OMNeT++
The user creates simple module types by subclassing the cSimpleModule class, which ispart of the OMNeT++ class library. cSimpleModule , just as cCompoundModule , is derivedfrom a common base class, cModule .
cSimpleModule , although stuffed with simulation-related functionality, doesn’t do anythinguseful by itself. The simulation programmer has to redefine some virtual member functionsto make it do useful work.
These member functions are the following:
54
OMNeT++ Manual – Simple Modules
• void initialize()
• void activity()
• void handleMessage(cMessage *msg)
• void finish()
In the initialization step, OMNeT++ builds the network: it creates the necessary simple andcompound modules and connects them according to the NED definitions. OMNeT++ also callsthe initialize() functions of all modules.
The activity() and handleMessage() functions are called during event processing. Thismeans that the user will implement the model’s behavior in these functions. activity()and handleMessage() implement different event processing strategies: for each simplemodule, the user has to redefine exactly one of these functions. activity() is a coroutine-based solution which implements the process interaction approach (coroutines are non-pre-emptive [cooperative] threads). handleMessage() is a method that is called by the simu-lation kernel when the module receives a message. Modules written with activity() andhandleMessage() can be freely mixed within a simulation model.
The finish() functions are called when the simulation terminates successfully. The mosttypical use of finish() is the recording of statistics collected during simulation.
All these functions will be discussed later in detail.
5.1.4 Events in OMNeT++
OMNeT++ uses messages to represent events. Each event is represented by an instance ofthe cMessage class or one its subclasses; there is no separate event class. Messages are sentfrom one module to another – this means that the place where the ”event will occur” is themessage’s destination module, and the model time when the event occurs is the arrival timeof the message. Events like ”timeout expired” are implemented with the module sending amessage to itself.
Simulation time in OMNeT++ is stored in the C++ type simtime_t , which is a typedef fordouble .
Events are consumed from the FES in arrival time order, to maintain causality. More pre-cisely, given two messages, the following rules apply:
1. the message with earlier arrival time is executed first. If arrival times are equal,
2. the one with smaller priority value is executed first. If priorities are the same,
3. the one scheduled or sent earlier is executed first.
Priority is a user-assigned integer attribute of messages.
Storing simulation time in doubles may sometimes cause inconveniences. Due to finite ma-chine precision, two doubles calculated in two different ways do not always compare equaleven if they mathematically should be. This means that if you want to explicitly rely onthe arrival times of two events being the same, you should take care that simulation timeswhich should be equal are calculated in exactly the same way. Another possible approachis to avoid equal arrival times, for example by adding/subtracting small values to scheduletimes to ensure specific execution order (inorder_epsilon).
One may suggest introducing a small simtime_precision parameter in the simulation kernelthat would force t1 and t2 to be regarded equal if they are ”very close” (if they differ less thansimtime_precision). However, in addition to the problem determining the correct value forsimtime_precision, this approach is likely to cause confusion in many cases.
55
OMNeT++ Manual – Simple Modules
5.1.5 FES implementation
The implementation of the FES is a crucial factor in the performance of a discrete eventsimulator. In OMNeT++, the FES is implemented with binary heap, the most widely useddata structure for this purpose. Heap is also the best algorithm we know, although exoticdata structures like skiplist may perform better than heap in some cases. In case you’reinterested, the FES implementation is in the cMessageHeap class, but as a simulation pro-grammer you won’t ever need to care about it.
5.2 Defining simple module types
5.2.1 Overview
The C++ implementation of a simple module consists of:
• declaration of the module class: your class subclassed from cSimpleModule (eitherdirectly or indirectly)
• a module type registration (Define_Module() or Define_Module_Like() macro)
• implementation of the module class
For example, the C++ source for a Sliding Window Protocol implementation might look likethis:
// file: swp.cc#include <omnetpp.h>
// module class declaration:class SlidingWindow : public cSimpleModule{
Module_Class_Members(SlidingWindow,cSimpleModule,8192)virtual void activity();
};
// module type registration:Define_Module( SlidingWindow );
// implementation of the module class:void SlidingWindow::activity(){
int window_size = par("window_size");...}
In order to be able to refer to this simple module type in NED files, we should have anassociated NED declaration which might look like this:
// file: swp.nedsimple SlidingWindow
parameters :window_size: numeric const ;
gates :
56
OMNeT++ Manual – Simple Modules
in: from_net, from_user;out: to_net, to_user;
endsimple
5.2.2 The module declaration
The module declaration
• announces that you’re going to use the class as a simple module type
• associates the module class with an interface declared in NED
Forms of module declarationModule declarations can take two forms:
Define_Module( classname );Define_Module_Like( classname , neddeclname );
The first form associates the class (subclassed from cSimpleModule ) with the NED simplemodule declaration of the same name. For example, the
Define_Module(SlidingWindow);
line would ensure that when you create an instance of SlidingWindow in your NED files, themodule has the parameters and gates given in the simple SlidingWindow NED declaration,and the implementation will be an instance of the SlidingWindow C++ class.
The second form associates the class with a NED simple module declaration of a differentname. You can use this form when you have several modules which share the same interface.This feature will be discussed in detail in the next section.
Header filesModule declarations should not be put into header files, because they are macros expandingto lines for which the compiler generates code.
Compound modulesAll module types (including compound modules) need to have module declarations. For allcompound modules, the NEDC compiler generates the Define_Module(..) lines automat-ically. However, it is your responsibility to put Define_Module(..) lines into one of the C++sources for all your simple module types.
ImplementationUnless you are dying to learn about the dirty internals, you may just as well skip this section.But if you’re interested, here it is: Define_Module() (and also Define_Module_Like() )is a macro which expands to a function definition plus the definition of a global object, some-thing like this ugly code (luckily, you won’t ever need to be interested in it):
static cModule * MyClass __create(const char *name, cModule *parentmod)return (cModule *) new MyClass (name, parentmod);
cModuleType MyClass __type(" MyClass "," MyClass ",(ModuleCreateFunc) MyClass __create);
57
OMNeT++ Manual – Simple Modules
The cModuleType object can act as a factory: it is able to create an instance of the givenmodule type. This, together with the fact that all cModuleType objects are available in asingle linked list, allows OMNeT++ to instantiate module types given only their class namesas strings, without having to include the class declaration into any other C++ source.
The global object also stores the name of the NED interface associated with the module class.The interface description object (another object, generated by nedc) is looked up automati-cally at network construction time. Whenever a module of the given type is created, it willautomatically have the parameters and gates specified in the associated interface descrip-tion.
5.2.3 Several modules, single NED interface
Suppose you have three different C++ module classes (TokenRing_MAC, Ethernet_MAC,FDDI_MAC) which have identical gates and parameters. Then you can create a single NEDdeclaration, General_MAC for them and write the following module declarations in the C++code:
Define_Module_Like(TokenRing_MAC, General_MAC);Define_Module_Like(Ethernet_MAC, General_MAC);Define_Module_Like(FDDI_MAC, General_MAC);
In this case, you won’t be able to directly refer to the TokenRing_MAC, Ethernet_MAC,FDDI_MAC module types in your NED files. For example, you cannot write
module PCsubmodules:
mac: Ethernet_MAC; // error: Ethernet_MAC not defined...endmodule
However, you can pass the module type in a string-valued parameter to the compound mod-ule:
module PCparameters:
mac_type: string;submodules:
mac: mac_type like General_MAC; // OK!...
endmodule
The mac_type parameter should take the value ”TokenRing_MAC”, ”Ethernet_MAC” or”FDDI_MAC”, and a submodule of the appropriate type will be created. The value for theparameter can even be given in the ini file. This gives you a powerful tool to customizesimulation models (see also Topology templates, Section 4.6.4).
5.2.4 The class declaration
As mentioned before, simple module classes have to be derived from cSimpleModule (eitherdirectly or indirectly). In addition to overwriting some of the previously mentioned fourmember functions (initialize() , activity() , handleMessage() ,finish() ), you haveto write a constructor and some more functions. Some of this task can be automated, so whenwriting the C++ class declaration, you have two choices:
58
OMNeT++ Manual – Simple Modules
1. either use a macro which expands to the ”stock” version of the functions
2. or write them yourself.
Using macro to declare the constructorIf you choose the first solution, you use the Module_Class_Members() macro:
Module_Class_Members( classname , baseclass , stacksize );
The first two arguments are obvious (baseclass is usually cSimpleModule ), but stacksizeneeds some explanation. If you use activity() , the module code runs as a coroutine, so itwill need a separate stack. (This will be discussed in detail later.)
As an example, the class declaration
class SlidingWindow : public cSimpleModule{
Module_Class_Members( SlidingWindow,cSimpleModule,8192)...
};
expands to something like this:
class SlidingWindow : public cSimpleModule{
public:SlidingWindow(const char *name, cModule *parentmodule,
unsigned stacksize = 8192) :cSimpleModule(name, parentmodule, stacksize) {}
...};
Expanded form of the constructorYou will implement:
• a constructor with the argument list: (const char *name, cModule *parentmodule, un-signed stacksize = stacksize)
The advantage is that you get full control over the constructor, so you can initialize datamembers of the class (if you have any). You should not change the number or types of thearguments taken by the constructor, because it is called by OMNeT++-generated code.
An example:
class TokenRing_MAC : public cSimpleModule{
public:cQueue queue; // a data memberTokenRing_MAC(const char *name, cModule *parentmodule,
unsigned stacksize = 8192);...
};
TokenRing_MAC(const char *name, cModule *parentmodule,
59
OMNeT++ Manual – Simple Modules
unsigned stacksize) :cSimpleModule(name, parentmodule, stacksize), queue("queue")
{// initialize data members
}
Stack size decides between activity() and handleMessage()
• if the specified stack size is zero, handleMessage() will be used;
• if it is greater than zero, activity() will be used.
If you make a mistake (e.g. you forget to set zero stack size for a handleMessage() simplemodule): the default versions of the functions issue error messages telling you what is theproblem.
5.2.5 Decomposing activity()/handleMessage() and inheritance
It is usually a good idea to decompose a activity() or handleMessage() function when itgrows too large. ”Too large” is a matter of taste of course, but you should definitely considersplitting up the function if it is more that a few screens (say 50-100 lines) long. This willhave a couple of advantages:
• will help future readers of the code understand your program;
• will help you understand what it is you’re really programming and bring some structureinto it;
• will enable you to customize the class by inheriting from it and overwriting memberfunctions
If you have variables which you want to access from all member functions (typically statevariables are like that), you’ll need to add those variables to the class as data members.
Let’s see an example:
class TransportProtocol : public cSimpleModule{
public:Module_Class_Members(TransportProtocol, cSimpleModule, 8192)int window_size;int n_s; // N(s)int n_r; // N(r)cOutVector eedVector;cStdDev eedStats;//...
virtual void activity();virtual void recalculateTimeout();virtual void insertPacketIntoBuffer(cMessage *packet);virtual void resendPacket(cMessage *packet);//...
};
60
OMNeT++ Manual – Simple Modules
Define_Module( TransportProtocol );
void TransportProtocol::activity(){
window_size = par("window_size");n_s = n_r = 0;eedVector.setName(’’End-to-End Delay’’);eedStats.setName(’’eedStats’’);//...
}
//...
Note that you may have to use the expanded form of the constructor (instead of Mod-ule_Class_Members() ) to pass arguments to the constructors of member objects like eed-Vector and eedStats. But most often you don’t need to go as far as that; for example, you canset parameters later from activity() , as shown in the example above.
To implement another variant of the Transport Protocol which uses a different timeoutscheme, you could simply subclass TransportProtocol:
class AdvancedTransportProtocol : public TransportProtocol{
public:Module_Class_Members(AdvancedTransportProtocol, TransportProtocol,
8192)virtual void recalculateTimeout();
};
Define_Module( AdvancedTransportProtocol );
void AdvancedTransportProtocol::recalculateTimeout(){
//...}
5.3 Adding functionality to cSimpleModule
This section discusses cSimpleModule ’s four previously mentioned member functions, in-tended to be redefined by the user: initialize() , activity() , handleMessage() andfinish() .
5.3.1 activity()
Process-style descriptionWith activity() , you can code the simple module much like you would code an operatingsystem process or a thread. You can wait for an incoming message (event) at any point of thecode, you can suspend the execution for some time (model time!), etc. When the activity()function exits, the module is terminated. (The simulation can continue if there are othermodules which can run.)
The most important functions you can use in activity() are (they will be discussed indetail later):
61
OMNeT++ Manual – Simple Modules
• receive..() family of functions – to receive messages (events)
• wait() – to suspend execution for some time (model time)
• send() family of functions – to send messages to other modules
• scheduleAt() – to schedule an event (the module ”sends a message to itself”)
• cancelEvent() – to delete an event scheduled with scheduleAt()
• end() – to finish execution of this module (same as exiting the activity() function)
The activity() function normally contains an infinite loop, with at least a wait() orreceive() call in its body.
Application areaOne area where the process-style description is especially convenient is when the process hasmany states but transitions are very limited, ie. from any state the process can only go to oneor two other states. For example, this is the case when programming a network applicationwhich uses a single network connection. The pseudocode of the application which talks to atransport layer protocol might look like this:
activity(){
while(true){
open connection by sending OPEN command to transport layerreceive reply from transport layerif (open not successful){
wait(some time)continue // loop back to while()
}
while(there’s more to do){
send data on network connectionif (connection broken){
continue outer loop // loop back to outer while()}wait(some time)receive data on network connectionif (connection broken){
continue outer loop // loop back to outer while()}wait(some time)
}close connection by sending CLOSE command to transport layerif (close not successful){
// handle error}wait(some time)
}}
62
OMNeT++ Manual – Simple Modules
If you want to handle several connections simultaneously, you may dynamically create asinstances of the simple module above as needed. Dynamic module creation will be discussedlater.
Activity() is run as a coroutineActivity() is run in a coroutine. Coroutines are a sort of threads which are schedulednon-preemptively (this is also called cooperative multitasking). From one coroutine you canswitch to another coroutine by a transferTo(otherCoroutine) call. Then this corou-tine is suspended and otherCoroutine will run. Later, when otherCoroutine does a trans-ferTo(firstCoroutine) call, execution of the first coroutine will resume from the pointof the transferTo(otherCoroutine) call. The full state of the coroutine, including localvariables are preserved while the thread of execution is in another coroutines. This impliesthat each coroutine must have an own processor stack, and transferTo() involves a switchfrom one processor stack to another.
Coroutines are at the heart of OMNeT++, and the simulation programmer doesn’t ever needto call transferTo() or other functions in the coroutine library, nor does he need to careabout the coroutine library implementation. But it is important to understand how the eventloop found in discrete event simulators works with coroutines.
When using coroutines, the event loop looks like this (simplified):
while (FES not empty and simulation not yet complete){
retrieve first event from FESt:= timestamp of this eventtransferTo(module containing the event)
}
That is, when the module has an event, the simulation kernel transfers the control to themodule’s coroutine. It is expected that when the module ”decides it has finished the process-ing of the event”, it will transfer the control back to the simulation kernel by a trans-ferTo(main) call. Initially, simple modules using activity() are ”booted” by events(”starter messages”) inserted into the FES by the simulation kernel before the start of thesimulation.
How does the coroutine know it has ”finished processing the event”? The answer: when it re-quests another event. The functions which request events from the simulation kernel are thereceive..() family and wait() , so their implementations contain a transferTo(main)call somewhere.
Their pseudocode, as implemented in OMNeT++:
receiveNew() // other receive...() variations are similar{
transferTo(main)retrieve current eventreturn the event // remember: events = messages
}
wait(){
create an event e and schedule it at (current sim. time +wait interval)
while(true) {transferTo(main)
63
OMNeT++ Manual – Simple Modules
retrieve current eventif (current event is e)
break from loopelse
store current event for later use (in the "put-aside queue")}delete event ereturn
}
Thus, the receive...() and wait() calls are special points in the activity() function,because that’s where:
• simulation time elapses in the module, and
• other modules get a chance to execute.
Starter messagesModules written with activity() need starter messages to ”boot”. These starter messagesare inserted into the FES automatically by OMNeT++ at the beginning of the simulation,even before the initialize() functions are called.
Coroutine stack sizeAll the simulation programmer needs to care about coroutines is to choose the processor stacksize for them. This cannot be automated (Eerrr... at least not without hardware support,some trick with virtual memory handling).
8 or 16 kbytes is usually a good choice, but you may need more if the module uses recursivefunctions or has local variables which occupy a lot of stack space. OMNeT++ has a built-mechanism that will usually detect if the module stack is too small and overflows. OMNeT++can also tell you how much stack space a module actually uses, so you can find it out if youoverestimated the stack needs.
initialize() and finish() with activity()Because local variables of activity() are preserved across events, you can store everything(state information, packet buffers, etc.) in them. Local variables can be initialized at the topof the activity() function, so there isn’t much need to use initialize() .
However, you need finish() if you want to write statistics at the end of the simulation.And because finish() cannot access the local variables of activity() , you have to put thevariables and objects that contain the statistics into the module class. You still don’t needinitialize() because class members can also be initialized at the top of activity() .
Thus, a typical setup looks like this pseudocode:
class MySimpleModule...{
...variables for statistics collectionactivity();finish();
};
MySimpleModule::activity(){
declare local vars and initialize them
64
OMNeT++ Manual – Simple Modules
initialize statistics collection variables
while(true){
...}
}
MySimpleModule::finish(){
record statistics into file}
Advantages and drawbacksAdvantages:
• initialize() not needed, state can be stored in local variables of activity()
• process-style description is a natural programming model in many cases
Drawbacks:
• memory overhead: stack allocation may unacceptably increase the memory require-ments of the simulation program if you have several thousands or ten thousands ofsimple modules;
• run-time overhead: switching between coroutines is somewhat slower than a simplefunction call
Other simulatorsCoroutines are used by a number of other simulation packages:
• All simulation software which inherit from SIMULA (e.g. C++SIM) are based on corou-tines, although all in all the programming model is quite different.
• The simulation/parallel programming language Maisie and its successor PARSEC (fromUCLA) also use coroutines (although implemented on with ”normal” preemptive threads).The philosophy is quite similar to OMNeT++. PARSEC, being ”just” a programminglanguage, has a more elegant syntax but much less features than OMNeT++.
• Many Java-based simulation libraries are based on Java threads.
5.3.2 handleMessage()
Function called for each eventThe idea is that at each event we simply call a user-defined function instead of switchingto a coroutine that has activity() running in it. The ”user-defined function” is the han-dleMessage(cMessage *msg) virtual member function of cSimpleModule ; the user hasto redefine the function to make it do useful work. Calls to handleMessage() occur in themain stack of the program – no coroutine stack is needed and no context switch is done.
The handleMessage() function will be called for every message that arrives at the module.The function should process the message and return immediately after that. The simula-tion time is potentially different in each call. No simulation time elapses within a call tohandleMessage() .
65
OMNeT++ Manual – Simple Modules
The pseudocode of the event loop which is able to handle both activity() and handleMes-sage() simple modules:
while (FES not empty and simulation not yet complete){
retrieve first event from FESt:= timestamp of this eventm:= module containing this eventif (m works with handleMessage())
m->handleMessage( event )else // m works with activity()transferTo( m )
}
Modules with handleMessage() are NOT started automatically: the simulation kernel cre-ates starter messages only for modules with activity() . This means that you have toschedule self-messages from the initialize() function if you want the handleMessage()simple module to start working ”by itself”, without first receiving a message from other mod-ules.
Programming with handleMessage()To use the handleMessage() mechanism in a simple module, you must specify zero stacksize for the module. This is important, because this tells OMNeT++ that you want to usehandleMessage() and not activity() .
Message/event related functions you can use in handleMessage() :
• send() family of functions – to send messages to other modules
• scheduleAt() – to schedule an event (the module ”sends a message to itself”)
• cancelEvent() – to delete an event scheduled with scheduleAt()
You cannot use the receive...() family and wait() functions in handleMessage() , be-cause they are coroutine-based by nature, as explained in the section about activity() .You also cannot use end() because its job is to terminate the coroutine.
You have to add data members to the module class for every piece of information you want topreserve. This information cannot be stored in local variables of handleMessage() becausethey are destroyed when the function returns. Also, they cannot be stored in static variablesin the function (or the class), because they would be shared between all instances of the class.
Data members to be added to the module class will typically include things like:
• state (e.g. IDLE/BUSY, CONN_DOWN/CONN_ALIVE/...)
• other variables which belong to the state of the module: retry counts, packet queues,etc.
• values retrieved/computed once and then stored: values of module parameters, gateindices, routing information, etc.
• pointers of message objects created once and then reused for timers, timeouts, etc.
• variables/objects for statistics collection
You can initialize these variables from the initialize() function. The constructor is nota very good place for this purpose because it is called in the network setup phase when the
66
OMNeT++ Manual – Simple Modules
model is still under construction, so a lot of information you may want to use is not yetavailable then.
Another task you have to do in initialize() is to schedule initial event(s) which triggerthe first call(s) to handleMessage() . After the first call, handleMessage() must take careto schedule further events for itself so that the ”chain” is not broken. Scheduling events isnot necessary if your module only has to react to messages coming from other modules.
finish() is used in the normal way: to record statistics information accumulated in datamembers of the class at the end of the simulation.
Application areaThere are two areas where handleMessage() is definitely a better choice than activ-ity() :
1. For modules which have to maintain little or no state information, such as packet sinks.
2. Other good candidates are modules with a large state space and many arbitrary statetransition possibilities (i.e. where there are many possible subsequent states for anystate). Such algorithms are difficult to program with activity() , or the result iscode which is better suited for handleMessage() (see rule of thumb below). Mostcommunication protocols are like this.
There’s also a good rule of thumb. If your module, programmed with activity() , looks likethis:
activity(){
initialization codewhile(true){
msg = receive();// arbitrary code which doesn’t contain any receive()// or wait() calls
}}
Then it can be trivially converted to handleMessage() :
initialize(){
initialization code}
handleMessage( msg ){
// arbitrary code which doesn’t contain any receive()// or wait() calls
}
Example 1: Simple traffic generators and sinksThe code for simple packet generators and sinks programmed with handleMessage() mightbe as simple as this:
PacketGenerator::handleMessage(m){
67
OMNeT++ Manual – Simple Modules
create and send out packetschedule m again to trigger next call to handleMessage
// (self-message)}PacketSink::handleMessage(m){
delete m}
Note that PacketGenerator will need to redefine initialize() to create m and schedule thefirst event.
The following simple module generates packets with exponential inter-arrival time. (Somedetails in the source haven’t been discussed yet, but the code is probably understandablenevertheless.)
class Generator : public cSimpleModule{
Module_Class_Members(Generator,cSimpleModule,0)// note zero stack size!virtual void initialize();virtual void handleMessage(cMessage *msg);
};
Define_Module( Generator );
void Generator::initialize(){
// schedule first sendingscheduleAt(simTime(), new cMessage);
}
void Generator::handleMessage(cMessage *msg){
// generate & send packetcMessage *pkt = new cMessage;send(pkt, ’’out’’);// schedule next callscheduleAt(simTime()+exponential(1.0), msg);
}
Example 2: Bursty traffic generatorA bit more realistic example is to rewrite our Generator to create packet bursts, each con-sisting of burst_length packets.
We add some data members to the class:
• burst_length will store the parameter that specifies how many packets a burst mustcontain,
• burst_ctr will count in how many packets are left to be sent in the current burst.
The code:
class BurstyGenerator : public cSimpleModule{
68
OMNeT++ Manual – Simple Modules
Module_Class_Members(Generator,cSimpleModule,0)// note the zero stack size!int burst_length;int burst_ctr;virtual void initialize();virtual void handleMessage(cMessage *msg);
};
Define_Module( BurstyGenerator );void BurstyGenerator::initialize(){
// init parameters and state variablesburst_length = par("burst_length");burst_ctr = burst_length;// schedule first packet of first burstscheduleAt(simTime(), new cMessage);
}
void BurstyGenerator::handleMessage(cMessage *msg){
// generate & send packetcMessage *pkt = new cMessage;send(pkt, ’’out’’);// if this was the last packet of the burstif (--burst_ctr == 0){
// schedule next burstburst_ctr = burst_length;scheduleAt(simTime()+exponential(5.0), msg);
}else{
// schedule next sending within burstscheduleAt(simTime()+exponential(1.0), msg);
}}
Advantages and drawbacksAdvantages:
• consumes less memory: no separate stack needed for simple modules
• fast: function call is faster than switching between coroutines
Drawbacks:
• local variables cannot be used to store state information
• need to redefine initialize()
• programming model is inconvenient in some cases
Other simulatorsMany simulation packages use a similar approach, often topped with something like a statemachine (FSM) which hides the underlying function calls. Such systems are:
69
OMNeT++ Manual – Simple Modules
• OPNET(TM) (MIL3, Inc.) which uses FSM’s designed using a graphical editor;
• NetSim++ clones OPNET’s approach;
• SMURPH (University of Alberta) defines a (somewhat eclectic) language to describeFSMs, and uses a precompiler to turn it into C++ code;
• Ptolemy (UC Berkeley) uses a similar method.
OMNeT++’s FSM support is described in the next section.
5.3.3 initialize() and finish()
Purposeinitialize() – to provide place for any user setup code
finish() – to provide place where the user can record statistics after the simulation hascompleted
When and how they are calledThe initialize() functions of the modules are invoked before the first event is processed,but after the initial events (starter messages) have been placed into the FES by the simula-tion kernel.
Both simple and compound modules have initialize() functions. A compound modulehas its initialize() function called before all its submodules have.
The finish() functions are called when the event loop has terminated, and only if it ter-minated normally (i.e. not with a runtime error). The calling order is the reverse as withinitialize() : first submodules, then the containing compound module. (The bottom line isthat in the moment there’s no ”official” possibility to redefine initialize() and finish()for compound modules; the unofficial way is to write into the nedc-generated C++ code. Fu-ture versions of OMNeT++ will support adding these functions to compound modules.)
This is summarized in the following pseudocode (although you won’t find this code ”as is” inthe simulation kernel sources):
perform simulation run:build network
(i.e. the system module and its submodules recursively)insert starter messages for all submodules using activity()do callInitialize() on system module
enter event loop // (described earlier)if (event loop terminated normally) // i.e. not with a runtime
errordo callFinish() on system module
clean upcallInitialize(){
call to user-defined initialize() functionif (module is compound)
for (each submodule)do callInitialize() on submodule
}callFinish(){
70
OMNeT++ Manual – Simple Modules
if (module is compound)for (each submodule)
do callFinish() on submodulecall to user-defined finish() function
}
initialize() vs. constructorUsually you should not put simulation-related code into the simple module constructor. Forexample, modules often need to investigate their surroundings (maybe the whole network)at the beginning of the simulation and save the collected info into internal tables. Code likethat cannot be placed into the constructor since the network is still being set up when theconstructor is called.
finish() vs. destructorKeep in mind that finish() is not always called, so it isn’t a good place for cleanup codewhich should run every time the module is deleted. finish() is only a good place for writingstatistics, result post-processing and other stuff which are to run only on successful comple-tion.
Cleanup code should go into the destructor. But in fact, you almost never need to write adestructor because OMNeT++ keeps track of objects you create and disposes of them auto-matically (sort of automatic garbage collection). However it cannot track objects not derivedfrom cObject (see later), so they may need to be deleted manually from the destructor.
Multi-stage initializationIn simulation models, when one-stage initialization provided by initialize() is not suf-ficient, one can use multi-stage initialization. Modules have two functions which can beredefined by the user:
void initialize(int stage);
int numInitStages() const;
At the beginning of the simulation, initialize(0) is called for all modules, then ini-tialize(1) , initialize(2) , etc. For each module, numInitStages() must be redefinedto return the number of init stages required, e.g. for a two-stage init, numInitStages()should return 2, and initialize(int stage) must be implemented to handle the stage=0 andstage=1 cases.
The callInitialize() function performs the full multi-stage initialization for that moduleand all its submodules.
If you do not redefine the multi-stage initialization functions, the default behavior is single-stage initialization: the default numInitStages() returns 1, and the default initial-ize(int stage) simply calls initialize() .
”end-of-simulation event”The task of finish() is solved in many simulators (e.g. OPNET) by introducing a specialend-of-simulation event. This is not a very good practice because the simulation programmerhas to code the algorithms (often FSMs) so that they can always properly respond to end-of-simulation events, in whichever state they are. This often makes program code unnecessarilycomplicated.
This fact is also evidenced in the design of the PARSEC simulation language (UCLA). Its pre-decessor Maisie used end-of-simulation events, but – as documented in the PARSEC manual– this has led to awkward programming in many cases, so for PARSEC, end-of-simulationevents were dropped in favour of finish() (called finalize() in PARSEC).
71
OMNeT++ Manual – Simple Modules
5.4 Finite State Machines in OMNeT++
OverviewFinite State Machines (FSMs) can make life with handleMessage() easier. OMNeT++ pro-vides a class and a set of macros to build FSMs. OMNeT++’s FSMs work very much likeOPNET’s or SDL’s.
The key points are:
• There are two kinds of states: transient and steady. At each event (that is, at each callto handleMessage() ), the FSM transitions out of the current (steady) state, undergoesa series of state changes (runs through a number of transient states), and finally arrivesat another steady state. Thus between two events, the system is always in one of thesteady states. Transient states are therefore not really a must – they exist only to groupactions to be taken during a transition in a convenient way.
• You can assign program code to entering and leaving a state (known as entry/exit code).Staying in the same state is handled as leaving and re-entering the state.
• Entry code should not modify the state (this is verified by OMNeT++). State changes(transitions) must be put into the exit code.
OMNeT++’s FSMs can be nested. This means that any state (or rather, its entry or exit code)may contain a further full-fledged FSM_Switch() (see below). This allows you to introducesub-states and thereby bring some structure into the state space if it would become too large.
The FSM APIFSM state is stored in an object of type cFSM. The possible states are defined by an enum;the enum is also a place to tell which state is transient and which is steady. In the followingexample, SLEEP and ACTIVE are steady states and SEND is transient (the numbers inparens must be unique within the state type and they are used for constructing the numericIDs for the states):
enum {INIT = 0,SLEEP = FSM_Steady(1),ACTIVE = FSM_Steady(2),SEND = FSM_Transient(1),
};
The actual FSM is embedded in a switch-like statement, FSM_Switch() , where you havecases for entering and leaving each state:
FSM_Switch(fsm){
case FSM_Exit( state1 )://...
break;case FSM_Enter( state1 ):
//...break;case FSM_Exit( state2 ):
//...break;
72
OMNeT++ Manual – Simple Modules
case FSM_Enter( state2 )://...
break;//...
};
State transitions are done via calls to FSM_Goto() , which simply stores the new state in thecFSMobject:
FSM_Goto(fsm, newState );
The FSM starts from the state with the numeric code 0; this state is conventionally namedINIT.
Debugging FSMsIf you #define FSM_DEBUG before including omnetpp.h, each state transition will be loggedto ev:
#define FSM_DEBUG#include <omnetpp.h>
The actual printing is done through the FSM_Print() macro. You might redefine it if youdon’t like what it currently does:
#define FSM_Print(fsm,exiting)(ev << "FSM " << (fsm).name()
<< ((exiting) ? ": exiting " : ": entering ")<< (fsm).stateName() << endl)
ImplementationThe FSM_Switch() is a macro. It expands to a switch() statement embedded in a for()loop which repeats until the FSM reaches a steady state. (The actual code is rather ugly, butif you’re dying to see it, it’s in cfsm.h .)
Infinite loops are avoided by counting state transitions: if an FSM goes through 64 transi-tions without reaching a steady state, the simulation will terminate with an error message.
An exampleLet us write another flavour of a bursty generator. It has two states, SLEEP and ACTIVE.In the SLEEP state, the module does nothing. In the ACTIVE state, it sends messages witha given inter-arrival time. The code was taken from the fifo2 sample simulation.
#define FSM_DEBUG#include <omnetpp.h>
class BurstyGenerator : public cSimpleModule{
public:Module_Class_Members(BurstyGenerator,cSimpleModule,0);
// parametersdouble sleepTimeMean;double burstTimeMean;
73
OMNeT++ Manual – Simple Modules
double sendIATime;cPar *msgLength;
// FSM and its statescFSM fsm;enum {
INIT = 0,SLEEP = FSM_Steady(1),ACTIVE = FSM_Steady(2),SEND = FSM_Transient(1),
};
// variables usedint i;cMessage *startStopBurst;cMessage *sendMessage;
// the virtual functionsvirtual void initialize();virtual void handleMessage(cMessage *msg);
};
Define_Module( BurstyGenerator );
void BurstyGenerator::initialize(){
fsm.setName("fsm");sleepTimeMean = par("sleep_time_mean");burstTimeMean = par("burst_time_mean");sendIATime = par("send_ia_time");msgLength = &par("msg_length");i = 0;WATCH(i); // always put watches in initialize()startStopBurst = new cMessage("startStopBurst");sendMessage = new cMessage("sendMessage");scheduleAt(0.0,startStopBurst);
}
void BurstyGenerator::handleMessage(cMessage *msg){
FSM_Switch(fsm){
case FSM_Exit(INIT):// transition to SLEEP stateFSM_Goto(fsm,SLEEP);break;
case FSM_Enter(SLEEP):// schedule end of sleep period (start of next burst)scheduleAt(simTime()+exponential(sleepTimeMean),
startStopBurst);break;case FSM_Exit(SLEEP):
// schedule end of this burstscheduleAt(simTime()+exponential(burstTimeMean),
74

OMNeT++ Manual – Simple Modules
startStopBurst);// transition to ACTIVE state:if (msg!=startStopBurst) {
error("invalid event in state ACTIVE");}FSM_Goto(fsm,ACTIVE);break;
case FSM_Enter(ACTIVE):// schedule next sendingscheduleAt(simTime()+exponential(sendIATime), sendMessage);
break;case FSM_Exit(ACTIVE):
// transition to either SEND or SLEEPif (msg==sendMessage) {
FSM_Goto(fsm,SEND);} else if (msg==startStopBurst) {
cancelEvent(sendMessage);FSM_Goto(fsm,SLEEP);
} else {error("invalid event in state ACTIVE");
}break;
case FSM_Exit(SEND):{
// generate and send out jobchar msgname[32];sprintf( msgname, "job-%d", ++i);ev << "Generating " << msgname << endl;cMessage *job = new cMessage(msgname);job->setLength( (long) *msgLength );job->setTimestamp();send( job, "out" );// return to ACTIVEFSM_Goto(fsm,ACTIVE);break;
}}
}
5.5 Message transmission modeling
Data rate modelingIf data rate is specified for a connection, a message will have a certain nonzero transmissiontime, depending on its length. This means that when a message is sent out through anoutput gate, the message ”reserves” the gate for a given period (”it is being transmitted”).
While a message is under transmission, other messages have to wait until the transmissionfinishes. You can still use send() while the gate is busy, but the message’s arrival will bedelayed; just like the gate had an internal queue for the messages waiting to be transmitted.
The OMNeT++ class library provides you with functions to check whether a certain outputgate is transmitting or to learn when it finishes transmission.
If the connection with a data rate is not the immediate one connected to the simple mod-
75
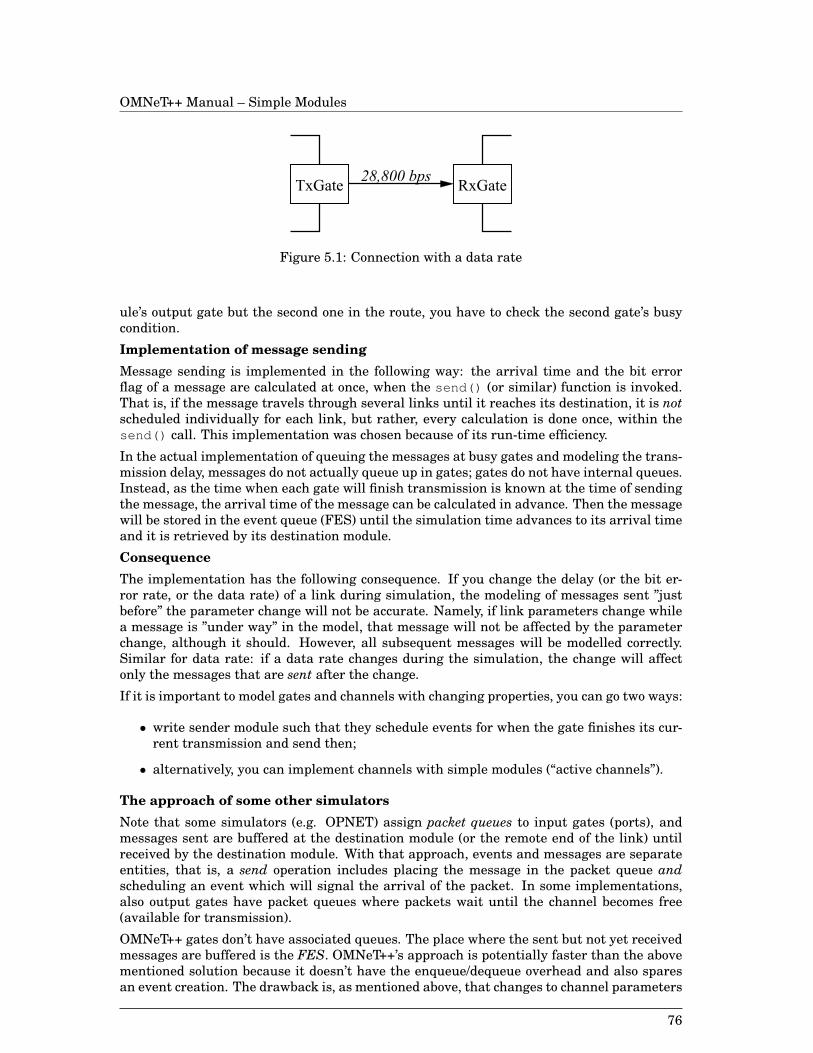
OMNeT++ Manual – Simple Modules
Figure 5.1: Connection with a data rate
ule’s output gate but the second one in the route, you have to check the second gate’s busycondition.
Implementation of message sendingMessage sending is implemented in the following way: the arrival time and the bit errorflag of a message are calculated at once, when the send() (or similar) function is invoked.That is, if the message travels through several links until it reaches its destination, it is notscheduled individually for each link, but rather, every calculation is done once, within thesend() call. This implementation was chosen because of its run-time efficiency.
In the actual implementation of queuing the messages at busy gates and modeling the trans-mission delay, messages do not actually queue up in gates; gates do not have internal queues.Instead, as the time when each gate will finish transmission is known at the time of sendingthe message, the arrival time of the message can be calculated in advance. Then the messagewill be stored in the event queue (FES) until the simulation time advances to its arrival timeand it is retrieved by its destination module.
ConsequenceThe implementation has the following consequence. If you change the delay (or the bit er-ror rate, or the data rate) of a link during simulation, the modeling of messages sent ”justbefore” the parameter change will not be accurate. Namely, if link parameters change whilea message is ”under way” in the model, that message will not be affected by the parameterchange, although it should. However, all subsequent messages will be modelled correctly.Similar for data rate: if a data rate changes during the simulation, the change will affectonly the messages that are sent after the change.
If it is important to model gates and channels with changing properties, you can go two ways:
• write sender module such that they schedule events for when the gate finishes its cur-rent transmission and send then;
• alternatively, you can implement channels with simple modules (“active channels”).
The approach of some other simulatorsNote that some simulators (e.g. OPNET) assign packet queues to input gates (ports), andmessages sent are buffered at the destination module (or the remote end of the link) untilreceived by the destination module. With that approach, events and messages are separateentities, that is, a send operation includes placing the message in the packet queue andscheduling an event which will signal the arrival of the packet. In some implementations,also output gates have packet queues where packets wait until the channel becomes free(available for transmission).
OMNeT++ gates don’t have associated queues. The place where the sent but not yet receivedmessages are buffered is the FES. OMNeT++’s approach is potentially faster than the abovementioned solution because it doesn’t have the enqueue/dequeue overhead and also sparesan event creation. The drawback is, as mentioned above, that changes to channel parameters
76
OMNeT++ Manual – Simple Modules
do not take effect immediately.
5.6 Coding conventions
Here’s a bunch of advice on how to write OMNeT++ models. Some of them are “rules ofthumb”, saying if you program like that, you’re likely to have less trouble; other conventionsare aimed at making the models produced by the OMNeT++ community more consistent.
Conventions for writing simple modules:
1. Put the NED description, the C++ class declaration and the implementation into threeseparate files. Do not put two or more modules’ code into the same file unless they arebuild upon one another - don’t be afraid of small files! Thus, for a simple module calledFoobar, you should have Foobar.ned, Foobar.h and Foobar.cc. This reduces coupling ofmodule sources and makes your code more reusable.
2. Adopt a good coding style. Some hints: Choose your favourite indentation style andkeep to that consistently. I recommend four-space indents and the brace placementstyle in which the OMNeT++ sources are written. Write only one statement per line.Avoid putting comments at the end of the line - place them above the code on a separateline instead! Use blank lines to break the code into not-very-long logical blocks, and puta few-word comment above each block what that block does. Leave at least two blanklines between two (member) functions. The purpose of all that is that the structure ofyour code be obvious at the first glance!
3. Identifiers: Begin module type names with a capital letter, and capitalize the begin-ning of each word, like in TokenRingMAC. Do not use underscore ‘_‘ in module names.Use the C++-style naming on member functions: beginning of each word is capital-ized (except for the first one) and no underscores: sendUnnumberedFrame(). On pa-rameter names, you may use C-style (window_size) or C++-style (windowSize) naming,whichever you prefer.
4. Make the functions virtual. Maybe someone who reuses your code will need a differentbehavior than what you thought of.
5. Use inheritance if you’re writing a very complex simple module: create a basic simplemodule class and build upon it deriving new module classes. This will make your codemore readable and easier to manage/reuse. Unfortunately, inheritance is not supportedin NED so you actually have to make distinct NED descriptions for each simple moduleclass. Even if you have an abstract classes, prepare a NED description for it: it isuseful as a reference to others who might derive a different simple module class fromyour abstract class. Inheritance in NED is planned in later releases of OMNeT++.
6. Avoid global variables (and what’s the same, static class members). They are not resetto their initial value (zero) when you run the simulation, stop it and rebuild the net-work. This can cause several problems when you use Cmdenv to execute several runsone after another, or in Tkenv when you rebuild the network from the menu.
7. Query the values of parameters into state variables (–>class members) of the samename at the top of the activity() function. If you know the value of a parame-ter is a random value (like uniform 0..10) or it can change during simulation, then toavoid having to look it up by name each time (like d=par(”delay”) ) you may queryits pointer into a cPar* state variable with the same name prepended with ’p’ (likepDelay=&par(”delay”) ).
77
OMNeT++ Manual – Simple Modules
8. Use ev.printf() and ev << ... (see later) to print out information on what the moduleis doing. Doing so will pay out several times when it comes to debugging. Use a param-eter and a state variable called debug. Surround your debugging output (ev << ... andev.printf() calls) with if(debug) . You may introduce more specific debug switches(like debug_queuing etc.)
5.7 Component libraries
Because of the structure of the simulation system, one can create libraries of reusable ele-ments in several ways. The three basic types are:
• simple module libraries
• NED source libraries
• precompiled compound module libraries
The elegant thing is that the user of the library does not need to know which kind of libraryhe/she is using; the three types of libraries are equivalent in terms of usage.
5.7.1 Simple module libraries
Simple modules that can be used in more than one simulations can form an object library.Good candidates for module libraries are simple modules that implement:
• Physical/Data-link protocols: Ethernet, Token Ring, FDDI, LAPB etc.
• Higher layer protocols: IP, TCP, X.25 L2/L3, etc.
• Network application types: E-mail, NFS, X, audio etc.
• Basic elements: message generator, sink, concentrator/simple hub, queue etc.
• Modules that implement routing algorithms in a multiprocessor or network
• ...
To create a library, you compile the simple module C++ sources and collect the object files inone directory. You’ll also need to the provide the NED descriptions:
library/generator.nedgenerator.osink.nedsink.oethernet.nedethernet.o
The NED files contain the interfaces of the simple modules. For example:
// generator.nedsimple Generator
parameters :interarrival time, message_length, message_kind;
gates :out : output;
endsimple
78

OMNeT++ Manual – Simple Modules
The user of the library would include generator.ned in his/her NED files, and link the ex-ecutable with generator.o. This is more or less the same concept as conventional C/C++header files and libraries. The basic advantage is the same as with C/C++: you save compi-lation time and hide concrete implementation. The latter also means that you can give themodule library to others without having to share the C++ source.
It could also be meaningful to provide the C++ header files with the module class declara-tions. This would enable the user to directly call the member functions of the module objectfrom the simulation program and derive new module classes by redefining the virtual func-tions.
You do not need to have a separate NED file for each module: you could merge all of theminto a single library.ned that contains the NED declarations of all modules without all sideeffects. However, it is not recommended to put all object files into one library (.a or .lib),because then every simple module would be present in simulation programs linked with thelibrary, regardless whether the simulation uses them or not.
5.7.2 Compound module NED source libraries
The NED sources of reusable compound modules can also be placed in a library. Candidatesare:
• network nodes such as hubs, bridges, routers
• different workstation/computer types: file server, X terminal etc.
• node of a massively parallel multiprocessor (used in testing different topologies)
• topology templates: parameterized ring, mesh, hypercube, torus etc. topologies, withthe sizes (shapes etc) and the actual node types to be left as parameters
• ...
The NED sources are used through the import mechanism; the corresponding simple moduleobject files still to be linked in the executable.
The user does not necessarily notice that he/she is using a compound module library andnot a simple module library. In NED files, the user imports and uses the compound modulesources in exactly the same way as he/she used the simple module interface declarations.Linking also goes in the same way; if the simple modules objects necessary for a certaincompound module are aggregated into a library (.a or .lib), the user does not even notice thedifference from the number of files he/she has to link in.
5.7.3 Precompiled compound module libraries
If you share a compound module with others, you do not necessarily have to share the NEDsource and reveal the internals of the compound module. You can turn the compound moduleinto something that very much looks like a simple module.
Suppose you have the following compound module:
// router-compound.nedmodule Router:
parameters :processing_delay, buffersize;
gates :
79
OMNeT++ Manual – Simple Modules
in : input_ports[];out : output_ports[];
submodules :routing: RoutingModule
parameters ://...
gatesizes ://...
datalink: DataLink[num_of_ports]parameters :
retry_count = 5,window_size = 2;//...
connections ://...
endmodule
First, you would compile this NED file with the NEDC compiler and the resulting C++ codewith the C++ compiler. Then you would aggregate this object file with the simple moduleobject files into a single library (.a or .lib). Also, you would write a separate NED file thatdeclares the interface of the new ”simple” module:
// router-simple.nedsimple Router:
parameters :processing_delay, buffersize;
gates :in : input_ports[];out : output_ports[];
endsimple
The method produced a precompiled compound module. The resulting two files can be placedinto a simple module library and can be used identically to ordinary simple modules.
Using precompiled compound modules you can hide the internal complexity of your modelfrom direct inspection. However, nothing can prevent a user from building a simulationexecutable with it and exploring the structure of your compound module using OMNeT++simulation kernel functions. Consequently, using precompiled compound modules is moreuseful as a structuring tool.
5.8 Some simulation techniques
5.8.1 Modeling computer networks
The hierarchical module structure of OMNeT++ allows you to organize the model arounddifferent levels:
Physical topology:
1. Top-level network
2. Subnetwork (site)
3. LAN
80
OMNeT++ Manual – Simple Modules
4. node
Within a node:
1. OSI layers. The Data-Link, Network, Transport, Application layers are of greater im-portance.
2. Applications/protocols within a layer.
The advantage of OMNeT++ over many existing simulators is that the depth of the modulenesting is not limited, and, what is in connection with the previous one, that a simple modulecan be transformed into a compound module by splitting the code into several simple moduleswithout affecting existing users of the module and vice versa. The latter means that theprogrammer of the model is not under pressure from possibly incorrect early design decisionsabout what to implement with a single module and what with a compound module.
5.8.2 Modeling multiprocessor systems
One can make use of flexible model topologies. It is straightforward to create ring, mesh,butterfly, torus, hypercube, tree, fat tree and other topologies with conditional loop connec-tions.
Furthermore, general topology templates (e.g. mesh or hypercube) can be created, wherethe types of the actual nodes are left as parameters. The actual node types are substitutedas parameter values for each concrete simulation. Topology templates could be placed in alibrary and imported from there if needed.
5.8.3 Parameter tuning
Tuning means finding the parameter values which produce optimal operation of the system.In OMNeT++, you can tune the model during runtime. The code that monitors performanceand changes parameter values can be placed:
• inside the model. In this case, the code does not necessarily form separate module(s);you can add the extra code to any already existing module.
• outside the model of the actual system. If you choose this method, you will create newmodules that monitor and control the model.
OMNeT++ supports the model tuning concept by providing reference parameters. Param-eters that influence the model performance and need to be tuned will be declared at thehighest layer and taken by both the model and the monitor part.
An example of model tuning is how one can determine the critical throughput of a commu-nication network by changing the offered load according to performance measures of thenetwork (queuing times etc.)
5.8.4 Multiple experiments within one simulation run
One might need to perform a large number of simulation runs where the model parametersare not known in advance. This can be the case when one wants to optimize a system andparameter tuning cannot be used because
1. for each experiment, he wants to start the model from a well-defined initial state, or
81
OMNeT++ Manual – Simple Modules
2. he wants to change the model topology from one simulation run to the other
In this case, the following solution be followed. The network would consist of only one simplemodule that would organize the simulation runs by creating, running and destroying theactual models with each experiment. The simple module’s code would look like this:
SimulationManager::activity(){
determine parameters for the first runwhile(true){
create the model (a compound module) with the currentrun parameters schedule
wait( some time) // while the model runsdelete future events that belong to the modelget statistics out of the modeldestroy the modelif (simulation is done)
breakcalculate parameters for the next run
}write out results
}
The solutions built into OMNeT++ (flexible module topologies, dynamic creation of compoundmodules etc.) strongly support this concept.
5.8.5 Dynamic topology optimization
Dynamic topology optimization is the generalization of the ”parameter tuning” and ”multipleexperiments within one simulation run” concepts. If one wants to simulate large systems,it is possible that one part of the model needs its topology to be optimized (optimal numberof servers, optimal interconnection etc.) while other parts of the model have reached theirsteady state and should not be bothered.
This can be achieved by modifying the previous scheme. Parts of the model that do not needtopology optimization can be created once and left running for the whole duration of thesimulation; other parts are examined and their structure is modified from time to time.
82
OMNeT++ Manual – The Simulation Library
Chapter 6
The Simulation Library
OMNeT++ has a rich C++ class library which you can use when implementing simple mod-ules. A quick overview of the areas supported by the simulation library:
• sending and receiving messages, scheduling and cancelling events, terminating themodule or the simulation: member functions of cSimpleModule
• events, messages, network packets: the cMessage and cPacket classes
• random number generation: normal() , exponential() , etc.
• access to module gates and parameters: member functions of cModule (base class forcSimpleModule ); cPar and cGate classes
• accessing other modules in the network: member functions of cModule and cGate
• storing data in containers: cArray , cQueue , cBag and cLinkedList classes
• discovering network topology and support routing: cTopology class
• recording statistics into file: cOutVector class
• collecting simple statistics: cStdDev and cWeightedStddev classes
• distribution estimation: cLongHistogram , cDoubleHistogram , cVarHistogram , cP-Square , cKSplit classes
• making variables inspectable in the graphical user interface (Tkenv): the WATCH()macro (cWatch class)
• sending debug output to and prompting for user input in the graphical user interface(Tkenv): the ev object (cEnvir class)
6.1 Class library conventions
Base classClasses in the OMNeT++ simulation library are derived from cObject . Functionality andconventions that come from cObject :
• name attribute
83
OMNeT++ Manual – The Simulation Library
• className() member and other member functions giving textual information aboutthe object
• conventions for assignment, copying, duplicating the object
• ownership control for containers derived from cObject
• support for traversing the object tree
• support for inspecting the object in graphical user interfaces (Tkenv)
• support for automatic cleanup (garbage collection) at the end of the simulation
Classes inherit and redefine several cObject member functions; in the following we’ll dis-cuss some of the practically important ones.
Setting and getting attributesMember functions that set and query object attributes follow consistent naming. The settermember function has the form setSomething(...) and its getter counterpart is named some-thing(), i.e. the ”get” verb found in Java and some other libraries is omitted for brevity. Forexample, the length attribute of the cMessage class can be set and read like this:
msg->setLength( 1024 );length = msg->length();
className()For each class, the className() member function returns the class name as a string:
const char *classname = msg->className(); // returns "cMessage"
Name attributeAn object can be assigned a name (a character string). The name string is the first argumentto the constructor of every class, and it defaults to NULL (no name string). If you supply aname string, the object will make its own copy (strdup() ). As an example, you can create amessage object like this:
cMessage *mymsg = new cMessage("mymsg");
You can also set the name after the object has been created:
mymsg->setName("mymsg");
You can get a pointer to the internally stored copy of the name string like this:
const char *name = mymsg->name(); // --> returns ptr to internal copy// of "mymsg"
For convenience and efficiency reasons, the empty string ”” and NULL are treated as equiv-alent by library objects: ”” is stored as NULL (so that it does not consume heap), but it isreturned as ”” (so that it is easier to print out etc). Thus, if you create a message object witheither NULL or ”” as name, it will be stored as NULL and name() will return a pointer to ””,a static string:
84
OMNeT++ Manual – The Simulation Library
cMessage *msg = new cMessage(NULL, <additional args>);const char *str = msg->name(); // --> returns ptr to ""
fullName() and fullPath()Objects have two more member functions which return other sort of names based on thename attribute: fullName() and fullPath() .
Suppose we have a module in the network university_lan, compound module fddi_ring, sim-ple module station[10]. If you call the functions on the simple module object (cSimpleMod-ule inherits from cObject , too), the functions will return these values:
ev << module->name(); // --> "station"ev << module->fullName(); // --> "station[10]"ev << module->fullPath(); // --> "university_lan.fddi_ring.station[10]"
These functions work for any object. For example, a local object inside the module wouldproduce results like this:
void FDDIStation::activity(){
cQueue buffer("buffer");ev << buffer->fullPath(); // --> "university_lan.fddi_ring.
// station[10].buffer"}
fullName() and fullPath() , together with className() can be used for example to gen-erate informative error messages.
Be aware that fullName() and fullPath() return pointers to static buffers. Each call willoverwrite the previous content of the buffer, so for example you shouldn’t put two calls in asingle printf() statement:
ev.printf("object1 is ’%s’, object2 is ’%s’\n",object1->fullPath(),object2->fullPath()
); // WRONG! Same string is printed twice!!!
Copying and duplicating objectsThe dup() member function creates an exact copy of the object, duplicating contained objectsalso if necessary. This is especially useful in the case of message objects. dup() returns apointer of type cObject* , so it needs to be cast to the proper type:
cMessage *copyMsg = (cMessage *) msg->dup();
dup() works through calling the copy constructor, which in turn relies on the assignmentoperator between objects. operator=() can be used to copy contents of an object into an-other object of the same type. The copying is done properly; object contained in the object willalso be duplicated if necessary. For various reasons, operator=() does not copy the namestring; the copy constructor does it.
IteratorsThere are several container classes in the library (cQueue , cArray etc.) For many of them,there is a corresponding iterator class that you can use to loop through the objects stored inthe container.
For example:
85
OMNeT++ Manual – The Simulation Library
cQueue queue;
//..for (cQueueIterator queueIter(queue); !queueIter.end(); queueIter++){
cObject *containedObject = queueIter();}
Ownership controlBy default, if a container object is destroyed, it destroys the contained objects too. If you calldup() , the contained objects are duplicated too for the new container. This is done so be-cause contained objects are owned by the container; ownership is defined as the right/duty ofdeallocation. However, there is a fine-grain ownership control mechanism built in which al-lows you to specify on per-object basis whether you want objects to be owned by the containeror not; by calling the takeOwnership() member function with false, you tell the containerthat you don’t want it to become the owner of objects that will be inserted in the future. Youcan explicitly select an owner for any object by calling its setOwner() member function.
6.2 Utilities
TracingThe tracing feature will be used extensively in the code examples, so it is shortly introducedhere. It will be covered in detail in a later section.
The ev object represents the user interface of the simulation. You can send debugging outputto ev with the C++-style output operators:
ev << "packet received, sequence number is "<< seq_num << endl;
An alternative solution is ev.printf() :
ev.printf("packet received, sequence number is %d\n", seq_num);
Simulation time conversionThere are utility functions which convert simulation time (simtime_t ) to a printable string(like ”3s 130ms 230us”) and vica versa.
The simtimeToStr() function converts a simtime_t (passed in the first arg) to textualform. The result is placed into the buffer pointed to by the second arg. If the second arg isomitted or it is NULL, simtimeToStr() will place the result into a static buffer which isoverwritten with each call:
char buf[32];ev.printf("t1=%s, t2=%s\n", simtimeToStr(t1), simTimeToStr(t2,buf));
The strToSimtime() function parses a time specification passed in a string, and returns asimtime_t . If the string cannot be entirely interpreted, -1 is returned:
simtime_t t = strToSimtime("30s 152ms");
86
OMNeT++ Manual – The Simulation Library
Another variant, strToSimtime0() can be used if the time string is a substring in a largerstring. Instead of taking a char*, it takes a reference to char* (char*&) as the first argument.The function sets the pointer to the first character that could not be interpreted as part ofthe time string, and returns the value. It never returns -1; if nothing at the beginning of thestring looked like simulation time, it returns 0.
const char *s = ’’30s 152ms and some rubbish’’;
simtime_t t = strToSimtime0(s); // now s points to "and some rubbish"
Utility <string.h> functionsThe opp_strdup() , opp_strcpy() , opp_strcmp() functions are the same as their<string.h> equivalents, except that they treat NULL and the empty string (””) as iden-tical, and opp_strdup() uses operator new instead of malloc() .
The opp_concat() function might also be useful, for example in constructing object names.It takes up to four const char * pointers, concatenates them in a static buffer and returns apointer to the result. The result’s length shouldn’t exceed 255 characters.
6.3 Messages and packets
6.3.1 The cMessage class
cMessage is a central class in OMNeT++. Objects of cMessage and subclasses may modela number of things: events; messages; packets, frames, cells, bits or signals travelling in anetwork; entities travelling in a system and so on.
AttributesA cMessage object has number of attributes. Some are used by the simulation kernel, othersare provided just for the convenience of the simulation programmer. A more-or-less completelist:
• The name attribute is inherited from cObject .
• The message kind attribute is supposed to carry some message type information. Zeroand positive values can be freely used for any purpose. Negative values are reserved foruse by the OMNeT++ simulation library; especially, MK_PACKET (-1) and MK_INFO(-2) are used to denote that the message is a network packet (see the cPacket classlater).
• The length attribute (understood in bits) is used to compute transmission delay whenthe message travels through a connection that has an assigned data rate.
• The bit error flag attribute is set to true by the simulation kernel with a probability of1− (1− ber)length when the message is sent through a connection that has an assignedbit error rate (ber).
• The priority attribute is used by the simulation kernel to order messages in the messagequeue (FES) that have the same arrival time values.
• The time stamp attribute is not used by the simulation kernel; you can use it for pur-poses like remembering the time when the message was enqueued or re-sent.
• Other attributes and data members make simulation programming easier, they will bediscussed later: parameter list, encapsulated message, context pointer.
87
OMNeT++ Manual – The Simulation Library
• A number of read-only attributes store information about the message’s (last) send-ing/scheduling: source/destination module and gate, sending (scheduling) and arrivaltime. They are mostly used by the simulation kernel while the message is in the FES,but the information is still in the message object when a module receives the message.
Basic usageA cMessage object can be created in the following way:
cMessage *msg = new cMessage("msg-name", kind, length,priority, errorflag);
The kind, length, and priority are integers, and errorflag is boolean. All arguments havedefault values, so the following initializations are also valid:
cMessage *msg1 = new cMessage;cMessage *msg2 = new cMessage("data-packet", DATAPACKET_KIND, 8*1500 );
Once a message has been created, its data members can be changed by the following func-tions:
msg->setKind( kind );msg->setLength( length );msg->setPriority( priority );msg->setBitError( err );msg->setTimestamp();msg->setTimestamp( simtime );
With these functions the user can set the message kind, the message length, the priority, theerror flag and the time stamp. The setTimeStamp() function without any argument setsthe time stamp to the current simulation time.
The values can be obtained by the following functions:
int k = msg->kind();int p = msg->priority();int l = msg->length();bool b = msg->hasBitError();simtime_t t = msg->timestamp();
Duplicating messagesIt is often needed to duplicate a message (for example, send one and keep a copy). This canbe done in the standard ways as for any other OMNeT++ object:
cMessage *copy1 = (cMessage *) msg->dup();cMessage *copy2 = new cMessage( *msg );
The two are equivalent. The resulting message is an exact copy of the original, includingmessage parameters (cPar or other object types) and encapsulated messages.
6.3.2 Message encapsulation
It is often necessary to encapsulate a message into another when you’re modeling layeredprotocols of computer networks. Although you can encapsulate messages by adding them tothe parameter list, there’s a better way.
88
OMNeT++ Manual – The Simulation Library
The encapsulate() function encapsulates a message into another one. The length of themessage will grow by the length of the encapsulated message. An exception: when the en-capsulating (outer) message has zero length, OMNeT++ assumes it is not a real packet butsome out-of-band signal, so its length is left at zero.
cMessage *userdata = new cMessage("userdata");
userdata->setLength(8*2000);cMessage *tcpseg = new cMessage("tcp");tcpseg->setLength(8*24);tcpseg->encapsulate(userdata);ev << tcpseg->length() << endl; // --> 8*2024 = 16192
A message can only hold one encapsulated message at a time. The second encapsulate()call will result in an error. It is also an error if the message to be encapsulated isn’t ownedby the module.
You can get back the encapsulated message by decapsulate() :
cMessage *userdata = tcpseg->decapsulate();
decapsulate() will decrease the length of the message accordingly, except if it was zero. Ifthe length would become negative, an error occurs.
The encapsulatedMsg() function returns a pointer to the encapsulated message, or NULLif no message was encapsulated.
6.3.3 Information about the last sending
There are several variables in cMessage that store information about the last time the mes-sage was sent or scheduled. These variables can only be read.
isSelfMessage() returns true if the message has been scheduled (scheduleAt() ) as op-posed to being sent with one of the send...() methods.
bool isSelfMessage()
The following methods can tell where the message came from and where it arrived (willarrive).
int senderModuleId();int senderGateId();int arrivalModuleId();int arrivalGateId();
The following two methods are just convenience functions that combine module id and gateid into a gate object pointer.
cGate *senderGate();cGate *arrivalGate();
And there are further convenience functions to tell whether the message arrived on a specificgate given with id or name+index.
89
OMNeT++ Manual – The Simulation Library
bool arrivedOn(int id);bool arrivedOn(const char *gname, int gindex=0);
The following methods return message creation time and the last sending and arrival times.
simtime_t creationTime()simtime_t sendingTime();simtime_t arrivalTime();
6.3.4 Context pointer
cMessage contains a void* pointer which is set/returned by the setContextPointer() andcontextPointer() functions:
void *context =...;msg->setContextPointer( context );void *context2 = msg->contextPointer();
It can be used for any purpose by the simulation programmer. It is not used by the simulationkernel, and it is treated as a mere pointer (no memory management is done on it).
Intended purpose: a module which schedules several self-messages (timers) will need toidentify a self-message when it arrives back to the module, ie. the module will have todetermine which timer went off and what to do then. The context pointer can be made topoint at a data structure kept by the module which can carry enough ”context” informationabout the event.
6.3.5 The cPacket class
The cPacket class is derived from cMessage . It is intended as a base for all messages thatmodel packets or frames in a telecommunications network.
cPacket adds two new data members to cMessage : protocol and PDU type (packet, frameor event type). Both are short integers, and are handled by the following member functions:
short protocol();short pdu();setProtocol(short p);setPdu(short p);
Acceptable message kind values are:
• MK_PACKET
• MK_INFO
The cPacket constructor sets the message kind to MK_PACKET. Both MK_PACKETand MK_INFOare defined as negative integers. (Remember, negative message kind values are reserved forthe simulation library.)
The protocol and PDU fields would ideally take a value from the protocol.h header in thesimulation library. The contents of protocol.h is currently experimental; comments andcontributions are welcome.
90
OMNeT++ Manual – The Simulation Library
6.3.6 Attaching parameters and objects
If you want to add parameters or objects to a message, the preferred way to do that is viamessage definitions, described in chapter 7.
Attaching objectsThe cMessage class has an internal cArray object which can carry objects. Only objectsthat are derived from cObject (most OMNeT++ classes are so) can be attached. The addOb-ject() , getObject() , hasObject() , removeObject() methods use the object name asthe key to the array. An example:
cLongHistogram *pklen_distr = new cLongHistogram("pklen_distr");msg->addObject( pklen_distr );...if (msg->hasObject("pklen_distr")){
cLongHistogram *pklen_distr =(cLongHistogram *) msg->getObject("pklen_distr");
...}
You should take care that names of the attached objects do not clash with each other or withcPar parameter names (see next section). If you do not attach anything to the message anddo not call the parList() function, the internal cArray object will not be created. Thissaves both storage and execution time.
You can attach non-object types (or non-cObject objects) to the message by using cPar ’svoid* pointer ’P’) type (see later in the description of cPar ). An example:
struct conn_t *conn = new conn_t; // conn_t is a C structmsg->addPar("conn") = (void *) conn;msg->par("conn").configPointer(NULL,NULL,sizeof(struct conn_t));
Attaching parametersThe old way of attaching parameters is adding cPar objects. There are several downsidesof this approach, the most notable ones being large memory and runtime overhead. It hasbeen reported that using cPar message parameters might account for a large part of exe-cution time, sometimes as much as 80%. (This depends on how many parameters you use.)Therefore it is recommended that you use message definitions 7 which adds the required pa-rameters to the new message class as int , long , bool etc. class members, via subclassing.
However, if you still need to use cPars, here’s a short summary how you can do it. Youadd a new parameter to the message with the addPar() member function, and get back areference to the parameter object with the par() member function. hasPar() tells you ifthe message has a given parameter or not.
Examples:
msg->addPar("dest_addr");msg->par("dest_addr") = 168;
if (msg->hasPar("dest_addr")) {long dest_addr = msg->par("dest_addr");...
}
91
OMNeT++ Manual – The Simulation Library
Message parameters can be accessed also by index in the parameter array. The findPar()function returns the index of a parameter or -1 if the parameter cannot be found. The pa-rameter can then be accessed using an overloaded par() function.
int index = msg->findPar("dest_addr");long dest_addr = msg->par(index);
6.4 Sending and receiving messages
6.4.1 Sending messages
Once the message has been created, it can be sent through an output gate using one of thesefunctions:
send(cMessage *msg, const char *gate_name, int index);send(cMessage *msg, int gate) ;
For the first function, the argument gate_name is the name of the gate the message hasto be sent through. If this gate is a vector gate, index determines though which particularoutput gate this has to be done; otherwise, the index argument is not needed.
The second function uses the gate number and because it does not have to search throughthe gate array, it is faster than the first one.
Examples:
send( new cMessage("token"), "out-gate");send( new cMessage("token"), "vectorgate", i);
int out_gate_id = findGate("out-gate");for (i=0; i<n; i++){
send( new cMessage("packet"), out_gate_id);wait(in_time);
}
All message sending functions check that you actually own the message you are about tosend. If the message is with another module, currently scheduled or in a queue etc., you’llget a runtime error. (The feature does not increase runtime overhead significantly, becauseit uses the object ownership management; it merely checks that the owner of the message isthe module which wants to send it.)
6.4.2 Delayed sending
It is often needed to model a delay (processing time, etc.) immediately followed by messagesending. In OMNeT++, it is possible to implement it like this:
wait( some_delay );send( msg, "outgate" );
If the module needs to react to messages that arrive during the delay, wait() cannot beused and the timer mechanism described in Section 6.4.6, “Self-messages”, would need to beemployed.
92
OMNeT++ Manual – The Simulation Library
However, there is a more straightforward method than the above two, and this is delayedsending. Delayed sending can be done with one of these functions:
sendDelayed(cMessage *msg, double delay, const char *gate_name, int in-dex);sendDelayed(cMessage *msg, double delay, int gate_id);
The arguments are the same as for send() , except for the extra delay parameter. The effectof the function is the same as if the module had kept the message for the delay interval andsent it afterwards. That is, the sending time of the message will be the current simulationtime (time at the sendDelayed() call) plus the delay. The delay value must be nonnegative.
Example:
sendDelayed( new cMessage("token"), 0.005, "out-gate");
6.4.3 Direct message sending
Sometimes it is necessary or convenient to ignore gates/connections and send a messagedirectly to a remote destination module. The sendDirect() function does that, and it takesthe pointer of the remote module (cModule *). You can also specify a delay and an input gateof the destination module.
cModule *destinationmodule =...;double delay = truncnormal(0.005, 0.0001);sendDirect( new cMessage, delay, destinationmodule, "in" );
The destination module receives the message as if it was sent ”normally”.
6.4.4 Receiving messages
With activity() only! The message receiving functions can only be used in the activity()function, handleMessage() gets the messages in its argument list.
A message can be received by a number of functions, the most general one is the receive()function:
cMessage *msg = receive();
Simple module objects contain a built-in queue object called putAsideQueue. The put-asidequeue is used by some of the message-receiving functions.
There are two groups of functions that receive messages:
• receive() , receiveOn()
• receiveNew() , receiveNewOn()
The functions receive() /receiveOn() check the put-aside queue first and try to return amessage from it. Only if they do not find an appropriate message in the put-aside queue, willwait for new messages.
The functions receiveNew() /receiveNewOn() wait for new messages, ignoring the put-aside queue.
Furthermore, the ...On() functions expect messages to arrive on a specific gate. Messagesthat arrive on another gate are inserted into the put-aside queue. The On-less versionsaccept any message.
93
OMNeT++ Manual – The Simulation Library
Since the receive() and receiveOn() return messages also from the put-aside queue,the arrival times of messages they return can be less than the current simulation time. Anaive (and also incorrect) approach to check whether a message is a new one or it has beenretrieved from the putaside-queue could be the following:
cMessage *msg = receive();
if (msg->arrivalTime()<simTime()) // not correct! several events may// occur at the same simulation time
{// handle msg as an old message
}
The correct way to do this is to check the putaside-queue:
bool queue_was_empty = putAsideQueue.empty();cMessage *msg = receive();
if (!queue_was_empty){
// handle msg as an old message}
To discard the contents of the put-aside queue, one could use the following code:
while (!putAsideQueue.empty())delete receive();
To demonstrate receiveOn() , the following code fragment waits for a message on one spe-cific input gate and discards all messages that arrived on other gates in the meanwhile:
cMessage *msg = receiveNewOn("important_input_gate");while (!putAsideQueue.empty())
delete receive();
The above code is almost equivalent to the following, except that it preserves the previouscontents of the put-aside queue:
cMessage *msg;for(;;){
msg = receiveNew();if (msg->arrivedOn("important_input_gate"))
break;delete msg;
}
All message receiving functions can be given a timeout value. (This is a delta, not an absolutesimulation time.) If an appropriate message doesn’t arrive within the timeout period, thefunction returns a NULL pointer. An example:
simtime_t timeout = 3.0;
94

OMNeT++ Manual – The Simulation Library
cMessage *msg = receive( timeout );
if (msg=NULL)// timeout expired without any messages
else// process message
6.4.5 The wait() function
With activity() only! The wait() function’s implementation contains a receive() callwhich cannot be used in handleMessage() .
The wait() function suspends the execution of the module for a given amount of simulationtime (a delta), regardless whether messages arrive at the module in the meanwhile or not:
wait( delay_interval );
In other simulation software, wait() is often called hold. Internally, the wait() functionis implemented by a scheduleAt() followed by a receive() . The wait() function is veryconvenient in modules that do not need to be prepared for arriving messages, for examplemessage generators. An example:
for(;;){
wait( par("interarrival-time") );// generate and send message
}
The messages that arrived during the wait() call will accumulate in the putaside-queue.The putaside-queue can be examined directly (an example was shown in the previous sec-tion), and its contents is also retrieved by the receive() or receiveOn() functions.
6.4.6 Self-messages
The module can send a message to itself using the scheduleAt() function:
scheduleAt( time, msg );
scheduleAt() accepts an absolute simulation time (usually simTime() +something). Mes-sages sent via scheduleAt() are called self-messages, and in OMNeT++ they are used tomodel events which occur within the module. Self-messages are delivered to the module inthe same way as other messages (via the usual receive calls or handleMessage() ); the mod-ule may call the isSelfMessage() member of any received message to determine if it is aself-message.
Before self-messages are delivered, they can be cancelled (removed from the FES). This isparticularly useful because self-messages are often used to model timers.
cancelEvent( msg );
The cancelEvent() function takes a pointer to the message to be cancelled, and also re-turns the same pointer. After having it cancelled, you may delete the message or reuse it in
95
OMNeT++ Manual – The Simulation Library
the next scheduleAt() calls. cancelEvent() gives an error if the message is not in theFES.
The following example shows how to implement timers:
cMessage *timeout_msg = new cMessage;
scheduleAt( simTime()+10.0, timeout_msg );//...
cMessage *msg = receive();if (msg == timeout_msg){
// timeout expired}else{
// other message has arrived, timer can be cancelled now:delete cancelEvent( timeout_msg );
}
You can determine if a message is currently in the FES by calling its isScheduled() mem-ber:
if (msg->isScheduled())delete cancelEvent(msg);
else...
An advanced version of the above code which also checks the put-aside queue:
if (msg->isScheduled())delete cancelEvent(msg);
else if (putAsideQueue.contains(msg))delete putAsideQueue.remove(msg);
else...
6.4.7 Querying the state of an output gate
You may have reasons to check whether a certain output gate is transmitting or to learnwhen it will finish transmission. This is done with gate object’s isBusy() and trans-missionFinishes() member functions. The latter function, transmissionFinishes()returns the time when the gate will finish its current transmission or (if it is currently free)when it finished its last transmission.
An example:
cMessage *packet = new cMessage("DATA");packet->setLength( 1000 );
if (gate("TxGate")->isBusy()) // if gate is busy, wait until it{ // becomes free
wait( gate("TxGate")->transmissionFinishes() - simTime());
96
OMNeT++ Manual – The Simulation Library
}send( packet, ’’TxGate’’);
If the connection with a data rate is not immediately the one connected to the simple mod-ule’s output gate but the second one in the route, you have to check the second gate’s busycondition. You would use the following code:
if (gate("mygate")->toGate()->isBusy())//...
Note that if data rates change during the simulation, the changes will affect only the mes-sages that are sent after the change.
6.4.8 Stopping the simulation
Normal terminationYou can finish the simulation with the endSimulation() function:
endSimulation() ;
However, typically you don’t need endSimulation() because you can specify simulationtime and CPU time limits in the ini file (see later).
Stopping on errorsIf your simulation detects an error condition and wants to stop the simulation, you can do itwith the error() member function of cModule . It is used like printf() :
if (windowSize<1)error("Invalid window size %d; must be >=1", windowSize);
Do not include a newline (”\n”) or punctuation (period or exclamation mark) in the printed-out text, it will be added by OMNeT++.
6.5 Accessing module parameters and gates
6.5.1 Module parameters
Module parameters can be accessed with the par() member function of cModule :
cPar& delay_par = par("delay");
The cPar class is a general value-storing object. It supports type casts to numeric types, soparameter values can be read like this:
int num_tasks = par("num_tasks");double proc_delay = par("proc_delay");
If the parameter is a random variable or its value can change during execution, it is best tostore a reference to it and re-read the value each time it is needed:
97
OMNeT++ Manual – The Simulation Library
cPar& wait_time = par("wait_time");for(;;){
//...wait( (simtime_t)wait_time );
}
If the wait_time parameter was given a random value (e.g. exponential(1.0)) in the NEDsource or the ini file, the above code results in a different delay each time.
Parameter values can also be changed from the program, during execution. If the param-eter was taken by reference (with a ref modifier in the NED file), other modules will alsosee the change. Thus, parameters taken by reference can be used as a means of modulecommunication.
An example:
par("wait_time") = 0.12;
Or:
cPar& wait_time = par("wait_time");wait_time = 0.12;
See cPar explanation later in this manual for further information on how to change a cPar ’svalue.
6.5.2 Gates and links
Gate objectsModule gates are cGate objects. Gate objects know whether and to which gate they areconnected, and they can be asked about the parameters of the link (delay, data rate, etc.)
The gate() member function of cModule returns a pointer to a cGate object, and an over-loaded form of the function lets you to access elements of a vector gate:
cGate *outgate = gate("out");cGate *outvec5gate = gate("outvec",5);
For gate vectors, the first form returns the first gate in the vector (at index 0).
The isVector() member function can be used to determine if a gate belongs to a gate vectoror not. But this is almost insignificant, because non-vector gates are treated as vectors withsize 1.
Given a gate pointer, you can use the size() and index() member functions of cGate todetermine the size of the gate vector and the index of the gate within the vector:
int size2 = outvec5gate->size(); // --> size of outvec[]int index = outvec5gate->index(); // --> 5 (it is gate 5 in the vector)
For non-vector gates, size() returns 1 and index() returns 0.
The type() member function returns a character, ’I’ for input gates and ’O’ for output gates:
char type = outgate->type() // --> ’O’
98
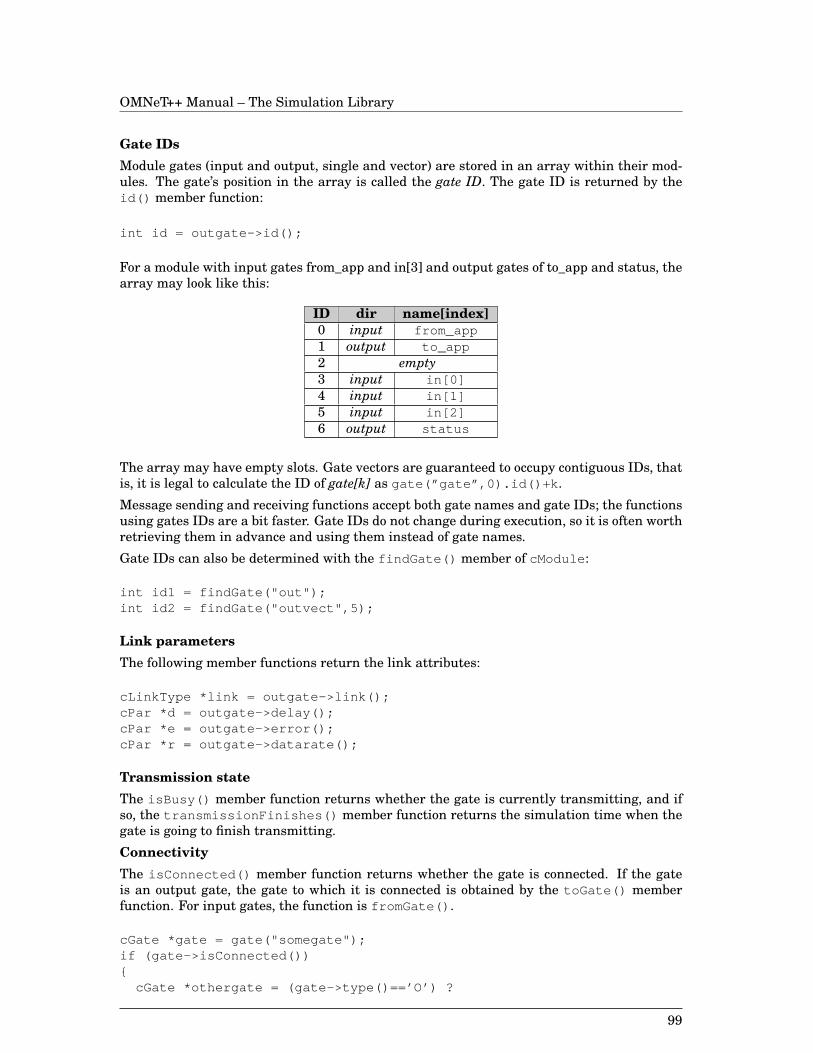
OMNeT++ Manual – The Simulation Library
Gate IDsModule gates (input and output, single and vector) are stored in an array within their mod-ules. The gate’s position in the array is called the gate ID. The gate ID is returned by theid() member function:
int id = outgate->id();
For a module with input gates from_app and in[3] and output gates of to_app and status, thearray may look like this:
ID dir name[index]0 input from_app1 output to_app2 empty3 input in[0]4 input in[1]5 input in[2]6 output status
The array may have empty slots. Gate vectors are guaranteed to occupy contiguous IDs, thatis, it is legal to calculate the ID of gate[k] as gate(”gate”,0).id()+k .
Message sending and receiving functions accept both gate names and gate IDs; the functionsusing gates IDs are a bit faster. Gate IDs do not change during execution, so it is often worthretrieving them in advance and using them instead of gate names.
Gate IDs can also be determined with the findGate() member of cModule :
int id1 = findGate("out");int id2 = findGate("outvect",5);
Link parametersThe following member functions return the link attributes:
cLinkType *link = outgate->link();cPar *d = outgate->delay();cPar *e = outgate->error();cPar *r = outgate->datarate();
Transmission stateThe isBusy() member function returns whether the gate is currently transmitting, and ifso, the transmissionFinishes() member function returns the simulation time when thegate is going to finish transmitting.
ConnectivityThe isConnected() member function returns whether the gate is connected. If the gateis an output gate, the gate to which it is connected is obtained by the toGate() memberfunction. For input gates, the function is fromGate() .
cGate *gate = gate("somegate");if (gate->isConnected()){
cGate *othergate = (gate->type()==’O’) ?
99

OMNeT++ Manual – The Simulation Library
gate->toGate() : gate->fromGate();
ev << "gate is connected to: " << othergate->fullPath() << endl;}else{
ev << "gate not connected" << endl;}
An alternative to isConnected() is to check the return value of toGate() or fromGate() .The following code is fully equivalent to the one above:
cGate *gate = gate("somegate");cGate *othergate = (gate->type()==’O’) ?
gate->toGate() : gate->fromGate();if (othergate)
ev << "gate is connected to: " << othergate->fullPath() << endl;else
ev << "gate not connected" << endl;
To find out to which simple module a given output gate leads finally, you would have to walkalong the path like this (the ownerModule() member function returns the module to whichthe gate belongs):
cGate *gate = gate("out");while (gate->toGate()!=NULL){
gate = gate->toGate();}
cModule *destmod = gate->ownerModule();
but luckily, there are two convenience functions which do that: sourceGate() and desti-nationGate() .
6.6 Walking the module hierarchy
Module vectorsIf a module is part of a module vector, the index() and size() member functions can beused to query its index and the vector size:
ev << "This is module [" << module->index() <<"] in a vector of size [" << module->size() << "].\n";
Module IDsEach module in the network has a unique ID that is returned by the id() member function.The module ID is used internally by the simulation kernel to identify modules.
int myModuleId = id();
If you know the module ID, you can ask the simulation object (a global variable) to get backthe module pointer:
100
OMNeT++ Manual – The Simulation Library
int id = 100;cModule *mod = simulation.module( id );
Module IDs are guaranteed to be unique, even when modules are created and destroyeddynamically. That is, an ID which once belonged to a module which was deleted is neverissued to another module later.
Walking up and down the module hierarchyThe surrounding compound module can be accessed by the parentModule() member func-tion:
cModule *parent = parentModule();
For example, the parameters of the parent module are accessed like this:
double timeout = parentModule()->par( "timeout" );
cModule ’s findSubmodule() and submodule() member functions make it possible to lookup the module’s submodules by name (or name+index if the submodule is in a module vector).The first one returns the numeric module ID of the submodule, and the latter returns themodule pointer. If the submodule is not found, they return -1 or NULL, respectively.
int submodID = compoundmod->findSubmodule("child",5);cModule *submod = compoundmod->submodule("child",5);
The moduleByRelativePath() member function can be used to find a submodule nesteddeeper than one level below. For example,
compoundmod->moduleByRelativePath("child[5].grandchild");
would give the same results as
compoundmod->submodule("child",5)->submodule("grandchild");
(Provided that child[5] does exist, because otherwise the second version will crash with anaccess violation because of the NULL pointer.)
The cSimulation ::moduleByPath() function is similar to cModule ’s moduleByRelative-Path() function, and it starts the search at the top-level module.
Iterating over submodulesTo access all modules within a compound module, use cSubModIterator .
For example:
for (cSubModIterator iter(*parentModule()); !iter.end(); iter++){
ev << iter()->fullName();}
(iter() is pointer to the current module the iterator is at.)
The above method can also be used to iterate along a module vector, since the name() func-tion returns the same for all modules:
101
OMNeT++ Manual – The Simulation Library
for (cSubModIterator iter(*parentModule()); !iter.end(); iter++){
if (iter()->isName(name())) // if iter() is in the same// vector as this module
{int its_index = iter()->index();// do something to it
}}
Walking along linksTo determine the module at the other end of a connection, use cGate ’s fromGate() , to-Gate() and ownerModule() functions. For example:
cModule *neighbour = gate( "outputgate" )->toGate()->ownerModule();
For input gates, you would use fromGate() instead of toGate() .
6.7 Dynamic module creation
WhyIf you do not know how many modules you’ll need, you can create modules dynamically anddispose of them when they are no longer needed. Both simple and compound modules can becreated this way. If you create a compound module dynamically, all its submodules will berecursively built.
Let’s suppose you are implementing a transport protocol for a computer network model. It isconvenient to have a separate module to handle each connection. However, there’s no way toknow how many connections there’ll be simultaneously. The solution is to create a managermodule which receives connection requests and creates a module for each connection. TheDyna example simulation does something like this.
It is often convenient to use direct message sending with dynamically created modules.
OverviewTo understand how dynamic module creation works, you have to know a bit about how nor-mally OMNeT++ instantiates modules. Each module type (class) has a corresponding de-scription object of the class cModuleType . This object is created under the hood by theDefine_Module() macro, and it has a factory function which can instantiate the moduleclass (this function basically only consists of a return new module-class(...) statement).
The cModuleType object can be looked up by its name string (which is the same as themodule class name). Once you have its pointer, it’s possible to call its factory method andcreate an instance of the corresponding module class – without having to include the module’sclass declaration into your C++ file.
The cModuleType object also knows what gates and parameters the given module type hasto have. (This info comes from compiled NED code.)
Simple modules can be created in one step. For a compound module, the situation is morecomplicated, because its internal structure (submodules, connections) may depend on param-eter values and gate vector sizes. Thus, for compound modules it is generally required to setparameter values and gate vector sizes after creation of the module itself, but before creatingits submodules and internal connections.
102
OMNeT++ Manual – The Simulation Library
As you know already, simple modules with activity() need a starter message. For stati-cally created modules, this message is created automatically by OMNeT++, but for dynami-cally created modules, you have to do this explicitly by calling the appropriate functions.
Calling initialize() has to take place after insertion of the stater messages, becausethe initializing code may insert new messages into the FES, and these messages should beprocessed after the starter message.
cModuleType *moduleType = findModuleType("TCPConnectionHandler");
Simple formMainly for creating simple modules.
cModuleType has createScheduleInit(const char *name, cModule *parentmod)convenience function to get a module up and running in one step.
mod = modtype->createScheduleInit("name",this);
It does create() + buildInside() + callInitialize() + scheduleStart(now) .
Should work for both simple and compound modules.
This method is not applicable if the module:
• has parameters to be set
• has gate vector sizes to be set
• has gates to be connected before initialize()
Expanded formIf the previous simple form cannot be used. There are 5 steps:
1. find descriptor object
2. create module
3. set up parameters and gate sizes (if needed)
4. call function that builds out submodules and finalizes the module
5. call function that creates activation message(s) for the new simple module(s)
Each step (except for Step 3.) can be done with one line of code.
See the following example where Step 3. is omitted:
// find descriptor objectcModuleType *moduleType = findModuleType("TCPConnectionHandler");// create (possibly compound) module and build its submodules (if any)cModule *module = moduleType->create( "TCPconn", this );module->buildInside();// create activation messagemodule->scheduleStart( simTime() );
If you want to set up parameter values or gate vector sizes (Step 3.), the code goes betweenthe create() and buildInside() calls:
103
OMNeT++ Manual – The Simulation Library
cModuleType *moduleType = findModuleType("TCP-conn-handler");cModule *module = moduleType->create( "TCPconn", this );// set up parameters and gate sizes before we set up its submodulesmodule->par("window-size") = 4096;module->setGateSize("to-apps", 3);module->buildInside();module->scheduleStart( simTime() );
DeletingTo delete a module dynamically:
module->deleteModule();
If the module was a compound module, this involves recursively destroying all its submod-ules. A simple module can also delete itself; in this case, if the module was implementedusing activity() , the deleteModule() call does not return to the caller (the reason isthat deleting the module also deletes the CPU stack of the coroutine).
Currently, you cannot safely delete a compound module from a simple module in it; you mustdelegate the job to a module outside the compound module.
Creating connectionsThere are two connect() -functions that you can use to connect gates. For a normal user,they are useful for creating connections to dynamically created modules.
connect( cModule *src_module, int src_gatenumber,cLinkType *channeltype,cModule *dest_module, int dest_gatenumber );
connect( cModule *src_module, int src_gatenumber,cPar *delay, cPar *error, cPar *datarate,cModule *dest_module, int dest_gatenumber );
Any of the channeltype, delay, error and datarate pointers can be NULL.
An example:
connect( this, findGate("out"),(cLinkType *)NULL,module, module->findGate("in",0) );
6.8 Routing support: cTopology
6.8.1 Overview
The cTopology class was designed primarily to support routing in telecommunication ormultiprocessor networks.
A cTopology object stores an abstract representation of the network in graph form:
• each cTopology node corresponds to a module (simple or compound), and
• each cTopology edge corresponds to a link or series of connecting links.
104
OMNeT++ Manual – The Simulation Library
You can specify which modules (either simple or compound) you want to include in the graph.The graph will include all connections among the selected modules. In the graph, all nodesare at the same level, there’s no submodule nesting. Connections which span across com-pound module boundaries are also represented as one graph edge. Graph edges are directed,just as module gates are.
If you’re writing a router or switch model, the cTopology graph can help you determinewhat nodes are available through which gate and also to find optimal routes. The cTopologyobject can calculate shortest paths between nodes for you.
The mapping between the graph (nodes, edges) and network model (modules, gates, connec-tions) is preserved: you can easily find the corresponding module for a cTopology node andvica versa.
6.8.2 Basic usage
You can extract the network topology into a cTopology object by a single function call. Youhave several ways to select which modules you want to include in the topology:
• by module type
• by a parameter’s presence and its value
• with a user-supplied boolean function
First, you can specify which node types you want to include. The following code extracts allmodules of type Router or User. (Router and User can be both simple and compound moduletypes.)
cTopology topo;topo.extractByModuleType( "Router", "User", NULL );
Any number of module types (up to 32) can be supplied; the list must be terminated byNULL.
Second, you can extract all modules which have a certain parameter:
topo.extractByParameter( "ip_address" );
You can also specify that the parameter must have a certain value for the module to beincluded in the graph:
cPar yes = "yes";topo.extractByParameter( "include_in_topo", &yes );
The third form allows you to pass a function which can determine for each module whetherit should or should not be included. You can have cTopology pass supplemental data to thefunction through a void* pointer. An example which selects all top-level modules (and doesnot use the void* pointer):
int select_function(cModule *mod, void *){
return mod->parentModule() == simulation.systemModule();}
topo.extractFromNetwork( select_function, NULL );
105
OMNeT++ Manual – The Simulation Library
A cTopology object uses two types: sTopoNode for nodes and sTopoLink for edges. (sTopo-LinkIn and sTopoLinkOut are ’aliases’ for sTopoLink ; we’ll speak about them later.)
Once you have the topology extracted, you can start exploring it. Consider the following code(we’ll explain it shortly):
for (int i=0; i<topo.nodes(); i++){
sTopoNode *node = topo.node(i);ev << "Node i=" << i << " is " << node->module()->fullPath() << endl;ev << " It has " << node->outLinks() << " conns to other nodes\n";ev << " and " << node->inLinks() << " conns from other nodes\n";
ev << " Connections to other modules are:\n";for (int j=0; j<node->outLinks(); j++){
sTopoNode *neighbour = node->out(j)->remoteNode();cGate *gate = node->out(j)->localGate();ev << " " << neighbour->module()->fullPath()
<< " through gate " << gate->fullName() << endl;}
}
The nodes() member function (1st line) returns the number of nodes in the graph, andnode(i) returns a pointer to the ith node, an sTopoNode structure.
The correspondence between a graph node and a module can be obtained by:
sTopoNode *node = topo.nodeFor( module );cModule *module = node->module();
The nodeFor() member function returns a pointer to the graph node for a given module. (Ifthe module is not in the graph, it returns NULL). nodeFor() uses binary search within thecTopology object so it is fast enough.
sTopoNode ’s other member functions let you determine the connections of this node: in-Links() , outLinks() return the number of connections, in(i) and out(i) return point-ers to graph edge objects.
By calling member functions of the graph edge object, you can determine the modules andgates involved. The remoteNode() function returns the other end of the connection, and lo-calGate() , remoteGate() , localGateId() and remoteGateId() return the gate point-ers and ids of the gates involved. (Actually, the implementation is a bit tricky here: the samegraph edge object sTopoLink is returned either as sTopoLinkIn or as sTopoLinkOut sothat ”remote” and ”local” can be correctly interpreted for edges of both directions.)
6.8.3 Shortest paths
The real power of cTopology is in finding shortest paths in the network to support optimalrouting. cTopology finds shortest paths from all nodes to a target node. The algorithm iscomputationally inexpensive. In the simplest case, all edges are assumed to have the sameweight.
A real-life example when we have the target module pointer, finding the shortest path lookslike this:
106
OMNeT++ Manual – The Simulation Library
cModule *targetmodulep =...;sTopoNode *targetnode = topo.nodeFor( targetmodulep );topo.unweightedSingleShortestPathsTo( targetnode );
This performs the Dijkstra algorithm and stores the result in the cTopology object. Theresult can then be extracted using cTopology and sTopoNode methods. Naturally, each callto unweightedSingleShortestPathsTo() overwrites the results of the previous call.
Walking along the path from our module to the target node:
sTopoNode *node = topo.nodeFor( this );
if (node == NULL){
ev < "We (" << fullPath() << ") are not included in the topology.\n";}else if (node->paths()==0){
ev << "No path to destination.\n";}else{
while (node != topo.targetNode()){
ev << "We are in " << node->module()->fullPath() << endl;ev << node->distanceToTarget() << " hops to go\n";ev << "There are " << node->paths()
<< " equally good directions, taking the first one\n";sTopoLinkOut *path = node-\texttt{>}path(0);ev << "Taking gate " << path->localGate()->fullName()
<< " we arrive in " << path->remoteNode()->module()->fullPath()<< " on its gate " << path->remoteGate()->fullName() << endl;
node = path->remoteNode();}
}
The purpose of the distanceToTarget() member function of a node is self-explanatory. Inthe unweighted case, it returns the number of hops. The paths() member function returnsthe number of edges which are part of a shortest path, and path(i) returns the ith edge ofthem as sTopoLinkOut . If the shortest paths were created by the ...SingleShortest-Paths() function, paths() will always return 1 (or 0 if the target is not reachable), thatis, only one of the several possible shortest paths are found. The ...MultiShortestPath-sTo() functions find all paths, at increased run-time cost. The cTopology ’s targetNode()function returns the target node of the last shortest path search.
You can enable/disable nodes or edges in the graph. This is done by calling their enable()or disable() member functions. Disabled nodes or edges are ignored by the shortest pathscalculation algorithm. The enabled() member function returns the state of a node or edgein the topology graph.
One usage of disable() is when you want to determine in how many hops the target nodecan be reached from our node through a particular output gate. To calculate this, you calcu-late the shortest paths to the target from the neighbor node, but you must disable the currentnode to prevent the shortest paths from going through it:
sTopoNode *thisnode = topo.nodeFor( this );
107
OMNeT++ Manual – The Simulation Library
thisnode->disable();topo.unweightedSingleShortestPathsTo( targetnode );thisnode->enable();
for (int j=0; j<thisnode->outLinks(); j++){
sTopoLinkOut *link = thisnode->out(i);ev << "Through gate " << link->localGate()->fullName() << " : "
<< 1 + link->remoteNode()->distanceToTarget() << " hops" << endl;}
In the future, other shortest path algorithms will also be implemented:
unweightedMultiShortestPathsTo(sTopoNode *target);weightedSingleShortestPathsTo(sTopoNode *target);weightedMultiShortestPathsTo(sTopoNode *target);
6.9 Generating random numbers
6.9.1 Random number generators
Having high quality random numbers is usually very important in simulation programs. Therandom number generator used in OMNeT++ is a linear congruential generator (LCG) with acycle length of 231−2. The startup code of OMNeT++ contains code that checks if the randomnumber generator works OK, so you do not have to worry about this if you port the simulatorto a new architecture or use a different compiler.
If a simulation program uses random numbers for more than one purpose, the numbersshould come from different random number generators. OMNeT++ provides several indepen-dent random number generators (by default 32; this number is #defined as NUM_RANDOM_GE-NERATORSin utils.h).
To avoid unwanted correlation, it is also important that different simulation runs and differ-ent random number sources within one simulation run use non-overlapping series of randomnumbers, so the generators should be started with seeds well apart. For selecting good seeds,the seedtool program can be used (it is documented later).
The random number generator was taken from [JAIN91, pp. 441-444,455]. It has the follow-ing properties:
• Range: 1...231 − 2
• Period length: 231 − 2
• Method: x := (x ∗ 75)mod(231 − 1)
• To check: if x[0] = 1 then x[10000] = 1, 043, 618, 065
• Required hardware: exactly 32-bit integer arithmetics
The concrete implementation:
long intrand(){
const long int a=16807, q=127773, r=2836;
108
OMNeT++ Manual – The Simulation Library
seed=a*(seed%q) - r*(seed/q);if (seed<=0) seed+=INTRAND_MAX;return seed;
}
The generator is directly accessible through the intrand() function:
long rnd = intrand(); // in the range 1..INTRAND\_MAX-1
The random number seed can be specified in the ini file (random-seed= ) or set directly fromwithin simple modules with the randseed() function:
randseed( 10 ); // set seed to 10long seed = randseed(); // current seed value
Zero is not allowed as a seed.
The intrand() and randseed() functions use generator 0. They have another variantwhich uses a specified generator:
long rnd = genk_intrand(6); // like intrand(), using generator 6genk_randseed( k, 167 ); // set seed of generator k to 167
The intrand(n) and dblrand() functions are based on intrand() :
int dice = 1 + intrand(6); // result of intrand(6) is in the range 0..5// (it is calculated as intrand()%6)
double prob = dblrand(); // dblrand() produces numbers in [0,1)// calculated as// intrand()/(double)INTRAND_MAX
They also have their counterparts that use generator k:
int dice = 1 + genk_intrand(k,6); // uses generator kdouble prob = genk_dblrand(k); // ""
6.9.2 Random variates
The following functions are based on dblrand() and return random variables of differentdistributions:
Random variate functions use one of the random number generators (RNGs) provided byOMNeT++. By default this is generator 0, but you can specify which one to be used.
OMNeT++ has the following predefined distributions:
Function DescriptionContinuous distributions
uniform(a, b, rng=0 ) uniform distribution in the range [a,b)exponential(mean, rng=0 ) exponential distribution with the given meannormal(mean, stddev, rng=0 ) normal distribution with the given mean and
standard deviation
109
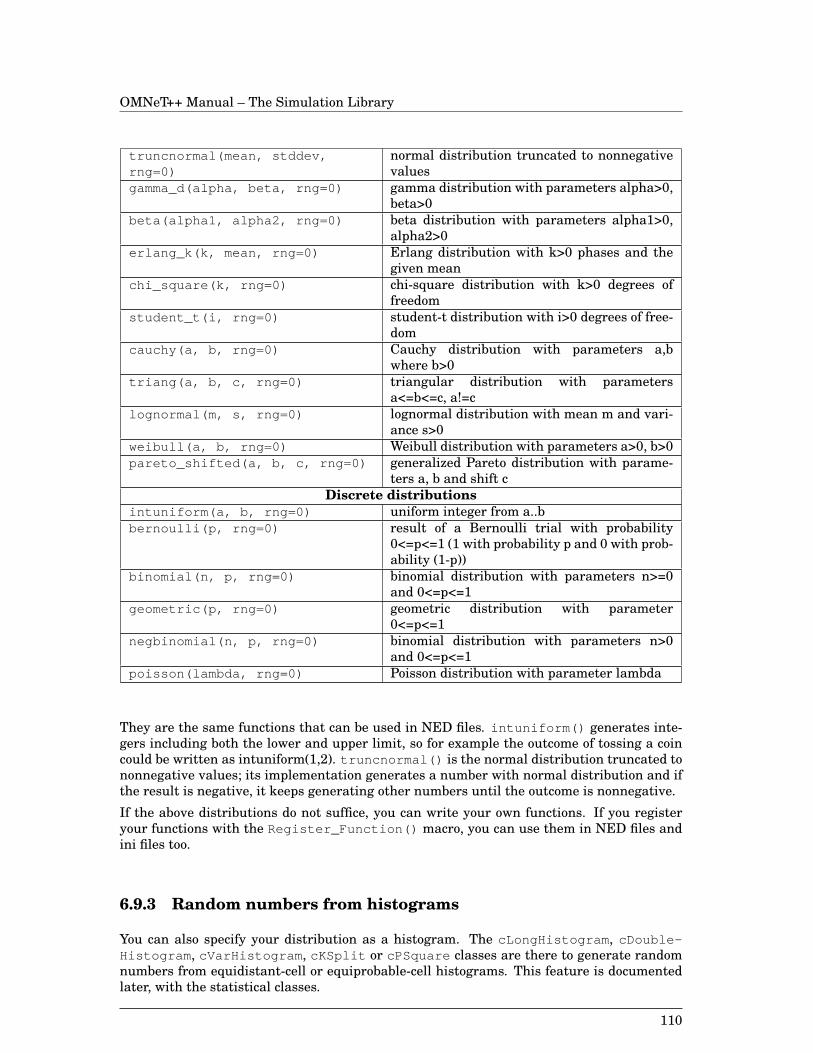
OMNeT++ Manual – The Simulation Library
truncnormal(mean, stddev,rng=0 )
normal distribution truncated to nonnegativevalues
gamma_d(alpha, beta, rng=0 ) gamma distribution with parameters alpha>0,beta>0
beta(alpha1, alpha2, rng=0 ) beta distribution with parameters alpha1>0,alpha2>0
erlang_k(k, mean, rng=0 ) Erlang distribution with k>0 phases and thegiven mean
chi_square(k, rng=0 ) chi-square distribution with k>0 degrees offreedom
student_t(i, rng=0 ) student-t distribution with i>0 degrees of free-dom
cauchy(a, b, rng=0 ) Cauchy distribution with parameters a,bwhere b>0
triang(a, b, c, rng=0 ) triangular distribution with parametersa<=b<=c, a!=c
lognormal(m, s, rng=0) lognormal distribution with mean m and vari-ance s>0
weibull(a, b, rng=0 ) Weibull distribution with parameters a>0, b>0pareto_shifted(a, b, c, rng=0 ) generalized Pareto distribution with parame-
ters a, b and shift cDiscrete distributions
intuniform(a, b, rng=0 ) uniform integer from a..bbernoulli(p, rng=0 ) result of a Bernoulli trial with probability
0<=p<=1 (1 with probability p and 0 with prob-ability (1-p))
binomial(n, p, rng=0 ) binomial distribution with parameters n>=0and 0<=p<=1
geometric(p, rng=0 ) geometric distribution with parameter0<=p<=1
negbinomial(n, p, rng=0 ) binomial distribution with parameters n>0and 0<=p<=1
poisson(lambda, rng=0 ) Poisson distribution with parameter lambda
They are the same functions that can be used in NED files. intuniform() generates inte-gers including both the lower and upper limit, so for example the outcome of tossing a coincould be written as intuniform(1,2). truncnormal() is the normal distribution truncated tononnegative values; its implementation generates a number with normal distribution and ifthe result is negative, it keeps generating other numbers until the outcome is nonnegative.
If the above distributions do not suffice, you can write your own functions. If you registeryour functions with the Register_Function() macro, you can use them in NED files andini files too.
6.9.3 Random numbers from histograms
You can also specify your distribution as a histogram. The cLongHistogram , cDouble-Histogram , cVarHistogram , cKSplit or cPSquare classes are there to generate randomnumbers from equidistant-cell or equiprobable-cell histograms. This feature is documentedlater, with the statistical classes.
110
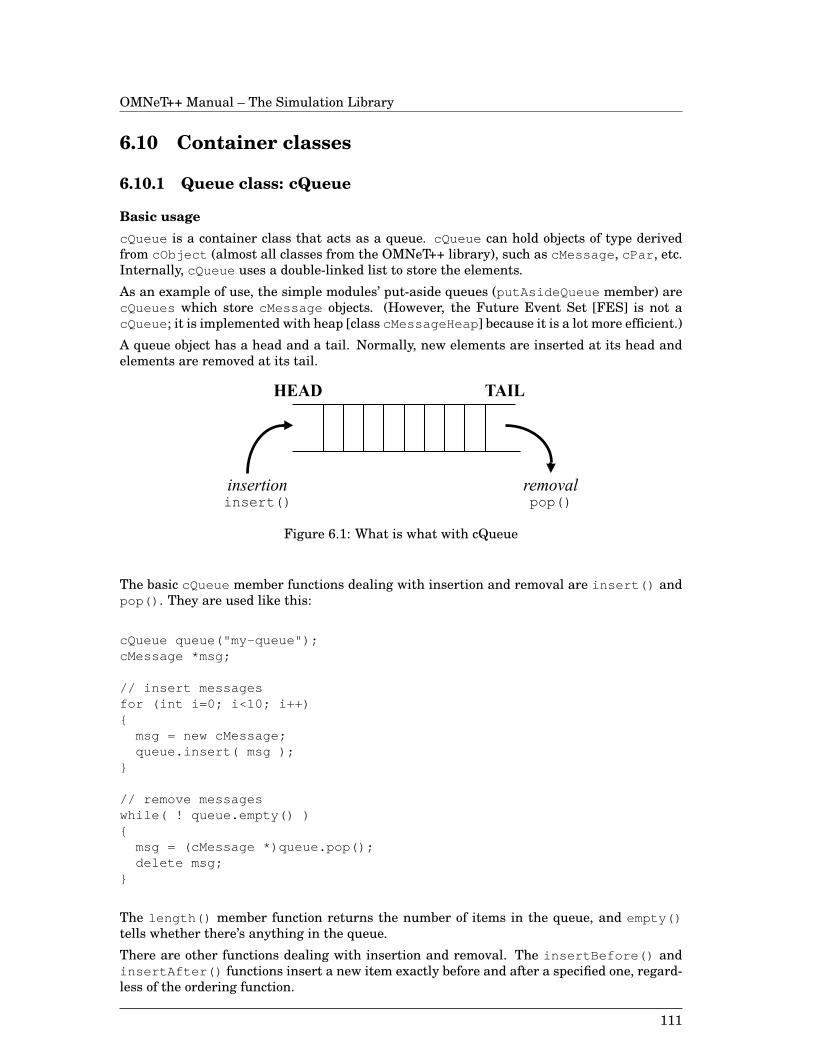
OMNeT++ Manual – The Simulation Library
6.10 Container classes
6.10.1 Queue class: cQueue
Basic usagecQueue is a container class that acts as a queue. cQueue can hold objects of type derivedfrom cObject (almost all classes from the OMNeT++ library), such as cMessage , cPar , etc.Internally, cQueue uses a double-linked list to store the elements.
As an example of use, the simple modules’ put-aside queues (putAsideQueue member) arecQueues which store cMessage objects. (However, the Future Event Set [FES] is not acQueue ; it is implemented with heap [class cMessageHeap ] because it is a lot more efficient.)
A queue object has a head and a tail. Normally, new elements are inserted at its head andelements are removed at its tail.
Figure 6.1: What is what with cQueue
The basic cQueue member functions dealing with insertion and removal are insert() andpop() . They are used like this:
cQueue queue("my-queue");cMessage *msg;
// insert messagesfor (int i=0; i<10; i++){
msg = new cMessage;queue.insert( msg );
}
// remove messageswhile( ! queue.empty() ){
msg = (cMessage *)queue.pop();delete msg;
}
The length() member function returns the number of items in the queue, and empty()tells whether there’s anything in the queue.
There are other functions dealing with insertion and removal. The insertBefore() andinsertAfter() functions insert a new item exactly before and after a specified one, regard-less of the ordering function.
111
OMNeT++ Manual – The Simulation Library
The tail() and head() functions return pointers to the objects at the tail and head of thequeue, without affecting queue contents.
The pop() function can be used to remove items from the tail of the queue, and the re-move() function can be used to remove any item known by its pointer from the queue:
queue.remove( msg );
Priority queueBy default, cQueue implements a FIFO, but it can also act as a priority queue, that is, itcan keep the inserted objects ordered. If you want to use this feature, you have to provide afunction that takes two cObject pointers, compares the two objects and returns -1, 0 or 1 asthe result (see the reference for details). An example of setting up an ordered cQueue :
cQueue sortedqueue("sortedqueue", cObject::cmpbyname, true );// sorted by object name, ascending
If the queue object is set up as an ordered queue, the insert() function uses the orderingfunction: it searches the queue contents from the head until it reaches the position wherethe new item needs to be inserted, and inserts it there.
IteratorsNormally, you can only access the objects at the head or tail of the queue. However, if youuse an iterator class, cQueueIterator , you can examine each object in the queue.
The cQueueIterator constructor takes two arguments, the first is the queue object and thesecond one specifies the initial position of the iterator: 0=tail, 1=head. Otherwise it acts asany other OMNeT++ iterator class: you can use the ++ and – operators to advance it, the ()operator to get a pointer to the current item, and the end() member function to examine ifyou’re at the end (or the beginning) of the queue.
An example:
for( cQueueIterator iter(queue,1); !iter.end(), iter++){
cMessage *msg = (cMessage *) iter();//...
}
6.10.2 Expandable array: cArray
Basic usagecArray is a container class that holds objects derived from cObject . cArray stores thepointers of the objects inserted instead of making copies. cArray works as an array, butif it gets full, it grows automatically. Internally, cArray is implemented with an array ofpointers; if the array gets full, it is reallocated.
cArray objects are used in OMNeT++ to store parameters attached to messages, and inter-nally, for storing module parameters and gates.
Creating an array:
cArray array("array");
Adding an object at the first free index:
cPar *p = new cPar("par");int index = array.add( p );
112
OMNeT++ Manual – The Simulation Library
Adding an object at a given index (if the index is occupied, you’ll get an error message):
cPar *p = new cPar("par");int index = array.addAt(5,p);
Finding an object in the array:
int index = array.find(p);
Getting a pointer to an object at a given index:
cPar *p = (cPar *) array[index];
You can also search the array or get a pointer to an object by the object’s name:
int index = array.find("par");Par *p = (cPar *) array["par"];
You can remove an object from the array by calling remove() with the object name, theindex position or the object pointer:
array.remove("par");array.remove(index);array.remove( p );
The remove() function doesn’t deallocate the object, but it returns the object pointer. If youalso want to deallocate it, you can write:
delete array.remove( index );
IterationcArray has no iterator, but it’s easy to loop through all the indices with an integer variable.The items() member function returns the largest index plus one.
for (int i=0; i<array.items(); i++){
if (array[i]) // is this position used?{
cObject *obj = array[i];ev << obj->name() << endl;
}}
6.11 Non-object container classes
There are two container classes to store non-object items: cLinkedList and cBag . The firstone parallels with cQueue , the second one with cArray . They can be useful if you have todeal with C structs or objects that are not derived from cObject .
See the class library reference for more info about them.
113

OMNeT++ Manual – The Simulation Library
6.12 The parameter class: cPar
6.12.1 Basic usage
cPar is a class that is designed to hold a value. The value is numeric (long or double) in thefirst place, but string, pointer and other types are also supported.
cPar is used in OMNeT++ in the following places:
• as module parameters
• as message parameters
There are many ways to set a cPar ’s value. One is the set...Value() member functions:
cPar pp("pp");pp.setDoubleValue(1.0);
or by using overloaded operators:
cPar pp("pp");pp = 1.0;
For reading its value, it is best to use overloaded type cast operators:
double d1 = (double)pp;// or simply:double d2 = pp;
Long integers:
pp = 89363L; // or:pp.setLongValue( 89363L );
Character string:
pp = "hi there"; // or:pp.setStringValue( "hi there" );
The cPar object makes its own copy of the string, so the original one does not need to bepreserved. Short strings (less than ∼20 chars) are handled more efficiently because they arestored in the object’s memory space (and are not dynamically allocated).
There are several other types cPar can store: such as boolean, void* pointer; cObject*pointer, function with constant args; they will be mentioned in the next section.
For numeric and string types, an input flag can be set. In this case, when the object’s valueis first used, the parameter value will be searched for in the configuration (ini) file; if it is notfound there, the user will be given a chance to enter the value interactively.
Examples:
cPar inp("inp");inp.setPrompt("Enter my value:");inp.setInput( true ); // make it an input parameterdouble a = (double)inp; // the user will be prompted HERE
114
OMNeT++ Manual – The Simulation Library
6.12.2 Random number generation through cPar
Setting cPar to call a function with constant arguments can be used to make cPar returnrandom variables of different distributions:
cPar rnd("rnd");rnd.setDoubleValue(intuniform, -10.0, 10.0);// uniform distr.rnd.setDoubleValue(normal, 100.0, 5.0); // normal distr. (mean,dev)rnd.setDoubleValue(exponential, 10.0); // exponential distr. (mean)
intuniform() , normal() etc. are ordinary C functions taking double arguments and re-turning double. Each time you read the value of a cPar containing a function like above,the function will be called with the given constant arguments (e.g. normal(100.0,5.0)) and itsreturn value used.
The above functions use number 0 from the several random number generators. To useanother generator, use the genk_xxx versions of the random functions:
rnd.setDoubleValue(genk\_normal, 3, 100.0, 5.0); // uses generator 3
A cPar object can also be set to return a random variable from a distribution collected by astatistical data collection object:
cDoubleHistogram hist =....; // the distributioncPar rnd2("rnd2");rnd2.setDoubleValue(hist);
6.12.3 Storing object and non-object pointers in cPar
cPar can store pointers to OMNeT++ objects. You can use both assignment and the setOb-jectValue() member function:
cQueue *queue = new cQueue("queue"); // just an examplecPar par1, par2;par1 = (cObject *) queue;par2.setObjectValue( queue );
To get the store pointer back, you can use typecast or the objectValue() member function:
cQueue *q1 = (cQueue *)(cObject *)par1;cQueue *q2 = (cQueue *)par2.objectValue();
Whether the cPar object will own the other object or not is controlled by the takeOwner-ship() member function, just as with container classes. This is documented in detail in theclass library reference. By default, cPar will own the object.
cPar can be used to store non-object pointers (for example C structs) or non-OMNeT++ objecttypes in the parameter object. It works very similarly to the above mechanism. An example:
double *mem = new double[15];cPar par1, par2;par1 = (void *) mem;par2.setPointerValue( (void *)mem );...double *m1 = (double *)(void *)par1;double *m2 = (double *)par2.pointerValue();
115

OMNeT++ Manual – The Simulation Library
Memory management can be specified by cPar ’s configPointer() member function. Ittakes three arguments: a pointer to a user-supplied deallocation function, a pointer to auser-supplied duplication function and an item size. If all three are 0 (NULL), no memorymanagement is done, that is, the pointer is treated as a mere pointer. This is the defaultbehaviour. If you supply only the item size (and both function pointers are NULL), cPar willuse the delete operator to deallocate the memory area when the cPar object is destructed,and it will use new char[size] followed by a memcpy() to duplicate the memory area when-ever the cPar object is duplicated. If you need more sophisticated memory management, youcan supply your own deallocation and duplication functions. All this is documented in detailin the class library reference. An example for simple memory management:
double *mem = new double[15];cPar par;par.setPointerValue((void *) mem);par.configPointer(NULL, NULL, 15*sizeof(double));// -> now if par goes out of scope, it will delete the 15-double array.
The configPointer() setting only affects what happens when the cPar is deleted, dupli-cated or copied, but does not apply to assigning new pointers. That is, if you assign a newvoid* to the cPar , you simply overwrite the pointer – the block denoted by the old pointeris not deleted. This fact can be used to extract some dynamically allocated block out of thecPar : carrying on the previous example, you would extract the array of 15 doubles from thecPar like this:
double *mem2 = (double *)par.pointerValue();par.setValue( (void *)0 );// -> now par has nothing to do with the double[15] array
However, if you assign some non-pointer value to the cPar , beware: this will activate thememory management for the block. If you temporarily use the same cPar object to storeother than void* (’P’) values, the configPointer() setting is lost.
6.12.4 Reverse Polish expressions
This feature is rarely needed by the user, it is more used internally. A cPar object can alsostore expressions. In this case, the expression must be given in reversed Polish form. Anexample:
sXElem *expression = new sXElem[5];expression[0] = &par( ’’count’’ ); // pointer tomodule parameterexpression[1] = 1;expression[2] = ’+’;expression[3] = 2;expression[4] = ’/’;
cPar expr("expr");expr.setDoubleValue(expression,5);
The cPar object created above contains the (count+1)/2 expression where count is a moduleparameter. Each time the cPar is evaluated, it recalculates the expression, using the currentvalue of count. Note the & sign in front of par(”count”) expression: if it was not there, the
116
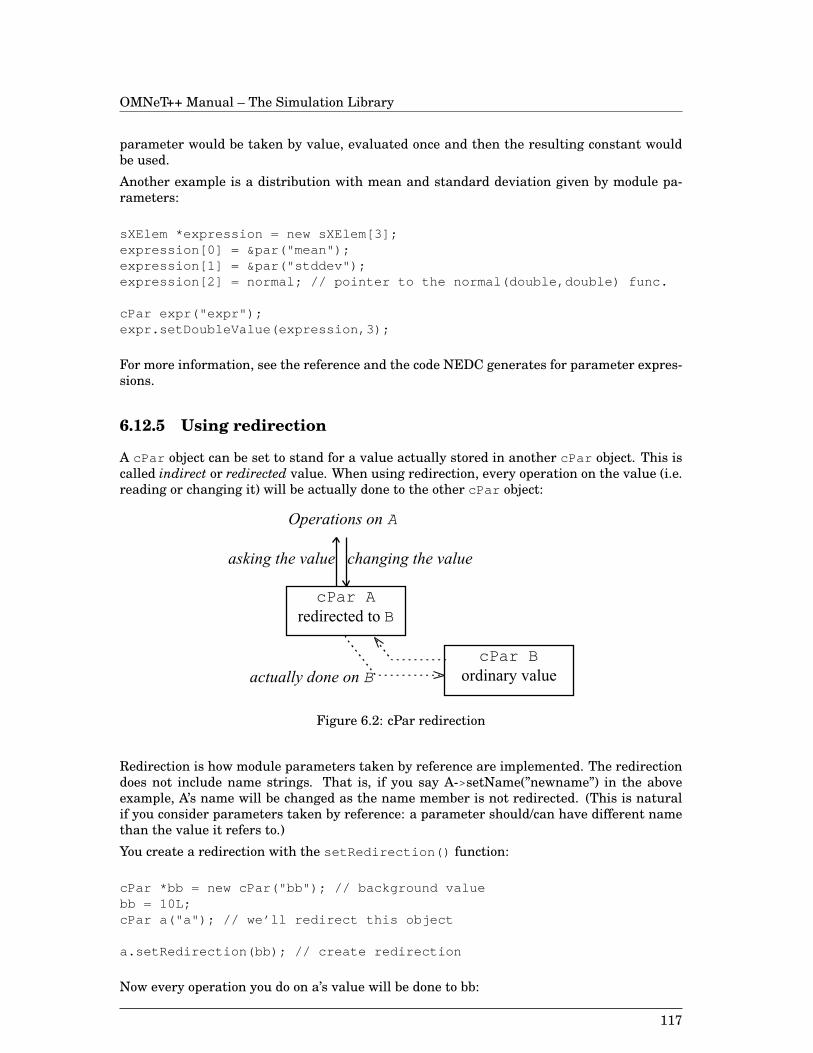
OMNeT++ Manual – The Simulation Library
parameter would be taken by value, evaluated once and then the resulting constant wouldbe used.
Another example is a distribution with mean and standard deviation given by module pa-rameters:
sXElem *expression = new sXElem[3];expression[0] = &par("mean");expression[1] = &par("stddev");expression[2] = normal; // pointer to the normal(double,double) func.
cPar expr("expr");expr.setDoubleValue(expression,3);
For more information, see the reference and the code NEDC generates for parameter expres-sions.
6.12.5 Using redirection
A cPar object can be set to stand for a value actually stored in another cPar object. This iscalled indirect or redirected value. When using redirection, every operation on the value (i.e.reading or changing it) will be actually done to the other cPar object:
Figure 6.2: cPar redirection
Redirection is how module parameters taken by reference are implemented. The redirectiondoes not include name strings. That is, if you say A->setName(”newname”) in the aboveexample, A’s name will be changed as the name member is not redirected. (This is naturalif you consider parameters taken by reference: a parameter should/can have different namethan the value it refers to.)
You create a redirection with the setRedirection() function:
cPar *bb = new cPar("bb"); // background valuebb = 10L;cPar a("a"); // we’ll redirect this object
a.setRedirection(bb); // create redirection
Now every operation you do on a’s value will be done to bb:
117
OMNeT++ Manual – The Simulation Library
long x = a; // returns bb’s value, 10La = 5; // bb’s value changes to 5
The only way to determine whether a is really holding the value or it is redirected to anothercPar is to use the isRedirected() member function which returns a bool, or redirec-tion() which returns the pointer to the background object, or NULL if there’s no redirec-tion:
cPar *redir = a.redirection(); // returns bb’s pointerif (redir != NULL)
ev << "a is redirected to " << redir->name() << endl;
To break the link between the two objects, use the cancelRedirection() member function.(No other method will work, including assigning a the value of another cPar object.) ThecancelRedirection() function gives the (long)0 value to the redirected object (the otherwill be unaffected). If you want to cancel the indirection but keep the old value, you can dosomething like this:
cPar *value = a.redirection(); // bb’s pointera.cancelRedirection(); // break the link; value of a is now 0a = *value; // copy the contents of bb into a
6.12.6 Type characters
Internally, cPar objects identify the types of the stored values by type characters. The typecharacter is returned by the type() member function:
cPar par = 10L;char typechar = par.type(); // returns ’L’
The full table of type characters is presented in the Summary section below.
The isNumeric() function tells whether the object stores one of the numeric types, so thate.g. asDoubleValue() can be invoked on it.
6.12.7 Summary
The various cPar types and the member functions used to manipulate them are summarizedin the following table:
Typechar
Typename
Member functions Description
S string setStringValue(const char *);
const char *stringValue();
op const char *();op=(const char *);
string value. Short strings (len<=27)are stored inside cPar object, with-out using heap allocation.
B boolean setBoolValue(bool);bool boolValue();op bool();op=(bool);
boolean value. Can also be retrievedfrom the object as long (0 or 1).
118
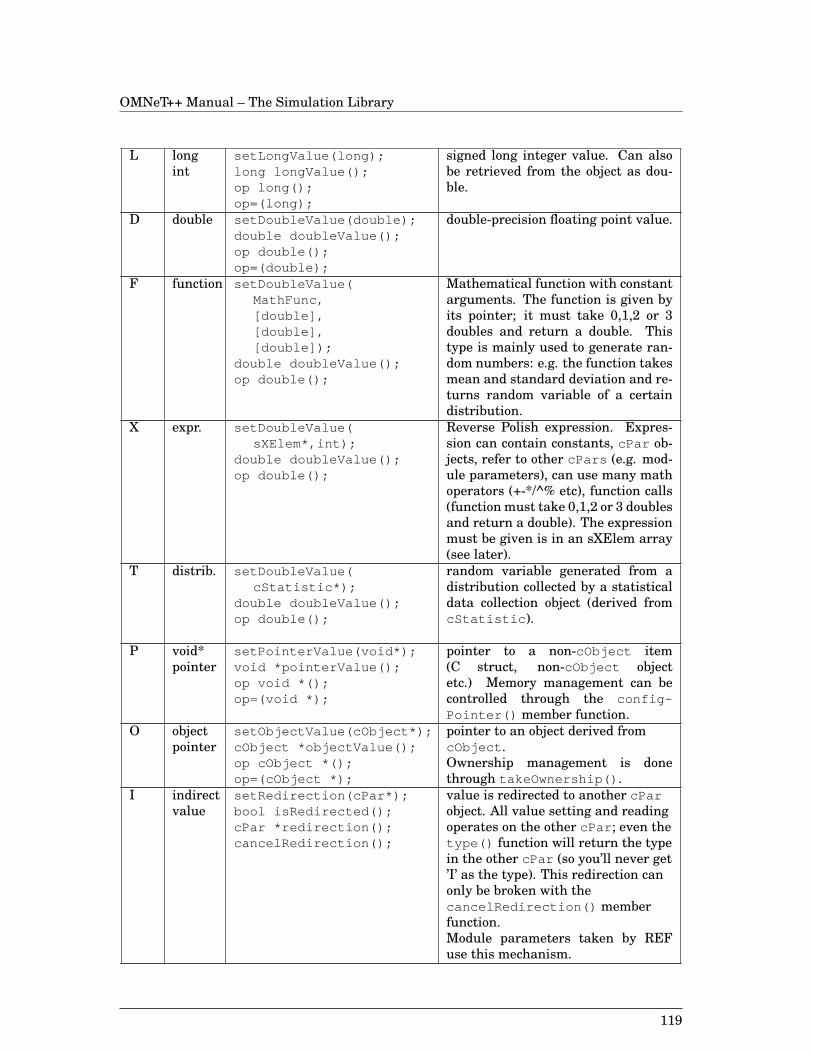
OMNeT++ Manual – The Simulation Library
L longint
setLongValue(long);long longValue();op long();op=(long);
signed long integer value. Can alsobe retrieved from the object as dou-ble.
D double setDoubleValue(double);double doubleValue();op double();op=(double);
double-precision floating point value.
F function setDoubleValue(MathFunc,[double],[double],[double]);
double doubleValue();op double();
Mathematical function with constantarguments. The function is given byits pointer; it must take 0,1,2 or 3doubles and return a double. Thistype is mainly used to generate ran-dom numbers: e.g. the function takesmean and standard deviation and re-turns random variable of a certaindistribution.
X expr. setDoubleValue(sXElem*,int);
double doubleValue();op double();
Reverse Polish expression. Expres-sion can contain constants, cPar ob-jects, refer to other cPars (e.g. mod-ule parameters), can use many mathoperators (+-*/^% etc), function calls(function must take 0,1,2 or 3 doublesand return a double). The expressionmust be given is in an sXElem array(see later).
T distrib. setDoubleValue(cStatistic*);
double doubleValue();op double();
random variable generated from adistribution collected by a statisticaldata collection object (derived fromcStatistic ).
P void*pointer
setPointerValue(void*);void *pointerValue();op void *();op=(void *);
pointer to a non-cObject item(C struct, non-cObject objectetc.) Memory management can becontrolled through the config-Pointer() member function.
O objectpointer
setObjectValue(cObject*);cObject *objectValue();op cObject *();op=(cObject *);
pointer to an object derived fromcObject .Ownership management is donethrough takeOwnership() .
I indirectvalue
setRedirection(cPar*);bool isRedirected();cPar *redirection();cancelRedirection();
value is redirected to another cParobject. All value setting and readingoperates on the other cPar ; even thetype() function will return the typein the other cPar (so you’ll never get’I’ as the type). This redirection canonly be broken with thecancelRedirection() memberfunction.Module parameters taken by REFuse this mechanism.
119
OMNeT++ Manual – The Simulation Library
6.13 Statistics and distribution estimation
6.13.1 cStatistic and descendants
There are several statistic and result collection classes: cStdDev , cWeightedStdDev , Long-Histogram , cDoubleHistogram , cVarHistogram , cPSquare and cKSplit . They are allderived from the abstract base class cStatistic .
• cStdDev keeps number of samples, mean, standard deviation, minimum and maxi-mum value etc.
• cWeightedStdDev is similar to cStdDev , but accepts weighted observations. cWeight-edStdDev can be used for example to calculate time average. It is the only weightedstatistics class.
• cLongHistogram and cDoubleHistogram are descendants of cStdDev and also keepan approximation of the distribution of the observations using equidistant (equal-sized)cell histograms.
• cVarHistogram implements a histogram where cells do not need to be the same size.You can manually add the cell (bin) boundaries, or alternatively, automatically have apartitioning created where each bin has the same number of observations (or as closeto that as possible).
• cPSquare is a class that uses the P 2 algorithm described in [JCH85]. The algorithmcalculates quantiles without storing the observations; one can also think of it as a his-togram with equiprobable cells.
• cKSplit uses a novel, experimental method, based on an adaptive histogram-like al-gorithm. (Published papers about k-split can be downloaded from the OMNeT++ Website; just go one level up in the directories: http://www.hit.bme.hu/phd/vargaa). Becausek-split is not very well known, we’ll devote a section to it.
Basic usageOne can insert an observation into a statistic object with the collect() function or the+= operator (they are equivalent). cStdDev has the following methods for getting statisticsout of the object: samples() , min() , max() , mean() , stddev() , variance() , sum() ,sqrSum() with the obvious meanings. An example usage for cStdDev :
cStdDev stat("stat");for (int i=0; i<10; i++)
stat.collect( normal(0,1) );long num_samples = stat.samples();double smallest = stat.min(),largest = stat.max();double mean = stat.mean(),standard_deviation = stat.stddev(),variance = stat.variance();
6.13.2 Distribution estimation
Initialization and usage
120

OMNeT++ Manual – The Simulation Library
The distribution estimation classes (the histogram classes, cPSquare and cKSplit ) are de-rived from cDensityEstBase . Distribution estimation classes (except for cPSquare ) as-sume that the observations are within a range. You may specify the range explicitly (basedon some a-priori info about the distribution) or you may let the object collect the first few ob-servations and determine the range from them. Methods which let you specify range settingsare part of cDensityEstBase . The following member functions exist:
setRange(lower,upper);setRangeAuto(num_firstvals, range_ext_factor);setRangeAutoLower(upper, num_firstvals, range_ext_factor);setRangeAutoUpper(lower, num, range_ext_factor);
setNumFirstVals(num_firstvals);The following example creates a histogram with 20 cells and automatic range estimation:
cDoubleHistogram histogram("histogram", 20);histogram.setRangeAuto(100,1.5);
Here, 20 is the number of cells (not including the underflow/overflow cells, see later), and100 is the number of observations to be collected before setting up the cells. 1.5 is the rangeextension factor. It means that the actual range of the initial observations will be expanded1.5 times and this expanded range will be used to lay out the cells. This method increasesthe chance that further observations fall in one of the cells and not outside the histogramrange.
Figure 6.3: Setting up a histogram’s range
After the cells have been set up, collecting can go on.
The transformed() function returns true when the cells have already been set up. You canforce range estimation and setting up the cells by calling the transform() function.
The observations that fall outside the histogram range will be counted as underflows andoverflows. The number of underflows and overflows are returned by the underflowCell()and overflowCell() member functions.
Figure 6.4: Histogram structure after setting up the cells
You create a P 2 object by specifying the number of cells:
cPSquare psquare("interarrival-times", 20);
121
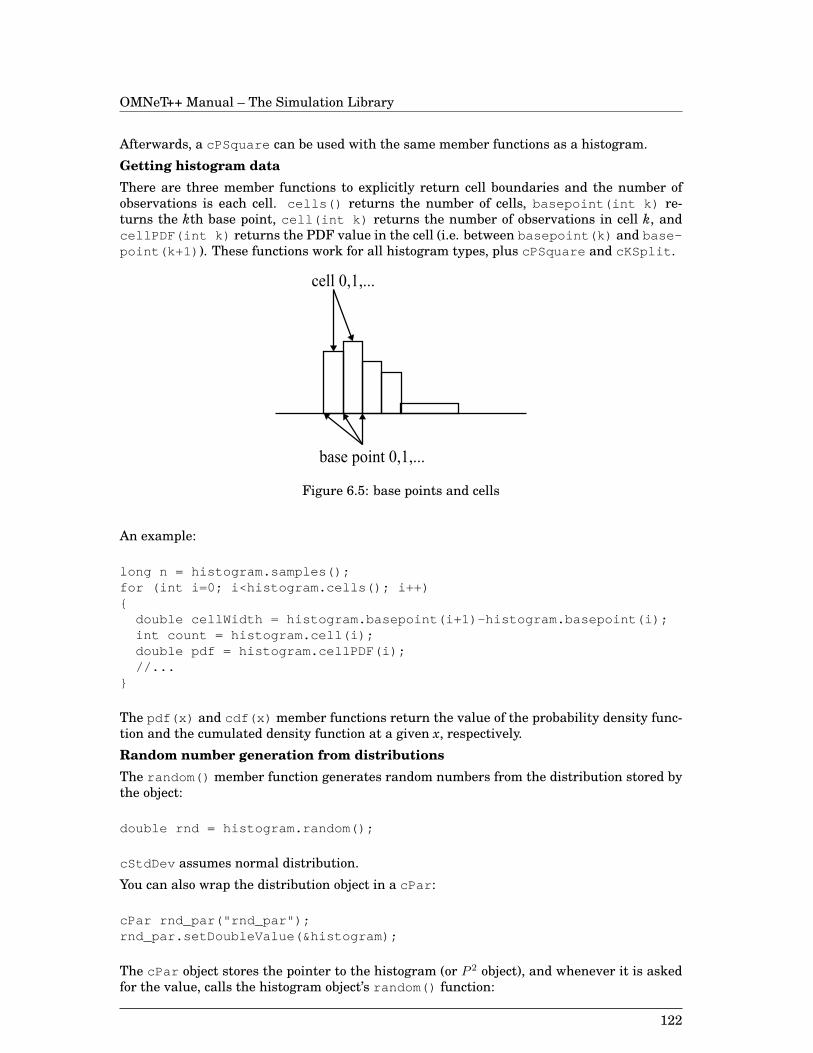
OMNeT++ Manual – The Simulation Library
Afterwards, a cPSquare can be used with the same member functions as a histogram.
Getting histogram dataThere are three member functions to explicitly return cell boundaries and the number ofobservations is each cell. cells() returns the number of cells, basepoint(int k) re-turns the kth base point, cell(int k) returns the number of observations in cell k, andcellPDF(int k) returns the PDF value in the cell (i.e. between basepoint(k) and base-point(k+1) ). These functions work for all histogram types, plus cPSquare and cKSplit .
Figure 6.5: base points and cells
An example:
long n = histogram.samples();for (int i=0; i<histogram.cells(); i++){
double cellWidth = histogram.basepoint(i+1)-histogram.basepoint(i);int count = histogram.cell(i);double pdf = histogram.cellPDF(i);//...
}
The pdf(x) and cdf(x) member functions return the value of the probability density func-tion and the cumulated density function at a given x, respectively.
Random number generation from distributionsThe random() member function generates random numbers from the distribution stored bythe object:
double rnd = histogram.random();
cStdDev assumes normal distribution.
You can also wrap the distribution object in a cPar :
cPar rnd_par("rnd_par");rnd_par.setDoubleValue(&histogram);
The cPar object stores the pointer to the histogram (or P 2 object), and whenever it is askedfor the value, calls the histogram object’s random() function:
122
OMNeT++ Manual – The Simulation Library
double rnd = (double)rnd_par; // random number from the cPSquare
Storing/loading distributionsThe statistic classes have loadFromFile() member functions that read the histogram datafrom a text file. If you need a custom distribution that cannot be written (or it is inefficient) asa C function, you can describe it in histogram form stored in a text file, and use a histogramobject with loadFromFile() .
You can also use saveToFile() that writes out the distribution collected by the histogramobject:
FILE *f = fopen("histogram.dat","w");histogram.saveToFile( f ); // save the distributionfclose( f );
FILE *f2 = fopen("histogram.dat","r");}cDoubleHistogram hist2("Hist-from-file");hist2.loadFromFile( f2 ); // load stored distributionfclose( f2 );
Histogram with custom cellsThe cVarHistogram class can be used to create histograms with arbitrary (non-equidistant)cells. It can operate in two modes:
• manual, where you specify cell boundaries explicitly before starting collecting
• automatic, where transform() will set up the cells after collecting a certain number ofinitial observations. The cells will be set up so that as far as possible, an equal numberof observations fall into each cell (equi-probable cells).
Modes are selected with a transform-type parameter:
• HIST_TR_NO_TRANSFORM: no transformation; uses bin boundaries previously definedby addBinBound()
• HIST_TR_AUTO_EPC_DBL: automatically creates equiprobable cells
• HIST_TR_AUTO_EPC_INT: like the above, but for integers
Creating an object:
cVarHistogram(const char *s=NULL,int numcells=11,int transformtype=HIST_TR_AUTO_EPC_DBL);
Manually adding a cell boundary:
void addBinBound(double x);
Rangemin and rangemax is chosen after collecting the num_firstvals initial observations.One cannot add cell boundaries when the histogram has already been transformed.
123
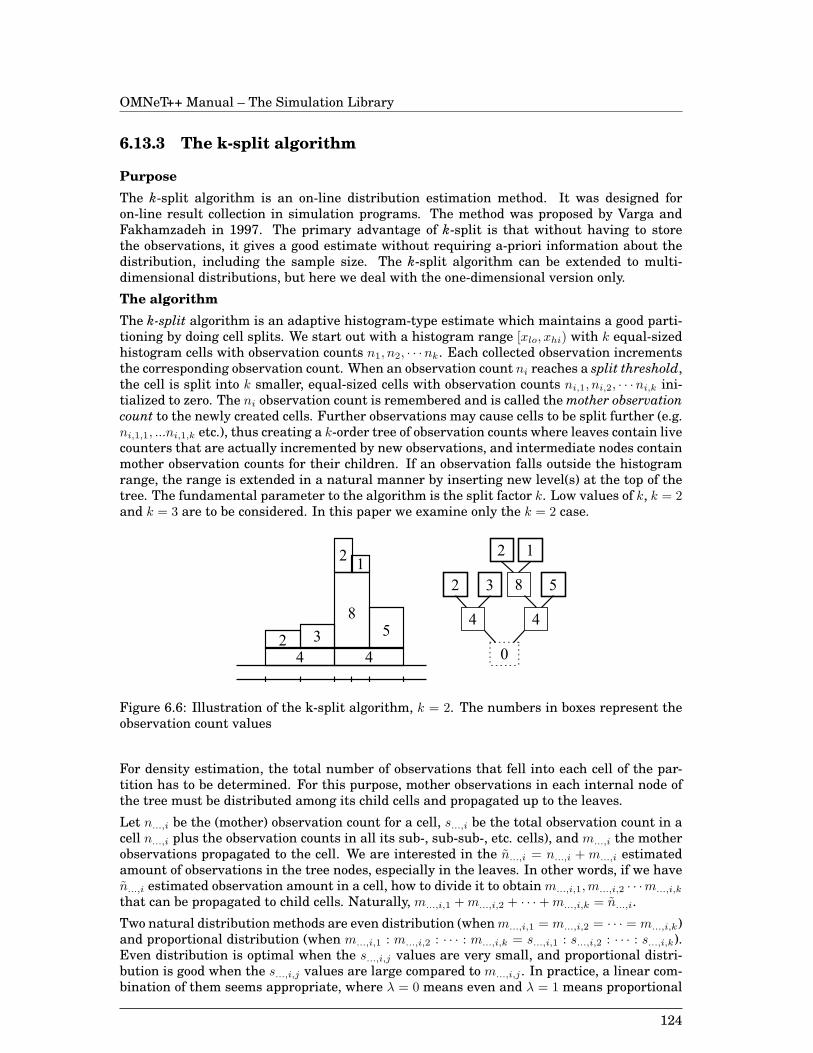
OMNeT++ Manual – The Simulation Library
6.13.3 The k-split algorithm
PurposeThe k-split algorithm is an on-line distribution estimation method. It was designed foron-line result collection in simulation programs. The method was proposed by Varga andFakhamzadeh in 1997. The primary advantage of k-split is that without having to storethe observations, it gives a good estimate without requiring a-priori information about thedistribution, including the sample size. The k-split algorithm can be extended to multi-dimensional distributions, but here we deal with the one-dimensional version only.
The algorithmThe k-split algorithm is an adaptive histogram-type estimate which maintains a good parti-tioning by doing cell splits. We start out with a histogram range [xlo, xhi) with k equal-sizedhistogram cells with observation counts n1, n2, · · ·nk. Each collected observation incrementsthe corresponding observation count. When an observation count ni reaches a split threshold,the cell is split into k smaller, equal-sized cells with observation counts ni,1, ni,2, · · ·ni,k ini-tialized to zero. The ni observation count is remembered and is called the mother observationcount to the newly created cells. Further observations may cause cells to be split further (e.g.ni,1,1, ...ni,1,k etc.), thus creating a k-order tree of observation counts where leaves contain livecounters that are actually incremented by new observations, and intermediate nodes containmother observation counts for their children. If an observation falls outside the histogramrange, the range is extended in a natural manner by inserting new level(s) at the top of thetree. The fundamental parameter to the algorithm is the split factor k. Low values of k, k = 2and k = 3 are to be considered. In this paper we examine only the k = 2 case.
Figure 6.6: Illustration of the k-split algorithm, k = 2. The numbers in boxes represent theobservation count values
For density estimation, the total number of observations that fell into each cell of the par-tition has to be determined. For this purpose, mother observations in each internal node ofthe tree must be distributed among its child cells and propagated up to the leaves.
Let n...,i be the (mother) observation count for a cell, s...,i be the total observation count in acell n...,i plus the observation counts in all its sub-, sub-sub-, etc. cells), and m...,i the motherobservations propagated to the cell. We are interested in the n...,i = n...,i + m...,i estimatedamount of observations in the tree nodes, especially in the leaves. In other words, if we haven...,i estimated observation amount in a cell, how to divide it to obtain m...,i,1,m...,i,2 · · ·m...,i,k
that can be propagated to child cells. Naturally, m...,i,1 + m...,i,2 + · · ·+ m...,i,k = n...,i.
Two natural distribution methods are even distribution (when m...,i,1 = m...,i,2 = · · · = m...,i,k)and proportional distribution (when m...,i,1 : m...,i,2 : · · · : m...,i,k = s...,i,1 : s...,i,2 : · · · : s...,i,k).Even distribution is optimal when the s...,i,j values are very small, and proportional distri-bution is good when the s...,i,j values are large compared to m...,i,j . In practice, a linear com-bination of them seems appropriate, where λ = 0 means even and λ = 1 means proportional
124
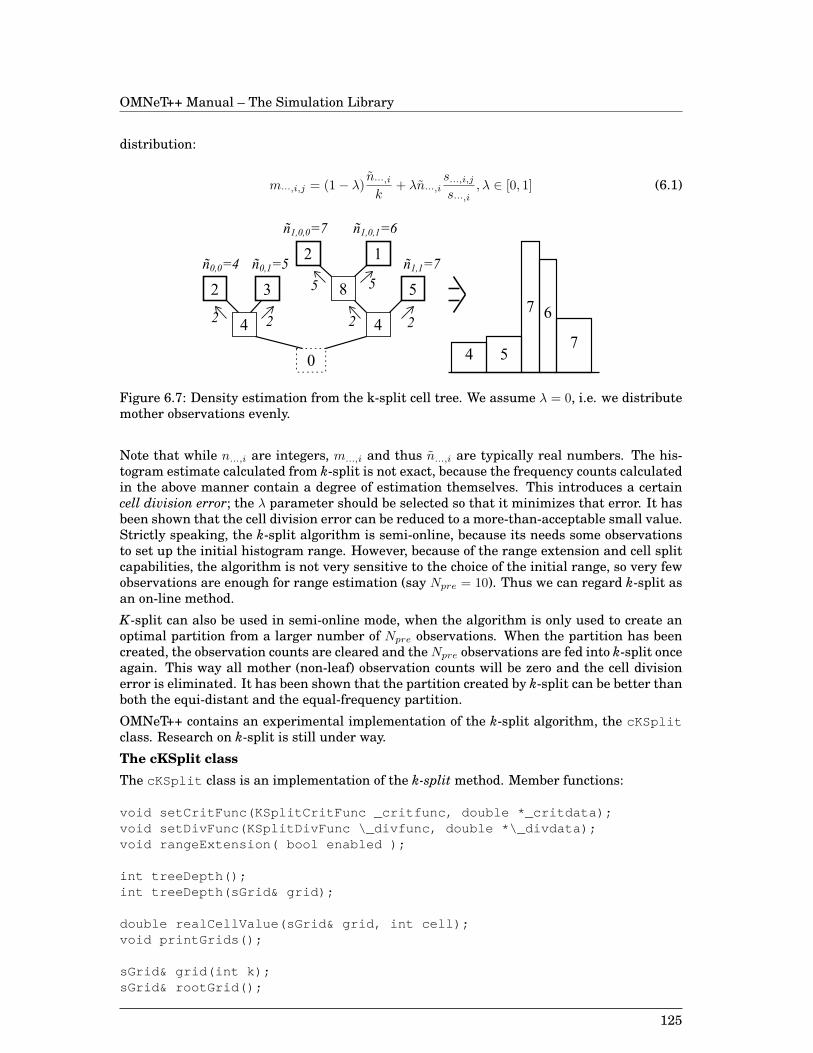
OMNeT++ Manual – The Simulation Library
distribution:
m···,i,j = (1− λ)n···,ik
+ λn···,is...,i,j
s···,i, λ ∈ [0, 1] (6.1)
Figure 6.7: Density estimation from the k-split cell tree. We assume λ = 0, i.e. we distributemother observations evenly.
Note that while n...,i are integers, m...,i and thus n...,i are typically real numbers. The his-togram estimate calculated from k-split is not exact, because the frequency counts calculatedin the above manner contain a degree of estimation themselves. This introduces a certaincell division error; the λ parameter should be selected so that it minimizes that error. It hasbeen shown that the cell division error can be reduced to a more-than-acceptable small value.Strictly speaking, the k-split algorithm is semi-online, because its needs some observationsto set up the initial histogram range. However, because of the range extension and cell splitcapabilities, the algorithm is not very sensitive to the choice of the initial range, so very fewobservations are enough for range estimation (say Npre = 10). Thus we can regard k-split asan on-line method.
K-split can also be used in semi-online mode, when the algorithm is only used to create anoptimal partition from a larger number of Npre observations. When the partition has beencreated, the observation counts are cleared and the Npre observations are fed into k-split onceagain. This way all mother (non-leaf) observation counts will be zero and the cell divisionerror is eliminated. It has been shown that the partition created by k-split can be better thanboth the equi-distant and the equal-frequency partition.
OMNeT++ contains an experimental implementation of the k-split algorithm, the cKSplitclass. Research on k-split is still under way.
The cKSplit classThe cKSplit class is an implementation of the k-split method. Member functions:
void setCritFunc(KSplitCritFunc _critfunc, double *_critdata);void setDivFunc(KSplitDivFunc \_divfunc, double *\_divdata);void rangeExtension( bool enabled );
int treeDepth();int treeDepth(sGrid& grid);
double realCellValue(sGrid& grid, int cell);void printGrids();
sGrid& grid(int k);sGrid& rootGrid();
125
OMNeT++ Manual – The Simulation Library
struct sGrid{
int parent; // index of parent gridint reldepth; // depth = (reldepth - rootgrid’s reldepth)long total; // sum of cells & all subgrids (includes ’mother’)int mother; // observations ’inherited’ from mother cellint cells[K]; // cell values
};
6.13.4 Transient detection and result accuracy
In many simulations, only the steady state performance (i.e. the performance after the sys-tem has reached a stable state) is of interest. The initial part of the simulation is called thetransient period. After the model has entered steady state, simulation must proceed untilenough statistical data have been collected to compute result with the required accuracy.
Detection of the end of the transient period and a certain result accuracy is supported byOMNeT++. The user can attach transient detection and result accuracy objects to a resultobject (cStatistic ’s descendants). The transient detection and result accuracy objects willdo the specific algorithms on the data fed into the result object and tell if the transient periodis over or the result accuracy has been reached.
The base classes for classes implementing specific transient detection and result accuracydetection algorithms are:
• cTransientDetection : base class for transient detection
• cAccuracyDetection : base class for result accuracy detection
Basic usageAttaching detection objects to a cStatistic and getting pointers to the attached objects:
addTransientDetection(cTransientDetection *object);addAccuracyDetection(cAccuracyDetection *object);cTransientDetection *transientDetectionObject();cAccuracyDetection *accuracyDetectionObject();
Detecting the end of the period:
• polling the detect() function of the object
• installing a post-detect function
Transient detectionCurrently one transient detection algorithm is implemented, i.e. there’s one class derivedfrom cTransientDetection . The cTDExpandingWindows class uses the sliding windowapproach with two windows, and checks the difference of the two averages to see if the tran-sient period is over.
void setParameters(int reps=3,int minw=4,double wind=1.3,double acc=0.3);
126
OMNeT++ Manual – The Simulation Library
Accuracy detectionCurrently one accuracy detection algorithm is implemented, i.e. there’s one class derivedfrom cAccuracyDetection . The algorithm implemented in the cADByStddev class is: di-vide the standard deviation by the square of the number of values and check if this is smallenough.
void setParameters(double acc=0.1,int reps=3);
6.14 Recording simulation results
6.14.1 Output vectors: cOutVector
Objects of type cOutVector are responsible for writing time series data (referred to as out-put vectors) to a file. The record() member is used to output a value (or a value pair) witha timestamp.
It can be used like this:
cOutVector resp_v("response time");
while (...){
double response_time;//...resp_v.record( response_time );//...
}
All cOutVector objects write to the same, common file. The file is textual; each record()call generates a line in the file. The output file can be processed using Plove, but otherwiseits simple format allows it to be easily processed with sed , awk, grep and the like, and itcan be imported by spreadsheet programs. The file format is described later in this manual(in the section about simulation execution).
You can disable the output vector or specify a simulation time interval for recording eitherfrom the ini file or directly from program code:
cOutVector v("v");simtime_t t =...;
v.enable();v.disable();v.setStartTime( t );v.setStopTime( t+100.0 );
If the output vector object is disabled or the simulation time is outside the specified interval,record() doesn’t write anything to the output file. However, if you have a Tkenv inspectorwindow open for the output vector object, the values will be displayed there, regardless ofthe state of the output vector object.
127
OMNeT++ Manual – The Simulation Library
6.14.2 Output scalars
While output vectors are to record time series data and thus they typically record a largevolume of data during a simulation run, output scalars are supposed to record a single valueper simulation run. You can use outputs scalars
• to record summary data at the end of the simulation run
• to do several runs with different parameter settings/random seed and determine thedependence of some measures on the parameter settings. For example, multiple runsand output scalars are the way to produce Throughput vs. Offered Load plots.
Output scalars are recorded with the recordScalar() member function. It is overloaded,you can use it to write doubles and strings (const char *):
double avg_throughput = total_bits / simTime();recordScalar("Average throughput", avg_throughput);
You can record whole statistics objects by calling recordStats() :
cStdDev *eedstats = new cStdDev;...recordStats("End-to-end Statistics", eedstats);
Calls to recordScalar() and recordStats() are usually placed in the redefined fin-ish() member function of a simple module.
The above calls write into the (textual) output scalar file. The output scalar file is preservedacross simulation runs (unlike the output vector file is, scalar files are not deleted at thebeginning of each run). Data are always appended at the end of the file, and output fromdifferent simulation runs are separated by special lines.
6.15 Deriving new classes
Nearly all classes in the simulation class library are descendants of cObject . If you want toderive a new class from cObject or a cObject descendant, you must redefine some memberfunctions so that objects of the new type can fully co-operate with other parts of the simu-lation system. A more-or-less complete list of these functions are presented here. Do not beembarrassed at the length of the list: most functions are not absolutely necessary to imple-ment. For example, you do not need to redefine forEach() unless your class is a containerclass.
• default constructor, copy constructor. The copy constructor can simply call the assign-ment operator.
• operator=() : the assignment operator (copies object contents from another object)
• dup() : duplicates the object by creating an exact copy (uses copy constructor)
• info() : returns a one-line info about object contents
• writeContents() : write a more detailed report about the object into a file
• forEach() : iterates through all contained objects if any
128

OMNeT++ Manual – The Simulation Library
• netPack() , netUnpack() : they are needed only if objects of this type will be sent overPVM/MPI from one segment to another. The netPack() ,netUnpack() functions of thelibrary classes are in the sim/pvm (sim/mpi) directory.
One should also use the Register_Class() macro to register the new class. It is used bythe createOne() function and the PVM/MPI extension of OMNeT++.
Let us see a simple example. The header file:
// File: cmyclass.h#include <omnetpp.h>
class cMyClass : public cObject{
public:int samples;
cMyClass(const cMyClass& myclass);cMyClass(const char *name=NULL, int k=0);virtual ~cMyClass() {}virtual cObject *dup() const {return new cMyClass(*this);}virtual void info(char *buf);virtual void writeContents(ostream& os);cMyClass& operator=(const cMyClass& myclass);
};
The corresponding .cc file:
// File: cmyclass.cc#include <stdio.h>#include <string.h>#include <iostream.h>#include "cmyclass.h"
Register_Class( cMyClass );
cMyClass::cMyClass(const cMyClass& myclass) : cObject(){
setName( myclass.name() );operator=( myclass );
}
cMyClass::cMyClass(const char *name, int k) : cObject( name ){
samples = k;}
void cMyClass::info(char *buf){
cObject::info( buf );sprintf( buf+strlen(buf), " samples=%d", samples);
}
void cMyClass::writeContents(ostream& os)
129
OMNeT++ Manual – The Simulation Library
{os << " samples: " << samples << ’\n’;
}
cMyClass& cMyClass::operator=(const cMyClass& myclass){
cObject::operator=(myclass);samples = myclass.samples;
}
See the virtual functions of cObject in the class library reference for more information.
6.16 Tracing and debugging aids
6.16.1 Displaying information about module activity
You can have simple modules print textual output for debugging purposes.
The global object called ev represents the user interface of the simulation program. You cansend data to ev using the C++-style I/O operator (<<).
ev << "started\n";ev << "about to send message #" << i << endl;ev << "queue full, discarding packet\n";
The more traditional-looking but functionally equivalent ev.printf() form also exists.
ev.printf("%d packets dropped out of %d\n", drops, total);
The exact way messages are displayed to the user depends on the user interface. In thecommand-line user interface (Cmdenv), it is simply dumped to the standard output. (Thisoutput can also be disabled from the ini file so that it doesn’t slow down simulation when it isnot needed.) In windowing user interfaces (Tkenv), each simple module can have a separatetext output window.
The above means that you should not use printf() , cout « and the like because withTkenv, their output would appear in the terminal window behind the graphical window ofthe simulation application.
6.16.2 Watches
You may want some of your int, long, double, char, etc. variables to be inspect-able in Tkenvand to be output into the snapshot file. In this case, you can create cWatch objects for themwith the WATCH() macro:
int i; WATCH(i);char c; WATCH(c);
When you open an inspector for the simple module in Tkenv and click the Objects/Watchestab in it, you’ll see your WATCHed variables and their values there. Tkenv also lets youchange the value of a WATCHed variable.
The WATCH()macro expands to a dynamically created cWatch object. The object remembersthe address and type of your variable. The macro expands to something like:
130
OMNeT++ Manual – The Simulation Library
new cWatch("i",i);
You can also make a WATCHfor pointers of type char* or cObject* , but this may cause a seg-mentation fault if the pointer does not point to a valid location when Tkenv or snapshot()wants to use it.
You can also set watches for variables that are members of the module class or for structurefields:
WATCH( lapbconfig.timeout );
Placement of WATCHesBe careful not to execute a WATCH() statement more than once, as each call would createa new cWatch object! If you use activity() , the best place for WATCHes is the top ofthe activity() function. If you use handleMessage() , place the WATCH()statement intoinitialize() . WATCH() creates a dynamic cWatch object, and we do not want to create anew object each time handleMessage() is called.
6.16.3 Snapshots
The snapshot() function outputs textual information about all or selected objects of thesimulation (including the objects created in module functions by the user) into the snapshotfile.
bool snapshot(cObject *obj = &simulation, const char *label = NULL);
The function can be called from module functions, like this:
snapshot(); // dump the whole networksnapshot(this); // dump this simple module and all its objectssnapshot(&putAsideQueue); // dump queue contentssnapshot(&simulation.msgQueue); // dump future events
This will append snapshot information to the end of the snapshot file. (The snapshot filename has an extension of .sna, default is omnetpp.sna. Actual file name can be set in theconfig file.)
The snapshot file output is detailed enough to be used for debugging the simulation: byregularly calling snapshot() , one can trace how the values of variables, objects changedover the simulation. The arguments: label is a string that will appear in the output file; objis the object whose inside is of interest. By default, the whole simulation (all modules etc)will be written out.
If you run the simulation with Tkenv, you can also create a snapshot from the menu.
An example of a snapshot file:
================================================|| SNAPSHOT ||================================================| Of object: ‘simulation’| Label: ‘three-station token ring’| Sim. time: 0.0576872457 ( 57ms)| Network: ‘token’
131
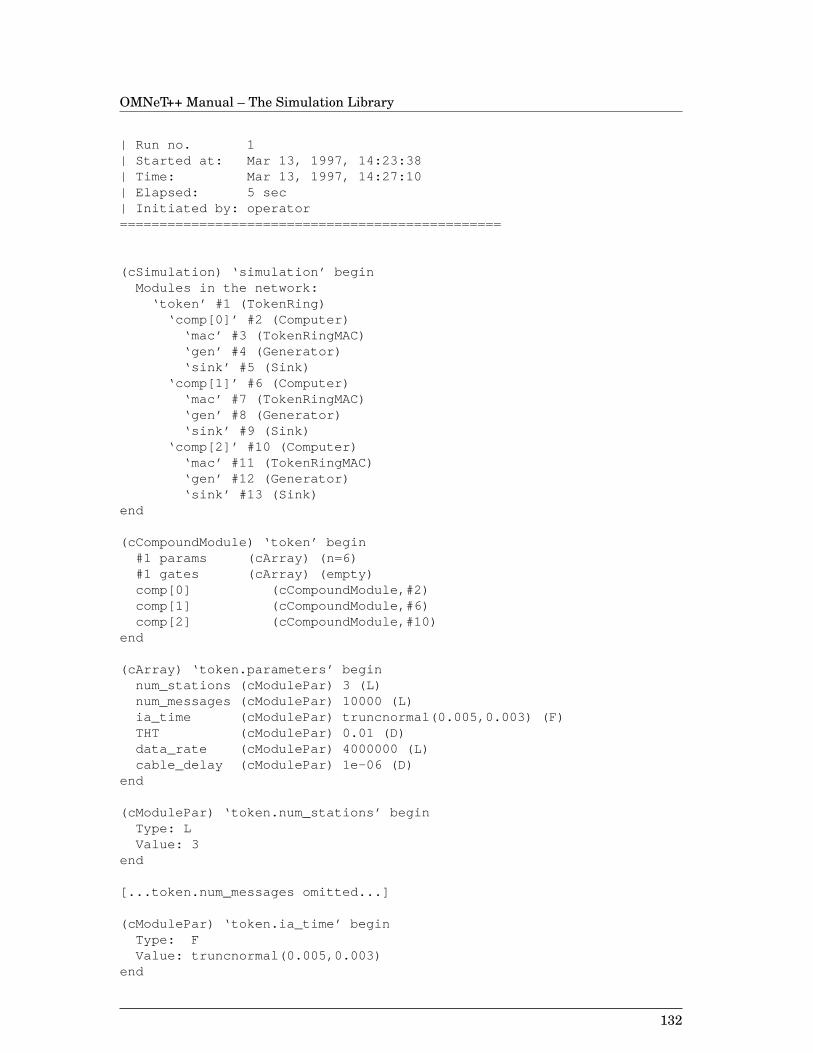
OMNeT++ Manual – The Simulation Library
| Run no. 1| Started at: Mar 13, 1997, 14:23:38| Time: Mar 13, 1997, 14:27:10| Elapsed: 5 sec| Initiated by: operator================================================
(cSimulation) ‘simulation’ beginModules in the network:
‘token’ #1 (TokenRing)‘comp[0]’ #2 (Computer)
‘mac’ #3 (TokenRingMAC)‘gen’ #4 (Generator)‘sink’ #5 (Sink)
‘comp[1]’ #6 (Computer)‘mac’ #7 (TokenRingMAC)‘gen’ #8 (Generator)‘sink’ #9 (Sink)
‘comp[2]’ #10 (Computer)‘mac’ #11 (TokenRingMAC)‘gen’ #12 (Generator)‘sink’ #13 (Sink)
end
(cCompoundModule) ‘token’ begin#1 params (cArray) (n=6)#1 gates (cArray) (empty)comp[0] (cCompoundModule,#2)comp[1] (cCompoundModule,#6)comp[2] (cCompoundModule,#10)
end
(cArray) ‘token.parameters’ beginnum_stations (cModulePar) 3 (L)num_messages (cModulePar) 10000 (L)ia_time (cModulePar) truncnormal(0.005,0.003) (F)THT (cModulePar) 0.01 (D)data_rate (cModulePar) 4000000 (L)cable_delay (cModulePar) 1e-06 (D)
end
(cModulePar) ‘token.num_stations’ beginType: LValue: 3
end
[...token.num_messages omitted...]
(cModulePar) ‘token.ia_time’ beginType: FValue: truncnormal(0.005,0.003)
end
132
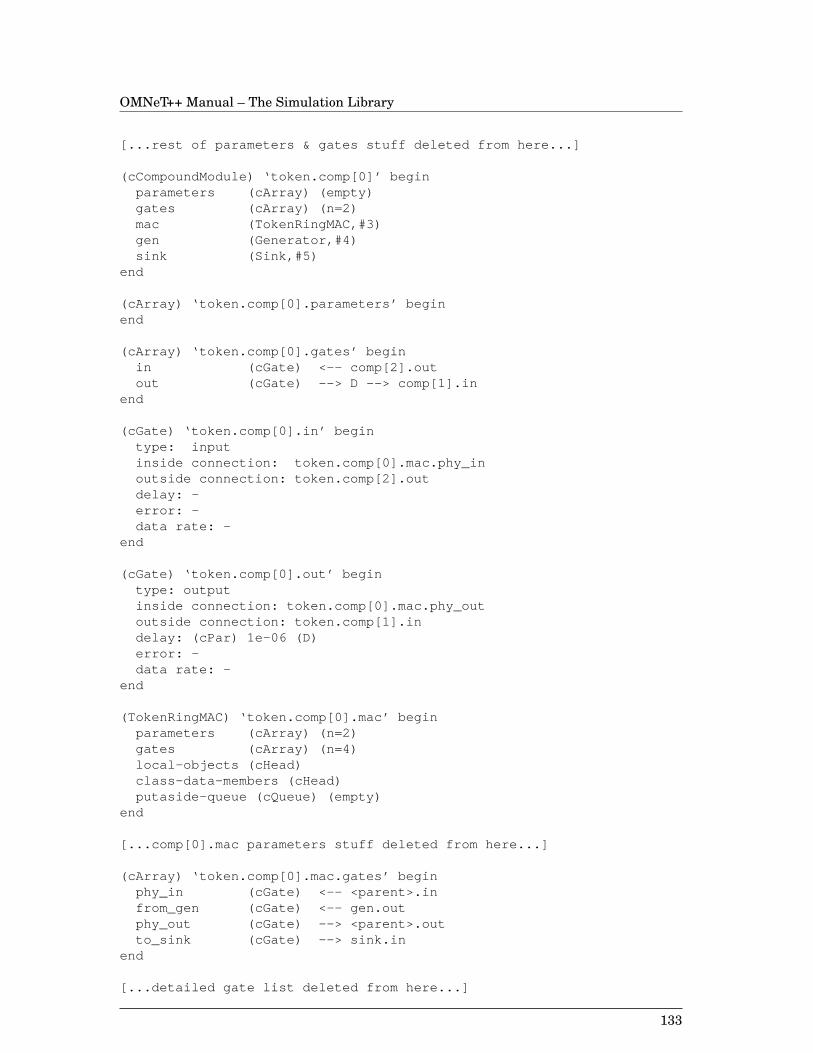
OMNeT++ Manual – The Simulation Library
[...rest of parameters & gates stuff deleted from here...]
(cCompoundModule) ‘token.comp[0]’ beginparameters (cArray) (empty)gates (cArray) (n=2)mac (TokenRingMAC,#3)gen (Generator,#4)sink (Sink,#5)
end
(cArray) ‘token.comp[0].parameters’ beginend
(cArray) ‘token.comp[0].gates’ beginin (cGate) <-- comp[2].outout (cGate) --> D --> comp[1].in
end
(cGate) ‘token.comp[0].in’ begintype: inputinside connection: token.comp[0].mac.phy_inoutside connection: token.comp[2].outdelay: -error: -data rate: -
end
(cGate) ‘token.comp[0].out’ begintype: outputinside connection: token.comp[0].mac.phy_outoutside connection: token.comp[1].indelay: (cPar) 1e-06 (D)error: -data rate: -
end
(TokenRingMAC) ‘token.comp[0].mac’ beginparameters (cArray) (n=2)gates (cArray) (n=4)local-objects (cHead)class-data-members (cHead)putaside-queue (cQueue) (empty)
end
[...comp[0].mac parameters stuff deleted from here...]
(cArray) ‘token.comp[0].mac.gates’ beginphy_in (cGate) <-- <parent>.infrom_gen (cGate) <-- gen.outphy_out (cGate) --> <parent>.outto_sink (cGate) --> sink.in
end
[...detailed gate list deleted from here...]
133
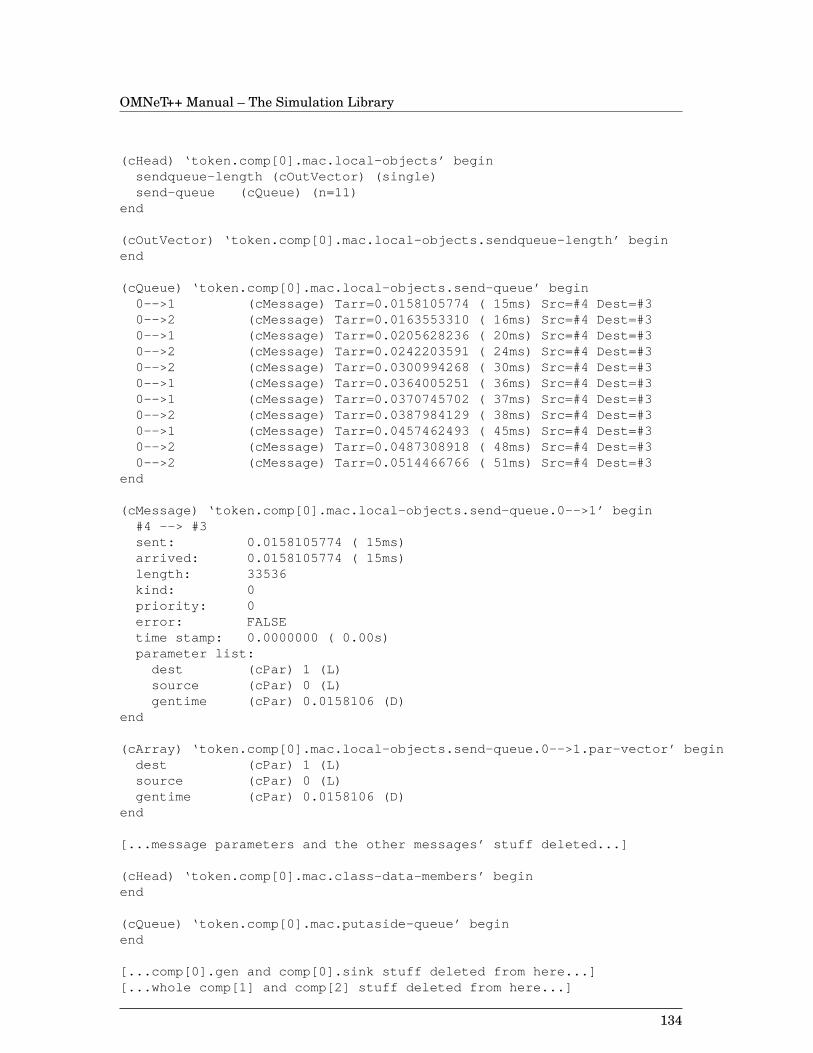
OMNeT++ Manual – The Simulation Library
(cHead) ‘token.comp[0].mac.local-objects’ beginsendqueue-length (cOutVector) (single)send-queue (cQueue) (n=11)
end
(cOutVector) ‘token.comp[0].mac.local-objects.sendqueue-length’ beginend
(cQueue) ‘token.comp[0].mac.local-objects.send-queue’ begin0-->1 (cMessage) Tarr=0.0158105774 ( 15ms) Src=#4 Dest=#30-->2 (cMessage) Tarr=0.0163553310 ( 16ms) Src=#4 Dest=#30-->1 (cMessage) Tarr=0.0205628236 ( 20ms) Src=#4 Dest=#30-->2 (cMessage) Tarr=0.0242203591 ( 24ms) Src=#4 Dest=#30-->2 (cMessage) Tarr=0.0300994268 ( 30ms) Src=#4 Dest=#30-->1 (cMessage) Tarr=0.0364005251 ( 36ms) Src=#4 Dest=#30-->1 (cMessage) Tarr=0.0370745702 ( 37ms) Src=#4 Dest=#30-->2 (cMessage) Tarr=0.0387984129 ( 38ms) Src=#4 Dest=#30-->1 (cMessage) Tarr=0.0457462493 ( 45ms) Src=#4 Dest=#30-->2 (cMessage) Tarr=0.0487308918 ( 48ms) Src=#4 Dest=#30-->2 (cMessage) Tarr=0.0514466766 ( 51ms) Src=#4 Dest=#3
end
(cMessage) ‘token.comp[0].mac.local-objects.send-queue.0-->1’ begin#4 --> #3sent: 0.0158105774 ( 15ms)arrived: 0.0158105774 ( 15ms)length: 33536kind: 0priority: 0error: FALSEtime stamp: 0.0000000 ( 0.00s)parameter list:
dest (cPar) 1 (L)source (cPar) 0 (L)gentime (cPar) 0.0158106 (D)
end
(cArray) ‘token.comp[0].mac.local-objects.send-queue.0-->1.par-vector’ begindest (cPar) 1 (L)source (cPar) 0 (L)gentime (cPar) 0.0158106 (D)
end
[...message parameters and the other messages’ stuff deleted...]
(cHead) ‘token.comp[0].mac.class-data-members’ beginend
(cQueue) ‘token.comp[0].mac.putaside-queue’ beginend
[...comp[0].gen and comp[0].sink stuff deleted from here...][...whole comp[1] and comp[2] stuff deleted from here...]
134
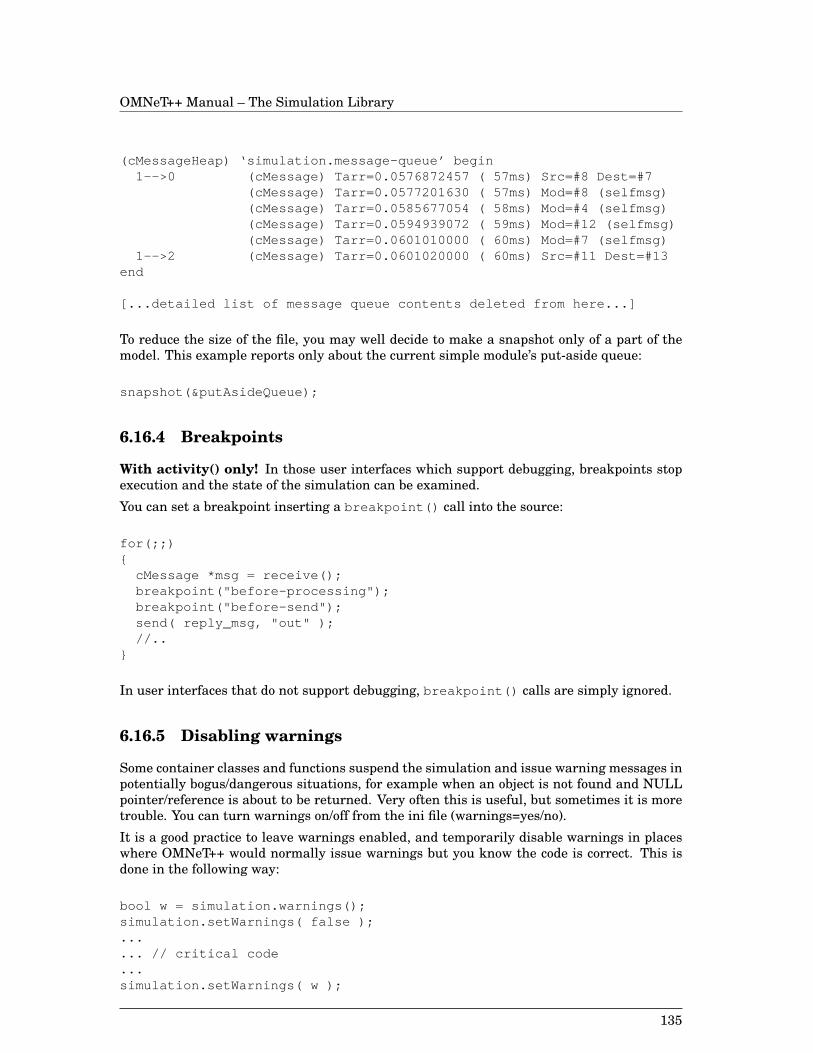
OMNeT++ Manual – The Simulation Library
(cMessageHeap) ‘simulation.message-queue’ begin1-->0 (cMessage) Tarr=0.0576872457 ( 57ms) Src=#8 Dest=#7
(cMessage) Tarr=0.0577201630 ( 57ms) Mod=#8 (selfmsg)(cMessage) Tarr=0.0585677054 ( 58ms) Mod=#4 (selfmsg)(cMessage) Tarr=0.0594939072 ( 59ms) Mod=#12 (selfmsg)(cMessage) Tarr=0.0601010000 ( 60ms) Mod=#7 (selfmsg)
1-->2 (cMessage) Tarr=0.0601020000 ( 60ms) Src=#11 Dest=#13end
[...detailed list of message queue contents deleted from here...]
To reduce the size of the file, you may well decide to make a snapshot only of a part of themodel. This example reports only about the current simple module’s put-aside queue:
snapshot(&putAsideQueue);
6.16.4 Breakpoints
With activity() only! In those user interfaces which support debugging, breakpoints stopexecution and the state of the simulation can be examined.
You can set a breakpoint inserting a breakpoint() call into the source:
for(;;){
cMessage *msg = receive();breakpoint("before-processing");breakpoint("before-send");send( reply_msg, "out" );//..
}
In user interfaces that do not support debugging, breakpoint() calls are simply ignored.
6.16.5 Disabling warnings
Some container classes and functions suspend the simulation and issue warning messages inpotentially bogus/dangerous situations, for example when an object is not found and NULLpointer/reference is about to be returned. Very often this is useful, but sometimes it is moretrouble. You can turn warnings on/off from the ini file (warnings=yes/no).
It is a good practice to leave warnings enabled, and temporarily disable warnings in placeswhere OMNeT++ would normally issue warnings but you know the code is correct. This isdone in the following way:
bool w = simulation.warnings();simulation.setWarnings( false );...... // critical code...simulation.setWarnings( w );
135
OMNeT++ Manual – The Simulation Library
6.16.6 Getting coroutine stack usage
It is important to choose the correct stack size for modules. If the stack is too large, itunnecessarily consumes memory; if it is too small, stack violation occurs.
From the Feb99 release, OMNeT++ contains a mechanism that detects stack overflows. Itchecks the intactness of a predefined byte pattern (0xdeadbeef ) at the stack boundary, andreports “stack violation” if it was overwritten. The mechanism usually works fine, but occa-sionally it can be fooled by large – and not fully used – local variables (e.g. char buffer[256]):if the byte pattern happens to fall in the middle of such a local variable, it may be preservedintact and OMNeT++ does not detect the stack violation.
To be able to make a good guess about stack size, you can use the stackUsage() call whichtells you how much stack the module actually uses. It is most conveniently called fromfinish() :
void FooModule::finish(){
ev << stackUsage() << "bytes of stack used\n";}
The value includes the extra stack added by the user interface library (see extraStackforEn-vir in envir/omnetapp.h), which is currently 8K for Cmdenv and at least 16K for Tkenv 1.
stackUsage() also works by checking the existence of predefined byte patterns in the stackarea, so it is also subject to the above effect with local variables.
6.17 Changing the network graphics at run-time
6.17.1 Setting display strings
Sometimes it is useful to change the appearance or position of some components in the net-work graphics, such as the color of the modules, color/width of connection arrows, position ofa submodule, etc.
The appearance of nodes and connections is determined by the display strings. Displaystrings (e.g. "p=100,10;i=pc" ) are initially taken from the NED description. You canchange the display string of a module or connection arrow at run-time by calling methodsnamed setDisplayString() .
Setting the module’s appearance when it is displayed as a component within a compoundmodule:
setDisplayString("p=100,100;b=60,30,rect;o=red,black,3", true);
Setting appearance of a compound module when it’s displayed as a bounding box for itssubmodules:
parentModule()->setDisplayStringAsParent("p=100.....", true);
The display string of a connection arrow is stored in its source gate, so you’ll need to writesomething like this:
gate("out")->setDisplayString("o=yellow,3");
1the actual value is dependent on the operating system, e.g. SUN Solaris needs more space
136
OMNeT++ Manual – The Simulation Library
The setDisplayString() methods additionally take a bool argument called immediate .It specifies whether the display string change should take effect immediately, or only af-ter processing the current event (the default is immediate=true). If several display stringchanges are going to be done within one event, then immediate=false is useful because it re-duces the number of necessary redraws. Immediate=false also uses less stack. But its draw-back is that a setDisplayString() followed by a send() would actually be displayed inreverse order (message animation first), because message animations are performed imme-diately (actually within the send() call).
6.17.2 The cDisplayStringParser class
The cDisplayStringParser utility class lets you parse and manipulate display strings.
As far as cDisplayStringParser is concerned, a display string (e.g. "p=100,125;i=cloud" )is a string that consist of several tags separated by semicolons, and each tag has a name andafter an equal sign, zero or more arguments separated by commas.
The class facilitates tasks such as finding out what tags a display string has, adding newtags, adding arguments to existing tags, removing tags or replacing arguments. The internalstorage method allows very fast operation; it will generally be faster than direct string ma-nipulation. The class doesn’t try to interpret the display string in any way, nor does it knowthe meaning of the different tags; it merely parses the string as data elements separated bysemicolons, equal signs and commas.
An example:
cDisplayStringParser dispstr("a=1,2;p=alpha,,3");dispstr.insertTag("x");dispstr.setTagArg("x",0,"joe");dispstr.setTagArg("x",2,"jim");dispstr.setTagArg("p",0,"beta");ev << dispstr.getString(); // result: "x=joe,,jim;a=1,2;p=beta,,3"
6.18 Tips for speeding up the simulation
Here are a few tips that can help you make the simulation faster:
• Turn off the display of screen messages when you run the simulation. You can do thisin the ini file. Alternatively, you can place #ifdefs around your ev<< and calls and turnoff the define when compiling the simulation for speed.
• Store the module parameters in local variables to avoid calling cPar member functionsevery time.
• Use gate numbers instead of gate names.
• Try to minimize message creations and deletions. Reuse messages if possible.
• Do not give name strings to objects that are created and deleted many times (passNULL pointer as name).
• Use numeric index to get an object from a cArray , not the object name. You can do thisalso with message parameters.
Two techniques are discussed here in detail:
137
OMNeT++ Manual – The Simulation Library
• message subclassing, and
• using shared objects
6.18.1 Using shared objects
In a complex simulation, a lot of messages are created, sent and destroyed. Messages typi-cally have some parameters attached to them as cPar objects and it frequently happens thata certain parameter has identical values in all messages (for example, source address in aframe is the same in all messages sent by one module). Still, separate parameter objects arecreated and destroyed with each message, which is very costly. One could save significantamount of CPU time and memory if a single object could serve as a parameter to all existingmessages.
This can be achieved with proper ownership control. See the following example:
void MyComputer::activity(){
cPar source_addr; // address of this nodecPar dest_addrs[3]; // possible destinations
source_addr.setStringValue( "DECnet000728" );dest_addrs[0].setStringValue( "cisco_F99030" );dest_addrs[1].setStringValue( "DEC___28E6AD" );dest_addrs[2].setStringValue( "DECnet000B04" );
long k=0;for(;;){
cMessage *packet = new cMessage("DATA");
packet->addPar( *new cPar("sequence", ’L’, k++) );
packet->parList().takeOwnership( false ); // NOTE THIS LINE!!!
packet->addPar( source_addr );packet->addPar( dest_addrs[ k%3 ] );
send(packet, "output-gate");
wait( truncnormal(1.5, 0.5) );}
}
The above simple module code models the message generation part of a computer on a LAN.The module sends out messages (packets) to different stations in every 1.5 seconds or so. Themessages have three parameters: the source address, the destination address and a sequencenumber. The source address is the same in each packet, and there are only three possibledestination stations. The sequence number is different in each packet.
To avoid the overhead caused by having to create source and destination address objects foreach message, the module creates these objects only once; they will be shared among allmessages. Separate sequence number objects are created for each message.
Let us see what happens to the sequence number object when it is inserted into the message.The message object, by default, takes the ownership of the object. Ownership means the
138
OMNeT++ Manual – The Simulation Library
responsibility of destruction; that is, when the message is destroyed, the parameter objectwill be destroyed as well.
This is exactly what we need most of the time. But if we just added the shared source anddestination address objects to a message, then we would have problems when the messageis destroyed. Somehow it must be told to the message object to leave our shared parametersalone and not to become their owner. This is exactly what the
packet->parList().takeOwnership(false);
line does: it sets a flag that tells the message (to be more precise, to its internal parameterlist object) not to take the ownership of objects that will be inserted from then on. It does notaffect objects already inserted. As a result, all messages will just hold pointers to the sharedcPar objects and never do any harm to them.
The above example shows that with CPU-intensive simulations, you can save a lot of com-putation time and memory just by using the ownership mechanism already present in OM-NeT++.
6.19 Building large networks
There are situations when using NED files to describe network topology is inconvenient, forexample because the topology information comes from an external source (e.g. it is exportedfrom a network management program). In such case, you have two possibilities to avoidwriting NED files by hand:
1. generating NED files from data files
2. building the network from C++ code
The two solutions have different advantages and disadvantages. The first is more useful inthe model development phase, while the second one is better for writing larger scale, moreproductized simulation programs. In the next sections we examine both methods.
6.19.1 Generating NED files
Text processing programs like awk or perl are excellent tools to read in textual data filesand generate NED files from them. Perl also has extensions to access SQL databases, so itcan also be used if the network topology is stored in a database.
The advantage is that the necessary awk or perl program can be written in a releativelyshort time, and it is inexpensive to maintain afterwards: if the structure of the data fileschange, the NED-creating program can be easily modified. The disadvantage is that theresulting NED files are often quite big and the C++ compilation of the *_n.cc files take toolong.
This method is best suited in the first phase of a simulation project when the topology, theformat of the data files, etc. have not yet settled down.
6.19.2 Building the network from C++ code
Another alternative is to write C++ code which becomes part of the simulation executable.The code would read the topology data from data files or a database, and build the network
139
OMNeT++ Manual – The Simulation Library
directly. The code which builds the network would be quite similar to the *_n.cc files outputby nedc.
Since writing such code is more complex than letting perl generate NED files, this methodis recommended when the simulation program has to be somewhat more productized, forexample when OMNeT++ and the simulation model is embedded into a larger program, e.g.a network design tool.
140
OMNeT++ Manual – Message Definitions
Chapter 7
Message Definitions
7.1 Motivation
In former releases of OMNeT++, cPar objects were the only way to add data to messageobjects. This technique had significant drawbacks: cPar ’s were fairly complex objects them-selves, and they added both execution and memory overhead. They were also error-pronebecause cPar objects had to be added dynamically and individually to each message object.
A better approach is to leave out cPar objects and rely on the C++ language instead. Sincethe simulation library is written in C++, it is very easy to subclass cMessage , and add thenecessary parameters as instance variables.
For defining a new message class, one could write the following:
class RadioMsg : public cMessage {public:
int freq;double power;...
};
Now it is possible to write code like this:
RadioMsg *msg = new RadioMsg();msg->freq = 1;msg->power = 10.0;...
This code is more efficient than using cPar s, and also benefits from static type checking: ifyou mistype the name of a parameter, already the compiler can detect the mistake.
Note that the above code is only for illustration. In real code, one should avoid public datamembers: freq and power should be private members, and getter/setter methods shouldexist to access them. Also, the above class definition misses several member functions (con-structor, assignment operator, etc.) that should be written.
In one test (slotted Aloha simulation with 10 nodes), the simulation was 8 times faster whenusing this technique. Of course, if your simulation doesn’t create and destroy many messages(compared to other activities), you may not benefit this much.
However, you’ll notice one drawback of this solution when you try to use Tkenv for debug-ging. While cPar -based message parameters can be viewed in message inspector windows,
141
OMNeT++ Manual – Message Definitions
parameters added by subclassing do not appear there. The reason is that Tkenv, being justanother C++ library in your simulation program, doesn’t know about your C++ instance vari-ables. The problem cannot be solved entirely within Tkenv, because the C++ language doesnot support “reflection” (extracting class information at runtime) like for example Java does.
There is a solution however: one can supply Tkenv with missing “reflection” informationabout the new class. Reflection info might take the form of a separate C++ class whosemethods return information about the RadioMsg fields. This descriptor class might look likethis:
class RadioMsgDescriptor : public Descriptor{
public:virtual int getFieldCount() {return 2;}
virtual const char *getFieldName(int k) {const char *fieldname[] = {"freq", "power";}if (k<0 || k>=2) return NULL;return fieldname[k];
}
virtual double getFieldAsDouble(RadioMsg *msg, int k) {if (k==0) return msg->freq;if (k==1) return msg->power;return 0.0; // not found
}//...
};
Then you have to inform Tkenv that a RadioMsgDescriptor exists and that it should beused whenever Tkenv finds messages of type RadioMsg (as it is currently implemented,whenever the object’s className() method returns "RadioMsg" ). So when you inspect aRadioMsg in your simulation, Tkenv can use RadioMsgDescriptor to extract and displaythe values of the freq and power variables.
The actual implementation is somewhat more complicated than this, but not much.
To relieve the simulation programmer from having to write this extra code, messages aredescribed in a higher-level syntax, and a compiler is used to generate the necessary C++ codewith subclasses of cMessage and cPacket . The message compiler can add the necessarydata members and methods. It also generates the necessary reflection code which makes itpossible to inspect message contents in Tkenv.
OMNeT++currently contains an experimental implementation of the message subclassingfeature described above. “Experimental” means that:
• The message description syntax and features may change in the future, based on feed-back from the community;
• The compiler that translates message descriptions into C++ is a perl script opp_msgc .This is a temporary solution until the C++-based nedtool is finished.
The subclassing approach for adding message parameters was originally suggested by Nim-rod Mesika.
142
OMNeT++ Manual – Message Definitions
7.2 The first message class
Let us begin with a simple example. Suppose that you need message objects to carry sourceand destination addresses as well as a hop count. You could write a mypacket.msg file withthe following contents:
message MyPacket{
fields :int srcAddress;int destAddress;int hops = 0;
};
The task of the “message subclassing compiler” is to generate C++ classes you can use fromyour models as well as “reflection” classes that allow Tkenv to inspect these data stuctures.
If you process mypacket.msg with “message subclassing compiler”, it will create the follow-ing files for you: mypacket_m.h and mypacket_m.cc . mypacket_m.h contains the decla-ration of the MyPacket C++ class, and it should be included into your C++ sources whereyou need to handle MyPacket objects.
The MyPacket class declaration in mypacket_m.h will look like this:
class MyPacket : public cMessage {...virtual int getSrcAddress() const;virtual void setSrcAddress(int srcAddress);...
};
So in your C++ file, you could use it like this:
#include "mypacket_m.h"
...MyPacket *pkt = new MyPacket("pkt");pkt->setSrcAddress( localAddr );...
The mypacket_m.cc file contains implementation of the generated MyPacket class, as wellas “reflection” code that allows you to inspect these data stuctures in the Tkenv GUI. Themypacket_m.cc file should be compiled and linked into your simulation. (If you use theopp_makemake tool to generate your makefiles, the latter will be automatically taken careof.)
7.3 Features
The following sections describe the message syntax and features in detail.
143
OMNeT++ Manual – Message Definitions
7.3.1 Declaring enums
An enum {..} generates a normal C++ enum, plus creates an object which stores text repre-sentations of the constants. The latter makes it possible to display symbolic names in Tkenv.An example:
enum ProtocolTypes{
IP = 1;TCP = 2;
};
7.3.2 Message declarations
Basic useYou can describe messages with the following syntax:
message FooPacket{
fields :int sourceAddress;int destAddress;bool hasPayload;
};
Processing this description with the message compiler will produce a C++ header file with agenerated class, FooPacket . FooPacket will be a subclass of cMessage .
For each field in the above description, the generated class will have a protected data mem-ber, a getter and a setter method. The names of the methods will begin with get and set ,followed by the field name with its first letter converted to uppercase. Thus, FooPacket willcontain the following methods:
virtual int getSourceAddress() const;virtual void setSourceAddress(int sourceAddress);
virtual int getDestAddress() const;virtual void setDestAddress(int destAddress);
virtual bool getHasPayload() const;virtual void setHasPayload(bool hasPayload);
Note that the methods are all declared virtual to give you the possibility of overriding themin subclasses.
Two constructors will be generated: one that optionally accepts an object name, and a copyconstructor:
FooPacket(const char *name=NULL);FooPacket(const FooPacket& other);
Appropriate assignment operator (operator=() ) and dup() methods will also be generated.
Data types for fields are not limited to int and bool . You can use the following primitivetypes (i.e. primitive types as defined in the C++ language):
144
OMNeT++ Manual – Message Definitions
• bool
• char , unsigned char
• short , unsigned short
• int , unsigned int
• long , unsigned long
• double
Field values are initialized to zero.
Initial valuesYou can initialize field values with the following syntax:
message FooPacket{
fields :int sourceAddress = 0;int destAddress = 0;bool hasPayload = false;
};
Initialization code will be placed in the constructor of the generated class.
Enum declarationsYou can declare that an int (or other integral type) field takes values from an enum. Themessage compiler can than generate code that allows Tkenv display the symbolic value ofthe field.
Example:
message FooPacket{
fields :int payloadType enum(PayloadTypes);
};
The enum has to be declared separately in the message file.
Fixed-size arraysYou can specify fixed size arrays:
message FooPacket{
fields :long route[4];
};
The generated getter and setter methods will have an extra k argument, the array index:
virtual long getRoute(unsigned k) const;virtual void setRoute(unsigned k, long route);
145
OMNeT++ Manual – Message Definitions
If you call the methods with an index that is out of bounds, an exception will be thrown.
Dynamic arraysIf the array size is not known in advance, you can declare the field to be a dynamic array:
message FooPacket{
fields :long route[];
};
In this case, the generated class will have two extra methods in addition to the getter andsetter methods: one for setting the array size, and another one for returning the currentarray size.
virtual long getRoute(unsigned k) const;virtual void setRoute(unsigned k, long route);virtual unsigned getRouteArraySize() const;virtual void setRouteArraySize(unsigned n);
The set...ArraySize() method internally allocates a new array. Existing values in thearray will be preserved (copied over to the new array.)
The default array size is zero. This means that you need to call the set...ArraySize()before you can start filling array elements.
String membersYou can declare string-valued fields with the following syntax:
message FooPacket{
fields :string hostName;
};
The generated getter and setter methods will return and accept const char* pointers:
virtual const char *getHostName() const;virtual void setHostName(const char *hostName);
The generated object will have its own copy of the string.
NOTE: a string member is different from a character array, which is treated as an array ofany other type. For example,
message FooPacket{
fields :char chars[10];
};
will generate the following methods:
virtual char getChars(unsigned k);virtual void setChars(unsigned k, char a);
146
OMNeT++ Manual – Message Definitions
7.3.3 Inheritance, composition
So far we have discussed how to add fields of primitive types (int , double , char , ...) tocMessage . This might be sufficient for simple models, but if you have more complex models,you’ll probably need to:
• set up a hierarchy of message (packet) classes, that is, not only subclass from cMessagebut also from your own message classes;
• use not only primitive types as fields, but also structs, classes or typedefs. Sometimesyou’ll want to use a C++ type present in an already existing header file, another timeyou’ll want a struct or class to be generated by the message compiler so that you canbenefit from Tkenv inspectors.
The following section describes how to do these tasks.
Inheritance among message classesBy default, messages are subclassed from cMessage . However, you can explicitly specify thebase class using the extends keyword:
message FooPacket extends FooBase{
fields :...
};
For the above example, the generated C++ code will look like:
class FooPacket : public FooBase { ... };
Inheritance also works for structs and classes (see next sections for details).
Defining classesUntil now we have used the message keyword to define classes, which implies that the baseclass is cMessage , either directly or indirectly.
But as part of complex messages, you’ll need structs and other classes (rooted or not rooted incObject ) as building blocks. Classes can be created with the class class keyword; structswe’ll cover in the next section.
The syntax for defining classes is almost the same as defining messages, only the classkeyword is used instead of message .
Slightly different code is generated for classes that are rooted in cObject than for thosewhich are not. If there is no extends , the generated class will not be derived from cObject ,thus it will not have name() , className() , setOwner() , etc. methods. To create a classwith those methods, you have to explicitly write extends cObject .
class MyClass extends cObject{
fields :...
};
Defining plain C structs
147
OMNeT++ Manual – Message Definitions
You can define C-style structs to be used as fields in message classes, “C-style” meaning“containing only data and no methods”. (Actually, in the C++ language a struct can havemethods, and in general it can do anything a class can.)
The syntax is similar to that of defining messages:
struct MyStruct{
fields :char array[10];short version;
};
However, the generated code is different. The generated struct has no getter or setter meth-ods, instead the fields are represented by public data members. For the above definition, thefollowing code is generated:
// generated C++struct MyStruct{
char array[10];short version;
};
A struct can have primitive types or other structs are fields. It cannot have string or class asfield.
Inheritance is supported for structs:
struct Base{
...};
struct MyStruct extends Base{
...};
But because a struct has no member functions, there are limitations:
• field initialization is not supported (it would need constructor)
• struct fields are not initialized to zero (it would need constructor)
• dynamic arrays are not supported (no place for the array allocation code)
• “generation gap” or abstract fields (see later) cannot be used, because they would buildupon virtual functions.
Using structs and classes as fieldsIn addition to primitive types, you can also use other structs or objects as a field. For example,if you have a struct named IPAddress , you can write the following:
148
OMNeT++ Manual – Message Definitions
message FooPacket{
fields :IPAddress src;
};
The IPAddress structure must be known in advance to the message compiler; that is, itmust either be a struct or class defined earlier in the message description file, or it must be aC++ type with its header file included via cplusplus {{...}} and its type announced (seeAnnouncing C++ types).
The generated class will contain an IPAddress data member (that is, not a pointer to anIPAddress ). The following getter and setter methods will be generated:
virtual const IPAddress& getSrc() const;virtual void setSrc(const IPAddress& src);
PointersNot supported yet.
7.3.4 Using existing C++ types
Announcing C++ typesIf you want to use one of your own types (a class, struct or typedef, declared in a C++ header)in a message definition, you have to announce those types to the message compiler. You alsohave to make sure that your header file gets included into the generated _m.h file so thatthe C++ compiler can compile it.
Suppose you have an IPAddress structure, defined in an ipaddress.h file:
// ipaddress.hstruct IPAddress {
int byte0, byte1, byte2, byte3;};
To be able to use IPAddress in a message definition, the message file (say foopacket.msg )should contain the following lines:
cplusplus {{#include "ipaddress.h"}};
struct IPAddress;
The effect of the first three lines is simply that the #include statement will be copied intothe generated foopacket_m.h file to let the C++ compiler know about the IPAddress class.The message compiler itself will not try to make sense of the text in the body of the cplus-plus {{ ... }} directive.
The next line, struct IPAddress , tells the message compiler that IPAddress is a C++struct. This information will (among others) affect the generated code.
Classes can be announced using the class keyword:
149
OMNeT++ Manual – Message Definitions
class cSubQueue;
The above syntax assumes that the class is derived from cObject either directly or indi-rectly. If it is not, the noncobject keyword should be used:
class noncobject IPAddress;
The distinction between classes derived and not derived from cObject is important becausethe generated code differs at places. The generated code is set up so that if you incidentallyforget the noncobject keyword (and so you mislead the message compiler into thinkingthat your class is rooted in cObject when in fact it is not), you’ll get a C++ compiler error inthe generated header file.
7.3.5 Customizing the generated class
The Generation Gap patternSometimes you need the generated code to something more or do something differently thanthe version generated by the message compiler. For example, when setting a integer fieldnamed payloadLength , you might also need to adjust the packet length. That is, the fol-lowing default (generated) version of the setPayloadLength() method is not suitable:
void FooPacket::setPayloadLength(int payloadLength){
this->payloadLength = payloadLength;}
Instead, it should look something like this:
void FooPacket::setPayloadLength(int payloadLength){
int diff = payloadLength - this->payloadLength;this->payloadLength = payloadLength;setLength( length() + diff );
}
According to common belief, the largest drawback of generated code is that it is difficult orimpossible to fulfill such wishes. Hand-editing of the generated files is worthless, becausethey will be overwritten and changes will be lost in the code generation cycle.
However, object oriented programming offers a solution. A generated class can simply becustomized by subclassing from it and redefining whichever methods need to be differentfrom their generated versions. This practice is known as the Generation Gap design pattern.It is enabled with the following syntax:
message FooPacket{
properties :customize = true;
fields :int payloadLength;
};
150
OMNeT++ Manual – Message Definitions
The properties section within the message declaration contains meta-info that affects howgenerated code will look like. The customize property enables the use of the Generation Gappattern.
If you process the above code with the message compiler, the generated code will contain aFooPacket_Base class instead of FooPacket . The idea is that you have to subclass fromFooPacket_Base to produce FooPacket , while doing your customizations by redefining thenecessary methods.
class FooPacket_Base : public cMessage{
protected:int src;// make constructors protected to avoid instantiationFooPacket_Base(const char *name=NULL);FooPacket_Base(const FooPacket_Base& other);
public:...virtual int getSrc() const;virtual void setSrc(int src);
};
There is a minimum amount of code you have to write for FooPacket , because not everythingcan be pre-generated as part of FooPacket_Base , e.g. constructors cannot be inherited. Thisminimum code is the following (you’ll find it the generated C++ header too, as a comment):
class FooPacket : public FooPacket_Base{
public:FooPacket(const char *name=NULL) : FooPacket_Base(name) {}FooPacket(const FooPacket& other) : FooPacket_Base(other) {}FooPacket& operator=(const FooPacket& other)
{FooPacket_Base::operator=(other); return *this;}virtual cObject *dup() {return new FooPacket(*this);}
};
Register_Class(FooPacket);
So, returning to our original example about payload length affecting packet length, the codeyou’d write is the following:
class FooPacket : public FooPacket_Base{
// here come the mandatory methods: constructor,// copy contructor, operator=(), dup()// ...
virtual void setPayloadLength(int newlength);}
void FooPacket::setPayloadLength(int newlength){
// adjust message lengthsetLength(length()-getPayloadLength()+newlength);
151
OMNeT++ Manual – Message Definitions
// set the new lengthFooPacket_Base::setPayloadLength(newlength);
}
Abstract fieldsThe purpose of abstract fields is to let you to override the way the value is stored inside theclass, and still benefit from inspectability in Tkenv.
For example, this is the situation when you want to store a bitfield in a single int or short ,and still you want to present bits as individual packet fields. It is also useful for implement-ing computed fields.
You can declare any field to be abstract with the following syntax:
message FooPacket{
properties :customize = true;
fields :abstract bool urgentBit;
};
For an abstract field, the message compiler generates no data member, and generatedgetter/setter methods will be pure virtual:
virtual bool getUrgentBit() const = 0;virtual void setUrgentBit(bool urgentBit) = 0;
Usually you’ll want to use abstract fields together with the Generation Gap pattern, so thatyou can immediately redefine the abstract (pure virtual) methods and supply your imple-mentation.
7.4 Summary
This section attempts to summarize the possibilities.
You can generate:
• classes rooted in cObject
• messages (default base class is cMessage )
• classes not rooted in cObject
• plain C structs
The following data types are supported for fields:
• primitive types: bool , char , short , int , long , unsigned short , unsigned int ,unsigned long , double
• string , a dynamically allocated string, presented as const char *
• fixed-size arrays of the above types
152
OMNeT++ Manual – Message Definitions
• structs, classes (both rooted and not rooted in cObject ), declared with the messagesyntax or externally in C++ code
• variable-sized arrays of the above types (stored as a dynamically allocated array plusan integer for the array size)
Further features:
• fields initialize to zero (except struct members)
• fields initializers can be specified (except struct members)
• assigning enums to variables of integral types.
• inheritance
• customizing the generated class via subclassing (Generation Gap pattern)
• abstract fields (for nonstandard storage and calculated fields)
Generated code (all generated methods are virtual , although this is not written out in thefollowing table):
Field declaration Generated codeprimitive types
double field; double getField();void setField(double d);
string type
string field; const char *getField();void setField(const char *);
fixed-size arrays
double field[4]; double getField(unsigned k);void setField(unsigned k, double d);unsigned getFieldArraySize();
dynamic arrays
double field[]; void setFieldArraySize(unsigned n);unsigned getFieldArraySize();double getField(unsigned k);void setField(unsigned k, double d);
customized class
class Foo {properties:
customize=true;
class Foo_Base { ... };
and you have to write:
class Foo : public Foo_Base {...
};
153
OMNeT++ Manual – Message Definitions
abstract fields
abstract double field; double getField() = 0;void setField(double d) = 0;
7.5 Example
Several of the example simulations (Token Ring, Dyna2, Hypercube) use message definitions.For example, in Dyna2 you’ll find this:
• dynapacket.msg defines DynaPacket and DynaDataPacket ;
• dynapacket_m.h and dynapacket_m.cc are produced by the message subclassingcompiler from it, and they contain the generated DynaPacket and DynaDataPacke tC++ classes (plus code for Tkenv inspectors);
• other model files (client.cc , server.cc , ...) use the generated message classes
154
OMNeT++ Manual – Building Simulation Programs
Chapter 8
Building Simulation Programs
8.1 Overview
As it was already mentioned, an OMNeT++ model physically consists of the following parts:
• NED language topology description(s). These are files with the .ned suffix.
• Simple modules. These are C++ files, with .cc suffix.
Model files are usually placed in the projects/modelname subdirectory of the main OMNeT++directory.
The NED files are compiled into C++ using the NEDC compiler which is part of OMNeT++.The NEDC compiler (source and executable) is normally located in the nedc subdirectory ofthe main OMNeT++ directory.
The simulation system provides the following components that will be part of the simulationexecutable:
• Simulation kernel with the simulation class library. This is a library file with .a or.lib extension, normally in the sim subdirectory of the main OMNeT++ directory. Itcomes in several versions: libsim_std.a (sim_std.lib) is the standard version andlibsim_pvm.a (sim_pvm.lib) and libsim_mpi.a (sim_mpi.lib) are the ones to be usedwith parallel execution.
• User interfaces. These are also library files (.a or .lib file), normally in the envir di-rectory and other directories. The common part of all user interfaces is libenvir.a(envir.lib), and the specific user interfaces are libcmdenv.a (cmdenv.lib), libtkenv.a(tkenv.lib).
Simulation programs are built from the above components. First, the NED files are compiledinto C++ source code using the NEDC compiler. Then all C++ sources are compiled andlinked with the simulation kernel and a user interface to form a simulation executable.
The following figure gives an overview of the process of building and running simulationprograms.
This section discusses how to use the simulation system on the following platforms:
• Unix with gcc (also Windows with Cygwin or MinGW)
• MSVC 6.0 on Windows
155
OMNeT++ Manual – Building Simulation Programs
Figure 8.1: Building and running simulation
156
OMNeT++ Manual – Building Simulation Programs
8.2 Using Unix and gcc
This section applies to using OMNeT++ on Linux, Solaris, FreeBSD and other Unix deriva-tives, and also more or less to Cygwin and MinGW on Windows.
Here in the manual we can give a rough overview only. The doc/ directory of your OM-NeT++ installation contains Readme. <platform> files that provide up-to-date, more detailedand more precise instructions.
8.2.1 Installation
The installation process depends on what distribution you take (source, precompiled RPM,etc.) and it may change from release to release, so it is better to refer to the readme files. Ifyou compile from source, you can expect the usual GNU procedure: ./configure , make.
8.2.2 Building simulation models
The opp_makemake script can automatically generate the Makefile for your simulationprogram, based on the source files in the current directory. (It can also handle large modelswhich are spread across several directories; this is covered later in this section.)
opp_makemake has several options, with the -h option it displays a summary.
% opp_makemake -h
Once you have the source files (*.ned , *.msg , *.cc , *.h ) in a directory, cd there then type:
% opp_makemake
This will create a file named Makefile . Thus if you simply type make, your simulationprogram should build. The name of the executable will be the same as the name of thedirectory containing the files.
The freshly generated Makefile doesn’t contain dependencies, it is advisable to add themby typing make depend . The warnings during the dependency generation process can besafely ignored.
In addition to the simulation executable, the Makefile contains other targets, too. Here isa list of important ones:
Target ActionThe default target is to build the simulation exe-cutable
depend Adds (or refreshes) dependencies in the Make-file
clean Deletes all files that were produced by the makeprocess
neddoc.html Generates documentation for all NED files. Theresulting file is named neddoc.html
htmldoc Generates code documentation using doxygen.The documentation will be placed into the direc-tory htmldoc
doc Convenience target that calls neddoc.html andhtmldoc
157
OMNeT++ Manual – Building Simulation Programs
re-makemake Regenerates the Makefile using opp_makemake(this is useful if e.g. after upgrading OMNeT++, ifopp_makemake has changed)
re-makemake-m Similar to make re-makemake , but it regener-ates the Makefile.in instead
If you already had a Makefile in that directory, opp_makemake will refuse overwriting it.You can force overwriting the old Makefile with the -f option:
% opp_makemake -f
If you have problems, check the path definitions (locations of include files and libraries etc.)in the configure script and correct them if necessary. Then re-run configure to commit thechanges to all makefiles, the opp_makemake script etc.
You can specify the user interface (Cmdenv/Tkenv) with the -u option (with no -u, Tkenv isthe default):
% opp_makemake -u Tkenv
The name of the output file is set with the -o option (the default is the name of the directory):
% opp_makemake -o fddi-net
If some of your source files are generated from other files (for example, you use machine-generated NED files), write your make rules into a file called makefrag. When you runopp_makemake , it will automatically insert makefrag into the resulting makefile . Withthe -i option, you can also name other files to be included into Makefile .
If you want better portability for your models, you can generate Makefile.in instead ofMakefile with opp_makemake ’s -m option. You can then use autoconf-like configure scriptsto generate the Makefile .
8.2.3 Multi-directory models
In the case of a large project, your source files may be spread across several directories. Youhave to decide whether you want to use static linking, shared or run-time loaded (shared)libraries. Here we discuss static linking.
In each subdirectory (say trafgen/ and router/), run
opp_makemake -n
The -n option means no linking is necessary, only compiling has to be done.
In your toplevel source directory, run
opp_makemake trafgen/ router/
This results in recursive makefiles: when you build the simulation, make will descend intotrafgen/ and router/, run make in both, then it will link an executable with the object files inthe two directories.
You may need to use the -I option if you include files from other directories. The -I option isfor both C++ and NED files. In our example, you could run
158

OMNeT++ Manual – Building Simulation Programs
opp_makemake -n -I../router
in the trafgen/ directory and vice versa.
If you’re willing to play with shared and run-time loaded libraries, several opp_makemakeoptions and the [General]/load-libs= ini file option leave you enough room to do so.
8.2.4 Static vs shared OMNeT++ system libraries
Default linking uses the shared libraries. One reason you would want static linking is thatdebugging the OMNeT++ class library is more trouble with shared libraries. Another rea-son might be that you want to run the executable on another machine without having toworry about setting the LD_LIBRARY_PATHvariable (which should contain the name of thedirectory where the OMNeT++ shared libraries are).
If you want static linking, find the
build_shared_libs=yes
line in the configure.user script and change it to
build_shared_libs=no
Then you have to re-run the configure script and rebuild everything:
./configuremake cleanmake
8.3 Using Windows and Microsoft Visual C++
This is only a rough overview. Up-to-date, more detailed and more precise instructions canbe found in the doc/ directory of your OMNeT++ installation, in the file Readme.MSVC.
8.3.1 Installation
It is easiest to start with the binary, autoinstaller version. It contains all necessary softwareexcept MSVC, and you can get a working system up and running very fast.
Later you’ll probably want to download and build the source distribution too. Reasons forthat might be to compile the libraries with different flags, to debug into them, or to recompilewith support for additional packages (e.g. Akaroa, MPI). Compilation should be painless (ittakes a single nmake -f Makefile.vc command) after you get the different componentdirectories right in configuser.vc . Additional software needed for the compilation is alsodescribed in doc/ .
8.3.2 Building simulation models
Now OMNeT++ has an automatic MSVC makefile creator named opp_nmakemake which isprobably the easier way to go. Its usage is very similar to the similarly named tool for Unix.
159
OMNeT++ Manual – Building Simulation Programs
However, if you like the MSVC IDE, you can also use it. There is an MSVC wizard which willcreate project files for you, or you can start by copying one of the sample simulations. Thereis also an AddNEDFileToProject macro that can, well, add NED files to your project with thenecessary custom build step (invoke nedc, etc.)
Some caveats (please read doc/Readme.MSVC for more!):
• how to get the graphical environment. By default, the sample simulations linkwith Cmdenv if you rebuild them from the IDE. To change to Tkenv, choose Build|Setactive configuration from the menu, select “Debug-Tkenv” or “Release-Tkenv”, then re-link the executable.
• can’t find a usable init.tcl. If you get this message, Tcl/Tk is missing the TCL_LIBRARYenvironment variable which is normally set by the installer. If you see this message,you need to set this variable yourself to the Tcl lib/ directory.
• changed compiler settings. Changes since OMNeT++ 2.2: You’ll need exception han-dling and RTTI turned ON, and stack size set to as low as 64K. See the readme file forrationale and more hints.
• adding NED files. After you added a .ned file to the project, you also have to add a_n.cpp file, and set a Custom Build Step for them:
Description: NED Compiling $(InputPath)Command: nedc -s _n.cpp $(InputPath)Outputs: $(InputName)_n.cpp
For msg files you need an analogous procedure.
• file name extension: as a gesture toward the free software community, MSVC refusesto treat .cc files as C++ sources, so first you have to rename them to .cpp . For thesample simulations this is done by samples/cc2cpp.bat .
160

OMNeT++ Manual – Running The Simulation
Chapter 9
Running The Simulation
9.1 User interfaces
OMNeT++ simulations can be run under different user interfaces. Currenly, two user inter-faces are supported:
• Tkenv: Tcl/Tk-based graphical, windowing user interface
• Cmdenv: command-line user interface for batch execution
You would typically test and debug your simulation under Tkenv, then do actual simulationexperiments with Cmdenv which supports batch execution. Tkenv is also better suited foreducational or demonstration purposes.
Both Tkenv and Cmdenv are provided in the form of a library, and you choose between themby linking one or the other into your simulation executable. (Creating the executable wasdescribed in chapter 8). Both user interfaces are supported on Unix and Windows platforms.
Common functionality in Tkenv and Cmdenv has been collected and placed into the Envirlibrary, which can be thought of as the “common base class” for the two user interfaces.
The user interface is separated from the simulation kernel, and the two parts interactthrough a well-defined interface. This also means that, if needed, you can write your ownuser interface or embed an OMNeT++ simulation into your application without any changeto models or the simulation library.
Configuration and input data for the simulation are described in a configuration file usuallycalled omnetpp.ini . Some entries in this file apply to Tkenv or Cmdenv only, other set-tings are in effect regardless of the user interface. Both user interfaces accept command-linearguments, too.
The following sections explain omnetpp.ini and the common part of the user interfaces,describe Cmdenv and Tkenv in detail, then go on to specific problems.
9.2 The configuration file: omnetpp.ini
9.2.1 An example
For a start, let us see a simple omnetpp.ini file which can be used to run the Fifo1 samplesimulation under Cmdenv.
161
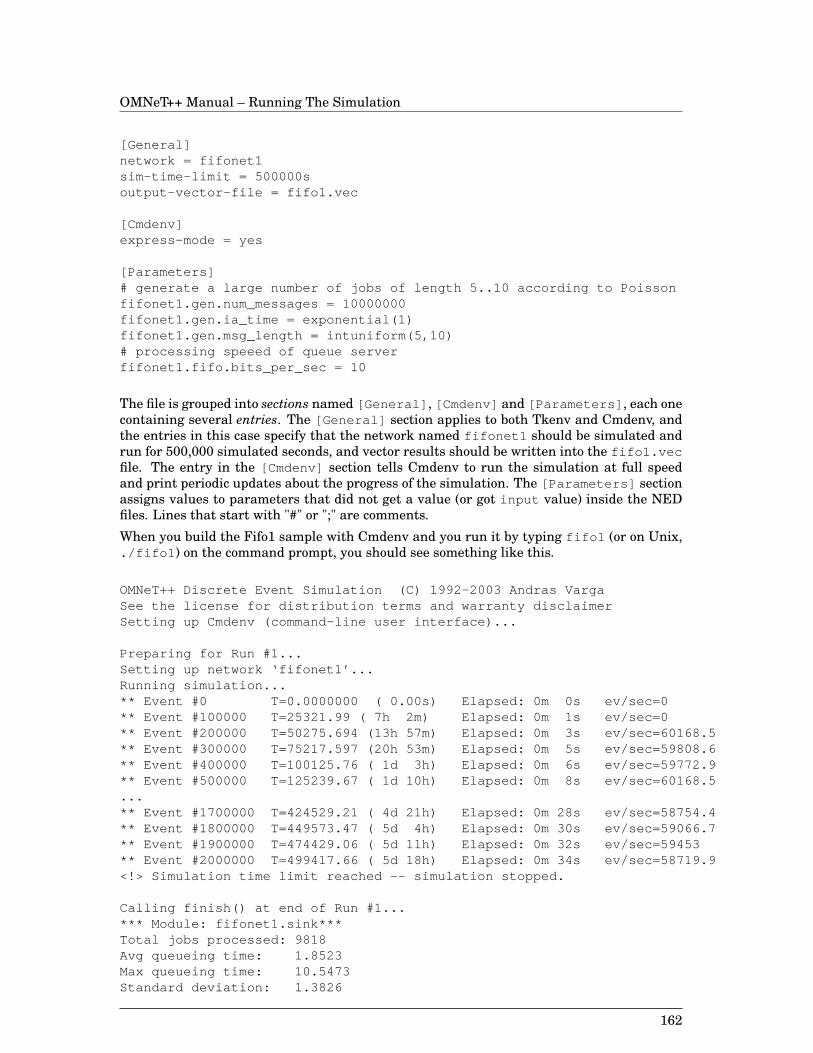
OMNeT++ Manual – Running The Simulation
[General]network = fifonet1sim-time-limit = 500000soutput-vector-file = fifo1.vec
[Cmdenv]express-mode = yes
[Parameters]# generate a large number of jobs of length 5..10 according to Poissonfifonet1.gen.num_messages = 10000000fifonet1.gen.ia_time = exponential(1)fifonet1.gen.msg_length = intuniform(5,10)# processing speeed of queue serverfifonet1.fifo.bits_per_sec = 10
The file is grouped into sections named [General] , [Cmdenv] and [Parameters] , each onecontaining several entries. The [General] section applies to both Tkenv and Cmdenv, andthe entries in this case specify that the network named fifonet1 should be simulated andrun for 500,000 simulated seconds, and vector results should be written into the fifo1.vecfile. The entry in the [Cmdenv] section tells Cmdenv to run the simulation at full speedand print periodic updates about the progress of the simulation. The [Parameters] sectionassigns values to parameters that did not get a value (or got input value) inside the NEDfiles. Lines that start with "#" or ";" are comments.
When you build the Fifo1 sample with Cmdenv and you run it by typing fifo1 (or on Unix,./fifo1 ) on the command prompt, you should see something like this.
OMNeT++ Discrete Event Simulation (C) 1992-2003 Andras VargaSee the license for distribution terms and warranty disclaimerSetting up Cmdenv (command-line user interface)...
Preparing for Run #1...Setting up network ‘fifonet1’...Running simulation...** Event #0 T=0.0000000 ( 0.00s) Elapsed: 0m 0s ev/sec=0** Event #100000 T=25321.99 ( 7h 2m) Elapsed: 0m 1s ev/sec=0** Event #200000 T=50275.694 (13h 57m) Elapsed: 0m 3s ev/sec=60168.5** Event #300000 T=75217.597 (20h 53m) Elapsed: 0m 5s ev/sec=59808.6** Event #400000 T=100125.76 ( 1d 3h) Elapsed: 0m 6s ev/sec=59772.9** Event #500000 T=125239.67 ( 1d 10h) Elapsed: 0m 8s ev/sec=60168.5...** Event #1700000 T=424529.21 ( 4d 21h) Elapsed: 0m 28s ev/sec=58754.4** Event #1800000 T=449573.47 ( 5d 4h) Elapsed: 0m 30s ev/sec=59066.7** Event #1900000 T=474429.06 ( 5d 11h) Elapsed: 0m 32s ev/sec=59453** Event #2000000 T=499417.66 ( 5d 18h) Elapsed: 0m 34s ev/sec=58719.9<!> Simulation time limit reached -- simulation stopped.
Calling finish() at end of Run #1...*** Module: fifonet1.sink***Total jobs processed: 9818Avg queueing time: 1.8523Max queueing time: 10.5473Standard deviation: 1.3826
162

OMNeT++ Manual – Running The Simulation
End run of OMNeT++
As Cmdenv runs the simulation, periodically it prints the sequence number of the currentevent, the simulation time, the elapsed (real) time, and the performance of the simulation(how many events are processed per second; the first two values are 0 because there wasn’tenough data for it to calculate yet). At the end of the simulation, the finish() methods ofthe simple modules are run, and the output from them are displayed. On my machine thisrun took 34 seconds. This Cmdenv output can be customized via other omnetpp.ini entries.The output file fifo1.vec contains vector data recorded during simulation (here, queueingtimes), and it can be processed using Plove or other tools.
9.2.2 The concept of simulation runs
OMNeT++ can execute several simulation runs automatically one after another. If multipleruns are selected, option settings and parameter values can be given either individuallyfor each run, or together for all runs, depending in which section the option or parameterappears.
9.2.3 Sections and entries
The ini file is a text file consisting of entries grouped into different sections.
Lines that start with "#" or ";" are comments, and will be ignore during processing.
The following sections can exist:
Section Description[General] Contains general settings that apply to all simulation runs
and all user interfaces. For details, see section 9.2.5.[Run 1] , [Run 2] , ... Contains per-run settings. These sections may contain any en-
tries that are accepted in other sections (except [Machines] ).[Cmdenv] Contains Cmdenv-specific settings. For details, see section
9.3.2[Tkenv] Contains Tkenv-specific settings. For details, see section 9.4.2[Parameters] Contains values for module parameters that did not get a
value (or got input value) inside the NED files. For details,see section 9.5.2
[OutVectors] Configures recording of output vectors. You can specify filter-ing by vector names and by simulation time (start/stop record-ing). For details, see section 9.5.3
[DisplayStrings] Module display strings for Tkenv. For details, see section 9.5.4[Machines] Used with distributed execution, describes logical - physical
machine mapping. For details, see section 11.2.1[Slaves] Used with distributed execution, contains settings for slave
processes. For details, see section 9.5.1
9.2.4 File inclusion
OMNeT++ supports including an ini file in another, via the include keyword. This featureallows you to partition large ini files into logical units, fixed and varying part etc.
An example:
163
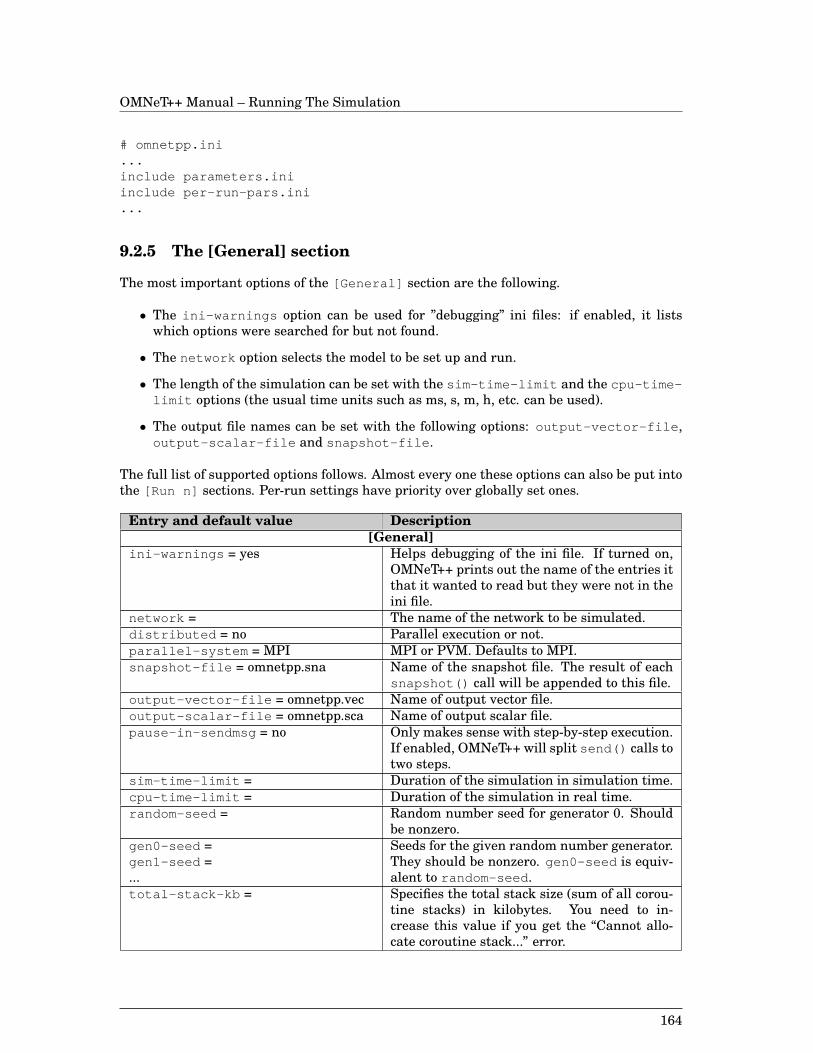
OMNeT++ Manual – Running The Simulation
# omnetpp.ini...include parameters.iniinclude per-run-pars.ini...
9.2.5 The [General] section
The most important options of the [General] section are the following.
• The ini-warnings option can be used for ”debugging” ini files: if enabled, it listswhich options were searched for but not found.
• The network option selects the model to be set up and run.
• The length of the simulation can be set with the sim-time-limit and the cpu-time-limit options (the usual time units such as ms, s, m, h, etc. can be used).
• The output file names can be set with the following options: output-vector-file ,output-scalar-file and snapshot-file .
The full list of supported options follows. Almost every one these options can also be put intothe [Run n] sections. Per-run settings have priority over globally set ones.
Entry and default value Description[General]
ini-warnings = yes Helps debugging of the ini file. If turned on,OMNeT++ prints out the name of the entries itthat it wanted to read but they were not in theini file.
network = The name of the network to be simulated.distributed = no Parallel execution or not.parallel-system = MPI MPI or PVM. Defaults to MPI.snapshot-file = omnetpp.sna Name of the snapshot file. The result of each
snapshot() call will be appended to this file.output-vector-file = omnetpp.vec Name of output vector file.output-scalar-file = omnetpp.sca Name of output scalar file.pause-in-sendmsg = no Only makes sense with step-by-step execution.
If enabled, OMNeT++ will split send() calls totwo steps.
sim-time-limit = Duration of the simulation in simulation time.cpu-time-limit = Duration of the simulation in real time.random-seed = Random number seed for generator 0. Should
be nonzero.gen0-seed =gen1-seed =...
Seeds for the given random number generator.They should be nonzero. gen0-seed is equiv-alent to random-seed .
total-stack-kb = Specifies the total stack size (sum of all corou-tine stacks) in kilobytes. You need to in-crease this value if you get the “Cannot allo-cate coroutine stack...” error.
164
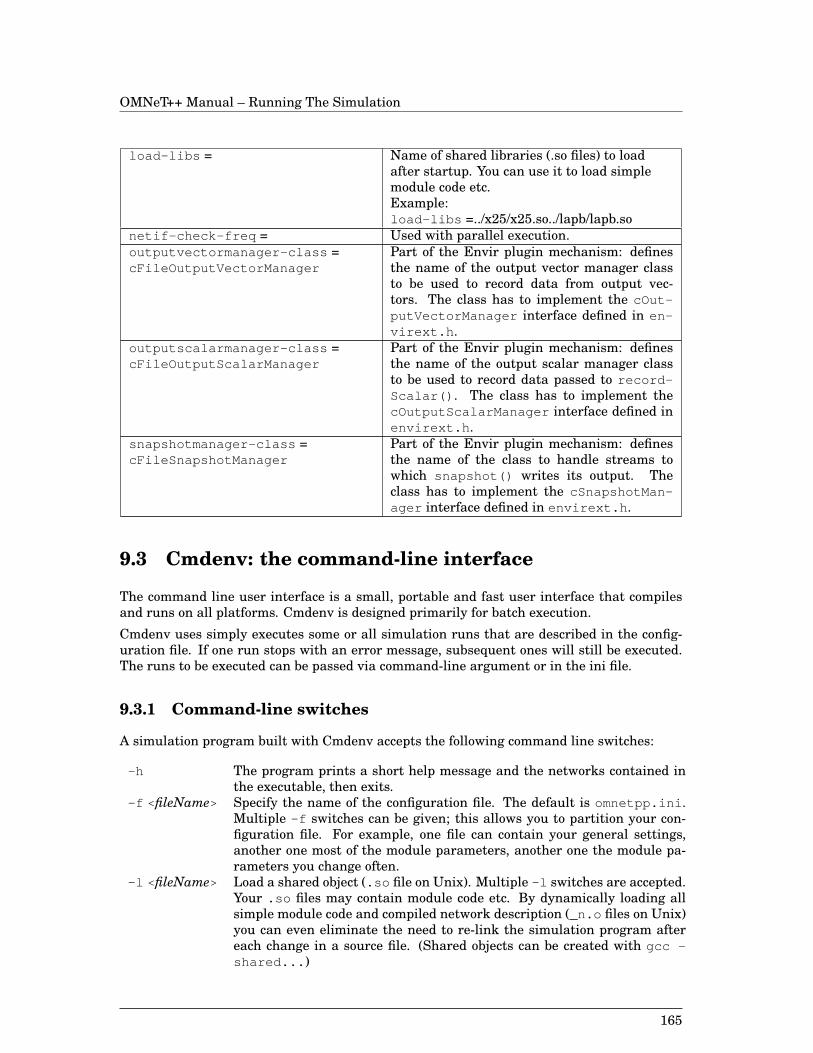
OMNeT++ Manual – Running The Simulation
load-libs = Name of shared libraries (.so files) to loadafter startup. You can use it to load simplemodule code etc.Example:load-libs =../x25/x25.so../lapb/lapb.so
netif-check-freq = Used with parallel execution.outputvectormanager-class =cFileOutputVectorManager
Part of the Envir plugin mechanism: definesthe name of the output vector manager classto be used to record data from output vec-tors. The class has to implement the cOut-putVectorManager interface defined in en-virext.h .
outputscalarmanager-class =cFileOutputScalarManager
Part of the Envir plugin mechanism: definesthe name of the output scalar manager classto be used to record data passed to record-Scalar() . The class has to implement thecOutputScalarManager interface defined inenvirext.h .
snapshotmanager-class =cFileSnapshotManager
Part of the Envir plugin mechanism: definesthe name of the class to handle streams towhich snapshot() writes its output. Theclass has to implement the cSnapshotMan-ager interface defined in envirext.h .
9.3 Cmdenv: the command-line interface
The command line user interface is a small, portable and fast user interface that compilesand runs on all platforms. Cmdenv is designed primarily for batch execution.
Cmdenv uses simply executes some or all simulation runs that are described in the config-uration file. If one run stops with an error message, subsequent ones will still be executed.The runs to be executed can be passed via command-line argument or in the ini file.
9.3.1 Command-line switches
A simulation program built with Cmdenv accepts the following command line switches:
-h The program prints a short help message and the networks contained inthe executable, then exits.
-f < fileName> Specify the name of the configuration file. The default is omnetpp.ini .Multiple -f switches can be given; this allows you to partition your con-figuration file. For example, one file can contain your general settings,another one most of the module parameters, another one the module pa-rameters you change often.
-l < fileName> Load a shared object (.so file on Unix). Multiple -l switches are accepted.Your .so files may contain module code etc. By dynamically loading allsimple module code and compiled network description (_n.o files on Unix)you can even eliminate the need to re-link the simulation program aftereach change in a source file. (Shared objects can be created with gcc -shared... )
165
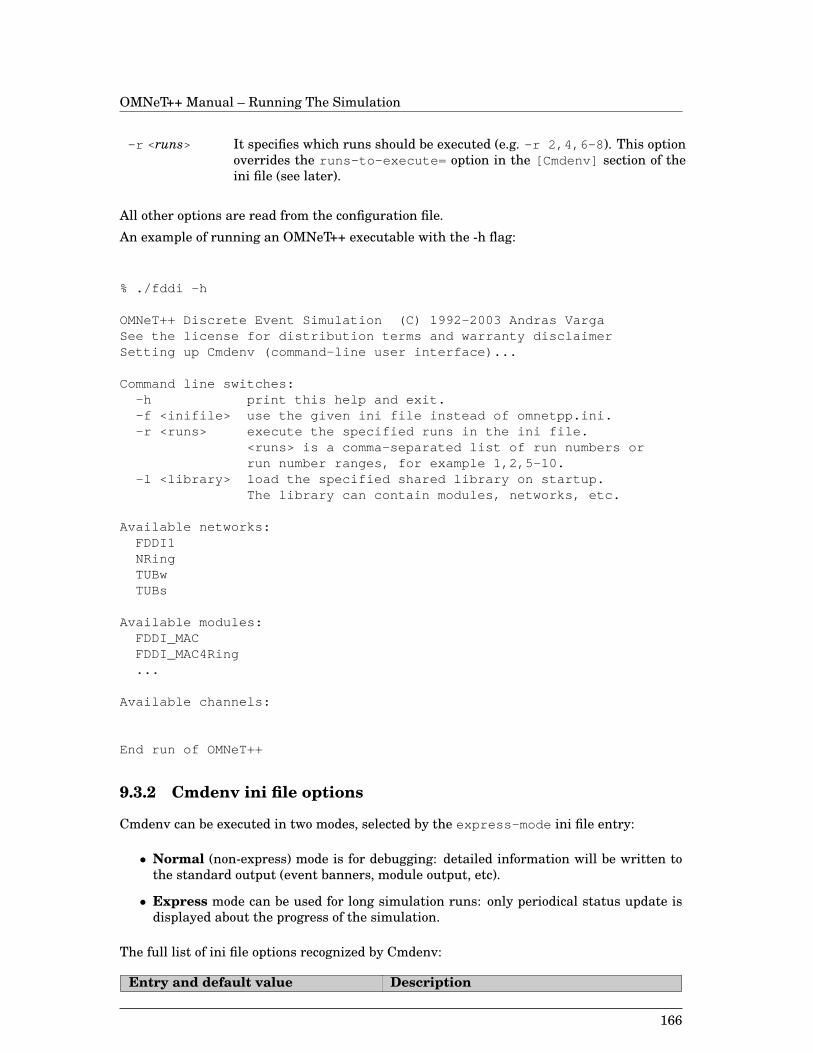
OMNeT++ Manual – Running The Simulation
-r < runs> It specifies which runs should be executed (e.g. -r 2,4,6-8 ). This optionoverrides the runs-to-execute= option in the [Cmdenv] section of theini file (see later).
All other options are read from the configuration file.
An example of running an OMNeT++ executable with the -h flag:
% ./fddi -h
OMNeT++ Discrete Event Simulation (C) 1992-2003 Andras VargaSee the license for distribution terms and warranty disclaimerSetting up Cmdenv (command-line user interface)...
Command line switches:-h print this help and exit.-f <inifile> use the given ini file instead of omnetpp.ini.-r <runs> execute the specified runs in the ini file.
<runs> is a comma-separated list of run numbers orrun number ranges, for example 1,2,5-10.
-l <library> load the specified shared library on startup.The library can contain modules, networks, etc.
Available networks:FDDI1NRingTUBwTUBs
Available modules:FDDI_MACFDDI_MAC4Ring...
Available channels:
End run of OMNeT++
9.3.2 Cmdenv ini file options
Cmdenv can be executed in two modes, selected by the express-mode ini file entry:
• Normal (non-express) mode is for debugging: detailed information will be written tothe standard output (event banners, module output, etc).
• Express mode can be used for long simulation runs: only periodical status update isdisplayed about the progress of the simulation.
The full list of ini file options recognized by Cmdenv:
Entry and default value Description
166
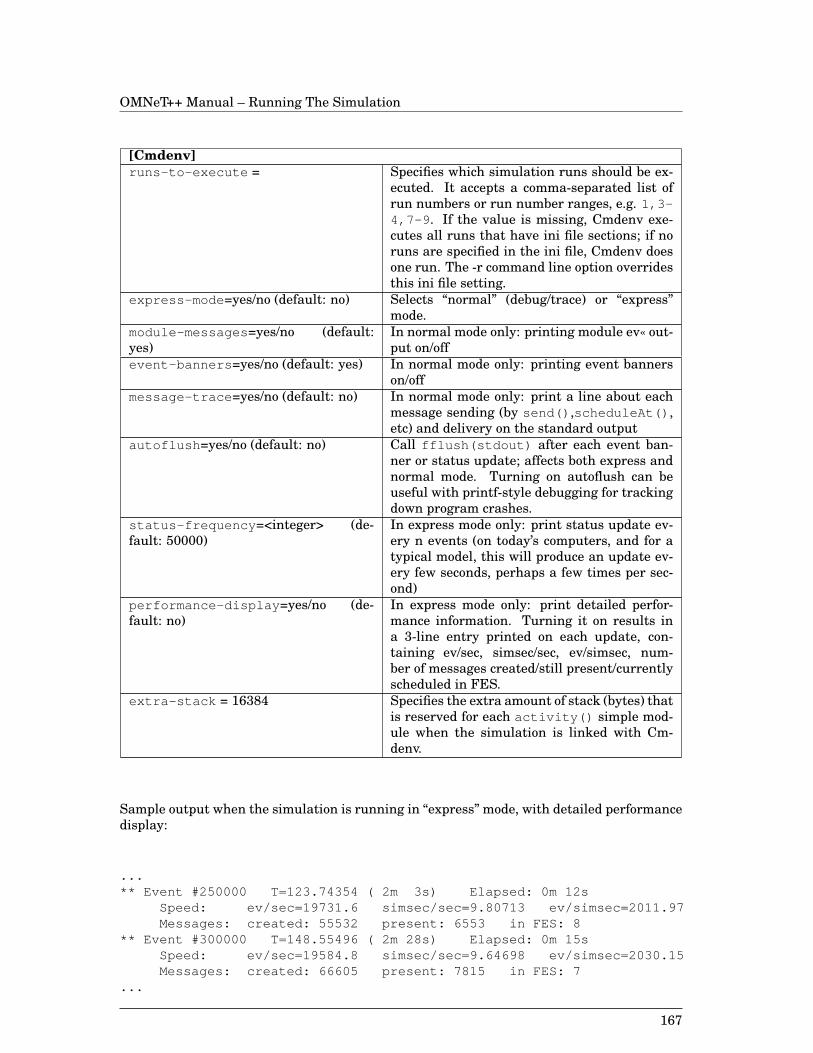
OMNeT++ Manual – Running The Simulation
[Cmdenv]runs-to-execute = Specifies which simulation runs should be ex-
ecuted. It accepts a comma-separated list ofrun numbers or run number ranges, e.g. 1,3-4,7-9 . If the value is missing, Cmdenv exe-cutes all runs that have ini file sections; if noruns are specified in the ini file, Cmdenv doesone run. The -r command line option overridesthis ini file setting.
express-mode =yes/no (default: no) Selects “normal” (debug/trace) or “express”mode.
module-messages =yes/no (default:yes)
In normal mode only: printing module ev« out-put on/off
event-banners =yes/no (default: yes) In normal mode only: printing event bannerson/off
message-trace =yes/no (default: no) In normal mode only: print a line about eachmessage sending (by send() ,scheduleAt() ,etc) and delivery on the standard output
autoflush =yes/no (default: no) Call fflush(stdout) after each event ban-ner or status update; affects both express andnormal mode. Turning on autoflush can beuseful with printf-style debugging for trackingdown program crashes.
status-frequency =<integer> (de-fault: 50000)
In express mode only: print status update ev-ery n events (on today’s computers, and for atypical model, this will produce an update ev-ery few seconds, perhaps a few times per sec-ond)
performance-display =yes/no (de-fault: no)
In express mode only: print detailed perfor-mance information. Turning it on results ina 3-line entry printed on each update, con-taining ev/sec, simsec/sec, ev/simsec, num-ber of messages created/still present/currentlyscheduled in FES.
extra-stack = 16384 Specifies the extra amount of stack (bytes) thatis reserved for each activity() simple mod-ule when the simulation is linked with Cm-denv.
Sample output when the simulation is running in “express” mode, with detailed performancedisplay:
...** Event #250000 T=123.74354 ( 2m 3s) Elapsed: 0m 12s
Speed: ev/sec=19731.6 simsec/sec=9.80713 ev/simsec=2011.97Messages: created: 55532 present: 6553 in FES: 8
** Event #300000 T=148.55496 ( 2m 28s) Elapsed: 0m 15sSpeed: ev/sec=19584.8 simsec/sec=9.64698 ev/simsec=2030.15Messages: created: 66605 present: 7815 in FES: 7
...
167
OMNeT++ Manual – Running The Simulation
9.4 Tkenv: the graphical user interface
FeaturesTkenv is a portable graphical windowing user interface. Tkenv supports interactive execu-tion of the simulation, tracing and debugging. Tkenv is recommended in the developmentstage of a simulation or for presentation and educational purposes, since it allows one toget a detailed picture of the state of simulation at any point of execution and to follow whathappens inside the network. The most important feaures are:
• message flow animation
• graphical display of statistics (histograms etc.) and output vectors during simulationexecution
• separate window for each module’s text output
• scheduled messages can be watched in a window as simulation progresses
• event-by-event, normal and fast execution
• labeled breakpoints
• inspector windows to examine and alter objects and variables in the model
• simulation can be restarted
• snapshots (detailed report about the model: objects, variables etc.)
Tkenv makes it possible to view simulation results (output vectors etc.) during execution.Results can be displayed as histograms and time-series diagrams. This can speed up theprocess of verifying the correct operation of the simulation program and provides a goodenvironment for experimenting with the model during execution. When used together withgdb or xxgdb , Tkenv can speed up debugging a lot.
Tkenv is built with Tcl/Tk, and it work on all platforms where Tcl/Tk has been ported to:Unix/X, Windows, Macintosh. You can get more information about Tcl/Tk on the Web pageslisted in the Reference.
9.4.1 Command-line switches
A simulation program built with Tkenv accepts the following command line switches:
-h The program prints a short help message and the networks contained inthe executable, then exits.
-f < fileName> Specify the name of the configuration file. The default is omnetpp.ini .Multiple -f switches can be given; this allows you to partition your con-figuration file. For example, one file can contain your general settings,another one most of the module parameters, another one the module pa-rameters you change often.
-l < fileName> Load a shared object (.so file on Unix). Multiple -l switches are accepted.Your .so files may contain module code etc. By dynamically loading allsimple module code and compiled network description (_n.o files on Unix)you can even eliminate the need to re-link the simulation program aftereach change in a source file. (Shared objects can be created with gcc -shared... )
168
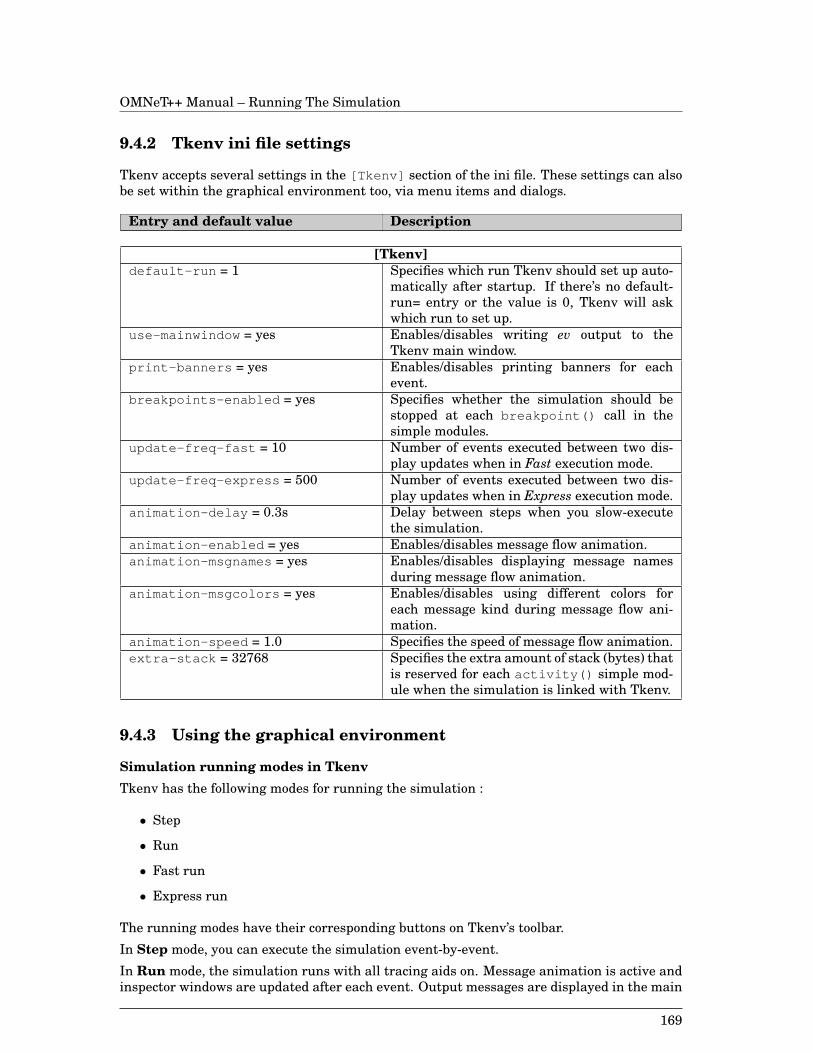
OMNeT++ Manual – Running The Simulation
9.4.2 Tkenv ini file settings
Tkenv accepts several settings in the [Tkenv] section of the ini file. These settings can alsobe set within the graphical environment too, via menu items and dialogs.
Entry and default value Description
[Tkenv]default-run = 1 Specifies which run Tkenv should set up auto-
matically after startup. If there’s no default-run= entry or the value is 0, Tkenv will askwhich run to set up.
use-mainwindow = yes Enables/disables writing ev output to theTkenv main window.
print-banners = yes Enables/disables printing banners for eachevent.
breakpoints-enabled = yes Specifies whether the simulation should bestopped at each breakpoint() call in thesimple modules.
update-freq-fast = 10 Number of events executed between two dis-play updates when in Fast execution mode.
update-freq-express = 500 Number of events executed between two dis-play updates when in Express execution mode.
animation-delay = 0.3s Delay between steps when you slow-executethe simulation.
animation-enabled = yes Enables/disables message flow animation.animation-msgnames = yes Enables/disables displaying message names
during message flow animation.animation-msgcolors = yes Enables/disables using different colors for
each message kind during message flow ani-mation.
animation-speed = 1.0 Specifies the speed of message flow animation.extra-stack = 32768 Specifies the extra amount of stack (bytes) that
is reserved for each activity() simple mod-ule when the simulation is linked with Tkenv.
9.4.3 Using the graphical environment
Simulation running modes in TkenvTkenv has the following modes for running the simulation :
• Step
• Run
• Fast run
• Express run
The running modes have their corresponding buttons on Tkenv’s toolbar.
In Step mode, you can execute the simulation event-by-event.
In Run mode, the simulation runs with all tracing aids on. Message animation is active andinspector windows are updated after each event. Output messages are displayed in the main
169
OMNeT++ Manual – Running The Simulation
window and module output windows. You can stop the simulation with the Stop button onthe toolbar. You can fully interact with the user interface while the simulation is running:you can open inspectors etc.
In Fast mode, animation is turned off. The inspectors and the message output windows areupdated after each 10 events (the actual number can be set in Options|Simulation optionsand also in the ini file). Fast mode is several times faster than the Run mode; the speedupcan get close to 10 (or the configured event count).
In Express mode, the simulation runs at about the same speed as with Cmdenv, all tracingdisabled. Module output is not recorded in the output windows any more. You can interactwith the simulation only once in a while (1000 events is the default as I recall), thus therun-time overhead of the user interface is minimal. You have to explicitly push the Updateinspectors button if you want an update.
InspectorsIn Tkenv, objects can be viewed through inspectors. To start, choose Inspect|Network fromthe menu. Usage should be obvious; just use double-clicks and popup menus that are broughtup by right-clicking. In Step, Run and Fast Run modes, inspectors are updated automaticallyas the simulation progresses. To make ordinary variables (int, double, char etc.) appear inTkenv, use the WATCH() macro in the C++ code.
Tkenv inspectors also display the object pointer, and can also copy the pointer value to theclipboard. This can be invaluable for debugging: when the simulation is running under adebugger like gdb or the MSVC IDE, you can paste the object pointer into the debugger andhave closer look at the data structures.
Configuring TkenvIn case of nonstandard installation, it may be necessary to set the OMNETPP_TKENV_DIRenvironment variable so that Tkenv can find its parts written in Tcl script.
The default path from where the icons are loaded can be changed with the OM-NETPP_BITMAP_PATHvariable, which is a semicolon-separated list of directories and de-faults to ”omnetpp-dir/bitmaps;.;./bitmaps”.
Embedding Tcl code into the executableA significant part of Tkenv is written in Tcl, in several .tcl script files. The default locationof the scripts is passed compile-time to tkapp.cc , and it can be overridden at run-time by theOMNETPP_TKENV_DIRenvironment variable. The existence of a separate script library canbe inconvenient if you want to carry standalone simulation executables to different machines.To solve the problem, there is a possibility to compile the script parts into Tkenv.
The details: the tcl2c program (its C source is there in the Tkenv directory) is used totranslate the .tcl files into C code (tclcode.cc ), which gets included into tkapp.cc . Thispossibility is built into the makefiles and can be optionally enabled.
9.4.4 In Memoriam. . .
There used to be other windowing user interfaces which have been removed from the distri-bution:
• TVEnv. A Turbo Vision-based user interface, the first interactive UI for OMNeT++.Turbo Vision was an excellent character-graphical windowing environment, originallyshipped with Borland C++ 3.1.
• XEnv. A GUI written in pure X/Motif. It was an experiment, written before I stumbledinto Tcl/Tk and discovered its immense productivity in GUI building. XEnv never gottoo far because it was really very-very slow to program in Motif. . .
170
OMNeT++ Manual – Running The Simulation
9.5 More about omnetpp.ini
9.5.1 The [Slaves] section
Entry and default value Description[Slaves]
write-slavelog = yes Enables/disables writing to the slave.log fileslavelog-file = slave.log Specifies an alternative filename for slave.log.module-messages = yes Specifies whether module messages are
printed or not.errmsgs-to-console = yes Specifies whether error messages should be
sent to and displayed at the ’console’ segment.infomsgs-to-console = no Specifies whether info messages should be
sent to and displayed at the ’console’ segment.modmsgs-to-console = no Specifies whether module ev output should be
sent to and displayed at the ’console’ segment.
9.5.2 Module parameters in the configuration file
Values for module parameters go into the [Parameters] or the [Run 1] , [Run 2] etc.sections of the ini file. The run-specific settings take precedence over the overall settings.Parameters that were assigned a (non-input) value in the NED file are not influenced by inifile settings.
Wildcards (*,?) can be used to supply values to several model parameters at a time. Filename-style (glob) and not regex-style pattern matching is used. Character ranges use curly bracesinstead of square brackets to avoid interference with the notation of module vectors: {a-zA-Z}. If a parameter name matches several wildcards-patterns, the first matching occurrenceis used.
An example ini file:
# omnetpp.ini
[Parameters]token.num_stations = 3token.num_messages = 10000
[Run 1]token.stations[*].wait_time = 10ms
[Run 2]token.stations[0].wait_time = 5mstoken.stations[*].wait_time = 1000ms
9.5.3 Configuring output vectors
As a simulation program is evolving, it is becoming capable of collecting more and morestatistics. The size of output vector files can easily reach a magnitude of several ten orhundred megabytes, but very often, only some of the recorded statistics are interesting tothe analyst.
In OMNeT++, you can control how cOutVector objects record data to disk. You can turn
171
OMNeT++ Manual – Running The Simulation
output vectors on/off or you can assign a result collection interval. Output vector configura-tion is given in the [OutVectors] section of the ini file, or in the [Run 1] , [Run 2] etcsections individually for each run. By default, all output vectors are turned on.
Entries configuring output vectors can be like that:
module-pathname . objectname .enabled = yes/nomodule-pathname . objectname .interval = start .. stopmodule-pathname . objectname .interval = .. stopmodule-pathname . objectname .interval = start ..
The object name is the string passed to cOutVector in its constructor or with the set-Name() member function.
cOutVector eed("End-to-End Delay",1);
Start and stop values can be any time specification accepted in NED and config files (e.g. 10h30m 45.2s).
As with parameter names, wildcards are allowed in the object names and module pathnames.
An example:
## omnetpp.ini#
[OutVectors]*.interval = 1s..60s*.End-to-End Delay.enabled = yes*.Router2.*.enabled = yes*.enabled = no
The above configuration limits collection of all output vectors to the 1s..60s interval, anddisables collection of output vectors except all end-to-end delays and the ones in any modulecalled Router2.
9.5.4 Display strings
Display strings control the modules’ graphical appearance in the Tkenv user interface. Dis-play strings can be assigned to modules, submodules and gates (a connection’s display stringis stored in its ”from” gate). Display strings can be hardcoded into the NED file or specifiedin the configuration file. (Hardcoded display strings take precedence over the ones given inini files.) Format of display string are documented in the Display String section ( 4.10).
Display strings can appear in the [DisplayStrings] section of the ini file. They are ex-pected as entries in one of the following forms:
moduletype = "..."moduletype.submodulename = "..."
moduletype.inputgatename = "..."moduletype.submodulename.outputgatename = "..."
As with parameter names, wildcards are allowed in module types, submodule and gatenames.
172
OMNeT++ Manual – Running The Simulation
9.5.5 Specifying seed values
As is was pointed out earlier, it is of great importance that different simulation runs anddifferent random number sources within one simulation run use non-overlapping sequencesof random numbers.
In OMNeT++, you have three choices:
1. Automatic seed selection.
2. Specify seeds in the ini file (with the help of the seedtool program, see later)
3. Manually set the seed from within the program.
If you decide for automatic seed selection, do not specify any seed value in the ini file. Forthe random number generators, OMNeT++ will automatically select seeds that are 1,000,000values apart in the sequence. If you have several runs, each run is started with a fresh setof seeds that are 1,000,000 values apart from the seeds used for previous runs. Since thegeneration of new seed values is costly, OMNeT++ has a table of pre-calculated seeds (256values); if they are all used up, OMNeT++ starts from the beginning of the table again.
Automatic seed selection may not be appropriate for you for several reasons. First, you mayneed more than 256 seeds values; or, if you use variance reduction techniques, you may wantto use the same seeds for several simulation runs. In this case, there is a standalone programto generate appropriate seed values (seedtool will be discussed in Section 9.6), and you canspecify the seeds explicitly in the ini file.
The following ini file explicitly initializes two of the random number generators, and usesdifferent seed values for each run:
[Run 1]gen0-seed = 1768507984gen1-seed = 33648008
[Run 2]gen0-seed = 1082809519gen1-seed = 703931312...
If you want the same seed values for all runs, you will write something like this:
[General]gen0-seed = 1768507984gen1-seed = 33648008
All other random number generators (2,3,...) will have their seeds automatically assigned.As a third way, you can also set the seed values from the code of a simple module usinggenk_randseed() , but I see no reason why you would want to do so.
9.6 Choosing good seed values: the seedtool utility
For selecting good seeds, the seedtool program can be used (it is in the utils directory).When started without command-line arguments, the program prints out the following help:
173
OMNeT++ Manual – Running The Simulation
seedtool - part of OMNeT++, (c) 1992-2001 Andras Varga, TU BudapestSee the license for distribution terms and warranty disclaimer.
A tool to help select good random number generator seed values.Usage:
seedtool i seed - index of ’seed’ in cycleseedtool s index - seed at index ’index’ in cycleseedtool d seed1 seed2 - distance of ’seed1’ and ’seed2’ in cycleseedtool g seed0 dist - generate seed ’dist’ away from ’seed0’seedtool g seed0 dist n - generate ’n’ seeds ’dist’ apart, starting
at ’seed0’seedtool t - generate hashtableseedtool p - print out hashtable
The last two options, p and t were used internally to generate a hash table of pre-computedseeds that greatly speeds up the tool. For practical use, the g option is the most important.Suppose you have 4 simulation runs that need two independent random number generatorseach and you want to start their seeds at least 10,000,000 values apart. The first seed valuecan be simply 1. You would type the following command:
C:\OMNETPP\UTILS> seedtool g 1 10000000 8
The program outputs 8 numbers that can be used as random number seeds:
176850798433648008108280951970393131218566107457846752964266766921100642647
You would specify these seed values in the ini file.
9.7 Repeating or iterating simulation runs
Variations over parameter valuesYou don’t need to generate the whole omnetpp.ini from program if you use include files.You can have a fixed omnetpp.ini which contains the line
include parameters.ini
and then generate parameters.ini by program for each run.
Here’s the ”runall” script of Joel Sherrill’s File System Simulator as an example:
#! /bin/bash## This script runs multiple variations of the file system simulator.#
174
OMNeT++ Manual – Running The Simulation
all_cache_managers="NoCache FIFOCache LRUCache PriorityLRUCache..."all_schedulers="FIFOScheduler SSTFScheduler CScanScheduler..."
for c in ${all_cache_managers}; dofor s in ${all_schedulers}; do(
echo "[Parameters]"echo "filesystem.generator_type = \"GenerateFromFile\""echo "filesystem.iolibrary_type = \"PassThroughIOLibrary\""echo "filesystem.syscalliface_type = \"PassThroughSysCallIface\""echo "filesystem.filesystem_type = \"PassThroughFileSystem\""echo "filesystem.cache_type = \"${c}\""echo "filesystem.blocktranslator_type = \"NoTranslation\""echo "filesystem.diskscheduler_type = \"${s}\""echo "filesystem.accessmanager_type = \"MutexAccessManager\""echo "filesystem.physicaldisk_type = \"HP97560Disk\""
) >algorithms.ini
./filesystemdone
done
And omnetpp.ini includes algorithms.ini .
Variations over seed value (multiple independent runs)The same technique can be used if you want several runs with different random seeds. Thiscode should do 500 runs with independent seeds (suppose one run doesn’t use more than 10million random values):
#! /bin/bash
for seed in ‘seedtool g 1 10000000 500‘do
(echo "[General]"echo "random-seed = ${seed}"echo "output-vector-file = xcube-${seed}.vec"
) > parameters.ini./xcube
done
omnetpp.ini should include parameters.ini.
Other languages for writing the control scriptThe above examples use the Unix shell, but you have quite a number of options in whatlanguage to implement the controlling script. Some ideas:
• shell (mentioned above)
• Perl
• Tcl
• Octave (suggested by Richard Lyon, see the contrib/octave directory for examples)
175
OMNeT++ Manual – Running The Simulation
9.8 Typical problems
9.8.1 Stack problems
”Stack violation (FooModule stack too small?) in module bar.foo”OMNeT++ detected that the module has used more stack space than it has allocated. Youshould increase the stack for that module type. You can call the stackUsage() from fin-ish() to find out actually how much stack the module used.
”Error: Cannot allocate nn bytes stack for module foo.bar”If you get the above message, you have to increase the total stack size (the sum of all corou-tine stacks). You can do so in omnetpp.ini :
[General]total-stack-kb = 2048 # 2MB
There is no penalty if you set total-stack-kb too high. I recommend to set it to a few Kless than the maximum process stack size allowed by the operating system (ulimit -s ; seenext section).
”Segmentation fault”On Unix, if you set the total stack size higher, you may get a segmentation fault duringnetwork setup (or during execution if you use dynamically created modules) for exceedingthe operating system limit for maximum stack size. For example, in Linux 2.0.x, the stackcan be at most 8192K (that is, 8MB). The ulimit syscall and utility program can be used tomodify the resource limits, but you can only increase if you’re root. Furthermore, resourcelimits are inherited by child processes. The following statement worked out for me underLinux to get a shell with a 64M stack limit:
$ su rootPassword:# ulimit -s 65536# su andras$ ulimit -s65536
If you do not want to go through the above process at each login, you can change the limit inthe PAM configuration files. In Redhat Linux (maybe other systems too), add the followingline to /etc/pam.d/login :
session required /lib/security/pam_limits.so
and the following line to /etc/security/limits.conf :
* hard stack 65536
A more drastic solution is to recompile the kernel with a larger stack limit.Edit /usr/src/linux/include/linux/sched.h and increase _STK_LIM from(8*1024*1024) to (64*1024*1024) .
Finally, it you’re tight with memory, you can switch to Cmdenv. Tkenv increases the stacksize of each module by about 32K so that user interface code that is called from a simplemodule’s context can be safely executed. Cmdenv does not need that much extra stack.
176
OMNeT++ Manual – Running The Simulation
9.8.2 Memory allocation problems
If you suspect that you may have memory allocation problems, it is best to use tools likePurify to track them down.
However, if you don’t have such tools, you can use the basic heap debugging code in Cm-denv. It is disabled by default; to turn it on, you have to uncomment the #defines insrc/envir/cmdenv/heap.cc :
HEAPCHECK checks heap on new/deleteCOUNTBLOCKS counts blocks on heap and tells it if none leftALLOCTABLE remembers pointers and reports heap contents if only LASTN
blocks remainedDISPLAYALL reports every new/deleteDISPSTRAYS reports deleting of pointers that were not registered by opera-
tor new or that were deleted since thenBKPT calls a function at a specified new/delete; you can set a break-
point to that function
If COUNTBLOCKSis turned on, you should see the [heap.cc-DEBUG:ALL BLOCKS FREEDOK] message at the end of the simulation. If you do not see it, it means that some blockshave not been freed up properly, that is, your simulation program is likely to have memoryleaks.
177

OMNeT++ Manual – Running The Simulation
178
OMNeT++ Manual – Analyzing Simulation Results
Chapter 10
Analyzing Simulation Results
10.1 Plotting output vectors with Plove
10.1.1 Plove features
Typically, you’ll get output vector files as a result of a simulation. Data written to cOutVec-tor objects from simple modules go to output vector files. Normally, you use Plove to lookinto output vector files and plot vectors in it.
Plove is a handy tool for plotting OMNeT++ output vectors. It uses Gnuplot to do the actualwork. You can specify the drawing style (lines, dots etc) for each vector as well as set themost frequent drawing options like axis bounds, scaling, titles and labels etc. You can savethe gnuplot graphs to files (postscript, latex, pbm etc) with a click. Plove can also generatestandalone shell scripts that plot output vectors in much the same way Plove does itself.These scripts can be used for batch processing or to debug filters (see later). Plove doesnot take away any of gnuplot’s flexibility – you can embed your own gnuplot commands tocustomize the output.
Filtering the results before plotting is possible. Filters can do averaging, truncation of ex-treme values, smoothing, they can do density estimation by calculating histograms etc. Somefilters are built in, and you can easily create new filters or modify the existing ones. Filterscan be incorporated in one of three ways: as awk expressions, as awk programs and as exter-nal filter programs. Filters can be parameterized. Multiple filters for the same vector is notcurrently supported; also, you cannot currently feed several vectors into a single filter.
Plove does not create temporary files, so you don’t need to worry about disk space: if theoutput vector is there, Plove can plot it for you. Moreover, it can also work with gzippedvector files without extracting them – just make sure you have zcat.
Plove never modifies the output vector files themselves.
On startup, Plove automatically reads the .ploverc file in your home directory. The filecontains general gnuplot settings, the filter configuration etc. (that is, the stuff from theOptions menu).
Portability: Plove works fine on Unix and (with some limitations) on Win95/NT.
10.1.2 Usage
First, you load an output vector file (.vec ) into the left pane. You can also load gzipped vectorfiles (.vec.gz ) without having to decompress them. You can copy vectors from the left pane
179
OMNeT++ Manual – Analyzing Simulation Results
to the right pane by clicking the right arrow icon in the middle. The large PLOT buttonwill plot the selected vectors in the right pane. Selection works as in Windows: dragging andshift+left click selects a range, and ctrl+left click selects/deselects individual items. To adjustdrawing style, change vector title or add filter, push the Options... button. This works forseveral selected vectors too. Plove accepts nc/mc-like keystrokes: F3, F4, F5, F6, F8, grey ’+’and grey ’*’.
The left pane works as a general storage for vectors you’re working with. You can loadseveral vector files, delete vectors you don’t want to deal with, rename them etc. All this willnot affect the vector files on disk. In the right pane, you can duplicate vectors if you wantto filter the vector and also keep the original. If you set the right options for a vector buttemporarily do not want it to hang around in the right pane, you can put it back into the leftpane for storage.
10.1.3 Writing filters
Filters get an output vector on their standard input (as plain text, with the timestamp beingthe second and the value being the third field on each line), do some processing to it andwrite the result to the standard output.
Filters can be incorporated in one of three ways: as awk expressions, as awk programs or asexternal programs. An ’awk expression’ filter means assembling and launching a commandlike this:
cat foobar.vec | awk ’{$3 = <expression> ; print}’ | ...
An awk program filter means running the following command:
cat foobar.vec | awk ’{ <program> }’ | ...
The third type of filters is used like this:
cat foobar.vec | <program> <parameters> | ...
Before the filter pipeline is launched, the following substitutions are performed on the awkscripts:
• t gets substituted to $2, which is the simulation time (the second column in the outputvector file)
• x gets substituted to $3, the actual value (the third column)
The parameters of the form $(paramname) are also replaced with their actual value.
For example, if you want to add 1 to all values, you can use the awk expression filter x+1 . Itwill turn into the following awk script:
awk ’{$3 = $3+1}; print’
When you want to shift the vector by a used-defined DT time, you can create the followingawk program filter:
{t += $(DT); print}
180
OMNeT++ Manual – Analyzing Simulation Results
To plot the mean on (0,t), you’d write
{sum+=x; x=sum/++n; print}
Do not forget the print statement, or your filter will not output anything and the gnuplotgraph will be empty.
Filters are automatically saved into and loaded from the ˜/.ploverc file.
10.2 Format of output vector files
An output vector file contains several series of data produced during simulation. The file istextual, it looks like this:
mysim.vec:vector 1 "subnet[4].term[12]" "response time" 11 12.895 2355.666666661 14.126 4577.66664666vector 2 "subnet[4].srvr" "queuelen+queuingtime" 22 16.960 2.00000000000.636636661 23.086 2355.666666662 24.026 8.00000000000.44766536
There are label lines (beginning with vector) and data lines.
A vector line introduces a new vector. Its columns are: vector ID, module of creation, nameof cOutVector object, multiplicity of data (single numbers or pairs will be written).
Lines beginning with numbers are data lines. The columns: vector ID, current simulationtime, and one or two double values.
10.3 Working without Plove
10.3.1 Extracting vectors from the file
You can use the Unix grep tool to extract a particular vector from the file. As the first step,you must find out the ID of the vector. You can find the appropriate vector line with a texteditor or you can use grep for this purpose:
% grep "queuelen+queuingtime" vector.vec
Or, you can get the list of all vectors in the file by typing:
% grep ^vector vector.vec
This will output the appropriate vector line:
vector 6 "subnet[4].srvr" "queuelen+queuingtime" 2
Pick the vector ID, which is 6 in this case, and grep the file for the vector’s data lines:
grep ^6 vector.vec > vector6.vec
181
OMNeT++ Manual – Analyzing Simulation Results
Now, vector6.vec contains the appropriate vector. The only potential problem is that thevector ID is there at the beginning of each line and this may be hard to explain to someprograms that you use for post-processing and/or visualization. This problem is eliminatedby the OMNeT++ splitvec utility (written in awk), to be discussed in the next section.
10.3.2 Using splitvec
The splitvec script (part of OMNeT++) breaks the vector file into several files which containone vector each:
% splitvec mysim.vec
creates several files: mysim1.vec, mysim2.vec etc.
mysim1.vec:# vector 1 "subnet[4].term[12]" "response time" 112.895 2355.6666666614.126 4577.6666466623.086 2355.66666666
mysim2.vec:# vector 2 "subnet[4].srvr" "queuelen+queuingtime" 216.960 2.00000000000.6366366624.026 8.00000000000.44766536
As you can see, the vector ID is gone.
The files can be further processed with math packages, or read by analysis or spreadsheetprograms which provide numerous ways to display data as diagrams, do calculations on themetc. One could use for example Gnuplot, Matlab, Excel, etc.
10.3.3 Visualization under Unix
Two programs are in common use: Gnuplot and Xmgr. Both are free and both have theirgood and bad sides; we’ll briefly discuss them. There are innumerable tutorials and docu-mentation about them on the Web; some of them you will find among the References.
Both programs can eat files produced by splitvec . Both programs can produce outputin various forms: on screen, in Postscript format, printer files, Latex output etc. For DTPpurposes, Postscript seems to be the most appropriate. On Windows, the easiest way is tocopy the picture to the clipboard from the Gnuplot window’s system menu.
Gnuplot has an interactive command interface. To get the vectors in mysim1.vec andmysim4.vec plotted in the same graph, you can type:
plot "mysim1.vec" with lines, "mysim4.vec" with lines
To adjust the y range, you would type:
set yrange [0:1.2]replot
182
OMNeT++ Manual – Analyzing Simulation Results
There are several commands to adjust ranges, plotting style, labels, scaling etc. Gnuplot canalso plot 3D graphs. Gnuplot is also available for Windows and other platforms. Gnuplot alsohas a simple graphical interactive user interface called PlotMTV. However, we recommendthat you use OMNeT++’s Plove tool, described in an earlier section.
Xmgr is an X/Motif based program, with a menu-driven graphical interface. You load theappropriate file by selecting in a dialog box. The icon bar and menu commands can be usedto customize the graph. Some say that Xmgr can produce nicer output that Gnuplot and it iseasier to use. Xmgr cannot do 3D and only runs on Unixes with X and Motif installed. Xmgralso has a batch interface so you can use it from scripts too.
183
OMNeT++ Manual – Analyzing Simulation Results
184
OMNeT++ Manual – Parallel Execution
Chapter 11
Parallel Execution
11.1 OMNeT++ support for parallel execution
11.1.1 Introduction to Parallel Discrete Event Simulation
OMNeT++ supports parallel execution of large simulations. The following paragraphs pro-vide a very brief (and thus not very accurate) picture of the problems and methods of paralleldiscrete event simulation (PDES). Interested readers – and those who are thinking aboutdoing PDES with OMNeT++ – are strongly encouraged to look into the literature.
For parallel execution, the model is to be partitioned to several segments that will be simu-lated independently on different hosts or processors. Each segment will have its own localFuture Event Set, thus they will maintain local simulation times. The main issue with par-allel simulations is keeping segments synchronized in order to avoid violating causality ofevents. Without synchronization, a message sent by one segment could arrive in anothersegment when the simulation time in the receiving segment has already passed the times-tamp (arrival time) of the message. This would break causality of events in the receivingsegment.
There are mainly three different methods used for synchronizing segments:
1. Conservative synchronization exploits knowledge about when segments send mes-sages to other segments, and uses ’null’ messages to propagate this info to other seg-ments. This may speed up simulation, since e.g. if a segment knows it won’t receiveany messages from other segments until t + ∆t simulation time, it may advance untilt + ∆t without the need for external synchronization. Conservative syncronization re-quires modifications to existing models, i.e., inserting code which sends out the ’null’messages. Conservative simulation tends to converge to sequential simulation (sloweddown by communication between segments) if there’s not enough parallelism in themodel, or parallelism is not exploited by sending enough ’null’ messages.
2. Optimistic synchronization allows incausalities to occur, but detects and repairsthem. Repairing involves rollbacks to a previous state, sending out anti-messages tocancel messages sent out during the period that is being rolled back, etc. Optimisticsynchronization is extremely difficult to implement, because it requires periodic statesaving and the ability to restore previous states. In any case, implementing optimisticsynchronization in OMNeT++ would require – in addition to a more complicated sim-ulation kernel – writing significantly more complex simple module code from the user.Optimistic synchronization may be slow in cases of excessive rollbacks.
185
OMNeT++ Manual – Parallel Execution
3. Statistical synchronization is a compromise where segments do not exchange indi-vidual messages but distributions of the traffic flow characteristics. While conserva-tive and optimistic synchronization are exact methods (they produce exactly the sameresults as the corresponding sequential simulation would), this is certainly not truefor statistical synchronization where the results may contain error introduced by thestatistical nature of the synchronization. Statistical synchronization does not requirechanges to existing models, only the insertion of extra modules, called ”statistical in-terfaces”, therefore it is significantly easier to implement than either conservative oroptimistic. In addition to easier implementation, there is a potential for much largerspeedup than with conservative or optimistic, because the method is much less sensi-tive to communication delay between processors running the segments. Therefore, forparallel simulation on a cluster of workstations, statistical synchronisation may be theonly feasible method.
11.1.2 OMNeT++ support for parallel simulation
The simulation kernel makes it possible to send messages from one segment to another. Amessage can contain arbitrarily complex data structures; these are transferred transpar-ently, even between hosts of different architectures. The simulation kernel provides a simplesynchronization mechanism (syncpoints, available through the syncpoint() call) that canensure that causality is kept when sending messages between segments. Syncpoints corre-spond to null messages found in the literature.
Message sending and syncpoints enable one to implement conservative PDES and also Sta-tistical Synchronization. The simulation class library contains objects that explicitly supportthe implementation of models using Statistical Synchronization.
High level debugging is supported by saving the textual output from remote segments to alog file and/or relaying them to a single console.
OMNeT++ supports flexible partitioning of the model. In the NED language, by using ma-chine parameters you can specify logical hosts for different modules at any level of the modulehierarchy of the network. You map logical hosts to physical ones in the ini file; if you mapseveral logical hosts into the same physical machine, they will be merged into a single OM-NeT++ process.
One may choose between using the MPI (Message Passing Interface) and the PVM3 (ParallelVirtual Machine Version 3) libraries for communication between hosts. Both libraries areportable and widely used in university and research environments. MPI is newer thoughand considered to be the successor of PVM. You can find MPI and PVM readings in theReference.
11.1.3 Syncpoints
OverviewWhen running a simulation in parallel, different segments of the model execute as indepen-dent UNIX processes, typically on separate hosts. Since the hosts can be of different speedand the simulated model segments can be of different complexity, at a given moment themodel times of different segments will differ: some segments are ahead of the others andsome lag behind. Suppose that a message is sent from segment A to segment B which isahead of A in model time. If B processed the message, causality would break. This shouldnever happen.
The solution built in OMNeT++ is the following. Segment A must know in advance whenit will send the next message to segment B and announce it with the syncpoint() call.
186

OMNeT++ Manual – Parallel Execution
The simulation kernel sends the syncpoint to segment B. When segment B’s model timereaches the specified time, segment B’s simulation kernel blocks execution until the promisedmessage arrives from A. Then the simulation continues, typically but not necessarily withthe message that has just been received from A.
In the reverse case when A is ahead of B, A’s message arrived at B before it has reachedthe syncpoint. In this case, there is no problem and the syncpoint is just an unnecessaryprecaution. B just inserts the message in its future event set, clears the syncpoint andcontinues execution.
The syncpoint APIThe syncpoint() call takes two arguments. The first is the model time when (or moreprecisely: when of after when) the simple module will send a message to another simplemodule in a different segment. The second argument is a gate given with its number or itsname. The gate implicitly specifies the destination segment to synchronize with.
syncpoint(t, "outgate");
Details of the syncpoint implementationIf the destination module is in the same segment, the call is ignored. (This makes it possibleto run models designed to execute in parallel as a single process, without any modification.)Each segment keeps a list of syncpoints sent to it (time + gate), ordered by time. Simulationexecutes normally until it comes to an event that has a time definitely past the first syncpointin the list. That event is not processed, but the segment goes into a blocked state. While thesegment is blocked, it listens for messages arriving from other segments. (In the actualimplementation, passive wait is used so a blocked segment doesn’t use much CPU time.)Each message that arrives deletes the first syncpoint in the list that matches its gate. Thesegment goes out of the blocked state when – because of deletions – the first syncpoint inthe list is no longer past the event in question. Then the simulation goes on normally, eitherwith the newly arrived message (or the earliest of them) or the original event. A messagethat arrives outside of the blocked state also causes deletion of the first matching syncpointin the list; this case corresponds to the reverse case when the sender segment is ahead of thereceiving segment in model time.
DeadlockIt is possible to cause deadlock with carelessly placed syncpoints. Suppose that segment Adeclares a syncpoint at 10s with segment B, but it will actually send a message only at 10.5s.If segment B does the same to segment A, a nice deadlock is created. OMNeT++ makes noeffort to detect or prevent such deadlocks; it is entirely the simulation programmer’s task totake care that deadlocks do not occur.
11.2 Configuring a simulation for parallel execution
11.2.1 Configuring OMNeT++
Choosing between MPI and PVM
You must let OMNeT++ know if you want to use MPI or PVM. This can be configured in the[General] section of the ini file, via te parallel-system= entry. Its value can be ”PVM”or ”MPI”; it defaults to ”MPI”.
; file: omnetpp.ini;...
187

OMNeT++ Manual – Parallel Execution
[General]parallel-system = MPI
Mapping logical machines to physical ones
The on: phrases in the NED descriptions specify the logical machine(s) on which the mod-ule is run. The machine parameters are mapped to physical machines in the [Machines]section of the configuration file:
; file: omnetpp.ini;...[Machines]node1 = whale.hit.bme.hunode4 = whale.hit.bme.hunode2 = puppis.hit.bme.hunode3 = dolphin.hit.bme.hu;...
Configuration of the slaves
Slave processes can be configured in the [Slaves] section of the configuration file:
; file: omnetpp.ini[Slaves]write-slavelog=slavelog-file=module-messages=errmsgs-to-console=infomsgs-to-console=modmsgs-to-console=
Screen input/output of the slaves is re-routed to the console. However, any file I/O is done inthe local file system of each host.
11.2.2 Setting up PVM
The PVM virtual machine
The pvmhosts file is used by PVM to describe what computers will participate in the virtualmachine, where the executables (in our case, the OMNeT++ programs) are located on eachcomputer, what working directories should be set etc.
It is advisable to have a common, shared directory mounted on all participating hosts; thiseliminates the tedious work of having to copy files to all hosts again and again.
If using OMNeT++, it is a good idea to write separate pvmhosts files for each simulationprogram. Since simulation programs are typically in separate directories, the pvmhosts filein each directory can name that directory as executables directory and working directory foreach host. This way, there is no need to create soft links or explicitly name directories in theOMNeT++ ini files.
Each line in the pvmhosts file describes one host. An example line (this all should be asingle line!):
188
OMNeT++ Manual – Parallel Execution
whale ip=whale.hit.bme.hu lo=andrasdx=/home/andras/pvm/pvmep=/home/andras/omnetpp/projects/fddiwd=/home/andras/omnetpp/projects/fddi
To start PVM with this configuration:
cd ~/omnetpp/projects/fddipvm pvmhosts
Configuration and running
The user must have PVM installed on the hosts he is going to run segments on.
To set up a simulation for distributed execution, the user must:
1. set the PVM_ROOTenvironment variable
2. link the simulation executable with sim_pvm instead of sim_std (You can do it bysetting PVM_SUPPORTto yes in a opp_makemake-generated makefile.)
3. set distributed=true in the [General] section of the configuration file.
4. specify the logical-hosts-to-physical-machines mapping in the [Machines] section
5. copy the simulation executable and the configuration file to each host if they have phys-ically different disks
6. start pvm with an appropriate pvmhosts file
7. start the simulation executable on the host which is supposed to be the console. Thatprocess will start up the program on the other hosts too and do the simulation.
The first machine is called ”console” or “master”, the others are called “slaves”.
If there are problems...
PVM programs in general are more difficult to get running than ordinary programs. Wrongsettings in the PVM configuration files can cause various problems, for example. Also, paral-lel programs are a lot harder to test and debug.
What can you do if your distributed OMNeT++ simulation won’t work?
• First of all, check the pvmhosts file to see if PVM looks for the executables in theright directories on all hosts and the working directories are right (typically, the samedirectory as the executable’s).
• In the ini file, enable writing the slave.log files for the slave processes and checkwhat is written into them.
• You can try enabling the SINGLE_HOSTdefine in the sim/pvm/pvmmod.cc source file.This will make OMNeT++ run all segments of the distributed simulation on the localhost, making things a lot easier to manage.
• Also, try the defining PVM_DEBUGat the same place: it enables a lot of ev.printf() sin the code interfacing with PVM, so it is easier to spot where the problems are.
• PVM itself also has an environment variable which, if set, causes the PVM library toprint out debugging information. However, this is very low-level information, it willrarely be useful.
189
OMNeT++ Manual – Parallel Execution
11.2.3 Setting up MPI
TBD
11.3 Statistical synchronization
11.3.1 The description of the Statistical Synchronization Method(SSM)
Similarly to other parallel discrete event simulation methods, the model to be simulated -which is more or less a precise representation of a real system - is divided into segments,where the segments usually describe the behaviour of functional units of the real system.The communication of the segments can be represented by sending and receiving variousmessages. The simulators of the segments are executed by separate processors.
The communication of these segments is simulated with appropriate interfaces. The mes-sages generated in a given segment and to be processed in a different segment are not trans-mitted there, but the output interfaces collect the statistical data of them. If the input in-terfaces generate messages for the segments according to the statistical characteristics ofthe messages collected by the proper output interfaces, the segments with their input- andoutput interfaces can be simulated separately, giving statistically correct results. The eventsin one segment have not the same effect in other segments as in the original model, so the re-sults collected during the SSM are not exact. The precision depends on the segmentation, onthe accuracy of statistics collection and regeneration, and on the frequency of the statisticsexchange among the processors.
SegmentationThe segments of the simulator are executed by separate processors, they have their own, in-dependent virtual times. Because the interactions among segments are performed by the sta-tistical parameters of these interactions, the segmentation should be done so, that the over-whelming majority of the interactions should happen within the segments and not amongthem. This speeds up the so-called inter-segment transients and improves the accuracy aswell.
Timing of statistics exchangeAsynchronous statistics exchange means, that whenever a statistical result collection in anoutput interface is ready, it is applied - after mapping and correction - in the proper inputinterface. This is clearly more efficient, than the so-called synchronous statistics exchange,which means, that we delay the application of collected values until all the output interfacesget ready with the result collection. Frequent statistics exchange makes the inter-segmenttransient faster, but the lower sample numbers makes the estimation - and the whole simu-lation - less precise.
To learn more about SSM, see [PON92] and [PON93].
11.3.2 Using SSM in OMNeT++
OMNeT++ directly supports the implementation of statistical interface with the followingclasses:
cLongHistogram , cDoubleHistogram , cPSquare , cPar .
190

OMNeT++ Manual – The Design of OMNeT++
Chapter 12
The Design of OMNeT++
12.1 Structure of an OMNeT++ executable
Consider the following diagram:
Figure 12.1: Architecture of OMNeT++ simulation programs
A simulation program contains the simulated network (with its simple and compound mod-ules etc.), SIM, ENVIR and exactly one of CMDENV and TKENV. SIM contains the simu-lation class library and the simulation kernel. The model only interacts with SIM1. ENVIRcontains code that is common for all user interfaces, and provides infrastructure like inifile handling for them. main() is also in ENVIR. Specific user interface code is containedin CMDENV and TKENV. The above components are also physically separated: they arein separate source directories and form separate library files (libsim_std.a , libenvir.aetc.)
The simulation program may contain several linked-in model components: networks, simplemodule types, compound module types, channel types etc. Any network (but only one at atime) can be set up for simulation which has all necessary components linked in.
1the only exception is textual module output: it is sent directly to ENVIR: ev<<”hello”; ev.printf(” world”);
191
OMNeT++ Manual – The Design of OMNeT++
12.2 Embedding OMNeT++
Embedding is a special issue. You probably do not want to keep the appearance of the sim-ulation program, so you do not want Cmdenv and Tkenv. You may or may not want to keepENVIR.
What you’ll absolutely need for a simulation to run is the SIM package. You can keep ENVIRif its philosophy and the infrastructure it provides (omnetpp.ini , certain command-lineoptions etc.) fit into your design. Then the embedding program will take the place of Cmdenvand Tkenv.
If ENVIR does not fit your needs (for example, you want the model parameters to come froma database not from omnetpp.ini ), then you have to replace it. Your ENVIR replacement(the embedding program, practically) must implement the cEnvir member functions fromenvir/cenvir.h , but you have full control over the simulation.
Normally, code that sets up a network or builds the internals of a compound module comesfrom compiled NED source. You may not like the restriction that your simulation programcan only simulate networks whose setup code is linked in. No problem; your program cancontain pieces of code like what is generated by nedc and then it can build any network whosecomponents (primarily the simple modules) are linked in. Moreover, it is possible to write anintegrated environment where you can put together a network using a graphical editor andright after that you can run it, without intervening NED compilation and linkage.
12.3 The simulation kernel
The source code for the simulation kernel of OMNeT++ and the library classes reside in thesim directory.
Almost all objects are derived from cObject which provides a common interface for them.
12.3.1 The central object: cSimulation simulation
The cSimulation class stores a network and manages simulation. There is only one in-stance, a global object called simulation . The object has two basic roles:
• as a vector of modules
• holds global variables (for example, the message queue).
12.3.2 Module classes
Base class for module classes: cModule . Two derived classes: cCompoundModule , cSim-pleModule . User simple modules are derived from cSimpleModule .
A cModule has: array of parameters, array of gates + member functions to set up and queryparameters and gates.
cSimpleModule adds: put-aside queue, list of local objects + the virtual function activ-ity() + member functions like send() , receive() etc.
Gates are represented by the cGate objects. Connections are not real objects: their attributes(delay, error, datarate) are managed by the connection’s source gate.
192
OMNeT++ Manual – The Design of OMNeT++
12.3.3 Global registration lists
There are global objects holding lists of components available in an OMNeT++ executable.These lists are:
List object Macro that creates amember.
Class of members
Function
cHeadnetworks;
Define_Network()
cNetworkType
List of available networks.A cNetworkType object holds a pointer to afunction that can build up the network.Define_Network() macros occur in thecode generated by the NEDC compiler.
cHeadmodtypes;
Define_Module(),De-fine_Module_Like(),
cModuleType
List of available module types.A cModuleType object knows how to createa module of a specific type. If it is compound,it holds a pointer to a function that can buildup the inside.Usually, Define_Module() macros for com-pound modules occur in the code generatedby the NEDC compiler; for simple modules,the Define_Module() lines are added bythe user.
cHeadclasses;
Register_Class()
ClassRegister
List of available classes of which the usercan create an instance.A cClassRegister object knows how tocreate an (empty) object of a specific class.The list is used by the createOne()function that can create an object of any(registered) type from a string containingthe class name. (E.g. ptr = createOne(“cArray”) creates an empty array.)createOne() is used by the PVM extension.Register_Class() macros are present inthe simulation source files for existingclasses; has to be written by the user for newclasses.
cHeadfunc-tions;
Define_Function()
cFunctionType
List of mathematical functions.A cFunctionType object holds a pointer tothe function and knows how many argumentsit takes.
cHeadlink-types;
Define_Link()
cLinkType
List of link types.A cLinkType object knows how to createcPar objects representing the delay, errorand datarate attributes for a channel.Define_Link() macros occur in the codegenerated by the NEDC compiler, one foreach channel definition.
cHeadlocals;
-
any object
This is only ‘dummy’ object, it stands for thecurrent module’s local object list
193
OMNeT++ Manual – The Design of OMNeT++
cHeadsuper-head;
-
cHead
List of all other lists.
12.3.4 The coroutine package
The coroutine package is in fact two coroutine packages:
• Portable coroutine package creates all coroutine stacks inside the main stack. It wastaken from [KOF85]. It allocates stack by deep-deep recursions and then plays withsetjmp() and longjmp() to switch from one another.
• On Windows, the Fiber functions (CreateFiber() , SwitchToFiber() , etc) are used,which are part of the standard Win32 API.
The coroutines are represented by the cCoroutine class. cSimpleModule has cCoroutineas one a base class.
12.3.5 Object ownership/contains relationships
Ownership: Exclusive right and duty to delete the child objects. Ownership works throughcObject ’s ownerp/prevp/nextp and firstchildp/lastchildp pointers.
’Contains’ relationship: Only for container classes, e. g. cArray or cQueue . Keeping trackof contained objects works with another mechanism, not the previously mentioned ptrs. (E.g.,cArray uses a vector, cQueue uses a separate list).
The two mechanisms are independent.
What cObject does:
• Owner of a new object can be explicitly given; if omitted, defaultOwner() will beused.
• An object created through the copy constructor will have the same owner as originaland does not dup() or take objects owned by the original.
• Destructor calls free() for owned objects (see later)
Rules for derived classes:
• Objects contained as data members: the enclosing object should own them.
Rules for container objects derived from cObject:
• they use the functions: take(obj) , drop(obj) , free(obj)
• when an object is inserted, if takeOwnership() is true, should take ownership ofobject by calling take(obj) . takeOwnership() defaults to true!
• when an object is removed, they should call drop(obj) for it if they were the owner.
• copy constructor copies should dup() and take ownership of objects that were ownedby the original.
194
OMNeT++ Manual – The Design of OMNeT++
• destructor doesn’t need not call free() for objects: this will be done in cObject ’sdestructor.
The class cHead is special case: it behaves as a container, displaying objects it owns ascontents.
12.4 The user interface
The source code for the user interface of OMNeT++ resides in the envir directory (commonpart) and in the cmdenv , tkenv directories.
The classes in the user interface are not derived from cObject , they are completely sepa-rated form the simulation kernel.
12.4.1 The main() function
The main() function of OMNeT++ simply sets up the user interface and runs it. Actualsimulation is done in cEnvir::run() (see later).
12.4.2 The cEnvir interface
The cEnvir class has only one instance, a global object called ev :
cEnvir ev;
cEnvir basically is only an interface, its member functions hardly contain any code. cEnvirmaintains a pointer to a dynamically allocated simulation application object (derived fromTOmnetApp, see later) which does all actual work.
cEnvir member functions deal with four basic tasks:
• I/O for module activities; actual implementation is different for each user interface (e.g.stdin/stdout for Cmdenv, windowing in Tkenv)
• setting up and running the simulation application
• provides functions called by simulation kernel objects to get information (for example,get module parameter settings from the configuration file)
• provides functions called by simulation kernel objects to notify the user interface ofsome events. This is especially important for windowing user interfaces (Tkenv), be-cause the events are like this: an object was deleted so its inspector window should beclosed; a message was sent so it can be displayed; a breakpoint was hit.
12.4.3 Implementation of the user interface: simulation applications
The base class for simulation application is TOmnetApp. Specific user interfaces such asTCmdenv, TOmnetTkApp are derived from TOmnetApp.
TOmnetApp’s member functions are almost all virtual.
• Some of them implement the cEnvir functions (described in the previous section)
195

OMNeT++ Manual – The Design of OMNeT++
• Others implement the common part of all user interfaces (for example: reading optionsfrom the configuration files; making the options effective within the simulation kernel)
• The run() function is pure virtual (it is different for each user interface).
TOmnetApp’s data members:
• a pointer to the object holding configuration file contents (type cInifile );
• the options and switches that can be set from the configuration file (these membersbegin with opt_ )
Concrete simulation applications:
• add new configuration options
• provide a run() function
• implement functions left empty in TOmnetApp (like breakpointHit() , object-Deleted() ).
196
OMNeT++ Manual – OPNET and OMNeT++
Appendix A
OPNET and OMNeT++
A.1 Comparison of OPNET and OMNeT++
OPNETTM (from MIL3 Inc.) is a state-of-the art commercial simulation program for themodeling of communication systems. OPNET is designed to enable full-detail modeling: ev-ery tool is given to implement nonstandard protocols or behaviour.
A quote from the OPNET brochure:
• OPNET presents an advanced graphical user interface that supports multi-windowing,makes use of menus and icons, and runs under X Windows. Supported platforms includepopular engineering workstations from SUN, DEC, HP and Silicon Graphics. (WindowsNT version also exists.)
• Graphical object-oriented editors for defining topologies and architectures directly par-allel actual systems, allowing an intuitive mapping between a system and its model.OPNET’s hierarchical approach simplifies the specification and representation of largeand complex systems.
• The process editor provides a powerful and flexible language to design models of proto-cols, resources, applications, algorithms, queuing policies, and other processes. Specifica-tion is performed in the Proto-C language, which combines a graphical state-transitiondiagram approach with a library of more than 300 communication- and simulation-specific functions. The full generality and power of the C language is also available.
• OPNET simulations generate user-selected performance and behavioral data. Simula-tion results can be plotted as time series graphs, scatter plots, histograms, and proba-bility functions. Standard statistics and confidence intervals are easily generated andadditional insight can be obtained by applying mathematical operators to the collecteddata.
• OPNET provides an advanced animation capability for visualising simulation events.Both automatic and user-customised animations can be displayed interactively duringor after a simulation. Animations can depict messages flowing between objects, controlflow in a process, paths of mobile nodes, and dynamic values such as queue size orresource status.
• OPNET provides open system features including: interfaces to standard languages; theability to take advantage of third-party libraries; an application program interface;access to databases and data files such as those generated by network analysers; and
197
OMNeT++ Manual – OPNET and OMNeT++
PostScript and TIFF export for desktop publishing. OPNET users are guided by a com-prehensive documentation set and are backed by outstanding technical support.
OPNET is very well designed and built commercial simulation software. The author of OM-NeT++ has worked for the Hungarian distributor of OPNET for over three years and he hasgained significant experience with the software. He has taken part in several computer net-work simulation projects for major Hungarian companies and also delivered OPNET train-ing. He has also written simulation models for a VSAT system in OPNET.Following is a comparison of the features that concern general-purpose computer systemssimulation (and are not specific to computer network simulation) and that are present bothin OMNeT++ and OPNET.
Model hierarchy levels
OPNET OMNeT++network level (subnetwork nesting possi-ble)node level (no nesting)process level (no nesting)
arbitrary levels of submodule nesting
Topology description methodOPNET provides two tools for defining module topology: graphical editors to design networkand node level models, and EMA (External Model Access), an API for building model filesfrom C programs. These tools correspond to OMNeT++’s tools in the following way:
OPNET OMNeT++Graphical graphical editor within the
IDEgraphical editor: GNED
High-level - NED languageLow-level EMA C++ output of NED compi-
lation
There is no high-level textual model description in OPNET (like NED is in OMNeT++). Thismeans that one has either to use the graphical editor or write lengthy C code using the EMAAPI.
The OPNET graphical model editor can only create fixed (non-parameterized) topologies.
There’s a significant difference between how EMA and OMNeT++’s NED are used. OPNET’sEMA generates model files. EMA applications are standalone programs: one writes the EMAC code, compiles and runs it, and the EMA executable will generate a model file that can beread into the graphical editor or loaded by simulation programs. EMA cannot be used fromwithin a simulation program. In contrast, the compiled NED code of OMNeT++ becomes partof the simulation program and it builds the model without having to run external programs;this means that you can have a single simulation executable that can be used to performsimulation studies on networks with different topologies.
Module parameters
OPNET OMNeT++Expressions no expressions are allowed:
only literals or exact copy ofanother parameter
arbitrary expressions usingother parameters
198
OMNeT++ Manual – OPNET and OMNeT++
Parameter passing by value parameters can be passedby value or by reference,and be changed during sim-ulation
Usage by process models only by process models; also todefine flexible topologies
In OPNET, module parameter values can be passed only ”as is”.
Packet streams or gates
OPNET OMNeT++Identification Packet streams are num-
bered from 0; no names canbe assigned.
Gates are identified bynames. Gate vectors aresupported.In the code, gates can bereferenced by ID for greaterspeed.
Directionality Packet streams are uni-directional.
Gates are uni-directional.
Flexible topologies
OPNET OMNeT++not really supported1 in the NED file, parameters can define sub-
module types, count of submodules, gatesand describe connections
Tracing, animation and interactive simulation
OPNET OMNeT++Tracing and debugging powerful command line de-
bugger (ODB)separate window for eachmodule’s output, single-steps, run until, inspectors,snapshot, etc. (Tkenv)
Animation mostly used in record/ play-back mode;animation spec. must begiven in advance (via anim.probes)
interactive execution withmessage-flow animation,statistics animation etc.(Tkenv)
Interactive simulation not supported strongly supported via ob-ject inspectors and watches.(Tkenv)
Random numbers
OPNET OMNeT++Distributions provided many built-in distributions
(through algorithms)four built-in distributions,as C functions
1If really necessary, it can be done through C programming (writing EMA code) and running external programto create a separate model file for each case.
199
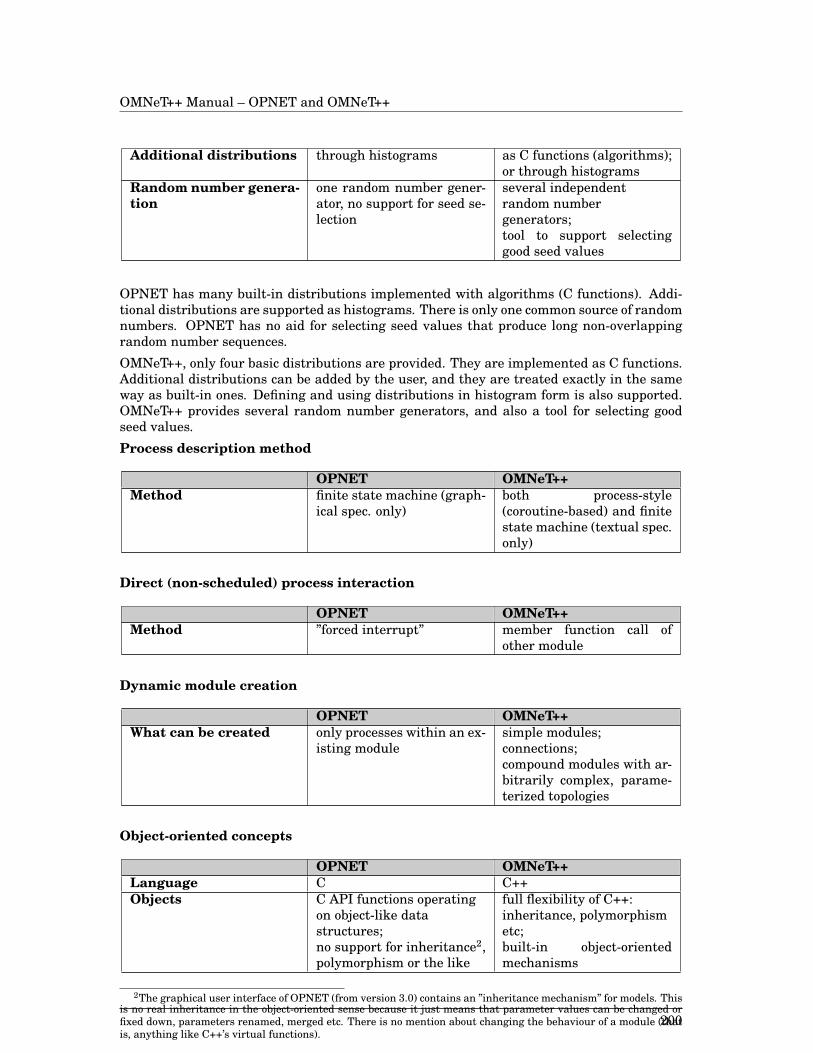
OMNeT++ Manual – OPNET and OMNeT++
Additional distributions through histograms as C functions (algorithms);or through histograms
Random number genera-tion
one random number gener-ator, no support for seed se-lection
several independentrandom numbergenerators;tool to support selectinggood seed values
OPNET has many built-in distributions implemented with algorithms (C functions). Addi-tional distributions are supported as histograms. There is only one common source of randomnumbers. OPNET has no aid for selecting seed values that produce long non-overlappingrandom number sequences.
OMNeT++, only four basic distributions are provided. They are implemented as C functions.Additional distributions can be added by the user, and they are treated exactly in the sameway as built-in ones. Defining and using distributions in histogram form is also supported.OMNeT++ provides several random number generators, and also a tool for selecting goodseed values.
Process description method
OPNET OMNeT++Method finite state machine (graph-
ical spec. only)both process-style(coroutine-based) and finitestate machine (textual spec.only)
Direct (non-scheduled) process interaction
OPNET OMNeT++Method ”forced interrupt” member function call of
other module
Dynamic module creation
OPNET OMNeT++What can be created only processes within an ex-
isting modulesimple modules;connections;compound modules with ar-bitrarily complex, parame-terized topologies
Object-oriented concepts
OPNET OMNeT++Language C C++Objects C API functions operating
on object-like datastructures;no support for inheritance2,polymorphism or the like
full flexibility of C++:inheritance, polymorphismetc;built-in object-orientedmechanisms
2The graphical user interface of OPNET (from version 3.0) contains an ”inheritance mechanism” for models. Thisis no real inheritance in the object-oriented sense because it just means that parameter values can be changed orfixed down, parameters renamed, merged etc. There is no mention about changing the behaviour of a module (thatis, anything like C++’s virtual functions).
200
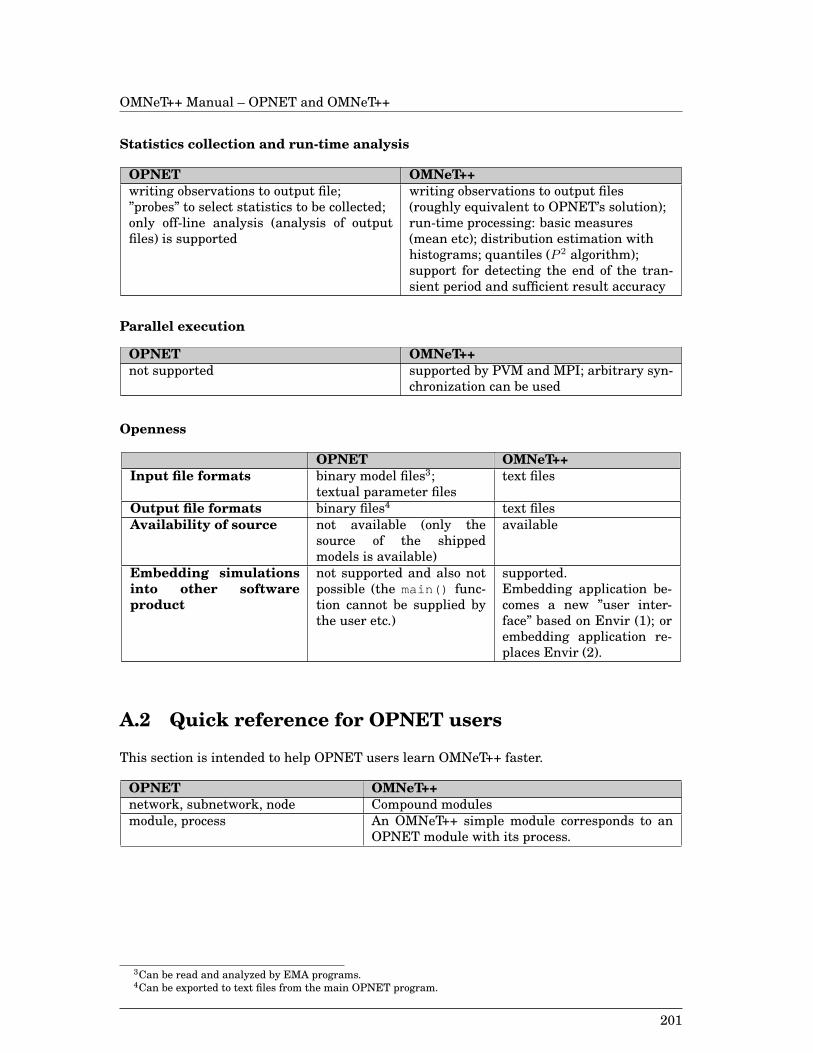
OMNeT++ Manual – OPNET and OMNeT++
Statistics collection and run-time analysis
OPNET OMNeT++writing observations to output file;”probes” to select statistics to be collected;only off-line analysis (analysis of outputfiles) is supported
writing observations to output files(roughly equivalent to OPNET’s solution);run-time processing: basic measures(mean etc); distribution estimation withhistograms; quantiles (P 2 algorithm);support for detecting the end of the tran-sient period and sufficient result accuracy
Parallel execution
OPNET OMNeT++not supported supported by PVM and MPI; arbitrary syn-
chronization can be used
Openness
OPNET OMNeT++Input file formats binary model files3;
textual parameter filestext files
Output file formats binary files4 text filesAvailability of source not available (only the
source of the shippedmodels is available)
available
Embedding simulationsinto other softwareproduct
not supported and also notpossible (the main() func-tion cannot be supplied bythe user etc.)
supported.Embedding application be-comes a new ”user inter-face” based on Envir (1); orembedding application re-places Envir (2).
A.2 Quick reference for OPNET users
This section is intended to help OPNET users learn OMNeT++ faster.
OPNET OMNeT++network, subnetwork, node Compound modulesmodule, process An OMNeT++ simple module corresponds to an
OPNET module with its process.
3Can be read and analyzed by EMA programs.4Can be exported to text files from the main OPNET program.
201
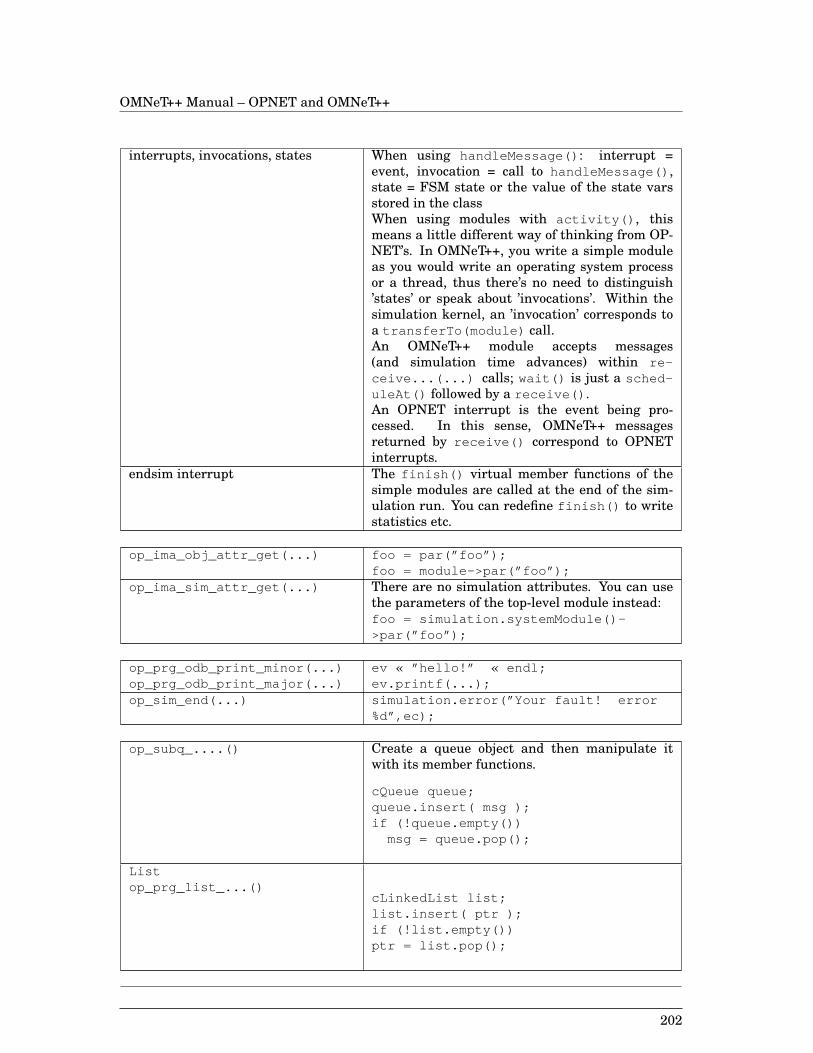
OMNeT++ Manual – OPNET and OMNeT++
interrupts, invocations, states When using handleMessage() : interrupt =event, invocation = call to handleMessage() ,state = FSM state or the value of the state varsstored in the classWhen using modules with activity() , thismeans a little different way of thinking from OP-NET’s. In OMNeT++, you write a simple moduleas you would write an operating system processor a thread, thus there’s no need to distinguish’states’ or speak about ’invocations’. Within thesimulation kernel, an ’invocation’ corresponds toa transferTo( module ) call.An OMNeT++ module accepts messages(and simulation time advances) within re-ceive...(...) calls; wait() is just a sched-uleAt() followed by a receive() .An OPNET interrupt is the event being pro-cessed. In this sense, OMNeT++ messagesreturned by receive() correspond to OPNETinterrupts.
endsim interrupt The finish() virtual member functions of thesimple modules are called at the end of the sim-ulation run. You can redefine finish() to writestatistics etc.
op_ima_obj_attr_get(...) foo = par(”foo”);foo = module->par(”foo”);
op_ima_sim_attr_get(...) There are no simulation attributes. You can usethe parameters of the top-level module instead:foo = simulation.systemModule()->par(”foo”);
op_prg_odb_print_minor(...)op_prg_odb_print_major(...)
ev « ”hello!” « endl;ev.printf(...);
op_sim_end(...) simulation.error(”Your fault! error%d”,ec);
op_subq_....() Create a queue object and then manipulate itwith its member functions.
cQueue queue;queue.insert( msg );if (!queue.empty())
msg = queue.pop();
Listop_prg_list_...()
cLinkedList list;list.insert( ptr );if (!list.empty())ptr = list.pop();
202
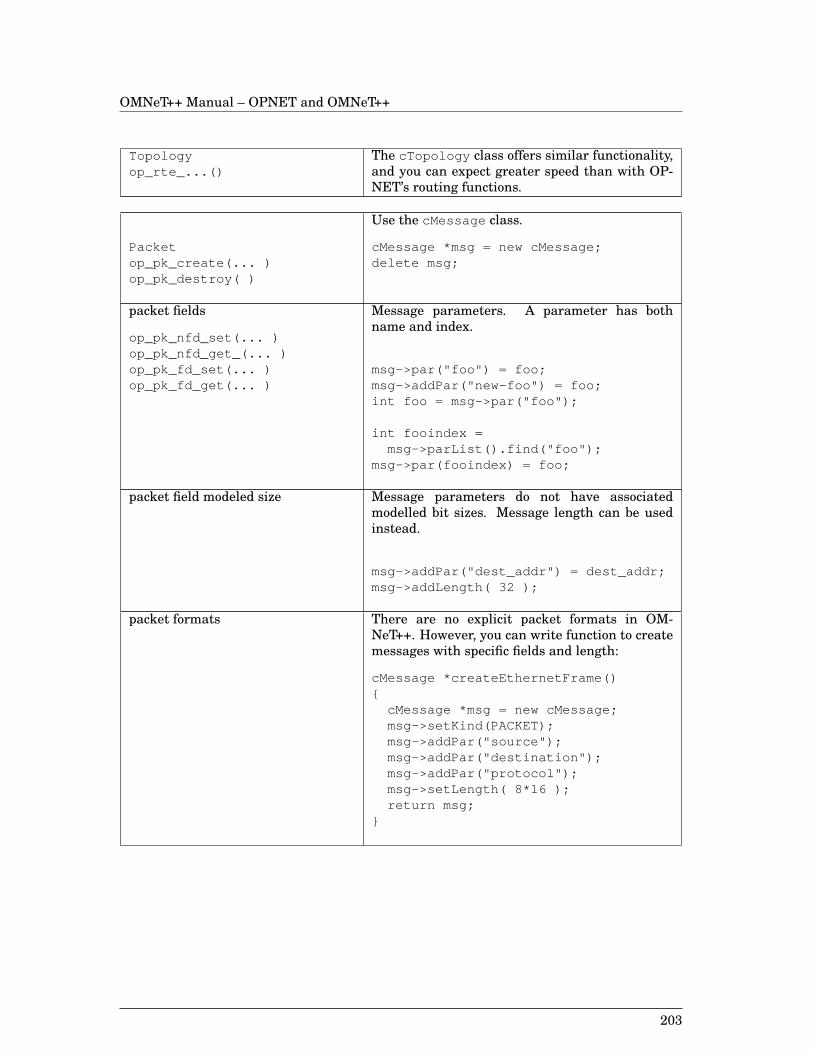
OMNeT++ Manual – OPNET and OMNeT++
Topologyop_rte_...()
The cTopology class offers similar functionality,and you can expect greater speed than with OP-NET’s routing functions.
Packetop_pk_create(... )op_pk_destroy( )
Use the cMessage class.
cMessage *msg = new cMessage;delete msg;
packet fields
op_pk_nfd_set(... )op_pk_nfd_get_(... )op_pk_fd_set(... )op_pk_fd_get(... )
Message parameters. A parameter has bothname and index.
msg->par("foo") = foo;msg->addPar("new-foo") = foo;int foo = msg->par("foo");
int fooindex =msg->parList().find("foo");
msg->par(fooindex) = foo;
packet field modeled size Message parameters do not have associatedmodelled bit sizes. Message length can be usedinstead.
msg->addPar("dest_addr") = dest_addr;msg->addLength( 32 );
packet formats There are no explicit packet formats in OM-NeT++. However, you can write function to createmessages with specific fields and length:
cMessage *createEthernetFrame(){
cMessage *msg = new cMessage;msg->setKind(PACKET);msg->addPar("source");msg->addPar("destination");msg->addPar("protocol");msg->setLength( 8*16 );return msg;
}
203
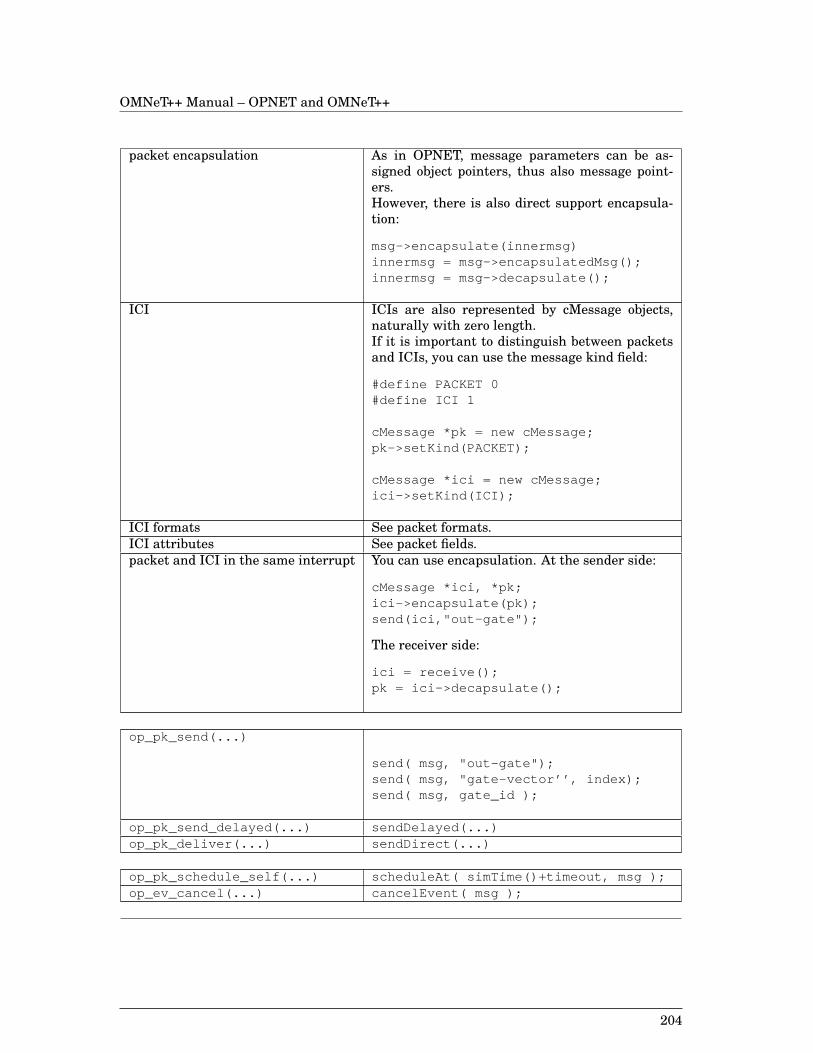
OMNeT++ Manual – OPNET and OMNeT++
packet encapsulation As in OPNET, message parameters can be as-signed object pointers, thus also message point-ers.However, there is also direct support encapsula-tion:
msg->encapsulate(innermsg)innermsg = msg->encapsulatedMsg();innermsg = msg->decapsulate();
ICI ICIs are also represented by cMessage objects,naturally with zero length.If it is important to distinguish between packetsand ICIs, you can use the message kind field:
#define PACKET 0#define ICI 1
cMessage *pk = new cMessage;pk->setKind(PACKET);
cMessage *ici = new cMessage;ici->setKind(ICI);
ICI formats See packet formats.ICI attributes See packet fields.packet and ICI in the same interrupt You can use encapsulation. At the sender side:
cMessage *ici, *pk;ici->encapsulate(pk);send(ici,"out-gate");
The receiver side:
ici = receive();pk = ici->decapsulate();
op_pk_send(...)
send( msg, "out-gate");send( msg, "gate-vector’’, index);send( msg, gate_id );
op_pk_send_delayed(...) sendDelayed(...)op_pk_deliver(...) sendDirect(...)
op_pk_schedule_self(...) scheduleAt( simTime()+timeout, msg );op_ev_cancel(...) cancelEvent( msg );
204
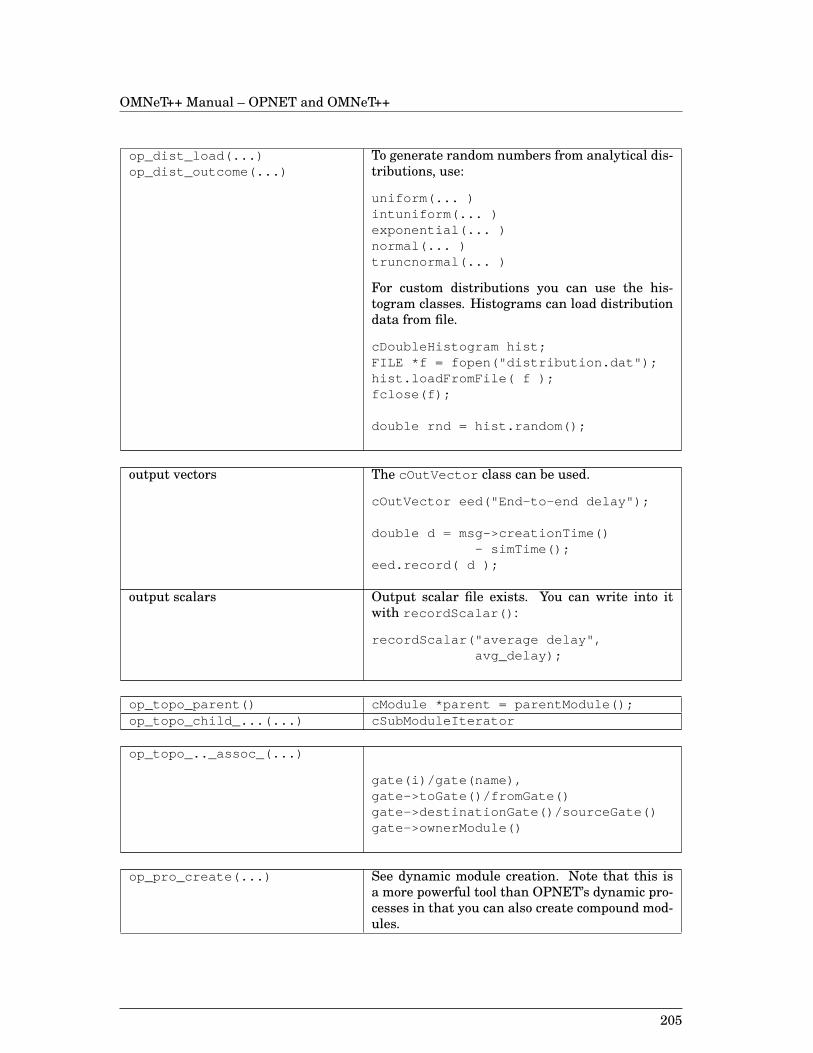
OMNeT++ Manual – OPNET and OMNeT++
op_dist_load(...)op_dist_outcome(...)
To generate random numbers from analytical dis-tributions, use:
uniform(... )intuniform(... )exponential(... )normal(... )truncnormal(... )
For custom distributions you can use the his-togram classes. Histograms can load distributiondata from file.
cDoubleHistogram hist;FILE *f = fopen("distribution.dat");hist.loadFromFile( f );fclose(f);
double rnd = hist.random();
output vectors The cOutVector class can be used.
cOutVector eed("End-to-end delay");
double d = msg->creationTime()- simTime();
eed.record( d );
output scalars Output scalar file exists. You can write into itwith recordScalar() :
recordScalar("average delay",avg_delay);
op_topo_parent() cModule *parent = parentModule();op_topo_child_...(...) cSubModuleIterator
op_topo_.._assoc_(...)
gate(i)/gate(name),gate->toGate()/fromGate()gate->destinationGate()/sourceGate()gate->ownerModule()
op_pro_create(...) See dynamic module creation. Note that this isa more powerful tool than OPNET’s dynamic pro-cesses in that you can also create compound mod-ules.
205
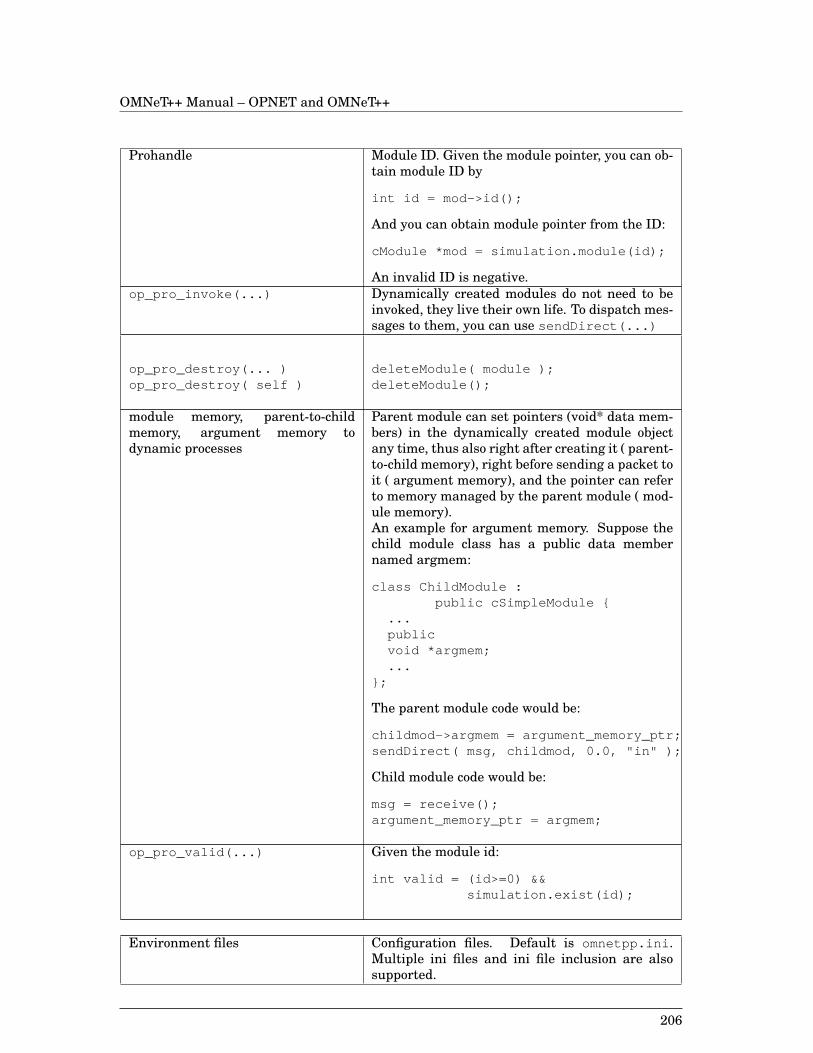
OMNeT++ Manual – OPNET and OMNeT++
Prohandle Module ID. Given the module pointer, you can ob-tain module ID by
int id = mod->id();
And you can obtain module pointer from the ID:
cModule *mod = simulation.module(id);
An invalid ID is negative.op_pro_invoke(...) Dynamically created modules do not need to be
invoked, they live their own life. To dispatch mes-sages to them, you can use sendDirect(...)
op_pro_destroy(... )op_pro_destroy( self )
deleteModule( module );deleteModule();
module memory, parent-to-childmemory, argument memory todynamic processes
Parent module can set pointers (void* data mem-bers) in the dynamically created module objectany time, thus also right after creating it ( parent-to-child memory), right before sending a packet toit ( argument memory), and the pointer can referto memory managed by the parent module ( mod-ule memory).An example for argument memory. Suppose thechild module class has a public data membernamed argmem:
class ChildModule :public cSimpleModule {
...publicvoid *argmem;...
};
The parent module code would be:
childmod->argmem = argument_memory_ptr;sendDirect( msg, childmod, 0.0, "in" );
Child module code would be:
msg = receive();argument_memory_ptr = argmem;
op_pro_valid(...) Given the module id:
int valid = (id>=0) &&simulation.exist(id);
Environment files Configuration files. Default is omnetpp.ini .Multiple ini files and ini file inclusion are alsosupported.
206
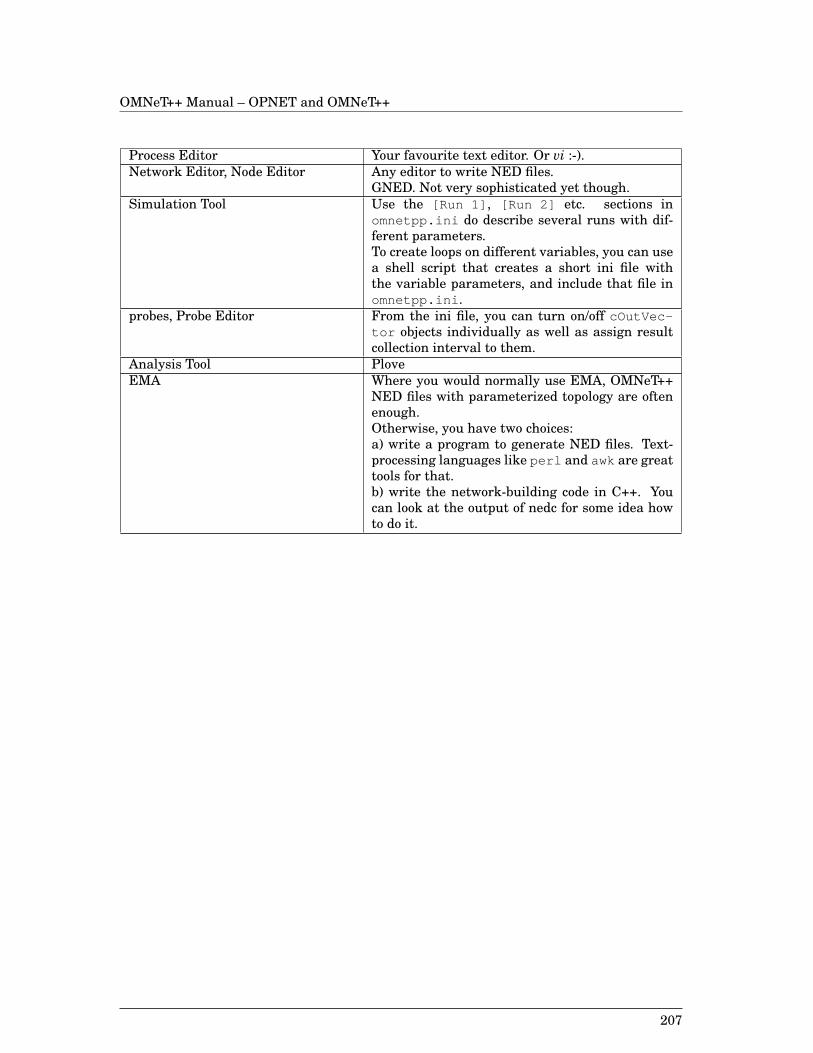
OMNeT++ Manual – OPNET and OMNeT++
Process Editor Your favourite text editor. Or vi :-).Network Editor, Node Editor Any editor to write NED files.
GNED. Not very sophisticated yet though.Simulation Tool Use the [Run 1] , [Run 2] etc. sections in
omnetpp.ini do describe several runs with dif-ferent parameters.To create loops on different variables, you can usea shell script that creates a short ini file withthe variable parameters, and include that file inomnetpp.ini .
probes, Probe Editor From the ini file, you can turn on/off cOutVec-tor objects individually as well as assign resultcollection interval to them.
Analysis Tool PloveEMA Where you would normally use EMA, OMNeT++
NED files with parameterized topology are oftenenough.Otherwise, you have two choices:a) write a program to generate NED files. Text-processing languages like perl and awk are greattools for that.b) write the network-building code in C++. Youcan look at the output of nedc for some idea howto do it.
207

OMNeT++ Manual – OPNET and OMNeT++
208

OMNeT++ Manual – PARSEC and OMNeT++
Appendix B
PARSEC and OMNeT++
B.1 What is PARSEC?
PARSEC is a very successful simulation language, with strong support for parallel simula-tion. PARSEC bears some similarity to OMNeT++ in that it is also based on threads andcoroutines. The language and the software has been developed at the Parallel ComputingLaboratory of the University of California at Los Angeles (UCLA), under the leadership ofProf. Rajive Bagrodia. PARSEC has been used in a number of simulation projects, for exam-ple in simulation of mobile radio networks in a military environment.
It is best to quote the PARSEC User Manual, Release 1.1 (August 1998):
PARSEC (for PARallel Simulation Environment for Complex programs) is a C-based dis-crete event simulation language. It adopts the process interaction approach to discrete eventsimulation. An object (also referred to as a physical process) or a set of objects in the physicalsystem is represented by a logical process [a thread – roughly equivalent to an OMNeT++ sim-ple module –Andras]. Interactions among physical processes (events) are modeled by times-tamped message exchanges among the corresponding logical processes.One of the important distinguishing features of PARSEC is its ability to execute a discrete-event simulation model using several different asynchronous parallel simulation protocols ona variety of parallel architectures. [...] Thus, with few modifications, a PARSEC program maybe executed using the traditional sequential (Global Event List) simulation protocol or one ofmany parallel [...] protocols.In addition, PARSEC provides powerful message receiving constructs that result in shorterand more natural simulation programs. [...]The PARSEC language has been derived from the Maisie language, but with several improve-ments, both in the syntax of the language and in its execution environment.
The PARSEC web site is at http://pcl.cs.ucla.edu/.
PARSEC is not open source. It seems that the source code is only available to researchcollaborators.
B.2 What is inside the PARSEC package?
When you download and install the PARSEC distribution, basically you find:
• pcc (the PARSEC compiler), and
• 2 variants of the PARSEC runtime library
209
OMNeT++ Manual – PARSEC and OMNeT++
This shows that PARSEC is strictly a simulation (and parallel programming) language whichis restricted to the area of entities, messages, and the tasks centered around message sendingand receiving. It is difficult to compare to OMNeT++ which is more of a complete simulationenvironment. (The OMNeT++ simulation library alone covers a much wider range of func-tionality than PARSEC as a whole.)
The primary strength of PARSEC is its parallel simulation support. The manual only de-scribes conservative PDES, but optimistic algorithms are also supported. However, the dis-tribution of Parallel PARSEC is limited to research collaborators (personal communicationfrom Richard A. Meyer, Nov. 2001).
B.3 PARSEC vs. the OMNeT++ simulation kernel
This section gives a brief overview of PARSEC, with special attention to the differences com-pared to OMNeT++.
PARSEC is compared against the core functionality of the OMNeT++ simulation kernel, thatis, message sending/receiving and the coroutines (activity() ). Other parts of the OM-NeT++ simulation kernel (e.g. statistics classes) and other parts of the OMNeT++ packagehave no equivalent in PARSEC.
Sample PARSEC codeThe PARSEC is a programming language based on C (not C++!). PARSEC programs, inaddition to normal C code, contain special syntactic constructs, so they do not compile as C.One has to invoke the PARSEC compiler (pcc ) on the source code in order to translate it intoC code that uses the PARSEC runtime library.
The main advantage of this solution is that the PARSEC language is clean and really elegant.
Let us see a bit of PARSEC code:
#include <stdio.h>...
message job {int id;int count;
};
message add_to_your_sorc {ename id;
};...
entity driver(int argc, char **argv) {...}
Entities and messagesIn the above PARSEC code fragment, two constructs stand out at once: message and entity .
The message constructs define message types, and they are translated to C structs by pcc.
Entities correspond to OMNeT++’s simple modules. (PARSEC has no equivalent of OM-NeT++’s compound modules.) The body of the entity contains the algorithm. Entities areimplemented with coroutines or threads much like OMNeT++’s activity() -based simple
210
OMNeT++ Manual – PARSEC and OMNeT++
modules; the entity body is equivalent to the activity() function. (PARSEC has no equiv-alent of handleMessage() -based simple modules.)
ename is a data type that holds entity references.
Problems with splitting up the entity bodyDuring programming, the code of an entity may become so large that it is no longer feasible tokeep it within a single function body. In OMNeT++ you can solve the problem by distributingthe simple module class’s activity() code into new member functions which are calledfrom activity() , and moving the some local variables of activity() into the moduleclass so that they can also be accessed by the new member functions.
The above approach doesn’t work in PARSEC, because PARSEC is C-based and entities arenot C++ classes. Of course one may call ordinary C functions from the entity body, but thenecessary parameters must be passed in the argument list (or as pointers to data structures).
Another solution in PARSEC is to use a construct called friend functions (not to be confusedwith C++ friend functions). PARSEC’s friend functions may access the local variables ofthe entity (quite strange in C, but much like an inner procedure in Pascal...). However, thePARSEC documentation does not recommend using friend functions (they are slow); it saysthey are provided for Maisie compatibility.
The driver entityThe driver entity is special; in a way it is similar to the C main() function. PARSEC startsthe simulation by creating and running a driver entity. The main task of the driver is tocreate all other entities in the simulation and provide them with information they need(parameter values, etc). The latter is done by sending out messages with the necessaryparameters to all entities that need it.
PARSEC does not have a high-level topology description language like NED in OMNeT++;instead, the driver entity is hand-coded most of the time. (There was no mention of tools thatcould generate the driver entity based on some higher-level description.).
OMNeT++ compound modules have no equivalent in PARSEC. All entities are at the samelevel, there’s no way to express hierarchy.
PARSEC has no notion of module gates, and there are no connections (in the OMNeT++sense) among the entities. This means that when sending messages, the receiving entitymust be explicitly named. Since the program contains no explicit topology information, anentity initially has no information about its communication partners (it knows no enamesexcept its own). The usual practice is that the driver entity sends the necessary enames inan initialization message to each entity. (For illustration, see the add_to_your_sorc messagetype from the above code fragment. The message name itself is quite descriptive.)
The consequence of the lack of compound modules and module gates is that it is a complicatedand tricky task to set up networks with but the most trivial topology. It is also very difficultto write reusable simulation components without well-defined interfaces and structuring(compound modules).
C++ syntax not allowedIt is not possible to use any C++ constructs in PARSEC programs. This means it is alsoimpossible to use any C++ class libraries in PARSEC programs; only C libraries can be used.
This limitation comes from pcc itself: the parser inside pcc is written for C, and as such, itcannot parse C++ syntax. It is irrelevant whether you use a C or C++ compiler to compilepcc’s output. One exception is that pcc accepts //-style comments.
Message sendingMessages can be sent to other entities with the send construct:
211
OMNeT++ Manual – PARSEC and OMNeT++
send message to dest-entity after delay ;
For example, creating a new message of type Request with the parameters 10 and self (thecurrent entity) and sending it to entity2 entity after a delay looks like this:
send Request{10, self } to entity2 after 5;
This PARSEC construct is totally equivalent in functionality to OMNeT++’s sendDirect( mes-sage, delay, dest-module [,dest-gate]) call. Since PARSEC has no equivalent of OMNeT++gates, OMNeT++’s other send() functions which send messages through a gate are notpresent in PARSEC.
Message receiving constructsPARSEC entities accept messages with the receive construct. Receive has many forms: theelegance and power of the PARSEC language stems from the receive construct. Some illus-trative examples:
receive (Request req) {...} or receive (Release rel) {...} or timeout in (5) { /*" in ": timeout with high priority*/...}
It is possible to add guards to the receive branches:
receive (Request req) when (req.units<=units) {...} or timeout after (5) { /*" after ": timeout with low priority*/...}
These constructs have to be explicitly programmed in OMNeT++ using while loops with re-ceive() calls and if/switch statements in its body. The reason OMNeT++ doesn’t have thissort of syntax and functionality is that it is impossible to express with plain C/C++: one can-not avoid the need for a special precompiler. Having to use a precompiler, however, causessome inconvenience during program development, and in practice, there isn’t as much needfor this sort of complex receive constructs that would justify making it mandatory to use aprecompiler for every source file.
One may wonder what happens to the messages which have arrived already but have notbeen accepted by the entity yet because they had no matching receive branch. PARSECstores those messages in what it calls the message buffer of the entity. PARSEC’s messagebuffer is practically the same as the put-aside queue in OMNeT++.
Guards may contain the special expressions qhead( msgtype ) , qempty( msgtype ) ,qlength( msgtype ) which refer to the messages in the message buffer. The programmerperceives as if each message type had a separate message buffer:
receive (Request req) when (qhead(Request).units<=units);receive (Request req) when (qempty(Release) && req.units<=units);
Note that the qhead() , qempty() and qlength() operations seem to be all you can do withthe message buffer, while in OMNeT++ you have free access to the put-aside queue throughthe cQueue member functions.
212
OMNeT++ Manual – PARSEC and OMNeT++
PARSEC also has a hold statement which is functionally equivalent to OMNeT++’s wait() :
hold(5);
Cancelling messagesPARSEC has no support for cancelling messages, that is, there is no equivalent to OMNeT++’scancelEvent() method. The reason is probably that message cancellation is difficult tohandle in certain parallel simulation algorithms. However, this doesn’t relieve the pain thatsuch functionality would often be needed in practice (e.g. when implementing timeouts).
The PARSEC team recommends various workarounds like keeping a list of valid (or can-celled) timers and checking messages against that.
Simulation clockThe PARSEC simulation clock is of integer type: optionally, unsigned int or long long (longlong is not a standard ANSI C/C++ type). The time unit is not specified by PARSEC: 1 maymean 1 nanosecond, 1 second or 1 hour. OMNeT++ uses double, with the time value to beinterpreted as seconds.
It is probably application-specific which is the better choice, but in the case of a large simu-lation model put together from components written with different time granularity in mind,double seems a better choice because it is relatively insensitive to the choice of the time unit.
Random number generationPARSEC provides platform-independent random number generators via the pc_erand() ,pc_nrand() , etc. library functions.
Thread/coroutine handlingSymbol names in the PARSEC runtime library give the impression that the thread/coroutineimplementation is quite similar in OMNeT++ and the single-processor implementation ofPARSEC. Both simulators use a setjmp/longjmp-based coroutine library. (Although it’s pos-sible that future versions of OMNeT++ will use the Fibers API on Win32 platforms.)
The worst problem with coroutines/threads is that if you create too many of them, you’llneed a lot of memory. With the current engineering workstations, it is practically impossibleto create more than a few times ten thousand entities in PARSEC (this is requires a fewhundred megabytes of memory).
It is possible to specify coroutine stack sizes in both PARSEC and OMNeT++. One advantageof OMNeT++ is that it can measure how much stack space a module actually uses during itsoperation (stackUsage() function), so it is relatively easy to find the optimal stack size. InPARSEC, this can only be done by trial and error (if the program crashes, a stack size wastoo small).
If memory requirements would grow too high due to the large number of coroutines, in OM-NeT++ it is possible to rewrite modules to use handleMessage() , thus eliminating the needfor a separate coroutine stack. PARSEC has no equivalent of handleMessage() , so corou-tine stacks cannot be eliminated.
Comparison of PARSEC and OMNeT++ as parallel simulation toolsPARSEC was created to be a parallel simulation (and parallel programming) language. Itprovides strong support for a wide range of conservative and optimistic PDES algorithms.
In contrast, OMNeT++ was created to be a generic simulation package, and as such, it offerssome support for conservative PDES and Statistical Synchronization.
PARSEC runs on both shared memory multiprocessors and distributed memory systems. Ona multiprocessor, NT native threads are used on Win32 platforms and the pthread libraryon Unix systems. MPI is used for communication between nodes on a distributed memory
213
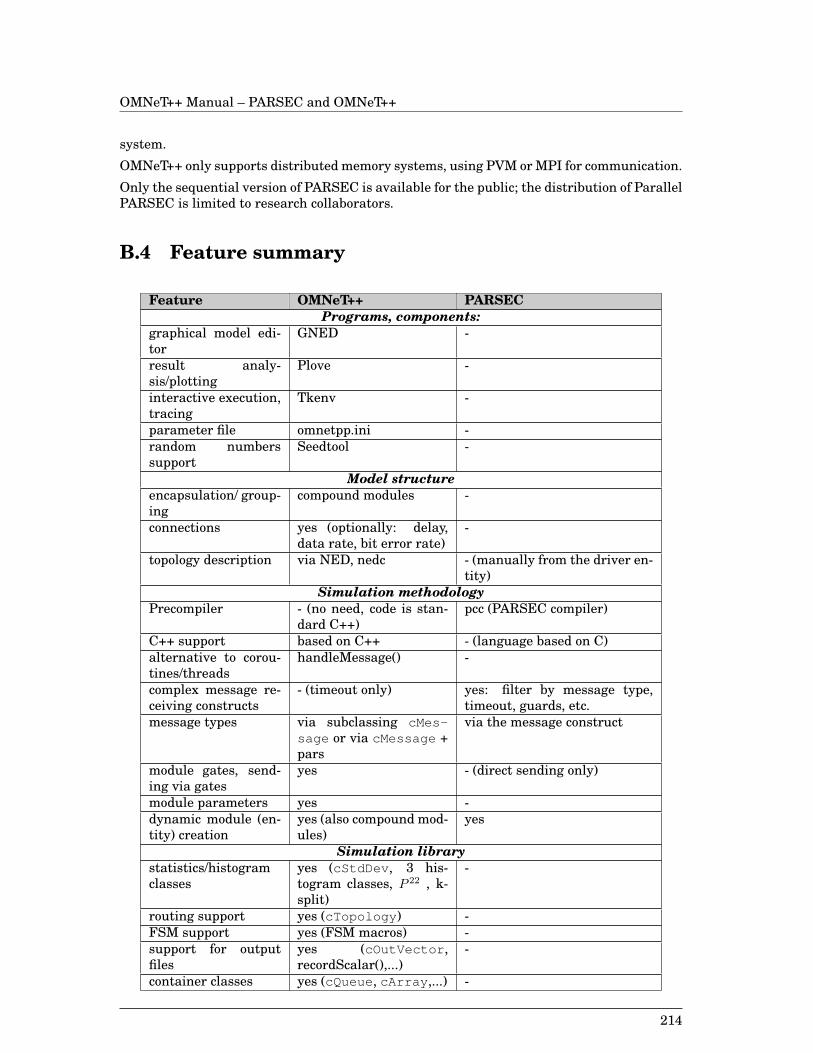
OMNeT++ Manual – PARSEC and OMNeT++
system.
OMNeT++ only supports distributed memory systems, using PVM or MPI for communication.
Only the sequential version of PARSEC is available for the public; the distribution of ParallelPARSEC is limited to research collaborators.
B.4 Feature summary
Feature OMNeT++ PARSECPrograms, components:
graphical model edi-tor
GNED -
result analy-sis/plotting
Plove -
interactive execution,tracing
Tkenv -
parameter file omnetpp.ini -random numberssupport
Seedtool -
Model structureencapsulation/ group-ing
compound modules -
connections yes (optionally: delay,data rate, bit error rate)
-
topology description via NED, nedc - (manually from the driver en-tity)
Simulation methodologyPrecompiler - (no need, code is stan-
dard C++)pcc (PARSEC compiler)
C++ support based on C++ - (language based on C)alternative to corou-tines/threads
handleMessage() -
complex message re-ceiving constructs
- (timeout only) yes: filter by message type,timeout, guards, etc.
message types via subclassing cMes-sage or via cMessage +pars
via the message construct
module gates, send-ing via gates
yes - (direct sending only)
module parameters yes -dynamic module (en-tity) creation
yes (also compound mod-ules)
yes
Simulation librarystatistics/histogramclasses
yes (cStdDev , 3 his-togram classes, P 22 , k-split)
-
routing support yes (cTopology ) -FSM support yes (FSM macros) -support for outputfiles
yes (cOutVector ,recordScalar(),...)
-
container classes yes (cQueue , cArray ,...) -
214
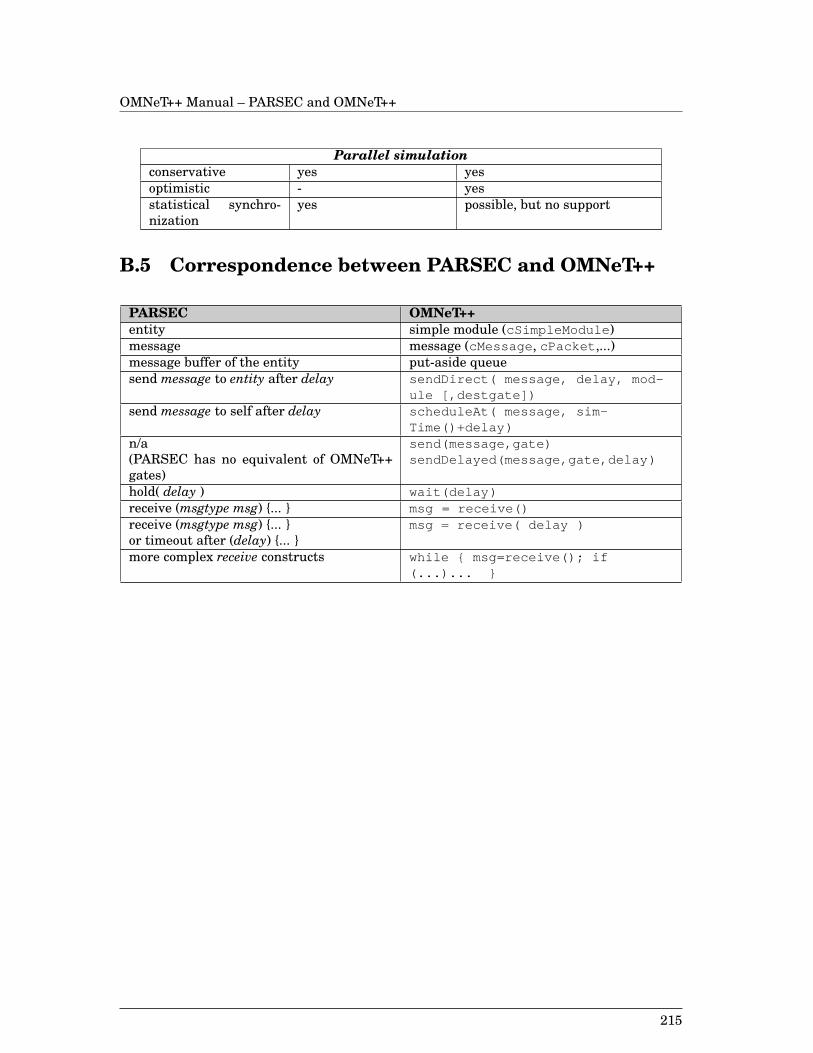
OMNeT++ Manual – PARSEC and OMNeT++
Parallel simulationconservative yes yesoptimistic - yesstatistical synchro-nization
yes possible, but no support
B.5 Correspondence between PARSEC and OMNeT++
PARSEC OMNeT++entity simple module (cSimpleModule )message message (cMessage , cPacket ,...)message buffer of the entity put-aside queuesend message to entity after delay sendDirect( message , delay , mod-
ule [, destgate ])send message to self after delay scheduleAt( message , sim-
Time()+ delay )n/a(PARSEC has no equivalent of OMNeT++gates)
send( message , gate )sendDelayed( message , gate , delay )
hold( delay ) wait( delay )receive (msgtype msg) {... } msg = receive()receive (msgtype msg) {... }or timeout after (delay) {... }
msg = receive( delay )
more complex receive constructs while { msg=receive() ; if(...)... }
215

OMNeT++ Manual – PARSEC and OMNeT++
216
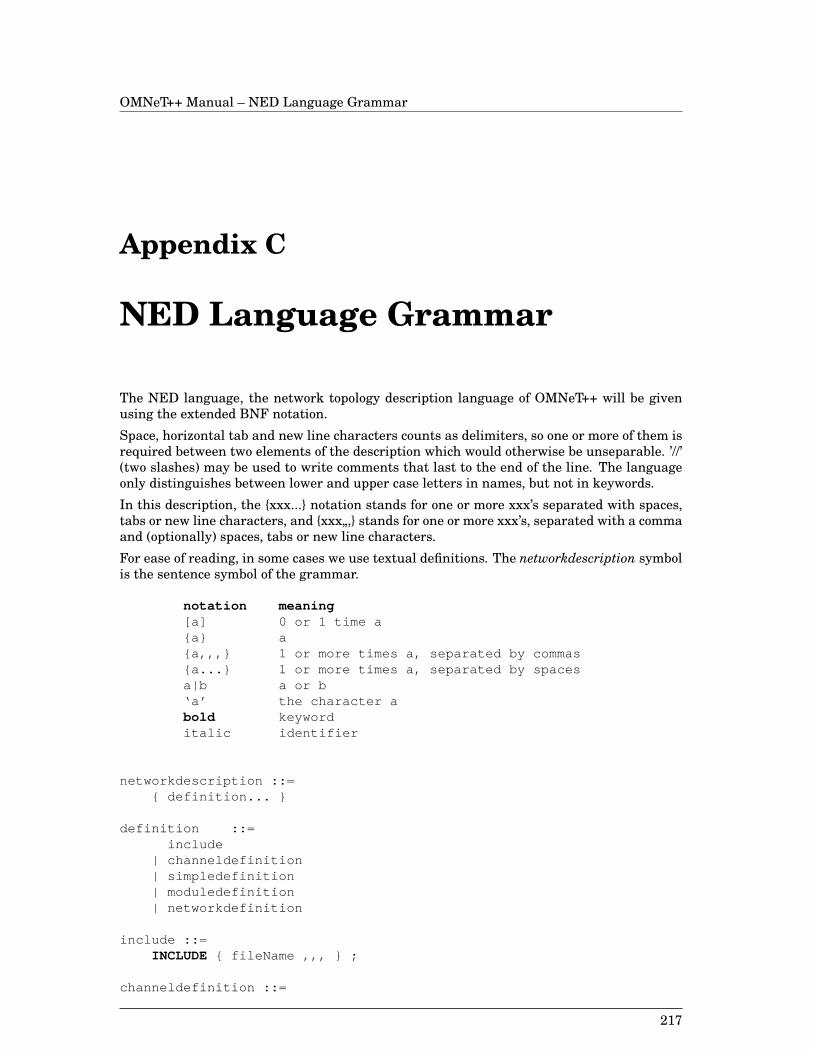
OMNeT++ Manual – NED Language Grammar
Appendix C
NED Language Grammar
The NED language, the network topology description language of OMNeT++ will be givenusing the extended BNF notation.
Space, horizontal tab and new line characters counts as delimiters, so one or more of them isrequired between two elements of the description which would otherwise be unseparable. ’//’(two slashes) may be used to write comments that last to the end of the line. The languageonly distinguishes between lower and upper case letters in names, but not in keywords.
In this description, the {xxx...} notation stands for one or more xxx’s separated with spaces,tabs or new line characters, and {xxx„,} stands for one or more xxx’s, separated with a commaand (optionally) spaces, tabs or new line characters.
For ease of reading, in some cases we use textual definitions. The networkdescription symbolis the sentence symbol of the grammar.
notation meaning[a] 0 or 1 time a{a} a{a,,,} 1 or more times a, separated by commas{a...} 1 or more times a, separated by spacesa|b a or b‘a’ the character abold keyworditalic identifier
networkdescription ::={ definition... }
definition ::=include
| channeldefinition| simpledefinition| moduledefinition| networkdefinition
include ::=INCLUDE { fileName ,,, } ;
channeldefinition ::=
217
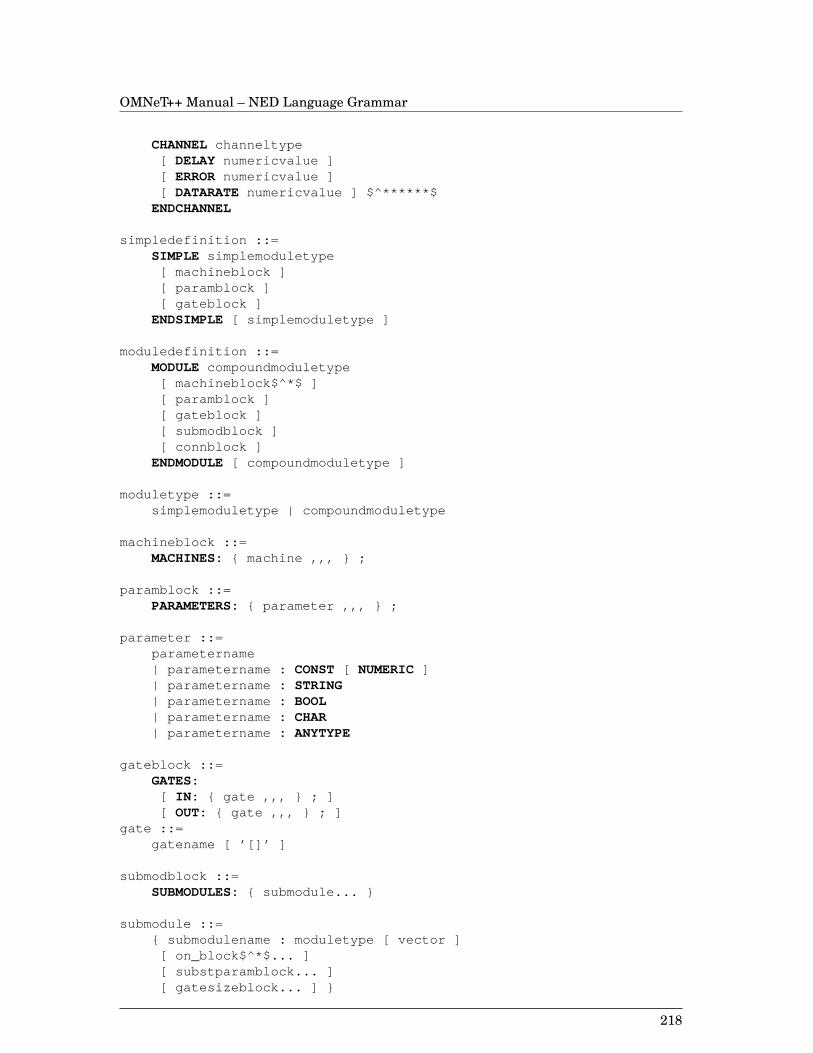
OMNeT++ Manual – NED Language Grammar
CHANNELchanneltype[ DELAY numericvalue ][ ERRORnumericvalue ][ DATARATEnumericvalue ] $^******$
ENDCHANNEL
simpledefinition ::=SIMPLE simplemoduletype
[ machineblock ][ paramblock ][ gateblock ]
ENDSIMPLE [ simplemoduletype ]
moduledefinition ::=MODULEcompoundmoduletype
[ machineblock$^*$ ][ paramblock ][ gateblock ][ submodblock ][ connblock ]
ENDMODULE[ compoundmoduletype ]
moduletype ::=simplemoduletype | compoundmoduletype
machineblock ::=MACHINES: { machine ,,, } ;
paramblock ::=PARAMETERS:{ parameter ,,, } ;
parameter ::=parametername| parametername : CONST [ NUMERIC ]| parametername : STRING| parametername : BOOL| parametername : CHAR| parametername : ANYTYPE
gateblock ::=GATES:
[ IN: { gate ,,, } ; ][ OUT: { gate ,,, } ; ]
gate ::=gatename [ ’[]’ ]
submodblock ::=SUBMODULES:{ submodule... }
submodule ::={ submodulename : moduletype [ vector ]
[ on_block$^*$... ][ substparamblock... ][ gatesizeblock... ] }
218
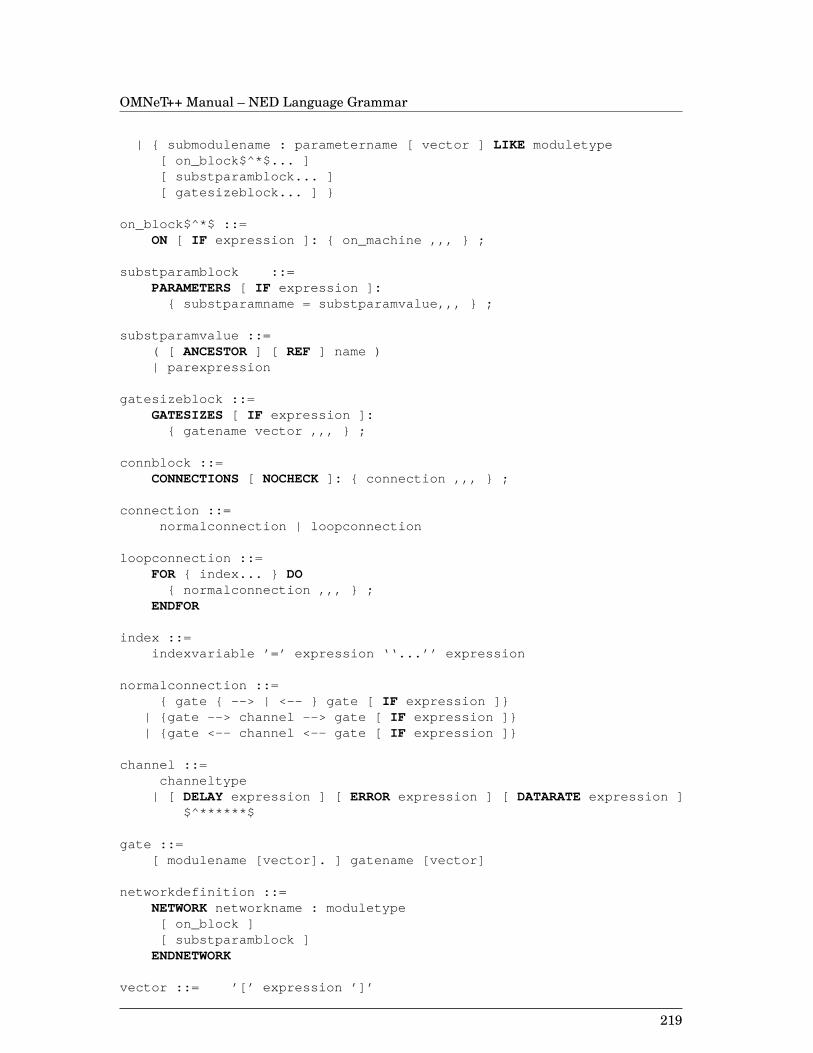
OMNeT++ Manual – NED Language Grammar
| { submodulename : parametername [ vector ] LIKE moduletype[ on_block$^*$... ][ substparamblock... ][ gatesizeblock... ] }
on_block$^*$ ::=ON [ IF expression ] : { on_machine ,,, } ;
substparamblock ::=PARAMETERS[ IF expression ] :
{ substparamname = substparamvalue,,, } ;
substparamvalue ::=( [ ANCESTOR] [ REF ] name )| parexpression
gatesizeblock ::=GATESIZES [ IF expression ] :
{ gatename vector ,,, } ;
connblock ::=CONNECTIONS[ NOCHECK] : { connection ,,, } ;
connection ::=normalconnection | loopconnection
loopconnection ::=FOR { index... } DO
{ normalconnection ,,, } ;ENDFOR
index ::=indexvariable ’=’ expression ‘‘...’’ expression
normalconnection ::={ gate { --> | <-- } gate [ IF expression ]}
| {gate --> channel --> gate [ IF expression ]}| {gate <-- channel <-- gate [ IF expression ]}
channel ::=channeltype
| [ DELAY expression ] [ ERRORexpression ] [ DATARATEexpression ]$^******$
gate ::=[ modulename [vector]. ] gatename [vector]
networkdefinition ::=NETWORKnetworkname : moduletype
[ on_block ][ substparamblock ]
ENDNETWORK
vector ::= ’[’ expression ’]’
219
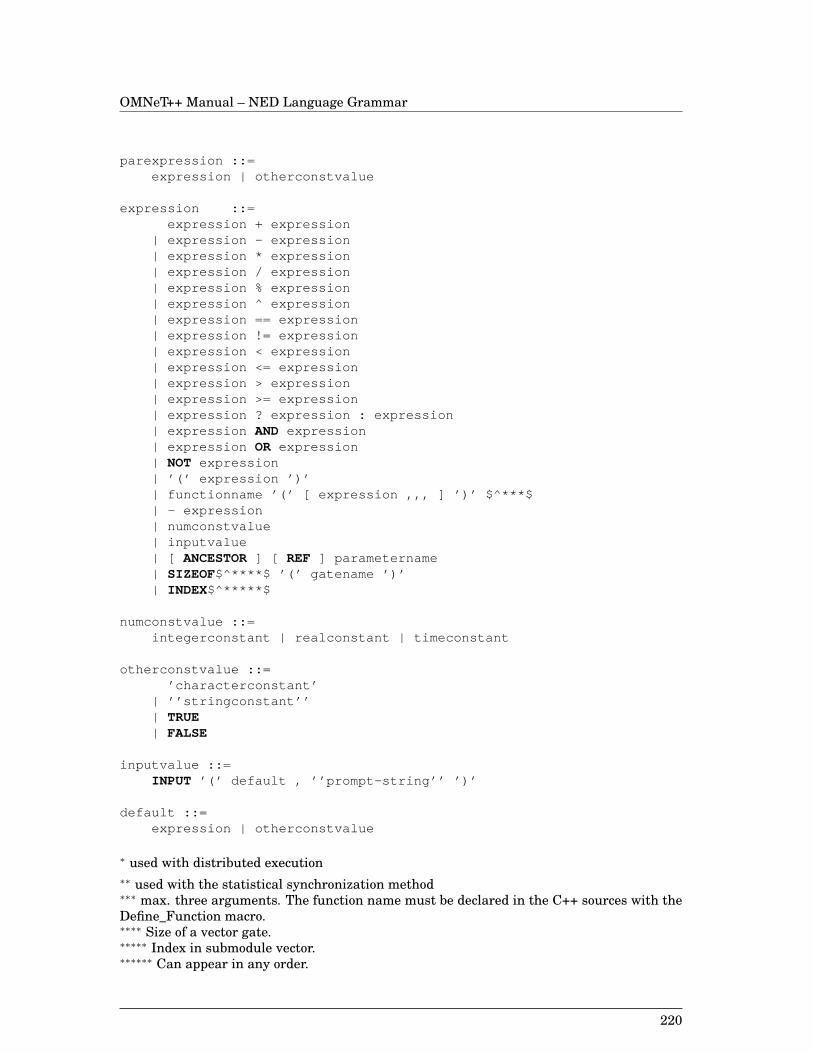
OMNeT++ Manual – NED Language Grammar
parexpression ::=expression | otherconstvalue
expression ::=expression + expression
| expression - expression| expression * expression| expression / expression| expression % expression| expression ^ expression| expression == expression| expression != expression| expression < expression| expression <= expression| expression > expression| expression >= expression| expression ? expression : expression| expression AND expression| expression OR expression| NOT expression| ’(’ expression ’)’| functionname ’(’ [ expression ,,, ] ’)’ $^***$| - expression| numconstvalue| inputvalue| [ ANCESTOR] [ REF ] parametername| SIZEOF$^****$ ’(’ gatename ’)’| INDEX$^*****$
numconstvalue ::=integerconstant | realconstant | timeconstant
otherconstvalue ::=’ characterconstant’
| ’’ stringconstant ’’| TRUE| FALSE
inputvalue ::=INPUT ’(’ default , ’’ prompt-string’’ ’)’
default ::=expression | otherconstvalue
∗ used with distributed execution∗∗ used with the statistical synchronization method∗∗∗ max. three arguments. The function name must be declared in the C++ sources with theDefine_Function macro.∗∗∗∗ Size of a vector gate.∗∗∗∗∗ Index in submodule vector.∗∗∗∗∗∗ Can appear in any order.
220
OMNeT++ Manual – References
Appendix D
References
Simulation-related[JAIN91] Jain, Raj: The Art of Computer Systems Performance Analysis. Wiley, New York,1991.
[BFS86] Bratley P., Fox, B. L. and Schrage, L. E.: A Guide to Simulation. Springer-Verlag,New York, 1986.
[JCH85] Jain, Raj and Chlamtac, Imrich: The P2 Algorithm for Dynamic Calculationof Quantiles and Histograms without Storing Observations, Communications of the ACM,28(10), 1076-1085, 1985.
[PON91] Pongor, György: OMNET: An Object-Oriented Network Simulator. 1991
[PON92] Pongor, György: Statistical Synchronization: A Different Approach of ParallelDiscrete Event Simulation. Lappeenranta University of Technology, Data CommunicationsLaboratory, Lappeenranta, Finland, 1992
[PON93] Pongor, György: On the Efficiency of the Statistical Synchronization Method. Eu-ropean Simulation Symposium (ESS’93), Delft, The Netherlands, Oct. 25-28, 1993
[KOF95] Kofoed, Stig: Portable Multitasking in C++. Dr. Dobb’s Journal, November 1995.ftp://ftp.mv.com/pub/ddj/1995/1995.11/mtask.zip
OMNeT++-related research papers[VAR99] ”Using the OMNeT++ Discrete Event Simulation System in Education”. AndrásVarga. IEEE Transactions on Education, November 1999 CD-ROM issue; abstract in vol. 42,no. 4, pp. 372, November 1999.
[VAR98a] ”K-split - On-Line Density Estimation for Simulation Result Collection”. AndrásVarga. In the Proceedings of the European Simulation Symposium (ESS’98). October 26-28,1998. Nottingham, UK.
[VAR98b] ”Parameterized Topologies for Simulation Programs”. András Varga. In theProceedings of the Western Multiconference on Simulation (WMC’98) / Communication Net-works and Distributed Systems (CNDS’98). January 11-14, 1998. San Diego, CA.
[V&F97] ”The K-Split Algorithm for the PDF Approximation of Multi-Dimensional Empiri-cal Distributions without Storing Observations”. András Varga and Babak Fakhamzadeh. InProceedings of the 9th European Simulation Symposium (ESS’97), pp.94-98. October 19-221997, Passau, Germany.
[V&P97] ”Flexible Topology Description Language for Simulation Programs”. András Vargaand György Pongor. In Proceedings of the 9th European Simulation Symposium (ESS’97),pp.225-229. October 19-22 1997, Passau, Germany.
221
OMNeT++ Manual – References
Former OMNeT++ documents[OMN1] Vass Zoltán.: PVM Extension of OMNeT++ to Support Statistical Synchronization.Diploma Thesis, Technical University of Budapest, 1996 (in Hungarian).
[OMN2] André Maurits, George van Montfort and Gerard van de Weerd: OMNeT++ exten-sions and examples. Technical University of Budapest, Dept. of Telecommunications, 1995.
[OMN3] Jan Heijmans, Alex Paalvast, Robert van der Leij: Network simulation using theJAR compiler for the OMNeT++ simulation system. Technical University of Budapest, Dept.of Telecommunications, 1995.
[OMN4] Varga András.: OMNeT++ - Portable User Interface for the OMNeT++ SimulationSystem. Diploma Thesis, Technical University of Budapest, 1994 (in Hungarian).
[OMN5] Lencse Gábor: Graphical Network Editor for OMNeT++. Diploma Thesis, Techni-cal University of Budapest, 1994 (in Hungarian).
[OMN6] Varga András.: OMNeT++ - Portable Simulation Environment in C++. TDK work,Technical University of Budapest, 1992 (in Hungarian).
Other simulation softwareSee web site
C++ languageToo many books to list.
Cygwin[CYGWIN] http://sourceware.cygnus.com/cygwin/top.html
PVM[PVM1] The Official PVM Home Page. http://www.epm.ornl.gov/pvm/pvm_home.html
[PVM2] http://www.sp2.uni-c.dk/PVM/PvmIntro.html
[PVM3] http://www.cse.ogi.edu/DISC/projects/mist/related-work/pvm.html
Tcl/Tk[TCLTK1] Welch, Brent: Practical Programming in Tcl and Tk. Prentice-Hall, 1995
Gnuplot[GPLOT1] Brief tutorial:http://nacphy.physics.orst.edu/DATAVIS/datavis.html
[GPLOT2] Reference:http://www.cm.cf.ac.uk/Latex/Gnuplot/gnuplot.html
[PMTV1] PlotMTV:http://cauchy.math.edu/workshop/Plotmtv/plotmtv.html
Xmgr[XMGR1] Brief tutorial:http://nacphy.physics.orst.edu/DATAVIS/xmgr.html
222
OMNeT++ Manual – INDEX
Index
./fifo1, 162«, 130#include, 149
abstract, 152accuracy detection, 127activity(), 3, 19, 24, 55, 58–67, 77, 93, 103,
104, 131, 167, 169, 192, 202, 210,211
addBinBound(), 123addObject(), 91addPar(), 91aggregate data structures, 12ALLOCTABLE, 177animation-delay, 169animation-enabled, 169animation-msgcolors, 169animation-msgnames, 169animation-speed, 169arrival time, 54, 55, 76arrivalGate(), 89arrivalGateId(), 89arrivalModuleId(), 89arrivalTime(), 90arrivedOn, 90arrivedOn(), 90arrow display string, 136asDoubleValue(), 118autoflush, 167average(), 47awk, 2, 13, 127, 139, 179, 180, 182, 207
basepoint(), 122bernoulli(p, rng=0), 46, 110beta(alpha1, alpha2, rng=0), 45, 110binary heap, 56binary tree, 36binomial(n, p, rng=0), 46, 110bit error, 76BKPT, 177bool, 144, 145bool(), 118boolValue(), 118breakpoint, 135breakpoint(), 135, 169
breakpointHit(), 196breakpoints-enabled, 169buildInside(), 103
cAccuracyDetection, 126, 127cADByStddev, 127callInitialize(), 71, 103cancelEvent(), 62, 66, 95, 96, 213cancelRedirection(), 118, 119cArray, 83, 85, 91, 112, 113, 137, 194, 214cauchy(a, b, rng=0), 46, 110cBag, 83, 113cClassRegister, 193cCompoundModule, 54, 192cCoroutine, 194cDensityEstBase, 121cdf(), 122cDisplayStringParser, 137cDoubleHistogram, 83, 110, 120, 190cell(), 122cellPDF(), 122cells, 87cells(), 122cEnvir, 83, 192, 195cEnvir::run(), 195cFileOutputScalarManager, 165cFileOutputVectorManager, 165cFileSnapshotManager, 165cFSM, 72, 73cFunctionType, 193cGate, 83, 98, 102, 192chain, 36channel, 25, 26, 33
bit error rate, 9data rate, 9datarate, 26, 193definition, 26definitions, 25delay, 26, 193error, 26, 193name, 33parameters, 33propagation delay, 9
char, 145, 147cHead, 193–195
223
OMNeT++ Manual – INDEX
chi_square(k, rng=0), 46, 110cInifile, 196cKSplit, 83, 110, 120–122, 125class, 147, 149class data members, 60className(), 84, 85, 142, 147cLinkedList, 83, 113cLinkType, 193cLongHistogram, 83, 110, 120, 190Cmdenv, 130, 165cMessage, 19, 55, 83, 84, 87–91, 111, 141,
142, 144, 147, 152, 203, 214, 215cMessageHeap, 56, 111cModule, 54, 83, 93, 97–99, 101, 192cModuleType, 58, 102, 103, 193cNetworkType, 193cObject, 71, 83–85, 87, 91, 111–113, 119,
128, 130, 131, 147, 150, 152, 153,192, 194, 195
collect(), 120command line switches, 165, 168command line user interface, 165configPointer(), 116, 119configure script, 158connect(), 104connection, 8, 33
conditional, 35dynamic creation, 104loop, 34, 81random, 35
conservative synchronization, 185const char*, 146contains relationship, 194context pointer, 90contextPointer(), 90copy constructor, 85, 128coroutine, 19, 55, 59, 63, 66, 69, 104, 194
stack size, 64COUNTBLOCKS, 177cout, 130cOutputScalarManager, 165cOutputVectorManager, 165cOutVector, 83, 127, 171, 172, 179, 181,
205, 207, 214cPacket, 83, 87, 90, 142, 215cPar, 77, 83, 88, 91, 97, 98, 111, 114–119,
122, 137–139, 141, 190, 193expressions, 116
cPar types and member functions, 118cPar memory management, 116cPars, 119cPSquare, 83, 110, 120–122, 190CPU time, 54cpu-time-limit, 164
cQueue, 24, 83, 85, 111–113, 194, 212, 214cQueueIterator, 112cQueues, 111create(), 103CreateFiber(), 194createOne(), 129, 193createScheduleInit(), 103creationTime(), 90cSimpleModule, 19, 54, 56–59, 61, 65, 83,
85, 192, 194, 215cSimulation, 101, 192cSnapshotManager, 165cStatistic, 119, 120, 126cStdDev, 83, 120, 122, 214cSubModIterator, 101cTDExpandingWindows, 126cTopology, 83, 104–107, 203, 214cTransientDetection, 126cVarHistogram, 83, 110, 120, 123cWatch, 83, 130, 131cWeightedStdDev, 120cWeightedStddev, 83
data rate, 75data rate change, 97datarate, 26dblrand(), 109debugging, 12, 130, 159decapsulate(), 89default-run, 169defaultOwner(), 194Define_Function(), 46, 193Define_Function2(), 47Define_Link(), 193Define_Module(), 56, 57, 102, 193Define_Module_Like(), 56, 57, 193Define_Network(), 193delay, 26delayed sending, 93deleteModule(), 104density estimation, 179DES, 53destinationGate(), 100detect(), 126Dijkstra algorithm, 107disable(), 107discrete event simulation, 53display strings, 47, 136, 172
tags, 48wildcards, 172
DISPLAYALL, 177DISPSTRAYS, 177distanceToTarget(), 107distributed, 164
224
OMNeT++ Manual – INDEX
distribution, 115, 117as histogram, 110custom, 110, 123estimation, 121even, 124multi-dimensional, 124online estimation, 124predefined, 45, 109proportional, 124random variables, 109
double, 55, 145, 147double(), 119doubleValue(), 119drop(), 194dup(), 85, 86, 128, 144, 194DynaDataPacke, 154DynaDataPacket, 154DynaPacket, 154
empty(), 111enable(), 107enabled(), 107encapsulate(), 89encapsulatedMsg(), 89end(), 62, 66, 112end-of-simulation, 71endSimulation(), 97entry code, 72enum {..}, 144Envir, 161, 165erlang_k(k, mean, rng=0), 46, 110errmsgs-to-console, 171error, 26error(), 97ev, 73, 83, 86, 130, 195ev.printf(), 78, 86, 130, 137, 189event, 63, 65
causality, 185event loop, 63, 70event processing strategies, 55event timestamp, 54event-banners, 167events, 53, 55, 87
initial, 67exit code, 72exponential(), 83exponential(mean, rng=0), 45, 109express-mode, 167extends, 147extra-stack, 167, 169extraStackforEnvir, 136
factory function, 102FES, 54–56, 64, 76, 96, 103, 111
fflush(stdout), 167fifo1, 162fifo1.vec, 162, 163fifonet1, 162filtering results, 179finalize(), 71findGate(), 99findPar(), 92findSubmodule(), 101finish(), 24, 55, 58, 61, 64, 67, 70, 71, 128,
136, 163, 176, 202finite state machine, 69, 72FooPacket, 144, 151FooPacket_Base, 151for(), 73forEach mechanism, 12forEach(), 128frames, 87free(), 194, 195freq, 141, 142fromGate(), 99, 100, 102FSM, 69, 70, 72, 73
nested, 72FSM_DEBUG, 73FSM_Goto(), 73FSM_Print(), 73FSM_Switch(), 72, 73fullName(), 85fullPath(), 85functions
user-defined, 46future events, 54
gamma_d(alpha, beta, rng=0), 45, 110gate, 18, 26, 27, 29, 76, 98
busy condition, 76conditional, 32destination, 100finish transmission, 96id, 99un-connected, see ned keywords nocheckvector, 27, 44, 98
size, 32vector index, 98vector size, 98
gate(), 98gate_name, 92gdb, 168gen0-seed, 164gen1-seed, 164genk_randseed(), 173geometric(p, rng=0), 46, 110get, 144getObject(), 91
225

OMNeT++ Manual – INDEX
global variables, 77gned
mouse bindings, 51Gnuplot, 179, 183grep, 127, 181
handleMessage(), 3, 55, 58, 60, 61, 65–67,72, 93, 95, 131, 202, 211, 213
hasObject(), 91hasPar(), 91head(), 112header files, 57HEAPCHECK, 177histogram, 179
equal-sized, 120equiprobable-cells, 120range estimation, 121
id(), 99, 100immediate, 137import files, 79import statements, 25in(), 106index, vi, 44index operator, 42index(), 98, 100info(), 128infomsgs-to-console, 171inheritance, 77ini file, 114, 166
file inclusion, 163include files, 174warnings, 135wildcards, 171
ini-warnings, 164initial events, 54initialization, 71
multi-stage, 71initialize, 71initialize(), 55, 58, 61, 64–71, 103, 131inLinks(), 106inorder_epsilon, 55input, 162, 163input flag, 114insert(), 111, 112insertAfter(), 111insertBefore(), 111int, 144, 145, 147, 152inter-segment transients, 190interface description object, 58intrand(), 109intuniform(), 110, 115intuniform(a, b, rng=0), 46, 110IPAddress, 148, 149
isBusy(), 96, 99isConnected(), 99, 100isNumeric(), 118isRedirected(), 118, 119isScheduled(), 96isSelfMessage(), 89, 95isVector(), 98items(), 113iter(), 101
k, 145k-split, 120
LD_LIBRARY_PATH, 159length(), 111linear congruential generator, 108link, 8link delay, 76load-libs, 165loadFromFile(), 123localGate(), 106localGateId(), 106logical hosts, 186lognormal(m, s, rng=0), 46, 110long, 145long(), 119LongHistogram, 120longjmp(), 194longValue(), 119
main(), 191, 195, 201, 211make, 157, 158Makefile, 157
dependencies, 157malloc(), 87math operators, 43max(), 120mean(), 120memcpy(), 116memory leaks, 177message, 55, 87, 147
attaching non-object types, 91attaching objects, 91cancelling, 95data members, 88duplication, 88encapsulation, 88error flag, 88exchanging, 8kind, 88priority, 55, 88subclassing, 138time stamp, 88timeout value, 94
226
OMNeT++ Manual – INDEX
length, 88message-trace, 167min(), 120MK_INFO, 90MK_PACKET, 90model
components, 191partitioning, 186time, 54tuning, 81
modmsgs-to-console, 171module
accessing parameters, 97array, 29as parameter, 30color, 136communication, 98compound, 7, 8, 25, 28, 35, 57, 79, 81,
191, 200, 218definition, 28deletion, 104gates, 28, 29parameters, 28patterns, 38precompiled, 80
constructor, 58, 59, 61, 66, 71conventions, 77coroutine, 11declaration, 57destructor, 71dynamic creation, 102dynamic deletion, 104families, 30gate sizes, 32hierarchy, 7id, 100libraries, 8, 13, 78nesting depth, 81parameters, 10, 26, 171
by reference, 98, 117process-style, 11simple, 4, 7, 11, 19, 25, 28, 53–56, 58,
63, 77, 78, 81, 185, 191, 192, 200–202, 209–211, 215, 218
creation, 11definition, 26gates, 27parameter declaration, 27parameters, 27
stack size, 136subclassing, 54submodule, 29
lookup, 101parameters, 30
types, 8vector, 29, 100
iteration, 101watches, 131
module-messages, 167, 171Module_Class_Members(), 59, 61moduleByPath(), 101moduleByRelativePath(), 101moduleByRelativePath(), 101MPI, 129, 186, 187MSVC, 159MultiShortestPathsTo(), 107multitasking
cooperative, 63MyPacket, 143
name(), 84, 101, 147ned
case sensitivity, 26compiler, 13, 14, 155components, 25connections, 33expression, 27expressions, 26, 31, 43
evaluation, 43operators, 43
file generation, 139files, 12, 13, 18, 78, 155functions, 45, 46gatesizes, 32graphical interface, 12, 50graphical interface, 14import files, 26include files, 26include path, 158index operator, 44inheritance, 77interface, 58keywords, 25
ancestor, 31anytype, 27bool, 27connections, 33const, 27, 38display, 47endnetwork, 41for, 34gates, 27gatesizes, 32if, 35, 42import, 26include, 26like, 30, 39machines, 41, 42
227
OMNeT++ Manual – INDEX
network, 41nocheck, 35, 37numeric, 27numeric const, 27on, 41, 42, 188ref, 27, 31, 43, 98string, 27submodules, 29
language, 4, 25, 155, 217libraries, 79nested for statements, 34network definition, 41parameter passing method, 31parameters, 32
by reference, 43by value, 31, 43
sizeof(), 44nedtool, 142negbinomial(n, p, rng=0), 46, 110netif-check-freq, 165netPack(), 129netUnpack(), 129network, 164
description, 25, 26list of, 193
nodeFor(), 106nodes(), 106non-object container, 113non-object pointers, 115non-pointer value, 116noncobject, 150normal(), 83, 115normal(mean, stddev, rng=0), 45, 109NUM_RANDOM_GENERATORS, 108numeric constants, 44numInitStages(), 71
objectcopy, 85duplication, 85
object library, 78objectDeleted(), 196objectValue(), 115, 119omnetpp.ini, 13, 22, 161, 163, 165, 168omnetpp.sna, 131OMNETPP_BITMAP_PATH, 170OMNETPP_TKENV_DIR, 170operator=(), 85, 128, 144opp_concat(), 87opp_makemake, 143, 157–159, 189opp_msgc, 142opp_strdup(), 87opp_strcmp(), 87opp_strcpy(), 87
opp_strdup(), 87optimal routes, 105optimal routing, 106optimistic synchronization, 185out(), 106outLinks(), 106output
file, 158gate, 92scalar file, 13scalars, 128vector, 127, 165vector file, 13, 171, 179, 181vector object, 127
output-scalar-file, 164output-vector-file, 164outputscalarmanager-class, 165outputvectormanager-class, 165overflowCell(), 121ownerModule(), 100, 102ownership, 12, 84, 86, 92, 115, 138, 194
copy constructor, 194
packets, 87par(), 91, 92, 97parallel simulation, 41parallel execution, 185parallel simulation
deadlock, 187parallel-system, 164, 187parameter
by value, 117expressions, 117
parameters, see module parametersparentModule(), 101pareto_shifted(a, b, c, rng=0), 46, 110parList(), 91PARSEC, 71, 209path(), 107paths(), 107pause-in-sendmsg, 164payloadLength, 150PDES, 185pdf(), 122pdu(), 90performance-display, 167perl, 2, 13, 139, 207petri nets, 11Plove, 179pointerValue(), 119poisson(lambda, rng=0), 46, 110pop(), 111, 112power, 141, 142print-banners, 169
228
OMNeT++ Manual – INDEX
printf(), 3, 85, 97, 130process-style description, 62properties, 151protocol(), 90protocol.h, 90putAsideQueue, 93, 111PVM, 129, 186, 187PVM_DEBUG, 189PVM_ROOT, 189PVM_SUPPORT, 189
qempty(), 212qhead(), 212qlength(), 212queue
iteration, 112order, 112
queue.remove(), 112
RadioMsg, 142RadioMsgDescriptor, 142random
number, 27numbers, 108, 122, 173numbers from distributions, 109seeds, 175variables, 115
random(), 122random-seed, 109, 164randseed(), 109real time, 54receive(), 62–64, 66, 93–95, 192, 202, 212receiveNew(), 93receiveNewOn(), 93receiveOn(), 93–95record(), 127recordScalar(), 128, 165recordStats(), 128redirection, 117redirection(), 118, 119Register_Class(), 129, 193Register_Function(), 110remoteGate(), 106remoteGateId(), 106remoteNode(), 106remove(), 112, 113removeObject(), 91result accuracy, 126reversed polish notation, 116rng, 46routing support, 104run(), 196runs-to-execute, 167
samples(), 120saveToFile(), 123scheduleAt(), 62, 66, 89, 95, 96, 167, 202scheduleStart(), 103sed, 13, 127seed, automatic selection, 173seedtool, 108, 173segmentation, 41segmentation fault, 176self-message, 66, 95
cancelling, 95send(), 62, 66, 75, 76, 92, 93, 137, 164, 167,
192, 212send...(), 89sendDelayed(), 93sendDirect(), 93senderGate(), 89senderGateId(), 89senderModuleId(), 89sendingTime(), 90set, 144set...ArraySize(), 146setContextPointer(), 90setDisplayString(), 136, 137setjmp(), 194setName(), 172setObjectValue(), 115setOwner(), 86, 147setPayloadLength(), 150setRedirection(), 117setTimeStamp(), 88shared libraries, 158, 159shared memory, 32shared objects, 138, 165, 168shared parameters, 139short, 145, 152shortest path, 105sim-time-limit, 164simTime(), 95simtime_t, 55, 86simtimeToStr(), 86simulation
building, 12class librarie, 155class library, 191concepts, 53configuration, 22configuration file, 13debugging, 168embedding, 192kernel, 13, 155, 192multiple runs, 163parallel segments, 190running, 12
229
OMNeT++ Manual – INDEX
user interface, 13simulation time, 54, 86simulation time limits, 97SINGLE_HOST, 189SingleShortestPaths(), 107size(), 98, 100sizeof(), vi, 44skiplist, 56slavelog-file, 171snapshot, 12snapshot file, 130, 131snapshot(), 131, 164, 165snapshot, partial, 135snapshot-file, 164snapshotmanager-class, 165sourceGate(), 100splitvec, 182sqrSum(), 120SSM, 190stack, 63, 69
for Tkenv, 176overflow, 64, 136size, 136, 176too small, 176usage, 64violation, 136
stackUsage(), 136, 176, 213starter messages, 63, 64, 66, 70, 103state transition, 73state-transition diagram, see finite state ma-
chinestatic linking, 158, 159statistic
asynchronous exchange, 190synchronous exchange, 190
statistical synchronization, 186statistical interface, 190status-frequency, 167stddev(), 120steady states, 72sTopoLinkIn, 106sTopoLink, 106sTopoLinkIn, 106sTopoLinkOut, 106, 107sTopoNode, 106, 107strdup(), 84stringValue(), 118strToSimtime(), 86strToSimtime0(), 87student_t(i, rng=0), 46, 110submodule, see modulesubmodule(), 101sum(), 120suspend execution, 62
switch(), 73SwitchToFiber(), 194syncpoint(), 186, 187
tail(), 112take(), 194takeOwnership(), 86, 115, 119, 194targetNode(), 107tcl2c, 170TCL_LIBRARY, 160TCmdenv, 195threads, 63time units, 45Tkenv, 83, 130, 168toGate(), 99, 100, 102TOmnetApp, 195, 196TOmnetTkApp, 195topology, 25
butterfly, 39defining, 18description, 11dynamic optimization, 82external source, 139hypercube, 39, 40mesh, 39patterns, 38perfect shuffle, 39random, 37shortest path, 106templates, 39, 81tree, 39
total-stack-kb, 164, 176transferTo(), 63transform(), 121, 123transformed(), 121transient detection, 126transient states, 72transmission time, 75transmissionFinishes(), 96, 99triang(a, b, c, rng=0), 46, 110truncnormal(), 110truncnormal(mean, stddev, rng=0), 45, 110type character, 118type(), 98, 118, 119
ulimit, 176underflowCell(), 121uniform(a, b, rng=0), 45, 109unsigned char, 145unsigned int, 145unsigned long, 145unsigned short, 145unweightedSingleShortestPathsTo(), 107update-freq-express, 169
230
OMNeT++ Manual – INDEX
update-freq-fast, 169use-mainwindow, 169user interface, see simulation interface, 161
variance(), 120virtual, 144virtual time, 54
wait(), 24, 62–64, 66, 92, 95, 202, 213warnings, 135WATCH(), 24, 83, 130, 131, 170weibull(a, b, rng=0), 46, 110write-slavelog, 171writeContents(), 128
Xmgr, 183xxgdb, 168
zero stack size, 60, 66
231