OfficeServ Call User Manual - Access Voice & Data
132
Every effort has been made to eliminate errors and ambiguities in the information contained in this guide. Any questions concerning information presented here should be directed to SAMSUNG TELECOMMUNICATIONS AMERICA, 1301 E. Lookout Dr. Richardson, TX. 75082 telephone (972) 761- 7300. SAMSUNG TELECOMMUNICATIONS AMERICA disclaims all liabilities for damages arising from the erroneous interpretation or use of information presented in this guide. OfficeServ Call User Manual
-
Upload
khangminh22 -
Category
Documents
-
view
0 -
download
0
Transcript of OfficeServ Call User Manual - Access Voice & Data

Every effort has been made to eliminate errors and ambiguities in the information contained in this guide. Any questions concerning information presented here should be directed to SAMSUNG TELECOMMUNICATIONS AMERICA, 1301 E. Lookout Dr. Richardson, TX. 75082 telephone (972) 761-7300. SAMSUNG TELECOMMUNICATIONS AMERICA disclaims all liabilities for damages arising from the erroneous interpretation or use of information presented in this guide.
OfficeServ Call User Manual

Samsung Telecommunications Publication Information SAMSUNG TELECOMMUNICATIONS AMERICA reserves the right without prior notice to revise information in this publication for any reason. SAMSUNG TELECOMMUNICATIONS AMERICA also reserves the right without prior notice to make changes in design or components of equipment as engineering and manufacturing may warrant. Copyright 2005 Samsung Telecommunications America All rights reserved. No part of this manual may be reproduced in any form or by any means—graphic, electronic or mechanical, including recording, taping, photocopying or information retrieval systems—without express written permission of the publisher of this material. PRINTED IN USA

TABLE OF CONTENTS
CHAPTER 1. Introduction........................................................................................................... 1
Conventions ..................................................................................................................................... 1
Overview .......................................................................................................................................... 2 Introduction to the OfficeServ Operator .............................................................................. 2
CHAPTER 2. Installation............................................................................................................. 4
System Requirements...................................................................................................................... 4 Computer System ............................................................................................................... 4 System Users and Password Requirements ...................................................................... 4
How to Install.................................................................................................................................... 4
CHAPTER 3. Overview of OfficeServ Call............................................................................... 11
Status Bar....................................................................................................................................... 12
Selection View................................................................................................................................ 13
Detailed List Views......................................................................................................................... 14 Directory Service............................................................................................................... 14 Scheduler Service ............................................................................................................. 14 Call Log Service ................................................................................................................ 14
Call Control View............................................................................................................................ 14
Configuration.................................................................................................................................. 15 How Do You Open BLF View?.......................................................................................... 15 How Do You Open EasySet?............................................................................................ 15 How Do You Change DDE Options? ................................................................................ 16
a. DDE Settings........................................................................................................ 16 b. Reinitialize DDE/Uninitialize DDE........................................................................ 17
How Do You Set Up Call Notification?.............................................................................. 17 a. How Do You Configure General Options?........................................................... 17 b. How Do You Configure Database Options? ........................................................ 20
How Do You Set Database Synchronization Options....................................................... 24 How Do You Change Phone Lines Options?.................................................................... 25 How Do You Set Environments? ...................................................................................... 26

a. Station Password ................................................................................................. 26 b. Page Zone Names ............................................................................................... 26 c. Time Out Parameters........................................................................................... 27 d. EasySet URL........................................................................................................ 28 e. System Tray ......................................................................................................... 28
CHAPTER 4. Station Setup.......................................................................................................29
How Do You Set a Station Lock/Unlock? ......................................................................... 29 a. How Do You Set a Station Lock?......................................................................... 29 b. How Do You Unlock Your Station?...................................................................... 30
How Do You Set a Station Programmed Message?OfficeServ........................................ 30 How Do You Set Your Station to Do Not Disturb Mode?.................................................. 31
a. How Do You Set/Reset DND on Your Station from Station Setup Menu? .......... 31 b. How Do You Set/Reset DND on Your Station from Status Bar? ......................... 31 c. How Do You Set/Reset DND Using Hot Key? ..................................................... 31
How Do You Set Call Forwarding? ................................................................................... 31 a. How Do You Set Call Forwarding from the Station Setup Menu? ....................... 31 b. How Do You Set Call Forwarding from Status Bar?............................................ 31 c. How Do You Reset Call Forwarding? .................................................................. 33
How Do You Redirect Calls to Follow You? ..................................................................... 33 How Do You Check Your Station’s Message List?........................................................... 34
a. How Do You Check Your Station’s Message List from the Station Setup Menu? ............................................................................. 34
b. How Do You Check Your Station’s Message List from the Status Bar?.............. 35 How Do You Check Your Station’s Call Back Status?...................................................... 35 How Do You Set OfficeServ Call to Auto Answer?........................................................... 36 How Do You Set Auto Trunk Callback?............................................................................ 36
CHAPTER 5. Call Control Services ......................................................................................... 37
Call List .......................................................................................................................................... 37
Call Control Buttons ....................................................................................................................... 37
Call Control Menu .......................................................................................................................... 38 How Do You Make a Call?................................................................................................ 39
a. How Do You Make a Call from the Call Control Menu?....................................... 39 b. How Do You Make a Call Using Hot Key?........................................................... 39 c. How Do You Make a Call Using the Dial Button?................................................ 39 d. Other Ways of Making a Call ............................................................................... 39
How Do You Answer a Call?............................................................................................. 40
a. How Do You Answer a Call from the Call Control Menu? ................................... 41 b. How Do You Answer a Call Using Hot Key? ....................................................... 41 c. How Do You Answer a Call Using the Answer Button?....................................... 41 d. Other Ways You Can Answer a Call.................................................................... 41
How Do You Release a Call? ........................................................................................... 41 a. How Do You Release an Active Call from the Call Control Menu? ..................... 41 b. How Do You Release an Active Call Using Hot Key? ......................................... 41 c. How Do You Release an Active Call Using the Release Button? ....................... 42
How Do You Redial the Last Number Dialed?.................................................................. 42 a. How Do You Redial the Last Number from the Call Control Menu?.................... 42 b. How Do You Redial the Last Number Using the Redial Button?......................... 42 c. Other Ways to Redial the Last Number ............................................................... 42
How Do You Hold/Retrieve a Call?................................................................................... 42 a. How Do You Hold/Retrieve a Call from the Call Control Menu? ......................... 42 b. How Do You Hold/Retrieve a Call Using the Hot Key?........................................ 43 c. How Do You Hold/Retrieve a Call Using the Call Control Button? ...................... 43 d. Other Ways to Retrieve a Call ............................................................................. 43
How Do You Transfer a Call? ........................................................................................... 44 a. How Do You Transfer a Call from the Call Control Menu?.................................. 44 b. How Do You Transfer a Call Using the Call Control Button? .............................. 45 c. How Do You Transfer a Call Using the Hot Key? ................................................ 45 d. Other Ways of Transferring a Call ....................................................................... 45
How Do You Conference? ................................................................................................ 45 a. Conferencing from Call Control Menu.................................................................. 46 b. How Do You Conference Using Hot Key? ........................................................... 47 c. How Do You Conference Using the Conference Button?.................................... 47 d. Other Ways to Conference .................................................................................. 47 e. How Do You Drop Parties from Conference?...................................................... 47
How Do You Make a New External Call? ......................................................................... 48 How Do You Dial Continuously to Make a Call?............................................................... 48
a. Other Ways to Dial Continuously ......................................................................... 49 How Do You Redirect an Incoming Call? ......................................................................... 49
a. How Do You Redirect a Call Using the Right Click Menu? ................................. 49 How Do You Park an Incoming Call?................................................................................ 50 How Do You Retrieve a System Holding Call?................................................................. 50 How Do You Pickup a Call?.............................................................................................. 51
a. How Do You Pickup a Call Using the Call Control Menu? .................................. 51 How Do You Toggle Between Calls?................................................................................ 51
a. How Do You Toggle Calls from Call Control Menu?............................................ 51 b. How Do You Toggle Calls from Call Control View?............................................. 52
How Do You Page to a Zone? .......................................................................................... 52 How do you Send DTMF (Dual Tone Multi Frequency) tones?........................................ 53 How Do You Call Back a Station? .................................................................................... 53
a. How Do You Call Back from the Call Control Button?......................................... 53 b. How Do You Call Back a Station Using Hot Key? ............................................... 53 c. Other Ways to Call Back a Station....................................................................... 54
How Do You Leave Message for Another Station? .......................................................... 54 a. How Do You Leave a Message from the Call Control Menu? ............................. 54 b. Other Ways to Leave a Message......................................................................... 54
How Do You Camp On to Another Station? ..................................................................... 54 a. How Do You Camp On from the Call Control Menu? .......................................... 54 b. Other Ways to Camp On...................................................................................... 54
How Do You Make an OHVA (Off Hook Voice Announce)?............................................. 55 How Do You Use Voice Mail Features?iDCS ...................................................................... 55
a. How Do You Open Your Voice Mailbox? iDCS....................................................... 55 b. How Do You Leave Your Voice Mailbox? iDCS...................................................... 56 c. How Do You Transfer a Call to a Voice Mail? iDCS ............................................... 56 d. How Do You Record a Call with Voice Mail Device? iDCS..................................... 57
What Happens When You Dial a Busy Station?............................................................... 57 What Happens if the Trunk is Busy When You Dial an External Number? ...................... 58 What Happens When You Answer the Trunk Call Back Call? ......................................... 59 How Do You Enter Call Note and Keyword for a Call?..................................................... 59
CHAPTER 6. BLF (Busy Lamp Field) View ............................................................................. 60
BLF Group......................................................................................................................... 61 a. New Group........................................................................................................... 61 b. Delete a Group..................................................................................................... 62 c. Rename a Group.................................................................................................. 63 d. Refresh Groups.................................................................................................... 63 e. New Device .......................................................................................................... 64 f. New Speed Dial ................................................................................................... 64 g. Add BLFs Using Drag and Drop .......................................................................... 65 h. Delete BLFs ......................................................................................................... 66
BLF.................................................................................................................................... 67 a. Edit a BLF ............................................................................................................ 67 b. List View/Card View ............................................................................................. 68 c. Arrange BLFs....................................................................................................... 68 d. Refresh BLFs ....................................................................................................... 69 e. Resize BLFs......................................................................................................... 69 f. Status Icons ......................................................................................................... 69
Call Control ....................................................................................................................... 70 a. Drag and Drop...................................................................................................... 70 b. Dial ....................................................................................................................... 70 c. Pickup .................................................................................................................. 70
Tool Buttons ...................................................................................................................... 70 Options.............................................................................................................................. 71
a. Enable DT/DS BLF Group OfficeServ ....................................................................... 71 b. Load DT/DS Configuration from BLF Database OfficeServ ...................................... 71 c. Request Station Setup Information on Launching ............................................... 71
Find BLF............................................................................................................................ 72
CHAPTER 7. Directory Services .............................................................................................. 73
Directory Services .......................................................................................................................... 73
Selection View Menus.................................................................................................................... 74
Detailed List View Menus............................................................................................................... 74
Drag and Drop................................................................................................................................ 74 What is a Phone Book? .................................................................................................... 75 What are the Default Phone Books?................................................................................. 75 What is a Network Phone Book? ...................................................................................... 75 What is a Contact?............................................................................................................ 75 How Do You Add a New Phone Book?............................................................................. 75
a. How Do You Add a New Phone Book from the Directory Menu?........................ 75 b. Other Ways to Add a New Phone Book............................................................... 76
How Do You Delete a Phone Book?................................................................................. 76 a. How Do You Add Delete a Phone Book from the Directory Menu? .................... 76 b. Other Ways to Delete a Phone Book................................................................... 77
How Do You Rename a Phone Book?.............................................................................. 77 a. How Do You Add Delete a Phone Book from the Directory Menu? .................... 77 b. Other Ways to Rename a Phone Book................................................................ 78
How Do You Add a Network Phone Book? ...................................................................... 78 a. How Do You Add a Network Phone Book from the Directory Menu?.................. 78 b. Other Ways to Add a Network Phone Book......................................................... 78
How Do You Remove a Network Phone Book? ............................................................... 79 a. How Do You Remove a Network Phone Book from the Directory Menu? .......... 79
How Do You Add a New Contact to a Phone Book?........................................................ 79 a. How Do You Add a New Contact Using the Edit Menu? ..................................... 79
How Do You Edit a Contact? ............................................................................................ 81 a. How Do You Edit a Contact Using Edit Menu?.................................................... 81 b. Other Ways to Edit a Contact .............................................................................. 82
How Do You Delete Contacts? ......................................................................................... 82 a. How Do You Delete Contacts from Edit Menu?................................................... 82 b. Other Ways to Delete Contacts ........................................................................... 82
How Do You Delete All Contacts? .................................................................................... 82 a. How Do You Delete All Contacts from Edit Menu?.............................................. 82 b. Other Ways to Delete All Contacts ...................................................................... 82
How Do You Search for a Particular Contact? ................................................................. 83

a. Find Results After Using the Search Option ........................................................ 83 b. Change in File Menu After Searching.................................................................. 84 c. Change in Edit Menu After Searching ................................................................. 84
Directory Services in Detailed List View ........................................................................... 85 a. How Do You Sort Contacts? ................................................................................ 85 b. How Do You Add a Contact? ............................................................................... 85 c. How Do You Edit a Contact? ............................................................................... 85 d. How Do You Delete a Contact? ........................................................................... 86 e. How Do You Delete All Contacts from your Phone Book? .................................. 86 f. How Do You Copy/Paste Contacts?.................................................................... 86 g. How Do You Import a Smart Control Phone Book?............................................. 86 h. How Do You Dial a Contact? ............................................................................... 86 i. How Do You Schedule a Call to a Contact? ........................................................ 86 j. How Do You Transfer a Call to a Contact?.......................................................... 86 k. How Do You Add a Contact to a Conference? .................................................... 87
How Do You Print Contacts From a Phone Book? ........................................................... 87 a. How Do You Set Up Fields for Printing?.............................................................. 88 b. How Do You Print a Single Contact?................................................................... 88
Sending Messages to OfficeServ Call Users iDCS.............................................................. 89 a. Enable Message iDCS ............................................................................................ 89 b. Send Message iDCS ............................................................................................... 89
How Do You Import/Export Excel Files?........................................................................... 90 a. How Do You Import Excel Worksheets into Phonebook? ................................... 92 b. How Do You Export Phonebook Tables from Excel Worksheets? ...................... 96
CHAPTER 8. Drag and Drop Services..................................................................................... 98
Drag and Drop-How Do You Dial?.................................................................................... 98 Drag and Drop-How Do You Transfer a Call? .................................................................. 99 Drag and Drop-How Do You Conference a Call? ............................................................. 99 Drag and Drop-How Do You Transfer a Call to a BLF?.................................................... 99 Drag and Drop-How Do You Add BLFs? .......................................................................... 99
CHAPTER 9. Scheduler Services .......................................................................................... 100
What is a Schedule? ....................................................................................................... 100 How Do You Add a New Schedule? ............................................................................... 101
a. How Do You Add a New Schedule from Edit Menu?......................................... 101 b. Other Ways to Add a New Schedule ................................................................. 104
Frequency Option in Scheduler ...................................................................................... 104 a. How Do You Schedule an Item Once? .............................................................. 105 b. How Do You Schedule an Item Daily?............................................................... 105 c. How Do You Schedule an Item Weekly?........................................................... 105 d. How Do You Schedule an Item Yearly? ............................................................ 105
Reminder Option in Scheduler........................................................................................ 105
How Do You Edit a Schedule?........................................................................................ 105 a. How Do You Edit a Schedule from Edit Menu? ................................................. 105 b. Other Ways to Edit a Schedule.......................................................................... 106
How Do You Delete Schedules?..................................................................................... 106 a. How Do You Delete Schedules from Edit Menu?.............................................. 106 b. Other Ways to Delete a Schedule...................................................................... 106
How Do You Delete All Schedules?................................................................................ 106 How Do You Refresh States of the Schedules? ............................................................. 107 How Do You Sort Schedules? ........................................................................................ 107
CHAPTER 10. Call Log Services............................................................................................ 108
How Do You View Call Logs? ......................................................................................... 108 a. How Do You View All Call Logs?....................................................................... 108 b. How Do You View Incoming Call Log? .............................................................. 109 c. How Do You View Outgoing Call Log? .............................................................. 109
How Do You Sort Logs? ................................................................................................. 109 How Do You Print Call Logs? ......................................................................................... 109
a. How Do You Print Call Logs from File Menu? ................................................... 109 b. How Do You Set Up Different Types of Call Log Print Formats? ...................... 109
How Do You Delete Logs?.............................................................................................. 110 How Do You Delete All Logs?......................................................................................... 110 How Do You Save Note of a Call Log?........................................................................... 111 How Do You Find a Log with given Keyword?................................................................ 111 How Do You Print a Single Log? .................................................................................... 111 How Do You Edit the Keyword and Call Note?............................................................... 111 How Do You Redial from Call Log List View?................................................................. 112 DNIS in the Call Log........................................................................................................ 112
CHAPTER 11. DDE in OfficeServ Call ................................................................................... 113
OfficeServ Call Application as DDE Client...................................................................... 113 a. OfficeServ Call as DDE Client to GOLDMINE................................................... 114 b. OfficeServ Call as DDE Client to SuperOffice ................................................... 115 c. OfficeServ Call as DDE Client to Maximizer for Windows................................. 115
Note for All PIMs (GoldMine, SuperOffice, Maximizer)................................................... 116 General DDE Support ..................................................................................................... 116 OfficeServ Call as DDE Server ....................................................................................... 119
ABBREVIATION....................................................................................................................... 120
SOFTWARE LICENSE AGREEMENT & LIMITED WARRANTY ............................................ 122

1
CHAPTER 1. Introduction This manual describes main functions, installation, various functional settings, and examples of usage of the OfficeServ Call. This manual includes a phased description of OfficeServ Call, from a fundamental understanding of the processes that shall be performed for the use of OfficeServ Call. Also, the layout of this manual is useful for users to select and read only the contents that they need to check. Before using the OfficeServ Call, users need to be familiar with this manual. Keep this manual handy before installing or using the program. If you have any question or problem while using the OfficeServ Call program, contact your local distributor.
Conventions The following special paragraphs are used in this document to point out information that must be read. This information may be set-off from the surrounding text, but is always preceded by a bold title in capital letters.
WARNING
Indicates a potentially hazardous situation which if not avoided, could result in death or serious injury.
CAUTION
Indicates a potentially hazardous situation, which if not avoided, may result in minor or moderate injury. It may also be used to alert against unsafe practices.
NOTE
Indicates additional information as a reference.
OPERATION PROCEDURES
Indicates the operation procedures that should be executed in order.
2
Overview
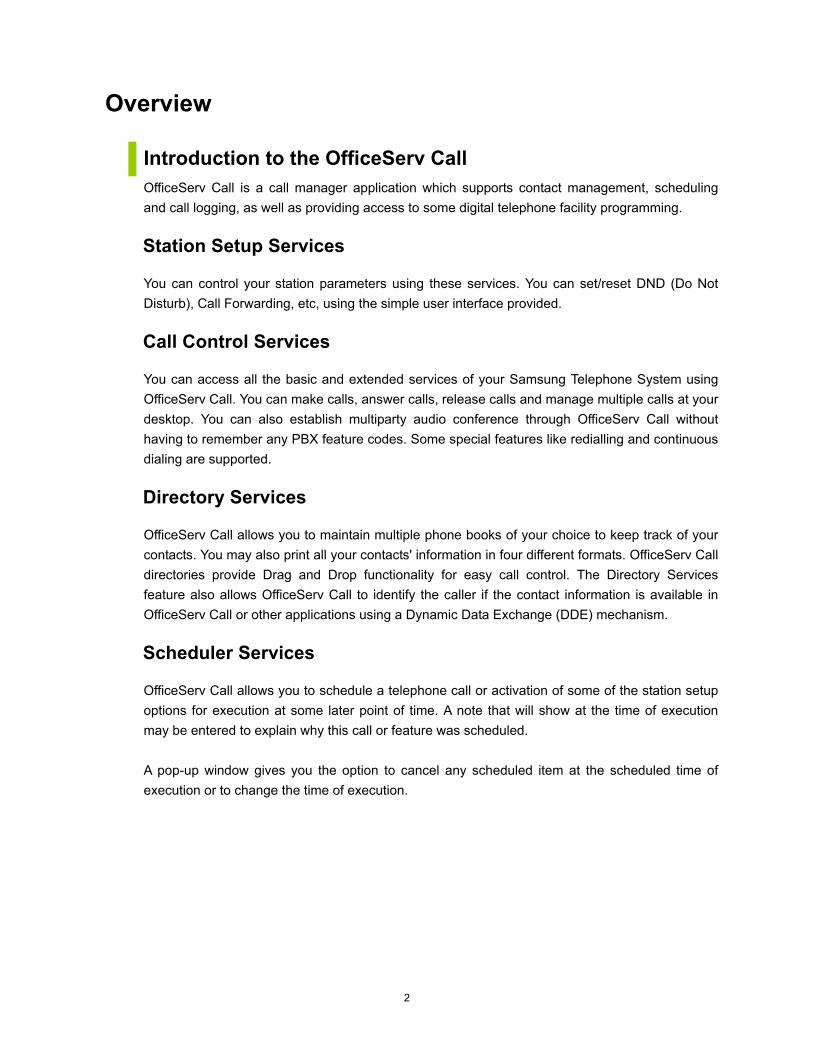
Introduction to the OfficeServ Call OfficeServ Call is a call manager application which supports contact management, scheduling and call logging, as well as providing access to some digital telephone facility programming. Station Setup Services
You can control your station parameters using these services. You can set/reset DND (Do Not Disturb), Call Forwarding, etc, using the simple user interface provided.
Call Control Services
You can access all the basic and extended services of your Samsung Telephone System using OfficeServ Call. You can make calls, answer calls, release calls and manage multiple calls at your desktop. You can also establish multiparty audio conference through OfficeServ Call without having to remember any PBX feature codes. Some special features like redialling and continuous dialing are supported.
Directory Services
OfficeServ Call allows you to maintain multiple phone books of your choice to keep track of your contacts. You may also print all your contacts' information in four different formats. OfficeServ Call directories provide Drag and Drop functionality for easy call control. The Directory Services feature also allows OfficeServ Call to identify the caller if the contact information is available in OfficeServ Call or other applications using a Dynamic Data Exchange (DDE) mechanism.
Scheduler Services
OfficeServ Call allows you to schedule a telephone call or activation of some of the station setup options for execution at some later point of time. A note that will show at the time of execution may be entered to explain why this call or feature was scheduled. A pop-up window gives you the option to cancel any scheduled item at the scheduled time of execution or to change the time of execution.

3
Call Log Services
OfficeServ Call’s Call Log maintains a record of all incoming and outgoing calls from the digital telephone while the application is active. Call log records contain a Notes field for recording information about a particular call and a Keyword field to enable the logs to be searched. OfficeServ Call allows you to print individual Call Log records, selected Call Log records or an entire Call Log. This will allow you to archive hard copies of the logs for later perusal.
Busy Lamp Field View
The BLF view is a distinctive new feature of the version 5.1. It can be used to monitor all the stations and trunks in a user configurable BLF view. You can drag a connected call from the call control view and drop the call to the BLF view to transfer it. You can also make a call or pick up a call by double clicking the BLF.

4
CHAPTER 2. Installation System Requirements
Computer System
• Microsoft Windows 2000 (Service Pack 2 or higher) , Windows XP (Service Pack 1 or higher) operating system software
• Pentium 4 1.6 GHz (or higher) microprocessor • 512 MB (or higher) RAM • 20 GB (or larger) hard disk drive • CD-ROM • 10/100 Network Interface Card (NIC) • Standard VGA monitor, keyboard, and mouse • TCP/IP configuration • Database Engine : Microsoft Jet(4.0 SP3 or higher), MDAC(2.7 or higher) • ‘File and printer sharing for Microsoft Networks’ has to be enabled if you want to open a
network phone book
System Users and Password Requirements
• Installation: Users must be logged on with an Administrator privileges to install this program successfully. Administrators have complete and unrestricted access to the computer/domain.
• Execution: There are no user requirements to run OfficeServ Call successfully. Users with restricted membership will be able to execute the application without any problems.
How to Install Before you run setup, locate the IP address of the PC on which the OfficeServ Link application is installed, you will need this information to complete the installation of OfficeServ Call. OfficeServ Link distributes the messages from the telephone system to each client. You may need to ask your system administrator for this IP address. Insert the OfficeServ Applications CD-ROM and follow the onscreen menus to locate the OfficeServ Call setup link.

5
Follow the instructions in the Setup program.
1. On Starting setup you will see the message box shown below.
If you have Smart Control Network or OfficeServ Call 5.0 installed, click cancel at the welcome dialog box, exit setup, and uninstall the Smart Control Network or older version of iDCS Call. Otherwise click OK to continue with the installation.
2. Click the Next button in the Welcome dialog box to continue Setup or the Cancel button to exit Setup.
Select the County using the drop down menu and an appropriate End User License Agreement will be displayed according to the selected country.
3. Read carefully the Software License Agreement. After reading the Software License and if you accept all the terms, click Yes button.
6
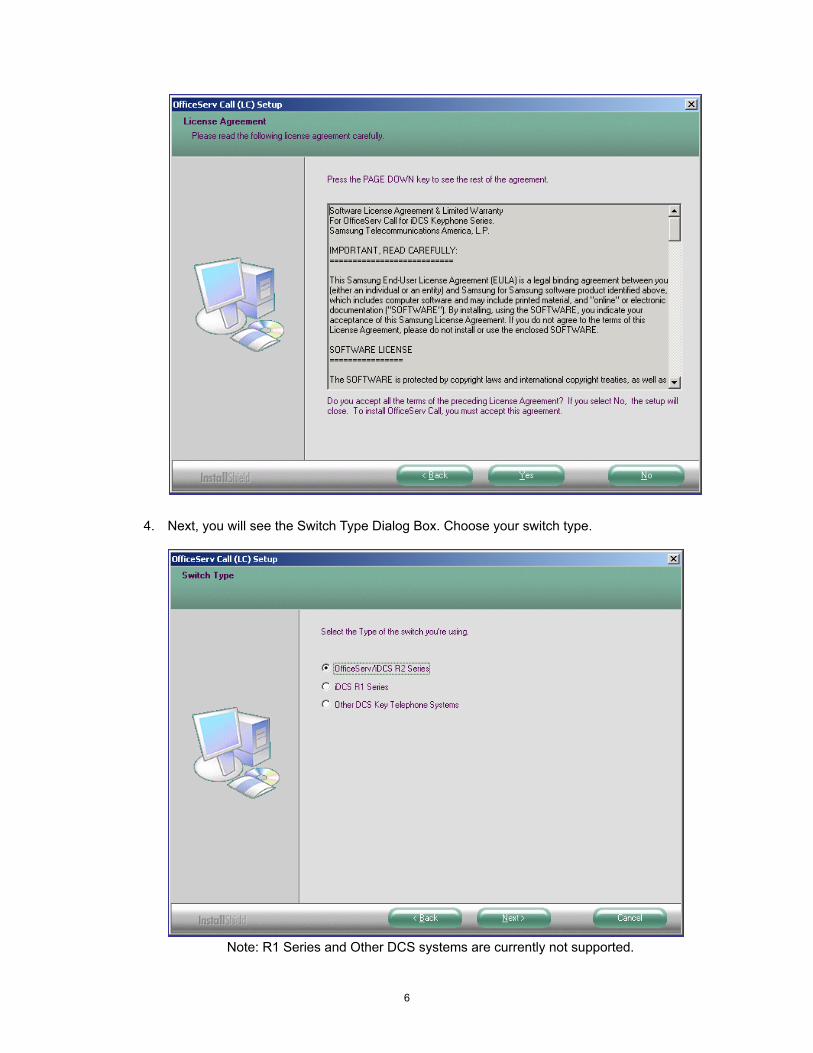
4. Next, you will see the Switch Type Dialog Box. Choose your switch type.
Note: R1 Series and Other DCS systems are currently not supported.

7
5. Choose the destination location where OfficeServ Call will be installed.
6. Next, you will see the Select Components Dialog Box. Choose the components you want to
install.
8
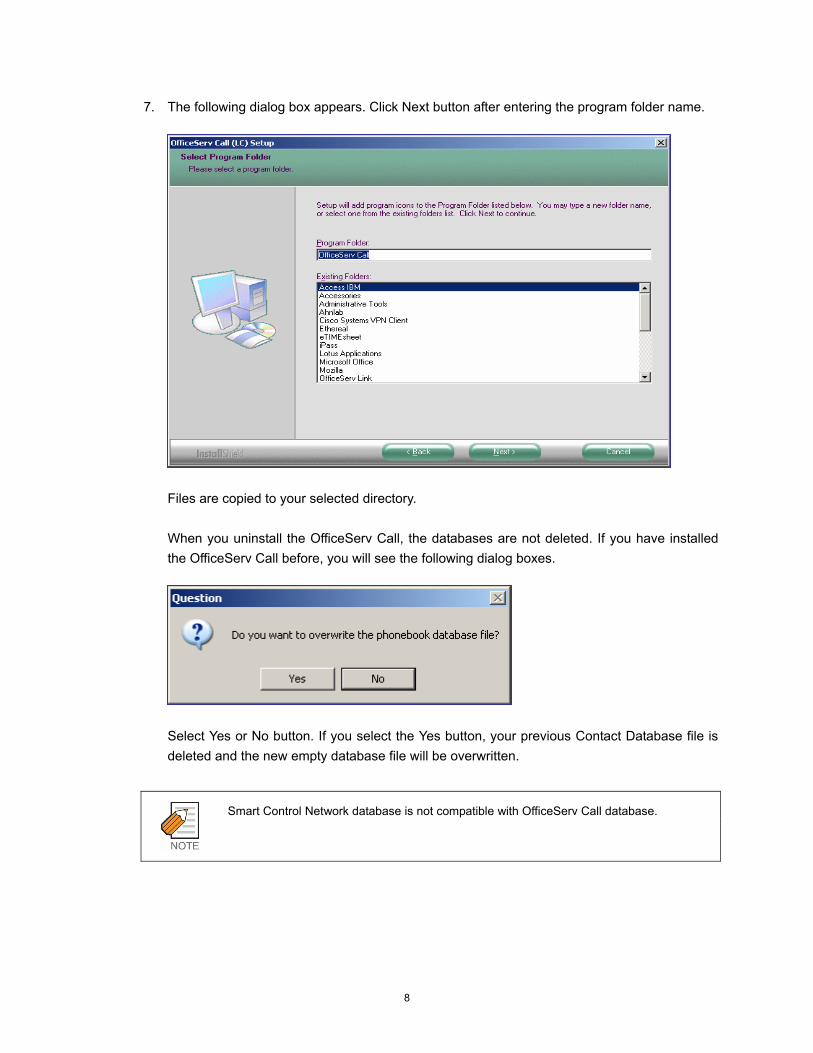
7. The following dialog box appears. Click Next button after entering the program folder name.
Files are copied to your selected directory.
When you uninstall the OfficeServ Call, the databases are not deleted. If you have installed the OfficeServ Call before, you will see the following dialog boxes.
Select Yes or No button. If you select the Yes button, your previous Contact Database file is deleted and the new empty database file will be overwritten.
Smart Control Network database is not compatible with OfficeServ Call database.
9
Select Yes or No button. If you select the Yes button, your previous call log database and BLF Database file is deleted and the new empty database file will be overwritten.
If you don’t have MDAC (Microsoft Data Access Components) 2.7 or higher installed on
your PC, MDAC setup will appear. Accept the license agreement, follow the MDAC 2.7
setup procedure, and close the setup dialog. The OfficeServ Call setup will be resumed
after the MDAC 2.7 setup done.
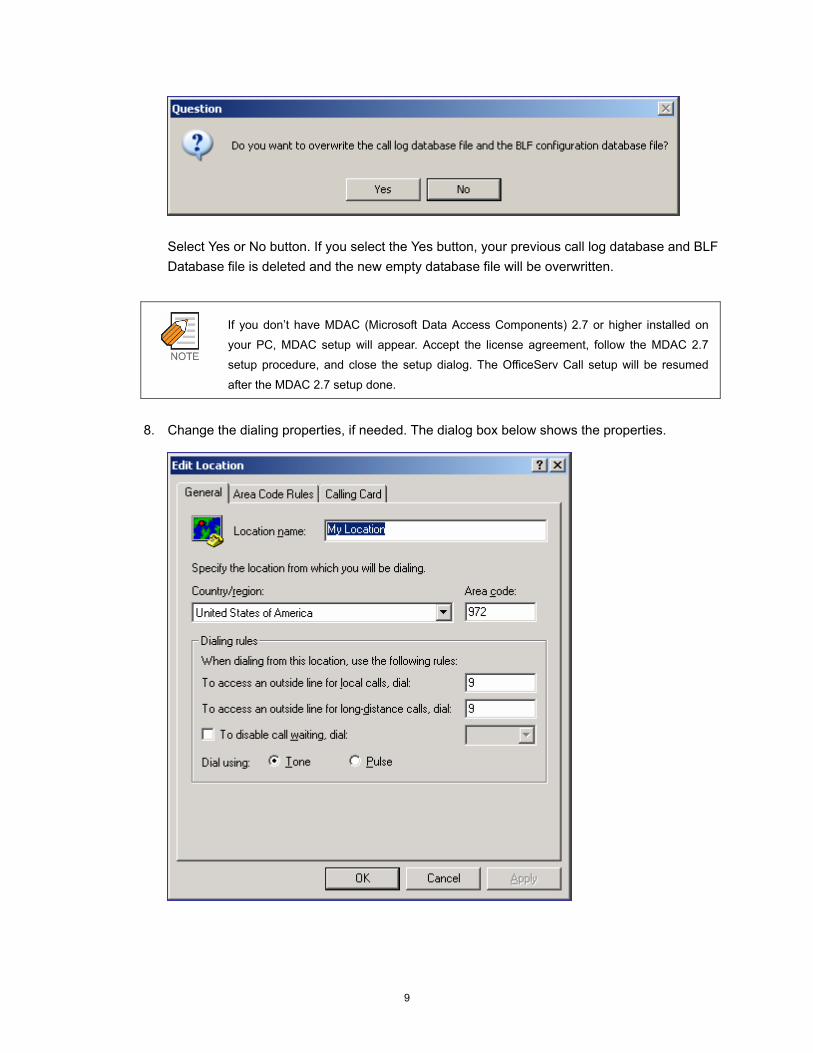
8. Change the dialing properties, if needed. The dialog box below shows the properties.
10
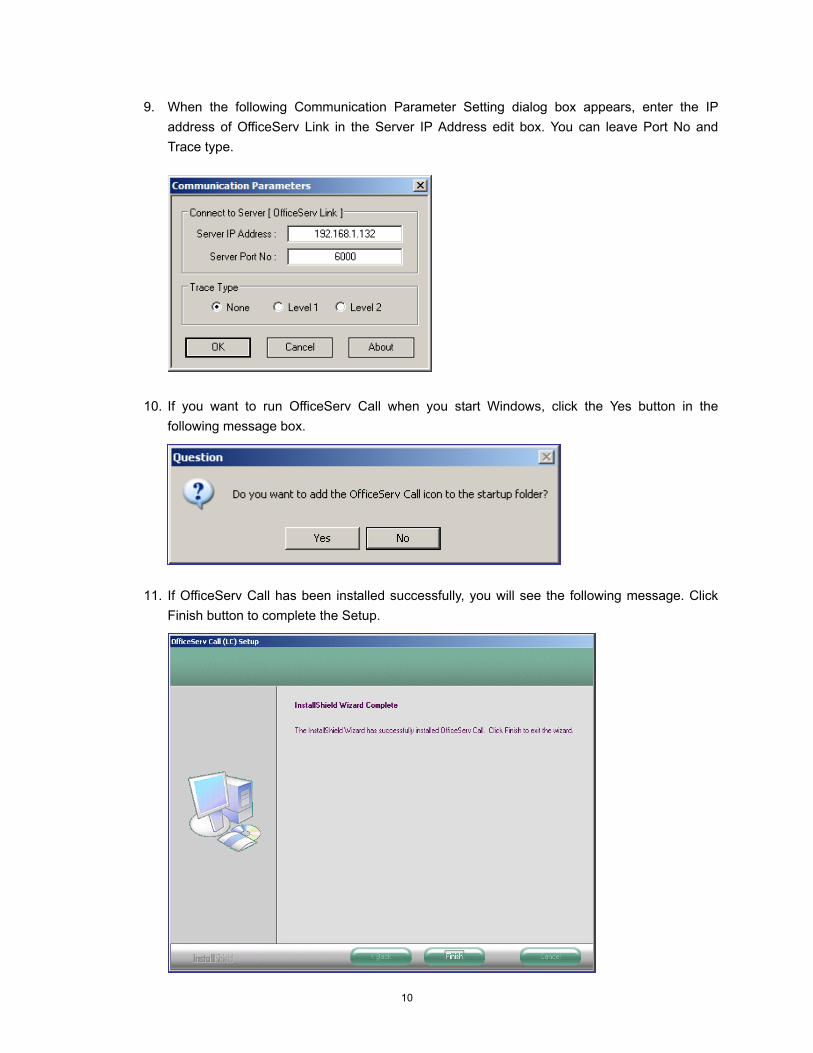
9. When the following Communication Parameter Setting dialog box appears, enter the IP address of OfficeServ Link in the Server IP Address edit box. You can leave Port No and Trace type.
10. If you want to run OfficeServ Call when you start Windows, click the Yes button in the
following message box.
11. If OfficeServ Call has been installed successfully, you will see the following message. Click
Finish button to complete the Setup.

11
CHAPTER 3. Overview of OfficeServ Call When OfficeServ Call is run for the first time, a dialog “Select A Subscriber Line” will appear to allow the user to select a phone line from a set of lines configured for the user.
After the selection of a Phone Line, the same line will be opened each time the OfficeServ Call is run. The user has the option of changing the phone line by selecting the [PhoneLine] option from the main menu under the [Option] menu item.
Main Screen
When you start OfficeServ Call, the main screen is displayed.

12
The table below describes the items shown in the main screen:
Item Purpose
Status Display the status of your application i.e. the connection status, login name, telephone extension, and Station Programmed Message.
Menu Bar Display the different menu options categorized by the services provided
Selection View Selection View is used to access various OfficeServ Call services. View the detailed contents of all the OfficeServ Call services. The Personal Phone Book is selected by default. In Detailed List View, Directory Services displays the contents of all the contacts. Its contents are as follows : Name, Company, Office phone, Home phone, Mobile Scheduler Services displays the details of all the scheduled items. Its contents are as follows : Function, Frequency, Time, State of Schedule
Detailed List View
Call Log Services displays the details of the logged calls. Its contents are as follows : Name, From/To, Date, Duration, Status
Call Control View Allow user to perform call control options like dialing, transferring a call, conferencing, etc.
Status Bar Display the current status of the telephone such as DND, Call Forward, Msg List (list of stations that left messages), Call Back (station on which Call Back is set.), and whether your station is currently locked.
Status Bar
The Status Bar shows the current status of several key features supported by your digital telephone, your station such as DND (Do Not Disturb), Locked, Msg List (list of stations that left messages), etc. The illustration below shows the Status Bar.
Status Bar
The highlighted panel indicates that the corresponding features are activated.
Status Description
Call Forwarding Type Displays the call forwarding type if the call forwarding feature is set.
DND Displays the Do Not Disturb mode.
Locked Displays when the station is Locked.
CallBack Displays if the user has set a Call Back on other station.
13
Status Description
Msg List Displays if other station has left a message for the user or if there are voice messages left in the voice mailbox.
Auto Ans Indicates Auto Answer set for any call types like Internal, External, Hold Recall etc.
You can set or reset any of the above station features by double clicking in the corresponding panel.
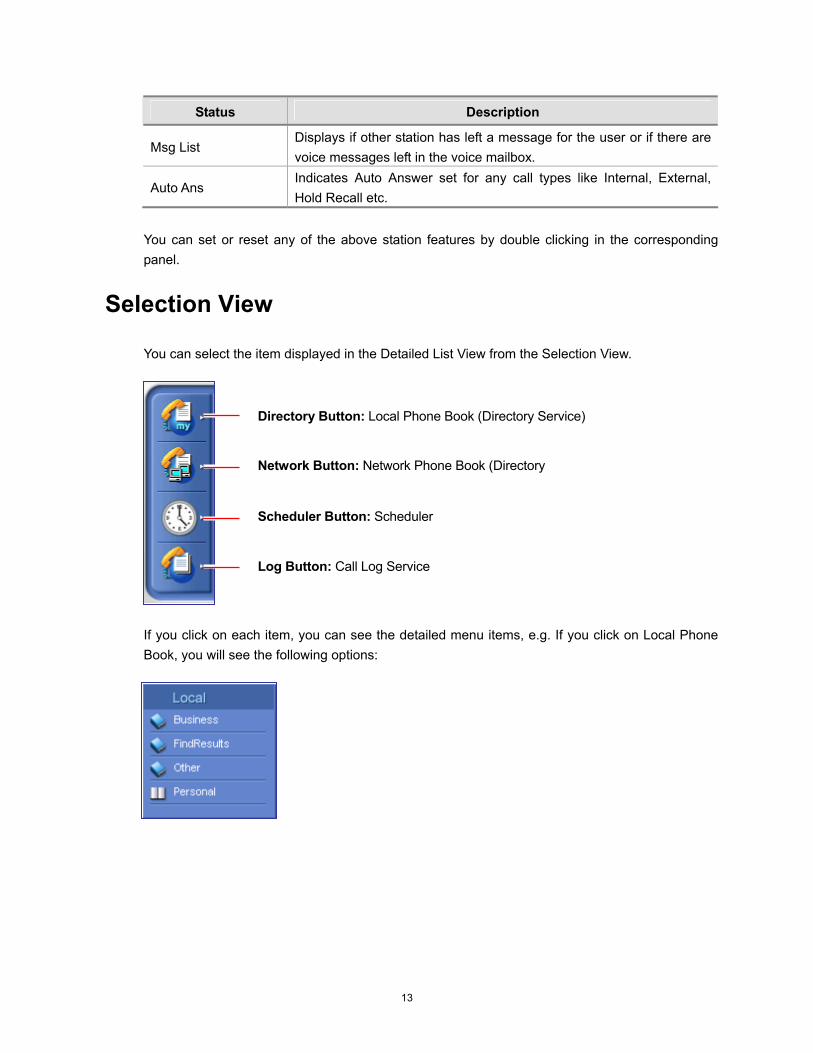
Selection View You can select the item displayed in the Detailed List View from the Selection View.
If you click on each item, you can see the detailed menu items, e.g. If you click on Local Phone Book, you will see the following options:
Directory Button: Local Phone Book (Directory Service)
Network Button: Network Phone Book (Directory S i )
Scheduler Button: Scheduler S i
Log Button: Call Log Service

14
Detailed List Views
Directory Service
Scheduler Service
Call Log Service
Call Control View The lower end of the main window is Call Control View

15
Configuration You can set various options provided in the OfficeServ Call software using the pull down menu the Option menu.
Option Purpose
Open BLF View Opens Busy Lamp Field window.
Open EasySet Opens the EasySet Login Page in the web browser
Call Notification Method Notify user about caller detail and Database Option between OfficeServ Call and Outlook
DDE Allows user to set the DDE Option for displaying the Contact Information
Database Synchronization Allows user to synchronize the local phone book with the network phone book if it is connected.
Phone Lines Allows user to elect the Device and Address assigned for the user.
Set Environment Station Password Allows user to save the station pass code for the features such as Station Lock, Station Programmed Message, and so on.
Set Environment Page Zone Name Allows user to set page zone names
Set Environment Time Out Allows user o set the time out for various services
Set Environment EasySet URL Allows user to change the EasySet URL.
Set Environment System Tray Allows user to enable/disable the Window Tray option
Set Environment Free Dial Allows user to enable/disable the Free Dial and configure the shortcut keys
Set Environment Language Allows user to set one of the supported languages: English, Italian, or Korean
How Do You Open BLF View? If you select this option the BLF window will be opened.
How Do You Open EasySet? This feature works only if your telephone system supports OfficeServ EasySet, and OfficeServ EasySet has been installed on a web server on your site. If you select the Open EasySet option for the first time, the EasySet URL dialog will appear.

16
The URL should begin with ‘http://’. If you click on OK, the entered URL will open in the web browser. This URL is saved and used from now on. If you want to change the URL, select Option Set Environment EasySet URL. The F12 function key is the hot key of ‘Open EasySet’
How Do You Change DDE Options? To change DDE (Dynamic Data Exchange) related options, select Option DDE. Option from the Option menu.
a. DDE Settings
Check the ‘Enable DDE for Incoming Calls’ checkbox if you want DDE for incoming calls. You can specify the call type, i.e. enable DDE for internal incoming calls or external incoming calls or both. You can also specify whether the contact search should be based on Caller ID or DNIS (Dialed Number Identification Services). Select the database application of your choice, such as GoldMine. This application will be a DDE server and OfficeServ Call will be a DDE client. Enter the selected application’s EXE file path in the program’s ‘Path’ box. You can even browse to find the EXE file using the Browse button. Enter the database file in the database’s ‘Path’ box. This is the file that contains your contact records. The Test button helps you to check whether you have entered the selected application's EXE file path properly. See ‘DDE Support in OfficeServ Call’ for more information.

17
b. Reinitialize DDE/Uninitialize DDE If you want to disable DDE while maintaining the DDE settings, select the Un-initialize DDE option. To enable the DDE without changing the current DDE options, select the Reinitialize DDE option. The DDE connection is closed when you close the DDE server application. If you want to recover the DDE connection without restarting the OfficeServ Call, use the Reinitialize DDE option. However, if you have selected ‘Other’ as a DDE server application, you have to launch the DDE server application prior to selecting the Reinitialize DDE option.
How Do You Set Up Call Notification? Click on the Options menu and select the Call Notification Method. There are General options and Database options. a. How Do You Configure General Options?
18
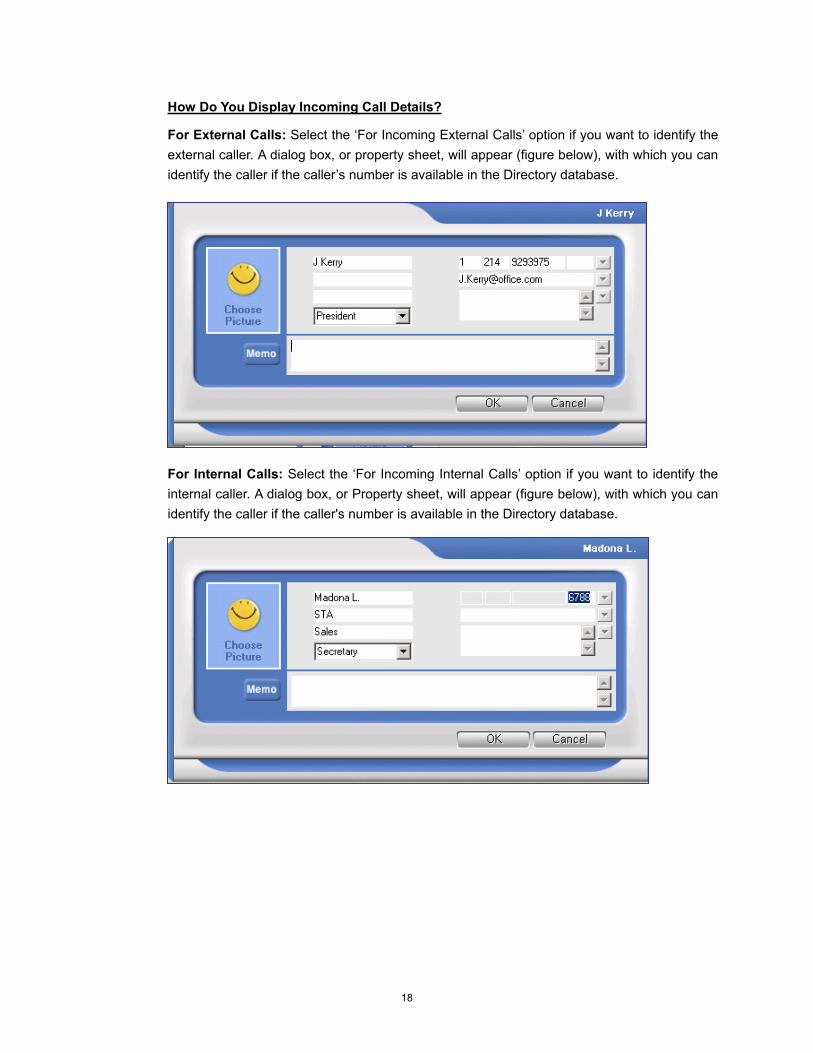
How Do You Display Incoming Call Details?
For External Calls: Select the ‘For Incoming External Calls’ option if you want to identify the external caller. A dialog box, or property sheet, will appear (figure below), with which you can identify the caller if the caller’s number is available in the Directory database.
For Internal Calls: Select the ‘For Incoming Internal Calls’ option if you want to identify the internal caller. A dialog box, or Property sheet, will appear (figure below), with which you can identify the caller if the caller's number is available in the Directory database.

19
For Outgoing Calls: Select the ‘For Outgoing Calls’ option if you want to identify the outgoing called number. A dialog box will appear (Figure below) with which you can identify the number, if the given number data is available in the Directory database.
If there is more than one contact in the Directory database which matches the incoming
phone number, then, the first contact which matches will be shown.
How Do You Bring OfficeServ Call to the Front for an Incoming Call?
Select the ‘Bring OfficeServ Call to Front’ option if you want OfficeServ Call to be maximized automatically on an incoming call while it is running in the minimized mode. The application also comes to the front if it’s in the background. If this option is not selected for an incoming call, the minimized OfficeServ Call window will flash. How Do You Play a Sound File for an Incoming Call?
Clicking on the ‘Play Sound for Incoming Calls’ option causes a sound file to be played through the multimedia card on the PC when a call comes in. You can select the *.wav file from the Open dialog box by clicking the Browse button. You can test the wave file that you have selected by clicking the Test button. How Do You Minimize OfficeServ Call when an Incoming Call dropped? Clicking on the ‘Minimize OfficeServ Call on hanging up’ option causes the OfficeServ Call to be minimized when an incoming call is dropped. This option takes effect only when the System Tray option is enabled.

20
b. How Do You Configure Database Options?
If you have set a ‘Display Call Details’ option (above), OfficeServ Call searches database records to get calling or called party records with phone number as a key. You can choose which database to search. Currently OfficeServ Call supports the internal OfficeServ Call Contacts database,Microsoft Outlook Contacts and Web Contents. If you are using a network phone book, the contact note will be stored in the ContactNotes folder under the network phone book folder. If you mark the ‘Save all contact notes in my computer’, all contact notes will be saved in your local ContactNotes folder afterwards. Search Web Contents allows OfficeServ Call to open the default internet browser and insert a predefined URL with the addition of CLID or DID information. The insertion of [CLID] or [DID] into the URL search string will tell OfficeServ Call to Insert either the current Caller ID or DID number into the URL Request String. Example: http://www.google.com/search?[CLID]&btnG=Google+Search Note: If you want to use other PIMs, refer to DDE Support in OfficeServ Call
21
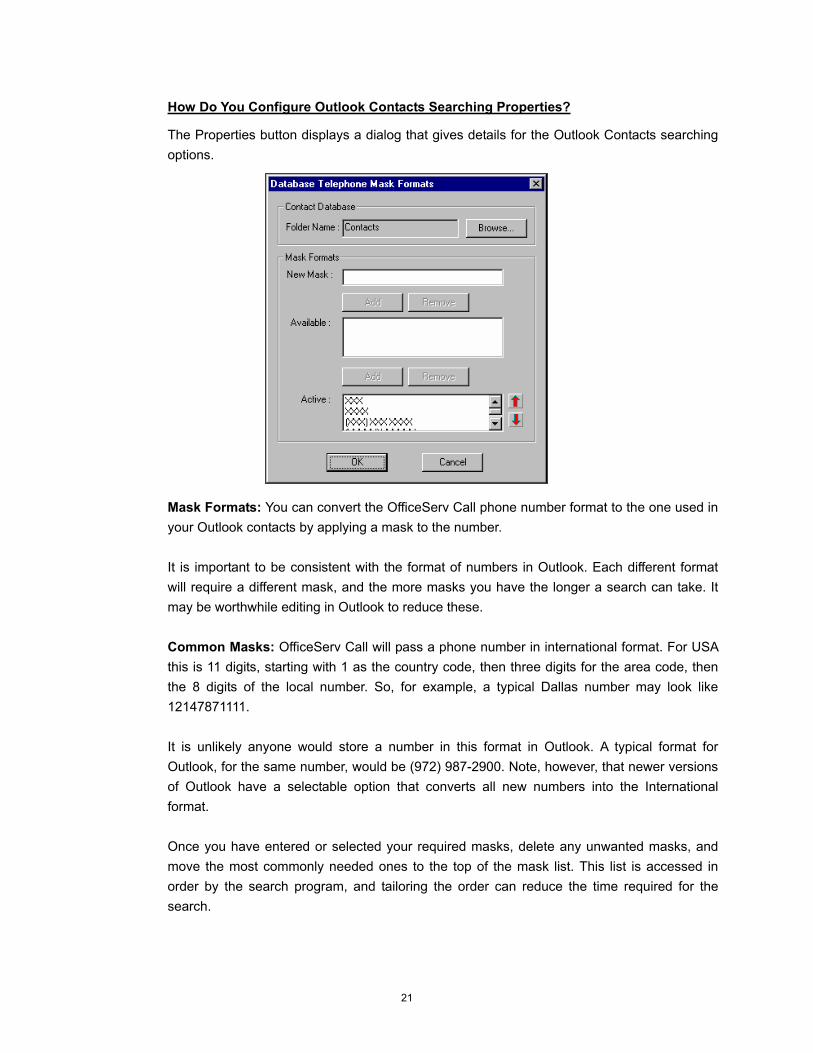
How Do You Configure Outlook Contacts Searching Properties?
The Properties button displays a dialog that gives details for the Outlook Contacts searching options.
Mask Formats: You can convert the OfficeServ Call phone number format to the one used in your Outlook contacts by applying a mask to the number. It is important to be consistent with the format of numbers in Outlook. Each different format will require a different mask, and the more masks you have the longer a search can take. It may be worthwhile editing in Outlook to reduce these.
Common Masks: OfficeServ Call will pass a phone number in international format. For USA this is 11 digits, starting with 1 as the country code, then three digits for the area code, then the 8 digits of the local number. So, for example, a typical Dallas number may look like 12147871111. It is unlikely anyone would store a number in this format in Outlook. A typical format for Outlook, for the same number, would be (972) 987-2900. Note, however, that newer versions of Outlook have a selectable option that converts all new numbers into the International format. Once you have entered or selected your required masks, delete any unwanted masks, and move the most commonly needed ones to the top of the mask list. This list is accessed in order by the search program, and tailoring the order can reduce the time required for the search.

22
Custom Masks: Please note that Outlook formats vary. Outlook phone numbers are configurable into any format the user wants to use. The task of the mask is to convert the inherent OfficeServ Call format into the Outlook format. The mask can be constructed of the characters +, -, (, ), 0 to 9, B (= blank), D (= delete character), and X (wild card character). To follow the above example through and make a mask to translate 12147871111 to (214) 787-1111, go through the logic from the first character of the OfficeServ Call format and Outlook format to the last, adding and subtracting characters. So you proceed as follows:
OfficeServ Call Format Outlook Contacts Format
12147871111 (214) 787-1111
From the OfficeServ Call format you need to delete the 1 country code {D}, add a left bracket {D(}before you use the first three digits of the OfficeServ Call format number (in this example 214, but you use the X wild card to generalize the mask) {D(XXX}. Then you want to add a right bracket, followed by a space (blank = B) {D(XXX)B}. Then 3 digits of the OfficeServ number are to be used {D(XXX)BXXX}. Next we need to add the hyphen, ‘-‘ to the format {D(XXX)BXXX-}. Then follow the last 4 digits {D(XXX)BXXX-XXXX}. So the mask required in this example is D(XXX)BXXX-XXXX
Summary/Rules: Wherever we have a digit in the OfficeServ Call number that we wanted to use in the Outlook format we use an X. Whenever we have any digits in the OfficeServ Call number we don’t want to use in the Outlook format, for example the country code, we delete them using D. If there are other characters in Outlook that we don’t have in the OfficeServ Call format, we add them in, providing they are allowable characters.
The mask is created in the ‘Database Telephone Mask Formats’ dialogue box, in the ‘New Mask’ entry panel. Click ‘Add’ to move it to the ‘Available’ panel, and then ‘Add’ to make it ‘Active’. Remember to remove all unwanted masks, and move your most commonly required masks to the top of the mask list using the arrows on the right of the ‘Active’ box.
23
You may need to keep XXX or XXXX if you want to trigger on internal calls. To deactivate a mask, select the mask in the ‘Active’ box and click on the ‘Remove’ button above the box. The selected mask will be moved into the ‘Available’ box. To completely remove a mask, move the mask from the ‘Active’ box into the ‘Available’ box first. Then select the mask in the ‘Available’ box and click on the ‘Remove’ button above the ‘Available’ box. Note: OfficeServ Call and Outlook get your location information for dialing from the Windows Telephony settings located in your Windows Control Panel.
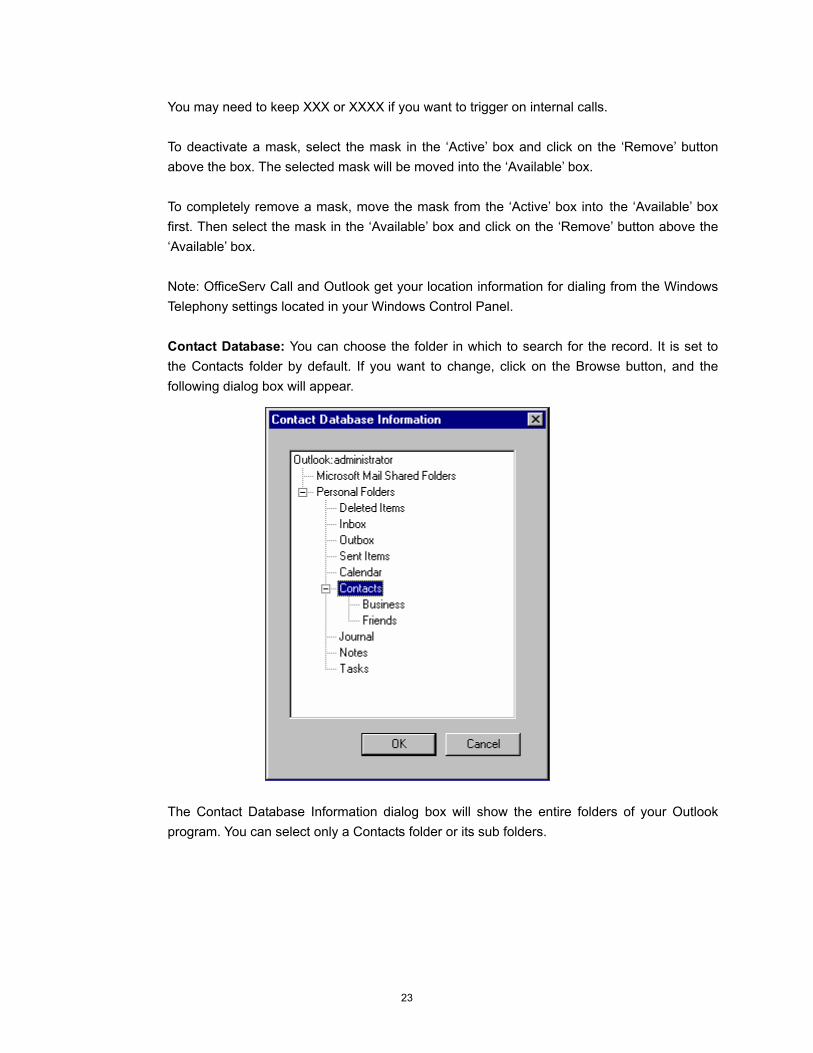
Contact Database: You can choose the folder in which to search for the record. It is set to the Contacts folder by default. If you want to change, click on the Browse button, and the following dialog box will appear.
The Contact Database Information dialog box will show the entire folders of your Outlook program. You can select only a Contacts folder or its sub folders.

24
How Do You Set Database Synchronization Options This option is available only when the network database is connected. If you have the same contact record on your local phone book and the network phone book, the previous one will be updated. If you select the Option Database Synchronization, an OfficeServ Call Database Synchronization Scheduling Dialog box will appear. Select the month, week, and specify the time. This scheduler should be running on that scheduled time to execute the scheduled database synchronization. If you click on Apply button, changes will be saved. If you click on Cancel button, changes will not be saved but the synchronization scheduler will remain running. If you click on Close button, the scheduler will be terminated.
25
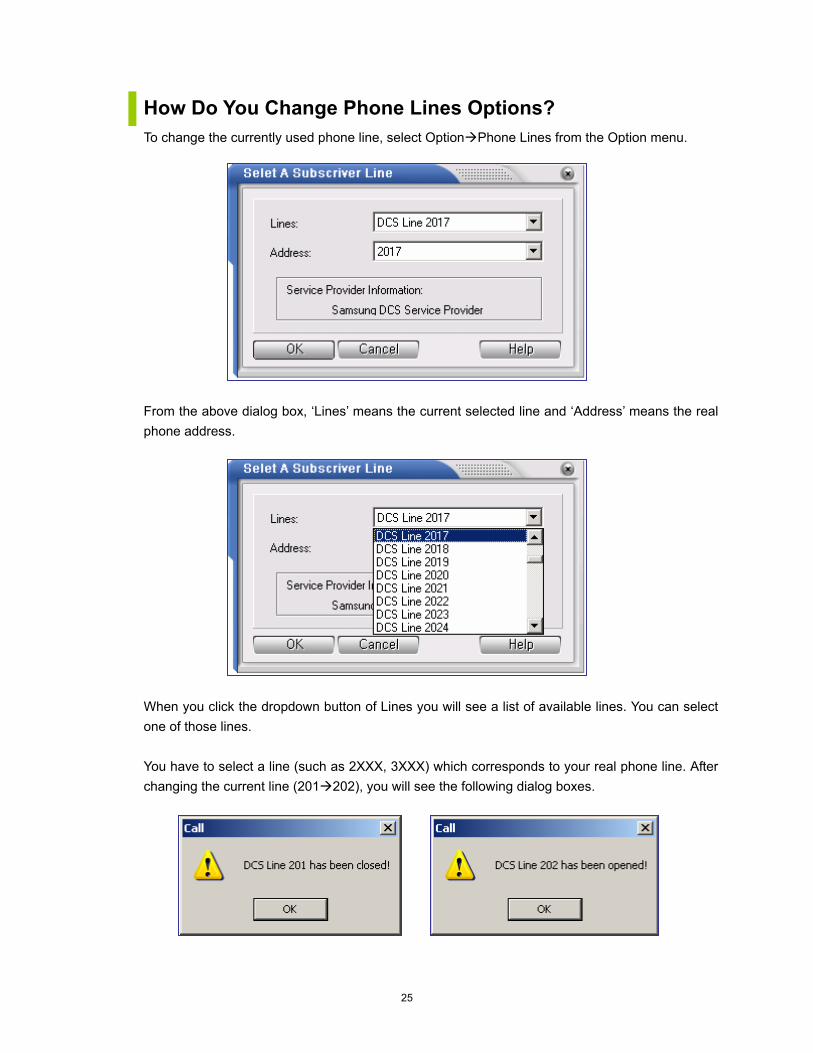
How Do You Change Phone Lines Options? To change the currently used phone line, select Option Phone Lines from the Option menu.
From the above dialog box, ‘Lines’ means the current selected line and ‘Address’ means the real phone address.
When you click the dropdown button of Lines you will see a list of available lines. You can select one of those lines. You have to select a line (such as 2XXX, 3XXX) which corresponds to your real phone line. After changing the current line (201 202), you will see the following dialog boxes.
26
How Do You Set Environments? a. Station Password
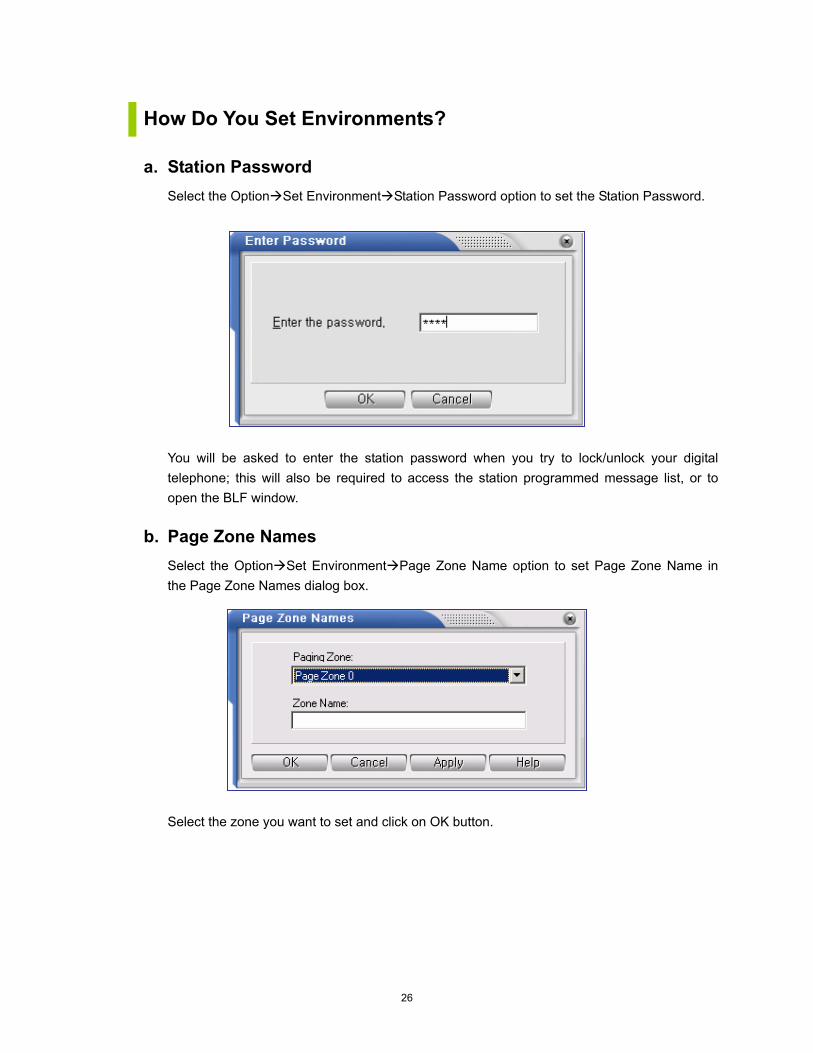
Select the Option Set Environment Station Password option to set the Station Password.
You will be asked to enter the station password when you try to lock/unlock your digital telephone; this will also be required to access the station programmed message list, or to open the BLF window.
b. Page Zone Names Select the Option Set Environment Page Zone Name option to set Page Zone Name in the Page Zone Names dialog box.
Select the zone you want to set and click on OK button.
27
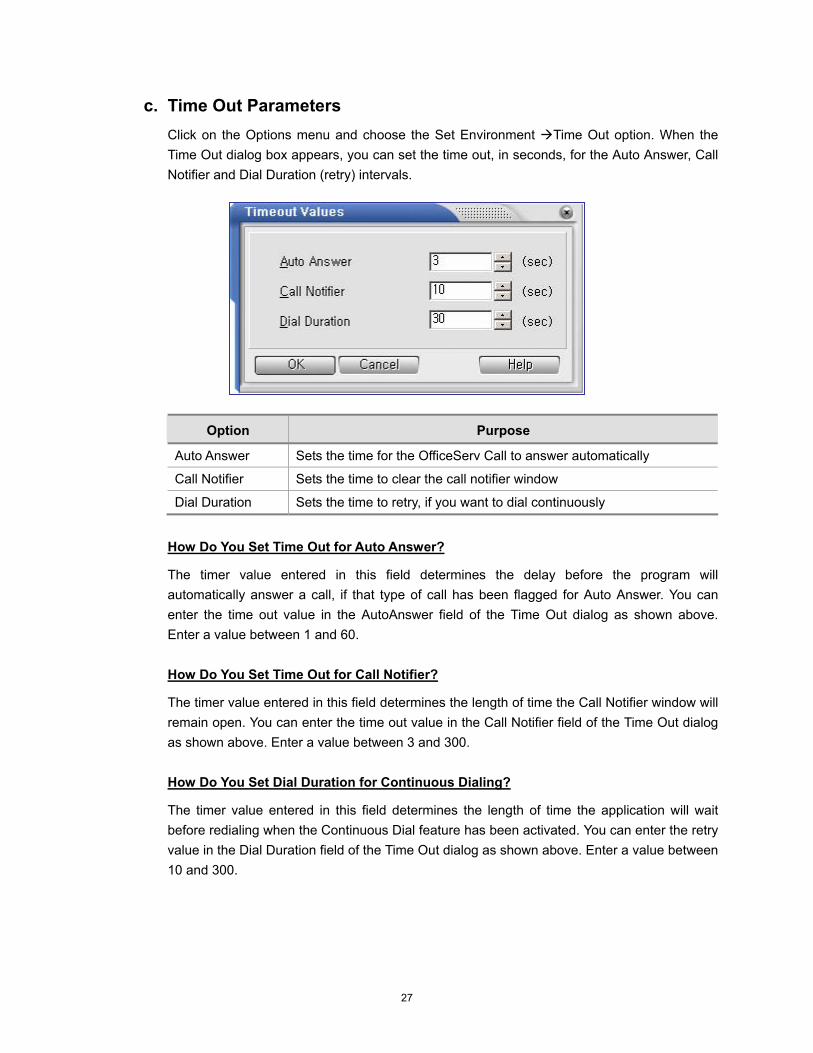
c. Time Out Parameters Click on the Options menu and choose the Set Environment Time Out option. When the Time Out dialog box appears, you can set the time out, in seconds, for the Auto Answer, Call Notifier and Dial Duration (retry) intervals.
Option Purpose
Auto Answer Sets the time for the OfficeServ Call to answer automatically
Call Notifier Sets the time to clear the call notifier window
Dial Duration Sets the time to retry, if you want to dial continuously
How Do You Set Time Out for Auto Answer?
The timer value entered in this field determines the delay before the program will automatically answer a call, if that type of call has been flagged for Auto Answer. You can enter the time out value in the AutoAnswer field of the Time Out dialog as shown above. Enter a value between 1 and 60. How Do You Set Time Out for Call Notifier?
The timer value entered in this field determines the length of time the Call Notifier window will remain open. You can enter the time out value in the Call Notifier field of the Time Out dialog as shown above. Enter a value between 3 and 300.
How Do You Set Dial Duration for Continuous Dialing?
The timer value entered in this field determines the length of time the application will wait before redialing when the Continuous Dial feature has been activated. You can enter the retry value in the Dial Duration field of the Time Out dialog as shown above. Enter a value between 10 and 300.
28
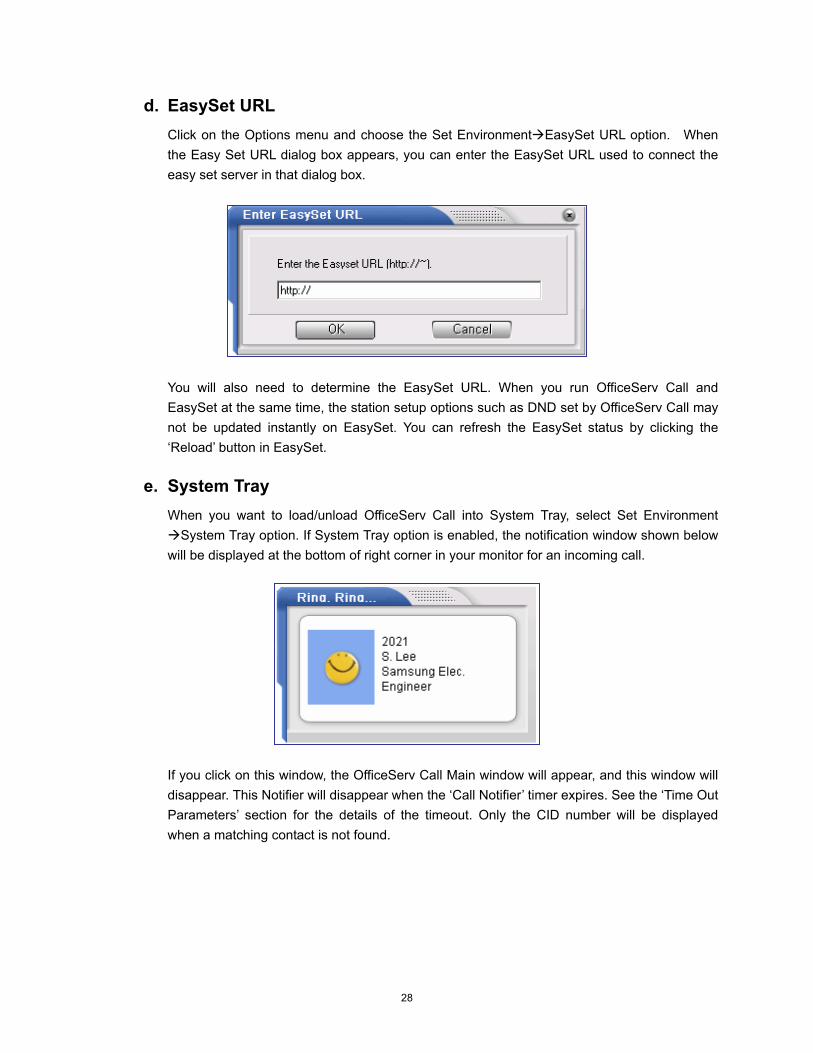
d. EasySet URL Click on the Options menu and choose the Set Environment EasySet URL option. When the Easy Set URL dialog box appears, you can enter the EasySet URL used to connect the easy set server in that dialog box.
You will also need to determine the EasySet URL. When you run OfficeServ Call and EasySet at the same time, the station setup options such as DND set by OfficeServ Call may not be updated instantly on EasySet. You can refresh the EasySet status by clicking the ‘Reload’ button in EasySet.
e. System Tray When you want to load/unload OfficeServ Call into System Tray, select Set Environment
System Tray option. If System Tray option is enabled, the notification window shown below will be displayed at the bottom of right corner in your monitor for an incoming call.
If you click on this window, the OfficeServ Call Main window will appear, and this window will disappear. This Notifier will disappear when the ‘Call Notifier’ timer expires. See the ‘Time Out Parameters’ section for the details of the timeout. Only the CID number will be displayed when a matching contact is not found.

29
CHAPTER 4. Station Setup You can set your station parameters with various features supported by your DCS Keyset. This menu has the following options.
Item Purpose
Station Lock/Unlock Locks/Unlocks the station from making or receiving any call
Station Prog. Msg. You can leave a Station Programmed Message for your station.
Do Not Disturb Sets/Resets your station to Do Not Disturb mode
Call Forward Forwards calls from your station to another station (or voicemail)
Follow Me Redirects calls from another station to your station
Message List Displays the list of messages left by other stations on your station and the number of messages left in your voice mail box iDCS.
Call Back Status Displays the station number or trunk number which you have set for a call back.
Auto Answer To auto answer after the time set in the Time Out option
Auto Trunk Call Back To set trunk call back automatically when trunk is busy
Open EasySet Opens the EasySet Login Page in the web browser
The Station Setup features works only when you have the right to change the
corresponding key telephone features. If some station setup features don’t work, ask your
key telephone system administrator your Class of Service contents.
How Do You Set a Station Lock/Unlock? a. How Do You Set a Station Lock?
You can lock your station using the Station Lock option. This prevents other people from making calls through your station in your absence. It also prevents you from receiving incoming calls.
30
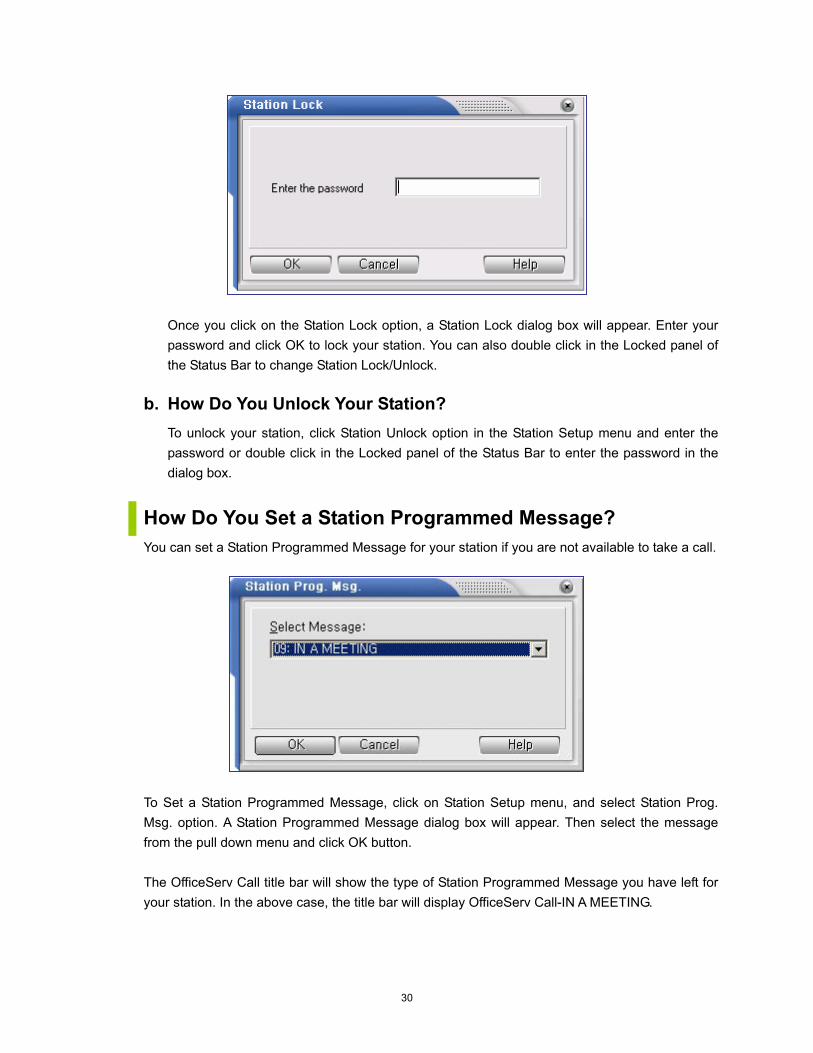
Once you click on the Station Lock option, a Station Lock dialog box will appear. Enter your password and click OK to lock your station. You can also double click in the Locked panel of the Status Bar to change Station Lock/Unlock.
b. How Do You Unlock Your Station?
To unlock your station, click Station Unlock option in the Station Setup menu and enter the password or double click in the Locked panel of the Status Bar to enter the password in the dialog box.
How Do You Set a Station Programmed Message? You can set a Station Programmed Message for your station if you are not available to take a call.
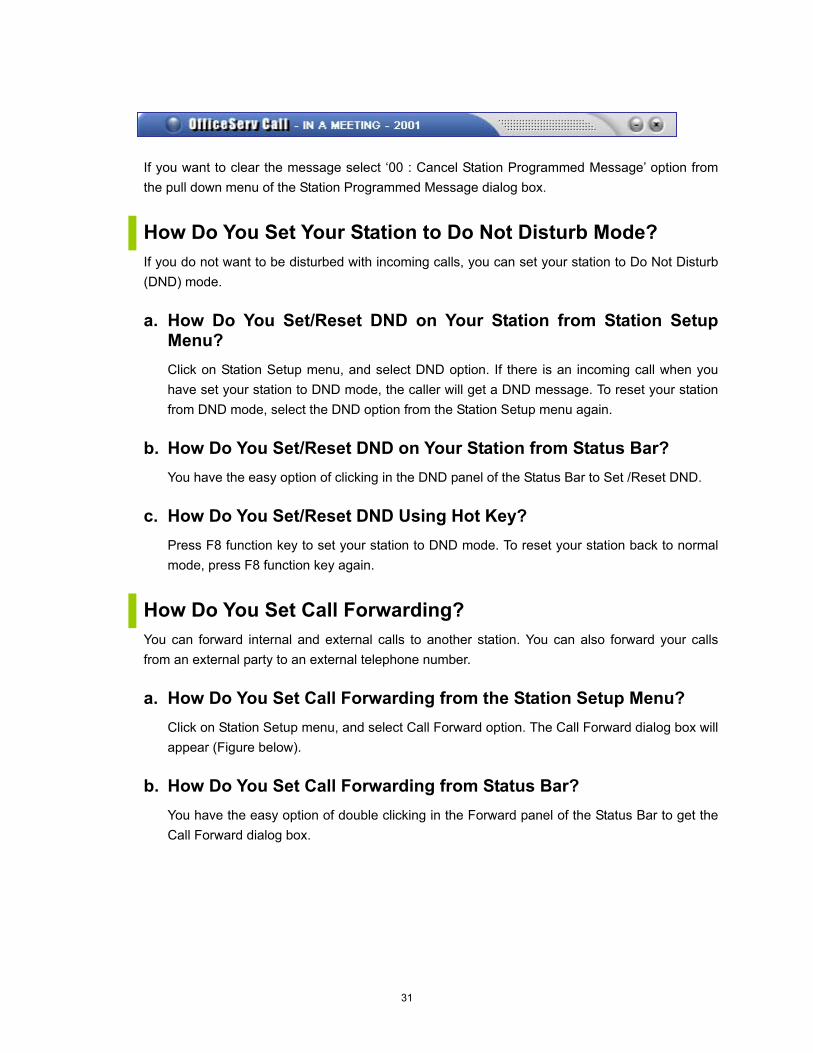
To Set a Station Programmed Message, click on Station Setup menu, and select Station Prog. Msg. option. A Station Programmed Message dialog box will appear. Then select the message from the pull down menu and click OK button. The OfficeServ Call title bar will show the type of Station Programmed Message you have left for your station. In the above case, the title bar will display OfficeServ Call-IN A MEETING.
31
If you want to clear the message select ‘00 : Cancel Station Programmed Message’ option from the pull down menu of the Station Programmed Message dialog box.
How Do You Set Your Station to Do Not Disturb Mode? If you do not want to be disturbed with incoming calls, you can set your station to Do Not Disturb (DND) mode. a. How Do You Set/Reset DND on Your Station from Station Setup
Menu? Click on Station Setup menu, and select DND option. If there is an incoming call when you have set your station to DND mode, the caller will get a DND message. To reset your station from DND mode, select the DND option from the Station Setup menu again.
b. How Do You Set/Reset DND on Your Station from Status Bar? You have the easy option of clicking in the DND panel of the Status Bar to Set /Reset DND.
c. How Do You Set/Reset DND Using Hot Key? Press F8 function key to set your station to DND mode. To reset your station back to normal mode, press F8 function key again.
How Do You Set Call Forwarding? You can forward internal and external calls to another station. You can also forward your calls from an external party to an external telephone number. a. How Do You Set Call Forwarding from the Station Setup Menu?
Click on Station Setup menu, and select Call Forward option. The Call Forward dialog box will appear (Figure below).
b. How Do You Set Call Forwarding from Status Bar? You have the easy option of double clicking in the Forward panel of the Status Bar to get the Call Forward dialog box.
32
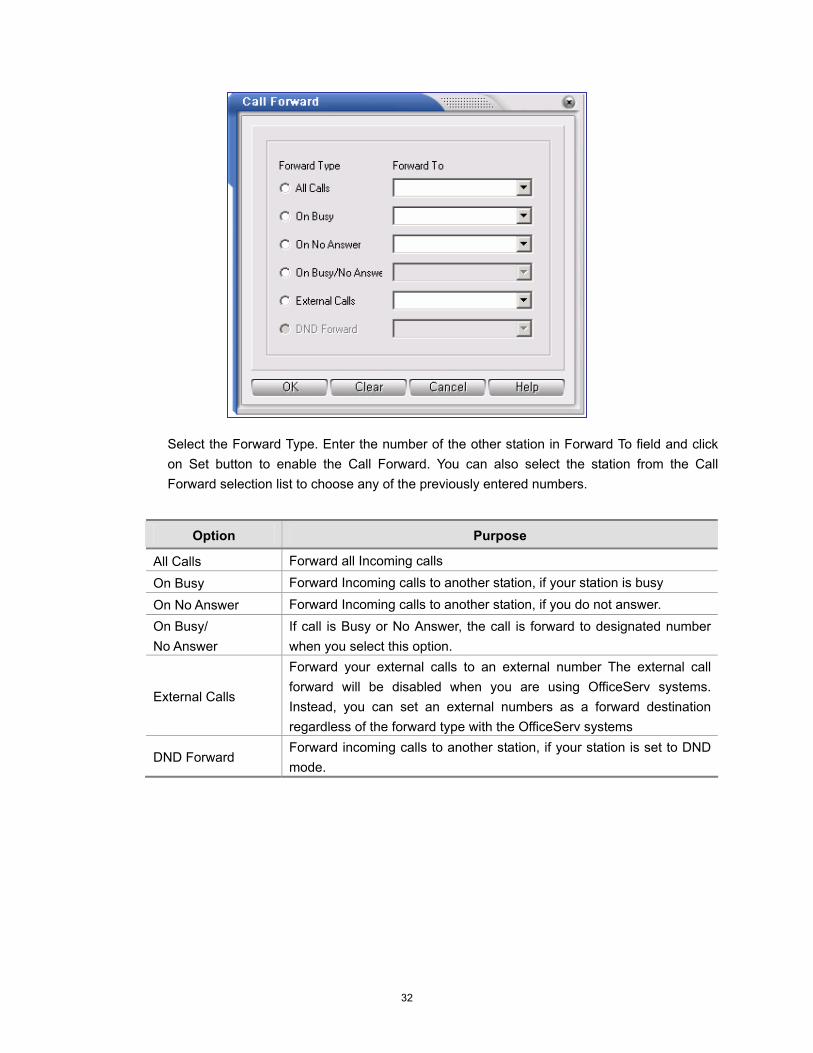
Select the Forward Type. Enter the number of the other station in Forward To field and click on Set button to enable the Call Forward. You can also select the station from the Call Forward selection list to choose any of the previously entered numbers.
Option Purpose
All Calls Forward all Incoming calls
On Busy Forward Incoming calls to another station, if your station is busy
On No Answer Forward Incoming calls to another station, if you do not answer. On Busy/ No Answer
If call is Busy or No Answer, the call is forward to designated number when you select this option.
External Calls
Forward your external calls to an external number The external call forward will be disabled when you are using OfficeServ systems. Instead, you can set an external numbers as a forward destination regardless of the forward type with the OfficeServ systems
DND Forward Forward incoming calls to another station, if your station is set to DND mode.

33
c. How Do You Reset Call Forwarding? Click on Station Setup menu, and select Call Forward option. The Call Forward dialog box will appear. Click on the Clear button to clear all types of call forwarding at your station. Click on the Call Forward Tool Bar button to get the Call Forward dialog box. Click on the Clear button to clear all types of call forwarding at your station. If forwarding is set for any type of call, the Status Bar of your station will display this. You can also click on this highlighted panel of your Status Bar to get the Call Forward dialog box.
How Do You Redirect Calls to Follow You? You can redirect your calls from another station to your current station. Click on Station Setup menu and select ‘Follow Me’ option. This will display the Follow Me dialog box. Enter station number from which all the calls will be forwarded to you. If there is an incoming call at that station, the call will be redirected to your station.

34
How Do You Check Your Station’s Message List? You can check your station’s message list and number of voice messages left in your voice mailbox. a. How Do You Check Your Station’s Message List from the Station
Setup Menu? Click on the Station Setup menu, and select the Message List option to check whether any other station has left a message for you when your station was busy or when you did not answer. The message list will contain the station number that has left the message for you. Station Setup menu’s Message List option will be disabled if no station has left a message for you.
You can select the station, and call the station back by clicking the Dial button. You can clear the selected message by clicking the Clear button or clear all the messages by selecting the Clear All button. If someone left a voice message in your voice mailbox, you can see the number of messages left. It will be displayed VM (number of messages) shown above. If you select the VM(#) entry and click the Dial button, you can connect to your mailbox. Clear and Clear All buttons will not work with voice messages.
You can control your voice mail using the OfficeServ Call only if the voice mail card has
been installed and is running on your switch.
35
b. How Do You Check Your Station’s Message List from the Status Bar? The Status Bar will show Msg List if another station has left a message on your station. Click in the highlighted panel of the Status Bar to get the Waiting Messages dialog box.
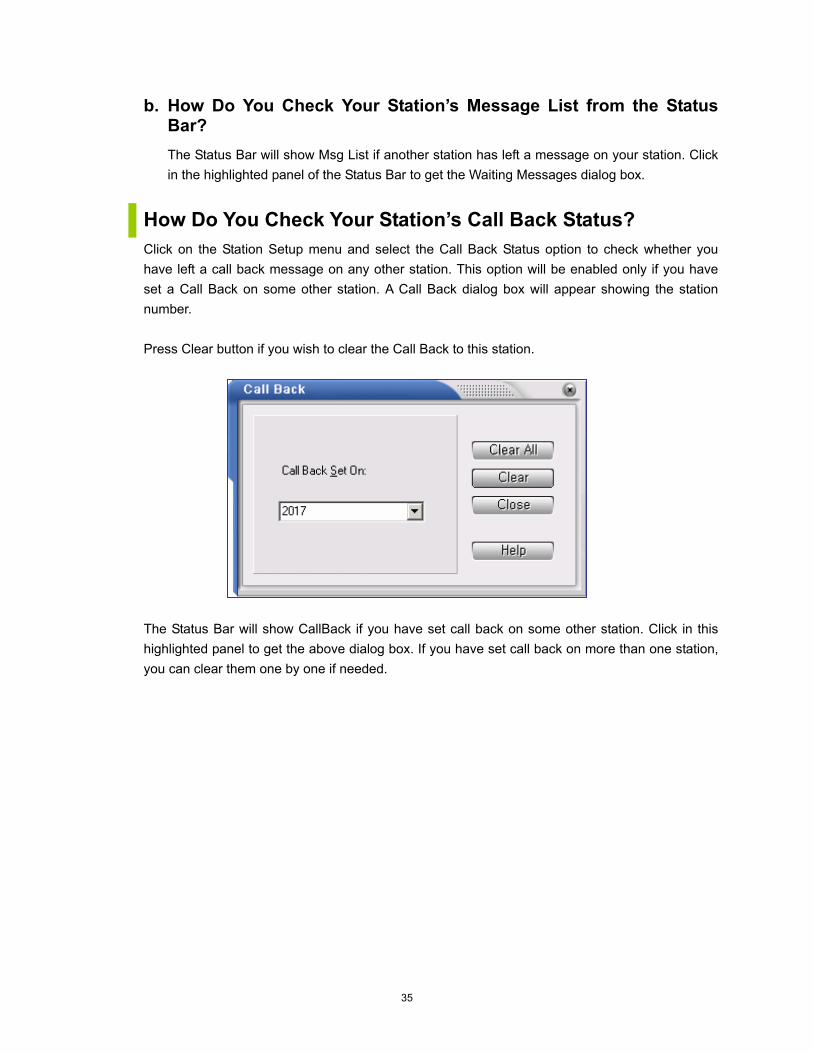
How Do You Check Your Station’s Call Back Status? Click on the Station Setup menu and select the Call Back Status option to check whether you have left a call back message on any other station. This option will be enabled only if you have set a Call Back on some other station. A Call Back dialog box will appear showing the station number. Press Clear button if you wish to clear the Call Back to this station.
The Status Bar will show CallBack if you have set call back on some other station. Click in this highlighted panel to get the above dialog box. If you have set call back on more than one station, you can clear them one by one if needed.
36
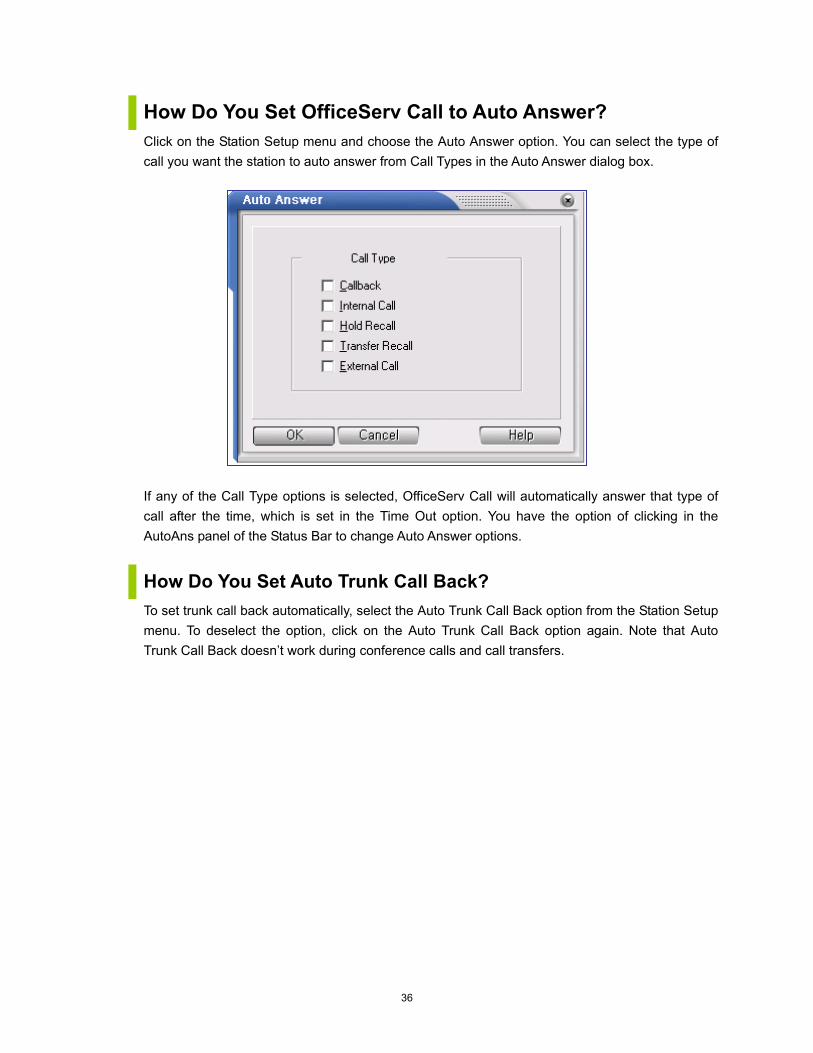
How Do You Set OfficeServ Call to Auto Answer? Click on the Station Setup menu and choose the Auto Answer option. You can select the type of call you want the station to auto answer from Call Types in the Auto Answer dialog box.
If any of the Call Type options is selected, OfficeServ Call will automatically answer that type of call after the time, which is set in the Time Out option. You have the option of clicking in the AutoAns panel of the Status Bar to change Auto Answer options.
How Do You Set Auto Trunk Call Back? To set trunk call back automatically, select the Auto Trunk Call Back option from the Station Setup menu. To deselect the option, click on the Auto Trunk Call Back option again. Note that Auto Trunk Call Back doesn’t work during conference calls and call transfers.

37
CHAPTER 5. Call Control Services This chapter tells you about the Call Control Services. The bottom half of the menu screen is called the Call Control View. The Call Control View is used to access call control related services.
The call view has buttons for various call control functions and a call list to display the calls at the station.
Call List
Header Purpose
Number For external calls, shows the caller id, if available; and it shows the trunk number and the DNIS (Dialed Number Identification Services), also if available. For internal calls, shows the station number.
Name Shows the name of the connected party.
Status Shows the status : incoming call, On Hold, On Hold pending transfer, On Hold pending Conference etc.
Duration Shows the connected duration of the call
Details Shows whether the call is a Recall, Call Back, etc.
Call Control Buttons
Buttons Purpose
To make a call
To answer a call or unhold a call
To release an active call
To hold an active call
To transfer an active call

38
Buttons Purpose
To conference
To Toggle between calls (Consultation Transfer Case Only)
To Redial the last number
To Continuously dial the last number
Call Control Menu
Options Purpose
Dial To make an Outgoing call or to dial on the current call
Answer To answer an incoming call or retrieve a holding call
Release To release an active call
Redial To redial the last dialed number
Hold To hold an active call
Transfer To transfer a call to another station
Conference To conference
Make New External Call To make a new outgoing external call
Continuous Dialing To continuously dial the last dialed number
Redirect To redirect the incoming call to another station
Park To park the trunk call at another station
Pick Up To pick up a call from another station/group
Toggle To toggle between two calls
Page To page a zone
Send DTMF To send DTMF Tones
Call Back To set the busy/no answer station to call back
Leave Message To leave a message for a busy station or a station which does not answer
Camp On To indicate to a busy station that your call is waiting
OHVA To intrude into a busy station
My Voice Mail To open your voice mailbox
Leave Voice Message To leave a voice message to other stations
Transfer to Voice Mail To transfer a connected call to an extensions voice mail box
Call Recording with Voice Mail To record a connected call with your voice mail device
39
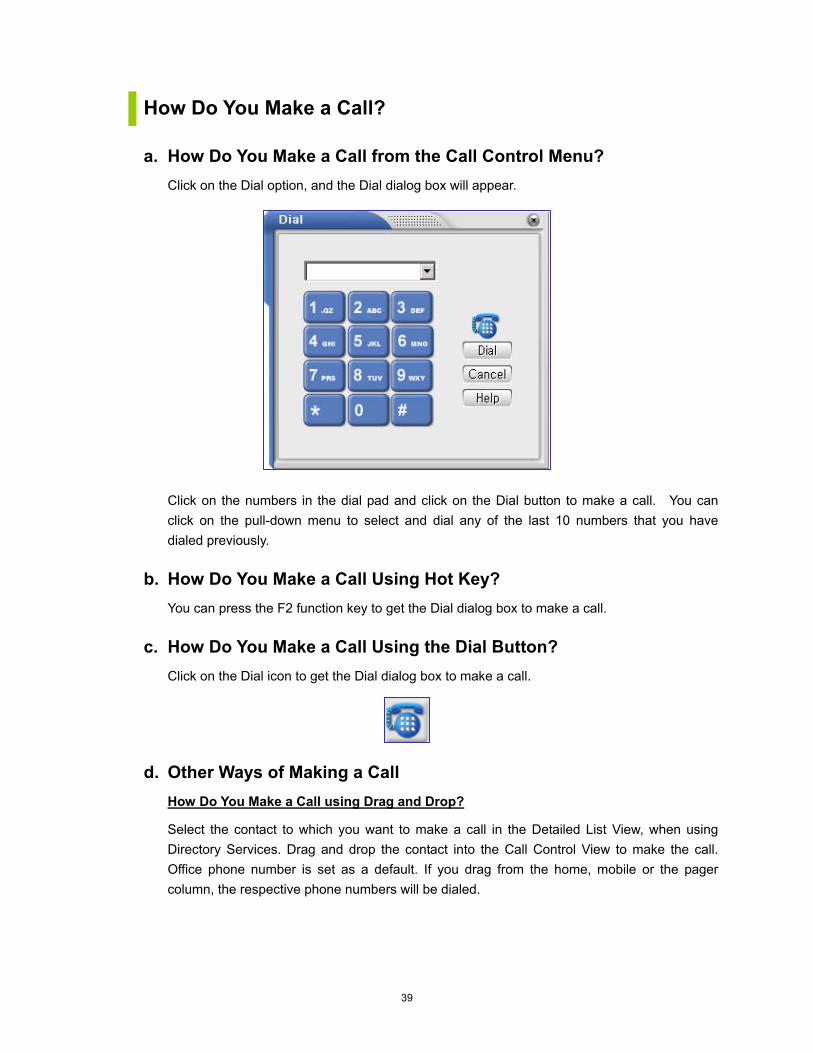
How Do You Make a Call? a. How Do You Make a Call from the Call Control Menu?
Click on the Dial option, and the Dial dialog box will appear.
Click on the numbers in the dial pad and click on the Dial button to make a call. You can click on the pull-down menu to select and dial any of the last 10 numbers that you have dialed previously.
b. How Do You Make a Call Using Hot Key? You can press the F2 function key to get the Dial dialog box to make a call.
c. How Do You Make a Call Using the Dial Button?
Click on the Dial icon to get the Dial dialog box to make a call.
d. Other Ways of Making a Call
How Do You Make a Call using Drag and Drop?
Select the contact to which you want to make a call in the Detailed List View, when using Directory Services. Drag and drop the contact into the Call Control View to make the call. Office phone number is set as a default. If you drag from the home, mobile or the pager column, the respective phone numbers will be dialed.

40
How Do You Make a Call by Double Clicking?
Double click on any telephone number field in the Detailed List View to have the number dialed. How Do You Make a Call from the Contact?
Double click on the name or company field of any contact in the Detailed List View to be dialed. Select the number you want to dial in the telephone number pull down option. Select Dial in the pull down option to dial the selected number. How Do You Make a Call using the Right Click Menu?
Select the contact that you want to dial in the Detailed List View and click the right mouse button. A pop-up menu will appear. Select the Dial option to dial the contact’s office number.
How Do You Answer a Call? When there is an incoming call, the status of the call is shown in the Call Control View. If there is more than one call in the call list, you can select the call to answer.
When an incoming call is received from a station, OfficeServ Call will display the station number and the name of the station, if they are set, and will display the type of the call if it is not a direct call. When an external incoming call is received by OfficeServ Call, it displays: • The trunk number, if the caller id is not available.
• The caller id, if it is available.
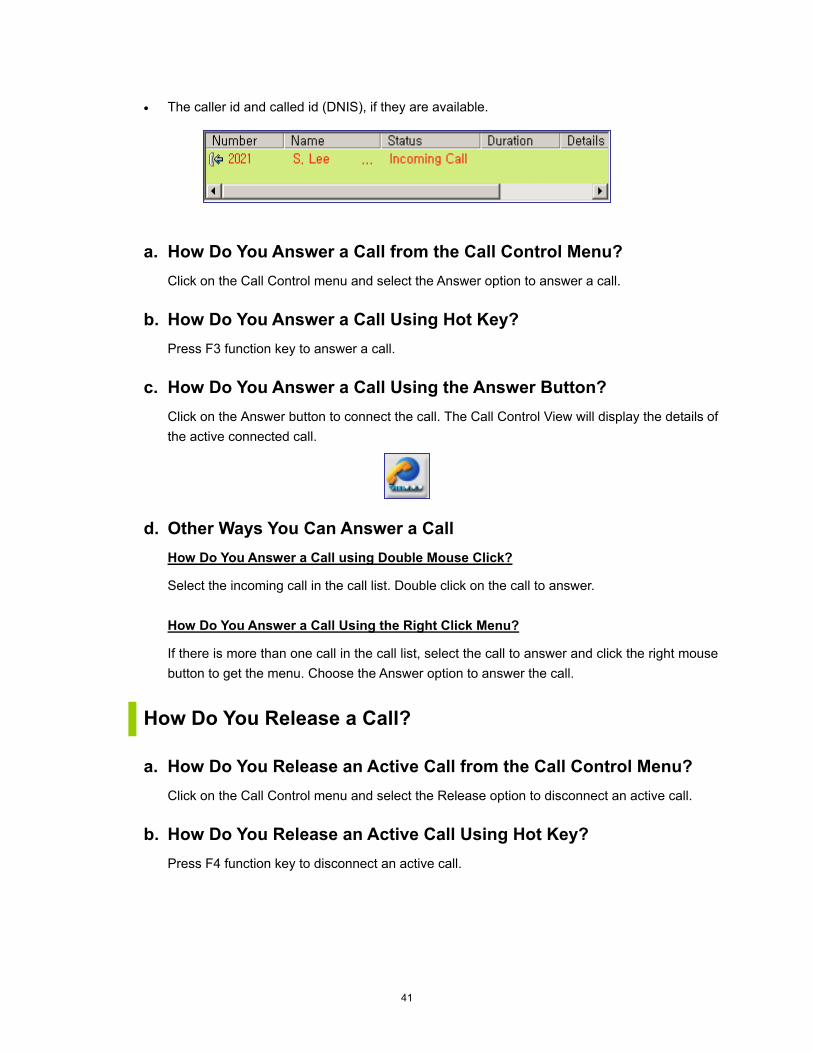
41
• The caller id and called id (DNIS), if they are available.
a. How Do You Answer a Call from the Call Control Menu?
Click on the Call Control menu and select the Answer option to answer a call.
b. How Do You Answer a Call Using Hot Key? Press F3 function key to answer a call.
c. How Do You Answer a Call Using the Answer Button? Click on the Answer button to connect the call. The Call Control View will display the details of the active connected call.
d. Other Ways You Can Answer a Call
How Do You Answer a Call using Double Mouse Click?
Select the incoming call in the call list. Double click on the call to answer. How Do You Answer a Call Using the Right Click Menu?
If there is more than one call in the call list, select the call to answer and click the right mouse button to get the menu. Choose the Answer option to answer the call.
How Do You Release a Call? a. How Do You Release an Active Call from the Call Control Menu?
Click on the Call Control menu and select the Release option to disconnect an active call.
b. How Do You Release an Active Call Using Hot Key? Press F4 function key to disconnect an active call.
42
c. How Do You Release an Active Call Using the Release Button? Click on the Release button to disconnect an active call.
How Do You Redial the Last Number Dialed? You can call the last dialed number again. a. How Do You Redial the Last Number from the Call Control Menu?
Click on the Call Control menu and select the Redial option from the Call Control menu to dial the last number dialed.
b. How Do You Redial the Last Number Using the Redial Button? Click on the Redial button to call the last dialed number again.
c. Other Ways to Redial the Last Number When you dial an external number and the trunk is busy, the Trunk Busy dialog box will be displayed. Click on the Redial button to call the number again.
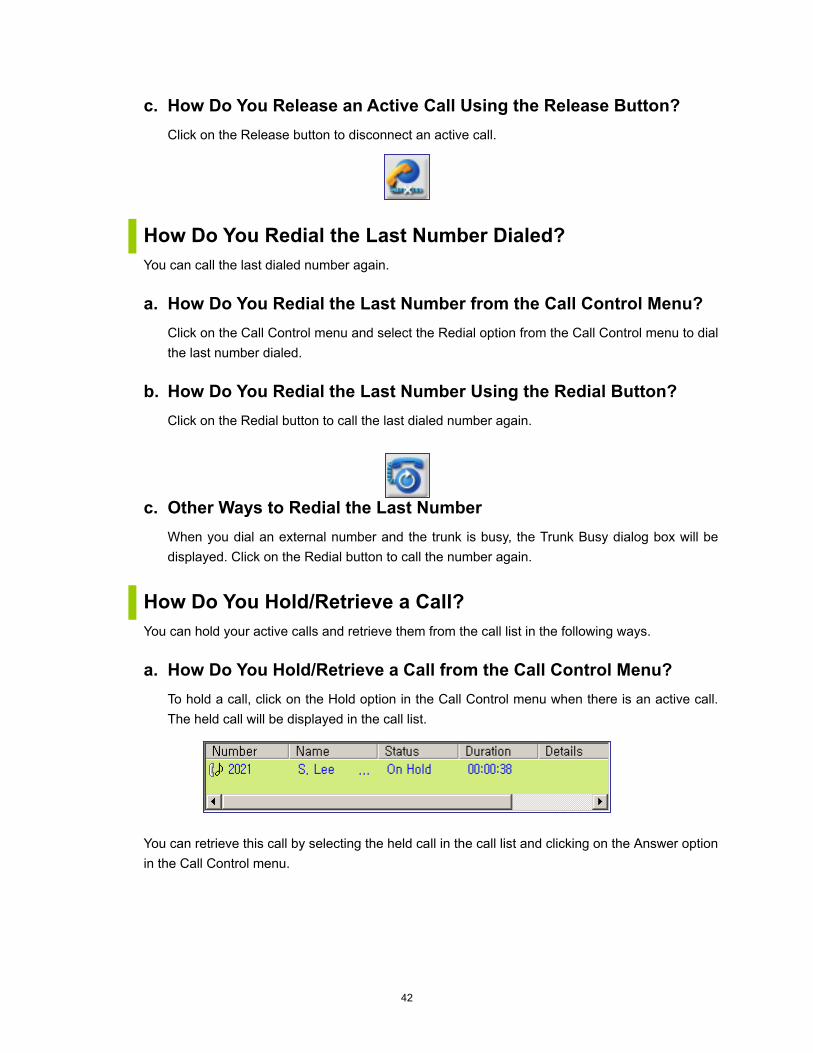
How Do You Hold/Retrieve a Call? You can hold your active calls and retrieve them from the call list in the following ways. a. How Do You Hold/Retrieve a Call from the Call Control Menu?
To hold a call, click on the Hold option in the Call Control menu when there is an active call. The held call will be displayed in the call list.
You can retrieve this call by selecting the held call in the call list and clicking on the Answer option in the Call Control menu.
43
When a call is put in hold state, it will go to the Call List and shows that it is ON HOLD. If
you do not retrieve this call within the set time, it will come back with the reason as a
HOLD RECALL. This is to avoid anyone waiting continuously for you to answer.
b. How Do You Hold/Retrieve a Call Using the Hot Key?
Press F5 function key to hold a call. To retrieve this call, press the F3 function key.
c. How Do You Hold/Retrieve a Call Using the Call Control Button? Click on the Hold button to send the active call to OnHold state in the call list. To retrieve this call, select the call from the call list and click on the Answer button.
d. Other Ways to Retrieve a Call
Using the Right Mouse Button in the Call List
Click the right mouse button on the held call in the call list and select the Answer option to retrieve the held call. Using Double Click in the Call List
Double click on the held call in the call list to retrieve a call.

44
How Do You Transfer a Call? You can transfer your active calls to other stations. a. How Do You Transfer a Call from the Call Control Menu?
Click on the Transfer option in the Call Control menu. You will get the Transfer Call dialog box. Enter the number in the pull-down menu to which the call is to be transferred.
You can also choose the last 10 numbers from the pull-down menu or click on any of the Speed Dial buttons. You can transfer your calls in two ways:
Option Purpose
Blind Transfer button
Consultation Transfer button
How Do You Consult and Transfer a Call?
After you enter the number that the call is to be transferred to, click on the Consultation Transfer button. The active call goes into OnHold pending transfer mode, while you consult with the station as to whether the station agrees to take the call. Click on the Release button to transfer the call.

45
How Do You Blind Transfer a Call?
After you enter the number that the call is to be transferred to, click on the Blind Transfer icon. The active call will get transferred to the station as soon as the transferred party’s phone rings. You cannot blind transfer a call to an external number.
Blind Transfer is not supported for external calls. If you choose Blind Transfer for an
external call, Consultation Transfer will be performed.
If the Transferred Party does not answer, the call comes back after a few rings with a call
reason as a Transfer Recall. This is because the original calling party is waiting for the
answer.
b. How Do You Transfer a Call Using the Call Control Button?
Click the Transfer button to transfer a call.
c. How Do You Transfer a Call Using the Hot Key?
Press F6 function key to transfer an active call.
d. Other Ways of Transferring a Call How Do You Transfer a Call Using Drag and Drop?
Select the contact to which you want to transfer from the Detailed List View. Drag that number by holding the CTRL key and drop into the Call Control View. How Do You Transfer a Call Using the Right Click Menu?
Click on the selected contact in the Detailed List View and right click to get a pop up menu. Select the Transfer option to transfer a call.
How Do You Conference? If there is an active call in the Call Control View, you can have another call joining you in a conference in the following ways.
You can have a maximum of five party conferences

46
a. Conferencing from Call Control Menu While there is an active connected call, click on the Call Control menu and select the Conference option. A Conference dialog box will appear.
The Call Control View will change as shown.
When the other party answers, click on Call Control menu and select Conference option again. If the other party does not answer, you can release this call and get connected to the original party using the Release menu/button. If you want to add another party to the conference, click on the Conference option, enter the number and dial. Once you are connected to the party, press the Conference button to include the party into the conference. The status of the calls in the call list which are already in conference goes into OnHold(Conf) till the party is included in the conference. You can add a maximum of five parties to the conference. When the other party answers, select Conference option again to add this party to conference. The status in the call list displays conference. If the party does not agree to join in the conference, you can release the party and get back to those already in the conference.

47
b. How Do You Conference Using Hot Key? While there is an active call, press F7 function key to conference. The Conference With dialog box will appear. Enter the number of the party to conference with.
c. How Do You Conference Using the Conference Button? While there is an active call, click on the Conference button to add a party to make a conference, you will get the Conference dialog box. Enter the phone number of the party to be included in the conference. The connected party will go OnHold pending Conference. After the party agrees to join the conference, press on the Conference button again to include the party in the conference. If the party does not agree to join the conference, press on the Release button in the Call Control View to reconnect to the holding party.
d. Other Ways to Conference
How Do You Conference Using Right Click Menu?
Select the contact with whom you want to conference in the Detailed List View and click the right mouse button. A pop-up will appear. Select the Conference option to add the party into conference. How Do You Conference Using Drag and Drop?
Select the contact from the Detailed List View and drag the contact to the Call Control View to dial the number. Click the Conference button once you are connected to the party to include the party in the conference.
e. How Do You Drop Parties from Conference?
Select the party to be dropped from Conference. Click the right mouse button and select the Release option to drop the party from Conference.
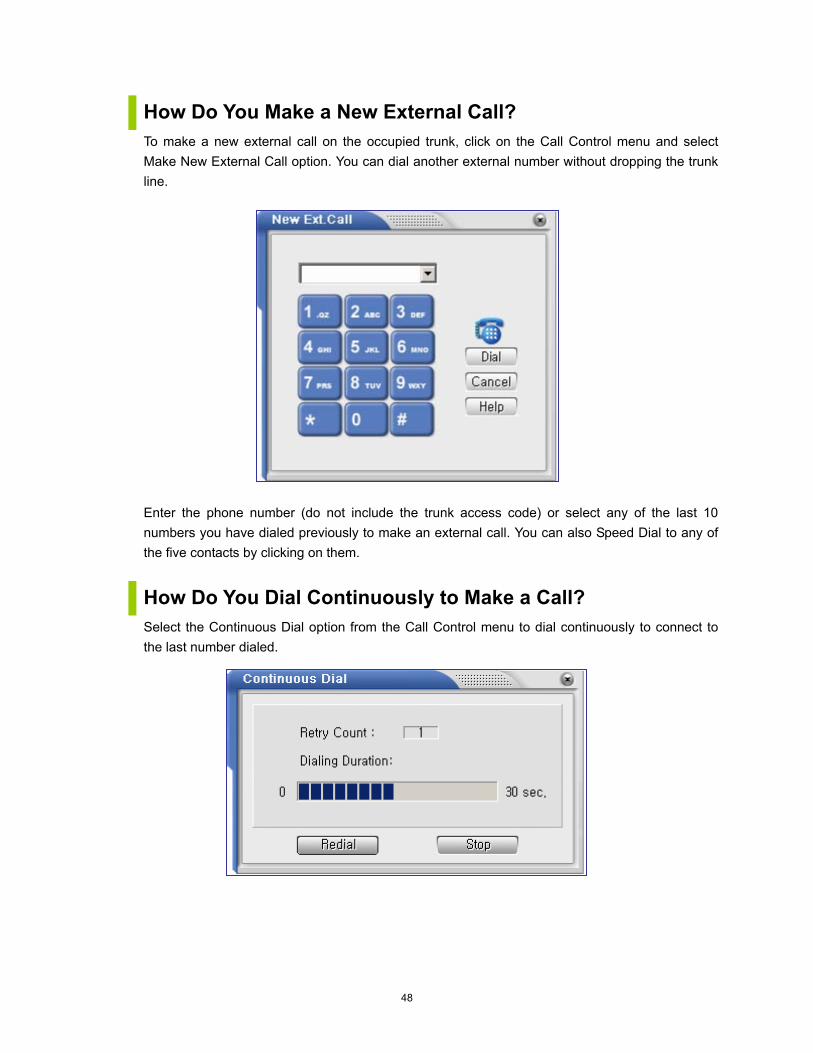
48
How Do You Make a New External Call? To make a new external call on the occupied trunk, click on the Call Control menu and select Make New External Call option. You can dial another external number without dropping the trunk line.
Enter the phone number (do not include the trunk access code) or select any of the last 10 numbers you have dialed previously to make an external call. You can also Speed Dial to any of the five contacts by clicking on them.
How Do You Dial Continuously to Make a Call? Select the Continuous Dial option from the Call Control menu to dial continuously to connect to the last number dialed.

49
If you want to redial before the time out occurs, click on the Dial button. Once you get connected to an internal party, the continuous dialing automatically stops. If you get connected to an external party, you have to click the Stop button to stop continuous dialing. You can change the redialing duration in the Set Environment Time Out option from the Options menu. The default redial duration is 30 seconds. a. Other Ways to Dial Continuously
When you dial an external number and the trunk is busy, the Trunk Busy dialog box will be displayed. Click on the Continuous Dial button to call the number repeatedly until a trunk line is connected.
How Do You Redirect an Incoming Call? For incoming calls at your station, you have the option of redirecting them to another station. The ‘Redirect’ option can be selected from Main menu under [Call Control] option. The call can also be redirected from pop up menu in the call view. Whenever you select this option, you get a Dialog Box to enter the station number where the call will be redirected.
a. How Do You Redirect a Call Using the Right Click Menu?
In the call list, select the call to redirect and click the right mouse button to get the menu. Choose the Redirect option to redirect the call.
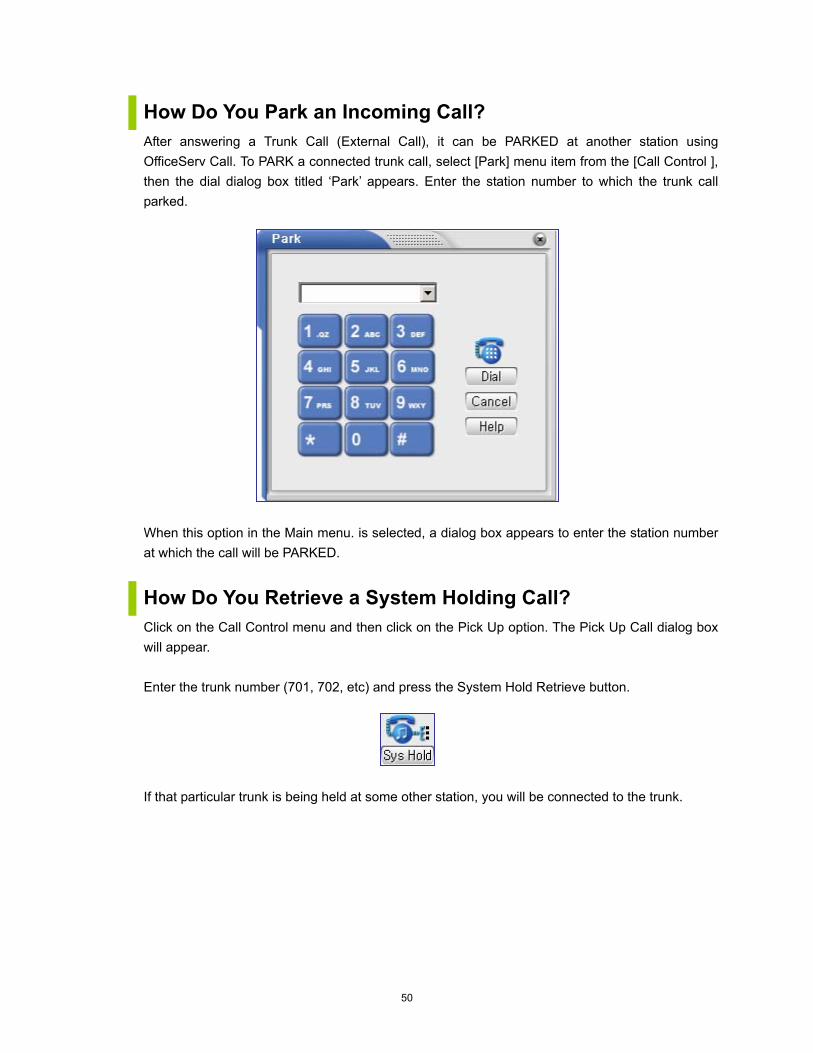
50
How Do You Park an Incoming Call? After answering a Trunk Call (External Call), it can be PARKED at another station using OfficeServ Call. To PARK a connected trunk call, select [Park] menu item from the [Call Control ], then the dial dialog box titled ‘Park’ appears. Enter the station number to which the trunk call parked.
When this option in the Main menu. is selected, a dialog box appears to enter the station number at which the call will be PARKED.
How Do You Retrieve a System Holding Call? Click on the Call Control menu and then click on the Pick Up option. The Pick Up Call dialog box will appear. Enter the trunk number (701, 702, etc) and press the System Hold Retrieve button.
If that particular trunk is being held at some other station, you will be connected to the trunk.

51
How Do You Pickup a Call? You can answer a call for any other station, which receives an incoming call, and when the call is not being answered, you can answer that call using the Pick Up option. a. How Do You Pickup a Call Using the Call Control Menu?
Click on the Call Control menu and then click on the Pickup option. The Pick Up Call dialog box will appear (Figure below). You can pick up a call from any station or from any other group.
• How do you pickup a call from another station? : Dial the extension of the station using
the Pick Up Call dialog box, or use the pull-down menu to choose any of the last 10 numbers dialed to pick up a call at a ringing station.
• How do you pickup a call from another group? : Dial the group number using the Pick Up Call dialog box, or use the pull-down menu to choose any of the last 10 group numbers dialed to pick up a call from a ringing station in another group. Press Group Pick Up(Grp P/U) button.
How Do You Toggle Between Calls? In the case of a Consultation Transfer, if the third party does not agree to speak to the calling party, you can toggle between these two parties. a. How Do You Toggle Calls from Call Control Menu?
Click on the Toggle option in the Call Control menu only after the Consultation call is connected.
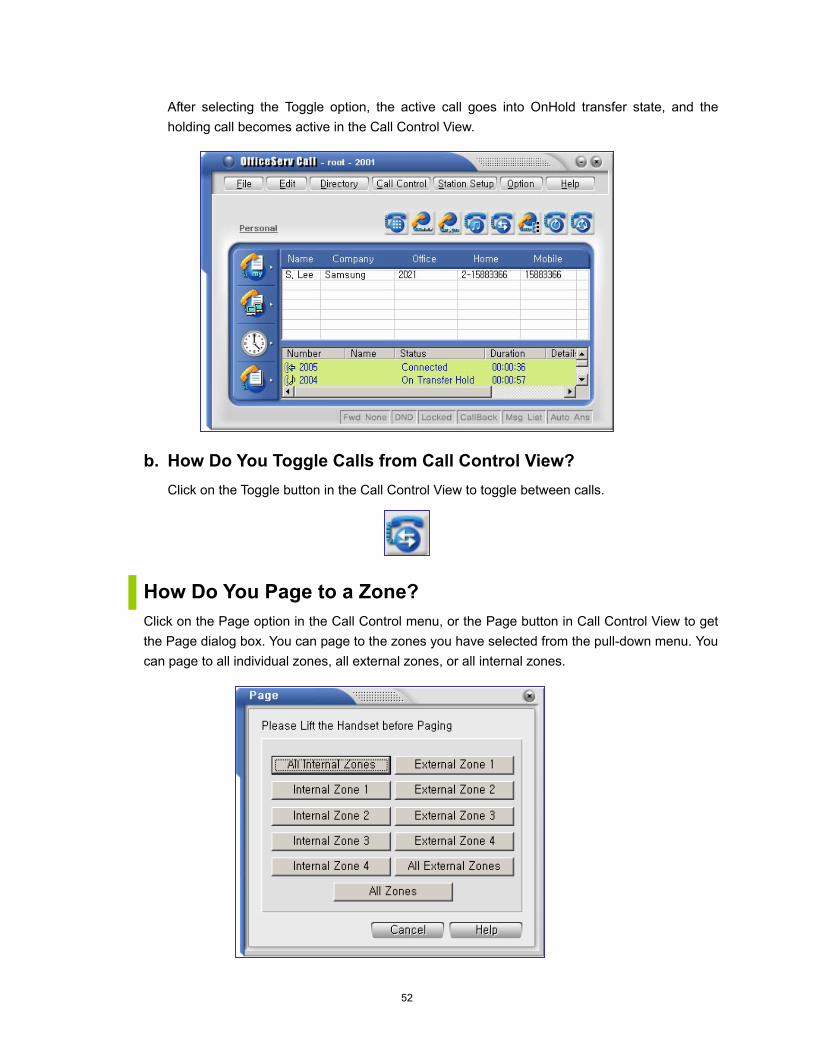
52
After selecting the Toggle option, the active call goes into OnHold transfer state, and the holding call becomes active in the Call Control View.
b. How Do You Toggle Calls from Call Control View?
Click on the Toggle button in the Call Control View to toggle between calls.
How Do You Page to a Zone? Click on the Page option in the Call Control menu, or the Page button in Call Control View to get the Page dialog box. You can page to the zones you have selected from the pull-down menu. You can page to all individual zones, all external zones, or all internal zones.

53
You have to lift the handset of your Keyset before you select the above option.
How do you send DTMF (Dual Tone Multi Frequency) Tones? When a call is connected, you can send DTMF tones using the menu option Call Control/Send DTMF. The following dialog box will appear.
DTMF tones are sent immediately when you click the buttons on the dialog box.
How Do You Call Back a Station? If you dial a station which is busy or does not answer, you can ask that station to call you back. The called station rings back to the caller once the station becomes idle. a. How Do You Call Back from the Call Control Button?
Select the Call Back option in the Call Control menu.
b. How Do You Call Back a Station Using Hot Key? Press F10 function key to request the other station to call you back.
54
c. Other Ways to Call Back a Station If you call a station which is busy, you can request the station to call back by choosing the Call Back button in the Station Busy dialog box.
How Do You Leave Message for Another Station? If you dial a station which is busy, or does not answer, you can leave a message for this party. a. How Do You Leave a Message from the Call Control Menu?
If you want to leave a message on a station, select the Leave Message option in the Call Control menu. This message will be shown in the Message List dialog box of the called station.
b. Other Ways to Leave a Message If you call on a station which is busy, you can leave a message for the station by choosing the Leave Message button in the Station Busy dialog box.
How Do You Camp On to Another Station? If you dial a station which is busy, you can notify the station that your call is waiting. a. How Do You Camp On from the Call Control Menu?
Select the Camp On option from the Call Control menu. The camped-on station receives a tone indication that your call is waiting. The other station can either ignore your call or put its active call on hold and answer your camped on call.
b. Other Ways to Camp On If you call on a station which is busy, you can notify the station that your call is waiting by choosing the Camp On button in the Station Busy dialog box. You can also press F9 to camp on if the called station is not answering.

55
How Do You Make an OHVA (Off Hook Voice Announce)? If you have called a busy station and you have a voice announcement to make, select the OHVA option in the Call Control menu. The busy station will receive the Off Hook Voice Announce from you while the station is in conversation.
If the station is set to DND, it will not receive an OHVA call.
How Do You Use Voice Mail Features?
The voice mail related features below:
- My Voice Mail
- Leave Voice Message
- Transfer to Voice Mail
- Call Recording with Voice Mail are available only if the voice mail card has been installed
and is running on your switch, and your switch supports “iDCS” features.
a. How Do You Open Your Voice Mailbox?
If you select My Voice Mail option from the Call Control menu, you can open your voice mailbox. If you are using a digital telephone, the speaker will be opened automatically. Otherwise you have to lift your telephone before selecting this option. Once you are connected to your voice mailbox, use your keypad or the Send DTMF feature of the OfficeServ Call.
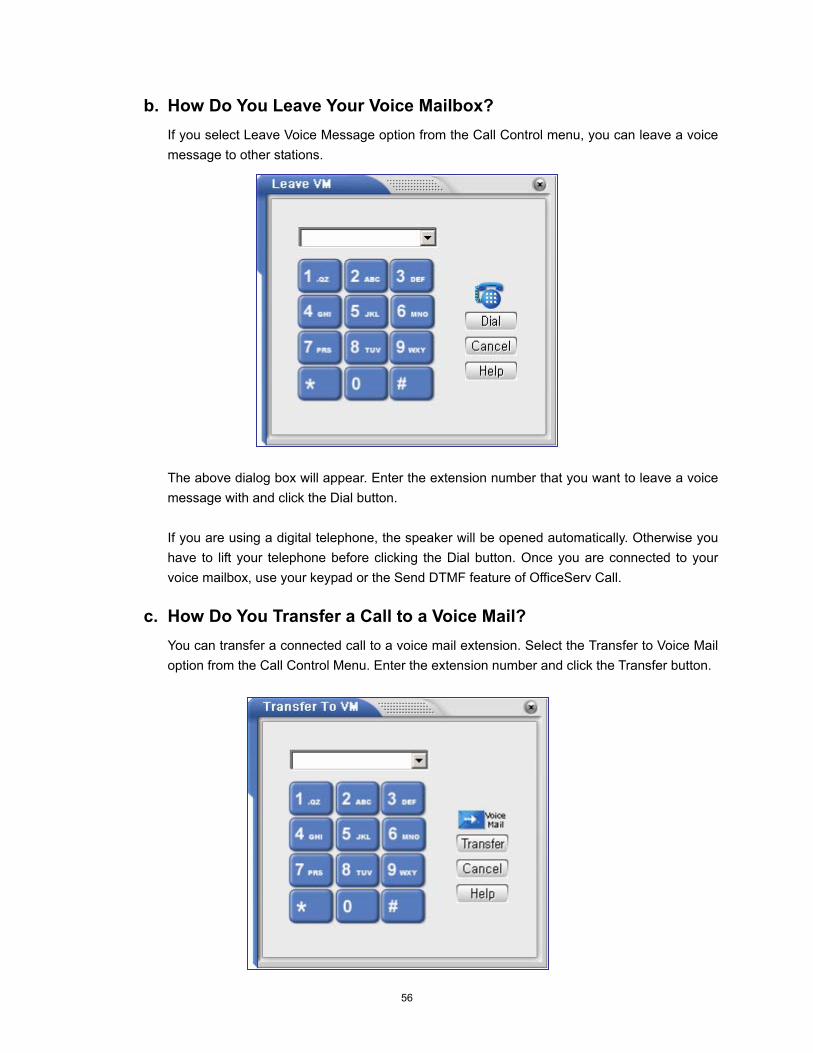
56
b. How Do You Leave Your Voice Mailbox? If you select Leave Voice Message option from the Call Control menu, you can leave a voice message to other stations.
The above dialog box will appear. Enter the extension number that you want to leave a voice message with and click the Dial button. If you are using a digital telephone, the speaker will be opened automatically. Otherwise you have to lift your telephone before clicking the Dial button. Once you are connected to your voice mailbox, use your keypad or the Send DTMF feature of OfficeServ Call.
c. How Do You Transfer a Call to a Voice Mail? You can transfer a connected call to a voice mail extension. Select the Transfer to Voice Mail option from the Call Control Menu. Enter the extension number and click the Transfer button.

57
d. How Do You Record a Call with Voice Mail Device? You can record a connected call with your voice mail device. If you have a connected call and you want to record it, select the Call Recording with Voice Mail option from the Call Control menu. Once recording starts, a recording icon will be shown with a call in the call control view, and the Call Recording with Voice Mail option will be checked.
If you want to stop recording, select the checked ‘Call Recording with Voice Mail’ option. The call icon will be restored, and the menu option will be unchecked. You can play the recording like any other voice messages. My Voice Mail option from the Call Control menu helps you to connect your voice mailbox.
What Happens When You Dial a Busy Station? If you call a station that is busy, the Station Busy dialog box will appear, from which you can choose the type of operation you want to perform.
Option Purpose
Click on Call button if you want to set a call back on the busy station
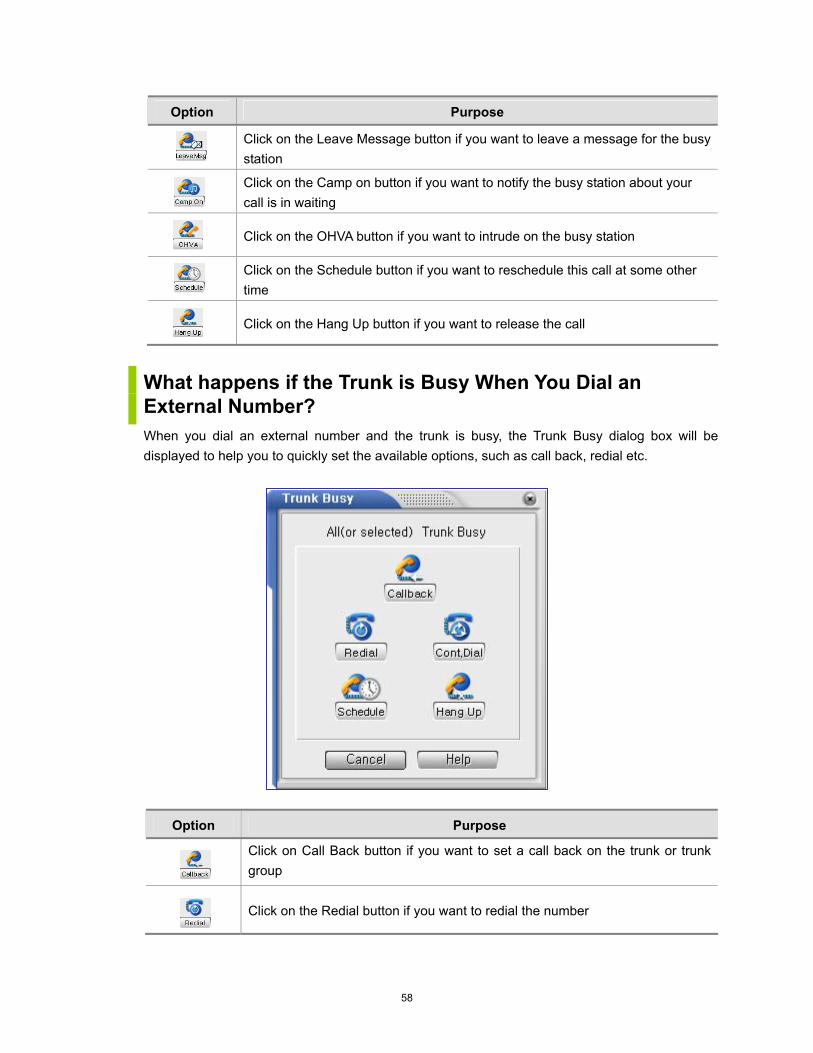
58
Option Purpose
Click on the Leave Message button if you want to leave a message for the busy station
Click on the Camp on button if you want to notify the busy station about your call is in waiting
Click on the OHVA button if you want to intrude on the busy station
Click on the Schedule button if you want to reschedule this call at some other time
Click on the Hang Up button if you want to release the call
What happens if the Trunk is Busy When You Dial an External Number? When you dial an external number and the trunk is busy, the Trunk Busy dialog box will be displayed to help you to quickly set the available options, such as call back, redial etc.
Option Purpose
Click on Call Back button if you want to set a call back on the trunk or trunk group
Click on the Redial button if you want to redial the number

59
Option Purpose
Click on the Continuous Dial button if you want to continuously dial the number
Click on the Schedule button if you want to reschedule this call for some other time
Click on the Hang Up button if you want to release the call
What Happens When You Answer the Trunk Call Back Call? If you have set a call back for a trunk when you dialed an external number from OfficeServ Call, the dial pad will come up, and display the number to be dialed when you answer the trunk call back.
How Do You Enter Call Note and Keyword for a Call? To make notes that relate to a call, select the call and click the right mouse button and select Call Note option. The Call Note dialog box will be displayed. Enter the call note and keyword (Identifier), and press OK button to save the call note and the keyword. The call note will be stored along with the call details in the call log. You can retrieve them later from the call log.
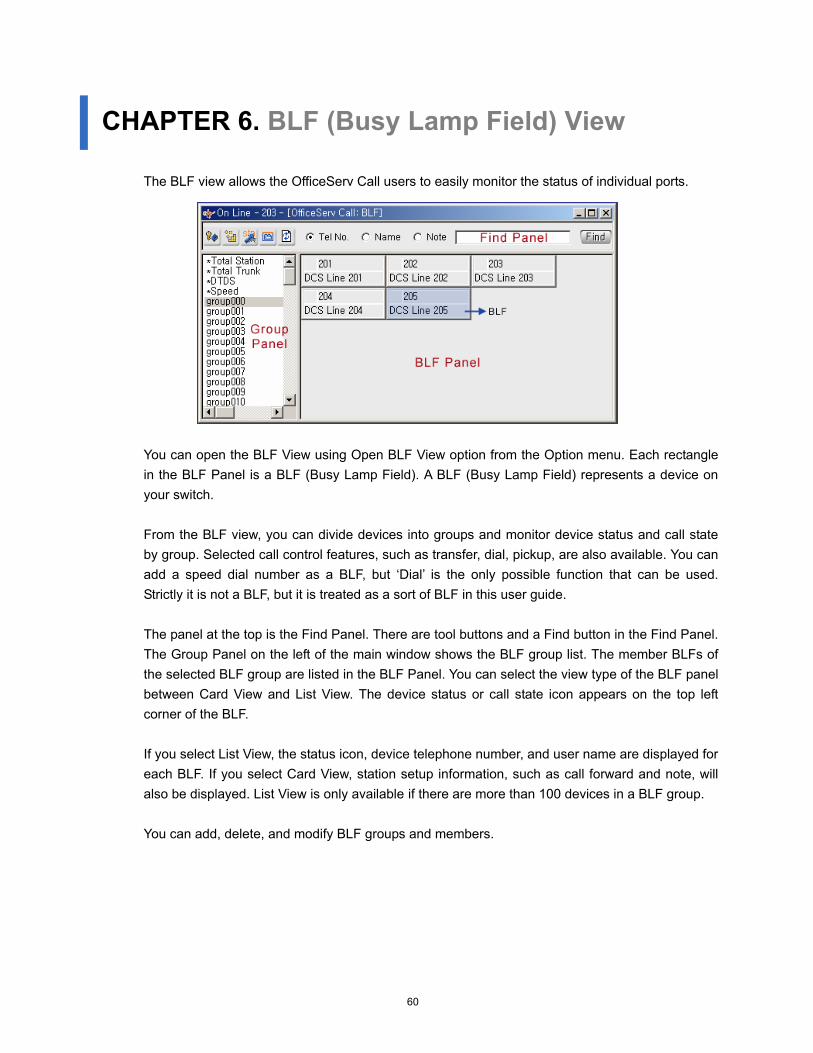
60
CHAPTER 6. BLF (Busy Lamp Field) View The BLF view allows the OfficeServ Call users to easily monitor the status of individual ports.
You can open the BLF View using Open BLF View option from the Option menu. Each rectangle in the BLF Panel is a BLF (Busy Lamp Field). A BLF (Busy Lamp Field) represents a device on your switch. From the BLF view, you can divide devices into groups and monitor device status and call state by group. Selected call control features, such as transfer, dial, pickup, are also available. You can add a speed dial number as a BLF, but ‘Dial’ is the only possible function that can be used. Strictly it is not a BLF, but it is treated as a sort of BLF in this user guide. The panel at the top is the Find Panel. There are tool buttons and a Find button in the Find Panel. The Group Panel on the left of the main window shows the BLF group list. The member BLFs of the selected BLF group are listed in the BLF Panel. You can select the view type of the BLF panel between Card View and List View. The device status or call state icon appears on the top left corner of the BLF. If you select List View, the status icon, device telephone number, and user name are displayed for each BLF. If you select Card View, station setup information, such as call forward and note, will also be displayed. List View is only available if there are more than 100 devices in a BLF group. You can add, delete, and modify BLF groups and members.

61
BLF Group There are default BLF groups listed below.
Group Name Description
*Total Station Total stations of the switch
*Total Trunk Total trunks of the switch
* Speed All the speed dials registered (station speed dials registered with the OfficeServ Call users call buttons + user defined speed dials)
You cannot delete or rename the default groups, and you cannot add or delete the members of the default groups. However, it is possible to modify a name and add a note to the member BLFs of the default groups.
The BLF name has nothing to do with the station name of the Keyset.
An exception is that you can add user defined station speed dials into the *Speed group. BLFs added in this way are distinguished from the system speed dials by a different icon. User defined BLF groups can be created, and this can be used to reflect an organizational structure for example. a. New Group
To create a new BLF group, click the right mouse button on the Group Panel and select New Group option from the context menu.
Enter the name of the new BLF group and click OK.

62
The new group is added to the Group Panel, and it is opened in the BLF Panel. You can create up to 100 BLF groups including default groups. For example, there are four default groups, [*Total Station], [*Total Trunk], [*DT/DS], and [*Speed], so you can create 96 user defined BLF groups.
b. Delete a Group
Select the BLF group to delete from the Group Panel, and click the right mouse button, then select Delete option.
Click OK to delete the selected group.

63
c. Rename a Group Select the BLF group to rename from the Group Panel. Click the right mouse button, and then select Rename option.
Or, click the selected group again.
Enter a new group name into the edit box.
You cannot delete or rename the default BLF groups.
d. Refresh Groups
Select a BLF group to refresh, and click the right mouse button, then select Refresh option.

64
Then, the selected group members are read from the database and the BLF Panel is refreshed. If you select the Refresh option without selecting any BLF group, the entire BLF group list is refreshed.
e. New Device
To add a device into a BLF group, click right mouse button on the BLF Panel of a user defined BLF group, and select the New Device option.
The New Lamp dialog box will appear.
Select a new device to add from the combo box and edit the name and note if needed. Click OK to add a new device.
f. New Speed Dial You can add a user defined speed dial into a BLF group. Click right mouse button on the BLF Panel, and select New Speed Dial option. The New Lamp dialog box will appear.
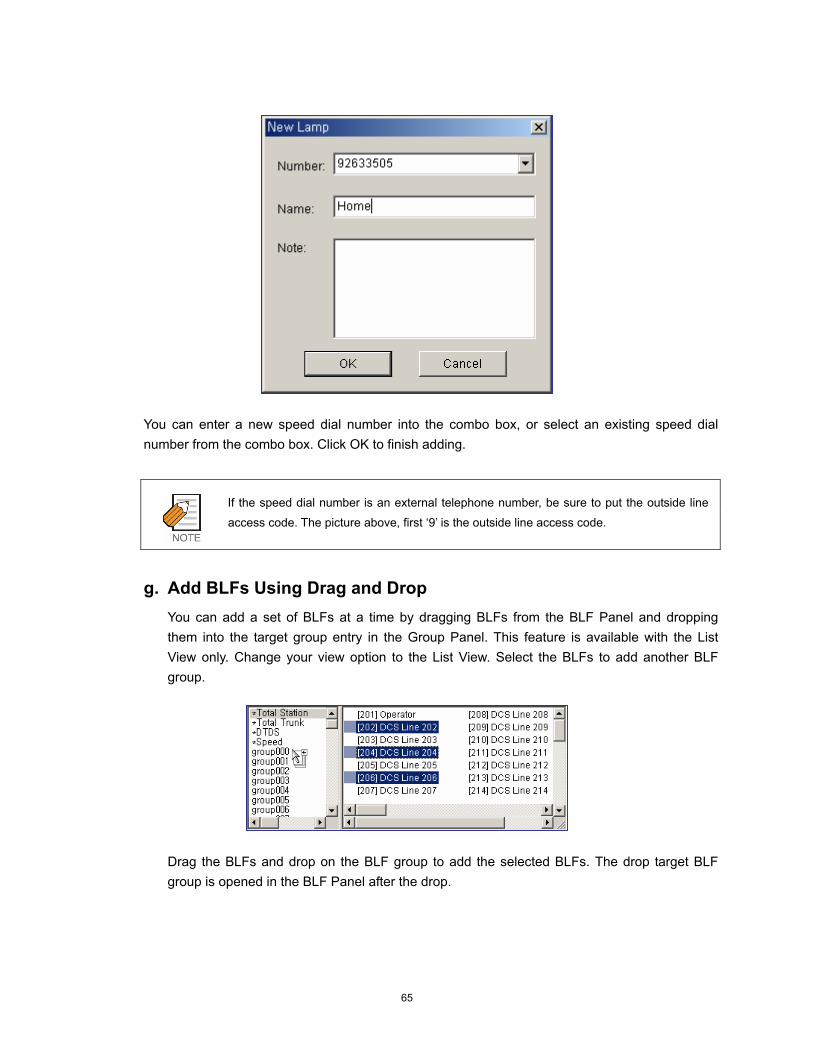
65
You can enter a new speed dial number into the combo box, or select an existing speed dial number from the combo box. Click OK to finish adding.
If the speed dial number is an external telephone number, be sure to put the outside line
access code. The picture above, first ‘9’ is the outside line access code.
g. Add BLFs Using Drag and Drop
You can add a set of BLFs at a time by dragging BLFs from the BLF Panel and dropping them into the target group entry in the Group Panel. This feature is available with the List View only. Change your view option to the List View. Select the BLFs to add another BLF group.
Drag the BLFs and drop on the BLF group to add the selected BLFs. The drop target BLF group is opened in the BLF Panel after the drop.
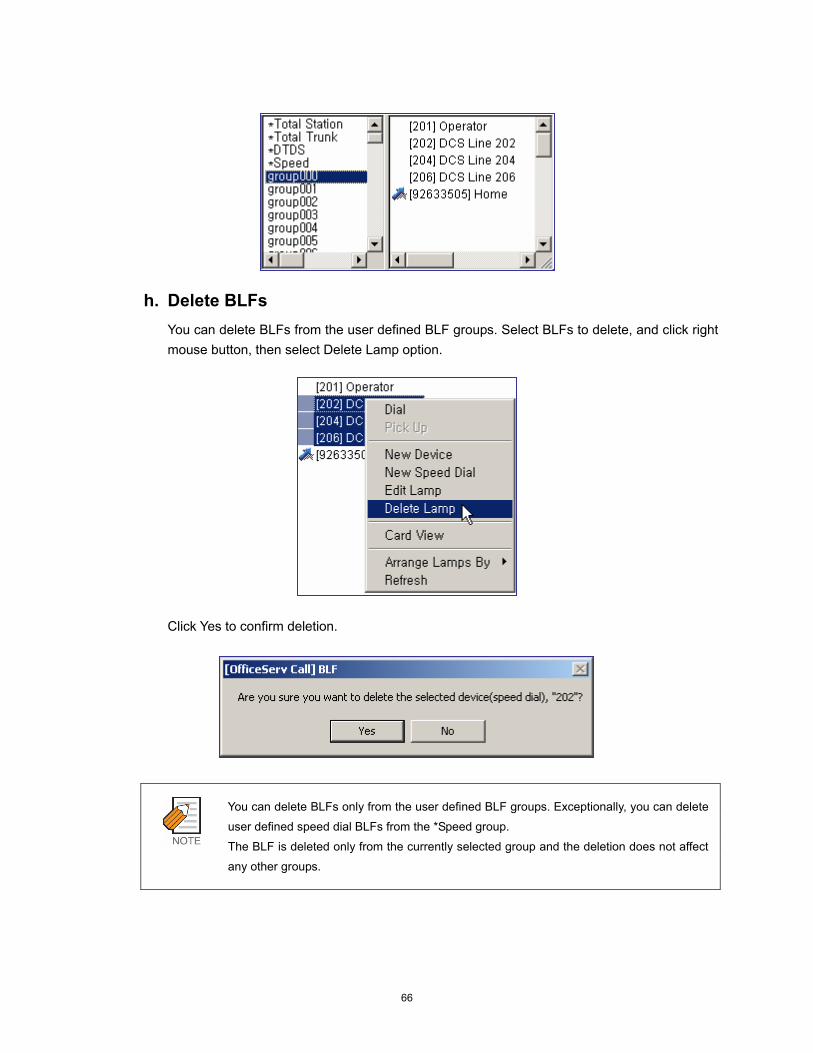
66
h. Delete BLFs
You can delete BLFs from the user defined BLF groups. Select BLFs to delete, and click right mouse button, then select Delete Lamp option.
Click Yes to confirm deletion.
You can delete BLFs only from the user defined BLF groups. Exceptionally, you can delete
user defined speed dial BLFs from the *Speed group.
The BLF is deleted only from the currently selected group and the deletion does not affect
any other groups.

67
BLF Each BLF has information shown below.
View Type BLF Type Description
Device Status Icon, Extension Number, Name List View
Speed Dial Speed Dial Icon, Speed Dial Number, Name
Device
Card View
Speed Dial Speed Dial Icon, Speed Dial Number, Name, Note
a. Edit a BLF
To edit name of a BLF or put a note on a BLF, click right mouse button on the BLF to edit and select Edit Lamp option.

68
When an Edit Lamp dialog appears, edit Name or Note and click OK. b. List View/Card View
You can choose either List View or Card View to decide how the BLF is shown. Click right mouse button on the BLF Panel, then you can select the view option from the context menu. If it is in List View at the moment, Card View option is visible. Otherwise List View option is visible.
c. Arrange BLFs
You can arrange BLFs by extension number or by name. Click right mouse button on the BLF Panel, then you can choose Number or Name from the sub-menu of ‘Arrange Lamps By’.
The current option appears as checked.
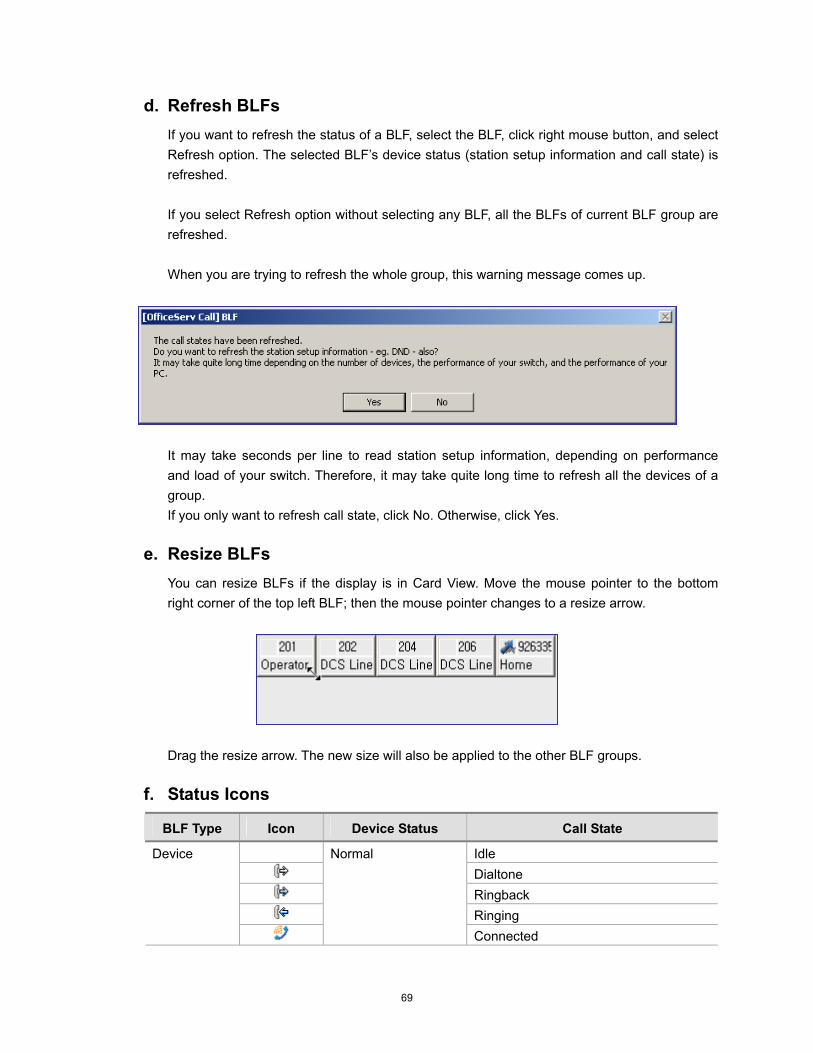
69
d. Refresh BLFs If you want to refresh the status of a BLF, select the BLF, click right mouse button, and select Refresh option. The selected BLF’s device status (station setup information and call state) is refreshed. If you select Refresh option without selecting any BLF, all the BLFs of current BLF group are refreshed. When you are trying to refresh the whole group, this warning message comes up.
It may take seconds per line to read station setup information, depending on performance and load of your switch. Therefore, it may take quite long time to refresh all the devices of a group. If you only want to refresh call state, click No. Otherwise, click Yes.
e. Resize BLFs You can resize BLFs if the display is in Card View. Move the mouse pointer to the bottom right corner of the top left BLF; then the mouse pointer changes to a resize arrow.
Drag the resize arrow. The new size will also be applied to the other BLF groups.
f. Status Icons
BLF Type Icon Device Status Call State
Idle Dialtone Ringback Ringing
Device
Normal
Connected
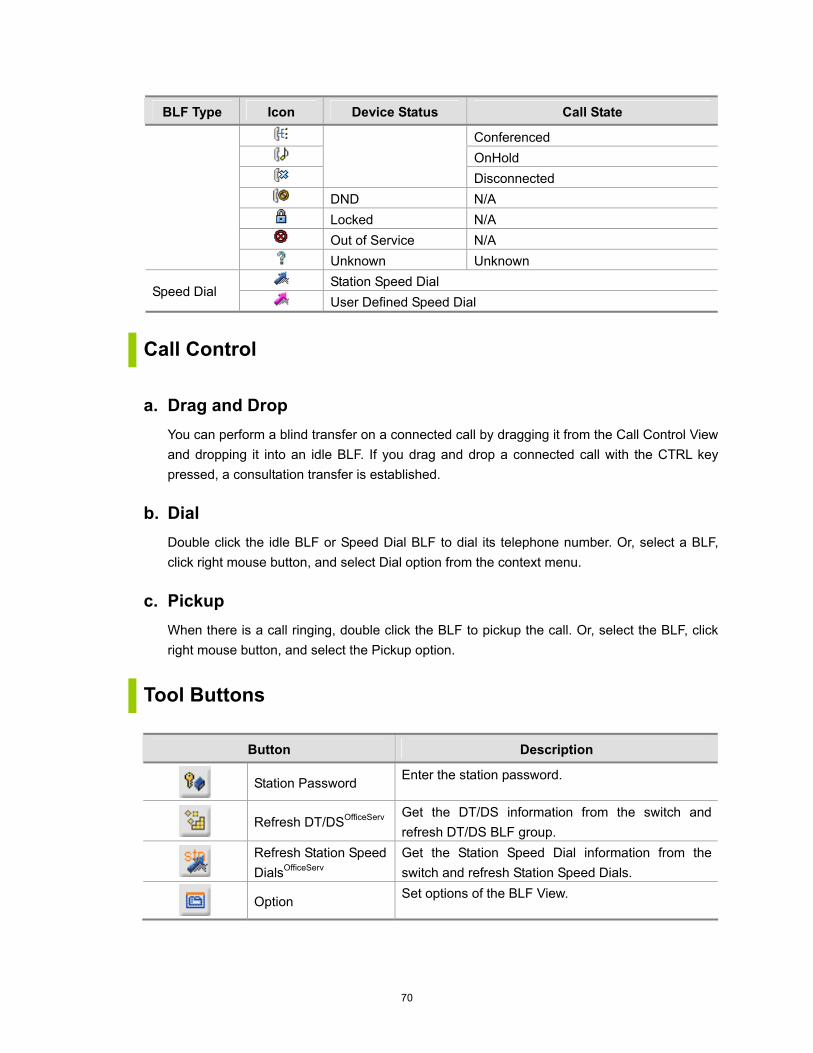
70
BLF Type Icon Device Status Call State
Conferenced OnHold
Disconnected DND N/A Locked N/A Out of Service N/A
Unknown Unknown Station Speed Dial
Speed Dial User Defined Speed Dial
Call Control
a. Drag and Drop You can perform a blind transfer on a connected call by dragging it from the Call Control View and dropping it into an idle BLF. If you drag and drop a connected call with the CTRL key pressed, a consultation transfer is established.
b. Dial Double click the idle BLF or Speed Dial BLF to dial its telephone number. Or, select a BLF, click right mouse button, and select Dial option from the context menu.
c. Pickup When there is a call ringing, double click the BLF to pickup the call. Or, select the BLF, click right mouse button, and select the Pickup option.
Tool Buttons
Button Description
Station Password Enter the station password.
Refresh DT/DSOfficeServ
Get the DT/DS information from the switch and refresh DT/DS BLF group.
Refresh Station Speed DialsOfficeServ
Get the Station Speed Dial information from the switch and refresh Station Speed Dials.
Option Set options of the BLF View.
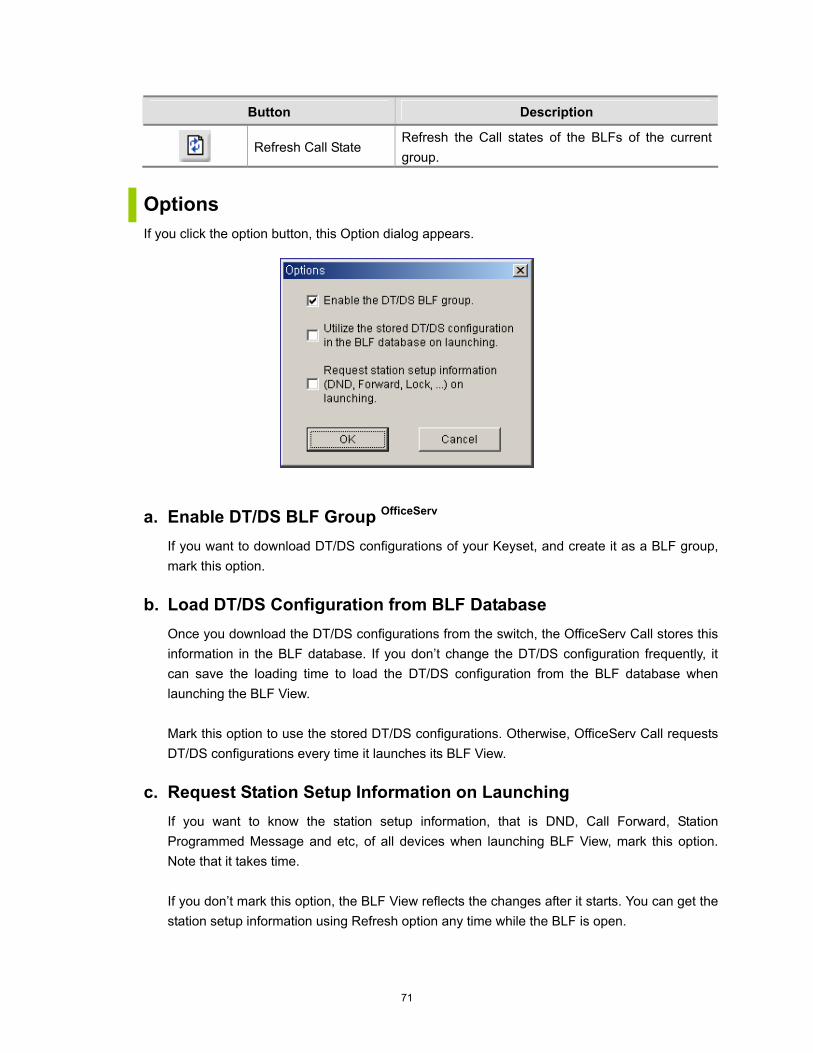
71
Button Description
Refresh Call State
Refresh the Call states of the BLFs of the current group.
Options If you click the option button, this Option dialog appears.
a. Enable DT/DS BLF Group OfficeServ
If you want to download DT/DS configurations of your Keyset, and create it as a BLF group, mark this option.
b. Load DT/DS Configuration from BLF Database
Once you download the DT/DS configurations from the switch, the OfficeServ Call stores this information in the BLF database. If you don’t change the DT/DS configuration frequently, it can save the loading time to load the DT/DS configuration from the BLF database when launching the BLF View. Mark this option to use the stored DT/DS configurations. Otherwise, OfficeServ Call requests DT/DS configurations every time it launches its BLF View.
c. Request Station Setup Information on Launching If you want to know the station setup information, that is DND, Call Forward, Station Programmed Message and etc, of all devices when launching BLF View, mark this option. Note that it takes time. If you don’t mark this option, the BLF View reflects the changes after it starts. You can get the station setup information using Refresh option any time while the BLF is open.

72
Find BLF You can find a BLF by the telephone number, the name, or the note. Select the finding option, enter the keyword, and click Find button. The matched BLF will be highlighted.
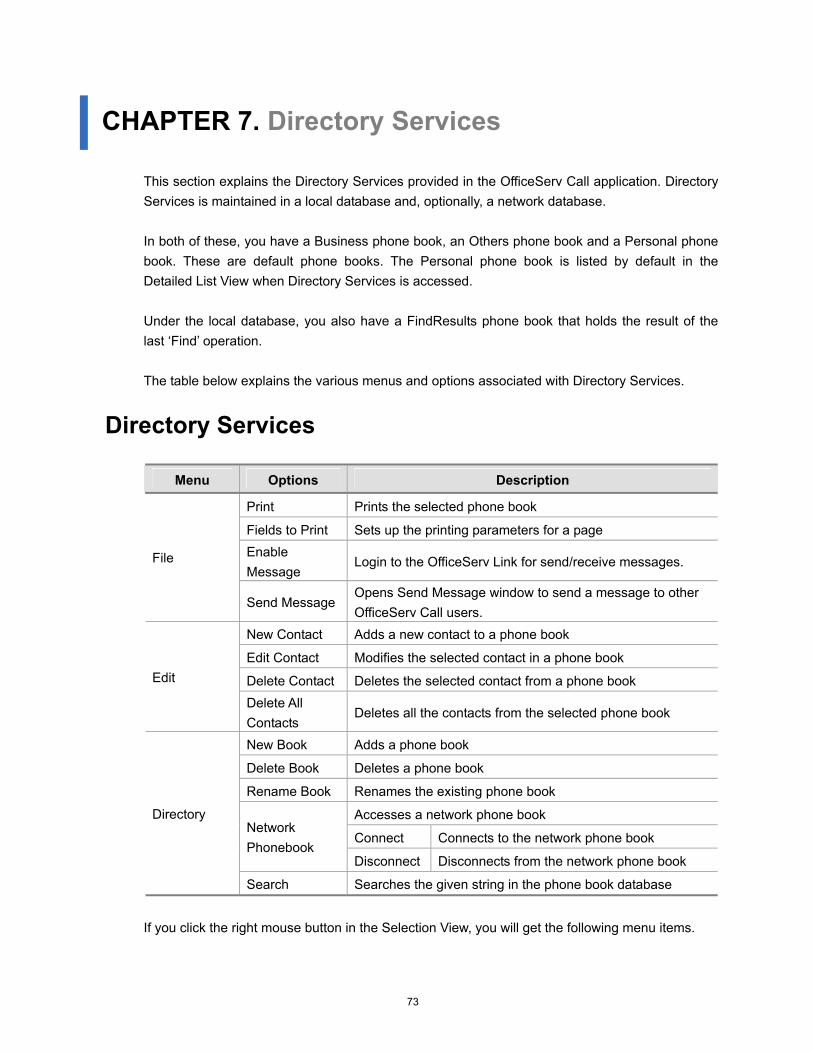
73
CHAPTER 7. Directory Services This section explains the Directory Services provided in the OfficeServ Call application. Directory Services is maintained in a local database and, optionally, a network database. In both of these, you have a Business phone book, an Others phone book and a Personal phone book. These are default phone books. The Personal phone book is listed by default in the Detailed List View when Directory Services is accessed. Under the local database, you also have a FindResults phone book that holds the result of the last ‘Find’ operation. The table below explains the various menus and options associated with Directory Services.
Directory Services
Menu Options Description
Print Prints the selected phone book
Fields to Print Sets up the printing parameters for a page Enable Message
Login to the OfficeServ Link for send/receive messages. File
Send Message Opens Send Message window to send a message to other OfficeServ Call users.
New Contact Adds a new contact to a phone book
Edit Contact Modifies the selected contact in a phone book
Delete Contact Deletes the selected contact from a phone book Edit
Delete All Contacts
Deletes all the contacts from the selected phone book
New Book Adds a phone book
Delete Book Deletes a phone book
Rename Book Renames the existing phone book
Accesses a network phone book
Connect Connects to the network phone book Network Phonebook
Disconnect Disconnects from the network phone book
Directory
Search Searches the given string in the phone book database
If you click the right mouse button in the Selection View, you will get the following menu items.
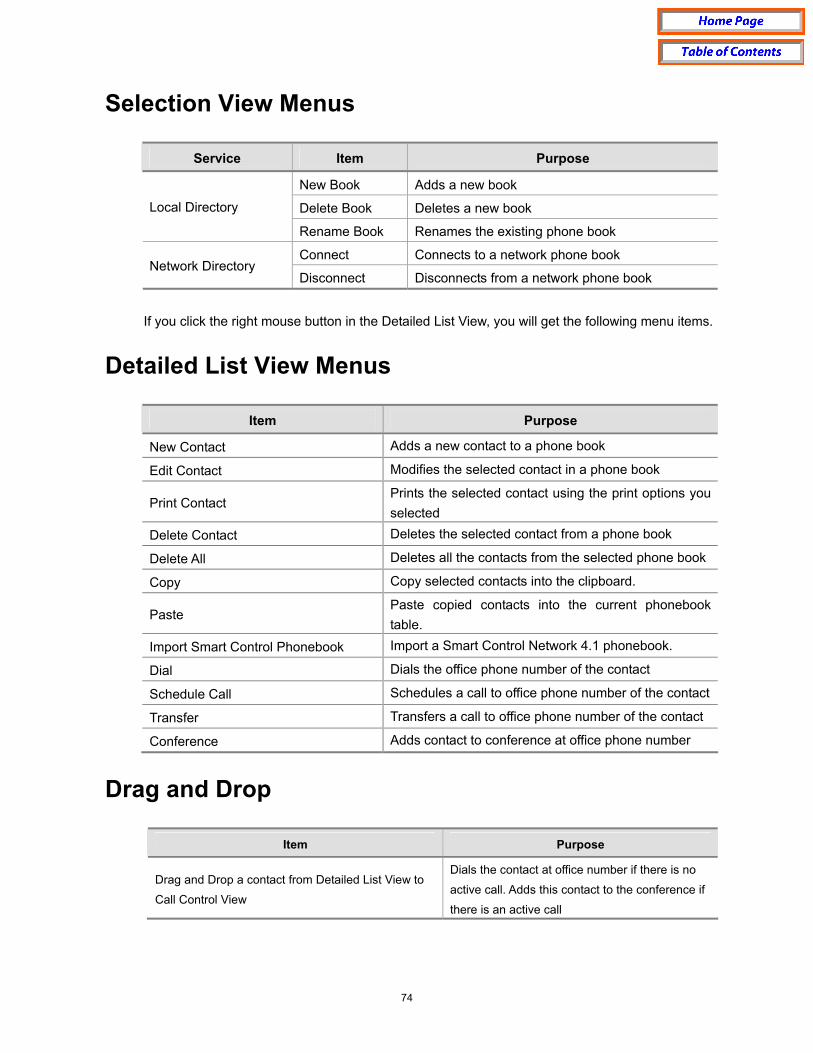
74
Selection View Menus
Service Item Purpose
New Book Adds a new book
Delete Book Deletes a new book Local Directory
Rename Book Renames the existing phone book
Connect Connects to a network phone book Network Directory
Disconnect Disconnects from a network phone book
If you click the right mouse button in the Detailed List View, you will get the following menu items.
Detailed List View Menus
Item Purpose
New Contact Adds a new contact to a phone book
Edit Contact Modifies the selected contact in a phone book
Print Contact Prints the selected contact using the print options you selected
Delete Contact Deletes the selected contact from a phone book
Delete All Deletes all the contacts from the selected phone book
Copy Copy selected contacts into the clipboard.
Paste Paste copied contacts into the current phonebook table.
Import Smart Control Phonebook Import a Smart Control Network 4.1 phonebook.
Dial Dials the office phone number of the contact
Schedule Call Schedules a call to office phone number of the contact
Transfer Transfers a call to office phone number of the contact
Conference Adds contact to conference at office phone number
Drag and Drop
Item Purpose
Drag and Drop a contact from Detailed List View to
Call Control View
Dials the contact at office number if there is no
active call. Adds this contact to the conference if
there is an active call

75
Item Purpose
Drag and Drop a contact from Detailed List View to
Call Control View (by pressing the CTRL key)
Transfers the active call to this contact
What is a Phone Book? A group of contacts is called a phone book. A phone book can have any number of contacts. You can create your own phone books, and delete them.
What are the Default Phone Books? The default phone books will always be there in the system. The default phone books cannot be deleted. They are Business, Others, Personal and Find Results.
What is a Network Phone Book? A phone book which is not local to your system and exists on the network is the network phone book.
What is a Contact? Each entry of a phone book is termed as a contact. A contact has a Name, Company, Office Phone No., Extension, Home No., Mobile Phone No., etc. You can create as many contacts as you wish. You can also edit and delete these contacts.
How Do You Add a New Phone Book?
a. How Do You Add a New Phone Book from the Directory Menu? In the Selection View select Local or Network phonebook, click on the Directory menu, and choose New Book option to create a new book. Enter the new phone book name in the new phone book dialog box.

76
Duplicate names are not allowed.
Maximum 28 characters including spaces are allowed as a phone book name.
b. Other Ways to Add a New Phone Book
You can also click the right mouse button on the directory button in the Selection View and click on the New Book option.
How Do You Delete a Phone Book?
a. How Do You Add Delete a Phone Book from the Directory Menu? Select the Delete Book option from the directory menu.
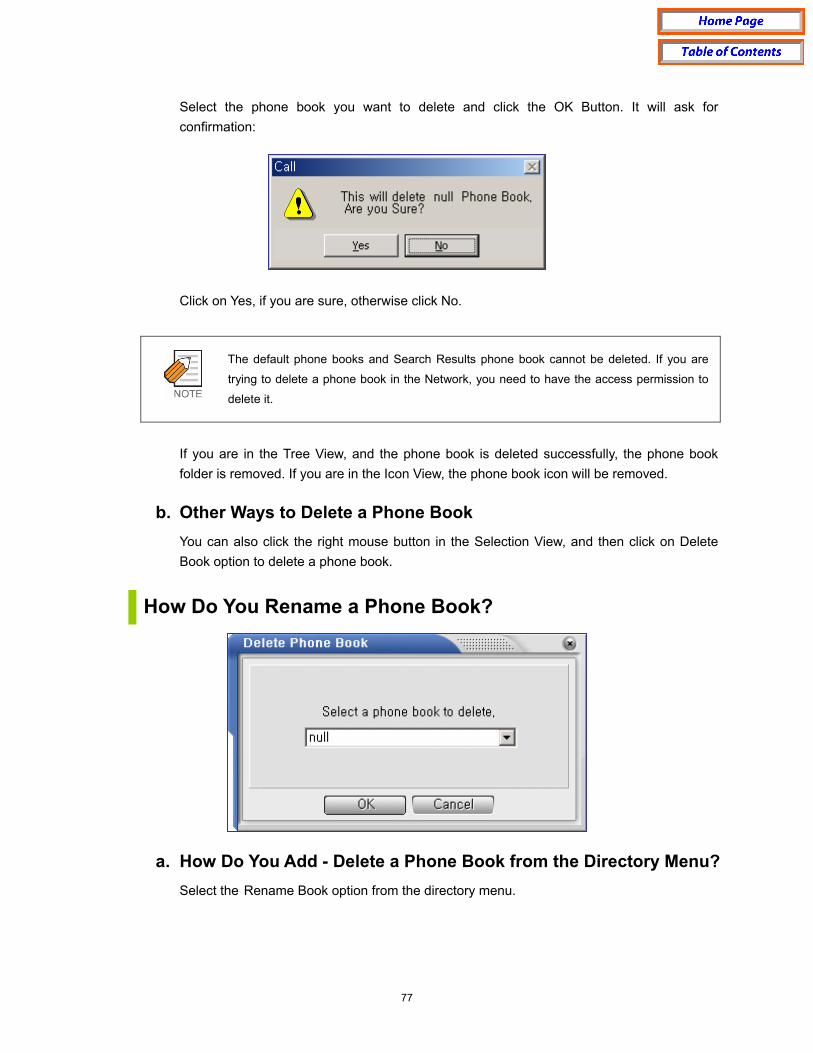
77
Select the phone book you want to delete and click the OK Button. It will ask for confirmation:
Click on Yes, if you are sure, otherwise click No.
The default phone books and Search Results phone book cannot be deleted. If you are
trying to delete a phone book in the Network, you need to have the access permission to
delete it.
If you are in the Tree View, and the phone book is deleted successfully, the phone book folder is removed. If you are in the Icon View, the phone book icon will be removed.
b. Other Ways to Delete a Phone Book
You can also click the right mouse button in the Selection View, and then click on Delete Book option to delete a phone book.
How Do You Rename a Phone Book?
a. How Do You Add - Delete a Phone Book from the Directory Menu?
Select the Rename Book option from the directory menu.

78
b. Other Ways to Rename a Phone Book You can also click the right mouse button in the Selection View, and then click on Rename Book option to rename a phone book.
How Do You Add a Network Phone Book?
a. How Do You Add a Network Phone Book from the Directory Menu? Click on Network PhoneBook option in the Directory menu, and then choose Connect option.
You will get a pop-up Open dialog box where you can select the network phone book you would like to access. If you are already connected to an OfficeServ Call network phone book, you have to disconnect it to connect to another network phone book. Only one network phone book at a time is allowed.
If you have connected to a network phone book while closing the application, the next time
you start your application, the network phone book connection will be restored.
Network PhoneBook folders are added in Tree View. In Icon View, the Network button is enabled.
b. Other Ways to Add a Network Phone Book
When you are in Directory Services, you can also choose the Connect option by clicking the right mouse button on the Network button in Selection View to connect to a network phonebook.
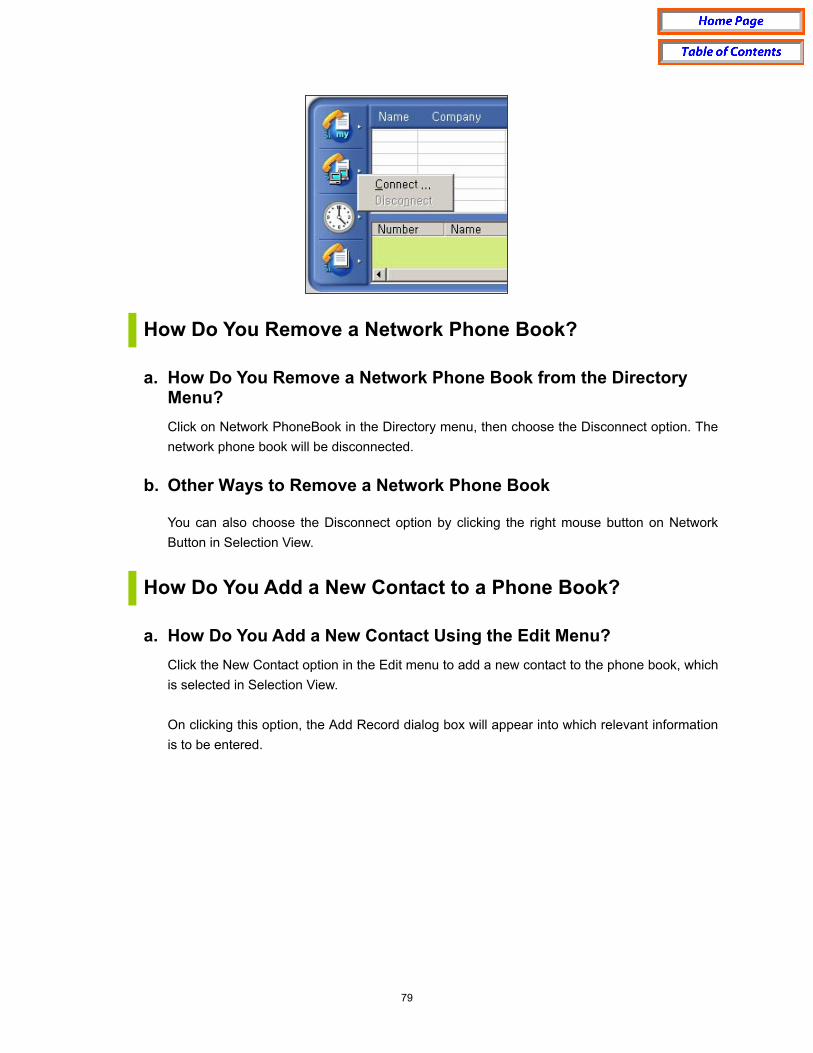
79
How Do You Remove a Network Phone Book? a. How Do You Remove a Network Phone Book from the Directory
Menu? Click on Network PhoneBook in the Directory menu, then choose the Disconnect option. The network phone book will be disconnected.
b. Other Ways to Remove a Network Phone Book
You can also choose the Disconnect option by clicking the right mouse button on Network Button in Selection View.
How Do You Add a New Contact to a Phone Book? a. How Do You Add a New Contact Using the Edit Menu?
Click the New Contact option in the Edit menu to add a new contact to the phone book, which is selected in Selection View. On clicking this option, the Add Record dialog box will appear into which relevant information is to be entered.
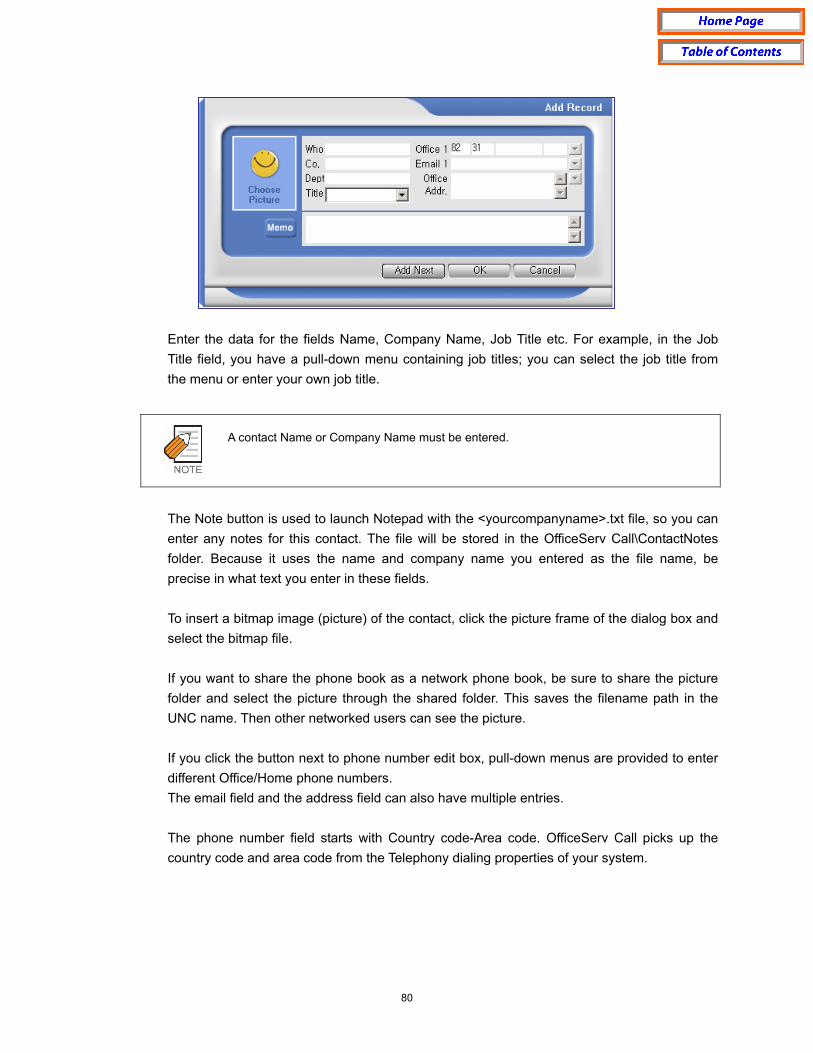
80
Enter the data for the fields Name, Company Name, Job Title etc. For example, in the Job Title field, you have a pull-down menu containing job titles; you can select the job title from the menu or enter your own job title.
A contact Name or Company Name must be entered.
The Note button is used to launch Notepad with the <yourcompanyname>.txt file, so you can enter any notes for this contact. The file will be stored in the OfficeServ Call\ContactNotes folder. Because it uses the name and company name you entered as the file name, be precise in what text you enter in these fields. To insert a bitmap image (picture) of the contact, click the picture frame of the dialog box and select the bitmap file. If you want to share the phone book as a network phone book, be sure to share the picture folder and select the picture through the shared folder. This saves the filename path in the UNC name. Then other networked users can see the picture. If you click the button next to phone number edit box, pull-down menus are provided to enter different Office/Home phone numbers. The email field and the address field can also have multiple entries. The phone number field starts with Country code-Area code. OfficeServ Call picks up the country code and area code from the Telephony dialing properties of your system.
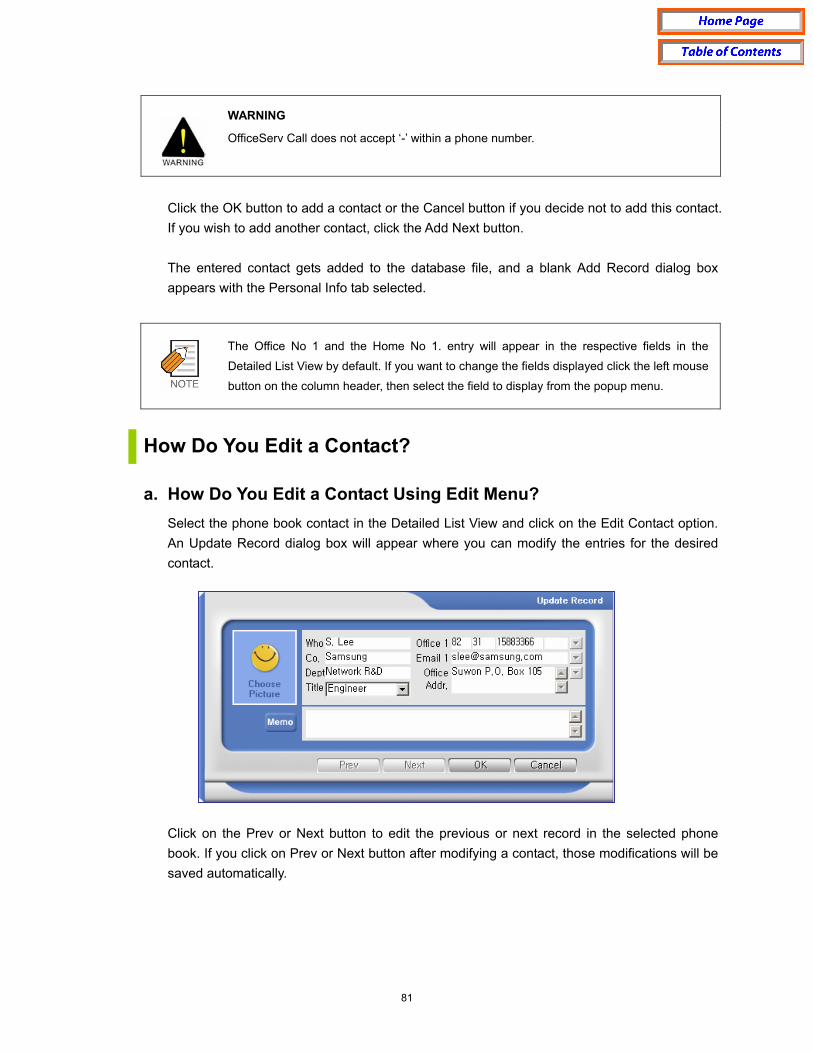
81
WARNING
OfficeServ Call does not accept ‘-’ within a phone number.
Click the OK button to add a contact or the Cancel button if you decide not to add this contact. If you wish to add another contact, click the Add Next button. The entered contact gets added to the database file, and a blank Add Record dialog box appears with the Personal Info tab selected.
The Office No 1 and the Home No 1. entry will appear in the respective fields in the
Detailed List View by default. If you want to change the fields displayed click the left mouse
button on the column header, then select the field to display from the popup menu.
How Do You Edit a Contact? a. How Do You Edit a Contact Using Edit Menu?
Select the phone book contact in the Detailed List View and click on the Edit Contact option. An Update Record dialog box will appear where you can modify the entries for the desired contact.
Click on the Prev or Next button to edit the previous or next record in the selected phone book. If you click on Prev or Next button after modifying a contact, those modifications will be saved automatically.

82
b. Other Ways to Edit a Contact You can also edit an existing contact by: • Clicking the right mouse button after selecting the phone book contact in the Detailed List
View and then clicking on Edit Contact option. • Double clicking on the selected contact in the Detailed List View.
The Edit option is enabled in the Detailed List View only when a contact has been
selected.
How Do You Delete Contacts? a. How Do You Delete Contacts from Edit Menu?
Select the phone book contacts in the Detailed List View and click the Delete Contact option in the Edit menu to delete selected contacts from the phone book.
b. Other Ways to Delete Contacts You can also delete a selected phone book contact from the Detailed List View by clicking the right mouse button and then selecting the Delete Contact option.
How Do You Delete All Contacts? a. How Do You Delete All Contacts from Edit Menu?
You can delete all contacts in a selected phone book by clicking the Delete All Contacts option in the Edit menu.
b. Other Ways to Delete All Contacts You can also delete all records in the selected phone book from the Detailed List View by clicking the right mouse button and then clicking on the Delete All option. Then, it will ask for confirmation. Click on Yes, if you are sure, otherwise click on No.
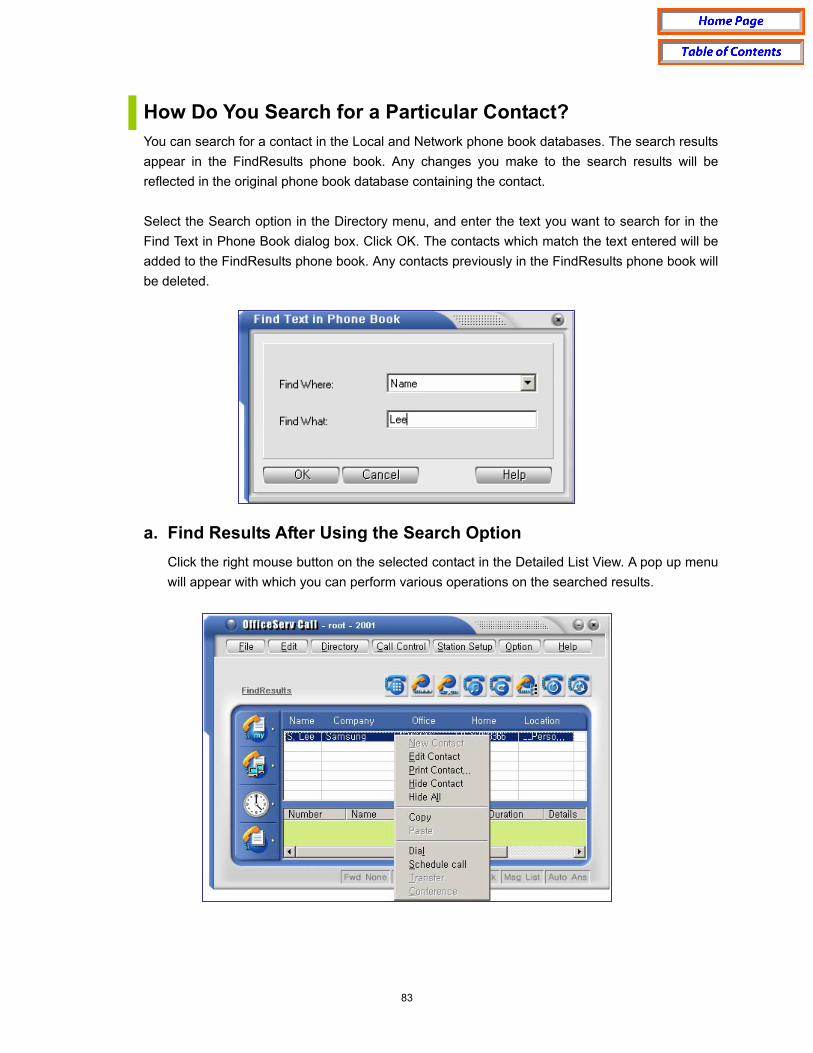
83
How Do You Search for a Particular Contact? You can search for a contact in the Local and Network phone book databases. The search results appear in the FindResults phone book. Any changes you make to the search results will be reflected in the original phone book database containing the contact. Select the Search option in the Directory menu, and enter the text you want to search for in the Find Text in Phone Book dialog box. Click OK. The contacts which match the text entered will be added to the FindResults phone book. Any contacts previously in the FindResults phone book will be deleted.
a. Find Results After Using the Search Option
Click the right mouse button on the selected contact in the Detailed List View. A pop up menu will appear with which you can perform various operations on the searched results.
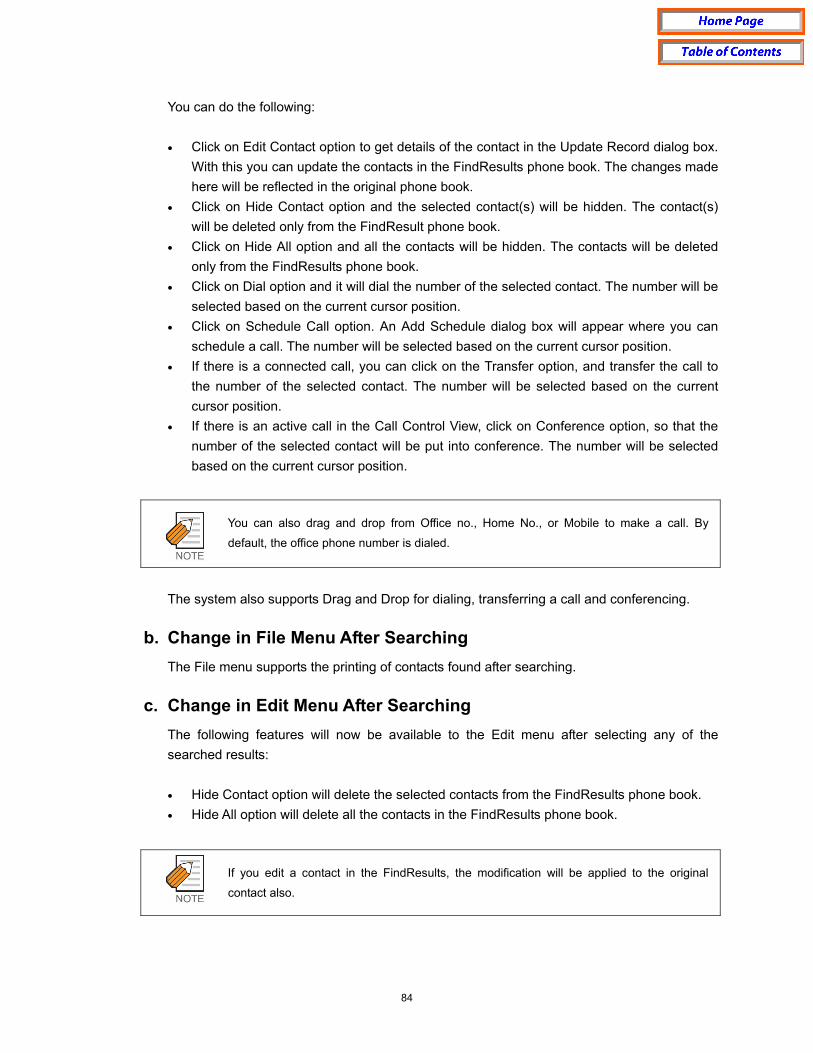
84
You can do the following: • Click on Edit Contact option to get details of the contact in the Update Record dialog box.
With this you can update the contacts in the FindResults phone book. The changes made here will be reflected in the original phone book.
• Click on Hide Contact option and the selected contact(s) will be hidden. The contact(s) will be deleted only from the FindResult phone book.
• Click on Hide All option and all the contacts will be hidden. The contacts will be deleted only from the FindResults phone book.
• Click on Dial option and it will dial the number of the selected contact. The number will be selected based on the current cursor position.
• Click on Schedule Call option. An Add Schedule dialog box will appear where you can schedule a call. The number will be selected based on the current cursor position.
• If there is a connected call, you can click on the Transfer option, and transfer the call to the number of the selected contact. The number will be selected based on the current cursor position.
• If there is an active call in the Call Control View, click on Conference option, so that the number of the selected contact will be put into conference. The number will be selected based on the current cursor position.
You can also drag and drop from Office no., Home No., or Mobile to make a call. By
default, the office phone number is dialed.
The system also supports Drag and Drop for dialing, transferring a call and conferencing.
b. Change in File Menu After Searching The File menu supports the printing of contacts found after searching.
c. Change in Edit Menu After Searching The following features will now be available to the Edit menu after selecting any of the searched results: • Hide Contact option will delete the selected contacts from the FindResults phone book. • Hide All option will delete all the contacts in the FindResults phone book.
If you edit a contact in the FindResults, the modification will be applied to the original
contact also.

85
Directory Services in Detailed List View
This displays the contents of the selected phone book in the Detailed List View. The fields listed are Name, Company, Office Phone, Home Phone and Mobile. If you click on Office or Home column header, a context menu will appear to enable a change to the phone number type shown in the list. a. How Do You Sort Contacts?
You can sort the list according to Name, Company, or Mobile field in ascending or descending order by clicking on the respective column headers. When you click on the column header, it will sort in ascending order on that field. If you want to sort it in descending order, click the header again.
b. How Do You Add a Contact? Click the right mouse button in the Detailed List View and choose New Contact option to add a new contact in your phone book.
c. How Do You Edit a Contact? Click the right mouse button in the Detailed List View and choose Edit Contact option to modify an existing contact in your phone book.

86
d. How Do You Delete a Contact? Click the right mouse button in the Detailed List View and choose Delete Contact option to delete the selected contact from the phone book.
e. How Do You Delete All Contacts from your Phone Book? Click the right mouse button in the Detailed List View and choose Delete All option to delete all the contacts from the phone book. Once you choose the Delete All option, it will ask for confirmation. Click on Yes, if you are sure, otherwise click No.
f. How Do You Copy/Paste Contacts? Select contacts to copy and click the right mouse button in the Detailed List View and choose Copy option. Choose the folder to paste the copied contacts. Click the right mouse button on its detailed list view and choose Paste.
g. How Do You Import a Smart Control Phone Book? If you have a Smart Control Network 4.1 phonebook, you can import it into OfficeServ Call phonebook. Select a phonebook table into which the imported contacts will be saved from My Phonebook, click right mouse button on the Detailed List View, and select Import Smart Control Phonebook option. A File Open dialog appears. Then select a Smart Control Network 4.1 phonebook. This feature only works with Smart Control Network 4.1 phonebooks.
h. How Do You Dial a Contact? Select the contact from the phone book in the Detailed List View and click the right mouse button. Choose the Dial option to dial. Dial option dials the number of the selected contact. The number will be selected based on the current cursor position.
i. How Do You Schedule a Call to a Contact? Select the contact from the phone book in the Detailed List View and click the right mouse button in the Detailed List View. Choose the Schedule Call option to schedule a call to the number of the contact. The number will be selected based on the current cursor position.
j. How Do You Transfer a Call to a Contact? Select the contact from the phone book in the Detailed List View and click the right mouse button in the Detailed List View. If you have an active connected call in the Call Control View, you can transfer this call to the number of the selected contact by clicking on Transfer option. The number will be selected based on the current cursor position.

87
k. How Do You Add a Contact to a Conference? Select the contact from the phone book in the Detailed List View and click the right mouse button in the Detailed List View. This dials the number of the contact. The number will be selected based on the current cursor position. If you have an active call in the Call Control View, you can include this contact in the ongoing conversation by clicking the Conference option.
How Do You Print Contacts From a Phone Book?
This prints all the contacts in your phone book. You have the option to select one of four different types of formats for printing. To print the contents of a phone book that you have selected in the Selection View, select contacts to print form the Detailed List View and click on the Print option in the File menu. The listing in the printout depends upon the options you have selected in ‘Print Fields…’dialog box. The output will appear like this: Name : Samsung Lee Profession : Software Engineer, Samsung Electronics Co., Ltd. Company Contact : Address : 416, MaeTanDong, Suwon First No : 82-31-279 1114-extn-1114 Second No : Other No : Direct No : Internal No : 1114 Home Contact : Address : 1Ga, TaePyoungNo, JoongGu, Seoul First No : Second No : Farm No :

88
GuestHouse No : Other Contact Nos : Fax : 82-31-279 4289 Mobile : Pager Email : [email protected]
a. How Do You Set Up Fields for Printing?
You can select the individual items of information to be printed by selecting options from the Information To Print dialog box.
Click the Fields to Print option on the File menu. The Information To Print dialog box will appear with five checkbox options. Select the option or options that you want to print out. For example, if you want a printout of a phone book listing only the professional details, check against the Profession checkbox and deselect the rest of the checkboxes. If Select All option is checked, all the other options get checked. The figure above shows all the options checked, so in this case you would get a printout of all the details in the phone book that you have selected in the Selection View.
b. How Do You Print a Single Contact?
Click the right mouse button in the Detailed List View after selecting a contact, then choose Print a Contact. The selected contact will be printed with the options set in Page Setup.

89
Sending Messages to OfficeServ Call Users You can send and receive text messages to/from other OfficeServ Call Users. There are 2 Message options in the File menu, Message Enable and Message Login.
a. Enable Message
You have to login to the OfficeServ Link to send/receive messages. If you select the Enable Message option, OfficeServ Call sends a login message to the OfficeServ Link. When the login succeeds, the Enable Message option is checked.
If other OfficeServ Call users send messages to you while you are logged in, the message window is open and the messages are displayed. To avoid receiving messages, select the Enable Message option once again. Then you are logged out, and the Enable Message option will be unchecked.
b. Send Message
If you want to send messages to other OfficeServ Call users, select the Send Message option. Then the Send Message dialog box appears. Select the destination extensions in combo box of the (1) window, enter the message text in bottom of the (2) window and click Send button. The sent message attached to the lists window.

90
You can select the destination extensions from the combo box at the top. If you want to send to all the logged-in users, select ‘Broadcasting’. To send the same message to multiple extensions, select as many stations as you want. The selected destinations are shown (1) window. You can edit the destination directly. Separate destination extensions from one another by using a semi-colon ‘;’. The messages sent and received are listed in the window. The latest message is attached at the bottom. If there are more than 1000 messages, the oldest message is deleted.
How Do You Import/Export Excel Files? A Microsoft Excel Import/Export tool is provided with the OfficeServ Call 5.1. You can import Excel worksheets into the OfficeServ Call phonebook tables. It is also possible to export OfficeServ Call Phonebook tables to Excel worksheets.
Excel Import/Export feature is available only when you have the Microsoft Excel version
7.0 or later installed on your PC.
To start Excel Import/Export, shutdown OfficeServ Call if it is running and select Excel Import/Export from the OfficeServ Call program folder.
(1)Destinations
(2)Message Log
(3)Message to send
(1)
(2)

91
If the OfficeServ Call is running, this warning message comes up.
When you launch the Excel Import/Export successfully, this dialog appears.
First, click on the browse button in the picture above, and select an OfficeServ Call phonebook file. The OfficeServ Call’s phonebook filename is Pbook.mdb in the OfficeServ Call’s program folder. To import an Excel worksheet into the selected phonebook, click Import button. To export selected phonebook to Excel Worksheets, click Export button.
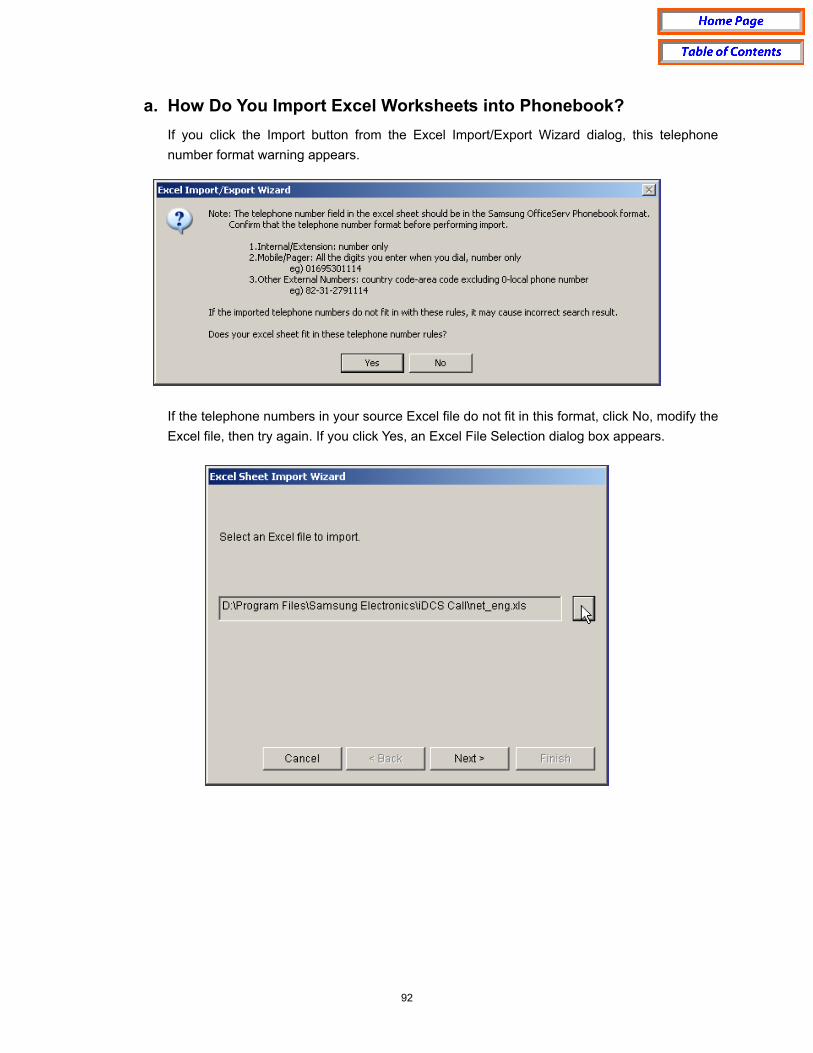
92
a. How Do You Import Excel Worksheets into Phonebook? If you click the Import button from the Excel Import/Export Wizard dialog, this telephone number format warning appears.
If the telephone numbers in your source Excel file do not fit in this format, click No, modify the Excel file, then try again. If you click Yes, an Excel File Selection dialog box appears.

93
Click the browse button, and select an Excel file whose worksheet is to be imported. Click Next, and select a worksheet to import.
If you click on the name of a worksheet, you can see first ten rows of the selected worksheet. Click Next, and select the range to import.

94
If you want to import the whole worksheet, mark the ‘Whole’ option. Otherwise select ‘Partial’ worksheet as shown above. If you have column headers in the first row of the selected range, mark ‘The first row of the selected range is a column header.’ Click Next, and map the phonebook table fields with the Excel worksheet columns.
Select a phonebook field from the left combo box, and select a corresponding Excel column from the right combo box, then click the map button in the middle. You can see the mapping result in the list box right below the combo boxes. Click Next, and select the destination phonebook table.

95
You can import the selected worksheet into either a new phonebook or an existing phonebook. If you select New Table, enter the name of a new table. Otherwise, select an existing table from the combo box. Click Next, and confirm your selection.
Click ‘Finish’, to complete importing. If the import succeeds, this message is shown.
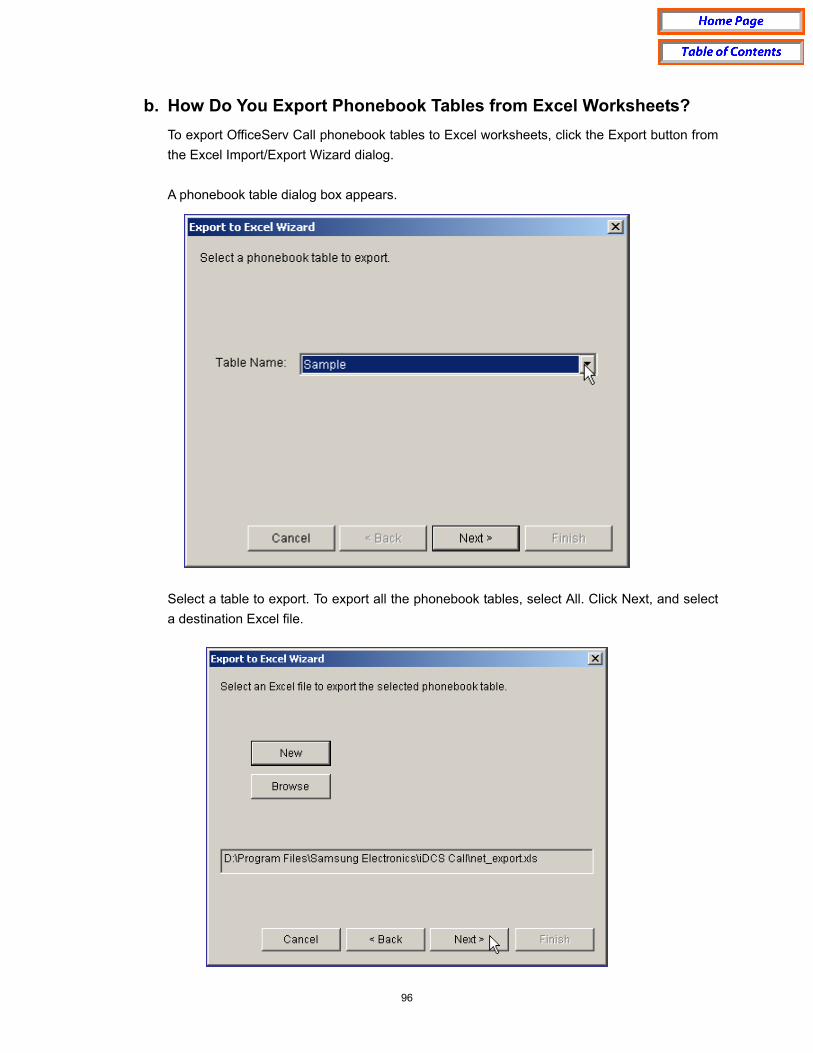
96
b. How Do You Export Phonebook Tables from Excel Worksheets? To export OfficeServ Call phonebook tables to Excel worksheets, click the Export button from the Excel Import/Export Wizard dialog. A phonebook table dialog box appears.
Select a table to export. To export all the phonebook tables, select All. Click Next, and select a destination Excel file.

97
If you want to create a new Excel file, click New button. You can select an existing Excel file by clicking the Browse button. Click Next, and confirm your selection.
Click ‘Finish’ to complete exporting. If the export succeeds, this message will be shown.
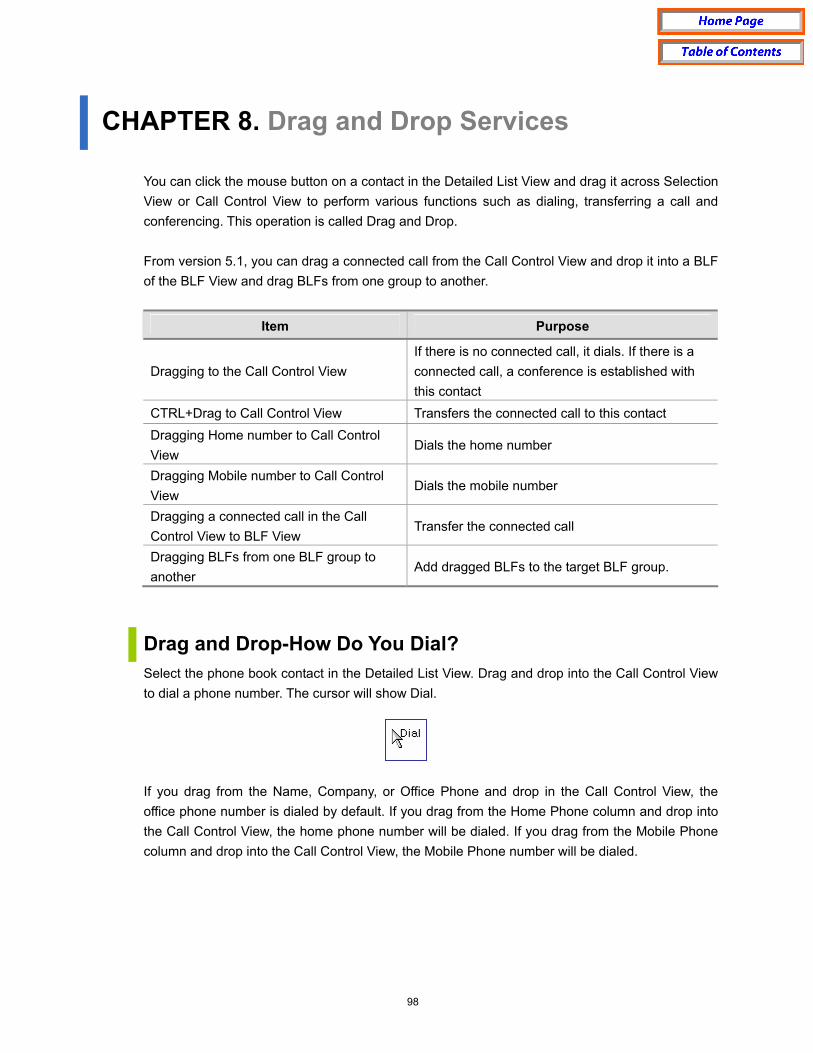
98
CHAPTER 8. Drag and Drop Services You can click the mouse button on a contact in the Detailed List View and drag it across Selection View or Call Control View to perform various functions such as dialing, transferring a call and conferencing. This operation is called Drag and Drop. From version 5.1, you can drag a connected call from the Call Control View and drop it into a BLF of the BLF View and drag BLFs from one group to another.
Item Purpose
Dragging to the Call Control View If there is no connected call, it dials. If there is a connected call, a conference is established with this contact
CTRL+Drag to Call Control View Transfers the connected call to this contact Dragging Home number to Call Control View
Dials the home number
Dragging Mobile number to Call Control View
Dials the mobile number
Dragging a connected call in the Call Control View to BLF View
Transfer the connected call
Dragging BLFs from one BLF group to another
Add dragged BLFs to the target BLF group.
Drag and Drop-How Do You Dial? Select the phone book contact in the Detailed List View. Drag and drop into the Call Control View to dial a phone number. The cursor will show Dial.
If you drag from the Name, Company, or Office Phone and drop in the Call Control View, the office phone number is dialed by default. If you drag from the Home Phone column and drop into the Call Control View, the home phone number will be dialed. If you drag from the Mobile Phone column and drop into the Call Control View, the Mobile Phone number will be dialed.

99
Drag and Drop-How Do You Transfer a Call? When there is an active call, press the CTRL key and drag the contact from the phone book in the Detailed List View, and drop into the Call Control View to transfer the call to the selected contact. The cursor will show TRSF.
Drag and Drop-How Do You Conference a Call? When there is an active call, drag the contact from the phone book in the Detailed List View, and drop into the Call Control View to add the contact to conference. The cursor will show Conf.
Drag and Drop-How Do You Transfer a Call to a BLF? You can perform a blind transfer for a connected call by dragging it from the Call Control View and drop it into an idle BLF. The cursor will show B’Xfr.
If you drag and drop a connected call with the CTRL key pressed, a consultation transfer is established. The cursor will show C’Xfr.
Drag and Drop-How Do You Add BLFs? You can add a set of BLFs one at a time by dragging BLFs from the BLF Panel and dropping them into the target group entry in the Group Panel. This feature is available with the List View only. Change your view option to the List View. Select the BLFs to add to another BLF group and them onto the group Panel. The cursor will show like this.
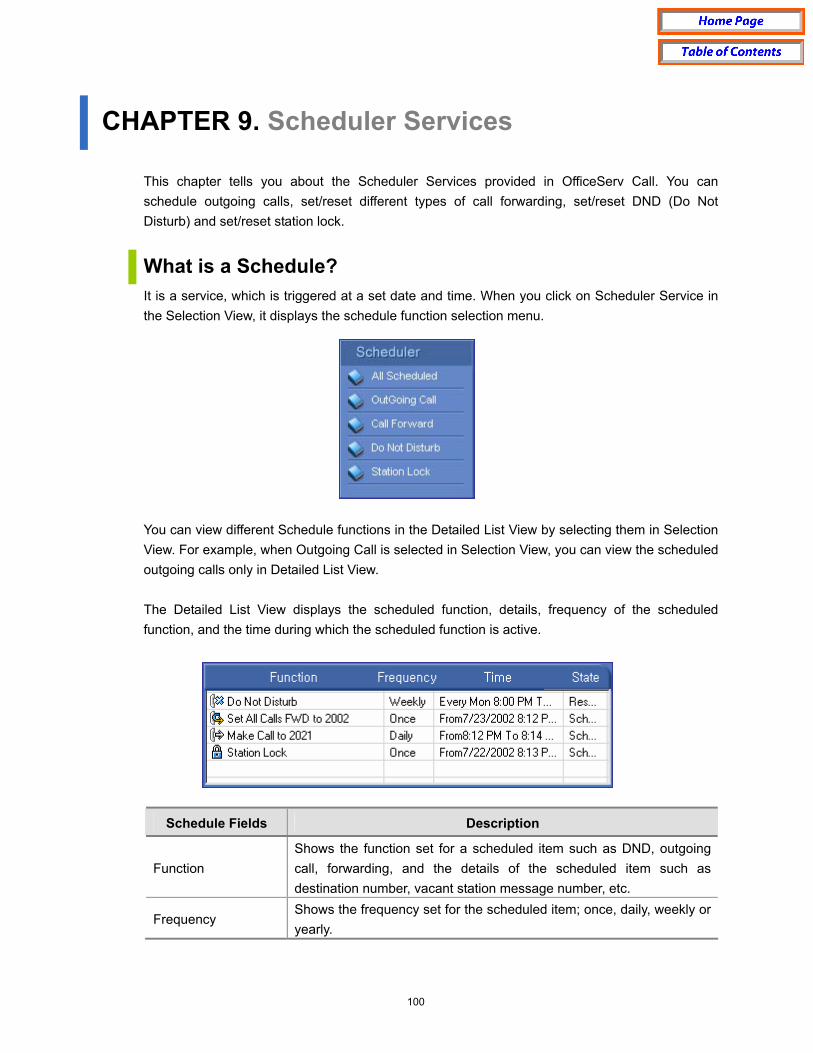
100
CHAPTER 9. Scheduler Services This chapter tells you about the Scheduler Services provided in OfficeServ Call. You can schedule outgoing calls, set/reset different types of call forwarding, set/reset DND (Do Not Disturb) and set/reset station lock.
What is a Schedule? It is a service, which is triggered at a set date and time. When you click on Scheduler Service in the Selection View, it displays the schedule function selection menu.
You can view different Schedule functions in the Detailed List View by selecting them in Selection View. For example, when Outgoing Call is selected in Selection View, you can view the scheduled outgoing calls only in Detailed List View. The Detailed List View displays the scheduled function, details, frequency of the scheduled function, and the time during which the scheduled function is active.
Schedule Fields Description
Function Shows the function set for a scheduled item such as DND, outgoing call, forwarding, and the details of the scheduled item such as destination number, vacant station message number, etc.
Frequency Shows the frequency set for the scheduled item; once, daily, weekly or yearly.
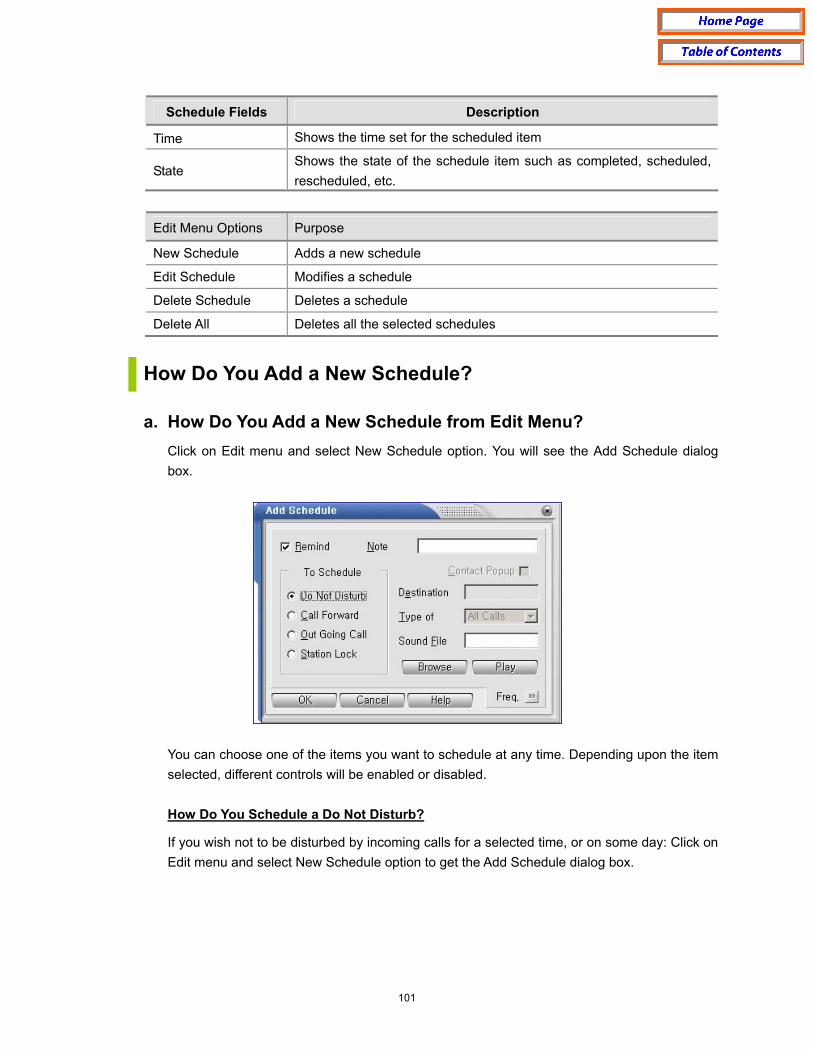
101
Schedule Fields Description
Time Shows the time set for the scheduled item
State Shows the state of the schedule item such as completed, scheduled, rescheduled, etc.
Edit Menu Options Purpose
New Schedule Adds a new schedule
Edit Schedule Modifies a schedule
Delete Schedule Deletes a schedule
Delete All Deletes all the selected schedules
How Do You Add a New Schedule? a. How Do You Add a New Schedule from Edit Menu?
Click on Edit menu and select New Schedule option. You will see the Add Schedule dialog box.
You can choose one of the items you want to schedule at any time. Depending upon the item selected, different controls will be enabled or disabled. How Do You Schedule a Do Not Disturb?
If you wish not to be disturbed by incoming calls for a selected time, or on some day: Click on Edit menu and select New Schedule option to get the Add Schedule dialog box.
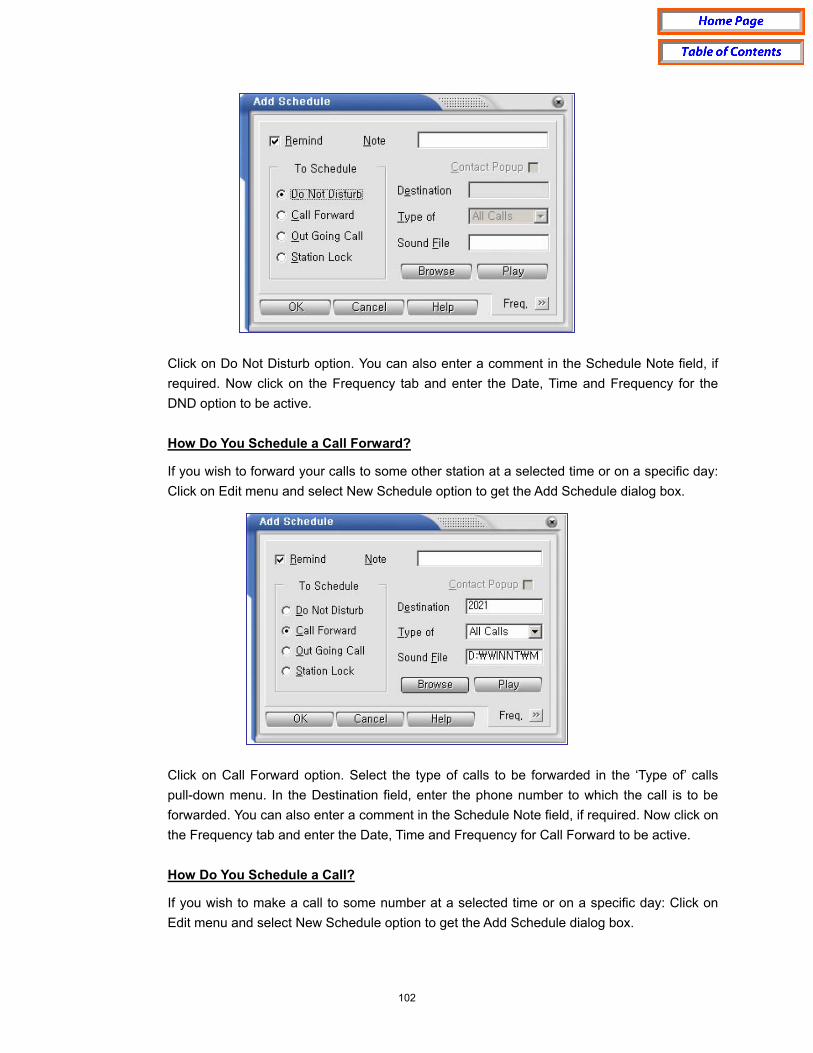
102
Click on Do Not Disturb option. You can also enter a comment in the Schedule Note field, if required. Now click on the Frequency tab and enter the Date, Time and Frequency for the DND option to be active.
How Do You Schedule a Call Forward?
If you wish to forward your calls to some other station at a selected time or on a specific day: Click on Edit menu and select New Schedule option to get the Add Schedule dialog box.
Click on Call Forward option. Select the type of calls to be forwarded in the ‘Type of’ calls pull-down menu. In the Destination field, enter the phone number to which the call is to be forwarded. You can also enter a comment in the Schedule Note field, if required. Now click on the Frequency tab and enter the Date, Time and Frequency for Call Forward to be active.
How Do You Schedule a Call?
If you wish to make a call to some number at a selected time or on a specific day: Click on Edit menu and select New Schedule option to get the Add Schedule dialog box.
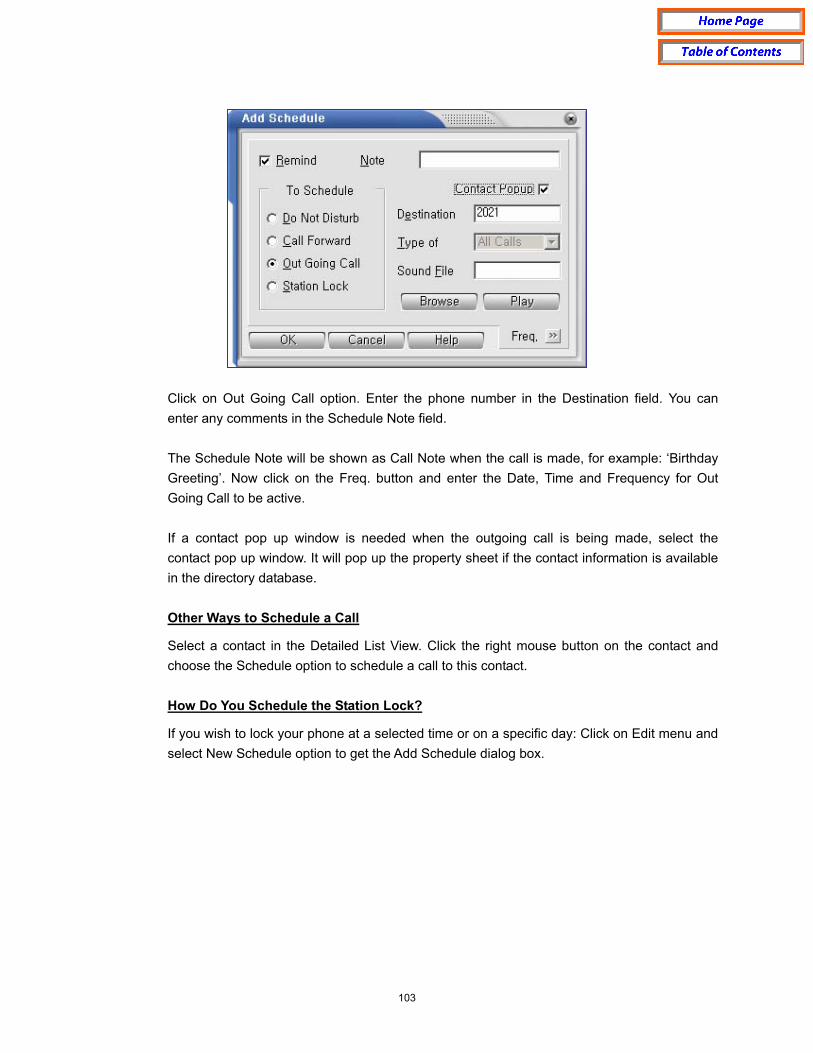
103
Click on Out Going Call option. Enter the phone number in the Destination field. You can enter any comments in the Schedule Note field. The Schedule Note will be shown as Call Note when the call is made, for example: ‘Birthday Greeting’. Now click on the Freq. button and enter the Date, Time and Frequency for Out Going Call to be active. If a contact pop up window is needed when the outgoing call is being made, select the contact pop up window. It will pop up the property sheet if the contact information is available in the directory database.
Other Ways to Schedule a Call
Select a contact in the Detailed List View. Click the right mouse button on the contact and choose the Schedule option to schedule a call to this contact.
How Do You Schedule the Station Lock?
If you wish to lock your phone at a selected time or on a specific day: Click on Edit menu and select New Schedule option to get the Add Schedule dialog box.

104
Click on Station Lock option. Enter the Password. You can also enter a comment in the Schedule Note field, if required. Now click on the Frequency tab and enter the Date, Time and Frequency for Station Lock to be active.
b. Other Ways to Add a New Schedule You can add a new schedule in the Detailed List View by clicking the right mouse button and then clicking on New Schedule.
Frequency Option in Scheduler This is used to set a time, date and frequency for execution of the scheduled item.
105
You can choose any one option from the Frequency pull-down menu. Depending on the type of frequency selected, certain fields may be enabled or disabled. These fields can be used to enter the day, date and time.
a. How Do You Schedule an Item Once?
If you select Once option, the scheduled services will be executed only once for the date and time you enter.
b. How Do You Schedule an Item Daily? If you select Daily option, the scheduled services will be executed every day at the time you enter.
c. How Do You Schedule an Item Weekly? If you select Weekly option, the scheduled services will be executed weekly on the day of the week and at the time you enter. You can select the day of the week from the Day pull-down menu.
d. How Do You Schedule an Item Yearly? If you select Yearly option, the scheduled services will be executed yearly on the day of the year and at the time you enter.
Reminder Option in Scheduler If you wish to be reminded before a scheduled item is activated, check the Reminder option box. At the scheduled time, a dialog box will pop up to ask for confirmation of continuation of the schedule. If a wave file is configured to be played for the Reminder, it will be played along with it. If you click on ‘No’, the scheduled item is not activated. The dialog box will remain for 10 seconds after which it will be assumed that the answer to the confirmation is ‘No’, and the scheduled item will not be activated.
How Do You Edit a Schedule?
a. How Do You Edit a Schedule from Edit Menu? If you have any change in plans and you have scheduled a service, you can modify the schedule using the Edit Schedule option from the Edit menu.
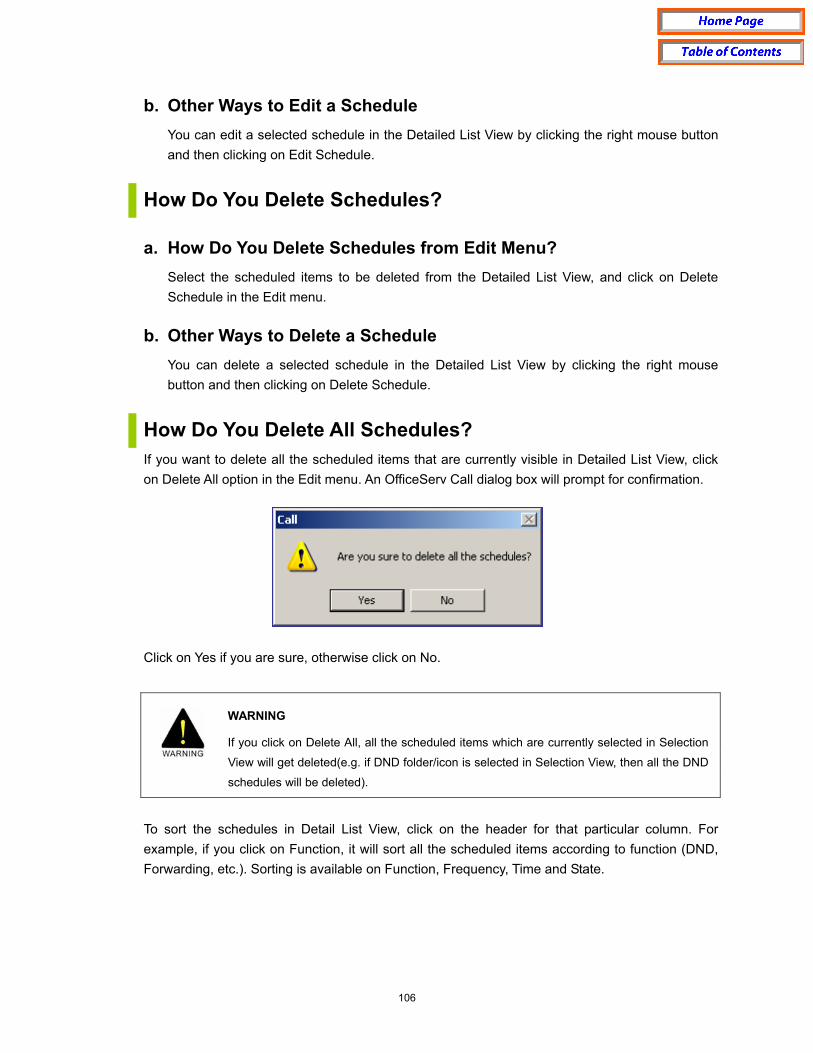
106
b. Other Ways to Edit a Schedule You can edit a selected schedule in the Detailed List View by clicking the right mouse button and then clicking on Edit Schedule.
How Do You Delete Schedules?
a. How Do You Delete Schedules from Edit Menu? Select the scheduled items to be deleted from the Detailed List View, and click on Delete Schedule in the Edit menu.
b. Other Ways to Delete a Schedule You can delete a selected schedule in the Detailed List View by clicking the right mouse button and then clicking on Delete Schedule.
How Do You Delete All Schedules? If you want to delete all the scheduled items that are currently visible in Detailed List View, click on Delete All option in the Edit menu. An OfficeServ Call dialog box will prompt for confirmation.
Click on Yes if you are sure, otherwise click on No.
WARNING
If you click on Delete All, all the scheduled items which are currently selected in Selection
View will get deleted(e.g. if DND folder/icon is selected in Selection View, then all the DND
schedules will be deleted).
To sort the schedules in Detail List View, click on the header for that particular column. For example, if you click on Function, it will sort all the scheduled items according to function (DND, Forwarding, etc.). Sorting is available on Function, Frequency, Time and State.
107
How Do You Refresh States of the Schedules? If you want to refresh the scheduled items on the list, click the right mouse button on the list. The states of the schedule items are refreshed instantly.
How Do You Sort Schedules? To sort the Schedules in Detail List View, click on the header for that particular column. For example, if you click on Function, it will sort either in ascending or descending order of the name of the scheduled function, depending on which order they are currently in. Sorting is available on Function, Frequency, Time, and State.
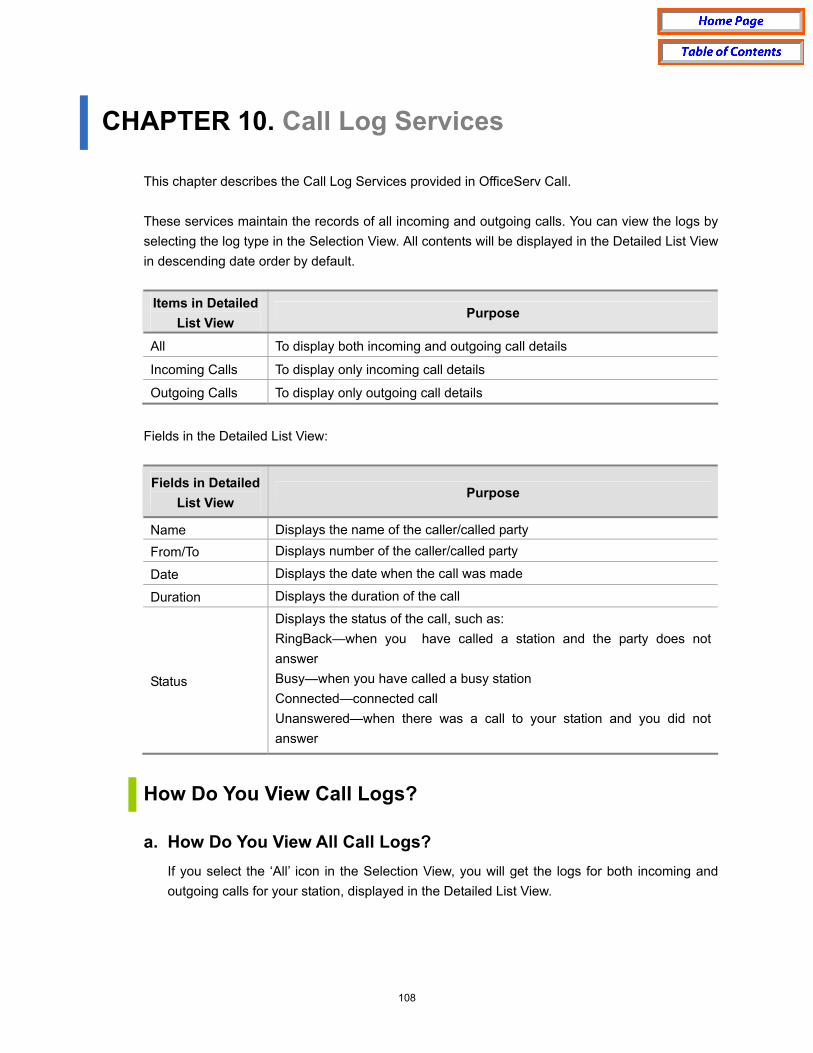
108
CHAPTER 10. Call Log Services This chapter describes the Call Log Services provided in OfficeServ Call. These services maintain the records of all incoming and outgoing calls. You can view the logs by selecting the log type in the Selection View. All contents will be displayed in the Detailed List View in descending date order by default.
Items in Detailed List View
Purpose
All To display both incoming and outgoing call details
Incoming Calls To display only incoming call details
Outgoing Calls To display only outgoing call details
Fields in the Detailed List View:
Fields in Detailed List View
Purpose
Name Displays the name of the caller/called party
From/To Displays number of the caller/called party
Date Displays the date when the call was made
Duration Displays the duration of the call
Status
Displays the status of the call, such as: RingBack—when you have called a station and the party does not answer Busy—when you have called a busy station Connected—connected call Unanswered—when there was a call to your station and you did not answer
How Do You View Call Logs?
a. How Do You View All Call Logs? If you select the ‘All’ icon in the Selection View, you will get the logs for both incoming and outgoing calls for your station, displayed in the Detailed List View.

109
b. How Do You View Incoming Call Log? If you select Incoming Calls in the Selection View, all the incoming call log records will be displayed in the Detailed List View.
c. How Do You View Outgoing Call Log? If you select Outgoing Calls in the Selection View, all the outgoing call log records will be displayed in the Detailed List View.
How Do You Sort Logs? To sort the logs in Detail List View, click on the header for that particular column. For example, if you click on Name, it will sort either in ascending or descending order of the name of the caller/called party, depending on which order they are currently in. Sorting is available on Name, Caller ID, Date, Duration, and Status.
How Do You Print Call Logs? a. How Do You Print Call Logs from File Menu?
Select the Print option from the File menu when you are in the Call Log Services to print all the call logs in the selected format.
b. How Do You Set Up Different Types of Call Log Print Formats? If you click the Print Setup option from the File menu, the Select Format to Print dialog box appears, from which the format for printing can be selected.
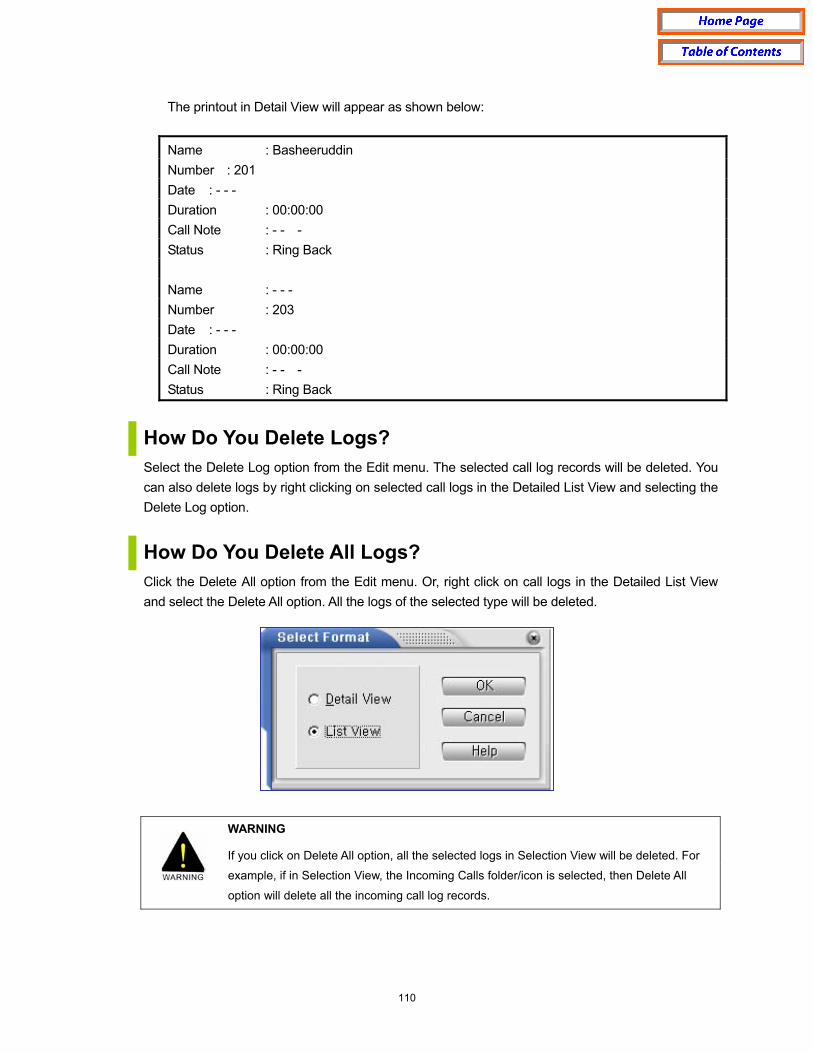
110
The printout in Detail View will appear as shown below:
Name : Basheeruddin Number : 201 Date : - - - Duration : 00:00:00 Call Note : - - - Status : Ring Back Name : - - - Number : 203 Date : - - - Duration : 00:00:00 Call Note : - - - Status : Ring Back
How Do You Delete Logs? Select the Delete Log option from the Edit menu. The selected call log records will be deleted. You can also delete logs by right clicking on selected call logs in the Detailed List View and selecting the Delete Log option.
How Do You Delete All Logs? Click the Delete All option from the Edit menu. Or, right click on call logs in the Detailed List View and select the Delete All option. All the logs of the selected type will be deleted.
WARNING
If you click on Delete All option, all the selected logs in Selection View will be deleted. For
example, if in Selection View, the Incoming Calls folder/icon is selected, then Delete All
option will delete all the incoming call log records.
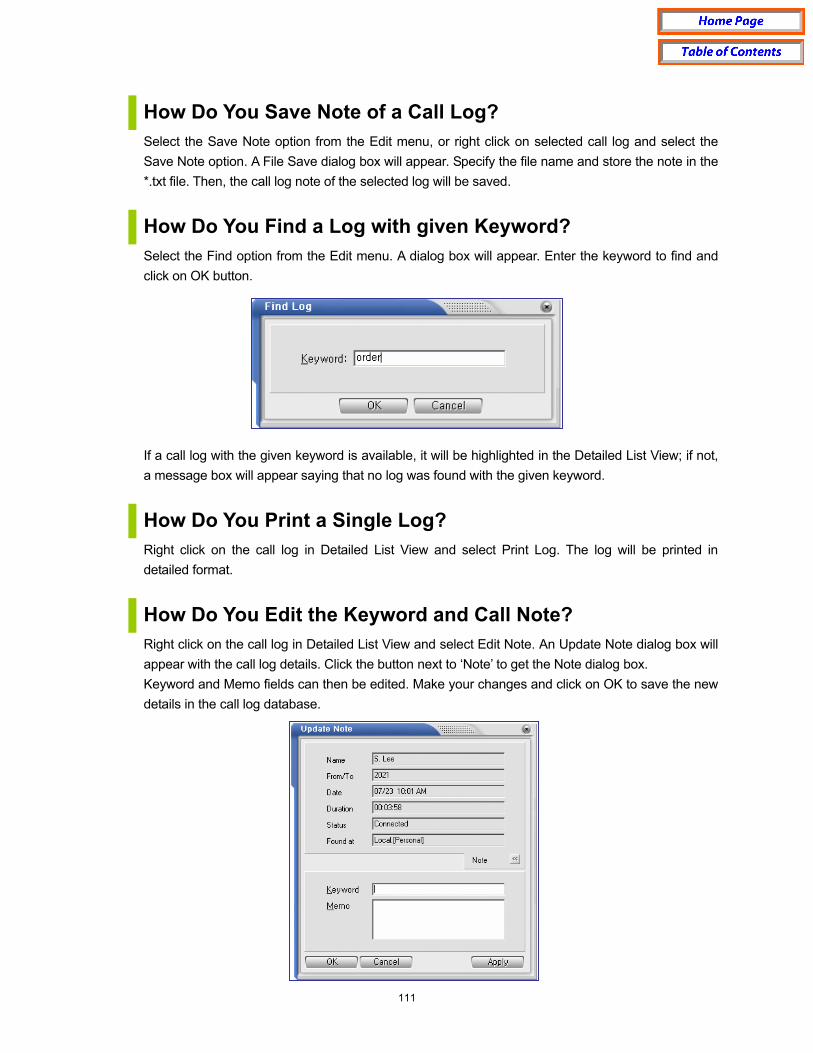
111
How Do You Save Note of a Call Log? Select the Save Note option from the Edit menu, or right click on selected call log and select the Save Note option. A File Save dialog box will appear. Specify the file name and store the note in the *.txt file. Then, the call log note of the selected log will be saved.
How Do You Find a Log with given Keyword? Select the Find option from the Edit menu. A dialog box will appear. Enter the keyword to find and click on OK button. If a call log with the given keyword is available, it will be highlighted in the Detailed List View; if not, a message box will appear saying that no log was found with the given keyword.
How Do You Print a Single Log? Right click on the call log in Detailed List View and select Print Log. The log will be printed in detailed format.
How Do You Edit the Keyword and Call Note? Right click on the call log in Detailed List View and select Edit Note. An Update Note dialog box will appear with the call log details. Click the button next to ‘Note’ to get the Note dialog box. Keyword and Memo fields can then be edited. Make your changes and click on OK to save the new details in the call log database.

112
How Do You Redial from Call Log List View? Right click on the call log in Detailed List View and select Redial, or double click the telephone number in the From/To field to redial. This will dial the number from the call log list. The phone number in incoming call logs is in CNTY-AREA-NUMBER format – except internal calls - whereas the phone number in outgoing call logs is formatted as the digits were dialed.
DNIS in the Call Log The DNIS number is shown as part of the From/To field itself in the call log dialog box. It appears as NUMBER DNIS.
113
CHAPTER 11. DDE in OfficeServ Call Dynamic Data Exchange (DDE) is a form of communication (inter-process) that uses shared memory to exchange data between applications. Applications can use DDE for one-time data transfers and for ongoing exchanges in which the applications send updates to one another as new data becomes available. Client and Server Interaction: DDE always takes place between a client application (the ‘client’) and a server application (the ‘server’). The client initiates the exchange by establishing a conversation with the server so that transactions can be sent to the server. (A transaction is a request for data or services.) The server responds to these transactions by providing data or services to the client. A server can have many clients at the same time, and a client can request data from multiple servers. Also, an application can be both a client and a server. A client terminates a conversation when it no longer needs a server’s data or services. For example, a graphics application might contain a bar graph that represents a corporation’s half -yearly profits, and the data for the bar graph might be contained in a spreadsheet application. To obtain the latest profit figures, the graphics application (client) establishes a conversation with the spreadsheet application (server). The graphics application then sends a transaction to the spreadsheet application, requesting the latest profit figures.
OfficeServ Call Application as DDE Client OfficeServ Call can act as a DDE client to start a conversation with Personal Information Manager (PIM) applications such as GoldMine for Windows, SuperOffice etc. These applications act as DDE servers. You can Enable DDE in OfficeServ Call by selecting options in Options DDE…. When DDE is enabled in OfficeServ Call, then for any incoming call a command is sent to your selected PIM application (which acts like a DDE server) to search for the caller’s contact record based on the incoming caller ID or DNIS (Dialed Number Identification Services). You have the option of specifying the search based on call type, such as Internal Call and/or External Call, as well as on Caller ID or DNIS. The dialog box that appears when you select Set Environment DDE… DDE Settings from the Option menu is shown below.

114
In the DDE Program combo box (dropdown list) the following PIM applications are supported: • GoldMine for Windows, • SuperOffice4.0, • Maximizer for Windows. For these applications, you need only select the PIM application name, the application’s EXE file path and the database file to be opened for finding the contact record. The DDE initialization based on the Services Name and Topic Name is handled by OfficeServ Call. a. OfficeServ Call as DDE Client to GOLDMINE
If you have Enabled DDE and selected GOLDMINE as your Personal Information Manager (PIM), then you need to enter proper path of the GOLDMINE EXE (i.e.gm4.EXE). Choose your GOLDMINE CONTACT file containing the contact records. If you are not sure about the path of the EXE, run the entered EXE by pressing the TEST button. When you click O.K button to ‘Select the DDE Server’ dialog, a dialog requiring for user to enter ‘Login & Password’ for GOLDMINE appears.

115
Enter your username and password, if any. When entered correctly, DDE is initialized.
Make sure to enter the correct GOLDMINE EXE file as the username and password are
passed along with it. If you enter any other EXE file there is a chance of the program
crashing.
b. OfficeServ Call as DDE Client to SuperOffice
If you have enabled DDE and selected SuperOffice4.0 as your PIM, you need to enter the path for the SUPEROFFICE file, SUPEROF4.EXE. (If you are not sure about the path of the file, run it by pressing the TEST button.) Even if you have not logged on to SuperOffice it still shows the contact pop up.
c. OfficeServ Call as DDE Client to Maximizer for Windows
If you have enabled DDE and selected Maximizer for Windows as your PIM, you need to enter the path of the Maximizer EXE file, MAXWIN.EXE. (If you are not sure about the path of the file, run it by pressing the TEST button.) When you click OK on the Select the DDE Server dialog box, DDE is initialized with Maximizer as the DDE server.
Guidelines for using Maximizer for Windows: If you have entered a username and password to access the database in Maximizer, then Maximizer must be running prior to initialization of DDE.
Guidelines for using SuperOffice4.0: 1. If your contact’s local area is the same as yours, you need to enter only the number. 2. SuperOffice doesn’t show a popup for numbers having more than eight digits. If you have entered the number in the form aannnnnnn, where aa indicates the area code, then you cannot view the popup.
Guidelines for using GOLDMINE: If it is a local number nnnnnnn, then GOLDMINE stores it in the format(aa)nnn-nnnn where aa denotes area code. For numbers other then local area numbers, you need to enter them continuously without any special character such as-or ( etc., for contact popup. For example: If your contact’s phone number is aa-nnnnnnn, where aa is the area code, you need to enter it as aannnnnnn in GOLDMINE.

116
Maximizer only points to the contact’s record. The contact's record is not popped up. It is
better to keep the Maximizer application maximized in the background.
Note for All PIMs (GoldMine, SuperOffice, Maximizer) If you get the following error when you select any of the above PIMs, it means that DDE has not been initialized.
The solution is to run the EXE file for the application you have selected. Go to Options/Set Environment DDE and enter the path of the program file and database file correctly. Then click OK on the dialog box to reinitialize DDE. Remember, if you simply click OK on the error message box (above), you cannot see a contact popup for incoming calls since DDE is not initialized.
If you close OfficeServ Call with DDE enabled, then when you start OfficeServ Call again,
DDE is initialized automatically.
General DDE Support OfficeServ Call can work with other applications acting as DDE servers. Select the Other option in the DDE Program combo box if you want to select an application other than that already mentioned. The following steps explain how to use this feature.
• Select the Other option in the DDE Program combo box (dropdown list) on the Select the DDE Server dialog box.
• A help dialog box appears (shown below) giving instructions you should follow.
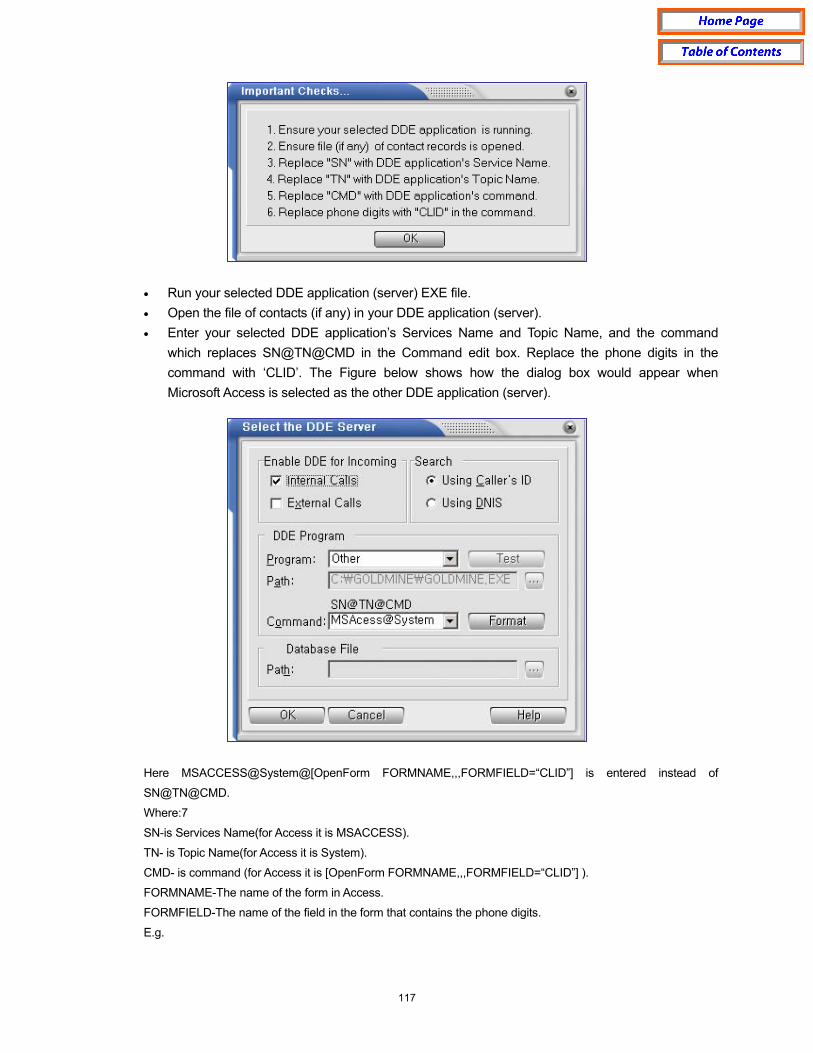
117
• Run your selected DDE application (server) EXE file. • Open the file of contacts (if any) in your DDE application (server). • Enter your selected DDE application’s Services Name and Topic Name, and the command
which replaces SN@TN@CMD in the Command edit box. Replace the phone digits in the command with ‘CLID’. The Figure below shows how the dialog box would appear when Microsoft Access is selected as the other DDE application (server).
Here MSACCESS@System@[OpenForm FORMNAME,,,FORMFIELD=“CLID”] is entered instead of
SN@TN@CMD.
Where:7
SN-is Services Name(for Access it is MSACCESS).
TN- is Topic Name(for Access it is System).
CMD- is command (for Access it is [OpenForm FORMNAME,,,FORMFIELD=“CLID”] ).
FORMNAME-The name of the form in Access.
FORMFIELD-The name of the field in the form that contains the phone digits.
E.g.
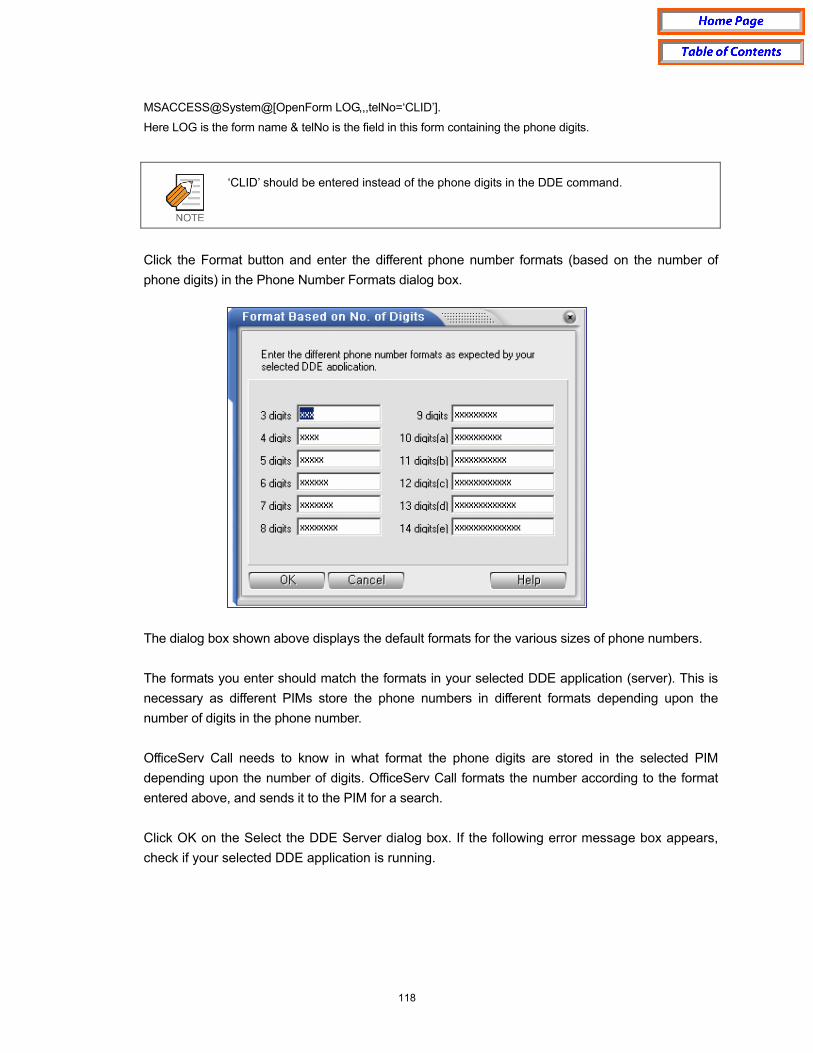
118
MSACCESS@System@[OpenForm LOG,,,telNo=‘CLID’].
Here LOG is the form name & telNo is the field in this form containing the phone digits.
‘CLID’ should be entered instead of the phone digits in the DDE command.
Click the Format button and enter the different phone number formats (based on the number of phone digits) in the Phone Number Formats dialog box.
The dialog box shown above displays the default formats for the various sizes of phone numbers. The formats you enter should match the formats in your selected DDE application (server). This is necessary as different PIMs store the phone numbers in different formats depending upon the number of digits in the phone number. OfficeServ Call needs to know in what format the phone digits are stored in the selected PIM depending upon the number of digits. OfficeServ Call formats the number according to the format entered above, and sends it to the PIM for a search. Click OK on the Select the DDE Server dialog box. If the following error message box appears, check if your selected DDE application is running.

119
The error signifies that DDE is not initialized with your selected DDE application (server).
OfficeServ Call as DDE Server OfficeServ Call as DDE server supports only the ‘SmartControl’ Services Name and ‘Telephony’ Topic Name. Any client PIM can place a call using OfficeServ Call. The client application needs to send the command as ‘MakeCall XYZ’ after starting the conversation using ‘SmartControl’ as the Services Name and ‘Telephony’ as the Topic Name. E.g.: A user of SuperOffice PIM can place a call using OfficeServ Call. The following command needs to be entered in the ‘Prefix’ field of the Dial dialog box in SuperOffice: Supported Commands: MakeCall DDE ; SmartControl ; Telephony ; MakeCall XYZ where XYZ is the number that is to be dialed. DropCall DDE ; SmartControl ; Telephony ; DropCall
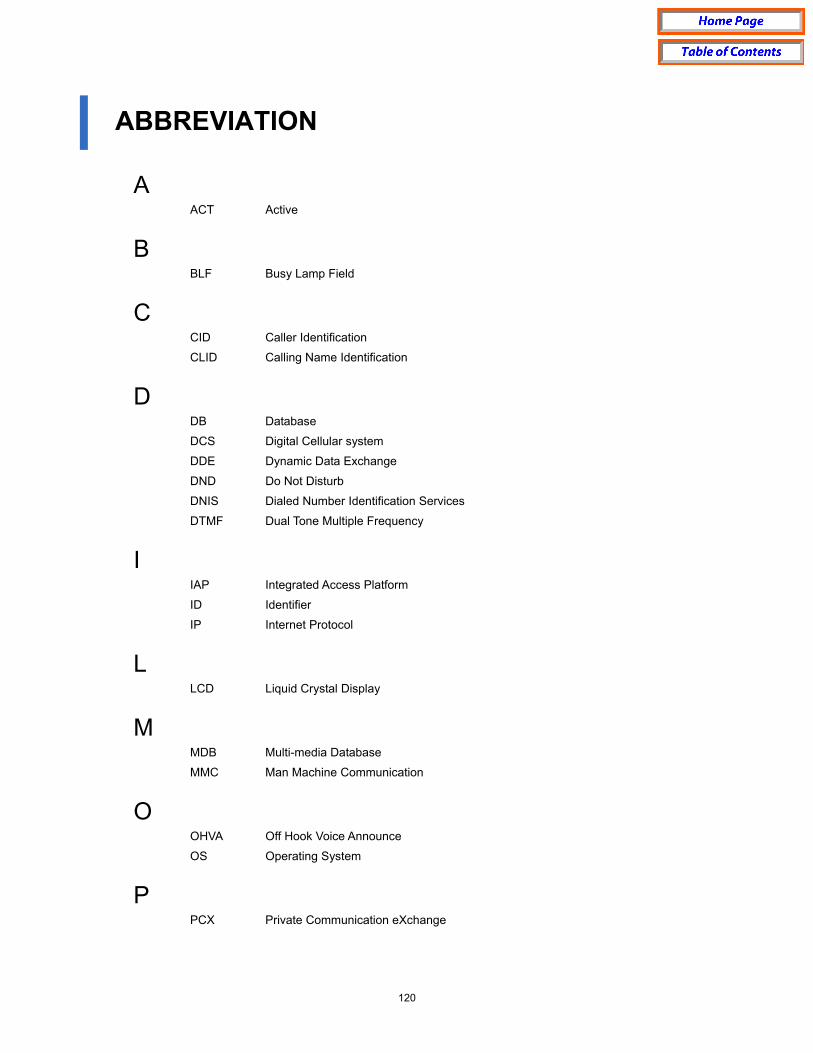
120
ABBREVIATION A
ACT Active
B BLF Busy Lamp Field
C CID Caller Identification
CLID Calling Name Identification
D DB Database
DCS Digital Cellular system
DDE Dynamic Data Exchange
DND Do Not Disturb
DNIS Dialed Number Identification Services
DTMF Dual Tone Multiple Frequency
I IAP Integrated Access Platform
ID Identifier
IP Internet Protocol
L LCD Liquid Crystal Display
M MDB Multi-media Database
MMC Man Machine Communication
O OHVA Off Hook Voice Announce
OS Operating System
P PCX Private Communication eXchange

121
S SN Service Name
T TAPI Telephony Application Program Interface
TEL Telephone
TELNO Telephone Number
TSP Telephony Service Provider

122
Software License Agreement & Limited Warranty For OfficeServ CTI Applications for
iDCS or OfficeServ 7000 Keyphone Series IMPORTANT, READ CAREFULLY This Samsung End-User License Agreement (EULA) is a legal binding agreement between you (either an individual or an entity) and Samsung for Samsung software product identified above, which includes computer software and may include printed material, and "online" or electronic documentation ("SOFTWARE"). By installing, using the SOFTWARE, you indicate your acceptance of this Samsung License Agreement. If you do not agree to the terms of this License Agreement, please do not install or use the enclosed SOFTWARE. SOFTWARE LICENSE The SOFTWARE is protected by copyright laws and international copyright treaties, as well as other intellectual property laws and treaties. 1. GRANT OF LICENSE. This License Agreement grants you following rights:
a. SOFTWARE: Samsung grants to you a personal, non-exclusive license to make and use one (1) copy of the
SOFTWARE accompanying this Agreement on any single computer, provided the SOFTWARE is in use on only one computer at any time. If you have multiple Licenses for the SOFTWARE, then at any time you may have as many copies of the SOFTWARE in use as you have Licenses.
b. Electronic Documents: Solely with respect to electronic documents included with the SOFTWARE, you may make an unlimited number of the copies, provided that such copies shall be used only for internal purpose and you shall not publish or distribute such to any third party, without Samsung Electronics Co., LTD. written and expressed consent.
c. Limitation on Reverse Engineering, Decompilation, Disassembly: You shall not reverse engineer, decompile or disassemble the SOFTWARE, except to the extent that this restriction is expressly prohibited applicable law.
d. Separation of Components: The SOFTWARE is licensed as a single product. Its component parts may not be separated for use on more than one computer.
e. Rental: You may not rent, lease and/or lend the licensed SOFTWARE. f. Support Services: Samsung may provide you with support services related to the SOFTWARE, according to
Samsung policies and programs and in for the country in which the SOFTWARE was purchased. With respect to technical information you provide to Samsung as part of the support services, Samsung may use such information for its business purpose, including for product support and development. Samsung will not utilize such technical information in a form that personally identifies you.
g. SOFTWARE Transfer: You may permanently transfer all of your rights according to this agreement, provided
you retain no copies, you transfer all of the SOFTWARE, and the recipient agrees to the terms of this agreement by notifying in writing to authorized Samsung VAR, outfit and/or dealer in which the SOFTWARE was purchased. And including all prior versions of SOFTWARE, if the SOFTWARE is an upgrade.
h. Termination: Without prejudice to any other rights, Samsung may terminate this agreement if you fail to
comply with the terms and condition of this agreement. In such event, you must destroy all copies of the SOFTWARE and all of its component parts.

123
2. SOFTWARE ACTIVATION
Software Activation; Samsung will provide a software activation code that will allow use of the purchased OfficeServ CTI products. The activation code will be associated with the MAC address of the LAN interface of the Samsung telephone system. In the event of hardware failure associated with the LAN interface Samsung will issue a replacement software activation code when requested by a Samsung authorized dealer. In the event that a replacement software activation code is issued the defective hardware associated with the original software activation code must be returned to Samsung. If the hardware associated to the software activation code is not returned to Samsung by the dealer the dealer will be billed for the original purchase price of the OfficeServ CTI application.
3. UPGRADES & COPYRIGHT
a. Upgrade: If the SOFTWARE is an upgrade of a component of a package of software programs that you licensed as a single product, the SOFTWARE may be used and transferred only as an part of that single product package and may not be separated for use on more than one computer.
b. Copyright: The SOFTWARE is owned by Samsung or its suppliers and protected by copyright laws and international treaty provisions. Therefore, you must treat the SOFWARE like any other copyrighted material except that you may install the SOFTWARE on a single computer provided you keep the original solely for backup or archival purpose. You may not copy the printed materials accompanying the SOFTWARE.
LIMITED WARRANTY Samsung warrants that (a) the SOFTWARE will perform substantially in accordance with the accompanying written materials for a period of ninety (90) days from the date of receipt, and (b) any Samsung supplied hardware accompanying the SOFTWARE will be free from defects in materials and workmanship under normal use and service for a period of one(1) year from the date of receipt. During the warranty periods specified above, Samsung will replace or repair any software or hardware found to be defective. Warranty claims should be made through the Samsung dealer from whom the products were purchased, and must be made within the applicable warranty period. NO OTHER WARRANTIES TO THE MAXIMUM EXTENT PERMITTED BY THE APPLICABLE LAW, SAMSUNG DISCLAIMS ALL OTHER WARRANTIES, EITHER EXPRESS OR IMPLIED, INCLUDING BUT NOT LIMITED TO IMPLIED WARRANTIES OF MERCHANTABILITY AND FITNESS FOR PARTICULAR PURPOSE, WITH RESPECT TO THE SOFTWARE, THE ACCOMPANYING PRODUCT MANUAL(S) AND WRITTEN MATERIALS, AND ANY ACCOMPANYING HARDWARE. NO LIABILITY FOR DAMAGES TO THE MAXIMUM EXTENT PERMITTED BY APPLICABLE LAW, IN NO EVENT SHALL SAMSUNG OR ITS SUPPLIERS BE LIABLE FOR ANY DAMAGES WHATSOEVER (INCLUDING, WITHOUT LIMITATION, DAMAGES FOR LOSS OF BUSINESS PROFITS, BUSINESS INTERRUPTION, LOSS OF BUSINESS INFORMATION, OR ANY OTHER PECUNIARY LOSS) ARISING OUT OF THE USE OF OR INABILITY TO USE THE SOFTWARE PRODUCT, EVEN IF SAMSUNG HAS BEEN ADVISED OF THE POSSIBILITY OF SUCH DAMAGES. Samsung Telecommunications America, L.P.