OFF CENTER LOG CABIN - Ultimate Seam Guide
9
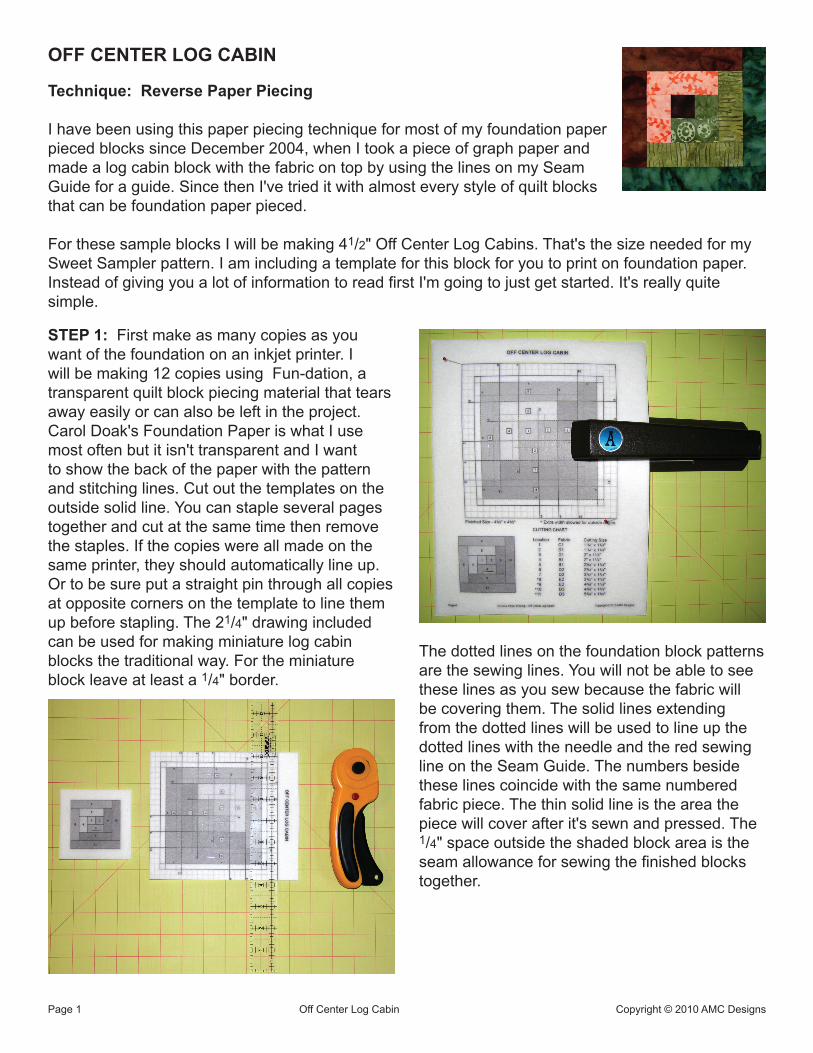
OFF CENTER LOG CABIN Technique: Reverse Paper Piecing I have been using this paper piecing technique for most of my foundation paper pieced blocks since December 2004, when I took a piece of graph paper and made a log cabin block with the fabric on top by using the lines on my Seam Guide for a guide. Since then I've tried it with almost every style of quilt blocks that can be foundation paper pieced. For these sample blocks I will be making 4 1 /2" Off Center Log Cabins. That's the size needed for my Sweet Sampler pattern. I am including a template for this block for you to print on foundation paper. Instead of giving you a lot of information to read first I'm going to just get started. It's really quite simple. Page 1 Off Center Log Cabin Copyright © 2010 AMC Designs STEP 1: First make as many copies as you want of the foundation on an inkjet printer. I will be making 12 copies using Fun-dation, a transparent quilt block piecing material that tears away easily or can also be left in the project. Carol Doak's Foundation Paper is what I use most often but it isn't transparent and I want to show the back of the paper with the pattern and stitching lines. Cut out the templates on the outside solid line. You can staple several pages together and cut at the same time then remove the staples. If the copies were all made on the same printer, they should automatically line up. Or to be sure put a straight pin through all copies at opposite corners on the template to line them up before stapling. The 2 1 /4" drawing included can be used for making miniature log cabin blocks the traditional way. For the miniature block leave at least a 1 /4" border. The dotted lines on the foundation block patterns are the sewing lines. You will not be able to see these lines as you sew because the fabric will be covering them. The solid lines extending from the dotted lines will be used to line up the dotted lines with the needle and the red sewing line on the Seam Guide. The numbers beside these lines coincide with the same numbered fabric piece. The thin solid line is the area the piece will cover after it's sewn and pressed. The 1 /4" space outside the shaded block area is the seam allowance for sewing the finished blocks together.
-
Upload
khangminh22 -
Category
Documents
-
view
0 -
download
0
Transcript of OFF CENTER LOG CABIN - Ultimate Seam Guide
OFF CENTER LOG CABIN
Technique: Reverse Paper Piecing
I have been using this paper piecing technique for most of my foundation paper pieced blocks since December 2004, when I took a piece of graph paper and made a log cabin block with the fabric on top by using the lines on my Seam Guide for a guide. Since then I've tried it with almost every style of quilt blocks that can be foundation paper pieced.
For these sample blocks I will be making 41/2" Off Center Log Cabins. That's the size needed for my Sweet Sampler pattern. I am including a template for this block for you to print on foundation paper. Instead of giving you a lot of information to read first I'm going to just get started. It's really quite simple.
Page 1 Off Center Log Cabin Copyright © 2010 AMC Designs
STEP 1: First make as many copies as you want of the foundation on an inkjet printer. I will be making 12 copies using Fun-dation, a transparent quilt block piecing material that tears away easily or can also be left in the project. Carol Doak's Foundation Paper is what I use most often but it isn't transparent and I want to show the back of the paper with the pattern and stitching lines. Cut out the templates on the outside solid line. You can staple several pages together and cut at the same time then remove the staples. If the copies were all made on the same printer, they should automatically line up. Or to be sure put a straight pin through all copies at opposite corners on the template to line them up before stapling. The 21/4" drawing included can be used for making miniature log cabin blocks the traditional way. For the miniature block leave at least a 1/4" border.
The dotted lines on the foundation block patterns are the sewing lines. You will not be able to see these lines as you sew because the fabric will be covering them. The solid lines extending from the dotted lines will be used to line up the dotted lines with the needle and the red sewing line on the Seam Guide. The numbers beside these lines coincide with the same numbered fabric piece. The thin solid line is the area the piece will cover after it's sewn and pressed. The 1/4" space outside the shaded block area is the seam allowance for sewing the finished blocks together.
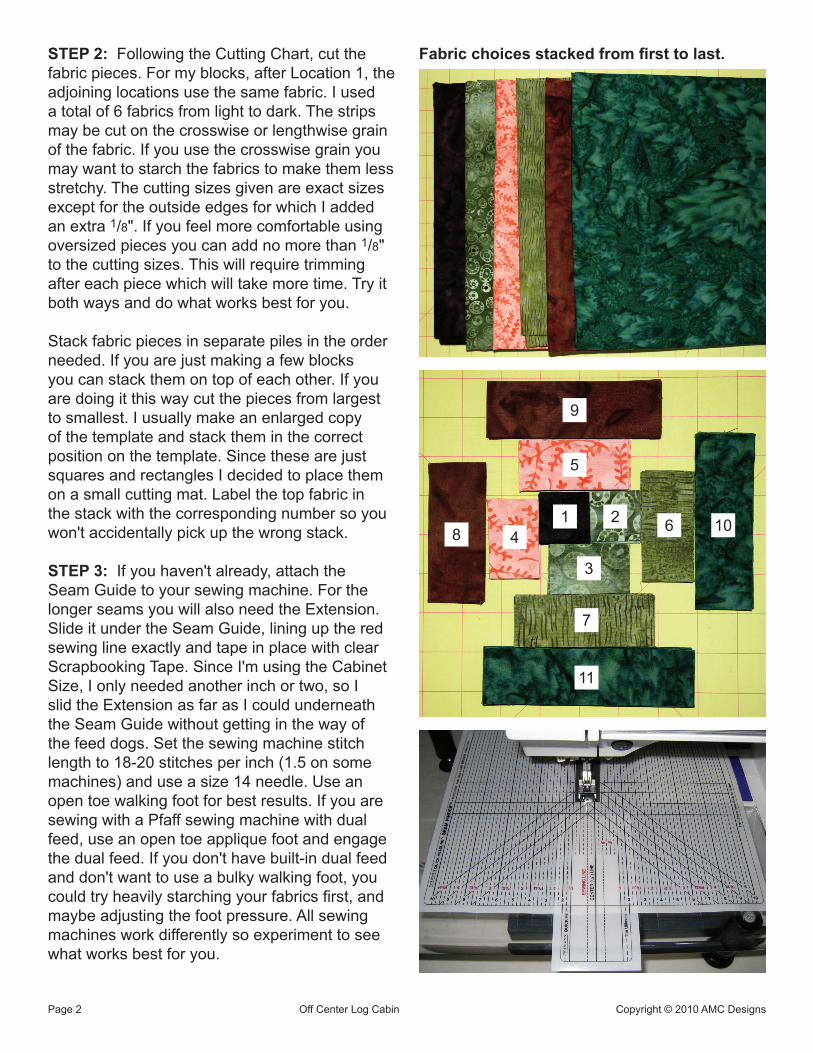
STEP 2: Following the Cutting Chart, cut the fabric pieces. For my blocks, after Location 1, the adjoining locations use the same fabric. I used a total of 6 fabrics from light to dark. The strips may be cut on the crosswise or lengthwise grain of the fabric. If you use the crosswise grain you may want to starch the fabrics to make them less stretchy. The cutting sizes given are exact sizes except for the outside edges for which I added an extra 1/8". If you feel more comfortable using oversized pieces you can add no more than 1/8" to the cutting sizes. This will require trimming after each piece which will take more time. Try it both ways and do what works best for you.
Stack fabric pieces in separate piles in the order needed. If you are just making a few blocks you can stack them on top of each other. If you are doing it this way cut the pieces from largest to smallest. I usually make an enlarged copy of the template and stack them in the correct position on the template. Since these are just squares and rectangles I decided to place them on a small cutting mat. Label the top fabric in the stack with the corresponding number so you won't accidentally pick up the wrong stack.
STEP 3: If you haven't already, attach the Seam Guide to your sewing machine. For the longer seams you will also need the Extension. Slide it under the Seam Guide, lining up the red sewing line exactly and tape in place with clear Scrapbooking Tape. Since I'm using the Cabinet Size, I only needed another inch or two, so I slid the Extension as far as I could underneath the Seam Guide without getting in the way of the feed dogs. Set the sewing machine stitch length to 18-20 stitches per inch (1.5 on some machines) and use a size 14 needle. Use an open toe walking foot for best results. If you are sewing with a Pfaff sewing machine with dual feed, use an open toe applique foot and engage the dual feed. If you don't have built-in dual feed and don't want to use a bulky walking foot, you could try heavily starching your fabrics first, and maybe adjusting the foot pressure. All sewing machines work differently so experiment to see what works best for you.
Page 2 Off Center Log Cabin Copyright © 2010 AMC Designs
1 2
3
4
5
6
7
8
9
10
11
Fabric choices stacked from first to last.
Page 3 Off Center Log Cabin Copyright © 2010 AMC Designs
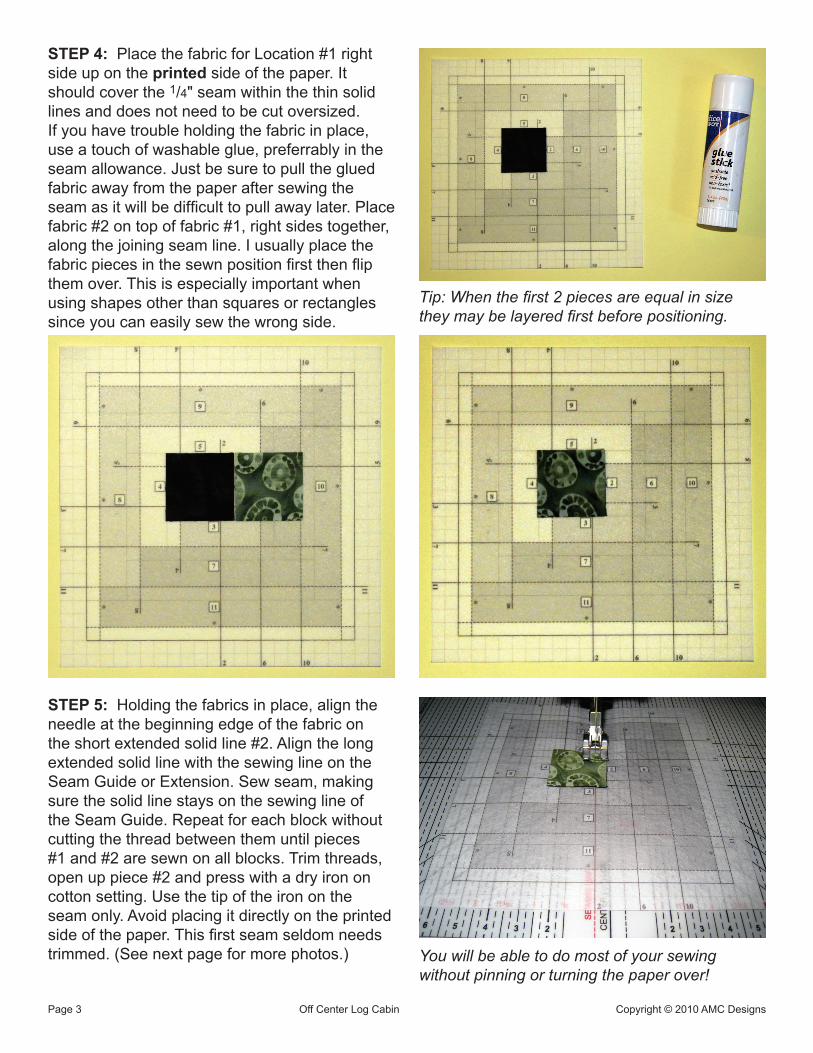
STEP 4: Place the fabric for Location #1 right side up on the printed side of the paper. It should cover the 1/4" seam within the thin solid lines and does not need to be cut oversized. If you have trouble holding the fabric in place, use a touch of washable glue, preferrably in the seam allowance. Just be sure to pull the glued fabric away from the paper after sewing the seam as it will be difficult to pull away later. Place fabric #2 on top of fabric #1, right sides together, along the joining seam line. I usually place the fabric pieces in the sewn position first then flip them over. This is especially important when using shapes other than squares or rectangles since you can easily sew the wrong side.
STEP 5: Holding the fabrics in place, align the needle at the beginning edge of the fabric on the short extended solid line #2. Align the long extended solid line with the sewing line on the Seam Guide or Extension. Sew seam, making sure the solid line stays on the sewing line of the Seam Guide. Repeat for each block without cutting the thread between them until pieces #1 and #2 are sewn on all blocks. Trim threads, open up piece #2 and press with a dry iron on cotton setting. Use the tip of the iron on the seam only. Avoid placing it directly on the printed side of the paper. This first seam seldom needs trimmed. (See next page for more photos.)
Tip: When the first 2 pieces are equal in size they may be layered first before positioning.
You will be able to do most of your sewing without pinning or turning the paper over!

Page 4 Off Center Log Cabin Copyright © 2010 AMC Designs
Tip: Once you start sewing the seam, keep your focus on the long extended solid line that ends at the edge of the paper. As you near the end of the fabric, change your focus to the solid line at the edge of the fabric and eyeball the last few stitches, ending on the solid line.
STEP 6: Rotate pattern as needed and place fabric #3 in position, making sure fabric stays within the seam allowance. Repeat Steps 4 and 5 using sewing line #3.
Tip: If you don't have to trim the seams, it's still a good idea to pull previously sewn seams loose from the paper at seam allowances (noted by red circle). This will make it easier to remove the paper when your blocks are finished.
Location #2 sewn
Location #2 pressed
Location #3 sewn

Page 5 Off Center Log Cabin Copyright © 2010 AMC Designs
STEP 7: Rotate pattern as needed and place fabric #4 in position, making sure fabric stays within the seam allowance. Repeat Steps 4 and 5 using sewing line #4.
Chain piecing Location #4.
If you need to trim the seam, fold the paper back on the seam line and trim to 1/4" by placing the 1/4" line of a ruler on the seam. Any narrow clear ruler will work. I use the frosted Olfa 11/4" x 121/2" ruler. Before trimming seams, you may need to pull previously sewn seams loose from the paper at seam allowances (noted by red circle). Be careful not to pull the stitches loose from the fabric. I almost always trim my seams after they are sewn rather than before like you do in traditional foundation paper piecing. There are a few exceptions if the fabric is cut oversized and it is covering the extended lines.
The seams for this block generally do not need trimmed, but if part of the seam of a dark fabric shows under a light fabric it should be trimmed to avoid a shadow.
Location #3 pressed
Location #4 sewn
Location #4 pressed
Location #4 trimmed
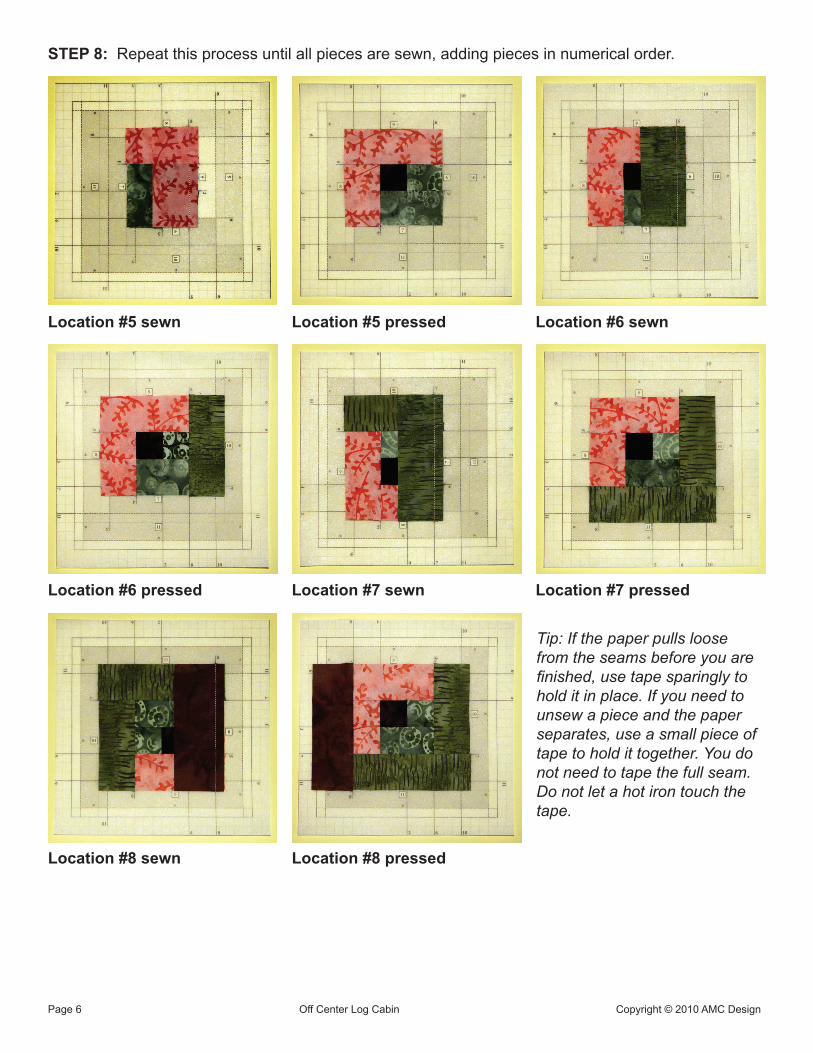
STEP 8: Repeat this process until all pieces are sewn, adding pieces in numerical order.
Location #5 sewn Location #5 pressed Location #6 sewn
Location #6 pressed Location #7 sewn Location #7 pressed
Location #8 sewn Location #8 pressed
Tip: If the paper pulls loose from the seams before you are finished, use tape sparingly to hold it in place. If you need to unsew a piece and the paper separates, use a small piece of tape to hold it together. You do not need to tape the full seam. Do not let a hot iron touch the tape.
Page 6 Off Center Log Cabin Copyright © 2010 AMC Design
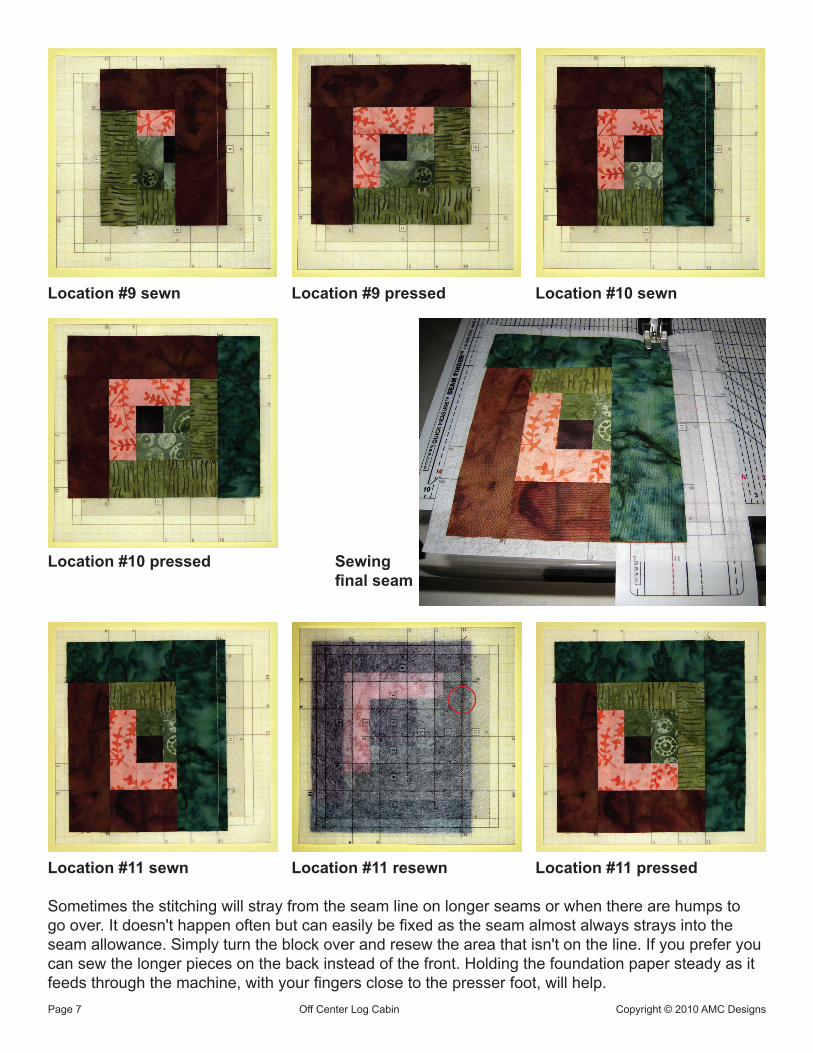
Location #9 sewn Location #9 pressed Location #10 sewn
Location #10 pressed Sewing final seam
Location #11 sewn Location #11 resewn Location #11 pressed
Sometimes the stitching will stray from the seam line on longer seams or when there are humps to go over. It doesn't happen often but can easily be fixed as the seam almost always strays into the seam allowance. Simply turn the block over and resew the area that isn't on the line. If you prefer you can sew the longer pieces on the back instead of the front. Holding the foundation paper steady as it feeds through the machine, with your fingers close to the presser foot, will help.Page 7 Off Center Log Cabin Copyright © 2010 AMC Designs
Page 8 Off Center Log Cabin Copyright © 2010 AMC Designs
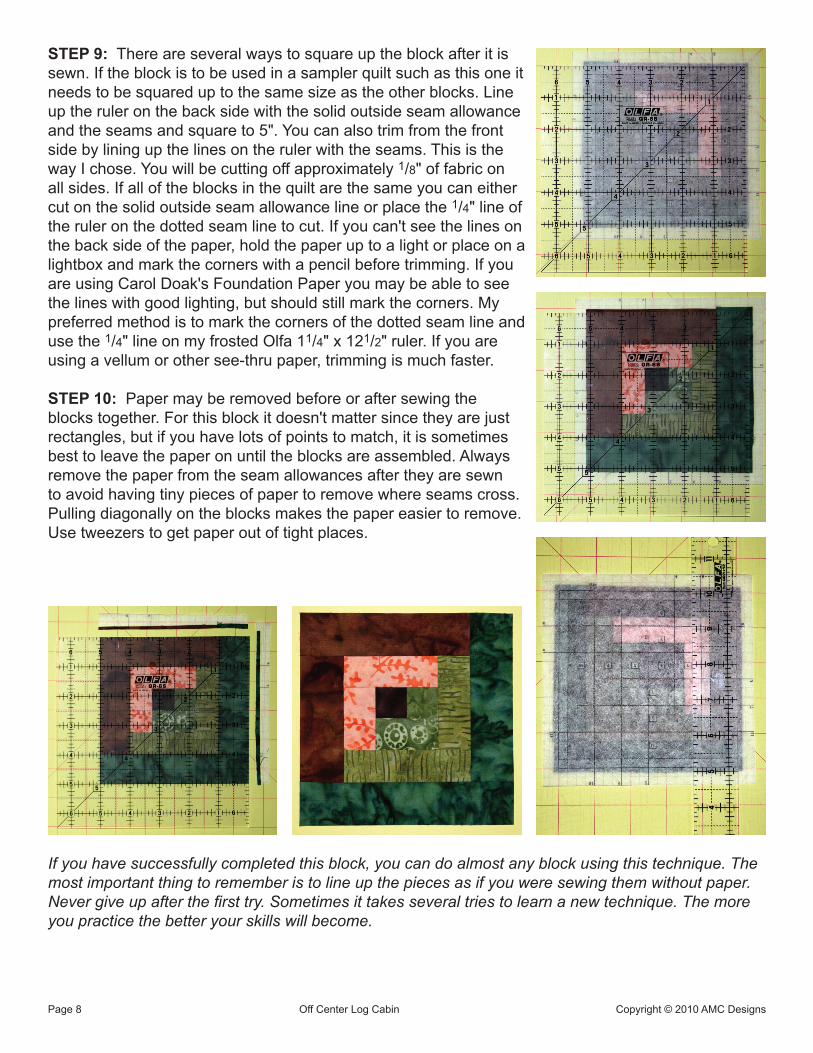
STEP 9: There are several ways to square up the block after it is sewn. If the block is to be used in a sampler quilt such as this one it needs to be squared up to the same size as the other blocks. Line up the ruler on the back side with the solid outside seam allowance and the seams and square to 5". You can also trim from the front side by lining up the lines on the ruler with the seams. This is the way I chose. You will be cutting off approximately 1/8" of fabric on all sides. If all of the blocks in the quilt are the same you can either cut on the solid outside seam allowance line or place the 1/4" line of the ruler on the dotted seam line to cut. If you can't see the lines on the back side of the paper, hold the paper up to a light or place on a lightbox and mark the corners with a pencil before trimming. If you are using Carol Doak's Foundation Paper you may be able to see the lines with good lighting, but should still mark the corners. My preferred method is to mark the corners of the dotted seam line and use the 1/4" line on my frosted Olfa 11/4" x 121/2" ruler. If you are using a vellum or other see-thru paper, trimming is much faster.
STEP 10: Paper may be removed before or after sewing the blocks together. For this block it doesn't matter since they are just rectangles, but if you have lots of points to match, it is sometimes best to leave the paper on until the blocks are assembled. Always remove the paper from the seam allowances after they are sewn to avoid having tiny pieces of paper to remove where seams cross. Pulling diagonally on the blocks makes the paper easier to remove. Use tweezers to get paper out of tight places.
If you have successfully completed this block, you can do almost any block using this technique. The most important thing to remember is to line up the pieces as if you were sewing them without paper. Never give up after the first try. Sometimes it takes several tries to learn a new technique. The more you practice the better your skills will become.

1
3
7
64
5
36
*
2
8
9
11
10
*
**
**
*
*
2 10
2
6
10
3
7 7
11 11
59
5
9
8
4
48
1 2
34
5
6
7
8
9
10
11
OFF CENTER LOG CABIN
CUTTING CHART
Location Fabric Cutting Size 1 C1 11/4" x 11/4" 2 D1 11/4" x 11/4" 3 D1 2" x 11/4" 4 B1 2" x 11/4" 5 B1 23/4" x 11/4" 6 D2 23/4" x 11/4" 7 D2 31/2" x 11/4" *8 E2 31/2" x 13/8" *9 E2 43/8" x 13/8" *10 D3 43/8" x 13/8" *11 D3 51/4" x 13/8"
Finished Size - 41/2" x 41/2" * Extra width allowed for outside edges.
Page 9 Off Center Log Cabin Copyright © 2010 AMC Designs