NFR Regional Travel Model – User's Guide - NFRMPO
58
www.camsys.com NORTH FRONT RANGE REGIONAL TRAVEL MODEL prepared for North Front Range MPO prepared by Cambridge Systematics, Inc. April 16, 2015 User’s Guide
-
Upload
khangminh22 -
Category
Documents
-
view
0 -
download
0
Transcript of NFR Regional Travel Model – User's Guide - NFRMPO

www.camsys.com
NORTH FRONT RANGE REGIONAL
TRAVEL MODEL
prepared for
North Front Range MPO
prepared by
Cambridge Systematics, Inc.
April 16, 2015
User’s Guide


North Front Range Regional Travel Model
NFR Regional Travel Model – User’s Guide i
Table of Contents
1.0 Introduction ......................................................................................................... 1-1
1.1 System Requirements............................................................................................... 1-1
2.0 Installing the Model Add-In ................................................................................... 2-2
2.1 Folder Structure ........................................................................................................ 2-3
3.0 Running the Model ............................................................................................... 3-1
3.1 Collecting the Required Data .................................................................................... 3-1
3.2 Creating and Running a Scenario .............................................................................. 3-2
Running Selected Model Steps ................................................................................. 3-6
Running Speed Feedback ......................................................................................... 3-7
4.0 Model Utilities - Input ........................................................................................... 4-1
4.1 Edit Network Year .................................................................................................... 4-1
4.2 Create Select Query .................................................................................................. 4-2
4.3 Copy Feedback Results ............................................................................................. 4-2
4.4 Update Input Network .............................................................................................. 4-3
4.5 Edit Network ............................................................................................................ 4-3
5.0 Model Utilities – Transit ........................................................................................ 5-3
5.1 Link/Verify Route System ......................................................................................... 5-3
5.2 Edit Routes ............................................................................................................... 5-3
5.3 Calibrate Constants .................................................................................................. 5-3
6.0 Model Utilities – Maps and Reports ........................................................................ 6-1
6.1 Create Performance Report ...................................................................................... 6-1
6.2 Create Maps (Dashboard) ......................................................................................... 6-1
6.3 Process Turns ........................................................................................................... 6-2
The Built-In Turn Movement Utilities ........................................................................ 6-2
Turn Movement Add-In ............................................................................................ 6-3
Intersection Definition File ........................................................................................ 6-3
Unadjusted Turns ..................................................................................................... 6-5
Adjusted Turns ......................................................................................................... 6-5
7.0 Model Database ................................................................................................... 7-7
7.1 Database Approach .................................................................................................. 7-7
7.2 Database Interface ................................................................................................... 7-8
7.3 Database Tables ..................................................................................................... 7-10
8.0 Transportation Networks ...................................................................................... 8-1

North Front Range Regional Travel Model
ii NFR Regional Travel Model – User’s Guide
8.1 Transportation Network Components ...................................................................... 8-1
8.2 Example Transportation Network Application .......................................................... 8-2
Before we Begin: Make a Backup Copy ..................................................................... 8-2
Part 1: Prepare Workspace ........................................................................................ 8-2
Part 2: Add New Roadway Link ................................................................................. 8-3
Part 3: Edit the Roadway Segment ........................................................................... 8-7
Part 4: Create a New Model Scenario ...................................................................... 8-10
Part 5: Realign a Transit Route ................................................................................ 8-11
Part 6: Run the Model ............................................................................................. 8-15
9.0 Working with Transit Data .................................................................................... 9-1
9.1 Updating the Route System after Roadway Layer Changes ...................................... 9-1
Maintaining Route System Integrity ......................................................................... 9-1
9.2 Route System Link and Verify ................................................................................... 9-2
9.3 Editing the Route System ......................................................................................... 9-2
Route Direction ........................................................................................................ 9-3
Stop Placement ........................................................................................................ 9-3

North Front Range Regional Travel Model
NFR Regional Travel Model – User’s Guide iii
List of Tables
Table 1: System Requirements ................................................................................................... 1-1 Table 3.1: NFR Model Folder Structure ....................................................................................... 3-1 Table 6.1: Map Types ................................................................................................................. 6-1 Table 6.2: Map Options .............................................................................................................. 6-2 Table 7.1: Access Database Tables ........................................................................................... 7-10


North Front Range Regional Travel Model
NFR Regional Travel Model – User’s Guide v
List of Figures
Figure 2.1: NFR Model Add-Ins Settings ..................................................................................... 2-2 Figure 2.2: NFR Model Folder Structure ..................................................................................... 2-3 Figure 3.1: The Scenario Toolbox ............................................................................................... 3-3 Figure 3.2: The Scenario Editor (Input Tab) ................................................................................ 3-4 Figure 3.3: The Scenario Editor (General Tab) ............................................................................ 3-4 Figure 3.4: The Scenario Editor (Output Tab) ............................................................................. 3-5 Figure 3.5: The Scenario Editor (Advanced Tab) ......................................................................... 3-5 Figure 3.6: The Model Dialog Box ............................................................................................... 3-6 Figure 3.7: Sub-Steps Dialog Box ............................................................................................... 3-6 Figure 4.1: Add/Delete Network Year Dialog Box ....................................................................... 4-1 Figure 6.1: The Process Turns Dialog Box ................................................................................... 6-3 Figure 6.2: Editing the Intersection Definition File ..................................................................... 6-4 Figure 7.1: Access Database Form Interface ............................................................................... 7-9 Figure 7.2: Data Scenario Management ................................................................................... 7-10


Introduction
NFR Regional Travel Model – User’s Guide 1-1
1.0 INTRODUCTION
This User’s Guide provides instructions on operation of the North Front Range Regional Travel
Model (NFR Model). Information is provided regarding installing the model, managing model
scenario data, and running the model.
The model is run from the TransCAD software platform through a customized user interface. This
interface provides access to custom calculations developed specifically for the NFR MPO.
Scenario and file management is achieved through a scenario management system integrated
into the custom user interface. A basic understanding of the TransCAD software program is
required to maximize model performance. However, users unfamiliar with the software should
be able to perform some modeling tasks with the assistance of this guide.
1.1 System Requirements
The model must be run on a computer running Windows 7 or later and the TransCAD software
program. Specific system requirements are shown in Table 1.
The listed requirements are suggested minimums; a computer that does not meet these
requirements may still succeed in running the model. Increased processor speeds, multiple
processor cores, and additional memory will reduce the amount of time required to run the
model. The disk space required for installation must be available on the drive where TransCAD
has been installed. The disk space required for additional scenarios can be located on a local or
network drive and must be available before attempting to run the model. However, model run
times will be longer if the model is run from a network drive rather than a local drive.
Table 1: System Requirements
Operating System Windows 7 or later
Processor Intel Core 2 processor or later
Note: Multiple cores will significantly improve model run times.
Memory 4GB – 12 GB
TransCAD Software Version 6.0 r2
Build 9080 or later is recommended.
Microsoft Office (including Access) Version 2007 or later
Disk Space (Installation and Input) 700-800 MB
Disk Space (Each scenario) 8 GB for each scenario, (About 2 GB if some intermediate files are deleted)
Software Type MS Office and TransCAD must either both be 32-bit or both be 64-bit.

Installing the Model Add-In
2-2 NFR Regional Travel Model – User’s Guide
2.0 INSTALLING THE MODEL ADD-IN
Installation of the NFR Model has been streamlined so that the model can be installed in a simple
three-step process. The entire NFR Model is typically provided in a 7-zip file named
NFRMPO_Model_vxxx_mm-dd-yyyy.7z, where xxx is a version reference and mm-dd-yyyy
represents the month, date, and year the installation package was created or delivered.
Installation of the model can be completed by following the three steps described below.
1. Extract the provided 7-zip file and place the resulting folder in a user specified location (e.g., C:\NFR Model v4). The 7-zip file can be extracted using the 7-zip software available from www.7-zip.org.
2. Open the TransCAD software and select Tools Setup Add-Ins… from the main menu. In the dialog box that appears:
a. Click Add to create a new entry b. Modify the new entry as shown in Figure 2.1.
3. Verify the NFR Model dialog box can be started by selecting Tools Add-Ins NFR Model from the TransCAD menu.
If the model dialog box appears, the model installation has been successful. If necessary, pre-
populated scenarios can be modified to reference the installed data.
Figure 2.1: NFR Model Add-Ins Settings
Note: This example assumes the model has been extracted into C:\NFR Model v4. The actual location of the UI
Database entry must be modified if the model is extracted to another location.

Installing the Model Add-In
NFR Regional Travel Model – User’s Guide 2-3
2.1 Folder Structure
The NFR Model has been set up to use a streamlined file and folder structure that maintains all
model data and macro files within a common folder. This folder can be placed at a user-specified
location anywhere on the computer that will be used to run the model. It is advised the model run
folder is placed on a local drive rather than a shared network drive. The general NFR Model folder
structure is shown in Figure 2.2.
Figure 2.2: NFR Model Folder Structure


Running the Model
NFR Regional Travel Model – User’s Guide 3-1
3.0 RUNNING THE MODEL
The model is controlled through a series of dialog boxes that allow the user to specify custom
model run settings or to copy settings from a previously defined scenario. Users may also run the
travel model, create reports and maps, and specify model run options. Steps required to
complete a successful model run are described in the following sections.
3.1 Collecting the Required Data
To successfully run the model, various data files are required. Some input files are optional and
will provide additional functionality. Each file is identified by a short keyword as shown in Table
3.1. All input files should be collected and placed in a model input directory. Input files will not be
modified when the model is run. Input files are placed in C:\NFR Model v4\Input when the model is
installed using the example directory location.
Table 3.1: NFR Model Folder Structure
ID Description and Notes Required / Optional
Network The Roadway Geographic File. Required
TurnPen A turn penalty file can be identified to enable specific turn penalties. By default, this file is not present and turn prohibitions or penalties will be applied. If used, this file must be formatted as described in the TransCAD online help system.
Optional
Database The Model Database contains various information items and is further described later in this document.
Required
Routes A TransCAD Route System based on the roadway network geographic file. Required
MODE The TransCAD Mode table compatible with the route system. Required
MODEXFER The TransCAD Mode Transfer table compatible with the route system. Required
TAZ The TAZ geographic file. Required
ParcelData The socioeconomic data parcel data centroid layer.
SelQry The Select link/node query file. If this file is present, select link analysis will be performed when traffic assignment is run.
Optional
KFAC The K-factor matrix file. By default, this file is not present and K-factors are not applied. If used, the K-factor matrix file must be compatible with trip tables output by the model.
Optional
Path** The OUE path files used for traffic assignment warm start. (These files are no loner used and may be removed from future versions of the model)
Optional

Running the Model
3-2 NFR Regional Travel Model – User’s Guide
3.2 Creating and Running a Scenario
After the input data has been collected, a scenario must be defined from the model dialog box.
Model scenarios are accessible from the scenario toolbox and contain information about the
following:
Input and output directories;
Filenames;
Network year/alternative;
Data year/alternative;
Individual alternatives; and
Advanced settings and parameters.
Scenarios can be copied based on existing scenarios or can be created using default settings.
Figure 3.1 through Figure 3.5 show the scenario toolbox and editor used to manage scenarios
along with annotations describing the available functions.
A scenario can be created or edited using the following steps listed below. It is recommended
these steps are performed in order.
1. Specify a scenario name and identify the scenario input and output directories.
2. As necessary, identify input files by name. Most files will be found automatically, but some files may need to be located manually.
3. Once the status for all required files is shown as “Exists,” edit the scenario settings on the General tab. Note network and data year settings do not need to match. It is possible to run a scenario based on the 2008 roadway network and 2035 socioeconomic data.
4. Optional: Review the output filenames and modify if desired (changes are not typically needed).
5. Optional: Review the advanced settings and modify if desired (changes are not typically needed).
WARNING: The Advanced tab in the Scenario Editor allows the user to edit values that are not often changed. The advanced interface does not prevent the user from entering invalid or inconsistent data, which may cause the model to crash or produce invalid results.

Running the Model
NFR Regional Travel Model – User’s Guide 3-3
The model dialog box, shown in Figure 3.6, provides flexibility in how the model is run. In most
cases a simple approach can be taken.
To run a standard, complete model run, start the model dialog box, create a scenario, review
file settings, and click on Step 1 – Prepare Networks. The model will be run with the standard
default settings.
To automatically create a performance report when the model run is complete, select the
appropriate checkbox.
If buttons are grayed out and cannot be used, input files may be missing or settings may be
invalid.
Figure 3.1: The Scenario Toolbox
Scenario Status: Ready to run Run Complete Partially Complete Missing Inputs
All scenarios in the scenario file are listed here. Double click a scenario to edit it. Select one or more scenarios before running the model.
Add, copy, and delete scenarios using these buttons.
Change the order in which scenarios are displayed.
Create a new blank scenario list.
Load or save a scenario list.
Show the current scenario filename.

Running the Model
3-4 NFR Regional Travel Model – User’s Guide
Figure 3.2: The Scenario Editor (Input Tab)
Figure 3.3: The Scenario Editor (General Tab)
Filenames and file status are displayed here. Double-click an item to change the filename or location.
When a file is selected, its
description will be shown here.
Use the Browse buttons to identify input and output directories.
Use Set to match the output directory to the scenario name.
Enter a scenario
name.
Identify the scenario
directories.
A description of the scenario
can be entered here.
Choose assignment
settings.
The default settings are
appropriate for most uses.
Set the network year, data year, and individual alternatives.
Run for the MPO or expanded area.
Set speed feedback options.

Running the Model
NFR Regional Travel Model – User’s Guide 3-5
Figure 3.4: The Scenario Editor (Output Tab)
Figure 3.5: The Scenario Editor (Advanced Tab)
Note: Advanced model parameters should not typically be changed.
Different model stages are listed
here. Files for the selected stage
are shown
When a file is selected, its
description will be shown here.
Filenames and file status are displayed here. Double-click an item to change the filename or location. Note: Files will be missing until the model has been run.
Different model stages are listed
here.
Tables, Parameters, or
Access Data (i.e., table names in the
access database) can be selected
here.
Available data is shown here. Some data can be edited directly in the grid. Arrays will be edited in a separate dialog. Subarray data can be displayed by clicking in a cell and selecting Edit.
This button will reset all parameters currently shown (including subarrays) to default values.

Running the Model
3-6 NFR Regional Travel Model – User’s Guide
Figure 3.6: The Model Dialog Box
Running Selected Model Steps
The user interface can be set to run only selected model steps or sub-steps. To run only a single
step, click the “Stop after each step” checkbox in the main model dialog box. When this box is
checked, the selected step will be run, but subsequent steps will not. When this checkbox is
cleared, subsequent steps will run automatically.
To exclude certain sub-steps or to run only selected sub-steps, the dialog box shown in Figure 8
can be used. By clicking on the button to the left of each model step, the user can enable or
disable specific steps. The behavior of the “Stop after each step” checkbox is not changed when
sub-steps are enabled or disabled.
Figure 3.7: Sub-Steps Dialog Box
If checked, only the selected model
step will be run. If unchecked,
subsequent steps will be run as well.
Click on a model step to run that
step.
Sub-steps can be deactivated.
Utilities are be run from this area.
Check to create a Summary.xlsx file upon model completion
Debug mode disables error handling and allows steps to be run even if required riles are missing.
The Dashboard can be used to create maps of model results.

Running the Model
NFR Regional Travel Model – User’s Guide 3-7
Running Speed Feedback
Speed feedback can be enabled from within the scenario editor. When enabled, speed feedback
will only be run if:
1. The model is not set to stop after each step and
2. The model is started from Step 1, 2, or 3.
Otherwise, the model will be run as if the selected scenario does not have speed feedback
enabled. When the model is run with speed feedback enabled, a file named “Feedback.txt” is
created in the model output directory. This file is updated as the model runs and contains a
history of the speed feedback convergence process. The file can be used to determine whether
speed feedback has converged successfully or if additional iterations are needed. Furthermore,
the file can be opened while the model is running to check speed feedback convergence progress
during a model run.
When performing alternatives analyses, it is often preferable to run the model without enabling
speed feedback. However, trip distribution patterns must still be consistent with a baseline
scenario (e.g., an existing plus committed model run). Running the travel model with speed
feedback enabled also requires considerably more time than running the model with speed
feedback disabled. The model can be run without speed feedback using speed feedback results
from a previous model run to produce consistent trip distribution results. To do this, follow the
steps listed below:
1. Perform a complete model run with speed feedback enabled.
2. Use the Copy Feedback Results utility to save resulting speeds to the input network file.
3. Create a new scenario that uses similar roadway and land use assumptions.
4. The new scenario should reference the same network year as the original run.
5. The new scenario may include network alternatives or changes to land use data.
6. Set the new scenario to run without speed feedback and without initializing speeds.
7. Run the new scenario.


Model Utilities - Input
NFR Regional Travel Model – User’s Guide 4-1
4.0 MODEL UTILITIES - INPUT
The model dialog box includes several utilities that can be used to prepare model inputs. Some of
these utilities will only be available if all required input files for a scenario have been identified
and are present.
4.1 Edit Network Year
The model roadway network is designed to contain data for various distinct scenarios. This tool
will allow network years to be added or deleted and can be operated as described below.
1. Select a model scenario that references an input network. The referenced input roadway network will be modified.
2. Click the Edit Network Year button in the main model dialog box (Input tab); the dialog box shown in Figure 4.1 will appear.
3. To add a network year:
a. Select a year from the drop-down list.
b. Click the Copy button. The tool will make an exact copy of the selected year. If the Alternatives option is enabled, you will be prompted to select alternatives to be included in the new network year.
c. Attributes for the new network year can be modified by opening the network file and using the tools available in the TransCAD software.
4. To delete a network year:
a. Select a year from the drop-down list. Note the base year network cannot be deleted.
b. Click the Delete button. The tool will delete all data fields associated with the selected year.
Figure 4.1: Add/Delete Network Year Dialog Box

Model Utilities - Input
4-2 NFR Regional Travel Model – User’s Guide
Network years can contain up to four digits. A recommended practice is to use a two to four digit
code formatted as YYXX.
Where YY represents the network year (e.g., 12 for 2012 or 40 for 2040) and XX is an optional
descriptor (e.g., 12A, 12B, 40A, 40AB).
4.2 Create Select Query
A select link or node query file (*.qry) can be created for a scenario using the Select Link/Zone
Query Builder provided with the TransCAD software. This toolbox, accessed from Planning
Assignment Utilities Select Link/Zone Query Builder, is explained in the TransCAD software
documentation. This tool interactively guides creation of a query file. It cannot be used to create
a select zone query based on a node selection set. To create a select zone query based on a node
selection set, use the Create Select Query tool using the following steps.
1. Add the attributes as needed to the input network node layer (e.g., use a subarea ID).
2. Create a scenario that references the modified input network and select this scenario.
3. Click the Create Select Query button in the main model dialog box (Input tab). The system will warn the user if an existing select link/query file is specified for the selected scenario.
4. Enter a name for the new select zone query.
5. Select the query method:
a. To or from: Track trips departing or arriving,
b. From: Only track departing trips, or
c. To: Only track arriving trips.
6. Enter a selection condition when prompted.
7. When prompted, choose whether or not to add an additional query to the query file.
Once the query file has been created, it can be viewed and edited using TransCAD’s Select
Link/Zone Query Builder and can be used as input to a travel model scenario.
4.3 Copy Feedback Results
This tool will copy speed feedback results from a completed model run to the input roadway
network file. Copying speed feedback results will allow a subsequent model run to produce trip
distribution results consistent with the completed model run, as described in the Running Speed
Feedback section.

Model Utilities – Transit
NFR Regional Travel Model – User’s Guide 5-3
4.4 Update Input Network
This tool will update the link facility type themes displayed when the roadway network is first
opened. Link theme settings will be set to be consistent with the settings provided in the original
model network.
In addition, this utility will update the ID field on the roadway network node layer with the correct
TAZ number. This action is necessary when splitting TAZs.
4.5 Edit Network
This utility creates a map containing the roadway network and route system, and then opens the
network editing toolbox. This map is set up and formatted to facilitate making changes to the
roadway network layer. This utility automates the process of setting up a workspace to edit the
roadway network. The resulting map operates on the input network associated with the selected
model scenario.
5.0 MODEL UTILITIES – TRANSIT
5.1 Link/Verify Route System
This utility links a route system to a particular roadway geographic file and checks the route
system for errors. More information on this tool can be found in the Editing the Route System
section.
5.2 Edit Routes
The Edit Routes utility creates a map containing the roadway network and route system, creates
a temporary working “.net” network, activates the route system layer, and then opens the route
editing toolbox. This utility also links and verifies the route system identified in the selected
model scenario. The resulting map is set up and formatted to facilitate making changes to the
route system. This utility automates the process of setting up a workspace to edit the route
system.
5.3 Calibrate Constants
The Constant Calibration utility runs the mode choice model and compares results to a set of
mode targets stored in the model database. The utility then adjusts mode constants and re-runs
mode choice iteratively until model results are consistent with mode choice targets, or an

Model Utilities – Transit
5-4 NFR Regional Travel Model – User’s Guide
iteration limit is met. The utility should only be run for scenarios where the roadway network,
route system, and socioeconomic data reflect conditions consistent with the mode choice target
values stored in the database.
This utility makes changes to the input database and should only be used when re-calibrating
the base year model. The model database should be backed up prior to running this utility.

Model Utilities – Maps and Reports
NFR Regional Travel Model – User’s Guide 6-1
6.0 MODEL UTILITIES – MAPS AND REPORTS
The model contains mapping and reporting utilities that can be used to produce additional model
outputs and summary data. These tools, described below, will only be available if all selected
scenarios have been run successfully and read “done” in the status column. Some of these
utilities can only operate on one scenario at a time and will be disabled when multiple scenarios
are selected.
6.1 Create Performance Report
This tool will allow the user to create a standard summary report for all selected scenarios. The
user will be prompted to select performance report options prior to report creation.
6.2 Create Maps (Dashboard)
The Create Maps utility creates maps that display model results. The utility opens a new toolbox
and can only be opened when a single completed model scenario is selected. The toolbar allows
the user to specify a map type and then choose options described in Table 6.1 and Table 6.2.
Once settings have been chosen, the Create button will generate the specified map.
Table 6.1: Map Types
Map Type Description
Validation The validation map displays model volumes and traffic counts. Volumes are shown in thousands, with counts also shown in thousands, but placed in parentheses. Model results are shown on all links, while count data is only shown on links where validation traffic count data is available. If the highlight option is selected, a color-coding scheme will identify model data similar, higher, or lower than count data.
This map is only meaningful when created for a base year model run.
Volume The volume map displays model volumes in thousands. The user can opt to display daily, peak hour, or off-peak volumes.
LOS The LOS map displays a planning-level peak-hour level of service estimate based on 24-hour volumes.
Select Link/Node The select link/node map displays the results of a select link or node analysis. This map can only be created successfully if select link or node analysis is enabled for the selected model run.
Traffic Comparison The traffic comparison displays the differences between two model runs. When creating this map, the user will be prompted to select a scenario for comparison.
Volume/Capacity The volume/capacity map displays the volume to capacity ratio using a color theme. While similar to the LOS map, this map uses modeled volume and capacity data rather than a planning-level analysis.

Model Utilities – Maps and Reports
6-2 NFR Regional Travel Model – User’s Guide
Table 6.2: Map Options
Map Option Description
NCHRP If selected, the map will display NCHRP-255 adjusted volumes instead of raw model results.
Volumes If selected, the map will include traffic volume labels. If left blank, the model will not include labels.
Connectors If selected, the map will show centroid connectors. If left blank, centroid connectors will be hidden.
Highlight If selected, a validation map will differentiate between links where model results are similar to, higher than, or lower than traffic count data. This option can only be selected when creating a validation map.
Label Connectors If selected, volume labels will be plotted on centroid connectors. However, labels will only be shown in the Volumes option is also selected.
Label Local If selected, volume labels will be plotted on local streets. However, labels will only be shown in the Volumes option is also selected.
6.3 Process Turns
The travel model saves turn movement information for selected intersections during traffic
assignment routines. No calibration or validation process has been performed to ensure turn
movements produced by the travel model are reasonable or realistic. Raw movement data
should not be used directly for analysis, a utility is provided to adjust data using processes
defined in NCHRP-255. TransCAD also contains built-in utilities for estimating turn movements
based on link flows. These estimates can be used to get a general sense of activity at an
intersection. When using the built-in utility, turning movement counts should be compared to
base year model results as well as turning movement forecasts.
The Built-In Turn Movement Utilities
The built-in turn movement utility can be accessed after opening or creating a map that includes
traffic assignment results (e.g. in a joined view). To view estimated turn movement results, click
the intersection diagram tool in the main mapping toolbox: and then select a node. After
settings are entered in the dialog box, an intersection diagram will be created. For additional
details on operation of this function, see the TransCAD online help system.
Alternately, raw modeled turn movements can be viewed using the tool accessible from Planning
Planning Utilities Display Intersection Flows. Modeled turn movement volumes for AM and
PM peak hours are saved in “TurnsAM1.bin” and “TurnsPM1.bin.” Turn movements are only
saved for intersections with a value in the INT_ID node field. When saving turn movements, each
node with a value in the INT_ID field should contain a unique positive number.

Model Utilities – Maps and Reports
NFR Regional Travel Model – User’s Guide 6-3
Turn Movement Add-In
The NFR Model includes an intersection processing utility which can read and write data using
comma separated value (CSV) files in universal traffic data format (UTDF). Operation of the
intersection processing utility requires additional data and is only run for those intersections
identified by the INT_ID field on the node layer. All intersections with a value in this field can be
included in the analysis. This ID also serves as a link between the TransCAD network and
information contained in other databases, such as a Synchro network. For functions requiring
count data and to export data to in an external format, the INT_ID field on the node layer must
match the node ID of intersections in a turn movement count file and a Synchro network. The
turn movement processor is currently limited to intersections with three or four legs. To access
the turn movement add-in shown in Figure 6.1, click the Process Turns button on the main model
dialog box (Maps and Reports tab).
Figure 6.1: The Process Turns Dialog Box
Intersection Definition File
Load, create, or edit an
Intersection Definition file.
Save raw (unadjusted)
turn movements to
a CSV or HTML file.
Save turn movement
estimates to a CSV file.

Model Utilities – Maps and Reports
6-4 NFR Regional Travel Model – User’s Guide
All turn movement functions require an intersection definition file that identifies the
configuration of each intersection selected for analysis. A new intersection definition file can be
created from the turn movement dialog box, or a previously created definition file can be loaded.
Turn movement definition files reference INT_ID values and link ID values, so a new definition file
must be created after certain input file modifications.
Once an intersection definition file is created, it should be
verified for accuracy. For functions requiring existing traffic
count data, the intersection leg definitions must match
those in an input data file. Definition files should be
checked manually to ensure that the correct legs are
identified at each intersection. To do this, click the “Edit”
button after creating an intersection definition file. If
necessary, correct the intersection definition file by
adjusting the definitions of each intersection as shown in
Figure 6.2
Figure 6.2: Editing the Intersection Definition File
Intersection approaches are color-coded. The red leg is the northern approach.
The initial guess may not be correct. Here, the north and east legs are defined incorrectly.
Click on a button and then click on an intersection leg to define its direction.
Use the arrows to browse through intersections, or the Jump button to select an intersection by number.
The turn movements utility cannot process intersections with more than 4 legs or with diagonal legs. To overcome this limitation, all intersection approaches must be renamed as N, S, E or W in a Synchro network and 5-legged
intersections must be evaluated manually.

Model Utilities – Maps and Reports
NFR Regional Travel Model – User’s Guide 6-5
Unadjusted Turns
Unadjusted turn movements can be saved to a CSV file. This file can then be read using a
program such as Excel or can be imported to Synchro. For import to Synchro, intersection ID
numbers and approach directions must be consistent. When outputting adjusted turns for
forecast scenarios, unadjusted turns from a base year scenario are also required as an input file.
Adjusted Turns
The model can adjust turn movements using NCHRP-255 intersection procedures. Use the steps
described in this section to export adjusted turn movement data to a CSV file which can be
imported to Synchro.
1. Identify intersections in the TransCAD Network:
Enter the intersection ID into the INT_ID field in the node layer of a TransCAD network. If a separate network is to be used for the calibrated base year model run, INT_ID values must be entered into this network. The INT_ID field should be cleared for nodes or intersections not present in the Synchro network.
2. Run the base and forecast year travel model: The base and forecast year model scenarios should be run in full with INT_ID information present in both networks.
3. Create a base year intersection definition file: Use the Process Turns utility to create an intersection definition file. Ensure all intersection approaches are defined in a manner consistent with the Synchro file.
4. Export the unadjusted base year model turn movements: Save the turn movement data with an easy to remember name.
5. Create a CSV file containing observed turn movement data: This file must contain complete turn movement data for each intersection to be analyzed. The file can be created by exporting turn movement data from Synchro, or by modifying the unadjusted base year model turn movements file to contain turn movement count data.
6. Load or create a forecast year intersection definition file: In most cases, the file created for the base year can be re-used. If not, a new file must be created. If in doubt, use the Edit function to verify a loaded intersection definition file is correct.
7. Export the adjusted forecast turn movements: CSV files containing base year count data and base year unadjusted modeled turn movements must be referenced. Exported turn movements can be loaded into Synchro or a spreadsheet program for additional analysis.
Once these steps have been followed, an adjusted turns CSV file will be created, which contains
turn movement forecasts based on observed turn movement counts and travel model forecasts.
However, these forecasts are estimates and professional judgment should be used to interpret
the results. Where intersection configurations change or where turn movement count data is

Model Utilities – Maps and Reports
6-6 NFR Regional Travel Model – User’s Guide
suspect, manual intervention will be required. If more detailed information, such as a traffic
study, is available, this information should be used in addition to or instead of these planning
level forecasts.

Model Database
NFR Regional Travel Model – User’s Guide 7-7
7.0 MODEL DATABASE
The model requires a large and varied set of input data for each model run. Each step of the
travel modeling process requires specific data items as inputs. The data is contained in three
primary places:
Spatial Data: The roadway line layer and route system contain the supply side information
used by the travel model. The TAZ layer is also input to the travel model, but zone data is not
stored directly in the TAZ layer.
Model Database: The model database contains socioeconomic data and other demand side
information used by the travel model. The database also contains model parameters such as
trip rates and other zonal data such as area type.
Scenario Manager: Some model parameters are stored directly in the scenario manager.
Aside from parameters accessible from the General tab in the scenario editor, this
information does not need to be changed in normal use of the model.
This chapter provides a detailed description of the data and parameters contained in the model
database.
7.1 Database Approach
The NFR MPO Travel Model relies on a large amount of data, numerous parameters, and lookup
tables. The TransCAD software uses a table format to store this information. The TransCAD table
format is relatively efficient, very stable, and allows for sufficient precision in storage of decimal
numbers. This format, Fixed Format Binary (FFB), has been used to store all data output from the
travel model. However, an Access database has been used to store the majority of data input to
the model. The Access format has been used rather than the FFB format for several reasons:
The TransCAD table format cannot be read or edited except with the TransCAD software;
The Access database can be used to store nearly all required input data for the travel model,
eliminating the need to manage a large number of input files containing data for various
model steps;
SQL queries within the Access software can be used to convert data from a human-readable
format into a format readily used by the travel model; and
The Access database is designed to manage multiple data scenarios within a single
consolidated database file.

Model Database
7-8 NFR Regional Travel Model – User’s Guide
The model has been designed to support both network and data scenarios. Network scenarios
are stored in the TransCAD geographic line layer, while data scenarios are stored within the
model database. A nearly unlimited number of data scenarios can be maintained within a single
database, but in practice it may be useful to maintain different databases for different purposes.
For example, one database could be maintained for the regional planning process, while a
different database could be maintained for testing minor land use alternatives associated with
proposed development.
The database contains some information that is static (does not change when a different data
scenario is selected) and other data that is dynamic (varies by data scenario).
Static Data includes:
Roadway parameters (lookup tables by facility type and area type);
Household size and income disaggregation curves;
Trip generation rates (production and attraction rates);
Friction factors (gamma parameters);
Terminal times;
Mode choice parameters; and
Time of day parameters.
Dynamic Data includes:
Socioeconomic data at the TAZ level;
Other TAZ data (area type, parking cost, sub-region, etc.);
Regional bivariate data (household size and income);
Special generator data; and
External station data.
7.2 Database Interface
When opened, the model database will present the user with a request to enable Visual Basic for
Applications (VBA) macros. Once macros are enabled, the database interface form will appear.
This form provides automated management of data scenarios and guided access to key datasets.
The interface is annotated in Figure 7.1.

Model Database
NFR Regional Travel Model – User’s Guide 7-9
To modify dynamic data for a specific data scenario, set the active scenario to the desired year
and open the scenario specific datasets from the main interface dialog box. Data can be edited
directly in Access. Alternately, data can be copied from Access and pasted into Excel. Once data
has been modified, it can be pasted back into the Access database.
Not all datasets can be accessed directly from the database interface form. Some datasets are
only edited during a model update and re-calibration and can be accessed only by opening the
data tables directly.
Figure 7.1: Access Database Form Interface
* All datasets contain expanded data regardless of the MPO/Expanded setting. This setting only changes
the amount of data shown.
The user interface can be used to copy dynamic datasets to a new data scenario, create a new
blank data scenario, or delete an existing data scenario. The dialog box that provides this
capability is accessed using the Manage Data Scenarios button and is shown in Figure 7.2. Once a
new dataset has been created, socioeconomic data, special generator data, and external station
These buttons will open data tables
containing dynamic datasets.
With the exception of EE data, these
tables can be edited.
Use these buttons to view or edit roadway lookup values or trip rates.
Use this button to add or delete data scenarios. The active scenario and a description are also shown in this section.
Set data views to show MPO data or expanded data*

Model Database
7-10 NFR Regional Travel Model – User’s Guide
data can be modified for the new scenario. Bivariate data can also be edited, but does not need
to be changed in most cases.
Figure 7.2: Data Scenario Management
7.3 Database Tables
Information is stored within tables in the Access database file. A list of these tables and a
description of their contents are included in Table 7.1. For some tables, SQL queries are used to
convert data from a human-readable format to a format compatible with the model. SQL queries
are also used to filter dynamic datasets to show only data for the selected year.
All tables that contain model data are prefixed with the letter “a.” Queries based on tables use
the same name as the source table, but include a suffix consisting of an underscore and a number
(e.g., _1). Tables, queries, and forms prefixed with an x, y, or z are present only for use with the
program interface and are not listed in Table 7.1.
Table 7.1: Access Database Tables
Section Table/Query Name Description
Roadway Network
aRoadwayLookup Roadway parameters by facility type and area type
aRoadwayLookup_1 Roadway lookup table formatted for TransCAD
aRoadwayVariables List of variables contained in the roadway lookup table
Socioeconomic Data
aSEData Socioeconomic data at the TAZ level for all data scenarios
aSEData_1 Socioeconomic data filtered to the active data scenario and modeling area
aZoneData Contains additional TAZ data for all data scenarios

Model Database
NFR Regional Travel Model – User’s Guide 7-11
Section Table/Query Name Description
aZoneData_1 Additional TAZ data filtered to the active data scenario and modeling area
Household Models
aDisaggIncome Household income disaggregation curves
aDisaggSize Household size disaggregation curves
aDisaggWorkers Household worker disaggregation curves
aRegBivarPct Regional bivariate distribution of households for all data scenarios
aRegBivarPct_1 Regional bivariate distribution of households filtered to the active data scenario and modeling area
Trip Generation
aProductionRates Production rates
aAttractionRates Attraction rates
aSpecialGen Special generator values for all data scenarios
aSpecialGen_1 Special generator values filtered to the active data scenario and modeling area
aTripRateFactors Trip rate factors by sub-region
aTripRateFactors_1 Trip rate factors by sub-region filtered to the active modeling area
aTripRateFactorsAT Trip rate factors by area type
External Trips aEETrips External/External trip table for all data scenarios
aEETrips_1 External/External trip table filtered to the active data scenario and modeling area
aIETrips Internal/External and Internal/External trip table for all data scenarios
aIETrips_1 Internal/External and Internal/External trip table filtered to the active data scenario and modeling area
Trip Distribution
aFrictionFactors Friction factor gamma parameters
aFrictionFactors_1 Friction factor gamma parameters filtered to the active modeling area
aTerminalTime Terminal time values by area type
Mode Choice aExternalTransit External station transit values (Caution: use with care)
aExternalTransit_1 External station transit values filtered to the active data scenario
aModeCoefficients Mode choice model coefficients
aModeConstants Mode choice model alternative specific constants (ASCs)
aModeTargets Mode choice target values (for use in mode choice calibration)
Assignment aLoadingFactors Traffic assignment loading factors
aLOSCap Daily planning-level level of service capacities
aPCE Passenger car equivalent values
aPeriodFactors Directional daily to sub-period factors
aPeriodFactors_Assignment Period factors to convert from peak/off-peak to traffic assignment periods
aPeriodFactors_Distribution Period factors to convert from daily to peak/off-peak


Transportation Networks
NFR Regional Travel Model – User’s Guide 8-1
8.0 TRANSPORTATION NETWORKS
The NFR Model requires both roadway and transit networks to operate. These networks are
described in detail in the model documentation. To work with the roadway and transit networks,
it is important to understand the connections and relationships between different components of
the transportation networks and the TAZ data.
8.1 Transportation Network Components
The transportation network is made up of the components listed below:
Links: Links are stored in the line layer in the roadway geographic file. Different types of links include: o Active roadway links: Each roadway segment is represented by a link (or line) in the
roadway network layer. o Inactive links: The roadway geographic file can also contain roadway and non-motorized
links inactive for a given scenario. These links are ignored by the model. o Centroid Connectors: Centroid connectors attach centroid nodes to roadway links
Nodes: Nodes are attached to links. Types of nodes include: o Centroids: Centroid nodes connect to the model database and the associated
socioeconomic data. These nodes are identified by a non-zero value in the “ZONE” field on the node layer. Zone numbers must be unique to each zone, but do not necessarily need to be sequential.
o External Stations: External stations are similar to centroids, but are located on the model boundary. Database information for external stations is maintained in a different format.
o Park-n-Ride Nodes: Park-n-Ride nodes are located at locations where trip-makers can transition from a personal vehicle to a transit vehicle. Park-n-ride nodes cannot be centroid or external station nodes and must be matched with at least one transit stop.
o Other Nodes: All other nodes are used solely to define link start and end points. These nodes may be located at intersections, where centroid connectors connect to roadway links, or mid-block.
Routes: The TransCAD Route System represents transit routes. Routes start and end at nodes and must traverse roadway links in between. Routes use information stored on the roadway links, such as freeflow and congested travel time.
Transit Stops: The transit stop layer is attached to the transit route system. Transit stops provide a connection between link and node layers, used to represent access to transit (via the walk or drive modes). All stops must be placed on a transit route and must be placed at a network node. o Note: TransCAD does not automatically enforce consistency between the node and stop
layer. It is important to follow the route system editing guidelines provided later in this document.

Transportation Networks
8-2 NFR Regional Travel Model – User’s Guide
8.2 Example Transportation Network Application
The example that follows includes a complete description of the process that would be used to
add a roadway segment to the network and modify a transit route to traverse the new link. The
example adds a new connection between Harmony Road and SH-392 parallel to Taft Hill Road,
and Shields Street. The connection is added as a four-lane principal arterial.
Note: This example is presented for illustrative purposes only and is not necessarily consistent
with NFR MPO planning documents.
Before we Begin: Make a Backup Copy
This example modifies the model input data. Before starting, it is advised the user make a
complete copy of the C:\NFR Model v4\Input folder. Once the example exercise has been
completed, the user can restore the original files from the backup copy.
Part 1: Prepare Workspace
Begin this section by starting the TransCAD software program. Once TransCAD is open, perform
the following actions:
1. Start the model dialog box from Tools Add-Ins NFR Model. 2. Make sure a valid scenario is selected in the Scenario Toolbar.
a. If the model was installed directly from the installation media, the included base year scenario should work correctly.
b. If the model data was not installed to the default location, it may be necessary to re-specify the scenario input and output directory.
3. From the Utilities section of the dialog box (bottom section), select the Input tab and click the Edit Network button. a. This action will create a new map showing the roadway network and route system. b. The NFR Model dialog box will be closed.
4. Verify the intended network file has been loaded into the map.
a. Click the map layers button ( ) in the TransCAD toolbar. b. In the window that appears, verify the NFR NETWORK entry is selected. c. Verify the Geographic File named at the bottom of the window is indeed the
geographic file to be edited. i. Note: If the wrong file is listed, edit the selected scenario to reference the correct
input network file. d. Click Close.
5. Use the zoom tool ( ) to zoom to the vicinity of the Harmony Road between Taft Hill Road and Shields Street.
6. Verify that the Map Editing toolbar is present in the workspace. If it is not, it can be enabled from the TransCAD
toolbar ( ) or menu (Tools Map Editing Toolbox).

Transportation Networks
NFR Regional Travel Model – User’s Guide 8-3
Part 2: Add New Roadway Link
Once the workspace has been set up, use the following steps to add the new roadway segment:
1. Review the area where the new roadway will be added. Observe: a. The new roadway will start and end at existing nodes, and b. The new roadway will cross two existing roads, creating new intersections.
2. Because the new roadway will cross and connect to existing facilities, it will be necessary to: a. Check for pre-existing nodes where the new link will cross existing roadways, b. Split existing facilities in cases where a node is not already present, and c. Create the new roadway segment in three steps creating three links.
3. Add the first segment of the new link:
a. Select the Add Line tool ( ) from the Map Editing Toolbox. b. Click once on the node on the north side of the new segment along Harmony Road,
then c. Double-click on the roadway link (Trilby Road) where the new link will intersect.
d. Click the green light ( ) on the Map Editing Toolbox to save the new link to the line layer file and create an undo point.

Transportation Networks
8-4 NFR Regional Travel Model – User’s Guide
Note: This action will split the roadway link to the south into two separate links and will retain important attributes
on both halves. It is a good idea to verify all important attributes have been retained on both halves of the
split link until the user has become comfortable with the network editing process.
4. Add the second segment of the new link:
a. Select the Add Line tool ( ) from the Map Editing Toolbox. b. Single-click on the newly created node, c. Single-click as needed to create shape points along the new link, and then d. Double-click on an existing node along Shields Street to add the second segment of
the new link.
e. Click the green light ( ) on the Map Editing Toolbox to save the new link to the line layer file. When the edit is saved, TransCAD will create an undo point, allowing the network modification to be reversed with the undo command.
1 – Single-click on the existing node
2 – Double-click on Trilby Road to split the link and create a new node.

Transportation Networks
NFR Regional Travel Model – User’s Guide 8-5
5. Add the third segment of the new link:
a. Select the Add Line tool ( ) from the Map Editing Toolbox. b. Single-click on the existing node along Shields Street , c. Single-click as needed to create shape points along the new link, and then d. Double-click on an existing node at College Avenue and SH-392 to finish the new link.
e. Click the green light ( ) on the Map Editing Toolbox to save the new link to the line layer file and create an undo point.
1 – Single-click on this node from step 3
2 – Single-click to create shape nodes
3 – Double-click to finish the line at an existing node on Shields Street
Transportation Networks
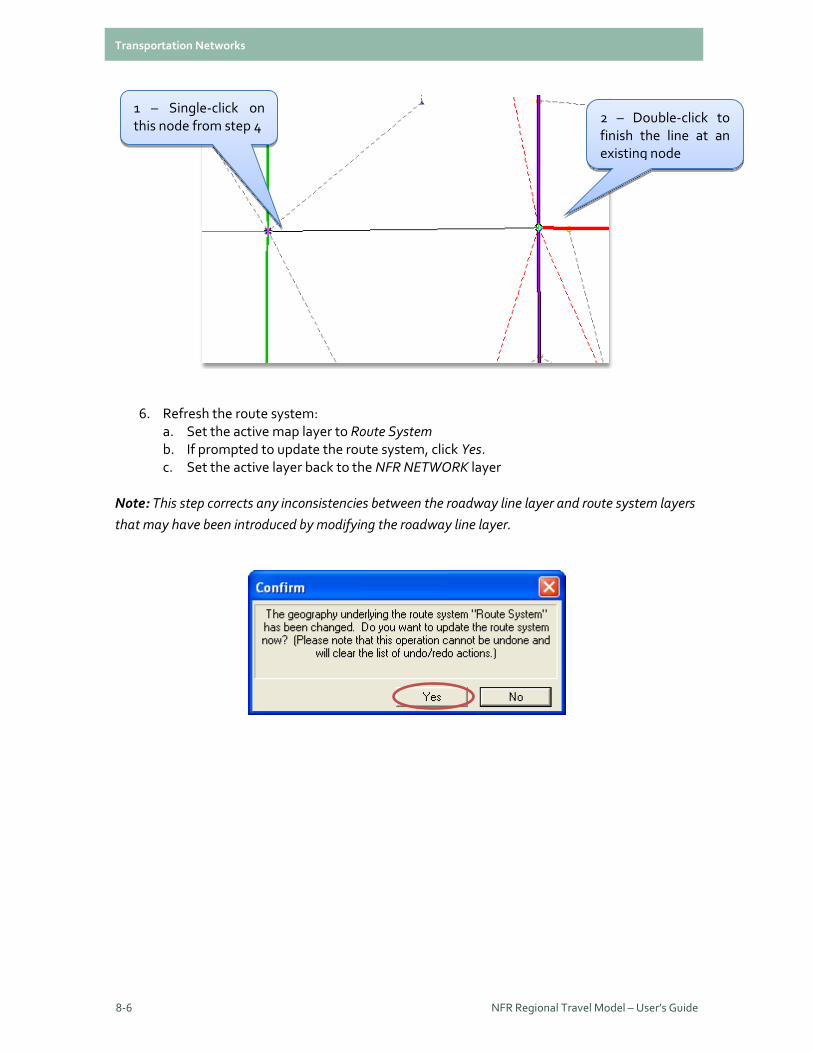
8-6 NFR Regional Travel Model – User’s Guide
6. Refresh the route system: a. Set the active map layer to Route System b. If prompted to update the route system, click Yes. c. Set the active layer back to the NFR NETWORK layer
Note: This step corrects any inconsistencies between the roadway line layer and route system layers
that may have been introduced by modifying the roadway line layer.
1 – Single-click on this node from step 4
2 – Double-click to finish the line at an existing node

Transportation Networks
NFR Regional Travel Model – User’s Guide 8-7
Part 3: Edit the Roadway Segment
The new roadway links do not initially contain any data. Attributes must be added to the new
links using the following steps.
1. Identify a nearby link (a “source link”) with the same facility type and area type as the new link.
2. Click the Edit Line Attributes tool ( ) from the Map Editing Toolbox. 3. Copy attributes from the source link to the new link:
a. Click on the source link, b. Hold shift, then click on each new link,
c. In the window that appears, right-click in the first column and select Copy Values. Note: You may need to resize the window to see the data for the source link. The column with source link data should be the only column that contains values.
1 – Click on the source link
2 – Shift-click on each target link
2 – Shift-click on each target link
2 – Shift-click on each target link

Transportation Networks
8-8 NFR Regional Travel Model – User’s Guide
d. Replace the street name for the new links by editing the values for Local_Name in the second three columns. Clear out any data in the Street_Name field. Take care not to modify the name of the source link.
e. Click the green light ( ) on the Map Editing Toolbox to save the updated attributes and create an undo point.
4. Modify attributes so this link will only be active in specific scenarios:
a. Use the standard information tool ( ) to edit attributes for the three new links. Click on one link, then shift-click on the rest.
b. Copy 2012 (i.e., *_12) attribute values to the alternative link value attributes (use Ctrl-C and Ctrl-V, or right click to select copy and paste). In most cases, only the fields shown in the image below need to be copied.

Transportation Networks
NFR Regional Travel Model – User’s Guide 8-9
c. Select an alternative number (e.g., 9999) and enter the value in the ALT field
d. Clear values from the base year attributes and from other network year attributes as
desired. In this example, clear all attributes for all sets of network attributes that do not end in _AL. When multiple cells are highlighted, the quickest way to clear them is to right-click and Clear.
Copy
Clear for All Years

Transportation Networks
8-10 NFR Regional Travel Model – User’s Guide
e. Check all remaining attributes, paying particular attention to count data. In this
example, it is recommended all count fields are cleared since the link does not exist in the base year.
i. Clear original count data from fields such as LAR_2010CNT and FC_2011CNT. ii. Clear summarized/processed count data from the fields shown below.
iii. Also clear the DO_NCHRP field so NCHRP-255 volume adjustments are not applied.
Part 4: Create a New Model Scenario
Once roadway edits are complete, the user can create a new model scenario that includes the new alternative. The steps required to do this include:
1. Create a new scenario that includes the new roadway alternatives: a. Close all files and windows in TransCAD (e.g., File Close All). b. Start the NFR Model dialog box from Tools NFR Model. c. In the Scenario Toolbox, make a copy of the base scenario.
2. Edit basic scenario information. a. Scenario Name: Base 2012 Alt 9999 b. Input Dir: No change (e.g., C:\NFR Model v4\Input\) c. Output Dir: Reference a new folder (e.g., C:\NFR Model v4\Output\Base 2012
Alt9999). 3. Input Tab – No changes at this time. 4. General Tab:
a. Click Alts under Scenario Settings. b. Move alternative 555 to the right side of the window. c. Make sure Run Speed Feedback and Initialize Speeds are not checked.
5. Output Tab – No changes at this time. 6. Click OK when done to exit the Scenario Editor.
Clear Values

Transportation Networks
NFR Regional Travel Model – User’s Guide 8-11
Part 5: Realign a Transit Route
To demonstrate the process of modifying the route system, this example includes realignment of
an existing transit route to use the newly added roadway. Detailed route system editing
guidelines are also provided later in this guide.
Warning: This example is performed in a separate copy of the route system. See the technical
documentation for information on use of a master route system.
1. Make a copy of the route system: a. From the model dialog box, select the Transit Utilities tab in the Utilities section. b. Click the Edit Routes button to close the dialog box and open the route system in a
map. c. Select Tools Geographic Utilities Geographic File from the TransCAD menu. d. Click the Copy button. e. Save the copy of the route system using a new name (e.g., NFRRoutes2009Alt555).
2. Edit a scenario to reference the route system copy: a. Close all files and windows in TransCAD (e.g., File Close All). b. Start the NFR Model dialog box from Tools NFR Model. c. In the Scenario Toolbox, double-click on the desired scenario (e.g., Base 2009 (Alt
555) d. Double-click the Routes item in the input file list. e. Select the new alternative route system. f. Click OK in the Scenario Editor to return to the model dialog box
3. Open a map to edit the route system: a. From the model dialog box, select the Transit tab in the Utilities section. b. Make sure the new scenario referencing the route system copy is selected. c. Click the Edit Routes button to close the dialog box and open the route system in a
map. d. Verify the Route System Toolbox has appeared on the screen. e. Zoom the map to the vicinity of the new links
added earlier in this example. 4. Verify the intended route system file has been loaded
into the map.
a. Click the map layers button ( ) in the TransCAD toolbar.
b. In the window that appears, verify the Route System entry is selected.
c. Verify the route system file named at the bottom of the window is indeed the route system to be edited.
i. Note: If the wrong file is listed, check the selected scenario and make sure it references the correct input route system.
5. Add a new route to use the new links:
a. Use the Select tool ( ) on the Route System toolbox. b. Click on the node at the intersection of Harmony Road, and Lemay Avenue.

Transportation Networks
8-12 NFR Regional Travel Model – User’s Guide
c. Click on the nodes along the roadway links as shown in the figure below and double click at the intersection of Centerra Parkway and Crossroads Boulevard.
d. This will prompt a new window asking for the route name. Type in “Route Centerra”
e. Select a new route alignment as shown in the example below.
f. The new route will be shown as a black line, two black dots, one each at the start and end of the route.
1 – Click where the route will begin
2 – Click on several points along the new alignment; make sure to click on nodes.
2 – Click on several points along the new alignment; make sure to click on nodes.
3 – Double-click at the
location where the route will
end

Transportation Networks
NFR Regional Travel Model – User’s Guide 8-13
g. Click the green light ( ) on the Route System Toolbox to save the new route. When the edit is saved, TransCAD will create an undo point, allowing the route system addition to be reversed with the undo command.
h. This will add the route to the Route System as shown in the figure below.
6. Add stops to the new Route:
a. Use the Select tool ( ) on the Route System toolbox. b. Click anywhere along the new Route Centerra. c. If prompted, select Route Centerra.
d. To add stops, use the zoom tool ( ) to zoom close to the intersection of Harmony Road and Lemay Avenue where the route starts.
e. Click on the tool ( ) on the Route System toolbox to add stops and click on the node where the route starts.
New Route added to the route system
New Route added to the route system

Transportation Networks
8-14 NFR Regional Travel Model – User’s Guide
f. Click the pan tool ( ) and pan along the route and add more stops at nodes where necessary.
g. Click the green light ( ) on the Route System Toolbox to save the new stop placement. When the edit is saved, TransCAD will create an undo point, allowing the stop addition to be reversed with the undo command.
Reminder: Refer to the Editing the Route System section of this document when choosing where to
place stops.
7. Verify the Route System: a. Close all files and windows in TransCAD (e.g., File Close All). b. Start the NFR Model Dialog Box c. Click the Link/Verify Route System button under the Transit Utilities tab.
i. Select the modified route system
Zoom VERY close to the node and add the stop on the node
Stop placement at nodes along the route

Transportation Networks
NFR Regional Travel Model – User’s Guide 8-15
ii. Select the roadway geographic file associated with the route system iii. The utility will ask about checking for disabled links; select No. iv. Note: The route system uses links that are disabled unless a specific alternative is
selected, so the disabled links will fail. It is OK to allow this check and observe the results.
d. If the verification step fails or produces a warning message, carefully review the route system and read all warning messages the utility produces.
8. Verify the Route System – Stage 2 (Optional) The route verify tool checks for many possible route system problems, but some errors cannot be identified until the model is run. After making route system edits, the following additional steps are recommended: a. Start the NFR Model dialog box. b. Select a scenario that references the modified route system. c. Un-check the Stop after Each Step option. d. Run the first model step (1 – Prepare Networks). e. If the model run fails, there may be an error in the route system.
i. Review the resulting Log.xml file – it may provide useful troubleshooting information.
ii. If the model run succeeds, the route system is probably valid. The user is advised to review the Log.xml file and Report.xml file to check for meaningful warnings.
Part 6: Run the Model
Once these steps are complete, the model should be ready to run. Attempt to run the newly
created model scenario in full. If the model produces an error message, verify all input data was
created, modified, and referenced properly.


Working with Transit Data
NFR Regional Travel Model – User’s Guide 9-1
9.0 WORKING WITH TRANSIT DATA
TransCAD Route systems must be created and maintained very carefully to ensure the TransCAD
Pathfinder builds reasonable and intuitive paths. Incorrect route system coding may produce
error or warning messages, but warning messages may only appear in the TransCAD log or report
file – without producing any obvious warning message from within the software. In some cases,
incorrect route editing will not result in any warning or error message, but will cause TransCAD to
build incorrect paths. This chapter provides general guidelines and recommendations for route
system editing in TransCAD.
9.1 Updating the Route System after Roadway Layer Changes
The TransCAD route system is based on the roadway network geographic file or the street line
layer. Because the route system relies on the roadway network, it is important to carefully
maintain the linkage between these two files. As a starting point, the user should always ensure
the route system is correctly linked to the roadway network and the route system is present in
the map when adding, deleting, splitting, or joining links in the roadway network.
Maintaining Route System Integrity
Because the route system is directly linked to the roadway network, TransCAD must modify the
route system any time a change is made to the roadway network layer. This is particularly
important if a roadway link traversed by a transit route is split, moved, or joined to another link.
When this happens, TransCAD will update the route system data to account for the change. The
easiest and least error-prone method of updating the route system is to add it to the map prior to
modifying the roadway line layer. After modifying a link traversed by a route, the user must set
the route system as the active layer to cause TransCAD to update the file.
If a user edits the roadway layer while the route system is not present in the map, TransCAD will
update the route system the next time it is opened. This update takes place even if none of the
modified links are traversed by a transit route. To ensure a route system is up to date, the
following procedure should be used regardless of whether the route system was present in a map
during network edits:
1. Close all files in the TransCAD program. 2. Run the Link/Verify Route System utility.
a. If this utility fails, continue to Step 3 anyway. 3. Open the route system in TransCAD.
a. Verify the correct line layer was opened automatically to support the route system. 4. Close all files.

Working with Transit Data
9-2 NFR Regional Travel Model – User’s Guide
5. If the Link/Verify Route System utility failed in Step 2, run the utility again. If the route system verification still fails, the route system must be repaired manually. (This is uncommon and will typically only occur if the guidelines in this section are not followed).
If multiple route systems are based on a roadway network file, it is important to perform the
steps listed above for each route system individually after making changes to the roadway
geographic file. When making major modifications to a geographic file, it is preferable to update
all route systems periodically during the editing process rather than waiting until all roadway
edits are complete.
It is only necessary to follow the guidelines specified above when splitting, joining, adding, and
deleting links from the roadway network. The steps above are not necessary when modifying
attributes of existing links.
9.2 Route System Link and Verify
Prior to making any changes to the route system or
roadway network, it is good practice to link the route
system to the roadway network and verify the route
system’s integrity. This can be done by using the
Link/Verify Route System utility available from the main
model dialog box. When activated, the utility will ask the
user to identify a route system, then the corresponding
roadway network file. The utility will link the selected files
and then check for errors in the route system. If the utility
is not available, this can be accomplished from the
TransCAD menu by using Route System Utilities Move, then Route System Reload, then
Route System Verify.
9.3 Editing the Route System
The route system can be edited with the Route System Editing Toolbox. However, this toolbox
requires a network (file with a .net extension) file as well as a geographic (file with a .dbd
extension) file. Prior to opening the Route System Editing Toolbox, create a working network as
follows:
1. Open the route system and verify the correct line layer has been opened with it. 2. Set the line (roadway) layer as the active layer. 3. Create a new network from Networks/Paths Create. 4. Save the network using a generic name (e.g., net.net). 5. Use the default network settings.
NOTE: A common mistake is to accidentally select the route
system stop layer (a “dbd” file) instead of the roadway network
layer. If this is done, the Link/Verify utility will not make
any changes to the route system, but will show an error message
instead.

Working with Transit Data
NFR Regional Travel Model – User’s Guide 9-3
After the network file has been created, the route system can be edited. The Route System
Editing Toolbox is activated by setting the route system as the active layer and then selecting
Route Systems Editing Toolbox from the TransCAD menu.
The TransCAD documentation provides detailed guidance on route system editing tools. Some
additional guidelines are provided here to ensure route systems will work properly.
Route stop problems are usually reported in the Log file that is generated during the first model
step. If the route system has been modified in any way, this file should be inspected for warnings
and errors. However, the log file will not indicate all possible problems, some of which may result
in flawed or illogical paths.
Route Direction
All routes are coded directionally from start to finish. If a route traverses a street more than once
(e.g., out and back along the same corridor), it must be coded to travel out and then back. A
simple way to think of this process is to code the route exactly as it is driven. There are two
approaches available to represent routes that travel out and back along a corridor:
1. Separate routes for each direction: This approach includes a separate route for each direction, such as “Route 1 EB” and Route 1 WB.”
2. Single route for both directions: This approach includes a single route that travels out and back, starting and ending at a single point.
For routes which travel in a loop pattern, it is typically best to code the route as a single route.
Stop Placement
Stops must be placed on the route system according to a specific set of rules. Incorrect stop
placement is the most common source of transit network related model crashes, warning
messages, and silent errors that can invalidate model results. This section includes a list of
guidelines regarding proper stop placement. Many of these guidelines have specific and
WARNING: Route stop problems do not always cause the model to crash. Problems are often reported in the Log file generated during the first model step. If the route system has been modified in any way, this file should be inspected for warnings and errors. HOWEVER: The log file will not provide warnings about improper route coding which may cause incorrect model results.

Working with Transit Data
9-4 NFR Regional Travel Model – User’s Guide
important exceptions, so it is important to consider the entire set of guidelines prior to editing a
route system in TransCAD.
Route stops should be placed on routes at all locations where walk access to transit is available.
Stops are not needed at nodes where walk access cannot be achieved or where other nearby
stops on the same route can be reached more quickly from all nearby zones.
Place Stops at Nodes
While TransCAD will allow the user to place stops at any location along a route, the pathfinding
algorithms used for mode choice modeling require each route stop to be located at a node in the
roadway geographic file. TransCAD does not “snap” route stops to line layer nodes, but instead
internally links each stop to the closest node. If any stops are placed too far from the nearest
node, the travel model will produce a warning (in the Log file) and the stop will be ignored. This
type of error may not cause a model crash or a visible error message.
Multi-Pass Stops (Mid-Route)
TransCAD’s path building algorithms allow one and only one stop for each time route passes a
node in the geographic file. This means only one stop is allowed at each node for routes that do
not double back or traverse a segment multiple times. For routes which do traverse a corridor
multiple times, TransCAD will allow multiple stops at a node. Multiple stops located at a single
node must be properly associated with the first, second, etc. route pass. In most cases, a stop
should be placed for each pass at all nodes along a two way segment.
To correctly create multiple stops at a node, use the following steps:
1. Select the route for editing and zoom in to the a node where a multi-pass stop is desired;
2. Use the Add a Stop tool ( ) to add a stop at the node, choosing Pass 1 when asked. 3. Use the Add a Stop too to add a second stop at the same node, choosing Pass 2 when
asked. 4. Verify the stop appears with a number 2 as shown in the example below.
Route Start/End
For all routes, stops must be placed at the beginning and end of the route. For loop routes or out-
and-back routes coded as a single route, this requires multiple stops at a single node. For out-
and-back routes, correct stop placement can be achieved by treating the start/end point as a
mid-route stop. For loop routes, stops cannot be placed as first and second passes. In such cases,

Working with Transit Data
NFR Regional Travel Model – User’s Guide 9-5
two stops should be placed as shown below. In this example, the scale has been set so the stops
shown are placed approximately 6 inches (in map units) from the node where the stop starts and
ends. At this scale, some versions of TransCAD may snap a stop to a node, in which case it is
advised to move the stop so it is slightly offset from the node.
WARNING: Failure to code loop routes as shown may result in improper transit paths, but will
not produce any warning or error messages in TransCAD.
Mid-Route Turnaround
At a point where a route reverses, but does not start or end, only one stop should be placed. If
two stops are placed at a mid-route reversal, the model will not work correctly and may fail to
run. Correct placement of a stop at a mid-route turnaround is shown below.
Route Start/End
First stop
Last stop
Only one stop should be placed at this location.

Working with Transit Data
9-6 NFR Regional Travel Model – User’s Guide
One-Way / Two-Way Transition
At locations where a route transitions from a loop configuration to an out-and-back
configuration, a two-stop pass must be placed on the two-way portion of the stop at a location
very close to the node. Additionally, at least one extra stop must be present on the loop portion
of the route. An example of a correct and an incorrect stop placement is shown below.
Correct Incorrect