netsupport school cce 11 simplified manual - Orani DepED ICT
50
1 NETSUPPORT SCHOOL CCE 11 SIMPLIFIED MANUAL TABLE OF CONTENTS Preliminaries i. What is NetSupport School CCE? 2 ii. Definitions 2 iii. NetSupport School New Features 2 iv. Conventions Used 5 v. Terminology Used 5 I. INSTALLATION 6 1. System Pre-Requisites 6 2. Installed Components 6 II. STARTING NETSUPPORT SCHOOL CCE 7 1. Starting NetSupport School CCE 7 2. The Control Window 7 3. Tutor Toolbar 8 4. Student Register 9 III. USING NETSUPPORT SCHOOL CCE 13 1. Lock/Unlock Students Mouse and Keyboard 13 2. Viewing Student Screens 14 3. Blank All Client Screens 16 4. Scanning Students 17 5. Monitor Mode 19 6. Messenger Monitoring 21 7. Keyboard Monitoring 22 IV. USING NETSUPPORT SCHOOL CCE 24 1. Showing to Students 24 2. Annotating Screens 26 3. NetSupport Video Player 26 4. Show Application 27 5. Chatting to Students 27 6. Sending a Message to Students 29 7. Help Requests 29 V. USING NETSUPPORT SCHOOL CCE 31 1. Transferring Files 31 2. Distributing Files 32 3. Sending and Collecting Work 33 4. Remotely Launching Applications and Students 36 5. Rebooting or Logging out Students 37 6. Web Control Module 38 7. Co-Browser 41 VI. USING NETSUPPORT SCHOOL CCE 42 1. Application Control Module 42 2. Student Surveys 42 3. Question and Answer Module 44 4. Printer Management 47 5. Student Rewards 48 References 50
-
Upload
khangminh22 -
Category
Documents
-
view
13 -
download
0
Transcript of netsupport school cce 11 simplified manual - Orani DepED ICT
1
NETSUPPORT SCHOOL CCE 11 SIMPLIFIED MANUAL
TABLE OF CONTENTS
Preliminaries
i. What is NetSupport School CCE? 2
ii. Definitions 2
iii. NetSupport School New Features 2
iv. Conventions Used 5
v. Terminology Used 5
I. INSTALLATION 6
1. System Pre-Requisites 6
2. Installed Components 6
II. STARTING NETSUPPORT SCHOOL CCE 7
1. Starting NetSupport School CCE 7
2. The Control Window 7
3. Tutor Toolbar 8
4. Student Register 9
III. USING NETSUPPORT SCHOOL CCE 13
1. Lock/Unlock Students Mouse and Keyboard 13
2. Viewing Student Screens 14
3. Blank All Client Screens 16
4. Scanning Students 17
5. Monitor Mode 19
6. Messenger Monitoring 21
7. Keyboard Monitoring 22
IV. USING NETSUPPORT SCHOOL CCE 24
1. Showing to Students 24
2. Annotating Screens 26
3. NetSupport Video Player 26
4. Show Application 27
5. Chatting to Students 27
6. Sending a Message to Students 29
7. Help Requests 29
V. USING NETSUPPORT SCHOOL CCE 31
1. Transferring Files 31
2. Distributing Files 32
3. Sending and Collecting Work 33
4. Remotely Launching Applications and Students 36
5. Rebooting or Logging out Students 37
6. Web Control Module 38
7. Co-Browser 41
VI. USING NETSUPPORT SCHOOL CCE 42
1. Application Control Module 42
2. Student Surveys 42
3. Question and Answer Module 44
4. Printer Management 47
5. Student Rewards 48
References 50
2
NETSUPPORT SCHOOL CCE 11 SIMPLIFIED MANUAL
Rodrigo S. Panlaque Jr.
i. What is NetSupport School?
NetSupport School is a class leading training software solution, providing Teachers with the ability
to instruct, monitor and interact with their Students either individually, as a pre-defined group or to the
overall class.
Combining advanced classroom PC monitoring, real-time Presentation and Annotation tools, with
an innovative customised Testing suite, Internet and Application control, real-time audio monitoring,
automated Lesson Plans, Printer Management, Instant Messenger control, Content Monitoring and Desktop
Security, this latest version of NetSupport School rises to the challenge and requirements of today's modern
classroom.
NetSupport School is a powerful training tool based on the award winning NetSupport Manager
Remote Control package.
The need for managing the use of technology in today’s modern classrooms has never been greater.
PC savvy students present several challenges to teachers who are required to maximise the benefits of
computer led instruction, ensuring students are spending time on assigned tasks rather than allowing them
to use the equipment as an extension of their social life!
NetSupport School helps teachers and trainers improve the efficiency of ICT teaching by centrally
instructing students on their computer. Maintain student focus by monitoring application and web usage,
track language lab audio activity, improve support through online help and chat requests and save time by
automatically sending and collecting work files or quickly polling the class and showing instant results.
ii. Definitions
The‘Tutor’ is the workstation that shows to or views/takes over the Student.
The ‘Student’ is the workstation that is being shown to, viewed or taken over.
iii. What's New
NetSupport School 11 delivers the following new and improved features to compliment the extensive range
of existing functionality.
New Question and Answer module
The Question and Answer module is a unique collaborative tool that enables
teachers to reinforce key learning points and instantly gauge student understanding
during a lesson.
New Tutor Assistant App for Apple iOS and Android
Version 11 introduces a new component available for free download from the Apple
iTunes and Google Play app stores.
3
For use in your existing NetSupport-managed classroom environment, the
NetSupport Tutor Assistant delivers greater mobility for teachers around the ICT
suite and is also the ideal tool to allow teaching assistants to help with monitoring
student progress.
New Google Chromebook Support
NetSupport School offers interaction and monitoring support for Google Chrome
OS Students within the classroom.
New Connection Mode
Version 11 sees the introduction of a new mode of connection 'User Mode' which
enables the Tutor to define a list of Students to connect to based on their logged-
on user name.
New Windows 8 PC and Tablet Support
Pre-release support provided for Windows 8 on both regular and touch-enabled
desktop computers as well as for use by both teacher and student on Windows 8
tablets.
New Student Toolbar
Toggle On/Off the Student Toolbar from the Tutor.
New Groups
Randomly group Students for team tasks. Students can also be grouped by
house/colour.
New Quick Launch
The new Quick Launch feature enables the Tutor to remotely launch applications,
specific documents or websites on selected or all Student computers instantly.
Enhanced Tech Console
View/set Power Management, Windows update and Security settings.
View NetSupport Protect status for students and teachers.
Edit the registry of a remote system.
Launch a local command prompt from the remote system on your PC.
Automatically connect to students/teachers using room mode.
Apply a school-wide set of internet, application, USB, CD/DVD and printer
restrictions that are 'always on'
Resize remote machine thumbnails using a convenient 'slider'.
Ability to search for students by name, device or room.
Enhanced Replay Files
4
Replay files can now be edited and exported in a range of standardised video
formats to ensure key learning activities are accessible to all.
Enhanced
Send/Collect Work
Now provides realtime feedback on the status of each document sent, so the teacher
can see which Students' documents are ready to collect and which Students need
reminding.
Enhanced
File Transfer Performance
File Transfer now utilises UDP for one-to-many transfers and delivers 10x faster
across the classroom.
Enhanced
Print Management
The Printer Management feature now highlights to the teacher the number of
paused print jobs requiring attention.
Enhanced
Internet Controls
Support added for Google Chrome Browser and Mozilla Firefox.
Enhanced
Application Controls
Ability to clear the student desktop. Ability to minimise student applications
Enhanced
Student Journal
An existing journal can be selected and resources continued to be added to
it. Chapters can be added, bookmarks created and missing content added by
synchronising Tutor and Student journals.
Enhanced
Tutor Configuration Options
Ability to include multiple rooms in preconfigured Tutor Room list.
Enhanced
User Interface
A fully redesigned interface. While it has retained the same layout for familiarity, all
aspects of navigation and feature access have been revisited and enhanced. All
menus within the product have been updated, many are now dock and un-dockable,
allowing them to be moved around the desktop for regular use.
5
iv. Conventions Used
The following logical and easy to understand conventions are used in this manual:
Step-by-step instructions, which should be performed in sequence, are shown as numbered
paragraphs, beneath a clearly stated, ‘How to do’ heading.
As there is often more than one way of carrying out a task you will find ‘Or’ options also included.
Additional tips or explanatory notes regarding these instructions are enclosed in a border under
the heading ‘Note’.
Individual items in menu commands are enclosed in braces and should be followed in
sequence, for example: {Clients}{Show}.
v. Terminology Used
Control/Tutor The workstation that is used to take over another.
Client/Student The workstation that is to be taken over.
Available Client When a Client has been installed on a workstation, it
becomes available for connection to a Control. A Client must be available before a Control can
connect to it.
Connected Client All available Client’s can be chosen for simultaneous
connection. A Control can only remote control a Client to which they are connected.
Selected Client A Client or group of connected Clients can be selected by the
Control. The Control can then perform a variety of functions such as View, Show, and
Message etc. A Control can also Watch, Control or Share the selected Clients screen,
keyboard and mouse.
6
I. INSTALLATION
SYSTEM PRE-REQUISITES
Some areas of NetSupport’s functionality rely on the presence of certain files/applications, please ensure
these are available before installing NetSupport School CCE.
Tutor
Internet Explorer 5 service pack 2 or above.
Windows XP (SP2), 2003 (SP2), Vista, 2008, Windows 7, Windows 8 and
Windows MultiPoint Server 2011.
35Mbytes free disk space for Student only installation.
90Mbytes free disk space for full installation. TCP/IP.
Tutor Assistant app supported on iOS devices running 4.3 and higher, Android 2.3 and higher.
The NetSupport School CCE Tutor requires a screen resolution of 1024 x
768 or above.
Student
The Student is only supported on virtual desktop environments such as, Microsoft Windows MultiPoint
Server 2011, NComputing (X-series & L- series), MiniFrame (SoftXpand) and many others.
NetSupport School CCE is already installed in the eClassroom Computer Server running Microsoft
Windows Multipoint Server 2010 / 2011.
By default, NetSupport School CCE will be installed in the folder C:\Program
Files\NetSupport\NetSupport School CCE.
Installed Components:
Tutor Console
This component, sometimes called the Control, should be installed on workstations which
will be used to remote control other PCs. It gives teachers access to NetSupport School CCE’s full
range of features, for example, viewing student screens and showing their screen to students.
Student
This feature, sometimes called the Client, can only be installed on a virtual session. By
installing this component, you are enabling a Tutor machine to establish a link with the Student.
The range of features available to students are limited to those that enable them to communicate
with the teacher, for example sending a help request.
7
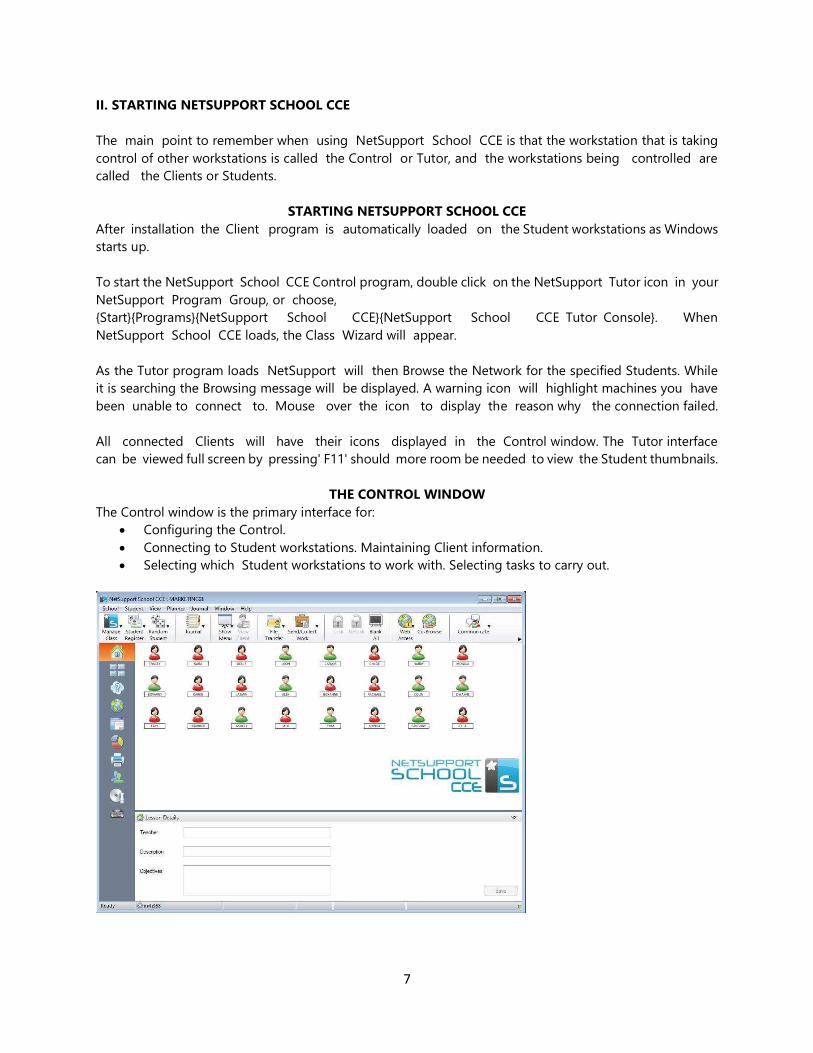
II. STARTING NETSUPPORT SCHOOL CCE
The main point to remember when using NetSupport School CCE is that the workstation that is taking
control of other workstations is called the Control or Tutor, and the workstations being controlled are
called the Clients or Students.
STARTING NETSUPPORT SCHOOL CCE
After installation the Client program is automatically loaded on the Student workstations as Windows
starts up.
To start the NetSupport School CCE Control program, double click on the NetSupport Tutor icon in your
NetSupport Program Group, or choose,
{Start}{Programs}{NetSupport School CCE}{NetSupport School CCE Tutor Console}. When
NetSupport School CCE loads, the Class Wizard will appear.
As the Tutor program loads NetSupport will then Browse the Network for the specified Students. While
it is searching the Browsing message will be displayed. A warning icon will highlight machines you have
been unable to connect to. Mouse over the icon to display the reason why the connection failed.
All connected Clients will have their icons displayed in the Control window. The Tutor interface
can be viewed full screen by pressing' F11' should more room be needed to view the Student thumbnails.
THE CONTROL WINDOW
The Control window is the primary interface for:
Configuring the Control.
Connecting to Student workstations. Maintaining Client information.
Selecting which Student workstations to work with. Selecting tasks to carry out.
8
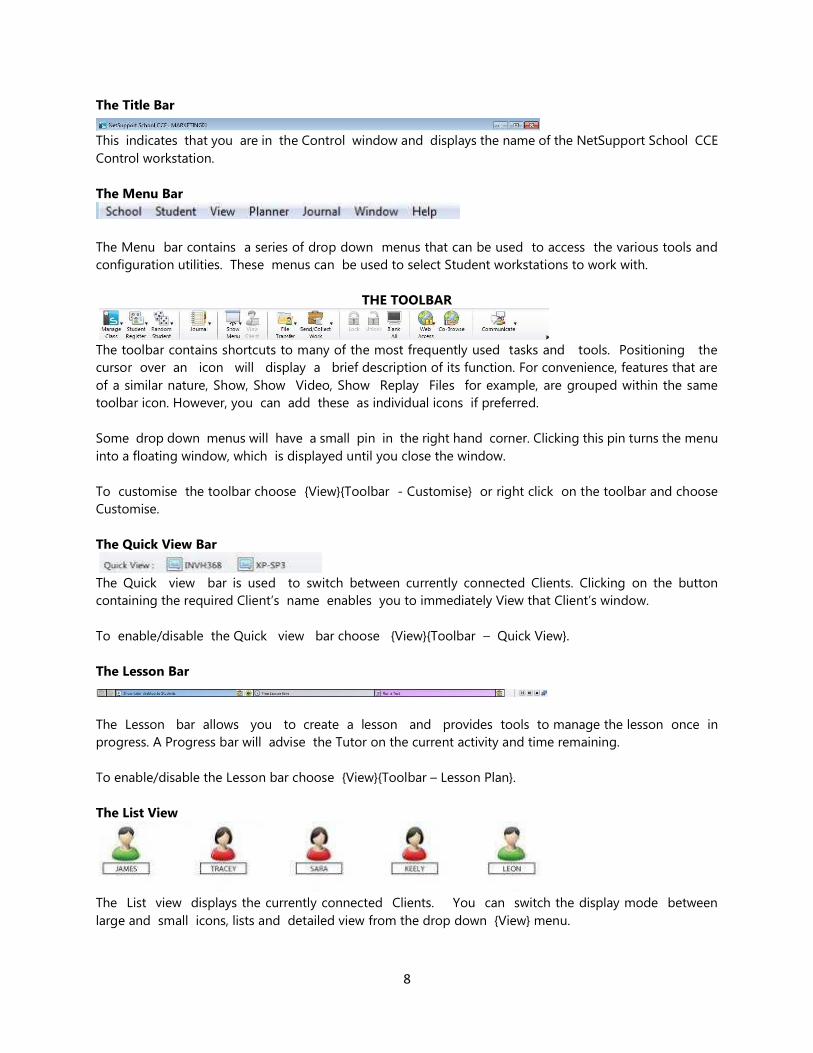
The Title Bar
This indicates that you are in the Control window and displays the name of the NetSupport School CCE
Control workstation.
The Menu Bar
The Menu bar contains a series of drop down menus that can be used to access the various tools and
configuration utilities. These menus can be used to select Student workstations to work with.
THE TOOLBAR
The toolbar contains shortcuts to many of the most frequently used tasks and tools. Positioning the
cursor over an icon will display a brief description of its function. For convenience, features that are
of a similar nature, Show, Show Video, Show Replay Files for example, are grouped within the same
toolbar icon. However, you can add these as individual icons if preferred.
Some drop down menus will have a small pin in the right hand corner. Clicking this pin turns the menu
into a floating window, which is displayed until you close the window.
To customise the toolbar choose {View}{Toolbar - Customise} or right click on the toolbar and choose
Customise.
The Quick View Bar
The Quick view bar is used to switch between currently connected Clients. Clicking on the button
containing the required Client’s name enables you to immediately View that Client’s window.
To enable/disable the Quick view bar choose {View}{Toolbar – Quick View}.
The Lesson Bar
The Lesson bar allows you to create a lesson and provides tools to manage the lesson once in
progress. A Progress bar will advise the Tutor on the current activity and time remaining.
To enable/disable the Lesson bar choose {View}{Toolbar – Lesson Plan}.
The List View
The List view displays the currently connected Clients. You can switch the display mode between
large and small icons, lists and detailed view from the drop down {View} menu.
9
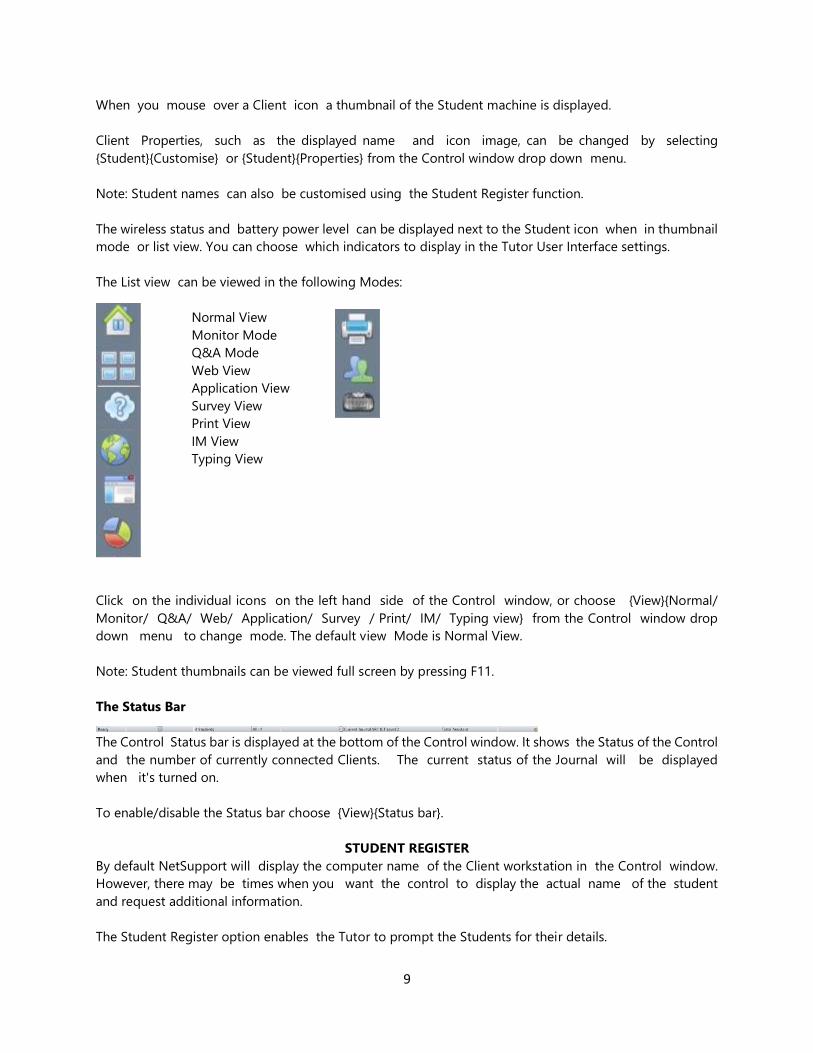
When you mouse over a Client icon a thumbnail of the Student machine is displayed.
Client Properties, such as the displayed name and icon image, can be changed by selecting
{Student}{Customise} or {Student}{Properties} from the Control window drop down menu.
Note: Student names can also be customised using the Student Register function.
The wireless status and battery power level can be displayed next to the Student icon when in thumbnail
mode or list view. You can choose which indicators to display in the Tutor User Interface settings.
The List view can be viewed in the following Modes:
Normal View
Monitor Mode
Q&A Mode
Web View
Application View
Survey View
Print View
IM View
Typing View
Click on the individual icons on the left hand side of the Control window, or choose {View}{Normal/
Monitor/ Q&A/ Web/ Application/ Survey / Print/ IM/ Typing view} from the Control window drop
down menu to change mode. The default view Mode is Normal View.
Note: Student thumbnails can be viewed full screen by pressing F11.
The Status Bar
The Control Status bar is displayed at the bottom of the Control window. It shows the Status of the Control
and the number of currently connected Clients. The current status of the Journal will be displayed
when it's turned on.
To enable/disable the Status bar choose {View}{Status bar}.
STUDENT REGISTER
By default NetSupport will display the computer name of the Client workstation in the Control window.
However, there may be times when you want the control to display the actual name of the student
and request additional information.
The Student Register option enables the Tutor to prompt the Students for their details.
10
Note: You can also change the name of the Client workstation by editing the Client Properties Details Tab.
To Prompt Students to Login:
1. If specific Student details are required select the relevant Client icons in the Control window.
Alternatively, to prompt all connected Students leave the icons unselected.
2. Choose {School}{Student Register} from the Control window drop down menu.
Or,
Click the Student Register icon on the toolbar.
3. Select Sign In from the available options.
4. The Student Register dialog will appear. The Tutor can then select the information that the Student
will be required to complete.
Note: The Student Register will also appear if you check Create a
Student Register in the Class Wizard
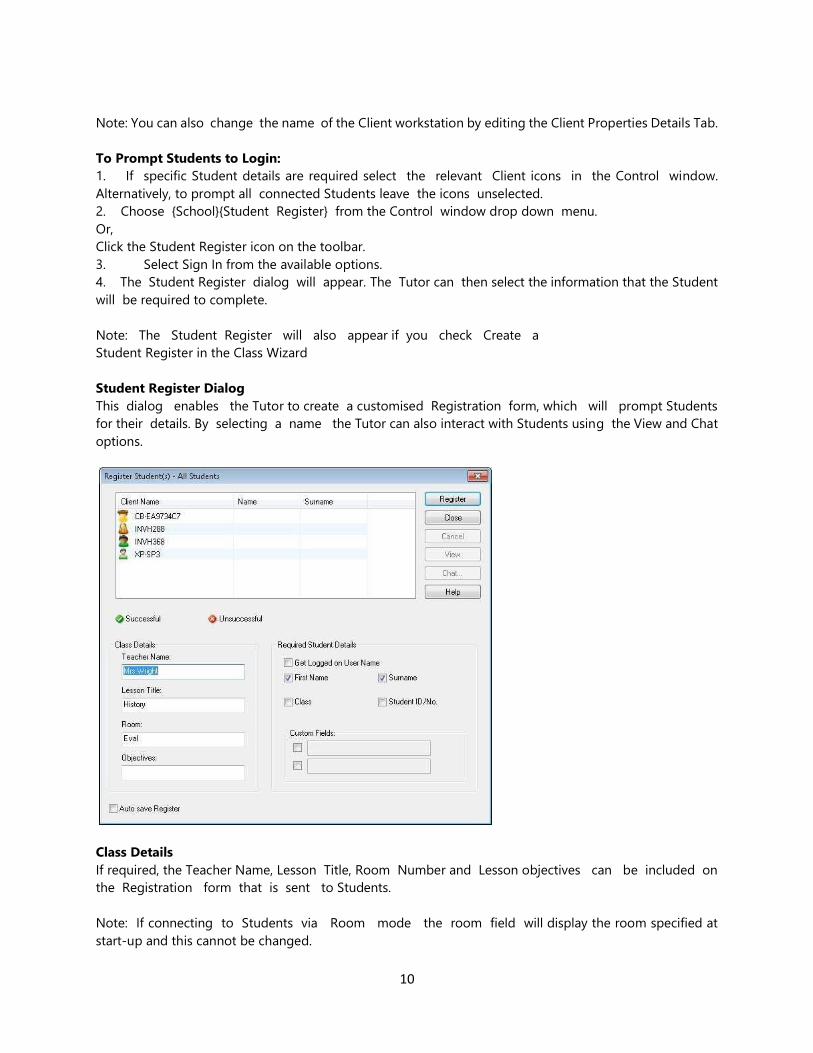
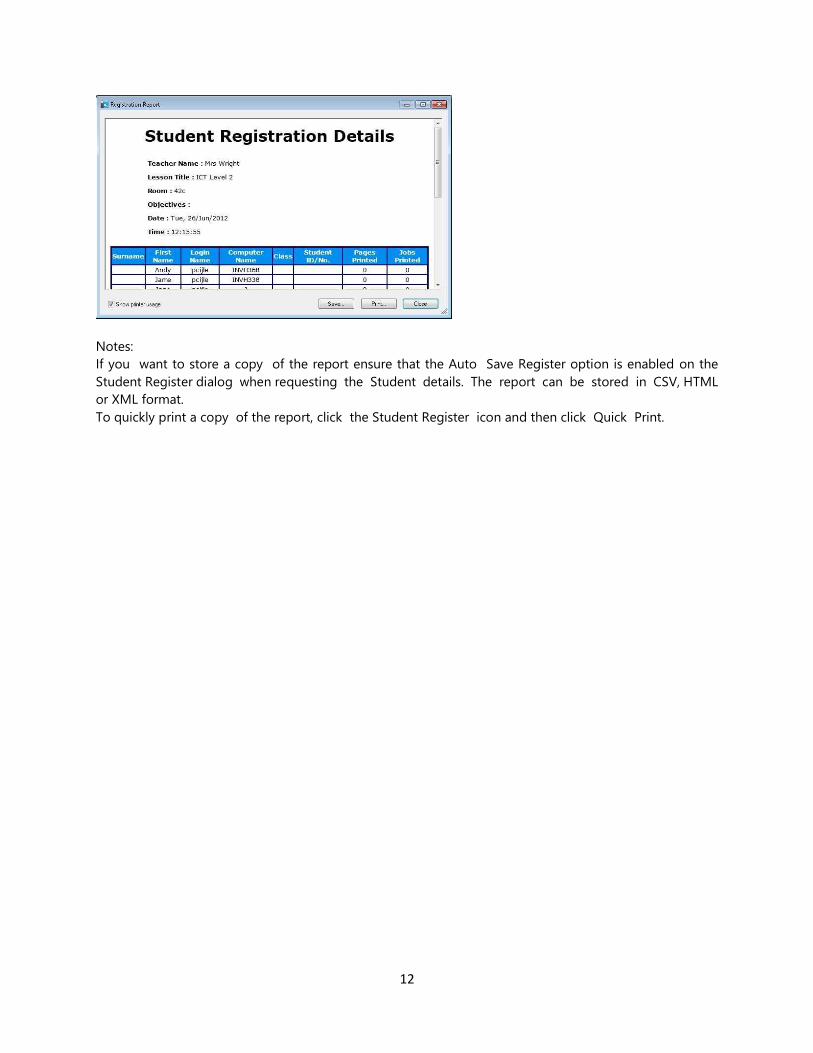
Student Register Dialog
This dialog enables the Tutor to create a customised Registration form, which will prompt Students
for their details. By selecting a name the Tutor can also interact with Students using the View and Chat
options.
Class Details
If required, the Teacher Name, Lesson Title, Room Number and Lesson objectives can be included on
the Registration form that is sent to Students.
Note: If connecting to Students via Room mode the room field will display the room specified at
start-up and this cannot be changed.
11
Required Student Details
Decide which details to prompt the Students for. You can also add two custom fields to the form.
Note: If the "Get Logged on User Name" option is selected, the first name and surname will be greyed
out and the Student name will automatically default to the Login name.
Auto Save Register
Student registration details can be viewed in a report but this will be lost when the Control disconnects.
If you want to store a copy of the report check this option. You will be prompted for a file name, location
and file format (CSV, HTML or XML).
Click Register to send the form to Student machines. You can monitor progress as the Students respond.
Click Close when all Students have Signed In, the Client icon in the Control window will now
display the Registered name.
Sign Out
At the end of a lesson you can reset the Client Names using the Sign Out option.
1. Choose {School}{Student Register} from the Control window drop down menu.
Or,
Click the Student Register icon on the toolbar.
2. Select Sign Out from the available options. Confirm that you want to unregister the Students.
Registration Report
Student registration and Printer usage details can be viewed in a report but this will be lost when the
Control disconnects.
1. Choose {School}{Student Register} from the Control window drop down menu.
Or,
Click the Student Register icon on the toolbar.
2. Select Registration Report from the available options.
12
Notes:
If you want to store a copy of the report ensure that the Auto Save Register option is enabled on the
Student Register dialog when requesting the Student details. The report can be stored in CSV, HTML
or XML format.
To quickly print a copy of the report, click the Student Register icon and then click Quick Print.
13
III. USING NETSUPPORT SCHOOL CCE
LOCK/UNLOCK STUDENTS MOUSE AND KEYBOARD
When you perform a Show, the Clients mouse and keyboard are automatically locked. There may,
however, be other occasions when you want to lock a Clients keyboard and mouse. You can only
Lock/Unlock Clients that are connected.
The keyboard and mouse can be configured to lock separately if required. From the Control window
drop down menu choose {View}{Current Settings – User Interface - Student}.
To Lock Clients
1. Select the Client(s) you wish to Lock.
2. From the Control window drop down menu, choose {Student}{Lock
Keyboard/Mouse}. Or,
From the toolbar, choose Lock. Or,
Right-click on selected Client icons and choose Lock keyboard/Mouse.
3. By default a graphic will appear on the Client workstation, informing them that you have locked their
mouse and keyboard.
To Unlock Clients
1. From the Control window drop down menu, choose {Student}{Unlock
Keyboard/Mouse}. Or,
From the toolbar, choose Unlock. Or,
Right Click on selected Client icons and select Unlock
Keyboard/Mouse.
To blank a Clients screen when locked
1. Choose {View}{Current Settings – User Interface - Student} from the Control window drop down
menu.
2. Check Blank screen when Locking mouse and keyboard.
3. Click OK.
4. Select the Client(s) you wish to Lock.
5. From the Control window drop down menu, choose {Student}{Lock
Keyboard/Mouse}. Or,
From the toolbar, press the Lock icon.
Notes:
If you View a locked Client, the blank Client screen setting will no longer apply. To blank a Client
screen when Viewing, choose
{Client}{Blank screen} from the View window drop down menu.
Alternatively, you can freeze the Clients screen and display a flashing image “This machine has been
locked by the Control user” Choose
{View}{Current Settings – User Interface} and disable the Blank
Screen and Display Image options, to enable the flashing message.
To display a graphic when locking a Client workstation
A graphic can be displayed on a Students screen when the Tutor uses the Lock function. When a Client’s
keyboard and mouse have been locked, a default image nss_lock_image_jpg appears on their screen.
14
1. Choose {View}{Current Settings – User Interface - Student} from the Control window drop down
menu.
2. Select “Display image when locking mouse and keyboard”.
3. Click OK.
4. Select the Client(s) you wish to Lock.
5. From the Control window drop down menu, choose {Student}{Lock
Keyboard/Mouse}. Or,
From the toolbar, press the Lock icon.
Notes:
If you View a locked Client, the display graphic on a Client screen will no longer apply.
If an Image file cannot be located on the Client machine, a flashing message “This machine has been
locked by the control user” will be displayed on the Client screen.
The image can be changed if necessary by replacing the file or by using the Client Configurator to select
an alternative file.
1. In the Client Configurator choose {Advanced}{Image Option}.
2. The Image file will display the default file.
3. Click Browse to select an alternative file, then Open.
4. The Image file will display the new file.
5. Click OK.
VIEWING STUDENT SCREENS
Having connected to a Client, you can now control it. This is called Viewing. The Client’s screen will
be displayed in a window on the Control workstation. NetSupport will allow you to View multiple Client
screens, each in its own window, simultaneously.
Note: If required, a message can be displayed at the Client workstation confirming it is being Viewed.
See the Configuring The Student Section of this manual.
The Quick view Bar allows you to View a connected Client quickly and easily. When you connect to
a Client a button with the Clients name will appear on the Quick view bar on the Control window. By
clicking on a button you will View the Clients screen, by clicking on the button while Viewing, the View
window will be closed.
15
To View a Client
1. Double click the required Client icon in the List view.
Or,
With the required Client icon selected, choose {Student}{View} from the Control window drop down menu.
Or,
Click the View Client icon on the Control toolbar. Or,
Right click on the Client icon and choose View. Or,
Click the required Client name on the Quick view toolbar.
2. The View window for that Client will appear at the Control. To aid navigation of the Client screen, a
thumbnail image of the screen is displayed enabling you to scroll the Client desktop more easily.
Simply click and drag inside the thumbnail to view specific areas. The navigation panel can be
enabled or disabled by selecting
{View}{Navigation} from the View window drop down menu.
Notes:
For acceptable performance while Viewing, ensure that the Client’s
Active Desktop is turned off.
If the Client uses multiple monitors you will be able to switch between desktops by clicking the tabs
displayed beneath the View window toolbar.
To stop Viewing the Client and return to the Control window
1. Choose {Client}{Close} from the View window drop down menu.
There are three modes in which you can View a Client workstation:
Share The Client’s screen will be displayed at both the Control and the Client. Both the Control
and the Client will be able to enter keystrokes and mouse movements.
Watch The Client’s screen will be displayed at both the Control and the Client. Only the Client
will be able to enter keystrokes and mouse movements. The user at the Control will be locked
out.
16
Control The Client's screen will be displayed at both the Control and the Client. Only the Control
will be able to enter keystrokes and mouse movements. The Client will be locked out.
To change the Viewing mode
1. While Viewing the Client, click the View Mode icon on the View window toolbar and select
Share, Watch or Control.
Or,
Select {Client}{Share/Watch/Control} from the View window drop down menu.
Other View window options are: Scaling to Fit
It may be that the Client is running in a higher resolution than the Control. In this case choosing
the Scale to Fit option from the View window menu or toolbar, will re-size its screen to fit the window
in which it is displayed.
Switching to Full Screen
Alternatively, you might choose to use the whole of the Control’s screen to display the Client’s screen.
This is known as the Full Screen Viewing. While Viewing a Client in Full Screen a floating toolbar
will also be displayed. If you close this down, remember to use the hot keys, usually
CTRL+RSHIFT+LSHIFT, to get back to the Control window or press
<PAUSE ALT> to display the drop down menus.
Blanking the Clients screen while Viewing
For security reasons, you may require the Client screen to be blank while you are remotely controlling it.
1. Choose {Client}{Blank screen} from the View window drop down menu.
2. The Clients screen will be blanked.
3. To restore the screen, choose {Client}{Blank screen} from the View window drop down menu.
Viewing multiple screens simultaneously
NetSupport enables you to View multiple Clients simultaneously, each in its own window. You can even
scale their individual View Windows to fit on the Control’s screen.
To View multiple screens
1. From the Control window menu or any Client View menu, choose
{window}{Tile} and then select which NetSupport Windows you want to display.
2. Your chosen Windows will be tiled on the Control’s screen. If you want to be able to see the entire
Client’s screen then choose the Scale to Fit option in the toolbar of each Client’s View window.
BLANK ALL CLIENT SCREENS
Although you can blank a Client screen while it is being Viewed, there may be occasions when you
quickly want to blank all Client screens simultaneously.
To Blank All Client Screens
1. Choose {School}{Blank Screen} from the Control window drop down menu.
2. The Lock symbol will appear on each Client icon.
3. To restore the screens, repeat the above process.
17
SCANNING STUDENTS
The Scan function enables you to cycle through each connected Client in turn, displaying its screen on
the Control. It is an alternative to Viewing multiple Clients in scaled windows, which may cause their
screens to be unreadable.
Multiple Client screens can also be scanned in one Scan window.
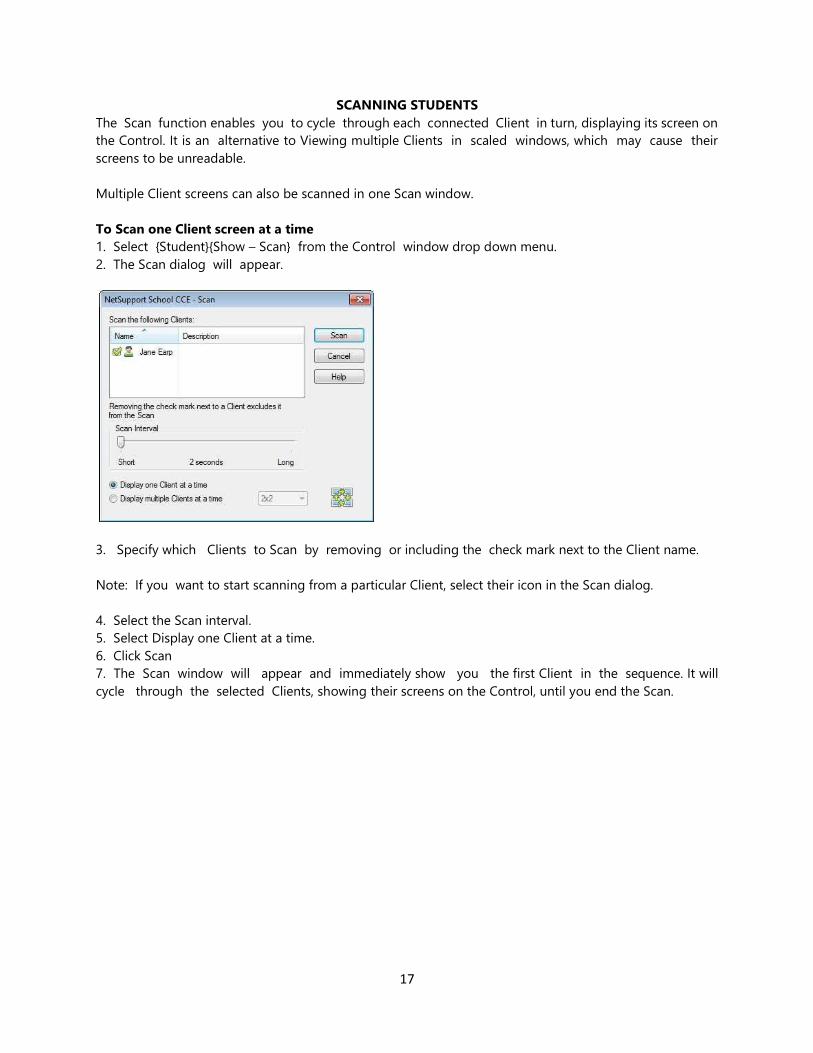
To Scan one Client screen at a time
1. Select {Student}{Show – Scan} from the Control window drop down menu.
2. The Scan dialog will appear.
3. Specify which Clients to Scan by removing or including the check mark next to the Client name.
Note: If you want to start scanning from a particular Client, select their icon in the Scan dialog.
4. Select the Scan interval.
5. Select Display one Client at a time.
6. Click Scan
7. The Scan window will appear and immediately show you the first Client in the sequence. It will
cycle through the selected Clients, showing their screens on the Control, until you end the Scan.

18
The toolbar buttons for a single Client Scan Window have the following functions: -
Previous, Auto and Next buttons
You can turn auto timing on or off from the Scan window toolbar, or choose to move forwards or
backwards between individual Clients. The previous button shows the previous Client screen scanned.
The next button shows the next Clients screen in the scan cycle.
Scaling to Fit
It may be that the Client is running in a higher resolution than the Control. In this case choosing
the Scale to Fit button, will re-size its screen to fit the window in which it is displayed.
Full Screen
When Scanning in full screen mode, you can use the Scan Floating toolbar to Control the operation.
Capture
A snapshot of the current Client view window will be taken. You will then have the option to name and
save the current screen contents to a file.
To end the Scan
1. Choose {Scan}{Close} from the Scan window drop down menu.
Scanning multiple screens simultaneously
Multiple Client screens can be scanned simultaneously in one Scan window.
To Scan multiple screens simultaneously
1. Select the Scan button from the Control toolbar.
2. The Scan dialog will appear.
3. Specify which Clients to Scan by removing or including the check mark next to the Client name.
4. Select Display multiple Clients at a time.
5. Select number of Client screens to be displayed in the Scan window.
19
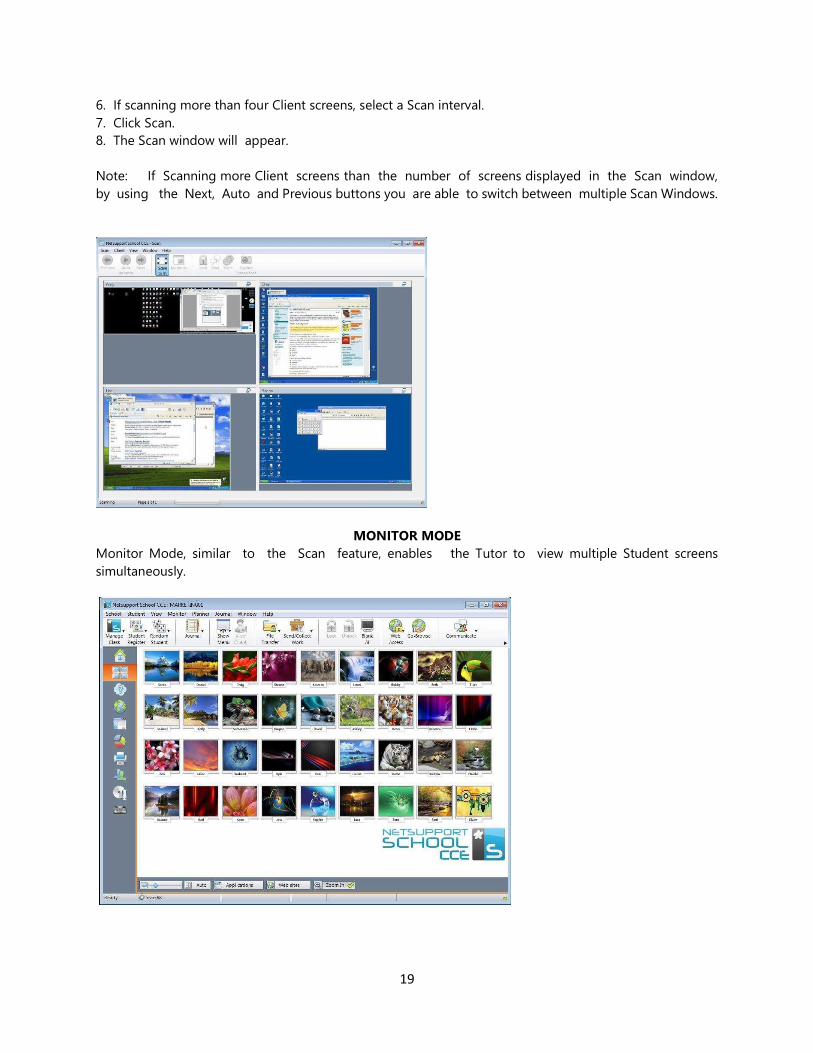
6. If scanning more than four Client screens, select a Scan interval.
7. Click Scan.
8. The Scan window will appear.
Note: If Scanning more Client screens than the number of screens displayed in the Scan window,
by using the Next, Auto and Previous buttons you are able to switch between multiple Scan Windows.
MONITOR MODE
Monitor Mode, similar to the Scan feature, enables the Tutor to view multiple Student screens
simultaneously.
20
A convenient thumbnail view of each connected Student screen is displayed at the Tutor providing
a quick and easy method for monitoring Student activity. While in Monitor mode the Tutor still has
access to the full range of NetSupport features such as View, Chat and File Transfer.
1. Choose {View}{Mode - Monitor View} from the Control window drop down menu.
Or,
Click the Monitor Mode icon on the left hand side of the Control window.
The List view will display each Student thumbnail. By mousing over a thumbnail you can zoom into
that screen. Double-clicking on a thumbnail will open a view session to the selected Student, right-click
and you can select from the full range of available Client features. For example, by selecting multiple
thumbnails you can invite those Students into a Chat session.
Monitor Mode provides a number of additional tools:
Customise Thumbnail Size
Student thumbnails can be resized to suit personal preferences. This is particularly useful when
connected to large numbers of Student machines.
1. Choose {Monitor}{Size} from the Control window drop down menu.
2. Select the required size from the available options. Or,
1. Use the slider on the Size icon at the bottom of the Control window to selected the required size.
Auto-Fit Size of Student Thumbnail
This option will automatically adjust the size of the displayed thumbnails to fit the window.
1. Choose {Monitor}{Auto fit Students} from the Control window drop down menu.
Or,
Click the Auto icon at the bottom of the Control window.
Note: The Tutor interface can be viewed full screen by pressing' F11' should more room be needed to
view the Student thumbnails.
Show Active Application
When enabled, an icon will appear in the top right of each thumbnail indicating which application is
currently active at the Student machine. In addition, if you have created approved and restricted
application lists, a green (approved) or red (restricted) border will appear on the thumbnail alerting you to
any potential misuse of applications.
1. Choose {Monitor}{Show Active Application} from the Control window drop down menu.
Or,
Click the Show Active Application icon at the bottom of the Control window.
Show Active Web Site
Displays an icon in the bottom right of each thumbnail indicating which site the Student is currently
visiting. If you have created approved and restricted web lists, a green (approved) or red (restricted)
border will appear on the thumbnail alerting you to any potential misuse of the Internet.
21
1. Choose {Monitor}{Show Active Web Site} from the Control window drop down menu.
Or,
Click the Show Active Web Site icon at the bottom of the Control window.
Show Help Requests
If enabled, this option highlights when a Student has outstanding help requests. A flashing Question Mark
icon appears in the top right of the relevant thumbnail.
To enable/disable, choose {Monitor}{Show Help Requests} from the
Control window drop down menu.
MESSENGER MONITORING
NetSupport School CCE extends its application control features with the availability of Messenger
Monitoring. In addition to the ability to prevent Messenger applications running within the classroom,
NetSupport School CCE also provides real-time monitoring of specific Messenger applications presenting
the Teacher with a real time view of chat activity and content.
Notes:
Messenger Monitoring supports the following Instant Messenger applications, Yahoo Messenger 8 or
above, Windows Messenger 4.0 or above and Windows Live Messenger 8.1.
Instant Messenger restrictions can be applied at startup. Choose
{School}{Configuration}{Start Options} from the Control window drop down menu.
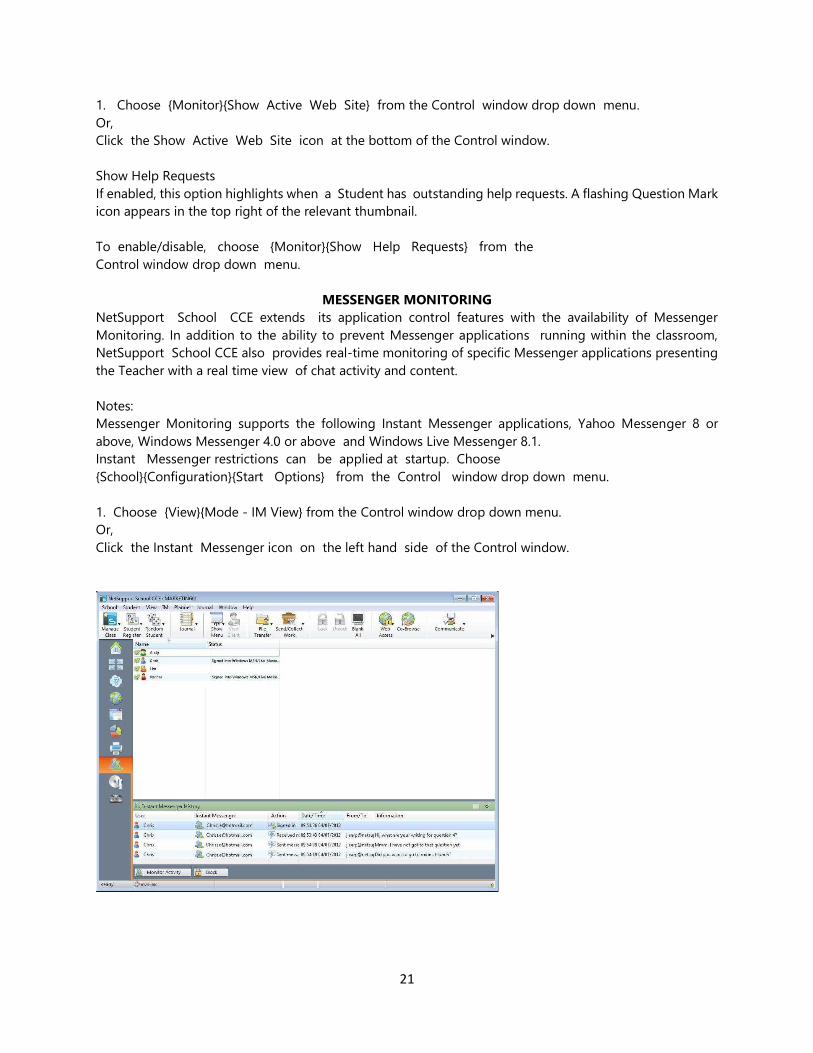
1. Choose {View}{Mode - IM View} from the Control window drop down menu.
Or,
Click the Instant Messenger icon on the left hand side of the Control window.
22
Identify Students Instant Messenger Activity
In the List view, the Student icons can be viewed in two different ways. Choose {View}{Large Icons/
Details} or right click in the List view and select one of these options to change the layout of the Student
icons.
When viewing the "Large Icons" layout, an icon is displayed next to the Student icon showing that the
Student is signed into Instant Messenger. If the List view is in "Details" layout, the Instant Messenger
status for each Student is displayed.
You can filter the Instant Messenger activity, choose {IM}{Filter}{Show Sign In/ Show Sign Out/ Show
Messages/ Show File Transfer} from the Control window drop down menu.
The lower panes can be minimised to make more room for the Student thumbnails. Click the button.
Monitor Instant Messenger
1. Choose {IM}{Monitor} from the Control window drop down menu.
Or,
Click the Monitor Activity icon at the bottom of the Control window.
2. You can now monitor the Students Instant Messenger.
Note: If monitoring is enabled and you switch modes, an icon will be displayed on the Messenger tab
to acknowledge that Messenger monitoring is currently switched on.
Block Instant Messenger
1. Choose {IM}{Block} from the Control window drop down menu.
Or,
Click the Block icon at the bottom of the Control window.
2. The Messenger Status for the Students will now show as blocked.
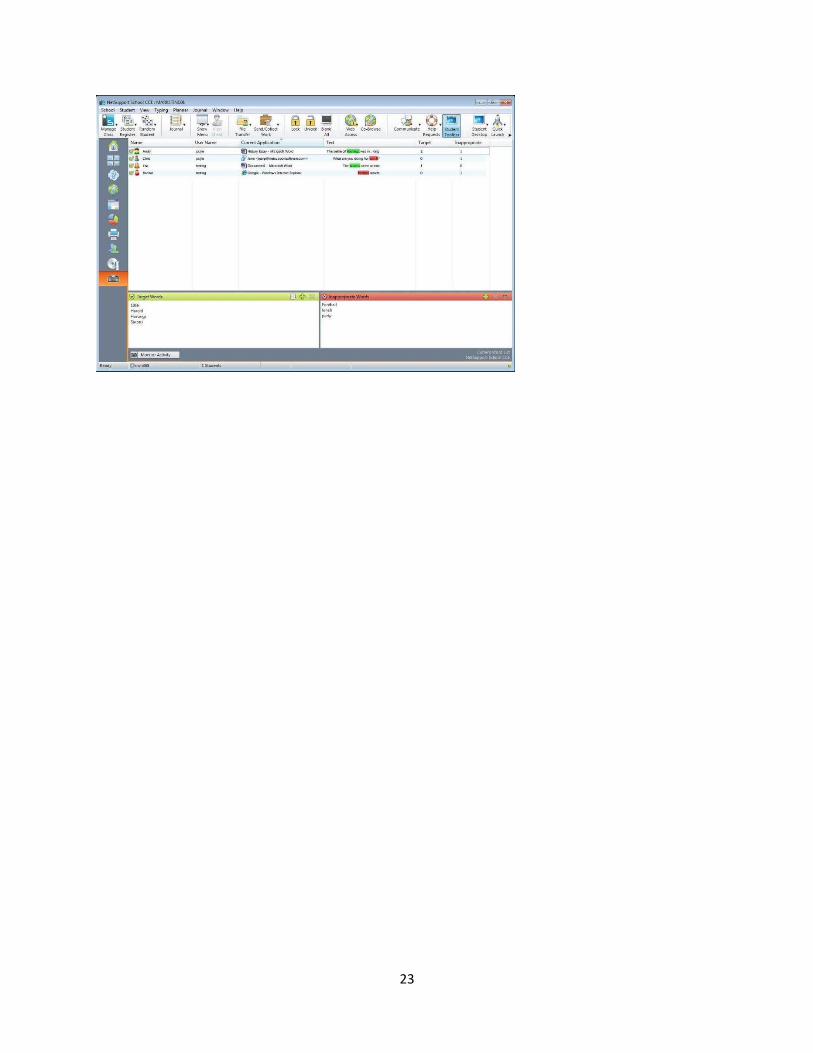
KEYBOARD MONITORING
Allows the Tutor to monitor Students keyboard usage while using any approved application, providing
a real-time insight into Student activity during a class. The Tutor can monitor the entire class, quickly
viewing any typed content and keeping an eye on Student activity levels. To further enhance the
monitoring process a Tutor can create 'Target' and
'Inappropriate' words lists, when a Student types a word on the list it will
be immediately highlighted.
The keyboard monitor also provides a perfect monitoring tool when
Students are online in forums or search forms.
23
24
IV. USING NETSUPPORT SCHOOL CCE
SHOWING TO STUDENTS
The Show feature enables the Control user to emphasise key learning points by displaying the
information on their screen to a selected Client or group of Clients. You can also show a stored Replay file,
a Video or an Application that is currently running at the Control.
During a Show, the Control can nominate a selected Client to take over the demonstration, making them
the Show Leader.
To include a 'snapshot' of the screen in the Student Journal click Print Screen during the Show or right-
click the Show icon on the taskbar. A dialog will appear displaying the image to be added to the Journal,
notes can be added to accompany the image.
To Show a Control screen
1. Click the ‘Show Menu’ icon on the Control toolbar and choose Show.
2. Your desktop will be displayed to all connected Students.
Note: You can set the properties for a Show session, select
{View}{Current Settings - Show} from the Control window drop down menu.
Or,
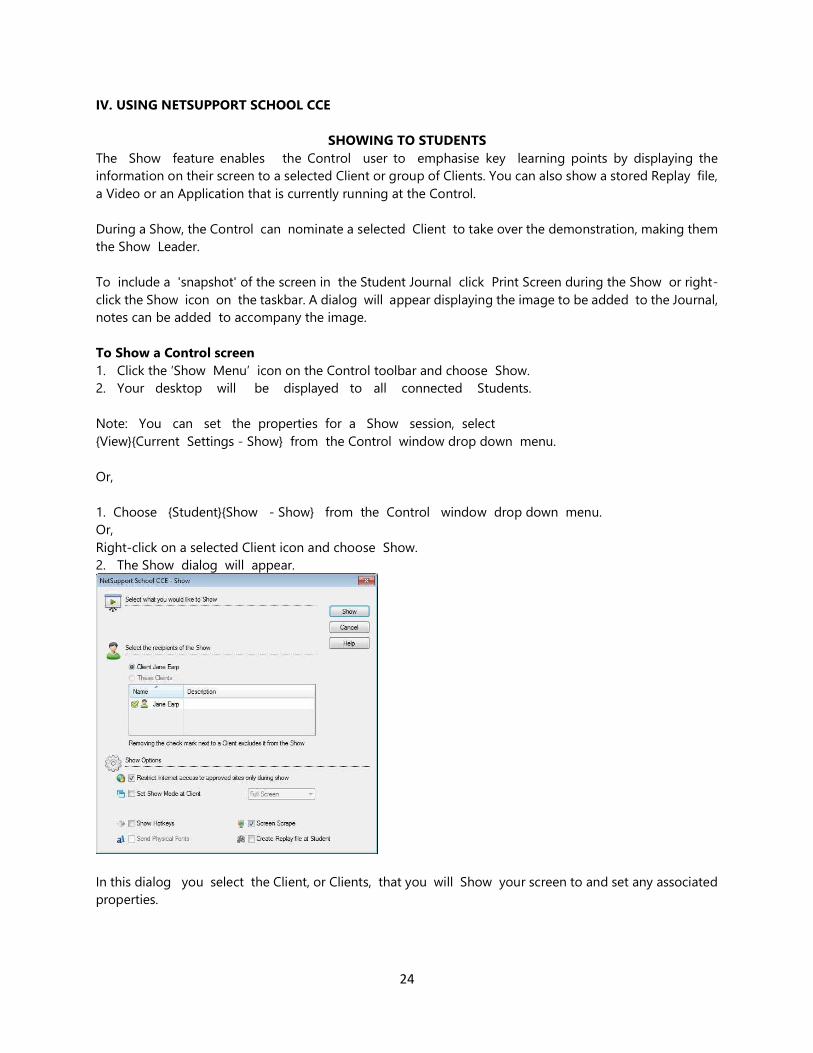
1. Choose {Student}{Show - Show} from the Control window drop down menu.
Or,
Right-click on a selected Client icon and choose Show.
2. The Show dialog will appear.
In this dialog you select the Client, or Clients, that you will Show your screen to and set any associated
properties.
25
Select what you would like to Show
NetSupport will identify if the Control is running multiple monitors, giving you the option to choose which
one to Show from the drop down list. If you are unsure which is the correct screen, click Identify.
Alternatively, select Whole Desktop to show all.
Select Recipients
Select the Client or Clients that you will Show your screen to.
Show Options
Set Show Mode at Client (Windowed, Full Screen or Maximise
Window)
This option allows you to Show at the Client either in a small window, full screen or maximised window
size. When showing in windowed and maximised window size the Clients Mouse and Keyboard are not
locked.
Exhibit - Showing a Student's screen on Student screens
With NetSupport School CCE, it is possible to Show the Control’s screen to a number of connected
Clients. It is also possible to show one Clients screen to other connected Clients, this is called Exhibit.
For example, Client 1 has produced some work, which you wish to show to rest of the class.
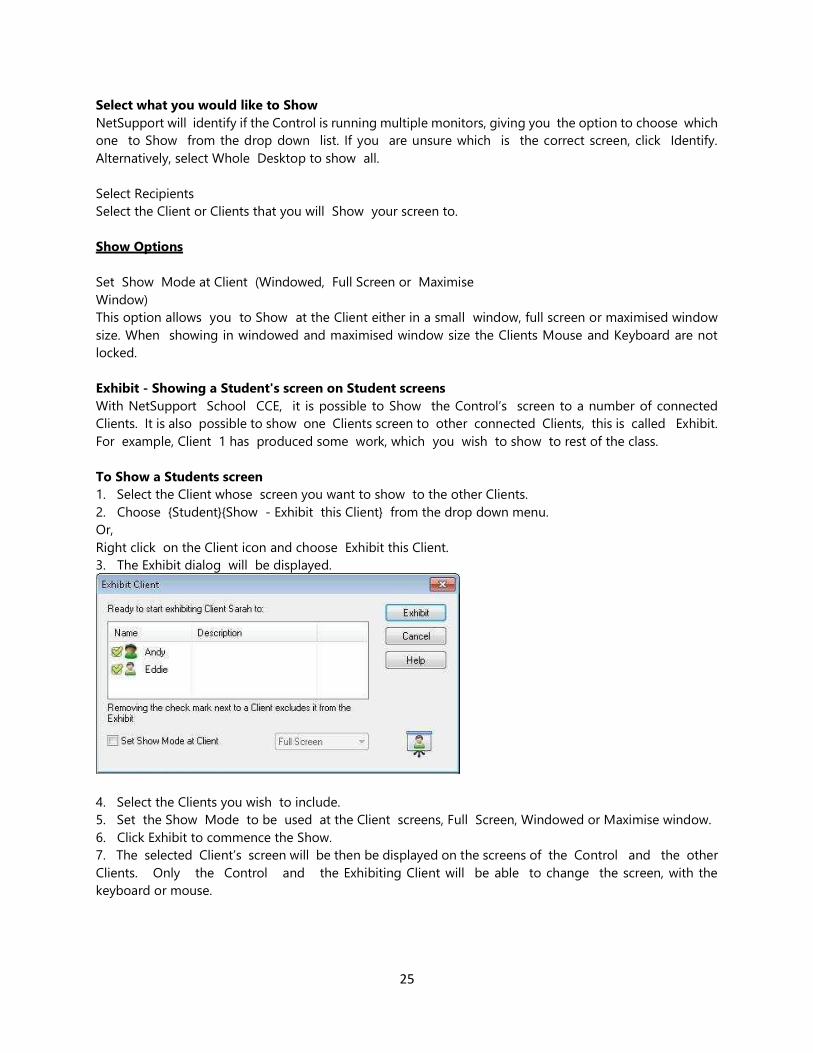
To Show a Students screen
1. Select the Client whose screen you want to show to the other Clients.
2. Choose {Student}{Show - Exhibit this Client} from the drop down menu.
Or,
Right click on the Client icon and choose Exhibit this Client.
3. The Exhibit dialog will be displayed.
4. Select the Clients you wish to include.
5. Set the Show Mode to be used at the Client screens, Full Screen, Windowed or Maximise window.
6. Click Exhibit to commence the Show.
7. The selected Client’s screen will be then be displayed on the screens of the Control and the other
Clients. Only the Control and the Exhibiting Client will be able to change the screen, with the
keyboard or mouse.
26
Note: You can also exhibit a Student's screen to others by clicking the Show Menu icon, selecting the
Student to exhibit from the drop down list under Exhibit and then clicking Exhibit.
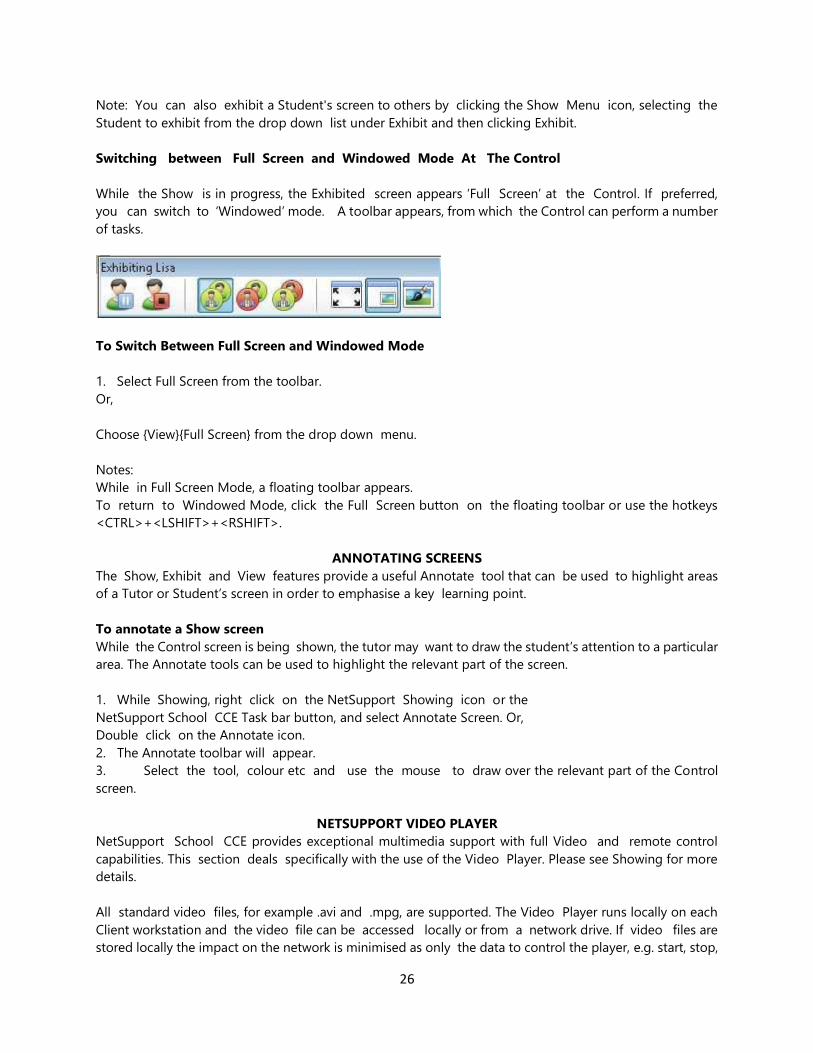
Switching between Full Screen and Windowed Mode At The Control
While the Show is in progress, the Exhibited screen appears ‘Full Screen’ at the Control. If preferred,
you can switch to ‘Windowed’ mode. A toolbar appears, from which the Control can perform a number
of tasks.
To Switch Between Full Screen and Windowed Mode
1. Select Full Screen from the toolbar.
Or,
Choose {View}{Full Screen} from the drop down menu.
Notes:
While in Full Screen Mode, a floating toolbar appears.
To return to Windowed Mode, click the Full Screen button on the floating toolbar or use the hotkeys
<CTRL>+<LSHIFT>+<RSHIFT>.
ANNOTATING SCREENS
The Show, Exhibit and View features provide a useful Annotate tool that can be used to highlight areas
of a Tutor or Student’s screen in order to emphasise a key learning point.
To annotate a Show screen
While the Control screen is being shown, the tutor may want to draw the student’s attention to a particular
area. The Annotate tools can be used to highlight the relevant part of the screen.
1. While Showing, right click on the NetSupport Showing icon or the
NetSupport School CCE Task bar button, and select Annotate Screen. Or,
Double click on the Annotate icon.
2. The Annotate toolbar will appear.
3. Select the tool, colour etc and use the mouse to draw over the relevant part of the Control
screen.
NETSUPPORT VIDEO PLAYER
NetSupport School CCE provides exceptional multimedia support with full Video and remote control
capabilities. This section deals specifically with the use of the Video Player. Please see Showing for more
details.
All standard video files, for example .avi and .mpg, are supported. The Video Player runs locally on each
Client workstation and the video file can be accessed locally or from a network drive. If video files are
stored locally the impact on the network is minimised as only the data to control the player, e.g. start, stop,
27
pause and synchronisation packets, are sent. If each Client machine retrieves the video file from a network
drive you will place additional demands on the network.
For optimum performance, store the video files locally on each workstation, you may wish to
use File Distribution to do this.
Other influencing factors will be:
The number of Client workstations accessing the file; The speed of the network e.g.: 10/100 MB;
The size of the video file;
Client workstation memory/performance specification; Other traffic on the network.
SHOW APPLICATION
The Show feature enables you to display the Control screen to Students. However, if a number of
programs are open at the Control, there may be occasions when you want to show a single application
in isolation.
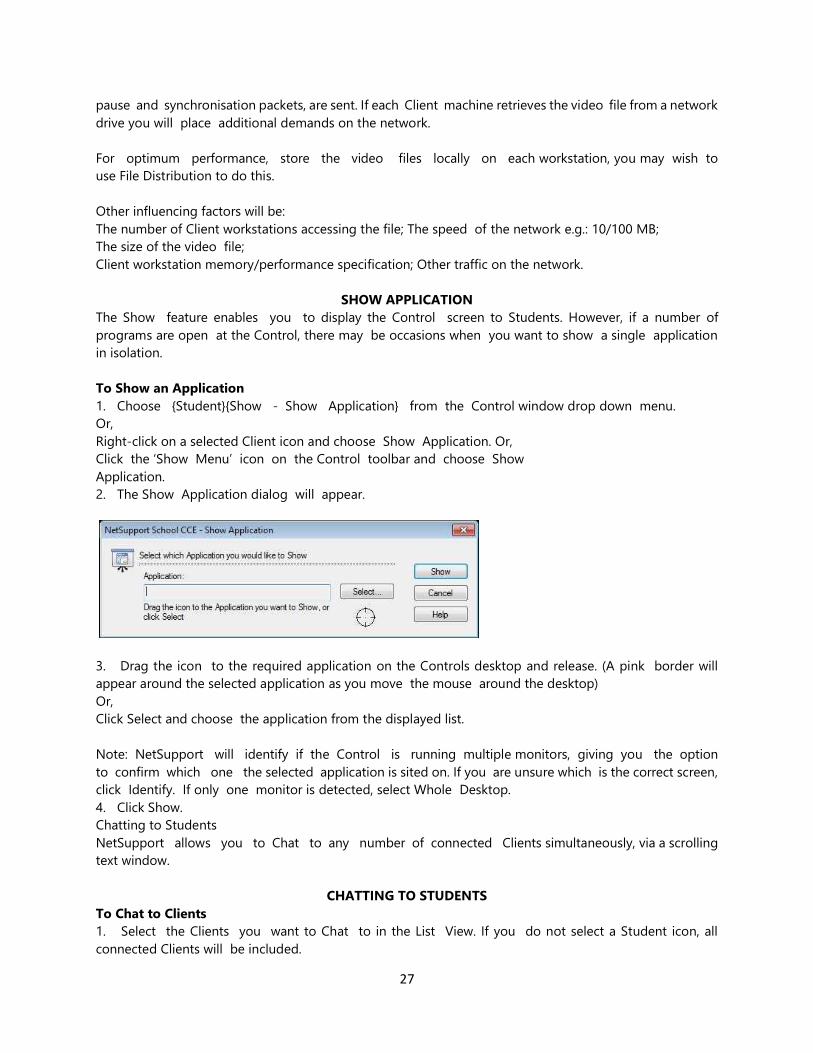
To Show an Application
1. Choose {Student}{Show - Show Application} from the Control window drop down menu.
Or,
Right-click on a selected Client icon and choose Show Application. Or,
Click the ‘Show Menu’ icon on the Control toolbar and choose Show
Application.
2. The Show Application dialog will appear.
3. Drag the icon to the required application on the Controls desktop and release. (A pink border will
appear around the selected application as you move the mouse around the desktop)
Or,
Click Select and choose the application from the displayed list.
Note: NetSupport will identify if the Control is running multiple monitors, giving you the option
to confirm which one the selected application is sited on. If you are unsure which is the correct screen,
click Identify. If only one monitor is detected, select Whole Desktop.
4. Click Show.
Chatting to Students
NetSupport allows you to Chat to any number of connected Clients simultaneously, via a scrolling
text window.
CHATTING TO STUDENTS
To Chat to Clients
1. Select the Clients you want to Chat to in the List View. If you do not select a Student icon, all
connected Clients will be included.
28
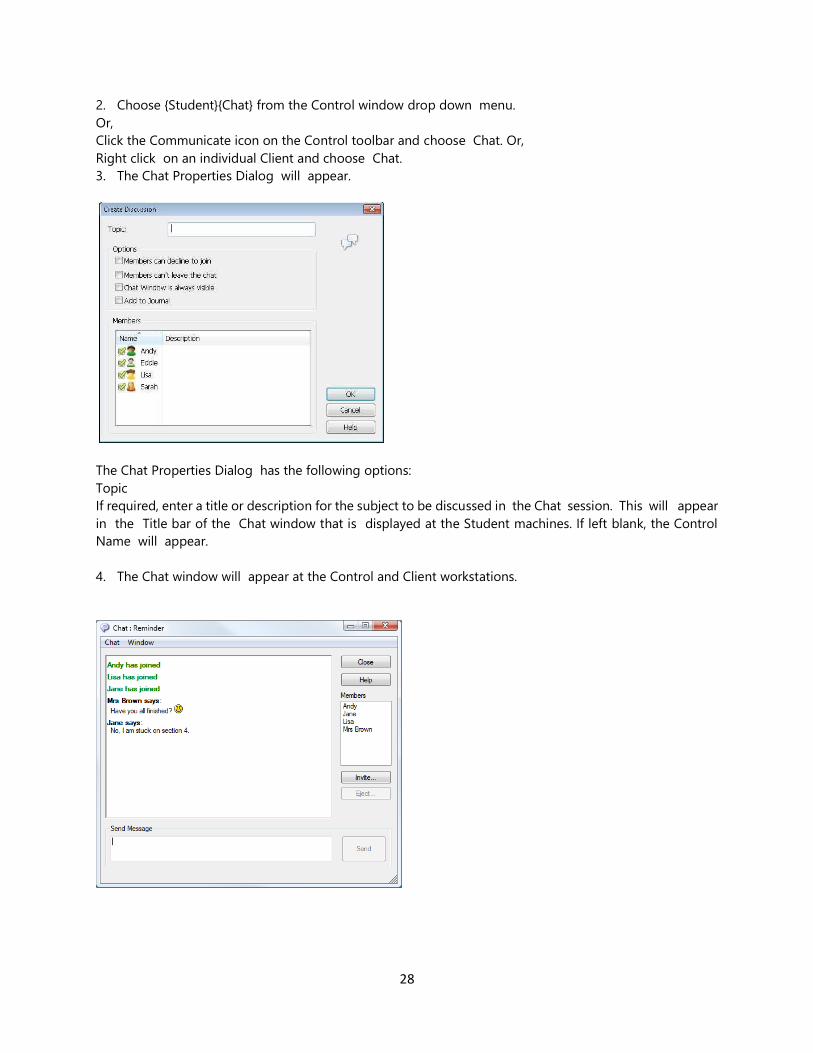
2. Choose {Student}{Chat} from the Control window drop down menu.
Or,
Click the Communicate icon on the Control toolbar and choose Chat. Or,
Right click on an individual Client and choose Chat.
3. The Chat Properties Dialog will appear.
The Chat Properties Dialog has the following options:
Topic
If required, enter a title or description for the subject to be discussed in the Chat session. This will appear
in the Title bar of the Chat window that is displayed at the Student machines. If left blank, the Control
Name will appear.
4. The Chat window will appear at the Control and Client workstations.
29
SENDING A MESSAGE TO STUDENTS
With NetSupport, you can send a message to all connected Students or the currently selected Students.
If you send the same message on a regular basis, you can store up to four pre-defined messages.
To enter and send a new message
1. Select the Students you want to send the message to.
2. Right click and choose {Message}{Message}.
Or,
Choose {Student}{Message - Message} from the Control window
drop down menu. Or,
Click the Communicate icon on the Control toolbar and select
Message. Or,
If displayed, click the Message icon on the toolbar.
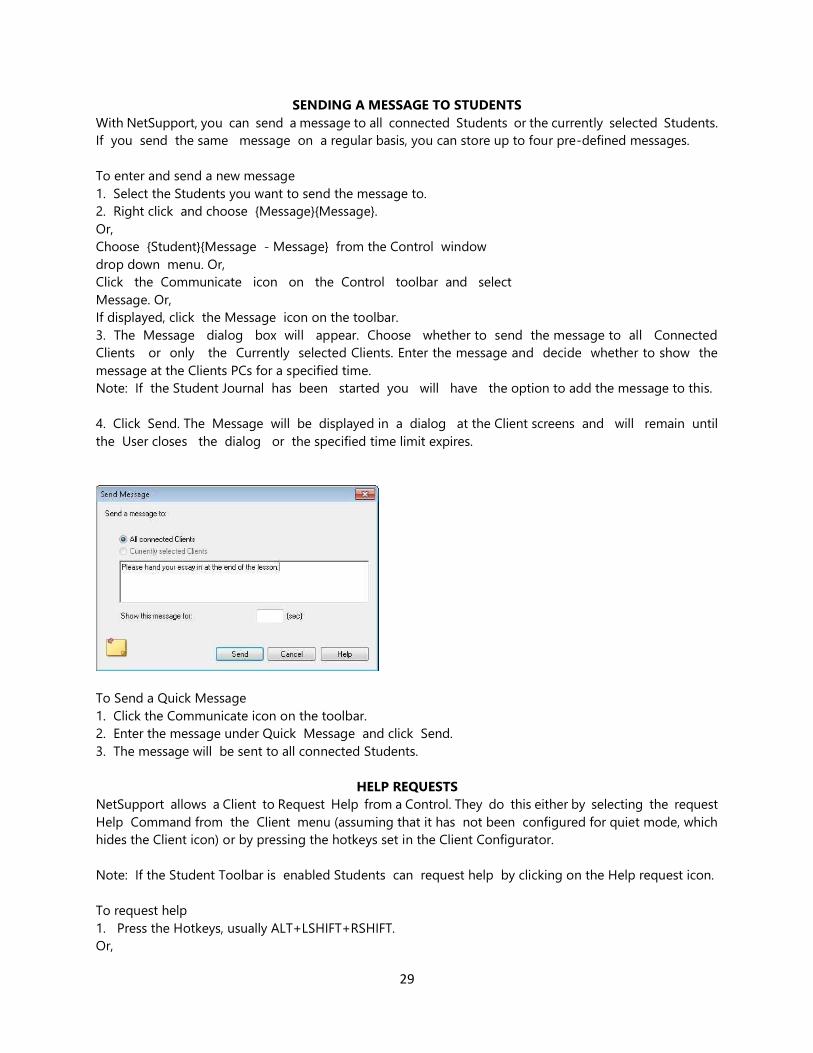
3. The Message dialog box will appear. Choose whether to send the message to all Connected
Clients or only the Currently selected Clients. Enter the message and decide whether to show the
message at the Clients PCs for a specified time.
Note: If the Student Journal has been started you will have the option to add the message to this.
4. Click Send. The Message will be displayed in a dialog at the Client screens and will remain until
the User closes the dialog or the specified time limit expires.
To Send a Quick Message
1. Click the Communicate icon on the toolbar.
2. Enter the message under Quick Message and click Send.
3. The message will be sent to all connected Students.
HELP REQUESTS
NetSupport allows a Client to Request Help from a Control. They do this either by selecting the request
Help Command from the Client menu (assuming that it has not been configured for quiet mode, which
hides the Client icon) or by pressing the hotkeys set in the Client Configurator.
Note: If the Student Toolbar is enabled Students can request help by clicking on the Help request icon.
To request help
1. Press the Hotkeys, usually ALT+LSHIFT+RSHIFT.
Or,
30
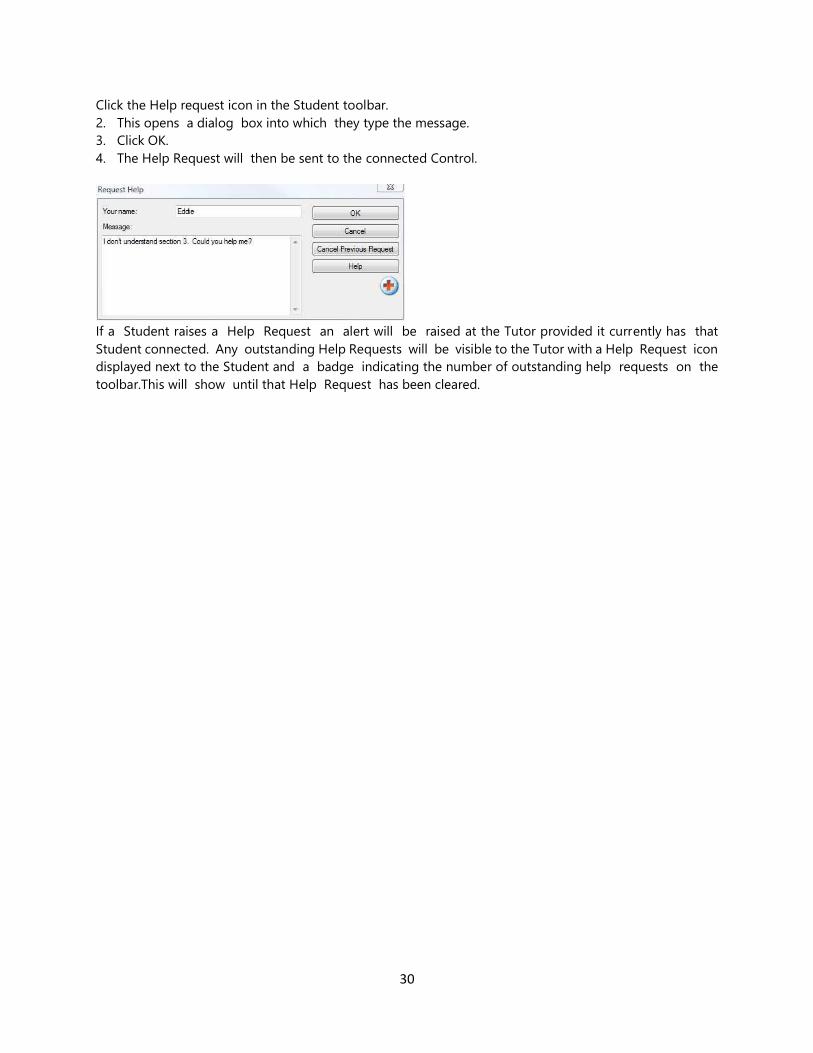
Click the Help request icon in the Student toolbar.
2. This opens a dialog box into which they type the message.
3. Click OK.
4. The Help Request will then be sent to the connected Control.
If a Student raises a Help Request an alert will be raised at the Tutor provided it currently has that
Student connected. Any outstanding Help Requests will be visible to the Tutor with a Help Request icon
displayed next to the Student and a badge indicating the number of outstanding help requests on the
toolbar.This will show until that Help Request has been cleared.
31
V. USING NETSUPPORT SCHOOL CCE
TRANSFERRING FILES
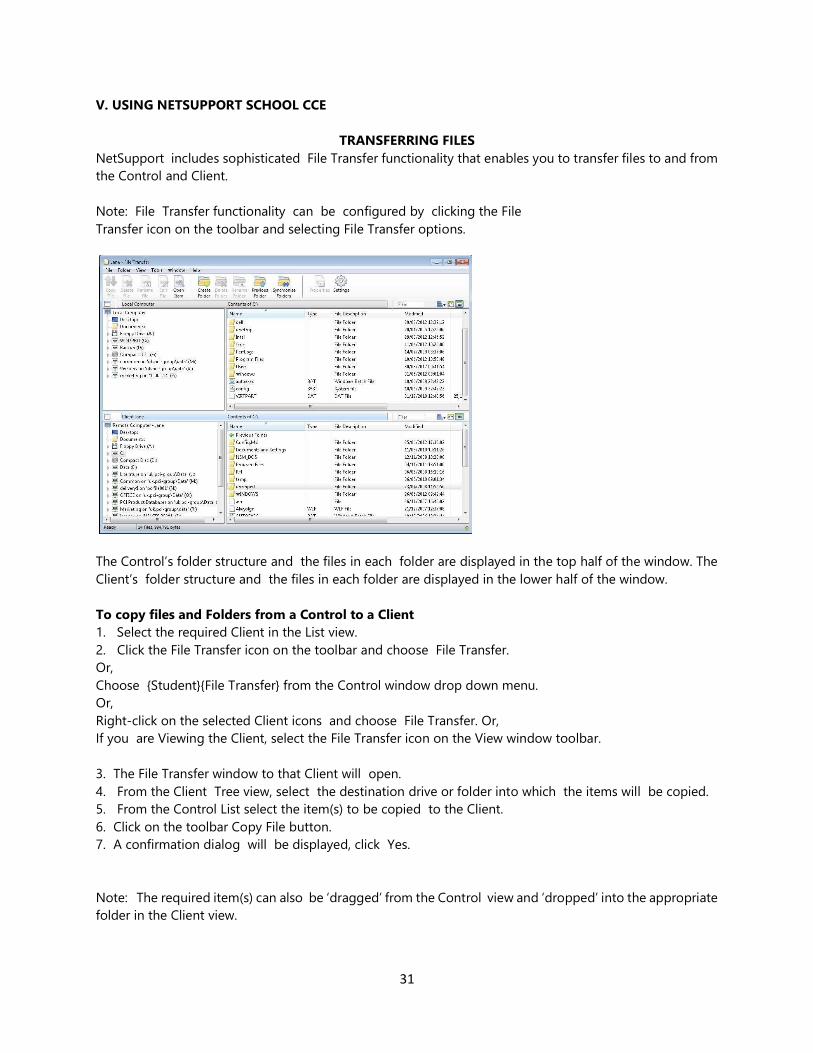
NetSupport includes sophisticated File Transfer functionality that enables you to transfer files to and from
the Control and Client.
Note: File Transfer functionality can be configured by clicking the File
Transfer icon on the toolbar and selecting File Transfer options.
The Control’s folder structure and the files in each folder are displayed in the top half of the window. The
Client’s folder structure and the files in each folder are displayed in the lower half of the window.
To copy files and Folders from a Control to a Client
1. Select the required Client in the List view.
2. Click the File Transfer icon on the toolbar and choose File Transfer.
Or,
Choose {Student}{File Transfer} from the Control window drop down menu.
Or,
Right-click on the selected Client icons and choose File Transfer. Or,
If you are Viewing the Client, select the File Transfer icon on the View window toolbar.
3. The File Transfer window to that Client will open.
4. From the Client Tree view, select the destination drive or folder into which the items will be copied.
5. From the Control List select the item(s) to be copied to the Client.
6. Click on the toolbar Copy File button.
7. A confirmation dialog will be displayed, click Yes.
Note: The required item(s) can also be ‘dragged’ from the Control view and ‘dropped’ into the appropriate
folder in the Client view.
32
To copy files and Folders from a Client to a Control
1. Select the required Client in the List view.
2. Click the File Transfer icon on the toolbar and choose File Transfer.
Or,
Choose {Student}{File Transfer} from the Control window drop down menu.
Or,
Right-click on the selected Client icons and choose File Transfer. Or,
If you are Viewing the Client, select the File Transfer icon on the View window toolbar.
3. The File Transfer window to that Client will open.
4. From the Control Tree view, select the destination drive or folder into which the items will be copied.
5. From the Client List view, select the item(s) to be copied to the
Control.
6. Click on the toolbar Copy File button.
7. A confirmation dialog will be displayed, click Yes.
Note: The required item(s) can also be ‘dragged’ from the Client view and ‘dropped’ into the appropriate
folder in the Control view.
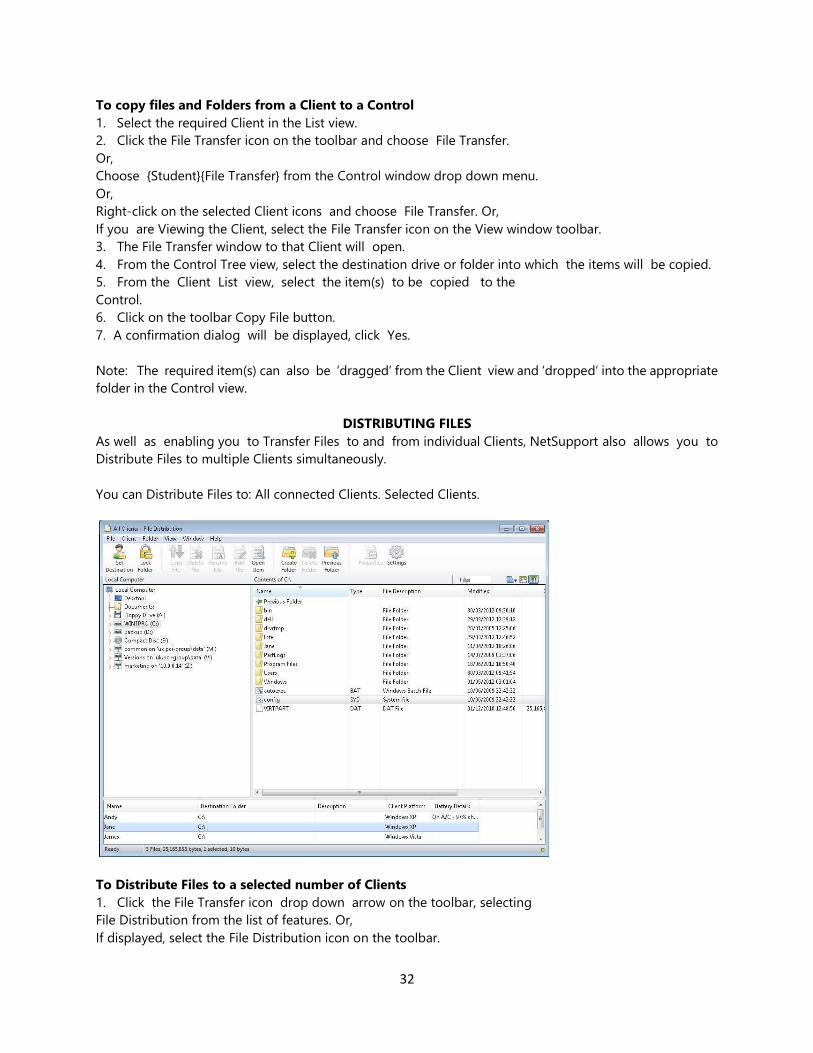
DISTRIBUTING FILES
As well as enabling you to Transfer Files to and from individual Clients, NetSupport also allows you to
Distribute Files to multiple Clients simultaneously.
You can Distribute Files to: All connected Clients. Selected Clients.
To Distribute Files to a selected number of Clients
1. Click the File Transfer icon drop down arrow on the toolbar, selecting
File Distribution from the list of features. Or,
If displayed, select the File Distribution icon on the toolbar.
33
2. The File Distribution window will appear.
3. In the Remote Pane indicate which Clients you wish to copy files to by checking the tick box beside
the Client name.
4. From the Local Pane Tree view, select the item(s) to be copied to the
Clients.
5. The location on the Client workstations where the files/folders are copied to is called the Destination
Folder. Unless otherwise specified, the Client Destination Folder will be the same as the item(s) location
on the Control workstation. If the Client does not have the same Folder available, the item(s) will be
copied to the C Drive by default and the folders automatically created.
Or,
To set a specific destination folder on the Client workstation, select the Client icon in the Remote Pane
and click Set Destination in the toolbar. Specify a destination, click OK.
6. Click Copy.
SENDING AND COLLECTING WORK
The Send/Collect work feature enables you to send a document or a number of documents to
individual or multiple Client workstations. You can then collect Students’ responses on your workstation.
To Send work
Two methods are available for sending pre-prepared work files to Student workstations:
Quick Send is useful for one-off operations where you want to send work to all connected Students or
selected Students.
Advanced Send enables you to store the properties of an operation that will be performed regularly and
provides greater flexibility as to which Students the work is sent to.
To Send Work Using Quick Send
1. Decide which Students to send work to. You cannot select individual
Students using Quick Send.
2. Choose {School}{Send/Collect Work – Quick Send} from the Control window drop down menu.
Or,
Click the Send/Collect Work icon on the Control toolbar and choose
Send Work.
3. The Quick Send dialog will appear.
34
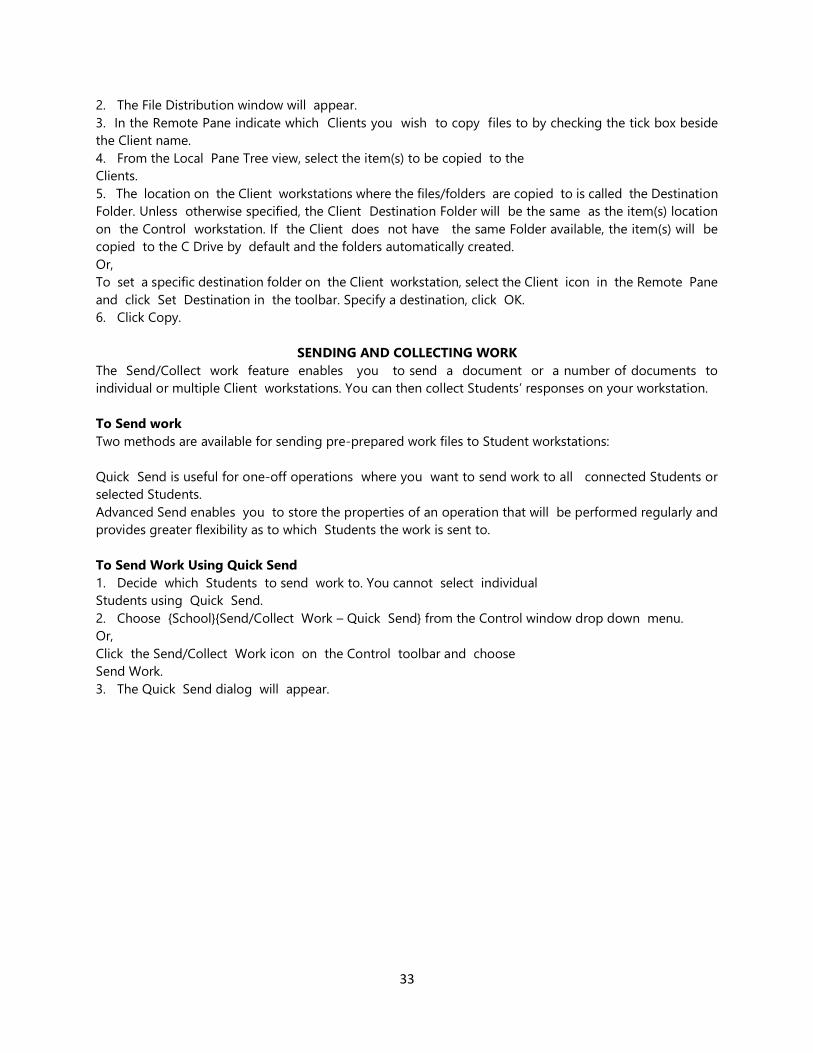
4. List the file(s) to send to the Students. Files should include a full path and optionally a wildcard
specification. You can include multiple specifications by separating them with ‘;’
Or,
Click on the Browse button to locate the file(s). Or,
Enter the path for the file or folder in the edit box and click Add.
5. Specify the folder at the Student workstation to copy the files to. A
new folder will be created if necessary.
6. Click Send.
7. The result of the operation will be displayed for you to check that the work has been sent successfully.
To Send Work Using Advanced Send
1. Decide which Students to send work to. You will have the opportunity to exclude Students if required.
2. Choose {School}{Send/Collect Work - Advanced} from the Control window drop down menu bar.
Or,
Click the Send/Collect Work icon on the Control toolbar and select
Send/Collect.
3. The Send/Collect Work wizard will open.
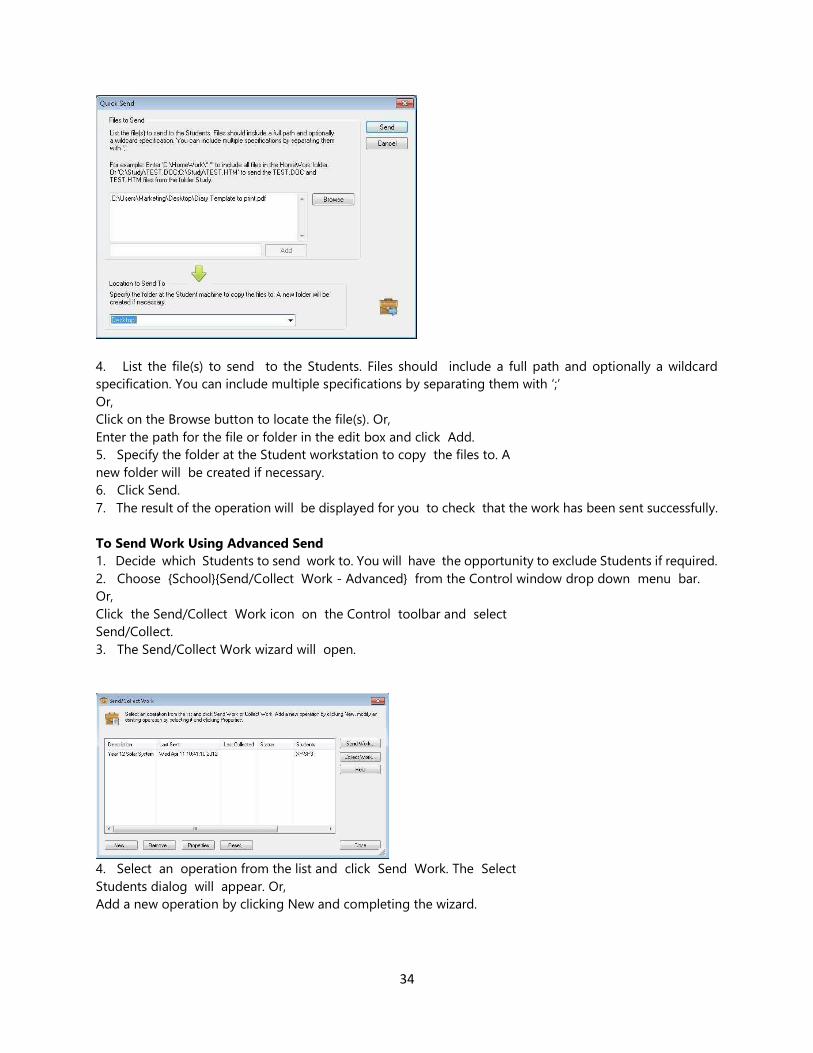
4. Select an operation from the list and click Send Work. The Select
Students dialog will appear. Or,
Add a new operation by clicking New and completing the wizard.
35
Once work has been sent to the Students you will be able to see the current status from the
Send/Collect Work icon drop down menu. You can toggle between showing Students who have
completed their work or those with items remaining.
The Students can open work items from the Student toolbar and click when a work item is complete,
this will then update the status in the Send/Collect Work icon drop down menu.
To Collect work
Two methods are available for retrieving completed work files from
Student workstations:
The Quick Collect option remembers the last file(s) sent via Quick Send and provides a quick and easy
method for retrieving the work back at the end of a session.
Advanced Collect lets you select the file(s) to retrieve from a list of pre-defined Send/Collect operations
and provides greater flexibility as to which Students the work is collected from.
To Collect Work Using Quick Collect
1. Choose {School}{Send/Collect Work – Quick Collect} from the
Control window drop down menu. Or,
Click the Send/Collect Work icon on the Control toolbar and select
Collect Work. Or,
If displayed, click the Collect Work icon on the Control toolbar.
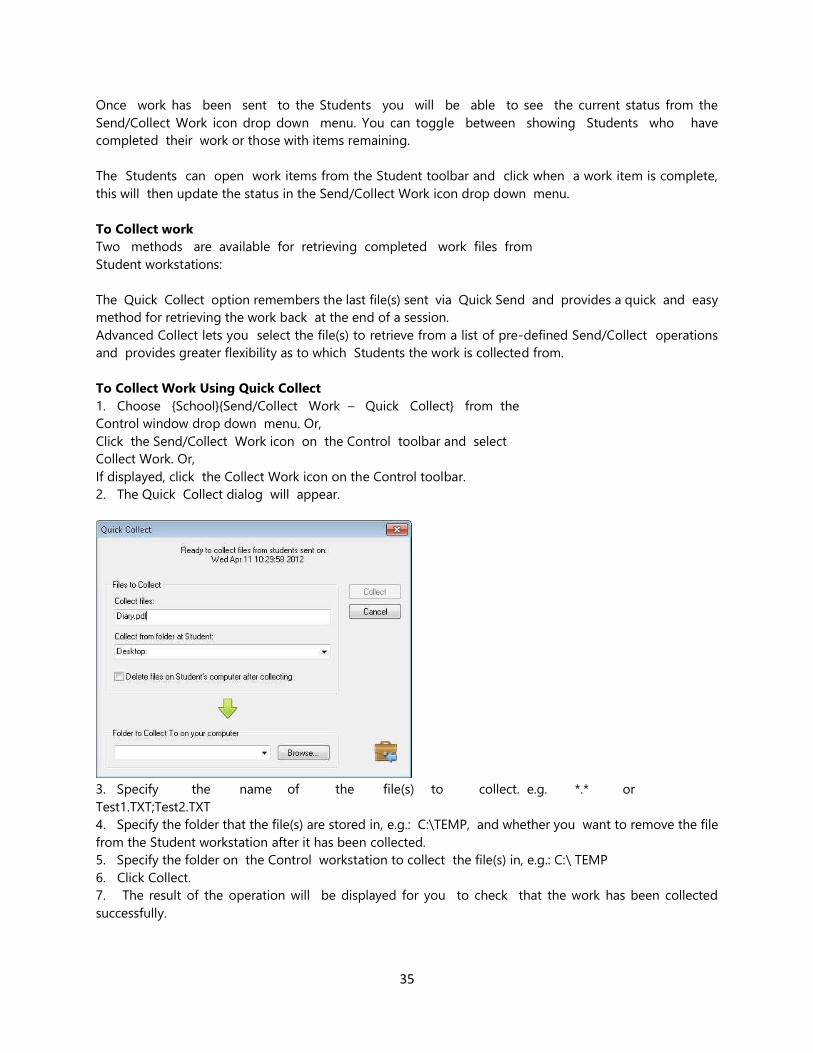
2. The Quick Collect dialog will appear.
3. Specify the name of the file(s) to collect. e.g. *.* or
Test1.TXT;Test2.TXT
4. Specify the folder that the file(s) are stored in, e.g.: C:\TEMP, and whether you want to remove the file
from the Student workstation after it has been collected.
5. Specify the folder on the Control workstation to collect the file(s) in, e.g.: C:\ TEMP
6. Click Collect.
7. The result of the operation will be displayed for you to check that the work has been collected
successfully.
36
To Collect Work Using Advanced Collect
1. Choose {School}{Send/Collect Work - Advanced} from the Control window drop down menu bar.
Or,
Click the Send/Collect Work icon drop down arrow on the Control toolbar and select Send/Collect.
2. The Send/Collect Work wizard will open.
3. Select the required operation from the list and click Collect Work.
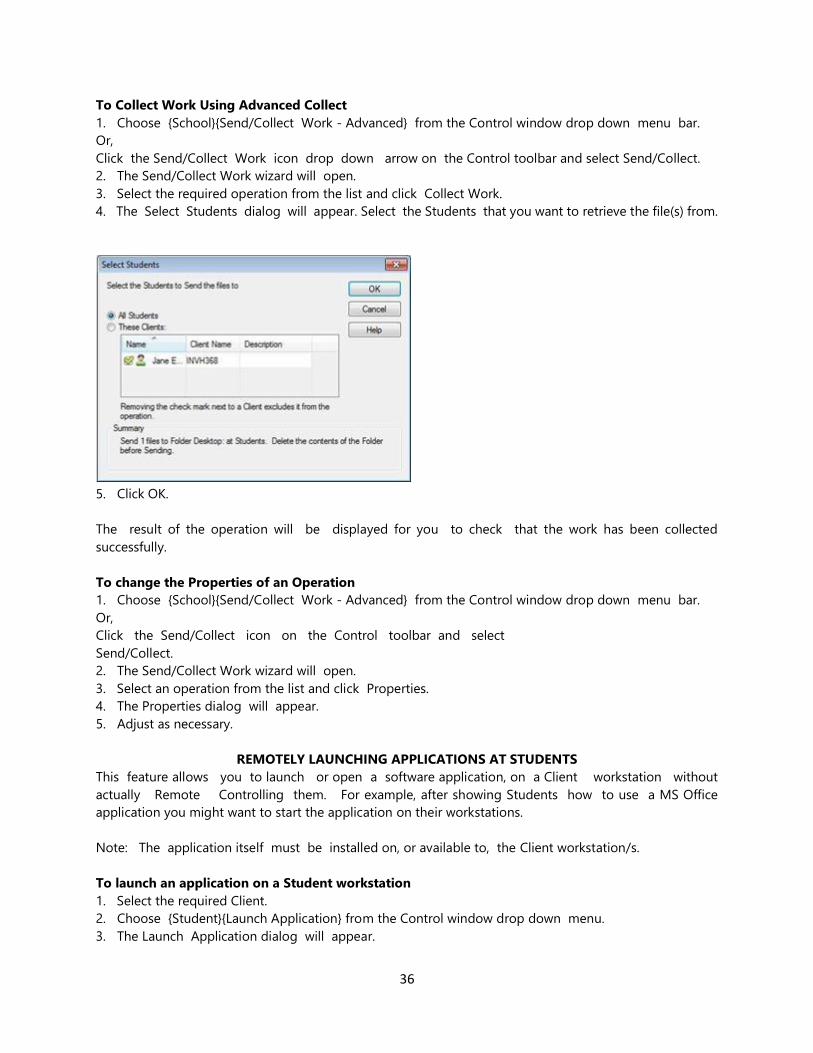
4. The Select Students dialog will appear. Select the Students that you want to retrieve the file(s) from.
5. Click OK.
The result of the operation will be displayed for you to check that the work has been collected
successfully.
To change the Properties of an Operation
1. Choose {School}{Send/Collect Work - Advanced} from the Control window drop down menu bar.
Or,
Click the Send/Collect icon on the Control toolbar and select
Send/Collect.
2. The Send/Collect Work wizard will open.
3. Select an operation from the list and click Properties.
4. The Properties dialog will appear.
5. Adjust as necessary.
REMOTELY LAUNCHING APPLICATIONS AT STUDENTS
This feature allows you to launch or open a software application, on a Client workstation without
actually Remote Controlling them. For example, after showing Students how to use a MS Office
application you might want to start the application on their workstations.
Note: The application itself must be installed on, or available to, the Client workstation/s.
To launch an application on a Student workstation
1. Select the required Client.
2. Choose {Student}{Launch Application} from the Control window drop down menu.
3. The Launch Application dialog will appear.
37
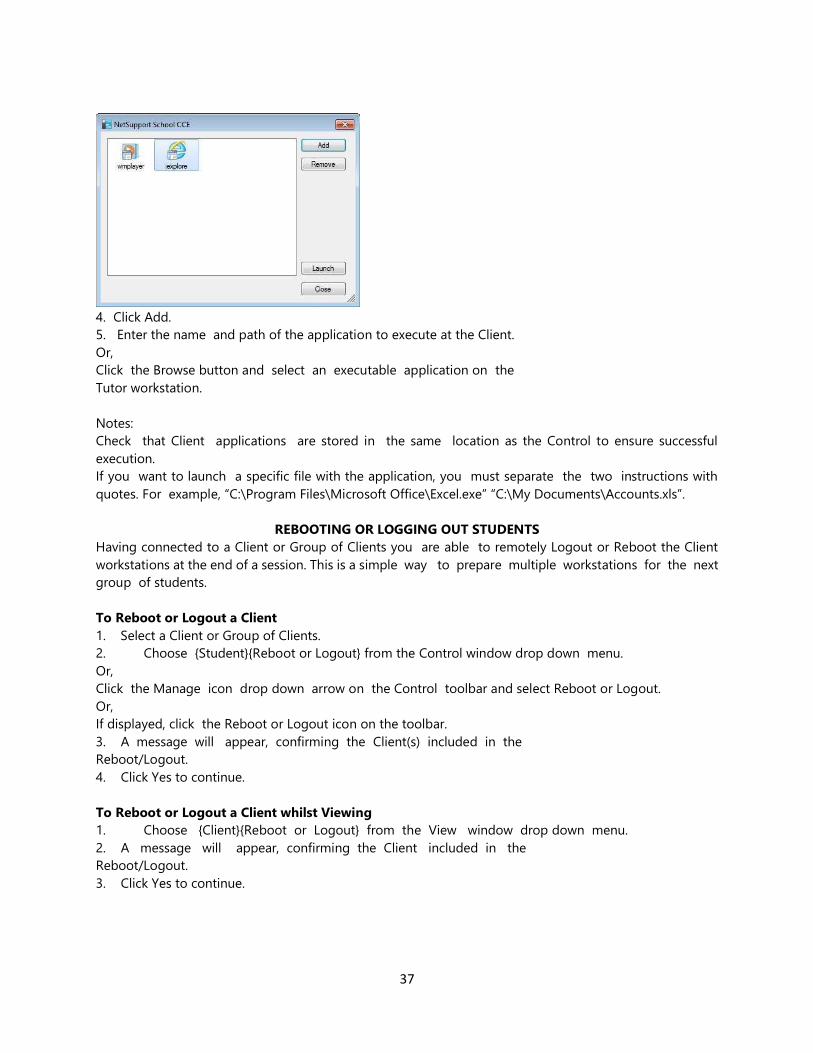
4. Click Add.
5. Enter the name and path of the application to execute at the Client.
Or,
Click the Browse button and select an executable application on the
Tutor workstation.
Notes:
Check that Client applications are stored in the same location as the Control to ensure successful
execution.
If you want to launch a specific file with the application, you must separate the two instructions with
quotes. For example, “C:\Program Files\Microsoft Office\Excel.exe” “C:\My Documents\Accounts.xls”.
REBOOTING OR LOGGING OUT STUDENTS
Having connected to a Client or Group of Clients you are able to remotely Logout or Reboot the Client
workstations at the end of a session. This is a simple way to prepare multiple workstations for the next
group of students.
To Reboot or Logout a Client
1. Select a Client or Group of Clients.
2. Choose {Student}{Reboot or Logout} from the Control window drop down menu.
Or,
Click the Manage icon drop down arrow on the Control toolbar and select Reboot or Logout.
Or,
If displayed, click the Reboot or Logout icon on the toolbar.
3. A message will appear, confirming the Client(s) included in the
Reboot/Logout.
4. Click Yes to continue.
To Reboot or Logout a Client whilst Viewing
1. Choose {Client}{Reboot or Logout} from the View window drop down menu.
2. A message will appear, confirming the Client included in the
Reboot/Logout.
3. Click Yes to continue.
38
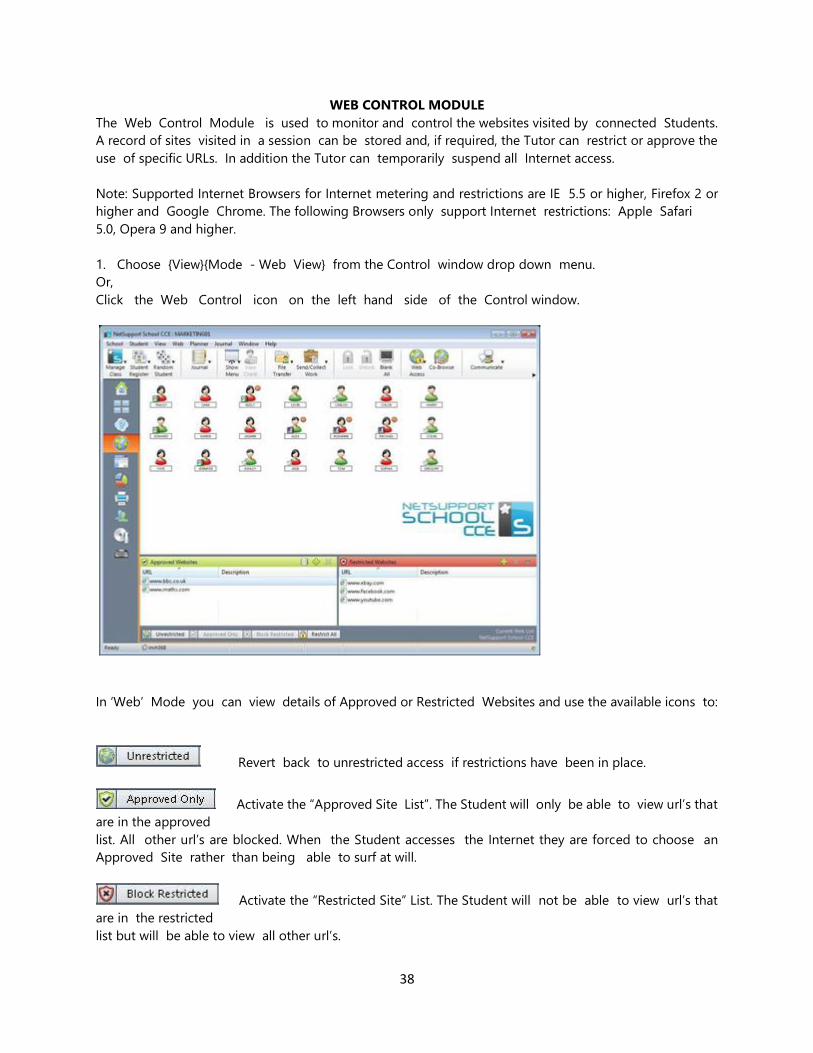
WEB CONTROL MODULE
The Web Control Module is used to monitor and control the websites visited by connected Students.
A record of sites visited in a session can be stored and, if required, the Tutor can restrict or approve the
use of specific URLs. In addition the Tutor can temporarily suspend all Internet access.
Note: Supported Internet Browsers for Internet metering and restrictions are IE 5.5 or higher, Firefox 2 or
higher and Google Chrome. The following Browsers only support Internet restrictions: Apple Safari
5.0, Opera 9 and higher.
1. Choose {View}{Mode - Web View} from the Control window drop down menu.
Or,
Click the Web Control icon on the left hand side of the Control window.
In ‘Web’ Mode you can view details of Approved or Restricted Websites and use the available icons to:
Revert back to unrestricted access if restrictions have been in place.
Activate the “Approved Site List”. The Student will only be able to view url’s that
are in the approved
list. All other url’s are blocked. When the Student accesses the Internet they are forced to choose an
Approved Site rather than being able to surf at will.
Activate the “Restricted Site” List. The Student will not be able to view url’s that
are in the restricted
list but will be able to view all other url’s.
39
Block all access to the Internet.
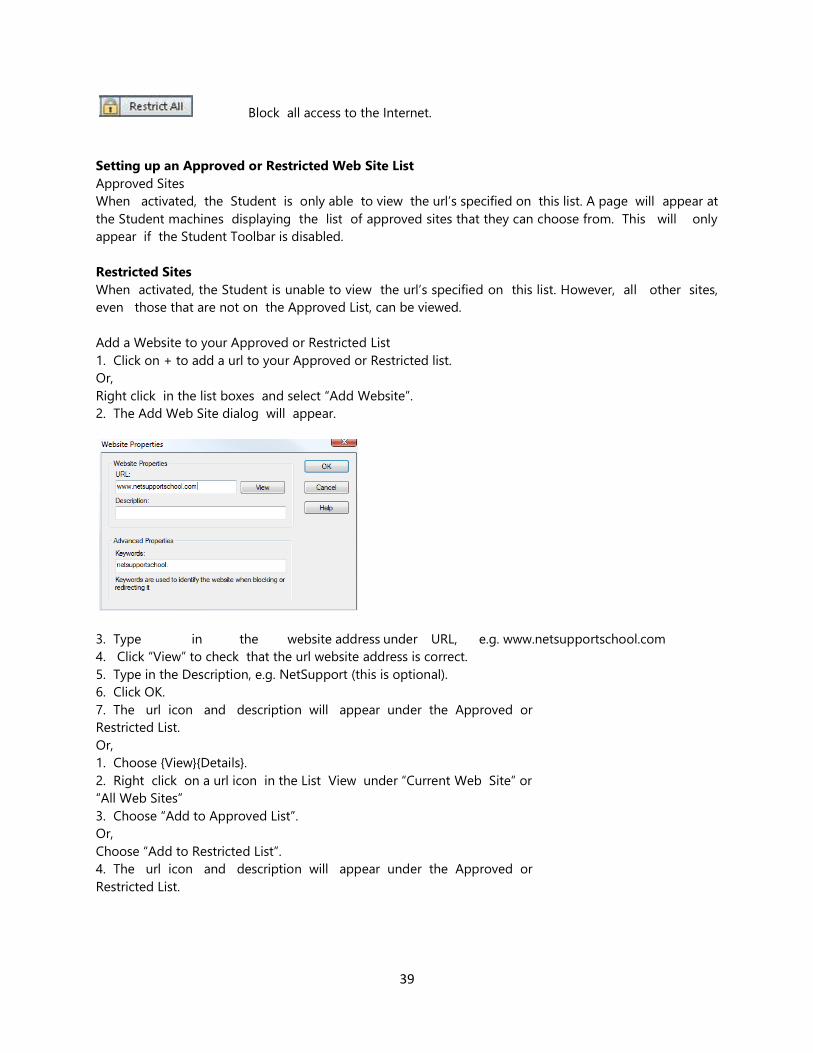
Setting up an Approved or Restricted Web Site List
Approved Sites
When activated, the Student is only able to view the url’s specified on this list. A page will appear at
the Student machines displaying the list of approved sites that they can choose from. This will only
appear if the Student Toolbar is disabled.
Restricted Sites
When activated, the Student is unable to view the url’s specified on this list. However, all other sites,
even those that are not on the Approved List, can be viewed.
Add a Website to your Approved or Restricted List
1. Click on + to add a url to your Approved or Restricted list.
Or,
Right click in the list boxes and select “Add Website”.
2. The Add Web Site dialog will appear.
3. Type in the website address under URL, e.g. www.netsupportschool.com
4. Click “View” to check that the url website address is correct.
5. Type in the Description, e.g. NetSupport (this is optional).
6. Click OK.
7. The url icon and description will appear under the Approved or
Restricted List.
Or,
1. Choose {View}{Details}.
2. Right click on a url icon in the List View under “Current Web Site” or
“All Web Sites”
3. Choose “Add to Approved List”.
Or,
Choose “Add to Restricted List”.
4. The url icon and description will appear under the Approved or
Restricted List.

40
Remove a Website from your Approved or Restricted List
1. To remove a url from the list, simply highlight the chosen url and click
x. Or,
Right click in the list boxes and select “Remove Site”.
Apply Approved or Restricted Web Sites
Restrictions can be applied to individual Students or all connected Students. Students can view
the current restrictions in the Student Toolbar.
1. If you want to apply restrictions to individual Students select their icons in the List View
2. To apply these restrictions choose {Web}{Allow Approved Websites
Only or Block Restricted Websites} Or,
Click on the relevant restriction icon at the bottom of the Control window.
Or,
Click the 'Web Access' icon on the Control toolbar and choose
Approved Only or Block Restricted.
3. To acknowledge which restriction has been activated an appropriate indicator will appear next to the
Student icons. (When viewing Large icons only). Red for restricted, green for approved.
4. If a Student is currently viewing a website included in the activated restriction list they will be redirected
to a message stating that the url has been blocked by the Tutor.
Block All Web Access
1. If you want to block Web Access to individual Students select their icons in the List view.
2. Choose {Web}{Restrict all Websites} from the Control window drop down menu.
Or,
Click the Restrict All icon at the bottom of the Control window. Or,
Click the Web Access icon on the toolbar and choose Restrict All.
3. All Web access will be blocked for the selected Students.
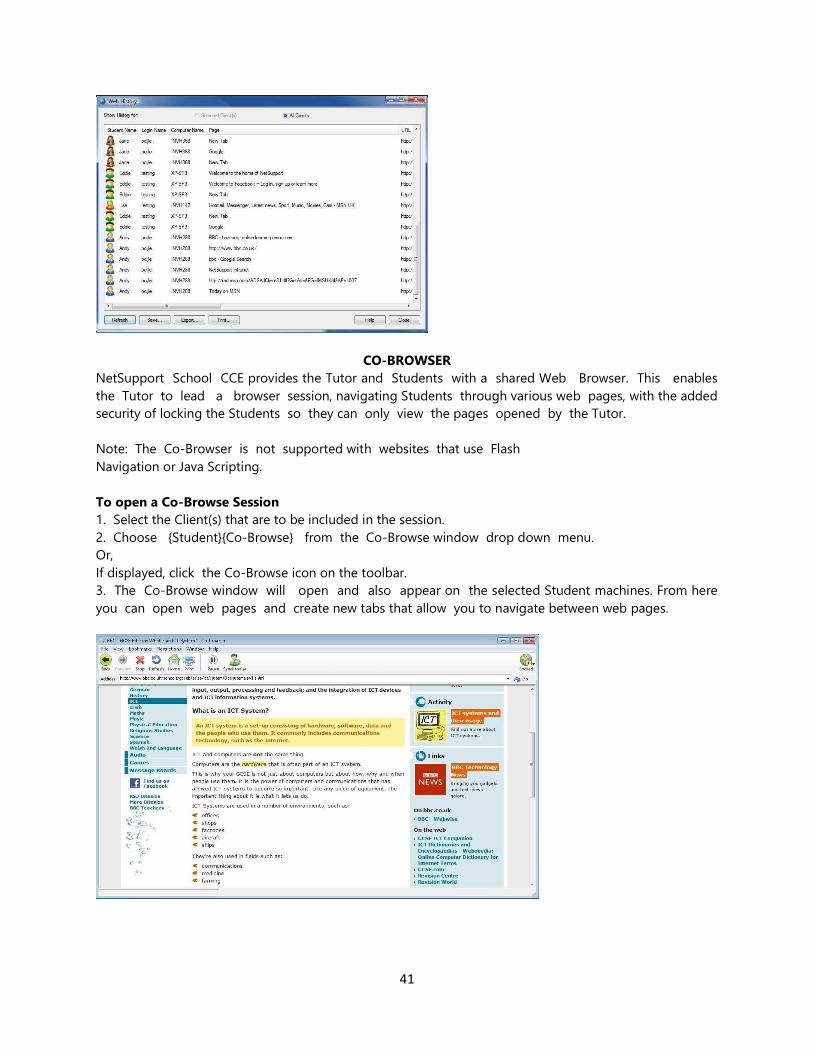
View Web History
This feature of the Web Control Module enables you to monitor the websites being visited by
connected Students and, if required, store or print a permanent record.
1. In Web View choose {Web}{History} from the Control window drop down menu.
2. The Web History dialog will appear.
This provides details of the sites visited by the Student(s) during the currently connected session.
41
CO-BROWSER
NetSupport School CCE provides the Tutor and Students with a shared Web Browser. This enables
the Tutor to lead a browser session, navigating Students through various web pages, with the added
security of locking the Students so they can only view the pages opened by the Tutor.
Note: The Co-Browser is not supported with websites that use Flash
Navigation or Java Scripting.
To open a Co-Browse Session
1. Select the Client(s) that are to be included in the session.
2. Choose {Student}{Co-Browse} from the Co-Browse window drop down menu.
Or,
If displayed, click the Co-Browse icon on the toolbar.
3. The Co-Browse window will open and also appear on the selected Student machines. From here
you can open web pages and create new tabs that allow you to navigate between web pages.
42
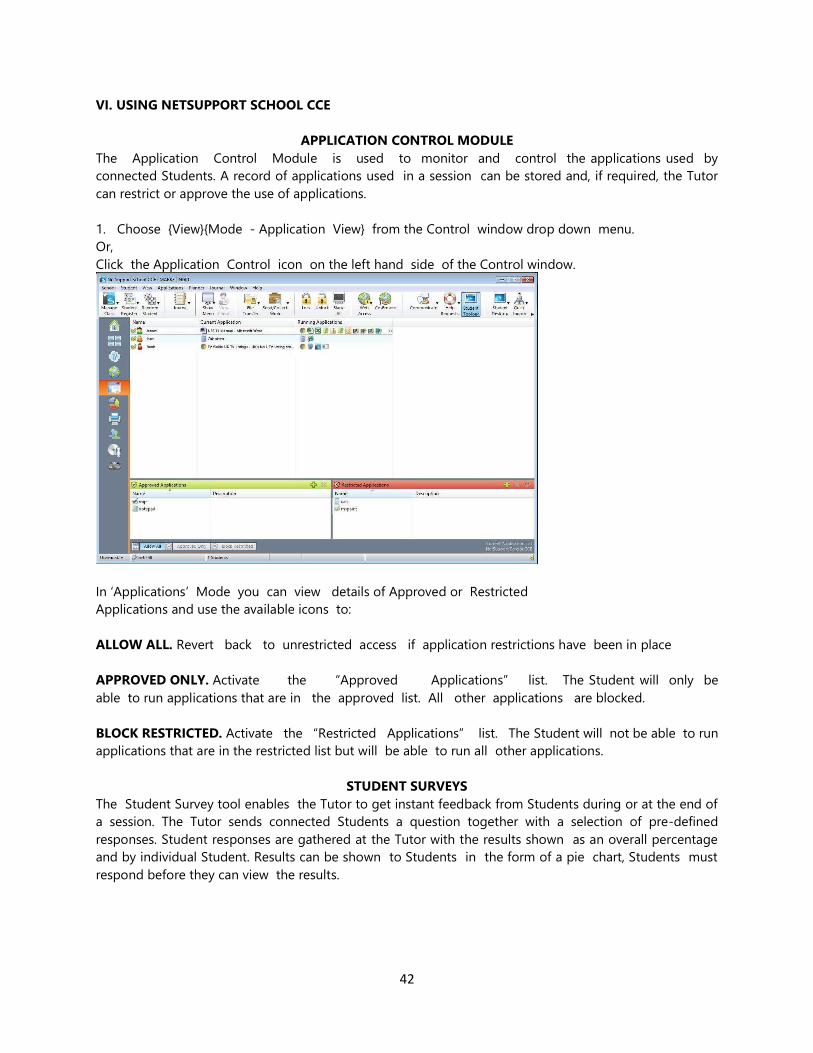
VI. USING NETSUPPORT SCHOOL CCE
APPLICATION CONTROL MODULE
The Application Control Module is used to monitor and control the applications used by
connected Students. A record of applications used in a session can be stored and, if required, the Tutor
can restrict or approve the use of applications.
1. Choose {View}{Mode - Application View} from the Control window drop down menu.
Or,
Click the Application Control icon on the left hand side of the Control window.
In ‘Applications’ Mode you can view details of Approved or Restricted
Applications and use the available icons to:
ALLOW ALL. Revert back to unrestricted access if application restrictions have been in place
APPROVED ONLY. Activate the “Approved Applications” list. The Student will only be
able to run applications that are in the approved list. All other applications are blocked.
BLOCK RESTRICTED. Activate the “Restricted Applications” list. The Student will not be able to run
applications that are in the restricted list but will be able to run all other applications.
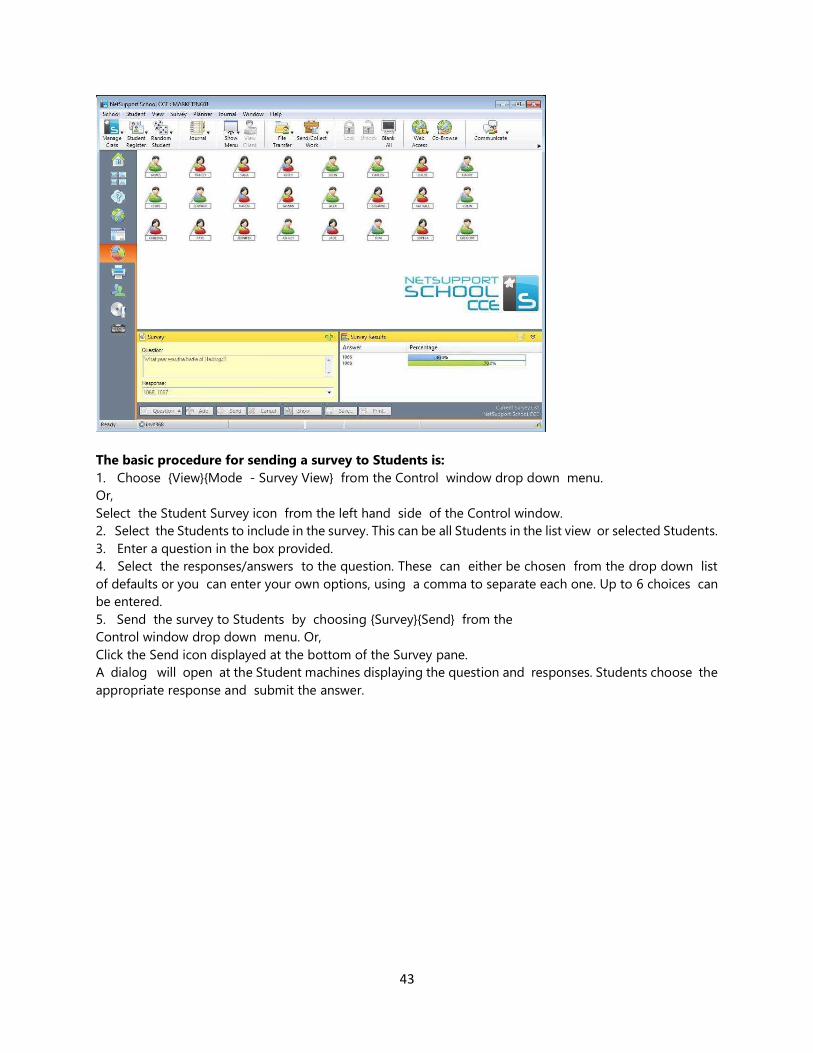
STUDENT SURVEYS
The Student Survey tool enables the Tutor to get instant feedback from Students during or at the end of
a session. The Tutor sends connected Students a question together with a selection of pre-defined
responses. Student responses are gathered at the Tutor with the results shown as an overall percentage
and by individual Student. Results can be shown to Students in the form of a pie chart, Students must
respond before they can view the results.
43
The basic procedure for sending a survey to Students is:
1. Choose {View}{Mode - Survey View} from the Control window drop down menu.
Or,
Select the Student Survey icon from the left hand side of the Control window.
2. Select the Students to include in the survey. This can be all Students in the list view or selected Students.
3. Enter a question in the box provided.
4. Select the responses/answers to the question. These can either be chosen from the drop down list
of defaults or you can enter your own options, using a comma to separate each one. Up to 6 choices can
be entered.
5. Send the survey to Students by choosing {Survey}{Send} from the
Control window drop down menu. Or,
Click the Send icon displayed at the bottom of the Survey pane.
A dialog will open at the Student machines displaying the question and responses. Students choose the
appropriate response and submit the answer.
44
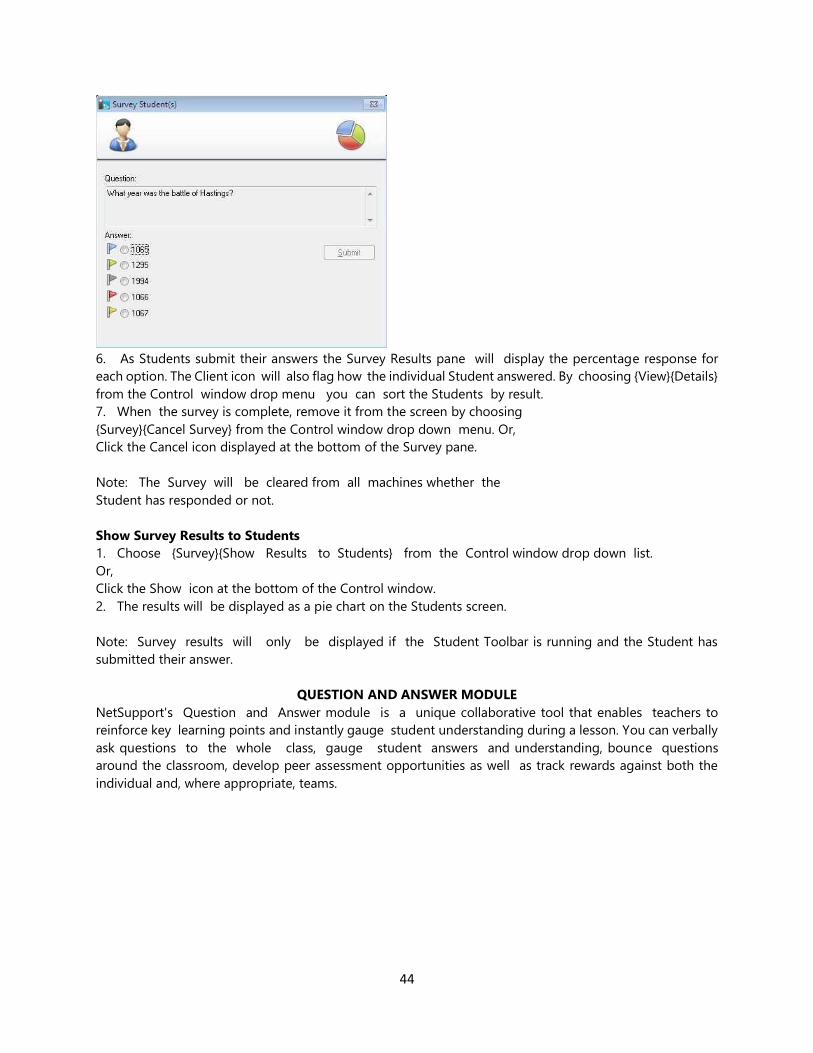
6. As Students submit their answers the Survey Results pane will display the percentage response for
each option. The Client icon will also flag how the individual Student answered. By choosing {View}{Details}
from the Control window drop menu you can sort the Students by result.
7. When the survey is complete, remove it from the screen by choosing
{Survey}{Cancel Survey} from the Control window drop down menu. Or,
Click the Cancel icon displayed at the bottom of the Survey pane.
Note: The Survey will be cleared from all machines whether the
Student has responded or not.
Show Survey Results to Students
1. Choose {Survey}{Show Results to Students} from the Control window drop down list.
Or,
Click the Show icon at the bottom of the Control window.
2. The results will be displayed as a pie chart on the Students screen.
Note: Survey results will only be displayed if the Student Toolbar is running and the Student has
submitted their answer.
QUESTION AND ANSWER MODULE
NetSupport's Question and Answer module is a unique collaborative tool that enables teachers to
reinforce key learning points and instantly gauge student understanding during a lesson. You can verbally
ask questions to the whole class, gauge student answers and understanding, bounce questions
around the classroom, develop peer assessment opportunities as well as track rewards against both the
individual and, where appropriate, teams.
45
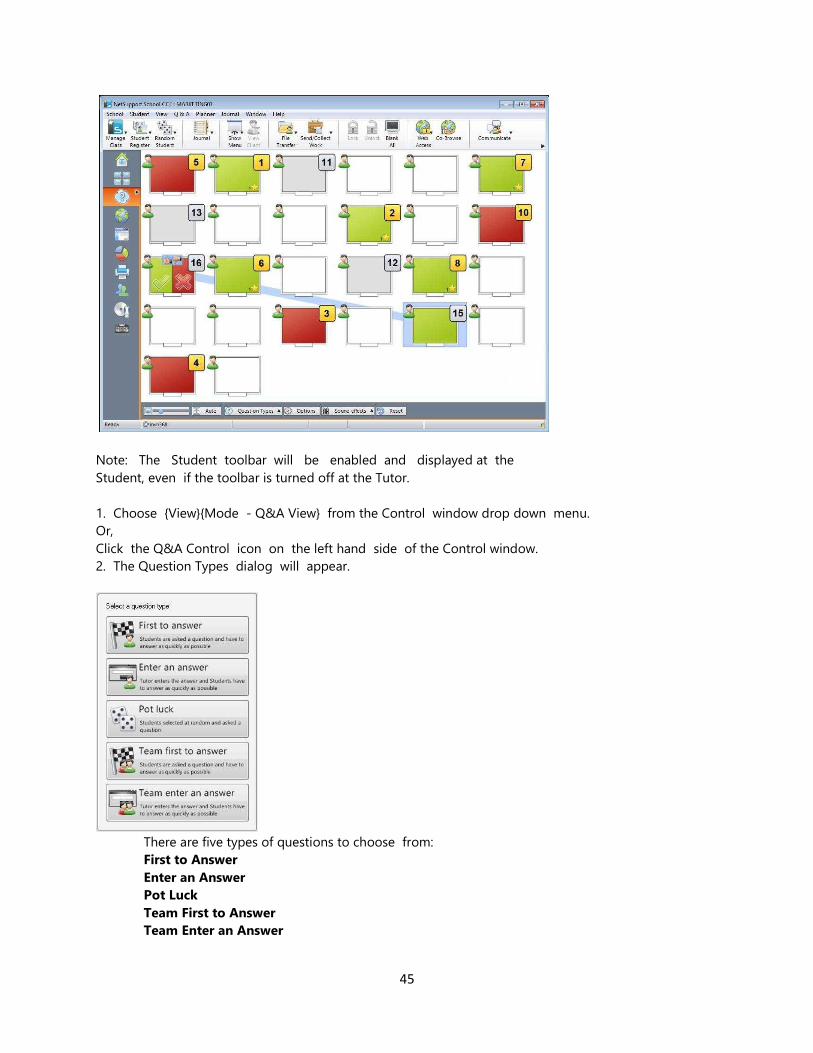
Note: The Student toolbar will be enabled and displayed at the
Student, even if the toolbar is turned off at the Tutor.
1. Choose {View}{Mode - Q&A View} from the Control window drop down menu.
Or,
Click the Q&A Control icon on the left hand side of the Control window.
2. The Question Types dialog will appear.
There are five types of questions to choose from:
First to Answer
Enter an Answer
Pot Luck
Team First to Answer
Team Enter an Answer
46
3. Select a question type to continue.
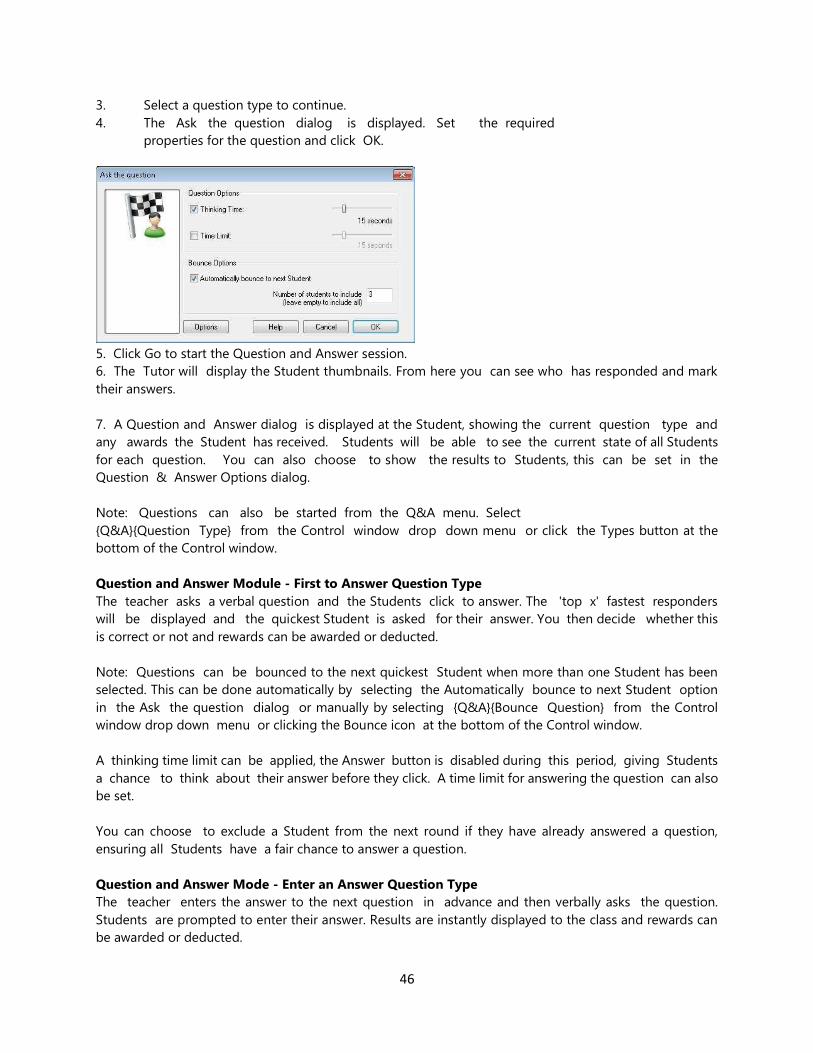
4. The Ask the question dialog is displayed. Set the required
properties for the question and click OK.
5. Click Go to start the Question and Answer session.
6. The Tutor will display the Student thumbnails. From here you can see who has responded and mark
their answers.
7. A Question and Answer dialog is displayed at the Student, showing the current question type and
any awards the Student has received. Students will be able to see the current state of all Students
for each question. You can also choose to show the results to Students, this can be set in the
Question & Answer Options dialog.
Note: Questions can also be started from the Q&A menu. Select
{Q&A}{Question Type} from the Control window drop down menu or click the Types button at the
bottom of the Control window.
Question and Answer Module - First to Answer Question Type
The teacher asks a verbal question and the Students click to answer. The 'top x' fastest responders
will be displayed and the quickest Student is asked for their answer. You then decide whether this
is correct or not and rewards can be awarded or deducted.
Note: Questions can be bounced to the next quickest Student when more than one Student has been
selected. This can be done automatically by selecting the Automatically bounce to next Student option
in the Ask the question dialog or manually by selecting {Q&A}{Bounce Question} from the Control
window drop down menu or clicking the Bounce icon at the bottom of the Control window.
A thinking time limit can be applied, the Answer button is disabled during this period, giving Students
a chance to think about their answer before they click. A time limit for answering the question can also
be set.
You can choose to exclude a Student from the next round if they have already answered a question,
ensuring all Students have a fair chance to answer a question.
Question and Answer Mode - Enter an Answer Question Type
The teacher enters the answer to the next question in advance and then verbally asks the question.
Students are prompted to enter their answer. Results are instantly displayed to the class and rewards can
be awarded or deducted.
47
Note: You can determine whether the answer is case sensitive or not.
A thinking time limit can be applied, the Answer button is disabled during this period, giving Students
a chance to think about their answer before they click. A time limit for answering the question can also
be set.
You can choose to exclude a Student from the next round if they have already answered a question,
ensuring all Students have a fair chance to answer a question.
Question and Answer Mode - Pot Luck Question Type
The teacher decides how many Students to select randomly, NetSupport School CCE will
pick and order them. A Student is then randomly selected and you verbally ask a question and the Student
answers. You then decide whether this is correct or not and have the option to 'bounce' the question to
another random Student. Rewards can be awarded or deducted.
Note: Questions can be bounced when more than one Student has been selected. This can be done
automatically by selecting the Allow question bounce option or manually by selecting
{Q&A}{Bounce Question} from the Control window drop down
menu or clicking the Bounce icon at the bottom of the Control window.
If a Student has answered correctly you can allow them to select the next random Student.
Note: If a Student has answered they will not be randomly selected again during this session.
You can also select a Student randomly by selecting {Student}{Select
Random Student} from the Control window drop down menu.
PRINTER MANAGEMENT
Print Management gives the Tutor total control over printer usage within the classroom, the Tutor can
monitor and control all printing activity by connected Students or printer. Students can be prevented
from printing, be assigned page limits or require Tutor authorisation to print.
The print management feature supports multiple printers within a classroom, prevents the addition,
deletion or modification of existing printers and provides printing usage summaries as part of the Student
register.
Note: Printers must be added to Student workstations before the Tutor connects.
1. Choose {View}{Mode - Print View} from the Control window drop down menu.
Or,
Click the Print Management icon on the left hand side of the Control window.
48
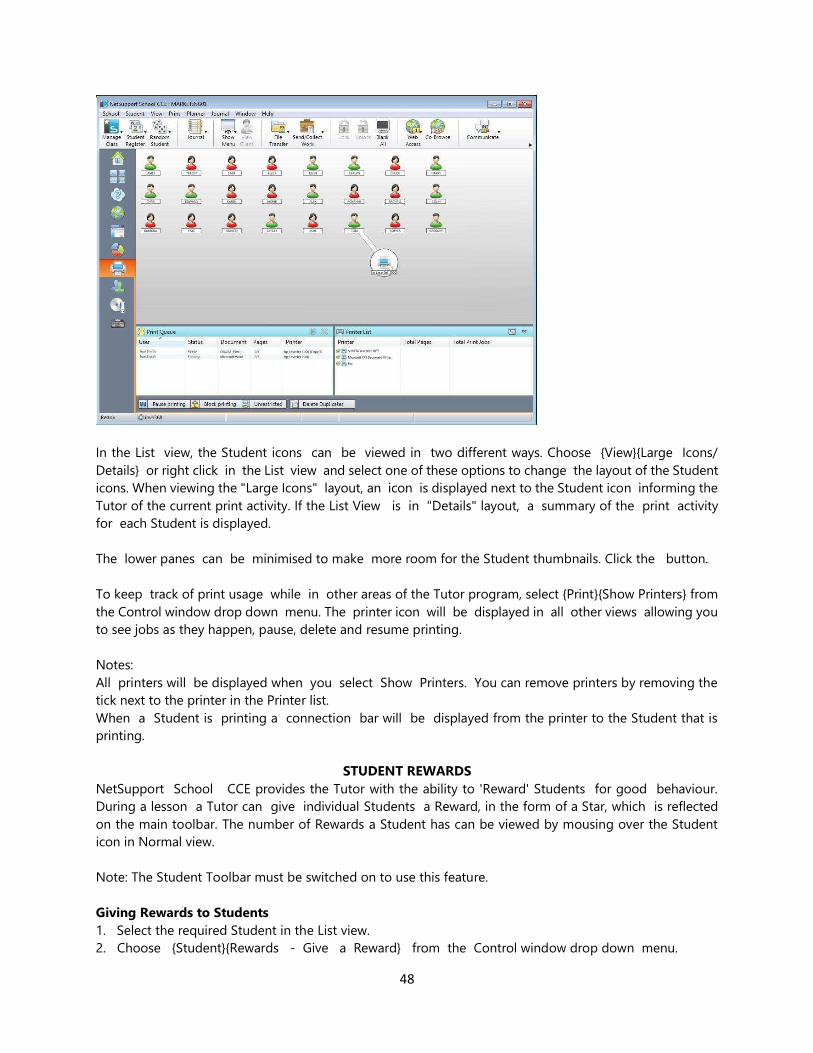
In the List view, the Student icons can be viewed in two different ways. Choose {View}{Large Icons/
Details} or right click in the List view and select one of these options to change the layout of the Student
icons. When viewing the "Large Icons" layout, an icon is displayed next to the Student icon informing the
Tutor of the current print activity. If the List View is in "Details" layout, a summary of the print activity
for each Student is displayed.
The lower panes can be minimised to make more room for the Student thumbnails. Click the button.
To keep track of print usage while in other areas of the Tutor program, select {Print}{Show Printers} from
the Control window drop down menu. The printer icon will be displayed in all other views allowing you
to see jobs as they happen, pause, delete and resume printing.
Notes:
All printers will be displayed when you select Show Printers. You can remove printers by removing the
tick next to the printer in the Printer list.
When a Student is printing a connection bar will be displayed from the printer to the Student that is
printing.
STUDENT REWARDS
NetSupport School CCE provides the Tutor with the ability to 'Reward' Students for good behaviour.
During a lesson a Tutor can give individual Students a Reward, in the form of a Star, which is reflected
on the main toolbar. The number of Rewards a Student has can be viewed by mousing over the Student
icon in Normal view.
Note: The Student Toolbar must be switched on to use this feature.
Giving Rewards to Students
1. Select the required Student in the List view.
2. Choose {Student}{Rewards - Give a Reward} from the Control window drop down menu.
49
Or,
Right Click on an individual Student and choose Reward - Give a
Reward.
3. A star will appear on the Student Toolbar.
Removing Rewards
1. Select the required Student in the List view.
2. Choose {Student}{Rewards - Remove a Reward} from the Control window drop down menu.
Or,
Right Click on an individual Student and choose Reward - Remove a
Reward.
3. A star will be removed from the Student Toolbar.
Note: All Rewards can be removed from a Student by selecting
{Student}[Rewards – Remove all Rewards} from the Control window drop down menu.

50
REFERENCES
http://www.netsupportschool.com/resources.asp Retrieved on September 1, 2013; 16:21
http://www.netsupportschool.com/wms.asp Retrieved on September 1, 2013; 16:21