expert knowledge for co:mputerized ecg interpretation - CORE
Upload
khangminh22Category
view
1download
0
© 2016 OPSWAT, Inc. All rights reserved. OPSWAT®, MetadefenderTM and the OPSWAT logo are trademarks of OPSWAT, Inc.All other trademarks, trade names, service marks, service names, and images mentioned and/or used herein belong to their respective owners.

Table of Contents
About This Guide 15
Key Features of Metadefender Core 16
1. Installing or Upgrading Metadefender Core 17
1.1. System Requirements 17Hardware requirements 17Software requirements 18Browser requirements for the Metadefender Core Management Console 18Additional installation of 3rd party framework/components 18Additional installation of Windows services by Metadefender Core 19Ports that must be available 20Driver installation by Metadefender Core 20Whitelisting requirements 20
1.2. Installing Metadefender Core 20Optional components 21Installing Metadefender Core Using the Command Line 21Installing Metadefender Core Using the Install Wizard 24
1.3. Activating Metadefender Core Licenses 27Activating and Managing Metadefender licenses 27Activation Mechanisms (online vs. offline activation) 28License System Validation 28Trial licenses 28License types 28License Manager Command Line Interface 29Offline License Activation By Management Console 32Online License Activation By Management Console 35
1.4. Upgrading Metadefender Core 38Exporting process history 40Exporting your current configuration using the command line 40Exporting Quarantined file and email history 40Installing the upgrade 41Restoring your previous configuration using the Management Console 41

Importing your previous configuration using the command line 42Importing Quarantined File and Email history 42Importing process history 43Upgrading from Metadefender Core 3.5 or earlier 43Upgrading from Metadefender Core 3.12.5 and using Mail Agent 43
1.5. Performance and Load Estimation 44What to know before reading the results: Some factors that affect performance 44How test results are calculated 45Test Report 45Performance Report - Multi-Scanning 45
2. Configuring Metadefender Core 49
Using Management Console to configure Metadefender 49
Using the Command Line Utility to configure Metadefender 49
Configuration options available through the omsConfig.ini file 50
2.1. Scan Configuration (global configuration options) 50
2.2. Engine Configuration 52Applying Offline Updates 53Configuring Scan Engines 54Online Update Configuration 55
2.3. Sources Configuration 58Metadefender Client Configuration 58Metadefender Email Configuration 60Metadefender Proxy Configuration 60
2.4. Workflow Profile Configuration 612.4.1. Creating a New Workflow Profile 612.4.2. Pre-defined Workflow Profiles 652.4.3. Archive Handling 672.4.4. File Type Detection And Filtration Overview 70
2.5. Metadefender Core Logs 72Debug logs 72Application Log 72Email Event Log 73Email History 73File Log 74

Logging Configuration 75Windows Event Log 78
2.6. Quarantine Management 79Accessing the Quarantine tab in the Metadefender Core Management Console 79Scheduling quarantine reports 80
2.7. Filter CLI - Whitelisting/Blacklisting 81omsFilter - about 83omsFilter - addtoblack 83omsFilter - addtowhite 83omsFilter - list 84omsFilter - remove 85
2.8. Advanced Configuration Options 85CORS Configuration 85Enabling HTTPS 86Engine Specific Configuration 98Import/Export from Command Line 101Post Action Script 102RAM Disk Configuration 105REST Server Configuration 107
2.9. Non-Workflow Configuration (Deprecated) 109Caching 109ScanEx Configuration 110
3. Data Sanitization (CDR) 114
What is Data Sanitization? 114
Supported File Types 114
Single Output File or Multiple Output File 115
Data Sanitization Performance (speed) 116System Info 116Resources 116Test result 116
Preventing Unknown Threats 117
4. Developer Guide 123

Building Custom Engines 123What you need to do 123Installation and configuration 124Example 125When uninstalling or upgrading Metadefender Core 125C# Custom Engine Template 125Custom Engine C Interface 134
COM Interface 146Important Return Type 153COM Connection Points 155Deprecated COM interface 171Methods 180Sample Code 200
Command Line Utility 202Exit code (for scan command) 202Process a File Command 202
Java Sample 204With the Eclipse IDE running: 204Running on the Command Line: 204
REST API (v2) 204API key-based authentication 205Getting Started 205Compatibility with Core v4 and Metadefender.com 205Advanced Usages 205Look Up Hash and Process (Scan / Sanitize) A File 222Response Description 233Creating Cpp library for REST API 247
5. Release Notes 253
New features 253
Other changes 253
General and Known Issues 253General 253Known issues 253

6. Important Concepts and Terminology 256
Usable AVs (antivirus) 256
Current AVs 256
Customer licensed engine 257
Synchronous/asynchronous scan 257
Valid file name 257
7. Metadefender / Client 258
About This Guide 258
Key Features of Metadefender Client 258
Available Metadefender Client Packages 259Metadefender Client 259Metadefender USB Client 259Metadefender Cloud Client 259
Metadefender Client Configuration in Metadefender Core 3.x 259
Release Notes 261Changes in 3.12.5 261
8. Metadefender / Email 263
Second Layer of Defense for Your Email Security Gateway 263
Key Features 263
Deployment Options 263Mail Proxy Deployment (Generic) 263Cloud Deployment 264Onsite Microsoft Exchange Deployment 264
Metadefender Email Does Not 265
1. Before Installation 265Increase Capacity and Resiliency 265System Requirements 266
2. Mail Proxy Deployment (Generic) 268

Configuring Incoming Threat Protection 268Configuring Outgoing Threat Protection 273Configuring Recipient Verification 277TLS support (Incoming/Outgoing emails) 279
3. Cloud Deployment 286Overview 286Steps 286Limitation 286Google Apps integration 287Microsoft Office 365 Integration 293
4. Onsite Microsoft Exchange Deployment 299How To Verify 300
5. Notification and Report 300Available Notification / Report 300Email Server For Notification 301Customizing Disclaimers 301Error Email Notification 302Infection Email Notification 304Quarantine Reports 305Sanitized Email Notifications 306
6. Additional Configuration 306Advanced Configuration 306Email Processing Workflow (Metadefender Core) 327Quarantine Email 328Skip Email Analysis 331
7. (Email) Release Notes 332New Features 332Other Changes 332(Email) General and Known Issues 332
9. Metadefender / ICAP Server 333
Web Proxy Integration 333
Reverse Proxy Integration 334
Web Proxy Servers Supported 334
1. ICAP server Configuration 335

Configuration via Metadefender Core Management Console 335Configuration via INI 335Enabling profiling logging 339TLS support 340
2. ICAP response headers 342
3. Web Proxy Integrations 344ICAP URL 346ARA network JAGUAR5000 346BlueCoat ProxySG 348F5 BIG IP 362McAfee Web Gateway 371Squid 375
4. Using ICAP server for Metadefender Core v4.x (BETA) 379For Windows 379For Linux (Ubuntu 16.04) 379Configuration via INI 380
10. Metadefender / Kiosk 385
Overview 385
Key Features 385
User authentication 386
Peripheral media 386
Encrypted USB devices 386
Media handling 387
Processing files 387
Scanning session results 388
Customizable interface 388
System hardening 388
1. Installing / Upgrading Metadefender Kiosk 3881.1. Kiosk System Requirements 3891.2. Installing Metadefender Kiosk Using the Install Wizard 3911.3. Installing Metadefender Kiosk from the Command Line 395

1.4. Managing License Information 3961.5. Upgrading Metadefender Kiosk 398
2. Kiosk Hardening 399User Access Control (UAC) 400Windows Update 401Setting the screen saver and power saving options 401Disabling mouse cursor pointer 401Disabling hotkeys 402Other system hardening configuration 402CORS Configuration 4022.1. Configuring the Web Server 4022.2. Disabling Windows Hot Keys 407
3. Management Console for Administration 409
4. Kiosk Authentication / User Workflow 4104.1. Workflow Profiles Page 4114.2. Properties & Membership 4144.3. Managing User Questions 4144.4. Allowed Media Types 4154.5. Selecting A Metadefender Core Workflow 4154.6. Selecting How to Handle Processed Files 4164.7. Custom Command Line Script 4194.8. Managing Printing Options 4224.9. Email Session Report 423
5. Configuring a Metadefender Core Server 423Detecting the Metadefender Core server URL 424Authenticating your configuration 424Associating workflows in Metadefender Kiosk to workflows in Metadefender Core 4275.1. Trusting an HTTPS Metadefender Core Server 427
6. Configuring with SFT 433Change on management console 433SFT account options for file uploads 4346.1. Arbit Data Diode configuration 434
7. Additional Kiosk Configuration 435Dashboard 435Configuration 4377.1. UI Localization / Customization 4387.2. Watchdog Behavior 440

7.3. Configuring User Settings 4417.4. Session Logs 4507.5 Alert Sound Customization 455
8. Launching Metadefender Kiosk 4568.1. Exiting the Kiosk User Interface 456
9.1. Logging In on the User Authentication Screen 457Answering User Questions 458
9.2. Inserting Digital Media 459
9.3. Unlocking Encrypted Devices 459
9.4. Processing Digital Media 460
9.5. Processing Encrypted Archives 461
9.6. Copying Files to Another Media 462
9.7. Viewing and Printing the Session Results 464Viewing details about copied files 464Viewing details about blocked files 465Viewing details about mismatched results 466Data Included in Metadefender Kiosk Log Files 466Example of a Scan Log File 473
10. Developer Guide 47610.1. Custom Authentication Module 476
11. Release Notes 490New features 490Other changes 49011.1. Archived Kiosk Release Notes 49011.2. Known Limitations of Metadefender Kiosk 502
11. Legal 504
Copyright 504DISCLAIMER OF WARRANTY 504COPYRIGHT NOTICE 504
Export Classification EAR99 504

12. Knowledge Base Articles 505
Are Metadefender Core upgrades free? 505
Avira engine not updating 506
Can I control access to the RAM disk? 506
Can I disable (and later re-enable) any of the antivirus engines in Metadefender Core? 507
Can I force an uninstall of Metadefender Core when the native uninstall does not work? 508
Can I install Metadefender Core v3 silently from a command line? 509
Can I run Metadefender Core without IIS? 509
Can I whitelist or blacklist a file so that Metadefender Core will always treat it as clean or dirty, respectively? 510
Can Metadefender Core scan attachments from within a PDF file? 511
Do any of the custom engines have updating limitations? 511
Does Metadefender Core offer real-time antivirus protection on the system where it is installed? 513
Does Metadefender Core v3.x require lots of memory for MongoDB usage? 513
Does the RAM Disk operate like other drives? 514
Does the RAM Disk size actually take space from the server-available hard disk space? 514
How are Metadefender Core remote clients licensed? 515
How can I purchase Metadefender licenses? 515
How can I see the number of files queued to be scanned? 515
How come the AnalyzeFileType API returns a failed result when scanning the System32 directory? 516
How do I change the directory Metadefender Core uses for archive extraction? 516
How do I change the location of Metadefender Core logs? 517
How do I configure Metadefender Core to only use one or several scan engines using the CLI? 518
How do I delete all scan logs from MongoDB and reset the database? 519

How do I disable real-time protection of my anti-malware software if it is not allowed by corporate policy? 520
How do I find my serial key / license key? 521
How do I install a RAM drive on an existing Metadefender Core installation? 521
How do I make Metadefender Core upload clean files to the FTP file server? 522
How do I modify the file size limit of the REST server in a remote Metadefender Core (formerly Metascan) configuration? 524
How do I set a password for the Metadefender Core Management Console? 525
How do I update my Metadefender Core Engines online? 525
How do I update the AhnLab engine? 526
How do I upgrade Metadefender Core while preserving configuration? 527
How do I upgrade to the latest release of Metadefender Core v3? 528
How fast can Metadefender Core process files? 529
How is MongoDB usage secured with Metadefender Core? 529
How long is the support life cycle for a specific version/release of Metadefender Core v3? 530
How would you recommend setting the RAM Disk size? 531
If I have an issue with Metadefender Core, what information does OPSWAT need in order to quickly troubleshoot my case? 532
Is it normal for Metadefender Core to consume 100% of my CPU? 533
Is it safe to use Metadefender Core COM APIs in Multi-threaded Apartment? 534
Is Metadefender Core available on 64-bit operating systems? 534
Is Metadefender Core compatible with .NET Framework 4.5.2? 534
Is there a .NET version of Metadefender Core? 535
Is there a virus test I could use to test Metadefender Core? 535
Metadefender Core shows a large number of files that failed to scan. What can I do? 535
My Customer Licensed Engine is not showing in Metadefender Core. What can I do? 536
Test cases for different scan results on Metadefender Core 536
Updated archive handling libraries 538

What are the maximum values for archive extraction settings? 538
What does "This key has reached the maximum usage" mean? 539
What do the 'skipped clean' and 'skipped dirty' scan results mean? 539
What file type conversions are supported in Metadefender Core 3.x? 540
What is a Customer Licensed Engine? 542
What is a Metadefender Client for licensing purposes? 543
What is a sanitized file? 543
What is Metadefender Core file type detection? 544
What is the difference between Scan, PutToScanQueue, and ScanEx? 545
What is the frequency of signature / definition updates? 545
What is the maximum file upload size limit when accessing Metadefender Core through the REST server? 546
What is the RAM Drive or Ram Disk and how is it used in Metadefender Core? 546
What is the support lifecycle for OPSWAT Appliances? 547
What operating system patches should I apply to the system hosting Metadefender Core? 547
What should you do if you have anti-malware on the same machine as Metadefender Core (formerly Metascan) ? 548
What URLs must be whitelisted to allow access to virus definition updates? 548
When I click Apply after I change the maximum total size of extracted files, I get an "Update failed" message. Why is that? 552
When will the updates for ThreatTrack and Agnitum no longer be available ? 552
Where are all of the Metascan knowledge base articles that I used to access? 552
Where can I submit false positives detected by Metadefender Core? 553
Where is Metadefender Core's temp directory located? 555
Which antivirus engines are designated by Metadefender Core as "customer licensed engines"? 556
Which antivirus products are compatible with Metadefender Core? 557

Why am I getting a COM UnauthorizedAccessException error: 80070005 when working with Metadefender Core from ASP? 557
Why did Metadefender Core stop working on Windows 10 ? 558
Why did the AVG engine disappear from the Metadefender Core Management Console? 559
Why does my Customer Licensed Engine (antivirus) always return "failed to scan"? 559
Why do I get a prompt to install OPSWAT by Christiaan Ghijselinck? 560
Why do MongoDB logs have a "You are running on a NUMA machine" warning? 561
Why is Bitdefender engine no longer working? 561
Why is engine heuristic scanning for some engines turned off by default in Metadefender Core? 561
Why is K7’s heuristic scanning turned off by default in Metadefender Core? 562 562
Why is Metadefender Core REST API returning different results than the Metadefender Management Console? 562
Why is Metadefender Core taking so long to start? 563
Why is my Avira engine no longer running? 563
Why is my Kaspersky engine no longer running? 564
Why isn't the Metadefender Email Agent processing my emails? 565
Why should I upgrade my Metadefender Core? 565

v3.13.0 15
About This Guide
Welcome to the Metadefender v3 guide. This guide is intended to provide the information you need to:
Install, configure, and manage Metadefender Core v3.
Integrate to other applications either through the Metadefender APIs or as a "Custom Engine".
Implement and use other Metadefender modules such as Email Agent, ICAP Server, Kiosk, Client, etc. (note that some of these modules require licenses that need to be purchased separately)
Learn about new features, updated features, and bug fixes on each Metadefender Release (i.e. each product version's release notes)
Learn about frequently asked questions and additional concepts through our library of knowledge base articles
While we offer the option to download this guide to a PDF file, it is optimized for online browser viewing. OPSWAT updates the online version of the guide regularly on an "as needed" basis. By viewing the document online, you are assured that you are always seeing the most recent and most comprehensive version of the guide.

v3.13.0 16
Key Features of Metadefender Core
File sanitization (aka Content Disarm and Reconstruction) using 90 data sanitization engines
Multi-scanning for malware with more than 30 leading anti-malware engines
Heuristic analysis to detect more unknown and targeted attacks
File Type Verification
Archive Extraction
Workflow Engine
Flexible APIs (REST, COM, Java, CLI)
High performance processing

v3.13.0 17
1. Installing or Upgrading Metadefender Core
1.1. System Requirements
Hardware requirements
Metadefender v3 hardware requirements are dependent on your Metadefender Package Size (which is related to the number of AV engines). The table below lists the requirements that need to be dedicated to the Metadefender application the underlying Operating System. It assumes there are no other applications or services other than those related to Metadefender or the Operating System
Package Size Minimum System RAM*
Minimum Free Hard Drive Space Minimum CPU
Metadefender Core 1
4 GB 16 GB + 1.5 GB / one million scan data
4 core
Metadefender Core 4
8 GB 32 GB + 1.5 GB / one million scan data
4 core
Metadefender Core 8
8 GB 32 GB + 1.5 GB / one million scan data
4 core
Metadefender Core 12
16 GB 32 GB + 1.5 GB / one million scan data
4 core
Metadefender Core 16
16 GB 32 GB + 1.5 GB / one million scan data
4 core
Metadefender Core 20
16 GB 32 GB + 1.5 GB / one million scan data
4 core
Metadefender 20+ Consult with OPSWAT Technical Support.
* Minimum RAM requirement excludes additional RAM required if you plan to use the RAM Drive

v3.13.0 18
Software requirements
Operating System: Windows 7 / 8 / 8.1 / 10 / 2008 R2 / 2012 / 2012 R2
Bitness: 64-bit only
Windows Installer 4.5 or higher
Windows hotfix for Windows Server 2008 R2 or Windows 7
Beginning with version 3.11.2, Metadefender Core is only supported on Windows 64 bit operating systems.
Browser requirements for the Metadefender Core Management Console
Internet Explorer 10 or later
Safari 5.1 or later
Firefox 3.5 or later
Chrome
Additional installation of 3rd party framework/components
The following framework/component may be shared with other applications. Uninstalling may result in unexpected behavior of other applications.
Name Details Optional
IIS express IIS express 7.5 (Metadefender Core 3.11.0 or older)
(Metadefender Core 3.11.1 IIS express 8.0or newer)
REQUIRED
.NET framework 4 Client ProfileExtended
REQUIRED

v3.13.0 19
Name Details Optional
Microsoft Visual C++ redistributable
Microsoft Visual C++ 2005 RedistributableMicrosoft Visual C++ 2008 RedistributableMicrosoft Visual C++ 2008 Redistributable - x86Microsoft Visual C++ 2008 Redistributable - x64Microsoft Visual C++ 2010 Redistributable - x86Microsoft Visual C++ 2012 Redistributable - x86Microsoft Visual C++ 2013 Redistributable - x86
REQUIRED
VMware Virtual Disk Development Kit
version 5.1.1.1042608 REQUIRED
Additional installation of Windows services by Metadefender Core
Name Service Name Optional
Metadefender Generic Mail Agent mdfExgEmailAgent by default
Metascan Metascan by default
Metascan Helper Metascan Helper by default
Metascan ICAP omsICAP by default
Metascan Quarantine omsQuarantine by default
Metascan REST omsRest by default
v3.13.0 20
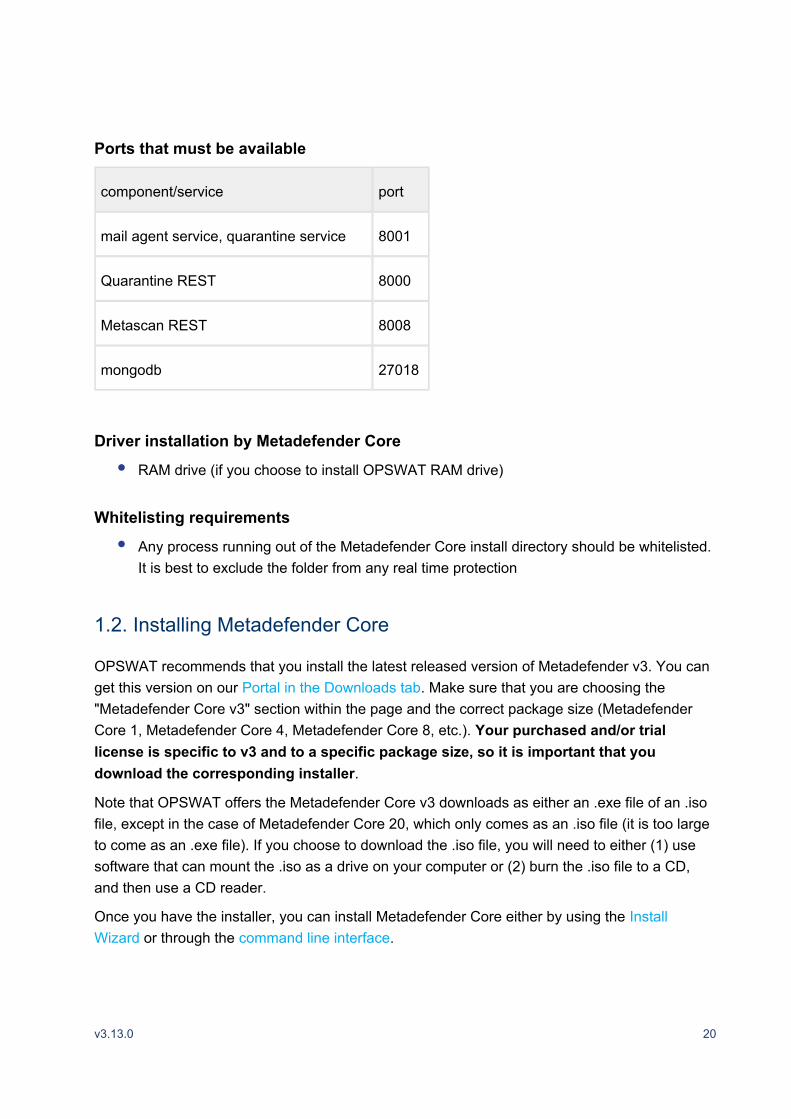
Ports that must be available
component/service port
mail agent service, quarantine service 8001
Quarantine REST 8000
Metascan REST 8008
mongodb 27018
Driver installation by Metadefender Core
RAM drive (if you choose to install OPSWAT RAM drive)
Whitelisting requirements
Any process running out of the Metadefender Core install directory should be whitelisted. It is best to exclude the folder from any real time protection
1.2. Installing Metadefender Core
OPSWAT recommends that you install the latest released version of Metadefender v3. You can get this version on our . Make sure that you are choosing the Portal in the Downloads tab"Metadefender Core v3" section within the page and the correct package size (Metadefender Core 1, Metadefender Core 4, Metadefender Core 8, etc.). Your purchased and/or trial license is specific to v3 and to a specific package size, so it is important that you
.download the corresponding installer
Note that OPSWAT offers the Metadefender Core v3 downloads as either an .exe file of an .iso file, except in the case of Metadefender Core 20, which only comes as an .iso file (it is too large to come as an .exe file). If you choose to download the .iso file, you will need to either (1) use software that can mount the .iso as a drive on your computer or (2) burn the .iso file to a CD, and then use a CD reader.
Once you have the installer, you can install Metadefender Core either by using the Install or through the .Wizard command line interface

v3.13.0 21
In addition to the standard Metadefender Core installation, there are optional components that can be installed, based on your requirements.
Optional components
RAM drive
RAM drive installation will appear in a separate pop-up window. Click to continue the Installinstallation of the RAM drive component. For more information on installing on Core servers that are already running without reinstalling Metadefender Core, click .here
Installing Metadefender Core Using the Command Line
Installing Metadefender Core from the command line requires Windows Installer 3.0 or Note:higher.
Command line options
Important: Command line options for Metadefender Core 3.7 and later are different than the command line options available for versions 3.6 or older. Older command line options will not work with versions 3.7 or later.
The following command line options are available with Metadefender Core. Note: All arguments are case sensitive. The Packages column indicates which Metadefender
Core package(s) each command line switch is available for: either 1, 4, 8, 12, 16, or ALL.
Command Line Option Description Example Packages
/install Install Metadefender Core
C:\Metadefender_Core.exe /install
ALL
/uninstall ALL

v3.13.0 22
Command Line Option Description Example Packages
Uninstall Metadefender Core and delete all files installed by Metadefender Core
C:\Metadefender_Core.exe /uninstall
/log <log-file-name> Create installation log file
C:\Metadefender_Core.exe /log C:\omsinst.log
ALL
/silent Run Metadefender Core installation silently
C:\Metadefender_Core.exe /silent
ALL
INSTALLLOCATION=<install-path>
Sets the install location for Metadefender Core
c:\Metadefender_Core.exe /i c:\Metascan.msi INSTALLLOCATION="c:\Metascan"
ALL
ADDLOCAL=<comma-separated-feature-list>
Install selected features only. Please see table below for list of features.
c:\Metadefender_Core.exe ADDLOCAL="RamdrvSupport, EsetEng,CaEng"
ALL
REST=0 This will avoid IIS Express, the webserver and all features that rely on the webserver to work.
This includes all REST APIs, Web Management Console, Mail Agent, & Metascan Client.
C:\Metadefender_Core.exe REST=0
ALL
UPDATEOFF=0 C:\Metadefender_Core.exe UPDATEOFF=1
ALL

v3.13.0 23
Command Line Option Description Example Packages
This installs Metadefender Core with automatic engine updates turned off.
Not officially documented yet.
Note that command line options were changed with the release of Metadefender Core 3.7 (which was then branded as Metascan 3.7). Command line options from earlier versions are no longer applicable. For example, “Repair Metascan” is no longer supported
Feature options
The features below can be added by using the ADDLOCAL command line option, as described in the table above.
Entries in the Feature Name column are case-sensitive. T Note: he Packages column indicates which Metadefender Core package(s) each command line switch is available for: either 1, 4, 8, 12, 16, or ALL.
Feature Name Description Package
RamdrvSupport RAM Drive ALL
Docs Documentation ALL
MetascanClient Metascan Client ALL
ClamavEng ClamAV scan engine ALL
AhnlabEng Ahnlab scan engine 4, 8, 12, 16, 20
AviraEng Avira scan engine 4, 8, 12, 16, 20
EsetEng ESET scan engine 4, 8, 12, 16, 20
CaEng Total Defensescan engine 8, 12, 16, 20

v3.13.0 241.
Feature Name Description Package
ZillyaEng Zillya! scan engine 8, 12, 16, 20
QuickhealEng Quick Heal scan engine 8, 12, 16, 20
BitDefenderEng BitDefender scan engine 8, 12, 16, 20
IkarusEng Ikarus scan engine 12, 16, 20
IncaEng nProtect scan engine 12, 16, 20
K7Eng K7 scan engine 12, 16, 20
AVGEng AVG scan engine 12, 16, 20
VirusBlokAdaEng VirusBlokAda scan engine 16, 20
EmsisoftEng Emsisoft scan engine 16, 20
FriskEng F-Prot scan engine 16, 20
KasperskyEng Kaspersky scan engine 16, 20
McAfeeEng McAfee scan engine 20
NanoEng NanoAV scan engine 20
SophosEng Sophos scan engine 20
TGSoftEng Vir.IT eXplorer scan eigne 20
Installing Metadefender Core Using the Install Wizard
To install Metadefender Core using the Install Wizard, follow the steps below: If you have Note:a previously installed version of Metadefender Core already installed, you must uninstall it as instructed in .Upgrading Metadefender Core

v3.13.0 25
1.
2.
3.
4.
5.
Locate the Metadefender Core Installation File. If this was not provided to you by OPSWAT, it can be found by clicking and scrolling down to the Metadefender Core hereV3 section.
This file is named Metadefender_Core___.exe where is the Metadefender Core Note:package you are installing, is the version of Metadefender Core, and is the build number.
Double-click on the desired Metadefender Core installation file to launch the Metadefender Core installer. If this does not work, right-click on the file and select . Open
The Welcome window is displayed. Click .Start
The setup Wizard is displayed. Click .Next
Accept the agreement and click .Next

v3.13.0 26
5.
6.
7.
8.
9.
Select the components you would like to add or remove from the installation. A drop-down menu is available to select whether to install the component or make it unavailable. After making your selections, click .Next
Click . Install
Click to exit the Setup Wizard.Finish
Click . Close

v3.13.0 27
Optional components
RAM drive
If you choose RAM Drive in the custom setup screen (step 6 above), the installation will appear in a separate pop-up window. Click to continue the installation of the RAM drive Installcomponent. For more information on installing the RAM drive, click .here
1.3. Activating Metadefender Core Licenses
Metadefender is operational only after an active license has been applied. In addition to the core license, some of the components require component-specific licenses either to activate them or to increase volume thresholds beyond the default settings. You should apply a Metadefender license as the next step right after installation, before you attempt any other activity with the product. (The one exception to this guideline is if you are trialing one of the smaller Metadefender v3 packages that comes pre-set with a short lived trial license, in which case you can delay license application for up to two weeks).
Activating and Managing Metadefender licenses
All types of Metadefender Core are activated through the Metadefender Core licenses typesManagement Console or through the License Manager CLI:
You can use the Licenses tab on the Metadefender Core Management Console:Management Console to activate your license or . You can also use it to online offlinecheck your license status.

v3.13.0 28
1.
2.
License Manager Command Line Interface : You can use the License Manager CLI to apply, update, or activate a Metadefender Core license ( or ), or to check the online offlinelicense status of Metadefender Core or Remote Clients. For more on using this tool, see
Metadefender Core should be restarted . License Manager Command Line Interfacewhenever a new license has been applied via command line.
REST API for advanced users
Activation Mechanisms (online vs. offline activation)
OPSWAT provides both an online and offline mechanism to apply licenses:
:Online activation Metadefender Core licenses can be activated online if the Metadefender Core server is connected to the Internet.
:Offline activation If the Metadefender Core Server is not connected to the Internet, Metadefender Core licenses can be activated offline through the OPSWAT Activation Portal.
License System Validation
Metadefender Core licenses are strongly bound to the Volume ID, MAC address and NetBIOS name of the computer. Changing any of these attributes will disable Metadefender Core, even if you have not yet activated Metadefender Core with a license. If one of these values has changed, please to receive a new license. For information on purchasing contact support Metadefender Core licenses, contact our .Sales Team
Trial licenses
Metadefender Core 1, 4 and 8 packages are pre-set with a 15-day trial license. For Metadefender Core 12, 16, and 20 trial licenses, please contact our . Requests for Sales Teamtrial licenses for other components are evaluated on a case-by-case basis. Please contact our
if you feel that you need a component specific license.Sales Team
Once the trial period is completed, the trial license key will be inactive and Metadefender will stop operating properly. If you intend to continue using Metadefender beyond the trial period, you must apply an active license to Metadefender. Work with your OPSWAT sales representative to make sure you have this license. Note that once you activate a trial license, uninstalling and re-installing Metadefender Core will not extend the evaluation period.
License types
Metadefender Core utilizes the following types of licenses:

v3.13.0 29
The main license, which must be activated in order to Metadefender Core (Required):use the product and for scanning. Other licenses (below) are not activated until the main license is activated.
This license increases the maximum number of Metadefender Clients (Optional):clients that can connect remotely to the server to perform scanning via REST APIs. With the main license only, you can use up to 1 customer-licensed engine.
This license increases the maximum number Customer-Licensed Engines :(Optional)of pre-installed anti-malware engines not embedded in Metadefender Core that can be used for scanning. With the main license only, you can use up to 1 customer licensed engine.
This license increases the maximum number of OPSWAT-Custom Engines :(Optional)provided custom engines that can be used simultaneously. With the main license only, you can use up to 1 custom engine.
License Manager Command Line Interface
You can use the License Manager CLI to apply, update, or activate a Metadefender Core license. You can also use it to check the license status of Metadefender Core or Remote Clients. This tool (omsLicMgrCLI.exe) is installed in the Metadefender Core installation directory.
To use this tool, open a command prompt by going to , and then enter start Start > Run > CMDomsLicMgrCLI.exe
Command Arguments Description
help Display each available command and its parameters.
checklicense [package]* Retrieve license status. *Optional.
Will pick a default based on directory that it is running in.
installcode Retrieve install code which is required for generating unlock keys in order to activate offline.
activateonline <serial key>
<email>
<company>
[package]
Activate license with a serial key through the Internet. The Metadefender Core Server where the license is being activated must have an Internet connection.

v3.13.0 30
activateoffline <serial key>
<company>
<unlock key>
<unlock key2>
<package>
Activate license on a Metadefender Core Server without a direct connection to the Internet. This command requires a serial key and 2 unlock keys.
Obtain the two unlock keys following the steps in Offline .License Activation By Management Console
finishactivation <unlock key>
<unlock key2>
[package]
Finish activation if the license status is “Activation Required”.
Argument values
Arguments Value Description
[package] 1
4
8
12
16
20
Metadefender Kiosk
Optional parameter, if not specified, package of the currently installed Metadefender Core service will be used.
1: Metadefender Core 1
4: Metadefender Core 4
8: Metadefender Core 8
12: Metadefender Core 12
16: Metadefender Core 16
20: Metadefender Core 20
Metadefender Kiosk
<serial key>
Serial number consisting of 6 blocks of 5 characters
The serial number is your proof of purchase. It is unique and will look like this:
dO8uc-G1iC9-jOGeA-BqgEX-U71lD-0V1VX

v3.13.0 31
Arguments Value Description
Although the serial key and unlock key have the same format, their properties are completely different. You must not mix them up and should keep them separate.
<email> Email address An email address of the contact who is responsible for Metadefender Core licenses.
e.g. [email protected]
<company> Name of company who owns the license
Used for the “company” property in Metadefender Core.
<unlock key>
<unlock key2>
Serial number consisting of 6 blocks of 5 characters
Keys tied to a unique machine and serial key. These are obtained from OPSWAT through phone, email, or the web activation portal for offline activation.
Common license activation errors
The following are common errors encountered during activation and their potential causes.
Error Possible Causes Notes
INVALID KEY
An unrecognized serial key was entered.
A serial key is specific to the type of Metadefender Core package. For example, a serial key for Metadefender Core 4 cannot be used for Metadefender Core 8 or 12.
invalid unlock keys
An unrecognized unlock key was entered.
Unlock keys are tied to a specific serial key and machine where the Install Code was generated. Using an unlock key on a different system, or with a different serial key will result in this error.
No internet connection
Metadefender Core is unable to connect to the Metadefender Core license server.
Check your Internet connection or follow the steps for offline activation.

v3.13.0 32
1.
Error Possible Causes Notes
Other In cases of other errors, an error code will be displayed along with this message.
Please contact OPSWAT support (support@opswat.) with the error code.com
Offline License Activation By Management Console
The following are required for offline activation:
A Metadefender Core Server
A serial key that matches the Metadefender Core package installed on that Metadefender Core Server. Metadefender Core licenses can only be used with the package for which they were created (1, 4, 8, 12, 16, 20 and Custom). For example, a serial key for Metadefender Core 4 will not work with Metadefender Core 8.
You can use the following methods for offline license activation:
The Metadefender Core Management Console included with the Metadefender Core installation
The License Manager Command Line Interface (CLI)
Offline activation of licenses using the Metadefender Core Management Console
The Metadefender Core Management Console is installed by default and can be launched from the Start menu or in any browser with network access to the Metadefender Core Server.
In the Metadefender Core Management Console, click the tab to check the Licensescurrent license information.

v3.13.0 33
1.
2.
3.
Select the option and copy or take note of the Install Code, which is Activate Offlineneeded to obtain the unlock keys.
To obtain the unlock keys, visit the Metadefender Core offline activation portal at .https://portal.opswat.com/activation

v3.13.0 34
3.
4.
5.
6.
7.
Enter your company name and other contact information.
Enter your serial key and the Install Code from step 2.
Click , which displays a page with two unlock keys. Copy or take Request Unlock Keynote of both of these.
Go back to the Metadefender Core Management Console. Enter the license key and unlock keys in the dialog box along with the company name.

v3.13.0 35
8.
1.
Click and confirm that the license expiration date has been updated and that it Activatematches the Metadefender Core contract.
Offline activation of licenses using the License Manager Command Line Interface (CLI)
See the "activateoffline" command in for more License Manager Command Line Interfaceinformation.
Online License Activation By Management Console
The Metadefender Core Server must be connected to the Internet for online activation.Note:
The following are required for online activation:
A Metadefender Core Server
A serial key that matches the Metadefender Core package installed on that Metadefender Core Server. Metadefender Core licenses can only be used with the package for which they were created (1, 4, 8, 12, 16, 20 and Custom). For example, a serial key for Metadefender Core 4 will not work with Metadefender Core 8.
You can use the following methods for online license activation:
The Metadefender Core Management Console included with the Metadefender Core installation
The License Manager Command Line Interface (CLI)
Online activation of licenses using the Metadefender Core Management Console
The Metadefender Core Management Console is installed by default and can be launched from the Start menu. You can also access the Metadefender Core Management Console directly from any machine with network access to the Metadefender Core Server at http://<metadefender core server>:8008/management.

v3.13.0 36
1.
2.
3.
4.
1.
In the Metadefender Core Management Console, navigate to the tab to check Licensesthe current license information.
Enter the Metadefender Core serial key, company name, and contact email address for the instance of Metadefender Core you wish to activate. For example,
Click to apply the license. Activate
Confirm that the license activation was successful and that the license expiration date matches the expiration date on your Metadefender Core contract.
Online activation of licenses using the License Manager CLI
Open a command prompt by going to .Start > Run > CMD

v3.13.0 37
1.
2.
3.
4.
Change the working directory to the Metadefender Core install directory by entering cd <Metadefender Core install dir> (e.g., cd “c:\Program Files (x86)\OPSWAT\Metadefender Core 4”).
Verify that your installation of Metadefender Core is NOT already activated by entering omsLicMgrCLI.exe checklicense [package] (e.g., omsLicMgrCLI.exe checklicense 4).
Activate the license by entering omsLicMgrCLI.exe activateonline <license key> “<email>” “<company>” [package]

v3.13.0 38
4.
5. After Metadefender Core activation completes successfully, the updated license status is displayed. Verify that the license status listed is “Activated” and that the expiration date matches the expiration date on your Metadefender Core contract.
Note: If online activation is not successful, check to ensure the Metadefender Core Server’s Internet connection is working. If online activation is still unsuccessful, follow the steps for
.offline activation
For more on using this tool, see .License Manager Command Line Interface
1.4. Upgrading Metadefender Core
To upgrade from one Metadefender Core version to another, you must uninstall the version you currently have and install the newer version. Before doing this, you should back up your current configuration so that you can restore the settings into your upgraded version. You can back up these settings either by using your Metadefender Core Management Console, or by exporting the settings using the command line.
Your Metadefender Core license is automatically retained as long as you are upgrading to same packages without additional add-ons.
Backup Using The Management Console

v3.13.0 39
1.
2.
3.
4.
5.
Backup using the management console does NOT contain process history and other application logs. If you want to backup process history, refer to "Exporting process history" section below.
If using Mail Agent see Mail Agent Upgrade
The preferred method of backing up your settings is by using the Metadefender Core Management Console. The following procedure downloads your current configuration settings in a file to a location of your choosing. The "Maximum File Size for files scanned through Note:the web interface" setting (found on the Configuration > Scan Configuration page of the Metadefender Core Management Console) is NOT backed up and must be manually reconfigured, if necessary, after upgrading Metadefender Core.
.Access the Metadefender Core Management Console
Click the tab. Backup/Restore
Optionally, you can select to create a Encrypt Backup with the following passwordpassword for your download.
Click . DOWNLOAD BACKUP
Save the download to the location where you want to store the backup.

v3.13.0 40
1.
2.
3.
1.
2.
3.
Exporting process history
Optionally, you can export your process history (scan results) and then import them after you have installed the upgrade.
Open the Windows command line as an administrator.
Navigate to <Metascan installation folder>\Mongo\64+ (e.g. C:\Program Files (x86)\OPSWAT\Metadefender Core 4\Mongo\64+).
Run the following command:
mongoexport.exe --host localhost --port 27018 --db metascan --collection files --out C:\output_files.json
"C:\output_files.json" is created, containing all scan records in Mongo DB.
Exporting your current configuration using the command line
Export the Metadefender Core configuration.
omsConfig.exe export <directory> [<option>]
The following command exports the Metadefender Core Properties (e.g., max archive size or temporary directory), database settings, REST server settings (e.g., API keys or REST port), SYSLOG settings, and MongoDB settings into a zip file.
[<option>] is optional, it should be in the format /pass=password
Exporting Quarantined file and email history
If you would like to export your quaratined file and email history for import after an update we recommend you use mongodump.exe.
Open a Windows command prompt as administrator
Navigate to <Metascan installation folder>\Mongo\64+ (e.g. C:\Program Files (x86)\OPSWAT\Metadefender Core 4\Mongo\64+).
Run the following command:

v3.13.0 41
1.
2.
3.
1.
2.
3.
4.
1.
2.
3.
mongodump.exe --host localhost --port 27018 --db MetadefenderQuarantine --out <path>
Replace <path> with a path to where you would like to save the exported database. See for more https://docs.mongodb.com/manual/reference/program/mongodump/#bin.mongodump
information about mongodump.exe.
Exporting/Importing the MetadefenderQuarantine database is a slow process and may take hours if your database is larger than a few GB.
Installing the upgrade
Uninstall Metadefender Core using your Windows Control Panel.
Double-click the Metadefender Core installer file for the version that you are upgrading to.
Follow the prompts to install the upgrade.
Note: If you are upgrading and your previously-set management console password stops working, perform the following steps:
Open the Windows Registry (regedit.exe).
Navigate to the Metadefender Core registry: hiveHKEY_LOCAL_MACHINE\SOFTWARE\Wow6432Node\OPSWAT\Metascan.
Double-click on the rest_stat_admin_apikey string item in the list and erase any value data.
Restart the Metadefender Core services (Metascan and Metascan REST).
Restoring your previous configuration using the Management Console
After installing your upgrade, you can restore your previous configuration. The preferred method of restoring your settings is by using the Metadefender Core Management Console.
.Access the Metadefender Core Management Console
Click the tab. Backup/Restore

v3.13.0 42
2.
3.
4.
1.
Click , scroll to the locations where you stored the backup, and select the Browsebackup.
Click . RESTORE FROM BACKUP
Importing your previous configuration using the command line
If you exported your configuration using the command line, you can import those settings into your upgrade.
omsConfig.exe import <file path> [<option>]
omsConfig.exe is installed in the Metadefender Core Installation directory (e.g., C:\Program Files (x86)\OPSWAT\Metadefender Core 4).
: All settings will take effect after a restart of Note Metadefender services
Importing Quarantined File and Email history
If you exported your MetadefenderQuarantine database you can import this information back after upgrading

v3.13.0 43
1.
2.
3.
1.
2.
3.
Open a Windows command prompt in administrator mode
Navigate to <Metascan installation folder>\Mongo\64+ (e.g. C:\Program Files (x86)\OPSWAT\Metadefender Core 4\Mongo\64+)
Run the following command:
mongorestore.exe --host localhost --port 27018 --db MetadefenderQuarantine <path>
Replace <path> with the directory where you saved the MetadefenderQuarantine database export. See https://docs.mongodb.com/manual/reference/program
for more information about mongorestore.exe/mongorestore/#bin.mongorestore
Exporting/Importing the MetadefenderQuarantine database is a slow process and may take hours if your database is larger than a few GB.
Importing process history
If you exported your scan results history as described above, you can import the history after you have completed upgrading.
Open the Windows command line as an administrator.
Navigate to <Metascan installation folder>\Mongo\64+ (e.g. C:\Program Files (x86)\OPSWAT\Metadefender Core 4\Mongo\64+).
Run the following command:
mongoimport.exe --host localhost --port 27018 --db metascan --collection files --file C:\output_files.json
Upgrading from Metadefender Core 3.5 or earlier
Metadefender Core 3.5 and earlier versions used a different licensing mechanism that is not supported in the current release of Metadefender Core. To obtain a new license key that will work with the current version of Metadefender Core, please contact technical support.
Upgrading from Metadefender Core 3.12.5 and using Mail Agent
Disable API keys on REST API calls if enabled.

v3.13.0 44
Make a copy of Metadefender.Email.Engine.Service.exe.config and Metadefender.Email.Engine.Generic.Agent.dll.config.
The files are located in the Metadefender Core installation directory (e.g. C:\Program Files (x86)\OPSWAT\Metadefender Core 4\Metadefender Mail Agent)
Follow the steps for "Backup Using The Management Console"
For installing Mail Agent on the newer version refer to the Metadefender Email User Guide.
Follow the steps for "Restoring your previous configuration using the Management Console"
Re-enable the REST API keys if previously enabled.
Copy over the saved Metadefender.Email.Engine.Service.exe.config and Metadefender.Email.Engine.Generic.Agent.dll.config.
The installation directory changed on the newer version, now located at C:\Program Files (x86)\OPSWAT\Metadefender Mail Agent
Restart the .Metadefender services
1.5. Performance and Load Estimation
Disclaimer: These results should be viewed as guidelines and not performance guarantees, since there are many variables that affect performance (file set, network configurations, hardware characteristics, etc.). If throughput is important to your implementation, OPSWAT recommends site-specific benchmarking before implementing a production solution.
What to know before reading the results: Some factors that affect performance
Metadefender product version
Metadefender package and configuration
set of engines (which and how many)
product configuration (e.g., thread pool size)
system environment
server profile (CPU, RAM, hard disk)
client application location - remote or local
system caching and engine level caching

v3.13.0 45
dataset
encrypted or decrypted
file types
different file types (e.g., document, image, executable)
archive file or compound document format files
file size
bad or unknown (assume to be clean)
performance tool itself
How test results are calculated
Performance (mainly scanning speed) is measured by throughput rather than unit speed. For example, if it takes 10 seconds to process 1 file, and it also takes 10 seconds to process 10 files, then performance is quantified as 1 second per file, rather than 10 seconds.
total time / total number of files processed: 10 seconds / 10 files = 1 second / file.
Test Report
Performance Report - Multi-Scanning
Performance Report - Multi-Scanning
Disclaimer: These results should be viewed as guidelines and not performance guarantees, since there are many variables that affect performance (file set, network configurations, hardware characteristics, etc.). If throughput is important to your implementation, OPSWAT recommends site-specific benchmarking before implementing a production solution.

v3.13.0 46
Setup / Configuration
Metadefender version
v3.13.0
System environment
OS: Windows 2008 R2 64 bit
CPU: 2.10GHz 4 core vCPUs
RAM:
16 GB RAM (for Metadefender Core 12, Metadefender Core 20)
8 GB RAM (for Metadefender Core 8)
Hard disk: 100 GB HDD
Product configuration
No. of threads: 20
Archive library: disabled
Workflow: default
Dataset All decrypted
Mixed 4% infected
Method REST v2
Others System caching and engine-level caching is ignored
Auto update disabled
Caching disabled
Test results
Total size (MB)
Average file size (MB)
M8*(sec/file)
M12*(sec/file)
M20*(sec/file)
Documents(1227 files)
<500KB 84.8 0.173 0.077 0.146 0.169
500kb~1m 88.9 0.723 0.189 0.17 0.272

v3.13.0 47
Total size (MB)
Average file size (MB)
M8*(sec/file)
M12*(sec/file)
M20*(sec/file)
1m~5m 930 2.467 0.912 0.593 0.585
5m~10m 1679.36 7.116 3.156 2.026 1.911
Executables(1249 files)
<500KB 59.8 0.120 0.136 0.192 0.327
500kb~1m 93.4 0.697 0.451 0.525 0.887
1m~5m 902 2.412 0.764 0.942 1.707
5m~10m 1699.84 7.053 1.38 1.763 2.524
Graphic Images(1250 files)
<500KB 85.1 0.170 0.068 0.073 0.076
500kb~1m 96.6 0.716 0.113 0.152 0.156
1m~5m 943 2.482 0.326 0.296 0.327
5m~10m 1597.44 6.798 1.134 1.027 0.868
Media(1249 files)
<500KB 88.3 0.177 0.072 0.079 0.092
500kb~1m 92.8 0.658 0.115 0.126 0.168
1m~5m 934 2.538 0.449 0.386 0.313
5m~10m 1689.6 7.011 1.44 1.176 0.934
Other Misc(1031 files)
<500KB 81.9 0.172 0.083 0.099 0.159
500kb~1m 89.9 0.719 0.118 0.18 0.255
1m~5m 603 2.319 0.255 0.391 0.482
5m~10m 1259.52 7.453 0.552 0.815 0.834

v3.13.0 48
Total size (MB)
Average file size (MB)
M8*(sec/file)
M12*(sec/file)
M20*(sec/file)
PDF(1246 files)
<500KB 85.8 0.173 0.096 0.105 0.156
500kb~1m 100 0.730 0.192 0.242 0.358
1m~5m 929 2.477 0.365 0.473 0.611
5m~10m 1638.4 6.913 0.876 1.121 1.362
Text(1248 files)
<500KB 91.4 0.183 0.227 0.284 0.539
500kb~1m 94.3 0.704 0.25 0.497 0.675
1m~5m 905 2.394 0.366 0.603 0.775
5m~10m 1628.16 6.899 0.875 1.471 2.251
Average scan time (sec/file) 0.537 0.570 0.706
M8: Metadefender 8 (Ahnlab, Avira, BitDefender, ClamAV, ESET, Quick Heal, Total Defense, Zillya!)
M12: Metadefender 12 (M8 + AVG, nProtect, Ikarus, K7)
M20: Metadefender 20 (M12 + Kaspersky, Emsisoft, F-Prot, QuickHeal, McAfee, Sophos, Vir.IT eXplorer, NanoAV)

v3.13.0 49
1.
2. Configuring Metadefender Core
Metadefender Core is designed to support many different use cases and security requirements. As a Metadefender Core administrator, you can tailor the product to your organization's specific needs through a set of configuration options available to you. There are two ways to access these configuration options: (1) Through the Metadefender Core Management Console, which is a web-based user interface, or (2) through a command line utility, which you access through a command line interpreter. There are also a few less commonly adjust settings that are stored in a omsConfig.ini file.
Using Management Console to configure Metadefender
You can access the Metadefender Core Management Console through any browser that has access to the Metadefender Core system. A link to the Management Console (named "Metadefender Core Management Console") is added to the Start menu during installation.
The Management Console can also be accessed directly in any web browser by going to http://<Metadefender Core Server>:8008/management. <Metadefender Core Server> is the name or IP address of the system where Metadefender Core is installed.
Using the Command Line Utility to configure Metadefender
Metadefender Core also provides a command line utility that lets you run Metadefender Core operations, such as scanning a file or setting preferences/properties, etc.
The command line utility is omsCmdLineUtil.exe. You type this command line followed by a relevant parameter to set a specific configuration or perform a specific action. You can display the inventory of supported parameters by using the "config" parameter: "omsCmdLineUtil.exe config" (exclude the quotes). Note that the command line utility must be run from the directory where Metadefender Core is installed.
Go to , and then click .Start > Run > cmd OK

v3.13.0 50
1.
2.
3.
Change the directory to the directory where Metadefender Core is installed.
Run the config command with omsCmdLineUtil.exe to bring up a list of options to configure.
In the subsequent sections of this guide, the command line utility commands/parameters are provided for each configuration setting.
Configuration options available through the omsConfig.ini file
There are some options that are set in the omsConfig.ini file, located in the installation directory of Metadefender Core. These are typically options that are not commonly adjusted from the default settings that come with product. You must restart the Metadefender Core service after making any changes to this file.
2.1. Scan Configuration (global configuration options)
The Scan Configuration settings affect the global behavior of Metadefender Core when scanning files; i.e. these configurations apply to all files being scanned, regardless of which workflow is being used.

v3.13.0 51
As with most configuration options, these can be set through the Management Console or through the command line utility. If you plan to use the console, see the diagram below to see where to access these settings. If you plan to use the command line, see the table below the diagram to get the respective CLI parameter nomenclature.
The table below explains each configuration option found on this console page, specifies the default value (the value provided on a fresh install of the product), and provides the equivalent command line utility command:
Configuration Name
Description Default Value
CLI Command Parameter
Detect Scan Failures
Specifies the number of engines that can fail to scan a file before the overall result to be 'failed to scan'. For example, if set to 1, then a single engine failing will not result in the file being labeled 'failed to scan' but if two or more engines fail the overall result will be 'failed to scan.'
0 dsf=<0-n-1>, where n is the total number of current AV engines.
Primary Temp Directory
Directory used to copy files for scanning.
RAMDisk (if installed) or the system temporary directory
td=<directory|secondary directory>

v3.13.0 52
Configuration Name
Description Default Value
CLI Command Parameter
Secondary Temp Directory
Optional. Will be used only if the size of an extracted archive exceeds the space available in the primary directory.
Number of simultaneous scans
The number of scans that can run at the same time. It is recommended to set 4 times the number of cores or just 20, which ever one is higher, but also less than 100, which can happen for example on a machine that has 32 cores. For example, if your machine has 100 cores you may see improved performance with 200 threads.
20 tp=<0-400>
Terminate engine if scan exceeds
The amount of time that Metadefender Core will wait for an engine to complete scanning before it terminates the engine process.
5 minutes te=<time in seconds>
Maximum File Size for files scanned through the web interface
The largest allowable size for files scanned through the Metadefender Core web interface.
Do not calculate hashes for files larger than
The maximum size of files to compute the hash. Computing hashes for very large files can take a long time and can significantly affect Metadefender Core's performance.
100 MB tfi=<size>
2.2. Engine Configuration

v3.13.0 53
1.
2.
3.
Applying Offline Updates
If your Metadefender Core server is deployed in an offline environment without connectivity to the Internet, you can deploy engine definition updates through the Update by File Upload section of the Engines Configuration page.
.Access the Metadefender Core Management Console
To configure the Engines section and apply offline updates, click the tab Configuration and then click .Engines
Scroll down to the Update by File Upload section.
You can download these update packages from the OPSWAT Portal or with the Automatic Definition Update Download Utility. For more information on how to download these updates, please visit the OPSWAT Portal, click , and then click Downloads Download Offline
. Definition Updates

v3.13.0 54
1.
2.
Configuring Scan Engines
Using the Metadefender Core Management Console
.Access the Metadefender Core Management Console
To configure the Engines section and apply offline updates, click the tab Configuration and then click .Engines
All bundled engines as well as custom and customer licensed engines that can be used in Metadefender Core are listed on this page. Each engine can be activated or deactivated by selecting the checkbox and then clicking Apply at the bottom of the page.
If applicable, an engine’s heuristic scanning feature can be activated or deactivated as well. These changes take effect after the Metadefender Core service has been restarted.
Any customer-licensed engine will not be enabled by default for Metadefender Core 4, 8, 12, 16, and 20 packages. You must enable customer-licensed engines before they can be used by Metadefender Core to process scan requests.
Using the command line interface
If you would like to enable or disable engines from the command line interface, run the following commands from the Metadefender Core installation directory.
Retrieving the list of available engines
omsCmdLineUtil.exe getinfo

v3.13.0 55
1.
2.
Enabling an engine
omsCmdLineUtil.exe config in=<engine(s) to be included>e.g., omsCmdLineUtil.exe config in="eset scan engine|avira scan engine"
Disabling an engine
omsCmdLineUtil.exe config ex=<engine(s) to be excluded>e.g., omsCmdLineUtil.exe config ex="eset scan engine|avira scan engine"
If you are enabling or disabling multiple engines, separate the engine names with a ‘|’ character.
Supporting customer-licensed engines
omsCmdLineUtil.exe config sp={0|1}e.g., omsCmdLineUtil.exe config sp=1
This property determines whether Metadefender Core will attempt to use antivirus engines that are installed on the system outside of Metadefender Core. These engines will often have reduced performance compared to embedded engines and may also reduce overall Metadefender Core performance. By default, customer licensed engines will be enabled in Metadefender Core 1 and disabled in Metadefender Core 4, 8, 12, 16, and 20 packages.
Online Update Configuration
.Access the Metadefender Core Management Console

v3.13.0 56
2.
3.
4.
To configure the Online Updates section, click the Configuration tab and then click Engines .
Scroll down to Online Updates.
Select your settings based on the following tables, and then click . Apply
The following settings apply to Metadefender Core's automatic engine definition update functionality:
Property Description Default Value
CLI config
During Updates
Specifies scanning behavior when an engine is in the process of having its definitions updated.
Scans can configured to either be skipped or paused during updates.
Skip Scans
(Pause) wu=<0|1>
(Skip) su=<0|1>

v3.13.0 57
Property Description Default Value
CLI config
Update Timeout
Specifies how long Metadefender Core should wait for an update to happen before timing out.
600 seconds
to=<time in milliseconds>
Update Interval
Specifies how often engines should be updated. 1440 minutes (1 day)
um=<time in minutes>
Proxy settings can also be defined in the omsConfig.ini configuration file (located in the Metadefender Core installation directory). Proxy settings defined in omsConfig.ini will only be used if the proxy configuration is not set in the Metadefender Core Management Console.
Property Description Default Value
omsConfig.ini Property
Enable Updates Through Proxy
Specifies whether the Metadefender Core server will be retrieving engine updates through a proxy server.
disabled enable_proxy
Server Address
The proxy server to use. proxy_server
Port The proxy server port to use. proxy_port
Username If authentication is required, the username for the proxy server.
proxy_user
Password If authentication is required, the password for the proxy server.
proxy_password

v3.13.0 58
1.
2.
2.3. Sources Configuration
The Management Console's Sources tab contains the configuration settings for Metadefender modules such as Metadefender Client, Metadefender Proxy, and Metadefender Email. Navigate to this tab and follow the instructions in the subsections below if you plan to use any of these modules.
Metadefender Client Configuration
"Metadefender Client Download Configuration" lets you specify the settings for the Metadefender Client package that you generate and download from the bottom of the page. After a client has been generated, the Metadefender Client download page (<ip or dns address>:8008/#/client) can be shared with anyone who should be able to use Metadefender Client to scan files with this Metadefender Core server.
Access the Metadefender Core Management Console .
Click the Sources tab and then c lick Metadefender Client .
Note: The Windows Metadefender Client is supported to run only on endpoints running Windows 7 or later.
The following properties can be set for the Metadefender Client download package.
Property Description Default Value
Metadefender Core
Local Metadefender Core
<IP Address>:8008/metascan_rest/

v3.13.0 59
Property Description Default Value
This is the address that Metadefender Client will use to access the Metadefender Core server. This should be an address (IP address or machine name) that will be accessible from every machine where Metadefender Client will be run.
Scan Options
File Size Limit
The maximum size of files to be scanned by Metadefender Client. Files larger than this size will not be scanned. Maximum file size limit: 2GB
50 MB
Scan Type
Set a default behavior
Select option to be used as the default behavior:
Full Scan: scans system drives, physical drives, running memory processes, and removable drives
Process (Quick Scan): scan running memory processes
Custom: select which system components to scan
Process (Quick Scan)
Allow custom selection in the client
Allows a user of Metadefender Client to select to which system components to scan.Enabling components will show the components to be selected upon startup of the Client.
No components are selected
Local Log Directory
Save scan log
The directory where Metadefender Client will log all scanning activity
Enabled
Destination: %AppData%\Metadefender-Local
Enabled

v3.13.0 60
Property Description Default Value
Allow App to Exit
Specifies whether the Metadefender Client can be exited from the system tray
After configuration changes have been made, you can generate a new Metadefender Client downloadable package by clicking . Update Client
Metadefender Email Configuration
From this release, Metadefender Email will not be installed along with Metadefender Core V3. Users should go to Metadefender Email download page to download Metadefender Email installer and manually install it.
For Metadefender Email configuration, refer to the Metadefender Email User Guide.
Metadefender Proxy Configuration
For Metadefender Proxy configuration, refer to the Metadefender Proxy User Guide.

v3.13.0 61
1.
2.
3.
4.
2.4. Workflow Profile Configuration
Workflow profiles let you differentiate how files gets processed based on the source or user submitting the file. The workflows are defined in the Management Console. They can be used within the process logic of the file REST API.
Metadefender Core allows the definition of as many different workflow profiles as are needed to meet security requirements. The Default profile is used to process requests that are not mapped to any other profiles. Section 2.4.2 lists the profiles that are included out-of-the-box by OPSWAT in the Metadefender Core installation.
2.4.1. Creating a New Workflow Profile
Access the Metadefender Core Management Console .
Click the Configuration tab and then click Workflows .
Click . CREATE NEW PROFILE

v3.13.0 62
4.
5.
6.
Enter a name and description of the new workflow profile, and specify which user agents should use this profile. (Type "|" between the agents.) These values can be changed for
Click .all profiles except for the Default profile. CONTINUE
If you enable archive handling, Metadefender Core extracts archives and scans the individual files within the archive. For more information about the archive handling options, refer to . After completing your selections, click 2.4.3. Archive Handling
CONTINUE .

v3.13.0 63
6.
7.
8.
The Profile File Type and Filtration screen is displayed. Select how you want file type mismatches to be scanned and file type filters to be applied. For additional information, refer to .2.4.4. File Type Detection And Filtration Overview
After selecting the the file types and filtration, click . Continue
The Scan page is displayed, which allows you to enable or disable scanning by the active Metadefender Core engines or specify files that will be skipped. By default, large video files are excluded from scanning for efficiency purposes. Select an option and click

v3.13.0 64
8.
9.
10.
. Continue
The Sanitization Rules page is displayed, allowing you to select if and how long files that have been sanitized by Metadefender Core workflows are available through the REST API. If sanitization is enabled, Metadefender Core automatically deletes the sanitized version of files after the specified time. This configuration determines how files are handled after processing is complete.Both allowed and blocked files can be configured to sanitize specific types of files and convert them to other formats. This can remove any threats embedded within the original file. If configured, the original file can be deleted after the sanitization.Select your options and click . APPLY

v3.13.0 65
10.
11.
Select whether to sanitize allowed and blocked files and then click . Continue
The File Handling screen is displayed, allowing you to select how files are handled after data sanitization is complete. File handling is configured separately for allowed and blocked files.You can configure blocked files to be removed, either by quarantining or deleting the blocked file. You can configure both blocked and allowed files to be copied to a specified directory path.Make your selections and click . FINISH
2.4.2. Pre-defined Workflow Profiles
Several profiles are included out-of-the box in every Metadefender Core installation:
Profile Name Description
Default Used to process requests that are not mapped to any other profiles

v3.13.0 66
Profile Name Description
Block EXE Blocks executable files
Client Used by the new Metadefender Client
Convert Docs Only allows documents and converts all documents to safe formats
Guest Used to process files by guests that do not have a defined account within an organization
High Security Recommended for usage in high security environments
Kiosk Used to process files with the Metadefender Kiosk
Mail Agent Used by the Metadefender Mail Agent
No EXE/Archives
Blocks all archives and executables
Only Docs Profile for users that only need to bring in office documents
Proxy Used by Metadefender Proxy
SFT Used by SFT
Web Scan Used to process requests made through the Web Scan page

v3.13.0 67
2.4.3. Archive Handling
The Archive Handling configuration determines how archives are handled within Metadefender Core. If archive handling is enabled, Metadefender Core extracts archives and scans the individual files within the archive.
Most common archive formats are supported, including Zip, PKLite, 7z, Jar, Jarc, rar, rar5, tar, taz, ISO, Gzip, CAB, ARC, ARJ, LZH, RPM, DEB, LZMA, WIM, SFX, XZ. Metadefender Core can also extract self-extracting archives created by both 7zip and WinRAR.
MS Office file (from 2007) by default are treated as archive files when scanning. This can be disabled in the Workflow editor in the Archive section. See screenshot below:
The following settings apply if archive handling is enabled:

v3.13.0 68
Property Description Default Value
CLI config Additional info
Enable Archive Handling
Enables Metadefender Core’s archive library handling.
Enabled le=<0|1>
Max Recursion Level
The maximum depth that Metadefender Core will continue to extract archives for scanning. After this depth is reached, Metadefender Core does not extract further archives but scans those archives as entire files. If the setting is 0, archives are not extracted.
5 rl=<levels> Maximum value: 2147483646
Number of Files
The maximum number of files that can be in an archive that Metadefender Core is extracting. If the number of files in an archive exceeds this value, Metadefender Core returns the result as a potential threat.
50 an=<number> Maximum value: 2147483646
Total Size The maximum total size of files that can be in an archive that Metadefender Core is extracting. If the total size of files in an archive exceeds this value, Metadefender Core returns the result as a potential threat.
2 GB as=<size in MB>
Maximum value:
Half the current available free space of the Metadefender Core temporary directory.

v3.13.0 69
Property Description Default Value
CLI config Additional info
If two temporary directories are set from different drives, the highest available space will be used.
Simultaneous Specifies if multiple archive files undergo extraction concurrently. This will increase speed of archive file extraction performance while disk space usage on temporary directory and disk I/O will increase which may impact overall performance drop. In other words, enable only if disk I/O has high capacity and enough disk space to handle temporary files.
Disabled ec=<0|1>
Self-Extracting
Specifies whether self-extracting archives should be extracted and treated as archives.
Disabled sx=<0|1>
Scan Original Un-extracted File
In addition to scanning files inside of an archive after extraction, un-extracted archives are sent directly to engines for scanning.
Disabled soa=<0|1>

v3.13.0 70
Property Description Default Value
CLI config Additional info
If “extract_archive” for an Note: engine is enabled, this potentially exposes performance overhead because extraction happens twice, once by Metadefender Core and once by the engine.
Microsoft Office Documents
Specifies whether or not Microsoft Office Files will be treated as archive files or as a regular file.
Enabled eod=<0|1>
Note: Microsoft Office Documents (e.g., DOCX files) are detected as archive files by default. If you would like to scan the Office file itself, OPSWAT recommends that you either enable the option to scan the original un-extracted archive or disable the option to detect these files as archives. Please note that you WILL NOT get extracted file details if the option to treat Office documents as archives is disabled.
2.4.4. File Type Detection And Filtration Overview
File type detection
The file type analysis configuration allows the administrator to specify whether file type analysis should be performed, and how Metadefender Core should handle file type mismatches (where the detected type of the file differs from its extension).
Common uses of file type detection include:
Monitoring for discrepancies between a file extension and a detected file type.
Altering the workflow of files based on certain file types (e.g., blocking files of a certain file type from entering a file system).
You can configure this setting in the Workflow tab via the link on the left-side menu.File Type

v3.13.0 71
Metadefender file type detection is driven by an OPSWAT proprietary algorithm that combines the logic as well as logic. Right now, there are 5837 file types that can be "Magic Number" TrID detected and compared to the file extension; a complete listing can be found at the .TrID site
File type detection/analysis is not as accurate as other file metadata analysis. There will be cases where the Metadefender file identification engine will not be able to correctly analyze the file type. In these cases, you can submit a ticket with the file to OPSWAT Support for more investigation. However, we cannot guarantee that we will be able to fix the underlying issue and we cannot provide an expected turnaround time to provide an answer. Please do not open an express ticket for false file type detection.
Note that while file type detection functionality is based on the logic above, file scanning functionality is not limited to these file types.
File type detection is also referred to as 'file type analysis', 'file type mismatch', and 'file mismatch analysis'.
Detect file type mismatch
If this is enabled, detected file type extension will be used to validate file path. If any of file inside of an archive file is detected as mismatch, the archive file will be marked as mismatch and blocked.

v3.13.0 72
Filtration
The Filtration configuration allows a Metadefender Core administrator to specify that certain file types should be blocked, or that only certain file types should be allowed.
If File Type Detection is turned on, filtering will happen based on the type returned. However, only the following types will be checked for mismatches: D, P, A, E, G. (Documents, PDFs, Archives, Executable & Images)
If File Type Detection information is not available, filtering is only based on the file extension.
2.5. Metadefender Core Logs
Metadefender Core stores the results of file scans for a period of time determined by its Log settings.Retention
Debug logs
On each log page, you can generate debug information if needed for troubleshooting purposes. To generate the debug log packages, click , and then click one of the links to either Downloadexport a quick or verbose debug log.
Application Log
This section of the Metadefender Core logs contains internal Metadefender Core DB event logging.
To access the Application Log from the Logs tab, click . Application Log

v3.13.0 73
Email Event Log
The Email Event Log contains email event logs. Information includes the severity of the event, the time the event was logged, and a description of the event.
To access the Email Event Log from the Logs tab, click . Email Event Log
Email History
The Email Scan History page allows you to view the history of processed emails.

v3.13.0 74
1.
2.
To access the Email Scan History from the Logs tab, click . Email History
Description of fields
Field name Description
SENDER The sender of the email.
RECIPIENT The recipient(s) of the email.
SUBJECT The subject of the email.
DATE/TIME The date and time when email was processed.
RESULT The result of processing the email.
File Log
To access Metadefender Core's file scan history, do the following:
.Access the Metadefender Core Management Console
Click the Logs tab and then the tab.File Log

v3.13.0 75
You can filter file results to display a specific time period. To view detailed scan results, select a file name from the list.
The following values display for each file in the file scan history:
Field Name Description
File Name The filename specified at the time of the scan request. This is determined by the following for the different Metadefender Core interfaces:
REST: The value specified in the 'filename' header in the scan request.
COM: The name of the file from where it is scanned on the Metadefender Core system.
ICAP: The value of the 'filename' header in the ICAP request. If this is not specified, then this will be the portion of the URL after the final forward slash (/).
Reason Provides detailed information why the file is blocked by Metadefender Core. For a complete list of possible block reasons, refer to Callback for Processing
.a File (COM)
Workflow Applied
Indicates which workflow profile is used for the specific file. Click the workflow name to go to the workflow profile detail page and view the profile's configurations.
Source The client IP address where the process initiated from.
Start Time The timestamp of when the scan started.
Logging Configuration
You can configure all events in the Event Log section to be sent to a Syslog server.
To access the Configuration section from the Logs tab, click Configuration .

v3.13.0 76
The following settings apply to Metadefender Core's Syslog logging functionality:
Property Description Default Value
Enable syslog messages
Indicates whether the following settings will be used to send messages to a Syslog server.
Off
IP Address The IP address of the Syslog server.
Port The port that the Syslog server is listening on. 514
Facility Level The facility level can be configured for an additional level of filtering of messages on the Syslog server.
User-Level
Example of Metadefender Core event and dirty result log in syslog:
2014-06-19 15:05:15 User.Notice 10.0.3.101 Metascan: Changed property [thread_pool_size] = [20]

v3.13.0 77
2014-06-19 15:05:15 User.Notice 10.0.3.101 Metascan: Changed property [enable_cache_scan] = [1]
Note: Only infected files scanned through Metadefender Core's REST API result in syslog messages. Files scanned through any other interface do not produce syslog messages. Files scanned using Metadefender Core's workflows are not logged to syslog.
Log Retention
Logging can use a significant amount of disk space while the server is running. By default, Metadefender Core retains 30 days of logging for the File Log, Application Log, and Quarantine. You can change this default value in the Metadefender Core Management Console.
Log Type Default Minimum Maximum
File Logs 30 DAYS 5 minutes
Setting 0 removes all records when check is performed
10675199 days
Application Logs
30 DAYS 0 days (removes all records when check is performed)
10675199 days
Quarantine 30 DAYS 0 days (removes all records when check is performed)
10675199 days
0 days (removes all records when check is performed)
Changing the number of days Metadefender Core stores log files
You can change the number of days Metadefender Core stores the log files for File Logs, Application Logs, and Quarantine by going to in the Metadefender Core Logs > Configuration Management Console.

v3.13.0 78
To make changes to this page, move the slider to . After making changes to the default Onnumber of days for any of the logs, click . Apply
Windows Event Log
The Windows Event Log contains system application event logging of all Metadefender Core-related components.
To access the Windows Event Log from the Logs tab, click . Windows Event Log

v3.13.0 79
1.
2.
2.6. Quarantine Management
Email messages or files that have been quarantined by Metadefender Core are listed in the Quarantine tab. From this tab, an administrator can choose to delete, download, or release files and emails that have been quarantined. An administrator can also schedule and send quarantine reports.
Quarantine reports contain emails which have been quarantined by Metadefender Core. Quarantine reports include a summary of quarantined email information (subject, quarantine reason, and sending time). They also contain a link to detailed scan results in the Metadefender Core Management Console. Administrators can choose further action for the quarantined email (such as delete, release email, and download.).
Quarantine reports are the only way to be notified about quarantined emails, other than viewing the Quarantine tab. If activated, quarantined reports are sent daily by default.
Accessing the Quarantine tab in the Metadefender Core Management Console
Access the Metadefender Core Management Console .
Click the Quarantine tab .

v3.13.0 80
1.
2.
3.
4.
a.
b.
c.
Note: Port 8000 must be open on the Metadefender Core server for the Quarantine history to be displayed correctly.
Scheduling quarantine reports
To set up and schedule quarantine reports, do the following:
From the Metadefender Core Management Console, click the .Quarantine tab
Click . Configure Quarantine Reports
To update SMTP settings, click . Update
Enter the following SMTP server information in the SMTP Settings section:
Host: The SMTP server's IP address or hostname.
Port: The SMTP server's connection port.

v3.13.0 81
4.
c.
d.
5.
6.
7.
8.
Enable SSL: If the SMTP server enables SSL, select this checkbox to allow Metadefender Core to send the quarantine report email via SSL.
Username/Password: The username and password for the SMTP server.
Click . Save
Move the Scheduled Quarantine Reports On/Off slide to . On
Enter which files to include, the quarantine schedule, and email information in the section. Schedule Quarantine Reports
Note: Separate multiple email addresses in the field with a comma or a semi colon.To
Click . Save
2.7. Filter CLI - Whitelisting/Blacklisting
Title Description Syntax
omsFilter - remove remove specific file from the lists remove <sha256>

v3.13.0 82
Title Description Syntax
omsFilter - list retrieve whitelist and blacklist list <type>
omsFilter - addtowhite
add the file to the whitelist addtowhite <path> <type>
omsFilter - addtoblack
add the file to the blacklist addtoblack <path> <type> <threat>
omsFilter - about Shows the info of the current version
about
omsFilterCLI.exe
C:\Program Files (x86)\OPSWAT\Metadefender Core 4>omsFilterCLI.exe Metascan(R) Filter Command Line Utility 3.12.3.28579 (C) OPSWAT, Inc. 2002-2016 Command Description ------- ----------------------------------- addtoblack <path> <type> <threat> add the file to the blacklist addtowhite <path> <type> add the file to the whitelist remove <sha256> remove specific file from the lists list <type> retrieve whitelist and blacklist about shows the info of the current version Arguments Description ---------- ------------------------------------- <type> 0: all, 1: archive library, 2: engines <threat> Name of threat for reference <path> Absolute file path

v3.13.0 83
omsFilter - about
Syntax about
Description Shows the info of the current version
about
C:\Program Files (x86)\OPSWAT\Metadefender Core 4>omsFilterCLI.exe about Metascan(R) Filter Command Line Utility 3.12.2.28579 (C) OPSWAT, Inc. 2002-2016
omsFilter - addtoblack
Syntax addtoblack <path> <type> <threat>
Description add the file to the blacklist
addtoblack
C:\Program Files (x86)\OPSWAT\Metadefender Core 4>omsFilterCLI.exe addtoblack C:\Files\200\10.txt 0 sampleThreatNameFile 'C:\Files\200\10.txt' successfully added to blacklistRestarting Metascan is required for changes to take effect
omsFilter - addtowhite
Syntax addtowhite <path> <type>
Description add the file to the whitelist
addtowhite
C:\Program Files (x86)\OPSWAT\Metadefender Core 4>omsFilterCLI.exe addtowhite C:\Files\200\10001.txt 0

v3.13.0 84
File 'C:\Files\200\10001.txt' successfully added to whitelistRestarting Metascan is required for changes to take effect
omsFilter - list
Syntax list <type>
Description retrieve whitelist and blacklist
list
C:\Program Files (x86)\OPSWAT\Metadefender Core 4>omsFilterCLI.exe list 0 <list><black_list><object><sha256_hash>1C403526E3A858775C88D113DF46ECEA85269964</sha256_hash><filter_type>0</filter_type><threat_name>Archbomb.ZIP trojan</threat_name></object><object><sha256_hash>753690994A18CF58ED0FE3749D16448B763047B8</sha256_hash><filter_type>0</filter_type><threat_name>Archbomb.ZIP trojan</threat_name></object><object><sha256_hash>75F2667CCACCE7C7947C186DCA5029FFEE720C01</sha256_hash><filter_type>0</filter_type><threat_name>Archbomb.ZIP trojan</threat_name></object><object><sha256_hash>541DF8E3BD1A55BCF3DC9839A0A1BBB7E7737EB7</sha256_hash><filter_type>0</filter_type><threat_name>Archbomb.ZIP trojan</threat_name></object><object><sha256_hash>12CF28C37E9BC65D67F30ED24154D1DE4503D7BD</sha256_hash><filter_type>0</filter_type><threat_name>Archbomb.ZIP trojan</threat_name></object><object><sha256_hash>54E65A7B23E3E5C3771C041BFA3198E877015925</sha256_hash><filter_type>0</filter_type><threat_name>Archbomb.ZIP trojan</threat_name></object><object><sha256_hash>C2AAB6A66924B29828C52E27AF9E8A8038E54EE0</sha256_hash><filter_type>0</filter_type><threat_name>yoda</threat_name></object></black_lis

v3.13.0 85
t><white_list></white_list></list>
omsFilter - remove
Syntax remove <sha256>
Description remove specific file from the lists
Version supportedSupported in Core version 3.12.3+
removefromblack
C:\Program Files (x86)\OPSWAT\Metadefender Core 4>omsFilterCLI.exe remove D7B0FD22C8741846EC35E43B224DED709A9A5E558BA6536F9CAC0BA5BB608658 File with hash of 'D7B0FD22C8741846EC35E43B224DED709A9A5E558BA6536F9CAC0BA5BB608658' successfully removedRestarting Metascan is required for changes to take effect
2.8. Advanced Configuration Options
CORS Configuration
You can harden the Metadefender Core's cross-origin resource sharing (CORS) configuration to only allow access from a restricted list of systems.
The following edits can be made in C:\Program Files (x86)\OPSWAT\Metadefender Core X\REST\Web\web.config.
To restrict access to the local system, the line
<add name="Access-Control-Allow-Origin" value="*"/>
can be changed to

v3.13.0 86
1.
2.
3.
4.
<add name="Access-Control-Allow-Origin" value="http://localhost"/>
Then add a new rule to <system.webServer><rewrite><outboundRules>
<rule name="Allow CORS on specify ip/subnet" > <match serverVariable="RESPONSE_Access-Control-Allow-Origin" pattern=".+" /> <conditions> <add input="{REMOTE_ADDR}" pattern="^(192.168.200.*|192.168.201.102)$" /> </conditions> <action type="Rewrite" value="*" /></rule>
Enabling HTTPS
By default, communication with the RESTful web server is not encrypted. By setting up an HTTPS server, the server can enforce secure connections between client and server on an SSL channel. Steps to configure IIS Express to host an HTTPS server are outlined in the sections below.
Requirements
To enable HTTPS, you must install a trusted certificate issued by a certificate authority OR a self-signed certificate used for development testing. The procedures detailed below cover how to install self-signed server certificate.
To install a CA (Certificate Authority) signed server certificate, go to Microsoft's TechNet website. If you enable HTTPS and are using a self-signed Install a Server Certificate
certificate, you MUST install the self-signed certificate.
Overview
The following high-level steps are covered on this page.
Obtain a certificate (we will use self-signed certificate in this documentation).
Install the certificate.
Configure IIS with HTTPs.
Restart Metadefender REST service.

v3.13.0 87
1.
2.
a.
1.
2.
3.
a.
b.
c.
1.
Generating a self-signed certificate
For Windows 8.1, Windows 2012 or newer
open Powershell as administrator
run New-SelfSignedCertificate -DnsName {DNS_NAME} -CertStoreLocation Cert:\LocalMachine\My\
replace {DNS_NAME} with the DNS name of your server
For Windows 7 or Windows 2008
Download Microsoft Windows SDK for Windows 7 and .NET Framework 4
You only need to install .NET Development → Tools
From an administrator command line navigate to the SDK install dir and run makecert.exe
cd "C:\Program Files\Microsoft SDKs\Windows\v7.1\Bin\x64\makecert.exe"
makecert.exe -n "CN={DNS_NAME}" -a sha256 -sr LocalMachine -ss MY -r
replace {DNS_NAME} with the DNS name of your server
Installing the certificate
Install Certificate from a command prompt run certutil -store MY

v3.13.0 88
1.
2.
1.
2.
3.
4.
1.
2.
3.
Copy the Cert Hash from the certificate that has Issuer: CN={DNS_NAME}. Edit the hash so that it does not have spaces (e.g., ef8a0fc5620b621a54fb367f1e7ee45e1ba6d006).
Create a new GUID at (e.g., https://www.guidgenerator.com/online-guid-generator.aspx{CDA52389-5954-44C2-8CF0-38062D1572F8}).
Open a command prompt.
Run the following command:
netsh http add sslcert ipport=0.0.0.0:443 appid={<guid retrieved from previous step>} certhash=<certificate thumbprint retrieved from previous step>
Confirm that the SSL Certificate is successfully added, as indicated by the example below.
Enabling HTTPS on IIS Express
The following procedure enables HTTPS on IIS Express.
Open the <Metadefender Core installation directory>\REST\Config folder (e.g., C:\Program Files (x86)\OPSWAT\Metadefender Core X\REST\Config).
Open the applicationhost.config file in a text editor.

v3.13.0 89
3.
a.
4.
5.
6.
Go to the <sites> tag and change metascan_rest website binding to HTTPS as shown in the example below. This port cannot be in use by any other application.
Original New
<bindings> <!--<binding protocol="http" bindingInformation="*:80:localhost" />--> <binding protocol="http" bindingInformation=":8008:"/></bindings>
<bindings> <!--<binding protocol="http" bindingInformation="*:80:localhost" />--> <binding protocol="https" bindingInformation=":443:"/> </bindings>
If you are also going to install Metadefender SFT on the same machine and will also be configuring this for HTTPS as well ( ), please make sure 4.6. Enable HTTPSto include a domain in bindingInformation in Step 3 above. For example: bindingInformation=":443:localhost"
Save and close the ‘applicationhost.config’ file.
Restart the service 'Metascan REST'.
Test that the site works by going to . The following webpage should be https://localhostdisplayed:

v3.13.0 90
7.
1.
2.
Click . Continue to this website
Enabling HTTPS for Quarantine
Perform these steps only if Metadfender Core has been configured to exclusively use HTTPS (Step 4 in section 'Enabling HTTPS on IIS Express').
Navigate to the Quarantine folder (by default, this is C:\Program Files (x86)\OPSWAT\Metadefender Core X\Metascan Quarantine).
Open Metadefender.Quarantine.Service.exe.config in a text editor and change the following section leaving the replace value with what is on the original. *DNS_or_IP*
Original New
<setting name="RestBaseUrl" serializeAs="String"> <value>http://*DNS_or_IP*:8000</value></setting><setting name="QuarantineBaseUrl" serializeAs="String"> <value>http://*DNS_or_IP*:8000</value></setting>
<setting name="RestBaseUrl" serializeAs="String"> <value>https://*DNS_or_IP*</value></setting><setting name="QuarantineBaseUrl" serializeAs="String"> <value>https://*DNS_or_IP*</value></setting>

v3.13.0 91
2.
3.
1.
2.
Original New
<setting name="QuarantineProtocol" serializeAs="String"> <value>REST</value></setting><setting name="MetascanUrl" serializeAs="String"> <value>http://*DNS_or_IP*:8008/metascan_rest/</value></setting><setting name="WebBaseUrl" serializeAs="String"> <value>http://*DNS_or_IP*:8008/management/#</value></setting>
<setting name="QuarantineProtocol" serializeAs="String"> <value>REST</value></setting><setting name="MetascanUrl" serializeAs="String"> <value>https://*DNS_or_IP*/metascan_rest/</value></setting><setting name="WebBaseUrl" serializeAs="String"> <value>https://*DNS_or_IP*/management/#</value></setting>
Restart the service 'Metadefender Quarantine'.
Enabling HTTPS for Mail Agents
Perform these steps only if:
Metadfender Core has been configured to exclusively use HTTPS (Step 4 in section 'Enabling HTTPS on IIS Express').
Mail Agent has been installed before switching to HTTPS. Any Mail Agent package downloaded from Metadefender Core after applying HTTPS will automatically have the correct configuration settings.
If you use a self-signed certificate and have deployed Mail Agent on other servers than the MD Core server, you must also complete steps 1-27 in the section 'Trusting local or remote self signed security certificate' on each Mail Agent server.
Navigate to the Metadefender Mail agent folder (by default, this is C:\Program Files (x86)\OPSWAT\Metadefender Mail Agent).

v3.13.0 92
2.
3.
4.
a.
b.
Open Metadefender.Email.Engine.Service.exe.config in a text editor and change the following section, replacing with your Mail Agent server's *DNS_or_IP_of_Mail_Agent*real DNS hostname or IP address and with your *DNS_or_IP_of_MD_Core*Metadefender Core server's real DNS hostname or IP address.
Original New
<setting name="RestBaseUrl" serializeAs="String"> <value>http://*DNS_or_IP_of_Mail_Agent*:8000</value></setting><setting name="QuarantineBaseUrl" serializeAs="String"> <value>http://*DNS_or_IP_of_MD_Core*:8000</value></setting><setting name="QuarantineProtocol" serializeAs="String"> <value>REST</value></setting><setting name="MetascanUrl" serializeAs="String"> <value>http://*DNS_or_IP_of_MD_Core*:8008/metascan_rest</value></setting>
<setting name="RestBaseUrl" serializeAs="String"> <value>https://*DNS_or_IP_of_Mail_Agent*</value></setting><setting name="QuarantineBaseUrl" serializeAs="String"> <value>https://*DNS_or_IP_of_MD_Core*</value></setting><setting name="QuarantineProtocol" serializeAs="String"> <value>REST</value></setting><setting name="MetascanUrl" serializeAs="String"> <value>https://*DNS_or_IP_of_MD_Core*/metascan_rest</value></setting>
Restart the service 'Metadefender Generic Mail Agent'.
If the Mail Agent is installed on an Exchange Server, complete the following steps:
Open Metadefender.Email.Engine.Exchange[version].dll.config in a text editor and change the 'RestBaseUrl' setting to the same as above (https://*DNS_or_IP_of_Mail_Agent*).Note: Modify the configuration file that corresponds to your Exchange Server version. For Exchange Server 2016, the 2013 file is used.
Restart the service 'Microsoft Exchange Transport'.

v3.13.0 93
1.
2.
3.
4.
Trusting local or remote self signed security certificate
If you use a self-signed certificate you must follow these steps for Metadfender to work as expected.
if you are using this guide on the local computer you should access and install the certificate from the DNS address (e.g. https://frosty7c/)
Open Internet Explorer and access the Metadefender Core dashboard (e.g. https://frosty7c/)
Click Continue to this website
Click certificate error
Click view certificates

v3.13.0 94
4.
5.
6.
7.
Click Install Certificate...
Select either Current User or Local Machine and click next
Select "Place all certificates in the following store" and click browse

v3.13.0 95
7.
8.
9.
10.
11.
12.
13.
Select "Trusted Root Certification Authorities" and Click OK
Select Next then select Finish
Restart your Internet Explorer and navigate to the same page again
You should now see a locked lock instead of certificate error
Run certmgr.msc
Select Trusted Root Certification Authority → Certificates

v3.13.0 96
13.
14.
15.
16.
17.
18.
19.
20.
Right click the DNS name → All Tasks → export
Click Next → Next →Browse
Choose anywhere to save the certificate and hit save
Click Next→finish
Run mmc
File → add/remove Snap-in
Select Certificates and click add

v3.13.0 97
20.
21.
22.
23.
24.
Select Computer account and hit next
Click finish then click ok
Select Trusted Root Certification Authority → Certificates

v3.13.0 98
24.
25.
26.
27.
Right click certificates → all tasks → Import
Click next
Select the file you created previously
Click next->next→finish
Engine Specific Configuration
Configuration specific to each built-in engine should be done via the configuration file: omsConfig.ini. This file is located in the directory where Metadefender Core is installed. The following table shows which configurations are available for each engine.
Important: The Metadefender Core service must be restarted to apply any changes.
Heuristic scan / extract archive
Some engines allow you to scan files using heuristics, which can detect viruses that are not yet in the engine’s virus definition database. Enabling heuristic scanning for engines increases detection of potential new viruses, but also increases the false positive rate.

v3.13.0 99
Note: Enabling heuristic scanning can also increase the engine's scan time.
Engine [CATEGORY] Configuration [ATTRIBUTE] Value
Ahnlab [ahnlab] Heuristic scan [heuristic_scan] 1: Enable
0: Disable
No entry: default levelArchive library [extract_archive]
AVG [avg] Heuristic scan [heuristic_scan]
Archive library [extract_archive]
Avira [avira] Heuristic scan [heuristic_scan]
Archive library [extract_archive]
Bitdefender [bitdefender] Archive library [extract_archive]
Clam AV [clamav] Heuristic scan [heuristic_scan]
Archive library [extract_archive]
Emsisoft [emsisoft] Heuristic scan [heuristic_scan]
Archive library [extract_archive]

v3.13.0 100
ESET [eset] Heuristic scan [heuristic_scan]
Archive library [extract_archive]
F-Prot [f-prot] Heuristic scan [heuristic_scan]
Archive library [extract_archive]
Ikarus [ikarus] Archive library [extract_archive]
K7 [k7] Heuristic scan [heuristic_scan]
Archive library [extract_archive]
Kaspersky [kaspersky] Heuristic scan [heuristic_scan]
Archive library [extract_archive]
McAfee [mcafee] Heuristic scan [heuristic_scan]
Archive library [extract_archive]
NANOAV [nanoav] Heuristic scan [heuristic_scan]
Archive library [extract_archive]
nProtect [nprotect] Heuristic scan [heuristic_scan]
Quick Heal [quickheal] Heuristic scan [heuristic_scan]
Archive library [extract_archive]
Sophos [sophos] Heuristic scan [heuristic_scan]
Archive library [extract_archive]
Vir.IT eXplorer [vir.itexplorer] Archive library [extract_archive]

v3.13.0 101
Engine [CATEGORY] Configuration [ATTRIBUTE] Value
Total Defense [totaldefense] Heuristic scan [heuristic_scan]
Archive library [extract_archive]
Zillya! [zillya!] Heuristic scan [heuristic_scan]
Archive library [extract_archive]
Import/Export from Command Line
Import/export configuration
You can import and export your Metadefender Core configuration using the omsConfig.exe command line utility. This can be useful for preserving configurations during an upgrade or when deploying multiple Metadefender Core installations with the same configuration.
Help
Syntax: help
This function prints the available command line options.
Import
Syntax: import <full file path> [<option>]
This command imports configurations from a file. All settings will take effect after a restart of the Metadefender Core services.
Export
Syntax: export <directory> [<option>]
This command exports current configurations to a file.
Options
The following argument can be used with the import and export commands.

v3.13.0 102
Option Description
/pass Password to encrypted & extract configuration.
Post Action Script
Using Post Action Script is not recommended. If you plan to use post action script, please contact OPSWAT Technical Support to see if there are different ways of achieving the same goal. For example, if you want to copy files after scan, use the Workflow - copy to directory feature instead.
Running scripts on clean/infected files
Creating a post action script provides the capability to handle simple or advanced application logic. Once a file is scanned by engines, the script will be executed on a file based on scan results.
XML format for post action script
<post_action> <scripts> <if type="[scan result]">[script]</if> … <if type="[scan result]">[script]</if> </scripts> <user_vars> <user_var name="[user variable]">[user variable string]</user_var> … <user_var name="[user variable]">[user variable string]</user_var> </user_vars></post_action>
Item Description Example
[script] Batch script supported by cmd.exe. For multiline scripts,use “&&”. (“&&” for xml)
DEL c:\eicar.com

v3.13.0 103
Item Description Example
[scan result]
Refer to asynchronous scan API in Software Developer Guide
for clean files,
0
[user variable]
Variables that you define data_folder
[user variable string]
Value for user variables C:\ data_folder_for_archiving
Pre-defined variables
Variables Description Note
%%%file_path%%% Absolute path to the file to be scanned.
This variable is supported only on local COM scans.
%%%threat_name%%%
Name of threats found by engines.
Applies only to infected(“1”) scan result.
%%%scan_finished%%%
The time when scan is finished.
Applying post action script
Property Name
post_action
Description XML-formatted scripts applied per scan result with support of pre-defined variables and user-defined variables.
CLI omsCmdLineUtil.exe config pa=<xml file path>
Management Console
On the Metadefender Core Management Console, use only the script in the text box, instead of the XML format for Post Action Script described in the above section.

v3.13.0 104
Property Name
post_action
Remark Any character that has special meaning to XML (e.g., &, <, >) must be escaped.
Example of post action script XML
Note: In the following examples, any variable surrounded with %%% that is not already defined in pre-defined variables, need to either be defined in your post action XML or replaced with the actual values you intend to use.
Moving clean file and infected files to different folder
<post_action> <scripts> <if type="0">move %%%file_path%%% c:\archive_data\clean</if> <if type="1">move %%%file_path%%% c:\archive_data\infected</if> </scripts></post_action>
Uploading infected file to ftp server
<post_action>

v3.13.0 105
1.
2.
<scripts> <if type="1">echo OPEN %%%server%%%> ftp.scr&&echo %%%username%%%>> ftp.scr&&echo %%%password%%%>> ftp.scr&&echo cd test_post_action>> ftp.scr&&echo put %%%file_path%%%>> ftp.scr&&echo CLOSE>> ftp.scr&&echo quit>> ftp.scr &&ftp -s:ftp.scr </if> </scripts> <user_vars> <user_var name="server">127.0.0.1</user_var> <user_var name="username">ftp_user</user_var> <user_var name="password">1234abcd</user_var> </user_vars> </post_action>
RAM Disk Configuration
Overview
You can configure the RAM Disk (or RAM Drive) from the Windows device property dialog box.
The RAM Disk turns a chunk of your system’s RAM into a disk drive. The RAM Disk is more secure than a fixed disk because the contents of the disk will be wiped clean on a system reboot. It provides speed optimization because the AV scanners being used do not have to fetch the data from a physical disk. The file is already stored in RAM.
Below are two use cases:
Temporary directory for extracting archive files before scanning
Set the temp_dir property of Metadefender Core to RAM Disk
As a temp directory for your application
You could use the RAM Disk if your application accepts files which are uploaded by your customers and you want to perform some temporary actions on that content before scanning.
RAM Disk as Temporary Directory
When you use the RAM Disk as a temporary directory, Metadefender Core uses this directory for the following purposes:
Extracting archive files (when “internal_archive_lib” is set to “1” (true))

v3.13.0 106
1.
2.
3.
Writing data to a file in this directory if using any of the Metadefender Core Buffer (stream) APIs
If the buffer is bigger than the available RAM Disk space, scan APIs will return Note:E_FAIL.
If the RAM Disk is used as the primary temp directory, the maximum extracted archive file size will be half the size of the RAM Disk for a single archive. If an archive exceeds that size, an error will be returned unless a secondary temp file is configured. If a secondary temp file is configured, then the archive will use it to extract the archive. The size of the secondary temp files is always half the available space on the drive.
Device Property
In order to change the RAM Disk properties, open the Device Manager using the following steps:
Go to and enter devmgmt.msc, and then press .Start > Run Return
Select the category.Ram Drive
Right-click on OPSWAT Secure RAM Disk and select .Properties

v3.13.0 107
1.
2.
REST Server Configuration
Enabling IIS Logging
By default, Internet Information Services (IIS) logging is disabled in the Metadefender Core REST server. In order to enable IIS logging, please follow these steps:
Go to the the REST\Config folder inside Metadefender Core's installation directory and open the applicationhost.config file. For example: C:\Program Files(x86)\OPSWAT\Metadefender Core X\REST\Config\applicationhost.config.

v3.13.0 108
2.
1.
2.
1.
2.
3.
Uncomment these 2 properties in the applicationhost.config file.
<! -- <add name="HttpLoggingModule" image="%IIS_BIN%\loghttp.dll" /> --><! -- <add name="HttpLoggingModule" lockItem="true" /> -->
Restart the Metadefender Core REST server using the following steps:
Using the Windows Control Panel:
Go to and click . (In Windows 10, open the Start > Administrative Tools ServicesControl Panel and click > and then double-System and Security Administrative Toolsclick .) Services
In the Services panel, right-click on Metascan REST Service and click . Start
Using the command line:
Open a command prompt.
To stop the service, execute the ‘net stop omsrest’ command.
To restart the service, execute the ‘net start omsrest’ command.
Load Balancing With Multiple Instance
When multiple instances of Metadefender Core are serving multiple clients with higher load than one Metadefender Core can handle, clients should make progress (file\<data_id>) on a specific server. Setting this value results in initial file upload response to provide rest_ip information so that the client can make follow up requests to this specific server. You can configure this in the Metascan registry key (HKEY_LOCAL_MACHINE\SOFTWARE \OPSWAT\Metascan on x86, HKEY_LOCAL_MACHINE\SOFTWARE\Wow6432Node\OPSWAT\Metascan on x64).
String value Value Description
rest_ip integer <IP address or URL> that client uses

v3.13.0 109
Storing File on the REST server
The server can be configured so that any data requested for scanning can be stored. This should be configured on the Metascan registry key (HKEY_LOCAL_MACHINE\SOFTWARE\OPSWAT\Metascan on x86, HKEY_LOCAL_MACHINE\SOFTWARE\Wow6432Node\OPSWAT\Metascan on x64). You must restart the Metadefender Core REST service after this key has been updated for the change to take effect.
String value Value Description
rest_filedb_type NONE or mongoDB
Set to mongoDB to enable storing files, the default is NONE. This key does not exist by default and must be created on the Metadefender Core system.
rest_store_file 0 or 1 Set to 1 to enable storing files, the default is 0.
Enabling storing files on the server side will consume disk space rapidly, depending on the load. Sufficient disk space must be apportioned according to the load. You can monitor disk space usage on the management console dashboard.
2.9. Non-Workflow Configuration (Deprecated)
Caching and ScanEx configurations are no longer recommended by OPSWAT, but may be used under certain circumstances. Please contact OPSWAT customer support (https://www.
) before using one of these methods.opswat.com/support#support-levels
There is no caching needed in the workflow API, because each process request is treated as new. There are a lot data processing in the workflow (e.g., file analyze, data sanitization, etc.). The workflow covers all ScanEx functions as well.
Caching
The caching configuration determines the size and behavior of the Metadefender Core scan result cache. The cache allows Metadefender Core to return results from a previous file scan with Metadefender Core if those scan results were cached and have not yet expired. Caching can only be configured through omsCmdLineUtil.exe.
The following settings apply if caching is enabled:

v3.13.0 110
1.
2.
3.
Property Description Default Value
CLI config
Enable Caching
This enables Metadefender Core's scan result caching. Disabled cs=<0|1>
Reset cache on engine update
Specifies whether the cache should be reset (and all cached results discarded) whenever there has been an engine definition update.
Disabled rc=<0|1>
Cache Expiration
Specifies how long (in hours) cached results remain available after a scan. After this time the cached results will be deleted.
72 hours kc=<time in seconds>
Maximum Cache Size
The maximum size of the cache in RAM. This is only the amount of space required to store the cached scan results, not the files themselves.
100 MB ms=<size in MB>
To manually reset the cache, do the following.
Stop the Metadefender Core service (net stop metascan).
Delete the cache database (<installation directory>\Data\omsCK_KN.db3).
Restart the Metadefender Core service (net start metascan).
ScanEx Configuration
This configuration is used when calling the Metadefender Core APIs that do not use the Metadefender Core workflows, and only scan files. This includes files scanned through Metadefender Core's ICAP interface, files scanned with Metascan Client, files scanned through the Java API, and the sample code provided on the OPSWAT Portal.
Archive handling
The archive handling configuration options determine how archives are handled.
If archive handling is enabled, Metadefender Core will extract archives and scan the individual files within the archive.

v3.13.0 111
Most common archive formats are supported, including 7z, XZ, BZIP2, GZIP, TAR, ZIP, WIM, ARJ, CAB, CHM, CPIO, CramFS, DEB, DMG, FAT, HFS, ISO, LZH, LZMA, MBR, MSI, NSIS, NTFS, RAR, RPM, SquashFS, UDF, VHD, WIM, XAR and Z. Metadefender Core can also extract self-extracting archives created by both 7zip and WinRAR.
The following settings apply if archive handling is enabled:
Property Description Default Value
CLI config Additional info
Enable Archive
This enables Metadefender Core's archive library handling.
Enabled le=<0|1>
Max Recursion Level
The maximum depth that Metadefender Core will continue to extract archives for scanning. Once this depth is reached, Metadefender Core will not extract further archives but will scan those archives as entire files. If this is set to 0, archives will not be extracted.
5 rl=<levels> Maximum value: 2147483646
Number of Files
The maximum number of files that can be in an archive that Metadefender Core is extracting. If the number of files in an archive exceeds this value, Metadefender Core will return the result as a potential threat.
50 an=<number> Maximum value: 2147483646
Total Size 2 GB

v3.13.0 112
Property Description Default Value
CLI config Additional info
The maximum total size of files that can be in an archive that Metadefender Core is extracting. If the total size of files in an archive exceeds this value, Metadefender Core will return the result as a potential threat.
as=<size in MB>
Maximum value:
Half the current available free space of the Metadefender Core temporary directory.
If two temporary directories are set from different drives, the highest available space will be used.
Simultaneous Specifies if multiple archive files undergo extraction concurrently. This may improve performance on a multi-core CPU, but means that the RAM-drive size should be increased (since more unpacked archives may reside on it at the same time).
Disabled ec=<0|1>
Self-Extracting
Specifies if self-extracting archives should be extracted and treated as archives
Disabled sx=<0|1>
Disabled soa=<0|1>

v3.13.0 113
Property Description Default Value
CLI config Additional info
Scan Original Un-extracted File
In addition to scanning files inside of an archive after extraction, un-extracted archives are sent directly to engines for scanning.
Note: If “extract_archive” for an engine is enabled, this potentially exposes performance overhead since extraction happens twice, once by Metadefender Core and once by the engine.
Note: DOCX and DOCM files can be detected as archive files. OPSWAT recommends that the option to scan the original un-extracted archive is enabled so that these files are properly scanned.
Post processing configuration
The Post Processing configuration allows an administrator to specify a script that should be executed for all allowed and/or blocked files. By clicking on ‘Run custom command line script’, a message can be put in place for both infected and clean files.
An administrator can also choose to delete or quarantine infected files.

v3.13.0 114
3. Data Sanitization (CDR)
What is Data Sanitization?
An increasingly popular and effective method of compromising computer security, especially as part of a targeted attack, involves sharing common document types or image files with victims. Even though the original versions of these files do not contain executable data, attackers have found ways to trigger these files to execute embedded malicious code. Popular techniques used to accomplish this include VBA macros, exploit payloads, and embedded Flash or JavaScript code. This type of attack has a high success rate because most users don’t expect common file types to contain infections. For high-risk files or scenarios, Data Sanitization, also known as Content Disarm & Reconstruction (CDR), prevents any possibility of malicious content (including zero-day threats) from executing. High-risk files can be sanitized through several different methods:
Removing hidden exploitable objects (scripts, macros, etc.)
Converting the file format
Supported File Types
Source File Type Target Sanitized Types
doc doc, pdf
xls xls, pdf
ppt ppt, pdf
rtf rtf
docx docx, txt, html, pdf, ps, jpg, bmp, png, tiff, svg
xlsx xlsx, csv, html, tiff, pdf, ps, jpg, bmp, png, svg
pptx pptx, pdf
htm/html html, pdf, ps, jpg, bmp, png, svg

v3.13.0 115
Source File Type Target Sanitized Types
pdf pdf, html, svg, jpg, bmp, png, tiff, txt
jpg jpg, bmp, png, tiff, svg, gif, ps, eps, pdf
bmp bmp, jpg, png, tiff, svg, gif, ps, eps, pdf
png png, jpg, bmp, tiff, svg, gif, ps, eps, pdf
tiff tiff, jpg, bmp, png, svg, gif, ps, eps
svg jpg, bmp, png, tiff, gif, ps, eps
gif jpg, bmp, png, tiff, svg, ps, eps, pdf
Single Output File or Multiple Output File
If target contains only one file, it will be not zipped and treat as single output file. For example, If a PDF file has only one page, converts to JPG will be JPG. If a PDF file has more than one page, there will be multiple JPG files and will result in a ZIP file. The following sanitization result in potentially multiple files (single ZIP file).
PDF->HTML
PDF->IMG
DOCX→HTML, IMG
XLSX->HTML, CSV, IMG
PPTX→HTML, IMG
Data Sanitization is only available on Windows OS.

v3.13.0 116
Data Sanitization Performance (speed)
Disclaimer: We do not guarantee same performance in your own environment. Performance can vary significantly depending on datasets and systems used when running the tests. The sole purpose of this section of the User Guide is to provide a high-level indicator of performance impact when enabling sanitization in your business logic.
System Info
RAM : 2GB
CPU: 2 core
OS: Windows Server 2008 x64
Harddisk: HDD
Resources
Dataset : 2000~5000 samples for each file type.
Metadefender Core version
v3.x: Metadefender Core v3.12.2.29144
v4.x: Metadefender Core v4.4.0.173-1
Configuration
Disabled multi-scanning
Test result
Sanitization Path AVG time (s) with Core v4.x AVG time (s) with Core v3.x
DOC->DOC 0.09 0.13
XLS->XLS 0.80 0.35
PPT->PPT 2.02 3.05
XLSX→XLSX 0.27 0.25

v3.13.0 117
Sanitization Path AVG time (s) with Core v4.x AVG time (s) with Core v3.x
DOCX→DOCX 0.11 0.22
PPTX→ PPTX 0.38 0.76
RTF->RTF 0.31 0.18
PDF->PDF 0.52 0.66
JPG->JPG 0.72 0.87
TIFF->TIFF 1.13 1.40
GIF->JPG 0.41 0.46
SVG->JPG 0.20 0.48
BMP->JPG 0.39 0.48
PNG->JPG 0.32 0.34
HTML->PDF 5.84 5.44
Preventing Unknown Threats
In this section, we describes the details how threats are being prevents with the details what hidden objects are being removed during sanitization. For same file type sanitization, this is customizable via configuration file which objects to be removed. For example, you can configure to remove macro while keeping hyperlinks. We have only documented subset of popular threats that sanitization can prevents.
file type
(supported) potential threats
configuration sample
doc OLE Objects
[X2X]remove_macro=1
embedded eicar
infected image
infected macro

v3.13.0 118
file type
(supported) potential threats
configuration sample
Crafted Embedded Multimedia
Macros
Embedded Objects
Script enabled ActiveX Controls
Crafted Images
Hyperlink
Chart
remove_embedded_object=1remove_hyperlink=1process_image=1
remove_macro will remove javascript and document open action
remove_embedded_object will remove all embedded objects in file
include: attachments, embedded files, activeX, ole object ...
CVE-2013-1331 crafted image
CVE-2012-0158 ActiveX control
xls infected embedded object
infected macro
ppt infected embedded object
infected image

v3.13.0 119
file type
(supported) potential threats
configuration sample
rtf Embedded object
Embedded html
No configuration embedded eicar
infected embedded html code
docx Macro
Embedded objects
OLE Objects
attachment
embedded binary file
script enabled ActiveX Controls
Chart (not support for xlsx)
Crafted Images
Hyperlink
Timing node (pptx only)
[X2X]remove_macro=1remove_embedded_object=1remove_hyperlink=1process_image=1
remove_macro will remove javascript and document open action
remove_embedded_object will remove all embedded objects in file included: attachments, embedded files, ...
infected macro
embedded eicar
infected active X control
infected image
xlsx embedded eicar
infected image
infected macro
pptx embedded_eicar
infected image
infected macro

v3.13.0 120
file type
(supported) potential threats
configuration sample
infected timing node
htm/html
Scripts
Forms
Frames
Comments
Images
Embedded Objects
Embedded Java applets
Href
[html2html]remove_script=1remove_object=1remove_applet=1remove_form=1remove_comment=1remove_iframe=1process_tags=2
process_tags has value: 0|1|2;0: do nothing;1: Ex1: Please click <a href="<script>....</script>">here</a> => Please click here ;Ex2: Please click <a href="https://www.opswat.com">https://www.opswat.com</a> => Please click https://www.opswat.com ;Ex3: Please click <a href="https://www.opswat.com">here</a> => Please click here (https://www.opswat.com);2: remove "href" attribute
iframe
form
comment
PDF Hyperlink
Actions/Java Script
Annotation
[pdf2pdf]remove_macro=1remove_embedded_object=1
infected javascript

v3.13.0 121
file type
(supported) potential threats
configuration sample
Attachments
Forms/Fields
Multimedia Objects
Images
Embedded font
process_image=1remove_embedded_font=0
remove_macro will remove javascript and document open action
remove_embedded_object will remove all embedded objects in pdf file included: attachments, embedded files, ...
remove_embedded_font will remove all embedded fonts in pdf file; if enable, it will break the Hebrew or Arabic (non-English) content
PDF.Exploit.CVE-2008-2992.A
CVE-2010-0188
eicar attachments
jpg Embedded malicious code
HTML
PHP
JAVA script
exploit codes
No configuration HTML code in JPG
PHP code in JPG2
Exploit in BMP
PHP code in PNG
CVE-2010-0188 in TIFF
HTML code in GIF
JAVA script in SVG
Buffer Overflow CVE-2004-0200
bmp
png
tiff
gif
svg

v3.13.0 122
file type
(supported) potential threats
configuration sample
The configuration is only available with Metadefender Core v3.x at this moment. For configuration change, it requires of restarting Metadefender service. You can locate the ini file under <Metadefender Core v3.x install directory>\omsDSConfig.ini

v3.13.0 123
1.
2.
3.
4.
5.
6.
4. Developer Guide
OPSWAT is committed to making the Metadefender Core API backward compatible to any older version of Metadefender Core. With the growing capabilities and features of Metadefender Core, it is necessary to add new APIs, new COM Connection Points, and new return types. When you upgrade your integration to Metadefender Core to a newer version, please keep the following factors in mind:
COM API integration in C/C++: By the design of COM, all Connection Points are required to be implemented in your application. Please check Metascan.idl for newly added Connection Points.
Beginning with Metascan 3.8.1, OPSWAT supports only using the JSON-based (v2) REST API and XML-based (v1) REST API is deprecated.
Building Custom Engines
You can develop your own custom engine integration. We provide documentation on how to do this as well as sample code in C & C#.
What you need to do
Install Metadefender Core 3.8.0 or newer.
Download the custom engine template package . This download includes the herefollowing templates:• Template for C custom engine (vc10)• Template for C# custom engine (vc10)
Obtain Metadefender Core custom engine handler (omsCEHandler.exe). This file is included in the template package's bin folder.
Implement the custom engine interface.
Build the custom engine library (DLL).
Deploy the custom engine library (DLL) with the Metadefender Core custom engine handler (omsCEHandler.exe).

v3.13.0 124
Installation and configuration
This section covers the configuration of Metadefender Core in order to load and use your custom engine. The following properties must be defined and configured in the omsConfig.ini, located in the Metadefender Core installation directory.
Section or attribute Value Description
[custom_engine_***] Replace *** with a unique identifier for your engine. (e.g., [custom_engine_myav] or [custom_engine_mycompany])
A unique section name to group the settings for your custom engine. This section must be unique and begin with “custom_engine”. If you do not name the section appropriately, Metadefender Core will not detect your custom engine.
custom_engine_dir Absolute path to the directory. Do not end this path with a trailing separator.
e.g., c:\my Custom Engine AV
The directory where your custom engine binaries reside. At a minimum, this includes omsCEHandler.exe and the C interface DLL.
custom_unique_id 4-10 characters starting with “ce” prefix
e.g., ce01
This is used for communication between Metadefender Core and the omsCEHandler processes. If you have multiple custom engines, this must be unique for each engine.
custom_dll_name Custom engine DLL name
e.g., sampleCustomEng.DLL
The sample custom engine project generates “sampleCustomEng.DLL” by default, but you can modify as you wish.
custom_engine_type Numerical value
0 – Indicates the engine is a scan engine
support_multithread Numerical Value.

v3.13.0 125
Section or attribute Value Description
0 – No
1 – YesYou must set this attribute to 0 if your custom engine is not thread-safe. If you are not sure, set to 0.
Example
The following is an example of the properties that need to be configured for the omsConfig.ini file.
custom_engine_myavcustom_engine_dir= c:\my Custom Engine AVcustom_dll_name=sampleCustomEng.dllcustom_engine_type=0support_multithread=0custom_unique_id=ce01
When uninstalling or upgrading Metadefender Core
Any configuration pertaining to the custom engines will not be preserved if you uninstall and reinstall Metadefender Core. You must backup and then restore the following changes after your installation or upgrade is complete:
omsConfig.ini (changes made pertaining to the custom engines)
Any custom engine directories located under the Metadefender Core installation folder
C# Custom Engine Template
Title/API Function
NReloadDatabase This method provides a way for Metadefender Core to explicitly reload the definition database of the engine, especially for a malware engine. During this call, any requests to scan should return ‘Not Scanned.’ If there is no specific step required for reloading the database, it should still return "0" to indicate that the engine is ready.
NGetDefinitionInfo This method is used to retrieve additional attributes about the definition files in use by the custom engine.

v3.13.0 126
1.
Title/API Function
NGetDefinitionTime This is used to retrieve the timestamp of the definition files currently in use by the custom engine. Memory is allocated by Metadefender Core.
NPerformUpdate This is called to initiate an update of the custom engine. This call should be a synchronous call and wait until the update completes.
NScan This is the main function of the custom engine. The scan result returned from this function call is used by Metadefender Core's scan-related API.
NGetProductName This method provides the name of the custom engine. Metadefender Core uses this for display purposes.
NDeinitCE This is called when Metadefender Core is shut down. Any resources acquired by your engine will be released and any unsaved data will be stored.
NInitCE This is the first method called. It allows you to initialize your engine. Metadefender Core will recognize your engine only if this method returns successfully (returns "0").
Additional steps for VB/C# custom engine
Place C wrapper DLL (Dynamic Link Library) with the custom engine DLLs.
If you compile the VB sample solution or C# solution, you get 2 DLLs, one for the cwrapper provided by OPSWAT and the other for your custom engine.
NDeinitCE
API NDeinitCE
Function This is called when Metadefender Core is shut down. Any resources acquired by your engine will be released and any unsaved data will be stored.

v3.13.0 127
Function prototype
int NDeinitCE()
Arguments
No arguments are required for this function.
NGetDefinitionInfo
API NGetDefinitionInfo
Function This method is used to retrieve additional attributes about the definition files in use by the custom engine.
Function prototype
int NGetDefinitionTime( ref string reserved, ref string defVer, ref string defSig, ref string engVer,)
Arguments
Argument Description
defVer Definition version you would like to report. Metadefender Core does not use this information for any logic. It is used only for display purposes.
defSig Definition signature count you would like to report. Metadefender Core does not use this information for any logic. It is used only for display purposes.

v3.13.0 128
Argument Description
engVer Engine version you would like to report. Metadefender does not use this information for any logic. It is used only for display purposes.
reserved Reserved for future use.
Return value
Value Description
0 Information successfully retrieved.
1 Information unavailable.
NGetDefinitionTime
API NGetDefinitionTime
Function This is used to retrieve the timestamp of the definition files currently in use by the custom engine. Memory is allocated by Metadefender Core.
Function prototype
int NGetDefinitionTime( ref int defYear, ref int defMon, ref int defDay, ref int defHour, ref int defMin, )

v3.13.0 129
Arguments
Argument Description
defYear Year portion of definition time.
defMon Month portion of definition time.
defDay Day portion of definition time.
defHour Hour portion of definition time.
defMin Minute portion of definition time.
Return value
Value Description
0 Information successfully retrieved.
1 Information unavailable.
NGetProductName
API NGetProductName
Function This method provides the name of the custom engine. Metadefender Core uses this for display purposes.
Function prototype
int GetProductName(ref string productName)
Arguments

v3.13.0 130
Arguments
Argument Description
productName The name of the custom engine.
Return value
Value Description
0 To indicate that the product name is successfully returned.
Other value Not supported. Reserved for future usage.
NInitCE
API NInitCE
Function This is the first method called. It allows you to initialize your engine. Metadefender Core will recognize your engine only if this method returns successfully (returns "0").
Function prototype
public int NInitCE()
Arguments
No argument.
Return value
Value Description
0 To indicate that the engine initialized correctly.

v3.13.0 131
Value Description
1 To indicate initialization failed and the engine should not be used.
NPerformUpdate
API NPerformUpdate
Function This is called to initiate an update of the custom engine. This call should be a synchronous call and wait until the update completes.
Function prototype
int PerformUpdate()
Return value
Value Description
0 Update completed successfully.
1 Failed to start or finish updating.
2 Engine is already up to date.
3 Failed to update due to network problem.
4 Engine is already updating.
5 Failed downloading update.
6 Failed reloading database.

v3.13.0 132
NReloadDatabase
API NReloadDatabase
Function This method provides a way for Metadefender Core to explicitly reload the definition database of the engine, especially for a malware engine. During this call, any requests to scan should return ‘Not Scanned.’ If there is no specific step required for reloading the database, it should still return "0" to indicate that the engine is ready.
Function prototype
int ReloadDatabase(ref string srcDir,)
Arguments
Argument Description
srcDir If specified, path to the folder where new definition files are placed.
Return value
Value Description
0 Database is successfully reloaded or nothing needs to be done to reload database.
1 Fail to reload database (same result as fail to init).

v3.13.0 133
NScan
API NScan
Function This is the main function of the custom engine. The scan result returned from this function call is used by Metadefender Core's scan-related API.
Function prototype
int NScan( int reserved, string filepath, ref int scanResult, ref string threatName,)
Arguments
Argument Description
reserved Reserved for future.
filepath Path to the file needed to scan.
scanResult Scan result to be returned.
0: clean
2: suspicious
1: found threat
3: failed to scan
10: not scanned (during update)
threatName Threat name to be returned.

v3.13.0 134
Return value
Value Description
0 Scan completed successfully.
1 Failed to start or finish scanning.
Custom Engine C Interface
Interface
API Function
FreeString This is called to free allocated memory for wchar **. Metadefender Core calls this after Metadefender Core is finished with the values allocated by your functionality.
GetDefinitionInfo This method is used to retrieve additional attributes about the definition files in use by the custom engine.
GetDefinitionTime This is used to retrieve the timestamp of the definition files currently in use by the custom engine. Memory is allocated by Metadefender Core.
GetEngineProperty This method is used to get engine properties such as extract archive, heuristic.
GetExpirationDate This method is used to retrieve the expiration date of engine.
GetProductName This method provides the name of the custom engine. Metadefender Core uses this for display purposes.
InitCE This is the first method called. It allows you to initialize your engine. Metadefender Core recognizes your engine only if this method returns successfully (returns 0).
PerformUpdate

v3.13.0 135
API Function
This is called in order to initiate an update of the custom engine. The call is synchronous and waits until the update completes.
ReloadConfig This is used to reload any or all specific engine configurations. If there is no specific engine configuration that needs to be reloaded, this function returns "0" without any re-initialization of engines.
ReloadDatabase This method provides a way for Metadefender Core to explicitly reload the definition database of the engine, especially for a malware engine. During this call, any requests to scan return "Not Scanned." If there is no specific step required for reloading the database, it still returns "0" to indicate that the engine is ready.
Scan File This is the main function of the custom engine. The scan result returned from this function call is used by Metadefender Core’s scan-related API.
SetEngineProperty This method is used to set engine properties such as extract archive and heuristic.
DeinitCE
API DeinitCE
Function This is called when Metadefender Core is shut down. Any resources acquired by your engine are released and any unsaved data is stored.
Function prototype
int DeinitCE ()
Arguments
No arguments are required for this function.

v3.13.0 136
Return value
Value Description
0 Indicates that the engine deinitialized correctly.
1 Indicates that deinitialization has failed.
FreeString
API FreeString
Function This is called to free allocated memory for wchar **. Metadefender Core calls this after Metadefender Core is finished with the values allocated by your functionality.
Function prototype
void FreeString ( wchar ** stringToFree)
Arguments
Argument Description Other
stringToFree Double pointer to wchar
Must be deallocated in the same way that memory is allocated.

v3.13.0 137
GetDefinitionInfo
API GetDefinitionInfo
Function This method is used to retrieve additional attributes about the definition files in use by the custom engine.
Function prototype
int GetDefinitionTime( wchar_t** reserved, wchar_t** defVer, wchar_t** defSig, wchar_t** engVer, void** reserved2)
Arguments
Argument Description Other
defVer Definition version you would like to report. Metadefender Core does not use this information for any logic. It is used only for display purposes.
Implementer must allocate the memory required.
defSig Definition signature count you would like to report. does not information for any Metadefender Core use this
logic. It is used only for display purposes.
Implementer must allocate the memory required.
engVer Engine version you would like to report. Metadefender Core does not information for any logic. It is used only for use this display purposes.
Implementer must allocate the memory required.
reserved,
reserved2
Reserved for future use.

v3.13.0 138
Important: defVer, defSig, engVer are double pointers to wchar_t or NULL. They must be allocated by the custom engine in a way that can be deallocated by the FreeString function unless NULL pointer is passed.
Return value
Value Description
0 Information successfully retrieved.
1 Information unavailable.
GetDefinitionTime
API GetDefinitionTime
Function This is used to retrieve the timestamp of the definition files currently in use by the custom engine. Memory is allocated by Metadefender Core.
Function prototype
int GetDefinitionTime( int * defYear, int * defMon, int * defDay, int * defHour, int * defMin, void** reserved)
Arguments
Argument Description
defYear Year portion of definition time
defMon Month portion of definition time

v3.13.0 139
Argument Description
defDay Day portion of definition time
defHour Hour portion of definition time
defMin Minute portion of definition time
Return value
Value Description
0 Information successfully retrieved.
1 Information unavailable.
GetExpirationDate
API GetExpirationDate
Function This method is used to retrieve the expiration date of engine.
Function prototype
int GetExpirationDate( int *licYear, int *licMon, int *licDay, void** reserved)
Arguments
Argument Description
licYear Year portion of license time.

v3.13.0 140
Argument Description
licMon Month portion of license time.
licDay Day portion of license time.
reserved Reserved for future use.
Return value
Value Description
0 Information successfully retrieved.
1 Information unavailable.
GetProductName
API GetProductName
Function This method provides the name of the custom engine. Metadefender Core uses this for display purposes.
Function prototype
int GetProductName( wchar_t ** productName void ** reserved)
Arguments
Argument Description Other
productName The name of the custom engine
Implementer must allocate the memory required.

v3.13.0 141
reserved Reserved for future use
Return value
Value Description
0 To indicate that product name is successfully returned.
Other value Not supported. Reserved for future use.
InitCE
API InitCE
Function This is the first method called. It allows you to initialize your engine. Metadefender Core recognizes your engine only if this method returns successfully (returns 0).
Function prototype
int InitCE ( void **reserved)
Arguments
Argument Description
reserved Reserved for future usage

v3.13.0 142
Return value
Value Description
0 To indicate that the engine initialized correctly.
1 To indicate initialization failed and the engine should not be used.
PerformUpdate
API PerformUpdate
Function This is called in order to initiate an update of the custom engine. The call is synchronous and waits until the update completes.
Function prototype
int PerformUpdate( void ** reserved)
Arguments
Argument Description
reserved Reserved for future use.
Return value
Value Description
0 Update completed successfully.
1 Failed to start or finish updating.

v3.13.0 143
Value Description
2 Engine is already up to date.
3 Failed to update due to network problem.
4 Engine is already updating.
5 Failed downloading update.
6 Failed reloading database.
ReloadConfig
API ReloadConfig
Function This is used to reload any or all specific engine configurations. If there is no specific engine configuration that needs to be reloaded, this function returns "0" without any re-initialization of engines.
Function prototype
int ReloadConfig( const wchar_t * reservedI, void** reservedIO)
Arguments
Argument Description
reservedI, OreservedI Reserved for future use

v3.13.0 144
Return value
Value Description
0 Successfully reloaded configuration.
1 Failed to reload configuration.
ReloadDatabase
API ReloadDatabase
Function This method provides a way for Metadefender Core to explicitly reload the definition database of the engine, especially for a malware engine. During this call, any requests to scan return "Not Scanned." If there is no specific step required for reloading the database, it still returns "0" to indicate that the engine is ready.
Function prototype
int ReloadDatabase( const wchar_t * srcDir, void ** reserved)
Arguments
Argument Description
srcDir If specified, path to the folder where new definition files are placed.
reserved Reserved for future use.
Important: If srcDir is used, the folder and its contents must be consumed and deleted by engine.

v3.13.0 145
Return value
Value Description
0 Database is successfully reloaded or nothing needs to be done to reload the database.
1 Failed to reload database (same result as fail to init).
Scan File
API Scan
Function This is the main function of the custom engine. The scan result returned from this function call is used by Metadefender Core’s scan-related API.
Function prototype
int Scan( int dataType, const void * data, int * scanResult, wchar_t ** threatName, void ** reserved)
Arguments
Argument Description
dataType 0: if data is a file path string (wide characters)
Other dataType values are not supported with 3.2.5
data When dataType indicates a file path, you must cast to a const wchar_t pointer.
e.g.,
wstring filePathToScan = (const wchar_t *)data;

v3.13.0 146
Argument Description
scanResult Scan result to be returned:
0: clean
1: found threat
2: suspicious
3: failed to scan
10: not scanned (during update)
threatName Threat name to be returned.
reserved Reserved for future.
Important: threatName is a double pointer to wchar_t. It must be allocated by the custom engine in a way that can be deallocated by the FreeString function.
Return value
Value Description
0 Scan completed successfully.
1 Failed to start or finish scanning.
COM Interface
The Metadefender Core COM server externalizes COM (Microsoft’s Component Object Model) interfaces. The interfaces are all based on the IDispatch automation interface making integration possible from many scripting languages.
When the Metadefender Core Server starts (this happens when you log in or upon the first invocation of the server from a client), it starts updating all the supported antivirus engines on the system. The server repeats the update process at configurable intervals.
Before any method is called, a client instance must be initialized by calling Init or InitEx (deprecated). For APIs via callbacks, please refer to .COM Connection Points

v3.13.0 147
Title Note Method Description
Stop ongoing scan (COM)
StopScan This method purges all scan requests and ongoing scans. Method returns only when all requests are purged.
Sanitize a file (COM)
ConvertFileType This method converts the specified input file into a different format.
Analyze file type III (COM)
AnalyzeEx This method is an extensible file type analysis API that allows the user to set various analyze file type options that can be configured for each file type analysis request. It can be used as a wrapper of the other file type analysis APIs. It also supports specifying custom ticket ID and session ID to associate file type analysis and scan.
Analyze file type II (COM)
AnalyzeFileTypeEx2 This method analyzes a file (or buffer) and attempts to guess its type, detects files of which the file extensions may have been altered, and recursively analyzes contents of archive files.
Get an engine info (COM)
GetUpdateStatusEx This method returns information about the virus definition files of the requested product.
Set a property value (COM)
SetProperty Modify one of Metadefender Core's internal properties.
GetProperty

v3.13.0 148
Title Note Method Description
Get a property value (COM)
Reads one of the internal properties.
Update an anti-malware engine (COM)
UpdateEngine This method is called to initiate an update of a specific anti-malware engine on the local machine.
Update anti-malware engines (COM)
UpdateAntiViruses This method is called to initiate an update of all anti-malware engines at the same time on the local machine. It is recommended to perform updates via automatic periodic update, which is performed at predetermined intervals as configured in “Update Interval” property.
Scan a file (COM)
ScanEx This method is an extensible scan API which allows the setting of various scan options that can be configured for each scan request.
Process a file (COM)
Process This method processes a file through a workflow based on the specified user agent.
Initialize (COM)
Init This method is called to initialize the connection to the Metadefender Core service. This method needs to be called before any other method can be called.

v3.13.0 149
Title Note Method Description
Callback for Processing a File (COM)
Connection Points
OnProcess This callback is fired after each Process method when a pre-defined event is found.
Callback For Archive File Info (COM)
Connection Points
OnFileInArchiveInfoAvailable This callback method is invoked when Metadefender Core's archive library is enabled and a file from within an archive is analyzed (not a scan result). This callback can be used to obtain more discrete information of a file contained within an archive.
Callback For Scan Started Report (COM)
Connection Points
ScanStartReport This callback method is invoked when each engine begins the scan. It is used when a scan request begins. This callback is fired on if “report_on_scan_start” is set to “1” (true).
Callback For Update Completion (COM)
Connection Points
MyOnUpdateComplete This callback method is invoked when an update completes. It is fired to all Metadefender Core client objects that are registered to this connection point. However, if there is already an update request that has not completed, only the Metadefender Core client that requested the update will get a callback with the update result of “updateAlreadyRequested(2)”.
Connection Points
MyOnUpdateProgressReport

v3.13.0 150
Title Note Method Description
Callback For Update Progress Report (COM)
This callback method is invoked when an update for each engine completes. It is fired to the Metadefender Core client object that initiates the update.
Callback For Additional Scan Progress Report (COM)
Connection Points
MyScanProgressReport This callback method is invoked when each engine completes the scan. The callback can be used for a scan progress report when more than one engine is used. If an engine is not used for any reason such as encrypted archive or scan request on a known file inside the folder, no progress report will be fired for the specific file.
Callback For Scan Progress Report (COM)
Connection Points
MyScanProgressReport This method is called to initialize the connection to the Metadefender Core service. This method needs to be called before any other method can be called.
Callback for Scan Completion (COM)
Connection Points
MyOnScanComplete This connection point is fired whenever a scan is completed. This event is not global, but is specific to the client that makes this scan request. In other words, when scanning is requested by a client, other client objects will not get a callback when the scanning is completed.
deprecated UnsubscribeGlobalEvents

v3.13.0 151
Title Note Method Description
Unsubscribe from global events (deprecated)
This method is called to unsubscribe to specific or all events. If you subscribe to a specific type of event, you must unsubscribe to that type of event. For example, if you subscribe to scan event type and update event type, you must unsubscribe to both scan event type and update event type. Calling to unsubscribe to events to which you are not subscribed has no effect.
Subscribe to global events (deprecated)
deprecated SubscribeGlobalEvents If you want to receive global callbacks such as OnLogAvailable, you must subscribe to global events with an appropriate event type through this call. If you subscribe to a specific type of event, you must unsubscribe to that type of event. For example, if you subscribe to a scan event type and update event type, you must both unsubscribe to the scan event type and update the event type.
Analyze file type (deprecated)
deprecated AnalyzeFileType This method analyzes the contents of a file and attempts to guess its type.
Get updated virus definition files (deprecated)
deprecated GetUpdateStatus This method returns information about the virus definition files of the requested product.

v3.13.0 152
Title Note Method Description
Put in scan-and-clean queue (deprecated)
deprecated PutToScanAndCleanQueue This method places a file to the scan-and-clean queue. In other words, the scan request will be processed asynchronously.
Put in scan queue (deprecated)
deprecated PutToScanQueue This method is called to place a file to the scan-queue. In other words, the scan request will be processed asynchronously.
Scan and clean file (deprecated)
deprecated ScanAndClean This method is called to scan and clean a file. This is done in a synchronous (blocking) fashion - the method returns only after the scan is complete.
Scan file (deprecated)
deprecated Scan This method is called to scan a file or a memory buffer. This is done in a synchronous (blocking) fashion - the method returns only after the scan is complete.
Initialize object (deprecated)
deprecated InitEx This method can still be used for the purpose of initializing an instance of a Metadefender Core object. However, with more flexible and extensive DB controller, the ability to have its own log writer per instance is disabled.

v3.13.0 153
Important Return Type
Scan outcome Return Type
Return value
Description Note
0 No threat found
No threat detection or the file is empty.
1 Infected/Known
Threat is found.
2 Suspicious Classified as possible threat but not identified as specific threat.
3 Failed To Scan
Scanning is not fully performed (For example, invalid file or no read permission). If no engine is included and scan is enabled, this will be the final result.
4 Cleaned Threat is found and file is cleaned (repaired or deleted).
5 Unknown Unknown scan result.
6 Quarantined File is quarantined.
7 Skipped Clean
Scan is skipped because this file type is in whitelist.
8 Skipped Dirty
Scan is skipped because this file type is in blacklist.
9 Exceeded Archive Depth
Threat is not found, but there are more archive levels that were not extracted. This is affected by the Metadefender Core property,‘internal_archive_recursive_level’.
10 Not Scanned
Scan is skipped by the engine, either due to update or other engine specific reason. If scan is disabled, this is the final result.
11 Aborted All ongoing scans are purged by StopScan API call.

v3.13.0 154
12 Encrypted File/buffer is not scanned because the file type is detected as encrypted (password-protected). If the Internal Archive Library is ON,
return type is going to be returned through encrypted notMetadefender Core scan progress callbacks because the engines do not perform any scan operations. If the Internal Archive Library is OFF, Metadefender Core passes the files to the engines encrypteddirectly, bypassing the detection.
13 Exceeded Archive Size
The extracted archive is larger than set in the maximum file size for archive. (For more details, refer to “archive_lib_max_size” properties in the topic.)Config
14 Exceeded Archive File Number
There are more files in the archive than set in the maximum number of files extracted. (For more details, refer to “archive_lib_max_num_files” properties in the Config topic.)
15 Password Protected Document
Only workflow has this result.
Others
Return Type Values API/Connection points which use this return type
ThreatList A threat list found on the scanned object, otherwise null (Threat name should NOT be used in a way that affects the application logic. For example, a threat name can be an empty string )
Scan
ScanEx
ScanAndClean
PutToScanQueue
PutToScanAndCleanQueue
FileTypeShort “E” – Executable (EXE, DLL, …)

v3.13.0 155
Return Type Values API/Connection points which use this return type
“D” – Document (MS Office word document, MS Office excel sheet)
“A” – Archive (Zip, Rar, Tar, …)
“G” – Graphical format (Jpeg, GIF, TIFF, BMP, …)
“F” – Folder
“Y” – Logical drive
“I” – Disk image
“T” – Text
“P” – PDF format
“M” – audio or video format
“Z” – mail messages (MSG, …)
“O” – Other (anything that is not recognized as one of the above)
Note: An ISO is treated as an archive file type (type “A”) and not as a disk image (type “I”).
COM Connection Points
The Metadefender Core server provides callback methods by allowing client objects to register connection points. In order to use Metadefender Core API in C/C++ development, all connection points must be implemented. For other languages such as C# or , only ASP.net desired methods can be implemented.

v3.13.0 156
Callback For Additional Scan Progress Report (COM)
Method MyScanProgressReport
Description This callback method is invoked when each engine completes the scan. The callback can be used for a scan progress report when more than one engine is used. If an engine is not used for any reason such as encrypted archive or scan request on a known file inside the folder, no progress report will be fired for the specific file.
Note Connection Points
Function prototype
void MyScanProgressReport( VARIANT ticket, VARIANT result, VARIANT threatList, VARIANT productName, VARIANT scanStartTime VARIANT scanEndTime VARIANT filePath)
Arguments
Argument Description Data Type
ticket The ticket which is generated when this scan has been requested.
UINT32
result A UINT32 value that specifies the scan outcome. UINT32
threatList An array of strings(String []). Each string element in the array is the name of the virus which has been detected.
Array of strings

v3.13.0 157
Argument Description Data Type
productName The description of the product. string
scanStartTime The time when the scan is started. date
scanEndTime The time when the scan is finished. date
filePath The path to the file which is scanned. string
Callback For Archive File Info (COM)
Method OnFileInArchiveInfoAvailable
Description This callback method is invoked when Metadefender Core's archive library is enabled and a file from within an archive is analyzed (not a scan result). This callback can be used to obtain more discrete information of a file contained within an archive.
Note Connection Points
Function prototype
void OnFileInArchiveInfoAvailable( VARIANT SessionID, VARIANT Ticket, VARIANT FileName, VARIANT MD5, VARIANT SHA1, VARIANT SHA256, VARIANT FileSize, VARIANT FileTypeDesc, VARIANT Reserved)

v3.13.0 158
Arguments
Argument Description Data Type
SessionID Reserved for future use.
Ticket The ticket that is generated when this scan has been requested. UINT 32
FileName The name of the file contained in the archive with the file path of the root archive preceding it.
string
MD5 MD5 signature of the file. string
SHA1 SHA1 signature of the file. string
SHA256 SHA256 signature of the file. string
FileSize Reserved for future use.
FileTypeDesc Reserved for future use.
Reserved Reserved for future use.
Callback for Processing a File (COM)
Method OnProcess
Description This callback is fired after each Process method when a pre-defined event is found.
Note Connection Points

v3.13.0 159
Function prototype
void OnProcess( [out] VARIANT *OutDetail, [out, retval] VARIANT *OutArgsArray)
Arguments
Argument Description Data Type
OutDetail The details from this event. The JSON schema depends on the callback type. See ‘‘callback types’’ for more details.
string
OutArgsArray 0: CallBackType: Since OnProcess is a general callback that is fired for different events, this specifies the event type. See the callback types for details of the type.
1: Ticket: The ticket returned from the Process API. For example 974989300.
2: The final result of processing the specified file through a workflow
1 = The file was allowed. JSON equivalent is "Allowed"
2 = The file was blocked. JSON equivalent is "Blocked"
3 = The file is currently being processed. JSON equivalent is "Processing"
Safearray of variants with the following order
0: UINT32
1: string
2: UINT32
Callback types
Callback Type
Description and example
2

v3.13.0 160
Callback Type
Description and example
This callback method is invoked whenever each engine completes the scan. This callback can be used for a progress report of scanning when more than one engine is used. If engines are not used for any reason such as encrypted archive or scan request on a known file, no progress report is fired.
Example
{ "type": "ScanProgressReport", "ticket": 974989300, "scan_result": "1", "threat_list": [ "eicar", "eicar" ], "product_name": "Clamwin Scan Engine", "scan_start_time": "6/5/2014 2:32 PM", "scan_end_time": "6/5/2014 2:32 PM", "scan_time_(ms)": "1", "file_path": "C:\\some\\file.txt", "process_result": "Processing"}
4 This connection point is fired whenever a scan is completed. This event is not global but specific to the client that makes this scan request. In other words, when scanning is requested by a client, other client objects will not get a callback when the scanning is completed.
Example
{ "type": "OnScanComplete", "ticket": 974989300,

v3.13.0 161
Callback Type
Description and example
"scan_result": "1", "threat_list": [ "eicar", "eicar" ], "scan_start_time": "6/5/2014 2:32 PM", "scan_end_time": "6/5/2014 2:32 PM", "scan_time_(ms)": "2", "file_path": "C:\\some\\file.txt", "process_result": "Processing"}
7 This callback method is invoked when Process' archive handling is enabled and an archive was successfully extracted.
This callback can be used to determine if a processed file is an archive.
Example
{ "type": "ArchiveFileInfo", "ticket": 783676241, "file_path": "2files_dirty.zip", "process_result": "Processing"}
8 This is fired after a file has been fully processed through each stage of a workflow.
If Data Sanitization (DS) is enabled and copy/move is disabled, the sanitized file will appear next to the original file.
If DS and copy/move are enabled, the sanitized filename will be reported in "post_processing.copy/move_destination"

v3.13.0 162
Callback Type
Description and example
Collisions are handled by incrementing the file name: file_name.txt , file_name_1.txt , file_name_2.txt , ..
Possible Blocked ReasonsFailed to start the processing job: "Process Failed"
Mismatch detected: "Mismatch"
File type disallowed: "Filtered"
Scan Result: "Known | ("Dirty" or "Infected") | Suspicious |Failed | Cleaned | Unknown |("Skipped Dirty" or "Skipped Infected") | Not Scanned |Aborted | Password Protected Document"
Archive: "Encrypted Archive | Missing File During Extraction |Insufficient Space For Archive Extraction |Exceeded Archive Size | Exceeded Archive File Number |Archive Extraction Error | Exceeded Archive Depth |Archive Error"
Post Action: "Sanitization Failed"(Copy or Quarantine failure will not cause blocked result)
Possible Process Results"Allowed": the file is allowed
"Blocked": the file is blocked
"Processing": the file is currently being processed
Possible Action Ran ResultsSanitized
Copied
Moved
Quarantined

v3.13.0 163
Callback Type
Description and example
Deleted
Ran Script
*Copied and Moved will never exist together*Quarantined and Deleted will never exist together*(Copied/Moved) and (Quarantined/Deleted) will never exist together
JSON Key Explanation Info
scan_all_result_i Final consolidated scan result
Normally, for single files, these values can be retrieved from the OnScanComplete type callback.However, for a final consolidated archive scan result (e.g. the scan result for each file in an archive is consolidated to represent the final archive scan result), these values can be useful.
scan_all_result_a String description of the final scan result
Example
{ "type": "ProcessComplete", "ticket": "974989300", "process_result": "Allowed", "file_path": "C:\\some\\file.txt", "user_agent": "metascan_rest", "profile": "Default", "file_type_skipped_scan": false, "blocked_reason": "", "scan_all_result_i": "0", "scan_all_result_a": "No Threat Detected"}
If Post Processing/File Handling is ran:
Example

v3.13.0 164
Callback Type
Description and example
{ "type": "ProcessComplete", "ticket": "974989300", "process_result": "Allowed", "file_path": "C:\\some\\toConvert.docx", "user_agent": "metascan_rest", "profile": "Default", "file_type_skipped_scan": false, "blocked_reason": "", "scan_all_result_i": "0", "scan_all_result_a": "No Threat Detected", "post_processing": { "actions_ran": "Sanitized | Quarantined | Moved", "actions_failed": "Delete Failed", "converted_to": "pdf", "copy_destination": "C:\\toConvert.pdf" }}
9 This callback is fired for AnalyzeFileType. It will be fired for a single file as well as for individual files within an archive.
For a single file it will be a fully qualified path, such as: "C:\\level1\\file.txt"For a file inside an archive it will be prefixed with \\, such as: "\\level1\\file.txt"
Example
{ "type": "FileTypeAnalyze", "ticket": "974989300", "file_path": "C:\\some\\toConvert.docx", "file_size": 5134, "file_type_category" : "E", "file_type_description" : "Win64 Executable", "file_type_extension" : "EXE/DLL", "md5": "20A2DFB5...", "sha1": "6D5052F...", "sha256": "4A7C7...", "process_result": "Processing"}

v3.13.0 165
Callback for Scan Completion (COM)
Method MyOnScanComplete
Description This connection point is fired whenever a scan is completed. This event is not global, but is specific to the client that makes this scan request. In other words, when scanning is requested by a client, other client objects will not get a callback when the scanning is completed.
Note Connection Points
Function prototype
void MyOnScanComplete( VARIANT ticket, VARIANT * result, VARIANT * threatList, VARIANT * scanStartTime VARIANT * scanEndTime)
Arguments
Argument Description Data Type
ticket The ticket that is generated when this scan has been requested. UINT32
result A UINT32 value that specifies the scan outcome. UINT32
threatList An array of strings (String []). Each string element in the array is the name of the virus which has been detected.
Array of strings
scanStartTime The time when the scan is started. Date

v3.13.0 166
Argument Description Data Type
scanEndTime The time when the scan is finished. Date
Callback For Scan Progress Report (COM)
Method MyScanProgressReport
Description This method is called to initialize the connection to the Metadefender Core service. This method needs to be called before any other method can be called.
Note Connection Points
Function prototype
void MyScanProgressReport( VARIANT ticket, VARIANT result, VARIANT threatList, VARIANT productName, VARIANT productNum, VARIANT totalNumberOfProducts, VARIANT scanStartTime VARIANT scanEndTime)
Arguments
Argument Description Data Type
ticket The ticket that is generated when this scan has been requested.
UINT32
result A UINT32 value that specifies the scan outcome. UINT32

v3.13.0 167
Argument Description Data Type
threatList An array of strings(String []). Each string element in the array is the name of the virus which has been detected.
Array of strings
productName The description of the product. string
productNumber The order of scan completion among the usable AVs. UINT32
totalNumberOfProducts The number of products scan is requested for this ticket.
UINT32
scanStartTime The time when the scan is started. date
scanEndTime The time when the scan is finished. date
Callback For Scan Started Report (COM)
Method ScanStartReport
Description This callback method is invoked when each engine begins the scan. It is used when a scan request begins. This callback is fired on if “report_on_scan_start” is set to “1” (true).
Note Connection Points
Function prototype
void ScanStartReport( VARIANT ticket, VARIANT productName, VARIANT filePath)

v3.13.0 168
Arguments
Argument Description Data Type
ticket The ticket which is generated when this scan has been requested.
UINT32
productName The description of the product. string
filePath The path to the file which is scanned. string
Callback For Update Completion (COM)
Method MyOnUpdateComplete
Description This callback method is invoked when an update completes. It is fired to all Metadefender Core client objects that are registered to this connection point. However, if there is already an update request that has not completed, only the Metadefender Core client that requested the update will get a callback with the update result of “updateAlreadyRequested(2)”.
Note Connection Points
Function prototype
void MyOnUpdateComplete( VARIANT updateResult, VARIANT updateReport)
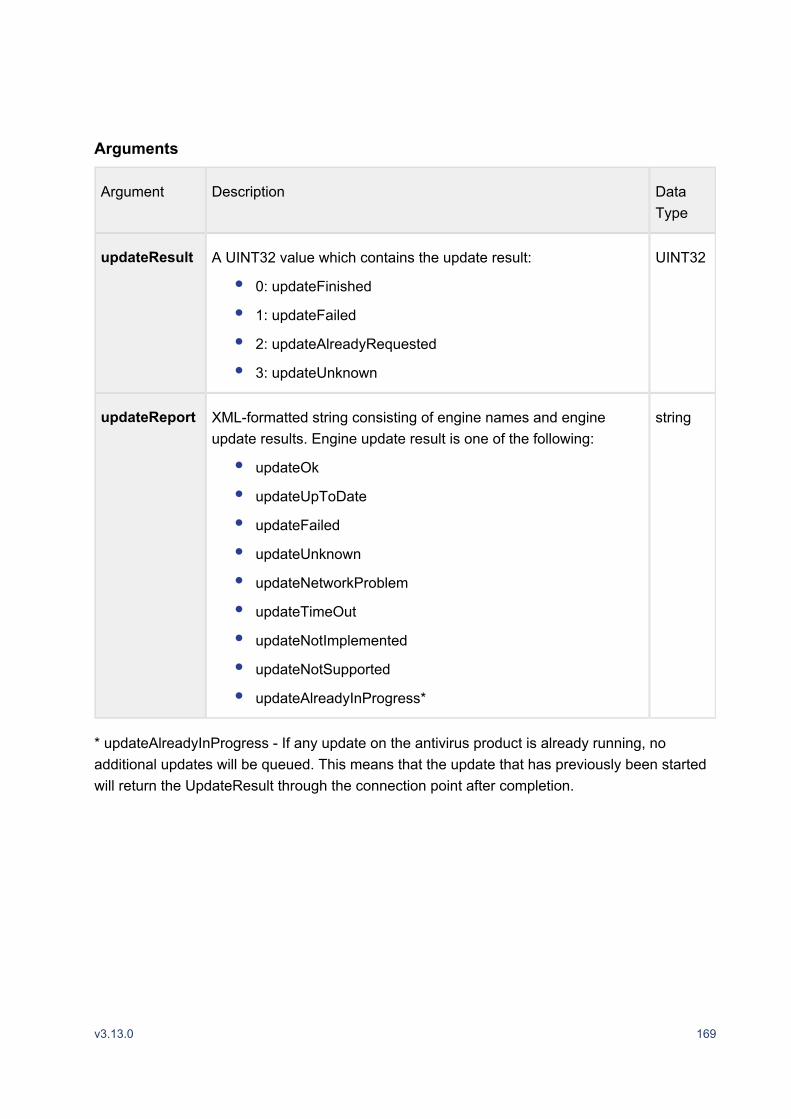
v3.13.0 169
Arguments
Argument Description Data Type
updateResult A UINT32 value which contains the update result:
0: updateFinished
1: updateFailed
2: updateAlreadyRequested
3: updateUnknown
UINT32
updateReport XML-formatted string consisting of engine names and engine update results. Engine update result is one of the following:
updateOk
updateUpToDate
updateFailed
updateUnknown
updateNetworkProblem
updateTimeOut
updateNotImplemented
updateNotSupported
updateAlreadyInProgress*
string
* updateAlreadyInProgress - If any update on the antivirus product is already running, no additional updates will be queued. This means that the update that has previously been started will return the UpdateResult through the connection point after completion.

v3.13.0 170
Callback For Update Progress Report (COM)
Method MyOnUpdateProgressReport
Description This callback method is invoked when an update for each engine completes. It is fired to the Metadefender Core client object that initiates the update.
Note Connection Points
Function prototype
void MyOnUpdateProgressReport( VARIANT productName, VARIANT updateState, VARIANT updateReport, VARIANT productNum, VARIANT totalNumberOfProducts, VARIANT startTime, VARIANT elapsedMiliSec, VARIANT reserved)
Arguments
Argument Description Data Type
productName The description of the product.
updateState The progress in percentage for update with the specified engine (0 indicates update started while 100 indicates update complete).
updateReport XML-formatted string consisting of engine names and engine update results. Engine update result is one of the following:
updateOk
string

v3.13.0 171
Argument Description Data Type
updateUpToDate
updateFailed
updateUnknown
updateNetworkProblem
updateTimeOut
updateNotImplemented
updateNotSupported
updateAlreadyInProgress*
* updateAlreadyInProgress - If any update on the antivirus product is already running, no additional updates will be queued. This means that the update that has previously been started will return the UpdateResult through the connection point after completion.
productNum The order of update among the current AVs.
totalNumberOfProducts The number of products scanned is requested for this ticket.
startTime Time when update for the engine is initiated.
elapsedMiliSec Time elapsed for update complete in milliseconds.
reserved Reserved
Deprecated COM interface
The following methods are no longer recommended by OPSWAT, but may be used under certain circumstances. Please contact OPSWAT customer support (https://www.opswat.com
) before using one of these methods./support#support-levels

v3.13.0 172
Analyze file type (deprecated)
Method AnalyzeFileType
Description This method analyzes the contents of a file and attempts to guess its type.
Note deprecated
Function prototype
HRESULT AnalyzeFileType( [in] VARIANT FileNameOrBuffer, [out] VARIANT * FileTypeLong, [out, retval] VARIANT * FilteTypeShort)
Arguments
Argument Description Data Type
FileNameOrBuffer If FileNameOrBuffer is of type string then it is treated as a file name to be analyzed. Otherwise, if it is a byte array (Byte []) it is treated as a memory buffer that should be analyzed.
File name: string
Buffer: byte array
FileTypeLong If the pointer that is passed to the method is not null, then the VARIANT will be filled with a string describing the file type in detail.
string
FileTypeShort A series of letters that summarize the file type. string
The string returned in FileTypeLong is a series of types that match the file. If the file matches more than one type (sometimes it’s impossible to tell the difference), the returned string will contain all the possible file types separated by ‘,’.

v3.13.0 173
The string returned in FileTypeShort is a string comprised of letters that give the rough classification of the file.
Get updated virus definition files (deprecated)
Method GetUpdateStatus
Description This method returns information about the virus definition files of the requested product.
Note deprecated
Function prototype
HRESULT GetUpdateStatus( [in] VARIANT ProductNamePart, [out] VARIANT * ProductDescription, [out] VARIANT * VirusDefinitionDate, [out] VARIANT * VirusDefinitionVersion)
Arguments
Argument Description Data Type
ProductNamePart A part of the product name of the desired package. Definition file information of the product containing this value is returned.
string
ProductDescription The description of the product that matched ProductNamePart.
string
VirusDefinitionDate The dates of virus definition files for the product. "0" is returned if the data file time is unavailable, for example when the product does not support the data file time.
Date
VirusDefinitionVersion The virus definition file version of the product. string

v3.13.0 174
Initialize object (deprecated)
Method InitEx
Description This method can still be used for the purpose of initializing an instance of a Metadefender Core object. However, with more flexible and extensive DB controller, the ability to have its own log writer per instance is disabled.
Note deprecated
Function prototype
HRESULT InitEx( [in] VARIANT * argsArray, [in] VARIANT argXML, [out, retval] VARIANT *UsableAntiViruses)
Arguments
Argument Description Data Type
argsArray empty
argXML This parameter is reserved for later use. Pass null as its value.
empty
UsableAntiViruses The list of AVs will be used for this instance of Metadefender Core client.
Array of strings

v3.13.0 175
Put in scan-and-clean queue (deprecated)
Method PutToScanAndCleanQueue
Description This method places a file to the scan-and-clean queue. In other words, the scan request will be processed asynchronously.
Note deprecated
Note: This is a deprecated method and we suggest using ScanEx instead.
Function prototype
HRESULT PutToScanAndCleanQueue( [in] VARIANT FileNameOrBuffer, [out, retval] VARIANT* Ticket)
Arguments
Argument Description Data Type
FileNameOrBuffer If FileNameOrBuffer is of type string then it is treated as a file or directory name to be scanned. Otherwise, if it is a byte array (Byte []), it is treated as a memory buffer that should be scanned.
File name: string
Buffer: byte array
Ticket A ticket for this scan job. This ticket is passed to the callback methods registered via the Callback for Scan Completion
connection point.(COM)
UINT32
Note: To get the result of this call, you must implement the Callback for Scan Completion connection point.(COM)
Put in scan queue (deprecated)

v3.13.0 176
Put in scan queue (deprecated)
Method PutToScanQueue
Description This method is called to place a file to the scan-queue. In other words, the scan request will be processed asynchronously.
Note deprecated
Note: This is a deprecated method and we suggest using ScanEx instead.
Function prototype
HRESULT PutToScanQueue( [in] VARIANT FileNameOrBuffer, [out, retval] VARIANT* Ticket)
Arguments
Argument Description Data Type
FileNameOrBuffer If FileNameOrBuffer is of type string then it is treated as a file / directory name to be scanned. Otherwise, if it is a byte array (Byte []) it is treated as a memory buffer that should be scanned.
File name: string
Buffer: byte array
Ticket A ticket for this scan job. This ticket will be passed to the callback methods registered via the Callback for Scan
connection point.Completion (COM)
UINT32
Note: To get the result of this call, you must implement the Callback for Scan Completion connection point.(COM)

v3.13.0 177
Scan and clean file (deprecated)
Method ScanAndClean
Description This method is called to scan and clean a file. This is done in a synchronous (blocking) fashion - the method returns only after the scan is complete.
Note deprecated
Note: This is a deprecated method and we suggest using ScanEx instead.
Function prototype
HRESULT ScanAndClean( [in] VARIANT FileName, [out] VARIANT* ThreatList, [out, retval] VARIANT* ScanOutcome)
Arguments
Argument Description Data Type
FileName If FileNameOrBuffer is of type string then it is treated as a file / directory name to scan. Otherwise, if it is a byte array (Byte []) it is treated as a memory buffer that should be scanned.
File name: string
Buffer: byte array
ThreatList A threat list found on the scanned object, otherwise null. Array of strings
ScanOutCome The scan result. UINT32

v3.13.0 178
Scan file (deprecated)
Method Scan
Description This method is called to scan a file or a memory buffer. This is done in a synchronous (blocking) fashion - the method returns only after the scan is complete.
Note deprecated
Note: This is a deprecated method and we suggest using ScanEx instead.
Function prototype
HRESULT Scan([in] VARIANT FileNameOrBuffer,[out] VARIANT* ThreatList,[out, retval] VARIANT* ScanOutcome)
Arguments
Argument Description Data Type
FileNameOrBuffer If FileNameOrBuffer is of type string, then it is treated as a file or directory name to scan. Otherwise, if it is a byte array (Byte []), it is treated as a memory buffer that should be scanned.
File name: string
Buffer: byte array
ThreatList A threat list found on the scanned object, otherwise null. array of strings
ScanOutCome The scan result. UINT32

v3.13.0 179
Subscribe to global events (deprecated)
Method SubscribeGlobalEvents
Description If you want to receive global callbacks such as OnLogAvailable, you must subscribe to global events with an appropriate event type through this call. If you subscribe to a specific type of event, you must unsubscribe to that type of event. For example, if you subscribe to a scan event type and update event type, you must both unsubscribe to the scan event type and update the event type.
Note deprecated
Function prototype
HRESULT SubscribeGlobalEvents( [in] VARIANT EventType [out, retval] VARIANT * Reserved)
Arguments
Argument Description Data Type
EventType Determines the type of events to subscribe.
0: All events
1: Update events
2: Log events
3: Scan events
UINT32
Reserved Reserved

v3.13.0 180
Unsubscribe from global events (deprecated)
Method UnsubscribeGlobalEvents
Description This method is called to unsubscribe to specific or all events. If you subscribe to a specific type of event, you must unsubscribe to that type of event. For example, if you subscribe to scan event type and update event type, you must unsubscribe to both scan event type and update event type. Calling to unsubscribe to events to which you are not subscribed has no effect.
Note deprecated
Function prototype
HRESULT UnsubscribeGlobalEvents( [in] VARIANT EventType [out, retval] VARIANT * Reserved)
Arguments
Argument Description Data Type
Reserved Reserved
Methods
This section lists all the methods available via Metadefender Core COM object. Before you can call any of the methods listed here, you need to create Metadefender Core COM object called ‘Metascanner’. When you install Metadefender Core, Metascanner is registered on the system as part of the type library .MetascanLib
Metascanner Program ID: Metascan.Metascanner.1

v3.13.0 181
Analyze file type I (COM)
Method AnalyzeFileTypeEx
Description This method analyzes a file (or buffer) and attempts to guess its type, detects files of which the file extensions may have been altered, and recursively analyzes contents of archive files.
Function prototype
HRESULT AnalyzeFileTypeEx( [in] VARIANT FileName, [out] VARIANT * SuggestedExtension, [out] VARIANT * FileTypeLong, [out, retval] VARIANT * FileTypeShort)
Arguments
Argument Description Data Type
FileName If FileNameOrBuffer is of type string then it is treated as a file name to be analyzed. Otherwise, if it is a byte array it is treated as a memory buffer that should be analyzed
String (file)
OR
Byte array(buffer)
FileTypeLong If the pointer that is passed to the method is not null then the VARIANT will be filled with a string describing the file type in detail.
string
SuggestedExtension If the pointer that is passed to the method is not null then the VARIANT will be filled with the suggested extension type of the file.
string

v3.13.0 182
Argument Description Data Type
FileTypeShort A series of letters that summarize the file type. More details are described in UOther Important Return Types.
string
The string returned in SuggestedExtension is the three letter extension of the filename. The AnalyzeFiletypeEx detection is based on the FileTypeLong returned from the AnalyzeFileType. The SuggestedExtension returns the actual extension of the file, even if it has been altered before scanning the file. If the file comprises of more than one extension, such as executable plus archive, the function returns only the first extension type detected.
Analyze file type II (COM)
Method AnalyzeFileTypeEx2
Description This method analyzes a file (or buffer) and attempts to guess its type, detects files of which the file extensions may have been altered, and recursively analyzes contents of archive files.
Function prototype
HRESULT AnalyzeFileTypeEx2{ [in] VARIANT FileNameOrBuffer, [out] VARIANT * InArgsArray, [out, retval] VARIANT * OutArgsArray}
Arguments
Argument Description Data Type
FileNameOrBuffer If FileNameOrBuffer is of type string then it is treated as a file name to be analyzed. Otherwise, if it is a byte array, it is treated as a memory buffer that should be analyzed.
String (file)
OR
Byte array (buffer)

v3.13.0 183
Argument Description Data Type
InArgsArray A list of input arguments in the following order:
[ ] Detect file extension mismatches. Result can be 0read from OutArgsArray. Set this to one of the following:
a. True - detect mismatches if the input file’s extension doesn’t match any of our suggested extensions
b. False - do not detect mismatches
[ ] If mismatch detection and recursive analysis is 1enabled, stop analyzing upon a mismatch and return immediately with results up until the file that contained the mismatch. Set this to one of the following:
a. True – stop analyzing on the first mismatch
b. False – analyze all the files within an archive
[ ] Analyze the full contents of archive files along 2with the archive file itself. Set this to one of the following:
a. True – recursively analyze archive files
b. False – only analyze the input file
*******************
Variant Array
[0] Boolean
[1] Boolean
[2] Boolean
*******************
OutArgsArray A list of output arguments in the following order:
[ ] If detection of file extension mismatch is enabled, 0this flag will indicate whether a mismatch was detected. This will be set to one of the following:
a. 0 – no mismatch is detected
b. 1 – a file extension mismatch was found while analyzing the input file or the contents of the archive
c. 2 –unknown because of no detection of file type and / or the input was a buffer
*******************
Variant Array
[0] UINT32 (mismatch flag)
[1] Variant Array (files)
----------------------
Variant Array (files)
[0][0] String (file name)

v3.13.0 184
Argument Description Data Type
[ ] Array containing the analyzed file(s) and file type 1information – consisting of the file name, file description, a short type, suggested extension, and extension mismatch flag
[0][1] Variant Array (file info)
[0][2] UINT32 (mismatch flag)
----------------------
Variant Array (file info)
[0][0] Long type
[0][1] Short type
[0][2] Suggested Extension
*******************
Comparison with AnalyzeFileTypeEx()
In addition to returning similar results as AnalyzeFileTypeEx, this method analyzes a file and the contents if it is an archive file. It also gives one or more suggestions for the file type information (description, category, and suggested extension) when available. Additionally, it can raise a flag if the extension of a file does not match any suggested extensions. The caller can specify to abort further analysis on the first mismatch. There are three levels of VARIANT arrays, the last two levels consisting of 2-dimensional SafeArrays.
Upon analysis with AnalyzeFileTypeEx(), if specific details of the file type could be not retrieved, the ‘FileTypeShort’ result will be set to the letter ‘O’, throwing it into the “others” category. In contrast, AnalyzeFileTypeEx2() will return an empty array, indicating that details could not be retrieved for the file
Analyze file type III (COM)
Method AnalyzeEx
Description This method is an extensible file type analysis API that allows the user to set various analyze file type options that can be configured for each file type analysis request. It can be used as a wrapper of the other file type analysis APIs. It also supports specifying custom ticket ID and session ID to associate file type analysis and scan.

v3.13.0 185
Function prototype
HRESULT AnalyzeEx{ [in] VARIANT ContentsToScan, [in] VARIANT * InArgsArray, [out, retval] VARIANT * OutArgsArray}
Arguments
Argument Description Data Type
ContentsToScan This argument may hold one of two types, a file path to be scanned or a memory buffer to be scanned based on the data type of this parameter and input argument (
) valueInArgsArray
A file path: if the type of this parameter is a string
Memory buffer: if the type of this parameter is a byte array(byte[])
File name: string
Buffer: byte array
InArgsArray A list of input arguments in the following order.
0. File Type Library choice
0: Use default
1: Magic File Type
2: TriD (Not supported for now)
1. Custom ticket #
(maximum 9 digits from 1-999999999) or (0 for not using custom ticket #)
2. Session ID
a. To associate multiple file scan as a group (e.g., multiple requests for single folder)
Array of variants with the following order:
1: UINT32
1: UINT32
2: String
OutArgsArray A list of outputs with the following order:

v3.13.0 186
Argument Description Data Type
0: Ticket number (if custom ticket # is specific in InargsArray, same ticket number is returned).
1: Suggested File Type Extension
2: File Type Long
3: File Type Short
Array of variants with the following order:
0: UINT32
1: String
2: String
3: String
Check license (COM)
Method Checklicense - COM
Description This method checks if the license installed on the machine is valid and when it expires. Metadefender Core processes, scans, and updates requests only if LicenseType is one of the“valid” types below.
Function prototype
HRESULT CheckLicense{ [out] VARIANT * LicenseType, [out] VARIANT * ExpiredDate, [out, retval] VARIANT * IsValid}
Arguments
Argument Description Data Type
LicenseType The type of license:
0: Expired (invalid)
1: Activated (valid)
UINT32

v3.13.0 187
Argument Description Data Type
2: Trial (valid)
3: Activate Required (invalid)
4: Activated but expires in 30 days (valid)
ExpiredDate The date when the license is expired in the following format:
MM/DD/YYYY (MM: month, DD: day, YYYY: year)
string
IsValid True: if the license is valid
False: if the license is invalid
bool
Get an engine info (COM)
Method GetUpdateStatusEx
Description This method returns information about the virus definition files of the requested product.
Function prototype
HRESULT GetUpdateStatusEx{ [in] VARIANT ProductNamePart, [out] VARIANT * ProductDescription, [out] VARIANT * VirusDefinitionDate, [out] VARIANT * VirusDefinitionVersion, [out] VARIANT * VirusDefinitionSignature, [out] VARIANT * ProductEngineVersion}
Arguments
Argument Description Data Type
ProductNamePart string

v3.13.0 188
Argument Description Data Type
A part of the product name of the desired package. Definition file information of the product containing this value will be returned.
ProductDescription The description of the product that matched ProductNamePart.
string
VirusDefinitionDate The dates of virus definition files for the product. 0 will be returned if the data file time is unavailable, for example when the product does not support the data file time.
date
VirusDefinitionVersion The virus definition file version of the product. string
VirusDefinitionSignature The virus definition file signature of the product. string
ProductEngineVersion The product (engine) version. string
Get a property value (COM)
Method GetProperty
Description Reads one of the internal properties.
Function prototype
HRESULT GetProperty( [in] VARIANT PropertyName, [out, retval] VARIANT* PropertyValue)

v3.13.0 189
Arguments
Argument Description Data Type
PropertyName The name of the requested property. For valid names, please refer to the Metadefender Core Configuration Guide.
string
PropertyValue The value of the property string
Initialize (COM)
Method Init
Description This method is called to initialize the connection to the Metadefender Core service. This method needs to be called before any other method can be called.
Function prototype
HRESULT Init( [out, retval] VARIANT *UsableAntiMalwares)
Arguments
Argument Description Data Type
UsableAntiMalwares The list of anti-malware engine names available to be used with this instance of Metadefender Core
array of strings (VT_BSTR)

v3.13.0 190
Process a file (COM)
Method Process
Description This method processes a file through a workflow based on the specified user agent.
Function p rototype
HRESULT Process( [in] VARIANT ContentsToBeProcessed, [in] VARIANT ContentsType, [in] VARIANT UserAgent, [in] VARIANT InArgsArray, [out] VARIANT *OutDetail, [out, retval] VARIANT *OutArgsArray)
Arguments
Argument Description Data Type
ContentsToBeProcessed Full path to the file to be processed string
ContentsType 0: holds a file path (Currently this is ignored since only 0 is supported)
UINT32
UserAgent A string to identify the user. Used for mapping to a specific workflow.
string
InArgsArray 0: Sync Flag - Reserved for future use.
1: Custom Ticket - Currently, only the integer range value is supported.
2: Password for Archives
Safearray of variants with the following order

v3.13.0 191
Argument Description Data Type
3: Additional Logging Parameter - This is passed to the user description argument in ScanEx if scanning is enabled on the workflow. Reserved for future use.
4: File Display Path - The full path of the file from the source machine to display to the user after processing.
5: Disable Logging - Disallows Metadefender Core to log any file type analysis and scan results.
6: Caching Option
0: disable to cache for the scan request
1: enable to cache for the scan request
2: disregard the existing cache
3: use the global setting
7: Customized data sanitization location
8: Workflow name - If you specify a workflow name, it overrides the mapping logic of the UserAgent parameter for workflow selection. If this string is not empty it MUST match a workflow name. Workflow names can be retrieved from the Metadefender Core Management Console (Configuration → Workflows)
0: boolean
1: string
2: string
3: string
4: string
5. boolean
6. uint32
7. string
8. string
OutDetail JSON result details string
Example JSON
{ "Ticket": "974989300" }
In case of error [e.g. "Server is too busy. Try again later." | "Invalid License" | "Daily scan limit reached" | "Failed to continue. unknown error" | "Invalid file path"] :
string

v3.13.0 192
Argument Description Data Type
{ "Error": "Invalid License" }
In case of too many simultaneous scans:
{ "Error": " Exceeded maximum thread count" }
OutArgsArray 0: Custom Ticket - to be used to associate callback results
Safearray of variants with the following order
0: string
When the Metadefender Core server is too busy, the HRESULT value returned will be Note:E_OUTOFMEMORY
Creating workflow profiles
Many configurations are supported via workflow profiles. To access the Workflow tab on the Metadefender Core Management Console, go here: http://localhost:8008/management/workflow.
Sanitize a file (COM)
Method ConvertFileType
Description This method converts the specified input file into a different format.
Function prototype
HRESULT ConvertFileType{ [in] VARIANT ContentsToConvert, [in] VARIANT ConvertTo, [in] VARIANT TargetFolderPath, [in] VARIANT * ReservedInArgsArray, [out] VARIANT * ReservedOutArgsArray,

v3.13.0 193
[out, retval] VARIANT * ConvertedFilePath}
Arguments
Argument Description Data Type
ContentsToConvert UNC of the input file to convert. String
ConvertTo Identifier for targeted conversion.
Usually file extension (e.g., pdf, docx…)
String
TargetFolderPath UNC of the destination folder path. The converted file will be created in that folder.
String
ReservedInArgsArray Reserved
ReservedOutArgsArray Reserved
ConvertedFilePath Path to the converted file if conversion was successful. String
Scan a file (COM)
Method ScanEx
Description This method is an extensible scan API which allows the setting of various scan options that can be configured for each scan request.
Function prototype
HRESULT ScanEx( [in] VARIANT ContentsToScan, [in] VARIANT* InArgsArray, [out, retval] VARIANT* OutArgsArray)
Arguments

v3.13.0 194
1.
2.
3.
4.
5.
Arguments
Argument Description Data Type
ContentsToScan This argument may hold one of four types: a file path to be scanned, a file signature to be scanned, a boot sector to be scanned, or a memory buffer to be scanned, based on the data type of this parameter and input argument ( ) InArgsArrayvalue
File path: if the type of this parameter is a string and the fifth argument of is set to 0 or the size InArgsArrayof is 3InArgsArray
File signature: if the type of this parameter is a string and the fifth argument of is set to 1InArgsArray
Boot sector scan: if the type of this parameter is a string and the fifth argument of is set to 2InArgsArray
Memory buffer: if the type of this parameter is a byte array(byte[])
Virtual Machine image folder path
File name: string
Buffer: byte array
InArgsArray A list of input arguments in following order:
(boolean) Sync flag (true: synchronous scan , false or invalid value: asynchronous scan)
(boolean) Clean flag (true: Action on dirty file, false: keep)
(UINT32) Custom ticket #
- maximum 9 digits from 1-999999999 or 0 for not using custom ticket #
(UINT32) Analyze before scan
0: disable analyze file before scan
1: enable analyze file before scan
2: use global setting (“analyze_before_scan”)
(UINT32) Contents Type
Array of variants

v3.13.0 195
5.
6.
7.
8.
9.
10.
Argument Description Data Type
0: ContentToScan argument holds file path or memory buffer
1: ContentToScan argument holds SHA1-based signature.
2: ContentToScan argument holds driver letter for a boot sector scan
4: ContenToScan argument holds Virtual Machine image folder path (Virtual machine disk must contain a Windows based filesystem)
(UINT32) Clean Action Type
0: take no action
1: quarantine (ignore global setting, “clean_action”)
2: delete (ignore global setting, “clean action”)
3: follow global setting
(UINT32) Caching option
0: disable to cache for this scan request
1: enable to cache for this scan request
2:rescan (disregard existing cache and update with new scan result)
3: use global setting(“enable_cache_scan”)
(String) Password for encrypted archive.
- Use empty string to when no password is required.(“enable_cache_scan”)
(String) User agent
- This is used to associate scan history with the source of scan request. Empty string is allowed.
(String) User description
- This will be logged along with scan request for the caller’s purpose. Empty string is allowed.

v3.13.0 196
10.
11.
12.
1.
2.
3.
Argument Description Data Type
- Pass the following JSON formatted string to control the file name and file path to be logged:
{"file_info.original_file_path":"<original file path not including file name", "file_info.display_name":"<original file name>"}
(UINT32) Configure logging
0: disable logging this particular scan request
1: enable logging this particular scan request
2: use global setting (omsConfig.ini)
(UINT32) Archive File Handling
0: do not extract archive file for this particular request
1: extract archive file for this particular scan request
2: use global setting (“internal_archive_lib_enable”)
OutArgsArray A list of outputs with the following order:
(UINT32) Ticket number (if custom ticket # is specific in InargsArray, same ticket number is returned
(UINT32) Scan result as described in ScanOutCome Return Type
(Array of strings) List of threats(String) Scan detail per engine
<scan_details> <objects> <object name="[object name]"> <engine_result> <engine_name>[engine name]</name> <scan_result>[scan outcome for the engine]</scan_result> </engine_result> </object> </objects></scan_details>

v3.13.0 197
3.
4.
Argument Description Data Type
[object_name]: file name or signature depends on type of scan requested
[scan outcome for the engine]: Scan result per engine as described in ScanOutCome Return Type
(String) File type information
this is returned only if analyze_before_scan is enabled orthe third argument of is set to 1InArgsArray
<file_type> <objects size=""> <object> <sha1></sha1> <type_infos size=""> <type_info> <long></long> <short></short> <extension></extension> </type_info> </type_infos> </object> </objects></file_type>
Set a property value (COM)
Method SetProperty
Description Modify one of Metadefender Core's internal properties.
Function prototype
HRESULT SetProperty{ [in] VARIANT PropertyName,

v3.13.0 198
[in] VARIANT PropertyValue}
Arguments
Argument Description Data Type
PropertyName The name of the requested property. string
PropertyValue New value of the property string
Stop ongoing scan (COM)
Method StopScan
Description This method purges all scan requests and ongoing scans. Method returns only when all requests are purged.
Function prototype
HRESULT StopScan{ [in] VARIANT Reserved}
Arguments
Argument Description Data Type
Reserved Reserved

v3.13.0 199
Update an anti-malware engine (COM)
Method UpdateEngine
Description This method is called to initiate an update of a specific anti-malware engine on the local machine.
Function prototype
HRESULT UpdateEngine( [in] VARIANT EngineName, [in] VARIANT ReservedArg)
Arguments
Argument Description Data Type
EngineName The name of the anti-malware product that needs to be updated (case in-sensitive).
string
ReservedArg Reserved. Any type of Variant is allowed except NULL pointer.
Note: The result of this call is provided via the OnUpdateComplete connection point.
Update anti-malware engines (COM)
Method UpdateAntiViruses
Description This method is called to initiate an update of all anti-malware engines at the same time on the local machine. It is recommended to perform updates via automatic periodic update, which is performed at predetermined intervals as configured in “Update Interval” property.

v3.13.0 200
1.
2.
3.
a.
b.
c.
d.
4.
5.
6.
7.
8.
9.
Function prototype
HRESULT UpdateAntiViruses()
Note: The result of this call is provided via the OnUpdateCompleteconnection point.
Sample Code
You can download for COM interface from . Metadefender Core Sample Code OPSWAT portalThis document describes how to set up and use the sample code you have downloaded.
ASP Sample
Install IIS.
Install Web Development support for Visual Studio.
Enable web sharing on the sample dir.
Go to sample dir.
Right-click on . Properties
Click Web Sharing > . Share this folder
Give all permissions to folder (including ). Execute for scripts
Enable advanced file sharing options – Open an explorer window -> Tools -> Folder Options -> View -> uncheck “Use simple file sharing”.
Ensure the following ASP accounts have permissions on the project folder:• ASP.Net machine account• Internet guest account (IUSR)• Launch IIS Process account (IWAM)
To change the permissions, right-click the folder and select Properties > . Security
Add the accounts. For each account, add read and execute permissions.
Open Internet Explorer, and change security settings to custom. Reset them to Medium low, and change the “Download unsigned ActiveX controls” and “Initialize and script ActiveX controls not marked as safe” options to “prompt”.
Open the project. You may get the following message "The specified Web server is not running ASP.NET version 1.1 ..." If so. follow the steps in: http://support.microsoft.com/kb
./817267/en-us

v3.13.0 201
10.
11.
1.
2.
3.
4.
5.
6.
a.
b.
c.
d.
e.
f.
g.
h.
i.
j.
7.
8.
9.
10.
11.
In the IIS, ensure access is allowed to the sample folder by setting the folder's "Directory Security".
Assign "Launch and Activation" permission on the Metascan to the account running ASP.Net in DCOM Configuration (DCOMCNFG).
PHP Sample Code for IIS 7
Install IIS 7 by adding a role to the server.
Add CGI/Fast CGI as an IIS feature (from cmd.exe):dism /online /enable-feature /featurename:IIS-CGI
Download the latest PHP 5 from .http://www.php.net/downloads.php
Install PHP as IIS FastCGI to “C:\PHP” (be sure to select script executable option to associate *.php with PHP).
Edit C:\PHP\php.ini.short_open_tag = Oncgi.force_redirect = 0
Configure IIS on the system.
Go to Start > Control Panel > Administrative Tools > Internet Information Services (IIS) Manager .
Choose Sites > Default Web Site .
Double-click on in the right pane. Handler Mappings
Double-click on PHP_via_FastCGIModule .
Click .Request Restrictions
Select the tab. Verbs
Select radial button , enter “GET,POST,HEAD”. One of the following verbs
Select the tab. Access
Select the radio button. Script
Click all the way out and accept changes. OK
Place scan.php, userInput.html and uploads folder into C:\Inetpub\wwwroot folder.
Allow necessary security permission to both the files and the folder (for testing please allow to everyone).
Configure Metadefender Core COM settings to allow IIS_USRS and IUSR to launch, access, and configure Metadefender Core (local permissions only).
Restart Metadefender Core service.

v3.13.0 202
11.
12.
Go to .http://localhost/userInput.html
Upload the file to be scanned. HTML calls PHP script and prints the scan results on the web page.
Command Line Utility
Metadefender Core provides a command line utility (omsCmdLineUtil.exe) that enables a user to run Metadefender Core operations such as scanning files, getting or setting preferences/properties, etc.
For more information, run "help" command from the directory in which the command line utility is located.
Exit code (for scan command)
Metadefender Core provides a process exit code for each scan to the command console. After you scan a file from CLI, you can enter “echo %errorlevel%” from the command prompt to get the scan result code. For detailed scan result return value information, refer to .COM Interface
Note: If omsCmdLineUtil.exe is unable to establish a connection to the Metadefender Core service, it returns the message "Failed to initialize Metadefender Core".
Process a File Command
syntax process <file path> <user_agent>
This function allows a user to process a file on the command line with a specific user agent using all available AV products on the machine. This effectively allows the user to choose which workflow to use when processing their file.
COM API
Calls Metascan COM Process asynchronously.
Process parameters
input parameters
<file path> user entered file path
<user_agent> the User Agent corresponding to desired Workflow

v3.13.0 203
Example
c:\Program Files (x86)\OPSWAT\Metascan 4>omsCmdLineUtil.exe process C:\TestFiles\eicar.com default Ticket:[ 2772276979 ] Process Details--------------- File: [ C:\TestFiles\eicar.com ] MD5: [ 44D88612FEA8A8F36DE82E1278ABB02F ] SHA1: [ 3395856CE81F2B7382DEE72602F798B642F14140 ] SHA256: [ 275A021BBFB6489E54D471899F7DB9D1663FC695EC2FE2A2C4538AABF651FD0F ] File Size: [ 68 bytes ] File Type Category: [ T ] File Type: [ unknown ] File Type Description: [ ASCII text, with no line terminators ] [ Dirty ] Avira scan engine [ 1 ms ] | Eicar-Test-Signature[ Dirty ] ESET scan engine [ 2 ms ] | Eicar test file[ Dirty ] Ahnlab scan engine [ 3 ms ] | EICAR_Test_File[ Dirty ] ClamAV scan engine [ 14 ms ] | Eicar-Test-Signature Scan Completion--------------- [ Dirty ] Ticket: [ 2772276979 ] File path: C:\TestFiles\eicar.com Found threats: EICAR_Test_File Scan time: 14 ms [01/25/2016 16:01:44:835] Process Completion------------------ Ticket: [ 2772276979 ] User agent: default Profile: Default Result: [ Blocked ] Blocked reason: [ Dirty ] File processed: C:\TestFiles\eicar.com

v3.13.0 204
1.
2.
3.
1.
2.
Limitations
Does not support processing a folder.
Java Sample
Below are the steps to use for the Java sample with Eclipse IDE running or by running on the command line. Java sample is not installed with Metadefender Core. You must download this separately from the OPSWAT portal. Go to https://portal.opswat.com/en/content/metadefender-
, and click .core-sample-code Download
With the Eclipse IDE running:
Create a new Java project from existing source code. (Choose the Java sample code folder you have downloaded).
Add Metasscan_java_interface.jar to the build path of the project. By default, Metascan_java_interface.jar file is installed in the directory where Metadefender Core is installed under the JNI folder.
Set java argument of Native library path to “omsJInterfaceImple.dll”
Example: (in -Djava.library.path=C:/Program Files (x86)/OPSWAT/Metadefender Core 8/JNIvm arguments of “Run Configuration”)
Running on the Command Line:
Go to bin directory.
Run the following command:Java.exe -cp .;<absolute path to Metascan_java_interface.jar file> -Djava.library.path=<absolute path to omsJInterfaceImpl.dll> com.opswat.metascan.Sample
REST API (v2)
Beginning with Metascan 3.8.1, OPSWAT supports only using the JSON-based (v2) REST API and XML-based (v1) REST API is deprecated.

v3.13.0 205
API key-based authentication
Metadefender Core allows you to limit access to the REST API only to users that have a defined API key. If no such API keys are defined then the 'apikey' parameter should be excluded from the REST API calls. If one or more API keys are defined, the 'apikey' parameter is required. To define API keys configure them in the management console.
Getting Started
Look Up Hash and Process (Scan / Sanitize) A File
Compatibility with Core v4 and Metadefender.com
We have designed REST API in a way that most common functions on Core v3, Core v4, and Metadefender.com public/private API share same structures and mechanism.
If you are moving from Metadefender.com to Core or vise versa, the change you need to make on your application should be minimal unless there is specific function that is only available to either one. If you notice any incompatible API, please contact OPSWAT support for consulting.
Advanced Usages

v3.13.0 206
Advanced Usages
API Version
Description Returns API version
URL Path /apiversion
Method GET
Summary
Returns API version info of REST. Core v3 and Core v4 return different values in order for client applications to identify which Core is being integrated to.
This is useful if a client application utilizes specific features which are only available to Core v3 or Core v4.
Request URL
http://localhost:8008/metascan_rest/apiversion
Method: GET Response
Example of successful request v3 Core:
200
{"version":"3"}
Example of successful request v4 Core:
200
{"version":"4"}
Load handling
Maximum Number of Simultaneous Workflow Clients Through REST

v3.13.0 207
1.
a.
b.
c.
2.
a.
b.
c.
1.
a.
2.
a.
Overview
Configuring many systems to perform a full system scan using MClient.
Queuing Mechanism
We will have 2 queues in REST.
Pending: Pending scans
Scan not yet submitted to the COM service.
Maximum 20,000 files here before server returns 500 too busy.
Files go pass through here first, then if the ongoing scan queue has space they are moved there.
Ongoing: Scan in progress
Scan already submitted to the COM service.
Maximum 1000 files here.
If this queue is full the files stay in pending scan queue.
Disk Check
We have 2 types of disk checks based on how much free space is left.
If < 3.5 GB free disk space:
With every file upload we will do a disk space check.
If > 3.5 GB free disk space:
We used the cached value from our already periodic check.
The reason we need to checks is because there is a known issue about Mongo not being able to start if there is enough free space on the disk. (3379MB)
Mongo Error
2016-09-06T16:12:15.514-0700 [initandlisten] ERROR: Insufficient free space for journal files2016-09-06T16:12:15.514-0700 [initandlisten] Please make at least 3379MB available in C:\Program Files (x86)\OPSWAT\Metadefender Core 4\Mongo\data\journal or use --smallfiles
Recommend REST integration in multiple client environment

v3.13.0 208
1.
2.
3.
Recommend REST integration in multiple client environment
REST users should only submit ~20 files at a time and wait until processing is complete before uploading more.
/file/inqueue reports how many files are in the queues (adding both pending on ongoing)
If client gets 503 server too busy they should wait a bit and try again.
Number of pending jobs
Description Number of pending jobs
URL Path /file/inqueue
Method GET
Summary
Returns the number of pending jobs on the server
Request URL
http://localhost:8008/metascan_rest/file/inqueue
HTTP header parameters
apikey API key assigned by user OPTIONAL
Method: GET
URL path /file/inqueue REQUIRED

v3.13.0 209
Response Code
200 OK Request is successful
400 Bad request Not supported HTTP method or invalid http request .
401 Invalid API key / Exceeded usage
Either missing API key or invalid api is passed.
500 Internal server error Server temporary unavailable. Try again later.
ResponseExample of when request is successful :
{ "in_queue" : "0"}
Descriptions of response:
in_queue Number of jobs inqueue.
Multiple Hashes Lookup
Description Retrieve scan report by multiple hashes.
URL Path /hash
Method POST
Summary
Get a list of available hashes for an API key.
Dues to business stuff, we need to remove scan result of Kaspersky in response json (MCL-3016) (Only applicable for Metascan Online)

v3.13.0 210
HTTP header parameters
apikey API key assigned by user OPTIONAL
include_scan_details include scan details
Value: 0, 1
OPTIONAL
Default: 0
"scan_details" exists in response when = 0|1|2 in response and header "scan_result"=1"include_scan_details"
Method: POST
URL path /hash REQUIRED
Body content {"hash":["hash_value_1","hash_value_2","hash_value_3",..]}
Response Codes
200 OK Found or Not Found
400 Bad request Not supported HTTP method or invalid http request .
401 Invalid API key Either missing API key or invalid api is passed.
403 Signature lookup limit reached, try again later
User exceeds limit
503 Internal server error Server temporary unavailable. Try again later.
Response
Example of when input body is empty :
{

v3.13.0 211
"err" : "hashes in body content is null or empty"}
Example of when input body is wrong format :
{ "err" : "Could not parse body content."}
Example of maximum hashes input.
{ "err" : "Exceeded maximum allowed. Allow maximum 1000 hashes"}
Example of when request is successful :
[ { "hash" : md5_1, "scan_result" : 0, "data_id" : data_id_1 }, { "hash" : md5_2, "scan_result" : 1, "data_id" : data_id_2 }, { "hash" : "abc", "scan_result" : 5, "data_id" : null } ]
Example of when request is successful and "include_scan_details"=1:
[ {

v3.13.0 212
"hash" : md5_1, "scan_result" : 0, "scan_details":{ "Agnitum":{ "scan_result_i":0, "threat_found":"", "def_time":"2014-08-07T07:00:00Z", "scan_time":78.0 }...{}}, "data_id" : data_id_1 }, { "hash" : md5_2, "scan_result" : 1, "scan_details":{ "Agnitum":{ "scan_result_i":0, "threat_found":"", "def_time":"2014-08-07T07:00:00Z", "scan_time":78.0 }...{}}, "data_id" : data_id_2 }, { "hash" : "abc", "scan_result" : 5, "data_id" : null } ]
Example of when the number of lookup hashes i s more than remaning lookup number:
e.g: user can only scan 2 hashes but posts 3 hashes.
[ { "hash" : md5_1, "scan_result" : 0, "data_id" : data_id_1 }, { "hash" : md5_2, "scan_result" : 1, "data_id" : data_id_2 }, { "hash" : md5_3,

v3.13.0 213
"scan_result" : 403, "data_id" : null } ]
Descriptions of response:
scan_result the newest final scan result of hash
5: unknown scan result - may be hash does not exist in mongo
data_id the newest data_id of hash
scan_details Array of scan results for engines
For more details of response, refer to .Response Description
Retrieve profiles (ID and name)
Description Retrieve a list of all the workflow profile names
URL Path /file/rules
Method GET
Summary
Retrieves a list of all workflow profile names [i.e. "rule"] and associated IDs.
HTTP header parameters
rule rule/profile name to search for OPTIONAL
Request Error
404 Not Found Could not find the rule specified with the rule header
500 Internal Error Unexpected error; check logs for details

v3.13.0 214
Response
Example of retrieving all rules:
200
[ { "name": "Block EXE", "id": "57c99fc376e0e0f1b9baab54" }, { "name": "Client", "id": "57c99fc376e0e0f1b9baab55" }, { "name": "Convert Docs", "id": "57c99fc376e0e0f1b9baab56" }, { "name": "Guest", "id": "57c99fc376e0e0f1b9baab57" }, { "name": "High Security", "id": "57c99fc376e0e0f1b9baab58" }, { "name": "Kiosk", "id": "57c99fc376e0e0f1b9baab59" }, { "name": "Mail Agent", "id": "57c99fc376e0e0f1b9baab5a" }, { "name": "No EXE/Archives", "id": "57c99fc376e0e0f1b9baab5b" }, { "name": "Only Docs", "id": "57c99fc376e0e0f1b9baab5c" }, { "name": "Default", "id": "57c99fc376e0e0f1b9baab5d" }, { "name": "Proxy",

v3.13.0 215
"id": "57c99fc376e0e0f1b9baab5e" }, { "name": "Web Scan", "id": "57c99fc376e0e0f1b9baab5f" }]
Example of searching for specific workflow with the rule header:
200
[ { "name": "Client", "id": "57f7e5621d9ac33a3788e031" }]
Descriptions of response:
name the name of the workflow profile (i.e. rule)
id Unique identifier for a workflow. Changing workflow name does not affect id. Use "name" for description and "id" to specify a workflow.
Statistics
Check Server health
Description Server health
URL Path /stat/serverhealth
Method GET

v3.13.0 216
Summary
Retrieve server health including free disk space, RAM and CPU usage, disk queue length. These are average values based on sampling.
Request URL
http://localhost:8008/metascan_rest/stat/serverhealth
Use Cases (used by)
Management Console (to retrieve server statistics of memory, CPU usage, and average disk queue length to monitor server health).
HTTP header parameters
Header Description Required
apikey API key assigned by OPSWAT or admin REQUIRED
Method: GET
/stat/serverhealth
Returns all entries in server health recorded.
/stat/serverhealth/{N}
n is hours. It will return entry between(inclusive) HH-n:00 and HH:00.
For example: call /stat/serverhealth/1 at 13:13, server will return entry between 12:00 and 13:00.
Response Codes
Code Status Description Notes
200 OK successful response
400 Bad request Not supported HTTP method or invalid http request.
401 Either missing API key or invalid API is passed.

v3.13.0 217
Code Status Description Notes
Permission Denied for statistic
500 Internal server error Server temporary unavailable. Try again later.
Response
Example of successful scan request:
[ { "usage_check_localtime": "2016-02-03T12:00:00-08:00", "avg_ram_usage": 84.92316500345866, "avg_cpu_usage": 13.39331203699112, "avg_disk_q_len": 0.2144404633436352, "avg_disk_free_space": 25.00000000000000 }, { "usage_check_localtime": "2016-02-03T13:00:00-08:00", "avg_ram_usage": 82.8503189086914, "avg_cpu_usage": 2.4295437335968018, "avg_disk_q_len": 0.0027925085742026567, "avg_disk_free_space": 25.0000000000000000 }]
Descriptions of response:
Response Description
usage_check_localtime The local time when the information is queried.
avg_ram_usage Average of RAM usage of Metadefender Core server as a percentage of total RAM.
avg_cpu_usage Average of CPU usage of Metadefender Core server as a percentage of total CPU.
avg_disk_q_len Tracks the number of requests that are queued and waiting for a disk during the sample interval, as well as requests in service.

v3.13.0 218
Response Description
avg_disk_free_space Average free disk space on Metadefender Core server as a percentage of total space.
Get enginedef stat
Description Get enginedef stat
URL Path /stat/enginedef
Method GET
Summary
Gets definition time of all current anti-malware engines. This is recommended API to check engine definition rather than using because it returns cached definition info Get engines statand relatively cheap API.
Request URL
http://localhost:8008/metascan_rest/stat/engines
Response Codes
200 OK
400 Bad request Not supported HTTP method or invalid http request.
500 Internal server error Server temporary unavailable. Try again later.
Response
Notice that engine name will be shortened to single word.
Example of successful scan request:
{ "Lavasoft" : "2014-11-24T00:00:00", "TotalDefense" : "2013-02-12T00:00:00",

v3.13.0 219
"ESET" : "2014-11-25T00:00:00", "AVG" : "2013-08-12T00:00:00", "Avira" : "2014-10-01T00:00:00"}
Get engines stat
Description Get engines stat
URL Path /stat/engines
Method GET
Summary
Returns engine information for all usable anti-malware engines. This is relatively expensive API call on the server side. If you want to retreive definition info, use .Get enginedef stat
Request URL
http://localhost:8008/metascan_rest/stat/engines
HTTP header parameters
apikey API key assigned by OPSWAT or admin REQUIRED
Request Error
400 Bad request Not supported HTTP method or invalid HTTP request.
500 Internal server error Server temporary unavailable. Try again later.
Response
Example of successful scan request:
[{ "eng_name" : "ClamWin scan engine", "eng_ver" : "0.97.8", "def_time" : "11/10/2013 12:00:00 AM",

v3.13.0 220
"eng_type" : "Bundled engine", "active" : true},{ "eng_name" : "ESET NOD32 Antivirus", "eng_ver" : "4.2.71.2", "def_time" : "11/11/2013 12:00:00 AM", "eng_type" : "Customer licensed engine", "active" : false},{ "eng_name" : "ESET scan engine", "eng_ver" : "1412 (20131023)", "def_time" : "6/1/2012 12:00:00 AM", "eng_type" : "Bundled engine", "active" : true},{ "eng_name" : "Norman scan engine", "eng_ver" : "7.2.6", "def_time" : "10/13/2013 12:00:00 AM", "eng_type" : "Bundled engine", "active" : true},{ "eng_name" : "Total Defense scan engine", "eng_ver" : "37.0.1.55", "def_time" : "11/8/2013 12:00:00 AM", "eng_type" : "Bundled engine", "active" : true}]
Descriptions of response:
def_time The last time updated of engine.
active True: engine is used to scan file.
Summary of scan
Description Retrieve scan history
URL Path /stat/scanhistory/{n_hour}
Method GET

v3.13.0 221
Summary
Retrieve history of scanning in last n hours.
HTTP header parameters
apikey API key assigned by OPSWAT or admin REQUIRED
Response Codes
200 OK successful response
400 Bad request Not supported HTTP method or invalid http request
401 Permission Denied for statistic
Either missing API key or invalid api is passed
500 Internal server error Server temporary unavailable. Try again later.
Response
Example of successful scan request:
200
[ { "total_scanned_files": 101, "total_infected": 0, "total_blocked": 1, "avg_scan_time": 19.712871287129, "localtime": "2013-11-11T11:00:00+07:00" }, { "total_scanned_files": 3, "total_infected": 0, "total_blocked": 2, "avg_scan_time": 113.66666666667, "localtime": "2013-11-11T10:00:00+07:00" }, { "total_scanned_files": 5, "total_infected": 1,

v3.13.0 222
1.
2.
3.
4.
5.
"total_blocked": 1, "avg_scan_time": 25.455566656565, "localtime": "2013-11-11T09:00:00+07:00" }]
Descriptions of response:
avg_scan_time Average scanning time
total_infected all logs with scan_result_i of 1, 2, 4, 6, 8
total_blocked All logs that have process_info.result equal to "Blocked"
Look Up Hash and Process (Scan / Sanitize) A File
Recommended Flow Of API Usage
Calculate hash value of a file.
Hash Lookup to see if known instead of sending whole file to server for scan.
If unknown, callInitiate Process File
Retrieve process result Retrieve process result by data_id
if file is sanitized, .Download Sanitized File
User Provided Info
Certain data processing requires of accurate metadata for better process results. Refer to for more information.Initiate Process File
Download Sanitized File
Description Download a file which was converted by the /file workflow API
URL Path /file/converted/{data_id}
Method GET

v3.13.0 223
Summary
Downloading file scanned from database using data_id
HTTP header parameters
apikey Only required if REST API keys have been defined OPTIONAL
Method: GET
URL path /file/converted/{data_id} REQUIRED
data_id Returned by Initiate Scan/Process a File REQUIRED
Example: http://localhost:8008/metascan_rest/file/converted/012e1a8945c041d181e79ab8d711555d
Request Codes
200 OK
400 Bad request Not supported HTTP method or invalid http request (e.g., empty body).
401 Invalid API key Either missing API key or invalid api is passed.
401 Exceeded usage
500 Internal server error
Server temporary unavailable. Try again later.
Response
Example of when request is not successful :
{ err: "DataID not found in the database"}

v3.13.0 224
Example of when request is successful :
It will return the content of that file if using rest client tool.If using browser, a pop up save file will appear with the file name is the display_name in database. (This API sets the filename using the Content-Disposition)
Hash Lookup
Description Retrieving previous scan reports using hash value
URL Path /hash/{hash value}
Method GET
Metadefender provides multipe ways of looking up previously processed results using hashes or known data_id. If data_id is unknown, hash value (md5, sha1, or sha256) can be used to look up known scan results. While single hash lookup provides full scan results related to hash if found, will return condensed results with links (data_ids) to full scan Multiple Hashes Lookupresult.
HTTP header parameters
apikey If API key is configured by the administrator OPTIONAL
Method: GET
URL path /hash/{hash value} REQUIRED
hash value: any of the followings.
SHA1
MD5
SHA256

v3.13.0 225
Response Codes
code status description note
200 OK either result is found or not found.
400 Bad request Not supported HTTP method or invalid http request
401 Invalid API key Either missing API key or invalid api is passed
404 Not found The scan result for the given data_id was not found.
503 Internal server error Server temporary unavailable. Try again later.
Response
Only when server returns 200 OK, proper response is returned.
Example of when result is not found :
When scan results are not found, a 200 response status code appears.
Status: 200
{ "BED12FDA073BB386B54700138FB47EEA": "Not Found"}
Response
When result is not found (example) :
Status: 200 (Should be 404)
{ "4f84e3b096d54908963d037b5457bf27": "Not Found"}
When result is found :

v3.13.0 226
When result is found :
It will return process result. Refer to .Response Description
Initiate Process File
Description Initiate scan request
URL Path /file
Method POST
Summary
There are two ways of initiate processing file. One is to upload file and the other is passing the file path (local to the server).
There are several important parameters should be passed along the request so that administrators can track such histories on the server side without relying on additional application logic on client sides.
HTTP header parameters
Parameter Value Required Description
apikey API key configured by administrator.
OPTIONAL
filename Name of files to preserve extension during scan and meta data.
RECOMMENDED filename should be encoded with URLencode and should not contains characters "<" and ">"
Otherwise, it will be removed from filename.
This will be sanitized and all invalid file_name characters will be removed.
If file type mismatch is enabled, needs filename to know original file

v3.13.0 227
Parameter Value Required Description
extension. If not providing this header, it will cause mismatch.
filepath Path of files that are accessible to Core server
OPTIONAL filepath should be URLEncoded.
filepath should be accessible to core server.
When this head is set, no content need to be put in HTTP request body. Core server will try to process/scan using filepath directly
user_agent A string to identify the client application
OPTIONAL Administrator configures to map user agents to specific workflow.
rule A string to define which workflow to use (i.e. workflow name)
OPTIONAL This will supersede user_agent and both should not be used at the same time
Note: Workflow names can be retrieved from the Management Console Workflow list or REST API, Retrieve profiles (ID and
.name)
archivepwd password of encrypted file
OPTIONAL If submitted file is password protected archive.
original_file_path File path of file scanned on local to the Metascan
OPTIONAL original_file_path should not contains characters "<" and ">".
Otherwise, it will be removed from original_file_path.

v3.13.0 228
Parameter Value Required Description
Note: This will be sanitized and all invalid path and file name characters will be removed.
source IP, hostname, or other client ID
RECOMMENDED Helps identify where the file is originated from. This should be end-user information to trace where the file came from.
X-File-Size Total size of the original file (before splitted to chunks)
OPTIONAL Used for chunk uploading.
Both MO and REST have already had these headers before. It still be used now.
Should expose, a big file can be uploaded as many parts.
Case insensitive.
This is data_id returned from 1st request and following request will return same data_id. Any further upload more than x-file-size will result in error (not affecting the scan). Checking progress until all file contents is uploaded will return "not found"
Limitation: returned data_id can after last chunk be changed
uploaded, see this case: database already had scan result for file A, customer uses chunk upload and posts this file again, for the first chunk we return data_id_1 (since don't know that
X-File-ID ID number is retrieved after uploading the 1st chunk
OPTIONAL

v3.13.0 229
Parameter Value Required Description
file already exist in DB with only first chunk), when all chunks are uploaded, we calculated hash and found the result in DB, then we return old data_id (different with data_id_1) without scanning.
Method: POST
HTTP body Contents of the file for scan REQUIRED
Response Codes
Code Status Description Notes
200 OK File is uploaded to the server for initiation.
400 Bad Request Invalid request format or server is not configured correctly for Metascan.
401 Invalid API key Either missing API key or invalid API is passed.
403 scan limit reached, try again later
403 exceeded number of allowed clients
exceeded number of simultaneous clients
403 Invalid License
500 Not enough disk space Not enough free space in the temp directory to upload the file.
500 License expired

v3.13.0 230
Code Status Description Notes
500 Internal error
503 Failed to request scan. Try again later.
503 Server is too busy. Try again later.
Response
Example of successful scan request:
{ "data_id":"4f84e3b096d54908963d037b5457bf27" "rest_ip": "scan01.metascan-online.com/v2"}
Example of failed to upload:
{ "err": "Failed to upload - <error message>"}
Descriptions of response:
Response Description
data_id Data ID used for retrieving scan results. Since there are potentially multiple scans for same files when any engine has different definition time or when there is an additional engine, this is identifier for per scan other than per file.
rest_ip Requests for the scan progress using 'data_id' should be made to this address instead of the original address. Once a scan is finished, future requests for this 'data_id' can be made to the original address.
Retrieve process result by data_id

v3.13.0 231
Retrieve process result by data_id
Description Query process result
URL Path /file/{data_id}
Method GET
Summary
Query a previously submitted file's scanning result. Scan can be initiated the API below. Calling this API is required to retrieve scan results since the initiate API does not return results.
Initiate Process File
You can retrieve scan results using the Data ID. The scan is done asynchronously and each scan request is tracked by the ID. You need to use two separate API calls to initiate a file scan and retrieve the scan results. This request needs to be made multiple times until the scan is complete. You can trace the scan completion using the “scan_results.progress_percentage” value from the response.
Use the following URL to initiate the scan request: http://localhost:8008/metascan_rest/file
Use the following URL to retrieve scan results: http://localhost:8008/metascan_rest/file/{data_id*}
Method: GET
URL path /file/{data_id} REQUIRED
data_id Returned from Initiate Process File REQUIRED

v3.13.0 232
Response Codes
200 OK Found the scan result for given data_id
400 Bad request Not supported HTTP method or invalid HTTP request.
401 Invalid API key Missing apikey header or invalid key passed
404 Not Found Unable to find a scan result for the given data_id. This is an error.
500 Internal Error Server temporary unavailable. Try again later.
Response
Example of when result is not found :
Status: 200 (Should be 404)
{ "4f84e3b096d54908963d037b5457bf27": "Not Found"}
When result is found :
It will return process result. Refer to .Response Description

v3.13.0 233
1.
2.
3.
4.
Response Description
Top levels of Process Result
data_id Metadefender provides asynchronous API calls (stateless) and data_id is used for identifying a specific process job. It is obtained from initial data (e.g., file) upload and can be used any time as long as scan history is preserved on the server side. It is generated randomly from the server and guaranteed to be unique so it can be used without worrying about having duplicate data_id. Not applicable for hash look up.
scan_results scan result from each engines along with other metadata for scanning job.
file_info static file information and analyzed file type based on contents
process_info overall process status and information including applied workflow and action results such as sanitization.
extracted_files list of files inside of an archive file. If file is not an archive file or not extracted, this block will not be present.
Minimum Required Parsing Process Results ( process_info)
This only applies if you are using workflow-based process.
There should always process_info field for process JSON message.
Clients should use to know whether the process process_info.progress_percentagehas been finished or still in progress.
Clients should use to check whether the file processed is process_info.result allowedor blocked.
When file is allowed, is empty string If file is blocked, process_info.blocked_reason . clients should use the field to retrieve detailed block reasons
Clients should use to retrieve which profile is used when processing.process.profile

v3.13.0 234
1.
2.
3.
4.
Clients should use to know if the input file's detected process_info. file_type_skipped_scantype is configured to skip scanning
If post processing is configured and applied, there will be field in process.post_processingJSON result. Clients should always check whether this field exists or not to find out if post_processing has been applied or not.
If exists, clients could use process_info.post_processing process.post_processing.to check what actions have been applied and these actions are separated by action_ran
"|". See details in [Description of Response]
If exists, clients could use process_info.post_processing process.post_processing.to check which post_processing failed.action_failed
If "Move" is in "action_ran", clients should check process.post_processing.to retrieve information of the target file type. And clients should call /fileconverted_to
/converted/{data_id} to retrieve link to download converted files
if "Copied" or "Moved" is in "action_ran", clients should check process.post_processing. for the target directory infocopy_or_move_destination

v3.13.0 235
Response Details For process_info
process_info
Process node Only applied if user scanned with user_agent
progress_percentage Percentage of processing completed
Scale of 0-100
user_agent A string which identifies the user. This is used for mapping to a specific workflow.
profile The profile name. This is what the user_agent mapped to.
result The final result of processing the file
Possible values:
Possible Process Results (COM)
"Not processed": default value set in REST before the file is processed by Core
blocked_reason The reason for a file being blocked
Possible list values:
Failed to request a process: "Process Failed"
Possible Blocked Reasons (COM)
"null": default value set in REST before the file is processed by Core
file_type_skipped_scan Indicates if the input file's detected type was configured to skip scanning
JSON Boolean type

v3.13.0 236
post_processing Post processing node Exists only if post processing was configured
actions_ran List of post processing actions ran
Delimited by " | "
Possible list values: "Sanitized | Copied | Moved | Quarantined | Deleted | Ran Script"
*Copied and Moved will never exist together*Quarantined and Deleted will never exist together*(Copied/Moved) and (Quarantined/Deleted) will never exist together
actions_failed List of post processing actions that failed
Delimited by " | "
Possible list values: "Sanitization Failed | Copy Failed | Move Failed | Quarantine Failed | Delete Failed | Ran Script Failed"
*Copy Failed and Move Failed will never exist together*Quarantine Failed and Delete Failed will never exist together*(Copy/Move Failed) and (Quarantine/Delete Failed) will never exist together
converted_to Extension the file was converted to
If the string contains a file type, the converted file can be downloaded
copy_move_destination Destination to where the file was copied/moved
converted_destination Location where the converted file exists

v3.13.0 237
Response Details For scan_results and others
file_id Populated only when files are configured to be stored. Not applicable for hash look up. This is unique per file so if same file is scanned twice, file_id would be identifical.
scan_result Global scan results, meta data, and scan reports from all engines.
file_info File metadata, hash value, analyzed file types
scan_details Array of scan results for engines
scan_result_i See table below for descriptions
threat_found Name of threat if detected by engine. Non ASCII characters removed.
def_time Definition time of engine at the time of scan
scan_time Elapsed scan time in mili-seconds per engine
rescan_available This value will be set to true
if engine definition has changed.
any engine is missing scan results such as "failed to scan", "not scanned"
scan_all_result_i See table below for descriptions
total_time Elapsed scan time in milli-seconds from when scan is initiated with the first engine until the last engine has completed.
total_avs Number of engines used for scanning
progress_percentage Indicator if scan is in progress
in_queue How many files are in queue before this scan request: 0 means it is being scanned or finished scanning.

v3.13.0 238
upload_timestamp First time file is uploaded to the server (even if file is rescanned this value will be preserved)
file_type_category High level categorization of file type see reference for descriptions
Additional Information For An Archive File
Note: Only applied when scanning an archive file
original_file Basic information and reference to the of the original file (actual data_id archive file, not the extracted contents)
Object Structure
"original_file": { "data_id": "96c7ce8170224bd29c427ec913e3d00b", "scan_result_i": 1, "progress_percentage": 100, "detected_by": 1}
extracted_files Basic information about the included files in the archive can be found in the property.files_in_archive
Files_in_archive only contains maximum 20000 results.
Entries with a non-zero scan_result_i always appear first.
More information about individual entries can be queried with the data_id
The under extracted_files is the reference to the engines data_id summaryor consolidated result for the archive
Object Structure
"extracted_files": { "data_id": "e511f16da3cc422eaa4127ed88ee9446", "scan_result_i": 0, "progress_percentage": 100, "detected_by": 0, "files_in_archive": [{

v3.13.0 239
"display_name": "\\U6367872802.exe", "data_id": "c421c7cfc5c34733ad037116cfe2b6f3", "scan_result_i": 0, "progress_percentage": 100, "file_size": -1, "file_type": "", "detected_by": 0 } ]}
parent_data_id When the scan result for a file within an archive is queried, this refer to the containing archive file.
Available Scan Results (scan_result_i, scan_all_result_i)
value short description
long description
0 No Threats Found
No threat detection or the file is empty
1 Infected/Known
Threat is found
2 Suspicious Classified as possible threat but not identified as specific threat.
3 Failed To Scan
Scanning is not fully performed (For example, invalid file or no read permission). If no engine is included and scan is enabled, this will be the final result.
4 Cleaned / Deleted
Threat is found and file is cleaned (repaired or deleted): repair is not supported yet
5 Unknown Unknown signature. NOTE: this is only used in multiple hash lookup. For single hash lookup, scan_result_* are not returned as response. see for more details.Retrieve scan report by hash (duplicate)
6 Quarantined File is quarantined

v3.13.0 240
value short description
long description
7 Skipped Clean
Scan is skipped because this file type is in white-list*
8 Skipped Infected
Scan is skipped because this file type is in black-list*
9 Exceeded Archive Depth
Threat is not found but there are more archive levels which were not extracted.
10 Not Scanned / No scan results
Scan is skipped by the engine either due to update or other engine specific reason. If scan is disabled, this will be the final result.
11 Aborted The current scan was stopped by the server
12 Encrypted File/buffer is not scanned because the file type is detected as encrypted (password-protected). If the Internal Archive Library is ON encrypted return type is not going to be returned through Metascan scan progress callbacks since the engines do not perform any scan operations. If the Internal Archive Library is OFF Metascan will pass the encrypted files to the engines directly, bypassing the detection.
13 Exceeded Archive Size
The extracted archive is too large to scan
14 Exceeded Archive File Number
There are more files in the archive than configured on the server
15 Password Protected Document
Document that is protected by a password [e.g. Office documents or PDFs that require a password to view its contents]. If a file is password protected document, no sanitization will be applied.
17 Mismatch The file's extension does not match the detected file type. Only applicable when using workflows.

v3.13.0 241
Scan not startedThis means the file has not yet been sent to the engines for scanning. The progress_percentage value will be 0 and the in_queue value will be non zero.
scan_results.scan_all_result_i = -1
scan_results.scan_all_result_a = ""
Scan partially completedThis means some engines have returned results but there are still more remaining. This progress_percentage value will be greater then 0 and less than 100.
Accumulated result at the time scan result was queried.
Scan is disabled or skippedThis means the request is complete but scanning has been disabled or has been skipped for some other reason such as file type mismatch. The progress_percentage value will be 100.
scan_results.scan_all_result_i = 10
scan_results.scan_all_result_a = "Not Scanned"
This is same as other Metascan interface such as COM interface and Java interface.
Available File Type Categories (file_type_category)
Mark Note
"E" Executable (EXE, DLL, …)
"D" Document (MS Office word document, MS Office excel sheet)
"A" Archive (Zip, Rar, Tar, …)
"G" Graphical format (Jpeg, GIF, TIFF, BM P, …)

v3.13.0 242
Mark Note
"T" Text
"P" PDF format
"M" audio or video format
"Z" mail messages (MSG, …)
"I" Disk image
"O" Other (anything that is not recognize d as one of the above)
Response Example
Status: 200
{ "extracted_files": { "data_id": "b3a0949e833840128a346fdd7ec42477", "scan_result_i": 0, "detected_by": 8, "files_in_archive": [ { "display_name": "\\\\eicar.com", "data_id": "372d93b94be04ed89da2a7d938b72452", "file_type": "-", "scan_result_i": 1, "detected_by": 4, "progress_percentage": 100, "file_size": 68 }, { "display_name": "\\\\Printout.pdf", "data_id": "6acba97776694ac89b8e3c573439bfbe", "file_type": "PDF/AI", "scan_result_i": 0, "detected_by": 0, "progress_percentage": 100, "file_size": 246121 } ]

v3.13.0 243
}, "file_id": "", "scan_results": { "scan_details": { "Ahnlab": { "threat_found": "EICAR_Test_File", "scan_result_i": 1, "def_time": "2016-08-03T00:00:00Z", "scan_time": 1 }, "Avira": { "threat_found": "", "scan_result_i": 0, "def_time": "2016-08-03T00:00:00Z", "scan_time": 15 }, "ClamAV": { "threat_found": "Heuristics.PDF.ObfuscatedNameObject", "scan_result_i": 1, "def_time": "2015-07-03T00:00:00Z", "scan_time": 31 }, "ESET": { "threat_found": "", "scan_result_i": 0, "def_time": "2016-08-03T00:00:00Z", "scan_time": 1 } }, "rescan_available": false, "data_id": "c0983103f31f4e74889cc7188f6c0cdd", "scan_all_result_i": 1, "start_time": "2016-08-03T17:08:52.949Z", "total_time": 31, "total_avs": 4, "progress_percentage": 100, "in_queue": 0, "scan_all_result_a": "Infected" }, "file_info": { "file_size": 2073, "upload_timestamp": "2016-08-03T17:08:52.949Z", "md5": "4D6B72DDC54514F82DDCDDA2E9923AAF", "sha1": "7B7B5487948E4EDC1AF62539ABF0DD72B456D03E", "sha256": "1A90EA551EE596F357794DFF314F042D84A9AFC3D56ED2C995A4908395CBABBC", "file_type_category": "P", "file_type_description": "Adobe Portable Document Format", "file_type_extension": "pdf/ai", "display_name": "1470244133_dirty_315.pdf", "original_file_path": ""

v3.13.0 244
}, "process_info": { "post_processing": { "actions_ran": "Sanitized", "actions_failed": "", "converted_to": "pdf", "copy_move_destination": "", "converted_destination": "toConvert_[sanitized].pdf" }, "progress_percentage": 100, "user_agent": "cactus", "profile": "default", "result": "Blocked", "blocked_reason": "Dirty", "file_type_skipped_scan": false }, "data_id": "c0983103f31f4e74889cc7188f6c0cdd", "rescan_count": 0, "source": "10.0.50.37", "scanned_on": "10.0.50.52"}
Description of File Type Categories
Available File Type Categories (file_type_category)
Mark Note
"E" Executable (EXE, DLL, …)
"D" Document (MS Office word document, MS Office excel sheet)
"A" Archive (Zip, Rar, Tar, …)
"G" Graphical format (Jpeg, GIF, TIFF, BM P, …)
"T" Text
"P" PDF format
"M" audio or video format
"Z" mail messages (MSG, …)

v3.13.0 245
Mark Note
"I" Disk image
"O" Other (anything that is not recognize d as one of the above)
Description of Scan Results
Available Scan Results (scan_result_i, scan_all_result_i)
value short description
long description
0 No Threats Found
No threat detection or the file is empty
1 Infected/Known
Threat is found
2 Suspicious Classified as possible threat but not identified as specific threat.
3 Failed To Scan
Scanning is not fully performed (For example, invalid file or no read permission). If no engine is included and scan is enabled, this will be the final result.
4 Cleaned / Deleted
Threat is found and file is cleaned (repaired or deleted): repair is not supported yet
5 Unknown Unknown signature. NOTE: this is only used in multiple hash lookup. For single hash lookup, scan_result_* are not returned as response. see for more details.Retrieve scan report by hash (duplicate)
6 Quarantined File is quarantined
7 Skipped Clean
Scan is skipped because this file type is in white-list*
8 Scan is skipped because this file type is in black-list*

v3.13.0 246
value short description
long description
Skipped Infected
9 Exceeded Archive Depth
Threat is not found but there are more archive levels which were not extracted.
10 Not Scanned / No scan results
Scan is skipped by the engine either due to update or other engine specific reason. If scan is disabled, this will be the final result.
11 Aborted The current scan was stopped by the server
12 Encrypted File/buffer is not scanned because the file type is detected as encrypted (password-protected). If the Internal Archive Library is ON encrypted return type is not going to be returned through Metascan scan progress callbacks since the engines do not perform any scan operations. If the Internal Archive Library is OFF Metascan will pass the encrypted files to the engines directly, bypassing the detection.
13 Exceeded Archive Size
The extracted archive is too large to scan
14 Exceeded Archive File Number
There are more files in the archive than configured on the server
15 Password Protected Document
Document that is protected by a password [e.g. Office documents or PDFs that require a password to view its contents]. If a file is password protected document, no sanitization will be applied.
17 Mismatch The file's extension does not match the detected file type. Only applicable when using workflows.
Scan not started

v3.13.0 247
This means the file has not yet been sent to the engines for scanning. The progress_percentage value will be 0 and the in_queue value will be non zero.
scan_results.scan_all_result_i = -1
scan_results.scan_all_result_a = ""
Scan partially completedThis means some engines have returned results but there are still more remaining. This progress_percentage value will be greater then 0 and less than 100.
Accumulated result at the time scan result was queried.
Scan is disabled or skippedThis means the request is complete but scanning has been disabled or has been skipped for some other reason such as file type mismatch. The progress_percentage value will be 100.
scan_results.scan_all_result_i = 10
scan_results.scan_all_result_a = "Not Scanned"
This is same as other Metascan interface such as COM interface and Java interface.
Creating Cpp library for REST API
This sample library is a C++ wrapper which interact with subset of REST API functions. These sample codes are written mainly for Metadefender Core v4.x but should be compatible with v3.x with minimum modification. It is a header only library, so there is no need for building it.
Sample Codes at Bitbucket
https://bitbucket.org/gergely_andras_nagy/mdrestclient
C API vs REST API
scanLocalFile: with filepath header for scanning a local file/file
scanFile: for sending a file for scan via POST/file
fetchScanResultById: for retrieving results via ID/file/{data_id}

v3.13.0 248
fetchScanResultByHash: for retrieving results via hash/hash/{md5|sha1|sha256 hash}
fetchSanitizedFileById: for retrieving a sanitized file via ID/file/converted/{data_id}
createSession: for creating a session/login
destroySession: for destroying a session/logout
getVersionInfo: for retrieving details about the product version/version
getLicenseInfo: for retrieving details about the licensing status of the /admin/licenseproduct
getEngineInfo: for retrieving information about the engines/stat/engines
Prerequisites for using the library
GCC 4.9+ or VS2013+
Prerequisites for building unit tests for the library
CMake 2.8+
GCC 4.9+ or VS2013+
Working internet connection for downloading Google's unit test framework
How to build unit tests
You should run CMake on TestOpswatMDRestLib/CMakeLists.txt found in the TestOpswatMDRestLib directory and use system dependent tools on the CMake output.
On Linux
Given you are standing in the root directory:
Making under Linux
$ mkdir build$ cd build$ cmake ../TestOpswatMDRestLib$ make
The executable test will be available under build/TestOpswatMDRestLib/test-mdrestclient
On Windows
After running CMake a Visual Studio solution file and projects will be generated. You can build the library using Visual Studio tools.

v3.13.0 249
How to use
The REST related functions can be accessed via the class, so you should create one MDRestfirst. In order to create MDRest you should provide type via template parameter.session
Session type
You can find two types of HTTP sessions: and MDPersistentHttpSession. MDPersistentHttpSession creates a persistent connection towards the MDSimpleHttpSession
REST server and re-uses it for every request, while MDSimpleHttpSession creates a new connection for every request. We recommend using MDPersistentHttpSession if you want to make consecutive requests. You should provide what type of you would like to use for the clientsession via template parameter.
Client type
This should be a class implementing . The client is used for sending requests to IMDHttpClientand receiving responses from the REST server. See for example.MDCurlHttpClient
Curl client
When using the curl client you should call or Opswat::MDCurlHttpClient::curlHttpClientInit() in your program. For more information Opswat::MDCurlHttpClient::curlHttpClientInitAll()
about initializing please refer to .curl_global_init documentation
Linking to libcurl and having libcurl headers are necessary if you want to use the MDCurlHttpClient in your application.
Using results of requests
Most of the functions found in MDRest return as a result. By calling MDResponse getJSON()on the response you can get the plain JSON answer received from the REST server in a string without any JSON parsing overhead. By calling a struct will be created and populated parse()by parsing the JSON. The struct's type depends on which function was called.
Using API keys
If you need to call functions which require API keys on REST side (like receiving license informations) you should get an API key first. After you have received an API key (for example after creating one with ) you should call with your key. By createSession() useSession()invoking useSession the provided API key will be included in every requests in the future.

v3.13.0 250
Example
Example code
#include <iostream>#include <string>#include <chrono>#include <thread> #include "md_rest.h"#include "md_curl_http_client.h"#include "md_http_session.h" using SessionType = Opswat::MDPersistentHttpSession<Opswat::MDCurlHttpClient>; int main(int argc, char* argv[]){ Opswat::MDCurlHttpClient::curlHttpClientInitAll(); try { // Create an MDRest object using persistent connection with curl client Opswat::MDRest<SessionType> rest(std::make_unique<SessionType>("127.0.0.1", 8008)); // Create session auto parsedLogin = rest.createSession("admin", "admin")->parse(); std::cout << "Session ID after login: " << parsedLogin->session_id << std::endl; rest.useSession(parsedLogin->session_id); // Initate scan for a local file by giving the path for the file and a display name std::unique_ptr<Opswat::MDResponse<Opswat::MDFileScanId>> response = rest.scanLocalFile("C:\\test.txt", "test"); std::unique_ptr<Opswat::MDFileScanId> parsedResponse = response->parse(); std::cout << "Data ID: " << parsedResponse->dataId << std::endl; // Give some time for scanning const int waitTime = 10; std::this_thread::sleep_for(std::chrono::milliseconds(waitTime));

v3.13.0 251
// Check periodically if the scan is still processing by using the raw JSON so we don't make a lot of parsing auto scanResult = rest.fetchScanResultById(parsedResponse->dataId); while (scanResult->getJSON().find("\"result\":\"Processing\"") != std::string::npos) { std::this_thread::sleep_for(std::chrono::milliseconds(waitTime)); scanResult = rest.fetchScanResultById(parsedResponse->dataId); } // Print the display name of the file and the overall scan result auto parsedScanResult = scanResult->parse(); std::cout << "Result for " << parsedScanResult->fileInfo->displayName << " is: " << parsedScanResult->scanResult->scanAllResultDesc << std::endl; // Get engine infos and print the engine name and type for all of them auto parsedEngines = rest.getEngineInfo()->parse(); for (auto &engine : parsedEngines->engines) { std::cout << "Engine name and type: " << engine->engineName << " -> " << engine->engineTypeDescription << std::endl; } // Use the previously created session ID for functions which require api key auto parsedVersion = rest.getVersionInfo()->parse(); std::cout << "Metadefender version: " << parsedVersion->version << "\nProduct ID: " << parsedVersion->productId << std::endl; // Destroy session when it is not needed anymore auto logout = rest.destroySession(parsedLogin->session_id); } catch (Opswat::MDException& e) { std::cout << e.what() << std::endl; } return 0;}
Notes

v3.13.0 252
Notes
Please note that the initialization function for curl is . Please check it's not thread safedocumentation
Persistent session with the curl client is . The same MDRest object not thread safeshouldn't be used from different threads.
Please use MDRest in a block. When facing an error the library throws try-catchdifferent types of exceptions. For example for connection MDConnectionExceptionerrors or when the parsing was unsuccessful.MDParsingException
Please find the licenses for third party libraries under licenses folder.

v3.13.0 253
5. Release Notes
New features
Many Metadefender Core components have been upgraded to 64-bit, including the REST server, allowing the scanning of very large archives simultaneously.
Support McAfee Web Gateway
Other changes
The Metadefender Mail Agent is no longer installed with Metadefender core. The Metadefender Mail Agent installer now needs to be generated from Metadefender Core's Management Console and then installed manually.
Scan results on the quarantine page are now linked to the scan results on the Logs page. If scan results are deleted from the Logs page they will also be removed from the quarantine page.
If the RAM drive is installed as part of Metadefender Core it will not be removed when Metadefender Core is uninstalled.
When the Metadefender Core license is expired the Management Console is now still accessible for configuration purposes
General and Known Issues
General
Metadefender Core 1, 4, and 8 come with a trial license good for 15 days after fresh installation (reinstalling does not reset trial).
Metadefender Core 12, 16, and 20 do not come with a trial license. To obtain a trial license, please contact OPSWAT sales ([email protected]).
Metadefender Core should be restarted whenever a new license has been applied via command line.
Metadefender Core was previously called Metascan.
Metadefender Core categorizes files as 'blocked' or 'allowed' based on the process results. Please refer to Callback for Processing a File (COM) for details.
Known issues

v3.13.0 254
Known issues
Metadefender Core embedded engines should not be installed on a system which has an alternate product provided by the same vendor, for example, installation of the Norman Scan Engine with Norman Security Suite. This configuration is not supported by Metadefender Core.
Metadefender Core license allows up to 10 Remote Desktop (RDP) sessions to a server running Metadefender Core . Please contact if you need more than OPSWAT supportten connections via RDP.
Scanning boot sector is only supported by the Total Defense/Quick Heal scan engine. Other engines will fail to scan for boot sector scan request.
REST Web Service installation may fail to install if UAC (User Access Control) is enabled. Turn off UAC and run the installation with Administrator privileges.
If logging all scan history is enabled, the Metadefender Core Management console dashboard may cause high load on mongoDB.
ICAP server does not block traffic if server is overloaded by default.
Metadefender Core does not support installation to directory paths that include non-ASCII characters.
Metadefender Core must have archive handling enabled in order to correctly scan GZIP content through the ICAP interface.
When Metadefender Core is configured to use a local instance of MongoDB (the default configuration) the HKEY_LOCAL_MACHINE\SOFTWARE\Wow6432Node\OPSWAT\Metascan\db_instance (or HKEY_LOCAL_MACHINE\SOFTWARE\OPSWAT\Metascan\db_instance for 32 bit systems) key must be set to 'localhost' or '127.0.0.1'. The local system cannot be referred to by IP address.
Metadefender Core does not support installation on systems where the TEMP environment variable contains more than one path.
In Metadefender Core 20 packages, the Sophos scan engine must have its definitions updated before scans can successfully complete.
Archives scanned through the COM interface do not have their scan results logged.
The setting "Maximum File Size for files scanned through the web interface" found on the Configuration->Scan Configuration page in the Metadefender Core Management Console cannot currently be imported or exported through the Backup/Restore feature.
Disabling the 'support_custom_engine' property will disable all engines in Metadefender Core.

v3.13.0 255
Threats found within archives will not be removed even if Metadefender Core is configured to delete or quarantine files that contain threats.
Verbose debug logs larger than 1GB cannot be downloaded from Metadefender Core management console, call omsDebugTool.exe from the command line instead.
Files scanned through the Process COM API only have partial logging. This includes files scanned through the ICAP interface.
File size must be less than 2GB when scanning single file via REST or Metadefender Client.

v3.13.0 256
6. Important Concepts and Terminology
Usable AVs (antivirus)
Usable AVs are the anti-malware engines that Metadefender Core uses to process scan requests. All embedded engines are usable anti-malware engines. For anti-malware applications that are installed by you, please check the list of products that Metascan supports.
This list can be retrieved from:
Init API
Any command line utility (omsCmdUtil.exe) command
Metadefender Core Management Console Configuration Page
Current AVs
Current AVs are anti-malware engines that Metadefender Core automatically uses for scans and updates. This list is affected by licenses and properties such as included antiviruses, excluded antiviruses, and supported pre-installed antiviruses.
For example, if you installed Metadefender Core 8 and you have McAfee VirusScan installed on your machine, but you exclude the ESET scanning engine and disable customer-licensed products, your usable AVs and current AVs will be designated as below:
Usable AVs (Usable AMs) Current AVs
Avira scan engine
ESET scan engine
ClamAV scan engine
AhnLab scan engine
ThreatTrack scan engine
Bitdefender scan engine
Total Defense scan engine
Quick Heal scan engine
McAfee VirusScan
Avira scan engine
ClamAV scan engine
AhnLab scan engine
ThreatTrack scan engine
Bitdefender scan engine
Total Defense scan engine
Quick Heal scan engine

v3.13.0 257
Customer licensed engine
Customer licensed engine is the term used to describe an antivirus application that is already installed on your server (for example, an antivirus application that is installed on all computers in your corporate environment) which can then be incorporated as another engine to be used by Metadefender Core. You can view a list of antivirus applications that can be used as a customer licensed engine . A compatible antivirus application that is installed on the server herewill be automatically detected and made visible as an engine in the Metadefender Core Management Console (MMC). You can then use the MMC to enable the engine for Metadefender Core.
Metadefender Core's embedded engines are configured for optimal performance, Note: whereas a customer licensed engine is not. Thus, the performance of Metadefender Core can be adversely affected by a customer licensed engine.
Synchronous/asynchronous scan
Metadefender Core can be delegated to queue scan requests and return the results of queued scans via callbacks with extensive scan details. Even if your application is single threaded, you can process many scan requests without blocking. In other words, as soon as you have data to be scanned and you call the asynchronous scan API of Metadefender Core (for example, PutToScanQueue), you can continue to request scans without waiting for the results of the scan.
On the other hand, a synchronous scan is more suitable if your application creates scan requests in many threads. Refer to the ScanEx section on how to retrieve scan details when scanning synchronously.
Valid file name
A valid file name as a parameter for any API related to scanning files should meet the following requirements:
Absolute path to file, folder, and drive (e.g., c:, C:\Windows, C:\boot.ini)
File path should be limited to the local machine (e.g., “\\remote_machine\testfile.txt” would be recognized as an invalid path)

v3.13.0 258
7. Metadefender / Client
About This Guide
Welcome to the Metadefender Client user guide. This guide is intended to provide the information you need to:
Install, configure, and manage Metadefender Client.
Learn about new features, updated features, and bug fixes on each Metadefender Client Release (i.e. each product version's release notes)
Learn about frequently asked questions and additional concepts through our library of knowledge base articles
While we offer the option to download this guide to a PDF file, it is optimized for online browser viewing. OPSWAT updates the online version of the guide regularly on an "as needed" basis. By viewing the document online, you are assured that you are always seeing the most recent and most comprehensive version of the guide.
Key Features of Metadefender Client
File scanning and processing with Metadefender Core workflows, including:
File sanitization (aka Content Disarm and Reconstruction) using 90 data sanitization engines
Multi-scanning for malware with more than 30 leading anti-malware engines
Heuristic analysis to detect more unknown and targeted attacks
Vulnerability Engines
File Type Verification
Archive Extraction
Enumeration and scanning of running processes and loaded libraries
Blocking of USB devices until they have been scanned by Metadefender and found clean

v3.13.0 259
1.
2.
Available Metadefender Client Packages
Metadefender Client
Metadefender Client can be run as a single executable for scanning files on demand without the need for installation.
Metadefender USB Client
The Metadefender USB Client can be installed on endpoints and run in the background, monitoring for any USB storage devices that are inserted into the system. When a USB storage device is detected Metadefender Client will block access to that device and prompt the user to initiate a scan. The user can select two options for scanning the USB storage device.
Browse mode - Allows users to specify specific files, which if found clean will be copied to the "Metadefender" folder on the desktop. If the file is suspicious, it will indicate this in the "Suspicious files" tab and not copy the file. After each scan, the drive will be ejected, the user can restart the process by removing and re-plugging-in the USB.
Full Scan mode - Scans the entire drive, if the drive is found clean then it unlocks the drive. Once unlocked, the drive should work as normal, it is fully accessible from Windows Explorer. It should be noted that if the user wants to copy files from the file system to the USB they will need to use this mode to unlock the drive first. If the drive is found dirty, it will be ejected from the system after scanning
Metadefender Cloud Client
The Metadefender Cloud Client scans files with the engines available in Metadefender Cloud (Metadefender.com).
Metadefender Client Configuration in Metadefender Core 3.x
"Metadefender Client Download Configuration" lets you specify the settings for the Metadefender Client package that you generate and download from the bottom of the page. After a client has been generated, the Metadefender Client download page (<ip or dns address>:8008/#/client) can be shared with anyone who should be able to use Metadefender Client to scan files with this Metadefender Core server.
Access the Metadefender Core Management Console .

v3.13.0 260
2. Click the Sources tab and then c lick Metadefender Client .
Note: The Windows Metadefender Client is supported to run only on endpoints running Windows 7 or later.
The following properties can be set for the Metadefender Client download package.
Property Description Default Value
Metadefender Core
Local Metadefender Core
This is the address that Metadefender Client will use to access the Metadefender Core server. This should be an address (IP address or machine name) that will be accessible from every machine where Metadefender Client will be run.
<IP Address>:8008/metascan_rest/
Scan Options
File Size Limit
The maximum size of files to be scanned by Metadefender Client. Files larger than this size will not be scanned. Maximum file size limit: 2GB
50 MB
Scan Type
Set a default behavior
Select option to be used as the default behavior:
Full Scan: scans system drives, physical drives, running memory processes, and removable drives
Process (Quick Scan)

v3.13.0 261
Property Description Default Value
Process (Quick Scan): scan running memory processes
Custom: select which system components to scan
Allow custom selection in the client
Allows a user of Metadefender Client to select to which system components to scan.Enabling components will show the components to be selected upon startup of the Client.
No components are selected
Local Log Directory
Save scan log
The directory where Metadefender Client will log all scanning activity
Enabled
Destination: %AppData%\Metadefender-Local
Allow App to Exit
Specifies whether the Metadefender Client can be exited from the system tray
Enabled
After configuration changes have been made, you can generate a new Metadefender Client downloadable package by clicking . Update Client
Release Notes
Changes in 3.12.5
Better handling of Malformed URLs that are inputted in the Metadefender Core Server URL dialog
Resolved an issue where the splash screen did not close under older operating systems (e.g. Windows 7 64bit)
Removed files from the Metadefender Client package which caused the package to be detected as encrypted archive
Improved performance by adding a hash lookup for existing scan results before uploading a file for scanning
Added support for network mapped drives

v3.13.0 262
Improved the reporting of processes with infected DLLs in the exported report
Added support for files that have been whitelisted or blacklisted on the Metadefender Core Server

v3.13.0 263
8. Metadefender / Email
Second Layer of Defense for Your Email Security Gateway
Email security gateways, although offering tremendous protection, are not perfect. Metadefender Email Security enhances existing email security gateways by offering additional protection with more than 30 anti-malware engines (leveraging both heuristics and signature-based detection) and data sanitization to combat increasingly popular document-based or image-based attacks.
Key Features
Prevent with email sanitization using 90 data sanitization engines
Detect and prevent more threats by scanning with more than 30 leading anti-malware engines
Leverage analysis to detect more unknown and targeted attacksheuristic
Decrease detection time of outbreaks
Easily integrate with existing email security layer
RealTime Monitoring threats
RealTime Alert / Monitoring
Schedule Report
High performance
Quarantine detected/sanitized Email
Deployment Options
Mail Proxy Deployment (Generic)
Email Proxy between Mail Gateway (anti-spam) and Mail Server

v3.13.0 264
Cloud Deployment
For hosted solution such as Office 365 and G Suite (formerly Google Apps for Work) Gmail
Onsite Microsoft Exchange Deployment

v3.13.0 265
Metadefender Email Does Not
Replace Email Gateway Spam Filtering
Replace Mail Server
1. Before Installation
Metadefender Email provides multiple deployment options as described in this documentation. If you need additional information in selecting the optimal deployment option, OPSWAT Technical Support is available to assist. Metadefender Email's performance and capacity vary depending on the specifications of the system hosting Metadefender Email. Increasing the resources available to the Metadefender Email system will likely increase the performance of the Metadefender Email system, however this is not guaranteed.
Increase Capacity and Resiliency
Single Server Capacity
System Profile Email Consists of Throughput CPU usage
4 Core Processor
16 GB RAM
64 bit OS
Metadefender Core 20
30% of emails with no attachment
40% of emails with single attachment (sanitization is not enabled)
12.5% of emails has PDF* attachment (sanitization is enabled)
12.5% of emails has DOCX* attachment (sanitization is enabled)
5% of emails has JPG* attachment (sanitization is enabled)
300 emails / minute
50-100%
*Files that we used for testing have the following sizes. The result may vary depending on data set you select. We strongly recommend to conduct testing based on your organization email statistics. If you need assistance on the tools for testing, contact OPSWAT support.
DOCX: 220 KB
PDF: 8 KB
JPG: 650 KB

v3.13.0 266
Load Balancing Metadefender Email
For Mail Proxy and Hosted deployment, this is desired configuration to increase the resilience and performance.
In order to achieve the following options should be considered.
Using load balancer (e.g., elastic load balancer, barracuda load balancer)
Using SMTP failover mechanism on your email gateway (configuration varies depending on the email gateway solution).
Load Balancing (remote) Metadefender Core
This is mainly for onsite exchange deployment scenario. See Multiple Metadefender Core for further instructions.Instances Configuration
System Requirements
The following does not include the system requirement for Metadefender Core if installed on the same system.
Hardware requirements
System RAM: 2 GB
Free Hard Drive Space: 16GB
CPU: 4 core
Software requirements
Operating System: Windows 7 / 8 / 8.1 / 10 / 2008 R2 / 2012 / 2012 R2
Bitness: 64-bit only
(Optional) 32-bit OpenSSL if using TLS encryption
Additional installation of 3rd party framework/components
Name Details Optional
.NET framework 4 Client ProfileExtended
REQUIRED
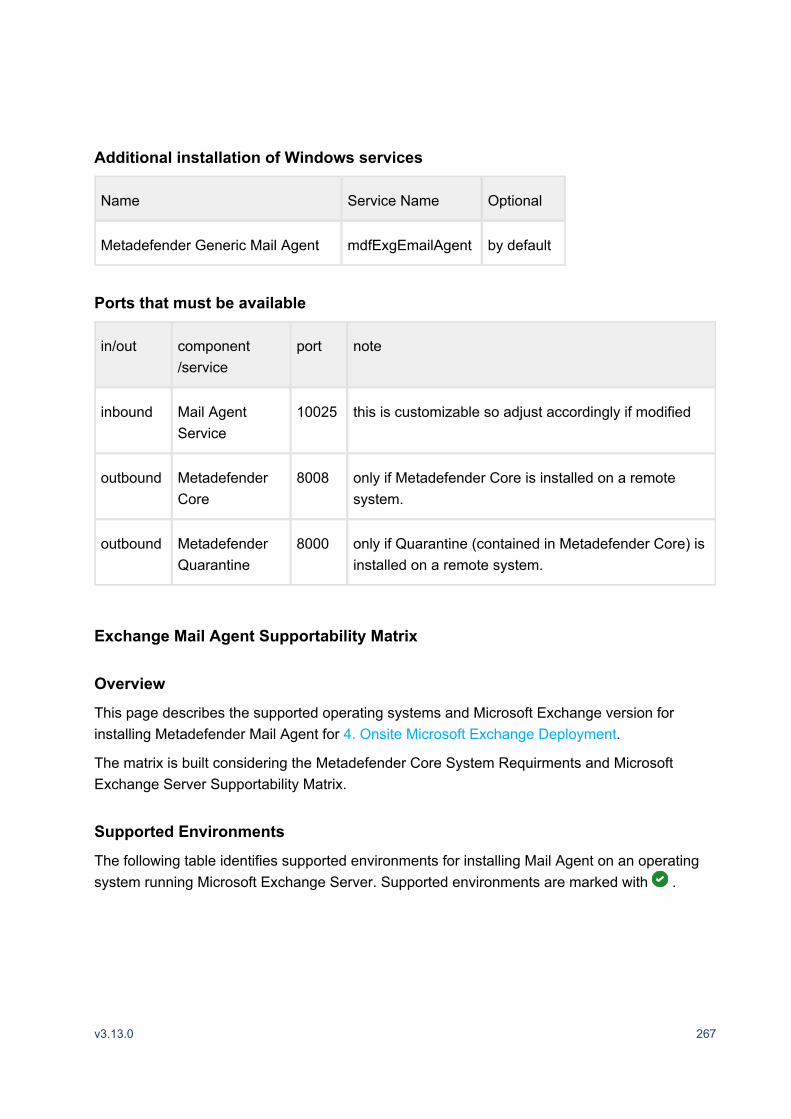
v3.13.0 267
Additional installation of Windows services
Name Service Name Optional
Metadefender Generic Mail Agent mdfExgEmailAgent by default
Ports that must be available
in/out component/service
port note
inbound Mail Agent Service
10025 this is customizable so adjust accordingly if modified
outbound Metadefender Core
8008 only if Metadefender Core is installed on a remote system.
outbound Metadefender Quarantine
8000 only if Quarantine (contained in Metadefender Core) is installed on a remote system.
Exchange Mail Agent Supportability Matrix
Overview
This page describes the supported operating systems and Microsoft Exchange version for installing Metadefender Mail Agent for .4. Onsite Microsoft Exchange Deployment
The matrix is built considering the Metadefender Core System Requirments and Microsoft Exchange Server Supportability Matrix.
Supported Environments
The following table identifies supported environments for installing Mail Agent on an operating system running Microsoft Exchange Server. Supported environments are marked with .

v3.13.0 268
Exchange Server Version
Windows Server 2008
Windows Server 2008 R2 Service Pack 1
Windows Server 2012
Windows Server 2012 R2
Exchange 2007 Service Pack 3
Exchange 2010 Service Pack 3
Exchange 2013 Cumulative Update 13
Exchange 2016 Cumulative Update 2
2. Mail Proxy Deployment (Generic)
Email Proxy between Mail Gateway (anti-spam) and Mail Server
Configuring Incoming Threat Protection
In order to install and configure Metadefender Email incoming threat protection, you must first install Metadefender Email and then configure the routing of the incoming threat protection, verify the routing settings, and then connect to your e-mail gateway.
Installation

v3.13.0 269
1.
2.
3.
Installation
Generate Metadefender Email installer package from Metadefender Core Management console. "Source">"Metadefender Email" > "Setup" page, choose "Generic / Cloud Agent". Download the Metadefender Email installer, copy it to where you want to install it, and follow the installation wizard to finish installation.
If you get Metadefender Email installer from OPSWAT portal or another source other than the Metadefender Core server you want it to process with, run the installation by opening a command prompt and type the following command:
MetadefenderEmailAgent.exe METASCANAPIKEY=<Mail Agent installer ID> METASCANURL=http://<Metadefender Core IP address>:8008/metascan_rest [ENTER]
Notes:
Replace with the ID shown on Metadefender Core <Mail Agent installer ID>management console source page under Email setup sectionNote:
Replace with the IP address or hostname of the <Metadefender Core IP address> machine where you have installed Metadefender Core.
Metadefender Email will automatically detect if Exchange Server is installed or not and install the appropriate edition (Proxy/Exchange)
Configure Routing & Connect to E-mail gateway
In this section, you will connect Metadefender Email to your mail server.
Open the Metadefender Core Management Console.
Select .Sources > Metadefender Email > Setup
Click on the newly installed Metadefender Email instance.Setup

v3.13.0 270
3.
4.
a.
b.
5.
Connect Metadefender Email to Mail Server.
In the Email Relay Out Server field, specify the of your mail IP address (or name)server and the SMTP protocol port that the mail server is listening on (usually port 25).
In the Email Direction field, select . Incoming
Connect E-mail Gateway to Metadefender Email

v3.13.0 271
5.
a.
6.
1.
2.
3.
Configure you're 3rd party e-mail gateway to forward all e-mails to the server:port specified in the dialog.
By default, Metadefender Email listens on SMTP port 10025 Make sure that Note: . your firewall allows traffic on the port used by the Mail Agent. You might need to open port 10025 in Windows Firewall
Click to save your changes.Apply
Verify Settings
In this section, you will verify your configuration settings and confirm that Metadefender Email works as expected.
Open the Metadefender Core Management Console.
Select .Sources > Metadefender Email > Setup
Click on the newly configured Metadefender Email instance.Verify

v3.13.0 272
3.
4.
5.
6.
7.
Select as verification type and specify an Incoming external e-mail address as senderand .a local mailbox as recipient
Click to perform the test. If the test is successful, Metadefender Email is Applyconfigured correctly.
Optionally, manually send an e-mail from an external source to a local mailbox to verify that email routing from the gateway to Metadefender Email is configured correctly.
Go to the Metadefender Core Management Console Dashboard and verify that the e-mail has been scanned.

v3.13.0 273
1.
Configuring Outgoing Threat Protection
In order to install and configure Metadefender Email outgoing threat protection, you must first install Metadefender Email and then configure the routing of the outgoing threat protection, verify the routing settings, and then connect your mail server to Metadefender Email.
Installation
Generate Metadefender Email installer package from Metadefender Core Management console. "Source">"Metadefender Email" > "Setup" page, choose "Generic / Cloud Agent". Download the Metadefender Email installer, copy it to where you want to install it, and follow the installation wizard to finish installation.
If you get Metadefender Email installer from OPSWAT portal or another source other than the Metadefender Core server you want it to process with, run the installation by opening a command prompt and type the following command:
MetadefenderEmailAgent.exe METASCANAPIKEY=<Mail Agent installer ID> METASCANURL=http://<Metadefender Core IP address>:8008/metascan_rest [ENTER]
Notes:
Replace with the ID shown on Metadefender Core <Mail Agent installer ID>management console source page under Email setup sectionNote:
Replace with the IP address or hostname of the <Metadefender Core IP address> machine where you have installed Metadefender Core.
Metadefender Email will automatically detect if Exchange Server is installed or not and install the appropriate edition (Proxy/Exchange)
Configure Routing & Connect to E-mail gateway
In this section, you will connect Metadefender Email to your mail server.
Open the Metadefender Core Management Console.

v3.13.0 274
2.
3.
4.
a.
b.
5.
Select .Sources > Metadefender Email > Setup
Click 'Setup' on the newly installed Metadefender Email instance.
Connect Metadefender Email to Mail Server.
In the Email Relay Out Server field, specify the of your IP address (or name)outbound gateway and the SMTP protocol port that the outbound gateway is listening on.
In the Email Direction field, select . Outgoing
Connect your Mail Server to Metadefender Email

v3.13.0 275
5.
a.
6.
7.
8.
1.
2.
3.
Configure you're 3rd party e-mail gateway to forward all e-mails to the server:port specified in the dialog.
By default, Metadefender Email listens on SMTP port 10025 Make sure that Note: . your firewall allows traffic on the port used by the Mail Agent. You might need to open port 10025 in Windows Firewall
Click to save your changes.Apply
Send an e-mail from a local mailbox to an external source and verify that the e-mail is being delivered as expected.
Go to the Metadefender Core Management Console Dashboard and verify that the e-mail has been scanned.
Verify Settings
In this section, you will verify your configuration settings and confirm that Metadefender Email works as expected.
Open the Metadefender Core Management Console.
Select .Sources > Metadefender Email > Setup
Click on the newly configured Metadefender Email instance.Verify

v3.13.0 276
3.
4.
5.
6.
7.
Select as verification type and specify an and Outgoing local mailbox as sender an .external e-mail address as recipient
Click to perform the test. If the test is successful, Metadefender Email is Applyconfigured correctly.
Optionally, manually send an e-mail from a local mailbox to an external source to verify that email routing from the Mail Server to Metadefender Email is configured correctly.
Go to the Metadefender Core Management Console Dashboard and verify that the e-mail has been scanned.

v3.13.0 277
1.
2.
3.
4.
1.
2.
3.
Configuring Recipient Verification
The Generic Mail Agent is capable of performing basic recipient verification on the incoming emails in order to ensure that emails not bound for a specific domain or containing illegal characters do not enter the system. By default, recipient verification is enabled but no domains are configured so every domain will be considered an accepted domain. If recipient verification fails the email will not enter the system.
Reject emails not bound for local domain(s)
In order to discard emails that are not addressed to recipients in your domain(s) you need to configure Mail Agent by specifying a list of local domains that are accepted.
Go to the installation folder (by default C:\Program Files (x86)\OPSWAT\Metadefender Core <engine count>\Metadefender Mail Agent)
Open as administrator the file Metadefender.Email.Engine.Generic.Agent.dll.config for editing
Add a comma (,) separated list of local domains as value for the setting called EmailRelayInLocalDomains
<setting name="EmailRelayInLocalDomains" serializeAs="String"> <value>opswat.com,metadefender.com</value></setting>
Note: by default the value is (*) which means all domains are accepted.Note: Multiple domains are separated with a comma (,) character. It is possible to prefix the domain name with an * to accept sub domains. For example: * will accept opswat.comboth & .opswat.com subdomain.opswat.com
Save the file.
Verify Settings
In this section, you will verify your recipient verification settings work as expected.
Open the Metadefender Core Management Console.
Select .Sources > Metadefender Email > Setup
Click on the newly configured Metadefender Email instance.Verify

v3.13.0 278
3.
4.
5.
6.
Select as verification type and specify an Recipient Verification an external e-mail and address as sender, a local mailbox as valid recipient e-mail address an invalid
.(unwanted) e-mail address as Invalid recipient address.
Click to perform the test. If the test is successful, recipient verification is Applyconfigured correctly.
Optionally, manually send an e-mail from an external source to a local mailbox to verify that recipient verification is working as expected.

v3.13.0 279
1.
2.
3.
4.
TLS support (Incoming/Outgoing emails)
Metadefender Email can both receive and send emails using TLS encryption for increased security. Refer to the sections below to enable TLS for incoming and/or outgoing emails.
Prerequisite
OpenSSL 32-bit
Incoming TLS support
Follow the instrutions below if you want to enable TLS encryption for incoming emails.
I have a pcks#12 certificate:
For these steps you will need a pcks#12 certificate file (.pfx).
If you don't have a certificate .pfx file, refer to for instructions how Export a certificateto export a certificate to a .pfx file.
Ensure that OpenSSL is installed. If you do not have OpenSSL installed, it can be downloaded from here: https://slproweb.com/products/Win32OpenSSL.html (unofficial distribution)
Open an administrator command prompt and navigate to the Mail Agent folder (default: C:\Program Files (x86)\OPSWAT\Metadefender Mail Agent)
Type the following command:
enableTls.exe -i -b "<path to .pfx>" -j "<certificate password>"
(Replace <path to .pfx> with the path to your .pfx certificate file. -j parameter can be omitted if the certificate is not password protected)
The certificate is imported and TLS settings automatically updated:
C:\Program Files (x86)\OPSWAT\Metadefender Mail Agent>enableTls.exe -i -b "<path to .pfx>" -j "<certificate password>"Reading Mail Agent settings...Updating settings...Mail Agent settings updated successfully

v3.13.0 280
4.
1.
2.
3.
4.
1.
2.
3.
Metadefender Email will now accept TLS encryption when receiving emails.
I have a pcks#8 certificate:
For these steps you will need a certificate file and a private key file (pcks#8).
Ensure that OpenSSL is installed. If you do not have OpenSSL installed, it can be downloaded from here: https://slproweb.com/products/Win32OpenSSL.html (unofficial distribution)
Open an administrator command prompt and navigate to the Mail Agent folder (default: C:\Program Files (x86)\OPSWAT\Metadefender Mail Agent)
Type the following command:
enableTls.exe -i -y "<path to certificate file>" -z "<path to private key file>"
(Replace <path to certificate file> with the path to your certificate file and <path to private key file> with with the path to your private key file)
The certificate and private key and imported and TLS settings automatically updated:
C:\Program Files (x86)\OPSWAT\Metadefender Mail Agent>enableTls.exe -i -y "<path to certificate file>" -z "<path to private key file>"Reading Mail Agent settings...Updating settings...Mail Agent settings updated successfully
Metadefender Email will now accept TLS encryption when receiving emails.
I want to use a self-signed certificate:
Follow these steps if you wish to use a self-signed certificate.
Ensure that OpenSSL is installed. If you do not have OpenSSL installed, it can be downloaded from here: https://slproweb.com/products/Win32OpenSSL.html (unofficial distribution)
Open an administrator command prompt and navigate to the Mail Agent folder (default: C:\Program Files (x86)\OPSWAT\Metadefender Mail Agent)
Type the following command:

v3.13.0 281
3.
4.
1.
2.
3.
enableTls.exe -i -e -d 365 -c US -s "California" -l "San Francisco" -o "Company"
Replace any of the following parameters with desired values:-d = Number of days the certificate is valid-c = Country code (2 letter ISO) -s = State/District-l = City-o = Company name
A new certificate is generated and TLS settings automatically updated:
C:\Program Files (x86)\OPSWAT\Metadefender Mail Agent>enableTls.exe -i -e -d 365 -c US -s "California" -l "San Francisco" -o "Company"Reading Mail Agent settings...Generating a 4096 bit RSA private key............++..............................................................................++ writing new private key to 'tls_key.pem'-----Updating settings...Mail Agent settings updated successfully
Metadefender Email will now accept TLS encryption when receiving emails.
Outgoing TLS support
To enable outgoing TLS encryption, do the following:
Ensure that OpenSSL is installed. If you do not have OpenSSL installed, it can be downloaded from here: https://slproweb.com/products/Win32OpenSSL.html (unofficial distribution)
Open an administrator command prompt and navigate to the Mail Agent folder (default: C:\Program Files (x86)\OPSWAT\Metadefender Mail Agent)
Type the following command:
enableTls.exe -g -r "<mail_server> -m 587 -q "<username>" -w "<password>"

v3.13.0 282
3.
4.
1.
2.
a.
b.
c.
d.
e.
Replace any of the following parameters with desired values:-r = Email relay out SMTP server name-m = Email relay out SMTP server port-q = Email relay out SMTP authentication user name. (Omit if no authentication is used)-w = Email relay out SMTP authentication password. (Omit if no authentication is used)
TLS settings are automatically updated:
C:\Program Files (x86)\OPSWAT\Metadefender Mail Agent>enableTls.exe -gReading Mail Agent settings...Updating settings...Mail Agent settings updated successfully
Metadefender Email will now use TLS when forwarding emails to your mailserver/gateway.
To enable both incoming and outgoing TLS, the parameters should be combined, for example:
enableTls.exe -i -b "<path to .pfx>" -j "<certificate password>" -g -r "<mail_server> -m 587 -q "<username>" -w "<password>"
For a complete list of available command line parameters, type: enableTls.exe -h
Export a certificate
If you have an existing certificate in your certificte store that you want to use with Metadefender Email to enable incoming TLS it will first have to be exported into a .pfx file. Follow the instructions below to export the certificate.
Run Microsoft Management Console (mmc.exe).
Add the Certificates Snap-In:
Select File > Add/Remove Snap in...
Select 'Certificates' and click 'Add >'.
Select the account for whom the certificate is installed (usually this is 'Computer account'), then click 'Next >'.
Select 'Local Computer' if the certificate is installed this computer, then click 'Finish'.
Click 'OK' to close the 'Add or Remove Snap-ins' dialog.

v3.13.0 283
2.
e.
f.
g.
h.
Navigate to the certificate you wish to export, then right-click and select 'All Tasks > Export...'.
Click 'Next >' in the 'Certificate Export Wizard' welcome step.

v3.13.0 284
2.
h.
i.
j.
Select 'Yes, export the private key' and click 'Next >'.
Note: The certificate must include the private key, so If this option is unavailable the certificate cannot be used with Metadefender Email.
Select 'Personal Information Exchange - PKCS #12 (.PFX) and click 'Next >'.
Specify a certificate password and click 'Next >'.

v3.13.0 285
2.
j.
k.
l.
m.
Specify a file name for the exported certificate and click 'Next >'.
Click 'Finish' to complete the export.

v3.13.0 286
2.
m.
1.
2.
3.
A dialog will display that export was successful.
Once the export is complete, refer to for instructions TLS support (Incoming/Outgoing emails)how to install the certificate in Metadefender Email.
3. Cloud Deployment
Overview
For hosted solution such as Office 365 and G Suite (formerly Google Apps for Work) Gmail
Steps
Configure the hosted email server to accept email from Metadefender Email server.
Configure Metadefender Email to relay out to hosted email server and use port 25.
Update MX record to point to Metadefender Email server.
Limitation
SPF enforcement will be skipped on the hosted email server

v3.13.0 287
1.
2.
3.
Google Apps integration
Overview
Configure the hosted email server to accept email from Metadefender Email server.
Configure Metadefender Email to relay out to hosted email server.
Update MX record to point to Metadefender Email server.
Detailed Steps
Step 1.1
Go to and login to your Google Apps subscription.https://admin.google.com
Step 1.2
Click 'MORE CONTROLS'.
Step 1.3
Click 'Apps'.

v3.13.0 288
Step 1.4
Click 'Google Apps'.
Step 1.5
Click 'Gmail'.

v3.13.0 289
Step 1.6
Click 'Advanced settings'.

v3.13.0 290
Step 1.7
Scroll down to the 'Inbound gateway' section and click 'CONFIGURE'.
Step 1.8
Specify a gateway name (Metadefender Email Relay) and the IP address of the Metadefender Email server. Check 'Automatically detect external IP (recommended)', 'Reject all mail not from gateway IPs' and 'Require TLS connection from the email gateways listed above'.

v3.13.0 291
Step 1.9
Click 'SAVE' at the bottom right of the screen to save the changes.
Step 2.1
Connect to the Mail agent server and run the following REST POST request (using ,for example, POSTMAN) to http://localhost:8000/MailAgent/Settings
{"EmailRelayInDirection": 0,"EmailRelayInLocalDomains": [],"EmailRelayInPort": 25,"EmailRelayOutPassword": null,"EmailRelayOutPort": 25,"EmailRelayOutServer": "alt1.aspmx.l.google.com","EmailRelayOutUseTls": true,"EmailRelayOutUsername": null}

v3.13.0 292
Step 2.2
Verify routing settings by sending an email to a Google Apps recipient directly to the Metadefender Email server and verify that it arrives correctly in the recipient inbox.
Step 3.1
Refer to your Internet domain registrar for details how to change MX record to point to Metadefender Email IP address. Verify email routing by sending an email to a Google Apps recipient.
Make sure that your MX record changes have propagated before verifying email routing.
Additional notes
Quarantine: Google Apps always does a malware check on all incoming emails, so releasing an infected item from quarantine will be rejected by Google Apps. As a workaround for this, configure quarantine to deliver emails to an alternative SMTP server that can accept infected emails

v3.13.0 293
1.
2.
3.
1.
2.
3.
4.
Microsoft Office 365 Integration
Overview
Configure the hosted email server to accept email from Metadefender Email server.
Configure Metadefender Email to relay out to hosted email server.
Update MX record to point to Metadefender Email server.
Detailed Steps
Configure the hosted email server to accept email from Metadefender Email server
Goto https://portal.office.com and login with your Office365 credentials.
Go to Office 365 Portal > Admin > Admin Centers > Exchange. Once the Exchange Admin has opened, go to mail flow > connectors and click + to add a new connector.
Select From: Partner organization and To: Office 365, then click Next
Specify a name for the connector (in this case Metadefender Email) and ensure that the option 'Turn it on' is checked. Then click Next.

v3.13.0 294
4.
5.
6.
Select 'Use the sender's domain' and click Next.
Click on the +.

v3.13.0 295
6.
7.
8.
Enter * as domain and click OK. Then c lick Next.

v3.13.0 296
8.
9.
Select 'Reject email messages if they aren't sent over TLS' and 'Reject email messages if they aren't sent from within this IP address range', then click +
Specify your public IP address (in this case ( 213.149.186.214) and click OK. Then click Next.

v3.13.0 297
9.
10. Verify connector properties and click Save to save the connector.
Configure Metadefender Email to relay out to hosted email server.

v3.13.0 298
1.
2.
3.
Configure Metadefender Email to relay out to hosted email server.
Obtain your MX record address by going to > Admin > Settings > https://portal.office.comDomain and click on your domain. Copy the MX Record value to the clipboard.
Connect to the Mail agent server and run the following REST POST request (using ,for example, POSTMAN) to . Specify the MX record http://localhost:8000/MailAgent/Settingsaddress obtained in the previous step and enter it in the EmailRelayOutServer value:
{"EmailRelayInDirection": 0,"EmailRelayInLocalDomains": [],"EmailRelayInPort": 25,"EmailRelayOutPassword": null,"EmailRelayOutPort": 25,"EmailRelayOutServer": "<MX record address>","EmailRelayOutUseTls": true,"EmailRelayOutUsername": null}
Verify routing settings by sending an email to a Office365 recipient directly to the Metadefender Email server and verify that it arrives correctly in the recipient inbox.
Update MX record to point to Metadefender Email server.
Refer to your Internet domain registrar for the details how to change MX record to point to Metadefender Email IP address. Verify email routing by sending an email to a Office365 recipient.
Make sure that your MX record changes have propagated before verifying email routing.

v3.13.0 299
4. Onsite Microsoft Exchange Deployment
Metadefender Email can only be installed on Hub or Edge role Exchange Servers (2007, 2010, 2013 or 2016).
Metadefender Core must be installed on separate machine than the Exchange Server.
Installation
Generate Metadefender Email installer package from Metadefender Core Management console. Go to "Source">"Metadefender Email" > "Setup" page, choose "Exchange Agent". Download the Metadefender Email installer, copy it to the Exchange server, and follow the installation wizard to finish installation.
If you get Metadefender Email installer from OPSWAT portal or another source other than the Metadefender Core server you want it to process with, run the installation by opening a command prompt and type the following command:

v3.13.0 300
MetadefenderEmailAgent.exe METASCANAPIKEY=<Mail Agent installer ID> METASCANURL=http://<Metadefender Core IP address>:8008/metascan_rest [ENTER]
Notes:
Replace with the ID shown on Metadefender Core <Mail Agent installer ID>management console source page under Email setup section
Replace with the IP address or hostname of the <Metadefender Core IP address> machine where you have installed Metadefender Core.
Metadefender Email will automatically detect if Exchange Server is installed or not and install the appropriate edition (Proxy/Exchange)
How To Verify
To verify that the Exchange Transport Agent has been installed successfully, open the Exchange Management Shell and type 'Get-TransportAgent' [ENTER]
Ensure that 'OPSWAT Metadefender' is listed and its enabled state is 'True'
[PS] C:\Windows\system32>Get-TransportAgent Identity Enabled Priority-------- ------- --------Transport Rule Agent True 1DLP Policy Agent True 2Malware Agent False 3Text Messaging Routing Agent True 4Text Messaging Delivery Agent True 5System Probe Drop Smtp Agent True 6System Probe Drop Routing Agent True 7OPSWAT Metadefender True 8
5. Notification and Report
Available Notification / Report
Infection Email Notification
Sanitized Email Notifications
Quarantine Reports

v3.13.0 301
1.
2.
a.
b.
c.
d.
Email Server For Notification
In the Metadefender Core Management Console, go to Sources > Metadefender Email > Settings
If you have already configured the SMTP settings and the Status is connected, skip to step 3.
Click .Update
In the Host field, specify the IP address or name of your mail server. You may also use an alternative mail server to deliver reports and Note:
notifications. To do this, replace the Host value with your alternative mail server address and specify Port, SSL, Username and Password settings as required for the alternative mail server.
Click .Save
SMTP connection will be validated and the status is updated to if Connectedconnection is established successfully.
Customizing Disclaimers

v3.13.0 302
Customizing Disclaimers
Currently customizing disclaimers are only supported using script or tools. Please contact OPSWAT support to obtain the instructions and tools.
Error Email Notification
Description
Metadefender Email can send a notification to the Administrator if unexpected events occur, such as loss of connection to Metadefender Core, Mail Sever/Gateway or queue build ups.
For a complete list of notifications please see .Mail Agent Alerts
Location
The tool is called and is shipped with the installer.configNotification.exe
The default location will be C:\Program Files (x86)\OPSWAT\Metadefender Core <x>\Metascan Quarantine
Run
If you run you will be able to see the help info:configNotification.exe -h
configNotification.exe -hUsage: configNotification.exe [OPTIONS]Example: configNotification.exe -t All -s [email protected] -r [email protected] --orgRecipients --debug Options: -t, --type=NOTIFICATION TYPE [REQUIRED] the NOTIFICATION TYPE you wish to change Possible values: All -> Enables all notifications (errors, blocked, sanitized, quarantined) QuarantinedEmail -> Enables the notification which is triggered when an email is sent to Quarantine QuarantinedFile -> Enables the notification which is triggered when a file is sent to Quarantine Blocked -> Enables the notification which is triggered when an email is blocked by Mail Agent Sanitized -> Enables the notification which is triggered when an email is sanitized by Mail Agent OnlyErrors -> Enables the error notifications NonErrors -> Enables the non-error notifications

v3.13.0 303
(blocked, sanitized, quarantined) -s, --sender=SENDER EMAIL [REQUIRED] the SENDER EMAIL from where the notification(s) will be sent -r, --recipients=RECIPIENT EMAIL(S) [REQUIRED] if notification type is All/OnlyErrors otherwise [OPTIONAL] The RECIPIENT EMAIL(S) where to send the notification(s) For non-errors email notifications, when this parameter is not set, the notification will be sent to both original sender and recipient(s) Note: multiple email addresses can be separated by comma --orgSender [OPTIONAL] applicable only to non-errors notifications If this option is set the notification will be sent to the original sender of the email that triggered the notification --orgRecipients [OPTIONAL] applicable only to non-errors notifications If this option is set the notification will be sent to the original recipient(s) of the email that triggered the notification -u, --url=ENDPOINT [OPTIONAL] the url ENDPOINT where Quarantine is located if it is not on the same machine --https [OPTIONAL] use https --disable [OPTIONAL] disable the specified notification(s) --debug [OPTIONAL] show debug info -h, --help [OPTIONAL] show help
If you run the tool on the machine where Mail Agent is installed and HTTPS is not enabled
configNotification.exe -t OnlyErrors -s [email protected] -r [email protected]
If you run the tool on the machine where Mail Agent is installed and HTTPS is

v3.13.0 304
If you run the tool on the machine where Mail Agent is installed and HTTPS is enabled
configNotification.exe -t OnlyErrors -s [email protected] -r [email protected] -https
If you don't run the tool on the machine where Mail Agent is installed
configNotification.exe --t OnlyErrors -s [email protected] -r [email protected] -u http://<mail_agent_ip>:8000/Quarantine/EmailAlerts
Troubleshooting
If you encounter any problems running the tool, please run with " " option so you can get -ddebugging information:
configNotification.exe -t OnlyErrors -s [email protected] -r [email protected] -d
Example, if the problem is an invalid email address:
configNotification.exe -s this.isnot.valid -d There was a problem updating email alerts: Invalid email address. You need to specify a valid email.System.Exception: Invalid email address. You need to specify a valid email.
This information will help us further investigate the problem.
Infection Email Notification
To send email notifications when an infected email is detected, move the On/Off slider to on, and specify a Sender email address, and modify subject and body as desired.
Notification email will be sent to the sender or recipient of the email with contents you configure on the following setting.

v3.13.0 305
1.
2.
a.
a.
b.
c.
Quarantine Reports
You can configure Metadefender Core so that it notifies administrator(s) of any e-mails that have been quarantined or sanitized during scanning.
In the Metadefender Core Management Console, go to Quarantine and click Configure .Quarantine Reports
Configure the SMTP settings and set the status to Connected. If you have already done this step, go to step 3.
In the SMTP Configuration Settings section, click .Update
In the Host field, specify the IP address or name of your mail server. You may also use an alternative mail server to deliver reports and Note:
notifications. To do this, replace the Host value with your alternative mail server address and specify Port, SSL, Username and Password settings as required for the alternative mail server.
Click .Save
Metadefender Core will verify that the SMTP connection can be established with your mail server and if so, the Status field is updated to Connected.

v3.13.0 306
3.
4.
5.
Enable Quarantine Reports by moving the On/Off slider to . On
Specify the scheduling interval for report generation, along with the sender, recipient and optional subject and message body.
Click to save the quarantine report settings.Save
Sanitized Email Notifications
To send email notifications when an email is sanitized, move the On/Off slider to on. Specify a sender email address, and modify subject and body as desired. Notification email will be sent to the sender or recipient of the email with contents you configure on the following setting.
6. Additional Configuration
Advanced Configuration

v3.13.0 307
Configuration From Config File
The Metadefender Mail Agent includes a set of configuration files that can be used to customize the application behavior and not most of the configurations are not available on management console.
Metadefender.Common.dll.config
Change will be applied within 30 seconds without restarting mail agent service.
Name Description Default Value
InstallationFolder Installation folder Run-time location of Metascan.Common.dll file
LogsFolder Logs folder [Installation folder]\Logs
LogMaxSize Possible values are, for example 100MB, or 4DAYS.
7DAYS
LogFormat Possible values are Text or Xml Text
LogLevel Possible values are Debug, Info, Warn, Error, Fatal
Debug
RestClientTimeoutMs Default timeout in milliseconds until a REST call times out
60000
Metadefender.Email.Engine.Exchange[2007/2010/2013].Agent.dll.config
Any change on this config file requires restarting Mail agent service.
Name Description Default Value
LogName Log name Metascan.Email.Engine.Exchange[2003/2007/2010/2013].Agent

v3.13.0 308
Name Description Default Value
LogFilename Log file name Metascan.Email.Engine.Exchange[2003/2007/2010/2013].Agent.log
PickupPath Exchange Server Replay Path Added at install time
AgentGuid Agent Guid. Should be unique. Added at install time
AgentStatusCheckInterval Durations between agent status checks
00:00:20
Protocol Protocol to use when sending process requests. Possible values are: REST
REST
RestBaseUrl REST base url http://localhost:8000/
UseQueueFile Use a temp queue file when submitting email instead of streaming content via protocol
True
Metadefender.Email.Engine.Generic.Agent.dll.config
Change will be applied within 30 seconds without restarting mail agent service.
Name Description
WorkExtension File extension to use when processing an email
BadExtension File extension to use for a file that cannot be parsed or processed
AgentGuid Agent Guid. Should be unique.
AgentStatusCheckInterval Durations between agent status checks

v3.13.0 309
Name Description
Protocol Protocol to use when sending process requests. Possible values are REST
StartRestServer Start the REST server
RestoreWorkItemsOnStartup Rename any items with a work extension (.work) to .eml on service startup
EmailProcessedHeaderNameMIME Header name for emails processed by Mail Agent in order to avoid duplicates
EmailRelayInProcessName Process name for emailrelay.exe application
EmailRelayOutProcessName Process name for emailrelayout.exe application
EmailRelayInStart Start Email relay process on service startup. (To monitor for incoming SMTP traffic)
EmailRelayInPort Port to monitor by email relay
EmailRelayInParameters Parameters that are passed to email relay application
EmailRelayOutStart Start Email relay process on service startup. (To monitor outgoing email and forward via SMTP)
EmailRelayOutHosts List of Name (or IP adress) and port of server(s) to forward all email to. Multiple servers are separated with a comma (,)For exampe: server1:25,server2:25
Note: Ensure that when the setting is updated the config file doesn't contain settings called 'EmailRelayOutServer' or 'EmailRelayOutPort' (delete them if they exist).
EmailRelayOutParameters Parameters that are passed to email relay application

v3.13.0 310
Name Description
EmailRelayInDirection Determine the direction of emails. Possible values :
0 = Incoming1 = Outgoing2 = Determine email direction using the local domain list in parameter EmailRelayInLocalDomains
(If sender's email domain exists in parameter direction is EmailRelayInLocalDomainsoutgoing, or else incoming)
EmailRelayInLocalDomains List of local domains. Separate multiple domains with a semi colon (;). For example opswat.com;mycompany.com.
Used to perform recipient verification (any recipient with a domain different than the specified domain(s) will be rejected at the SMTP protocol level).
Also used when is set to 2 in order to determine direction.EmailRelayInDirection
EmailRelayInQueueThreshold Maximum inbound email queue size (exceeding this value will generate an email alert)
EmailRelayOutQueueThreshold Maximum outbound email queue size (exceeding this value will generate an email alert)
EmailRelayOutRetryStart Start the retry monitor thread (for emails that failed submission)
EmailRelayOutRetryInterval Duration between submit retries (increasing with retry count) See Mail Agent Retry functionality
EmailRelayOutRetryMaxInterval Maximum duration between retries.See Mail Agent Retry functionality
EmailRelayOutRetryCount Maximum number of submit retries before email is moved to permanent failure

v3.13.0 311
Name Description
EmailRelayOutQueueBadThreshold
Maximum number of .bad files in email queue (exceeding this value cause email alert to be generated)
EmailRelayOutPermanentFailureThreshold
Maximum number of items in permanent failure (exceeding this value cause email alert to be generated)
EmailRelayOutMaxConnections Maximum number of simultaneous SMTP connections when forwarding emails to remote server.
EmailRelayInRetryStart Start the retry monitor thread (for emails that failed processing)
EmailRelayInRetryInterval Minimum duration between process retries
EmailRelayInRetryCount Maximum number of process retries before email is moved to process failure
MaxMonitorProcessThreads Maximum number of emails processed simultaneously
FastNoAttachmentProcessingEnabled
Avoid sending emails without attachments for processing (improved performance)
LowPriorityMinSize Minimum size (in MB) for emails that will be processed on the low priority threads
HighPriorityMaxSize Maximum size (in MB) for emails that will be processed on the high priority threads
UseAdjustingThreads Specifies if monitoring threads for incoming emails should adjust thread count dynamically or have fixed count
AddressValidation Specifies if Mail Agent should perform address validation on the incoming emails to detect invalid address (e.g. root@smth, ..@stop, inv'/alid)
EmailRelayInUseTls Enable TLS for incoming SMTP connections
EmailRelayInForceTls Force all incoming SMTP connections to use TLS (only used when EmailRelayInUseTls is true)

v3.13.0 312
Name Description
EmailRelayInTlsCertificate TLS certificate for incoming SMTP connections (only used when EmailRelayInUseTls is true) Example:-----BEGIN CERTIFICATE-----MIIFYDCCA0igAwIBAgIJALmTgUaaiHNjMA0GCSqGSIb3DQEBCwUAMEUxCzAJBgNV
....-----END CERTIFICATE-----
EmailRelayInTlsKey TLS certificate private key for incoming SMTP connections (only used when EmailRelayInUseTls is true) Example:
-----BEGIN PRIVATE KEY-----
MIIJQgIBADANBgkqhkiG9w0BAQEFAASCCSwwggkoAgEAAoICAQDjAkwDuWFOHKUw
....-----END PRIVATE KEY-----
EmailRelayOutClientCertificate Client certificate for outoing SMTP connections (used when a server requests a client certificate) Example:-----BEGIN CERTIFICATE-----
MIIFYDCCA0igAwIBAgIJALmTgUaaiHNjMA0GCSqGSIb3DQEBCwUAMEUxCzAJBgNV
....-----END CERTIFICATE-----
Metadefender.Quarantine.Mail.dll.config
Name Description Default Value
StartRestServer Start the REST server (SmtpConfiguration)
True
SubmitCommandTimeout Timeout for SMTP commands 00:01:00 (1 minute)
EmailSubmissionRequestExpireSpan
TTL (Time To Live) for an SMTP submit request. If email has not been submitted within this timespan the request is lost
01:00:00 (1 hour)

v3.13.0 313
Metadefender.Engine.History.dll.config
Any change on this config file requires restarting Mail agent service.
Name Description Default Value
HistoryEntryExpireSpan Duration to keep history entries in the database
91:00:00 (91 days)
StartRestServer Start the REST server (History) True
Metadefender.Email.Engine.Processor.dll.config
Any change on this config file requires restarting Mail agent service.
Name Description Default Value
StartRestServer Start the REST server (Processor)
True
ConvertTnefMessagesToSmtp Convert TNEF encoded emails to MIME format
False
MonitorMode Enables a monitoring mode of the Mail Agent. When set, no emails will be sanitized or quarantined (even when infected etc.)
False
AddXHeadersToOutgoingEmail Force Mail Agent to add x-headers (Custom Email Headers) to outgoing emails
False
EmailProcessedHeaderName

v3.13.0 314
Name Description Default Value
MIME Header name for emails processed by Mail Agent in order to avoid duplicates
X-Metadefender-EmailSecurity-Id
EmailAddCustomXHeaders Add custom x-headers to each email processed by Mail Agent. See for Custom Email Headersmore information.
EmailBlockedQuarantineMode Option to move blocked emails to MD Core quarantine or submit them via SMTP for quarantine by other service.
Possible values are REST (MD Core Quarantine) or SMTP
REST
EmailSanitizedQuarantineMode Option to move original copy of sanitized emails to MD Core quarantine or submit them via SMTP for quarantine by other service.
Possible values are REST (MD Core Quarantine) or SMTP
REST
EmailQuarantineHeaderName The name of the X-Header that will be added to emails when
or EmailBlockedQuarantineMode EmailSanitizedQuarantineMode is set to SMTP.
Header value will always be 'True'
X-Metadefender-To-Quarantine
DoSpfCheck Enables SPF (Sender Policy Framework) lookups in Mail Agent. Result is placed in a header.
False

v3.13.0 315
Name Description Default Value
SpfCheckHeaderName The name of the X-Header where to store the SPF lookup result
X-Metadefender-Spf-Result
SpfCheckReasonName The name of the X-Header where to store a reason for a failed/skipped SPF lookup
X-Metadefender-Spf-Reason
Metadefender.Scanner.dll.config
Change will be applied within 30 seconds without restarting mail agent service.
Name Description Default Value
MetascanMode Possible values are COM, RESTv1 RESTv2and
RESTv2
MetascanScanTimeout Scanning timeout 00:05:00
MetascanScanQueueTimeout Metadefender Core In Queue timeout 00:05:00
MetascanScanProgressPauseMS Used in RESTv2 mode. Pause (in ms) between progress request calls
100
MaxMetadefenderCoreInQueueThreshold
If this limit is exceeded an alert will be sent saying that Metadefender Core is unresponsive and email delivery might be slower
250
MetadefenderUnavailableRetrySpan Minimum pause for retry after a Metadefender Core goes down (only applicable if multiple scanners are configured)
00:01:00

v3.13.0 316
Name Description Default Value
MetadefenderAvergeScanTimeSpan Span for for scan times when calculating average scan time (when using multiple MD Cores)
00:01:00
UrlPrioritzationMethod Metadefender Core Url prioritization method. Possible vaules: RoundRobin, Circular, ScanTime
RoundRobin
LogAllRequests Increased logging. When set to true it will log all GET requests for getting scan settings and email disclaimers
false
Metadefender.Quarantine.dll.config
Any change on this config file requires restarting Mail agent service.
Name Description Default Value
MaintenanceInterval Interval between checking folder actions & auto-deliver 00:00:30
RunAutoActionThread Start the thread checking folder actions & auto-deliver True
CompressionMode Quarantine item compression mode. Possible values are None, Zip
Zip
MonitoringFolderId Predefined Quarantined folder id
QuarantineReportId Predefined Quarantine Report id
StartRestServer Start the REST server (Quarantine) True
ReportUidExpireSpan Expiry time for entries used to record which quarantine items were inlucded in Quarantine Reports
1095:00:00

v3.13.0 317
Name Description Default Value
MaxQuarantineItemSize Maximum buffer size when accepting quarantine items via REST
long max value
EmailAlertExpireSpan The minimum interval between unique email alerts (errors). This is used to prevent too many alerts being sent during continuous errors
01:00:00
Metadefender.Email.Engine.Service.exe.config
Any change on this config file requires restarting Mail agent service.
Name Description Default Value
LogName Log name Metascan.Email.Engine.Service
LogFilename Log file name Metascan.Email.Engine.Service.log
ComponentList List of component loaded by service at startup
RestBaseUrl REST server base URL http://<computer_name>:8000
QuarantineBaseUrl Metadefender Core Quarantine server base URL
http://<computer_name>:8000
MetascanUrl Metadefender Core REST URL
http://<core_url>:8008/metascan_rest
MetascanApiKey Metascan API key (encrypted)

v3.13.0 318
Name Description Default Value
StatusCheckInterval Interval between component status checks (for error alerts)
00:00:30
UsePerformanceCounters Creates a performance counter category (Metadefender Generic Mail Agent) for monitoring and recording processing data
False
ScanEmailBody Specifies if Mail Agent should scan the body of the email
True
MaxRetries Maximum number of retries before quit trying to connect to Metadefender Core
10000
TimeBetweenRetries Number of milliseconds before attempting to connect to Metadefender Core
6000
UpdateUrlsOnStartup Specifies if the service should attempt to update config URLs at startup.
Note: If MD Core load balancing is configured (multiple MetascanUrl's) no URL update will be performed for that setting, regardless of this value.
True
MetadefenderCoreIsLocal Specifies if Metadefender Core is installed locally
True when installed with Metadefender Core
False when installed remotely
ConnectionCheckOnStartup False

v3.13.0 319
Name Description Default Value
Specifies if Mail Agent should do a connection + valid license test on service startup. If enabled Mail Agent will not intercept emails before MD Core is responding.
Metadefender.Quarantine.Service.exe.config
Any change on this config file requires restarting Mail agent service.
Name Description Default Value
MongoDbUrl Mongo DB URL mongodb://localhost:27018
MongoDbUrlEncryptionMode MongoDb Url value encryption mode. Possible values are None, Encrypted
None
MongoDbName MongoDB database name
MetadefenderQuarantine
MongoDBStartupTimeout Timeout to wait for MongoDB to respond
00:00:30
LogName Log name Metascan.Email.Engine.Quarantine.Service
LogFilename Log file name Default is Metascan.Email.Engine.Quarantine.Service.log
ComponentList

v3.13.0 320
Name Description Default Value
List of component loaded by service at startup
RestBaseUrl REST server base URL
http://<computer_name>:8000
QuarantineBaseUrl Metadefender Core Quarantine server base URL
http://<computer_name>:8000
MetascanUrl Metadefender Core REST URL
http://<core_url>:8008/metascan_rest
MetascanApiKey Metadefender API key (encrypted)
WebBaseUrl Metadefender Web Site base URL
http://<core_url>:8008//management/#
MongoDBStartupTimeout Time to wait for MongoDB database to start
00:00:30
UpdateUrlsOnStartup Specifies if the service should attempt to update config URLs at startup
True
MetadefenderCoreIsLocal Specifies if Metadefender Core is installed locally
True when installed with Metadefender Core
False when installed remotely

v3.13.0 321
Metadefender.Engine.Statistics.dll.config
Any change on this config file requires restarting Mail agent service.
Name Description Default Value
StartRestServer Start the REST server (Statistics) True
StatisticsEntryExpireSpan Duration to keep statistics entries in the database 31:00:00
StatisticsEntryInterval Interval used when storing statistics. Possible values are Minute, TenMinute, Hour, Day
Minute
Metadefender.Engine.Events.dll.config
Any change on this config file requires restarting Mail agent service.
Name Description Default Value
EventEntryExpireSpan Duration to keep system event entries in the database
91:00:00 (91 days)
StartRestServer Start the REST server (Events) True
XML schema for config file
Below is a sample configuration file.
File Format
<?xml version="1.0"?><configuration>

v3.13.0 322
<applicationSettings> <[namespace]> <setting name="[name]" serializeAs="String"> <value>[value]</value> </setting> </[namespace]> </applicationSettings></configuration>
Attribute Description
namespace For display reasons only. For example: Metadefender.Common
name Setting name. Example: InstallationFolder
value Setting value. Example: c:\MyInstallFolder
Custom Email Headers
The following custom email headers are added once processed by Metadefender Email. These can be used for custom rules on mail servers such as spam rules using X-Metadefender-Core-Result.
X-Metadefender-Core-Urls
The Metadefender Core REST API URL used in scanning operations for this email. If multiple MD Core scanners are configured and have been used for scans (this can happen when an email has multiple attachments) the list is comma separated.
Note: the field is empty if the email doesn't contain attachments.
Note: the URLwill contain the hostname of the machine. If hostname is not available it will contain the machine name. If machine name is not available it will contain "localhost".
X-Metadefender-Core-Result
When workflow is enabled (default), this header value will contain the Metadefender Core process result. For Blocked results, the reason is also displayed (separated by a / character).Example values:
Allowed (or Delivered - if email doesn't contain attachments)
Blocked/Dirty
Blocked/Filtered

v3.13.0 323
If workflow is disabled this value will be the Metadefender Core scan result for the email. Refer to for details.Description of Scan Results
X-Metadefender-To-Quarantine
See for more details.Quarantine Email On Another Mail Server
X-Metadefender-EmailSecurity-Sanitized
This header is added to all emails that have been sanitized by the Mail Agent (header value 'True')
X-Metadefender-EmailSecurity-OriginalCopy
This header is added to all original copies of sanitized emails (header value 'True')
Your Own Custom X-headers
In addition to the above headers, Mail Agent can also add custom x-headers to every email processed. These X-Headers are configured in Metadefender.Email.Engine.Processor.dll.config as follows:
Custom X-headers
...<setting name="EmailAddCustomXHeaders" serializeAs="String"> <value>X-MyHeader:MyHeaderValue,X-MyHeaderNoValue:</value></setting>...
The above will add the following 2 X-headers to the email:
X-myheader: myheadervalueX-myheadernovalue:
If header name is not prefixed by X- it will automatically be added to the header name. (myheadername → X-myheadername)
Header names should only contain 7-bit characters (ASCII 33-126 included) excluding colon (:) See for more details. Any https://tools.ietf.org/html/rfc2822header name that does not comply with these restrictions will be ignored (and not added)
If no text is added after : the header value will be empty

v3.13.0 324
1.
2.
3.
If emails are not processed ( ), the customers headers will Skip Email Analysisnot be appended.
X-Headers are only added to emails when direction is configured as Incoming (Web MC > Sources > Metadefender Email > Setup). To force Mail Agent to also add X-Headers to outgoing emails, set AddXHeadersToOutgoingEmail in Metadefender.Email.Engine.Processor.dll.config (See Configuration From
)Config File
Enable Sender Policy Framework (SPF) Lookup
Sender Policy Framework ( ) is a mechanism defined by RFC 7208 which can help SPFdetermine if incoming mails are sent from a host authorized by the domain's administrators. Usually a domain administrator will publish a TXT record in the Domain Name System (DNS) in order to specify a list of authorized hosts that can send emails from that domain. Enabling SPF is an anti-spam technique that will instruct Mail Agent to perform SPF checks on the "FROM" address(es) and add a header to the email with the SPF result.
How to Enable SPF checks
Go to the installation directory (by default C:\Program Files (x86)\OPSWAT\Metadefender Core <engine count>\Metadefender Mail Agent) and open the file for editing.Metadefender.Email.Engine.Processor.dll.config
Find the setting called and modify the value to .DoSpfCheck true
(Optionally) Find the setting called and modify the value to the SpfCheckHeaderNamedesired value to be used for the header name that will be added to the email. This header value will contain the SPF result.
Possible SPF results
After the SPF check is performed a header will be added to the email (by default X-) and the value will be one of the following:Metadefender-Spf-Result
Pass
NoRecord
SoftFail
HardFail
Error
Neutral
Unknown

v3.13.0 325
1.
2.
UnknownMechanism
Please note that you will be required to add a rule on the target (destination) server to check for this header and take action based on the value (e.g delete the message, send to quarantine, etc).
An optional header (by default ) is added if the SPF check has X-Metadefender-Spf-Reasonfailed or is skipped.
Log collection (collectLogs.exe)
Metadefender Email provides a tool to collect logs into a single archive to aid troubleshooting issues.
Usage
To create a debug log archive, open a command prompt and navigate to the Metadefender Email folder and run the collectLogs.exe application:
C:\>cd "Program Files (x86)\OPSWAT\Metadefender Core X\Metadefender Mail Agent"C:\Program Files (x86)\OPSWAT\Metadefender Core X\Metadefender Mail Agent>collectLogs.exeCollecting data:....Logs collected and saved to file:C:\Program Files (x86)\OPSWAT\Metadefender Core X\Metadefender Mail Agent\md-email-logs-2016-11-17_02-59-00-PM.zip
The collected log file will be compressed as an archive file (e.g., md-email-logs-2016-11-17_02-59-00-PM.zip)
When Metadefender Email is installed on the same computer as Metadefender Core, additional information from Metadefender Quarantine will also be collected.
Advanced options
The collectLogs.exe application also options to, for example, password protect the archive or prevent certain information from being collected.
-o (–output)

v3.13.0 326
1.
2.
a.
3.
4.
-o (–output)
Override the default output archive name.
-p (–password)
Protect the output archive with a password.
Multiple Metadefender Core Instances Configuration
Overview
Single Mail Agent instance connecting to more than one Metadefender Core. Once it is configured, email will be processed depending on the number of ongoing jobs on each Metadefender Core instance.
How
Open file.Metadefender.Email.Engine.Service.exe.config
Modify settingMetascanUrl
Append the secondary MD instance IP, using semicolon (i.e. ) - as a separator.;
Save and Close the file
Restart the Metadefender Mail Agent service to make change effective
MetascanUrl Configuration
Metadefender.Email.Engine.Service.exe.config
... <applicationSettings> <OPSWAT.Metadefender.Email.Engine.Service.Properties.Settings> <setting name="MetascanUrl" serializeAs="String"> <value>http://server1:8008/metascan_rest;http://server2:8008/metascan_rest;http://server3:8008/metascan_rest</value> </setting>...

v3.13.0 327
1.
2.
Unavailable Metadefender Core
If a Metadefender Core server becomes unavailable, process requests will be skipped until it becomes available again. Once it becomes unavailable, the Mail Agent will try to attempt again periodically.
Email Processing Workflow (Metadefender Core)
Metadefender Mail Workflow
Metadefender Mail Workflow relies on Metadefender Core "Mail Agent" workflow. You can modify the workflow on
Sources > Metadefender Email > Workflows
Metadefender Core > configuration > Workflows
Modify Metadefender Core URL
Navigate to the Metadefender Mail agent folder (by default, this is C:\Program Files (x86)\OPSWAT\Metadefender Core X\Metadefender Mail Agent).

v3.13.0 328
2.
3.
Open Metadefender.Email.Engine.Service.exe.config in a text editor and change the following section, replacing with your server's real DNS hostname or IP *DNS_or_IP*address.
Original New
<setting name="RestBaseUrl" serializeAs="String"> <value>http://*DNS_or_IP*:8000</value></setting><setting name="QuarantineBaseUrl" serializeAs="String"> <value>http://*DNS_or_IP*:8000</value></setting><setting name="QuarantineProtocol" serializeAs="String"> <value>REST</value></setting><setting name="MetascanUrl" serializeAs="String"> <value>http://*DNS_or_IP*:8008/metascan_rest</value></setting>
<setting name="RestBaseUrl" serializeAs="String"> <value>https://*DNS_or_IP*</value></setting><setting name="QuarantineBaseUrl" serializeAs="String"> <value>https://*DNS_or_IP*</value></setting><setting name="QuarantineProtocol" serializeAs="String"> <value>REST</value></setting><setting name="MetascanUrl" serializeAs="String"> <value>https://*DNS_or_IP*/metascan_rest</value></setting>
Restart Metadefender Mail Agent service
Quarantine Email
Metadefender Email provides quarantine capability either when email (including attachments) are marked as threat (blocked) or are sanitized. When sanitized, original copy of the email will be quarantined while sanitized email will be delivered. Once quarantine is enabled, any emails that are blocked will be moved to quarantine. To enable quarantine, go to Metadefender Core
.Management Console > Sources > Metadefender Email > Settings

v3.13.0 329
1.
2.
3.
4.
If you want to quarantine email on 3rd party solution (e.g., hosted email solution), refer to .Quarantine Email On Another Mail Server
When emails are quarantined the following disclaimer is added to the email body (by default):This email was quarantined by Metadefender. For more information on Metadefender's Email Security technology please visit .www.opswat.com
Quarantine Email On Another Mail Server
Metadefender Email does NOT provide access to quarantined files for each email users other than access to administrator for all the quarantined emails. If your email server (either hosted or onsite mail server) has quarantine management capability for each user, it is recommended to quarantine email on your email server. By default, Metadefender Email will quarantine emails on Metadefender Quarantine but you can change this behavior.
Change Quarantine Mode For Blocked Email
Changing this setting will allow you to quarantine emails that are detected as blocked by Metadefender on a different email server by changing to EmailBlockedQuarantineModeSMTP. By doing this a header will be appended to the email for which you can configure a rule on your email server to quarantine emails that contain this header.
(Prerequisite): Quarantine should be enabled. Refer to for the Quarantine Emailinstructions.
Edit configuration file "C:\Program Files (x86)\OPSWAT\Metadefender Core 4\Metadefender Mail Agent\Metadefender.Email.Engine.Processor.dll.config"
Change the setting value to If you want to EmailBlockedQuarantineMode SMTP. restore the behavior, use instead REST .
Excerpt from the config file
<setting name="EmailBlockedQuarantineMode" serializeAs="String"> <value>SMTP</value></setting>
[Optionally] You can change the name of the header by modifying X-Metadefender-To- to something else.Quarantine
Excerpt from the config file

v3.13.0 330
4.
5.
1.
2.
3.
4.
<setting name="EmailQuarantineHeaderName" serializeAs="String"> <value>X-Metadefender-To-Quarantine</value></setting>
Restart the Generic Mail Agent service
net stop mdfExgEmailAgentnet start mdfExgEmailAgent
Change Quarantine Mode For Sanitized Email
Changing this setting will allow you to quarantine original copies of emails that have been sanitized by Metadefender on a different email server by changing
to SMTP. By doing this a header will be appended to the EmailSanitizedQuarantineModeemail for which you can configure a rule on your email server to quarantine emails that contain this header.
(Prerequisite): Quarantine should be enabled. Refer to for the Quarantine Emailinstructions.
Edit configuration file "C:\Program Files (x86)\OPSWAT\Metadefender Core 4\Metadefender Mail Agent\Metadefender.Email.Engine.Processor.dll.config"
Change the setting value to If you want to EmailSanitizedQuarantineMode SMTP. restore the behavior, use instead REST .
Excerpt from the config file
<setting name="EmailSanitizedQuarantineMode" serializeAs="String"> <value>SMTP</value></setting>
[Optionally] You can change the name of the header by modifying X-Metadefender-To- to something else.Quarantine
Excerpt from the config file
<setting name="EmailQuarantineHeaderName" serializeAs="String"> <value>X-Metadefender-To-Quarantine</value></setting>

v3.13.0 331
4.
5. Restart the Generic Mail Agent service
net stop mdfExgEmailAgentnet start mdfExgEmailAgent
How To Verify
If you open the message headers for an email that you will see should be quarantinedsomething similar to this:
Received: from ALING-PC ([192.168.16.16]) by alig-win8-dev.local with ESMTP ; Fri, 2 Sep 2016 16:45:18 +0300MIME-Version: 1.0From: [email protected]: [email protected]: 2 Sep 2016 16:45:18 +0300Subject: Checking new Quarantien modeContent-Type: multipart/mixed; boundary=--boundary_2_95887891-94da-4b66-8dc9-f2bceb4394d9X-Metadefender-EmailSecurity-Id: d9db058d-b568-4501-bbe7-d63378bbd56dX-Metadefender-Core-Urls: http://alig-win8-dev:8008/metascan_restX-Metadefender-Core-Result: Blocked/InfectedX-Metadefender-To-Quarantine: True
Notice the header is set to and this won't exist if email is X-Metadefender-To-Quarantine True NOT quarantined.
Skip Email Analysis
Emails without attachments can be skipped from being analyzed in order to increase throughput. If email body analysis is enabled this setting will not apply.
Configuration
To enable this functionality, make the following configuration file modification.
Metadefender.Email.Engine.Generic.Agent.dll.config
<setting name="FastNoAttachmentProcessingEnabled" serializeAs="String"> <value>true</value></setting>

v3.13.0 332
7. (Email) Release Notes
New Features
Support Microsoft Exchange servers
Support multiple relay-out mail servers for mail proxy deployment
Other Changes
Many bug fixes
(Email) General and Known Issues
Limitation
If target server requires of authentication, multiple target servers (relay out) is supported when same credential is configured.
A separate SMTP server is required for notification.
Exchange (malware agent configuration) may block release from quarantine.
Email sanitization to HTML may be blocked and attachment may be replaced with text "This attachment was removed because it contains data that could pose a security risk."
An attachment that has been sanitized may be larger than the original attachment. As a result, it may be necessary to increase the maximum attachment size setting on your mail server
Rich Text (RTF) body sanitization & disclaimers only available when Mail Agent is installed on Exchange server.
Embedded objects within sanitized Rich Text (RTF) may not retain its position in email body
Limitation for Onsite Microsoft Exchange Deployment
Mail agent will be installed on Metadefender Core server by default even if separate is required on exchange server.installation
Installing Metadefender Core on the exchange server is not supported.

v3.13.0 333
9. Metadefender / ICAP Server
By scanning all network traffic through an established proxy server, an organization can eliminate openings for advanced threats to enter an internal network. Scanning with a Metadefender ICAP Server also allows a record to be kept of when files entered a network, in case a threat needs to be investigated after it has been discovered within a secure network.
Any files scanned through the ICAP interface will be scanned with the same anti-malware engines and policies as files scanned through any other Metadefender Core interface. All files will be logged so that activity can be reviewed later if necessary. Especially important for a Metadefender ICAP Server, file scan results can be cached, which will significantly improve scanning throughout. Metadefender Core can be integrated with a Web Proxy Servers as well as a Reverse Proxy Servers.
Web Proxy Integration
Secure your web traffic and extend the protection of your organization against advanced threats by integrating Metadefender Core with your web proxy. Metadefender Core exposes an ICAP interface that allows system administrators to easily integrate the multi-scanning technology into an existing web proxy to enable anti-malware scanning of all HTTP downloads and uploads. System administrators can set up any proxy that implements ICAP, such as Blue
Coat® ProxySG or Squid, to automatically send HTTP requests to a Metadefender ICAP Server, where multiple anti-malware engines scan the requests for potential advanced threats.

v3.13.0 334
Reverse Proxy Integration
Secure your web or application servers against advanced threats by integrating Metadefender Core with your reverse proxy. The Metadefender ICAP Server interface allows system administrators to easily add Metadefender Core multi-scanning technology into an existing reverse proxy to enable anti-malware scanning of all file uploads. System administrators can set up any reverse proxy that implements ICAP, such as F5® BIG-IP® Load Traffic Manager™ (LTM®), to automatically forward any uploaded files to a Metadefender ICAP Server that will scan the files with multiple anti-malware engines for potential advanced threats.
Web Proxy Servers Supported
Squid
BlueCoat ProxySG
F5 BIG IP
McAfee Web Gateway
ARA network JAGUAR5000

v3.13.0 335
1.
2.
3.
4.
1. ICAP server Configuration
Configuration via Metadefender Core Management Console
To start the ICAP server from the Metadefender Core Management Console, follow the steps below and see the screenshot:
In your browser, go to http://localhost:8008/management
Click on the ' ' tab.Sources
Click on ' ' on the left side.Metadefender Proxy
Select ' '.Apply
Configuration via INI
Metadefender Core ICAP server can be configured using an ini configuration file which is installed under Metadefender Core install directory.
The ICAP server configuration is done in omsConfig.ini. Applying configuration changes requires to restart the ICAP server.

v3.13.0 336
Key Description
maxnum_sockets Range: 1~1000: 60Defaut
Number of worker threads to handle ICAP requests. Configures the number of threads that will be used by the Metadefender Core ICAP server for handling requests. For optimal performance, this should be set to a value higher than the number of processor cores available to the Metadefender Core system
maxnum_connections Default: 355
The maximum number of simultaneous connections that the ICAP server is able to support. Certain proxy servers will use this value to restrict the requests that are made of the Metadefender Core ICAP server and will not send more than this number of simultaneous requests to the Metadefender Core ICAP server.
By ICAP specs, the client (proxy) is not supposed to send more requests than what is advertised by the ICAP server.
If the client receives more than this number of connections, it is supposed to handle the overload itself (i.e. queuing, bypassing, rejecting...)
The ICAP server does not enforce that number, this means that if the client does not respect the rules and sends more than the advertised max number of connections, we will still process them.
port Range: 1 - 65535: 1344Default
Port the server is listening to. If you are installing with other product which have ICAP interface, you must change to different port.
block_on_max_capacity Range: 0 - 1: 0Default

v3.13.0 337
Key Description
Blocking (i.e. return 403 forbidden to HTTP clients) every request coming in when Metadefender Core is overloaded (i.e. "Metascan server too busy"). A "Metascan server is too busy. Please try again later." message will be displayed in clients browsers.
0: Allow files when overloaded
1: Block files when overloaded
path_to_custom_html Value: Absolute file path or file path relative to omsICAPServer.exe directory
: Default omsICAPdefault.htm
Path to custom HTML page to be displayed to the user when content is blocked, request rejected due to license, server too busy, etc.
Content is parsed by ICAP server.
Use the "%%%icap_block_message%%%" macro in the web page as a place holder for the ICAP message. ICAP server will replace that message by whatever message it has to say.
scan_health_checks Range: 0 - 1: 0Default
Scan client specific health checks.Disabling scanning health checks improves performance as it reduces the load on Metascan.
Only implemented for BlueCoat for now.
Easy to add support for different health checks
BlueCoat periodically sends requests to the ICAP server to make sure it's working fine.
Disabling scanning health checks improves performance.
dump_invalid_requests Range: 0 - 1: 0Default

v3.13.0 338
Key Description
Outputs the invalid buffer to a file ending in "_400_Bad_Request.txt" Slight performance impact when invalid requests are processed. Should only be enabled for investigation purpose.
0: Disables dumping invalid (ICAP 400 response) raw requests to a file.
1: Dumps invalid (ICAP 400 response) raw requests to a file.
log_file Value: Absolute file path or file path relative to omsICAPServer.exe directory
: Empty (Logs folder under install directory)Default
The path to the debug log file.
skip_too_big_file Range: 0 - Max Unsigned Long : 0Default
Allows the ICAP server to skip scanning a file if the file is too large. The value specifies in the threshold for skipping bytesfiles. A value of 0 means this feature is off, anything greater than 0 indicates this feature is on
use_persistent_connections Range: 0 - 1: 0Default
This should be used for improved performance. The ICAP server keeps the connections open, so they can be reused for several requests.
0 : ICAP server is not using persistent connections. Connections are closed after serving a request.
1 : ICAP server is using persistent connections. Connections are kept open after serving a request.
sanitization_postfix Value: Custom text postfix, that will be appended to Content-Disposition header's filename if the file is sanitized.
: No postfix will be appended.Default

v3.13.0 3391.
Key Description
This postfix can be used to indicate if a file is sanitized. If the key is not set or set to empty string, no postfix will be appended.
For example (PDF to PDF sanitization is enabled in Core workflow) and this configuration is done as follows. For the following HTTP header,
sanitization_postfix=[sanitized]
Content-Disposition: attachment; filename="report.pdf";
will be modified to
Content-Disposition: attachment; filename="report[sanitized].pdf";
Enabling profiling logging
Profiling logging can be used to identify issues with connections. It provides debug level details for each connections as well as the time each step took (e.g. parsing time, scan time, response time). It also tracks the number of active connections.
Warning
Profiling logging is not designed to be constantly enabled. It should only be used for investigating issues for short periods of time.
Keeping it enabled permanently may impact performances. If running for too long, the log file can become huge and significantly reduce the available disk space.
Step-by-step guide
In order to enable profiling logging.

v3.13.0 340
1.
2.
3.
4.
5.
1.
2.
3.
4.
5.
1.
Make sure ICAP is stopped (net stop omsICAP).
Open omsConfig.ini in a text editor.
Add the following in the "icap server" section.enable_debug_logging=1
Save and close.
Start ICAP server (net start omsICAP).
In order to disable profiling logging.
Make sure ICAP is stopped (net stop omsICAP).
Open omsConfig.ini in a text editor.
Set the following in the "icap server" section. (You can also completely delete the line)enable_debug_logging=0
Save and close.
Start ICAP server (net start omsICAP).
How to read the logs
<Metascan installation directory>\Log\icap_profiling.log.
TLS support
Metadefender ICAP does not support TLS natively but Using stunnel, you should be able to handle ICAP message to be encrypted between ICAP client and ICAP server.
Introduction
What is ?stunnel
Stunnel is a proxy designed to add TLS encryption functionality to existing clients and servers without any changes in the programs' code. [ ]stunnel's website
By using stunnel one can receive ICAP requests via SSL connection which will be decrypted and send toward Metadefender ICAP Server locally.
Installation on Windows

v3.13.0 341
1.
2.
3.
4.
1.
2.
3.
1.
2.
a.
b.
Installation on Windows
Download the Windows installer from stunnel's pagedownload
Start the installer and follow its steps (use default values if you are not sure)
During the installation you will be asked to generate a certificate file. Fill in the required fields with your information
Make sure that " " is at the end of the setupStart stunnel after installation not checked
Configuration
Locate and open the file. It should be under the directory in the stunnel.conf configstunnel installation directory. (e.g., "C:\Program Files (x86)\stunnel\config\stunnel.conf")
Add the following lines at the end of the file
ICAP service in stunnel
[icaps]accept = 11344connect = 1344cert = stunnel.pem
Save and close the configuration file
Explanation of configuration properties
accept: The port number where stunnel listens for TLS connections for the given service
connect: The port number where the decrypted connections are forwarded to. (This should be the port used by Metadefender ICAP Server)
cert: The TLS certification used by the service. You can set your own or use the one generated during stunnel setup (which is stunnel.pem next to stunnel.conf)
Starting stunnel
After setting the configuration you are ready to start and use stunnel.
There are two ways of doing this:
Starting it with GUI: Execute stunnel.exe under <stunnel installation directory>\bin\
Installing and starting it as a service:
Install as a service: execute stunnel.exe with option-install

v3.13.0 342
2.
b. Start as a service: execute stunnel.exe with option or start it from Windows -startServices
For more information, FAQ and HOWTO please check the .official stunnel documentation
2. ICAP response headers
The following response headers are used by the ICAP server:
Header name
Description Example Note
X-Blocked-Reason
Metadefender specific custom header. Contains the blocking reason of the content.
X-Blocked-Reason: Infected
It is available only if the content was scanned and some violations were found.
X-ICAP-Profile
Contains the applied workflow's name.
X-ICAP-Profile: Proxy It is available only if the file was scanned.
X-Response-Info
Contains the one word description of the action the ICAP server applied on the request.
X-Response-Info: AllowedX-Response-Info: BlockedX-Response-Info: Options
This header is available in all responses sent by the ICAP server.
X-Response-Desc
Contains the blocking reason.
X-Response-Desc: InfectedX-Response-Desc: Encrypted Archive
The header is available in all "blocked" responses.
In case of the content was scanned and some violations were found, the returned string is equivalent to X-Blocked-Reason's value.

v3.13.0 343
Header name
Description Example Note
X-Virus-ID Contains a short description of the threat that was found in the content. If multiple threats were found, only the first one is returned.
X-Virus-ID: EICAR Test StringX-Virus-ID: Encrypted Archive
The header is available only if the content was scanned and some violations were found.
X-Infection-Found
Contains the description of the threat that was found in the content. If multiple threats were found, only the first one is returned.
The value is a semicolon separated list with three parameters:
Type
0: Infection has been found
2: Container violation has been found
Resolution:
0: The suspicious content was not repaired
Threat: Threat name
X-Infection-Found: Type=0; Resolution=0; Threat=EICAR Test String;X-Infection-Found: Type=2; Resolution=0; Threat=Encrypted Archive;
The header is present only if the content was scanned and some violations were found.
X-Violations-Found
Contains the detailed description of the violations that were found. If the scanned content was an archive, the scan results for the contained files too are
X-Violations-Found: 2test.zipEICAR Test String00\eicar.txt
The header is present only if the content was scanned and some violations were found.

v3.13.0 344
Header name
Description Example Note
listed. If multiple threats were found for a single file, only the first one is returned.
The structure of the header value is the following:
The first line contains the number of the reported violations. The following lines contain the details.
FilenameThreat nameProblemID (currently 0 returned for all threats)ResolutionID:
0: File was not repaired
1: File was repaired
2: Violating part was removed
EICAR Test String00
X-Include Contains the list of requested headers, that the ICAP clients should add to the requests, if the information is available.
X-Include: X-Client-IP The header is present only in Options responses.
3. Web Proxy Integrations
Metadefender Core's ICAP server functionality allows for integration with any proxy server that implements the ICAP interface. The Metadefender Core ICAP server can be configured and started from the Metadefender Proxy Configuration page. The Metadefender Core ICAP server is not started by default when Metadefender Core is installed.

v3.13.0 345
The following settings apply to Metadefender Core's ICAP server functionality:
Property Description Default Value
ICAP Port The port the Metadefender ICAP server is operating on 1344
Maximum Sockets
Specifies how many concurrent threads will be used by the Metadefender ICAP server to handle requests.
60
After changes have been made click the ‘Apply’ button to save the changes. Click the ‘Restart ICAP Service’ or ‘Start ICAP Service’ button to restart or start the Metadefender Core ICAP server.
A custom ICAP block page can be uploaded to Metadefender Core to be displayed whenever a malicious file has been found. To upload a custom block page, browse to select the appropriate HTML file and then click to upload it.

v3.13.0 346
1.
2.
3.
4.
5.
6.
7.
8.
9.
ICAP URL
Mode URL Example
Request Modification Mode (REQMOD, OPTIONS)
icap://<IP address>:<port>/OMSScanReq-AV
e.g, icap://10.0.50.36:1344/OMSScanReq-AV
Response Modification Mode (REQMOD, OPTIONS)
icap://<IP address>:<port>/OMSScanResp-AV
e.g, icap://10.0.50.36:1344/OMSScanResp-AV
ARA network JAGUAR5000
Configuration via Web-based manager
In your browser log into Jaguar's Web Administration
Go to the pageConfiguration
From the menu on the left, click on under the groupOthers Protocol
From the top menu, select ICAP
Make sure that checkbox is checkedSend Client Address
Apply changes
Click on the button on the bottom of the pageICAP Profile
Add a new profile

v3.13.0 347
9.
10.
11.
1.
2.
3.
4.
5.
6.
7.
Type in "icap://<IP>:<PORT>/OMSScanReq-AV" to Vectoring Point 1
Type in "icap://<IP>:<PORT>/OMSScanResp-AV " to Vectoring Point 3
Apply changes
Scanning HTTPS Content
Go to the Configuration page
From the menu on the left, select SSL under the Protocol group
Check the Enable SSL checkbox
Check the Support SSL intercepting checkbox
Upload root certificate
Upload root key
Apply changes and restart the device

v3.13.0 348
7.
1.
2.
3.
BlueCoat ProxySG
Prerequisite
ICAP server Configuration
(recommended) - Blue Coat is reusing connections to the enable persistent connectionsICAP server, so it is highly recommended to enable persistent connections on the ICAP side or the Blue Coat might detect some ICAP connection drop errors under high load.
ProxySG Management Console
The ProxySG configuration should be done from the ProxySG Management Console interface. Below is the minimum configuration required for Metascan ICAP integration with ProxySG. Please refer to the ProxySG manual for advanced proxy configuration. Open a web browser and load the ProxySG Management Console. (Please refer to the ProxySG manual for details about how to open the .) The ProxySG configuration should be ProxySG Management Consoledone from the ProxySG Management Console interface. Below is the minimum configuration required for Metadefender Core ICAP integration with ProxySG. Please refer to the ProxySG manual for advanced proxy configuration. Open a web browser and load the ProxySG Management Console. (e.g. https://<ip address>:8082 Please refer to the ProxySG manual for details about how to open the ProxySG Management Console.)
Disable Automatic Cache Refresh
Click on the 'Configuration' tab, and navigate to 'Proxy Settings'->'HTTP Proxy'
Select the 'Freshness' tab and select the 'Disable refreshing' option

v3.13.0 349
3.
a.
b.
c.
d.
4.
1.
2.
3.
4.
5.
a.
i.
ii.
b.
i.
ii.
c.
i.
ii.
6.
7.
1.
2.
3.
Select the 'Acceleration Profile' tab and uncheck the following options
Pipeline embedded objects in client request
Pipeline redirects for client request
Pipeline embedded objects in prefetch request
Pipeline redirects for prefetch request
Click 'Apply' to save these settings
Adding REQMOD Service (Upload Mode)
Within the 'Configuration' tab, navigate to 'External Services'->'ICAP'
Click 'New'
Enter a service name for the Metascan service (in this example we use 'MetascanReqmod') and click 'OK'
In the services list, select 'MetascanReqmod' and click 'Edit'
Update the following values
In ICAP Service
Set Service URL to 'icap://<Metascan Server>/OMSScanReq-AV'
Select 'Use vendor's "virus found" page'
In ICAP Service Ports
Check 'This service supports plain ICAP connections
Set the 'Plain ICAP port' value to your Metascan's ICAP port (1344 by default)
In ICAP v1.0 Options
Check 'Request modification'
Check 'Send Client address'
Click 'OK'
Click 'Apply' to save the configuration
Adding RESPMOD Service (Download Mode)
Within the 'Configuration' tab, navigate to 'External Services'->'ICAP'
Click 'New'
Enter a service name for the Metascan service (in this example we use 'MetascanRespmod') and click 'OK'

v3.13.0 350
4.
5.
a.
i.
ii.
b.
i.
ii.
c.
i.
ii.
6.
7.
1.
2.
3.
4.
5.
6.
7.
a.
b.
8.
1.
2.
In the services list, select 'MetascanReqmod' and click 'Edit'
Update the following values
In ICAP Service
Set Service URL to 'icap://<Metascan Server>/OMSScanResp-AV'
Select 'Use vendor's "virus found" page'
In ICAP Service Ports
Check 'This service supports plain ICAP connections
Set the 'Plain ICAP port' value to your Metascan's ICAP port (1344 by default)
In ICAP v1.0 Options
Check 'Response modification'
Check 'Send Client address'
Click 'OK'
Click 'Apply' to save the configuration
Create Metadefender REQMOD Policy
Within the 'Configuration' tab, navigate to 'Policy'->'Visual Policy Manager'
Click the 'Launch' button
In the 'BlueCoat Visual Policy Manager' window, navigate to 'Policy'->'Add Web Content Layer'
Enter a layer name (in this example we use 'Metascan ICAP ReqMod') and click 'OK'
In the newly created 'Metascan ICAP ReqMod' tab, right click on 'Use Default Caching' and choose 'Set...'
In the 'Set Action Object' window, click 'New' and select 'Set ICAP Request Service...'
In the 'Add ICAP Request Service Object' window, set the following values
Set 'name' to 'Metascan ICAP Request Service'
In 'Available services', select 'MetascanReqMod' and click 'Add'
Click 'OK' to finish and 'Apply' to save
Create Metadefender RESPMOD Policy
Within the 'Configuration' tab, navigate to 'Policy'->'Visual Policy Manager'
Click the 'Launch' button

v3.13.0 351
3.
4.
5.
6.
7.
a.
b.
8.
1.
2.
3.
4.
5.
6.
7.
In the 'BlueCoat Visual Policy Manager' window, navigate to 'Policy'->'Add Web Content Layer'
Enter a layer name (in this example we use 'Metascan ICAP RespMod') and click 'OK'
In the newly created 'Metascan ICAP RespMod' tab, right click on 'Use Default Caching' and choose 'Set...'
In the 'Set Action Object' window, click 'New' and select 'Set ICAP Response Service...'
In the 'Add ICAP Response Service Object' window, set the following values
Set 'name' to 'Metascan ICAP Response Service'
In 'Available services', select 'MetascanRespMod' and click 'Add'
Click 'OK' to finish and 'Apply' to save
Configure Bluecoat SSL
refer to Configure Bluecoat SSL
Bypassing ICAP server Temporarily
This guide describes how to enable and disable ICAP server on BlueCoat proxy.
This documentation is assuming that Metadefender ICAP server is already configured and working properly.
Enable ICAP server
To enable ICAP server on BlueCoat:
Open the BlueCoat Management Console.
Go to "Configure" tab > "Advanced configuration" button.
In the left side menu, go to "Policy" > "Visual Policy Manager"
Click "Launch"
In the VPM window, right click on the service you want to enable tab (typically "ICAP Respmod" or "ICAP Reqmod")
Click "Enable layer".
The tab color should turn black.
Click "Install policy"

v3.13.0 352
1.
2.
3.
4.
5.
6.
7.
Disable ICAP server
To disable ICAP server on BlueCoat:
Open the BlueCoat Management Console.
Go to "Configure" tab > "Advanced configuration" button.
In the left side menu, go to "Policy" > "Visual Policy Manager"
Click "Launch"
In the VPM window, right click on the service you want to disable tab (typically "ICAP Respmod" or "ICAP Reqmod")
Click "Disable layer".
The tab color should turn red.
Click "Install policy"
Configure Bluecoat SSL
Enabling Bluecoat To Intercept SSL traffic
By default SSL (HTTPS) connections are not intercepted by Bluecoat and therefore data in them are not scanned by the ICAP server. If you would like to scan files which were sent using secure connection, then you can optionally configure Bluecoat to decrypt SSL connections.
How To Configure

v3.13.0 353
1.
2.
3.
4.
How To Configure
Please refer to .bluecoat documentation
Limitations
If the ICAP server is not connected directly to Bluecoat or it is not in a private network, then the connection between Bluecoat and ICAP won't be secure anymore and the decrypted data could be in danger. (https://bto.bluecoat.com/sites/default/files/tech_pubs
"Securing access to an ICAP Server")/SGOS%20Administration%20Guide_1.pdf
Valid SSL certificates are needed for Bluecoat and user experience could be altered by certification notifications.
How to overcome certificate issues
When creating a keyring and certificate explained in the please Bluecoat documentationgive attention to that the Common name "must match the ProxySG name or IP address that the client expects"
After the keyring and the certificate is ready go to Statics → Advanced → SSL → in ProxySG Management Download a ProxySG Certificate as a CA certificate
Console
Select the previously created certificate and download/install it to the browser in use
This certificate should be set under and under the Proxy Settings → SSL Proxy which was created during configuring SSL interceptionSSLInterception
Data Trickling
Overview
Blue Coat ProxySG appliances implement Data Trickling to improve the user experience during ICAP scanning. Internet Content Adaptation Protocol (ICAP) is the protocol used by Blue Coat ProxySG and ProxyAV appliances, as well as some third party partner appliances, to perform scanning of objects to detect viruses, worms, spyware, and Trojans. Data Trickling is a mechanism implemented by Blue Coat ProxySG appliances performing ICAP scanning that slowly delivers, or trickles, data to the client as it is being scanned. By trickling data, users do not experience the timeouts sometimes associated with waiting for large objects to be scanned, or when scanning is delayed by high loads on content servers or upstream bandwidth limitations.

v3.13.0 354
1.
2.
3.
4.
How does Data Trickling work?
Data Trickling is designed to prevent the timeouts that can sometimes be associated with patience pages. To prevent such timeouts, Data Trickling trickles – or transmits at a very slow rate – bytes to the client at the beginning of the scan or near the very end. Because the ProxySG appliance begins serving content without waiting for the ICAP scan result, timeouts do not occur. However, to maintain security, the full object is not delivered until the results of the content scan are complete (and the object is determined to not be infected). Two types of Data Trickling are available on Blue Coat ProxySG appliances – trickle from start and trickle at end.
Trickle from start
In trickle from start mode, the ProxySG appliance buffers a small amount of the beginning of the response body. As the ICAP server continues to scan the response, the ProxySG appliance allows one byte per second to the client. After the ICAP server completes its scan, if the object is deemed to be clean (no response modification is required), the ProxySG appliance sends the rest of the object bytes to the client at the best speed allowed by the connection. If the object is deemed to be malicious, the ProxySG appliance terminates the connection and the remainder of the response object. Trickling from the start is the more secure Data Trickling option because the client receives only a small amount of data pending the outcome of the virus scan.
Trickle at end
In trickle at end mode, the ProxySG appliance sends the response to the client at the best speed allowed by the connection, except for the last 16KB of data. As the ICAP server performs the content scan, the ProxySG appliance allows one byte per second to the client. After the ICAP server completes its scan, if the object is deemed to be clean (no response modification is required), the ProxySG appliance sends the rest of the object bytes to the client at the best speed allowed by the connection. This method is more user-friendly than trickle at start. This is because users tend to be more patient when they notice that 99% of the object is downloaded versus 1%, and are less likely to perform a connection restart. However, network administrators might perceive this method as the less secure method, as a majority of the object is delivered before the results of the ICAP scan.
Step-by-step guide
To enable data trickling:
Open the BlueCoat Management Console.
Go to "Configuration" tab > "Advanced configuration" button.
Enter credentials if prompted.

v3.13.0 355
4.
5.
6.
a.
b.
c.
7.
a.
b.
c.
In the Advanced configuration menu, go to "Configuration" tab > "External Services" > "ICAP".
Click the "ICAP Feedback" tab.
In the "ICAP Feedback for Interactive Traffic" section:
Check "Provide feedback after X seconds" checkbox
Set the number of seconds to the time you want to wait for ICAP to respond before starting trickling
8 seconds is a usually a good timing, long enough for average file sizes to be fully scanned by ICAP, short enough for browsers to not timeout before trickling starts.
Check the "Trickle object data from start" or "Trickle object data at end" depending on the trickling type you want (see "How does Data Trickling work" section).
"From start" is the most secure.
"At end" is the most user friendly.
In the "ICAP Feedback for Non-Interactive Traffic" section:
Check "Provide feedback after X seconds" checkbox
Set the number of seconds to the time you want to wait for ICAP to respond before starting trickling
5 seconds is a usually a good timing for non-interactive traffic
Check the "Trickle object data from start" or "Trickle object data at end" depending on the trickling type you want (see "How does Data Trickling work" section).
"From start" is the most secure.
"At end" is the most user friendly.
More info
https://www.bluecoat.com/sites/default/files/documents/files/ICAP_Data_Trickling.7.pdf
Disable BlueCoat caching
Step-by-step guide
To prevent the transmission of stale content or other issues caused by object caching, you can use either or in content policy language (CPL). For a cache(no) bypass_cache(yes)
comparison of and , see .cache(no) bypass_cache(yes) KB1772

v3.13.0 356
1.
2.
3.
4.
5.
6.
7.
1.
2.
3.
This sample provides instructions for disabling object caching for specific URLs by adding a policy rule in the Web Access Layer.
In the Management Console, select > > , Configuration Policy Visual Policy Mangerand then click .Launch
From the Visual Policy Manager (VPM) dialog box, select Policy > Add Web Access . The Add New Layer dialog box appears.Layer
In the Add New Layer dialog box, name the layer to reflect the purpose of the layer, such as "Web Access Layer (bypass cache)," then click .OK
Right click the field and select from the drop-down list.Destination Set
In the Set Destination Object dialog box, click and enter the URL New > Request URL,you want to exclude from the cache. Click then .Add, OK
Right click on and select > Then, click .Action Set Bypass Cache. OK
Click to apply the new policy. Install policy
To use CPL code for the same policy rules, add the following CPL code in the local policy file or in a VPM CPL Policy Layer:
<Proxy>url.domain=< > bypass_cache(yes)url
In the example above, < > is the URL you want to exclude from caching.url
Source:
https://kb.bluecoat.com/index?page=content&id=KB5229
Related articles
Error rendering macro 'contentbylabel' : parameters should not be empty
Process Only Specific File Types
Step-by-step guide
Open the BlueCoat management console using a web browser (default URL: http://<bluecoat proxy IP>:8082/)
When prompted, enter your user name and password and click "Ok".
In the BlueCoat management console, click on the "Configure" tab)

v3.13.0 357
3.
4.
5.
On the "Configuration" page, click on the "Advanced configuration" button
In the management console menu, go to Policy -> Visual Policy Manager.

v3.13.0 358
5.
6.
7.
Click "Launch" to start the Visual Policy Manager.
In the Visual Policy Manager, click on the tab where you set the ICAP rule you plan to add file type filtering on.
In these instructions, the ICAP layer is named "Metascan ICAP RespMod". The tab name on your installation might be different.
The window you see should look similar to the screenshot below.

v3.13.0 359
7.
8.
9.
Right click the "Destination" cell of the ICAP rule (line where the "Action" is set to your ICAP service) and click "Set".
In the "Set Destination Object", select "New" and click "Apparent Data Type".

v3.13.0 360
9.
10. In the "Add Apparent Data Type Object" window, change the "Name" value to whatever you want (optional) and select the file types you want forwarded to the ICAP server.

v3.13.0 361
10.
11.
12.
Click "Ok" twice to get back to the Visual Policy Manager.
In the "Visual Policy Manager" window, click "Install policy" to apply the new configuration.

v3.13.0 362
12.
1.
F5 BIG IP
Prerequisite
ICAP server Configuration
Big-IP Management Console
The F5 Big-IP configuration should be done from the F5 Big-IP Management Console interface. Below is the minimum configuration required for Metascan ICAP integration with F5 Big-IP. Please refer to the F5 Big-IP manual for advanced configuration. Open a web browser and load the Big-IP Management Console. (Please refer to the Big-IP manual for details about how to open the Big-IP Management Console.) Metascan can be used to scan all files being uploaded to the F5 BIG IP server with all of the engines in Metascan to make sure that no malware is able to get to the web servers behind the Big IP server. This guide describes the basic steps to getting Metascan working with your F5 BIG IP server.
Configuring the F5 BIG IP Appliance
The following configuration steps should be done from the F5 BIG IP Management Console interface. The steps below describe the minimum configuration required for Metascan ICAP integration with F5 BIG IP. Please refer to the .F5 BIG IP manual for advanced configuration
Open a web browser and load the BIG IP Management Console. (Please refer to the BIG IP manual for details about how to open the BIG IP Management Console.)
Creating a custom client-side ICAP profile
You create this ICAP profile when you want to use an ICAP server to wrap an HTTP request in an ICAP message before the BIG-IP system sends the request to a pool of web servers. The profile specifies the HTTP request-header values that the ICAP server uses for the ICAP message.Important: You can use macro expansion for all ICAP header values. For example, if an ICAP header value contains ${SERVER_IP}, the BIG-IP system replaces the macro with the IP address of the ICAP server selected from the pool assigned to the internal virtual server. If an ICAP header value contains ${SERVER_PORT}, the BIG-IP system replaces the macro with

v3.13.0 363
1.
2.
3.
4.
5.
6.
7.
8.
the port of the ICAP server selected from the pool assigned to the internal virtual server. For example, you can set the URI value in an ICAP profile to icap://${SERVER_IP}:${SERVER_PORT}/OMSScanReq-AV.
On the Main tab, click Local Traffic > Profiles > Services > ICAP.
Click Create.
In the Name field, type a unique name for the profile.
For the Parent Profile setting, retain the default value, icap.
On the right side of the screen, select the Custom check box.
In the URI field, type a URI in this format: . For example, using icap://hostname:port/pathmacro expansion, you can set the URI value to:icap://${SERVER_IP}:${SERVER_PORT}/OMSScanReq-AV .
In the Preview Length field, type a length or retain the default value 0. This value defines the amount of the HTTP request or response that the BIG-IP system offers to the ICAP server when sending the request or response to the server for adaptation. This value should not exceed the length of the preview that the ICAP server has indicated it will accept.
Leave empty for "Header From", "Host", "Referer", "User Agent" fields.

v3.13.0 364
8.
9.
1.
2.
3.
4.
5.
6.
7.
a.
b.
Click Finished.
After you create the ICAP profile, you can assign it to an internal virtual server so that the HTTP request that the BIG-IP system sends to an ICAP server is wrapped in an ICAP message, according to the settings you specified in the ICAP profile.
Creating a pool of ICAP servers
You perform this task to create a pool of ICAP servers that perform content adaptation on HTTP requests.
On the Main tab, click Local Traffic > Pools. The Pool List screen opens.
Click Create. The New Pool screen opens.
In the Name field, type a unique name for the pool.
For the Health Monitors setting, from the Available list, select the http monitor, and click << to move the monitor to the Active list.
From the Load Balancing Method list, select how the system distributes traffic to members of this pool. The default is Round Robin.
For the Priority Group Activation setting, specify how to handle priority groups:
Select Disabled to disable priority groups. This is the default option.
Select Less than, and in the Available Members field type the minimum number of members that must remain available in each priority group in order for traffic to remain confined to that group.
Using the New Members setting, add each resource that you want to include in the pool:
Either type an IP address in the Address field, or select a node address from the Node List.

v3.13.0 365
7.
b.
c.
d.
8.
1.
2.
3.
4.
5.
6.
7.
8.
9.
10.
1.
Type a port number in the Service Port field, or select a service name from the list.
To specify a priority group, type a priority number in the Priority field.
Click Add.
Click Finished.
The pool of ICAP load balancing servers appears in the Pools list.
Creating an internal virtual server for forwarding requests to an ICAP server
A virtual server of type internal provides a destination that a standard type of virtual server can use when forwarding HTTP requests slated for ICAP-based content adaptation.
On the Main tab, click Local Traffic > Virtual Servers. The Virtual Server List screen opens.
Click the Create button. The New Virtual Server screen opens.
In the Name field, type a unique name for the virtual server.
In the Description field, type a description of the virtual server. For example: This virtual server ensures HTTP request modification through the use of the service_name ICAP service..
From the Type list, select Internal.
For the State setting, verify that the value is set to Enabled.
From the Configuration list, select Advanced.
From the ICAP Profile list, select the ICAP profile that you previously created for handling HTTP requests.
From the Default Pool list, select the pool of ICAP servers that you previously created.
Click Finished.
After you perform this task, a standard type of virtual server can forward HTTP requests to an internal type of virtual server. The internal virtual server then sends the request to a pool of ICAP servers, before sending the request back to the standard virtual server for forwarding to the pool of web servers.
Creating a custom Request Adapt profile
You create a Request Adapt type of profile when you want a standard HTTP virtual server to forward HTTP requests to an internal virtual server that references a pool of ICAP servers. A Request Adapt type of profile instructs the HTTP virtual server to send an HTTP request to a named internal virtual server for possible request modification.

v3.13.0 366
1.
2.
3.
4.
5.
6.
7.
8.
9.
10.
11.
1.
On the Main tab, click Local Traffic > Profiles > Services > Request Adapt.
Click Create.
In the Name field, type a unique name for the profile.
For the Parent Profile setting, retain the default value, requestadapt.
On the right side of the screen, click the Custom check box.
For the Enabled setting, retain the default value, Enabled. When you set this value to Enabled, the BIG-IP system forwards HTTP requests to the specified internal virtual server for adaptation.
From the Internal Virtual Name list, select the name of the internal virtual server that you previously created for forwarding HTTP requests to the pool of iCAP servers.
In the Preview Size field, type a numeric value. This specifies the maximum size of the preview buffer. This buffer holds a copy of the HTTP request header and the data sent to the internal virtual server, in case the adaptation server reports that no adaptation is needed. Setting the preview size to 0 disables buffering of the request and should only be done if the adaptation server always returns a modified HTTP request or the original HTTP request.
In the Timeout field, type a numeric value, in seconds. If the internal virtual server does not return a result within the specified time, a timeout error occurs. To disable the timeout, use the value 0.
From the Service Down Action list, select an action for the BIG-IP system to take if the internal virtual server returns an error:
Select Ignore to instruct the BIG-IP system to ignore the error and send the unmodified HTTP request to an HTTP server in the HTTP server pool.
Select Drop to instruct the BIG-IP system to drop the connection.
Select Reset to instruct the BIG-IP system to reset the connection.
Click Finished.
After you perform this task, the BIG-IP system contains a Request Adapt profile that a standard HTTP virtual server can use to forward an HTTP request to an internal virtual server for ICAP traffic.
Creating a custom HTTP profile
An HTTP profile defines the way that you want the BIG-IP system to manage HTTP traffic.®
Note: Other HTTP profile types (HTTP Compression and Web Acceleration) enable you to configure compression and cache settings, as required. Use of these profile types is optional.

v3.13.0 367
1.
2.
3.
4.
5.
6.
7.
1.
2.
3.
4.
5.
6.
7.
a.
b.
c.
d.
8.
On the Main tab, click Local Traffic > Profiles > Services > HTTP. The HTTP profile list screen opens.
Click Create. The New HTTP Profile screen opens.
In the Name field, type a unique name for the profile.
From the Parent Profile list, select http.
Select the Custom check box.
Modify the settings, as required.
Click Finished.
The custom HTTP profile now appears in the HTTP profile list screen.
Creating a pool to process HTTP traffic
You can create a pool of web servers to process HTTP requests.
On the Main tab, click Local Traffic > Pools. The Pool List screen opens.
Click Create. The New Pool screen opens.
In the Name field, type a unique name for the pool.
For the Health Monitors setting, from the Available list, select the http monitor, and click << to move the monitor to the Active list.
From the Load Balancing Method list, select how the system distributes traffic to members of this pool. The default is Round Robin.
For the Priority Group Activation setting, specify how to handle priority groups:
Select Disabled to disable priority groups. This is the default option.
Select Less than, and in the Available Members field type the minimum number of members that must remain available in each priority group in order for traffic to remain confined to that group.
Using the New Members setting, add each resource that you want to include in the pool:
Type an IP address in the Address field, or select a node address from the Node List.
Type 80 in the Service Port field, or select HTTP from the list.
(Optional) Type a priority number in the Priority field.
Click Add.
Click Finished.
The new pool appears in the Pools list.

v3.13.0 368
1.
2.
3.
4.
5.
6.
7.
8.
9.
10.
11.
1.
2.
a.
b.
c.
Creating an HTTP virtual server for enabling request adaptation
You perform this task to create a standard virtual server that can forward an HTTP request to an internal virtual server. The internal virtual server then sends the request to a pool of ICAP servers before the BIG-IP system sends the request to the web server.®
On the Main tab, click Local Traffic > Virtual Servers. The Virtual Server List screen opens.
Click the Create button. The New Virtual Server screen opens.
In the Name field, type a unique name for the virtual server.
For the Destination setting, in the Address field, type the IP address that you want to use as a destination for client traffic destined for a pool of HTTP web servers.The IP address you type must be available and not in the loopback network.
In the Service Port field, type 80, or select HTTP from the list.
From the Configuration list, select Advanced.
From the HTTP Profile list, select the name of the HTTP profile that you created previously.
From the Request Adapt Profile list, select the name of the Request Adapt profile that you previously created.
From the Source Address Translation list, select Auto Map.
From the Default Pool list, select the name of the HTTP server pool that you previously created.
Click Finished.
Configuring the REQMOD ( Request Modification) service
In order to configure F5 BIG-IP LTM to only forward HTTP requests to the Metadefender Core ICAP server, follow the steps described below. In the case you want to configure F5 BIG-IP LTM to forward both HTTP requests and responses, refer to the "Configuring REQMOD and RESPMOD Services" section.
Open a Web browser and follow the instructions from the page:https://support.f5.com/kb/en-us/products/big-ip_ltm/manuals/product/ltm-implementations-11-3-0/12.html
Update the REQMOD ICAP service profile.
Go to “Local Traffic” > “Profiles” > “Services” > “ICAP”.
In the list that appears select your ICAP Request mod service.

v3.13.0 369
2.
c.
d.
3.
a.
b.
c.
d.
1.
2.
a.
b.
c.
d.
3.
a.
b.
c.
d.
4.
a.
b.
c.
d.
5.
a.
Set “Preview Length” to 0 and make sure the checkbox next to it is checked.
Click “Update” to apply the changes.
Update the Request Adapt profile.
Go to “Local Traffic” > “Profiles” > “Services” > “Request Adapt”.
In the list that appears select your request adapt service.
Set “Preview Size” to 0 and make sure the checkbox next to it is checked.
Click “Update” to apply the changes.
Configuring REQMOD and RESPMOD Services
In order to configure F5 BIG-IP LTM to forward both HTTP requests and responses to the Metadefender Core ICAP server, follow the steps described below. In the case you want to configure F5 BIG-IP LTM to only forward HTTP responses, refer to the "Configuring REQMOD Service" section.
Open a Web browser and follow the instructions from the page:https://support.f5.com/kb/en-us/products/big-ip_ltm/manuals/product/ltm-implementations-11-3-0/13.html
Update your REQMOD ICAP service profile.
Go to “Local Traffic” > “Profiles” > “Services” > “ICAP”.
In the list that appears select your ICAP Request mod service.
Set “Preview Length” to 0 and make sure the checkbox next to it is checked.
Click “Update” to apply the changes.
Update your RESPMOD ICAP service profile.
Go back to “Local Traffic” > “Profiles” > “Services” > “ICAP”.
In the list that appears select your ICAP Response mod service.
Set “Preview Length” to 0 and make sure the checkbox next to it is checked.
Click “Update” to apply the changes.
Update your Request Adapt profile.
Go to “Local Traffic” > “Profiles” > “Services” > “Request Adapt”.
In the list that appears select your request adapt service.
Set “Preview Size” to 0 and make sure the checkbox next to it is checked.
Click “Update” to apply the changes.
Update Response Adapt service profile (only if RESPMOD is used)

v3.13.0 370
5.
a.
b.
c.
d.
1.
2.
3.
1.
2.
3.
4.
1.
Go to “Local Traffic” > “Profiles” > “Services” > “Response Adapt”.
In the list that appears select your response adapt service.
Set “Preview Size” to 0 and make sure the checkbox next to it is checked.
Click “Update” to apply the changes.
Configuring Service Down Actions
If you followed the steps described in "Configuring REQMOD Service" or "Configuring REQMOD and RESPMOD Services". Big-IP will be configured to drop all connections when the ICAP service is down.
F5 can be configured to forward HTTP data to the web server/web client in the case the ICAP server is unrechable. If you are using an ICAP server pool that contains more than one Metascan ICAP server, F5 can also be configured to forward the HTTP content to a different pool member.Bypass ICAP server on service down
Note that bypassing ICAP on service down may lower your organisation's security as content will be forwarded without being scanned.
Open the “Request adapt” profile (“Profiles” > “Services” > “Request Adapt”)
Set “Service Down Action” to “Ignore”.
Click the "Update" button to apply the changes.
Transfer content to different pool member
If you are using an ICAP server pool that contains more than one Metascan ICAP server, you can also configure Big-IP to send the HTTP content to a different ICAP pool member.
Open your ICAP services pool properties ("Pools" > "Pool List").
Set the "Configuration" list to "Advanced".
Set the “Action on Service Down” property to “Reselect”.
Click the "Update" button to apply the changes
Throughput limitation by license
If you experience slow download/upload through F5 then there is a chance that your throughput is limited by F5 license.
How to check the maximum throughput allowed by license:
SSH into F5: On Windows open PuTTY then type the IP of the F5 device, and click Open

v3.13.0 371
1.
2.
3.
4.
5.
Use the default login: admin/admin
Type tmsh and press enter
Type "show /sys license detail | grep perf" to see performance limitations by license
To exit from tmsh type "quit" and press enter, to quit from PuTTY type "exit" then press enter
F5 BIG IP SSL configuration
To be able to scan data transmitted using SSL connection you have to take similar steps as listed in .F5 BIG IP and Metascan Getting Started Guide
The only difference is that you should setup a HTTPS pool and virtual server instead of plain HTTP.
Please check the following links to be able to setup HTTPS connection handling:
Managing client-side HTTPS traffic using a self-signed certificate
Managing client and server HTTPS traffic using a self-signed certificate
Managing client-side HTTPS traffic using a CA-signed certificate
McAfee Web Gateway
The current documentation is based on McAfee Web Gateway version 7.7.
Prerequisites
McAfee Web Gateway is installed and license is activated
ICAP server is started and configured with " " option enabled. Use persistent connectionFor details please check 1. ICAP server Configuration
Configure McAfee Web Gateway to use Metadefender ICAP

v3.13.0 372
1.
2.
3.
4.
Configure McAfee Web Gateway to use Metadefender ICAP
In your browser navigate to the McAfee Web Gateway's user interface. By default it is accessible via http://<IP address>:4711 or https://<IP address>:4712. Default user/password combination is admin/webgateway
Choose Policy
Under the tab select Rule Sets Add → Rule Set from Library...
Select from the rule set list and click ICAP Client → ICAP Client OK

v3.13.0 373
4.
5.
6.
Select the newly created under and click on next to ICAP Client Rule Sets Edit...ReqMod server

v3.13.0 374
6.
7.
8.
1.
2.
3.
In the window under double-click on the first item. Edit List (ICAP Server) List contentIn the new window change the URI for the ICAP server. It should look Edit ICAP Serverlike . Click OK to close the Edit ICAP icap://<ICAP IP>:<ICAP port>/OMSScanReq-AVServer window and click OK again to close the ReqMod server editor window
Repeat steps 5-6 to set the . The URI for ICAP server should be RespMod servericap://<ICAP IP>:<ICAP port>/OMSScanResp-AV
After everything is configured click in the top-right corner. McAfee is now Save Changesconfigured to use Metadefender ICAP
Enabling SSL Scanner
If you want to inspect contents in HTTPS connections with Metadefender ICAP you should enable in Mcafee Web Gateway.SSL Scanner
In your browser navigate to the McAfee Web Gateway's user interface. By default it is accessible via http://<IP address>:4711 or https://<IP address>:4712. Default user/password combination is admin/webgateway
Choose Policy
Under select the rule which is disabled by defaultRule Sets SSL Scanner

v3.13.0 375
3.
4. Check option and click McAfee is now configured to decrypt Enable Save Changes.HTTPS traffic and send it to Metadefender ICAP unencrypted
Troubleshooting
To use the Mcafee Web Console, you need to enable java in your browser and add the Web Console's url to the trusted sites in Java Config.
If you see a McAfee Web Gateway malware detection page instead of a Metadefender ICAP block page then you should disable Anti-Malware scanning. This can be done under Policy → Rule Sets → Gateway Anti-Malware → Gateway Anti-Malware Settings
There are notifications or even non-working web pages after enabling SSL Scanner: you should download and install the SSL certificate used by Web Gateway to your browser. You can get the certificate under Policy → Settings → SSL Client Context with CA →
. Click next to and import the created file to Default CA Export... Certificate Authorityyour browser's trusted root certificates
If you see errors: Metadefender ICAP server should "16000 - NoIcapServerAvailable"be configured to use persistent connections. Please check 1. ICAP server Configuration
Squid
Basic Configuration
Squid configuration should be done by modifying “squid.conf” (e.g, /etc/squid3/squid.conf). Below is an example of a simplified version of configuration for Squid. For more detailed documentation, please refer to the Squid manual.
1. Enable acl localnet.
Search for “acl localnet” section, uncomment all “acl localnet” lines. Below is an example of how the configuration might look:

v3.13.0 376
acl localnet src 10.0.0.0/8acl localnet src 172.16.0.0/12 # RFC1918 possible internal networkacl localnet src 192.168.0.0/16 # RFC1918 possible internal networkacl localnet src fc00::/7 # RFC 4193 local private network rangeacl localnet src fe80::/10 # RFC 4291 link-local (directly plugged) machines acl SSL_ports port 443acl Safe_ports port 80 # httpacl Safe_ports port 21 # ftpacl Safe_ports port 443 # httpsacl Safe_ports port 70 # gopheracl Safe_ports port 210 # waisacl Safe_ports port 1025-65535 # unregistered portsacl Safe_ports port 280 # http-mgmtacl Safe_ports port 488 # gss-httpacl Safe_ports port 591 # filemakeracl Safe_ports port 777 # multiling httpacl CONNECT method CONNECT
2. Allow localnet and localhost access by adding the following lines. (under the "Recommended minimum Access Permission configuration" section)
http_port 3128http_access allow localnethttp_access allow localhosthttp_access deny all
3. Enable ICAP and set the Preview Size to 0. (these values don't exist, so you simply add them anywhere in the file)
icap_enable onicap_send_client_ip onicap_preview_enable onicap_preview_size 0icap_service_failure_limit -1
Enable ReqMod (upload mode)...again, these don't exist, so add them anywhere

v3.13.0 377
Enable ReqMod (upload mode)...again, these don't exist, so add them anywhere
icap_service metascan_req reqmod_precache bypass=0 icap://<Metascan>:1344/OMSScanReq-AVadaptation_access metascan_req allow all
Enable RespMod (download mode) again, these don't exist, so add them anywhere
icap_service metascan_resp respmod_precache bypass=0 icap://<Metascan>:1344/OMSScanResp-AVadaptation_access metascan_resp allow all
4. Persistent connections
By default, Squid is using persistent connections to the ICAP server, this feature can be controlled explicitly by the following directive:
icap_persistent_connections on/off
If persistent connections are enabled in Squid, the same setting should be applied to the ICAP side or Squid might report some ICAP errors. See: Configuration via INI
5. Restart Squid to apply the new configuration.
NOTE: If you are using Squid 3.1 there is a bug in Squid that drops the connection to the ICAP server. You will notice messages in Squid's cache.log file similar to the following:
"essential ICAP service is down after an options fetch failure: icap://<metascan IP>:1344 [down,!opt]"/OMSScanReq-AV
This may cause you to get Squid error messages when trying to access websites.
To fix this, either upgrade to Squid 3.2 or higher, or add "icap_persistent_connections off" to your squid.conf file.

v3.13.0 378
Scanning HTTPS content
Learn how to configure Squid to scan HTTPS content below. This allows Squid to send HTTPS content to the Metadefender Proxy server for scanning purposes.
Requirements
Version: ? Tried with 3.5.19
Squid has to be compiled with SSL support. For further information, please see: http://docs.diladele.com/
Configuration
Tell Squid to listen on the following ports:
http_port 3128 ssl-bump generate-host-certificates=on dynamic_cert_mem_cache_size=4MB cert=<SQUIDFOLDER>\etc\ssl\myc.pem# intercepted traffichttps_port 3130 ssl-bump intercept generate-host-certificates=on dynamic_cert_mem_cache_size=4MB cert=<SQUIDFOLDER>\etc\ssl\myc.pem
In addition, the following lines have to be inserted:
sslcrtd_program <SQUIDFOLDER>\lib\squid\ssl_crtd.exe -s <SQUIDFOLDER>\var\cache\squid_ssldb -M 4MB ssl_bump stare allssl_bump bump all
Certification
Generate a new root certification for Squid by entering the following in the squid.conf file:
openssl.exe req -new -newkey rsa:1024 -days 1000 -nodes -x509 -keyout myc.pem -out myc.pem
After generating a new certification, the certification storage should be reinitialized by deleting the <SQUIDFOLDER>\var\cache\squid_ssldb folder and running:

v3.13.0 379
1.
2.
3.
a.
4.
a.
b.
c.
<SQUIDFOLDER>\lib\squid\ssl_crtd.exe -c -s <SQUIDFOLDER>\var\cache\squid_ssldb
The certification has to be added to the browser. Squid has to be restarted after the changes.
4. Using ICAP server for Metadefender Core v4.x (BETA)
For Windows
Prerequisites
Metadefender Core v4.x Windows is installed on the same machine.
Obtained a ICAP_for_v4_beta.zip package.
How To Install
Unpack ICAP_for_v4_beta.zip
Open icap_config.ini and set to the port used by Metadefender Core REST rest_port(default is 8008)
Start omsICAPServer.exe
For a better performance install omsICAPServer.exe as a Windows service
sc.exe create <new_service_name> binPath= "<path_to_the_service_executable>"
Using Metadefender Core v4 management enable local file scan:
Open Policies → Security rules → File scan
Check "Allow scan files on server"
Add the ICAP temp directory to the list of allowed directories. This is C:\Windows\Temp\ by default on Windows but can be overwritten by in temp_diricap_config.ini
For Linux (Ubuntu 16.04)
Prerequisites
Ubuntu 16.04 or newer

v3.13.0 380
1.
2.
3.
4.
a.
b.
c.
Metadefender Core V4 Linux is installed on the same machine
Obtained a ICAP_for_v4_beta.zip package.
How To Install
Unpack ICAP_for_v4_beta.zip into a directory
Open icap_config.ini and set to the port used by Metadefender Core REST rest_port(default is 8008)
Start md_icap
Using Metadefender Core v4 management enable local file scan:
Open Policies → Security rules → File scan
Check "Allow scan files on server"
Add the ICAP temp directory to the list of allowed directories. This is /tmp/ by default on Linux but can be overwritten by in icap_config.initemp_dir
Configuration via INI
The ICAP server configuration is done in omsConfig.ini. Applying configuration changes requires to restart the ICAP server.
Key Description
maxnum_sockets Range: 1~1000: 60Defaut
Number of worker threads to handle ICAP requests. Configures the number of threads that will be used by the Metadefender Core ICAP server for handling requests. For optimal performance, this should be set to a value higher than the number of processor cores available to the Metadefender Core system
maxnum_connections Default: 355
The maximum number of simultaneous connections that the ICAP server is able to support. Certain proxy servers will use this value to restrict the requests that are made of the Metadefender Core ICAP server and will not send more than this number of simultaneous requests to the Metadefender Core ICAP server.

v3.13.0 381
Key Description
By ICAP specs, the client (proxy) is not supposed to send more requests than what is advertised by the ICAP server.
If the client receives more than this number of connections, it is supposed to handle the overload itself (i.e. queuing, bypassing, rejecting...)
The ICAP server does not enforce that number, this means that if the client does not respect the rules and sends more than the advertised max number of connections, we will still process them.
port Range: 1 - 65535: 1344Default
Port the server is listening to. If you are installing with other product which have ICAP interface, you must change to different port.
block_on_max_capacity Range: 0 - 1: 0Default
Blocking (i.e. return 403 forbidden to HTTP clients) every request coming in when Metadefender Core is overloaded (i.e. "Metascan server too busy"). A "Metascan server is too busy. Please try again later." message will be displayed in clients browsers.
0: Allow files when overloaded
1: Block files when overloaded
path_to_custom_html Value: Absolute file path or file path relative to omsICAPServer.exe directory
: Default omsICAPdefault.htm
Path to custom HTML page to be displayed to the user when content is blocked, request rejected due to license, server too busy, etc.
Content is parsed by ICAP server.

v3.13.0 382
Key Description
Use the "%%%icap_block_message%%%" macro in the web page as a place holder for the ICAP message. ICAP server will replace that message by whatever message it has to say.
scan_health_checks Range: 0 - 1: 0Default
Scan client specific health checks.Disabling scanning health checks improves performance as it reduces the load on Metascan.
Only implemented for BlueCoat for now.
Easy to add support for different health checks
BlueCoat periodically sends requests to the ICAP server to make sure it's working fine.
Disabling scanning health checks improves performance.
dump_invalid_requests Range: 0 - 1: 0Default
Outputs the invalid buffer to a file ending in "_400_Bad_Request.txt" Slight performance impact when invalid requests are processed. Should only be enabled for investigation purpose.
0: Disables dumping invalid (ICAP 400 response) raw requests to a file.
1: Dumps invalid (ICAP 400 response) raw requests to a file.
log_dir Value: Absolute or relative path for the logging directory. All the generated log files are placed here.
: Empty (Log folder under install directory)Default
The path to the logging directory.
temp_dir

v3.13.0 383
Key Description
Value: Absolute or relative path for a directory that can be used by ICAP server for saving temporary files.
: Empty (C:\Windows\Temp\ on Windows and /tmp/ Defaulton Linux)
The path to the directory that can be used by the ICAP server to save temporary files.
skip_too_big_file Range: 0 - Max Unsigned Long : 0Default
Allows the ICAP server to skip scanning a file if the file is too large. The value specifies in the threshold for skipping bytesfiles. A value of 0 means this feature is off, anything greater than 0 indicates this feature is on
use_persistent_connections Range: 0 - 1: 0Default
This should be used for improved performance. The ICAP server keeps the connections open, so they can be reused for several requests.
0 : ICAP server is not using persistent connections. Connections are closed after serving a request.
1 : ICAP server is using persistent connections. Connections are kept open after serving a request.
rest_port Range: 1 - 65535: 8008Default
Port of the Metadefender V4 REST which can be used by the ICAP to initiate scanning.
sanitization_postfix Value: Custom text postfix, that will be appended to Content-Disposition header's filename if the file is sanitized.
: No postfix will be appended.Default
This postfix can be used to indicate if a file is sanitized. If the key is not set or set to empty string, no postfix will be appended.

v3.13.0 384
Key Description
For example (PDF to PDF sanitization is enabled in Core workflow) and this configuration is done as follows. For the following HTTP header,
sanitization_postfix=[sanitized]
Content-Disposition: attachment; filename="report.pdf";
will be modified to
Content-Disposition: attachment; filename="report[sanitized].pdf";

v3.13.0 385
10. Metadefender / Kiosk
Overview
Metadefender Kiosk helps protect your network by enabling control over the flow of data into and out of your organization. It can be used as a media scanning station on your own hardware or on OPSWAT's custom-made kiosks. Typically, media such as USB devices, DVDs, card readers, SD cards, flash drives, or floppy disks, are scanned by Metadefender Kiosk by inserting the media device into the appropriate drive. After the scan is complete, Kiosk generates a detailed report.
This user guide covers installing, configuring, upgrading, using, and troubleshooting Metadefender Kiosk.
Key Features
Protection against zero-day attacks (Metadefender Core integration).
Customized data security policies.
Control over data flow.
System restore.
Active Directory authentication.
Custom Authentication.
Portable Media including floppy disks, SD cards, CDs, DVDs, encrypted USB and disc, and more.

v3.13.0 386
UI localization/internalization (comes with English, Arabic, Hebrew, Japanese, Korean and the ability to manually add any other language).
Securely wipe USB drives.
Easier system hardening.
User authentication
Metadefender Kiosk has the following authentication features:
Active Directory authentication
Supports custom authentication
Peripheral media
Metadefender Kiosk automatically detects multiple peripheral media insertions for the following media types:
USB devices*
CDs/DVDs/Blu-ray
Card readers
SD cards
Floppy disks
* Not all USB devices are currently supported. If you have a specific device you need supported, please contact OPSWAT support.
Encrypted USB devices
Metadefender Kiosk can unlock encrypted USB devices with a given password. Metadefender Kiosk supports the following encrypted USB devices:
Biocryptodisk-ISPX
Buffalo RUF2-HSCT and RUF3-HSL
IronKey S200
IronKey D250
Kanguru Defender Elite 30
Kanguru 2000 and 3000
Kingston DataTraveler Vault Privacy

v3.13.0 387
SanDisk Cruzer Enterprise FIPS Edition
SanDisk Cruzer Contour
U3 based USBs
EncryptDisc CDs/DVDs
Microsoft BitLocker: Metadefender Kiosk supports BitLocker To Go using passwords. Metadefender Kiosk does not support BitLocker encryption using key files, smart cards, or VHD (Virtual Hard Drive) BitLocker encryptions.
McAfee Complete Data Protection when McAfee file and Removable Media Protection client is installed
Media handling
Metadefender Kiosk's media handling features include the following:
Can scan drives with multiple partitions
Can perform a full or partial media scan
Can wipe/format USB drives
Supports integration with Metadefender SFT ( Secure File Transfer) for accessing and downloading scanned files
USB device soft eject
CD/DVD eject
Processing files
Metadefender Kiosk uses Metadefender Core to process files. Metadefender Core has the following processing features:
Multi-engine scanning of files
Data sanitation
Heuristics for zero-day threats
Archive extraction
File type verification
Workflow engines

v3.13.0 388
Scanning session results
After scanning media, Metadefender Kiosk allows you to view detailed scan logs, and print scan results.
Customizable interface
The Metadefender Kiosk interface supports English, Arabic, Hebrew, Japanese, Korean, German, and Vietnamese languages.
System hardening
Metadefender Kiosk comes with a variety of system hardening features for maximum security.
Disabled autorun
Users can only exit by pressing ALT+F4 and, if Kiosk is configured to require a password to exit, entering the admin password
Blocks the ability to copy files to the system
Blocks the ability to execute files on the system
Runs automatically on system startup
Configurable file policy by file type
Select allowed/blocked and skipped files by file type and size
Select file extensions to be taken under consideration when a file type mismatch is performed
1. Installing / Upgrading Metadefender Kiosk
Before you begin the installation, you should ensure that are met. You system requirementscan install Metadefender Kiosk by either using the embedded Install Wizard or from the Windows command line.
Once you finish installing Kiosk and , you can Harden the kiosk deploy and launch the kiosk UI for usage.
This section does not cover installation of Metadefender SFT and Metadefender Core. Refer to the user guides for them.

v3.13.0 389
1.1. Kiosk System Requirements
Hardware requirements
When Metadefender Kiosk is installed on a separate machine than Metadefender Core, the machine Metadefender Kiosk is installed on must meet the following requirements:
Minimum system memory: 4 GB
Minimum available hard drive space: 10 GB
When Metadefender Kiosk is installed on the same machine as Metadefender Core, refer to Metadefender Core system requirements for additional requirement.
Software requirements
Metadefender Kiosk can only process files on devices with Windows file systems. It does not detect Linux or Macintosh file systems.
Operating System - Windows 7 / 8 / 8.1 / 10 / 2008 R2 / 2012 / 2012 R2 / 2016
Windows Installer - 4.5 or higher
Adobe Flash Player - 10.1 or newer
Internet Explorer - Install the latest official (non-beta) version of Internet Explorer from . If you are configuring Metadefender Kiosk on a tablet, you can Microsoft’s website
disable the touchscreen zoom functionality by creating a DWORD value ZoomDisabled with the value of 1 in the registry key (HKEY_CURRENT_USER/Software/Microsoft/Internet Explorer/Zoom).
OPSWAT Metadefender Core® - In order to scan files with Metadefender Core's multi-scanning capabilities, Metadefender Kiosk requires a Metadefender Core server. You can install the Metadefender Core server on the same machine as Metadefender Kiosk, or a separate machine. The requirements for Metadefender Core vary depending on which version you plan to use. Metadefender Kiosk version 3.2.0 and later require Metadefender Core version 3.10.1 or later. If Metadefender Kiosk is installed on the same system as Metadefender Core, Metadefender Core 3.11.0 or later is required. Refer to the for installation instructions for Metadefender Core Product DocumentationMetadefender Core.
Installed third party components
The following third party components are installed as part of the Metadefender Kiosk installation process. These components may be shared with other applications.

v3.13.0 390
All of these are required by Metadefender Kiosk. Uninstalling them may result in unexpected behavior of other applications.
Component Details
IIS express IIS express 7.5 (Metadefender Kiosk 3.2.0 or older)
IIS express 8.0 (Metadefender Kiosk 3.3.0 or newer)
.NET framework 4 Client Profile
Extended
Microsoft Visual C++ redistributable
Microsoft Visual C++ 2005 Redistributable
Microsoft Visual C++ 2008 Redistributable
Microsoft Visual C++ 2008 Redistributable - x86
Microsoft Visual C++ 2008 Redistributable - x64
Microsoft Visual C++ 2010 Redistributable - x86
Microsoft Visual C++ 2012 Redistributable (x86)
Microsoft Visual C++ 2013 Redistributable (x86)
MongoDB An open source database that uses a document-oriented data mode.
Installed Windows services
The following Windows services are installed as part of the Metadefender Kiosk installation process.
Metadefender Kiosk REST
Metadefender Kiosk
Ports that need to be available
The following ports need to be available for the machine Metadefender Kiosk is installed on.
Component/service Port
Metadefender REST 8009

v3.13.0 391
1.
Component/service Port
MongoDB 27019
Application directory and registry key
Installation location
You can choose the installation location for Metadefender Kiosk.
Application directory
The %PROGRAMDATA%\OPSWAT directory is used for storing Metadefender Core application data. It also stores the license file.
Registry key
HKEY_LOCAL_MACHINE\SOFTWARE\Wow6432Node\OPSWAT is the registry key for all OPSWAT products.
Temporary directory used for processing files
When processing files, Metadefender Core uses the temporary directory (c:\windows\temp).
Antivirus whitelist requirements
You must whitelist any process running out of the Metadefender Kiosk installation directory. Best practice is to exclude the folder from any real-time antivirus protection
Programs not uninstalled during uninstallation process
If you uninstall Metadefender Kiosk, Microsoft Runtimes, .NET, and IIS Express are not removed.
1.2. Installing Metadefender Kiosk Using the Install Wizard
Go to and click http://portal.opswat.com/en/product-categories/metadefender-kiosk. Download
If you are not already logged in to the portal, you will be prompted to login.Note:

v3.13.0 392
1.
2.
3.
Open the downloaded executable and click . The Welcome window appears. Run
Click . The Setup Progress window appears, followed by the Setup Wizard StartWelcome window.

v3.13.0 393
3.
4.
5.
Click . Next The End User License Agreement window appears.

v3.13.0 394
5.
6.
7.
8.
Read the EULA, select the checkbox, I accept the terms in the License Agreementand then click . The Custom Setup window appears. Next
Change the default location of the Metadefender Kiosk components, if required, using the button. Click to view a window that displays the disk space Browse Disk Usage
requirements for Metadefender Kiosk, and the amount of available disk space for the selected location. Click to reset the location to the default.Reset
It is recommend to install Metadefender Kiosk in the default location.Note:
Click . The Ready to Install window appears. Next

v3.13.0 395
8.
9.
10.
1.
2.
3.
Click . A window appears which displays the status of the installation process, Installfollowed by the Completed window.
Click . The Setup Complete window appears. Finish
Click . Metadefender Kiosk is now installed. Close
1.3. Installing Metadefender Kiosk from the Command Line
Verifying windows installer
To install Metadefender Kiosk from the command line, you must have Windows Installer 3.0 or higher. To verify what version you have:
Open Windows Explorer and go to C:\Windows\System32.
Right-click MSI.DLL and select the menu. Properties

v3.13.0 396
3. Click the tab to check the version. Details
If 3.0 or higher is not installed, you can download it at .Microsoft.com
Command line options
The following command line options are available with Metadefender Kiosk. All arguments are case sensitive.
Command Line Option Description Example
/install Install Metadefender Kiosk
c:\Metadefender Kiosk.exe /install
/uninstall Uninstall Metadefender Kiosk
c:\Metadefender Kiosk.exe /uninstall
/log <log-file-name> Create installation log file
c:\Metadefender Kiosk.exe /log c:\omsinst.log
/quiet Run Metadefender Kiosk installation silently
c:\Metadefender Kiosk.exe /logc:\omsinst.log
INSTALLLOCATION=<install-path>
Sets the installation location for Metadefender Kiosk
c:\Metadefender Kiosk.exe /i INSTALLLOCATION="c:\Metadefender"
1.4. Managing License Information
Metadefender Kiosk requires a valid license to be applied before you can use it. You can apply your Metadefender Kiosk license on the License page in the Metadefender Kiosk Management Console.

v3.13.0 397
If Metadefender Kiosk is not connected to the Internet, you can use the offline activation functionality of Metadefender Kiosk. Follow the instructions on the License page to activate Metadefender Kiosk.

v3.13.0 398
1.
2.
3.
4.
5.
If your Metadefender Kiosk license has expired or is invalid, the Metadefender Kiosk user interface displays an error and does not allow you to proceed.
1.5. Upgrading Metadefender Kiosk
You can upgrade Metadefender Kiosk to a newer version. Before upgrading, be sure to back up your configuration profiles as indicated below.
If Metadefender Kiosk is running, close it.
Backup your configuration settings and save your data log as instructed in Backing Up and Restoring the Configuration.
Uninstall Kiosk from control panel add / remove program.
Install the new version of Kiosk using one of the following methods:
1.2. Installing Metadefender Kiosk Using the Install Wizard
1.3. Installing Metadefender Kiosk from the Command Line
Restore your configuration settings as instructed in Backing Up and Restoring the .Configuration
The encryption method for passwords saved in the Metadefender Kiosk configuration changed with Metadefender Kiosk 3.3.2. Importing a configuration from versions prior to Metadefender Kiosk 3.3.2 will not import passwords.
Backing Up and Restoring the Configuration
To backup or restore the Metadefender Kiosk configuration, click in the top- Back Up / Restoreright corner of the Configuration page.

v3.13.0 399
Downloading a configuration backup
Click to download a file with all of the Metadefender Kiosk configuration Download Backupsettings saved.
If you select the checkbox, the backup will also Include Metadefender Core Configurationinclude all configuration settings from the Metadefender Core server. This option is only available if the Metadefender Core server has already been configured in Metadefender Kiosk.
Restoring configuration settings
To restore settings on this or a different Metadefender Kiosk system, upload the configuration settings file using the button in the Restore From Backup section.Browse
Optional Steps to Preserve Data
If you are installing Metadefender Kiosk on a system where there was a previous version installed, the following folders should be copied to a safe location prior to upgrading:
Metadefender Kiosk Log Directory
Default Location: C:\Program Files (x86)\OPSWAT\Metadefender Kiosk\Client\Log
2. Kiosk Hardening
OPSWAT recommends that the following additional setup is performed if Metadefender Kiosk is deployed on a dedicated system.

v3.13.0 400
1.
2.
3.
4.
1.
2.
3.
4.
5.
6.
Auto login
If Metadefender Kiosk is being used on a dedicated system we recommend that the Windows system on the kiosk is configured to auto-login into the account with Administrator privileges that Metadefender will run with. If the Metadefender Kiosk system is part of a domain additional steps may be required to allow this.
User Access Control (UAC)
OPSWAT recommends that UAC is disabled on systems that are being used as dedicated Metadefender Kiosks. If UAC is not disabled Metadefender Kiosk's print functionality may not work correctly. Metadefender Kiosk's watchdog functionality will also not work correctly if UAC is not disabled.
There are two ways to completely disable UAC in Windows:
By editing the registry
Click and type "regedit.exe" to open the Registry Editor. Start
Navigate to the registry key at HKEY_LOCAL_MACHINE > SOFTWARE > Microsoft > .Windows > CurrentVersion > Policies > System
Set EnableLUA to 0.
Restart Windows.
By adjusting Local Group Policy settings
Click and type "gpedit.msc" to open the Group Policy Editor. Start
Navigate to Computer Configuration > Windows Settings > Local Policies > Security .Options
After clicking Security Options, the right pane populates with your policies. Locate the ones for User Access Control.
Set "Run all administrators in Admin Approval Mode" to "Only elevate executables that are signed and validated."
Set "Switch to the secure desktop when prompting for elevation" to "Disabled."
Restart Windows.

v3.13.0 401
1.
2.
3.
1.
2.
3.
4.
5.
1.
2.
3.
1.
2.
Windows Update
Install all patches and updates available through Windows Update. Once all updates are installed, OPSWAT recommends that automatic updates are turned off to prevent system reboots.
Navigate to .Start > Control Panel > Windows Update > Change settings
Select from the menu.sNever check for update
Click or and close the dialog box. Apply OK
If turning off automatic updates is not desired, you must configure a mechanism or process to restart Metadefender Kiosk system. We recommend using standard organizational patch practices and tools.
Setting the screen saver and power saving options
Select the maximum performance power saving option.
Navigate to .Start > Control Panel > Power Options
Click . Change plan settings
Click . Change advanced power settings
Select from the menu. High Performance
Click . OK
You should turn off the screensaver.
Navigate to .Start > Control Panel > Personalization > Change screen saver
Select from the menu. ( None)
Click or and close the dialog box. Apply OK
Disabling mouse cursor pointer
Note: This configuration is optional. Once these steps are taken, there will be no visible mouse pointer.
OPSWAT recommends that mouse cursor points are turned off after Metadefender Kiosk has been configured.. If the system touchscreen configuration software does not have this feature, it can be done manually by following the steps below:
Navigate to .Start > Control Panel > Mouse
Click the tab. Pointers

v3.13.0 402
3.
4.
5.
Browse to C:\Program Files (x86)\OPSWAT\Metadefender Kiosk\Client\blank.cur.
Customize each pointer type to the provided blank pointer, blank.cur
Click and close the dialog box. Apply
Disabling hotkeys
By default, the Kiosk will ignore any command that is a combination of Ctrl and another key.
The Ctrl + Alt + Del combination is disabled once you launch the Kiosk UI first time. When a user presses these keys, the following screen appears and it is expected.
if you want to disable completely where nothing happens, please follow 2.2. Disabling Windows .Hot Keys
Other system hardening configuration
Metadefender Kiosk does the following system hardening when installed:
Disables auto-run on all plug-and-play media and drives
Captures and disables all Hotkey combinations such as Windows Key, Alt+Tab, etc.
CORS Configuration
see for more detailed instruction Limit Access to the REST Server
2.1. Configuring the Web Server
Metadefender Kiosk's Management Console relies on REST interface which runs on HTTP by default. You can configure the REST server for the following to harden the system.
changing the default port number
setting up an HTTPS server to enforce a secure connection between server and client

v3.13.0 403
1.
2.
3.
limiting the systems that have access to the REST server
Changing the Default Port Number
You can change the default port number of the REST server to any available port if the default port number is already in use.
To change the default port number, locate the <binding> tag in the applicationhost.config file located here: C:\Program Files (x86)\OPSWAT\Metadefender Kiosk\Client\REST\Config\applicationhost.config.
Limit Access to the REST Server
You can harden Metadefender Kiosk's cross-origin resource sharing (CORS) configuration to only allow access to the REST server for a restricted list of systems.
To limit access to the REST server, do the following:
Open the web.config file in Program Files (x86)\OPSWAT\Metadefender Kiosk\REST\Web\web.config.
Change the following line:
<add name="Access-Control-Allow-Origin" value="*"/>
to
<add name="Access-Control-Allow-Origin" value="http://localhost"/>
Next, add a new rule to <system.webServer><rewrite><outboundRules>:

v3.13.0 404
3.
1.
2.
3.
4.
<rule name="Allow CORS on specify ip/subnet" > <match serverVariable="RESPONSE_Access-Control-Allow-Origin" pattern=".+" /> <conditions> <add input="{REMOTE_ADDR}" pattern="^(192.168.200.*|192.168.201.102)$" /> </conditions> <action type="Rewrite" value="*" />....</rule>
Run REST on HTTPS
By default, communication with the REST web server is not encrypted. If you set up an HTTPS server, the server can enforce secure connections between client and server on an SSL channel. This section describes how to configure IIS Express to host an HTTPS server.
Requirements
In order to set up an HTTP server, you must have a trusted certificate issued by a certificate authority or a self-signed certificate used for development testing.
See the Installing a Certificate section below for information on how to install a self-signed server certificate.
Go for information on how to install a certificate authority-signed server certificate.here
Installing a certificate
To install a certificate, do the following:
Click on the Start menu, type “MMC.exe” in the search box and press Enter.The MMC window appears.
Select .> File Add/Remove Snap-In
In the Available snap-ins drop-down menu, select and click . Certificates Add
Select , click , and then click . Computer account Next Finish This process creates a certificate for all user accounts. The certmgr.msc command Tip:
only creates a certificate for the current user account.

v3.13.0 405
4.
5.
6.
7.
8.
Click to load the certificates snap-in. OK
Expand the Certificates menu and browse to your certificate location.The image below uses the metascan_rest certificate as an example. Your Note:
certificate can have any name.
Double-click the certificate name you want to use for the Metadefender REST Server and go to the Details tab.
Select in the list and copy the value to a text editor for later use. Thumbprint

v3.13.0 406
8.
9.
10.
11.
1.
2.
3.
Click on the Start menu and open a command prompt.
Execute the following command:netsh http add sslcert ipport=0.0.0.0:443 appid={214124cd-d05b-4309-9af9-9caa44b2b74a} certhash=<certificate thumbprint retrieved on step 8>
Be sure to remove any spaces in the thumbprint so the command can execute Note:properly.
The following message appears indicating that the SSL Certificate was successfully added.
Enabling HTTPS on IIS Express
To enable HTTPS on IIS Express, do the following:
Open the REST Config folder (e.g., C:\Program Files (x86)\OPSWAT\Metadefender Kiosk\Client\REST\Config).
Open the applicationhost.config file in a text editor.

v3.13.0 407
3.
4.
5.
6.
7.
8.
9.
Go to the <sites> tag and add the HTTPS binding to the ‘metadefender_rest’ website.See the image below for details.Note:
Save and close the applicationhost.config file.
Open a command prompt.
Stop the Metadefender REST server by executing the following command: net stop omdREST
Restart the Metadefender REST server by executing the following command: net start omdREST
Test that the site works by visiting . The following message should https://localhostappear:
For additional information see 5.1. Trusting an HTTPS Metadefender Core Server
2.2. Disabling Windows Hot Keys
You can completely disable Windows hot keys Ctrl+Alt+Delete and Windows+L. After disabling the hot keys, nothing happens when the hot keys are pressed.

v3.13.0 408
1.
2.
3.
Disabling Ctrl+Alt+Delete
You must first disable "Windows secure logon", so that you do not need to press Ctrl+Alt+Delete from the windows login screen. Use one of the following procedures.
- Windows 7 http://pcsupport.about.com/od/windows7/ht/auto-logon-windows-7.htm - Windows 8 http://www.eightforums.com/tutorials/5761-secure-sign-ctrl-alt-delete-
enable-disable-windows-8-a.html - Windows 10 https://www.tekrevue.com/tip/skip-windows-10-login-screen/
- Windows 2008 http://www.expta.com/2008/04/how-to-enable-autologon-for-windows.html
While signed in as an Administrator, open the command line and run the following command:
reg add "HKLM\SYSTEM\CurrentControlSet\Control\Keyboard Layout" /v "Scancode Map" /t REG_BINARY /d 0000000000000000030000004de01de04be01d0000000000 /f
Log out of the system and log in again. To re-enable Ctrl+Alt+Delete, run the following command line.
reg delete "HKLM\SYSTEM\CurrentControlSet\Control\Keyboard Layout" /v "Scancode Map" /f
Disabling Windows+L
Run the following command line.
reg add "HKCU\Software\Microsoft\Windows\CurrentVersion\Policies\System" /v "DisableLockWorkstation" /t REG_DWORD /d 1 /f
To re-enable Windows+L, run the following command line.
reg add "HKCU\Software\Microsoft\Windows\CurrentVersion\Policies\System" /v "DisableLockWorkstation" /t REG_DWORD /d 0 /f

v3.13.0 409
3. Management Console for Administration
The Metadefender Kiosk Management Console allows you to manage the Metadefender Kiosk system through a web browser. The Metadefender Kiosk Management Console can be accessed through any browser at .http://<Metadefender Kiosk System>:8009/management
When you open the Metadefender Kiosk Management Console, the Dashboard appears. This page displays a summary of all of the files that Metadefender Kiosk has processed.
If Metadefender Kiosk has been configured with a Metadefender Core server, the dashboard for the Metadefender Core server also appears.

v3.13.0 410
4. Kiosk Authentication / User Workflow
Metadefender Kiosk Workflow is based on list of users from the authenticated system. If you disable user authentication, only one workflow can be applied. Metadefender Kiosk lets you assign different Kiosk options to different groups of users, called workflows. For example, you can assign users to the Only Docs workflow if they are only allowed to scan office documents, and you can assign users to the No EXE/Archives workflow if you want to block all executable files and archives for these users. You can create new workflows and edit any default ones. The page contains all workflows in Metadefender Kiosk.Workflow Profiles
For each workflow, you can do the following:
Edit the name and assign users to the workflow
Create and edit user questions
Select the allowed media types
Select a Metadefender Core Server
Select how to handle processed files
Use variables in post-processing scripts
Manage printing options
Manage email options for session scan logs

v3.13.0 411
4.1. Workflow Profiles Page
You can edit or create new workflow profiles on the Workflow Profiles page of the Metadefender Kiosk Management Console. You can also enable user authentication.
Note: Any users (Windows or Guest) that are not included in one of the defined profiles will be assigned the Default profile.
Note: Workflow profiles labeled with an "!" do not match with any existing Core profile names (V3) or security rules (V4). You must select a corresponding Metadefender Core in the
section.Selecting A Metadefender Core Workflow
The followings are the default workflows:
Name Description
Default Users that are not covered by other profiles.
Guest Account used when Guest Login is selected.
Block EXE Blocks executable files.
Convert Docs Only allows documents and converts all documents to safe formats.

v3.13.0 412
Name Description
Copy Clean Copies all clean files to new user-provided media.
High Security Recommended workflow for high security environments.
No EXE/Archives Blocks all archives and executables.
Only Docs Profile for users that only need to bring in Office documents.
Enabling user authentication
To enable user authentication, select the checkbox on the Require user authenticationWorkflows page.
If you enable user authentication, you can choose between using the default Metadefender Kiosk authentication or using a custom authentication module that has been installed on that Metadefender Kiosk. For more information, see . If you are Managing Custom Authenticationusing the default Metadefender Kiosk authentication you can choose between authenticating against the local Active Directory (Windows user login), a remote Active Directory server, or not enabling authenticated login.
Windows user login
If Windows user login is enabled, you can choose whether to restrict the users by domain. If selected, only users on the same domain as the Metadefender system are allowed to use Metadefender through the Kiosk interface. If this is not selected, users will be able to enter authentication information for users on any domain as well as local system users.

v3.13.0 413
Remote Active Directory
If Remote Active Directory authentication is enabled, the URL of the remote Active Directory server, as well as user credentials to authenticate against the server are required. These credentials will be used to retrieve the list of users from the remote Active Directory server for the purposes of assigning users to specific workflows.
Note: when using the Remote Active Directory authentication the Kiosk end user credentials are not used for copying files as part of the Metadefender Kiosk workflows.
Creating a new workflow profile
To create a new workflow profile, click . You will be guided through the Create New Profileprocess of creating a new Metadefender Kiosk Workflow profile. After the profile has been created, each step in the workflow can be edited independently.

v3.13.0 414
1.
2.
1.
2.
4.2. Properties & Membership
The Properties & Membership page lets you specify the name and description for a Metadefender Kiosk workflow profile. It also lets you manage the users assigned to that profile. You can add both domain users (the domain of the Metadefender Kiosk system) as well as local system users.
To add users to the profile:
Select the user(s) from the Available To Add section.
Click . The user(s) appear in the Members section. Add
To remove users from the profile:
Select the user(s) from the Members section.
Click . The user(s) appear in the Available To Add section. Remove
if you assign a user who is already on another workflow to new workflow, the user will be removed from the previous workflow and assigned to the new workflow.
4.3. Managing User Questions
The User Questions Policy page lets you create questions for users to answer before processing files. You can require that these questions be answered before the user is allowed to continue. Any required responses are stored in the User Question section of the session log.

v3.13.0 415
4.4. Allowed Media Types
The Allowed Media Types page lets you select which media types (CDs/DVDs and/or floppy disks) Metadefender Kiosk can process for the selected workflow profile.
4.5. Selecting A Metadefender Core Workflow
In order to use the multi-scanning functionality of Metadefender Core, Metadefender Kiosk requires a Metadefender Core Server. The Metadefender Core Server can be installed either locally on the same system as Metadefender Kiosk or remotely on another machine. The Metadefender Core Workflow page lets you select if you want to use a Metadefender Core Server to process files. By default, Metadefender Kiosk uses a locally installed Metadefender Core Server if one is available. To specify a remote Metadefender Core Server, use the Remote Metadefender Core Server URL option in the Advanced Configuration settings of the
page.Configuration

v3.13.0 416
There is also the option to define a max file size to be scanned by Metadefender Core, all files larger than this will still be processed by Kiosk without being processed by Core. The files that are larger are treated as allowed and are marked as skipped.
The Workflow Identifier drop-down menu determines which Metadefender Core workflow/security rule is used to process files from Metadefender Kiosk.
Metadefender Kiosk 3.3.6 or lower
Metadefender Core 3.12.3 or lower: The value for Workflow Identifier is the user_agent of a Metadefender Core workflow profile. If the specified Identifier does not match the user_agent values for any workflows in Metadefender Core, the Default workflow will be used.
Metadefender Core 4.x: The value for Workflow Identifier must match the name of the desired Security Rule defined in Metadefender Core. If there is no rule that matches the value specified, Metadefender Kiosk will not be able to process files.
Metadefender Kiosk 3.4.0 or greater
Metadefender Core 3.12.4 or greater: The value for Workflow Identifier is the name of a Metadefender Core workflow profile. If the selected value does not match the profile name for any workflows in Metadefender Core, the Default workflow will be used.
Metadefender Core 4.x: The value for Workflow Identifier must match the name of the desired Security Rule defined in Metadefender Core. If there is no rule that matches the value specified, Metadefender Kiosk will not be able to process files.
4.6. Selecting How to Handle Processed Files
The File Handling page is divided into two sections: actions to take on blocked files, and actions to be taken on allowed files. You can set different file handling options for each, including copying to either new media or a network path.

v3.13.0 417
Stop processing if a blocked file is found
Selecting this option will cause a Kiosk session to stop processing immediately after the first blocked file is found. Kiosk will alert the user that a blocked file was found and go directly to the session summary after the user has acknowledged the message.
Deleting, removing or taking no action on files
You can choose for this workflow to automatically delete blocked or allowed files that have been sanitized by Metadefender Core, take no action on blocked or allowed files, or remove non-sanitized blocked files.
To delete blocked or allowed files that have been sanitized by Metadefender Core, select the If a file has been sanitized by the Metadefender Core workflow, delete the original file
checkbox.
To take no action on blocked or allowed files, select the radio button.No Action
To remove any non-sanitized blocked files, select the radio button, then select Remove file Quarantine or Deleted from the drop-down menu.
Copying files to a designated location
You can configure files to be automatically copied to a designated location as part of the post-processing step in the Copy to section. Metadefender Kiosk will copy files to the directory specified by one of the three naming conventions below, depending on which option you select.
Note: If a file has been sanitized by Metadefender Core's Data Sanitization and Copy to is selected here, the sanitized file will be copied to the desired location, not the original file.

v3.13.0 418
Directory
The Directory field allows you to specify a specific location for blocked or allowed files.
You can use the pre-defined ‘%%%username%%%’ variable within the designated location in the Directory field to allow Metadefender Kiosk to copy files to a folder (e.g. ‘username’). This is for the user logged into the session. When Windows authentication is not enabled, or guest login is used, the %%%username%%% variable is replaced by the session ID.
You can copy files to a remote server(network share) by providing a UNC path. To allow for more restrictive permissions on a network share, a Metadefender Kiosk profile will need to be created containing users that have, at minimum, write permission to the network share. When a user logs into a session, Metadefender Kiosk will attempt to use the permissions of the user to copy files to the network share.
This section contains three directory name options:

v3.13.0 419
Copy to directory named with the unique session ID: Copies files to a directory identified by the session ID.
Copy to directory named with the session start time (GMT): Copies files to a directory identified by the session start time.
Keep the same folder structure as on original media (no subfolders): Copies files to the same directory as in the original media.
User media
You can also enable files to be copied to media that the Kiosk user provides. If you select the User media checkbox, the user will be prompted to insert media that the files are to be copied to. You can also select the Allow Copying to Floppy Drives option, if desired.
Metadefender Secure File Transfer Server
See for instructions and more details.6. Configuring with SFT
SHA-256 Verification
If you select the SHA-256 Verification checkbox, Metadefender Kiosk compares the hash value of files on the target directory with the ones from the original directory. Metadefender Kiosk displays and logs any mismatches. Metadefender Kiosk will not retry copying files in case of a hash value mismatch.
Delete after copy
Select this checkbox if you want Metadefender Kiosk to delete the blocked or allowed file after copying it to the specified location.
4.7. Custom Command Line Script
How To Configure
The File Handling page also allows you to run post-processing scripts via the Run custom command line script option. You can use variables from the table below in post-processing scripts. After entering your scripts, click . Apply

v3.13.0 420
For example, the following command line will copy the file that was analyzed by Kiosk to "E:\MD_POST_ACTION_BY_PAC" folder and delete after the copy.
copy /y %%%file_path%%% E:\MD_POST_ACTION_BY_PACdel /q %%%file_path%%%
Metadefender does not validate your script so make sure to test your script before configuring with Kiosk.
Using Pre-defined Variables in Your Command Line Scripts
Variable Description Notes
%%%file_path%%% The absolute path to the file to be scanned.
%%%threat_name%%%
The name of threats found by engines. This variable only applies to infected (“1”) scan results.
%%%scan_finished%%%
The time when the scan was finished.
%%%ticket_id%%% A random number assigned to each scan request.

v3.13.0 421
Variable Description Notes
%%%scan_results%%%
The scan outcome return type. The scan outcome return types are listed below:
No threat detection 0 - No threat found:or the file is empty.
Threat is found.1 - Infected/Known:
Classified as possible 2 - Suspicious:threat but not identified as specific threat.
Scanning is not fully 3 - Failed To Scan:performed (for example, invalid file or no read permission).
Threat is found and file is 4 - Cleaned:cleaned (repaired or deleted).
Unknown scan result.5 - Unknown:
File is quarantined.6 - Quarantined:
Scan is skipped 7 - Skipped Clean:because this file type is in whitelist.
Scan is skipped 8 - Skipped Dirty:because this file type in in blacklist.
Threat is 9 - Exceeded Archive Depth:not found but there are more archive levels which were not extracted.
Scan is skipped by 10 - Not Scanned:the engine either due to update or other engine specific reason.
All ongoing scans are 11 - Aborted:purged by StopScan API call.
File/buffer is not 12 - Encrypted:scanned because the file type is detected as encrypted (password-protected).
The 13 - Exceeded Archive Size:extracted archive is larger than set in the maximum file size for archive.

v3.13.0 422
Variable Description Notes
14 - Exceeded Archive File Number:There are more files in the archive than set in the maximum number of files extracted.
%%%process_result%%%
The process outcome
allowed
blocked
4.8. Managing Printing Options
The Printing Policy page lets you determine whether users have the option to print a receipt of their session and if so, what information will be included on the receipt. You can also choose to have the receipts print automatically at the end of each session.
Note: Metadefender Kiosk will use the printer which is set to default to the system.

v3.13.0 423
4.9. Email Session Report
The Email Session Report page lets you set up automatic emails that are sent to a designated recipient after each session is completed. The email includes the session log as an attachment. To enable this feature, move the slider on the right hand side of the page to . On
SMTP settings are configured in the Advanced Configuration section of the .Configuration page
5. Configuring a Metadefender Core Server
Metadefender Kiosk requires a Metadefender Core Server for multi-scanning functionality.
Metadefender Kiosk automatically connects with a Metadefender Core Server that is installed locally on the same system as Metadefender Kiosk. However, if you are using a remote Metadefender Core Server with your installation of Metadefender Kiosk, configure your Metadefender Core Server as detailed below.
Setting up your Metadefender Core Server with Metadefender Kiosk consists of the following steps.
Detecting the Metadefender Core server URL
Authenticating your configuration
Associating workflows in Metadefender Kiosk to workflows in Metadefender Core

v3.13.0 424
1.
2.
3.
1.
2.
Detecting the Metadefender Core server URL
If Metadefender Core is installed on a remote machine from Kiosk, the server URL must be specified.
Access your Metadefender Kiosk Management Console at http://<Metadefender Kiosk System>:8009/management. You can also access the Kiosk Management Console using Windows > > .Start OPSWAT Metadefender Kiosk Management Console
Click and enter your Metadefender Core Server's URL. Configuration
You can enter a backup server if you have on in case the primary server become inaccessible, its license expires, or other issues the primary server might encounter.
Authenticating your configuration
If you are using Metadefender Core Version 4, you must authenticate your configuration. This authentication is optional with Metadefender Core Version 3. You must obtain the API key from the Metadefender Core Management Console and enter that information on Kiosk Management Console's Configuration page.
Authenticating your configuration when using Metadefender Core Version 3
To obtain your Metadefender Core API key, go to Metadefender Core Management Console.

v3.13.0 425
2.
3.
4.
5.
1.
2.
Click the Configuration tab and then c lick Scan Configuration .
Scroll down to the API Key section and copy the value in the API Key field.
Return to the Metadefender Kiosk Management Console and click the Configurationtab.
Paste your Core API Key value in the API Key field.
Authenticating your configuration when using Metadefender Core Version 4
To obtain your Metadefender Core API key, access your Metadefender Core 4 Management Console.

v3.13.0 426
2.
3.
4.
Click and then click . Settings User Management
Click any user name.
Copy the contents of the APIKEY field.

v3.13.0 427
4.
5.
6.
7.
1.
2.
Click to save and close the window. OK
Return to the Metadefender Kiosk Management Console and click the Configurationtab.
Paste your Core API Key value in the API Key field.
Associating workflows in Metadefender Kiosk to workflows in Metadefender Core
Refer to .4.5. Selecting A Metadefender Core Workflow
5.1. Trusting an HTTPS Metadefender Core Server
In order to allow a Metadefender Kiosk to work properly with a Metadefender Core server, configured to use HTTPS, the certificate must be trusted on the system the Metadefender Kiosk resides on.
Trusting local or remote self signed security certificate
If you are using this guide on the local computer you should access and install the certificate from the DNS address (e.g. https://frosty7c/)
Open Internet Explorer and access the Metadefender Core dashboard (e.g. https://frosty7c/)
Click Continue to this website

v3.13.0 428
2.
3.
4.
5.
Click Certificate error
Click View certificates
Click Install Certificate...

v3.13.0 429
5.
6.
7.
8.
Select either or and click nextCurrent User Local Machine
Select and click browsePlace all certificates in the following store

v3.13.0 430
8.
9.
10.
11.
12.
13.
14.
Select and click OKTrusted Root Certification Authorities
Select Next, then select Finish
Restart your Internet Explorer and navigate to the same page again
You should now see a locked padlock instead of a certificate error
Run certmgr.msc
Select → Trusted Root Certification Authority Certificates
Right click the → → DNS name All Tasks Export

v3.13.0 431
14.
15.
16.
17.
18.
19.
20.
21.
Click Next → Next → Browse
Choose anywhere to save the certificate and hit save
Click Next → Finish
Run mmc
File → Add or Remove Snap-in
Select and click Certificates Add
Select and hit nextComputer account

v3.13.0 432
21.
22.
23.
24.
Click finish then click ok
Select → CertificatesTrusted Root Certification Authority
Right click → → Certificates All Tasks Import

v3.13.0 433
24.
25.
26.
27.
Click next
Select the file you created previously
Click Next → Next → Finish
6. Configuring with SFT
Change on management console
If you select the Metadefender Secure File Transfer Server checkbox, you must also enter the following information:
Server URL: Enter SFT REST server's URL in this field.

v3.13.0 434
1.
2.
3.
1.
2.
a.
b.
3.
a.
Add Token: Enter token information in this field. You can obtain token information from the Metadefender Secure File Transfer management interface.
Select an SFT account option for file uploads: Choose an SFT account option in this section.
Maximum File Upload Size: Choose a size limit for uploaded files.
SFT account options for file uploads
If you select the radio button, Metadefender Always upload to an SFT guest accountKiosk creates and provides a temporary guest login ID to the Kiosk user both on the scan results screen as well as in the digital and printed logs.
If you select the radio button, eAttempt to use user credentials if they are availabl Metadefender Kiosk uploads files to the user account that matches the one used during authentication.
If authentication fails, files will be uploaded to the SFT guest account.
6.1. Arbit Data Diode configuration
This guide describes how to deploy Metadefender Kiosk, an Arbit data diode, and a Metadefender SFT server for the following use case.
Portable media is scanned by Metadefender Kiosk.
Clean files are passed through an Arbit data diode to an SFT Server.
User downloads files from the SFT server.
System Deployment
The following should be done before configuring the individual systems.
Install Metadefender KIosk with Metadefender Core on the low-side network
Install the Arbit data diode with the receiving side in the low-side network and the transmitting side on the high side network
Assign a static IP address to the low side
Assign a static IP address to the high side
Install the SFT server on the high side network
Assign a static IP address

v3.13.0 435
1.
a.
2.
1.
a.
1.
2.
a.
3.
4.
SFT Server Configuration
Create the known user accounts on the SFT server
Note the account that should be used as the 'from' account for files coming from Metadefender Kiosk
Generate the Authorization token
Arbit Data Diode Configuration
Define the URL list on the high side of the data diode to include the SFT server
URL List includes http://<SFT IP Address>:8000/sft_rest/file
Metadefender Kiosk Configuration
Configure the appropriate Metadefender Kiosk workflow profile to enable Copy To SFT in the post-action
Put in the URL of the data diode low-side receiver
http://<diode low-side IP address>:8080/pitcherrestapi/transfer/<URL List>
Enter the Authorization token generated by the SFT Server
Enter the Sender SFT account that was created on the SFT server
7. Additional Kiosk Configuration
The Metadefender Management Console allows you to manage the Metadefender Kiosk system through a web browser. The Metadefender Management Console can be accessed through any browser at http://<Metadefender Kiosk System>:8009/management
Note: If a license has not been previously applied to a Metadefender Kiosk installation, opening the Metadefender Management Console will direct the user to the ‘License’ page so that a Metadefender license can be applied.
Dashboard
The Dashboard will be the first page that is seen when opening the Metadefender Management Console. This page provides a summary of all of the files that have been processed by Metadefender Kiosk.

v3.13.0 436
If Metadefender Kiosk has been configured with a Metadefender Core server, the dashboard for the Metadefender Core server will also be displayed.

v3.13.0 437
Configuration
The Configuration page allows you to configure all Metadefender Kiosk settings that apply to all users of Metadefender Kiosk . Metadefender Kiosk configuration settings can also be saved from this page to be restored at a later date or on another Metadefender Kiosk system.
Advanced configuration options can be set by expanding the ‘Advanced Configuration’ section of the Configuration page. To display advanced options, click on the arrow to expand the settings

v3.13.0 438
7.1. UI Localization / Customization
You can change the language displayed in Metadefender Kiosk from the ‘Choose Language’ drop-down menu. The default languages included in the installation are English, Arabic, Hebrew, Korean, Vietnamese, German, and Japanese. Furthermore, if you wish to add a language to the Metadefender Kiosk UI or edit the translations of any of the existing languages, you can do so by clicking on ‘View and edit languages’.
After clicking 'View and edit languages' you can edit the translations for any of the strings which appear in Metadefender Kiosk. You can choose which language to edit from the drop-down menu next to ‘Choose language to update’. Once finished, click on ‘Apply’ at the bottom of the page.

v3.13.0 439
If you wish to add a new language, click ‘Add Language’ and type in the desired language. On the following page you can create translations for each of the strings to be displayed in Metadefender Kiosk.
If the language you are adding reads right to left, make sure to check that box when editing your added language.
There is also an option to enable "dead keys". A dead key is a special kind of modifier key on a mechanical typewriter, or in this case a computer keyboard, that is typically used to attach specific diacritic to a base letter. For example, if a keyboard has a dead key for the grave accent (`), the French character à can be generated by first pressing ` and then A, whereas è can be generated by first pressing ` then E.

v3.13.0 440
Once finished, click ‘Save’ at the bottom of the page and your language will now appear in the Advanced Configuration section where it can be selected.
7.2. Watchdog Behavior
The watchdog is an additional process that monitors the running processes of the Metadefender Kiosk.In the case where the Kiosk exits unexpectedly, the watchdog will run a specified action to take.
Configure watchdog behavior
Action Description
Do nothing No action will be performed, the system will remain on the secure desktop
Restart Metadefender Kiosk
Metadefender Kiosk will be restarted while the system remains on the secure desktopFor a brief moment, a blank secure desktop will be displayed before the Metadefender Kiosk starts up again
Log out of Windows
The user currently logged into Windows will have their session terminated and be logged outThe system will exit out to the Windows OS login
Lock Windows

v3.13.0 441
Action Description
The user currently logged into Windows will be locked outThe system will exit out to the Windows OS login where the admin must log back into Windows
Restart Windows
The Windows system will be rebootedThe system will either return back to the Windows OS login or be logged in to the default Windows user (this is dependent on the system's automatic login settings)
7.3. Configuring User Settings
The Configuration page lets you configure user settings for Metadefender Kiosk. You can also save configuration settings to be restored at a later date or on another Metadefender Kiosk system.

v3.13.0 442
Setting an exit password
Select the Exit Password checkbox to require users to enter a password when exiting Metadefender Kiosk. After selecting this checkbox, two fields appear: and New password
. Confirm password
Entering API Key information for Metadefender Core
If you have configured Metadefender Core server to use an application programming interface (API) key, you can enter that key in the API Key field.
Configuring session log files
You can save session log files as a text or PDF file, and choose to save log files to a specific location on the system or to the processed media. By default, Metadefender Kiosk saves session log files to the Log folder in the Metadefender Kiosk installation directory.

v3.13.0 443
1.
a.
b.
2.
3.
4.
To save session log files:
To save session log files to the local system, select the Save session log file to local checkbox. This checkbox is selected by default. To disable this feature, system Note:
deselect this checkbox.
To have the session log files save to the Log folder in the in the Metadefender Kiosk installation directory, do nothing.
To enter a specific location other than the Log folder, enter the path of the folder in the text box provided.
To save session log files to the media being processed, select the Save session log file checkbox. This setting will not apply to read-only media, such as to processed media
CDs or DVDs.
Select the or radio button, depending on the output type Save as Text File Save as PDF of the session log files you prefer.
Display the Metadefender Core Server URL used in the session log allows for the Core URL, that was used for the session, to be displayed in the log file. This is useful when configuring a backup Core server and determining which server was used for a particular session.
Note: The save options are independent from each other. You can save session logs locally and/or save it to the processed media or disable session log files altogether.
Setting advanced configuration options
You can set advanced configuration options by expanding the Advanced Configuration section of the Configuration page. To display advanced options, click the arrow.

v3.13.0 444
Max number of parallel scan
The recommended value of parallel scans is 3x the number of physical processing cores available or 20, whichever is greater.
Multiple Partitions
Multiple Partitions
Option Only 1 Windows Partition
Only Windows Partitions
Mixed Windows and Non Windows Partitions
Only Mac / Linux Partitions
Block all media with multiple partitions
SCAN ONE BLOCKED BLOCKED BLOCKED
Process files on all accessible partitions
SCAN ALL SCAN ALL SCAN ALL BLOCKED
The action will mount every partition it can successfully mount. All partitions will SCAN ALL
be scanned by "Process All." The file browser will have the ability to select files on any partition.
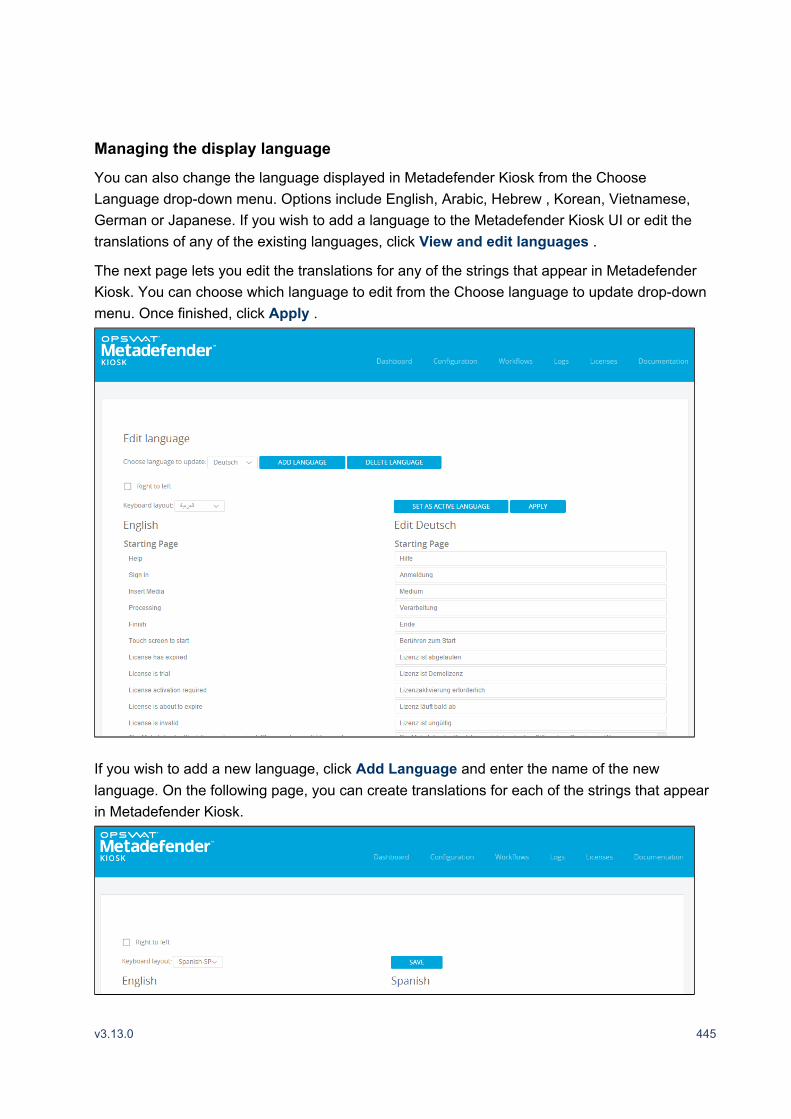
v3.13.0 445
Managing the display language
You can also change the language displayed in Metadefender Kiosk from the Choose Language drop-down menu. Options include English, Arabic, Hebrew , Korean, Vietnamese, German or Japanese. If you wish to add a language to the Metadefender Kiosk UI or edit the translations of any of the existing languages, click . View and edit languages
The next page lets you edit the translations for any of the strings that appear in Metadefender Kiosk. You can choose which language to edit from the Choose language to update drop-down menu. Once finished, click . Apply
If you wish to add a new language, click and enter the name of the new Add Languagelanguage. On the following page, you can create translations for each of the strings that appear in Metadefender Kiosk.

v3.13.0 446
Once finished, click . Your language now appears in the Advanced Configuration section. Save
Session Report Email configuration
The last group of configuration options in the Advanced section are the SMTP settings for emailing session logs at the end of a session. Here you can enter the host, port, username and password, and whether or not to enable SSL. The sender, recipient, and the message of the email is configured per .Metadefender Kiosk Workflow
Configuration Field Descriptions and Default Settings
The following table provides a brief description and default values for the Kiosk Configuration screen.
Basic Configuration
Configuration Setting
Description Default Value Range
Remote Metadefender Core Server URL
URL of primary remote Core server (Blank)
API Key The API Key of the primary remote Core server, if one is set
(Blank)
Backup Core Server
URL & API key input for an additional Core server for the Kiosk to use if the primary is inaccessible
(Blank)

v3.13.0 447
Configuration Setting
Description Default Value Range
Printer Setup Select the color of the printing output: Black & White or Color
Black & White
Side margins Left and right margin length
Recommended settings:3 for zebra printer200 for laser jet
3 0 or greater
Display the Core URL in the session printout
The URL of the Core used for a session will be displayed on the printout
Disabled
Save session log file to local system
Enables a session text/PDF log to be created at the end of a session in a location on the system
Enabled
Logging directory: <kiosk install dir>\Client\Log
Save session log file to processed media
Enables a session text/PDF log to be created at the end of a session on the media processed
Disabled
If enabled, the log will be saved to the root of the media
Save as Text File / Save as PDF
Specifies whether the session log file will be a text or PDF file
Text file
Display the Core URL in the session log
The URL of the Core used for a session will be displayed on the log file
Disabled

v3.13.0 448
Configuration Setting
Description Default Value Range
Wipe Method Specifies which wipe options to display to the user
Format1 pass wipe3 pass wipe7 pass wipe
All wipe methods shown
0,1,3,7 pass wipe
Exit Password Require password when terminating the Kiosk UI (ALT + F4)
Disabled
Watchdog Custom action watchdog that will run when the Kiosk UI is unexpectedly terminated
Do nothingRestart Metadefender KioskLog out of WindowsLock WindowsRestart Windows
Restart Windows
Advanced Configuration
Configuration Setting
Description Default Value Range
Wait time before processing
Time period to wait before allowing users to interact with the UI after the device (media) is detectedThis helps administrators to optimize time for device initialization (which have some latency after initial detection is reported to system)
5 seconds 0 or greater

v3.13.0 449
Configuration Setting
Description Default Value Range
Max number of parallel scans
Maximum amount of concurrent process requests Kiosk will make to the Core server
20 0 or greater
Allow decryption of encrypted archives
Allows you to input passwords when encrypted archives are detected
Enabled
User Interface Timeout
The time the Kiosk UI will wait for a session to begin before automatically switching back to the idle screen
5 minutes 60 seconds or greater
Allow user to browse for files
Allow user to select files before processing media
Enabled
Alert user if Metadefender Core license is close to expiration
Alerts you on the Kiosk idle screen if the Core license is close to expiration
Disabled
Alert user if Metadefender Kiosk license is close to expiration
Alert you on the Kiosk idle screen if the Kiosk license is close to expiration
Disabled
Exit at end of session
Specifies if the system should exit Kiosk after a session completes
Disabled
Reboot at end of session
Specifies if the system should reboot after a session completes
Disabled
Choose Language The default language to be used for the UI English

v3.13.0 450
Configuration Setting
Description Default Value Range
Multiple Partitions Selects the method for processing files on partitions
Process files only on accessible primary partition
Host IP or DNS of SMTP server 127.0.0.1
Port Port of the SMTP server 25
Enable SSL Enable the use of SSL Disabled
Username Username to authenticate to the SMTP server
(Blank)
Password Password to authenticate to the SMTP server
(Blank)
7.4. Session Logs
Metadefender Kiosk displays the most recent scanning sessions on the Logs page. You can select any of these sessions to view details from that scanning session.

v3.13.0 451
Searching by file hash or session ID
You can also search Metadefender Kiosk logs by either file hash (SHA256) or by Metadefender Kiosk session ID on the Session History page.

v3.13.0 452
If you search by session ID, Metadefender Kiosk displays a summary of the results of that session. Click any of the list items in the summary page to display the individual files that were included in that Metadefender Kiosk session.

v3.13.0 453

v3.13.0 454
Searching by specific file name
Click to upload a file to check if it has been processed by Want to upload a file to searchMetadefender Kiosk.
If you search by SHA256 hash code, Metadefender Kiosk displays a summary of all of the times that file was processed by Metadefender Kiosk.
Viewing session details
Click any of the items in the list to display details from the specific processing sessions.
Similarly, you can click any of the items in the new list to display the details from that specific session.

v3.13.0 455
7.5 Alert Sound Customization
To change the alert sound when threats are detected, replace <Kiosk install directory>\Client\en\res\alarm.wav with your own .wav file.

v3.13.0 456
The file name must be maintained or Metadefender Kiosk will not recognize the sound to play.
8. Launching Metadefender Kiosk
The Metadefender Kiosk application automatically launches upon system startup. If there is a system malfunction and you restart the system, Metadefender Kiosk re-initializes upon startup
If your Metadefender Kiosk license has expired or is invalid, the Metadefender Kiosk application displays an error and does not allow you to proceed.
After startup, the Idle Screen displays. If you would like to modify this screen, you can edit the file at C:\Program Files (x86)\OPSWAT\Metadefender Kiosk\Client\en\res\main-screenshot.png.
Note: An error message displays if Adobe Flash Player is not installed.
Touch the screen to start (or click on the screen if it is installed on a PC).
Touch to view a brief demonstration video. Help
8.1. Exiting the Kiosk User Interface
To exit the Kiosk UI, press . When exiting the UI, it may take a few minutes if kiosk is in +Alt F4the middle of processing media. It is not recommended to exit UI while Kiosk is processing media. It is strongly suggested to set exit password in order to prevent non-administrator to access the system.
To set exist password on management console:

v3.13.0 457
To set exist password on management console:
When exit password is configured:
9.1. Logging In on the User Authentication Screen
If user authentication is required, you must login either with a Windows user account or as a Guest. If both of those options are enabled, the following screen displays.

v3.13.0 458
If you login with a Windows account (or if only the Windows authentication is enabled and the guest login is disabled) the Sign in screen displays.
If you authenticate as a domain account, the domain must be specified in the field. Username
If you log in as a Guest, or if only the Guest login is enabled (and the Windows login is disabled), you must answer the user questions defined for the Guest profile (see Answering
).User Questions
After logging in with either your Windows credentials or as a Guest, your workflow is determined by the workflow profile settings configured in the Metadefender Kiosk Management Console. For more information on configuring multiple workflow profiles, see 4.1. Workflow
.Profiles Page
Answering User Questions
If your workflow profile (either as a guest or domain user) specifies user questions, the questions are displayed. Answer the questions, and then click . Submit

v3.13.0 459
9.2. Inserting Digital Media
After the login process is complete and, if applicable, all user questions have been submitted, the Insert Media screen displays.
9.3. Unlocking Encrypted Devices
If the USB device you are trying to scan is encrypted, the Unlock screen displays. See the for a list of encrypted USB drives that are supported.Overview

v3.13.0 460
1.
2.
3.
4.
a.
b.
9.4. Processing Digital Media
Insert the media you want to scan. The Start screen appears.
Click . (If you want to scan the entire media, click and skip to step Browse Process All5.) All detected drives display. Files and folders are not sorted.
Click to remove all data from the detected media and overwrite the entire Note: Wipedisk with random data, depending on the configuration set in the Metadefender Kiosk Management Console .
StartScreen.png
Select the drive, folders, or files (including system files) you want to scan and click Begin . Processing
Note:1) Boot Records in the figure below means the Master Boot Record and Volume Boot Record; they will be processed.2) When a folder is selected, the subfolders and files within are not displayed as selected, but they will be processed.
BrowseScreen.png
Click . The Progress screen displays the following information: Begin Processing
Current File: The current file being processed. If the file path is more than 60 characters, the beginning will be trimmed and replaced with ellipses (…).

v3.13.0 461
4.
b.
c.
5.
6.
Number of Files Processed: The number of files already processed and the total number of files to be processed.
Size Processed: The total size of all the files that have already been processed and the total size for all of the files to be processed.
ProcessProgress.png
Note: If the inserted media does not have Windows-readable partitions, or if multiple partitions have been disabled in the Metadefender Kiosk Management Console and the drive has multiple partitions, the No volumes mounted for the
error message appears and you will be returned to the Idle selected devicescreen. This error message also appears if Metadefender Kiosk is unable to read a partition because it is a private or encrypted partition.
If at least one encrypted archive is found, and encrypted archive decryption is enabled in the Metadefender Kiosk Management Console, a list of the encrypted files display. See
for additional information.9.5. Processing Encrypted Archives
When processing is complete, the Sessions Results screen displays. See 9.7. Viewing .and Printing the Session Results
If you click during the scan or remove the media during Note: Cancel Processingprocessing, the Session Results screen displays ‘Processing Aborted’. Ejecting the media during processing does not stop the processing.
9.5. Processing Encrypted Archives
If at least one encrypted archive is found during processing (as described in 9.4. Processing ), and encrypted archive decryption is enabled in the Metadefender Kiosk Digital Media
Management Console, a list of the encrypted files displays.

v3.13.0 462
1.
2.
3.
To process encrypted archives:
Select the checkbox next to one or more of the encrypted archives. A password screen appears.
Enter the password for the encrypted archive, and then click .Submit If you selected multiple encrypted archives, you are prompted to enter different Note:
passwords for each archive.
Click . If the encrypted Begin processing to scan the selected encrypted archives archives are successfully unlocked, the Session Results appear.
Click to bypass the encrypted archives and go directly to the Session Results Note: Skipscreen.
9.6. Copying Files to Another Media
If your workflow profile specifies copying scanned files to other media, you are prompted to insert the media to which you want to copy your files. If you do not want to copy the files, click
to display the page. Skip Copy Session Results
The original source media must remain connected to Metadefender Kiosk to successfully copy the files.

v3.13.0 463
If the user media is configured to be wiped before copying, a prompt will alert the user that the destination media will be wiped.
Select 'Continue' to have the media wiped and copy files to or 'Cancel' to be taken back to insert another media to copy files to.
Note: If you insert an encrypted device as the media to copy to, you will be prompted to enter the password to unlock the media before files are copied.

v3.13.0 464
9.7. Viewing and Printing the Session Results
After media has been processed, the session results appear. The session results include whether processing was completed or aborted, the number of files blocked and why they were blocked, the actions taken on blocked and allowed files, and the total number of files processed.
The session results page includes the following buttons:
View Copy Details: If at least one file was copied as a result of the post processing configuration set in the Metadefender Kiosk Management Console, then the View Copy
button is enabled. Click this button to go to the Copied File Details screen. For Detailsadditional information, see below.Viewing details about copied files
View Blocked File Details: If at least one file was blocked, the View Blocked File button is enabled. Click this button to go to the Blocked File Details screen. If at Details
least one mismatched file is found, the File Type Analysis Mismatch section is included in the Blocked File Details screen. For additional information, see Viewing details about
below.blocked files
Print Report: If report printing is enabled, the button appears. Click this Print Reportbutton to print the session results. See Data Included in Metadefender Kiosk Log Filesand for additional information.Example of a Scan Log File
Done: Click to go back to the Idle screen. If Metadefender Kiosk is configured Done(through the Metadefender Kiosk Management Console) to exit after processing, Metadefender Kiosk closes.
Viewing details about copied files

v3.13.0 465
Viewing details about copied files
The Copied File Details screen displays the location files were copied to by Metadefender Kiosk during processing. This location is the path specified in the Metadefender Kiosk Management Console with a unique identifier for that processing session.
Viewing details about blocked files
The Blocked File Details screen displays the blocked files detected by Metadefender Kiosk during processing. You can click a blocked file to view more details. Click the and Back Nextbuttons to toggle between blocked files.

v3.13.0 466
Viewing details about mismatched results
Mismatched files have extensions that do not match the expected file type based on the content of the file. A mismatched file is not always a threat; many custom files or files generated by custom software have extensions that are different than standard file types. You should evaluate mismatched files on a case-by-case basis to determine whether the file is a potential threat.
Data Included in Metadefender Kiosk Log Files
After scanning is complete, you can print the scanning session log file. Click from Print Reportthe Session Results screen.

v3.13.0 467
See for more information.9.7. Viewing and Printing the Session Results
The following information is included in the printout.
Data Item Description
User ID If you are using Windows authentication, this is your Windows user ID. If you are not using Windows authentication, this is blank.
Profile The Metadefender Kiosk profile that was used for this session.
Session ID The unique session ID generated for this Metadefender Kiosk processing session.
Scan Completion Status
PROCESSING FINISHED SUCCESSFULLY or
PROCESSING ABORTED!
Start Time Processing start time.
Finish Time Processing finished time.
Metadefender Core Version
The product version of the Metadefender Core server. If the Metadefender Core server is installed remotely on another system, the IP address and communication method (e.g., metascan_rest) is listed as well.

v3.13.0 468
Data Item Description
Metadefender Kiosk Version
The product version of the Metadefender Kiosk application.
Device Information
Section that includes identifying information for the physical media device that was scanned, if available, from the device.
Manufacturer Manufacturer of the media that was processed.
Model The model of the physical media that was processed.
Media Type The type of physical media that was processed.
Serial Number The serial number of the physical media that was processed.
Partition Count
The number of partitions on the device.
Disk Usage The amount of space used / the total size of the drive.
Scanning System
The machine name of the Metadefender Kiosk system where the processing was done.
Full Media Processed
Indicates whether all of the files on the media were processed.
Total Files Scanned
The total number of files scanned by Metadefender Core.
Total Files Processed
The total number of files processed by Metadefender Kiosk.
Blocked Files Section that includes a summary of the files blocked by the profiles defined in Metadefender Core.

v3.13.0 469
Data Item Description
Mismatched The number of files detected as a file type mismatch.
Blocked File Types
The number of files blocked as a result of the file type filtering policy.
Password Protected
The number of files skipped because they were password protected and/or the password was not provided for an archive.
Potentially Vulnerable File
The number of files that have a known vulnerability. (detection available only in Core V4)
Noncompliant Archives
The number of archive files that exceeded limits specified in the archive handling policy.
Threats The number of files blocked because Metadefender Core detected a non-clean result.
Error The number of files that failed to scan either because one or more engines did not finish scanning them successfully or errors communicating with Metadefender Core.
Failed to Sanitize
The number of files that failed data sanitization.
Blocked Actions Taken
The number of files blocked because Metadefender Core detected a non-clean result.
Converted The number of files sanitized by Metadefender Core.
Quarantined The number of files quarantined by Metadefender Kiosk.
Deleted The number of files deleted by Metadefender Kiosk.

v3.13.0 470
Data Item Description
Post Action Ran
The number of files processed by the post action script defined in Metadefender Kiosk
Copied To Media
The number of files copied to another device.
Copied To Directory
The number of files copied to another location.
Copied To SFT Server
The number of files copied to a Metadefender Secure File Transfer server.
Moved To Media
The number of files moved to another device.
Moved To Directory
The number of files that were moved to another location.
Moved To SFT Server
The number of files moved to a Metadefender Secure File Transfer server.
Copied to [media, directory, SFT Server]
The location where files were copied.
Moved to [media, directory, SFT Server]
The location where files were moved.
Allowed Actions Taken
Section that includes a summary of the actions taken on allowed files. The descriptions are the same as those described above for blocked files.

v3.13.0 471
Data Item Description
Skipped Files The number of files skipped when scanning by Metadefender Core because of the policy set in the Core profile.
File Type Totals
The number of files of each file type that were included in the processing session.
Threats The list of files detected as threats during the session. Each file will have the PATH, SHA-256, THREAT NAME (if applicable) and SCAN RESULT listed.
Deleted Files The list of files removed during processing. Each file will have the PATH and SHA-256 listed.
Quarantine Failed Files
The list of files quarantined during processing. Each file will have the PATH and SHA-256 listed.
Password Protected Files
The list of files included in the process that were password protected. Each file will have the PATH and SHA-256 listed.
Potentially Vulnerable Files
The list of files that contain a vulnerability. Each file will have the PATH and SHA-256 listed.
Noncompliant Archives
The list of archives included in the process that exceeded archive handling limits. Each file will have the PATH, SHA-256 and REASON listed
Errors - Process Files
The list of files that failed to scan by Metadefender Core. Each file will have the PATH, SHA-256 and REASON listed.
Failed To Quarantine Files
The list of files that could not be quarantined.
Skipped Files

v3.13.0 472
Data Item Description
The list of files that were configured to be skipped from being scanned by Metadefender Core. Each file will have the PATH and SHA-256 listed.
File Type Analysis Results
The list of files where the detected file content type did not match the file extension. Each file will have the PATH, SHA-256, SUGGESTED EXTENSION and DETECTED FILE TYPE listed.
Blocked File Types
The list of files whose file type was configured to be blocked. Each file will have the PATH, SHA-256, SUGGESTED EXTENSION and DETECTED FILE TYPE listed
Files Failed SHA-256 Verification
The list of files that failed SHA-256 verification during copy/move (if SHA-256 Verification was enabled). Each file will have the PATH and SHA-256 listed.
Files Failed to be Sanitized
The list of files that failed to be sanitized. Each file will have the PATH listed.
Allowed Files The list of allowed files in the session. Each file will have the PATH and SHA-256 listed.
Path The relative path to the given file.
SHA-256 The hash value of the given file.
Threat Name The name of the infection for the given file.
Scan Result The scan result of the detected file threat
Suggested Extension
The expected file extension based on the detected content type of the file.
Detected File Type
The detected content type of the file.

v3.13.0 473
Data Item Description
Reason The reason the file has been included in the current list.
Example of a Scan Log File
OPSWAT - METADEFENDER KIOSK SCAN RESULTS
What is the ID of the media you will be scanning?: GX3419
What is the source of the files on this media?: 3rd Party Vendor
What is your name?: Metadefender Kiosk User
User ID: opswat\sampleuser
Profile: Default
Session ID: F624AA1F-BFF1-4501-A8F7-75DAC4C9EF2A
PROCESSING FINISHED SUCCESSFULLY
Process Start Time: 2016-07-23 10:54:09
Process Finish Time: 2016-07-23 10:54:35
Metadefender Core Version: 3.11.1.27535
Metadefender Kiosk Version: 3.3.1.27740
Device Information
Manufacturer: (Standard disk drives)
Model: SCSIDISK SCSI_DISK_1234 USB Device
Serial Number: USBSTOR\DISK&VEN_SCSIDISK&PROD_SCSI_DISK_1234&REV_1.00\12102314434D&0
Media Type: USB Device
Partition Count: 1
Disk Usage: 30.8MB / 1.8GB
Scanning System: METADEFENDER-KIOSK
Full Media Processed: YES
Total Files Scanned: 19
Total Files Processed: 20
Blocked Files
- Mismatched: 0

v3.13.0 474
- Blocked File Types: 0
- Password Protected: 1
- Noncompliant Archives: 1
- Threats: 5
- Failed To Scan: 0
Blocked Actions Taken
- Converted: 0
- Quarantined: 0
- Deleted: 0
- Post Action Ran: 0
- Copied To Media: 6
- Copied To Directory: 0
- Copied To SFT Server: 0
- Moved To Media: 0
- Moved To Directory: 0
- Moved To SFT Server: 0
- Copied to directory: C:\Kiosk\Sessions\F624AA1F-BFF1-4501-A8F7-75DAC4C9EF2A\blocked
Allowed Actions Taken
- Converted: 2
- Post Action Ran: 0
- Copied To Media: 16
- Copied To Directory: 0
- Copied To SFT Server: 0
- Moved To Media: 0
- Moved To Directory: 0
- Moved To SFT Server: 0
- Copied to directory: C:\Kiosk\Sessions\F624AA1F-BFF1-4501-A8F7-75DAC4C9EF2A\allowed
Skipped Files: 0
File Type Totals
bmp: 1

v3.13.0 475
doc: 1
docm/docx: 2
exe/dll: 1
gif: 1
htm/html: 1
jpg/jpeg: 1
pdf/ai: 1
png: 2
pps/ppt: 1
pptm/pptx/ppsx: 1
tif/tiff: 1
xls/xla: 1
xlsm/xlsx: 1
zip/jar: 4
_______________________________________________________________________
THREATS
1. PATH: F:\Samples\eicar_com.zip
SHA-256: F3F0C45B82514D6B2AB45F988288249AD73F3591BBD51CD
9302815EDE372143D
THREAT NAME: Eicar-Test-Signature
SCAN RESULT: Dirty
-----------------------------------------------------------------------
2. PATH: F:\Samples\eicarcom2.zip
SHA-256: 4FDABC19CFC54D84153389CEB1F75461606275207E24B60
04B74314200AB201B
THREAT NAME: Eicar-Test-Signature
SCAN RESULT: Dirty
-----------------------------------------------------------------------
3. PATH: F:\Samples\Sample Embedded.docx
SHA-256: 89309D4B57F87D6A25FA6053032B9E2106C41D146C9F8A3
C2BC56DE736619A2A

v3.13.0 476
THREAT NAME: Eicar-Test-Signature
SCAN RESULT: Dirty
-----------------------------------------------------------------------
4. PATH: F:\Samples\Self-Extracting.exe
SHA-256: 987204377CCE14B041BDCE2B2821063711E4B4786EDFBB9
103131EE3CB57FF25
THREAT NAME: Eicar test file
SCAN RESULT: Dirty
-----------------------------------------------------------------------
5. PATH: F:\Samples\Sample Files.zip
SHA-256: 7FD5107BF4D2A6FA445752025163C7F3B931B52E0BE22E7
D49A65FB3AA80FD31
THREAT NAME: Eicar-Test-Signature
SCAN RESULT: Dirty
-----------------------------------------------------------------------
_______________________________________________________________________
PASSWORD PROTECTED FILES
1. PATH: F:\Samples\File Test Set.zip
SHA-256: 1126E898787D018BE43BFF14A2AB24C605F5592654EFDA3692
821AA7E3AC9052
_______________________________________________________________________
_______________________________________________________________________
10. Developer Guide
10.1. Custom Authentication Module
Metadefender Kiosk allows you to audit the users that transfer data to and from the organization as well as to create a secure dataflow. Commonly used as a checkpoint to protect infrastructure from the risk of removable media devices (such as USB drives, CDs/DVDs, and other portable media), Metadefender Kiosk allows you to configure detailed content filters for unknown removable devices brought in by employees, contractors, vendors and others.

v3.13.0 477
1.
2.
3.
4.
1.
2.
3.
4.
This section provides instructions for developers who intend to build or integrate their own authentication method of these users into Metadefender Kiosk. We recommend that you have a strong understanding of C/C++ before reading this section.
The bundled code included in this section is a sample of how the authentication module can be implemented. You should modify the contents in each method described in this section to accommodate your integration needs. You can remove any additional methods in the sample code not described in this section if not needed.
Important: Any configuration pertaining to the custom authentication module are not saved if you uninstall and re-install Metadefender Kiosk. You must keep a copy of your module before uninstalling and then copy it back to the same directory once your installation or upgrade is complete.
System requirements
The system requirements for implementing custom authentication are as follows:
Metadefender Kiosk 3.2.0 or later
Visual Studio 2013 or later
NET 4.5 or later for running the Custom Authentication Sample for the sample UI
Deploying and configuring custom authentication
The steps necessary to deploy custom authentication are as follows:
Obtain a custom authentication template package from the downloads.OPSWAT Portal Use the template for C++ custom authentication module (vc12).Note:
Implement the custom authentication interface & build the custom authentication module (authenticationModule.dll).
Deploy the custom authentication module.
Configure Metadefender Kiosk to load and use the custom authentication.
Configuring custom authentication
After successfully building the custom authentication module, you can configure the custom authentication module.
Place the module (authenticationModule.dll) in the expected directory (e.g., <Metadefender Kiosk Install Directory>\Client\Authentication).
Open the Metadefender Kiosk Management Console, and go to the Workflows tab.
Go to the Configuration section.

v3.13.0 478
4. Select Require user authentication, then select Custom Authentication, and click . Apply If Custom Authentication does not appear, the authentication module is either Note:
named incorrectly or not in the expected directory.
Understanding C++ code in the custom authentication template
The following section describes the C++ code in the custom authentication template.
Init
This is the first method called. It allows you to initialize your authentication module.
init
int Init( bool * showUI)
Arguments
Argument Description
showUI Output indicates if the authentication module has a UI to display to the user.

v3.13.0 479
Argument Description
True: Has a UI.
False: Has no UI.
Return value
Value Description
0 The module initialized correctly.
Non-zero Initialization failed and the module cannot be used.
Verify
This method initiates the authentication process to run. The return value has nothing to do with if the user is authenticated or not. Instead, it indicates if the authentication process was successful or not.
init
int Verify( wchar_t ** verifiedID wchar_t * desktopName wchar_t ** password)
Arguments
Argument Description Notes
verifiedID The ID associated with the user that successfully authenticated. If a user is denied, then this is empty.
Implementer must allocate the memory required.
desktopName

v3.13.0 480
Argument Description Notes
Metadefender Kiosk uses a second desktop for security reasons. If your authentication process has a UI to display to the user, this will indicate the desktop in which your authentication process will be launched.
Disregard if your authentication process does not require a UI.
password The verified user’s credentials which allows Metadefender Kiosk to handle post processing permissions. If you don't want Metadefender Kiosk to have the user’s permissions, leave this empty.
Implementer must allocate the memory required.
Note: From 3.5.0, if is empty, Guest profile will be used.verifiedID
Return value
Value Description
0 Verification ran successfully.
Non-zero Verification failed to run.
Denit
This method is called when Metadefender Kiosk is shut down. Any resources acquired by your module should be released and any unsaved data should be stored.
init
int Deinit()
Arguments
No arguments are required for this function.
Cancel

v3.13.0 481
Cancel
This method is called when the user tries to cancels while verification is running.
int Cancel
(
)
Arguments
No arguments are required for this function.
Return value
Value Description
0 The cancel request was accepted.
Non-zero The cancel request was denied.
FreeString
This method is called to free allocated memory for wchar_t **. Metadefender Kiosk calls this function when finished with the values allocated by your functionality.
init
int FreeString( wchar_t ** stringToFree)
Arguments
Argument Description Notes
stringToFree Double pointer to wchar_t
This function must be de-allocated in the same way that memory is allocated.

v3.13.0 482
1.
2.
3.
4.
Return value
Value Description
0 The allocated memory was successfully released.
Non-zero The allocated memory failed to be released.
Using the custom authentication tester
The custom authentication testing package includes a file called TestCustomAuthentication.exe that lets you test and troubleshoot your authentication module before using it with Metadefender Kiosk.
TestCustomAuthentication.exe behaves similarly to the component Metadefender Kiosk uses to load the authentication module. Since Metadefender Kiosk runs under a SYSTEM context, you should run the authentication module under SYSTEM as well. Attempting to run the authentication module under any other user may invalidate the module's results. You must run TestCustomAuthenticationModule.exe under SYSTEM to properly load authenticationModule.dll and test the methods.
You can use Windows Sysinternals to run the tool as SYSTEM.
To run the custom authentication tester:
Download PsExec.
Open a command prompt (as an administrator) to where PsExec is installed and enter "PsExec.exe -s cmd.exe"
Navigate to the <Metadefender Kiosk Install Directory>\Client\Authentication directory.

v3.13.0 483
4.
5.
Run TestCustomAuthentication.exe. At all points of method testing, the tester pauses and allows you to control when to move on to the next test.
A PASSED or FAILED result appears.
pcProx Plus RFID Reader Custom Authentication Module
Overview of Module
Required Components
Configuration
Metadefender Kiosk Configuration
Reader Configuration
pcProxConfig Installation
Adding pcProx Custom Authentication Module to Metadefender Kiosk
Using the pcProx Custom Authentication Module
Overview of Module
This documentation describes usage of the pcProx Plus RFID Reader custom authentication module. This authentication module can be used with any version of Metadefender Kiosk version 3.2.0 or later to allow RFID cards to be used for Metadefender Kiosk authentication.
Required Components
Installed Metadefender Kiosk system (version 3.2.0 or later)
Installer available on OPSWAT's portal at https://portal.opswat.com/en/product-categories/metadefender-kiosk

v3.13.0 484
1.
2.
3.
4.
a.
pcProx Plus RFID Reader
https://www.rfideas.com/support/product-support/pcprox-plus
pcProxConfig reader configuration tool
Download available at https://www.rfideas.com/support/product-support/pcprox-plus
Documentation available at https://www.rfideas.com/files/downloads/manuals/Enroll_Plus_Wiegand_Manual.pdf
pcProx Plus RFID Reader Custom Authentication Module
Compiled binaries and source available on the OPSWAT Portal at https://portal.opswat.com/en/content/metadefender-kiosk-custom-authentication-module-sample-code
Configuration
Metadefender Kiosk Configuration
If Metadefender Kiosk has not already been installed on the system, install it using the installer available on the OPSWAT Portal at https://portal.opswat.com/en/product-categories
. Follow the installation steps in the ./metadefender-kiosk Metadefender Kiosk documentation
Reader ConfigurationpcProxConfig Installation
Download the pcProxConfig installer from https://www.rfideas.com/support/product-support/pcprox-plus
Run the installer to install the pcProxConfig configuration tool
Connect the pcProx reader to the Metadefender Kiosk system and wait for the driver to be installed. The LED on the reader will turn red
Launch the pcProxConfig tool, the device should be automatically detected

v3.13.0 485
4.
a.
b.
c.
5.
a.
6.
a.
b.
If the reader is not automatically detected you can click on the 'Connect' button to detect the reader
The reader should be shown in the device list
Select 'Card Analyzer' from the menu
Click 'Learn Card'
Click Start Scan, and when prompted put the RFID card that you want the device to learn on the scanner. The card will need to stay on the reader until the scanning is complete.

v3.13.0 486
6.
b.
c.
7.
8.
a.
9.
Click the 'Auto Config>' button
Select the Configuration # to set and click the 'Write' button

v3.13.0 487
9.
10.
a.
b.
11.
a.
b.
c.
12.
a.
b.
After the configuration has been written click 'Exit' to close the Card Analyzer dialog or click the 'Learn Card' button to learn another card type
Confirm that the configuration has the 'High priority' checkbox selected
If two configurations are saved make sure this is selected for both
Select the 'Format' tab. On the 'Data Format' subtab do the following.
Confirm the 'Send ID' checkbox is selected
OPSWAT recommends that the 'Send FAC' checkbox is also selected
On the 'Delimiters' subtab, do the following
Confirm the Pre-data delimiter is set to <NONE>

v3.13.0 488
12.
b.
c.
d.
e.
13.
14.
1.
a.
b.
c.
Confirm the Post-data delimiter is set to <NONE>
Confirm the Termination Keystroke is set to <ENTER>
Click the 'Write Active' button to save the configuration. If there are two configurations set this needs to be done for both configurations.
Test the configuration by opening the Notepad application and scanning a card. The card ID should be written into Notepad.
Adding pcProx Custom Authentication Module to Metadefender Kiosk
Copy the following files from the custom authentication module download package into your C:\Program Files (x86)\OPSWAT\Metadefender Kiosk\Client\Authentication directory
authenticationModule.dll
CustomAuthExample.exe

v3.13.0 489
1.
c.
d.
2.
a.
b.
3.
a.
b.
1.
a.
omConfig_CAM.ini
db
If you would like to restrict users to the RFID cards that are listed in the database
Set the property validate_ID=1 in omConfig_CAM.ini
Open the 'db' file with a text editor, such as Notepad. Update/add the valid card IDs (can be read by pcProxConfig tool, step 14) with the corresponding user names in the format <Card ID>:<Name>. Only card IDs that are listed in this file can be used for authentication.
In the Metadefender Kiosk Management Console, enable Custom Authentication on the 'Workflows' configuration page
Click the 'Apply' button
Using the pcProx Custom Authentication Module
Users will be prompted to scan their RFID badge

v3.13.0 490
2.
a.
i.
b.
c.
The ID from the card will be saved as the user ID for the session
In the session log viewable through the Management Console
On the scan receipt
In the saved text log file
11. Release Notes
New features
Metadefender Kiosk can now be configured to abort scans as soon as a blocked file is found
Multiple Metadefender Core servers can be defined for redundancy
Support for wiping encrypted USBs
Alert sound can be customized
Other changes
Better reporting of mismatched files that are found within archives
SMTP settings for emailed session reports are now configured globally
Estonian keyboard layout is now supported for the onscreen keyboard
Options for handling multiple partitions have been simplified to either block devices with multiple partitions or scan all available partitions
11.1. Archived Kiosk Release Notes
Version 3.4.1
=============

v3.13.0 491
New features
------------
- None
Other changes
-------------
- Kiosk user will now be prompted to confirm before destination media is wiped before files are copied to it
Version 3.4.0
=============
New features
------------
- Each Metadefender Kiosk workflow specifies a specific Metadefender Core workflow or rule to use
- Files identified as potentially vulnerable by Metadefender Core's vulnerability engine are shown in the scan results
- Metadefender Kiosk will now scan the boot sector of any media
Other changes
-------------
- The Metadefender Kiosk session log page user interface has been updated
- Potential security vulnerability with Ctrl-L key combination has been closed
- Better handling of McAfee encrypted USB devices
- Requires Metadefender Core 3.12.4 or later
Version 3.3.6
=============
New features
------------

v3.13.0 492
- Built in user authentication now supports remote Active Directory authentication. Note that for remote Active Directory authentication provided user credentials are not used when files are copied as a post action.
Other changes
-------------
- Metadefender Kiosk will validate SSL certificates when using HTTPS to communicate to the Metadefender Core server. If Metadefender Core is using a self-signed certificate, this certificate must be installed on the Metadefender Kiosk machine, otherwise validation will fail.
- The Metadefender Kiosk UI will reset after the scanned media has been removed when at the scan results page
Version 3.3.5
=============
New features
------------
- Encrypted drives can now be used as the "Copy To" destination
- Drives that are being copied to can now be wiped before files are copied
Other changes
-------------
- Server settings for e-mail notifications are now configured in Metadefender Kiosk instead of in Metadefender Core
Version 3.3.4
=============
New features
------------
- Compatible with Metadefender Core 4.4 and later versions
- Support for Kanguru 2000 and 3000 encrypted USBs
- More flexibility allowed in the destination directory when "Copy To" post action is enabled
- Scan session log can be saved as a PDF

v3.13.0 493
Other changes
-------------
- High security workflow included by default in installation
- Kiosk UI now scales to higher resolutions
- Count of files sent to a Metadefender Secure File Transfer server added to Management Console dashboard
Version 3.3.3
=============
New features
------------
- Non-guest Metadefender Kiosk profiles can now upload to Metadefender SFT guest accounts.
Other changes
-------------
- Updated onscreen Japanese keyboard
- Metadefender Kiosk can now be used with a Metadefender Core server that has an API key set.
- Fixed bug where files on read-only media that are sanitized were not getting copied as part of the file handling part of the workflow.
- Several hotkeys are now automatically disabled when the UI is running
- Additional minor bug fixes.
Version 3.3.2
=============
New features
------------
- Scan reports can now be sent by e-mail after the scanning session is complete.
- The file upload chunk size for uploading files to a Metadefender SFT server is now configurable.
Other changes

v3.13.0 494
Other changes
-------------
- The sender e-mail address is no longer required when uploading files to a Metadefender SFT server.
- Additional strings have been added to the Kiosk UI and can be modified through the Management Console.
- The encryption method for passwords saved in the Metadefender Kiosk configuration has changed. Importing configuration from versions prior to Metadefender Kiosk 3.3.2 will not import passwords.
Version 3.3.1
=============
New features
------------
- None
Other changes
-------------
- Better cancellation of a scan in progress
- Fixed issue when browsing blank media
- Correct detection of unencrypted Kanguru devices
- Database and Windows events can be viewed through the Management Console
Version 3.3.0
=============
New features
------------
- The name of the product is now Metadefender Kiosk.
- Administrators have the option to restrict access to domain users when Windows authentication is enabled.

v3.13.0 495
Other changes
-------------
- Fixed bug in importing saved configuration
- IIS Express component has been upgraded to version 8.0
Version 3.2.0
=============
New features
------------
- Metadefender now uses Metascan workflows (Metascan versions 3.10.1 and later)
- Custom authentication modules are supported
- Windows 10 support
Other changes
-------------
- None
Version 3.1.0
=============
New features
------------
- Metascan functionality can now be configured within the Metadefender Management Console. This is only supported for Metascan servers version 3.9.5 or later.
- Support for floppy disks as the copy destination in post-actions
Other changes
-------------
- Custom time periods can be set for the statistics displayed on the Metadefender dashboard
Version 3.0.12
=============

v3.13.0 496
New features
------------
- Upload to Policy Patrol Secure File Transfer (Requires version 2.2 or later of SFT) is now available as a post action
- The Metadefender Management Console has an updated look and feel, matching the Metascan Management Console
Other changes
-------------
- The security and compatibility of the Metadefender Management Console has been improved by replacing the PHP component with JavaScript
- Stability of the data sanitization post-action has been improved
- Fixed issue where floppy disk drives on non-English operating systems were not being recognized
- Fixed issue where in certain circumstances Metadefender might not start automatically upon system restart
Version 3.0.11
=============
New features
------------
- None
Other changes
-------------
- Updated kiosk UI strings for non-English languages
- Improved support of Ironkey D250 encrypted USBs
- Improved support for Kanguru Elite Defender 30 USBs
- Improved support for Kingston encrypted USBs
- If Windows authentication is enabled, non-local (i.e. domain) users are now required to specify their domain
Version 3.0.10

v3.13.0 497
Version 3.0.10
=============
New features
------------
- None
Other changes
-------------
- Resolved issue where files would fail to copy to network locations when SHA-256 hash verification was enabled
- Resolved issue in displaying large number of files in Metadefender's browse dialog
- Support for file type conversion from image files has been removed. Conversion from PDF is now only supported to sanitized PDF. For customers that will be exporting Metadefender workflows that used this functionality OPSWAT recommends that these conversions are disabled before exporting.
Version 3.0.9
=============
New features
------------
- None
Other changes
-------------
- Reduced the latency in loading workflow configuration when there are many user accounts on the associated active directory server
- Resolved race condition where Metadefender occasionally did not start upon system startup when installed on Windows 8 or newer operating systems
- Improved behavior when multiple instances of Metadefender are running on the same system
Version 3.0.8
=============
New features

v3.13.0 498
New features
------------
- Windows 8.1 and 2012 R2 are now supported
- Buffalo RUF2-hsc-2gt Encrypted USBs are now supported
- McAfee Complete Data Protection Encrypted USBs are now supported
- EncryptDisc media is now supported
- Kanguru Defender Elite 30 USB devices are now supported
- Metadefender Idle Screen can be customized
- German and Korean translations of the Metadefender kiosk UI
Other changes
-------------
- Hashes of files are re-verified when the 'Copy To' post action command is used
- Better handling of network failures when scanning with a remote Metascan server
Version 3.0.7
=============
New features
------------
- Scan logs can be saved to the media being scanned
- Recent sessions now listed in the Metadefender Management Console logs page
- Support for Buffalo SecureLock encrypted devices
- Receipt can be configured to print automatically
Other changes
-------------
- More details available in the scan result screen for files that failed to scan
- Kiosk user can be alerted when Metadefender license is close to expiration
- New HTML documentation available through the Management Console
- Romaji input supported on Japanese keyboard
- More robust support for Kingston DataTraveler encrypted USBs

v3.13.0 499
- Bitlocker encrypted drives are now supported on Windows 8.1
- Other minor changes
Version 3.0.6
=============
New features
------------
- Support for Ironkey D250 encrypted USBs
- Support for BitLocker (password) encrypted devices
- Vietnamese and Japanese user interface available by default
Other changes
-------------
- User account credentials used for post actions when Windows authentication is enabled
- Better indication when potential threats are found
- Additional scan result details included in text log file
- Debug log package available for download in Management Console
- Additional printout configuration options
Version 3.0.5
=============
New features
------------
- Added Support of KIOSK UI localization
- Added predefined KIOSK UI Localization for Hebrew & Arabic
- Added additional predefined profiles
- More configuration for printouts
Other changes
-------------
- Fixed error when scanning empty media

v3.13.0 500
- Improved accuracy of timestamps in logs
- Improved error handling and logging for errors
- Updated logs to include scan failure reason.
- Clearer notification when a threat is found
- Add ability to set password in Metadefender Management Console
- Various bug fixes.
Version 3.0.4
=============
New features
------------
- Copy to user provided media as post-action
- Username is available as a variable in post-actions when Windows login is enabled
Other changes
-------------
- Improved archive handling
- Improved physical keyboard support
- Scan is aborted if connection with Metascan server is interrupted (when Metascan is on separate machine)
- Improved handling when Metascan server is operating at maximum capacity
- Fixed potential issue where Metadefender failed to launch due to latency of Windows desktop preparation
- Better logging for interruptions during post processing
- Minor bug fixes
- UI improvements
Version 3.0.3
=============
New features
------------

v3.13.0 501
- None
Other changes
-------------
- Fixed print formatting issues
Version 3.0.2
=============
New features
-----------------
- Search for processing result by file upload
- Ability to export processing logs
- Allow search results to be bookmarked for later reference
- Display more detailed progress during file enumeration
- Improved Metadefender Management Console
- Improved formatting for built-in kiosk printers
Other changes
-------------
- Fixed bug that was preventing restoration of default and guest profiles
- Prevent users from being added to more than one workflow profile
Version 3.0.1
=============
New features
-----------------
- User Authentication
- Customizable User Profiles
- Configurable User Questions
- Filtering by File Type
- Web-Based Metadefender Management Console

v3.13.0 502
- System Restore with Deep Freeze
- File Type Conversions
- Enhanced Post-Processing Options
- New End User Workflow
- Option to Restart After Each Session
- Comprehensive Logging for all Processed Files
- Support for Kingston encrypted USB drives
- Handling USB with partially corrupted file system
11.2. Known Limitations of Metadefender Kiosk
Upgrading from 2.x
All configuration is now DB-based. For migration, please contact OPSWAT.
Handling Multiple Devices
Metadefender Kiosk does not allow multiple devices to be processed at the same time. Each device must be inserted independently. If a device has a private, or encrypted partition, Metadefender Kiosk may not be able to read it. Encrypted drives can be scanned as covered in the Unlock Screen section. If a drive does not have any readable partitions, OPSWAT recommends using Metadefender Kiosk’s ‘Wipe’ functionality to clean the drive and ensure that there are no hidden partitions. Refer to the Advanced Options section of 7.3. Configuring User
for additional information.Settings
Non-Windows Partitions
Metadefender Kiosk does not support scanning partitions that cannot be mounted to volumes in Windows (e.g. Linux/Android/Mac). However, many anti-malware engines incorporate virus definitions for all operating systems, regardless of the system on which the engine will be installed. OPSWAT tests indicate that for each non-windows threat sample, a large number of antivirus engines detected that the file is infected.
USB Hubs
If a USB hub with multiple USB drives is inserted into a Metadefender Kiosk system for scanning, Metadefender Kiosk will only scan the first device reported to Windows. This is not guaranteed to be the same device each time the USB hub is inserted. OPSWAT does not recommend connecting drives to Metadefender Kiosk through a USB hub.
Self-Extracting Archives

v3.13.0 503
Self-Extracting Archives
The only self-extracting archives that are fully supported to be scanned as archives are ones created by 7-zip and WinRAR. Self-extracting archives created using other technologies may be recognized and scanned as archives but OPSWAT does not guarantee that this will be possible.
Private or encrypted partitions
If a device has a private, or encrypted partition, Metadefender Kiosk may not be able to read it. Encrypted drives can be scanned as described in . Non-9.3. Unlocking Encrypted Devicesprimary encrypted partitions can be blocked in the Metadefender Kiosk Management Console. If a drive does not have any readable partitions, you can use Metadefender Kiosk’s Wipe functionality to clean the drive and ensure that there are no hidden partitions.
UAC
If UAC is not disabled Metadefender Kiosk's print functionality may not work correctly. Metadefender Kiosk's watchdog functionality will also not work correctly if UAC is not disabled.
Other Known Issues
All external USB drives, such as SD card readers, floppy disk drives, and CD ROM drives, must be inserted before Metadefender Kiosk is started.
Windows User Accounts (domain or local) can be assigned to multiple workflow profiles and only one of the profiles will be used.
To be able to configure profiles with domain users, the Metadefender Kiosk system must be part of the domain.
Kiosk users cannot browse directories that contain more than 2,000 items.
For certain encrypted devices (e.g., Kanguru and Ironkey), unlocking may fail even with the correct password if a user interacts with the Kiosk UI during the process of unlocking.
The encryption method for passwords saved in the Metadefender Kiosk configuration changed with Metadefender Kiosk 3.3.2. Importing configuration from versions prior to Metadefender Kiosk 3.3.2 will not import passwords.
If the Metadefender Kiosk license has expired or is invalid, the Metadefender Kiosk application will display an error to the end user and will not allow them to proceed through the Metadefender Kiosk workflow.
McAfee & BitLocker encrypted drives are not supported for the wipe functionality.

v3.13.0 504
11. Legal
Copyright
DISCLAIMER OF WARRANTY
OPSWAT Inc. makes no representation or warranties, either express or implied by or with respect to anything in this document, and shall not be liable for any implied warranties of merchantability or fitness for a particular purpose or for any indirect special or consequential damages.
COPYRIGHT NOTICE
OPSWAT, OESIS, Metascan, Metadefender, AppRemover and the OPSWAT logo are trademarks and registered trademarks of OPSWAT, Inc. All other trademarks, trade names and images mentioned and/or used herein belong to their respective owners.
No part of this publication may be reproduced, stored in a retrieval system or transmitted, in any form or by any means (photocopying, recording or otherwise) without prior written consent of OPSWAT Inc. No patent liability is assumed with respect to the use of the information contained herein. While every precaution has been taken in the preparation of this publication, OPSWAT Inc. assumes no responsibility for errors or omissions. This publication and features described herein are subject to change without notice.
Export Classification EAR99
EAR99 (Export Administration Regulation 99) is an export classification category regulated by the U.S. Department of Commerce that covers most commercial items exported out of the U.S.
OPSWAT’s software is designated as EAR99, and there are no export restrictions other than embargoed countries and persons.

v3.13.0 505
12. Knowledge Base Articles
Page: What URLs must be whitelisted to allow access to virus definition updates?
Page: What is the difference between Scan, PutToScanQueue, and ScanEx?
Page: What is the RAM Drive or Ram Disk and how is it used in Metadefender Core?
Page: What is the support lifecycle for OPSWAT Appliances?
Page: What operating system patches should I apply to the system hosting Metadefender Core?
Page: What should you do if you have anti-malware on the same machine as Metadefender Core (formerly Metascan) ?
Page: What is the frequency of signature / definition updates?
Page: What is the maximum file upload size limit when accessing Metadefender Core through the REST server?
Page: Where can I submit false positives detected by Metadefender Core?
Page: Why did the AVG engine disappear from the Metadefender Core Management Console?
Page: Where is Metadefender Core's temp directory located?
Page: Which antivirus engines are designated by Metadefender Core as "customer licensed engines"?
Page: Why did Metadefender Core stop working on Windows 10 ?
Page: When I click Apply after I change the maximum total size of extracted files, I get an "Update failed" message. Why is that?
Page: When will the updates for ThreatTrack and Agnitum no longer be available ?
Are Metadefender Core upgrades free?
Yes. Your Metadefender Core license lets you run the latest version of the product. In fact, OPSWAT recommends that you upgrade to the latest release as soon as possible so that you can benefit from new AV engine versions, new features, and bug fixes.
If you are interested in upgrading, please check our Release Notes and our Installation and Upgrade Guide, which can be found here.
If you are a Metadefender Core Custom customer, OPSWAT recommends that you contact OPSWAT Support and let us guide you through the upgrade process. You can contact OPSWAT Support by .logging a support ticket with us

v3.13.0 506
1.
2.
3.
4.
5.
6.
This article applies to Metadefender Core productThis article was last updated on 2016-09-02CA
Avira engine not updating
If you are running a version of Metascan that includes Avira, you can download the patch . hereTo apply this patch, please follow the instructions below.
Open an elevated command prompt.
Run the following command: net stop metascan
Extract the package you downloaded from the link above.
Copy the contents of the archive into the Engines\Avira directory in the Metascan install directory (usually C:\Program Files (x86)\OPSWAT\Metascan XX\Engines\Avira).
From an elevated command prompt, run the following command: net start metascan
Confirm that the Avira engine is scanning and returns the valid definition time from either the command line (by running the command ‘omsCmdLineUtil.exe debug’ in the Metascan directory) or through the Metascan Management Console web interface.
Note: This patch only affects your Metascan installation if it includes the Avira engine. If you are currently using Metascan 3.9.X, this is applicable to Metascan 4, 8, 12 and 16 packages. All other Metascan functionality will work normally even if the patch is not applied.
If you have any questions about this patch or about Metascan, please do not hesitate to contact .us
This article pertains to Metascan 3.9.XThis article was last updated on 2016-08-25.EF
Can I control access to the RAM disk?
Yes, you can set security permissions for the RAM disk just like a regular hard disk. To do so, right-click on that drive, select , and then navigate to the Security tab to access Propertiessecurity permissions for that drive.
Note: This only applies to the RAM disk that is installed as a part of Metadefender Core.

v3.13.0 507
1.
2.
1.
2.
3.
4.
This article applies to Metadefender Core version 3.xThis article was last updated on 2016-08-11TV
Can I disable (and later re-enable) any of the antivirus engines in Metadefender Core?
Occasionally, administrators may need to disable one or more of the antivirus engines that are part of Metadefender Core. This can be done from the Metadefender Core Management Console, which is accessible either via the Start menu or by opening a browser and navigating to .http://localhost:8008/management
Once there, follow the instructions below:
Go to the Configuration tab.
Deselect the engines you wish to disable in the Active column.
Enabling or disabling the engines can also be done from a command prompt. To do this:
Open an elevated command prompt and navigate to the Metadefender Core installation folder.
To see the names of the engines you have in your Metadefender Core installation, enter omsCmdLineUtil.exe debug
To enable an engine, enter omsCmdLineUtil.exe config in=<engine(s) to be included> (e.g., omsCmdLineUtil.exe config in="eset scan engine|avira scan engine").

v3.13.0 508
4.
1.
2.
3.
4.
5.
To disable an engine, enter omsCmdLineUtil.exe config ex=<engine(s) to be excluded> (e.g., omsCmdLineUtil.exe config ex="eset scan engine|avira scan engine").
Note: If you are enabling or disabling multiple engines, separate the engine names using the ‘|’ character.
This article applies to Metadefender Core product This article was last updated on 2016-08-05
CN
Can I force an uninstall of Metadefender Core when the native uninstall does not work?
Sometimes an error will occur when you uninstall older versions of Metadefender Core which use the MSI-based installer. When the uninstall process fails, you cannot install a new Metadefender Core instance, which means you cannot install a newer version of the product, nor can you re-install the version you had installed.
If you encountered a problem uninstalling Metadefender Core using the standard method, you will need to do a forced uninstall:
Stop all running Metadefender Core processes by opening an elevated command prompt and entering the following commands:
net stop metascannet stop metascan helper
Delete your Metadefender Core directory.Usually this located here: C:\Program Files (x86)\OPSWAT\Metadefender Core X Note:
where "X" is your Metadefender Core package (1, 4, 8, 12, 16 or 20). For example, if your package is Metadefender Core 16, your directory would likely be C:\Program Files (x86)\OPSWAT\Metadefender Core 16.
Delete the Metadefender Core registry: HKEY_LOCAL_MACHINE\SOFTWARE\Wow6432Node\OPSWAT\Metascan
Remove Metadefender Core from the MSI database using Msizap.This is a special command line utility provided by Microsoft that removes either all Note:
Windows Installer information for a product or all products installed on a computer. Information about Msizap (including where to download and how to install it) is located
. When installing the Windows SDK, you only need to select the Win32 Development hereTools option.

v3.13.0 509
5.
6.
7.
After downloading Msizap, the .exe file is located here: C:\Program Files\Microsoft SDK\Bin\Msizap.Exe.
Run Msizap from the command line prompt:
Msizap.Exe T {834E5CFA-B648-49e9-ADEE-7ED24383BACD}
You have successfully force-uninstalled Metadefender Core and can now install a new version of it.
This article applies to Metadefender Core productThis article was last updated on 2016-09-02
CN
Can I install Metadefender Core v3 silently from a command line?
Yes, Metadefender Core supports silent installation from the command line. Please refer to the Installation & Upgrade Guide section of the .Metadefender Core Documentation
This article applies to Metadefender Core v3This article was last updated on 2016-10-04CA
Can I run Metadefender Core without IIS?
IIS is one of the required components for Metadefender Core to function as it is intended. You may uninstall IIS if you wish, and Metadefender Core will still retain the local scan functionality. However, doing this. OPSWAT does not support Metadefender Core we do not recommend with IIS removed.
IIS is a necessary component of Metadefender Core REST which is responsible for the REST API and other components which require REST service to be operational, including remote scanning, generation and scanning via Metadefender Client, and configuring or activating your Metadefender Core via Management Console.
This article applies to Metadefender Core v 3.x.This article was last updated on 2016-08-16.CN

v3.13.0 510
1.
2.
a.
b.
3.
1.
2.
a.
b.
c.
3.
1.
2.
3.
Can I whitelist or blacklist a file so that Metadefender Core will always treat it as clean or dirty, respectively?
Metadefender Core allows you to create and maintain a set of whitelisted and blacklisted files.
You add a file to the whitelist when you want the scan result for that file to be returned as "clean." Likewise, you add a file to the blacklist when you want the scan result for that file to be returned as "threat." In both cases, the files are not processed by any antivirus engines. To add files to the whitelist or blacklist, you can use a command line executable named omsFilterCLI.exe. This executable comes with your Metadefender Core package.
To add a file to your whitelist:
Open a command line prompt.
Enter omsFilterCLI.exe addtowhite <path> <type>
Replace <path> with the absolute directory path of the file location.
Replace <type> with the number 0. This parameter is a placeholder for future functionality.
Press .Enter
To add a file to your blacklist:
Open a command line prompt.
Enter omsFilterCLI.exe addtoblack <path> <type> <threat>
Replace <path> with the absolute directory path of the file location.
Replace <type> with the number 0. This parameter is a placeholder for future functionality.
Replace <threat> with the threat name. This can be a name of your choosing as it is used for your own categorization purposes.
Press .Enter
To generate a list of files in xml format that are in the whitelist and blacklist:
Open a command line prompt.
Enter omsFilterCLI.exe list 0
Press .Enter

v3.13.0 511
This article pertains to Metadefender Core 3.xThis article was last updated on 2016-08-29EF
Can Metadefender Core scan attachments from within a PDF file?
Metadefender Core does not directly scan and analyze PDF files for malware. Instead, it enables multiple underlying antivirus engines to do this using those engines' algorithms.
The scanning of attachments within PDFs will depend on which underlying antivirus engines are incorporated into your version of Metadefender Core, and whether they include this function or not. According to our testing, the following engines can scan attachments from within a PDF file:
Quick Heal
F-prot
Ahnlab
ClamAV
Ikarus
Sophos
TrendMicro
TrendMicro
Symantec
NANOAV*
Note: You need to enable the extract_archive option for NANOAV engine in the Metadefender Core configuration file (omsConfig.ini).
This article pertains to Metadefender CoreThis article was last updated on 2016-08-31TV
Do any of the custom engines have updating limitations?
Some of the custom engines have limitations for updating and OS compatibility.
You can see these listed below:
Engine Name Proxy Update
Offline Update
Scan During Update
Other Limitations

v3.13.0 512
TGSoft/VirIT
Filseclab None Supported None
F-Secure Supported Supported None
Lavasoft
Microsoft Security Essentias
Supported Supported Supported None
Xvirus
NANO Supported Supported Supported None
NetGate Supported Supported None
STOPZilla Supported Supported Supported None
Symantec Supported Supported N/A Runs on Server 2008 R2 or 2012
Systweak Not Supported
Supported None
Trend Micro Supported Supported Supported None
Trend Micro HouseCall
Supported Supported Supported None
Note: This list is accurate for the latest packages of custom engines.
This article pertains to Metadefender Core Product.This article was last updated on 2016-08-05.CA

v3.13.0 513
Does Metadefender Core offer real-time antivirus protection on the system where it is installed?
Although Metadefender Core uses a number of antivirus engines that are typically found in anti-malware products, it does not offer real-time protection for the system it is installed on. Metadefender Core only scans files that are submitted to it on demand. We recommend installing an anti-malware product that provides real time protection on the Metadefender Core server if such protection is needed. If a real-time protection agent is installed on the Metadefender Core server, the Metadefender Core installation directory and the temporary directory used for scanning need to be excluded from this protection.
This article pertains to Metadefender CoreThis article was last updated on 2016-08-10TV
Does Metadefender Core v3.x require lots of memory for MongoDB usage?
No, Metadefender Core does not require lots of memory because MongoDB does not work in this way.
First of all, MongoDB allocates minimum Memory for "private working set" while it may allocate a lot bigger size for Working Set which include Shareable Memory which is the biggest portion. See example below.
Secondly, Metadefender Core utilizes MongoDB ( for file scanning and other logging MMAPv1) such as application log. Please refer to MongoDB for expected system memory documentationutilization.
Please see the quote below from MongoDB FAQ for more details.
Not necessarily. It’s certainly possible to run MongoDB on a machine with a small amount of free RAM.

v3.13.0 514
MongoDB automatically uses all free memory on the machine as its cache. System resource monitors show that MongoDB uses a lot of memory, but its usage is dynamic. If another process suddenly needs half the server’s RAM, MongoDB will yield cached memory to the other process.
Technically, the operating system’s virtual memory subsystem manages MongoDB’s memory. This means that MongoDB will use as much free memory as it can, swapping to disk as needed. Deployments with enough memory to fit the application’s working data set in RAM will achieve the best performance.
For better performance and a stable environment, you can reduce mongoDB memory usage by decreasing the length of log/history retention.
This article pertains to Metadefender Core v.3.xThis article was last updated on 2016-12-06EF
Does the RAM Disk operate like other drives?
Yes, the RAM Disk is no different than any other drive. You can browse it, map it, etc. More information about the RAM Disk can be found .here
Note: Files which are stored in RAM Disk are removed when the machine is rebooted.
This article applies to Metadefender Core v.3.x.This article was last updated on 2016-09-02CN
Does the RAM Disk size actually take space from the server-available hard disk space?
No, the RAM Disk takes space from server RAM.
Note: Not all the space you specified for the RAM Disk is taken from the system's available RAM immediately. RAM used for the RAM Disk increases as required up to the maximum specified size .
This article applies to Metadefender Core productThis article was last updated on 2016-09-02CN

v3.13.0 515
1.
2.
3.
How are Metadefender Core remote clients licensed?
Each Metadefender Core package allows to your Metadefender Core 25 remote connectionsserver by default. A single remote client license is needed for each server or process that sends files to Metadefender Core. You can add any number of remote client licenses to allow additional devices to interact with your Metadefender Core server. A license is held by a single IP address/application for a total of 24 hours before being released. For example, if you have nine servers that send files to your Metadefender Core server for scanning within the same 24 hour period, you will need a total of nine remote client licenses. Typically, the remote client connections are acquired by your integrated application using REST API (for more information about REST API, go ) or by one of our dependent products in OPSWAT's Security Suite. hereFor more information, go .herePlease contact OPSWAT sales team at to learn more about pricing and [email protected] options for remote clients. This article applies to Metadefender Core productThis article was last updated on 2016-08-31TV
How can I purchase Metadefender licenses?
Please visit to contact our sales team or to connect with one of our http://www.opswat.com/buyauthorized channel partners.
This article applies to Metadefender Core productThis article was last updated on 2016-09-29CN
How can I see the number of files queued to be scanned?
You can see the number of files pending scan from the command line interface (CLI):
Open the Command Prompt.
Navigate to the Metadefender Core folder (typically C:\Program Files (x86)\OPSWAT\Metadefender Core X) Where X is the package number.
Enter the command “omsCmdLineUtil.exe dumpinternals”
This article pertains to Metadefender Core Product.This article was last updated on 2016-08-11.RR

v3.13.0 516
1.
2.
3.
How come the AnalyzeFileType API returns a failed result when scanning the System32 directory?
In earlier versions of Metadefender Core (named Metascan), the (now deprecated) AnalyzeFileType API may return a failed result when scanning the System32 directory with your application.
When your application requests to scan a file in the System32 directory, the Windows File System will instead direct the request to the SysWOW64 folder. For example, if you are scanning C:\Windows\System32\notepad.exe, Metadefender Core will scan the file at c:\Windows\Syswow64\notepad.exe.
Using the example above, you can workaround this issue by doing the following:
Instead of using the path System32, use the path Sysnative. Sysnative is a virtual folder, or special alias, that can be used to access the 64-bit System32 folder (e.g, C:\Windows\Sysnative\notepad.exe).
If it is a native 64-bit application, only use Buffer scan, as this will result in no direct access to the file.
This article applies to Metadefender Core v3.8.1 and olderThis article was last updated on 2016-08-16AA
How do I change the directory Metadefender Core uses for archive extraction?
Metadefender Core uses a temporary directory in order to process files. By default, the temporary directory used is C:\Windows\Temp. You can change this directory from the Metadefender Core Management Console. You can also set a secondary temporary directory within Metadefender Core product if needed. Use this second temporary directory if you think that the primary temporary directory will not have enough space to hold all the files submitted to Metadefender Core while they are being processed.
You can change the directory Metadefender Core uses for archive extraction to a location either on a RAM drive or a hard disk. Here is a explaining how to set up a RAM drive. KB articleTo change the directory location, please follow the instructions below:
Open the Metadefender Core Management Console and navigate to Workflow > Scan .Configuration
Change the location of the Primary Temp Directory, which by default is C:\Windows\TEMP.

v3.13.0 517
3.
4.
1.
2.
3.
4.
5.
6.
7.
Click .Save
Restart the Metascan service.
This article pertains to all supported Metadefender Core V3 versions.This article was last updated on 2016-08-30.CA
How do I change the location of Metadefender Core logs?
Some Metadefender Core administrators want Metadefender Core logs sent to a directory other than the one Metadefender Core uses by default. If you have this requirement, follow the guidelines below:
Create new folders named "data" and "log" under the new location you want to use as the destination for log files.
Open the registry editor and navigate to this location: HKEY_LOCAL_MACHINE\SOFTWARE\Wow6432Node\OPSWAT\Metascan
Change the "mongo_data_dir" default value in C:\Program Files (x86)\OPSWAT\Metadefender Core (X)\Mongo\data\ with the path of the data folder that you created in the step 1.
Change the "mongo_log_dir" default value in C:\Program Files (x86)\OPSWAT\Metadefender Core (X)\Mongo\log\ with the path of the log folder that you created in the step 1.
Open Task Manager, select the Process tab, locate the mongod.exe process, and right-click on the process and choose to kill it.End Process Tree
Open Services and restart Metascan service.
Check if Metadefender Core populated the folders where you moved the logs.

v3.13.0 518
This article pertains to all supported versions of Metadefender Core 3.x.This article was last updated on 2016-08-31TT
How do I configure Metadefender Core to only use one or several scan engines using the CLI?
You can include or exclude the engines used by Metadefender Core, respectively, through the following properties:
"included_avs"
"excluded_avs"
"included_avs" is set to "ALL" by default.
If you change this value from "ALL" to the name(s) of the antiviruses you want to use as they are reported by Metadefender Core (separating by a "|"), then only they will be included in Metadefender Core operations.
There are a few ways you can change these properties (described in detail in the Metadefender Core manual, or ). The following examples demonstrate how to set this using the herecommand line.
Examples:

v3.13.0 519
1.
2.
1.
2.
You would like to use Avira and Eset. The precise directory depends on the number of installed engines.
cd "C:\Program Files (x86)\OPSWAT\Metadefender Core X\"omsCmdLineUtil config in="Avira|Eset"
You would like to exclude QuickHeal from scanning:
omsCmdLineUtil config ex="QuickHeal"
This article applies to Metadefender Core productThis article was last updated on 2016-08-31TV
How do I delete all scan logs from MongoDB and reset the database?
One way to free some disk space is by periodically removing the MongoDB data and logs. You could manually delete all log files located in the <Metadefender Core installation folder>\Mongo\log\ folder.
In order to permanently delete all scan logs and reset the Metadefender Core database, please do the following.
Caution: This means you will permanently erase all logged scan results made before. If you do not want to lose any data from MongoDB and you prefer to change the location of the database
.and logs, follow this KB
1. Open a command prompt .with administrative privileges
2. Change the directory to the directory where the Metascan Mongo Database is installed (e.g., cd "c:\program files\OPSWAT\Metadefender Core 4\Mongo\64+" for Metadefender Core 4).
3. Stop the Metascan service and the Metascan REST service by running the following commands:
net stop Metascan
net stop omsRest
mongo
4. Reset the database by running the following command:
mongo localhost:27018/metascan --eval "db.dropDatabase()"

v3.13.0 520
2.
1.
2.
mongo localhost:27018/omsdb --eval "db.dropDatabase()"
5. Start the Metascan service and the Metascan REST service by running the following commands:
net start Metascan
net start omsRest
This article applies to Metadefender Core 3.xThis article was last updated on 2016-09-01CA
How do I disable real-time protection of my anti-malware software if it is not allowed by corporate policy?
Anti-malware engines included with Metadefender Core do not install real-time protection agents. If you have an anti-malware product already installed on your system that is included as one of the anti-malware engines in your version of Metadefender Core, it will interfere with the scanning process performed by Metadefender Core. For this reason, it is recommend that you disable the real-time protection of your anti-malware product.
If your corporate policy does not allow you to disable your real-time anti-virus product, you will need to add some exception rules. As part of your exception rule, you need to exclude the folder where Metadefender Core is creating temporary files (configurable via temp_dir property) and the Windows Temp folder which by default is located in C:\Windows\Temp.
If you do not add this exception or if you do not disable real-time protection, results returned by Metadefender Core for scanning will not be consistent. The return value of scans would be one of the following:
Clean: If your existing anti-malware product was able to clean the threat.
Failed (or other errors): If your existing anti-malware product removed the file before Metadefender Core could scan it.
If you need help on how to add an exception rule to exclude a given folder from scanning for a anti-malware product, please what product you are using and we may be able to help tell usyou. Be sure to include the product version.

v3.13.0 521
1.
2.
3.
4.
1.
2.
3.
This article pertains to Metadefender Core Product.This article was last updated on 2016-08-30RR
How do I find my serial key / license key?
You can find your license key using the command line interface (CLI):
Open your CLI.
Navigate to the Metadefender Core folder (typically C:\Program Files (x86)\OPSWAT\Metadefender Core XX).
Enter the following command (without quotes): "omsLicMgrCLI.exe checklicense X" (where X is your package number).
Example 1: If you have a Metadefender Core 4, enter the following: omsLicMgrCLI.exe checklicense 4
Example 2: If you have a custom Metadefender Core, figure out the base package. Most often it is Metadefender Core 16, so you would enter the following: omsLicMgrCLI.exe checklicense 16
In the output, look for the value paired with the text “Key:”
You can also get your license key from the debug.txt file which is generated when you click in the Logs tab of the Metadefender Core Management Console.Export quick debug log
This article pertains to Metadefender Core productThis article was last updated on 2016-07-27CN
How do I install a RAM drive on an existing Metadefender Core installation?
When installing Metadefender Core for the first time, you will be given the option to install the RAM drive which will automatically configure itself for your installation.
If you wish to set up and configure the RAM drive for Metascan servers that are already running without reinstalling Metadefender Core, please follow the steps below:
Download the and extract it to a permanent location.RAMdrive ZIP file
Open the folder that corresponds to the number of bits for your Windows installation. For most customers, this will be the 64 folder.

v3.13.0 522
3.
4.
5.
6.
7.
8.
9.
10.
11.
12.
13.
1.
Run ramdrv_install.exe as an administrator.
Run ramdrv_restart.exe as an administrator.
Check your computer for the O: drive. If this drive is not present, restart the machine.
Open Windows Device Manager.
Under RAM Drive, double-click OPSWAT Secure RAM Disk.This menu allows you to configure the size of the RAM drive. Please read Note: this to understand how the RAM drive constraints should be set on your system.article
Allocate as much capacity as you feel comfortable. The larger the files you plan to scan, the larger you will want the RAM drive to be.
Metascan will not allow you to scan archives larger than half the available Note:temporary storage. To get around this limitation, we recommend setting a secondary temporary directory.
Open the Metascan Management Console and go to .Workflow > Scan Configuration
Set the Secondary Temp Directory to the current value of the Primary Temp Directory. Typically, this is C:\Windows\TEMP\.
Set the Primary Temp Directory to O:\.
In the tab, navigate to Archive Handling and ensure that the current archive Workflowsettings are adequate as they may have been lowered during the previous steps.
If you run a local antivirus with real-time protection, add an exclusion for the O: drive.
This article applies to Metadefender Core version 3.xThis article was last updated on 2016-08-10TV
How do I make Metadefender Core upload clean files to the FTP file server?
Metadefender Core provides the ability to specify custom scripts that will run after scanning every clean or infected file.
Using this feature, an administrator working with Metadefender Core can easily add custom script that will upload all clean files to file server. The following example is based on using FTP to upload files to file server.
Specify Custom Script from Command Line
Create an XML file with the following content.Code:

v3.13.0 523
1.
2.
1.
2.
3.
4.
<post_action>
<scripts>
<if type="0">echo OPEN myftpserver.myftp.com > ftp.scr&&echo
myusername>> ftp.scr&&echo mypassword>
ftp.scr&&echo cd test_post_action > > ftp.scr&&echo put
%%%file_path%%% > > ftp.scr&&echo CLOSE > > ftp.scr&&echo
quit > > ftp.scr&&ftp -s:ftp.scr</if>
</scripts>
</post_action>
Enable script by running the following commands from Metadefender Core installation directory.Code:
omsCmdLineUtil.exe config pa=<full path to the xml created in step 1>
Specify Custom Script in Metadefender Core Management Console
Open The Metadefender Core Management Console through the Start menu or go to .http://localhost:8008
Go to .Configuration > ScanEx Configuration > Post Processing
Under Clean Files, enable post action by selecting the checkbox next to Run custom command line script.
Enter the following script in the text box and click .ApplyCode:
echo OPEN > ftp.scr&&echo myusername>> ftp.myftpserver.myftp.comscr&&echo mypassword>ftp.scr&&echo cd test_post_action > > ftp.scr&&echo put %%%file_path%%% > > ftp.scr&&echo CLOSE > > ftp.scr&&echo quit > > ftp.scr&&ftp -s:ftp.scr
This article pertains to Metadefender Core v3 This article was last updated on 2016-09-01
HN

v3.13.0 524
How do I modify the file size limit of the REST server in a remote Metadefender Core (formerly Metascan) configuration?
When using a remote Metadefender Core configuration that relies on the REST server, you can modify the file upload size limit. The default size limit is approximately 200MB. In order to change that size limit, perform the following actions on your Metadefender Core server machine:
1. Open the Web.config file with a Chrome or Firefox browser. By default, this file is located in the \REST\Web\folder. The complete path depends on the Metadefender Core version you are using:
- For Metadefender Core 1, use C:\Program Files (x86)\OPSWAT\Metadefender 1\REST\Web\Web *config file
- For Metadefender Core 4, use C:\Program Files (x86)\OPSWAT\Metadefender 4\REST\Web\Web *config file
- For Metadefender Core 8, use C:\Program Files (x86)\OPSWAT\Metadefender 8\REST\Web\Web *config file
- For Metadefender Core 12, use C:\Program Files (x86)\OPSWAT\Metadefender 12\REST\Web\Web *config file
- For Metadefender Core 16, use C:\Program Files (x86)\OPSWAT\Metadefender 16\REST\Web\Web *config file
- For Metadefender Core 20, use C:\Program Files (x86)\OPSWAT\Metadefender 20\REST\Web\Web *config file
2. In the httpRuntime XML tag, set the maxRequestLength value to the desired maximum file upload size. For example, to set the maximum file upload size to 2GB, use <httpRuntime maxRequestLength="2097151" requestLengthDiskThreshold=" 204800" />. The value in Note:maxRequestLength and requestLengthDiskThreshold is calculated in kilobytes. To set a proper value, you need a byte convertor that you can access from . 3. In the requestLimits tag, hereset the maxAllowedContentLength value to the maximum allowed file upload size. For example, for a 2GB size limit, use <requestLimits maxAllowedContentLength="2147482624" />. 4. Save and close the configuration file. 5. Restart the Metadefender Core REST service by opening a command prompt with administrator privileges.6. Enter net stop omsREST and then press .Enter7. Enter net start omsREST and then press . When setting your size limit, please be Enteraware of the following about maximum size limits:
These filesize parameters are IIS related configurations. IIS is the platform of the Metascan REST server.

v3.13.0 525
1.
2.
3.
1.
2.
3.
The maximum IIS file upload limit is 3GB.
The values specified in the above instructions are the maximum values allowed by IIS. Setting higher values will result in file upload failures.
This article applies to Metadefender Core v3 productThis article was last updated on 2016-08-11CA
How do I set a password for the Metadefender Core Management Console?
In order to set a password for Metadefender Core Management Console, please follow the next steps:
Go to .http://localhost:8008/management/#/changepassword
Click the Automatic Login menu and select .Off
Enter the desired password, confirm it, and then click .Apply
This article applies to Metadefender Core v.3.x. product.This article was last updated on 2016-08-26.CN
How do I update my Metadefender Core Engines online?
To perform an online update:
The Metadefender Core Management Console is installed by default and can be launched from the Start menu or in any browser with network access to the Metadefender Core Server by navigating to .http://localhost:8008/management
In the Metadefender Core Management Console, click on the Configuration tab.
Here you can select to update specific engines or you can click 'Update All' to update all your currently active engines. (Please note that this can take some time depending on your internet connection speed)
You can also view a on the subject on the OPSWAT YouTube channel.short video tutorial
This article pertains to all supported Metascan versions

v3.13.0 526
1.
2.
3.
4.
5.
6.
This article was last updated on 2015-06-30
EA
How do I update the AhnLab engine?
AhnLab is one of the engines included in Metascan 4, 8, 12, and 16. AhnLab is changing the way that it is distributing online updates. AhnLab has discontinued the previous method of distributing updates and online updating of AhnLab within Metascan no longer works.
You will need to update your Metascan installation only if all of the following apply:
Your installed version of Metascan is 3.9.0, 3.9.1, or 3.9.2.
Your installed package of Metascan is 4, 8, 12, or 16.
You use Metascan’s online updating functionality to update engine definitions.
Before upgrading the AhnLab engine, make sure you meet the following requirements:
Visual C++ redistributable 2013 x86
No engine is updating/scanning before upgrading engine
:To upgrade the AhnLab engine, do the following
Download the AhnLab engine installer from .here
Stop the Metascan service by opening an elevated command prompt and entering net stop metascan
Extract the package you downloaded from the link above.
Run the installer as Administrator.
Start the Metascan service by opening an elevated command prompt and entering net start metascan
Confirm the AhnLab engine is scanning and returns the valid definition time either from command line (by running the command omsCmdLineUtil.exe debug in the Metascan directory) either from the Metascan Management Console.
Note: Since the versions mentioned in this article are very old, we strongly recommend to upgrade to our latest version of Metadefender Core which have a lot of improvements and new features. The latest version of Metadefender Core can always be found on OPSWAT Portal.
This article pertains to Metascan 3.9.0, 3.9.1 and 3.9.2.This article was last updated on 2016-10-13.EF

v3.13.0 527
1.
2.
3.
4.
1.
2.
3.
4.
5.
How do I upgrade Metadefender Core while preserving configuration?
Some of Metadefender Core's components are stored in the Windows registry and others in a local configuration file. Therefore, it is important to preserve the configurations of these when upgrading. OPSWAT recommends using the backup and restore functionality in the Metadefender Core Management Console. Export the settings before uninstalling Metadefender Core and then import the settings after the new version of Metadefender Core has been installed. There is also a tool to export and import settings from the command line. To export your current configuration do the following:
Navigate to http://localhost:8008/management/
In the upper-right section of the page click on Backup / Restore
If you want to set a password for the exported configuration file, check Encrypt Backup with the following password and provide a password
Click on DOWNLOAD BACKUP
This backup, unfortunately, will only handle a portion of the needed configurations. Other configurations reside in the Metadefender Core configuration file (by default it's C:\Program Files\OPSWAT\Metadefender Core X\omsConfig.ini). In this file many antivirus engine specific configurations are placed, along with Custom Engine settings, DB controller settings, proxy settings and ICAP settings. NONE of this information is handled by the upgrade and if any information has been added to this file, it will be lost during the upgrade. Make a copy of this file and store it in a safe place before uninstalling for an upgrade. The same goes for any IISExpress web server changes the user might have made in the web.config file located in the Metadefender Core installation directory, Rest\Web folder. In this file, the user could have blocked certain API's or modified the file upload size by the variables maxRequestLength, requestLengthDiskThreshold and maxAllowedContentLength. Such changes are rather unlikely but make a copy of this file as well and place it somewhere safe. Now, the user can safely uninstall Metadefender Core and reinstall the new version, a restart may be required. After installing Metadefender Core do the following:
Navigate to http://localhost:8008/management/
In the upper-right section of the page click on Backup / Restore
Under Restore From Backup click Browse and select the previously exported configuration to import it
If you encrypted the backup file with a password, check Decrypt Backup with the following password and provide the password
Click on UPLOAD & RESTORE
(Optional) To import other non-registry settings please do the following:

v3.13.0 528
1.
2.
3.
1.
2.
3.
4.
5.
Copy over pertinent information to the new “omsConfig.ini” from the old "omsConfig.ini", being the engine-specific configurations such as “heuristic scanning” and “extract archive”, but NOT the “update server”. The reason that “update server” should not be changed is due to newer Metadefender Core releases may contain newer AV engine versions, which cannot use the old definition files.
If ICAP or Proxy is used, port those configurations over as well.
If the DB controller settings were , change them as well.changed by the Administrator
You can also view a on the subject on the OPSWAT YouTube channel.short video tutorial
This article pertains to Metadefender Core v3 productThis article was last updated on 2016-09-01AF
How do I upgrade to the latest release of Metadefender Core v3?
In order to upgrade to a new release of Metadefender Core v3 you must do the following:
Save your existing configurations. This step only needs to be performed if you have modified the default configurations that come out-of-the-box with Metadefender Core v3. Guidelines on how to save existing configuration are located in our "How do I upgrade
article.Metadefender Core while preserving configuration?"
Stop your current release of Metadefender Core v3 if its still running.
Uninstall your current release of Metadefender Core v3.
Run the installer for the new release of the product which you can get it for free from .OPSWAT Portal - Metadefender Core v3 download section

v3.13.0 529
5.
1.
Apply your saved configurations. This step is applicable only if you performed step 1. Guidelines on how to upload existing configuration are located in our "How do I upgrade
article.Metadefender Core while preserving configuration?"
Your license information (license keys and expiration dates) will remain intact as long as you install the new release on the same machine that the older version was on and you haven't refreshed the operating system.
If you have a Metadefender Core Custom installation (i.e. an installation that OPSWAT provided that includes custom engines) it is best to contact OPSWAT Support before upgrading to a new release. OPSWAT Support will then provide additional guidelines on how to upgrade the custom engines.
You can also view a on the subject on the OPSWAT YouTube channel.short video tutorial
This article pertains to all supported Metascan versionsThis article was last updated on 2016-08-31CA
How fast can Metadefender Core process files?
our performance will vary based upon many factors.Y
These include:
The more engines you have, the longer the scans will take.
Customer licensed engines are slower than integrated engines.
Files stored locally scan faster than those which have to be transferred over the network, such as with the REST interface.
Using the option will improve performance.RAM Disk
Archive extraction comes before scanning, so archives take longer to scan.
For an estimate of what to expect, please see our .performance test
This article applies to Metadefender Core productThis article was last updated on 2016-09-02CN
How is MongoDB usage secured with Metadefender Core?
Metadefender Core's MongoDB instance is secured in two ways:

v3.13.0 530
1.
2.
When a username and password is not supplied, MongoDB can ONLY be accessed via a localhost. Metadefender Core can access the MongoDB instance from the localhost while access from outside of the system is denied.
MongoDB's HTTP interface is disabled so that it cannot be accessed remotely via HTTP (this is different from ).DB authentication
For more details about securing Metadefender Core's MongoDB interface, please refer to .Security and MongoDB API Interfaces
This article applies to Metadefender Core productThis article was last updated on 2016-08-10TV
How long is the support life cycle for a specific version/release of Metadefender Core v3?
OPSWAT provides support on each release of Metadefender Core for after the 18 monthspublication of the next release of the product (i.e. once a new release is published, you have 18 more months of support on the previous release). However, bug fixes and enhancements are applied only to the next release of a product, not to the current release or historical releases, even when those releases are still under support. In some cases hot-fixes can be provided for the current release of the product, and then incorporated as a regular fix in the next release.
OPSWAT strongly encourages customers to upgrade to the latest release on a regular basis and not to wait until the end of a releases supported life-cycle.
Note that prior to release v3.11.1, Metadefender Core was called Metascan. The name change does not affect the support life cycle of any of the releases, regardless of which name they were released under.
All releases older than v3.9.1 are no longer supported.
Release number Release date End-of-life date
3.12.5 22 Nov 2016
3.12.4 17 Oct 2016 22 May 2018
3.12.3 16 Sep 2016 17 Apr 2018
3.12.2 16 Aug 2016 16 Mar 2018

v3.13.0 531
3.12.1 24 Jun 2016 16 Feb 2018
3.12.0 16 May 2016 24 Dec 2017
3.11.2 07 Apr 2016 16 Nov 2017
3.11.1 24 Feb 2016 07 Oct 2017
3.11.0 10 Feb 2016 24 Aug 2017
3.10.1 22 Dec 2015 10 Aug 2017
3.10.0 17 Nov 2015 22 Jun 2017
3.9.5 20 Oct 2015 17 May 2017
3.9.4 16 Sept 2015 20 Apr 2017
3.9.3 18 Aug 2015 18 Mar 2017
3.9.2 20 Jul 2015 18 Feb 2017
3.9.1 13 Mar 2015 20 Jan 2017
3.9.0 9 Dec 2014 13 Sep 2016
This article pertains to all supported releases of Metadefender Core (formerly called Metascan). This article was last updated on 2016-11-23
TV
How would you recommend setting the RAM Disk size?
In order to take advantage of RAM disk technology, the total memory allocated on the Metadefender Core machine must be greater than or equal to the minimum settings required to run Metadefender Core. The system requirements for Metadefender Core are .here
In order to process multiple concurrent scan requests, the RAM disk must be big enough to hold the combined size of all of the files being scanned at any point in time. OPSWAT recommends the following way of estimating the size of the RAM disk:

v3.13.0 532
1.
2.
3.
RAM disk size = (Max number of simultaneous requests + 1) * Average size of a file * File type multiplier
Notes:
File type multiplier: If the majority of the scanned files are archives, this should be 2.
If the RAM disk is used as the primary temp directory, the maximum extracted archive file size will be half the size of the RAM disk for a single archive. If an archive exceeds that size, an error message appears unless a secondary temp directory is configured. If a secondary temp directory is configured, then the archive will use that temp directory to extract the archive. The size of the secondary temp directory is always half the available space on the drive.
This article applies to Metadefender Core 3.x
This article was last updated on 2016-08-10
TV
If I have an issue with Metadefender Core, what information does OPSWAT need in order to quickly troubleshoot my case?
In order to speed up the troubleshooting process of an issue, you should with a log a ticket summary of your issue and attach Metadefender Core debug information to that ticket. This information is important when troubleshooting scanning-related issues for Metadefender Core.
You can collect Metadefender Core debug information two eways: either via a web-based GUI or using CLI.
Method 1: Web-based GUI
Open a browser and navigate to the Metadefender Core Management Console ().http://localhost:8008/management
Go to the Logs tab
On the right-hand side of the page, select .Download > Verbose Log

v3.13.0 533
3.
4.
5.
1.
2.
3.
4.
5.
Save the zip file (Metascan_Debug[...].zip) with the log files.
Attach Metascan_Debug[...].zip to your ticket using the button.Submit Large Files
Method 2: Using CLI
Open a command prompt.
Change the directory to the one where Metadefender Core is installed (e.g., cd "c:\program files\OPSWAT\Metadefender Core").
Enter the debug command: omsDebugTool.exe all
Locate Metascan_Debug[...].zip in the directory where Metadefender Core is installed.
Attach Metascan_Debug[...].zip to your ticket using the button.Submit Large Files
If your issue appears only when Metadefender Core is called by your application, also attach a code snippet including the line where the Metadefender Core API is called and describe what is expected and what is returned.
This article applies to Metadefender Core 3.x This article was last updated on 2016-08-11TV
Is it normal for Metadefender Core to consume 100% of my CPU?
Metadefender Core might consume 100% of your CPU when it first starts. This happens only once (if you run Metadefender Core as a service, it happens when the machine first boots).
This happens because Metadefender Core is trying to detect the presence of any antivirus systems that may be placed on your machine. After running through this detection phase, Metadefender Core establishes a list of usable antiviruses on the machine, and never runs the detection phase again. After installing a new antivirus program, you should restart the

v3.13.0 534
Metadefender Core service.
Generally, the 100% of CPU consumption lasts for a short time (a minute or less) and then moves to the normal CPU consumption state.
Also, Metadefender Core automatically updates your installed antiviruses when it first starts, and then at pre-defined periods (every 24 hours is the default). If your antivirus requires a large update, it may take up some CPU time as well.
This article applies to Metadefender Core productThis article was last updated on 2016-08-10TV
Is it safe to use Metadefender Core COM APIs in Multi-threaded Apartment?
Yes. Metascan COM APIs are thread-safe, so it is safe to use them in multi-threaded apartment
This article pertains to all supported Metadefender Core 3.x versions.This article was last updated on 2016-09-21.CA
Is Metadefender Core available on 64-bit operating systems?
Yes. Since version 3.11.2, Metadefender Core is only offered as a 64-bit application for Windows.
This article applies to Metadefender Core 3.11.2 or aboveThis article was last updated on 2016-08-29EF
Is Metadefender Core compatible with .NET Framework 4.5.2?
Metadefender Core is compatible with .NET Framework 4.5.2. NET 4.5.2 should be fully backward compatible with .NET 4.0. Please refer to https://msdn.microsoft.com/en-us/library
for more information./ff602939(v=vs.110).aspx
This article pertains to all supported versions of Metadefender Core 3.xThis article was last updated on 2016-08-30CA

v3.13.0 5351.
Is there a .NET version of Metadefender Core?
There is no version of Metadefender Core V3 or Metadefender Core v4 for Windows written in pure .NET technology.
However, Metadefender Core provides COM API's so that .NET clients can be integrated seamlessly.
This article pertains to Metadefender Core productThis article was last updated on 2016-06-13CN
Is there a virus test I could use to test Metadefender Core?
Tests to determine an engine's operation are rarely run with live malware. Fortunately, you can use a standard file called an EICAR Test File, which antivirus engines detect as positive even though no threat exists.The EICAR Test File is simply a text file containing the string listed below. Copy the string into a file and rename it to " ".eicar.com
X5O!P%@AP[4\PZX54(P^)7CC)7}$EICAR-STANDARD-ANTIVIRUS-TEST-FILE!$H+H*
For more information about the EICAR Test File, please visit the European Expert Group for IT-Security's .website
This article pertains to Metadefender Core productThis article was last updated on 2016-07-07CN
Metadefender Core shows a large number of files that failed to scan. What can I do?
Recent versions of Metadefender Core include an option that modifies the behavior of Metadefender Core when a specific engine fails to scan.
Under normal circumstances, all active engines scan every file. Occasionally, an engine will encounter a file that causes it to crash. When this happens, Metadefender Core will wait some time for the engine to recover, after which it will step in and restart the engine. During this time, the engine’s results will be logged as “Failed to scan”.
However, Metadefender Core can be configured to simply fail the scan if any of the engines report problems. In other words, it can toss out all partially incomplete scans.
Follow the instructions below to disable this option:

v3.13.0 536
1.
2.
3.
4.
1.
2.
3.
4.
Navigate to the Metadefender Core Management Console at http://localhost:8008./management
Click .Configuration
Select .Scan Configuration
Uncheck Detect scan failures.
This article applies to Metadefender Core product version 3.xThis article was last updated on 2016-09-08TV
My Customer Licensed Engine is not showing in Metadefender Core. What can I do?
Below are actions that must be done in order for Metadefender Core to recognize your Customer Licensed Engine:
Make sure the antivirus application has the latest updates.
Perform at least one scan on demand with your current antivirus.
Upgrade your Custom License Manager by following these steps:
Open an elevated command prompt on your Metadefender Core server.
Navigate to the Metadefender Core installation folder (the default location is C:\Program Files (X86)\OPSWAT\Metadefender Core X).
Enter omsCmdLineUtil.exe update cle-manager
Restart Metadefender Core Services.
If these do not fix the problem, please log a Support ticket using our .Portal
This article applies to Metadefender Core v 3.x.This article was last updated on 2016-08-24.CN
Test cases for different scan results on Metadefender Core
It's not possible to test every result. The results below only appear if there is an error related to specific files:

v3.13.0 537
Unknown
Aborted
The following are cases you can test:
Clean: You can test this with any file that you are certain is clean (e.g., a newly created text file).
Infected/Known: You can download an EICAR test file from http://www.eicar.org/85-0-.Download.html
Suspicious: This result is usually caused by an engine's heuristic algorithm. Since the heuristic algorithm is different from one engine to another, we do not have sample files for all of the engines. You could use the attached file below for testing (2-suspiciousSamples_Xvirus.zip), as it is detected as "suspicious" by XVirus engine which is one of the 42 engines of Metadefender Cloud ( ).https://www.metadefender.com/
FailedToScan: If you have any other antivirus which is installed separately from Metadefender Core, try to turn on its real time protection, then try to scan an infected file (e.g., eicar file), and you should get this result.
Cleaned: You can test this case by setting Clean Action to "Delete", then scanning an infected file. To do this, run this command:
<Metadefender Core install dir>\omsCmdLineUtil.exe config ca=2
Quarantined: You can test this case by setting Clean Action to "Quarantine", then scanning an infected file. To do this, run this command:
<Metadefender Core install dir>\omsCmdLineUtil.exe config ca=1
SkippedClean: You can get this result by adding the scanned file to the whitelist. For instructions on how to add files to the whitelist, please refer to Metadefender Core
, page 87.Documentation
SkippedDirty: You can get this result by adding the scanned file to the blacklist. For instructions on how to add files to the blacklist, please refer to Metadefender Core
, page 87.Documentation
Exceeded Archive Depth: You can set "Max recursion level" with a small integer (e.g., 2) at in the http://localhost:8008/management/#/configuration-scan_configurationScanEx Configuration section. Then create an archive file which has archive depth greater than 2 for testing.
Not Scanned: You can try to kill all processes of the available engines by running this command:
taskkill /F /IM omsAMEHandler.exe

v3.13.0 538
If you have custom engines, please run this command as well:
taskkill /F /IM omsCEHandler.exe
Then scan an arbitrary text file to get this result.
Encrypted: You can test this with any password-protected archive.
Exceeded Archive Size: You can set "Max total size of extracted files" with a small value (e.g., 5 MB) at http://localhost:8008/management/#/configuration-
in the ScanEx Configuration section. Then create an archive file with scan_configurationa total size of over 5 MB after extracting for testing.
Exceeded Archive File Number: You can set "Max number of files extracted" with a small value (e.g., 10) at http://localhost:8008/management/#/configuration-
in the ScanEx Configuration section. Then create an archive file scan_configurationwhich has more than 10 files after extracting for testing. Alternately, you can download a sample at https://s3.amazonaws.com/opswat-metascan-online-files/b07fcd92c31d5c45df2ccc3b66f16e05/6f97d459a0ee497ba650ff7ba07f3f72
This article pertains to Metadefender Core v.3.x.This article was last updated on 2016-09-02CN
Updated archive handling libraries
We have updated the archive handling libraries to support extraction of more types of ISO archives. These updated libraries are included in Metascan releases 3.9.3 and later, as well as in all versions of Metadefender Core.
OPSWAT recommends upgrading to the latest version of Metadefender Core (formerly known whenever possible.as Metascan)
This article pertains to Metadefender Core versions older than 3.9.3.This article was last updated on 2016-08-24CA
What are the maximum values for archive extraction settings?
The maximum value of "Max number of files extracted" is 2147483646.

v3.13.0 539
The maximum total size of extracted files is half the current available free space of the Metadefender Core temporary directory. If two temporary directories are set from different drives, the highest available space will be used.
This article pertains to all supported versions of Metadefender Core 3.x.This article was last updated on 2016-08-31.TT
What does "This key has reached the maximum usage" mean?
You will typically see the message "This key has reached the maximum usage" when you are trying to activate a new instance of Metadefender Core v3. This means that you have already used all of your purchased activations.
Typically there is no need to reactivate a license on a machine that already has or had Metadefender Core v3 installed (e.g., you do not need to reactivate if you uninstalled and are now re-installing the application).
If you want to install Metadefender Core v3 on additional machines and no longer have any unused activations, you need to contact OPSWAT Sales (sales@ ) about opswat.compurchasing more activations
If you are looking to transfer an activation from one machine to another machine (e.g., you are retiring the machine that initially hosted your Metadefender Core v3 and now want a new machine to host it), you need to log a ticket with OPSWAT Support using the "License Transfer
topic.Request"
This article pertains to Metadefender Core Product v3.This article was last updated on 2016-09-01RR
What do the 'skipped clean' and 'skipped dirty' scan results mean?
The scan results 'skipped clean" and "skipped dirty" are returned when a file's hash matches a hash that has been whitelisted or blacklisted, respectively. Whitelisting and blacklisting allows Metadefender Core administrators to eliminate false negatives/positives without waiting for engine vendors to update their detection definitions.

v3.13.0 540
1.
2.
In Metadefender Core 3.x, the feature is only available through the Metadefender Core CLI. Whitelists and blacklists will be available through the Metadefender Core Management Console in Metadefender Core 4.x.
You can read more about whitelisting and blacklisting .here
This article pertains to Metadefender Core 3.x.This article was last updated on 2016-08-30.RR
What file type conversions are supported in Metadefender Core 3.x?
OPSWAT introduced file type conversion functionality in Metadefender Core 3.8.1. As part of the workflow, Metadefender Core allows administrators to specify that certain file types are converted to other files types (e.g., Microsoft Word documents are converted to PDFs).
By adding this step to the data processing workflow, zero-day attacks where malicious objects are embedded into office documents or image files can be eliminated, even if no antivirus engine detects the threat.
File type conversions allow you to eliminate zero day threats that are embedded into document or image files.
You can check the conversion files by following these steps:
Open the Metadefender Core Management Console and select Configuration > .Workflows
In the Workflow Profiles section, click the Convert docs profile and then click Data Sanitization.
Here you will find all the files types conversion supported in Metadefender Core V3.

v3.13.0 541
You can sanitize a file manually from the command line by typing the following command in the Metadefender Core installation directory: omsCmdLineUtil.exe convert (file path) (target file path) (output folder path)
Below is an example of sanitizing the Metadefender Core Product Documentation to .png image format and the output.

v3.13.0 542
To view the sanitization file format support, enter the following command in the Metadefender Core installation directory: omsCmdLineUtil.exe getinfo
This article applies to Metadefender Core 3.x, versions 3.8.1 or laterThis article was last updated on 2016-08-12RR
What is a Customer Licensed Engine?
"Customer licensed engine" is the term used to describe an antivirus application that is already installed on your server (for example, an antivirus application that is installed on all computers in your corporate environment) which can then be incorporated as another engine to be used by Metadefender Core. You can view a list of antivirus applications that can be used as a customer licensed engine . A compatible antivirus application that is installed on the server herewill be automatically detected and made visible as an engine in the Metadefender Core Management Console (MMC). You can then use the MMC to enable the engine for

v3.13.0 543
Metadefender Core. Metadefender Core's embedded engines are configured for optimal Note: performance, whereas a customer licensed engine is not. Thus, the performance of Metadefender Core can be adversely affected by a customer licensed engine. This article pertains to Metadefender Core 3.x. Customer Licensed Engines are not supported in Metadefender Core 4.x.This article was last updated on 2016-08-30.EF
What is a Metadefender Client for licensing purposes?
Metadefender Core tracks the number of remote clients that connect to the server and access scanning functionality. The number of clients in any 24 hour period cannot exceed the number licensed for a Metadefender Core server.
For licensing purposes, a Metadefender Client is any remote system that is scanning files through either the REST or ICAP interfaces. For clients connecting through the REST interface, the number of clients is equal to the number of systems accessing the REST interface, as measured by unique IP addresses. For scanning through the ICAP interface, Metadefender counts the number of unique endpoints scanning files through the proxy server.
By default, the Metadefender Core license includes 25 Metadefender Clients. You can increase the number of clients by purchasing an additional license provided by OPSWAT.
For more information on the and , please consult the Metadefender REST ICAP interfacesMetadefender Core Documentation.
This article applies to Metadefender Core products, versions 3.x.This article was last updated on 2016-07-27CN
What is a sanitized file?
A sanitized file is a file which has been gone through a process to strip any embedded objects and exploits while preserving the usability of a file. The sanitized will still have the format and file extension of the original file (unless its been explicitly set up to be converted to another type of file). For example, a sanitized PDF will still contain the PDF format, contain the .PDF extension, and be accessible by a PDF reader.
Some of the actions performed as part of santization can include:
Removing all attachments and document action
Removing all annotations
Removing java script

v3.13.0 544
Making the form fields present in PDF file un-editable/in-accessible so that the user cannot update the values
Removing hyperlinks
Recent versions of Metadefender Core v3 allow administrators to create sanitization processes as part of the file type conversion process. For more information refer to the user manual:
For Metadefender Core v3, read about it in the Online Metadefender Core v3 Documentationat Configuring Metadefender Core v3 > Workflow Profile Configuration -> Creating a New Workflow Profile
Metadefender Core v3 supports file type sanitization for many of the most common types of document files. If you have a request for a file type that we do not support, log a ticket with us on the to let us know. Though we cannot make any commitments as to when OPSWAT portalwe will add support, we are always looking to add new file types that are commonly used by our customers.
This article pertains to Metadefender Core v3This article was last updated on 2016-08-31.CA
What is Metadefender Core file type detection?
Metadefender Core support file type detection is also referred to as 'file type analysis', 'file type mismatch', 'file mismatch analysis', etc.
Common uses of file type detection include (1) monitoring for discrepancies between a file extension and a detected file type and (2) altering the workflow of files based on certain file types (e.g., blocking files of a certain file type from entering a file system).
Metadefender Core supports file type detection via the API (introduced in Metascan 3.7.4) and the CLI (introduced in Metascan 3.8.1). More information can be found in the Metadefender Core User Guide.
Metadefender Core file type detection is driven by an OPSWAT proprietary algorithm that combines the logic as well as logic. As of this writing, there are 5837 file "Magic Number" TrIDtypes that can be detected and compared to the file extension; a complete listing can be found at the .TrID site
File type detection / analysis is not as accurate as other file metadata analysis. There will be cases where the Metadefender Core file identification engine will not be able to correctly analyze the file type. In these cases, you can submit a ticket with the file to OPSWAT Supportfor more investigation. However, we cannot guarantee that we will be able to fix the underlying issue and we cannot provide an expected turnaround time to provide an answer.

v3.13.0 545
Note that while file type detection functionality is based on the logic above, file scanning functionality is not limited to these file types.
This article pertains to Metadefender Core 3.xThis article was last updated on 2016-09-08CA
What is the difference between Scan, PutToScanQueue, and ScanEx?
Scan and PutToScanQueue are old functions which have been replaced by ScanEx. ScanEx provides more flexibility to programmers.
Scan and ScanEx with the sync flag set are synchronous calls, meaning they will not return until all results have been received from the the underlying scanning engines.
PutToScanQueue and ScanEx without the sync flag set are asynchronous calls, meaning they return immediately and results are returned via callbacks (COM connection points).
Both synchronous and asynchronous scans depend on the thread pool. Anytime you call a scan function, the work is dispatched to a worker thread. That worker thread is then allocated to scan the file/buffer with one engine. If no worker threads are available, the request will wait until one is available.
To learn more about synchronous and asynchronous scans on Metadefender Core, please refer to the documentation .here
This article pertains to Metadefender Core Product.This article was last updated on 2016-08-10TV
What is the frequency of signature / definition updates?
There are two parameters that determine the frequency of signature/definition updates:
The frequency with which each antivirus vendor releases an update
The configuration setting on your Metadefender Core or Metadefender Kiosk installation that specifies the time interval between system checks and applying new updates.
Most of the antivirus vendors release definitions at least once per day. Many release multiple daily. Some vendors release updates on weekends while others do not.

v3.13.0 546
1.
2.
If you use OPSWAT's online update mechanism to apply updates (i.e. via direct internet connection) then you can configure the update interval to suit your needs. The default setting that comes with a new installation of Metadefender Core or Metadefender Kiosk is every 1440 minutes (once per day).
If you are using manual updates (aka offline updates) the frequency is controlled by how often you download and apply the offline update package from OPSWAT.
This article pertains to Metadefender CoreThis article was last updated on 2016-07-07CN
What is the maximum file upload size limit when accessing Metadefender Core through the REST server?
When scanning files through the Metadefender Core REST API, you can modify the file upload size limit to a maximum of 3GB. This maximum size is based on the limit set by IIS, which is the underlying platform of the Metadefender Core REST server. The default size limit (the limit as set with a fresh Metadefender Core installation) is 200MB.
For more information about changing the size limit, please click .here
This article applies to Metadefender Core 3.xThis article was last updated on 2016-08-12CA
What is the RAM Drive or Ram Disk and how is it used in Metadefender Core?
The RAM Drive (or RAM Disk) is a block of RAM that the computer treats as a disk drive (secondary storage). It serves two purposes:
It is much faster than other forms of storage media, thus speeding the scanning process.
It is more secure then a fixed disk because the contents of the disk are wiped clean on reboot. For example, if the system crashes during the scan process, the files do not inadvertently stay stored in the workspace being used by the antivirus engines.
The RAM Drive is an optional configuration in the Metadefender Core installation process. It is used as a location for temporary files used by the scanning process.Since the RAM Drive uses system RAM, please make sure that you configure the RAM Drive's size so that you have enough remaining RAM for at least the minimum system requirement of the version of Metadefender Core you are using. For further details on how to install and configure a RAM

v3.13.0 547
Drive for your Metadefender Core server, please refer to . This the online documentation articleexplains how to configure the Ram Disk size. This article applies to Metadefender Core v.3.x. productThis article was last updated on 2016-08-30CN
What is the support lifecycle for OPSWAT Appliances?
For OPSWAT sold hardware, support is available no less than 5 years from the date it is last sold. OPSWAT retains the right to update the specifications of our hardware as more optimal components become available, so later purchases or replacement units may use different components of equal or better performance specifications. There is a yearly hardware maintenance fee which must be kept up to date in order to receive hardware support which is an addition to any software licensing costs.
Metascan/Metadefender Core Appliance V1
1u form factor
Dual 6 core Xeon processors
32gb ECC RAM
Dual 200gb SSDs in RAID 1
Hot swappable power supplies
TAA compliant
Last sold Date: not yet set
What is covered by hardware maintenance
All support provided via OPSWAT
Advanced replacement for Blocker HW issues included
Hard drives can be kept/destroyed in the event a replacement is necessary
This article pertains to Metadefender Core ApplianceThis article was last updated on 2016-06-22CN
What operating system patches should I apply to the system hosting Metadefender Core?
We recommend that you keep the operating system hosting Metadefender Core completely updated with the latest operating system updates.

v3.13.0 548
The systems in OPSWAT's labs are updated with the latest patches and thus Metadefender Core is tested and optimized for that condition.
This article applies to Metadefender Core productThis article was last updated on 2016-08-26HN
What should you do if you have anti-malware on the same machine as Metadefender Core (formerly Metascan) ?
If you have anti-malware installed on the same machine as Metadefender Core (formerly Metascan), we recommend that the Metadefender installation directory (C:\Program Files (x86)\OPSWAT) as well as Metadefender's temporary directory be excluded from the anti-malware engine's real-time protection
The real-time protection feature provides automatic protection which checks computer systems for suspicious activity in real-time. If a file is detected as infected, the anti-malware will try to clean or delete that file before Metadefender Core will have the chance to scan it. This will affect Metadefender Core's results and/or performance.
This article pertains to all Metadefender Core products.This article was updated on 2016-08-11.CA
What URLs must be whitelisted to allow access to virus definition updates?
To download incremental/full updates for engine definitions, you must allow Metadefender Core to communicate with the servers listed below. Depending on the scan engines you are using, you may include a subset of the servers.
The following table describes the servers which Metadefender Core connects to for each corresponding scan engine. Some scan engines have two URLs because Metadefender Core initially connects to and then redirects to its final destination.metascan.dl.opswat.com
If your firewall or router blocks HTTP redirection (302 status code), you must consult with your administrator to handle this configuration properly.
Note: Server URLs and IPs are subject to change without notification.
Note: Avira version 26150 must use https://metascan.dl.opswat.com/avira2
Avira version 30011 must use 3 https://metascan.dl.opswat.com/avira

v3.13.0 549
Engine URL PORT
Clamwin database.clamav.net :80
ESET metascan.dl.opswat.com :80
Avira https://metascan.dl.opswat.com/avira :443
https://metascan.dl.opswat.com/avira2 :443
https://metascan.dl.opswat.com/avira3 :443
AhnLab *.ahnlab.com :80
ahnlab.nefficient.co.kr :80
Total Defense consumerdownloads*.totaldefense.com :80
Quickheal metascan.dl.opswat.com/quickheal1400 :80
BitDefender upgrade.bitdefender.com :80
AVG https://metascan.dl.opswat.com/avg2 :443
c1515002.r2.cf0.rackcdn.com :80
K7 http://updates.k7computing.com :80
Inca/Nprotect https://metascan.dl.opswat.com/nprotect :443
Zillya! http://updateserver.zillya.com :80
Virusblokada https://metascan.dl.opswat.com/virusblokada :443
Emsisoft update.emisisoft.com :80
dl.emsisoft.com :80
Frisk/F-Prot directupdates.f-prot.net :80

v3.13.0 550
fprot*.ctmail.com :80
Kaspersky http://metascan.dl.opswat.com/kaspersky :80
McAfee update.nai.com :80
download.nai.com :80
Symantec liveupdate.symantec.com :80
F-Secure fsbwserver.f-secure.com :80
Lavasoft definitionsbd.lavasoft.com :80
downloadnada.lavasoft.com :80
Microsoft Security Essentials
v4.windowsupdate.microsoft.com :80
Nano updates.nanoav.ru :80
metascan.dl.opswat.com/nano (EE) :80
Trend Micro metascan.dl.opswat.com :80
TM Housecall metascan.dl.opswat.com :80
Netgate www.ngt.sk/update/* :80
Ikarus http://mirror03.ikarus.at/updates/ :80
http://mirror01.ikarus.at/updates/ :80
Systweak updates3.systweak.com; :80
updates4.systweak.com :80
Fileseclab fdrfilup.filseclab.com, :80

v3.13.0 551
filup21.dot5hosting.com, :80
filup01.filseclab.com, :80
filup03.filseclab.com, :80
filup04.filseclab.com, :80
filup05.filseclab.com :80
update3.filseclab.com, :80
Stopzilla download.stopzilla.com :80
TGSoft/Vir.IT. metascan.dl.opswat.com :80
Sophos metascan.dl.opswat.com :80
Xvirus Personal Guard
metascan.dl.opswat.com :80
IP addresses are not included in the table above because they cannot be guaranteed to remain constant. For example, Metadefender Core connects to Rackspace CDN which has different hosting servers depending on your location. You must check the IPs of those URLs (*.rackcdn.
). To check the IPs for those URLS, you can use the the nslookup command from the comCommand Prompt.
Note: You may also need to grant access to the following URLs to allow the software to update itself:
verisign.com
onlineupdates.cdn.opswat.com
msftncsi.com
e.g., nslookup c1515002.r2.cf0.rackcdn.com
Antivirus vendors use similar hosting services and therefore the firewall rules should rely on the URLs presented above.
This article pertains to Metadefender CoreThis article was last updated on 2016-08-31CA

v3.13.0 552
When I click Apply after I change the maximum total size of extracted files, I get an "Update failed" message. Why is that?
Usually this error indicates that you have tried to set a value which is bigger than half of your current available disk space in Metadefender Core temporary directory.
For example, if you have 20 GB of disk space available and you set the maximum total size of extracted files at 11 GB, you will get an "Update failed" message.
The maximum allowed amount for this setting is 10 GB.
This article applies to Metadefender Core productThis article was last updated on 2016-08-30CA
When will the updates for ThreatTrack and Agnitum no longer be available ?
Starting with Metadefender Core version 3.12.0, ThreatTrack and Agnitum will be discontinued and replaced with Zillya! and Ikarus respectively.
Legacy Metadefender Core packages will continue to support Agnitum and Threat Track definition updates until May 15, 2017.
If you are using any other version which is older than 3.12.0., please make sure you upgrade your Metadefender Core installation by the end of Q1 2017 as afterwards, these two engines will not receive updates for virus signatures.
This article applies to Metadefender Core 3.12.0 and aboveThis article was last updated on 2016-05-27.CA
Where are all of the Metascan knowledge base articles that I used to access?
In February, 2016, with the release of 3.11.1, OPSWAT renamed Metascan to Metadefender Core. Knowledge base articles that had been in the Metascan section of our knowledge base were reviewed and either moved to the section or, in cases where the Metadefender Core v3

v3.13.0 553
article was deemed no longer applicable, removed entirely from our knowledge base. Even articles that pertain solely to releases of the product from before 3.11.1 are now in the Metadefender Core v3 section, though in these cases the article body might refer to the product as Metascan.
Articles that have been moved to the Metadefender Core v3 section might have gotten new URLs associated with them.You can use the search box to find an article, or simply scroll through the list of articles in the Metadefender Core v3 section to find all the published articles that are of interest to you. If you still cannot find what you are looking for, contact .Support
This article applies to Metascan productThis article was last updated on 2016-08-16RR
Where can I submit false positives detected by Metadefender Core?
Below is a list of where you can send false positives detected by Metadefender Core to:
AhnLab
Email 1: [email protected] 2: [email protected]
Avira AntiVir
Submission: http://analysis.avira.com/samples/
AVGEmail: [email protected]: https://support.avg.com/SupportArticleView?urlname=How-to-report-a-false-incorrect-detectionSubmission: http://cgi.clamav.net/sendvirus.cgi
BitDefenderSubmission: http://www.bitdefender.com/submitEmail: [email protected]
ClamAVSubmission: https://www.clamav.net/reports/fp

v3.13.0 554
EmsisoftSubmission: https://www.emsisoft.com/en/support/submit/
ESET / Nod32Email: [email protected]: http://kb.eset.com/esetkb/index?page=content&id=SOLN141
FilseclabEmail: [email protected]
F-PROTSubmission: http://www.f-prot.com/virusinfo/false_positive_form.html
F-SecureSubmission: https://www.f-secure.com/en/web/labs_global/submit-a-sample
IkarusEmail 1: [email protected] 2: [email protected]
K7Email: [email protected]
KasperskyEmail: [email protected]: https://newvirus.kaspersky.com/Info: http://forum.kaspersky.com/index.php?showtopic=13881
LavasoftSubmission: http://www.lavasoft.com/support/securitycenter/report_false_positives.php
McAfeeInfo: https://kc.mcafee.com/corporate/index?page=content&id=KB85567Email: [email protected]: https://kc.mcafee.com/corporate/index?page=content&id=KB67411
Microsoft Security Essentials and Windows DefenderEmail: [email protected]: https://www.microsoft.com/security/portal/submission/submit.aspxInfo: http://www.microsoft.com/windows/products/winfamily/defender/fpform.mspx
nProtectEmail: [email protected]

v3.13.0 555
1.
2.
Quick HealInfo: http://support.quickheal.com/v4/index.php?/Tickets/Submit/RenderForm
SophosSubmission: https://secure.sophos.com/support/samples/Info: http://www.sophos.com/support/knowledgebase/article/35504.html
STOPzillaSubmission: http://www.stopzilla.com/support/false-positive/
Symantec / NortonSubmission: https://submit.symantec.com/dispute/false_positive/
SystweakInfo: http://support.systweak.com/kayako/index.php?/Tickets/Submit
Trend MicroEmail: [email protected]: http://www.trendmicro.com/us/about-us/detection-reevaluation/Info: https://esupport.trendmicro.com/en-us/home/pages/technical-support/1031392.aspx
VirIT/TGSoftSubmission: http://www.tgsoft.it/italy/file_sospetti.asp
VirusBlokAdaEmail: [email protected]: http://www.anti-virus.by/check/
XvirusEmail: [email protected]
ZillyaEmail: [email protected]
This article pertains to all Metadefender Core packages including the engines above.This article was last updated on 2016-08-31RR
Where is Metadefender Core's temp directory located?
You can locate the temp directory of the Management Console by following these steps:
Access the Management Console by going to http://localhost:8008/management.

v3.13.0 556
2.
3.
4.
1.
2.
3.
4.
Click the Configuration tab.
On the left navigation panel, select Scan Configuration.
The screen displays the Primary Temp Directory, where you can view and/or change the location of the temp directory.
You can also locate the temp directory using the command line (on Windows only):
Press the Start button, enter cmd, and click Enter*. The command prompt appears.Note: For operating systems other than Windows 7, click Run to open the command prompt.
Enter cd, then the file path of the Metadefender Core installation folder, and click Enter.
Enter omscmdlineutil.exe getinfo and click Enter.
The readout has the location of the temp directory (in most cases it will be C:\Windows\TEMP, which is the non-RamDrive default).
This article pertains to Metadefender CoreThis article was last updated on 2016-06-24CR
Which antivirus engines are designated by Metadefender Core as "customer licensed engines"?
While many antivirus products will work as customer licensed engines (CLEs), OPSWAT does not maintain a comprehensive list of these products, nor does OPSWAT officially support any products as compatible engines. Metadefender Core requires integration functionality to be available on the antivirus product in order to work, but it is up to the antivirus product vendors to make that functionality available.
Below are the results of testing we did in our labs on the latest releases of the most popular antivirus products on the market. However, we strongly recommend that you validate the integration of Metadefender Core with your antivirus product to determine if it will work for you. If this integration is key to the way you want to use Metadefender Core, we recommend doing this before you make your Metadefender Core purchase.
In some cases, we can help you test your integration. If you can provide us with an installer of the antivirus product, we can test the integration in our labs and give you the results, although positive results do not constitute binding support for the integration.
Popular antivirus products tested successfully as CLEs on Metadefender Core are as follows:
avast! Premier 10.2.2218
AVG Internet Security 2015.0.5863

v3.13.0 557
1.
2.
3.
ESET Endpoint Antivirus 6.1.2222.0
F-Secure Internet Security 14.132.102.0
Fix-it Utilities 8 Professional 8.0.2.2
McAfee VirusScan Enterprise 8.8.0.1274
Sophos AntiVirus 10.3.11
This article pertains to Metadefender Core 3.x.This article was last updated on 2016-08-18.CN
Which antivirus products are compatible with Metadefender Core?
Metadefender Core is sold in packages with each package containing a bundle of engines. The engines included in each bundle .are listed here
Metadefender Core also supports , which means that certain Customer Licensed Enginesantivirus products already existing on your machine can be controlled through the Metadefender interface, similarly to a built-in engine. A list of these engines can be found .here
If you do not see the antivirus product you wish to use, to request that submit a support ticketsupport for that product be added.
This article pertains to Metadefender Core versions 3.xThis article was last updated on 2016-08-09RR
Why am I getting a COM UnauthorizedAccessException error: 80070005 when working with Metadefender Core from ASP?
You will see this error if you do not have the proper permissions.
You can resolve the "COM UnauthorizedAccessException" error by doing the following:
Check your IIS setting:
In IIS, right-click on your project and choose .Properties
Select . Directory security
Click on Anonymous access.Edit
Make note of the username (copy the name or CTRL+C).
Go to DCOM config ( or ).Start > run > dcomcnfg Win-R > dcomcnfg

v3.13.0 558
3.
4.
5.
6.
7.
Go to .My Computer > DCOM config > Metascan
Right-click and select .Properties
Click the Security tab:
Launch and Activation: Edit, add username (paste or CTRL+V) and give all local permissions.
Access Permissions: Edit, add username (paste or CTRL+V) and give all local permissions.
Configuration Permission: Edit, add user and give full control.
Restart Metadefender Core service.
Restart IIS.
This article applies to Metadefender Core 3.xThis article was last updated on 2016-08-30CA
Why did Metadefender Core stop working on Windows 10 ?
If you are using Windows 10 and applied the Anniversary Update, your REST service will stop functioning.
To fix this issue, please follow the steps below :
1. Open an elevated Command Prompt by clicking Start, typing cmd in the search bar, right-clicking the command prompt and selecting run as administrator2. Type net stop omsrest3. Uninstall IIS Express 8.04. Install IIS express 8.0 again. If you need any guidance for installing IIS express 8.0., please check https://www.microsoft.com/en-us/download/details.aspx?id=346795. Type net start omsrest
For more information about the update, please check the related .Microsoft page
This article pertains to Metadefender Core versions 3.xThis article was last updated on 2016-11-08CN

v3.13.0 559
1.
2.
3.
4.
5.
Why did the AVG engine disappear from the Metadefender Core Management Console?
An issue with the AVG engine caused it to disappear from the Metadefender Core Management Console. If you are having this issue, download the patch and follow the instructions herebelow:
Open an elevated command prompt and enter net stop metascan
Extract the package you downloaded from the link above with the password "opswat"
Copy the omsAMEHandler.exe file into the AVG engine directory in the Metascan install directory (usually C:\Program Files (x86)\OPSWAT\Metascan XX\Engines\AVG\bin).
From an elevated command prompt, enter net start metascan
Confirm the AVG engine is scanning and returns the valid definition time from either the command line (by running the command ‘omsCmdLineUtil.exe debug’ in the Metascan directory) or through the Metadefender Core Management Console.
Note: This patch only affects your Metadefender Core installation if it includes the AVG engine. If you are currently using Metadefender Core 3.9.1 or a later version, this is only applicable to Metadefender Core 12 and 16 engine packages. All other Metadefender Core functionality will work normally even if the patch is not applied. The only thing that will not work correctly until this patch is applied is the AVG engine.
If these instructions don't resolve your issue, or if you have any questions about this patch or about Metadefender Core, please do not hesitate to .contact us
This article pertains to Metadefender Core 3.9.1 and older This product was last updated on 2016-08-24 EF
Why does my Customer Licensed Engine (antivirus) always return "failed to scan"?
Most antivirus products will be detected by Metadefender Core, but this does not necessarily mean they are compatible. You can check to see that yours is on our list.Compatible Engines
There are a number of possible causes for Customer Licensed Engines to return a "Failed to Scan" error. These include:

v3.13.0 560
You are not running the most up to date version of Metadefender Core. The Compatible list is only valid for the latest version of Metadefender CoreEngines
You have not properly configured the antivirus to work with Metadefender Core. This is usually just a matter of excluding Metadefender's Core installation and temp directory from the antivirus engine's real time protection.
If you have done all this and you are still receiving the error, please via submit a support ticketthe OPSWAT Portal.
This article pertains to Metadefender Core 3.x.This article was last updated on 2016-08-18.CN
Why do I get a prompt to install OPSWAT by Christiaan Ghijselinck?
When installing Metadefender Core, one of the optional components that you can install is the RAM drive.
The message below appears if you choose to install the RAM drive. The RAM drive was built by a third-party, so the publisher appears as Christiaan Ghijselinck.
This article applies to Metadefender Core 3.xThis article was last updated on 2016-08-10TV

v3.13.0 561
Why do MongoDB logs have a "You are running on a NUMA machine" warning?
Metadefender Core 3.x and Metadefender Kiosk use mongoDB as a database for storing the scan history, configuration, and other information. If you are seeing this warning in the mongodb log, please refer to the MongoDB to resolve a potential performance production notesissue.
This article pertains to Metadefender CoreThis article was last updated on 2016-08-25EF
Why is Bitdefender engine no longer working?
If your Bitdefender engine is no longer working, we recommend upgrading to the latest Metadefender Core version. If you cannot upgrade for whatever reason, you must apply a patch to your Bitdefender engine.Please note that in order for the patch to be applied you need to have the Visual C++ redistributable 2013 x86 package installed and run the patch as Administrator.Please also make sure no engine is updating/scanning before patching Bitdefender.
If you are using Metascan 3.9.5. or older, please download the patch from here.
If you are using Metascan 3.10.0., please download the patch from .here
After the installation is complete, please check omsAplier.log in the Metascan installation directory to see the upgrade result.
This article is applicable to Metascan 3.10.0 and earlier versions. This article was last updated on 2016-10-04CN
Why is engine heuristic scanning for some engines turned off by default in Metadefender Core?
Some engines allow you to scan files using heuristics, which can detect viruses that are not yet in the engine’s virus definition database. Enabling heuristic scanning for engines will increase detection of potential new viruses, but will also increase the false positive rate. Also, enabling heuristic scanning can increase the engine's scan time.

v3.13.0 562
1.
2.
For example, ESET has heuristic scanning turned off by default because in the past some customers had problems with the performance. You can enable the heuristic scanning feature for any engine via the Metadefender Core Management Console.
This article applies to Metadefender Core productThis article was last updated on 2016-08-31TV
Why is K7’s heuristic scanning turned off by default in Metadefender Core?
Antivirus heuristic logic only estimates malware risk, so there is always a chance for false positives.
Each antivirus engine that offers heuristics does so using its own proprietary logic, and thus the rate of false positives differs for each of these engines.
OPSWAT has determined that the rate of false positives for K7's heuristic scanning is too high to have it enabled by default. Users who are willing to accept a higher rate of false positives in order to also increase detection rate can turn this feature on manually. You can disable heuristics for any engine via the Heuristic checkbox in the Engines section of the Metadefender Core Management Console's Configuration tab.
The K7 engine is part of Metadefender Core 12, Metadefender Core 16, Metadefender Core 20 and Metadefender Core Custom installations which are based on one of these packages.
This article pertains to Metadefender CoreThis article was last updated on 2016-07-27CN
Why is Metadefender Core REST API returning different results than the Metadefender Management Console?
Metadefender Core does not treat files differently, regardless of how they are delivered. You should receive the same results whether you use the command line, web scan, or a custom COM or REST interface.If you are seeing different results, check to make sure that the files are not being inadvertently manipulated before being posted to the REST Server:
Scan the file via the Command Line.

v3.13.0 563
2.
3.
Compare the file in the scan logs.
Compare the hash against the file submitted via REST.
If the file sizes and hash values differ, the extra data is most likely being added to the file before or while it is getting transferred to the REST API. This would affect the results of some engines.The most common cause of this are antivirus products, firewalls, and proxy servers.
If the file sizes and hash values are the same in both cases, please log a support ticket in the OPSWAT Portal.
This article pertains to Metadefender Core productThis article was last updated on 2016-06-14RR
Why is Metadefender Core taking so long to start?
Below are some common reasons why Metadefender Core might be slow to start:
If Metadefender Core starts slowly the first time, please refer to this article: https://portal.opswat.com/en-us/articles/208210753-Metadefender-Core-is-consuming-100-CPU-Is-this-normal-behavior-
Otherwise, please check system requirements for Metadefender Core and make heresure your Metadefender Core machine's current state meets the minimum requirements.
If your Metadefender Core instance is installed on Windows 7 or Windows Server 2008 R2, there is a known issue that can cause delays in Metadefender Core start-up. Metadefender Core uses an embedded MongoDB database to log scan results. On Windows7 and Windows 2008 R2, memory initialization by MongoDB can be adversely affected by an issue identified by Microsoft and addressed via a hotfix available in this
.Microsoft support KB article
This article pertains to Metadefender CoreThis article was last updated on 2016-08-31TV
Why is my Avira engine no longer running?
Any customer that is still running Metascan 3.9.0 or 3.9.1 will need to update the Avira engine.
OPSWAT recommends upgrading to the latest version of Metadefender Core if at all possible. If upgrading is not an option, perform the following task to ensure the Avira engine continues to work. This only needs to be done for Metascan 3.9.0 and 3.9.1.
You can download the patch . To apply this patch, please follow the instructions below.here

v3.13.0 564
1.Extract the package you downloaded from the link above with the password "opswat".
2. Install the Visual C++ redistributable 2013 x86 from this . If you already have it installed linkplease skip this step.
3. Before installing the patch, please read the readme.txt file.
4. Install the Avira engine patch.
5. Restart the Metascan service by opening a command prompt and entering net stop metascan / net start metascan .
6. Confirm the Avira engine is scanning and returns the valid definition time from either the command line (by running the command omsCmdLineUtil.exe debug in the Metascan directory) or through the Metascan Management Console.
This article applies to Metadefender Core 3.9.0 and 3.9.1.This article was last updated on 2016-11-15.CA
Why is my Kaspersky engine no longer running?
Any customer that is still running Metascan 3.9.0 through 3.11.1 with the 16 or 20 engine package will need to update the Kaspersky engine in their package before July 1, 2016. Because their Kaspersky license will expire on 7/15/2016.
OPSWAT recommends upgrading to the latest version of Metadefender Core, if at all possible. If upgrading is not an option, perform the following task to ensure the Kaspersky engine continues to work. This only needs to be done for Metascan 3.9.0 through 3.11.1 and only for customers that have the 16 or 20 engine packages.
You can download the patch . To apply this patch, please follow the instructions below.here
1. Stop the Metascan service by opening a command prompt and entering net stop metascan
2. Extract the package you downloaded from the link above with the password "opswat".
3. Copy all of the extracted files into the Kaspersky engine directory in the Metascan install directory (usually C:\Program Files (x86)\OPSWAT\Metascan XX\Engines\Kaspersky).
4. Start the Metascan service by opening a command prompt and entering net start metascan
5. Confirm the Kaspersky engine is scanning and returns the valid definition time from either the command line (by running the command omsCmdLineUtil.exe debug in the Metascan directory) or through the Metascan Management Console.
This article applies to Metascan product from 3.9.0. to 3.11.1This article was last updated on 2016-08-16.CA

v3.13.0 565
Why isn't the Metadefender Email Agent processing my emails?
Starting with version 3.11.0, the Metadefender Email Agent is embedded in the Metadefender Core installation. The most common reason why it would not process emails is that it is not correctly configured.
First, make sure the agent is properly detected by running the Exchange Management Shell and typing "get-transportagent" (without quotes) on the exchange machine.
You should see the mail agent listed there.
Second, make sure the correct ports are open on both machines (the MS Exchange Server/SMTP and the Metadefender Core server). On each machine, if the firewall is on, open the following ports for inbound and outbound:
-port 8000 (used for Quarantine)
-port 8008 (used to submit files to Metadefender Core Server)
Please note the following :
1. Before installing Metadefender Core, you must uninstall the old mail agent.
2. A separate SMTP server is required for notification.
3. Exchange (malware agent configuration) may block release from quarantine.
4. Email sanitization to HTML may be blocked and the attachment may be replaced with the following text: "This attachment was removed because it contains data that could pose a security risk." An attachment that has been sanitized may be larger than the original attachment. As a result, it may be necessary to increase the maximum attachment size setting on your mail server.
This article applies to Metadefender Email Agent 3.11.0 or above.This article was last updated on 2016-07-08CN
Why should I upgrade my Metadefender Core?
Upgrading to the latest releases of OPSWAT products allows you to take advantage of new features, added functionality, bug fixes and performance improvements. It also ensures the best path to timely support.
OPSWAT typically has a new release of the Metadefender Core once a month. We recommend that you uptake each new release as it comes out. For organizations that have more restrictive upgrade policies, we recommend that you plan out regularly scheduled upgrades as part of your application management procedures.

v3.13.0 566
Customers with active licenses are entitled to upgrade for free. The upgrade can be done self-service by downloading the latest installer on our in the and following portal downloads sectionthe guidelines in our KB How do I upgrade to the latest release of Metadefender Core?
Note that Metascan was renamed Metadefender Core, but the license is interchangeable. i.e. a license for Metascan is the same as a license for Metadefender Core. Customers with active licenses can download the latest Metadefender Core releases.
This article pertains to all supported releases of Metadefender Core.This article was last updated on 2016-07-07CN
Copyright © 2022 FDOKUMEN