
MCA - Tanzania - IHSN Survey Catalog
103
MCA - Tanzania IMPACT EVALUATION STUDY Evaluating the Impact of Trunk Road Upgrades Financed by the Millennium Challenge Account - Tanzania FIELD INTERVIEWER’S MANUAL FIELD ADMINISTRATION February 2008 Table of contents:
-
Upload
khangminh22 -
Category
Documents
-
view
0 -
download
0
Transcript of MCA - Tanzania - IHSN Survey Catalog
MCA - Tanzania
IMPACT EVALUATION STUDY
Evaluating the Impact of Trunk Road Upgrades Financed by the Millennium Challenge Account - Tanzania
FIELD INTERVIEWER’S MANUAL FIELD ADMINISTRATION
February 2008
Table of contents:

1
1. Introduction ..................................................................................................................................... 4 1.1. Foreword ...............................................................................................................4
1.2. Background to the Project ...................................................................................4
1.3. Background to the Evaluation Survey ................................................................5
1.4. Listing ....................................................................................................................5 2. Basic principles of survey work....................................................................................................... 7
2.1. The interviewer .....................................................................................................7
2.1.1. The interviewer’s role and work conditions ................................................7
2.1.2. Your main job: to carry out household and community interviews ..........7
2.1.3. You and your supervisor ..............................................................................8
2.2. Before the interview .............................................................................................8
2.2.1. Meeting the Households to Be Interviewed ...............................................8
2.2.2. Selection of Interpreters ...............................................................................8
2.3. The interview.........................................................................................................9
2.3.1. Basic concepts of an interview ....................................................................9
2.3.2. Private Nature of the Interview ..................................................................10
2.3.3. Establishing a Trusting Relationship with the Respondents...................10
2.3.4. Objectivity of the Interviewer .....................................................................11
2.3.5. Suggestion for professional behaviour .....................................................11
2.3.6. How to ask questions? ...............................................................................11
2.3.7. Pace of the Interview..................................................................................12
2.3.8. Reaction to respondents ............................................................................12
2.4. After the interview...............................................................................................13
2.4.1. Double check questionnaire .......................................................................13
2.4.2. Writing comments .......................................................................................13
2.4.3. Checking your belongings .........................................................................13
2.4.4. Thanking the household and the wazee...................................................14
2.4.5. Your feedback duties..................................................................................14
2.4.6. Big Brother is watching you! ......................................................................14 3. Field work procedures specific to this project............................................................................... 15 4.1 15
3.1. Introduction .........................................................................................................15
3.2. Field planning .....................................................................................................15
3.3. Reporting procedure ..........................................................................................16
3.3.1. Arrival in village...........................................................................................16
3.3.2. Reporting .....................................................................................................16
3.4. Preparation for listing .........................................................................................16
4.2....................................................................................................................................16
3.4.1. Confirming village information ...................................................................16
3.4.2. Mapping procedure.....................................................................................16
3.4.3. Assign neighbourhoods to interviewers for listing ...................................17
3.4.4. Finding scouts .............................................................................................17
5.2....................................................................................................................................17
3.5. Listing procedure ................................................................................................17
3.5.1. The role of the scout...................................................................................17
3.5.2. Identification of listed households .............................................................18
3.5.3. Capturing GPS coordinates .......................................................................18
3.5.4. Short versus long listing surveys...............................................................18
3.5.5. How to introduce yourself to the household?...........................................19
3.5.6. Make sure all households in the village are listed ...................................19
3.5.7. Absent household members during listing ...............................................19
2
3.6. Sampling procedure ...........................................................................................20
3.7. HH QX survey procedure ..................................................................................20
3.8. Group QX and community QX ..........................................................................20
3.9. Equipment hand-over procedure ......................................................................21
6.2....................................................................................................................................21
3.10. Evening discussion.........................................................................................21
3.11. Questionnaire Review procedure..................................................................21
3.12. Battery charging procedure ...........................................................................22 4. a guide through the community survey......................................................................................... 23 4.1 SECTION 0: KITONGOJI BASICS ............................................................................................... 23 5. A guide through the household survey ......................................................................................... 26
5.1. Introduction .........................................................................................................26
5.2. Form and question identification scheme ........................................................26
5.2.1. Form identification scheme........................................................................26
5.2.2. Question identification scheme .................................................................31
4.2 ....................................................................................................................................34
5.3. How to find your way through the electronic forms and how to complete the questionairre?.................................................................................................................35
5.3.1. Colour scheme ............................................................................................35
5.3.2. Questions where you insert text ................................................................36
5.3.3. Arrow scheme (►)......................................................................................36
5.3.4. Letter and number scheme: the basis of the survey sequence .............37
5.3.5. Going back to the previous form ......................................................37
4.3.6. Going straight to the front page (=’home’ page) ...............................38
5.2....................................................................................................................................38
4.3.7. Type of response fields ..............................................................................38
5.2.1.............................................................................................................................40
6.2....................................................................................................................................40
4.3.8. ‘Other’ response .........................................................................................40
4.3.9. DON’T KNOW (DK)..........................................................................................41
4.3.10. BLANKS VERSUS SKIPS ..............................................................................41
4.3.11. Check scheme ........................................................................................42
4.3.12. Delete data .........................................................................................45
4.3.13. Indication of last visited section ...................................................46
4.3.14. Add new record ......................................................46
4.3.15. Set date and time .......................................................................46
4.3.16. Roster button .........................................................................47
4.3.17. Scroller .....................................................................................................48 4.1 48
4.3.18. Filter ..................................................................................................49
4.3.19. Sorting tool ..................................................49
4.3.20. Change ID ...........................................................................49
4.3.21. Get GPS data ..........................................................................................50
4.2.1.............................................................................................................................50 5. Important definitions...................................................................................................................... 51 4.1 51 6. The questionnaires in detail: General instructions per form ......................................................... 52
6.1. Introduction .........................................................................................................52
6.2. Starting off forms ................................................................................................52

3
4.2.1 Form S: Select data file form ..................................................................53
4.2.2 Form F: Home page ..................................................................................54
4.2.3 Form H: Households form .......................................................................55
4.2.4 Form A: Add new household .....................................................................57
4.2.5 Form C: Control data ................................................................................57
6.3. Listing questionnaire ..........................................................................................59
6.3.4. Section 1: Control data...............................................................................59
4.2.2 Form L1: Main form of section 1 – Control data....................................59
.4.5.1.1 Form L1a: Capture GPS data............................................................60
.4.5.1.2 Form L1b: Matching procedure .........................................................61
6.3.5. Section 2: Vulnerable groups ....................................................................64
4.2.2 Form L2: Main form of section 2 – Vulnerable groups..........................64
.4.5.2.1 Form L2a: Disabled persons details.................................................65
6.3.6. Section 3: HH Head data ...........................................................................65
4.2.2 Form L3: Main form section 3 – HH Head data.....................................65
6.3.7. Section 4: Amenities...................................................................................66
4.2.2 Form L4: Main form section 4 – Amenities ............................................66
6.3.8. Section 5: Assets ........................................................................................66
4.2.2 Form L5: Main form section 5 - Assets ..................................................67
6.3.9. Section 6: Groups & Links .........................................................................67
4.2.2 Form L6: Main form section 6 – Groups & Links...................................67
6.3.10. Section 7: TASAF info ............................................................................68
4.2.2 Form L7: Main form section 7 – TASAF info .........................................68
6.3.11. Section 8: Finish .....................................................................................68
4.2.2 Form L8: Main form section 8 – Finish...................................................69 4.1 69
4.2 6.4. Household questionnaire ...........................................................................70
6.4.1. Section 1: Start ...........................................................................................70
4.2.2 Form T1: Main form of section 1 – Start ................................................70
6.4.2. Section 2: HH Head info ............................................................................70
4.2.2 Form T2: Main form of section 2 – HH head info ..................................71
6.4.3. Section 3: Roster ........................................................................................71
4.2.2 Form T3: Main form of section 3 – Household Roster ..........................71
6.4.4. Section 2: Assets and Livestock of the Household .................................74
6.4.5. Section 3: Living Conditions of the Household..............................................74
6.4.6. Section 4: Transport ......................................................................................75
6.4.7. Section 5: Economic Activities......................................................................78
6.4.8. Section 6: Networks ......................................................................................78
.4.1.3.1 Form T5h: Credit ................................................................................79
.4.1.3.2 Form T5i: Information sources...........................................................80
.4.1.3.3 Form T5j: Self-help groups ................................................................81
6.4.9. Section 7: Finish .........................................................................................82
4.2.2 Form T7: Main form of section 7 – Finish ..............................................82
6.4.10. Section 8: Comments .............................................................................82
4.2.2 Form T8: Main form of section 8 – Comments ......................................82 7. Some important things to remember ............................................................................................ 84 4.1 84
7.1. Concerning the use of umpc for surveying ......................................................84
7.2. General points ....................................................................................................84 4.1 Appendix A: getting started with the umpc ................................................................................... 85 4.1 Appendix b: Handover check list .................................................................................................. 98

4
4.1 Appendix c: questionnaire review booklet .................................................................................... 99 4.1 99 4.1 Appendix D: How to use the GPS?............................................................................................. 100
1. INTRODUCTION
1.1. FOREWORD
EDI has been contracted by the Millennium Challenge Account – Tanzania (MCA-T) to organise a survey to evaluate the socioeconomic impact of rural road upgrades. It is EDI’s job to send its interviewer teams out to the field to collect high-quality, reliable data that can be analysed by researchers on the project. The conclusions from this research are of extreme importance for the Tanzanian Government, the Millennium Challenge Corporation and the Donor Community in general. They will be used to plan future projects and plan the further development of the nation’s infrastructure. The role of the interviewer is key in this process. You, as an interviewer, are the source of the data and the quality of the research and resulting policies will stand or fall depending on your job. This job of high responsibility needs strict guidelines and strict discipline. Unless you follow these guidelines to the letter the data you collect will be of no value. This document, the interviewer’s manual, will form what you should regard as the ‘constitution’ of the survey. It should answer any queries you have about your job as an interviewer and about the way the data should be collected. You should know this constitution by heart. You should have this constitution with you at all times during your work. During discussions with fellow interviewers, your supervisor or the project management it will be the manual that has the last word and final authority. But remember too that the manual is a working document and just as a country passes new laws and amends old ones so this manual can be adapted and changed by the project management. This will happen through addendums. Whenever a new addendum appears you will be given official notification and your supervisor will sit with you to review its contents. You are instrumental in formulating these addendums. If you find omissions, situations that are not adequately covered, or anything that you find unclear or think is wrong, notify your supervisor or the project management so that your query can be reviewed and, if necessary, the laws governing the survey altered through an addendum.
1.2. BACKGROUND TO THE PROJECT
The 2005 National Strategy for Growth and the Reduction of Poverty in Tanzania (MKUKUTA) identifies the poor state of the rural road network as one of the major impediments to growth and poverty reduction. In this light, the Government of Tanzania has adopted the 10-year Transport Sector Investment Programme (2007/8 – 2017/18; TSIP). The TSIP identifies nine rural trunk roads – “development corridors” – that are important for opening up the country, spurring economic growth and alleviating rural poverty. The development corridors embrace 10,300 km of roads of which approximately 40% is currently bituminized. The challenge set forth by TSIP is to bituminize the remaining 60%. In the framework of TSIP, the Millennium Challenge Corporation (US development cooperation) will – through its local branch Millennium Challenge Account Tanzania – upgrade three important stretches of road on three development corridors (see Figure 1):
• Tanga to Horohoro road (the green line in Figure 1): A 68 km stretch of road linking the port of Tanga to the border with Kenya in Horohoro (Tanga region in northeast Tanzania). This is part of the northeast development corridor that will facilitate production of cash and subsistence crops, tourism and mining.
• Tunduma to Sumbawanga road (the yellow line in Figure 1): A 224 km stretch of road linking Tunduma at the Zambian border to the regional centre of Sumbawanga (Rukwa region). This is part of the western development corridor linking Zambia (Tunduma border) to Kigoma (Burundi

5
border). Main economic activities along this corridor are agriculture, tourism, mining, fishing and gold smiting.
• Mtwara corridor (the two blue lines in Figure 1): Upgrading of two sections of the southern development corridor consisting of (1) the 61 km stretch of road between Namtumbo and Songea and (2) the 78 km stretch of road between the Peramiho junction (approximately 20 km west of Songea) and Mbinga. This corridor will promote agricultural production including livestock and fishing, mining and trade. This corridor will also open up the yet unexploited steel and coal mines of Liganga and Mchuchuma.
1.3. BACKGROUND TO THE EVALUATION SURVEY
To examine whether the financing of the road upgrades are good investments, Millennium Challenge Account – Tanzania has contracted EDI to undertake an impact evaluation of the road upgrades. Broadly speaking, an impact evaluation examines the effects of a specific policy intervention on a specific outcome of interest. In this fashion, EDI will evaluate the impact of better roads on the socio-economic situation of the people living in the villages along the roads. Good roads are widely believed to have large benefits through the reduction of transport costs (and time) and a better access to schools, markets, hospitals... Through this project EDI will investigate whether the road upgrades financed by MCC did indeed have such beneficial effects. EDI has adopted a “treatment and comparison group” design to evaluate the impacts of the road upgrades. The treatment group consists of villages along the roads that will be upgraded by MCA, while the comparison group consists of villages along roads that will not be upgraded. In this way, we will have two groups of villages that are similar, except that one group will receive a treatment (the road upgrades) while the other group will not. If after the treatment (the road upgrades), the treatment group is different than the comparison group, the road upgrades will have had an impact. During the survey, the field teams will visit 100 villages in mainland Tanzania (50 treatment villages and 50 comparison villages). Per village, two vitongoji will be surveyed. The total sample size will thus be 200 vitongoji, spread over four Regions: Tanga, Mbeya, Rukwa and Ruvuma. In each of the vitongoji, the field teams will administer a Community Profile Questionnaire. Next, 15 households will be randomly selected in each kitongoji to participate in a Focus Group Discussion called the Ladder of Life. The participants to the Ladder of Life will also be administered a Short Household Questionnaire. Hence, there are three instruments to complete for each kitongoji:
1) the Community Profile 2) the Ladder of Life 3) the Short Household Questionnaire.
1.4. LISTING
For this particular survey, two listing exercises will be carried out before the start of the actual interviews. First, for each village in which the survey takes place the listing team (which consists of two people) will make a complete list of all vitongoji in the village. Per village, the vitongoji will be divided in two groups, depending on whether the time to walk from the kitongoji center to the treatment or comparison road is less than 30 minutes or at least 30 minutes. In this way, each village in the sample will be divided in two groups of vitongoji: the close group and the far group. The supervisor will then randomly sample one kitongoji from each group. Proceeding as such, we will survey one close kitongoji and one far kitongoji in each village. In order to collect these data for every village in the sample, the coordinator will first need to visit each village and complete a short listing form that asks the above questions. Depending on the answers to these questions vitongoji will be placed into exactly one group (the close group or the far group). From each of the two groups (strata) one kitongoji will be sampled.

6
Following the sampling of the vitongoji, the coordinator will visit – per village – the two selected vitongoji. The second listing exercise will take place in each selected kitongoji. The coordinator will ask the kitongoji chairman to draw up a list of all households in the kitongoji. Two days later, the listing team will revisit each kitongoji to pick up and verify the list of households, and randomly sample 15 households from the list in each kitongoji. This sampling will be based on forms with randomly generated numbers that will be distributed to the listing team.

7
2. BASIC PRINCIPLES OF SURVEY WORK
2.1. THE INTERVIEWER 2.1.1. The interviewer’s role and work conditions The interviewer's role is central to the survey. The Project needs high quality information from the households and communities that you interview. We depend on you to get us high quality information. It is very important that all interviewers follow the same procedures. If each interviewer has a particular way of conducting his work then the results of the survey cannot be trusted, because they will be influenced by, for example, the way each interviewer asked a particular question. In order to assure uniformity, we ask you to please be sure to follow all of the instructions contained in this manual. You will be working closely with your supervisor. Inform him or her of any problems encountered in the field. When you are in doubt, ask your SUPERVISOR what to do. Again, it is better to take time and ask about proper procedures than to make a mistake. The supervisor will provide you with all the necessary materials and instructions. He/she will collect and check your work and will help you solve any problems that may arise. The survey will be carried out in rural areas. Living conditions will sometimes be difficult, and you will need to be flexible. It is advised that you stay in one guest house if possible. If this is not possible it is advised you stay in guest houses that are nearby. This will ensure both ease of communication, as well as your security. We ask you to go into this work knowing that you need to be very flexible. You may not get the food you want at the time you need, you might also sleep in unsympathetic conditions. Often your team will be in villages for extended periods of time. Communication from remote areas may not always be easy. You will need to ensure that your family life permits you to conduct this type of work.
2.1.2. Your main job: to carry out household and community interviews Your principal task is to conduct community and household interviews. You are required to conduct interviews according to the workload assigned to you by the supervisor. Interviews are ideally conducted in a single visit, but may need more visits, for example if a particular survey respondent is not present at the time of your visit. Please take into account that you are responsible for interviewing all of the communities and/or households assigned to you. You and your supervisor need to make sure that you have planned the use of your time well, in order to be able to leave the village in time. In conducting the interviews, please follow the instructions contained in this Manual. You will be provided with the following materials for use in carrying out the interviews:
• This instruction manual
• Your personal Questionnaire Review Booklet
• UMPC
• GPS
• UMPC Stylus pen
• UMPC batteries (1 large and 1 small)
• UMPC bag
• Field bag
• Blue UMPC screen cleaning tissue
• Rain coat
• Stationeries

8
• Identification card 2.1.3. You and your supervisor
You should always follow the advice and instructions of your supervisor. Your supervisor will assign you your work at the start of each field visit. She/he will carry out the following checks in the field:
• Examining all of your electronic questionnaires to make sure that each interview has been carried out correctly and in full;
• Visiting some of the households that you have already interviewed. He/she will repeat some sections of the questionnaire in order to verify that you recorded that household's answers correctly;
• Observing one or more of your interviews, to evaluate your method of asking the questions. You may or may not be informed of their "sitting-in" beforehand.
• Discussing your work with you, and evaluating your work; she/he will report on your performance to the management team.
Your supervisor is the link between yourself and the project management team. You must inform her/him of any difficulties or problems that you encounter. If you do not understand a procedure, you should ask your supervisor for advice.
2.2. BEFORE THE INTERVIEW
2.2.1. Meeting the Households to Be Interviewed Good approach will assist you to get proper response from the respondents. A good first impression can be created by being polite, being friendly, good attitude and showing confidence. When meeting the household, explain the purpose of your interview. This introduction should be brief but clear:
• You are conducting a survey for the Millennium Challenge Account - Tanzania to evaluate rural road upgrades. The conclusions from this research will be used to plan future projects and plan the development of the nation’s infrastructure.
• If the issue is raised, you can inform them that the survey is not concerned in any way with taxes, and all the information recorded will be regarded as confidential and covered by the obligation of statistical secrecy.
2.2.2. Selection of Interpreters Our goal is to conduct all interviews in Kiswahili. You should make a great effort to encourage the respondent to use Kiswahili, it is better to explain a few difficult questions in another language than to change completely to another language. If no one in the household speaks Kiswahili well enough to interpret and no one in the team speaks the language of the household, you must ask the household to choose someone (for instance, a friend, neighbour or relative) to interpret for the interview. This person should be someone who speaks Kiswahili well and is trusted by the household, since the questions are confidential. It is always best to use an interpreter chosen by the household, as this will help to ensure the confidentiality of the interview. If the household does not know anyone suitable, you must inform your supervisor, who will ask the village leaders to designate someone. The person chosen to translate should be a person who is respected and trusted in the community.

9
You should instruct the translator not to elaborate on the question asked, to be patient with the household members responding, and to remain neutral and professional in attitude toward the questions and answers obtained, and to maintain the confidentiality of the respondent and his or her answers. Avoid having the interpreter suggest answers to the respondent. The interpreter should ask the question as it is, without giving context or interpretation to the respondent. If the respondent does not understand the question then the interpreter should be instructed to communicate the problem to you and you should elaborate on the question as per instructions in this manual. If you do the translation yourself, you must be very careful to stick to the sense and meaning of the questions as they are written on the questionnaire. If at all possible, the household interview should be conducted in Kiswahili. This is because great care has been taken to obtain the most precise translation of each question from English into Kiswahili to capture the exact intent and meaning. As soon as another language is used, either by the interviewer, or by someone else designated to serve in this role, the precision of each question in the questionnaire is compromised and an unknown bias may damage the quality of the information obtained. In summary, certain problems can arise from the use of interpreters:
• It is difficult to know how good the translation is. It is possible that the respondent's friend who speaks Kiswahili does not speak it well enough to translate everything said during the interview, and he will not want to admit it.
• The interpreter may be so familiar with the household that he starts to answer for the respondent without asking the questions. In that case, you must politely remind the interpreter that it is the respondent that has been chosen for the interview, and that it is only his/her answers that you can write in the questionnaire.
2.3. THE INTERVIEW
2.3.1. Basic concepts of an interview Survey interviewing is a technique of collecting information from the public by asking some structured questions to the respondent. The interviewer’s role is vital to accomplish the survey objectives for three reasons, namely:
• Interviewer plays a major role in getting responses from respondents.
• Interviewer is responsible for initiating and motivating respondent.
• Interviewer should handle parts of the interaction in the interview and interview proceeding in standard procedures, so that there is no bias. She/he is a key to a successful interview by making respondent feel that they have participation in the interview, keeping all secrecy and give sufficient information about the purpose of survey.
To achieve this, the interviewer needs to have good communication skills. Communication skills are the art and science of attaining mutual understanding between two persons or two parties. This can be either verbal or non-verbal. Sometimes the strength of non-verbal communication is underestimated. You should be aware of this when you meet the respondent. Their behaviour towards you can be influenced by:
• Expectation of getting something from the interviewer.
• Suspicious on what does this outsider want from them.
• A feeling of being socially inferior to the visitor.
• Trying not to disappoint his guest. All these factors can be the reason for respondent not to talk openly and freely.

10
2.3.2. Private Nature of the Interview All of the information collected is strictly confidential In principle, all of the questions should be asked of the respondent in complete privacy to ensure that his/her answers remain confidential. The presence of other people during the interview may cause him/her embarrassment and influence some of his/her answers. The only exception to this rule is when a respondent is incapable of answering the questions, due to language difficulties or he/she has problems in remembering things. In these cases, look for someone else in the household who has the best knowledge of the household and the household members activities. But it is important that you interview the household head whenever is possible. On the other hand, it is often difficult to limit the number of people present during an interview. The visit of an interviewer may be a big event for the household. The household members and the neighbours are bound to be curious. When faced with this situation you should explain to the respondent that the answers are confidential. You must make effort to ensure no one except household members are present. Sometimes interviewers feel that it is okay for a respondent's friends to sit in, or be present at, the interview. This is not true. First, the household may have exaggerated the proximity of the person to the household. Second, it may not be true that s/he "knows everything about the household and all of their secrets" as the respondent told you. You will often need to insist that the friend or visitor leave. Sometimes the village/kitongoji chairman may be around (for instance, in case he/she is the interpreter). However, you should make effort to ensure that he/she is NOT present during the interview, because households may change their responses due to the present of the village/kitongoji leader. How can you do this? During the first meeting in the village with the village leaders and sub village leaders, you need to explain that our interviews must be conducted in privacy. Even the leader must leave. At the household level, you will need to persuade the respondent of the importance of the interview. Our task is of great importance to our society and to the nation as a whole. You will need to "prepare the ground" for the interview, by explaining that we will be asking personal and confidential information, and that we will guard the confidentiality of this information. By "preparing the ground", we mean that you will carefully explain the purpose of the survey and to create a relationship of mutual respect with the respondent. You can say that you are under instructions not to proceed with the interview in a public way. Finally, you will have to repeat and repeat your arguments until the respondent complies. It will be a big mistake to start the interview with friends or neighbours present. 2.3.3. Establishing a Trusting Relationship with the Respondents As much as possible, you should use a conversational tone while you are reading the questions. You must read the questions exactly as stated, but your eye contact with the respondent and your tone of voice is important in establishing a good relationship with the household members. Good eye contact is important, because you are learning about the respondent from his/her eyes, face, and body language. At the end of each question, we encourage you to look at the respondent while you are waiting for his or her reply. You need to think about the answers you are receiving and weigh them. Does the answer make sense in the context of this household and in the local environment? Most respondents will give truthful answers. However, you need to be on your guard for the respondent who is giving you false information, or who feels he can shorten the interview by either not telling you, or by making up a false story. When probing, you must be both "mpole na makini", that is, you must be fully polite, but also firm in your desire to get a good and truthful answer. When a respondent does not give you truthful answers, you must make it clear in a polite way that you understand that the story you are hearing is not the real story, or full story. You may need to point out contradictions that you have understood.

11
If a respondent observes that you accept his/her first untruthful answers, then you can expect more false answers. As result, you will be recording bad data. Remember that you are there in the household and the village, to get good information that can be used for improving policies. If you accept false stories as answers, then you are failing to collect good quality data. Remember the respondent is not legally bound to answer your questions it is only by his/her GOODWILL that she/he responds to what you will be asking’ 2.3.4. Objectivity of the Interviewer It is extremely important that you should remain absolutely NEUTRAL about the subject of the interview. Most people are naturally polite, particularly with visitors. Respondents tend to give answers and adopt attitudes that they think will please the visitor. You must not show any surprise, approval or disapproval about the answers given by the respondent, and you must not tell him/her what you think about these things yourself. If he/she asks you for your opinion, wait until the end of the interview to discuss the matter with him/her. You must also avoid any preconceived idea about the respondent's ability to answer certain questions or about the kind of answer he/she is likely to give. 2.3.5. Suggestion for professional behaviour Remember that you are working on an assignment for the World Bank and Economic Development Initiatives. You must observe the following rules at all times:
• Be courteous towards everyone (the respondent and his/her family and friends, the supervisor, other members of the team and anyone else involved). YOUR BEHAVIOUR can have a significant influence on the opinions of people in the areas covered by the survey as to the value of the whole project.
• Avoid disturbing or upsetting anyone by YOUR BEHAVIOUR.
• Be properly dressed, so that the respondent will be inclined to trust you, as a reliable and responsible person.
• Exercise patience and tact in conducting the interview, to avoid antagonizing the respondent or leading him/her to give answers that are not accurate.
• Avoid involving yourself in politics and religious discussion in any case, symbols related to a political party or religion should be avoided as much as it is possible. The project covers a large part of the country which exercises different norms and customs. Without compromising your freedom of speech and dress, maintain professional at all times.
• Never ever discuss the answers given by one household with members of another household or with any other person except the team supervisor and the project management team. The Management team has promised the Government, the village leaders and the household’s strict confidentiality and all team members must conduct themselves according to this code.
• Avoid using street jargon such as “poa”, “bibi”, etc.
• Do not ask for any gifts (e.g. “May I take this mango?”). Do not accept money. 2.3.6. How to ask questions? Interviewer’s behaviours can influence the respondent’s answer. Avoid influencing them; our job is to record respondent’s answers.

12
• The way to ask questions:
• Read questions in exactly the way they are formulated in the questionnaire, without adding reducing or changing. Do not use your own words, since this may alter the meaning of the whole question and it can influence your respondent to give a different answer. However, in case the respondent is not a member of the household (which may occur in the listing exercise), you should use you common sense and adjust the wording of the question to the circumstances. For instance, instead of saying “When was the last time that you or anyone else in your household attended a village assembly?”, you should say “When was the last time that anyone in this household attended a village assembly?”.
• If the respondent doesn’t understand, repeat the question slowly, don’t explain by your own words.
• Don’t change the chronological questions (deviation can change the answer). Always ask the questions exactly as in the form in which they appear in the questionnaire. And follow the exact sequence of sections used in the questionnaire.
• Don’t pass a question due to previous answers or since you know the answer.
• Don’t show your respondent that you are in a hurry or tired. Give them time to think on their response.
• Follow exactly the questions’ instructions like skips, brackets and red coloured instructions.
When reading questions you must control voice intonation. This can differ from one interviewer to the other. Avoid a low voice and loudness since that can bore or annoy the respondent. After reading a question once in a clear and comprehensible manner, you should await the reply. If the respondent does not answer in the reasonable time, he has probably 1) not heard the question; or 2) not understood the question; or 3) does not know the answer. In any case, if there is no answer, repeat the question. If there is still no reply, you must ask whether the question has been understood. If the answer is “No”, you may reword the question. If the difficulty lies in finding the right answer, you should help the respondent to consider his/her reply.
The questionnaire should be completed during the interview. Do NOT record the answers on scraps of paper and transfer them to the questionnaire later. We know you are very intelligent that is why we choose you to work with us, but do not count on your memory for filling in the answers once you have left the household. 2.3.7. Pace of the Interview You must determine the pace of the interview. Avoid long discussions of the questions with the respondents. If you are receiving irrelevant or complicated answers, listen to the respondent and then lead him/her back to the original question. Remember that it is you who are running the interview and that you must be on top of the situation at all times. 2.3.8. Reaction to respondents There are three reactions that you can come across during the interview.
• Respondents who need courage to talk, who look tired and bored or are in a hurry to give answers.
• People who are very talkative.
• People who can respond by crying. Strategies:
1. For those who look tired or bored and try to respond to many questions by “I don’t know” try to keep them interested with the questions. Explain that questions are being asked to many others.
2. Those who are very talkative be careful! (Especially with time and getting more information than needed).

13
3. Those who cry give them time to cry, then show sympathy and continue to ask questions.
2.4. AFTER THE INTERVIEW 2.4.1. Double check questionnaire After finishing each interview, verify that all the sections of the questionnaire have been correctly completed. This counts for surveys of all kinds, i.e. both the community and the household questionnaires. A huge advantage of the UMPC is that many inconsistencies and/or missing fields are automatically detected by the software once you activate the validation checks during the interview. How exactly this is done will be discussed below, but note already that it is very important that you carry out this validation procedure and that you immediately make the necessary changes in case the alert report lists some error alerts. Note, however, that YOU SHOULD NOT MAKE ANY CHANGES IN THE COMPLETED QUESTIONNAIRE WITHOUT ASKING THE RESPONDENT(S) THE QUESTIONS AGAIN, unless your supervisor asks you to do so. It may be that not all inconsistencies are automatically detected by the program, however. Hence, it is important that you also go through the questionnaire yourself and verify that all sections have been correctly completed. You should do this immediately after each interview, before you hand over your UMPC to your supervisor, and –most importantly- before leaving the village. Otherwise, if you leave the village without checking, and if you have made a mistake, you will have to return to the village – a waste of time and money. 2.4.2. Writing comments
Before leaving the household, you should write comments in the comments box in case something unusual has occurred. This can be of any kind. Note that it is compulsory to write a comment in the following cases:
� If an interpreter was used. You need to confirm whether using an interpreter has influenced the responses of the respondent or not.
� There is a missing field. This should be avoided, but in case you had been forced to do so, you should explain the reason why in the comments box.
� There is an unusual response compared to average responses. You are all very intelligent, so we expect you to conduct interviews actively (as opposed to passively). That is, we expect you to think about the responses of the respondent and not to just enter them with your brains on level zero. If you think the response of the respondent is rather unusual (based for instance on previous interviews with other respondents in the village), you should first make sure whether he/she has understood the question properly (without influencing his/her answer!). In case he/she does not change his/her answer, you should make a comment about this in the comment box.
� In case a DK answer was given � For the household and community questionnaire, in case there was nothing to comment, you
have to write ‘ok’ in the comment box.
2.4.3. Checking your belongings Before leaving the household and community, double check whether you have at least the following 12 objects with you:
• UMPC
• Stylus Pen
• GPS
• Dry screen cleaning tissue
• Small battery
• Large battery
• Black UMPC cover bag
• Larger UMPC cover bag

14
• Field bag
• Notebook
• Identity card 2.4.4. Thanking the household and the wazee Before leaving, thank all the members of the community and the household who took part in the interview. Although you should make sure to thank the household sincerely, you should try not to stay around in the household longer than necessary. This is important to remember, especially for the listing exercise, where you cannot afford wasting time. You should make sure you leave the household as soon as possible, after having thanked the household. In case any household member asks you to stay a bit longer for lunch/drinks, you should thank him kindly for the offer, but refuse accepting it with the excuse that you still have a lot of work to do. 2.4.5. Your feedback duties The UMPC survey method no doubt has many advantages compared to the traditional survey methods, among them having the possibility of running an immediate automatic validation check procedure. However, it is a relatively new survey technology. Hence, there certainly is scope for improvement. As an interviewer, you are in the best position to encounter any inconsistencies/errors/impracticalities etc. of this survey method. In order to improve future research, we therefore kindly ask for your cooperation in optimizing the UMPC survey method by giving us as much feedback as possible on your experience with it. This may be feedback of any kind, about the survey software, about the UMPC itself, about its battery use, its battery charging system, its bag use, etc. Very important feedback, for instance, is feedback concerning the automatic validation check procedure. In case you find some errors yourself that were not detected by the automatic validation check procedure, please notify this to your supervisor the same evening. It is very important that you give this feedback, since it enables us to make the collected data more reliable for future research purposes. In order not to forget any (feedback) comments you may have to your supervisor, we advice you to note them down immediately, even during the interview. You can do this in your notebook, or maybe more practically, in the Windows Journal of your UMPC. How exactly to use the Windows Journal is explained in Appendix A of this manual. 2.4.6. Big Brother is watching you!
Another huge advantage/improvement of using a UMPC for survey work is that each action the interviewer undertakes is electronically registered. Hence, it can easily be verified whether the remunerator performs his tasks according to requirements. For instance whether he follows all questions in the required sequence, at the required speed, at the required moment on the required day, etc. Your work is continuously monitored and evaluated by both your supervisor and the project management team at the head quarters. Therefore, for your own sake, you better listen to the advice given by your supervisor and stick to all instructions lined out in this manual.

15
3. FIELD WORK PROCEDURES SPECIFIC TO THIS PROJECT 4.1 3.1. INTRODUCTION For the field work to go smoothly the listed procedures have to be followed as they have been worked out and proved efficient. The quality of data collected will depend much on how the field work has been planned and how this plan is followed. 3.2. FIELD PLANNING Table 3.1. Field planning
Day Interviewers’ field procedures
Day 0
- Travel - Arrival in village - Reporting - Recruitment of scouts - Equipment hand-over procedure - Battery charging procedure
Day 1
- Equipment hand-over procedure - Preparing car for field work - Leaving to field - Assisting supervisor in preparations for listing:
- Confirming village information - Mapping - Assigning of neighbourhoods for listing to interviewers and scouts
- Start listing exercise - Equipment hand-over procedure - Evening discussion - Battery charging procedure
Day 2
- Equipment hand-over procedure - Preparing car for field work - Leaving to field - Finalising listing exercise - Conducting HH QX surveys - Assisting supervisor in conducting community QX if necessary. - Equipment hand-over procedure
Day 3
- Equipment hand-over procedure - Preparing car for field work - Leaving to field - Conducting HH QX surveys - Assisting supervisor in conducting group QX’s if necessary. - Equipment hand-over procedure - Evening discussion - Battery charging procedure
Day 4
- Equipment hand-over procedure - Preparing car for field work - Conducting remaining of HH QX surveys - Tying up loose ends - Packing and leaving to next village - Equipment hand-over procedure - Evening discussion - Battery charging procedure

16
On average, field work in one village in this project should be completed in 4 days. Table 3.1 shows you all field procedures of this project, each scheduled on a specific day. You and your team should try to follow this schedule as good as possible. Of course, this schedule is based on an average village. Sometimes the village will be smaller, in case it may be completed in 2-3 days. Sometimes the village may be larger, in case it may take you longer to complete. However, your supervisor will make sure that on average, the time schedule in table 3.1 is maintained. The rest of part 3 of this manual will explain the listed field procedures in more detail. 3.3. REPORTING PROCEDURE
3.3.1. Arrival in village
Teams are required to stay within or close to the village being visited. Your supervisor will arrange for the team’s accommodation. It is compulsory that a supervisor will visit a village a day or some days before day 1. During this pre-visit appointments or confirmation of when a team will arrive will be made. 3.3.2. Reporting
All villages will be informed by the district TASAF management about your visit. They will be informed on what you are going to do and they will be asked to give necessary supports to your exercise. As soon as a team arrives in the village, it is important to visit the village leaders before anything else so as to explain the intentions of being there and ask for their support. The VEO, Village chairperson and the kitongoji chairpersons will be the most important leaders to report to. The leaders will be asked to organise for scouts (cf. 3.4.4) and to organise groups and community meetings. In some cases, especially for the first village in a district, a TASAF representative may be available for initial introduction of the survey team to the village leaders.
3.4. PREPARATION FOR LISTING 4.2 Usually in the morning of day 1 but always after reporting to the village officials, a few other procedures need to be carried out before the listing procedure can take off. Mainly your supervisor will be in charge of this. However, he/she may and should ask you to assist him/her in these tasks, so that the listing exercise can start as soon as possible. Preparation for listing involves 1) confirming village information, 2) mapping, 3) assigning of neighbourhoods to interviewers for listing and 4) finding scouts and allocating them to interviewers.
3.4.1. Confirming village information
Before the start of the listing exercise, probably several days before your teams arrives in the village, a group of well-informed people from the village (including scouts) will be gathered together with the assistance of the VEO or village chairman. Among the well-informed people will be some of the TASAF group members of the village, at least one per group. These people will assist in confirming village information that we obtained before the start of the project. This confirmation is very important, since the listing and sampling procedure will be based on this information. Probably the lead supervisor will take this task of confirming village information on his shoulders, however, you and your team might be asked to assist or finalize the procedure once in the village. More specifically, the lead supervisor or your team supervisor confirms a list of names of TASAF members that we already obtained before arrival in the village. Other information that the gathered village members will confirm is among other things the position of the mentioned members in the group, the name of their household head, the name of the group they are member of, etc. The gathered people will also be asked similar information about the VEO and Village Chairman. 3.4.2. Mapping procedure Mapping involves sketching the village, sectioning locality to visit and identifying possible neighbourhoods. Mapping is done so as to know the exact locations where the interviewing team will visit. Since we have to make sure that we visit EACH AND EVERY HOUSEHOLD in the village during listing, the mapping procedure might even be the most important procedure in the field planning list.

17
Hence, you should carry it out with special care. A map of the village is provided by the village chairperson. The map usually shows the number and names of all vitongoji in the village and their locations. When looking at the map, it is important to note the easily recognizable signs such as mosques or schools and hospitals. Using these signs will help the interviewer and the guide to remember easily the place that has been visited.
3.4.3. Assign neighbourhoods to interviewers for listing
After mapping, every interviewer is assigned locations that he/she will have to visit in order to list ALL households in that area. The village/kitongoji chairperson should also help in identifying which places should be visited first and at what time because they know the village better than your team members.
3.4.4. Finding scouts
Seven scouts (one for each interviewer) should be assigned in order to assist in the listing procedure. You should make sure, before starting the listing, that your guide knows the location of all of the households in the area you are assigned to for listing. Moreover, every scout will be provided with a list of all TASAF group members, the VEO and the Village chairperson. You need to give this list to your guide, while telling him/her that he/she should alert you each time you are approaching a household on that list. You will have to remind him/her several times during the listing so that he/she does not forget doing so. The role of the scout is discussed in more detail in section 3.5.1. 5.2 3.5. LISTING PROCEDURE Listing is done so as to stratify the village population, after which a sample of households can be drawn. This sample will be interviewed after listing by use of the household questionnaire. In its full form, the listing exercise is conducted in 8 minutes on average. The questions involved mainly aim to know if there are vulnerable people in a household, whether these vulnerable people are in a vulnerable group or not and if the respondent knows anything about TASAF projects in their village. 3.5.1. The role of the scout
The main role of the scout is to guide you to ALL households in the neighbourhood assigned to you and to make sure ALL households are listed in the end of the day. Hence, we need a guide that knows every single corner of the neighbourhood by heart. Make sure your guide knows that you need to visit EACH SINGLE HOUSEHOLD, this includes households of which the guide knows that they are not present at the moment of our visit, because even for those households, we need GPS coordinates AND information that enables us to draw a random sample. This information can be given by neighbours or by the guide himself. Another important task of your guide is to alert you if you are approaching households in which a TASAF member, VEO or Village chairperson live. To help him/her in this task, you should give him/her a list of names (provided to you by your supervisor) of all TASAF members in the village + VEO and Village Chairperson. Example: Village = Buchurago
-------------------------------------------------------------------------
| sno TASAF member/ gender position Kitongoji
| VEO/Chairperson
---------------------------------------------------------------------------
1. | 54 Gloria Mbiha female Member
2. | 34 Shallon Mitti female Chairperson
3. | 7 Bet Caeyers female Member

18
4. | 12 Jiwe Udongo female Treasurer
Most of the time, the column ‘kitongoji’’ can only be filled in after arrival in the village, in which case you will have to enter the vitongoji manually. Before the start of the listing, you should check on this list all (at the right hand side of the table) those households that you and your guide plan to visit during the listing exercise. Once you have visited a household on the list, you should check the person on the list (at the left hand side of the table). In the end of the day, you should hand over this list to your supervisor, who will then verify whether all persons on the list their respective households have been listed. You can also ask your guide to assist you in the ‘identification of listed households’ procedure (cf. section 3.5.2). It is important that your guide keeps distance while you are interviewing a household member. In order to maintain confidentiality you have to ensure that no outsider, including the guide, is around while interviewing your respondent. Ask your guide to keep distance, even if he/she is a village/kitongoji leader. We want to avoid outsiders to influence the respondent in his/her answers (especially for village officials this may be the case). You should make this clear to your guide BEFORE the start of the listing exercise. The guide/outsider will be allowed to be closer ONLY in case he takes the role of interpreter cf. section 2.2.2. In summary, BEFORE THE START OF THE LISTING, you need to kindly ask your guide whether he/she could
• Guide you to EACH SINGLE HOUSEHOLD in the neighbourhood assigned to you. Emphasize that he/she should also take you to dwellings of households of which he/she knows that the members are not present.
• Flag households of people that are listed on the list of TASAF members/VEO/Village Chairman you gave him/her before the start of the listing exercise. Moreover, he/she needs to check a person on the list once you have visited his/her household.
• Keep distance while you are interviewing a household member, in order to maintain confidentiality.
• Assist you in the ‘identification of listed households’ procedure (cf. section 3.5.2). Emphasize that he/she should put the sticker on the front door of the dwelling.
3.5.2. Identification of listed households
Your supervisor will provide you with stickers in order to identify listed households. Make sure you put a sticker/identifying mark on the front door of the dwelling of every listed HH. This is done so as to avoid a listing interview to be done in the same household twice and also this will help to note that every household is visited. The marking process may be assisted by the guide (cf. section 3.5.1).
3.5.3. Capturing GPS coordinates GPS coordinates will be captured by the program through Bluetooth detection. UMPC are installed with a program that detects GPS signals via Bluetooth. Each interviewer will be provided with a GPS acquiring device that will be used to give location coordinates. All locations at which interviews are conducted will be marked. Marked locations will include dwellings of households, village centres and service facilities. It is very important that you use the GPS units correctly. Appendix D of this manual gives a detailed explanation about how to use the GPS units. Read this appendix carefully!
3.5.4. Short versus long listing surveys
In order to minimize the duration of the listing exercise, some households will get a very short listing survey (3 minutes on average). The software will randomly select households for long survey (8

19
minutes on average) and households for short survey. Most households, however, will get the long form. Section 6.3 will discuss in more detail the difference between these 2 survey types. 3.5.5. How to introduce yourself to the household?
When arriving at the household for listing, you should always briefly introduce yourself and inform the household members about the purpose of your visit. You should keep the introduction very brief though. You should stick to the following 5 points:
• We are from the district council
• We are collecting information for evaluation of supports in villages
• We are here to list ALL households in the village.
• On top of listing, we will be asking a few basic questions.
• All the responses are confidential and will remain between the respondent and our office. That is why your guide is keeping distance.
Note that you should NOT mention the World Bank. The reason why is not because we want to keep this secret, in the contrary, but if you would mention it, the respondent may ask you for more detailed information, and we do not have time for this. Also, it may create wrong expectations of the respondent.
3.5.6. Make sure all households in the village are listed For the sake of the randomness of our sample, it is VERY important that ALL households in the village are listed. Your guide plays an important role in this (cf. section 3.5.1). However, also you as an interviewer can make a difference. When leaving a household after a visit, you should always ask its members who their neighbours in the village are. You should make sure you visit all of the neighbours they mention.
3.5.7. Absent household members during listing For the listing survey, your aim should always be to have as a respondent either 1) the head of the household, 2) the spouse of the head of the household or 3) other adult member of the household (‘adult’ here should be interpreted as a person who is mature enough and in the condition/position to answer the questions in the survey). These are most likely to be in the position to give reliable responses to the questions in the listing questionnaires. However, there are 2 possible cases in which a survey cannot be satisfactorily completed during first listing visit and that a follow-up visit is necessary:
1) The head, spouse or other adult member is present but he/she cannot provide you with all required information. In this case, your answer to the question “Is a follow-up interview necessary for this household?” on form L8 should be ‘yes’. You will also need to give the reason why this is the case on the same form, together with the identification codes of the questions for which there are missing fields, or for which information needs to be confirmed. You should also mention the name and relationship to head of the person that would be able to give you the missing information. This information will be used by your supervisor while organising follow-up interviews. Note that in case none of the other HH members would be able to give you the information neither, you should mention this in the “why is follow up necessary field”.
OR
2) None of these members (head, spouse or other adult member) is at home at the moment of your visit. In that case, you will need to select one of the other members in the response list of the question ‘who gave you the listing information’ on form L1. In case the respondent is any other person, the following questions will be automatically skipped (since the respondent is assumed not to be in the position to answer these questions):
20
- Have you ever heard of a development program called TASAF? - Have you or anyone in your household attended a meeting in which the details of TASAF were explained? - In the past 7 days, on how many days have you or anyone in your HH eaten […]?
Selecting a respondent other than the 3 members mentioned above, will also imply that the question “Is a follow-up interview necessary for this household?” is automatically set to ‘yes’, since several questions have been skipped. Moreover, the “why is follow up necessary?” field will be automatically filled with ‘Infosource > 3”, which indicates to the supervisor that a follow up is necessary because the respondent was somebody else than code 1, 2 or 3 and hence the questions listed here above had been skipped. In case only the skipped questions are left blank, you do not have to add anything to the “why is follow up necessary” field. However, in case you had to enter/select DK in one of the enabled fields, you will have to indicate those as well.
Note, however, that selecting ‘yes’ for the question “Is a follow-up interview necessary for this household?” automatically implies that your supervisor will have to organise re-interviews with these households, a waste of time, which we want to avoid as much as possible. Hence, your aim should always be to satisfactorily complete the record at the first visit. Hence, always try to have either the head, spouse of other adult member as respondent to the interview.
It might be that you pass at a certain household, but that you decide to first interview another one (for instance, in case nobody is around). In that case, however, you should ALWAYS create a record for that household, and capture its GPS coordinates. This reminds you later that you should not forget to come back to this household. You will notice that if you try to add a new household record while either the GPS coordinates or the name of the HH head of the previous HH record is missing, a warning window will pop up.
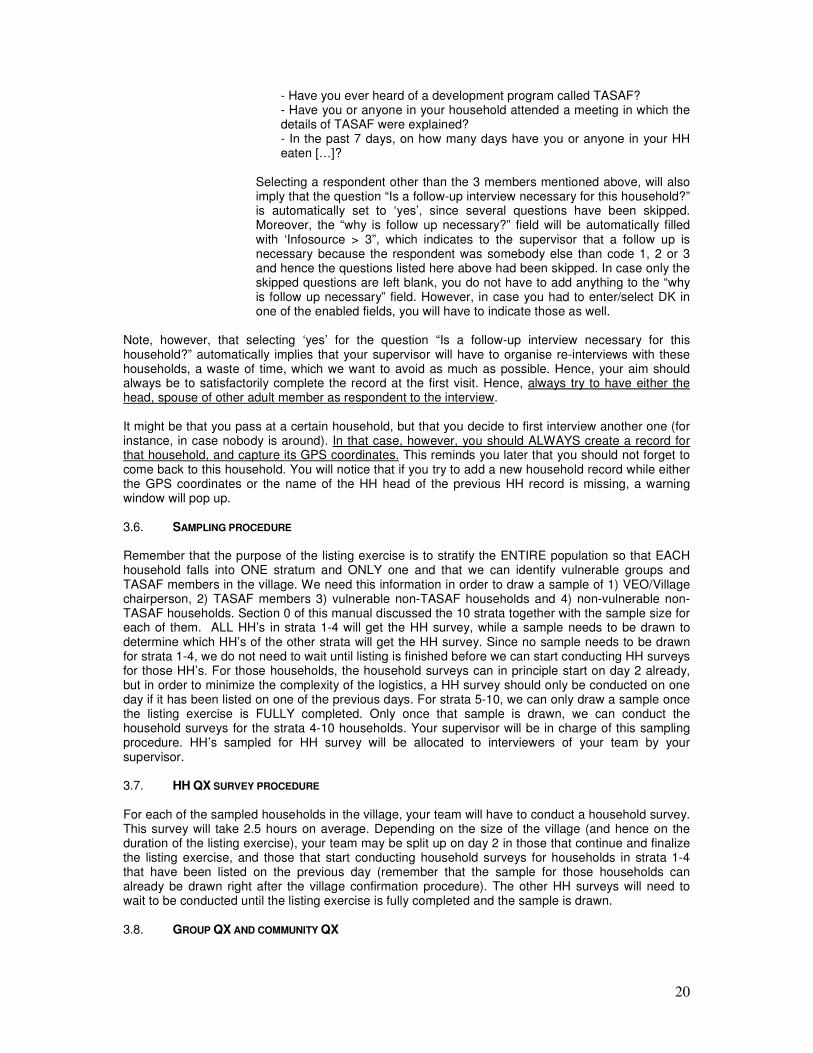
3.6. SAMPLING PROCEDURE Remember that the purpose of the listing exercise is to stratify the ENTIRE population so that EACH household falls into ONE stratum and ONLY one and that we can identify vulnerable groups and TASAF members in the village. We need this information in order to draw a sample of 1) VEO/Village chairperson, 2) TASAF members 3) vulnerable non-TASAF households and 4) non-vulnerable non-TASAF households. Section 0 of this manual discussed the 10 strata together with the sample size for each of them. ALL HH’s in strata 1-4 will get the HH survey, while a sample needs to be drawn to determine which HH’s of the other strata will get the HH survey. Since no sample needs to be drawn for strata 1-4, we do not need to wait until listing is finished before we can start conducting HH surveys for those HH’s. For those households, the household surveys can in principle start on day 2 already, but in order to minimize the complexity of the logistics, a HH survey should only be conducted on one day if it has been listed on one of the previous days. For strata 5-10, we can only draw a sample once the listing exercise is FULLY completed. Only once that sample is drawn, we can conduct the household surveys for the strata 4-10 households. Your supervisor will be in charge of this sampling procedure. HH’s sampled for HH survey will be allocated to interviewers of your team by your supervisor. 3.7. HH QX SURVEY PROCEDURE For each of the sampled households in the village, your team will have to conduct a household survey. This survey will take 2.5 hours on average. Depending on the size of the village (and hence on the duration of the listing exercise), your team may be split up on day 2 in those that continue and finalize the listing exercise, and those that start conducting household surveys for households in strata 1-4 that have been listed on the previous day (remember that the sample for those households can already be drawn right after the village confirmation procedure). The other HH surveys will need to wait to be conducted until the listing exercise is fully completed and the sample is drawn. 3.8. GROUP QX AND COMMUNITY QX

21
For each village, a community survey needs to be conducted and for each TASAF group, a group survey. You supervisor will be in charge of this, but he might ask you to assist him in this task. We will not, however, go into more detail on those questionnaires in this interviewer’s manual. 3.9. EQUIPMENT HAND-OVER PROCEDURE
Each morning and each evening of a working day, your UMPC equipment, together with your “questionnaire Review Booklet” gets handed over from your supervisor to you (morning) and from you to your supervisor (evening) respectively. The following objects need to be handed over each time:
� Your UMPC � Your stylus pen � Your small battery � Your large battery � Your blue cleaning tissue � Black UMPC cover � UMPC bag � Your questionnaire Review Booklet
The main reason for handing over the UMPC equipment to your supervisor in the evening is that he/she needs 1) to transfer the data from your UMPC to his/her laptop for questionnaire review and later for transfer to the EDI head quarters and 2) to charge the batteries. The questionnaire review procedure will be explained in section 3.11. The moment a hand-over of an object takes place, you need to check this object in a hand-over check list, of which an example is presented in appendix B of this manual. Some items may be added to this list by your supervisor. On the same list, the recipient of the equipment is required to provide his signature to confirm that he actually received all items that have been checked on the list. In the morning, the recipient is the interviewer, in the evening this is the supervisor. Once you have an item in your possession, it is your own responsibility to take good care of it. It is also your own responsibility to check whether the items you received are in the same condition as in which you handed it over the previous time. If an object has been handed over, but not in the same condition as the previous time, the item needs to be checked in the list, but a comment about the damage you encountered needs to be made before providing your signature. In case an object is missing, you should NOT check that item in the list and provide a comment about it. 6.2
3.10. EVENING DISCUSSION
At the end of each working day, the supervisor meets with the whole team of interviewers (sometimes individually, if necessary) so as to discuss all matters which caught any kind of attention on the respective day. During this discussion, you should pay careful attention to what your supervisor has to say. Sometimes a session will be short, sometimes it will be long. In any case, you should keep your concentration until it is finished. You should listen to your supervisor’s advice, and follow his/her instructions. In case he/she asks you to adjust your behaviour on the field, for instance your way of conducting interviews, you should take the instructions seriously.
3.11. QUESTIONNAIRE REVIEW PROCEDURE Each evening of a working day, you must hand over your UMPC together with your personal “Questionnaire Review Booklet” to your supervisor who will transfer all recently completed household records onto his/her computer in order to review them. For the household questionnaire, you need to tick the ‘ok for transfer’ check box on form H (cf. infra) once a record is completed. Do not forget to do so. Only records for which this check box is ticked will be transferred in the evening. For the listing questionnaire records, records of households for which a follow-up interview is necessary, will also be transferred to the supervisor’s laptop, though not yet for final review. For those household

22
records, your supervisor will first have to organise re-visits/invitations to base camp, in order to complete all records. Note that records will only be transferred once, unless you have been asked by your supervisor to edit a specific household record, in which case it will be transferred again once you have made the required changes. Hence, you should NOT change ANY data after the first transfer, unless your supervisor asks you to do so. The moment you have checked the ‘ok for transfer’ box and the record got transferred to the supervisor’s laptop, your supervisor will have the ‘live version’ of the record, which means that he/she decides who will make changes, if necessary. Each morning, your supervisor will return to you your UMPC equipment and your personal “Questionnaire Review Booklet”, in which he/she will have written comments for the household records that had been transferred the evening before. For the listing questionnaires, your supervisor will ONLY make a comment if something was wrong with one of your listing records of the previous day. For the household questionnaires, however, there will be a comment box for EACH of the households for which a record had been transferred the evening before, even for those that had been satisfactorily completed. A typical page of the Questionnaire Review Booklet is presented in appendix C of this manual. Each reviewed household record for the HH questionnaire survey will be assigned a new box in the Review Booklet. Your supervisor will enter the ID of the household record that has been reviewed and the date on which this review has taken place. In case the record was reviewed for the first time, your supervisor will have selected ‘yes’ to the question “first entry”? In case the record had been reviewed before but you had been asked to make some changes which were now subject to review, the answer to this question will be “no”. In case a household record is satisfactorily completed by you as an interviewer, your supervisor will haven written ‘ok’ in the respective comment box and he will have selected ‘yes’ to the question ‘OK?’. In case your supervisor has selected ‘no’ to the ‘OK?’ question, he/she will have written comments in the comment box referring to which changes need to be made in order to correctly complete the questionnaire. These changes need to be made the following day, after which you should again make sure that the ‘ok for review’ box on form H of that household record is checked, so that it can be re-transferred to your supervisor for review. In case the comments concern a listing record, the box in the upper right corner will be checked. Most of the times, these listing comments, if any, will mainly be there for feedback purposes and you will not be asked by your supervisor to make any changes. You should, however, make sure that you take this feedback seriously and that you do not make the mistakes again in the future.
Note that the communication of your supervisor to you in your Questionnaire Review Booklet will be based on the Question Identification Code scheme as it is lined out in section 5.2 of this manual. It is therefore VERY important that you fully understand this scheme in order to be able to understand the comments of your supervisor. We emphasize again that YOU SHOULD NOT MAKE ANY CHANGES IN THE COMPLETED QUESTIONNAIRE WITHOUT ASKING THE RESPONDENT THE QUESTIONS AGAIN, unless your supervisor asks you to do so. The comment box in your Questionnaire Review Booklet will instruct you what to do and whether a re-visit of the household is necessary. 3.12. BATTERY CHARGING PROCEDURE
The batteries of the UMPC’s need to be charged at the end of each working day. The UMPC have small and large batteries. Both batteries should be fully charged before starting the interviewing process. Therefore the charging process should be conducted every evening after the interviewing process. Electricity is used in charging these batteries, however if there is no electricity, there is an alternative use of charging the batteries by use of solar power or inventors. Your supervisor will be in charge of this. However, he/she might ask you to assist him in this task and you should do so in this case.

23
4. A GUIDE THROUGH THE COMMUNITY SURVEY
The Community Profile Questionnaire will be administered in 200 vitongoji (100 villages) throughout the Mainland Tanzania Regions of Tanga, Mbeya, Rukwa and Ruvuma. The goal is to collect reliable data at the level of the kitongoji. The Community Questionnaire consists of six sections:
0. KITONGOJI BASICS 1. KITONGOJI DEMOGRAPHICS AND GENERAL INFORMATION 2. INFRASTRUCTURE, SERVICES, MARKETS AND TRANSPORT 3. AGRICULTURE AND TRADE 4. HEALTH 5. AVAILABILITY AND PRICE OF GOODS
In the following, we will discuss each section in detail. 4.1 SECTION 0: KITONGOJI BASICS
Purpose:
• To specify the name and specific location of the surveyed kitongoji Question 1: Type the name of the kitongoji in the UMPC. Be sure to spell the name correctly! Question 2: Select the village in which the kitongoji is located. You will select the village from an alphabetical drop down menu of 100 villages programmed in the survey software. Once you have answered questions 1 and 2, the survey software will automatically answer question 3 (whether the village is a treatment or comparison village). The region (question 4) and district (question 5) in which the kitongoji is located will also be automatically generated by the survey software. The answer to question 6 will be provided by the listing team, as it is this team that will have sampled the two vitongoji in each village. After question 6, the survey software will generate the following question(s) based on two criteria:
1. the specific district in which the kitongoji is located 2. whether the kitongoji is located in a treatment or a comparison village
IF DISTRICT = MBOZI AND VILLAGE = TREATMENT Question 7: Ask the kitongoji wazee how long it takes to walk from the kitongoji center to the Tunduma – Mkutano trunk road. Note the time in number of minutes. IF DISTRICT = MBOZI AND VILLAGE = COMPARISON Question 7: Ask the kitongoji wazee how long it takes to walk from the kitongoji center to the Mlowo – Kamsamba regional road. Note the time in number of minutes. IF DISTRICT = SUMBAWANGA RURAL AND VILLAGE = TREATMENT Question 7: Ask the kitongoji wazee how long it takes to walk from the kitongoji center to the Mkutano - Sumbawanga trunk road. Note the time in number of minutes. IF DISTRICT = SUMBAWANGA RURAL AND VILLAGE = COMPARISON
Question 7: Ask the kitongoji wazee how long it takes to walk from the kitongoji center to the Kaengesa – Kale regional road. Note the time in number of minutes.

24
Question 7: Ask the kitongoji wazee how long it takes to walk from the kitongoji center to the old trunk road between Mkima and Malonje. Note the time in number of minutes. IF DISTRICT = NAMTUMBO AND VILLAGE = TREATMENT Question 7: Ask the kitongoji wazee how long it takes to walk from the kitongoji center to the Songea – Namtumbo trunk road. Note the time in number of minutes. IF DISTRICT = NAMTUMBO AND VILLAGE = COMPARISON Question 7: Ask the kitongoji wazee how long it takes to walk from the kitongoji center to the Lumecha – Kitanda regional road. Note the time in number of minutes. IF DISTRICT = SONGEA RURAL AND VILLAGE = TREATMENT Question 7: Ask the kitongoji wazee how long it takes to walk from the kitongoji center to the Songea – Mbinga trunk road. Note the time in number of minutes. IF DISTRICT = SONGEA RURAL AND VILLAGE = COMPARISON
Question 7: Ask the kitongoji wazee how long it takes to walk from the kitongoji center to the Likuyufusi - Mitomoni regional road. Note the time in number of minutes.
Question 7: Ask the kitongoji wazee how long it takes to walk from the kitongoji center to the Peramiho – Liganga district road. Note the time in number of minutes. IF DISTRICT = MBINGA AND VILLAGE = TREATMENT Question 7: Ask the kitongoji wazee how long it takes to walk from the kitongoji center to the Songea – Mbinga trunk road. Note the time in number of minutes. IF DISTRICT = MBINGA AND VILLAGE = COMPARISON Question 7: Ask the kitongoji wazee how long it takes to walk from the kitongoji center to the Kitai – Lituhi regional road. Note the time in number of minutes. IF DISTRICT = MKINGA AND VILLAGE = TREATMENT Question 7: Ask the kitongoji wazee how long it takes to walk from the kitongoji center to the Tanga – Horohoro trunk road. Note the time in number of minutes. IF DISTRICT = MKINGA AND VILLAGE = COMPARISON Question 7: Ask the kitongoji wazee how long it takes to walk from the kitongoji center to the Mabokweni – Bombomtoni regional road. Note the time in number of minutes. IF DISTRICT = TANGA AND VILLAGE = TREATMENT

25
Question 7: Ask the kitongoji wazee how long it takes to walk from the kitongoji center to the Tanga – Horohoro trunk road. Note the time in number of minutes. IF DISTRICT = TANGA AND VILLAGE = COMPARISON Question 7: Ask the kitongoji wazee how long it takes to walk from the kitongoji center to the Mabokweni – Bombomtoni regional road. Note the time in number of minutes. 4.2 SECTION 1: KITONGOJI DEMOGRAPHICS AND GENERAL INFORMATION Purpose:
• To collect demographic information on the people living in the kitongoji
• To collect information on migration of people into and out of the kitongoji
• To collect information on kitongoji land and water resources Question 1: Ask for the total number of persons currently living in the kitongoji Question 2: Ask for the number of men currently living in the kitongoji Question 3: Ask for the number of women currently living in the kitongoji NOTE THAT THE SUM OF QUESTIONS 2 AND 3 HAS TO BE EQUAL TO QUESTION 1! Question 4: Ask for the number of households in the kitongoji Question 5: This question examines the prevalence of different religions in the kitongoji. For each of the seven religions listed in the questionnaire, ask the proportion of households that adhere to this religion. You can also ask for the number of households practicing a particular religion and then divide this number by the total number of households in the kitongoji (question 4) to obtain the proportion. Question 6: Ask for the three most common tribes in the district. You will be able to select the tribes from a drop down menu in the survey software. Begin with the most common tribe, then list the second most common, and then the third most common. Question 7: For the three tribes listed in question 6, ask the proportion of each tribe in the kitongoji. The tribes that were listed in question 6 will be automatically generated for question 7 by the survey software. Question 8: In this question, we want to know whether the population of the kitongoji has increased or decreased since 2005. We are interested in NATURAL population growth. Ask the respondents to disregard in- and outmigration and only focus on natality and mortality in the kitongoji since 2005. Ask the respondents whether, based on birth and death rates, the population in the kitongoji has increased, decreased or remained unchanged. Select the appropriate answer from a drop down menu in the survey software. Question 9: This question focuses on permanent migration into and out of the kitongoji. Ask the respondents whether (1) more people moved in the kitongoji than out, (2) more people moved out of the kitongoji than in, (3) about the same number of people moved in and out, or (4) nobody moved in or out. Select the appropriate answer from a drop down menu in the survey software. Question 10: Ask the respondents how many households permanently left the kitongoji since 2005. Question 11: Ask the respondents how many households permanently settled in the kitongoji since 2005. Question 12: This question focuses on temporary migration out of the kitongoji. This is defined as people who left the kitongoji for a period of MAXIMUM six months. Ask the respondents whether or not people temporary left the kitongoji during the past 12 months. Question 13: Ask the respondents how many people temporary migrated out of the kitongoji during the past 12 months.

26
Question 14: This question focuses on temporary migration into the kitongoji. This is defined as people coming to the kitongoji to live there for a period of MAXIMUM six months. Ask the respondents whether or not people temporary came to kitongoji during the past 12 months. Question 15: Ask the respondents how many people temporary migrated into the kitongoji during the past 12 months. Question 16: If people temporary moved into the kitongoji during the past 12 months, ask for the type of work most people came to do. Select the appropriate type from the drop down menu in the survey software. If different people came to perform different types of work, select the most frequent type! 5. A GUIDE THROUGH THE HOUSEHOLD SURVEY
5.1. INTRODUCTION This survey project will be carried out by use of a UMPC (ultra mobile PC). If you are not familiar with a UMPC, it is important that you first read Appendix A very carefully. It guides you through the basic UMPC features that you need to fully understand before getting familiar with the questionnaire itself. Once you are familiar with the basic UMPC features, you are ready to familiarize yourself with the electronic survey. The questionnaire has been designed to enable you to administer it with as little difficulty as possible. In spite of these design efforts, nevertheless, it is a complex questionnaire. To build your familiarity with it, as you’re preparing for your fieldwork with the survey households, make an effort to learn how the questionnaire is put together, how you can find your way through the different electronic forms, and how a typical administration to a survey respondent would proceed. To start, it is important that you understand the question identification scheme (based on letters and numbers), which is very useful for communication purposes. This part of the manual will start by briefly discussing this question identification scheme. It will proceed by discussing in detail how to find your way through the electronic survey.
5.2. FORM AND QUESTION IDENTIFICATION SCHEME As discussed in section 3.11, the supervisor daily will have to communicate his questionnaire review results to the interviewers by use of their Questionnaire Review Booklets. Likewise, it may happen that an interviewer wants to communicate an issue concerning a specific survey question to his supervisor. Instead of referring to questions in full words as they appear on the forms, we recommend using the question identification scheme, which is developed especially for communication purposes. For instance, instead of referring to the question ‘Who provided the listing information?” in the listing questionnaire, you should refer to field L1Q11. This section will discuss in detail how to code a specific question. It is important that you understand this scheme and that you apply it as such. In short, the identification scheme is based on the form location of the survey questions in the electronic survey version. Important here is the form identification scheme, which will be the topic of the first discussion here below. We will then proceed by discussing how the question identification scheme depends on this form identification scheme. 5.2.1. Form identification scheme Both questionnaires are divided into 8 different sections, which in the electronic survey are represented on 8 different tabs. Each section consists of several forms. Note the difference between a section and a form. A section is the aggregate of questions about 1 topic (can be very broad), for instance ‘consumption’. Each ‘tab’ in the electronic survey represents 1 section. A form is a subset of questions of one section represented together on the electronic screen. Often (especially in the household questionnaire), one section is represented by several forms, because usually not all questions of a section can fit on one screen. Most of the time, however, the questions in a section are grouped in a way such that each form represents a sub-section of the section as a whole. For instance, form T6a ‘food
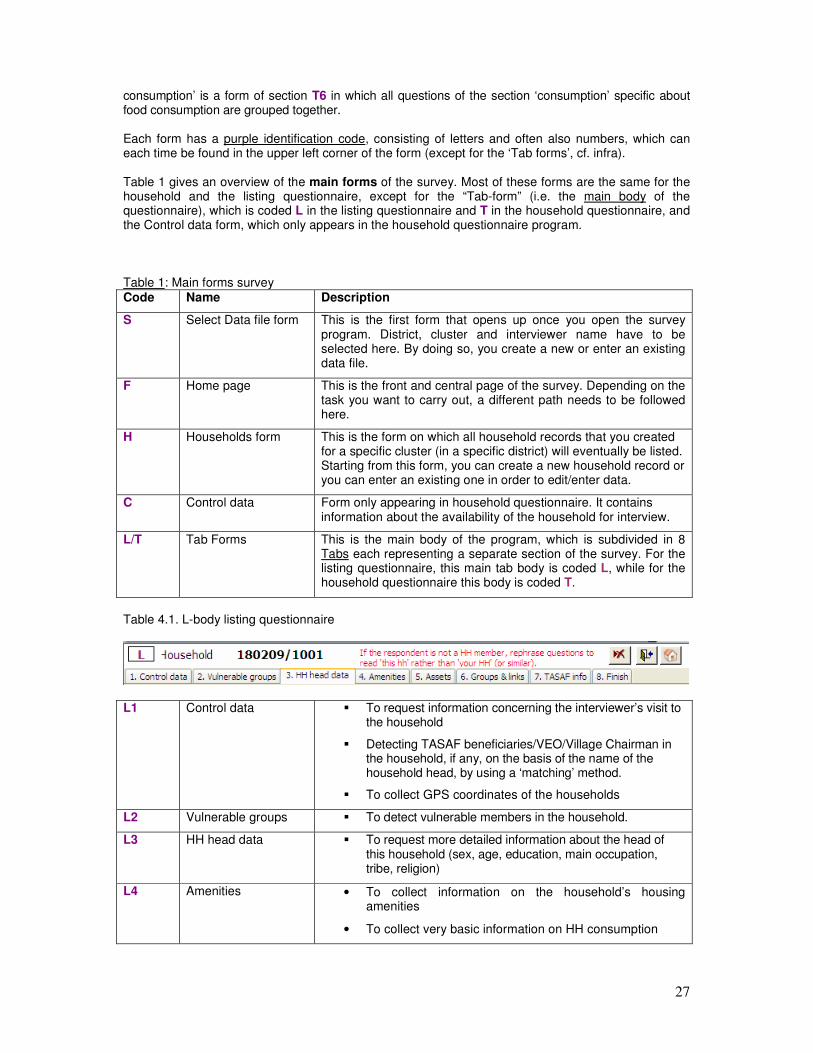
27
consumption’ is a form of section T6 in which all questions of the section ‘consumption’ specific about food consumption are grouped together. Each form has a purple identification code, consisting of letters and often also numbers, which can each time be found in the upper left corner of the form (except for the ‘Tab forms’, cf. infra). Table 1 gives an overview of the main forms of the survey. Most of these forms are the same for the household and the listing questionnaire, except for the “Tab-form” (i.e. the main body of the questionnaire), which is coded L in the listing questionnaire and T in the household questionnaire, and the Control data form, which only appears in the household questionnaire program. Table 1: Main forms survey Code Name Description
S Select Data file form This is the first form that opens up once you open the survey program. District, cluster and interviewer name have to be selected here. By doing so, you create a new or enter an existing data file.
F Home page This is the front and central page of the survey. Depending on the task you want to carry out, a different path needs to be followed here.
H Households form This is the form on which all household records that you created for a specific cluster (in a specific district) will eventually be listed. Starting from this form, you can create a new household record or you can enter an existing one in order to edit/enter data.
C Control data Form only appearing in household questionnaire. It contains information about the availability of the household for interview.
L/T Tab Forms This is the main body of the program, which is subdivided in 8 Tabs each representing a separate section of the survey. For the listing questionnaire, this main tab body is coded L, while for the household questionnaire this body is coded T.
Table 4.1. L-body listing questionnaire
L1 Control data � To request information concerning the interviewer’s visit to the household
� Detecting TASAF beneficiaries/VEO/Village Chairman in the household, if any, on the basis of the name of the household head, by using a ‘matching’ method.
� To collect GPS coordinates of the households
L2 Vulnerable groups � To detect vulnerable members in the household.
L3 HH head data � To request more detailed information about the head of this household (sex, age, education, main occupation, tribe, religion)
L4 Amenities • To collect information on the household’s housing amenities
• To collect very basic information on HH consumption

28
L5 Assets
• To collect information on the household’s assets
L6 Groups & links • To collect information on group membership and village participation of the household members
• To collect information of the household’s social networks (links with village officials, relatives, etc.).
L7 TASAF info • To collect information on household’s awareness of and membership in TASAF- and other projects.
L8 Finish • To add comments about the interview
• To indicate whether a follow-up interview for this household is necessary
• To run final validation check procedure
Main forms L (for the listing questionnaire) and T (for the household questionnaire) are subdivided in 8 different tabs, of which the sequence needs to be followed while surveying the households. Each tab denotes one section of the questionnaire. Table 4.1 gives an overview of the 8 different tabs of the listing questionnaire. Table 4.2 gives an overview of the 8 tabs in the household questionnaire. Note that on these tab forms the specific identification code is not shown as such in the upper left corner. However, their code composition is straightforward. It is L or T (depending on which questionnaire) + the section number as it appears in the tab. For instance, the identification code of the tab “Vulnerable groups” in the listing questionnaire is L2. Table 4.2. T-body household questionnaire
T1 Start � To request information concerning the interviewer’s visit to the household (starting time, language interview, etc.)
T2 HH head info � To request more detailed information about the head of this household (name, origin, religion, tribe).
T3 Roster � In this section the interviewer has to build up the household roster, i.e. make a list of all household member names together with their basic data (age, sex, marital status, relationship to head, etc.), educational data and health data.
T4 Children • To collect more detailed information on the child household members of less than 5 years old (Food consumption, anthropometrics, etc.)
T5 Various
• This large section groups 12 sub-sections together on one tab: Amenities, assets, agriculture, livestock, enterprises, transfers, shocks, credit, information sources, self-help groups, time preference & risk aversion and HIV/AIDS.
T6 Consumption data • This section contains questions about the household’s consumption patterns. It is subdivided by several sub-sections (cf. infra) based on the type of consumption and the recall period.
T7 Finish • To collect information about the status of the survey

29
• To take you back to form T4b to enter the anthropometrics data.
• To run final validation check
T8 Comments • To add comments about the interview
For clarity purposes, many of the tab forms (especially in the household questionnaire) in turn are subdivided in several sub-forms (a, b, c, etc.). The identification codes of these new forms are composed by Example: T5 in household questionnaire
Tab T5, shown in this figure, has 12 sub-sections, each denoted by a letter. Each of these sub-sections is represented on a different form, which is coded as T5 + letter of sub-section. Hence, we have sub-forms T5a, T5b, T5c, etc. Moreover, questions on some of the sub-forms in turn are spread over several sub-sub-forms (again denoted by a, b, etc.). Their form identification codes follow the same logic as the sub-forms, i.e. they consist of Examples: T4aa, T5ab, Example:
+ +
The identification code of the
main tab to which the sub-form
belongs +
The identification letter of
the sub-form (a, b, etc.)
The identification
code of the main tab
form to which the sub-
form belongs
The identification
letter of the sub-
form
The identification
letter of the sub-sub-
form

30
Example:
Tab T5 has a sub-form T5e (“enterprises”), which in turn has a sub-sub form T5ea in which you need to enter more detailed information on each enterprise, i.e. form T5ea which is shown here above. Special cases (household questionnaire):
• T6S: One special case of a sub-sub-form is T6S, i.e. the ‘select items’ form in the consumption section (T6). In this form, the household is asked whether or not it has consumed/purchased specific consumption items over a specific period of time (yes or no). The same T6S form can be accessed from several consumption sub-sections of T6 (i.e. T6a, T6b, T6c and T6d). However, the lists of consumption items differ each time, depending on the consumption form from where T6S has been accessed. The following figure shows you the T6S form accessed from sub-form T6a.

31
• T6aE: Another special case is sub-sub-form T6aE, a sub-form of form T6a. It is the enter/edit data form in which you need to answer questions about all food consumption items that have been selected on the T6S form as being consumed by the household over the last 7 days.
5.2.2. Question identification scheme Once you understand the form identification code scheme, understanding the question identification scheme is straightforward. Each question code is composed by Examples:
• L3Q5 = Question 5 on tab L3: “What is head of household [NAME]’s tribe?”.
• T5gaQ1 = Question 1 on form T5ga: “How widely spread was this shock? It affected…”
The identification code of the form
on which the question from which
the variable is derived is located
+ Q + The exact number of the question,
as it appears on the form

32
Special cases:
• Some questions have several response fields associated to them. In those cases, you should refer to the response fields by use of a, b, c, etc.
o Examples:
• On form T5ga shown here above, question 2 has 2 response fields: YEAR and MONTH. You should refer to the first response field (YEAR) as T5gaQ2a and to the second one (MONTH) as T5gaQ2b.
• On form T5ea (shown here below): Question 1 has two response fields, one for the first member and another for the second one. You should refer to the FIRST MEMBER response field as ‘T5eaQ1a’ and the SECOND MEMBER response fields as ‘T5eaQ1b’.
• Form T6aE:

33
Most of the questions on this form have 2 response fields, one for the value consumed and one for the measurement units. For instance for question 1, the ‘units’ field should be referred to as T6aEQ1b.
• ‘Other’ fields:
In some cases, the respondent is allowed to answer ‘other’ to a specific question, in case the response is not included in the list of possible answers. In those cases, the interviewer needs to fill in an ‘other’ field to specify the ‘other’ answer. We will denote this field by
Examples: On form L4 in the listing questionnaire, if you select ‘Other (specify)’ as a response to question 1, a ‘other code’ window will pop up, as is shown in the figure here below:
This ‘other’ field should be referred to as L4Q1Other.
• Some sub-forms in the household questionnaire are subdivided in several tabs. The questions on these forms, however, do continue in sequence of numbering. For instance, form T3a:
Code of question where
the unit belongs to + Other

34
4.2
The previous two figures show how the questions on form T3a are spread over two tabs. Their identification code, however, does not depend on which tab they are located. Question 1 on tab 1 will simply be referred to as T3aQ1, and question 8 on tab 2 will be referred to as T3aQ8.
• Identification code of questions on individual members/enterprises/etc: Often, the same questions are asked from different individual members/enterprises/etc. Hence, there are several response fields for one question, each associated to a different member or enterprise (etc.). For instance:

35
In these cases, you should refer to response fields as For example in the figure here above, the response field of question 3 associated to household member ID 1 should be referred to as: T3Q3ID1. The same applies to enterprises, children, transfers, credit sources, etc.
5.3. HOW TO FIND YOUR WAY THROUGH THE ELECTRONIC FORMS AND HOW TO COMPLETE THE
QUESTIONAIRRE?
For the UMPC survey, we have used specific tools such as letters, numbers, skips, colours and arrows (►) to guide both the interviewer and the data user through the forms. For the interviewer, more specifically, these tools facilitate finding all the fields for which an entry needs to be made, and especially to identify the sequence in which this should happen. This section of the manual will discuss these different tools. The software will be continuously updated to satisfy your needs as good as possible. New features may be added, others may be deleted. Hence, it is more important that you understand the general tools used in the electronic survey, rather than learning the setup of the forms by heart without understanding the logic behind them. Therefore, please read this part of the manual very carefully. 5.3.1. Colour scheme The most obvious tools to guide the interviewer through the survey procedure are the 5 different colours used: Purple, red, blue, green and black. Table 4 gives an overview of the purpose of these colours. Table 4. Colour scheme:
Purple - Colour of all identification codes in upper left corner of the forms
- Command buttons that you should tick if you want to continue the data entry process, for instance if you want to move on to the next section or if you want to move to the next HH member.
- Purple buttons are also used for icons that set time and date.
Red - All instructions specific to the interviewer. These should NOT be read out loud to the respondent!
- Command buttons that you should tick ONLY if you want to delete specific
Identification code of
the question + ID ID number +

36
blocks of data. Cf. infra.
Blue Questions to be asked to the household members out loud. Note that sometimes this also includes a list of possible answers if this list is blue coloured.
Green - All ‘check’ command buttons, i.e. buttons that you should tick in order to run the validation check procedure. Cf. infra.
- The ‘roster’ command button on form T6a, form T6 and form T6S. Cf. infra.
Black All other characters on the forms.
5.3.2. Questions where you insert text You will often have to insert the name of a person, item, or animal into a blue question, i.e. a question that you need to ask out loud to the respondent. This is indicated by brackets […]. For those cases, the name of the person/item/animal will always be shown in red on top of the form to remind you of the name. Example: On form L3:
To ask this question you would say to the respondent in Kiswahili, “Is head of household [Frolida] male or female?” 5.3.3. Arrow scheme (►) All purple icons that lead to the opening of a new form include an arrow (►) and a letter, referring to the identification code of the forms that you can access through ticking this icon. Examples:
• On form T3, command buttons , and respectively lead you to forms T3a, T3b and T3c.
• On form F in household questionnaire
The purple icon means ‘Ticking this icon will lead you to form H, form A and body T. This arrow tool is useful for at least two reasons: 1) It enables the interviewer to distinguish between those purple icons that lead to the opening of new forms and those that don't, and 2) to guide the data user through the questionnaire when he's trying to link questions to variable names, based on the question identification scheme.

37
5.3.4. Letter and number scheme: the basis of the survey sequence As discussed in section 5.2, each form and each question has an identification code. Moreover, on each form, all questions are numerically ordered and all sub-sections are either numerically (e.g. the tab forms) or alphabetically ordered (e.g. the sub-sections on the T-forms and L-forms). While interviewing a household, it is important that you follow the sequence of the questions and sections as they appear in the survey. Moreover, you should FIRST answer all QUESTIONS (1, 2, 3, etc.) on a form BEFORE moving on to the sub-sections (a, b, etc.). In case the questions are asked from several individuals, animals, land plots, individually, you first answer ALL questions for the first one, then you do the same for the next one, and so on. Once you have completed the questions for all individuals/animals/etc., you move on to the sub-sections, starting with the sub-section for the first individual, then the second, etc. There are some exceptions to this rule, which will be discussed below. Also VERY important in the survey sequence are the validation checks, which should be carried out each time right after completing a form but BEFORE moving on to the next form. Given the great importance of this validation procedure, we will spend an entire section on it in much more detail below (cf. section 4.3.11). Equally important in the sequence of the survey are skips, which will also be discussed in a separate section below (cf. section 4.3.10). Examples:
• Listing questionnaire: The 8 tabs on main form L are numbered, and the sequence of this numbering must be followed while interviewing. You only move on to the next tab once you have entirely completed the previous one.
• On form T2, the questions are numerically ordered from 1 to 7 and this sequence must be followed, conditional on skip pattern:
5.3.5. Going back to the previous form
In case you want to go back to the previous form, you need to tick the button, which is shown in the upper right corner of each form. Note that you will need to do this each time you want to go back from a sub-form to its main form. For instance if you have completed one sub-form and you want to go to the next sub-form of the main form, you always need to go back to the main form to access the next sub-form.
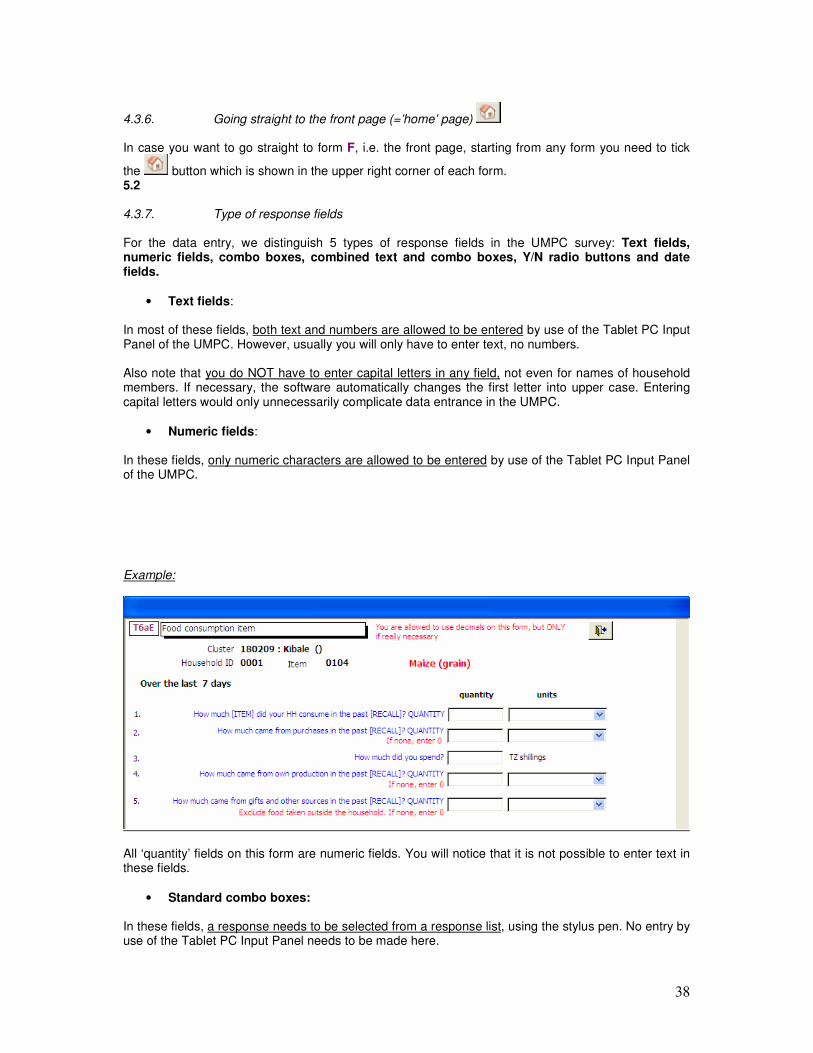
38
4.3.6. Going straight to the front page (=’home’ page) In case you want to go straight to form F, i.e. the front page, starting from any form you need to tick
the button which is shown in the upper right corner of each form. 5.2
4.3.7. Type of response fields For the data entry, we distinguish 5 types of response fields in the UMPC survey: Text fields, numeric fields, combo boxes, combined text and combo boxes, Y/N radio buttons and date fields.
• Text fields:
In most of these fields, both text and numbers are allowed to be entered by use of the Tablet PC Input Panel of the UMPC. However, usually you will only have to enter text, no numbers. Also note that you do NOT have to enter capital letters in any field, not even for names of household members. If necessary, the software automatically changes the first letter into upper case. Entering capital letters would only unnecessarily complicate data entrance in the UMPC.
• Numeric fields:
In these fields, only numeric characters are allowed to be entered by use of the Tablet PC Input Panel of the UMPC. Example:
All ‘quantity’ fields on this form are numeric fields. You will notice that it is not possible to enter text in these fields.
• Standard combo boxes:
In these fields, a response needs to be selected from a response list, using the stylus pen. No entry by use of the Tablet PC Input Panel needs to be made here.

39
Example: On form L1: Before doing anything, the response field to L1Q11 looks as follows:
In order to answer this question, you need to tick by use of your stylus pen the button in the right corner of the response field. The following response field will consequently be shown:
Using your stylus pen, you need to select ONE of the responses in the response list. It is not possible to select more than one response. As an interviewer, you can ignore the codes in between brackets, since these are only relevant for data use purposes.
• Combined text and combo boxes Occasionally (but very rarely) there will be a response field that combines the text and combo box features. When closed, they look exactly the same as a standard combo box. However, the FIRST TIME you answer these questions, the response field will be EMPTY and you will need to enter text by use of the Tablet PC input panel. The text you enter will then be stored in the software memory so that the second time you answer the question, for instance for the next household, all previously entered responses will be shown in the combo box response field. Example: Form L1:
As you can see, the response field L1Q4 is empty the first time you answer this question for that kitongoji. However, once you have entered the neighbourhood for the first household, this neighbourhood will be listed in the response list (combo box) for all following households:
• Yes/No radio buttons : The survey uses Yes/No radio buttons in several sections. The Yes/No radio button set consists of a
pair of two radio buttons, i.e. , one of them representing the ‘yes’ radio button and the other

40
representing the ‘no’ radio button. Before you have answered the question, both radio buttons are grey. Once you have answered the yes/no question by ticking one of the two buttons, however, the one that you have ticked will become black, while the other one will become white. In case you have mistakenly selected the wrong radio button, you can still reverse the black/white colour scheme by ticking the correct radio button. Example: On form T6S:
Before answering this question, the two radio buttons are coloured in grey. Assume the correct answer
to this question is ‘yes’. Using your stylus pen, you then tick the radio button which is located in the ‘yes’ column. The correct response entry to this question will then look as follows:
5.2.1 6.2 4.3.8. ‘Other’ response If the reply by the respondent is not in the list of answers shown in the questionnaire, select ‘other’ in the list. In that case, you will always be asked for details that must be filled in. Example: On form T5d:

41
Note that in the field for ‘Other livestock’, i.e. category 99 on form T5d, you first enter the number of the other livestock, for instance ‘2’. Once you leave that field, a new window will pop up, namely the ‘other code’ window. In that window you must specify the other livestock type. 4.3.9. DON’T KNOW (DK) You should always try to avoid Don’t Know (DK) answers. For every DK you select in the questionnaire, you have to explain the reason for the “Don’t know” in the comment section, i.e. in form T8. How to enter a DK response depends on the field type. For combo boxes, you simply select ‘DK’ from the list. Note, however, that for most questions DK answers are not allowed, hence you cannot select DK in many cases. For text fields, you simply write ‘DK’. For numeric fields where DK answers are allowed, you enter ‘-99’ if you want to answer DK. For Radio buttons: In the consumption section, you should tick ‘yes’ and then enter ‘-99’ in the respective fields. In the asset section, you should not tick any of the radio buttons (hence, leave the answer to this question blank), but in this case do not forget to mention the reason for this in the comments section. But we emphasize that you should ALWAYS try to avoid DK answers. 4.3.10. BLANKS VERSUS SKIPS In the survey, we make a distinction between ‘unconditional fields’ and ‘conditional fields’. Unconditional fields are fields for which an entry is always required, independent of your previous responses. Conditional fields are fields for which the entry requirement is conditional on the response to a previous question. In order to have a logical order in filling in the questionnaire, it has been designed with a system of skips that allow you to follow the logical sequence of questions based on the responses to questions already provided. In some cases, a certain question will no longer apply based on a previous reply. In this case, an automatic skip disables that specific conditional field, which then becomes grey instead of white. It is impossible to make an entry once the field is disabled, i.e. once it is grey. Grey fields must be left blank, while white fields, must be filled in! Leaving white fields blank will lead to MISSING alerts in the alert report, while filling in grey fields will lead to ERROR alerts in the alert report. Cf. infra.

42
Example: Form T3a:
In case the biological father of the child is not alive, it does not make sense (it may even be rather painful) to ask whether the father of the child lives in the household. Hence, question T3aQ9 is conditional on question T3aQ8: It is disabled (grey) as long as the answer to T3aQ8 is not ‘yes’. It only becomes enabled (i.e. white) in case the answer to question T3aQ8 is ‘yes’. We emphasise that it is very important to make sure that there is no data entered in grey fields. It may be, for instance, that at first you have answered a certain question, say question x, such that the conditional field of a following question, say question y, is enabled (white). Hence, following the sequence of the questionnaire, you also make an entry in the white field belonging to question y. If you then for some reason decide to change the answer to question x such that the field of question y gets disabled, i.e. it becomes grey, you must first make sure that you delete the data you had entered in the y field, BEFORE disabling it! Remember that it is not possible to enter/delete data once the field is grey. If you do not do so, the data gets stored in the datafile, even though the field was supposed to be disabled. This would lead to errors in data analysis, which we need to avoid. Example: Form T3a
As you can see, an entry has been made in a GREY field, which is an ERROR, and should be removed. This entry had been made while T3aQ9 was enabled (previously), but it no longer applies. What you should do is the following: You answer ‘yes’ to question 8, after which question 9 becomes enabled. You then delete the entry in that field. Once the field is empty, you switch the answer to question 8 back to ‘no’. 4.3.11. Check scheme

43
VERY important in the survey sequence are the validation checks, which are located on most of the forms. In the view of its great importance, we will spend quite a large part of this manual on its discussion. BEFORE leaving a form once you have completed all of its questions, you should tick the
green check box , if it is located on that form, in order to run the validation process. Any missing fields and/or inconsistencies between question responses will consequently be listed in an alert report. Also, at the entire end of the interview, you should tick the final validation of completed interview check, which will run all validation checks of all forms all over again. Since it is a repeated check procedure serving as a double check, it should not show many new alerts. The alert report distinguishes between three alert types that are listed and discussed in table 4.3. What you should do in case one or more of these alert types appear in your alert report depends on the alert type. Table. 4.3. Type of alerts in alert report
Alert type Type code Description What to do?
Missing M This alert tells you that you have forgotten to fill in a required field
You must immediately go back to that field and make sure that it is filled in. Do not make any changes, however, without asking the respondent the questions again. Run the validation check again to make sure that the missing error has been removed from the alert report.
Error E This alert tells you that you have made an entry error. This can be of different kind.
E.g., you have entered a negative value, while only positive values are allowed for that field
E.g., you have made an entry in a
You must immediately go back to the relevant fields and make the necessary changes until the error alert disappears from the alert report (i.e. after making changes run the validation check again until the error alert disappears).

44
disabled, i.e. grey, field.
E.g., there is an inconsistency between two responses. For instance, if Mary claims to be married to Francis, while Francis claims to be separated.
Do not make any changes, however, without asking the respondent the questions again.
Warning W This alert WARNS you that you MIGHT have made a mistake, but not necessarily so.
E.g., if you have entered a higher level than usual for the level of education completed.
E.g., if you have entered a higher number than usual for the number of rooms used by the household
You should reconsider the relevant question, and make sure that the given information is correct. However, if the given information is correct, you should not make any changes. In that case, the warning alert will NOT disappear from the list, but it can be ignored if you are sure the given information is correct.
Fig. 4.1. Example of an Error report
Cluster ID/Household ID Code for alert type, cf. Table
3 for discussion
= Alert group. It tells you to which section the
alert applies

45
An example of an alert report is shown in the figure here above. (By default the report opens in a small format. You have to tick the screen once with your stylus pen in order to enlarge the report and to be able to read the alerts). Note that right after each alert description in the alert report, there is a code in between brackets. You may ignore it, as it denotes the alert code, which is there rather for design purposes and is not very relevant to you. To close the error report on the UMPC, tick ‘print preview’ in the upper left corner of the report, and then select ‘close’. In the ideal case where there are no errors or warnings detected during the validation process, the following window will pop up once you have ticked a ‘check’ box:
4.3.12. Delete data In rare cases, and only under special circumstances, you may have to delete entire blocks of data: If you want to delete all data of an entire household, for instance, you can do so on the main form T
of that household survey by ticking the button in the upper right corner of that form. This should ONLY be done, of course, in case the data of that household is no longer useful. Once you have
ticked the button, the following window will pop up:
= Entity to which the alert applies. If this is the household as a
whole, it lists ‘Main record’. It not, it is specified. E.g. specific
member name, consumption item, etc.

46
If you are very sure that the data on this household is useless, type DELETE by use of the Tablet PC Input Panel. All data on that household will consequently be deleted. If you want to delete all data of a specific household member, you can do so on form T2 by ticking
the button at the right of this member’s roster line:
Once you have ticked the button, a window will pop up that asks you ‘Do you really want to remove this record?’ Again, only if you are sure that the data on this member is useless, you select ‘yes’. All data on that household member will consequently be deleted.
4.3.13. Indication of last visited section Once you have left a sub-form to go back to its main form, it may be useful to have an indication on that main form that tells you which sub-section you have just visited. This is done by a dotted square
surrounding the icon that gave access to the last visited sub-section . In the figure here above, the interviewer had just visited sub-form a for household member ID 1.
4.3.14. Add new record On several forms, you will have to make a list of names/items, for which you then need to provide more detailed information afterwards. For instance, on form T3 you need to make a list of all the members in the household. On form T5e, you have to make a list of all enterprises the household
owns (if any). Etc. In order to add a record to the list, you need to tick the button, which is each time located on top of the respective form.
4.3.15. Set date and time

47
Another advantage of using an electronic survey is that date and time can be automatically set. You
don’t need to manually enter this data. Simply by ticking the button, the date and time fields are automatically filled in. Example: Form T1:
You should, however, ALWAYS check whether the inserted date and time are consistent with your own watch! It may be that for some reason the UMPC clock is incorrectly installed, which would
lead to incorrect date and time data by use of the button. You should always verify whether the clock is correctly set, BEFORE starting the interview.
4.3.16. Roster button
A very useful tool is the roster button . Ticking this button opens up the following window that summarizes basic roster information:
Using the or button, you can sort the table ascending or descending respectively based on either the household member ID, Name, sex or age. This tool is very useful for instance on form T6e, where some consumption items listed may refer to a specific age category, as in the following example:

48
In order to make the sum of total clothing expenditures of all household members under 15 years old, for instance, you need to know which members exactly this question applies to, so that you can remind the respondent which members’ clothing expenditures you are talking about. Sorting the roster
window by age will facilitate this task.
4.3.17. Scroller
Given the relatively small size of the UMPC, it may be that not all contents of a form are visible. Most of the forms, however, are developed such that they have a scroller utility. A scroller enables you to read all contents of a form, even if they are hidden at first. You should always use the scroller to check whether there are no hidden contents on the form. Example: Form T6S accessed from form T6e
4.1 On this form, many more items are listed than those that are shown on the screen,but they are hidden because the screen is too small. However, by using the scroller, you can scroll down the list. It is very important that your remember this, because often trainees forget this, and then confusion abounds when the alert report lists many missing fields.

49
4.3.18. Filter
Another special tool to note is the ‘Filter’ tool . The usefulness of this tool is to be able to filter out specific items in a list. This might be useful for instance in case you want to review/edit data about one particular item on a list after the list has been completed. This can be a person’s name or certain
shocks in the list of shocks, etc. If you want to return to the complete list of people, simply tick the button once again. Example: Form T5g
On this form, the button enables you to filter out those shocks for which the answer to the question “Affected?” is “yes”.
4.3.19. Sorting tool
The sorting tool is useful to sort items in a list by a certain category. For instance, on form H, you can sort the households in the list by 1) HH number or by 2) head name, or by 3) Kitongoji or by Date & Time:
4.3.20. Change ID
Once you have created a household record by use of form A in the household questionnaire, you can
only change the ID or cluster location of that household by using the button which is located on top of the T body. Ticking this command button will pop up the following form:
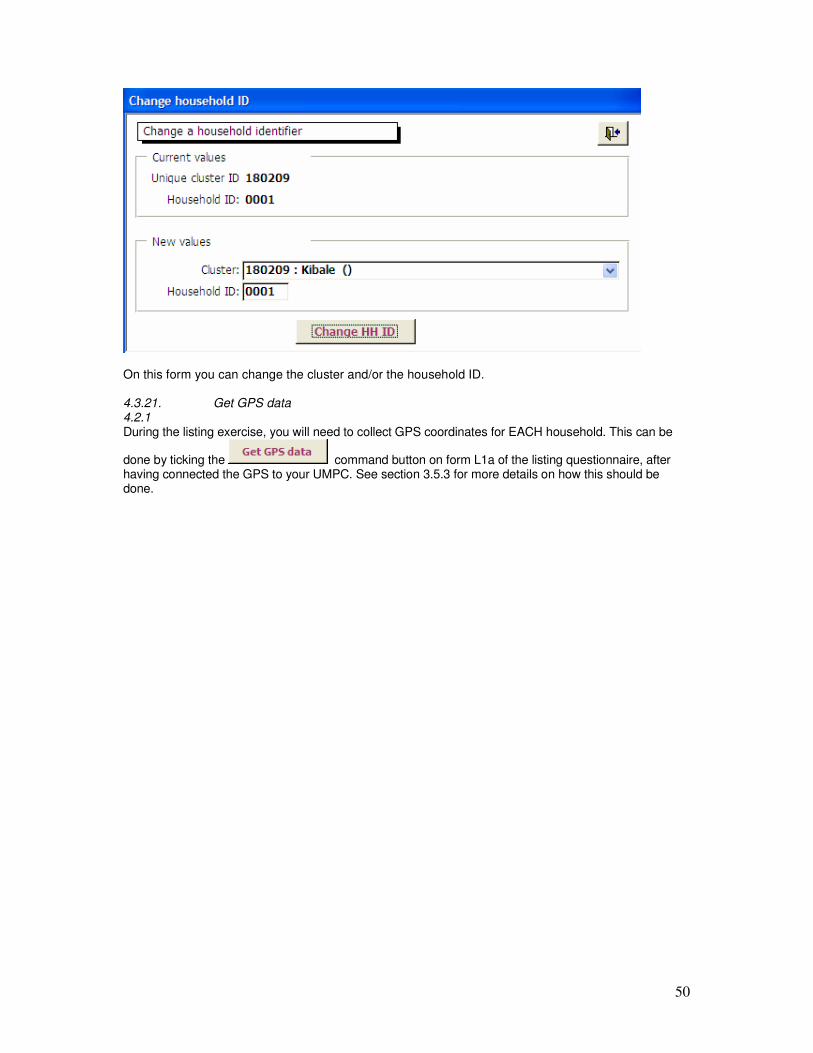
50
On this form you can change the cluster and/or the household ID. 4.3.21. Get GPS data
4.2.1 During the listing exercise, you will need to collect GPS coordinates for EACH household. This can be
done by ticking the command button on form L1a of the listing questionnaire, after having connected the GPS to your UMPC. See section 3.5.3 for more details on how this should be done.

51
5. IMPORTANT DEFINITIONS A DWELLING is the house, houses or apartment in which the household members are presently living. A HOUSEHOLD is one or more persons who usually sleep in the same dwelling and take their meals together. A HOUSEHOLD MEMBER is a person who ate and slept in the household’s dwelling for at least 6 out of the past 12 months. Two exceptions to this rule are tenants or boarders and mkataba servants who may sleep or eat in the household’s dwelling, but SHOULD NOT be classified as a household member. The HOUSEHOLD HEAD is the person identified by the household members themselves as the head. He/she is the person who is named in reply to the question: "Who is the head of this household?" Most often, but not always, it will be the person who is the main provider and who is familiar with all the activities and occupations of household members. The head of the household can be male or female. When determining who is household head, pay attention to the customs and traditions of the area in which you are interviewing. Do not be prejudiced in thinking that only a man can be a household head. In Ngara Kagera for example, if the male head dies, the first wife will often replace him as the head of the household. There are many different types of HOUSEHOLDS, for example:
• a household with a head, his wives and children, his father, nephew, and other persons, whether blood relations or not, who have slept in the same dwelling and taken their meals together for three of the twelve months preceding the interview.
• a household with a single adult.
• a household with a married couple, with or without children.
• a child headed household (household headed by the oldest sibling/orphaned). The household may include several persons who are blood relatives. However, it will only include the members of the extended family who live and take their meals together in the same dwelling for at least three of the last twelve months before the survey. Relatives who do not satisfy this criterion cannot be considered household members for the purpose of the survey. To avoid confusion for the respondents, the interviewer must be careful to explain the survey’s household definition and use the term "kaya" for household, not "familia". If the term "kaya" is not understood, then you need to explain it’s meaning, and differentiate the term from "familia".
THE RESPONDENT is a well informed household member who will answer the questions you ask on behalf of him\herself and the other household members. The PAST 7 DAYS are the 7 days preceding the interview. If the interview is taking place on a Tuesday, then the past 7 days begin on Tuesday a week ago and extend until Monday the day before the interview. The PAST 12 MONTHS are the 12 months preceding the interview. The interviewer must be specific by referring to the same date one year ago. If the interview is on August 1
st 2007, then the interviewer
should ask about activities since August 1st 2006.
4.1

52
6. THE QUESTIONNAIRES IN DETAIL: GENERAL INSTRUCTIONS PER FORM
6.1. INTRODUCTION This part of the manual discusses both the listing and the household questionnaire in detail. The instructions in this manual will be grouped per section (Tab). Within each section, the instructions will be grouped per form. For each section of the questionnaire, the manual presents 3 kinds of information:
• The purpose of the section as a whole and of each of its sub-sections
• General instructions that apply to the entire section or to an entire form
• Specific Instructions that apply to specific questions (Appendix E) The specific instructions to the questions in the questionnaires can be found in Appendix E of this manual. They are grouped together per form and in the sequence in which the questions appear in the electronic survey. You need to have Appendix E in hand while reading part 6 of this manual, since both parts go together: Part 6 has the general instructions per form, while Appendix E contains specific instructions to the questions on those forms. Once you have finished reading the general instructions of one form, you should read the specific instructions to the questions before moving on to the general instructions of the next form. In the near future, the UMPC software is likely to offer a nice tool to recall instructions to a specific question electronically while carrying out the survey. At the moment of this writing, this tool is not yet in place. Hence, we will not elaborate on it at this stage. However, once this tool is developed, we will provide you with an addendum on this. Please do read the remaining parts of the manual with special care and preferably more than once. This is important, because in order to collect high quality information, all interviewers and supervisors must have
• The same understanding of what a question means
• A standard manner of asking the question
• A standard manner of probing for the best possible answer The procedure of opening the program and finding your way to the main body of the questionnaire (the so called ‘Tab forms’) is similar for both the listing and the household questionnaires. Section 6.2 discusses this starting off procedure and the forms that need to be completed on your way to the Tabs. Section 6.3 discusses the general instructions of the main body (the so called L tabs) of the listing questionnaire in detail. This questionnaire is very short. In its full form it should not take more than 8 minutes on average to conduct. Section 6.4 discusses the general instructions of the main body of the household questionnaire (the so called T tabs). This questionnaire is much longer, it takes on average 2.5 hours to conduct. For each of the 2 questionnaires, we will discuss the forms in the same sequence that you as an interviewer will be required to follow.
6.2. STARTING OFF FORMS
For the interviewer, the starting off procedure for the listing and household questionnaires is very similar. After opening the program, on your way to the main body of the questionnaires (the Tabs), you will run through the following 5 forms (in the sequence of appearance):

53
4.2.1 Form S: Select data file form
Listing questionnaire:
This form looks similar for the household questionnaire. Purpose:
This is the first form that opens up once you open the survey program. District, cluster and interviewer name have to be selected here. By doing so, you create a new or enter an existing data file.
General instructions:
Once you have entered the 3 fields on this form, you need to tick the button in order to connect to the datafile. For the HH survey, in case it is the first time you will be entering data for a specific cluster in a district, a window of the following kind will pop up:
If you are sure you entered the correct information on form S (i.e. you are sure you entered the correct region, district and your OWN name – DOUBLE CHECK THIS!), you select ‘yes’, which will bring you straight to form F. From the second time onwards (within one cluster) this ‘done’ window will no longer appear, since the file for that cluster has already been created the first time you connected.
For the listing survey, no such window will pop up. Ticking the button will take you straight to form F. However, your UMPC need to be installed with the datafile containing the village information collected by the (lead) supervisor before the start of the listing exercise.

54
This datafile needs to be installed in your UMPC BEFORE you start listing. If this datafile is not there, you will NOT be able to connect and the following window will pop up:
To ensure that data does not get lost in the (hopefully rare) case that your computer crashes, we have developed a backup system in the listing and HH program. In order to recover data, you need to use
the button. Note that this system SHOULD ONLY BE USED IF THE PROGRAM WAS CRASHED AND THE DATA FILE HAS BEEN LOST! Consult your supervisor in case you have lost data. He/she will then assist you in restoring the data. Ticking the ‘restore’ button will pop up a window of the following kind:
Follow the instructions. Note that the warning tells you when was the datafile was backed up for the last time. In the example, this happened 15 minutes ago. All data that changed within 15 minutes ago will unfortunately be lost. But better to only loose that data, than all of your data… Only if you’re really sure you need the backup, you should enter RESTORE and tick ‘ok. The current datafile will be replaced with the backup one. The data that can be recovered depends on the type of program you are in:
o Listing program: The function will restore the data file exactly as it was before the record which was being edited when the crash occurred. This means that the interviewer should only ever loose 1 HH record. The system keeps 10 backup files.
o Each time you disconnect from a datafile, a backup of the data for that cluster is created. For the interviewer, this is a backup of the datafile of the interviewer for the cluster.
4.2.2 Form F: Home page
For listing questionnaire:
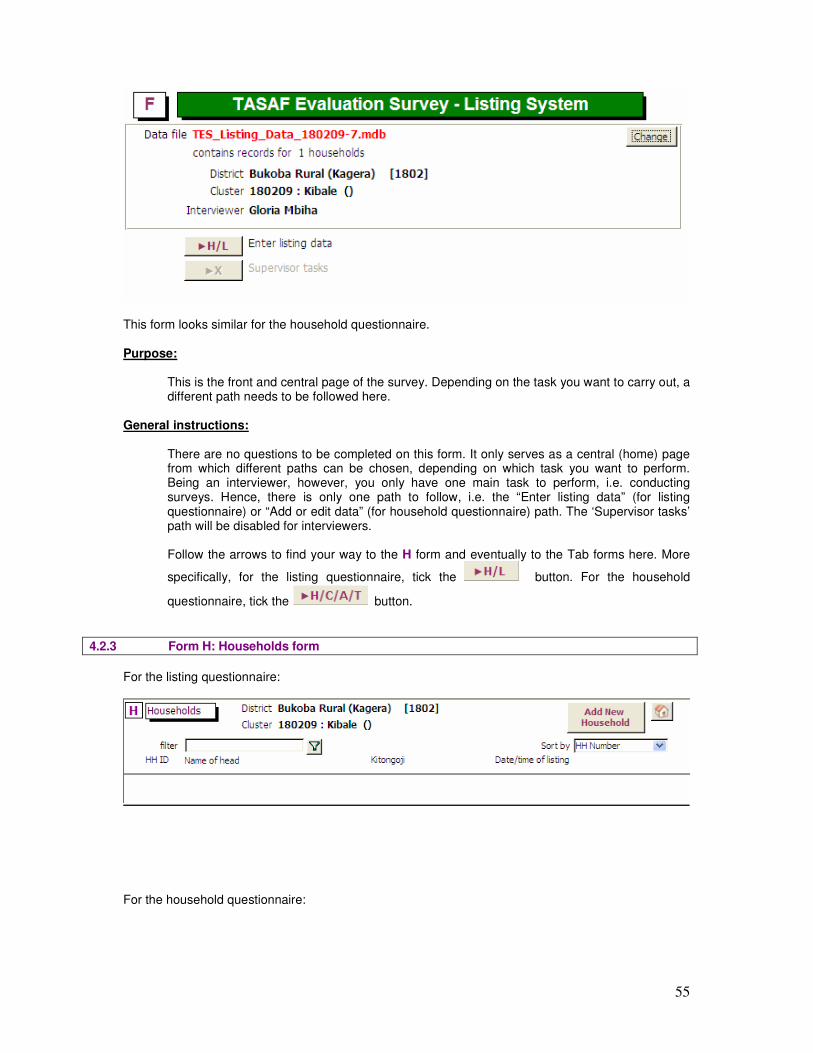
55
This form looks similar for the household questionnaire. Purpose:
This is the front and central page of the survey. Depending on the task you want to carry out, a different path needs to be followed here.
General instructions:
There are no questions to be completed on this form. It only serves as a central (home) page from which different paths can be chosen, depending on which task you want to perform. Being an interviewer, however, you only have one main task to perform, i.e. conducting surveys. Hence, there is only one path to follow, i.e. the “Enter listing data” (for listing questionnaire) or “Add or edit data” (for household questionnaire) path. The ‘Supervisor tasks’ path will be disabled for interviewers. Follow the arrows to find your way to the H form and eventually to the Tab forms here. More
specifically, for the listing questionnaire, tick the button. For the household
questionnaire, tick the button.
4.2.3 Form H: Households form
For the listing questionnaire:
For the household questionnaire:

56
Purpose:
This is the form on which all household records assigned to the interviewer will be listed. Starting from this form, you can create a new household record or you can enter an existing one in order to edit/enter data.
General instructions:
Listing questionnaire: When you arrive at form H for the first time in a cluster for listing, the form will be empty. Each time you arrive at a household for listing, you will need to create a new household record for
that household. You can do so by ticking the button. The listing program will then take you straight to the L Tab forms, but when you return to the H form after completion of the listing survey for the household, the household records will be listed on form H as follows (example):
Besides the HH ID, a few other characteristics of the household will be summarized on form H once the survey is completed: The number of households in total listed by you, the name of head, the kitongoji in which the household’s dwelling is located and date/time of listing are summarized here as well. Moreover, for each record, once the stratum of the household is known (usually only after completion of the household questionnaire), it will be shown in the column at the right hand side of form H in the listing questionnaire. In case you want to edit a listing record after it has been completed, you can go back to the L body of the record by
ticking its button. Note that you will have many records listed at the end of the listing exercise (given that an interviewer lists 45 households on an average day). You can use the Filter tool (cf. section

57
4.3.18) in order to filter out household records for editing. You can also use the Sorting tool (cf. section 4.3.19) if you want to sort the records by category. Household questionnaire: For the household questionnaire, this form will be similar. There are 4 important differences, however. First, the list of household records that are assigned to you by your supervisor for household survey will be pre-populated by your supervisor, i.e. you do not need to create new household records yourself. The only thing you need to do when you want to start editing the record of a
specific household is to tick the button of the respective record which will take you through form C (cf. infra) to the T-body of the household questionnaire. Second, different from the listing program is that you will need to check the ‘ok for transfer’ box of the household record the moment that the record is completed. Only records for which the ‘ok for transfer’ check box are checked will be transferred for review by the supervisor in the evening. It is VERY important not to forget this. Third, for the household questionnaire, the H form does not have the filter and sorting tools, since you will never have a lot of records listed for household survey. Finally, although the list of records on form H will be pre-populated for the household questionnaire, there is a possibility to add a new household record to the form, which should only be done in the rare case that your supervisor asks you to do so. This can be done on
form A which can be accessed by ticking the button. The next sub-section shows this form.
4.2.4 Form A: Add new household
Purpose:
This form only applies to the household questionnaire. As discussed in the previous section, you can create a new household record here, in the rare case that this is necessary.
4.2.5 Form C: Control data

58
Purpose:
Also this form only occurs on your way to the T-body of the household questionnaire. You need to enter information about the household’s availability for interview here.
General instructions:
This form occurs right after you have ticked the button on form H of the household questionnaire. In case the answer to question 1 is ‘yes’ (i.e. the household is available for
interview), the will be enabled and ticking it will take you straight to the T- body of the questionnaire. In case the household is unavailable, you do not have to answer any other question than those on form C. You will have to consult your supervisor in that case, who will provide you with a replacement household.

59
6.3. LISTING QUESTIONNAIRE
Moving your way through the starting off forms will eventually bring you to the main body of the questionnaires, i.e. the Tab body. For the listing questionnaire, this is the so called L body existing of 3 or 8 tabs, depending on whether the household will get a long or short listing form. The software is developed in a way that it randomly determines which households get a very short listing form (only 3 tabs to be completed, 3 minutes survey on average) and which households get a longer listing survey (8 tabs, 8 minutes on average). The reason why some households only get a very short listing survey is because we want to minimize the duration of the listing exercise. When starting the listing survey, by default only 3 tabs will be shown:
When arriving at the end of form L2, the software will randomly determine whether the household gets a short or long listing survey. In case it is selected for a short survey, you move straight from L2 to L8, the finishing form of the survey. In case the household is selected for a long listing survey, all other tabs show up once you arrive at the end of form L2:
In that case, you must also complete tabs 3 to 7 for that household. You will need to follow the sequence of the tabs carefully. Each tab represents a section, which may consist of several forms. Remember to ALWAYS run the validation check procedure BEFORE moving on the next form!! We will now discuss each section of the listing questionnaire separately.
6.3.4. Section 1: Control data
Purpose:
� To collect GPS coordinates of the households � To request information concerning the interviewer’s visit to the household � Detecting TASAF beneficiaries/VEO/Village Chairman in the household, if there are any, on the
basis of the name of the household head, by using a ‘matching’ method.
4.2.2 Form L1: Main form of section 1 – Control data

60
General instructions: This form deviates somewhat from the sequence rules described in section 4.3.4:
• First (BEFORE asking any question), you should go to form L1a in order to capture GPS coordinates of the dwelling (cf. infra)
• Once that is done, you return to L1 in order to answer questions 1-6.
• BEFORE moving on to question 7, you MUST enter form L1b and carry out the matching procedure (cf. infra)
• You then return to L1 and complete questions 7-11
• Before moving on to section L2, you carry out the validation check procedure. Note that this deviates somewhat from the sequence rules because you need to enter sub-forms a and b BEFORE having completed all questions on the form.
.4.5.1.1 Form L1a: Capture GPS data

61
General instructions:
This form can be accessed by ticking on form L1. BEFORE the start of the interview, you need to collect the GPS coordinates of the household. You should ALWAYS do this, even if an interview has not been able to be conducted for one reason or another. Furthermore, you should obviously do this AT THE DWELLING where the household lives, that is NOT at another location, even if the interview had to be conducted somewhere else. Another great advantage of using the UMPC for survey work is that GPS coordinates of households can be automatically captured. There is no need to manually enter the coordinates into the forms. Appendix D of this manual gives a detailed explanation of how to use the GPS. You MUST FOLLOW
THESE INSTRUCTIONS CAREFULLY. Tick the button, and all coordinates will be automatically entered in the fields on form L1a.
.4.5.1.2 Form L1b: Matching procedure

62
General instructions: You have to access this form right after having answered question 6 on L1. In case you forget to do so, the form will automatically pop up once you have completed question 11 (final question of the form). The screen shot here is just an example. The purpose of this form is to detect 1) TASAF members or 2) Village chairman or 3) VEO in a household, if there are any. The way it works is as follows:
� In field L1Q5 you enter the name of the head of the household and in field L1Q6 you enter his/her commonly used name
� The moment you access form L1a a ‘matching’ software starts operating and compares the names you entered with the names on a list of the heads of the households of all TASAF beneficiaries + VEO + village chairman in the village. This list has been pre-entered in the computer before the start of the listing exercise. The matching mechanism matches all names that are phonetically similar.
� The results of the matching process are shown on form L1b. More specifically, it shows you a list of names of TASAF members, VEO or chairman, of whom the household head sounds similar to the name you entered in fields L1Q5 and L1Q6.
� The list shows you o The official name of the head of the household of TASAF members/VEO/Chairperson
in the kitongoji with similar names, together with his/her commonly used name o The name of the TASAF member/VEO/chairperson that is a member of the household
of that household head o The name of the TASAF project that member belongs to (if it is a VEO or chairman
not belonging to a project, that field will be empty) o The name of the kitongoji the household belongs to o The matching score, which indicates how similar the household head name on the
TASAF list and the name you entered in fields L1Q5 and L1Q6 are similar. This score has a range of 0 to 20. The higher the score, the higher the possibility that there is a match, i.e. that a person on the list actually is a member of the household.
o A ‘match’ box (cf. infra) � In case there are no matches, i.e. in case none of the TASAF members/VEO/Chairman in that
kitongoji have a household head of whom the name is similar to the names you entered in fields L1Q5 and L1Q6, the list will be empty:
What to do when form L1b pops up?

63
3 different situations are possible:
1) Form L1b shows you a list of names:
In this case, you should read out to the respondent ALL names listed in column “group member/VEO/Chairperson” (NOT the household heads) on that list, while asking “Is person [GROUP MEMBER/VEO/CHAIRPERSON] a member of this household?”. For instance, in the example in the figure above, you should say “Is Paulina Ndyamakuma” a member of this household?”. Furthermore, in case the commonly used name shown in brackets in the same column differs from the official name, you should verify (as a double check) whether that listed commonly used name could indeed be the person’s commonly used name”. Example: “Do people call Paulina sometimes “Lutane Ndyamukama”?”. If the answer for a certain person is ‘yes’, that means that there is a match and that you should check the ‘Match’ box on the line of that person in the list. DO NOT FORGET TO MATCH IN THIS CASE!!
In case the answer is ‘no’, you should NOT check the ‘Match’ box. You should do this for each and every name listed on form L1b. (Note that your guide is supposed to flag those households in which there are TASAF members/VEO/Chairman. In case you found a match, while your guide did NOT flag the household, you should, after the interview, kindly remind him that he/she should not forget to flag those households.) Once this is done, you go back to form L1 and you move on to question L1Q7.
2) Form L1b does NOT list any names and your guide did NOT flag the
household as having a TASAF member/VEO/Chairperson:
This will be the most common situation. You should not do anything with the list in that case. You go back to form L1 and you move on to question L1Q7.
3) Form L1b does NOT list any names, WHILE your guide DID flag the household as having a TASAF member/VEO/Chairperson:

64
This situation will hopefully be the least common. It means that the matching procedure did not work properly, i.e. that the software did not recognize the names of the household head that you had entered in fields L1Q5 and L1Q6, while the person was on the TASAF list and hence should have been listed. This means that you have to find the match manually. What you should do in this case is the following:
� You tick the button on top of form L1b. A list of all TASAF members/VEO/Chairperson for that kitongoji will pop up
� You search for a name of the household head that looks similar to the name you entered in field L1Q5 (and/or similar commonly used names)
� In case you find one (which you should, since the guide flagged the household), you ask the respondent whether the group member/VEO/Chairman listed on the line of that household head is indeed a member of the household Remember that in case there is more than 1 similar name, you should ask this question for several members.
� If the answer is ‘yes’, you check the ‘match’ box � Once this is done, you go back to form L1 and move on to question
L1Q7. 6.3.5. Section 2: Vulnerable groups
Purpose:
� To detect vulnerable members in the household.
4.2.2 Form L2: Main form of section 2 – Vulnerable groups
General instructions: You will notice that the software will randomly determine whether the household gets a short or long listing survey once you have answered question 10. In case it is selected for a short survey, you go straight to form L8 from here. In case the household is selected for a long survey, you move on to form L3.

65
.4.5.2.1 Form L2a: Disabled persons details
General instructions: This form will automatically pop up in case the answer to question L2Q10 is ‘yes’.
Tick the button in order to add a new record. Only add a record for those members with a disability. For instance, if there are 2 disabled members in the household, you add 2 separate records, one after the other. Note that we are not interested in the name of the persons here.
6.3.6. Section 3: HH Head data
Purpose:
� To request more detailed information about the head of this household (sex, age, education, main occupation, tribe, religion)
4.2.2 Form L3: Main form section 3 – HH Head data

66
6.3.7. Section 4: Amenities
Purpose:
• To collect information on the household’s housing amenities
4.2.2 Form L4: Main form section 4 – Amenities
Questions 7-9 are only enabled if the respondent is the HH head, spouse of HH head, or other adult member. 6.3.8. Section 5: Assets
Purpose:
• To collect information on the household’s assets

67
4.2.2 Form L5: Main form section 5 - Assets
6.3.9. Section 6: Groups & Links
Purpose:
• To collect information on group membership and participation of the household members
• To collect information of the household’s social networks (links with village officials, relatives, etc.).
4.2.2 Form L6: Main form section 6 – Groups & Links

68
6.3.10. Section 7: TASAF info
Purpose:
• To collect information on household’s awareness of and membership in TASAF- and other projects.
4.2.2 Form L7: Main form section 7 – TASAF info
General instructions: The TASAF groups in the village (a maximum of 3) will be listed on this form. In the example here above, there is only 1 group in the village, i.e. Dairy cattle for widows. Hence, questions 3 and 4 should only be asked for this one group. In case there are more groups in the village, a maximum of 3 of them will be listed on the form and for each of them questions 3-4 have to be completed (if the questions are enabled). Question 1 is disabled if the respondent is not the household head, spouse of HH head or other adult member. Question 3 is set automatically to DK in this case. 6.3.11. Section 8: Finish
Purpose:
• To indicate whether a follow-up interview for this household is necessary
• To run final validation check procedure
• To add comments about the interview

69
4.2.2 Form L8: Main form section 8 – Finish
General instructions: In case the answer to L8Q1 = ‘yes’, the form will look as follows:
4.1

70
4.2 6.4. HOUSEHOLD QUESTIONNAIRE
Moving your way through the starting off forms of the household questionnaire, cf. section 6.2, will eventually bring you to the main body of the household questionnaire, i.e. the T-body, existing of 8 different tabs:
You will need to follow the sequence of the tabs carefully. Each tab represents a section, which may consist of several forms. At the moment of this writing, the validation check procedures are not yet implemented in the household questionnaire. This will happen very soon. Once they are there, remember to ALWAYS run the validation check procedure BEFORE moving on the next form!!
We will now discuss each section of the household questionnaire separately.
6.4.1. Section 1: Start
Purpose:
� To request information concerning the interviewer’s visit to the household (Starting time, language of interview, whether interpreter is used)
4.2.2 Form T1: Main form of section 1 – Start
General instructions: The starting time is automatically set the moment you arrive at form T1 (since this is usually the moment that the interview starts). In the rare case that you want to change the starting time, you can tick the
button. If you do so, an alert window will pop up to ask you whether you are sure you want to re-set the starting time. 6.4.2. Section 2: HH Head info
Purpose:

71
• To collect more details about the household head (where raised, religion, tribe).
4.2.2 Form T2: Main form of section 2 – HH head info
General instructions:
Fields T2Q6 and T2Q7 will be pre-populated since they are copied from the information collected during the listing survey. The reason why the questions are repeated here is for confirmation purpose. Please verify the pre-filled answer with the respondent. In case the respondent gives you a different answer, you should ask the question again. Only when you are sure the information is correct, you can change the entry in the respective field. Double clicking field T2Q2 will copy the entry in T2Q1.
6.4.3. Section 3: Roster Purpose:
• To identify all household members, together with their age and sex
• To identify TASAF members in the roster
• To collect basic information such as marital status of the household members and their relationships to the head:
• To collect information on educational background of the household members
• To collect information on the health status of the household members
4.2.2 Form T3: Main form of section 3 – Household Roster
1. Make list of household members
You must start by making a list of all household members’ names, together with their sex and age, i.e. you must first answer questions 1-4 for household member ID 1, then answer questions 1-4 for household member ID 2, etc. until you have answered question 1-4 for all household members.

72
The person listed in the FIRST ROW will always be the HEAD of the household. If the respondent to the questionnaire is not the head of the household, the head of the household will still be listed in the first row (not the respondent). The household head is the person identified by the respondent as the household head. He is the person who is named in reply to the question “who is the head of this household”.
The process of listing household members should be done carefully to ensure that no one is missed. All people who usually eat and sleep in the dwelling are considered to be household members. To ensure complete coverage, the interviewer should explicitly ask about three types of persons which are commonly overlooked by survey respondents:
1) Persons who are temporarily absent; they should be included. 2) Servants makubaliano 3) Infants or small children who have not been listed, as very young
children are often overlooked in accountings of household members. Note:
Children who don’t reside in the household (Example, living with relatives), should not be registered as household members even if their parents live in the respective household. Children at boarding school are also NOT included.
Note that you do NOT need to enter capital letters for names, the software will do this automatically. Also, since often the members have the same family name, it may be useful to know that double clicking the name field will copy the FULL name of the previously listed member. In case both members have the same family name, you then only need to change the first name of the copied name. 2. Relationship to the household’s head Once questions 1 to 4 have been answered for all household members, ask the relationship to the household head (question 5) for each household member, starting with the household’s head him/herself (ID1) and then for the other household members (ID2, ID3, ID4,...). The interviewer will be able to choose the specific kind of relationship to the household’s head from a drop down menu in the survey software. There are 10 possible answers:
(SPECIFY____)....10
3. Education of household members Question 6 only applies to household members who are five years of age or older. This will be automatically filtered by the survey software based on question 3 (the survey software will select only those members who are 5 years of age or older). If the household member has ever been to school,
HEAD.............1 SPOUSE...........2 SON/DAUGHTER.....3 FATHER/MOTHER....4 SISTER/BROTHER...5 NIECE/NEPHEW.....6 GRANDCHILD.......7 OTHER RELATIVE (SPECIFY____)....8 LIVE-INSERVANT...9 OTHER NON RELATIVES

73
proceed with question 7 and ask for the highest level of education completed by the household member. If the household member has never been to school, proceed with question 8 and ask whether he/she is literate (that is, knows how to read AND write). The sequence of questions will be automatically generated by the survey software. Ask questions 6 to 8 for all household members beginning with ID1 (the household’s head). Once questions 6 to 8 have been completed, proceed with question 9 4. Employment of household members. Question 9 asks for the main occupation of each household member. This question only applies to household members who are 7 years of age or older (this will be automatically filtered by the survey software based on question 3). There are nine possible answers:
1.household work 2.traditional farming on the hh farm 3.modern farming on hh farm 4.self employed (off-farm, small enterprise) 5.wage employment farming 6.wage employment off-farm (incl. government) 7.in school or training 8.too old 9.disabled 9.other (Specify____)
4. Health of household members Question 10 is a general question to probe for the extent of morbidity in the household and applies to all household members regardless of age. Once question 10 has been completed, the household roster is finished for the household members who are 5 years or older. Questions 12 to 18 only apply to persons who are under five years of age. Household members will be automatically filtered by the survey software. ). In case there are no such members, this section will be disabled, in which case you will proceed with question 19. If there is at least one such member, ask - for each child under five years of age - questions 12 to 18. Question 14 asks for the exact date of birth of the child as noted on the clinic card. The exact date of birth will be noted in three separate steps (three separate questions): a question for the DAY of birth, a question for the MONTH of birth and a question for the YEAR of birth. For instance, if a child was born on March 12
th 2006, the answer to question 14 will be this:
14 a: 12 14 b: 03 14 c: 06 Question 15 (the exact date the child was last weighted – as noted on the clinic card) will be answered in a similar fashion. The answers to questions 16 to 18 should be copied directly from the clinic card! 5. Miscellaneous The household roster section finishes with three miscellaneous questions. Question 19 asks for the tribe of the household head while question 20 asks for his/her religion. You will be able to choose the designated tribe/religion from a drop down menu in the survey software. Question 21 probes for the behaviour of the household head in case of illness. From a drop down menu in the survey software, select the type of health practitioner consulted by the household head in case of illness.

74
6.4.4. Section 2: Assets and Livestock of the Household
Purpose: To get an idea about the wealth of the household by:
• Collecting information on household land endowments
• Collecting information on ownership of assets
• Collecting information on livestock holdings
1. Household land endowments and land use Question 1 asks whether the household owns any land, while question 2 asks how many hectares (subquestion 2.1) and acres (subquestion 2.2) of land the household owns. If the household does not own any land, the survey software will automatically jump to question 4. Question 3 simply asks whether the household uses irrigation on (parts of) its land. 2. Asset ownership This subsection examines whether the household owns specific functioning assets. For each of the eight assets noted in the questionnaire, ask whether the household owns the asset, and – if the asset is present in the household – how many in total are owned by the household. An asset is ‘owned’ by the household if at least one member of the household owns the asset. If an asset is not present in the household, proceed with the next asset. 3. Livestock ownership This subsection examines whether the household owns specific animals. For each of the six livestock types noted in the questionnaire, ask whether the household owns the animal, and – if the animal is present in the household – how many in total are owned by the household. An animal is ‘owned’ by the household if at least one member of the household owns an animal of this type. If a specific livestock type is not present in the household, proceed with the next type.
6.4.5. Section 3: Living Conditions of the Household Purpose: To get an idea about the living conditions of the household by:
• Collecting information on the household dwelling
• Collecting information on the type of sanitation used by the household
• Collecting information on sources of drinking water and energy used by the household 1. Materials of the household dwelling The first three questions of Section 3 ask for the type of material used to construct the household dwelling’s floor (question 1), walls (question 2) and roof (question 3). You will be able to select the appropriate type of material from a drop down menu in the survey software. 2. Toilet, drinking water and energy Question 4 probes for the type of toilet used by the household. Again, you will be able to select the appropriate type of toilet from a drop down menu in the survey software. Question 5 asks for the main source of drinking water used by the household. You will be able to select this main type from a drop down menu in the survey software. Question 6 is related to the previous question and asks for the time it takes the household to fetch drinking water. Here, we are interested in the total time of a round trip dwelling – source of drinking water – dwelling on foot. Mark the total time it takes for a household member to walk to the source of drinking water, get the water, and walk back to the household dwelling. Note the time in number of hours and number of minutes.

75
Question 7 asks what type of energy the household uses for lightning. You will be able to select the appropriate type from a drop down menu in the survey software. Question 8 is related to question 7 and asks for the time it takes the household to fetch firewood. Here, we are interested in the total time of a round trip dwelling – firewood – dwelling on foot. Mark the total time it takes for a household member to walk to the place where one can get firewood and walk back to the household dwelling. Note the time in number of hours and number of minutes.
6.4.6. Section 4: Transport
Purpose:
• To collect information on the household’s use of existing transport infrastructure
• To collect information on the modes of transportation most frequently used by the household
• To collect information on the time it takes the household to reach important urban centres (district and regional capital)
1. District capital Questions 1 to 5 examine whether household members travel to the district capital, which modes of transportation they use, how long it takes them to get to the district capital and how much it costs. Question 2 asks how (using which mode of transportation) household members generally travel to the district capital. If different household members use different modes of transportation to go to the district capital, or if the same household member sometimes uses one mode of transportation and sometimes another mode, you will list ALL modes of transportation used by household members to get to the district capital. You will be able to select the mode(s) of transportation from a drop down menu in the survey software. Important remark: If a household member first has to walk to a daladala stop in order to take the daladala to the district capital, the mode of transportation is ‘public transport’ and NOT ‘on foot and public transport’. Always note the mode of transportation that covers most of the distance to get to the district capital! Question 3 asks, for each mode of transportation listed in question 2, the ONE-WAY fare to get to the district capital. If the mode of transport listed in question 2 was ‘public transport’, ask for the ONE-WAY bus fare to the district capital. If the mode of transportation was ‘motorcycle’, ask for the ONE-WAY motorcycle fare to the district capital. If there is no fare (for instance, in case of own bicycle, own motorcycle, on foot…), note 0. In the survey software, all modes of transportation recorded in question 2 will automatically be selected for question 3. Question 4 applies to the LAST TIME any of the household members (including the respondent, which will usually be the household head) travelled to the district capital. You will ask for the mode of transportation that was used the last time any of the household members went to the district capital. Question 5 relates to question 4 and asks for the time it took the last time to travel to the district capital (ONE WAY trip). Note the time in hours and minutes.
2. Regional capital If the regional capital is the same as the district capital, the survey software will automatically skip questions 6 to 10! Questions 6 to 10 examine whether household members travel to the regional capital, which modes of transportation they use, how long it takes them to get to the regional capital and how much it costs. Question 7 asks how (using which mode of transportation) household members generally travel to the regional capital. If different household members use different modes of transportation to go to the regional capital, or if the same household member sometimes uses one mode of transportation and sometimes another mode, you will list ALL modes of transportation used by household members to get to the regional capital. You will be able to select the mode(s) of transportation from a drop down menu in the survey software.

76
Important remark: If a household member first has to walk to a daladala stop in order to take the daladala to the regional capital, the mode of transportation is ‘public transport’ and NOT ‘on foot and public transport’. Always note the mode of transportation that covers most of the distance to get to the regional capital! Question 8 asks, for each mode of transportation listed in question 7, the ONE-WAY fare to get to the regional capital. If the mode of transport listed in question 7 was ‘public transport’, ask for the ONE-WAY bus fare to the regional capital. If the mode of transportation was ‘motorcycle’, ask for the ONE-WAY motorcycle fare to the regional capital. If there is no fare (for instance, in case of own bicycle, own motorcycle, on foot…), note 0. In the survey software, all modes of transportation recorded in question 7 will automatically be selected for question 8. Question 9 applies to the LAST TIME any of the household members (including the respondent, which will usually be the household head) travelled to the regional capital. You will ask for the mode of transportation that was used the last time any of the household members went to the regional capital. Question 10 relates to question 9 and asks for the time it took the last time to travel to the regional capital (ONE WAY trip). Note the time in hours and minutes. 3. Other important centres (big towns and border towns) Depending on the district where the interviewed household lives, the survey software will request you to ask a number of additional questions to the respondent: If district = Songea Rural or Namtumbo Questions 12 to 17 examine whether household members travel to Mbinga town, which modes of transportation they use, how long it takes them to get to Mbinga town and how much it costs. Question 13 asks how (using which mode of transportation) household members generally travel to Mbinga town. If different household members use different modes of transportation to go to Mbinga town, or if the same household member sometimes uses one mode of transportation and sometimes another mode, you will list ALL modes of transportation used by household members to get to Mbinga town. You will be able to select the mode(s) of transportation from a drop down menu in the survey software. Important remark: If a household member first has to walk to a daladala stop in order to take the daladala to Mbinga town, the mode of transportation is ‘public transport’ and NOT ‘on foot and public transport’. Always note the mode of transportation that covers most of the distance to get to Mbinga town! Question 14 asks, for each mode of transportation listed in question 13, the ONE-WAY fare to get to Mbinga town. If the mode of transport listed in question 13 was ‘public transport’, ask for the ONE-WAY bus fare to Mbinga town. If the mode of transportation was ‘motorcycle’, ask for the ONE-WAY motorcycle fare to Mbinga town. If there is no fare (for instance, in case of own bicycle, own motorcycle, on foot…), note 0. In the survey software, all modes of transportation recorded in question 13 will automatically be selected for question 14. Question 15 applies to the LAST TIME any of the household members (including the respondent, which will usually be the household head) travelled to Mbinga town. You will ask for the mode of transportation that was used the last time any of the household members went to Mbinga town. Question 16 relates to question 15 and asks for the time it took the last time to travel to Mbinga town (ONE WAY trip). Note the time in hours and minutes. Finally, question 17 asks for the ONE-WAY fare to get to Mbinga town using the specified mode of transportation (specified in question 15). If district = Tanga or Mkinga Questions 12 to 17 examine whether household members travel to the border at Horohoro, which modes of transportation they use, how long it takes them to get to the border at Horohoro and how much it costs. Question 13 asks how (using which mode of transportation) household members generally travel to the border at Horohoro. If different household members use different modes of transportation to go to the

77
border at Horohoro, or if the same household member sometimes uses one mode of transportation and sometimes another mode, you will list ALL modes of transportation used by household members to get to the border at Horohoro. You will be able to select the mode(s) of transportation from a drop down menu in the survey software. Important remark: If a household member first has to walk to a daladala stop in order to take the daladala to the border at Horohoro, the mode of transportation is ‘public transport’ and NOT ‘on foot and public transport’. Always note the mode of transportation that covers most of the distance to get to the border at Horohoro! Question 14 asks, for each mode of transportation listed in question 13, the ONE-WAY fare to get to The border at Horohoro. If the mode of transport listed in question 13 was ‘public transport’, ask for the ONE-WAY bus fare to the border at Horohoro. If the mode of transportation was ‘motorcycle’, ask for the ONE-WAY motorcycle fare to the border at Horohoro. If there is no fare (for instance, in case of own bicycle, own motorcycle, on foot…), note 0. In the survey software, all modes of transportation recorded in question 13 will automatically be selected for question 14. Question 15 applies to the LAST TIME any of the household members (including the respondent, which will usually be the household head) travelled to the border at Horohoro. You will ask for the mode of transportation that was used the last time any of the household members went to the border at Horohoro. Question 16 relates to question 15 and asks for the time it took the last time to travel to the border at Horohoro (ONE WAY trip). Note the time in hours and minutes. Finally, question 17 asks for the ONE-WAY fare to get to the border at Horohoro using the specified mode of transportation (specified in question 15). If district = Mbozi or Sumbawanga Rural Questions 12 to 17 examine whether household members travel to the border at Tunduma, which modes of transportation they use, how long it takes them to get to the border at Tunduma and how much it costs. Question 13 asks how (using which mode of transportation) household members generally travel to the border at Tunduma. If different household members use different modes of transportation to go to the border at Tunduma, or if the same household member sometimes uses one mode of transportation and sometimes another mode, you will list ALL modes of transportation used by household members to get to the border at Tunduma. You will be able to select the mode(s) of transportation from a drop down menu in the survey software. Important remark: If a household member first has to walk to a daladala stop in order to take the daladala to the border at Tunduma, the mode of transportation is ‘public transport’ and NOT ‘on foot and public transport’. Always note the mode of transportation that covers most of the distance to get to the border at Tunduma! Question 14 asks, for each mode of transportation listed in question 13, the ONE-WAY fare to get to The border at Tunduma. If the mode of transport listed in question 13 was ‘public transport’, ask for the ONE-WAY bus fare to the border at Tunduma. If the mode of transportation was ‘motorcycle’, ask for the ONE-WAY motorcycle fare to the border at Tunduma. If there is no fare (for instance, in case of own bicycle, own motorcycle, on foot…), note 0. In the survey software, all modes of transportation recorded in question 13 will automatically be selected for question 14. Question 15 applies to the LAST TIME any of the household members (including the respondent, which will usually be the household head) travelled to the border at Tunduma. You will ask for the mode of transportation that was used the last time any of the household members went to the border at Tunduma. Question 16 relates to question 15 and asks for the time it took the last time to travel to the border at Tunduma (ONE WAY trip). Note the time in hours and minutes. Finally, question 17 asks for the ONE-WAY fare to get to the border at Tunduma using the specified mode of transportation (specified in question 15).

78
6.4.7. Section 5: Economic Activities Purpose:
• To collect information on cultivation of cash crops
• To collect information on non-agricultural activities 1. Cash Crop Cultivation Here we want to know whether the household cultivates cash crops (question 1) and what types of cash crops are cultivated (question 2). In question 2, note the three cash crops that are most important for the household in terms of cash income (if the household only cultivates one or two different cash crops, note these ones). You will be able to select the cash crops from a drop down menu in the survey software. Question 3 asks – for each cash crop listed in question 2 – the total amount of money the household received the last time the household sold its harvest. Note the total amount in TSHS. 2. Non Agricultural Activities In question 1, ask the respondent how many members of his/her household engage (part-time or full-time) in non agricultural activities to generate income. Make the sum of all people in the household who engage in non agricultural activities. Question 2 asks in which sectors the household members who engage in non agricultural activities are employed. If household members are employed in different non-agricultural sectors, list all of them. You will be able to select the sectors in a drop down menu in provided by the survey software. In question 3, mark – for each sector of activity listed in question 2 – the number of household members employed in each sector. The sectors selected in question 2 will automatically be imported in question 3. Finally, in question 4, ask the respondent to estimate the proportion of total household income that is gained through non agricultural activities. This proportion will lay between 0% (no income through non agricultural activities) and 100% (all income gained through non agricultural activities).
6.4.8. Section 6: Networks
Purpose:
• To collect information on the geographic distribution of the respondent’s social networks The questions in this section examine whether the respondent interacts with people from outside the village, outside the district or outside the region. Ask for the last time the respondent visited someone (or received visit from someone) residing in (1) another village within the same district, (2) another district within the same region and (3) another region. You will be able to select the appropriate answer from a drop down menu in the survey software.

79
.4.1.3.1 Form T5h: Credit
When opening the form:
When the answer to question 2 is ‘yes’ and a credit record has been added:

80
General instructions: The sequence of this forms deviates somewhat from the sequence rules:
• You first answer questions 1-2.
• If the answer to T5hQ2 = yes, you make a list of all credit sources. that is you answer questions 1-4 for all credit sources. Once you have made the list, you start entering sub-form a for all listed credit sources. Once that is done, you move on to questions 5-7.
• If the answer to T5hQ2 = no, you go straight to question 5. Note that this deviates from the sequence rules because you need to enter sub-form a BEFORE answering questions 5-7 in case the household has taken credit.
.4.1.3.1.1 Form T5ha: Credit details
.4.1.3.2 Form T5i: Information sources

81
.4.1.3.3 Form T5j: Self-help groups
When opening the form:
If the answer to T5jQ1 = yes:
General instructions: If the answer to T5jQ1 = yes, you need first to make a list of all members in the HH that are member of a self-help group. The way to do this is as follows. The combo box on the form contains all members of the household. Example:

82
6.4.9. Section 7: Finish Purpose:
• To collect information about the status of the interview.
• To run final validation check procedure
4.2.2 Form T7: Main form of section 7 – Finish
General instructions: Do NOT forget to run the final validation check!!!! You should do this BEFORE setting the finish time. 6.4.10. Section 8: Comments Purpose:
• To write any comments that can help with the interpretation of the interview
4.2.2 Form T8: Main form of section 8 – Comments

83
General instructions: Write any comments that can help with the interpretation of the interview. All questionnaires should have something written in the comments box. If there is nothing to comment, then simply write “ok”. Comments could be, for example: “the respondent seemed ill at ease and was not comfortable answering questions about their earnings”, or “the respondent seemed drunk and there was no one else in the household to interview instead of him”. There are several cases in which a comment is compulsory. See section 2.4.2. Other possible comments are comments concerning the validation check procedure. Also these should be written in the comments section. In order to minimize the time spent at the household, we ask you to note down all the possible comments that you think of during the interview in the Window Journal. Afterwards, once you have left the household, you can take your time to copy the comments into the comment section, which may be a bit more time consuming. You can then delete the files in the Window Journal.

84
7. SOME IMPORTANT THINGS TO REMEMBER 4.1
This section contains a summary of the most important points to remember. You should read these several times, until you know them by heart. Please, take this advice seriously. These points are most important for successful completion of this project. This list is NOT exhaustive, and points will be added during training. 7.1. CONCERNING THE USE OF UMPC FOR SURVEYING
• ALWAYS replace the stylus pen in its holder DIRECTLY after use.
• Always close the Tablet PC Input Panel (keyboard) right after using it. It might hide important information on the screen.
• Do not touch the UMPC screen with your hands while entering data with the stylus pen, since this will hinder the contact between the pen and the screen.
• Each evening, hand over all UMPC equipments to your supervisor, together with your Questionnaire Review Booklet. Sign the daily ‘hand over’ check list each time you do so.
• Always decrease the brightness of the screen (by use of Menu Button, cf. Appendix A) once you have entered the household, in order to safe battery life.
• Always switch off the sound of the UMPC (by use of Menu Button, cf. Appendix A) before visiting the household, since sound may take away the concentration of the respondent.
• You are NOT allowed to use internet on the UMPC.
• Frequently check the remaining battery charge. Do so especially before the interview starts and try to avoid changing the battery whilst visiting the household.
• NEVER install any program onto the UMPC. NEVER plug in any device other than your supervisor’s USB stick into the UMPC.
• Use the HOLD function of the UMPC in case you want to avoid changes on the screen while not using the UMPC for as short while (for instance while going from one household to another during listing).
• Use the Windows Journal (cf. Appendix A) in case you want to write some comments to your supervisor DURING the interview. These comments need to be copied in the comments section on form T8 AFTER the interview. By transferring the household record to your supervisor at the end of the day, the comments will be transferred as well.
• When you want to change the battery, make sure your UMPC is switched off first.
• Make sure your UMPC is well protected when it rains!
7.2. GENERAL POINTS
� Each time before leaving the household, double check whether you have with you all things listed in section 2.4.3.
� Remember to fill in EACH enabled (white) field. � Remember to enter comments for EACH household record (not compulsory for listing if there
is nothing unusual). Enter ‘ok’ if there is nothing to comment. � Run the validation check procedure EACH TIME BEFORE MOVING ON TO THE NEXT
FORM and run the final validation check at the end of the interview. � Listing survey:
o ALWAYS run the matching procedure on form L1. o Capture GPS coordinates of EACH dwelling in the village. o Make sure you put a sticker/identifying mark to every listed HH. o Frequently remind your guide that he/she should flag households with TASAF
members/VEO/Village chairman. � Do not waste unnecessary time doing things which are not related to the survey. Especially for
listing, this matters a lot. � Remember to always thank your respondent for the responses and time he/she has spent on
you. � In order to maintain confidentiality, make sure no outsiders (including the guide and/or village
official) are around while interviewing your respondent. � Read this manual several times until you know every point by heart…

85
4.1 Appendix A: getting started with the umpc In general, the functioning of a UMPC is similar to that of a standard computer. The main difference, however, is that a UMPC does not have a keyboard nor a mouse. Instead, it supports a Touch Screen LCD that can be operated with a stylus pen or with your fingers. This section of the manual will guide you through the basic UMPC features that you need to fully understand before using it on the field. Before turning to the discussion on how to use the computer, however, please read the following safety instructions carefully. It is of utter most importance that you do so for security purposes and to prevent damage of the product. 1.1. Safety precautions
- Use related: o Operate the touch screen LCD following the instructions below, i.e. ONLY by use of
the Stylus Pen or your fingers. NEVER use any other object, as sharp objects may scratch or damage the LCD surface.
o Use the computer with special care. Avoid dropping the computer or any of its parts and do not put heavy objects on top of it. Take particular care not to drop the product when using the computer on the stand.
o Keep the UMPC and all its attributes out of reach of children. Take particular care with the Stylus Pen. Children may injure themselves by swallowing it or damaging their eyes. Keep this always in mind while visiting a household.
o Do not place a candle, lighted cigar, etc. over the product. o In case of lightning, immediately turn the system off and disconnect the power cord
from the wall outlet. o Do not connect any devices to the connectors or ports of the computer, unless you
have been permitted to do so by your supervisor. o When the computer is used for a long time, an ‘odd’ smell may arise. Ventilate the
room frequently and use the computer carefully. o Only use computer parts (e.g. batteries) given to you by your supervisor. o When moving the product, turn the power off and separate all connected cables first.
Failing to do so may damage the product or cause users to trip over the cables. o For cleaning the UMPC screen, only use the blue tissue or wet tissues provided to
you by your supervisor. Using a cleansing solution or chemical not explicitly developed for computer use may damage the product.
o Avoid damaging the data on a hard disk drive. A hard disk is extremely sensitive to external impact and may cause data loss on the surface of the disk. Possible causes of data loss:
� Due to an external impact to the disk while assembling or disassembling the computer.
� When the computer is turned off or reset by a power failure while the hard disk drive is in operation.
� Moving the computer or any impact caused to it while the hard disk drive is in operation, may damage the data on the hard disk drive.
- Power related:
o Do not touch the power cord with wet hands, as there is a danger of electric shock. o If the power cord or power outlet makes a noise, disconnect the power cord from the
wall outlet and contact your supervisor, as there is danger of electric shock or fire. o Do not use a damaged or loose power cord or power outlet. o Plug the power cord into the power outlet firmly. Failing to do so may cause fire. o Do not unplug the power cord by pulling only the cable. If the cord is damaged, this
may cause electric shock. o Do not bend the power cord excessively and do not place heavy objects on the power
cord o Keep the power cord out of the reach of infants and pets. o If water or another substance comes into contact with the power input jack or into the
computer, disconnect the power cord and contact your supervisor. o Keep the power cord and power outlet clean.

86
o Never disassemble parts (e.g. the power supply or AC adapter). There is a danger of electric shock. If your computer does not work properly, contact your supervisor instead of trying to fix it yourself.
o Do not block the ports (hole), vents, etc. of the product and take care not to insert any alien substances into the product.
o Do not touch the antenna and power outlet, as there is a danger of electric shock.
- Battery use related : o Do not dispose of non-functioning batteries. Carry them with you and take them back
to the office of E.D.I. Failing to do so may cause fire or an explosion. o Do not throw or disassemble the battery, as this may cause injury, fire or an
explosion. o Avoid contact with metal objects such as car keys or clips when storing or carrying a
battery. Contact with metal may cause excessive current and high temperature and may damage the battery or cause fire.
o Change the battery according to the instructions below. o Do not place the battery into a fire or heat it, as there is a danger of fire or explosion.
1.2. Getting started Keeping all the above precautions in mind, you are now ready to start getting familiar with the UMPC. This section will teach you all the basic things you need to know in order to be able to use it on the field for surveying purposes. The first subsection gives an overview of all the UMPC features, together with a brief explanation of their purposes. Not all of them will be as relevant to your needs, however. The next subsection will focus on those features that are relevant to you and will discuss those in more detail. (In case you do need further information on another feature, we refer to the detailed pdf UMPC manual situated on the UMPC desktop. The exact pages of this pdf manual where you can find information on a specific feature are referred to in the overview here below). a. Overview of all UMPC features

87

88

89

90
b. Discussion of the relevant UMPC features
• Turning the computer on and off
Make sure that you switch the Power switch to the right, NOT to the left, if you want to turn on the computer. Switching it to the left will launch AVStation Now, of which the meaning is irrelevant for your purposes, and will not switch on your computer.
Turning the computer on Stand By If you will not be using the computer for a very short while, you may not want to shut down the computer. In that case, however, please do turn the computer on Stand By in order to safe battery life.
1. Click the start button on the taskbar. 2. Click Turn Off the Computer 3. Click Stand By

91
• How to operate the UMPC
As mentioned above, the UMPC does not have a keyboard nor a mouse. Instead, one has to operate the touch screen LCD with a Stylus Pen or with his fingers. We emphasise again that you may NOT use any other object, since sharp objects may scratch or damage the LCD surface. Removing the Stylus Pen from the computer: Pull the Stylus Pen upwards and out.
When finished, return it to the Stylus Slot! We emphasize that it is VERY important not to forget this, since it is the only object that can be used to operate the UMPC. Please, double check this before you leave a place each time after using the UMPC.
Stylus Pen Functions:
Entering text:
During the survey, you will often have to enter text in the UMPC. You can enter text by using the Tablet PC Input Panel.
The Tablet PC Input Panel is an on-screen letter input pad provided by Windows. With this method, letters are entered by use of the Stylus Pen. There are three ways in which letters can be entered using the Tablet PC: With the Writing Pad, with the Character Pad, and with the On-Screen Keypad. In practice, for your purposes we suggest only using the On-Screen Keypad while entering responses of respondents, and the Writing Pad for entering comments in the Windows Journal.
To open the Tablet PC Input Panel, click on the Tablet PC Input Panel ( ) icon on the taskbar. A picture of the Tablet PC Input Panel is displayed below.

92
(Note that in the figure the Program Notepad is opened only for demonstrative purposes) We recommend that you close the Tablet PC Input Panel each time right after using it, since it may hide important information on the screen. Ignoring this advice may lead you to miss important questions of the questionnaire, so please try to remember thi advice.
• Volume control
You can control the volume with the Volume Control button or Volume Control program.
• Using the Menu Button ( )
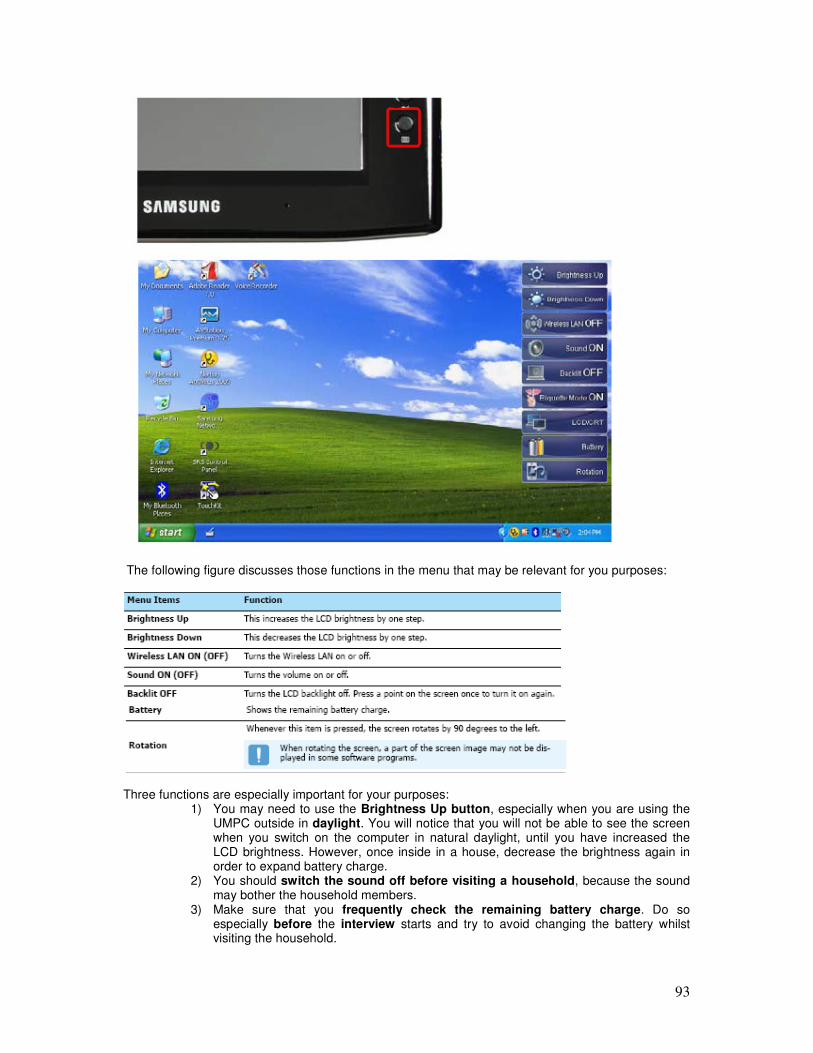
93
The following figure discusses those functions in the menu that may be relevant for you purposes:
Three functions are especially important for your purposes:
1) You may need to use the Brightness Up button, especially when you are using the UMPC outside in daylight. You will notice that you will not be able to see the screen when you switch on the computer in natural daylight, until you have increased the LCD brightness. However, once inside in a house, decrease the brightness again in order to expand battery charge.
2) You should switch the sound off before visiting a household, because the sound may bother the household members.
3) Make sure that you frequently check the remaining battery charge. Do so especially before the interview starts and try to avoid changing the battery whilst visiting the household.

94
• The Quick Launch Button
The Quick Launch Button launches a prior registered program just by pressing this button. At the moment of this writing, the buttons have not yet been installed. But we may pre-install them such that U1 launches the listing questionnaire and U2 launches the household questionnaire for instance.
• The Auto Scaler Button Using this button, you can change the screen resolution. However, we have developed the survey software in a way such that the default resolution, i.e. 800x480 pixels, is most suitable. You should better not change these settings.
• The HOLD switch button When sliding the HOLD switch into the HOLD position (upwards), no buttons will work. To use the computer again, slide the HOLD switch down. You will have to use this UMPC feature on the field. For instance, while listing you should not switch off your computer in between two household visits. Instead, you should switch on the hold button on HOLD before putting it in its protection bag.
• Windows Journal While interviewing, you may want to write down some comments to your supervisor in order not to forget them. Useful for this purpose is Windows Journal, an electronic sheet on which you can write anything you want, by use of your stylus pen. The advantage is that you can use your stylus pen in the same way as you would use a standard pen. We have installed the UMPC such that the u4 button launches Windows Journal. We recommend you to keep this notebook open (though minimized) throughout the interview, so that you can immediately write down anything unusual you encounter. The Windows Journal is also very useful for adding comments in the comments box of each questionnaire. You can copy then into the comment box once you are finished.
• Minimize the Ribbon
It may be that a large menu ribbon appears on the screen of your UMPC. You should always minimize this, but selecting ‘minimize’ the ribbon in the scroll down menu.
• Using the Battery
- Charging the Battery using standard electricity:

95
Once on the field, electricity is often unavailable. Hence, it is important that you carry a spare battery, that you are able to replace them, and that you frequently monitor the Battery Charge.
- Removing and Attaching a Battery:
Double check if the battery latch has been moved inwards!
- Monitoring the Battery Charge:
It is important that you frequently monitor the Battery Charge, BEFORE the interview takes place, and DURING the interview, to make sure that you do not run out of battery while interviewing a household.
o Viewing the battery charge from the Menu Button
o Viewing the battery charge from the Control Panel

96
o Viewing the battery charge on the battery
o Battery warning
c. Questions and answers This section provides information on possible problems and solutions.

97

98
4.1 APPENDIX B: HANDOVER CHECK LIST
DATE handing over SUPERVISOR to INTERVIEWER
DATE handing over INTERVIEWER to SUPERVISOR
Interviewer ID Hand-over
Direction UMPC
UMPC
Cover
UMPC
Bag
Large
Batt.
Small
Batt.
Cleaning
tissue
Stylus
Pen
Qu. Review
Booklet Signature recipient Comments
SUP – INT
1
INT – SUP
SUP – INT
2
INT – SUP
SUP – INT
3
INT – SUP
SUP – INT
4
INT – SUP
SUP – INT
5
INT – SUP
SUP – INT
6
INT – SUP
SUP – INT
7
INT – SUP

99
4.1 APPENDIX C: QUESTIONNAIRE REVIEW BOOKLET
Date
HH ID
First entry? YES / NO
OK? YES / NO
If the comments concern listing, the following
box will be checked:
Comments:
4.1

100
4.1 APPENDIX D: HOW TO USE THE GPS?
It is very important that the GPS units are used correctly. Here are some instructions.
1. ALWAYS TURN ON THE GPS BEFORE TURNING ON OR RESTARTING THE UMPC
2. ALWAYS HOLD THE GPS SO THAT IT CAN ‘SEE’ THE SKY 3. ALWAYS CHECK THAT THE GREEN LIGHT IS FLASHING (move so the
GPS can see the sky and give it time to find the position, this may take up to 2 minutes in sheltered areas)
4. There are now new messages for the GPS a. If you see this message:
then everything is OK, just press ok and continue with the survey.
b. If you see this message:
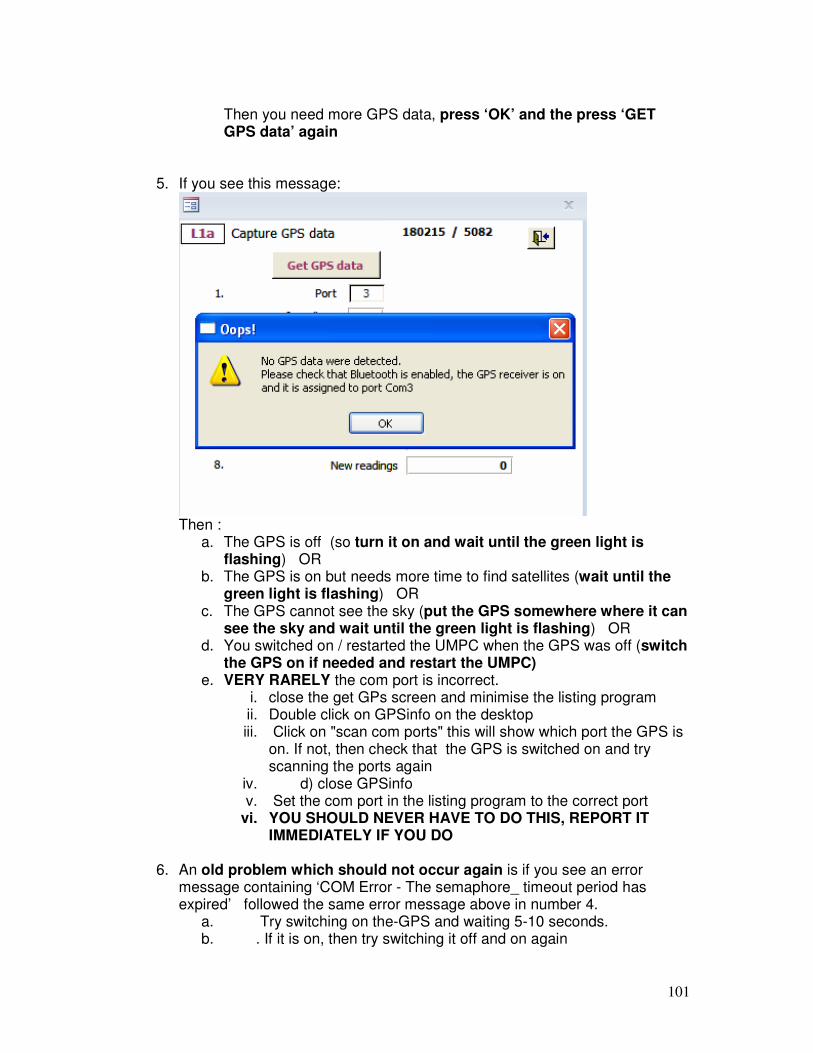
101
Then you need more GPS data, press ‘OK’ and the press ‘GET GPS data’ again
5. If you see this message:
Then :
a. The GPS is off (so turn it on and wait until the green light is flashing) OR
b. The GPS is on but needs more time to find satellites (wait until the green light is flashing) OR
c. The GPS cannot see the sky (put the GPS somewhere where it can see the sky and wait until the green light is flashing) OR
d. You switched on / restarted the UMPC when the GPS was off (switch the GPS on if needed and restart the UMPC)
e. VERY RARELY the com port is incorrect. i. close the get GPs screen and minimise the listing program ii. Double click on GPSinfo on the desktop iii. Click on "scan com ports" this will show which port the GPS is
on. If not, then check that the GPS is switched on and try scanning the ports again
iv. d) close GPSinfo v. Set the com port in the listing program to the correct port
vi. YOU SHOULD NEVER HAVE TO DO THIS, REPORT IT IMMEDIATELY IF YOU DO
6. An old problem which should not occur again is if you see an error message containing ‘COM Error - The semaphore_ timeout period has expired’ followed the same error message above in number 4.
a. Try switching on the-GPS and waiting 5-10 seconds. b. . If it is on, then try switching it off and on again

102
7. Another old problem which should not occur again is the message ’COM
Error: -the system cannot Find the File specified’, followed the same error message above in number 4.
a. Follow the procedure above in number 4 part d. NEVER LOG on as administrator to try to fix it. This can introduce more
problems