Maths JSS 2 Term 2
180
-
Upload
khangminh22 -
Category
Documents
-
view
1 -
download
0
Transcript of Maths JSS 2 Term 2


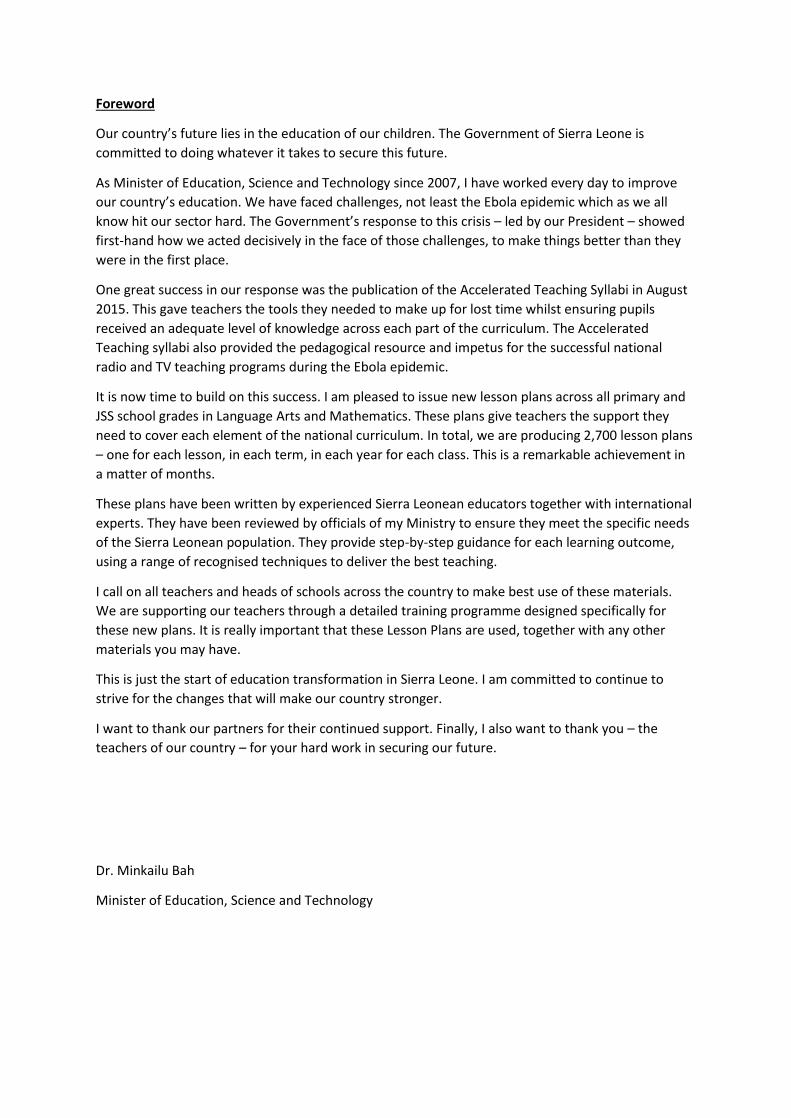
Foreword
Our country’s future lies in the education of our children. The Government of Sierra Leone is
committed to doing whatever it takes to secure this future.
As Minister of Education, Science and Technology since 2007, I have worked every day to improve
our country’s education. We have faced challenges, not least the Ebola epidemic which as we all
know hit our sector hard. The Government’s response to this crisis – led by our President – showed
first-hand how we acted decisively in the face of those challenges, to make things better than they
were in the first place.
One great success in our response was the publication of the Accelerated Teaching Syllabi in August
2015. This gave teachers the tools they needed to make up for lost time whilst ensuring pupils
received an adequate level of knowledge across each part of the curriculum. The Accelerated
Teaching syllabi also provided the pedagogical resource and impetus for the successful national
radio and TV teaching programs during the Ebola epidemic.
It is now time to build on this success. I am pleased to issue new lesson plans across all primary and
JSS school grades in Language Arts and Mathematics. These plans give teachers the support they
need to cover each element of the national curriculum. In total, we are producing 2,700 lesson plans
– one for each lesson, in each term, in each year for each class. This is a remarkable achievement in
a matter of months.
These plans have been written by experienced Sierra Leonean educators together with international
experts. They have been reviewed by officials of my Ministry to ensure they meet the specific needs
of the Sierra Leonean population. They provide step-by-step guidance for each learning outcome,
using a range of recognised techniques to deliver the best teaching.
I call on all teachers and heads of schools across the country to make best use of these materials.
We are supporting our teachers through a detailed training programme designed specifically for
these new plans. It is really important that these Lesson Plans are used, together with any other
materials you may have.
This is just the start of education transformation in Sierra Leone. I am committed to continue to
strive for the changes that will make our country stronger.
I want to thank our partners for their continued support. Finally, I also want to thank you – the
teachers of our country – for your hard work in securing our future.
Dr. Minkailu Bah
Minister of Education, Science and Technology

Table of Contents
Lesson 56: Personal Expenditure 2
Lesson 57: Income Tax 4
Lesson 58: Sales Tax 6
Lesson 59: Time and Duration 9
Lesson 60: Problem Solving with Time 11
Lesson 61: Perimeter and Area of Rectangles and Squares 13
Lesson 62: Perimeter and Area of Parallelograms 16
Lesson 63: Perimeter and Area of Trapeziums 20
Lesson 64: Perimeter and Area of Triangles 23
Lesson 65: Perimeter and Area of Circles 26
Lesson 66: Perimeter and Area of Composite Shapes 29
Lesson 67: Perimeter and Area Story Problems 32
Lesson 68: Volume of Solids 35
Lesson 69: Volume of Cubes 38
Lesson 70: Volume of Rectangular Prisms 40
Lesson 71: Volume of Triangular Prisms 42
Lesson 72: Volume of Cylinders 45
Lesson 73: Volume of Composite Solids 47
Lesson 74: Volume Story Problems 49
Lesson 75: Surface Area of Solids 52
Lesson 76: Surface Area of Cubes and Rectangular Prisms 55
Lesson 77: Surface Area of Rectangular Prisms 58
Lesson 78: Surface Area of Cylinders 60
Lesson 79: Surface Area of Composite Solids 63
Lesson 80: Surface Area Story Problems 66
Lesson 81: Introduction to Angles 69
Lesson 82: Measurement of Angles 72
Lesson 83: Finding Unknown Angles in Triangles 75
Lesson 84: Finding Unknown Angles in Quadrilaterals 79
Lesson 85: Angle Practice 82
Lesson 86: Polygons 85
Lesson 87: Sum of the Interior Angles of a Pentagon 89
Lesson 88: Sum of the Interior Angles of a Polygon 91
Lesson 89: Interior Angle Practice 94
Lesson 90: Interior Angle Story Problems 96
Lesson 91: Introduction to Transformation 98
Lesson 92: Translation 101
Lesson 93: Reflection 104
Lesson 94: Line Symmetry 107
Lesson 95: Rotation 110
Lesson 96: Rotational Symmetry 113
Lesson 97: Enlargement 116
Lesson 98: Combining Transformations 119
Lesson 99: Applying Scale Factor to Drawing 122
Lesson 100: Practical Applications of Scale 125
Lesson 101: Arithmetic Patterns 128
Lesson 102: Creating Arithmetic Patterns 131
Lesson 103: Introduction to Geometric Patterns 133
Lesson 104: Terms of Geometric Patterns 135
Lesson 105: Creating Geometric Patterns 137
Lesson 106: Simplifying Algebraic Expressions 139
Lesson 107: Simplifying Expressions with Higher Powers 141
Lesson 108: Simplifying Expressions with Fractions 143
Lesson 109: Multiplying an Algebraic Expression by an Integer 145
Lesson 110: Multiplying Variables 147
Lesson 111: Multiplying an Algebraic Expression by a Variable 149
Lesson 112: Simplifying and Expanding Algebraic Expressions 151
Lesson 113: Algebraic Expression Story Problems 153
Lesson 114: Factoring Integers from Algebraic Expressions 156
Lesson 115: Factoring Variables from Algebraic Expressions 158
1
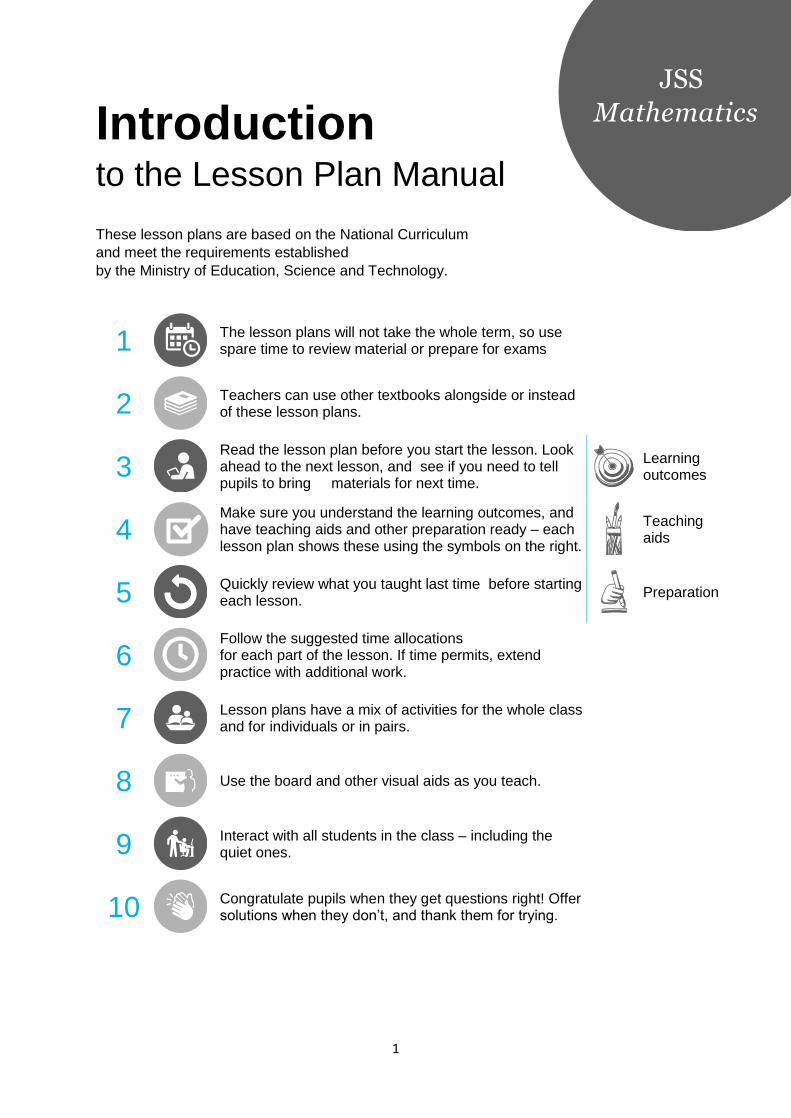
Introduction to the Lesson Plan Manual
These lesson plans are based on the National Curriculum
and meet the requirements established
by the Ministry of Education, Science and Technology.
1
The lesson plans will not take the whole term, so use spare time to review material or prepare for exams
2
Teachers can use other textbooks alongside or instead of these lesson plans.
3
Read the lesson plan before you start the lesson. Look ahead to the next lesson, and see if you need to tell pupils to bring materials for next time.
Learning outcomes
4 Make sure you understand the learning outcomes, and
have teaching aids and other preparation ready – each lesson plan shows these using the symbols on the right.
Teaching aids
5
Quickly review what you taught last time before starting each lesson.
Preparation
6
Follow the suggested time allocations for each part of the lesson. If time permits, extend practice with additional work.
7
Lesson plans have a mix of activities for the whole class and for individuals or in pairs.
8
Use the board and other visual aids as you teach.
9
Interact with all students in the class – including the quiet ones.
10
Congratulate pupils when they get questions right! Offer solutions when they don’t, and thank them for trying.
Mathematics
JSS
2
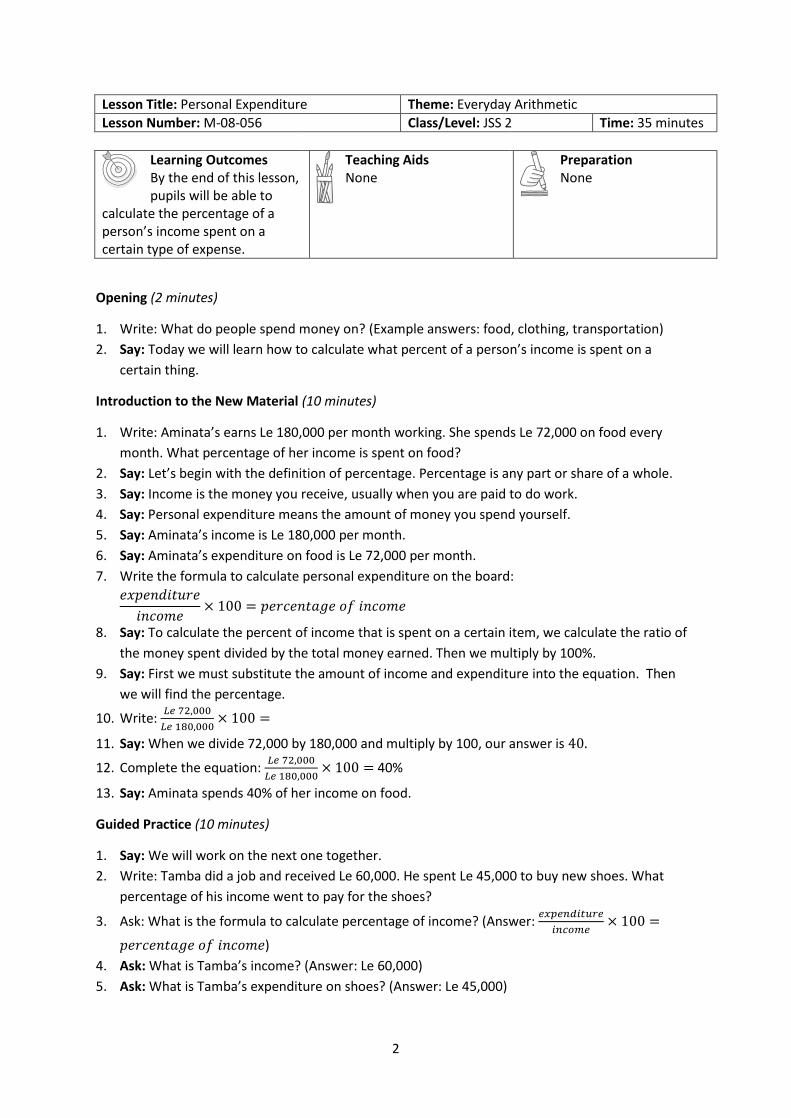
Lesson Title: Personal Expenditure Theme: Everyday Arithmetic
Lesson Number: M-08-056 Class/Level: JSS 2 Time: 35 minutes
Learning Outcomes By the end of this lesson, pupils will be able to
calculate the percentage of a person’s income spent on a certain type of expense.
Teaching Aids None
Preparation None
Opening (2 minutes)
1. Write: What do people spend money on? (Example answers: food, clothing, transportation)
2. Say: Today we will learn how to calculate what percent of a person’s income is spent on a
certain thing.
Introduction to the New Material (10 minutes)
1. Write: Aminata’s earns Le 180,000 per month working. She spends Le 72,000 on food every
month. What percentage of her income is spent on food?
2. Say: Let’s begin with the definition of percentage. Percentage is any part or share of a whole.
3. Say: Income is the money you receive, usually when you are paid to do work.
4. Say: Personal expenditure means the amount of money you spend yourself.
5. Say: Aminata’s income is Le 180,000 per month.
6. Say: Aminata’s expenditure on food is Le 72,000 per month.
7. Write the formula to calculate personal expenditure on the board:
𝑒𝑥𝑝𝑒𝑛𝑑𝑖𝑡𝑢𝑟𝑒
𝑖𝑛𝑐𝑜𝑚𝑒× 100 = 𝑝𝑒𝑟𝑐𝑒𝑛𝑡𝑎𝑔𝑒 𝑜𝑓 𝑖𝑛𝑐𝑜𝑚𝑒
8. Say: To calculate the percent of income that is spent on a certain item, we calculate the ratio of
the money spent divided by the total money earned. Then we multiply by 100%.
9. Say: First we must substitute the amount of income and expenditure into the equation. Then
we will find the percentage.
10. Write: 𝐿𝑒 72,000
𝐿𝑒 180,000× 100 =
11. Say: When we divide 72,000 by 180,000 and multiply by 100, our answer is 40.
12. Complete the equation: 𝐿𝑒 72,000
𝐿𝑒 180,000× 100 = 40%
13. Say: Aminata spends 40% of her income on food.
Guided Practice (10 minutes)
1. Say: We will work on the next one together.
2. Write: Tamba did a job and received Le 60,000. He spent Le 45,000 to buy new shoes. What
percentage of his income went to pay for the shoes?
3. Ask: What is the formula to calculate percentage of income? (Answer: 𝑒𝑥𝑝𝑒𝑛𝑑𝑖𝑡𝑢𝑟𝑒
𝑖𝑛𝑐𝑜𝑚𝑒× 100 =
𝑝𝑒𝑟𝑐𝑒𝑛𝑡𝑎𝑔𝑒 𝑜𝑓 𝑖𝑛𝑐𝑜𝑚𝑒)
4. Ask: What is Tamba’s income? (Answer: Le 60,000)
5. Ask: What is Tamba’s expenditure on shoes? (Answer: Le 45,000)
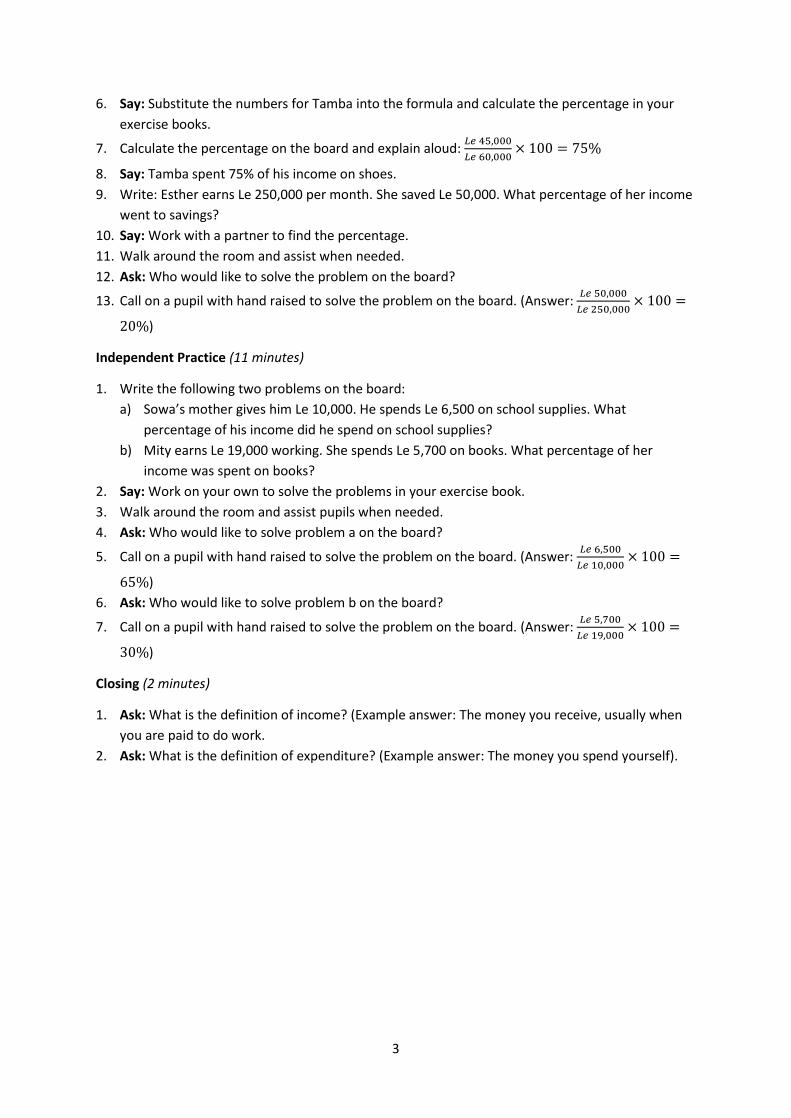
3
6. Say: Substitute the numbers for Tamba into the formula and calculate the percentage in your
exercise books.
7. Calculate the percentage on the board and explain aloud: 𝐿𝑒 45,000
𝐿𝑒 60,000× 100 = 75%
8. Say: Tamba spent 75% of his income on shoes.
9. Write: Esther earns Le 250,000 per month. She saved Le 50,000. What percentage of her income
went to savings?
10. Say: Work with a partner to find the percentage.
11. Walk around the room and assist when needed.
12. Ask: Who would like to solve the problem on the board?
13. Call on a pupil with hand raised to solve the problem on the board. (Answer: 𝐿𝑒 50,000
𝐿𝑒 250,000× 100 =
20%)
Independent Practice (11 minutes)
1. Write the following two problems on the board:
a) Sowa’s mother gives him Le 10,000. He spends Le 6,500 on school supplies. What
percentage of his income did he spend on school supplies?
b) Mity earns Le 19,000 working. She spends Le 5,700 on books. What percentage of her
income was spent on books?
2. Say: Work on your own to solve the problems in your exercise book.
3. Walk around the room and assist pupils when needed.
4. Ask: Who would like to solve problem a on the board?
5. Call on a pupil with hand raised to solve the problem on the board. (Answer: 𝐿𝑒 6,500
𝐿𝑒 10,000× 100 =
65%)
6. Ask: Who would like to solve problem b on the board?
7. Call on a pupil with hand raised to solve the problem on the board. (Answer: 𝐿𝑒 5,700
𝐿𝑒 19,000× 100 =
30%)
Closing (2 minutes)
1. Ask: What is the definition of income? (Example answer: The money you receive, usually when
you are paid to do work.
2. Ask: What is the definition of expenditure? (Example answer: The money you spend yourself).
4
Lesson Title: Income Tax Theme: Everyday Arithmetic
Lesson Number: M-08-057 Class/Level: JSS 2 Time: 35 minutes
Learning Outcomes By the end of this lesson, pupils will be able to
calculate tax on a person’s income.
Teaching Aids None
Preparation None
Opening (5 minutes)
1. Write: Bintu’s income was Le 300,000 and she purchased medicine for Le 12,000; what
percentage of her income did she spend on medicine?
2. Ask: Who would like to solve this problem on the board?
3. Call on a pupil with hand raised to solve the problem on the board. (Answer: 𝑒𝑥𝑝𝑒𝑛𝑑𝑖𝑡𝑢𝑟𝑒
𝑖𝑛𝑐𝑜𝑚𝑒×
100 = 𝑝𝑒𝑟𝑐𝑒𝑛𝑡𝑎𝑔𝑒 𝑜𝑓 𝑖𝑛𝑐𝑜𝑚𝑒 =𝐿𝑒 12,000
300,000= 4%).
4. Say: Bintu spent 4% of her income on medicine.
5. Say: Today our lesson topic is to calculate the sales tax on a transaction.
Introduction to the New Material (13 minutes)
1. Write: Abdul’s income is Le 3,000,000 per year. His income tax rate is 10%. How much tax will he
pay?
2. Say: Income tax is a fee you pay to the government based on your annual. Taxes are how a
government raises money to cover public costs.
3. Write on the board: 𝐼𝑛𝑐𝑜𝑚𝑒 𝑡𝑎𝑥 = 𝑖𝑛𝑐𝑜𝑚𝑒 × 𝑡𝑎𝑥 𝑟𝑎𝑡𝑒.
4. Say: Abdul’s income is Le 3,000,000 per year.
5. Say: The income tax rate is 10%.
6. Say: To use this formula, we must rewrite the tax rate as a fraction.
7. Write: 10% =10
100
8. Say: Now we can substitute the values into the formula on the board: 𝐼𝑛𝑐𝑜𝑚𝑒 𝑡𝑎𝑥 =
𝐿𝑒 3,000,000 ×10
100
9. Solve the problem on the board and explain aloud: 𝐼𝑛𝑐𝑜𝑚𝑒 𝑡𝑎𝑥 = 𝐿𝑒 3,000,000 ×10
100=
30,000,000
100= 𝐿𝑒 300,000.
10. Say: Abdul’s income tax will be Le 300,000 for the whole year. He will owe that money to the
government.
11. Say: The National Revenue Authority collects income tax in Sierra Leone, and you must file
paperwork with them once a year.
Guided Practice (6 minutes)
1. Write: Marima has an annual income of Le 2,850,000. Calculate how much she must pay in
income tax if the rate is 8%.
2. Say: We will solve this problem together.
3. Write: 𝐼𝑛𝑐𝑜𝑚𝑒 𝑡𝑎𝑥 = 𝑖𝑛𝑐𝑜𝑚𝑒 × 𝑡𝑎𝑥 𝑟𝑎𝑡𝑒.
5
4. Say: Write this formula in your exercise book.
5. Ask: What step comes next? (Example answer: substitute in the amounts for income and tax
rate).
6. Say: The tax rate is 8% so we must write it as a fraction.
7. Write: 8% = 8
100
8. Say: Now you can calculate the amount of income tax.
9. Ask: What is the answer? (Answer: 𝐿𝑒 228,000)
10. Write: (Answer: 𝐼𝑛𝑐𝑜𝑚𝑒 𝑡𝑎𝑥 = 𝐿𝑒 2,850,000 ×8
100=
22,800,000
100= 𝐿𝑒 228,000)
11. Say: Please check the work in your exercise book to make sure you have the same answer.
Independent Practice (8 minutes)
1. Write: Jeneba has an annual income of Le 2,460,000. Calculate how much she must pay in
income tax if the rate is 9%.
2. Say: Please work on your own to solve the problem in your exercise book.
3. Walk around the room and assist pupils when needed.
4. Ask: Who would like to solve the problem on the board?
5. Call on a pupil with hand raised to solve the problem on the board. (Answer: 𝐼𝑛𝑐𝑜𝑚𝑒 𝑡𝑎𝑥 =
𝐿𝑒 2,460,000 ×9
100=
22,140,000
100= 𝐿𝑒 221,400)
Closing (3 minutes)
1. Ask: What is income? (Example answer: The money you are paid to receive, usually when you do
work.)
2. Ask: What is the formula to calculate income tax? (Answer: 𝐼𝑛𝑐𝑜𝑚𝑒 𝑡𝑎𝑥 = 𝑖𝑛𝑐𝑜𝑚𝑒 × 𝑡𝑎𝑥 𝑟𝑎𝑡𝑒)
6
Lesson Title: Sales Tax Theme: Everyday Arithmetic
Lesson Number: M-08-058 Class/Level: JSS 2 Time: 35 minutes
Learning Outcomes By the end of this lesson, pupils will be able to
calculate the sales tax on a transaction.
Teaching Aids None
Preparation None
Opening (3 minutes)
1. Write: Calculate the income tax paid if your yearly income is Le 4,000,000 and the rate is 10%.
2. Ask: Who would like to solve this problem on the board?
3. Call on a pupil with hand raised to solve the problem on the board. (Answer: 𝐼𝑛𝑐𝑜𝑚𝑒 𝑡𝑎𝑥 =
𝑖𝑛𝑐𝑜𝑚𝑒 × 𝑡𝑎𝑥 𝑟𝑎𝑡𝑒 = 𝐿𝑒 4,000,000 ×10
100= 𝐿𝑒 400,000).
4. Say: Today our lesson topic is to calculate the sales tax on a transaction.
Introduction to the New Material (8 minutes)
1. Write: Jusu bought lappa for a new suit for Le 80,000. If the sales tax rate is 5%, what is the sales
tax?
2. Say: A tax is a fee you pay. Taxes are how a government raises money to cover public costs.
3. Say: You do not always pay sales tax at every small shop. However, more and more shops are
adding sales tax to the cost of items. This money goes to the government to help Sierra Leone
pay for things we need.
4. Write: 𝑆𝑎𝑙𝑒𝑠 𝑡𝑎𝑥 = 𝑡ℎ𝑒 𝑐𝑜𝑠𝑡 𝑜𝑓 𝑡ℎ𝑒 𝑖𝑡𝑒𝑚 × 𝑡𝑎𝑥 𝑟𝑎𝑡𝑒.
5. Say: The cost of the item is Le 80,000.
6. Say: The tax rate is 5%.
7. Say: To use this formula, we must rewrite the tax rate as a fraction.
8. Say: 5% expressed as a fraction is 5
100.
9. Write: 5% =5
100
10. Substitute the values into the formula on the board: 𝑠𝑎𝑙𝑒𝑠 𝑡𝑎𝑥 =5
100× 𝐿𝑒 80,000
11. Solve the problem on the board and explain aloud: 𝑆𝑎𝑙𝑒𝑠 𝑡𝑎𝑥 =5×80,000
100=
400,000
100= 𝐿𝑒 4,000
12. Say: The sales tax for the lappa is 𝐿𝑒 4000. Jusu will pay Le 4,000 more for sales tax. This means
he pays Le 84,000 in total to get the lappa.
13. Remind pupils that taxes are fees on top of the price.
Guided Practice (10 minutes)
1. Write: Mamie is buying some household goods that cost Le 35,000. If there is 8% sales tax rate,
what is the total cost of the items?
2. Say: We will solve this problem together.
3. Ask: What is the cost of the items? (Answer: 𝑐𝑜𝑠𝑡 = 𝐿𝑒 35,000)
4. Ask: What is the tax rate? (Answer: 𝑅 = 8%)
5. Ask: What is 8% as a fraction? (Answer: 8
100)
7
6. Write: 8
100
7. Ask: What is the first step to solve the problem? (Answer: state the formula)
8. Write: 𝑆𝑎𝑙𝑒𝑠 𝑡𝑎𝑥 = 𝑐𝑜𝑠𝑡 𝑜𝑓 𝑡ℎ𝑒 𝑖𝑡𝑒𝑚 × 𝑡𝑎𝑥 𝑟𝑎𝑡𝑒
9. Say: Write this in your exercise book.
10. Ask: What is the next step? (Answer: substitute the values)
11. Write: 𝑆𝑎𝑙𝑒𝑠 𝑡𝑎𝑥 = 35,000 ×8
100
12. Say: Write this in your exercise book.
13. Ask: What is the next step? (Answer: simplify the values)
14. Write: 𝑆𝑎𝑙𝑒𝑠 𝑡𝑎𝑥 =280,000
100
15. Say: Write this in your exercise book.
16. Ask: What is the last step? (Answer: solve the equation)
17. Write: 𝑆𝑎𝑙𝑒𝑠 𝑡𝑎𝑥 = 𝐿𝑒 2,800
18. Say: Write this in your exercise book.
19. Say: The sales tax for the items is Le 2,800.
20. Say: To find the total cost, add the cost of the item and the sales tax together.
21. Say: Calculate the total cost in your exercise book.
22. Ask: What is the total cost? (Answer: Total cost = 𝐿𝑒 37,800)
23. Write on the board: Total cost= 𝐿𝑒 35,000 + 𝐿𝑒 2,800 = 𝐿𝑒 37,800
24. Say: The total cost of the items is Le 37,800.
25. Write a problem on the board: Sao is saving money to buy a generator. The generator costs Le
900,000 and the sales tax rate is 6%. How much money must she save?
26. Say: Solve the problem with a partner.
27. Walk around the room and assist pupils when needed.
28. Ask: Who would like to calculate the amount of tax he will pay?
29. Call on a pupil with hand raised to solve the equation on the board. (Answer: 𝑠𝑎𝑙𝑒𝑠 𝑡𝑎𝑥 =
900,000 ×6
100=
5,400,000
100= 𝐿𝑒 54,000)
30. Ask: Who would like to calculate the total amount he must save?
31. Call on a pupil with hand raised to solve the equation on the board. (Answer: 𝑇𝑜𝑡𝑎𝑙 𝑐𝑜𝑠𝑡 =
𝑐𝑜𝑠𝑡 𝑜𝑓 𝑡ℎ𝑒 𝑔𝑒𝑛𝑒𝑟𝑎𝑡𝑜𝑟 + 𝑠𝑎𝑙𝑒𝑠 𝑡𝑎𝑥 = 900,000 + 54,000 = 𝐿𝑒 954,000)
32. Say: Sao must save Le 954,000.
Independent Practice (10 minutes)
1. Write the following two problems on the board:
a) Sahr wants to buy goods to sell in the market. The goods cost 280,000 and sales tax is 7%.
How much tax will Sahr have to pay?
b) Mity bought furniture for Le 150,000 and pays a tax of 4%. What is the total cost?
2. Say: Work on your own to solve the problems in your exercise book.
3. Walk around the room and assist pupils when needed.
4. Ask: Who would like to solve problem a on the board?
5. Call on a pupil with hand raised to solve problem a on the board. (Answer: 𝑡𝑎𝑥 =7
100×
280,000 = 𝐿𝑒 19,600)
6. Ask: Who would like to solve problem b on the board?

8
7. Call on a pupil with hand raised to solve problem b on the board. (Answer: 𝑡𝑎𝑥 =4
100×
150,000 = 𝐿𝑒 6,000; the total cost is 150,000 + 6,000 = 𝐿𝑒 156,000)
Closing (4 minutes)
1. Ask: What is the formula we use to calculate sales tax? (Answer: 𝑆𝑎𝑙𝑒𝑠 𝑡𝑎𝑥 =
𝑐𝑜𝑠𝑡 𝑜𝑓 𝑡ℎ𝑒 𝑖𝑡𝑒𝑚 × 𝑡𝑎𝑥 𝑟𝑎𝑡𝑒)
2. Ask: What is the difference between income tax and sales tax? (Example answer: Sales tax is
charged on transactions, it is higher if you spend more. Income tax is on salary)

9
Lesson Title: Time and Duration Theme: Time
Lesson Number: M-08-059 Class/Level: JSS 2 Time: 35 minutes
Learning Outcomes By the end of this lesson,
pupils will be able to: 1. Identify and use language for 12- and 24-hour time. 2. Solve simple problems involving duration.
Teaching Aids None
Preparation None
Opening (3 minutes)
1. Ask pupils the following questions:
a) What are the units we use to count time? (Answer: Seconds, minutes, hours, days, etc.)
b) How many seconds are there in a minute? (Answer: 60 seconds)
c) How many minutes are there in an hour? (Answer: 60 minutes)
d) How many hours are there in a day? (Answer: 24 hours)
2. Ask: What do you do when you need to know the time? (Example answer: Check your phone,
watch or a clock.)
3. Say: Today we will learn to identify 12- and 24-hour time and solve problems involving duration.
Introduction to the New Material (13 minutes)
1. Ask: What time is it? (Allow pupils to answer, for example 9:00am)
2. Say: It is 9 o’clock AM. (Substitute the correct time for your class.)
3. Say: There are two ways to count time. You can count to 12 two times or count to 24 one time.
We start counting the hours in a day at midnight.
4. Say: If you count to 12 two times we call times using ‘AM’ after the number the first time or in
the morning, and ‘PM’ after the number the second time around or in the afternoon and
evening.
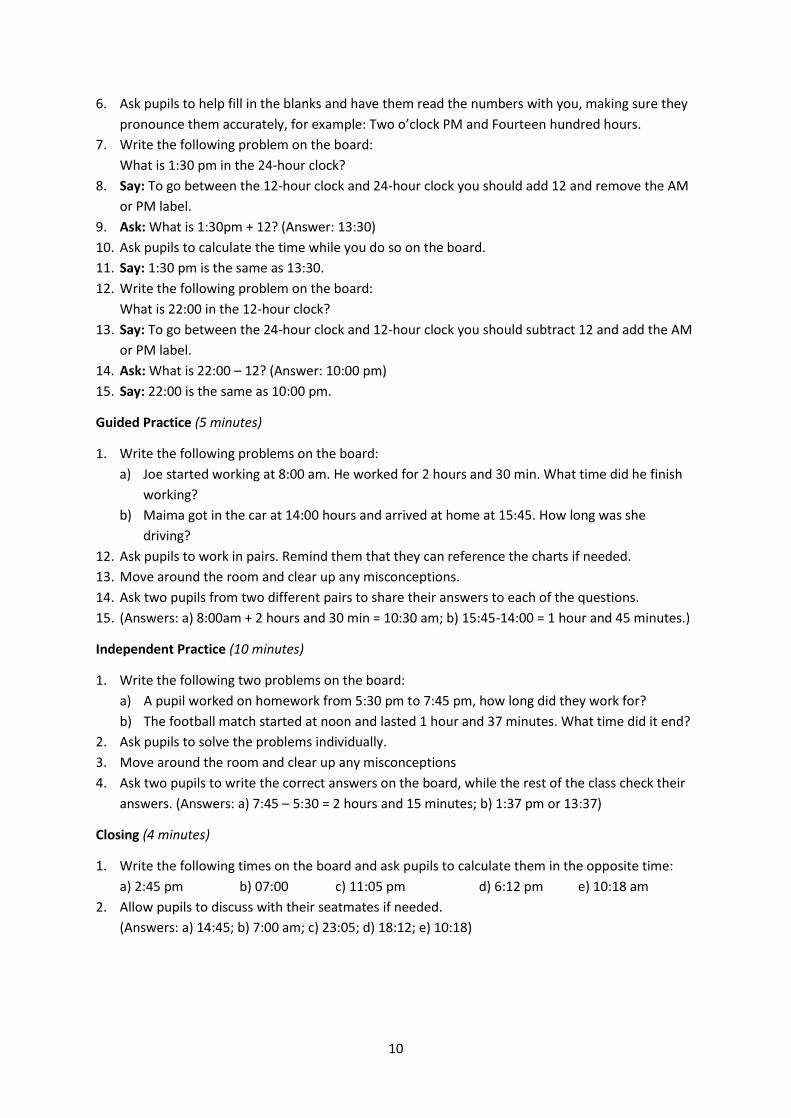
5. Write the following charts on the board with some answers in each column missing:
12-hour 24-hour 12-hour 24-hour
12 am midnight 00:00 12 pm noon 12:00
1 am 01:00 1 pm 13:00
2 am 02:00 2 pm 14:00
3 am 03:00 3 pm 15:00
4 am 04:00 4 pm 16:00
5 am 05:00 5 pm 17:00
6 am 06:00 6 pm 18:00
7 am 07:00 7 pm 19:00
8 am 08:00 8 pm 20:00
9 am 09:00 9 pm 21:00
10 am 10:00 10 pm 22:00
11 am 11:00 11 pm 23:00
10
6. Ask pupils to help fill in the blanks and have them read the numbers with you, making sure they
pronounce them accurately, for example: Two o’clock PM and Fourteen hundred hours.
7. Write the following problem on the board:
What is 1:30 pm in the 24-hour clock?
8. Say: To go between the 12-hour clock and 24-hour clock you should add 12 and remove the AM
or PM label.
9. Ask: What is 1:30pm + 12? (Answer: 13:30)
10. Ask pupils to calculate the time while you do so on the board.
11. Say: 1:30 pm is the same as 13:30.
12. Write the following problem on the board:
What is 22:00 in the 12-hour clock?
13. Say: To go between the 24-hour clock and 12-hour clock you should subtract 12 and add the AM
or PM label.
14. Ask: What is 22:00 – 12? (Answer: 10:00 pm)
15. Say: 22:00 is the same as 10:00 pm.
Guided Practice (5 minutes)
1. Write the following problems on the board:
a) Joe started working at 8:00 am. He worked for 2 hours and 30 min. What time did he finish
working?
b) Maima got in the car at 14:00 hours and arrived at home at 15:45. How long was she
driving?
12. Ask pupils to work in pairs. Remind them that they can reference the charts if needed.
13. Move around the room and clear up any misconceptions.
14. Ask two pupils from two different pairs to share their answers to each of the questions.
15. (Answers: a) 8:00am + 2 hours and 30 min = 10:30 am; b) 15:45-14:00 = 1 hour and 45 minutes.)
Independent Practice (10 minutes)
1. Write the following two problems on the board:
a) A pupil worked on homework from 5:30 pm to 7:45 pm, how long did they work for?
b) The football match started at noon and lasted 1 hour and 37 minutes. What time did it end?
2. Ask pupils to solve the problems individually.
3. Move around the room and clear up any misconceptions
4. Ask two pupils to write the correct answers on the board, while the rest of the class check their
answers. (Answers: a) 7:45 – 5:30 = 2 hours and 15 minutes; b) 1:37 pm or 13:37)
Closing (4 minutes)
1. Write the following times on the board and ask pupils to calculate them in the opposite time:
a) 2:45 pm b) 07:00 c) 11:05 pm d) 6:12 pm e) 10:18 am
2. Allow pupils to discuss with their seatmates if needed.
(Answers: a) 14:45; b) 7:00 am; c) 23:05; d) 18:12; e) 10:18)
11
Lesson Title: Problem Solving with Time Theme: Time
Lesson Number: M-08-060 Class/Level: JSS 2 Time: 35 minutes
Learning Outcomes By the end of this lesson, pupils will be able to
solve story problems involving time and duration.
Teaching Aids None
Preparation None
Opening (3 minutes)
1. Ask the pupils to convert the following times between 12- and 24-hour times.
a) 3:15 pm (Answer: 15:15)
b) 16:45 (Answer: 4:45 pm)
c) 11:30 am (Answer: 11:30)
d) 21:20 (Answer: 9:20 pm)
2. Say: Today we will learn to solve story problems involving time and duration.
Introduction to the New Material (13 minutes)
1. Write the following question on the board:
Momoh worked for 5 and a half hours. He started at 4:15 pm. What time did he finish?
2. Ask pupils to discuss what this question is asking us to do. Allow them to understand that we
need to figure out what time is 5.5 hours after 4:15 pm.
3. Say: To figure out the time, we add 5.5 hours to 4:15pm. But remember you cannot just add like
you would normal numbers.
4. Ask: How many minutes are in half an hour? (Answer: 30 minutes)
5. Say: So when the question says “5 and a half hours”, it means 5 hours and 30 minutes.
6. Say: So let us start with the hours.
7. Write on the board: 4:00pm + 5 hours = 9:00pm.
8. Say: Now let us add the minutes. 15 minutes +30 minutes = 45 minutes.
9. Ask pupils to calculate the time Momoh finished working by adding 45 minutes to 9:00pm.
10. Ask: What time did Momoh finish his work? (Answer: 9:45 pm)
11. Write another question on the board:
Jebbeh started work at 08:00 hours. She worked for 3 hours and 45 min., she took a break for an
hour, and then she worked for another 4 and a half hours. How many hours did she work total,
excluding her break, and what time did she finish working according to a 24 hour clock?
12. Ask pupils to discuss what this question is asking us to do. Allow them to understand that we
need to figure out the number of hours and then add it to the start time.
13. Say: First let us calculate how many hours Jebbeh worked excluding lunch.
14. Ask: What numbers do we need to add together? (Answer: 3 hours 45 minutes, plus 4 hours 30
minutes)
15. Ask pupils to calculate the length of time Jebbeh worked in their exercise books.
16. Write the following steps on the board:
3 ℎ𝑜𝑢𝑟𝑠 + 4 ℎ𝑜𝑢𝑟𝑠 = 7 ℎ𝑜𝑢𝑟𝑠
45 𝑚𝑖𝑛𝑢𝑡𝑒𝑠 + 30 𝑚𝑖𝑛𝑢𝑡𝑒𝑠 = 1 ℎ𝑜𝑢𝑟 15 𝑚𝑖𝑛.
12
17. Ask a pupil to solve the final answer by adding the two times on the board, while the rest of the
class do so in their exercise books. (Answer: 7 ℎ𝑜𝑢𝑟𝑠 + 1 ℎ𝑜𝑢𝑟 15 𝑚𝑖𝑛. = 8 ℎ𝑜𝑢𝑟𝑠 15 𝑚𝑖𝑛𝑢𝑡𝑒𝑠)
18. Say: Jebbeh worked for 8 hours and 15 minutes, excluding her hour long break.
19. Say: Now we need to solve the second part of the question: What time did she finish working?
20. Ask: How do we calculate that? (Answer: Add 8 hr. 15 min. to the time she started, plus 1hr
break)
21. Ask pupils to calculate what time Jebbeh finished working in their exercise books.
22. Ask a pupil to give the answer: 8:00 + 9 hr. 15 min. = 17:15
23. Say: Jebbeh finished work at 17:15.
Guided Practice (6 minutes)
1. Write the following problem on the board:
Bokai spent 1 hour and 25 minutes traveling by car and 55 minutes walking to arrive at his
home. How long was his total travel time? And what time did he begin travelling if he arrived at
home at 3:00pm?
2. Ask pupils to work in pairs.
3. Say: Since the time says 3:00 pm we know it is a 12 hour clock.
4. Move around the room and help pupils who need help.
5. Ask a pair of pupils to show their work for each of the steps to solving the problem.
(Answer: 1 ℎ𝑜𝑢𝑟 + 25 𝑚𝑖𝑛𝑢𝑡𝑒𝑠 + 55 𝑚𝑖𝑛𝑢𝑡𝑒𝑠 = 2 ℎ𝑜𝑢𝑟𝑠 20 𝑚𝑖𝑛𝑢𝑡𝑒𝑠; 3: 00𝑝𝑚 −
2 ℎ𝑜𝑢𝑟𝑠 20 𝑚𝑖𝑛𝑢𝑡𝑒𝑠 = 12: 40 𝑝𝑚)
Independent Practice (10 minutes)
1. Write the following problem on the board:
In the morning Paul spends 10 minutes getting dressed, 20 minutes doing chores, 15 minutes
eating breakfast, and 30 minutes traveling to school. How much time does he spend between
waking up and arriving at school? What time must he wake up if he wants to be on time for
school at 8:00 am?
2. Ask pupils to solve the problems individually.
3. Move around the room and assist pupils who need help.
4. Ask a pupil to write the correct answers on the board while the rest of the class check the
answers in their exercise books. Answers:
10 𝑚𝑖𝑛𝑢𝑡𝑒𝑠 + 20 𝑚𝑖𝑛𝑢𝑡𝑒𝑠 + 15 𝑚𝑖𝑛𝑢𝑡𝑒𝑠 + 30 𝑚𝑖𝑛𝑢𝑡𝑒𝑠 = 75 𝑚𝑖𝑛𝑢𝑡𝑒𝑠; 75 𝑚𝑖𝑛𝑢𝑡𝑒𝑠
= 1 ℎ𝑜𝑢𝑟 15 𝑚𝑖𝑛𝑢𝑡𝑒𝑠. 𝑆𝑜, 𝑃𝑎𝑢𝑙 𝑚𝑢𝑠𝑡 𝑤𝑎𝑘𝑒 𝑢𝑝 𝑎𝑡 6: 45𝑎𝑚 𝑡𝑜 𝑎𝑟𝑟𝑖𝑣𝑒 𝑎𝑡 𝑠𝑐ℎ𝑜𝑜𝑙 𝑏𝑦 8: 00𝑎𝑚
Closing (3 minutes)
1. Ask pupils the following questions as review:
a) What are units of time? (Answers: minutes, hours, seconds, days, etc.)
b) How many minutes are in an hour? (Answer: 60 minutes)
c) How many minutes in half an hour? (Answer: 30 minutes)
d) How many hours in half a day? (Answer: 12 hours)
2. Allow pupils to discuss and then call on 4 volunteers to quickly share their answers.
13
Lesson Title: Perimeter and Area of Rectangles and Squares
Theme: Measurement and Estimation
Lesson Number: M-08-061 Class/Level: JSS 2 Time: 35 minutes
Learning Outcomes By the end of the lesson, pupils will be able to
find the perimeter and area of rectangles and squares.
Teaching Aids None
Preparation None
Opening (3 minutes)
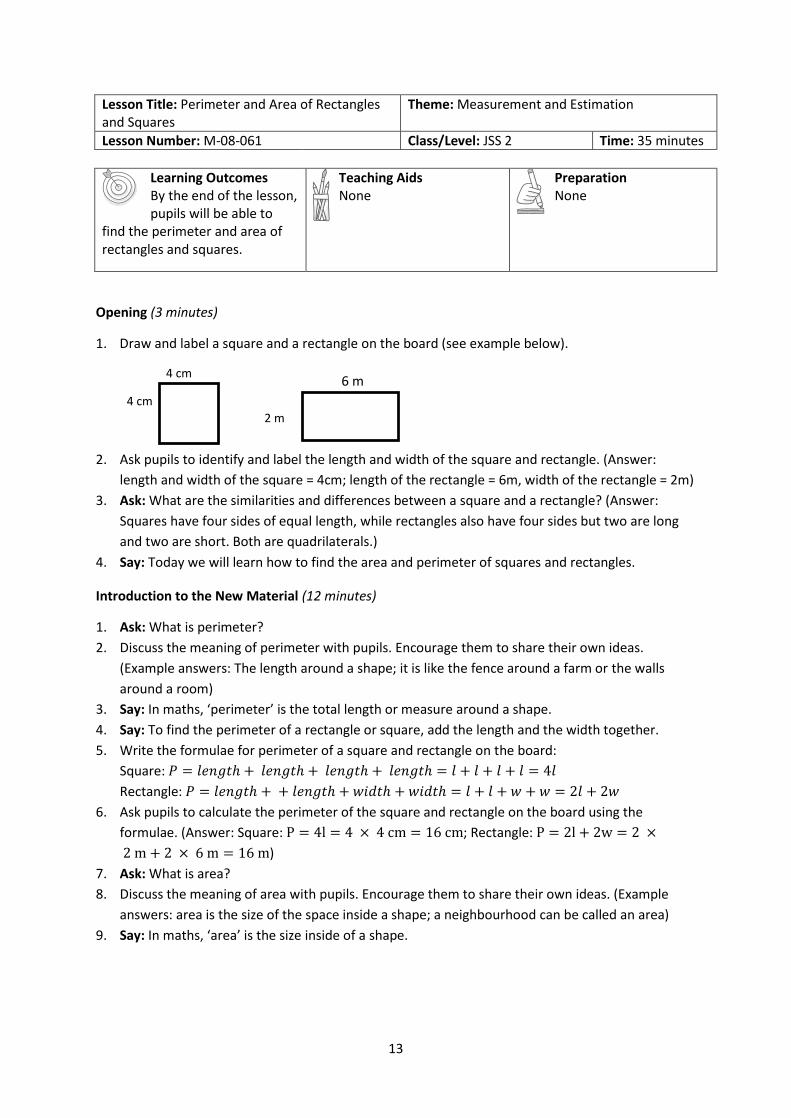
1. Draw and label a square and a rectangle on the board (see example below).
2. Ask pupils to identify and label the length and width of the square and rectangle. (Answer:
length and width of the square = 4cm; length of the rectangle = 6m, width of the rectangle = 2m)
3. Ask: What are the similarities and differences between a square and a rectangle? (Answer:
Squares have four sides of equal length, while rectangles also have four sides but two are long
and two are short. Both are quadrilaterals.)
4. Say: Today we will learn how to find the area and perimeter of squares and rectangles.
Introduction to the New Material (12 minutes)
1. Ask: What is perimeter?
2. Discuss the meaning of perimeter with pupils. Encourage them to share their own ideas.
(Example answers: The length around a shape; it is like the fence around a farm or the walls
around a room)
3. Say: In maths, ‘perimeter’ is the total length or measure around a shape.
4. Say: To find the perimeter of a rectangle or square, add the length and the width together.
5. Write the formulae for perimeter of a square and rectangle on the board:
Square: 𝑃 = 𝑙𝑒𝑛𝑔𝑡ℎ + 𝑙𝑒𝑛𝑔𝑡ℎ + 𝑙𝑒𝑛𝑔𝑡ℎ + 𝑙𝑒𝑛𝑔𝑡ℎ = 𝑙 + 𝑙 + 𝑙 + 𝑙 = 4𝑙
Rectangle: 𝑃 = 𝑙𝑒𝑛𝑔𝑡ℎ + + 𝑙𝑒𝑛𝑔𝑡ℎ + 𝑤𝑖𝑑𝑡ℎ + 𝑤𝑖𝑑𝑡ℎ = 𝑙 + 𝑙 + 𝑤 + 𝑤 = 2𝑙 + 2𝑤
6. Ask pupils to calculate the perimeter of the square and rectangle on the board using the
formulae. (Answer: Square: P = 4l = 4 × 4 cm = 16 cm; Rectangle: P = 2l + 2w = 2 ×
2 m + 2 × 6 m = 16 m)
7. Ask: What is area?
8. Discuss the meaning of area with pupils. Encourage them to share their own ideas. (Example
answers: area is the size of the space inside a shape; a neighbourhood can be called an area)
9. Say: In maths, ‘area’ is the size inside of a shape.
6 m 4 cm
4 cm
2 m
14
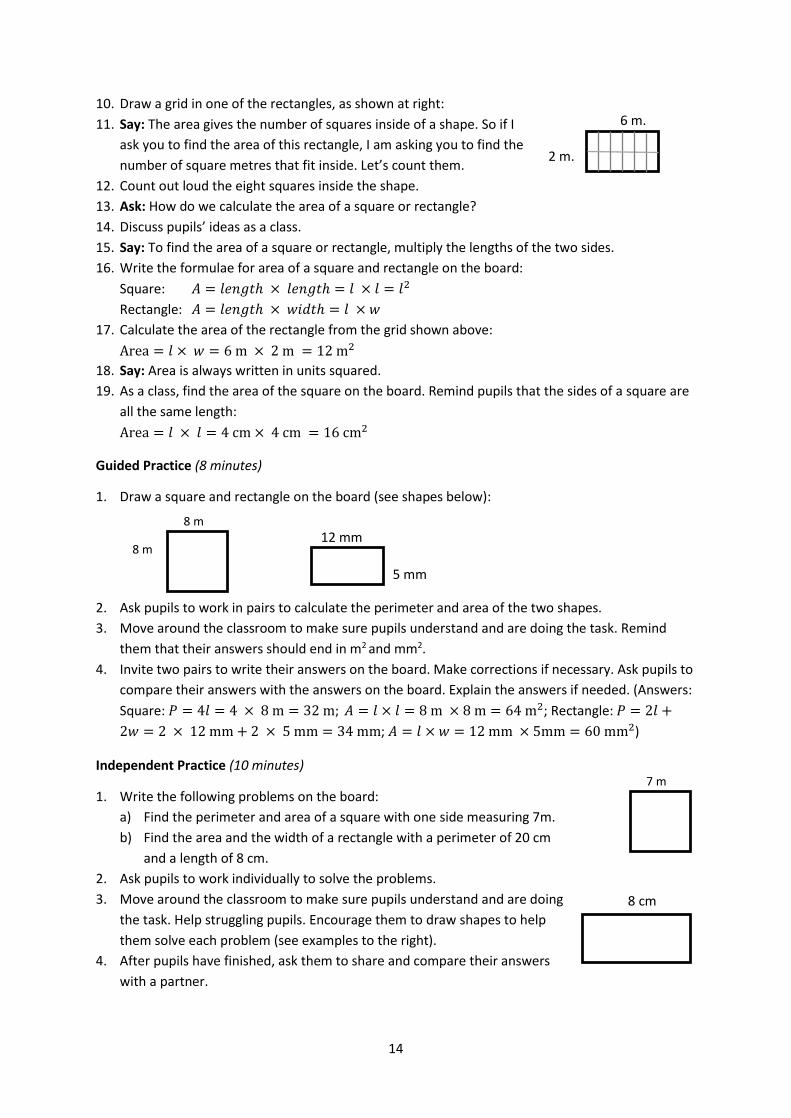
10. Draw a grid in one of the rectangles, as shown at right:
11. Say: The area gives the number of squares inside of a shape. So if I
ask you to find the area of this rectangle, I am asking you to find the
number of square metres that fit inside. Let’s count them.
12. Count out loud the eight squares inside the shape.
13. Ask: How do we calculate the area of a square or rectangle?
14. Discuss pupils’ ideas as a class.
15. Say: To find the area of a square or rectangle, multiply the lengths of the two sides.
16. Write the formulae for area of a square and rectangle on the board:
Square: 𝐴 = 𝑙𝑒𝑛𝑔𝑡ℎ × 𝑙𝑒𝑛𝑔𝑡ℎ = 𝑙 × 𝑙 = 𝑙2
Rectangle: 𝐴 = 𝑙𝑒𝑛𝑔𝑡ℎ × 𝑤𝑖𝑑𝑡ℎ = 𝑙 × 𝑤
17. Calculate the area of the rectangle from the grid shown above:
Area = 𝑙 × 𝑤 = 6 m × 2 m = 12 m2
18. Say: Area is always written in units squared.
19. As a class, find the area of the square on the board. Remind pupils that the sides of a square are
all the same length:
Area = 𝑙 × 𝑙 = 4 cm × 4 cm = 16 cm2
Guided Practice (8 minutes)
1. Draw a square and rectangle on the board (see shapes below):
2. Ask pupils to work in pairs to calculate the perimeter and area of the two shapes.
3. Move around the classroom to make sure pupils understand and are doing the task. Remind
them that their answers should end in m2 and mm2.
4. Invite two pairs to write their answers on the board. Make corrections if necessary. Ask pupils to
compare their answers with the answers on the board. Explain the answers if needed. (Answers:
Square: 𝑃 = 4𝑙 = 4 × 8 m = 32 m; 𝐴 = 𝑙 × 𝑙 = 8 m × 8 m = 64 m2; Rectangle: 𝑃 = 2𝑙 +
2𝑤 = 2 × 12 mm + 2 × 5 mm = 34 mm; 𝐴 = 𝑙 × 𝑤 = 12 mm × 5mm = 60 mm2)
Independent Practice (10 minutes)
1. Write the following problems on the board:
a) Find the perimeter and area of a square with one side measuring 7m.
b) Find the area and the width of a rectangle with a perimeter of 20 cm
and a length of 8 cm.
2. Ask pupils to work individually to solve the problems.
3. Move around the classroom to make sure pupils understand and are doing
the task. Help struggling pupils. Encourage them to draw shapes to help
them solve each problem (see examples to the right).
4. After pupils have finished, ask them to share and compare their answers
with a partner.
8 m
8 m
12 mm
5 mm
6 m.
2 m.
8 cm
7 m
15
5. Invite two pupils to write their answers on the board. Make corrections if necessary. Ask pupils
to compare their answers with the answers on the board. Explain the answers if needed.
(Answers: a) 𝑃 = 4𝑙 = 4 × 7𝑚 = 28𝑚.; 𝐴 = 𝑙 × 𝑙 = 7 m × 7 m = 49 m2; b) 𝑙 = 8𝑐𝑚. , 𝑤 =
2 𝑐𝑚. ; 𝑃 = 2𝑙 + 2𝑤 = 2 × 8𝑐𝑚 + 2 × 2𝑐𝑚 = 20𝑐𝑚; 𝐴 = 𝑙 × 𝑤 = 8cm × 2cm = 16 cm2)
Closing (2 minutes)
1. Ask: When would you use perimeter and area in everyday life? Discuss the answers as a class.
(Example answers: To know the amount of mats to be purchased for a room; to know the length of
fence to be purchased for a square garden.)

16
Lesson Title: Perimeter and Area of Parallelograms
Theme: Measurement and Estimation
Lesson Number: M-08-062 Class/Level: JSS 2 Time: 35 minutes
Learning Outcomes By the end of the lesson,
pupils will be able to find the perimeter and area of parallelograms, including rhombuses.
Teaching Aids None
Preparation None
Opening (3 minutes)
1. Ask: What is the difference between perimeter and area? (Example answer: Perimeter is the
total length around the outside of a shape, while area is the space inside a shape.)
2. Write: Find the perimeter and area of the square:
3. Ask: What is the answer for the perimeter? (Answer: 16)
4. Ask: What is the answer for the area? (Answer: 16 cm2)
5. cm2)
6. Say: Today, we are going to learn about the perimeter and area of shapes other than squares
and rectangles.
Introduction to the New Material (15 minutes)
1. Draw the plane shapes below on the board.
2. Say: Please draw these shapes in your exercise book.
3. Say: All of these shapes are quadrilaterals, meaning they have four sides. They are also
parallelograms.
4. Say: A parallelogram is a four-sided plane figure with opposite sides parallel.
5. Label the shapes: Rectangle, square, parallelogram, and rhombus.
6. Say: Please label the shapes in your exercise book.
7. Say: Rectangle, square, and rhombus are special kinds of parallelograms.
8. Say: The small lines show sides that are equal in length. If the sides in a shape have one small
line marked on them, they are equal. If they have 2 small lines, those are equal to each other
too.
9. Say: A rhombus is a parallelogram with four equal sides.
10. Say: For parallelograms and rhombuses, we can use the same formulae for perimeter that we
used for rectangles and squares.
11. Say: We use different, special formulae to find the area of
parallelograms and rhombuses.
12. Label the parallelogram on the board:
4 cm
9 m
14 m

17
13. Say: The formula for perimeter of a rectangle is 𝑃 = 𝑙𝑒𝑛𝑔𝑡ℎ + 𝑙𝑒𝑛𝑔𝑡ℎ + 𝑤𝑖𝑑𝑡ℎ + 𝑤𝑖𝑑𝑡ℎ
14. Write: 𝑃 = 𝑙𝑒𝑛𝑔𝑡ℎ + 𝑙𝑒𝑛𝑔𝑡ℎ + 𝑤𝑖𝑑𝑡ℎ + 𝑤𝑖𝑑𝑡ℎ = 𝑙 + 𝑙 + 𝑤 + 𝑤 = 2𝑙 + 2𝑤
15. Write: 𝑃 = 2𝑙 + 2𝑤 = 2 × 14 𝑚 + 2 × 9 𝑚 = 46 𝑚
16. Say: The perimeter of the parallelogram is 46 m.
17. Label the rhombus on the board and Say: Please label the rhombus in your exercise book.
18. Write: 𝑃 = 𝑙 + 𝑙 + 𝑙 + 𝑙 = 4𝑙
19. Say: This is the formula for the perimeter of a square.
20. Calculate the perimeter of the rhombus on the board using the formula.
21. Write: 𝑃 = 4𝑙 = 4 × 9 𝑚 = 36 𝑚
22. Say: The perimeter of this rhombus is 36 m. Please copy the equation and solution into your
address book.
23. Say: The perimeter of the rhombus is 36 m.
24. Say: Now let’s look at the special formulae for the area of a rhombus and parallelogram.
25. Say: We need to know measurements that are inside of them.
26. Draw the height into the parallelogram, and the two diagonals of the rhombus:
27. Say: For the parallelogram, we use its height to find the area. We use the similar formula to the
one we used for area of a rectangle.
28. Write: 𝐴 = 𝑏𝑎𝑠𝑒 × ℎ𝑒𝑖𝑔ℎ𝑡 = 𝑏 × ℎ.
29. Say: The base of the parallelogram is 14 m and the height of the parallelogram is 8 m.
30. Write: 14 m × 8 m = 112 m2
31. Say: The area of the parallelogram is 112 m2
32. Say: For the rhombus, we use the length of its two diagonals to find the area.
33. Write on the board: 𝐴 =1
2𝑑1 × 𝑑2
34. Point to the diagonals and Say: 𝑑1 = 8 m and 𝑑2 = 12 m
35. Write: 𝐴 =1
2𝑑1 × 𝑑2 =
1
2× 8 m × 12 m = 48 m2
36. Say: The area of the rhombus is 48 m2
Guided Practice (7 minutes)
1. Say: We will work on the next few together.
2. Draw and label the parallelograms on the board with the
measurements at right.
3. Say: Draw and label the parallelogram in your exercise book.
4. Say: Calculate the perimeter using the formula you learned
earlier.
9 m
14 m
h=8 m
d2=12 m
8 km
h= 10
km
9 m 9 m
d1=8 m
m
13 km
18
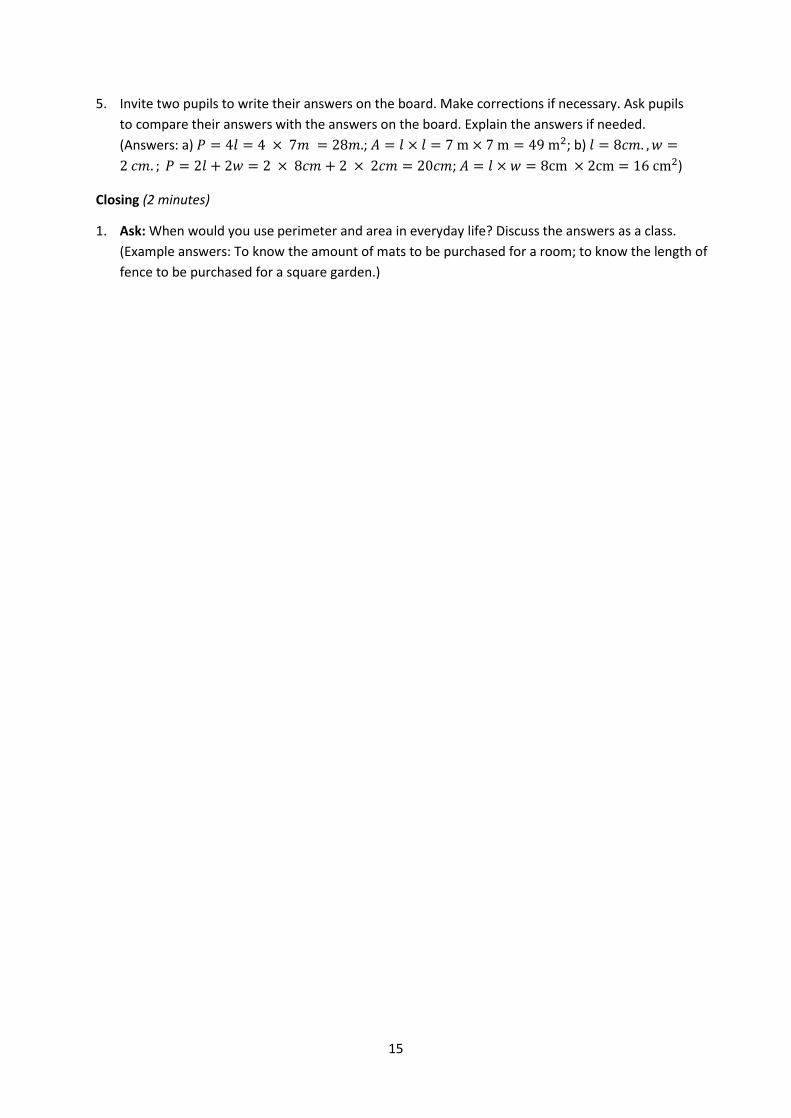
5. Ask: What is the answer? (Answer = 42 km)
6. Write: 𝑃 = 2𝑙 + 2𝑤 = 2 × 8 km + 2 × 13 km = 42 km
7. Say: The perimeter is 42 km. Please check your answer to make sure it
matches the answer written on the board.
8. Draw and label the rhombus on the board with the measurements at
right.
9. Say: Calculate the area using the formula you learned earlier.
10. Ask: What is the answer? (Answer: 59.5 cm2)
11. Write: 𝐴 =1
2𝑑1 × 𝑑2 =
1
2× 7 cm × 17 cm = 59.5 cm2
12. Say: The area is 59.5 cm2. Please check your answer to make sure it matches the answer written
on the board.
Independent Practice (8 minutes)
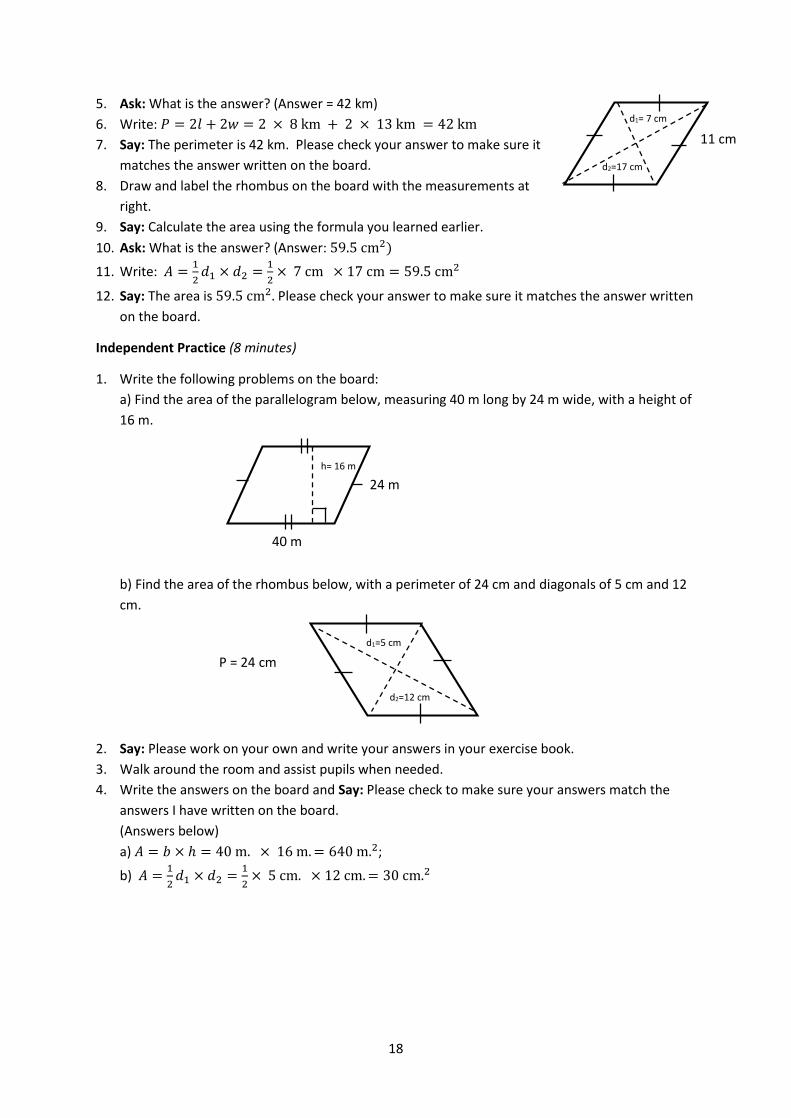
1. Write the following problems on the board:
a) Find the area of the parallelogram below, measuring 40 m long by 24 m wide, with a height of
16 m.
b) Find the area of the rhombus below, with a perimeter of 24 cm and diagonals of 5 cm and 12
cm.
2. Say: Please work on your own and write your answers in your exercise book.
3. Walk around the room and assist pupils when needed.
4. Write the answers on the board and Say: Please check to make sure your answers match the
answers I have written on the board.
(Answers below)
a) 𝐴 = 𝑏 × ℎ = 40 m. × 16 m. = 640 m.2;
b) 𝐴 =1
2𝑑1 × 𝑑2 =
1
2× 5 cm. × 12 cm. = 30 cm.2
11 cm
d1= 7 cm
d2=17 cm
40 m
h= 16 m
P = 24 cm
d2=12 cm
24 m
d1=5 cm

19
Closing (5 minutes)
1. Draw the table on the board:
2. Say: Copy and fill the table with characteristics of different plane shapes.
3. Say: Answer yes or no in the first 3 columns. Write the formulae in the last columns.
4. Say: You can use this table to do revision on this topic.
5. Walk around the room and assist pupils when needed.
6. Say: You may complete the table at home if you do not finish it during class. (Answers below)
Plane Shape Quadrilateral Equal Sides Equal Angles Perimeter Formula Area Formula
Square
Rectangle
Parallelogram
Rhombus
Plane Shape Quadrilateral Equal Sides Equal Angles Perimeter Formula Area Formula
Square Yes Yes Yes P = 4l 𝐴 = 𝑙2
Rectangle Yes No Yes P = 2l + 2w 𝐴 = 𝑙 × 𝑤
Parallelogram Yes No No P = 2l + 2w 𝐴 = 𝑏 × ℎ
Rhombus Yes Yes No P = 4l 𝐴 =1
2𝑑1 × 𝑑2

20
Lesson Title: Perimeter and Area of Trapeziums Theme: Measurement and Estimation
Lesson Number: M-08-063 Class/Level: JSS 2 Time: 35 minutes
Learning Outcomes By the end of the lesson,
pupils will be able to find the perimeter and area of trapeziums.
Teaching Aids None
Preparation None
Opening (2 minutes)
1. Ask: What is the formula for the perimeter of a square? (Answer: 𝑃 = 4𝑙)
2. Ask: What is the formula for the area of a square? (Answer: 𝐴 = 𝑙2)
3. Ask: What is the formula for the perimeter of a rectangle? (Answer: 𝑃 = 2𝑙 + 2𝑤)
4. Ask: What is the formula for the area of a rectangle? (Answer: 𝐴 = 𝑙 × 𝑤)
5. Ask: What is the formula for the perimeter of a parallelogram? (Answer: 𝑃 = 2𝑙 + 2𝑤)
6. Ask: What is the formula for the area of a parallelogram? (Answer: = 𝐴 = 𝑏 × ℎ)
7. Ask: What is the formula for the perimeter of a rhombus? (Answer: 𝑃 = 2𝑙 + 2𝑤)
8. Ask: What is the formula for the area of a rhombus? (Answer: 𝐴 =1
2𝑑1 × 𝑑2)
9. Say: Today we are going to learn about the perimeter and area of another plane shape,
trapeziums.
Introduction to the New Material (14 minutes)
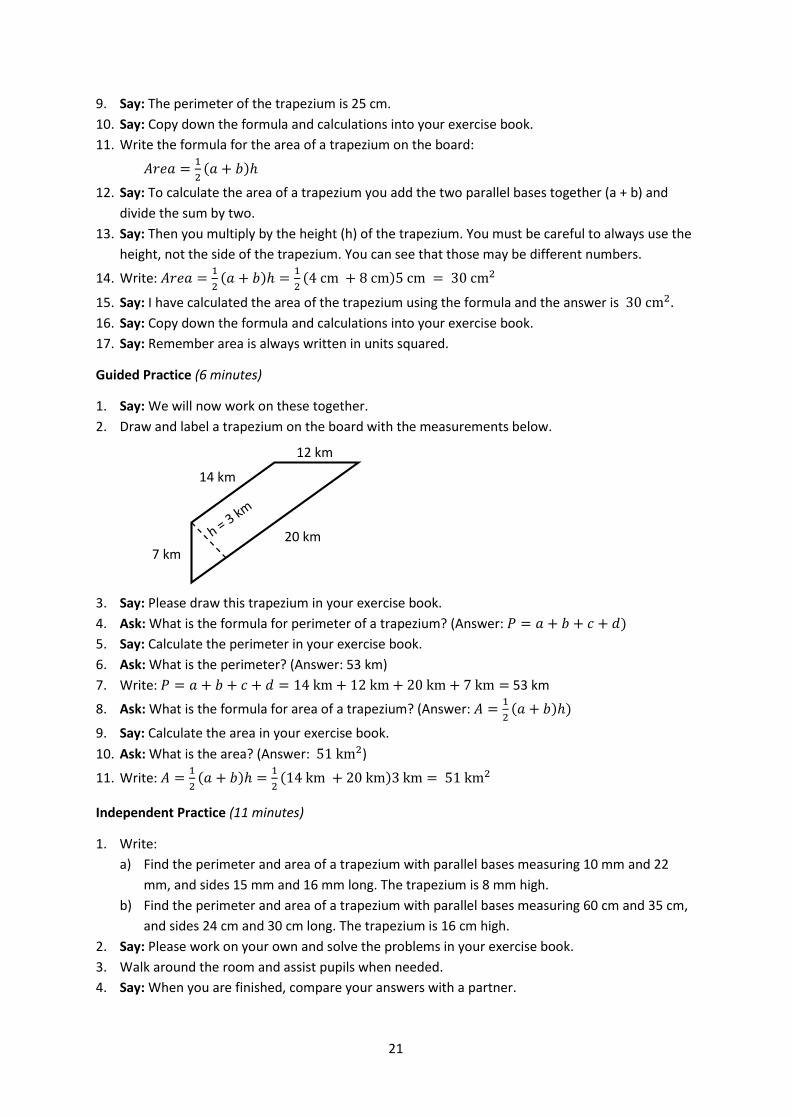
1. Sketch and label the trapezium below on the board.
2. Say: Please draw this trapezium in your exercise book.
3. Say: A trapezium is a quadrilateral, meaning it has four sides. However only one set of sides is
parallel, so it is not a parallelogram like the other shapes we have been studying.
4. Say: The formula for calculating the perimeter of a trapezium is different than the formula for a
parallelogram.
5. Say: The formula for the perimeter of a trapezium is: 𝑃 = 𝑎 + 𝑏 + 𝑐 +
𝑑, where a, b, c, and d are the different sides of the trapezium.
6. Label the sides of the trapezium with measurements and Say: Label the sides with the
measurements as I have done here.
7. Write: 𝑃 = 𝑎 + 𝑏 + 𝑐 + 𝑑 = 4 cm + 6 cm + 8 cm + 7 cm = 25 cm
8. Say: I have added the sides together to find the perimeter of the trapezium.
d
a
b
c
4 cm
8 cm
7 cm h = 5 cm
6 cm
21
9. Say: The perimeter of the trapezium is 25 cm.
10. Say: Copy down the formula and calculations into your exercise book.
11. Write the formula for the area of a trapezium on the board:
𝐴𝑟𝑒𝑎 =1
2(𝑎 + 𝑏)ℎ
12. Say: To calculate the area of a trapezium you add the two parallel bases together (a + b) and
divide the sum by two.
13. Say: Then you multiply by the height (h) of the trapezium. You must be careful to always use the
height, not the side of the trapezium. You can see that those may be different numbers.
14. Write: 𝐴𝑟𝑒𝑎 =1
2(𝑎 + 𝑏)ℎ =
1
2(4 cm + 8 cm)5 cm = 30 cm2
15. Say: I have calculated the area of the trapezium using the formula and the answer is 30 cm2.
16. Say: Copy down the formula and calculations into your exercise book.
17. Say: Remember area is always written in units squared.
Guided Practice (6 minutes)
1. Say: We will now work on these together.
2. Draw and label a trapezium on the board with the measurements below.
3. Say: Please draw this trapezium in your exercise book.
4. Ask: What is the formula for perimeter of a trapezium? (Answer: 𝑃 = 𝑎 + 𝑏 + 𝑐 + 𝑑)
5. Say: Calculate the perimeter in your exercise book.
6. Ask: What is the perimeter? (Answer: 53 km)
7. Write: 𝑃 = 𝑎 + 𝑏 + 𝑐 + 𝑑 = 14 km + 12 km + 20 km + 7 km = 53 km
8. Ask: What is the formula for area of a trapezium? (Answer: 𝐴 =1
2(𝑎 + 𝑏)ℎ)
9. Say: Calculate the area in your exercise book.
10. Ask: What is the area? (Answer: 51 km2)
11. Write: 𝐴 =1
2(𝑎 + 𝑏)ℎ =
1
2(14 km + 20 km)3 km = 51 km2
Independent Practice (11 minutes)
1. Write:
a) Find the perimeter and area of a trapezium with parallel bases measuring 10 mm and 22
mm, and sides 15 mm and 16 mm long. The trapezium is 8 mm high.
b) Find the perimeter and area of a trapezium with parallel bases measuring 60 cm and 35 cm,
and sides 24 cm and 30 cm long. The trapezium is 16 cm high.
2. Say: Please work on your own and solve the problems in your exercise book.
3. Walk around the room and assist pupils when needed.
4. Say: When you are finished, compare your answers with a partner.
20 km
12 km
14 km
7 km

22
5. Write the answers on the board and Say: Please check your work to make sure the answers
match what I have written on the board.
(Answers: a) 𝑃 = 𝑎 + 𝑏 + 𝑐 + 𝑑 = 10 mm. +22 mm. +15 mm. +16 mm. = 63 mm.; 𝐴 =1
2(𝑎 + 𝑏)ℎ =
1
2(10 mm. +22 mm. ) 8 mm. = 128 mm.2; b) 𝑃 = 𝑎 + 𝑏 + 𝑐 + 𝑑 = 35 cm +
60 cm + 30 cm + 24 cm = 149 cm; 𝐴 =1
2(𝑎 + 𝑏)ℎ =
1
2(35 cm + 60 cm)16 cm = 760 cm2)
a) b)
Closing (2 minutes)
1. Say: Add another line to the chart you filled out in the previous lesson with characteristics of different
plane shapes (see Closing section of lesson M-08-062). Write the information for trapezium in the last
line.
Plane Shape Quadrilateral Equal Sides Equal Angles Perimeter Formula Area Formula
Square Yes Yes Yes P = 4l 𝐴 = 𝑙2
Rectangle Yes No Yes P = 2l + 2w 𝐴 = 𝑙 × 𝑤
Parallelogram Yes No No P = 2l + 2w 𝐴 = 𝑏 × ℎ
Rhombus Yes Yes No P = 4l 𝐴 =1
2𝑑1 × 𝑑2
Trapezium Yes No No P = a + b + c + d 𝐴 =1
2(𝑎 + 𝑏)ℎ
30 cm 24 cm h = 16 cm
60 cm
35 cm 10 mm
15 mm 16 mm
22 mm
h = 8 mm

23
Lesson Title: Perimeter and Area of Triangles Theme: Measurement and Estimation
Lesson Number: M-08-064 Class/Level: JSS 2 Time: 35 minutes
Learning Outcomes By the end of the lesson,
pupils will be able to find the perimeter and area of triangles.
Teaching Aids None
Preparation None
Opening (5 minutes)
1. Draw and label a trapezium on the board with the measurements below:
2. Say: Please calculate the perimeter and area of the trapezium in your exercise book.
3. Ask: What is the perimeter of the trapezium? (Answer: 34 m)
4. Write: 𝑃 = 𝑎 + 𝑏 + 𝑐 + 𝑑 = 5 m + 7 m + 15 m + 7 m = 34 𝑚
5. Ask: What is the area of the trapezium? (Answer: 50 m2)
6. Write: 𝐴 =1
2(𝑎 + 𝑏)ℎ =
1
2(5 m + 15 m)5 m = 50 m2)
7. Say: We have been learning how to find the perimeter and area of quadrilateral plane shapes.
Today, you will learn how to find the perimeter and area of a triangle using a formula.
Introduction to the New Material (10 minutes)
1. Sketch triangle DEF on the board:
2. Write: 𝑃𝑒𝑟𝑖𝑚𝑒𝑡𝑒𝑟 = 𝑎 + 𝑏 + 𝑐, where a, b and c are the sides
of the triangle.
3. Say: To calculate the perimeter of a triangle, you add up the
three sides.
4. Write: 6 cm + 8 cm + 10 cm = 24 cm
5. Say: I have added all the sides and the perimeter of the triangle is 24 cm.
6. Write: 𝐴𝑟𝑒𝑎 𝑜𝑓 𝑎 𝑡𝑟𝑖𝑎𝑛𝑔𝑙𝑒 =1
2 𝑏𝑎𝑠𝑒 × ℎ𝑒𝑖𝑔ℎ𝑡 =
1
2𝑏ℎ
7. Say: This is the formula for the area of a triangle.
8. Say: To calculate the area of a triangle, you multiply one half times the base times the height.
9. Say: The base of this triangle is Side EF, which is 8 cm in length.
10. Say: The height of the triangle is Side DE, which is 6 cm in length.
11. Say: These are the two numbers we need to find the area of the triangle. We will substitute
them into the formula.
12. Say: Base and height are always perpendicular to each other.
13. Say: You can take any side of the triangle as its base. Then you find the height of the triangle
from that base.
6 cm
8 cm E F
D
10 cm
7 m
5 m
7m
15 m
h = 5 m
24
14. Say: The height is a perpendicular line drawn from the base to the opposite angle of the triangle.
15. Write on the board: 𝐴 =1
2𝑏ℎ =
1
2 × 8 cm × 6 cm
16. Say: Now I will compute the area of the triangle.
17. Solve for A by multiplying: 𝐴 =1
2 × 8 cm × 6 cm = 4 cm × 6 cm = 24 cm2
18. Say: The area of the triangle is 24 cm2
19. Say: The area of a triangle with known height and base is half of the area of the rectangle.
Remember that the formula for the area of a rectangle: length x width.
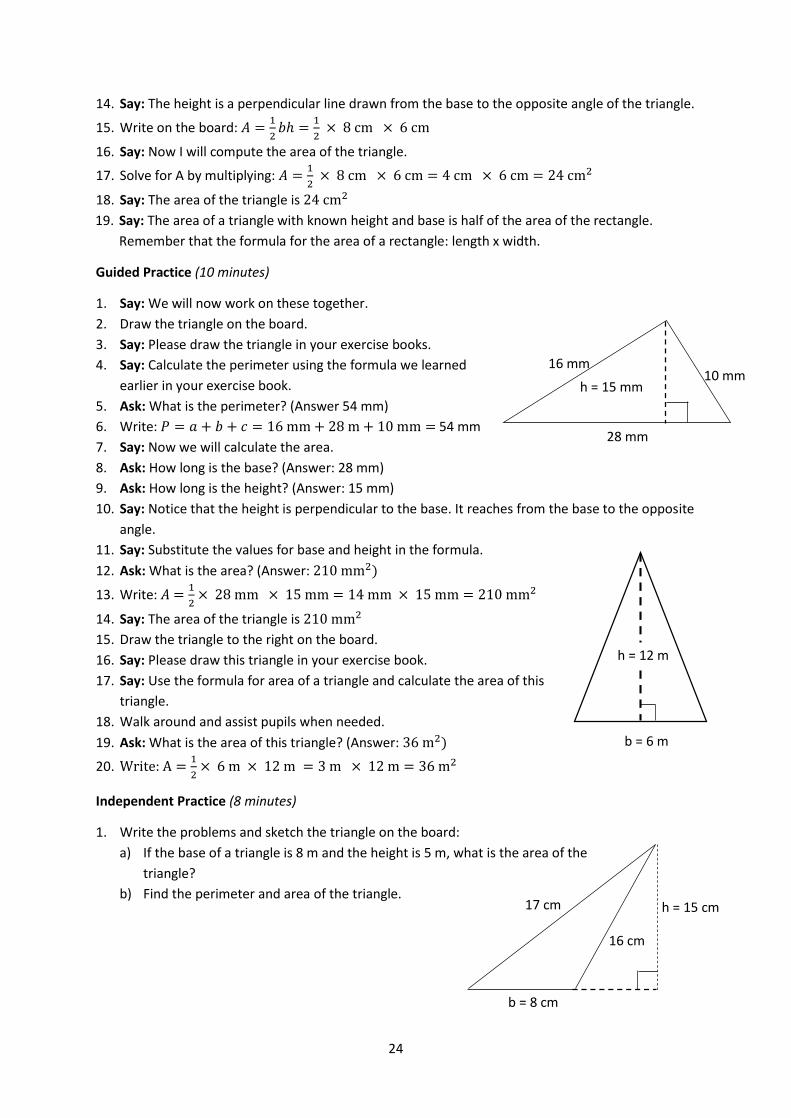
Guided Practice (10 minutes)
1. Say: We will now work on these together.
2. Draw the triangle on the board.
3. Say: Please draw the triangle in your exercise books.
4. Say: Calculate the perimeter using the formula we learned
earlier in your exercise book.
5. Ask: What is the perimeter? (Answer 54 mm)
6. Write: 𝑃 = 𝑎 + 𝑏 + 𝑐 = 16 mm + 28 m + 10 mm = 54 mm
7. Say: Now we will calculate the area.
8. Ask: How long is the base? (Answer: 28 mm)
9. Ask: How long is the height? (Answer: 15 mm)
10. Say: Notice that the height is perpendicular to the base. It reaches from the base to the opposite
angle.
11. Say: Substitute the values for base and height in the formula.
12. Ask: What is the area? (Answer: 210 mm2)
13. Write: 𝐴 =1
2× 28 mm × 15 mm = 14 mm × 15 mm = 210 mm2
14. Say: The area of the triangle is 210 mm2
15. Draw the triangle to the right on the board.
16. Say: Please draw this triangle in your exercise book.
17. Say: Use the formula for area of a triangle and calculate the area of this
triangle.
18. Walk around and assist pupils when needed.
19. Ask: What is the area of this triangle? (Answer: 36 m2)
20. Write: A =1
2× 6 m × 12 m = 3 m × 12 m = 36 m2
Independent Practice (8 minutes)
1. Write the problems and sketch the triangle on the board:
a) If the base of a triangle is 8 m and the height is 5 m, what is the area of the
triangle?
b) Find the perimeter and area of the triangle.
28 mm
h = 15 mm
16 mm 10 mm
h = 15 cm
b = 8 cm
17 cm
16 cm
h = 12 m
b = 6 m

25
2. Say: You will now work on your own to find the answers.
3. Walk around the room and assist pupils when needed.
4. Say: When you are finished, exchange your exercise book with a partner to compare answers.
5. Say: If your answers do not match, work together to solve the equations again.
Answers: a) 𝐴 =1
2𝑏ℎ =
1
2× 8 m × 5 m = 4 m × 5 m = 20 m2)
b) (𝑃 = 𝑎 + 𝑏 + 𝑐 = 16 cm + 8 cm + 17 cm = 41 cm; 𝐴 =1
2× 8 cm × 15 cm = 4 cm ×
15 cm = 60 cm2)
Closing (2 minutes)
1. Ask: What is the formula for the area of a triangle? (Answer: 𝐴 =1
2𝑏ℎ)
2. Ask: How is the formula for the area of a triangle different than that for the area of a rectangle?
(Example answer: The triangle takes up half as much space as a rectangle with the same base
and height. The formula is 𝐴 =1
2𝑏ℎ, while for a rectangle it is 𝐴 = 𝑏 × ℎ).
26
Lesson Title: Perimeter and Area of Circles Theme: Measurement and Estimation
Lesson Number: M-08-065 Class/Level: JSS 2 Time: 35 minutes
Learning Outcomes By the end of the lesson,
pupils will be able to find the circumference and area of circles.
Teaching Aids None
Preparation None
Opening (3 minutes)
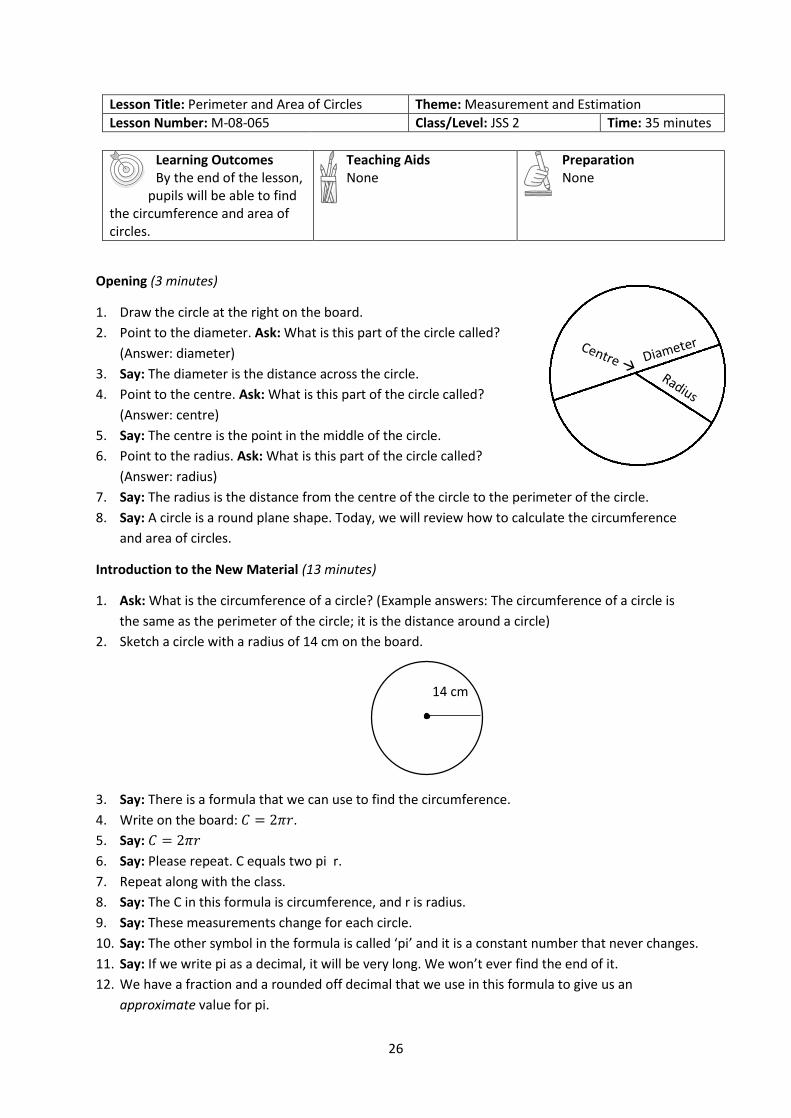
1. Draw the circle at the right on the board.
2. Point to the diameter. Ask: What is this part of the circle called?
(Answer: diameter)
3. Say: The diameter is the distance across the circle.
4. Point to the centre. Ask: What is this part of the circle called?
(Answer: centre)
5. Say: The centre is the point in the middle of the circle.
6. Point to the radius. Ask: What is this part of the circle called?
(Answer: radius)
7. Say: The radius is the distance from the centre of the circle to the perimeter of the circle.
8. Say: A circle is a round plane shape. Today, we will review how to calculate the circumference
and area of circles.
Introduction to the New Material (13 minutes)
1. Ask: What is the circumference of a circle? (Example answers: The circumference of a circle is
the same as the perimeter of the circle; it is the distance around a circle)
2. Sketch a circle with a radius of 14 cm on the board.
3. Say: There is a formula that we can use to find the circumference.
4. Write on the board: 𝐶 = 2𝜋𝑟.
5. Say: 𝐶 = 2𝜋𝑟
6. Say: Please repeat. C equals two pi r.
7. Repeat along with the class.
8. Say: The C in this formula is circumference, and r is radius.
9. Say: These measurements change for each circle.
10. Say: The other symbol in the formula is called ‘pi’ and it is a constant number that never changes.
11. Say: If we write pi as a decimal, it will be very long. We won’t ever find the end of it.
12. We have a fraction and a rounded off decimal that we use in this formula to give us an
approximate value for pi.
14 cm
27
13. Write on the board: 𝑝𝑖 = 𝜋 ≈22
7≈ 3.14.
14. Say: We can use either value of pi, 22
7 or 3.14.
15. Say: Now, I will calculate the circumference of the circle on the board.
16. Say: r is 14 cm
17. Say: Since I know all the numbers to compute the answer, all that is left is to find the answer.
18. Write: 𝐶 = 2𝜋𝑟 = 2 ×22
7× 14 cm = 88 cm. (use
22
7 for 𝜋):
19. Say: I multiplied 2 times the fraction for pi times the radius, which is 14. My answer is 88. The
circumference of the circle is 88 cm.
20. Say: We can also find the area of a circle. The area of a circle is the total space inside the
circumference.
21. Write: 𝐴𝑟𝑒𝑎 = 𝜋𝑟2
22. Say: 𝐴𝑟𝑒𝑎 = 𝜋𝑟2
23. Say: Please repeat. Area equals pi r squared.
24. Repeat along with the class.
25. Say: Now, we will find the area of this circle using the formula.
26. Say: I can solve the equation by substituting the values.
27. Substitute the values of r and 𝜋 on the board: 𝐴 = 𝜋𝑟2 =22
7× (14 cm)2
28. Say: Now all that is left to do is multiply.
29. Multiply and find the area: 𝐴 =22
7× 14 cm × 14 cm = 616 cm2
30. Say: The area of the circle is 616 cm2. Remember that area must be written in units squared.
Guided Practice (7 minutes)
1. Sketch a circle with radius = 3 m on the board:
2. Say: Please sketch this circle in your exercise book.
3. Say: We will first find the circumference for the circle.
4. Write: 𝐶 = 2𝜋𝑟
5. Say: Substitute the values for pi and r into the equation and solve. Use 3.14 for pi.
6. Ask: What is the answer? (Answer: 18.84 m)
7. Write: 𝐶 = 2𝜋𝑟 = 2 × 3.14 × 3 m = 18.84 m
8. Say: The circumference of the circle is: 18.84 m
9. Say: Now we will find the area of the circle.
10. Write: 𝐴 = 𝜋𝑟2
11. Say: Substitute the values for pi and r into the equation and solve. Use 3.14 for pi.
12. Ask: What is the answer? (Answer: 28.26 m2)
13. Write: 𝐴 = 𝜋𝑟2 = 3.14 × (3 m)2 = 3.14 × 9 m2 = 28.26 m2
14. Say: The area of the circle is 28.26 m2
Independent Practice (10 minutes)
1. Say: You will now work on your own to solve the following problems. Write the answers in your
exercise book.
2. Write:
a) Find the circumference and area of a circle with a radius of 6 mm.
b) Find the circumference and area of a circle with a diameter of 22 km.
3m.
28
3. Say: Use 3.14 for the value of 𝜋 for both questions.
4. Walk around the room and assist pupils when needed.
5. Ask: Who would like to find the circumference of the circle with radius 6 mm on the board?
6. Call on a pupil with hand raised to solve the problem on the board.
7. Ask: Who would like to find the area of the circle with radius 6 mm on the board?
8. Call on a pupil with hand raised to solve the problem on the board.
9. Ask: Who would like to solve for the circumference of the circle with diameter of 22 mm on the
board?
10. Call on a pupil with hand raised to solve the problem on the board.
11. Ask: Who would like to find the area of the circle with diameter of 22 mm on the board?
12. Call on a pupil with hand raised to solve the problem on the board.
Answers: 𝐶 = 2𝜋𝑟 = 2 × 3.14 × 6 mm = 37.68 mm; 𝐴 = 3.14 × (6 mm)2 = 113.04 mm2;
b) 𝑟 =𝑑
2=
22 𝑘𝑚
2= 11 km; 𝐶 = 2𝜋𝑟 = 2 × 3.14 × 11 km = 69.08 km; 𝐴 = 3.14 ×
(11 km)2 = 379.94 km2)
Closing (2 minutes)
1. Ask: What is the formula for the circumference of a circle? (Answer: 𝐶 = 2𝜋𝑟)
2. Ask: What is the formula for the area of a circle? (Answer: 𝐴 = 𝜋𝑟2)
3. Ask: What fraction or decimal do we use for pi? (Answer: 22
7 𝑜𝑟 3.14)
29
Lesson Title: Perimeter and Area of Composite Shapes
Theme: Measurement and Estimation
Lesson Number: M-08-066 Class/Level: JSS 2 Time: 35 minutes
Learning Outcomes By the end of the lesson,
pupils will be able to calculate the perimeter and area of composite shapes.
Teaching Aids None
Preparation None
Opening (5 minutes)
1. Ask: What is the formula for the perimeter of a square? (Answer: 𝑃 = 4𝑙)
2. Ask: What is the formula for the area of a square? (Answer: 𝐴 = 𝑙2)
3. Ask: What is the formula for the perimeter of a rectangle? (Answer: 𝑃 = 2𝑙 + 2𝑤)
4. Ask: What is the formula for the area of a rectangle? (Answer: 𝐴 = 𝑙 × 𝑤)
5. Ask: What is the formula for the perimeter of a trapezium? (Answer: 𝑃 = 𝑎 + 𝑏 + 𝑐 + 𝑑)
6. Ask: What is the formula for the area of a trapezium? (Answer: 𝐴 =1
2(𝑎 + 𝑏)ℎ)
7. Ask: What is the formula for the perimeter of a triangle? (Answer: 𝑃 = 𝑎 + 𝑏 + 𝑐)
8. Ask: What is the formula for the area of a triangle? (Answer: 𝐴 =1
2𝑏ℎ)
9. Ask: What is the formula for the perimeter of a circle? (Answer: 𝐶 = 2𝜋𝑟)
10. Ask: What is the formula for the area of a circle? (Answer: 𝐴 = 𝜋𝑟2)
11. Say: Today, we are going to learn how to calculate the perimeter and area of composite plane
shapes.
Introduction to the New Material (8 minutes)
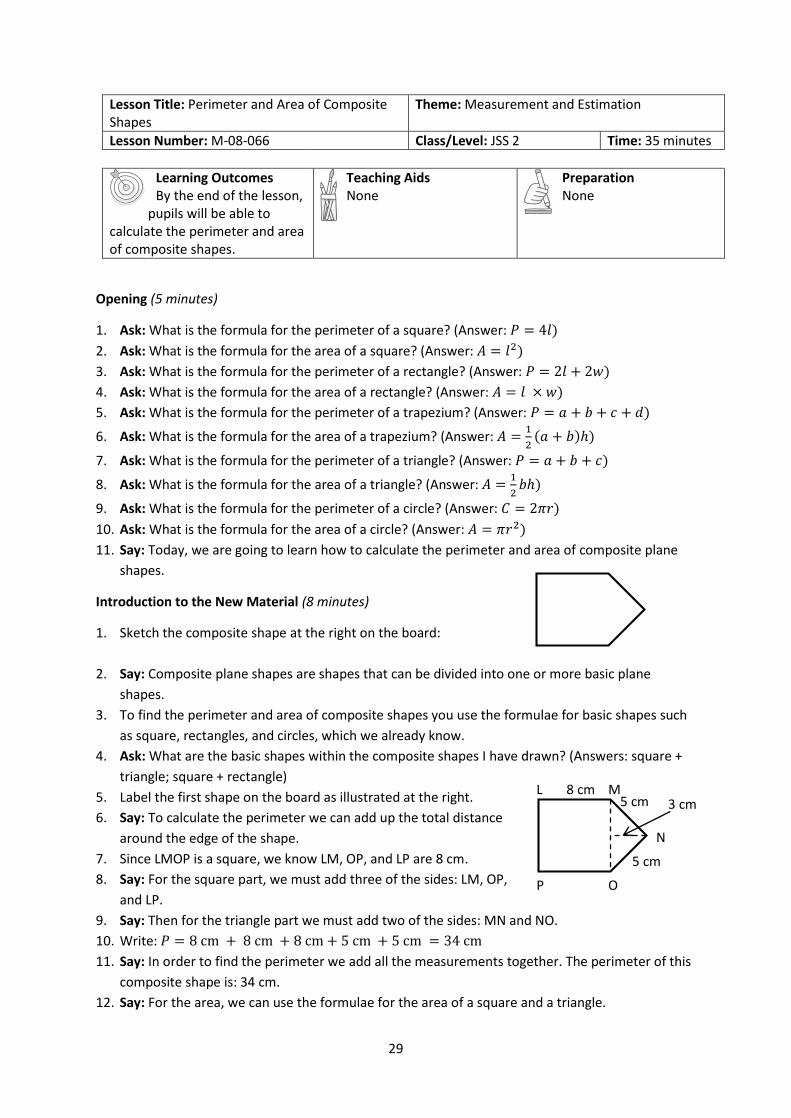
1. Sketch the composite shape at the right on the board:
2. Say: Composite plane shapes are shapes that can be divided into one or more basic plane
shapes.
3. To find the perimeter and area of composite shapes you use the formulae for basic shapes such
as square, rectangles, and circles, which we already know.
4. Ask: What are the basic shapes within the composite shapes I have drawn? (Answers: square +
triangle; square + rectangle)
5. Label the first shape on the board as illustrated at the right.
6. Say: To calculate the perimeter we can add up the total distance
around the edge of the shape.
7. Since LMOP is a square, we know LM, OP, and LP are 8 cm.
8. Say: For the square part, we must add three of the sides: LM, OP,
and LP.
9. Say: Then for the triangle part we must add two of the sides: MN and NO.
10. Write: 𝑃 = 8 cm + 8 cm + 8 cm + 5 cm + 5 cm = 34 cm
11. Say: In order to find the perimeter we add all the measurements together. The perimeter of this
composite shape is: 34 cm.
12. Say: For the area, we can use the formulae for the area of a square and a triangle.
ML3 cm
N
OP
8 cm
5 cm
5 cm
30
13. Write: 𝐴 = 𝑙2
14. Say: The formula for area of a square is 𝐴 = 𝑙2
15. Write: 𝐴 = 𝑙2 = 8 cm2 = 64 cm2
16. Say: The area of the square is 64 cm2
17. Write: 𝐴 =1
2𝑏ℎ
18. Say: The formula for area of a triangle is 𝐴 =1
2𝑏ℎ
19. Write: 𝐴 =1
2𝑏ℎ =
1
2 × 8 cm × 3 cm = 4 cm × 3 cm = 12 cm2
20. Say: The area of the triangle is 12 cm2
21. Say: Now we must add together the two areas: 64 cm2 +
12 cm2 = 76 cm2.
Guided Practice (10 minutes)
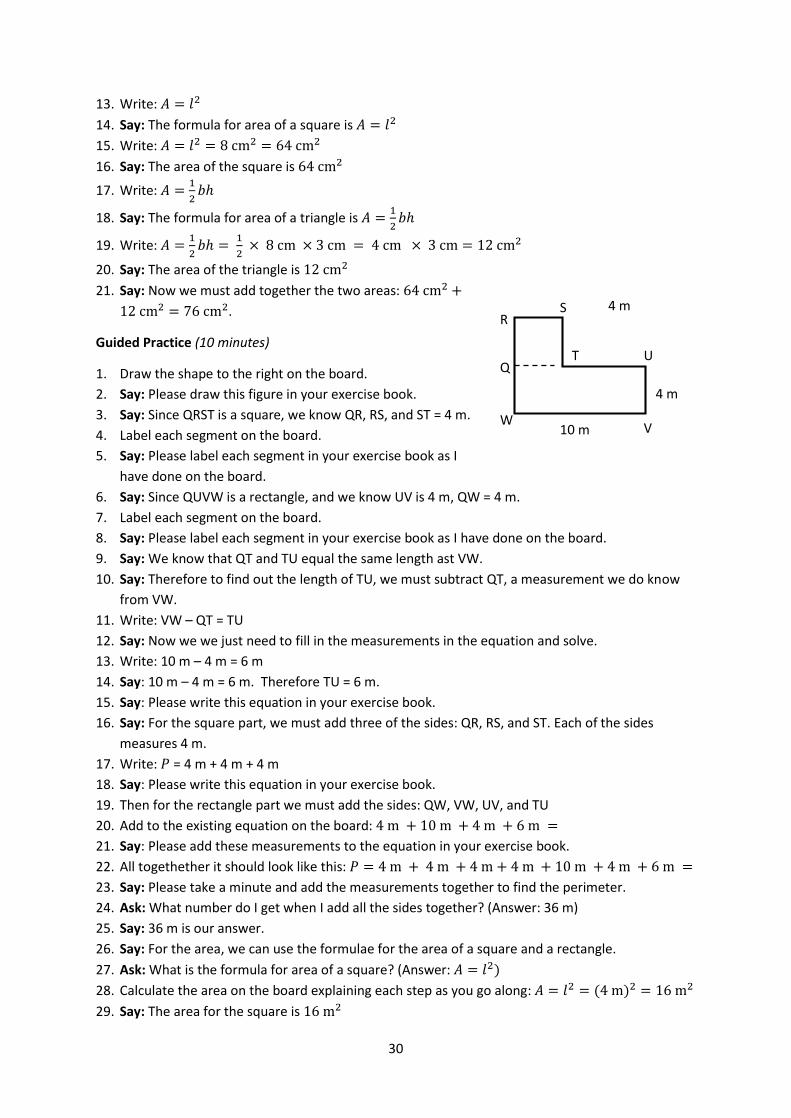
1. Draw the shape to the right on the board.
2. Say: Please draw this figure in your exercise book.
3. Say: Since QRST is a square, we know QR, RS, and ST = 4 m.
4. Label each segment on the board.
5. Say: Please label each segment in your exercise book as I
have done on the board.
6. Say: Since QUVW is a rectangle, and we know UV is 4 m, QW = 4 m.
7. Label each segment on the board.
8. Say: Please label each segment in your exercise book as I have done on the board.
9. Say: We know that QT and TU equal the same length ast VW.
10. Say: Therefore to find out the length of TU, we must subtract QT, a measurement we do know
from VW.
11. Write: VW – QT = TU
12. Say: Now we we just need to fill in the measurements in the equation and solve.
13. Write: 10 m – 4 m = 6 m
14. Say: 10 m – 4 m = 6 m. Therefore TU = 6 m.
15. Say: Please write this equation in your exercise book.
16. Say: For the square part, we must add three of the sides: QR, RS, and ST. Each of the sides
measures 4 m.
17. Write: 𝑃 = 4 m + 4 m + 4 m
18. Say: Please write this equation in your exercise book.
19. Then for the rectangle part we must add the sides: QW, VW, UV, and TU
20. Add to the existing equation on the board: 4 m + 10 m + 4 m + 6 m =
21. Say: Please add these measurements to the equation in your exercise book.
22. All togethether it should look like this: 𝑃 = 4 m + 4 m + 4 m + 4 m + 10 m + 4 m + 6 m =
23. Say: Please take a minute and add the measurements together to find the perimeter.
24. Ask: What number do I get when I add all the sides together? (Answer: 36 m)
25. Say: 36 m is our answer.
26. Say: For the area, we can use the formulae for the area of a square and a rectangle.
27. Ask: What is the formula for area of a square? (Answer: 𝐴 = 𝑙2)
28. Calculate the area on the board explaining each step as you go along: 𝐴 = 𝑙2 = (4 m)2 = 16 m2
29. Say: The area for the square is 16 m2
4 m R
S
W
T U
V
Q
10 m
4 m

31
30. Ask: What is the formula for area of a rectangle? (Answer: 𝐴 = 𝑙 × 𝑤)
31. Calculate the area on the board explaining each step as you go along: 𝐴 = 𝑙 × 𝑤 = 10 m ×
4 m = 40 m2
32. Say: The area for the rectangle is 40 m2
33. Say: Now we must add together the two areas: 16 m2 + 40 m2 = 56 m2
34. Say: The area of the composite shape is 56 m2
Independent Practice (10 minutes)
1. Sketch the shape to the right on the board.
2. Ask: What shapes will you use to calculate? (Answer: A
square, minus a triangle)
3. Say: Please work with a partner and calculate the
perimeter and area of the shape in your exercise
books.
4. Walk around the room and assist pupils when needed.
5. Ask: Who would like to share their answer for
perimeter? (Answer: 156 m)
6. Write: 𝑃 = 35 m + 40 m + 40 m + 35 m + 6 m =
156 m
7. Ask: Who would like to share their answer for area of
the square? (Answer: 1600 m2)
8. Write: 𝑆𝑞𝑢𝑎𝑟𝑒: 𝐴 = 𝑙2 = (40 m)2 = 1600 m2
9. Ask: Who would like to share their answer for area of the triangle? (Answer: 12 m2)
10. Write: 𝑇𝑟𝑖𝑎𝑛𝑔𝑙𝑒: 𝐴 =1
2𝑏ℎ =
1
2× 6 m × 4 m = 3 m × 4 m = 12 m2
11. Ask: How did you calculate the area of the figure? (Example answer: We subtracted the area of
the triangle from the area of the square)
12. Write: 𝑇𝑜𝑡𝑎𝑙 𝐴𝑟𝑒𝑎 = 1600 m2 − 12 m2 = 1588 m2
13. Say: The total area of the composite shape is 1588 m2
Closing (2 minutes)
1. Ask: How do we find the perimeter of composite shapes? (Example answer: The perimeter of a plane
shape is the total distance around the edges of the shape.)
2. Ask: How do we find the area of composite shapes? (Example answer: Use the formulae form the
shapes within the composite shape and either add or subtract to find the area.)
40 m.
35 m.
6 m.
35 m.
40 m.
4 m.
32
Lesson Title: Perimeter and Area Story Problems Theme: Measurement and Estimation
Lesson Number: M-08-067 Class/Level: JSS 2 Time: 35 minutes
Learning Outcomes By the end of the lesson,
pupils will be able to solve practical problems on perimeter and area.
Teaching Aids None
Preparation None
Opening (2 minutes)
1. Say: Please sketch a square, rectangle, triangle, trapezium, and rhombus in their exercise books.
2. Ask: Who would like to come to the board and sketch one of the shapes and label it with its
proper name?
3. Call on 5 pupils with hands raised to come to the board to draw the shapes and label them with
their proper names.
4. Say: Today, we will learn how to solve story problems involving the perimeter and area of plane
shapes, such as the ones you have just sketched.
Introduction to the New Material (8 minutes)
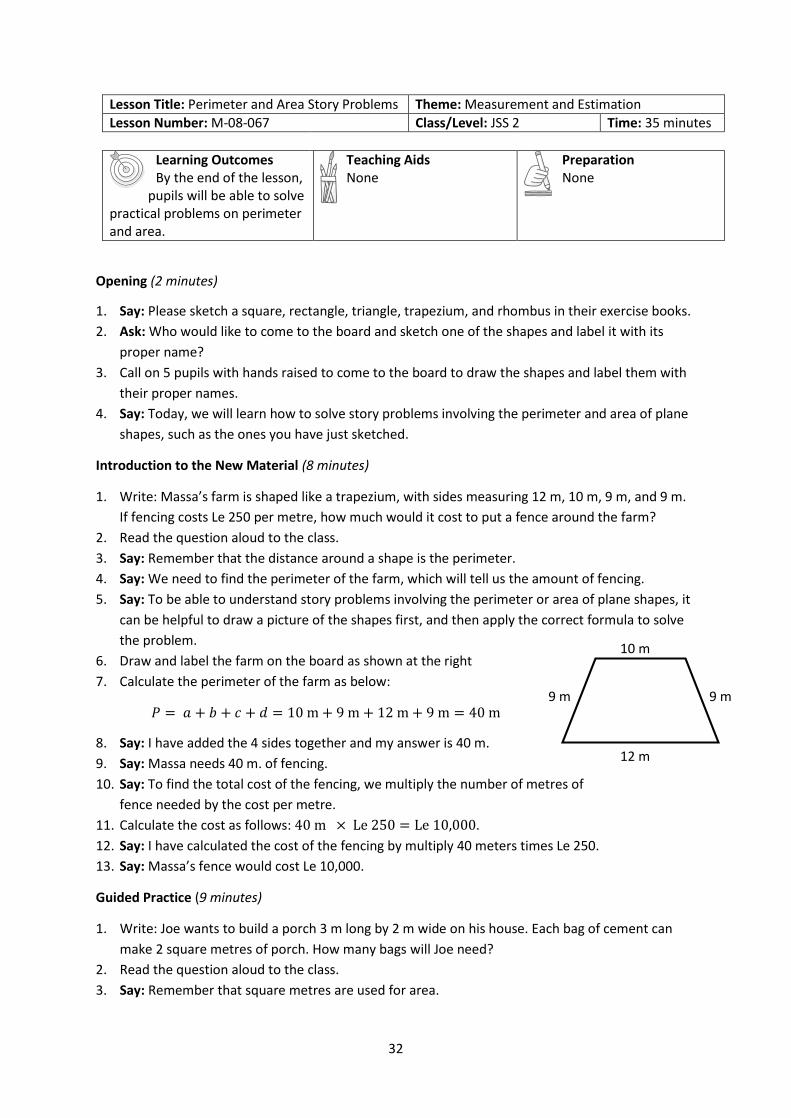
1. Write: Massa’s farm is shaped like a trapezium, with sides measuring 12 m, 10 m, 9 m, and 9 m.
If fencing costs Le 250 per metre, how much would it cost to put a fence around the farm?
2. Read the question aloud to the class.
3. Say: Remember that the distance around a shape is the perimeter.
4. Say: We need to find the perimeter of the farm, which will tell us the amount of fencing.
5. Say: To be able to understand story problems involving the perimeter or area of plane shapes, it
can be helpful to draw a picture of the shapes first, and then apply the correct formula to solve
the problem.
6. Draw and label the farm on the board as shown at the right
7. Calculate the perimeter of the farm as below:
𝑃 = 𝑎 + 𝑏 + 𝑐 + 𝑑 = 10 m + 9 m + 12 m + 9 m = 40 m
8. Say: I have added the 4 sides together and my answer is 40 m.
9. Say: Massa needs 40 m. of fencing.
10. Say: To find the total cost of the fencing, we multiply the number of metres of
fence needed by the cost per metre.
11. Calculate the cost as follows: 40 m × Le 250 = Le 10,000.
12. Say: I have calculated the cost of the fencing by multiply 40 meters times Le 250.
13. Say: Massa’s fence would cost Le 10,000.
Guided Practice (9 minutes)
1. Write: Joe wants to build a porch 3 m long by 2 m wide on his house. Each bag of cement can
make 2 square metres of porch. How many bags will Joe need?
2. Read the question aloud to the class.
3. Say: Remember that square metres are used for area.
12 m
10 m
9 m 9 m
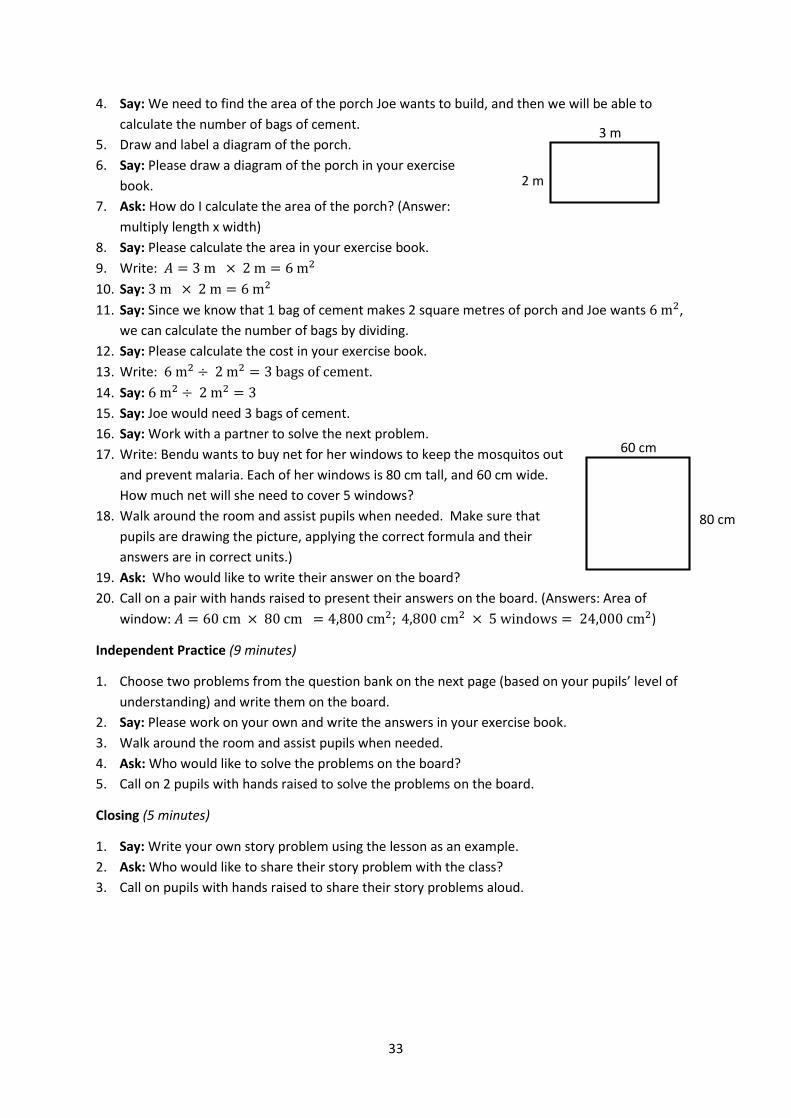
33
4. Say: We need to find the area of the porch Joe wants to build, and then we will be able to
calculate the number of bags of cement.
5. Draw and label a diagram of the porch.
6. Say: Please draw a diagram of the porch in your exercise
book.
7. Ask: How do I calculate the area of the porch? (Answer:
multiply length x width)
8. Say: Please calculate the area in your exercise book.
9. Write: 𝐴 = 3 m × 2 m = 6 m2
10. Say: 3 m × 2 m = 6 m2
11. Say: Since we know that 1 bag of cement makes 2 square metres of porch and Joe wants 6 m2,
we can calculate the number of bags by dividing.
12. Say: Please calculate the cost in your exercise book.
13. Write: 6 m2 ÷ 2 m2 = 3 bags of cement.
14. Say: 6 m2 ÷ 2 m2 = 3
15. Say: Joe would need 3 bags of cement.
16. Say: Work with a partner to solve the next problem.
17. Write: Bendu wants to buy net for her windows to keep the mosquitos out
and prevent malaria. Each of her windows is 80 cm tall, and 60 cm wide.
How much net will she need to cover 5 windows?
18. Walk around the room and assist pupils when needed. Make sure that
pupils are drawing the picture, applying the correct formula and their
answers are in correct units.)
19. Ask: Who would like to write their answer on the board?
20. Call on a pair with hands raised to present their answers on the board. (Answers: Area of
window: 𝐴 = 60 cm × 80 cm = 4,800 cm2; 4,800 cm2 × 5 windows = 24,000 cm2)
Independent Practice (9 minutes)
1. Choose two problems from the question bank on the next page (based on your pupils’ level of
understanding) and write them on the board.
2. Say: Please work on your own and write the answers in your exercise book.
3. Walk around the room and assist pupils when needed.
4. Ask: Who would like to solve the problems on the board?
5. Call on 2 pupils with hands raised to solve the problems on the board.
Closing (5 minutes)
1. Say: Write your own story problem using the lesson as an example.
2. Ask: Who would like to share their story problem with the class?
3. Call on pupils with hands raised to share their story problems aloud.
80 cm
60 cm
3 m
2 m
34
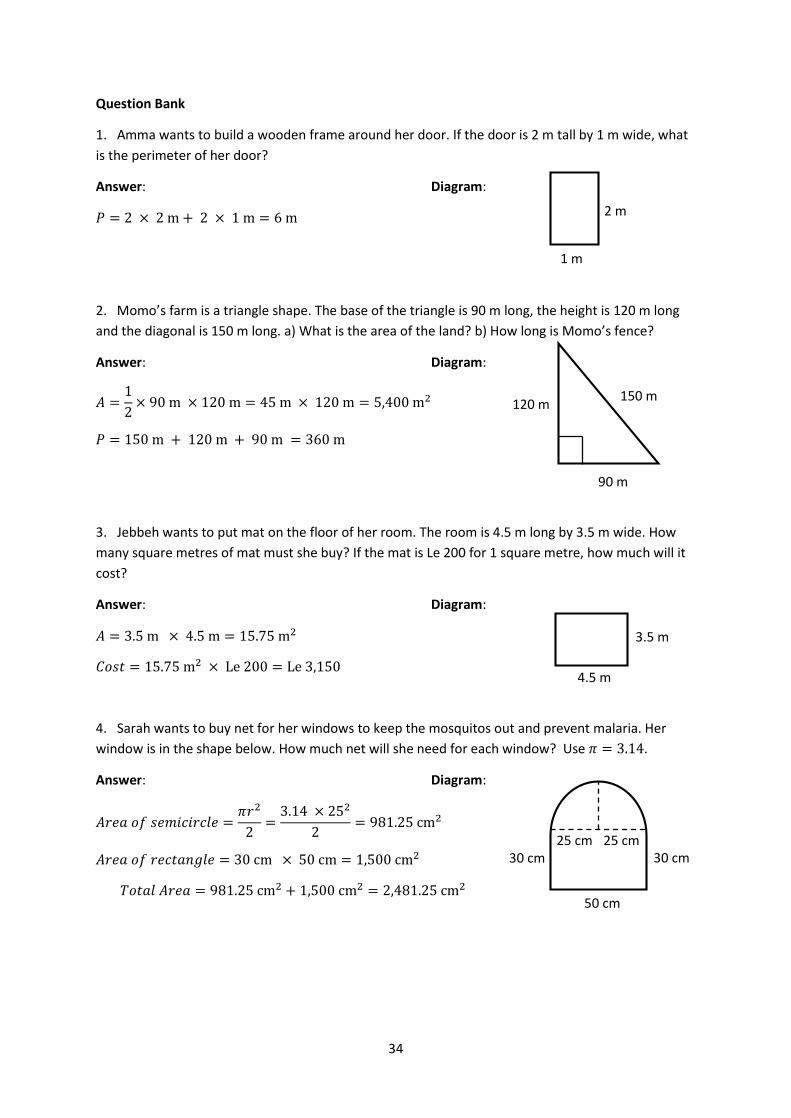
Question Bank
1. Amma wants to build a wooden frame around her door. If the door is 2 m tall by 1 m wide, what
is the perimeter of her door?
Answer: Diagram:
𝑃 = 2 × 2 m + 2 × 1 m = 6 m
2. Momo’s farm is a triangle shape. The base of the triangle is 90 m long, the height is 120 m long
and the diagonal is 150 m long. a) What is the area of the land? b) How long is Momo’s fence?
Answer: Diagram:
𝐴 =1
2× 90 m × 120 m = 45 m × 120 m = 5,400 m2
𝑃 = 150 m + 120 m + 90 m = 360 m
3. Jebbeh wants to put mat on the floor of her room. The room is 4.5 m long by 3.5 m wide. How
many square metres of mat must she buy? If the mat is Le 200 for 1 square metre, how much will it
cost?
Answer: Diagram:
𝐴 = 3.5 m × 4.5 m = 15.75 m2
𝐶𝑜𝑠𝑡 = 15.75 m2 × Le 200 = Le 3,150
4. Sarah wants to buy net for her windows to keep the mosquitos out and prevent malaria. Her
window is in the shape below. How much net will she need for each window? Use 𝜋 = 3.14.
Answer: Diagram:
𝐴𝑟𝑒𝑎 𝑜𝑓 𝑠𝑒𝑚𝑖𝑐𝑖𝑟𝑐𝑙𝑒 =𝜋𝑟2
2=
3.14 × 252
2= 981.25 cm2
𝐴𝑟𝑒𝑎 𝑜𝑓 𝑟𝑒𝑐𝑡𝑎𝑛𝑔𝑙𝑒 = 30 cm × 50 cm = 1,500 cm2
𝑇𝑜𝑡𝑎𝑙 𝐴𝑟𝑒𝑎 = 981.25 cm2 + 1,500 cm2 = 2,481.25 cm2
90 m
120 m
3.5 m
4.5 m
150 m
30 cm
50 cm
30 cm 25 cm 25 cm
2 m
1 m

35
Lesson Title: Volume of Solids Theme: Measurement and Estimation
Lesson Number: M-08-068 Class/Level: JSS 2 Time: 35 minutes
Learning Outcomes By the end of the lesson,
pupils will be able to: 1. Identify the general formula for the volume of prisms and cylinders as cross-section multiplied by height. 2. Identify and interpret measurements for volume (units cubed).
Teaching Aids None
Preparation None
Opening (3 minutes)
1. Say: Please turn to a partner and describe the difference between m and m2 in your own words.
2. Ask: What is the difference? (Example answer: metres are one dimension, such as length; m2
give a measurement in two dimensions, to tell the area of a shape.)
3. Say: Today, we will identify the general formula for the volume of prisms and how to interpret
measurements for volume.
Introduction to the New Material (13 minutes)
1. Say: Let us consider a box of pencils, a football, and a bottle of gasoline.
2. Say: In the bottle of gasoline, the gasoline inside is taking up space. In the football, there is air or
gas inside taking up space. In the pencil box, the pencils are taking up space.
3. Say: This shows that solids, liquids and gases all take up space. This space is called volume.
4. Say: Volume is the measurement of space taken up by a 3-dimensional solid.
5. Draw a rectangle on the board:
6. Say: The formula used to find the area of a rectangle is 𝐴 = 𝑙 cm × 𝑤 cm = 𝑙𝑤 cm2
7. Write: 𝐴 = 𝑙 cm × 𝑤 cm = 𝑙𝑤 cm2
8. Draw a rectangular prism on the board. Label the height, length and
width, as in the diagram at the right.
9. Say: This solid is occupying a certain amount of space, which is called
the volume (V).
10. Say: To find the volume of a rectangular solid, we multiply the area of
one side (a cross-section, 𝐴 = 𝑙 × 𝑤) by the height (ℎ).
ℎ = height
𝑤 = width 𝑙 = length
𝑙 cm
𝑤 cm

36
11. Write on the board:
𝑉 = 𝐴 × ℎ
𝑉 = 𝑙 × 𝑤 × ℎ
𝑉 = 𝑙𝑤ℎ
12. Say: Since we multiply 3 lengths with the unit cm together, the unit for this volume will be cubic
centimeters. We use a power of 3 to show ‘cubic’. This is the same as the ‘cubed’ we use for
indices.
13. Write on the board: cm3.
14. Draw a cylinder on the board. Label the height and radius as shown at
the right.
15. Say: To find the volume of a cylinder, we multiply the area of one side
(a cross-section, 𝐴 = 𝜋𝑟2) by the height (ℎ).
16. Write on the board:
𝑉 = 𝐴 × ℎ
𝑉 = 𝜋𝑟2 × ℎ
𝑉 = 𝜋𝑟2ℎ
17. Say: To find volume, it is important that the sides of a solid are all given in the same units.
Guided Practice (5 minutes)
1. Write: Draw a cylindrical prism with height of 9 cm and a radius of 2 cm.
2. Draw:
3. Say: Please draw the same cylindrical prism in your exercise book.
4. Ask: How do we find the volume of a cylinder? (Answer example: multiply the area of one side
by the height)
5. Ask: What units will the volume be in? (Answer: cm3)
6. Write: cm3
7. Say: cm3
Independent Practice (10 minutes)
1. Write:
a) Draw a rectangular prism with a height of 14 cm, length of 10 cm,
and width of 8 cm.
b) How do you write cubic millimetres, metres, and kilometres?
2. Say: Please work on your own and write your answers in your exercise
book.
3. Walk around the room and assist pupils when needed.
4. Ask: Who would like to draw the rectangular prism on the board?
5. Call on a pupil with hand raised to draw the prism on the board.
14 cm
10 cm
h cm
r cm
9 cm
r = 2 cm
37
6. Ask: Who would like to write the answer for the units of measurement on the board?
7. Call on a pupil with hand raised to write the answers on the board.
(Answers: Cubic millimetres: mm3; cubic metres: m3; cubic kilometres: km3)
Closing (3 minutes)
1. Say: Please turn to a partner and describe the difference between m and m2 in your own words.
2. Ask: What is the difference? (Example answers: metres are one dimension such as length; m2
give a measurement in two dimensions, such as to tell area of a shape; m3 give a measurement
in three dimensions, to tell the volume of an object.)

38
Lesson Title: Volume of Cubes Theme: Measurement and Estimation
Lesson Number: M-08-069 Class/Level: JSS 2 Time: 35 minutes
Learning Outcomes By the end of the lesson,
pupils will be able to calculate the volume of a cube using the formula (𝐴 = 𝑙3).
Teaching Aids None
Preparation None
Opening (2 minutes)
1. Ask: What is the formula of the volume of a rectangular solid? (Answer: 𝑉 = 𝑙 × 𝑤 × ℎ)
2. Write: 𝑉 = 𝑙 × 𝑤 × ℎ
3. Ask: What units do we measure volume in? (Answer: Cubic units, such as m3 or cm3)
4. Say: Today our lesson topic is how to calculate the volume of a cube using the formula.
Introduction to the New Material (9 minutes)
1. Ask: What is a cube? (Answer: A three-dimensional shape contained by 6 equal squares)
2. Draw a cube on the board:
3. Say: Because it is a cube, each face is a square.
4. Say: Every edge is the same length, labeled as 𝑙.
5. Ask: What is the formula of the volume of a rectangular solid? (Answer: 𝑉 = 𝑙 × 𝑤 × ℎ = 𝑙𝑤ℎ)
6. Write: 𝑉 = 𝑙 × 𝑤 × ℎ = 𝑙𝑤ℎ
7. Say: Since all the sides are of the same length, then one number will represent all the sides.
8. Say: We can replace the width and height with length as they are all the same for a square.
9. Write: Volume of a cube is 𝑉 = 𝑙 × 𝑙 × 𝑙 = 𝑙3.
10. Say: If you know the length of one side of the cube, then you will be able to calculate its volume.
11. Write: Calculate the volume of a cube with sides of length 4 m.
12. Draw and label a diagram of the cube on the board.
13. Say: Remember the formula for volume of a cube is: = 𝑙 × 𝑙 × 𝑙 = 𝑙3.
14. Write: 𝑉 = 4 m × 4 m × 4 m
15. Say: When we multiply the numbers 4 m x 4 m x 4 m, our answer is:
64 m3
16. Write: 4 m × 4 m × 4 m = 64 m3
Guided Practice (10 minutes)
1. Write: Calculate the volume of a cube with sides of length 8 cm.
2. Say: Please draw the cube in your exercise book.
4 m
4 m 4 m
𝑙
𝑙 𝑙
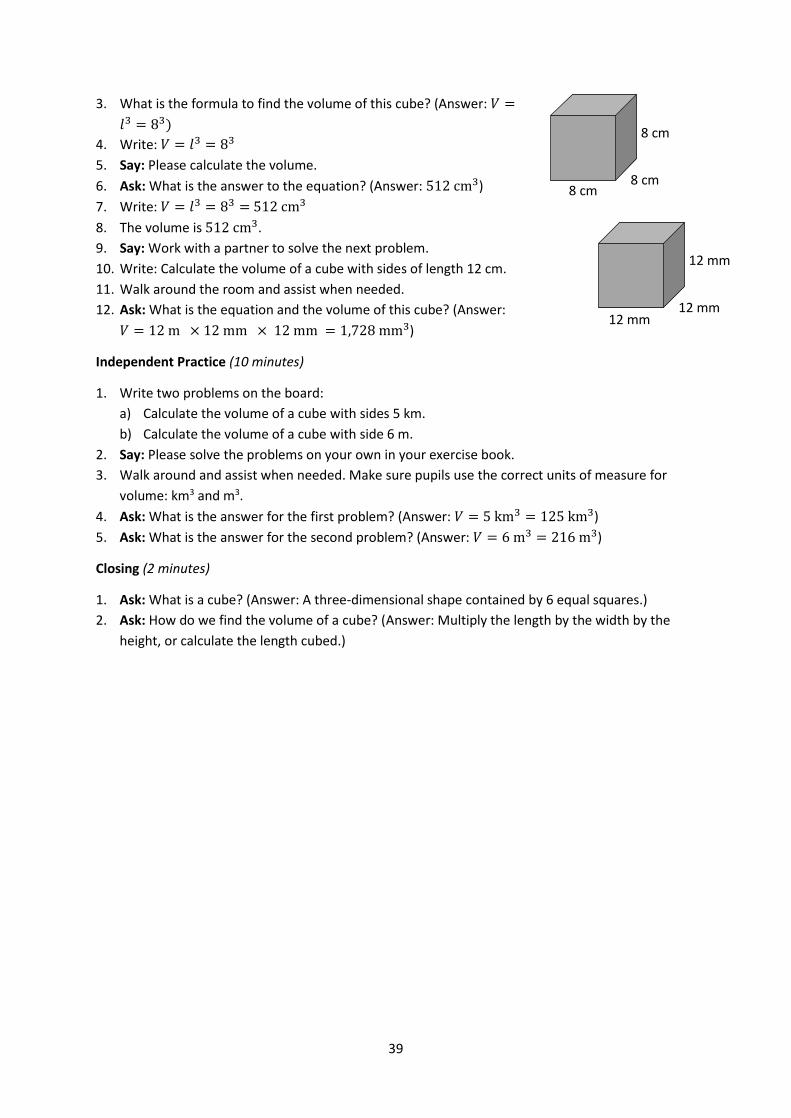
39
3. What is the formula to find the volume of this cube? (Answer: 𝑉 =
𝑙3 = 83)
4. Write: 𝑉 = 𝑙3 = 83
5. Say: Please calculate the volume.
6. Ask: What is the answer to the equation? (Answer: 512 cm3)
7. Write: 𝑉 = 𝑙3 = 83 = 512 cm3
8. The volume is 512 cm3.
9. Say: Work with a partner to solve the next problem.
10. Write: Calculate the volume of a cube with sides of length 12 cm.
11. Walk around the room and assist when needed.
12. Ask: What is the equation and the volume of this cube? (Answer:
𝑉 = 12 m × 12 mm × 12 mm = 1,728 mm3)
Independent Practice (10 minutes)
1. Write two problems on the board:
a) Calculate the volume of a cube with sides 5 km.
b) Calculate the volume of a cube with side 6 m.
2. Say: Please solve the problems on your own in your exercise book.
3. Walk around and assist when needed. Make sure pupils use the correct units of measure for
volume: km3 and m3.
4. Ask: What is the answer for the first problem? (Answer: 𝑉 = 5 km3 = 125 km3)
5. Ask: What is the answer for the second problem? (Answer: 𝑉 = 6 m3 = 216 m3)
Closing (2 minutes)
1. Ask: What is a cube? (Answer: A three-dimensional shape contained by 6 equal squares.)
2. Ask: How do we find the volume of a cube? (Answer: Multiply the length by the width by the
height, or calculate the length cubed.)
12 mm
12 mm 12 mm
8 cm
8 cm 8 cm
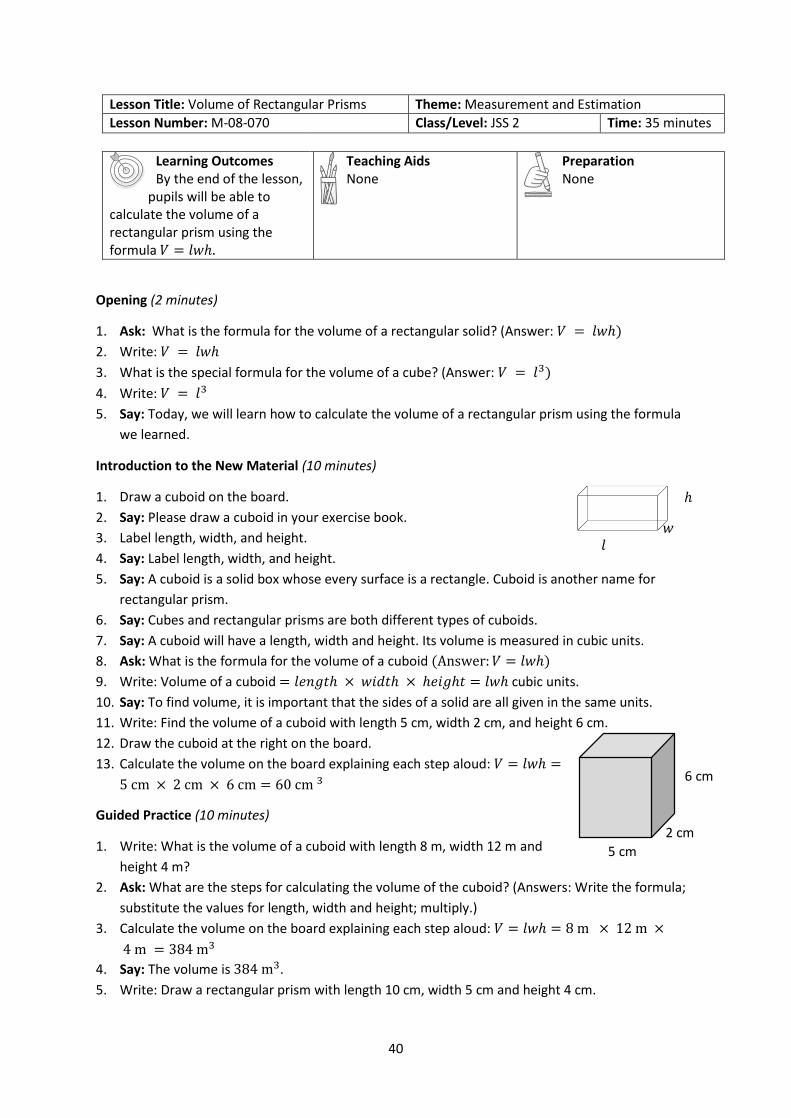
40
Lesson Title: Volume of Rectangular Prisms Theme: Measurement and Estimation
Lesson Number: M-08-070 Class/Level: JSS 2 Time: 35 minutes
Learning Outcomes By the end of the lesson,
pupils will be able to calculate the volume of a rectangular prism using the formula 𝑉 = 𝑙𝑤ℎ.
Teaching Aids None
Preparation None
Opening (2 minutes)
1. Ask: What is the formula for the volume of a rectangular solid? (Answer: 𝑉 = 𝑙𝑤ℎ)
2. Write: 𝑉 = 𝑙𝑤ℎ
3. What is the special formula for the volume of a cube? (Answer: 𝑉 = 𝑙3)
4. Write: 𝑉 = 𝑙3
5. Say: Today, we will learn how to calculate the volume of a rectangular prism using the formula
we learned.
Introduction to the New Material (10 minutes)
1. Draw a cuboid on the board.
2. Say: Please draw a cuboid in your exercise book.
3. Label length, width, and height.
4. Say: Label length, width, and height.
5. Say: A cuboid is a solid box whose every surface is a rectangle. Cuboid is another name for
rectangular prism.
6. Say: Cubes and rectangular prisms are both different types of cuboids.
7. Say: A cuboid will have a length, width and height. Its volume is measured in cubic units.
8. Ask: What is the formula for the volume of a cuboid (Answer: 𝑉 = 𝑙𝑤ℎ)
9. Write: Volume of a cuboid = 𝑙𝑒𝑛𝑔𝑡ℎ × 𝑤𝑖𝑑𝑡ℎ × ℎ𝑒𝑖𝑔ℎ𝑡 = 𝑙𝑤ℎ cubic units.
10. Say: To find volume, it is important that the sides of a solid are all given in the same units.
11. Write: Find the volume of a cuboid with length 5 cm, width 2 cm, and height 6 cm.
12. Draw the cuboid at the right on the board.
13. Calculate the volume on the board explaining each step aloud: 𝑉 = 𝑙𝑤ℎ =
5 cm × 2 cm × 6 cm = 60 cm 3
Guided Practice (10 minutes)
1. Write: What is the volume of a cuboid with length 8 m, width 12 m and
height 4 m?
2. Ask: What are the steps for calculating the volume of the cuboid? (Answers: Write the formula;
substitute the values for length, width and height; multiply.)
3. Calculate the volume on the board explaining each step aloud: 𝑉 = 𝑙𝑤ℎ = 8 m × 12 m ×
4 m = 384 m3
4. Say: The volume is 384 m3.
5. Write: Draw a rectangular prism with length 10 cm, width 5 cm and height 4 cm.
𝑙
ℎ
𝑤
5 cm
2 cm
6 cm

41
6. Say: Together with a partner, calculate the volume of the rectangular prism using the formula
you learned. Write the answer in your exercise books.
7. Say: Remember that cuboids and rectangular prisms are the same thing.
8. Walk around the room and assist pupils when needed.
9. Ask: Who would like to draw the cuboid on the board and answer the question?
10. Call on a pair with hands raised to draw the cuboid and calculate the volume.
𝑉 = 𝑙 × 𝑤 × ℎ = 10 cm. × 5 cm × 4 cm. = 200 cm3
Independent Practice (10 minutes)
1. Write the following problems on the board:
a) Find the volume of a cuboid with length 5 km, width 3 km and height 2 km.
b) Calculate the volume of a cuboid with length 6.5 m, width 1.4 m and height 2.8 m.
2. Say: Work on your own and write their answers in your exercise book.
3. Walk around the room and assist pupils when needed.
4. Ask: Who would like to draw the cuboids and calculate the volume on the board?
5. Call on one boy and one girl with hands raised to draw a cuboid and calculate the volume on the
board.
Answers:
a) b)
a) 𝑉 = 𝑙𝑤ℎ = 5 km × 3 km × 2 km = 30 km3
b) 𝑉 = 𝑙𝑤ℎ = 6.5 m × 1.4 m × 2.8 m = 25.48 m3
Closing (3 minutes)
1. Ask: When would you need to calculate the volume of a cuboid or rectangular prism?
2. Allow pupils to share ideas aloud.
4 cm
10 cm
5 km
2 km
3 km
6.5 m
1.4 m
2.8 m
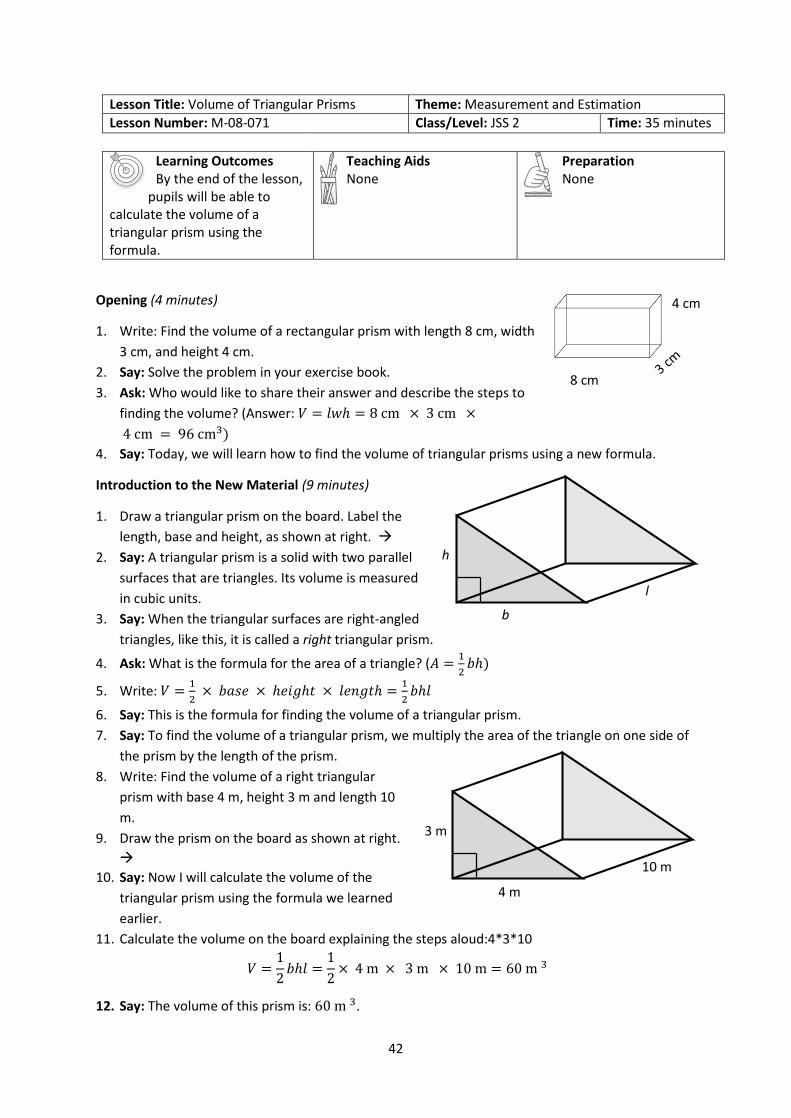
42
Lesson Title: Volume of Triangular Prisms Theme: Measurement and Estimation
Lesson Number: M-08-071 Class/Level: JSS 2 Time: 35 minutes
Learning Outcomes By the end of the lesson,
pupils will be able to calculate the volume of a triangular prism using the formula.
Teaching Aids None
Preparation None
Opening (4 minutes)
1. Write: Find the volume of a rectangular prism with length 8 cm, width
3 cm, and height 4 cm.
2. Say: Solve the problem in your exercise book.
3. Ask: Who would like to share their answer and describe the steps to
finding the volume? (Answer: 𝑉 = 𝑙𝑤ℎ = 8 cm × 3 cm ×
4 cm = 96 cm3)
4. Say: Today, we will learn how to find the volume of triangular prisms using a new formula.
Introduction to the New Material (9 minutes)
1. Draw a triangular prism on the board. Label the
length, base and height, as shown at right.
2. Say: A triangular prism is a solid with two parallel
surfaces that are triangles. Its volume is measured
in cubic units.
3. Say: When the triangular surfaces are right-angled
triangles, like this, it is called a right triangular prism.
4. Ask: What is the formula for the area of a triangle? (𝐴 =1
2𝑏ℎ)
5. Write: 𝑉 =1
2 × 𝑏𝑎𝑠𝑒 × ℎ𝑒𝑖𝑔ℎ𝑡 × 𝑙𝑒𝑛𝑔𝑡ℎ =
1
2𝑏ℎ𝑙
6. Say: This is the formula for finding the volume of a triangular prism.
7. Say: To find the volume of a triangular prism, we multiply the area of the triangle on one side of
the prism by the length of the prism.
8. Write: Find the volume of a right triangular
prism with base 4 m, height 3 m and length 10
m.
9. Draw the prism on the board as shown at right.
10. Say: Now I will calculate the volume of the
triangular prism using the formula we learned
earlier.
11. Calculate the volume on the board explaining the steps aloud:4*3*10
𝑉 =1
2𝑏ℎ𝑙 =
1
2× 4 m × 3 m × 10 m = 60 m 3
12. Say: The volume of this prism is: 60 m 3.
4 cm
8 cm
l
h
b
10 m
3 m
4 m

43
Guided Practice (10 minutes)
1. Write: Find the volume of a triangular prism with base 12 mm, height 8 mm and length 20 mm.
2. Sketch the triangular prism at right on the board.
3. Say: Please sketch this triangular prism in your exercise book.
4. Say: This triangular prism looks different, but we use
the same formula.
5. Ask: What are the steps to calculate the volume
of the triangular prism? (Answers: Write the
formula; substitute the values for base, height and
length; multiply.)
6. Calculate the volume on the board explaining the steps aloud: 𝑉 =1
2𝑏ℎ𝑙 =
1
2× 12 mm ×
8 mm × 20 mm = 960 mm 3
7. Say: The volume of this triangular prism is 960 mm 3.
8. Say: Please copy the calculations into your exercise book.
9. Write: Draw a right triangular prism with base 4 m, height 7 m and length 10 m. Find the volume
of the triangular prism.
10. Say: Please work with a partner and write your answers in your exercise books.
11. Walk around the room and assist pupils when needed.
12. Ask: Who would like to draw the shape on the board and answer the question?
13. Call on a pair of pupils with hands raised to draw the shape and
answer the question on the board.
14. (Answers: See below)
The shape can look many different ways and face any direction. See
example at right.
𝑉 =1
2𝑏ℎ𝑙 =
1
2× 4 m × 7 m × 10 m = 140 m3
15. Say: The volume of the triangular prism is: 140 m 3.
Independent Practice (10 minutes)
1. Write:
a) Find the volume of a triangular prism with base 2 cm, height 8 cm and length 15 cm.
b) Find the volume of a triangular prism with base 4 m, height 6 m and length 18.5 m.
2. Say: Please work on your own and write your answers in your exercise book.
3. Walk around the room and assist pupils when needed.
4. Ask: Who would like to come to the board and share their answers?
5. Call on two pupils with hands raised to come to the board and share their answers. Assist when
needed.
(Answers: a) 𝑉 =1
2𝑏ℎ𝑙 =
1
2× 2 cm × 8 cm × 15 cm = 120 cm3;
b) 𝑉 =1
2𝑏ℎ𝑙 =
1
2× 4 m × 6 m × 18.5 m = 222 m3)
6. Say: Please check your work in your exercise book to make sure you have answered the
problems correctly.
12 mm
8 mm
20 mm
4 m
7 m
10 m
44
Closing (2 minutes)
1. Ask: What pieces of information must you know about a triangular prism to find the volume?
(Answer: The base and height of the triangular face, and the length of the prism)
2. Ask: What is the formula for finding the volume of a triangular prism? (Answer: 𝑉 =1
2𝑏ℎ𝑙)
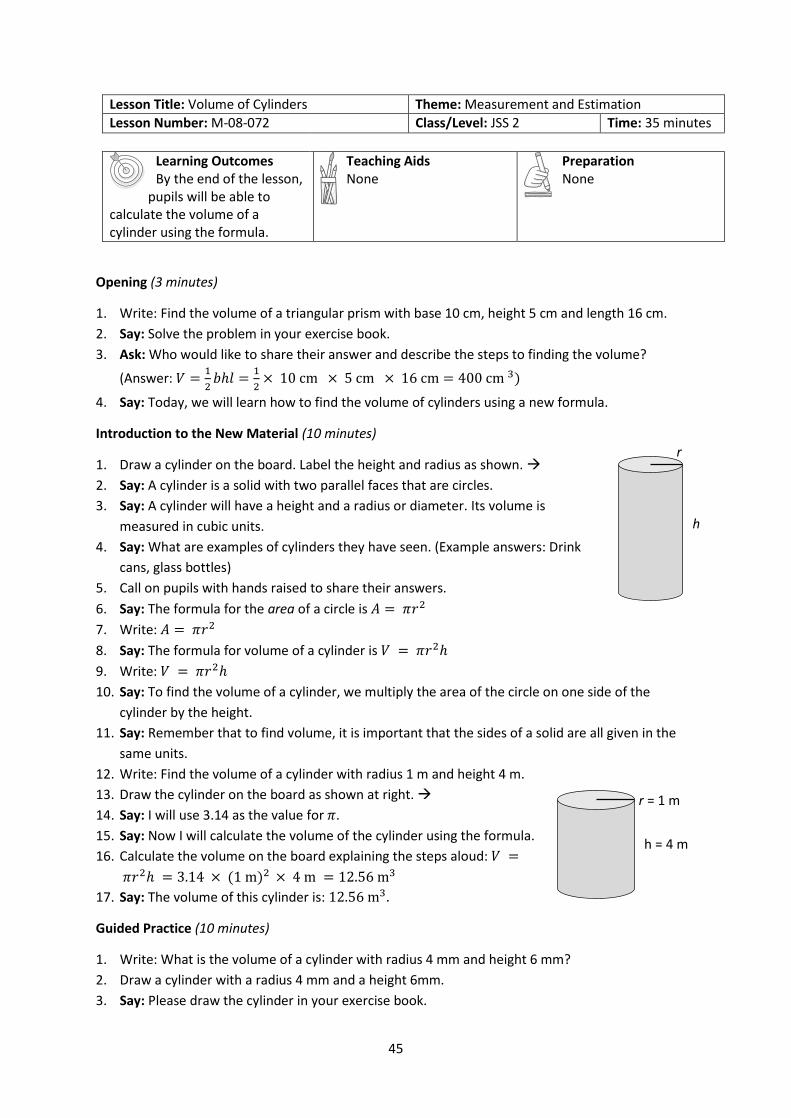
45
Lesson Title: Volume of Cylinders Theme: Measurement and Estimation
Lesson Number: M-08-072 Class/Level: JSS 2 Time: 35 minutes
Learning Outcomes By the end of the lesson,
pupils will be able to calculate the volume of a cylinder using the formula.
Teaching Aids None
Preparation None
Opening (3 minutes)
1. Write: Find the volume of a triangular prism with base 10 cm, height 5 cm and length 16 cm.
2. Say: Solve the problem in your exercise book.
3. Ask: Who would like to share their answer and describe the steps to finding the volume?
(Answer: 𝑉 =1
2𝑏ℎ𝑙 =
1
2× 10 cm × 5 cm × 16 cm = 400 cm 3)
4. Say: Today, we will learn how to find the volume of cylinders using a new formula.
Introduction to the New Material (10 minutes)
1. Draw a cylinder on the board. Label the height and radius as shown.
2. Say: A cylinder is a solid with two parallel faces that are circles.
3. Say: A cylinder will have a height and a radius or diameter. Its volume is
measured in cubic units.
4. Say: What are examples of cylinders they have seen. (Example answers: Drink
cans, glass bottles)
5. Call on pupils with hands raised to share their answers.
6. Say: The formula for the area of a circle is 𝐴 = 𝜋𝑟2
7. Write: 𝐴 = 𝜋𝑟2
8. Say: The formula for volume of a cylinder is 𝑉 = 𝜋𝑟2ℎ
9. Write: 𝑉 = 𝜋𝑟2ℎ
10. Say: To find the volume of a cylinder, we multiply the area of the circle on one side of the
cylinder by the height.
11. Say: Remember that to find volume, it is important that the sides of a solid are all given in the
same units.
12. Write: Find the volume of a cylinder with radius 1 m and height 4 m.
13. Draw the cylinder on the board as shown at right.
14. Say: I will use 3.14 as the value for 𝜋.
15. Say: Now I will calculate the volume of the cylinder using the formula.
16. Calculate the volume on the board explaining the steps aloud: 𝑉 =
𝜋𝑟2ℎ = 3.14 × (1 m)2 × 4 m = 12.56 m3
17. Say: The volume of this cylinder is: 12.56 m3.
Guided Practice (10 minutes)
1. Write: What is the volume of a cylinder with radius 4 mm and height 6 mm?
2. Draw a cylinder with a radius 4 mm and a height 6mm.
3. Say: Please draw the cylinder in your exercise book.
r = 1 m
h = 4 m
h
r
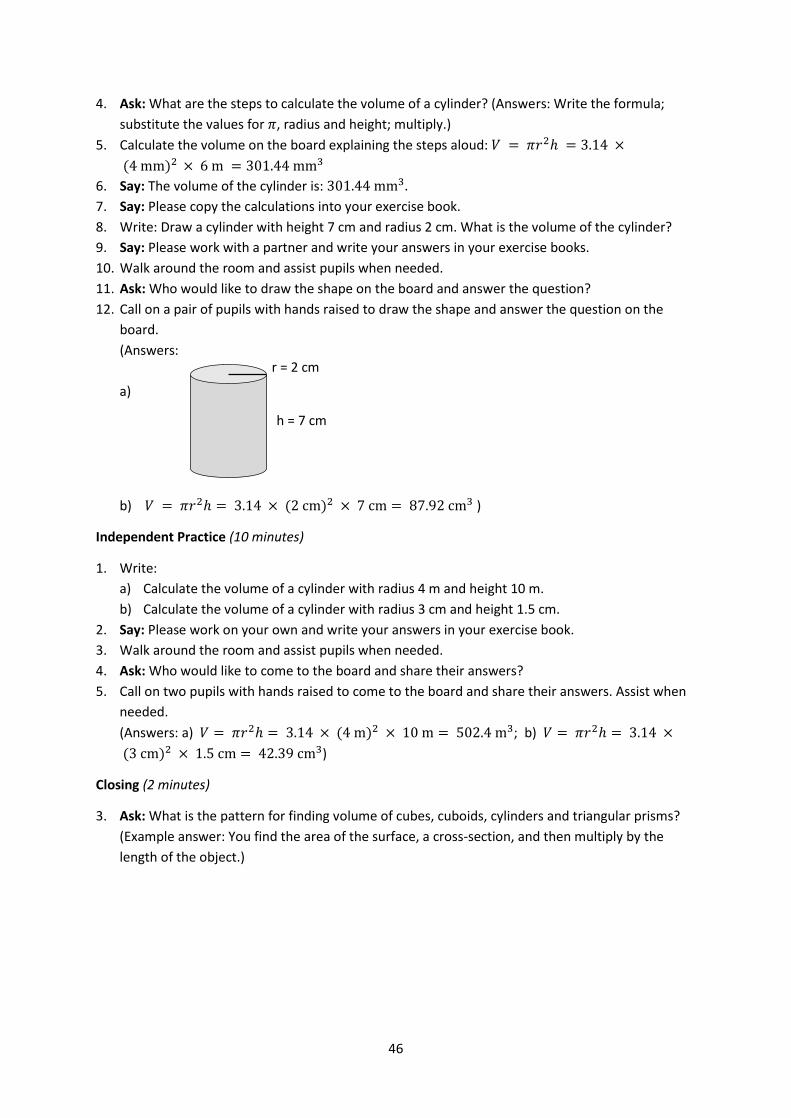
46
4. Ask: What are the steps to calculate the volume of a cylinder? (Answers: Write the formula;
substitute the values for 𝜋, radius and height; multiply.)
5. Calculate the volume on the board explaining the steps aloud: 𝑉 = 𝜋𝑟2ℎ = 3.14 ×
(4 mm)2 × 6 m = 301.44 mm3
6. Say: The volume of the cylinder is: 301.44 mm3.
7. Say: Please copy the calculations into your exercise book.
8. Write: Draw a cylinder with height 7 cm and radius 2 cm. What is the volume of the cylinder?
9. Say: Please work with a partner and write your answers in your exercise books.
10. Walk around the room and assist pupils when needed.
11. Ask: Who would like to draw the shape on the board and answer the question?
12. Call on a pair of pupils with hands raised to draw the shape and answer the question on the
board.
(Answers:
a)
b) 𝑉 = 𝜋𝑟2ℎ = 3.14 × (2 cm)2 × 7 cm = 87.92 cm3 )
Independent Practice (10 minutes)
1. Write:
a) Calculate the volume of a cylinder with radius 4 m and height 10 m.
b) Calculate the volume of a cylinder with radius 3 cm and height 1.5 cm.
2. Say: Please work on your own and write your answers in your exercise book.
3. Walk around the room and assist pupils when needed.
4. Ask: Who would like to come to the board and share their answers?
5. Call on two pupils with hands raised to come to the board and share their answers. Assist when
needed.
(Answers: a) 𝑉 = 𝜋𝑟2ℎ = 3.14 × (4 m)2 × 10 m = 502.4 m3; b) 𝑉 = 𝜋𝑟2ℎ = 3.14 ×
(3 cm)2 × 1.5 cm = 42.39 cm3)
Closing (2 minutes)
3. Ask: What is the pattern for finding volume of cubes, cuboids, cylinders and triangular prisms?
(Example answer: You find the area of the surface, a cross-section, and then multiply by the
length of the object.)
h = 7 cm
r = 2 cm

47
Lesson Title: Volume of Composite Solids Theme: Measurement and Estimation
Lesson Number: M-08-073 Class/Level: JSS 2 Time: 35 minutes
Learning Outcomes By the end of the lesson,
pupils will be able to calculate the volume of composite solids.
Teaching Aids None
Preparation None
Opening (4 minutes)
1. Sketch the following composite shape on the board:
2. Ask: How do you find the area of composite shapes? (Answer: Divide the
shape into basic shapes and find the individual areas, then add them.)
3. Ask: What are composite shapes? (Answer: Shapes that can be divided into
one or more basic plane shapes.)
4. Ask: What basic shapes make up this composite shape? (Answer: triangle and
rectangle)
5. Ask: What formulae would you use to calculate the area? (Answers: Rectangle: 𝐴 = 𝑙 × 𝑤;
triangle: 𝐴 =1
2𝑏ℎ )
6. Say: Today, we will learn how to find the volume of composite solids.
Introduction to the New Material (9 minutes)
1. Sketch this composite solid at right on the board:
2. Say: Composite solids are solid objects that can be divided into one or
more basic solids.
3. Say: The solids within the composite solid are cube + cuboid/rectangular
prism.
4. Say: To find the volume of composite solids you use the formula for volume of the solids that
make up the composite solid.
5. Label the shape on the board as shown on the right.
6. Say: The formulae must we use to calculate the volume of this solid are:
cube: 𝑉 = 𝑙3 and cuboid: 𝑉 = 𝑙𝑤ℎ
7. Write: cube: 𝑉 = 𝑙3 and cuboid: 𝑉 = 𝑙𝑤ℎ
8. Say: Now I will calculate the volume of the solid using the formulae.
9. Calculate the volume on the board explaining the steps aloud:
𝑉1 = 𝑙3 = 3 cm3 = 27 cm3
𝑉2 = 𝑙𝑤ℎ = 6 cm × 3 cm × 3 cm = 54 cm3;
V = 27 cm3 + 54 cm3 = 81 cm3
10. Say: The volume of the solid is 81 cm3.
Guided Practice (10 minutes)
1. Sketch and label the composite solid at right on the board:
2. Write: Find the volume of the solid.
3. Say: We will now calculate the volume of the solid together.
10 m
8 m
6 m 8 m
3 cm
3 cm
6 cm 3 cm
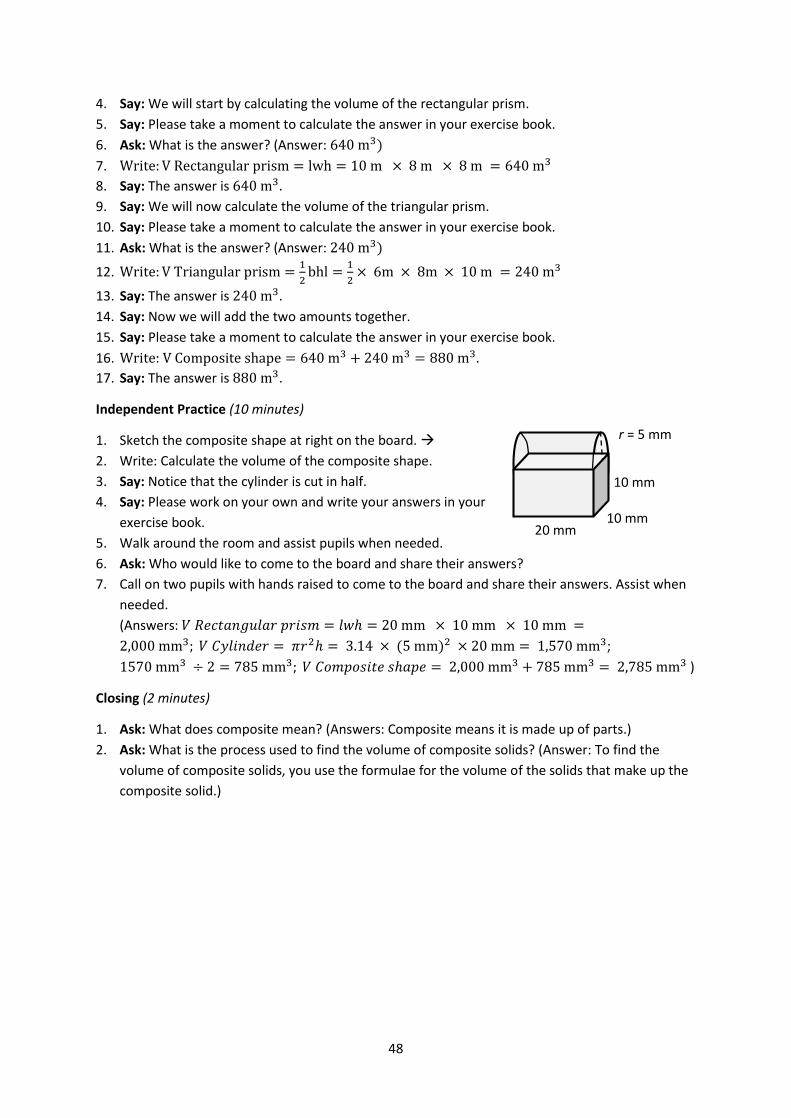
48
4. Say: We will start by calculating the volume of the rectangular prism.
5. Say: Please take a moment to calculate the answer in your exercise book.
6. Ask: What is the answer? (Answer: 640 m3)
7. Write: V Rectangular prism = lwh = 10 m × 8 m × 8 m = 640 m3
8. Say: The answer is 640 m3.
9. Say: We will now calculate the volume of the triangular prism.
10. Say: Please take a moment to calculate the answer in your exercise book.
11. Ask: What is the answer? (Answer: 240 m3)
12. Write: V Triangular prism =1
2bhl =
1
2× 6m × 8m × 10 m = 240 m3
13. Say: The answer is 240 m3.
14. Say: Now we will add the two amounts together.
15. Say: Please take a moment to calculate the answer in your exercise book.
16. Write: V Composite shape = 640 m3 + 240 m3 = 880 m3.
17. Say: The answer is 880 m3.
Independent Practice (10 minutes)
1. Sketch the composite shape at right on the board.
2. Write: Calculate the volume of the composite shape.
3. Say: Notice that the cylinder is cut in half.
4. Say: Please work on your own and write your answers in your
exercise book.
5. Walk around the room and assist pupils when needed.
6. Ask: Who would like to come to the board and share their answers?
7. Call on two pupils with hands raised to come to the board and share their answers. Assist when
needed.
(Answers: 𝑉 𝑅𝑒𝑐𝑡𝑎𝑛𝑔𝑢𝑙𝑎𝑟 𝑝𝑟𝑖𝑠𝑚 = 𝑙𝑤ℎ = 20 mm × 10 mm × 10 mm =
2,000 mm3; 𝑉 𝐶𝑦𝑙𝑖𝑛𝑑𝑒𝑟 = 𝜋𝑟2ℎ = 3.14 × (5 mm)2 × 20 mm = 1,570 mm3;
1570 mm3 ÷ 2 = 785 mm3; 𝑉 𝐶𝑜𝑚𝑝𝑜𝑠𝑖𝑡𝑒 𝑠ℎ𝑎𝑝𝑒 = 2,000 mm3 + 785 mm3 = 2,785 mm3 )
Closing (2 minutes)
1. Ask: What does composite mean? (Answers: Composite means it is made up of parts.)
2. Ask: What is the process used to find the volume of composite solids? (Answer: To find the
volume of composite solids, you use the formulae for the volume of the solids that make up the
composite solid.)
20 mm 10 mm
10 mm
r = 5 mm
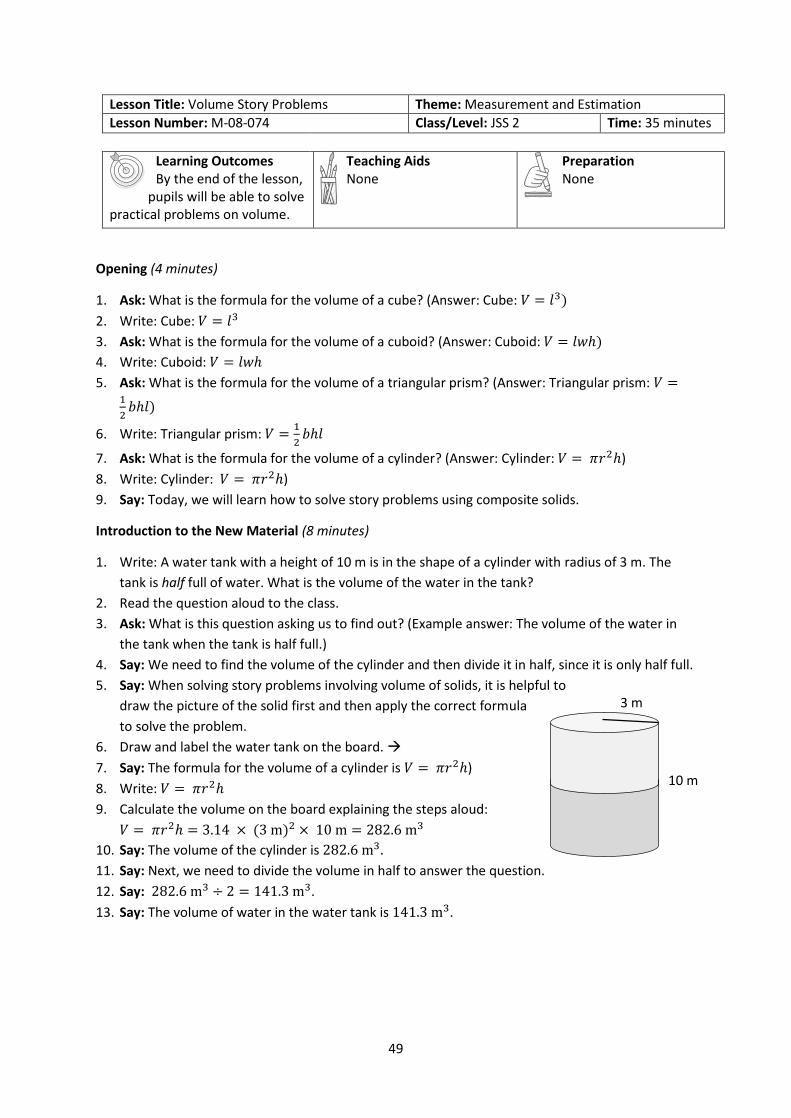
49
Lesson Title: Volume Story Problems Theme: Measurement and Estimation
Lesson Number: M-08-074 Class/Level: JSS 2 Time: 35 minutes
Learning Outcomes By the end of the lesson,
pupils will be able to solve practical problems on volume.
Teaching Aids None
Preparation None
Opening (4 minutes)
1. Ask: What is the formula for the volume of a cube? (Answer: Cube: 𝑉 = 𝑙3)
2. Write: Cube: 𝑉 = 𝑙3
3. Ask: What is the formula for the volume of a cuboid? (Answer: Cuboid: 𝑉 = 𝑙𝑤ℎ)
4. Write: Cuboid: 𝑉 = 𝑙𝑤ℎ
5. Ask: What is the formula for the volume of a triangular prism? (Answer: Triangular prism: 𝑉 =1
2𝑏ℎ𝑙)
6. Write: Triangular prism: 𝑉 =1
2𝑏ℎ𝑙
7. Ask: What is the formula for the volume of a cylinder? (Answer: Cylinder: 𝑉 = 𝜋𝑟2ℎ)
8. Write: Cylinder: 𝑉 = 𝜋𝑟2ℎ)
9. Say: Today, we will learn how to solve story problems using composite solids.
Introduction to the New Material (8 minutes)
1. Write: A water tank with a height of 10 m is in the shape of a cylinder with radius of 3 m. The
tank is half full of water. What is the volume of the water in the tank?
2. Read the question aloud to the class.
3. Ask: What is this question asking us to find out? (Example answer: The volume of the water in
the tank when the tank is half full.)
4. Say: We need to find the volume of the cylinder and then divide it in half, since it is only half full.
5. Say: When solving story problems involving volume of solids, it is helpful to
draw the picture of the solid first and then apply the correct formula
to solve the problem.
6. Draw and label the water tank on the board.
7. Say: The formula for the volume of a cylinder is 𝑉 = 𝜋𝑟2ℎ)
8. Write: 𝑉 = 𝜋𝑟2ℎ
9. Calculate the volume on the board explaining the steps aloud:
𝑉 = 𝜋𝑟2ℎ = 3.14 × (3 m)2 × 10 m = 282.6 m3
10. Say: The volume of the cylinder is 282.6 m3.
11. Say: Next, we need to divide the volume in half to answer the question.
12. Say: 282.6 m3 ÷ 2 = 141.3 m3.
13. Say: The volume of water in the water tank is 141.3 m3.
3 m
10 m

50
Guided Practice (10 minutes)
1. Write: The carpenter is building a cube box with side lengths of 15 cm.
How many cubic centimetres of seeds will the box be able to hold?
2. Draw and label the box on the board.
3. Say: Draw and label the box in your exercise book.
4. Say: Calculate the volume of the box in your exercise book using the
formula 𝑉 = 𝑙3.
5. Ask: What is the answer? (Answer: 3,375 cm3)
6. Calculate the volume on the board explaining the steps aloud:
𝑉 = 𝑙3 = 15 cm = 3,375 cm3
7. Say: The volume of the cube is 3,375 cm3. Check to make sure have the same answer.
8. Write: Biscuit boxes are 6 cm long, 4 cm wide and 2 cm high. How many biscuit boxes can fit
stacked inside a carton that is 72 cm long, 48 cm wide and 24 cm high?
9. Say: Please work with a partner and write your answers in your exercise books.
10. Say: Remember to sketch a diagram of the solids.
11. Walk around the room and assist pupils when needed. Pupils may
not understand that they will need to divide the total volume by
the volume of each box.
12. Ask: Who would like to sketch the solids and share their answers
on the board?
13. Call on a pair of pupils with hands raised to sketch the solids and
answer the question on the board.
14. (Answer: 𝑉 𝐵𝑖𝑠𝑐𝑢𝑖𝑡 𝑏𝑜𝑥 = 𝑙𝑤ℎ = 6 cm × 4 cm × 2 cm =
48 cm3; 𝑉 𝐶𝑎𝑟𝑡𝑜𝑛 = 𝑙𝑤ℎ = 72 cm × 48 cm × 24 cm =
82,944 cm3; 𝑐𝑎𝑟𝑡𝑜𝑛 ÷ 𝑏𝑖𝑠𝑐𝑢𝑖𝑡 𝑏𝑜𝑥𝑒𝑠 = 82,944 cm3 ÷ 48 cm3 =
1,728 𝑏𝑖𝑠𝑐𝑢𝑖𝑡 𝑏𝑜𝑥𝑒𝑠 𝑝𝑒𝑟 𝑐𝑎𝑟𝑡𝑜𝑛)
Independent Practice (10 minutes)
1. Choose 1-2 problems from the question bank on the next page (based on your pupils’ level of
understanding) and write them on the board.
2. Say: Please work on your own and write your answers in your exercise book.
3. Walk around and check for understanding, assisting pupils when needed.
4. Ask: Who would like to share their answers?
5. Call on 1-2 pupils with hands raised to come and solve the problems on the board.
Closing (3 minutes)
1. Say: Write your own story problem using the lesson as an example.
2. Allow pupils to share their story problems with a partner of the class if time allows.
24 cm
72 cm
48 cm
6 cm
4 cm
2 cm
Biscuit box
Carton
15 cm
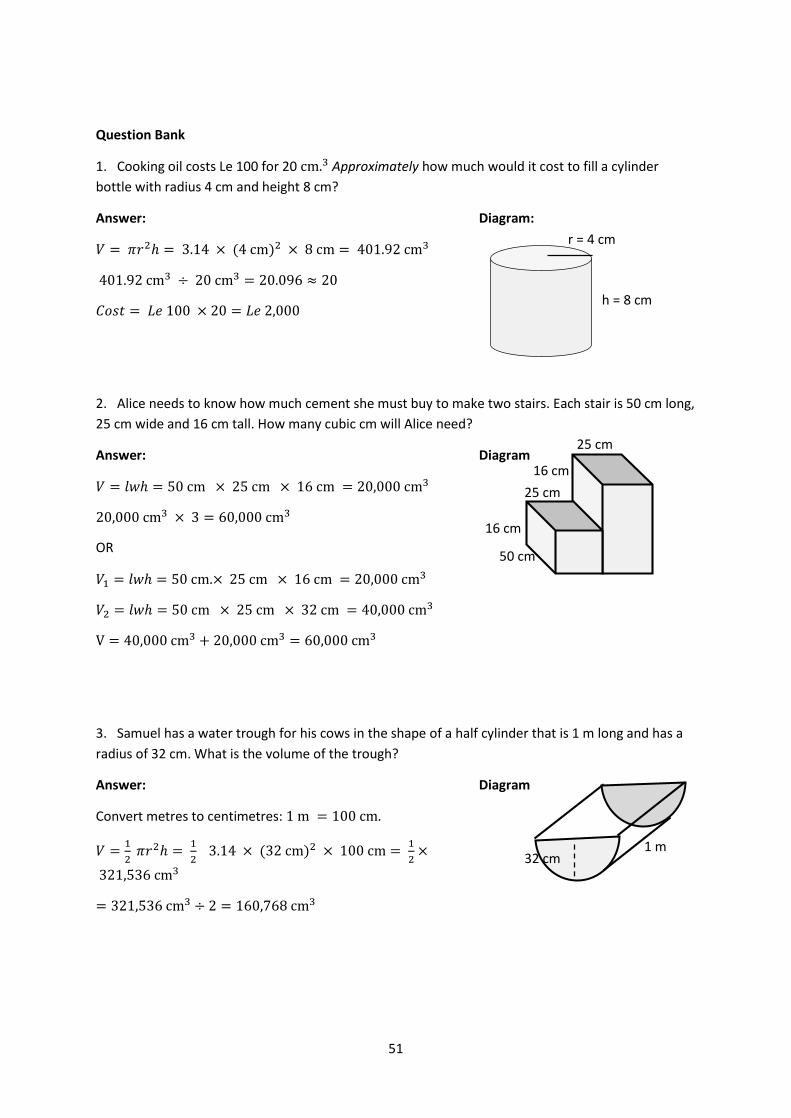
51
Question Bank
1. Cooking oil costs Le 100 for 20 cm.3 Approximately how much would it cost to fill a cylinder
bottle with radius 4 cm and height 8 cm?
Answer: Diagram:
𝑉 = 𝜋𝑟2ℎ = 3.14 × (4 cm)2 × 8 cm = 401.92 cm3
401.92 cm3 ÷ 20 cm3 = 20.096 ≈ 20
𝐶𝑜𝑠𝑡 = 𝐿𝑒 100 × 20 = 𝐿𝑒 2,000
2. Alice needs to know how much cement she must buy to make two stairs. Each stair is 50 cm long,
25 cm wide and 16 cm tall. How many cubic cm will Alice need?
Answer: Diagram
𝑉 = 𝑙𝑤ℎ = 50 cm × 25 cm × 16 cm = 20,000 cm3
20,000 cm3 × 3 = 60,000 cm3
OR
𝑉1 = 𝑙𝑤ℎ = 50 cm.× 25 cm × 16 cm = 20,000 cm3
𝑉2 = 𝑙𝑤ℎ = 50 cm × 25 cm × 32 cm = 40,000 cm3
V = 40,000 cm3 + 20,000 cm3 = 60,000 cm3
3. Samuel has a water trough for his cows in the shape of a half cylinder that is 1 m long and has a
radius of 32 cm. What is the volume of the trough?
Answer: Diagram
Convert metres to centimetres: 1 m = 100 cm.
𝑉 =1
2 𝜋𝑟2ℎ =
1
2 3.14 × (32 cm)2 × 100 cm =
1
2×
321,536 cm3
= 321,536 cm3 ÷ 2 = 160,768 cm3
r = 4 cm
h = 8 cm
16 cm
1 m 32 cm
50 cm
25 cm
16 cm
25 cm
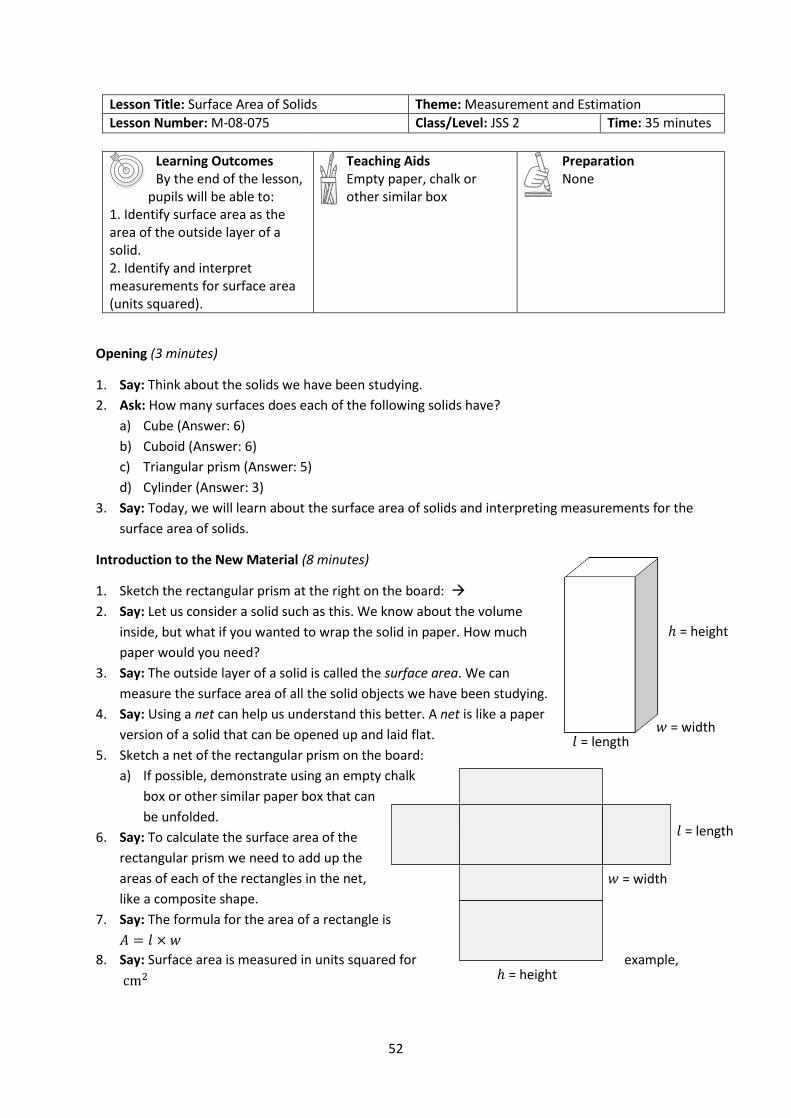
52
Lesson Title: Surface Area of Solids Theme: Measurement and Estimation
Lesson Number: M-08-075 Class/Level: JSS 2 Time: 35 minutes
Learning Outcomes By the end of the lesson,
pupils will be able to: 1. Identify surface area as the area of the outside layer of a solid. 2. Identify and interpret measurements for surface area (units squared).
Teaching Aids Empty paper, chalk or other similar box
Preparation None
Opening (3 minutes)
1. Say: Think about the solids we have been studying.
2. Ask: How many surfaces does each of the following solids have?
a) Cube (Answer: 6)
b) Cuboid (Answer: 6)
c) Triangular prism (Answer: 5)
d) Cylinder (Answer: 3)
3. Say: Today, we will learn about the surface area of solids and interpreting measurements for the
surface area of solids.
Introduction to the New Material (8 minutes)
1. Sketch the rectangular prism at the right on the board:
2. Say: Let us consider a solid such as this. We know about the volume
inside, but what if you wanted to wrap the solid in paper. How much
paper would you need?
3. Say: The outside layer of a solid is called the surface area. We can
measure the surface area of all the solid objects we have been studying.
4. Say: Using a net can help us understand this better. A net is like a paper
version of a solid that can be opened up and laid flat.
5. Sketch a net of the rectangular prism on the board:
a) If possible, demonstrate using an empty chalk
box or other similar paper box that can
be unfolded.
6. Say: To calculate the surface area of the
rectangular prism we need to add up the
areas of each of the rectangles in the net,
like a composite shape.
7. Say: The formula for the area of a rectangle is
𝐴 = 𝑙 × 𝑤
8. Say: Surface area is measured in units squared for example,
cm2
ℎ = height
𝑤 = width 𝑙 = length
ℎ = height
𝑤 = width
𝑙 = length

53
Guided Practice (10 minutes)
1. Say: All of the solids we have studied have surface area. Sketching nets for each of them can be
helpful.
2. Draw a cylinder on the board.
3. Say: Please draw a cylinder in your exercise book.
4. Ask: If you could cut the cylinder along the height and lay it flat, what
would it look like?
5. Allow pupils to share their answers.
6. Sketch the net of the cylinder on the board.
7. Say: Please draw the net of the cylinder in your exercise book.
8. Ask: How can we calculate the area of the cylinder? (Answer: Add up the area of the rectangle
and the two circles, like a composite shape).
9. Say: Remember that the formula for the area of a circle is 𝐴 = 𝜋𝑟2
10. Ask: What units must we give area in? (Answer: Units squared, e.g.
cm2)
11. Write: Sketch the net of a cube with length 3 cm.
12. Sketch the net of a triangular prism with the base of the
triangle 8 cm, the height of the triangle 3 cm, the other two
sides of the triangle 5 cm, and the length of the prism 15 cm.
13. Ask: What units will the surface area be in for both?
14. Say: Please work with a partner and write your answers in your exercise
books.
15. Walk around the room and assist pupils when needed.
16. Ask: Who would like to sketch the solids and share their answers on the board?
17. Call on three pairs of pupils with hands raised to share their answers on the board.
18. Answers:
c) cm2 a) b)
Independent Practice (10 minutes)
1. Write the following problems on the board:
a) Sketch the net of a cylinder with height 10 m, and radius 2 m.
b) Sketch the net of a rectangular prism with length 10 cm, width 8 cm and height 15 cm.
2. Say: Please work on your own and write your answers in your exercise book.
3. Walk around the room and assist pupils when needed.
4. Ask: Who would like come to the board and sketch their answers?
h
r
15 cm
8 cm
3 cm
5 cm
5 cm
h
r
3 cm
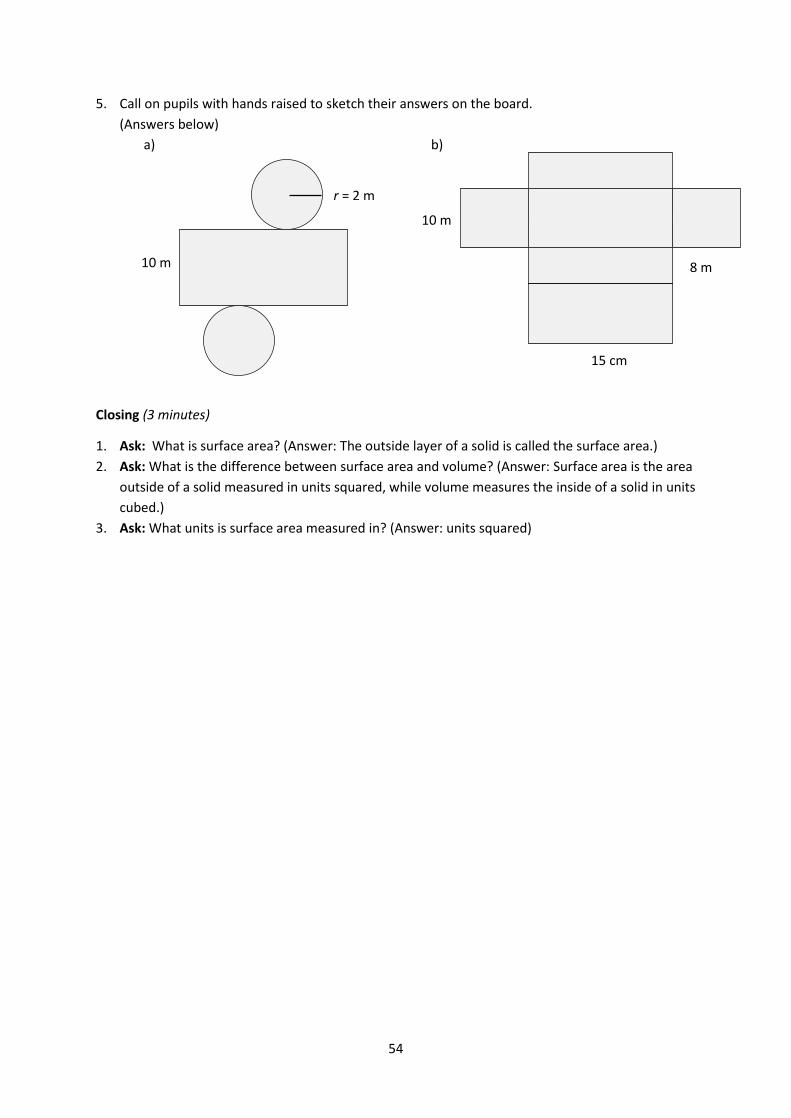
54
5. Call on pupils with hands raised to sketch their answers on the board.
(Answers below)
a) b)
Closing (3 minutes)
1. Ask: What is surface area? (Answer: The outside layer of a solid is called the surface area.)
2. Ask: What is the difference between surface area and volume? (Answer: Surface area is the area
outside of a solid measured in units squared, while volume measures the inside of a solid in units
cubed.)
3. Ask: What units is surface area measured in? (Answer: units squared)
10 m
r = 2 m
10 m
8 m
15 cm
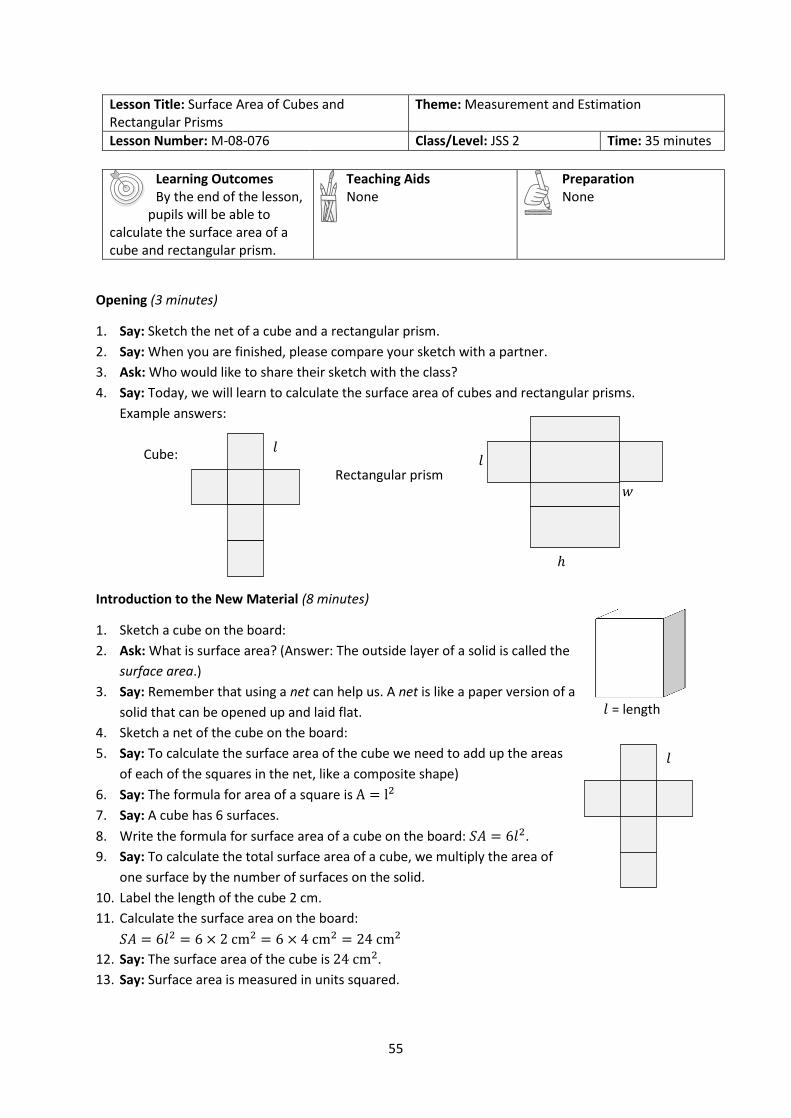
55
Lesson Title: Surface Area of Cubes and Rectangular Prisms
Theme: Measurement and Estimation
Lesson Number: M-08-076 Class/Level: JSS 2 Time: 35 minutes
Learning Outcomes By the end of the lesson,
pupils will be able to calculate the surface area of a cube and rectangular prism.
Teaching Aids None
Preparation None
Opening (3 minutes)
1. Say: Sketch the net of a cube and a rectangular prism.
2. Say: When you are finished, please compare your sketch with a partner.
3. Ask: Who would like to share their sketch with the class?
4. Say: Today, we will learn to calculate the surface area of cubes and rectangular prisms.
Example answers:
Cube:
Rectangular prism
Introduction to the New Material (8 minutes)
1. Sketch a cube on the board:
2. Ask: What is surface area? (Answer: The outside layer of a solid is called the
surface area.)
3. Say: Remember that using a net can help us. A net is like a paper version of a
solid that can be opened up and laid flat.
4. Sketch a net of the cube on the board:
5. Say: To calculate the surface area of the cube we need to add up the areas
of each of the squares in the net, like a composite shape)
6. Say: The formula for area of a square is A = l2
7. Say: A cube has 6 surfaces.
8. Write the formula for surface area of a cube on the board: 𝑆𝐴 = 6𝑙2.
9. Say: To calculate the total surface area of a cube, we multiply the area of
one surface by the number of surfaces on the solid.
10. Label the length of the cube 2 cm.
11. Calculate the surface area on the board:
𝑆𝐴 = 6𝑙2 = 6 × 2 cm2 = 6 × 4 cm2 = 24 cm2
12. Say: The surface area of the cube is 24 cm2.
13. Say: Surface area is measured in units squared.
ℎ
height
𝑤
width
𝑙
𝑙 = length
𝑙
𝑙
56
Guided Practice (10 minutes)
1. Sketch a rectangular prism on the board, as shown at right.
2. Say: Sketch a rectangular prism in your exercise books.
3. Sketch a net of the rectangular prism on the board.
4. Say: Sketch a rectangular prism in your exercise books.
5. Ask: How can we calculate the surface area of the rectangular
prism? (Answer: Add up the areas of each of the rectangles in the
net, like a composite shape).
6. Say: The formula for the area of a rectangle is 𝐴 = 𝑙 × 𝑤.
7. Say: A rectangular prism has 6 sides, just like a cube, but they are
not all the same.
8. Ask: What rectangles in the prism are the same? (Answer:
The top and bottom are the same, the front and back are
the same, and the left and right are the same.)
9. Write the formula for surface area of a cube on the board:
𝑆𝐴 = 2𝑙𝑤 + 2𝑤ℎ + 2𝑙ℎ
10. Say: To calculate the total surface area of a rectangular
prism, we find the area of each of the three different
surfaces and multiply by two.
11. Label the rectangular prism with length 4 cm, width 2 cm, and height 1 cm.
12. Say: Label your rectangular prism with length 4 cm, width 2 cm, and height 1 cm.
13. Say: Calculate the surface area in your exercise book.
14. Calculate the surface area on the board:
𝑆𝐴 = 2𝑙𝑤 + 2𝑤ℎ + 2𝑙ℎ = 2 × 4 cm × 2 cm + 2 × 2 cm × 1 cm + 2 × 4 cm × 1 cm
= 16 cm2 + 4 cm2 + 8 cm2 = 28 cm2.
15. Say: The surface area of the rectangular prism is 28 cm2.
16. Write: What is the surface area of a rectangular prism with length 12 m, width 2 m, and height 2
m?
17. Say: Please work with a partner and write your answers in your exercise books.
18. Walk around the room and assist pupils as needed.
19. Ask: Who would like to draw the prism on the board and answer the question?
20. Call on a pair of pupils with hands raised to draw the prism and answer the question.
Answer: 𝑆𝐴 = 2𝑙𝑤 + 2𝑤ℎ + 2𝑙ℎ = 2 × 12 m × 2 m + 2 × 2 m × 2 m + 2 × 12 m × 2 m
= 48 m2 + 8 m2 + 48 m2 = 104 m2
12 m
2 m
2 m
2 m
2 m
12 m
ℎ
height
𝑤
width
𝑙
ℎ = height
𝑤 = width 𝑙 = length

57
Independent Practice (10 minutes)
1. Write the following problems on the board:
a) Find the surface area of a cube with length 4 mm.
b) Find the surface area of a rectangular prism with length 10 km, width 3 km, and height 2 km.
2. Say: Please work on your own and write your answers in your exercise book.
3. Walk around the room and assist pupils when needed.
4. Ask: Who would like come to the board and share their answers?
5. Call on pupils with hands raised to share their answers on the board.
(Answers:
a) 𝑆𝐴 = 6𝑙2 = 6 × (4 mm)2 = 6 × 16 mm2 = 96 mm2
b) 𝑆𝐴 = 2𝑙𝑤 + 2𝑤ℎ + 2𝑙ℎ = 2 × 10 km × 3 km + 2 × 3 km × 2 km + 2 × 10 km × 2 km
= 60 km2 + 12 km2 + 40 km2 = 112 km2 )
Closing (3 minutes)
1. Ask: Who would like to describe the process to find the surface area of a cube or rectangular
prism? (Example answer: Find the area of each of the surfaces of the solid and add them up.
With a cube they are all the same, but with a rectangle the top and bottom are the same, the
front and back are the same, and the left side and the right side are the same.)

58
Lesson Title: Surface Area of Rectangular Prisms Theme: Measurement and Estimation
Lesson Number: M-08-077 Class/Level: JSS 2 Time: 35 minutes
Learning Outcomes By the end of the lesson,
pupils will be able to calculate the surface area of a triangular prism.
Teaching Aids None
Preparation None
Opening (2 minutes)
1. Ask: What is the formula to calculate the surface area of a cube? (Answer: SA = 6l2)
2. Write: Cube: SA = 6l2
3. Ask: What is the formula to calculate the surface area of a rectangular prism? (Answer: SA =
2lw + 2wh + 2lh)
4. Write: Rectangular prism: SA = 2lw + 2wh + 2lh
5. Say: Today we will learn to calculate the surface area of a triangular prism.
Introduction to the New Material (13 minutes)
1. Sketch a triangular prism on the board:
2. Ask: What is surface area? (Answer: The outside layer of
a solid is called the surface area.)
3. Say: Remember that using a net can help us. A net is
like a paper version of a solid that can be opened up and
laid flat.
4. Sketch a net of the triangular prism on the board:
5. Say: We calculate the surface area of the triangular prism by adding the
areas of each of the shapes in the net, like a composite shape.
6. Say: The formula for area of a triangle is 𝐴 =1
2𝑏ℎ.
7. Write the formula for surface area of a triangular prism on the
board:
𝑆𝐴 = 𝑏ℎ + (𝑎 + 𝑏 + 𝑐)𝑙
8. Say: To calculate the total surface area of a triangular prism we add
the area of the triangle surfaces to the area of the three rectangles
made by the sides of the triangle.
9. Say: The formula only says 𝑏ℎ and not 1
2𝑏ℎ because there are two
triangular surfaces and 1
2× 2 cancels out.
10. Label the length of the prism 8 cm., the height 4 cm., the base 6 cm., and both sides
a and c as 5 cm.
11. Calculate the surface area on the board explaining the steps aloud:
𝑆𝐴 = 𝑏ℎ + (𝑎 + 𝑏 + 𝑐)𝑙 = 6 cm.× 4 cm. +(5cm. +6 cm. +5 cm. ) × 8 cm.
= 24 cm.2+ (16 cm. ) × 8 cm.
= 24 cm.2+ 128 cm.2 = 152 cm.2
12. Say: The surface area of the rectangular prism is 152 cm.2.
13. Say: Remember that surface area is measured in units squared.
𝑏 = 𝑏𝑎𝑠𝑒
ℎ = ℎ𝑒𝑖𝑔ℎ𝑡
𝑙 = 𝑙𝑒𝑛𝑔𝑡ℎ
𝑎 𝑐
𝑏 = 𝑏𝑎𝑠𝑒
ℎ = ℎ𝑒𝑖𝑔ℎ𝑡
𝑙=
𝑙𝑒𝑛
𝑔𝑡ℎ
𝑎 𝑐
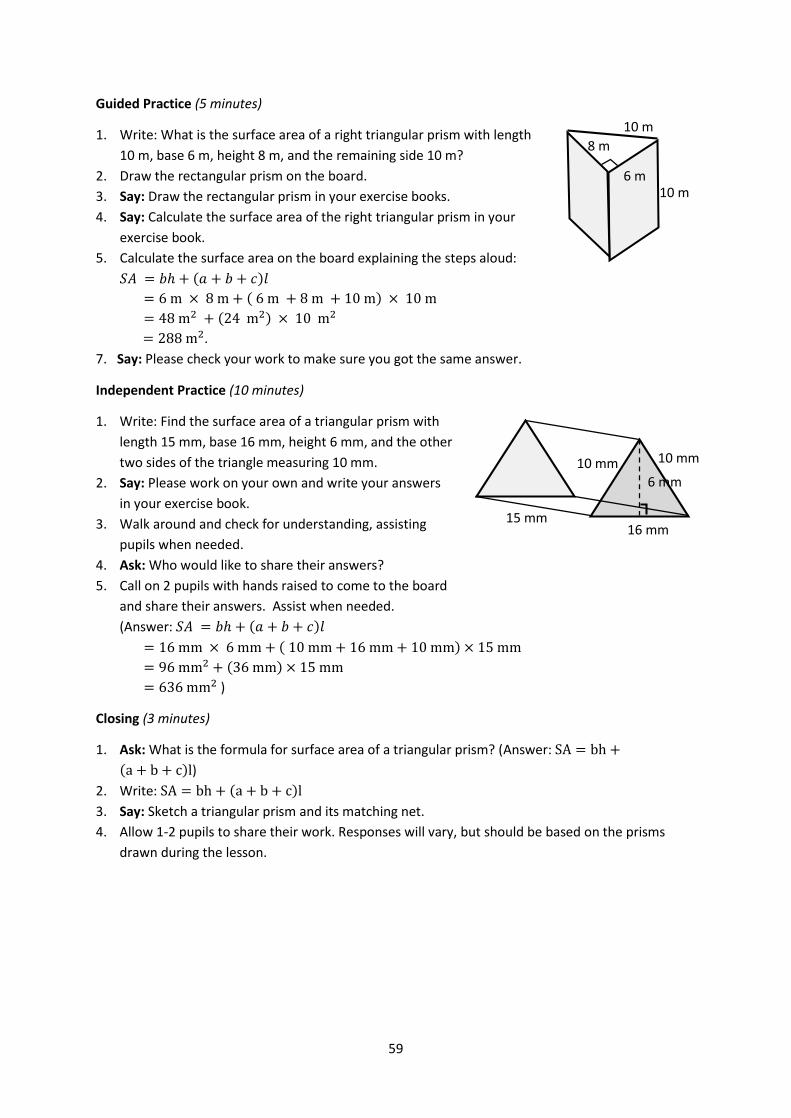
59
Guided Practice (5 minutes)
1. Write: What is the surface area of a right triangular prism with length
10 m, base 6 m, height 8 m, and the remaining side 10 m?
2. Draw the rectangular prism on the board.
3. Say: Draw the rectangular prism in your exercise books.
4. Say: Calculate the surface area of the right triangular prism in your
exercise book.
5. Calculate the surface area on the board explaining the steps aloud:
𝑆𝐴 = 𝑏ℎ + (𝑎 + 𝑏 + 𝑐)𝑙
= 6 m × 8 m + ( 6 m + 8 m + 10 m) × 10 m
= 48 m2 + (24 m2) × 10 m2
= 288 m2.
7. Say: Please check your work to make sure you got the same answer.
Independent Practice (10 minutes)
1. Write: Find the surface area of a triangular prism with
length 15 mm, base 16 mm, height 6 mm, and the other
two sides of the triangle measuring 10 mm.
2. Say: Please work on your own and write your answers
in your exercise book.
3. Walk around and check for understanding, assisting
pupils when needed.
4. Ask: Who would like to share their answers?
5. Call on 2 pupils with hands raised to come to the board
and share their answers. Assist when needed.
(Answer: 𝑆𝐴 = 𝑏ℎ + (𝑎 + 𝑏 + 𝑐)𝑙
= 16 mm × 6 mm + ( 10 mm + 16 mm + 10 mm) × 15 mm
= 96 mm2 + (36 mm) × 15 mm
= 636 mm2 )
Closing (3 minutes)
1. Ask: What is the formula for surface area of a triangular prism? (Answer: SA = bh +
(a + b + c)l)
2. Write: SA = bh + (a + b + c)l
3. Say: Sketch a triangular prism and its matching net.
4. Allow 1-2 pupils to share their work. Responses will vary, but should be based on the prisms
drawn during the lesson.
16 mm
6 mm
15 mm
10 mm 10 mm
6 m
8 m
10 m
10 m

60
Lesson Title: Surface Area of Cylinders Theme: Measurement and Estimation
Lesson Number: M-08-078 Class/Level: JSS 2 Time: 35 minutes
Learning Outcomes By the end of the lesson, pupils will be able to
calculate the surface area of a cylinder.
Teaching Aids None
Preparation None
Opening (2 minutes)
1. Write the following questions on the board:
a) What is the method to calculate the surface area of a solid?
b) What is a cylinder?
2. Ask pupils to raise their hand to answer. (Example answers: a) Add up the area of the shapes
that make up the net; b) A cylinder is a solid with two parallel faces that are circles.)
3. Say: Today we will learn to calculate the surface area of a cylinder.
Introduction to the New Material (13 minutes)
1. Ask: What is surface area? (Answer: The outside layer of a solid is called the
surface area.)
2. Remind pupils that using a net can help us calculate surface area. A net is like a
paper version of a solid that can be opened up and laid flat.
3. Draw a cylinder and a net of the cylinder on the board on the board (see
examples to the right).
4. Ask: How can we calculate the surface area of the cylinder? (Answer: Add the areas of each of
the shapes in the net, like a composite shape).
5. Revise the formulae for area and circumference of a circle with pupils.
6. Write the formulae for area and circumference of a circle on the board: 𝐴 =
𝜋𝑟2; 𝐶 = 2𝜋𝑟
7. Write the formula for surface area of a cylinder on the board: 𝑆𝐴 =
2𝜋𝑟2 + 2𝜋𝑟ℎ
8. Say: To calculate the total surface area of a cylinder we add the area
of the two circle surfaces on the ends to the area of the rectangle made
by the circumference of the circle and the height.
9. Label the height of the cylinder 7 cm, and the radius 2 cm.
10. Ask pupils to calculate the surface area of the cylinder in their exercise books.
Tell them to use 3.14 for 𝜋.
11. Remind pupils that surface area is measured in units squared.
12. Calculate the surface area on the board:
𝑆𝐴 = 2𝜋𝑟2 + 2𝜋𝑟ℎ = 2 × 3.14 × (2 cm. )2 + 2 × 3.14 × 2 cm.× 7 cm.
= 25.12 cm.2 + 87.92 cm.2
= 113.04 cm.2
h
r
h
r
C

61
Guided Practice (6 minutes)
1. Write the following problem on the board:
What is the surface area of a cylinder with height 6 m, and radius 3 m?
2. Ask pupils to work in pairs to determine the surface area. Tell them to write their answers in
their exercise books.
3. Move around the classroom to make sure pupils understand and are doing the task. Remind
them to use a net if needed.
4. Invite one pair of pupils to come to the board to draw and label the cylinder. Ask another pair to
solve the problem on the board. Make corrections if necessary. Discuss as a class. Explain
answers if needed. (Answers: see below)
𝑆𝐴 = 2𝜋𝑟2 + 2𝜋𝑟
= 2 × 3.14 × (3 m)2 + 2 × 3.14 × 3 m × 6 m
= 56.52 m2 + 113.04 m2
= 169.56 m2
Independent Practice (10 minutes)
1. Write the following problem on the board:
2. Find the surface area of a cylinder with height 4 mm, and radius 4 mm.
3. Ask pupils to work individually to determine the surface area. Tell them to write their answers in
their exercise books.
4. Move around the classroom to make sure pupils understand and are doing the task. Help
struggling pupils.
5. After they have finished, ask pupils to share and compare their work with a partner.
6. Invite one pupil to come to the board to draw and label the cylinder. Ask another pupil to solve
the problem on the board. Make corrections if necessary. Discuss as a class. Explain answers if
needed. (Answers: see below)
𝑆𝐴 = 2𝜋𝑟2 + 2𝜋𝑟ℎ = 2 × 3.14 × (4 mm)2 + 2 × 3.14 × 4 mm × 4 mm
= 100.48 mm2 + 100.48 mm2
= 200.96 mm2
Closing (4 minutes)
1. Draw the following chart on the board and ask pupils to complete it.
2. Give pupils time to copy and fill the table.
3. Discuss the answers as a class. (Answers: See completed table below)
Solid Surface Area Formula
Cube
Cuboid
Triangular Prism
Cylinder
h=6 m.
r = 3 m.
4 mm.
r = 4 mm.
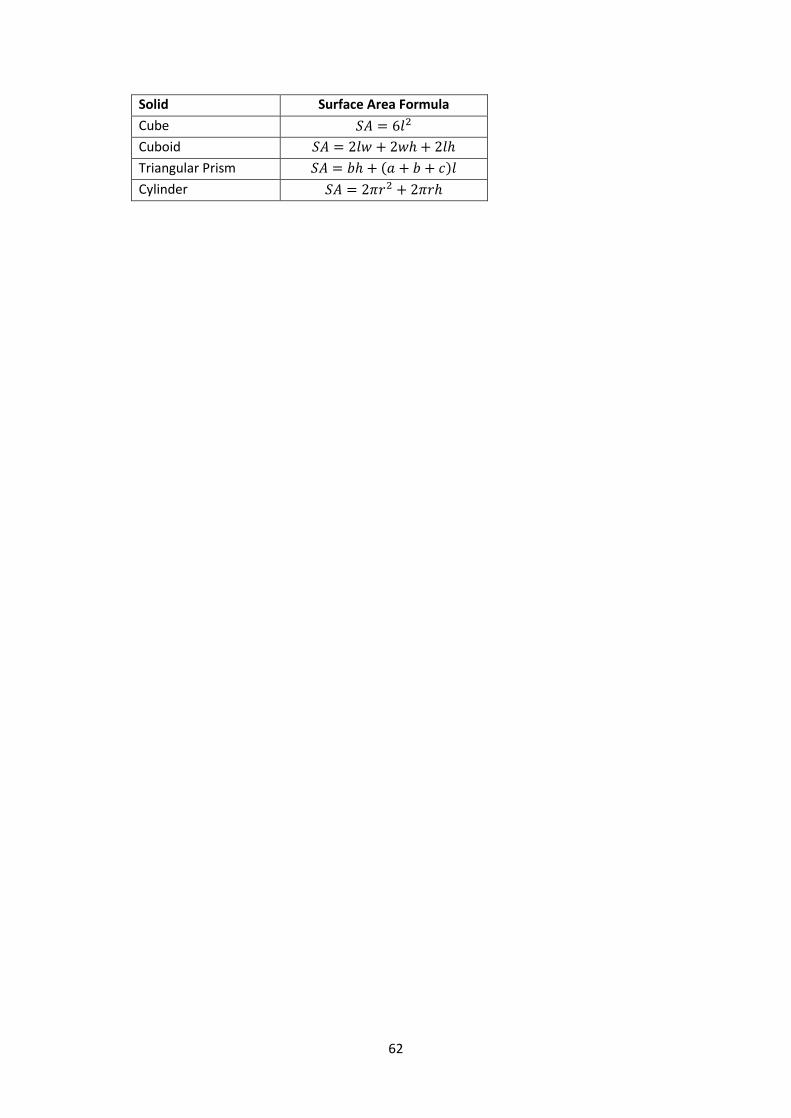
62
Solid Surface Area Formula
Cube 𝑆𝐴 = 6𝑙2
Cuboid 𝑆𝐴 = 2𝑙𝑤 + 2𝑤ℎ + 2𝑙ℎ
Triangular Prism 𝑆𝐴 = 𝑏ℎ + (𝑎 + 𝑏 + 𝑐)𝑙
Cylinder 𝑆𝐴 = 2𝜋𝑟2 + 2𝜋𝑟ℎ
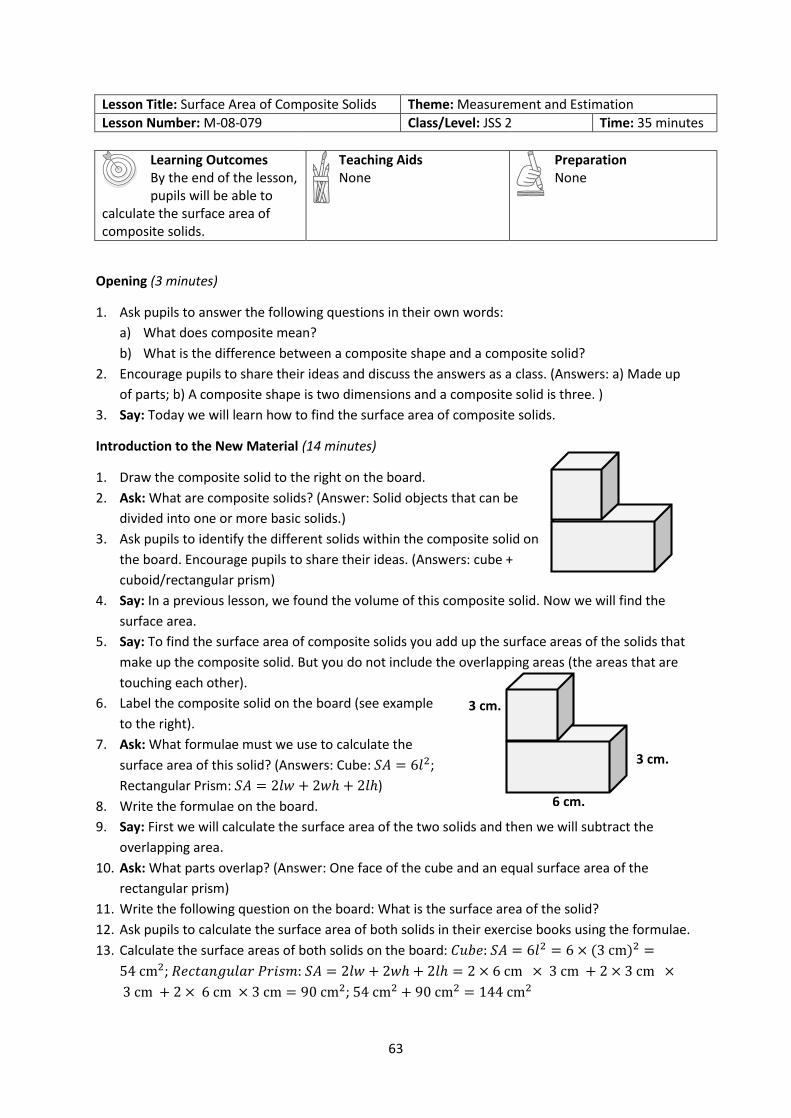
63
Lesson Title: Surface Area of Composite Solids Theme: Measurement and Estimation
Lesson Number: M-08-079 Class/Level: JSS 2 Time: 35 minutes
Learning Outcomes By the end of the lesson, pupils will be able to
calculate the surface area of composite solids.
Teaching Aids None
Preparation None
Opening (3 minutes)
1. Ask pupils to answer the following questions in their own words:
a) What does composite mean?
b) What is the difference between a composite shape and a composite solid?
2. Encourage pupils to share their ideas and discuss the answers as a class. (Answers: a) Made up
of parts; b) A composite shape is two dimensions and a composite solid is three. )
3. Say: Today we will learn how to find the surface area of composite solids.
Introduction to the New Material (14 minutes)
1. Draw the composite solid to the right on the board.
2. Ask: What are composite solids? (Answer: Solid objects that can be
divided into one or more basic solids.)
3. Ask pupils to identify the different solids within the composite solid on
the board. Encourage pupils to share their ideas. (Answers: cube +
cuboid/rectangular prism)
4. Say: In a previous lesson, we found the volume of this composite solid. Now we will find the
surface area.
5. Say: To find the surface area of composite solids you add up the surface areas of the solids that
make up the composite solid. But you do not include the overlapping areas (the areas that are
touching each other).
6. Label the composite solid on the board (see example
to the right).
7. Ask: What formulae must we use to calculate the
surface area of this solid? (Answers: Cube: 𝑆𝐴 = 6𝑙2;
Rectangular Prism: 𝑆𝐴 = 2𝑙𝑤 + 2𝑤ℎ + 2𝑙ℎ)
8. Write the formulae on the board.
9. Say: First we will calculate the surface area of the two solids and then we will subtract the
overlapping area.
10. Ask: What parts overlap? (Answer: One face of the cube and an equal surface area of the
rectangular prism)
11. Write the following question on the board: What is the surface area of the solid?
12. Ask pupils to calculate the surface area of both solids in their exercise books using the formulae.
13. Calculate the surface areas of both solids on the board: 𝐶𝑢𝑏𝑒: 𝑆𝐴 = 6𝑙2 = 6 × (3 cm)2 =
54 cm2; 𝑅𝑒𝑐𝑡𝑎𝑛𝑔𝑢𝑙𝑎𝑟 𝑃𝑟𝑖𝑠𝑚: 𝑆𝐴 = 2𝑙𝑤 + 2𝑤ℎ + 2𝑙ℎ = 2 × 6 cm × 3 cm + 2 × 3 cm ×
3 cm + 2 × 6 cm × 3 cm = 90 cm2; 54 cm2 + 90 cm2 = 144 cm2
3 cm.
3 cm.
6 cm.
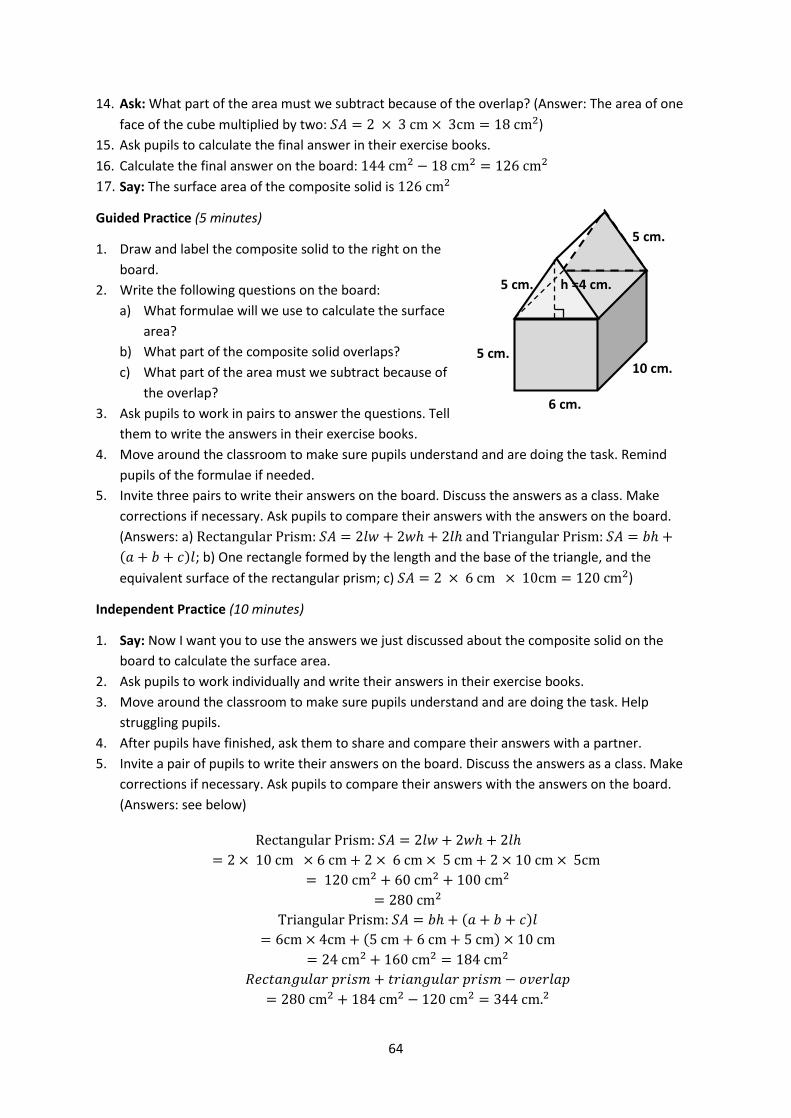
64
14. Ask: What part of the area must we subtract because of the overlap? (Answer: The area of one
face of the cube multiplied by two: 𝑆𝐴 = 2 × 3 cm × 3cm = 18 cm2)
15. Ask pupils to calculate the final answer in their exercise books.
16. Calculate the final answer on the board: 144 cm2 − 18 cm2 = 126 cm2
17. Say: The surface area of the composite solid is 126 cm2
Guided Practice (5 minutes)
1. Draw and label the composite solid to the right on the
board.
2. Write the following questions on the board:
a) What formulae will we use to calculate the surface
area?
b) What part of the composite solid overlaps?
c) What part of the area must we subtract because of
the overlap?
3. Ask pupils to work in pairs to answer the questions. Tell
them to write the answers in their exercise books.
4. Move around the classroom to make sure pupils understand and are doing the task. Remind
pupils of the formulae if needed.
5. Invite three pairs to write their answers on the board. Discuss the answers as a class. Make
corrections if necessary. Ask pupils to compare their answers with the answers on the board.
(Answers: a) Rectangular Prism: 𝑆𝐴 = 2𝑙𝑤 + 2𝑤ℎ + 2𝑙ℎ and Triangular Prism: 𝑆𝐴 = 𝑏ℎ +
(𝑎 + 𝑏 + 𝑐)𝑙; b) One rectangle formed by the length and the base of the triangle, and the
equivalent surface of the rectangular prism; c) 𝑆𝐴 = 2 × 6 cm × 10cm = 120 cm2)
Independent Practice (10 minutes)
1. Say: Now I want you to use the answers we just discussed about the composite solid on the
board to calculate the surface area.
2. Ask pupils to work individually and write their answers in their exercise books.
3. Move around the classroom to make sure pupils understand and are doing the task. Help
struggling pupils.
4. After pupils have finished, ask them to share and compare their answers with a partner.
5. Invite a pair of pupils to write their answers on the board. Discuss the answers as a class. Make
corrections if necessary. Ask pupils to compare their answers with the answers on the board.
(Answers: see below)
Rectangular Prism: 𝑆𝐴 = 2𝑙𝑤 + 2𝑤ℎ + 2𝑙ℎ
= 2 × 10 cm × 6 cm + 2 × 6 cm × 5 cm + 2 × 10 cm × 5cm
= 120 cm2 + 60 cm2 + 100 cm2
= 280 cm2
Triangular Prism: 𝑆𝐴 = 𝑏ℎ + (𝑎 + 𝑏 + 𝑐)𝑙
= 6cm × 4cm + (5 cm + 6 cm + 5 cm) × 10 cm
= 24 cm2 + 160 cm2 = 184 cm2
𝑅𝑒𝑐𝑡𝑎𝑛𝑔𝑢𝑙𝑎𝑟 𝑝𝑟𝑖𝑠𝑚 + 𝑡𝑟𝑖𝑎𝑛𝑔𝑢𝑙𝑎𝑟 𝑝𝑟𝑖𝑠𝑚 − 𝑜𝑣𝑒𝑟𝑙𝑎𝑝
= 280 cm2 + 184 cm2 − 120 cm2 = 344 cm.2
6 cm.
5 cm.
10 cm.
h =4 cm. 5 cm.
5 cm.

65
Closing (3 minutes)
1. Draw the composite solid to the right on the board.
2. Ask pupils the following questions to revise the material:
1. What basic solids form this composite solid?
2. What part of the composite solids overlaps?
3. Discuss the answers as a class. (Answers: a) half a cylinder and a rectangular prism; b) One
surface of the rectangular prism and the rectangle made by the diameter of the cylinder
multiplied by the height)
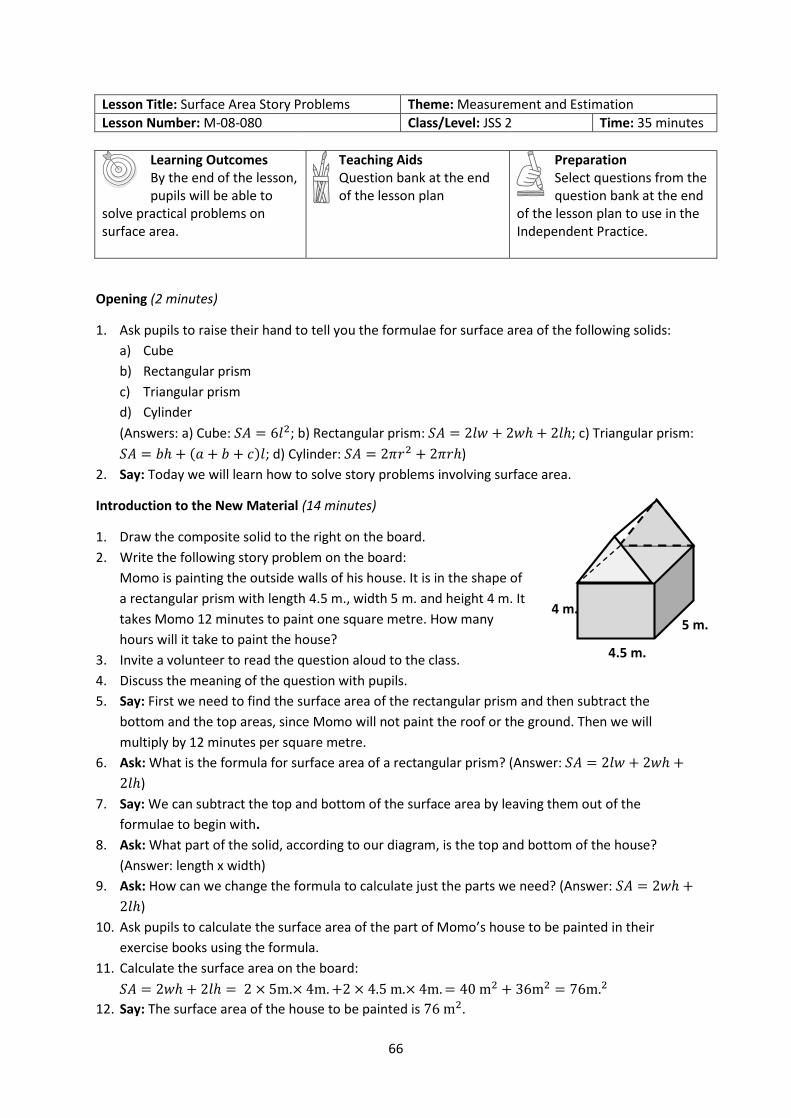
66
Lesson Title: Surface Area Story Problems Theme: Measurement and Estimation
Lesson Number: M-08-080 Class/Level: JSS 2 Time: 35 minutes
Learning Outcomes By the end of the lesson, pupils will be able to
solve practical problems on surface area.
Teaching Aids Question bank at the end of the lesson plan
Preparation Select questions from the question bank at the end
of the lesson plan to use in the Independent Practice.
Opening (2 minutes)
1. Ask pupils to raise their hand to tell you the formulae for surface area of the following solids:
a) Cube
b) Rectangular prism
c) Triangular prism
d) Cylinder
(Answers: a) Cube: 𝑆𝐴 = 6𝑙2; b) Rectangular prism: 𝑆𝐴 = 2𝑙𝑤 + 2𝑤ℎ + 2𝑙ℎ; c) Triangular prism:
𝑆𝐴 = 𝑏ℎ + (𝑎 + 𝑏 + 𝑐)𝑙; d) Cylinder: 𝑆𝐴 = 2𝜋𝑟2 + 2𝜋𝑟ℎ)
2. Say: Today we will learn how to solve story problems involving surface area.
Introduction to the New Material (14 minutes)
1. Draw the composite solid to the right on the board.
2. Write the following story problem on the board:
Momo is painting the outside walls of his house. It is in the shape of
a rectangular prism with length 4.5 m., width 5 m. and height 4 m. It
takes Momo 12 minutes to paint one square metre. How many
hours will it take to paint the house?
3. Invite a volunteer to read the question aloud to the class.
4. Discuss the meaning of the question with pupils.
5. Say: First we need to find the surface area of the rectangular prism and then subtract the
bottom and the top areas, since Momo will not paint the roof or the ground. Then we will
multiply by 12 minutes per square metre.
6. Ask: What is the formula for surface area of a rectangular prism? (Answer: 𝑆𝐴 = 2𝑙𝑤 + 2𝑤ℎ +
2𝑙ℎ)
7. Say: We can subtract the top and bottom of the surface area by leaving them out of the
formulae to begin with.
8. Ask: What part of the solid, according to our diagram, is the top and bottom of the house?
(Answer: length x width)
9. Ask: How can we change the formula to calculate just the parts we need? (Answer: 𝑆𝐴 = 2𝑤ℎ +
2𝑙ℎ)
10. Ask pupils to calculate the surface area of the part of Momo’s house to be painted in their
exercise books using the formula.
11. Calculate the surface area on the board:
𝑆𝐴 = 2𝑤ℎ + 2𝑙ℎ = 2 × 5m.× 4m. +2 × 4.5 m.× 4m. = 40 m2 + 36m2 = 76m.2
12. Say: The surface area of the house to be painted is 76 m2.
4.5 m.
5 m. 4 m.
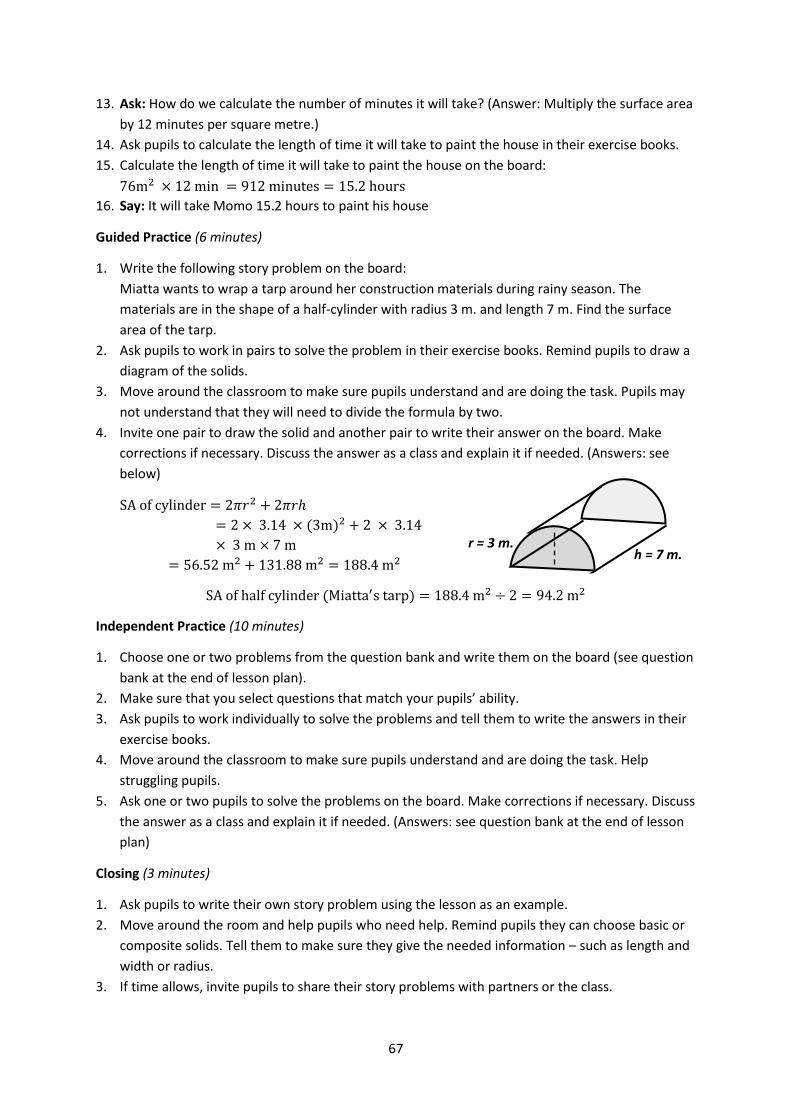
67
13. Ask: How do we calculate the number of minutes it will take? (Answer: Multiply the surface area
by 12 minutes per square metre.)
14. Ask pupils to calculate the length of time it will take to paint the house in their exercise books.
15. Calculate the length of time it will take to paint the house on the board:
76m2 × 12 min = 912 minutes = 15.2 hours
16. Say: It will take Momo 15.2 hours to paint his house
Guided Practice (6 minutes)
1. Write the following story problem on the board:
Miatta wants to wrap a tarp around her construction materials during rainy season. The
materials are in the shape of a half-cylinder with radius 3 m. and length 7 m. Find the surface
area of the tarp.
2. Ask pupils to work in pairs to solve the problem in their exercise books. Remind pupils to draw a
diagram of the solids.
3. Move around the classroom to make sure pupils understand and are doing the task. Pupils may
not understand that they will need to divide the formula by two.
4. Invite one pair to draw the solid and another pair to write their answer on the board. Make
corrections if necessary. Discuss the answer as a class and explain it if needed. (Answers: see
below)
SA of cylinder = 2𝜋𝑟2 + 2𝜋𝑟ℎ
= 2 × 3.14 × (3m)2 + 2 × 3.14
× 3 m × 7 m
= 56.52 m2 + 131.88 m2 = 188.4 m2
SA of half cylinder (Miatta′s tarp) = 188.4 m2 ÷ 2 = 94.2 m2
Independent Practice (10 minutes)
1. Choose one or two problems from the question bank and write them on the board (see question
bank at the end of lesson plan).
2. Make sure that you select questions that match your pupils’ ability.
3. Ask pupils to work individually to solve the problems and tell them to write the answers in their
exercise books.
4. Move around the classroom to make sure pupils understand and are doing the task. Help
struggling pupils.
5. Ask one or two pupils to solve the problems on the board. Make corrections if necessary. Discuss
the answer as a class and explain it if needed. (Answers: see question bank at the end of lesson
plan)
Closing (3 minutes)
1. Ask pupils to write their own story problem using the lesson as an example.
2. Move around the room and help pupils who need help. Remind pupils they can choose basic or
composite solids. Tell them to make sure they give the needed information – such as length and
width or radius.
3. If time allows, invite pupils to share their story problems with partners or the class.
r = 3 m. h = 7 m.
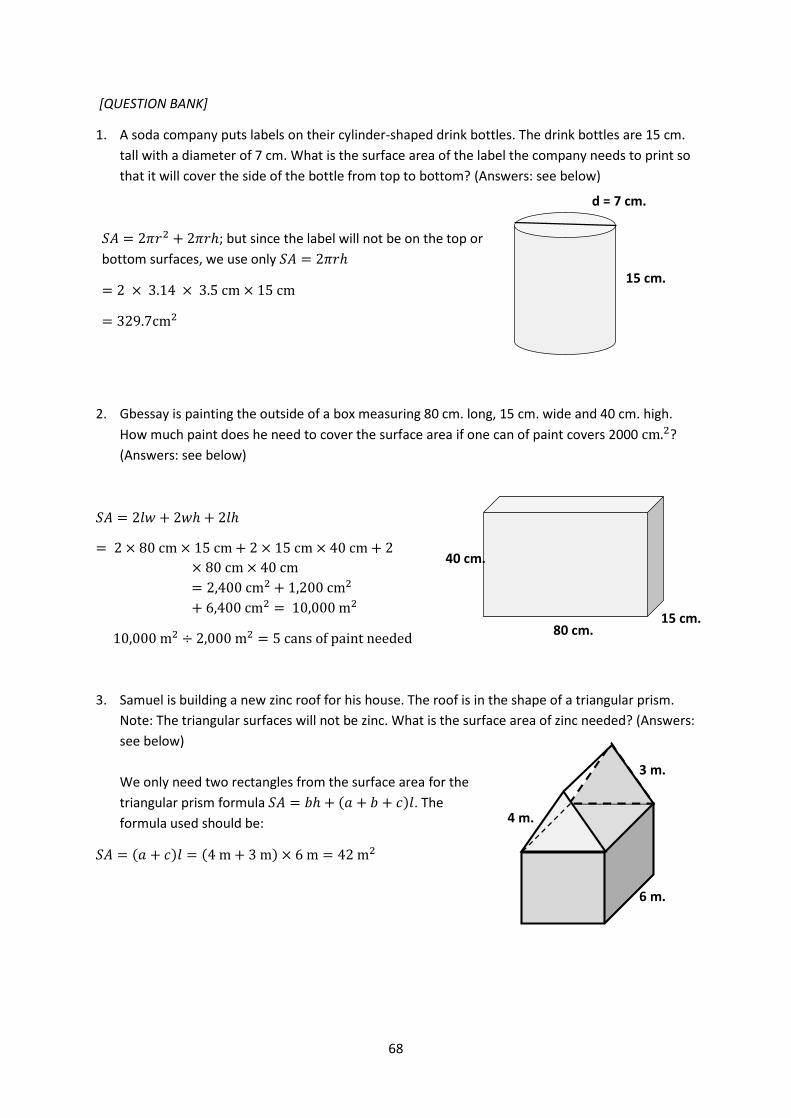
68
[QUESTION BANK]
1. A soda company puts labels on their cylinder-shaped drink bottles. The drink bottles are 15 cm.
tall with a diameter of 7 cm. What is the surface area of the label the company needs to print so
that it will cover the side of the bottle from top to bottom? (Answers: see below)
𝑆𝐴 = 2𝜋𝑟2 + 2𝜋𝑟ℎ; but since the label will not be on the top or
bottom surfaces, we use only 𝑆𝐴 = 2𝜋𝑟ℎ
= 2 × 3.14 × 3.5 cm × 15 cm
= 329.7cm2
2. Gbessay is painting the outside of a box measuring 80 cm. long, 15 cm. wide and 40 cm. high.
How much paint does he need to cover the surface area if one can of paint covers 2000 cm.2?
(Answers: see below)
𝑆𝐴 = 2𝑙𝑤 + 2𝑤ℎ + 2𝑙ℎ
= 2 × 80 cm × 15 cm + 2 × 15 cm × 40 cm + 2
× 80 cm × 40 cm
= 2,400 cm2 + 1,200 cm2
+ 6,400 cm2 = 10,000 m2
10,000 m2 ÷ 2,000 m2 = 5 cans of paint needed
3. Samuel is building a new zinc roof for his house. The roof is in the shape of a triangular prism.
Note: The triangular surfaces will not be zinc. What is the surface area of zinc needed? (Answers:
see below)
We only need two rectangles from the surface area for the
triangular prism formula 𝑆𝐴 = 𝑏ℎ + (𝑎 + 𝑏 + 𝑐)𝑙. The
formula used should be:
𝑆𝐴 = (𝑎 + 𝑐)𝑙 = (4 m + 3 m) × 6 m = 42 m2
d = 7 cm.
15 cm.
80 cm.
40 cm.
15 cm.
3 m.
4 m.
6 m.
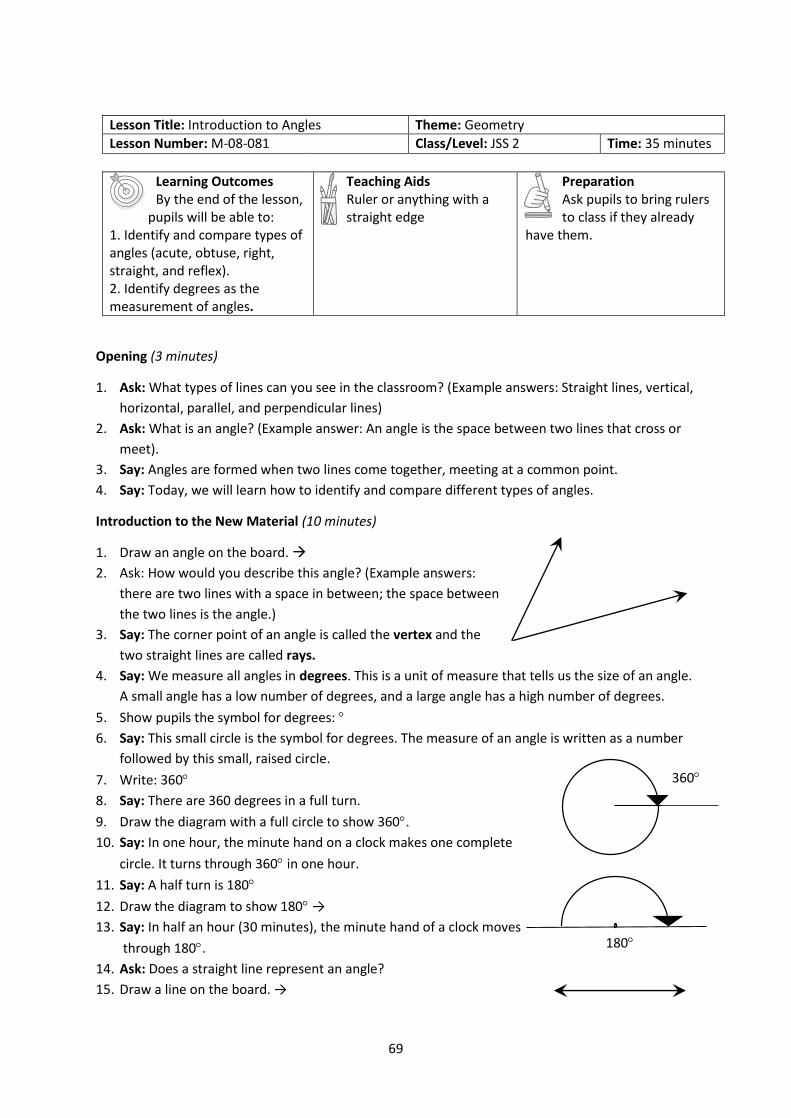
69
Lesson Title: Introduction to Angles Theme: Geometry
Lesson Number: M-08-081 Class/Level: JSS 2 Time: 35 minutes
Learning Outcomes By the end of the lesson,
pupils will be able to: 1. Identify and compare types of angles (acute, obtuse, right, straight, and reflex). 2. Identify degrees as the measurement of angles.
Teaching Aids Ruler or anything with a straight edge
Preparation Ask pupils to bring rulers to class if they already
have them.
Opening (3 minutes)
1. Ask: What types of lines can you see in the classroom? (Example answers: Straight lines, vertical,
horizontal, parallel, and perpendicular lines)
2. Ask: What is an angle? (Example answer: An angle is the space between two lines that cross or
meet).
3. Say: Angles are formed when two lines come together, meeting at a common point.
4. Say: Today, we will learn how to identify and compare different types of angles.
Introduction to the New Material (10 minutes)
1. Draw an angle on the board.
2. Ask: How would you describe this angle? (Example answers:
there are two lines with a space in between; the space between
the two lines is the angle.)
3. Say: The corner point of an angle is called the vertex and the
two straight lines are called rays.
4. Say: We measure all angles in degrees. This is a unit of measure that tells us the size of an angle.
A small angle has a low number of degrees, and a large angle has a high number of degrees.
5. Show pupils the symbol for degrees:
6. Say: This small circle is the symbol for degrees. The measure of an angle is written as a number
followed by this small, raised circle.
7. Write: 360
8. Say: There are 360 degrees in a full turn.
9. Draw the diagram with a full circle to show 360.
10. Say: In one hour, the minute hand on a clock makes one complete
circle. It turns through 360 in one hour.
11. Say: A half turn is 180
12. Draw the diagram to show 180 →
13. Say: In half an hour (30 minutes), the minute hand of a clock moves
through 180.
14. Ask: Does a straight line represent an angle?
15. Draw a line on the board. →
360
180
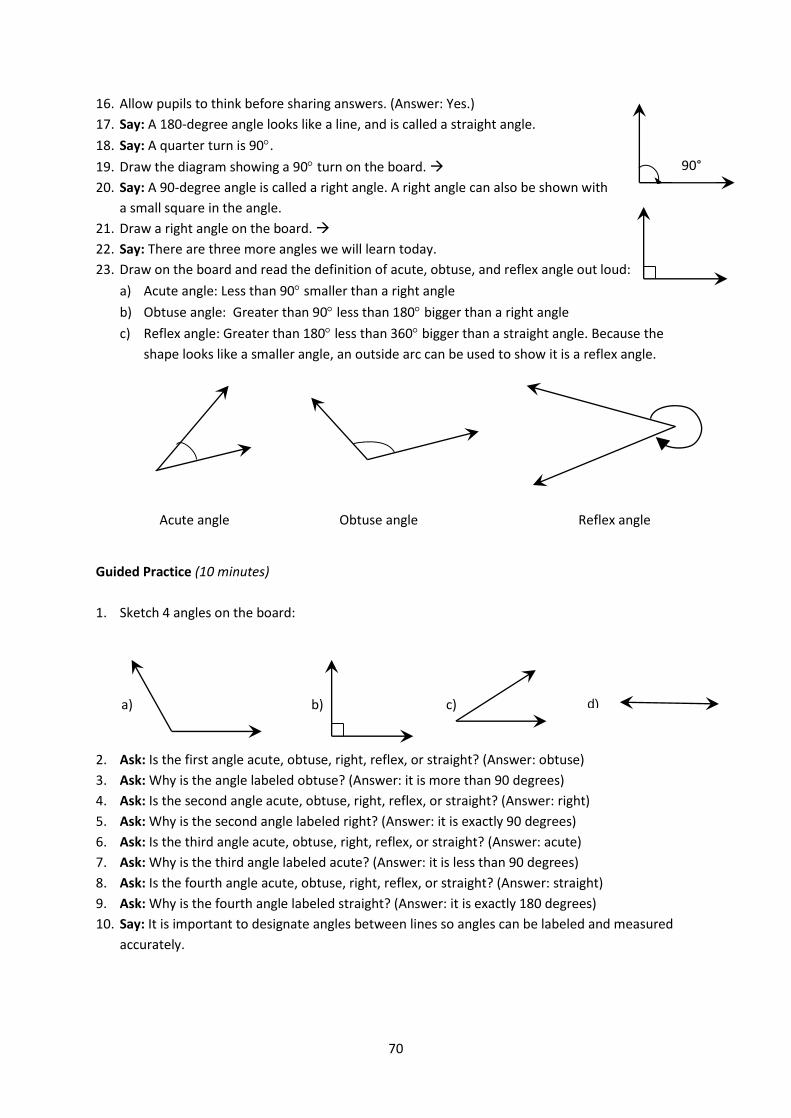
70
16. Allow pupils to think before sharing answers. (Answer: Yes.)
17. Say: A 180-degree angle looks like a line, and is called a straight angle.
18. Say: A quarter turn is 90.
19. Draw the diagram showing a 90 turn on the board.
20. Say: A 90-degree angle is called a right angle. A right angle can also be shown with
a small square in the angle.
21. Draw a right angle on the board.
22. Say: There are three more angles we will learn today.
23. Draw on the board and read the definition of acute, obtuse, and reflex angle out loud:
a) Acute angle: Less than 90 smaller than a right angle
b) Obtuse angle: Greater than 90 less than 180 bigger than a right angle
c) Reflex angle: Greater than 180 less than 360 bigger than a straight angle. Because the
shape looks like a smaller angle, an outside arc can be used to show it is a reflex angle.
Acute angle Obtuse angle Reflex angle
Guided Practice (10 minutes)
1. Sketch 4 angles on the board:
2. Ask: Is the first angle acute, obtuse, right, reflex, or straight? (Answer: obtuse)
3. Ask: Why is the angle labeled obtuse? (Answer: it is more than 90 degrees)
4. Ask: Is the second angle acute, obtuse, right, reflex, or straight? (Answer: right)
5. Ask: Why is the second angle labeled right? (Answer: it is exactly 90 degrees)
6. Ask: Is the third angle acute, obtuse, right, reflex, or straight? (Answer: acute)
7. Ask: Why is the third angle labeled acute? (Answer: it is less than 90 degrees)
8. Ask: Is the fourth angle acute, obtuse, right, reflex, or straight? (Answer: straight)
9. Ask: Why is the fourth angle labeled straight? (Answer: it is exactly 180 degrees)
10. Say: It is important to designate angles between lines so angles can be labeled and measured
accurately.
90°
a) b) c) d)
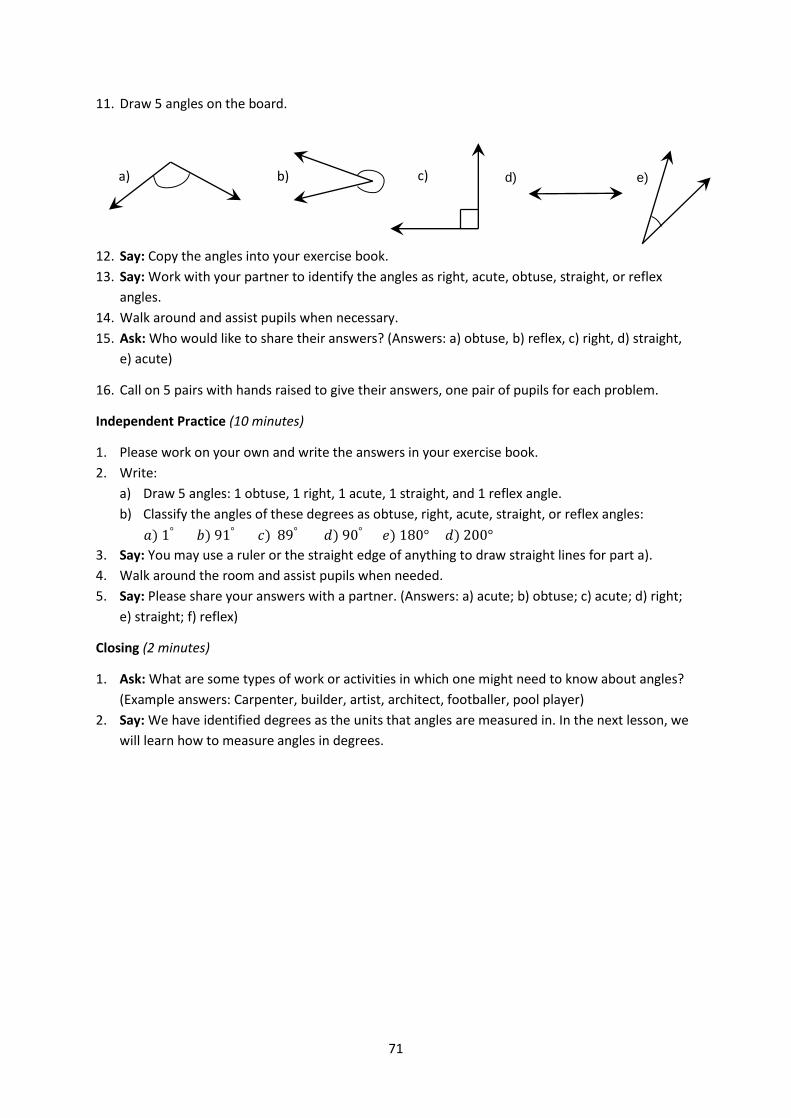
71
11. Draw 5 angles on the board.
12. Say: Copy the angles into your exercise book.
13. Say: Work with your partner to identify the angles as right, acute, obtuse, straight, or reflex
angles.
14. Walk around and assist pupils when necessary.
15. Ask: Who would like to share their answers? (Answers: a) obtuse, b) reflex, c) right, d) straight,
e) acute)
16. Call on 5 pairs with hands raised to give their answers, one pair of pupils for each problem.
Independent Practice (10 minutes)
1. Please work on your own and write the answers in your exercise book.
2. Write:
a) Draw 5 angles: 1 obtuse, 1 right, 1 acute, 1 straight, and 1 reflex angle.
b) Classify the angles of these degrees as obtuse, right, acute, straight, or reflex angles:
𝑎) 1° 𝑏) 91° 𝑐) 89° 𝑑) 90° 𝑒) 180° 𝑑) 200°
3. Say: You may use a ruler or the straight edge of anything to draw straight lines for part a).
4. Walk around the room and assist pupils when needed.
5. Say: Please share your answers with a partner. (Answers: a) acute; b) obtuse; c) acute; d) right;
e) straight; f) reflex)
Closing (2 minutes)
1. Ask: What are some types of work or activities in which one might need to know about angles?
(Example answers: Carpenter, builder, artist, architect, footballer, pool player)
2. Say: We have identified degrees as the units that angles are measured in. In the next lesson, we
will learn how to measure angles in degrees.
a) b) c) d) e)

72
Lesson Title: Measurement of Angles Theme: Geometry
Lesson Number: M-08-082 Class/Level: JSS 2 Time: 35 minutes
Learning Outcomes By the end of the lesson,
pupils will be able to: 1. Estimate the measure of a
given angle.
2. Measure given angles (acute, obtuse, right) using a protractor.
Teaching Aids Protractors (see the attached pages)
Preparation Ask pupils to bring a mathematical set to class
if they have them. For pupils who do not have them, see the page on how to make them.
Opening (3 minutes)
1. Write the following angle measures on the board: a) 115 b) 75 c) 10 d) 90 e) 155 f) 45.
2. Ask: Based on the degree measurements, which angles are acute? (Answer: 75, 10, 45)
3. Say: Based on the degree measurements, which angles are obtuse? (Answer: 115 and 155)
4. Say: Based on the degree measurements, which angles are right angles? (Answer: 90)
5. Say: Today we will be measuring acute, obtuse, and right angles using a protractor.
Introduction to the New Material (12 minutes)
1. Draw three examples of acute, obtuse, and right angles as shown below.
Examples:
2. Say: Angle NOM is 90 degrees. It is a right angle. I know this because of the small square near
the vertex O.
3. Say: Angle QOP is less than 90 degrees. I know this because the angle is smaller than the right
angle.
4. Say: Angle SOR is more than 90 degrees. I know this because the angle is larger than the right
angle.
5. Say: We can use a protractor to measure acute and obtuse angles.
6. Show pupils how to measure the obtuse angle on
the board and say the instructions in the next step.
7. Say: To measure the obtuse angle, I have placed a
protractor over the angle so that its Centre O, is
exactly over the vertex of the angle and the baseline
is exactly along one line of the angle.
8. Say: Since the angle opens on the right, I will count
the degrees using the inside numbers, starting on the right, from the baseline to where the
other ray of the angle is pointing.
9. Write the angle measure on the board. (Example: ∠𝑆𝑂𝑅 = 140°)
10. Say: The angle measures _____.
Q
P O
O
S
R
N
O M
O
S
R

73
11. Say: I will now measure the acute angle. This angle opens on the left. I will line OP up with the
base line and count the degrees using the outside numbers, starting on the left, from the
baseline to where the other ray of the angle is pointing.
12. Write the angle measure on the board. (Example:∠𝑄𝑂𝑃 = 20°)
13. Say: The angle measures _____.
Guided Practice (8 minutes)
1. Write: Draw an acute angle and an obtuse angle. Estimate the measure of each. Then measure
each angle with a protractor.
2. Say: After drawing your angles, write your estimation for how large each angle is in degrees.
Then measure the angles and write the correct measurements in degrees.
3. Say: Remember that if an angle opens on the right, use the inside row of numbers on your
protractor. If the angle opens on the left, use the outside row of numbers on your protractor.
4. Walk around the room and assist pupils when necessary.
Independent Practice (10 minutes)
1. Say: Draw 2 obtuse and 2 acute angles in your exercise book. Make sure to leave room for writing.
2. Say: When you have finished drawing the angles, exchange exercise books with a partner.
3. Say: Measure the angles in your partner’s book and write down the measurements in degrees.
4. Say: Once you have measured all four angles and written down the measurements, exchange
books back. Measure the angles with your protractor and write your measurements.
5. Say: If the measurements for any of the angles are not the same, work with your partner to
measure the angle again.
6. Walk around the room and assist pupils when needed.
Closing (2 minutes)
1. Say: In today’s lesson you learned how to measure angles using a protractor.
2. Say: In the next lesson we will learn about angles in triangles.
O
D
G
Pupil’s estimation = 100
Angle measure = 110
Pupil’s drawing:
C
T A
Pupil’s estimation = 35
Angle measure = 28
Pupil’s drawing

74
[MAKING TEACHING AIDS: PROTRACTORS]
Teac
her
s ca
n u
se t
he
larg
e p
rotr
acto
r to
sh
ow
pu
pils
ho
w t
o m
easu
re a
ngl
es o
n t
he
bo
ard
. Pu
pils
can
use
th
e sm
all p
rotr
acto
rs o
n t
he
nex
t p
age
to m
easu
re a
ngl
es in
th
eir
exer
cise
bo
oks
. Te
ach
ers
do
no
t n
eed
to
cu
t o
ut
the
pro
trac
tors
fro
m t
his
bo
ok.
Th
ese
can
be
trac
ed w
ith
a p
en o
nto
a s
hee
t o
f p
aper
, an
d t
hen
cu
t o
ut
wit
h s
ciss
ors
. Te
ach
ers
do
no
t n
eed
to
tra
ce e
ach
of
the
18
0 li
nes
. If
yo
u t
race
the
ten
s lin
es (
0, 1
0, 2
0, a
nd
so
on
) it
will
be
eno
ugh
to
est
imat
e th
e m
easu
re o
f an
gles
. Th
e p
age
wit
h s
mal
l pro
trac
tors
can
als
o b
e
ph
oto
cop
ied
to
pro
vid
e p
rotr
acto
rs t
o m
ore
pu
pils
.

75

76
Lesson Title: Finding Unknown Angles in Triangles
Theme: Geometry
Lesson Number: M-08-083 Class/Level: JSS 2 Time: 35 minutes
Learning Outcomes By the end of the lesson,
pupils will be able to: 1. Identify that the sum of the
angles in a triangle is 180.
2. Find unknown angles in a triangle.
Teaching Aids None
Preparation None
Opening (3 minutes)
1. Write: Draw the following triangles: a) right-angled triangle, b) equilateral triangle, c) isosceles
triangle.
2. Give pupils a minute to draw the triangles in their exercise books.
3. Ask: Who would like to draw a triangle on the board?
4. Call on 3 pupils with hands raised and assign them each a triangle to draw on the board.
5. Examples:
6. Say: We have been learning about angles. Today, we will learn how to find unknown angles in
triangles.
Introduction to the New Material (9 minutes)
1. Say: The sum of the angles in any triangle is 180 degrees.
2. Write: Angles in a triangle = 180.
3. Label the right-angled triangle on the board with letters a and b.
4. Point at the right angle.
5. Say: This angle is 900.
6. Write: 90° + 𝑎 + 𝑏 = 180°.
7. Say: The sum of the angles must be 1800. We can use this to solve
problems.
8. Label the angle 𝑎 as 60 degrees.
9. Say: When we know two of the angles in a triangle we can find the
third angle. This is because we know their sum is 180.
10. Write: 90° + 60° + 𝑏 = 180°.
11. Explain aloud as you solve for b: 150° + 𝑏 = 180° → 𝑏 = 180° −
150° = 30°.
a
b
a=60°
b
a=60°
b=30
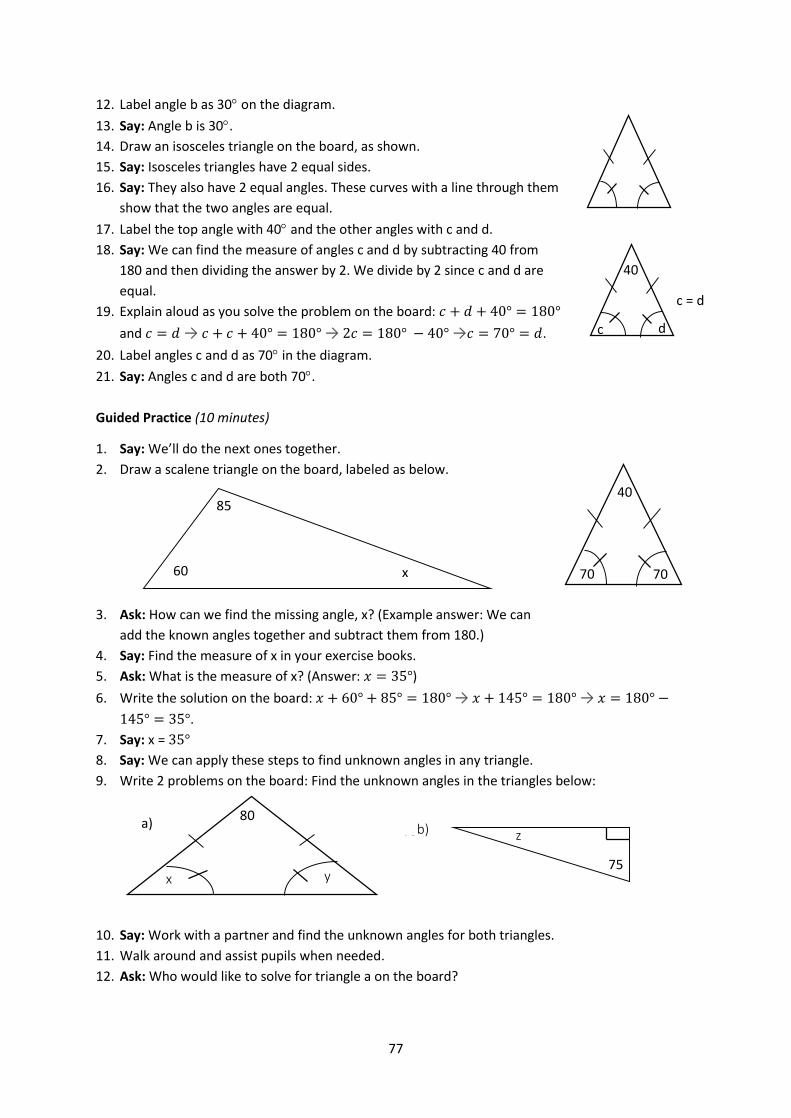
77
12. Label angle b as 30 on the diagram.
13. Say: Angle b is 30.
14. Draw an isosceles triangle on the board, as shown.
15. Say: Isosceles triangles have 2 equal sides.
16. Say: They also have 2 equal angles. These curves with a line through them
show that the two angles are equal.
17. Label the top angle with 40 and the other angles with c and d.
18. Say: We can find the measure of angles c and d by subtracting 40 from
180 and then dividing the answer by 2. We divide by 2 since c and d are
equal.
19. Explain aloud as you solve the problem on the board: 𝑐 + 𝑑 + 40° = 180°
and 𝑐 = 𝑑 → 𝑐 + 𝑐 + 40° = 180° → 2𝑐 = 180° − 40° →𝑐 = 70° = 𝑑.
20. Label angles c and d as 70 in the diagram.
21. Say: Angles c and d are both 70.
Guided Practice (10 minutes)
1. Say: We’ll do the next ones together.
2. Draw a scalene triangle on the board, labeled as below.
3. Ask: How can we find the missing angle, x? (Example answer: We can
add the known angles together and subtract them from 180.)
4. Say: Find the measure of x in your exercise books.
5. Ask: What is the measure of x? (Answer: 𝑥 = 35°)
6. Write the solution on the board: 𝑥 + 60° + 85° = 180° → 𝑥 + 145° = 180° → 𝑥 = 180° −
145° = 35°.
7. Say: x = 35°
8. Say: We can apply these steps to find unknown angles in any triangle.
9. Write 2 problems on the board: Find the unknown angles in the triangles below:
10. Say: Work with a partner and find the unknown angles for both triangles.
11. Walk around and assist pupils when needed.
12. Ask: Who would like to solve for triangle a on the board?
c
40
d
c = d
70
70
40
85
60 x
80
x y
a)
b)
75
z b)
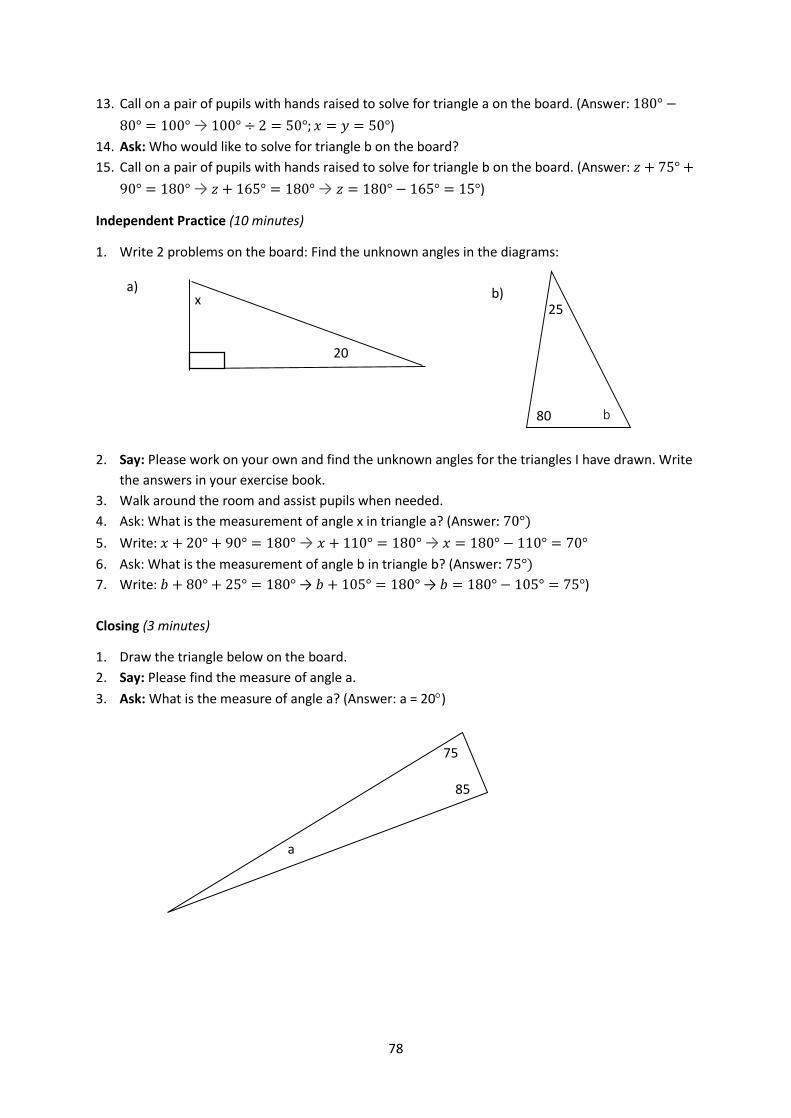
78
13. Call on a pair of pupils with hands raised to solve for triangle a on the board. (Answer: 180° −
80° = 100° → 100° ÷ 2 = 50°; 𝑥 = 𝑦 = 50°)
14. Ask: Who would like to solve for triangle b on the board?
15. Call on a pair of pupils with hands raised to solve for triangle b on the board. (Answer: 𝑧 + 75° +
90° = 180° → 𝑧 + 165° = 180° → 𝑧 = 180° − 165° = 15°)
Independent Practice (10 minutes)
1. Write 2 problems on the board: Find the unknown angles in the diagrams:
2. Say: Please work on your own and find the unknown angles for the triangles I have drawn. Write
the answers in your exercise book.
3. Walk around the room and assist pupils when needed.
4. Ask: What is the measurement of angle x in triangle a? (Answer: 70°)
5. Write: 𝑥 + 20° + 90° = 180° → 𝑥 + 110° = 180° → 𝑥 = 180° − 110° = 70°
6. Ask: What is the measurement of angle b in triangle b? (Answer: 75°)
7. Write: 𝑏 + 80° + 25° = 180° → 𝑏 + 105° = 180° → 𝑏 = 180° − 105° = 75°)
Closing (3 minutes)
1. Draw the triangle below on the board.
2. Say: Please find the measure of angle a.
3. Ask: What is the measure of angle a? (Answer: a = 20)
a)
80
25
b
b)
x
20
85
75
a
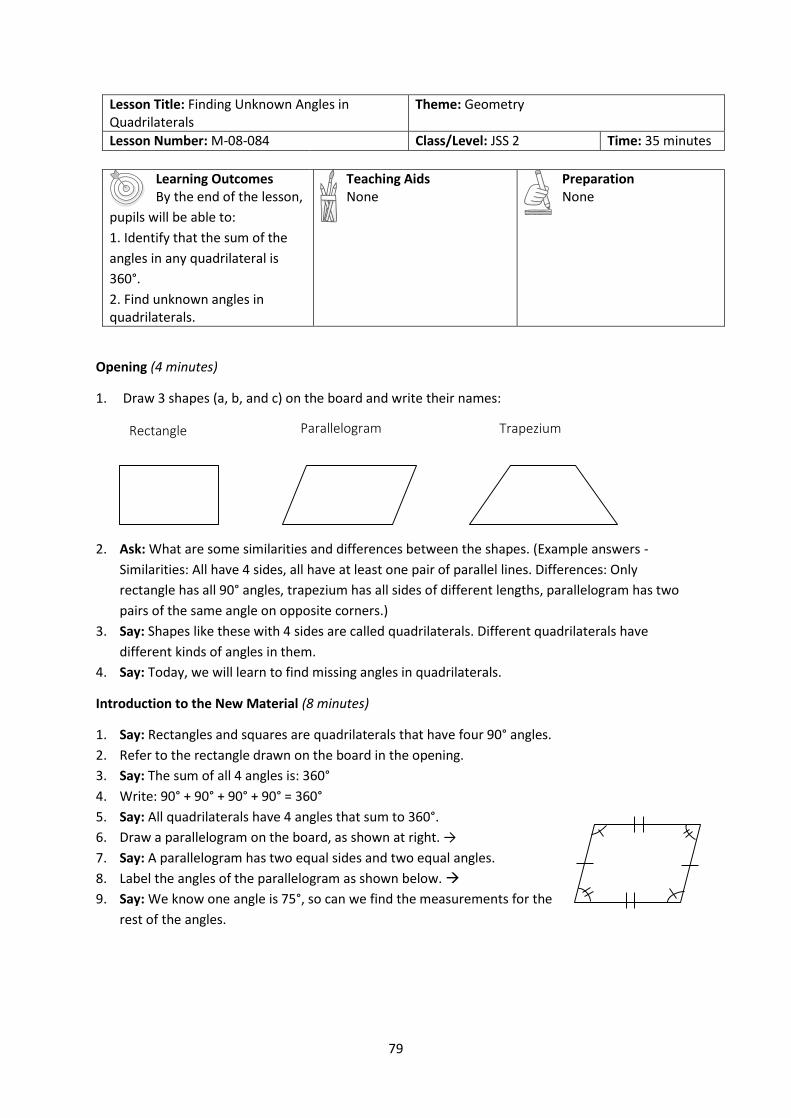
79
Lesson Title: Finding Unknown Angles in Quadrilaterals
Theme: Geometry
Lesson Number: M-08-084 Class/Level: JSS 2 Time: 35 minutes
Learning Outcomes By the end of the lesson,
pupils will be able to:
1. Identify that the sum of the
angles in any quadrilateral is
360°.
2. Find unknown angles in quadrilaterals.
Teaching Aids None
Preparation None
Opening (4 minutes)
1. Draw 3 shapes (a, b, and c) on the board and write their names:
2. Ask: What are some similarities and differences between the shapes. (Example answers -
Similarities: All have 4 sides, all have at least one pair of parallel lines. Differences: Only
rectangle has all 90° angles, trapezium has all sides of different lengths, parallelogram has two
pairs of the same angle on opposite corners.)
3. Say: Shapes like these with 4 sides are called quadrilaterals. Different quadrilaterals have
different kinds of angles in them.
4. Say: Today, we will learn to find missing angles in quadrilaterals.
Introduction to the New Material (8 minutes)
1. Say: Rectangles and squares are quadrilaterals that have four 90° angles.
2. Refer to the rectangle drawn on the board in the opening.
3. Say: The sum of all 4 angles is: 360°
4. Write: 90° + 90° + 90° + 90° = 360°
5. Say: All quadrilaterals have 4 angles that sum to 360°.
6. Draw a parallelogram on the board, as shown at right. →
7. Say: A parallelogram has two equal sides and two equal angles.
8. Label the angles of the parallelogram as shown below.
9. Say: We know one angle is 75°, so can we find the measurements for the
rest of the angles.
Rectangle
Parallelogram
Trapezium
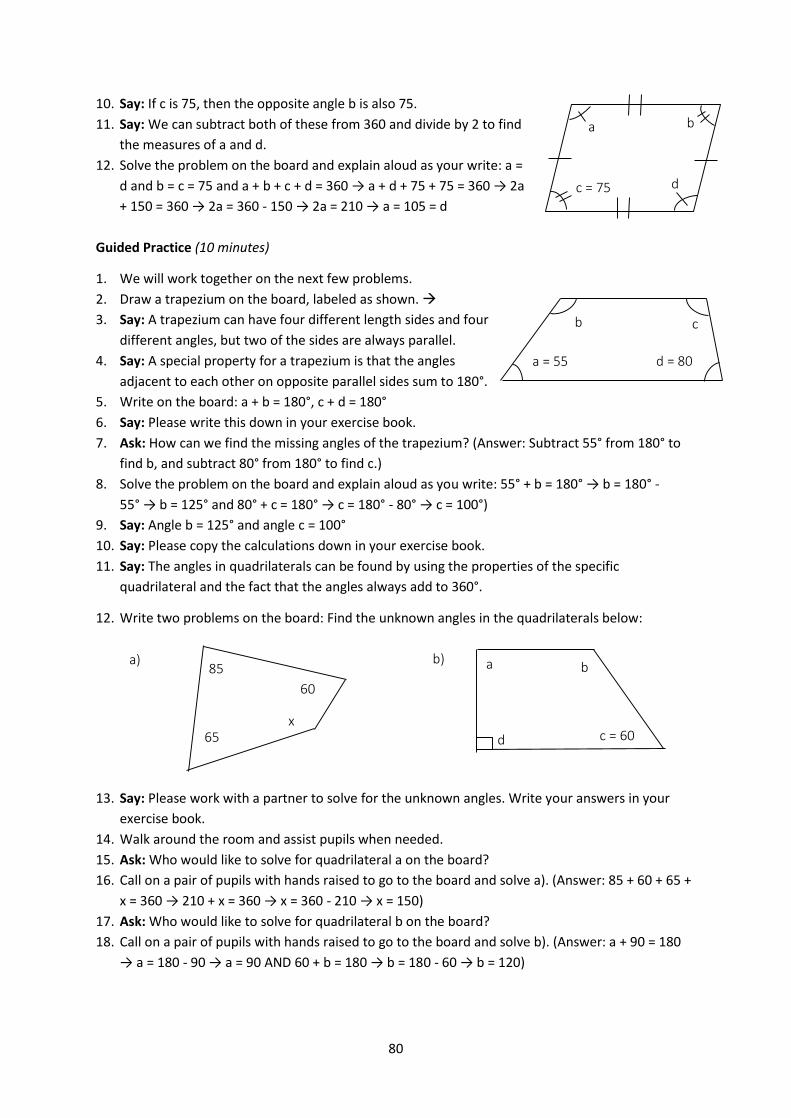
80
10. Say: If c is 75, then the opposite angle b is also 75.
11. Say: We can subtract both of these from 360 and divide by 2 to find
the measures of a and d.
12. Solve the problem on the board and explain aloud as your write: a =
d and b = c = 75 and a + b + c + d = 360 → a + d + 75 + 75 = 360 → 2a
+ 150 = 360 → 2a = 360 - 150 → 2a = 210 → a = 105 = d
Guided Practice (10 minutes)
1. We will work together on the next few problems.
2. Draw a trapezium on the board, labeled as shown.
3. Say: A trapezium can have four different length sides and four
different angles, but two of the sides are always parallel.
4. Say: A special property for a trapezium is that the angles
adjacent to each other on opposite parallel sides sum to 180°.
5. Write on the board: a + b = 180°, c + d = 180°
6. Say: Please write this down in your exercise book.
7. Ask: How can we find the missing angles of the trapezium? (Answer: Subtract 55° from 180° to
find b, and subtract 80° from 180° to find c.)
8. Solve the problem on the board and explain aloud as you write: 55° + b = 180° → b = 180° -
55° → b = 125° and 80° + c = 180° → c = 180° - 80° → c = 100°)
9. Say: Angle b = 125° and angle c = 100°
10. Say: Please copy the calculations down in your exercise book.
11. Say: The angles in quadrilaterals can be found by using the properties of the specific
quadrilateral and the fact that the angles always add to 360°.
12. Write two problems on the board: Find the unknown angles in the quadrilaterals below:
13. Say: Please work with a partner to solve for the unknown angles. Write your answers in your
exercise book.
14. Walk around the room and assist pupils when needed.
15. Ask: Who would like to solve for quadrilateral a on the board?
16. Call on a pair of pupils with hands raised to go to the board and solve a). (Answer: 85 + 60 + 65 +
x = 360 → 210 + x = 360 → x = 360 - 210 → x = 150)
17. Ask: Who would like to solve for quadrilateral b on the board?
18. Call on a pair of pupils with hands raised to go to the board and solve b). (Answer: a + 90 = 180
→ a = 180 - 90 → a = 90 AND 60 + b = 180 → b = 180 - 60 → b = 120)
a) b) a b
c = 60 d
85
65
60
x
a = 55
b c
d = 80
a b
c = 75 d
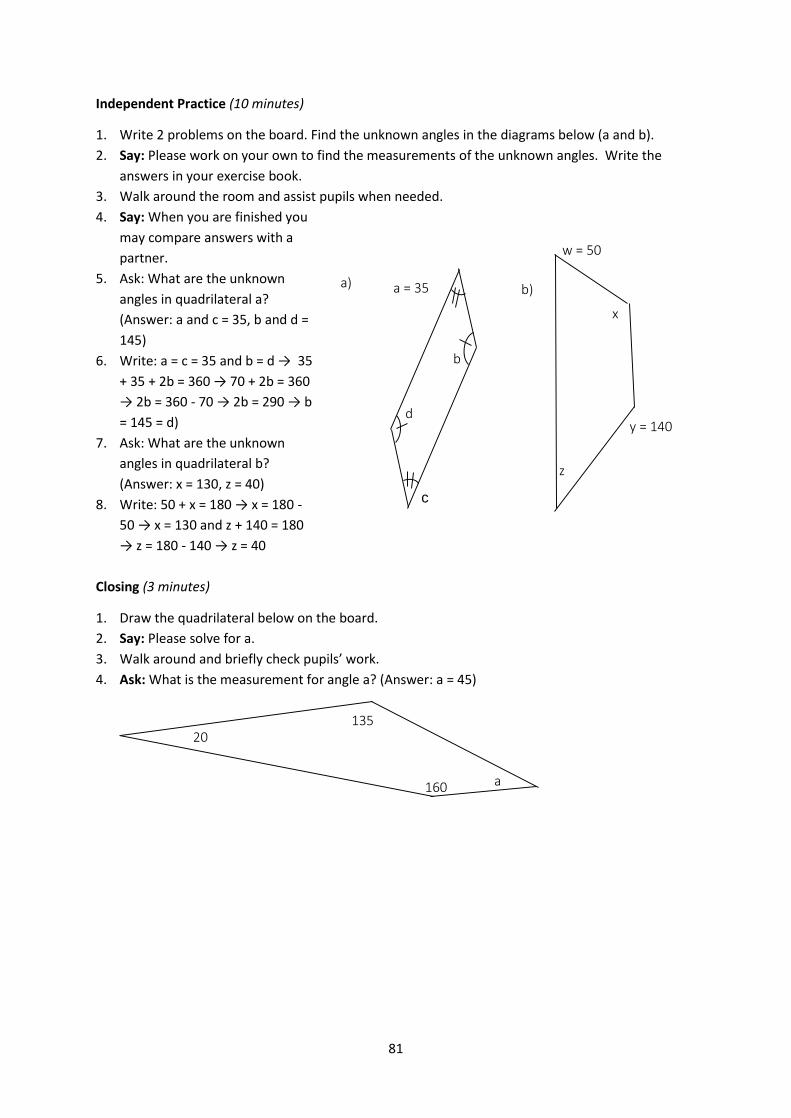
81
Independent Practice (10 minutes)
1. Write 2 problems on the board. Find the unknown angles in the diagrams below (a and b).
2. Say: Please work on your own to find the measurements of the unknown angles. Write the
answers in your exercise book.
3. Walk around the room and assist pupils when needed.
4. Say: When you are finished you
may compare answers with a
partner.
5. Ask: What are the unknown
angles in quadrilateral a?
(Answer: a and c = 35, b and d =
145)
6. Write: a = c = 35 and b = d → 35
+ 35 + 2b = 360 → 70 + 2b = 360
→ 2b = 360 - 70 → 2b = 290 → b
= 145 = d)
7. Ask: What are the unknown
angles in quadrilateral b?
(Answer: x = 130, z = 40)
8. Write: 50 + x = 180 → x = 180 -
50 → x = 130 and z + 140 = 180
→ z = 180 - 140 → z = 40
Closing (3 minutes)
1. Draw the quadrilateral below on the board.
2. Say: Please solve for a.
3. Walk around and briefly check pupils’ work.
4. Ask: What is the measurement for angle a? (Answer: a = 45)
20 135
160 aa
a = 35
b
c
d
a) b)
w = 50
x
y = 140
z
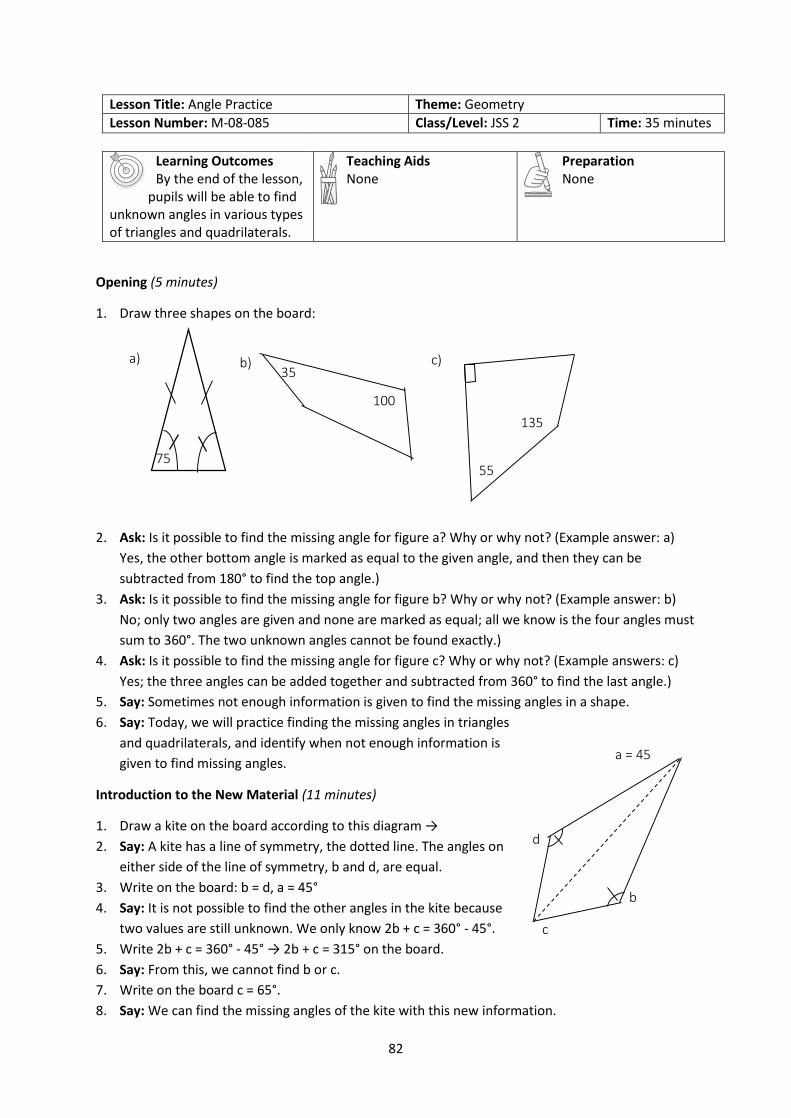
82
Lesson Title: Angle Practice Theme: Geometry
Lesson Number: M-08-085 Class/Level: JSS 2 Time: 35 minutes
Learning Outcomes By the end of the lesson,
pupils will be able to find unknown angles in various types of triangles and quadrilaterals.
Teaching Aids None
Preparation None
Opening (5 minutes)
1. Draw three shapes on the board:
2. Ask: Is it possible to find the missing angle for figure a? Why or why not? (Example answer: a)
Yes, the other bottom angle is marked as equal to the given angle, and then they can be
subtracted from 180° to find the top angle.)
3. Ask: Is it possible to find the missing angle for figure b? Why or why not? (Example answer: b)
No; only two angles are given and none are marked as equal; all we know is the four angles must
sum to 360°. The two unknown angles cannot be found exactly.)
4. Ask: Is it possible to find the missing angle for figure c? Why or why not? (Example answers: c)
Yes; the three angles can be added together and subtracted from 360° to find the last angle.)
5. Say: Sometimes not enough information is given to find the missing angles in a shape.
6. Say: Today, we will practice finding the missing angles in triangles
and quadrilaterals, and identify when not enough information is
given to find missing angles.
Introduction to the New Material (11 minutes)
1. Draw a kite on the board according to this diagram →
2. Say: A kite has a line of symmetry, the dotted line. The angles on
either side of the line of symmetry, b and d, are equal.
3. Write on the board: b = d, a = 45°
4. Say: It is not possible to find the other angles in the kite because
two values are still unknown. We only know 2b + c = 360° - 45°.
5. Write 2b + c = 360° - 45° → 2b + c = 315° on the board.
6. Say: From this, we cannot find b or c.
7. Write on the board c = 65°.
8. Say: We can find the missing angles of the kite with this new information.
75
a) b) c) 35
100
55
135
a = 45
b
c
d

83
9. Write the full solution of the problem on the board and explain aloud: a + b + c + d = 360 → 45 +
2b + 65 = 360 → 110 + 2b = 360 → 2b = 360 - 110 → 2b = 250 → b = 125 = d.
10. Say: To find the missing angles for the kite we could start with three different combinations of
two angles:
a) a and c, as we demonstrated above
b) c, and b or d: since b and d are the same, add two of that value to c, then subtract the sum
360 to find the missing angle a.
c) a and b or d: same strategy as above.
Guided Practice (5 minutes)
1. Write problems on the board: Find the unknown angles in one of the shapes below, and mark
which shape that it is impossible to find the unknown angles in:
2. Say: In figure a, we know that angle a = 100.
3. Ask: What is the measurement of angle c? (Answer: 100)
4. Say: We know that angle c is also 100 because the two angles are marked as being identical.
5. Say: We will use this information to find the measurements of the remaining two angles when
combined.
6. Ask: How many degrees are in a quadrilateral? (Answer: 360)
7. Write: a = c = 100 and b = d and a + b + c + d = 360
8. Say: We know that a quadrilateral’s angles total 360 degrees. We also know that angles b and d
are identical as they are marked as identical, therefore the measure of angles b and d = 2b
9. Write: 100 + 2b + 100 = 360 → 200 + 2b = 360 → 2b = 360 - 200 → 2b = 160 → b = 80 = d
10. Say: I have used algebra to solve for the unknown angles.
11. Say: Angles b and d = 80
12. Ask: Can we find the measurements for the angles in figure b? (Answer: No, there is not enough
information)
Independent Practice (10 minutes)
1. Write problems below on the board: Find the unknown angles in the diagrams for two of the
shapes, and mark which shape that it is impossible to do this for:
a)
a = 100
b
c d
b)
45 e
f
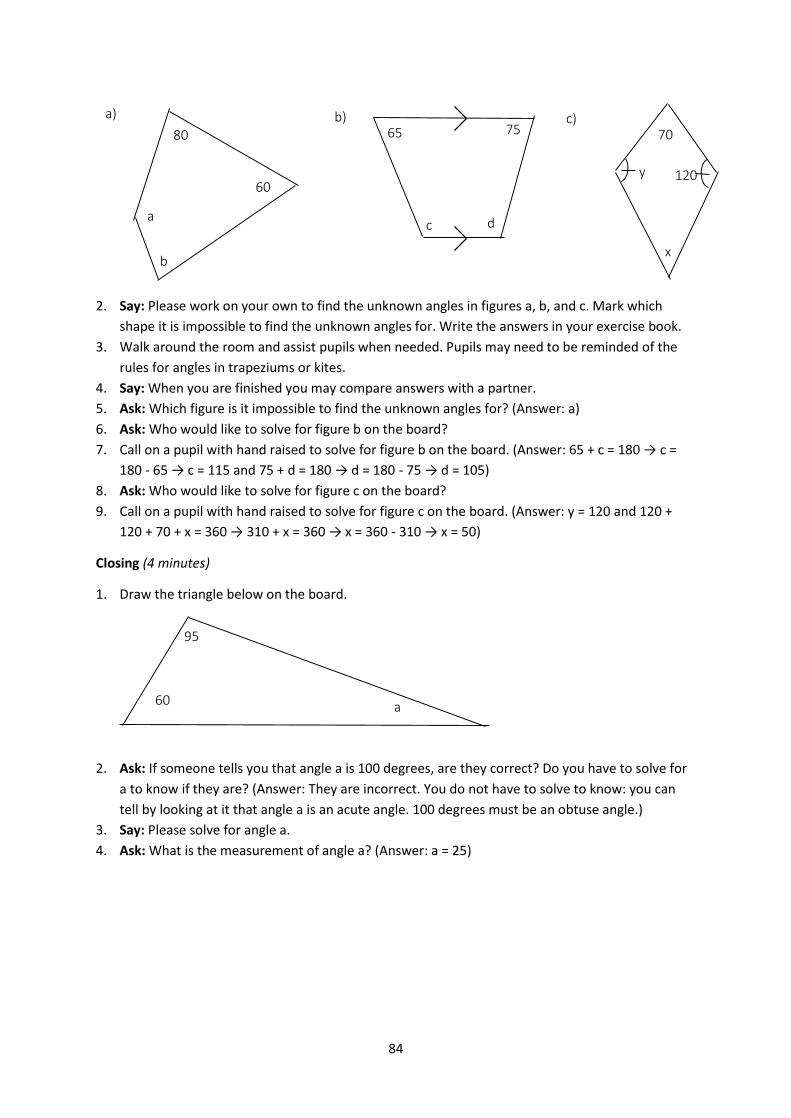
84
2. Say: Please work on your own to find the unknown angles in figures a, b, and c. Mark which
shape it is impossible to find the unknown angles for. Write the answers in your exercise book.
3. Walk around the room and assist pupils when needed. Pupils may need to be reminded of the
rules for angles in trapeziums or kites.
4. Say: When you are finished you may compare answers with a partner.
5. Ask: Which figure is it impossible to find the unknown angles for? (Answer: a)
6. Ask: Who would like to solve for figure b on the board?
7. Call on a pupil with hand raised to solve for figure b on the board. (Answer: 65 + c = 180 → c =
180 - 65 → c = 115 and 75 + d = 180 → d = 180 - 75 → d = 105)
8. Ask: Who would like to solve for figure c on the board?
9. Call on a pupil with hand raised to solve for figure c on the board. (Answer: y = 120 and 120 +
120 + 70 + x = 360 → 310 + x = 360 → x = 360 - 310 → x = 50)
Closing (4 minutes)
1. Draw the triangle below on the board.
2. Ask: If someone tells you that angle a is 100 degrees, are they correct? Do you have to solve for
a to know if they are? (Answer: They are incorrect. You do not have to solve to know: you can
tell by looking at it that angle a is an acute angle. 100 degrees must be an obtuse angle.)
3. Say: Please solve for angle a.
4. Ask: What is the measurement of angle a? (Answer: a = 25)
a)
80
60
b) c)
x
y
60
95
a
c
65
d
75
a
b
70
120
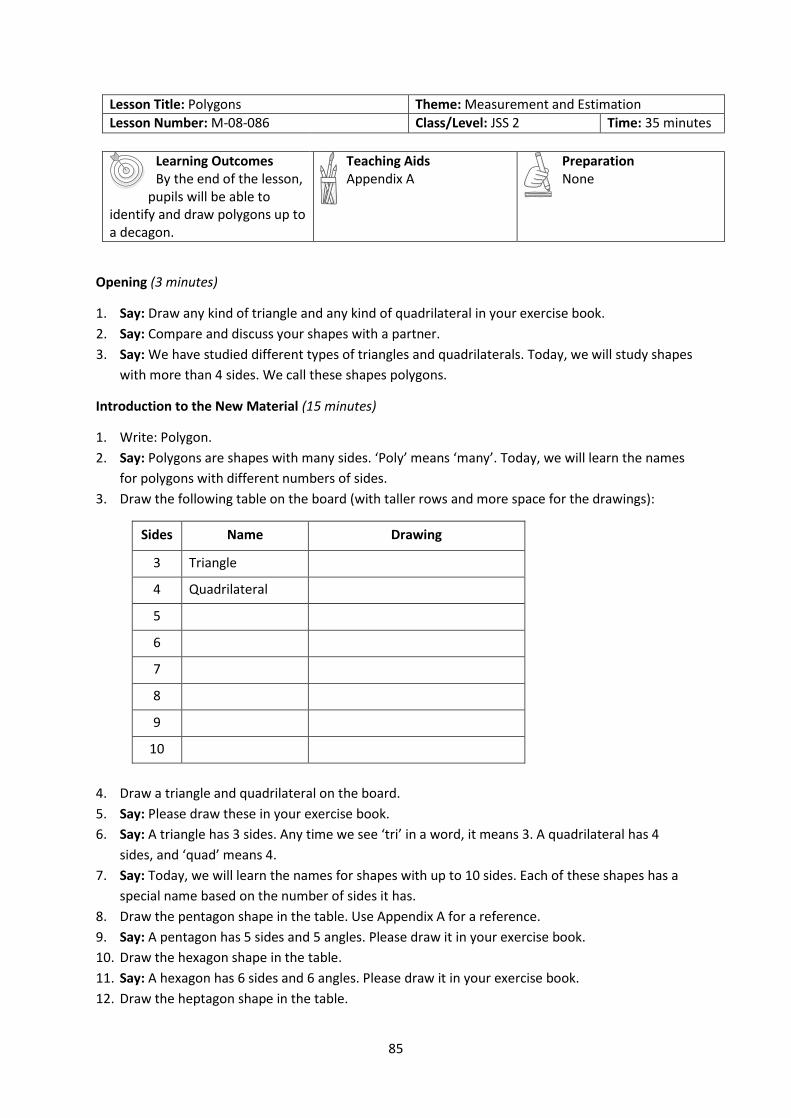
85
Lesson Title: Polygons Theme: Measurement and Estimation
Lesson Number: M-08-086 Class/Level: JSS 2 Time: 35 minutes
Learning Outcomes By the end of the lesson,
pupils will be able to identify and draw polygons up to a decagon.
Teaching Aids Appendix A
Preparation None
Opening (3 minutes)
1. Say: Draw any kind of triangle and any kind of quadrilateral in your exercise book.
2. Say: Compare and discuss your shapes with a partner.
3. Say: We have studied different types of triangles and quadrilaterals. Today, we will study shapes
with more than 4 sides. We call these shapes polygons.
Introduction to the New Material (15 minutes)
1. Write: Polygon.
2. Say: Polygons are shapes with many sides. ‘Poly’ means ‘many’. Today, we will learn the names
for polygons with different numbers of sides.
3. Draw the following table on the board (with taller rows and more space for the drawings):
Sides Name Drawing
3 Triangle
4 Quadrilateral
5
6
7
8
9
10
4. Draw a triangle and quadrilateral on the board.
5. Say: Please draw these in your exercise book.
6. Say: A triangle has 3 sides. Any time we see ‘tri’ in a word, it means 3. A quadrilateral has 4
sides, and ‘quad’ means 4.
7. Say: Today, we will learn the names for shapes with up to 10 sides. Each of these shapes has a
special name based on the number of sides it has.
8. Draw the pentagon shape in the table. Use Appendix A for a reference.
9. Say: A pentagon has 5 sides and 5 angles. Please draw it in your exercise book.
10. Draw the hexagon shape in the table.
11. Say: A hexagon has 6 sides and 6 angles. Please draw it in your exercise book.
12. Draw the heptagon shape in the table.

86
13. Say: A heptagon has 7 sides and 7 angles. Please draw it in your exercise book.
14. Draw the octagon shape in the table.
15. Say: An octagon has 8 sides and 8 angles. Please draw it in your exercise book.
16. Draw the nonagon shape in the table.
17. Say: A nonagon has 9 sides and 9 angles. Please draw it in your exercise book.
18. Draw the decagon shape in the table.
19. Say: A decagon has 10 sides and 10 angles. Please draw it in your exercise book.
20. Say: The beginning of each word has a meaning that tells you the number of sides. ‘Pent-‘ means
‘Five’, ‘Hex-‘ means ‘six’, and so on.
21. Say: The part of the word ‘-gon’ refers to the angles. A polygon has many angles
Guided Practice (5 minutes)
1. Say: Draw a hexagon in your exercise book. When you are finished, hold it up for me to see.
2. Give pupils a minute to draw a hexagon and walk around the room assisting when needed.
3. Check pupils’ work and make corrections when needed.
4. Ask: How many sides does a hexagon have? (Answer: 6)
5. Ask: How many angles does a hexagon have? (Answer: 6)
6. Say: Draw an octagon in your exercise book. When you are finished, hold it up for me to see.
7. Give pupils a minute to draw an octagon and walk around the room assisting when needed.
8. Check pupils’ work and make corrections when needed.
9. Ask: How many sides does an octagon have? (Answer: 8)
10. Ask: How many angles does an octagon have? (Answer: 8)
11. Say: Draw a pentagon in your exercise book. When you are finished, hold it up for me to see.
12. Give pupils a minute to draw a pentagon and walk around the room assisting when needed.
13. Check pupils’ work and make corrections when needed.
14. Ask: How many sides does a pentagon have? (Answer: 5)
15. Ask: How many angles does a pentagon have? (Answer: 5)
Independent Practice (10 minutes)
1. Write: Draw these compound shapes:
a) A pentagon and a square that share a side.
b) A decagon and a triangle that share a side.
2. Say: A compound shape is a shape that is made from two or more other shapes. The shapes are
stuck together, and share a side. Draw the shapes described on the board.
3. Say: Work on your own and draw the compound shapes in your exercise book.
4. Ask: Who would like to draw one of the shapes on the board?
5. Call on 2 pupils with hands raised to each draw one of the shapes on the board.
6. Note that they could all look different and still be correct.
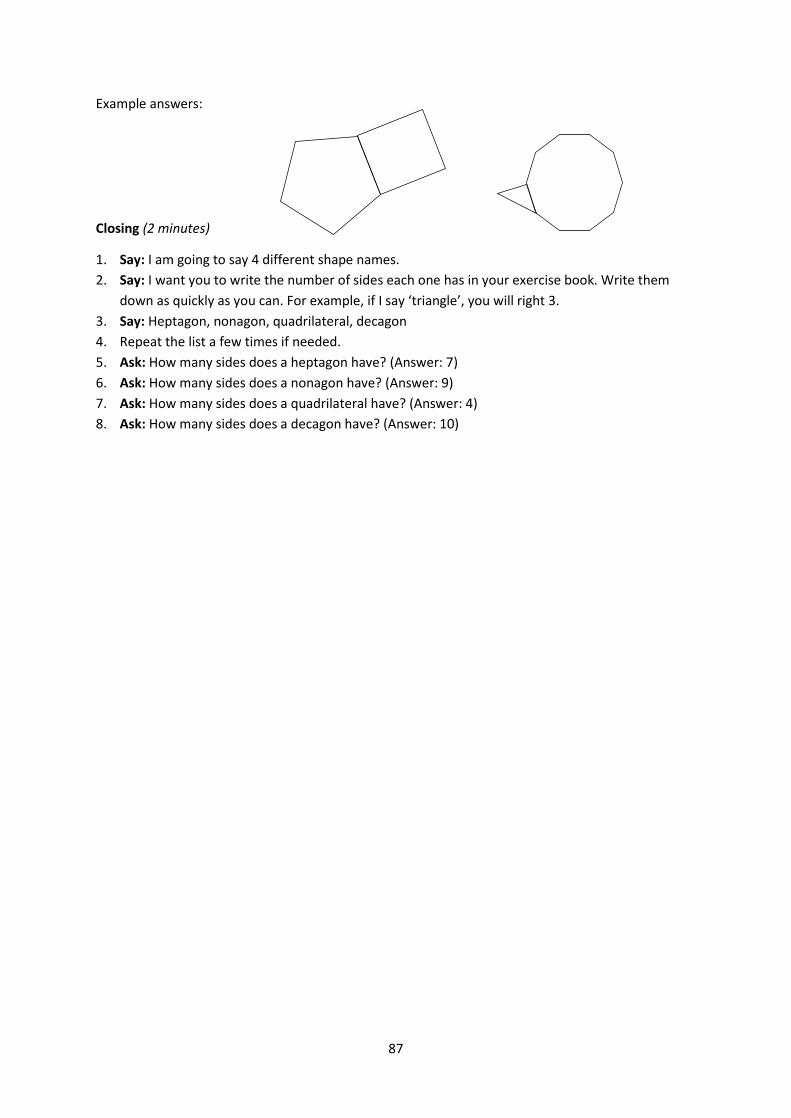
87
Example answers:
Closing (2 minutes)
1. Say: I am going to say 4 different shape names.
2. Say: I want you to write the number of sides each one has in your exercise book. Write them
down as quickly as you can. For example, if I say ‘triangle’, you will right 3.
3. Say: Heptagon, nonagon, quadrilateral, decagon
4. Repeat the list a few times if needed.
5. Ask: How many sides does a heptagon have? (Answer: 7)
6. Ask: How many sides does a nonagon have? (Answer: 9)
7. Ask: How many sides does a quadrilateral have? (Answer: 4)
8. Ask: How many sides does a decagon have? (Answer: 10)
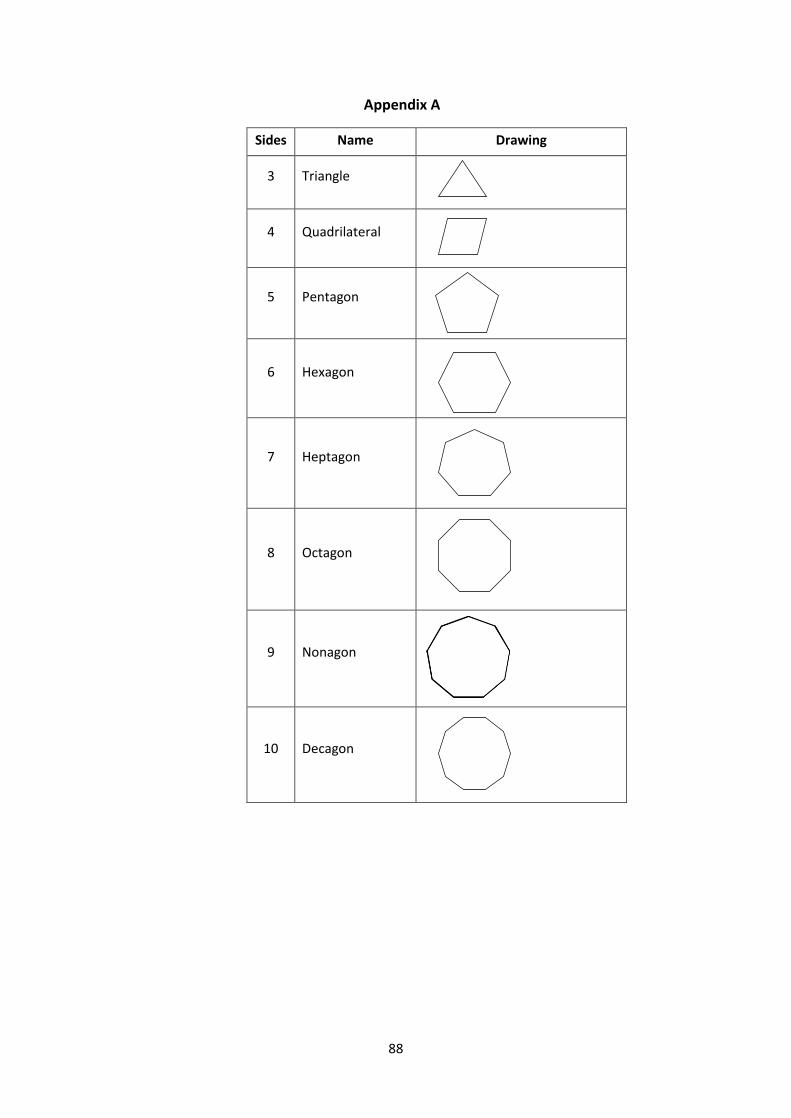
88
Appendix A
Sides Name Drawing
3 Triangle
4 Quadrilateral
5 Pentagon
6 Hexagon
7 Heptagon
8 Octagon
9 Nonagon
10 Decagon
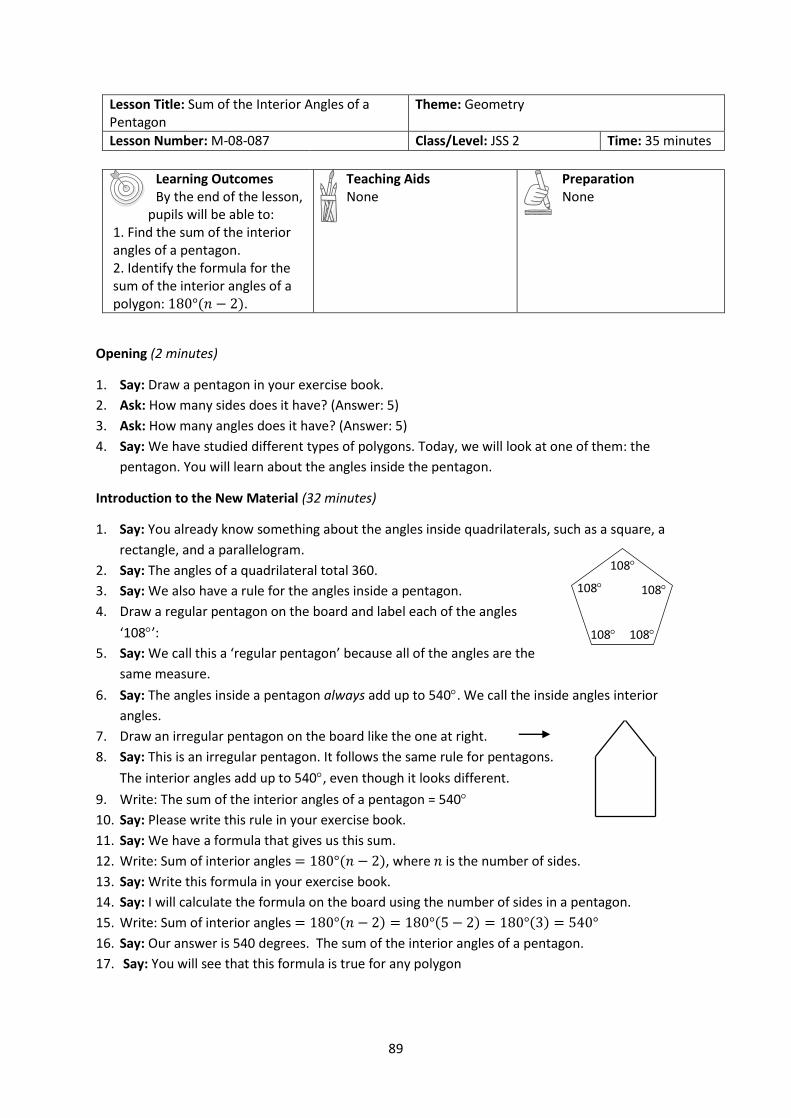
89
Lesson Title: Sum of the Interior Angles of a Pentagon
Theme: Geometry
Lesson Number: M-08-087 Class/Level: JSS 2 Time: 35 minutes
Learning Outcomes By the end of the lesson,
pupils will be able to: 1. Find the sum of the interior angles of a pentagon. 2. Identify the formula for the sum of the interior angles of a polygon: 180°(𝑛 − 2).
Teaching Aids None
Preparation None
Opening (2 minutes)
1. Say: Draw a pentagon in your exercise book.
2. Ask: How many sides does it have? (Answer: 5)
3. Ask: How many angles does it have? (Answer: 5)
4. Say: We have studied different types of polygons. Today, we will look at one of them: the
pentagon. You will learn about the angles inside the pentagon.
Introduction to the New Material (32 minutes)
1. Say: You already know something about the angles inside quadrilaterals, such as a square, a
rectangle, and a parallelogram.
2. Say: The angles of a quadrilateral total 360.
3. Say: We also have a rule for the angles inside a pentagon.
4. Draw a regular pentagon on the board and label each of the angles
‘108’:
5. Say: We call this a ‘regular pentagon’ because all of the angles are the
same measure.
6. Say: The angles inside a pentagon always add up to 540. We call the inside angles interior
angles.
7. Draw an irregular pentagon on the board like the one at right.
8. Say: This is an irregular pentagon. It follows the same rule for pentagons.
The interior angles add up to 540, even though it looks different.
9. Write: The sum of the interior angles of a pentagon = 540
10. Say: Please write this rule in your exercise book.
11. Say: We have a formula that gives us this sum.
12. Write: Sum of interior angles = 180°(𝑛 − 2), where 𝑛 is the number of sides.
13. Say: Write this formula in your exercise book.
14. Say: I will calculate the formula on the board using the number of sides in a pentagon.
15. Write: Sum of interior angles = 180°(𝑛 − 2) = 180°(5 − 2) = 180°(3) = 540°
16. Say: Our answer is 540 degrees. The sum of the interior angles of a pentagon.
17. Say: You will see that this formula is true for any polygon
108 108
108
108
108

90
Guided Practice (5 minutes)
1. Draw the pentagons at right on the board.
2. Say: Draw the two pentagons I have drawn on the
board in your exercise book.
3. Walk around the room and assist pupils when needed.
4. Say: Add the angles for the first pentagon in your
exercise book.
5. Ask: What is the sum of the angles? (Answer: 540)
6. Say: Add the angles for the second pentagon in your
exercise book.
7. Ask: What is the sum of the angles? (Answer: 540)
Independent Practice (10 minutes)
1. Say: Now I’m going to read you a story problem. I want you to work independently to draw a
picture from the information I tell you.
2. Say: Bendu wants to build a house. She will draw an accurate picture of the house before she
hires people to build it.
3. Say: The walls of her house will be at right angles with the ground. The top of her roof will be an
80 angle. The two angles between her roof and the walls of her house will each be
140. Help her draw her house.
4. Read the story 2-3 times, until pupils get all of the information.
5. Walk around to check their work, and make sure they draw the house accurately.
6. Ask: Who would like to draw the house on the board?
7. Call on a pupil with hand raised to draw the house on the board.
8. Say: Let’s check Bendu’s maths before she gives this drawing to the builders. Please add the
angles inside the house, and make sure they add up to 540.
9. Say: Please add the angles in your exercise book.
10. Walk around the room and assist pupils when needed.
11. Ask: Who would like to write the equation and answer on the board?
12. Call on a pupil with hand raised to write the equation and answer on the board. (Answer: 90° +
90° + 140° + 140° + 80° = 540°)
Closing (5 minutes)
1. Say: Now I want us to find the sum of the angles in a quadrilateral with the formula I gave you
for a pentagon.
2. Write: Sum of interior angles = 180°(𝑛 − 2)
3. Ask: For a quadrilateral, what is 𝑛 equal to? (Answer: 4)
4. Say: Please substitute 𝑛 = 4 into the formula and find the sum of the angles of a quadrilateral.
5. Walk around and assist pupils when needed.
6. Ask: What is the sum of the angles? (Answer: 360°)
7. Write: 180°(𝑛 − 2) = 180°(4 − 2) = 180°(2) = 360°
8. Say: We already knew that the sum of the angles in a quadrilateral is 360°. Now you have shown
this with the formula. We will use this formula again in the next lesson.
80
140 140
80
100 100
130 130 105
85
130
120
100
91
Lesson Title: Sum of the Interior Angles of a Polygon
Theme: Geometry
Lesson Number: M-08-088 Class/Level: JSS 2 Time: 35 minutes
Learning Outcomes By the end of the lesson,
pupils will be able to calculate the sum of the interior angles of a polygon using the formula: 180°(𝑛 − 2).
Teaching Aids None
Preparation None
Opening (3 minutes)
1. Ask: What is a polygon with 5 sides called? (Answer: Pentagon)
2. Ask: What is a polygon with 10 sides called? (Answer: Decagon)
3. Ask: What is a polygon with 8 sides called? (Answer: Octagon)
4. Say: In the previous lesson we used a formula to find the sum of the interior angles of a
pentagon.
5. Write: 180°(𝑛 − 2)
6. Say: In the previous lesson we used this formula to show that the angles in a pentagon add up to
540. Today we will use it for other polygons. You will see that they also follow this formula for
the sum of their interior angles.
Introduction to the New Material (8 minutes)
1. Draw the table on the board.
2. Say: Please copy this table into your
exercise book.
3. Say: Today we will fill this table out with
the sum of the interior angles in each
polygon.
4. Say: We already know that the sum of the
interior angles of a triangle is 180.
5. Say: Please write this in your table.
6. Say: We know that the sum of the interior
angles of a quadrilateral is 360.
7. Say: Please write this in your table.
8. Say: We know that the sum of the interior angles of a pentagon is 540.
9. Say: Please write this in your table.
10. Write the sum of the angles in your table on the board.
Sides Name Sum of Interior Angles
3 Triangle
4 Quadrilateral
5 Pentagon
6 Hexagon
7 Heptagon
8 Octagon
9 Nonagon
10 Decagon
Sides Name Sum of Interior Angles
3 Triangle 180
4 Quadrilateral 360
5 Pentagon 540
92
11. Say: We will use the formula to fill the rest of the table.
12. Draw a hexagon on the board.
13. Say: First, let’s look at the hexagon.
14. Say: Let’s use the formula to calculate the sum of the angles.
15. Write the formula on the board: Sum of interior angles = 180°(𝑛 − 2),
where 𝑛 is the number of sides.
16. Say: When we look at the hexagon, we know the value for 𝑛 is 6, because a hexagon has 6 sides.
17. Substitute 𝑛 = 6 into the formula and find the sum of the interior angles.
18. Write: Sum of interior angles = 180°(𝑛 − 2) = 180°(6 − 2) = 180°(4) = 720°
19. Say: The sum of the interior angles of a hexagon equal 720°
20. Write 720 in the correct place in your table on the board.
21. Say: Please write this in your table in your exercise book.
Guided Practice (12 minutes)
1. You will now help me calculate the rest of the
sums.
2. Say: We will start with the nonagon.
3. Ask: What is the value of 𝑛 for the nonagon?
(Answer: 9)
4. Say: Substitute the value into the formula.
5. Ask: What is the answer? (Answer: 1,260°)
6. Write: Sum of interior angles = 180°(𝑛 − 2) =
180°(9 − 2) = 180°(7) = 1,260°
7. Say: This formula is true for any polygon. Now
you will work with a partner to fill in the rest of the table.
8. Say: Fill in the rest of the table. Use the
formula to find the sum of the interior angles
for heptagon, octagon, and decagon.
9. Walk around the room and assist pupils when
needed.
10. Ask: What is the sum of the angles for a
heptagon? (Answer: 900)
11. Ask: What is the sum of the angles for an
octagon? (Answer: 1,080)
12. Ask: What is the sum of the angles for a
decagon? (Answer: 1,440)
Independent Practice (10 minutes)
1. Say: Now I want you to use this information to draw shapes and label their angles accurately.
2. Write:
a) Draw a regular hexagon and label its angles.
b) Draw a regular octagon and label its angles.
3. Say: Remember that a regular shape has equal sides. The angles in your shapes should add up to
the number you wrote in the table for that shape.
Sides Name Sum of Interior Angles
3 Triangle 180
4 Quadrilateral 360
5 Pentagon 540
6 Hexagon 720
7 Heptagon
8 Octagon
9 Nonagon 1,260
10 Decagon
Sides Name Sum of Interior Angles
3 Triangle 180
4 Quadrilateral 360
5 Pentagon 540
6 Hexagon 720
7 Heptagon 900
8 Octagon 1,080
9 Nonagon 1,260
10 Decagon 1,440
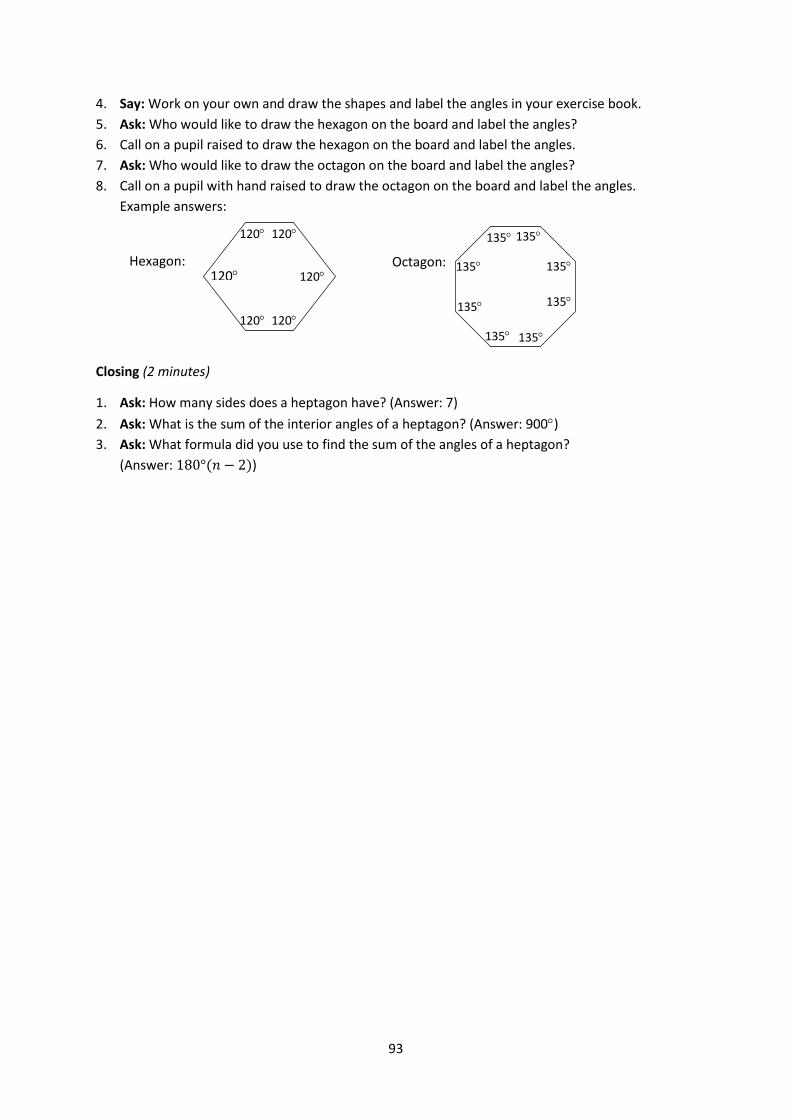
93
4. Say: Work on your own and draw the shapes and label the angles in your exercise book.
5. Ask: Who would like to draw the hexagon on the board and label the angles?
6. Call on a pupil raised to draw the hexagon on the board and label the angles.
7. Ask: Who would like to draw the octagon on the board and label the angles?
8. Call on a pupil with hand raised to draw the octagon on the board and label the angles.
Example answers:
Closing (2 minutes)
1. Ask: How many sides does a heptagon have? (Answer: 7)
2. Ask: What is the sum of the interior angles of a heptagon? (Answer: 900)
3. Ask: What formula did you use to find the sum of the angles of a heptagon?
(Answer: 180°(𝑛 − 2))
120 120
120 120
120 120 Hexagon: 135
135
135
135
135
135
135
135
Octagon:
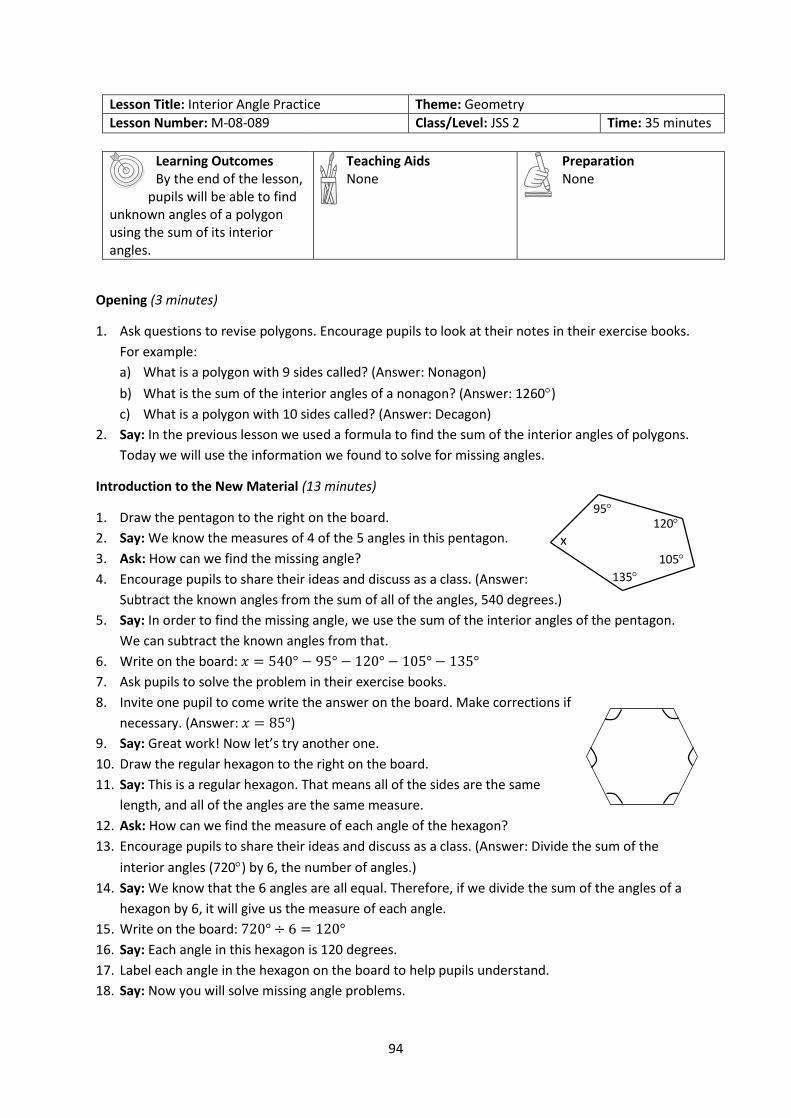
94
Lesson Title: Interior Angle Practice Theme: Geometry
Lesson Number: M-08-089 Class/Level: JSS 2 Time: 35 minutes
Learning Outcomes By the end of the lesson,
pupils will be able to find unknown angles of a polygon using the sum of its interior angles.
Teaching Aids None
Preparation None
Opening (3 minutes)
1. Ask questions to revise polygons. Encourage pupils to look at their notes in their exercise books.
For example:
a) What is a polygon with 9 sides called? (Answer: Nonagon)
b) What is the sum of the interior angles of a nonagon? (Answer: 1260)
c) What is a polygon with 10 sides called? (Answer: Decagon)
2. Say: In the previous lesson we used a formula to find the sum of the interior angles of polygons.
Today we will use the information we found to solve for missing angles.
Introduction to the New Material (13 minutes)
1. Draw the pentagon to the right on the board.
2. Say: We know the measures of 4 of the 5 angles in this pentagon.
3. Ask: How can we find the missing angle?
4. Encourage pupils to share their ideas and discuss as a class. (Answer:
Subtract the known angles from the sum of all of the angles, 540 degrees.)
5. Say: In order to find the missing angle, we use the sum of the interior angles of the pentagon.
We can subtract the known angles from that.
6. Write on the board: 𝑥 = 540° − 95° − 120° − 105° − 135°
7. Ask pupils to solve the problem in their exercise books.
8. Invite one pupil to come write the answer on the board. Make corrections if
necessary. (Answer: 𝑥 = 85°)
9. Say: Great work! Now let’s try another one.
10. Draw the regular hexagon to the right on the board.
11. Say: This is a regular hexagon. That means all of the sides are the same
length, and all of the angles are the same measure.
12. Ask: How can we find the measure of each angle of the hexagon?
13. Encourage pupils to share their ideas and discuss as a class. (Answer: Divide the sum of the
interior angles (720) by 6, the number of angles.)
14. Say: We know that the 6 angles are all equal. Therefore, if we divide the sum of the angles of a
hexagon by 6, it will give us the measure of each angle.
15. Write on the board: 720° ÷ 6 = 120°
16. Say: Each angle in this hexagon is 120 degrees.
17. Label each angle in the hexagon on the board to help pupils understand.
18. Say: Now you will solve missing angle problems.
120
x
135
105
95

95
Guided Practice (7 minutes)
1. Draw the pentagon and heptagon to the right on the board.
2. Write the following problems on the board:
a) Find the missing angle in the pentagon.
b) Find the missing angle in the heptagon.
3. Ask pupils to work in pairs to find the missing angles.
4. Say: Use the sum of the interior angles for the pentagon and heptagon to
find the missing angles.
5. Move around the classroom to make sure pupils understand and are doing the task. Help
struggling pupils.
6. Invite two pairs to come to the front and each write one of the missing values on the board.
Make corrections if necessary. Discuss the answers as a class.
7. Ask pupils to compare their answers with the answers on the board. (Answers: a) 𝑦 = 70°; b)
𝑥 = 120°)
Independent Practice (10 minutes)
1. Draw the hexagon to the right on the board.
2. Write the following problems on the board:
a) Find the missing angle in the hexagon.
b) Find the measure of the angles of a regular decagon.
3. Ask pupils to work individually to find the angles.
4. Move around the classroom to make sure pupils understand and are
doing the task. For example, in question (b) you may need to remind
pupils they can divide by the total number of angles because the
angles of a regular polynomial are all equal.
5. Invite two pupils to come to the front and write the answers on the board. Make corrections if
necessary. Discuss the answers as a class.
6. Ask pupils to compare their answers with the answers on the board. (Answers: a) 𝑧 = 720° −
140° − 125° − 80° − 130° − 165° = 80°; b) 1,440° ÷ 10 = 144°)
Closing (2 minutes)
1. Ask the following questions to revise the material:
a) If we are given an octagon with seven known angles, how do we find the measure of the
eighth angle?
b) How do we find the measure of the angles of a nonagon?
2. Discuss the answers as a class. (Answers: a) Subtract the seven angles from the sum of the
angles of an octagon, 1080; b) Divide the sum of the angles, 1260, by the number of angles, 9)
y
145
145 92
155
160
113
110
150
x
z
165
140
130
80
125
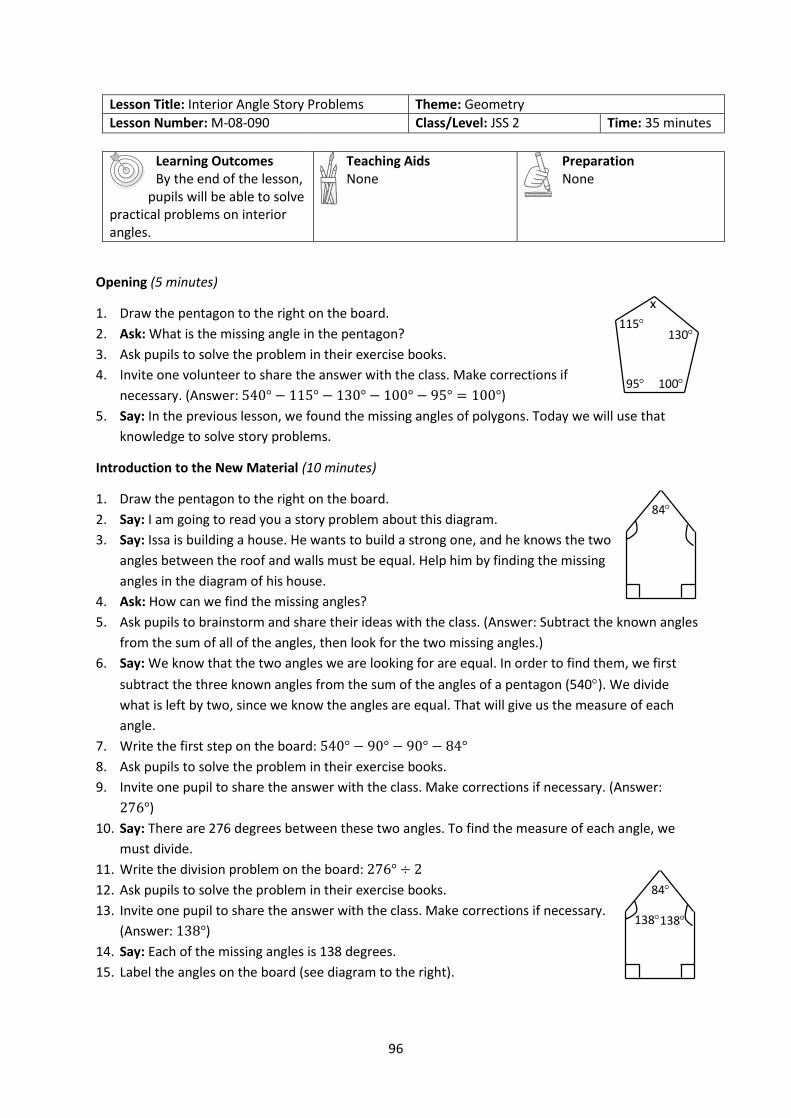
96
Lesson Title: Interior Angle Story Problems Theme: Geometry
Lesson Number: M-08-090 Class/Level: JSS 2 Time: 35 minutes
Learning Outcomes By the end of the lesson,
pupils will be able to solve practical problems on interior angles.
Teaching Aids None
Preparation None
Opening (5 minutes)
1. Draw the pentagon to the right on the board.
2. Ask: What is the missing angle in the pentagon?
3. Ask pupils to solve the problem in their exercise books.
4. Invite one volunteer to share the answer with the class. Make corrections if
necessary. (Answer: 540° − 115° − 130° − 100° − 95° = 100°)
5. Say: In the previous lesson, we found the missing angles of polygons. Today we will use that
knowledge to solve story problems.
Introduction to the New Material (10 minutes)
1. Draw the pentagon to the right on the board.
2. Say: I am going to read you a story problem about this diagram.
3. Say: Issa is building a house. He wants to build a strong one, and he knows the two
angles between the roof and walls must be equal. Help him by finding the missing
angles in the diagram of his house.
4. Ask: How can we find the missing angles?
5. Ask pupils to brainstorm and share their ideas with the class. (Answer: Subtract the known angles
from the sum of all of the angles, then look for the two missing angles.)
6. Say: We know that the two angles we are looking for are equal. In order to find them, we first
subtract the three known angles from the sum of the angles of a pentagon (540). We divide
what is left by two, since we know the angles are equal. That will give us the measure of each
angle.
7. Write the first step on the board: 540° − 90° − 90° − 84°
8. Ask pupils to solve the problem in their exercise books.
9. Invite one pupil to share the answer with the class. Make corrections if necessary. (Answer:
276°)
10. Say: There are 276 degrees between these two angles. To find the measure of each angle, we
must divide.
11. Write the division problem on the board: 276° ÷ 2
12. Ask pupils to solve the problem in their exercise books.
13. Invite one pupil to share the answer with the class. Make corrections if necessary.
(Answer: 138°)
14. Say: Each of the missing angles is 138 degrees.
15. Label the angles on the board (see diagram to the right).
x
130
115
95 100
84
138 138
84

97
Guided Practice (7 minutes)
1. Write the following problem on the board:
Michael has eight people in his family. He wants to build a table in the shape of a regular octagon
for his family to sit around. Draw a picture of the table’s top. What will the measure of each
angle be?
2. Ask pupils to work in pairs to solve the problem.
3. Move around the classroom to make sure pupils understand and are doing the task. If needed,
remind them that all angles in a regular octagon are the same.
4. Invite a pair to come to the board and draw the table’s top. (Example: see
diagram to the right)
5. Ask another pair to write the solution for finding the measure of each angle
on the board. Make corrections if necessary.
6. Ask pupils to check their work with the answers on the board and do
corrections. (Answer: 1,080° ÷ 8 = 135°)
Independent Practice (10 minutes)
1. Draw the shapes to the right on the board.
2. Write the following problems on the board:
a) Juliet’s farm is in the shape of a hexagon. She wants to find
each angle of the farm for planning purposes. The map of
her farm is shown. Help her find the missing angle.
b) The principal of a school wants to have a podium built for
when guests come to give speeches. He drew a picture to show
the carpenter. He decided on the measures of three angles.
Help him find the missing angle.
3. Ask pupils to work individually to find the missing angles.
4. Move around the classroom to make sure pupils understand and
are doing the task. Help struggling pupils.
5. Invite two pupils to write the answers on the board. Make
corrections if necessary.
6. Ask pupils to check their work with the answers on the board and
do corrections. (Answers: a) 𝑥 = 720° − 100° − 115° − 135° −
90° − 130° = 150°; b) 360° − 90° − 90° − 108° = 72°)
Closing (3 minutes)
1. Ask the following questions to revise the material:
a. When do you think it would be useful to do angle calculations?
b. Who are some of the people in our community who could use this maths?
2. Discuss the answers as a class. (Example answers: a) When building a house; when building
furniture or doing any kind of carpentry; b) Farmers could use geometry for planning; carpenters
for building)
135
100
115 130
x
108
y
Table Top
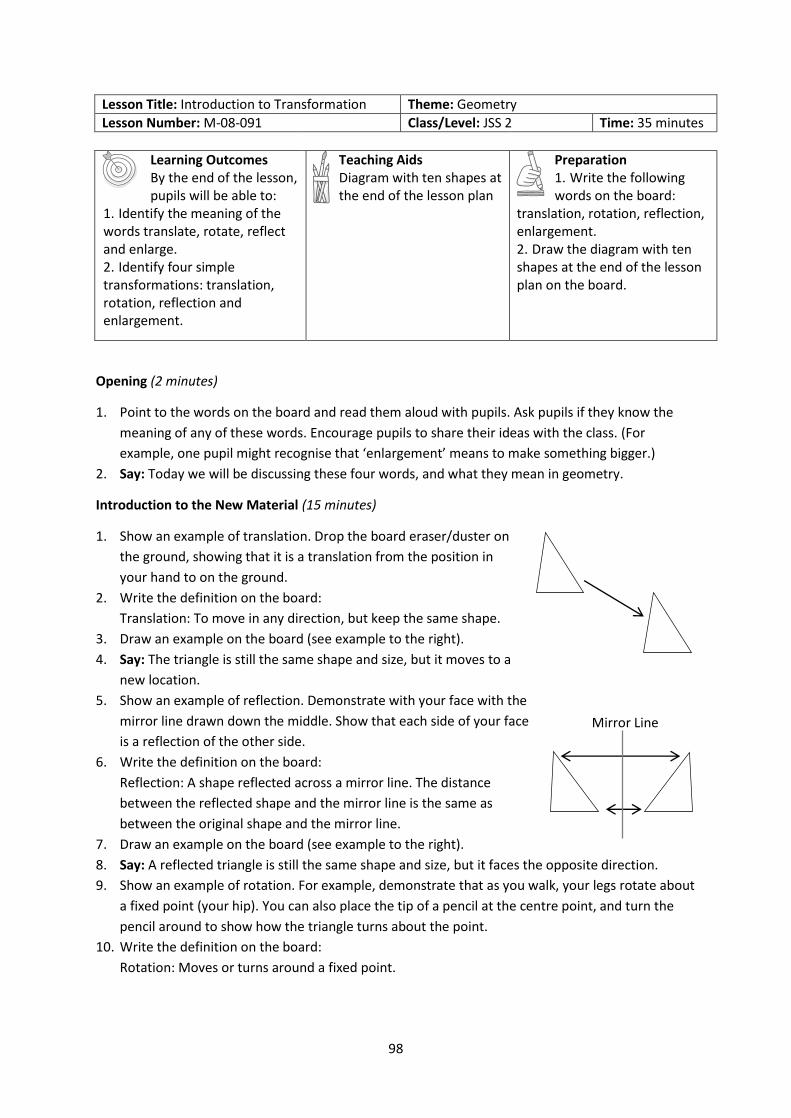
98
Lesson Title: Introduction to Transformation Theme: Geometry
Lesson Number: M-08-091 Class/Level: JSS 2 Time: 35 minutes
Learning Outcomes By the end of the lesson, pupils will be able to:
1. Identify the meaning of the words translate, rotate, reflect and enlarge. 2. Identify four simple transformations: translation, rotation, reflection and enlargement.
Teaching Aids Diagram with ten shapes at the end of the lesson plan
Preparation 1. Write the following words on the board:
translation, rotation, reflection, enlargement. 2. Draw the diagram with ten shapes at the end of the lesson plan on the board.
Opening (2 minutes)
1. Point to the words on the board and read them aloud with pupils. Ask pupils if they know the
meaning of any of these words. Encourage pupils to share their ideas with the class. (For
example, one pupil might recognise that ‘enlargement’ means to make something bigger.)
2. Say: Today we will be discussing these four words, and what they mean in geometry.
Introduction to the New Material (15 minutes)
1. Show an example of translation. Drop the board eraser/duster on
the ground, showing that it is a translation from the position in
your hand to on the ground.
2. Write the definition on the board:
Translation: To move in any direction, but keep the same shape.
3. Draw an example on the board (see example to the right).
4. Say: The triangle is still the same shape and size, but it moves to a
new location.
5. Show an example of reflection. Demonstrate with your face with the
mirror line drawn down the middle. Show that each side of your face
is a reflection of the other side.
6. Write the definition on the board:
Reflection: A shape reflected across a mirror line. The distance
between the reflected shape and the mirror line is the same as
between the original shape and the mirror line.
7. Draw an example on the board (see example to the right).
8. Say: A reflected triangle is still the same shape and size, but it faces the opposite direction.
9. Show an example of rotation. For example, demonstrate that as you walk, your legs rotate about
a fixed point (your hip). You can also place the tip of a pencil at the centre point, and turn the
pencil around to show how the triangle turns about the point.
10. Write the definition on the board:
Rotation: Moves or turns around a fixed point.
Mirror Line
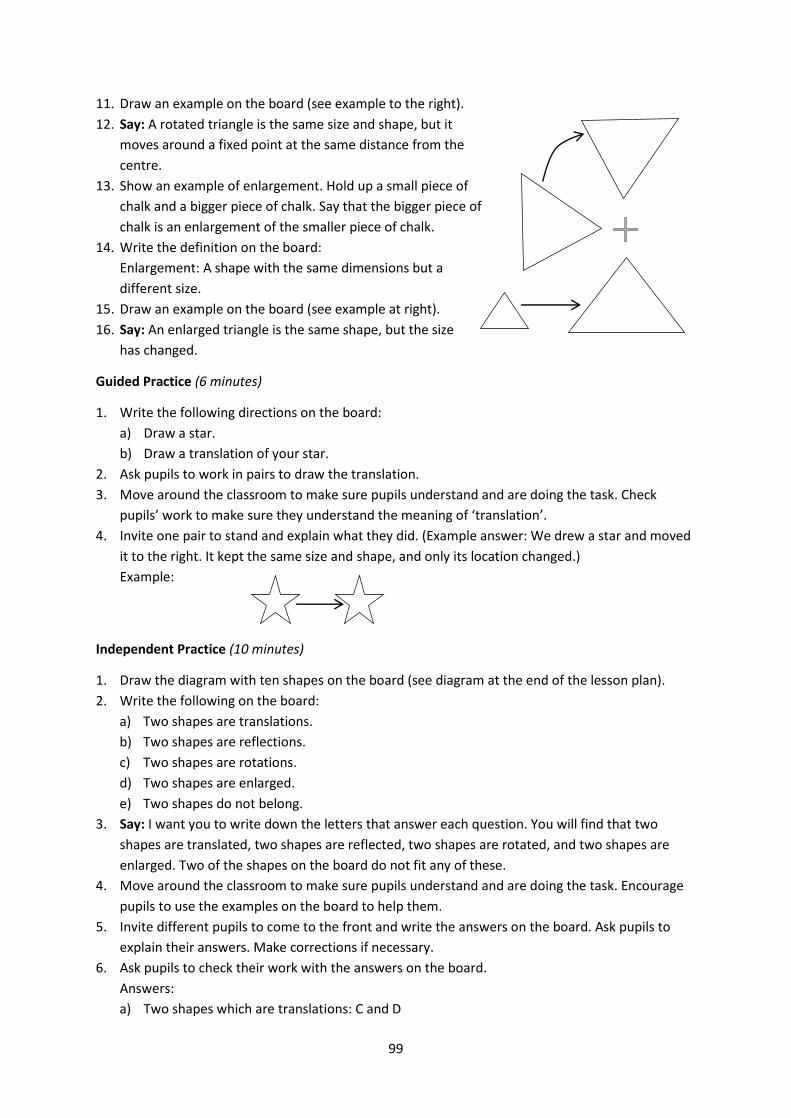
99
11. Draw an example on the board (see example to the right).
12. Say: A rotated triangle is the same size and shape, but it
moves around a fixed point at the same distance from the
centre.
13. Show an example of enlargement. Hold up a small piece of
chalk and a bigger piece of chalk. Say that the bigger piece of
chalk is an enlargement of the smaller piece of chalk.
14. Write the definition on the board:
Enlargement: A shape with the same dimensions but a
different size.
15. Draw an example on the board (see example at right).
16. Say: An enlarged triangle is the same shape, but the size
has changed.
Guided Practice (6 minutes)
1. Write the following directions on the board:
a) Draw a star.
b) Draw a translation of your star.
2. Ask pupils to work in pairs to draw the translation.
3. Move around the classroom to make sure pupils understand and are doing the task. Check
pupils’ work to make sure they understand the meaning of ‘translation’.
4. Invite one pair to stand and explain what they did. (Example answer: We drew a star and moved
it to the right. It kept the same size and shape, and only its location changed.)
Example:
Independent Practice (10 minutes)
1. Draw the diagram with ten shapes on the board (see diagram at the end of the lesson plan).
2. Write the following on the board:
a) Two shapes are translations.
b) Two shapes are reflections.
c) Two shapes are rotations.
d) Two shapes are enlarged.
e) Two shapes do not belong.
3. Say: I want you to write down the letters that answer each question. You will find that two
shapes are translated, two shapes are reflected, two shapes are rotated, and two shapes are
enlarged. Two of the shapes on the board do not fit any of these.
4. Move around the classroom to make sure pupils understand and are doing the task. Encourage
pupils to use the examples on the board to help them.
5. Invite different pupils to come to the front and write the answers on the board. Ask pupils to
explain their answers. Make corrections if necessary.
6. Ask pupils to check their work with the answers on the board.
Answers:
a) Two shapes which are translations: C and D

100
b) Two shapes which are reflections: E and F
c) Two shapes which are rotations: I and J
d) Two shapes which are enlarged: H and G
e) Two shapes which do not belong: A and B
Closing (2 minutes)
1. Ask pupils to define translation, rotation, reflection and enlargement. Have them raise their
hand to answer.
[TEACHING AID: DIAGRAM WITH 10 SHAPES]
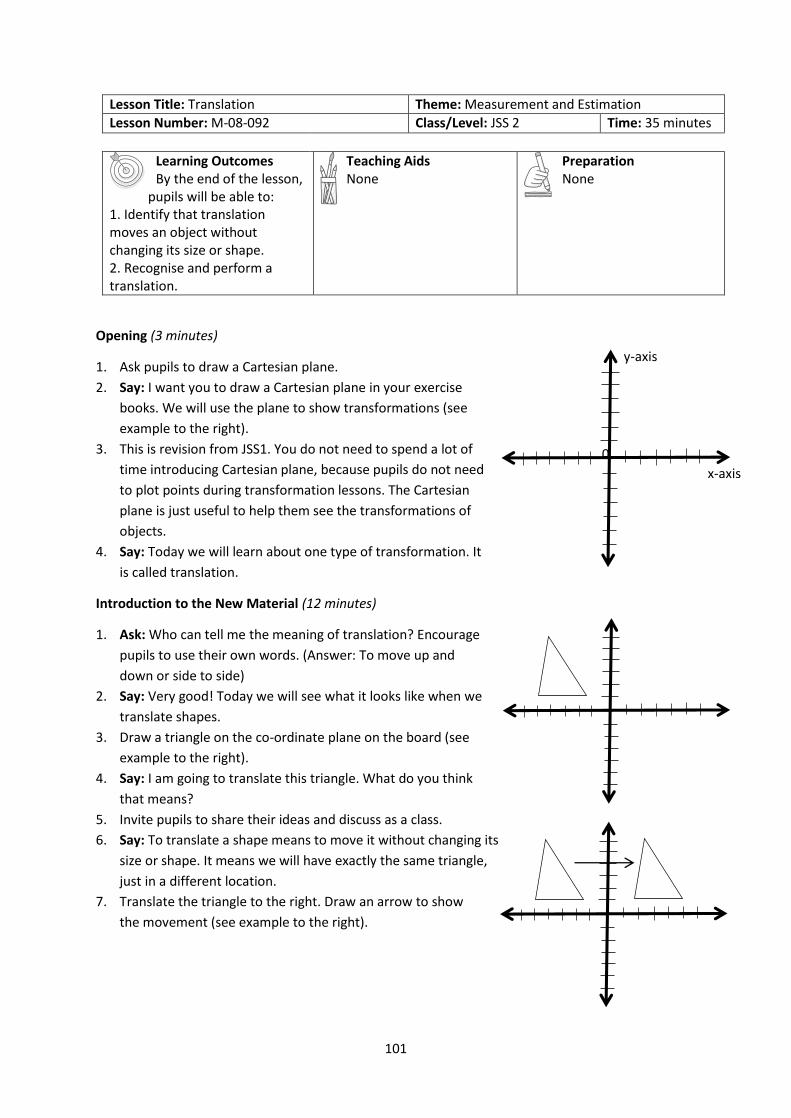
101
Lesson Title: Translation Theme: Measurement and Estimation
Lesson Number: M-08-092 Class/Level: JSS 2 Time: 35 minutes
Learning Outcomes By the end of the lesson,
pupils will be able to: 1. Identify that translation moves an object without changing its size or shape. 2. Recognise and perform a translation.
Teaching Aids None
Preparation None
Opening (3 minutes)
1. Ask pupils to draw a Cartesian plane.
2. Say: I want you to draw a Cartesian plane in your exercise
books. We will use the plane to show transformations (see
example to the right).
3. This is revision from JSS1. You do not need to spend a lot of
time introducing Cartesian plane, because pupils do not need
to plot points during transformation lessons. The Cartesian
plane is just useful to help them see the transformations of
objects.
4. Say: Today we will learn about one type of transformation. It
is called translation.
Introduction to the New Material (12 minutes)
1. Ask: Who can tell me the meaning of translation? Encourage
pupils to use their own words. (Answer: To move up and
down or side to side)
2. Say: Very good! Today we will see what it looks like when we
translate shapes.
3. Draw a triangle on the co-ordinate plane on the board (see
example to the right).
4. Say: I am going to translate this triangle. What do you think
that means?
5. Invite pupils to share their ideas and discuss as a class.
6. Say: To translate a shape means to move it without changing its
size or shape. It means we will have exactly the same triangle,
just in a different location.
7. Translate the triangle to the right. Draw an arrow to show
the movement (see example to the right).
x-axis
y-axis
0

102
8. Say: These two triangles are congruent. Shapes are congruent if they
change but keep the same size and shape.
9. Say: We can translate a shape in any direction. I will show you more
translations of this triangle.
10. Draw two more translations of the triangle on the Cartesian
plane to show pupils that transformation can be in any
direction (see example to the right).
11. Ask pupils to draw a transformation of the triangle in their
exercise books.
12. Move around the classroom to make sure pupils understand and are doing the task.
Their triangle could be anywhere on the co-ordinate plane, but it should be the same size and
shape as the original triangle.
13. Invite one pupil to come draw their transformation on the co-ordinate plane on the board. Make
corrections if necessary.
Guided Practice (8 minutes)
1. Write the following problem on the board:
Draw a circle anywhere on the co-ordinate plane. Show three
different transformations of your circle.
2. Ask pupils to work in pairs to draw the transformations. Tell
them to write their answers in their exercise books.
3. Move around the classroom to make sure pupils understand
and are doing the task. For example, make sure that pupils are
drawing all of their circles the same size, just in a different location.
4. Invite two pairs to draw their work on the board. Make corrections if
necessary.
5. Ask pupils to check their work with the answers on the board (see example above).
Independent Practice (10 minutes)
1. Draw the Cartesian plane to the right on the board.
2. Write the following problems on the board:
a) Copy the Cartesian plane and trapezoid. Translate the
trapezoid to two different locations.
b) Draw a small cat on the Cartesian plane. Translate your
cat to another location on the plane.
3. Ask pupils to work individually to solve the problems. Tell
them to write their answers in their exercise books.
4. Move around the classroom to make
sure pupils understand and are doing
the task. Help struggling pupils.

103
5. Invite two pupils to come to
the front and share their
answers on the board. Make
corrections if necessary.
6. Ask pupils to check their
answers with the answers on the
board (see examples to the
right).
Closing (2 minutes)
1. Ask the following questions to revise the material:
a) What does it mean to translate an object?
b) Would it be possible to translate a very large object, like a football pitch? Why or why not?
2. Discuss the answers as a class. (Answers: a) To move it to another location without changing its
size; b) Yes, it’s possible to translate any shape. We just need to move it without changing its
size.)
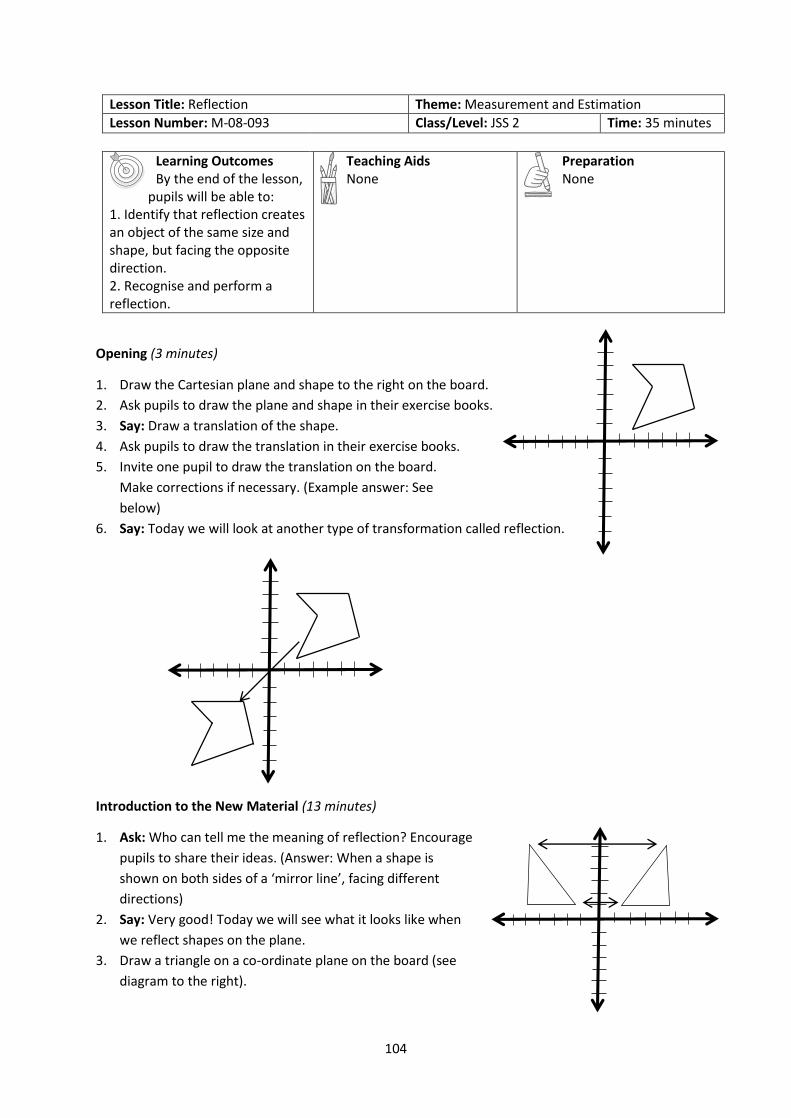
104
Lesson Title: Reflection Theme: Measurement and Estimation
Lesson Number: M-08-093 Class/Level: JSS 2 Time: 35 minutes
Learning Outcomes By the end of the lesson,
pupils will be able to: 1. Identify that reflection creates an object of the same size and shape, but facing the opposite direction. 2. Recognise and perform a reflection.
Teaching Aids None
Preparation None
Opening (3 minutes)
1. Draw the Cartesian plane and shape to the right on the board.
2. Ask pupils to draw the plane and shape in their exercise books.
3. Say: Draw a translation of the shape.
4. Ask pupils to draw the translation in their exercise books.
5. Invite one pupil to draw the translation on the board.
Make corrections if necessary. (Example answer: See
below)
6. Say: Today we will look at another type of transformation called reflection.
Introduction to the New Material (13 minutes)
1. Ask: Who can tell me the meaning of reflection? Encourage
pupils to share their ideas. (Answer: When a shape is
shown on both sides of a ‘mirror line’, facing different
directions)
2. Say: Very good! Today we will see what it looks like when
we reflect shapes on the plane.
3. Draw a triangle on a co-ordinate plane on the board (see
diagram to the right).

105
4. Say: I will draw the reflection of this triangle. What do you think that means?
5. Ask pupils to share their ideas and discuss as a class.
6. Say: To reflect a shape means to flip it over a mirror line. It means we will have the same shape,
but it will be facing the opposite direction and it will move to the other side of the mirror line.
7. Draw the reflection of the triangle about the y-axis. Draw an arrow to show the movement (see
diagram to the right).
8. Say: It looks like this triangle is looking in the mirror. There is a mirror image of itself on the
other side of the y-axis.
9. Say: These two triangles are congruent. Shapes are congruent if they keep the same size and
shape. Only the direction the triangle is facing has changed.
10. Say: We can reflect a shape across a mirror line in any direction. Now I
will show you an example with a horizontal line.
11. Draw a reflection of the triangle about the x-axis (see
diagram to the right).
12. Say: It is important in any reflection that the shapes
are the same size. They should also be the same
distance from the mirror line.
13. Say: Now you will work on your own reflection.
Guided Practice (7 minutes)
1. Write the following problem on the board:
Draw a rectangle anywhere on the co-ordinate plane. Show its
reflection across the x-axis and the y-axis.
2. Ask pupils to work in pairs and write their answers in
their exercise books.
3. Move around the classroom to make sure pupils
understand and are doing the task. Make sure pupils
understand that they should draw two new rectangles: one
with the x-axis as the mirror line, and the other with the y-
axis as the mirror line.
4. Invite a pair to come to the front and share their answer on the board. Make board. Give
corrections if necessary. Discuss answers as a class.
5. Ask pupils to check their reflections with the ones on the board. (Example: See above)
Independent Practice (10 minutes)
1. Draw the co-ordinate plane and star to the right on
the board.
2. Write the following problems on the board:
a) Copy the Cartesian plane and star. Draw the
reflection of the star about the x-axis and y-axis.
b) Draw a small house on the Cartesian plane.
Reflect the house about the x-axis.
3. Ask pupils to work individually and write their
answers in their exercise books.

106
4. Move around the classroom to make sure pupils understand and are doing the task. Remind
pupils that the spacing from the mirror line should be the same.
5. Invite two pairs to come to the front and share their answer on the board. Make corrections if
necessary. Discuss answers as a class.
6. Ask pupils to check their reflections with the ones on the board. (Examples: See below)
Closing (2 minutes)
1. Ask the following questions to revise the material:
a) What does it mean to reflect an object?
b) What are some important things to remember when drawing the reflection of an object?
2. Discuss the answers as a class. (Example answers: a) To flip it across a mirror line, so that it is
facing the opposite direction; b) The reflection should be the same size, and it should be the
same distance from the mirror line; the two shapes are congruent.)
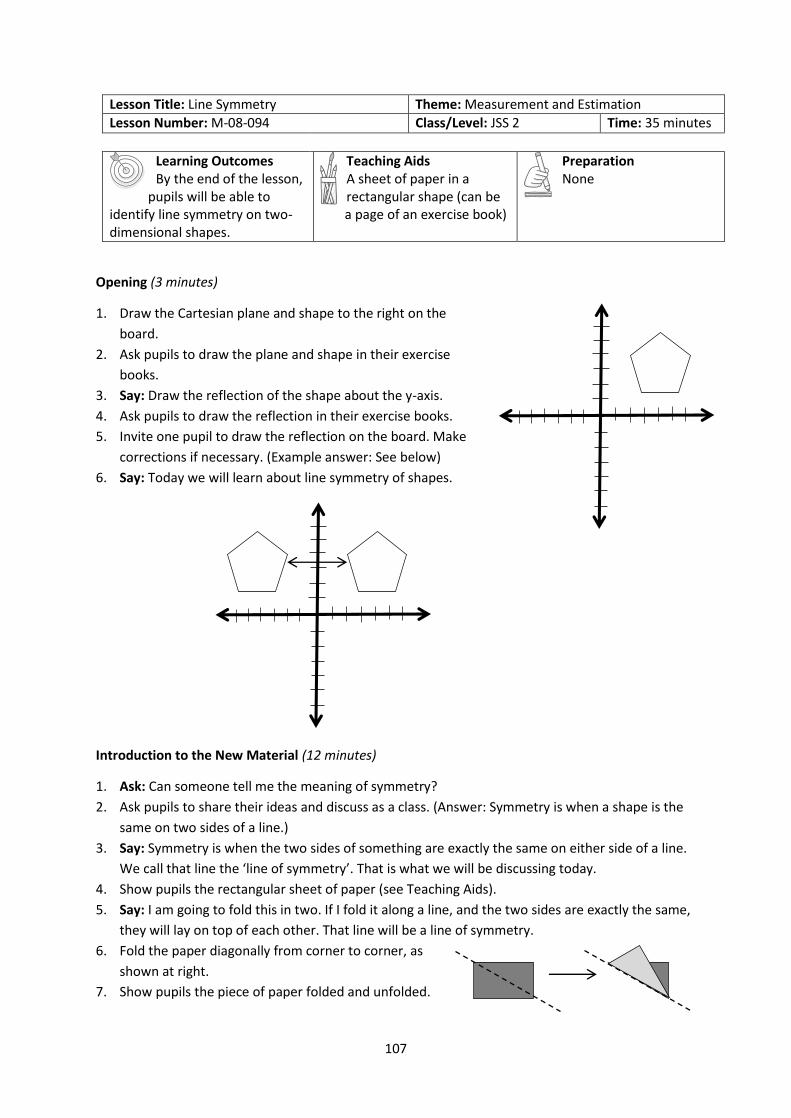
107
Lesson Title: Line Symmetry Theme: Measurement and Estimation
Lesson Number: M-08-094 Class/Level: JSS 2 Time: 35 minutes
Learning Outcomes By the end of the lesson,
pupils will be able to identify line symmetry on two-dimensional shapes.
Teaching Aids A sheet of paper in a rectangular shape (can be a page of an exercise book)
Preparation None
Opening (3 minutes)
1. Draw the Cartesian plane and shape to the right on the
board.
2. Ask pupils to draw the plane and shape in their exercise
books.
3. Say: Draw the reflection of the shape about the y-axis.
4. Ask pupils to draw the reflection in their exercise books.
5. Invite one pupil to draw the reflection on the board. Make
corrections if necessary. (Example answer: See below)
6. Say: Today we will learn about line symmetry of shapes.
Introduction to the New Material (12 minutes)
1. Ask: Can someone tell me the meaning of symmetry?
2. Ask pupils to share their ideas and discuss as a class. (Answer: Symmetry is when a shape is the
same on two sides of a line.)
3. Say: Symmetry is when the two sides of something are exactly the same on either side of a line.
We call that line the ‘line of symmetry’. That is what we will be discussing today.
4. Show pupils the rectangular sheet of paper (see Teaching Aids).
5. Say: I am going to fold this in two. If I fold it along a line, and the two sides are exactly the same,
they will lay on top of each other. That line will be a line of symmetry.
6. Fold the paper diagonally from corner to corner, as
shown at right.
7. Show pupils the piece of paper folded and unfolded.

108
8. Ask: Is the paper symmetrical on both sides of this line? (Answer: No. The two sides are
different. The paper does not fit perfectly on itself when folded.)
9. Say: This is not a line of symmetry. Let’s try to fold it again.
10. Fold the paper in half as shown to the right.
11. Show the pupils the piece of paper folded and unfolded.
12. Ask: Is the paper symmetrical on both sides of this line? (Answer: Yes. The
two sides are the same. The paper fits perfectly on itself when folded.)
13. Say: This is a line of symmetry. This rectangle has exactly the same shape on both sides of the
line.
14. Draw a few shapes on the board and ask pupils to identify whether the line shown is a line of
symmetry (see shapes below):
Guided Practice (6 minutes)
1. Draw a regular pentagon on the board, as shown to the right.
2. Ask pupils to copy the pentagon and work with a partner to draw all of the
lines of symmetry they can find.
3. Move around the classroom to make sure pupils understand and are doing
the task. Make sure pupils understand that a line of symmetry can be drawn in any direction, as
long as it divides a shape into two equal sides.
4. Invite one pair to come to the front and draw their work on the board. Make corrections if
necessary.
5. Ask other pairs if they have any additional lines of symmetry. If they do, ask them to draw them
on the board.
6. Ask pupils to compare their work with the example on the board. (Answer: See below)
Independent Practice (12 minutes)
1. Write the following problems on the board:
a) Copy the following shapes and draw all of the lines of symmetry:
Yes, a line of
symmetry
No, not a line
of symmetry
Yes, a line of
symmetry
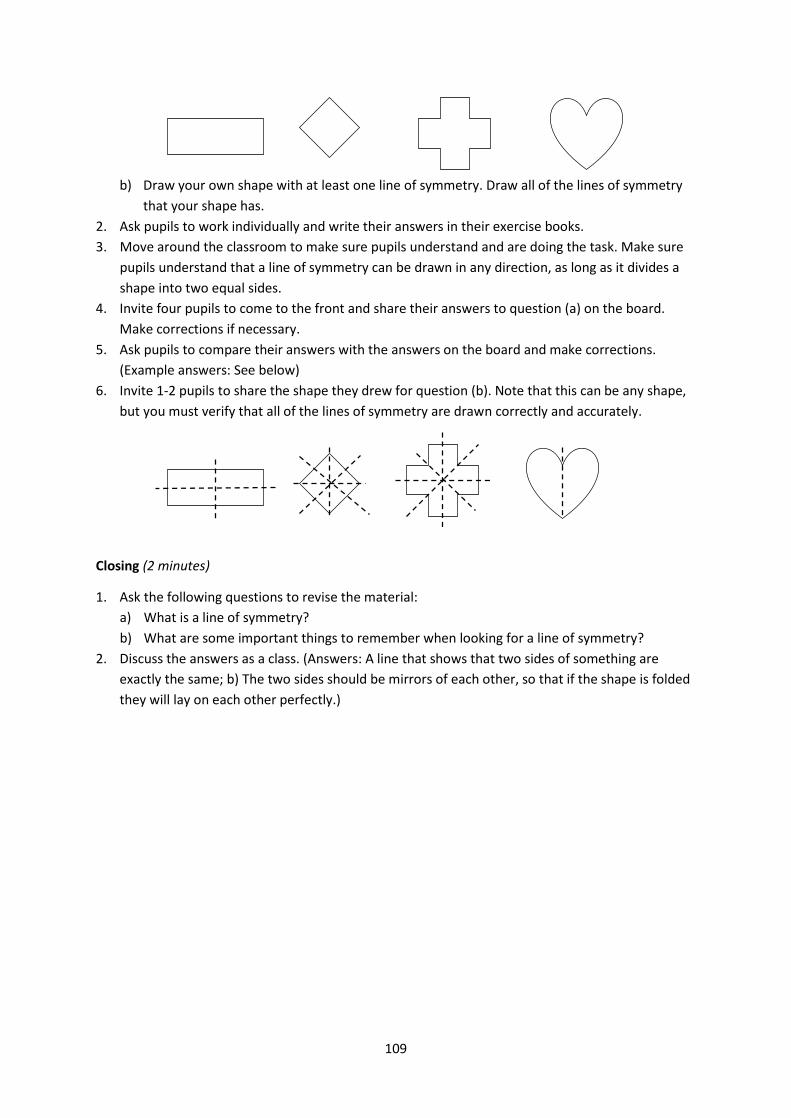
109
b) Draw your own shape with at least one line of symmetry. Draw all of the lines of symmetry
that your shape has.
2. Ask pupils to work individually and write their answers in their exercise books.
3. Move around the classroom to make sure pupils understand and are doing the task. Make sure
pupils understand that a line of symmetry can be drawn in any direction, as long as it divides a
shape into two equal sides.
4. Invite four pupils to come to the front and share their answers to question (a) on the board.
Make corrections if necessary.
5. Ask pupils to compare their answers with the answers on the board and make corrections.
(Example answers: See below)
6. Invite 1-2 pupils to share the shape they drew for question (b). Note that this can be any shape,
but you must verify that all of the lines of symmetry are drawn correctly and accurately.
Closing (2 minutes)
1. Ask the following questions to revise the material:
a) What is a line of symmetry?
b) What are some important things to remember when looking for a line of symmetry?
2. Discuss the answers as a class. (Answers: A line that shows that two sides of something are
exactly the same; b) The two sides should be mirrors of each other, so that if the shape is folded
they will lay on each other perfectly.)
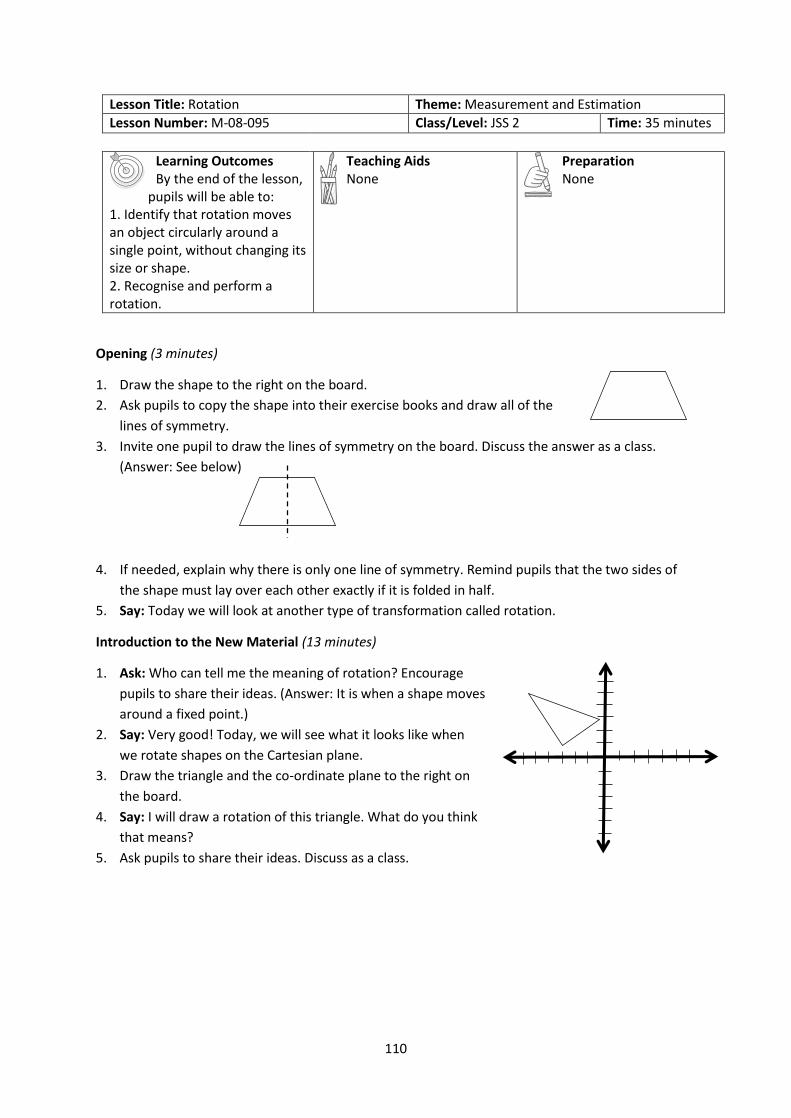
110
Lesson Title: Rotation Theme: Measurement and Estimation
Lesson Number: M-08-095 Class/Level: JSS 2 Time: 35 minutes
Learning Outcomes By the end of the lesson,
pupils will be able to: 1. Identify that rotation moves an object circularly around a single point, without changing its size or shape. 2. Recognise and perform a rotation.
Teaching Aids None
Preparation None
Opening (3 minutes)
1. Draw the shape to the right on the board.
2. Ask pupils to copy the shape into their exercise books and draw all of the
lines of symmetry.
3. Invite one pupil to draw the lines of symmetry on the board. Discuss the answer as a class.
(Answer: See below)
4. If needed, explain why there is only one line of symmetry. Remind pupils that the two sides of
the shape must lay over each other exactly if it is folded in half.
5. Say: Today we will look at another type of transformation called rotation.
Introduction to the New Material (13 minutes)
1. Ask: Who can tell me the meaning of rotation? Encourage
pupils to share their ideas. (Answer: It is when a shape moves
around a fixed point.)
2. Say: Very good! Today, we will see what it looks like when
we rotate shapes on the Cartesian plane.
3. Draw the triangle and the co-ordinate plane to the right on
the board.
4. Say: I will draw a rotation of this triangle. What do you think
that means?
5. Ask pupils to share their ideas. Discuss as a class.

111
6. Say: To rotate a shape means to turn or spin a shape. It
means we will have the same shape, but it will be facing
a different direction.
7. Draw a rotation of the triangle on the plane, as shown
to the right. Draw a curved arrow to show the
movement.
8. Say: This triangle is rotated about a centre. The centre
is the origin of the Cartesian plane.
9. Say: These two triangles are congruent. Shapes are
congruent if they keep the same size and shape. Notice
that only the direction it is facing has changed.
10. Say: I will show you another example of rotation.
11. Draw the rotation of the triangle below, with the plus sign.
12. Say: This plus sign is the centre of this rotation. The
triangle is rotating about this point.
13. Say: It is important in any rotation that the shapes are
the same size.
14. Say: Now you will work on your own rotation.
Guided Practice (7 minutes)
1. Draw the Cartesian plane and rectangle to the right on the
board.
2. Write the following problem on the board:
Draw the rectangle on the co-ordinate plane. Show its
rotation in any direction.
3. Remind pupils that the shape can be rotated from its
short side or long side.
4. Ask pupils to work in pairs and to write their answers in
their exercise books.
5. Move around the classroom to make sure pupils understand and are doing the task. Make sure
pupils understand that rotations can be around any point. They do not have to be around the
origin.
6. Invite one pair to come to the front and draw their work on the board. Make corrections if
necessary. Discuss the answers as a class.
7. Ask pupils to compare their answer with the one on the board. (Example answers: see below)
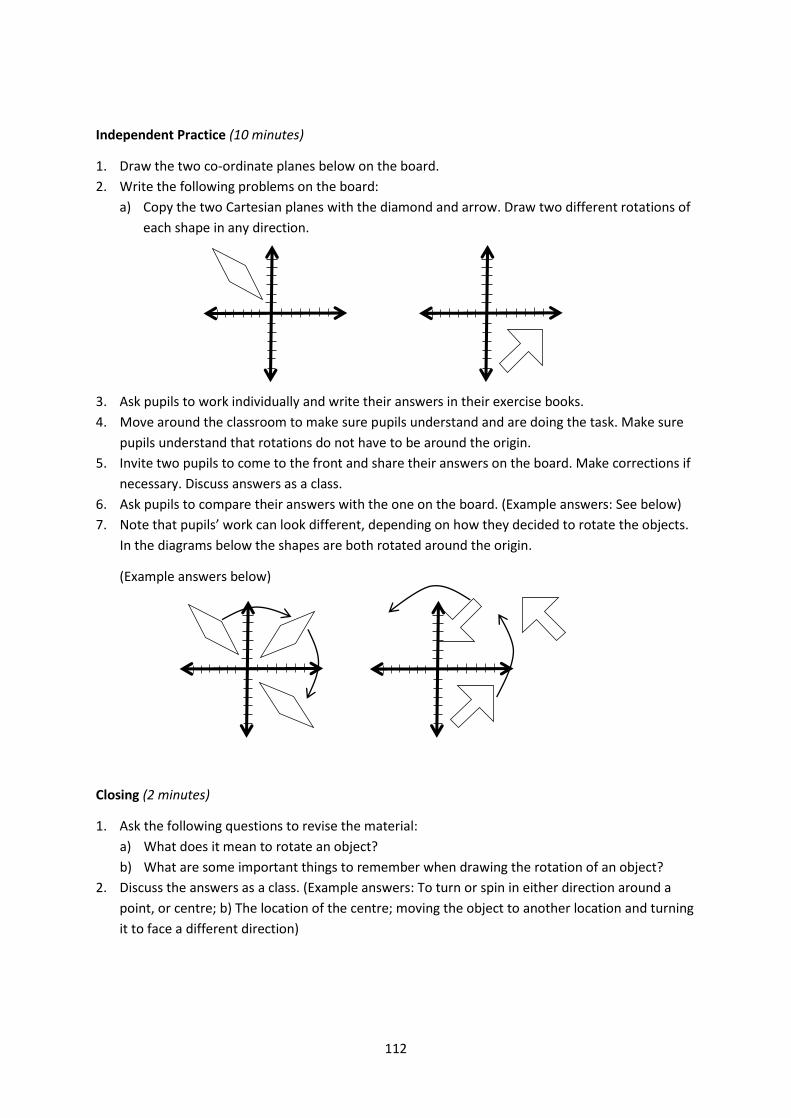
112
Independent Practice (10 minutes)
1. Draw the two co-ordinate planes below on the board.
2. Write the following problems on the board:
a) Copy the two Cartesian planes with the diamond and arrow. Draw two different rotations of
each shape in any direction.
3. Ask pupils to work individually and write their answers in their exercise books.
4. Move around the classroom to make sure pupils understand and are doing the task. Make sure
pupils understand that rotations do not have to be around the origin.
5. Invite two pupils to come to the front and share their answers on the board. Make corrections if
necessary. Discuss answers as a class.
6. Ask pupils to compare their answers with the one on the board. (Example answers: See below)
7. Note that pupils’ work can look different, depending on how they decided to rotate the objects.
In the diagrams below the shapes are both rotated around the origin.
(Example answers below)
Closing (2 minutes)
1. Ask the following questions to revise the material:
a) What does it mean to rotate an object?
b) What are some important things to remember when drawing the rotation of an object?
2. Discuss the answers as a class. (Example answers: To turn or spin in either direction around a
point, or centre; b) The location of the centre; moving the object to another location and turning
it to face a different direction)
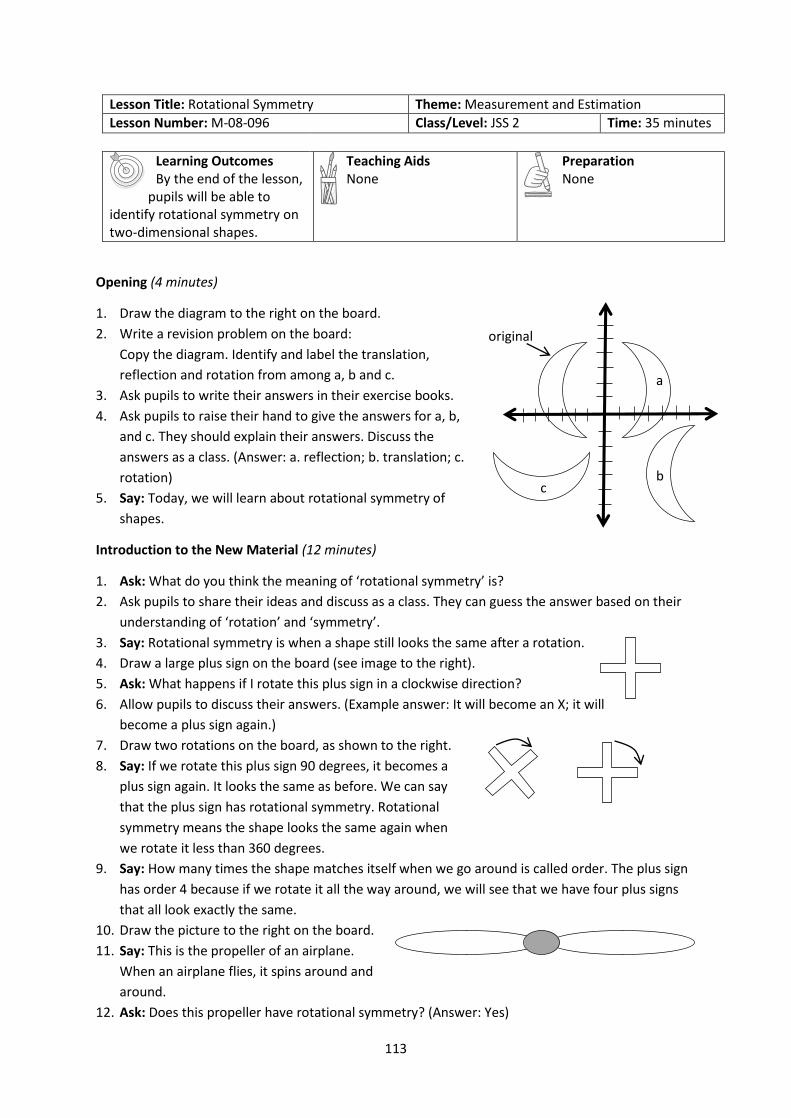
113
Lesson Title: Rotational Symmetry Theme: Measurement and Estimation
Lesson Number: M-08-096 Class/Level: JSS 2 Time: 35 minutes
Learning Outcomes By the end of the lesson,
pupils will be able to identify rotational symmetry on two-dimensional shapes.
Teaching Aids None
Preparation None
Opening (4 minutes)
1. Draw the diagram to the right on the board.
2. Write a revision problem on the board:
Copy the diagram. Identify and label the translation,
reflection and rotation from among a, b and c.
3. Ask pupils to write their answers in their exercise books.
4. Ask pupils to raise their hand to give the answers for a, b,
and c. They should explain their answers. Discuss the
answers as a class. (Answer: a. reflection; b. translation; c.
rotation)
5. Say: Today, we will learn about rotational symmetry of
shapes.
Introduction to the New Material (12 minutes)
1. Ask: What do you think the meaning of ‘rotational symmetry’ is?
2. Ask pupils to share their ideas and discuss as a class. They can guess the answer based on their
understanding of ‘rotation’ and ‘symmetry’.
3. Say: Rotational symmetry is when a shape still looks the same after a rotation.
4. Draw a large plus sign on the board (see image to the right).
5. Ask: What happens if I rotate this plus sign in a clockwise direction?
6. Allow pupils to discuss their answers. (Example answer: It will become an X; it will
become a plus sign again.)
7. Draw two rotations on the board, as shown to the right.
8. Say: If we rotate this plus sign 90 degrees, it becomes a
plus sign again. It looks the same as before. We can say
that the plus sign has rotational symmetry. Rotational
symmetry means the shape looks the same again when
we rotate it less than 360 degrees.
9. Say: How many times the shape matches itself when we go around is called order. The plus sign
has order 4 because if we rotate it all the way around, we will see that we have four plus signs
that all look exactly the same.
10. Draw the picture to the right on the board.
11. Say: This is the propeller of an airplane.
When an airplane flies, it spins around and
around.
12. Ask: Does this propeller have rotational symmetry? (Answer: Yes)
original
a
b c

114
13. Ask: What is the order of this propeller? (Answer: Two, because if we spin it all the way around
we see that there are two shapes that look exactly the same.)
14. Draw a star on the board (see image to the right).
15. Ask: Does this star have rotational symmetry? (Answer: Yes)
16. Ask: What is the order of this star? (Answer: Order 5, because if we spin it all
the way around we see that there are five shapes that look exactly the same.)
17. Draw a heart on the board (see image to the right).
18. Ask: Does this heart have rotational symmetry? (Answer: No, because if we
spin it all the way around, there is no point where it looks exactly like this.)
19. Say: Now you will identify rotational symmetry on your own.
Guided Practice (5 minutes)
1. Draw a regular pentagon on the board (see image to the right).
2. Ask pupils to work in pairs.
3. Say: With your partner, decide whether the pentagon has rotational symmetry.
If it does have rotational symmetry, find the order.
4. Move around the classroom to make sure pupils understand and are doing the task. For
example, make sure pupils are considering rotational symmetry and are not confusing it with
line symmetry.
5. Invite one pair to share their answer. Invite other pupils in the class to respond and discuss the
answer. Explain the answer if necessary. (Answer: The pentagon does have rotational symmetry,
and its order is 5.)
Independent Practice (10 minutes)
1. Write the following problems on the board:
a) Look at the shapes. Do they have rotational symmetry? If they do have, write their order.
b) Draw your own shape with rotational symmetry. Write the order of your shape.
2. Ask pupils to work individually and write their answers in their exercise books.
3. Move around the classroom to make sure pupils understand and are doing the task. Remind
them of the difference between line symmetry and rotational symmetry if needed.
4. Invite four pupils to come to the front and share their answers to question (a) on the board.
Make corrections if necessary.
5. Ask pupils to compare their answers with the answers on the board. (Answers: a. No; b. Yes,
order = 4; c. Yes, order = 2; d. No)
6. Invite two pupils to come to the front and share the shape they drew for question (b) on the
board. Note that pupils could draw any shape, but be sure to verify that the shapes are accurate.
a. b. c. d.
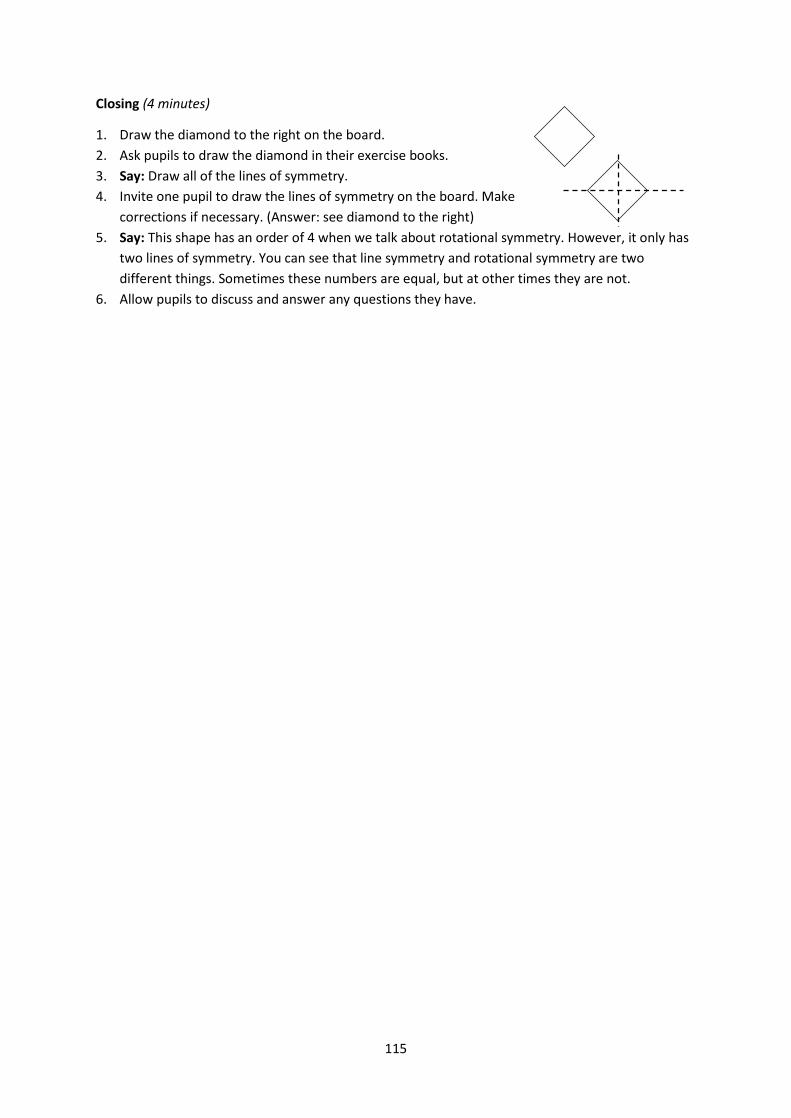
115
Closing (4 minutes)
1. Draw the diamond to the right on the board.
2. Ask pupils to draw the diamond in their exercise books.
3. Say: Draw all of the lines of symmetry.
4. Invite one pupil to draw the lines of symmetry on the board. Make
corrections if necessary. (Answer: see diamond to the right)
5. Say: This shape has an order of 4 when we talk about rotational symmetry. However, it only has
two lines of symmetry. You can see that line symmetry and rotational symmetry are two
different things. Sometimes these numbers are equal, but at other times they are not.
6. Allow pupils to discuss and answer any questions they have.
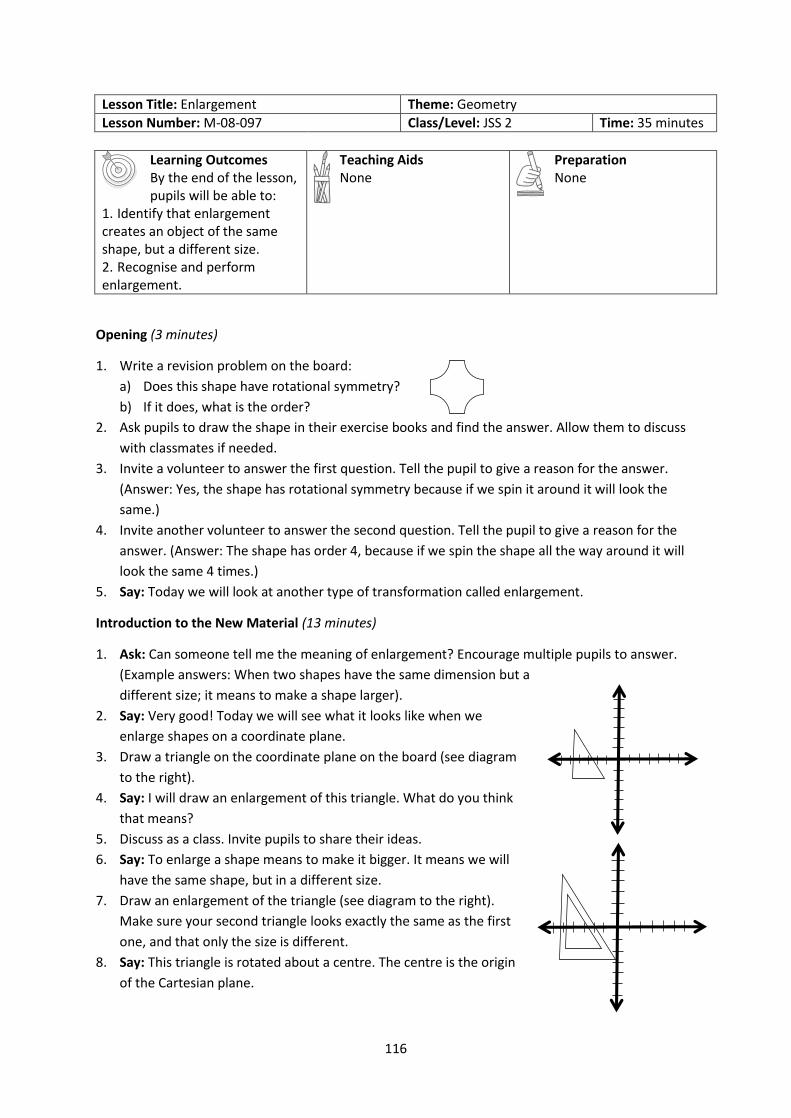
116
Lesson Title: Enlargement Theme: Geometry
Lesson Number: M-08-097 Class/Level: JSS 2 Time: 35 minutes
Learning Outcomes By the end of the lesson, pupils will be able to:
1. Identify that enlargement creates an object of the same shape, but a different size. 2. Recognise and perform enlargement.
Teaching Aids None
Preparation None
Opening (3 minutes)
1. Write a revision problem on the board:
a) Does this shape have rotational symmetry?
b) If it does, what is the order?
2. Ask pupils to draw the shape in their exercise books and find the answer. Allow them to discuss
with classmates if needed.
3. Invite a volunteer to answer the first question. Tell the pupil to give a reason for the answer.
(Answer: Yes, the shape has rotational symmetry because if we spin it around it will look the
same.)
4. Invite another volunteer to answer the second question. Tell the pupil to give a reason for the
answer. (Answer: The shape has order 4, because if we spin the shape all the way around it will
look the same 4 times.)
5. Say: Today we will look at another type of transformation called enlargement.
Introduction to the New Material (13 minutes)
1. Ask: Can someone tell me the meaning of enlargement? Encourage multiple pupils to answer.
(Example answers: When two shapes have the same dimension but a
different size; it means to make a shape larger).
2. Say: Very good! Today we will see what it looks like when we
enlarge shapes on a coordinate plane.
3. Draw a triangle on the coordinate plane on the board (see diagram
to the right).
4. Say: I will draw an enlargement of this triangle. What do you think
that means?
5. Discuss as a class. Invite pupils to share their ideas.
6. Say: To enlarge a shape means to make it bigger. It means we will
have the same shape, but in a different size.
7. Draw an enlargement of the triangle (see diagram to the right).
Make sure your second triangle looks exactly the same as the first
one, and that only the size is different.
8. Say: This triangle is rotated about a centre. The centre is the origin
of the Cartesian plane.
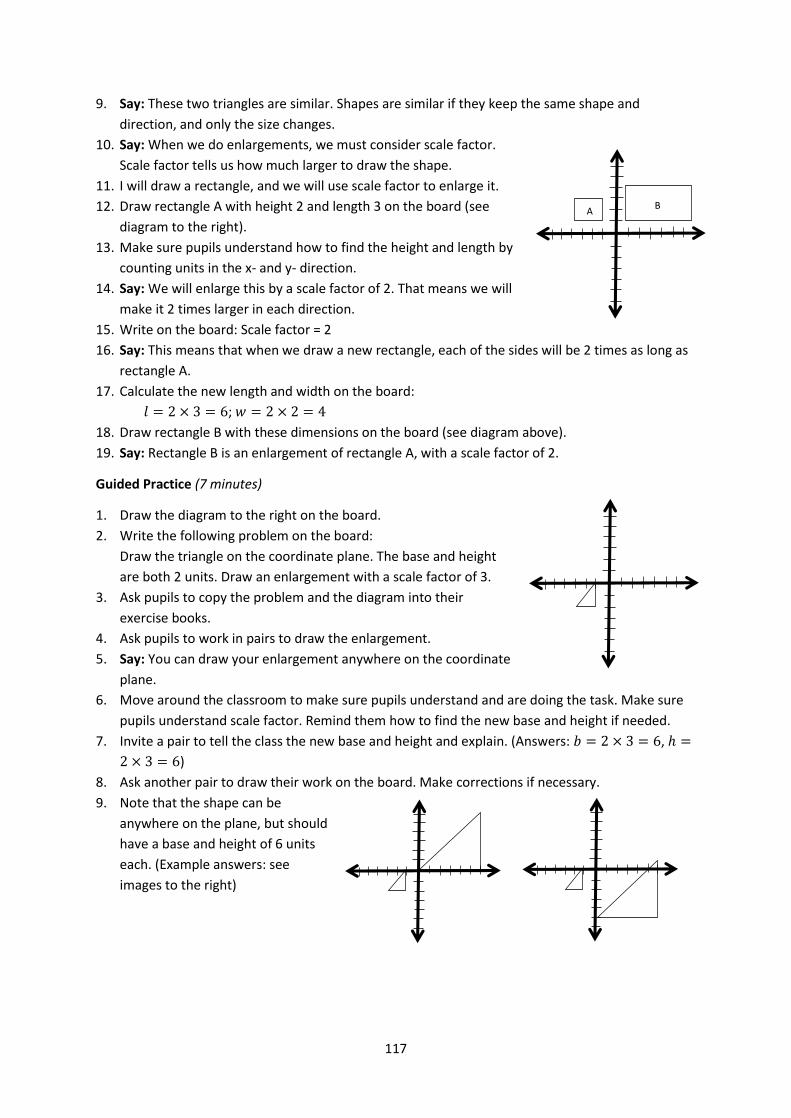
117
9. Say: These two triangles are similar. Shapes are similar if they keep the same shape and
direction, and only the size changes.
10. Say: When we do enlargements, we must consider scale factor.
Scale factor tells us how much larger to draw the shape.
11. I will draw a rectangle, and we will use scale factor to enlarge it.
12. Draw rectangle A with height 2 and length 3 on the board (see
diagram to the right).
13. Make sure pupils understand how to find the height and length by
counting units in the x- and y- direction.
14. Say: We will enlarge this by a scale factor of 2. That means we will
make it 2 times larger in each direction.
15. Write on the board: Scale factor = 2
16. Say: This means that when we draw a new rectangle, each of the sides will be 2 times as long as
rectangle A.
17. Calculate the new length and width on the board:
𝑙 = 2 × 3 = 6; 𝑤 = 2 × 2 = 4
18. Draw rectangle B with these dimensions on the board (see diagram above).
19. Say: Rectangle B is an enlargement of rectangle A, with a scale factor of 2.
Guided Practice (7 minutes)
1. Draw the diagram to the right on the board.
2. Write the following problem on the board:
Draw the triangle on the coordinate plane. The base and height
are both 2 units. Draw an enlargement with a scale factor of 3.
3. Ask pupils to copy the problem and the diagram into their
exercise books.
4. Ask pupils to work in pairs to draw the enlargement.
5. Say: You can draw your enlargement anywhere on the coordinate
plane.
6. Move around the classroom to make sure pupils understand and are doing the task. Make sure
pupils understand scale factor. Remind them how to find the new base and height if needed.
7. Invite a pair to tell the class the new base and height and explain. (Answers: 𝑏 = 2 × 3 = 6, ℎ =
2 × 3 = 6)
8. Ask another pair to draw their work on the board. Make corrections if necessary.
9. Note that the shape can be
anywhere on the plane, but should
have a base and height of 6 units
each. (Example answers: see
images to the right)
A B

118
Independent Practice (10 minutes)
1. Draw the diagram to the right on the board.
2. Write the following problems on the board:
a) The square has length 1. Enlarge the square by a factor of 4.
b) Draw a rectangle with length 5 and width 2 anywhere on the
coordinate plane. Enlarge the rectangle by a factor of 2 and
draw the result anywhere on the same plane.
3. Ask pupils to work individually and write their answers in their
exercise books.
4. Move around the classroom to make sure pupils understand and are doing the task. Make sure
pupils understand scale factor. Remind them how to find the new base and height if needed.
5. When pupils have finished, ask them to work in pairs to share and compare their drawings.
6. Invite two pupils to come to the board and demonstrate how they calculated the enlargements.
(Answers: a) l = 1 × 4 = 4; b) l = 5 × 2 = 10, w = 2 × 2 = 4)
7. Invite two different pupils to each draw their work on the coordinate plane. Make corrections if
necessary.
8. Note that pupils’ work can look different, depending on where they drew the shapes. Make sure
they all drew their original and enlarged rectangles facing the same direction. (Example answers:
see below)
Closing (2 minutes)
1. Ask pupils the following questions to revise the material:
a) What does it mean to enlarge an object?
b) What are some important things to remember when drawing the enlargement of an object?
2. Discuss the answers as a class. (Example answers: a) To make it larger by a certain scale factor;
b) its shape and direction does not change, only its size; multiply each side by the same scale
factor)
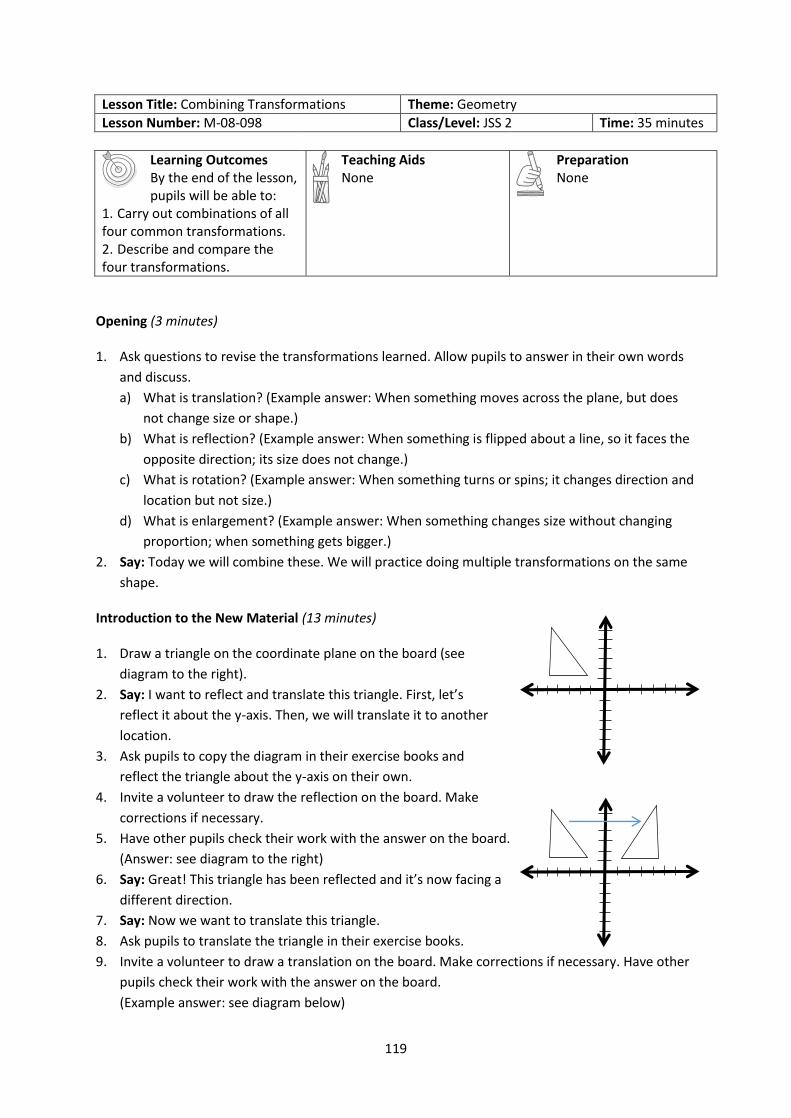
119
Lesson Title: Combining Transformations Theme: Geometry
Lesson Number: M-08-098 Class/Level: JSS 2 Time: 35 minutes
Learning Outcomes By the end of the lesson, pupils will be able to:
1. Carry out combinations of all four common transformations. 2. Describe and compare the four transformations.
Teaching Aids None
Preparation None
Opening (3 minutes)
1. Ask questions to revise the transformations learned. Allow pupils to answer in their own words
and discuss.
a) What is translation? (Example answer: When something moves across the plane, but does
not change size or shape.)
b) What is reflection? (Example answer: When something is flipped about a line, so it faces the
opposite direction; its size does not change.)
c) What is rotation? (Example answer: When something turns or spins; it changes direction and
location but not size.)
d) What is enlargement? (Example answer: When something changes size without changing
proportion; when something gets bigger.)
2. Say: Today we will combine these. We will practice doing multiple transformations on the same
shape.
Introduction to the New Material (13 minutes)
1. Draw a triangle on the coordinate plane on the board (see
diagram to the right).
2. Say: I want to reflect and translate this triangle. First, let’s
reflect it about the y-axis. Then, we will translate it to another
location.
3. Ask pupils to copy the diagram in their exercise books and
reflect the triangle about the y-axis on their own.
4. Invite a volunteer to draw the reflection on the board. Make
corrections if necessary.
5. Have other pupils check their work with the answer on the board.
(Answer: see diagram to the right)
6. Say: Great! This triangle has been reflected and it’s now facing a
different direction.
7. Say: Now we want to translate this triangle.
8. Ask pupils to translate the triangle in their exercise books.
9. Invite a volunteer to draw a translation on the board. Make corrections if necessary. Have other
pupils check their work with the answer on the board.
(Example answer: see diagram below)

120
10. Ask: Did anyone translate the triangle to a different location?
11. If any pupils respond ‘yes’, ask them to draw their triangle on
the board as well.
12. Say: We can combine any of the transformations and do them
together on the same shape.
13. Write on the board: Congruent Similar
14. Say: Congruent and similar sound like they mean the same
thing, but they have slightly different meanings.
15. Write the definitions on the board:
a) Congruent: Two objects are the same shape and size.
b) Similar: Two objects are the same shape, but different sizes.
16. Say: If we do not change the size of a shape, the result is congruent. So if we rotate, reflect, or
translate a shape, the result is congruent to the first shape.
17. Say: If we do change the size of a shape, the result is similar. So if we do an enlargement on a
shape, the result is similar to the first shape.
18. Say: Now you will work on your own transformations.
Guided Practice (7 minutes)
1. Write the following problem on the board:
Draw a rectangle anywhere on the coordinate plane. Rotate it 90⁰, then enlarge it by a scale
factor of 2.
2. Ask pupils to work in pairs to do the problem.
3. Move around the classroom to make sure pupils understand and are doing the task. Make sure
they recall and understand how to rotate and enlarge a shape. Help struggling pupils.
4. If time permits, invite different pairs to show their work and answers on the board. They should
also explain their process, including both the rotation and enlargement. (Example answer: see
below)
Independent Practice (10 minutes)
1. Draw the coordinate plane and triangle to the right on the
board.
2. Write the following problem on the board:
The triangle has measurements 𝑏 = 2 and ℎ = 3.
a) Reflect the triangle about the x-axis.
b) Translate the triangle anywhere to the left of the y-axis.
c) Reflect the triangle about the x-axis again.
Step 1: Rotation Step 2: Enlargement Enlargement:
L=2x4=8
w=2x1=2
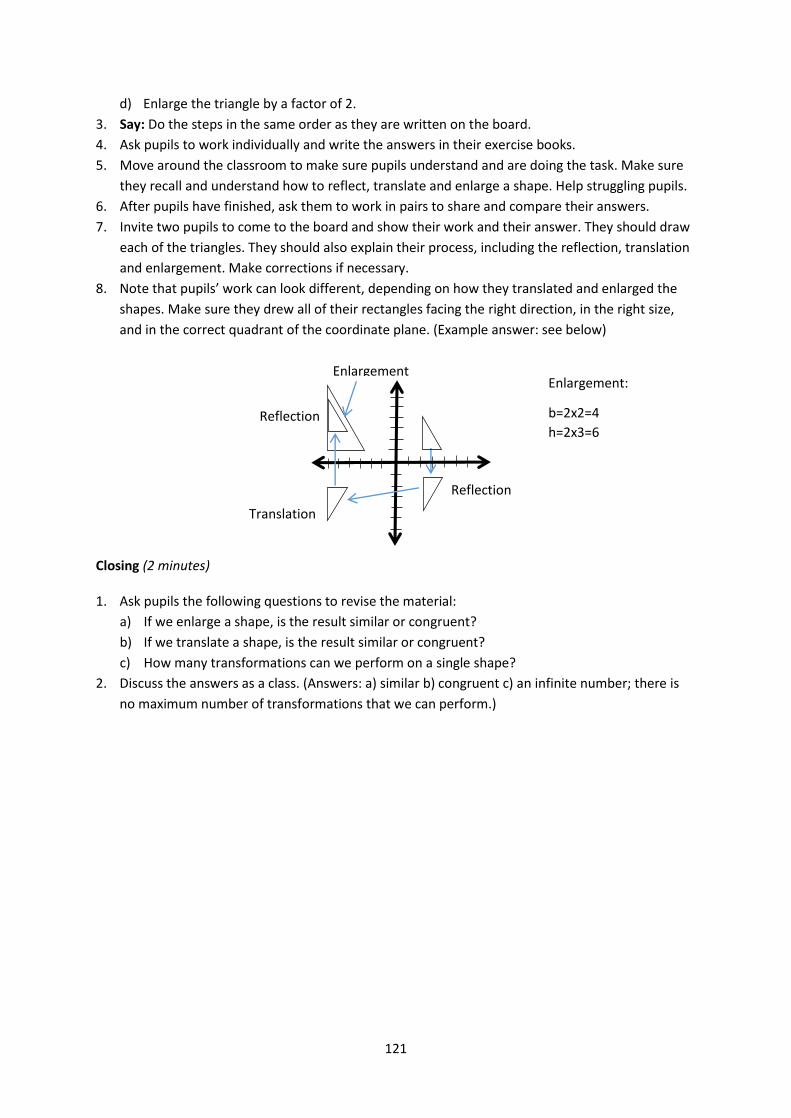
121
d) Enlarge the triangle by a factor of 2.
3. Say: Do the steps in the same order as they are written on the board.
4. Ask pupils to work individually and write the answers in their exercise books.
5. Move around the classroom to make sure pupils understand and are doing the task. Make sure
they recall and understand how to reflect, translate and enlarge a shape. Help struggling pupils.
6. After pupils have finished, ask them to work in pairs to share and compare their answers.
7. Invite two pupils to come to the board and show their work and their answer. They should draw
each of the triangles. They should also explain their process, including the reflection, translation
and enlargement. Make corrections if necessary.
8. Note that pupils’ work can look different, depending on how they translated and enlarged the
shapes. Make sure they drew all of their rectangles facing the right direction, in the right size,
and in the correct quadrant of the coordinate plane. (Example answer: see below)
Closing (2 minutes)
1. Ask pupils the following questions to revise the material:
a) If we enlarge a shape, is the result similar or congruent?
b) If we translate a shape, is the result similar or congruent?
c) How many transformations can we perform on a single shape?
2. Discuss the answers as a class. (Answers: a) similar b) congruent c) an infinite number; there is
no maximum number of transformations that we can perform.)
Reflection
Translation
Reflection
Enlargement Enlargement:
b=2x2=4
h=2x3=6

122
Lesson Title: Applying Scale Factor to Drawing Theme: Geometry
Lesson Number: M-08-099 Class/Level: JSS 2 Time: 35 minutes
Learning Outcomes By the end of the lesson, pupils will be able to use
a scale factor to draw an object with accurate proportions.
Teaching Aids Small items to use as measuring tools; for
example: matchsticks, sticks or strips of paper
Preparation Identify a teaching aid from your classroom or
community that can be used for measuring and creating a scale factor. Bring the item to class.
Opening (3 minutes)
1. Say: Today we will discuss enlargement and how it is used for practical purposes.
2. Ask: What are some times when we might use enlargement in real life? Ask pupils to raise their
hands to answer. (Example answers: To understand or draw maps; to sketch something before
building it, such as furniture or a house)
3. Say: Today we will use scale factor to draw objects with accurate proportions.
Introduction to the New Material (13 minutes)
1. Show pupils the item that you will use to create a scale factor. For example, a strip of paper:
2. Choose an item in your classroom that you want to draw to scale. For example, an exercise
book.
3. Say: I will draw this exercise book on the board, with the same proportions but a different size.
4. Say: First, I will measure it using this piece of paper. I want to find how many pieces of paper the
length and width of the exercise book are.
5. Measure the length and width of the exercise book with the strip of paper. For example, the
width might be 3 pieces and the height 4 pieces (see image to the right).
6. You can use multiple strips of paper, or you can use one strip of paper and
place it on the exercise book multiple times to show pupils how to measure.
7. Make a sketch and record the width and height on the board (see example
below).
8. Say: Now I want to draw this exercise book with a scale factor of 2.
9. Write on the board: Scale factor = 2.
10. Ask pupils to calculate the enlarged width and height in their exercise books.
11. When they finish, discuss the answers and write them on the board.
(Answer: 𝑙 = 2 × 4 = 8; 𝑤 = 2 × 3 = 6)
12. Say: Now we will draw an exercise book with these
dimensions: length 8 and width 6.
13. Use your measurement object to draw the enlarged exercise
book on the board (see image to the right).
14. Say: Now we have drawn an enlarged object. This drawing has the same
proportions as our exercise book, but it is bigger.
Composition
l=4 w=3
l = 8 units
w = 6 units
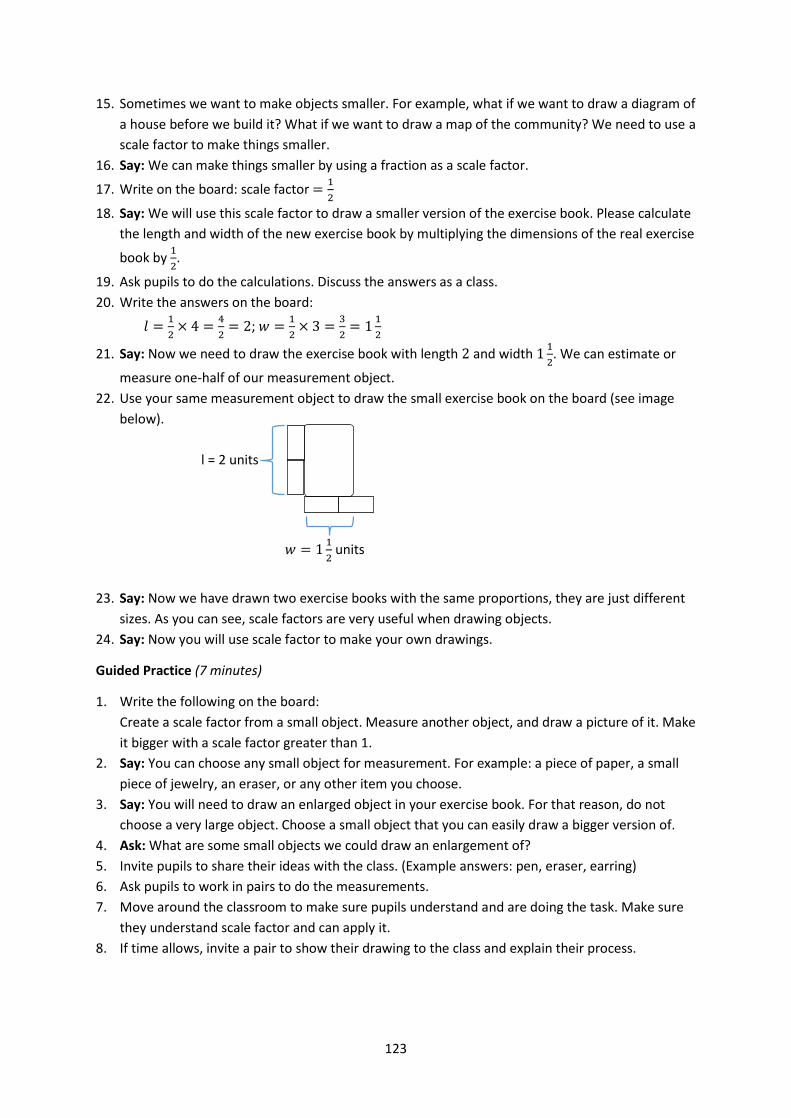
123
15. Sometimes we want to make objects smaller. For example, what if we want to draw a diagram of
a house before we build it? What if we want to draw a map of the community? We need to use a
scale factor to make things smaller.
16. Say: We can make things smaller by using a fraction as a scale factor.
17. Write on the board: scale factor =1
2
18. Say: We will use this scale factor to draw a smaller version of the exercise book. Please calculate
the length and width of the new exercise book by multiplying the dimensions of the real exercise
book by 1
2.
19. Ask pupils to do the calculations. Discuss the answers as a class.
20. Write the answers on the board:
𝑙 =1
2× 4 =
4
2= 2; 𝑤 =
1
2× 3 =
3
2= 1
1
2
21. Say: Now we need to draw the exercise book with length 2 and width 11
2. We can estimate or
measure one-half of our measurement object.
22. Use your same measurement object to draw the small exercise book on the board (see image
below).
23. Say: Now we have drawn two exercise books with the same proportions, they are just different
sizes. As you can see, scale factors are very useful when drawing objects.
24. Say: Now you will use scale factor to make your own drawings.
Guided Practice (7 minutes)
1. Write the following on the board:
Create a scale factor from a small object. Measure another object, and draw a picture of it. Make
it bigger with a scale factor greater than 1.
2. Say: You can choose any small object for measurement. For example: a piece of paper, a small
piece of jewelry, an eraser, or any other item you choose.
3. Say: You will need to draw an enlarged object in your exercise book. For that reason, do not
choose a very large object. Choose a small object that you can easily draw a bigger version of.
4. Ask: What are some small objects we could draw an enlargement of?
5. Invite pupils to share their ideas with the class. (Example answers: pen, eraser, earring)
6. Ask pupils to work in pairs to do the measurements.
7. Move around the classroom to make sure pupils understand and are doing the task. Make sure
they understand scale factor and can apply it.
8. If time allows, invite a pair to show their drawing to the class and explain their process.
l = 2 units
𝑤 = 11
2 units

124
Independent Practice (10 minutes)
1. Write the following problem on the board:
Choose an object in the classroom. Use a fraction as a scale factor to draw a smaller version of
the object.
2. Ask pupils to work individually. They may choose any small object to use for measurement and
any fraction for the scale. However, tell them that it is best to have 1 in the numerator, such as 1
2
or 1
3.
3. Allow pupils to discuss with a partner if needed.
4. Move around the classroom to make sure pupils understand and are doing the task. Make sure
they understand how to use a fraction as a scale factor.
5. When pupils have finished, ask them to work in pairs to share and compare their drawings.
6. If time permits, invite different pupils to show their drawings to the class and explain their
process. (Example: see below)
A backpack is 2 pencils tall and 11
2 pencils wide.
With a scale factor of 1
2, it is 1 pencil tall and 1
1
2×
1
2=
3
4 pencil wide.
Closing (2 minutes)
1. Ask pupils the following questions to revise the material:
a) What kinds of scale factors make an object larger?
b) What kinds of scale factors make an object smaller?
2. Discuss the answers as a class. (Answers: a) Numbers greater than 1; b) Numbers less than 1, or
fractions)
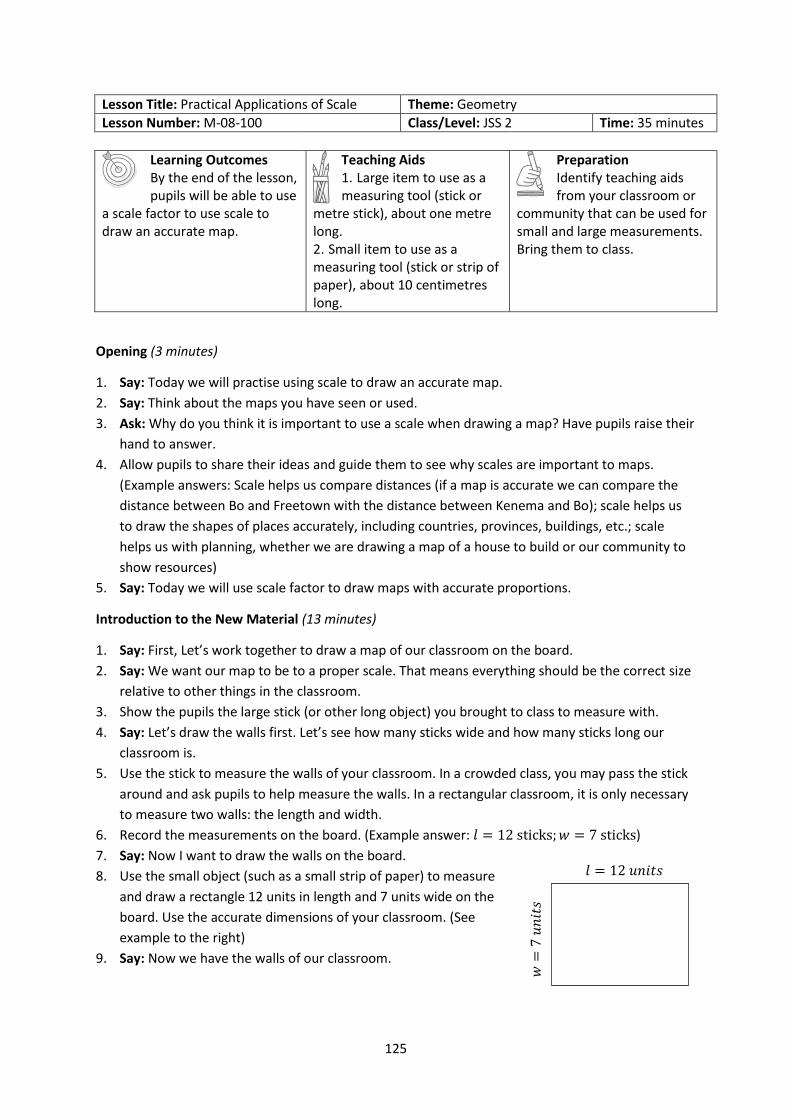
125
Lesson Title: Practical Applications of Scale Theme: Geometry
Lesson Number: M-08-100 Class/Level: JSS 2 Time: 35 minutes
Learning Outcomes By the end of the lesson, pupils will be able to use
a scale factor to use scale to draw an accurate map.
Teaching Aids 1. Large item to use as a measuring tool (stick or
metre stick), about one metre long. 2. Small item to use as a measuring tool (stick or strip of paper), about 10 centimetres long.
Preparation Identify teaching aids from your classroom or
community that can be used for small and large measurements. Bring them to class.
Opening (3 minutes)
1. Say: Today we will practise using scale to draw an accurate map.
2. Say: Think about the maps you have seen or used.
3. Ask: Why do you think it is important to use a scale when drawing a map? Have pupils raise their
hand to answer.
4. Allow pupils to share their ideas and guide them to see why scales are important to maps.
(Example answers: Scale helps us compare distances (if a map is accurate we can compare the
distance between Bo and Freetown with the distance between Kenema and Bo); scale helps us
to draw the shapes of places accurately, including countries, provinces, buildings, etc.; scale
helps us with planning, whether we are drawing a map of a house to build or our community to
show resources)
5. Say: Today we will use scale factor to draw maps with accurate proportions.
Introduction to the New Material (13 minutes)
1. Say: First, Let’s work together to draw a map of our classroom on the board.
2. Say: We want our map to be to a proper scale. That means everything should be the correct size
relative to other things in the classroom.
3. Show the pupils the large stick (or other long object) you brought to class to measure with.
4. Say: Let’s draw the walls first. Let’s see how many sticks wide and how many sticks long our
classroom is.
5. Use the stick to measure the walls of your classroom. In a crowded class, you may pass the stick
around and ask pupils to help measure the walls. In a rectangular classroom, it is only necessary
to measure two walls: the length and width.
6. Record the measurements on the board. (Example answer: 𝑙 = 12 sticks; 𝑤 = 7 sticks)
7. Say: Now I want to draw the walls on the board.
8. Use the small object (such as a small strip of paper) to measure
and draw a rectangle 12 units in length and 7 units wide on the
board. Use the accurate dimensions of your classroom. (See
example to the right)
9. Say: Now we have the walls of our classroom.
𝑙 = 12 𝑢𝑛𝑖𝑡𝑠
𝑤=
7 𝑢
𝑛𝑖𝑡
𝑠

126
10. Ask: What is inside our classroom that we can draw on our map? (Example answers: Desks,
chairs, table, door, windows, board etc.)
11. Say: We need to draw these to scale too. We need to see how many sticks each of them are.
12. Invite different pupils to come to the front and use the stick to measure a few objects in the
classroom. Assist them if needed. Draw each of the objects to scale on the board using the small
measurement object. (An example using a desk is provided below.)
a) Measure the length and width of the top of the desk with the stick. The width is probably a
fraction of the length of the stick. The length might be longer or shorter than the stick.
b) Record the measurements on the board. (For example: 𝑙 = 11
2 stick; 𝑤 =
1
2 stick)
c) Use the smaller object to draw the desk with the same units on the board. For example, you
would draw it 11
2 strips of paper long and
1
2 strip of paper wide. Make sure it is in the correct
location on the map.
d) If there are more desks of the same size in your classroom, you may draw 2-3 more of them
on your map.
13. Follow the same process for a few more objects in the room. Involve pupils in measurement and
drawing of the map as much as possible. (Example map: See below)
14. Say: Now you will draw your own map in your exercise books.
Guided Practice (7 minutes)
1. Write the following instructions on the board:
Draw a map of the roads and paths in the community. Write the names of the roads and
neighborhoods you know.
2. Say: Please draw a map of our community. I want each person to draw their own map in their
exercise book, but you can work with a partner to do the work.
3. Note: If you are in a village, you can ask pupils to draw the entire village. If you are in a big town
or city, you can ask them to draw the neighborhood around the school or around their home.
4. Say: You need to draw your map with accurate scale. Longer roads should be drawn longer on
your paper. To draw them to scale, imagine how long it takes you to walk down them. If it takes
you five minutes to walk down one road and 10 minutes to walk down another road, the second
road would be drawn twice as long as the first road.
5. Move around the classroom to make sure pupils understand and are doing the task. Make sure
they understand how scale factor applies to maps and are drawing accurate maps.
desks board
door
table
𝑙 = 12 𝑢𝑛𝑖𝑡𝑠
𝑤=
7 𝑢
𝑛𝑖𝑡
𝑠

127
6. If time allows, invite pupils to share their map with
the class and explain their process in creating it.
(Example map: See image to the right)
Independent Practice (10 minutes)
1. Say: Our community has many resources. Resources include schools, clinics, shops, tailors,
mosques, churches and any other useful places in our community.
2. Write the following instructions on the board: Draw the resources in your community on your map.
3. Ask pupils to work individually to draw their map. They may compare maps and share ideas with
their neighbours.
4. Say: Remember to draw everything to scale. For example, the school is bigger than your house.
On your map, the shape you draw for the school should be bigger than the shape for your house.
If the secondary school is two times as big as the primary school, draw the secondary school
twice as big on the map.
5. Move around the classroom to make sure pupils understand and are doing the task. If needed,
show pupils how to draw a building on the board or on their paper maps.
6. If time allows, invite different pupils to share their maps with the class and explain their process
in creating it. (Example map: See below)
Closing (2 minutes)
1. Ask the following questions to revise the material:
a) Why are scales useful when drawing a map?
b) What kind of scale factor do you think we would need to draw the country of Sierra Leone
on a piece of paper?
2. Discuss the answers as a class. (Example answers: a) They help us to accurately draw distances
and relationships between places; b) A fraction, since we want to draw it smaller. The fraction to
change Sierra Leone to a paper size would be a very small number, such as 1
1,000,000)
Koroma
Road
Freetown
Highway
Koroma
Road
Freetown Highway
Hospital
Primary
School
Secondary
School
Primary
School
Radio
Station
My house
128
Lesson Title: Arithmetic Patterns Theme: Algebra
Lesson Number: M-08-101 Class/Level: JSS 2 Time: 35 minutes
Learning Outcomes By the end of the lesson, pupils will be able to:
1. Identify and describe arithmetic patterns. 2. Find missing terms of an arithmetic pattern.
Teaching Aids None
Preparation None
Opening (2 minutes)
1. Ask: Who can tell me what a pattern is? Have pupils raise their hand to answer. (Answer: Things
that are arranged following a rule or rules)
2. Ask: Who can give me an example of a pattern in your real life? (Example answers: Anything
which exhibits a pattern or repeats, such as a daily schedule, going to school every Monday-
Friday, the pattern of the moon, the organisation of a seed bed etc.)
3. Say: Today, we are going to learn about arithmetic patterns.
Introduction to the New Material (12 minutes)
1. Say: Today we will be learning about arithmetic patterns.
2. Say: Arithmetic patterns are a list of numbers that show a pattern in which the difference
between two consecutive terms is constant.
3. Remind pupils that the difference between two numbers is what you get when you subtract the
two numbers.
4. Say: Two consecutive terms are two numbers next to each other in the pattern.
5. Say: To determine if a list of numbers is an arithmetic pattern, you find the difference between
each of the consecutive numbers. If the difference is the same, it is an arithmetic pattern.
6. Write the following on the board:
2, 4, 6, 8, 10 …
7. Ask: What is the pattern of these numbers?
8. Say: First we need to find the difference between the consecutive terms.
9. Write on the board: 4 − 2 = 2, 6 − 4 = 2, 8 − 6 = 2, 10 − 8 = 2
10. Say: Because the difference is constant (it is always two) this is an arithmetic pattern in which
you add two to each number to get the next number.
11. Write on the board:
5, 10, 15, 20 …
12. Ask: What is the pattern of these numbers?
13. Say: First let’s find the difference between each of the two consecutive terms.
14. Write on the board: 10 − 5 = 5, 15 − 10 = 5, 20 − 15 = 5
15. Say: This is an arithmetic pattern because the difference is constant; it is always 5.
16. Ask: What if we want to find the next number in this pattern? What will we do?
17. Allow pupils to share their ideas and discuss as a class.
18. Say: To get the next number, you must add 5 to the previous number.
19. Say: It is important to identify when a list of numbers is not an arithmetic pattern.
129
20. Write on the board:
1, 2, 4, 7, 11, 16
21. Ask: Is this an arithmetic pattern?
22. Say: Remember, to determine if this is an arithmetic pattern, we take the difference between
each consecutive term.
23. Write on the board:
2 − 1 = 1, 7 − 4 = 3, 11 − 7 = 5, 16 − 11 = 4
24. Say: We can see that this is not an arithmetic pattern, because the difference between two
consecutive numbers is not constant. It changes.
25. Say: We also want to be able to identify the missing number in an arithmetic pattern.
26. Write on the board:
4, 8, 12, ___, 20, 24
27. Say: First we must find the difference between the known numbers to determine what the
pattern is.
28. Ask: What is the difference in this pattern? (Answer: 4)
29. Ask: What is missing in this arithmetic pattern?
30. Allow pupils to think for a minute before sharing their answers. (Answer: 16)
31. Say: Correct! The difference is 4. We find that the missing number is 16 by adding 4 to the
previous number, 12.
Write 16 in the blank space on the board: 4, 8, 12, 16, 20, 24
Guided Practice (9 minutes)
1. Write the following problems on the board:
a) Identify whether the numbers follow an arithmetic pattern. If it is an arithmetic pattern, give
the common difference:
6,12,18,24,30,36
2, 4, 8, 16, 32
b) Find the missing term in the pattern: 7, 14, ___, 28, 35, 42
2. Ask pupils to work in pairs to solve the problems on the board.
3. Move around the classroom to make sure pupils understand and are doing the task. Remind
pupils to first find the difference between the known numbers.
4. Invite three pairs to give the answer for each question. Discuss the answers as a class. Make
corrections if necessary. Explain answers if needed. (Answers: a) First pattern: Yes, common
difference = 6; Second pattern - No; b) 7, 14, 21, 28, 35, 42)
5. Ask: What is the common difference in question b)? (Answer: 7)
Independent Practice (10 minutes)
1. Write the following problems on the board:
Find the common difference and missing numbers in each pattern:
a) 10, 20, 30, ___, ___, 60, 70
b) 9, 18, 27, 36, ___, 54, 63
c) 2, 10, 18, ___, 34, ___, 50, 58, 66
2. Ask pupils to work individually to solve the problems on the board.
3. Move around the classroom to make sure pupils understand and are doing the task. Help
struggling pupils.
130
4. Invite three pupils to give the answer for each question. Discuss the answers as a class. Make
corrections if necessary. Explain answers if needed. (Answers: a) Common difference = 10,
Missing numbers = 40, 50; b) Common difference = 9, Missing number = 45; c) Common
difference = 8, Missing numbers = 26, 42)
Closing (2 minutes)
1. Ask pupils to explain in their own words what an arithmetic pattern is. Discuss as a class.
(Example answer: It is a pattern with the same difference between numbers that are next to
each other.)
2. Say: Sometimes you will hear ‘pattern’ called ‘sequence’. Do not be confused if you hear
‘arithmetic sequence’ because it is the same thing as an arithmetic pattern!
3. Say: Today we learned how to identify arithmetic patterns and find the missing number in an
arithmetic pattern. In the next lesson, we will learn how to write our own arithmetic patterns.
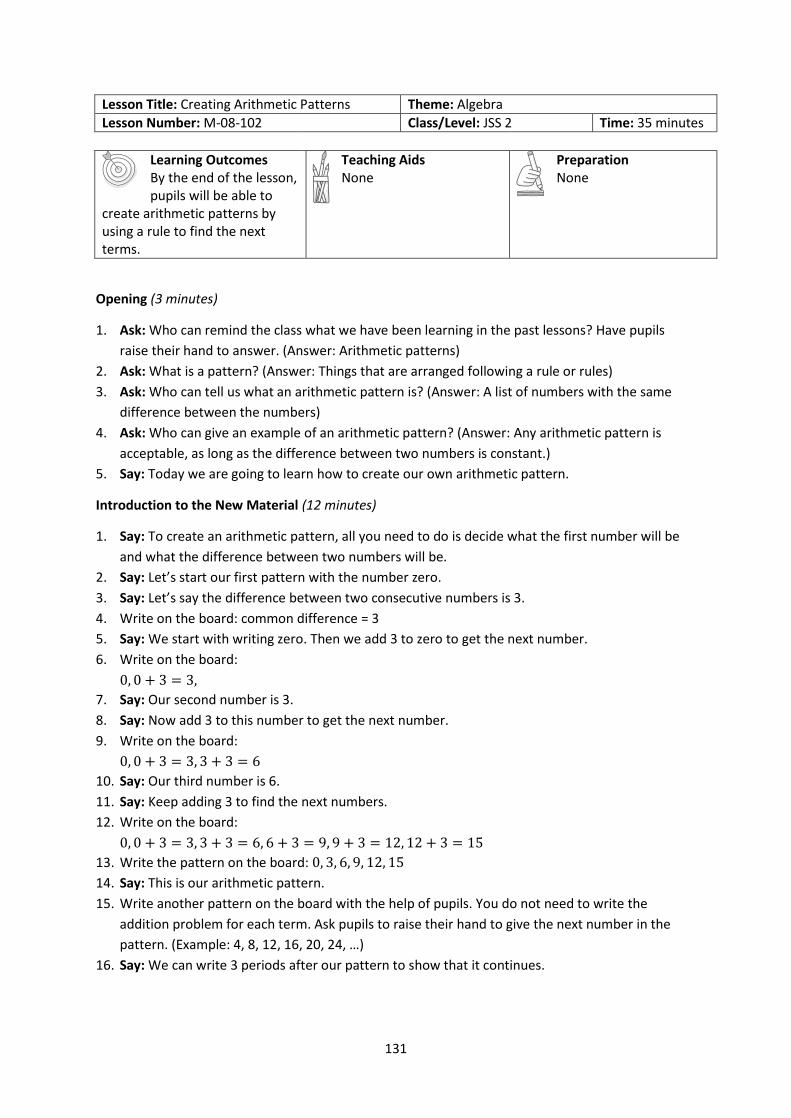
131
Lesson Title: Creating Arithmetic Patterns Theme: Algebra
Lesson Number: M-08-102 Class/Level: JSS 2 Time: 35 minutes
Learning Outcomes By the end of the lesson, pupils will be able to
create arithmetic patterns by using a rule to find the next terms.
Teaching Aids None
Preparation None
Opening (3 minutes)
1. Ask: Who can remind the class what we have been learning in the past lessons? Have pupils
raise their hand to answer. (Answer: Arithmetic patterns)
2. Ask: What is a pattern? (Answer: Things that are arranged following a rule or rules)
3. Ask: Who can tell us what an arithmetic pattern is? (Answer: A list of numbers with the same
difference between the numbers)
4. Ask: Who can give an example of an arithmetic pattern? (Answer: Any arithmetic pattern is
acceptable, as long as the difference between two numbers is constant.)
5. Say: Today we are going to learn how to create our own arithmetic pattern.
Introduction to the New Material (12 minutes)
1. Say: To create an arithmetic pattern, all you need to do is decide what the first number will be
and what the difference between two numbers will be.
2. Say: Let’s start our first pattern with the number zero.
3. Say: Let’s say the difference between two consecutive numbers is 3.
4. Write on the board: common difference = 3
5. Say: We start with writing zero. Then we add 3 to zero to get the next number.
6. Write on the board:
0, 0 + 3 = 3,
7. Say: Our second number is 3.
8. Say: Now add 3 to this number to get the next number.
9. Write on the board:
0, 0 + 3 = 3, 3 + 3 = 6
10. Say: Our third number is 6.
11. Say: Keep adding 3 to find the next numbers.
12. Write on the board:
0, 0 + 3 = 3, 3 + 3 = 6, 6 + 3 = 9, 9 + 3 = 12, 12 + 3 = 15
13. Write the pattern on the board: 0, 3, 6, 9, 12, 15
14. Say: This is our arithmetic pattern.
15. Write another pattern on the board with the help of pupils. You do not need to write the
addition problem for each term. Ask pupils to raise their hand to give the next number in the
pattern. (Example: 4, 8, 12, 16, 20, 24, …)
16. Say: We can write 3 periods after our pattern to show that it continues.

132
Guided Practice (8 minutes)
1. Write the following problems on the board:
a) Write an arithmetic pattern starting with 3, with a common difference of 5. Write 6 terms in
the pattern.
b) Write an arithmetic pattern starting with 1, with a common difference of 4. Write 5 terms in
the pattern.
2. Ask pupils to work in pairs to write the arithmetic patterns.
3. Walk around the classroom to make sure the pupils understand and are doing the task.
4. Invite two pairs to write the answers on the board and explain their answers. Discuss answers as
a class. Make corrections if necessary. (Answers: (a) 3, 8, 13, 18, 23, 28; (b) 1, 5, 9, 13, 17)
Independent Practice (10 minutes)
1. Write the following problem on the board:
a) Write five arithmetic patterns of your own. Write the common difference after each pattern.
2. Ask pupils to work individually to write their arithmetic patterns.
3. Move around the classroom to make sure pupils understand how to write their own arithmetic
pattern, and to make sure their arithmetic patterns make sense.
4. After pupils have finished, ask them to work in pairs to share and compare their arithmetic
patterns with a partner.
5. Invite a few pupils to write their patterns on the board. Ask the rest of the class to check if the
patterns on the board are arithmetic patterns. Discuss the answers as a class. (Example: 1, 3, 5,
7, 9, 11 … common difference = 2)
Closing (2 minutes)
1. Say: Today we learned how to write our own arithmetic pattern.
2. Ask: What are the steps in writing your own arithmetic pattern? (Answer: First write the first
number. Next decide the difference between consecutive terms. Then write the pattern by
adding the difference to each previous number.)
3. Say: In our next lesson, we will learn about a different type of pattern: geometric patterns.

133
Lesson Title: Introduction to Geometric Patterns Theme: Algebra
Lesson Number: M-08-103 Class/Level: JSS 2 Time: 35 minutes
Learning Outcomes By the end of the lesson, pupils will be able to
identify and describe geometric patterns.
Teaching Aids None
Preparation None
Opening (2 minutes)
1. Ask: Who can remind us what an arithmetic pattern is? Have pupils raise their hand to answer.
(Answer: A list of numbers with the same difference between the numbers)
2. Ask: Who can give us an example of an arithmetic pattern? (Answer: Any arithmetic pattern is
acceptable, as long as the difference between two numbers is constant.)
3. Say: Today we are going to learn about another type of pattern called geometric patterns.
Introduction to the New Material (11 minutes)
1. Say: A geometric pattern is a list of numbers where the ratio between two consecutive terms is
constant.
2. Remind pupils that consecutive terms are numbers that are next to each other. The ratio
between two numbers is found by dividing the two numbers.
3. Write on the board:
2, 4, 8,16,32 …
4. Ask: What is the pattern of these numbers?
5. Ask pupils to share their ideas and discuss as a class.
6. Say: We can take the ratio of the consecutive numbers to determine the pattern.
7. Write on the board:
4
2= 2,
8
4= 2,
16
8= 2 ,
32
16= 2
8. Say: The ratio between each of the numbers is 2. We can also multiply by two to get the next
term in the pattern.
9. Show pupils this is true by multiplying some of the terms by 2: 2 × 2 = 4; 4 × 2 = 8
10. Say: Let’s look at another example.
11. Write on the board:
3, 9, 27, 81, 243 …
12. Ask: What is the ratio of two consecutive numbers?
(Answer: 3; it can be found by dividing any consecutive terms: 9
3= 3,
27
9= 3,
81
27= 3,
243
81= 3)
13. Say: We can also multiply each term by three to get the next term in the pattern.
14. Say: We need to identify when a pattern is geometric, and when it is not.
15. Write on the board: 3, 6, 9, 12, 15, 18, 21, 24
16. Ask: Is this a geometric pattern? Why or why not?
17. Say: We need to find the ratios of the consecutive terms to determine if this is a geometric pattern.
18. Write on the board: 6
3= 2,
9
6=
3
2,
15
12=
5
4…
19. Say: The ratios are not the same so this is not a geometric pattern.

134
Guided Practice (10 minutes)
1. Write the following problem on the board:
Find whether each pattern is a geometric pattern. If it is, write the number that each term is
multiplied by to get the next one:
a) 1, −1, 1, −1, 1, −1, 1, …
b) 1, 4, 16, 64, 256
c) 1,3,5,7,9,11,13,15
2. Ask pupils to work in pairs to solve the problems.
3. Move around the classroom to make sure pupils understand and are doing the task. Help pupils
to find the ratios if needed.
4. Invite three pairs to write their answers on the board and explain them to the class. Make
corrections if necessary.
Answers and explanations:
a) Ratios: −1
1= −1, −
1
1= −1, −
1
1= −1, …
This is a geometric pattern, because the ratios are constant.
The pattern is multiplying each number by -1 to get the next number.
b) Ratios: 4
1= 4,
16
4= 4,
16
4= 4,
64
16= 4,
256
64= 4
This is a geometric pattern because the ratios are constant.
The pattern is multiplying each number by 4 to get the next number.
c) Ratios: 3
1= 3,
5
3=
5
3,
7
5=
7
5, …
This is not a geometric pattern because the ratios between two consecutive numbers are
different.
Independent Practice (10 minutes)
1. Write the following problem on the board:
Find whether each pattern is a geometric pattern. If it is, write the number that each term is
multiplied by to get the next one:
a) 1, 5, 25, 125, 625
b) 1, 2, 3, 4, 5, 6, 7, 8, 9, 10
c) 1, −2, 4, −8, 16, −32, 64, −128
2. Ask pupils to work individually to find the patterns.
3. Move around the classroom to make sure pupils understand and are doing the task. Help
struggling pupils.
4. After pupils have finished, ask them to share and compare their answers with a partner.
5. Invite three pupils to identify whether each pattern is a geometric pattern. If it is, ask them to
give the number that each term is multiplied by. Make corrections if necessary. Explain answers
if needed. (Answers: a) Yes, 5; b) No; c) Yes, -2)
Closing (2 minutes)
1. Ask: What did we learn today? (Answer: What a geometric pattern is, and how to identify a
geometric pattern.)
2. Say: In our next lesson, we will practise writing our own geometric patterns.
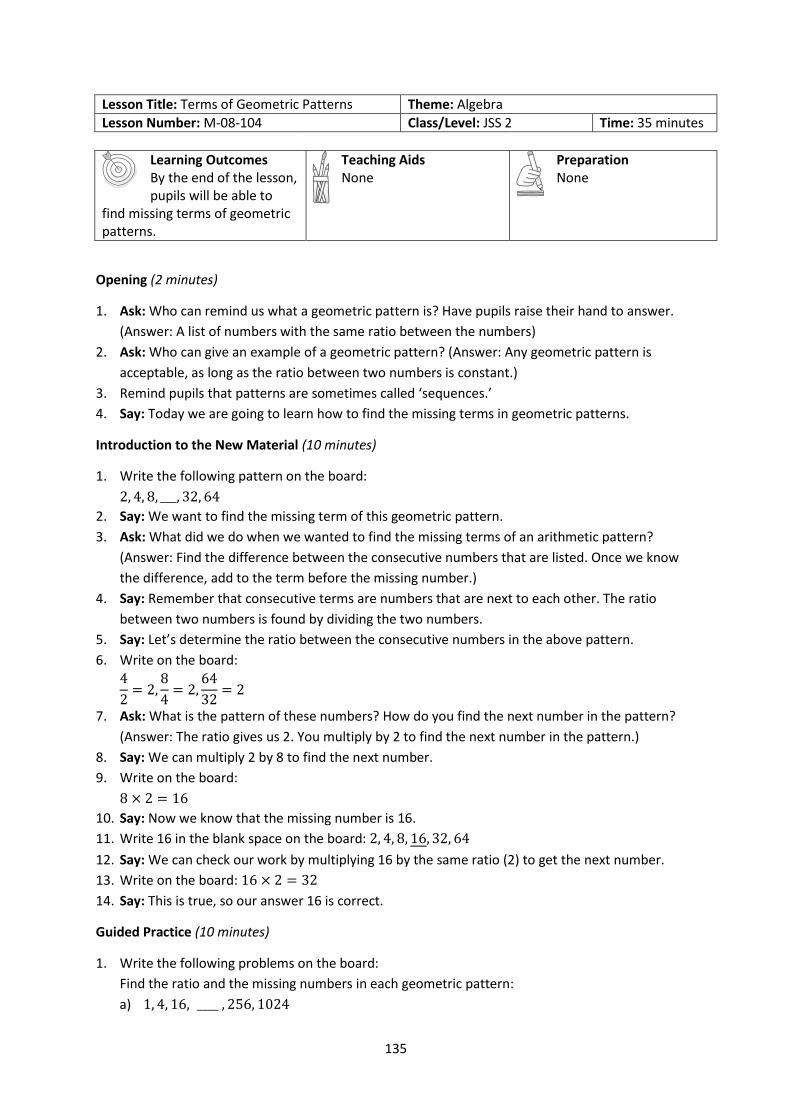
135
Lesson Title: Terms of Geometric Patterns Theme: Algebra
Lesson Number: M-08-104 Class/Level: JSS 2 Time: 35 minutes
Learning Outcomes By the end of the lesson, pupils will be able to
find missing terms of geometric patterns.
Teaching Aids None
Preparation None
Opening (2 minutes)
1. Ask: Who can remind us what a geometric pattern is? Have pupils raise their hand to answer.
(Answer: A list of numbers with the same ratio between the numbers)
2. Ask: Who can give an example of a geometric pattern? (Answer: Any geometric pattern is
acceptable, as long as the ratio between two numbers is constant.)
3. Remind pupils that patterns are sometimes called ‘sequences.’
4. Say: Today we are going to learn how to find the missing terms in geometric patterns.
Introduction to the New Material (10 minutes)
1. Write the following pattern on the board:
2, 4, 8, ___, 32, 64
2. Say: We want to find the missing term of this geometric pattern.
3. Ask: What did we do when we wanted to find the missing terms of an arithmetic pattern?
(Answer: Find the difference between the consecutive numbers that are listed. Once we know
the difference, add to the term before the missing number.)
4. Say: Remember that consecutive terms are numbers that are next to each other. The ratio
between two numbers is found by dividing the two numbers.
5. Say: Let’s determine the ratio between the consecutive numbers in the above pattern.
6. Write on the board:
4
2= 2,
8
4= 2,
64
32= 2
7. Ask: What is the pattern of these numbers? How do you find the next number in the pattern?
(Answer: The ratio gives us 2. You multiply by 2 to find the next number in the pattern.)
8. Say: We can multiply 2 by 8 to find the next number.
9. Write on the board:
8 × 2 = 16
10. Say: Now we know that the missing number is 16.
11. Write 16 in the blank space on the board: 2, 4, 8, 16, 32, 64
12. Say: We can check our work by multiplying 16 by the same ratio (2) to get the next number.
13. Write on the board: 16 × 2 = 32
14. Say: This is true, so our answer 16 is correct.
Guided Practice (10 minutes)
1. Write the following problems on the board:
Find the ratio and the missing numbers in each geometric pattern:
a) 1, 4, 16, ____ , 256, 1024
136
b) 1,5, ___, 125, 625
c) 2, ___, 8, 16, 32, ___
2. Ask pupils to work in pairs to complete the geometric patterns.
3. Move around the classroom to make sure pupils understand and are doing the task. Remind
pupils of how to find the ratio if needed.
4. Invite three pairs to share their answers. Make corrections if necessary. Write the correct
answers on the board and have pupils check their answers with the answers on the board.
Explain answers if needed. (Answers: a) ratio = 4, missing number = 64; b) ratio = 5, missing
number = 25; c) ratio=2, missing numbers = 4, 64)
Independent Practice (10 minutes)
1. Write the following problems on the board:
Find the ratio and the missing numbers in each geometric pattern:
a) 1, −2, 4, −8, ____, −32, 64, −128
b) 1,3,9,27, ___,243
c) −1, 3, −9, 27, ___, 243
2. Ask pupils to work individually to complete the geometric patterns.
3. Move around the classroom to make sure pupils understand and are doing the task. Help
struggling pupils.
4. After pupils have finished, ask them to share and compare their answers with a partner.
5. Invite three pupils to share their answers. Make corrections if necessary. Write the correct
answers on the board and have pupils check their answers with the answers on the board.
Explain answers if needed. (Answers: a) ratio = -2, missing number = 16; b) ratio = 3, missing
number = 81; c) ratio= −3, missing numbers = −81)
Closing (3 minutes)
1. Ask: What did we learn today? (Answer: How to find the missing term of a geometric pattern)
2. Ask: What steps do we use to find the missing term of a geometric pattern? (Answer: Find the
ratio of the written terms then multiply this ratio by the number before the missing term.)
3. Ask: How can you check your work after finding the missing number? (Answer: Multiply the
missing number you found by the ratio. If it gives the next number, you are correct.)
4. Say: In our next lesson, we will practise writing our own geometric patterns.
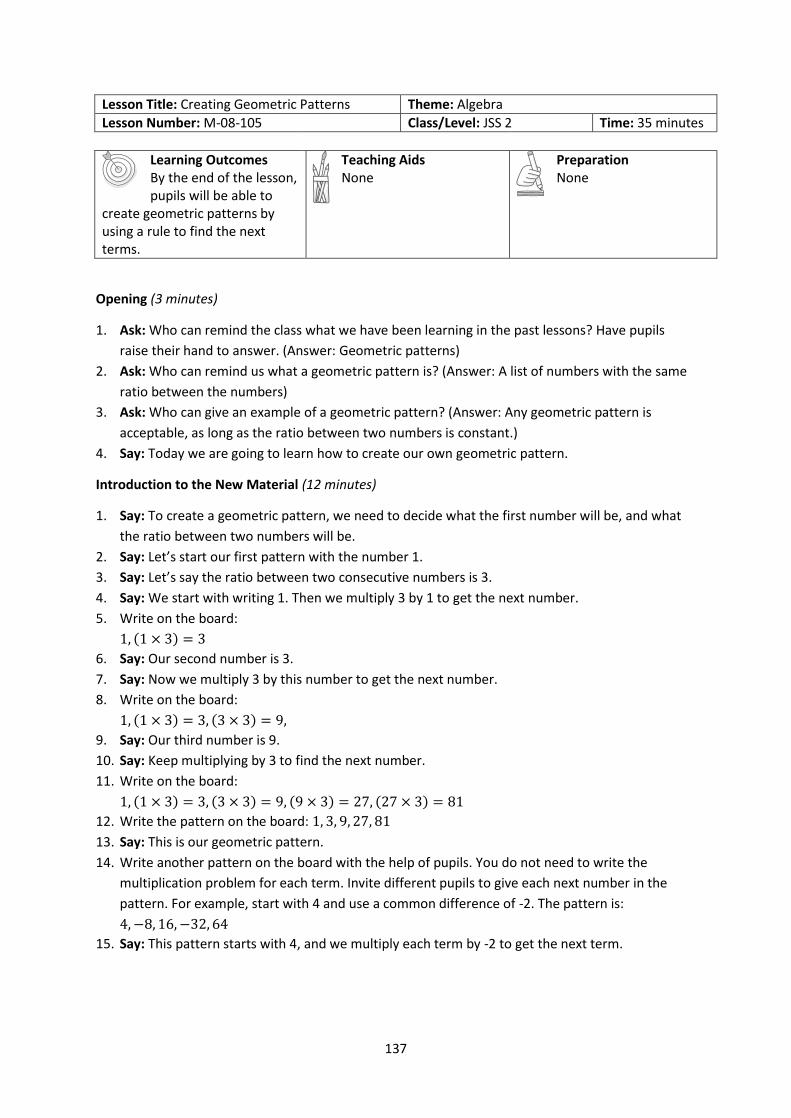
137
Lesson Title: Creating Geometric Patterns Theme: Algebra
Lesson Number: M-08-105 Class/Level: JSS 2 Time: 35 minutes
Learning Outcomes By the end of the lesson, pupils will be able to
create geometric patterns by using a rule to find the next terms.
Teaching Aids None
Preparation None
Opening (3 minutes)
1. Ask: Who can remind the class what we have been learning in the past lessons? Have pupils
raise their hand to answer. (Answer: Geometric patterns)
2. Ask: Who can remind us what a geometric pattern is? (Answer: A list of numbers with the same
ratio between the numbers)
3. Ask: Who can give an example of a geometric pattern? (Answer: Any geometric pattern is
acceptable, as long as the ratio between two numbers is constant.)
4. Say: Today we are going to learn how to create our own geometric pattern.
Introduction to the New Material (12 minutes)
1. Say: To create a geometric pattern, we need to decide what the first number will be, and what
the ratio between two numbers will be.
2. Say: Let’s start our first pattern with the number 1.
3. Say: Let’s say the ratio between two consecutive numbers is 3.
4. Say: We start with writing 1. Then we multiply 3 by 1 to get the next number.
5. Write on the board:
1, (1 × 3) = 3
6. Say: Our second number is 3.
7. Say: Now we multiply 3 by this number to get the next number.
8. Write on the board:
1, (1 × 3) = 3, (3 × 3) = 9,
9. Say: Our third number is 9.
10. Say: Keep multiplying by 3 to find the next number.
11. Write on the board:
1, (1 × 3) = 3, (3 × 3) = 9, (9 × 3) = 27, (27 × 3) = 81
12. Write the pattern on the board: 1, 3, 9, 27, 81
13. Say: This is our geometric pattern.
14. Write another pattern on the board with the help of pupils. You do not need to write the
multiplication problem for each term. Invite different pupils to give each next number in the
pattern. For example, start with 4 and use a common difference of -2. The pattern is:
4, −8, 16, −32, 64
15. Say: This pattern starts with 4, and we multiply each term by -2 to get the next term.

138
Guided Practice (8 minutes)
1. Write the instructions on the board:
a) Write a geometric pattern starting with 1, with a common ratio of 5. Write 4 terms in the
pattern.
b) Write a geometric pattern starting with 2, with a common ratio of -3. Write 6 terms in the
pattern.
2. Ask pupils to work in pairs to write the geometric patterns.
3. Move around the classroom to make sure pupils understand and are doing the task. Help pupils
start the pattern if needed.
4. Invite two pairs to write the patterns on the board and explain their answers. Make corrections
if necessary. Ask pupils to compare their answers with the answers on the board. Explain the
answers if needed. (Answers: a) 1, 5, 25, 125; b) 2, -6, 18, -54, 162, -486)
Independent Practice (10 minutes)
1. Write the instructions on the board:
Write 5 geometric patterns of your own. Write the common ratio after each pattern.
2. Ask pupils to work individually to write their own geometric patterns.
3. Move around the classroom to make sure pupils understand how to write their own geometric
patterns and to make sure their geometric patterns make sense.
4. After pupils have finished, ask them to share and compare their geometric patterns with a
partner.
5. Invite a few pupils to come to the front and write their patterns on the board. Ask the rest of the
class to check if they are correct geometric patterns. Make corrections if necessary. (Example: 3,
6, 12, 24, 48, common ratio = 2)
Closing (2 minutes)
1. Say: Today we learned how to write our own geometric pattern, or sequence.
2. Ask: What are the steps in writing your own geometric pattern? (Answer: First write the first
number. Next decide the ratio between consecutive terms. Then determine the pattern by
multiplying that number by each previous number. Finally, write the pattern.)
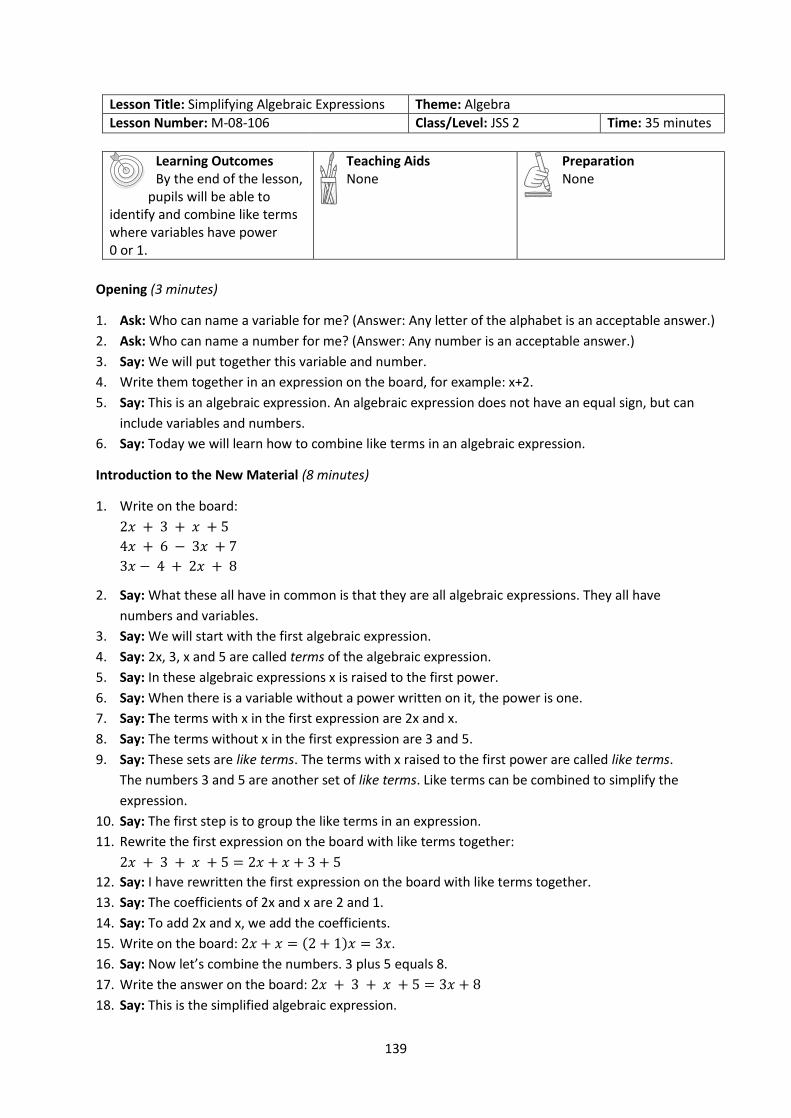
139
Lesson Title: Simplifying Algebraic Expressions Theme: Algebra
Lesson Number: M-08-106 Class/Level: JSS 2 Time: 35 minutes
Learning Outcomes By the end of the lesson,
pupils will be able to identify and combine like terms where variables have power 0 or 1.
Teaching Aids None
Preparation None
Opening (3 minutes)
1. Ask: Who can name a variable for me? (Answer: Any letter of the alphabet is an acceptable answer.)
2. Ask: Who can name a number for me? (Answer: Any number is an acceptable answer.)
3. Say: We will put together this variable and number.
4. Write them together in an expression on the board, for example: x+2.
5. Say: This is an algebraic expression. An algebraic expression does not have an equal sign, but can
include variables and numbers.
6. Say: Today we will learn how to combine like terms in an algebraic expression.
Introduction to the New Material (8 minutes)
1. Write on the board:
2𝑥 + 3 + 𝑥 + 5
4𝑥 + 6 − 3𝑥 + 7
3𝑥 − 4 + 2𝑥 + 8
2. Say: What these all have in common is that they are all algebraic expressions. They all have
numbers and variables.
3. Say: We will start with the first algebraic expression.
4. Say: 2x, 3, x and 5 are called terms of the algebraic expression.
5. Say: In these algebraic expressions x is raised to the first power.
6. Say: When there is a variable without a power written on it, the power is one.
7. Say: The terms with x in the first expression are 2x and x.
8. Say: The terms without x in the first expression are 3 and 5.
9. Say: These sets are like terms. The terms with x raised to the first power are called like terms.
The numbers 3 and 5 are another set of like terms. Like terms can be combined to simplify the
expression.
10. Say: The first step is to group the like terms in an expression.
11. Rewrite the first expression on the board with like terms together:
2𝑥 + 3 + 𝑥 + 5 = 2𝑥 + 𝑥 + 3 + 5
12. Say: I have rewritten the first expression on the board with like terms together.
13. Say: The coefficients of 2x and x are 2 and 1.
14. Say: To add 2x and x, we add the coefficients.
15. Write on the board: 2𝑥 + 𝑥 = (2 + 1)𝑥 = 3𝑥.
16. Say: Now let’s combine the numbers. 3 plus 5 equals 8.
17. Write the answer on the board: 2𝑥 + 3 + 𝑥 + 5 = 3𝑥 + 8
18. Say: This is the simplified algebraic expression.

140
Guided Practice (12 minutes)
1. Say: We will now work on the remaining two expressions together.
2. Ask: What is the first step to simplify the second expression? (Answer: Group the like terms
together (4x and -3x, 6 and 7))
3. Write: 4𝑥 + 6 − 3𝑥 + 7 = 4𝑥 − 3𝑥 + 6 + 7 =
4. Say: I have grouped the like terms together.
5. Say: Remember to apply the correct sign to each term. When we rearrange these, we must keep
the negative sign with 3x.
6. Ask: What is the next step? (Answer: combine 4𝑥 − 3𝑥, combine 6 + 7)
7. Write: 4𝑥 + 6 − 3𝑥 + 7 = 4𝑥 − 3𝑥 + 6 + 7 = 𝑥 + 13
8. Say: The expression simplified is x + 13
9. Say: Take a few minutes and simplify the third expression in your exercise book.
10. Ask: Who would like to simplify the expression on the board?
11. Call on one pupil with hand raised to write the answer on the board. (Answer: 3𝑥 − 4 + 2𝑥 +
8 = 3𝑥 + 2𝑥 − 4 + 8 = 5𝑥 + 4)
12. Say: The expression simplified is 5x + 4.
13. Write: 10𝑥 + 3 − 4𝑥 − 6 + 𝑥 + 2
14. Say: Take a few minutes and simplify the third expression in your exercise book.
15. Ask: Who would like to simplify the expression on the board?
16. Call on one pupil with hand raised to write the answer on the board. (Answer: 10𝑥 + 3 − 4𝑥 −
6 + 𝑥 + 2 = 10x – 4x + x + 3 – 6 + 2 = 7x – 1)
17. Say: The expression simplified is 7x – 1.
Independent Practice (10 minutes)
1. Write on the board: Simplify:
a) 6𝑥 + 3 + 2𝑥 − 5 + 𝑥
b) 7𝑥 − 1 + 3𝑥 − 4 + 2𝑥 + 7 − 2𝑥
c) 8𝑥 + 4 − 5𝑥 + 3 − 4𝑥 + 2
d) 2𝑥 − 1 + 6𝑥 − 3 + 4𝑥 + 2 − 3𝑥 +
2. Say: Please work on your own in your exercise book to simplify the expressions I have written on
the board. When you are finished, compare your answer with the person sitting next to you.
3. Walk around the room and assist when needed.
4. Ask: What is the answer for the first expression? (Answer: 9x – 2)
5. Ask: What is the answer for the second expression? (Answer: 10x + 2)
6. Ask: What is the answer for the third expression? (Answer: -x + 9)
7. Ask: What is the answer for the fourth expression? (Answer: 9x + 3)
Closing (2 minutes)
1. Write on the board: Simplify 3𝑥 + 5 − 2𝑥 − 6
2. Say: Please write this expression down and solve it. We will share our answers at the beginning
of the next class! (Answer: 𝑥 − 1)
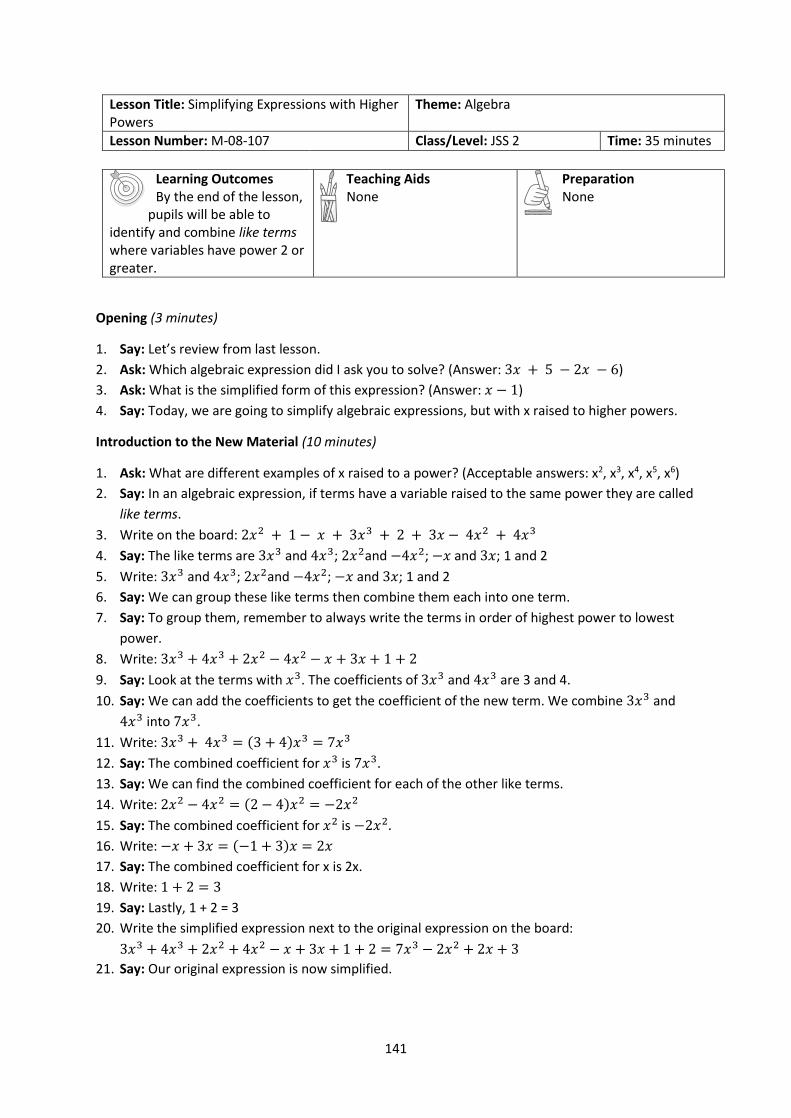
141
Lesson Title: Simplifying Expressions with Higher Powers
Theme: Algebra
Lesson Number: M-08-107 Class/Level: JSS 2 Time: 35 minutes
Learning Outcomes By the end of the lesson,
pupils will be able to identify and combine like terms where variables have power 2 or greater.
Teaching Aids None
Preparation None
Opening (3 minutes)
1. Say: Let’s review from last lesson.
2. Ask: Which algebraic expression did I ask you to solve? (Answer: 3𝑥 + 5 − 2𝑥 − 6)
3. Ask: What is the simplified form of this expression? (Answer: 𝑥 − 1)
4. Say: Today, we are going to simplify algebraic expressions, but with x raised to higher powers.
Introduction to the New Material (10 minutes)
1. Ask: What are different examples of x raised to a power? (Acceptable answers: x2, x3, x4, x5, x6)
2. Say: In an algebraic expression, if terms have a variable raised to the same power they are called
like terms.
3. Write on the board: 2𝑥2 + 1 − 𝑥 + 3𝑥3 + 2 + 3𝑥 − 4𝑥2 + 4𝑥3
4. Say: The like terms are 3𝑥3 and 4𝑥3; 2𝑥2and −4𝑥2; −𝑥 and 3𝑥; 1 and 2
5. Write: 3𝑥3 and 4𝑥3; 2𝑥2and −4𝑥2; −𝑥 and 3𝑥; 1 and 2
6. Say: We can group these like terms then combine them each into one term.
7. Say: To group them, remember to always write the terms in order of highest power to lowest
power.
8. Write: 3𝑥3 + 4𝑥3 + 2𝑥2 − 4𝑥2 − 𝑥 + 3𝑥 + 1 + 2
9. Say: Look at the terms with 𝑥3. The coefficients of 3𝑥3 and 4𝑥3 are 3 and 4.
10. Say: We can add the coefficients to get the coefficient of the new term. We combine 3𝑥3 and
4𝑥3 into 7𝑥3.
11. Write: 3𝑥3 + 4𝑥3 = (3 + 4)𝑥3 = 7𝑥3
12. Say: The combined coefficient for 𝑥3 is 7𝑥3.
13. Say: We can find the combined coefficient for each of the other like terms.
14. Write: 2𝑥2 − 4𝑥2 = (2 − 4)𝑥2 = −2𝑥2
15. Say: The combined coefficient for 𝑥2 is −2𝑥2.
16. Write: −𝑥 + 3𝑥 = (−1 + 3)𝑥 = 2𝑥
17. Say: The combined coefficient for x is 2x.
18. Write: 1 + 2 = 3
19. Say: Lastly, 1 + 2 = 3
20. Write the simplified expression next to the original expression on the board:
3𝑥3 + 4𝑥3 + 2𝑥2 + 4𝑥2 − 𝑥 + 3𝑥 + 1 + 2 = 7𝑥3 − 2𝑥2 + 2𝑥 + 3
21. Say: Our original expression is now simplified.
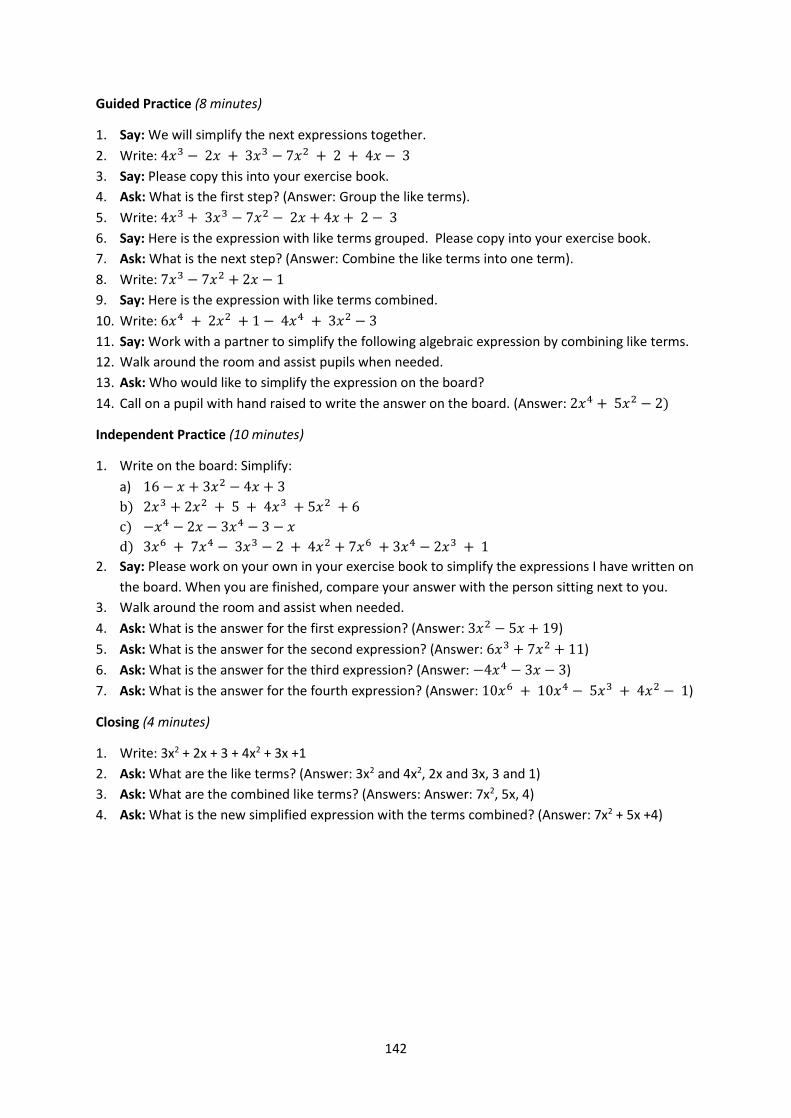
142
Guided Practice (8 minutes)
1. Say: We will simplify the next expressions together.
2. Write: 4𝑥3 − 2𝑥 + 3𝑥3 − 7𝑥2 + 2 + 4𝑥 − 3
3. Say: Please copy this into your exercise book.
4. Ask: What is the first step? (Answer: Group the like terms).
5. Write: 4𝑥3 + 3𝑥3 − 7𝑥2 − 2𝑥 + 4𝑥 + 2 − 3
6. Say: Here is the expression with like terms grouped. Please copy into your exercise book.
7. Ask: What is the next step? (Answer: Combine the like terms into one term).
8. Write: 7𝑥3 − 7𝑥2 + 2𝑥 − 1
9. Say: Here is the expression with like terms combined.
10. Write: 6𝑥4 + 2𝑥2 + 1 − 4𝑥4 + 3𝑥2 − 3
11. Say: Work with a partner to simplify the following algebraic expression by combining like terms.
12. Walk around the room and assist pupils when needed.
13. Ask: Who would like to simplify the expression on the board?
14. Call on a pupil with hand raised to write the answer on the board. (Answer: 2𝑥4 + 5𝑥2 − 2)
Independent Practice (10 minutes)
1. Write on the board: Simplify:
a) 16 − 𝑥 + 3𝑥2 − 4𝑥 + 3
b) 2𝑥3 + 2𝑥2 + 5 + 4𝑥3 + 5𝑥2 + 6
c) −𝑥4 − 2𝑥 − 3𝑥4 − 3 − 𝑥
d) 3𝑥6 + 7𝑥4 − 3𝑥3 − 2 + 4𝑥2 + 7𝑥6 + 3𝑥4 − 2𝑥3 + 1
2. Say: Please work on your own in your exercise book to simplify the expressions I have written on
the board. When you are finished, compare your answer with the person sitting next to you.
3. Walk around the room and assist when needed.
4. Ask: What is the answer for the first expression? (Answer: 3𝑥2 − 5𝑥 + 19)
5. Ask: What is the answer for the second expression? (Answer: 6𝑥3 + 7𝑥2 + 11)
6. Ask: What is the answer for the third expression? (Answer: −4𝑥4 − 3𝑥 − 3)
7. Ask: What is the answer for the fourth expression? (Answer: 10𝑥6 + 10𝑥4 − 5𝑥3 + 4𝑥2 − 1)
Closing (4 minutes)
1. Write: 3x2 + 2x + 3 + 4x2 + 3x +1
2. Ask: What are the like terms? (Answer: 3x2 and 4x2, 2x and 3x, 3 and 1)
3. Ask: What are the combined like terms? (Answers: Answer: 7x2, 5x, 4)
4. Ask: What is the new simplified expression with the terms combined? (Answer: 7x2 + 5x +4)

143
Lesson Title: Simplifying Expressions with Fractions
Theme: Algebra
Lesson Number: M-08-108 Class/Level: JSS 2 Time: 35 minutes
Learning Outcomes By the end of the lesson, pupils will be able to
identify and combine like terms that involve fractions.
Teaching Aids None
Preparation None
Opening (5 minutes)
1. Say: Let’s revise adding fractions.
2. Write on the board: 1
3+
1
4
3. Ask: How do we solve this problem? Have pupils raise their hand to answer. (Answer: Find the
LCD, make the denominators the same and add the numerators.)
4. Ask pupils to solve the problem in their exercise books.
5. Invite a volunteer to write their answer on the board. Make corrections if necessary.
(Answer: 1
3+
1
4= (
(1×4)+(1×3)
3×4) = (
4+3
12) = (
7
12))
Introduction to the New Material (12 minutes)
1. Say: During the last lesson, we learned how to combine like terms.
2. Ask pupils to explain how to identify like terms and discuss like terms as a class. (Answer: Terms
that have the same variable raised to the same power are called ‘like terms’. Any two whole
numbers are like terms.)
3. Say: We can combine like terms with fraction coefficients by following the same rules we already
know.
4. Write the expression on the board: (1
2) 𝑥2+ (
3
8) 𝑥 + (
1
2) 𝑥2 + (
1
8) 𝑥
5. Say: Each of the variables is multiplied by a fraction instead of a whole number.
6. Ask: What are the like terms? (Answer: (1
2) 𝑥2 and (
1
2) 𝑥2; (
3
8) 𝑥 and (
1
8) 𝑥)
7. Rewrite the expression on the board with like terms grouped: (1
2) 𝑥2 + (
1
2) 𝑥2 + (
3
8) 𝑥 + (
1
8) 𝑥
8. Ask: How did we combine like terms when there were whole number coefficients? (Answer: Add
the coefficients of the like terms together.)
9. Say: We will do the same thing for fractions.
10. Write the expression with addition of the coefficients: (1
2+
1
2) 𝑥2 + (
3
8+
1
8) 𝑥
11. Add the coefficients of 𝑥2 on the board: (1
2) + (
1
2) = (
1+1
2) = (
2
2) = 1
12. Do the same for 𝑥: (3
8) + (
1
8) = (
3+1
8) = (
4
8) = (
1
2)
13. Write the expression on the board with the new coefficients and simplify:
14. (1
2+
1
2) 𝑥2 + (
3
8+
1
8) 𝑥 = 1𝑥2 +
1
2𝑥 = 𝑥2 +
1
2𝑥
15. Say: This is the most simplified form of the expression.

144
Guided Practice (6 minutes)
1. Write on the board:
(1
6) 𝑥2+ (
4
5) 𝑥 + (
1
3) 𝑥2 − (
2
5) 𝑥
2. Ask pupils to work in pairs to simplify the expression on the board.
3. Say: With your partner, simplify the algebraic expressions by combining like terms.
4. Move around the classroom to make sure pupils understand and are doing the task. Remind
pupils how to add and subtract fractions with different denominators if needed. Remind them to
subtract the coefficient if there is a negative sign in front of it.
5. Invite one pair to come to the front and write their answer on the board. Make corrections if
necessary. Ask pupils to compare their answers with the answer on the board. Explain the
answer if needed. (Answer: (1
6+
1
3) 𝑥2 + (
4
5−
2
5) 𝑥 =
3
6𝑥2 +
2
5𝑥 =
1
2𝑥2 +
2
5𝑥)
Independent Practice (10 minutes)
1. Write on the board:
a) 3 −1
2𝑥 + 3𝑥2 −
1
3𝑥 +
1
2
b) 2𝑥3 +1
7𝑥2 + 5 + 4𝑥3 +
3
7𝑥2 + 6
c) −1
2𝑥4 − 2𝑥 +
1
3𝑥4 − 3 − 𝑥
2. Ask pupils to work individually to simplify the expressions on the board.
3. Move around the classroom to make sure pupils understand and are doing the task. Remind
pupils of any rules for adding or subtracting fractions that they might have forgotten. Remind
them to combine the constant terms as well as the terms with variables.
4. After pupils have finished, ask them to share and compare their answers with a partner.
5. Invite three pupils to come to the front and write their answers on the board. Make corrections
if necessary. Ask pupils to compare their answers with the answers on the board. Explain the
answer if needed.
Answers:
a) 3𝑥2 + (−1
2−
1
3) 𝑥 + 3 +
1
2= 3𝑥2 −
5
6𝑥 + 3
1
2
b) (2 + 4)𝑥3 + (1
7+
3
7) 𝑥2 + 5 + 6 = 6𝑥3 +
4
7𝑥2 + 11
c) (−1
2+
1
3) 𝑥4 + (−2 − 1)𝑥 − 3 = −
1
6𝑥4 − 3x − 3
Closing (2 minutes)
1. Ask pupils to explain in their own words how to combine like terms with fraction coefficients.
(Example answer: Add or subtract the fractions in front of the variable. Keep the same variable
with its same power.)
2. Say: Algebraic expressions containing fractions are simplified just like any other algebraic
expression, except for the extra step of adding or subtracting the fractions.
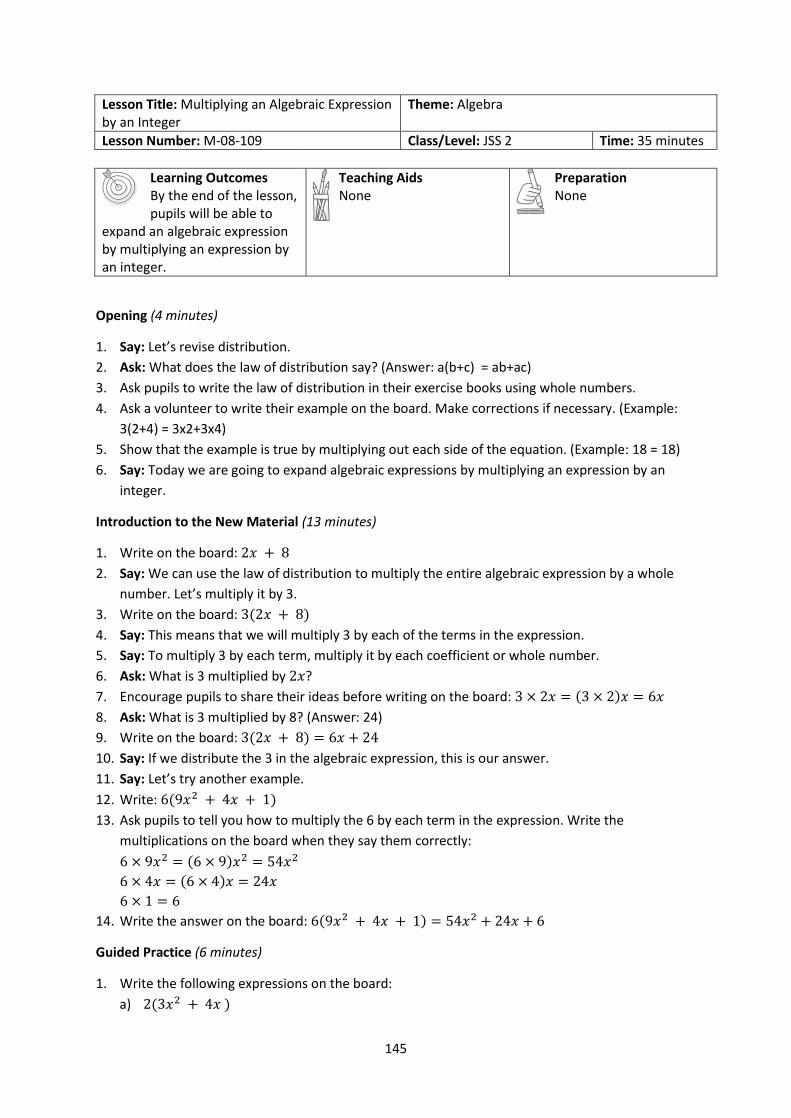
145
Lesson Title: Multiplying an Algebraic Expression by an Integer
Theme: Algebra
Lesson Number: M-08-109 Class/Level: JSS 2 Time: 35 minutes
Learning Outcomes By the end of the lesson, pupils will be able to
expand an algebraic expression by multiplying an expression by an integer.
Teaching Aids None
Preparation None
Opening (4 minutes)
1. Say: Let’s revise distribution.
2. Ask: What does the law of distribution say? (Answer: a(b+c) = ab+ac)
3. Ask pupils to write the law of distribution in their exercise books using whole numbers.
4. Ask a volunteer to write their example on the board. Make corrections if necessary. (Example:
3(2+4) = 3x2+3x4)
5. Show that the example is true by multiplying out each side of the equation. (Example: 18 = 18)
6. Say: Today we are going to expand algebraic expressions by multiplying an expression by an
integer.
Introduction to the New Material (13 minutes)
1. Write on the board: 2𝑥 + 8
2. Say: We can use the law of distribution to multiply the entire algebraic expression by a whole
number. Let’s multiply it by 3.
3. Write on the board: 3(2𝑥 + 8)
4. Say: This means that we will multiply 3 by each of the terms in the expression.
5. Say: To multiply 3 by each term, multiply it by each coefficient or whole number.
6. Ask: What is 3 multiplied by 2𝑥?
7. Encourage pupils to share their ideas before writing on the board: 3 × 2𝑥 = (3 × 2)𝑥 = 6𝑥
8. Ask: What is 3 multiplied by 8? (Answer: 24)
9. Write on the board: 3(2𝑥 + 8) = 6𝑥 + 24
10. Say: If we distribute the 3 in the algebraic expression, this is our answer.
11. Say: Let’s try another example.
12. Write: 6(9𝑥2 + 4𝑥 + 1)
13. Ask pupils to tell you how to multiply the 6 by each term in the expression. Write the
multiplications on the board when they say them correctly:
6 × 9𝑥2 = (6 × 9)𝑥2 = 54𝑥2
6 × 4𝑥 = (6 × 4)𝑥 = 24𝑥
6 × 1 = 6
14. Write the answer on the board: 6(9𝑥2 + 4𝑥 + 1) = 54𝑥2 + 24𝑥 + 6
Guided Practice (6 minutes)
1. Write the following expressions on the board:
a) 2(3𝑥2 + 4𝑥 )
146
b) 8(5𝑥 − 9)
2. Ask pupils to work in pairs to simplify the expressions.
3. Move around the classroom to make sure pupils understand and are doing the task. Remind
pupils to use the law of distribution to help them.
4. Invite two pairs to share their answers on the board. Make corrections if necessary. Ask pupils to
check their answers with the answers on the board. Explain the answers if needed. (Answers: a)
6𝑥2 + 8𝑥; b) 40𝑥 − 72)
Independent Practice (10 minutes)
1. Write the following expressions on the board:
a) 4(𝑥2 + 4𝑥 + 5)
b) −2(𝑥 + 7)
c) −3(2𝑥2 − 2𝑥 + 1)
2. Ask pupils to work individually to simplify the expressions.
3. Move around the classroom to make sure pupils understand and are doing the task. Remind
them of the rules for multiplying negative numbers if needed.
4. After they have finished, ask pupils to share and compare their answers with a partner.
5. Invite three pupils to share their answers on the board. Make corrections if necessary. Ask pupils
to check their answers with the answers on the board. Explain the answers if needed. (Answers:
a) 4𝑥2 + 16𝑥 + 20; b) −2𝑥 − 14; c) −6𝑥2 + 6𝑥 − 3)
Closing (2 minutes)
1. Say: Today, we used the property of distribution to simplify algebraic expressions!
2. Ask pupils to explain how to multiply a number by an expression in their own words. (Example
answer: Multiply the number by the coefficient of each term.)
3. Say: We will continue solving algebraic expressions in our next lesson.

147
Lesson Title: Multiplying Variables Theme: Algebra
Lesson Number: M-08-110 Class/Level: JSS 2 Time: 35 minutes
Learning Outcomes By the end of the lesson, pupils will be able to
multiply two monomials with variables, applying the rules of indices.
Teaching Aids None
Preparation None
Opening (4 minutes)
1. Say: Let’s revise one of the laws of indices.
2. Write on the board: 𝑎𝑚 × 𝑎𝑛
3. Ask pupils to think about and answer the multiplication. Give them one minute.
4. Invite one pupil to write the answer on the board. (Answer: 𝑎𝑚 × 𝑎𝑛 = 𝑎𝑚+𝑛)
5. Say: Remember that we use this law when multiplying terms with exponents with the same
base.
6. Write an example on the board: 34 × 35 = 34+5 = 39
7. Write on the board: 𝑎𝑚 × 𝑏𝑛
8. Say: This law cannot be used if the bases are different. This equation cannot be simplified
because the bases are different.
9. Say: Today we will use this law of indices to multiply two monomials with variables.
Introduction to the New Material (12 minutes)
1. Ask: What is a monomial?
2. Invite pupils to share their ideas and discuss as a class.
3. Say: A monomial is an algebraic expression that contains one term.
4. Say: Examples of monomials include numbers and variables with coefficients.
5. Write some examples of monomials on the board: 5x, 3x2y, 10xy, 5y3, 6x10
6. Write on the board: Simplify 𝑥4 × 𝑥3
7. Say: These are two monomials. Let’s simplify this expression. Use the law of indices and multiply
the monomials in your exercise books.
8. Allow pupils to work for a minute. Then invite one pupil to write the answer on the board.
(Answer: 𝑥4 × 𝑥3 = 𝑥4+3 = 𝑥7)
9. Write another problem on the board: Simplify 4𝑦2 × 2𝑦3
10. Ask: How do you think we can simplify this problem?
11. Invite pupils to share their ideas and discuss as a class.
12. Say: We will multiply the coefficients together, and we will use the law of indices to multiply the
indices together.
13. Write the answer on the board: 4𝑦2 × 2𝑦3 = (4 × 2)(𝑦2 × 𝑦3) = 8𝑦2+3 = 8𝑦5
14. Say: We have simplified the expression.
15. Write another example on the board: Simplify 2𝑥2 × 2𝑦2
16. Ask: How do you think we can simplify this problem?
17. Say: We can still multiply the coefficients together. However, we cannot use the law of indices
because the variables are different.
148
18. Write the answer on the board: 2𝑥2 × 2𝑦2 = (2 × 2)𝑥2𝑦2 = 4𝑥2𝑦2
19. Say: When we multiply two terms with different variables, we write the variables next to each
other like this. Note that we should write them in alphabetical order.
20. Write another example on the board: Simplify 5𝑎 × 4𝑏2
21. Ask: How do you think we can simplify this problem?
22. Invite pupils to share their ideas and discuss as a class. (Answer: multiply the coefficients; we
cannot use the law of indices, so we write the variables together in alphabetical order.)
23. Write the answer on the board: 5𝑎 × 4𝑏2 = (5 × 4)𝑎𝑏2 = 20𝑎𝑏2
Guided Practice (8 minutes)
1. Write the following problems on the board:
a) 2𝑥 × 4𝑦
b) 3𝑎2 × 𝑎4
c) 𝑏4 × 10𝑏
2. Ask pupils to work in pairs to simplify the expressions.
3. Move around the classroom to check for understanding and make sure pupils are doing the task.
Help struggling pupils. For example, make sure they understand that if there is not a coefficient
written, the coefficient there is actually 1.
4. Invite three pairs to write their answers on the board. Make corrections if necessary. Ask the
class to check their answers with the answers on the board. Explain the answers if needed.
(Answers: (a) 8𝑥𝑦; (b) 3𝑎6; (c) 10𝑏5)
Independent Practice (9 minutes)
1. Write the following problems on the board:
a) −2𝑥 × 3𝑥2
b) 3𝑎9 × 8𝑎12
c) 4𝑥𝑦 × 3𝑥2
2. Ask pupils to work individually to simplify the expressions.
3. Move around the classroom to check for understanding and make sure pupils are doing the task.
Help struggling pupils.
4. Remind pupils of the rules for multiplying negative numbers if needed. For question c, you may
need to explain how to combine any matching variables.
5. After they have finished, ask pupils to work in pairs to share and compare their answers.
6. Invite three pupils to write their answers on the board. Make corrections if necessary. Ask the
class to check their answers with the answers on the board. Explain the answers if needed.
(Answers: (a) −6𝑥3; (b) 24𝑎21; (c) 12𝑥3𝑦)
Closing (2 minutes)
1. Say: Today we learned how to simplify monomials by using the law of indices.
2. Ask: Who can remind us what a monomial is? (Answer: A monomial is an algebraic expression
that contains one term.)
3. Ask: Who can remind us what the law of indices says? (Answer: 𝑎𝑚 × 𝑎𝑛 = 𝑎𝑚+𝑛)
149
Lesson Title: Multiplying an Algebraic Expression by a Variable
Theme: Algebra
Lesson Number: M-08-111 Class/Level: JSS 2 Time: 35 minutes
Learning Outcomes By the end of the lesson, pupils will be able to
expand an algebraic expression by multiplying an expression by a variable.
Teaching Aids None
Preparation None
Opening (4 minutes)
1. Say: During the last lesson, we learned how to multiply monomials by using the law of indices.
2. Write a revision problem on the board: 2𝑥𝑦 × 3𝑥
3. Ask pupils to solve the problem in their exercise books.
4. Invite a volunteer to write the answer on the board and explain the answer to the class. Make
corrections if needed. (Answer: 2𝑥𝑦 × 3𝑥 = 6𝑥2𝑦; because we multiply the coefficients, and use
the law of indices to multiply x. We write y after x, in alphabetical order.)
5. Say: Today we are going to learn how to use the same type of process to multiply an entire
algebraic expression by a variable.
Introduction to the New Material (13 minutes)
1. Write on the board: Multiply: 𝑥(3𝑥 + 1)
2. Ask: How do you think we can multiply this?
3. Invite pupils to share their ideas and discuss as a class.
4. Say: We use the property of distribution to multiply x by each term in the expression. Let’s do
the multiplication for each term.
5. Multiply 𝑥 by the first term on the board: 𝑥 × 3𝑥 = 3𝑥1+1 = 3𝑥2
6. Multiply 𝑥 by the second term on the board: 𝑥 × 1 = 𝑥
7. Rewrite the expression: 𝑥(3𝑥 + 1) = 3𝑥2 + 𝑥
8. Say: Another word for multiplying a variable by an expression is ‘expand’.
9. Write another problem on the board: Expand 𝑦(6𝑦2 + 2𝑦 + 1)
10. Ask: How can we solve this problem? (Example answer: Multiply y by each term in the
expression.)
11. Multiply y by each term in the expression on the board:
𝑦 × 6𝑦2 = 6𝑦3
𝑦 × 2𝑦 = 2𝑦2
𝑦 × 1 = 𝑦
12. Write the expanded expression on the board: 𝑦(6𝑦2 + 2𝑦 + 1) = 6𝑦3 + 2𝑦2 + 𝑦
13. Write another example on the board: Expand 𝑥(𝑦2 + 2)
14. Ask pupils to explain how to multiply x by each term. (Example answer: The law of indices
cannot be used, so we need to write the variables next to each other.)
15. Multiply each term by x on the board: 𝑥 × 𝑦2 = 𝑥𝑦2 and 𝑥 × 2 = 2𝑥
16. Write the expanded expression on the board: 𝑥(𝑦2 + 2) = 𝑥𝑦2 + 2𝑥
150
Guided Practice (6 minutes)
1. Write the following problems on the board:
a) 𝑎(𝑎2 + 𝑎)
b) 𝑏(3𝑎 + 2𝑏)
2. Ask pupils to work in pairs to expand the expressions.
3. Move around the classroom to check for understanding and make sure pupils are doing the task.
Help struggling pupils.
4. Invite two pairs to write their answers on the board. Make corrections if necessary. Ask the class
to check their answers with the answers on the board. Explain the answers if needed. (Answers:
(a) 𝑎3 + 𝑎2; (b) 3𝑎𝑏 + 2𝑏2)
Independent Practice (10 minutes)
1. Write the following problems on the board:
a) 𝑥(𝑥 + 𝑦 + 𝑧)
b) 𝑦(3𝑥 + 2𝑦 + 𝑦2)
c) 𝑥(3𝑥4 + 6𝑥3 + 4𝑥2 + 2𝑥 + 6)
2. Ask pupils to work individually to expand the expressions.
3. Move around the classroom to check for understanding and make sure pupils are doing the task.
Help struggling pupils.
4. After pupils have finished, ask them to work in pairs to share and compare their answers.
5. Invite three pupils to write their answers on the board. Make corrections if necessary. Ask the
class to check their answers with the answers on the board. Explain the answers if needed.
(Answers: (a)𝑥2 + 𝑥𝑦 + 𝑥𝑧; (b) 3𝑥𝑦 + 2𝑦2 + 𝑦3; (c) 3𝑥5 + 6𝑥4 + 4𝑥3 + 2𝑥2 + 6𝑥)
Closing (2 minutes)
1. Ask: What are some important things to remember when multiplying an algebraic expression by
a variable? (Example answers: We can use the law of indices to combine variables if they are the
same letter; if we need to write variables next to each other, they should be in alphabetical
order)
2. Say: In the next lesson, we will use what we learned to simplify more complicated algebraic
expressions.
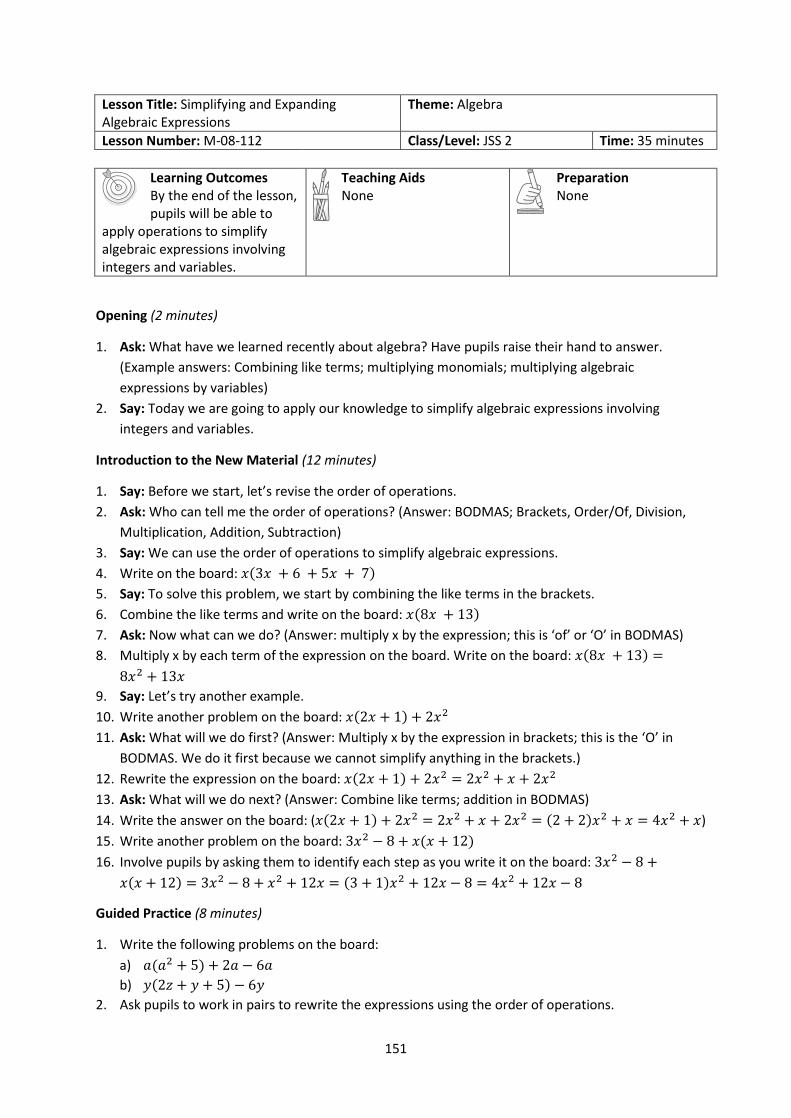
151
Lesson Title: Simplifying and Expanding Algebraic Expressions
Theme: Algebra
Lesson Number: M-08-112 Class/Level: JSS 2 Time: 35 minutes
Learning Outcomes By the end of the lesson, pupils will be able to
apply operations to simplify algebraic expressions involving integers and variables.
Teaching Aids None
Preparation None
Opening (2 minutes)
1. Ask: What have we learned recently about algebra? Have pupils raise their hand to answer.
(Example answers: Combining like terms; multiplying monomials; multiplying algebraic
expressions by variables)
2. Say: Today we are going to apply our knowledge to simplify algebraic expressions involving
integers and variables.
Introduction to the New Material (12 minutes)
1. Say: Before we start, let’s revise the order of operations.
2. Ask: Who can tell me the order of operations? (Answer: BODMAS; Brackets, Order/Of, Division,
Multiplication, Addition, Subtraction)
3. Say: We can use the order of operations to simplify algebraic expressions.
4. Write on the board: 𝑥(3𝑥 + 6 + 5𝑥 + 7)
5. Say: To solve this problem, we start by combining the like terms in the brackets.
6. Combine the like terms and write on the board: 𝑥(8𝑥 + 13)
7. Ask: Now what can we do? (Answer: multiply x by the expression; this is ‘of’ or ‘O’ in BODMAS)
8. Multiply x by each term of the expression on the board. Write on the board: 𝑥(8𝑥 + 13) =
8𝑥2 + 13𝑥
9. Say: Let’s try another example.
10. Write another problem on the board: 𝑥(2𝑥 + 1) + 2𝑥2
11. Ask: What will we do first? (Answer: Multiply x by the expression in brackets; this is the ‘O’ in
BODMAS. We do it first because we cannot simplify anything in the brackets.)
12. Rewrite the expression on the board: 𝑥(2𝑥 + 1) + 2𝑥2 = 2𝑥2 + 𝑥 + 2𝑥2
13. Ask: What will we do next? (Answer: Combine like terms; addition in BODMAS)
14. Write the answer on the board: (𝑥(2𝑥 + 1) + 2𝑥2 = 2𝑥2 + 𝑥 + 2𝑥2 = (2 + 2)𝑥2 + 𝑥 = 4𝑥2 + 𝑥)
15. Write another problem on the board: 3𝑥2 − 8 + 𝑥(𝑥 + 12)
16. Involve pupils by asking them to identify each step as you write it on the board: 3𝑥2 − 8 +
𝑥(𝑥 + 12) = 3𝑥2 − 8 + 𝑥2 + 12𝑥 = (3 + 1)𝑥2 + 12𝑥 − 8 = 4𝑥2 + 12𝑥 − 8
Guided Practice (8 minutes)
1. Write the following problems on the board:
a) 𝑎(𝑎2 + 5) + 2𝑎 − 6𝑎
b) 𝑦(2𝑧 + 𝑦 + 5) − 6𝑦
2. Ask pupils to work in pairs to rewrite the expressions using the order of operations.

152
3. Move around the classroom to check for understanding and make sure pupils are doing the task.
Help struggling pupils. Remind pupils to follow BODMAS.
4. Invite two pairs to write their answers on the board. Make corrections if necessary. Ask the class
to check their answers with the answers on the board. Explain the answers if needed.
(Answers: (a) 𝑎(𝑎2 + 5) + 2𝑎 − 6𝑎 = 𝑎3 + 5𝑎 + 2𝑎 − 6𝑎 = 𝑎3 + (5 + 2 − 6)𝑎 = 𝑎3 + 𝑎;
(b) 𝑦(2𝑧 + 𝑦 + 5) − 6𝑦 = 2𝑦𝑧 + 𝑦2 + 5𝑦 − 6𝑦 = 2𝑦𝑧 + 𝑦2 − 𝑦)
Independent Practice (10 minutes)
1. Write the following problems on the board:
a) 𝑥(𝑥 + 5𝑥 + 9) − 12𝑥
b) 25𝑦 − 𝑦(3 + 9)
c) 𝑥(2 + 𝑦) + 6𝑥 − 𝑦
2. Ask pupils to work individually to rewrite the expressions.
3. Move around the classroom to check for understanding and make sure pupils are doing the task.
Help struggling pupils.
4. After they have finished, ask pupils to work in pairs to share and compare their answers.
5. Invite three pupils to write their answers on the board. Make corrections if necessary. Ask the
class to check their answers with the answers on the board. Explain the answers if needed.
(Answers: (a) 𝑥(𝑥 + 5𝑥 + 9) − 12𝑥 = 𝑥(6𝑥 + 9) − 12𝑥 = 6𝑥2 + 9𝑥 − 12𝑥 = 6𝑥2 −
3𝑥; (b)25𝑦 − 𝑦(3 + 9) = 25𝑦 − 12𝑦 = 13𝑦; (c) 𝑥(2 + 𝑦) + 6𝑥 − 𝑦 = 2𝑥 + 𝑥𝑦 + 6𝑥 − 𝑦 =
8𝑥 + 𝑥𝑦 − 𝑦)
Closing (3 minutes)
1. Ask: What are some important things to remember when we need to do multiple steps, such as
combine like terms and expand expressions? (Example answer: We need to follow the order of
BODMAS; work the inside of brackets if possible, then multiply/expand any expression (‘of’),
then combine like terms.)
2. Say: We will use everything we learned about simplifying algebraic expressions to solve word
problems. We will practise this in the next lesson.
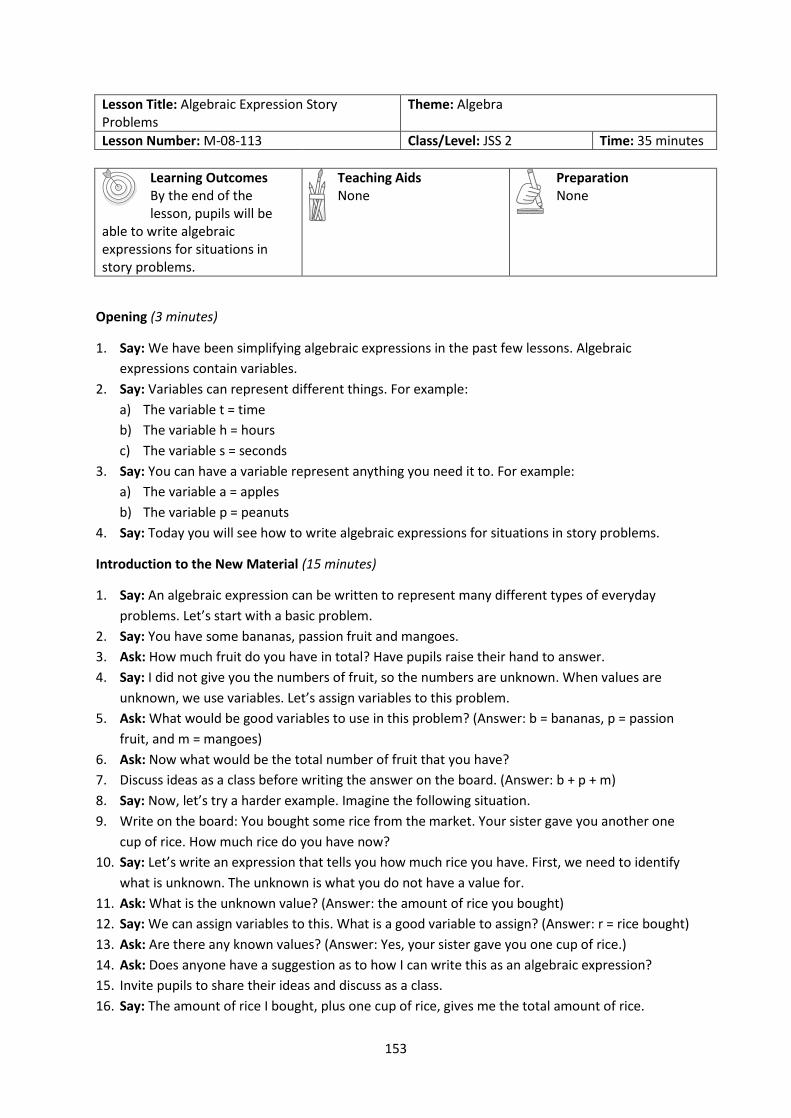
153
Lesson Title: Algebraic Expression Story Problems
Theme: Algebra
Lesson Number: M-08-113 Class/Level: JSS 2 Time: 35 minutes
Learning Outcomes By the end of the lesson, pupils will be
able to write algebraic expressions for situations in story problems.
Teaching Aids None
Preparation None
Opening (3 minutes)
1. Say: We have been simplifying algebraic expressions in the past few lessons. Algebraic
expressions contain variables.
2. Say: Variables can represent different things. For example:
a) The variable t = time
b) The variable h = hours
c) The variable s = seconds
3. Say: You can have a variable represent anything you need it to. For example:
a) The variable a = apples
b) The variable p = peanuts
4. Say: Today you will see how to write algebraic expressions for situations in story problems.
Introduction to the New Material (15 minutes)
1. Say: An algebraic expression can be written to represent many different types of everyday
problems. Let’s start with a basic problem.
2. Say: You have some bananas, passion fruit and mangoes.
3. Ask: How much fruit do you have in total? Have pupils raise their hand to answer.
4. Say: I did not give you the numbers of fruit, so the numbers are unknown. When values are
unknown, we use variables. Let’s assign variables to this problem.
5. Ask: What would be good variables to use in this problem? (Answer: b = bananas, p = passion
fruit, and m = mangoes)
6. Ask: Now what would be the total number of fruit that you have?
7. Discuss ideas as a class before writing the answer on the board. (Answer: b + p + m)
8. Say: Now, let’s try a harder example. Imagine the following situation.
9. Write on the board: You bought some rice from the market. Your sister gave you another one
cup of rice. How much rice do you have now?
10. Say: Let’s write an expression that tells you how much rice you have. First, we need to identify
what is unknown. The unknown is what you do not have a value for.
11. Ask: What is the unknown value? (Answer: the amount of rice you bought)
12. Say: We can assign variables to this. What is a good variable to assign? (Answer: r = rice bought)
13. Ask: Are there any known values? (Answer: Yes, your sister gave you one cup of rice.)
14. Ask: Does anyone have a suggestion as to how I can write this as an algebraic expression?
15. Invite pupils to share their ideas and discuss as a class.
16. Say: The amount of rice I bought, plus one cup of rice, gives me the total amount of rice.
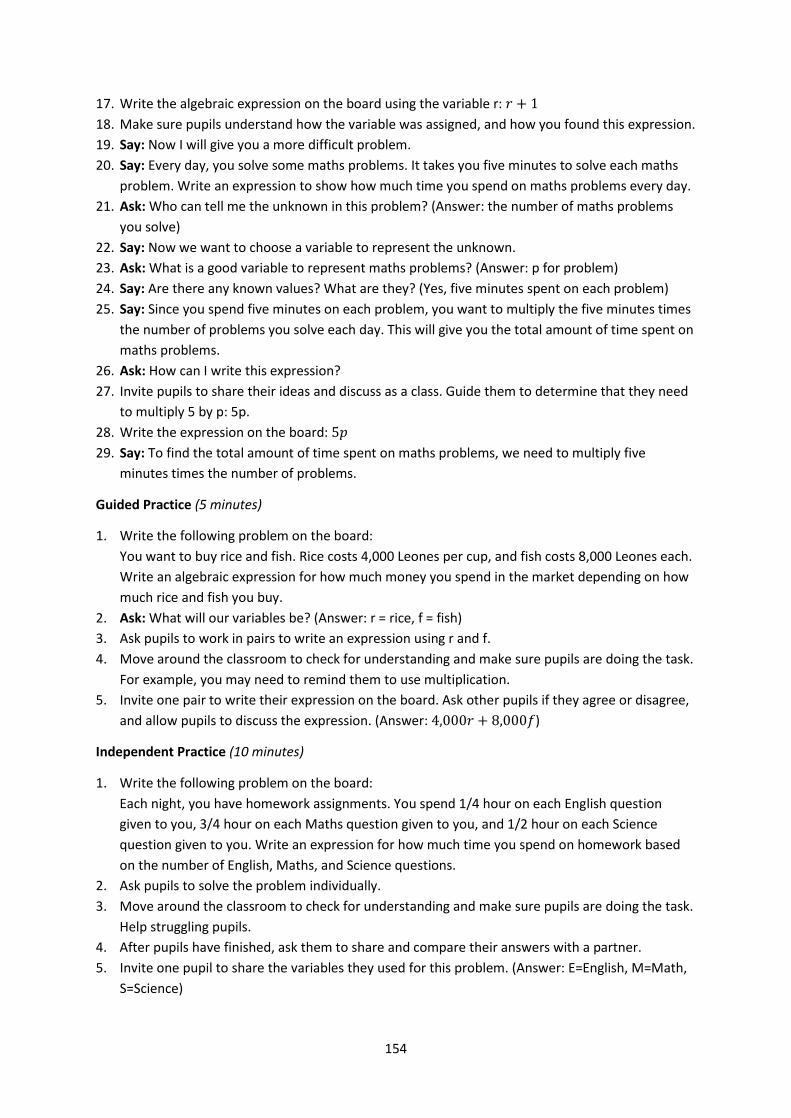
154
17. Write the algebraic expression on the board using the variable r: 𝑟 + 1
18. Make sure pupils understand how the variable was assigned, and how you found this expression.
19. Say: Now I will give you a more difficult problem.
20. Say: Every day, you solve some maths problems. It takes you five minutes to solve each maths
problem. Write an expression to show how much time you spend on maths problems every day.
21. Ask: Who can tell me the unknown in this problem? (Answer: the number of maths problems
you solve)
22. Say: Now we want to choose a variable to represent the unknown.
23. Ask: What is a good variable to represent maths problems? (Answer: p for problem)
24. Say: Are there any known values? What are they? (Yes, five minutes spent on each problem)
25. Say: Since you spend five minutes on each problem, you want to multiply the five minutes times
the number of problems you solve each day. This will give you the total amount of time spent on
maths problems.
26. Ask: How can I write this expression?
27. Invite pupils to share their ideas and discuss as a class. Guide them to determine that they need
to multiply 5 by p: 5p.
28. Write the expression on the board: 5𝑝
29. Say: To find the total amount of time spent on maths problems, we need to multiply five
minutes times the number of problems.
Guided Practice (5 minutes)
1. Write the following problem on the board:
You want to buy rice and fish. Rice costs 4,000 Leones per cup, and fish costs 8,000 Leones each.
Write an algebraic expression for how much money you spend in the market depending on how
much rice and fish you buy.
2. Ask: What will our variables be? (Answer: r = rice, f = fish)
3. Ask pupils to work in pairs to write an expression using r and f.
4. Move around the classroom to check for understanding and make sure pupils are doing the task.
For example, you may need to remind them to use multiplication.
5. Invite one pair to write their expression on the board. Ask other pupils if they agree or disagree,
and allow pupils to discuss the expression. (Answer: 4,000𝑟 + 8,000𝑓)
Independent Practice (10 minutes)
1. Write the following problem on the board:
Each night, you have homework assignments. You spend 1/4 hour on each English question
given to you, 3/4 hour on each Maths question given to you, and 1/2 hour on each Science
question given to you. Write an expression for how much time you spend on homework based
on the number of English, Maths, and Science questions.
2. Ask pupils to solve the problem individually.
3. Move around the classroom to check for understanding and make sure pupils are doing the task.
Help struggling pupils.
4. After pupils have finished, ask them to share and compare their answers with a partner.
5. Invite one pupil to share the variables they used for this problem. (Answer: E=English, M=Math,
S=Science)
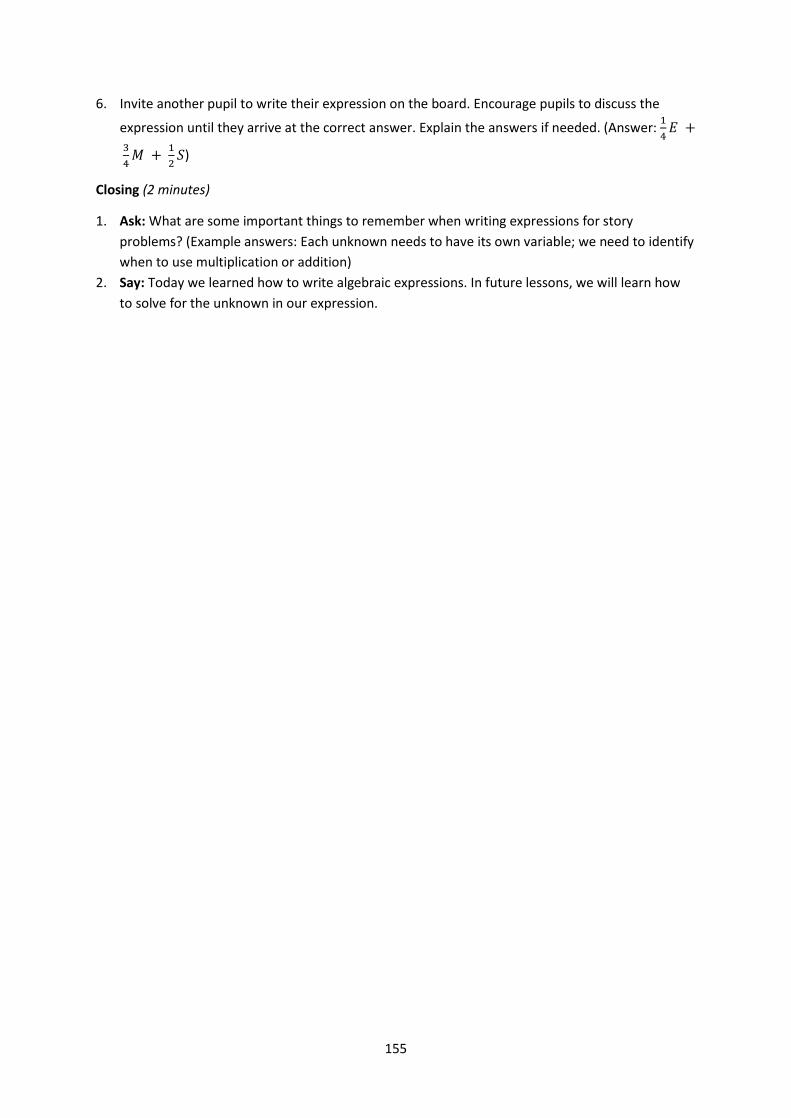
155
6. Invite another pupil to write their expression on the board. Encourage pupils to discuss the
expression until they arrive at the correct answer. Explain the answers if needed. (Answer: 1
4𝐸 +
3
4𝑀 +
1
2𝑆)
Closing (2 minutes)
1. Ask: What are some important things to remember when writing expressions for story
problems? (Example answers: Each unknown needs to have its own variable; we need to identify
when to use multiplication or addition)
2. Say: Today we learned how to write algebraic expressions. In future lessons, we will learn how
to solve for the unknown in our expression.
156
Lesson Title: Factoring Integers from Algebraic Expressions
Theme: Algebra
Lesson Number: M-08-114 Class/Level: JSS 2 Time: 35 minutes
Learning Outcomes By the end of the lesson, pupils will be able to:
1. Identify integers that are common factors in an algebraic expression. 2. Divide common factors from an algebraic expression.
Teaching Aids None
Preparation None
Opening (4 minutes)
1. Say: We are going to revise factors.
2. Ask: What is a factor? Have pupils raise their hand to answer. (Answer: Factors are the numbers
you multiply to get a number.)
3. Ask: What are the factors of 8? (Answer: 8, 4, 2, and 1)
4. Ask: What are the factors of 12? (Answer: 12, 6, 4, 3, 2, and 1)
5. Say: Today we are going to identify and divide common factors from algebraic expressions.
Introduction to the New Material (13 minutes)
1. Say: First, let’s look for common factors in an algebraic expression.
2. Write on the board: 8𝑥 + 4
3. Ask: Look at the terms in this expression. Are there any common factors?
4. Discuss the expression as a class and guide pupils to see that 4 is a common factor, because it
divides both 8x and 4.
5. Say: Now we can factor out 4 from the entire expression. Let’s divide each term by 4.
6. Ask: What is 8x divided by 4? (Answer: 2x, we just divide the coefficient by 4)
7. Write on the board: 8𝑥
4=
8
4𝑥 = 2𝑥
8. Ask: What is 4 divided by 4? (Answer: 1)
9. Say: We can rewrite this expression with the factor outside of the brackets.
10. Write on the board: 8𝑥 + 4 = 4(2𝑥 + 1)
11. Say: The factor goes outside of the brackets. Inside the brackets, we write what we get when we
divide each term by the factor. This is the simplified expression.
12. Write another example on the board: 15𝑥2 + 5𝑥 + 10
13. Ask: Are there any common factors? (Answer: Yes, 5 divides all of the terms)
14. Say: We need to divide each term by 5.
15. Ask pupils to identify how to divide each term by 5, and write the answers on the board: 15𝑥2
5=
15
5𝑥2 = 3𝑥2;
5𝑥
5= 𝑥;
10
5= 2
16. Write the simplified expression on the board: 5(3𝑥2 + 𝑥 + 2)
17. Write another expression on the board: 4x2 +3x +1
18. Ask: Does this expression have a common factor? (Answer: No)
19. Say: We cannot simplify this expression because it does not have a common factor!

157
20. Write another expression on the board: 4𝑥2 + 3𝑥 + 2𝑥2 − 𝑥 + 8 − 4
21. Say: If there are any like terms, we can combine them before factoring. To simplify this
expression, first we combine the like terms.
22. Ask: What do we get if we simplify this expression by combining the like terms? (Answer: 6x2 +
2x +4)
23. Ask: What is the common factor we can factor out of this expression? (Answer: 2)
24. Ask: What is the simplified expression after we factor out the 2? (Answer: 2(3𝑥2 + 𝑥 + 2))
Guided Practice (6 minutes)
1. Write the following problems on the board:
a) 9𝑥3 + 6𝑥2 + 12𝑥 + 15
b) 3𝑥2 + 10𝑥 + 1 + 4𝑥2 + 4𝑥 + 6
2. Ask pupils to work in pairs to rewrite the expressions.
3. Say: With your partner, first try to combine any like terms. Then, try to factor out any numbers.
4. Move around the classroom to check for understanding and make sure pupils are doing the task.
Help struggling pupils.
5. Invite two pairs to write their answers on the board. Make corrections if necessary. Ask the class
to check their answers with the answers on the board. Explain the answers if needed. (Answers:
(a) 9𝑥3 + 6𝑥2 + 12𝑥 + 15 = 3(𝑥3 + 2𝑥2 + 4𝑥 + 5);
(b) 3𝑥2 + 10𝑥 + 1 + 4𝑥2 + 4𝑥 + 6 = 7𝑥2 + 14𝑥 + 7 = 7(𝑥2 + 2𝑥 + 1))
Independent Practice (10 minutes)
1. Write the following problems on the board:
a) 2x2 + 6x + 9 + 7x2 + 6x +3
b) 5x2 + 3x + 4 + x2 + 6x +2
c) 4𝑏 + 16𝑏2 − 8b + 12
2. Ask pupils to work individually to rewrite the expressions.
3. Move around the classroom to check for understanding and make sure pupils are doing the task.
Help struggling pupils.
4. After pupils have finished, ask them to work in pairs to share and compare their answers.
5. Invite three pupils to write their answers on the board. Make corrections if necessary. Ask the
class to check their answers with the answers on the board. Explain the answers if needed.
(Answers: (a) 9𝑥2 + 12𝑥 + 12 = 3(3𝑥2 + 4𝑥 + 4); (b) 6𝑥2 + 9𝑥 + 6 = 3(2𝑥2 + 3𝑥 + 2);
(c) 16𝑏2 − 4b + 12 = 4(4𝑏2 − b + 3))
Closing (2 minutes)
1. Ask: What are some important things to remember when factoring algebraic expressions?
(Answer: Try to combine like terms first, then factor the number out of all of the terms in the
expression.)
2. Say: Today we learned how to simplify an expression by factoring out the common factor.
During our next lesson, we will learn how to factor out variables. Variables can be common
factors too.
158
Lesson Title: Factoring Variables from Algebraic Expressions
Theme: Algebra
Lesson Number: M-08-115 Class/Level: JSS 2 Time: 35 minutes
Learning Outcomes By the end of the lesson, pupils will be able to:
1. Identify variables that are common factors in an algebraic expression. 2. Divide common factors from an algebraic expression.
Teaching Aids None
Preparation None
Opening (3 minutes)
1. Write a revision problem on the board: Factor 4𝑦2 + 16𝑦 − 8
2. Ask: Are there any common factors? Have pupils raise their hand to answer. (Answer: Yes, 4)
3. Ask pupils to factor the expression in their exercise books. If necessary, remind pupils of the
rules for dividing negative numbers.
4. Invite a volunteer to write the answer on the board and explain the answer to the class. Make
corrections if needed. (Answer: 4𝑦2 + 16𝑦 − 8 = 4(𝑦2 + 4𝑦 − 2)
5. Say: Today we are going to learn how to identify variables that are common factors in an
algebraic expression and divide common factors from an algebraic expression.
Introduction to the New Material (14 minutes)
1. Say: Like numbers, variables can be factored.
2. Ask: What are the factors of 𝑥2? (Answer: 𝑥2 = 𝑥 × 𝑥, the factors are 𝑥 and 𝑥)
3. Ask: What are the factors of 2𝑥? (Answer: 2𝑥 = 2 × 𝑥, the factors are 2 and 𝑥)
4. Ask: What are the factors of 𝑥𝑦? (Answer: 𝑥𝑦 = 𝑥 × 𝑦, the factors are 𝑥 and 𝑦)
5. Say: In an algebraic expression, we can look for the common factor, whether number or
variable, and factor it out!
6. Write on the board: 𝑥2 + 2𝑥
7. Say: What is the common factor in the algebraic expression?
8. Invite pupils to share their ideas and discuss as a class.
9. Say: The common factor is x, because it is a factor of both terms. We can rewrite this with x
outside of brackets.
10. Ask: What will I get if I divide the first term by x? (Answer: x, because 𝑥2
𝑥= 𝑥)
11. Ask: What will I get if I divide the second term by x? (Answer: 2, because 2𝑥
𝑥= 2)
12. Write the answer on the board: 𝑥2 + 2𝑥 = 𝑥(𝑥 + 2)
13. Say: This is the factored expression.
14. Write another example on the board: 𝑥2 + 𝑥𝑦
15. Follow the same process to factor this expression with pupils.
16. Write the answer on the board: 𝑥2 + 𝑥𝑦 = 𝑥(𝑥 + 𝑦)
17. Write another example on the board: 𝑥6 + 𝑥2 + 𝑥
159
18. Say: The common factor in this algebraic expression is x, because it can be factored out of all of
the terms.
19. Ask pupils to divide each term by x and state the terms in the factored expression.
20. Write the terms in the factored expression on the board: 𝑥(𝑥5 + 𝑥 + 1)
21. Remind pupils about the laws of indices if needed. When dividing by two indices with the same
base, simply subtract the powers: 𝑥6
𝑥= 𝑥6−1 = 𝑥5
22. Write another example on the board: 10𝑥2 + 20𝑥
23. Say: for this algebraic expression, there is both a common variable and number which can be
factored out.
24. Ask: What is the common number which is a factor? (Answer: 10)
25. Ask: What is the common variable which is a factor? (Answer: x)
26. Say: We write these together on the outside of the brackets, as 10x.
27. Ask pupils to factor 10 and x out of each term. Ask them to raise their hand to share the answer.
Write the correct answer on the board: 10𝑥2 + 20𝑥 = 10𝑥(𝑥 + 2)
28. Say: We can also simplify expressions by combining like terms before factoring out.
29. Write another example on the board: 3𝑦 + 10𝑦2 − 4𝑦2 + 6𝑦
30. Ask pupils to combine the like terms in their exercise book. Give pupils time to write.
31. Invite one pupil to write the answer on the board. (Answer: 6𝑦2 + 9𝑦)
32. Ask: Now, what can be factored out from this expression? (Answer: 3 and y)
33. Ask pupils to identify how to factor 3y, and write the answer on the board: 6𝑦2 + 9𝑦 =
3𝑦(2𝑦 + 3)
Guided Practice (6 minutes)
1. Write the following problems on the board:
a) 8𝑥2 + 2𝑥2 + 10𝑥
b) 3𝑎3 + 4𝑎 + 5𝑎 + 15𝑎3
2. Ask pupils to work in pairs to simplify the algebraic expressions by factoring out the common
numbers and variables.
3. Say: Now, with your partner, simplify the algebraic expressions by factoring out the common
numbers and variables. Make sure you combine like terms before removing the common
factors.
4. Move around the classroom to check for understanding and make sure pupils are doing the task.
Help struggling pupils.
5. Invite two pairs to write their answers on the board. Make corrections if necessary. Ask the class
to check their answers with the answers on the board. Explain the answers if needed. (Answers:
(a) 8𝑥2 + 2𝑥2 + 10𝑥 = 10𝑥2 + 10𝑥 = 10𝑥(𝑥 + 1); (b) 3𝑎3 + 4𝑎 + 5𝑎 + 15𝑎3 = 18𝑎3 +
9𝑎 = 9𝑎(2𝑎2 + 1))
Independent Practice (10 minutes)
1. Write the following problems on the board:
a) 2𝑎𝑏 + 4𝑎2
b) 5𝑥2 − 15x + 25x
c) 3𝑥5 − 6𝑥4 + 7𝑥3
2. Ask pupils to work individually to factor the expressions.

160
3. Say: Simplify the expressions by combining like terms and factoring out the common factors.
4. Move around the classroom to check for understanding and make sure pupils are doing the task.
Help struggling pupils.
5. After pupils have finished, ask them to work in pairs to share and compare their answers.
6. Invite 3 pupils to write their answers on the board. Make corrections if necessary. Ask the class
to check their answers with the answers on the board. Explain the answers if needed.
(Answers: (a) 2𝑎𝑏 + 4𝑎2 = 2𝑎(𝑏 + 2𝑎); (b) 5𝑥2 − 15x + 25x = 5𝑥2 + 10x =
5x(x + 2); (c) 3𝑥5 − 6𝑥4 + 7𝑥3 = 𝑥3(3𝑥2 − 6x + 7))
Closing (2 minutes)
1. Ask: What are some important things to remember when factoring variables and numbers?
(Answer: Combine like terms first if possible; divide each term by the same variable and/or
numbers; write any factors together outside of the brackets)
1. Say: In this lesson, we learned how to remove common factors, both numbers and variables
from an expression. In the next unit, we will use what we have learned to solve algebraic
equations.

161