
manual_eng_v1-1.pdf - Glide Instruments
25
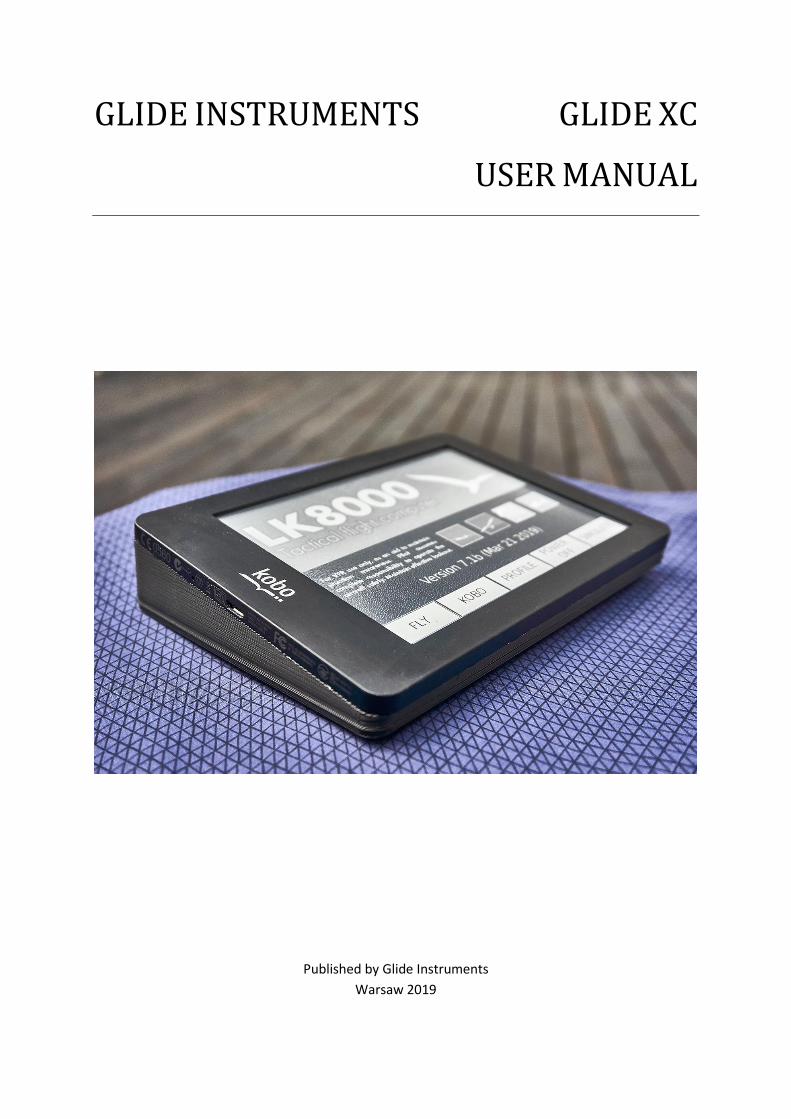
GLIDE INSTRUMENTS GLIDE XC USER MANUAL Published by Glide Instruments Warsaw 2019
-
Upload
khangminh22 -
Category
Documents
-
view
4 -
download
0
Transcript of manual_eng_v1-1.pdf - Glide Instruments
GLIDE INSTRUMENTS GLIDE XC
USER MANUAL
Published by Glide Instruments
Warsaw 2019
Page 3 of 25
Table of contents
1 INSTRUMENT OVERVIEW .................................................................................................................. 4
1.1 IN THE BOX ........................................................................................................................................ 4
1.2 PHYSICAL DETAILS ............................................................................................................................... 4
1.3 BUTTONS AND CONNECTORS ................................................................................................................. 5
1.4 SUPPORT ........................................................................................................................................... 5
2 QUICK START ..................................................................................................................................... 6
3 START MENU ..................................................................................................................................... 8
3.1 OVERVIEW ......................................................................................................................................... 8
3.2 NICKEL .............................................................................................................................................. 8
3.3 TOOLS MENU ..................................................................................................................................... 9
3.4 NETWORK MENU ................................................................................................................................ 9
4 LK8000 ............................................................................................................................................. 10
4.1 WHY LK8000? ................................................................................................................................ 10
4.2 BASIC OPERATION ............................................................................................................................. 11
4.3 SCREEN LAYOUT ................................................................................................................................ 12
4.3.1 MAIN MAP ................................................................................................................................... 13
4.3.2 SIDE TRACK (MULTIMAP 1) .............................................................................................................. 13
4.3.3 SIDE TARGET (MULTIMAP 2) ............................................................................................................ 14
4.3.4 SIDE AIRSPACE (MULTIMAP 3) .......................................................................................................... 14
4.3.5 THERMAL ASSISTANT ...................................................................................................................... 15
4.3.6 MAP PAN MODE ............................................................................................................................ 15
4.3.7 BOTTOM BAR ................................................................................................................................ 16
4.4 AIRSPACES ....................................................................................................................................... 17
4.5 TASKS AND WAYPOINTS ...................................................................................................................... 18
4.6 CONFIGURATION ............................................................................................................................... 20
5 XCSOAR ............................................................................................................................................ 20
6 ADDITIONAL FEATURES ................................................................................................................... 21
6.1 FTP SERVER ..................................................................................................................................... 21
6.2 AUP DOWNLOAD .............................................................................................................................. 23
6.3 VARIO MENU .................................................................................................................................... 24
7 APPENDIX A: GPS+VARIO MODULE CONFIGURATION .................................................................... 25
7.1 GPS + VARIO MODULE ...................................................................................................................... 25
7.2 LK8000 CONFIGURATION .................................................................................................................. 25
Page 4 of 25
1 INSTRUMENT OVERVIEW
1.1 IN THE BOX • Glide Instruments Glide XC
• 2x velcro
• micro USB cable
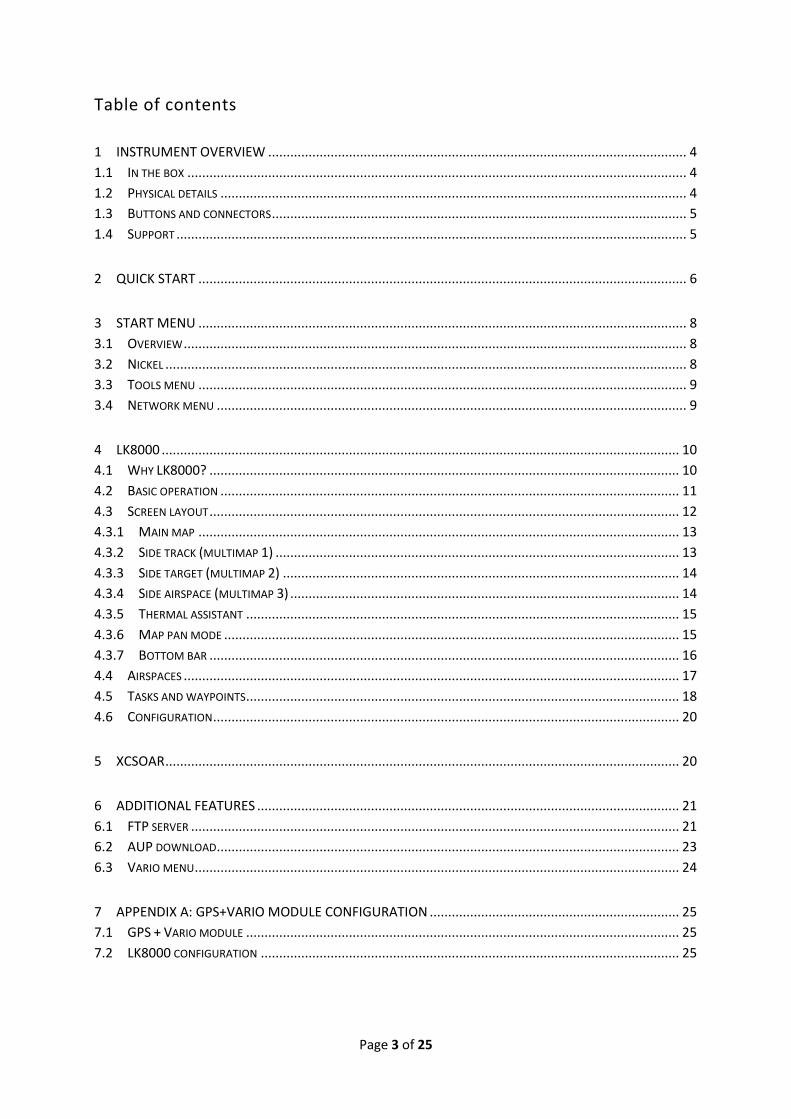
1.2 PHYSICAL DETAILS • dimensions: 157 x 114 x 14-34 mm
• weight: ~280 g
• screen size: 6 inch (15 cm; 12 x 9 cm; 4:3)
34
mm
1
4 m
m
Page 5 of 25
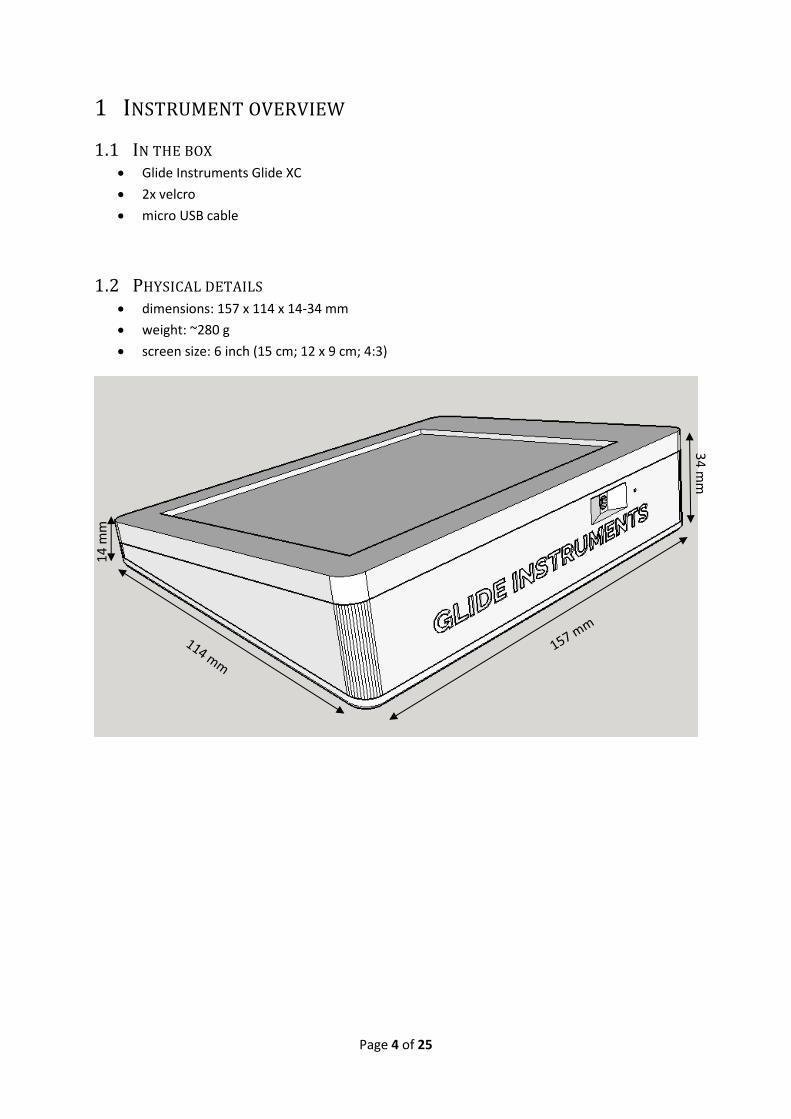
1.3 BUTTONS AND CONNECTORS • power button (right side, slide switch),
• backlight button (right side, push, e-book mode only),
• vario module button (top side, long push to turn on/off, click to change sound mode),
• micro USB connector (left side, charging and communication port).
1.4 SUPPORT To reset the device, slide power button down and hold it for 30 seconds. After that, again slide power
button down and turn on the device. In case of damage or malfunction, please contact us via e-mail or
website:
• https://glideinstruments.eu
All products are subject to 24 months warranty, including all defects, excluding physical damage of the
device. Feel free to write to us with any question.
backlight
button
power
button
vario button
micro USB
power backlight button button
Page 6 of 25
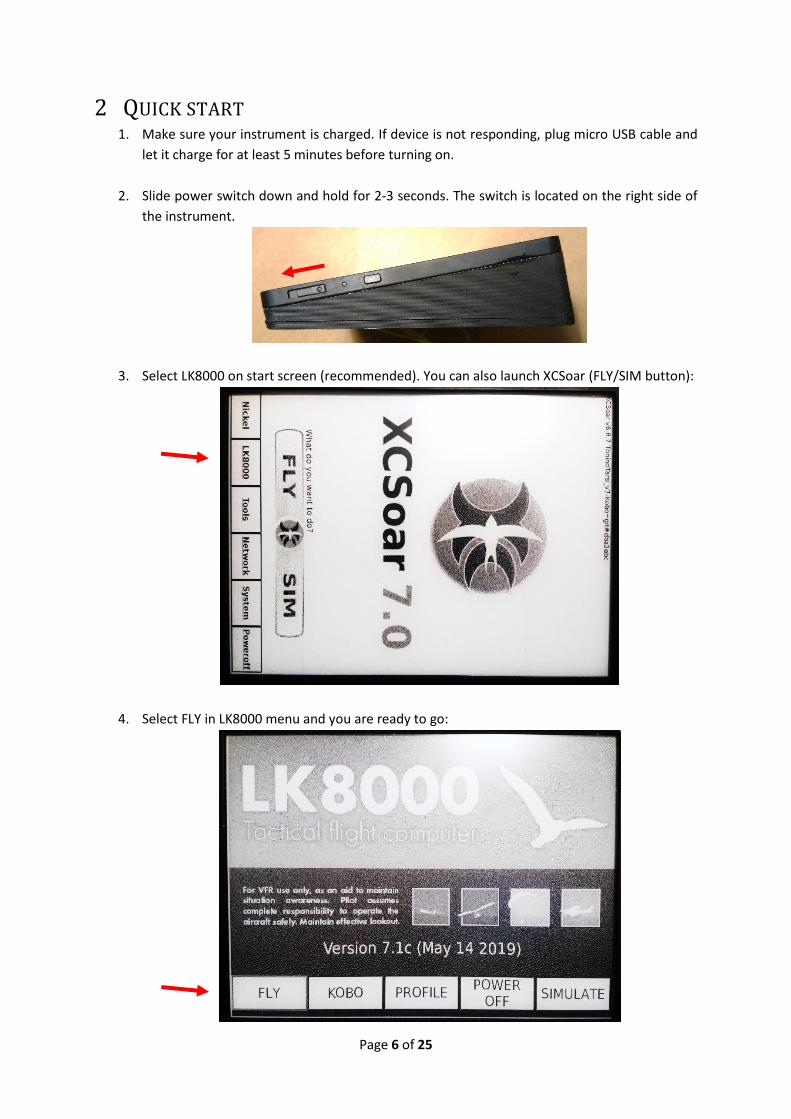
2 QUICK START 1. Make sure your instrument is charged. If device is not responding, plug micro USB cable and
let it charge for at least 5 minutes before turning on.
2. Slide power switch down and hold for 2-3 seconds. The switch is located on the right side of
the instrument.
3. Select LK8000 on start screen (recommended). You can also launch XCSoar (FLY/SIM button):
4. Select FLY in LK8000 menu and you are ready to go:
Page 7 of 25
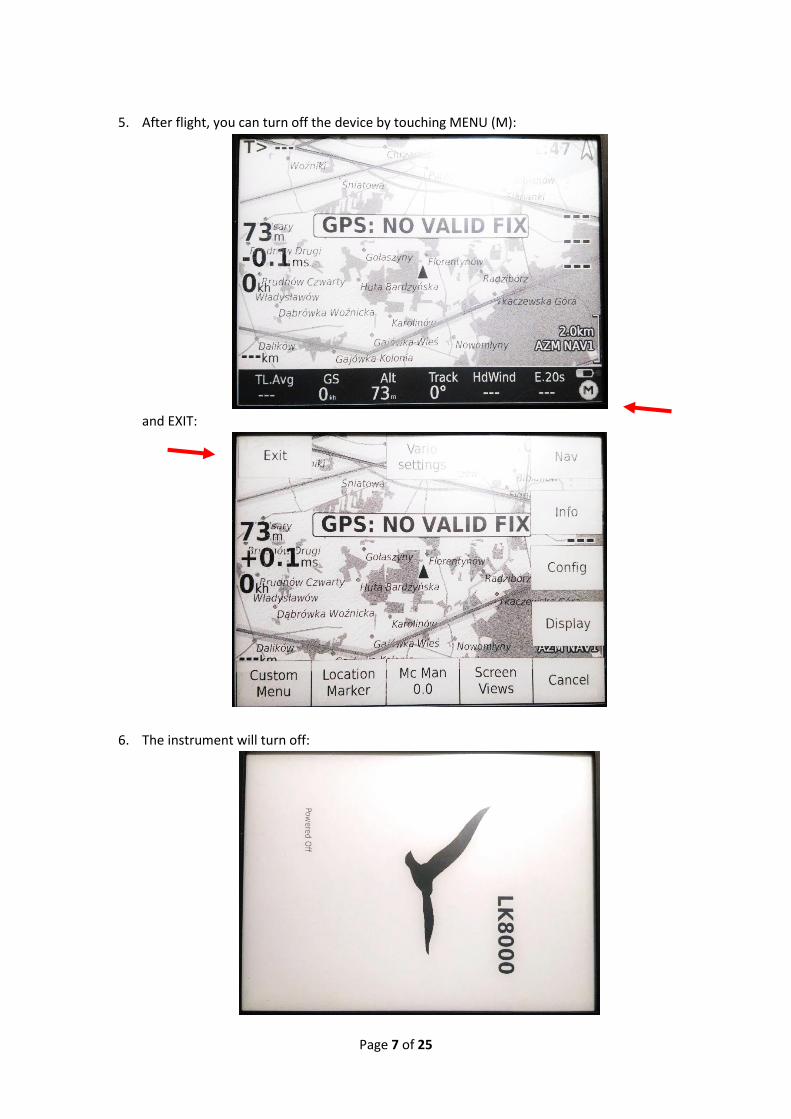
5. After flight, you can turn off the device by touching MENU (M):
and EXIT:
6. The instrument will turn off:
Page 8 of 25
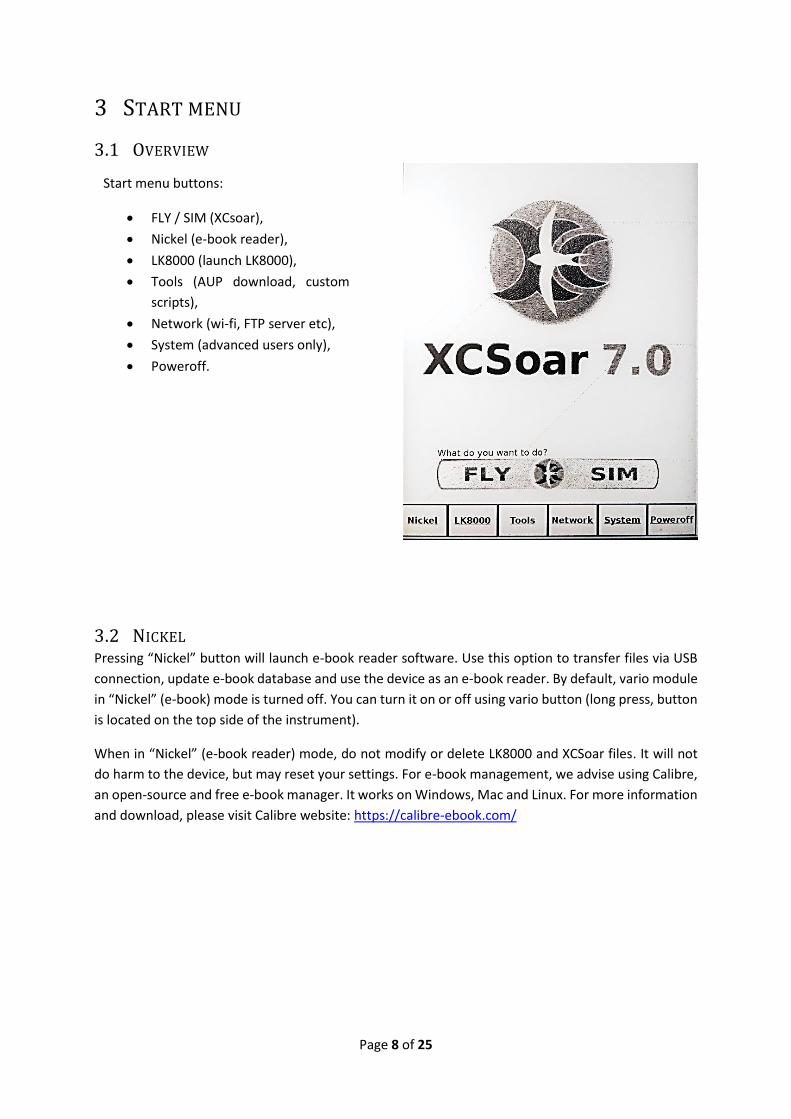
3 START MENU
3.1 OVERVIEW
3.2 NICKEL Pressing “Nickel” button will launch e-book reader software. Use this option to transfer files via USB
connection, update e-book database and use the device as an e-book reader. By default, vario module
in “Nickel” (e-book) mode is turned off. You can turn it on or off using vario button (long press, button
is located on the top side of the instrument).
When in “Nickel” (e-book reader) mode, do not modify or delete LK8000 and XCSoar files. It will not
do harm to the device, but may reset your settings. For e-book management, we advise using Calibre,
an open-source and free e-book manager. It works on Windows, Mac and Linux. For more information
and download, please visit Calibre website: https://calibre-ebook.com/
Start menu buttons:
• FLY / SIM (XCsoar),
• Nickel (e-book reader),
• LK8000 (launch LK8000),
• Tools (AUP download, custom
scripts),
• Network (wi-fi, FTP server etc),
• System (advanced users only),
• Poweroff.
Page 9 of 25
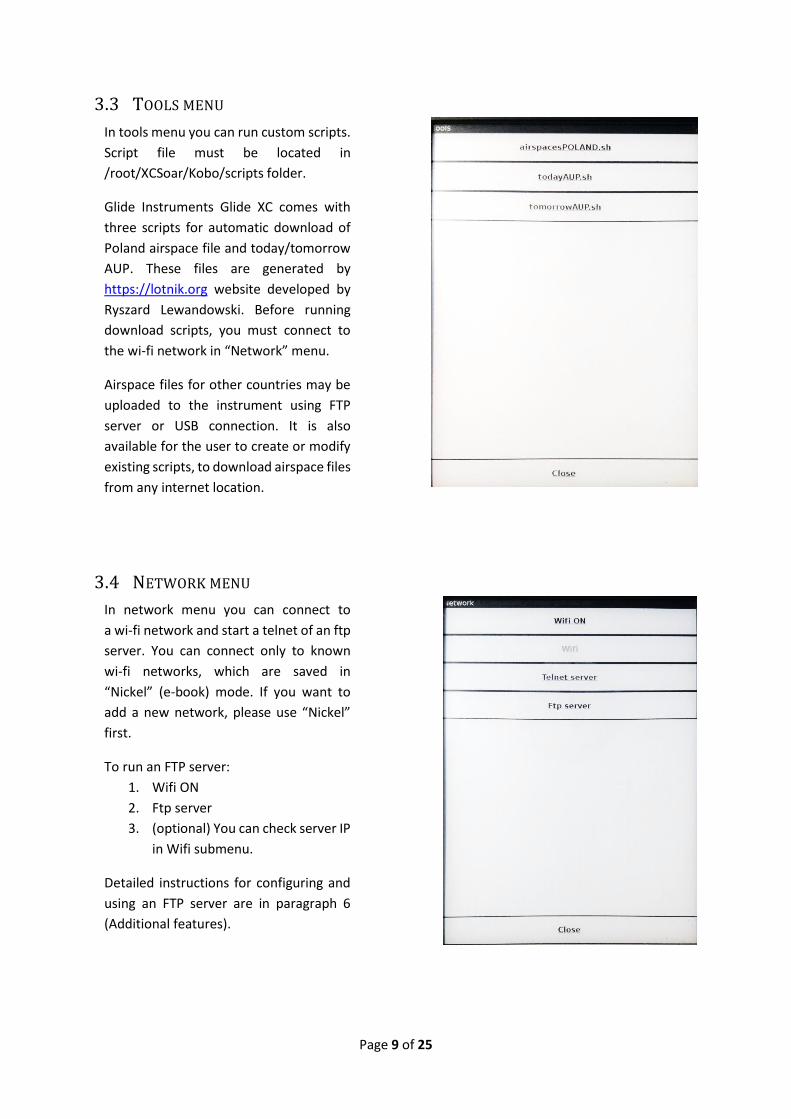
3.3 TOOLS MENU
3.4 NETWORK MENU
In tools menu you can run custom scripts.
Script file must be located in
/root/XCSoar/Kobo/scripts folder.
Glide Instruments Glide XC comes with
three scripts for automatic download of
Poland airspace file and today/tomorrow
AUP. These files are generated by
https://lotnik.org website developed by
Ryszard Lewandowski. Before running
download scripts, you must connect to
the wi-fi network in “Network” menu.
Airspace files for other countries may be
uploaded to the instrument using FTP
server or USB connection. It is also
available for the user to create or modify
existing scripts, to download airspace files
from any internet location.
Advanced users can put their own scripts
and run them from “Tools” menu.
In network menu you can connect to
a wi-fi network and start a telnet of an ftp
server. You can connect only to known
wi-fi networks, which are saved in
“Nickel” (e-book) mode. If you want to
add a new network, please use “Nickel”
first.
To run an FTP server:
1. Wifi ON
2. Ftp server
3. (optional) You can check server IP
in Wifi submenu.
Detailed instructions for configuring and
using an FTP server are in paragraph 6
(Additional features).

Page 10 of 25
4 LK8000
4.1 WHY LK8000? LK8000 is an open-source software developed by glider and paraglider pilots and based on well-known
glide computer – XCSoar. While both programs use the same “engine”, they differ in interface and
some useful features. We strongly encourage you to use LK8000, even if you are familiar with XCSoar,
for the following reasons:
• LK8000 is reliable and well-tested software, with full support of used GPS+Vario module,
• LK8000 receives faster updates, current version 7.1c was released in May 2019,
• LK8000 is better suited for paragliding, with paragliding specific options in configuration menu,
• LK8000 does not have “big cylinder” bug, which exists in the current version of XCSoar
(miscalculation of distance to cylinder edge),
• LK8000 shows better airspace warnings and airspace maps, with horizontal and vertical cross-
section. LK8000 supports sound warnings, which are not supported in current XCSoar version.
Main LK8000 features are:
• display basic flight data, such as altitude, speed, lift/sink value (using GPS and baro sensor),
• track logger, IGC file with g-record (OLC verification),
• calculate wind speed and bearing, calculate current L/D (using wing polar and wind speed),
• create task directly on the instrument, save it or load from file,
• navigate through terrain and task/waypoints, with sound warnings (next turnpoint, final glide,
altitude warning),
• show predicted altitude over next waypoint and task finish,
• show predicted range including terrain and wind,
• switchable and configurable terrain, topo and airspace maps,
• thermal assistant (previous thermal locations, current core, thermal statistics),
• airspace assistant, vertical and horizontal cross-sections and sound warnings,
• dedicated screens (so called “multimaps”) showing vertical cross-sections of airspaces and
terrain, on current and next turnpoint bearing,
• calculating OLC distance during flight,
• FAI triangle assistant,
• track replay (sim mode),
• and many other.
Next paragraphs describe these features in more detail.

Page 11 of 25
4.2 BASIC OPERATION Glide Instruments Glide XC is preconfigured and ready to use “out of the box”. It uses touch interface,
where the screen is divided into sections. You navigate through maps and menus with one finger only.
The main screen is divided into two sections:
• map, with touch areas (zoom in/out, change multimap) and overlays (time, flight parameters),
• bottom bar, with more information. You can change whats on the bar touching its left or right
side. The bottom bar changes itself when in thermalling, cruise or final-glide mode and displays
context-important parameters.
• on the map there are two additional touch areas (configurable): top left – pan mode;
top right – screen lock, extremely useful before takeoff and auto disabling after takeoff.
• touching bottom bar in the middle will open a full screen infopage and close the map. To return
to a map view, touch it again.
• long click on a map screen will show nearby objects, waypoint and airspaces. You can do
variety action with them.

Page 12 of 25
4.3 SCREEN LAYOUT LK8000 map interface is divided into so called “multimaps”. You can change current multimap by
swiping left or right in the middle of the screen. Current multimap number is shown in the bottom
right corner as a number ( ).
In all multimap screens, you can manually change zoom by touching the top or bottom part of the map:
Change bottom bar by touching its left or right side:
Open and close full screen infopage by touching the bottom bar in the middle:
Change to previous / next multimap (or infopage) by swiping left / right in the middle of the screen:
Note that changing multimap requires 2-3 seconds of computing time. It is a lot to process.
Page 13 of 25
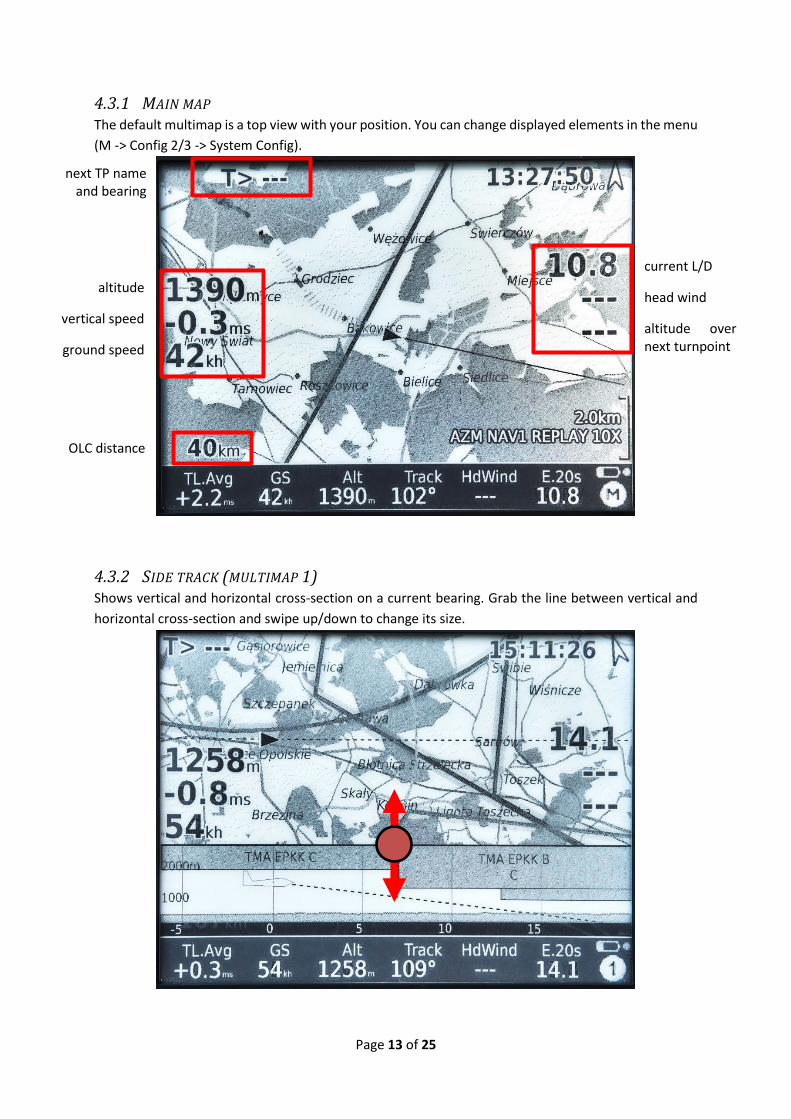
4.3.1 MAIN MAP The default multimap is a top view with your position. You can change displayed elements in the menu
(M -> Config 2/3 -> System Config).
4.3.2 SIDE TRACK (MULTIMAP 1) Shows vertical and horizontal cross-section on a current bearing. Grab the line between vertical and
horizontal cross-section and swipe up/down to change its size.
altitude
vertical speed
ground speed
current L/D
head wind
altitude over next turnpoint
next TP name and bearing
OLC distance
Page 14 of 25
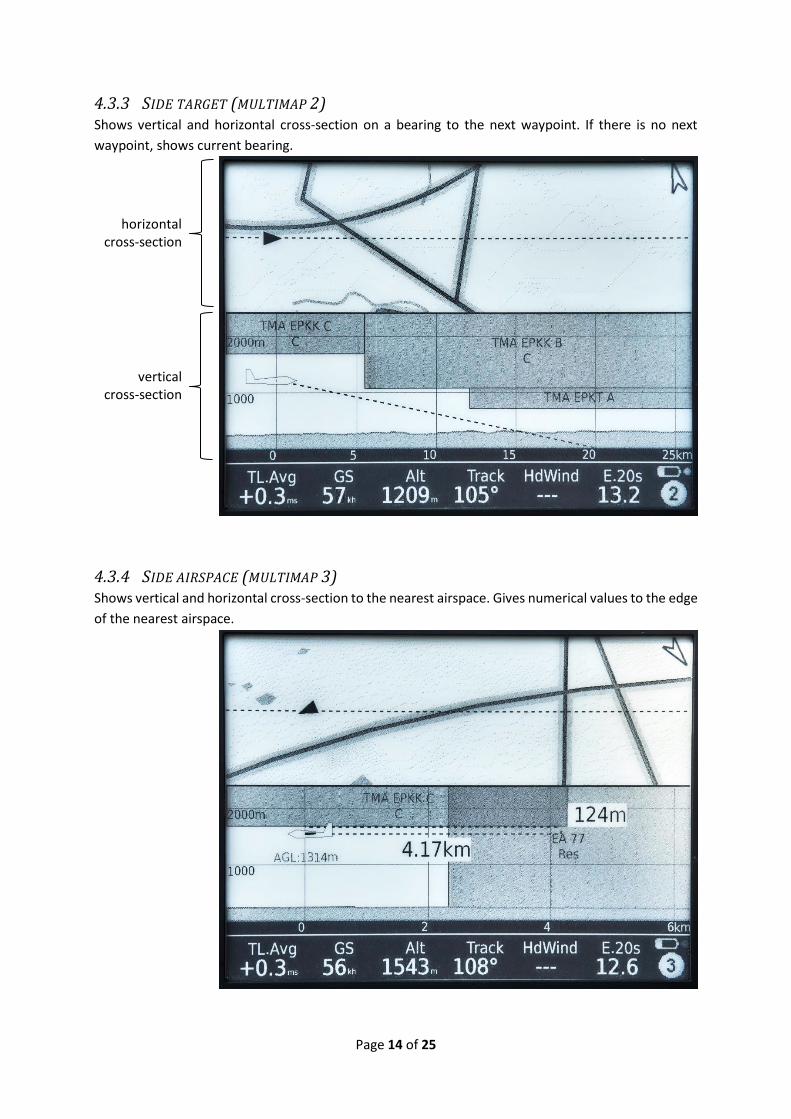
4.3.3 SIDE TARGET (MULTIMAP 2) Shows vertical and horizontal cross-section on a bearing to the next waypoint. If there is no next
waypoint, shows current bearing.
4.3.4 SIDE AIRSPACE (MULTIMAP 3) Shows vertical and horizontal cross-section to the nearest airspace. Gives numerical values to the edge
of the nearest airspace.
horizontal cross-section
vertical cross-section
Page 15 of 25
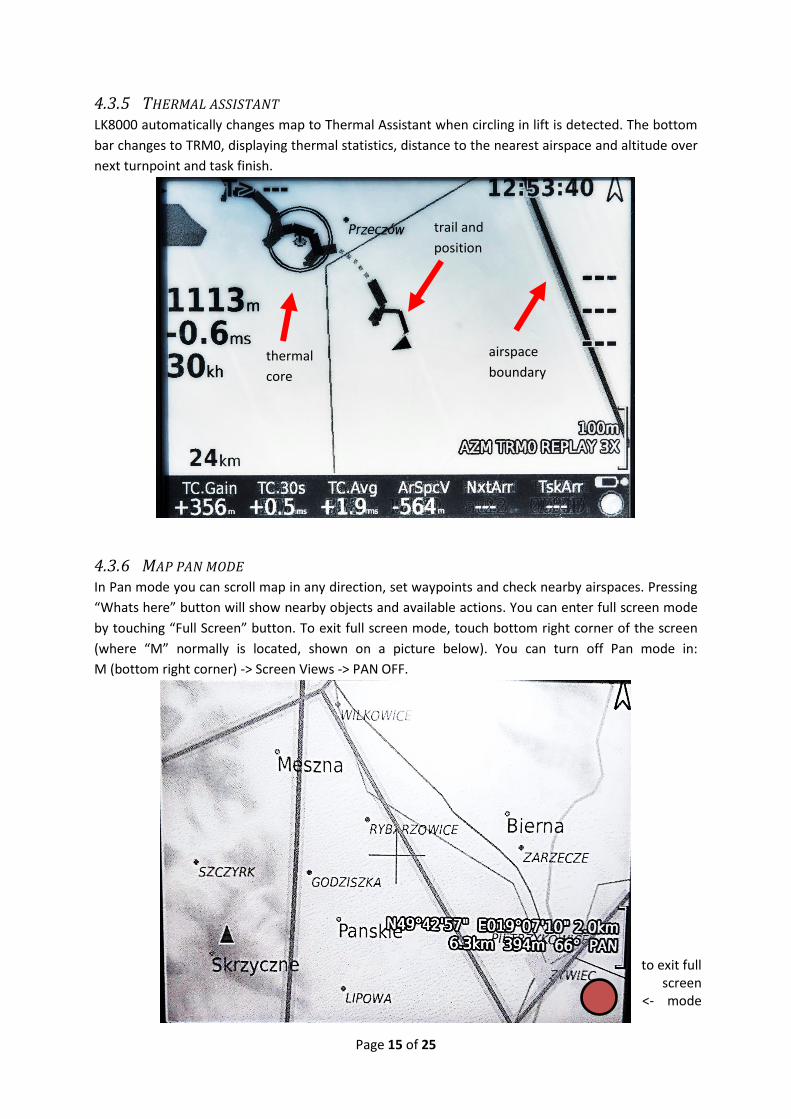
4.3.5 THERMAL ASSISTANT LK8000 automatically changes map to Thermal Assistant when circling in lift is detected. The bottom
bar changes to TRM0, displaying thermal statistics, distance to the nearest airspace and altitude over
next turnpoint and task finish.
4.3.6 MAP PAN MODE In Pan mode you can scroll map in any direction, set waypoints and check nearby airspaces. Pressing
“Whats here” button will show nearby objects and available actions. You can enter full screen mode
by touching “Full Screen” button. To exit full screen mode, touch bottom right corner of the screen
(where “M” normally is located, shown on a picture below). You can turn off Pan mode in:
M (bottom right corner) -> Screen Views -> PAN OFF.
thermal
core
trail and
position
airspace
boundary
to exit full screen
<- mode
Page 16 of 25
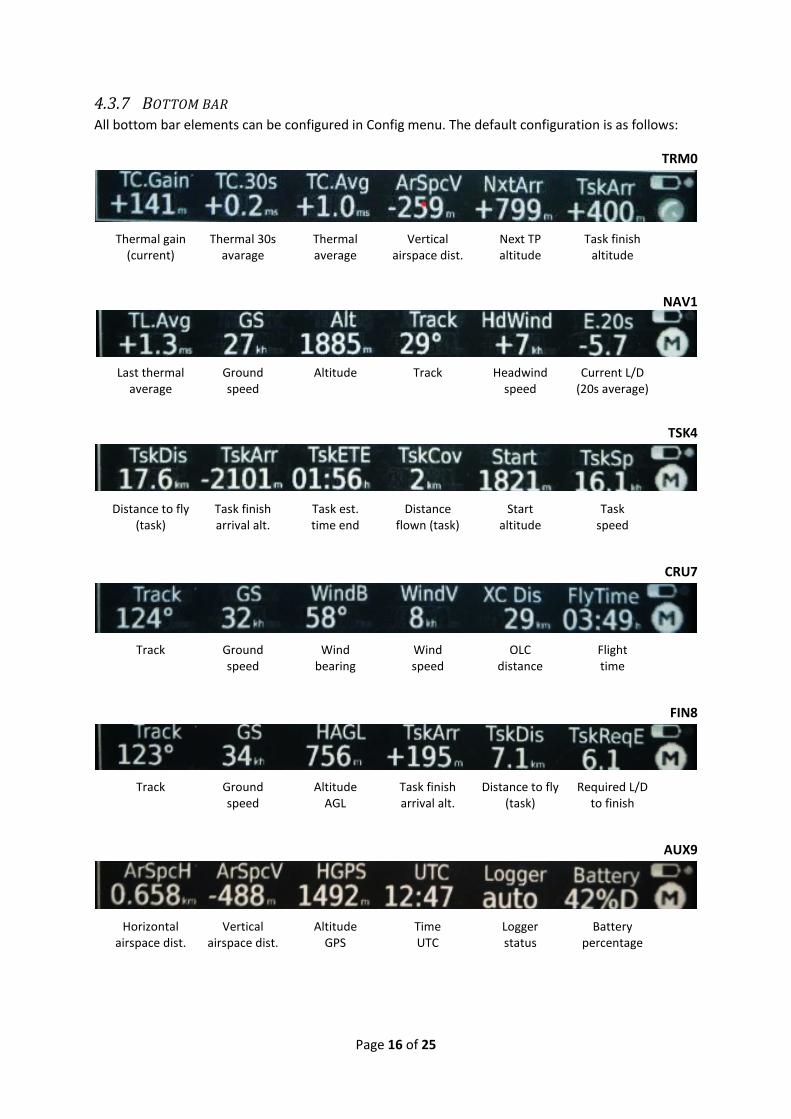
4.3.7 BOTTOM BAR All bottom bar elements can be configured in Config menu. The default configuration is as follows:
TRM0
NAV1
TSK4
CRU7
FIN8
AUX9
Thermal gain (current)
Thermal 30s avarage
Thermal average
Vertical airspace dist.
Next TP altitude
Task finish altitude
Last thermal average
Ground speed
Altitude Track Headwind speed
Current L/D (20s average)
Distance to fly (task)
Task finish arrival alt.
Task est. time end
Distance flown (task)
Start altitude
Task speed
Track Ground speed
Wind bearing
Wind speed
OLC distance
Flight time
Track Ground speed
Altitude AGL
Task finish arrival alt.
Distance to fly (task)
Required L/D to finish
Horizontal airspace dist.
Vertical airspace dist.
Altitude GPS
Time UTC
Logger status
Battery percentage
Page 17 of 25
4.4 AIRSPACES Airspace files can be downloaded from the Internet and uploaded to Glide Instruments Glide XC using
FTP server or USB connection. It is also possible to download airspace and current AUP files for Poland
airspaces, directly from the instrument, using AUP download feature (“Tools” menu from start screen,
described in paragraph 6.2). You have to connect the device to the wi-fi network before running AUP
download scripts.
In other cases, you can download airspace files manually and upload them to the instrument. The most
popular and reliable sources are:
• Soaring web: http://soaringweb.org/Airspace/HomePage.html
• XContest: https://airspace.xcontest.org/
• lotnik.org (Poland only): https://lotnik.org
It is possible to add user script for downloading airspace files for desired location, directly from the
instrument “Tools” menu. By default, only Poland airspaces are supported.
To use an airspace file, you have to select it in the System Setup menu (M-> Config 2/3 -> System setup
-> 1. Site: Airspace files). Airspaces can be shown on the map screen or not – to change airspaces
visibility, use Display setting menu (M -> Display -> Airspace ON/OFF).
Airspace warnings are displayed automatically, no matter if airspaces are displayed on a map screen
or not. They are displayed when approaching, entering and leaving an airspace and are followed by a
sound warning. You can disable any airspace on a map screen, acknowledge it for 30 minutes
(suppresses warnings for 30 minutes) or close warning dialog (you still will be warned about that
airspace).
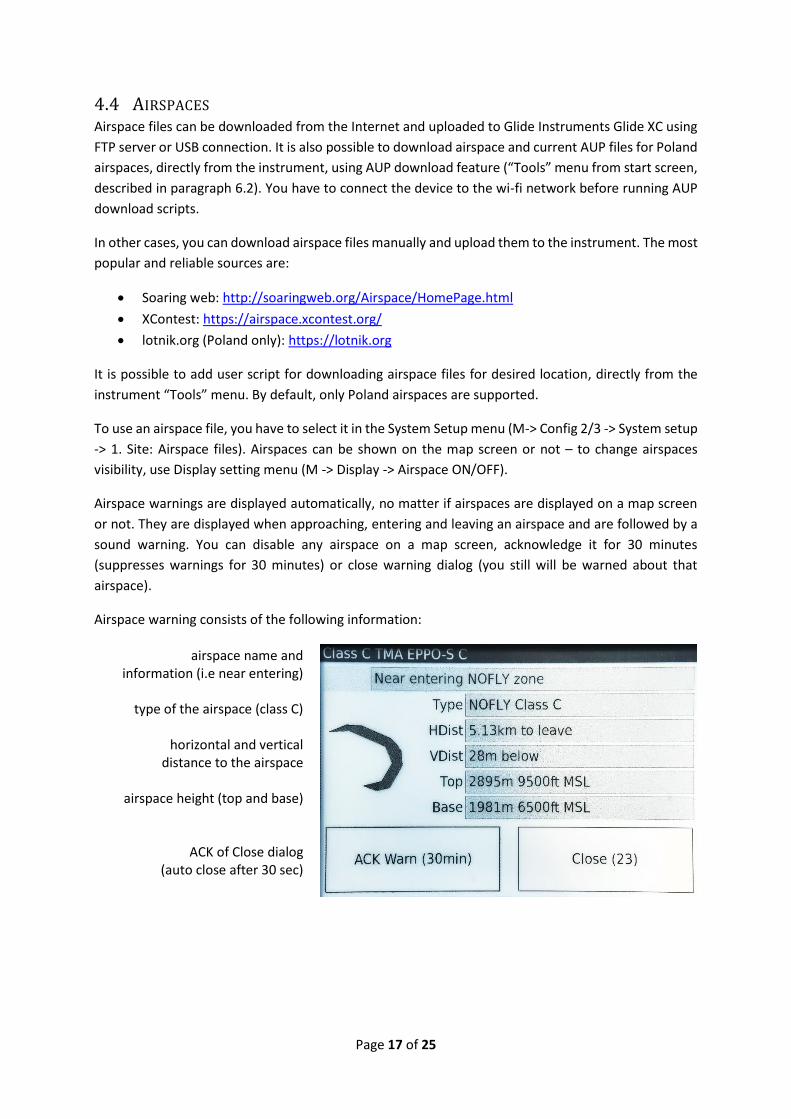
Airspace warning consists of the following information:
airspace name and information (i.e near entering)
type of the airspace (class C)
horizontal and vertical
distance to the airspace
airspace height (top and base)
ACK of Close dialog (auto close after 30 sec)
Page 18 of 25
4.5 TASKS AND WAYPOINTS Task and waypoints can be set using Nav menu. It is possible to manually define tasks and waypoints
using LK8000 interface or upload .wpt, .cup and .lkt (LK8000 task) files. Files should be placed in folders:
LK8000/_Waypoints for wpt and cup waypoints and LK8000/_Tasks for lkt tasks.
If you have all necessary waypoints defined in a file, you can upload it on the instrument. To add
waypoint file to LK8000 go to System Setup menu (M -> Config 2/3 -> LK8000 Setup -> System Setup)
and in “1. Site” submenu select desired .cup or .wpt file.
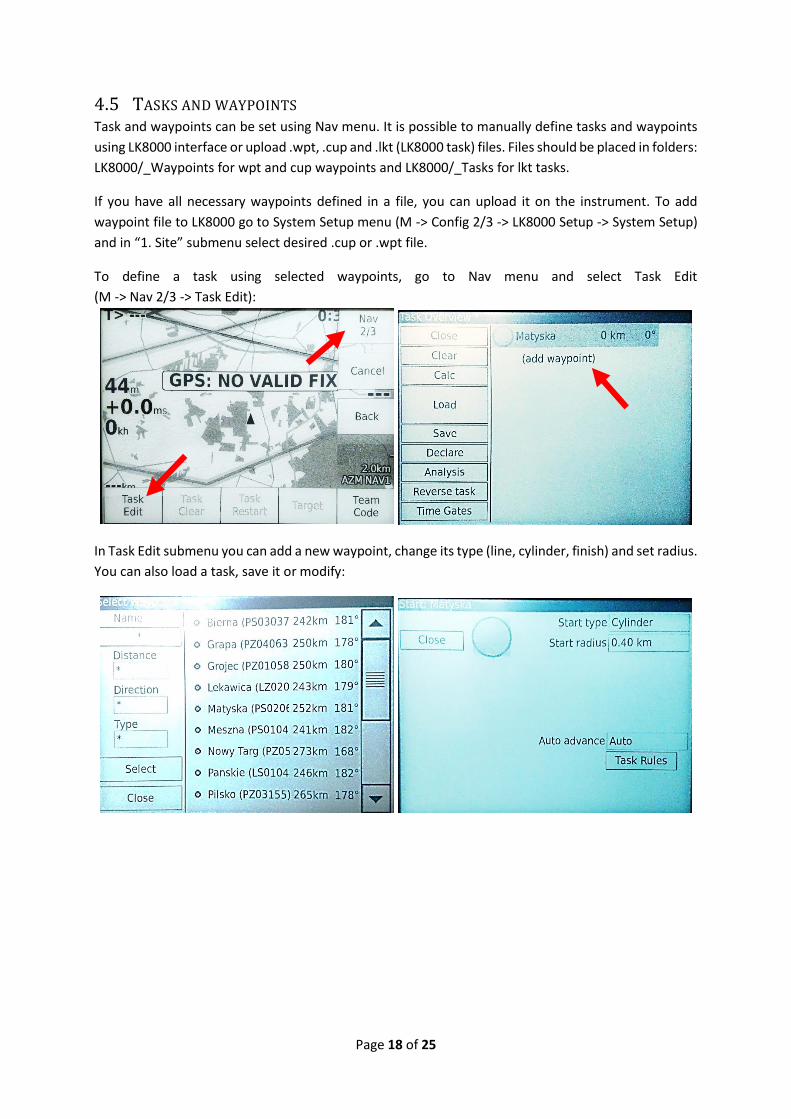
To define a task using selected waypoints, go to Nav menu and select Task Edit
(M -> Nav 2/3 -> Task Edit):
In Task Edit submenu you can add a new waypoint, change its type (line, cylinder, finish) and set radius.
You can also load a task, save it or modify:

Page 19 of 25
To define a new waypoint using LK8000, there are two options:
a) using map view:
1. select Pan mode (top left corner or M -> Screen Views -> PAN ON),
2. move map left/right, top/down in desired direction,
3. touch Location Marker button
4. new waypoint is saved in a file named LK[YYYMMDD].cup (where YYYYMMDD =
current date). This waypoint will not be available after restart. You can manually add
appropriate LK[YYYYMMDD].cup file in System Setup menu to restore created
waypoints.
b) using System Setup menu:
1. go to System Setup menu (M -> Config 2/3 -> LK8000 Setup -> System Setup),
2. go to 21. Waypoint Edit submenu (using Next > and < Prev buttons),
3. Touch “New”, “Edit”, “Save” or “Delete” button to manage waypoints manually.
4. New waypoints will be saved using “Save” button in the first .cup or .wpt file specified
in System Setup -> 1. Site -> Waypoint Files submenu. These waypoints will be
available after restart automatically.
Page 20 of 25
4.6 CONFIGURATION You can change most of described above features in Config menu. You can select which multimaps and
infopages are displayed, as well as define custom menu items and screen shortcuts. In default settings,
only the most essential features are turned on.
Please do not change values in Device settings menu and variometer module comm ports. Default
settings are the optimal settings for used hardware.
5 XCSOAR Glide Instruments Glide XC can run XCSoar as well as LK8000. It comes with both programs preinstalled.
We strongly recommend using LK8000, which is better suited for paragliding and comes preconfigured
„out of the box”. If you wish, you can run XCSoar and configure it yourself. Please follow the guidelines
in Appendix A.

Page 21 of 25
6 ADDITIONAL FEATURES
6.1 FTP SERVER FTP server feature allows you to transfer files from and to the instrument without any cables. All you
have to do, is to turn on wi-fi hotspot in your phone or connect to a known wi-fi network.
If you do not know IP address of the FTP server or want to connect to the wifi for the first time, follow
this steps. It is necessary only for the first time with a new network.
• To connect to a new network:
1. go back to the start menu and select “Nickel”,
2. after e-book software starts, turn on wi-fi, connect to a new network and save it,
3. restart the device. Your network should be saved and connect automatically.
To activate FTP server on Glide XC, follow these
steps:
1. turn on the device, turn on wifi hotspot
or wifi router,
2. select “Network” from the start menu,
3. turn WiFi on. The device should connect
automatically to nearest saved network,
4. select FTP Server in “Network” menu,
5. you can connect to the FTP server.

Page 22 of 25
• To get server IP address:
1. go to the “Network” menu in the start menu,
2. turn on wi-fi by clicking “Wifi ON”,
3. select Wifi and wait a few seconds for the device to connect. If necessary go back to
the previous menu and enter “Wifi” again.
4. Connected network should have an IP address written under wi-fi network name
(i.e. 192.168.1.82),
5. When the device is connected to a wi-fi network, you can start an FTP server by
selecting “Ftp server” in the “Network” menu.
When you are successfully connected to a wi-fi network and started an FTP server, you can connect to
the instrument using your smartphone or a computer. Follow these steps:
• on a computer (windows):
1. open file explorer,
2. enter ftp server address: ftp://[ip address] (i.e. ftp://192.168.1.82),
3. if asked for login and password, leave empty and enter,
4. you can access all files on the device. LK8000 files are located in /LK8000 folder.
Page 23 of 25
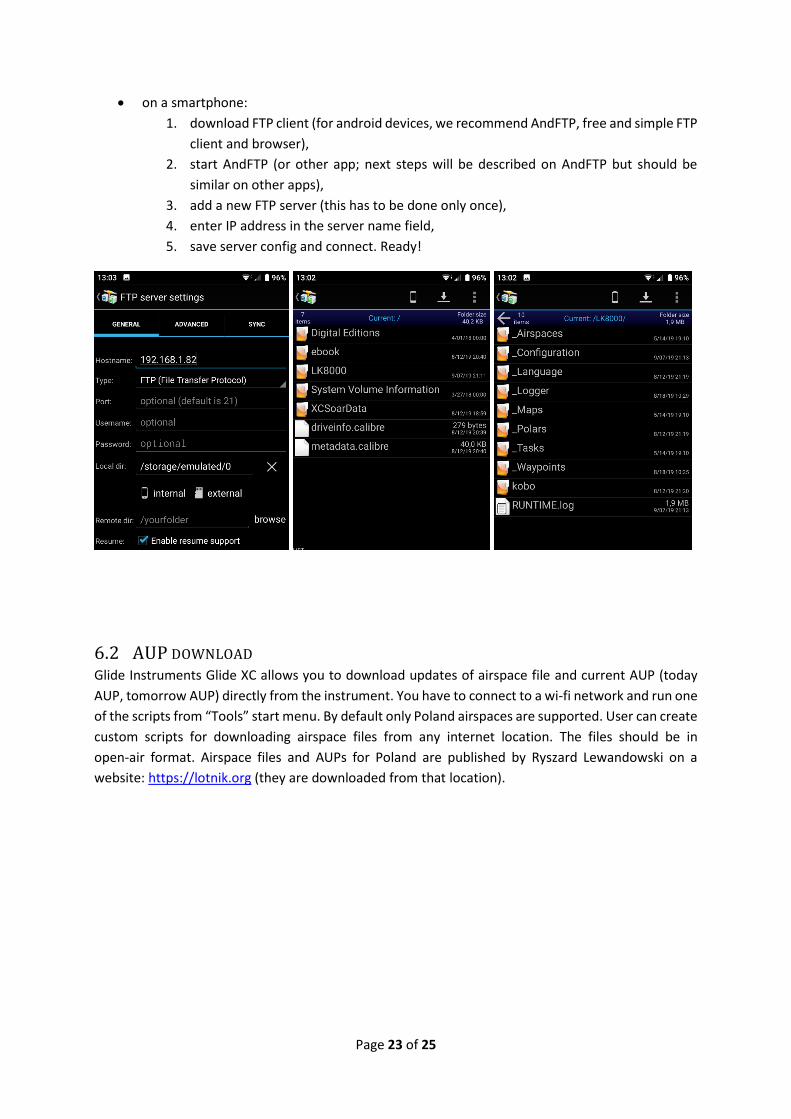
• on a smartphone:
1. download FTP client (for android devices, we recommend AndFTP, free and simple FTP
client and browser),
2. start AndFTP (or other app; next steps will be described on AndFTP but should be
similar on other apps),
3. add a new FTP server (this has to be done only once),
4. enter IP address in the server name field,
5. save server config and connect. Ready!
6.2 AUP DOWNLOAD Glide Instruments Glide XC allows you to download updates of airspace file and current AUP (today
AUP, tomorrow AUP) directly from the instrument. You have to connect to a wi-fi network and run one
of the scripts from “Tools” start menu. By default only Poland airspaces are supported. User can create
custom scripts for downloading airspace files from any internet location. The files should be in
open-air format. Airspace files and AUPs for Poland are published by Ryszard Lewandowski on a
website: https://lotnik.org (they are downloaded from that location).
Page 24 of 25
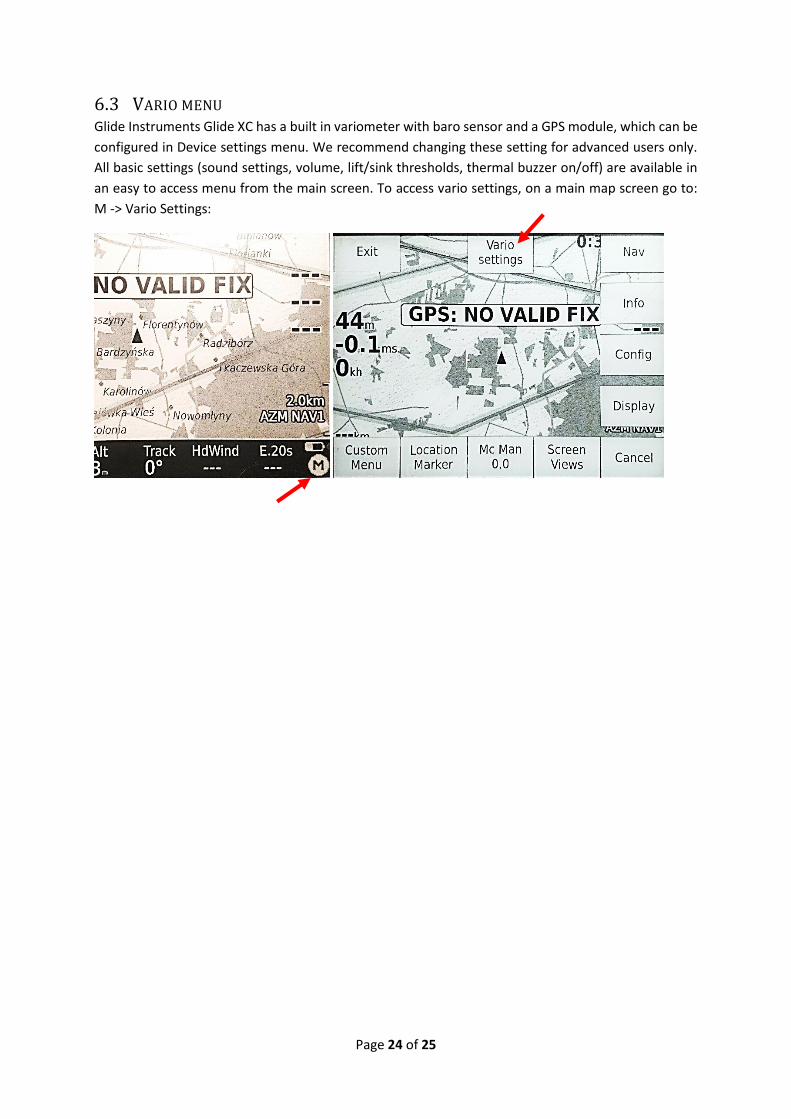
6.3 VARIO MENU Glide Instruments Glide XC has a built in variometer with baro sensor and a GPS module, which can be
configured in Device settings menu. We recommend changing these setting for advanced users only.
All basic settings (sound settings, volume, lift/sink thresholds, thermal buzzer on/off) are available in
an easy to access menu from the main screen. To access vario settings, on a main map screen go to:
M -> Vario Settings:
Page 25 of 25
7 APPENDIX A: GPS+VARIO MODULE CONFIGURATION
7.1 GPS + VARIO MODULE Glide Instruments Glide XC uses well known and tested GPS+Variometer module –
BlueFly Vario TTL GPS v12 with latest firmware (12.M25: Oct 2019). The module is connected to e-book
reader and shares the same power button. To turn the device and vario module on, slide the power
button down and hold for 2-3 seconds. You can turn vario module on and off independently, using
vario button on the top side of the device (long press; vario will work only with the device turned on).
The vario button also allow you to change sound setting, with one short click. By default sound modes
will change from SOUND ON - > SOUND ON (thermal buzzer) -> SOUND OFF. Note that SOUND OFF
settings does not mean, the gps+vario module is turned off.
Vario module is connected directly to e-book reader and uses the same battery. When the device is
used as e-book reader, vario module enters sleep mode and consumes very little energy. If variometer
detects movement and turns itself on, you can turn it off by long pressing vario button, located on the
top of the device.
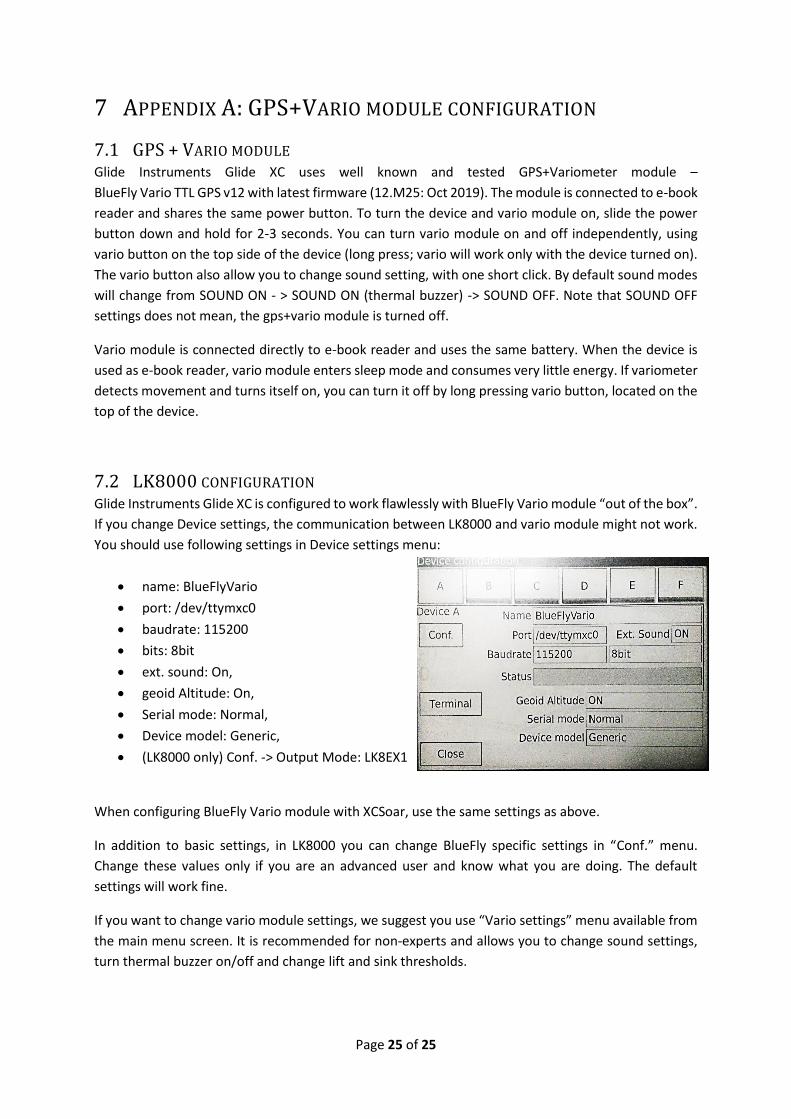
7.2 LK8000 CONFIGURATION Glide Instruments Glide XC is configured to work flawlessly with BlueFly Vario module “out of the box”.
If you change Device settings, the communication between LK8000 and vario module might not work.
You should use following settings in Device settings menu:
• name: BlueFlyVario
• port: /dev/ttymxc0
• baudrate: 115200
• bits: 8bit
• ext. sound: On,
• geoid Altitude: On,
• Serial mode: Normal,
• Device model: Generic,
• (LK8000 only) Conf. -> Output Mode: LK8EX1
When configuring BlueFly Vario module with XCSoar, use the same settings as above.
In addition to basic settings, in LK8000 you can change BlueFly specific settings in “Conf.” menu.
Change these values only if you are an advanced user and know what you are doing. The default
settings will work fine.
If you want to change vario module settings, we suggest you use “Vario settings” menu available from
the main menu screen. It is recommended for non-experts and allows you to change sound settings,
turn thermal buzzer on/off and change lift and sink thresholds.

Glide Instruments
Glide XC User Manual
Revision 1.1
Warsaw, 2019.
All rights reserved.