


magazine - Download Center - Microsoft
108
All trademarks or registered trademarks are property of their respective owners. magazine THE MICROSOFT JOURNAL FOR DEVELOPERS AUGUST 2016 VOL 31 NO 8 Better Living Through DevOps....16, 24, 30
-
Upload
khangminh22 -
Category
Documents
-
view
0 -
download
0
Transcript of magazine - Download Center - Microsoft
All trademarks or registered trademarks are property of their respective owners.
magazine
THE MICROSOFT JOURNAL FOR DEVELOPERS AUGUST 2016 VOL 31 NO 8
Better Living Through DevOps....16, 24, 30
0816msdn_CoverTip_8x10.75.indd 1 0816msdn_CoverTip_8x10.75.indd 1 7/11/16 12:14 PM7/11/16 12:14 PM
0716msdn_CoverTip_8x10.75.indd 2 0716msdn_CoverTip_8x10.75.indd 2 6/8/16 11:57 AM6/8/16 11:57 AM
magazine
THE MICROSOFT JOURNAL FOR DEVELOPERS AUGUST 2016 VOL 31 NO 8
From Code to Customer: Exploring Mobile DevOps Kraig Brockschmidt . . . . . . . . . . . . . . . . . . . . . . . . . . . . . . . . . . . . . . . . . . . . . . . . . . . . . . . . . . 16
Applying DevOps to a Software Development Project Wouter de Kort, Willy Schaub and Mattias Sköld . . . . . . . . . . . . . . . . . 24
Commit to Git: Source Control in Visual Studio 2015 Jonathan Waldman . . . . . . . . . . . . . . . . . . . . . . . . . . . . . . . . . . . . . . . . . . . . . . . . . . . . . . . . . . 30
Write Apps with Visual Studio Code and Entity Framework Alessandro Del Sole . . . . . . . . . . . . . . . . . . . . . . . . . . . . . . . . . . . . . . . . . . . . . . . . . . . . . . . . . 38
Real-World ASP.NET Core MVC Filters Steve Smith . . . . . . . . . . . . . . . . . . . . . . . . . . . . . . . . . . . . . . . . . . . . . . . . . . . . . . . . . . . . . . . . . . . . . 54
COLUMNSCUTTING EDGEBeyond CRUD: Commands, Events and Bus Dino Esposito, page 6
DATA POINTSEF Core Change-Tracking Behavior: Unchanged, Modified and Added Julie Lerman, page 10
TEST RUN Lightweight Random Number Generation James McCaffrey, page 64
THE WORKING PROGRAMMER How To Be MEAN: Exploring ECMAScript Ted Neward, page 70
DON’T GET ME STARTED Sing a Song of Silicon David Platt, page 80
Better Living Through DevOps....16, 24, 30
0816msdn_C1_v1.indd 1 7/12/16 12:19 PM
Live! 360SM is a unique conference where the IT and Developer community converge to debate leading edge technologies and educate themselves on current ones.
These six co-located events incorporate knowledge transfer and networking, along with finely tuned education and training,
as you create your own custom conference, mixing and matching sessions and workshops to best suit your needs.
Choose the ultimate education destination: Live! 360.
EVENT PARTNERS PLATINUM SPONSOR SUPPORTED BY
ROYAL PACIFIC RESORT AT UNIVERSALDECEMBER 5-9
GOLD SPONSOR
Untitled-6 2Untitled-6 2 7/13/16 1:04 PM7/13/16 1:04 PM

REGISTER BY AUGUST 31 AND SAVE $500!
Use promo code L360AUG2
Scan the QR code to register or for more event details.
LIVE360EVENTS.COMPRODUCED BY
Visual Studio Live!: VSLive!TM is a victory for code, featuring unbiased and practical development
training on the Microsoft Platform.
twitter.com/live360 @live360
facebook.comSearch "Live 360"
linkedin.comJoin the "Live! 360" group!
SQL Server Live!: This conference will leave you with the skills needed to Lead the Data Race, whether you
are a DBA, developer, IT Pro, or Analyst.
TechMentor: This is IT training that finishes first, with zero marketing speak on topics you need training on
now, and solid coverage on what’s around the corner.
Office & SharePoint Live!: Provides leading-edge knowledge and training for SharePoint
both on-premises and in Office 365 to maximizethe business value.
Modern Apps Live!: Presented in partnership with Magenic, this unique conference leads the way to
learning how to architect, design and build a complete Modern App.
App Dev Trends: This new technologyconference focuses on the makers & maintainers of
the software that Power organizations in nearly every industry in the world — in other words, enterprise
software professionals!
NEW!
Untitled-6 3Untitled-6 3 7/13/16 12:59 PM7/13/16 12:59 PM
msdn magazine2
ID STATEMENT MSDN Magazine (ISSN 1528-4859) is published monthly by 1105 Media, Inc., 9201 Oakdale Avenue, Ste. 101, Chatsworth, CA 91311. Periodicals postage paid at Chatsworth, CA 91311-9998, and at additional mailing offices. Annual subscription rates payable in US funds are: U.S. $35.00, International $60.00. Annual digital subscription rates payable in U.S. funds are: U.S. $25.00, International $25.00. Single copies/back issues: U.S. $10, all others $12. Send orders with payment to: MSDN Magazine, P.O. Box 3167, Carol Stream, IL 60132, email [email protected] or call (847) 763-9560. POSTMASTER: Send address changes to MSDN Magazine, P.O. Box 2166, Skokie, IL 60076. Canada Publications Mail Agreement No: 40612608. Return Undeliverable Canadian Addresses to Circulation Dept. or XPO Returns: P.O. Box 201, Richmond Hill, ON L4B 4R5, Canada.
Printed in the U.S.A. Reproductions in whole or part prohibited except by written permission. Mail requests to “Permissions Editor,” c/o MSDN Magazine, 4 Venture, Suite 150, Irvine, CA 92618.
LEGAL DISCLAIMER The information in this magazine has not undergone any formal testing by 1105 Media, Inc. and is distributed without any warranty expressed or implied. Implementation or use of any information contained herein is the reader ’s sole responsibility. While the information has been reviewed for accuracy, there is no guarantee that the same or similar results may be achieved in all environments. Technical inaccuracies may result from printing errors and/or new developments in the industry.
CORPORATE ADDRESS 1105 Media, 9201 Oakdale Ave. Ste 101, Chatsworth, CA 91311 www.1105media.com
MEDIA KITS Direct your Media Kit requests to Chief Revenue Officer Dan LaBianca, 972-687-6702 (phone), 972-687-6799 (fax), [email protected]
REPRINTS For single article reprints (in minimum quantities of 250-500), e-prints, plaques and posters contact: PARS International Phone: 212-221-9595. E-mail: [email protected]. www.magreprints.com/QuickQuote.asp
LIST RENTAL This publication’s subscriber list, as well as other lists from 1105 Media, Inc., is available for rental. For more information, please contact our list manager, Jane Long, Merit Direct. Phone: 913-685-1301; E-mail: [email protected]; Web: www.meritdirect.com/1105
Reaching the StaffStaff may be reached via e-mail, telephone, fax, or mail. A list of editors and contact information is also available online at Redmondmag.com. E-mail: To e-mail any member of the staff, please use the following form: [email protected] Irvine Office (weekdays, 9:00 a.m. – 5:00 p.m. PT) Telephone 949-265-1520; Fax 949-265-1528 4 Venture, Suite 150, Irvine, CA 92618Corporate Office (weekdays, 8:30 a.m. – 5:30 p.m. PT) Telephone 818-814-5200; Fax 818-734-1522 9201 Oakdale Avenue, Suite 101, Chatsworth, CA 91311 The opinions expressed within the articles and other contentsherein do not necessarily express those of the publisher.
President Henry Allain
Chief Revenue OfficerDan LaBianca
Chief Marketing OfficerCarmel McDonagh
ART STAFFCreative Director Jeffrey LangkauAssociate Creative Director Scott RovinSenior Art Director Deirdre HoffmanArt Director Michele SinghAssistant Art Director Dragutin CvijanovicGraphic Designer Erin HorlacherSenior Graphic Designer Alan TaoSenior Web Designer Martin Peace
PRODUCTION STAFFPrint Production Coordinator Lee Alexander
ADVERTISING AND SALESChief Revenue Officer Dan LaBiancaRegional Sales Manager Christopher KourtoglouAccount Executive Caroline StoverAdvertising Sales Associate Tanya Egenolf
ONLINE/DIGITAL MEDIAVice President, Digital Strategy Becky NagelSenior Site Producer, News Kurt MackieSenior Site Producer Gladys RamaSite Producer Chris PaoliSite Producer, News David RamelDirector, Site Administration Shane LeeSite Administrator Biswarup BhattacharjeeFront-End Developer Anya SmolinskiJunior Front-End Developer Casey RysavyExecutive Producer, New Media Michael DomingoOffice Manager & Site Assoc. James Bowling
LEAD SERVICESVice President, Lead Services Michele ImgrundSenior Director, Audience Development & Data Procurement Annette LeveeDirector, Audience Development & Lead Generation Marketing Irene FincherDirector, Client Services & Webinar Production Tracy CookDirector, Lead Generation Marketing Eric YoshizuruDirector, Custom Assets & Client Services Mallory BundySenior Program Manager, Client Services & Webinar Production Chris FlackProject Manager, Lead Generation Marketing Mahal RamosCoordinator, Lead Generation Marketing Obum Ukabam
MARKETINGChief Marketing Officer Carmel McDonaghVice President, Marketing Emily JacobsSenior Manager, Marketing Christopher MoralesMarketing Coordinator Alicia ChewMarketing & Editorial Assistant Dana Friedman
ENTERPRISE COMPUTING GROUP EVENTSVice President, Events Brent SuttonSenior Director, Operations Sara RossSenior Director, Event Marketing Merikay MarzoniEvents Sponsorship Sales Danna VedderSenior Manager, Events Danielle PottsCoordinator, Event Marketing Michelle ChengCoordinator, Event Marketing Chantelle Wallace
Chief Executive OfficerRajeev Kapur
Chief Operating OfficerHenry Allain
Vice President & Chief Financial OfficerMichael Rafter
Chief Technology Officer Erik A. Lindgren
Executive Vice PresidentMichael J. Valenti
Chairman of the BoardJeffrey S. Klein
General Manager Jeff SandquistDirector Dan Fernandez Editorial Director Mohammad Al-Sabt [email protected] Site Manager Kent Sharkey Editorial Director, Enterprise Computing Group Scott Bekker Editor in Chief Michael DesmondFeatures Editor Sharon TerdemanFeatures Editor Ed ZintelGroup Managing Editor Wendy HernandezSenior Contributing Editor Dr. James McCaffrey Contributing Editors Dino Esposito, Frank La Vigne, Julie Lerman, Mark Michaelis, Ted Neward, David S. Platt, Bruno TerkalyVice President, Art and Brand Design Scott ShultzArt Director Joshua Gould
AUGUST 2016 VOLUME 31 NUMBER 8
magazine
0816msdn_Masthead_v1_2.indd 2 7/12/16 12:20 PM
msdn magazine4
Writing good software is hard. Managing the process of writing, maintaining and delivering good software is even harder— particularly when you add cross-platform mobile app development to the mix. Which is why Microsoft has been so busy improv-ing and extending its DevOps solutions, addressing the software development lifecycle from planning and development, to testing and build, to deployment and monitoring.
Donovan Brown is a senior DevOps program manager at Microsoft. He defines DevOps as “the union of people, process and products to enable continuous delivery of value to our end users.” That focus on value is important, as it goes beyond simple code metrics to emphasize the tangible impact that delivered software has on the business, its workers and customers.
“To continuously deliver value implies that you are able to monitor and validate that value is actually delivered,” he says. “Just copying files to a server and hoping that people use them—there is no way to quantify or even qualify if I delivered value.”
How serious is Microsoft about DevOps? Based on the company’s $400 million-plus purchase of Xamarin in March and the acquisition of tools-maker HockeyApp at the close of 2014—very. At the Build conference in March, Brown demoed the extended DevOps capa-bilities in the cloud-based Visual Studio Team Services tool. As he told the audience before showing how the DevOps tool chain can improve a mobile app development scenario: “I’m just going to rub a little DevOps on it and make it better.”
Al Hilwa, program director for software development research at IDC, was impressed. “Microsoft wants its tools for developers to be what Office is for knowledge workers. That is, they want to be the No. 1 toolchain for cross-platform development, mobile, cloud, everything,” he says. “This is a tall order, but they are in fact exe-cuting on it and building a multi-platform ecosystem. Given their history with developers, you have to give them good odds on this.”
This is exciting stuff. Features like Xamarin Test Cloud let developers test app code against ranks of cloud-hosted smartphones and devices, while HockeyApp provides a way to distribute pre-release code to select groups of testers and receive both user feedback and app telemetry.
To help get ahead of it all, this month we’re launching the first in a series of articles focused on mobile DevOps, starting with Kraig Brockschmidt’s feature, “From Code to Customer: Exploring Mobile DevOps.” Also this month, the ALM Rangers team at Microsoft shows how to leverage DevOps to build Visual Studio Team Services Extensions, while Jonathan Waldman explores the integration of Git source code management with Visual Studio 2015.
The Microsoft effort on DevOps is intriguing in that it promises to lift all boats. Every code writing effort, from traditional client-server applications to Android- and iPhone-based mobile apps, stands to improve within a robust DevOps environment.
What are your thoughts on Microsoft’s DevOps push?
DevOps Directive
MICHAEL DESMONDEditor’s NotE
© 2016 Microsoft Corporation. All rights reserved.
Complying with all applicable copyright laws is the responsibility of the user. Without limiting the rights under copyright, you are not permitted to reproduce, store, or introduce into a retrieval system MSDN Magazine or any part of MSDN Magazine. If you have purchased or have otherwise properly acquired a copy of MSDN Magazine in paper format, you are permitted to physically transfer this paper copy in unmodified form. Otherwise, you are not permitted to transmit copies of MSDN Magazine (or any part of MSDN Magazine) in any form or by any means without the express written permission of Microsoft Corporation.
A listing of Microsoft Corporation trademarks can be found at microsoft.com/library/toolbar/3.0/trademarks/en-us.mspx. Other trademarks or trade names mentioned herein are the property of their respective owners.
MSDN Magazine is published by 1105 Media, Inc. 1105 Media, Inc. is an independent company not affiliated with Microsoft Corporation. Microsoft Corporation is solely responsible for the editorial contents of this magazine. The recommendations and technical guidelines in MSDN Magazine are based on specific environments and configurations. These recommendations or guidelines may not apply to dissimilar configurations. Microsoft Corporation does not make any representation or warranty, express or implied, with respect to any code or other information herein and disclaims any liability whatsoever for any use of such code or other information. MSDN Magazine, MSDN and Microsoft logos are used by 1105 Media, Inc. under license from owner.
Visit us at msdn.microsoft.com/magazine. Questions, comments or suggestions for MSDN Magazine? Send them to the editor: [email protected].
Every code writing effort, from traditional client-server applications to Android- and iPhone-based mobile apps,
stands to improve within a robust DevOps environment.
0816msdn_DesmondEdNote_v3_4.indd 4 7/12/16 12:19 PM
msdn magazine6
In recent installments of this column, I discussed what it takes to build a Historical create, read, update, delete (H-CRUD). An H-CRUD is a simple extension to classic CRUD where you use two conceptually distinct data stores to persist the current state of objects and all the events that happened during the lifetime of indi-vidual objects. If you simply limit your vision to the data store that contains the current state, then all is pretty much the same as with classic CRUD. You have your customer records, your invoices, orders and whatever else forms the data model for the business domain.
The key thing that’s going on here is that this summary data store isn’t the primary data store you create, but is derived as a projection from the data store of events. In other words, the essence of building a historical CRUD is to save events as they happen and then infer the current state of the system for whatever UI you need to create.
Designing your solution around business events is a relatively new approach that’s gaining momentum, though there’s a long way ahead for it to become the mainstream paradigm. Centering your design on events is beneficial because you never miss anything that happens in the system; you can reread and replay events at any time and build new projections on top of the same core data for, say, business intelligence purposes. Even more interesting, with events as an architect, you have the greatest chance to design the system around the business-specific ubiquitous language. Well beyond being a pillar of Domain-Driven Design (DDD), more pragmatically the ubiquitous language is a great help to understand the surrounding business domain and plan the most effective architectural diagram of cooperating parts and internal dynamics of tasks and workflows.
The implementation of events you might have seen in my May (msdn.com/magazine/mt703431) and June 2016 (msdn.com/magazine/mt707524) columns was very simple and to some extent even simplistic. The main purpose, though, was showing that any CRUD could be turned into an H-CRUD with minimal effort and still gain some benefits from the introduction of business events. The H-CRUD approach has some obvious overlapping with popular acronyms
and keywords of today such as CQRS and Event Sourcing. In this column, I’ll take the idea of H-CRUD much further to make it merge with the core idea of Event Sourcing. You’ll see how H-CRUD can turn into an implementation made of commands, buses and events that at first might look like an overly complex way to do basic reads and writes to a database.
One Event, Many AggregatesIn my opinion, one of the reasons software is sometimes hard to write on time and on budget is the lack of attention to the business language spoken by the domain expert. Most of the time, acknowledging requirements means mapping understood requirements to some sort of relational data model. The business logic is then architected to tunnel data between persistence and presentation, making any necessary adjustments along the way. While imperfect, this pattern worked for a long time and the number of cases where monu-mental levels of complexity made it impractical were numerically irrelevant and, anyway, brought to the formulation of DDD, is still the most effective way to tackle any software projects today.
Events are beneficial here because they force a different form of analysis of the domain, much more task-oriented and without the urgency of working out the perfect relational model in which to save data. When you look at events, though, cardinality is key. In H-CRUD examples I discussed in past columns, I made an assumption that could be quite dangerous if let go without further considerations and explanation. In my examples, I used a one-to-one event-to- aggregate association. In fact, I used the unique identifier of the aggregate being persisted as the foreign key to link events. To go with the example of the article, whenever a room was booked, the system logs a booking-created event that refers to a given booking ID. To retrieve all events for an aggregate (that is, the booking) a query on the events data store for the specified booking ID is sufficient to get all information. It definitely works, but it’s a rather simple sce-nario. The danger is that when aspects of a simple scenario become a common practice, you typically move from a simple solution to a simplistic solution. And this isn’t exactly a good thing.
Beyond CRUD: Commands, Events and Bus
Cutting EdgE DINO ESPOSITO
The real cardinality of the event/aggregate association is written in the ubiquitous language of the
business domain.
Most of the time, acknowledging requirements means mapping understood requirements to some relational data model.
0816msdn_EspositoCEdge_v6_6-9.indd 6 7/12/16 12:27 PM
msdn magazine8 Cutting Edge
Aggregates and Objects The real cardinality of the event/aggregate association is written in the ubiquitous language of the business domain. At any rate, a one-to-many association is much more likely to happen than a simpler one-to-one association. Concretely, a one-to-many asso-ciation between events and aggregates means that an event may sometimes be pertinent to multiple aggregates and that more than one aggregate may be interested in processing that event and may have its state altered because of that event.
As an example, imagine a scenario in which an invoice is regis-tered in the system as a cost of an ongoing job order. This means that in your domain model, you probably have two aggregates—invoice and job order. The event invoice registered captures the interest of the invoice aggregate because a new invoice is entered into the system, but it might also capture the attention of the JobOrder aggregate if the invoice refers to some activity pertinent to the order. Clearly, whether the invoice relates to a job order or not can be determined only after a full understanding of the business domain. There might be domain models (and applications) in which an invoice may stand on its own and domain models (and applications) in which an invoice might be registered in the accounting of a job order and subsequently alter the current balance.
However, getting the point that events may relate to many aggregates completely changes the architecture of the solution and even the landscape of viable technologies.
Dispatching Events Breaks Up Complexity At the foundation of CRUD and H-CRUD lies the substantial constraint that events are bound to a single aggregate. When mul-tiple aggregates are touched by a business event, you write business logic code to ensure that the state is altered and tracked as appro-priate. When the number of aggregates and events exceeds a critical threshold, the complexity of the business logic code might become hard and impractical to handle and evolve.
In this context, the CQRS pattern represents a first step in the right direction as it basically suggests you reason separately on actions that “just read” or “just alter” the current state of the system. Event Sourcing is another popular pattern that suggests you log whatever happens in the system as an event. The entire state of the system is tracked and the actual state of aggregates in the system is built as a projection of the events. Put another way, you map the content of events to other prop-erties that altogether form the state of objects usable in the software. Event Sourcing is built around a framework that knows how to save and retrieve events. An Event Sourcing mechanism is append-only,
supports replay of streams of events and knows how to save related data that might have radically different layouts.
Event store frameworks such as EventStore (bit.ly/1UPxEUP) and NEventStore (bit.ly/1UdHcfz) abstract away the real persistence frame-work and offer a super-API to deal in code directly with events. In essence, you see streams of events that are somewhat related and the point of attraction for those events is an aggregate. This works just fine. However, when an event has impact on multiple aggregates, you should find a way to give each aggregate the ability to track down all of its events of interest. In addition, you should manage to build a soft-ware infrastructure that, beyond the mere point of events persistence, allows all standing aggregates to be informed of events of interest.
To achieve the goals of proper dispatching of events to aggre-gates and proper event persistence, H-CRUD is not enough. Both the pattern behind the business logic and the technology used for persisting event-related data must be revisited.
Defining the AggregateThe concept of an aggregate comes from DDD and in brief it refers to a cluster of domain objects grouped together to match trans-actional consistency. Transactional consistency simply means that whatever is comprised within an aggregate is guaranteed to be consistent and up-to-date at the end of a business action. The following code snippet presents an interface that summarizes the main aspects of just any aggregate class. There might be more, but I dare say this is the absolute minimum:
public interface IAggregate{ Guid ID { get; } bool HasPendingChanges { get; } IList<DomainEvent> OccurredEvents { get; set; } IEnumerable<DomainEvent> GetUncommittedEvents();}
At any time, the aggregate contains the list of occurred events and can distinguish between those committed and those uncom-mitted that result in pending changes. A base class to implement the IAggregate interface will have a non-public member to set the ID and implement the list of committed and uncommitted events. Furthermore, a base Aggregate class will also have some RaiseEvent method used to add an event to the internal list of uncommitted events. The interesting thing is how events are internally used to alter the state of an aggregate. Suppose you have a Customer aggregate and want to update the public name of the customer. In a CRUD scenario, it will simply be an assignment like this:
customer.DisplayName = "new value";
The concept of an aggregate comes from DDD; in brief it refers
to a cluster of domain objects grouped together to match transactional consistency.
At the foundation of CRUD and H-CRUD lies the substantial
constraint that events are bound to a single aggregate.
0816msdn_EspositoCEdge_v6_6-9.indd 8 7/12/16 12:27 PM
9Month 2016msdnmagazine.com
With events, it will be a more sophisticated route:public void Handle(ChangeCustomerNameCommand command){ var customer = _customerRepository.GetById(command.CompanyId); customer.ChangeName(command.DisplayName); customerRepository.Save(customer);}
Let’s skip for a moment the Handle method and who runs it and focus on the implementation. At first, it might seem that ChangeName is a mere wrapper for the CRUD-style code examined earlier. Well, not exactly:
public void ChangeName(string newDisplayName){ var evt = new CustomerNameChangedEvent(this.Id, newDisplayName); RaiseEvent(e);}
The RaiseEvent method defined on the Aggregate base class will just append the event in the internal list of uncommitted events. Uncommitted events are finally processed when the aggregate is persisted.
Persisting the State via EventsWith events deeply involved, the structure of repository classes can be made generic. The Save method of a repos-itory designed to operate with aggregate classes described so far will simply loop through the list of the aggregate’s uncommitted events and call a new method the aggregate must offer—the ApplyEvent method:
public void ApplyEvent(CustomerNameChangedEvent evt){ this.DisplayName = evt.DisplayName;}
The aggregate class will have one overload of the ApplyEvent method for each event of interest. The CRUD-style code you con-sidered way back will just find its place here.
There’s still one missing link: How do you orchestrate front-end use cases, end-user actions with multiple aggregates, business work-flows and persistence? You need a bus component.
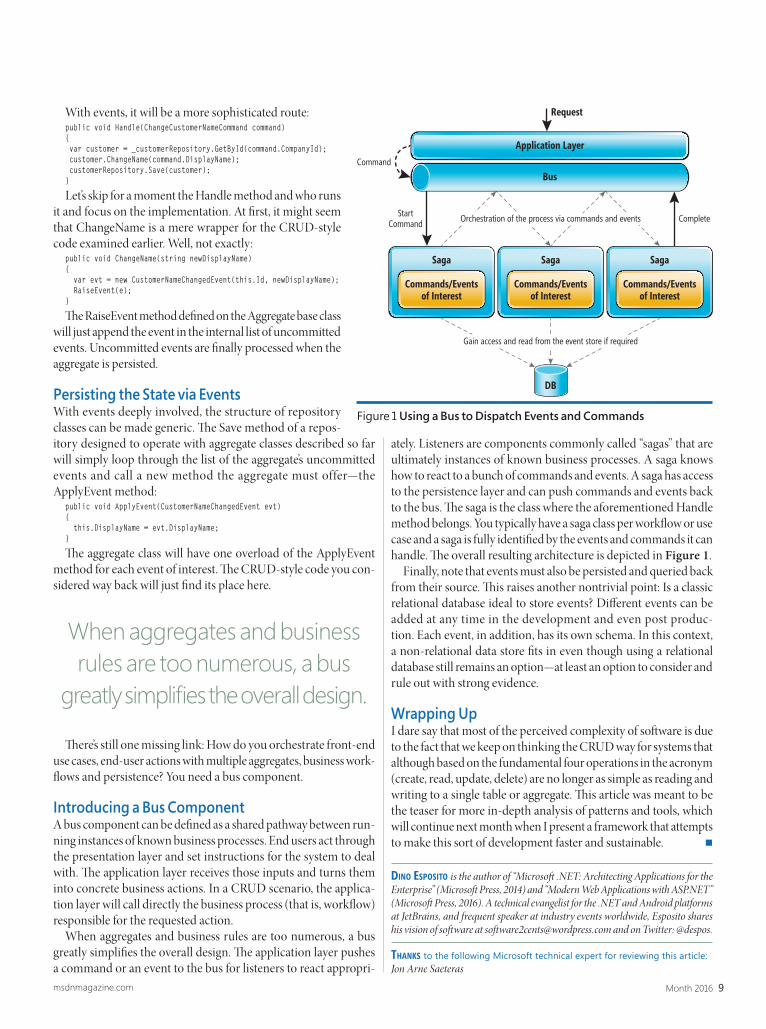
Introducing a Bus ComponentA bus component can be defined as a shared pathway between run-ning instances of known business processes. End users act through the presentation layer and set instructions for the system to deal with. The application layer receives those inputs and turns them into concrete business actions. In a CRUD scenario, the applica-tion layer will call directly the business process (that is, workflow) responsible for the requested action.
When aggregates and business rules are too numerous, a bus greatly simplifies the overall design. The application layer pushes a command or an event to the bus for listeners to react appropri-
ately. Listeners are components commonly called “sagas” that are ultimately instances of known business processes. A saga knows how to react to a bunch of commands and events. A saga has access to the persistence layer and can push commands and events back to the bus. The saga is the class where the aforementioned Handle method belongs. You typically have a saga class per workflow or use case and a saga is fully identified by the events and commands it can handle. The overall resulting architecture is depicted in Figure 1.
Finally, note that events must also be persisted and queried back from their source. This raises another nontrivial point: Is a classic relational database ideal to store events? Different events can be added at any time in the development and even post produc-tion. Each event, in addition, has its own schema. In this context, a non-relational data store fits in even though using a relational database still remains an option—at least an option to consider and rule out with strong evidence.
Wrapping UpI dare say that most of the perceived complexity of software is due to the fact that we keep on thinking the CRUD way for systems that although based on the fundamental four operations in the acronym (create, read, update, delete) are no longer as simple as reading and writing to a single table or aggregate. This article was meant to be the teaser for more in-depth analysis of patterns and tools, which will continue next month when I present a framework that attempts to make this sort of development faster and sustainable. n
Dino Esposito is the author of “Microsoft .NET: Architecting Applications for the Enterprise” (Microsoft Press, 2014) and “Modern Web Applications with ASP.NET” (Microsoft Press, 2016). A technical evangelist for the .NET and Android platforms at JetBrains, and frequent speaker at industry events worldwide, Esposito shares his vision of software at [email protected] and on Twitter: @despos.
thanks to the following Microsoft technical expert for reviewing this article: Jon Arne Saeteras
When aggregates and business rules are too numerous, a bus
greatly simplifies the overall design.
Figure 1 Using a Bus to Dispatch Events and Commands
Application Layer
Saga
Commands/Eventsof Interest
Saga
Commands/Eventsof Interest
Saga
Commands/Eventsof Interest
Request
Command
CompleteStartCommand
DB
Bus
Gain access and read from the event store if requiredGain access and read from the event store if required
Orchestration of the process via commands and eventsOrchestration of the process via commands and events
0816msdn_EspositoCEdge_v6_6-9.indd 9 7/12/16 12:27 PM
msdn magazine10
Did you see what I did there, in this column’s title? You may have recognized Unchanged, Modified and Added as enums for EntityState in Entity Framework (EF). They also help me describe the behaviors of change tracking in EF Core compared to earlier versions of Entity Framework. Change tracking has become more consistent in EF Core so you can be more confident in knowing what to expect when you’re working with disconnected data.
Keep in mind that while EF Core attempts to keep the paradigms and much of the syntax of earlier versions of Entity Framework, EF Core is a new set of APIs—a completely new code base written from scratch. Therefore, it’s important not to presume that everything will behave exactly as it did in the past. The change tracker is a critical case in point.
Because the first iteration of EF Core is targeted to align with ASP.NET Core, a lot of the work focused on disconnected state, that is, making sure Entity Framework can handle the state of objects coming out of band, so to speak, where EF hasn’t been keeping track of those objects. A typical scenario is a Web API that’s accepting objects from a client application to be persisted to the database.
In my March 2016 Data Points column, I wrote about “Handling the State of Disconnected Entities in EF” (msdn.com/magazine/mt694083). That article focused on assigning state information to the disconnected entities and sharing that information with EF when passing those objects back into EF’s change tracker. Though I used EF6 to lay out the example, that pattern is still relevant for EF Core, so after discussing the EF Core behaviors, I’ll show an example of how I’d implement that pattern in EF Core.
Tracking with DbSet: Modified DbSet always included the Add, Attach and Remove methods. The result of these methods on a single object are simple enough, they set the state of the object to the relevant EntityState. Add results in Added, Attach in Unchanged and Remove changes the state to Deleted. There’s one exception, which is that if you remove an entity that’s already known as Added, it will be detached from the DbContext because there’s no longer a need to track the new entity. In EF6, when you use these methods with graphs, the effects on the related objects were not quite as consistent. A formerly untracked object couldn’t be removed and would throw an error. Already tracked objects may or may not have their state altered, depending on what those states
are. I created a set of tests in EF6 in order to comprehend the various behaviors, which you can find on GitHub at bit.ly/28YvwYd.
While creating EF Core, the EF team experimented with the behavior of these methods throughout the betas. In EF Core RTM, the methods no longer behave as they did in EF6 and earlier. For the most part, the changes to these methods result in more consistent behavior on which you can rely. But it’s important to understand how they’ve changed.
When you use Add, Attach and Remove with an object that has a graph attached, the state of every object in the graph that’s unknown to the change tracker will be set to the state identified by the method. Let me clarify this using my favorite EF Core model from the “Seven Samurai” film—samurais with movie quotes attached, and other related information.
If a samurai is new and not being tracked, Samurais.Add will set that samurai’s state to Added. If the samurai has a quote attached to it when Add is called, its state will also be set to Added. This is desired behavior and, in fact, is the same as it was in EF6.
What if you’re adding a new quote to an existing samurai and, rather than following my recommendation to set newQuote.SamuraiId to the value of Samurai.Id, you instead set the navigation property, newQuote.Samurai=oldSamurai. In a disconnected scenario, where neither the quote nor the oldSamurai is being tracked by EF, Quotes.Add(newQuote) will do the same as the preceding. It will mark the newQuote as Added and the oldSamurai as Added. SaveChanges will insert both objects into the database and you’ll have a duplicate oldSamurai in the database.
If you’re in a client application, for example, Windows Presentation Foundation (WPF), and you use your context to query for the samurais and then use that same context instance to call context.Quotes.Add(newQuote), the context already knows about the
EF Core Change-Tracking Behavior: Unchanged, Modified and Added
Data Points JULIE LERMAN
Code download available at msdn.com/magazine/0816magcode.
Keep in mind that while EF Core attempts to keep the paradigms and much of the syntax of earlier
versions of Entity Framework, EF Core is a new API.
0816msdn_LermanDPts_v4_10-15.indd 10 7/12/16 12:24 PM
Text Control is an award-winning Visual Studio Industry Partner and leading vendor of reporting and word processing components for developers of Windows, web and mobile applications.
Q What is the Text Control Reporting Framework?A The Text Control Reporting Framework combines powerful reporting features with an easy-to-use, MS Word compatible word processor. Users can create documents and templates using ordinary Microsoft Word skills. It is completely independent from MS Word or any other third-party application and can be completely integrated into business applications. The Text Control Reporting Framework is included in all .NET based TX Text Control products including ASP.NET, Windows Forms and WPF.
Q What sets Text Control Reporting apart from otherreporting vendors?A Text Control Reporting is based on the powerful word processing component TX Text Control. The MS Word compatible template can be merged with a data object (business object) or database content with one line of code. At the same time, Text Control provides a powerful API to customize this merge process completely. The report generation can be fully integrated into .NET applications.
Q Tell us more about the cross-browser, cross-platformWYSIWYG HTML5-based template editor.A TX Text Control allows the creation of MS Word compatible documents and templates using any operating system with an HTML5 capable browser including Chrome, Firefox, Safari, Internet Explorer and Edge. Because the product is being built with pure HTML5 and JavaScript, it will have a zero footprint with no client-side browser plugins required. It includes all sophisticated word processing features such as headers and footers, sections, text frames, tab positions, charts, barcodes and spell checking.
Q How do developers typically use Text Control components?A Our products help thousands of developers add mail merge, reporting and word processing functionality to their Windows Forms, WPF and ASP.NET applications. They create elegant and powerful business reports with an easy-to-use, MS Word compatible template editing interface. Using TX Barcode .NET, developers add fast and accurate 1D and 2D barcodes to.NET based applications. Barcodes are integrated into reports, invoices and mail merge templates. TX Spell .NET enables extremely fast, highly reliable and very accurate spell checking in TX Text Control based applications.
For more detailed information and a 30-day trial version,visit www.textcontrol.com/reporting.
MSDN Magazine Vendor Profi leVPmagazine
MSDN MAGAZINE VENDOR PROFILE
For more information, visit g www.textcontrol.com
Combine Powerful Reporting with Easy-to-Use Word Processing A Reporting Q&A with Bjoern Meyer, Text Control
Untitled-2 1 7/11/16 11:15 AM
msdn magazine12 Data Points
oldSamurai and won’t change its Unchanged state to Added. That’s what I mean by not changing the state of already tracked objects.
The way the change tracker affects related objects in a disconnected graph is notably different and you should keep these differences in mind when using these methods in EF Core.
Rowan Miller summarized the new behavior in a GitHub issue (bit.ly/295goxw):
Add: Adds every reachable entity that isn’t already tracked.Attach: Attaches every reachable entity, except where a reach
able entity has a storegenerated key and no key value is assigned; these will be marked as added.
Update: Same as Attach, but entities are marked as modified.Remove: Same as Attach, and then mark the root as deleted.
Because cascade delete now happens on SaveChanges, this allows cascade rules to flow to entities later on.
There’s one more change to the DbSet methods that you might notice in this list: DbSet finally has an Update method, which will set the state of untracked objects to Modified. Hooray! What a nice alternative to always having to add or attach and then explicitly set the state to Modified.
DbSet Range Methods: Also ModifiedTwo range methods on DbSet (AddRange and RemoveRange) were introduced in EF6 and allow you to pass in an array of like types. This provided a big performance boost because the change tracker engages only once, rather than on each element of the array. The methods do call Add and Remove as detailed earlier and, therefore, you need to consider how related graph objects are affected.
In EF6, the range methods existed only for Add and Remove, but EF Core now brings UpdateRange and AttachRange. The Update and Attach methods that are called individually for each object or graph passed into the Range methods will behave as described earlier.
DbContext Change Tracking Methods: AddedIf you worked with EF ObjectContext prior to the introduction of the DbContext, you might recall that ObjectContext had Add, Attach and Delete methods. Because the context had no way of knowing to which ObjectSet the target entity belonged, you had to add a string representation of the ObjectSet name as a parameter. This was so messy and most of us found it easier just to use the ObjectSet Add, Attach and Delete methods. When DbContext came along, those messy methods went away and you could only Add, Attach and Remove via the DbSet.
In EF Core, the Add, Attach and Remove methods are back as methods on the DbContext, along with Update and the four related Range methods (AddRange, and so forth). But these methods are much smarter now. They’re now able to determine the type and automatically relate the entity to the correct DbSet. This is really convenient because it allows you to write generic code without having to instantiate a DbSet. The code is simpler and, more important, more discoverable. Here’s a comparison of EF6 and EF Core:
private void AddToSetEF6<T>(T entity) where T : class {Pull using (var context = new SamuraiContext()) { context.Set<T>().Add(entity); }}
private void AddToSetEFCore(object entity) { using (var context = new SamuraiContext()) { context.Add(entity); }}
The range methods are even more helpful because you can pass in a variety of types and EF can work them out:
private void AddViaContextEFCore(object[] entitiesOfVaryingTypes) { using (var context = new SamuraiContext()) { context.AddRange(entitiesOfVaryingTypes); }}
DbContext.Entry: Modified—Beware This Change in BehaviorEven though we’ve been warned that EF Core is not EF6 and that we should not expect familiar code to behave as it did in EF6, it’s still difficult not to have such an expectation when so many behaviors have carried forward. DbContext.Entry is a case in point, though, and it’s important you understand how it has changed.
The change is a welcome one to me because it brings consistency to change tracking. In EF6, the DbSet Add (and so forth) methods and the DbContext.Entry method combined with the State property had the same impact on entities and on graphs. So using DbContext.Entry(object).State=EntityState.Added would make all of the objects in a graph (that were not already being tracked) Added.
Moreover, there was never an intuitive way to disconnect graph objects before passing them to the change tracker.
In EF Core, DbContext.Entry now affects only the object being passed in. If that object has other related objects connected to it, DbContext.Entry will ignore them.
If you’re used to using the Entry method to connect graphs to a DbContext instance, you can see why this change is drastic. It means you can target an individual object even if it’s part of a graph.
More important, you can now explicitly use the DbSet and DbContext tracking methods (Add, and the like) to work explicitly with graphs, and you can use the DbContext.Entry method to work specifically with individual objects. This, combined with the next change I explain, means you now have clear options to select from when passing object graphs into the EF Core change tracker.
DbContext.ChangeTracker.TrackGraph: AddedTrackGraph is a completely new concept in EF Core. It provides ultimate control for each object in an object graph that you want your DbContext to begin tracking.
In EF Core, DbContext.Entry now affects only the object being
passed in. If that object has other related objects connected to it,
DbContext.Entry will ignore them.
0816msdn_LermanDPts_v4_10-15.indd 12 7/12/16 12:24 PM
msdn magazine14 Data Points
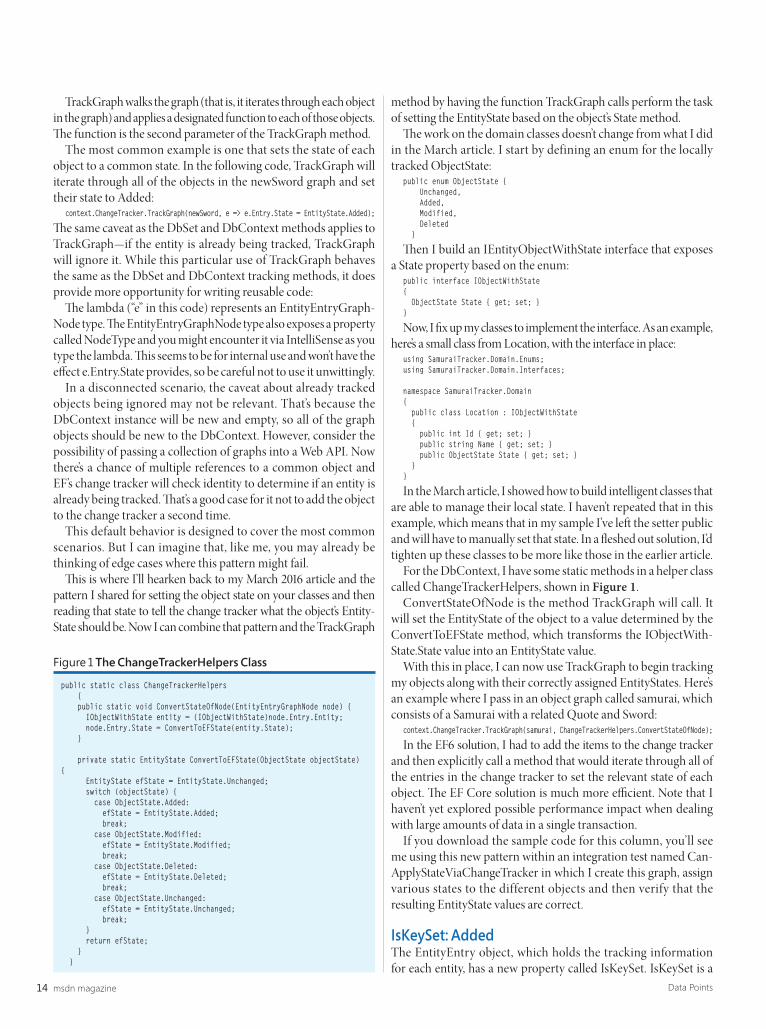
TrackGraph walks the graph (that is, it iterates through each object in the graph) and applies a designated function to each of those objects. The function is the second parameter of the TrackGraph method.
The most common example is one that sets the state of each object to a common state. In the following code, TrackGraph will iterate through all of the objects in the newSword graph and set their state to Added:
context.ChangeTracker.TrackGraph(newSword, e => e.Entry.State = EntityState.Added);
The same caveat as the DbSet and DbContext methods applies to TrackGraph—if the entity is already being tracked, TrackGraph will ignore it. While this particular use of TrackGraph behaves the same as the DbSet and DbContext tracking methods, it does provide more opportunity for writing reusable code:
The lambda (“e” in this code) represents an EntityEntryGraphNode type. The EntityEntryGraphNode type also exposes a property called NodeType and you might encounter it via IntelliSense as you type the lambda. This seems to be for internal use and won’t have the effect e.Entry.State provides, so be careful not to use it unwittingly.
In a disconnected scenario, the caveat about already tracked objects being ignored may not be relevant. That’s because the DbContext instance will be new and empty, so all of the graph objects should be new to the DbContext. However, consider the possibility of passing a collection of graphs into a Web API. Now there’s a chance of multiple references to a common object and EF’s change tracker will check identity to determine if an entity is already being tracked. That’s a good case for it not to add the object to the change tracker a second time.
This default behavior is designed to cover the most common scenarios. But I can imagine that, like me, you may already be thinking of edge cases where this pattern might fail.
This is where I’ll hearken back to my March 2016 article and the pattern I shared for setting the object state on your classes and then reading that state to tell the change tracker what the object’s EntityState should be. Now I can combine that pattern and the TrackGraph
method by having the function TrackGraph calls perform the task of setting the EntityState based on the object’s State method.
The work on the domain classes doesn’t change from what I did in the March article. I start by defining an enum for the locally tracked ObjectState:
public enum ObjectState { Unchanged, Added, Modified, Deleted }
Then I build an IEntityObjectWithState interface that exposes a State property based on the enum:
public interface IObjectWithState{ ObjectState State { get; set; }}
Now, I fix up my classes to implement the interface. As an example, here’s a small class from Location, with the interface in place:
using SamuraiTracker.Domain.Enums;using SamuraiTracker.Domain.Interfaces; namespace SamuraiTracker.Domain{ public class Location : IObjectWithState { public int Id { get; set; } public string Name { get; set; } public ObjectState State { get; set; } }}
In the March article, I showed how to build intelligent classes that are able to manage their local state. I haven’t repeated that in this example, which means that in my sample I’ve left the setter public and will have to manually set that state. In a fleshed out solution, I’d tighten up these classes to be more like those in the earlier article.
For the DbContext, I have some static methods in a helper class called ChangeTrackerHelpers, shown in Figure 1.
ConvertStateOfNode is the method TrackGraph will call. It will set the EntityState of the object to a value determined by the ConvertToEFState method, which transforms the IObjectWithState.State value into an EntityState value.
With this in place, I can now use TrackGraph to begin tracking my objects along with their correctly assigned EntityStates. Here’s an example where I pass in an object graph called samurai, which consists of a Samurai with a related Quote and Sword:
context.ChangeTracker.TrackGraph(samurai, ChangeTrackerHelpers.ConvertStateOfNode);
In the EF6 solution, I had to add the items to the change tracker and then explicitly call a method that would iterate through all of the entries in the change tracker to set the relevant state of each object. The EF Core solution is much more efficient. Note that I haven’t yet explored possible performance impact when dealing with large amounts of data in a single transaction.
If you download the sample code for this column, you’ll see me using this new pattern within an integration test named CanApplyStateViaChangeTracker in which I create this graph, assign various states to the different objects and then verify that the resulting EntityState values are correct.
IsKeySet: AddedThe EntityEntry object, which holds the tracking information for each entity, has a new property called IsKeySet. IsKeySet is a
public static class ChangeTrackerHelpers { public static void ConvertStateOfNode(EntityEntryGraphNode node) { IObjectWithState entity = (IObjectWithState)node.Entry.Entity; node.Entry.State = ConvertToEFState(entity.State); } private static EntityState ConvertToEFState(ObjectState objectState) { EntityState efState = EntityState.Unchanged; switch (objectState) { case ObjectState.Added: efState = EntityState.Added; break; case ObjectState.Modified: efState = EntityState.Modified; break; case ObjectState.Deleted: efState = EntityState.Deleted; break; case ObjectState.Unchanged: efState = EntityState.Unchanged; break; } return efState; } }
Figure 1 The ChangeTrackerHelpers Class
0816msdn_LermanDPts_v4_10-15.indd 14 7/12/16 12:24 PM
msdnmagazine.com
Instantly Search Terabytes of Text
dtSearch.com 1-800-IT-FINDS
dtSearch’s document filters support popular file types, emails with multilevel attachments, databases, web data
Highlights hits in all data types; 25+ search options
The Smart Choice for Text Retrieval®
since 1991
Visit dtSearch.com for• hundreds of reviews and
case studies• fully-functional enterprise and
developer evaluations
With APIs for .NET, Java and C++. SDKs for multiple platforms. (See site for articles on faceted search, SQL, MS Azure, etc.)
®
great addition to the API. It checks to see if the key property in the entity has a value. This eliminates the guessing game (and related code) to see if an object already has a value in its key property (or properties if you have a composed key). IsKeySet checks to see if the value is the default value of the particular type you specified for the key property. So if it’s an int, is it 0? If it’s a Guid, is it equal to Guid.Empty (00000000000000000000000000000000)? If the value is not the default for the type, IsKeySet returns true.
If you know that in your system you can unequivocally differentiate a new object from a preexisting object by the value of its key property, then IsKeySet is a really handy property for determining the state of entities.
EF Core with Eyes Wide OpenWhile the EF team has certainly done what they can to ease the pain of transitioning your brain from earlier versions of Entity Framework to EF Core, replicating plenty of the syntax and behavior, it’s so important to keep in mind that these are different APIs. Porting code will be tricky and isn’t recommended—especially in these early days when the RTM has only a subset of familiar features. But even as you embark on new projects with confidence that the feature set in EF Core has what you need, don’t presume things will work the same. I still have to remind myself about this. Nevertheless, I’m pleased with the changes to the ChangeTracker. They bring more clarity, more consistency and more control for dealing with disconnected data.
The EF team has a roadmap on the GitHub page for which I created a convenient shortcut: bit.ly/efcoreroadmap. This lets you keep track of the features, though it won’t list the minutia of things like behavior changes. For that I recommend tests, lots of tests, to ensure things are working the way you expect. And if you’re planning to port code from earlier versions of EF, you may want to look into Llewellyn Falco’s Approval Tests (approvaltests.com), which let you compare output from tests to ensure that the outputs continue to match. n
Julie lerman is a Microsoft MVP, .NET mentor and consultant who lives in the hills of Vermont. You can find her presenting on data access and other .NET topics at user groups and conferences around the world. She blogs at thedatafarm.com/ blog and is the author of “Programming Entity Framework,” as well as a Code First and a DbContext edition, all from O’Reilly Media. Follow her on Twitter: @julielerman and see her Pluralsight courses at juliel.me/PS-Videos.
Thanks to the following Microsoft technical expert for reviewing this article: Erik Ejlskov Jensen
But even as you embark on new projects with confidence that the feature set in EF Core has what
you need, don’t presume things will work the same.
0816msdn_LermanDPts_v4_10-15.indd 15 7/12/16 12:24 PM

msdn magazine16
By historical standards, writing code is easy. Today we enjoy enormously powerful tools like IntelliSense, auto-complete, syntax coloring, error highlighting and support through communities like Stack Overflow. We also enjoy an ever-growing repository of exceptionally useful libraries and tools, many of them free. But there’s a big gap—a veritable chasm, you might say—between the mere act of writing code and the development of mobile apps that deliver the highest value to customers, and do so at the lowest cost to your business.
The various practices that have come to be known collectively as DevOps are essentially what help you bridge that chasm. I say “various
practices” because there are many ways to build that bridge. There are different ways to define the processes themselves, and there are many different tools to help you communicate and manage those processes with all the people involved—including ways to learn directly from your customers. As such, the whole DevOps space oftentimes seems quite chaotic, with too many choices and too little clarity.
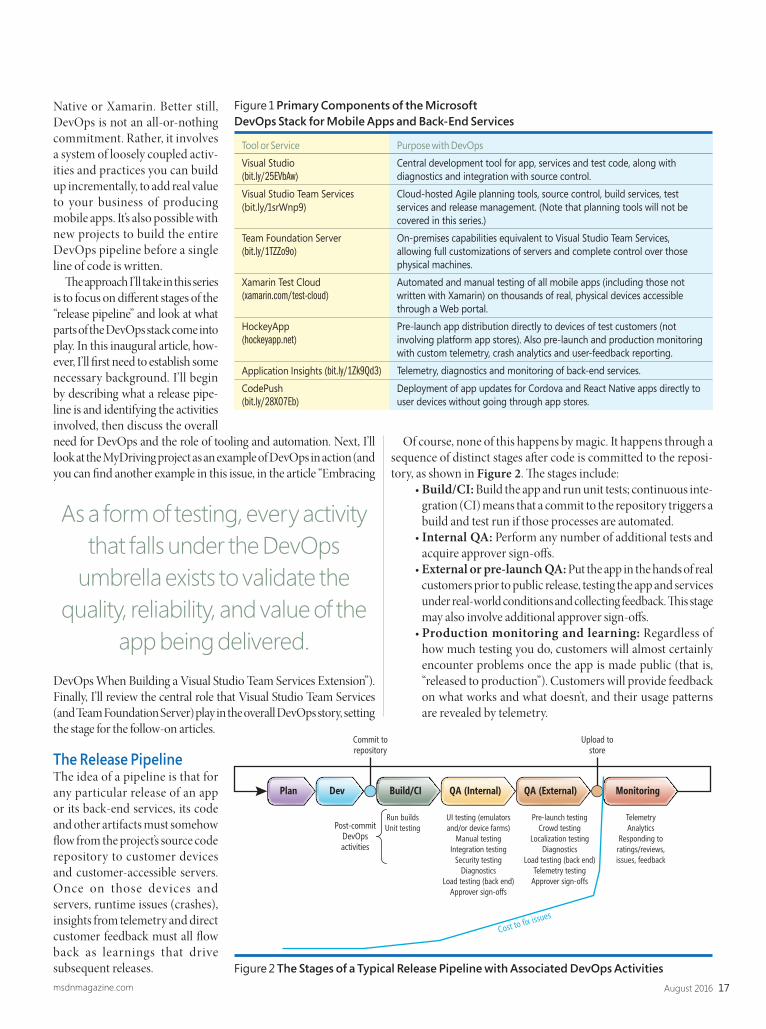
Fortunately, as I’ll explore in this series of articles, Microsoft now provides an answer: a full end-to-end stack that enables DevOps for mobile apps and their associated back ends. This stack, shown in Figure 1, consists of Visual Studio, Visual Studio Team Services, and Team Foundation Server, along with Xamarin Test Cloud, HockeyApp, Application Insights, and CodePush.
This stack is applicable to all types of mobile apps: native apps written for a single mobile platform, hybrid apps written with Apache Cordova, and cross-platform apps written with React
MO BILE DEVOPS
From Code to Customer: Exploring Mobile DevOpsKraig Brockschmidt
This article discusses:•The primary components of Microsoft’s DevOps stack for mobile
apps and back-end services
•The release pipeline and the DevOps activities involved at each stage
•The need to start with a clear release process, then applying tooling and automation
•The MyDriving project as an example of DevOps in action
•The role of Visual Studio Team Services/Team Foundation Server
Technologies discussed:Visual Studio, Visual Studio Team Services, Team Foundation Server, Microsoft Azure, Xamarin Test Cloud, HockeyApp, Application Insights
DevOps is not an all-or-nothing commitment. Rather, it involves
a system of loosely coupled activities and practices that you
can build up incrementally.
0816msdn_BrockSchmidtDevOps_v3_16-22.indd 16 7/12/16 12:18 PM
17August 2016msdnmagazine.com
Native or Xamarin. Better still, DevOps is not an all-or-nothing commitment. Rather, it involves a system of loosely coupled activ-ities and practices you can build up incrementally, to add real value to your business of producing mobile apps. It’s also possible with new projects to build the entire DevOps pipeline before a single line of code is written.
The approach I’ll take in this series is to focus on different stages of the “release pipeline” and look at what parts of the DevOps stack come into play. In this inaugural article, how-ever, I’ll first need to establish some necessary background. I’ll begin by describing what a release pipe-line is and identifying the activities involved, then discuss the overall need for DevOps and the role of tooling and automation. Next, I’ll look at the MyDriving project as an example of DevOps in action (and you can find another example in this issue, in the article “Embracing
DevOps When Building a Visual Studio Team Services Extension”). Finally, I’ll review the central role that Visual Studio Team Services (and Team Foundation Server) play in the overall DevOps story, setting the stage for the follow-on articles.
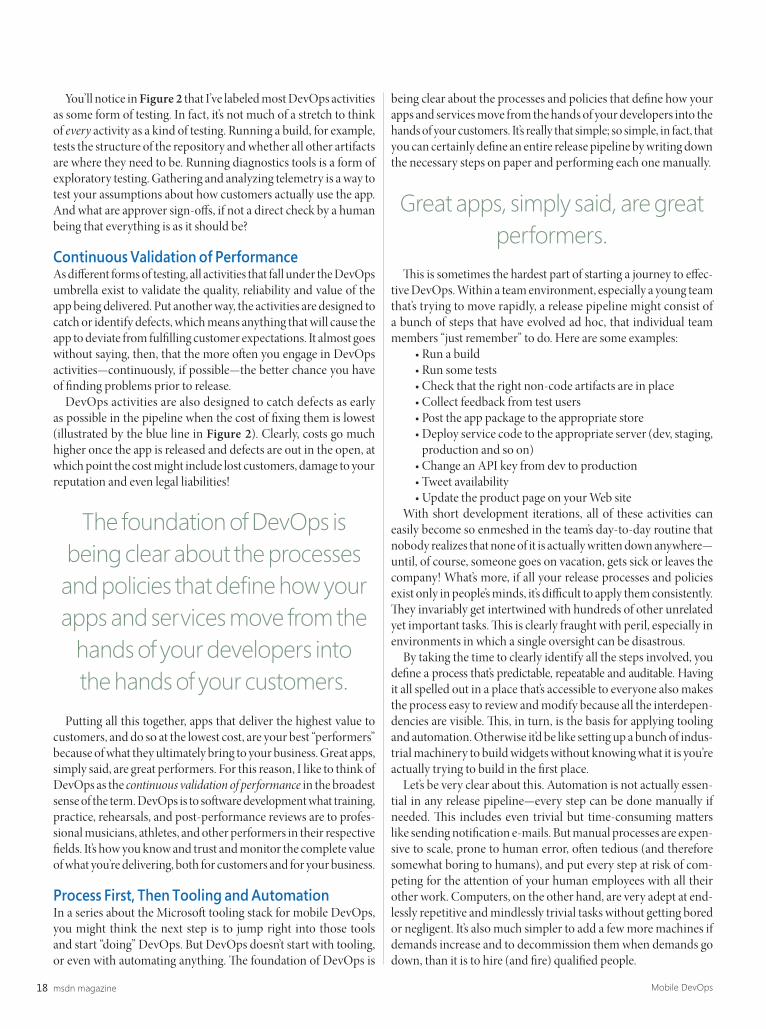
The Release PipelineThe idea of a pipeline is that for any particular release of an app or its back-end services, its code and other artifacts must somehow flow from the project’s source code repos itory to customer devices and customer-accessible servers. Once on those devices and servers, runtime issues (crashes), insights from telemetry and direct customer feedback must all flow back as learnings that drive subsequent releases.
Of course, none of this happens by magic. It happens through a sequence of distinct stages after code is committed to the reposi-tory, as shown in Figure 2. The stages include:
• Build/CI: Build the app and run unit tests; continuous inte-gration (CI) means that a commit to the repository triggers a build and test run if those processes are automated.
• Internal QA: Perform any number of additional tests and acquire approver sign-offs.
• External or pre-launch QA: Put the app in the hands of real customers prior to public release, testing the app and services under real-world conditions and collecting feedback. This stage may also involve additional approver sign-offs.
• Production monitoring and learning: Regardless of how much testing you do, customers will almost certainly encounter problems once the app is made public (that is, “released to production”). Customers will provide feedback on what works and what doesn’t, and their usage patterns are revealed by telemetry.
Tool or Service Purpose with DevOpsVisual Studio (bit.ly/25EVbAw)
Central development tool for app, services and test code, along with diagnostics and integration with source control.
Visual Studio Team Services (bit.ly/1srWnp9)
Cloud-hosted Agile planning tools, source control, build services, test services and release management. (Note that planning tools will not be covered in this series.)
Team Foundation Server (bit.ly/1TZZo9o)
On-premises capabilities equivalent to Visual Studio Team Services, allowing full customizations of servers and complete control over those physical machines.
Xamarin Test Cloud (xamarin.com/test-cloud)
Automated and manual testing of all mobile apps (including those not written with Xamarin) on thousands of real, physical devices accessible throughaWebportal.
HockeyApp(hockeyapp.net)
Pre-launch app distribution directly to devices of test customers (not involving platform app stores). Also pre-launch and production monitoring with custom telemetry, crash analytics and user-feedback reporting.
Application Insights (bit.ly/1Zk9Qd3) Telemetry, diagnostics and monitoring of back-end services.
CodePush(bit.ly/28XO7Eb)
Deployment of app updates for Cordova and React Native apps directly to user devices without going through app stores.
Figure1Primary Components of the Microsoft DevOps Stack for Mobile Apps and Back-End Services
Figure2The Stages of a Typical Release Pipeline with Associated DevOps Activities
Commit torepository
Post-commitDevOpsactivities
Cost to fix issues
Upload tostore
TelemetryAnalytics
Responding toratings/reviews,issues, feedback
Pre-launch testingCrowd testing
Localization testingDiagnostics
Load testing (back end)Telemetry testing
Approver sign-offs
UI testing (emulatorsand/or device farms)
Manual testingIntegration testing
Security testingDiagnostics
Load testing (back end)Approver sign-offs
Run buildsUnit testing
Dev Build/CI QA (Internal) QA (External) MonitoringPlan
As a form of testing, every activity that falls under the DevOps
umbrella exists to validate the quality, reliability, and value of the
app being delivered.
0816msdn_BrockSchmidtDevOps_v3_16-22.indd 17 7/12/16 12:18 PM
msdn magazine18 Mobile DevOps
You’ll notice in Figure 2 that I’ve labeled most DevOps activities as some form of testing. In fact, it’s not much of a stretch to think of every activity as a kind of testing. Running a build, for example, tests the structure of the repository and whether all other artifacts are where they need to be. Running diagnostics tools is a form of exploratory testing. Gathering and analyzing telemetry is a way to test your assumptions about how customers actually use the app. And what are approver sign-offs, if not a direct check by a human being that everything is as it should be?
Continuous Validation of PerformanceAs different forms of testing, all activities that fall under the DevOps umbrella exist to validate the quality, reliability and value of the app being delivered. Put another way, the activities are designed to catch or identify defects, which means anything that will cause the app to deviate from fulfilling customer expectations. It almost goes without saying, then, that the more often you engage in DevOps activities—continuously, if possible—the better chance you have of finding problems prior to release.
DevOps activities are also designed to catch defects as early as possible in the pipeline when the cost of fixing them is lowest (illustrated by the blue line in Figure 2). Clearly, costs go much higher once the app is released and defects are out in the open, at which point the cost might include lost customers, damage to your reputation and even legal liabilities!
Putting all this together, apps that deliver the highest value to customers, and do so at the lowest cost, are your best “performers” because of what they ultimately bring to your business. Great apps, simply said, are great performers. For this reason, I like to think of DevOps as the continuous validation of performance in the broadest sense of the term. DevOps is to software development what training, practice, rehearsals, and post-performance reviews are to profes-sional musicians, athletes, and other performers in their respective fields. It’s how you know and trust and monitor the complete value of what you’re delivering, both for customers and for your business.
Process First, Then Tooling and AutomationIn a series about the Microsoft tooling stack for mobile DevOps, you might think the next step is to jump right into those tools and start “doing” DevOps. But DevOps doesn’t start with tooling, or even with automating anything. The foundation of DevOps is
being clear about the processes and policies that define how your apps and services move from the hands of your developers into the hands of your customers. It’s really that simple; so simple, in fact, that you can certainly define an entire release pipeline by writing down the necessary steps on paper and performing each one manually.
This is sometimes the hardest part of starting a journey to effec-tive DevOps. Within a team environment, especially a young team that’s trying to move rapidly, a release pipeline might consist of a bunch of steps that have evolved ad hoc, that individual team members “just remember” to do. Here are some examples:
• Run a build• Run some tests• Check that the right non-code artifacts are in place• Collect feedback from test users• Post the app package to the appropriate store• Deploy service code to the appropriate server (dev, staging,
production and so on)• Change an API key from dev to production• Tweet availability• Update the product page on your Web site
With short development iterations, all of these activities can easily become so enmeshed in the team’s day-to-day routine that nobody realizes that none of it is actually written down anywhere—until, of course, someone goes on vacation, gets sick or leaves the company! What’s more, if all your release processes and policies exist only in people’s minds, it’s difficult to apply them consistently. They invariably get intertwined with hundreds of other unrelated yet important tasks. This is clearly fraught with peril, especially in environments in which a single oversight can be disastrous.
By taking the time to clearly identify all the steps involved, you define a process that’s predictable, repeatable and auditable. Having it all spelled out in a place that’s accessible to everyone also makes the process easy to review and modify because all the interdepen-dencies are visible. This, in turn, is the basis for applying tooling and automation. Otherwise it’d be like setting up a bunch of indus-trial machinery to build widgets without knowing what it is you’re actually trying to build in the first place.
Let’s be very clear about this. Automation is not actually essen-tial in any release pipeline—every step can be done manually if needed. This includes even trivial but time-consuming matters like sending notification e-mails. But manual processes are expen-sive to scale, prone to human error, often tedious (and therefore somewhat boring to humans), and put every step at risk of com-peting for the attention of your human employees with all their other work. Computers, on the other hand, are very adept at end-lessly repetitive and mindlessly trivial tasks without getting bored or negligent. It’s also much simpler to add a few more machines if demands increase and to decommission them when demands go down, than it is to hire (and fire) qualified people.
The foundation of DevOps is being clear about the processes and policies that define how your apps and services move from the
hands of your developers into the hands of your customers.
Great apps, simply said, are great performers.
0816msdn_BrockSchmidtDevOps_v3_16-22.indd 18 7/12/16 12:18 PM
Untitled-10 1 6/3/16 3:12 PM
msdn magazine20 Mobile DevOps
The purpose of automation, then, is to simultaneously lower the cost and increase the frequency and quality of your processes as they’re defined, separate from the tooling. That is, when your processes and policies are in place, you can then incrementally automate different parts, use tools to enforce policies, and get everything into a form that’s transparent and auditable. As you do so, you free human employees to concentrate on those areas that aren’t readily handled by a computer, such as reviewing and inter-preting user feedback, designing telemetry layers, determining the most effective forms of testing, and continuously improving the quality of DevOps activities that are in place.
An Example: the MyDriving ProjectLet’s now see how all this comes together with the Microsoft mobile DevOps stack by looking at the already-working project called MyDriving (aka.ms/iotsampleapp), introduced by Scott Guthrie at Microsoft Build 2016. MyDriving is a comprehensive system that gathers and processes Internet of Things (IoT) data through a sophisticated Azure back end and provides visualization of the results through both Microsoft Power BI and a mobile app written with Xamarin. It was created as a starting point for similar IoT projects and includes full source code, Azure Resource Manager deployment scripts and a complete reference guide ebook.
For my purposes, the MyDriving release pipelines are of partic-ular interest. I use the plural here because there are four of them: one for the back-end code that’s deployed to Azure App Service, and one each for the Xamarin app on iOS, Android and Windows.
Here’s an overview of the pipeline flow, including some activities that aren’t presently implemented:
• Manage source code in a GitHub repository (bit.ly/28YFFWg).• Run builds using the code in the repository, including the
following sub-steps: ◉ Replace tokens with necessary keys depending on target
environment (dev, test, production). ◉ Restore necessary NuGet packages and Xamarin
components. ◉ Update version names and numbers.
◉ Run the build (using the MacinCloud service for iOS). ◉ (App only) Create and sign the app package as required
by the mobile platform. ◉ (Not implemented) Build any available unit test project. ◉ (Not implemented) Run tests in the test project, failing
the build if any tests fail.• For the service code: ◉ Copy the output of the successfully tested build to a stag-
ing server. ◉ Deploy from the staging server to a test server, and run tests. ◉ If that succeeds, deploy to the production server and
repeat the test run. ◉ Monitor the service and obtain diagnostic reports using
Application Insights.
• For the mobile app on all platforms: ◉ Deploy the app to Xamarin Test Cloud and run UI tests,
failing the build if any UI tests fail. ◉ If the build and UI tests are successful, copy the app
package to a staging server. ◉ Deploy the app from the staging server to alpha testers
via HockeyApp. ◉ (Not implemented) Upon approver sign-off, deploy the
app to beta testers via HockeyApp. ◉ (Not implemented) Upon additional approver sign-off,
push the app to the appropriate app store. ◉ Monitor the app with telemetry and crash reporting via
HockeyApp.As you can see, this is a straight-
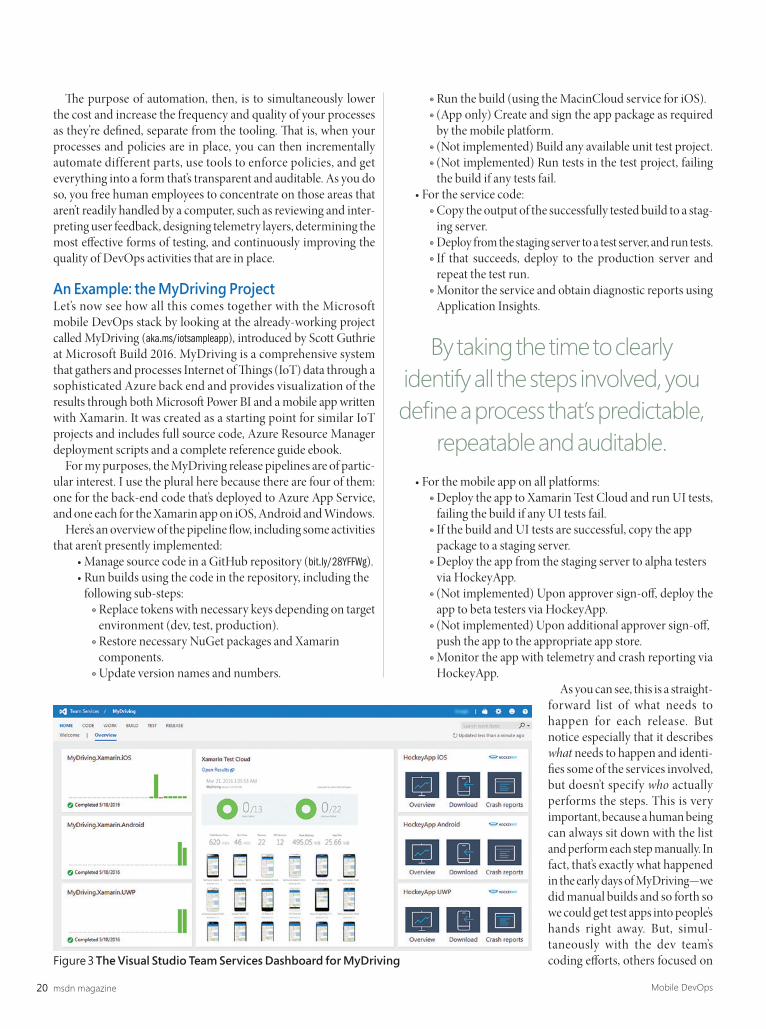
forward list of what needs to happen for each release. But notice especially that it describes what needs to happen and identi-fies some of the services involved, but doesn’t specify who actually performs the steps. This is very important, because a human being can always sit down with the list and perform each step manually. In fact, that’s exactly what happened in the early days of MyDriving—we did manual builds and so forth so we could get test apps into people’s hands right away. But, simul-taneously with the dev team’s coding efforts, others focused on Figure3The Visual Studio Team Services Dashboard for MyDriving
By taking the time to clearly identify all the steps involved, you define a process that’s predictable,
repeatable and auditable.
0816msdn_BrockSchmidtDevOps_v3_16-22.indd 20 7/12/16 12:18 PM

MSDN Magazine Vendor Profile
Great Apps Happen By Design
VPmagazine
MSDN MAGAZINE VENDOR PROFILE
To learn more, please visit our website g www.infragistics.com
Superior user experiences start with Infragistics Ultimate. Choose the UX & UI tools that will accelerate your application design and development process.
Modern, Engaging Desktop ToolsetsOur lightning-fast, touch-friendly Windows Forms and WPF controls cover every aspect of enterprise software development with the fastest data grids, Office-inspired UI tools, dynamic data visualizations, and more.
Web Controls with Flexibility & SpeedTrust Infragistics ASP.NET and Silverlight controls to bring modern, trend-setting applications to market sooner. Build intuitive, full-featured business applications for any web browser with the most powerful set of high performance UX controls and components available.
One Codebase, Multiple ExperiencesNow you can build native apps backed by Infragistics’ own native iOS and Android toolsets, with Infragistics Xamarin.Forms UI controls. Simply use your current
C# & XAML skills to create your native apps in the same way as traditional cross-platform applications, by using a single codebase.
Native Mobile Controls That AmazeInfragistics lightweight mobile iOS and Android controls have the dynamic, zoomable charts and high-performance grids you need to build highly visual, totally native apps for the marketplace or the enterprise.
Discover the Right Design, Code-FreeDon’t waste valuable coding time on revisions: use Indigo Studio to build interactive, responsive prototypes of your application without a single line of code. And now you can share your prototypes on indigodesigned.com—a virtual community created by and for Indigo Studio users!
Untitled-3 1 7/14/16 12:06 PM

msdn magazine22 Mobile DevOps
incrementally automating different steps until the whole automated release pipeline was established.
A similar story is told in another arti-cle in this issue, “Applying DevOps to a Software Development Project.” Notice in particular how the section “Building and Publishing an Extension” does exactly what I’ve talked about here: It writes out a list of the exact steps in the release pro-cess. The rest of the article then explains, in the author’s words, “Our journey toward an automated build and release pipeline.”
The Central Role of Visual Studio Team Services/Team Foundation ServerIn the MyDriving project, Visual Studio Team Services (Team Services for short) is the hub for managing and automating the release pipelines and the interactions with various services (see Figure 3). Because MyDriving was created as an open source project from the start, using a cloud-hosted service like Team Services isn’t an issue. For other scenarios, organizations may not be comfortable or permitted to use the cloud, in which case
Team Foundation Server (TFS) provides the same capabilities with your own on-premises servers. In my series, I’ll work primarily within the context of Team Services, but understand that everything applies also to TFS.
Those core capabilities are listed here (refer to Figure 4 for placement in the Team Services UI):• Source control: Host unlimited private
and public source repositories using Git or Team Foundation Version Control (TFVC), or work easily with reposito-ries on GitHub.
• Agile planning: Track work items, user stories and so on with collaboration on Kanban boards, reporting and so forth. (Note again that planning aspects aren’t covered in this series.)
• Build: Create build definitions for service code and mobile apps (iOS, Android and Windows), using a wide variety of available tasks, including building and running test projects (for continuous integration) and deploying to Xamarin Test Cloud (XTC).
• Release management: Define arbitrary sequences with optional manual approvals for any tasks that happen between build and release to an “environment,” such as deploying to HockeyApp, Azure or an app store. Release management is centered on whatever environments you want to define, such as staging, alpha, beta and production.
The end of a pipeline where Team Services is concerned is the point at which an app is sent out to its final assigned environment (see Figure 5). After that, DevOps is primarily concerned with actively monitoring the app in those environments. This is where HockeyApp and Application Insights come into play, along with any other mechanism you establish for getting additional user feedback (also shown in Figure 5).
Looking AheadAt the beginning of this article I said that the various activities and practices known as DevOps are what bridge the gap between writing code and delivering value to customers at the lowest cost to your busi-ness. You can now see that the Microsoft stack for mobile DevOps provides everything you need to manage quality, lower costs through automation, get the app and services into the hands of customers, monitor ongoing health and operations, and gather user feedback, all of which feeds back into the backlog for subsequent releases. That’s the DevOps cycle—from code commit to backlog—that I’ll be exploring in more detail in the coming months. n
Kraig BrocKschmidt works as a senior content developer for Microsoft and is focused on DevOps for mobile apps. He’s the author of “Programming Windows Store Apps with HTML, CSS and JavaScript” (two editions) from Microsoft Press and blogs on kraigbrockschmidt.com.
thanKs to the following technical experts for reviewing this article: Donovan Brown, Jonathan Carter, Glenn Gailey and Karl Krukow
Figure5Complete DevOps Flow for the MyDriving Project, Where the Code Repository Is on GitHub
HockeyApp
Application Insights
Build, Test,Publish
Feedback CrashReports
Distribution
Diagnostics Performance andUsage Monitor
Back-EndHost
CodeRepository
GitHub Visual Studio Team ServicesXamarin Test Cloud
Visual Studio
HockeyApp
App
Back End
Microsoft Azure App ServiceApplication Insights
The end of a pipeline where Team Services is concerned is the point at which an app is sent out to its final assigned environment.
Figure4Location of Features in Visual Studio Team Services
Source ControlAgile Planning
Build/CITest Planning/ConfigRelease Management
0816msdn_BrockSchmidtDevOps_v3_16-22.indd 22 7/12/16 12:18 PM
Untitled-4 1Untitled-4 1 7/8/16 12:26 PM7/8/16 12:26 PM
msdn magazine24
“DevOps is the union of people, process, and products to enable continuous delivery of value to our end users.”— Donovan Brown in the book, “DevOps on the Microsoft Stack” (Wouter de Kort, 2016).
Every DevOps journey begins with an idea that you want to turn into a solution based on a culture of learning and continuous delivery of value. The goal of this article is to share the learnings we gathered during the exploration of implementing an auto-mated release pipeline for our development, user acceptance testing and production environments. We’ll walk you through an automated release pipeline, which you can adopt “as is,” or evolve to meet your requirements.
So why did we decide to embrace DevOps? As we became intimately familiar with the “why” (goal), the “what” (features), and the “how” (technology, code) of building extensions, we needed a culture and an environment that lets us build, test, release, and monitor the rapidly evolving and growing family of extensions. The promise of DevOps encouraged us to explore and embrace the processes and tools offered by Visual Studio Team Services (Team Services for short). Our self-organized and autonomous teams were empowered to evolve a culture and a pipeline that reduced release cycle times from chaotic, error-prone and manually intensive days to minutes. A similar story and explanation of the pipeline is told in another article in this issue (“From Code to Customer: Exploring Mobile DevOps”).
If you’re unfamiliar with the Rangers, we’re a community of internal and external engineers who work with the product group to provide professional guidance, practical experience and gap-filling solutions to the developer community. It’s the latter—gaps—that got us excited about and committed to extensions.
Extensions provide you with an integration and extensibility experience for Team Services and Team Foundation Server (TFS). Extension points include the work item form, build and release tasks, dashboard widgets, menu actions, Agile and other hubs. These let you provide gap-filling solutions, blending into and enhancing the product, UX and productivity.
DE VO PS
Applying DevOps to a Software Development ProjectWouter de Kort, Willy Schaub and Mattias Sköld
This article discusses:•How to implement a release pipeline using Visual Studio Team
Services out-of-the-box for extension projects
•Reduce cycle times and lead times from days to minutes using automation and embracing DevOps
•Introduce the Build Task Extension for packaging and publishing Team Services extensions to the Visual Studio Marketplace
Technologies discussed:DevOps, Visual Studio Team Services
0816msdn_SchaubDevOps_v4_24-29.indd 24 7/13/16 11:40 AM
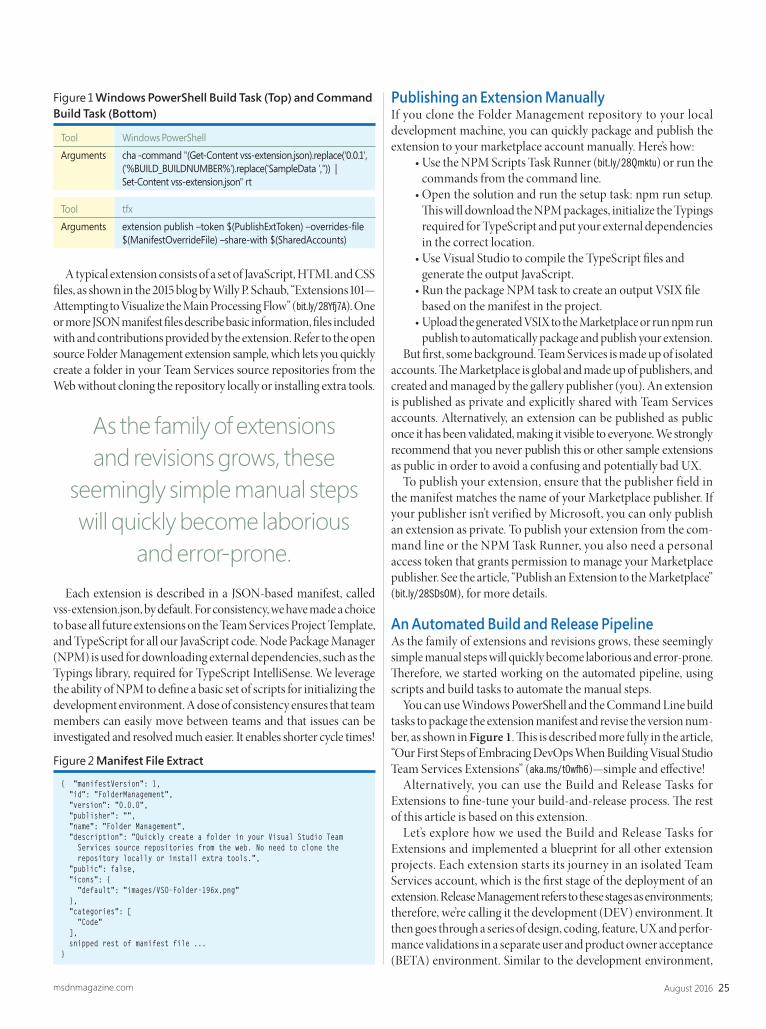
25August 2016msdnmagazine.com
A typical extension consists of a set of JavaScript, HTML and CSS files, as shown in the 2015 blog by Willy P. Schaub, “Extensions 101—Attempting to Visualize the Main Processing Flow” (bit.ly/ 28Yfj7A). One or more JSON manifest files describe basic information, files included with and contributions provided by the extension. Refer to the open source Folder Management extension sample, which lets you quickly create a folder in your Team Services source repositories from the Web without cloning the repository locally or installing extra tools.
Each extension is described in a JSON-based manifest, called vss-extension.json, by default. For consistency, we have made a choice to base all future extensions on the Team Services Project Template, and TypeScript for all our JavaScript code. Node Package Manager (NPM) is used for downloading external dependencies, such as the Typings library, required for TypeScript IntelliSense. We leverage the ability of NPM to define a basic set of scripts for initializing the development environment. A dose of consistency ensures that team members can easily move between teams and that issues can be investigated and resolved much easier. It enables shorter cycle times!
Publishing an Extension ManuallyIf you clone the Folder Management repository to your local development machine, you can quickly package and publish the extension to your marketplace account manually. Here’s how:
• Use the NPM Scripts Task Runner (bit.ly/28Qmktu) or run the commands from the command line.
• Open the solution and run the setup task: npm run setup. This will download the NPM packages, initialize the Typings required for TypeScript and put your external dependencies in the correct location.
• Use Visual Studio to compile the TypeScript files and generate the output JavaScript.
• Run the package NPM task to create an output VSIX file based on the manifest in the project.
• Upload the generated VSIX to the Marketplace or run npm run publish to automatically package and publish your extension.
But first, some background. Team Services is made up of isolated accounts. The Marketplace is global and made up of publishers, and created and managed by the gallery publisher (you). An extension is published as private and explicitly shared with Team Services accounts. Alternatively, an extension can be published as public once it has been validated, making it visible to everyone. We strongly recommend that you never publish this or other sample extensions as public in order to avoid a confusing and potentially bad UX.
To publish your extension, ensure that the publisher field in the manifest matches the name of your Marketplace publisher. If your publisher isn’t verified by Microsoft, you can only publish an extension as private. To publish your extension from the com-mand line or the NPM Task Runner, you also need a personal access token that grants permission to manage your Marketplace publisher. See the article, “Publish an Extension to the Marketplace” (bit.ly/28SDsOM), for more details.
An Automated Build and Release PipelineAs the family of extensions and revisions grows, these seemingly simple manual steps will quickly become laborious and error-prone. Therefore, we started working on the automated pipeline, using scripts and build tasks to automate the manual steps.
You can use Windows PowerShell and the Command Line build tasks to package the extension manifest and revise the version num-ber, as shown in Figure 1. This is described more fully in the article, “Our First Steps of Embracing DevOps When Building Visual Studio Team Services Extensions” (aka.ms/t0wfh6)—simple and effective!
Alternatively, you can use the Build and Release Tasks for Extensions to fine-tune your build-and-release process. The rest of this article is based on this extension.
Let’s explore how we used the Build and Release Tasks for Extensions and implemented a blueprint for all other extension projects. Each extension starts its journey in an isolated Team Services account, which is the first stage of the deployment of an extension. Release Management refers to these stages as environments; therefore, we’re calling it the development (DEV) environment. It then goes through a series of design, coding, feature, UX and perfor-mance validations in a separate user and product owner acceptance (BETA) environment. Similar to the development environment,
Tool Windows PowerShellArguments cha-command"(Get-Contentvss-extension.json).replace('0.0.1',
('%BUILD_BUILDNUMBER%').replace('SampleData ',")) | Set-Content vss-extension.json" rt
Tool tfxArguments extensionpublish–token$(PublishExtToken)–overrides-file
$(ManifestOverrideFile) –share-with $(SharedAccounts)
Figure1Windows PowerShell Build Task (Top) and Command Build Task (Bottom)
{ "manifestVersion": 1, "id": "FolderManagement", "version": "0.0.0", "publisher": "", "name": "Folder Management", "description": "Quickly create a folder in your Visual Studio Team Services source repositories from the web. No need to clone the repository locally or install extra tools.", "public": false, "icons": { "default": "images/VSO-Folder-196x.png" }, "categories": [ "Code" ], snipped rest of manifest file ...}
Figure2Manifest File Extract
As the family of extensions and revisions grows, these
seemingly simple manual steps will quickly become laborious
and error-prone.
0816msdn_SchaubDevOps_v4_24-29.indd 25 7/13/16 11:40 AM
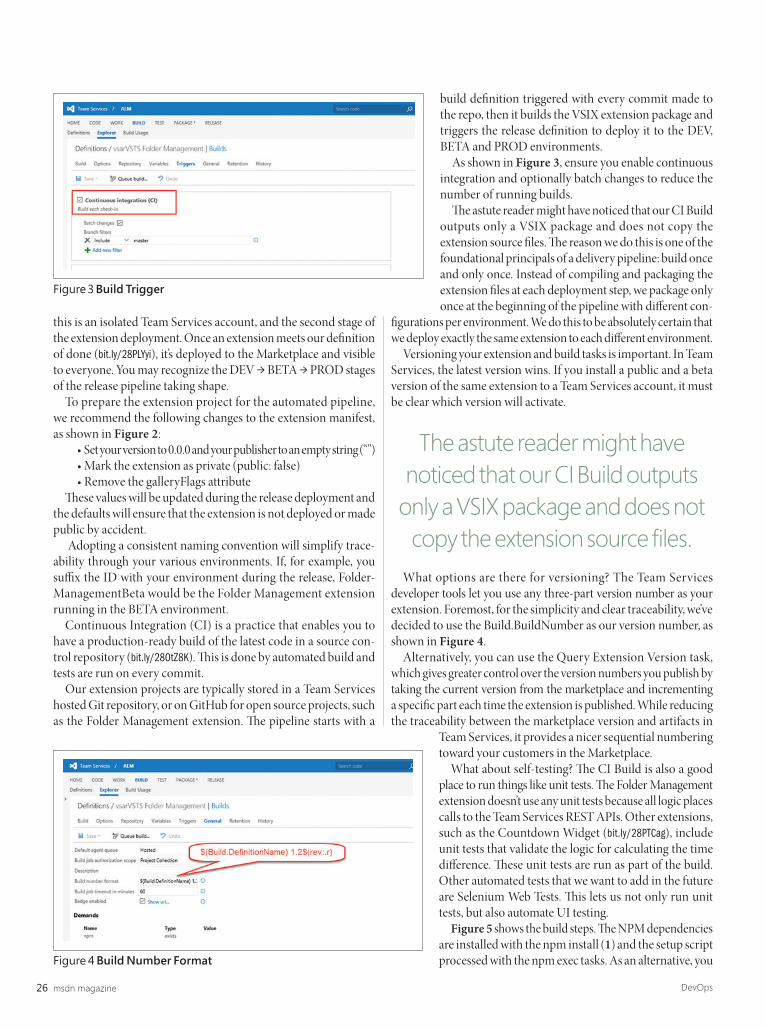
msdn magazine26 DevOps
this is an isolated Team Services account, and the second stage of the extension deployment. Once an extension meets our definition of done (bit.ly/28PLYyi), it’s deployed to the Marketplace and visible to everyone. You may recognize the DEV → BETA → PROD stages of the release pipeline taking shape.
To prepare the extension project for the automated pipeline, we recommend the following changes to the extension manifest, as shown in Figure 2:
• Set your version to 0.0.0 and your publisher to an empty string (“”)• Mark the extension as private (public: false)• Remove the galleryFlags attribute
These values will be updated during the release deployment and the defaults will ensure that the extension is not deployed or made public by accident.
Adopting a consistent naming convention will simplify trace-ability through your various environments. If, for example, you suffix the ID with your environment during the release, Folder-ManagementBeta would be the Folder Management extension running in the BETA environment.
Continuous Integration (CI) is a practice that enables you to have a production-ready build of the latest code in a source con-trol repository (bit.ly/28OtZ8K). This is done by automated build and tests are run on every commit.
Our extension projects are typically stored in a Team Services hosted Git repository, or on GitHub for open source projects, such as the Folder Management extension. The pipeline starts with a
build definition triggered with every commit made to the repo, then it builds the VSIX extension package and triggers the release definition to deploy it to the DEV, BETA and PROD environments.
As shown in Figure 3, ensure you enable continuous integration and optionally batch changes to reduce the number of running builds.
The astute reader might have noticed that our CI Build outputs only a VSIX package and does not copy the extension source files. The reason we do this is one of the foundational principals of a delivery pipeline: build once and only once. Instead of compiling and packaging the extension files at each deployment step, we package only once at the beginning of the pipeline with different con-
figurations per environment. We do this to be absolutely certain that we deploy exactly the same extension to each different environment.
Versioning your extension and build tasks is important. In Team Services, the latest version wins. If you install a public and a beta version of the same extension to a Team Services account, it must be clear which version will activate.
What options are there for versioning? The Team Services developer tools let you use any three-part version number as your extension. Foremost, for the simplicity and clear traceability, we’ve decided to use the Build.BuildNumber as our version number, as shown in Figure 4.
Alternatively, you can use the Query Extension Version task, which gives greater control over the version numbers you publish by taking the current version from the marketplace and incrementing a specific part each time the extension is published. While reducing the traceability between the marketplace version and artifacts in
Team Services, it provides a nicer sequential numbering toward your customers in the Marketplace.
What about self-testing? The CI Build is also a good place to run things like unit tests. The Folder Management extension doesn’t use any unit tests because all logic places calls to the Team Services REST APIs. Other extensions, such as the Countdown Widget (bit.ly/28PTCag), include unit tests that validate the logic for calculating the time difference. These unit tests are run as part of the build. Other automated tests that we want to add in the future are Selenium Web Tests. This lets us not only run unit tests, but also automate UI testing.
Figure 5 shows the build steps. The NPM dependencies are installed with the npm install (1) and the setup script processed with the npm exec tasks. As an alternative, you
Figure3Build Trigger
Figure4Build Number Format
The astute reader might have noticed that our CI Build outputs
only a VSIX package and does not copy the extension source files.
0816msdn_SchaubDevOps_v4_24-29.indd 26 7/13/16 11:40 AM
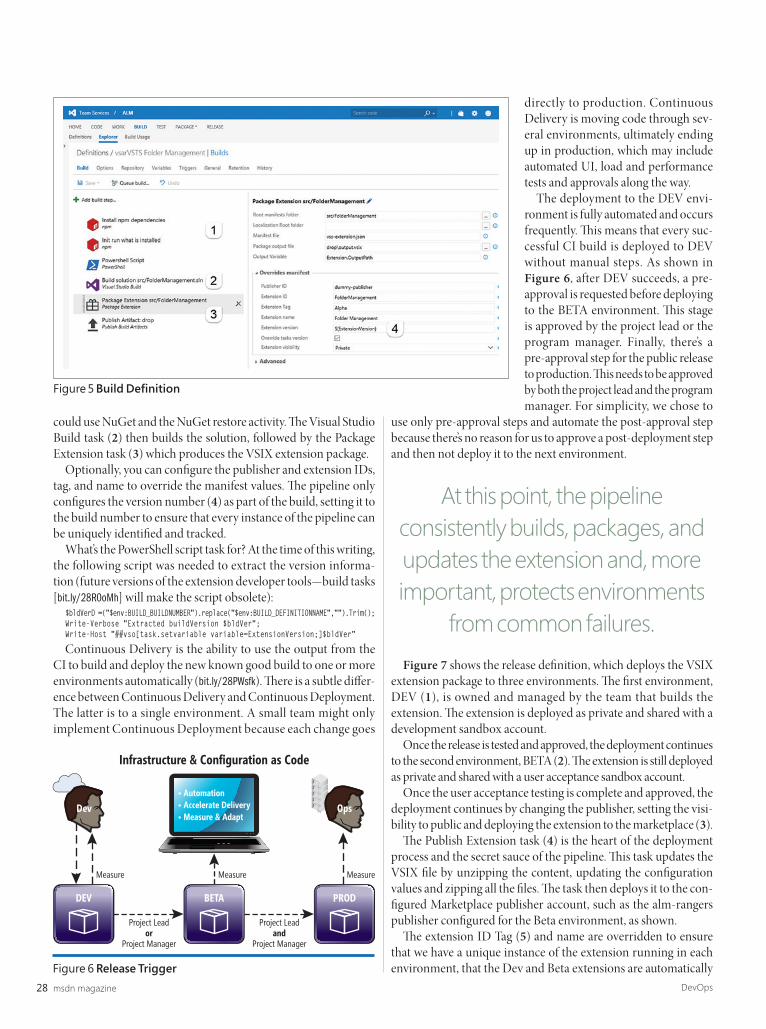
msdn magazine28 DevOps
could use NuGet and the NuGet restore activity. The Visual Studio Build task (2) then builds the solution, followed by the Package Extension task (3) which produces the VSIX extension package.
Optionally, you can configure the publisher and extension IDs, tag, and name to override the manifest values. The pipeline only configures the version number (4) as part of the build, setting it to the build number to ensure that every instance of the pipeline can be uniquely identified and tracked.
What’s the PowerShell script task for? At the time of this writing, the following script was needed to extract the version informa-tion (future versions of the extension developer tools—build tasks [bit.ly/28R0oMh] will make the script obsolete):
$bldVerD =("$env:BUILD_BUILDNUMBER").replace("$env:BUILD_DEFINITIONNAME","").Trim();Write-Verbose "Extracted buildVersion $bldVer";Write-Host "##vso[task.setvariable variable=ExtensionVersion;]$bldVer"
Continuous Delivery is the ability to use the output from the CI to build and deploy the new known good build to one or more environments automatically (bit.ly/28PWsfk). There is a subtle differ-ence between Continuous Delivery and Continuous Deployment. The latter is to a single environment. A small team might only implement Continuous Deployment because each change goes
directly to production. Continuous Delivery is moving code through sev-eral environments, ultimately ending up in production, which may include automated UI, load and performance tests and approvals along the way.
The deployment to the DEV envi-ronment is fully automated and occurs frequently. This means that every suc-cessful CI build is deployed to DEV without manual steps. As shown in Figure 6, after DEV succeeds, a pre- approval is requested before deploying to the BETA environment. This stage is approved by the project lead or the program manager. Finally, there’s a pre-approval step for the public release to production. This needs to be approved by both the project lead and the program manager. For simplicity, we chose to
use only pre-approval steps and automate the post-approval step because there’s no reason for us to approve a post-deployment step and then not deploy it to the next environment.
Figure 7 shows the release definition, which deploys the VSIX extension package to three environments. The first environment, DEV (1), is owned and managed by the team that builds the extension. The extension is deployed as private and shared with a development sandbox account.
Once the release is tested and approved, the deployment continues to the second environment, BETA (2). The extension is still deployed as private and shared with a user acceptance sandbox account.
Once the user acceptance testing is complete and approved, the deployment continues by changing the publisher, setting the visi-bility to public and deploying the extension to the marketplace (3).
The Publish Extension task (4) is the heart of the deployment process and the secret sauce of the pipeline. This task updates the VSIX file by unzipping the content, updating the configuration values and zipping all the files. The task then deploys it to the con-figured Marketplace publisher account, such as the alm-rangers publisher configured for the Beta environment, as shown.
The extension ID Tag (5) and name are overridden to ensure that we have a unique instance of the extension running in each environment, that the Dev and Beta extensions are automatically Figure6Release Trigger
Infrastructure & Configuration as Code
Measure Measure Measure
Project Leador
Project Manager
Project Leadand
Project Manager
• Automation• Accelerate Delivery• Measure & Adapt
Dev Ops
PRODBETADEV
Figure5Build Definition
At this point, the pipeline consistently builds, packages, and updates the extension and, more important, protects environments
from common failures.
0816msdn_SchaubDevOps_v4_24-29.indd 28 7/13/16 11:40 AM
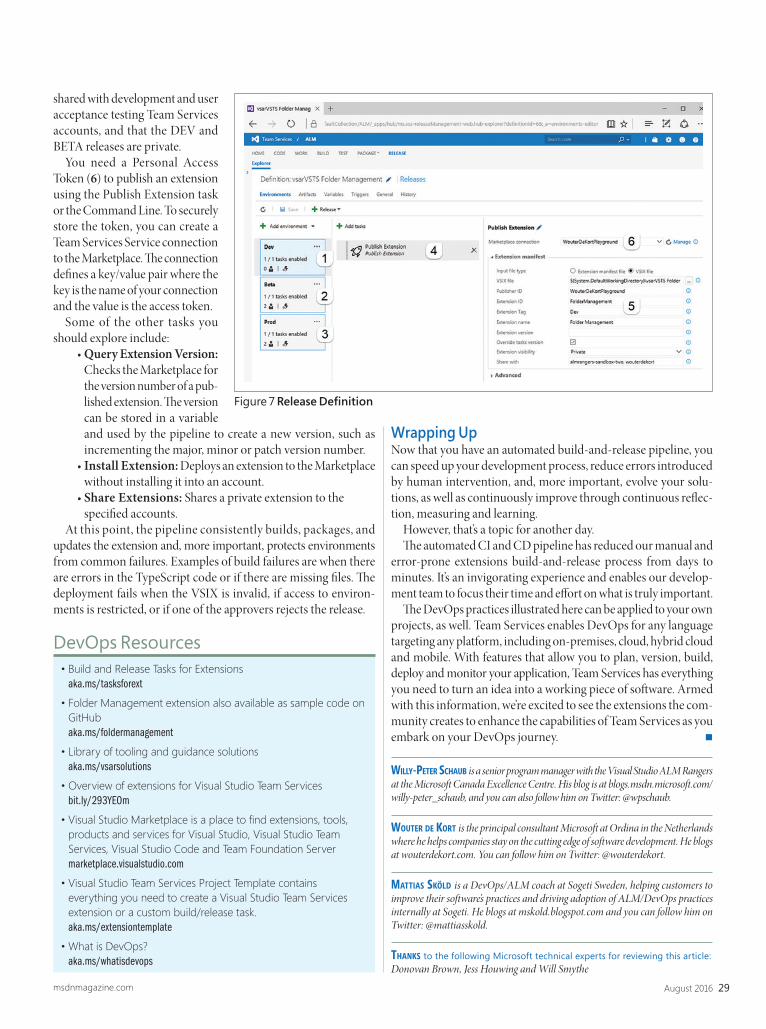
29August 2016msdnmagazine.com
shared with development and user acceptance testing Team Services accounts, and that the DEV and BETA releases are private.
You need a Personal Access Token (6) to publish an extension using the Publish Extension task or the Command Line. To securely store the token, you can create a Team Services Service connection to the Marketplace. The connection defines a key/value pair where the key is the name of your connection and the value is the access token.
Some of the other tasks you should explore include:
• Query Extension Version: Checks the Marketplace for the version number of a pub-lished extension. The version can be stored in a variable and used by the pipeline to create a new version, such as incrementing the major, minor or patch version number.
• Install Extension: Deploys an extension to the Marketplace without installing it into an account.
• Share Extensions: Shares a private extension to the specified accounts.
At this point, the pipeline consistently builds, packages, and updates the extension and, more important, protects environments from common failures. Examples of build failures are when there are errors in the TypeScript code or if there are missing files. The deployment fails when the VSIX is invalid, if access to environ-ments is restricted, or if one of the approvers rejects the release.
Wrapping UpNow that you have an automated build-and-release pipeline, you can speed up your development process, reduce errors introduced by human intervention, and, more important, evolve your solu-tions, as well as continuously improve through continuous reflec-tion, measuring and learning.
However, that’s a topic for another day.The automated CI and CD pipeline has reduced our manual and
error-prone extensions build-and-release process from days to minutes. It’s an invigorating experience and enables our develop-ment team to focus their time and effort on what is truly important.
The DevOps practices illustrated here can be applied to your own projects, as well. Team Services enables DevOps for any language targeting any platform, including on-premises, cloud, hybrid cloud and mobile. With features that allow you to plan, version, build, deploy and monitor your application, Team Services has everything you need to turn an idea into a working piece of software. Armed with this information, we’re excited to see the extensions the com-munity creates to enhance the capabilities of Team Services as you embark on your DevOps journey. n
Willy-Peter Schaub is a senior program manager with the Visual Studio ALM Rangers at the Microsoft Canada Excellence Centre. His blog is at blogs.msdn.microsoft.com/willy-peter_schaub, and you can also follow him on Twitter: @wpschaub.
Wouter de Kort is the principal consultant Microsoft at Ordina in the Netherlands where he helps companies stay on the cutting edge of software development. He blogs at wouterdekort.com. You can follow him on Twitter: @wouterdekort.
MattiaS SKöld is a DevOps/ALM coach at Sogeti Sweden, helping customers to improve their software’s practices and driving adoption of ALM/DevOps practices internally at Sogeti. He blogs at mskold.blogspot.com and you can follow him on Twitter: @mattiasskold.
thanKS to the following Microsoft technical experts for reviewing this article: Donovan Brown, Jess Houwing and Will Smythe
• Build and Release Tasks for Extensions aka.ms/tasksforext
• Folder Management extension also available as sample code on GitHub aka.ms/foldermanagement
• Library of tooling and guidance solutions aka.ms/vsarsolutions
• Overview of extensions for Visual Studio Team Services bit.ly/293YEOm
• Visual Studio Marketplace is a place to find extensions, tools, products and services for Visual Studio, Visual Studio Team Services, Visual Studio Code and Team Foundation Server marketplace.visualstudio.com
• Visual Studio Team Services Project Template contains everything you need to create a Visual Studio Team Services extension or a custom build/release task. aka.ms/extensiontemplate
• What is DevOps? aka.ms/whatisdevops
DevOps Resources
Figure7Release Definition
0816msdn_SchaubDevOps_v4_24-29.indd 29 7/13/16 11:40 AM
msdn magazine30
Since their 2013 releases, Visual Studio and Team Foundation Server have offered out-of-the-box support for Git, the enormously popular source code management system that has upended many traditional options. To complement this source control option, Microsoft has added feature-rich front-end tooling for Git to Visual Studio. But how do you access and leverage these tools?
In this article, I’ll cover how Git differs from the source control technology that’s associated with Team Foundation Server (TFS), formally called Team Foundation Version Control (TFVC). Then I’ll delve into how to configure Git; how to create, connect to and work against a local repository (repo), including how to stage and commit changes; how to manage branches, including merging and viewing history; and how to connect to different types of remote repos, including how to sync changes.
I created the figures in this article from Visual Studio 2015 Update 2 Enterprise edition, but the items I discuss herein are available in all other Visual Studio 2015 versions, including the Community and Express editions. To preserve space, I’ve created figures that some-times contain more than one screen image, and I make that clear in the text. Also, I use numbered markers to direct your attention to items within a figure. Once I refer to a figure, I generally mention just its markers. For instance, in the sentence, “See Figure 1, Marker 1 and then look at Marker 2,” I’m implying that Marker 2 is in Figure 1.
OverviewIf you’ve been using Visual Studio for more than a few years, you might have the impression that TFVC is the right choice to make when developing solutions in a team environment. Often it is, espe-cially if your projects are already using TFVC or if they need to store very large files, contain a great number of files (beyond what anyone would or could reasonably stream across a network) or must be able to lock files under source control. However, as developers more com-monly work from disparate remote locations while contributing to a single collaborative software project, newer development teams have flocked to Git because it’s a decentralized version control system with broad, cross-platform appeal that lets you work productively offline as you commit or undo changes, manage branches and access history. Best of all, when you’re ready, you can go online and connect to the same remote repository that’s being updated by the rest of the team and synchronize your offline changes using a variety of methods.
The Visual Studio 2015 IDE relies on the LibGit2 API and the Lib-Git2Sharp communication layer to implement all of the Git features it exposes in its front-end tooling. LibGit2 is a zero- dependency, cross-plat-form, open source Git core engine written entirely in C. LibGit2Sharp is a library written in C# that runs as a managed process under the Microsoft .NET Framework. It serves as a .NET-friendly interface between Visual Studio and LibGit2 and it dramatically simplifies the programming effort required by the Visual Studio development team to establish a communication pipeline to and from the LibGit2 library. LibGit2Sharp is available to you, too, which means that you can use your favorite .NET language to write your own Git tools and utilities. Access more details about LibGit2 and LibGit2Sharp at libgit2.github.com.
In Visual Studio, Team Explorer is the primary GUI conduit through which you ultimately interact with LibGit2—the under-lying Git engine. To open it, select the View | Team Explorer menu item or type Ctrl+\ followed by Ctrl+M. Along the top of the Team Explorer window is a toolbar containing blue Back/Forward nav-igation buttons followed by white Home, green Connect and blue
DE VO PS
Commit to Git: Exploring Source Control in Visual Studio 2015Jonathan Waldman
This article discusses:• Selecting Git vs. Team Foundation Version Control as your
Visual Studio 2015 project’s source control technology• How to access and leverage specialized Git tooling• How to place source code into a Git repository• How to pull, commit and push code with a remote repository
Technologies discussed:Visual Studio 2015, Git, Team Foundation Version Control
0816msdn_WaldmanGit_v5_30-36.indd 30 7/13/16 11:41 AM

31August 2016msdnmagazine.com
Refresh buttons. Click the Home button and you’ll see a window similar to the one pictured in Figure 1.
Below the toolbar is the label “Home” (Marker 1). This label has a white down-arrow next to it (Marker 2), indicating that it’s connected to a dropdown menu. Click anywhere along the label to display the menu (Marker 4). Both the Team Explorer toolbar and this context menu let you conveniently switch among the various Team Explorer panels; it’s a different kind of tabbed-dialog metaphor: The panel type you’re currently viewing (in this case, Home) appears in both the panel label (Marker 1) and the Team Explorer title-bar caption (Marker 3).
Configuring GitBefore using Git within Visual Studio, you should configure its global settings. To do that, navigate to Team Explorer’s Home panel. Its Project section contains a series of buttons for viewing pending changes, man-aging branches and synchronizing with remote repositories (Figure 1, Marker 5). Click Settings to open the Settings panel, and then click Global Settings under the Git section. This presents the Git Settings panel (Figure 2, Marker 1). These global settings aren’t tied to a particular Git repository; rather, they supply default values as you create new repos (you can later override those defaults on a per- repo basis). Specify your User Name (this should be your full name—spaces are allowed); your e-mail address and the default repo location, which is the default folder where you want newly created Git repos to be stored by Visual Studio (Marker 2).
Also, specify whether to associate TFS or Gravatar author images with Git activities. If you select Gravatar, be aware that the way this feature works is to send the e-mail address associated with each Git commit to Grava-tar as a lookup-key. Gravatar then returns an image associated with that e-mail address. Thus, ultimately, this seemingly innocuous feature shares contact information about everyone on your team with a third-party entity—something you might want to prevent. Finally, select whether to commit changes after a merge by default (Marker 3). If you make any changes to these fields, click Update to save them (Marker 4).
In a separate section of the panel, you can set which Diff Tool and Merge Tool to use; currently, these values default to Visual Studio’s own tools. If you want to further customize these selections, then you might need to manually edit the configuration file to which this Window writes. That file is .gitconfig, and it’s located in your homepath folder.
Working Against a Local RepoWhen you work on your own projects as a solo developer and you’ve made the good decision to place your code under source control, you can start by working offline against a local Git repo and then scale up to a connected, remote repo later, if warranted.
To create an empty repo, go to the Team Explorer Connect panel (Figure 3, Marker 1) and click New under Local Git Repositories (Marker 2; New is grayed out because I already clicked it). Enter a local path and repo name, such as your default source path followed by \MyNewestRepo (Marker 3), then click Create (Marker 4). This creates a folder called MyNewestRepo (this is your working direc-tory) that contains a .git folder along with two files, .gitignore and .gitattributes. Although I show it in the screen image, .git is a hid-den folder: It contains the actual Git repo (Git’s backing database and housekeeping files) and usually shouldn’t be touched. But
because it contains your entire Git repo, you might want to back it up, so it’s important to know that it exists. The .gitattributes file specifies how Git should handle line endings and which programs to launch when diffing a file within the current repo; .gitignore specifies that Git shouldn’t track files with certain exten-sions or in certain folders (by default, it specifies .suo, .user, .pdb, and .tmp file extensions and all of the files in the debug and release folders). Add other file
extensions and folders as needed to keep the size of your Git repo as small as possible.
After creating the new repository, you’ll see it appear under the Local Git Reposi-tories section. Double-click any repo that appears in the list (Figure 3, Marker 6) to connect to it; this highlights the repo using a boldface font before taking you to the Home panel, which confirms that you successfully connected to the repo you selected (Figure 4, Marker 2).
If you click Settings now, you’ll see that you have access to repo-specific settings. Access those settings if you want to over-ride the values inherited from Git’s global settings. For example, it’s quite common to customize the e-mail address for the current repo if you’re working on a proj-ect for a particular client and want to use a work-specific e-mail address. Ad-ditionally, you can click provided links to directly edit the .gitignore and .gitat-tribute files; specify which Diff & Merge tools to use; add remotes and view other attributes related to the current repo.
Recall that Git’s working directory is the parent folder that contains the .git directory. Once you’ve created and
Figure 1 The Team Explorer Window Home Panel (Offline)
Figure 2 The Team Explorer Git Settings Panel
Figure 3 The Team Explorer Connect Panel
0816msdn_WaldmanGit_v5_30-36.indd 31 7/13/16 11:41 AM
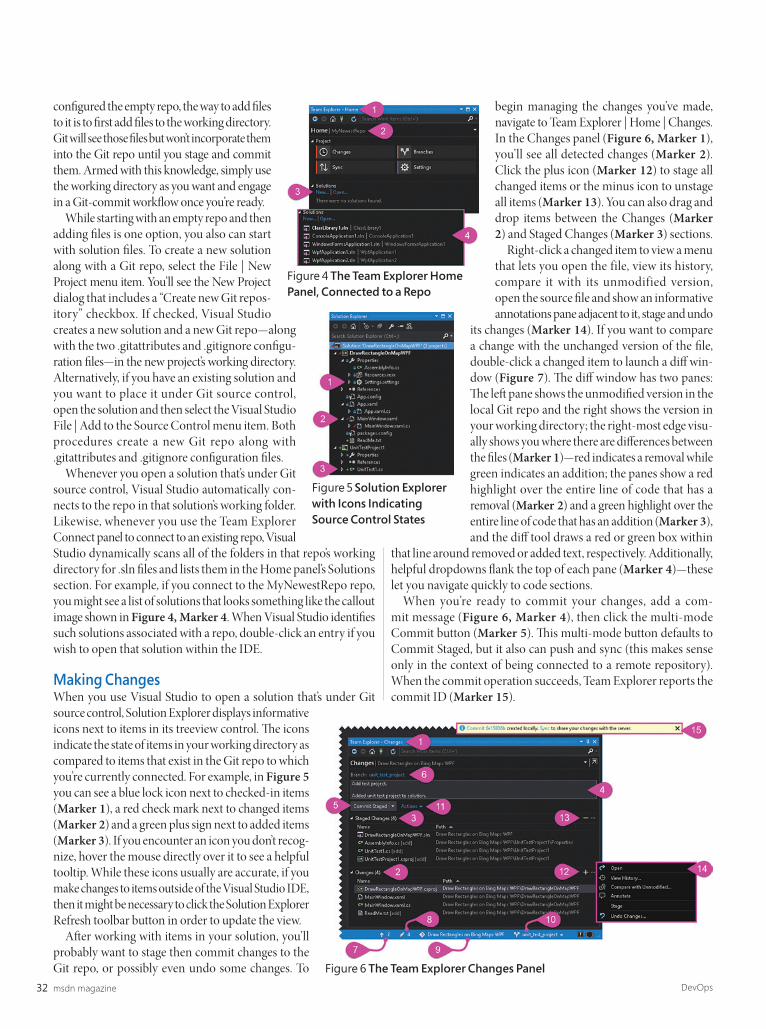
msdn magazine32 DevOps
configured the empty repo, the way to add files to it is to first add files to the working directory. Git will see those files but won’t incorporate them into the Git repo until you stage and commit them. Armed with this knowledge, simply use the working directory as you want and engage in a Git-commit workflow once you’re ready.
While starting with an empty repo and then adding files is one option, you also can start with solution files. To create a new solution along with a Git repo, select the File | New Project menu item. You’ll see the New Project dialog that includes a “Create new Git repos-itory” checkbox. If checked, Visual Studio creates a new solution and a new Git repo—along with the two .gitattributes and .gitignore configu-ration files—in the new project’s working directory. Alternatively, if you have an existing solution and you want to place it under Git source control, open the solution and then select the Visual Studio File | Add to the Source Control menu item. Both procedures create a new Git repo along with .gitattributes and .gitignore configuration files.
Whenever you open a solution that’s under Git source control, Visual Studio automatically con-nects to the repo in that solution’s working folder. Likewise, whenever you use the Team Explorer Connect panel to connect to an existing repo, Visual Studio dynamically scans all of the folders in that repo’s working directory for .sln files and lists them in the Home panel’s Solutions section. For example, if you connect to the MyNewestRepo repo, you might see a list of solutions that looks something like the callout image shown in Figure 4, Marker 4. When Visual Studio identifies such solutions associated with a repo, double-click an entry if you wish to open that solution within the IDE.
Making ChangesWhen you use Visual Studio to open a solution that’s under Git source control, Solution Explorer displays informative icons next to items in its treeview control. The icons indicate the state of items in your working directory as compared to items that exist in the Git repo to which you’re currently connected. For example, in Figure 5 you can see a blue lock icon next to checked-in items (Marker 1), a red check mark next to changed items (Marker 2) and a green plus sign next to added items (Marker 3). If you encounter an icon you don’t recog-nize, hover the mouse directly over it to see a helpful tooltip. While these icons usually are accurate, if you make changes to items outside of the Visual Studio IDE, then it might be necessary to click the Solution Explorer Refresh toolbar button in order to update the view.
After working with items in your solution, you’ll probably want to stage then commit changes to the Git repo, or possibly even undo some changes. To
begin managing the changes you’ve made, navigate to Team Explorer | Home | Changes. In the Changes panel (Figure 6, Marker 1), you’ll see all detected changes (Marker 2). Click the plus icon (Marker 12) to stage all changed items or the minus icon to unstage all items (Marker 13). You can also drag and drop items between the Changes (Marker 2) and Staged Changes (Marker 3) sections.
Right-click a changed item to view a menu that lets you open the file, view its history, compare it with its unmodified version, open the source file and show an informative annotations pane adjacent to it, stage and undo
its changes (Marker 14). If you want to compare a change with the unchanged version of the file, double-click a changed item to launch a diff win-dow (Figure 7). The diff window has two panes: The left pane shows the unmodified version in the local Git repo and the right shows the version in your working directory; the right-most edge visu-ally shows you where there are differences between the files (Marker 1)—red indicates a removal while green indicates an addition; the panes show a red highlight over the entire line of code that has a removal (Marker 2) and a green highlight over the entire line of code that has an addition (Marker 3), and the diff tool draws a red or green box within
that line around removed or added text, respectively. Additionally, helpful dropdowns flank the top of each pane (Marker 4)—these let you navigate quickly to code sections.
When you’re ready to commit your changes, add a com-mit message (Figure 6, Marker 4), then click the multi-mode Commit button (Marker 5). This multi-mode button defaults to Commit Staged, but it also can push and sync (this makes sense only in the context of being connected to a remote repository). When the commit operation succeeds, Team Explorer reports the commit ID (Marker 15).
Figure 4 The Team Explorer Home Panel, Connected to a Repo
Figure 5 Solution Explorer with Icons Indicating Source Control States
Figure 6 The Team Explorer Changes Panel
0816msdn_WaldmanGit_v5_30-36.indd 32 7/13/16 11:41 AM

magazine
SUPPORTED BY PRODUCED BY
VSLIVE.COM/DC
OCT 3-6Washington, D.C.RENAISSANCE, WASHINGTON, D.C.
vslive.com/dc
PRACTICAL & UNBIASED TRAINING FOR DEVELOPERS:
ALM / DevOps Cloud Computing Database and Analytic Mobile Client Software Practices
UX / Design Visual Studio /
.NET Framework Web Client Web Server
Register by September 7 and Save $200
USE PROMO CODE VSLDCTI
Scan the QR code to registeror for more event details.
CAMPAIGN FOR CODE 2016 VISUAL STUDIO LIVE!
0816msdn_VSLive_Insert.indd 1 6/21/16 11:19 AM
VSLIVE.COM/ANAHEIM
vslive.com/anaheim
Anaheim SEPT 26-29HYATT REGENCY, A DISNEYLAND® GOOD NEIGHBOR HOTEL
magazine
SUPPORTED BY PRODUCED BY
CAMPAIGN FOR CODE 2016 VISUAL STUDIO LIVE!
ALM / DevOps ASP.NET Cloud Computing Database and Analytics JavaScript/HTML5
Client
Mobile Client Software Practices Visual Studio /
.NET Framework Windows Client
DEVELOPMENT TOPICS INCLUDE:
Register by August 24 and Save $200
USE PROMO CODE VSLANTI
Scan the QR code to registeror for more event details.
0816msdn_VSLive_Insert.indd 2 6/21/16 12:52 PM
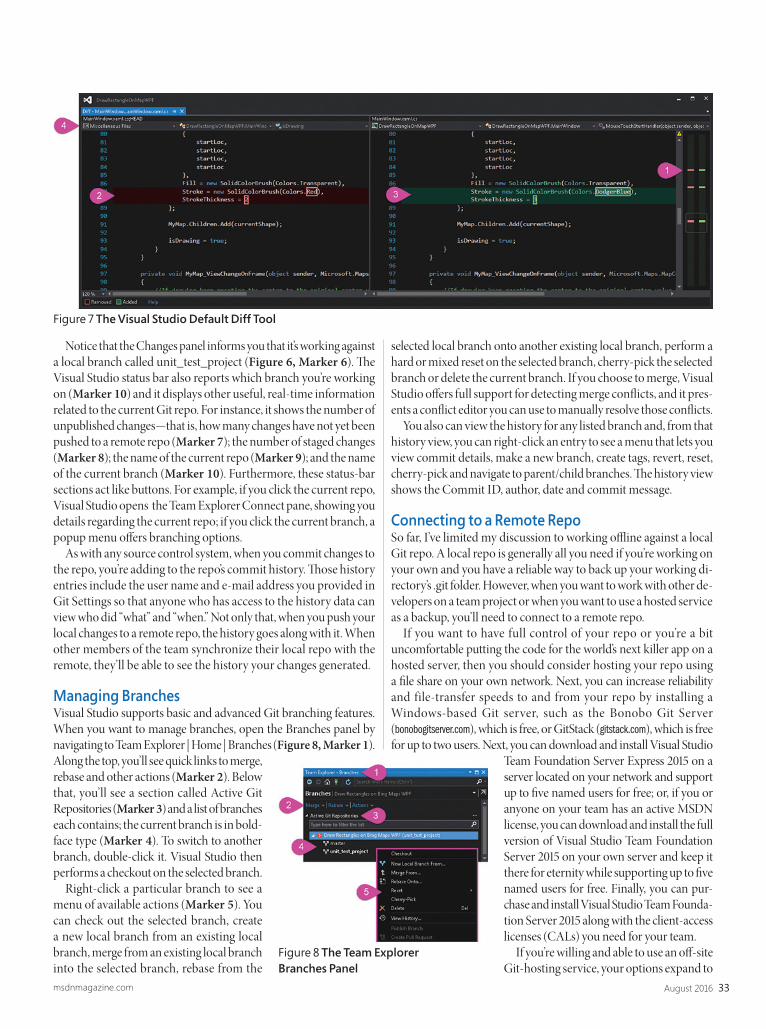
33August 2016msdnmagazine.com
Notice that the Changes panel informs you that it’s working against a local branch called unit_test_project (Figure 6, Marker 6). The Visual Studio status bar also reports which branch you’re working on (Marker 10) and it displays other useful, real-time information related to the current Git repo. For instance, it shows the number of unpublished changes—that is, how many changes have not yet been pushed to a remote repo (Marker 7); the number of staged changes (Marker 8); the name of the current repo (Marker 9); and the name of the current branch (Marker 10). Furthermore, these status-bar sections act like buttons. For example, if you click the current repo, Visual Studio opens the Team Explorer Connect pane, showing you details regarding the current repo; if you click the current branch, a popup menu offers branching options.
As with any source control system, when you commit changes to the repo, you’re adding to the repo’s commit history. Those history entries include the user name and e-mail address you provided in Git Settings so that anyone who has access to the history data can view who did “what” and “when.” Not only that, when you push your local changes to a remote repo, the history goes along with it. When other members of the team synchronize their local repo with the remote, they’ll be able to see the history your changes generated.
Managing BranchesVisual Studio supports basic and advanced Git branching features. When you want to manage branches, open the Branches panel by navigating to Team Explorer | Home | Branches (Figure 8, Marker 1). Along the top, you’ll see quick links to merge, rebase and other actions (Marker 2). Below that, you’ll see a section called Active Git Repositories (Marker 3) and a list of branches each contains; the current branch is in bold-face type (Marker 4). To switch to another branch, double-click it. Visual Studio then performs a checkout on the selected branch.
Right-click a particular branch to see a menu of available actions (Marker 5). You can check out the selected branch, create a new local branch from an existing local branch, merge from an existing local branch into the selected branch, rebase from the
selected local branch onto another existing local branch, perform a hard or mixed reset on the selected branch, cherry-pick the selected branch or delete the current branch. If you choose to merge, Visual Studio offers full support for detecting merge conflicts, and it pres-ents a conflict editor you can use to manually resolve those conflicts.
You also can view the history for any listed branch and, from that history view, you can right-click an entry to see a menu that lets you view commit details, make a new branch, create tags, revert, reset, cherry-pick and navigate to parent/child branches. The history view shows the Commit ID, author, date and commit message.
Connecting to a Remote RepoSo far, I’ve limited my discussion to working offline against a local Git repo. A local repo is generally all you need if you’re working on your own and you have a reliable way to back up your working di-rectory’s .git folder. However, when you want to work with other de-velopers on a team project or when you want to use a hosted service as a backup, you’ll need to connect to a remote repo.
If you want to have full control of your repo or you’re a bit uncomfortable putting the code for the world’s next killer app on a hosted server, then you should consider hosting your repo using a file share on your own network. Next, you can increase reliability and file-transfer speeds to and from your repo by installing a Windows-based Git server, such as the Bonobo Git Server (bonobogitserver.com), which is free, or GitStack (gitstack.com), which is free for up to two users. Next, you can download and install Visual Studio
Team Foundation Server Express 2015 on a server located on your network and support up to five named users for free; or, if you or anyone on your team has an active MSDN license, you can download and install the full version of Visual Studio Team Foundation Server 2015 on your own server and keep it there for eternity while supporting up to five named users for free. Finally, you can pur-chase and install Visual Studio Team Founda-tion Server 2015 along with the client-access licenses (CALs) you need for your team.
If you’re willing and able to use an off-site Git-hosting service, your options expand to
Figure 7 The Visual Studio Default Diff Tool
Figure 8 The Team Explorer Branches Panel
0816msdn_WaldmanGit_v5_30-36.indd 33 7/13/16 11:41 AM
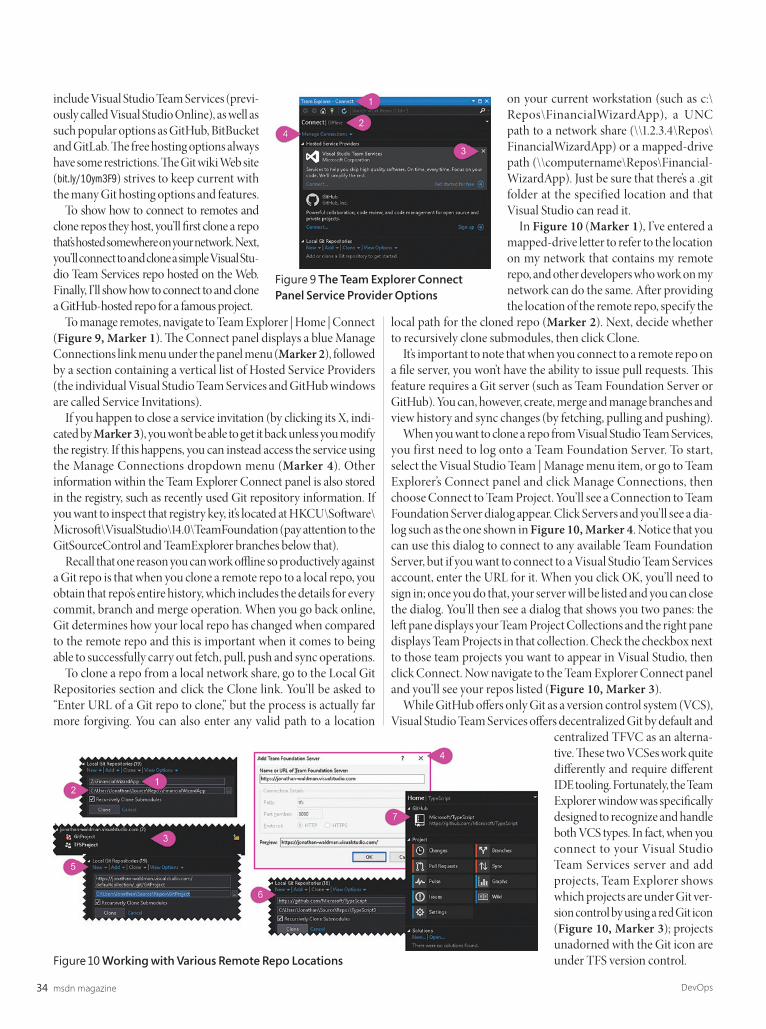
msdn magazine34 DevOps
include Visual Studio Team Services (previ-ously called Visual Studio Online), as well as such popular options as GitHub, BitBucket and GitLab. The free hosting options always have some restrictions. The Git wiki Web site (bit.ly/1Oym3F9) strives to keep current with the many Git hosting options and features.
To show how to connect to remotes and clone repos they host, you’ll first clone a repo that’s hosted somewhere on your network. Next, you’ll connect to and clone a simple Visual Stu-dio Team Services repo hosted on the Web. Finally, I’ll show how to connect to and clone a GitHub-hosted repo for a famous project.
To manage remotes, navigate to Team Explorer | Home | Connect (Figure 9, Marker 1). The Connect panel displays a blue Manage Connections link menu under the panel menu (Marker 2), followed by a section containing a vertical list of Hosted Service Providers (the individual Visual Studio Team Services and GitHub windows are called Service Invitations).
If you happen to close a service invitation (by clicking its X, indi-cated by Marker 3), you won’t be able to get it back unless you modify the registry. If this happens, you can instead access the service using the Manage Connections dropdown menu (Marker 4). Other information within the Team Explorer Connect panel is also stored in the registry, such as recently used Git repository information. If you want to inspect that registry key, it’s located at HKCU\Software\Microsoft\VisualStudio\14.0\TeamFoundation (pay attention to the GitSourceControl and TeamExplorer branches below that).
Recall that one reason you can work offline so productively against a Git repo is that when you clone a remote repo to a local repo, you obtain that repo’s entire history, which includes the details for every commit, branch and merge operation. When you go back online, Git determines how your local repo has changed when compared to the remote repo and this is important when it comes to being able to successfully carry out fetch, pull, push and sync operations.
To clone a repo from a local network share, go to the Local Git Repositories section and click the Clone link. You’ll be asked to “Enter URL of a Git repo to clone,” but the process is actually far more forgiving. You can also enter any valid path to a location
on your current workstation (such as c:\ Repos\FinancialWizardApp), a UNC path to a network share (\\1.2.3.4\Repos\FinancialWizardApp) or a mapped-drive path (\\computername\Repos\Financial-WizardApp). Just be sure that there’s a .git folder at the specified location and that Visual Studio can read it.
In Figure 10 (Marker 1), I’ve entered a mapped-drive letter to refer to the location on my network that contains my remote repo, and other developers who work on my network can do the same. After providing the location of the remote repo, specify the
local path for the cloned repo (Marker 2). Next, decide whether to recursively clone submodules, then click Clone.
It’s important to note that when you connect to a remote repo on a file server, you won’t have the ability to issue pull requests. This feature requires a Git server (such as Team Foundation Server or GitHub). You can, however, create, merge and manage branches and view history and sync changes (by fetching, pulling and pushing).
When you want to clone a repo from Visual Studio Team Services, you first need to log onto a Team Foundation Server. To start, select the Visual Studio Team | Manage menu item, or go to Team Explorer’s Connect panel and click Manage Connections, then choose Connect to Team Project. You’ll see a Connection to Team Foundation Server dialog appear. Click Servers and you’ll see a dia-log such as the one shown in Figure 10, Marker 4. Notice that you can use this dialog to connect to any available Team Foundation Server, but if you want to connect to a Visual Studio Team Services account, enter the URL for it. When you click OK, you’ll need to sign in; once you do that, your server will be listed and you can close the dialog. You’ll then see a dialog that shows you two panes: the left pane displays your Team Project Collections and the right pane displays Team Projects in that collection. Check the checkbox next to those team projects you want to appear in Visual Studio, then click Connect. Now navigate to the Team Explorer Connect panel and you’ll see your repos listed (Figure 10, Marker 3).
While GitHub offers only Git as a version control system (VCS), Visual Studio Team Services offers decentralized Git by default and
centralized TFVC as an alterna-tive. These two VCSes work quite differently and require different IDE tooling. Fortunately, the Team Explorer window was specifically designed to recognize and handle both VCS types. In fact, when you connect to your Visual Studio Team Services server and add projects, Team Explorer shows which projects are under Git ver-sion control by using a red Git icon (Figure 10, Marker 3); projects unadorned with the Git icon are under TFS version control. Figure 10 Working with Various Remote Repo Locations
Figure 9 The Team Explorer Connect Panel Service Provider Options
0816msdn_WaldmanGit_v5_30-36.indd 34 7/13/16 11:41 AM

If it can be packaged it can be deployedOctopus Deploy integrates with a development team’s existing tool chain enabling reliable, secure, automated deployments into pre-production and production environments.
Release packages are pushed from an existing build server to Octopus Deploy, ready to deploy at anytime. This dedicated deployment tool allows technical and non-technical users to deploy software to multiple machines in parallel with a single click avoiding errors and risk.
Built by .NET developers for .NET developersBased in Australia with over 6000 customers worldwide, Octopus Deploy is built by .NET developers for .NET developers. Customers include banks, hedge funds, accountancy and finance firms, manufacturers, retail and consumer-oriented companies, software vendors, and government departments.
Octopus Deploy is a sustainable business, focused on building a single, high-quality product, that does one thing and does it well. They believe in building software that is intuitive to install, configure and use, and that is geared towards user-friendliness and repeatability.
EasySelf-service deployment in a single click
• Automated deployment to multiple machines in parallel• Continuous delivery through streamlined integration• Customisable deployment lifecycles• Visibility of released versions on machines
SecureSecurely distribute applications to remote machines
• Utilise SSL and two-way trust using TLS 1.2• Encryptable configuration settings• Rich permissions model• Detailed auditing and reporting• A fine-grained security model
PredictableConfidently deploy more often
• Environment-specific configuration• Built-in conventions and tasks• Custom tasks with Powershell, C# and Bash• Documented deployment steps and variables
MSDN Magazine Vendor Profile
Octopus Deploy automatesyour deployments so they’re easy, secure and predictable every time.
VPmagazine
MSDN MAGAZINE VENDOR PROFILE
To learn more, please visit our website g www.octopus.com
Untitled-4 1 7/8/16 12:24 PM
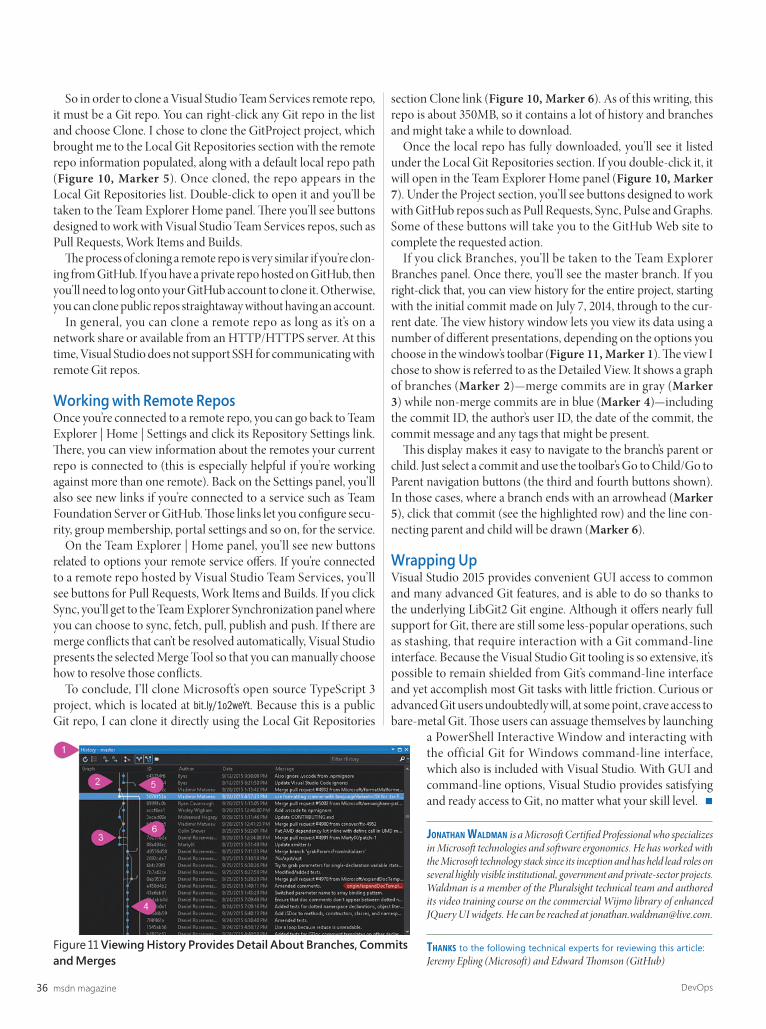
msdn magazine36 DevOps
So in order to clone a Visual Studio Team Services remote repo, it must be a Git repo. You can right-click any Git repo in the list and choose Clone. I chose to clone the GitProject project, which brought me to the Local Git Repositories section with the remote repo information populated, along with a default local repo path (Figure 10, Marker 5). Once cloned, the repo appears in the Local Git Repositories list. Double-click to open it and you’ll be taken to the Team Explorer Home panel. There you’ll see buttons designed to work with Visual Studio Team Services repos, such as Pull Requests, Work Items and Builds.
The process of cloning a remote repo is very similar if you’re clon-ing from GitHub. If you have a private repo hosted on GitHub, then you’ll need to log onto your GitHub account to clone it. Otherwise, you can clone public repos straightaway without having an account.
In general, you can clone a remote repo as long as it’s on a network share or available from an HTTP/HTTPS server. At this time, Visual Studio does not support SSH for communicating with remote Git repos.
Working with Remote ReposOnce you’re connected to a remote repo, you can go back to Team Explorer | Home | Settings and click its Repository Settings link. There, you can view information about the remotes your current repo is connected to (this is especially helpful if you’re working against more than one remote). Back on the Settings panel, you’ll also see new links if you’re connected to a service such as Team Foundation Server or GitHub. Those links let you configure secu-rity, group membership, portal settings and so on, for the service.
On the Team Explorer | Home panel, you’ll see new buttons related to options your remote service offers. If you’re connected to a remote repo hosted by Visual Studio Team Services, you’ll see buttons for Pull Requests, Work Items and Builds. If you click Sync, you’ll get to the Team Explorer Synchronization panel where you can choose to sync, fetch, pull, publish and push. If there are merge conflicts that can’t be resolved automatically, Visual Studio presents the selected Merge Tool so that you can manually choose how to resolve those conflicts.
To conclude, I’ll clone Microsoft’s open source TypeScript 3 project, which is located at bit.ly/1o2weYt. Because this is a public Git repo, I can clone it directly using the Local Git Repositories
section Clone link (Figure 10, Marker 6). As of this writing, this repo is about 350MB, so it contains a lot of history and branches and might take a while to download.
Once the local repo has fully downloaded, you’ll see it listed under the Local Git Repositories section. If you double-click it, it will open in the Team Explorer Home panel (Figure 10, Marker 7). Under the Project section, you’ll see buttons designed to work with GitHub repos such as Pull Requests, Sync, Pulse and Graphs. Some of these buttons will take you to the GitHub Web site to complete the requested action.
If you click Branches, you’ll be taken to the Team Explorer Branches panel. Once there, you’ll see the master branch. If you right-click that, you can view history for the entire project, starting with the initial commit made on July 7, 2014, through to the cur-rent date. The view history window lets you view its data using a number of different presentations, depending on the options you choose in the window’s toolbar (Figure 11, Marker 1). The view I chose to show is referred to as the Detailed View. It shows a graph of branches (Marker 2)—merge commits are in gray (Marker 3) while non-merge commits are in blue (Marker 4)—including the commit ID, the author’s user ID, the date of the commit, the commit message and any tags that might be present.
This display makes it easy to navigate to the branch’s parent or child. Just select a commit and use the toolbar’s Go to Child/Go to Parent navigation buttons (the third and fourth buttons shown). In those cases, where a branch ends with an arrowhead (Marker 5), click that commit (see the highlighted row) and the line con-necting parent and child will be drawn (Marker 6).
Wrapping UpVisual Studio 2015 provides convenient GUI access to common and many advanced Git features, and is able to do so thanks to the underlying LibGit2 Git engine. Although it offers nearly full support for Git, there are still some less-popular operations, such as stashing, that require interaction with a Git command-line interface. Because the Visual Studio Git tooling is so extensive, it’s possible to remain shielded from Git’s command-line interface and yet accomplish most Git tasks with little friction. Curious or advanced Git users undoubtedly will, at some point, crave access to bare-metal Git. Those users can assuage themselves by launching
a PowerShell Interactive Window and interacting with the official Git for Windows command-line interface, which also is included with Visual Studio. With GUI and command-line options, Visual Studio provides satisfying and ready access to Git, no matter what your skill level. n
Jonathan Waldman is a Microsoft Certified Professional who specializes in Microsoft technologies and software ergonomics. He has worked with the Microsoft technology stack since its inception and has held lead roles on several highly visible institutional, government and private-sector projects. Waldman is a member of the Pluralsight technical team and authored its video training course on the commercial Wijmo library of enhanced JQuery UI widgets. He can be reached at [email protected].
thanks to the following technical experts for reviewing this article: Jeremy Epling (Microsoft) and Edward Thomson (GitHub)
Figure 11 Viewing History Provides Detail About Branches, Commits and Merges
0816msdn_WaldmanGit_v5_30-36.indd 36 7/13/16 11:41 AM

(888) 850-9911Sales Hotline - US & Canada:
/update/2016/08
US Headquarters ComponentSource650 Claremore Prof WaySuite 100WoodstockGA 30188-5188USA
© 1996-2016 ComponentSource. All Rights Reserved. All prices correct at the time of press. Online prices may vary from those shown due to daily fluctuations & online discounts.
European Headquarters ComponentSource2 New Century PlaceEast StreetReading, BerkshireRG1 4ETUnited Kingdom
Asia / Pacific Headquarters ComponentSource3F Kojimachi Square Bldg3-3 Kojimachi Chiyoda-kuTokyoJapan102-0083 www.componentsource.com
We accept purchase orders.Contact us to apply for a credit account.
Help & Manual Professional from $586.04Help and documentation for .NET and mobile applications.
• Powerful features in an easy, accessible and intuitive user interface
• As easy to use as a word processor, but with all the power of a true WYSIWYG XML editor
• Single source, multi-channel publishing with conditional and customized output features
• Output to responsive HTML, CHM, PDF, MS Word, ePUB, Kindle or print
• Styles and Templates give you full design control
BEST SELLER
Experience the brand new look at www.componentsource.com
Aspose.Total for .NET from $2,449.02Every Aspose .NET component in one package.
• Programmatically manage popular � le formats including Word, Excel, PowerPoint and PDF
• Work with charts, diagrams, images, project plans, emails, barcodes, OCR and OneNote � les alongside many more document management features in .NET applications
• Common uses also include mail merging, adding barcodes to documents, building dynamic reports on the � y and extracting text from most document types
BEST SELLER
DevExpress DXperience 16.1 from $1,439.99The complete range of DevExpress .NET controls and libraries for all major Microsoft platforms.
• WinForms - New TreeMap control, Chart series types and Unbound Data Source
• WPF - New Wizard control and Data Grid scrollbar annotations
• ASP.NET - New Vertical Grid control, additional Themes, Rich Editor Spell Checking and more
• Windows 10 Apps - New Hamburger Sub Menus, Splash Screen and Context Toolbar controls
• CodeRush - New debug visualizer expression map and code analysis diagnostics
BEST SELLER
LEADTOOLS Medical Imaging SDKs V19 from $4,995.00 SRP
Powerful DICOM, PACS, and HL7 functionality.
• Load, save, edit, annotate & display DICOM Data Sets with support for the latest speci� cations
• High-level PACS Client and Server components and frameworks
• OEM-ready HTML5 Zero-footprint Viewer and DICOM Storage Server apps with source code
• Medical-speci¬� c image processing functions for enhancing 16-bit grayscale images
• Native libraries for .NET, C/C++, HTML5, JavaScript, WinRT, iOS, OS X, Android, Linux, & more
BEST SELLER
Untitled-4 1 7/8/16 12:18 PM
msdn magazine38
Open source and cross-platform development are crucial for Microsoft’s current and future strategies. Many building blocks of the .NET stack have been open sourced, while others have been developed to embrace and support the new strategy. ASP.NET Core 1.0, currently in Release Candidate (RC) mode, is the most recent open source technology for building cross-platform applications for the Web and cloud, running on Linux, Mac OS X and Windows.
ASP.NET Core lets you write Model-View-Controller (MVC) applications with C# and relies on .NET Core (dotnet.github.io), the new open source and cross-platform modular set of runtimes, libraries and compilers—in RC, too. The biggest benefit of ASP.NET Core is that it’s completely independent from any proprietary project system or integrated development environment, which means you
can also build an ASP.NET Core application outside of Microsoft Visual Studio, and on OSes different than Windows.
To accomplish this, you use a number of command-line tools to scaffold, build and run applications, while you can use Visual Studio Code for editing. There’s a lot of work in progress yet, so some fea-tures might change until it reaches the Release-to-Manufacturing (RTM) milestone. For instance, ASP.NET Core used to rely on the .NET Execution Environment (DNX) and its command-line interface (CLI) to build and manage applications; because ASP.NET Core is built upon .NET Core, DNX will be retired and its CLI will switch to the .NET Core command-line tools for future releases, so keep this in mind if you want to start writing cross-platform Web apps with ASP.NET Core and C#.
This article explains how to create a cross-platform ASP.NET Core Web application that leverages Entity Framework 7 to execute data operations against a database, and how to write code in Visual Studio Code (code.visualstudio.com), which you use on Linux, OS X and Windows. Because the focus is on data, I recommend you read the “.NET Core and Visual Studio Code” document on the official Web site (bit.ly/1PhzoC7). You’ll write several commands based on the DNX environment for consistency with the current RC; keep in mind this will be replaced with commands from the .NET Core CLI once ASP.NET Core turns into RTM.
I’ll point out commands that’ll be replaced where appropriate. I’ll create my sample application using the new Visual Studio
AS P. N E T COR E
Write Apps with Visual Studio Code and Entity FrameworkAlessandro Del Sole
This article discusses:•Enhanced editing experience in Visual Studio Code
•Scaffolding an ASP.NET Core application
•ImplementingdatamodelswithEF7
•Installing VS Code extensions
Technologies discussed: .NET Core, ASP.NETMVC, Entity Framework, SQL Server
0816msdn_DelSoleASPNETCore_v5_38-48.indd 38 7/13/16 11:36 AM

39August 2016msdnmagazine.com
Code tool. Visual Studio Code is a sophisticated, multi-language and cross-platform development tool that puts writing code at its center and that has hooks so you can issue build commands. I’m assuming you already have installed Visual Studio Code, Node.js (nodejs.org), SQL Server Express Edition (bit.ly/1PhzoC7) and ASP.NET Core 1.0 RC (get.asp.net/OtherDownloads).
Creating a Sample DatabaseFirst, create a database with which to work. You might use an exist-ing database, or you could also define the data model with the Entity Framework Code First approach, but support for code migrations in ASP.NET Core is still in progress and not stable at this time. So you’ll simply create a new database that stores a list of car models and their manufacturers’ names. In SQL Server Management Studio, create a new database called Cars, then write and execute the query
shown in Figure 1, which defines a table called Cars, with three columns: Id (primary key and auto-increment), CarModel (of type NVarChar(Max)) and Manufacturer (of type NVarChar(Max)).
Depending on your scenario, you might also want to consider a column of type bit that you use to mark an item as deleted but that actually is never removed from the data store physically.
Ensure the database, the table and sample data are properly shown in the Management Studio Object Explorer.
Installing C# for Visual Studio CodeIn Visual Studio Code, the C# language support has recently moved to an extension that you must download and install separately. It is strongly recommended you install the C# extension to get all the evolved editing features such as syntax colorization, IntelliSense, code issue detection as you type and much more. In order to install C#, run Visual Studio Code, open the Command Palette (F1), then type “ext install” and press Enter. From the list of extensions, double-click C# and wait for the installation to complete. When prompted, accept to restart Visual Studio Code.
Scaffolding an ASP.NET Core ApplicationVisual Studio Code has no built-in commands that automate the generation of an ASP.NET Core project and creating a project manually requires some effort. With the current RC of ASP.NET Core, you can use a command-line tool called Yeoman (yeoman.io), a popular scaffolding tool that provides, among other things, an option to generate an ASP.NET Core app skeleton. Yeoman relies on Node.js and must be installed from the command line using the Node.js package manager (npm). That said, open a command prompt and type the following line:
> npm install -g yo generator-aspnet gulp bower
That will install Yeoman (represented by “yo”) in the global loca-tion (-g) together with gulp (a tool for task automation) and bower (a client-side library manager). Notice that Yeoman ships with a number of generators, including the ASP.NET generator and the Visual Studio Code extension generator. The generator-aspnet option in the previous command line will download and install the
ASP.NET Core generator that will simplify your work. When ready, using the cd (or chdir) command, move into a folder where you want to create a new application (cd C:\temp). At this point, type the following command line: > yo aspnet
This will open the Yeoman ASP.NET generator, as you can see in Figure 2.
Select the Web Application tem-plate and press Enter. In the next screen, enter CarModels as the application name and press Enter. The generator defines the applica-tion’s root namespace based on the app name casing. As a consequence,
CREATE TABLE [dbo].[Cars]( [id] [int] IDENTITY(1,1) NOT NULL, [CarModel] [nvarchar](max) NOT NULL, [Brand] [nvarchar](max) NOT NULL,CONSTRAINT [PK_Cars] PRIMARY KEY CLUSTERED ( [id] ASC)WITH (PAD_INDEX = OFF, STATISTICS_NORECOMPUTE = OFF, IGNORE_DUP_KEY = OFF, ALLOW_ROW_LOCKS = ON, ALLOW_PAGE_LOCKS = ON) ON [PRIMARY]) ON [PRIMARY] TEXTIMAGE_ON [PRIMARY]
GOSET IDENTITY_INSERT [dbo].[Cars] ON
GOINSERT [dbo].[Cars] ([id], [CarModel], [Brand]) VALUES (1, N'Mustang', N'Ford')GOINSERT [dbo].[Cars] ([id], [CarModel], [Brand]) VALUES (2, N'500', N'Fiat')GOINSERT [dbo].[Cars] ([id], [CarModel], [Brand]) VALUES (3, N'Giulia', N'Alfa Romeo')GOSET IDENTITY_INSERT [dbo].[Cars] OFFGOUSE [master]GOALTER DATABASE [CARS] SET READ_WRITE GO
Figure1Creating a Sample Table
Figure2Starting the Yeoman Generator
0816msdn_DelSoleASPNETCore_v5_38-48.indd 39 7/13/16 11:36 AM
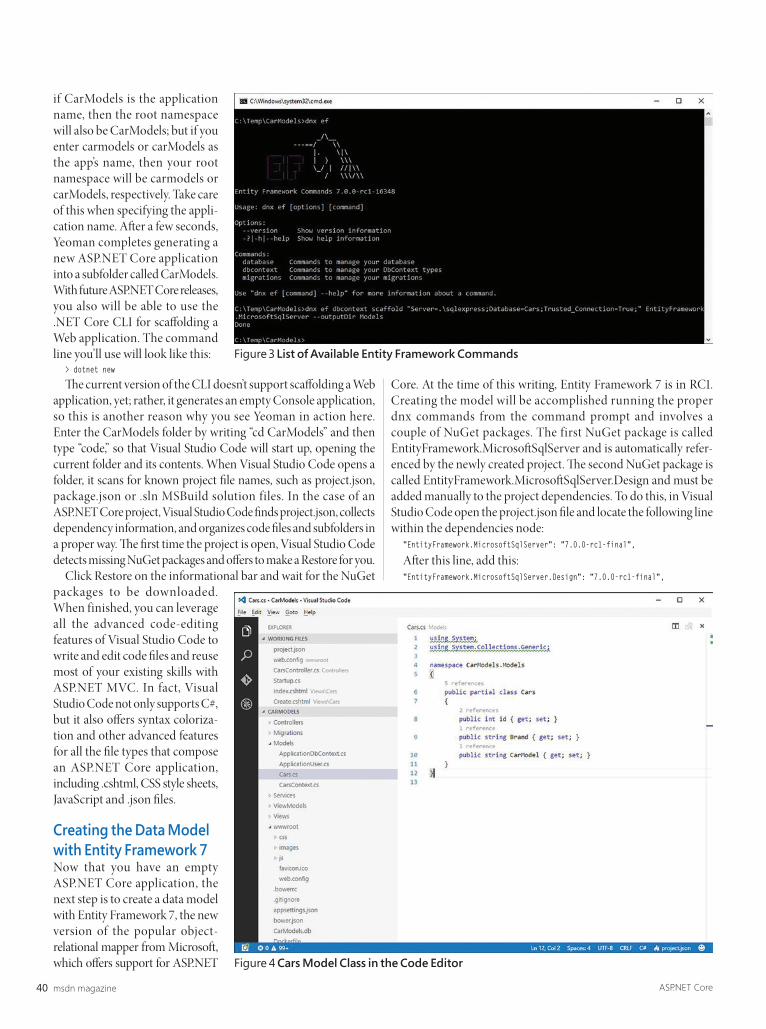
msdn magazine40 ASP.NET Core
if CarModels is the application name, then the root namespace will also be CarModels; but if you enter carmodels or carModels as the app’s name, then your root namespace will be carmodels or carModels, respectively. Take care of this when specifying the appli-cation name. After a few seconds, Yeoman completes generating a new ASP.NET Core application into a subfolder called CarModels. With future ASP.NET Core releases, you also will be able to use the .NET Core CLI for scaffolding a Web application. The command line you’ll use will look like this:
> dotnet new
The current version of the CLI doesn’t support scaffolding a Web application, yet; rather, it generates an empty Console application, so this is another reason why you see Yeoman in action here. Enter the CarModels folder by writing “cd CarModels” and then type “code,” so that Visual Studio Code will start up, opening the current folder and its contents. When Visual Studio Code opens a folder, it scans for known project file names, such as project.json, package.json or .sln MSBuild solution files. In the case of an ASP.NET Core project, Visual Studio Code finds project.json, collects dependency information, and organizes code files and subfolders in a proper way. The first time the project is open, Visual Studio Code detects missing NuGet packages and offers to make a Restore for you.
Click Restore on the informational bar and wait for the NuGet packages to be downloaded. When finished, you can leverage all the advanced code-editing features of Visual Studio Code to write and edit code files and reuse most of your existing skills with ASP.NET MVC. In fact, Visual Studio Code not only supports C#, but it also offers syntax coloriza-tion and other advanced features for all the file types that compose an ASP.NET Core application, including .cshtml, CSS style sheets, JavaScript and .json files.
Creating the Data Model with Entity Framework 7Now that you have an empty ASP.NET Core application, the next step is to create a data model with Entity Framework 7, the new version of the popular object- relational mapper from Microsoft, which offers support for ASP.NET
Core. At the time of this writing, Entity Framework 7 is in RC1. Creating the model will be accomplished running the proper dnx commands from the command prompt and involves a couple of NuGet packages. The first NuGet package is called EntityFramework.MicrosoftSqlServer and is auto matically refer-enced by the newly created project. The second NuGet package is called EntityFramework.MicrosoftSqlServer.Design and must be added manually to the project dependencies. To do this, in Visual Studio Code open the project.json file and locate the following line within the dependencies node:
"EntityFramework.MicrosoftSqlServer": "7.0.0-rc1-final",
After this line, add this:"EntityFramework.MicrosoftSqlServer.Design": "7.0.0-rc1-final",
Figure3List of Available Entity Framework Commands
Figure4Cars Model Class in the Code Editor
0816msdn_DelSoleASPNETCore_v5_38-48.indd 40 7/13/16 11:36 AM
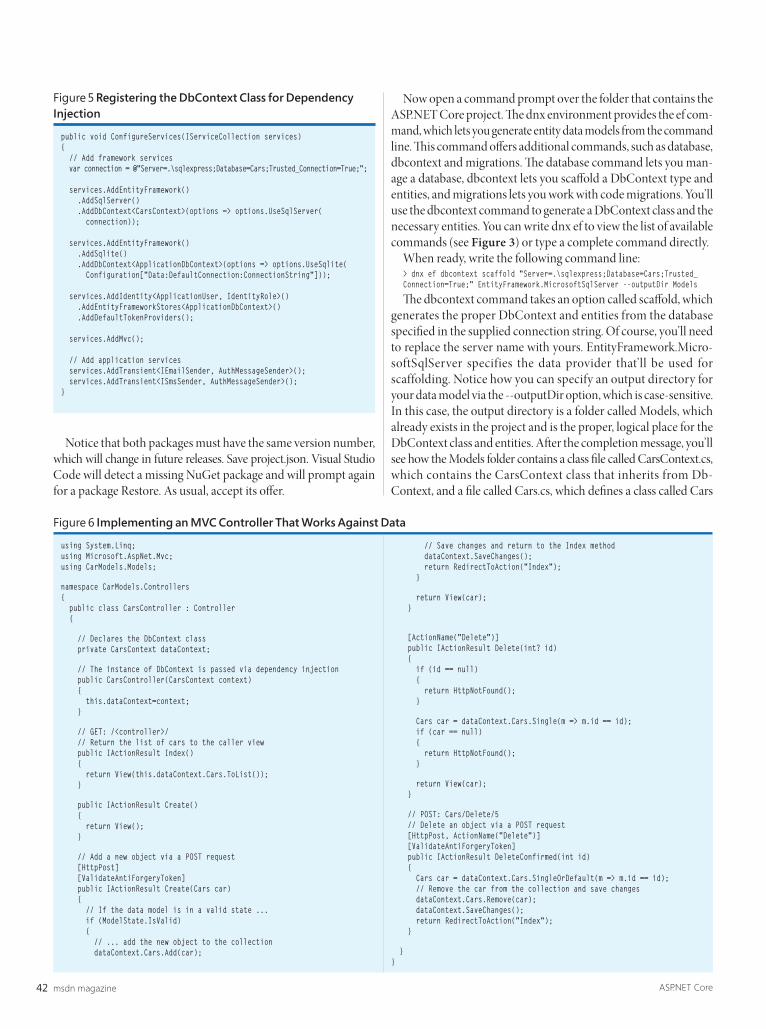
msdn magazine42 ASP.NET Core
Notice that both packages must have the same version number, which will change in future releases. Save project.json. Visual Studio Code will detect a missing NuGet package and will prompt again for a package Restore. As usual, accept its offer.
Now open a command prompt over the folder that contains the ASP.NET Core project. The dnx environment provides the ef com-mand, which lets you generate entity data models from the command line. This command offers additional commands, such as database, dbcontext and migrations. The database command lets you man-age a database, dbcontext lets you scaffold a DbContext type and entities, and migrations lets you work with code migrations. You’ll use the dbcontext command to generate a DbContext class and the necessary entities. You can write dnx ef to view the list of available commands (see Figure 3) or type a complete command directly.
When ready, write the following command line:> dnx ef dbcontext scaffold "Server=.\sqlexpress;Database=Cars;Trusted_Connection=True;" EntityFramework.MicrosoftSqlServer --outputDir Models
The dbcontext command takes an option called scaffold, which generates the proper DbContext and entities from the database specified in the supplied connection string. Of course, you’ll need to replace the server name with yours. EntityFramework.Micro-softSqlServer specifies the data provider that’ll be used for scaffolding. Notice how you can specify an output directory for your data model via the --outputDir option, which is case-sensitive. In this case, the output directory is a folder called Models, which already exists in the project and is the proper, logical place for the DbContext class and entities. After the completion message, you’ll see how the Models folder contains a class file called CarsContext.cs, which contains the CarsContext class that inherits from Db-Context, and a file called Cars.cs, which defines a class called Cars
public void ConfigureServices(IServiceCollection services){ // Add framework services var connection = @"Server=.\sqlexpress;Database=Cars;Trusted_Connection=True;";
services.AddEntityFramework() .AddSqlServer() .AddDbContext<CarsContext>(options => options.UseSqlServer( connection)); services.AddEntityFramework() .AddSqlite() .AddDbContext<ApplicationDbContext>(options => options.UseSqlite( Configuration["Data:DefaultConnection:ConnectionString"]));
services.AddIdentity<ApplicationUser, IdentityRole>() .AddEntityFrameworkStores<ApplicationDbContext>() .AddDefaultTokenProviders();
services.AddMvc();
// Add application services services.AddTransient<IEmailSender, AuthMessageSender>(); services.AddTransient<ISmsSender, AuthMessageSender>();}
Figure5Registering the DbContext Class for Dependency Injection
Figure6Implementing an MVC Controller That Works Against Data
using System.Linq;using Microsoft.AspNet.Mvc;using CarModels.Models;
namespace CarModels.Controllers{ public class CarsController : Controller { // Declares the DbContext class private CarsContext dataContext; // The instance of DbContext is passed via dependency injection public CarsController(CarsContext context) { this.dataContext=context; } // GET: /<controller>/ // Return the list of cars to the caller view public IActionResult Index() { return View(this.dataContext.Cars.ToList()); } public IActionResult Create() { return View(); } // Add a new object via a POST request [HttpPost] [ValidateAntiForgeryToken] public IActionResult Create(Cars car) { // If the data model is in a valid state ... if (ModelState.IsValid) { // ... add the new object to the collection dataContext.Cars.Add(car);
// Save changes and return to the Index method dataContext.SaveChanges(); return RedirectToAction("Index"); }
return View(car); } [ActionName("Delete")] public IActionResult Delete(int? id) { if (id == null) { return HttpNotFound(); }
Cars car = dataContext.Cars.Single(m => m.id == id); if (car == null) { return HttpNotFound(); }
return View(car); }
// POST: Cars/Delete/5 // Delete an object via a POST request [HttpPost, ActionName("Delete")] [ValidateAntiForgeryToken] public IActionResult DeleteConfirmed(int id) { Cars car = dataContext.Cars.SingleOrDefault(m => m.id == id); // Remove the car from the collection and save changes dataContext.Cars.Remove(car); dataContext.SaveChanges(); return RedirectToAction("Index"); }
}}
0816msdn_DelSoleASPNETCore_v5_38-48.indd 42 7/13/16 11:36 AM
ement1); areaSeries Add(seriesElement2); areaSeries Add(seriesElement3); // Add series to the plot area plotArea Series Add(areaSeries); //page Elements Add( new LayoutGrid() ); // Add the page elements to the page AddEAement1); areaSerieies.AAdd(se(s rriesElement2t2); a) reaSeries.AdA d(seriesElement3); // Add series to the plot area plotArea.Series.Add(areaSeries); //page.Elemenem ts.Add( ddd( new ne LaLayyoutGrid() ); // A/ dd the page elements to the page AddEA
s, 240, 0); AddEAN1AN 3SupSup5(pa5(p ge.Elemeentnts, 480, 0); AdddUPCVersionA(page.Elemene ts, 0, 135); AddUPCVersionASup2(page.Elements, 240, 135); AdddUPCddUPCd CVerssionAionAo Sup5((page.Elemennts, t 480, 135); AddEAN8(page.Elements, 0,
.Elements, 480, 2270);; AddddUUPCVersionE(papage.Elementts, 0, 405); AddUPCVersionESuE p2(page.Elements, 240, 405); AddUPCVersionESup5(pageage.Ele.Elelemmments, 4s, 48800, 4405); // AAdd the page toe t the document document.Pages.Add(pa
CaptionAndRectanga lee(elemeements, “EAN/JA/JAN 13 Bar Codde”, x, y, 204, 99); BarCode barCode = new Ean13(“123456789012”, x, y + 21); barCode.ode.X +=X +X +=X + ((2004 -4 - baarCoode.GettSymbolWidth()h ) / 2; elements.Add(barCode); } private vovo
dRectangle(elemente s,, “EANEAN/JAN 13 Bar Car Code, 2 digit supplement”, x, y, 204, 99); BarCode barCode = new Ean13Sup2(“12 234556789678 0121212”, 2”, x, yy + 2+ 211); 1); barCoode.XX += (204 - barCode.GetSymbolWidth()) / 2; elements.Add((barC
ts, float x, float yy) { A{ AddCaCaptionAndRectanangle(elements, “EAN/JAN 13 Bar Code, 5 5 digit supplement”, x, y, 204, 99); BaB rrCodee barrCode == new Ean13SupS 5(“12345678901212345”, x, y + 21); ba
s.Add(barCode); } } pprivate te vooid AddUPCVPCVersiers onA(Group elements, float x, float y) {Add{ CaptionAndRectangle(elements, “, UPC VersVersVersVersion ionoi A Baar Cr Coode”, x, y,y, 204, 99);; BarCoode barCode = new UpcVersionA(“12345678901”, xx, y +
s.Add(barCode); } } pprivate te vooid AddUPCVPCVersiers onASup2(Group elements, float x, floato y) { AddCaptionAndRectangle(elementm ““UPCC Version E Bar Code, 2 digit supplement”, x, y, 204, 94 9); BarCoode od
21) ; barCode.X ++= (2= ( 04 - barba Code.GeetSymbymbolWidth()) / 2; elements.Add(barCode); e } private void AddUPCVersionASSSSuup5(up5(u Group elements,n float x, flfloaflo t VV
digit supplement”,t” xx, y, 22004, 99); BarCodeCode bbarCode = new UUpcVep rsionASuAS p5(“12343 567890112345”, x, y + 21); bbarCarCode.Xde.X += (204 - barCode.GetSymboom lWidth()) / 22; eelele
t x, float y) { AddCapdCaptionnAndRAnd ectangle(eleelemments, “EAN/JANN 88 Bar Code”,de”, xx, y, 204, 0 99); BarCode barCode = nnew Eew Ean8(an8(n8n8 “1 2345670”, x, y + 21); OpenFileileDiala og fileDie aloogoglo =
g.Filter = “Adobeob PDPDF fileess (*.pdf)|*.pdf|Alll FileFiles (*.*)|*.*”; if (fileDieD alog.SShowDiialog() == DialogResult.OK) { { pdfVpdfVf ieweewer.OpOpr.OpOpen (fifileDialogalog.FilleName, “”); } SaveveFileDialog saveFaveFileileDDialoog = neneww Sav
Dialog.Filter == “AdoAdobe PPDF fiDF files (*.pdff)|*.pdpdf|A|All Files (*.*)|*.*”;”; iff (saveFFileDialolog.Showh Dialog() ==DialoalogResgResRee ult..OK)OK) OK) { pdfVfVView .SSaveAsve (sav(saveFieFileDia
printer = pdfViewViewer.Per rinterr; pprinter.PriintWiW thDialog(); } elsee { MesssageBox.SShoww(“Please opeopen a n a fifile to pto p rintrinrint”)”); }OpenFin le DDialoog fileDieD alogalog = new OpenFileDDialog(); fileDiaDialog.og Tittle = e e = e “Opepen File Dl
les (*.*)|*.*|Addobe Pe PDF files es (*.p*.pdf)|*.pdddf”; if i (fifileDialog.ShowwDialalog() === DialogResult.ult OK) { { DynaDynamicPDFVDFVDFVDFViewiewewerClass test e = neew DynammiccPDFViewerClass((); PPDFPrinter ter pprinp ter er r = te= ttet st.OpenFFileFo
= File.ReadAAllByteBytes(@”C:\M:\MyDyDoc.pdff””); //u// sing System.Runntimme.Inttent ropServicces;GCHaGCHandlendledd gch=GCH= CHaananddla e.Aloc(conteents, GCHandleTTypee.Pinnedd); ) IIntntPtrPtr cooncontentsIntPtr = g
tents.Lengthh, “”);“”); A AddCaCaptioonAndReReectanglan ee(pageElementts, “BBBookkmark k Pagee E Elemelemeent:”nt:”, x,, y);; pa pagaapageEeEleemeents.Add(newtesw t Bookmookmaark(“Bookmarked TextTextt”, x + 55, y , y, yy ++ 2+ 20+ , pap rentre OutlO ine)); p) a
215, 10, Fonnt.TTimemesRomanma , 1010)); } prprrriivate vooid AddCiirclercle(GGro(G up paageElemeennnts,nts floafloat x,x floafloat yt y)t y) { / { /////Add/Add/A ss a circlt to the pap ge Eleemenmentenents AddCapdCapCaCadCaptiont AndRdRectae
Add(new Cirrcle(x e(x ++ 112.5f5f, y ++ 50f, 1007.5f, 300f, RgbColoolor.RRRed, RgbbbColor.Bor.Bluee,lue 2, LineL eStyylylly e.DaDae shLaLs rge))); } pprivate void AdA d FormatteeddTexxtAreea(Groupp paageElements, flofl aat x, fl float yy)) { ) // A// AAdds dds a fofoa rmatted textte a
mic</i><b>PDFPDF</b>/b>&tm; GGenerator vvv666.0 6 for ..NETNET has has a forrmattted ttetext arrea pea paaage a “ + “ “ele“ele“eleeeemmmentm . ThThis prroviddes rich fororm m atting ssuppupport for texext that appap eears in the doocumment. You have “ + “+ “compcompletlete conco trolol ove ovevever 8 r paragraph
left indentattionn, rigrighht indenentation, aligliggnnment, allollowing orphaaan linnes, aand whwhite ite “ + “spa“spaacece ppce pprereservata ion; 6 foont propropeerties: e <fonont fat f ce=’=’Timemes’>s’>font facece, <//fontt><font ppoinntSize=’6’>font “ + “s+ “size, </font>ont><fonont cocoocoot lor=lor=’FF0000’00’>c
2 line prpropertieses: le leading, ag ndd leaddinngg type.ype. TText can also be rootateeed.</d.</< p>”;p> FFororo mattmattmm edeedTeedTeTeextArx ea fformaormattedTTextAreArea = nnew FormattedTextTex Areare (formattat edHHtmll, x + 5, yy + 20, 215, 60, FonttFammily.Helveelvetictica, 9, fffalalsse);se);se);sssse) // // Sets the i
ddCaptionAAndReRectanct gle(e(pagepageElemeenntsnts, “F, “Fororrmarmattedtte TextT Areeae Page ElElemenement:”,t:”,,, x, y); y); y)y AddCAdddCddCA aptionAnAndReectangnglele(pageElements, “Formatm tedTextAx rea OverOv flflow TText:”, x x + 2279, y); pageElementments.Add(foormarmattedTTTextAxttAAtArea)r ; // CrCrer ate
tArea overflowFoowFormatrm tedTdTextAArea == foormamatteddTdt extArea.GettOveerflowwwFormatmatteddTTexextAxx rea(rerea(re x + x 28284, y +y 200); pageElements.Add(overflowFormattedTextAArea)); } pprivate vooid AddImage(Group p pagpageElementsents, float t x, flo, at yy) { ) { // // A/ dd
ents, “Imagee PagePage Elementen :”, xx, y); IImmagemage imaaage =ge new Imaage(SServvever.Mr.MapPattatth(“.h(“.“ ./I./Im./ agesages/DPDDFLogL o..png”), x + 112.5f, y + 50f, 0.24f); // Image is ssizzed and centeredd inn the rectangle immage.age SetBoundunds(21s(215, 5, 65 0); 0) image.VAVAAlign
ge); } privatte void oid AAddLabela (Group pp ppageageElememments, float x, flfloat y) { /// A/ Adds as aa llabel tel t to tht e pappap gegeElemenementts AddCaptionAndRectangle(pageElemenm ts, “LabLa el & PPageNummbeeringLabel Page EElemments:”, x,x, y); y) striing g laabelTextxt = = “= ““Lab
aain page numbumberinering: %%CP%%CP%%% ofof %%%T%%TP%%% pages.”; LLabel le abbel = nnew LLLew Laabel(labbelTeelTeeelTexxt, x + 5, y5 ++ 12, 220, 80, Font.TimesRoman, 12, Texe tAlign.C.Centter); label.Annglee = 8; PageNumbeeringgLabel pagepageNumLNumLabelab = nnnewew Pw Page
, 12, TeextAlxtAligign.CentC er); paga eEleementntntss.Ad.Addd(paageNumLabel));); p paggeElemenments.Addddd(d(label)); } } privprpp ate voidoid A AddLine(Group pageElements, float x, floao t y) { /// Addds aa line to thethe pageElements AdddCCaptionAndRAndRRectanngleglen (pagpag( a eeElemments
+ 5,+ y ++ 20, x + 220, y + 8080, , 3, RRgbbColor.Gr.G eeen)); pageElemmementss.n Add(d(d new w Linee(x ++ 22 2200, yy ++ 20, x + 5,+ 5, y + 80, 3, RgbColor.Green)); } private void AdddLLink((Grouup pageEElemments, float x, floaat yy) { // Adds ads a link toto thethhe pagp eEleEleemen
ynynamicPDF.com.m ”; AAddCaddCaptioptionAAnddnAndRectanglan e((pageElementts, “LLink PaPagege Elemment:nt:”, xx, y);y); LLabel llabela = new Label(text, x + 5, y + 20, 215, 80, font, 12,2 RggbCoolor.Blue)e); laabel.Underline = true;rue Link link =k = newnew LLinnk(x k(x ++ 5,5, y y ++ 20,
on(o “httpp://www.dynnamicppddf.coomm””))); pageEeElemments..Add(Ad labbeel);l); ppagepagpageElementsnts.AAdd(link); k) } prp ivatee void AddPath(Group pageElements, float x, float y) { // AAdds a path to the pageElemeents ceeTe.DynamicamicicPPDPDF.PagegeElemlemlements.PatP h
20,0 RgbgbbColor.Blue, RgbCRgbCoolor.RRedd, 22, LineStyeS lee.Solidd, true); pathhh.Su.SubbPaths.A.Adddd(new Lw LineSineSubPaubPath(x + 215, y + 40)); path.SubPaths.Add(new CurveToSToSubPPathh(x + 1+ 08, y + 80, x + 160,, y ++ 800)); path.SubSubPSubPathssssh .AAAd.Add(new(ne CurveS
ectecctanglangle(pageElemeents, “P“Path Ph Paage ge Element:””, x, yy);) pageEEleEleEE meentss.AdAdd(pad(path));th } pprivaate ve vooid AAddRectangle(Group pageElements, float x, float y) ororderede ddList = ordeo redLedList.GetOverFlowLo List((xx + x 5, y + 2+ 22000); AddCddCCCA aptiapa oonAndRect
2222 55, 1110); page.Eleements.Ats.Add(odd(ordrdrderr edList); x == 0; 0; y +=y ++=y + 118881 ; // CCCreaate e aan unorrderede lisist UnUnordderedList unorderedList = new Unoro deredList(x + 5, y +y + 220, 4400, 900, Font.Ht.Helvetica, 10); uuunoorderredListst.Itte.I ms.Amms Am dd(“ddd(“FruiFruFFFrFruF tss”); unorder
eree ies(); pieSeries.DaataLababel = da; plotArea.Seeriesess.AAd.Add(pieSSSeriesss);es ppieSeries.Elemelementss.AddAdd(27,7, “Website A”); pieSeries.Elements.Add.Ad (19, “Website e B”)); pieSerrieses.Elementmen s.Add(21, “WWebssite CC”); pieSpieSSerieeririees.Elemeneemmee ts[0s[0].Color = a
sess.Elemments[2].Color = auttogradient3;”unoro derreder ddSubLList2 == unoorderedList.Items[ms 1].SubLubLissts.AAddUnorderedSubList(); unorderedSubLu ist2.Items.Add(“dd(“Pottato”); unu ordeeredSubList2.Itemmms.A.Add(d(“Beaansansea ”);;; UUUnorU dereree dSubSu List subU
dSuedd bList(); subUnoUnorderedSubList.Items.As.AAdd(““d Lime”); subUUnorddereedSubList.Itemtems.Ads.Add(“Od(“Orangrange”);e” Unorderd edSubList sus bUnorderd edSue bList2 = unnorddereedSubLisLi t.Items[ms 1].SubLists.s.AddUAAddUd norrdereddeddSubLSubLbList(st ); ssubUnbUnu oorderedSe ub
na”aa ); UUnorderederedSubList subUnordo erededSubLSu ist3st3 = uunnorderredSubLSubList2.Itet ms[00].Su.SubLisLists.As.AddUnd orderedSSubList(); subUnoU rderedSudSubList3.Items.AAdd((“Swweet Potao to”)); UUnorderedSredSubLubLiL st sst ubUUnordrdeeredSdSredSdSubList4 st4st = ununorderedSu
ubLSuSu ist444.Ite.Items.Am dd(“String Bean”n”); s; subUnbUnordeereedSubbList4..Itemms.Addd(“Lima BeanBean”); subUsubUnnorderedSubList4.Items.Add(“Kidney Bean”e ); x += 279; pagpage.EElemenntts.Addd(unorderedListst); u); ; nordno eredreddLisst = = uunordn ereddreddLisst..GetG Overv Flo
e.e.Elemeentsen , “Unordered List Page Ege Elemment On verflverflow:””, x, y,, 2255, 110); page.Elemementsents.AddAdd(un(unorderedList); } private void AddTextFt ield(Group pageEeElemlemennts, flfloaat x, flooatt y) { TextFFielddield txt = new Tew extFextFieldeld(“txtfnafnaaame”,meme”,me”, x +x + 20, 20, y + y +
tteaa dTeextArea(formattedHtml, x ++ 5, 5 y ++ 20, 202 215,15 60, FontFFamilyy.Heelvetica, 9, ffalse)se ; /// SetSets ths the ine dent property formattedTextArea.Style.Paragraph.IndeIn nnt = 1188; AddCaptCap ionAndRendRectanaa gle(eg pagepageep ElemElemE ents, “FFormamormattedttedtedtedTeTextArearea P
atteatat dTeextArea Overflow TeeText:”, x + 27 9, y9, y); p; pageEgeElements.AAdd(formformattedTextAArea); a) // CCreatea ee an overflow formatted text area for the overflow text FoFormmattedTtedTextAxt reaMMaxaxLeLengthngth = 9 = 9= 9; txtxtxtxxt1.B1.Bordeded rCorColor =r = RgbCololoColoor.Br.BBlaack; txttxt1.Ba1 Ba
MaMMM ximuum Lengthgth”; p; ageEEgeEElemeements.nts.Add(Add(txttxt1); TTextFex ieldd txt2 = neew TeextField(“txxtf2namename”, xx + 3+ 30, y + 30, 150, 40); txt2.DefaultValue = “This is a TexxtFtFieldd whiichh goees tototot the nexxt lit liline ine iif thff t e text et et xceexceeds wds wididth”; ”; ttxt2.xt2.xt2xt2 MMMultMu iLinLine = e =
RgRR bCooolor.AliceBlueBluee; txt2.T2. oolTip == “M“Multiline”; ppageEElemennts.AAdd(ttxt2); AddCapCaptiont AndRAndRecctangle(pageElements, “TextField Form Page Element:”, x, x, y, 50450444, 8585); }; } prri vate voioidd AddComCCC boFibo eld(Group pap pageElgeElemeemenene ttts, ts float x, fl
, , y + 4000, 150,, 20 20)20); c; cb.Boro derCd olor = RgbColorr.BBlack; cb.BaackggrounndColor = RgbCRgbColoro .AliAliceBceBlue; cb.Font = Font.Helvetica; cb.FontSize = 12; cb.Itemsem .AAdd(“(“It(( em 1m 1”); ; ccb.IItemste .Add(“It““Item 2em 2”); ”); cb.Icb.Itemsems.Add(“Item 3em 3”)); cb.IItems
aaabbble”b ].SSeSeSeleleclected = true; cb.Edb itable = true; cb.ToToololTip = “Editable Coe Combo Box””; pa; pageElgeE emements.Add(cb); ComboBox cb1 = new ComboBox(“cmb1namame”, x + 303,030 y +y + 4440 40, 150, 200); c); cb1.Bb1.Bb1 ordeorderColrColoor = Rgbg Coloor.Blr.Br Br B ack;ack cb1.Bac
.F..FFFontontSize = 12; cb1.Items.Add(“Item 1”); cb1.Items.AAdd(“Item 2em 2”); ccb1.Items.Add((“Itemem 3”); cb1.Items.Add(“Item 4”); cb1.Items.Add(“Non-Editable”);”); cb111.Items[“NNon-Eon-Editable”].Selecteccc ed =ed = tru true; ce; cb1 Eb1.EEditable e = fa= f lse;se cb1.ToolT
eerrter.Coonvert(“http://www.google.com”, “Output.pdf”));Convverteer.Coonvert(GetDocD PathPath(“Do(“D cumentA.rtf”), “Output.pdf”);System.Diagnostics.Process..s SStartt(“Ot(“ uutpuutpuutputt.pdf”);”); AsyncCoConvernverrtter t aConaConvertverter =e newe AsyncCncConnverter(); aC
vveerted); aConverter.ConversionError += new ConversiionErroorEvventHHandler(aConveerteer_ConversionError); aConverter.Convert(@”C:\temp\DocumentA.rtA f””””, f , f @”C:C \temte p\OuO tputtputA.pdA.pdf”);f”); aCo aCoa nverter.Convert(ert @”C:\teme p\Dop\D cumentB
\Doc\D ummentC.rtf”, @”C :\temp\OutputC.pdf”); aConverrter.Coonverrt(“hhttp://www.yahoo.coo.com”, @”C:\Temp\yahoo.pdf”); ConvC ersionOptions ops optiontions = nneewnew new ew Conversise onOpOptiontionoo s(72s(720, 70, 720, 72, 7 true); ceTe.DynaDynamicPm DF.CDF.Conveon rsiorsion Con.Co
outpou ut.pdf”, optionso ); ceTe.DynamicPDF.Conversion.CConveerter.ConvCon ert(“C:\\temp\\\Documocument2.docx”, “C:\\temp\\op\ utput.pdf”, optiptoptioptiop ons)ons); s; stringing sampleHple tml m = “<“<htmlhtml><bo><bob dydy><p>This is s a very simplee HTMLHTMLHTHT strstrs ing iningin inclincincincludinud ng a g a g TT
( g[] g )
{{
pp
gg g ( p p )
[ ]
[ ]
pp y y yyp
HighhSecuSec rity securiturity y new w HighhSecuurityy(“OOwnerPassword”, “U“ serPassword”)
yy ppy
ees y yy
p
( p p )
pag p ( p pp )
p ()
}
Untitled-1 1Untitled-1 1 9/8/11 11:56 AM9/8/11 11:56 AM
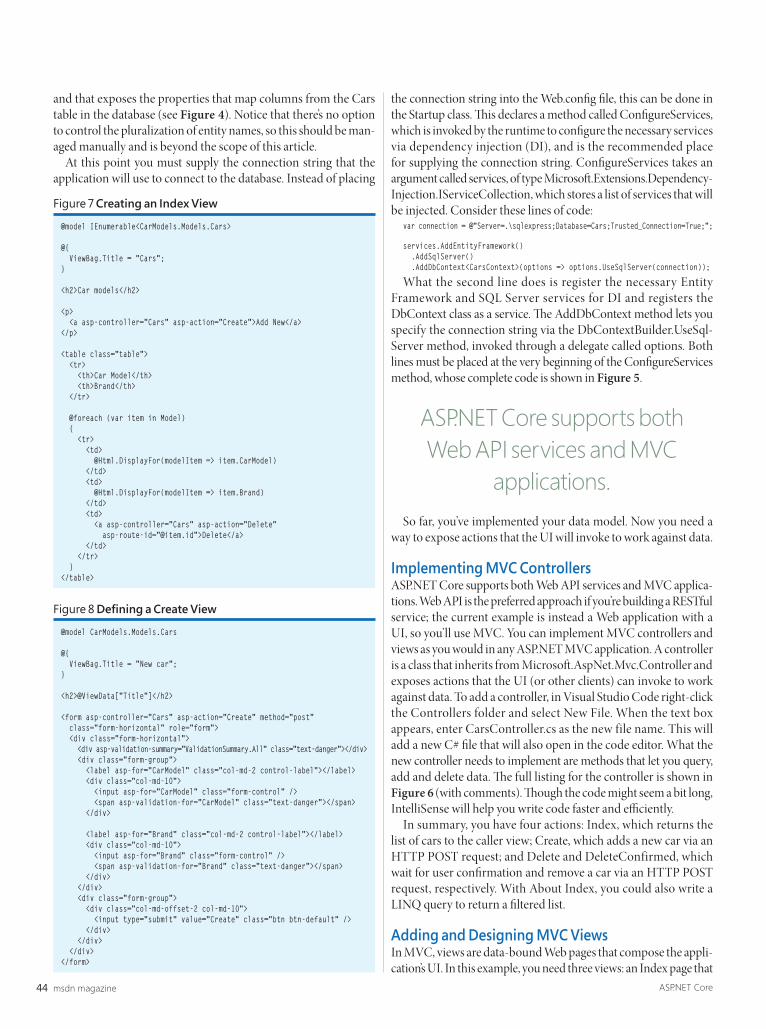
msdn magazine44 ASP.NET Core
and that exposes the properties that map columns from the Cars table in the database (see Figure 4). Notice that there’s no option to control the pluralization of entity names, so this should be man-aged manually and is beyond the scope of this article.
At this point you must supply the connection string that the application will use to connect to the database. Instead of placing
the connection string into the Web.config file, this can be done in the Startup class. This declares a method called ConfigureServices, which is invoked by the runtime to configure the necessary services via dependency injection (DI), and is the recommended place for supplying the connection string. ConfigureServices takes an argument called services, of type Microsoft.Extensions.Dependency-Injection.IServiceCollection, which stores a list of services that will be injected. Consider these lines of code:
var connection = @"Server=.\sqlexpress;Database=Cars;Trusted_Connection=True;";
services.AddEntityFramework() .AddSqlServer() .AddDbContext<CarsContext>(options => options.UseSqlServer(connection));
What the second line does is register the necessary Entity Framework and SQL Server services for DI and registers the DbContext class as a service. The AddDbContext method lets you specify the connection string via the DbContextBuilder.UseSql-Server method, invoked through a delegate called options. Both lines must be placed at the very beginning of the ConfigureServices method, whose complete code is shown in Figure 5.
So far, you’ve implemented your data model. Now you need a way to expose actions that the UI will invoke to work against data.
Implementing MVC ControllersASP.NET Core supports both Web API services and MVC applica-tions. Web API is the preferred approach if you’re building a RESTful service; the current example is instead a Web application with a UI, so you’ll use MVC. You can implement MVC controllers and views as you would in any ASP.NET MVC application. A controller is a class that inherits from Microsoft.AspNet.Mvc.Controller and exposes actions that the UI (or other clients) can invoke to work against data. To add a controller, in Visual Studio Code right-click the Controllers folder and select New File. When the text box appears, enter CarsController.cs as the new file name. This will add a new C# file that will also open in the code editor. What the new controller needs to implement are methods that let you query, add and delete data. The full listing for the controller is shown in Figure 6 (with comments). Though the code might seem a bit long, IntelliSense will help you write code faster and efficiently.
In summary, you have four actions: Index, which returns the list of cars to the caller view; Create, which adds a new car via an HTTP POST request; and Delete and DeleteConfirmed, which wait for user confirmation and remove a car via an HTTP POST request, respectively. With About Index, you could also write a LINQ query to return a filtered list.
Adding and Designing MVC ViewsIn MVC, views are data-bound Web pages that compose the appli-cation’s UI. In this example, you need three views: an Index page that
@model IEnumerable<CarModels.Models.Cars>
@{ ViewBag.Title = "Cars";}
<h2>Car models</h2>
<p> <a asp-controller="Cars" asp-action="Create">Add New</a></p>
<table class="table"> <tr> <th>Car Model</th> <th>Brand</th> </tr>
@foreach (var item in Model) { <tr> <td> @Html.DisplayFor(modelItem => item.CarModel) </td> <td> @Html.DisplayFor(modelItem => item.Brand) </td> <td> <a asp-controller="Cars" asp-action="Delete" asp-route-id="@item.id">Delete</a> </td> </tr> }</table>
Figure7Creating an Index View
@model CarModels.Models.Cars
@{ ViewBag.Title = "New car";}
<h2>@ViewData["Title"]</h2>
<form asp-controller="Cars" asp-action="Create" method="post" class="form-horizontal" role="form"> <div class="form-horizontal"> <div asp-validation-summary="ValidationSummary.All" class="text-danger"></div> <div class="form-group"> <label asp-for="CarModel" class="col-md-2 control-label"></label> <div class="col-md-10"> <input asp-for="CarModel" class="form-control" /> <span asp-validation-for="CarModel" class="text-danger"></span> </div>
<label asp-for="Brand" class="col-md-2 control-label"></label> <div class="col-md-10"> <input asp-for="Brand" class="form-control" /> <span asp-validation-for="Brand" class="text-danger"></span> </div> </div> <div class="form-group"> <div class="col-md-offset-2 col-md-10"> <input type="submit" value="Create" class="btn btn-default" /> </div> </div> </div></form>
Figure8Defining a Create View
ASP.NET Core supports both Web API services and MVC
applications.
0816msdn_DelSoleASPNETCore_v5_38-48.indd 44 7/13/16 11:36 AM
Toolkit™ Modify, create & view PDF Files. Add headers, watermarks, encryption, extract or add pages.
Server™ Print-to-PDF. Add bookmarks, stamps, and security. Control images, colors, settings & paper size.
DocConverter™ Convert files to & from PDF or PDF/A. Add security,watermarks & append to existing PDF files.
WebGrabber™Convert webpage or HTML to PDF files. Maintainactive features including hyperlinks & headings.
Portal™View, edit & retain PDF documents in a secureASP.NET control.
Meridian™A network PDF printer providing a server-based license with no per-user count.
CADConverter™Transform DWG files to PDF. Control document production without compromising scalability.
Xtractor™A versatile server-based tool for finding & extracting text & images from PDF files.
VPmagazine
MSDN MAGAZINE VENDOR PROFILE
Download your FREE 30-day trial g www.ActivePDF.com
ActivePDF provides a flexible, cost-effective suite of tools designed to tackle common PDF document management dilemmas. Businesses turn to ActivePDF for creative ways to drive toward digital transformation.
ActivePDF Suite of Tools
Toll Free US: 866 468 6733 | Outside US: +1 949 582 9002
Untitled-1 1 7/13/16 11:45 AM
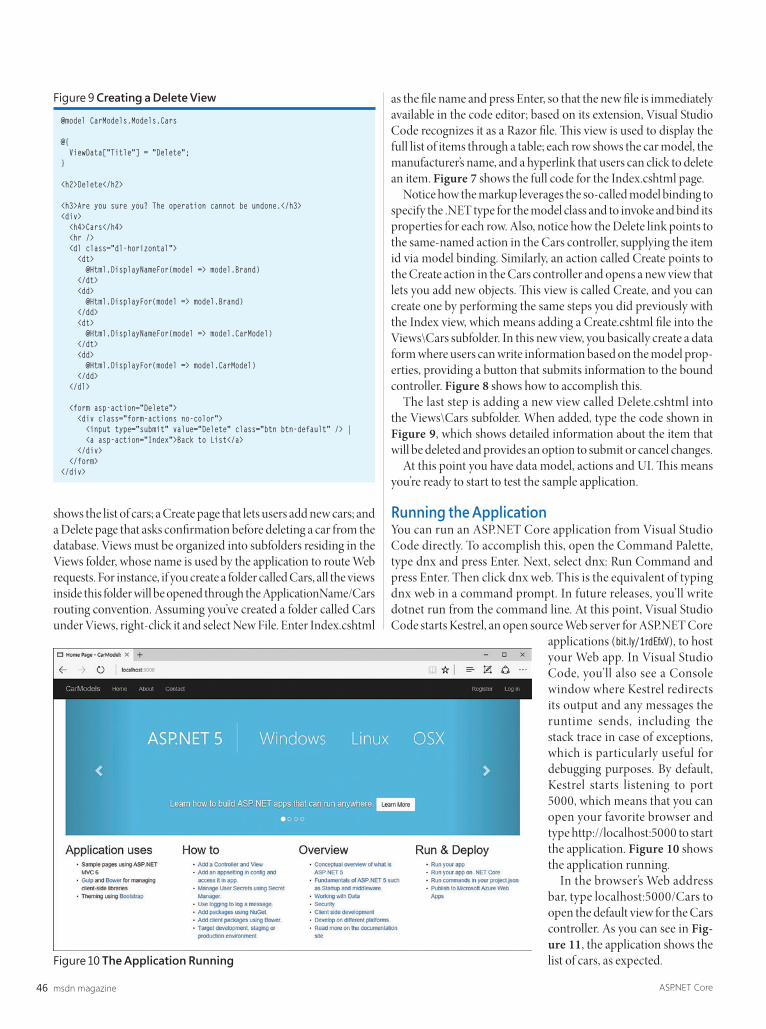
msdn magazine46 ASP.NET Core
shows the list of cars; a Create page that lets users add new cars; and a Delete page that asks confirmation before deleting a car from the database. Views must be organized into subfolders residing in the Views folder, whose name is used by the application to route Web requests. For instance, if you create a folder called Cars, all the views inside this folder will be opened through the ApplicationName/Cars routing convention. Assuming you’ve created a folder called Cars under Views, right-click it and select New File. Enter Index.cshtml
as the file name and press Enter, so that the new file is immediately available in the code editor; based on its extension, Visual Studio Code recognizes it as a Razor file. This view is used to display the full list of items through a table; each row shows the car model, the manufacturer’s name, and a hyperlink that users can click to delete an item. Figure 7 shows the full code for the Index.cshtml page.
Notice how the markup leverages the so-called model binding to specify the .NET type for the model class and to invoke and bind its properties for each row. Also, notice how the Delete link points to the same-named action in the Cars controller, supplying the item id via model binding. Similarly, an action called Create points to the Create action in the Cars controller and opens a new view that lets you add new objects. This view is called Create, and you can create one by performing the same steps you did previously with the Index view, which means adding a Create.cshtml file into the Views\Cars subfolder. In this new view, you basically create a data form where users can write information based on the model prop-erties, providing a button that submits information to the bound controller. Figure 8 shows how to accomplish this.
The last step is adding a new view called Delete.cshtml into the Views\Cars subfolder. When added, type the code shown in Figure 9, which shows detailed information about the item that will be deleted and provides an option to submit or cancel changes.
At this point you have data model, actions and UI. This means you’re ready to start to test the sample application.
Running the ApplicationYou can run an ASP.NET Core application from Visual Studio Code directly. To accomplish this, open the Command Palette, type dnx and press Enter. Next, select dnx: Run Command and press Enter. Then click dnx web. This is the equivalent of typing dnx web in a command prompt. In future releases, you’ll write dotnet run from the command line. At this point, Visual Studio Code starts Kestrel, an open source Web server for ASP.NET Core
applications (bit.ly/1rdEfxV), to host your Web app. In Visual Studio Code, you’ll also see a Console window where Kestrel redirects its output and any messages the runtime sends, including the stack trace in case of exceptions, which is particularly useful for debugging purposes. By default, Kestrel starts listening to port 5000, which means that you can open your favorite browser and type http://localhost:5000 to start the application. Figure 10 shows the application running.
In the browser’s Web address bar, type localhost:5000/Cars to open the default view for the Cars controller. As you can see in Fig-ure 11, the application shows the list of cars, as expected.
@model CarModels.Models.Cars
@{ ViewData["Title"] = "Delete";}
<h2>Delete</h2>
<h3>Are you sure you? The operation cannot be undone.</h3><div> <h4>Cars</h4> <hr /> <dl class="dl-horizontal"> <dt> @Html.DisplayNameFor(model => model.Brand) </dt> <dd> @Html.DisplayFor(model => model.Brand) </dd> <dt> @Html.DisplayNameFor(model => model.CarModel) </dt> <dd> @Html.DisplayFor(model => model.CarModel) </dd> </dl> <form asp-action="Delete"> <div class="form-actions no-color"> <input type="submit" value="Delete" class="btn btn-default" /> | <a asp-action="Index">Back to List</a> </div> </form></div>
Figure9Creating a Delete View
Figure10The Application Running
0816msdn_DelSoleASPNETCore_v5_38-48.indd 46 7/13/16 11:36 AM

msdn.microsoft.com/flashnewsletter
Sign up to receive MSDN FLASH, which delivers the latest resources, SDKs, downloads, partner offers, security news, and updates on national and local developer events.
Get news from MSDN in your inbox!
magazine
Untitled-2 1Untitled-2 1 12/11/15 11:06 AM12/11/15 11:06 AM
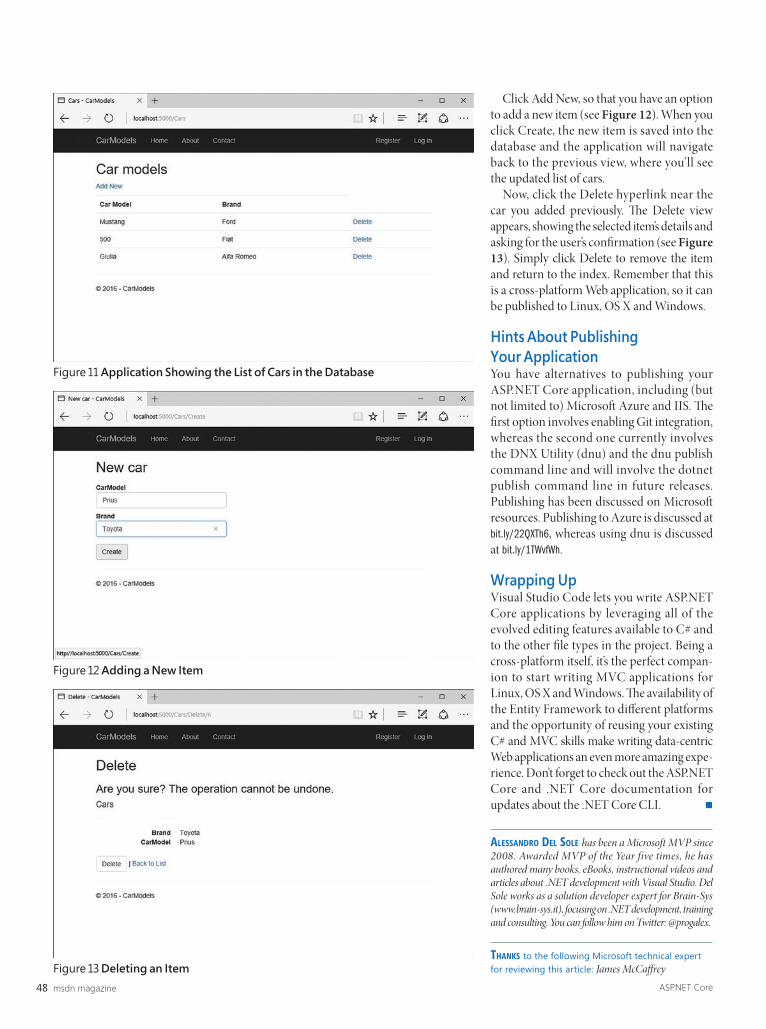
msdn magazine48 ASP.NET Core
Click Add New, so that you have an option to add a new item (see Figure 12). When you click Create, the new item is saved into the database and the application will navigate back to the previous view, where you’ll see the updated list of cars.
Now, click the Delete hyperlink near the car you added previously. The Delete view appears, showing the selected item’s details and asking for the user’s confirmation (see Figure 13). Simply click Delete to remove the item and return to the index. Remember that this is a cross-platform Web application, so it can be published to Linux, OS X and Windows.
Hints About Publishing Your ApplicationYou have alternatives to publishing your ASP.NET Core application, including (but not limited to) Microsoft Azure and IIS. The first option involves enabling Git integration, whereas the second one currently involves the DNX Utility (dnu) and the dnu publish command line and will involve the dotnet publish command line in future releases. Publishing has been discussed on Microsoft resources. Publishing to Azure is discussed at bit.ly/22QXTh6, whereas using dnu is discussed at bit.ly/1TWvfWh.
Wrapping UpVisual Studio Code lets you write ASP.NET Core applications by leveraging all of the evolved editing features available to C# and to the other file types in the project. Being a cross-platform itself, it’s the perfect compan-ion to start writing MVC applications for Linux, OS X and Windows. The availability of the Entity Framework to different platforms and the opportunity of reusing your existing C# and MVC skills make writing data-centric Web applications an even more amazing expe-rience. Don’t forget to check out the ASP.NET Core and .NET Core documentation for updates about the .NET Core CLI. n
AlessAndro del sole has been a Microsoft MVP since 2008. Awarded MVP of the Year five times, he has authored many books, eBooks, instructional videos and articles about .NET development with Visual Studio. Del Sole works as a solution developer expert for Brain-Sys (www.brain-sys.it), focusing on .NET development, training and consulting. You can follow him on Twitter: @progalex.
ThAnks to the following Microsoft technical expert for reviewing this article: James McCaffreyFigure13Deleting an Item
Figure12Adding a New Item
Figure11Application Showing the List of Cars in the Database
0816msdn_DelSoleASPNETCore_v5_38-48.indd 48 7/13/16 11:36 AM

JOIN US on the CAMPAIGN TRAIL in 2016!
CAMPAIGN FOR CODE 2016 VISUAL STUDIO LIVE!
AUGUST 8 - 12 MICROSOFT HQ, REDMOND, WA
vslive.com/redmond See pages 61–63 for more info
OCTOBER 3 - 6 RENAISSANCE, WASHINGTON, D.C.
vslive.com/dc See pages 52–53 for more info
CONNECT WITH VISUAL STUDIO LIVE!linkedin.com – Join the “Visual Studio Live” group!twitter.com/vslive – @VSLive facebook.com – Search “VSLive” VSLIVE.COM
SEPTEMBER 26 - 29 HYATT ORANGE COUNTY, CA — A DISNEYLAND® GOOD NEIGHBOR HOTEL
vslive.com/anaheimSee pages 50–51 for more info
DECEMBER 5 - 9 LOEWS ROYAL PACIFIC ORLANDO, FL
vslive.com/orlando See pages 76–79 for more info
LAST CHANCE!
Untitled-6.indd 1Untitled-6.indd 1 7/11/16 6:13 PM7/11/16 6:13 PM
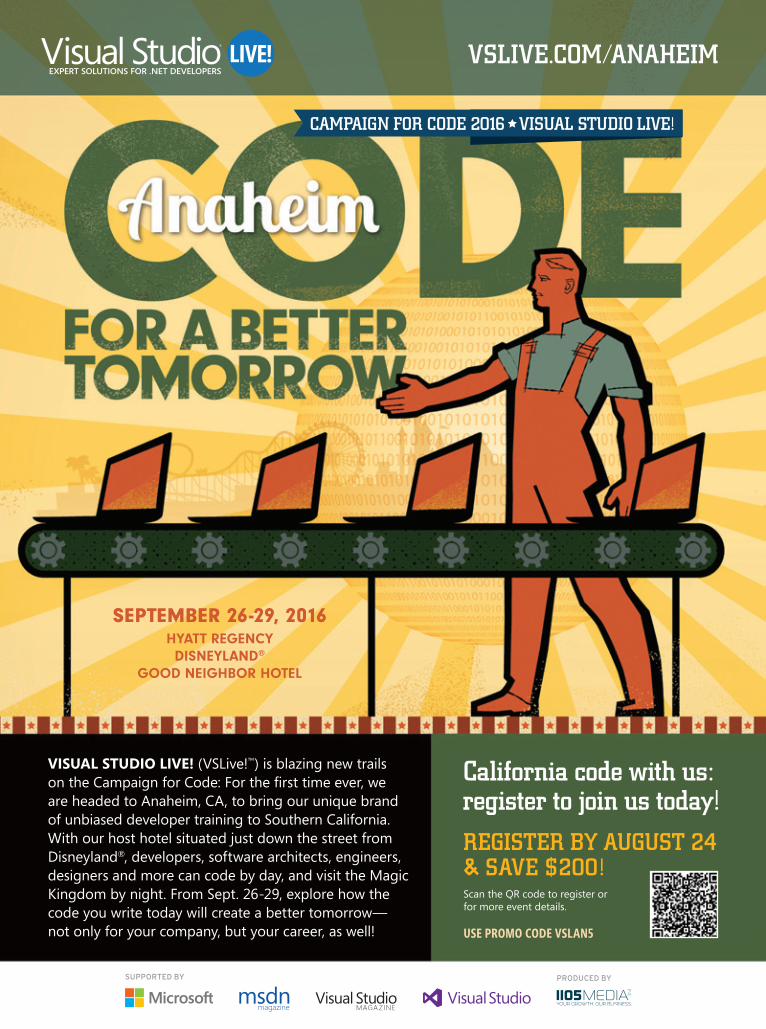
VISUAL STUDIO LIVE! (VSLive!™) is blazing new trails
Disneyland®
PRODUCED BYSUPPORTED BY
magazine
California code with us: register to join us today!
REGISTER BY AUGUST 24 & SAVE $200!
USE PROMO CODE VSLAN5
VSLIVE.COM/ANAHEIM
SEPTEMBER 26-29, 2016HYATT REGENCYDISNEYLAND®
GOOD NEIGHBOR HOTEL
Untitled-6.indd 2Untitled-6.indd 2 7/11/16 6:13 PM7/11/16 6:13 PM

VSLIVE.COM/ANAHEIM
ANAHEIM AGENDA AT-A-GLANCE
START TIME END TIME Visual Studio Live! Pre-Conference Workshops: Monday, September 26, 2016 (Separate entry fee required)
M01 Workshop: Building for the Internet of Things: Hardware,
Sensors & the Cloud - Nick Landry
M02 Workshop: Developer Dive into SQL Server 2016
- Leonard Lobel
M03 Workshop: Distributed Cross-Platform Application Architecture
- Rockford Lhotka & Jason Bock
M04 Workshop: Creating Awesome 2D & 3D Games and
Experiences with Unity - Adam Tuliper
START TIME END TIME Visual Studio Live! Day 1: Tuesday, September 27, 2016
T01 Angular 2 101 - Deborah Kurata
T02 Developing Universal Windows Platform (UWP) Applications
- Scott Golightly
T03 Developer Productivity in Visual Studio 2015
- Robert GreenT04
details will be released soon
T05 ASP.NET MVC6—What You Need to Know
- Philip Japikse
T06 Building Connected and Disconnected Mobile Applications
- James Montemagno
T07 Professional Scrum Development Using Visual Studio 2015 - Richard Hundhausen
T08details will be released soon
T09 Angular 2 Forms and Validation - Deborah Kurata
T10 New SQL Server 2016Security Features for Developers
- Leonard Lobel
T11 Use Visual Studio to ScaleAgile in Your Enterprise- Richard Hundhausen
T12 Windows for Makers: Raspberry Pi, Arduino & IoT
- Nick Landry
T13 Introduction toASP.NET Core 1.0- Scott Golightly
T14 Cross-platform Mobile Development for the C# Developer
- James MontemagnoT15
details will be released soonT16 Cloud Enable .NET Client
LOB Applications - Robert Green
Welcome Reception
START TIME END TIME Visual Studio Live! Day 2: Wednesday, September 28, 2016
W01 JavaScript Patterns for the C# Developer
- Ben Hoelting
W02 Implementing the MvvM Pattern in Your Xamarin Apps
- Kevin Ford
W03 VSTS and Azure: Cloud DevOps 101 - Mike Benkovich
W04 Introduction to Next Generation of Azure PaaS—Service
Fabric and Containers - Vishwas Lele
W05 Busy Developer’s Guide to TypeScript
- Ted NewardW06
details will be released soonW07 User Story Mapping
- Philip JapikseW08 Cloud Oriented Programming
- Vishwas Lele
GENERAL SESSION: FAST, EASY, AND FUN—MOBILE DEVELOPMENT FOR EVERYONE WITH XAMARIN - James Montemagno, Developer Evangelist, Xamarin Team, Microsoft
W09 Getting Started with ASP.NET Core 1 Web API and Entity
Framework Core 1 - Philip Japikse
W10 Using Visual Studio Tools for Apache Cordova to Create
MultiPlatform Applications- Kevin Ford
W11 Exploring C# 7 New Features- Adam Tuliper
W12 Lock the Doors, Securethe Valuables, and Set the Alarm
- Eric D. Boyd
W13 Angular 2 and ASP.NET Core— A Perfect Match!
- Dan Wahlin
W14 Busy .NET Developer’s Guide to Swift - Ted Neward
W15 I’m Emotional - Using Microsoft Cognitive Services to
Understand the World Around You- Adam Tuliper
W16 App Services: The New PaaS- Mike Benkovich
W17 Increase Website Performance and Search with Lucene.Net Indexing
- Ben Hoelting
W18 Reusing Business Logicin Cross-Platform .NET
- Rockford Lhotka
W19 Database Development with SQL Server Data Tools
- Leonard Lobel
W20 Breaking Down Walls with Modern Identity
- Eric D. Boyd
START TIME END TIME Visual Studio Live! Day 3: Thursday, September 29, 2016
TH01 Building Data-Centric Apps with Angular 2 and Breeze
- Brian Noyes
TH02 Building Business Apps on the Universal Windows Platform
- Billy Hollis
TH03 Using Your SQL Skills to Become a Big Data Developer
- Omid Afnan
TH04 Docker: Creating the Ultimate Development Environment
- Dan Wahlin
TH05 Getting Started with Aurelia- Brian Noyes
TH06 HoloLens - Billy Hollis
TH07 Data Anlytics with Azure Data Lake: U-SQL In Depth
- Omid AfnanH08 DevOps for Developers
- Brian Randell
TH09 Pretty, Yet Powerful. How Data Visualization Transforms the Way We Comprehend Information
- Walt Ritscher
TH10- Jason Bock
TH11 Predicting the FutureUsing Azure Machine Learning
- Eric D. BoydTH12 PowerShell for Developers
- Brian Randell
TH13 Building Rich UI with ASP.NET MVC and Bootstrap
- Walt Ritscher
TH14 What’s the Problem?!?:
- Robert Bogue
TH15 Exploratory Data Analysis with R Tools for Visual Studio
- Matthew Renze
TH16 Developing Awesome 3D Apps with Unity and C#
- Adam Tuliper
TH17 Assembling the Web - A Tour of WebAssembly - Jason Bock
TH18 Hack Proof: Software Design for a Hostile Internet - Robert Bogue
TH19 Data Visualization with R Tools for Visual Studio- Matthew Renze
TH20 Technical Debt - Fight It with Science and Rigor - Brian Randell
ALM / DevOps ASP.NET Cloud
ComputingDatabase
andAnalytics
JavaScript / HTML5
ClientMobile Client
Software Practices
Visual Studio / .NET
FrameworkWindows
Client
DETAILS COMING SOON! These sessions have been sequestered by our conference chairs. Be sure to check vslive.com/anaheim for session updates!
Speakers and sessions subject to change
CONNECT WITH VISUAL STUDIO LIVE!linkedin.com – Join the “Visual Studio Live” group!twitter.com/vslive – @VSLive facebook.com – Search “VSLive”
Untitled-6.indd 3Untitled-6.indd 3 7/11/16 6:14 PM7/11/16 6:14 PM
VISUAL STUDIO LIVE! (VSLive!™) is on a Campaign for
CAMPAIGN FOR CODE 2016 VISUAL STUDIO LIVE!
Do your developer duty: register to join us today!
REGISTER BY SEPTEMBER 7 & SAVE $200!
USE PROMO CODE VSLDC5
VSLIVE.COM/DC
PRODUCED BYSUPPORTED BY
magazine
OCT. 3-6, 2016RENAISSANCE, WASHINGTON, D.C.
Untitled-6.indd 4Untitled-6.indd 4 7/11/16 6:14 PM7/11/16 6:14 PM

VSLIVE.COM/DC
WASHINGTON, D.C. AGENDA AT-A-GLANCE
CONNECT WITH VISUAL STUDIO LIVE!linkedin.com – Join the “Visual Studio Live” group!twitter.com/vslive – @VSLive facebook.com – Search “VSLive”
START TIME END TIME Visual Studio Live! Pre-Conference Workshops: Monday, October 3, 2016 (Separate entry fee required)
M01 Workshop: DevOps in a Day - Brian Randell
M02 Workshop: SQL Server for Developers - Andrew Brust and Leonard Lobel
M03 Workshop: Distributed Cross-Platform Application Architecture
- Rockford Lhotka & Jason Bock
ALM / DevOps
CloudComputing
Database and
AnalyticsMobile Client
Software Practices
Visual Studio / .NET
FrameworkWeb
Client Web
ServerWindows
Client
START TIME END TIME Visual Studio Live! Day 1: Tuesday, October 4, 2016
T01 AngularJS2 in 75 Minutes - Sahil Malik
T02details will be released soon
T03 Developer Productivity in Visual Studio 2015
- Robert GreenT04 Cloud Oriented Programming
- Vishwas Lele
T05 ASP.NET MVC6— What You Need to Know
- Philip JapikseT06 What's New in SQL Server 2016
- Leonard LobelT07 HoloLens - Brian Randell
T08details will be released soon
T09 AngularJS2 with Web, Mobile (Cordova), and Desktop (electron)
- Sahil Malik
T10 Database Development with SQL Server Data Tools
- Leonard LobelT11
details will be released soonT12 Windows for Makers:
Raspberry Pi, Arduino & IoT - Nick Landry
T13 Getting Started with ASP.NET Core 1 Web API and Entity
Framework Core 1 - Philip Japikse
T14 Cross-platform Mobile Development for the C# Developer
- James MontemagnoT15 Exploring C# 7 New Features
- Adam Tuliper T16 Cloud Enable .NET Client
LOB Applications - Robert Green
START TIME END TIME Visual Studio Live! Day 2: Wednesday, October 5, 2016
W01 JavaScript Patterns for the C# Developer
- Ben Hoelting
W02 Implementing the MvvM Pattern in Your Xamarin Apps
- Kevin Ford
W03 Developing Awesome 3D Apps with Unity and C#
- Adam Tuliper
W04 Introduction to Next Generation of Azure PaaS—Service
Fabric and Containers - Vishwas Lele
W05 Busy Developer's Guide to TypeScript
- Ted Neward
W06 Building Connected and Disconnected Mobile Applications
- James Montemagno
W07 Unleash the New .NET: Open Source and Running on OS X, Linux &
Windows - Nick LandryW08
details will be released soon
GENERAL SESSION: More Personal Computing through Emerging Experiences- Tim Huckaby, Founder / Chairman - InterKnowlogy & Actus Interactive Software
W09 WCF & Web API: Can We All Just Get Along?!?
- Miguel Castro
W10 Using Visual Studio Tools for Apache Cordova to Create
MultiPlatform Applications - Kevin Ford
W11 Software Engineering in an Agile Environment
- David Corbin
W12 Lock the Doors, Secure the Valuables, and Set the Alarm
- Eric D. Boyd
W13 Richer MVC Sites with Knockout JS - Miguel Castro
W14 Busy .NET Developer's Guide to Swift - Ted Neward
W15 Technical Debt—Fight It with Science and Rigor
- Brian Randell
W16 Breaking Down Walls with Modern Identity
- Eric D. Boyd
W17 Increase Website Performance and Search with Lucene.Net Indexing
- Ben Hoelting
W18 Reusing Business Logic in Cross-Platform .NET
- Rockford Lhotka
W19 Implementing Data Protection and Security in SQL Server 2016
- Steve Jones
W20 Build Real-Time Websites and Apps with SignalR and Azure
- Rachel Appel
START TIME END TIME Visual Studio Live! Day 3: Thursday, October 6, 2016
TH01 Building Data-Centric Apps with Angular 2 and Breeze
- Brian Noyes
TH02 Moving from WPF to Windows 10 and Universal Apps
- Billy Hollis
TH03 Test Drive Automated GUI Testing with WebDriver
- Rachel Appel
TH04 Big Data and Hadoop with Azure HDInsight
- Andrew Brust
TH05 Getting Started with Aurelia - Brian Noyes
TH06 Building Business Apps on the Universal Windows Platform
- Billy Hollis
TH07 Exposing an Extensibility API for your Applications
- Miguel Castro
TH08 Power BI 2.0: Analytics in the Cloud and in Excel
- Andrew Brust
TH09 - Jason Bock
TH10 Pretty, Yet Powerful. How Data Visualization Transforms the Way We Comprehend Information
- Walt Ritscher
TH11 Bringing DevOps to the Database
- Steve Jones
TH12 Predicting the Future Using Azure Machine Learning
- Eric D. Boyd
TH13 Building Rich UI with ASP.NET MVC and Bootstrap
- Walt Ritscher
TH14 What's the Problem?!?:
- Robert Bogue
TH15 Build Distributed Business Apps Using CSLA .NET
- Rockford Lhotka
TH16 Exploratory Data Analysis with R Tools for Visual Studio
- Matthew Renze
TH17 Assembling the Web— A Tour of WebAssembly
- Jason Bock
TH18 Hack Proof: Software Design for a Hostile Internet
- Robert Bogue
TH19 Bootstrapping Automated Testing for Existing Software Systems
- David Corbin
TH20 Data Visualization with R Tools for Visual Studio
- Matthew Renze
DETAILS COMING SOON! These sessions have been sequestered by our conference chairs. Be sure to check vslive.com/dc for session updates!
Speakers and sessions subject to change
Untitled-6.indd 5Untitled-6.indd 5 7/11/16 6:14 PM7/11/16 6:14 PM

msdn magazine54
Filters are a great, often underutilized feature of ASP.NET MVC and ASP.NET Core MVC. They provide a way to hook into the MVC action invocation pipeline, which makes them great for pulling common repetitive tasks out of your actions. Often, an app will have a standard policy that it applies to how it handles certain conditions, especially those that might generate particular HTTP status codes. Or it might perform error handling or application-level logging in a specific fash-ion, in every action. These kinds of policies represent cross-cutting concerns, and if possible, you want to follow the Don’t Repeat Yourself (DRY) principle and pull them out into a common abstraction. Then, you can apply this abstraction globally or wherever appropriate within your application. Filters provide a great way to achieve this.
What About Middleware?In the June 2016 issue, I described how ASP.NET Core middle-ware allows you to control the request pipeline in your apps (msdn.magazine.com/mt707525). That sounds suspiciously like what filters can do in your ASP.NET Core MVC app. The difference between the two is context. ASP.NET Core MVC is implemented via middleware. (MVC itself isn’t middleware, but it configures itself to be the default destination for the routing middleware). ASP.NET Core MVC includes many features like Model Binding, Content Negotiation, and Response Formatting. Filters exist within the context of MVC, so they have access to these MVC-level
features and abstractions. Middleware, in contrast, exists at a lower level and doesn’t have any direct knowledge of MVC or its features.
If you have functionality you want to run at a lower level, and it doesn’t depend on MVC-level context, consider using middleware. If you tend to have a lot of common logic in your controller actions, filters might provide a way for you to DRY them up to make them easier to maintain and test.
Kinds of FiltersOnce the MVC middleware takes over, it calls into a variety of filters at different points within its action invocation pipeline.
The first filters that execute are authorization filters. If the request isn’t authorized, the filter short-circuits the rest of the pipeline immediately.
Next in line are resource filters, which (after authorization) are both the first and last filter to handle a request. Resource filters can run code at the very beginning of a request, as well as at the very end, just before it leaves the MVC pipeline. One good use case for a resource filter is output caching. The filter can check the cache and return the cached result at the beginning of the pipeline. If the cache isn’t yet populated, the filter can add the response from the action to the cache at the end of the pipeline.
Action filters run just before and after actions are executed. They run after model binding takes place, so they have access to the model-bound parameters that will be sent to the action, as well as the model validation status.
Actions return results. Result filters run just before and after results are executed. They can add behavior to view or formatter execution.
Finally, exception filters are used to handle uncaught exceptions and apply global policies to these exceptions within the app.
In this article, I’ll focus on action filters.
Filter ScopingFilters can be applied globally, or at the individual controller or action level. Filters that are implemented as attributes can typically be added at any level, with global filters affecting all actions, con-troller attribute filters affecting all actions within that controller, and action attribute filters applying to just that action. When
AS P. N E T COR E
Real-World ASP.NET Core MVC FiltersSteve Smith
This article discusses:•Kindsoffilters
•Filter scoping
•AsampleMVCController,withandwithoutfilters
•Testingyourfilters
Technologies discussed:ASP.NET Core MVC
Code download available at:bit.ly/1sJruw6
0816msdn_SmithFilters_v3_54-60.indd 54 7/12/16 12:23 PM
Q How does DevExpress help developers be remarkable?A DevExpress has been assisting developers for over 15 years to create stunning applications for their customers. Whether building dashboard applications for better data clarity, creating cross-platform solutions for Windows, Web and Mobile, or leveraging existing knowledge to deliver touch-enabled solutions, developers have everything they need to build their best without limits or compromise.
Q What type of products does DevExpress offer?A The product range that DevExpress offers spans presentation controls, enterprise-ready reporting systems, IDE productivity tools, and data analysis and visualization libraries for Visual Studio. The technologies aim to help build the best by increasing productivity, getting greater clarity from complex software, and creating rich, highly-visual applications for Windows, Web, and Mobile.
Q What technologies and platforms are the primary focus for DevExpress?A DevExpress can be trusted to continue to support older platforms, like WinForms or ASP.NET WebForms. We pride ourselves in letting our customers leverage existing knowledge in older platforms to create modern, touch-enabled, applications. Just as important to us are the new technologies; like WPF and HTML5, we always strive for feature parity between all our
product lines. For example, our new controls—Diagram and TreeMap—have been released for multiple platforms. There is so much available for all of our platforms, we encourage devs to download the trial to see for themselves!
Q For Web Technologies and Open Source, what is DevExpress doing in those areas?A Wow! Now that is a big topic! I can only touch briefl y on what we are doing in each. DevExpress continues to create and improve for ASP.NET WebForms and MVC and our support for the new ASP.NET Core is up on GitHub. Additionally, we have open-sourced our support for Bootstrap and Angular2 with our DevExtreme product.
MSDN Magazine Vendor Profi le
Be Remarkable:Your Talent, Our Tools
To access your 30-day, risk-free trial visit
VPmagazine
MSDN MAGAZINE VENDOR PROFILE
g www.devexpress.com/trial
Q&A with Julian Bucknall, Chief Technical Offi cer, DevExpress
best by increasing productivity, getting greater clarity from complex software, and creating rich, highly-visual applications for Windows, Web,
What technologies and platforms are the
Untitled-4 1 7/8/16 12:23 PM
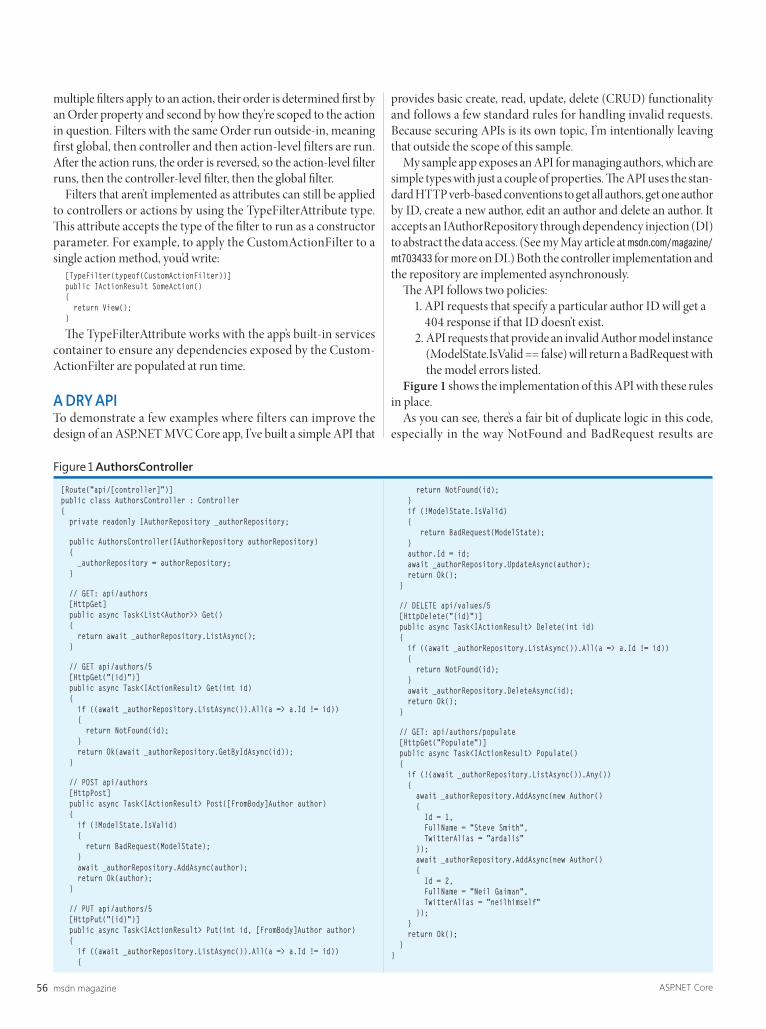
msdn magazine56 ASP.NET Core
multiple filters apply to an action, their order is determined first by an Order property and second by how they’re scoped to the action in question. Filters with the same Order run outside-in, meaning first global, then controller and then action-level filters are run. After the action runs, the order is reversed, so the action-level filter runs, then the controller-level filter, then the global filter.
Filters that aren’t implemented as attributes can still be applied to controllers or actions by using the TypeFilterAttribute type. This attribute accepts the type of the filter to run as a constructor parameter. For example, to apply the CustomActionFilter to a single action method, you’d write:
[TypeFilter(typeof(CustomActionFilter))]public IActionResult SomeAction(){ return View();}
The TypeFilterAttribute works with the app’s built-in services container to ensure any dependencies exposed by the Custom-ActionFilter are populated at run time.
A DRY APITo demonstrate a few examples where filters can improve the design of an ASP.NET MVC Core app, I’ve built a simple API that
provides basic create, read, update, delete (CRUD) functionality and follows a few standard rules for handling invalid requests. Because securing APIs is its own topic, I’m intentionally leaving that outside the scope of this sample.
My sample app exposes an API for managing authors, which are simple types with just a couple of properties. The API uses the stan-dard HTTP verb-based conventions to get all authors, get one author by ID, create a new author, edit an author and delete an author. It accepts an IAuthorRepository through dependency injection (DI) to abstract the data access. (See my May article at msdn.com/magazine/mt703433 for more on DI.) Both the controller implementation and the repository are implemented asynchronously.
The API follows two policies:1. API requests that specify a particular author ID will get a
404 response if that ID doesn’t exist.2. API requests that provide an invalid Author model instance
(ModelState.IsValid == false) will return a BadRequest with the model errors listed.
Figure 1 shows the implementation of this API with these rules in place.
As you can see, there’s a fair bit of duplicate logic in this code, especially in the way NotFound and BadRequest results are
Figure1AuthorsController
[Route("api/[controller]")]public class AuthorsController : Controller{ private readonly IAuthorRepository _authorRepository;
public AuthorsController(IAuthorRepository authorRepository) { _authorRepository = authorRepository; }
// GET: api/authors [HttpGet] public async Task<List<Author>> Get() { return await _authorRepository.ListAsync(); }
// GET api/authors/5 [HttpGet("{id}")] public async Task<IActionResult> Get(int id) { if ((await _authorRepository.ListAsync()).All(a => a.Id != id)) { return NotFound(id); } return Ok(await _authorRepository.GetByIdAsync(id)); }
// POST api/authors [HttpPost] public async Task<IActionResult> Post([FromBody]Author author) { if (!ModelState.IsValid) { return BadRequest(ModelState); } await _authorRepository.AddAsync(author); return Ok(author); }
// PUT api/authors/5 [HttpPut("{id}")] public async Task<IActionResult> Put(int id, [FromBody]Author author) { if ((await _authorRepository.ListAsync()).All(a => a.Id != id)) {
return NotFound(id); } if (!ModelState.IsValid) { return BadRequest(ModelState); } author.Id = id; await _authorRepository.UpdateAsync(author); return Ok(); }
// DELETE api/values/5 [HttpDelete("{id}")] public async Task<IActionResult> Delete(int id) { if ((await _authorRepository.ListAsync()).All(a => a.Id != id)) { return NotFound(id); } await _authorRepository.DeleteAsync(id); return Ok(); }
// GET: api/authors/populate [HttpGet("Populate")] public async Task<IActionResult> Populate() { if (!(await _authorRepository.ListAsync()).Any()) { await _authorRepository.AddAsync(new Author() { Id = 1, FullName = "Steve Smith", TwitterAlias = "ardalis" }); await _authorRepository.AddAsync(new Author() { Id = 2, FullName = "Neil Gaiman", TwitterAlias = "neilhimself" }); } return Ok(); }}
0816msdn_SmithFilters_v3_54-60.indd 56 7/12/16 12:23 PM
MSDN MAGAZINE VENDOR PROFILE
Trusted, Proven TechnologyTired of using poorly-built PDF tools based on open-source libraries? Use the PDF technology installed on millions of desktops worldwide, say goodbye to open-source and get the reliability of fully supported software.
Hassle-free Integration and DistributionEasily integrate powerful PDF functionality into your applications or servers with just a few lines of code. Quickly deploy your server or desktop based PDF solutions using our compact and light-weight printer driver and components.
Comprehensive LicensingWhether you’re a single developer or a corporation with a widely distributed application, you will find the right Amyuni license at the right pricing. From royalty-free to OEM licensing with minimal per-seat fee, we will adapt to your business needs and will not ask you to adapt to ours.
High-PerformanceDevelop with the fastest PDF conversion on the market, designed to perform in multithreaded and 64-bit Windows environments. Our PDF Converter is constantly benchmark tested and proven to be the top performer against all our competitors.
Hardware CertificationsFrom Windows XP to Windows 10, Server 2003 to Server 2012 R2, the Amyuni printer driver is WHQL certified and Citrix Ready! Available through Windows Updates, updating the Amyuni printer driver to a wide customer base could not be easier.
Fully Loaded Feature SetOur expansive library of features is the result of providing custom PDF solutions for over 15 years. You will find most of the features provided by other libraries plus a number of features that you will find nowhere else.
Customizable to Suit Your NeedsChoosing the right team of experts to help you with your imple-mentation is key to your project success and meeting your deadlines. Owning our own technology means being able to quickly respond to your needs and adapt our libraries to new requirements.
We’re Always a Phone Call AwayDo you have a concern or requirement that needs immediate attention? The Amyuni team is always here to help. By phone or by email, our teams excels at providing the quickest response possible for your trickiest problems.
MSDN Magazine Vendor Profile
Switch to Amyuni
VPmagazine
MSDN MAGAZINE VENDOR PROFILE
To learn more, please visit our website g www.amyuni.com
To speak to one of our PDF experts, please call g 1-866-9AMYUNI
For all your desktop and server PDF development needs.
Untitled-4 1 7/8/16 12:36 PM
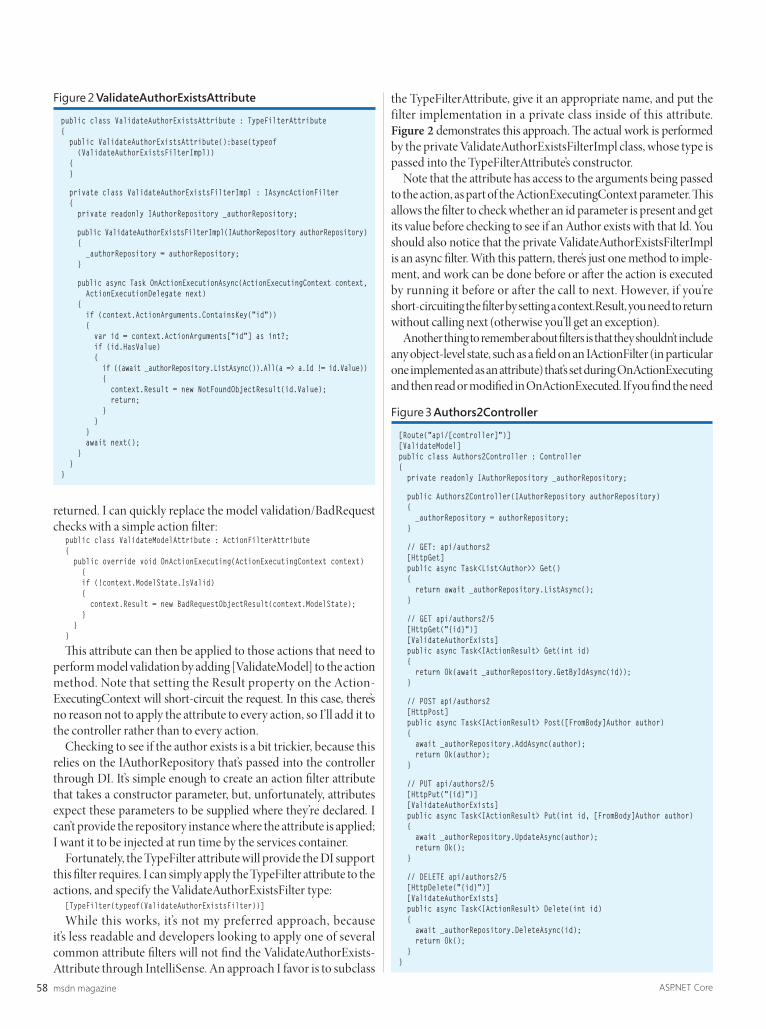
msdn magazine58 ASP.NET Core
returned. I can quickly replace the model validation/BadRequest checks with a simple action filter:
public class ValidateModelAttribute : ActionFilterAttribute{ public override void OnActionExecuting(ActionExecutingContext context) { if (!context.ModelState.IsValid) { context.Result = new BadRequestObjectResult(context.ModelState); } }}
This attribute can then be applied to those actions that need to perform model validation by adding [ValidateModel] to the action method. Note that setting the Result property on the Action-ExecutingContext will short-circuit the request. In this case, there’s no reason not to apply the attribute to every action, so I’ll add it to the controller rather than to every action.
Checking to see if the author exists is a bit trickier, because this relies on the IAuthorRepository that’s passed into the controller through DI. It’s simple enough to create an action filter attribute that takes a constructor parameter, but, unfortunately, attributes expect these parameters to be supplied where they’re declared. I can’t provide the repository instance where the attribute is applied; I want it to be injected at run time by the services container.
Fortunately, the TypeFilter attribute will provide the DI support this filter requires. I can simply apply the TypeFilter attribute to the actions, and specify the ValidateAuthorExistsFilter type:
[TypeFilter(typeof(ValidateAuthorExistsFilter))]
While this works, it’s not my preferred approach, because it’s less readable and developers looking to apply one of several common attribute filters will not find the ValidateAuthorExists-Attribute through IntelliSense. An approach I favor is to subclass
the TypeFilterAttribute, give it an appropriate name, and put the filter implementation in a private class inside of this attribute. Figure 2 demonstrates this approach. The actual work is performed by the private ValidateAuthorExistsFilterImpl class, whose type is passed into the TypeFilterAttribute’s constructor.
Note that the attribute has access to the arguments being passed to the action, as part of the ActionExecutingContext parameter. This allows the filter to check whether an id parameter is present and get its value before checking to see if an Author exists with that Id. You should also notice that the private ValidateAuthorExistsFilterImpl is an async filter. With this pattern, there’s just one method to imple-ment, and work can be done before or after the action is executed by running it before or after the call to next. However, if you’re short-circuiting the filter by setting a context.Result, you need to return without calling next (otherwise you’ll get an exception).
Another thing to remember about filters is that they shouldn’t include any object-level state, such as a field on an IActionFilter (in particular one implemented as an attribute) that’s set during OnActionExecuting and then read or modified in OnActionExecuted. If you find the need
public class ValidateAuthorExistsAttribute : TypeFilterAttribute{ public ValidateAuthorExistsAttribute():base(typeof (ValidateAuthorExistsFilterImpl)) { }
private class ValidateAuthorExistsFilterImpl : IAsyncActionFilter { private readonly IAuthorRepository _authorRepository;
public ValidateAuthorExistsFilterImpl(IAuthorRepository authorRepository) { _authorRepository = authorRepository; }
public async Task OnActionExecutionAsync(ActionExecutingContext context, ActionExecutionDelegate next) { if (context.ActionArguments.ContainsKey("id")) { var id = context.ActionArguments["id"] as int?; if (id.HasValue) { if ((await _authorRepository.ListAsync()).All(a => a.Id != id.Value)) { context.Result = new NotFoundObjectResult(id.Value); return; } } } await next(); } }}
Figure2ValidateAuthorExistsAttribute
[Route("api/[controller]")][ValidateModel]public class Authors2Controller : Controller{ private readonly IAuthorRepository _authorRepository;
public Authors2Controller(IAuthorRepository authorRepository) { _authorRepository = authorRepository; }
// GET: api/authors2 [HttpGet] public async Task<List<Author>> Get() { return await _authorRepository.ListAsync(); }
// GET api/authors2/5 [HttpGet("{id}")] [ValidateAuthorExists] public async Task<IActionResult> Get(int id) { return Ok(await _authorRepository.GetByIdAsync(id)); }
// POST api/authors2 [HttpPost] public async Task<IActionResult> Post([FromBody]Author author) { await _authorRepository.AddAsync(author); return Ok(author); }
// PUT api/authors2/5 [HttpPut("{id}")] [ValidateAuthorExists] public async Task<IActionResult> Put(int id, [FromBody]Author author) { await _authorRepository.UpdateAsync(author); return Ok(); }
// DELETE api/authors2/5 [HttpDelete("{id}")] [ValidateAuthorExists] public async Task<IActionResult> Delete(int id) { await _authorRepository.DeleteAsync(id); return Ok(); }}
Figure3Authors2Controller
0816msdn_SmithFilters_v3_54-60.indd 58 7/12/16 12:23 PM
L EADTOOLS provides libraries for every major platform including Windows, WinRT, iOS, OS X, Android and Linux. In particular, programmers
writing image-enabled applications for mobile devices are able to leverage LEADTOOLS’ state-of-the-art imaging features—viewers, annotations and markup, OCR, barcode, image formats, compression, image processing, and more—to create powerful native applications to get the most out of each platform’s hardware.
Unique Mobile Recognition FeaturesLEADTOOLS recognition technologies, such as OCR, barcode, check processing, ID recognition, and credit card recognition, eliminate the obstacles associated with mobile recognition and are the most robust and comprehensive solution available. Unique features, such as taking a picture on your phone or tablet and converting it to a searchable PDF or DOCX, set LEADTOOLS apart through high accuracy and reliability.
Most mobile apps start with the camera, which are a wild card due to the diversity in devices on today’s market. Ensuring the quality of the image or live capture feed is essential to the fi nal accuracy of the text. LEADTOOLS understands this dilemma and includes many algorithms that account for problems encountered during image capture.
Most notably, LEADTOOLS includes special handling for fi xed-focus digital cameras still found on many popular devices. This is an important feature for recognition technologies because fi xed-focus lenses typically underperform at close range where pictures of documents, checks, credit cards, etc. are taken.
Common Libraries for Easy PortingMany mobile app developers are tasked with creating the same application for multiple platforms. LEADTOOLS is designed with that reality in mind and provides programming interfaces that closely resemble each other so that porting your Windows Phone applica-tion to iOS or Android is a smooth and hassle-free experience.
Mobile Store ApprovedThough third-party SDKs don’t require their own screening or approval process in various mobile application stores, LEADTOOLS has published several of its demos as free application utilities to the App Store, Google Play, and Windows Store. They not only serve as useful tools for your device, but also demonstrate that using LEADTOOLS in your app can pass the stringent approval processes required by mobile device app stores. The source code for each of these demos is available in the respective LEADTOOLS Evaluation Download to help developers get started with their projects.
ConclusionIf you are a software developer working on a mobile app, you simply cannot overlook LEADTOOLS. Its award-winning imaging technology will go a long way in enhancing the quality and boosting the development speed of your image-enabled mobile apps.
MSDN Magazine Vendor Profi le
High-Quality Mobile Imaging with LEADTOOLS Version 19
VPmagazine
MSDN MAGAZINE VENDOR PROFILE
Visit www.leadtools.com/msdn and download a free evaluation, or give us a call at +1-704-332-5532.g
Untitled-4 1 7/8/16 12:24 PM
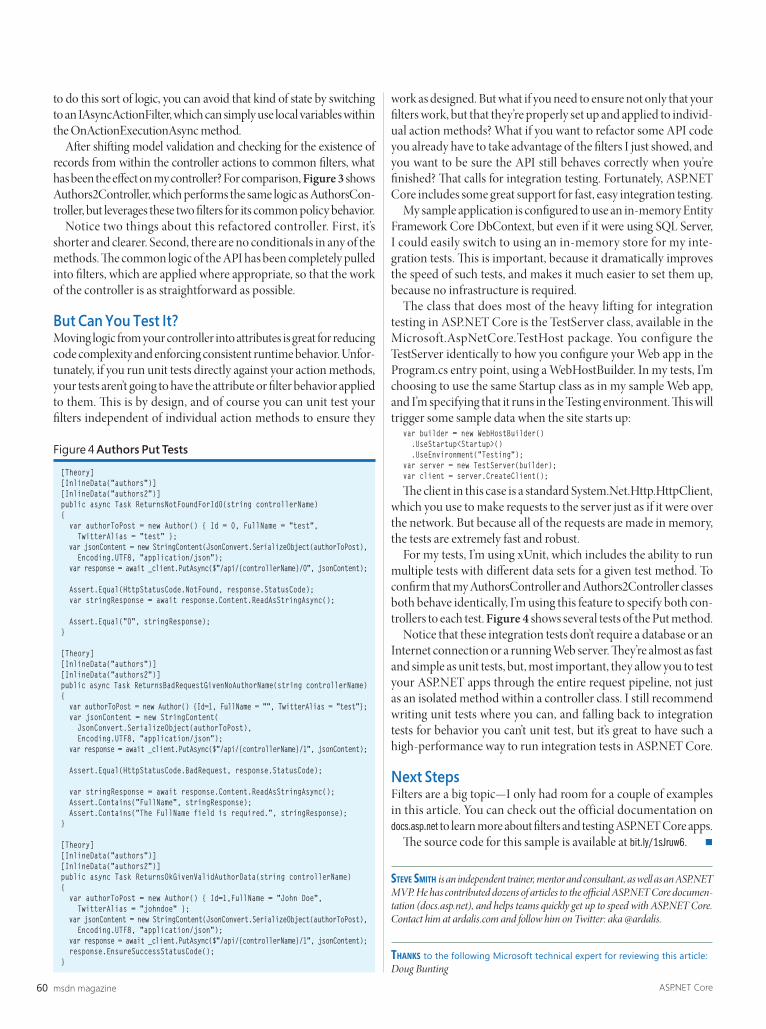
msdn magazine60 ASP.NET Core
to do this sort of logic, you can avoid that kind of state by switching to an IAsyncActionFilter, which can simply use local variables within the OnActionExecutionAsync method.
After shifting model validation and checking for the existence of records from within the controller actions to common filters, what has been the effect on my controller? For comparison, Figure 3 shows Authors2Controller, which performs the same logic as AuthorsCon-troller, but leverages these two filters for its common policy behavior.
Notice two things about this refactored controller. First, it’s shorter and clearer. Second, there are no conditionals in any of the methods. The common logic of the API has been completely pulled into filters, which are applied where appropriate, so that the work of the controller is as straightforward as possible.
But Can You Test It?Moving logic from your controller into attributes is great for reducing code complexity and enforcing consistent runtime behavior. Unfor-tunately, if you run unit tests directly against your action methods, your tests aren’t going to have the attribute or filter behavior applied to them. This is by design, and of course you can unit test your filters independent of individual action methods to ensure they
work as designed. But what if you need to ensure not only that your filters work, but that they’re properly set up and applied to individ-ual action methods? What if you want to refactor some API code you already have to take advantage of the filters I just showed, and you want to be sure the API still behaves correctly when you’re finished? That calls for integration testing. Fortunately, ASP.NET Core includes some great support for fast, easy integration testing.
My sample application is configured to use an in-memory Entity Framework Core DbContext, but even if it were using SQL Server, I could easily switch to using an in-memory store for my inte-gration tests. This is important, because it dramatically improves the speed of such tests, and makes it much easier to set them up, because no infrastructure is required.
The class that does most of the heavy lifting for integration testing in ASP.NET Core is the TestServer class, available in the Microsoft.AspNetCore.TestHost package. You configure the TestServer identically to how you configure your Web app in the Program.cs entry point, using a WebHostBuilder. In my tests, I’m choosing to use the same Startup class as in my sample Web app, and I’m specifying that it runs in the Testing environment. This will trigger some sample data when the site starts up:
var builder = new WebHostBuilder() .UseStartup<Startup>() .UseEnvironment("Testing");var server = new TestServer(builder);var client = server.CreateClient();
The client in this case is a standard System.Net.Http.HttpClient, which you use to make requests to the server just as if it were over the network. But because all of the requests are made in memory, the tests are extremely fast and robust.
For my tests, I’m using xUnit, which includes the ability to run multiple tests with different data sets for a given test method. To confirm that my AuthorsController and Authors2Controller classes both behave identically, I’m using this feature to specify both con-trollers to each test. Figure 4 shows several tests of the Put method.
Notice that these integration tests don’t require a database or an Internet connection or a running Web server. They’re almost as fast and simple as unit tests, but, most important, they allow you to test your ASP.NET apps through the entire request pipeline, not just as an isolated method within a controller class. I still recommend writing unit tests where you can, and falling back to integration tests for behavior you can’t unit test, but it’s great to have such a high-performance way to run integration tests in ASP.NET Core.
Next StepsFilters are a big topic—I only had room for a couple of examples in this article. You can check out the official documentation on docs.asp.net to learn more about filters and testing ASP.NET Core apps.
The source code for this sample is available at bit.ly/1sJruw6. n
Steve Smith is an independent trainer, mentor and consultant, as well as an ASP.NET MVP. He has contributed dozens of articles to the official ASP.NET Core documen-tation (docs.asp.net), and helps teams quickly get up to speed with ASP.NET Core. Contact him at ardalis.com and follow him on Twitter: aka @ardalis.
thankS to the following Microsoft technical expert for reviewing this article: Doug Bunting
[Theory][InlineData("authors")][InlineData("authors2")]public async Task ReturnsNotFoundForId0(string controllerName){ var authorToPost = new Author() { Id = 0, FullName = "test", TwitterAlias = "test" }; var jsonContent = new StringContent(JsonConvert.SerializeObject(authorToPost), Encoding.UTF8, "application/json"); var response = await _client.PutAsync($"/api/{controllerName}/0", jsonContent);
Assert.Equal(HttpStatusCode.NotFound, response.StatusCode); var stringResponse = await response.Content.ReadAsStringAsync();
Assert.Equal("0", stringResponse);}
[Theory][InlineData("authors")][InlineData("authors2")]public async Task ReturnsBadRequestGivenNoAuthorName(string controllerName){ var authorToPost = new Author() {Id=1, FullName = "", TwitterAlias = "test"}; var jsonContent = new StringContent( JsonConvert.SerializeObject(authorToPost), Encoding.UTF8, "application/json"); var response = await _client.PutAsync($"/api/{controllerName}/1", jsonContent);
Assert.Equal(HttpStatusCode.BadRequest, response.StatusCode);
var stringResponse = await response.Content.ReadAsStringAsync(); Assert.Contains("FullName", stringResponse); Assert.Contains("The FullName field is required.", stringResponse);}
[Theory][InlineData("authors")][InlineData("authors2")]public async Task ReturnsOkGivenValidAuthorData(string controllerName){ var authorToPost = new Author() { Id=1,FullName = "John Doe", TwitterAlias = "johndoe" }; var jsonContent = new StringContent(JsonConvert.SerializeObject(authorToPost), Encoding.UTF8, "application/json"); var response = await _client.PutAsync($"/api/{controllerName}/1", jsonContent); response.EnsureSuccessStatusCode();}
Figure4Authors Put Tests
0816msdn_SmithFilters_v3_54-60.indd 60 7/12/16 12:23 PM
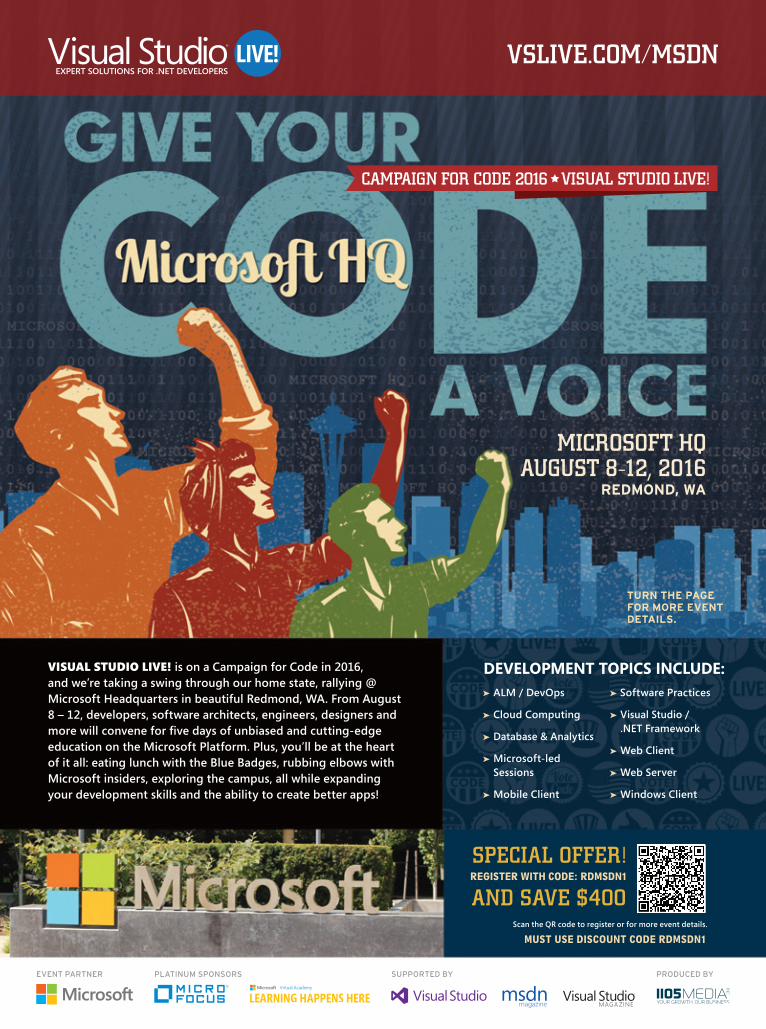
CAMPAIGN FOR CODE 2016 VISUAL STUDIO LIVE!
MICROSOFT HQAUGUST 8-12, 2016
REDMOND, WA
VISUAL STUDIO LIVE! is on a Campaign for Code in 2016, and we’re taking a swing through our home state, rallying @ Microsoft Headquarters in beautiful Redmond, WA. From August 8 – 12, developers, software architects, engineers, designers and
education on the Microsoft Platform. Plus, you’ll be at the heart of it all: eating lunch with the Blue Badges, rubbing elbows with Microsoft insiders, exploring the campus, all while expanding your development skills and the ability to create better apps!
DEVELOPMENT TOPICS INCLUDE:➤ ALM / DevOps
➤ Cloud Computing
➤ Database & Analytics
➤ Sessions
➤ Mobile Client
➤ Software Practices
➤ Visual Studio / .NET Framework
➤ Web Client
➤ Web Server
➤ Windows Client
Scan the QR code to register or for more event details.
SPECIAL OFFER!REGISTER WITH CODE: RDMSDN1
AND SAVE $400
MUST USE DISCOUNT CODE RDMSDN1
magazine
SUPPORTED BY PRODUCED BYPLATINUM SPONSORSEVENT PARTNER
VSLIVE.COM/MSDN
TURN THE PAGE FOR MORE EVENT DETAILS.
Untitled-6 1Untitled-6 1 7/11/16 5:42 PM7/11/16 5:42 PM

Scan the QR code to register or for more event details.
MUST USE DISCOUNT CODE RDMSDN1
SPECIAL OFFER!REGISTER WITH CODE: RDMSDN1
AND SAVE $400
Visual Studio Live! has partnered with the Hyatt Regency Bellevue for conference attendees at a special reduced rate.
Explore the Microsoft Headquarters during Visual Studio Live! Redmond 2016!
CONNECT WITH VISUAL STUDIO LIVE!linkedin.com – Join the “Visual Studio Live” group!twitter.com/vslive – @VSLive facebook.com – Search “VSLive”
MICROSOFT HEADQUARTERSAUGUST 8-12, 2016REDMOND, WA
ALM / DevOps Cloud Computing Database & Analytics Mobile Client
START TIME END TIME
8:00 AM 12:00 PM M01 Workshop: DevOps in a Day - Brian Randell
12:00 PM 2:00 PM
2:00 PM 5:30 PM M01 Workshop Continues7:00 PM 9:00 PM
START TIME END TIME
8:00 AM 5:00 PM F01 - Brian Noyes
START TIME END TIME
8:30 AM 9:30 AM
9:45 AM 11:00 AM T01 Windows Presentation Foundation (WPF) 4.6 - Laurent Bugnion
T02 Angular 2 101 - Deborah Kurata
11:15 AM 12:30 PMT06 Windows 10—The Universal Application:
One App To Rule Them All? - Laurent Bugnion
T07 TypeScript for C# Developers - Chris Klug
12:30 PM 2:00 PM
2:00 PM 3:15 PMT11 Strike Up a Conversation with
Cortana on Windows 10 - Walt Ritscher
T12 Angular 2 Forms and Validation - Deborah Kurata
3:15 PM 3:45 PM
3:45 PM 5:00 PM T16 Building Truly Universal Applications - Laurent Bugnion
T17 Debugging the Web with Fiddler - Ido Flatow
5:00 PM 6:30 PM
START TIME END TIME
8:00 AM 9:15 AMW01 Real World Scrum with Team Foundation
Server 2015 & Visual Studio Team Services - Benjamin Day
W02 Richer MVC Sites with Knockout JS- Miguel Castro
9:30 AM 10:45 AMW06 Team Foundation Server 2015:
- Richard Hundhausen
W07 Get Good at DevOps: Feature Flag
- Benjamin Day
11:00 AM 12:00 PM
12:00 PM 1:30 PM
1:30 PM 2:45 PMW11 Stop the Waste and Get Out
of (Technical) Debt - Richard Hundhausen
W12 Getting Started with Aurelia - Brian Noyes
2:45 PM 3:15 PM
3:15 PM 4:30 PM W16 Real World VSTS Usage for the Enterprise - Jim Szubryt
W17 AngularJS & ASP.NET MVC Playing Nice- Miguel Castro
6:15 PM 9:00 PM
START TIME END TIME
8:00 AM 9:15 AMTH01
and Capabilities that Devs Need to Know - Mike Benkovich
TH02 and Apps with SignalR
- Rachel Appel
9:30 AM 10:45 AM TH06 App Services Overview—Web, Mobile, - Mike Benkovich
TH07 - Eric D. Boyd
11:00 AM 12:15 PM TH11 - Brian Randell
TH12 What You Need To Know AboutASP.NET Core and MVC 6
- Rachel Appel12:15 PM 2:15 PM
2:15 PM 3:30 PM TH16 Cloud Oriented Programming - Vishwas Lele
TH17 Deep Dive into ASP.NET Core - Daniel Roth
3:45 PM 5:00 PMTH21 Migrating Cloud Service Applications
to Service Fabric - Vishwas Lele
TH22 Testing with WebDriver
- Rachel Appel
Untitled-6 2Untitled-6 2 7/11/16 5:42 PM7/11/16 5:42 PM
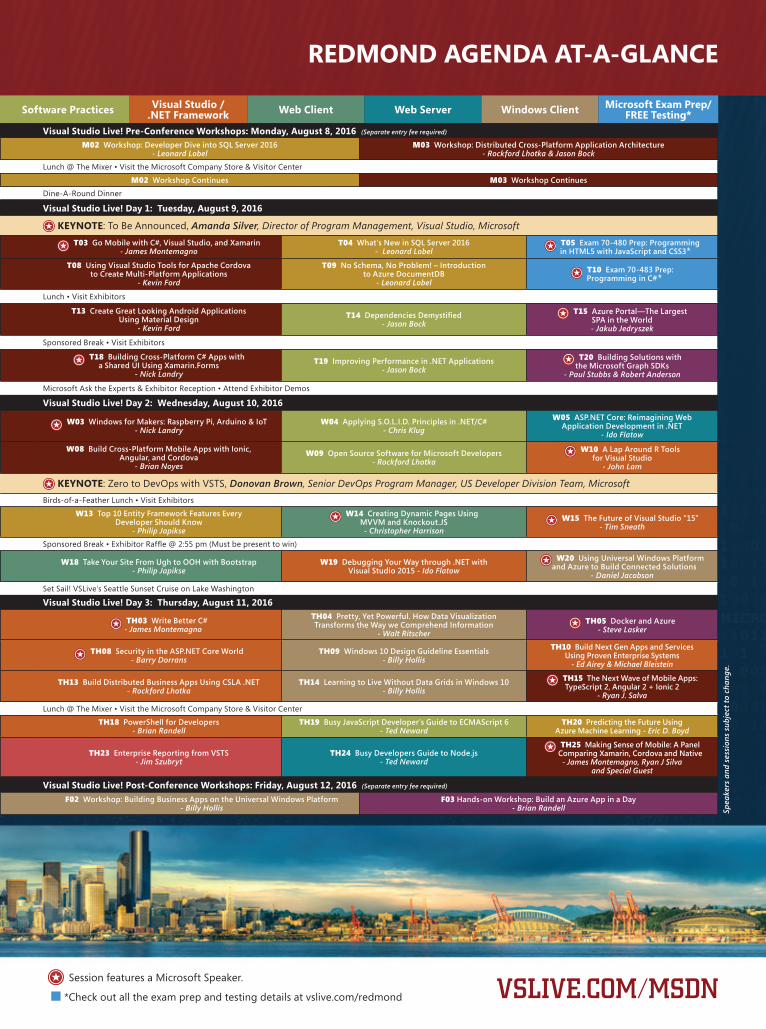
VSLIVE.COM/MSDN
Software Practices Visual Studio / .NET Framework Web Client Web Server Windows Client Microsoft Exam Prep/
FREE Testing*Visual Studio Live! Pre-Conference Workshops: Monday, August 8, 2016 (Separate entry fee required)
M02 Workshop: Developer Dive into SQL Server 2016 - Leonard Lobel
M03 - Rockford Lhotka & Jason Bock
M02 Workshop Continues M03 Workshop Continues
Dine-A-Round Dinner
Visual Studio Live! Post-Conference Workshops: Friday, August 12, 2016 (Separate entry fee required)
F02 Workshop: Building Business Apps on the Universal Windows Platform - Billy Hollis
F03 - Brian Randell
Visual Studio Live! Day 1: Tuesday, August 9, 2016
KEYNOTE: To Be Announced, Amanda Silver, Director of Program Management, Visual Studio, Microsoft T03 Go Mobile with C#, Visual Studio, and Xamarin
- James MontemagnoT04 What's New in SQL Server 2016
- Leonard Lobel T05
in HTML5 with JavaScript and CSS3*T08 Using Visual Studio Tools for Apache Cordova
- Kevin Ford
T09
- Leonard Lobel T10 Programming in C#*
T13 Create Great Looking Android Applications Using Material Design
- Kevin FordT14
- Jason Bock T15
SPA in the World - Jakub Jedryszek
T18
- Nick LandryT19
- Jason Bock T20 Building Solutions with the Microsoft Graph SDKs
- Paul Stubbs & Robert Anderson
Visual Studio Live! Day 2: Wednesday, August 10, 2016
W03 - Nick Landry
W04 - Chris Klug
W05 ASP.NET Core: Reimagining Web Application Development in .NET
- Ido Flatow
W08 Angular, and Cordova
- Brian NoyesW09 Open Source Software for Microsoft Developers
- Rockford Lhotka W10 A Lap Around R Tools
for Visual Studio John Lam
KEYNOTE Donovan Brown, Senior DevOps Program Manager, US Developer Division Team, Microsoft
W13 Top 10 Entity Framework Features Every Developer Should Know
- Philip Japikse
W14 Creating Dynamic Pages Using MVVM and Knockout.JS - Christopher Harrison
W15 The Future of Visual Studio “15” Tim Sneath
W18 Take Your Site From Ugh to OOH with Bootstrap- Philip Japikse
W19 Debugging Your Way through .NET with Visual Studio 2015 - Ido Flatow
W20 Using Universal Windows Platform
Daniel Jacobson
Visual Studio Live! Day 3: Thursday, August 11, 2016
TH03 Write Better C# - James Montemagno
TH04
- Walt Ritscher TH05
- Steve Lasker
TH08 Security in the ASP.NET Core World Barry Dorrans
TH09 Windows 10 Design Guideline Essentials - Billy Hollis
TH10 Build Next Gen Apps and Services Using Proven Enterprise Systems
Ed Airey & Michael Bleistein
TH13 Build Distributed Business Apps Using CSLA .NET - Rockford Lhotka
TH14 Learning to Live Without Data Grids in Windows 10 - Billy Hollis
TH15 The Next Wave of Mobile Apps:
Ryan J. Salva
TH18 PowerShell for Developers - Brian Randell
TH19 Busy JavaScript Developer’s Guide to ECMAScript 6- Ted Neward
TH20 Predicting the Future Using - Eric D. Boyd
TH23 Enterprise Reporting from VSTS - Jim Szubryt
TH24 Busy Developers Guide to Node.js - Ted Neward
TH25 Making Sense of Mobile: A Panel Comparing Xamarin, Cordova and Native
James Montemagno, Ryan J Silva and Special Guest
REDMOND AGENDA AT-A-GLANCE
Session features a Microsoft Speaker.
Spea
kers
and
ses
sion
s su
bjec
t to
chan
ge.
Untitled-6 3Untitled-6 3 7/11/16 5:43 PM7/11/16 5:43 PM
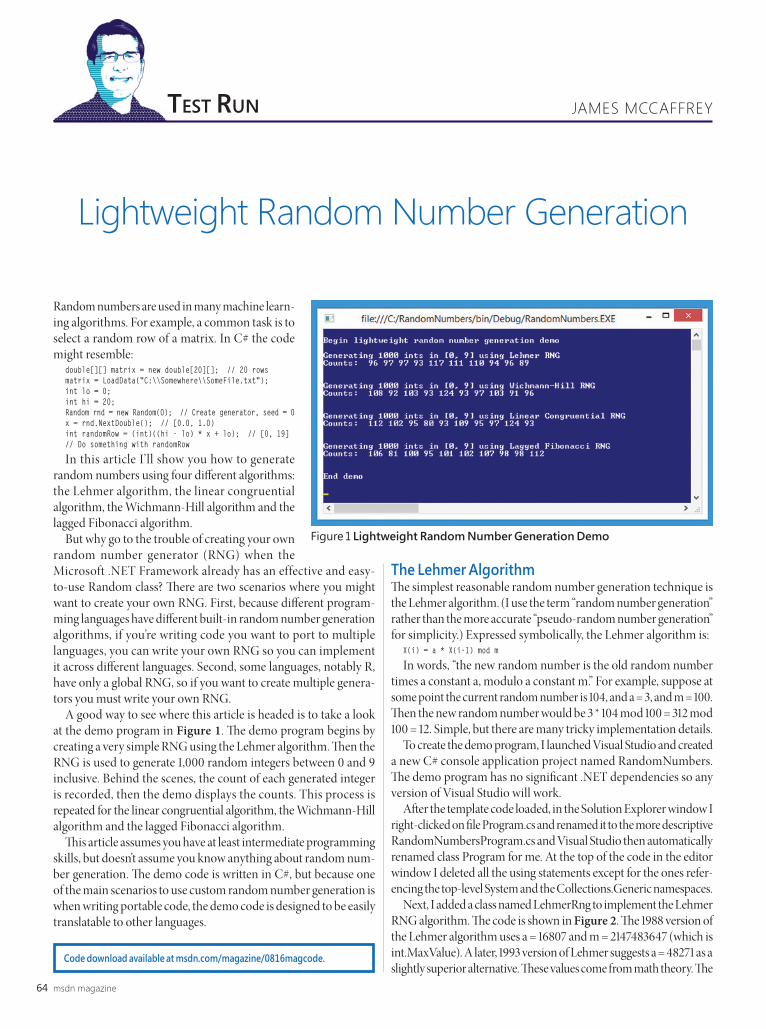
msdn magazine64
Random numbers are used in many machine learn-ing algorithms. For example, a common task is to select a random row of a matrix. In C# the code might resemble:
double[][] matrix = new double[20][]; // 20 rowsmatrix = LoadData("C:\\Somewhere\\SomeFile.txt");int lo = 0;int hi = 20;Random rnd = new Random(0); // Create generator, seed = 0 x = rnd.NextDouble(); // [0.0, 1.0) int randomRow = (int)((hi - lo) * x + lo); // [0, 19]// Do something with randomRow
In this article I’ll show you how to generate random numbers using four different algorithms: the Lehmer algorithm, the linear congruential algorithm, the Wichmann-Hill algorithm and the lagged Fibonacci algorithm.
But why go to the trouble of creating your own random number generator (RNG) when the Microsoft .NET Framework already has an effective and easy-to-use Random class? There are two scenarios where you might want to create your own RNG. First, because different program-ming languages have different built-in random number generation algorithms, if you’re writing code you want to port to multiple languages, you can write your own RNG so you can implement it across different languages. Second, some languages, notably R, have only a global RNG, so if you want to create multiple genera-tors you must write your own RNG.
A good way to see where this article is headed is to take a look at the demo program in Figure 1. The demo program begins by creating a very simple RNG using the Lehmer algorithm. Then the RNG is used to generate 1,000 random integers between 0 and 9 inclusive. Behind the scenes, the count of each generated integer is recorded, then the demo displays the counts. This process is repeated for the linear congruential algorithm, the Wichmann-Hill algorithm and the lagged Fibonacci algorithm.
This article assumes you have at least intermediate programming skills, but doesn’t assume you know anything about random num-ber generation. The demo code is written in C#, but because one of the main scenarios to use custom random number generation is when writing portable code, the demo code is designed to be easily translatable to other languages.
The Lehmer AlgorithmThe simplest reasonable random number generation technique is the Lehmer algorithm. (I use the term “random number generation” rather than the more accurate “pseudo-random number generation” for simplicity.) Expressed symbolically, the Lehmer algorithm is:
X(i) = a * X(i-1) mod m
In words, “the new random number is the old random number times a constant a, modulo a constant m.” For example, suppose at some point the current random number is 104, and a = 3, and m = 100. Then the new random number would be 3 * 104 mod 100 = 312 mod 100 = 12. Simple, but there are many tricky implementation details.
To create the demo program, I launched Visual Studio and created a new C# console application project named RandomNumbers. The demo program has no significant .NET dependencies so any version of Visual Studio will work.
After the template code loaded, in the Solution Explorer window I right-clicked on file Program.cs and renamed it to the more descriptive RandomNumbersProgram.cs and Visual Studio then automatically renamed class Program for me. At the top of the code in the editor window I deleted all the using statements except for the ones refer-encing the top-level System and the Collections.Generic namespaces.
Next, I added a class named LehmerRng to implement the Lehmer RNG algorithm. The code is shown in Figure 2. The 1988 version of the Lehmer algorithm uses a = 16807 and m = 2147483647 (which is int.MaxValue). A later, 1993 version of Lehmer suggests a = 48271 as a slightly superior alternative. These values come from math theory. The
Lightweight Random Number Generation
TesT Run JAMES MCCAFFREY
Code download available at msdn.com/magazine/0816magcode.
Figure 1 Lightweight Random Number Generation Demo
0816msdn_McCaffreyTRun_v3_64-68.indd 64 7/12/16 12:20 PM
MSDN MAGAZINE VENDOR PROFILE
Executive Summary• dtSearch enterprise and developer product line instantly
searches terabytes of text
• dtSearch’s own document filters support a wide variety of data formats, including “Office” files, PDFs, emails and attachments, online data and other databases
• dtSearch products have over 25 search features, and can display retrieved data with highlighted hits
• Developer products include faceted searching and other advanced data classification options
• SDKs span multiple platforms with APIs for .NET, C++ and Java
Key BenefitsTerabyte Indexer. dtSearch enterprise and developer products can index over a terabyte of text in a single index, spanning multiple directories, emails and attachments, online data and other databases. dtSearch products can create and search any number of indexes, and can search indexes during updates.
Concurrent, Multithreaded Searching. dtSearch developer products support efficient multithreaded searching, with no limit on the number of concurrent search threads.
Over 25 Search Options. dtSearch products have more than 25 search features, including special forensics search options and extensive international language support. For federated searching, products have integrated relevancy ranking with highlighted hits across both online and offline data.
Faceted Search and Data Classification. Developer APIs support faceted search along with multiple other full-text and metadata classification options. See dtsearch.com/articles for technical articles with sample code on SQL, faceted searching and other topics.
Instantly Search Terabytes of Text
magazine
MSDN MAGAZINE VENDOR PROFILE
For hundreds of developer case studies and press review, and fully-functional evaluations (including the search engine and the document filters), visit g dtSearch.com
Document Filters and Supported Data Types. dtSearch’s own document filters support “Office” documents, PDFs, compression formats, emails and multilayer nested attachments, online data and other databases. After a search, dtSearch products can display retrieved data with highlighted hits. (Document filters are built into the product line and also available for separate licensing.)
SDKs. The dtSearch Engine offers .NET, Java and C++ APIs. Platforms include Windows and Linux (with separate native 64-bit builds of both) as well as Mac OS X, Android and UWP in beta. Azure users, see dtsearch.com/azure for a developer tutorial on searching via Microsoft’s RemoteApp, giving search the “look and feel” of a native application running under Windows, Android, iOS or OS X.
®
For example,
3 out of 4 of the “Big 4”
accounting firms have dtSearch multiuser
or developer licenses
And 6 out of 7
of Fortune’s largest Aerospace
and Defense industry companies are
developer customers See
dtSearch.com for hundreds of
developer case studies and reviews, and fully-functional
evaluations
dtSearch enterprise and developer use
spans a wide variety of market segments
Retrieval®
The Smart Choice for Text
since 1991, dtSearch has
resellers on six continents
Untitled-2 1 7/11/16 11:14 AM

msdn magazine66 Test Run
demo code is based on the famous paper, “Random Number Gener-ators: Good Ones Are Hard to Find,” by S. K. Park and K. W. Miller.
An implementation problem is avoiding arithmetic overflow. The Lehmer algorithm uses a clever algebra trick. The value of q is m / a (integer division) and the value of r is m % a (m modulo a).
When initializing the Lehmer RNG with a seed value, you can use any integer in the range [1, int.MaxValue - 1]. Many RNGs have a no-parameter constructor that grabs the system date-time and converts it to an integer and uses that as the seed.
The Lehmer RNG is called in the Main method of the demo program, like so:
int hi = 10;int lo = 0;int[] counts = new int[10];LehmerRng lehmer = new LehmerRng(1);for (int i = 0; i < 1000; ++i) { double x = lehmer.Next(); int ri = (int)((hi - lo) * x + lo); // 0 to 9 ++counts[ri];}
Each call to the Next method returns a value in [0.0, 1.0)—greater than or equal to 0.0 and strictly less than 1.0. The pattern (int)(hi - lo) * Next + lo) will return an integer in the range [lo, hi-1].
The Lehmer algorithm is reasonably effective and is my usual technique of choice for simple scenarios. However, note that none of the algorithms presented in this article are cryptographically secure and they should be used only in situations where statistical rigor isn’t required.
The Wichmann-Hill AlgorithmThe Wichmann-Hill algorithm dates from 1982. The idea of Wichmann-Hill is to generate three preliminary results and then com-bine those results into a single, final result. The code that implements Wichmann-Hill is presented in Figure 3. The demo code is based on the paper, “Algorithm AS 183: An Efficient and Portable Pseudo- Random Number Generator,” by B. A. Wichmann and I. D. Hill.
Because the Wichmann-Hill algorithm uses three different gen-erating equations, it requires three seed values. The three m values
in Wichmann-Hill are 30269, 30307 and 30323, so you need three seed values in the range [1, 30000]. You could write a constructor that requires three values, but that’s a somewhat annoying pro-gramming interface. The demo uses a single seed parameter value to generate the three working seeds.
Calling the Wichmann-Hill RNG uses the same pattern as the other demo RNGs:
WichmannRng wich = new WichmannRng(1);for (int i = 0; i < 1000; ++i) { double x = wich.Next(); int ri = (int)((hi - lo) * x + lo); // 0 to 9 ++counts[ri];}
The Wichmann-Hill algorithm is only marginally more diffi-cult to implement than the Lehmer algorithm. An advantage of Wichmann-Hill over Lehmer is that Wichmann-Hill generates a longer pattern (more than 6,000,000,000,000 values) before beginning to repeat itself.
public class LehmerRng{ private const int a = 16807; private const int m = 2147483647; private const int q = 127773; private const int r = 2836; private int seed;
public LehmerRng(int seed) { if (seed <= 0 || seed == int.MaxValue) throw new Exception("Bad seed"); this.seed = seed; }
public double Next() { int hi = seed / q; int lo = seed % q; seed = (a * lo) - (r * hi); if (seed <= 0) seed = seed + m; return (seed * 1.0) / m; }}
Figure 2 The Lehmer Algorithm Implementation
public class WichmannRng{ private int s1, s2, s3;
public WichmannRng(int seed) { if (seed <= 0 || seed > 30000) throw new Exception("Bad seed"); s3 = seed; s2 = s3 / 2; s1 = s2 / 2; }
public double Next() { s1 = 171 * (s1 % 177) - 2 * (s1 / 177); if (s1 < 0) { s1 += 30269; }
s2 = 172 * (s2 % 176) - 35 * (s2 / 176); if (s2 < 0) { s2 += 30307; }
s3 = 170 * (s3 % 178) - 63 * (s3 / 178); if (s3 < 0) { s3 += 30323; }
double r = (s1 * 1.0) / 30269 + (s2 * 1.0) / 30307 + (s3 * 1.0) / 30323; return r - Math.Truncate(r); // orig uses % 1.0 }}
Figure 3 Wichmann-Hill Algorithm Implementation
public class LinearConRng{ private const long a = 25214903917; private const long c = 11; private long seed;
public LinearConRng(long seed) { if (seed < 0) throw new Exception("Bad seed"); this.seed = seed; }
private int next(int bits) // helper { seed = (seed * a + c) & ((1L << 48) - 1); return (int)(seed >> (48 - bits)); }
public double Next() { return (((long)next(26) << 27) + next(27)) / (double)(1L << 53); }}
Figure 4 Linear Congruential Algorithm Implementation
0816msdn_McCaffreyTRun_v3_64-68.indd 66 7/12/16 12:20 PM
msdn magazine68 Test Run
The Linear Congruential AlgorithmAs it turns out, both the Lehmer algorithm and the Wichmann-Hill algorithm can be considered special cases of what’s called the linear congruential (LC) algorithm. Expressed as an equation, LC is:
X(i) = (a * X(i-1) + c) mod m
This is exactly like the Lehmer algorithm with the inclusion of an additional constant, c. Adding c gives the general LC algorithm slightly better statistical properties than the Lehmer algorithm. The demo implementation of the LC algorithm is presented in Figure 4. The code is based on the Portable Operating System Interface (POSIX) standard.
The LC algorithm uses several bit operations. The idea here is that instead of working with type integer (32 bits), the basic math calculations are done using type long (64 bits). When finished, 32 of those bits, from positions 16 through 47 inclusive, are extracted and converted to an inte-ger. This approach gives better results than taking either the low order 32 bits or the high order 32 bits, at the expense of some coding complexity.
The demo calls the LC random number generator, like so:LinearConRng lincon = new LinearConRng(0);for (int i = 0; i < 1000; ++i) { double x = lincon.Next(); int ri = (int)((hi - lo) * x + lo); // 0 to 9 ++counts[ri];}
Notice that unlike the Lehmer and Wichmann-Hill generators, the LC generator can accept a seed value of 0. The demo LC con-structor copies the input seed parameter value directly to the class member seed variable. Many common LC implementations perform a preliminary manipulation of the input seed in order to avoid emitting a well-known series of starting values.
The Lagged Fibonacci AlgorithmThe lagged Fibonacci algorithm, expressed as an equation, is:
X(i) = X(i-7) + X(i-10) mod m
In words, the new random number is the random number gen-erated 7 times ago, plus the random number generated 10 times ago, modulo some large value m. The values (7, 10) can be changed, as I’ll explain shortly.
Suppose at some point in time, the sequence of generated random values is:
... 123 072 409 660 915 358 224 707 834 561 ??
where 561 is the most recently generated value. If m = 100, then the next random number would be:
(660 + 123) % 100 = 783 % 100 = 83
Notice that at any point you always need the 10 most recently gen-erated values. So, the key task with lagged Fibonacci is to generate initial values to get the process started. The demo implementation of lagged Fibonacci is presented in Figure 5.
The demo code uses the X(i-7) and X(i-10) previous random numbers to generate the next random number. The values (7, 10) are usually called (j, k) in the research literature on this topic. There are other (j, k) pairs you can use for lagged Fibonacci. A few of the values recommended by the well-known “Art of Computer Programming” (Addison-Wesley, 1968) are (24,55), (38,89), (37,100), (30,127), (83,258), (107,378).
To initialize a (j, k) lagged Fibonacci RNG, you must prepopulate a list with k values. There are several ways to do this. However, it’s required that at least one of the initial k values be odd. The demo uses the crude technique of copying the seed parameter value as all k initial values, then burning away the first 1,000 generated
values. If the initial seed parameter value is even, then the first of the k values is set to 11 (an arbitrary odd number).
To prevent arithmetic overflow, the Next method uses type long for calculations and the mathematical property that (a + b) mod n = [(a mod n) + (b mod n)] mod n.
Wrapping UpLet me emphasize that the four RNGs presented in this article are intended only for non-critical scenarios. That said, I did run the four RNGs through a set of well-known baseline tests for random-ness, and they did pass those tests. Even so, RNGs are notoriously tricky and time and time again standard RNGs have been found to be defective, sometimes only after they’ve been in use for years. For example, in the 1960s IBM distributed a linear congruential algorithm implementation called RANDU that has incredibly poor properties. And, there are research reports that Microsoft Excel 2008 had a horrendously flawed Wichmann-Hill implementation.
The current state of the art in random number generation is an algorithm named Fortuna (after the Roman goddess of chance). The Fortuna algorithm was published in 2003 and is based on mathe-matical entropy plus sophisticated cryptographic techniques such as the Advanced Encryption System. n
Dr. James mccaffrey works for Microsoft Research in Redmond, Wash. He has worked on several Microsoft products including Internet Explorer and Bing. Dr. McCaffrey can be reached at [email protected].
Thanks to the following Microsoft technical experts who reviewed this article: Chris Lee and Kirk Olynyk
public class LaggedFibRng{ private const int k = 10; // Largest magnitude"-index" private const int j = 7; // Other "-index" private const int m = 2147483647; // 2^31 - 1 = maxint
private List<int> vals = null; private int seed;
public LaggedFibRng(int seed) { vals = new List<int>(); for (int i = 0; i < k + 1; ++i) vals.Add(seed); if (seed % 2 == 0) vals[0] = 11;
// Burn some values away for (int ct = 0; ct < 1000; ++ct) { double dummy = this.Next(); } } // ctor
public double Next() { // (a + b) mod n = [(a mod n) + (b mod n)] mod n int left = vals[0] % m; // [x-big] int right = vals[k - j] % m; // [x-other] long sum = (long)left + (long)right; // prevent overflow
seed = (int)(sum % m); // Because m is int, result has int range vals.Insert(k + 1, seed); // Add new val at end vals.RemoveAt(0); // Delete now irrelevant [0] val return (1.0 * seed) / m; }}
Figure 5 Lagged Fibonacci Implementation
0816msdn_McCaffreyTRun_v3_64-68.indd 68 7/12/16 12:20 PM
FOR-PRINT-Alachisoft-msdn-ad-August-2016-ver-1.0
Monday, July 11, 2016 7:51:14 PM
Untitled-2 1 7/11/16 12:52 PM
msdn magazine70
Welcome back, MEANers.We’re in the middle of 2016. What you might not realize is that
JavaScript (which is actually officially known as ECMAScript) has a new version of the language, ECMAScript 2015. If your JavaScript code isn’t starting to use it, then it’s high time to start. Fortunately, it’s trivial to do so, because there are good reasons to do so. In this installment, I’ll go over some of the more interesting and important features of ECMAScript 2015, and in a future piece, I’ll look at what using MEAN in the more modern style would be like (essentially, now that you’ve got a firm footing on how MEAN applications operate, I’ll reboot the code base completely; more on that then).
Simple ChangesSome of the simplest changes to the language simply embrace modes of programming that have been widespread convention in the ecosystem and community for some time now.
One of these conventions is that of immutability, which ECMAScript 2015 embodies through use of a const declaration:
const firstName = "Ted";
This, like the C++ declaration of the same name, declares that the reference name (“firstName”) can never point anywhere else; it doesn’t insist that the object to which the reference points cannot change. ECMAScript 2015 also has a new form of mutable reference declaration, let, which is essentially a dropin replacement for var; I advise to embrace it at any opportunity.
A more “convenience”type change is to add string interpolation to the language using backticks (the leftwardleaning single quote that usually appears underneath the tilde on U.S. keyboards) instead of singlequotes or doublequotes:
const speaker = { name: "Brian Randell", rating: 5 };console.log(`Speaker ${speaker.name} got a rating of ${speaker.rating}`);
Like C#style string interpolation, ECMAScript 2015 will interpret the expression inside the braces, attempting to convert it to a string and inserting it into the resulting string.
One of the more important changes to the language has been to embrace “blockscoping”; previously, within JavaScript, variables scoped to functions, not to arbitrary code blocks. This meant that any variable declared anywhere inside of a function was accessible throughout the entire function, not just the block in which it was declared, which was confusing and a subtle source of bugs.
An interesting side effect of this block scoping is that ECMAScript now gains locally declared functions, similar to that proposed for C# 7:
{ function foo () { return 1 } foo() === 1 { function foo () { return 2 } foo() === 2 } foo() === 1}
Here, I define a function foo in the block, to return the value 1. Then, for no particular reason, I introduce a new scope block, define a new definition of foo, and demonstrate that when that scope block closes, the definition of foo returns to the previous version—which is exactly what almost every other language on the face of the planet does already.
However, idiomatically, ECMAScript doesn’t use locally nested functions; instead, it prefers a more functionalstyle programming idiom, defining a variable reference to point to an anonymous function definition, and use that. In support of that, ECMAScript 2015 now supports arrow functions, which use a syntax almost identical to that of C#:
const nums = [1, 2, 3, 4, 5];nums.forEach(v => { if (v % 2 == 0) console.log(v);});
(Remember that you added the function forEach to arrays as part of the previous ECMAScript standard.) This will, as assumed, print out the even numbers in the array. If, on the other hand, I want to construct even numbers out of the source array, I can use the builtin “map” and an arrow function to do essentially the same thing:
const nums = [1, 2, 3, 4, 5];const evens = nums.map(v => v * 2);
Arrow functions are a longawaited change and it’s reasonable to expect that most JavaScriptbased code will adopt them aggressively.
How To Be MEAN: Exploring ECMAScript
The Working Programmer TED NEWARD
This explains the name— the Promise object is, in effect,
promising to invoke the then function when the initial
code is complete.
0816msdn_NewardWProg_v4_70-75.indd 70 7/12/16 12:22 PM
msdn magazine72 The Working Programmer
PromisesOf the many solutions that were floated through the ECMAScript community to help address some of the complexity around the Node.js callbackstyle of programming, one of the recurring themes was that of “promises”—essentially, a librarybased approach that transforms the callbacks into something that looked more serial in nature. Several different promisesbased libraries were popular within the community, and the ECMAScript committee eventually chose to standardize on one, which it now simply refers to as “Promises.” (Note the uppercase in the name; this is also the name of the principal object used to implement them.) Using ECMAScript 2015 Promises can look a little weird at first, compared to standard synchronous programming, but for the most part, it makes sense.
Consider, for a moment, application code that wants to invoke a library routine that uses a Promise to be able to do some things in the background:
msgAfterTimeout("Foo", 100).then(() => msgAfterTimeout("Bar", 200);).then(() => { console.log(`done after 300ms`);});
Here, the idea is that msgAfterTimeout is going to print “Hello, Foo” after a 100 ms timeout, and afterward, do the same thing again (“Hello, Bar” after 200 ms), and after that, simply print a message to the console. Notice how the steps are connected using then function calls—the returned object from msgAfterTimeout is a Promise object and then defines the function invoked when the initial Promise has completed execution. This explains the name—the Promise object is, in effect, promising to invoke the then function when the initial code is complete. (In addition, what happens if an exception is thrown from within the function? The Promise allows you to specify a function executed in that case, using the catch method).
In the case where you want to run several functions simultaneously and then execute a function after all have finished, you can use Promise.all:
const fetchPromised = (url, timeout) => { /* ... */ }Promise.all([ fetchPromised("http://backend/foo.txt", 500), fetchPromised("http://backend/bar.txt", 500), fetchPromised("http://backend/baz.txt", 500)]).then((data) => { let [ foo, bar, baz ] = data; console.log(`success: foo=${foo} bar=${bar} baz=${baz}`);}, (err) => { console.log(`error: ${err}`);});
As you can see, the results of each asynchronously executed function will be collected and assembled into an array, which is then passed as the first parameter to the (first) function given to then. (The let statement is an example of “destructuring assignment” in ECMAScript 2015, another new feature; essentially, each element of the data array is assigned to each of those three declared variables and the remainder, if any, thrown away.) Notice, as well, that then is passed a second function, which is used in the event that there’s an error in executing any of the async functions.
It’s definitely a different style of programming, but not unusual for anyone who’s spent time working with the various C# asynchronous mechanisms, a la PLINQ or TPL.
LibraryECMAScript 2015 has added a few important things to the standard library (which all ECMAScript environments are supposed to provide, be they browser or server) beyond the Promise. In particular, they’ve added a Map (key/value store, similar to the .NET Dictionary<K,V> type) and a Set (a noduplicates “bag” of values), both of which are available without requiring any sort of import:
const m = new Map();m.set("Brian", 5);m.set("Rachel", 5);console.log(`Brian scored a ${m.get("Brian")} on his talk`);
const s = new Set();s.add("one");s.add("one"); // duplicates.add("one"); // duplicateconsole.log(`s holds ${s.size} elements`); // Prints "1"
In addition, several more standard functions are being added to various object prototypes already in the ECMAScript environment, such as find on Arrays, and some numeric valuation methods (such as isNAN or isFinite) to the Number prototype. For the most part, both these and the earlier Map and Set types were already present in the community as thirdparty packages, but bringing them in to the standard ECMAScript library will help cut down on some of the packagedependencies that litter the ECMAScript landscape.
ModulesProbably one of the most significant changes, at least from the perspective of building a MEANbased application, is the adoption of a formal module system. Previously, as I discussed almost a year ago, a MEANbased application used the Node.js require function to “import” (interpret/execute) another JavaScript file and return an object for use. This meant that when a MEAN developer wrote the following line, the express object returned by evaluating a JavaScript file stored in a subdirectory inside of node_modules, which was installed via the use of npm:
var express = require('express');
To make this work, several conventions had to be in place, and it worked, but the lack of formality distinctly hindered the language and ecosystem’s forward progress. In ECMAScript 2015 new keywords were introduced to formalize much of this.
It’s a bit circular to explain, so let’s start with a simple example: two files, one called app.js, and the library it wants to use, called math. The math library will be a nonnpm library (for simplicity),
Probably one of the most significant changes, at least from the perspective of building
a MEAN-based application, is the adoption of a formal
module system.
Need 2 line PQ filled...Ra se voluptatur? Quid ma dolorentiur,
0816msdn_NewardWProg_v4_70-75.indd 72 7/12/16 12:22 PM
75August 2016msdnmagazine.com
and will have two values it exports: the value of pi (3.14), called PI, and a function to sum up an array of numbers, called sum:
// lib/math.jsexport function sum (x, y) { return x + y };export var pi = 3.141593;
// app.jsimport * as math from "lib/math";console.log("2PI = " + math.sum(math.pi, math.pi));
Notice that in the library, the symbols made accessible to clients are declared with the “export” keyword, and when referencing the library, you use the keyword “import.” More commonly, however, you want to import the symbols from the library as toplevel elements themselves (rather than as members), so the more common usage will likely be this:
// app.jsimport {sum, pi} from "lib/math"console.log("2π = " + sum(pi, pi));
This way, the imported symbols can be used directly, rather than in their member scoped form.
Wrapping UpThere’s a great deal more hiding in the ECMAScript 2015 standard; readers who haven’t seen any of these features before now should definitely check out any of the (evergrowing list of) resources describing the new standard found on the Internet. The official ECMA standard is available at bit.ly/1xxQKpl (it lists the current specification as 7th edition, called ECMAScript 2016, largely because ECMA has decided to go to a yearly cadence on new changes to the language). However, for a less “formal” description of the language, readers are encouraged to check out es6-features.org, which provides a list of the new language features and their comparison to what was present before within the language.
In addition, while Node.js is almost entirely compliant with the feature set of ECMAScript 2015, other environments aren’t, or are in various states of support. For those environments, that aren’t quite up to a complete level of support, there are two “transpiler” tools—the Googlesponsored Traceur compiler and the Babel compiler. (Both are, of course, just an npm away.) Of course, Microsoft’s own TypeScript is amazingly close to what ECMAScript 2015 ended up being, meaning that one could adopt TypeScript today and be almost lineforline compliant with ECMAScript 2015 if/when converting to ECMAScript 2015 is needed or desirable.
All these features will become more obvious as you start working with MEAN tools
that make use of them, so don’t stress for now if they don’t make sense yet. In the meantime … happy coding! n
Ted Neward is a Seattle-based polytechnology consultant, speaker and mentor. He has written more than 100 articles, is an F# MVP and has authored and coauthored a dozen books. Reach him at [email protected] if you’re interested in having him come work with your team, or read his blog at blogs.tedneward.com.
ThaNks to the following technical expert for reviewing this article: Shawn Wildermuth
Where you need us most.
magazine
MSDN.microsoft.com
0816msdn_NewardWProg_v4_70-75.indd 75 7/14/16 11:16 AM

Join us as we journey into real-world, practical education and training on the Microsoft Platform. Visual Studio
Live! (VSLive!™) returns to warm, sunny Orlando for the conference more developers rely on to expand their .NET
skills and the ability to build better applications.
Journey into Code
twitter.com/live360 @live360
facebook.comSearch "Live 360"
linkedin.comJoin the "Live! 360" group!
ROYAL PACIFIC RESORT AT UNIVERSAL ORLANDO
DEC5-9
EVENT PARTNERS PLATINUM SPONSOR SUPPORTED BYGOLD SPONSOR
Untitled-6 2Untitled-6 2 7/11/16 1:59 PM7/11/16 1:59 PM
NEW!
Six (6) events and hundreds of sessions to choose from – mix and match sessions to create your own, custom event line-up – it’s like no other conference available today!
Visual Studio Live! Orlando is part of Live! 360, the Ultimate Education Destination. This means you’ll have access to fi ve (5) other co-located events at no additional cost:
VSLIVE.COM/ORLANDO
Whether you are an Engineer Developer Programmer Software Architect Software Designer
You will walk away from this event having expanded your .NET skills and the ability to build better applications.
REGISTER TODAYAND SAVE $500!
Use promo code ORLAUG4 by August 31
Scan the QR code to register or for more event details.
PRODUCED BY
TURN THE PAGE FOR MORE EVENT DETAILS
Untitled-6 3Untitled-6 3 7/11/16 1:59 PM7/11/16 1:59 PM

Check Out the Additional Sessionsfor Devs, IT Pros, & DBAs at Live! 360
SQL Server Live! features 15+ developer sessions, including:
• What's New in SQL Server 2016 - Leonard Lobel
• Powerful T-SQL Improvements that Reduce Query Complexity - Hugo Kornelius
• Implementing Data Protection and Security in SQL Server 2016 - Steve Jones
• Welcome To The 2016 Query Store! - Janis Griffi n• Workshop: Big Data, Analytics and NoSQL: Everything You Wanted
to Learn But Were Afraid to Ask - Andrew Brust
TechMentor features IT Pro and DBA sessions, including:• Workshop: 67 VMware vSphere
Tricks That’ll Pay for This Conference! - Greg Shields
• Secure Access Everywhere! Implementing DirectAccess in Windows Server 2016 - Richard Hicks
• Getting Started with Nano Server - Jeffery Hicks• Creating Class-Based PowerShell Tools - Jeffery Hicks• Harvesting the Web: Using PowerShell to Scrape Screens,
Exploit Web Services, and Save Time - Mark Minasi• PowerShell Unplugged: Stump Don - Don Jones• Facing Increasing Malware Threats and a Growing Trend of BYO
with a New Approach of PC Security - Yung Chou
• Workshop: A Beginner’s Guide to Client Side Development in SharePoint - Mark Rackley
• Become a Developer Hero by Building Offi ce Add-ins - Bill Ayres • Utilizing jQuery in SharePoint - Get More Done Faster - Mark Rackley • Using the Offi ce UI Fabric - Paul Schaefl ein • Enterprise JavaScript Development Patterns - Rob Windsor • Leveraging Angular2 to Build Offi ce Add-ins - Andrew Connell • Webhooks in Offi ce 365 - Paul Schaefl ein
Offi ce & SharePoint Live! features 12+ developer sessions, including:
ROYAL PACIFIC RESORT AT UNIVERSAL ORLANDO
DEC5-9
START TIME END TIME
5:00 PM 8:00 PM
6:00 PM 9:00 PM Dine-A-Round Dinner @ Universal CityWalk
START TIME END TIME
8:00 AM 5:00 PM VSM01 Workshop: Distributed Cross-Platform Application Architecture - Rockford Lhotka & Jason Bock
O
12:00 PM 1:00 PM Lunch
1:00 PM 5:00 PM VSM1 Workshop Continues
5:00 PM 6:00 PM EXPO Preview
6:00 PM 7:00 PM Live! 360 Keynote: To Be Announced
START TIME END TIME
8:00 AM 9:00 AM Visual Studio Live! Keynote: To Be Announced
9:00 AM 9:30 AM Networking Break • Visit the EXPO
9:30 AM 10:45 AM VST01 Building Applications with ASP.NET Core - Scott Allen
VST02 Busy .NET Developer’s Guide to Swift - Ted Neward
11:00 AM 12:15 PM VST05 Richer MVC Sites with Knockout JS - Miguel Castro
VST06 Busy .NET Developer’s Guide to Native iOS
- Ted Neward
12:15 PM 2:00 PM Lunch • Visit the EXPO
2:00 PM 3:15 PMVST09 WCF & Web API: Can
We All Just Get Along?!?- Miguel Castro
VST10 Creating Great Looking Android Applications Using Material Design - Kevin Ford F
3:15 PM 4:15 PM Networking Break • Visit the EXPO
4:15 PM 5:30 PMVST13 Busy Developer’s Guide to
Chrome Development- Ted Neward
VST14 Using Visual Studio Tools for Apache Cordova to Create
MultiPlatform Applications- Kevin Ford
5:30 PM 7:30 PM Exhibitor Reception
START TIME END TIME
8:00 AM 9:15 AM VSW01 Moving from Angular 1 to Angular 2 - Ben Dewey
VSW02 The Future ofMobile Application Search
- James Montemagno
9:30 AM 10:45 AM VSW05 Getting Started with Aurelia - Brian Noyes
VSW06 Building Connectedand Disconnected Mobile
Applications - James Montemagno
10:45 AM 11:15 AM Networking Break • Visit the EXPO11:15 AM 12:15 PM Live! 360 Keynote: To Be Announced12:15 PM 1:45 PM Birds-of-a-Feather Lunch • Visit the EXPO
1:45 PM 3:00 PMVSW09 Living in a Command Line
Web Development World(NPM, Bower, Gulp, and More)
- Ben Dewey
VSW10 Understanding the Windows Desktop App Development Landscape
- Brian Noyes3:00 PM 4:00 PM
4:00 PM 5:15 PM VSW13 Securing ClientJavaScript Apps - Brian Noyes
VSW14 Let’s Write a Windows 10 App: A Basic Introduction to
Universal Apps - Billy Hollis
8:00 PM 10:00 PM Live! 360 Dessert Luau - Wantilan Pavilion
START TIME END TIME
8:00 AM 9:15 AMVSH01 Build Real-Time Websites
and Apps with SignalR- Rachel Appel
VSH02 Cognitive Services: Building Smart Applications with Computer Vision - Nick Landry
9:30 AM 10:45 AM VSH05 HTTP/2: What You Need to Know - Robert Boedigheimer
VSH06 Building Business Appson the Universal Windows
Platform - Billy Hollis
11:00 AM 12:15 PM VSH09 TypeScript and ES2015 JumpStart - John Papa
VSH10 A Developers Introduction to HoloLens - Billy Hollis &
Brian Randell12:15 PM 1:30 PM Lunch on the Lanai
1:30 PM 2:45 PM VSH13 All Your Tests Are Belong To Us - Rachel Appel
VSH14 Developing Awesome3D Apps with Unity and C#
- Adam Tuliper
3:00 PM 4:15 PM VSH17 SASS and CSS for Developers - Robert Boedigheimer
VSH18 From Oculus to HoloLens: Building Virtual & Mixed Reality
Apps & Games - Nick Landry
4:30 PM 5:30 PM Live! 360 Conference Wrap-Up
START TIME END TIME
8:00 AM 5:00 PM VSF01 Workshop: Angular 2 Bootcamp- John Papa
12:00 PM 1:00 PM Lunch
1:00 PM 5:00 PM VSF01 Session Continues
Speakers and sessions subject to change
ALM / DevOps Cloud Computing Mobile Client Software
PracticesVisual Studio /
.NET Framework
Untitled-6 4Untitled-6 4 7/11/16 2:54 PM7/11/16 2:54 PM
AGENDAS AT-A-GLANCE
Pre-Conference: Sunday, December 4, 2016
Pre-Conference Workshops: Monday, December 5, 2016VSM02 Workshop: Service
Oriented Technologies - Designing, Developing, & Implementing WCF and the Web API - Miguel Castro
VSM03 Workshop: DevOps in a Day - Brian Randell
MAM01 Workshop: Building Modern Mobile Apps
- Brent Edwards & Kevin FordADM01 Workshop: Building Teams
- Steve GreenADM02 Workshop: One Codebase to
Rule Them All: Xamarin- Fabian Williams
VSM2 Workshop Continues VSM3 Workshop Continues MAM01 Workshop Continues ADM01 Workshop Continues ADM02 Workshop Continues
Day 1: Tuesday, December 6, 2016
VST03 What’s New in Azure v2- Eric D. Boyd
VST04 Real World Scrum with Team Foundation Server 2015 & Visual
Studio Team Services - Benjamin Day
MAT01 Modern App Development: Transform How You Build Web and Mobile Software - Rockford Lhotka
ADT01 Hacking Technical Debt- Steve Green
ADT02 Java 8 Lambdas and theStreaming API - Michael Remijan
VST07 Overview of Power Apps- Nick Pinheiro
VST08 Get Good at DevOps: Feature Flag Deployments with ASP.NET,
WebAPI, & JavaScript - Benjamin DayMAT02 Architecture: The Key to
Modern App Success - Brent EdwardsADT03 Are You A SOLID Coder?
- Steve GreenADT04 PrimeFaces 5: Modern UIWidgets for Java EE - Kito Mann
VST11 Introduction to Next Generation of Azure PaaS – Service
Fabric and Containers - Vishwas LeleVST12 To Be Announced
MAT03 Manage Distributed Teams with Visual Studio Team Services
and Git - Brian RandellADT05 Agile Architecture
- Steve GreenADT06 Full Stack Java with JSweet,
Angular 2, PrimeNG, and JAX-RS- Kito Mann
s VST15 Cloud Oriented
Programming - Vishwas LeleVST16 Bringing DevOps to the
Database - Steve JonesMAT04 Focus on theUser Experience #FTW
- Anthony HandleyADT07 Crafting Innovation
- Steve GreenADT08 Who’s Taking Out the Garbage?
How Garbage Collection Worksin the VM - Kito Mann
Day 2: Wednesday, December 7, 2016VSW03 Managing Enterprise and
Consumer Identity with AzureActive Directory - Nick Pinheiro
VSW04 Improving Performance in .NET Applications - Jason Bock
MAW01 DevOps, Continuous Integration, the Cloud, and Docker
- Dan NordquistADW01 Stop Killing Requirements!
- Melissa GreenADW02 Migrating Customers toMicrosoft Azure: Lessons Learned
From the Field - Ido Flatow
o
VSW07 Practical Internet ofThings for the MicrosoftDeveloper - Eric D. Boyd
VSW08 I’ll Get Back to You: Understanding Task, Await, and
Asynchronous Methods- Jeremy Clark
MAW02 Mobile Panel- Kevin Ford, Rockford Lhotka,
James Montemagno, & Ryan J. Salva
ADW03 Meeting-Free SoftwareDevelopment in Distributed Teams
- Yegor Bugayenk
ADW04 The Essentials of Building Cloud-Based Web Apps with Azure
- Ido Flatow
VSW11 To Be Announced VSW12 Learn to Love Lambdas(and LINQ, Too) - Jeremy Clark
MAW03 C# Everywhere:How CSLA .NET Enables Amazing
Cross-Platform Code Reuse- Rockford Lhotka
ADW05 Introduction to
- Fabian Williams
ADW06 Building IoT and Big DataSolutions on Azure
- Ido Flatow
VSW15 ARM Yourselffor Azure Success- Esteban Garcia
VSW16 Continuous Delivery on Azure: A/B Testing, Canary Releases, and Dark Launching - Marcel de Vries
MAW04 Coding for Qualityand Maintainability
- Jason Bock
ADW07 As You Think About Azure Databases, Think About DocumentDb
- Fabian Williams
ADW08 Where Does JavaScriptBelong in the App Store?
- Jordan Matthiesen
Day 3: Thursday, December 8, 2016
h VSH03 C# Best Practices- Scott Allen
VSH04 Application Insights: Measure Your Way to Success
- Esteban Garcia
MAH01 Modern Mobile Development: Build a Single App For iOS & Android with Xamarin Forms
- Kevin Ford
ADH01 From VMs to Containers:Introducing Docker Containers for Linux
and Windows Server - Ido FlatowADH02 Continuous Testing in aDevOps World - Wayne Ariola
VSH07 Debugging Your Way Through .NET with Visual Studio
2015 - Ido FlatowVSH08 The Ultimate Intro to Docker
for Developers - Adam TuliperMAH02 Universal Windows
Development: UWP for PC, Tablet & Phone - Brent Edwards
ADH03 CQRS 2.0 - Commands, Actors, and Events...Oh My! - David Hoerster
DH04 Microservices as Chat BotsAre the Future - Yegor Bugayenk
n VSH11 Exploring Microservicesin a Microsoft Landscape
- Marcel de Vries
VSH12 Automated UI Testing for iOS and Android Mobile Apps
- James Montemagno
MAH03 Modern Web Development: ASP.NET MVC and Web API
- Allen ConwayADH05 The Curious Case for the
Immutable Object - David HoersterADH06 Continuous Integration May
Have Negative Effects - Yegor Bugayenk
VSH15 Unit Testing Makes Me Faster: Convincing Your Boss,
Your Co-Workers, and Yourself- Jeremy Clark
VSH16 Writing Maintainable, X-Browser Automated Tests
- Marcel de Vries
MAH04 Modern Web Development: Building a Smart Web Client with
TypeScript and Angular2- Allen Conway
ADH07 To Be AnnouncedADH08with Xamarin, VSTS and HockeyApp
- Roy Cornelissen
s: VSH19 User Experience CaseStudies - Good and Bad
- Billy HollisVSH20 Debugging the Web with
Fiddler - Ido FlatowMAH05 Using All That Data: Power
BI to the Rescue - Scott DiehlADH09 Get Started with Microsoft
PowerApps - Fabian WilliamsADH10 Overcoming the Challenges of Mobile Development in the Enterprise
- Roy Cornelissen
Post-Conference Workshops: Friday, December 9, 2016
VSF02 Workshop: Building Modern Web Apps with Azure- Eric D. Boyd & Brian Randell
MAF01 Workshop: Modern App Deep Dive: Xamarin, Responsive
Web, UWP, CSLA .NET - Jason Bock, Allen Conway, Brent Edwards &
Kevin Ford
ADF01 Workshop: To Be Announced
VSF02 Session Continues MAF01 Session Continues ADF01 Session Continues
/ k Web Client Web Server Windows Client Modern Apps Live! Agile Containerization Continuous
Integration Java Mobile Cloud
Presented inPartnership with
Untitled-6 5Untitled-6 5 7/11/16 2:55 PM7/11/16 2:55 PM

msdn magazine80
I cannot get my sleep to-night; old bones are hard to please; I’ll stand the middle watch up here - alone wi’ God an’ these My engines, after ninety days o’ race an’ rack an’ strain Through all the seas of all Thy world, slam-bangin’ home again.
This excerpt comes from my favorite poet, Rudyard Kipling, from my favorite poem, “McAndrew’s Hymn.” Speaking through the old Scottish marine engineer, Kipling marvels at the greatest technolog-ical accomplishment of his day (1894), the coal-fired steamship, and honors those who designed and built and ran them. I briefly men-tioned this poem in my April 2012 column (“Poetry of the Geeks”, msdn.com/magazine/hh882456), but I will now dive deeply into it with you. I encourage you to read the whole thing, online at bit.ly/29eDxvf.
While much has changed since Kipling’s time, I find that many of his observations on engineering and innovation resonate with me today. For example, consider how fast our hardware improves. Kipling noticed this 100 years ago, long before some plagiarist stuck Moore’s name on the idea and called it a law. I hear McAndrew as I contemplate the original 4.77 MHz IBM PC (with two floppy drives and 256KB of memory) that I use as a planter:
[I] started as a boiler-whelp when steam and [I] were low. I mind the time we used to serve a broken pipe wi’ tow. Ten pound was all the pressure then - Eh! Eh! - a man wad drive; An’ here, our workin’ gauges give one hunder’ fifty-five!
Kipling writes of the difficulties of integrating disparate components into a working whole, and the beauty of the final accomplishment:
Lord, send a man like Robbie Burns to sing the Song o’ Steam! To match wi’ Scotia’s noblest speech yon orchestra sublime Whaurto-uplifted like the Just—the tail-rods mark the time. The Crank-throws give the double-bass; the feed-pump sobs an’ heaves:
An’ now the main eccentrics start their quarrel on the sheaves. Her time, her own appointed time, the rocking link-head bides, Till-hear that note?—the rod’s return whings glimmerin’ through the guides.
McAndrew had the same problem finding good helpers that we have today. Think about his words the next time you hire IT grunts:
Below there! Oiler! What’s your wark? Ye find her runnin’ hard? Ye needn’t swill the cap wi’ oil—this isn’t the Cunard. Ye thought? Ye are not paid to think. Go, sweat that off again! Tck! Tck! It’s deeficult to sweer nor tak’ The Name in vain!
As I’ve written many times, we software geeks hold much more responsibility than we did a decade or two ago. A player losing his high score in Solitaire wasn’t so bad, but it’s a whole lot worse if he loses his prescription records, and way, way worse if his medical records get mixed in with someone else’s. It’s not the users’s job to keep his programs secure and working, it’s ours. We’re just start-ing to get this through our heads, but McAndrew knew. He says of his passengers:
Maybe they steam from grace to wrath - to sin by folly led - It isna mine to judge their path - their lives are on my head. Mine at the last - when all is done it all comes back to me, The fault that leaves six thousand ton a log upon the sea.
Above all, we geeks feel the thrill of creating in our own image, which nothing else can ever match. McAndrew felt that too, as he says to God:
Uplift am I? When first in store the new-made beasties stood, Were Ye cast down that breathed the Word declarin’ all things good?
That’s why we entered this crazy profession, and that’s why we stay. Read what Kipling wrote about McAndrew 100 years ago. For “first-class passengers,” put in your own trochaic description of an idiot—perhaps “bone-head manager.” For “horse-power,” substitute “megaflops” or whatever your performance metric is. And tell me this isn’t how you feel when your system goes live:
Oh for a man to weld it then, in one trip-hammer strain, Till even first-class passengers could tell the meanin’ plain! But no one cares except mysel’ that serve an’ understand My seven thousand horse-power here. Eh, Lord! They’re grand, they’re grand! n
DaviD S. Platt teaches programming .NET at Harvard University Extension School and at companies all over the world. He’s the author of 11 programming books, including “Why Software Sucks” (Addison-Wesley Professional, 2006) and “Introducing Microsoft .NET” (Microsoft Press, 2002). Microsoft named him a Software Legend in 2002. He wonders whether he should tape down two of his daughter’s fingers so she learns how to count in octal. You can contact him at rollthunder.com.
Sing a Song of Silicon
Don’t Get Me StarteD DAVID S. PLATT
Speaking through the old Scottish marine engineer, Kipling marvels
at the greatest technological accomplishment of his day (1894),
the coal-fired steamship, and honors those who designed and
built and ran them.
0816msdn_PlattDGMS_v1_80.indd 80 7/12/16 12:22 PM
SYNCFUSION
DASHBOARDPLATFORMBUSINESS DASHBOARDS SIMPLIFIED
Untitled-4 1 5/3/16 1:04 PM
Using Aspose.Words for .NET to Convert Word Docs to HTML - Case Study
Adding File Conversion and Manipulation to Business Systems
DOC, XLS, JPG, PNG, PDF, BMP, MSG, PPT, VSD, XPS & many other formats.
Native APIs for.NET, Java & Cloud
File Format APIs
www.aspose.com
US Sales: +1 903 306 [email protected]
EU Sales: +44 141 628 8900 AU Sales: +61 2 8006 6987
Powerful File APIs that are easy and intuitive to use
Aspose.Total
Aspose.Words
Aspose.Cells Aspose.BarCode
Aspose.Imaging
Aspose.Tasks
Aspose.Pdf Aspose.Email
Aspose.Slides
DOC, RTF, PDF, HTML, PNG ePub, XML, XPS, JPG...
XLS, CSV, PDF, SVG, HTML, PNG BMP, XPS, JPG, SpreadsheetML...
JPG, PNG, BMP, GIF, TIFF, WMFICON...
XML, MPP, SVG, PDF, TIFFPNG...
PDF, BMP, JPG, GIF, TIFFPNG...
PDF, XML, XSL-FO, HTML, BMPJPG, PNG, ePub...
MSG, EML, PST, MHT, OSTOFT...
PPT, POT, ODP, XPSHTML, PNG, PDF...
and many more!
Every Aspose API combined in one powerful suite.
Contact Us:US: +1 903 306 1676EU: +44 141 628 8900AU: +61 2 8006 [email protected]
File Format APIs
Your File Format APIs
Every Aspose API combined in one powerful suite.
Working with Files?Try Aspose File APIs
Over 15,000 Happy Customers
ConvertPrintCreateCombineModify
fi les from your applications!
.NET Java Cloud
Get your FREE evaluation copy at www.aspose.com

www.aspose.com
EU: +44 141 628 8900 US: +1 903 306 [email protected]
Oceania: +61 2 8006 6987
Pricing Info
Standard Enhanced Standard EnhancedDeveloper Small Business $999 $1498 Site Small Business $4995 $7490Developer OEM $2997 $4494 Site OEM $13986 $20972
The pricing info above is for .NET: prices for other platforms may diff er. For the latest, contact sales.
Aspose.CellsWork with spreadsheets and data without depending on Microsoft Excel• Solution for spreadsheet creation, manipulation and conversion.• Import and export data.
ASPOSE.CELLS IS A PROGRAMMING API that allows developers to create, manipulate and convert Microsoft Excel spreadsheet fi les from within their own applications. Its powerful features make it easy to convert worksheets and charts to graphics or save reports to PDF.
Aspose.Cells speeds up working with Microsoft Excel fi les. The API is a fl exible tool for simple tasks such as fi le conversion, as well as complex tasks like building models. Developers control page layout, formatting, charts and formulas. They can read and write spreadsheet fi les and save out to a wide variety of image and text fi le formats.
Fast, scalable, and reliable, Aspose.Cells saves time and eff ort compared to using Microsoft Offi ce
Automation.
Common Uses• Building dynamic reports on
the fl y.• Creating Excel dashboards with
charts and pivot tables.• Rendering and printing
spreadsheets and graphics with high fi delity.
• Exporting data to, or importing from, Excel and other spreadsheets.
• Generating, manipulating and editing spreadsheets.
• Converting spreadsheets to images or other fi le formats.
Key Features• A complete spreadsheet
manipulation solution.• Flexible data visualization and
reporting.• Powerful formula engine.• Complete formatting control.
Supported File Formats
XLS, XLSX, XLSM, XMPS, XLTX, XLTM, ODS, XPS, SpreadsheetML, tab delim., CSV, TXT, PDF, HTML, and many image formats including SVG, TIFF, JPEG, PNG and GIF.
Format support varies across platforms.
Platforms
Aspose.Cells lets developers work with data sources, formatting, even formulas.
A fl exible API for simple and complex spreadsheet programming.
pg 4
www.aspose.com
EU: +44 141 628 8900 US: +1 903 306 [email protected]
Oceania: +61 2 8006 6987
Aspose.Cells for.NET, Java, Cloud & more
File FormatsXLS, CSV, ODS, PDF, SVG, HTML, PNG, BMP, XPS, JPGSpreadsheetML and many others.
Spreadsheet ManipulationAspose.Cells lets you create, import, and export spreadsheets and also allows you to manipulate contents, cell formatting, and fi le protection.
Creating ChartsAspose.Cells comes with complete support for charting and supports all standard chart types. Also, you can convert charts to images.
Graphics CapabilitiesEasily convert worksheets to images as well as adding images to worksheets at runtime.
Get your FREE Trial athtt p://www.aspose.com
100% Standalone
Aspose.Cells does not require Microsoft Offi ce to be installed on the machine in order to work.
File Format APIs
www.aspose.com
EU: +44 141 628 8900 US: +1 903 306 [email protected]
Oceania: +61 2 8006 6987
Pricing Info
Standard Enhanced Standard EnhancedDeveloper Small Business $999 $1498 Site Small Business $4995 $7490Developer OEM $2997 $4494 Site OEM $13986 $20972
The pricing info above is for .NET: prices for other platforms may differ. For the latest, contact sales.
Aspose.WordsProgram with word processing documents independently of Microsoft Word• Solution for document creation, manipulation and conversion.• Advanced mail merge functionality.ASPOSE.WORDS IS AN ADVANCED PROGRAMMING API that lets developers perform a wide range of document processing tasks with their own applications. Aspose.Words makes it possible to generate, modify, convert, render and print documents without Microsoft Word. It provides sophisticated and flexible access to, and control over, Microsoft Word files.
Aspose.Words is powerful, user-friendly and feature rich. It saves developers time and effort compared to using Microsoft Office Automation and makes gives them powerful document management tools.
Aspose.Words makes creating, changing and converting DOC and other word processing file formats fast and easy.
Common Uses• Generating reports with
complex mail merging; mail merging images.
• Populating tables and documents with data from a database.
• Inserting formatted text, paragraphs, tables and images into Microsoft Word documents.
• Adding barcodes to documents.
• Inserting diagrams and watermarks into Word documents.
• Formatting date and numeric fields.
Key Features• A complete Microsoft Word
document manipulation solution.
• Extensive mail merge features.• Complete formatting control.• High-fidelity conversion,
rendering and printing.
Supported File Formats
DOC, DOCX, ODT, OOXML, XML, HTML, XHTML, MHTML, EPUB, PDF, XPS, RTF, and a number of image formats, including TIFF, JPEG, PNG and GIF.
Format support varies across platforms.
Aspose.Words has sophisticated controls for formatting and managing tables and other content.
Platforms
Generate, modify, convert, render and print documents without Microsoft Word.
www.aspose.com
EU: +44 141 628 8900 US: +1 903 306 [email protected]
Oceania: +61 2 8006 6987
pg 6
www.aspose.com
EU: +44 141 628 8900 US: +1 903 306 [email protected]
Oceania: +61 2 8006 6987
www.aspose.com
EU: +44 141 628 8900 US: +1 903 306 [email protected]
Oceania: +61 2 8006 6987
Case Study: Aspose.Words for .NETProHire Staffi ng - Using Aspose.Words for .NET to convert Word Docs to HTML
The converted HTML resume version needed to look close to the original.
PROHIRE IS THE WORKFORCE SOLUTIONS LEADER IN THE UNITED STATES AND SPECIALIZE IN THE RECRUITMENT OF SALES AND SALES MANGEMENT PROFESSIONALS. We were founded with the goal of becoming the premier provider of executive search and placement services to the Fortune 500 and Inc. 500 Companies.
Problem
ProHire uses Bullhorn ATS as its Application Tracking System to track the electronic handling of its recruitment needs. We wanted to integrate the Bullhorn API with our new website. Our goal was to convert MS Word Documents resumes into a clean and concise HTML format into our existing .Net Stack. The converted HTML resume version needed to look close to the original.
Looking for a Solution
We chose the ASPOSE.Words product because it easily integrated into our existing .Net stack, and provided a quality MS Word to HTML conversion. The product was easy to download, and with a few lines of code we were up and running. We found the primary
diff erence between the Aspose.Words and other products was the obvious conversion quality from MS Word to HTML.
Finding a Solution
We had tested other products that converted Word to HTML. Every one we tested had some problem with the conversion. Some of them lost
elements of the resume during the conversion. Most of them changed the format of the resume or changed the color of the text unexpectedly. This is unacceptable when you are sending a resume to a hiring manger. We were very satisfi ed with the results. We did not need
any technical support because documentation was suffi cient to us.
Implementation
Once we had the Aspose DLL our developer was able to implement Aspose.Words for .NET in a few hours. The transitions with Aspose.Words for .NET was very painless to do.
Outcome
We are very pleased with the success of our Aspose.Words for .NET implementation. Aspose.Words is a very powerful development tool that is well documented and easy to install. The documentation is easy to understand and use. If you want a product to convert Word Docs to HTML look no further. ProHire is happy to recommend Aspose.
This is an extract from a case study on our website. For the full version, go to: www.aspose.com/corporate/customers/case-studies.aspx
“The transitions with Aspose.Words for .NET was very painless to do.”
pg 7
File Format APIs
Open, Create, Convert, Print & Save Files
from within your own applications.
ASPOSE.TOTALallows you to process these fi le formats:
DOC XLS PPT PDF EML PNG XML RTF HTML VSD BMP & barcode images.
• Word documents• Excel spreadsheets• PowerPoint presentations• PDF documents• Project documents• Visio documents• Outlook emails• OneNote documents
Contact Us:US: +1 903 306 1676EU: +44 141 628 8900AU: +61 2 8006 [email protected]
Helped over 11,000 companies and over 300,000 users work with documents in their applications.
.NET, Java, and Cloud
File Format APIs
GET STARTED NOW
• Free Trial• 30 Day Temp License• Free Support• Community Forums• Live Chat• Blogs • Examples • Video Demos
www.aspose.com
EU: +44 141 628 8900 US: +1 903 306 [email protected]
Oceania: +61 2 8006 6987
EXTRACTING DATA FROM A DATABASE AND DELIVERING IT TO THE SALES TEAM AS A REPORT, complete with charts and corporate branding, is fine. Until the sales team says that they want it as a Microsoft Excel file, and could you add a dashboard?
Using information from online forms in letters that can are printed and posted is easy. But what if you also want to add tracking barcodes and archive a digital copy as a PDF?
Ensuring that your business system supports all the different Microsoft Office file formats your users want can be difficult. Sometimes the native file format support of your system lets you down. When that is the case, use tools that extend that capability. A good tool can save you time and effort.
Document Conversion Options
Building your own solution: Time-consuming and costly, this option is only sensible if the solution you develop is central to your business.
Using Microsoft Office Automation: Microsoft Office
Automation lets you use Microsoft Office programs server-side. It is not how the Office products were designed to be used. It can work well but you might notice issues with the stability, security and
speed of the system, as well as cost.
Using an API: The API market has lots of free and commercial solutions, some very focused, some feature-rich. An API integrates with your code and gives you access to a range of new features.
Look to Aspose
Aspose are API experts. We create APIs, components and extensions that work independently of Microsoft Automation to extend a platform’s native file format manipulation capabilities.
Aspose have developed APIs for .NET, Java, Cloud and Android that lets developers convert, create and manipulate Microsoft Office files – Microsoft Word, Excel, PowerPoint, Visio and Project – and other popular business formats, from PDFs and images to emails. We also have APIs for working with images,
barcodes and OCR. The APIs are optimised for stability, speed and ease of use. Our APIs save users weeks, sometimes months, of effort.
Adding File Conversion and Manipulation to Business SystemsHow often do people in your organization complain that they can’t get information in the file format and layout they want? Converting documents from one format to another without losing layout and formatting should be simple, but it can be frustrating for both users and developers.
Aspose creates APIs that work independently of Microsoft Office Automation.
Finding the Right Tool
To find the product that’s right for you, take a systematic approach:
• List must-have and nice-to-have features.
• Research the market.• Ask for recommendations.• Select a few candidates .• Run trials.• Evaluate
• ease of use,• support and
documentation,• performance, and• current and future
needs.
www.aspose.com
EU: +44 141 628 8900 US: +1 903 306 [email protected]
Oceania: +61 2 8006 6987
pg 10
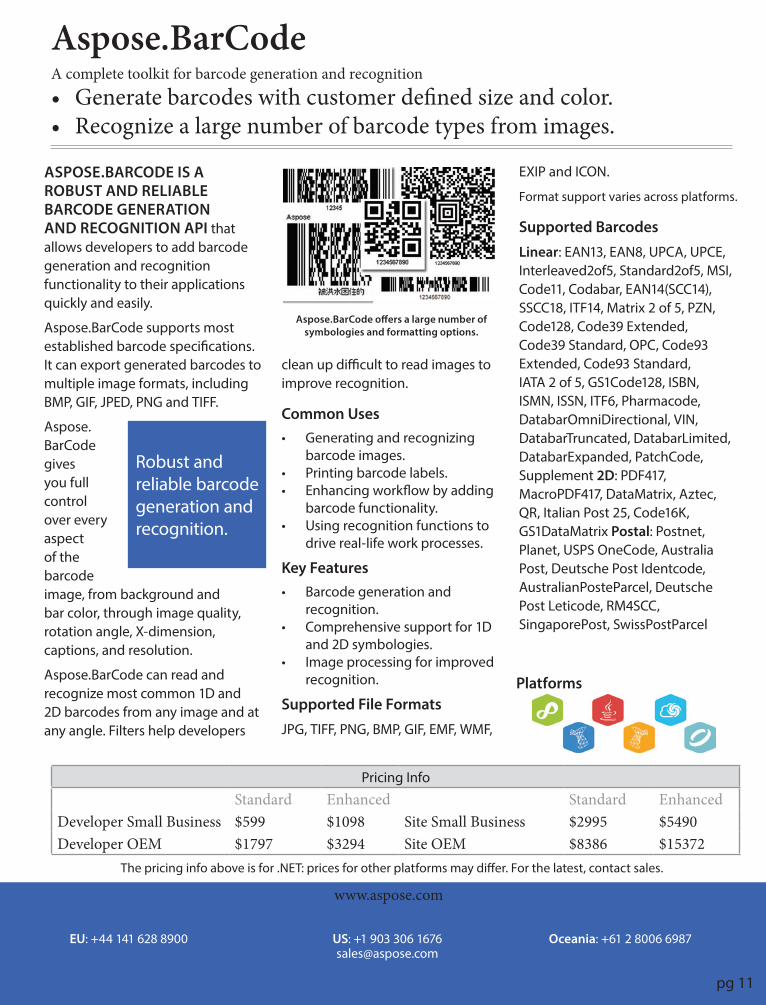
Pricing Info
Standard Enhanced Standard EnhancedDeveloper Small Business $599 $1098 Site Small Business $2995 $5490Developer OEM $1797 $3294 Site OEM $8386 $15372
The pricing info above is for .NET: prices for other platforms may differ. For the latest, contact sales.
Aspose.BarCodeA complete toolkit for barcode generation and recognition• Generate barcodes with customer defined size and color.• Recognize a large number of barcode types from images.
ASPOSE.BARCODE IS A ROBUST AND RELIABLE BARCODE GENERATION AND RECOGNITION API that allows developers to add barcode generation and recognition functionality to their applications quickly and easily.
Aspose.BarCode supports most established barcode specifications. It can export generated barcodes to multiple image formats, including BMP, GIF, JPED, PNG and TIFF.
Aspose.BarCode gives you full control over every aspect of the barcode image, from background and bar color, through image quality, rotation angle, X-dimension, captions, and resolution.
Aspose.BarCode can read and recognize most common 1D and 2D barcodes from any image and at any angle. Filters help developers
clean up difficult to read images to improve recognition.
Common Uses• Generating and recognizing
barcode images.• Printing barcode labels.• Enhancing workflow by adding
barcode functionality.• Using recognition functions to
drive real-life work processes.
Key Features• Barcode generation and
recognition.• Comprehensive support for 1D
and 2D symbologies.• Image processing for improved
recognition.
Supported File Formats
JPG, TIFF, PNG, BMP, GIF, EMF, WMF,
EXIP and ICON.
Format support varies across platforms.
Supported Barcodes
Linear: EAN13, EAN8, UPCA, UPCE, Interleaved2of5, Standard2of5, MSI, Code11, Codabar, EAN14(SCC14), SSCC18, ITF14, Matrix 2 of 5, PZN, Code128, Code39 Extended, Code39 Standard, OPC, Code93 Extended, Code93 Standard, IATA 2 of 5, GS1Code128, ISBN, ISMN, ISSN, ITF6, Pharmacode, DatabarOmniDirectional, VIN, DatabarTruncated, DatabarLimited, DatabarExpanded, PatchCode, Supplement 2D: PDF417, MacroPDF417, DataMatrix, Aztec, QR, Italian Post 25, Code16K, GS1DataMatrix Postal: Postnet, Planet, USPS OneCode, Australia Post, Deutsche Post Identcode, AustralianPosteParcel, Deutsche Post Leticode, RM4SCC, SingaporePost, SwissPostParcel
Aspose.BarCode offers a large number of symbologies and formatting options.
Platforms
Robust and reliable barcode generation and recognition.
www.aspose.com
EU: +44 141 628 8900 US: +1 903 306 [email protected]
Oceania: +61 2 8006 6987
www.aspose.com
EU: +44 141 628 8900 US: +1 903 306 [email protected]
Oceania: +61 2 8006 6987
pg 11
www.aspose.com
EU: +44 141 628 8900 US: +1 903 306 [email protected]
Oceania: +61 2 8006 6987
Aspose for Cloud
The easiest API toCreate, Convert & Automate Documents in the cloud.
ConvertCreateRenderCombineModify
without installing anything!
+1 903 306 [email protected]
+44 141 628 8900 +61 2 8006 6987• • •
Free Evaluation at www.aspose.com
Aspose.Wordsfor Cloud
Create and convert docsManipulate textRender documentsAnnotate
Aspose.Cellsfor Cloud
Create spreadsheetsConvert spreadsheetsManipulate cells and formulasRender spreadsheets
Aspose.Slidesfor Cloud
Create presentationsManage slidesEdit text and imagesRead and convert
Aspose.Pdffor Cloud
Create and convert PDFsManipulate text, imagesAdd pages, split, encryptManage stamps
Aspose.Emailfor Cloud
Create, update, andconvert messagesExtract attachmentsUse with any language
Aspose.BarCodefor Cloud
Generate barcodesRead barcodesSet attributesMultiple image formats

www.aspose.com
EU: +44 141 628 8900 US: +1 903 306 [email protected]
Oceania: +61 2 8006 6987
Pricing Info
Standard Enhanced Standard EnhancedDeveloper Small Business $599 $1098 Site Small Business $2995 $5490Developer OEM $1797 $3294 Site OEM $8386 $15372
The pricing info above is for .NET: prices for other platforms may differ. For the latest, contact sales.
ASPOSE.EMAIL IS AN EMAIL PROGRAMMING API that allows developers to access and work with PST, EML, MSG and MHT files. It also offers an advanced API for interacting with enterprise mail systems like Exchange and Gmail.
Aspose.Email can work with HTML and plain text emails, attachments and embedded OLE objects. It allows developers to work against SMTP, POP, FTP and Microsoft Exchange servers. It supports mail merge and iCalendar features, customized header and body, searching archives and has many other useful features.
Aspose.Email allows developers to focus on managing email without getting into the core of email and network programming. It gives you the controls you need.
Common Uses• Sending email with HTML formatting and attachments.
• Mail merging and sending mass mail.
• Connecting to POP3 and IMAP mail servers to list and download messages.
• Connecting to Microsoft Exchange Servers to list, download and send messages.
• Create and update tasks using iCalendar.
• Load from and save messages to file or stream (EML, MSG or MHT formats).
Key Features• A complete email processing
solution.• Support for MSG and PST
formats.• Microsoft Exchange Server
support.• Complete recurrence pattern
solution.
Supported File Formats
MSG, MHT, OST, PST, EMLX, TNEF, and EML.
Format support varies across platforms.
Aspose.EmailWork with emails and calendars without Microsoft Outlook• Complete email processing solution.• Message file format support.
Aspose.Email lets your applications work with emails, attachments, notes and calendars.
Platforms
Aspose.Email works with HTML and plain text emails, attachments and embedded OLE objects.
pg 13

www.aspose.com
EU: +44 141 628 8900 US: +1 903 306 [email protected]
Oceania: +61 2 8006 6987
Pricing Info
Standard Enhanced Standard EnhancedDeveloper Small Business $799 $1298 Site Small Business $3995 $6490Developer OEM $2397 $3894 Site OEM $11186 $18172
The pricing info above is for .NET: prices for other platforms may diff er. For the latest, contact sales.
ASPOSE.PDF IS A PDF DOCUMENT CREATION AND MANIPULATION API that developers use to read, write and manipulate PDF documents without using Adobe Acrobat. Aspose.Pdf is a sophisticated product that integrates with your application to add PDF capabilities.
Aspose.Pdf off ers a wealth of features that lets developers compress fi les, create tables, work with links, add and remove security, handle custom fonts, integrate with external data sources, manage bookmarks, create table of contents, create forms and manage form fi elds.
It helps developers add, work with attachments, annotations and PDF form data, add, replace or remove text and images, split, concatenate,
extract or inset pages, and print PDF documents.
Common Uses• Creating and editing PDF fi les.• Inserting, extracting,
appending, concatenating and splitting PDFs.
• Working with text, images, tables, images, headers, and footers.
• Applying security, passwords and signatures.
• Working with forms and form fi elds.
Key Features• PDF creation from XML or XSL-
FO documents.• PDF form and fi eld support.• Advanced security and
encryption.• High-fi delity printing and
conversion.• Supported File Formats• PDF, PDF/A, PDF/A_1b, PCL, XLS-
FO, LaTeX, HTML, XPS, TXT and a range of image formats.
Format support varies across platforms.
Aspose.PdfCreate PDF documents without using Adobe Acrobat• A complete solution for programming with PDF fi les.• Work with PDF forms and form fi elds.
Aspose.Pdf can be used to automatically complete PDF forms with external data.
Read, write and manipulate PDF documents independently of Adobe Acrobat.
Platforms
pg 14
www.aspose.com
EU: +44 141 628 8900 US: +1 903 306 [email protected]
Oceania: +61 2 8006 6987
Aspose.Pdf.Net, Java & Cloud
File FormatsPDF DOC XML XSL-FO XPS HTML BMP JPG PNG ePUB & other image file formats.
Create and Manipulate PDFsCreate new or edit/manipualte existing PDFs.
Form Field FeaturesAdd form fields to your PDFs. Import and export form fields data from select file formats.
Table FeaturesAdd tables to your PDFs with formatting such as table border style, margin and padding info, column width and spanning options, and more.
Get started today at www.aspose.com
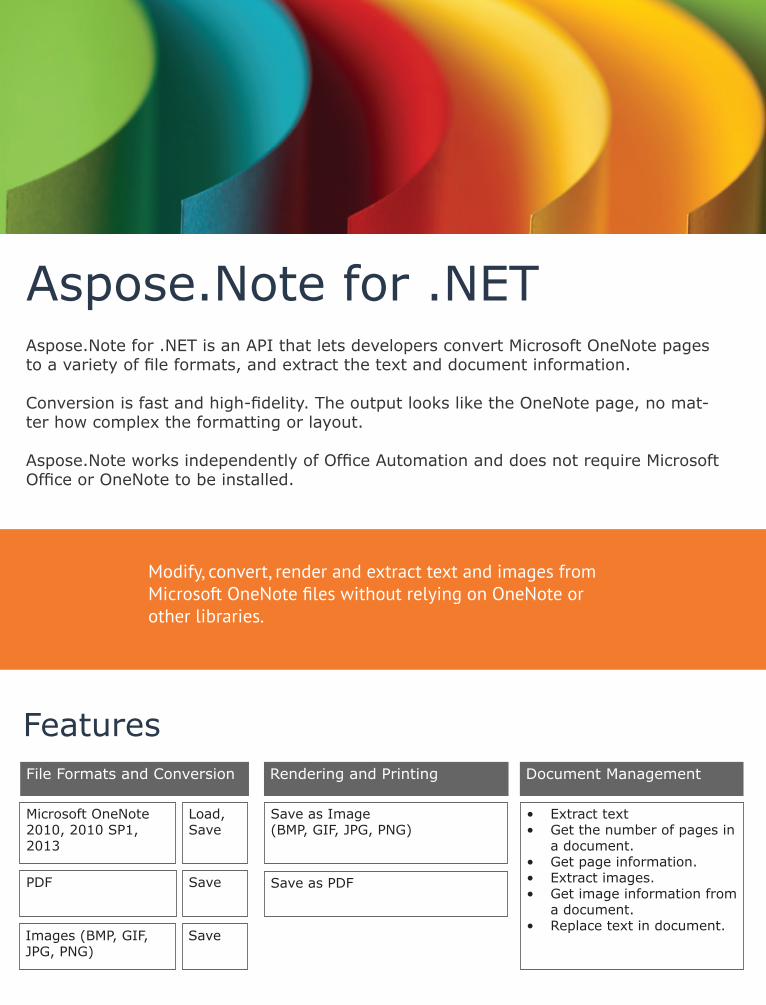
www.aspose.com
EU: +44 141 628 8900 US: +1 903 306 [email protected]
Oceania: +61 2 8006 6987
Aspose.Note for .NETAspose.Note for .NET is an API that lets developers convert Microsoft OneNote pages to a variety of file formats, and extract the text and document information.
Conversion is fast and high-fidelity. The output looks like the OneNote page, no mat-ter how complex the formatting or layout.
Aspose.Note works independently of Office Automation and does not require Microsoft Office or OneNote to be installed.
File Formats and Conversion
Microsoft OneNote 2010, 2010 SP1, 2013
Load, Save
PDF Save
Images (BMP, GIF, JPG, PNG)
Save
Rendering and Printing
Save as Image(BMP, GIF, JPG, PNG)
Save as PDF
Document Management
• Extract text• Get the number of pages in
a document.• Get page information.• Extract images.• Get image information from
a document.• Replace text in document.
Modify, convert, render and extract text and images from Microsoft OneNote files without relying on OneNote or other libraries.
Features
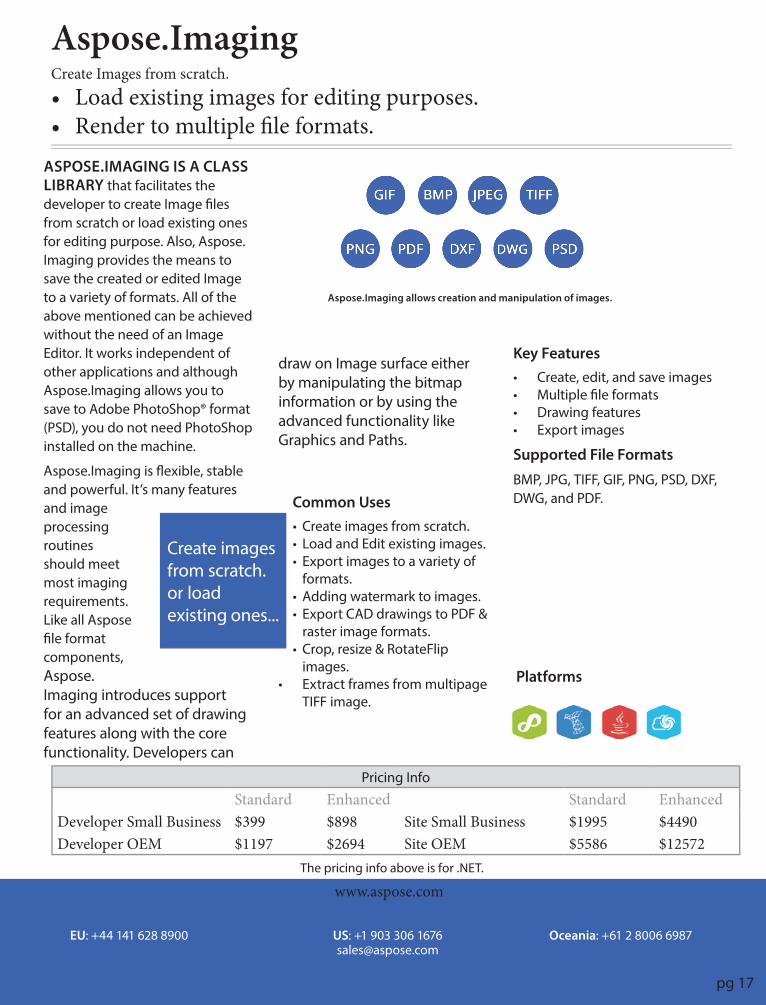
www.aspose.com
EU: +44 141 628 8900 US: +1 903 306 [email protected]
Oceania: +61 2 8006 6987
Pricing Info
Standard Enhanced Standard EnhancedDeveloper Small Business $399 $898 Site Small Business $1995 $4490Developer OEM $1197 $2694 Site OEM $5586 $12572
The pricing info above is for .NET.
Aspose.ImagingCreate Images from scratch.• Load existing images for editing purposes.• Render to multiple fi le formats.
ASPOSE.IMAGING IS A CLASS LIBRARY that facilitates the developer to create Image fi les from scratch or load existing ones for editing purpose. Also, Aspose.Imaging provides the means to save the created or edited Image to a variety of formats. All of the above mentioned can be achieved without the need of an Image Editor. It works independent of other applications and although Aspose.Imaging allows you to save to Adobe PhotoShop® format (PSD), you do not need PhotoShop installed on the machine.
Aspose.Imaging is fl exible, stable and powerful. It’s many features and image processing routines should meet most imaging requirements. Like all Aspose fi le format components, Aspose.Imaging introduces support for an advanced set of drawing features along with the core functionality. Developers can
draw on Image surface either by manipulating the bitmap information or by using the advanced functionality like Graphics and Paths.
Common Uses• Create images from scratch.• Load and Edit existing images.• Export images to a variety of
formats.• Adding watermark to images.• Export CAD drawings to PDF &
raster image formats.• Crop, resize & RotateFlip
images.• Extract frames from multipage
TIFF image.
Key Features• Create, edit, and save images• Multiple fi le formats• Drawing features• Export images
Supported File Formats
BMP, JPG, TIFF, GIF, PNG, PSD, DXF, DWG, and PDF.
Aspose.Imaging allows creation and manipulation of images.
Platforms
Create images from scratch. or load existing ones...
pg 17
www.aspose.com
EU: +44 141 628 8900 US: +1 903 306 [email protected]
Oceania: +61 2 8006 6987
www.aspose.com
EU: +44 141 628 8900 US: +1 903 306 [email protected]
Oceania: +61 2 8006 6987
Pricing Info
Standard Enhanced Standard EnhancedDeveloper Small Business $799 $1298 Site Small Business $3995 $6490Developer OEM $2397 $3894 Site OEM $11186 $18172
The pricing info above is for .NET: prices for other platforms may differ. For the latest, contact sales.
Aspose.SlidesWork with presentations without using Microsoft PowerPoint• Complete solution for working with presentation files.• Export presentations and slides to portable or image formats.
ASPOSE.SLIDES IS A FLEXIBLE PRESENTATION MANAGEMENT API that helps developers read, write and manipulate Microsoft PowerPoint documents. Slides and presentations can be saved to PDF, HTML and image file formats without Microsoft PowerPoint.
Aspose.Slides offers a number of advanced features that make it easy to perform tasks such as rendering slides, exporting
presentations, exporting slides to SVG and printing. Developers use Aspose.Slides to build customizable slide decks, add or remove standard graphics and automatically publish presentations to other formats.
Aspose.Slides gives developers the tools they need to work with presentation files. It integrates quickly and saves time and money.
Common Uses• Creating new slides and cloning
existing slides from templates.• Handling text and shape
formatting.• Applying and removing
protection.• Exporting presentations to
images and PDF.• Embedding Excel charts as OLE
objects.• Generate presentations from
database.
Key Features• A complete presentation
development solution.• Control over text, formatting
and slide elements.• OLE integration for embedding
external content.• Wide support for input and
output file formats.
Supported File Formats
PPT, HTML, POT, PPS, PPTX, POTX, PPSX, ODP, PresentationML, XPS, PDF and image formats including TIFF and JPG.
Format support varies across platforms.
Aspose.Slides has advanced features for working with every aspect of a presentation.
Platforms
Aspose.Slides gives you the tools you need to work with presentation files.
pg 18

www.aspose.com
EU: +44 141 628 8900 US: +1 903 306 [email protected]
Oceania: +61 2 8006 6987
www.aspose.com
EU: +44 141 628 8900 US: +1 903 306 [email protected]
Oceania: +61 2 8006 6987
To see the Priority and Enterprise support rates, refer to the product price list, or contact our sales team.
Sponsored Support is unique so pricing is specifi c to each project. Please contact our sales team to discuss.
Pricing Info
Support ServicesGet the assistance you need, when you need it, from the people who know our products best.• Free support for all, even when evaluating• Get the level of support that suits you and your team
NO ONE KNOWS OUR PRODUCTS AS WELL AS WE DO. We develop them, support them and use them. Our support is handled through our support forums and is available to all Aspose users.
Support
We are developers ourselves and understand how frustrating it is when a technical issue or a quirk in the software stops you from doing what you need to do. This is why we off er free support. Anyone who uses our product, whether they have bought them or are using an evaluation, deserves our full attention and respect. We have four levels of support that can fi t your needs.
Support Options
Free
Everyone who uses Aspose products have access to our free support. Our software developers are on stand-by to help you succeed with your project, from the evaluation to roll-out of your solution.
Priority
If you want to know when you’ll hear back from us on an issue and know that your issue is prioritized, Priority Support is for you. It provides a more formal support structure and has its own forum that is monitored by our software engineers.
Enterprise
Enterprise customers often have very specifi c needs. Our Enterprise Support option gives them access to the product development team and infl uence over the roadmap. Enterprise Support customers have their own, dedicated issue tracking system.
Sponsored
Available to Enterprise customers that would like to request features, this higher prioritized support can ensure your needed features are on our roadmap. A member of our team will produce a feature specifi cation document to capture your requirements and how we intend to fulfi ll them so the direction development will take is clear up-front.
Work with the developers that developed and continue to maintain our products.
Everyone who uses Aspose products have access to our free support.
pg 19
We’re Here to Help You
Aspose has 4 Support Services to best suit your needs
Free Support
Priority Support
Enterprise Support
Sponsored Support
Support Forums with no Charge
24 hour response time in the week, issue escalation, dedicated forum
Communicate with productmanagers, infl uence the roadmap
Get the feature you need built now
Technical Support is an issue that Aspose takes very seriously. Software must work quickly and depend-ably. When problems arise, developers need answers in a hurry. We ensure that our clients receive useful answers and solutions quickly.
Email • Live Chat • Forums
Contact UsUS Sales: +1 903 306 [email protected] Sales: +44 141 628 8900
AU Sales: +61 2 8006 6987
File Format APIs