Practical Web Penetration Testing - Open Directory Data Archive
Upload
khangminh22Category
view
0download
0


LINUXCOOKBOOK™

Other Linux resources from O’Reilly
Related titles Linux Device Drivers
Linux in a Nutshell
Running Linux
Building Embedded LinuxSystems
Linux Security Cookbook
Exploring the JDS LinuxDesktop
Learning Red Hat EnterpriseLinux and Fedora
Linux Pocket Guide
Understanding the LinuxKernel
Linux BooksResource Center
linux.oreilly.com is a complete catalog of O’Reilly’s books onLinux and Unix and related technologies, including samplechapters and code examples.
ONLamp.com is the premier site for the open source web plat-form: Linux, Apache, MySQL, and either Perl, Python, or PHP.
Conferences O’Reilly brings diverse innovators together to nurture the ideasthat spark revolutionary industries. We specialize in document-ing the latest tools and systems, translating the innovator’sknowledge into useful skills for those in the trenches. Visitconferences.oreilly.com for our upcoming events.
Safari Bookshelf (safari.oreilly.com) is the premier online refer-ence library for programmers and IT professionals. Conductsearches across more than 1,000 books. Subscribers can zero inon answers to time-critical questions in a matter of seconds.Read the books on your Bookshelf from cover to cover or sim-ply flip to the page you need. Try it today with a free trial.

LINUXCOOKBOOK
Carla Schroder
Beijing • Cambridge • Farnham • Köln • Paris • Sebastopol • Taipei • Tokyo
™
Linux Cookbook™
by Carla Schroder
Copyright © 2005 O’Reilly Media, Inc. All rights reserved.Printed in the United States of America.
Published by O’Reilly Media, Inc., 1005 Gravenstein Highway North, Sebastopol, CA 95472.
O’Reilly books may be purchased for educational, business, or sales promotional use. Online editionsare also available for most titles (safari.oreilly.com). For more information, contact our corporate/insti-tutional sales department: (800) 998-9938 or [email protected].
Editor: Mike Loukides
Production Editor: Colleen Gorman
Cover Designer: Emma Colby
Interior Designer: David Futato
Printing History:
December 2004: First Edition.
Nutshell Handbook, the Nutshell Handbook logo, and the O’Reilly logo are registered trademarks ofO’Reilly Media, Inc. The Linux series designations, Linux Cookbook, images of the American West, andrelated trade dress are trademarks of O’Reilly Media, Inc.
Many of the designations used by manufacturers and sellers to distinguish their products are claimed astrademarks. Where those designations appear in this book, and O’Reilly Media, Inc. was aware of atrademark claim, the designations have been printed in caps or initial caps.
While every precaution has been taken in the preparation of this book, the publisher and author assumeno responsibility for errors or omissions, or for damages resulting from the use of the informationcontained herein.
This book uses RepKover™, a durable and flexible lay-flat binding.
ISBN: 0-596-00640-3
[M] [5/05]

To Dawn Marie.
During the writing of this book, she tilled the
fields, trained the horses, cooked the meals,
cleaned the ditches, and graciously fended off
generous neighbors bearing large zucchinis.
No author could ask for more. Thank you
for 14 great years; may we have many more.


vii
Table of Contents
Preface . . . . . . . . . . . . . . . . . . . . . . . . . . . . . . . . . . . . . . . . . . . . . . . . . . . . . . . . . . . . . . . . xix
1. Finding Documentation . . . . . . . . . . . . . . . . . . . . . . . . . . . . . . . . . . . . . . . . . . . . . 11.1 Introduction 11.2 Understanding man Pages 21.3 Finding Appropriate man Pages 41.4 Finding Lost man Pages 51.5 Reading man Pages Without a man Viewer 61.6 Configuring Your manpath 71.7 Using info Pages 81.8 Printing man Pages 91.9 Printing info Pages 10
1.10 Printing Selected man or info Pages 111.11 Finding All of the Documentation for a Program 11
2. Installing and Managing Software on RPM-Based Systems . . . . . . . . . . . . . . 142.1 Introduction 142.2 Installing RPMs 152.3 Upgrading RPMs 162.4 Removing RPMs 172.5 Collecting Information on Installed RPMs 182.6 Collecting Information from RPMs That Are Not Installed 202.7 Finding Recently Installed RPMs 212.8 Rebuilding the RPM Database 212.9 Tracking Source-Built Libraries on an RPM-Based System 22
2.10 Fixing RPM Installation Problems 242.11 Installing Source RPMs 252.12 Customizing Build Options in a Source RPM 26

viii | Table of Contents
2.13 Installing Yum 282.14 Configuring Yum 292.15 Installing and Upgrading Packages with Yum 302.16 Removing Packages with Yum 312.17 Getting Information on Installed Packages with Yum 312.18 Maintaining Yum 32
3. Installing and Managing Software on Debian-Based Systems . . . . . . . . . . . 343.1 Introduction 343.2 Getting Software for a Debian System 353.3 Installing Debian Packages from CD-ROM 373.4 Installing Packages on Debian-Based Systems 383.5 Removing Packages from a Debian System 393.6 Installing from Sources on a Debian System 403.7 Upgrading Packages on Debian 413.8 Upgrading a Debian System 413.9 Upgrading to a Newer Debian Release 42
3.10 Running a Mixed Debian System 433.11 Finding Out What Is Installed on a Debian System 443.12 Maintaining the Debian Package Cache 463.13 Resolving Debian Dependency Conflicts 473.14 Building a Local Debian Repository 493.15 Selecting Package Mirrors for apt-proxy.conf 503.16 Adding Your Existing Package Cache to apt-proxy.conf 51
4. Installing Programs from Source Code . . . . . . . . . . . . . . . . . . . . . . . . . . . . . . . . 524.1 Introduction 524.2 Preparing Your System for Compiling Programs from Sources 524.3 Generating a List of Files from a Source Install for Easy Uninstalls 544.4 Installing Programs from Source Code 554.5 Using CheckInstall to Create Packages from Sources 56
5. Discovering Hardware from Outside the Box . . . . . . . . . . . . . . . . . . . . . . . . . . 585.1 Introduction 585.2 Detecting Hardware with lspci 595.3 Using dmesg to Collect Hardware Information 605.4 Getting Live Hardware Snapshots with /proc 625.5 Viewing Drive Partitions with fdisk 655.6 Calculating Hard Drive Capacity 66

Table of Contents | ix
6. Editing Text Files with JOE and Vim . . . . . . . . . . . . . . . . . . . . . . . . . . . . . . . . . . 686.1 Introduction 686.2 Finding JOE Commands 706.3 Customizing JOE 716.4 Organizing JOE’s Preferences in a Separate File 726.5 Copying Between Two Files in JOE 736.6 Searching and Replacing in JOE 746.7 Selecting Text Vertically in JOE 756.8 Finding and Opening Files in JOE 766.9 Learning Vim Quickly 77
6.10 Creating Autotext with Vim’s Abbreviations 796.11 Mapping Commands to Keystrokes 796.12 Customizing Vim 816.13 Navigating Quickly in Vim with Marks 836.14 Picking Up Where You Left Off: Using Vim’s Sessions 846.15 Setting Your Default Editor 866.16 Discovering Vim’s Compile-Time Options 87
7. Starting and Stopping Linux . . . . . . . . . . . . . . . . . . . . . . . . . . . . . . . . . . . . . . . . 897.1 Introduction 897.2 Changing Runlevels After Bootup 917.3 Changing the Default Runlevel 937.4 Starting and Stopping X 947.5 Managing Debian’s Runlevels 947.6 Creating Both Text and Graphical Login Runlevels on Debian 957.7 Managing Red Hat’s Runlevels 977.8 Manually Configuring Startup Services 987.9 Manually Starting and Stopping Services 99
7.10 Shutting Down or Rebooting Linux 1007.11 Disabling or Limiting Access to Ctrl-Alt-Delete 1017.12 Shutting Down Automatically 102
8. Managing Users and Groups . . . . . . . . . . . . . . . . . . . . . . . . . . . . . . . . . . . . . . . 1038.1 Introduction 1038.2 Sorting Human Users from System Users 1048.3 Finding a User’s UID and GID 1058.4 Adding Users with useradd 1068.5 Adding Users with adduser 1078.6 Modifying User Accounts 109

x | Table of Contents
8.7 Deleting a User 1108.8 Killing User Processes the Easy, Fun Way 1118.9 Disabling Accounts 112
8.10 Managing Passwords 1138.11 Adding Groups with groupadd 1148.12 Deleting Groups with groupdel 1148.13 Creating a System User 1158.14 Creating System Groups with addgroup 1168.15 Adding and Deleting Group Members 1168.16 Checking Password File Integrity 1178.17 Adding New Users in Batches 1188.18 Changing Masses of Passwords 1248.19 Adding Batches of Users to Groups 1258.20 Using su to Be Root Temporarily 1268.21 Granting Limited Rootly Powers with sudo 1278.22 Using Disk Quotas 129
9. Managing Files and Partitions . . . . . . . . . . . . . . . . . . . . . . . . . . . . . . . . . . . . . . 1329.1 Introduction 1329.2 Setting File and Directory Permissions with chmod’s
Numeric Notation 1389.3 Doing Batch Operations with chmod 1409.4 Setting File and Directory Permissions with chmod’s
Symbolic Notation 1409.5 Setting File Ownership with chown 1429.6 Doing Batch Operations with chown 1439.7 Setting Up a Shared Directory with setgid and the Sticky Bit 1449.8 Setting Permissions Defaults with umask 1459.9 Mounting and Unmounting Removable Disks 147
9.10 Configuring Filesystem Mounts with /etc/fstab 1489.11 Mounting and Unmounting Filesystems on Hard Drives 1519.12 Finding Device Names for mount and fstab 1529.13 Creating Files and Directories 1559.14 Deleting Files and Directories 1559.15 Copying, Moving, and Renaming Files and Directories 1579.16 Creating Linux Disk Partitions with fdisk 1589.17 Creating a Filesystem on a New Partition 159

Table of Contents | xi
10. Patching, Customizing, and Upgrading Kernels . . . . . . . . . . . . . . . . . . . . . . . 16110.1 Introduction 16110.2 Adding New Features to the 2.4 Kernel 16310.3 Slimming a Stock 2.4 Kernel 16710.4 Upgrading to the Latest Stable Version of the 2.4 Kernel 16910.5 Building the 2.6 Kernel 17010.6 Adding New Features to the 2.6 Kernel 17110.7 Adding a New Loadable Kernel Module 17210.8 Patching a Kernel 17310.9 Removing a Kernel Patch 175
10.10 Creating an initrd Image 17610.11 Creating a Boot Disk on Debian 17710.12 Creating a Boot Disk on Red Hat 177
11. CD and DVD Recording . . . . . . . . . . . . . . . . . . . . . . . . . . . . . . . . . . . . . . . . . . . . . 17911.1 Introduction 17911.2 Finding the SCSI Address for CD and DVD Writers 18211.3 Enabling SCSI Emulation for IDE/Atapi CD and DVD Writers 18311.4 Making a Data CD for General Distribution 18511.5 Building File Trees on a Data CD 18711.6 Copying a CD or DVD 18811.7 Erasing a CD-RW 19011.8 Recording a Multisession Data CD 19111.9 Creating a Bootable CD 192
11.10 Spanning a Large File over Several CDs 19311.11 Recording Data DVDs 19411.12 Recording an Audio CD for Standard CD Players 196
12. Managing the Bootloader and Multi-Booting . . . . . . . . . . . . . . . . . . . . . . . . 19912.1 Introduction 19912.2 Migrating from LILO to GRUB 20012.3 Installing GRUB Without a Floppy Disk 20212.4 Installing GRUB with grub-install 20412.5 Preparing a System for Multibooting Linux 20512.6 Adding More Linuxes to a Multiboot System 20612.7 Discovering Boot Parameters from the GRUB Command Shell 20812.8 Configuring the Boot Partition 21012.9 Creating the GRUB Boot Menu 211
12.10 Customizing menu.lst 212

xii | Table of Contents
12.11 Adding Windows 95/98/ME to a Linux System 21412.12 Adding Windows NT/2000/XP to a Multiboot System 21612.13 Restoring GRUB to the MBR with a Knoppix CD 21712.14 Protecting System Files with a GRUB Password 21812.15 Locking Out Users from Individual GRUB Menu Entries 21912.16 Creating a GRUB Splash Image 22012.17 Booting Linux with LILO 22112.18 Multibooting Linuxes with LILO 22412.19 Multibooting Windows and Linux with LILO 22512.20 Creating a LILO Boot Diskette 22612.21 Password-Protecting LILO 22712.22 Backing Up the MBR 228
13. System Rescue and Recovery with Knoppix . . . . . . . . . . . . . . . . . . . . . . . . . . 22913.1 Introduction 22913.2 Booting Knoppix 22913.3 Creating a Knoppix Boot Diskette 23113.4 Saving Your Knoppix Configuration on a USB Memory Stick 23113.5 Creating a Persistent, Encrypted Knoppix Home Directory 23213.6 Copying Files to Another Linux PC 23313.7 Copying Files to a Samba Share 23513.8 Copying Files to a CD-R/RW 23613.9 Editing Configuration Files from Knoppix 236
13.10 Installing Software from Knoppix 23713.11 Repairing a Lost Root Password 23813.12 Installing Knoppix to a Hard Disk 23913.13 Virus-Scanning Windows PCs with Knoppix 239
14. Printing with CUPS . . . . . . . . . . . . . . . . . . . . . . . . . . . . . . . . . . . . . . . . . . . . . . . 24114.1 Introduction 24114.2 Installing a Printer on a Standalone Linux PC 24314.3 Serving Linux Clients 24614.4 Sharing a Printer Without Using Name Resolution 24714.5 Serving Windows Clients Without Samba 24914.6 Sharing Printers on a Mixed LAN with Samba 25014.7 Building a Dedicated CUPS Printer Server 25014.8 Distributed Printing with Classes 25114.9 Restricting Users from Printers and Classes 252
14.10 Troubleshooting 253

Table of Contents | xiii
15. Configuring Video and Managing X Windows . . . . . . . . . . . . . . . . . . . . . . . . . 25515.1 Introduction 25515.2 Using Both X Windows and Consoles 25815.3 Installing a New Video Adapter 26015.4 Editing XF86Config 26115.5 Enabling 3D Hardware Acceleration with XFree86/DRI 26215.6 Troubleshooting 3D Acceleration Problems 26415.7 Configuring a Multihead Display 26615.8 Choosing Different ServerLayouts at Startup 26815.9 Setting a Default ServerLayout 271
15.10 Configuring startx 27215.11 Changing Your Login Display Manager 27315.12 Running Different Window Managers Simultaneously with Xnest 274
16. Backup and Recovery . . . . . . . . . . . . . . . . . . . . . . . . . . . . . . . . . . . . . . . . . . . . . 27716.1 Introduction 27716.2 Using rsync for Local File Transfers and Synchronization 27816.3 Making Secure Transfers with rsync and ssh 28016.4 Building an rsync Backup Server 28116.5 Securing rsync Modules 28416.6 Building an Anonymous Public rsync Server 28516.7 Launching the rsync Daemon at Startup 28616.8 Fine-Tuning File Selection 28716.9 Automating rsync over ssh Backups 288
16.10 Limiting rsync’s Bandwidth Requirements 28916.11 Customizing Filepaths in rsync 29016.12 Installing rsync on Windows Clients 29016.13 Creating a Message of the Day for rsync 29116.14 Creating a Bootable System Restore CD with Mondo Rescue 29316.15 Verifying the Mondo Backup 29616.16 Creating a Bootable System Restore DVD with Mondo Rescue 29616.17 Using Mondo Rescue to Clone Linux Systems 29816.18 Using the mindi-kernel for a “Sane” Backup 29816.19 Restoring a System from a Mondo Rescue Disk 29916.20 Restoring Selected Files from a Mondo Disk 300
17. Remote Access . . . . . . . . . . . . . . . . . . . . . . . . . . . . . . . . . . . . . . . . . . . . . . . . . . . 30117.1 Introduction 30117.2 Setting Up OpenSSH the First Time 302
xiv | Table of Contents
17.3 Generating New Host Keys 30417.4 Authenticating Via Public Keys 30517.5 Using Multiple Key Pairs 30717.6 Passwordless Logins with ssh-agent 30817.7 Better Passwordless Logins with keychain 31017.8 Passwordless Logins for cron Jobs 31117.9 Shutting Down ssh-agent Automatically at Logout 311
17.10 Customizing the Bash Prompt for ssh 31217.11 Tunneling X over SSH 31317.12 Connecting from a Windows PC 31417.13 Setting File Permissions on ssh Files 316
18. Version Control . . . . . . . . . . . . . . . . . . . . . . . . . . . . . . . . . . . . . . . . . . . . . . . . . . . 31718.1 Introduction 31718.2 Building a Simple Local RCS Repository 31918.3 Retrieving Older File Revisions from RCS 32118.4 Comparing File Versions in RCS 32218.5 Managing System Configuration Files with RCS 32418.6 Using CVS for a Single-User Local Repository 32618.7 Adding New Files to a CVS Repository 32818.8 Deleting Files from a CVS Repository 32918.9 Creating a Shared CVS Repository 330
18.10 Sharing a Single Repository Between Several Groups 33218.11 Accessing a Remote CVS Repository 33218.12 Updating Your Working Files in CVS 33418.13 Retrieving Specific Older Revisions from CVS 33518.14 Building an Anonymous Read-Only CVS Repository with Pserver 33718.15 Mirroring a CVS Repository 33918.16 Storing Binary Files in CVS 34018.17 Creating Release Snapshots with Tags 34118.18 Creating Stable and Development Branches for a Project 34218.19 Customizing Your CVS Environment 34418.20 Calculating Storage Size for a CVS Repository 345
19. Keeping Time with NTP . . . . . . . . . . . . . . . . . . . . . . . . . . . . . . . . . . . . . . . . . . . . 34719.1 Introduction 34719.2 Building a Local Time Server 34819.3 Connecting to a Local Time Server 35019.4 Adding Access Controls 351

Table of Contents | xv
19.5 Deciding Which NTP Pools to Use 35319.6 Connecting to a Time Server from an Intermittent Connection 35519.7 Setting Up Multiple Local Time Servers 35719.8 Using NTP Keys for Authentication 358
20. Building a Postfix Mail Server . . . . . . . . . . . . . . . . . . . . . . . . . . . . . . . . . . . . . . 36120.1 Introduction 36120.2 Building a POP3 Mail Server 36220.3 Building a POP3 Mail Server on Debian 36620.4 Testing the SMTP/POP3 Mail Server 36820.5 Sending Internet Mail 37020.6 Receiving Internet Mail 37120.7 Installing Cyrus-SASL for SMTP Authorization 37220.8 Installing Cyrus-SASL on Debian 37420.9 Setting Up smtp-auth to Authenticate Users 376
20.10 Using smtp-auth to Authenticate Postfix to Another Server 37820.11 Configuring a Fully Qualified Domain Name 37920.12 Building an IMAP Mail Server 38020.13 Connecting Your Users 38220.14 Sharing IMAP Folders 38320.15 Using Postfix’s Virtual Mailbox Domains 38520.16 Creating a Mail List with couriermlm 38720.17 Administering a couriermlm List 38920.18 Squirreling Around with Webmail 39120.19 Table of SMTP Response Codes and SMTP Commands 392
21. Managing Spam and Malware . . . . . . . . . . . . . . . . . . . . . . . . . . . . . . . . . . . . . . 39521.1 Introduction 39521.2 Basic Checklist: Preparing to Build Spam Malware Defenses 39721.3 Safely Testing New UBE Controls in Postfix 39821.4 Basic UBE Configurations for Postfix 39921.5 Creating Whitelists 40221.6 Using DNS Blackhole Lists 40321.7 Rejecting Messages with Attachments 40521.8 Setting Up Clam Anti-Virus on a Postfix Server 40621.9 Setting Up SpamAssassin on Postfix with Amavisd-new 410
21.10 Setting Up SpamAssassin Without Amavisd-new 411

xvi | Table of Contents
22. Running an Apache Web Server . . . . . . . . . . . . . . . . . . . . . . . . . . . . . . . . . . . . 41522.1 Introduction 41522.2 Installing Apache 2.0 from Sources 41922.3 Adding New Modules After Installation 42222.4 Setting Apache File Permissions and Ownership 42322.5 Accessing the Apache User’s Manual Locally 42422.6 Setting Up a Simple Public Web Server 42522.7 Redirecting URLs to a New Directory 42622.8 Giving Users Individual Web Directories 42722.9 Starting Apache at Boot 428
22.10 Hosting Multiple Domains with Apache 42822.11 Using Individual Log Files for Virtual Hosts 43022.12 Keeping LAN Web Sites Off the Internet 43222.13 Password-Protecting Individual Directories 43322.14 Using robots.txt to Control Web Crawlers 43622.15 Blocking Obnoxious Visitors 43722.16 Making Custom Error Pages 43822.17 Customizing Apache’s Default Error Pages 43922.18 Making Full-Length Directory Indexes 43922.19 Using Content Negotiation to Deliver Pages in Different Languages 44022.20 Using Favicons 44322.21 Viewing Apache Access Logs with Webalizer 444
23. File and Printer Sharing, and Domain Authentication with Samba . . . . . . 44723.1 Introduction 44723.2 Building a Simple Anonymous Samba File Server for Windows 44923.3 Building a Windows/Linux Peer Network 45223.4 Enabling File Sharing on Windows PCs 45323.5 Adding Authentication to a Samba Server 45723.6 Batch-Converting System Users to Samba Users 45823.7 Managing Samba Logins from Windows 95/98/ME 46023.8 Dealing with Windows Encrypted Password Confusion 46023.9 Controlling Share Access with Access Control Lists 461
23.10 Creating Public Shares for Users 46223.11 Accessing Users’ Home Directories in Samba 46323.12 Building a Primary Domain Controller with Samba 46423.13 Connecting Windows 95/98/ME to a Samba Domain 46723.14 Connecting Windows NT/2000 Clients to a Samba Domain 46823.15 Connecting Windows XP Clients to a Samba Domain 469

Table of Contents | xvii
23.16 Enabling Roaming Profiles 47023.17 Connecting Linux Clients to a Samba File Server or Peer Network 47123.18 Connecting Linux Clients to Samba Workgroups
with Command-Line Tools 47423.19 Connecting Linux Clients to a Samba Domain
with GUI LAN Browsers 47623.20 Connecting Linux Clients to a Samba Domain
with Command-Line Tools 47723.21 Keeping Samba and Linux Passwords in Sync 47823.22 Sharing Linux Printers with Windows 47923.23 Sharing Windows Printers with Linux 48023.24 Running Windows Applications on Linux with CrossOver Office 481
24. Managing Name Resolution . . . . . . . . . . . . . . . . . . . . . . . . . . . . . . . . . . . . . . . 48724.1 Introduction 48724.2 Enabling Local Name Resolution with hosts Files 48924.3 Setting Up a DHCP Server 49124.4 Configuring dhcp Clients 49224.5 Adding Static Hosts to dhcp 49324.6 Running a Public DNS Server 49424.7 Installing djbdns 49624.8 Moving tinydns’s and dnscache’s Logfiles 49724.9 Running a Local Caching Name Server with djbdns 498
24.10 Configuring Linux and Windows Clients to Use YourCaching DNS Server 500
24.11 Building a Public DNS Server with tinydns 50224.12 Building a Private tinydns Server 50524.13 Enabling Simple Load Balancing with tinydns 50624.14 Synchronizing with a Second tinydns Server 50724.15 Running a Local Caching Name Server with BIND 50824.16 Running a Private BIND DNS Server 51024.17 Checking Syntax 51524.18 Configuring a Public BIND DNS Server 51524.19 Building a BIND Secondary Server 51824.20 Simple Load Balancing with BIND 52024.21 Testing Your tinydns Server 52124.22 Testing and Querying DNS Servers with dig and dnstrace 522

xviii | Table of Contents
A. Finding Linux Documentation . . . . . . . . . . . . . . . . . . . . . . . . . . . . . . . . . . . . . . 525
B. Online References . . . . . . . . . . . . . . . . . . . . . . . . . . . . . . . . . . . . . . . . . . . . . . . . 528
C. Microsoft File Types . . . . . . . . . . . . . . . . . . . . . . . . . . . . . . . . . . . . . . . . . . . . . . . 530
D. Init Script for CVSD . . . . . . . . . . . . . . . . . . . . . . . . . . . . . . . . . . . . . . . . . . . . . . . . 533
Index . . . . . . . . . . . . . . . . . . . . . . . . . . . . . . . . . . . . . . . . . . . . . . . . . . . . . . . . . . . . . . . . . 537

This is the Title of the Book, eMatter EditionCopyright © 2007 O’Reilly & Associates, Inc. All rights reserved.
xix
Preface
So: you’re a relatively new Linux user. You’ve got Linux installed, you’ve managed tolog in, do some web browsing, send and receive email, and—now what? Althoughyou can handle some of the basics, you feel like you’re flying blind: you know you’vegot lots of really powerful stuff at your fingertips, or at least so your Linux gurufriend told you, but how do you make it do tricks? What’s there, and how does itwork? What’s this thing called grep that they’re always talking about? How do youSamba? And where’s the #$%^ documentation?
The Linux-Unix world is abundantly documented. No, really! You can always findan answer, if you know where to look. The problem, of course, is knowing where tolook. There are man pages, info pages, READMEs, HTML manuals, and the codeitself. You don’t have to be a programmer to unearth useful bits in source code,because the comments often tell you what you need to know.
There are thousands upon thousands of online communities, one (or more) sur-rounding nearly every bit of software in the Linux universe. Nearly every program,no matter how small, has its own user mailing list. Every Linux distribution has itsown mailing lists and user forums. There are forums and lists and Usenet groups forevery computing subject under the sun.
And of course there are books and magazines of every description. So the real prob-lem with Linux documentation is not the lack of it, but finding the bits you needwithout having to embark on a lengthy, heroic quest.
AudienceThis book is aimed at folks who want to know what button to push. Understandingthe underlying theory is useful, but if you can’t make the darn thing work, not veryhelpful. So it’s light on theory and heavy on how-to-make-this-go, with detailed,step-by-step instructions. I’ve included many references to additional resources.

This is the Title of the Book, eMatter EditionCopyright © 2007 O’Reilly & Associates, Inc. All rights reserved.
xx | Preface
Readers should have a bit of Linux experience. You don’t need to be a guru, but youshould have some familiarity with the basics of booting up and shutting down, start-ing applications, Web surfing, and poking around the filesystem. You should knowhow to find and use the command line, as well as work in a graphical environment.You should understand that Linux is a true multi-user system, and that you use anordinary unprivileged user account as much as possible, and that you only invokeroot when you really need to.
This book assumes that you are in charge of a PC or LAN, and can acquire rootlypowers when the occasion calls for them. You might be a power user who wantscomplete control of your Linux box, or a home user who wants to run a personalweb or mail server, or set up a small LAN. Perhaps you are a Windows system admi-ninstrator who has suddenly been ordered to “do Linux,” and you need to knowhow to set up Linux servers for Windows clients. Maybe you want to add Linux serv-ers to an existing network. You might need to integrate Linux and Windows desk-top users on a LAN.
Or you have no need for Windows at all, and just want to learn Linux systemadministration.
What Is Included/OmittedGiven that there are thousands of software packages to choose from, almost all ofwhich do something useful, it was a foregone conclusion that I couldn’t cover every-thing. Or even most of everything. I decided what to include, and what to leave out,based on my opinion of what a fundamental Linux skill set should include. (You mayhave different ideas.) I included programs that I consider to be the best-of-breed,such djbdns, GRUB, Apache 2, vim, and Postfix. And I didn’t neglect old standbyslike LILO and BIND.
You’ll find some excellent, innovative scripts for:
• Adding users in batches
• Changing passwords in batches
• Finding all the installed documentation for a program
• Finding orphaned libraries on RPM-based systems, and adding them to the RPMdatabase
I decided not to include productivity and desktop applications, like Open Office,KMail, Firefox, Konqueror, the Gimp, GnuCash, and so forth. This book is aboutbuilding infrastructure. Once you master the fundamentals of running and maintain-ing a Linux system, it will take you anywhere you want to go.

This is the Title of the Book, eMatter EditionCopyright © 2007 O’Reilly & Associates, Inc. All rights reserved.
Preface | xxi
PlatformsThere are more Linux distributions than can be counted; there are literally thou-sands of distributions, many of which are peculiar to a company, a campus, or even acircle of friends who like to roll their own. However, the world of distributionsbreaks (not very cleanly) into two large camps: RPM-based systems, represented inthis book by Red Hat and Fedora, and apt-based systems, represented by Debian.Debian-based distributions are spreading like weeds, such as Knoppix, Xandros,Libranet, Unbuntu, and Linspire.
Even if you are using a distribution that does not fall into one of these two categories,such as Slackware or Gentoo, the fundamentals are pretty much the same. The kernelis the same; the programs and utilities available are the same; the window managers arethe same; the only substantial difference is the way you install software.
That’s not to say there aren’t other differences between Linux distributions. Achronic bugaboo with Linux is differing file locations on different distributions. Getused to it; it’s not going to go away. This book provides several excellent methodsfor finding out where your particular distribution puts configuration files, executa-bles, and program documentation.
ConventionsThe following typographical conventions are used in this book:
ItalicUsed for filenames and pathnames, hostnames, domain names, commands,URLs, and email addresses. Italic is also used for new terms where they aredefined.
Constant widthUsed for code examples and fragments.
Constant width boldUsed for user input.
Constant width italicUsed to indicate text that is replaceable.
Indicates a tip, suggestion, or general note.
Indicates a warning or caution.

This is the Title of the Book, eMatter EditionCopyright © 2007 O’Reilly & Associates, Inc. All rights reserved.
xxii | Preface
One particularly important convention in this book involves the use of commandline prompts. I can’t say it too often: don’t get into the habit of su’ing to root when-ever you have to do anything remotely administrative. Even worse, don’t say “It’s mymachine, I can do anything as root.” Use root privileges only when you really needthem. You’ll be safer that way; you’ll have some protection against your own mis-takes, and against attacks made by outsiders.
To show you when you need root privileges, commands requiring root privileges arepreceded by the root prompt, #. Commands that don’t require root privileges arepreceded by the default bash shell prompt, $.
Don’t be confused—there are many file listings in the book, and in many of thesefiles, comments are preceded by #. Yes, it can be confusing, but you’ll get used to it.
Downloads and FeedbackDoubtless this book, despite the heroic efforts of me and the fabulous O’Reilly team,contains flaws, errors, and omissions. Please email your feedback and suggestions [email protected], so we can make the second edition even better. Be sure tovisit http://tuxcomputing.com for errata, updates, and to download the scripts andconfiguration files used in the book.
This book was authored entirely in Open Office Writer, on Libranet Debian 2.8.
Comments and QuestionsPlease address comments and questions concerning this book to the publisher:
O’Reilly Media, Inc.1005 Gravenstein Highway NorthSebastopol, CA 95472(800) 998-9938 (in the United States or Canada)(707) 829-0515 (international or local)(707) 829-0104 (fax)
There is a web page for this book, which lists errata, examples, and any additionalinformation. You can access this page at:
http://www.oreilly.com/catalog/linuxckbk/
To comment on or ask technical questions about this book, send email to:
For more information about books, conferences, software, Resource Centers, and theO’Reilly Network, see the O’Reilly web site at:
http://www.oreilly.com

This is the Title of the Book, eMatter EditionCopyright © 2007 O’Reilly & Associates, Inc. All rights reserved.
Preface | xxiii
AcknowledgmentsThank you to ace O’Reilly editor Michael Loukides, whose good taste, eagle edito-rial eye, patient endurance, and implacable insistence made this a much better book.
Thank you to ace technical reviewer Jenn Vesperman, and her attention to detail.Silly computers are completely literal, and must be fed precise input—thanks Jenn!
Many thanks to Akkana Peck, Jenn Vesperman, Paul Heinlein, and Peter Samuel-son, whose contributions appear in this book. Heartfelt thanks to the gang atLinuxchix, including Jenn Vesperman (benevolent dictator of Linuxchix), DancerVesperman, Danamania (the camera does not lie), Colby, Evilpig, Almut Behrens,Andrew (Mandrake Guru), Hamster, Piglet, Val Henson (uppity rabble rouser),H. Peter Anvin (kernel guru and rabbit rouser), Rik Rose, Devdas Bhagat, DavidNorth (for comic relief), Telsa Gwynne, Maria Blackmore, Meredydd Luff, Kai Mac-Tane, and Erinn Clark (for more uppity rabble-rousing). Linuxchix rawks!
I’m sure I missed some folks who patiently endured my endless pestering. Tell mewho you are, and I’ll fix it in the second edition.


This is the Title of the Book, eMatter EditionCopyright © 2007 O’Reilly & Associates, Inc. All rights reserved.
1
Chapter 1 CHAPTER 1
FindingDocumentation
1.1 IntroductionDocumentation for Linux programs is abundant. Finding it can be a bit challenging,though. You’re not going to find lots of sleek, glossy printed manuals, because mostLinux software is distributed online, rather than in shiny boxed sets.
There’s another difficulty, too: Linux follows the grand Unix tradition of small, spe-cialized programs working cooperatively, so any Linux distribution contains a largenumber of individual programs. For example, Tom’s Root Boot, “The most GNU/Linux on one floppy disk,” contains over 230 separate, individual programs on a sin-gle 3.5" diskette. A general-purpose distribution such as Mandrake or SuSE containsseveral thousand programs and there are over 12,000 packages in the Debian reposi-tories. While organizing and maintaining a printed library presents some difficulties,the good news is that all of these things are documented. Whatever you want toknow, there is a way to find it.
man and info: The Universal Linux ManualsAlmost every program written for Linux has a man page. They’re usually not the bestteaching tool for newbies. Their purpose is to document the command syntax andevery command option, and to be universally available. No matter what kind ofstrange desert-island scenario you may find yourself in, there will always be manpages. And because man pages are incorporated into the programs to which theybelong, you’ll find that only installed programs have man pages and that the ver-sions of those pages are pertinent to your system.
info pages tend to be more verbose than man pages and are hyperlinked. The hyper-links navigate to the various nodes, or chapters, inside the document and to cross-references in other info pages. Many info pages are simply reformatted man pages.But in some instances—primarily the GNU project programs—the info pages aremore detailed, containing tutorials and extensive examples.

This is the Title of the Book, eMatter EditionCopyright © 2007 O’Reilly & Associates, Inc. All rights reserved.
2 | Chapter 1: Finding Documentation
Other DocumentationA large number of README, CHANGELOGS, RELEASE NOTES, COPYRIGHT,INSTALL, integrated Help systems, and HTML docs are going to be squirreled awayin various locations on your system. Yes, it’s a jumble. Don’t worry, you’ll learn easyways to find all these things in this chapter, including a nice Python script to do thefinding for you.
There are many web sites that host complete archives of man and info pages, whichcomes in handy if your system is missing the ones you want, or you want to readthem without having to download and install new programs. A Google search willfind them quickly.
The commercial Linux distributions—for example, Red Hat, SuSE, Mandrake, Xan-dros, and Linspire—supply excellent user manuals. Every major Linux distributionprovides a feast of online resources. Search engines, user mailing lists, Usenet, and allsorts of Linux web sites also supply a wealth of help and information.
Graphical ViewersThere are several good graphical man and info page viewers:
KonquerorThe web and file browser in KDE also contains an excellent man and info pageviewer. Simply type man:foo or info:/foo in the address bar. It is easy to printfrom Konqueror, and easy to select individual man or info pages for printing.
YelpThe Gnome viewer. Displays man and info pages, and Gnome’s help docu-ments. It is indexed and searchable.
PinfoA nice ncurses-based info and man viewer for the console. Users can add newdocuments to it, and it supports regexp searches.
1.2 Understanding man Pages
ProblemYou’re trying to use some programs (for example, everyone’s favorite, grep; the nametells you so much) and you can’t make them them do what you want. So, heedingthe standard “RTFM” (read the fine man page) advice, you dig up the relevant manpages. But they don’t make a lot of sense—now what?

This is the Title of the Book, eMatter EditionCopyright © 2007 O’Reilly & Associates, Inc. All rights reserved.
1.2 Understanding man Pages | 3
SolutionLearn how man pages are organized, and familiarize yourself with their conventionsfor teaching command syntax and options, and you’ll find that man pages really arehelpful.
DiscussionLinux sees all the man pages on a system as part of a single manual. This manual isdivided into sections:
1 Executable programs or shell commands2 System calls3 Library calls4 Special files (usually found in /dev)5 File formats and conventions6 Games7 Miscellaneous8 System administration commands9 Nonstandard kernel routinesn New documentation, which may be moved laterl Local documentation, specific to your system
Each individual program, utility, or function has its own page in this manual, like apage in a book. Finding the man page for a program or command is usually as easyas typing man foo, where foo is the name of the program.
You’ve probably seen references to numbered man pages, like grep(1). This is refer-ring to man grep in section 1. Call it up this way:
$ man 1 grep
Some man pages are in more than one section. man foo will only display the first one.You can list all of them with the -f switch:
$ man -f manman (1) an interface to the online reference manualsman (7) macros to format man pages
Each man page is divided into sections. The section names vary, but you’ll usuallysee these: NAME, SYNOPSIS, DESCRIPTION, OPTIONS, FILES, EXAMPLES, SEEALSO, BUGS, and AUTHOR.
Here’s the notation used to show command syntax, found in the Synopsis of the manpages:
command-name [optional flags] any-other-required-elements
Command flags are shown this way:
bold textType this exactly as it is shown.

This is the Title of the Book, eMatter EditionCopyright © 2007 O’Reilly & Associates, Inc. All rights reserved.
4 | Chapter 1: Finding Documentation
italic textItalic text indicates an argument, which means you replace it with your desiredvalue. Depending on the viewer you are using, you may not see italics, but ratherunderlines or bold text.
[-abc]Everything inside square brackets is optional and can be combined.
[-a|-b|-c]Options separated by the pipe | (Shift-backslash) cannot be combined.
argument...The ellipsis indicates that several arguments can be listed. Watch out for delimit-ers—usually they are spaces, but sometimes commas are used.
[expression] ...The ellipsis indicates that several expressions can be listed.
Short options can be typed two ways:
-abc
or:
-a -b -c
Long options must be individually hyphenated, and they use double hyphens:
--option1 --option2 --option3
Long options are especially useful in scripts, so you can remember what the script does.
The bulk of most man pages is a list of the options available.
See Also• man(1)
1.3 Finding Appropriate man Pages
ProblemYou need a program or utility to perform a specific function—for example, counting thewords in a file—but you don’t know what to look for. If you knew what you were look-ing for, you wouldn’t need to look for it, right? How do you get out of this dilemma?
SolutionDo keyword searches with apropos or man -k. For example, if you want a commandto count the words in a file, use:
$ apropos count words

This is the Title of the Book, eMatter EditionCopyright © 2007 O’Reilly & Associates, Inc. All rights reserved.
1.4 Finding Lost man Pages | 5
or:
$ man -k count wordsamerican-english (5) - a list of english wordsgrpconv (8) - convert to and from shadow passwords and groups.grpunconv (8) - convert to and from shadow passwords and groups.kmessedwords (1) - a letter order game for KDElppasswd (1) - add, change, or delete digest passwords.pwconv (8) - convert to and from shadow passwords and groups.pwunconv (8) - convert to and from shadow passwords and groups.shadowconfig (8) - toggle shadow passwords on and offwc (1) - print the number of newlines, words, and bytes in files
It doesn’t matter which you use; apropos and man -k are the same. There are a lot ofoptions, but wc looks like the program you want.
Remember the -f switch, to find all versions of a man page:
$ man -f manpathmanpath (1) - determine search path for manual pagesmanpath (5) - format of the /etc/manpath.config file
DiscussionThese commands perform keyword searches in the Description sections of the manpages. You can use any number of search terms, but the more you use, the moreresults you’ll get, because they search each keyword in sequence.
Because these are literal keyword searches, broad concepts like “bandwidth shap-ing” or “user management” do not carry the same meaning for apropos and man -k;they see “bandwidth shaping” as two unrelated search terms, so single-word searchesusually work best.
See Also• apropos(1), man(1)
1.4 Finding Lost man Pages
ProblemYou can’t find a man page for an installed program, and you’re certain it should beon the system.
SolutionSometimes the man database gets corrupted, users make strange modifications, orprograms install man pages incorrectly. First try searching with whereis -m:
$ whereis -m catcat:/usr/man/man1/cat.1.gz /usr/share/man/man1/cat.1.gz

This is the Title of the Book, eMatter EditionCopyright © 2007 O’Reilly & Associates, Inc. All rights reserved.
6 | Chapter 1: Finding Documentation
Now you’ve found the page. Read it with man:
$ man /usr/man/man1/cat.1.gz
If that doesn’t work, try rebuilding the man database with mandb:
# mandb
If that doesn’t work, try a system-wide search with locate and egrep:
$ locate / cat. | egrep -w 'cat\.[1-9][a-zA-Z]*[.gz]?'
This works for any man page—simply replace cat with whatever you’re looking for.
If none of these approaches turn up the man page you are looking for, try the finddocscript in Recipe 1.11. If this doesn’t find it, it’s not on your system.
DiscussionThere are all kinds of man page repositories on the Web, so you can always try aGoogle search. However, some programs simply don’t have man pages, so don’t ruinyour health searching for one that may not exist.
See Also• whereis(1), mandb(8)
• grep comes in several flavors; see grep(1) for details
1.5 Reading man Pages Without a man Viewer
ProblemYou’re working on a system that is seriously messed up, and you can’t read manpages because the man viewer doesn’t work.
SolutionTry reading the raw man page with zcat and nroff:
$ zcat /usr/man/man1/cat.1.gz | nroff -man | less
As a last resort, read the raw page code with zless:
$ zless /usr/man/man1/cat.1.gz.\" DO NOT MODIFY THIS FILE! It was generated by help2man 1.32..TH CAT "1" "July 2003" "cat (coreutils) 5.0" "User Commands".SH NAMEcat \- concatenate files and print on the standard output.SH SYNOPSIS.B cat[\fIOPTION\fR] [\fIFILE\fR]...
It’s not pretty, but it works.

This is the Title of the Book, eMatter EditionCopyright © 2007 O’Reilly & Associates, Inc. All rights reserved.
1.6 Configuring Your manpath | 7
Discussionnroff is a wrapper for groff, for formatting man pages. groff is a document-format-ting, or typesetting, program. It enables you to create many differently formatteddocuments from a single source file: HTML, .pdf, printed hard copies, info pages,and many more. See Chapter 9 of Running Linux for a good introduction.
See Also• mandb(8), locate(1), grep(1), nroff(1), groff(1), zless(1), zcat(1)
• Recipe 1.6, “Configuring Your manpath”
• Chapter 9 of Running Linux, by Matt Walsh, Matthias Dalheimer, Terry Daw-son, and Lar Kaufman (O’Reilly)
1.6 Configuring Your manpath
ProblemYou’re repeatedly having trouble finding man pages; using tools from Recipe 1.4,you find that most of the missing pages are in a directory that man doesn’t seem toknow about. Perhaps a newly-installed program put its man pages in a strange place,like /opt/man. Or perhaps you want to put some man pages in a nonstandard loca-tion. How do you configure man to find them?
SolutionEdit /etc/manpath.config.
Suppose the directory you want to add is /opt/man. Add /opt/man to /etc/manpath.config:
# every automatically generated MANPATH includes# these fields
MANDATORY_MANPATH /usr/manMANDATORY_MANPATH /usr/share/manMANDATORY_MANPATH /usr/X11R6/manMANDATORY_MANPATH /usr/local/manMANDATORY_MANPATH /opt/man
And you’re done. Now man will find the man pages in the new directory.
When you create a custom man page directory, be sure to include the sectiondirectories:
$ ls /opt/man/localman1 man2 man3 man4 man5 man6 man7 man8 man9

This is the Title of the Book, eMatter EditionCopyright © 2007 O’Reilly & Associates, Inc. All rights reserved.
8 | Chapter 1: Finding Documentation
It’s not necessary to include all the numbered sections, just the ones pertinent to theman pages you’ll be storing there.
If you’re going to have subdirectories—for example, /opt/man and /opt/man/local—be sure to list them in this order:
MANDATORY_MANPATH /opt/man/localMANDATORY_MANPATH /opt/man
Subdirectories must be listed before parent directories, or they will be overlooked bythe man viewer.
DiscussionYou can run manpath with no options to see your current manpaths:
$ manpath/usr/local/man:/usr/share/man:/usr/X11R6/man:/usr/man
See Also• manpath(1), manpath(5)
1.7 Using info Pages
ProblemYou decide to give info pages a try, so you call up info tar (or any other info page ofyour choice). But you find that navigating info tar is confusing and difficult. What isthe best way to learn your way around?
SolutionUse info’s built-in tutorial. Type info at any command line, hit the letter h, then dowhat it says. It should take 15–30 minutes, and it is time well-spent.
DiscussionEven though some folks think that info pages are unnecessarily complicated to navi-gate, it is worth getting acquainted with them. Even though they are more difficult tonavigate than man pages, they are (usually) easier to understand. Once you get thehang of moving around in them, you can go very fast and find information quickly.Info pages often contain more information than man pages, and they sometimesinclude tutorials and extensive examples.
There are also a number of nice info viewers, such as pinfo, Konqueror, and Yelp.Pinfo runs in the console, and Konqueror and Yelp need X. Konqueror is especiallyeasy to navigate and to use for printing selected pages.
This is the Title of the Book, eMatter EditionCopyright © 2007 O’Reilly & Associates, Inc. All rights reserved.
1.8 Printing man Pages | 9
See Also• info info
1.8 Printing man Pages
ProblemYou want to print a man page, nicely formatted and readable. You have tried manfoo | lpr, but it doesn’t look very good. The margins are too small, and all the format-ting is lost.
SolutionOne way to print a nicely formatted man page is to use the -t flag, which formats itespecially for printing. man finger is good for practice, because it’s only two pages long:
$ man -t finger | lpr
To use a networked printer:
$ man -t finger | lpr -P printername
To see your available printers:
$ lpstat -p -d
Another option is to use the following command, which formats the page in HTMLand sends it to the web browser of your choice:
$ man -Hmozilla finger
Then use the browser’s print command. Be sure there is no space between -H andthe browser name.
DiscussionAll of the major Linux distributions ship with CUPS, the Common Unix PrintingSystem. CUPS supports both the System V (lp) and Berkeley (lpr) commands. Thisrecipe uses the Berkeley commands. Here is the System V equivalent.
$ man -t finger | lp
To use a networked printer:
$ man -t finger | lp -d printername
See Also• man(1), lpr(1), lp(1)
• Chapter 14, Printing with CUPS
• CUPS Software Users Manual (http://localhost:631/documentation.html)

This is the Title of the Book, eMatter EditionCopyright © 2007 O’Reilly & Associates, Inc. All rights reserved.
10 | Chapter 1: Finding Documentation
1.9 Printing info Pages
ProblemYou want to print some info pages, but there doesn’t seem to be a built-in print com-mand for info.
SolutionYou can use lpr:
$ info finger | lpr
However, this may result in too-small margins and odd line breaks, depending onyour printer defaults. Use lpr options to format it:
$ info finger | lpr -o cpi=12 -o page-left=54 -o page-right=54 -o page-top=54 \ -o page-bottom=54
The numbered values are points, or 1/72". This example creates 3/4" margins all theway around. cpi=12 sets the number of characters to 12 per inch. All of these optionsare documented in the CUPS Software Users Manual, at http://localhost:631/documentation.html.
DiscussionAll of the major Linux distributions ship with CUPS, the Common Unix PrintingSystem. CUPS supports both the System V (lp) and Berkeley (lpr) commands. Thisrecipe uses the Berkeley commands. Here are the System V equivalents.
To print an info page use:
$ info finger | lp
To print the info page using lp’s formatting options use:
$ info finger | lp -o cpi=12 -o page-left=54 -o page-right=54 -o page-top=54 \-o page-bottom=54
See Also• info info, lpr(1), lp(1)
• Chapter 14, Printing with CUPS
• CUPS Software Users Manual (http://localhost:631/documentation.html)

This is the Title of the Book, eMatter EditionCopyright © 2007 O’Reilly & Associates, Inc. All rights reserved.
1.11 Finding All of the Documentation for a Program | 11
1.10 Printing Selected man or info Pages
ProblemYou would like to print selected man and info pages, because most man and infodocuments are quite long. For example, man bash consumes 33 printed pages. Howcan you print pages selectively?
SolutionExport the man or info page to a plain text file, using the col command. Then youcan easily select the pages to print. To do this with man bash or info bash use:
$ man bash | col -b > bash.txt$ info bash | col -b > bash.txt
DiscussionIf you just type man bash > bash.txt, the results will be unpleasant. col -b cleans thingsup considerably by removing reverse line feeds, or backspaces. This is especially suitedfor converting man pages to plain text, because man pages are full of reverse line feeds,which then appear in text files as either empty boxes or repeated characters.
See Also• col(1)
1.11 Finding All of the Documentationfor a Program
ProblemYou want to find all the relevant readmes, changelogs, howtos, guides, examples,samples, and other documentation that accompanies your installed programs.
SolutionUse finddoc, that wonderful Python script that comes to you courtesy of the excel-lent Akkana Peck.
You can call it anything you like. Remember to make it executable:
$ chmod +x finddoc
Using it requires only the script name and the name of the program for which youneed the documentation. For example:
$ ./finddoc grep/usr/share/doc/grep

This is the Title of the Book, eMatter EditionCopyright © 2007 O’Reilly & Associates, Inc. All rights reserved.
12 | Chapter 1: Finding Documentation
/usr/share/doc/grep-dctrl/usr/share/doc/grep-dctrl/changelog.gz...
The output can be filtered through other commands, or redirected to a file:
$ ./finddoc | grep -i examples | lpr$ ./finddoc | grep -i faq$ ./finddoc | grep -i examples > python-examples.txt
Program: finddoc#!/usr/bin/env python
# Finddoc: A Script For Finding Linux Program Documentation# When making your own copy of this script, be sure to# preserve the leading spaces exactly as they are written# here, because Python needs them.
# Search for documentation related to the given strings;# case-insensitive, and whole-word only.# Relies on "locate" and assumes that the locate# database is current.## Copyright 2003 by Akkana Peck.# You may use, distribute or modify this program# under the terms of the GPL.
import sys, os, string, re
# This is the list of document-related filenames# to search for. You may edit this list as needed.# Be sure to add only lowercase names.docfilenames = [ "changelog", "readme", "install", "howto", "authors", "news", "todo", "config", "sample", "samples", "example", "examples", "ref", "guide", "manual", "quickstart", "thanks", "notes", "features", "faq", "acknowledgement",

This is the Title of the Book, eMatter EditionCopyright © 2007 O’Reilly & Associates, Inc. All rights reserved.
1.11 Finding All of the Documentation for a Program | 13
"bugs", "problems"]
def system_out (cmdstr) : retlist = [ ] fp = os.popen(cmdstr) while 1: s = fp.readline( ) if not s : break retlist.append(s) fp.close( ) return retlist
# main( )for arg in sys.argv : #print string.split(arg, " \t./")
files = system_out("locate " + arg + " | grep -w " + arg);
for path in files : #print path
# Special case for anything with "man", "doc", or "info" in the path: if (string.find(path, "/man") >= 0) \ or (string.find(path, "/doc") >= 0) \ or (string.find(path, "/info") >= 0) : print path,) continue
# Now see if it matches any of the docfilenames: base = os.path.basename(path) for nam in docfilenames : if base = = "" : continue
# Non full word search would use this::
# Full-word-search: # Make a regexp to search for nam as full-word only pat = "^" + nam + "$" if (re.compile(nam).search(base, 1)) : print path, base = "" continue
See Also• locate(1), grep(1)
• Chapter 9 of Python in a Nutshell

This is the Title of the Book, eMatter EditionCopyright © 2007 O’Reilly & Associates, Inc. All rights reserved.
14
Chapter 2CHAPTER 2
Installing and ManagingSoftware on RPM-BasedSystems
2.1 IntroductionInstalling a Linux distribution is quite easy these days. Pop in a CD-ROM, make afew configuration choices, then go enjoy a cup of tea while it finishes. ModernLinuxes have excellent hardware detection, install quickly (typically in 30 minutes orless), and require no more than a single reboot.
Source-Built Systems: The Olde WayMaintaining a Linux system has also evolved tremendously. Packages and intelligentdependency resolvers mean that keeping a system updated and patched is now eas-ier and less error-prone. Today’s youngsters have it so easy. We didn’t have CD-ROMs in the primitive olden days of computing—instead of broadband, we had astation wagon full of floppy disks. To get new programs, us old-timers had to unpacklaboriously downloaded tarballs, or copy them off floppy disks, then compile theprograms from source code. Dependency problems? Why, us old geeks handled allthose things without help from any fancy-pants dependency resolvers. It went some-thing like this:
# tar -xvf someprogram.tar# ./configure# make
The make failed, because of unresolved dependencies. So the next step was to down-load a tarball containing the program with the required libraries, which took sixhours over a 300-baud modem. You know, the kind with the rubber cup that fitsover the phone. I passed the time by going outside and planting a garden. I cameback inside when the download was finished, unpacked the new tarball, and triedagain:
# ./configure# make

This is the Title of the Book, eMatter EditionCopyright © 2007 O’Reilly & Associates, Inc. All rights reserved.
2.2 Installing RPMs | 15
Boy howdy, another long string of error messages indicating more unresolved depen-dencies. Download yet another tarball, do more garden work. By the time every-thing was installed and working, I had tomatoes the size of melons. It’s a good thingwe were so smart we hardly even needed computers.
Why was there all this dependency drama? Because Linux uses shared libraries thatare dynamically linked at runtime. Many separate, unrelated programs can use thesame libraries. This makes for a fast, efficient system. Less memory and storageresources are consumed, and programs are smaller and easier to distribute. But asLinux evolved and became more complex, managing source-built systems becamemore difficult. So programs were put into packages. Packages include compiled bina-ries, pre- and post-installation scripts, file indexes, uninstallation scripts, and othergoodies. Each package knows what it needs to resolve its own dependencies. Pack-age databases track all the installed-from-package files on a system.
Dependency ResolversHowever, not all was bliss in Whoville. RPM, the Red Hat Package Manager, is themost widely used Linux package manager. RPM is quite powerful. It runs depen-dency and version checks, and it tracks all installed packages in the RPM database.But it cannot fetch additional packages to resolve dependencies, nor can it managethe relationships between packages. When it gets stuck because of dependency prob-lems, it tells you what additional packages to install, which means you have to findthese packages and install them. This can lead to more dependency conflicts, and asimple installation can go haywire in a hurry. This is known as “RPM hell.”
Many dependency resolvers have been developed for RPM-based systems, includingapt-rpm, urpmi, Yum, and Ximian’s Red Carpet. There are excellent distribution-spe-cific installers/resolvers, such as Red Hat’s up2date and SuSE’s YaST and Mainte-nance Web. In this chapter we’ll cover RPM basics and Yum, which was developednatively for RPM systems. For many users, Yum strikes the right balance of featuresand ease of use.
2.2 Installing RPMs
ProblemYou need to know how to install software packages on Red Hat and Red Hat–typesystems.
SolutionUse RPM, the Package Manager. Red Hat installation command syntax looks likethis:
# rpm -i packagename

This is the Title of the Book, eMatter EditionCopyright © 2007 O’Reilly & Associates, Inc. All rights reserved.
16 | Chapter 2: Installing and Managing Software on RPM-Based Systems
For example, the following command installs the drawing program Tuxpaint. -vadds verbose feedback, and -h draws progress hashmarks:
# rpm -ivh tuxpaint-9.13-1.i386.rpmPreparing...########################### [100%] 1. tuxpaint ######################## [100%]
To test the installation first, without installing anything, use:
# rpm -ivh --test tuxpaint-9.13-1.i386.rpmPreparing...########################### [100%]#
DiscussionRPM hell, or getting caught in an endless chain of unresolved dependencies, is themost common RPM problem. Here are some ways to prevent it:
• Do not let any dependencies remain unresolved. They don’t fix themselves; theylurk and grow larger over time.
• The quality of RPMs varies wildly. Anyone can throw one together and post itfor distribution. As much as possible, stick with RPMs built for your distribu-tion and architecture. Polished Linux Distribution (PLD) builds good-qualityRPMs for all x86 systems.
• Use CheckInstall when you need a source-built program. CheckInstall createsRed Hat, Debian, and Slackware packages, so you get the benefits of both a cus-tom compilation and your package manager (see Recipe 4.5, “Using CheckIn-stall to Create Packages from Sources).
See Also• rpm(8)
• RPM.org (http://www.rpm.org/)
• Maximum RPM (http://www.rpm.org/max-rpm/index.html)
2.3 Upgrading RPMs
ProblemYou need to upgrade an installed RPM package: there’s a new version of some pro-gram you like, with new features and important bug fixes.
SolutionUse the -U flag:
# rpm -Uvh tuxpaint-9.13-1.i386.rpm
To test the command first, use:
# rpm -Uvh --test tuxpaint-9.13-1.i386.rpm

This is the Title of the Book, eMatter EditionCopyright © 2007 O’Reilly & Associates, Inc. All rights reserved.
2.4 Removing RPMs | 17
Discussion-U can be used in place of -i, install. It doesn’t matter if you’re upgrading a packageor installing a new one, it works in both cases. -U replaces the old package. If youwant to have multiple versions of the same package, such as gcc, or install several dif-ferent kernels, don’t use -U, use -i.
See Also• rpm(8)
• RPM.org (http://rpm.org/)
• Maximum RPM (http://www.rpm.org/max-rpm/index.html)
2.4 Removing RPMs
ProblemYou’ve gotten tired of some program and want to get rid of it. Or you’ve justinstalled something you don’t want. So, you want to remove an RPM package.
Solutionrpm -e does the job:
# rpm -ev tuxpaint
You don’t need the entire package name (e.g., tuxpaint-9.13-1.i386.rpm), just thelabel.
To uninstall several programs at once, use a space-delimited list:
# rpm -ev tuxpaint SDL_ttf SDL_ttf-devel SDL_images
If you don’t want to check dependencies:
# rpm -ev --nodeps tuxpaint
To test your command first, before executing it, use:
# rpm -ev --test tuxpaint SDL_ttf SDL_ttf-devel SDL_images
DiscussionIf RPM reports that it cannot remove a package because other packages depend on it,you either need to remove the other packages, or leave it alone. There are times whenyou need to break dependencies; for example, when replacing Sendmail. Your newMTA—Postfix, Exim, or qmail—will resolve Sendmail’s dependencies, but you haveto remove Sendmail first, which you can’t do without breaking all kinds ofdependencies.

This is the Title of the Book, eMatter EditionCopyright © 2007 O’Reilly & Associates, Inc. All rights reserved.
18 | Chapter 2: Installing and Managing Software on RPM-Based Systems
See Also• rpm(8)
• Maximum RPM (http://www.rpm.org/max-rpm/index.html)
2.5 Collecting Information on Installed RPMs
ProblemYou want to know what packages are installed on your system, what files belong to apackage, or what package a file belongs to. There are lots of reasons for wanting thisinformation; you might want to know exactly what version of some program is onyour system, or you may be asking, “what does this thingy belong to?” You mighteven change some file accidentally, and want to know what you’ve broken.
SolutionUse RPM’s querying features. All queries start with rpm -q.
To query the RPM database to see if a program is already installed, use:
$ rpm -q tuxpainttuxpaint-9.13-1
To do a case-insensitive search for an installed RPM, using a partial package name, use:
$ rpm -qa | grep -i kdelockdev-1.0.1-1.3kdebase-3.1.4-6kdeutils-3.1.4-1kdegames-3.1.4-4
To list files in an installed package, use:
$ rpm -ql kdegames/usr/bin/atlantik/usr/bin/kasteroids/usr/bin/katomic...
To list the documentation for an application, use:
$ rpm -qd kdegames | grep katomic/usr/share/doc/HTML/en/katomic/common/usr/share/doc/HTML/en/katomic/index.docbook...
To list the configuration files for a package, use:
$ rpm -qc openssh/etc/ssh/moduli
To list the configuration files for a command, use:
$ rpm -qcf /usr/bin/ssh/etc/ssh/ssh_config

This is the Title of the Book, eMatter EditionCopyright © 2007 O’Reilly & Associates, Inc. All rights reserved.
2.5 Collecting Information on Installed RPMs | 19
To list all installed packages, use:
$ rpm -qasetup-2.5.27-1.1tzdata-2003d-1bzip2-libs-1.0.2-10...
To save the list to a file, while viewing the output on the screen, use:
$ rpm -qa | tee rpmlist.txt
To see what package a file belongs to, use:
$ rpm -qf /usr/bin/tuxkarttuxkart-0.2.0-3
RPM queries will not follow symlinks, and will report that the file is “not owned byany package.” To find the file that a symlink points to, use:
$ namei ~/tuxkartf: tuxkart l tuxkart -> /usr/games/tuxkart d / d usr d games - tuxkart
To display package information, use:
$ rpm -qi kdegamesName :kdegames Relocations/usrVersion :3.1.4 Vendor:Red Hat, Inc.Release :2 Build date: Mon 13 Oct 2003Install date:Tue Nov 5 2003 Build host:daffy.perf.redhat.comGroup : Amusements/Games Source RPM:kdegames-3.1.4-2.src.rpmSize :16167441 License: GPLSignature :DSA/SHA1, Tue 28 Oct 2003 Key ID b446d04f2a6fd2Packager :Red Hat, Inc.<http://bugzilla.redhat.com/bugzilla>Summary :K Desktop Environment - GamesDescription :Games and gaming libraries for the K Desktop EnvironmentIncluded with this package are: kenolaba, kasteroids, kblackbox, kmhajongg, kmines,konquest, kpat, kpoker, kreversi, ksame, kshisen, ksokoban, ksmiletris, ksnake,ksirtet, katomic, kjumpingcube, ktuberling
DiscussionAnother way to find documentation for a particular application is with the finddocscript in Recipe 1.11.
See Also• rpm(8)
• Recipe 1.11, “Finding All of the Documentation for a Program”

This is the Title of the Book, eMatter EditionCopyright © 2007 O’Reilly & Associates, Inc. All rights reserved.
20 | Chapter 2: Installing and Managing Software on RPM-Based Systems
• Maximum RPM (http://www.rpm.org/max-rpm/index.html)
• Chapter 16 of Linux in a Nutshell by Ellen Siever, Stephen Figgins, and AaronWeber (O’Reilly)
2.6 Collecting Information from RPMsThat Are Not Installed
ProblemYou want to know what dependencies a new RPM requires, what files are in it, or if aparticular file is in it.
SolutionAdd the -p switch to run queries on uninstalled RPMs.
To list the documentation files, use:
$ rpm -qpd tuxpaint-9.13-1.i386.rpm/usr/share/doc/tuxpaint-9.13-1/AUTHORS.txt/usr/share/doc/tuxpaint-9.13-1/CHANGES.txt/usr/share/doc/tuxpaint-9.13-1/COPYING.txt...
To list all the files, use:
$ rpm -qpl tuxpaint-9.13-1.i386.rpm/etc/tuxpaint/tuxpaint.conf/usr/bin/tuxpaint...
To see what dependencies this package requires, use:
$ rpm -qpR tuxpaint-9.13-1.i386.rpm/bin/shSDL >= 1.2.4SDL_image...
To see what this package provides, use:
$ rpm -qp --provides tuxpaint-9.13-1.i386.rpmconfig (tuxpaint) = 9.13-1tuxpaint-9.13-1tuxpaint = 9.13-1
DiscussionYou can also get all this information on individual packages, before downloadingthem, from RPM repositories such as http://freshrpms.net, http://rpmfind.net, andhttp://rpm.pbone.net.

This is the Title of the Book, eMatter EditionCopyright © 2007 O’Reilly & Associates, Inc. All rights reserved.
2.8 Rebuilding the RPM Database | 21
See Also• rpm(8)
• Maximum RPM (http://www.rpm.org/max-rpm/index.html)
• FreshRPMS (http://freshrpms.net/)
• rpmfind (http://rpmfind.net)
• rpm.pbone (http://rpm.pbone.net)
2.7 Finding Recently Installed RPMs
ProblemYou installed some new packages a few days ago, and you’ve forgotten what they are.
SolutionUse the --last option:
# rpm -qa --last
This command lists all installed RPMs, with the newest first.
DiscussionIf the list is too long, pipe it into less or head: rpm -qa --last|head.
See Also• rpm(8)
• Maximum RPM (http://www.rpm.org/max-rpm/index.html)
2.8 Rebuilding the RPM Database
ProblemYou think your RPM database may be corrupted, or out-of-date, because it does notanswer queries for RPMs you know are installed; or you’ve given your system amajor overhaul and want to be sure the RPM database is up-to-date.
SolutionTry rebuilding the RPM database, as root:
# rpm --rebuilddb
or completely re-create it:
# rpm --initdb

This is the Title of the Book, eMatter EditionCopyright © 2007 O’Reilly & Associates, Inc. All rights reserved.
22 | Chapter 2: Installing and Managing Software on RPM-Based Systems
DiscussionIt is uncommon for the RPM database to need rebuilding, but it doesn’t hurt any-thing to try. Any time you make major changes to your system is a good time torebuild the RPM database. If you compare the size of /var/lib/rpm/packages beforeand after running rpm --rebuilddb, you may notice some shrinkage, because it hasremoved unused portions of the database.
See Also• rpm(8)
• Maximum RPM (http://www.rpm.org/max-rpm/index.html)
• Chapter 16 of Linux in a Nutshell
2.9 Tracking Source-Built Librarieson an RPM-Based System
ProblemYou want to run both source-built programs and RPMs on the same system. ButRPM does not know about the source-built libraries, so it incorrectly reports depen-dency errors.
SolutionUse the rpm-orphan-find script. This script searches for all the libraries on your sys-tem, then compares the results with the contents of the RPM database. Anyorphaned libraries are then rolled into a new, virtual .rpm. There are no files in this.rpm, just a list of provides. Run this like any Bash script:
# chmod +x rpm-orphan-find# ./rpm-orphan-find
When the script is finished, install the shiny new .rpm, and your formerly orphanedlibraries will be included in your RPM database.
Program: rpm-orphan-findThank you to Paul Heinlein and Peter Samuelson for this great script.
#!/bin/bash## rpm-orphan-find, a script that finds## orphaned libs on an RPM-based system## and rolls them into a virtual .rpm## written by Paul Heinlein and Peter Samuelson## Copyright 2003## You may use, distribute or modify this## program under the terms of the GPL.

This is the Title of the Book, eMatter EditionCopyright © 2007 O’Reilly & Associates, Inc. All rights reserved.
2.9 Tracking Source-Built Libraries on an RPM-Based System | 23
OS=$(uname -s)LIBS="/lib /usr/lib $(cat /etc/ld.so.conf)"NAME=$(echo ${OS}-base-libs | tr '[A-Z]' '[a-z]')VER=1.0; REL=1TMPSPEC=$(mktemp /tmp/${NAME}.spec.XXXXXX)
exec 9>$TMPSPEC
cat <<__eof__ >&9Summary: $OS Base Virtual PackageName: $NAMEVersion: $VERRelease: $RELGroup: System Environment/BaseLicense: None__eof__
found=0; orphan=0;echo "Scanning system libraries $NAME version $VER-$REL..."find $LIBS -type f \( -name '*.so.*' -o -name '*.so' \) |while read fdo ((found++)) if ! rpm -qf $f >/dev/null 2>&1 then ((orphan++)) echo "Provides: $(basename $f)" >&9 fi echo -ne "Orphans found: $orphan/$found...\r"doneecho ''; echo ''
cat <<__eof__ >&9
%descriptionThis is a virtual RPM package. It contains noactual files. It uses the 'Provides' token from RPM 3.x and later to list many ofthe shared libraries that are part of the base operating system and associatedsubsets for this $OS environment.
%prep# nothing to do
%build# nothing to do
%install# nothing to do
%clean# nothing to do
%post# nothing to do

This is the Title of the Book, eMatter EditionCopyright © 2007 O’Reilly & Associates, Inc. All rights reserved.
24 | Chapter 2: Installing and Managing Software on RPM-Based Systems
%files
__eof__
exec 9>&-rpmbuild -ba $TMPSPEC; rm $TMPSPEC
Note that rpmbuild has replaced rpm. Since when, you ask? Since the turn of the cen-tury. It first appeared in Red Hat 8, RPM Version 4.1. The old RPM commands oftenstill work, though, because they are aliased in /etc/popt. Run rpm --version to seewhat version you have.
If you have an older version of RPM, edit the last line of the script as follows:rpm -bb $TMPSPEC; rm $TMPSPEC
See Also• rpm(8), rpmbuild(8)
• Maximum RPM (http://www.rpm.org/max-rpm/index.html)
2.10 Fixing RPM Installation Problems
ProblemYou are trying to install an RPM, but the installation fails with “Error: Failed depen-dencies.” Welcome to dependency hell.
SolutionCollect all of the RPMs needed to satisfy the dependencies, then install them all atonce. For example:
# rpm -ivh tuxpaint-0.9.13-1.i386.rpmerror: Failed dependencies SDL_image is needed by tuxpaint-0.9.13-1 SDL_ttf is needed by tuxpaint-0.9.13-1 libSDL_image-1.2.so.O is needed by tuxpaint-0.9.13-1 libSDL_ttf-2.0.so.O is needed by tuxpaint-0.9.13-1# rpm -ivh tuxpaint-0.9.13-1.i386.rpm SDL_image-1.2.3-4.i386.rpm SDL_ttf-2.0.6-1.i386.rpm
The installer will sort them out and install them in the correct order.
What if RPM complains about a missing file or package, and you are certain it isinstalled? Sometimes the RPM database contains errors, so try rebuilding it:
# rpm -rebuilddb
If that doesn’t help, reinstall the allegedly missing package with --replacepkgs:
# rpm -ivh --replacepkgs SDL_ttf-2.0.6-1.i386.rpm

This is the Title of the Book, eMatter EditionCopyright © 2007 O’Reilly & Associates, Inc. All rights reserved.
2.11 Installing Source RPMs | 25
If you are certain the necessary libraries exist on your system, try either forcing theinstallation, ignoring errors:
# rpm -ivh --force tuxpaint-2002.10.20-1.i386.rpm
or don’t check dependencies:
# rpm -ivh --nodeps tuxpaint-2002.10.20-1.i386.rpm
If you find yourself stuck with unresolvable dependency conflicts, try installing yournew program and all of its dependent packages from source RPMs (see Recipe 2.11).
DiscussionWhere do you find the packages you need? Your first stop should be the home pageof the program you’re trying to install. Be sure to read any available documentation.
RPM-based distributions are quite diverse these days, so be sure to get RPMs builtfor your system. These are some of largest public RPM archives:
FreshRPMshttp://freshrpms.net
rpmfindhttp://rpmfind.net
rpm.pbonehttp://rpm.pbone.net
See Also• rpm(8)
• RPM.org (http://www.rpm.org/)
• Maximum RPM (http://www.rpm.org/max-rpm/index.html)
2.11 Installing Source RPMs
ProblemYou can’t install an RPM because of binary incompatibilities with your system, oryou just prefer to compile applications on your system, or you want to edit thesource code then build the package.
SolutionBuild your new program from source RPMs.
Download the SRPM—in this example, tuxpaint-2002.10.20-1.src.rpm—into yourdirectory of choice. Be sure to get the SRPM for your Linux distribution.

This is the Title of the Book, eMatter EditionCopyright © 2007 O’Reilly & Associates, Inc. All rights reserved.
26 | Chapter 2: Installing and Managing Software on RPM-Based Systems
Then run the package installer:
# rpm -ivh tuxpaint-2002.10.20-1.src.rpm
This will place sources in /usr/src/SOURCES and the spec file in /usr/src/SPECS:
$ ls /usr/src/SOURCEStuxpaint-2002.09.29.tar.gz ruxpaint-Makefile.patch tuxpaint-stamps-2002.09.29.tar.gztuxpaint.desktop tuxpaint-opt.patch$ ls /usr/src/SPECStuxpaint.spec
Build the spec file:
# rpmbuild -bb tuxpaint.spec
This creates a new RPM in /usr/src/RPMS/i386:
# ls /usr/src/RPMS/i386tuxpaint-2002.10.20-1.i386.rpm
You now have a nice, new Tuxpaint RPM, compiled for your system.
DiscussionThe source directory on your particular distribution may be different. Fedora 1 uses/usr/src/redhat/RPMS/, as did some early versions of Mandrake. Other distributionsuse /usr/src/RPM/RPMS. Poke around and you’ll find the right one.
This is not an escape from RPM hell. It simply lets you build an RPM from sourcescompiled on your system, so you have binary compatibility with system libraries andthe RPM is optimized for your architecture. You still need to manually satisfy depen-dencies, which is not as much fun as it sounds.
Note that rpmbuild is a separate package from rpm.
See Also• rpmbuild(8), rpm(8)
• RPM.org (http://rpm.org/)
• Maximum RPM (http://www.rpm.org/max-rpm/index.html)
2.12 Customizing Build Options in a Source RPM
ProblemYour site has some unique requirements requiring special non-default features to bebuilt into some applications. Therefore, you want to control the compile-timeoptions in a source RPM and make sure the features you need are built into theapplication.

This is the Title of the Book, eMatter EditionCopyright © 2007 O’Reilly & Associates, Inc. All rights reserved.
2.12 Customizing Build Options in a Source RPM | 27
SolutionFirst, download and install the source RPM:
# rpm -ivh samba-3.0.0-15.src.rpm
Then change to the SPECS directory, and open the spec file:
# cd /usr/src/redhat/SPECS# vim samba.spec
Look for the section containing the %configure options:
%configure \ --with-acl-support \ --with-automount \ --with-fhs \...
Add or remove your desired configuration options, save and close the spec file, thenbuild your RPM just like in Recipe 2.11:
# cd /usr/src/redhat/SPECS# rpmbuild -bb tuxpaint.spec
DiscussionWhere do you find a list of options? Change to the SOURCES directory, and unpackthe source tarball:
# cd /usr/src/redhat/SOURCES# tar xzvf samba-3.0.0.tar.bz2
As mentioned in Recipe 2.11, the source directory on your distribution may be different.
Poke around the unpacked tarball to find the configure script, and run its built-inhelp command:
# cd /usr/src/redhat/SOURCES/samba-3.0.0/source# ./configure --help'configure' configure this package to adapt to many kinds of systems...Optional Packages: with-PACKAGE[=ARG] use PACKAGE [ARG=yes] without-PACKAGE do not use PACKAGE with-fhs Use FHS-compliant paths with-privated=DIR Where to put smbpasswd...
You’ll also find the usual jumble of READMEs and howtos. When the %configuredirective is customized to your satisfaction, save and close it.
Package maintainers cannot possibly meet the needs of every user. Customizing yoursource RPMs is a simple way to make sure you get what you want.
The most common reason to customize the build of a source RPM, in these moderntimes, is to add to or customize your authentication support. There are many

This is the Title of the Book, eMatter EditionCopyright © 2007 O’Reilly & Associates, Inc. All rights reserved.
28 | Chapter 2: Installing and Managing Software on RPM-Based Systems
different kinds of authentication backends (LDAP, MySQL, BerkeleyDB, Postgr-eSQL) and many different authentication protocols. It’s a good security practice toenable only the options you need.
See Also• rpmbuild(8), rpm(8)
• RPM.org (http://www.rpm.org)
• Maximum RPM (http://www.rpm.org/max-rpm/index.html)
2.13 Installing Yum
ProblemYou’re rather tired of getting sucked into RPM-dependency hell, and you’re ready tolet the computer do the work.
SolutionUse Yum, the Yellow Dog Updater, Modified.
Yum is standard on Fedora; on other systems you may need to install it:
# rpm -ivh yum-2.0.4-1.noarch.rpm
Next, download the appropriate GPG keys. This key is for downloads from theFedora project:
# rpm --import http://www.fedora.us/FEDORA-GPG-KEY
You’ll find more keys in the download directories, such as http://download.fedora.redhat.com/pub/fedora/linux/core/2/i386/os/. You’ll need keys fromall the repositories you configure Yum to use. Add this line to /etc/yum.conf to makeYum automatically check the keys:
gpgcheck=1
Now you can install a new program:
# yum install tuxpaint
Your first Yum download will take as long as 30 minutes, because it will downloadpackage lists:
Gathering header information file(s) from server(s)Server: Fedora Linux / stable for Red Hat Linux 9 (i386)Server: Red Hat Linux 9 (i386)Server: Red Hat Linux 9 (i386) updatesFinding updated packagesDownloading needed headersgetting /var/cache/yum/fedora-stable/headers/leafnode-0-1.9.43-0.fdr.1.rh90.i386.hdr

This is the Title of the Book, eMatter EditionCopyright © 2007 O’Reilly & Associates, Inc. All rights reserved.
2.14 Configuring Yum | 29
getting /var/cache/yum/fedora-stable/headers/libzvt-devel-0-2.0.1-0.fdr.5.rh90.i386.hdr...Dependencies resolvedI will do the following:[install: tuxpaint-2002.10.20-1.i386.rpm]Is this ok [y/N]:
Say yes, and you’re finished.
DiscussionFreshRPMs is a good source of quality packages. Yum mirrors are at http://ayo.freshrpms.net. Your Yum RPM from FreshRPMs will already be configured touse the FreshRPMs repositories. Be sure to install the GPG key:
# rpm --import http://freshrpms.net/packages/RPM-GPG-KEY.txt
Putting gpgcheck=1 in yum.conf, and importing the keys, ensures that Yum will auto-matically check package signatures. It’s an easy, painless method for checking thatyou are installing packages that have not been maliciously altered or messed up intransit.
See Also• yum(8), yum.conf(5)
• Yum home page (http://linux.duke.edu/projects/yum/)
• Yum mirrors at FreshRPMs (http://ayo.freshrpms.net)
2.14 Configuring Yum
ProblemYou want to change the download source from which Yum gets software.
SolutionEdit your download sources in /etc/yum.conf. For example, say you want to use someFedora mirrors at http://www.fedora.us/wiki/FedoraMirrorList:
University of Southern California, USA ftp://mirrors.usc.edu/pub/linux/fedora/ http://mirrors.usc.edu/pub/linux/fedora/
Now edit /etc/yum.conf, using the default entries as a template:
[base]name=Fedora Core $releasever - $basearch - Basebaseurl=http://mirrors.kernel.org/fedora/core/$releasever/$basearch/os
baseurl=http://mirrors.usc.edu/pub/linux/fedora/$releasever/$basearch/os

This is the Title of the Book, eMatter EditionCopyright © 2007 O’Reilly & Associates, Inc. All rights reserved.
30 | Chapter 2: Installing and Managing Software on RPM-Based Systems
DiscussionIt’s good netiquette to use mirrors whenever possible, as the primary site at http://fedora.redhat.com gets hammered.
See Also• yum(8), yum.conf(5)
• Yum home page (http://linux.duke.edu/projects/yum)
• Yum mirrors at FreshRPMs (http://ayo.freshrpms.net)
• Fedora Mirror List (http://www.fedora.us/wiki/FedoraMirrorList)
2.15 Installing and Upgrading Packageswith Yum
ProblemYou need to know how to install packages, how to upgrade packages, and how to dosystem upgrades.
SolutionFirst, update your package list:
# yum check-update
To install a new package, use:
# yum -y install tuxkart
The -y flag allows unattended installation, by answering yes to all questions.
To update a single package, use:
# yum update gltron
To update several packages, use:
# yum update gltron ktron tuxracer
To update all installed packages, use:
# yum update
To search for a package to install, use:
# yum search quake
Now say you need a particular library, but you don’t know what package provides it.Yum will find it:
# yum provides libc6.1-1.so.2

This is the Title of the Book, eMatter EditionCopyright © 2007 O’Reilly & Associates, Inc. All rights reserved.
2.17 Getting Information on Installed Packages with Yum | 31
DiscussionOne of the nicest features of Yum is that you can add it to an existing system. It readsthe existing RPM database and creates a new package list, so you can use it rightaway without missing anything.
See Also• yum(8), yum.conf(5)
• Yum home page (http://linux.duke.edu/projects/yum/)
• Yum mirrors at FreshRPMs (http://ayo.freshrpms.net)
• Fedora mirror list (http://www.fedora.us/wiki/FedoraMirrorList)
2.16 Removing Packages with Yum
ProblemYou want to delete some packages.
SolutionYum can do this, too:
# yum remove gltron
You can also remove several packages at once:
# yum remove gltron ktron tuxkart xpoker
DiscussionYum also removes dependent packages that are no longer needed by the system.
See Also• yum(8), yum.conf(5)
• Yum home page (http://linux.duke.edu/projects/yum/)
2.17 Getting Information on Installed Packageswith Yum
ProblemYou want to know what packages are installed on your system, or get informationabout specific packages.

This is the Title of the Book, eMatter EditionCopyright © 2007 O’Reilly & Associates, Inc. All rights reserved.
32 | Chapter 2: Installing and Managing Software on RPM-Based Systems
SolutionUse Yum’s querying commands. To list all installed packages, use:
# yum list installed
To search for specific packages, use:
# yum list installed | grep -i tuxtuxracer i386 0.61-23tuxkart i386 0.2.0-3
To show information on a package, use:
# yum info tuxracer
To show packages with available updates, use:
# yum list updates
DiscussionYou can get all the same information using RPM queries, but Yum does it a littlemore easily.
See Also• yum(8), yum.conf(5)
• Yum home page (http://linux.duke.edu/projects/yum/)
2.18 Maintaining Yum
ProblemYou want to keep downloaded RPMs from piling up on your system, or you want toensure that Yum has fresh packages to work with.
SolutionUse the clean options. To delete all cached packages, use:
# yum clean packages
To force a fresh download of package headers, use:
# yum clean headers
To remove old headers that the system no longer needs, use:
# yum clean oldheaders
To remove cached packages and old headers, preserving the current headers, use:
# yum clean all

This is the Title of the Book, eMatter EditionCopyright © 2007 O’Reilly & Associates, Inc. All rights reserved.
2.18 Maintaining Yum | 33
DiscussionIt’s a good idea to refresh your local package and header cache periodically, to helpprevent odd errors, and to make sure installations and updates are getting currentpackages.
See Also• yum(8), yum.conf(5)
• Yum home page (http://linux.duke.edu/projects/yum/)

This is the Title of the Book, eMatter EditionCopyright © 2007 O’Reilly & Associates, Inc. All rights reserved.
34
Chapter 3CHAPTER 3
Installing and ManagingSoftware on Debian-BasedSystems
3.1 IntroductionDebian is known for being extremely stable and reliable, and for its excellent pack-age manager/dependency resolver, apt. Installing a new application is this simple:
# apt-get programname
All dependencies will be automatically fetched and installed. Not only is apt asophisticated, intelligent tool, but the official Debian software repositories maintainstrict packaging standards. The official Debian repositories contain over 12,000 pro-grams, more than any other platform.
dpkg is RPM’s Debian cousin, with an extra ability: dpkg also performs basic configu-rations. For example, when you install Postfix, dpkg will ask you for some basic sys-tem information, install startup files and configuration files, and fire it up.
Debian has three different releases: Stable, Testing, and Unstable. (There is also afourth release for the adventurous, Experimental.) These are also known as Woody,Sarge, and Sid. Woody is extremely conservative. Packages are accepted into Woodyonly after extensive dependency testing and security patching. Sarge and Sid containnewer, less-tested releases. Security patches are swift for Woody and erratic for Sargeand Sid.
Which release should you use? The obvious choice is Woody (Stable). It’s rock-solid.However, this stability comes at a price: programs in Woody are months, sometimesyears behind the latest releases. Woody is great for servers. For desktops and work-stations, Sarge (Testing) and Sid (Unstable) are more up-to-date. And despite thescary names—“Testing” and “Unstable”—they perform just fine.
As cute as the code names are, they shouldn’t be used in configuration files. Unsta-ble will always be Sid, but Woody and Sarge will not always be associated with Sta-ble and Testing—someday the current Testing release, Sarge, will be promoted toStable, and the current Woody will be retired. A well-maintained Debian system canbe continuously upgraded forever and ever, without ever needing to be completely

This is the Title of the Book, eMatter EditionCopyright © 2007 O’Reilly & Associates, Inc. All rights reserved.
3.2 Getting Software for a Debian System | 35
reinstalled, so you don’t want to goober it up by using release codenames that willchange.
These are the release codenames, all taken from the movie Toy Story:
“Buzz”—Buzz Lightyear, the spaceman (1.1)“Rex”—Rex the tyrannosaurus (1.2)“Bo”—Bo Peep (1.3.x)“Hamm”—Hamm, the piggy bank (2.0)“Slink”—Slinky Dog (2.1)“Potato”—Mr. Potato Head (2.2)
And for the 3.x releases:
“Woody”—the cowboy (Stable)
“Sarge”—the leader of the Green Plastic Army Men (Testing)
“Sid”—the rotten kid who destroys toys (Unstable)
3.2 Getting Software for a Debian System
ProblemYou need some software for your Debian system. There are gigabytes of software outthere, waiting for you—but where do you find software that’s packaged for Debian?How do you decide which software archives to use?
SolutionDebian packages come from official Debian package repositories, unofficial reposito-ries, and CD-ROMs. You must specify these sources in /etc/apt/sources.list, then useDebian’s packaging tools to install software from these sources.
Visit these sites to find the addresses for download sites:
Official Debian mirrorhttp://www.debian.org/mirror/
Unofficial APT repositorieshttp://www.apt-get.org
Visit this site for a worldwide list of CD vendors:
Vendors of Debian CDshttp://www.debian.org/CD/vendors/
Use the Debian package search page to find individual packages:
Debian packages search page and informationhttp://www.debian.org/distrib/packages/

This is the Title of the Book, eMatter EditionCopyright © 2007 O’Reilly & Associates, Inc. All rights reserved.
36 | Chapter 3: Installing and Managing Software on Debian-Based Systems
The next step is to edit /etc/apt/sources.list with your selected sources. See the Discus-sion for some sample configurations.
DiscussionHere are three sources.list examples. Run apt-get update every time you changesources.list, and run it periodically to keep your package lists up-to-date.
sources.list for Woody:
# See sources.list(5) for more information# Remember that you can only use http, ftp, or file URIs# CD-ROMs are managed through the apt-cdrom tool.deb http://http.us.debian.org/debian stable main contrib non-freedeb http://non-us.debian.org/debian-non-US stable/non-US main contrib non-freedeb http://security.debian.org stable/updates main contrib non-free# Uncomment if you want the apt-get source function to work#deb-src http://http.us.debian.org/debian stable main contrib non-free#deb-src http://non-us.debian.org/debian-non-US stable/non-US main contrib non-free
sources.list for Sarge:
deb http://http.us.debian.org/debian testing main contrib non-freedeb http://non-us.debian.org/debian-non-US testing/non-US main contrib non-freedeb http://security.debian.org testing/updates main contrib non-free# Uncomment if you want the apt-get source function to work#deb-src http://http.us.debian.org/debian testing main contrib non-free#deb-src http://non-us.debian.org/debian-non-US testing/non-US main contrib non-free
sources.list for Sid:
deb ftp://ftp.us.debian.org/debian unstable main contrib non-freedeb ftp://non-us.debian.org/debian-non-US unstable/non-US main contrib non-free# Sourcesdeb-src ftp://ftp.us.debian.org/debian unstable main contrib non-freedeb-src ftp://non-us.debian.org/debian-non-US unstable/non-US main contrib non-free
apt-get always takes the newest package version, if it finds multiple sources. List yoursources in order of preference, because apt-get starts at the top and works its waydown.
Editing your sources.list a lot is perfectly acceptable, and it’s a simple way to controlinstallations. Put in all the lines you think you might ever want to use, and commentout the lines that are unneeded for specific installations.
A nice thing to do is to select official Debian mirrors for your sources.list, to take theload off the servers at Debian.org. A complete list of the official mirrors is at http://www.debian.org/mirror/.

This is the Title of the Book, eMatter EditionCopyright © 2007 O’Reilly & Associates, Inc. All rights reserved.
3.3 Installing Debian Packages from CD-ROM | 37
Security updates are available only from http://www.debian.org/security/. Security updates are not mirrored. See the appropiatesources.list above to get the correct lines for Stable and Testing. Andremember while that Stable receives swift, timely security updates,they are issued much more slowly for Testing and Unstable.
See Also• sources.list(5)
• Official Debian mirrors (http://www.debian.org/mirror/)
• Debian packages search page and information (http://www.debian.org/distrib/packages)
3.3 Installing Debian Packages from CD-ROM
ProblemYou want to install packages from a CD-ROM. The process we’ve just describedassumes you want to download software from an archive. How do you add a CD tosources.list?
SolutionModify /etc/apt/sources.list with the apt-cdrom command. This is the only way to addCD archives to sources.list. There must be a disk in the drive, but it does not need tobe mounted. Then type:
# apt-cdrom addUsing CD-ROM mount point /cdrom/Unmounting CD-ROMPlease insert a Disc in the drive and press enterMounting CD-ROMIdentifying.. [0eabc03d10414e59dfa1622326e20da7-2]Scanning Disc for index files.. Found 1 package indexes and 0 source indexes.This Disc is called: 'Libranet GNU/Linux 2.8.1 CD2'Reading Package Indexes... DoneWrote 1271 records.Writing new source listSource List entries for this Disc are:deb cdrom:[Libranet GNU/Linux 2.8.1 CD2]/ archive/Repeat this process for the rest of the CDs in your set.
Use the -d switch to add a CD in a different CD drive:
# apt-cdrom -d /cdrom1 add
To identify a disk, use:
$ apt-cdrom identUsing CD-ROM mount point /cdrom/

This is the Title of the Book, eMatter EditionCopyright © 2007 O’Reilly & Associates, Inc. All rights reserved.
38 | Chapter 3: Installing and Managing Software on Debian-Based Systems
Mounting CD-ROMIdentifying.. [0eabc03d10414e59dfa1622326e20da7-2]Stored Label: 'Libranet GNU/Linux 2.8.1 CD2'$
Discussionapt-get selects the newest versions of packages to install from the available sources.As the Linux world advances swiftly, your online sources will always be the newest.To make sure a program gets installed from a CD, comment out the other lines inyour sources.list.
Remember to run apt-get update every time you change yoursources.list.
See Also• apt-cdrom(8), apt-get(8)
• Debian on CD, the ISO archives (http://www.debian.org/CD/http-ftp/)
3.4 Installing Packages on Debian-BasedSystems
ProblemAll these software archives, CDs, and so on are meaningless if you can’t install thesoftware. So: you need to know how to install packages on Debian.
SolutionUse apt-get install:
# apt-get install tuxkart
To reinstall a package, overwriting the files, use:
# apt-get install --reinstall tuxkart
To install several packages at once, use a space-delimited list:
# apt-get install tuxkart gltron frozen-bubbletuxracer nethack galaga
To download only, without installing or unpacking, use:
# apt-get -d install tuxkart
Append --dry-run to test the command before executing it:
# apt-get install tuxkart gltron frozen-bubble tuxracer nethack galaga --dry-run

This is the Title of the Book, eMatter EditionCopyright © 2007 O’Reilly & Associates, Inc. All rights reserved.
3.5 Removing Packages from a Debian System | 39
DiscussionTo find package names, use Debian’s package search page at http://www.debian.org/distrib/packages/. Debian’s package names are often very different from their RPMcousins. For example, CyrusSASL is packaged as sasl-2.x.rpm, but on Debian it’ssplit into several packages named libsasl-*.
Remember to run apt-get update after changing /etc/apt/sources.list, and run it period-ically to stay current with the package repositories.
apt-get fetches and installs (and when necessary, deletes) all packages necessary toresolve all dependencies.
See Also• apt-get(8)
• Local documentation (/usr/share/doc/Debian/apt-howto)
3.5 Removing Packages from a Debian System
ProblemYou want to remove a package, or several packages, from your Debian system.
SolutionUse apt-get remove:
# apt-get remove tuxpaintReading Package Lists... DoneBuilding Dependency Tree... DoneThe following packages will be REMOVED: tuxkart0 upgraded, 0 newly installed, 1 to remove and 79 not upgraded.Need to get 0B of archives.After unpacking 188kB disk space will be freed.Do you want to continue? [Y/n] y(Reading database ... 141283 files and directories currently installed.)Removing tuxkart ...#
To test the remove command first, use:
# apt-get remove tuxpaint --dry-run
To remove all traces of a package, including configuration files, use:
# apt-get --purge remove tuxpaint
To remove several packages, use a space-delimited list:
# apt-get remove tuxkart gltron frozen-bubble tuxracer nethack galaga

This is the Title of the Book, eMatter EditionCopyright © 2007 O’Reilly & Associates, Inc. All rights reserved.
40 | Chapter 3: Installing and Managing Software on Debian-Based Systems
See Also• apt-get(8)
• Local documentation (/usr/share/doc/Debian/apt-howto)
3.6 Installing from Sources on a Debian System
ProblemYou want to compile a program on your system, rather than installing the Debianbinaries. Perhaps you want to edit the source code, or you want to run a packagefrom Testing or Unstable on Stable, and recompiling it will ensure that the correctdependencies will be built.
SolutionUse apt-get source, with an assist from dpkg.
First, download the dependent headers and libraries into the directory in which youwant to build the package:
# cd /usr/src# apt-get build-dep tuxkart
To download and build the package:
# apt-get -b source tuxkart
and install the package:
# dpkg -i tuxkart.deb
DiscussionA common reason for building .debs from sources is to use packages from Testing orUnstable on Stable. Recompiling them adjusts the dependencies for Stable.
An alternative to building .debs from sources is to use backports. These are nice com-piled Debian binaries, all ready to use. See http://www.backports.org.
If you want to install a program that is not in the Debian repositories, you can builda .deb using CheckInstall, a utility that creates RPM, .deb, and Slackware packages(see Recipe 4.5).
See Also• apt-get(8), dpkg-source(1)
• Local documentation (/usr/share/doc/Debian/apt-howto)
• Recipe 4.5, “Using CheckInstall to Create Packages from Sources”

This is the Title of the Book, eMatter EditionCopyright © 2007 O’Reilly & Associates, Inc. All rights reserved.
3.8 Upgrading a Debian System | 41
3.7 Upgrading Packages on Debian
ProblemYou want to upgrade a Debian package, because the new version has new features orbug fixes.
SolutionUse apt-get install:
# apt-get install gltronReading Package Lists... DoneBuilding Dependency Tree... DoneThe following packages will be upgraded: gltron1 upgraded, 0 newly installed, 0 to remove and 78 not upgraded.Need to get 89.5kB of archives.After unpacking 266kB of additional disk space will be used.Get:1 ftp://ftp.debian.org sid/main gltron 3.53 [89.5kB]Fetched 89.5kB in 5s (16.8kB/s)Preconfiguring packages ...(Reading database ... 141286 files and directories currently installed.)Preparing to replace adduser 3.52 (using .../archives/adduser_3.53_all.deb) ...Unpacking replacement gltron ...Setting up adduser (3.53) ...#
To upgrade several packages, use:
# apt-get install tuxkart gltron frozen-bubble tuxracer nethack galaga
DiscussionThere is no separate command for upgrading a package. apt-get install always looksfor the newest version.
See Also• apt-get(8)
• Local documentation (/usr/share/doc/Debian/apt-howto)
3.8 Upgrading a Debian System
ProblemYou want to upgrade all the packages on your system to the latest versions.

This is the Title of the Book, eMatter EditionCopyright © 2007 O’Reilly & Associates, Inc. All rights reserved.
42 | Chapter 3: Installing and Managing Software on Debian-Based Systems
SolutionMake sure your /etc/apt/sources.list is pointing to your desired sources, then runapt-get upgrade.
Always update your package lists first:
# apt-get update
This command upgrades all installed packages, but does not remove any packages toresolve dependencies:
# apt-get -u upgrade
This upgrades all installed packages, and removes or installs packages as needed tosatisfy all dependencies:
# apt-get -u dist-upgrade
The -u flag gives you a chance to review all changes first. The upgrade can take sev-eral hours, depending on the speed of your Internet connection, and how manypackages need to be downloaded.
DiscussionTo make -u the default action, edit (or create) /etc/apt/apt.conf:
// Always list packages to be upgraded// and prompt userAPT::Get::Show-Upgraded "true";
Every time you want to run apt-get dist-upgrade, run apt-get upgrade first to reducethe chances of dist-upgrade encountering errors.
See Also• apt-get(8)
• Local Documentation (/usr/share/doc/Debian/apt-howto)
3.9 Upgrading to a Newer Debian Release
ProblemYou want to upgrade to a newer release; for example, from Woody to Sarge.
SolutionFirst, edit /etc/apt/sources.list so that it has only Sarge entries. Then do the following:
# apt-get update# apt-get -u upgrade# apt-get -u dist-upgrade

This is the Title of the Book, eMatter EditionCopyright © 2007 O’Reilly & Associates, Inc. All rights reserved.
3.10 Running a Mixed Debian System | 43
The -u flag lets you review the changes first. Depending on the speed of your Internetconnection and how many packages are required, this can take up to several hours.
If apt-get -u dist-upgrade shows any held packages, this indicates dependency con-flicts that apt cannot resolve. See Recipe 3.13 for how to resolve these conflicts.
DiscussionAt some point Sarge will be promoted to Stable, and Woody will be “retired.” Whenthat happens, this is how to “promote” your system as well.
See Also• apt-get(8)
• Local Documentation (/usr/share/doc/Debian/apt-howto)
3.10 Running a Mixed Debian System
ProblemYou want Stable for a base system, plus some programs from Testing. That is, youwant a rock-solid base system, but for a few programs you need the most recent ver-sions to get necessary features.
SolutionEdit /etc/apt/sources.list to point to both Stable and Testing sources, then edit /etc/apt/apt.conf to set the default release. In this example, Stable is the default. Thenwhen you install or upgrade packages, select the version you want with the -t flag.
First, edit /etc/apt/sources.list to point to both Stable and Testing. (See Recipe 3.2 formore information on sources.list.)
Now edit (or create) /etc/apt/apt.conf:
// This is the default system release-// version can be: woody, sarge, sid// or stable, testing, unstableAPT::Default-Release "stable";
and update your package lists:
# apt-get update
Stable is now the default release, so it’s not necessary to specify it when installingpackages. This command installs Tuxkart from Stable:
# apt-get install tuxkart
To install a package from Sarge (Testing), use the -t switch:
# apt-get -t testing install tuxkart

This is the Title of the Book, eMatter EditionCopyright © 2007 O’Reilly & Associates, Inc. All rights reserved.
44 | Chapter 3: Installing and Managing Software on Debian-Based Systems
Specifying the package number will ensure that you get exactly the version you want:
# apt-get install tuxkart=0.2.0-3
DiscussionYou want to be careful running a mixed system, especially when Woody is the basesystem. As Woody ages, binary compatibility with Sarge/Sid becomes an issue. Keysystem files, such as libc and gcc, can diverge to the point that Sarge/Sid packageswon’t install on Woody. If that happens, try building the packages from sources, orusing backports (Recipe 3.6).
See Also• apt.conf(5), sources.list(5)
• Debian package search page (http://www.debian.org/distrib/packages)
3.11 Finding Out What Is Installed on a DebianSystem
ProblemYou want to know what packages are on your system, what packages files belong to,and what’s in individual packages.
SolutionUse the querying features of dpkg.
To list all installed packages and pipe the list to a file, use:
$ dpkg -l | tee dpkglist
To find all packages related to your search term and show their installation status, use:
$ dpkg -l '*gnome*'Desired=Unknown/Install/Remove/Purge/Hold| Status=Not/Installed/Config-files/Unpacked/Failed-config/Half-installed|/ Err?=(none)/Hold/Reinst-required/X=both-problems (Status,Err: uppercase=bad)||/ Name Version Description+++-= = = = = = = = = = = = = = = = = = = = = = = = = = = = = = = = = = = = = = = = = = = = = = = =pn gnome <none> (no description available)un gnome-about <none> (no description available))ii gnome-applets 2.4.2-1 Various applets for GNOME 2 panelrc gnome-bin 1.4.2-18 Miscellaneous binaries used by GNOME
To find only installed packages related to your search term, use:
$ dpkg -l | grep gnome

This is the Title of the Book, eMatter EditionCopyright © 2007 O’Reilly & Associates, Inc. All rights reserved.
3.11 Finding Out What Is Installed on a Debian System | 45
To list files belonging to a package, use:
$ dpkg -L gnome-applets./usr/usr/share/usr/share/lintian/usr/share/lintian/overrides/usr/share/lintian/overrides/gnome-applets...
To see what package a file belongs to, use:
$ dpkg -S boing.wavtuxkart-data: /usr/share/games/tuxkart/wavs/boing.wav
To show complete package information, use:
$ dpkg -s kpokerPackage: kpokerStatus: install ok installedPriority: optionalSection: gamesInstalled-Size: 428Maintainer: Daniel Schepler <[email protected]>Source: kdegamesVersion: 4:3.1.5-1....
DiscussionThe table displayed by dpkg -l is a bit cryptic, so here’s a translation. Believe it or not,it’s ASCII art.
$ dpkg -l gnome*Desired=Unknown/Install/Remove/Purge/Hold| Status=Not/Installed/Config-files/Unpacked/Failed-config/Half-installed|/ Err?=(none)/Hold/Reinst-required/X=both-problems (Status,Err: uppercase=bad)||/ Name Version Description+++-= = = = = = = = = = = = = = = = = = = = = = = = = = = = = = = = = = = = = = = = = = = = = = = =pn gnome <none> (no description available)un gnome-about <none> (no description available))ii gnome-applets 2.4.2-1 Various applets for GNOME 2 panelrc gnome-bin 1.4.2-18 Miscellaneous binaries used by GNOME
On the pn gnome line, follow the p upward; there are three “arrows” pointing toDesired=Unknown/Install/Remove/Purge/Hold. This represents the state you wish thepackage to have (in this case, “purge”).
The next column, n, points to the Status line, where we are informed that it is“Not/Installed.”
The third column points to the error and is empty (a good thing). As the end of thisline indicates, anything in the Status or Err columns in uppercase is really bad.

This is the Title of the Book, eMatter EditionCopyright © 2007 O’Reilly & Associates, Inc. All rights reserved.
46 | Chapter 3: Installing and Managing Software on Debian-Based Systems
So, package gnome was installed once upon a time, but I desired it purged, and so itwas.
un means a package has never been installed.
ii means a package is desired and installed.
rc means a package was once installed but then was removed, leaving the configura-tion files behind. This is easy to check:
$ dpkg -L gnome-bin/etc/logcheck/ignore.d.server/gnome-bin/etc/logcheck/ignore.d.workstation/gnome-bin
See Also• dpkg(8)
3.12 Maintaining the Debian Package Cache
ProblemYou want to keep your package cache and package lists tidy and up-to-date, so thatapt will work correctly and not encounter bogus dependency problems.
SolutionUse apt and dpkg.
Remember to run apt-get update after making changes to /etc/apt/sources.list, and runit periodically to keep package lists current.
To look for downloaded, uninstalled packages, use:
$ dpkg --yet-to-unpack
To check for broken dependencies, use:
# apt-get check
To remove cached packages that are no longer needed, use:
# apt-cache autoclean
To remove all cached packages, use:
# apt-cache clean
To show partially installed packages, use:
$ dpkg --audit
If dpkg --audit returns any results, as in the following case:
$ dpkg --auditvpw (no information available)

This is the Title of the Book, eMatter EditionCopyright © 2007 O’Reilly & Associates, Inc. All rights reserved.
3.13 Resolving Debian Dependency Conflicts | 47
first check that the returned package exists:
$ dpkg -l vpwPackage `vpw' is not installed and no info is available.
If it exists, either complete the installation or remove it. If it is not installed, searchboth /var/lib/dpkg/available and /var/lib/dpkg/status for the offending entry, andremove it.
DiscussionYour package cache can easily consume tens, or even hundreds, of megabytes. Seefor yourself in /var/cache/apt/archives. To conserve storage space, set up a local pack-age cache for your network (Recipe 3.14).
See Also• dpkg(8), apt-cache(8), apt-get(8)
• Local documentation (/usr/share/doc/Debian/apt-howto)
• The Debian Reference Manual (http://qref.sourceforge.net/)
3.13 Resolving Debian Dependency Conflicts
ProblemA program will not install because of dependency problems, or apt-get dist-upgradeleaves held packages behind and you need to clean them up.
SolutionThere are several different commands to try; this recipe lists them in the order youshould try them.
Suppose libpam-modules is the problem package, and it won’t upgrade:
# apt-get install libpam-modules...The following packages have unmet dependencies: libpam-modules: Depends: libdb3 (>= 3.2.9-19.1) but 3.2.9-19 is to be installedE: Broken packages
If you are running a mixed system, first try specifying the version:
# apt-get install -t stable libpam-modules
If that doesn’t help, or you are not running a mixed system, try Debian’s conflictresolver:
# apt-get -f install
Then run:
# dpkg --configure -a

This is the Title of the Book, eMatter EditionCopyright © 2007 O’Reilly & Associates, Inc. All rights reserved.
48 | Chapter 3: Installing and Managing Software on Debian-Based Systems
Then run this one again:
# apt-get -f install
If it reports:
Reading Package Lists... DoneBuilding Dependency Tree... Done0 upgraded, 0 newly installed, 0 to remove and 1 not upgraded.
That means it failed. Next, test what happens if you delete the existing libpam-modules:# apt-get remove --dry-run libpam-modulesReading Package Lists... DoneBuilding Dependency Tree... DoneThe following packages will be REMOVED: adduser adminmenu apache at base-config courier-imap courier-imap-ssl courier-popcourier-pop-ssl cron cupsys cupsys-driver-gimpprint dict-elements dict-foldoc dict-gcide dict-jargon dict-vera dict-wn dictd gdm2.......WARNING: The following essential packages will be removedThis should NOT be done unless you know exactly what you are doing! login libpam-modules (due to login)
In this instance, it’s going to take almost a system rebuild to correct the dependencyconflict. Most times, there are only a few packages involved. In that case, delete theleast important ones first, until all dependency conflicts are resolved, and then rein-stall any that are needed.
If apt-get -u dist-upgrade shows any held packages, it is best to eliminate them. Pack-ages are held because of dependency conflicts that apt cannot resolve. Try this com-mand to find and repair the conflicts:
# apt-get -o Debug::pkgProblemResolver=yes dist-upgrade
If it cannot fix the conflicts, it will exit with:
0 upgraded, 0 newly installed, 0 to remove and 6 not upgraded.
Delete the held packages one by one, running dist-upgrade each time, until thereare no more held packages. Then reinstall any needed packages. Be sure to use the--dry-run option, so that you are fully informed of consquences:
# apt-get remove --dry-run libsdl-perl
DiscussionThese sorts of dependency conflicts are rare on single-release systems. Users ofmixed systems run into them more often. The best prevention is to be very selectiveabout what you install—when you first install Debian, take the time to select all thepackages you want individually.
See Also• dpkg(8), apt-get(8)
• Debian User’s List, with searchable archives (http://lists.debian.org/debian-user/)

This is the Title of the Book, eMatter EditionCopyright © 2007 O’Reilly & Associates, Inc. All rights reserved.
3.14 Building a Local Debian Repository | 49
3.14 Building a Local Debian Repository
ProblemYou want to build a local package repository for your LAN to share. A local reposi-tory is useful if you have many users sharing a low-bandwidth Internet connection;your Debian systems can grab packages from the local repository, rather than goingout over the network.
SolutionUse apt-proxy:
# apt-get install apt-proxy
apt-proxy starts up automatically after installation.
Next, edit the add_backend/debian/ section of /etc/apt-proxy/apt-proxy.conf so that itpoints to geographically close package mirrors. (See http://www.debian.org/mirror/listfor a list of package mirrors.)
Now edit /etc/apt/sources.list on the client machines to point to the apt-proxy server.The default port is 9999:
deb http://ip-or-hostname:9999/main stable main contrib non-freedeb http://ip-or-hostname:9999/non-US stable/non-US main contrib non-freedeb http://ip-or-hostname:9999/security stable/updates main contrib non-free
Run apt-get update on the client machines, and you’re in business. Every time a cli-ent machine on your LAN installs a new program, it will be cached on the apt-proxyserver. Subsequent requests for the same package will be served by the local cache.
DiscussionMost of the default settings in /etc/apt-proxy/apt-proxy.conf, other than the packagesources, are just fine, except for one thing: the “updates” frequency, which specifieshow often to download the latest packages list. This is the default:
# Maximum frequency of Packages/etc. updates from back end (minutes)# Keep high to speed things up.BACKEND_FREQ=240
I set mine to 1440; once a day is plenty. There’s really not so much happening thatmore frequent updates are necessary. The main reason to check as often as once aday is to stay on top of security updates.
See Also• apt-proxy(8), apt-proxy.conf(5)
• The official Debian mirrors list (http://www.debian.org/mirror/)
• Apt-proxy home page (http://apt-proxy.sourceforge.net/)

This is the Title of the Book, eMatter EditionCopyright © 2007 O’Reilly & Associates, Inc. All rights reserved.
50 | Chapter 3: Installing and Managing Software on Debian-Based Systems
3.15 Selecting Package Mirrorsfor apt-proxy.conf
ProblemThe default package mirrors in apt-proxy.conf are all over the globe, how do you selectwhich mirrors to use? Ideally, you’d like to use mirror sites that are close to you.
SolutionThe default sources in /etc/apt-proxy/apt-proxy.conf look like this:
add_backend /debian/ \ $APT_PROXY_CACHE/debian/ \ http://ftp.us.debian.org/debian/ \ http://ftp.de.debian.org/debian/ \ http://ftp.uk.debian.org/debian/ \ +ftp.us.debian.org::debian/
Visit http://www.debian.org/mirror/list for the current list of Debian mirrors. Forexample, here are some of the German mirrors on mirror/list:
DE Germany----------ftp.de.debian.org /debian/ /debian/ftp2.de.debian.org /debian/ /debian/ftp.tu-clausthal.de /pub/linux/debian/ /pub/linux/debian/debian.uni-essen.de /debian/ /debian/...
Replace the defaults with your selections, prefixing each entry with http://:
add_backend /debian/ \ $APT_PROXY_CACHE/debian/ \ http://ftp.de.debian.org/debian/ \ http://ftp2.de.debian.org/debian/ \ http://ftp.tu-clausthal.de/pub/linux/debian \
The /etc/apt/sources.list files on the client machines do not need to be changed.
DiscussionYou can use ping and traceroute to find out which mirrors have the fastest responsetimes, because geographic proximity doesn’t always mean faster responses.
Having three separate sources gives redundancy. apt-proxy queries them in order, soif the first one does not respond, it tries the next one.
See Also• apt-proxy(8), apt-proxy.conf(5), apt-proxy-import(8)
• The official Debian mirrors list (http://www.debian.org/mirror/)
• apt-proxy home page (http://apt-proxy.sourceforge.net/)

This is the Title of the Book, eMatter EditionCopyright © 2007 O’Reilly & Associates, Inc. All rights reserved.
3.16 Adding Your Existing Package Cache to apt-proxy.conf | 51
3.16 Adding Your Existing Package Cacheto apt-proxy.conf
ProblemYou already have a sizeable .deb cache on your apt-proxy server, and you would likeapt-proxy to use it instead of downloading everything all over again.
SolutionFirst run apt-get update on at least one client machine to initialize the cache. Then,on the server, run:
# apt-proxy-import -d /var/cache/apt/archives
And you’re done.
See Also• apt-proxy(8), apt-proxy.conf(5), apt-proxy-import(8)
• The official Debian mirrors list (http://www.debian.org/mirror/)
• apt-proxy home page (http://apt-proxy.sourceforge.net)

This is the Title of the Book, eMatter EditionCopyright © 2007 O’Reilly & Associates, Inc. All rights reserved.
52
Chapter 4CHAPTER 4
Installing Programs fromSource Code
4.1 IntroductionEven with all the package managers and dependency resolvers out there, there aretimes when building from sources is preferable. For example, a program you wantmay not be available in a packaged version, or you may need to control exactly whatoptions and features are built into it, or you may want to optimize it for your archi-tecture. Many experienced administrators recommend building programs critical tosecurity (ssh and all servers, for example) from sources.
When building from sources, be sure to read all the instructions. While theconfigure-make-make install procedure is fairly standard, there are many exceptions,according to the quirks of the program authors. And there are often many configura-tion options, which only the documention for the program can tell you.
If you prefer using packages, all the tools are freely available for building your ownRPMs and .debs. However, it’s a fair learning curve to learn to use RPM or to buildyour own .debs. There is a third option: CheckInstall. CheckInstall is a great utilityfor easily building your own RPM, Debian, or Slackware packages from source code.
4.2 Preparing Your System for CompilingPrograms from Sources
ProblemYou know you need a compiler and maybe some other utilities to be able to compileprograms from sources, but you’re not sure exactly what.

This is the Title of the Book, eMatter EditionCopyright © 2007 O’Reilly & Associates, Inc. All rights reserved.
4.2 Preparing Your System for Compiling Programs from Sources | 53
SolutionThere are two categories of programs that you will need:
• Essential development tools common to all Linux systems
• Specific libraries or utilities for whatever program you are compiling
Here is a list of the common Linux development tools:
GNU coreutilsThis is a large collection of essential system utilities: shellutils, fileutils, and textutils.See http://www.gnu.org/software/cororeutils/ for a complete listing, or infocoreutils.
GNU binutilsUtilities for doing things to binary files (http://www.gnu.org/software/binutils/).
gccGNU compiler collection, containing C, C++, Objective-C, Fortran, Java, andAda, and libraries for these languages.
GNU tarArchiving utility for source tarballs; these end in .tar.
gunzipCompression utility often paired with tar. These end in .tar.gz.
bunzip2A super-compression format for packing and unpacking tarballs; these end in.bz2.
makeThis does the work of reading your configuration options and building theactual program files.
The documentation for the application you are building will tell you everything thatit needs to build successfully.
DiscussionMost Linux distributions have an installation option for “Core Development Tools,”or some such, so you don’t have to hunt down and install them individually.
You’ll need to read the documentation for the application you are building to findout any requirements specific to the program. Look for README, INSTALL, andother documentation in the source tarball. Read everything. When you run the con-figure script, it will check your system to see if all the required elements are present.If anything is missing, it will exit with errors, and tell what you need.

This is the Title of the Book, eMatter EditionCopyright © 2007 O’Reilly & Associates, Inc. All rights reserved.
54 | Chapter 4: Installing Programs from Source Code
See Also• Chapter 14 of LPI Linux Certification in a Nutshell by Jeff Dean (O’Reilly)
4.3 Generating a List of Files from a SourceInstall for Easy Uninstalls
ProblemYou need to know what files are installed on your system when you install a pro-gram from source code, so that you can find and remove all of them if you decideyou don’t want them anymore. Some program authors thoughtfully include a “makeuninstall” target to perform a clean uninstall, but many do not.
SolutionYou can use standard Linux utilities to generate a pre-installation list of all files onyour system. Then generate a post-installation list, and diff the two lists to make alist of newly-installed files. This example uses JOE: Joe’s Own Editor:
# find / | grep -v -e ^/proc/ -e ^/tmp/ -e ^/dev/ > joe-preinstall.list
Compile and install your new program, then generate the post-installation list:
# find / | grep -v -e ^/proc/ -e ^/tmp/ -e ^/dev/ > joe-postinstall.list
Then create a list of files installed by Joe by diffing the two lists:
$ diff joe-preinstall.list joe-postinstall.list > joe-installed.list
DiscussionUsing find and grep together makes it easy to exclude directories that don’t matterfor your final list. The -v option for grep means “exclude the following,” or “displaythings that do not match the following expressions.” -e specifies the pattern to searchfor. The caret, ^, means “look for the pattern at the beginning of the lines.”
You don’t need to bother with /proc or /tmp files, because these are transient andconstantly changing. /dev files are managed by the system, so you can ignore these aswell. And it’s a also an important safety measure—when you remove a programmanually, using your nice diff list, /proc, /tmp, and /dev are all directories youshouldn’t touch in any case.
See Also• grep(1), find(1), diff(1)

This is the Title of the Book, eMatter EditionCopyright © 2007 O’Reilly & Associates, Inc. All rights reserved.
4.4 Installing Programs from Source Code | 55
4.4 Installing Programs from Source Code
ProblemYou want to install a program from source code, but you’re having trouble navigat-ing the thickets of tarballs, makefiles, and bunzips.
SolutionUnpack the tarball (compressed archive), then configure, make, and install the program.
Start in the directory where you store your tarballs and source trees. This exampleuses JOE (Joe’s Own Editor):
# cd /usr/src/downloads# tar zxvf joe-2.9.8.tar.gz# cd joe-2.9.8# ls# less README# less INFO# ./configure --help# ./configure <options, if needed># make# make install | tee joe-makeinstall
The last command stores the installation output in the text file joe-makeinstall.
Some programs are archived with the bunzip2 utility, rather than the more tradi-tional gzip. This is how to unpack a .bz2 archive:
# tar jxvf joe-2.9.8.tar.bz2
To uninstall a source-built program, use:
# make uninstall
Uninstalling works only if the program author included a make uninstall option. Pip-ing the output of make install to a text file gives you a reference if you have to removeall the files manually. Or generate a list using Recipe 4.3.
DiscussionThe steps described in this section are the standard way of installing programs fromsource code. However, not all program authors follow the same procedures. Be sureto review all the program documentation first.
Studying your configure options is the most important part. Some programs, likeApache, have dozens of compile-time options. For prudent basic security, you onlywant to compile in support for things you really need. This is most important onservers that are exposed to untrusted networks, such as web and mail servers.

This is the Title of the Book, eMatter EditionCopyright © 2007 O’Reilly & Associates, Inc. All rights reserved.
56 | Chapter 4: Installing Programs from Source Code
Good reasons to compile programs from source are:
• You can configure exactly the options you need.
• You can optimize the program for your architecture.
• You have ultimate control over what is installed.
The bad part:
• Upgrades and removals can be messy.
• Dependency hell is only a short step away.
• Compiling a large program can take hours.
Some servers should be built from sources. For example, an Apache web server reallyneeds to be source-built to get full customization and optimization.
For a desktop system, forget it. They’re too big and complex. Use the nice package-based Linux distributions for these.
See Also• info tar, make(1), bzip2(1)
4.5 Using CheckInstall to Create Packagesfrom Sources
ProblemYou want to create Slackware, Red Hat, or Debian packages from source code,because an application that you want to install does not come in the package youwant. You have read up on building packages, and it’s very complicated. Isn’t therean easier way?
SolutionUse CheckInstall. Again using Joe’s Own Editor in this example, on Debian, do thefollowing:
# mkdir /doc-pak# tar zxvf joe-2.9.8.tar.gz# cd joe-2.9.8# ./configure# make# checkinstall -D
CheckInstall replaces make install, so it must run from the root of the source tree.Follow the prompts and do what they say. It will build and install a .deb, as we canverify:

This is the Title of the Book, eMatter EditionCopyright © 2007 O’Reilly & Associates, Inc. All rights reserved.
4.5 Using CheckInstall to Create Packages from Sources | 57
$ dpkg -l | grep joeii joe 2.9.8-1 joe's own editor, my fave
And that’s it. It’s installed and ready to go to work. A copy of the package willremain in the source directory.
To build a Slackware package, use:
# checkinstall -S
To build an RPM package, use:
# checkinstall -R
DiscussionThe doc-pak directory is where CheckInstall places READMEs and other programdocumentation. If you don’t create the doc-pak directory, CheckInstall asks if youwant to build a default documentation directory. If you say no, your package willhave no documentation.
CheckInstall uses the native installation program’s package manager: RPM on RedHat, installpkg on Slackware, .apt on Debian. To remove a CheckInstall package,simply use your system’s package manager.
CheckInstall supports any install scripts. For example:
# checkinstall -D make install_packages# checkinstall -R make modules_install# checkinstall -S install.sh# checkinstall -D setup
Remember to study the README of the program you’re installing, and any otherincluded documentation. Not all source packages use the traditional configure-make-make install dance. Some use other installation scripts, as in the example above.
CheckInstall does not yet allow creating a package without automatically installingit, though this may change in future releases.
See Also• CheckInstall home page (http://asic-linux.com.mx/~izto/checkinstall/news.php)

This is the Title of the Book, eMatter EditionCopyright © 2007 O’Reilly & Associates, Inc. All rights reserved.
58
Chapter 5CHAPTER 5
Discovering Hardware fromOutside the Box
5.1 IntroductionLinux comes with several good utilities for getting detailed information on what’sinside the box. You can sit down at a machine and in minutes have an inventory ofall its components.
Not only do these utilities save you the hassle of opening the box and pokingaround, but they are invaluable for finding the correct drivers for a device, or findingout if it is supported in Linux at all. In a foolishly Windows-centric world, determin-ing if a modem, NIC, or video card has Linux drivers usually requires that you knowthe chipset used in the device. There are a few chipsets that go into many brands andmodels. Some manufacturers change chipsets without changing model numbers, sodon’t count on model numbers. Once you know the chipset, you can find drivers.
Hardware Compatibility ListsLinux support for most PC hardware is quite good, as valiant Linux programmerscontinue to churn out drivers, often with little or no support from hardware manu-facturers. But you still need to shop carefully. And even if a device has Linux drivers,it may not come with the nice management utilities, or complete feature set, thatWindows users get.
Your first and best stop is the web site of your Linux distribution. Most of them havehardware compatibility lists (HCLs). If your particular flavor of Linux has no HCL,borrow one from another distribution. Whatever works on one Linux distributionshould work on all of them. What differentiates them are the levels of out-of-the-boxsupport. For example, Mandrake and Linspire are configured for advanced soundand video support. Other distributions are capable of running the same devices, butyou may have to find and install the drivers yourself. Sometimes it may even be nec-essary to compile some kernel modules (which is no big deal for us ace Linux users,just inconvenient). So be sure to first research any distribution-specific issues.

This is the Title of the Book, eMatter EditionCopyright © 2007 O’Reilly & Associates, Inc. All rights reserved.
5.2 Detecting Hardware with lspci | 59
A fast way to get information on a particular device is to search Google Groups, likethis:
debian linux riva tnt2
Most of the time this zeros right in on useful links.
My final choice is the device manufacturer’s web site. Sometimes you get pleasantlysurprised and find actual Linux information on these sites.
Why Binary-Only Drivers Are BadSome hardware vendors limit their Linux support to providing binary drivers. Avoidthese, if that’s at all possible. Binaries are compiled against a single architecture andkernel version. This means you are dependent on the vendor to supply upgrades andalternate versions. It is so easy to recompile a program so that it works correctly onyour system that it’s just plain silly to deny users this option. We end-users are shel-tered from these issues when we use package-based systems, such as Red Hat, SuSE,and Debian, because the package maintainers do the work for us. But again, theyneed the source code. Linus Torvalds said,
I allow binary-only modules, but I want people to know that they are only everexpected to work on the one version of the kernel that they were compiled for. Any-thing else is just a very nice unexpected bonus if it happens to work.
(See http://lwn.net/1999/0211/a/lt-binary.html for the whole message.)
5.2 Detecting Hardware with lspci
ProblemYou’re looking at new systems, or installing Linux on a box that used to run a differ-ent OS, and you’re wondering if all the components—video, modem, Ethernet,sound—will work on Linux. The vendors can’t, or won’t, tell you if their productswill work on Linux. You need to know what the chipsets are, to find out if there areLinux drivers.
Alternatively, you want to know what components are installed inside a computer, andyou don’t feel like hauling the thing out, popping the case open, and tearing it apart.
SolutionUse lspci:
# /sbin/lscpi# /sbin/lspci -v# /sbin/lspci -vv
To show a summary of all devices connected to the PCI bus, use:
$ /sbin/lspci00:00.0 Host bridge: VIA Technologies, Inc. VT8363/8365 [KT133/KM133] (rev 02)

This is the Title of the Book, eMatter EditionCopyright © 2007 O’Reilly & Associates, Inc. All rights reserved.
60 | Chapter 5: Discovering Hardware from Outside the Box
00:01.0 PCI bridge: VIA Technologies, Inc. VT8363/8365 [KT133/KM133 AGP]00:06.0 Ethernet controller: Linksys Network Everywhere Fast Ethernet 10/100 modelNC100 (rev 11)...
Use the -v or -vv flags to display more information:
# /sbin/lspci -v0000:01:00.0 VGA compatible controller: 3Dfx Interactive, Inc. Voodoo 3 (rev 01)(prog-if 00 [VGA]) Subsystem: 3Dfx Interactive, Inc.: Unknown device 1252 Flags: 66MHz, fast devsel, IRQ 10 Memory at d4000000 (32-bit, non-prefetchable) [size=32M] Memory at d8000000 (32-bit, prefetchable) [size=32M] I/O ports at c000 [size=256] Expansion ROM at <unassigned> [disabled] [size=64K] Capabilities: [54] AGP version 1.0 Capabilities: [60] Power Management version 1
If you’re looking for drivers, you can now take this output (e.g., VT8363/8365 or3Dfx Interactive, Inc. Voodoo 3 (rev 01)) to run a Google search.
Discussionlspci reads some information from the PCI bus, then displays additional informationfrom its own database of hardware IDs—vendors, devices, classes and subclasses—at /usr/share/misc/pci.ids. There is even a command to update this file:
# update-pciids
The lspci maintainers welcome submissions of new data; please read /usr/share/misc/pci.ids for how to make submissions.
If there is a device attached to the system that the lspci simply does not recognize,such as a very old, odd ISA device, you’ll have to open the case to see what it is. Ortry running dmesg (Recipe 5.3).
See Also• lspci(8)
5.3 Using dmesg to Collect HardwareInformation
ProblemPCI is fine, but it’s yesterday’s news; you need an inventory of all the devices on thesystem, not just PCI devices. You’re interested in USB devices, SCSI devices, mem-ory configuration, even the CPU.

This is the Title of the Book, eMatter EditionCopyright © 2007 O’Reilly & Associates, Inc. All rights reserved.
5.3 Using dmesg to Collect Hardware Information | 61
SolutionUse dmesg. dmesg is a record of everything detected by the kernel.
To view all dmesg output, use:
$ dmesg | less
You can also filter the output of dmesg to find specific devices. For example, to list allUSB devices, use:
$ dmesg | grep -i usb
To list ISA devices, use:
$ dmesg | grep -i isaisapnp: Scanning for PnP cards...isapnp: SB audio device quirk - increasing port rangeisapnp: Card 'SupraExpress 56i Voice'
To see how much physical memory is on the system, use:
$ dmesg | grep -i memoryMemory: 256492k/262080k available (1467k kernel code, 5204k reserved, 516k data, 96kinit, 0k highmem)
This shows IDE devices using the SCSI emulation subsystem, which is used on 2.4and older kernels:
$ dmesg | grep -i scsiKernel command line: root=/dev/hda6 ro hdb=scsi hdc=scsiide_setup: hdb=scsiide_setup: hdc=scsiSCSI subsystem driver Revision: 1.00hdb: attached ide-scsi driver.hdc: attached ide-scsi driver.scsi0 : SCSI host adapter emulation for IDE ATAPI devices...
Here are what “real,” not emulated, SCSI devices look like:$ dmesg | grep -i scsiSCSI subsystem driver Revision: 1.00scsi0 : Adaptec AIC7XXX EISA/VLB/PCI SCSI HBA DRIVER, Rev 6.2.8 <Adaptec aic7892 Ultra160 SCSI adapter> aic7892: Ultra160 Wide Channel A, SCSI Id=7, 32/253 SCBs...Vendor: IBM-PSG Model: DPSS-336950M M Rev: S9HAAttached scsi disk sda at scsi0, channel 0, id 0, lun 0(scsi0:A:0): 160.000MB/s transfers (80.000MHz DT, offset 63, 16bit)SCSI device sda: 71096640 512-byte hdwr sectors (36401 MB)Partition check: sda: sda1 sda2 sda3 sda4 < sda5 sda6 >
Shown here is information about a USB camera that is connected to the system,including its location in the filesystem. Typically, USB output runs to a dozen linesor more:
$ dmesg | grep -i usb...

This is the Title of the Book, eMatter EditionCopyright © 2007 O’Reilly & Associates, Inc. All rights reserved.
62 | Chapter 5: Discovering Hardware from Outside the Box
usb.c: registered new driver ibmcamibmcam.c: IBM PC Camera USB camera found (model 2, rev. 0x030a)usbvideo.c: ibmcam on /dev/video0: canvas=352x240 videosize=352x240
To show serial ports, use:
$ dmesg | grep -i ttyttyS00 at 0x03f8 (irq = 4) is a 16550A
To show CPU or CPUs, use:
$ dmesg | grep -i cpuInitializing CPU#0CPU: L1 I Cache: 64K (64 bytes/line), D cache 64K (64 bytes/line)CPU: L2 Cache: 64K (64 bytes/line)Intel machine check reporting enabled on CPU#0.CPU: After generic, caps: 0183f9ff c1c7f9ff 00000000 00000000CPU: Common caps: 0183f9ff c1c7f9ff 00000000 00000000CPU: AMD Duron(tm) Processor stepping 01
Note that these searches only return lines containing your search string. There isoften more information adjacent to these lines, which you’ll find by eyeballing thewhole file:
Initializing CPU#0Detected 801.446 MHz processor.
Discussiondmesg always provides up-to-date information, even if you’re changing hardware fre-quently (for example, plugging in and detaching hotplug USB devices).
See Also• dmesg(8)
5.4 Getting Live Hardware Snapshots with /proc
ProblemYou want to monitor a running system in real time, and view things like physicalmemory and CPU information, or identify drives.
SolutionRead the /proc virtual filesystem. Use only cat to read /proc, or utilities designedexpressly for it, such as sysctl, lspci, ps, and top. The syntax is the same as for read-ing any file:
$ cat /proc/filename

This is the Title of the Book, eMatter EditionCopyright © 2007 O’Reilly & Associates, Inc. All rights reserved.
5.4 Getting Live Hardware Snapshots with /proc | 63
You can explore /proc just like any filesystem and easily find the information youwant. Look to the named folders for hardware information:
$ ls /procbus cmdline cpuinfo devices dma driver filesystems ide kcore kmsg ksymsloadavg meminfo misc modules mounts mtrr partitions pci scsi swaps sys tty
For example, to show CPU information, use:
$ cat /proc/cpuinfoprocessor : 0vendor_id : AuthenticAMDcpu family : 6model : 3model name : AMD Duron(tm) Processorstepping : 1cpu MHz : 801.442...
To show physical memory and swap usage, use:
$ cat /proc/meminfototal: used: free: shared: buffers: cached:Mem: 262746112 237740032 25006080 0 11575296 150138880Swap: 534601728 81661952 452939776MemTotal: 256588 kBMemFree: 24420 kB...
To tell all about an IDE hard drive, use:
$ cat /proc/ide/via-------VIA BusMastering IDE Configuration---------Driver Version: 3.37South Bridge: VIA vt82c686aRevision: ISA 0x22 IDE 0x10Highest DMA rate: UDMA66BM-DMA base: 0xd400PCI clock: 33.3MHz...
To see disk geometry, both real and logical, use:
$ cat /proc/ide/ide0/hda/geometryphysical 39870/16/63logical 2501/255/63
To identify a drive, use:
$ cat /proc/ide/ide0/hda/modelIBM-DTLA-305020
To show driver versions for all IDE drivers, use:
$ cat /proc/ide/driversde-scsi version 0.93ide-cdrom version 4.59-ac1ide-floppy version 0.99.newide

This is the Title of the Book, eMatter EditionCopyright © 2007 O’Reilly & Associates, Inc. All rights reserved.
64 | Chapter 5: Discovering Hardware from Outside the Box
ide-disk version 1.17ide-default version 0.9.newide
To show capabilities of CD drives, use:
$ cat /proc/sys/dev/cdrom/infoCD-ROM information, Id: cdrom.c 3.12 2000/10/18drive name: sr1 sr0drive speed: 40 32...Can read multisession: 1 1Can read MCN: 1 1Reports media changed: 1 1Can play audio: 1 1Can write CD-R: 1 0Can write CD-RW: 1 0Can read DVD: 0 1Can write DVD-R: 0 0Can write DVD-RAM: 0 0
To show SCSI devices, using the following command. Note that it does not differen-tiate between devices attached to the SCSI bus and IDE devices using the SCSI-emulation subsystem. These are IDE CD drives:
$ cat /proc/scsi/scsiAttached devices:Host: scsi0 Channel: 00 Id: 00 Lun: 00 Vendor: TOSHIBA Model: DVD-ROM SD-M1202 Rev: 1020 Type: CD-ROM ANSI SCSI revision: 02Host: scsi0 Channel: 00 Id: 01 Lun: 00 Vendor: LITE-ON Model: LTR-24102B Rev: 5S54 Type: CD-ROM ANSI SCSI revision: 02
This following command is just plain fun and has absolutely no practical value. Itrequires a functioning sound system. Warning: it’s noisy—this is the sound of yourCPU in action. Ctrl-C stops it:
# cat /proc/kcore > /dev/dsp
For AMD UsersSince AMD went to “performance ratings,” instead of plain ole gigahertz, CPU ratingscan be confusing. Your shiny new Athlon 3200 won’t appear in /proc/cpuinfo as “cpuMHz 3200”—instead, it will be something like 2800. You’re not being ripped off;that’s a result of how AMD chooses to rate the performance of their processors. In anutshell, they claim that clock speed alone is not an accurate measure of performance,so they devised a different scale that more accurately reflects the CPU’s true abilities.Visit http://www.amd.com for details.
On the other hand if your Pentium 3200 shows up in /proc/cpuinfo as a number otherthan 3200, there is a problem, because Intel uses the literal clock speeds.

This is the Title of the Book, eMatter EditionCopyright © 2007 O’Reilly & Associates, Inc. All rights reserved.
5.5 Viewing Drive Partitions with fdisk | 65
DiscussionDisk geometry, as expressed by /proc or any other utility, is largely a fiction. Moderndrives are far more complex than the old “heads × sectors × cylinders” model.
As mentioned earlier, to read /proc use only cat or utilities designed expressly for it,such as sysctl, lspci, ps, and top. Pagers like less and more give a different picture,because they re-read /proc with each page. And you don’t want to use a text editor,or any utility with write powers, because you can mess up your system in a heart-beat.
See Also• proc(5)
5.5 Viewing Drive Partitions with fdisk
ProblemYou need to see all the partitions on a hard drive or drives. You may need to seeexactly how space is allocated on the disk drives; you may want to “reclaim” someold Windows partitions, convert an unused partition to swap space, or find the /devnumber for a partition. fdisk also tells you the filesystem on the partition, and showsany free space on a drive.
SolutionUse fdisk. To display all partitions on all hard drives, use:
# /sbin/fdisk -lDisk /dev/hda: 20.5 GB, 20576747520 bytes255 heads, 63 sectors/track, 2501 cylindersUnits = cylinders of 16065 * 512 = 8225280 bytes Device Boot Start End Blocks Id System/dev/hda1 * 1 893 7172991 7 HPFS/NTFS/dev/hda2 894 1033 1124550 c W95 FAT32 (LBA)/dev/hda4 1034 2501 11791710 f W95 Ext'd (LBA)/dev/hda5 2437 2501 522081 82 Linux swap/dev/hda6 1034 1670 5116639+ 83 Linux/dev/hda7 1671 2436 6152863+ 83 LinuxDisk /dev/hdb: 40.0 GB, 40020664320 bytes16 heads, 63 sectors/track, 77545 cylindersUnits = cylinders of 1008 * 512 = 516096 bytes Device Boot Start End Blocks Id System/dev/hdb1 * 1 4162 2097616+ 82 Linux swap/dev/hdb2 4163 77545 36985032 83 LinuxPartition table entries are not in disk order

This is the Title of the Book, eMatter EditionCopyright © 2007 O’Reilly & Associates, Inc. All rights reserved.
66 | Chapter 5: Discovering Hardware from Outside the Box
To display the partition table on a selected drive, use:
# /sbin/fdisk -l /dev/hdaDisk /dev/hda: 20.5 GB, 20576747520 bytesDisk /dev/hda: 20.5 GB, 20576747520 bytes255 heads, 63 sectors/track, 2501 cylindersUnits = cylinders of 16065 * 512 = 8225280 bytes...
DiscussionYou can also see what type of filesystem is located on any partition. In this example,you see two different types of Windows filesystems (HPFS/NTFS, FAT32) and aWindows extended partition on which some Linux filesystems and a swap partitionhave been built.
See Also• fdisk(8)
5.6 Calculating Hard Drive Capacity
ProblemYou want to measure precisely the capacity of a hard drive, but you can’t seem to geta straight answer because of confusion over measurement values. How much is amegabyte—is it 1 million bytes, or 220 bytes? Which measurement is used for therated size of your drive?
SolutionUse fdisk to get the total disk size in bytes:
# /sbin/fdisk -l /dev/hdaDisk /dev/hda: 20.5 GB, 20576747520 bytes
Then do a little math to get the value in gibibytes, which is a power of 2:
20576747520 / 1,073,741,824 = 19.16 gibibytes
Gigabytes, which are most often used as powers of 10, are easy to figure:
20576747520 / 10 = 20.58 gigabytes
Table 5-1 shows a comparison of binary and decimal multiples.
Table 5-1. Comparison of binary and decimal multiples
Base-2 values Base-10 values
Kibibyte 1,024 bytes 210 Kilobyte 1,000 bytes 103
Mibibyte 1,048,576 bytes 220 Megabyte 1,000,000 bytes 106
Gibibyte 1,073,741,824 bytes 230 Gigabyte 1,000,000,000 bytes 109

This is the Title of the Book, eMatter EditionCopyright © 2007 O’Reilly & Associates, Inc. All rights reserved.
5.6 Calculating Hard Drive Capacity | 67
DiscussionIn 1998, the International Electrotechnical Commission (IEC) decided that weneeded new terminology and ratified some nice new words for us to use. So now wehave kibibyte, mibibyte, gibibyte, tebibyte, and so forth. Even though they are weirdto pronounce, it’s good to have precise terminology.
There are times when it is important to know the precise size of a drive, such aswhen you’re selecting drives for a RAID array, or calculating the number of disksneeded for a system backup. The debate over how much a gigabyte or megabyte iswill probably continue for as long as computer users have breath, and drive manu-facturers use whatever math gives the most inflated numbers. In the example above,it appears that using gigabytes inflates the drive capacity by well over one gigabyte(or gibibyte—take your pick). As the base unit of measurement is a byte, I say stickwith base 2.
To get an unambiguous, absolute value, you’re probably stuck with bytes—unlesssomeone starts messing with them, too.
See Also• Prefixes for binary multiples (http://physics.nist.gov/cuu/Units/binary.html)

This is the Title of the Book, eMatter EditionCopyright © 2007 O’Reilly & Associates, Inc. All rights reserved.
68
Chapter 6CHAPTER 6
Editing Text Files withJOE and Vim
6.1 IntroductionMastering a text editor is an important skill for anyone who wants to be a happy,proficient Linux user. Choosing one can get interesting, as the Linux world is over-full of ASCII text editors. There are two reasons for the proliferation of text editors:creating a text editor is a good, and common, project for newbie programmers; and atext editor is a rather personal tool. Linux gurus often write or alter them to suit theirown personal whims...er, requirements.
Linux users love to engage in flamewars over text editors (especially Emacs versusVim), which are fun, but pointless. The idea is to find one that suits your needs andtemperament. The beauty of Linux, and free/open source software in general, is thewealth of choices for users. There is something for everybody, including entertainingflamewars.
In this chapter we’ll look at using JOE, Joe’s Own Editor, and Vim, which is adescendant of vi. Why not Emacs? Emacs is a wonderful program; it’s big, complex,and endlessly customizable and extensible. It is not a mere text editor; it’s more of acomplete integrated environment. With Emacs, users can read mail and Usenetposts, write programs, play games, fuss endlessly over custom macros and key bind-ings, cobble up windowed environments when X Windows is not available, and con-sult their psychiatrists (M-x doctor). Emacs will do nearly anything you want it to, ifyou can figure out how. For someone who simply wants to edit text files, it’s a bitmuch. Emacs weighs in at over 22 megabytes, while JOE and Vim both fit on afloppy disk, with room left over.
JOE and Vim are both well suited to the everyday task of editing configuration files.Of course, they can also be used for writing any kind of text file—articles, webpages, coding, whatever you like.
Which brings me to something that may be a bit of an unpleasant reality for some:typing skills matter. The better you can type, the more productive you’ll be. For

This is the Title of the Book, eMatter EditionCopyright © 2007 O’Reilly & Associates, Inc. All rights reserved.
6.1 Introduction | 69
sheer speed and satisfaction, it’s hard to beat never having to take your hands off thekeyboard, or your eyes off the screen.
JOE is a “modeless” editor, which means that entering commands and editing texthappens on the same screen. Vim has two modes: Normal/Command mode, andInsert/Edit mode. When you’re in Normal mode, everything you type is treated as acommand. In Insert mode, it’s all treated as typed text. This vexes some folks whotry Vim for the first time, because there is no helpful animated assistant to tell themthat it is necessary to switch between the two modes to get anything done. Vim is aserious power tool, and as you’ll see in this chapter, it’s not that difficult to learn.
vi/Vim, the Universal Editorvi (officially pronounced “vee eye,” though I like to say “vi,” rhyming with “fie,” justto be annoying) is the universally available text editor. No matter what sort of Linuxsystem you may find yourself working on, you can count on vi, or one of its manyoffspring, being present.
vi has inspired a host of cleverly named clones: Vim, elvis, vile, calvin, Vigor, viper,and virus, to name a few. These sorts of projects come and go, but Vim, elvis, andvile are popular and actively maintained. Vigor is noteworthy for its snide animatedpaperclip, the intentionally annoying Vigor Assistant. The Vigor Assistant continu-ally interrupts your work with “helpful” comments, like “Are you sure you want tomove left?” and “Don’t cry—it won’t help.” Vigor is fun, and useful too, because it isan extension of nvi, which is yet another vi clone. Yes, you can do real work withVigor, though the author himself finds this questionable: “One user actually foundVigor to be useful! After all that time and effort I put into making a totally uselessapp, somebody has to go and get some benefit out of it.”
Moving back to the serious side of the vi ledger, Vim is the most popular vi descen-dant. When you fire up vi on most Linux distributions, such as Red Hat, Debian,and Mandrake, you get Vim. Vim does windows and color syntax highlighting, andit has extensive online help and documentation. This is handy, because even if youfind yourself stuck on a desert island with only the ancestral vi, your Vim skills willserve you well.
Typing TutorThere is an excellent, free Linux typing tutor called Gtypist (http://www.gnu.org/software/gtypist/gtypst.html), for anyone who wants a little help. It teaches bothQWERTY and Dvorak, and it has typing tutorials in English, Czech, Russian, Spanish,German, French, and Norwegian. Like most ncurses-based programs, it looks better ina text console than in X.

This is the Title of the Book, eMatter EditionCopyright © 2007 O’Reilly & Associates, Inc. All rights reserved.
70 | Chapter 6: Editing Text Files with JOE and Vim
JOE, the Five-in-One EditorJOE has a number of nice features. It has multiple personalities, and onscreen help.You can fire up JOE and start muddling around and editing files without botheringto read any documentation. Of course, this is not the the optimum method, but in apinch it works.
JOE has three emulation modes:
and two native modes, JOE and RJOE. RJOE is “Restricted JOE”; it can only openfiles specified on the command line. After RJOE is up and running, you cannot opennew files from inside RJOE, or open any command shells. This makes RJOE a goodoption for your sudo users, preventing them from escaping to a command shell withtheir rootly powers. All five modes run from the same 200-kilobyte executable.
See Also• joe(1), vi(1)
• Gtypist (http://www.gnu.org/software/gtypist/gtypist.html)
• Vigor (http://vigor.sourceforge.net/index.shtml)
6.2 Finding JOE Commands
ProblemHow do you make JOE do anything useful? You want a complete command refer-ence for JOE, in all of its personalities. And you want it online, so you can use itwhile you type.
SolutionTurn on the online help, which is present in every one of JOE’s personalities.
To start up JOE with the Help screen turned on, use:
$ joe -help
Do the same for rjoe, jpico, jmacs, and jstar.
DiscussionJOE uses a lot of three-key commands. The caret (^) is the Ctrl key. Hit the first twokeys (e.g., ^K) together, then release them and strike the third key. Here are some ofthe basic Help screen commands:
jstar (WordStar)jpico (Pico)jmacs (Emacs)

This is the Title of the Book, eMatter EditionCopyright © 2007 O’Reilly & Associates, Inc. All rights reserved.
6.3 Customizing JOE | 71
JOE and RJOE^K H toggles the Help screen on and off.
Esc . moves forward in the Help screens, Esc , moves backward.
Jpico^G toggles the Help screen on and off.
Esc . moves forward, Esc , moves backward.
Jmacs^X H toggles the Help screen on and off.
^X . moves forward, ^X , moves backward.
Jstar^J toggles the Help screen on and off.
Esc . moves forward, Esc , moves backward.
See Also• joe(1)
6.3 Customizing JOE
ProblemJOE has many personalities and command-line options. You want it to have custom-ized defaults, so at startup everything is just the way you want it.
SolutionCreate a personalized .joerc file containing your preferences, and put it in your homedirectory.
First take a peek in /etc/joe, because that’s where JOE’s default initialization files are:
$ ls /etc/joejmacsrc joerc jpicorc jstarrc rjoerc terminfo
This example uses joerc—just plain ole JOE, not pretending to be anyone else. Copyit to your home directory, make it a hidden file, and keep the filename:
$ joe -linums -help /etc/joe/joerc^K DName of file to save (^C to abort): ~/.joercCould not make backup file. Save anyway (y,n,^C)? YFile ~/.joerc saved
^ means the Ctrl key. Don’t worry about case; K D is the same as k d.
While .joerc lets you micromanage every last little thing, the first two sections con-tain the most useful options. For example:
-marking Text between ^K B and cursor is highlighted (use with -lightoff)

This is the Title of the Book, eMatter EditionCopyright © 2007 O’Reilly & Associates, Inc. All rights reserved.
72 | Chapter 6: Editing Text Files with JOE and Vim
-force Force final newline when files are saved-lightoff Turn off highlighting after block copy or move-exask ^K X always confirms filename-beep Beep on errors and when cursor goes past extremes-keepup %k and %c status-line escape sequences updated frequently-help Start with help on-linums Enable line numbers on each line
Inactive options have a leading space or tab. To activate an option, simply delete theleading space, and make sure the line is all the way flush left.
DiscussionA nice feature of JOE is that your work is done in a copy of the original file. The orig-inal file is saved as a backup file. (This is a configurable option that can be turned offin .joerc.)
See Also• joe(1)
• Recipe 6.4, “Organizing JOE’s Preferences in a Separate File”
6.4 Organizing JOE’s Preferences in a SeparateFile
ProblemJOE’s rc files are large, so it’s not easy to keep track of your changes. How do youkeep your changes separate from the things that have stayed the same?
SolutionPut your changes in a separate file, which in this example is called .joercprefs. Callthis file by adding the following line near the top of .joerc; anywhere before the “FirstSection” is good. Be sure to include the leading colon, and make it flush left:
:include .joercprefs
DiscussionHere’s an example of .joercprefs:
my JOE preferences---active options only--- created 2/15/2004
-marking Text between ^K B and cursor is highlighted (use with -lightoff)-force Force final newline when files are saved

This is the Title of the Book, eMatter EditionCopyright © 2007 O’Reilly & Associates, Inc. All rights reserved.
6.5 Copying Between Two Files in JOE | 73
-lightoff Turn off highlighting after block copy or move-exask ^K X always confirms filename-beep Beep on errors and when cursor goes past extremes-keepup %k and %c status-line escape sequences updated frequently-help Start with help on-linums Enable line numbers on each line
Keeping all of your changes in a separate file will save your sanity, guaranteed. Notethat .joercprefs does not overwrite .joerc—any options that are explicitly enabled ordisabled in .joerc will remain that way, regardless of what .joerc says. However,options in .joerc that begin with leading whitespace are ignored, so these can beenabled or disabled in .joercprefs.
See Also• joe(1)
6.5 Copying Between Two Files in JOEProblemAll right, you’re sold. You want to have your own ~/.joercprefs. But how do you cre-ate this file without having duplicate entries or entries that conflict with the original~/.joerc?
SolutionOpen two windows inside of JOE, one containing ~/.joerc and the second containingthe new file, ~/.joercprefs. Copy your desired preferences from ~/.joerc into ~/.joercprefs.
First, make a backup copy of the original ~./joerc.
$ cp ~/.joerc ~/.joerc.bak
Open ~/.joerc, then open a second window and name the new file:
$ joe -linums -help ~/.joerc^K O^K EName of file to edit (^C to abort): ~/.joercprefs
Navigate between the two windows with ^K P and ^K N. Sometimes the windowsplay tricks on you; toggle ^K I to show all windows/hide inactive windows.
Mark a block of text to copy with ^K B and ^K K. Position the cursor at your inser-tion point, and copy with ^K C.
DiscussionBecause ~/.joerc is so large, it can be helpful to display only the inactive options. Inthe ~/.joerc window, use JOE’s filter command to grep the inactive options:
^K /$ grep '^[[:space:]]'

This is the Title of the Book, eMatter EditionCopyright © 2007 O’Reilly & Associates, Inc. All rights reserved.
74 | Chapter 6: Editing Text Files with JOE and Vim
Now you can easily see which commands are inactive and copy the ones you wish toactivate into ~/.joercprefs.
You can also show only the active options:
$ grep '^[^[:space:]]'
Hit ^K X to save ~/.joercprefs and exit.
Now your changes are nicely separated for easy tracking and editing.
See Also• joe(1)
6.6 Searching and Replacing in JOEProblemYou’re editing some document and finding a particularly annoying misspelling allover the place. What tools does JOE offer for finding and replacing words, textstrings, and punctuation in a document?
SolutionUse the ^K F command for all of your find-and-replace needs. Use special searchsequences, which are JOE’s regular expressions, for fine-grained, precise searches.
Begin a search with ^K F. Use the up and down arrows to scroll through your previ-ous search and replace terms. ^L continues a search without the replace function.
For example, say you find yourself typing “nucular,” even though you know better,because you hear it all day from your annoying coworker. You need to go backthrough your work and change it to “nuclear.” Here’s how:
^K FFind (^C to abort): \<nucular\>(I)gnore (R)eplace (B)ackwards Bloc(K) NNN (^C to abort): rReplace with (^C to abort): nuclearReplace (Y)es (N)o (R)est (B)ackup (^C to abort)? r
Note the use of \<\>. This tells JOE to perform a whole-word search. Otherwise,JOE will conduct a literal search for your search string, even if it’s inside anotherword.
Rather than correcting the spelling, you may wish to draw attention to this annoyinghabit of your coworker by putting quotation marks around the word:
Replace with (^C to abort): "\&"
The result is:
"nucular"

This is the Title of the Book, eMatter EditionCopyright © 2007 O’Reilly & Associates, Inc. All rights reserved.
6.7 Selecting Text Vertically in JOE | 75
Or you can really go nuts, using:
Replace with (^C to abort): "It's nuclear, not "\&" dammit!!"
which creates:
"It's nuclear, not "nucular" dammit!!"
To find a match only at the beginning of a line, use:
\^nucular
To find a match only at the end of a line, use:
nucular\$
To find empty lines, use:
\^\$
To find whitespace, press the spacebar and tab key inside the square brackets:
\[ ]
To match any character in the square brackets (for doing a case-insensitive search), use:
\[Nn]ucular
To match any number of characters, use:
nu\*r
To match exactly one character, use:
nuc\?l
See Also• joe(1)
• The “Special search sequences” in JOE’s online help
6.7 Selecting Text Vertically in JOE
ProblemYou’ve laboriously created a table and want to move the columns around. That is,you want to select a section of text vertically—for example, the first word on severallines, or chunks of text in the middle of several lines, or a column.
SolutionUse JOE’s rectangle mode.
The command ^T X turns on rectangle mode. Use ^K B and ^K K to select a block oftext, then do with it as you will.

This is the Title of the Book, eMatter EditionCopyright © 2007 O’Reilly & Associates, Inc. All rights reserved.
76 | Chapter 6: Editing Text Files with JOE and Vim
DiscussionThese are some useful commands to use on blocks of text:
^K B, ^K KMark/unmark the beginning and end of a block of text.
^K MMove the block to where the cursor is.
^K CCopy the block to where the cursor is.
^K YDelete the block of text.
^K .Move the block right.
^K ,Move the block left.
^K ACenter text.
^K /Open a command line for your favorite text-manipulating command.
See Also• joe(1)
• JOE’s online help
6.8 Finding and Opening Files in JOE
ProblemYou have lots of work to do. Lots of files to edit, lots of tasks to accomplish. Youdon’t want to be starting and stopping JOE all the time. You want to search for filesand open them without leaving JOE.
SolutionTo search for files from inside JOE, use ^K R or ^K E. This either opens an existingfile, or creates a new file:
^K EName of file to edit (^C to abort):
Use tab completion to expand existing filenames. In this example, type ga, then hit Tabtwice. JOE inserts the asterisk when you hit the Tab key, so don’t type it yourself:

This is the Title of the Book, eMatter EditionCopyright © 2007 O’Reilly & Associates, Inc. All rights reserved.
6.9 Learning Vim Quickly | 77
^K EName of file to edit (^C to abort):.ga*.gaby/ .gaim/ .gaimrc .galeon/
To navigate up and down the file tree, use Enter/Return to go “down” the tree; Back-space to go “up,” or toward the root directory (but aren’t roots down in the earth?);and Tab to select.
To insert an existing file at the cursor, use:
^K RName of file to edit (^C to abort):
Remember the window navigation commands:
^K OOpens a new window.
^K IShows all/ hides inactive windows.
^K P and ^K NNavigates up and down between windows.
DiscussionEven though JOE does not have mouse support, you can copy and paste from otherapplications with the mouse, in an X session. This is a terminal function, not a JOEfunction. You’ll need to use the classic Unix method: highlight text with the mouse,then click the middle mouse button to paste. Don’t use ^V or ^C, because thosemean other things in JOE.
See Also• joe(1)
6.9 Learning Vim Quickly
ProblemYou have done a bit of homework, including reading the “Introduction” to this chap-ter, and you have decided to use Vim. So you want to get up to speed on Vim asquickly as possible, and learn it right the first time.
SolutionRun the Vim tutor. Simply type vimtutor at any command line. Within 30–60 minutes,you’ll be cruising like an old pro. This is the #1 best way to get proficient quickly.

This is the Title of the Book, eMatter EditionCopyright © 2007 O’Reilly & Associates, Inc. All rights reserved.
78 | Chapter 6: Editing Text Files with JOE and Vim
DiscussionVim rewards good typing skills. If you’re a not-so-good typist, consider brushing upyour skills with Gtypist, the free typing tutor.
It may be that the tutorial teaches all the commands you’ll ever need to know. Foradditional study and a reference for Vim’s nine zillion and four abilities, make use ofthe excellent user and reference manual by Bram Moolenaar, the author of Vim. Thiscomes in Vim’s own internal help system, and in several versions online at http://vimdoc.sourceforge.net (searchable HTML, .pdf, and printable HTML).
To access the user manual inside Vim, type:
:help
Use arrow keys to scroll through the table of contents, and hit ^] to open a chapter.
Or you can go directly to a topic:
:help quickref:help tutor:help usr_06.txt
To search for a particular term and bring up a list of choices, type:
:help vimrc
Do not hit Return, but hit ^D. The output looks like this:
:help vimrcvimrc vimrc-intro system-vimrc _gvimrcvimrc vimrc-filetype gvimrc :mkvimrc_vimrc vimrc_example.vim .gvimrc
Then choose the one you want:
:help vimrc_example.vim
There are two very good actual printed books on VIM:
• Vi IMproved—Vim, by Steve Oualline, available at http://iccf-holland.org/click5.html. Not only is this an excellent book, but a percentage of the proceedsgoes to helping orphans in Uganda.
• Learning the vi Editor, by Linda Lamb and Arnold Robbins (O’Reilly).
If you’re new to Vim, be sure to practice with the Vim tutor first. The following reci-pes show how to customize your work environment and navigate Vim.
See Also• vimtutor(1)
• Vim.org documentation page (http://www.vim.org/docs.php)
• The Vimdoc page at SourceForge (http://vimdoc.sourceforge.net/)
• Gtypist (http://www.gnu.org/software/gtypist/gtypist.html)

This is the Title of the Book, eMatter EditionCopyright © 2007 O’Reilly & Associates, Inc. All rights reserved.
6.11 Mapping Commands to Keystrokes | 79
6.10 Creating Autotext with Vim’s Abbreviations
ProblemYou do a lot of repetitious typing, such as copyright statements, code comments, sig-natures, and so forth, and you would like some kind of auto-text feature.
SolutionUse Vim’s abbreviations feature. Abbreviations are created in Normal mode:
:ab th This is an example of a Vim abbreviation.
To use the abbreviation, switch to Insert mode and type th, followed by anywhitespace above (space, tab, or carriage return).
To see all of your abbreviations, type:
:ab
To remove an abbreviation, use:
:unabbreviate th
To delete all abbreviations, use:
:abclear
Like everything else in Vim, abbreviations can be preserved forever in ~/.vimrc.
DiscussionYou can use the abbreviation as an automatic spelling-fixer (like Recipe 6.6). Justdefine your common misspellings as abbrevations. This trick works best for typos(teh for the, for instance).
See Also• Vim’s online help (:help map.txt)
• Recipe 6.12, “Customizing Vim”
• Chapter 24 of Vi IMproved—Vim
• Chapter 7 of Learning the vi Editor
6.11 Mapping Commands to Keystrokes
ProblemSome of Vim’s commands are long and complex, and you are amassing your owncollection of custom commands, so you would like to create keyboard shortcuts foryour most-used commands.

This is the Title of the Book, eMatter EditionCopyright © 2007 O’Reilly & Associates, Inc. All rights reserved.
80 | Chapter 6: Editing Text Files with JOE and Vim
SolutionUse the map command to assign custom keystrokes to any command or text string.map creates keymappings for Normal mode; map! creates keymappings for Insertmode. To see your current set of mappings, type:
:map
or:
:map!
Be careful when creating your own maps—don’t map to keys thatalready have commands assigned to them by Vim, as map will hap-pily, and without comment, overwrite them. (This is a good reason towait until you’re proficient before going crazy with maps.)
Creating a new keymapping is done like this:
:map <F3> :runtime! syntax/2html.vim
This command adds HTML tags to the current document, in a new window. Nowhitting F3 activates it.
You can delete a map like this:
:unmap <F3>
You have to spell out the names of the Esc, <CR> (carriage return) and <F2>–<F12>keys, because if you simply press the keys they will execute whatever command isassigned to them.
This example maps a command to F3 that goes into Insert mode, inserts an HTMLtag around a word, and leaves off in Insert mode so you can continue typing:
:map <F3> i<B><Esc>ea</B><Esc>a
These are examples of Insert mode mappings for quickly adding HTML tags. They’refast, because you never leave Insert mode, and it’s unlikely that such comma-lettercombinations will come up in ordinary typing.
:map! ,ah <A href="">:map! ,a </A>:map! ,b <B><Esc>ea</B><Esc>a:map! ,i <I><Esc>ea</I><Esc>a:map! ,l <LI><Esc>ea</LI><Esc>a
DiscussionThe safest keys to use are F2–F12 and Shift-F2–F12. (F1 is mapped to Vim’s helppages.) However, you’ll use those up pretty quickly, so using combinations likecomma-letter that usually do not occur in normal usage gives you the ability to cre-ate as many keymappings as you like.
This is the Title of the Book, eMatter EditionCopyright © 2007 O’Reilly & Associates, Inc. All rights reserved.
6.12 Customizing Vim | 81
See :help map-which-keys for complete information on Vim’s built-in keymappings.You can also query Vim’s help for a specific key or combination:
:help CTRL-V:help F5:help /b
Remember to spell out CTRL and F5; don’t press the Ctrl and F5 keys.
See Also• Vim’s online help (:help 2html.vim, :help key-mapping)
• Chapter 8 of Vi IMproved—Vim
• Chapter 7 of Learning the vi Editor
6.12 Customizing Vim
ProblemAll this customization is great, but it goes away when you quit. You don’t want to re-type all your abbreviations and mappings each time you start. How do you customizeyour Vim environment, and preserve your abbreviations and custom keymappings?
SolutionCreate a ~/.vimrc file with your desired options. You can create one from scratch, orcopy and modify the global /etc/vim/vimrc file.
What can you put in your ~/.vimrc? Any Vim option that you want. And what mightthose options be? You can list all option names by typing:
:set all aleph=224noarabic arabicshapenoallowrevinsnoaltkeymap...
Then look up what they mean:
:help noaltkeymap
This opens the hyperlinked options help page:
:help options
As you can see, a person could happily spend a lifetime fine-tuning Vim (and, withluck, completely avoid doing any real work).

This is the Title of the Book, eMatter EditionCopyright © 2007 O’Reilly & Associates, Inc. All rights reserved.
82 | Chapter 6: Editing Text Files with JOE and Vim
DiscussionWhen you read the Vim documentation, it’s easy to become overwhelmed by its flex-ibility, and the sheer number of possible options. Start with the basics, as illustratedhere, and don’t worry about the super-duper geeky stuff until you’re sure you actu-ally need it. There comes a point where plain old typing does the job just fine.
This sample ~/.vimrc demonstrates three fundamental Vim features: customizingstartup options, abbreviations, and keymaps. Quotation marks are used to commentout lines.
"""""""""""""""""""""""""""""""""""""""""" Carla's vimrc, created 4/22/2004 "" Vim options """"""""""""""""""""""""""""""""""""""""""" Turn off vi compatibility, to get all of Vim's featuresset nocompatible" Tabs use 4 spacesset tabstop=4" more powerful backspacingset backspace=indent,eol,start" Syntax highlighting on by defaultsyntax on" auto-detect filetypes for syntax highlightingfiletype plugin indent on"""""""""""""""""""""""""""""""""""""""""" Abbreviations """""""""""""""""""""""""""""""""""""""""":ab Qu Carla Has Gone Fishing, Back Much Later:ab Co Copyright (c) 2004 Carla Schroder all rights reserved:ab Em [email protected]:ab Wb http://tuxcomputing.com"""""""""""""""""""""""""""""""""""""""""" HTML tag mappings, for Insert mode """""""""""""""""""""""""""""""""""""""""":map! ,ah <A href="">:map! ,a </A>:map! ,b <B><Esc>ea</B><Esc>a:map! ,i <I><Esc>ea</I><Esc>a:map! ,l <LI><Esc>ea</LI><Esc>a
Any changes made to ~/.vimrc take effect the next time you open Vim.
See Also• vim(1)
• Vim’s online help (:help vimrc, :help usr_05.txt, :help ab)
• Chapter 11 of Learning the vi Editor
• Chapter 8 of Vi IMproved—Vim

This is the Title of the Book, eMatter EditionCopyright © 2007 O’Reilly & Associates, Inc. All rights reserved.
6.13 Navigating Quickly in Vim with Marks | 83
6.13 Navigating Quickly in Vim with Marks
ProblemYou are editing a large document, or you are editing several files at once, and youneed to jump back and forth between different sections. But it takes time, and youkeep losing your place.
SolutionUse Vim’s marks to mark cursor positions, like bookmarks.
There are 52 available marks: a–z and A–Z. In Command mode, position the cursor,then type:
ma
to mark the spot. To return to this mark, type:
`a
That is a backtick, not an apostrophe.
Lowercase marks work only inside a single file. Use uppercase marks to navigatebetween files. Suppose you mark a location in the file configstuff.txt:
mA
Now when you hit `A from any other open file, or any Vim window, it will go tothat location in configstuff.txt, opening it if necessary. Uppercase marks are storedin ~/.viminfo, so they survive between sessions.
Numbered marks are a cool thing that Vim does for you. Every time you exit Vim, itstores your last cursor position. Next time you fire up Vim, you can return to whereyou left off by typing:
`0
Vim stores these marks in ~/.viminfo and rotates through numbers 0–9. So, if youwant to go back to where you exited three sessions ago, type:
`2
To see all of your marks, type:
:marks
See Also• Vim’s online help (:help mark-motions, :help viminfo)
This is the Title of the Book, eMatter EditionCopyright © 2007 O’Reilly & Associates, Inc. All rights reserved.
84 | Chapter 6: Editing Text Files with JOE and Vim
6.14 Picking Up Where You Left Off: Using Vim’sSessions
ProblemYou get all involved in a project, then have to shut down for the night before you’refinished. Wouldn’t it be nice to save everything—options, mappings, open files,open windows, window positions and sizes—that normally goes away when youclose out?
SolutionNo problem—create sessions. A Vim session saves everything, and restores it exactlythe way you left it the next time you start the session. When you reach a point whereyou would like to preserve the work environment, save all open files, then name thesession:
:wall:mksession myarticle.vim
If more than one file is open, use :wqall to save and close all of them at once. Thisexample creates a file called myarticle.vim. To start up the same session, enter:
$ vim -S myarticle.vim
After working in this session, you have two choices. You can save all your changesunder the same filename:
:mksession! myarticle.vim
or do your own quick-and-easy version control by changing the session name:
:mksession myarticle_rev2.vim
You can also go directly to another session without shutting down:
:wall:mksession! myarticle_rev2.vim:source myarticle.vim
Another cool thing you can do with sessions is create your perfect working environ-ment, then save it for posterity:
$ vim:help^W w:vertical split /~
Figure 6-1 shows what this looks like.

This is the Title of the Book, eMatter EditionCopyright © 2007 O’Reilly & Associates, Inc. All rights reserved.
6.14 Picking Up Where You Left Off: Using Vim’s Sessions | 85
Enlarge the file tree window and shrink the help window until they’re just right. Use^W w to navigate between the windows and ^W + or - to adjust the window sizes.When it’s all perfect, save it as :mksession 3pane.vim (Figure 6-2).
DiscussionUsing sessions gives you a fast, powerful way to create custom working environ-ments. It’s a good idea to organize your session files in their own directory, so youcan find them quickly.
See Also• Vim’s online help (:help session, :help usr_08.txt)
• Chapter 21 of Vi IMproved—Vim
Figure 6-1. Create an ideal working environment

This is the Title of the Book, eMatter EditionCopyright © 2007 O’Reilly & Associates, Inc. All rights reserved.
86 | Chapter 6: Editing Text Files with JOE and Vim
6.15 Setting Your Default Editor
ProblemBy now, you’re totally sold on Vim and JOE. But some programs, such as crontaband quota, require use of the default editor, and the editor you get by default is somecreaky old monster. How do you set the default editor to something you like?
SolutionEdit your environment variables, in ~/.bashrc or ~/.bash_profile. ~/.bashrc is prefera-ble, because it applies to all shells opened during a session. ~/.bash_profile is readonly at login.
Add these lines to ~/.bashrc, or modify any existing entry:
EDITOR=vimVISUAL=$EDITORexport EDITOR VISUAL
Obviously, you’ll enter the editor of your choice. Usually it is better to use a consoletext editor like JOE, Pico, Vim, or Emacs. You may select an X editor like Kwrite orGEdit, but keep in mind there may be times when X is not available, so these won’t
Figure 6-2. Make your adjustments and save the session

This is the Title of the Book, eMatter EditionCopyright © 2007 O’Reilly & Associates, Inc. All rights reserved.
6.16 Discovering Vim’s Compile-Time Options | 87
always work. It is important to use both the VISUAL and EDITOR variables.VISUAL is an older term, leftover from ancient times, but some programes still lookfor it.
Make sure your ~/.bash_profile calls ~/.bashrc:
# include .bashrc if it existsif [ -f ~/.bashrc ]; then source ~/.bashrcfi
See Also• bash(1)
• Chapter 17 of LPI Linux Certification in a Nutshell
6.16 Discovering Vim’s Compile-Time Options
ProblemYou are having some troubles with Vim, and you think some features you need werenot compiled in. How do you find out what options Vim was compiled with?
SolutionOpen Vim and run:
:version
This shows all of Vim’s compile-time options and initialization file locations on yoursystem.
DiscussionHere is a simplified example of what :version output looks like. + means a feature isincluded; - means excluded. Now you can easily find out if you need to recompileVim to enable a feature you want.
:versionVIM - Vi IMproved 6.2 (2003 Jun 1, compiled Apr 1 2004 23:39:33)Included patches: 1-298, 300-426Compiled by Norbert Tretkowski <[email protected]>Big version with GTK2 GUI. Features included (+) or not (-):+arabic +autocmd +balloon_eval +browse ++builtin_terms +byte_offset +cindent+clientserver -hangul_input +iconv +insert_expand +jumplist
system vimrc file: "$VIM/vimrc" user vimrc file: "$HOME/.vimrc" user exrc file: "$HOME/.exrc" system gvimrc file: "$VIM/gvimrc"

This is the Title of the Book, eMatter EditionCopyright © 2007 O’Reilly & Associates, Inc. All rights reserved.
88 | Chapter 6: Editing Text Files with JOE and Vim
user gvimrc file: "$HOME/.gvimrc" system menu file: "$VIMRUNTIME/menu.vim" fall-back for $VIM: "/usr/share/vim"
Compilation: gcc -c -I. -Iproto -DHAVE_CONFIG_H -DFEAT_GUI_GTK -I/usr/include/gtk-2.0 -I/usr/lib/gtk-2.0/include -I/usr/include/atk-1.0 -I/usr/include/pango- -O2 -DFEAT_LANGMAP -DFEAT_KEYMAP -DFEAT_SIGNS -DFEAT_RIGHTLEFT -I/usr/X11R6/includeLinking: gcc -L/usr/X11R6/lib -L/usr/local/lib -o vim -Wl,--export-dynamic -lgtk-x11-2.0 -lgdk-x
See Also• Vim online help (:help version) for a description of every available feature

This is the Title of the Book, eMatter EditionCopyright © 2007 O’Reilly & Associates, Inc. All rights reserved.
89
Chapter 7 CHAPTER 7
Starting and StoppingLinux
7.1 IntroductionThere are a lot of ways to start and stop a Linux system. Plus, there are initializationscripts for controlling how various services start up, and there are different systemrunlevels, each of which can run a different set of services. Run this command:
$ ps axfl
Take a look at the top, at process number 1 (this is slimmed-down; yours will showmore columns and lines):
UID PID PPID STAT TTY TIME COMMAND0 1 0 S ? 0:03 init
That’s init, the grandmother of all processes on a Linux system. Notice that the ppid,or parent process ID, is zero, because init is the first process started after the kernelruns.
But why doesn’t ps afxl show init as the root of the process tree? The ppids tell thestory:
UID PID PPID STAT TTY TIME COMMAND0 1 0 S ? 0:03 init0 2 1 SW ? 0:00 [keventd]0 0 1 SWN ? 0:00 [ksoftirqd_CPU0]0 0 1 SW ? 0:00 [kswapd]0 10 1 SW ? 0:00 [kreiserfsd]0 101 1 SW ? 0:00 [kapmd]1 274 1 S ? 0:00 /sbin/portmap0 360 1 S ? 0:00 /sbin/syslogd0 376 1 S ? 0:00 /usr/sbin/slapd0 387 376 S ? 0:00 \_ /usr/sbin/slapd0 388 387 S ? 0:00 \_ /usr/sbin/slapd0 389 1 S ? 0:00 /usr/sbin/cupsd

This is the Title of the Book, eMatter EditionCopyright © 2007 O’Reilly & Associates, Inc. All rights reserved.
90 | Chapter 7: Starting and Stopping Linux
The Linux boot process goes something like this:
1. The system BIOS initializes hardware, then loads the boot sector.
2. The master boot record (MBR) loads the bootloader, which points the way tothe kernel.
3. The kernel initializes peripheral devices, loads drivers, and mounts the root file-system, then calls /sbin/init.
4. /sbin/init is the master startup program that spawns all user-level processes. Itreads /etc/inittab, then it moves on to activate yet more scripts, which are namedin /etc/inittab.
5. Now it gets distribution-specific. On Debian, the next script in line is /etc/init.d/rcS, which then hands off to whatever /etc/rc*.d directory is specified in /etc/inittab. The Debian default is runlevel 2, so /etc/rc2.d is used, and all the scriptsin /etc/rc2.d are executed. This is the SysV style of startup.
On Red Hat, /etc/rc.d/rc.sysinit comes next, then the scripts in the default run-level directory (usually /etc/rc3.d or /etc/rc5.d).
Slackware does it a little differently. It’s more akin to the BSD style of systemstartup, which has a single /etc/rc.d/ directory with an init script for each run-level, though it incorporates some SysV features as well.
On Red Hat and Debian systems, the /etc/rc*.d directories do not contain the actualstartup scripts, but rather symlinks to scripts in /etc/init.d. By linking to a masterscript directory, /etc/init.d, unnecessary duplication is avoided. And, in a masterstroke of sheer ingenuity, the way the symlinks are named determines how the ser-vices will run. For example, consider:
$ ls -go S20cupsyslrwxrwxrwx 1 16 Sep 9 17:51 S20cupsys -> ../init.d/cupsys
S20 means the service cupsys is to be started with a priority level of 20. Lower num-bers equal higher priority. If it were K20cupsys, that would mean the service is to bekilled. (The Linux world is harsh.) This is a simple way to ensure that services arestopped and started the way you want, and in the right order.
RunlevelsThis is the common Linux runlevel scheme:
0 Halt
1 Single user
2–5 Multiuser
6 Reboot

This is the Title of the Book, eMatter EditionCopyright © 2007 O’Reilly & Associates, Inc. All rights reserved.
7.2 Changing Runlevels After Bootup | 91
These are the runlevels in Debian distributions:
0 Halt the system
1 Single user
2–5 Multiuser mode (the defaults are all the same)
6 Reboot
The runlevels in Red Hat distributions are:
0 Halt the system
1 Single-user text mode
2 Not used (user-definable)
3 Multiuser text mode
4 Not used (user-definable)
5 Multi-user graphical mode
6 Reboot
The runlevels in Slackware distributions are:
0 Halt the system
1 Single-user mode
2 Unused, same as 3
3 Multiuser text mode
4 Multiuser graphical mode
5 Unused, same as 3
6 Reboot
There may be even more variations in other distributions, and theoretically runlevels7–9 exist, though they are not used. It’s easy enough to see what each runleveldoes—simply read the rc*.d directories.
7.2 Changing Runlevels After Bootup
ProblemSomewhere during the installation of your Linux system, you selected either “boot totext mode” or “boot to graphical mode.” Maybe you didn’t quite understand whatthese options meant—or maybe you did, but now you want a nice graphical inter-face instead of a boring text-only console. Or you’re having problems with the graph-ical interface, and want to drop to a runlevel with minimal services fortroubleshooting.

This is the Title of the Book, eMatter EditionCopyright © 2007 O’Reilly & Associates, Inc. All rights reserved.
92 | Chapter 7: Starting and Stopping Linux
SolutionUse init. First, check what runlevel you are in:
# /sbin/runlevelN 5
The N means you have not previously booted to a different runlevel. If you had, thenumber of the runlevel would be displayed. You must be root to change the runlevel:
# /sbin/init 3
This will stop all runlevel 5 services, then start up the runlevel 3 services. It’s likedoing a partial reboot. All users will be logged out.
Sometimes you need to change to runlevel 1 to get out of trouble:
# /sbin/init 1
This stops X and drops you to a root shell, with limited services and no X. On RedHat, you don’t need to supply the root password after dropping to runlevel 1, sodon’t give any sudo users init access.
DiscussionIn Red Hat, Fedora, Mandrake, and Slackware, changing runlevels is one way to killan X session, because runlevel 3 boots to a text console. However, it’s rather drastic,as it stops and restarts all services and boots out all logged-in users.
Why change runlevels with init? Here are some good reasons:
• To drop to runlevel 1 for troubleshooting and repairs.
• To stop or reboot the system when normal methods don’t work.
• To restart all services, or to switch to a different set of services.
Bad reasons include:
• To change from a text console session to an X session, because init must be runas root, and running an X session as root is a very bad idea. It’s insecure, and it’stoo easy to inadvertently make mistakes and mess up your system.
• To exit an X session.
There are other, better ways to manage switching between X sessions and consolesessions, as you’ll see in Recipe 7.4, “Starting and Stopping X.”
telinit works too, as it’s simply a hard link to init (“tell init”—more clever geekwordplay):
$ ls -al /sbin/telinitlrwxrwxrwx 1 root root 4 Oct 31 07:51 /sbin/telinit -> init

This is the Title of the Book, eMatter EditionCopyright © 2007 O’Reilly & Associates, Inc. All rights reserved.
7.3 Changing the Default Runlevel | 93
See Also• init(8)
• Recipe 7.4, “Starting and Stopping X”
• Chapter 5 of Running Linux, by Matt Welsh, Mattias Dalheimer, Terry Dawson,and Lar Kaufman (O’Reilly)
• Chapter 10 of LPI Linux Certification in a Nutshell
7.3 Changing the Default Runlevel
ProblemYou don’t like the runlevel your system boots to, and you want to change it. Forexample, you might boot into text-mode rather than a nice window system. Or per-haps you have customized different runlevels to run different sets of services, andafter a suitable amount of testing and tweaking, you’re ready to choose one for adefault.
SolutionEasy as pie. Edit /etc/inittab, and look for this line:
# The default runlevel.id:2:initdefault:
Simply change id:2 to whatever number you desire (except 0 or 6).
If you’re commitment-shy and want the most flexibility at boot time, comment out theid:X:initdefault line. Then init will ask you during bootup which runlevel you want.
DiscussionDebian’s default 2–5 runlevels are all the same and will boot either to a text consoleor a graphical login manager, depending on what was selected at installation. Run-level 2 is the Debian default. Recipe 7.5 tells how to customize Debian’s runlevels.
See Also• inittab(5)
• Recipe 7.5, “Managing Debian’s Runlevels”
• Chapter 5 of Running Linux
• Chapter 10 of LPI Linux Certification in a Nutshell

This is the Title of the Book, eMatter EditionCopyright © 2007 O’Reilly & Associates, Inc. All rights reserved.
94 | Chapter 7: Starting and Stopping Linux
7.4 Starting and Stopping X
ProblemYou don’t like the idea of changing runlevels just to kill an X session. After all, itmeans restarting all services, and it will mess up any users who are logged in. What’sa better way to stop an X session?
SolutionThere are several choices. The best way is to configure one runlevel to boot to a textconsole. Then start X when you want it with the startx command:
$ startx
Then you can exit X simply by logging out of the X session. You won’t be logged outof Linux, just X.
On most distributions, runlevel 3 boots to a text console. On Red Hat, Fedora, Man-drake, and SuSE, runlevel 5 is a graphical login manager. On Slackware, this is run-level 4.
Debian users may have to take some extra steps, as Debian’s default 2–5 runlevelsare all the same. See Recipe 7.6 to learn how to customize Debian’s runlevels.
DiscussionThere are other ways to stop an X session. These are better suited for when X locks up.
Any user can use “xkill”, by typing Ctrl-Alt-Backspace.
If you’re running a graphical login manager (xdm, kdm, or gdm), root can stop thelogin manager. This also logs out users:
# /etc/init.d/gdm stop
See Also• The “Introduction” to this chapter
• Recipe 7.3, “Changing the Default Runlevel”
• Recipe 7.6, “Creating Both Text and Graphical Login Runlevels on Debian”
7.5 Managing Debian’s Runlevels
ProblemYou need to manage what services start up at boot on a Debian system, on each run-level, because when you install new services, such as Apache, Exim, or OpenSSH,

This is the Title of the Book, eMatter EditionCopyright © 2007 O’Reilly & Associates, Inc. All rights reserved.
7.6 Creating Both Text and Graphical Login Runlevels on Debian | 95
Debian configures them to start at boot. You’re still testing things, so you want tostart/stop them manually. Or you want different services to start on different run-levels during testing.
SolutionUse the update-rc.d command. This example adds a new service, the KDE DisplayManager, to runlevel 5. kdm is the name of a startup file in /etc/init.d. There must bea trailing dot ending the runlevels list:
# update-rc.d kdm start 99 5 . stop 01 0 1 2 3 4 6 .
This command removes a service from all runlevels. Removal is all or nothing; youcannot be selective:
# update-rc.d -f kdm remove
Changing the runlevels for an existing service is a two-step process: first remove it,then add it back to the levels in which you want it to run. Be sure to make an entryfor every service on every runlevel, either stop or start.
DiscussionRemember, update-rc.d operates on the script names in /etc/init.d. You can test-drivethe update-rc.d commands with the -n option, which means “not really”:
# update-rc.d -f -n kdm remove
You can delete init.d scripts if you really really want to, with the remove option:
# update-rc.d --purge kdm remove
But it’s usually better to leave them in place, because you may want them again.
See Also• update-rc.d(8)
7.6 Creating Both Text and Graphical LoginRunlevels on Debian
ProblemYour Debian system boots to a graphical login manager. You want to change this sothat your Debian system’s runlevel 3 is a text console, and runlevel 5 boots to agraphical login.

This is the Title of the Book, eMatter EditionCopyright © 2007 O’Reilly & Associates, Inc. All rights reserved.
96 | Chapter 7: Starting and Stopping Linux
SolutionFirst you need to know which display manager the system is using. Then you canadd it to or remove it from the appropriate levels. To see which one is running, use:
$ ps ax | grep dm 537 ? S 0:00 /usr/bin/kdm 544 ? S< 0:10 /usr/X11R6/bin/X :0 -dpi 100 -nolisten tcp vt7 -auth /var/lib/kdm/A:0-PbCLdj
kdm, the K display manager, is running. First remove it from all runlevels:
# update-rc.d -f kdm removeupdate-rc.d: /etc/init.d/kdm exists during rc.d purge (continuing) Removing any system startup links for /etc/init.d/kdm ... /etc/rc0.d/K01kdm /etc/rc1.d/K01kdm /etc/rc2.d/S99kdm /etc/rc3.d/S99kdm /etc/rc4.d/S99kdm /etc/rc5.d/S99kdm /etc/rc6.d/K01kdm
Now have kdm start on runlevel 5, and stop on all the others:
# update-rc.d kdm start 99 5 . stop 01 0 1 2 3 4 6 . Adding system startup for /etc/init.d/kdm ... /etc/rc0.d/K01kdm -> ../init.d/kdm /etc/rc1.d/K01kdm -> ../init.d/kdm /etc/rc2.d/K01kdm -> ../init.d/kdm /etc/rc3.d/K01kdm -> ../init.d/kdm /etc/rc4.d/K01kdm -> ../init.d/kdm /etc/rc6.d/K01kdm -> ../init.d/kdm /etc/rc5.d/S99kdm -> ../init.d/kdm
Note that it’s important to have an entry on every runlevel, explicitly starting or stop-ping each service. The priority number must always be two digits. 99 is the lowestpriority. Last to live, first to die, that’s the fate of kdm.
Finally, edit /etc/inittab so that your chosen runlevel becomes the default:
# The default runlevel.id:3:initdefault:
When you reboot, your new runlevel scheme will take effect. You can also commentout the line, and then you’ll be asked during boot up to select a runlevel.
Discussiongdm is the Gnome display manager, xdm is the X display manager, and kdm belongsto KDE. It’s not uncommon to find all three installed. xdm is pretty barebones; itdoes nothing but provide a graphical login screen. Both kdm and gdm have severallogin and shutdown options, including a menu for selecting your window manager.

This is the Title of the Book, eMatter EditionCopyright © 2007 O’Reilly & Associates, Inc. All rights reserved.
7.7 Managing Red Hat’s Runlevels | 97
See Also• update-rc.d(8)
• Recipe 7.3, “Changing the Default Runlevel”
• The Debian Reference manual (http://qref.sourceforge.net)
• This chapter’s “Introduction”
7.7 Managing Red Hat’s Runlevels
ProblemUnless you took the time to do a custom installation, Red Hat/Fedora typically startsall kinds of services when it boots. If you took the fast way, you probably have allsorts of services running that you’d like to shut off. Or you’d like to start differentservices on different runlevels, for testing and tinkering.
SolutionUse chkconfig. For example, configuring ssh:
# chkconfig --level 2345 ssh on# chkconfig --level 016 ssh off
You need both steps—define which runlevels the service will run on, and definewhich runlevels it will not run on. “Off” means kill, and “on” means start.
To add a new service to all levels, use:
# chkconfig --add ssh
To delete a service from all runlevels, use:
# chkconfig --del ssh
xinetd services are slightly different, and are also managed with chkconfig:
# chkconfig ktalk on# chkconfig rsync off
xinetd services are either on or off; you don’t have to worry about different runlevels.
To display the status of all services, on all runlevels, and xinetd services, use:
# chkconfig --listanacron 0:off 1:off 2:on 3:on 4:on 5:on 6:offsyslog 0:off 1:off 2:on 3:on 4:on 5:on 6:offcups 0:off 1:off 2:on 3:on 4:on 5:on 6:offapmd 0:off 1:off 2:on 3:on 4:on 5:on 6:offxinetd based services: chargen-udp off rsync: off sgi-fam: on

This is the Title of the Book, eMatter EditionCopyright © 2007 O’Reilly & Associates, Inc. All rights reserved.
98 | Chapter 7: Starting and Stopping Linux
To query a single service, use:
# chkconfig --list syslogsyslog 0:off 1:off 2:on 3:on 4:on 5:on 6:off
Discussionchkconfig gets its default priority and runlevel values from the program’s startupscript. For example, in /etc/rc.d/init.d/cups:
# Linux chkconfig stuff# chkconfig 2345 90 10
This tells chkconfig to start in runlevels 2, 3, 4, and 5, with a priority of 90 for start-ing and 10 for stopping. Of course, you can easily change these to suit yourself, byeither editing the original init.d script or simply renaming the links:
# mv /etc/rc.d/rc3.d/S90cups /etc/rc.d/rc3.d/S45cups
See Also• chkconfig(8)
• The Red Hat Customization Guide (http://www.redhat.com/docs/manuals/linux/)
7.8 Manually Configuring Startup Services
ProblemYou need to manually configure your startup services, either because you think usingthese fancy-schmancy utilities like update-rc.d to manage your runlevels is sissy, youdon’t care for the utility that your Linux distribution provides, or you’re stuck onsome strange barebones system with no helpful utilities.
SolutionCreate entries in the /rc*.d directories with the ln command. Delete entries for ser-vices that are not going to be used at all.
As an example, let’s create a nice soft link to start up CUPS in runlevel 3:
# ln -s /etc/rc.d/init.d/cups /etc/rc.d/rc3.d/S90cups
Now repeat this for every runlevel. Don’t forget the “kill” runlevels:
# ln -s /etc/rc.d/init.d/cups /etc/rc.d/rc0.d/K01cups
Priority choices are 1–99. It doesn’t matter if there are duplicates; priority 20 is themost common. Priorities usually aren’t all that important, but some things, such asfirewalls and logging, should be assigned an early priority between 1–10 (for startingup) and a late priority 80 or greater (for stopping). Also, pay attention to sequence. Forexample, networking needs to be started before services that depend on networking.

This is the Title of the Book, eMatter EditionCopyright © 2007 O’Reilly & Associates, Inc. All rights reserved.
7.9 Manually Starting and Stopping Services | 99
DiscussionDoing it this way is a little more work, but it’s you’re no big deal—you’re just creat-ing soft links. Remember, every service that you start must also be explicitly stoppedin all runlevels in which it is not going to run. Also, some services in 0, 1, and 6should not be killed, as these are important system services created by Linux. Make arecord of these before changing anything:
$ ls /etc/rc0.d /etc/rc1.d /etc/rc6.d > original-runlevels.txt
Also include rcS.d, and any others that may be hanging around. You can do any-thing you want in runlevels 2–5, but take care not to mess up the others.
See Also• ln(1)
• Chapter 5 of Running Linux
7.9 Manually Starting and Stopping ServicesProblemYou need to start, stop, or restart a service, but you don’t want to make it perma-nent. Maybe your network connection has wedged or your web server has died. Oryou changed the configuration file for a service, and need to restart it to activate thechanges. Or you are testing a new service, so you want to start it up only whenyou’re testing it.
SolutionRun the program’s startup script in /init.d. Find the appropriate script in init.d, thenread the script to see the available options. For example, restarting networking is acommon need. Take a look in /etc/init.d/networking:
echo "Usage: /etc/init.d/networking {start|stop|restart|force-reload}"
There’s a line like this in every init script. Another way to get this information is torun the script with no arguments:
# /etc/init.d/networkingUsage: /etc/init.d/networking {start|stop|restart|force-reload}
So, to stop networking, use the command:
# /etc/init.d/networking stop
DiscussionFor any program that has a startup script, it is preferable to use the script, ratherthan executing the program’s binary, because the script includes include error andfile checking, and any needed conditional tests.

This is the Title of the Book, eMatter EditionCopyright © 2007 O’Reilly & Associates, Inc. All rights reserved.
100 | Chapter 7: Starting and Stopping Linux
7.10 Shutting Down or Rebooting Linux
ProblemLook at all these shutdown and reboot commands: shutdown, halt, init 0, poweroff,Ctrl-Alt-Delete, etc. What’s the right one to use?
SolutionIt doesn’t matter all that much; use what suits you. Only root can use these com-mands to shut down:
# shutdown -h now
or:
# poweroff
or:
# halt
To shut down in six minutes:
# shutdown -h +6
shutdown sends a notification to all logged-in users. To make your own message, use:
# shutdown -h +6 "Time to stop working and start partying."
Console users will see:
Broadcast message from root (pts/6) Wed Aug 14 13:51:24 2003Time to stop working and start partying.The system is going DOWN for system halt in 6 minutes!
To cancel a shutdown as root, use:
# shutdown -c
To reboot, you can use:
# shutdown -r now
or:
# reboot
or press Ctrl-Alt-Delete. Any user can do this, unless you disable it in /etc/inittab. (SeeRecipe 7.11 to learn to disable this, or how to grant permission to specific users.)
DiscussionThe most important thing to remember is to always have a controlled shutdown. Allcomputers, including Linux machines, have to do a lot of tidying up and puttingaway before they can be turned off. Services must be turned off, filesystemsunmounted, and buffers written to disk.

This is the Title of the Book, eMatter EditionCopyright © 2007 O’Reilly & Associates, Inc. All rights reserved.
7.11 Disabling or Limiting Access to Ctrl-Alt-Delete | 101
shutdown, poweroff, and halt all must be executed by the root user. This seems rathersilly, as all window managers and desktop environments have their own shutdownmenus that any user can use, and anyone physically sitting at the machine can hit thepower switch. However, there it is, and we must deal with it. One option is to grantlimited privileges for shutdown commands with sudo. Another is to create a “shut-down” group.
See Also• shutdown(8), poweroff(8)
• Recipe 8.20, “Using su to Be Root Temporarily”
• Recipe 8.21, “Granting Limited Rootly Powers with sudo”
• Chapter 25 of Unix Power Tools, by Shelley Powers, Jerry Peek, Tim O’Reilly,and Mike Loukides (O’Reilly)
• Chapter 8 of Running Linux
7.11 Disabling or Limiting Accessto Ctrl-Alt-Delete
ProblemWe all know that Ctrl-Alt-Delete reboots the machine. But is this what you want?From a security standpoint, a machine is vulnerable when booting; and anyone withaccess to the keyboard can force a reboot. Therefore, you want to disable Ctrl-Alt-Delete for rebooting the machine, or you want to limit it to some users.
SolutionTo disable it completely, comment out this line in /etc/inittab:
# ca:12345:ctrlaltdel:/sbin/shutdown -t1 -r now
To enable it for a specific set of users, add the -a switch:
ca:12345:ctrlaltdel:/sbin/shutdown -t1 -a -r now
Then add your list of allowed users to /etc/shutdown.allow.
DiscussionYou may need to create the /etc/shutdown.allow file, if it does not already exist.
See Also• shutdown(8)

This is the Title of the Book, eMatter EditionCopyright © 2007 O’Reilly & Associates, Inc. All rights reserved.
102 | Chapter 7: Starting and Stopping Linux
7.12 Shutting Down Automatically
ProblemYour users are careless watt-wasters who refuse to develop the habit of shuttingdown their PCs at night, or maybe you think it would be nice to have your machineturn itself off at night, so you can just walk away and not worry about it.
SolutionIt’s easy as pie, thanks to cron. Add this line to /etc/crontab to automatically shutdown your machine every night at 11p.m.:
# m h dom mon dow user command 00 23 * * * root /sbin/shutdown -h now
Discussion/etc/crontab is perfect for simple cron setups. Note that it has a name field, so anyuser can have entries in this file. However, only root can edit /etc/crontab.
Another way is to use the crontab command:
# crontab -u root -e
This opens the root user’s crontab. Edit and save, and you’re done. Don’t try toname the file yourself—during editing, it’s a /tmp file, which is automaticallyrenamed by crontab when you save it. It will end up in /var/spool/cron/crontabs, orsomewhere close by.
A Brief Word on UptimesYou’ve probably noticed Linux users bragging and obsessing about their uptimes.There’s even an uptime command. There is nothing sacred about uptimes. Yes, I toolove that Linux is stable as a table, and that most software installations and systemupgrades never require a reboot. But let’s not go nuts. If a particular machine doesnot need to be running 24 × 7, turn it off. It saves electricity, reduces the risk ofsomething bad happening, and extends the life of your hardware.
See Also• cron(8), crontab(1), crontab(5)

This is the Title of the Book, eMatter EditionCopyright © 2007 O’Reilly & Associates, Inc. All rights reserved.
103
Chapter 8 CHAPTER 8
Managing Users andGroups
8.1 IntroductionOn a Linux system, both human users and system processes have user accounts.Some system processes need user accounts to control privileges and access rights,just like human users.
Remember the most fundamental Linux security principles:
1. Use the minimum necessary privileges to get the job done.
2. Strong passwords work.
Following these two principles will prevent all sorts of aggravation and mishaps.
Linux has a collection of utilities for managing users and groups: useradd, groupadd,userdel, groupdel, usermod, groupmod, passwd, chfn, and chsh. These are part of the“Shadow Suite.”
The Shadow Suite was created by Julianne Frances Haugh to improve passwordsecurity and to make user account management easier. In the olden days, all the rele-vant files had to be edited individually, and encrypted passwords were stored in /etc/passwd. But because /etc/passwd must remain world-readable, storing passwords init, even if they’re encrypted, is asking for trouble. Anyone who copies it can thencrack the passwords at their leisure. Relocating the encrypted passwords to /etc/shadow, which is accessible only by root, adds a useful layer of protection.
useradd behaves differently on different systems. Traditionally, it lumped all newusers into the same login group, users (100). This meant that all home directorieswere wide open by default, because users all belonged to the same group. Red Hatchanged this with their “User Private Group” scheme. Red Hat’s useradd creates aprivate group for each new user, with the same user ID (UID) and group ID (GID).Obviously, different users have different needs, and some prefer that their user’sdirectories be open. A fundamental security principle is “deny all, allow as needed.”

This is the Title of the Book, eMatter EditionCopyright © 2007 O’Reilly & Associates, Inc. All rights reserved.
104 | Chapter 8: Managing Users and Groups
Newer arrivals on the scene are adduser and addgroup, which are Perl script wrap-pers for useradd and groupadd. These scripts walk you through a complete new userconfiguration. adduser and addgroup are very nice for making individual entries, butthey’re no good for batch operations (unless, of course, you modify the adduser oraddgroup scripts yourself).
See Recipe 8.17 for a custom script for adding new users in batches and changingpasswords en masse.
8.2 Sorting Human Users from System Users
ProblemEvery Linux system has a bunch of system accounts (root, uucp, daemon, etc.) inaddition to regular users. They’re all lumped together in /etc/password. How do youlist your human users separately from system accounts?
SolutionTake advantage of Linux’s user identification (UID) numbering scheme and awk’sability to sort by fields or columns. This is for a Debian or Slackware system:
$ awk -F: '$3 > 999 { print $0}' /etc/passwdnobody:x:65534:65534:nobody:/nonexistent:/bin/shcarla:x:1000:1000::/home/carla:/bin/bashfoober:x:1001:1001::/home/test:/bin/falsebitchkat:x:1002:1002::/home/test2:/bin/bashcolby:x:1003:1003::/home/test3:/bin/bash
To show a subset use:
$ awk -F: '($3 >= 1000) &&($3 <=1005) { print $0}' /etc/passwd
This is for a Red Hat or SuSE system:
$ awk -F: '$3 > 499 { print $0}' /etc/passwd
To sort them alphabetically use:
$ awk -F: '$3 > 499 { print $0}' /etc/passwd | sort
There’s a neat trick you can do with UIDs, if you cannily plot out a numberingscheme in advance. For example:
• Trainers 1000–1100
• Coaches 1101–1200
• Players 1200–2000
Following a convention like this gives you a simple tool to sort your users and addthem in batches to groups.

This is the Title of the Book, eMatter EditionCopyright © 2007 O’Reilly & Associates, Inc. All rights reserved.
8.3 Finding a User’s UID and GID | 105
DiscussionUsing a numbering scheme like the “Trainers, Coaches, Players” example works allright for smaller user bases that are fairly static. For large, busy establishments with alot of change, it’s more headache than help. In those circumstances, it’s better to putyour energy into keeping group assignments orderly and up-to-date.
As always, there are interesting little differences between distributions.
UIDs and GIDs on all Linuxes range from 0 to 65534.
For example, on Debian:
• IDs 0–99 are for system accounts.
• IDs 100–999 are for user-installed programs and daemons, such as Postfix,Fetchmail, gdm, dictd, and so on.
• IDs 1000–29999 are ordinary user accounts.
• IDs 30000–65533 are reserved, according to the Debian policy manual, but youmay use them however you like.
• ID 65534 is user “nobody,” an account with no rights or permissions.
And on Red Hat:
• IDs 0–499 are reserved for system use.
• IDs 500–60000 are for ordinary users.
• ID 65534 is user “nobody,” an account with no rights or permissions.
Most Linuxes follow similar numbering schemes. Feel free to tinker with the numberranges reserved for ordinary user accounts, but don’t mess with the system or UIDs.
See Also• awk(1)
• Recipe 8.17, “Adding Batches of Users to Groups”
• Chapter 5 of Running Linux, by Matt Welsh, Matthias Dalheimer, Terry Daw-son, and Lar Kaufman (O’Reilly)
• sed & awk Pocket Reference, by Arnold Robbins (O’Reilly)
• Debian Policy Manual, Chapter 9.2.2 (http://www.debian.org/doc/debian-policy/)
• Red Hat Linux Reference Guide(http://www.redhat.com/docs/manuals/linux/)
8.3 Finding a User’s UID and GID
ProblemYou want to know a quick way to check the UIDs of users and see what groups theybelong to.

This is the Title of the Book, eMatter EditionCopyright © 2007 O’Reilly & Associates, Inc. All rights reserved.
106 | Chapter 8: Managing Users and Groups
SolutionUse the id command:
$ id carlauid=1000(carla) gid=1000(carla)groups=1000(carla),20(dialout),24(cdrom),25(floppy),29(audio),30(dip),44(video),105(windows),432(usb),1001(cdrecording)
Discussionid has a few options:
-uShow the UID only.
-gShow the GID only.
-gnShow the user’s primary group name, instead of the GID.
See Also• id(1)
8.4 Adding Users with useradd
ProblemYou need to add new users to a Linux system.
SolutionUse useradd -m to create a login name, home directory, and other environment vari-ables, and use the passwd -e command to set the new password. The account is notactive until you create a password.
This is the simplest invocation. The -m flag creates a home directory and copies inthe files from /etc/skel:
# useradd -m newusername
Under most circumstances, you should also specify the user’s full name, using the -c(comments) flag. Put four commas after the user’s name, to leave other parts of thecomments field (office number, etc.) blank.
# useradd -m -c Grace Hopper,,,, ghopper
When adding a new user, newusername becomes the user’s login name. This must bea unique name.

This is the Title of the Book, eMatter EditionCopyright © 2007 O’Reilly & Associates, Inc. All rights reserved.
8.5 Adding Users with adduser | 107
Next, run passwd -e. The -e flag expires the password at first login, forcing the userto change it:
# passwd -e ghopperEnter new UNIX password:Retype new UNIX password:passwd: password updated successfully
The user’s environment is created according to the defaults in /etc/default/useraddand /etc/skel/. You can display the useradd defaults:
# useradd -D
Any of the default values can be overridden at the command line—for example, theUID and shell:
# useradd -u 1500 -s tcsh ghopper
Or you can add to the default values—for example, adding additional groupmemberships:
# useradd -G users,cdrecord,dialout ghopper
Discussionuseradd, unlike its cousin adduser, performs splendidly in scripts (such as themass_useradd script in Recipe 8.17).
The comments fields are also known as the GECOS data. GECOS has five comma-delimited subfields. If you’re going to use the comments fields, it is best to include allfour commas, even if you don’t enter all the values. This pays off handsomely overthe long run, especially for batch and search operations. The traditional values arefull name, room number, work phone, home phone, and other (this field can be usedfor anything you like). Many external programs, such as mail servers, use the fullname field. But you can use the other subfields any way you like. It provides a usefulway to arbitrarily categorize and sort users (see Recipe 8.19).
GECOS is a dusty holdover from the very olden days; it stands for the “General Elec-tric Comprehensive Operating System.” Visit the Jargon File for the full story.
See Also• useradd(8)
• The Jargon File (http://www.catb.org/~esr/jargon/)
8.5 Adding Users with adduser
ProblemYou want to use adduser instead of useradd, because it walks you through a com-plete new user setup—password, GECOS fields, and all.

This is the Title of the Book, eMatter EditionCopyright © 2007 O’Reilly & Associates, Inc. All rights reserved.
108 | Chapter 8: Managing Users and Groups
SolutionTo add a user, simply run adduser newusername and follow the prompts:
# adduser anitabAdding user anitab...Adding new group anitab (1008).Adding new user anitab (1008) with group anitab.Creating home directory /home/anitab.Copying files from /etc/skelEnter new UNIX password:Retype new UNIX password:passwd: password updated successfullyChanging the user information for anitabEnter the new value, or press ENTER for the default Full Name [ ]: Room Number [ ]: Work Phone [ ]: Home Phone [ ]: Other [ ]:Is the information correct? [y/n] y
You can assign a UID, overriding the default:
# adduser --uid 1500 anitab
adduser’s defaults are configured in /etc/adduser.conf.
DiscussionThe full name is the only important part of the user information. Any external pro-grams that use /etc/passwd, such as mail servers, need the full user name. And,believe it or not, finger still lingers on most Linuxes:
$ finger anitabLogin: anitab Name:Directory: /home/anitab Shell: /bin/bashOn since Sun May 30 08:46 (PDT) on tty1 10 hours 55 minutes idle (messages off)No mail.No plan.Phone 555-5555Office Fooo
The other fields for the user data can contain anything you want. Using these fields isa quick and easy way to keep notes on users, or to categorize them.
Users can change their own room and phone numbers with chfn, but they can’tchange the full name or the “other” field.
See Also• adduser(8), adduser.conf(5), finger(1)

This is the Title of the Book, eMatter EditionCopyright © 2007 O’Reilly & Associates, Inc. All rights reserved.
8.6 Modifying User Accounts | 109
8.6 Modifying User Accounts
ProblemYou need to make changes to an existing user account, such as changing the login orUID, updating the GECOS data, or home directory.
SolutionUse usermod and chfn.
Anything and everything is modifiable, including the login name and UID. Tochange the login, list first the new login name, then the old one:
# usermod -l aborg anitab
The following command changes the UID—in this example, from the original 1050to 1200—without changing the login name. Name the new UID first, then the login:
# usermod -u 1200 anitab
Group memberships are not changed. All files in the user’s home directory will auto-matically be updated with the new UID. However, you must hunt down and changeany files outside the user’s home directory, such as crontabs, mail directories, /tmpfiles, and files in shared directories. You can hunt them down with find, searching forthe original UID, if you want to review them before making changes:
# find / -uid 1050/usr/src/include/lber.h/usr/src/include/ldap.h/usr/src/include/ldbm.h
Use chown to update ownership of the files:
# chown 1200 /usr/src/include/lber.h
Doing this one file at a time can be rather tedious. chown and find can do the workfor you:
# find / -uid 1050 -exec chown -v 1200 { } \;changed owner of `/usr/src/include/lber.h' to 1200changed owner of `/usr/src/include/ldap.h' to 1200changed owner of `/usr/src/include/ldbm.h' to 1200
The following command moves the user’s home directory, and its contents, to a dif-ferent location. It will create the new directory if it does not already exist. Name thenew directory first, then the login name. Be sure to use both the -d and -m flags:
# usermod -d /server1/home/aborg/ -m aborg
To change a user’s GECOS information use:
# chfn aborg
This is the Title of the Book, eMatter EditionCopyright © 2007 O’Reilly & Associates, Inc. All rights reserved.
110 | Chapter 8: Managing Users and Groups
Users can change their own GECOS data with chfn, with the exception of the fullname and “other” fields, which only the superuser can edit.
DiscussionIt is better not to change the login and UID, as changing these has system-widerepercussions. If you do, remember to hunt down all the files belonging to the user,change the name on the user’s home directory, and update group memberships.
You can make find verify each change by substituting the -ok flag for -exec, ratherthan letting it make all the changes automatically:
# find / -uid 1050 -ok chown -v 1200 { } \;
This will prompt you to approve each change.
This particular use of find is endlessly useful. The -exec or -ok options tell find to exe-cute the command that follows. { } is replaced by the current file being processed.The semicolon tells find where the chown command stops, and the backslash escapesthe semicolon so it isn’t gobbled by the shell.
See Also• usermod(8), chfn(1)
• The Jargon File (http://www.catb.org/~esr/jargon/)
8.7 Deleting a User
ProblemYou need to delete a user, and you want to track down all the files that belong to theuser.
SolutionUse userdel to delete the account, and use find to locate the files belonging to theuser.
To delete a user:
# userdel aborg
The user cannot be logged in or running any processes for userdel to work.
userdel removes the user from all system account files (/etc/passwd, etc/shadow, /etc/group), but it does not touch files owned by the user. To remove the user’s homedirectory and mail spool, add the -r flag:
# userdel -r aborg

This is the Title of the Book, eMatter EditionCopyright © 2007 O’Reilly & Associates, Inc. All rights reserved.
8.8 Killing User Processes the Easy, Fun Way | 111
Other files, such as crontabs and data files outside the home directory, will have tobe hunted down separately:
# find / -uid 1200
DiscussionThe politics and policies around terminating someone’s account are sensitive. If thisis a home system, do whatever you want. If it’s a commercial system, make sure youunderstand your company’s policies. It’s always a good idea to remove or lock theaccount of any employee who is terminated. Then back up the employee’s files.
See Also• userdel(8), find(1)
• Recipe 8.9, “Disabling Accounts”
8.8 Killing User Processes the Easy, Fun Way
ProblemYou need to delete a user, but userdel reports that some of the user’s processes are run-ning. You sure would like single command to find and stop all of the user’s processes.
SolutionUse the slay program:
# slay fooberslay: -KILL is kicking foober's butt!slay: Whoa, I have the power supreme.
slay finds and kills all the user’s processes at once, saving you the trouble of huntingthem down and killing them yourself. slay has four modes: nice, normal, mean, andbutthead. Mean mode kills any nonprivileged user who attempts to slay anotheruser. Set your desired mode in /etc/slay_mode.
DiscussionThe traditional method of finding processes belonging to a user is to use ps, as in:
$ ps U 1007
or:
$ ps U foober3936 ? S 0:00 xchat3987 ? S 0:00 /usr/lib/galeon-bin4209 ? S 0:00 kdeinit: kio_file file /tmp/ksocket-carla/klauncherkF21rc.slave-

This is the Title of the Book, eMatter EditionCopyright © 2007 O’Reilly & Associates, Inc. All rights reserved.
112 | Chapter 8: Managing Users and Groups
You can then kill one by one:
# kill 3936# kill 3987# kill 4209
See Also• slay(1), kill(1)
8.9 Disabling Accounts
ProblemYou need to disable an account and temporarily prevent the user from logging in, butyou don’t want to delete the account.
SolutionTo temporarily deactivate an account, disable the user’s password with the -l (lock)flag:
# passwd -l aborgPassword changed.
To re-enable, or unlock, a user’s password use:
# passwd -u aborgPassword changed.
DiscussionAnother way to disable an account is to insert an exclamation point at the beginningof the password field in /etc/shadow:
foobar:!$1$wiDlQr34$mitGZA76MSYCY04AHIY1:12466:0:99999:7:::
Yet another way is replace the x in the password field in /etc/passwd with an asterisk (*):
foober:*:1025:1025:Foober Smith,,,:/home/foober:/bin/bash
You can also take away the user’s login shell:
# usermod -s /bin/false foober
But it’s best to stick with passwd -l and -u.
See Also• passwd(1), passwd(5)

This is the Title of the Book, eMatter EditionCopyright © 2007 O’Reilly & Associates, Inc. All rights reserved.
8.10 Managing Passwords | 113
8.10 Managing Passwords
ProblemYou need to reset a password, or put an expiration date on it, or you want to set alimit on failed login attempts. Resetting a password is the solution to the perennial “Iforgot my password” problem; many Linux administrators think it’s a good idea to“expire” passwords, forcing users to change them periodically.
SolutionUse passwd to set and configure passwords.
To reset or change a password use:
# passwd aborg
Users can also change their own passwords:
aborg@server04:~$ passwd
This command sets aborg’s password to expire after six months, with five days’warning:
# passwd -x 180 -w 5 -i 1 aborg
To view a user’s password settings, use:
# passwd -S optionaborg P 02/18/2004 0 10 5 1
DiscussionPasswords can consist of numbers, letters, and punctuation marks, and they are case-sensitive. Don’t use spaces or function keys. Strong passwords work best—thismeans no names, no dictionary words, no birthdays or addresses. The best way tokeep track of passwords is write them down and keep them in a safe place. Mostpeople, if they can’t remember all of their passwords, end up choosing weak, easilyguessable passwords, or leaving them in obvious, insecure places (such as on a notestuck to the monitor).
Linux passwords are not designed to be recoverable. If a password is lost, the usermust depend on the benevolence of the superuser to create a new one.
See Also• passwd(1), passwd(5)

This is the Title of the Book, eMatter EditionCopyright © 2007 O’Reilly & Associates, Inc. All rights reserved.
114 | Chapter 8: Managing Users and Groups
8.11 Adding Groups with groupadd
ProblemYou need to create some new user or system groups. Any server programs that youinstall should have their own users and group.
SolutionUse groupadd.
This command creates a new group, using the system values configured in /etc/default/useradd and /etc/skel/:
# groupadd newgroup
You can create a system group with -r flag:
# groupadd -r newgroup
The -r flag is a Red Hat–specific option. If your version of groupadd does not have it,you’ll have to specify the next available system group number:
# groupadd -g 127 newgroup
Look in /etc/group to see the next available group number.
DiscussionIt’s a good idea to stick to a consistent group numbering scheme. Linux doesn’t care,for the most part, but for your own sanity it’s essential. Red Hat system groups are0–499; Debian’s are 100–999. See the “Discussion” section in Recipe 8.2 for moreinformation on numbering schemes.
See Also• groupadd(8)
8.12 Deleting Groups with groupdel
ProblemYou need to delete a group or groups, and you want to be sure there are no orphanedfiles or users.
SolutionFirst reassign the group members, if necessary, by editing /etc/group. Simply copyand paste them into another group. Then use groupdel to delete the group, and findand chgrp to locate and reassign the group’s files to another group.

This is the Title of the Book, eMatter EditionCopyright © 2007 O’Reilly & Associates, Inc. All rights reserved.
8.13 Creating a System User | 115
To delete a group use:
# groupdel groupname
Deleting a group tends to be messy, because there is no utility for automaticallymigrating or deleting any files or users belonging to the group. You’ll need to huntthese down and change the GIDs manually:
# find / -gid 750/usr/src/include/lber.h/usr/src/include/ldap.h/usr/src/include/ldbm.h
You can change these one at a time:
# chgrp 800 /usr/src/include/lber.h
Or you can let find and chgrp do the work:
# find / -gid 750 -exec chgrp -v 800 { } \;
See Also• groupdel(8), find(1), chgrp(1)
• Recipe 8.6, “Modifying User Accounts,” for an explanation of how the find com-mand works in these examples
8.13 Creating a System User
ProblemYou need to know how to create system users for programs like Postfix, Apache, orSquid. These programs should have their own unique user accounts and not just allpile into “nobody.”
SolutionBoth adduser and useradd can do this. adduser works like this:
# adduser --system --no-create-home --group squidAdding system user squid...Adding new group squid (109).Adding new user squid (109) with group squidNot creating home directory
Check your work:
# cat /etc/passwd | grep squidsquid:x:109:109::/home/squid:/bin/false
Even though it lists /home/squid, a home directory is not created.
Here’s how useradd does it:
# useradd -d /dev/null -g squid -s /bin/false squid

This is the Title of the Book, eMatter EditionCopyright © 2007 O’Reilly & Associates, Inc. All rights reserved.
116 | Chapter 8: Managing Users and Groups
DiscussionThe nobody user is the default for a lot of daemons and processes that need a systemaccount, but an increasing number of applications require their own unique users.Use a unique user whenever possible, because it’s a good security practice. Thenobody account is a common cracker target, and you don’t want to expose all kindsof processes and daemons to a common point of attack.
See Also• adduser(8), adduser.conf(5), useradd(8)
8.14 Creating System Groups with addgroup
ProblemYou need to create some new system groups, and you want to use addgroup.
SolutionHere’s how to create system groups with addgroup:
# addgroup --system newsysgroup
You can assign the GID, overriding the default. Remember to stick with your distri-bution’s (or your personal) numbering scheme:
# addgroup --system --gid 300 newsysgroup
See Also• addgroup(8)
• Recipe 8.11, “Adding Groups with groupadd”
8.15 Adding and Deleting Group Members
ProblemYou need to give users some group memberships, or delete some users from groups.
SolutionEdit /etc/groups manually. Just copy and paste; it’s the fastest way.

This is the Title of the Book, eMatter EditionCopyright © 2007 O’Reilly & Associates, Inc. All rights reserved.
8.16 Checking Password File Integrity | 117
DiscussionYou may also use adduser and usermod, but beware of sneaky gotchas: adduser willonly add a user to one group at a time, but usermod, which allows you to list severalgroups at once, will overwrite any existing group assignments.
See Also• adduser(8), usermod(8)
8.16 Checking Password File Integrity
ProblemThere’s a lot going on in all these files (/etc/group, /etc/passwd, /etc/shadow, and /etc/gshadow), and you need some kind of password file syntax integrity checker. Youdon’t want to find out that you’ve made some mistake—like forgetting to give some-one a password—after an attacker has broken into your system!
SolutionUse pwck for checking /etc/passwd and /etc/shadow, and use grpck for /etc/group and/etc/gshadow:
# pwck# grpck
If they exit silently, no errors were found. Otherwise, errors will be listed; you willhave to correct the errors, or the program will exit. You can get around this, and sim-ply view all errors, by running in read-only mode:
# pwck -r# grpck -r
Discussionpwck performs a consistency check on the /etc/passwd and /etc/shadow files. It checkseach user account, and verifies that it has:
• The correct number of fields
• A unique user name
• A valid user and group identifier
• A valid primary group
• A valid home directory
• A valid login shell
pwck will report any account that has no password. I love the wording in the manpage: “The checks for correct number of fields and unique user name are fatal.”

This is the Title of the Book, eMatter EditionCopyright © 2007 O’Reilly & Associates, Inc. All rights reserved.
118 | Chapter 8: Managing Users and Groups
That’s hardly an inducement to utilize this useful program! However, rest assured–you are perfectly safe and will not be harmed.
When pwck finds an error, your choices are to delete the account or to ignore theaccount, in which case pwck shuts down and won’t check any more lines (with oneexception: if it finds a duplicate name, it will continue checking even if you don’tdelete the account)
grpck checks the /etc/group and /etc/gshadow files to verify that each group has:
• The correct number of fields
• A unique group name
• A valid list of members and administrators
See Also• pwck(8), grpck(8)
8.17 Adding New Users in Batches
ProblemYou want to be able to add several users at once, rather than having to enter eachone individually.
SolutionUse the mass_useradd script. It’s a shell script, so it should run just about anywhere.You’ll also need mass_passwd. Store the two scripts in the same directory. Youshould also install the pwgen utility, for generating passwords. You’ll need a colon-delimited text list of logins and usernames in this format:
login:firstname lastname
You may also include additional GECOS data, like this:
dawns:Dawn Marie Schroder,,123-4567,trainers
Then invoke the mass_useradd script. It creates entries in /etc/passwd, /etc/group, and/etc/shadow; home directories; personal login groups; and passwords that expire atfirst use.
This tells mass_useradd to use the list of new users in newusers and to overwrite orcreate the output file newlogins.txt:
# sh mass_useradd < newusers > newlogins.txt
This appends the new logins and passwords to newlogins.txt:
# sh mass_useradd < newusers >> newlogins.txt

This is the Title of the Book, eMatter EditionCopyright © 2007 O’Reilly & Associates, Inc. All rights reserved.
8.17 Adding New Users in Batches | 119
In addition to the output file, which is a simple list, mass_passwd creates a separatefile for each user, containing the new login name and instructions. This makes it easyto print them individually for distribution. These files, plus a log file, are stored inthe home directory of the user who runs the scripts (usually root):
# ls /root/mass_passwdsdawns.passwd.txt nikitah.passwd.txt mass_passwd.log rubst.passwd.txt
DiscussionBecause the scripts use standard Shadow Suite utilities, they are easy to customize byadjusting the options for the various utilities used in the scripts.
The output file looks like this:
dawns shabaefi 1002nikitah gohbinga 1003rubst ahtoohaa 1004
/etc/passwd looks like this:
dawns:x:1002:1002:Dawn Marie Schroder,,123-4567,trainers:/home/dawns:/bin/bashnikitah:x:1003:1003:Nikita Horse,,123-4567,equine:/home/nikitah:/bin/bashrubst:x:1004:1004:Rubs The Cat,101,,234-5678,,test:/home/rubst:/bin/bash
The individual files generated for each user look like this:
--------------------------------------------------------- Login name: rubst Password: eejahgue
Please log in and change your password; the system should prompt you to do thiswhen you log in. You can change your password at any time with the 'passwd' command. Choose a strong password - everyday words, birthdays, names of people oranimals, all these are too easy to guess. Also, DO NOT give your password to anyone, ever. The IT staff will never ask you for your password, and neither should anyone else. You will be held responsible for all activity done via your account.------------------------------------------------------------
Program: mass_useradd#!/bin/sh
## Mass Useradd For Linux## This script extracts new user data from a delimited## text file, and automatically generates new user accounts.## It generates a random password for each login, and exports## the new logins and passwords to a text file.## Passwords automatically expire at first login. The## input file format is "username: full name" (no quotes) for## each line.#### Mass Useradd creates a "User Personal Group."## The UID and the GID are the same. User's home directories

This is the Title of the Book, eMatter EditionCopyright © 2007 O’Reilly & Associates, Inc. All rights reserved.
120 | Chapter 8: Managing Users and Groups
## are created with restrictive permissions, chmod 700.## Mass Useradd uses standard Shadow Suite utilities.## Values and behaviors are easily modifiable, according## to the individual utility being called. It calls## a companion script, mass_passwd, to set each user password.## You should have received mass_passwd from the same source## as mass_useradd.#### This script was created by Aaron Malone, and modified by## Meredydd Luff, Peter Samuelson, and Kathryn Hogg.## Many thanks!## Carla Schroder wrote the documentation and pestered## the aforementioned persons to write the script.## Copyright (C) 2003 Carla Schroder## carla at bratgrrl dot com## This program is free software; you can redistribute## it and/or modify it under the terms of the GNU General## Public License as published by the Free Software## Foundation; either version 2 of the License, or (at your## option) any later version.#### This program is distributed in the hope that it will## be useful, but WITHOUT ANY WARRANTY; without even the## implied warranty of MERCHANTABILITY or FITNESS FOR A## PARTICULAR PURPOSE. See the## GNU General Public License for more details.## http://www.fsf.org/licenses/gpl.html#### Usage:## # sh mass_useradd < inputfile >> new-passwords.txt##
PATH=/usr/local/sbin:/usr/sbin:/sbin:/usr/local/bin:/usr/bin:/bin:$PATH
# Read a line of input.# the format of the input file must be like this:# userlogin : FirstName LastName# to use a comma-delimited file, change IFS=":$IFS" to# IFS=",$IFS"
while IFS=":$IFS" read username realname; do
# First, weed out blank lines and #comments case "$username" in '' | \#*) continue ;; esac
# this part reads /etc/passwd and /etc/group, and calculates# the next available UID and GID.# it starts at {id=1000}, change this to suit id=$({ getent passwd; getent group; } | cut -f3 -d: | sort -un | awk 'BEGIN { id=1000 } $1 = = id { id++ } $1 > id { print id; exit }')

This is the Title of the Book, eMatter EditionCopyright © 2007 O’Reilly & Associates, Inc. All rights reserved.
8.17 Adding New Users in Batches | 121
# Now users are added to /etc/group, /etc/passwd,# and home directories with chmod 700 are created# Any of the groupadd, useradd, and chmod options# can be changed to suit groupadd -g $id $username useradd -m -c "$realname" -g $username -u $id $username chmod 700 /home/$username
# Set the password. This calls another script from# this toolkit, mass_passwd, which can be used independently.# mass_passwd outputs the username, password and userid. $(dirname $0)/mass_passwd -M $username
done
Program: mass_passwd#!/bin/sh
## Mass Password Change for Linux## This requires the Shadow Suite utilities.## Usage:## mass_passwd username username ...## mass_passwd -g groupname groupname ...## mass_passwd -a#### This program is free software; you can redistribute## it and/or modify it under the terms of the GNU General## Public License as published by the Free Software## Foundation; either version 2 of the License, or (at your## option) any later version.#### This program is distributed in the hope that it will## be useful, but WITHOUT ANY WARRANTY; without even the## implied warranty of MERCHANTABILITY or FITNESS FOR A## PARTICULAR PURPOSE. See the## GNU General Public License for more details.## http://www.fsf.org/licenses/gpl.html
#############################################################
## This is where the "username.passwd.txt" files will## be dumped. It will be created if it doesn't already existtext_file_dir=$HOME/mass_passwdslog_file=mass_passwd.log
## Minimum userid considered a regular (human) usermin_uid=1000
## Length of generated passwordspass_len=8
## Length of time, in days, before a password expirespass_expire=90

This is the Title of the Book, eMatter EditionCopyright © 2007 O’Reilly & Associates, Inc. All rights reserved.
122 | Chapter 8: Managing Users and Groups
################################################################ Few user-serviceable parts inside.## You may wish to edit the text between the two ---------## lines, below.
# Get the name of this program (probably "mass_passwd")prog=${0##*/}
usage ( ) { echo "usage: $prog [-v] [-n] username ..." echo " $prog [-v] [-n] [-g] groupname ..." echo " $prog [-v] [-n] [-a]" echo " -g change passwords of everyone in a group" echo " -a change everyone's password" echo " -v verbose" echo " -n don't do it, just simulate (implies -v)" exit 0}short_usage ( ) { echo >&2 "usage: $prog [-v] [-g] [-a] name..." echo >&2 " $prog -h for help" exit 1}
# echo something, but only if in verbose modevecho ( ) { test -n "$verbose" && echo "$@"}
# Generate a random password.## If pwgen is available, use that - that's what it's for, and it works well.## If not, read /dev/urandom and filter out all non-#alphanumeric characters until we have enough for a password.# The numbers in the "tr -d" are ASCII values, in octal# notation, of ranges of character values to delete.## Using /dev/urandom like this is very inefficient, but# who cares?randompass ( ) { pwgen $pass_len 1 2>&- || tr -d '[\000-\057][\072-\100][\133-\140][\173-\377]' < /dev/urandom | dd bs=$pass_len count=1 2>&-}
# Interpret usernames / groupnames / "-a" mode, and return# a list of usernamesget_users ( ) { if [ -n "$all_mode" ]; then getent passwd | awk -F: '{if ($3 >= '$min_uid') {print $1}}' return fi if [ -z "$group_mode" ]; then

This is the Title of the Book, eMatter EditionCopyright © 2007 O’Reilly & Associates, Inc. All rights reserved.
8.17 Adding New Users in Batches | 123
echo "$@" return fi
# ok, we're in group mode, must look up the users who# belong to a group while [ -n "$1" ]; do g_ent=$(getent group "$1" 2>&-) if [ -z "$g_ent" ]; then echo >&2 "warning: $1: group not found" continue fi members=${g_ent##*:} gid=${g_ent%:*} gid=${gid##*:} echo "$members" | tr ',' ' ' getent passwd | awk -F: '{if ($4 = = '$gid') { print $1 } }' shift done}
############################################################### main body
group_mode=; verbose=; all_mode=; simulate=; eol=;while [ -z "$eol" ]; do case "$1" in -g) group_mode=1; shift ;; -v) verbose=1; shift ;; -a) all_mode=1; shift ;; -n) simulate=true; verbose=1; shift ;; # we're called from mass_useradd -M) mass_out=1; shift ;; -h | -? | --help) usage ;; --) eol=1; shift ;; -*) short_usage ;; *) eol=1 ;; esacdone
# Set up a secure environment and the directory for# printable text filesPATH=/usr/sbin:/usr/bin:$PATHumask 077mkdir -p $text_file_dircd $text_file_dir
processed=0for u in $(get_users "$@"); do vecho -n "generating password for $u..." pass=$(randompass) echo "$u:$pass" | eval $simulate chpasswd vecho -n "." eval $simulate chage -M $pass_expire -d 2003-01-01 $u

This is the Title of the Book, eMatter EditionCopyright © 2007 O’Reilly & Associates, Inc. All rights reserved.
124 | Chapter 8: Managing Users and Groups
vecho -n "."
rm -f $u.passwd.txt echo > $u.passwd.txt "\------------------------------------------------------------- Login name: $u Password: $pass Please log in and change your password; the system should prompt you to dothis when you log in. You can change your password at any time with the 'passwd'command. Choose a strong password - everyday words, birthdays, names of people oranimals, all these are too easy to guess. Use combinations of letters and numbers.Write down your password in a safe place. Also, DO NOT give your password to anyone, ever. The IT staff will never ask you for your password, and neither should anyone else. You will be held responsible for all activity done via your account.-------------------------------------------------------------" printf >> $log_file "$(date) %-12s %s\\n" $u $pass vecho "$pass" if [ -n "$mass_out" ]; then uid=$(getent passwd $u | cut -f3 -d:) echo -e "$u\\t$pass\\t$uid" fi processed=$(expr $processed + 1)done
if [ $processed -gt 0 ]; then test -z "$mass_out" && echo >&2 "$processed password(s) reset - see $text_file_dir/$log_file"else echo >&2 "no users specified - see '$prog -h' for help"fi
See Also• bash(1), pwgen(1)
• Get pwgen from the usual package repositories or from its home page (http://sourceforge.net/projects/pwgen/)
8.18 Changing Masses of Passwords
ProblemAs part of your routine security policy, you would like to periodically be able to eas-ily change batches of passwords. Or your network may have been compromised, soyou want to change all the passwords yourself and not leave it up to your users.

This is the Title of the Book, eMatter EditionCopyright © 2007 O’Reilly & Associates, Inc. All rights reserved.
8.19 Adding Batches of Users to Groups | 125
SolutionUse the mass_passwd script in Recipe 8.17. It lets you select batches of users in threedifferent ways:
# mass_passwd username1 username2...# mass_passwd -g groupname groupname...# mass_passwd -a
The first method uses a simple space-delimited list of logins.
The second method changes the passwords of users belonging to the named groups.
The third method changes every password in /etc/passwd.
Then mass_passwd generates a separate file for each user, containing their new loginnames and passwords and whatever instructions or policies you choose to include.This is designed to make it easy to print a separate instruction sheet for each user.
DiscussionYou may do a dry run with the -n flag:
# ./mass_passwd -v -g -n usergroupgenerating password for dawns.....teivuphugenerating password for nikitah.....kohfahsh2 password(s) reset - see /root/mass_passwds/mass_passwd.log
No passwords are changed; this just lets you test-drive your options before commit-ting to any changes.
See Also• Recipe 8.17, “Adding New Users in Batches”
8.19 Adding Batches of Users to GroupsProblemYou need to add a whole bunch of users to a group.
SolutionPaste your list of login names directly into /etc/group.
Here’s a quick way to generate a list of users to add to /etc/group. This depends onhaving a UID numbering scheme already in place, so that you can easily sort outselected groups of users (as we discussed in Recipe 8.2 with our “Trainers, Coaches,Players” example). Let’s add some Trainers to a group:
$ awk -F: '($3 >= 1050) && ($3 <=1060) { print $1}' /etc/passwd | tr '\n' ','bcool,bkind,frnow,kthxbye,oknodo,
Now copy and paste into /etc/group.

This is the Title of the Book, eMatter EditionCopyright © 2007 O’Reilly & Associates, Inc. All rights reserved.
126 | Chapter 8: Managing Users and Groups
What if you do not have a nice, tidy, organized UID scheme? This is where theGECOS fields come in handy. Go back and pick one for entering some kind of label.The “other” field is best, because users are blocked from changing it. Where is this“other” field? It’s inside the “full name,” or GECOS, field which contains fivecomma-delimited fields. It looks like this:
bcool:x:1300:1300:Bob Cool,,,,trainer:/home/bkind:/bin/bashbkind:x:1055:1055:Bev Kind,,,,trainer:/home/bkind:/bin/bash
Once you’ve added the labels, grep and awk can easily fetch these users for you:
$ cat /etc/passwd | grep trainer | awk -F: '{ print $1}' | tr '\n' ','bkind,bcool,
DiscussionHere is the complete /etc/passwd fields scheme:
username:passwd:UID:GID:full name,room number,work phone,home phone,other:directory:shell
See Also• passwd(5), awk(1)
• sed & awk Pocket Reference, by Arnold Robbins (O’Reilly)
8.20 Using su to Be Root Temporarily
ProblemLike all good Linux users, you understand the importance of using the least neces-sary privileges to get a job done. You know that root is all-powerful, so you run asroot only when absolutely necessary. How do you temporarily switch to root whenyou need to?
SolutionUse the su, or “switch user,” command when you need to do system chores:
carla@windbag:~$ suPassword:root@windbag:/home/carla#
Then go back to being yourself:
root@windbag:/home/carla# exitexitcarla@windbag:~$
To change to root and invoke root’s shell and environment settings use:
carla@windbag:~$ su -Password:root@windbag:~#
This is the Title of the Book, eMatter EditionCopyright © 2007 O’Reilly & Associates, Inc. All rights reserved.
8.21 Granting Limited Rootly Powers with sudo | 127
To change to a different shell use:
$ su - --shell=tcshPassword:
Available shells are listed in /etc/shells.
DiscussionYou can change to any user, as long as you have the password.
The dash after su makes a world of difference. Without it, you’re still in your ownsystem environment, using your environment variables—shell, default editor, paths,and umask.
See Also• su(1)
8.21 Granting Limited Rootly Powers with sudo
ProblemYou would like to delegate some system administration chores to other users, or setup an extra layer of safety for your own root chores—but you want to do it in a waythat uses only limited rootly powers, and does not give away root’s password.
SolutionUse sudo. sudo grants limited root powers to specific users for specific tasks, logsactivity, and does not give away root’s password.
Let’s say that you have a user, jhaugh, upon whom you wish to bestow full rootlypowers. Because sudo users use their own passwords, root’s password is protected.Edit /etc/sudoers with visudo—it will open in your default text editor:
# visudo# sudoers file.## This file MUST be edited with the 'visudo'# command as root.# See the man page for details on how to write# a sudoers file.## Host alias specification
# User alias specification
# Cmnd alias specification
# User privilege specificationroot ALL=(ALL) ALL
This is the Title of the Book, eMatter EditionCopyright © 2007 O’Reilly & Associates, Inc. All rights reserved.
128 | Chapter 8: Managing Users and Groups
First, set up a host alias:
Host_Alias LOCALHOST= localhost
Under the “User privilege specification” line, you can add individual users:
jhaugh ALL=(ALL) ALL
This gives jhaugh root powers for everything on the system and on all connectedmachines. Now say you have another user, tgwynne, who needs root privileges onlyon the local machine. Add the following line for this user:
tgwynne LOCALHOST = ALL
Adding to your delegation of minions is msmith, who is allowed only to shut downthe local machine:
msmith LOCALHOST = /sbin/shutdown, /sbin/halt
This grants groups of ordinary users shutdown privileges on their own machines:
# Host alias specificationHost_Alias LOCALHOST= localhost
# User alias specificationUser_Alias USERS = tgwynne, msmith, jhaugh, \abyron, jwinters
# Cmnd alias specificationCmnd_Alias SHUTDOWN = /usr/sbin/shutdown, /usr/sbin/halt, \/usr/sbin/reboot, /usr/sbin/poweroff
# User privilege specificationUSERS LOCALHOST = SHUTDOWN
To execute a sudo command, users do this:
$ sudo /usr/sbin/halt
They will be prompted for their passwords, then the command will execute. Userscan check which commands they are authorized for with the following command:
$ sudo -lUser jhaugh may run the following commands on this host: (ALL) ALL
sudo logs all errors to the syslog, and tattles to root:
$ sudo /usr/sbin/haltcarla is not in the sudoers file. This incident will be reported.
Groups of servers can be defined, and users can be given privileges to the groups:
# Host alias specificationHost_Alias FILESERVERS = host1, host2, host3
# User alias specificationUser_Alias FILESERVADMINS = jhaugh, abyron, jwinters

This is the Title of the Book, eMatter EditionCopyright © 2007 O’Reilly & Associates, Inc. All rights reserved.
8.22 Using Disk Quotas | 129
# Cmnd alias specificationCmnd_Alias FILEUTILS = /bin/chgrp, /bin/chmod, \ /bin/chown, /bin/cp, /bin/dd, /bin/df, \ /bin/dir, /bin/dircolors, /bin/du, /bin/install, \ /bin/ln, /bin/ls, /bin/mkdir, /bin/mkfifo, \ /bin/mknod,bin/mv, /bin/rm, /bin/rmdir, \ /bin/shred, /bin/touch, /bin/vdir sync
# User privilege specificationFILESERVADMIN FILESERVERS = FILEUTILS
Discussionsudo can also be used to let users execute scripts, such as backup scripts. Be verycareful with scripts, or any command that gives shell access or invokes a text editor,because these may allow users to escalate their privileges. You can try to restrict sudousers to RJOE, which is a restricted editor that cannot invoke a shell, but it’s betterto be careful with how you delegate rootly chores in the first place.
See Also• su(1), sudo(8), sudoers(5)
• Chapter 49 of Unix Power Tools
• sudo main page (http://www.courtesan.com/sudo/)
8.22 Using Disk Quotas
ProblemYou want to limit the amount of disk storage any user can consume. Most sites havea few disk hogs around, who just love to fill the disk with their MP3 collections anddownloaded sitcoms.
SolutionUse the Linux Disk Quota package. This contains several components, includingquota, edquota, quotacheck, and repquota.
First, edit /etc/fstab and select the partitions to enable quotas. Your choices areusrquota, for individual users, or grpquota, for putting quotas on groups. It’s okay tohave both:
/dev/hda6 / ext3 defaults 0 1/dev/hda7 /home ext3 defaults,usrquota,grpquota 0 2
Now remount the filesystem:
# mount -o remount /home

This is the Title of the Book, eMatter EditionCopyright © 2007 O’Reilly & Associates, Inc. All rights reserved.
130 | Chapter 8: Managing Users and Groups
Quota’s init script will run quotacheck, which will examine the installation, create adatabase of disk usage, and create quota files.
Next, assign a quota to a user. This opens a configuration file in your default editor:
# edquota -u vhensonDisk quotas for user vhenson (uid 1550): Filesystem blocks soft hard inodes soft hard /dev/hda7 550466 0 0 47466 0 0
Soft limits allow a grace period, with warnings to the user. Hard limits cut them offimmediately. To set limits, simply edit the file:
# edquota -u vhensonDisk quotas for user vhenson (uid 1550): Filesystem blocks soft hard inodes soft hard /dev/hda7 550466 650000 700000 47466 0 0
Blocks are always 1024 bytes, so 650,000 blocks is about 665 megabytes.
Save and close the file, and verify that the quota is in effect:# quota vhensonDisk quotas for user vhenson (uid 1550): 650000 700000
To assign a quota to a group use:
# edquota -g engineers
Note that if a single greedy user in a group uses up the group quota, it’s too bad forthe rest of the group—it’s all gone.
This invokes the default editor, for setting the grace period for soft limits on theentire filesystem:
# edquota -tGrace period before enforcing soft limits for users:Time units may be: days, hours, minutes, or seconds Filesystem Block grace period Inode grace period /dev/hda3 7days 7days
You can use one “prototype” user as the model for new users:
# edquota -p vhenson dnorth
or for a whole bale of users:
# edquota -p vhenson `awk -F: '$3 > 999 {print $1}' /etc/passwd`
Or you can list several at once:
# edquota -p vhenson dnorth jvesperman sanvin
You’ll doubtless want to keep an eye on things. This repquota command gives asystem-wide snapshot of current usage:
# repquota -a
For a specific filesystem, use:
# repquota /home

This is the Title of the Book, eMatter EditionCopyright © 2007 O’Reilly & Associates, Inc. All rights reserved.
8.22 Using Disk Quotas | 131
DiscussionAdd this line to the mass_useradd script, after the chmod line, to automatically applyvhenson’s quota to all the new users:
/usr/sbin/edquota -p vhenson $username
The adduser command can be configured to apply quotas. Edit adduser.conf:
QUOTAUSER="vhenson"
And now, the bad news. Quota is in a transition phase. The Quota code in the 2.2and 2.4 kernel trees is obsolete and doesn’t work with the current versions of Quota.If your distribution has kindly patched the kernel for you, you’re good to go. Youprobably won’t know for sure until you install and configure it and try to set a quotaon a user (although it’s possible that your distribution’s documentation tells thestory). If your distribution does not come with a ready-to-go version of Quota, you’llprobably have to install a raft of kernel patches. See the “Quota mini-HOWTO” forcomplete instructions.
SuSE supplies the only reliable ready-to-go Quota-enabled ReiserFS, as of this writ-ing. ReiserFS patches for other distributions are available from the ReiserFS homepage at http://www.namesys.com.
The good news is that the 2.6 kernel tree fully supports Quota, so we won’t have togo through all this fol-de-rol forever.
After passing the kernel hurdle, the next step is to install the latest Quota. It’s best tofind the RPM for your system (Debian users, use apt-get install quota). That way theinit scripts will be set up and ready to go. If you find handcrafting init scripts to be anenjoyable activity, you can download the tarball and have at it. Instructions are inthe “Quota mini-HOWTO.”
See Also• man(1) quota, man(8) edquota, man(8) quotacheck, man(8) repquota
• The mass_useradd script (Recipe 8.17)
• “Quota mini-HOWTO” (http://www.tldp.org/HOWTO/Quota.html)
• Quota project home page (http://sourceforge.net/projects/linuxquota/)
• ReiserFS home page (http://www.namesys.com)

This is the Title of the Book, eMatter EditionCopyright © 2007 O’Reilly & Associates, Inc. All rights reserved.
132
Chapter 9CHAPTER 9
Managing Files andPartitions
9.1 IntroductionUnderstanding filesystem fundamentals is key to understanding how Linux works.Everything is a file—data files, partitions, pipes, sockets, and hardware devices.Directories are simply files that list other files.
The Filesystem Hierarchy Standard (FHS) was developed as a voluntary standard.Most Linuxes follow it. These are the required elements of the Linux root filesystem:
/Root directory, even though it is always represented at the top
/binEssential system commands
/bootStatic boot loader files
/devDevice files
/etcHost-specific system configuration files
/libShared libraries needed to run the local system
/mntTemporary mount points
/optAdd-on software packages (not used much in Linux)
/procLive kernel snapshot and configuration
/sbinSystem administration commands

This is the Title of the Book, eMatter EditionCopyright © 2007 O’Reilly & Associates, Inc. All rights reserved.
9.1 Introduction | 133
/tmpTemporary files—a well-behaved system flushes them between startups
/usrShareable, read-only data and binaries
/varVariably sized files, such as mail spools and logs
These are considered optional because they can be located anywhere on a network,whereas the required directories must be present to run the machine:
/homeUser’s personal files
/rootSuperuser’s personal files
The FHS goes into great detail on each directory, for those who are interested. Hereare some things for the Linux user to keep in mind:
• /tmp and /var can go in their own individual partitions, as a security measure. Ifsomething goes awry and causes them to fill up uncontrollably, they will be iso-lated from the rest of the system.
• /home can go in its own partition, or on its own dedicated server, for easier back-ups and to protect it from system upgrades. You can then completely wipe outand re-install a Linux system, or even install a different distribution, while leav-ing /home untouched.
• Because all configuration files are in /etc and /home, backups are simplified. It ispossible to get away with backing up only /etc and /home and to rely on yourinstallation disks to take care of the rest. However, this means that programupdates will not be preserved—be sure to consider this when plotting a disaster-recovery plan.
Linux File TypesRemember that “everything is a file.” There are seven file types in Linux; everythingthat goes in the file tree must be one of the types in Table 9-1.
Table 9-1. File types
Type indicator Type of file
- Regular file
d Directory
l Link
c Character device
s Socket
p Named pipe
b Block device

This is the Title of the Book, eMatter EditionCopyright © 2007 O’Reilly & Associates, Inc. All rights reserved.
134 | Chapter 9: Managing Files and Partitions
The type indicators show up at the very front of the file listings:
# ls -l /dev/initctlprw------- 1 root root 0 Jan 12 00:00 /dev/initctl# ls -l /tmp/.ICE-unix/551srwx------ 1 carla carla 0 Jan 12 09:09 /tmp/.ICE-unix/551
You can specify which file types to look at with the find command:
# find / -type p# find / -type s
Ctrl-C interrupts find, if it goes on for too long.
File AttributesTake a look at the attributes of a file, such as this shell script, sortusers:
$ ls -l sortusers-rwxr-xr-x 1 meredydd programmers 3783 Jan 7 13:29 sortusers
-rwxr-xr-x 1 meredydd programmers tells us a lot of things:
• The - means that this is a regular file. This attribute is not changeable by theuser. This is the bit that tells Linux what the file type is, so it does not need fileextensions. File extensions are for humans and applications.
• rwx are the file owner’s permissions.
• The first r-x is the group owner’s permissions.
• The second r-x applies to anyone with access to the file, or “the world.”
• 1 is the number of hard links to the file. All files have at least one, the link fromthe parent directory.
• meredydd programmers names the file owner and the group owner of the file.“Owner” and “user” are the same; remember this when using chmod’s symbolicnotation u = user = owner.
Permissions and ownership are attributes that are configurable, with the chmod,chgrp, and chown commands; chmod changes the permissions, chown and chgrpchange ownership.
All those rwx things look weird, but they are actually mnemonics: rwx = read, write,execute. These permissions are applied in order to user, group, and other.
So, in the sortusers example, meredydd can read, write, and execute the file. Groupmembers and others may only read and execute. Even though only meredydd mayedit the file itself, nothing is stopping group and other users from copying it.
Since this is a shell script, both read and execute permissions must be set, becausethe interpreter needs to read the file. Binary files are read by the kernel directly, with-out an interpreter, so they don’t need read permissions.

This is the Title of the Book, eMatter EditionCopyright © 2007 O’Reilly & Associates, Inc. All rights reserved.
9.1 Introduction | 135
File Type DefinitionsLet’s take a closer look at what the file types in Linux really are:
Regular filesPlain ole text and data files, or binary executables.
DirectoriesLists of files.
Character and block devicesFiles that could be considered as meeting points between the kernel, and devicedrivers—for example, /dev/hda (IDE hard drive), /dev/ttyS1 (serial modem), andso forth. These allow the kernel to correctly route requests for the various hard-ware devices on your system.
Local domain socketsCommunications between local processes. They are visible as files but cannot beread from or written to, except by the processes directly involved.
Named pipesAlso for local interprocess communications. It is highly unlikely that a Linuxuser will ever need to do anything with either sockets or pipes; they are strictlysystem functions. Programmers, however, need to know everything about them.
LinksLinks are of great interest to Linux users. There are two types: hard links and softlinks. Links are pointers to files. A hard link is really just another name for a file,as it points to a specific inode. All the hard links that point to a file retain all ofthe file’s attributes—permissions, ownership, and so on. rm will happily delete ahard link, but the file will remain on disk until all hard links are gone and allprocesses have released it. Hard links cannot cross filesystems, so you can’tmake hard links over a network share. Soft links point to a filename; they canpoint to any file, anywhere. You can even create “dead” soft links by deleting thefiles they point to, or changing the names of the files.
Filesystem InternalsHere are some more useful definitions relating to filesystems:
Logical blockThe smallest unit of storage, measured in bytes, that can be allocated by the file-system. A single file may consume several blocks.
Logical volumeA disk partition, a disk, or a volume that spans several disks or partitions—anyunit of storage that is perceived as a single, discrete allocation of space.

This is the Title of the Book, eMatter EditionCopyright © 2007 O’Reilly & Associates, Inc. All rights reserved.
136 | Chapter 9: Managing Files and Partitions
Internal fragmentationEmpty spaces that occur when a file, or a portion of a file, does not a fill a blockcompletely. For example, if the block is 4K, and the file is 1K, 3K are wasted space.
External fragmentationFragmentation occurs when the blocks that belong to a single file are not storedcontiguously, but are scattered all over the disk.
ExtentA number of contiguous blocks that belong to a single file. The filesystem seesan extent as a single unit, which is more efficient for tracking large files.
B+treesFirst there were btrees (balanced trees), which were improved and becameb+trees. These are nifty concepts borrowed from indexed databases, whichmake searching and traversing a given data structure much faster. Filesystemsthat use this concept are able to quickly scan the directory tree, first selecting theappropriate directory, then scanning the contents. The Ext2 filesystem does asequential scan, which is slower.
MetadataEverything that describes or controls the internal data structures is lumpedunder metadata. This includes everything except the data itself: date and timestamps, owner, group, permissions, size, links, change time, access time, thelocation on disk, extended attributes, and so on.
InodeMuch of a file’s metadata is contained in an inode, or index node. Every file has aunique inode number.
Journaling FilesystemsOur faithful old Ext2 filesystem is showing its age. It can’t keep up with users whoneed terabytes to play with and who need fast recovery from service interruptions.For the majority of users, who still measure their storage needs in gigabytes or less,fast recovery and data integrity are the most important reasons to use a journalingfilesystem.
Linux filesystems are asynchronous. They do not instantly write metadata to disk,but rather use a write cache in memory and then write to disk periodically, duringslack CPU moments. This speeds up overall system performance, but if there is apower failure or system crash, there can be metadata loss. In this event, when thefilesystem driver kicks in at restart and fsck (filesystem consistency check) runs, itfinds inconsistencies. Because Ext2 stores multiple copies of metadata, it is usuallyable to return the system to health.
The downside to this is recovery time. fsck checks each and every bit of metadata.This can take from a few minutes to 30 minutes or more on a large filesystem. Jour-naling filesystems do not need to perform this minute, painstaking inspection,
This is the Title of the Book, eMatter EditionCopyright © 2007 O’Reilly & Associates, Inc. All rights reserved.
9.1 Introduction | 137
because they keep a journal of changes. They check only files that have changed,rather than the entire filesystem.
Linux users have a number of great choices for journaling filesystems, includingExt3, ReiserFS, XFS, and JFS. Ext3 is a journaling system added to Ext2. ReiserFS,XFS, and JFS are all capable of handling filesystems that measure in exabytes on 64-bit platforms. ia32 users are limited to mere terabytes, I’m afraid.
Which one should you use? There’s no definitive “best” one; they’re all great. Here’sa rundown on the high points:
Ext3This one is easy and comfortable. That’s what it’s designed to be. It fits right ontop of Ext2, so you don’t need to rebuild the system from scratch. All the otherfilesystems discussed here must be selected at system installation, or when youformat a partition. You can even have “buyer’s remorse”—you can remove Ext3just as easily. Because it’s an extension of Ext2, it uses the same file utilitiespackage, e2fsprogs. One major difference between Ext3 and the others is that ituses a fixed number of inodes, while the others allocate them dynamically.Another difference is that Ext3 can do data journaling, not just metadata jour-naling. This comes at a cost, though, of slower performance and more disk spaceconsumed. Ext3 runs on any Linux-supported architecture.
ReiserFSReiserFS is especially suited for systems with lots of small files, such as a mailserver using the maildir format, or a news server. It’s very efficient at file storage;it stuffs leftover file bits into btree leaf nodes, instead of wasting block space.This is called “tail packing.” It scales up nicely, and it handles large files justfine. ReiserFS runs on any Linux-supported architecture.
JFSThis is IBM’s entry in the Way Big Linux Filesystems contest, ported from AIXand OS/2 Warp. It supports multiple processors, access control lists (ACLs),and—get this—native resizing. That’s right, simply remount a JFS filesystemwith the new size you desire, and it’s done. Note that you may only increase thevolume size, not decrease it.
XFSThis is SGI’s brainchild, ported from IRIX. XFS thinks big—it claims it can han-dle filesystems of up to nine exabytes. Its strength is handling very large files,such as giant database files. There is one excellent feature unique to XFS, calleddelayed allocation. It procrastinates. It puts off actually writing to disk, delayingthe decision on which blocks to write to, so that it can use the largest possiblenumber of contiguous blocks. When there are a lot of short-term temp files inuse, XFS might never allocate blocks to these at all, in effect ignoring them untilthey go away. XFS has its own native support for quotas, ACLs, and backupsand restores.

This is the Title of the Book, eMatter EditionCopyright © 2007 O’Reilly & Associates, Inc. All rights reserved.
138 | Chapter 9: Managing Files and Partitions
On a 32-bit system, there’s only so much addressing space available, so the theoreti-cal upper filesystem size limit is 16 terabytes (as of the 2.5 kernel). Calculating themaximum possible filesystem size depends on hardware, operating system, andblock sizes, so I shall leave that as an exercise to those who really need to figure outthose sort of things.
Another way to while away the hours is to compare performance benchmarks, or runyour own. About all they agree on is that Ext3 really isn’t suited for high-performance, high-demand applications. It’s fine for workstations and light-to-medium-duty servers, but the others are better choices for high-demand servers.
When Not to Use a Journaling FilesystemStick with plain ole Ext2 when you have a /boot partition and are running LILO.LILO cannot read any filesytem but Ext2 or Ext3. The /boot partition is so small, andso easily backed up and restored, that there’s no advantage to be gained from jour-naling in any case. You can put a journaling filesystem on your other partitions; infact, you can mix and match all you like, as long as your kernel supports them.
On small partitions or small disks, such as 100-MB Zip disks, the journal itself con-sumes a significant amount of disk space. The ReiserFS journal can take up to 32MB. Ext3, JFS, and XFS use about 4 MB, but if data journaling is enabled in Ext3, itwill eat up a lot more space.
See Also• JFS (http://www-124.ibm.com/jfs/)
• XFS (http://oss.sgi.com/projects/xfs/)
• ReiserFS (http://www.namesys.com)
• Ext2/3 (http://e2fsprogs.sourceforge.net/ext2.html)
• Filesystem Hierarchy Standard (http://www.pathname.com/fhs/)
9.2 Setting File and Directory Permissionswith chmod’s Numeric Notation
ProblemYou need to control who can access what file. Either you need to keep prying eyesaway from the recipe for the secret sauce, or you have some other secure informa-tion that needs protection. Or (more likely) you want to make something execut-able. In any case, you need to set permissions on files, and you need to understandhow to calculate the correct numeric permission values.

This is the Title of the Book, eMatter EditionCopyright © 2007 O’Reilly & Associates, Inc. All rights reserved.
9.2 Setting File and Directory Permissions with chmod’s Numeric Notation | 139
SolutionUse the chmod (change mode) command. Only root user (superuser) and the file’sowner can change permissions.
For example, this command gives the file owner read and write access to /archive/datafile, with verbose output. No other user, except root, can access this file at all:
$ chmod -v 600 /archive/datafilemode of `/archive/datafile' changed to 0600 (rw-------)
Here the owner of /shared/list makes it world-readable, but only the file owner androot can make changes to it:
$ chmod -v 644 /shared/listmode of `/shared/list' changed to 0644 (rw-r--r--)
Any script must have the executable bit set for it to work. This command makes ascript editable only by the owner, and readable and executable by everyone:
$ chmod 755 /shared/somescript
Directories must always have the executable bit set, or they won’t work:
$ chmod 755 /shared
Set permissions for a directory and its contents, including subdirectories, with the -R(recursive) flag. -v turns on verbosity, so you can see what it is doing:
$ chmod -R -v 755 /shared
DiscussionUse Table 9-2 to calculate file permissions. Simply add the values you need for eachtype of user, and list them in the order shown in the table: file owner, group owner,all other users. Special bits are explained in Recipe 9.7.
See Also• info chmod
• Linux in a Nutshell, by Ellen Siever, Stephen Figgins, and Aaron Weber (O’Reilly)
• Chapter 4 of LPI Linux Certification in a Nutshell, by Jeff Dean (O’Reilly), forexhaustive detail on permissions and ownership, right down to the binary level
Table 9-2. Calculating file permissions
Special bits Permission Owner Group Other
setuid 4 Read 4 4 4
setgid 2 Write 2 2 2
sticky 1 Execute 1 1 1

This is the Title of the Book, eMatter EditionCopyright © 2007 O’Reilly & Associates, Inc. All rights reserved.
140 | Chapter 9: Managing Files and Partitions
9.3 Doing Batch Operations with chmodProblemYou need to set permissions on all the files or a directory, or on batches of files.
Solutionchmod supports operating on lists of files. You can also use find or shell wildcards togenerate a list.
To make several files read-only for everyone, you can use chmod as follows:
$ chmod 444 file.txt file2.txt file3.txt
To make all files in the current directory readable/writable, for the file owner andgroup, without changing the directory permissions, use:
$ find . -type f -exec chmod -v 660 { } \;
You can also change all files belonging to a particular user. This example starts at theroot of the filesystem:
$ find / -user terri -exec chmod -v 660 { } \;
You can set permissions for a directory and its contents, including subdirectories,with the -R (recursive) flag:
$ chmod -R -v 755 /shared
This example makes all the .txt files in the current directory readable/writable to theowner, and world-readable:
$ chmod -v 644 *.txt
To change all files in the current directory that begin with your chosen string, use:
$ chmod -v 644 apt*
See Also• info chmod
• Linux in a Nutshell
• Chapter 4 of LPI Linux Certification in a Nutshell for exhaustive detail on per-missions and ownership, right down to the binary level
9.4 Setting File and Directory Permissionswith chmod’s Symbolic Notation
ProblemYou would like to change specific permission bits, rather than using the all-or-nothingapproach of chmod’s numeric notation, such as marking a script as executable.

This is the Title of the Book, eMatter EditionCopyright © 2007 O’Reilly & Associates, Inc. All rights reserved.
9.4 Setting File and Directory Permissions with chmod’s Symbolic Notation | 141
SolutionThe most common use for symbolic notation is to add the executable bit to a file’spermissions without changing any other permissions:
$ chmod +x scriptname
The default action is a, or all, so the example makes scriptname executable by every-one. This adds the executable bit to the file owner only:
$ chmod u+x scriptname
You can surgically remove a specific mode bit. In this example, the group and otherusers lose their executable bits:
$ chmod go-x scriptname
This is a quick way to set the setgid bit on a directory, for creating a shared direc-tory. All files created in this directory will have the same group ownership as thedirectory:
$ chmod +s /shared-directory
You can remove all permissions for group and other users by doing the following:
$ chmod go= scriptname
To make group permissions the same as the file owner’s, use:
$ chmod g=u scriptname
DiscussionUsing chmod’s symbolic notation can get quite elaborate. This examples erases allexisting permissions and starts over:
$ chmod -v a=,u=rwx,g=rx,o=r scriptname
You can do the same thing with chmod 754. Here’s the key:
Symbolic notation is also called mnemonic notation:
r Read
w Write
x Execute
X File must already have execute permissions, or be a directory
s Set user or group ID on execution—dangerous! do not use on executables,unless you really really know what you are doing!
t Sticky bit
u User, or file owner
g Group file owner
o Everyone else; others

This is the Title of the Book, eMatter EditionCopyright © 2007 O’Reilly & Associates, Inc. All rights reserved.
142 | Chapter 9: Managing Files and Partitions
+ Adds the new values to the existing values
= Overwrites
- Subtracts from existing values
See Also• info chmod
• Recipe 9.7, “Setting Up a Shared Directory with setgid and the Sticky Bit,” for anexplanation of sticky bits
• Chapter 4 of LPI Linux Certification in a Nutshell, for exhaustive detail on per-missions and ownership, right down to the binary level
9.5 Setting File Ownership with chown
ProblemYou need to change ownership on a file or directory. Perhaps you’ve copied some-thing to someone else’s directory but she still can’t edit it, because it’s owned by you.Many Linux problems result from incorrect ownership or permission. You’re seeingmessages like “Permission denied” or “File is read-only” when it shouldn’t be.
SolutionUse chown (change owner) to change the file owner, the file and group owner, or thegroup owner:
# chown user filename# chown user:group filename# chown :group filename
For example:
$ chown -v carlas:share index.txtchanged ownership of `index.txt' to carlas:share$ chown -v :share toc.txtchanged ownership of `toc.txt' to :share
DiscussionOrdinary users can only make changes to files that they own, and they cannot trans-fer file ownership to another user. However, ordinary users can change group fileownership, provided that they belong to both the original group and the final group.
See Also• info chown

This is the Title of the Book, eMatter EditionCopyright © 2007 O’Reilly & Associates, Inc. All rights reserved.
9.6 Doing Batch Operations with chown | 143
9.6 Doing Batch Operations with chown
ProblemYou want to change ownership of directories and their contents, or just the contentsof directories, a list of files, or change ownership of files from one UID to another.
Solutionchown supports some batch operations, or you can use find, or you can use shellwildcards.
To change several files at once with chown, use a space-delimited list:
# chown carlas file.txt file2.txt file3.txt
Alternatively, you can use shell wildcards:
# chown carlas *.txt
To give all of a user’s files to another user, use:
# chown -R -v --from valh piglet /shared/scripts
You can do the same thing with find:
# find / -user valh -exec chown -v piglet { } \;
find can also search by UID, which chown cannot:
# find / -uid 1050 -exec chown -v 1200 { } \;
To change the ownership of a directory, including subdirectories and files, with ver-bose output, use:
# chown -R -v piglet /shared/scriptschanged ownership of `scripts' to pigletchanged ownership of `scripts/backups.tgz' to pigletchanged ownership of `scripts/fake-spec-rpm' to piglet
Either the user’s login name or UID can be used. If you’ve deleted a user and the userhas left behind orphan files, you’ll need the UID.
See Also• info chown
• Recipe 8.6, “Modifying User Accounts,” for how to hunt down and change allfiles on the system belonging to a particular user

This is the Title of the Book, eMatter EditionCopyright © 2007 O’Reilly & Associates, Inc. All rights reserved.
144 | Chapter 9: Managing Files and Partitions
9.7 Setting Up a Shared Directory with setgidand the Sticky Bit
ProblemYour users need a directory for sharing files, and you want all the shared files tobelong to the same group.
SolutionUse the setgid bit to automatically set the shared group ownership on files.
This is how to set it with octal notation:
# chmod -v 2775 /shared-directory
You can also use symbolic notation:
# chmod -v +s /shared-directory
Keep in mind that +s sets both the setgid and setuid bits, which could be a securityproblem if executables or scripts are stored in this directory. chmod 2775 sets onlythe setgid bit.
setuid is a big fat security hole. Do not use it on executables. Programsthat use it, such as /usr/bin/passwd, have safeguards built in to preventprivilege escalation and other mischief. If there are scripts that youwant users to run, create a group for that purpose.
Add the sticky bit to prevent anyone but the file owner from deleting the file, byusing:
# chmod +t /shared-directory
or:
# chmod 3775 /shared-directory
DiscussionAny files created in the directory will have the same group owner as the directory.Any files copied into the directory will retain their original group ownership. Usersmust belong to a common group to access the directory. Files created in the direc-tory will have permissions as determined by the umasks of the file owners.
A classic example of a directory making canny use of the sticky bit is /tmp:
$ stat /tmp...Access: (1777/drwxrwxrwt) Uid: ( 0/ root) Gid: ( 0/ root)

This is the Title of the Book, eMatter EditionCopyright © 2007 O’Reilly & Associates, Inc. All rights reserved.
9.8 Setting Permissions Defaults with umask | 145
/tmp needs to be world-readable and writable, but we do not want users or processesdeleting temp files that do not belong to them. So the sticky bit takes care of that.
The setuid bit lets users run a command with the same permissions as the file owner.This is how ordinary users are able to change their own passwords, even though /etc/passwd can only be written to by root:
$ stat /usr/bin/passwd File: `/usr/bin/passwd' Size: 26584 Blocks: 56 IO Block: 4096 regular file...Access: (4755/-rwsr-xr-x) Uid: ( 0/ root) Gid: ( 0/ root)
DiscussionSticky bits have one other use. A long time ago, setting the sticky bit on an execut-able kept it in memory after execution had finished. In the olde Unix days of lesssophisticated memory management and feebler hardware, this made programs startfaster. These days, don’t bother—it won’t do a thing.
See Also• info chmod
• The mode tables in Recipes 9.2 (“Setting File and Directory Permissionswith chmod’s Numeric Notation”) and 9.4 (“Setting File and Directory Permis-sions with chmod’s Symbolic Notation”)
9.8 Setting Permissions Defaults with umask
ProblemYou want to understand why files are created with a certain set of default permis-sions, and how to configure them yourself.
SolutionThe umask (user file-creation mode mask) controls this behavior. To see what yoursis, use:
$ umask0022
or:
$ umask -Su=rwx,g=rx,o=rx
To change it temporarily, for the duration of your login session, use:
$ umask 0002

This is the Title of the Book, eMatter EditionCopyright © 2007 O’Reilly & Associates, Inc. All rights reserved.
146 | Chapter 9: Managing Files and Partitions
You can set the umask permanently by inserting the line umask 0022 or whatevervalue you want in your ~/.bashrc file. Table 9-3 shows common umask values.
DiscussionTable 9-4 shows that you can come up with a umask for any occasion.
umasks “subtract” permissions—though I warn you, do not say this to a program-mer, because you will be subjected to a tedious lecture on how it’s not subtraction,it’s that “the umask is bitwise and-ed to whatever modes are specified when the fileis created.” However, I do not have a problem with calling it subtraction.
When a program, such as a text editor or a compiler, creates a file, it is hardcoded toset the file permissions at either 0666 or 0777. If it knows the file it is creating is exe-cutable, it sets the permissions to 0777. The most common value is 0666, which iswhy you have to chmod +x scripts. Neither 0666 nor 0777 are appropriate permis-sions most of the time, so umask screens out the bits you don’t want. For example, aumask of 0002 means regular files will become 0664, and executable files willbecome 0775.
See Also• Chapter 4 of LPI Linux Certification in a Nutshell, for exhaustive detail on
umask, right down to the binary level
Table 9-3. Common umask values
umask User Group Other
0002 All All Read and Execute
0022 All Read and Execute Read and Execute
0007 All All None
0077 All None None
Table 9-4. All umask values
umask File permissions Directory permissions
7 None None
6 None Execute
5 Write Write
4 Write Write and execute
3 Read Read
2 Read Read and execute
1 Read and write Read and write
0 Read and Write Read-write-execute

This is the Title of the Book, eMatter EditionCopyright © 2007 O’Reilly & Associates, Inc. All rights reserved.
9.9 Mounting and Unmounting Removable Disks | 147
9.9 Mounting and Unmounting RemovableDisks
ProblemYou need to know how to insert and remove removable disks, such as floppies, CDs,or USB storage devices.
SolutionUse the mount and umount commands.
This example mounts a CD drive:
# mount -r -t iso9660 /dev/scd0 /cdrom
-r means read-only; -t iso9660 is the filesystem type. /dev/scd0 is the name the kernelassigns to the device. /cdrom is the directory in which it is mounted. The /cdromdirectory must already be present before you try to mount the disk.
To find the filesystem type, use the file command:
$ file - < /dev/scd0/dev/stdin: ISO 9660 CD-ROM filesystem data 'Data1
You can omit the -r (read-only) flag when mounting a CD-ROM. It will complain,but it’ll mount the disk anyway:
# mount -t iso9660 /dev/scd0 /cdrommount: block device /dev/scd0 is write-protected, mounting read-only
This mounts a floppy disk readable/writable:
# mount -w /dev/fd0 /floppy
The following command mounts a USB storage device. The noatime option shouldbe used on rewritable media that have a limited number of rewrites, such as CD/DVD-RW and flash storage devices:
# mount -w -o noatime /dev/sda1 /memstick
To unmount the device, use:
# umount /memstick
You may get a response like:
# umount /memstickumount: /memstick: device is busy
This means something (an application, a shell, or a file manager) is reading the file-system. You can find out what with lsof (list open files):
$ lsof /memstickCOMMAND PID USER FD TYPE DEVICE SIZE NODE NAMEgs 938 dawnm 128r DIR 2,0 1024 12 /memstick/may-04.pdfbash 938 dawnm 129r DIR 2,0 1024 24 /memstick

This is the Title of the Book, eMatter EditionCopyright © 2007 O’Reilly & Associates, Inc. All rights reserved.
148 | Chapter 9: Managing Files and Partitions
Now you can either close out the applications, or kill the lot with a single command:
# kill -9 `lsof -t /memstick`
mount can only be run by root. To give non-root users permission to mount remove-able disks, you’ll need to edit /etc/fstab (see the next recipe).
DiscussionThe umount “device is busy” error most commonly comes from having a terminalwindow open with the mounted device as a current working directory, like this:
carla@windbag:/floppy$
It is important to unmount a disk before removing it. This gives the system a chanceto complete any writes and to cleanly unmount the filesystem.
On newer Linux systems, you can get away without specifying the filesystem type,because mount autodetects the filesystem types.
See Also• mount(8)
• Recipe 9.10, “Configuring Filesystem Mounts with /etc/fstab”
9.10 Configuring Filesystem Mountswith /etc/fstab
ProblemUsers need to make their own backups on CDs, and use USB memory sticks andother types of removeable media. You don’t want to give them root privileges just sothey can mount these devices. But only root can use the mount command we dis-cussed in Recipe 9.9. And you also want to control which filesystems are automati-cally mounted at boot.
SolutionAdd entries to /etc/fstab, defining mountpoints and access permissions.
This example shows a Linux partition, two Windows partitions, and removeablemedia:
#<device> <mountpoint> <type> <options> <dump> <pass>/dev/hda6 /rh-data reiserfs defaults,user,noauto 0 1/dev/hda1 /win2k ntfs defaults,user,ro,gid=win2k 0 0/dev/hda2 /win98 vfat defaults,user,gid=win98 0 0/dev/hdc0 /cdrom auto defaults,user,noauto,ro 0 0/dev/fd0 /floppy auto defaults,user,noauto 0 0/dev/sda1 /memstick auto defaults,user,noauto 0 0

This is the Title of the Book, eMatter EditionCopyright © 2007 O’Reilly & Associates, Inc. All rights reserved.
9.10 Configuring Filesystem Mounts with /etc/fstab | 149
Once a device has an entry in /etc/fstab, it can be mounted by using the mountpoint:
$ mount /cdrom$ mount /memstick
And unmounted the same way:
$ umount /cdrom
DiscussionThese are the six fields that make up /etc/fstab:
deviceThe device name assigned by the kernel.
mountpointThe directory to which the filesystem is attached, which is user-defined.
typeThe filesystem type. It’s okay to use “auto” in this field for most filesystems. Seemount(8) for the supported filesystem types.
optionsCommand options in a comma-delimited list. See mount(8) for a complete list
dumpIf you’re using the dump command for backups, this tells dump the backup inter-val, in days. 1 means every day, 2 means every other day, and so on.
passThis tells fsck which filesystem to check first at boot up, if it ever needs to. Makeyour root filesystem 1, any other Linux filesystems 2, and non-Linux filesystems 0.
Let’s take a closer look at what goes in the options field. All these values belong tothe defaults option:
rwRead/write.
suidAllow setuid and setgid bits to operate.
devInterpret block and character devices.
execAllow execution of binaries.
autoThis is used in boot scripts (Debian uses /etc/init.d/mountall.sh; Red Hat uses /etc/rc.d/rc.sysinit), indicating which filesystems are to be started at boot up.

This is the Title of the Book, eMatter EditionCopyright © 2007 O’Reilly & Associates, Inc. All rights reserved.
150 | Chapter 9: Managing Files and Partitions
nouserNon-root users cannot mount or unmount the filesystem.
asyncAsynchronous I/O, which is standard for Linux.
The defaults values are overridden by appending additional options, as on the win2kline in the /etc/fstab example above (defaults,user,ro,gid=win2k). The options are:
userNon-root users can mount and unmount the device, provided they were the oneswho mounted it.
usersAny user can unmount the device.
noautoThe device must be explicitly mounted by a user and does not automaticallymount at boot.
roThe device is read-only. Be sure to use this for NTFS volumes.
noatimeDo not update the “time accessed” file attribute. This speeds up filesystem per-formance. It also extends the life of CD-RWs and DVD-RWs that use packet-writing, and of USB storage media, by reducing the number of writes.
gid=win2kAssign group membership, if you are controlling access with groups.
Mounting filesystems, not devicesWe tend to think of mounting devices and partitions, but strictly speaking, only file-systems are mounted. “Mount” and “attach” mean the same thing, if you want a dif-ferent word to use. Some Linux distributions, such as Red Hat, use the /mntdirectory. Debian uses top-level directories, such as /floppy or /cdrom. There’s nohard-and-fast rule; put them wherever it suits you. Just be careful not to mount twofilesystems in the same directory. If you do, the existing files will disappear until theintruder filesystem is unmounted.
Usually it’s not necessary to specify the filesystem type, because mount will figure itout. First, it will probe the superblock. Currently adfs, bfs, cramfs, ext, ext2, ext3, hfs,hpfs, iso9660, jfs, minix, ntfs, qnx4, reiserfs, romfs, udf, ufs, vxfs, xfs, and xiafs aresupported. If that fails, it will try each filesystem listed in /proc/filesystems, whichshows all the filesystems supported by your kernel.
See Also• mount(8), fstab(5)

This is the Title of the Book, eMatter EditionCopyright © 2007 O’Reilly & Associates, Inc. All rights reserved.
9.11 Mounting and Unmounting Filesystems on Hard Drives | 151
9.11 Mounting and Unmounting Filesystemson Hard Drives
ProblemYou have a multiboot system with several different Linux versions, or Linux andWindows, and you want to access the filesystems from whatever Linux you’vebooted into—or maybe you’ve created some new partitions, and you don’t knowhow to access them.
SolutionUse fdisk to find all the partitions on local drives, mount to access them, and /etc/fstab to automate mounting. First, identify all the local partitions:
# /sbin/fdisk -lDisk /dev/hda: 20.5 GB, 20576747520 bytes255 heads, 63 sectors/track, 2501 cylindersUnits = cylinders of 16065 * 512 = 8225280 bytes
Device Boot Start End Blocks Id System/dev/hda1 * 1 893 7172991 7 HPFS/NTFS/dev/hda2 894 1033 1124550 c W95 FAT32 (LBA)/dev/hda3 1034 2501 11791710 f W95 Ext'd (LBA)/dev/hda5 2437 2501 522081 82 Linux swap/dev/hda6 1034 1670 5116639+ 83 Linux/dev/hda7 1671 2436 6152863+ 83 Linux
Disk /dev/hdc: 255 heads, 63 sectors, 4865 cylinders Units = cylinders of 16065 * 512 bytes Device Boot Start End Blocks Id System/dev/hdc1 * 1 5 40131 83 Linux/dev/hdc2 6 4865 39037950 5 Extended/dev/hdc5 6 69 514048+ 83 Linux/dev/hdc6 70 2680 20972826 83 Linux
Partition table entries are not in disk order
How do you know which ones are already mounted, and what their mountpointsare? Use df (disk free) to show which partitions are mounted, and their mountpoints:
$ dfFilesystem 1K-blocks Used Available Use% Mounted on/dev/hda6 5116472 1494584 3621888 30% //dev/hda7 6152668 4011652 2141016 66% /home
You can use df to show information on a single mounted partition. Use the -h flag tomake “human-readable” numbers:
$ df -h /dev/hdc6Filesystem Size Used Avail Use% Mounted on/dev/hdc6 4.9G 1.4G 3.5G 29% /home

This is the Title of the Book, eMatter EditionCopyright © 2007 O’Reilly & Associates, Inc. All rights reserved.
152 | Chapter 9: Managing Files and Partitions
To mount /dev/hda1, the Windows NTFS partition, follow these steps:
# mkdir -m 755 /win2k# mount -t ntfs -r /dev/hda1 /win2k
Write access for NTFS is still experimental. Don’t enable write accessunless you wish to risk your NTFS data. That’s why we used the -roption in the mount command. If you need to share NTFS files, useSamba.
To unmount, use:
# umount /win2k
DiscussionRemember to adjust mount directory permissions to suit your own needs. If you’rerunning a multiboot system, you can access all installed filesystems with the mountcommand.
See Also• mount(8)
• The NTFS FAQ (http://linux-ntfs.sourceforge.net/info/ntfs.html)
9.12 Finding Device Names for mount and fstab
ProblemYou want to mount a storage disk, such as an IDE or SCSI hard drive, CD, DVD,USB storage device, or Zip disk. You don’t know what device name to use—wheredo you look?
SolutionUse dmesg and fdisk. dmesg finds device names, and fdisk shows the partition num-bers on hard drives. Referring to http://www.lanana.org/docs/device-list/devices.txtcan be helpful as well, as it is the list of official /dev names. (If you have kernelsources installed, the devices.txt file may be present on your system in the /usr/src/*directory.)
This command searches dmesg for CD drives:
$ dmesg | grep -i cdhdc: ATAPI CDROM, ATAPI CD/DVD-ROM DRIVEhdc: ATAPI 40X CD-ROM DRIVE, 128K cache, UDMA (33)
A quick search in devices.txt reveals
Second IDE hard disk/CD-ROM interface0 = /dev/hdc Master: whole disk (or CD-ROM)

This is the Title of the Book, eMatter EditionCopyright © 2007 O’Reilly & Associates, Inc. All rights reserved.
9.12 Finding Device Names for mount and fstab | 153
Ignore the 0 = part; your device name is /dev/hdc.
This is what CD drives using the IDE-SCSI subsystem look like:
$ dmesg | grep -i cdhdb: TOSHIBA DVD-ROM SD-M1202, ATAPI CD/DVD-ROM drivehdc: LITE-ON LTR-24102B, ATAPI CD/DVD-ROM driveide-cd: ignoring drive hdbide-cd: ignoring drive hdc Type: CD-ROM ANSI SCSI revision: 02 Type: CD-ROM ANSI SCSI revision: 02Attached scsi CD-ROM sr0 at scsi0, channel 0, id 0, lun 0Attached scsi CD-ROM sr1 at scsi0, channel 0, id 1, lun 0scd0: scsi3-mmc drive: 32x/32x cd/rw xa/form2 cdda trayUniform CD-ROM driver Revision: 3.12scd1: scsi3-mmc drive: 131x/40x writer cd/rw xa/form2 cdda tray
So the drive names are /dev/scd0 and /dev/scd1.
With hard drives, you must select specific partitions, since each partition is a sepa-rate block device. fdisk -l displays all partitions on all detected hard drives:
# /sbin/fdisk -lDisk /dev/hda: 20.5 GB, 20576747520 bytes255 heads, 63 sectors/track, 2501 cylindersUnits = cylinders of 16065 * 512 = 8225280 bytes
Device Boot Start End Blocks Id System/dev/hda1 * 1 893 7172991 7 HPFS/NTFS/dev/hda2 894 1033 1124550 c W95 FAT32 (LBA)/dev/hda4 1034 2501 11791710 f W95 Ext'd (LBA)/dev/hda5 2437 2501 522081 82 Linux swap/dev/hda6 1034 1670 5116639+ 83 Linux/dev/hda7 1671 2436 6152863+ 83 Linux
Partition table entries are not in disk order
Copy the device name from the Device column exactly as it is shown.
This is what a USB pen drive looks like in dmesg:hub.c: new USB device 00:1d.0-2.3, assigned address 5usb.c: USB device 5 (vend/prod 0x1915/0x2220) is not claimed ...SCSI device sda: 128000 512-byte hdwr sectors (66 MB)sda: Write Protect is offsda: sda1
Your device name is /dev/sda1.
This how fdisk sees USB drives:
# fdisk -lDisk /dev/sda: 65 MB, 65536000 bytes8 heads, 32 sectors/track, 500 cylindersUnits = cylinders of 256 * 512 = 131072 bytes
Device Boot Start End Blocks Id System/dev/sda1 * 1 499 63856 6 FAT16

This is the Title of the Book, eMatter EditionCopyright © 2007 O’Reilly & Associates, Inc. All rights reserved.
154 | Chapter 9: Managing Files and Partitions
DiscussionAll storage devices are block devices in /dev. /dev names them according to theirphysical connections. For example:
/dev/hdaPrimary device on IDE0 (whole disk)
/dev/hdbSecondary device on IDE0 (whole disk)
/dev/fd0Floppy drive on controller 0, drive 0
/dev/fd1Floppy drive on controller 0, drive 1
/dev/sdaFirst SCSI disk (whole disk)
/dev/sdbSecond SCSI disk (whole disk)
Storage devices on Linux follow this naming convention:
/dev/fd*Floppy disks
/dev/hd*IDE drives
/dev/sd*SCSI drives
/dev/sd*USB storage devices
/dev/hd*IDE/Atapi CD/DVD-ROM drives
/dev/sd*IDE/Atapi CD/DVD-R/RW drives
/dev/sd*, /dev/hd*, or /dev/XXXx4Zip drives
IDE and USB devices that use the SCSI emulation subsystem are sometimesnamed /dev/sr*, which is symlinked to /dev/sd*.
If you have kernel sources installed, look for the devices.txt file to see the definitionsof all those /dev names.
See Also• Chapter 5, Discovering Hardware from Outside the Box
• Official list of /dev names (http://www.lanana.org/docs/device-list/devices.txt), orthe devices.txt file in your system’s /usr/src/* directory

This is the Title of the Book, eMatter EditionCopyright © 2007 O’Reilly & Associates, Inc. All rights reserved.
9.14 Deleting Files and Directories | 155
9.13 Creating Files and Directories
ProblemYou want to organize your files by placing them in directories. But where do directo-ries come from? For that matter, how do you create a file?
SolutionUse mkdir and touch.
mkdir creates directories. Mind your filepaths! This comand creates a new subdirec-tory in the current directory:
$ mkdir photos
This creates a new top-level directory. Only the superuser can do this:
# mkdir /local_bins
You can set permissions when you create a directory:
# mkdir -m 755 /shared
To create a subdirectory and all of its parent directories at once, use the -p flag:
$ mkdir -p photos/scanned/jpgs/thumbs
Most files are created by a program, such as a word processor, image editor, or com-piler. You can also create a new, empty file with touch:
$ touch newfile.txt
Discussiontouch is useful in scripting, when you need the script to create a new file. It’s alsouseful for creating placeholders, or for populating a directory for testing things.
See Also• mkdir(1), touch(1)
9.14 Deleting Files and Directories
ProblemYou have files and directories all over the place. How do you get rid of the ones youdon’t want?
SolutionUse rm (remove)—with caution! rm will happily delete everything, with no warning.

This is the Title of the Book, eMatter EditionCopyright © 2007 O’Reilly & Associates, Inc. All rights reserved.
156 | Chapter 9: Managing Files and Partitions
To delete a single file, with verbose output, use:
$ rm -v games-stats.txtremoved 'game-stats.txt'
To prompt for confirmation first, use:
$ rm -vi dpkglistrm: remove regular file `dpkglist'? yremoved `dpkglist'
Use the -r (recursive) flag to delete a directory, with all files and subdirectories:
$ rm -rvi /home/games/stats/baseball
That deletes the /baseball directory, and everything in it. To delete /games and every-thing in it, use:
$ rm -rvi /home/games
You can use shell wildcards to delete groups of files, as in:
$ rm -v *.txtremoved `file4.txt'removed `file5.txt'removed `file6.txt'removed `file7.txt'
Or:
$ rm -v file*
Use the -f (force) flag to make it work, no matter what. This is verydangerous! It will not prompt you, it will simply delete everything inits path:
$ rm -rf /home/games
Be very careful when you’re using the -rf flags. rm will happily erase your entire drive.
Discussionrm -rf / will erase your entire root filesystem. Some folks think it is a funny prank totell newbies to do this.
Even though the common usage is “rm deletes files,” it does not actually delete them,but rather unlinks them from their inodes. A file is not truly deleted until all hardlinks pointing to it are removed, and it is overwritten. Ordinary users can rm any filesin any directories to which they have access, but they can rm only directories thatthey own.
touch is actually for changing the timestamps on files. Using it to create new emptyfiles is an unintended bonus.
There’s also a rmdir command for deleting directories. rmdir won’t delete a directorythat has something in it. This may make you feel safer, but over time, it will become

This is the Title of the Book, eMatter EditionCopyright © 2007 O’Reilly & Associates, Inc. All rights reserved.
9.15 Copying, Moving, and Renaming Files and Directories | 157
annoying; lots of programs create files that don’t show up in a normal listing (filena-mes starting with a . are ignored unles you use ls -a). So you’ll try to use rmdir and itwill tell you that there are still files in the directory. Eventually, you’ll just use rm -r.
See Also• touch(1), rm(1)
9.15 Copying, Moving, and Renaming Filesand Directories
ProblemYou’ve got directories, you’ve got files. How do you get the files into the directories?How do you change a file’s name? And how do you make a copy?
SolutionUse the cp and mv commands.
This command copies two files from the current working directory into the ~/images2directory:
$ cp -v navbar.gif redheart.gif ~/images2`navbar.gif ' -> `/home/terri/images2/navbar.gif'`redheart.gif ' -> `/home/terri/images2/redheart.gif'
If you’re overwriting files, you might want to use the -b flag to create backups of theold files in the destination directory:
$ cp -bv icon-zip.gif main.gif ~/data2`icon-zip.gif' -> `/home/terri/data2/icon-zip.gif' (backup: `/home/terri/data2/icon-zip.gif~')`main.gif' -> `/home/terri/data2/main.gif' (backup: `/home/terri/data2/main.gif~')
What if you need to preserve the full filepath? Use the --parents flag:
$ cp -v --parents ~/homes/images/kitchen.jpg ~/data2'/home/terri/homes/images/kitchen.jpg' ->'/home/terri/data2/homes/images/kitchen.jpg'
Use the -s flag to create soft links to files, instead of copying the files:
$ cp -s navbar.gif redheart.gif ~/images2
Copy a directory and all of its contents with the -r flag:
$ cp -rv ~/homes/images/ /shared/archives
Moving and renaming files are done with the mv command. To move two files toanother directory, use:
$ mv -v about.gif arrow.gif ~/data2`about.gif' -> `/home/terri/data2/about.gif'`arrow.gif' -> `/home/terri/data2/arrow.gif'

This is the Title of the Book, eMatter EditionCopyright © 2007 O’Reilly & Associates, Inc. All rights reserved.
158 | Chapter 9: Managing Files and Partitions
To rename a file, use:
$ mv -v downloads.gif email.gif`downloads.gif' -> `email.gif'
DiscussionA graphical file manager, such as Nautilus, Konqueror, Midnight Commander, Gen-too file manager, gmc, or Rox Filer, often makes chores like these go faster and easier.
See Also• mv(1), cp(1)
• Linux in a Nutshell
9.16 Creating Linux Disk Partitions with fdisk
ProblemYou need to partition a new hard drive, or partition free space on an existing harddrive.
SolutionOne way is to boot up a Knoppix disk and use QTParted, a great graphical applica-tion that creates, deletes, moves, and resizes partitions, without destroying the data.It even resizes NTFS partitions.
You can also use fdisk. This example shows how to create a primary partition:
# fdisk /dev/hdaThe number of cylinders for this disk is set to 2501.There is nothing wrong with that, but this is larger than 1024,and could in certain setups cause problems with:1) software that runs at boot time (e.g., old versions of LILO)2) booting and partitioning software from other OSs (e.g., DOS FDISK, OS/2 FDISK)Command (m for help): nCommand action l logical (5 or over) p primary partition (1-4)pPartition number (1-4): 3First cylinder (511-1232, default 511): 511Last cylinder or +size or+sizeM or +sizeK (511-1232, default1232): +3000MCommand (m for help): wThe partition table has been altered!
Calling ioctl( ) to re-read the partition tableSyncing disks#

This is the Title of the Book, eMatter EditionCopyright © 2007 O’Reilly & Associates, Inc. All rights reserved.
9.17 Creating a Filesystem on a New Partition | 159
That’s it. You can change your mind right up to the end, until you hit w to write thenew partition table to disk. At any time, you can hit m to see a menu of commands. qalways quits.
Before you can put any data on the new partition, you’ll need to reboot, then put afilesystem on it (see the next recipe).
DiscussionUse Linux’s fdisk only to create Linux volumes. For Windows volumes, use MS-DOS’s fdisk.
Here is a list of the more commonly used Linux fdisk options:
m Display help.
p Show the current partition table.
d Delete a partition.
n Create a new partition.
w Write the partition table to disk.
l Display the list of filesystem types.
q Quit fdisk without changing anything.
See Also• fdisk(8)
9.17 Creating a Filesystem on a New Partition
ProblemYou have a brand-new disk partition all ready to go to work. But you can’t use it yet.A partition by itself is just a chunk of disk. How do you put a filesystem on it?
SolutionUse the commands specific to the filesystem you want to use.
Ext2# mke2fs /dev/hda3
Ext3# mke2fs -j /dev/hda3
ReiserFS# mkreiserfs /dev/hda3

This is the Title of the Book, eMatter EditionCopyright © 2007 O’Reilly & Associates, Inc. All rights reserved.
160 | Chapter 9: Managing Files and Partitions
JFS# mkfs.jfs /dev/hda3
XFS# mkfs.xfs /dev/hda3
Discussionmke2fs is for creating Ext2/3 filesystems. It is part of the e2fsprogs package, availablefrom http://e2fprogs.sourceforge.net.
mkreiserfs comes with ReiserFS, as part of reiserfsprogs. Get it from http://www.namesys.com.
mkfs.jfs is part of jfsutils, from http://www-124.ibm.com/jfs/.
mkfs.xfs is part of xfsprogs, which can be downloaded from http://oss.sgi.com/project/xfs.
See Also• This chapter’s “Introduction,” for more information on the four filesystems in
this recipe
• JFS (http://www-124.ibm.com/jfs/)
• XFS (http://oss.sgi.com/projects/xfs/)
• ReiserFS (http://www.namesys.com/)
• Ext2/3 (http://e2fsprogs.sourceforge.net/ext2.html)

This is the Title of the Book, eMatter EditionCopyright © 2007 O’Reilly & Associates, Inc. All rights reserved.
161
Chapter 10 CHAPTER 10
Patching, Customizing,and Upgrading Kernels
10.1 IntroductionPatching, customizing, and upgrading the Linux kernel are useful tasks to master,and they’re really not all that scary. These are among the few system maintenencechores that require a reboot, which can be dismaying for those who glory in sustain-ing long uptimes. Other than that, it’s no worse than patching or upgrading anyother software.
You’ll need kernel sources, and gcc, the GNU C compiler. There are two places toget kernel sources: from your own distribution, or from http://kernel.org. The differ-ent Linux distributions modify kernels to varying degrees. Red Hat, SuSE, and Man-drake ship heavily modified kernels. Debian and Slackware mess with them only alittle bit. It’s possible that installing a vanilla kernel from http://kernel.org will causethings to break on distributions that use modified kernels, so it’s better to use kernelsources for your distribution. (See Chapters 2 and 3 for more information on obtain-ing and installing Linux software, and Recipe 4.2 to learn about build tools.)
As with most Linux software, when you patch a kernel, you’re not patching your exist-ing kernel; rather, you’re patching the sources and building a new binary, so you’ll endup with two kernels. This is a good thing, because then you’ll have your original ker-nel to use in the event the new one doesn’t boot. You can install as many different ker-nels as you like, and test the latest releases and different configurations.
When should you modify a kernel?
• To optimize it for your hardware
• To get new functionality
• To remove unneeded functions
• To test new features
• To upgrade

This is the Title of the Book, eMatter EditionCopyright © 2007 O’Reilly & Associates, Inc. All rights reserved.
162 | Chapter 10: Patching, Customizing, and Upgrading Kernels
Configuring the New KernelConfiguration is the most time-consuming part of building a new kernel. It’s also themost important. This step is where you decide what hardware, filesystems, power-management features, and other features are going to be supported. There are over ahundred different items to choose from, and there are potentially three decisions tomake for each feature: should it be enabled, and if so, as a loadable module or stati-cally compiled into the kernel? As a general rule, if it can be made into a module, doit. This conserves memory, as memory is not allocated for modules until they areactually in use. Also, it’s easier to update or add modules than it is to rebuild thewhole kernel.
The kernel configurator contains help entries for almost every item. It tells you if a fea-ture can be built as a module, or if it must be built into the base kernel. The helpentries describe what each feature is for and advise you what to do with it if you’re notsure it should be enabled. If there is no help entry and you don’t know what to do, it’ssafe to enable it. At worst, you’ll have a fatter kernel with features you don’t use.
The kernel configuration program won’t let you make something into a module if itneeds to be part of the base kernel, with one important exception: the driver for thedisk drive that contains the root filesystem. This must be built into the base kernel,so that the system can boot. Otherwise, you’re in a chicken-and-egg situation: driv-ers are needed to load the root filesystem, but the filesystem cannot be loadedbecause the drivers are on the filesystem. If you don’t build the drivers into the ker-nel, you’ll need to create an initrd image. initrd creates an initial ramdisk that loadsthe disk drivers, so that the system can boot.
A common misconception is that using loadable modules is slower than buildingeverything into a monolithic kernel. Either way, it simply involves calls to memorylocations, so there is no speed difference at all.
Use menuconfig for configuring 2.4 kernels, and use either menuconfig or xconfig for2.6 kernels. menuconfig is ncurses-based, so you don’t need X. If you don’t havencurses, your options are to install it or to use config, which is a seriously dreadfulchoice. config is the original kernel configurator. It takes forever, and if you make asingle mistake you have to start over.
xconfig was completely redesigned for the 2.6 kernel. It’s efficient and extremelyhelpful, containing good help files for every option. You’ll need Qt, qt-devel, gtt, andX to run it. Figure 10-1 shows you the xconfig user interface in all its glory. As youcan tell, there are lots of optional features you can configure.
The kernel build tree contains reams of documentation. Look in linux-$VERSION/Documentation/. Also, see linux-$VERSION/README for important installationtips, and read linux-$VERSION/Documentation/Changes for important informationon what versions of gcc and other utilities.

This is the Title of the Book, eMatter EditionCopyright © 2007 O’Reilly & Associates, Inc. All rights reserved.
10.2 Adding New Features to the 2.4 Kernel | 163
10.2 Adding New Features to the 2.4 Kernel
ProblemYou want to add some new feature to your existing 2.4 kernel, such as support fornew hardware, new filesystems, or additional networking capabilities. For example,you’ve just finally gotten around to buying a USB drive for backup, and you’ve neverused USB before. How do you find out whether your system supports USB now? Andhow do you add it if it doesn’t?
SolutionDownload fresh kernel sources and compile a new kernel using your existing .configfile, adding the new features you want.
The prerequisites are:
• First, make sure you have at least 500 MB of free disk space for the build process.
• Next, make hard copies of the outputs of dmesg, lscpi, cat /proc/cpuinfo, andlsusb. (See Chapter 5 for more information on these.)
• Back up all of your data, and have a bootable rescue disk at hand.
• You’ll also need a kernel .config file.
Figure 10-1. xconfig user interface

This is the Title of the Book, eMatter EditionCopyright © 2007 O’Reilly & Associates, Inc. All rights reserved.
164 | Chapter 10: Patching, Customizing, and Upgrading Kernels
To add a new feature to your existing kernel, download new sources of the same ker-nel version. To find your kernel version, use uname:
$ uname -r2.4.22
Unpack the new kernel sources into a folder in your home directory, such as ~/src:
$ tar xvjf linux-2.4.22.tar.bz2
Edit the new kernel makefile (~/src/linux-2.4.22/Makefile), giving a custom value toEXTRAVERSION, such as EXTRAVERSION = -new-kernel.
Run the following commands from ~/src/linux-2.4.22:
$ make mrproper
Copy your .config file to ~/src/linux-2.4.22 now.
Next, configure the new kernel. The configurator will ask many questions. This iswhere you select the new features you want:
$ make oldconfig
Then run these commands:
$ make dep$ make bzImage$ make modules$ su# make modules_install# cp ~/src/linux-2.4.22/arch/i386/boot/bzImage /boot/vmlinuz-2.4.22-new-kernel# cp ~/src/linux-2.4.22/System.map /boot/System.map-2.4.22-new-kernel
Finally, to use your new kernel, add it to your bootloader and reboot. A GRUB entrylooks like this:
title Kernel 2.4.22, new kernelroot (hd0,0)kernel /boot/vmlinuz-2.4.22-new-kernel root=/dev/hda1 ro
LILO users do this:
image=boot/vmlinuz-2.4.22-new-kernel label=Kernel 2.4.22, new kernel root=/dev/hda1 read-only
And remember to re-run LILO, to write the new configuration to the boot record:
# /sbin/lilo
Save a copy of your new .config file in a directory outside of the build tree, so that itdoes not get deleted or overwritten. Give it a unique, helpful name:
$ cp ~/src/linux-2.4.22/.config ~/kernel-configs/.config-2.4.22-jan-04
You can also add coments to the .config file itself, to help you keep track:
This is the Title of the Book, eMatter EditionCopyright © 2007 O’Reilly & Associates, Inc. All rights reserved.
10.2 Adding New Features to the 2.4 Kernel | 165
# Automatically generated by make menuconfig: don't edit## jan 2004 added udf r/w support, jfs, and xfs
When you’re satisfied that the new kernel works correctly, you can delete the oldkernel, its /lib/modules/$VERSION directory, the build tree, and its bootloaderentries (or you can hang on to them, if you prefer).
DiscussionA lot of documentation tells you to put your kernel sources and build tree in /usr/src/linux. This is a bad idea. As the kernel Readme states: “Do NOT use the /usr/src/linux area! This area has a (usually incomplete) set of kernel headers that are used bythe library header files. They should match the library, and not get messed up bywhatever the kernel-du-jour happens to be.” And you don’t want to abuse rootlypowers by using a directory that requires root access. A kernel can be built any-where, even on a completely separate PC.
Finding .configIf you’ve previously built a kernel on your system, you’ll find the .config file in thetop-level directory of the old build tree. If you have not built a kernel on the system,look in /boot for .config, as most distributions put it there. If you find one in /usr/src/linux, it’s most likely a generic .config, and not useful to you.
If there is not a .config file for your system, skip ahead to Recipe 10.3, because you’llhave to configure your new kernel from scratch. make oldconfig will still work, but itwill use the defaults in the build tree, which will not suit your system at all. makeoldconfig tells you which file it is using:
$ make oldconfig...# Using defaults found in arch/i386/defconfig
You don’t want to use that one! It should say this:
# Using defaults found in .config
Hit Ctrl-C to interrupt and start over, if necessary.
Explanations of the build commandsYou can have several kernels on your system, as long as you remember to give eachone a unique EXTRAVERSION value and to use a unique name when copying thenew kernel image to /boot.
Documentation/Changes recommends using gcc 2.95.3. Most newer distributionsship with 3.x, which ought to work, but if you have problems you can install morethan one version of gcc on your system, and select the one you want to use atcompile-time:
$ make bzImage CC=gcc-2.95.3

This is the Title of the Book, eMatter EditionCopyright © 2007 O’Reilly & Associates, Inc. All rights reserved.
166 | Chapter 10: Patching, Customizing, and Upgrading Kernels
make mrproper cleans the build tree to a pristine state, removing configuration files,dependency information, and object files. Do this even with freshly downloadedsources. (mrproper, according to Linux lore, is named for Mr. Proper. Mr. Proper isthe European version of Mr. Clean, for those occasions when you need to makesomething cleaner than clean.) mrproper cleans the build tree more thoroughly thanmake clean, which removes object files but does not touch configuration or depen-dency files. Read the Makefile to see exactly what files are removed.
make oldconfig reuses your existing kernel configuration. When you’re making aminor addition to your kernel, make oldconfig lets you whiz right through and onlyasks about new things. It will not let you change any existing settings. “y/n/m/?”means “yes, build this into the kernel / no, do not add this feature / yes, add this as amodule / help, please.”
If you don’t know what to choose, hit ? for help.
make dep builds all the necessary dependencies.
make bzImage compiles the new kernel. This can take up to an hour, depending onthe speed of your PC and how complex your new kernel is.
make modules compiles all of the necessary modules.
make modules_install is the first operation that requires superuser privileges. For thisexample, your new modules are installed into /lib/modules/2.4.22.
cp ~/src/arch/i386/boot/bzImage /boot/vmlinuz-2.4.22-new-kernel copies your nicenew kernel image to the /boot directory, and renames it. It is important, when install-ing multiple kernels, to make sure each one has a unique name and to use the samekernel name in your bootloader.
cp ~/src/System.map /boot/System.map-2.4.22-new-kernel copies the new System.mapto /boot. Be sure that the System.map has the same version number as the kernel towhich it belongs. The System.map is a symbol table that maps kernel addresses tohuman-readable names. For example:
c01001f8 t int_msgc0100210 t ignore_intc0100232 t idt_descr
The kernel is happier with numbers, while human coders do better with names. Thismap keeps everyone happy. If you are running multiple kernels on a system, eachkernel needs its own System.map. If you have the wrong System.map, the conse-quences are not dire. You’ll occasionally see the “System.map does not match actualkernel” error message, and you won’t get accurate kernel debugging if you need totroubleshoot.

This is the Title of the Book, eMatter EditionCopyright © 2007 O’Reilly & Associates, Inc. All rights reserved.
10.3 Slimming a Stock 2.4 Kernel | 167
See Also• This chapter’s “Introduction,” for where to get kernel sources and where to look
for documentation
• The online help in the kernel configurator—almost every configuration item hasan entry
10.3 Slimming a Stock 2.4 Kernel
ProblemYou would like to overhaul the kernel that came with your distribution and weed outall the unnecessary drivers, getting rid of support for hardware and functions youdon’t need.
SolutionDownload new sources of the same kernel version and compile the new kernel, con-figuring it from scratch. To find your kernel version, use uname:
$ uname -r2.4.22
The prequisites are:
• First, make sure you have at least 500 MB of free disk space for the buildprocess.
• Next, make hard copies of the outputs of dmesg, lscpi, cat /proc/cpuinfo, andlsusb. (See Chapter 5 for more information on these.)
• Back up all of your data, and have a bootable rescue disk at hand.
Unpack the new kernel sources into a folder in your home directory, such as ~/src:
$ tar xvjf linux-2.4.22.tar.bz2
Edit the new kernel makefile (~/src/linux-2.4.22/Makefile), giving a custom value toEXTRAVERSION, such as EXTRAVERSION = -slim-kernel
All of the following commands are run from ~/src/linux-2.4.22:
$ make mrproper$ make menuconfig$ make dep$ make bzImage$ make modules$ su# make modules_install# cp ~/src/linux-2.4.22/arch/i386/boot/bzImage /boot/vmlinuz-2.4.22-new-kernel# cp ~/src/linux-2.4.22/System.map /boot/System.map-2.4.22-new-kernel
This is the Title of the Book, eMatter EditionCopyright © 2007 O’Reilly & Associates, Inc. All rights reserved.
168 | Chapter 10: Patching, Customizing, and Upgrading Kernels
When you configure the kernel, keep in mind that you are starting from scratch, soyou must explicitly enable every feature that you want. And you must make sure thatfeatures you do not want are not enabled. These are some core features that you defi-nitely want:
• Loadable module support, built into the kernel.
• Under the “General Setup” menu, be sure that support is built in for a.out bina-ries, ELF binaries, and MISC binaries.
• Be sure to build support for all of your boot devices—IDE drives, CD-ROM,floppy disk, SCSI disk, or USB—into the kernel. If you leave them out, or buildthem as modules, your system will require a ramdisk (initrd image) to boot.
When you’re finished, add the new kernel to the bootoader, reboot, and enjoy.Remember to copy your new .config file to a directory outside of the build tree topreserve it.
DiscussionThis procedure configures the new kernel from scratch. make oldconfig doesn’t work,because it does not let you change the old configuration; it only lets you add newthings.
A typical base kernel runs around 1–3 MB (compressed), and the corresponding /lib/modules/$version runs around 10–30 MB. Some folks like to strip their kernels to theabsolute bare essentials. On a server, especially one that is exposed to the Internet,it’s a good security practice to keep it as lean as possible. But having a bit of fat on adesktop system or workstation isn’t all that significant, and it may be convenient forfuture changes.
The name vmlinuz, according to lore, came about because the kernel on old Unix sys-tems was vmunix. The vm stands for “virtual memory,” to distinguish it from olderkernels that did not have this feature. In your build tree, you’ll see a vmlinux file.vmlinuz is the compressed version of this file. There’s no need to be dull and stickwith naming your kernels vmlinuz-$version. You can name them anything you like—kernel-mustard, kernel-panic, kernel-of-truth, fred-and-ginger... anything at all.
See Also• This chapter’s “Introduction,” for where to get kernel sources and where to look
for documentation
• The online help in the kernel configurator—almost every configuration item hasan entry
• Recipe 10.2, for explanations of build commands, managing .config files, andinstalling the new kernel

This is the Title of the Book, eMatter EditionCopyright © 2007 O’Reilly & Associates, Inc. All rights reserved.
10.4 Upgrading to the Latest Stable Version of the 2.4 Kernel | 169
10.4 Upgrading to the Latest Stable Versionof the 2.4 Kernel
ProblemYou’ve heard there have been many updates and patches to the kernel. You wouldlike to update your old kernel to the latest stable version (e.g., from 2.4.22 to 2.4.25),because this is the easiest way to get all the updates and patches.
SolutionBack up of all of your data, and have a bootable rescue disk at hand.
Make hard copies of the outputs of dmesg, lscpi, cat /proc/cpuinfo, and lsusb.
Unpack the new kernel sources into a folder in your home directory, such as ~/src:
$ tar xvjf linux-2.4.25.tar.bz2
Edit the new kernel makefile (~/src/linux-2.4.25/Makefile), giving a custom value toEXTRAVERSION, such as EXTRAVERSION = -new-kernel.
All of the following commands are run from ~/src/linux-2.4.25:
$ make mrproper
If want to use your existing .config file, copy it to ~/src/linux-2.4.25 now and con-tinue with this recipe. If not, go back to Recipe 10.3.
Run the following commands:.
$ make oldconfig$ make dep$ make bzImage$ make modules$ su# make modules_install# cp ~/src/linux-2.4.25/arch/i386/boot/bzImage /boot/vmlinuz-2.4.25-new-kernel# cp ~/src/linux-2.4.25/System.map /boot/System.map-2.4.25-new-kernel
Add the new kernel to your bootloader, reboot, and enjoy.
Discussionhttp://lwn.net and http://kerneltrap.org are good sites for keeping on top of kernelnews, changes, improvements, and problems.

This is the Title of the Book, eMatter EditionCopyright © 2007 O’Reilly & Associates, Inc. All rights reserved.
170 | Chapter 10: Patching, Customizing, and Upgrading Kernels
See Also• This chapter’s “Introduction,” for where to get kernel sources and where to look
for documentation
• Recipe 10.2, “Adding New Features to the 2.4 Kernel,” for complete details onbuilding and installing a kernel
• The online help in the kernel configurator—almost every configuration item hasan entry
10.5 Building the 2.6 Kernel
ProblemYou would like to try the 2.6 kernel, and you need to know the new build com-mands, which are different from those for the 2.4 kernel.
SolutionIn this example, our new kernel is version 2.6.3. Back up of all of your data, and havea rescue disk at hand.
Make hard copies of the outputs of dmesg, lscpi, cat /proc/cpuinfo, and lsusb.
Download and unpack new kernel sources into a folder in your home directory, suchas ~/src. Change to the top-level directory of your new source tree (~/src/linux-2.6.3).
Edit the new kernel makefile (~/src/linux-2.6.3/Makefile), giving a custom value toEXTRAVERSION, such as EXTRAVERSION =-test. Then run the followingcommands:
$ make mrproper$ make xconfig$ make$ su# make modules_install# cp ~/src/linux-2.6.3/arch/i386/boot/bzImage /boot/vmlinuz-2.6.3-test# cp ~/src/linux-2.6.3/System.map /boot/System.map-2.6.3-test
Save a copy of your new .config file in a directory outside of the build tree. Add thenew kernel to your bootloader, reboot, and have fun.
DiscussionYou need Qt, qt-devel, and X to run xconfig. menuconfig also works nicely.
The make command, all by itself, replaces make dep, make bzImage, and makemodules.

This is the Title of the Book, eMatter EditionCopyright © 2007 O’Reilly & Associates, Inc. All rights reserved.
10.6 Adding New Features to the 2.6 Kernel | 171
See Also• This chapter’s “Introduction,” for where to get kernel sources
• Recipe 10.2, “Adding New Features to the 2.4 Kernel,” for explanations of thebuild commands and how to configure the bootloader
• The online help in the kernel configurator—almost every configuration item hasan entry
10.6 Adding New Features to the 2.6 Kernel
ProblemYou need to add features to your 2.6 kernel.
SolutionFollow Recipe 10.5, except you’ll use oldconfig instead of xconfig:
$ make mrproper
Copy your existing .config file to ~/src/linux-2.6.3 now. Then run the followingcommands:
$ make oldconfig$ make$ su# make modules_install# cp ~/src/linux-2.6.3/arch/i386/boot/bzImage /boot/vmlinuz-2.6.3-test# cp ~/src/linux-2.6.3/System.map /boot/System.map-2.6.3-test
Add your new kernel to your bootloader, and you’re ready to go.
DiscussionDo not try to use a 2.4 .config file—the two kernels are quite different, and it willcause many troubles.
The make command, all by itself, replaces make dep, make bzImage, and makemodules.
See Also• The documentation in the kernel build tree, starting with the Readme, which
covers building, configuring, and compiling the kernel
• This chapter’s “Introduction,” for where to get kernel sources and where to lookfor documentation
• Recipe 10.2, “Adding New Features to the 2.4 Kernel,” for explanations of thebuild commands and how to configure your bootloader

This is the Title of the Book, eMatter EditionCopyright © 2007 O’Reilly & Associates, Inc. All rights reserved.
172 | Chapter 10: Patching, Customizing, and Upgrading Kernels
10.7 Adding a New Loadable Kernel Module
ProblemYou have changed or added some hardware, such as a NIC card, sound card, or USBdevice, and you need to install a new kernel module (driver) for the device.
SolutionThe steps are the same for 2.4 and 2.6 kernels. Change to the directory that containsthe build tree (e.g., ~/src/linux-2.4.25). You’ll need a good, up-to-date .config file.Copy it to the top level of your build tree, then run:
$ make oldconfig
As you go through the configuration, find the driver you need and select it as a mod-ule (for example, the tulip module, which is a common driver for many Ethernetcards). Then:
$ make dep$ make modules# make modules_install# depmod -av
Load the module with modprobe:
# modprobe tulip
This whole process doesn’t need a reboot.
Discussionmake menuconfig also works, if you can’t use oldconfig. It just takes longer, and youhave to be careful to not leave out anything important.
If you’re installing a third-party module that is not in the kernel tree, you must relyon the vendor’s installation instructions. The usual method is to download sources,build the module, then load it with modprobe. Some vendors, like nVidia, provide ascript that does everything for you.
Most distributions probe hardware at bootup, and automatically load the correctmodules. If this does not happen, you’ll need to configure some startup files. On RedHat and SuSE, add the module to /etc/modules.conf. On Debian, add it to /etc/modules. Slackware uses rc.modules.
Even easier is to enable kmod, the automatic module loader, in your kernel. Mostdistributions enable it by default. In the kernel configurator, look for “Automatickernel module loading” (2.6 kernel) or “Kernel module loader” (2.4) under “Load-able module support.”
Don’t use kerneld; kmod replaced it starting from the 2.2 kernel.

This is the Title of the Book, eMatter EditionCopyright © 2007 O’Reilly & Associates, Inc. All rights reserved.
10.8 Patching a Kernel | 173
See Also• This chapter’s Introduction, for where to get kernel sources and where to look
for documentation
• Recipe 10.2, “Adding New Features to the 2.4 Kernel,” for explanations of thebuild commands, where to find a .config file, and how to preserve it for reuse
10.8 Patching a Kernel
ProblemYou want to add a new feature or correct a problem by patching your kernel, testsome new features, or update to the next point release.
SolutionDownload and apply the patch to the kernel sources, then compile and build thenew kernel. In this example, we are upgrading the 2.6.3 kernel to 2.6.4.
The patch must be in the next-highest directory upstream from your build tree, likethis:
$ ls ~/srclinux-2.6.3 patch-2.6.4.bz2
Now change to the top level of your build tree, then unpack and apply the patch:
$ cd linux-2.6.3$ bzip2 -dc ../patch-2.6.4.bz2 | patch -s -p1
Or, you can do a test drive with the --dry-run option:
$ bzip2 -dc ../patch-2.6.4.bz2 | patch -s -p1 --dry-run
Now configure and build your kernel, and away you go.
Your build tree thoughtfully includes a script to handle applying patches for you, in/scripts/patch-kernel. This is a great little script, especially when you have severalpatches to apply, because it automatically applies them in the correct order. Usage issimple. From your top-level source directory, run:
$ scripts/patch-kernel
Patches must be applied in order, and you must have all of them. For example, to usepatch-2.6.5-rc6, you also need the first five patches in the series (rc1 through rc5).When you’re upgrading to a newer point release, you can’t skip any of them; all ofthem have to be applied in sequence.

This is the Title of the Book, eMatter EditionCopyright © 2007 O’Reilly & Associates, Inc. All rights reserved.
174 | Chapter 10: Patching, Customizing, and Upgrading Kernels
DiscussionThis is what the different patch options mean:
-dDecompress.
-cSend output to stdout.
../ patch-2.6.4.bz2Specifies that the patch file is one directory level up.
-sSilent output, except for errors.
-pStrips directory prefixes from the filenames in the patch, also called the “patchlevel.” p1 strips the first prefix from the filepaths in the patch, because it’s highlyunlikely that you have the same directory structure as the author of the patch. p0would do a literal copy, and the operation would probably fail.
-sSuccessful operation returns no output
Kernel patches come in several flavors. Release candidate (rc) patches are one stepremoved from being accepted into the stable kernel trees; pre-release (pre) candi-dates are two steps away. If you’re dying to have a new feature and you don’t want towait for the final stable release, rc and pre patches are the way to go. Numbering isseemingly backward: patch-2.6.5-rc3 will wind up in the 2.6.4 kernel.
The official kernel releases on Kernel.org are the “Linus” kernel trees. These are welltested and considered production-ready. Even-numbered kernels are stable releases;odd-numbered kernels are under development. The Linux kernel is actively main-tained back to 2.0, and all kernels back to the beginning of Linux are available in thearchives.
Each stable kernel has its own maintainer. Linus Torvalds, of course, is the Big Bossof everything. The maintainers of the individual kernels are.
• David Weinehall (2.0)
• Marc-Christian Petersen (2.2)
• Marcelo Tosatti (2.4)
• Andrew Morton (2.6)
Then there are the various kernel trees, run by different maintainers. These are wherenew designs and features are tested. If they survive, they will eventually be mergedinto the stable kernel tree. Patches from these have the maintainer’s initialsappended, as in patch-2.6.5-rc3-mm4. The abbreviations you’ll see are:

This is the Title of the Book, eMatter EditionCopyright © 2007 O’Reilly & Associates, Inc. All rights reserved.
10.9 Removing a Kernel Patch | 175
-acMaintainer: Alan Cox. Pending patches for sending to Marcelo (for 2.4 series),and extra add-ons, fixes, etc.
-ckMaintainer: Con Kolivas. 2.4-based patchset for performance tweaks to thescheduler and vm, and faster desktop performace.
-mmMaintainer: Andrew Morton. Primarily virtual memory improvements.
-rmapMaintainer: Rik van Riel. rmap relates to performance and design of virtualmemory management.
-aaMaintainer: Andrea Arcangeli. Virtual memory updates, fixes, and improvements.
-djMaintainer: Dave Jones. Forward ports of 2.4 bugfixes to 2.5 series.
-osdlFor the enterprise; large, heavy-use machines and high-performance databases.
See Also• patch(1)
• Kernel Newbies (http://kernelnewbies.org)
• Kernel.org (http://kernel.org)
10.9 Removing a Kernel Patch
ProblemYou applied a patch, and now you want to get rid of it. It may be unstable or buggy,or maybe you simply made a mistake and want to start over.
SolutionUse the same command you used to unpack and apply it, adding the -R option:
$ bzip2 -dc ../patch-2.6.4.bz2 | patch -s -p1 -R
See Also• patch(1)
• Kernel Newbies (http://kernelnewbies.org)
• Kernel.org (http://kernel.org)

This is the Title of the Book, eMatter EditionCopyright © 2007 O’Reilly & Associates, Inc. All rights reserved.
176 | Chapter 10: Patching, Customizing, and Upgrading Kernels
10.10 Creating an initrd Image
ProblemYou are using SCSI drives, and you like to load the drivers as modules, because thereare so many different SCSI drivers. You want the flexibility to change drives or con-trollers without rebuilding the kernel every time, and you don’t want to fatten yourkernel by compiling in every possible driver. But how will the system boot withoutthe SCSI driver built into the base kernel?
SolutionBuild an initrd (initialize RAM disk) image with mkinitrd (make initial RAM disk)after you build the kernel. Then add an entry to your bootloader that loads theimage.
On both 2.4 and 2.6 kernels, after running make modules_install, run mkinitrd:
# mkinitrd -o /boot/initrd-2.4.25-new-kernel.img
This builds the image and installs it into the /boot directory. Then create your boot-loader entries. In GRUB:
title Kernel 2.4.25, new kernelroot (hd0,0)kernel /boot/bzImage-2.4.25-new-kernel root=/dev/hda1 roinitrd /boot/initrd-2.4.25-new-kernel.img
LILO users do this:
image=/boot/bzImage-2.4.22-new-kernel initrd=/boot/initrd-2.4.25-new-kernel.img label=Kernel 2.4.22, new kernel root=/dev/hda1 read-only
Remember to run /sbin/lilo to activate the changes.
DiscussionBe sure to read the mkinitrd man page for your system, as the options differ slightlybetween the different distributions.
It’s perfectly okay to build your SCSI driver into the base kernel; using initrd isn’trequired.
Most of the major Linux distributions use initrd, so that their stock kernels will booton most systems without needing every driver in the world to be built in.
See Also• mkinitrd(8)

This is the Title of the Book, eMatter EditionCopyright © 2007 O’Reilly & Associates, Inc. All rights reserved.
10.12 Creating a Boot Disk on Red Hat | 177
10.11 Creating a Boot Disk on Debian
ProblemYou forgot to create a boot diskette when you installed your Linux system, and nowyou want to make one. You know how to create a GRUB or LILO boot diskette, andyou know that you can download and burn a nice Knoppix disk for free. But all youreally want is a nice little generic boot diskette for your Debian system.
SolutionUse the mkboot utility and a new, blank diskette. The default is to create a bootdiskusing vmlinuz and the current root partition:
$ mkboot
You may specify a kernel:
$ mkboot vmlinuz-2.4.21
Or a different root partition and kernel:
$ mkboot /dev/hda2 vmlinuz-2.4.21
If your floppy drive has a non-standard location, use the -d flag to tell mkboot whereit is:
$ mkboot -d /dev/fd1
Discussionmkboot is part of the debianutils package.
Remember to write-protect your diskette by moving the little slide up, so that theslide is open. Always test boot disks before putting them away, and be sure to keep itwith the system it was created on.
See Also• mkboot(8)
10.12 Creating a Boot Disk on Red Hat
ProblemYou forgot to create a boot diskette when you installed your Linux system, and nowyou want to make one. You know how to create a GRUB or LILO boot diskette, and

This is the Title of the Book, eMatter EditionCopyright © 2007 O’Reilly & Associates, Inc. All rights reserved.
178 | Chapter 10: Patching, Customizing, and Upgrading Kernels
you know that you can download and burn a nice Knoppix disk for free. But all youreally want is a nice little generic boot diskette for your Red Hat/Fedora system.
SolutionUse the mkbootdisk utility and a new, blank diskette. You must specify the kernelname:
$ mkbootdisk vmlinuz-2.6.5-1.358
mkbootdisk, by default, does not generate any output. You can turn on verbosity:
$ mkbootdisk --verbose vmlinuz-2.6.5-1.358
If your floppy drive is not /dev/fd0, you must specify the device name:
$ mkbootdisk --device /dev/fd1 vmlinuz-2.6.5-1.358
DiscussionRemember to write-protect your diskette by moving the little slide up, so that theslide is open. Always test boot disks before putting them away, and be sure to keep itwith the system it was created on.
See Also• mkbootdisk(8)

This is the Title of the Book, eMatter EditionCopyright © 2007 O’Reilly & Associates, Inc. All rights reserved.
179
Chapter 11 CHAPTER 11
CD and DVD Recording
11.1 IntroductionLinux offers a host of CD/DVD writing and authoring utilities. The entire field isevolving rapidly, and CD/DVD standards are in a chaotic state. There are severalcompeting, incompatible standards, and more are looming on the horizon as com-mercial distributors toil to develop a magical disc that will permit playback but notcopying. This chapter sidesteps all of this drama and introduces some basic tech-niques for writing data CDs and DVDs. You’ll need the cdrtools and dvd+rw-toolspackages.
To create discs the easy way, use K3b. It is a graphical frontend to cdrtools, cdrdao,mkisofs, growisofs, and other command-line editing tools. K3b makes it easy to setup your drives and to give users any necessary root privileges, such as those requiredby cdrecord and cdrdao. The layout is logical and simple to use; it gets my vote as thebest CD/DVD writer on any platform. Of course, the Linux world offers many morechoices, such as GCombust, X-CD-Roast, and Gnome Toaster. These are all simpleto use, so this chapter will cover the command-line tools. Understanding these willalso make the graphical tools more useful, as you’ll understand the commands andweird terminology.
A major change in the 2.6 kernel is that you no longer need to use SCSI emulationfor CD/DVD drives. Instead of running cdrecord scanbus to find the SCSI busaddresses, simply use the /dev names of the devices:
# cdrecord dev=/dev/hdc <commands>
If you have upgraded from a 2.4 to a 2.6 kernel and you used IDE-SCSI for your CD/DVD drives, be sure that the IDE-SCSI entries areremoved from your bootloader, or you’ll get strange boot errors.

This is the Title of the Book, eMatter EditionCopyright © 2007 O’Reilly & Associates, Inc. All rights reserved.
180 | Chapter 11: CD and DVD Recording
Glossary of Formats and StandardsHere are the hardware standards:
CD-RCD-Recordable, or WORM (Write Once, Read Many). CD-Rs are universal andshould be readable in any CD-ROM drive.
CD-RWCD-Rewritable, or WMRM (Write Many, Read Many). A drive must be “multi-read” to be able to read CD-R and CD-RW discs. CD-RWs should be readablein all contemporary drives.
CD-ROMCompact Disc-Read-Only Memory. Commercially produced discs are pressed,not burned with a laser, and cannot be written to.
Mount Rainier ReWriteThe circuitry needed by a drive to support UDF.
DVD-VideoThe standard used on commercially produced movie discs, playable on all DVDmachines.
DVD-R and DVD+RWORM format. Playable on all DVD players. DVD-R has two different, incom-patible disc types: DVD-R(A) and DVD-R(G). You can’t use A discs in G writ-ers, and vice versa.
DVD-RAMRewritable, designed for data storage. Theoretically, it can take up to 100,000rewrites per disc. You can also record and play movies on a PC, but a stand-alone DVD player probably won’t be able to read DVD-RAMs.
DVD-R/RWDesigned for recording movies. This DVD standard is supported by the DVDForum (http://www.dvdforum.com).
DVD+R/RWA competing, incompatible standard to DVD-R/RW, supported by theDVD+RW Alliance (http://www.dvdrw.com). Only DVD+R/RW supports UDF.
The newest generation of DVD drives for computers support all formats. StandaloneDVD recorders are still fighting standards wars between the DVD+ and DVD- formats.
Here are the CD and DVD filesystem standards:
El ToritoBootable format specification.
UDFUniversal Disk Format, the industry-standard incremental packet-writing filesys-tem. This allows dropping files directly on to a disc, just like on a 3.5" diskette.

This is the Title of the Book, eMatter EditionCopyright © 2007 O’Reilly & Associates, Inc. All rights reserved.
11.1 Introduction | 181
It was expected that Linux would fully support this in the 2.6 kernel, but it’s notthere yet.
ISO-9660The old file layout standard, allowing only 8.3 filenames (from the ancientMS-DOS days, where filenames could have only up to 8 letters and had tohave 3-letter file extensions).
Rock RidgeExtensions to ISO-9660, allowing long filenames and Unix-style symlinks. It pre-serves all file attributes, such as ownership and permissions. Unix file attributesare not displayed when the disc is read on a Windows system.
JolietMicrosoft extension to the ISO-9660 filesystem that allows Unicode charactersto be used in filenames, as well as long filenames. It also creates truncated file-names for MS-DOS compatibility (these weird-looking things: FILENA~1.TXT).It allows filenames of up to 64 characters, including spaces, and is readable byWindows 95 or later and by Macintosh computers running the Joliet VolumeAccess extension. Macs will not read Joliet filenames that are longer than 31characters.
Here are the CD standards books:
Yellow BookPhysical format for data CDs
Orange BookPhysical format for recordable CDs, with multisession capability:
Part I: CD-MO (Magneto-Optical)Part II: CD-R (Write-once; includes “hybrid” spec for PhotoCD)Part III: CD-RW (Re-writable)
Red BookCD Audio standard that describes the physical properties of the disc and the dig-ital audio encoding
These books can be purchased from http://www.licensing.philips.com, if you reallywant to get into the gory details.
These are the write options:
SessionAny single recorded segment on a disc, which can contain data files or a numberof music tracks. A disc can contain several sessions.
TrackThe program area of a CD is divided into tracks; each track can contain data ofonly one type. A disc (even a DVD) holds a maximim of 99 tracks—the numberis hardcoded.

This is the Title of the Book, eMatter EditionCopyright © 2007 O’Reilly & Associates, Inc. All rights reserved.
182 | Chapter 11: CD and DVD Recording
MultisessionAllows adding files to a single disc over time, rather than having to record all ofyour files in a single session. For a disc to be readable, the session must be“closed,” or fixated. However, this prevents adding more files to the disc. Multi-session links the individual sessions and updates the disc’s table of contents sothat it appears as a single directory.
SAO (session-at-once)A single, complete session (lead-in, program, and lead-out areas) of a CD-R orCD-RW disc, written in one uninterrupted sequence.
DAO (disc-at-once)Writes the entire CD in one pass, or session. The entire burn must completewithout interruption, and no more sessions may be added. This is the most reli-able way to record audio tracks.
TAO (track-at-once)Allows the writes to be done in multiple passes. There is a maximum of 99tracks per disc. Sometimes this causes audio CDs to not play correctly on audiodisc players, though I’ve found it to be reliable.
For more information on DVDs, see the DVD FAQ at http://www.dvddemystified.com/dvdfaq.html.
For more information on CDs, see the CD Recordable FAQ at http://www.cdrfaq.org.
11.2 Finding the SCSI Address for CD and DVDWriters
ProblemYou’re using a 2.4 kernel and want to write a CD or DVD. You need to know theSCSI bus address, or dev= number, for your CD/DVD writer.
Solutioncdrecord -scanbus will find it for you. This is what a CD/DVD-ROM and a CD writeron a single system look like:
$ cdrecord -scanbusCdrecord 1.10 (i686-pc-linux-gnu) Copyright (C) 1995-2001 Jrg SchillingLinux sg driver version: 3.1.24Using libscg version 'schily-0.5'scsibus0:0,0,0 0) 'TOSHIBA ' 'DVD-ROM SD-M1202' '1020' Removable CD-ROM0,1,0 1) 'LITE-ON ' 'LTR-24102B ' '5S54' Removable CD-ROM0,2,0 2) *0,3,0 3) *0,4,0 4) *

This is the Title of the Book, eMatter EditionCopyright © 2007 O’Reilly & Associates, Inc. All rights reserved.
11.3 Enabling SCSI Emulation for IDE/Atapi CD and DVD Writers | 183
0,5,0 5) *0,6,0 6) *0,7,0 7) *
DVD writers look like this:
1,2,0 2) 'PIONEER ' 'DVD-ROM DVD-303 ' '1.09' Removable CD-ROM
The first three numbers for each item refer to the SCSI bus, device ID, and LUN(Logical Unit Number), respectively. The fourth number is the device ID again.cdrecord wants the first three numbers, like this:
dev=0,1,0
Discussioncdrecord requires root privileges. The most common convention for giving users per-missions to use cdrecord is to create a cdrecord group.
Sometimes you’ll see documentation where it looks like this:
dev=1,0
It’s a common convention to leave off the leading 0 for devices on SCSI bus 0. How-ever, it’s not much trouble to type an extra digit and leave no room for doubt.
The 2.6 kernel needs no special steps to determine the device ID. Simply use the /devname:
$ cdrecord dev=/dev/hdc <commands>
See Also• cdrecord(1)
11.3 Enabling SCSI Emulation for IDE/Atapi CDand DVD Writers
ProblemYour CD-writing program (whether it’s cdrecord or one of the good graphical pro-grams such as X-CD-Roast or K3b) reports that it cannot find any drives on your sys-tem, or it sees your CD-R/RW drive just fine but does not see your CD-ROM drive,so you can’t copy discs.
SolutionMake sure the IDE-SCSI emulation system is enabled and your drives are configuredto use it. This applies only to the 2.4 Linux kernel, because the 2.6 kernel supportsIDE/ATAPI drives directly, using the standard /dev/hd* designations.

This is the Title of the Book, eMatter EditionCopyright © 2007 O’Reilly & Associates, Inc. All rights reserved.
184 | Chapter 11: CD and DVD Recording
First, verify that the ide-scsi pseudo-device driver is available:
$ locate ide-scsi.o/lib/modules/2.4.21/kernel/drivers/scsi/ide-scsi.o
Next, there are two text files to edit: /etc/modules.conf, and the configuration file foryour bootloader. (Debian users, please refer to the “Discussion” section of this rec-ipe, as file locations are different.) First, find the device names for your drives:
$ dmesg | grep '^hd.:'hda: IBM-DTLA-305020, ATA DISK drivehdb: TOSHIBA DVD-ROM SD-M1202, ATAPI CD/DVD-ROM drivehdc: LITE-ON LTR-24102B, ATAPI CD/DVD-ROM drive
The CD drives are hdb and hdc. Add the following to /etc/modules.conf:
alias scsi_hostadapter ide-scsioptions ide-cd ignore="hdb hdc"alias scd0 sr_modpre-install sg modprobe ide-scsipre-install sr_mod modprobe ide-scsipre-install ide-scsi modprobe ide-cd
Next, LILO users, add the following to the end of lilo.conf, using the hd* designa-tions for your devices:
append="hdb=ide-scsi"append="hdc=ide-scsi"
GRUB users, add the following to /etc/grub.conf at the end of the kernel line, usingthe hd* designations for your devices:
hdb=scsi hdc=scsi
It should look like this, all on one line:
kernel /boot/vmlinuz-2.4.21 root=/dev/hda1 ro hdb=scsi hdc=scsi
Reboot, then verify that the ide-scsi module loaded:
$ lsmod | grep ide-scsiide-scsi 9456 1scsi_mod 55124 2 [ide-scsi sr_mod]
Now when you run cdrecord -scanbus it should show SCSI device names for all thedrives you configured to use IDE-SCSI, and you should be ready to start CD writing.
Note that the device names are changed now, so when you mount the discs thedevice names won’t be /dev/hd* any more, but rather /dev/scd*. You’ll probably wantto update /etc/fstab with the new /dev names.
DiscussionDebian’s module configuration files are in different locations. First, Debian uses /etc/modules and /etc/modutils/idecd_opts. Add:
ide-scsi

This is the Title of the Book, eMatter EditionCopyright © 2007 O’Reilly & Associates, Inc. All rights reserved.
11.4 Making a Data CD for General Distribution | 185
to /etc/modules. Then add:
options ide-cd ignore="hdb hdc
to /etc/modutils/idecd_opts.
There is no downside to running all of your CD/DVD drives under the IDE-SCSIsubsystem, except for having different device names.
The 2.6 kernel needs no special steps. Simply use the /dev name:
$ cdrecord dev=/dev/hdc <commands>
Remember, you can use a cdrecord group to grant permissions to users for cdrecord.
See Also• grub(8), lilo(8)
11.4 Making a Data CD for General Distribution
ProblemYou want to create a data CD that will be readable on Linux and Windows, withnon-restrictive file permissions. The disk may contain text files, documents, pro-grams, or graphical images.
SolutionUse mkisofs, mount, and cdrecord. First use mkisofs to package all of the files into asingle .iso file, then mount the .iso to verify the filesystem is good. Then write to diskwith cdrecord.
In this example, the .iso is called data.iso, the CD is named data_disk, and all the fileswill be copied from the /disk-data directory. The mountpoint for the .iso is /test-iso.
Here are the commands:
# mkisofs -J -r -v -V data_disk -o data.iso /disk-data# mkdir /test-iso# mount -t iso9660 -o ro,loop data.iso /test-iso# ls /test-iso# umount /test-iso# cdrecord -v -eject dev=0,1,0 data.iso
DiscussionThis recipe shows the root user running all commands, for simplicity, becausemount, mkisofs, and cdrecord require root privileges. To allow users to run the mountcommand, use sudo. To allow users to run mkisofs and cdrecord, create a cdrecordgroup. Make it own mkisofs and cdrecord, and put users in the cdrecord group.

This is the Title of the Book, eMatter EditionCopyright © 2007 O’Reilly & Associates, Inc. All rights reserved.
186 | Chapter 11: CD and DVD Recording
Remember that the 2.6 kernel doesn’t need IDE-SCSI, so you can just use the /devname:
# cdrecord dev=/dev/hdc <commands>
There’s a whole lot of doings packed into these few lines. Let’s break them down oneat a time. mkisofs takes all of your files and rolls them into one big .iso file. If you’veever downloaded a Linux distribution to burn to CD, it was packaged as an .iso file.This is a common source of confusion for Linux newbies, who don’t understand whythey have this giant single file, instead of a nice directory tree full of Linux files.
Let’s look at the mkisofs line in more detail:
# mkisofs -J -r -v -V data_disk -o data.iso /disk-data
Here are the options:
-JUse Joliet naming conventions, for Windows compatibility.
-rUse Rock Ridge naming conventions for Unix/Linux compatibility, and make allfiles publicly readable.
-vUse verbose mode.
-V data_diskCreate a volume ID (data_disk); this is the disc name that shows up in WindowsExplorer and with the file - < /dev/scd* command (see Recipe 9.12 for how tofind the /dev names).
-o data.iso /disk-dataThe name of the new .iso image, and the files selected for packaging into the .iso,which in this case is everything in /disk-data. Note that the root directory /disk-data is not copied, only the contents.
Mounting the .iso before burning the disc is cheap insurance to make sure you’re notcreating a coaster. If you see all of your files, it’s good to go. If not, the .iso is nogood, and it needs to be rebuilt. Here’s how to test your .iso:
# mkdir /test-iso# mount -t iso9660 -o ro,loop data.iso /test-iso
Then look in the /test-iso directory to verify your files.
Here are the parts of the mount command:
-t iso9660The filesystem type. Data CDs are always iso9660 (except when they are udf, butyou would not need to create an .iso image for these).

This is the Title of the Book, eMatter EditionCopyright © 2007 O’Reilly & Associates, Inc. All rights reserved.
11.5 Building File Trees on a Data CD | 187
-o ro,loop data.isoMount options for the file data.iso: in this case read-only, using the loop device.The loop device lets you mount filesystems that are embedded in files, the classicuse being .iso images.
/test-isoThe directory created to be the mountpoint.
Now that the .iso is all ship-shape, we can burn it to disc.
# cdrecord -v -eject dev=0,1,0 data.iso
The options are:
-vBe verbose.
-ejectEject the disc when finished. This is optional.
dev=0,1,0The SCSI address of the CD writer.
data.isoThe name of the .iso file that contains the files you want burned to disc.
cdrecord automatically writes at the highest speed the drive and disc support. If thereare errrors, try specifiying a lower write speed:
# cdrecord -v -eject speed=4 dev=0,1,0 data.iso
Modern writers have fast write speeds (20X and higher). However, many CD-R/RWdiscs are limited to much slower speeds. Usually, cdrecord will auto-detect the appro-priate write speed.
See Also• cdrecord(1), mount(8), mkisofs(8)
• Recipe 9.12, “Finding Device Names for mount and fstab”
• Recipe 11.2, “Finding the SCSI Address for CD and DVD Writers”
11.5 Building File Trees on a Data CD
ProblemWhen you select directories for writing to CD, mkisofs discards the root directoriesand keeps only the files and subdirectories. But you’d like to preserve the file trees,or create new ones.

This is the Title of the Book, eMatter EditionCopyright © 2007 O’Reilly & Associates, Inc. All rights reserved.
188 | Chapter 11: CD and DVD Recording
SolutionUse the -graft-points option in mkisofs. This example preserves the existing directorystructure for the directories scripts and finances:
$ lsfinances scripts$ mkisofs -r -J -v -o cdimg1.iso -graft-points scripts/=scripts finance/=finances...
Which is easily verified by mounting the image and viewing the file tree with the tree-d command:
$ sudo mount -t iso9660 -o ro,loop cdimg1.iso /mnt/iso$ tree -d /mnt/isomnt|-- finances`-- scripts
Suppose you want to move these two directories into /files/archive/june on the CD.First, the directory /files/archive/june must be present on the hard drive. Then run:
$ mkisofs -r -J -v -o cdimg1.iso -graft-points \files/archive/june/finances/=finances files/archive/june/scripts/=scripts
Again, we can mount it and check:
$ tree -dL 4 /mnt/isomnt`-- files `-- archive `-- june |-- finances `-- scripts
This works for both files and directories.
See Also• tree(1), mkisofs(8)
11.6 Copying a CD or DVD
ProblemYou need to make copies of CDs or DVDs—data, audio, video, or any format.
SolutionTo directly copy from the source disc to the recordable disc, use this command:
$ cdrecord -v dev=0,1,0 -isosize /dev/scd0

This is the Title of the Book, eMatter EditionCopyright © 2007 O’Reilly & Associates, Inc. All rights reserved.
11.6 Copying a CD or DVD | 189
This is fast, but risky, because any interruption to the data stream will spoil theentire copy. It’s better to cache it to a hard drive first. This example makes a dummyrun first:
$ dd if=/dev/scd0 of=/tmp/diskfile.iso$ cdrecord dev=0,1,0 fs=8m -v -eject -dummy /tmp/diskfile.iso
Simply delete the -dummy flag to write to disc.
DiscussionRemember that the 2.6 kernel doesn’t need IDE-SCSI—just use the /dev name:
# cdrecord dev=/dev/hdc <commands>
Don’t forget that you’ll need a tmp file as large as the disc you’re copying.
The dd command does a literal, byte-by byte copy. Its components are:
ifInput, or source, file.
/dev/scd0/dev name for the drive. Be sure to use the correct /dev name for your drive (seeRecipe 11.3). The disc does not need to be mounted.
ofOutput, or destination, file.
/tmp/diskfile.isoTemporary copy of the source disc on the hard drive. Call it anything you want,as long as it has an .iso extension.
The cdrecord options are the same as in Recipe 11.4, with two new ones:
fs=8mThis defines the size of the ring buffer: the bigger the better, up to a point.Remember, interruptions are fatal; fs=8m creates a large enough buffer to keepthe recorder working if something slows down the data transfer. If 8 MB isn’tenough, you might need a better PC. On the other hand, more than 8 MB is notnecessarily better, as the operating system can waste time reloading the MemoryManagement Unit (MMU) tables. The default is 4 MB.
-dummyA marvelous option for doing a dry run before risking an actual disc. Therecorder does everything with the laser turned off, giving the user a chance tocatch errors before committing them to disc.
See Also• cdrecord(1), dd(1)
• Recipe 11.4, “Making a Data CD for General Distribution”
This is the Title of the Book, eMatter EditionCopyright © 2007 O’Reilly & Associates, Inc. All rights reserved.
190 | Chapter 11: CD and DVD Recording
11.7 Erasing a CD-RW
ProblemYou want to erase a rewritable disk, to prepare it for recording new material, or youmight want to erase single tracks.
SolutionUse the blank option for cdrecord. blank=fast erases only the table of contents(TOC), the program memory area (PMA), and the pregap:
$ cdrecord -v blank=fast dev=0,1,0
A more complete erasure is done with the all option:
$ cdrecord -v blank=all dev=0,1,0
Don’t count on this for a secure erasure; data can still be recovered. blank=fast is per-fectly fine for routine use, and it’s a lot faster—plus, your CD-RW will last longer.
You can erase the last session on a multisession disc:
$ cdrecord blank=session
And on the off chance that your drive supports blanking at the track level, you canerase tracks just like sessions, starting with the last one:
$ cdrecord blank=track
DiscussionBlanking at track level is not supported by most drives. Erasing tracks or sessions inrandom order is not possible, either—you have to start at the end and work your wayback. If you get error messages when using any of the blank options, try adding -force:
$ cdrecord blank=track -force
However, the disc is probably damaged or defective, so the wiser course is to discard it.
To see all the blanking options, use:
$ cdrecord blank=help
Keep in mind that CD-RWs have a limited lifespan and can take only so many era-sures. The number varies, but you should get at least 100 rewrites before it becomesunreliable.
See Also• cdrecord(1)

This is the Title of the Book, eMatter EditionCopyright © 2007 O’Reilly & Associates, Inc. All rights reserved.
11.8 Recording a Multisession Data CD | 191
11.8 Recording a Multisession Data CD
ProblemYou want to add data files to a disc over time, rather than all at once. cdrecord closesand fixates discs, so that no additional files can be added. How do you get around this?
SolutionThis is a two-step process. Both cdrecord and mkisofs have special options for creat-ing multisession discs. The first time you write files to a CD, create an .iso in theusual manner, then use the -multi switch in cdrecord:
$ cdrecord -v -eject dev=0,1,0 -multi first-image.iso
Then create additional .iso images using the -C and -M options:
$ mkisofs -o second-image.iso -J -r -V Session2 -C `cdrecord dev=0,1,0 -msinfo` \-M 0,1,0 /path-to-new-files
Then write the new .iso to disc, using the -multi option again:
$ cdrecord -v -eject dev=0,1,0 -multi second-image.iso
Do this as many times as you like. When you get to the last session, omit the -multioption. It’s important to close and fixate the disc, or it won’t be readable in mostdrives. Another way to close and fixate the disc, without recording an additional ses-sion, is with the fix option:
$ cdrecord -v -fix -eject dev=0,1,0
DiscussionCDs are written in sessions. Each session covers a number of disc sectors. On a single-session disc, there is a lead-in, a single TOC, the data, and a lead-out, which final-izes the disc and prevents further recording on the disc. mkisofs links multiple ses-sions together on a multisession disc. To do this, it needs to know the starting andending sector numbers of each session. Let’s take it a piece at a time:
$ mkisofs -o second-image.iso -J -r -C `cdrecord dev=0,1,0 -msinfo` \-M 0,1,0 /path-to-new-files
-o second-image.isoGive the new .iso you are building a name; call it anything you want.
-JUse Joliet naming conventions, for Windows compatibility. This is optional.
-rUse Rock Ridge naming conventions for Unix/Linux compatibility, and make allfiles publicly readable. This is required for creating multisession discs.

This is the Title of the Book, eMatter EditionCopyright © 2007 O’Reilly & Associates, Inc. All rights reserved.
192 | Chapter 11: CD and DVD Recording
-C `cdrecord dev=0,1,0 -msinfo`The -C flag goes by several names: CD+, CDExtra, last_sess_start, next_sess_start.It tells mkisofs the ending point of the last session and the starting point of thenext session. The backticks tell the shell to find and use the values automati-cally. You can generate these values manually, and see for yourself:
$ cdrecord dev=0,1,0 -msinfo12968,20172
-M 0,1,0The -M flag must be used when you use the -C flag. This is the SCSI bus addressof the CD writer.
/path-to-new-filesList here the files, or directory, that are going into the new .iso.
See Also• cdrecord(1), mkisofs(8)
11.9 Creating a Bootable CD
ProblemYou need to burn a bootable CD. You already have the boot image and data files.
SolutionThe boot image needs to be rolled into the .iso with mkisofs.
If the bootable image is on a floppy disk, first make a boot/ directory in the file treethat is going on the CD, and copy it there:
$ dd if=/dev/fd0 of=~/cd-files/boot/boot.img bs=10k count=144
Or copy it from another location on the hard drive:
$ cp boot.img ~/cd-files/boot/boot.img
Then package the .iso:
$ mkisofs -r -b boot/boot.img -c boot/boot.catalog -o bootable-cd.iso ~/cd-files
Now burn it to disc with cdrecord, in the usual fashion, and you have a bootable CD.
Discussionmkisofs uses the El Torito specification to create a boot image that fools a PC intothinking it’s seeing a boot floppy. All you need is the boot image, and mkisofs cre-ates the boot catalog.

This is the Title of the Book, eMatter EditionCopyright © 2007 O’Reilly & Associates, Inc. All rights reserved.
11.10 Spanning a Large File over Several CDs | 193
The options are:
-rSet the file ownership and modes so that anyone can read the files.
-b boot/boot.imgSpecify the path and filename of the boot image. The boot/ directory is relative tothe root filesystem of the CD.
-c boot/boot.catalogCreate and name the boot catalog file.
-o bootable-cd.iso ~/cd-filesName the new .iso, and give the path to the files that go into it.
See Also• mkisofs(8)
11.10 Spanning a Large File over Several CDs
ProblemYou have a very large file, such as a tar archive or a large graphical image, that youwish to store on CD. However, it is larger than a single disc.
SolutionUse the split utility to divide the file, then convert the new files to .iso images andburn them to discs. Use cat to reassemble the original file.
For example, here is a 2-GB tar archive named big-backup. This example splits it into650-MB chunks. The CD capacity is 700 MB, but there must be room for file overhead:
$ split -b 650m big-backup.tar.gzcreating file `xaa'creating file `xab'creating file `xac'
Each file is now about 682 MB. Now convert each one to an .iso image:
$ for i in xa*; do echo -e "$i"; mkisofs -o $i.iso $i; done
This generates a lot of output. When it’s finished, the ls command will show this:
$ lsxaa xaa.iso xab xab.iso xac xac.iso
Now you can transfer each one of the .iso files to its own CD:
$ cdrecord -v -eject dev=0,1,0 xaa.iso$ cdrecord -v -eject dev=0,1,0 xab.iso$ cdrecord -v -eject dev=0,1,0 xac.iso

This is the Title of the Book, eMatter EditionCopyright © 2007 O’Reilly & Associates, Inc. All rights reserved.
194 | Chapter 11: CD and DVD Recording
To reassemble the tarball, copy the .iso files from the CD to your hard drive, and usethe cat command:
$ cat xaa xab xac > big-backup.tar.gz
Or, append the contents of each CD to the archive on your hard drive one at a time,without having to copy them over first:
$ cat /cdrom/xaa > big-backup.tar.gz$ cat /cdrom/xab >> big-backup.tar.gz$ cat /cdrom/xac >> big-backup.tar.gz
You can name the reassembled file anything you like—just be sure to preserve thetar.gz extension. And you can now extract the archive:
$ tar xvzf big-backup.tar.gz
DiscussionThis is a good way to make a quick and dirty backup, or to move a large number offiles, but don’t count on it for regular backups. If any of the split files become cor-rupted, it is difficult to recover the data, especially from compressed files.
See Chapter 16 to learn how to do large backups.
See Also• split(1), tar(1), cat(1)
• Chapter 16, Backup and Recovery
11.11 Recording Data DVDs
ProblemYou want to record data files on DVD, such as backups, image galleries, or Linuxinstallation discs from .iso images.
SolutionUse growisofs, from dvd+rw-tools. Before you touch anything, make sure you do nothave automount or supermount enabled for your DVD writer. Supermount/automount will guarantee a coaster.
Copying files from a hard drive to DVD is done in one step:
# growisofs -Z <device name> <mkisofs commands> <files>
For example:
# growisofs -Z dev=1,2,0 -dvd-compat -udf -R -J -v /home/carla
This is the Title of the Book, eMatter EditionCopyright © 2007 O’Reilly & Associates, Inc. All rights reserved.
11.11 Recording Data DVDs | 195
It is easy to add more files to the DVD. Always use the -Z option for the first batch offiles written to the DVD, then use the -M flag for all additional files:
# growisofs -Z dev=1,2,0 -dvd-compat -udf -R -J -v /etc# growisofs -M dev=1,2,0 -dvd-compat -udf -R -J -v /shared/projectfiles# growisofs -M dev=1,2,0 -dvd-compat -udf -R -J -v /var/www/public_site
There’s no need to explicitly close and fixate the disc.
You may also write .iso images; for example, when you want to create a Linux instal-lation disc on DVD:
# growisofs -Z dev=1,2,0=KNOPPIX_V3.4-2004-05-17-EN.iso
DiscussionAn increasing number of Linux distributions are becoming available on DVD-sized.isos, and none too soon, as some take up eight or more CDs.
growisofs replaces cdrecord, and is a frontend to mkisofs, so you get to use the same,familiar mkisofs options, with these two exceptions:
• Don’t use -o to specify an output file, because growisofs writes directly to theDVD.
• Don’t use -C, because growisofs figures out the starting and ending points oftracks all by itself.
-dvd-compat helps to ensure compatibility with the majority of DVD drives.
-udf adds limited udf support. As this was written, packet writing was still not reli-ably implemented in the Linux kernel. This can be left out, though the price ofincluding it “just-in-case” is just a few bits of extra metadata.
There are RPMs, Debian packages, and tarballs for dvd+rw-tools. The tarball alsoincludes a spec file, if you want to roll your own RPM.
It’s not necessary to format new DVD-RW discs, because from version 5.10 growisofsdoes it automatically as you add files to the DVD. To get your version number, run:
$ growisofs --version
supermount is supposed to enable inserting and removing disks, like floppies, with-out having to enter mount and unmount commands. It is starting to appear on RedHat, SuSE, and other distributions, and is usually enabled by default.
To disable supermount temporarily:
# /usr/sbin/supermount -i disable
Use -i enable to reenable it. Unfortunately, supermount doesn’t work very reliablyyet, so you might be better off disabling it permanently. Remove supermount entries

This is the Title of the Book, eMatter EditionCopyright © 2007 O’Reilly & Associates, Inc. All rights reserved.
196 | Chapter 11: CD and DVD Recording
from /etc/fstab to do so. To get rid of it with extreme prejudice, remove the magicdevpackage:
# rpm -q magicdev
or in Debian:
# apt-get remove magic-dev
See Also• The dvd+rw-tools home page (http://fy.chalmers.se/~appro/linux/DVD+RW)
11.12 Recording an Audio CD for Standard CDPlayers
ProblemYou want to know how to record audio CDs for playback on a standard audio diskplayer, like in your car. You need to know how to convert different audio file for-mats, such as ogg-vorbis, mp3, .wav, and .cdr, because these do not play on standardaudio CD players, only on computers.
SolutionUse sox, normalize, and cdrecord. And use CD blanks that are made for audio recording.
The first step is to use sox to convert your sound files to .cdr format, to convert themto the correct file structure; then convert the .cdr to .wav format.
Then, the -audio option for cdrecord converts .wav files to CD-DA (Compact DiskDigital Audio) format, which is what standard audio CD players need.
$ sox soundfile filename.cdr$ sox filename.cdr filename.wav$ cdrecord -v -nofix -eject dev=0,1,0 -audio -pad filename.wav
The -pad options ensures that disk sectors will be filled correctly, and -nofix leavesthe disk open for adding additional music tracks. To fix and close the disk:
$ cdrecord -v -fix -eject dev=0,1,0
Converting files one at a time is tedious. This Bash command converts a batch of.ogg files to .cdr format:
$ for i in *.ogg ; do echo $i ; sox $i ${i%%.ogg}.cdr ; echo ${i%%.ogg}.cdr;done
Simply substitute whatever file extensions you need to convert.

This is the Title of the Book, eMatter EditionCopyright © 2007 O’Reilly & Associates, Inc. All rights reserved.
11.12 Recording an Audio CD for Standard CD Players | 197
If you’re compiling a collection of tracks from diverse sources, use the normalize util-ity to equalize sound volumes,with the -m (mixed-mode) option:
$ normalize -m /soundfiles/*.wav
There are many ways to select tracks to record. This command records all the *.wav-formatted songs in the /home/songs directory, in sorted order: numbers first, thenalphabetic capitals, then alphabetic lowercase.
$ cdrecord -v -nofix -eject dev=0,1,0 -audio -pad /home/songs/*.wav
Or, you can change to the /songs directory, then list individual songs:
$ cdrecord -v -nofix -eject dev=0,1,0 -audio -pad song1.wav song3.wav song7.wav
Be sure to use an audio CD-R made for playback in standard audio players.
DiscussionNewer versions of sox are supposed to support .mp3, but this isn’t always the case.Run sox -h to see what formats it supports. If your particular version of sox will notconvert .mp3s, use mpg123 and sox:
$ mpg123 -b 10000 -s filename.mp3 | sox -t raw -r 44100 -s -w -c 2 -filename.wav
-b 10000This sets the buffer size, in bytes.
-sThe -s flag redirects to stdout, instead of trying to play the file.
sox -t raw -r 44100 -s -w -c 2This is the same as .cdr format, only all the specs are spelled out.
There is a limit of 99 songs per disk. They would have to be very short songs to actu-ally stuff that many on to a CD. You could record about 30 Ramones songs, or a sin-gle Beethoven symphony, so it just depends.
If your music files are already in the .wav format, like the files you get from onlinemusic services, you probably don’t need to convert them. However, not all .wav fileshave the correct structure for making CDRs; cdrecord will halt and give an error mes-sage if this is the case. Use sox to convert the errant .wav to .cdr, then .cdr to .wav.
.wav and .flac formats are the highest-quality digital audio formats. Always start withthese, if you can. Then convert them to other formats as needed. The primary rea-son to convert is to save disk space, as .wav and .flac files are very large. An .ogg fileis typically one-tenth the size of a .wav file.
Ogg Vorbis is an open, patent-free, audio encoding and streaming technology. It hasno licensing fees or other restrictions that accompany patented, proprietary formatslike MP3. It delivers decent sound quality in a compressed, lossy format. “Lossy”means bits are stripped away to reduce file sizes.

This is the Title of the Book, eMatter EditionCopyright © 2007 O’Reilly & Associates, Inc. All rights reserved.
198 | Chapter 11: CD and DVD Recording
MP3 is also a compressed, lossy format of good quality. It’s a patented, proprietaryformat, so there are restrictions on its use, the code is closed, and there are licensingfees for artists and distributors. Thomson and Fraunhofer, who control the MP3 for-mat, are adding DRM (Digital Rights Management, or copy restriction) technologyto the MP3 format.
See Also• cdrecord(1), sox(1), normalize(1)

This is the Title of the Book, eMatter EditionCopyright © 2007 O’Reilly & Associates, Inc. All rights reserved.
199
Chapter 12 CHAPTER 12
Managing theBootloader
and Multi-Booting
12.1 IntroductionLinux has two excellent bootloaders: GRUB (the Grand Unified Bootloader) andLILO (Linux Loader). GRUB is newer and more capable than the elder LILO. Bothare flexible, configurable, and capable of managing complex boot scenarios, such asmultibooting several different operating systems or different Linux kernels, and pass-ing in boot-time kernel options.
If you’re still running LILO, it might be worth considering migrating to GRUB.While they work similarly, there are four major differences that set GRUB apart:
• You can discover boot images, kernels, and root filesystems from the GRUBcommand shell.
• GRUB stores boot information in a filesystem, rather than in the master bootrecord (MBR).
• GRUB reads filesystems and kernel executables, rather than inflexibly restrictingthe user to disk geometry.
• And best of all, GRUB is completely operating system–independent. If youinstall GRUB into a separate boot partition, you can remove and reinstall operat-ing systems to your heart’s content, without having to reinstall the bootloaderevery time.
Both GRUB and LILO can boot non-Linux operating systems, such as Windows,OS/2, the BSD Unixes, and so forth. For operating systems that they cannot bootdirectly, such as Windows, GRUB and LILO employ chain loading. That is, theypoint the way to Windows’s own bootloader.
The MBR is the first 512 bytes of the first sector of the first partition on the drive. Itcontains the partition table and the first-stage bootloader. The first-stage loader is awee bit of code stored in the first 446 bytes of the MBR, which points the way to thesecond-stage loader, which is stored in the /boot directory. The remaining 66 bytesare for the partition table.

This is the Title of the Book, eMatter EditionCopyright © 2007 O’Reilly & Associates, Inc. All rights reserved.
200 | Chapter 12: Managing the Bootloader and Multi-Booting
Linux partitioning is limited to 63 total partitions per IDE drive: 3 primary partitions,with the 4th containing up to 60 logical partitions in a single extended partition.
SCSI drives are limited to 15 partitions per drive: 3 usable primary partitions, and 12logical partitions in a single extended partition.
12.2 Migrating from LILO to GRUB
ProblemYou’ve read the advantages of GRUB in the previous section. You are using LILOand would like to replace it with GRUB, preferably without needing to overhaul yourentire system.
SolutionGRUB can be installed without disrupting anything.
First, install GRUB, or upgrade to the latest version. To get the version number, use:
$ grub --versiongrub (GNU GRUB 0.94)
Then, take a few preparatory steps:
1. Make a hard copy of your partition table (fdisk -l | lpr).
2. Make a hard copy of lilo.conf.
3. Back up your data and have a rescue disk, like a LILO boot diskette or Knoppix,at hand.
4. Leave your LILO installation intact, in case you want it back.
Next, follow these steps, in order:
1. Create a GRUB boot diskette.
2. Install GRUB to the MBR.
3. Boot the system.
4. Edit GRUB’s configuration file, menu.lst.
To create a boot floppy, find the /grub/i386 directory. The official location is /usr/lib/grub/i386-pc. Red Hat uses /usr/share/grub/i386-pc, and other distributions may varyas well. Copy the stage1 and stage2 files to the diskette with dd:
$ dd if=stage1 of=/dev/fd0 bs=512 count=11+0 records in1+0 records out512 bytes transferred in 0.550740 seconds (930 bytes/sec)$ dd if=stage2 of=/dev/fd0 bs=512 seek=1209+1 records in

This is the Title of the Book, eMatter EditionCopyright © 2007 O’Reilly & Associates, Inc. All rights reserved.
12.2 Migrating from LILO to GRUB | 201
209+1 records out107250 bytes transferred in 6.889581 seconds (15567 bytes/sec)$
Now reboot to the diskette. You will be greeted by the nice blue GRUB screen:
GRUB version 0.93 (640K lower / 3072K upper memory)
[ Minimal BASH-like line editing is supported. For the first word, TAB lists possiblecommand completions. Anywhere else TAB lists the possible completions of a device/filename. ]
grub>
Next, you need to find the root device, which is the partition that contains GRUB’sfirst- and second-stage boot files:
grub> find /boot/grub/stage1 (hd0,0)
This value is our root device. Set the root device:
grub> root (hd0,0)
Note that GRUB has its own partition numbering scheme. hd0,0 is the same as /dev/hda1. (See the “Discussion” section of this recipe for details.)
Now install GRUB to the MBR, which is the first sector of the first drive:
grub> setup (hd0)
Now it is time to finish booting. Again, set the root device:
grub> root (hd0,0)
Next, enter the path to the kernel and the path to the root filesystem. These are inlilo.conf. Be sure to append ro, to mount the kernel and root filesystem read-only:
grub> kernel /boot/vmlinuz-2.4.21 root=/dev/hda1 ro
Don’t confuse “root” on the kernel line with the root device. “Root” on the kernelline identifies the root filesystem. The root device is the partition containing the /bootdirectory.
This step applies only to systems that require a ramdisk to boot. Enter the path to theinitrd image, which should also be in lilo.conf:
grub> initrd /boot/initrd-2.4.21.img
Finally, enter the boot command, and the system should start normally:
grub> boot
If your root and kernel parameters do not work, see Recipe 12.7 for how to findthem from the GRUB command shell.
Now you’ll probably want to create the GRUB boot menu. See Recipe 12.9 fordetails.

This is the Title of the Book, eMatter EditionCopyright © 2007 O’Reilly & Associates, Inc. All rights reserved.
202 | Chapter 12: Managing the Bootloader and Multi-Booting
DiscussionAlways test your rescue disks before you need them.
GRUB uses its own partition numbering scheme; it starts from 0, instead of 1. BothSCSI and IDE drives are represented by hd. Floppy drives are fd.
This is the Linux partition table:
In GRUB, it’s like this:
Additional drives are hd1, hd2, and so on. So hd0,3 is the same as /dev/hda4; hd1,5 is/dev/hdb6.
Note that the root device uses GRUB’s numbering system:
grub> root (hd0,0)
and the root filesystem, which is specified on the kernel line, does not:
grub> kernel /boot/vmlinuz-2.4.21 ro root=/dev/hda1
See Also• This chapter’s “Introduction” for a comparison of GRUB and LILO
• Recipe 12.7, “Discovering Boot Parameters from the GRUB Command Shell”
• Recipe 12.9, “Creating the GRUB Boot Menu”
• The GRUB Manual (http://www.gnu.org/software/grub/manual/grub.html)
• info grub
12.3 Installing GRUB Without a Floppy Disk
ProblemYou would like to install GRUB, but your system does not have a floppy drive. Oryou have a floppy drive but can’t find a usable floppy disk.
SolutionUse GRUB’s own command shell to set it up.
First, install GRUB, or upgrade to the latest version. To get the version number, use:
$ grub --versiongrub (GNU GRUB 0.94)
1–4 Primary partitions5 and up Extended partitions
0–3 Primary partitions4 and up Extended partitions

This is the Title of the Book, eMatter EditionCopyright © 2007 O’Reilly & Associates, Inc. All rights reserved.
12.3 Installing GRUB Without a Floppy Disk | 203
Next, take a few preparatory steps:
1. Make a hard copy of your partition table (fdisk -l | lpr).
2. Make a hard copy of lilo.conf.
3. Back up your data and have a rescue disk, like Knoppix, at hand.
4. Leave your LILO installation intact, in case you want it back.
Then open a root shell on your Linux system, and start up a GRUB shell:
# grubProbing devices to guess BIOS drives. This may take a long time.
GNU GRUB version 0.94 (640K lower / 3072K upper memory)[ Minimal BASH-like line editing is supported. For the first word, TAB listspossible command completions. Anywhere else TAB lists the possible completions of adevice/filename. ]
grub>
Find the stage1 loader:
grub> find /boot/grub/stage1 (hd0,0)
Now run these three commands:
grub> root (hd0,0)grub> setup (hd0)grub> quit
Reboot, and you will be greeted by the GRUB command shell.
You’ll probably want to boot into Linux and create a GRUB boot menu. See Recipes12.7 and 12.9 to learn how to do this.
DiscussionThis is what happened with those three little commands:
You will see output similar to this:
grub> root (hd0,0) Filesystem type is reiserfs, partition type 0x83
grub> setup (hd0) checking if "/boot/grub/stage1" exists...yes checking if "/boot/grub/stage2" exists...yes checking if "/boot/grub/e2fs_stage1_5" exists...yes Running "embed /boot/grub/e2fs_stage1_5 (hd0)"... 15 sectors are embedded. Succeeded.
grub> root (hd0,0) Set the root device.grub> setup (hd0) Install GRUB to the MBR.grub> quit Exit GRUB.

This is the Title of the Book, eMatter EditionCopyright © 2007 O’Reilly & Associates, Inc. All rights reserved.
204 | Chapter 12: Managing the Bootloader and Multi-Booting
Running "install /boot/grub/stage1 (hd0) (hd0)1+15 p (hd0,0)/boot/grub/stage2 /boot/grub/menu.lst"...Succeeded
grub> quit
See Also• Recipe 12.7, “Discovering Boot Parameters from the GRUB Command Shell”
• Recipe 12.9, “Creating the GRUB Boot Menu”
• The GRUB Manual (http://www.gnu.org/software/grub/manual/grub.html)
• info grub
12.4 Installing GRUB with grub-install
ProblemRecipe 12.3 does not work on your Debian, Gentoo, or other Linux system, becausethe GRUB files are installed into /usr/lib/grub. Or maybe you just want a simplermethod for installing GRUB without a floppy disk.
SolutionUse GRUB’s built-in installation script, grub-install.
First, install GRUB, or upgrade to the latest version. To get the version number, use:
$ grub --versiongrub (GNU GRUB 0.94)
Then run grub-install. When you have a separate /boot partition, you must specify it:
# grub-install --root-directory=/boot /dev/hda
Otherwise, all you need is the device name for the drive:
# grub-install /dev/hda
Then run:
# update-grub
This creates a new menu.lst. When you reboot, the GRUB menu will appear and yoursystem will boot normally.
Discussionupdate-grub probably won’t create a complete menu.lst on a multiboot system, but itwill enable you to boot into Linux. Then you can add your other operating systemsto menu.lst.

This is the Title of the Book, eMatter EditionCopyright © 2007 O’Reilly & Associates, Inc. All rights reserved.
12.5 Preparing a System for Multibooting Linux | 205
See Also• grub-install(8)
• info grub
• The GRUB Manual (http://www.gnu.org/software/grub/manual/grub.html)
12.5 Preparing a System for Multibooting Linux
ProblemYou plan to multiboot several different Linux distributions, and you want to prepareyour system. You want a standalone /boot partition and shared /home and /swappartitions.
SolutionMost Linux distributions let you customize the partitioning during installation. Cre-ate new partitions only as you need them during each installation, and leave freespace for additional installations.
Let’s walk through a clean Fedora installation on a 20-GB IDE drive, using this parti-tioning scheme:
Here are the steps:
1. Boot up the first installation CD. Select your keyboard, mouse, and display.When you get to the Disk Partitioning Setup window, select “Manually parti-tion with Disk Druid.” A nice graphical display shows your hard drive.
2. Delete any existing partitions. Highlight them one at a time, then click the“delete” button.
3. Next, highlight “Free Space,” and click “New.” The mountpoint is /boot. SelectExt2 for the filesystem, and enter the partition size. One hundred megabytes isthe minimum Fedora will accept for /boot. Click OK. That is now /dev/hda1.
4. Highlight “Free Space” again and click “New.” The mountpoint is /. Select Ext3,2500 MB. Click OK. That’s /dev/hda2.
5. Highlight “Free Space” again and click “New.” The mountpoint is /home. SelectExt3, 3000 MB. Click OK. That’s /dev/hda3.
/dev/hda1 Primary 100 MB /boot/dev/hda2 Primary 2,500 MB //dev/hda3 Primary 3,000 MB /home/dev/hda4 Extended/dev/hda5 256 MB /swapFree space 14,144 MB

This is the Title of the Book, eMatter EditionCopyright © 2007 O’Reilly & Associates, Inc. All rights reserved.
206 | Chapter 12: Managing the Bootloader and Multi-Booting
6. Highlight “Free Space” again and click “New.” Scroll down “filesystem options”until you find “swap.” There is no mountpoint; make it 256 MB. Click OK. Thisis /dev/hda5.
7. At this point you may go back and make changes, because the new partitiontable has not yet been written to disk. When you’re finished, write the changesto disk by clicking OK in the main Disk Druid menu.
Now you can continue with the installation. Make sure that you install GRUB, notLILO. When you install additional Linuxes, they will share /home and /swap. Youcan install any number of Linuxes, until your disk is full or you have used all avail-able partitions.
DiscussionMost modern Linux distributions install GRUB by default. Make sure you don’tinstall LILO.
QTParted is an excellent graphical utility for creating, deleting, moving, and resizingdisk partitions. QTParted is included on Knoppix, so you can set up your partition-ing before installing a new Linux, if you prefer. You can also make changes afterinstallation, even to partitions with data on them. Of course, you must have goodbackups first. QTParted does a good job, but messing with partitions can backfire.
Putting /swap on its own partition improves performance, and it can be shared on amultiboot system. Giving /home its own partition lets you share it between the differ-ent Linux systems you’re running, and it allows you to do all sorts of system installa-tions and removals without forcing you to restore your data from backup every time.
Linux partitioning is limited to 63 partitions per IDE drive: 3 usable primary parti-tions, with the 4th containing up to 60 logical partitions in a single extended partition.
SCSI drives are limited to 15 partitions per drive: 3 usable primary partitions, and 12logical partitions in a single extended partition.
See Also• fdisk(8)
• Chapter 13, System Rescue and Recovery with Knoppix
• QTParted home page (http://qtparted.sourceforge.net)
12.6 Adding More Linuxes to a Multiboot System
ProblemYou have your nice new boot partition all set up, and your first Linux installed. Nowyou’re ready to add more Linuxes.

This is the Title of the Book, eMatter EditionCopyright © 2007 O’Reilly & Associates, Inc. All rights reserved.
12.6 Adding More Linuxes to a Multiboot System | 207
SolutionInstall additional Linuxes into logical partitions. Then you’ll need to create GRUBboot menu entries for each one.
First, prepare the system according to Recipe 12.5.
Next, boot the installation CD of the second Linux. This example uses LibranetDebian for the second Linux. When you get to the disk partitioning menu, select“Partition & layout drives.” You will then see a menu showing the existing disk par-titions. Highlight “Free” and select “New.” Enter 2500 MB for the partition size. Themountpoint is /. Choose your filesystem type, and make sure “Initialize?” is checked.This is now /dev/hda6.
Select /dev/hda3 to “Modify.” Select /home and Ext3, and do not check “Initialize?”
You may now go back and make changes to the partitioning, or select “Write” towrite your new partition table to disk. After you select “Write,” a warning willappear: “ALL EXISTING DATA ON THESE PARTITIONS WILL BEDESTROYED,” with a list of partitions that are going to be formatted, or “initial-ized.” Only / should be listed here.
Continue with the installation. When you get to the bootloader installation menu,do not overwrite the MBR. The installer will ask, “Do you want Linux to handlebooting your system?” Say no. You want the boot files installed to the first sector ofthe root partition, which is /dev/hda6.
When Libranet requires a reboot, bring up the GRUB command shell at boot, andboot Libranet manually:
grub> root (hd0,0)grub> kernel /boot/vmlinuz-2.4.21 root=/dev/hda6 rogrub> boot
(See Recipe 12.7 to learn how to discover the boot parameters from GRUB.)
When everything is working satisfactorily, edit menu.lst to add the new system to theGRUB boot menu. (See Recipe 12.9.)
Write down the partitions you create during installation; it will help when you editmenu.lst.
DiscussionThe Libranet installer will automatically find any existing swap partitions; you don’tneed to select them during installation.
You can edit menu.lst from any of your new Linuxes. Simply mount the boot parti-tion, and there it is:
# mkdir /bootpartition# mount /dev/hda1 /bootpartition# vim /bootpartition/boot/grub/menu.lst
This is the Title of the Book, eMatter EditionCopyright © 2007 O’Reilly & Associates, Inc. All rights reserved.
208 | Chapter 12: Managing the Bootloader and Multi-Booting
This highlights some of the benefits of using a boot partition—you always knowwhere it is, and it is safely isolated from your root filesystems.
Partitioning is probably the most complicated part of building a multiboot system.Use logical partitions as much as possible. With only four primary partitions avail-able per physical hard disk, you’ll run out pretty quickly if you don’t.
See Also• The GRUB Manual (http://www.gnu.org/software/grub/manual/grub.html)
• info grub
12.7 Discovering Boot Parameters from theGRUB Command Shell
ProblemYou don’t know the locations of Linux kernels and root devices on your system, andyou need to find them so you can boot the system.
SolutionUse GRUB’s tab completion to find root devices and kernel images.
First, boot to the GRUB command shell by hitting c when GRUB starts up.
To find the root device (partition containing /boot), type root (hd0 and hit the Tabkey until you see some partitions displayed:
grub> root (hd0,<tab> Possible partitions are: Partition num: 0, Filesystem type is ext2fs, partition type 0x83 Partition num: 1, Filesystem type is ext2fs, partition type 0x83
When there are several partitions displayed, and you are not sure which one youwant, it does not hurt to try them all. First, try (hd0,0):
grub> root (hd0,0) Filesystem type is ext2fs, partition type 0x83
Then search for the kernel image. Type kernel /boot/vmlinuz, and hit Tab. If there isno /boot/vmlinuz, GRUB will tell you:
grub> kernel /boot/vmlinuz<tab>Error 15: File not found
If this happens, reset the root device to the other partition, and look for a kernelimage there:
grub> root (hd0,1) Filesystem type is ext2fs, partition type 0x83

This is the Title of the Book, eMatter EditionCopyright © 2007 O’Reilly & Associates, Inc. All rights reserved.
12.7 Discovering Boot Parameters from the GRUB Command Shell | 209
grub> kernel /boot/vmlinuz<tab>possible files are: vmlinuz vmlinuz-2.4.21
Okay, you’ve found a kernel. Type the path to the kernel and the root filesystem:
grub> kernel /boot/vmlinuz-2.4.21 ro root=/dev/hda2
Remember, GRUB’s partition numbering starts from zero, so hd0,1 = /dev/hda2.
These next two steps apply only to systems that require a ramdisk to boot. Find initrd:
grub> find /boot/init<tab>grub> find /boot/initrd-2.4.22-1.img
Load the initrd image:
grub> initrd /boot/initrd-2.4.22-1.img
Now you can boot up:
grub> boot
And the system should start normally.
DiscussionIf you are not sure that the usual kernel naming conventions were followed, haveGRUB display the entire contents of /boot. Type kernel /boot/, and hit tab:
grub> kernel /boot/<tab> System.map System.map-2.4.21 System.map-2.6.3 boot grub config-2.4.21 config-2.6.3 splash.xpm.gz vmlinuz vmlinuz-2.4.21 kernel-of-truth-2.6.3
Well, it looks like we have a wackily-named 2.6 kernel, “kernel-of-truth-2.6.3.”Regardless of the silly name, it should work just like its more soberly named cousins.
With tab completion, you can easily search entire filesystems. This is useful forexploring unfamiliar systems, as you can start from the root:
grub> root (hd0,6)grub> find /<tab>Possible files are bin dev etc lib mnt opt tmp sys var usr boot home proc sbin root
cdrom floppy initrd
However, this is a big security hole, as anyone with access to the GRUB commandshell can read any file on the system with cat:
grub> cat /root/secretpersonalstuff.txtgrub> cat /etc/shadow
To close this hole, see Recipe 12.14 to learn how to password-protect GRUB.
GRUB will find root devices and kernels anywhere they may be. Suppose, for exam-ple, you have two IDE hard drives. The second drive has a Linux root filesysteminstalled on /dev/hdb5. Boot it this way:
grub> root (hd1,4)grub> kernel /boot/vmlinuz-2.4.21 ro root=/dev/hdb5grub> boot

This is the Title of the Book, eMatter EditionCopyright © 2007 O’Reilly & Associates, Inc. All rights reserved.
210 | Chapter 12: Managing the Bootloader and Multi-Booting
On an unfamiliar system, you can have GRUB detect all installed hard drives:
grub> root (hd <tab> Possible disks are: hd0 hd1
See Also• The GRUB Manual (http://www.gnu.org/software/grub/manual/grub.html)
• info grub
12.8 Configuring the Boot Partition
ProblemBecause you are using a boot partition, instead of a /boot directory on the root file-system, you’re not sure that the filepaths are correct.
SolutionUse df to see what partitions your filesystems are on. You’ll need to make sure anypartitions you want to check are mounted.
First, you can verify that your filesystems are installed to the correct partitions with df:
$ df -hFilesystem Size Used Available Use% Mounted on/dev/hda2 2.5G 1.5G 1G 60% //dev/hda1 100M 30M 70M 30% /boot
Now, verify that the file tree in the boot partition is correct, look for /boot/boot:
$ ls /bootSystem.map-2.4.21 boot grub config splash.xpm.gz vmlinuz vmlinuz-2.4.21
If there is not a /boot/boot directory, create one, and copy over the files from the par-ent directory:
# cp -av /boot/ /boot/boot/
Some distributions, such as Debian, create a /boot soft link to the parent directory:
$ cd /boot$ ls -al bootlrwxrwxrwx 1 root root 1 Apr 16 08:50 /boot/boot -> .
It is okay to leave this alone and not create a new /boot directory, even though thislink creates an endless loop in the file tree. It’s another way to ensure having a /bootdirectory in the boot partition.
DiscussionConfused over all these boots? Just keep in mind that a partition name is not a direc-tory name, because a partition is not a directory, and a mountpoint can be given any

This is the Title of the Book, eMatter EditionCopyright © 2007 O’Reilly & Associates, Inc. All rights reserved.
12.9 Creating the GRUB Boot Menu | 211
name. GRUB knows nothing about mountpoints—it reads filesystems before theyare mounted. So if there is not a /boot directory in the boot partition, GRUB does notsee /boot/grub, but /grub. While it’s not strictly necessary to have a /boot directory,following this convention will make your life a lot easier.
See Also• The GRUB Manual (http://www.gnu.org/software/grub/manual/grub.html)
• info grub
12.9 Creating the GRUB Boot MenuProblemAs fun as it is to discover root devices and kernels from the GRUB command line,you would like to preserve your boot parameters in a configuration file and have anice boot menu to use at startup. In this menu you will configure your chosendefaults, and have a menu of all of your installed operating systems to choose from.
SolutionAdd boot entries to GRUB’s configuration file, /boot/grub/menu.lst. (Red Hat usesgrub.conf and creates a soft link named menu.lst.)
GRUB calls the different boot entries stanzas. Here is a basic configuration:
title Fedora 1 coreroot (hd0,0)kernel /boot/vmlinuz-2.4.22-1 root=/dev/hda1 roinitrd /boot/initrd-2.4.22-1.img
The title can be anything at all, and you must have one—it tells GRUB where eachstanza starts, and it appears in the boot menu. The other two lines are the same val-ues we used on the GRUB command line. It is not necessary to use the boot com-mand in menu.lst.
You can list as many operating systems as you want; each one requires a stanza likethis one. Make sure the kernel line points to the right partition and kernel execut-able. It’s common to have several bootable kernels in the same root partition. And itis common (even good) for all the boot configurations to use the same boot partition.
Not all Linux distributions require a ramdisk, which is loaded by the initrd image. If/boot/initrd-* exists, you must use it.
DiscussionRemember that the root device, indicated by:
root (hd0,0)
This is the Title of the Book, eMatter EditionCopyright © 2007 O’Reilly & Associates, Inc. All rights reserved.
212 | Chapter 12: Managing the Bootloader and Multi-Booting
is the location of the /boot directory, and hd0,0 is GRUB’s own numbering system.On the kernel line:
kernel /boot/vmlinuz-2.4.22-1 root=/dev/hda2 ro
root is the root filesystem, using the kernel dev name.
See Also• The GRUB Manual (http://www.gnu.org/software/grub/manual/grub.html)
• info grub
12.10 Customizing menu.lst
ProblemYou want to change the look of the GRUB menu, and customize options such astimeouts and default boot entries.
SolutionMake your customizations in /boot/grub/menu.lst. (Some systems use grub.conf.)
There are two sections: the global settings and the boot stanzas. Colors, timeouts,and default boot entries are defined in the global section.
This is a complete sample menu.lst, including global configuration options:
##GRUB configuration for windbag, created 10-22-2003## global settings
## default numdefault 0
## timeout sectimeout 5
# Pretty colorscolor cyan/blue white/blue
# Display a splash screensplashimage (hd0,0)/boot/splash.xpm.gzforeground bbbbbbbackground 000000
### Boot menu## defaulttitle Libranet GNU/Linux, kernel 2.4.21root (hd0,0)kernel /boot/vmlinuz-2.4.21 root=/dev/hda1 ro hdb=scsi hdc=scsi

This is the Title of the Book, eMatter EditionCopyright © 2007 O’Reilly & Associates, Inc. All rights reserved.
12.10 Customizing menu.lst | 213
## new 2.6 test kerneltitle Libranet GNU/Linux, kernel 2.6.3-test1root (hd0,0)kernel /boot/bzImage-2.6.3-test1 root=/dev/hda1 ro
## Stock Red Hat 9title Red Hat 9root (hd0,4)kernel /boot/vmlinuz-2.4.22-1 root=/dev/hda5 roinitrd /boot/initrd-2.4.22-1.img
DiscussionThese are definitions for the global configuration options:
default 0Sets your default boot entry. Stanzas are read in order, starting from zero, sodefault 0 selects the first one.
timeout 5Specifies how long to wait before the default entry boots.
color cyan/blue white/blueConfigures the colors for the GRUB boot menu. cyan/blue defines the fore-ground and background colors. white/blue defines the highlight colors for linesof text selected by the cursor. The available colors are listed in the GRUB man-ual and info grub.
splashimage (hd0,0)/boot/splash.xpm.gzforeground bbbbbbbackground 000000
Yes, you can replace the splash screen that came with your distribution with animage of your choosing. (See Recipe 12.16 for how to create the image.) Use thesplashimage option to set the filepath to the image. You’ll also need to configurethe foreground and background colors for the fonts, using standard HTML hexcolor codes.
Another default choice is default saved. When you use default saved, you must alsoadd savedefault to the boot stanzas, like this:
title Libranet GNU/Linux, kernel 2.4.21root (hd0,0)kernel /boot/vmlinuz-2.4.21 ro root=/dev/hda1savedefault
This makes the last item booted the default for the next boot. Many distributionsconfigure the boot stanzas to include savedefault, but they don’t add default saved, soit doesn’t work.

This is the Title of the Book, eMatter EditionCopyright © 2007 O’Reilly & Associates, Inc. All rights reserved.
214 | Chapter 12: Managing the Bootloader and Multi-Booting
See Also• The GRUB Manual (http://www.gnu.org/software/grub/manual/grub.html)
• info grub
• Recipe 12.16, “Creating a GRUB Splash Image”
12.11 Adding Windows 95/98/ME to a LinuxSystem
ProblemYou have a single computer, and you would like to dual-boot Windows 95/98/MEand Linux, because you use applications on both platforms. Or you have a small testnetwork, and you want to install as many operating systems are you can in multi-boot configurations, so that you can test different combinations of operating sys-tems without using a lot of computers. Or you already tried to add Windows 95/98/ME to your nice new Linux multiboot system, but it didn’t even install—it com-plained about not being able to format the C: drive, which is a good thing, because itwould have overwritten your Linux installations. You don’t want to use an emulatorlike VMWare, which lets you run both at the same time without rebooting, becauseit’s too expensive, or your hardware is too feeble.
SolutionThere are a number of tricky bits to adding Windows 95/98/ME to a Linux system.You’ll need to hide partitions, and restore GRUB to the MBR after the Windowsinstallation, because Windows overwrites the bootloader. Windows 95/98/ME musthave a primary partition prepared in advance. Unfortunately, GRUB does not bootCD-ROMs, so you’ll need a Windows Startup diskette. (This is a very useful disk forall versions of Windows.) If you don’t have one, it is easy to make one from 98 or ME:
1. Load a new, blank diskette.
2. Go to Control Panel ➝ Add/Remove Programs.
3. Click on the Startup Disk tab.
4. Click on the Create Disk button.
Write-protect the disk, and it’s ready to go.
To install Windows 95/98/ME on /dev/hda4:
1. Boot to the GRUB command shell.
2. Insert the Windows 98 Startup diskette.
3. At the GRUB command line, hide all of your existing partitions:

This is the Title of the Book, eMatter EditionCopyright © 2007 O’Reilly & Associates, Inc. All rights reserved.
12.11 Adding Windows 95/98/ME to a Linux System | 215
grub> hide (hd0,0)grub> hide (hd0,1)grub> hide (hd0,2)
4. Now boot the Windows diskette:grub> chainloader (fd0) +1grub> boot
Be sure to enable CD-ROM support as the diskette boots.
5. Use MS-DOS fdisk on the Windows rescue diskette to create a primary DOS par-tition for Windows. When you’re finished partitioning and back at the A:\>prompt, insert the Windows installation CD, change to the D: drive, and startthe Windows Setup program:
A:\> D:D:\> setup
6. Windows will overwrite the MBR, which is convenient for getting through themany reboots. When it’s done, restore GRUB to the MBR. Boot to your GRUBfloppy, and run the following comands:
grub> root (hd0,0)grub> setup (hd0)
7. Remove the GRUB diskette and reboot, and your GRUB menu will reappear.Boot to Linux so you can edit menu.lst:
title Windows 98 on /dev/hda4hide (hd0,0)hide (hd0,1)hide (hd0,2)unhide (hd0,3)rootnoverify(hd0,3)makeactivechainloader +1
DiscussionLet’s look at the last three options more closely:
rootnoverifyDon’t try to read or mount the partition.
makeactiveSet the bootable flag on the partition. Windows needs this.
chainloader +1Points to the bootloader of operating systems that GRUB does not directly sup-port, like Windows.
If you’re thinking “Wow, this sounds like a lot of work,” you are right. There is aneasier way to dual-boot Windows 95/98/ME with Linux: install Windows 95/98/MEfirst, then add Linux. If you install Linux last, the installer will load GRUB in the MBRfor you and will automatically create an entry for Windows in the GRUB menu.

This is the Title of the Book, eMatter EditionCopyright © 2007 O’Reilly & Associates, Inc. All rights reserved.
216 | Chapter 12: Managing the Bootloader and Multi-Booting
You cannot run more than one 95/98/ME, unless you use GRUB’s partition-hidingon every one and have enough primary partitions to give each one its own.
See Also• Microsoft Knowledge Base Article 217210: “How to Multiple Boot Windows
XP, Windows 2000, Windows NT, Windows 95, Windows 98, Windows Me,and MS-DOS”
• Recipe 9.16, “Creating Linux Disk Partitions with fdisk”
• The GRUB Manual (http://www.gnu.org/software/grub/manual/grub.html)
• info grub
12.12 Adding Windows NT/2000/XPto a Multiboot System
ProblemYou have a single computer and you would like to dual-boot Windows NT/2000/XPand Linux, because you use applications on both platforms. Or you have a small testnetwork and you want to install as many operating systems as you can in multibootconfigurations, so that you can test different combinations of operating systems with-out using a lot of computers. You don’t want to use an emulator like VMWare, whichlets you run both at the same time without rebooting, because it’s too expensive or yourhardware is too feeble. And you hope it’s not as much hassle as Windows 95/98/ME.
SolutionFear not, Windows NT/2000/XP is a lot easier. The installer is more intelligent—itwill let you choose which partition to use, or create a new one. You can even add itto a system with Linux already installed, as long as you have enough free space andan unused primary partition.
Make a hard copy of your partition table, and note what you have installed on eachpartition. Windows won’t recognize any of your Linux partitions, it will only printthe sizes of them, so having it written down will help you keep track.
You won’t need a boot floppy; just install it from CD like you normally would.When the installation is completed, you’ll need to restore GRUB to the MBR. Loadyour GRUB boot floppy, then do:
grub> root (hd0,0)grub> setup (hd0)grub> reboot
Remove the boot floppy, reboot, and your GRUB menu will reappear. Boot to Linux,and create a menu.lst entry for Windows:

This is the Title of the Book, eMatter EditionCopyright © 2007 O’Reilly & Associates, Inc. All rights reserved.
12.13 Restoring GRUB to the MBR with a Knoppix CD | 217
title WindowsXP on /dev/hda4rootnoverify (hd0,3)makeactivechainloader +1
It is not necessary to hide partitions from Windows NT/2000/XP.
DiscussionWhen you want to multiboot more than one version of Windows, start with the old-est, and install them in sequence from oldest to newest. You can install only one ofWindows 95/98/ME, because it does not support multibooting. Windows NT/2000/XP all support multibooting.
You can use a single primary partition for all of your Windows versions, by dividingit into several logical partitions. Use the Windows NT/2000/XP installer to do thepartitioning and formatting; don’t use Linux fdisk.
See Also• Microsoft Knowledge Base Article 217210: “How to Multiple Boot Windows
XP, Windows 2000, Windows NT, Windows 95, Windows 98, Windows Me,and MS-DOS”
• The GRUB Manual (http://www.gnu.org/software/grub/manual/grub.html)
• info grub
• Recipe 12.13, “Restoring GRUB to the MBR with a Knoppix CD”
12.13 Restoring GRUB to the MBRwith a Knoppix CD
ProblemWhen you installed Windows on your Linux/Windows dual-boot system, Windowsoverwrote the MBR (master boot record), so your GRUB menu was replaced withthe Windows boot menu, and now you can’t boot to Linux. The GRUB documenta-tion tells how to restore GRUB to the MBR, but it seems to assume that you have afloppy drive. And you don’t. How can you restore GRUB to the MBR when your sys-tem does not have a floppy drive?
SolutionUse a Knoppix CD. Boot it up, and open a command shell. su to root—there is nopassword—and run GRUB:
# grubProbing devices to guess BIOS drives. This may take a long time.

This is the Title of the Book, eMatter EditionCopyright © 2007 O’Reilly & Associates, Inc. All rights reserved.
218 | Chapter 12: Managing the Bootloader and Multi-Booting
GNU GRUB version 0.94 (640K lower / 3072K upper memory)[ Minimal BASH-like line editing is supported. For the first word, TAB listspossible command completions. Anywhere else TAB lists the possible completions of adevice/filename. ]
grub>
Then run these three commands:
grub> root (hd0,0)grub> setup (hd0)grub> quit
When you reboot, your GRUB menu will reappear.
DiscussionFloppy drives are disappearing from all kinds of systems, especially laptops. Even the“desktop replacement” notebooks are omitting the floppy drive, in favor of combina-tion CD-ROM/DVD-ROM/CD-R/RW drives.
See Also• Knoppix home page (http://www.knopper.net/)
• The GRUB Manual (http://www.gnu.org/software/grub/manual/grub.html)
• info grub
12.14 Protecting System Files with a GRUBPassword
ProblemYou don’t want your users to have access to the GRUB command shell, because theywould be able to access all system files, regardless of permissions or access privileges.
SolutionSet a password in menu.lst to lock users out of the GRUB command shell.
First, from a Bash shell, use grub-md5-crypt to generate a hashed password:
# grub-md5-cryptPassword:Retype password:$1$RiAfJ0$QTuAlS/BGqlkYHQADZejs1
Now paste the encrypted password into menu.lst, in the global configuration part,before the boot stanzas:
password --md5 $1$RiAfJ0$QTuAlS/BGqlkYHQADZejs1

This is the Title of the Book, eMatter EditionCopyright © 2007 O’Reilly & Associates, Inc. All rights reserved.
12.15 Locking Out Users from Individual GRUB Menu Entries | 219
You can also use a plain text password, like this:
password bigsecretword
Obviously, this is less secure. If you use plain text, restrict file permissions to rootonly:
# chmod 600 menu.lst
When the system boots and the GRUB menu appears, hit p to enter the passwordand unlock the command shell. Users without the password will only be able tomake selections from the boot menu; they will not have access to the GRUB com-mand shell.
DiscussionFile access permissions are attributes of the filesystem. GRUB operates outside offilesystems, so anyone with access to the GRUB command shell can read any file onthe system.
If you lose your GRUB password, it’s not the end of the world, because you can bootwith a rescue disk and edit menu.lst—which illustrates the ancient Unix security dic-tum, “anyone with physical access to the box owns it.”
See Also• The GRUB Manual (http://www.gnu.org/software/grub/manual/grub.html)
• info grub
12.15 Locking Out Users from Individual GRUBMenu Entries
ProblemYour GRUB menu contains several entries. You don’t want any user to be able toboot any entry; you would like to lock out users from some of the entries.
SolutionFirst set up a GRUB password (Recipe 12.14), then use the lock command inmenu.lst:
title Libranet GNU/Linux, kernel 2.4.21, single user modelockroot (hd0,0)kernel /boot/vmlinuz-2.4.21 root=/dev/hda1 ro single
GRUB reads menu.lst in order, so everything after lock is blocked from users who donot have the password. Don’t lock out the title, or no one will be able to boot to this

This is the Title of the Book, eMatter EditionCopyright © 2007 O’Reilly & Associates, Inc. All rights reserved.
220 | Chapter 12: Managing the Bootloader and Multi-Booting
entry. Users without the password will only be able to boot to unlocked entries. Ifthey try locked entries, they will get an error message:
Error 32: Must be authenticated
It’s a good idea to use titles that tell users which ones are restricted:
Libranet GNU/Linux, kernel 2.4.21, single user mode, AUTHENTICATION REQUIRED
DiscussionUsing a GRUB password and lock is useful on shared workstations—for example, inclassrooms, training labs, and the workplace. However, anyone with physical accessto the box can use a bootable rescue disk to gain unrestricted access. This can befoiled by disabling the rescue disks in the system BIOS, but don’t forget how manydifferent boot devices there are now: floppy disks, CDs, USB devices, SuperDisks,Jaz/Zip disks, Ethernet Wake-on-LAN, and probably some more I haven’t thoughtof. Then set a BIOS password when you’re done.
Still, a determined user can open the case and reset the BIOS password with ajumper on the motherboard. You could put a physical lock on the case, but eventhen a really determined person could haul the whole works out the door.
How far you need to go on boot security is obviously something you need to evalu-ate for your particular situation.
See Also• The GRUB Manual (http://www.gnu.org/software/grub/manual/grub.html)
• info grub
12.16 Creating a GRUB Splash Image
ProblemYou’re totally bored with the default GRUB splash screen that came with your distri-bution, and you’d like to use an image that you created.
SolutionYou can create a GRUB splash image from any kind of image file. You must convertthe image to a specific format and size, then make an entry in menu.lst that points tothe image.
GRUB splash images must meet these specs:
• xpm.gz file type
• 640 × 480
• 14 colors only

This is the Title of the Book, eMatter EditionCopyright © 2007 O’Reilly & Associates, Inc. All rights reserved.
12.17 Booting Linux with LILO | 221
Start with an image of your own creation, at least 640 × 480, in any graphical fileformat. Use ImageMagick and gzip to do the rest. In this example, we’ll convert a.jpg:
$ convert -depth 14 -resize 640x480 image.jpg newimage.xpm && gzip newimage.xpm
Move the new file, newimage.xpm.gz, to the /boot directory. Edit menu.lst, and add(or edit) an entry for the splash image:
# Display a splash screensplashimage (hd0,5)/boot/newimage.xpm.gz
When you reboot, the GRUB menu will be adorned with your nice, new customsplash screen.
DiscussionImageMagick does not create a backup of your original image, so you’ll probablywant to work from a copy.
ImageMagick is a suite of command-line utilities:
animatecompositeconjureconvertdisplayidentifyimportmogrifymontage
There is no “imagemagick” command. See imagemagick(1) for full details.
Try a Google search on “grub splashimage” to find all sorts of interesting onlinesplash image galleries, as well as tips and tricks for creating them.
See Also• imagemagick(1), gzip(1), info grub
• The GRUB Manual (http://www.gnu.org/software/grub/manual/grub.html)
12.17 Booting Linux with LILO
ProblemYou want to use LILO and need to know how to configure it to boot a Linux system.

This is the Title of the Book, eMatter EditionCopyright © 2007 O’Reilly & Associates, Inc. All rights reserved.
222 | Chapter 12: Managing the Bootloader and Multi-Booting
SolutionUse liloconfig to generate a basic lilo.conf, then edit lilo.conf to add comments, titles,and any additional options you want.
Make sure you have the latest version of LILO, and as always, have a current backupof your data and bootable rescue disks at hand:
# /sbin/lilo -VLILO version 22.4.1
After installing/upgrading, run liloconfig:
# liloconfig
It asks many questions, and gives many instructions. In this example, the root filesys-tem is on /dev/hda3. Say yes to these four questions:
Install a partition boot record to boot Linux from /dev/hda3?Use LBA32 for addressing big disks using new BIOS features?Install a master boot record on /dev/hda?Make /dev/hda3 the active partition?
Run lilo to write the changes to the MBR:
# /sbin/lilo -v
Reboot to test it. When the system comes back up, you’ll probably want to edit /etc/lilo.conf, because liloconfig does a rather barebones job on the boot stanzas. Here is asample lilo.conf, first generated by liloconfig, then edited:
# Specifies the boot deviceboot=/dev/hda3# Location of the map file. This is a binary# file generated by lilo, don't touch itmap=/boot/map# Video resolution for the boot screenvga=normal# the LILO boot screenmessage = /boot/boot_message.txt# Show the LILO prompt for ten seconds# before booting the defaultprompttimeout=100# Access large disks beyond cylinder 1024lba32
# Boot menu ## default boot entrydefault="Libranet-hd3"
# Stable 2.4 kernelimage=/boot/vmlinuz-2.4.21label="Libranet-hd3"root=/dev/hda3read-only

This is the Title of the Book, eMatter EditionCopyright © 2007 O’Reilly & Associates, Inc. All rights reserved.
12.17 Booting Linux with LILO | 223
# Test 2.6 kernelimage=/boot/bzImage-2.6.3label="2.6-test-hd3"root=/dev/hda3read-only
There is a limit of 16 different images that can be configured in lilo.conf.
DiscussionThis is what the original liloconfig-generated boot stanzas looked like:
# These images were automagically added. You may need to edit something.
image=/boot/vmlinuzlabel="DEB 0"read-only
image=/boot/vmlinuz-2.4.21label="DEB 1"read-only
image=/boot/bzImage-2.6.3label="DEB 2"read-only
liloconfig is good for setting up your first lilo.conf; after that, it is easier and better toedit it manually. Let’s take a look at the four liloconfig questions you answered yes to:
Install a partition boot record to boot Linux from /dev/hda3?This refers to where the /boot directory is located, and it must be a primarypartition.
Use LBA32 for addressing big disks using new BIOS features?Definitely say yes to this, unless you are using a system BIOS that does not sup-port large-block addressing. Mainboards built in 1998 and after should supportLBA32. This is the option that lets LILO boot partitions that are beyond the1024-cylinder limit. The 1024-cylinder limit is a limitation of the x86 architec-ture; see “The Large Disk Howto” on tldp.org for details.
Install a master boot record on /dev/hda?LILO stores the first-stage bootloader in the MBR; this bootloader then points toyour other partition boot records.
Make /dev/hda3 the active partition?This marks the partition as bootable, which Linux does not care about, but Win-dows does.
Any time you make changes to /etc/lilo.conf, you must re-run LILO to write thechanges to the MBR:
# /sbin/lilo -v

This is the Title of the Book, eMatter EditionCopyright © 2007 O’Reilly & Associates, Inc. All rights reserved.
224 | Chapter 12: Managing the Bootloader and Multi-Booting
The -v flag turns on verbosity, with levels ranging from 1 to 5:
# /sbin/lilo -v5
Another useful flag is -t, for test. Use this with -v to see what will happen beforeactually writing the changes to disk:
# /sbin/lilo -t -v2
See Also• lilo(8), lilo.conf(5)
• /usr/doc/lilo, or /usr/share/doc/lilo
• “The Large Disk Howto” on tldp.org
12.18 Multibooting Linuxes with LILO
ProblemYou would like to run several different Linuxes on a single PC, and you want LILOfor the bootloader.
SolutionThe first Linux installed is the “host” system. You need to preserve it to keep LILOworking. Make sure that the root filesystem containing the /boot directory is on a pri-mary partition, or LILO won’t work.
Write down the location of the partition where the root filesystem of your next Linuxis going to be installed. If you also know the exact name of the kernel, and the initrdimage (if there is one), you’re ahead of the game. While you’re still in the host Linux,you can create a lilo.conf entry for Linux #2:
# Red Hat 9image=/boot/vmlinuz-2.4.22-1initrd=/boot/initrd-2.4.22-1.imglabel="Red Hat 9"root=/dev/hda6read-only
Then write the changes to the MBR:
# /sbin/lilo -v
Now you can go ahead and install Linux #2, and because you already have a LILOboot menu entry for it, you can glide through however many reboots it takes to com-plete the installation.
When the installer gets to the bootloader installation, be sure to select “install to thefirst sector of the root partition,” or however your installer words it. Do not over-write the MBR.

This is the Title of the Book, eMatter EditionCopyright © 2007 O’Reilly & Associates, Inc. All rights reserved.
12.19 Multibooting Windows and Linux with LILO | 225
If you don’t know the exact kernel name and initrd image, you’ll have to discoverthem from the host Linux. Go ahead and start the installation of Linux #2. When itcomes to the first reboot, you’ll end up back in the host Linux. Mount the new Linux#2 filesystem and read the /boot directory:
# mount /dev/hda6 /mnt/tmp# cd /mnt/tmp# ls bootSystem.map initrd-2.4.22-1.img System.map-2.4.22-1 vmlinuz vmlinuz-2.4.22-1
There’s your kernel and initrd. Make your lilo.conf entry, re-run /sbin/lilo, andreboot. Now you can select your new Linux from the bootloader menu and finish theinstallation.
DiscussionSometimes a ramdisk is required for the system to boot properly. If this is the case,there will be an initrd image. Note that not all distributions require an initrd image. Ifit’s in /boot, it’s needed, and it requires an entry in lilo.conf.
See Also• lilo(8), lilo.conf(5)
• /usr/doc/lilo, or /usr/share/doc/lilo
12.19 Multibooting Windows and Linux with LILO
ProblemYou want to dual-boot Linux and Windows, or multiboot several versions of each.
SolutionThe easy way is to first install all versions of Windows that you want to run on thesystem. Always install them in order, starting with the oldest. Save the fourth pri-mary partition for Linux.
You may install only one of Windows 95/98/ME, because they do not support multi-booting. Windows NT/2000/XP all support multibooting and will create entries foreach installed Windows in the Windows bootloader.
Install Linux last. Make the fourth primary partition into an extended partition, thencreate a logical partition for Linux. During the Linux installation, install LILO to theMBR, and LILO will automatically create an entry for Windows. Here is an exampleof what lilo.conf will look like:
# Stable 2.4 kernelimage=/boot/vmlinuz-2.4.21label="Libranet-hd3"
This is the Title of the Book, eMatter EditionCopyright © 2007 O’Reilly & Associates, Inc. All rights reserved.
226 | Chapter 12: Managing the Bootloader and Multi-Booting
root=/dev/hda5read-only
# Windowsother = /dev/hda1 label = "Windowses" table = /dev/hda
There is only one entry for Windows, because LILO only needs to point to the Win-dows boot menu.
DiscussionWhen you have more than one Windows installed, the Windows bootloader willalways stay with the first one. So if Windows 95 is installed on /dev/hda1, and Win-dows 2000 is installed on /dev/hda2, LILO still needs to point to /dev/hda1.
See Also• lilo(8), lilo.conf(5)
• /usr/doc/lilo, or /usr/share/doc/lilo
• Microsoft Knowledge Base Article 217210: “How to Multiple Boot WindowsXP, Windows 2000, Windows NT, Windows 95, Windows 98, Windows Me,and MS-DOS”
12.20 Creating a LILO Boot Diskette
ProblemYou would like to create a LILO boot diskette, for easy recovery in case of trouble.
SolutionUse LILO’s built-in boot diskette creator:
# cd /usr/lib/lilo# make -f Makefile.floppy
Be sure to write-protect the diskette.
DiscussionThe Linux world contains an amazing number and variety of bootable rescue disks.As long as you can boot the system, you can fix anything. Be sure to check the instal-lation disks for your distribution, because they often come with rescue utilities cus-tomized for the distribution, including utilities for reinstalling the bootloader.

This is the Title of the Book, eMatter EditionCopyright © 2007 O’Reilly & Associates, Inc. All rights reserved.
12.21 Password-Protecting LILO | 227
See Also• lilo(8), lilo.conf(5)
• /usr/doc/lilo, or /usr/share/doc/lilo
12.21 Password-Protecting LILO
ProblemYou don’t want your users messing around with your carefully crafted bootloaderconfiguration. You also want to prevent them from exploiting LILO’s ability to allowroot access without a password, which can easily be done by entering:
linux single
or:
linux init=/bin/sh
at the LILO prompt.
SolutionFirst, restrict lilo.conf to root only:
# chmod 600 lilo.conf
Then password-protect LILO. In the global section of lilo.conf, make these entries:
password=""restricted
Re-run LILO to write the changes:
# /sbin/lilo
It will ask you to enter a password. Give it your root password. It will then create a/etc/lilo.conf.shs file, containing a password hash accessible only to root.
Now when the system reboots, anyone trying to enter linux single or linux init=/bin/sh at the LILO prompt will be asked for the password.
DiscussionFor additional boot-time security, disable all external boot devices in the systemBIOS, and use a BIOS password. This is not perfect—after all, as we showed in Reci-pes 12.14 and 12.15, “Anyone with physical access to a box owns it.” But it’s goodenough to keep ordinary users from mucking up the works.
See Also• lilo(8), lilo.conf(5)
• /usr/doc/lilo, or /usr/share/doc/lilo

This is the Title of the Book, eMatter EditionCopyright © 2007 O’Reilly & Associates, Inc. All rights reserved.
228 | Chapter 12: Managing the Bootloader and Multi-Booting
12.22 Backing Up the MBR
ProblemYou would like to have a backup copy of your master boot record. And what good isthat backup if you don’t know how to restore it?
SolutionYou can back up the MBR to a floppy disk. Mount the disk first, using the mount-point appropriate for your system, then use the dd command:
# dd if=/dev/hda of=/floppy/mbr bs=512 count=1
Restore it this way:
# dd if=/floppy/mbr of=/dev/hda bs=512 count=1
The filename of your backup can be anything you like: for example, /mbr-server01labels it so you know which computer it belongs to. You can store many MBRs on asingle floppy disk:
# ls /floppylost+found mbr-server01 mbr-workstation04 mbr-host15
If you need to format a floppy disk first, do this:
$ mke2fs /dev/fd0
This creates a nice Linux-formatted disk, using the Ext2 filesystem.
DiscussionThe dd command does a literal, byte-by-byte copy. It doesn’t need to understand file-systems, so it can be used to copy block devices, like /dev/hda.
If your system does not have a floppy drive, you can restore a borked MBR with aKnoppix disk, by reinstalling GRUB (Recipe 12.13).
See Also• dd(1), mke2fs(8)
• Recipe 12.13, “Restoring GRUB to the MBR with a Knoppix CD”

This is the Title of the Book, eMatter EditionCopyright © 2007 O’Reilly & Associates, Inc. All rights reserved.
229
Chapter 13 CHAPTER 13
System Rescue andRecovery with Knoppix
13.1 IntroductionFacing a nonbooting system is one of life’s less pleasant sensations. Knoppix, a com-plete Debian-based Linux distribution on a live, bootable CD, is a first-rate recoverydisk. You get over 2 GB of Linux utilities and drivers, compressed onto a 700-MBCD. It has great hardware detection, supports all the major filesystems, automati-cally finds your existing partitions, creates mountpoints, and automatically findsyour DHCP server. If you need to configure networking manually, it has a nice util-ity called netcardconfig. Knoppix can’t be beat for ease of use. Just pop it in, boot itup, and everything works.
Knoppix can be downloaded as a 700-MB .iso, or you can purchase commerciallyproduced CDs, which is nice for folks with slow or expensive Internet service.
A entire creative community has grown up around Knoppix; on Knoppix.net you’llfind a large number of specialty projects inspired by Knoppix, and howtos for creat-ing your own custom bootable live CD.
13.2 Booting KnoppixProblemYou want to customize Knoppix’s boot process. First, you need to find out whatboot-time options Knoppix has.
SolutionTo see all boot options, hit F2 at the prompt.
You can just pop Knoppix into the drive and let it boot itself, but there are a largenumber of boot-time options at your disposal. The default keyboard layout isGerman, so you might want to change it to your own locale:
knoppix lang=uk

This is the Title of the Book, eMatter EditionCopyright © 2007 O’Reilly & Associates, Inc. All rights reserved.
230 | Chapter 13: System Rescue and Recovery with Knoppix
The default desktop is KDE. You can choose a different one:
knoppix desktop=icewm
Or boot to a console, and not run X:
knoppix 2
You can speed up the boot process a bit by disabling hardware detection for thingsyou don’t have:
knoppix nopcmcia noscsi
To boot with minimal hardware detection, use:
failsafe
You can combine as many options as you need:
knoppix lang=uk desktop=icewm nopcmcia noscsi
DiscussionYou’ll need about 20 MB of RAM to boot console Knoppix, and a minimum of 96MB to run an X session satisfactorily. To run KDE, you’d better have 256 MB ofRAM. Knoppix will find and use the swap partition on the hard drive, if there is one.
The fun thing about Knoppix is that if you don’t like how it booted, or you want totry something different, you don’t have to bother with a graceful shutdown—justpull the plug and start over.
Knoppix glitchesRunning programs from a CD can cause some odd troubles, especially on note-books. It is common for power management to mess up a Knoppix session: whenyou wake up the machine, Knoppix doesn’t respond to commands any more. Trydisabling power management, or simply hit the power switch and start over.
Sometimes Knoppix gets stuck during boot-up and hangs partway into KDE (or anyX session) startup. Switch to the first virtual console (Ctrl-Alt-F1) to see the live sys-tem messages; this should tell you where the problem is. For example, Knoppixmight hang on SCSI detection. In this case, reboot and disable SCSI detection:
knoppix noscsi
See Also• Documentation on the Knoppix CD
• Knoppix.net (http://www.knoppix.net/)—the best Knoppix resource, with allkinds of tips and howtos
• Knopper.net (http://www.knopper.net/)—the official home page of KlausKnopper, the creator of Knoppix

This is the Title of the Book, eMatter EditionCopyright © 2007 O’Reilly & Associates, Inc. All rights reserved.
13.4 Saving Your Knoppix Configuration on a USB Memory Stick | 231
13.3 Creating a Knoppix Boot Diskette
ProblemYour system will not boot from a CD, but you would still like to use Knoppix. Howdo you get a Knoppix boot diskette?
SolutionKnoppix comes with a boot image all ready to copy to a diskette. Load and mountyour Knoppix CD on any Linux system, load a new, blank diskette, and run:
# dd if=/cdrom/KNOPPIX/boot.img of=/dev/fd0 bs=1440k
You can also create the boot diskette in Windows. Open a DOS window, then openthe KNOPPIX directory on the CD:
c:> d:d:> cd \KNOPPIX
Then create the diskette:
d:> mkfloppy.bat
Boot the system with the diskette, stick in the Knoppix CD when it tells you to, andyou’re in business.
DiscussionIncluding a DOS batch file to make a Knoppix boot diskette is a nice touch—anotherhandy tool for your rescue kit.
See Also• Documentation on the Knoppix CD
• Knoppix.net (http://www.knoppix.net/)
• Klaus Knopper’s official homepage (http://www.knopper.net/)
13.4 Saving Your Knoppix Configurationon a USB Memory Stick
ProblemYou would like to save your Knoppix configuration, such as network settings anddesktop configuration, so you don’t have to start over every time.

This is the Title of the Book, eMatter EditionCopyright © 2007 O’Reilly & Associates, Inc. All rights reserved.
232 | Chapter 13: System Rescue and Recovery with Knoppix
SolutionThis is a perfect job for one of those little USB memory sticks. Boot Knoppix with thememory stick inserted. On the Knoppix menu, look for Configuration ➝ SaveKNOPPIX Configuration. Select /dev/sda1 as the device to save it to.
Now when you boot Knoppix, make sure your USB stick is inserted, and use the fol-lowing boot command:
knoppix myconfig=/dev/sda1
You may also make Knoppix autodetect it:
knoppix myconfig=scan
Discussion256- and 512-MB USB pen drives are getting dirt cheap. Carry one of these and aKnoppix disk, and you can make yourself at home almost anywhere.
See Also• Documentation on the Knoppix CD
• Knoppix.net (http://www.knoppix.net/)
• Klaus Knopper’s official homepage (http://www.knopper.net/)
13.5 Creating a Persistent, Encrypted KnoppixHome Directory
ProblemYou really like running Knoppix from the CD, because it cannot be infested byviruses, Trojans, or rootkits, and you would like to use it in place of a hard driveinstallation. But there’s a problem: where do you store personal data, email, andother things that you’d like to keep with you? You want a secure home directory inwhich to store email and other data files.
SolutionRun Knoppix ➝ Configure ➝ Create to make a persistent Knoppix home directory.You’ll have the option of creating /home on the hard drive, or on removeable mediasuch as USB memory sticks, compact flash cards, or Zip disks. This creates a filecalled knoppix.img.
Say yes when it asks you if you want to create an AES-encrypted directory. The direc-tory will be encrypted with a 256-bit key. You have to come up with a passphrase of

This is the Title of the Book, eMatter EditionCopyright © 2007 O’Reilly & Associates, Inc. All rights reserved.
13.6 Copying Files to Another Linux PC | 233
at least 20 characters. Make it a sentence that you can remember, like “thisismylong-password,” because you’ll need it every time you boot.
To boot using your nice, new encrypted /home, insert your removable media andtype:
boot: knoppix home=/dev/sda1
If you also saved your Knoppix configuration, you can specify both:
boot: knoppix home=/dev/sda1 myconfig=/dev/sda1
Your new /home directory will appear in Knoppix as /home/knoppix and will be auto-matically mounted at boot. If you store your encrypted /home in an existing Linuxpartition on the hard drive, the whole partition will be mounted.
DiscussionThe default size of /home/knoppix is 30 MB. Make it as large as you need.
See Also• Documentation on the Knoppix CD
• Knoppix.net (http://www.knoppix.net/)
• Klaus Knopper’s official homepage (http://www.knopper.net/)
13.6 Copying Files to Another Linux PC
ProblemYou want to copy files from a troubled PC to another machine on your network.This is a good way to do an emergency backup of critical files when a PC appears tobe dying or behaving strangely.
SolutionBoot up Knoppix. The troubled PC must then connect to the LAN. If you have aDHCP server, Knoppix will connect automatically.
If you need to configure a static IP address, run netcardconfig from the console, oruse Knoppix ➝ Network/Internet.
You’ll need an SSH server set up on the receiving machine. (See the “Discussion”section of this recipe if you need to set this up.)
First, mount the filesystem containing the files you want to copy. Knoppix creates /etc/fstab, puts all the mountpoints under /mnt, and creates desktop icons for all file-systems. The easy way to mount the filesystem is to click on the desktop icon. Or you

This is the Title of the Book, eMatter EditionCopyright © 2007 O’Reilly & Associates, Inc. All rights reserved.
234 | Chapter 13: System Rescue and Recovery with Knoppix
can peek into /etc/fstab and use the command line. First change to root. There is nopassword:
knoppix@tty0[knoppix]$ suroot@ttyp0[knoppix]# mount /mnt/hda5
Then run the scp (secure copy) command:
# scp -rp /mnt/hda5/home/kmartin 192.168.1.5:/home/kmartin/tmp
It will complain:
Could not create directory '/home/kmartin/.ssh'.The authenticity of host '192.168.1.5 (192.168.1.5)' can't be established.RSA key fingerprint is a2:c6:77:2e:63:b2:ed:90:b2:9b:bc:e7:d4:22:baAre you sure you want to continue connecting?" (yes/no)?
Say yes. Then it will ask you for root’s password on the SSH server. Enter the pass-word, and the files will be copied.
You can also do this as an ordinary user, for the user’s own account. At the Knoppixroot prompt, create a new user:
root@ttyp0[knoppix]# useradd kmartin
Don’t bother with a password—you only need the user’s password on the SSHserver. Now kmartin can move files into her own account on the SSH server. Onlyroot can copy files into other users’ accounts.
DiscussionThe -r option for scp copies directories recursively. -p preserves permissions.
This is how to set up a quick-and-dirty SSH server. Install OpenSSH on the Linuxmachine to which you want to copy files. If it’s already installed, upgrade to the lat-est version to get all the security fixes. Then start it up:
# /etc/init.d/ssh start
and it is ready to receive files. If you intend to use SSH routinely for remote adminis-tration, don’t stop here—you’ll need to take a few more steps to ensure a safe con-nection. See Chapter 17 for more recipes on running SSH.
Because you are running Knoppix in memory, there is no way to save SSH keys orhosts, so it will emit the same complaints every time. If you plan to make a habit ofcopying files via scp, see Recipe 13.5.
See Also• scp(1), ssh(1)
• Recipe 13.5, “Creating a Persistent, Encrypted Knoppix Home Directory”

This is the Title of the Book, eMatter EditionCopyright © 2007 O’Reilly & Associates, Inc. All rights reserved.
13.7 Copying Files to a Samba Share | 235
13.7 Copying Files to a Samba Share
ProblemYou would like to copy files from a Linux PC to a Windows PC on your LAN usingKnoppix.
SolutionYou need to have Samba (Chapter 23) already configured and working on your LAN.Open a root shell:
knoppix@ttyp0[knoppix]$ suroot@ttyp0[knoppix]#
Create a local directory on which to mount the remote share, then mount the remoteshare:
root@ttyp0[knoppix]# mkdir /mnt/sambaroot@ttyp0[knoppix]# mount -t smbfs -o \uid=knoppix,workgroup=local,username=helix,password=tehsecuar \//windbag/lan_share/mnt/samba
Substitute your own workgroup, username, password, hostname, and shared foldername. On Windows 95/98/ME, if you did not configure file sharing to require apassword, use “guest” as the username and leave the password field blank.
Now you can open a couple of Konqueror windows for copying files or you can usethe cp command:
root@ttyp0[knoppix]# cp -av /home/helix /mnt/samba
DiscussionIf you prefer a graphical interface, there are a couple of options. If you know thehostname and share name, enter them in Konqueror’s Location bar:
smb://HOST/SHARE
Knoppix also includes LinNeighborhood for network browsing, under Internet ➝
LinNeighborhood.
See Also• Chapter 9 of Using Samba, by Jay Ts, Robert Eckstein, and David Collier-Brown
(O’Reilly)
• The Official Samba-3 Howto and Reference Guide for Samba 3.x (http://samba.org/)
• Chapter 23, File and Printer Sharing, and Domain Authentication with Samba

This is the Title of the Book, eMatter EditionCopyright © 2007 O’Reilly & Associates, Inc. All rights reserved.
236 | Chapter 13: System Rescue and Recovery with Knoppix
13.8 Copying Files to a CD-R/RW
ProblemYou have a CD writer on your PC, and you would like to burn files to a CD-R/RW.
SolutionThe absolute easiest way is to use K3b. Start up Knoppix, and open System ➝ K3bSetup. K3b will automatically find your CD drives; verify this in step 3 of the setupwizard. In step 6, add any non-root users you want to use K3b. (Remember, youneed to create the users first.)
When you’re finished with the setup wizard, close it, and open System ➝ K3b. ClickFile ➝ New Project. Simply drag and drop the files you want to copy, hit the Burnbutton, and you’re done.
DiscussionK3b is a great CD/DVD-writing interface, one of the best on any platform. It is logi-cally organized, and it hides all the grotty details of CD/DVD writing, so you don’thave to navigate bales of windows and menus to burn a disc, or bother with odd ter-minology like “Joliet,” “Rock Ridge,” or “El Torito.” While it is good to know theinner workings of a program, it is also nice when the computer does the work.
See Also• Chapter 11, CD and DVD Recording
• The K3b home page (http://www.k3b.org/)
13.9 Editing Configuration Files from Knoppix
ProblemSomeone with more confidence than knowledge (maybe even you) “fixed” some-thing in a configuration file and now the system won’t boot. You need to fix it. Buthow do you edit a file on a machine that won’t boot?
SolutionThis is a perfect job for Knoppix. You can open and edit any file on a PC from Knoppix.
Boot up your Knoppix disk to KDE. Right-click the icon on the desktop for the file-system you want to use, left-click “Mount,” then left-click “Change read/write mode.”
Open a root shell, then navigate to the file you want to edit and open it with the edi-tor of your choice:

This is the Title of the Book, eMatter EditionCopyright © 2007 O’Reilly & Associates, Inc. All rights reserved.
13.10 Installing Software from Knoppix | 237
knoppix@ttyp0[knoppix]$ suroot@ttyp0[knoppix]# cd /mnt/hda3/etcroot@ttyp0[etc]# kate inittab &
Now you can edit the file, just as you normally would.
It’s easy to become confused over whether you are in Knoppix or your PC’s file-system. Check with pwd:
root@ttyp0[etc]# pwd/mnt/hda3/etc
Remember that the filesystems on your PC’s hard drives are all mounted under /mntin Knoppix.
DiscussionKnoppix comes with a variety of window managers: larswm, IceWM, XFce,Windowmaker, Fluxbox, and TWM. But only KDE comes with the Knoppix menuand desktop icons for all of your partitions.
Just like with any Linux, you can also do everything from the console. To mount afilesystem as readable/writable, use:
root@ttyp0[knoppix]# mount -o rw /mnt/hda3
To open a file for editing, use:
root@ttyp0[knoppix]# vim /mnt/hda3/etc/inittab
Knoppix autodetects your filesystems and partitions and creates an /etc/fstab file, soyou can look in there to find mountpoints.
See Also• mount(8)
• Recipe 9.11, “Mounting and Unmounting Filesystems on Hard Drives”
13.10 Installing Software from Knoppix
ProblemYou need to run apt-get, apt-rpm, up2date, or some other updater utility that needsto be run from inside its own root filesystem.
SolutionIn Knoppix, you can chroot to the root filesystem on the hard drive. Open a Knoppixroot shell, then do:
root@ttyp0[knoppix]# mount -o rw /mnt/hda6root@ttyp0[knoppix]# chroot /mnt/hda6root@Knoppix:/

This is the Title of the Book, eMatter EditionCopyright © 2007 O’Reilly & Associates, Inc. All rights reserved.
238 | Chapter 13: System Rescue and Recovery with Knoppix
This gives you a root shell in the filesystem on the hard drive, as though you werebooted directly into it. You are no longer in the /mnt directory in Knoppix. Now youcan run any command, as though the system had booted normally. That includescommands for updating software like apt-get.
DiscussionFrom an ordinary Knoppix session it’s easy to keep track of your whereabouts, as allthe filesystems on the hard drive are mounted under /mnt. But in chroot, you won’tsee Knoppix files. If you get confused, try poking around and reading filenames—you should recognize files that belong on the hard drive, and not to Knoppix.
See Also• chroot(8)
13.11 Repairing a Lost Root Password
ProblemOops, you lost your root password.
SolutionNo problem whatsoever. Fire up Knoppix and open a root shell. Mount the filesys-tem containing /etc/shadow, and make it writable (see Recipe 9.10). Open /etc/shadow in your favorite editor, and find root’s entry:
root:$1$7nMNZYci$E.U6ftxnAZU0rk29qvYpk0:12460:0:99999:7:::
Delete the password hash, which is between the first set of colons:
root::12460:0:99999:7:::
Now when you start up the system and log in as root, you will not be asked for apassword.
DiscussionDon’t forget to set a new root password.
This is yet another demonstration that “anyone with physical access to the box ownsit.” See Chapter 12 for tips on securing the boot process.
See Also• shadow(5)
• Recipes 12.14 (“Protecting System Files with a GRUB Password”), 12.15 (“Lock-ing Out Users from Individual GRUB Menu Entries”), and 12.21 (“Password-Protecting LILO”) for how to set passwords on LILO and GRUB

This is the Title of the Book, eMatter EditionCopyright © 2007 O’Reilly & Associates, Inc. All rights reserved.
13.13 Virus-Scanning Windows PCs with Knoppix | 239
13.12 Installing Knoppix to a Hard Disk
ProblemYou really like using Knoppix, and you want to install it to a hard drive, just like a“real” Linux.
SolutionFire up Knoppix and open a root shell. Type knoppix-installer. Follow the menus andprompts, and when you’re done you’ll have a thoroughly modern Debian system.
DiscussionThis operates pretty much like any Linux installation. Check the release notes for yourversion of Knoppix, because up to Version 3.2 the installer script was knx-hdinstall. In3.3 it changed to knoppix-installer. It could change again—the Linux world waits forno one.
See Also• The Knoppix Wiki on http://www.knoppix.net/docs/—all the latest and greatest
tips and howtos are here
13.13 Virus-Scanning Windows PCs with Knoppix
ProblemYou want a quick, inexpensive method for running virus scans on Windows, inde-pent of the operating system. You know that the installation disks for commercialantivirus productes, like Symantec and McAfee, can be used to run a preinstallationvirus scan, but the virus definitions are going to be months out of date.
SolutionGet yourself a copy of Knoppix 3.4 or newer. You’ll need Internet connectivity todownload fresh virus definitions. You can either run a scan-only or a scan-and-disinfect on Windows partitions with FAT16/32. On NTFS filesystems, you can onlyrun a scan because write support for NTFS is still unreliable in Linux.
Boot up Knoppix. Go to KNOPPIX ➝ Utilities ➝ Install software. This brings up amenu of available packages to install; check f-prot.
After f-prot is installed, select KNOPPIX ➝ Extra Software ➝ f-prot. This brings upthe f-prot menu; the first thing you want to do is 4, “Online Update.”

This is the Title of the Book, eMatter EditionCopyright © 2007 O’Reilly & Associates, Inc. All rights reserved.
240 | Chapter 13: System Rescue and Recovery with Knoppix
After the new virus defintions are downloaded, select partitions or directories toscan. Knoppix automatically mounts all partitions on your system, so you can easilyselect the ones you want. To run a scan-only, hit the “scan” button—and go findsomething to do, because it will take awhile. When it’s finished, you’ll see a reportshowing the results of the scan.
To scan and disinfect, run f-prot from the command line instead of the graphicalmenu. First, make sure the partition is mounted read/write; simply right-click on theicon for the drive, which is on your Knoppix desktop, and left-click Actions ➝
Change read/write mode.
Next, open a command shell and run this command, naming the partition you wantscanned:
$ f-prot -disinf -list /mnt/hda1
The -list option shows the scan’s progress and the -disinf option will disinfect the sys-tem. That’s all there is to it.
DiscussionThis approach has a number of advantages:
• You are working from a guaranteed clean operating system—and since it’s on anonwritable disk, it’s impossible to compromise.
• Because you must power down the PC to boot Knoppix, any memory-residentnasties are evicted.
• It’s free—so you can burn masses of disks and go on a virus-scanning spree.
f-prot has a Windows edition for $29, and liberal licensing terms for home users; itcovers all your home computers. There is also a free Linux workstation edition; sure,we can mock and abuse Microsoft all we want, but all it would take is one evil geniuswriting a lethal Linux exploit and hordes of happy script kiddies distributing it allover the planet in a heartbeat, and we wouldn’t be laughing anymore.
See Also• Knoppix net, for bales of howtos (http://www.knoppix.net)
• f-prot home page (http://www.f-prot.com)

This is the Title of the Book, eMatter EditionCopyright © 2007 O’Reilly & Associates, Inc. All rights reserved.
241
Chapter 14 CHAPTER 14
Printing with CUPS
14.1 IntroductionThe Common Unix Printing System (CUPS) is a modern printing subsystem forLinux and Unix that replaces the hoary old Unix line-printer protocols. It runs onUnix, Linux, Mac OS, and Mac OS X, and it serves clients on nearly any platform,including Windows.
CUPS is thoroughly modern, supporting laser and inkjet printers as well as dotmatrix and other legacy printers.
There are two versions of CUPS: the free GPL version, which is the default on mostof the major Linux distributions, and a commercial edition. The commercial versioncomes with support, a larger selection of drivers, and nicer management interfaces.
Printer drivers in CUPS consist of one or more filters specific to a printer, which arepackaged in PPD (PostScript Printer Description) files. All printers in CUPS—evennon-PostScript printers—need a PPD. The PPDs contain descriptions about theprinters, specific printer commands, and filters.
Filters are the heart and soul of CUPS. Filters translate print jobs to formats theprinter can understand, such as PDF, HP-PCL, raster, and image files, and they passin commands for things such as page selection and ordering. PPDs are text files—take a look in /usr/share/cups/model/ to see what they look like. Installed printershave PPDs in /etc/cups/ppd.
Finding DriversIncluded in CUPS are generic PPDs for 9-pin and 24-pin Epson dot matrix printers,Epson Stylus and Color Stylus Photo printers, LaserJet and HP DeskJet printers, andeven Dymo label printers. These will work for hundreds of printers, but they do notsupport all printer functions, such as duplexing, inkjet head-cleaning and alignment,or tray selection.

This is the Title of the Book, eMatter EditionCopyright © 2007 O’Reilly & Associates, Inc. All rights reserved.
242 | Chapter 14: Printing with CUPS
There are four good sources for printer drivers, if your printer manufacturer does notsupply Linux drivers:
• Foomatic, at http://linuxprinting.org
• Gimp-Print, at http://gimp-print.sourceforge.net
• The commercial edition of CUPS, at http://www.easysw.com/cups/
• Windows PostScript drivers
Foomatic is a free printer-driver project that integrates with all the common Linuxprinting systems (CUPS, LPRng, LPD, GNUlpr, PPR, PDQ, CPS).
Gimp-Print originally started out as a Gimp plug-in, but it has expanded to supportall Linux printing. Gimp-Print drivers are very high quality; if there is one for yourcolor printer, it is probably the best choice.
Be sure to check the hardware compatibility list for your Linux distribution, or theprinter database on linuxprinting.org, before purchasing a printer.
Gimp-Print and Foomatic are available as packages that you can install on your sys-tem, if they are not already included in your distribution. This ensures that you get acomplete selection of drivers, plus all the required subsystems that make everythingwork together correctly. The RPMs are complete; Debian splits them into severalsmaller packages. Visit the Debian package search page to find them (http://packages.debian.org).
You can use the Windows drivers for PostScript printers on Linux. Look for PPDfiles in your Windows system directory. Note that only PPDs for real PostScriptprinters will work. Many printers are only PostScript-compatible; your printer docu-mentation will tell you.
You can test PPDs at http://www.cups.org/testppd.php. This site looks for syntaxerrors in PPD files. The errors it finds are usually things you can fix, such as a typo orincorrect command.
Networking PrintersThere are four ways to share printers on a network:
• Share printers that are attached to users’ PCs.
• Build a dedicated Linux printer server.
• Buy network-direct printers, such as the HP JetDirect series.
• Buy hardware printer servers, such as the Linksys EPSX3, that can connect anyprinter directly to your LAN.
This chapter covers the first two options. The last two are too diverse, and there aretoo many choices to try to cover here. Here are some things to keep in mind whenyou’re deciding which one to use:

This is the Title of the Book, eMatter EditionCopyright © 2007 O’Reilly & Associates, Inc. All rights reserved.
14.2 Installing a Printer on a Standalone Linux PC | 243
• Using a Linux box as a printer server gives you maximum flexibility and custom-ization options.
• Network-direct printers, with built-in networking hardware, tend to be expen-sive and require proprietary network hardware.
• Network-direct printers are usually built for heavy-duty use.
• A hardware printer server lets you network any printers you want.
Using network-direct printers and hardware printer servers means less power con-sumption and smaller space requirements than using a PC as a dedicated printerserver. You must shop carefully for Linux support, though, because some of themcome with Windows-only management software. Anything that is managed via aweb interface should work fine.
14.2 Installing a Printer on a StandaloneLinux PC
ProblemYou need to connect a printer to your Linux PC.
SolutionIf you have a USB printer, it must be connected and powered up at boot time.
First, make sure that the CUPS daemon is running:$ lpstat -tscheduler is running...
If it is not running, it says:
$ lpstat -tlpstat: Unable to connect to server: Connection refused
If that is the case, start it with its init script:
# /etc/init.d/cupsys start
On Red Hat and Fedora, use:
# /sbin/service cups restart
The easiest way to install a new printer is with the CUPS web interface. Type theCUPS URL in any browser:
http://localhost:631
You’ll need the root password. Click the Printers tab, then click “Add printer,”which opens the Admin menu. There are three values to enter here:
Name: hp6LLocation: room-202Description: bw-laser

This is the Title of the Book, eMatter EditionCopyright © 2007 O’Reilly & Associates, Inc. All rights reserved.
244 | Chapter 14: Printing with CUPS
Choose the name carefully—CUPS needs this name, and changing it will cause prob-lems. Your printer name will be used on the next few configuration pages. I’veentered “hp61” for my Hewlett-Packard LaserJet6L printer. The Location andDescription are optional.
On the next page, define the “Device for <printername>.” This means the physicalconnection: parallel port, USB, SCSI, serial port, or network. Select your deviceURIfrom the drop-down menu. In this example, that is “Parallel port #1 Hewlett-Pack-ard HP LaserJet6L.”
On the “Model/Driver for <printername>” menu, scroll to the model number of yourprinter, and select a driver from the list.
Now it should say “Printer <printername> has been added successfully.” Click onthe printer name to go the printer’s control page, and print a test page. Your CUPSpage should look like Figure 14-1.
DiscussionIf you prefer the command line, this long command does the same thing as the aboveexample:
# lpadmin -p hp6L -L room-202 -D bw-laser -E -v parallel:/dev/lp0 \-m HP-LaserJet_6-hpijs.ppd
Figure 14-1. CUPS page

This is the Title of the Book, eMatter EditionCopyright © 2007 O’Reilly & Associates, Inc. All rights reserved.
14.2 Installing a Printer on a Standalone Linux PC | 245
Here are some definitions:
lpadmin -pSet the printer name.
-LSet the printer location.
-DDescribe the printer.
-EEnable the printer and make it ready to receive jobs.
-vSet the device URI.
-mSpecify which driver (PPD file) to use. Note that the filepath is hardcoded intoCUPS; if you try to use a filepath like /usr/share/cups/model/laserjet.ppd, it willfail, saying “lpadmin: add-printer (set model) failed: server-error-internal-error.”Just use the PPD name, and make sure the PPD file you want is in /usr/share/cups/model/.
If you have Gimp-Print and Foomatic installed (if you don’t you probably should)you’ll find additional PPDs in /usr/share/cups/model/gimp-print and /usr/share/cups/model/foomatic. They are compressed:
HP-LaserJet_6-hpijs.ppd.gz
You’ll need to uncompress the file and move it to the /usr/share/cups/model directory:
# gunzip HP-LaserJet_6-hpijs.ppd.gz && mv HP-LaserJet_6-hpijs.ppd \/usr/share/cups/model/
It is not necessary to uncompress and move PPD files when you install printers usingthe CUPS web interface.
Generic driversThese are the generic drivers that come with the free version of CUPS:
$ ls /usr/share/cups/modelepson24.ppd laserjet.ppd pxlcolor.ppd stphoto.ppd deskjet.ppd epson9.ppdokidat24.ppd pxlmono.ppd stphoto2.ppd deskjet2.ppd okidata9.ppd stcolor.ppddymo.ppd pcl-6.ppd stcolor2.ppd
If you can’t find a driver specific to your printer, one of these should work. (Youdid check your distribution’s hardware compatibility list, or the database onlinuxprinting.org, before purchasing the printer, right?)
See Also• This chapter’s “Introduction,” for more information on printer drivers
• CUPS Software Administrators Manual (http://localhost:631/documentation.html)
This is the Title of the Book, eMatter EditionCopyright © 2007 O’Reilly & Associates, Inc. All rights reserved.
246 | Chapter 14: Printing with CUPS
14.3 Serving Linux Clients
ProblemYou want to share the printers attached to your Linux PCs with other Linux clientson your LAN.
SolutionFirst, make sure CUPS is installed on all the computers with attached printers. ThesePCs must have static IP addresses and you’ll need name resolution in place andworking (/etc/hosts or a local DNS server).
Next, on the PCs with printers attached, edit /etc/cupsd.conf. This sample cupsd.confshows how to make the printers accessible to the local subnet. You can use this asit’s shown, using your own network values:
LogLevel infoPort 631<Location />Order Deny,AllowDeny From AllAllow From 127.0.0.1Allow From 192.168.1.*</Location>BrowseAddress 192.168.1.255
Add this entry to restrict administrative access to the server only and not allow itfrom client machines:
<Location /admin>AuthType BasicAuthClass SystemOrder Deny,AllowDeny From AllAllow From 127.0.0.1</Location>
Restart cupsd after editing cupsd.conf:
# /etc/init.d/cupsys restart
On Red Hat and Fedora, use:
# /sbin/service cups restart
Print a test page. If you get the infamous “client-error-not-found” message, stop andrestart the printer from the CUPS web interface.
CUPS printers will now automatically broadcast themselves on the network. Makesure that TCP port 631 is not blocked on either the server or the client machines.
This is the Title of the Book, eMatter EditionCopyright © 2007 O’Reilly & Associates, Inc. All rights reserved.
14.4 Sharing a Printer Without Using Name Resolution | 247
Open the CUPS web interface (http://localhost:631) on any of the Linux client PCs,and all CUPS printers should automatically appear on the Printers page. You cannow print a test page and print from applications.
DiscussionIf there is a sample cupsd.conf on your system, don’t let its size scare you. Chancesare you’ll never need most of the directives; just hang on to it as a reference, and cre-ate your own cupsd.conf from scratch.
All of the directives in cupsd.conf are listed and defined in the CUPS Software Admin-istrators Manual, at http://localhost:631/documentation.html.
LogLevel infoThere are 10 levels of logging. info is the default; it logs errors and printer activ-ity in /var/log/cups/error_log.
Port 631This is reserved for IPP (Internet Printing Protocol).
<Location /></Location>
The Location directive specifies access control and authentication options. Notethe positioning of the slashes—make sure you get them right, or things won’twork.
Order Deny,AllowDeny From AllAllow From 127.0.0.1Allow From 192.168.1.*
Your standard “deny all, allow as needed” scheme, limiting inbound connec-tions to the local machine and the local subnet.
See Also• The “Printing System Management” section in the CUPS Software Administra-
tors Manual (http://localhost:631/documentation.html)
14.4 Sharing a Printer Without Using NameResolution
ProblemYou haven’t bothered to create /hosts files, or set up a local DNS server on yourLAN, because you have no need for name resolution. The PCs on your LAN sit com-fortably behind a NAT firewall, for sharing an Internet connection, and that’s allthey need. So how do you share a printer?

This is the Title of the Book, eMatter EditionCopyright © 2007 O’Reilly & Associates, Inc. All rights reserved.
248 | Chapter 14: Printing with CUPS
SolutionGive your printer server a static IP address. Add a ServerName directive to /etc/cupsd.conf on the server, using its own IP address:
ServerName 192.168.1.5
Restart cupsd. On Debian, use:
# /etc/init.d/cupsys restart
On Red Hat and Fedora, use:
# /sbin/service cups restart
There is nothing to do on the client PCs, except wait a few seconds for CUPS tobroadcast the printer. If you get the infamous “client-error-not-found” message, stopand restart the printer.
DiscussionBy default, CUPS uses the hostname as the ServerName. If you are not using anykind of name resolution, your client PCs will not see any CUPS printers. Specifyingthe IP address as the ServerName fixes that. A side effect is that you may not be ableto print a test page from the server; instead, you’ll get the screen shown inFigure 14-2.
However, you’ll still be able to print from applications on the server. Client PCswon’t notice anything odd.
If you don’t need to set up a network filesystem such as NFS or Samba, or use DNS;it’s perfectly okay, even if the other geeks laugh at you. A primary rule of security is“don’t run what you don’t need.”
See Also• CUPS Software Administrators Manual (http://localhost:631/documentation.html)
Figure 14-2. No CUPS page

This is the Title of the Book, eMatter EditionCopyright © 2007 O’Reilly & Associates, Inc. All rights reserved.
14.5 Serving Windows Clients Without Samba | 249
14.5 Serving Windows Clients Without Samba
ProblemYou would like to connect your Windows clients to a Linux printer server, but youreally don’t want to set up Samba just to share printers.
SolutionCUPS can handle the job without Samba. You need your Windows installation CDor printer driver disk, and Windows clients need to have Internet Printing Servicesinstalled. This is the same as IPP (Internet Printing Protocol) on Linux.
Windows 95/98 users can get the download at http://www.microsoft.com/windows98/downloads/. Look for “Internet Print Services.” The file you want is wpnpins.exe.
Windows ME supplies the Internet Printing Services software in the Add-on folder onthe installation CD.
On Windows NT, go to Control Panel ➝ Network ➝ Services tab ➝ Add MicrosoftTCP/IP Printing.
On Windows2000/XP, install TCP/IP Print Services from Network and Dial-up Con-nections ➝ Advanced Menu ➝ Optional Networking Components ➝ Other NetworkFile and Print Services.
Next, fire up the Add Printer wizard. Select Network Printer, then add the printerURI. This consists of the IP address or server name, port number, and /printers/<printername>. Be sure to use the exact name you gave the printer, like this:
http://192.168.1.5:631/printers/hp6L
There isn’t a /printers directory anywhere; that’s just a convention used by CUPS.
When Windows first connects to the CUPS server, it will install its own local printerdrivers and print its own test page, rather than the CUPS test page. So you may needa Windows CD or the driver installation disk.
DiscussionIf you have name resolution working on your LAN, you can use the server nameinstead of the IP address:
http://windbag:631/printers/hp6L
See Also• This chapter’s “Introduction,” for more information on printer drivers

This is the Title of the Book, eMatter EditionCopyright © 2007 O’Reilly & Associates, Inc. All rights reserved.
250 | Chapter 14: Printing with CUPS
14.6 Sharing Printers on a Mixed LANwith Samba
ProblemYour LAN has both Linux and Windows printers, and you want all of them to beaccessible by both Linux and Windows clients.
SolutionYou’ll need both Samba and CUPS to make this work. See Recipe 23.22 and Recipe23.23.
See Also• The Official Samba-3 Howto and Reference Guide (http://samba.org)
14.7 Building a Dedicated CUPS Printer Server
ProblemSharing printers connected to PCs works fine, but it places an extra load on the PCs,and the PCs must be running for printers to be accessible. And sometimes it meansrunning all over to fix things. You want to set up a dedicated printer server, for eas-ier centralized printer management.
SolutionA plain-vanilla Pentium-class PC with several attached printers makes a dandy CUPSprinter server. There are two good ways to install multiple printers to a single PC:
• Use additional parallel-PCI cards, for connecting parallel-port printers.
• Add USB hubs for connecting more USB printers.
Set up a minimal Linux installation, with CUPS. Install all the Foomatic and Gimp-Print packages and drivers. (These are available both as RPMs and in Debian reposi-tories.)
Then all you need to do is install the printers and configure CUPS. See the first fourrecipes in this chapter for how to install printers, and information on sharing withboth Windows and Linux clients without needing to use Samba.
DiscussionA centralized printer server has a lot of advantages: all the printers are in one place,supplies can be stored close by, and users are not bothered by other people wanting

This is the Title of the Book, eMatter EditionCopyright © 2007 O’Reilly & Associates, Inc. All rights reserved.
14.8 Distributed Printing with Classes | 251
to use their printers. And if you use Linux and CUPS for a print server, you don’tneed to set up Samba to share printers with Windows clients.
See Also• PC Hardware in a Nutshell, by Robert Bruce Thompson and Barbara Fritchman
Thompson (O’Reilly). This is a great hardware guide, even though it isWindows-centric, and their companion web site (http://www.ttgnet.com)includes a lot of useful updates to the book.
• The “Printing System Management” section in the CUPS Software Administra-tor’s Manual at (http://localhost:631/documentation.html).
14.8 Distributed Printing with Classes
ProblemYou have a user group that generates a lot of high-volume printing, and you need aneasy way to give users a group of printers to use, without having to hassle with indi-vidual print queues.
SolutionUse classes to create, in effect, a single printer queue containing several printers.From the Admin page of the CUPS web interface, click “Add Class.” Select printersfor the class from your installed printers. Users can now send print jobs to the class,instead of to an individual printer, and the first available printers will take them. Youcan add or remove printers from this menu, and even create subclasses.
You can also do this from the command line. Create a class and populate it withprinters this way:
# lpadmin -p printer1 -p printer2 -p printer3 -c art-dept
To add another printer to this class, use:
# lpadmin -p printer4 -c art-dept
Remove a printer with the -r option:
# lpadmin -p printer4 -r art-dept
To delete the entire class, use:
# lpadmin -x art-dept
DiscussionObviously, you don’t want to group geographically dispersed printers into the sameclass—they should be in the same room. It will get confusing enough, as users won’tknow which printers have their print jobs. The advantage is that if a printer gets

This is the Title of the Book, eMatter EditionCopyright © 2007 O’Reilly & Associates, Inc. All rights reserved.
252 | Chapter 14: Printing with CUPS
jammed or otherwise becomes unavailable, jobs will still be printed without userintervention. It’s also great for high-volume printing, as idle printers will automati-cally take over from busy ones.
See Also• The “Printer Classes” section in the CUPS Software Administrators Manual (http://
localhost:631/documentation.html)
14.9 Restricting Users from Printers and Classes
ProblemYou have some printers you would like to restrict to selected users. You don’t wantpeople printing pictures of their kids on the design group’s fancy graphics printer, forexample.
SolutionUse the lpadmin command:
# lpadmin -p hp6L -u allow:carla,jenn,dancer
This changes /etc/cups/printers.conf:
# Printer configuration file for CUPS v1.1.20# Written by cupsd on Fri Jan 7 00:36:36 2004<DefaultPrinter hp6L>InfoLocationDeviceURI parallel:/dev/lp0State IdleAccepting YesJobSheets none noneQuotaPeriod 0PageLimit 0KLimit 0AllowUser carlaAllowUser jennAllowUser dancer</Printer>
You can also restrict classes:
# lpadmin -p art-dept -u allow:carla,jenn,dancer
This modifies /etc/cups/classes.conf.
You can also deny users:
# lpadmin -p hp6L -u deny:daryl,larry,otherlarry

This is the Title of the Book, eMatter EditionCopyright © 2007 O’Reilly & Associates, Inc. All rights reserved.
14.10 Troubleshooting | 253
DiscussionDon’t try to edit classes.conf or printers.conf directly, because your changes will belost. Use lpadmin.
See Also• The “Managing Printers” section in the CUPS Software Administrators Manual
(http://localhost:631/documentation.html)
14.10 TroubleshootingProblemPrinting, especially network printing, is probably the most difficult and troublesomeaspect of system administration. What tools are there for diagnosing and fixingproblems?
SolutionYour first stop is /var/log/cups/error_log. The default log level in cupsd.conf isLogLevel info. This logs errors and ordinary activity. If LogLevel info does not gener-ate enough detail, the highest levels are debug and debug2.
Trying a different printer driver cures a large number of printing problems.
If test pages won’t print, try printing other documents. A test page not printing indi-cates a problem somewhere, but if you can get your work done, you can probablylive without the test page.
For network printing, make sure you have connectivity. Ping both IP addresses andhostnames. Try connecting manually to Samba shares. Try printing from themachine to which the printer is attached.
Run the ppd file for the printer through the PPD checker at http://www.cups.org/testppd.php to test for syntax errors.
If you can’t decipher for yourself where the problem is, you can post log output andthe steps you’ve tried in help forums. Here is a listing of the more useful ones:
http://printing.kde.orgSpecific to printing in KDE, but still a thorough resource for many aspects ofprinting with CUPS
http://gimp-print.sourceforge.net/p_Mailing_Lists.php3Help for Gimp-Print drivers
http://www.linuxprinting.org/forums.cgiHelp forums for HP, Epson, Alps, and many more printers
http://www.cups.org/newsgroups.phpCUPS newsgroups

This is the Title of the Book, eMatter EditionCopyright © 2007 O’Reilly & Associates, Inc. All rights reserved.
254 | Chapter 14: Printing with CUPS
As always, search the archives before posting your query. There is nothing newunder the sun.
See Also• The Troubleshooting-CUPS-and-Asking-for-Help Howto, by Kurt Pfeifle—a
wonderful, comprehensive CUPS troubleshooting guide (http://www.cups.org/cups-help.html)

This is the Title of the Book, eMatter EditionCopyright © 2007 O’Reilly & Associates, Inc. All rights reserved.
255
Chapter 15 CHAPTER 15
Configuring Video andManaging X Windows
15.1 IntroductionThe X Window System is the foundation of Linux’s graphical interface. All thosenice window managers and desktop environments—XFce, Enlightenment, KDE,Gnome, and so forth—run on top of X.
The X Window System is an amazing piece of work. You can run in a graphical envi-ronment, have text consoles open at the same time, and easily switch back and forthbetween them. The X Window System does more than draw pretty pictures; it’s anetworking protocol as well. You can even log in to remote systems via X. (This iscovered in Chapter 17.)
While the X Window System has been the Linux standard forever, there is a newwindowing system finding acceptance: X.org. It is a fork of the XFree86™ projectthat found sudden popularity when the 4.4 release of XFree86 adopted a licensingchange that was possibly incompatible with the GPL. Fedora and Mandrake were thefirst on board with X.org. By the time you read this, everyone may have kissed andmade up, or it may all be a jumble, with yet another distribution difference to trapthe unwary. You’ll need to know which one is on your system. This command givesthe version number for XFree86:
$ XFree86 -version
And this is for X.org:
$ X.org -version
X.org currently mirrors XFree86 very closely; the primary differences are in the con-figuration filenames and locations. However, the two will probably diverge morewith time.

This is the Title of the Book, eMatter EditionCopyright © 2007 O’Reilly & Associates, Inc. All rights reserved.
256 | Chapter 15: Configuring Video and Managing X Windows
There is a lot of confusing terminology around the X Window System, as well asinconvenient capitalizations. Here are a few definitions:
XFree86 Project, Inc.The organization that produces XFree86, which is a freely redistributable opensource implementation of the X Window System.
XFree86 4.xThe current version of XFree86 on Linux.
X Window SystemThe original network-aware windowing environment for Unix. It is also called “anetwork protocol that draws pictures.”
X11The eleventh version of the X Window System.
X11R6The specifications for the X Window System.
X.Org FoundationA fork of the XFree86 project.
Make it easy on yourself, and just call it “X.”
HardwareAll video adapters will work in Linux; even the most obscure card will work at ageneric VGA level (640 × 480, 16 colors). All the major Linux distributions comewith good video configuration tools that will detect your hardware and find driversautomatically. It is unlikely you’ll ever need to edit XF86Config, except perhaps toenable hardware acceleration or to customize multihead displays.
The majority of video adapters have Linux drivers and will deliver good 2D perfor-mance, which means that for everyday tasks—email, web surfing, spreadsheets,word processing, and so forth—most any adapter will do. Getting 3D hardwareacceleration support can take a little more effort, but if you play games like TuxRacer and Quake, or do 3D computer-aided design (CAD) or 3D modeling, hard-ware acceleration is essential.
Modern video cards are more powerful than PCs of yesteryear: a high-end model has256 MB of RAM, a 256-bit bus, a 256-MHz GPU, and often even has its own cool-ing fan.
Video-card performance is limited by the type of motherboard slot it is plugged into.PCI cards are the slowest. AGP is much faster, and is found on all modern boards.There are several flavors of AGP:
AGP 1.01X = 266 MB/sec
2X = 533 MB/sec

This is the Title of the Book, eMatter EditionCopyright © 2007 O’Reilly & Associates, Inc. All rights reserved.
15.1 Introduction | 257
AGP 2.01X = 266 MB/sec
2X = 533 MB/sec
4X = 1.066 GB/sec
AGP 3.01X = 266 MB/sec
2X = 533 MB/sec
4X = 1.066 GB/sec
8X = 2 GB/sec
The AGP standards are backward- and forward-compatible; you can mix up newcards and old motherboards and old cards and new motherboards. However, put-ting a new, high-end card on an older board means you won’t get all the perfor-mance you paid for.
DriversOne way to get hardware video acceleration in Linux is by using Direct RenderingInfrastructure (DRI) and a Linux-supported video card. DRI is built in to XFree86.Currently, XFree86/DRI support is available for these chipsets: 3dfx, Gamma, Inteli8x0 motherboard chipsets, Matrox, ATI Rage, ATI Radeon, Mach64, and Sis300.Visit http://xfree.org and http://dri.sourceforge.net for up-to-date information on sup-ported chipsets and howtos.
The other way to get hardware video acceleration is by using drivers supplied by themanufacturer. For example, nVidia supplies their own binary-only drivers and ker-nel modules, which are currently the only way to get hardware acceleration fornVidia adapters. You can use the the open source nv driver for nonaccelerated 2Doperation.
ATI and Matrox both have some cards that are fully supported by open source driv-ers and some that require proprietary binary drivers to get full functionality. Asalways, do your homework before buying.
TerminologyHere’s some terminology:
DACDigital-to-analog converter. Usually a single chip that converts digital data toanalog, for example in modems.
RAMDACRandom Access Memory digital-to-analog converter. The chip that converts digi-tal signals to analog, for analog displays.

This is the Title of the Book, eMatter EditionCopyright © 2007 O’Reilly & Associates, Inc. All rights reserved.
258 | Chapter 15: Configuring Video and Managing X Windows
GPUGraphics processing unit. The processor that does the intense computationsrequired for 3D video.
SRAMStatic Random Access Memory. It’s “static” because it does not need to berefreshed, unlike DRAM (Dynamic Random Access Memory). SRAM is consid-erably faster than DRAM, with access times as low as 10 nanoseconds, com-pared to 60 nanoseconds for DRAM.
AGPAccelerated graphics port. AGP is based on the PCI bus. It is a dedicated chan-nel to system memory, and it is considerably faster than PCI, which tops out at133 MB/sec. Currently the fastest AGP slot is 8X, or 2 GB/sec.
15.2 Using Both X Windows and Consoles
ProblemYou want both console sessions and X sessions.
SolutionYes, Linux user, you can have it all. To switch from an X session to one of the con-soles, simply hit Ctrl-Alt-Fn, where Fn is F1–F6. To switch between consoles, hit Alt-Fn. To switch back to X, hit Alt-F7. The first X session is always :0. To open a sec-ond X session, do this from a console:
$ startx -- :1
Make sure there is a space on either side of the double hyphen. The X session you’vejust created belongs to the F8 key. Don’t log into two X sessions as the same user, asstrange and bad conflicts will occur. You can create as many X sessions as you haveavailable consoles and system resources for.
When you start X from a console, all of the debugging messages and backgroundmutterings can be seen on the console. KDE is especially talkative, like it’s on a cof-fee jag. Most of it is not significant, but sometimes it’s useful for troubleshooting.
DiscussionMost Linuxes install with seven virtual consoles. Take a look in /etc/inittab:
# Note that on most Debian systems tty7 is used by the X Window System,# so if you want to add more gettys go ahead, but skip tty7 if you run X.#1:2345:respawn:/sbin/getty 38400 tty12:23:respawn:/sbin/getty 38400 tty23:23:respawn:/sbin/getty 38400 tty34:23:respawn:/sbin/getty 38400 tty4

This is the Title of the Book, eMatter EditionCopyright © 2007 O’Reilly & Associates, Inc. All rights reserved.
15.2 Using Both X Windows and Consoles | 259
5:23:respawn:/sbin/getty 38400 tty56:23:respawn:/sbin/getty 38400 tty6
The majority of Linux systems bind the default X session to tty7. A notable excep-tion is Knoppix, which uses only five virtual terminals.
What can you do with all of these? Express all of your personalities. Log in as severaldifferent users. Log in as yourself many times. Switch to another console to get out oftrouble. Gloat about how flexible and versatile Linux is.
gettys and ttysThese words, like so much of Linux’s terminology, are Unix history lessons. gettymeans get tty. tty is teletype. That’s right, Linux sees your expensive new full-color,high-definition monitor, with built-in sound and FireWire ports, as a teletype—justsome old thing to stream output to.
getty manages logins over serial connections. It opens a serial device, such as a textterminal, virtual terminal, or modem, and waits for a connection. It displays thelogin prompt; then, when you enter your username, hands off to the login program.There are many gettys: mgetty, mingetty, ugetty, agetty, getty-ps, fbgetty, and doubt-less more. mingetty is a minimal getty designed only for virtual consoles. It won’t talkto modems. mgetty is probably the best modem getty. How do you know which gettyyour system uses?
$ ps ax | grep getty 456 tty2 S 0:00 /sbin/getty 38400 tty2 457 tty3 S 0:00 /sbin/getty 38400 tty3 458 tty4 S 0:00 /sbin/getty 38400 tty4 459 tty5 S 0:00 /sbin/getty 38400 tty5 460 tty6 S 0:00 /sbin/getty 38400 tty6
Why doesn’t this show tty1? Because that’s the terminal you’re logged in on. gettyonly sticks around waiting for logins; it retires quietly once a login is completed.
This tells us we’re running getty itself, and not a link to some other getty:
$ ls -go /sbin/getty-rwxr-xr-x 1 14264 Sep 19 21:25 /sbin/getty
tty is a program. Go ahead, try it out in a console:
$ tty/dev/tty3
Now try it in an X terminal:
$ tty/dev/pts/2
tty tells you what virtual terminal you are in (“virtual” because in the olden days,they had real terminals that had no processing power of their own—they weremerely interfaces to a great and mighty mainframe somewheres).

This is the Title of the Book, eMatter EditionCopyright © 2007 O’Reilly & Associates, Inc. All rights reserved.
260 | Chapter 15: Configuring Video and Managing X Windows
ttyS* is a serial port. The serial ports are numbered ttyS0 through ttyS04. While wethink of a serial port as the physical DB-9 connector, it’s also a logical port with anIRQ and I/O address.
tty* names the virtual consoles: tty1, tty2, etc. While most Linux systems ship with 7,theoretically you could have up to 63 virtual consoles.
pts means pseudoterminal. These are X terminals, like xterm, gnome-terminal, wterm,powershell, and Konsole.
Because these are serial interfaces, horrid things like flow control, data flow paths,buffers, and other things that used to be of concern to users are involved. Thank-fully, in these modern times, Linux handles all this for us (though these are still com-pletely configurable, for those who wish to do so).
See Also• tty(1), tty(4), pts(4), console(4), getty(8), mingetty(8), mgetty(8)
• The Serial Howto (http://www.tldp.org/HOWTO/Serial-HOWTO.html)
15.3 Installing a New Video Adapter
ProblemYou are adding a second video adapter to a system, or replacing the old one with adifferent type of adapter. How do you configure it and get it working?
SolutionThe best way is to use the graphical configuration tool that comes with your distribu-tion. Let these excellent tools do the work. SuSE has SaX, Red Hat has redhat-config-xfree, Fedora uses system-config-xfree, and Mandrake’s is XFdrake. Every distribu-tion has its own utility; you’ll get the best results by using it.
The second-best way is to edit XF86Config manually, changing only the parts thatare pertinent to your new adapter. See the next recipe for how to edit XF86Config.
DiscussionYou may find these X utilities to be helpful:
• XFree86 -configure
• /usr/X11R6/bin/xf86config
• /usr/sbin/ddcprobe
All of these must be run as root.

This is the Title of the Book, eMatter EditionCopyright © 2007 O’Reilly & Associates, Inc. All rights reserved.
15.4 Editing XF86Config | 261
XFree86 -configure probes your hardware and automatically generates a newXF86Config file. It thoughtfully stores the file in a separate location, without over-writing your original XF86Config file, so that you can test it first.
xf86config requires that you know configuration data about your mouse, keyboard,video adapter, and monitor. It takes you through the setup line by line, asking ques-tions until you’re ready to explode. Most important are the name of your video card,the amount of video RAM, and the horizontal/vertical refresh rates for your monitor.
Run /usr/sbin/ddcprobe to collect the information you need for your video card. Itmay also probe your monitor, but most likely it won’t, so be sure to have your moni-tor’s documentation at hand. If you don’t have it, these values are common to mod-ern multisync monitors and will get you up and running so you can Google for thecorrect figures:
• Horizontal Sync (kHz): 30–58
• Vertical Sync (Hz): 50–85
If your new configuration does not work, check /var/log/Xfree86.0.log to see whatwent wrong. If you get stuck in a bad X session and can’t log out, use Ctrl-Alt-Back-space to break free.
See Also• XFree86 documentation (http://www.xfree86.org/resources.html)—look here to
find the driver name for your adapter
• X(7x)
15.4 Editing XF86Config
ProblemYou installed a new video adapter in a system, and you prefer to make the new set-tings manually. Your distribution utility doesn’t do what you want, or you just wantto edit a text file and be done with it.
SolutionX configuration is stored in the XF86Config file, which can be in a number of locations:
/etc/X11/XF86Config-4/etc/XF86Config/usr/X11R6/etc/X11/XF86Config-4/usr/X11R6/etc/X11/XF86Config

This is the Title of the Book, eMatter EditionCopyright © 2007 O’Reilly & Associates, Inc. All rights reserved.
262 | Chapter 15: Configuring Video and Managing X Windows
Installing a new driver means changing a single section. This example shows chang-ing from a Voodoo 3 adapter to an nVidia card. Simply change the Driver and theIdentifier, by commenting out the old lines and adding your new values:
Section "Device"# Identifier "3Dfx"# Driver "tdfx" Identifier "nVidia" Driver "nv"EndSection
The Identifier can be anything you like; the Driver must be the actual name of thedriver. You’ll find these at http://www.xfree86.org/resources.html.
DiscussionIf you’re using vendor-supplied drivers, you’ll have to download the drivers and fol-low their installation instructions.
Commenting out old lines instead of deleting them makes it easy to undo yourchanges, if necessary.
See Also• XFree86 documentation (http://www.xfree86.org/resources.html)—look here to
find the driver name for your adapter
15.5 Enabling 3D Hardware Accelerationwith XFree86/DRI
ProblemYou want to play Tux Racer, TuxKart, or Quake 3, or do some 3D modeling, CAD,or other high-end video work. You have a supported card and you’ve installed thedrivers, but you’re still stuck in 2D.
SolutionMaking 3D hardware video acceleration work correctly requires having a supportedvideo adapter and editing XF86Config to load the appropriate kernel modules.
First, see if the DRI extension is working:
$ glxinfo | grep renderingXlib: extension "XFree86-DRI" missing on display ".0.0".direct rendering: no
It is not, so the next step is to enter the following lines in XF86Config:
Section "Module"...

This is the Title of the Book, eMatter EditionCopyright © 2007 O’Reilly & Associates, Inc. All rights reserved.
15.5 Enabling 3D Hardware Acceleration with XFree86/DRI | 263
Load "dri" Load "glx"...EndSection...Section "dri" Mode 0666EndSection
Save your changes and restart X.
Test the new configuration by running glxgears, or by playing Tux Racer, TuxKart,or any game that requires hardware acceleration. Or you can run glxinfo again. Lookfor these lines:
$ glxinfodirect rendering:..yes...OpenGL vendor string: VA Linux Systems, Inc.OpenGL renderer string: Mesa DRI 20020221 Voodoo3 x86/MMX/3DNow!OpenGL version string: 1.2 Mesa 4.0.4...
This shows that hardware acceleration is working, because it names your hardware.If it were not, it would say this:
OpenGL vendor string: VA Linux Systems, Inc.OpenGL renderer string: Mesa GLX IndirectOpenGL version string: 1.2 Mesa 4.0.4
Most times, editing XF86Config this way cures the problem. If it doesn’t, go to thenext recipe for troubleshooting tips.
DiscussionRemember that your XF86Config file can be in a number of locations, depending onyour distribution:
/etc/X11/XF86Config-4/etc/XF86Config/usr/X11R6/etc/X11/XF86Config-4/usr/X11R6/etc/X11/XF86Config
XFree86, starting with Version 4.0, comes with DRI and the Mesa libraries built in,so you don’t have to install any additional packages. Check your version:
$ XFree86 -versionXFree86 Version 4.3.0 (Debian 4.3.0-0ds2 20030304042836 dstone@aedificator)Release Date: 27 February 2003X Protocol Version 11, Revision 0, Release 6.6Build Operating System: Linux 2.4.21-pre5 i686 [ELF]Build Date: 04 March 2003 Before reporting problems, check http://www.XFree86.Org/to make sure that you have the latest version.

This is the Title of the Book, eMatter EditionCopyright © 2007 O’Reilly & Associates, Inc. All rights reserved.
264 | Chapter 15: Configuring Video and Managing X Windows
Module Loader presentOS Kernel: Linux version 2.4.21 (root@galaxy) (gcc version 3.2.3 20030316 (Debianprerelease)) #1 Sun Aug 3 20:15:59 PDT 2003
If you’re using XFree86 3.x, you really need to update. It’s not worth trying to addDRI and the Mesa libraries to Version 3; it’s better to upgrade the whole works.
See Also• XF86Config(7)
• The DRI User Guide (http://xfree.org/)
• The Resources page at http://xfree.org/, for documentation for your version ofXFree86 and for hardware-specific information, including drivers andconfigurations
15.6 Troubleshooting 3D Acceleration Problems
ProblemYou went through the steps in Recipe 15.5, but you still don’t have hardwareacceleration.
SolutionStart from the beginning, and make sure all the pieces are in place.
Is your video card supported? See this chapter’s “Introduction” for a list of supportedmodels, and check http://xfree.org and http://dri.sourceforge.net for current information.
Did your driver modules load? Run lsmod to find out:
$ lsmodModule Size Used by Not taintedtdfx 30432 17agpgart 37312 0 (unused)
tdfx is a 3dfx Voodoo3 driver. agpgart is needed for the AGP subsystem to work. Ifyour driver module or agpgart does not show up in lsmod, look in the /lib/modulesdirectory to see if the modules exist:
/lib/modules/2.4.21/kernel/drivers/char/agp/agpgart.0/lib/modules/2.4.21/kernel/drivers/char/drm/tdfx.0
If either one is missing, you’ll need to build and load it. (See Recipe 10.7.) Thenrestart X.
Is the dri subsytem working? If /proc/dri/0 exists, then it is:
$ ls /proc/dri/0bufs clients mem name queues vm vma

This is the Title of the Book, eMatter EditionCopyright © 2007 O’Reilly & Associates, Inc. All rights reserved.
15.6 Troubleshooting 3D Acceleration Problems | 265
If it doesn’t, it may be that DRI was not enabled in the kernel. Check your kernel.config file. Look for:
# Hardware configuration...CONFIG_DRM=y...# DRM 4.1 drivers...CONFIG_DRM_TDFX=m
If CONFIG_DRM=y is not there, you’ll need to rebuild the kernel. If the DRM mod-ule for your video card is not there, you can build and load it without rebuilding thekernel. Look in the kernel configurator for Character Devices, Direct RenderingManager (XFree86 DRI support).
Unlike other kernel modules, all of these will be loaded by the X server. Make surethey are entered in the Modules section in XF86Config.
Always check /var/log/XFree86.0.log. Look for error messages, and check that all themodules listed in the Modules section of XF86Config loaded. If you still can’t figureit out, visit the Getting Help, Resources, and Community Lists pages on http://xfree.org.
DiscussionIf you are using drivers supplied by the manufacturer of your video adapter, you’llneed to look to them for support. Check your documentation, make sure you havethe right driver, and look on the manufacturer’s web site for user forums and sup-port knowledge bases.
Enabling hardware acceleration for supported cards is a matter of having the correctkernel configuration and making sure the relevant kernel modules load. SeeChapter 10 for how to build kernels and modules.
See Also• The DRI User Guide (http://xfree.org)
• The Resources page at http://xfree.org, for documentation for your version ofXFree86 and for hardware-specific information, including drivers andconfigurations

This is the Title of the Book, eMatter EditionCopyright © 2007 O’Reilly & Associates, Inc. All rights reserved.
266 | Chapter 15: Configuring Video and Managing X Windows
15.7 Configuring a Multihead Display
ProblemYou would like to connect two monitors to a single system. You might want to havea single desktop span both monitors, or have two separate desktops, and maybe rundifferent screen resolutions on each monitor.
SolutionXFree86 does it all. You’ll need to have either two video cards or a single dual-headcard installed and working. You’ll also need two monitors, and XFree86 Version 4.x.Then edit XF86Config to create your desired multihead configuration.
To check your X version, use:
$ X -versionXFree86 Version 4.3.0...
You should configure your system to boot to a text console, so you can start X inwhatever mode you want. You’ll have four modes to choose from:
TraditionalTwo different desktops, which can have different resolutions and color depths
XineramaA single desktop spanning across all screens, which must have the same resolu-tions and color depths
CloneTwo displays, mirrored
SingleUse only one monitor
First, back up your current XF86Config, then open it for editing. The PCI bus IDmust be added to the Device entries:
Section "Device" Identifier "3dfx" Driver "tdfx" BusID "PCI:1:0:0"EndSection...Section "Device" Identifier "nVidia" Driver "nv" BusID "PCI:0:12:0"EndSection
This information comes from lspci:
$ /sbin/lspci...

This is the Title of the Book, eMatter EditionCopyright © 2007 O’Reilly & Associates, Inc. All rights reserved.
15.7 Configuring a Multihead Display | 267
0000:00:12:0 VGA compatible controller: nVidia Corporation NV5M64 [RIVA TNT Model 64/Model 64 Pro](rev 15)0000:01:00.0 VGA compatible controller: 3Dfx Interactive, Inc. Voodoo 3 (rev 01)
Next, create a ServerLayout section. This example activates Xinerama at startup:
Section "ServerLayout" Identifier "Xinerama" InputDevice "Default Keyboard0" "CoreKeyboard" InputDevice "Default Mouse0" "CorePointer" Option "Clone" "off" Option "Xinerama" "on"# Other screen position options are Below, Above, and LeftOf Screen "Screen0" RightOf "Screen1" Screen "Screen1"EndSection
To start X, boot to a text console and run:
$ startx
It will start up in full-color Xinerama.
DiscussionTo start up in Traditional mode, set both Clone and Xinerama to “off,” and changethe Identifier to “Traditional.”
To set Clone mode, turn off Xinerama, turn on Clone, and change the Identifier to“Clone.”
Many video adapters are not capable of handling 3D acceleration in multiheadmode. Check your documentation to find out if yours can.
PCI bus numbers that start with 0 are PCI cards. AGP cards start with 1.
Sometimes two video cards conflict and simply won’t work together. If you thinkyou have a problem, first run each card individually, to verify that they work. Thentry moving the PCI card to a different slot. If that does not cure the conflict, you’llhave to try different cards.
See Also• XF86Config(5x), for a complete description of all the available configuration
options
• Recipe 7.4, “Starting and Stopping X,” to learn how to configure your system toboot to either X or a text console

This is the Title of the Book, eMatter EditionCopyright © 2007 O’Reilly & Associates, Inc. All rights reserved.
268 | Chapter 15: Configuring Video and Managing X Windows
15.8 Choosing Different ServerLayoutsat Startup
ProblemYou don’t want to be locked into the same old thing every time you start X. Maybeyou want Xinerama. Maybe you want Traditional. Maybe you want to run a singlemonitor on occasion, and you want to be able to select which one.
SolutionConfigure different ServerLayouts in XF86Config, then select the one you want withstartx options:
$ startx -- -layout Single0$ startx -- -layout Single1$ startx -- -layout Clone$ startx -- -layout Traditional
This layout starts a single monitor:
Section "ServerLayout" Identifier "Single0" InputDevice "Default Keyboard0" "CoreKeyboard" InputDevice "Default Mouse0" "CorePointer" Screen "Screen0"EndSection
Start this layout like this:
$ startx -- -layout Single0
Now add a second Single layout, so that you can select either monitor at startup:
Section "ServerLayout" Identifier "Single1" InputDevice "Default Keyboard0" "CoreKeyboard" InputDevice "Default Mouse0" "CorePointer" Screen "Screen1"EndSection
Start this layout like this:
$ startx -- -layout Single1
You can also create ServerLayouts for each of your multihead modes. This examplestarts Clone mode:
Section "ServerLayout" Identifier "Clone" InputDevice "Default Keyboard0" "CoreKeyboard" InputDevice "Default Mouse0" "CorePointer" Option "Clone" "on" Option "Xinerama"off"#Other screen position options are Below, Above, and LeftOf

This is the Title of the Book, eMatter EditionCopyright © 2007 O’Reilly & Associates, Inc. All rights reserved.
15.8 Choosing Different ServerLayouts at Startup | 269
Screen "Screen0" RightOf "Screen1" Screen "Screen1"EndSection
This example starts Traditional mode:
Section "ServerLayout" Identifier "Traditional" InputDevice "Default Keyboard0" "CoreKeyboard" InputDevice "Default Mouse0" "CorePointer" Option "Clone" "off" Option "Xinerama"off"#Other screen position options are Below, Above, and LeftOf Screen "Screen0" RightOf "Screen " Screen "Screen1"EndSection
Recipe 15.7 shows the Xinerama ServerLayout.
DiscussionHere is a sample XF86Config, showing all the required elements and two ServerLayouts.
The core elements are the Input Device, Device, and Monitor sections. These are thesections where your devices are identified and linked to their drivers. The Screen sec-tion sets resolution and color depth. In the ServerLayout sections, you put togetherthe pieces for your various modes by their Identifiers.
Section "Files" FontPath "unix/:7100" FontPath "/usr/lib/X11/fonts/misc" FontPath "/usr/lib/X11/fonts/cyrillic" FontPath "/usr/lib/X11/fonts/75dpi"EndSection
Section "ServerFlags" Option "DefaultServerLayout" "Xinerama"EndSection
Section "Module" Load "ddc" Load "GLcore" Load "dbe" Load "dri" Load "extmod" Load "glx" Load "record" Load "bitmap" Load "speedo"EndSection
Section "InputDevice" Identifier "Default Keyboard0" Driver "keyboard" Option "CoreKeyboard"

This is the Title of the Book, eMatter EditionCopyright © 2007 O’Reilly & Associates, Inc. All rights reserved.
270 | Chapter 15: Configuring Video and Managing X Windows
Option" XkbRules" "xfree86" Option "XkbModel" "pc104" Option "XkbLayout" "us" EndSection
Section "InputDevice" Identifier "Default Mouse0" Driver "mouse" Option "CorePointer" Option "Device" "/dev/input/mice" Option "Protocol""IMPS/2" Option" Emulate3Buttons" "true" Option "ZAxisMapping" "4 5"EndSection
Section "Device" Identifier "3dfx" Driver "tdfx" BusID "PCI:1:0:0"EndSection
Section "Device" Identifier "nVidia" Driver "nv" BusID "PCI:0:12:0"EndSection
Section "Monitor" VendorName "0195" ModelName "SYL" Identifier "Monitor0" HorizSync 30-70 VertRefresh 0-160 Option "DPMS"EndSection
Section "Monitor" VendorName "0195" ModelName "SYL" Identifier "Monitor1" HorizSync 30-70 VertRefresh 0-160 Option "DPMS"EndSection
Section "Screen" Identifier "Screen0" Device "3dfx" Monitor "Monitor0" DefaultDepth 24 SubSection "Display" Depth 24 Modes "1024x768"
This is the Title of the Book, eMatter EditionCopyright © 2007 O’Reilly & Associates, Inc. All rights reserved.
15.9 Setting a Default ServerLayout | 271
EndSubSectionEndSection
Section "Screen" Identifier "Screen1" Device "nVidia" Monitor "Monitor1" DefaultDepth 24 SubSection "Display" Depth 24 Modes "1024x768" EndSubSectionEndSection
Section "ServerLayout" Identifier "Xinerama" InputDevice "Default Keyboard0" "CoreKeyboard" InputDevice "Default Mouse0" "CorePointer" Option "Clone" "off" Option "Xinerama" "on"#Other screen position options are Below, Above, and LeftOf Screen "Screen0" RightOf "Screen1" Screen "Screen1"EndSection
Section "ServerLayout" Identifier "Single0" InputDevice "Default Keyboard0" "CoreKeyboard" InputDevice "Default Mouse0" "CorePointer" Screen "Screen0"EndSection
See Also• XF86Config(5x), for a complete description of all the available configuration
options
15.9 Setting a Default ServerLayout
ProblemYou like having all those X startup options, but you also want a default, so you don’thave to be bothered with selecting one every time.
SolutionCreate a ServerFlags section to set the default. This must come before the Server-Layout entries:
Section "ServerFlags" Option "DefaultServerLayout" "Xinerama"EndSection

This is the Title of the Book, eMatter EditionCopyright © 2007 O’Reilly & Associates, Inc. All rights reserved.
272 | Chapter 15: Configuring Video and Managing X Windows
Then simply use:
$ startx
to start an X session.
15.10 Configuring startx
ProblemYou like to boot to the console and then run startx when you want an X session. Butyou need to know how to configure startx to start the desktop or window manager ofyour choice.
SolutionEdit .xinitrc in your home directory. This will start Gnome:
exec gnome-session
You can list all of your installed window managers and desktop environments:
exec gnome-session#exec startkde#exec icewm#exec icewm-experimental#exec afterstep#exec enlightenment#exec blackbox
Entering all of your installed window managers makes it easy to change the defaultby uncommenting the one you want. Be sure that only one is uncommented at atime.
DiscussionGnome, KDE, and XFce should be started from their startup scripts—gnome-session,startkde, and startxfce—rather than their executables.
If a user has no ~/.xinitrc file, startx will look for the global .xinitrc, which will betucked away somewhere in /etc, like /etc/X11/xinit/.xinitrc. X Windows file locationstend to be different on the various Linux distributions, so you might as well get usedto hunting them down.
See Also• startx(1x)

This is the Title of the Book, eMatter EditionCopyright © 2007 O’Reilly & Associates, Inc. All rights reserved.
15.11 Changing Your Login Display Manager | 273
15.11 Changing Your Login Display Manager
ProblemYou don’t like your login display manager, and you want to try a different one. Per-haps your distribution installed xdm, which is rather bare-bones, and you’d like totry a login display manager with more features, like gdm or kdm. Or you’ve havingproblems, such as hanging at shutdown, and you think a different login managermight help.
SolutionThe three main display managers are xdm (X display manager), gdm (Gnome displaymanger), and kdm (KDE display manager). To find out which one your system isusing, use ps:
$ ps ax | grep dm3796 ? S 0.00 /usr/bin/kdm -nodaemon
Most distributions use /etc/X11/default-display-manager. It should contain a single line:
/usr/bin/kdm
Change this to the display manager of your choice, using the full pathname:
/usr/bin/gdm
or:
/usr/bin/xdm
Red Hat and Fedora do it a little differently. Edit /etc/sysconfig/desktop, and add thisline:
DISPLAYMANAGER="GNOME"
or “KDE,” or “XDM.” Don’t use the paths to the executables; that doesn’t work.
Discussionxdm, the X display manager, can be thought of as a graphical replacement for thelogin command. It requires only the X Windows System to run, unlike gdm and kdm(which require Gnome and KDE, respectively).
gdm and kdm do the same thing as xdm, plus allow users to shutdown or restart;select a different window manager or desktop; and customize the login screen with apicture or logo.
Red Hat and Fedora use the /etc/X11/prefdm script to start the display manager,which is called from /etc/inittab. /etc/X11/prefdm looks to /etc/sysconfig/desktop forthe default display manager, as you can see by reading the script:
$ less /etc/X11/prefdm...

This is the Title of the Book, eMatter EditionCopyright © 2007 O’Reilly & Associates, Inc. All rights reserved.
274 | Chapter 15: Configuring Video and Managing X Windows
preferred=if [ -f /etc/sysconfig/desktop ]; then . /etc/sysconfig/desktop if [ "$DISPLAYMANAGER" = GNOME ]; then preferred=gdm elif [ "$DISPLAYMANAGER" = KDE ]; then preferred=kdm elif [ "$DISPLAYMANAGER" = XDM ]; then preferred=xdm fifi
This is where we see that it wants DISPLAYMANAGER = “GNOME”, instead of /usr/bin/gdm.
If you peruse Red Hat’s /rc*.d directories, you’ll notice there are no entries for anydisplay manager. How can this be? Take a look at the bottom of /etc/inittab:
# Run xdm in runlevel 5x:5:respawn:/etc/X11/prefdm -nodaemon
The moral is, in Linux, there are always many ways to do things.
See Also• Chapter 7, Starting and Stopping Linux, for recipes on how to change to differ-
ent runlevels and how to configure runlevels to boot to a text console or to a dis-play manager
• the xdm and XTerminal mini-howto (http://www.tldp.org/HOWTO/XDM-xterm)
• gdm homepage (http://freshmeat.net/projects/gdm)
• kdm handbook (http://docs.kde.org/en/3.2/kdebase/kdm)
15.12 Running Different Window ManagersSimultaneously with Xnest
ProblemYou have all these great window managers and desktop environments installed—KDE, Gnome, Enlightenment, Fluxbox, XFce, and such—and you would like to runsome of them simultaneously. You know you can start up separate additional X ses-sions, or log out of X and start up in another window manager, but you wonder ifthere isn’t a way to run them at the same time.
SolutionXnest, the “nested X server,” is just the tool for the job. Xnest allows you to runadditional X sessions inside of already running X sessions.

This is the Title of the Book, eMatter EditionCopyright © 2007 O’Reilly & Associates, Inc. All rights reserved.
15.12 Running Different Window Managers Simultaneously with Xnest | 275
Open a command shell in any X session—let’s say you’re running IceWM—and fireup Xnest:
$ Xnest -ac :1
You should see a blank screen with an X cursor in the middle. Now you can open awindow manager. This example starts up WindowMaker:
$ wmaker -display :1
Now you can start up another one. From a command shell on IceWM, enter:
$ Xnest -ac :2
Some window managers or desktop environments, such as Gnome, need to startfrom an xterm in the Xnest window. First start up an xterm:
$ xterm -display :2
Then start Gnome from the xterm:
$ gnome-session
You can start up yet another Xnest session from any available terminal in any of thewindows:
$ Xnest -ac :3
You can continue to open more window managers until your system resources areexhausted and everything slows to a crawl. Figure 15-1 shows Gnome inside ofIceWM, on KDE.
DiscussionX sessions are numbered from 0, so the default X session is always :0. The -ac optionto Xnest specifies the session number for the new display. Keep track of your where-abouts by checking the DISPLAY value:
$ echo $DISPLAY:0.0
The -ac option disables access controls. Otherwise, X will not let you open any appli-cations. Xnest uses the same options as the X command—see xserver(1x).
When you get several window managers going, you might see an error message likethis, and the new one won’t start:
$ gnome-sessiongnome-session: you're already running a session manager
No problem. Just track it down and kill it:
$ echo $SESSION_MANAGERlocal/windbag:/tmp/.ICE-unix/2774$ rm /tmp/.ICE-unix/2774
and now Gnome will start.

This is the Title of the Book, eMatter EditionCopyright © 2007 O’Reilly & Associates, Inc. All rights reserved.
276 | Chapter 15: Configuring Video and Managing X Windows
See Also• xnest(1), xserver(1)
• Window managers for X (http://www.plig.org/xwinman)
Figure 15-1. Gnome

This is the Title of the Book, eMatter EditionCopyright © 2007 O’Reilly & Associates, Inc. All rights reserved.
277
Chapter 16 CHAPTER 16
Backup and Recovery
16.1 IntroductionMaking good backups is a fundamental chore, and one that is too often messy andinconvenient. This chapter covers using rsync and Mondo Rescue for robust, easybackups and, just as important, easy restores.
rsync is extremely efficient. It only transfers changes in files, and it can perform on-the-fly compression. It excels at keeping file trees sychronized; unlike a lot of backup soft-ware, it even mirrors deletions. Because of these features, rsync is the tool of choice forupdating and mirroring web sites, CVS trees, and other large, complex file trees.
There are two ways to use rsync: over ssh, for authenticated login and transport; or byrunning it as a daemon to create public archives, which do not use ssh. Using sshrequires users to have login accounts on every machine for which they need rsyncaccess. When rsync is run in daemon mode, you can use its built-in authenticationmethods to control access, so that users do not need login accounts on the rsync server.
Mondo Rescue is a great utility for creating a bootable system restore disk. Use it tomake a snapshot of your current system configuration, and a bare-metal rebuild is aseasy as booting to a CD or DVD. You’ll have all of your patches, configurations, andupdates. Then pull your data from your rsync server, and you’re back in business inrecord time. Mondo can also be used for a complete system backup, all by itself.
Tape backups have long been a mainstay, because they used to provide the moststorage for the least money. But they are slow to write to, and even slower to restorefrom. If you’re getting paid by the hour, it might not seem so bad to sit back andenjoy the endless whirring when you’re looking for a little bitty text file at the end ofthe tape. But there are other disadvantages:
• Hard drives are much larger than tapes now, so you may have to use a tape auto-loader, which is expensive, or have a designated tape-changing minion, whichcan raise dependability issues.
• Users must depend on system administrators to restore files.

This is the Title of the Book, eMatter EditionCopyright © 2007 O’Reilly & Associates, Inc. All rights reserved.
278 | Chapter 16: Backup and Recovery
• Doing a bare-metal restore is complicated, because you must first install a file-system, then the tape drivers, and then do the restore.
• Even when a single tape is large enough to store a complete backup, you stillhave to change and store tapes, even if it’s only on a weekly basis.
Tape has one advantage: longevity. CDs, DVDs, and hard drives cannot be countedon for long-term archiving. I wouldn’t count on home-burned CDs/DVDs for longerthan two years. Tapes should be good for 20 years, if stored carefully. Of course,there’s no guarantee that there will be drives or software to read them in 20 years,but the tapes themselves should last just fine.
Longevity is the primary difficulty with all digital storage media, because even if themedium (tape, DVD, etc.) survives, there’s no guarantee that the tools to read it willendure. Hardware is in a continual state of change, and file formats change too. Canyou still read 5.25" floppy disks? WordStar files? VisiCalc? Even the most offbeatobsolete file can be read, if it’s a plain ASCII file. But what are you going to do withproprietary binary datafile formats, like .ppt and .pst? If the vendor decides to stopsupporting them, or goes out of business, you’re out of luck.
Paper is still the long-term storage champion. (Yes, stone tablets, parchment scrolls,and clay tablets win hands-down for sheer durability, but let’s stick to contemporarymedia.) However, movies and songs do not translate well to paper, and paper is hun-dreds of times bulkier than any digital storage medium.
So, as a practical matter, planning good short-term archiving and disaster recovery isusually the best we can do. rsync and Mondo Rescue are perfect for this. rsync is fast,compact, and completely automatic—no need to remember to swap discs or tapes.Restores are easy and fast. You can even set up user-accessible backup archives, sousers don’t have to pester you to restore files.
What about backing up your backup server? No problem. Setting up a remote rsyncmirror for backing up the backups is a common strategy.
Also, there are more choices than ever for removable media, including removabledrive trays for IDE drives, USB/FireWire portable drives, and flash storage devices. Insum, there are a lot of excellent options for designing your backup and recoveryschemes.
16.2 Using rsync for Local File Transfersand Synchronization
ProblemYou need to keep file trees synchronized on your workstation because your work-station is a staging ground for web directories, image galleries, source code trees, or

This is the Title of the Book, eMatter EditionCopyright © 2007 O’Reilly & Associates, Inc. All rights reserved.
16.2 Using rsync for Local File Transfers and Synchronization | 279
other complex collections of files. So you use a working directory for editing files,and then copy the finished files to a separate upload directory. You would like some-thing faster and more intelligent than cp, because cp takes a long time and you losetrack of what needs to be copied.
SolutionUse rsync to keep file trees synchronized. rsync copies only changes, so it speeds upfile copying, and it tracks changes inside files and in file trees.
Be sure you have the latest version, to get all the bugfixes and security patches. Youdefinitely want 2.6 or later:
$ rsync --versionrsync version 2.6.2 protocol version 26...
This command copies a directory of web files to a staging directory that will later beuploaded to the web server:
$ rsync -av --stats /home/pearlbear/webs ~/web_uploadbuilding file list ... done...<all the files being copied fly by>...Number of files: 254Number of files transferred: 235Total file size: 8923014 bytesTotal transferred file size: 8923014 bytesLiteral data: 8923014 bytesMatched data: 0 bytesFile list size: 6490Total bytes written: 8939848Total bytes read: 3780
To verify the transfer, use:$ ls ~/web_uploadwebs
There is a subtle gotcha here: /home/pearlbear/images transfers the con-tents of /images and the images directory itself. Adding a trailing slash(/home/pearlbear/images/) copies only the contents of the /images direc-tory, but not the directory itself. The trailing slash only matters on thesource directory; it makes no difference on the destination directory.
If more files are added to /home/pearlbear/webs, or any existing files are changed,simply re-run the same command. rsync will transfer only the changes.
You can specify more than one source directory to be copied:
$ rsync -av /home/pearlbear/webs /home/pearlbear/web_images ~/web_upload
You can also test your rsync command first with the --dry-run option:
$ rsync -av --dry-run /home/pearlbear/webs /home/pearlbear/web_images ~/web_upload

This is the Title of the Book, eMatter EditionCopyright © 2007 O’Reilly & Associates, Inc. All rights reserved.
280 | Chapter 16: Backup and Recovery
DiscussionIf any files are deleted from the source directory, rsync will not delete them from thedestination directory unless you explicitly tell it to with the --delete flag:
$ rsync -av --delete /home/pearlbear/webs ~/web_upload
The -av flags mean archive, which retains file permissions and ownership, andverbose output.
Be careful using the --delete flag; if you accidentally delete from the rsync archive afile that you wanted to keep, it’s gone for good. Be especially careful with your file-paths, because --delete will happily erase an entire directory or file tree.
rsync is a great tool for keeping local archives synchronized. When you’re authoringweb pages, writing code, assembling files to burn to CD, or managing any kind oflarge collection of files, it’s a real timesaver to have rsync track and synchronize allthe changes.
Installation is simple—both RPMs and Debian packages are named rsync, and youonly need the single package. The sources are statically linked, so there is no dangerof dependency problems, however you elect to install it.
See Also• rsync(1)
16.3 Making Secure Transfers with rsync and ssh
ProblemYou want to use rsync to copy files to another PC over a LAN, or over the Internet,and you want encrypted transport and authentication.
SolutionUse rsync over ssh. ssh must be set up and working on all hosts.
Specify your source and destination, and specify ssh with the -e flag. This commandtransfers files over the local network, to ljl’s account on the remote PC “stinkpad”:
ljl@compak:~$ rsync -av -e ssh stationery stinkpad:testljl@stinkpad's password:building file list ... donestationery/stationery/ljl-return-address-small.sxwstationery/ljl-holiday-label.sxwstationery/ljl-return-address-MV-small.sxwwrote 25984 bytes read 68 bytes 7443.43 bytes/sectotal size is 25666 speedup is 0.99

This is the Title of the Book, eMatter EditionCopyright © 2007 O’Reilly & Associates, Inc. All rights reserved.
16.4 Building an rsync Backup Server | 281
Beware of filepath trickiness. stinkpad:test uploads the stationery directory and itscontents to /home/ljl/test on stinkpad. If /test does not exist, rsync will create it:
ljl@stinkpad's password:building file list ... donecreated directory test
If you want to upload to a directory outside of your home directory, you’ll need suffi-cient permissions for rsync to create a new directory, or you’ll need it to be an exist-ing directory that you can write to. Precede the upload directory with a forwardslash, to make it relative to the root filesystem instead of to your home directory:
$ rsync -av -e ssh stationery stinkpad:/shared_uploads
To upload files over the Internet, use your login on the remote system and the fulldomain name:
$ rsync -av -e ssh stationery [email protected]:/shared_uploads
The syntax for copying files from a remote host is a little different. This copies the/scripts directory and its contents from the remote host to your local /downloadsdirectory:
$ rsync -av -e ssh [email protected]:/shared_uploads/scripts ~/downloads/
DiscussionBoth authentication and transport are encrypted, so this is a nice, secure way totransfer sensitive files. The one downside is that users need shell accounts on allmachines they are going to store files on or retrieve files from, so it’s a bit of work toset up. A central server, with shared directories, is a good way to manage complexfile sharing scenarios. You can control access with the usual Linux tools—file anddirectory permissions, and user groups, and you can use unique logins on the sharedserver, for extra security.
See Also• rsync(1)
16.4 Building an rsync Backup Server
ProblemYou want users to back up their own data. But you really don’t want to give usersshell accounts all over the place, just so that they can do backups. You’d also like tomake it easier for them to share files, again without giving all your users shellaccounts.

This is the Title of the Book, eMatter EditionCopyright © 2007 O’Reilly & Associates, Inc. All rights reserved.
282 | Chapter 16: Backup and Recovery
SolutionUse a dedicated PC for a central server, and run rsync in daemon mode. Users willnot need login accounts on the server, and you can use rsync’s own access controlsand user authorization for security.
rsync must be installed on all machines.
First, on the rsync server, edit or create /etc/rsyncd.conf to create an rsync moduledefining the archive:
# global settingslog file = /var/log/rsyncd.log# modules[backup_dir1] path = /backups comment = server1 archive list = yes read only = no
Make sure that /backups exists. Next, start rsync on the server in daemon mode:
# rsync --daemon
Now you can copy files from a remote machine to the server. In this example, theremote PC is “workstation,” and the rsync server is “server1.” First, verify that thersync server is accessible:
sue@workstation:~$ rsync server1::backup_dir1 server1 archive
This command copies Sue’s /spreadsheets directory to the module backup_dir1:
sue@workstation:~$ rsync -av spreadsheets server1::backup_dir1building file list.....donespreadsheets/aug_03spreadsheets/sept_03spreadsheets/oct_03wrote 126399 bytes read 104 bytes 1522.0 bytes/sectotal size is 130228 speedup is 0.94
Now, view the nice, new uploaded files:
sue@workstation:~$ rsync server1::backup_dir1drwx------ 192 2003/02/12 spreadsheets-rw-r--r-- 21560 2003/09/17 aug_03-rw-r--r-- 21560 2003/10/14 sept_03-rw-r--r-- 21560 2003/11/10 oct_03
Sue can easily retrieve files from server1 to her workstation:
sue@workstation:~$ rsync -av server1::backup_dir1/sept_03 ~/downloadsreceiving file list...donesept_03wrote 21560 bytes read 126 bytes 1148.0 bytes/sectotal size is 22031 speedup is 0

This is the Title of the Book, eMatter EditionCopyright © 2007 O’Reilly & Associates, Inc. All rights reserved.
16.4 Building an rsync Backup Server | 283
DiscussionThis particular setup is perfectly functional, but not very secure. backup_dir1 is wideopen, so any rsync user can access it. Files are transmitted in the clear, so youshouldn’t use this for sensitive files.
You can use rsync’s built-in simple authentication and access controls to limit access,so it’s possible to set up reasonably private archives. See Recipe 16.5 to learn how toadd some security.
This is what the rsync command options mean:
rsync server1::Double colons are used when connecting to an rsync server running in daemonmode. When you connect to an rsync server, you use the module names, ratherthan filepaths.
rsync -av-a means archive mode. This tells rsync to copy directories recursively, preservepermissions, copy symlinks, preserve group, preserve owner, and preserve time-stamps. -a is the same as -rlptgoD. -v is verbose.
--statsThis option prints a verbose set of statistics on the file transfer, for those whowish to calculate the efficiency of the rsync algorithm.
/etc/rsyncd.conf should be familiar to Samba users, as it uses the same style assmb.conf. Global settings go at the top. Then you can define as many modules as youneed. A module defines a single directory, with its options and access permissions:
[backup_dir1]The module name is enclosed in square brackets. Make this anything you like.
path = /backupsThe directory for this module. Always use absolute paths.
comment = server1 archiveThis is optional; say anything you want here.
list = yesThis allows the module to be listed when users query the server. The default isno, which will hide the module.
read only = noThe default is read-only. If you want to be able to upload files to this directory,turn off read-only.
See Also• rsync(1), rsyncd.conf(5)
• The rsync home page (http://rsync.samba.org)

This is the Title of the Book, eMatter EditionCopyright © 2007 O’Reilly & Associates, Inc. All rights reserved.
284 | Chapter 16: Backup and Recovery
16.5 Securing rsync Modules
ProblemYou followed Recipe 16.4, and you really like giving users the power to fetch theirown files from the backup server, or delegating updates of web and FTP servers tosomeone else. But it’s wide open to anyone using rsync—how do you secure themodules?
Solutionrsync comes with its own simple authentication and access controls. You’ll create anew file containing username/password pairs, and add “auth users” and “secrets file”directives to /etc/rsyncd.conf.
First create the password file on the rsync server. This example is for our fearlessuser, Sue. Make it chmod 600:
# rsync-users for server1# created 2/7/2004sue:sekkrit
Next, edit /etc/rsyncd.conf. Give Sue her own module, and lock out everyone but her:
# global settingslog file = /var/log/rsyncd.log#modules[sue_backup] path = /backups/sue comment = Sue's private archive list = yes read only = no auth users = sue secrets file = /etc/rsync/rsync-users
To access the module, Sue must prefix the server name with her rsync username:
sue@workstation:~$ rsync sue@server1::sue_backupPassword:drwx------ 192 2003/02/12 spreadsheets-rw-r--r-- 21560 2003/09/17 aug_03-rw-r--r-- 21560 2003/10/14 sept_03-rw-r--r-- 21560 2003/11/10 oct_03
Now she can upload and download files just like before, as long as she remembers touse her rsync login. Don’t forget the double colons, which are used when connectingto an rsync server.

This is the Title of the Book, eMatter EditionCopyright © 2007 O’Reilly & Associates, Inc. All rights reserved.
16.6 Building an Anonymous Public rsync Server | 285
DiscussionThe username/password pairs are arbitrary and are not related to system useraccounts, so it is quick and easy to create or edit modules and add or delete users.
For additional security, add these directives to rsyncd.conf:
strict modes = yesThis enforces strict permissions on the password file. The file will not bechecked by rsync if it is readable by any user other than the rsync daemon, andusers will not be allowed access. The default is “yes,” so it’s not necessary toinclude this line, except as a reminder. If you don’t want strict mode, you’ll haveto use strict modes = false.
hosts allowUse this to specify hosts that are allowed to access the rsync archives. For exam-ple, you can limit access to hosts on your domain:
hosts allow = *.windbag.nethosts allow = 192.168.1.
All hosts not allowed are denied, so you don’t need a hosts deny directive.
hosts denyThis usually isn’t needed, if you use hosts allow. It is useful for denying access tospecific hosts that cause annoyance, if you don’t want to use hosts allow.
The password file is in cleartext, so it must be restricted to the superuser.
See Also• rsync(1), rsyncd.conf(5)
• The rsync home page (http://rsync.samba.org)
16.6 Building an Anonymous Public rsync Server
ProblemYou want to distribute software or other files, using an rsync-enabled server to con-serve bandwidth. So you’ll need anonymous access for downloads, and restrictionson who can upload files to the server.
SolutionFirst, build an rsync server as described in Recipe 16.4. Then make all public modulesread-only, and be sure that permissions on directories do not allow write access to any-one but user and group owners. To upload files to your server, use rsync over ssh.

This is the Title of the Book, eMatter EditionCopyright © 2007 O’Reilly & Associates, Inc. All rights reserved.
286 | Chapter 16: Backup and Recovery
DiscussionTo make a module read-only, add this line to the section for the module inrsyncd.conf:
read only = yes
Remember, the syntax for uploading files via ssh is a little different than the syntaxfor uploading files when rsync is running in daemon mode. You’ll want to specify thetrue directory name, not the module name, and use only a single colon:
$ rsync -av -e ssh /webfiles [email protected]:/www/publicPassword:
DiscussionIf you want to automate nightly uploads over ssh, see Recipe 16.9.
See Also• rsync(1), rsyncd.conf(5)
• Chapter 17, Remote Access
• The rsync home page (http://rsync.samba.org)
• Recipe 16.4, “Building an rsync Backup Server”
16.7 Launching the rsync Daemon at Startup
ProblemYou don’t want to start the rsync daemon by hand all the time. But rsync does notcome with an init script. How do you make it start at boot time?
SolutionPut this script in /etc/init.d, then add it to your desired runlevels:
#!/bin/bash# simple init script to run# rsync in daemon mode
case "$1" in start) echo "Starting the rsync server..." exec /usr/bin/rsync --daemon ;;
stop) echo "Stopping the rsync server...."

This is the Title of the Book, eMatter EditionCopyright © 2007 O’Reilly & Associates, Inc. All rights reserved.
16.8 Fine-Tuning File Selection | 287
killall /usr/bin/rsync ;;
restart) $0 stop sleep 1 $0 start ;;
*) echo "Usage: $0 {start|stop|restart}" exit 1 ;;esac
DiscussionRemember to chmod +x to make this script executable.
See Also• Chapter 7, Starting and Stopping Linux, to learn how to add rsync to your
desired runlevels
16.8 Fine-Tuning File Selection
ProblemYou would like to exclude some files (such as .tmp and .bak files) from being backedup, or you would like to create a list of included files.
SolutionPut your file lists in files, then call them with rsync’s --exclude-from or --include-fromoptions.
The files can contain a list of files, regular expressions, or both:
*.tmp*.temp*.bak/etc/skel/etc/local
Then add the --exclude-from or --include-from option on the rsync command line:
$ rsync -ae ssh /home /etc --exclude-from=~/exclude-list backup.test.net:/home-etc
This is the Title of the Book, eMatter EditionCopyright © 2007 O’Reilly & Associates, Inc. All rights reserved.
288 | Chapter 16: Backup and Recovery
DiscussionIt’s best to use only one or the other; using both options is the fast track to confusion.
See Also• rsync(1)
16.9 Automating rsync over ssh Backups
ProblemYou would like to automate your rsync over ssh backups.
SolutionWrite a script, create a cron job, and set up keychain to authenticate to your remotehosts. (See Recipe 17.7 to learn how to use keychain.)
Here is a simple script that backs up /home and /etc, using the “backupadmin” usercreated just for this job.The second line of the script tells cron to hook into keychainfor remote authentication:
#!/bin/bashsource /home/backupadmin/.keychain/$HOSTNAME-shrsync -av -e ssh --delete --force /home /etc stinkpad:home-etc-backup/
Once you have fine-tuned your file selection and tested your backup script, create acron job to run the script. This runs it every night at 10 p.m.:
# crontab -e0 22 * * * /usr/local/bin/rsyncbackup.sh
DiscussionA lot of documentation tells you to create keys with null passphrases, so that you canschedule ssh transfers with cron. It’s dangerous to do this, because anyone who gainsaccess to your private key will be able to easily misuse it. keychain handles authenti-cation for you, so you can properly protect your private keys with passphrases. Theone downside to keychain is that it does not survive a reboot, so you have to enteryour passphrase, or passphrases, at startup. But this is a security utility, after all—you don’t want just anyone to be able to boot your machine and have unfetteredaccess to your remote hosts.

This is the Title of the Book, eMatter EditionCopyright © 2007 O’Reilly & Associates, Inc. All rights reserved.
16.10 Limiting rsync’s Bandwidth Requirements | 289
Using the --delete flag means that all files deleted from the local archive will also beremoved from the remote archive.
--force means that directories will be deleted even if they are not empty.
This is an easy way to perform secure, offsite backups. If all of your users’ /home andshared data directories are on a central server, it’s even easier.
See Also• ssh(1), rsync(1)
• Recipe 16.8, “Fine-Tuning File Selection”
• Recipe 17.7, “Better Passwordless Logins with keychain”
• Hack #42, “Automated Snapshot-Style Incremental Backups with rsync,” inLinux Server Hacks, by Rob Flickenger, for a really nice script that creates sys-tem snapshots at any interval you like (hourly, every four hours, daily, etc.)
• The Examples page at http://samba.anu.edu.au/rsync
16.10 Limiting rsync’s Bandwidth Requirements
Problemrsync can gobble up your bandwidth in nothing flat; imagine backing up a fewgigabytes of ripped audio files on a busy network. What’s an easy way to restrict it,without implementing full-blown traffic shaping?
SolutionUse the --bwlimit option:
$ rsync -a --bwlimit=256 rsync.test.net::testnetftp/ /ftp/mirror
Discussion--bwlimit uses kilobytes per second, so be sure to take this into account when you’recalculating what value to use. Remember that most network speeds are measured inkilobits, which are one-eighth the size of kilobytes.
See Also• rsync(1)
This is the Title of the Book, eMatter EditionCopyright © 2007 O’Reilly & Associates, Inc. All rights reserved.
290 | Chapter 16: Backup and Recovery
16.11 Customizing Filepaths in rsync
ProblemYou want to be able to specify filepaths, instead of dumping everything into a singledirectory.
SolutionUse the -R option:
$ rsync -aR -e ssh /webfiles/site1 stinkpad.test.net:/www/public
This creates /www/public/webfiles/site1, instead of /www/public/site1.
DiscussionThis is especially useful when you are transferring several directories and want tomaintain separate filepaths for each one.
See Also• rsync(1)
16.12 Installing rsync on Windows Clients
ProblemYou’re running a mixed LAN, and you would like to back up your Windows clientson your Linux rsync server.
SolutionOn all the Windows clients, install Cygwin, rsync, OpenSSH, and a Linux text edi-tor. Then make a few Windows-specific tweaks, and you can use rsync just like onLinux clients.
To get all of these, visit http://www.cygwin.com and download setup.exe to your Win-dows PC. Click “Install from Internet,” then proceed through the installation stepsuntil you get to the Select Packages menu. In the +Net menu, select rsync andOpenSSH. In the +Editors menu, select an editor.
Now you need to add Cygwin’s path to Windows. On Windows 95/98/ME, addC:\Cygwin\bin, or whatever your path is, to the SET PATH= statement inAUTOEXEC.BAT. Then reboot.

This is the Title of the Book, eMatter EditionCopyright © 2007 O’Reilly & Associates, Inc. All rights reserved.
16.13 Creating a Message of the Day for rsync | 291
On Windows NT, go to Control Panel ➝ System ➝ Environment tab. Add the pathsetting to the end, then click the Set button. Click OK. You won’t need to reboot.
On Windows 2000/XP, go to Control Panel ➝ System ➝ Advanced tab, then click theEnvironment Variables button. Double-click on the PATH statement in the SystemVariable screen, append the path, then click OK. You won’t need to reboot.
Remember to separate your PATH statements with semicolons. Now your WindowsPC is ready to make rsync and rsync over ssh transfers.
To use Cygwin, open an MS-DOS command shell, and start up Cygwin like this:
C:\cygwin\cygwin.batadministrator@powerpc ~$
This puts you in a nice, familiar Bash environment. Alternatively, you can run anapplication directly from the C: prompt:
C:\cygwin\bin\rsync -av -e ssh stationery stinkpad:test
DiscussionFor running rsync on Windows, use all the same commands as on Linux. Justremember to be careful of filepaths—Windows uses backslashes instead of forwardslashes, and drive letters:
C:\cygwin\bin\rsync -av -e ssh stationery stinkpad:test
Cygwin creates a nice native Linux environment on your Windows system, and itcomes with a large assortment of Linux utilities. If Cygwin doesn’t include a Linuxprogram you want to use, you may be able to make it work by compiling it on Win-dows. See http://www.cygwin.com for details.
See Also• rsync(1)
• Cygwin home (http://www.cygwin.com)
16.13 Creating a Message of the Day for rsync
ProblemYou’re running an rsync server, by running rsync in daemon mode, and you think itwould be nice to greet users with a cheery daily message.

This is the Title of the Book, eMatter EditionCopyright © 2007 O’Reilly & Associates, Inc. All rights reserved.
292 | Chapter 16: Backup and Recovery
SolutionFirst create your MOTD, in a plain text file, then configure the path to the file inrsyncd.conf:
motd file = /etc/rsync/motd
When users connect to your server, they will see your message:
sue@workstation:~$ rsync server1::Greetings from Asbury Park! I'm Bruce, and I'll be your rsync server today!
backup_dir1 server1 archivesue_backup sue's private stuff
DiscussionYou don’t have to settle for dull old text messages. ASCII art makes a nice MOTD;see Figure 16-1 for an example.
Create your own with the FIGlets ASCII generator, available at http://www.figlet.org.
Figure 16-1. An ASCII message of the day

This is the Title of the Book, eMatter EditionCopyright © 2007 O’Reilly & Associates, Inc. All rights reserved.
16.14 Creating a Bootable System Restore CD with Mondo Rescue | 293
See Also• rsync(1), rsyncd.conf(5)
16.14 Creating a Bootable System Restore CDwith Mondo Rescue
ProblemYou need a simple method for creating a system image. You want a perfect clone topreserve your configurations, patches, and updates, so you can easily do a bare-metalrestore, or migrate to a new hard drive, or roll out a number of identical installa-tions. Your data are backed up separately, so you only want to preserve system andconfiguration files.
SolutionUse Mondo Rescue to create a custom bootable system CD.
Be sure there is enough free space on your hard drive to store the temporary CDimage (at least 700 MB) per CD. Do not run any other programs (games, email, wordprocessors, etc.) while running Mondo. Then, as root, run mondoarchive at the com-mand line. Mondo will think about things for a minute or two, then open the win-dow shown in Figure 16-2.
Figure 16-2. Mondo

This is the Title of the Book, eMatter EditionCopyright © 2007 O’Reilly & Associates, Inc. All rights reserved.
294 | Chapter 16: Backup and Recovery
Choose your backup medium. In this example, we’ll use a CD-RW at SCSI address0,1,0. In the next window, it asks if your writer has “Burn-Proof” technology (yes).Next, choose the compression level (Maximum), then specify the speed of your CD(re)writer (4).
Tell it the SCSI address of your CD writer 0,1,0. Next, you’ll be asked which filesyou want to back up. Select /, or the entire root filesystem, because the next ques-tion is which files you want to exclude. /tmp and /proc are automatically excluded.You should also exclude /home and any other data directories, such as shared datadirectories, mail spools, and logfiles.
Mondo will then ask whether you want to verify your backups after it has createdthem (yes) and whether you are confident that your kernel is a sane, sensible, stan-dard Linux kernel (say no if you are using an older Debian kernel—see the “Discus-sion” section of this recipe for more information). Next it will ask if you are sure youwant to proceed (yes).
When it asks you to enter your CD-ROM’s /dev device, give it the SCSI /dev name—/dev/scdn—if your system has a 2.4 kernel. For 2.6 kernels, use /dev/hdn. The backupcan take up to a couple of hours. However, you can’t wander away, because you’llneed to push some buttons near the end.
DiscussionIf you’re running Mondo from the console and your screen blanks from inactivity,bring it back by hitting the Alt key.
cdrecord --scanbus shows the SCSI address of your drive. On systems with 2.4 ker-nels, look in /etc/fstab to get the SCSI /dev name, or dig through the output of dmesg.
To qualify as “sane,” your kernel needs to include:
• loopfs support
• CD-ROM support
• ISO9660 filesystem support
• initrd ramdisk support (built-in)
• Virtual memory filesystem support (built-in)
• Floppy disk support (built-in)
• Ext2 filesystem support (built-in)
• Support for the backup media
• SCSI emulation in 2.4 kernels
Most stock kernels newer than 2.4.7 ought to be fine. Debian, in particular, didn’tused to be well supported by Mondo, but Debian kernels from 2.4.18 should have allthe required bits. If your kernel cannot be used to boot a Mondo Rescue CD, use the

This is the Title of the Book, eMatter EditionCopyright © 2007 O’Reilly & Associates, Inc. All rights reserved.
16.14 Creating a Bootable System Restore CD with Mondo Rescue | 295
failsafe mindi-kernel (see Recipe 16.18). The mindi-kernel is used only to boot theRescue CD; it does not replace your system kernel.
If you’re not sure whether your drive supports “Burn-Proof” technology, run thiscommand to show all of your drive’s capabilities:
$ cdrecord --atip dev=0,1,0Cdrecord 2.01a07 (i686-pc-linux-gnu) Copyright (C) 1995-2003 Jörg Schillingscsidev: '0,1,0'scsibus: 0 target: 1 lun: 0...Using generic SCSI-3/mmc CD-R driver (mmc_cdr).Driver flags : MMC-3 SWABAUDIO BURNFREESupported modes: TAO PACKET SAO SAO/R96P SAO/R96R RAW/R16 RAW/R96P RAW/R96R...
Mondo has its own ideas about how GRUB should be set up, so GRUB users mayneed to create this soft link:
# ln -s /boot/grub/menu.lst /etc/grub.conf
Mondo insists on it and won’t perform a backup without it, so it’s best to humor it.
Mondo comes in source form, Debian packages, and RPMs. You’ll need severalpackages:
MondoMindiafioNewtlzopsyslinuxcdrecordmkisofs
Debian users will also see apt-get fetch:
buffergawkmindi-busyboxms-sys, tintslang
See Also• mondoarchive(1)
• Your locally installed Mondo documentation (/usr/share/doc/mondo/hml/1.6x-howto)
• Mondo user forums (http://forum.mondorescue.org)

This is the Title of the Book, eMatter EditionCopyright © 2007 O’Reilly & Associates, Inc. All rights reserved.
296 | Chapter 16: Backup and Recovery
16.15 Verifying the Mondo Backup
ProblemYou would like to verify that your new Mondo backup is good. It’s always a goodidea to verify that a backup is good; finding out that it’s bad when you need to do arestore is not good for your health.
SolutionUse Mondo’s compare command.
Boot up the Mondo disk on the same system that created it. At the commandprompt, type:
# compare
This will take a while, depending on the size of the backup. When it’s finished,review the changes by reading the /tmp/changed.txt file. You can expect to see differ-ences in logfiles, mail spools, /etc/mtab, and other files that change frequently. Thereshould not be changes in static system files, such as executables in /bin, /sbin, /usr/bin, and /usr/sbin, or in static configuration files in /etc.
DiscussionAlways test your backups! After running compare, restore a few files from the Mondodisk. If you have a spare PC that is the same hardware configuration, you can do acomplete restore on it (the surest method).
See Also• mondoarchive(1)
• Your locally installed Mondo documentation (/usr/share/doc/mondo/hml/1.6x-howto)
• Mondo user forums (http://forum.mondorescue.org)
16.16 Creating a Bootable System Restore DVDwith Mondo Rescue
ProblemYou would like to put your system backup on a single DVD, instead of several CDs.
This is the Title of the Book, eMatter EditionCopyright © 2007 O’Reilly & Associates, Inc. All rights reserved.
16.16 Creating a Bootable System Restore DVD with Mondo Rescue | 297
SolutionRun Mondo Rescue from the command line, instead of using the graphical interface,and create an .iso. Then burn the .iso to DVD. In addition to the Mondo Rescuecomponents listed in the “Discussion” section of Recipe 16.14, you’ll need dvd+rw-tools and cdrtools.
The first command creates an .iso, and the second command copies it to the DVD:
# mondoarchive -OVmF -5 -S /tmp/scratch -T /tmp/mondo -E "/home /shared /var/www" \-i -d /tmp/iso# growisofs -dvd-compat -Z /dev/scd0=/tmp/iso
DiscussionThis task can also be performed from the Mondo graphical interface. In the openingscreen, select “Backup to Hard Disk.” Using the command line gives you greater con-trol; for example, you can turn off the prompt to create boot floppies and disableejecting the drive tray.
This is what the various mondoarchive command flags mean:
-O Create a backup.
-V Verify the backup.
-m Don’t eject the drive tray. Use this for unattended backups and for laptops,which usually do not have self-retracting disc trays.
-F Don’t ask to create boot floppies.
-5 Compression level. The range is 0–9, with 0 being uncompressed and 9 thegreatest level of compression. The default is 3.
-S Location of the scratch directory, where images are built before being archived.
-T The directory where other temporary files are stored.
-E List directories that are to be excluded from the backup. Removable mounts, /tmp,and /proc are automatically excluded.
-i Create .iso images.
-d The directory where the completed .iso is to be stored. The default is /root/images/mondo.
See Also• mondoarchive(1), growisofs(1)
• Your locally installed Mondo documentation (/usr/share/doc/mondo/hml/1.6x-howto)
• Mondo user forums (http://forum.mondorescue.org)

This is the Title of the Book, eMatter EditionCopyright © 2007 O’Reilly & Associates, Inc. All rights reserved.
298 | Chapter 16: Backup and Recovery
16.17 Using Mondo Rescue to Clone LinuxSystems
ProblemYou have a number of identical PCs, and you want to install identical custom Linuxconfigurations on each one. It sounds easy, but in practice, installing the same cus-tom configuration on two or more PCs is a pain and error-prone. Mondo Rescuemakes it easy.
SolutionFirst, customize a single Linux installation to your specifications. Then create aMondo CD or DVD from your customized system, and use it for your new installa-tions. Boot to the Mondo disk, then select “Nuke” to perform the installation. It willoverwrite anything that is already installed and create an exact copy of your custom-ized Linux.
DiscussionThis is a nice timesaver when you have a particular server configuration to replicate,or when you want to roll out a number of identical workstations. Don’t forget totweak network settings, such as hostnames and static IPs, and to set up useraccounts as needed.
See Also• mondoarchive(1)
• Your locally installed Mondo documentation (/usr/share/doc/mondo/hml/1.6x-howto)
• Mondo user forums (http://forum.mondorescue.org)
16.18 Using the mindi-kernel for a “Sane” Backup
ProblemYour Linux kernel is missing some of the elements Mondo needs to create a bootablerescue disk. You know this because when you tried to boot your Mondo rescue disk,it failed with a “VFS: Unable to mount root fs” error. What do you do next? How doyou create a useable rescue disk?

This is the Title of the Book, eMatter EditionCopyright © 2007 O’Reilly & Associates, Inc. All rights reserved.
16.19 Restoring a System from a Mondo Rescue Disk | 299
SolutionUse the mindi-kernel to create your Mondo rescue disk.
The mindi-kernel is a failsafe 2.4.7 kernel provided by the Mondo authors. If you’reusing Mondo’s graphical interface, it will ask you if you want to use the mindi-kernel.Say yes.
Use the -k flag to specify it at the command line:
-k FAILSAFE
DiscussionDebian users may need to install the mindi-kernel separately.
The mindi-kernel does not replace your system kernel; all it does is ensure a bootablerescue disk.
See Also• mondoarchive(1)
• Your locally installed Mondo documentation (/usr/share/doc/mondo/hml/1.6x-howto)
• Mondo user forums (http://forum.mondorescue.org)
16.19 Restoring a System from a MondoRescue Disk
ProblemYou need to do a complete system rebuild because your system has been compro-mised, or you just want to blow away your existing installation and restore it to aprevious, known-good state.
SolutionTo perform a complete system rebuild, boot to your Mondo rescue disk and typenuke at the command prompt. It will completely overwrite your system and restore itto the state saved on the Mondo disk.
DiscussionYou can use Mondo to back up your entire system, including datafiles, or just theroot filesystem. Using Mondo to preserve the root filesystem on a bootable CD, then

This is the Title of the Book, eMatter EditionCopyright © 2007 O’Reilly & Associates, Inc. All rights reserved.
300 | Chapter 16: Backup and Recovery
backing up data separately on an rsync server, is an easy, fast way to do both back-ups and restores.
See Also• mondoarchive(1)
• Your locally installed Mondo documentation (/usr/share/doc/mondo/hml/1.6x-howto)
• Mondo user forums (http://forum.mondorescue.org)
16.20 Restoring Selected Files from a Mondo Disk
ProblemYou just need to replace a few selected files; you don’t want to nuke your system andstart over.
SolutionBoot your Mondo disk, and run it in interactive mode.
Type interactive at the prompt. Mondo will ask you which partitions to mount.Select the ones you want by editing the mountlist. Then follow the prompts:
Do you want to partition your devices? noDo you want to format them? noDo you want to restore everything? noDo you want to restore something? yesWhich path do you want to restore? /etc/rsyncSelect your restore path: /etc/rsync
Mondo will give you the option to try to boot your system directly from Mondowhen you’re finished restoring files, but it’s usually simpler to remove the Mondodisk and reboot.
DiscussionYou may wish to restore to the default path, which is /mnt/RESTORE, and review thefiles before copying them to their final locations.
See Also• mondoarchive(1)
• Your locally installed Mondo documentation (/usr/share/doc/mondo/hml/1.6x-howto)
• Mondo user forums (http://forum.mondorescue.org)

This is the Title of the Book, eMatter EditionCopyright © 2007 O’Reilly & Associates, Inc. All rights reserved.
301
Chapter 17 CHAPTER 17
Remote Access
17.1 IntroductionRemote access is one of Linux’s great features, and there are many ways to do it. Foraccess over untrusted networks, don’t use those old reliable standbys, telnet or X,because logins and data are sent in the clear. Your best bet is OpenSSH (SecureShell), a suite containing a number of secure remote transfer programs: scp (securecopy), ssh (Secure Shell), and sftp (SSH file transfer protocol). ssh is the tool of choicefor remote system administration; with ssh, you can log into remote systems and runthem as though you were physically there. Logins and data are encrypted, and sshwill detect if any packets have been altered en route. Eavesdroppers can sniff andmuck with all the packets they want—they won’t get anywhere.
SSH isn’t really a shell; it’s a protocol. There are two incompatible versions of thisprotocol: SSH-1 and SSH-2. OpenSSH supports both. This chapter covers SSH-2,because you should be using a current version of OpenSSH.
SSH nomenclature can get a bit confusing. SSH, capitalized, is the pro-tocol. ssh, scp, and so forth, in lowercase, are programs that use SSH.OpenSSH is the implementation of SSH used in this chapter.
Using SSH is not very complicated. If you’re used to rsh, rlogin, or rcp, the com-mand syntax is pretty much the same. You’ll need sshd, the OpenSSH daemon, run-ning on all machines to which you want to enable remote access, and you’ll needshell accounts on the remote machines. You can log in as any user, as long you havethe login and password.
OpenSSH uses public/private key pairs for authentication. Private keys are carefullyguarded and never, ever shared. Always create a strong passphrase to encrypt andprotect your private keys. A really strong passphrase is a nonsense sentence thatcombines words and numbers, like “t4is is mai 733t s3kkrit p4ssphr4se”. As always,

This is the Title of the Book, eMatter EditionCopyright © 2007 O’Reilly & Associates, Inc. All rights reserved.
302 | Chapter 17: Remote Access
you must strike a balance between security and usability, because you may need totype your passphrase frequently.
Public keys are distributed to both remote SSH clients and remote SSH servers. Forexample, when you use host-key authentication, this means the public key of the serveris stored on clients that are allowed to access it. All SSH sessions start with host-keyauthentication. Once the remote host’s public key is copied to your local ~/.ssh direc-tory, you can log into any user account you have access to on the remote host, usingthe account logins.
If you want to use SSH keys for authentication, instead of user account logins, yougenerate your own public/private key pair, and copy your public key to all theremote hosts you wish to access. A couple of configuration steps, which are coveredin this chapter, must be carried out to make this work. This is called public-keyauthentication.
If you’re going to access a lot of remote machines, managing logins can be difficult.Recycling the same public key and passphrase all over the place presents a potentialsecurity problem, but tracking a lot of different passphrases can also be trouble.OpenSSH provides a way to avoid all this login drama, by using public-keyauthentication, ssh-agent, and keychain. These let you set up secure, passphraselesslogins.
17.2 Setting Up OpenSSH the First Time
ProblemYou need to establish a connection between your local workstation and a remote PC.The connection needs to be secure; you don’t want your data exposed to prying eyes.(They’re there, and you should be worried about them—even if you aren’t para-noid.) So you want to set up OpenSSH.
SolutionInstall OpenSSH on both machines. sshd, the ssh daemon, must be running on theremote host, so that it can receive connections. Copy the remote host’s public key tothe local machine’s ~/.ssh/known_hosts file, and you’re in business.
Starting and stopping sshd on most rpm-based systems is done like this:
# /etc/init.d/sshd start# /etc/init.d/sshd stop
On Debian, it’s slightly different:
# /etc/init.d/ssh start# /etc/init.d/ssh stop
This is the Title of the Book, eMatter EditionCopyright © 2007 O’Reilly & Associates, Inc. All rights reserved.
17.2 Setting Up OpenSSH the First Time | 303
Always check your init filenames, as they vary on different distributions.
Copying the remote host’s public key to your local ~/.ssh/known_hosts file is as sim-ple as connecting to the remote host:
carla@windbag carla$ ssh stinkpadThe authenticity of host 'stinkpad (192.168.1.100)' can't be established.RSA key fingerprint is a2:c6:70:3e:73:00:b3:ed:90:b1:9a:bc:e7:d5:32:ba.Are you sure you want to continue connecting (yes/no)?
Type yes, and it will respond:
Warning: Permanently added 'stinkpad,192.168.1.100' (RSA) to the list of known hosts.carla@stinkpad's password:Linux stinkpad 2.4.21 #1 Sun Aug 3 20:15:59 PDT 2003 i686 GNU/LinuxLibranet GNU/LinuxLast login: Sat June 3 22:16:24 2004 from :0.0carla@stinkpad:~$
Now you are logged into your account on the remote PC, and can work just as if youwere sitting physically at the remote machine. (To learn how to run a remote X ses-sion, see Recipe 17.11.) To close the session, type exit.
DiscussionUsing the simple ssh <hostname> login connects you to another host on your LAN,using the same login. You can connect as a different user with the -l flag:
carla@windbag ~$ ssh -l wilmaf stinkpad
To make an SSH connection over the Internet, you must use the full domain name:
carla@windbag ~$ ssh stinkpad.test.net
Making that initial connection, and copying the host’s RSA key, is the riskiest part ofsetting up SSH. If an intruder managed to compromise your nameserver, she couldpossibly hijack your SSH session and capture your login. It’s a pretty small risk,though, and you can verify the IP address before logging in the first time. To close offthis hole, you can manually copy the host’s public key to your local ~/.ssh/known_hostsfile first. You must edit it slightly; see the examples below.
Host keys are stored in /etc/ssh. These are used to validate the identity of the remotehost. This is all you need to allow users to access this machine. All they need is acopy of the public host key in their ~/.ssh/known_hosts files and an account to loginto. Some Linux distributions create two key pairs when you install OpenSSH—oneRSA key pair and one DSA key pair:
$ ls /etc/sshssh_host_dsa_keyssh_host_dsa_key.pubssh_host_rsa_keyssh_host_rsa_key.pub
This is the Title of the Book, eMatter EditionCopyright © 2007 O’Reilly & Associates, Inc. All rights reserved.
304 | Chapter 17: Remote Access
If your system does not create these for you, or you wish to change them, see Recipe17.3 to learn how to generate new host keys.
This is what the public rsa key looks like:
$ cat ssh_host_rsa_key.pubssh-rsaAAAAB3NzaC1yc2EAAAABIwAAAIEA5pSqNmtqRzK2JaLr8qkIQ41nBDLI2JRJ6gRBmwg9gwK3S8xXnMUHIsu8wh5S1oei8hs47x2I9cnNpxHfj1wQWwqP6lVyelDfD+y+uWIz0UGzUXN5IrqYZ70EdQ4Xn++Jl1kmFG6Ll6KySb070OX0nlC09rNxisHL5GC0qi1+qM= root@windbag
The key itself must be one long, unbroken line—it must not have line breaks, as itdoes on this page. Copy it to a removeable disk, transfer it to your local ~/.ssh/known_hosts file, and modify it in this manner:
windbag.test.net,192.168.1.6 ssh-rsaAAAAB3NzaC1yc2EAAAABIwAAAIEA5pSqNmtqRzK2JaLr8qkIQ41nBDLI2JRJ6gRBmwg9gwK3S8xXnMUHIsu8wh5S1oei8hs47x2I9cnNpxHfj1wQWwqP6lVyelDfD+y+uWIz0UGzUXN5IrqYZ70EdQ4Xn++Jl1kmFG6Ll6KySb070OX0nlC09rNxisHL5GC0qi1+qM=
As you can see, the hostname and IP address must be written at the beginning of theline, and the hostname must be deleted from the end of the line.
The .pub, or public, keys are world-readable, but private keys must be readable onlyby the key owner.
See Also• ssh(1)
• SSH, The Secure Shell: The Definitive Guide, by Daniel J. Barrett and Richard Sil-verman (O’Reilly)
17.3 Generating New Host Keys
ProblemYou looked in /etc/ssh and didn’t see any key files: your Linux distribution did notgenerate host keys when you installed OpenSSH. Or you just want to create newhost keys yourself.
SolutionUse ssh-keygen to create a new key pair. This must be done as root, and you have tospecify the name of the new key pair. You only need one key pair. Always specify apassphrase:
# ssh-keygen -t rsa -f /etc/ssh/ssh_host_rsa_keyGenerating public/private rsa key pair.Enter passphrase (empty for no passphrase):Enter same passphrase again:

This is the Title of the Book, eMatter EditionCopyright © 2007 O’Reilly & Associates, Inc. All rights reserved.
17.4 Authenticating Via Public Keys | 305
Your identification has been saved in /etc/ssh/ssh_host_rsa_key.Your public key has been saved in /etc/ssh/ssh_host_rsa_key.pub.The key fingerprint is:6c:24:75:54:d3:21:17:c9:11:db:41:dd:95:3f:d0:ac root@windbag
This example uses the default key names, but you can call the keys anything you like.If you use different names, be sure to enter them in /etc/ssh/sshd_config:
# HostKeys for protocol version 2HostKey /etc/ssh/ssh_host_rsa_key
Comment out or delete any entries for keys that do not exist.
DiscussionSee this chapter’s “Introduction” for how to create a strong passphrase.
Once you have OpenSSH set up and working and you have distributed public keys,you don’t want to change your private keys without a really good reason, becauseyou’ll have to distribute new public keys. If users try to connect with the old publickey, they will get this message:
@@@@@@@@@@@@@@@@@@@@@@@@@@@@@@@@@@@@@@@@@@@@@@@@@@@@ WARNING: HOST IDENTIFICATION HAS CHANGED! @@@@@@@@@@@@@@@@@@@@@@@@@@@@@@@@@@@@@@@@@@@@@@@@@@@@IT IS POSSIBLE THAT SOMEONE IS DOING SOMETHING NASTY!Someone could be eavesdropping on you right now (man-in-the-middle attack)!It is also possible that the host key has just been changed.Please contact your system administrator.Add correct host key in <path>/known_hosts to get rid of this message.Agent forwarding is disabled to avoid attacks by corrupted servers.X11 forwarding is disabled to avoid attacks by corrupted servers.Are you sure you want to continue connecting (yes/no)
It’s a good idea to train your users to say no at the prompt, and to contact you to seewhat is going on.
See Also• ssh(1), ssh-keygen(1)
• SSH, The Secure Shell: The Definitive Guide
17.4 Authenticating Via Public Keys
ProblemYou would prefer to authenticate your SSH sessions with keys, rather than your sys-tem logins. This will let you use your SSH private-key passphrase instead of your sys-tem login, which means your system login is protected, and you can reuse the samepublic/private key pair for as many remote hosts as you need to connect to.

This is the Title of the Book, eMatter EditionCopyright © 2007 O’Reilly & Associates, Inc. All rights reserved.
306 | Chapter 17: Remote Access
SolutionIn this example, Valorie wishes to log in to saturn from jupiter. To do this, she mustgenerate a new, personal private/public key pair with ssh-keygen on jupiter, thentransfer a copy of her new public key to saturn.
This command generates a new RSA key pair, protected by a passphrase:valorie@jupiter:~$ ssh-keygen -t rsaGenerating public/private rsa key pair.Enter file in which to save the key (/home/valorie/.ssh/id_rsa):Enter passphrase (empty for no passphrase):Enter same passphrase again:Your identification has been saved in /home/valorie/.ssh/id_rsa.Your public key has been saved in /home/valorie/.ssh/id_rsa.pub.The key fingerprint is:79:1f:a5:5f:5f:17:e5:a8:bc:02:50:8c:3a:1e:e1:d1 valorie@jupiter
The new key pair is named /home/valorie/.ssh/id_rsa and /home/valorie/.ssh/id_rsa.pub.Now Valorie copies the new id_rsa.pub key to her account on saturn. Since this is herfirst entry in her authorized_keys file on saturn, she can use scp:
valorie@jupiter:~$ scp ~/.ssh/id_rsa.pub valorie@saturn:.ssh/authorized_keys
Now when Valorie logs into saturn, she will be asked for her private SSH key pass-phrase, instead of her system login:
valorie@jupiter:~$ ssh saturnEnter passphrase for key '/home/valorie/.ssh/id_rsa':Linux saturn 2.4.21 #1 Sun Aug 3 20:15:59 PDT 2003 i686 GNU/LinuxLibranet GNU/Linux
valorie@saturn:~$
To close the session, she can simply type exit.
DiscussionOpenSSH creates both RSA and DSA keys. Both support SSH2, which is the latestand greatest, so it doesn’t matter which one you choose. RSA is the default.
A single key in ~/.ssh/authorized_keys looks like this:
ssh-rsa AAAAB3NzaC1yc2EAAAABIwAAAIEAnYF8XfIqzuOIOXNw07143OhjOt4OuSN9NgWY8zlB7UkTQNuAFXo2UWNU2WLDMPu3mJ6V1ixf49+wdfoENvWXNMuuAFiPHopHk2+PPHN750LxlD8kvJc7BMTtYCU7GLj6lpH1OyOglyUdMx02GkjA45kPLYiXMpGNCclHRHVHU= valorie@jupiter
Remember, it must be one long, unbroken line. You can store as many keys here asyou like.
Another way to copy a key to an authorized_keys file on a remote PC is to simplycopy and paste. Open a normal SSH session:
$ ssh valorie@saturnPassword:
Then open a text editor on each side of the connection, and copy and paste.

This is the Title of the Book, eMatter EditionCopyright © 2007 O’Reilly & Associates, Inc. All rights reserved.
17.5 Using Multiple Key Pairs | 307
You can do this for any account on the SSH server to which you have access. Onepublic/private key pair should suffice; you can copy your public key to as many hostsas you need to, and use the same passphrase for all of them.
Keep track of where you are! It’s easy to type a command thinking you’re at the localmachine when you’re logged into a remote host.
Another point of confusion is which host is the client, and which host is the server.Any host that is running the ssh daemon, and is waiting to accept connections, canbe thought of as the server.
Protect your keys! Public keys must be world-readable, but only owner-writable (mode644). Private keys must absolutely not be anything but owner readable/writable (mode600). Never, ever share your private keys.
Beware of text editors that automatically make backup copies. Either disable this fea-ture, be very diligent about deleting the backup copies of keys and other sensitiveSSH files, or make sure that permissions are set appropriately on the backups.
Public/private key pairs are a lovely stroke of genius that allow “hiding in plainsight.” The public key encrypts, the private key decrypts. So you can (theoretically)strew your public keys all over the planet without harm.
See Also• ssh(1)
• SSH, The Secure Shell: The Definitive Guide
17.5 Using Multiple Key Pairs
ProblemYou would like to generate separate sets of keys for accessing different hosts, or dif-ferent types of accounts. For example, you would like one SSH key for administeringan FTP server, and a different one for accessing your private user accounts.
SolutionYou can name your key pairs anything you like with ssh-keygen. ssh-keygen will auto-matically append .pub to the public key. Always create a passphrase!
akkana@windbag:$ ssh-keygen -t rsa -f /home/akkana/.ssh/ftp_keyGenerating public/private rsa key pair.Enter passphrase (empty for no passphrase):Enter same passphrase again:Your identification has been saved in /home/akkana/.ssh/ftp_key.Your public key has been saved in /home/akkana/.ssh/ftp_key.pub.

This is the Title of the Book, eMatter EditionCopyright © 2007 O’Reilly & Associates, Inc. All rights reserved.
308 | Chapter 17: Remote Access
The key fingerprint is:95:d2:12:55:66:ba:ec:a8:5c:40:4b:1e:03:2b:6c:ea akkana@windbagakkana@windbag:~$
When you create a key pair with non-default names, you need to enter the privatekey name in ~/.ssh/ssh_config. If this file does not exist, create it, and make an entrylike this:
IdentityFile ~/.ssh/ftp_key
DiscussionThere should be a copy of the default ssh_config in /etc/ssh. When you make changes,the simplest method is to append your options to the end of the file.
ssh_config is for both user-specific configurations and system-wide client options. Cre-ating and storing a copy in a user’s home directory configures user-specific options.
See Also• ssh(1), ssh_config(5)
• SSH, The Secure Shell: The Definitive Guide
17.6 Passwordless Logins with ssh-agent
ProblemTyping passwords is a pain, and typing passphrases is even worse. You want to setup OpenSSH to open connections without having to enter a passphrase, and youwant it to still be secure.
SolutionFirst, set up your private/public keys as in Recipe 17.3. Then use ssh-agent. ssh-agenthandles authentication requests while you are gallivanting about the world, SSH-inginto various systems. You’ll enter your passphrase once, at the beginning of yourSSH session; when you log out of the session, you’ll have to start over.
ssh-agent won’t enable you to schedule SSH transfers from cron—see Recipe 17.8 tolearn how to do this.
First, start up ssh-agent. You must name the shell you want to use:
$ shh-agent bash
You’ll be returned to a normal-looking prompt. Now run ssh-add. This will load allof the keys in your ~/.ssh directory:
$ ssh-addEnter passphrase for /home/jenn/.ssh/id_rsa:

This is the Title of the Book, eMatter EditionCopyright © 2007 O’Reilly & Associates, Inc. All rights reserved.
17.6 Passwordless Logins with ssh-agent | 309
Identity added: /home/jenn/.ssh/id_rsa (/home/jenn/.ssh/id_rsa)Enter passphrase for /home/jenn/.ssh/apache_key:Identity added: /home/jenn/.ssh/id_dsa (/home/jenn/.ssh/apache_key)
Now you can log into any of your SSH hosts without entering a passphrase:
jenn@windbag:$ ssh powerpcLinux powerpc 2.4.21 #1 Sun Aug 3 20:15:59 PDT 2003 i686 GNU/LinuxLibranet GNU/Linux
Last login: Wed Feb 7 18:28:20 2004 from windbag.test.netjenn@powerpc:~$
To shut down ssh-agent, just exit out of the ssh-agent shell:
$ exit
DiscussionBecause the passphrases and keys are tied to a particular Bash shell process, they’lldisappear when you log out of the ssh-agent shell. If you open a second shell to startanother ssh-agent, you’ll have to enter your passphrase again, even if the first one isstill active.
You can see what keys are being used by ssh-agent:
$ ssh-add -l1024 65:91:77:71:24:66:46:ea:cb:00:fe:83:ad:b8:4a:34 /home/jenn/.ssh/id_rsa (RSA)1024 da:f7:27:6a:37:4e:a5:bb:1d:00:c7:a8:e9:fe:23:d8 /home/jenn/.ssh/apache_key (RSA)
You’ll need to be back in the local ssh-agent shell for this to work, and not loggedinto a remote host. When you are logged in to a remote host, the remote host con-trols your terminal, and you’ll get the “Could not open a connection to your authen-tication agent” error message.
You can specify a particular key to load:
$ ssh-add /home/jenn/adminkeys/id_rsa_http
or you can delete a key from the active ssh-agent session (this does not delete the keyfrom your system):
$ ssh-add -d /home/jenn/.ssh/id_dsaIdentity removed: /home/jenn/.ssh/id_dsa (/home/jenn/.ssh/id_dsa.pub)
To delete all keys, use:
$ ssh-add -DAll identities removed.
See Also• ssh(1), ssh-add(1), ssh-agent(1)
• SSH, The Secure Shell: The Definitive Guide

This is the Title of the Book, eMatter EditionCopyright © 2007 O’Reilly & Associates, Inc. All rights reserved.
310 | Chapter 17: Remote Access
17.7 Better Passwordless Logins with keychain
Problemssh-agent is nice, but you still have to enter a passphrase with every new shell youopen, and when you log out you have to start over. Also, ssh-agent doesn’t enablepassphraseless SSH transfers to work with cron.
SolutionFirst, set up your system to use ssh-agent. Then use keychain to keep your SSH pass-phrases alive, system-wide, until you reboot. keychain also makes it possible to runSSH transfers from cron.
Download and install keychain from the usual sources; it comes in RPMs, .debs, andsources. Then edit your local ~/.bash_profile, adding these lines:
keychain id_dsa. ~/.keychain/$HOSTNAME-sh
Use the real name of your private key: id_rsa, my_own_groovy_key, whatever. Besure to use the leading dot on the second line; this tells Bash to read the file namedon the line.
That’s all you have to do. Now when you log in to your local workstation, a keychainprompt will appear, asking for the passphrase of your key. keychain will handleauthentications until the system reboots.
DiscussionYou can name as many keys as you wish to use, like this:
keychain id_dsa apache_key ftp_key
You’ll enter the passphrase for each one at system login. Then keychain will handleauthentications as long as the system stays up, even if you log out and log back in afew times. When you restart the system, you start over.
A lot of documentation tells you to use null passphrases on keys generated for serv-ers, to enable unattended reboots. The risk is that anyone who gets a copy of the pri-vate key will be able to easily misuse it. As always, you’ll have to decide for yourselfwhat balance of convenience and security is going to serve your needs.
See Also• ssh(1), ssh-add(1), ssh-agent(1), keychain(1)
• SSH, The Secure Shell: The Definitive Guide

This is the Title of the Book, eMatter EditionCopyright © 2007 O’Reilly & Associates, Inc. All rights reserved.
17.9 Shutting Down ssh-agent Automatically at Logout | 311
17.8 Passwordless Logins for cron Jobs
ProblemYou want to schedule some backups or file transfers via SSH, using cron. How doyou tell cron to look to keychain to handle authentication of remote hosts?
SolutionUse the same source line in your cron scripts that you used in your .bash_profile.This is a simple script that uses rsync to back up a user’s home directory:
#!/bin/bashsource /home/saz/.keychain/$HOSTNAME-shrsync -a -e ssh --delete --force rsync.test.net::home/saz/ /backups/saz
Slap it in a cron job, and you’re fully automated until the next reboot.
DiscussionAgain, using null-passphrase keys leaves your private keys wide open to being mis-used by anyone who gains access to them. Using keychain ensures that you can prop-erly protect your SSH keys with passphrases and still automate SSH transfers.
See Also• ssh(1), keychain(1)
• Chapter 16, Backup and Recovery
• SSH, The Secure Shell: The Definitive Guide
17.9 Shutting Down ssh-agent Automaticallyat Logout
ProblemAs a security measure, you would like to ensure that any stray ssh-agent processes arekilled automatically when you log out.
SolutionMake this entry in your ~/.bash_logout file:
kill $SSH_AGENT_PID

This is the Title of the Book, eMatter EditionCopyright © 2007 O’Reilly & Associates, Inc. All rights reserved.
312 | Chapter 17: Remote Access
DiscussionDon’t do this if you’re using keychain, because the whole point of using keychain isto be able to log in and out without having to re-enter your passphrases.
If you don’t have a ~/.bash_logout file, create one. There should be a system-widedefault logout file at /etc/skel/.bash_logout to use as a model.
See Also• bash(1), ssh-agent(1)
• SSH, The Secure Shell: The Definitive Guide
17.10 Customizing the Bash Prompt for ssh
ProblemSure, you know that the prompt changes to display the remote hostname whenyou’re logged in via SSH. But it’s just a dumb little black-and-white prompt, and it’seasy to make mistakes, so you want a customized, colorful prompt to indicate whenyou have an active SSH login.
SolutionCustomize the Bash prompt on the remote PCs. This example turns the prompt redand adds “ssh” to it.
Add these lines to the ~./bashrc for the remote account you want to log into:
if [ -n "$SSH_CLIENT" ]; then text=" ssh"fiexport PS1='\[\e[0;31m\]\u@\h:\w${text}$\[\e[m\] '
When you log into this machine, the prompt will look like this, in red:carla@server06:~ssh $
Only the prompt is red; all the other text will be your normal shell colors.
DiscussionCustomizing the Bash prompt is practically a book topic in itself. The example inthis recipe can easily be edited to suit your preferences. You don’t have to use “ssh”or name the variable “text;” these can be anything you like. [\e[0;31m\] determinesthe text color—just change the numbers.
[\e[m\] turns off the colors, so that your commands and command output will returnto the normal shell colors (Table 17-1).
Table 17-1. Bash prompt text colors
Black 0;30 Dark Gray 1;30
Blue 0;34 Light Blue 1;34

This is the Title of the Book, eMatter EditionCopyright © 2007 O’Reilly & Associates, Inc. All rights reserved.
17.11 Tunneling X over SSH | 313
This customization works by checking for the presence of the SSH_CLIENT environ-ment variable. Then Bash knows to use the custom SSH prompt instead of thedefault prompt. To see this for yourself, log into a remote host via SSH, then run:
user@remotehost$ echo $SSH_CLIENT192.168.1.5 33232 22
This only works on the remote prompt. Running it at the local prompt will return ablank line:
user@localhost$ echo $SSH_CLIENT
because once you complete an SSH login, the remote machine controls your localterminal, and the SSH client is running on the remote PC. That is why you have tocustomize ~/.bachrc on the remote hosts.
See Also• bash(1)
• The Bash Prompt Howto (http://www.tldp.org/HOWTO/Bash-Prompt-HOWTO/index.html)
17.11 Tunneling X over SSH
ProblemYou like running remote X sessions, but you know that they are completely inse-cure, so you want to run X over SSH.
SolutionFollow the previous recipes to get SSH configured and running, then enable X for-warding on the SSH server, in /etc/ssh/sshd_config. Then use the -X flag when youstart your SSH session.
Put this line in /etc/ssh/sshd_config on the SSH server:
X11Forwarding yes
Green 0;32 Light Green 1;32
Cyan 0;36 Light Cyan 1;36
Red 0;31 Light Red 1;31
Purple 0;35 Light Purple 1;35
Brown 0;33 Yellow 1;33
Light Gray 0;37 White 1;37
Table 17-1. Bash prompt text colors (continued)

This is the Title of the Book, eMatter EditionCopyright © 2007 O’Reilly & Associates, Inc. All rights reserved.
314 | Chapter 17: Remote Access
Then connect to the server with the -X flag:
$ ssh -X saturn.test.net
Run this command to test that X forwarding is working:
$ echo $DISPLAYlocalhost:10.0
If it weren’t, it would return a blank line. Now you can run any X program installedon the server as though it were local. Try this for a simple test:
$ xeyes
Or run glxgears, or any X program that is installed on the server.
DiscussionUsing SSH for remote X sessions is both simpler and more secure than running aplain-vanilla X session without SSH, which is not secure at all. However, it still car-ries some risks. Use this to connect only to trusted hosts, because a snoopy admincan easily capture your keystrokes or logins, or even connect to your local desktopand snoop even more. Make sure your local ~/.Xauthority file is mode 600, to pre-vent unprivileged users on the remote host from also joining in the snooping.
Be sure that these entries are in your local /etc/ssh/ssh_config file and any ~/ ssh/ssh_config files on your system:
Host * ForwardX11 no ForwardAgent no
It’s important to ensure that X forwarding is turned off, except when you absolutelyneed it.
Depending on your physical distance from the remote server and the speed of yournetwork connection, you may notice some lag in your keystrokes or mouse move-ments, as the X protocol is a bit of a network hog.
See Also• ssh(1)
• SSH, The Secure Shell: The Definitive Guide
17.12 Connecting from a Windows PC
ProblemSSH on Linux is great. But you want to access your Linux PCs from Windows. Howcan you use OpenSSH on a Windows PC?

This is the Title of the Book, eMatter EditionCopyright © 2007 O’Reilly & Associates, Inc. All rights reserved.
17.12 Connecting from a Windows PC | 315
SolutionThere are several ways to do this. The two we’ll look at here are Cygwin and PuTTY.
Recipe 16.12 details how to install and run Cygwin. Cygwin creates a native Linuxenvironment on Windows. You’ll be able to run OpenSSH from Windows just likefrom a Linux box, both as a server and as a client. You can even run X over SSH.
PuTTY is a free SSH client for Windows. There is no server component. PuTTY isdead easy—just download, install, and double-click, then type in the name of thehost to which you want to connect and click Open. Figure 17-1 shows the mainPuTTY window.
DiscussionIf all you need a is a simple SSH client, PuTTY is the quickest and easiest. putty.exeeasily fits on a floppy disk, for portable SSH-ing.
Figure 17-1. PuTTY

This is the Title of the Book, eMatter EditionCopyright © 2007 O’Reilly & Associates, Inc. All rights reserved.
316 | Chapter 17: Remote Access
See Also• PuTTY home page (http://www.chiark.greenend.org.uk/~sgtatham/putty/
download.html)
• Cygwin (http://www.cygwin.com)
17.13 Setting File Permissions on ssh Files
ProblemYou want to be sure that your SSH files and keys have the correct, most securepermissions.
SolutionFor user accounts in ~/.ssh, use the following permissions:
Files in /etc/ssh should have these permissions:
DiscussionFile permissions and ownership are fundamental security tools in Linux, so it’simportant to be careful and make sure to get them right. Again, beware of text edi-tors that create automatic backup copies, and be careful when you delete files. If theysit in the Trash, they can easily be retrieved.
See Also• ssh(1), sshd(8)
• SSH, The Secure Shell: The Definitive Guide
~/.ssh mode 700~/.ssh/id_dsa and other private keys mode 400~/.ssh/id_dsa.pub and other public keys mode 644~/.ssh/ssh_config mode 644~/.ssh/known_hosts mode 644~/.ssh/authorized_keys mode 644
/etc/ssh mode 755/etc/ssh/sshd_config mode 644/etc/ssh/ssh_config mode 644/etc/ssh/ssh_host_dsa_key and other private keys mode 400/etc/ssh/ssh_host_dsa_key.pub and other public keys mode 644/etc/ssh/moduli mode 644

This is the Title of the Book, eMatter EditionCopyright © 2007 O’Reilly & Associates, Inc. All rights reserved.
317
Chapter 18 CHAPTER 18
Version Control
18.1 IntroductionWhat is the point of using a version control system? A version control system is anefficient way to track changes in documents and to preserve a complete history of aproject. It’s like having a time machine; months later, you can easily roll back to anearlier system configuration, or code block, or manuscript version.
Version control systems are useful for all sorts of things: source code, binary files,configuration files, scripts, articles and books, songs, inventories, indexes—any kindof text document. You can keep your shopping lists in a version control repository, ifyou like. Because a version control repository keeps track of every change ever made,you can easily go back to any point in the lifetime of a particular project. And theversion control system does the work—you don’t have to depend on users to createand store copies of the different versions of documents. This is quite handy whenyou want to retrieve that brilliant code you wrote months ago, or that perfect config-uration file, or that astonishingly fine arugula recipe.
Version control systems allow teams of users to work on a single project in a con-trolled manner. For example, you can break up a project into separate branches,which can later be merged. You can also merge different versions of files, though youneed to be aware that the software doesn’t know what the files mean and cannotintelligently resolve conflicts—it only knows how files differ, so merging files some-times requires some human intervention to be managed correctly.
There are whole lot of free/open source version control programs out there. Here arethe more popular ones:
• RCS (Revision Control System)
• CVS (Concurrent Versions System)
• Subversion
• GNU Arch
• Monotone

This is the Title of the Book, eMatter EditionCopyright © 2007 O’Reilly & Associates, Inc. All rights reserved.
318 | Chapter 18: Version Control
Commercial products include:
• BitKeeper
• Visual SourceSafe
• OpenCM
• CMSynergy
• Perforce
• ClearCase
RCS and CVS are the oldest and most widely used. They are fairly simple to set upand use, and they have been around long enough to be thoroughly torture-tested.
Subversion, GNU Arch, and Monotone all offer features not present in CVS: you canset up distributed repositories, as opposed to the central-server model of CVS, andthey support atomic commits. With an atomic commit, changes happen all at once.When a user commits a change to the repository, the whole change is applied, and itis visible to other users only once completed. CVS applies changes a file at a time, soif a network outage interrupts the commit, the changes will be only partially applied.
While this feature is quite cool and useful, Subversion, GNU Arch, and Monotoneare still somewhat immature. GNU Arch and Subversion are difficult to install andconfigure and not that easy to learn to use. Monotone has an interestingly differentarchitecture—one major difference is it transfers files via an embedded network pro-tocol, netsync, rather than using HTTP, NNTP, or SMTP. This eliminates a lot ofgnarly setup steps and means that every installation of Monotone is ready to func-tion either as a client or a server.
A forward-thinking person might set up some of these on some test machines, keepan eye on their development, and get the hang of using them, because these are theversion control systems of the future.
BitKeeper is one of the more popular commercial products. Linux kernel develop-ment is done on BitKeeper. You can test-drive BitKeeper for free; its makers offerboth a free 30-day evaluation and a somewhat dumbed-down free-of-cost version forpersonal use.
Although there are numerous alternatives, this chapter concentrates on RCS andCVS, the most mature and widely used version control systems. RCS is the backendto CVS, so it’s easy to learn both of them. RCS is perfect for a single user with sim-ple needs; CVS is good both for a single user, and to support teams of users workingon complex projects.
Essential CVS (O’Reilly), by Jennifer Vesperman is an excellent CVS howto and com-mand reference. If you have the budget for only one CVS book, this is the one youshould buy.

This is the Title of the Book, eMatter EditionCopyright © 2007 O’Reilly & Associates, Inc. All rights reserved.
18.2 Building a Simple Local RCS Repository | 319
18.2 Building a Simple Local RCS Repository
ProblemYou’re worried that someday you’ll change some file, break something, and you’llforget how to undo the change. So you want a simple, local version control reposi-tory for tracking code changes, configuration files, scripts, and other documents for asingle user. You don’t need network access or support for multiple users—just some-thing quick and easy to use for yourself.
SolutionInstall RCS (Revision Control System) from RPMs, .debs, or sources. Then followthese steps to create your RCS repository.
First create a working directory, then create an RCS subdirectory:
$ mkdir projecthome$ cd projecthome$ mkdir RCS
Make sure you are in your working directory (projecthome) with some files to playwith. This is how you check a file into the repository:
terri@workstation1:~/projecthome$ ci -u cupsd.confRCS/cupsd.conf,v <-- cupsd.confenter description, terminated with single '.' or end of file:NOTE: This is NOT the log message!>> LAN printer server, for windows and linux, no samba>> .initial revision: 1.1done
When you want to edit the file, check it out of the repository, then open it in yourfavorite text editor:
terri@workstation1:~/projecthome$ co -l cupsd.confRCS/cupsd.conf,v --> cupsd.confrevision 1.1 (locked)doneterri@workstation1:~/projecthome$ kate cupsd.conf &
When you’re finished, close and save the file, then check it in just like above. Add acomment for the log detailing your changes:
$ ci -u cupsd.confRCS/cupsd.conf,v <-- cupsd.confnew revision: 1.2; previous revision: 1.1enter log message, terminated with single '.' or end of file:>> added administrative controls to prevent users from making changes to the server>> .done

This is the Title of the Book, eMatter EditionCopyright © 2007 O’Reilly & Associates, Inc. All rights reserved.
320 | Chapter 18: Version Control
DiscussionIn a simple version control repository like this, you have only two directories to keeptrack of. Your working directory is where the working copies of documents are kept.The RCS directory is the actual repository. The files in the repository are given a ,vsuffix, like this:
$ ls RCScupsd.conf,v
The different revisions are tracked inside the file:
$ less cupsd.conf,vhead 1.3;access;symbols;locks; strict;comment @# @;1.3date 2004.06.15.03.33.46; author terri; state Exp;branches;next 1.2;1.2date 2004.06.13.30.47; author terri; state Exp;branches;next 1.1;1.1date 2004.06.12.03.27.01; author terri; state Exp;branches;next ;desc@LAN printer server, for windows and linux, no samba.....
Keep in mind that the files in your working directory are temporary versions. When afile has reached a state where you wish to preserve it, check it into the repository.
RCS’s commands are mnemonic:
ci -uCheck in and unlock
co -lCheck out and lock
Using the -u flag on checkin preserves the copy in your working directory. The file inthe working directory is set to read-only, which prevents accidents, and reminds youto check the file out of the repository for editing.
File locking means only one person at a time can check out and edit a file, so RCS isnot suitable for a busy project with multiple users. However, it is perfect for smallprojects and single users, with the added advantage of being simple to learn.
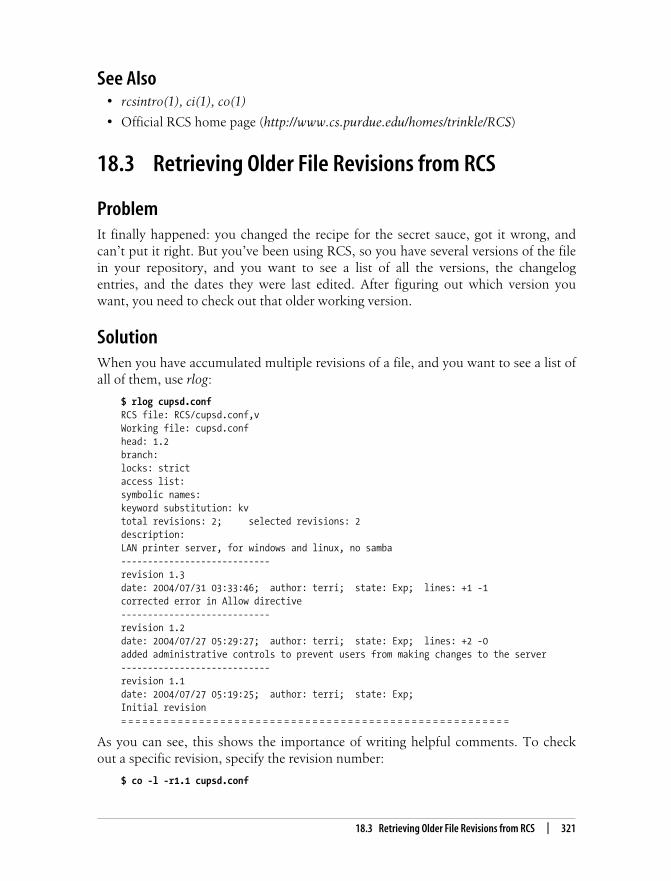
This is the Title of the Book, eMatter EditionCopyright © 2007 O’Reilly & Associates, Inc. All rights reserved.
18.3 Retrieving Older File Revisions from RCS | 321
See Also• rcsintro(1), ci(1), co(1)
• Official RCS home page (http://www.cs.purdue.edu/homes/trinkle/RCS)
18.3 Retrieving Older File Revisions from RCS
ProblemIt finally happened: you changed the recipe for the secret sauce, got it wrong, andcan’t put it right. But you’ve been using RCS, so you have several versions of the filein your repository, and you want to see a list of all the versions, the changelogentries, and the dates they were last edited. After figuring out which version youwant, you need to check out that older working version.
SolutionWhen you have accumulated multiple revisions of a file, and you want to see a list ofall of them, use rlog:
$ rlog cupsd.confRCS file: RCS/cupsd.conf,vWorking file: cupsd.confhead: 1.2branch:locks: strictaccess list:symbolic names:keyword substitution: kvtotal revisions: 2; selected revisions: 2description:LAN printer server, for windows and linux, no samba----------------------------revision 1.3date: 2004/07/31 03:33:46; author: terri; state: Exp; lines: +1 -1corrected error in Allow directive----------------------------revision 1.2date: 2004/07/27 05:29:27; author: terri; state: Exp; lines: +2 -0added administrative controls to prevent users from making changes to the server----------------------------revision 1.1date: 2004/07/27 05:19:25; author: terri; state: Exp;Initial revision= = = = = = = = = = = = = = = = = = = = = = = = = = = = = = = = = = = = = = = = = = = = = = = = = = = = = = =
As you can see, this shows the importance of writing helpful comments. To checkout a specific revision, specify the revision number:
$ co -l -r1.1 cupsd.conf
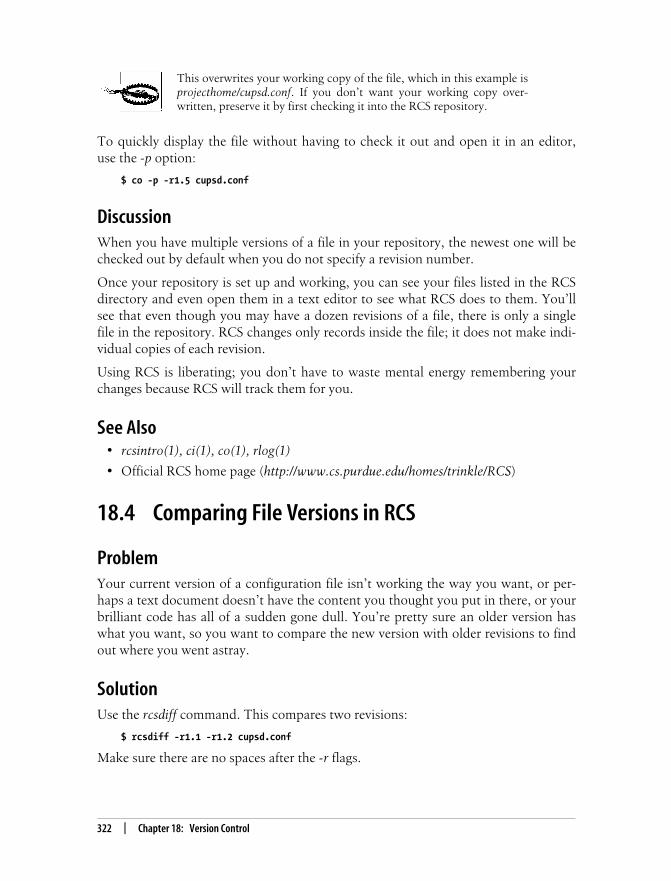
This is the Title of the Book, eMatter EditionCopyright © 2007 O’Reilly & Associates, Inc. All rights reserved.
322 | Chapter 18: Version Control
This overwrites your working copy of the file, which in this example isprojecthome/cupsd.conf. If you don’t want your working copy over-written, preserve it by first checking it into the RCS repository.
To quickly display the file without having to check it out and open it in an editor,use the -p option:
$ co -p -r1.5 cupsd.conf
DiscussionWhen you have multiple versions of a file in your repository, the newest one will bechecked out by default when you do not specify a revision number.
Once your repository is set up and working, you can see your files listed in the RCSdirectory and even open them in a text editor to see what RCS does to them. You’llsee that even though you may have a dozen revisions of a file, there is only a singlefile in the repository. RCS changes only records inside the file; it does not make indi-vidual copies of each revision.
Using RCS is liberating; you don’t have to waste mental energy remembering yourchanges because RCS will track them for you.
See Also• rcsintro(1), ci(1), co(1), rlog(1)
• Official RCS home page (http://www.cs.purdue.edu/homes/trinkle/RCS)
18.4 Comparing File Versions in RCS
ProblemYour current version of a configuration file isn’t working the way you want, or per-haps a text document doesn’t have the content you thought you put in there, or yourbrilliant code has all of a sudden gone dull. You’re pretty sure an older version haswhat you want, so you want to compare the new version with older revisions to findout where you went astray.
SolutionUse the rcsdiff command. This compares two revisions:
$ rcsdiff -r1.1 -r1.2 cupsd.conf
Make sure there are no spaces after the -r flags.

This is the Title of the Book, eMatter EditionCopyright © 2007 O’Reilly & Associates, Inc. All rights reserved.
18.4 Comparing File Versions in RCS | 323
This compares the working file with a specific revision:
$ rcsdiff -r1.2 cupsd.conf
And this compares the current working file with the most recent revision:
$ rcsdiff cupsd.conf
Use this command to review your changes after you’ve edited the file, but before youcheck it in.
DiscussionIf the rcsdiff output is long, you can always direct it to a file for leisurely perusal:
$ rcsdiff -r1.1 -r1.2 cupsd.conf > cupsdiff.txt
Here is an example of rcsdiff’s output:
$ rcsdiff -r1.1 -r1.3 cupsd.conf= = = = = = = = = = = = = = = = = = = = = = = = = = = = = = = = = = = = = = = = = = = = = = = = = = = = = = = =RCS file: RCS/cupsd.conf,vretrieving revision 1.1retrieving revision 1.3diff -r1.1 -r1.39c9,17< BrowseAddress 192.168.1.255\ No newline at end of file---> BrowseAddress 192.168.1.255>> <Location /admin>> AuthType Basic> AuthClass System> Allow From 127.0.0.1> Order Deny,Allow> Deny From All> </Location>
It tells you right at the top what file versions you are looking at:
< Means the line is unique to the first file.
> Means the line is unique to the second file.
\ Prefixes comments from RCS.
See Also• rcsdiff(1)
• Official RCS home page (http://www.cs.purdue.edu/homes/trinkle/RCS)

This is the Title of the Book, eMatter EditionCopyright © 2007 O’Reilly & Associates, Inc. All rights reserved.
324 | Chapter 18: Version Control
18.5 Managing System Configuration Fileswith RCS
ProblemYou want to preserve all versions of your system configuration files so that you caneasily roll back to an earlier configuration, or just to preserve all of your brilliant con-figuration ideas as they occur.
SolutionIt is tempting to stuff all of /etc into an RCS repository, but that’s unnecessary andwasteful. Back up /etc in your usual manner, then use RCS to store only files that youchange. Start out by checking the files you are going to edit into RCS. Check themout to make your changes, then check them back in when you’re finished. Copy theworking file to its final home in /etc after checkin. Then you will have a completerevision history of every configuration file that you edit.
DiscussionThis example walks through creating an RCS repository for two programs, Amavisd-new and Clam Anti-Virus. Each program will have its own subdirectory in the repos-itory. All commands are run as root.
# mkdir /rcs_configs# cd /rcs_configs# mkdir -p amavis/RCS# mkdir -p clamav/RCS# cd /amavis# cp /etc/amavis/amavisd.conf amavisd.conf# ci -l amavisd.confRCS/amavisd.conf,v <-- amavisd.confenter description, terminated with single '.' or end of file:NOTE: This is NOT the log message!>> original amavis config, used with clamav and postfix>> .initial revision: 1.1done# co -l amavisd.conf# vim amavisd.conf
Make your edits, save and close the file, then check it back in:
# ci -u amavisd.conf
Copy your working file into /etc:
# cp amavisd.conf /etc/amavis/amavisd.conf

This is the Title of the Book, eMatter EditionCopyright © 2007 O’Reilly & Associates, Inc. All rights reserved.
18.5 Managing System Configuration Files with RCS | 325
and you’re ready to go. Your original copy and first revision are safely preserved, andyou’re all set up to easily save additional revisions.
You may keep everything in single directory, rather than creating subdirectories foreach program. It’s up to you how to organize your files. Just remember to alwayschange to the correct working directory before you start, or you’ll find your files get-ting scattered all over.
When using RCS, it’s easy to get confused and lock files at checkin instead of check-out, or to check out files and forget to check them back in. If you make such anerror, the next time you try to check out the file, you’ll get a message:
# co -l amavisd.confRCS/amavisd.conf,v --> amavisd.confco: RCS/amavisd.conf,v: multiple revisions locked by carla; please specify one
So when you specify a revision, you still get warnings:
# co -l -r1.4 amavisd.confRCS/amavisd.conf,v --> amavisd.confrevision 1.4 (locked)writable amavisd.conf exists; remove it? [ny](n): yco: RCS/amavisd.conf,v: warning: You now have 2 locks.done
The easiest way to get to get out of this is to open the RCS file (in this example, RCS/amavisd.conf,v) and edit it directly. You’ll need to make it writable first:
# chmod 644 amavisd.conf,v
Then edit the header. Look for this:
head 1.4;access;symbols;locks carla:1.1 carla:1.2; strict;comment @# @;
Delete the locks, so it looks like this:
head 1.4;access;symbols;locks; strict;comment @# @;
Save and close the file, and be sure to reset it to read-only:
# chmod 444 amavisd.conf,v
That’s the end of the locks.

This is the Title of the Book, eMatter EditionCopyright © 2007 O’Reilly & Associates, Inc. All rights reserved.
326 | Chapter 18: Version Control
See Also• rcsintro(1), ci(1), co(1)
• Official RCS home page (http://www.cs.purdue.edu/homes/trinkle/RCS)
18.6 Using CVS for a Single-UserLocal Repository
ProblemYou would rather use CVS for your local, personal repository because you plan to alsouse it for larger projects, and you want to stick to learning a single system. Or your per-sonal repository is getting complex, so you need the additional abilities of CVS to man-age it, such as more complex directory structures, and being able to checkout multiplefiles or entire directories at once.
SolutionCVS scales nicely from small personal projects to large projects without a problem.Installation is simple. Both RPMs and .debs are named “cvs”; if you prefer to installfrom sources, get them from https://www.cvshome.org/.
After installing CVS, create your personal repository with these commands:
$ mkdir ~/cvsroot$ chmod -R 700 ~/cvsroot$ cvs -d ~/cvsroot init
Now select a directory of files to store in your repository. Change to that directory,and import the directory into your CVS repository:
$ cd /scripts$ cvs -d ~/cvsroot import scripts jenns_configs version_1N scripts/useradd.txtN scripts/postfix_ube.txtN scripts/logparse.plNo conflicts created by this import
During the import, your default editor will open, displaying this text:
CVS: -----------------------------------------------------CVS: Enter Log. Lines beginning with `CVS:' are removed automaticallyCVS:CVS: -----------------------------------------------------
Enter your project description here (e.g., “Jenn’s system administration scripts forSlackware 9”). Make this detailed enough so that six months from now, it will stillmake sense.

This is the Title of the Book, eMatter EditionCopyright © 2007 O’Reilly & Associates, Inc. All rights reserved.
18.6 Using CVS for a Single-User Local Repository | 327
To check out a file for editing, you must first create a working directory. This direc-tory must be outside of the directory that holds your CVS repository. Then change tothe working directory, and check out a file:
$ mkdir ~/sandbox$ cd ~/sandbox$ cvs -d ~/cvsroot checkout scripts/postfix_ube.txtcvs checkout: Updating scriptsU scripts/postfix_ube.txt
Checking out files from the CVS repository creates a CVS sandbox in your workingdirectory. The sandbox is the local working directory where all of your actual worktakes place. When you check out files from CVS, a batch of CVS admininistrativefiles are installed in the sandbox. Always work from a sandbox; never enter a CVSrepository to edit files. Your sandbox can have any name you choose.
The file you just checked out is in the scripts directory, so that is your sandbox, andyou should change to that directory to edit the file:
$ cd scripts$ vim postfix_ube.txt
When you’re finished editing the file, save it in the normal fashion, and put it back inthe CVS repository using the commit subcommand:
$ cvs commitcvs commit: Examining ./home/jenn/cvsroot/scripts/postfix_ube.txt,v <-- postfix_ube.txtnew revision: 1.2; previous revision: 1.1
Again, your default editor will open, and you’ll be asked to write a log entry detail-ing your changes.
As long as you are in the sandbox, which in this example is ~/sandbox/scripts, youcan omit specifying the name of the repository for checkouts and commits.
DiscussionThis is the CVS command syntax:
cvs [ global_options ] command [ command_options ] [ command_args ]
CVS is all about record keeping. Take the time to make useful log entries—you willthank yourself many times during the life of your CVS project.
You can name your CVS root directory anything you like.
jenns_configs and version_1 are the vendor tag and release number, respectively.While you may not care about these, CVS requires them. The vendor tag usuallyidentifies whoever supplies the source files, and the version number is the startingversion number for the project.
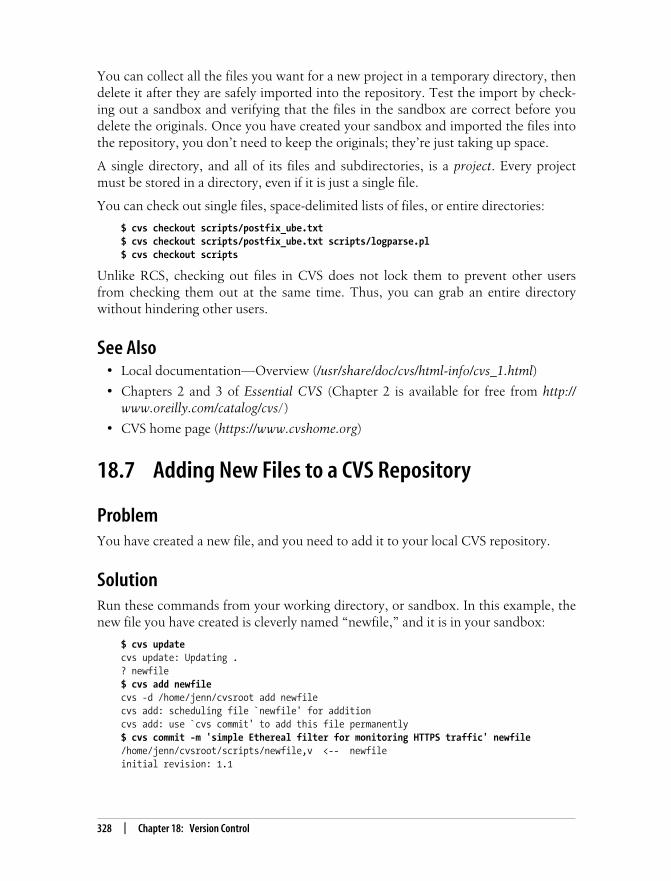
This is the Title of the Book, eMatter EditionCopyright © 2007 O’Reilly & Associates, Inc. All rights reserved.
328 | Chapter 18: Version Control
You can collect all the files you want for a new project in a temporary directory, thendelete it after they are safely imported into the repository. Test the import by check-ing out a sandbox and verifying that the files in the sandbox are correct before youdelete the originals. Once you have created your sandbox and imported the files intothe repository, you don’t need to keep the originals; they’re just taking up space.
A single directory, and all of its files and subdirectories, is a project. Every projectmust be stored in a directory, even if it is just a single file.
You can check out single files, space-delimited lists of files, or entire directories:
$ cvs checkout scripts/postfix_ube.txt$ cvs checkout scripts/postfix_ube.txt scripts/logparse.pl$ cvs checkout scripts
Unlike RCS, checking out files in CVS does not lock them to prevent other usersfrom checking them out at the same time. Thus, you can grab an entire directorywithout hindering other users.
See Also• Local documentation—Overview (/usr/share/doc/cvs/html-info/cvs_1.html)
• Chapters 2 and 3 of Essential CVS (Chapter 2 is available for free from http://www.oreilly.com/catalog/cvs/)
• CVS home page (https://www.cvshome.org)
18.7 Adding New Files to a CVS Repository
ProblemYou have created a new file, and you need to add it to your local CVS repository.
SolutionRun these commands from your working directory, or sandbox. In this example, thenew file you have created is cleverly named “newfile,” and it is in your sandbox:
$ cvs updatecvs update: Updating .? newfile$ cvs add newfilecvs -d /home/jenn/cvsroot add newfilecvs add: scheduling file `newfile' for additioncvs add: use `cvs commit' to add this file permanently$ cvs commit -m 'simple Ethereal filter for monitoring HTTPS traffic' newfile/home/jenn/cvsroot/scripts/newfile,v <-- newfileinitial revision: 1.1

This is the Title of the Book, eMatter EditionCopyright © 2007 O’Reilly & Associates, Inc. All rights reserved.
18.8 Deleting Files from a CVS Repository | 329
DiscussionWhen you run the update command, the question mark shows which files have notyet been committed to the CVS repository.
The update command synchronizes changes from the repository to the sandbox (notthe other way). Use the status command to see the differences first, without makingany changes in your sandbox:
$ cvs status
The commit -m command demonstrates how to create a log entry for a single file onthe command line, to avoid invoking a text editor. It’s nice little timesaver.
Keep in mind that when you edit a file to a point where you want to preserve it, thething to do is check it into the repository. Don’t leave it lying around in your sand-box. When you start work for the day, you should run update first thing to bringyour local copies up-to-date.
Even when you’re the only user of a repository, it’s a good idea to keep your sand-box in sync with the repository. But in a shared repository, it’s very important to staysynchronized—it’s much easier to deal with small conflicts than larger ones, and ifyou’re synched, conflicts are rarer.
See Also• Chapter 3 of Essential CVS
• “A.18 update—Bring work tree in sync with repository” (/usr/share/doc/cvs/html-info/cvs_16.html)
• CVS home page (https://www.cvshome.org)
18.8 Deleting Files from a CVS Repository
ProblemYou want to delete some files from your CVS repository.
SolutionDelete the file from your sandbox, then run the cvs remove command:
$ rm badfile$ cvs remove badfilecvs remove: scheduling 'badfile' for removalcvs remove: use 'cvs'commit' to remove this file permanently

This is the Title of the Book, eMatter EditionCopyright © 2007 O’Reilly & Associates, Inc. All rights reserved.
330 | Chapter 18: Version Control
The next time you run a commit, the file will be moved to a special subdirectorycalled Attic. This preserves the file history and allows you to restore the file, shouldyou change your mind.
Alternatively you can use a single command to delete the file from both your sand-box and repository:
$ cvs remove -f badfile
DiscussionYou can’t remove directories like you can remove files. Using the -P flag for updateand checkout prevents empty directories from being downloaded to your sandbox. Acommon shortcut is to make this the default behavior in ~/cvsrc (see Recipe 18.19).
CVS never really deletes anything. It’s not supposed to. If you have a “spring clean-ing” mindset you may find CVS a bit frustrating, because you’re not supposed toclean its closets. The purpose of using a version control system is to maintain a com-plete history of a project.
See Also• Chapter 2 of Essential CVS
• Recipe 18.19, “Customizing Your CVS Environment”
• CVS home page (https://www.cvshome.org)
18.9 Creating a Shared CVS Repository
ProblemCVS is nice for tracking your own files, but in the real world teams of people usuallywork together on projects. How do you set up a CVS repository that’s shared by agroup of users?
SolutionFirst create a CVS owner and group; these will own the repository. Then create therepository:
# groupadd cvsusers# useradd -g cvsusers -u 105 cvs# mkdir /cvsroot# chown -R cvs /cvsroot# chmod -R 770 /cvsroot# cvs -d /cvsroot init

This is the Title of the Book, eMatter EditionCopyright © 2007 O’Reilly & Associates, Inc. All rights reserved.
18.9 Creating a Shared CVS Repository | 331
# chgrp cvsusers /cvsroot# chmod g+s /cvsroot
Add users to the cvsusers group to give them access.
Now any user in the cvsusers group can import a project into the repository. Thisexample adds the techbook project:
$ cd /techbook$ cvs -d /cvsroot import techbook cups_howto version_1
The new project will be owned by the person who imported it, and the cvsusersgroup:
$ stat /cvsroot/techbookFile: `techbook' Size: 136 Blocks: 1 IO Block: 4096 directoryDevice: 306h/774d Inode: 69624 Links: 2Access: (2775/drwxrwsr-x) Uid: ( 1000/ carla) Gid: ( 1005/cvsusers)
DiscussionThe commands in this recipe must be run on the CVS server. See Recipe 18.11 tolearn how to access a remote repository.
It’s important to follow the above command sequence, to get the permissions cor-rect. cvs init creates a large batch of administration files, with its own set of permis-sions, so you don’t want to change them. (You can view them in the CVSROOTsubdirectory.)
When you’re creating a system or daemon user, remember to assign an appropriateUID (see Recipe 8.2, “Sorting Human Users from System Users”).
You should set all users’ umask values to 007 to eliminate any kind of world accessto the CVS repository files. Just add this line to everyone’s ~/.bashrc:
umask 007
Setting the sticky bit restricts removing or renaming of files to the file owners, thegroup owners, or the superuser.
See Also• Chapters 2 and 6 of Essential CVS
• Local documentation—“The Repository” (/usr/share/doc/cvs/html-info/cvs_2.html)
• CVS home page (https://www.cvshome.org)

This is the Title of the Book, eMatter EditionCopyright © 2007 O’Reilly & Associates, Inc. All rights reserved.
332 | Chapter 18: Version Control
18.10 Sharing a Single Repository BetweenSeveral Groups
ProblemYou have several different project groups that each need their own CVS repository,and you want to put them inside a single master CVS repository to make it easier todo backups and administrative chores. You need to configure file permissions tokeep users from wandering into the wrong repositories.
SolutionFollow Recipe 18.9, and create a new subdirectory for each individual repository.Adjust owner and group permissions on the individual repositories to control access:
# cd /3dgame# cvs -d /cvsroot import 3dgame best_game_ever version_1# chown gamers:gamegroup /cvsroot/3dgame
DiscussionYou can create a separate repository for each project, or put everything under a sin-gle CVS root. Backups are easier with a single CVS root, but having separate multi-ple repositories makes it a little easier to manage permissions and user access.
See Also• Chapters 2 and 6 of Essential CVS
• Recipe 18.19, “Customizing Your CVS Environment”
• CVS home page (https://www.cvshome.org)
18.11 Accessing a Remote CVS Repository
ProblemYou have your CVS server all set up and ready to go; now how do you give userssecure, remote access?
SolutionUse OpenSSH. OpenSSH is the simplest, most secure method for accessing yourCVS repository, both over your LAN and over the Internet. If you set up OpenSSH

This is the Title of the Book, eMatter EditionCopyright © 2007 O’Reilly & Associates, Inc. All rights reserved.
18.11 Accessing a Remote CVS Repository | 333
right from the start, you’ll have only a single connection and authentication methodto maintain for all remote connectivity. (See Chapter 17 to learn how to set upOpenSSH.)
Follow these steps to connect via SSH:
1. Install and configure OpenSSH on all hosts (the CVS server, and everyone who isgoing to connect to it).
2. Run OpenSSH on the CVS server in daemon mode.
3. Make sure that all users have login accounts on the CVS server.
4. Set up your keys, and test SSH logins to the server.
5. On the users’ PCs, add this line to their ~./cvsrc files, or create ~./cvsrc files forthem:
CVS_RSH SSH
Suppose the remote CVS server is cvs.project.net. You would connect to the reposi-tory like this, from the parent directory of your local sandbox:
$ cvs -d :ext:[email protected]:/cvsroot checkout [email protected]'s password:
If the CVS server is on your LAN, all you need is the hostname or IP address:
$ cvs -d :ext:jenn@cvs:/cvsroot checkout scripts
DiscussionIf you have NFS implemented, you might be tempted to create NFS shares for yourCVS repository. Don’t do this. NFS is not secure, you’ll encounter permissions hell,and there is a risk of data corruption. Also, it makes it too easy for users to acciden-tally delete CVS files.
OpenSSH gives you a number of methods for logging into remote hosts. You can usesystem logins, or (even easier) you can authenticate via public/private key pairs. Usethe keychain program to handle key authentication for security and convenience, soyou won’t have to enter a password or passphrase at all (see Recipe 17.7).
OpenSSH encrypts the entire session—login and transport. It’s easy to implement,and using the same mechanism for both LAN and Internet access simplifies the jobof administering the CVS server.
See Also• Chapter 17, Remote Access
• Recipe 17.7, “Better Passwordless Logins with keychain”
• CVS home page (https://www.cvshome.org)

This is the Title of the Book, eMatter EditionCopyright © 2007 O’Reilly & Associates, Inc. All rights reserved.
334 | Chapter 18: Version Control
18.12 Updating Your Working Files in CVS
ProblemBecause you are working on a shared project, you want to be sure that your firstcheckout of the day brings all your sandbox files up to date, and incorporateschanges made by other users.
SolutionAt the start of the day, run the update command, with the -n flag (for “not really”),from your sandbox:
$ cvs -n update -dPcvs update: Updating .cvs update: Updating CVSROOTcvs update: Updating projectM project/oldfile? project/newfile
This shows what files are different, and the status of each of these files. To synchro-nize your sandbox with the repository, re-run the command without the -n flag. Thiswill merge, or attempt to merge, both sets of files.
To get even more information, run the following command:
$ cvs diff
This will display line-by-line changes.
DiscussionRunning update routinely will keep your local working copies in sync with the repos-itory copies. If you’re concerned about other users making annoying changes (whichis not a CVS problem, but a project-management problem), you can always reviewthem first. Keep in mind that when you have edited a file to a point where you wishto preserve it, you should check it into the repository. Don’t leave it lying around inyour sandbox—the whole point of using CVS is to preserve many versions of thesame file.
These are the possible states that files will be in:
U The file was updated successfully.
A The file was added but has not yet been committed.
R The file was removed but has not yet been committed.
M The file in the repository was different from your sandbox copy, and the changeswere successfully merged.

This is the Title of the Book, eMatter EditionCopyright © 2007 O’Reilly & Associates, Inc. All rights reserved.
18.13 Retrieving Specific Older Revisions from CVS | 335
C A conflict exists between the repository copy and your copy, requiring humanintervention.
? The file is in your working directory but not the repository, and CVS doesn’tknow what to do with it. You’ll see this when you have created a new file andnot yet added it to CVS.
See Also• Recipe 18.7, “Adding New Files to a CVS Repository”
• Chapter 3 of Essential CVS
• CVS home page (https://www.cvshome.org)
• Recipe 18.8, “Deleting Files from a CVS Repository”
18.13 Retrieving Specific Older Revisionsfrom CVS
ProblemYou want to check out a particular older revision of a file. It might be a configurationscript that you want to roll back to, or an earlier version of some brilliant code, or thebest version of a short story you’ve been working on. Whatever it is, you’re not happywith the current version, so you want to review an earlier version or versions.
SolutionFrom your sandbox, use cvs log to see the available versions of the file:
$ cvs log newerfile
RCS file: /home/foober/cvsroot/project/newerfile,vWorking file: newerfilehead: 1.2branch:locks: strictaccess list:symbolic names:keyword substitution: kvtotal revisions: 2; selected revisions: 2description:----------------------------revision 1.2date: 2004-08-01 07:37:07 +0000; author: foober; state: Exp; lines: +3 -0added a new line for tracking specific hosts----------------------------revision 1.1

This is the Title of the Book, eMatter EditionCopyright © 2007 O’Reilly & Associates, Inc. All rights reserved.
336 | Chapter 18: Version Control
date: 2004-07-29 21:22:20 +0000; author: foober; state: Exp;simple ethereal script to monitor HTTPS traffic= = = = = = = = = = = = = = = = = = = = = = = = = = = = = = = = = = = = = = = = = = = = = = = = = = = = = = = = = = = = = = = =
Then fetch the version you want:
$ cvs update -r 1.1 newerfileU newerfile
This downloads a static, unchangeable version of the file. You can see the “stickytag” with the cvs status command; this is what marks a file as static, by locking it at aparticular revision:
$ cvs status newerfile= = = = = = = = = = = = = = = = = = = = = = = = = = = = = = = = = = = = = = = = = = = = = = = = = = = = = = = = = = = = = = = =File: newerfile Status: Up-to-date Working revision: 1.1 Sun Aug 1 07:47:17 2003 Repository revision: 1.1 /home/foober/cvsroot/project/newerfile,v Sticky Tag: 1.1 Sticky Date: (none) Sticky Options: -kkv
At this point, there are a lot of things you can do with this file: use it as a reference,copy things out of it, or make a copy of it. Don’t try to edit it directly, because thiswill goof up the revision history.
If you make a copy, you’ll need to remove the sticky tag from the copy. Simply openthe copy in a text editor, and change “Sticky Tag: 1.1” to “Sticky Tag: (none).”
Then, when you’re finished editing, commit the file in the usual manner:
$ cvs commit
DiscussionThis recipe demonstrates the importance of making good, descriptive log entries.When the revisions start accumulating, the descriptions are the best tool you have tofind what you want.
Use cvs diff to view the differences between revisions:
cvs diff newerfileShow changes that have been made in this file.
cvs diff -r1.3 newerfileShow changes in this file from Version 1.3 to the current version.
cvs diff -r1.3 -r1.5 newerfileShow changes in this file between Versions 1.3 and 1.5.
See Also• Chapters 3 and 5 of Essential CVS
• CVS home page (https://www.cvshome.org)

This is the Title of the Book, eMatter EditionCopyright © 2007 O’Reilly & Associates, Inc. All rights reserved.
18.14 Building an Anonymous Read-Only CVS Repository with Pserver | 337
18.14 Building an Anonymous Read-Only CVSRepository with Pserver
ProblemIn the spirit of “many eyes make all bugs shallow,” you want to set up a public CVSrepository, so that random users can download your nightly builds (or whateveryou’ve stored there—your Great Collaborative Anime, World’s Best Arugula Reci-pes, Finest Unheard Songs, etc.). Your anonymous users will be allowed to onlycheck out files; they won’t be able to do checkins.
SolutionSet up a CVS Pserver. You’ll need cvsd, a functioning CVS server, and OpenSSH setup and running on the CVS server in daemon mode. cvsd is an add-on for runningCVS in Pserver mode, tucked away in a nice chroot jail.
cvsd is available in Debian Testing and Unstable, and in a source tarball. When thiswas written, the only available RPMs were quite old (Version .6-2). This recipe waswritten for Version 1.0.2, so if you can’t find a current RPM, you should install fromsources. Sources (as well as .debs) are available from the cvsd home page (http://tiefighter.et.tude.nl/~arthur/cvsd).
This is how to install from sources:
$ ./configure --prefix=/usr --sysconfdir=/etc$ make# make install
Create a cvsd user and group:
# groupadd cvsd# useradd -d /cvs/home -s /bin/false -c "cvs pserver daemon" -g cvsd -u 110 cvsd
Then create your repository root directory and chroot jail. This must be a subdirec-tory of an empty directory, so that the chroot jail will work:
# mkdir /cvs# cd /cvs# cvsd-buildroot /cvs
Change ownership to the cvsd user and group, and set permissions:
# chown -R cvsd:cvsd /cvs# chmod 775 /cvs
Next, initialize your new cvsd repository, and create the root directory for the reposi-tory. Put this in a subdirectory:
# cvs -d /cvs/home init

This is the Title of the Book, eMatter EditionCopyright © 2007 O’Reilly & Associates, Inc. All rights reserved.
338 | Chapter 18: Version Control
Now edit /etc/cvsd/cvsd.conf as follows:
• The UID and GID should be cvsd and cvsd.
• Umask should be 027.
• RootJail must correspond to the root of your CVS repository (in this example, /cvs).
• Edit one of the Repos entries to name the new root directory of your repository(in this example, /home).
Next, add anonymous access to your repository. As root, create a sandbox directorysomewhere, then check out the CVSROOT directory:
# mkdir /sandbox# cd /sandbox# cvs -d /cvs/home checkout CVSROOT# cd CVSROOT
Create a CVSROOT/readers file, adding a guest user. There should be just one line oftext in this file, the word “guest”. Be sure to end the file with a couple of blank lines.Then use the add and update commands to add it to the repository:
# cvs -d /cvs/home update# cvs -d /cvs/home add readers# cd /sandbox# cvs -d /cvs/home commit -m 'pserver guest access' CVSROOT/readers
Finally, give guest a null password:
# cvsd-passwd /cvs/home guest
Don’t create a password; just hit Enter until it goes away. Now fire up cvsd, andconnect as an ordinary user:
# /etc/init.d/cvsd start$ cvs -d:pserver:guest:@localhost:/home loginLogging in to :pserver:guest@localhost:2401/home
If you type a colon after “guest”, it won’t prompt you for the empty password. Mindyour filepaths: use /home, not /cvs/home.
DiscussionIt is important to follow all the steps in order, to get the file permissions correct. Youwant the chroot filesystem in /cvs to be owned by cvsd, but not the CVSROOT directory.
Populate your new public repository in the usual manner. Add authorized users tothe cvsd group. They can then import project files locally, or over SSH.
Do not use the CVS Pserver for anything but anonymous public access, and neverallow checkins via Pserver. Its authentication methods are wide-open cleartext, asyou saw when you created the readers and passwd files. For extra insurance, to pre-vent write access via Pserver, create an empty CVSROOT/writers file.

This is the Title of the Book, eMatter EditionCopyright © 2007 O’Reilly & Associates, Inc. All rights reserved.
18.15 Mirroring a CVS Repository | 339
Users connecting over the Internet must use the full domain name:
$ cvs -d:pserver:guest:@cvsserver.test.net:/home login
You’ll have to post explicit instructions to tell them how to connect to your reposi-tory. Users can also go directly to checkout:
$ cvs -d :pserver:guest:@cvsserver.test.net:/home checkout .
OpenSSH is for your authorized users who will be maintaining the files in the reposi-tory. (They will use the access methods described in Recipe 18.11.) It is best to keepyour public repository separate from your private, working repository, and to updateit nightly via rsync-over-ssh. If someone manages to compromise your Pserver, youdon’t want to provide an easy path to your working CVS server.
See Also• The Readme and the FAQ in the source tarball, which contain bales of essential
information—you should get this even if you install cvsd from packages
• cvsd home page (http://tiefighter.et.tudelft.nl/~arthur/cvsd)
• CVS home page (https://www.cvshome.org)
18.15 Mirroring a CVS Repository
ProblemYou don’t want your public, anonymous Pserver repository to be your main workingrepository; you would rather mirror it nightly, so that you can keep your workingrepository safely sheltered somewhere else, and keep access strictly controlled.
SolutionPut your Pserver and working CVS server on two separate boxes. Use rsync overSSH, with keychain managing authentication, automated by cron, to do a nightlyupload to the Pserver. You need:
• Two separate CVS repositories set up and working—the anonymous publicserver and the private working server
• OpenSSH set up and working for both repositories
• rsync installed on the working repository
• A mirroring script placed in a nightly cron job
This is the simplest rsync invocation, copying files from the working repository to thepublic repository. The user cvsadmin was created especially for this job:
#!/bin/bashsource /home/cvsadmin/.keychain/$HOSTNAME-sh

This is the Title of the Book, eMatter EditionCopyright © 2007 O’Reilly & Associates, Inc. All rights reserved.
340 | Chapter 18: Version Control
rsync -av -e ssh --cvs-exclude --delete --force /cvsroot publiccvs.test.net:cvsroot/
Save the script as cvsmirror.sh or whatever you like, make it executable, and stick itin a cron job. This runs the script every morning at 2 a.m.:
# crontab -e0 02 * * * /usr/local/bin/cvsmirror.sh
DiscussionThe --cvs-exclude option is a nice rsync feature that ignores the same files that CVSignores.
This is a simple and perfectly serviceable script. One possible problem is running themirror script while users are editing repository files. Any writes committed during thebackup could be lost. CVS includes a locking mechanism, to lock files as read-onlyduring a backup. This is rather complex to implement, but Chapter 6 of Essential CVSdiscusses the implementation in detail and provides locking and unlocking scripts.
You could probably get away with having the two repositories on the same box, butthe risk is that anyone who compromises your Pserver could gain access to the wholesystem and get into your private, working CVS repository.
See Also• Chapter 16, Backup and Recovery
• Chapter 6 of Essential CVS
• CVS home page (https://www.cvshome.org)
18.16 Storing Binary Files in CVS
ProblemCVS is great with plain ASCII text files, but you are running into problems withbinary files, like binary executables, MS Word files, image files, and such. How canyou store binary files in the CVS repository without CVS doing strange things tothem and making them not work?
SolutionUse the -kb flags with the add command, like this:
$ cvs update binaryfile$ cvs add -kb binaryfile$ cvs commit -m 'C proggie for timing tea' binaryfile

This is the Title of the Book, eMatter EditionCopyright © 2007 O’Reilly & Associates, Inc. All rights reserved.
18.17 Creating Release Snapshots with Tags | 341
You should also check out binary files with the -kb flags. If you are working withbinary files a lot, you can make this the default in your ~/.cvsrc.
DiscussionMaking -kb the default means you will have to use cvs add -kkv when adding non-binary files. If you forget to use the -kkv flags when adding a non-binary file, run thefollowing command:
$ cvs admin -kkv textfile
to modify the file for future commits and updates.
CVS makes a number of changes to text files that do no good to binary files:
• It changes linefeeds to carriage return/linefeeds, for cross-platform compatibility.
• It performs keyword expansion, so that any string in a binary file that looks likea CVS keyword will be changed. Embedded strings in the form $keyword$ and$keyword:…$ are replaced with their actual values whenever you fetch a newrevision of the file. This is definitely not something you want to happen to abinary file.
See Also• Chapter 3 of Essential CVS
• Local documentation—“Keyword Substitution” (/usr/share/doc/cvs/html-info/cvs_12.html)
• Recipe 18.19, “Customizing Your CVS Environment”
18.17 Creating Release Snapshots with Tags
ProblemYou need a way to mark a specific set of files as a set. They may be in different direc-tories, or simply a subset of files in a directory. You can’t just grab them by revisionnumber, because the files belonging to a particular project can have all kinds of dif-ferent revision numbers. And you want to be able to retrieve the selected files with asingle command, instead of having to hunt them down individually.
SolutionCVS uses tags to collectively label a particular set of files. With a tag, you can easilyretrieve all the revisions of all the files that correspond to a specific milestone, suchas an official 1.0 release of a project.

This is the Title of the Book, eMatter EditionCopyright © 2007 O’Reilly & Associates, Inc. All rights reserved.
342 | Chapter 18: Version Control
All the files are linked by the tags, like pearls on a string, and can be retrieved with asingle command. They do not have to be in the same directories; simply list the filesyou want tagged on the command line, as follows:
$ cvs tag rel_1.0_3dgame file1 file2 file2 file4
The easy way is to have all the files you want tagged sitting in your sandbox; then tagthem this way:
$ cvs tag rel_1.0_3dgame
This will recurse directories and tag all of your checked-out files. To retrieve taggedfiles, yank the whole batch by tag name:
$ cvs checkout -r rel_1.0_3dgame
DiscussionHere’s a bit of ASCII art to show how tags work. In this example, the files thatbelong to your upcoming 1.0 release are stored in several different places. They aremarked with asterisks:
file1 file2 file3 file4
1.1 1.1 1.1 1.11.2 1.2 1.2 1.21.3 1.3* 1.3 1.31.4 1.4 1.4* 1.41.5* 1.5 1.5*1.6 1.6
This means you don’t have to worry about creating perfect file trees to keep the filesbelonging to the release organized, which is pretty much impossible in any case.
See Also• Chapter 4 of Essential CVS
• Local documentation—“4 Revisions” (/usr/share/doc/cvs/html-info/cvs_4.html)
• CVS home page (https://www.cvshome.org)
18.18 Creating Stable and DevelopmentBranches for a Project
ProblemYou want to divide a programming project into two branches: one that is stable, inmaintenance mode, and one that is under active development. This way you’ll have areliable, stable branch that is ready for production use, and a wild and crazy

This is the Title of the Book, eMatter EditionCopyright © 2007 O’Reilly & Associates, Inc. All rights reserved.
18.18 Creating Stable and Development Branches for a Project | 343
development branch where improvements and new features will be developed andtested. When features from the development branch are ready for prime-time, youcan merge them back into the stable branch.
SolutionTo create the wild and crazy development branch from the nice, stable project mod-ule, first make all your commits and have your sandbox up-to-date. Then run thiscommand:
$ cvs rtag -b projectbranch project
Name the new branch first, and the module for which it is created second. This com-mand operates directly on the repository, not on the sandbox.
You can also create a branch from tagged files, which were discussed in Recipe 18.17:
$ cvs tag -r rel_1.0_3dgame -b rel_1.0_3dgame_branch
To check out the branch files you’ll need to create a separate sandbox. Create a newdirectory for the new sandbox, then check out the branch files:
$ cvd -r projectbranch project
Committing files back to the branch requires no special options:
$ cvd commit
Someday, you will want to merge your branches. This is how (the -j means “join”):
$ cvs checkout project$ cvs update -j projectbranch
How do you know if you’re working in a branch, or on the main trunk? Read thesticky tag:
$ cvs status= = = = = = = = = = = = = = = = = = = = = = = = = = = = = = = = = = = = = = = = = = = = = = = = = = = = = = = = = = = = =File: somefile Status: Up-to-date
Working revision: 1.2 Wed Jul 28 06:08:54 2003 Repository revision: 1.2 /home/foober/cvsroot/project/somefile,v Sticky Tag: project (branch: 1.2.6) Sticky Date: (none) Sticky Options: -kkv
DiscussionCreating a CVS branch is no small thing. You must keep track and pay attention towhat you are doing. It’s rather pointless if the files get all mixed up and you losetrack of the branches you’ve created.
After branches are merged, the individual branches will still remain in the CVSrepository. Remember, CVS is designed to never forget anything.

This is the Title of the Book, eMatter EditionCopyright © 2007 O’Reilly & Associates, Inc. All rights reserved.
344 | Chapter 18: Version Control
CVS is pretty good at merging branches, and the majority of the merges succeedwithout incident. However, it’s not magical; the various people working on theproject will still need to have manners, communicate progress with each other, andhave something in the way of project goals to aim for.
See Also• Chapter 4 of Essential CVS, which goes into detail on branching, merging, and
keeping track of everything
• Local documentation—“Branching and Merging” (/usr/share/doc/cvs/html-info/cvs_5.html)
18.19 Customizing Your CVS Environment
ProblemYou want to customize your CVS environment: the default editor, filepaths, defaultrepository, and perhaps some command options. You want less typing and moreworking, or maybe less typing and less working, but at least you’d like to set up yourworking environment to please yourself.
SolutionCreate a .cvsrc file and store it in your home directory. Every user can do this to cus-tomize their CVS working environment. This example sets some basic defaults:
cvs -T /tmpcvs -d /cvsrootcvs -e nanoupdate -dPcheckout -Pcvs -z3diff -c
These changes do not affect the CVS server at all; this is how you make your life eas-ier on the client side.
DiscussionA lot of CVS documentation will instruct you to set your CVS environment variablesin your system profile (e.g., in ~/.bashrc). Using ~/.cvsrc is usually preferable, becauseit’s portable and simple to configure. ~/.cvsrc, when present, overrides any CVS envi-ronment variables in ~/.bashrc.
The above ~./cvsrc does these things:

This is the Title of the Book, eMatter EditionCopyright © 2007 O’Reilly & Associates, Inc. All rights reserved.
18.20 Calculating Storage Size for a CVS Repository | 345
cvs -T /tmpSets the temporary directory where you want it.
cvs -d /cvsrootSets the path to the default repository, so you don’t have to type cvs -d<cvsserver>. This saves you a bit of typing when you’re importing new projects;after you initialize a new sandbox, you don’t need to specify the repositoryanyway.
cvs -e nanoSets the default editor.
update -dPChecks out new directories but not empty directories.
checkout -PDoes not check out empty directories.
cvs -z3Sets the compression level. The range is 1–9. Note that higher compression lev-els place a greater load on the CVS server, and may cause nastiness to flow fromthe server admin.
diff -cFormats diff output as context diffs, which are the easiest to read.
As you use your CVS repository, make note of the command options you use themost, so you can set yourself some sensible defaults and save some typing.
See Also• cvs(1)
• Chapter 3 of Essential CVS
• The CVS Quick Reference on the last page of Essential CVS
• Local documentation—“Guide to CVS commands” (/usr/share/doc/cvs/html-info/cvs_16.html)
• Local documentation—“All environment variables which affect CVS” (/usr/share/doc/cvs/html-info/cvs_19.html)
18.20 Calculating Storage Size for a CVSRepository
ProblemYou need to know how to calculate how much storage space to allocate for your CVSrepository, and if you should put it on its own partition.

This is the Title of the Book, eMatter EditionCopyright © 2007 O’Reilly & Associates, Inc. All rights reserved.
346 | Chapter 18: Version Control
SolutionA simple rule of thumb is to allocate 10 times as much space as the expected finalsize of the project files. When you have a lot of users busy on a project, it’s easy togenerate a lot of activity and eat up a lot of disk space. The definitive answer is “themore the better.”
The best place to put your repository is in a filesystem that is already segregated on itsown partition, such as /var or /home. This makes it easy to back up and keeps it sepa-rate from the root filesystem, which is always good for data files. You can also create atop-level directory on its own partition, such as /cvsroot, to make it easier to find.
See Also• Chapter 2 of Essential CVS

This is the Title of the Book, eMatter EditionCopyright © 2007 O’Reilly & Associates, Inc. All rights reserved.
347
Chapter 19 CHAPTER 19
Keeping Time with NTP
19.1 IntroductionKeeping accurate time on a single PC, or on a LAN, is important for a number of rea-sons: maintaining accurate timestamps in logs, keeping databases happy, and ensur-ing that batch jobs and other automated processes run at the right times. Even moreimportant than keeping precisely correct time is keeping all of your servers andworkstations synchronized with each other.
Linux includes a motley collection of time and date utilities: ntpdate, hwclock.sh,date, 822-date, tzselect, tzsetup, vcstime, uptime, zdump, ddate, rdate, ctime, anddoubtless several more. In olden times, we ran hwclock.sh, rdate, or ntpdate at boot-time, or put them in cron jobs for periodic updating. ntp—the Network Time Proto-col—replaces all of that. It is best to disable any of the other utilities that are set torun automatically, whether from rc*.d files or cron, and let ntp be your sole time-keeper. With one exception: ntpdate is still useful for making large corrections. Ifyour system time is off by more than 20 or 30 minutes, ntp will take several hours, oreven days, to correct it, whereas ntpdate takes care of large corrections instantly.
The command ntpd -g is supposed to replace ntpdate, but it doesn’t work well forcorrections of more than an hour. If your system time is off by several hours, the ntpdocumentation tells you to correct it manually. If that works for you, fine; in thischapter, we’ll cover how to make the computer do the work.
ntp is implemented on Linux by ntpd, the Network Time Protocol daemon. It isnearly “set it and forget it;” once you have it configured and running, you shouldn’thave to do more than make an occasional check to verify it’s keeping time correctly.
It is good time server etiquette to configure a single host on your LAN to synchro-nize with a group of external time servers, and to then use this host to serve yourLAN. This prevents you from placing an undue burden on the public time servers,and it keeps your LAN hosts in sync with each other.

This is the Title of the Book, eMatter EditionCopyright © 2007 O’Reilly & Associates, Inc. All rights reserved.
348 | Chapter 19: Keeping Time with NTP
In the olden days, admins had to select a list of public time servers to use, from http://www.eecis.udel.edu/~mills/ntp/servers.html. However, due to abuse and users notrespecting access policies, http://pool.ntp.org was created. www.pool.ntp.org createsDNS round-robins to automatically spread the load. A nice side benefit is that it’seasier to configure.
19.2 Building a Local Time Server
ProblemYou want to set up a local time server. It will synchronize with a public time server,and your LAN clients will connect to the local machine. The PC acting as the localtime server has a full-time Internet connection.
SolutionFirst, install or upgrade ntp on the PC that is going to act as a time server for yourLAN. You’ll also want ntpdate.
Next, make sure the ntp daemon is not running:
# /etc/init.d/ntpd stop
On Debian, use:
# /etc/init.d/ntp-server stop
Make these entries in /etc/ntp.conf, and create the driftfile and logfile if they do notalready exist. root should own them (chmod 644).
#/etc/ntp.confdriftfile /etc/ntp.driftlogfile /var/log/ntp.log
server pool.ntp.orgserver pool.ntp.orgserver pool.ntp.org
Make the initial time correction with ntpdate:
# ntpdate pool.ntp.org
Then start up ntpd:
# /etc/init.d/ntpd start
On Debian, use:
# /etc/init.d/ntp-server start
Use ntpq to see which servers you’re connected to:
# ntpq -p remote refid st t when poll reach delay offset jitter

This is the Title of the Book, eMatter EditionCopyright © 2007 O’Reilly & Associates, Inc. All rights reserved.
19.2 Building a Local Time Server | 349
= = = = = = = = = = = = = = = = = = = = = = = = = = = = = = = = = = = = = = = = = = = = = = = = = = = = = = = = +clock.fmt.he.ne .GPS. 1 u 37 64 377 105.562 26.771 2.539 +dewey.lib.ci.ph reaper.twc.weat 2 u 25 64 377 398.666 -30.285 51.555 *clock.sjc.he.ne .CDMA. 1 u 21 64 377 98.269 15.298 4.000
Be patient, because it takes a few minutes for a server list to appear and up to 30minutes for the first correction to take place. The * and + prefixes indicate that theconnections were successful and synchronization is occurring.
If you are running any databases, be sure to consult with your data-base admins before making any significant time changes. Large, sud-den changes are generally unhealthy for databases, so it may be betterto run only ntpd and allow it to make changes in its normal slow,incremental manner.
DiscussionBe sure to get the ntp rpm, not xntp. ntp is newer and replaces xntp. Debian usersneed ntp-simple, ntp-doc, and ntp-server.
ntpd makes small, incremental changes over a period of time. By itself, it will takehours, or even days, to adjust the system time, depending how far off it is. If the sys-tem time is off by more than 60 minutes, ntpdate is the quickest way to make the ini-tial correction. ntpdate will not run if ntpd is running.
The maintainers at ntp.org are trying to deprecate ntpdate, claiming that ntpd -g, whichis ntpd’s “burst” command, does the same thing. Unfortunately, it doesn’t handle cor-rections larger than 60 minutes any faster than ntpd, so ntpdate is still useful.
Using the same entry in ntp.conf three times—server pool.ntp.org—puts three differ-ent hits on the DNS pool at your disposal, so you’ll never have to worry about serv-ers being unavailable.
pool.ntp.org is a worldwide DNS round-robin of participating time servers. SeeRecipe 19.5 for more pool options, and how to get the best performance.
See Also• Your local documentation, at /usr/share/doc/ntp-doc/html, or online at http://
www.ntp.org/documentation.html
• The home page for the pool.ntp.org project (http://www.pool.ntp.org)
• The ntp.org web site (http://www.ntp.org/), for more information than you’ll everwant about how ntp works
• See the archives of comp.protocols.time.ntp, and also get help with new questions

This is the Title of the Book, eMatter EditionCopyright © 2007 O’Reilly & Associates, Inc. All rights reserved.
350 | Chapter 19: Keeping Time with NTP
19.3 Connecting to a Local Time Server
ProblemYou were tired of seeing a different incorrect time on every machine in your shop. Soyou set up a local time server—now how do you connect the clients?
SolutionInstall or update ntp on the client PCs, and make sure the ntp daemon is not running:
# /etc/init.d/ntpd stop
On Debian, use:
# /etc/init.d/ntp-server stop
Edit /etc/ntp.conf to point to the local time server:
# /etc/ntp.confdriftfile /etc/ntp.driftlogfile /var/log/ntp.logdriftfile
#use either hostnames or IPsserver 192.168.1.101
You can also include a fallback, in case the time server becomes unavailable:
# local fudge if network servers not available# stratum 10 means low priorityserver 127.127.1.0fudge 127.127.1.0 stratum 10
ntp will continue to keep the time, based on past performance, until the serverbecomes available.
Now run ntpdate, pointing to the local server:
# ntpdate 192.168.1.101
Start up ntpd:
# /etc/init.d/ntpd start
On Debian, use:
# /etc/init.d/ntp-server start
Again, it may take a few minutes for a query to show any results:
# ntpq -p remote refid st t when poll reach delay offset jitter = = = = = = = = = = = = = = = = = = = = = = = = = = = = = = = = = = = = = = = = = = = = = = = = = = = = = = = = *clock.sjc.he.ne .CDMA. 1 u 21 64 377 98.269 15.298 4.000

This is the Title of the Book, eMatter EditionCopyright © 2007 O’Reilly & Associates, Inc. All rights reserved.
19.4 Adding Access Controls | 351
DiscussionIt is a good practice to also add some access controls; see the next recipe for /etc/ntp.conf access rules and some sample iptables rules.
Windows clients should use the free Automachron sntp (Simple Network Time Pro-tocol) client. It works on all versions of Windows, is easy to configure, and is free ofcost (although if you use it, it would be a nice gesture to click the PayPal link on theauthor’s web site and send him a few dollars). Download it from http://www.oneguycoding.com/automachron.
Automachron has a nice feature for dialup connections—the “Wait for dialup con-nection” setting. It won’t attempt to synchronize until a connection is established. Itis also easy to set the synchronization intervals.
See Also• Recipe 19.4, “Adding Access Controls”
• Your local documentation at /usr/share/doc/ntp-doc/html, or online at http://www.ntp.org/documentation.html
• The ntp.org web site (http://www.ntp.org)
• The Usenet group comp.protocols.time.ntp
19.4 Adding Access Controls
ProblemYou want to be sure your local clients look like clients, and not ntp servers. You wantthem to receive time service only, and from only the specified servers.
SolutionAdd some access rules in /etc/ntp.conf, or you may add a couple of iptables rules tothe client’s firewall to allow time service only, and to disallow everything else.
To use ntp’s access controls, add these lines to /etc/ntp.conf:
# default access policy# this denies all ntp traffic that is not# explicitly allowedrestrict default ignore
# allow time service from this server# do not allow peering# do not allow runtime configuration changes# do not allow remote loggingrestrict 192.168.1.101 nopeer nomodify notrap

This is the Title of the Book, eMatter EditionCopyright © 2007 O’Reilly & Associates, Inc. All rights reserved.
352 | Chapter 19: Keeping Time with NTP
# we trust localhostrestrict 127.0.0.0 mask 255.0.0.0
Remember to restart ntpd after making changes to ntp.conf.
An alternative to adding access rules to ntp.conf is to use these iptables rules. If theclient machines are running iptables, add these rules to create a client that acceptsonly time service and rejects everything else:
iptables -A INPUT -p udp --dport 123 -m state --state ESTABLISHED -j ACCEPTiptables -A INPUT -p udp --dport 123 -j REJECT
The first rule accepts all responses to sent ntp packets, and the second denies all oth-ers. Any host attempting to initiate a connection will be blocked, but responses tothe client’s own requests will be allowed.
DiscussionHere are some of the ntp.conf configuration options explained:
peer [hostname or IP]The specified host is polled in symmetric active mode, which means peers syn-chronize each other. Never peer with a public time server.
server [hostname or IP]The specified server is polled in client mode, so that only the client machinereceives time synchronization.
restrictDefine restrictions on specific hosts, and override defaults. When a default isspecified, restrict [host] with no options is the same as allow all [host].
ignoreIgnore all ntp packets.
nomodifyDo not allow runtime configuration changes. Queries that return informationare permitted.
nopeerDo not allow peering. This means the only servers allowed to supply time ser-vice are the ones specified by the server directive, and other hosts cannot use usethis machine as a time server.
notrapDo not trap mode 6 control messages. In effect, this disables remote logging.
noqueryIgnore all NTP mode 6 and 7 packets. In other words, do not allow queries,remote logging, or runtime configuration requests. Time service is not affected.
The main reasons for using access controls are to prevent your clients from becom-ing the timekeepers to the world, and to keep order and sanity in your network.

This is the Title of the Book, eMatter EditionCopyright © 2007 O’Reilly & Associates, Inc. All rights reserved.
19.5 Deciding Which NTP Pools to Use | 353
See Also• Your local documentation at /usr/share/doc/ntp-doc/html, or online at http://
www.ntp.org/documentation.html
• The home page for the pool.ntp.org project (http://www.pool.ntp.org)
• The ntp.org web site (http://www.ntp.org)
• The Usenet group comp.protocols.time.ntp
19.5 Deciding Which NTP Pools to Use
ProblemSo you’d like to know about other choices for ntp pools. It seems that connecting toa global pool runs the risk of using servers that are too far away for goodperformance.
SolutionThere are three classes of ntp pools available:
Globalpool.ntp.org
Regionaleurope.pool.ntp.org
north-america.pool.ntp.org
oceania.pool.ntp.org
asia.pool.ntp.org
Countryus.pool.ntp.org
de.pool.ntp.org
fr.pool.ntp.org
br.pool.ntp.org
...
There is not yet a definitive list of country pools. You can check to see if one existsfor your country with ping:
$ ping nl.pool.ntp.orgPING nl.pool.ntp.org (194.109.206.206): 56 data bytes64 bytes from 194.109.206.206: icmp_seq=0 ttl=49 time=240.8 ms
See http://www.iana.org/cctld/cctld-whois.htm for a list of country codes.

This is the Title of the Book, eMatter EditionCopyright © 2007 O’Reilly & Associates, Inc. All rights reserved.
354 | Chapter 19: Keeping Time with NTP
As a general rule, use a pool when it has at least three servers. You can find this outwith dig:
$ dig de.pool.ntp.org; <<>> DiG 9.2.4rc2 <<>> de.pool.ntp.org;; global options: printcmd;; Got answer:;; ->>HEADER<<- opcode: QUERY, status: NOERROR, id: 13116;; flags: qr rd ra; QUERY: 1, ANSWER: 8, AUTHORITY: 6, ADDITIONAL: 6;; QUESTION SECTION:;de.pool.ntp.org. IN A
;; ANSWER SECTION:de.pool.ntp.org. 5400 IN A 81.169.174.99de.pool.ntp.org. 5400 IN A 134.99.176.3de.pool.ntp.org. 5400 IN A 195.185.228.210de.pool.ntp.org. 5400 IN A 213.133.108.8de.pool.ntp.org. 5400 IN A 217.160.141.61de.pool.ntp.org. 5400 IN A 80.190.100.192de.pool.ntp.org. 5400 IN A 80.237.234.15de.pool.ntp.org. 5400 IN A 81.169.158.205...
To investigate further, run ping a few times to get an idea of roundtrip times:
$ ping de.pool.ntp.orgPING de.pool.ntp.org (217.204.76.170): 56 data bytes64 bytes from 217.204.76.170: icmp_seq=0 ttl=238 time=221.7 ms64 bytes from 217.204.76.170: icmp_seq=1 ttl=238 time=224.3 ms64 bytes from 217.204.76.170: icmp_seq=2 ttl=238 time=223.8 ms
Then run traceroute a few times. Track the number of hops, and look for timeouts:
$ traceroute de.pool.ntp.orgtraceroute: Warning: de.pool.ntp.org has multiple addresses; using 199.184.165.1351 80.239.142.1 (80.239.142.1) 0.236 ms 0.129 ms 0.115 ms2 ge-0-2-0.pr1.k88.fra.de.eurotransit.net (82.96.89.245) 0.317 ms 0.259 ms 0.248ms3 ffm-k88-i2-geth3-2.telia.net (213.248.79.65) 0.417 ms 0.243 ms 0.241 ms...11 195.185.228.210 (195.185.228.210) 9.191 ms 8.925 ms 9.094 ms
11 hops and no timeouts is pretty good. Each test should be run several times to geta reasonably accurate picture.
DiscussionThe nice thing about using the ntp pools is that they do the work for you. Once yoursystem is configured, you shouldn’t have to fuss with it. And time server abuse ismitigated, so everyone is happy. If you have a good full-time Internet connection andwant to be part of a pool, see http://www.pool.ntp.org for the details. The more timeservers there are, the less load there is on each one.

This is the Title of the Book, eMatter EditionCopyright © 2007 O’Reilly & Associates, Inc. All rights reserved.
19.6 Connecting to a Time Server from an Intermittent Connection | 355
See Also• Your local documentation at /usr/share/doc/ntp-doc/html, or online at http://
www.ntp.org/documentation.html
• The home page for the pool.ntp.org project (http://www.pool.ntp.org)
• The ntp.org web site (http://www.ntp.org)
• The Usenet group comp.protocols.time.ntp
19.6 Connecting to a Time Serverfrom an Intermittent Connection
ProblemYou do not have a full-time Internet connection; you’re still on a dialup account, youhave a limited DSL account, or you travel. How can you synchronize to an ntpserver?
Solutionntp will still work for you. Install ntp and ntpdate. Make sure the ntp daemon is notrunning. Configure /etc/ntp.conf, and create the driftfile and logfile if they do notalready exist:
# /etc/ntp.confdriftfile /etc/ntp.driftlogfile /var/log/ntp.log
server pool.ntp.orgserver pool.ntp.orgserver pool.ntp.org
root should own the driftfile and logfile (chmod 644).
Debian users (or users of any system that puts PPP scripts in the /etc/ppp/ip-up.d/directory) can copy this script:
#!/bin/bash# ntp-dialup script for Debian# put this in /etc/ppp/ip-up.d/# set the correct time immediately# and run /etc/init.d/ntp-server every time PPP starts
/usr/sbin/ntpdate pool.ntp.org if [ -x /etc/init.d/ntp-server ]; then /etc/init.d/ntp-server restart fi

This is the Title of the Book, eMatter EditionCopyright © 2007 O’Reilly & Associates, Inc. All rights reserved.
356 | Chapter 19: Keeping Time with NTP
root should own this script (chmod 744). The script will run every time you startPPP.
On Red Hat and Fedora, you’ll need to edit or create the /etc/ppp/ip-up.local script,adding these lines:
#!/bin/bash# add these lines to /etc/ppp/ip-up.local# on Red Hat and Fedora# set the correct time immediately# and run /etc/init.d/ntpd every time PPP starts
/usr/sbin/ntpdate pool.ntp.org if [ -x /etc/init.d/ntpd]; then /etc/init.d/ntpd restart fi
When you connect, ntpdate will run and correct the time within the first minute ortwo. Then the ntp daemon will continue running in the background:
11 Feb 11:38:18 ntpdate[6796]: adjust time server 163.1.87.28 offset -0.018303 secntpdate is updating the timeStarting NTP server: ntpd.
If this is a dialup server serving an Ethernet LAN, you can now configure the clientmachines as per Recipe 19.3.
DiscussionThese scripts contain a bit of a kludge, by using restart instead of start. ntpd bindsitself to whatever IP address is assigned when ntpd starts up. When a PC has adynamically assigned IP address, ntpd does not track when the lease expires and theaddress changes. So, if you leave your PC running all the time and need to dial upperiodically, ntpd will lose the connection. restart ensures that ntpd will shut downcompletely and then restart, and thus will pick up the current IP address with eachnew dialup connection.
These scripts can easily be adapted for a PC that is dialing into a private network thathas a local time server. In your PPP scripts, simply point ntpdate to the local server,and edit /etc/ntp.conf to point to the local server.
See Also• Recipe 19.4, “Adding Access Controls”
• The manuals for your distribution, for how to run scripts that start up with PPP
• Your local ntp documentation, at /usr/share/doc/ntp-doc/html, or online at http://www.ntp.org/documentation.html; on Debian, you may need to install ntp-doc
• The home page for the pool.ntp.org project (http://www.pool.ntp.org)

This is the Title of the Book, eMatter EditionCopyright © 2007 O’Reilly & Associates, Inc. All rights reserved.
19.7 Setting Up Multiple Local Time Servers | 357
• The ntp.org web site (http://www.ntp.org)
• The Usenet group comp.protocols.time.ntp
19.7 Setting Up Multiple Local Time Servers
ProblemYour local time server is getting overwhelmed, so you need to add more servers. Andyou would like the additional servers to peer, so that your network hosts are alwayssynchronized with each other.
SolutionIn this example, two internal servers—server1 and server2—synchronize withus.pool.ntp.org and with each other:
# /etc/ntp.conf for server1
driftfile /etc/ntp.driftlogfile /var/log/ntp.log
# default access policy# this denies all ntp traffic that is not# explicitly allowedrestrict default ignore
# ntp server listserver pool.ntp.orgserver pool.ntp.orgserver pool.ntp.orgpeer server2
# allow time service from peer# but not run-time configuration changes# disable remote loggingrestrict server2 nomodify notrap
# allow localhost unrestrictedrestrict 127.0.0.0 mask 255.0.0.0
/etc/ntp.conf for server2 is identical, except the server2 entries must be replaced withserver1. Configure LAN clients as described in Recipe 23.2, using the peers as theserver entries:
# /etc/ntp.conf for clientsdriftfile /etc/ntp.driftlogfile /var/log/ntp.log
server server1server server2

This is the Title of the Book, eMatter EditionCopyright © 2007 O’Reilly & Associates, Inc. All rights reserved.
358 | Chapter 19: Keeping Time with NTP
DiscussionYou can set up as many additional peers as you like; workstations can even peer witheach other. For your own sanity, keep it as simple as possible. Don’t try to peer withthe public time servers! They have no reason to trust your servers, and you do notwant to annoy time server admins. The idea behind peering is to hit the public serv-ers as little as possible, while adequately serving the local network.
See Also• The manuals for your distribution, for how to run scripts that start up with PPP
• Your local ntp documentation at /usr/share/doc/ntp-doc/html, or online at at http://www.ntp.org/documentation.html
• The ntp.org web site (http://www.ntp.org)
• The Usenet group comp.protocols.time.ntp
19.8 Using NTP Keys for Authentication
ProblemYou’re not comfortable running your local servers without some sort of authenticationscheme. While ntp exploits are rare, you would feel better having some method ofensuring that your clients and servers can verify that they are who they claim to be.
SolutionUse ntp’s built-in key authentication scheme, ntpkeys.
First, configure the server (in this example server1):
# /etc/ntp.conf...crypto pw seekritwordkeysdir /etc/ntp/keys...
Because the password is stored in cleartext, ntp.conf should be chmod 600.
Create the key on server1:
# ntp-keygen -T -I -p seekritword
This may take a few minutes. Now, copy the newly generated file ntpkey_IFFpar_server1.4558615255 to /etc/ntp on all clients of server1. (Your timestamp will be dif-ferent.) Because this is a secret key, you’ll want to transfer it in a secure manner.

This is the Title of the Book, eMatter EditionCopyright © 2007 O’Reilly & Associates, Inc. All rights reserved.
19.8 Using NTP Keys for Authentication | 359
Floppy disks work fine. (Don’t forget to secure the floppy disk when you’refinished.)
Now configure the client machines. First, create two symlinks to the new key:
# ln -s ntpkey_IFFpar_server1.4558615255 ntpkey_iff_server1# ln -s ntpkey_IFFpar_server1.4558615255 ntpkey_iff_client1
Now edit the server line in the client’s /etc/ntp.conf, adding the autokey keyword:
server server1 autokey
Restart ntpd on all participating machines and find something else to do for awhile,as the server and clients will take a little time to get the new authentication schemesynchronized and working. Within an hour or two, everything will be operatingnormally.
DiscussionThis is what the ntp-keygen flags mean:
-T Generate a trusted certificate. By default, the program generates a nontrustedcertificate.
-I Use the IFF identification scheme, overwriting any key files that already exist.
-p Set the password.
If you want to use authentication with public time servers, you’ll need to do twothings:
1. Find public servers that support authentication.
2. Configure the servers individually in ntp.conf, instead of using ntp pools.
See http://www.eecis.udel.edu/~mills/ntp/servers.html for a current list of public timeservers. Warning: pay attention to their access policies! Do not connect to Stratum 1servers, unless you meet their criteria. Always use Stratum 2 for ordinary timeservice.
The keys file is the obvious headache and weak point of this whole scheme. As thentp documentation says, “The big trouble with the authentication facility is the keysfile. It is a maintenance headache and a security problem. This should be fixed someday. Presumably, this whole bag of worms goes away if/when a generic securityregime for the Internet is established.”
In the real world, the chances of ntp being exploited are low. Even if a public timeserver is spoofed and sends you wrong time signals, you have some built-in protec-tions: ntp makes small changes, and you’re getting service from a pool of servers, soany mistakes, whether deliberate or not, are quickly corrected.

This is the Title of the Book, eMatter EditionCopyright © 2007 O’Reilly & Associates, Inc. All rights reserved.
360 | Chapter 19: Keeping Time with NTP
See Also• The “ntp-keygen—Generate Public and Private Keys” section of the NTP man-
ual, either at /usr/share/doc/ntp-doc/html, or online at http://www.ntp.org/documentation.html
• The ntp.org web site (http://www.ntp.org)
• The Usenet group comp.protocols.time.ntp

This is the Title of the Book, eMatter EditionCopyright © 2007 O’Reilly & Associates, Inc. All rights reserved.
361
Chapter 20 CHAPTER 20
Building a Postfix MailServer
20.1 IntroductionThe Linux world has many excellent programs for handling email: Sendmail, Exim,qmail, and Postfix are the top four mail transfer agents (MTAs). This chapter coversPostfix. Like most of the post-Sendmail generation of MTAs, Postfix is designed fromthe ground up to be secureable and robust. It scales nicely from the single user whowants more control over her personal mail all the way up to the largest service provider.
Here’s a bit of terminology:
MTAMail transfer agent. This moves email between servers. Sendmail, Exim, qmail,and Postfix are MTAs. An MTA must support SMTP.
SMTPSimple Mail Transfer Protocol. This moves messages between mail servers.
MUAMail user agent, also called “mail client.” Mutt, Pine, Kmail, Evolution, andBalsa are MUAs. This is the user’s program for composing, sending, and receiv-ing email. MUAs can fetch mail from a local folder, or from a remote server viaPOP and IMAP.
MDAMail delivery agent. This is an intermediary between an MTA and a MUA. Proc-mail and Fetchmail are two popular MDAs. An MDA is not required; it is usedfor extra functionality, such as filtering, sorting, and autoresponding.
POPPost Office Protocol. Moves messages from the server to the user’s inbox. A POPserver is simple to operate and does not need a lot of horsepower.
IMAPInteractive Message Access Protocol. The message store remains on the server.An IMAP server needs a lot of RAM and lots of storage space.

This is the Title of the Book, eMatter EditionCopyright © 2007 O’Reilly & Associates, Inc. All rights reserved.
362 | Chapter 20: Building a Postfix Mail Server
TLSTransport Layer Security is an evolution of SSL (Secure Sockets Layer). It pro-vides encrypted transport for SASL-authenticated logins.
SASLSimple Authentication and Security Layer, for authenticating users. SASL doesthe authenticating, then TLS provides the encrypted transport of the authentica-tion data.
These are the official ports for different mail protocols:
tcp/25SMTP
tcp/110POP3
tcp/995POP3 over SSL
tcp/143IMAP
tcp/993IMAP over SSL
There are several ways to build a Linux mail server. Most admins take the modularapproach and build it from a collection of specialized programs. That is what we willdo in this chapter. Another option is to use the Courier package, because it is a com-plete package that contains an MTA, POP3, IMAP, and a mailing list manager. Orpurchase a distribution that puts it all together for you, like SuSE OpenExchange.
20.2 Building a POP3 Mail Server
ProblemYou want to set up a POP3 mail server—nothing fancy, just a basic server for Inter-net mail for a single domain, with TLS/SSL support for more secure logins.
SolutionHere are the requirements:
• Postfix
• Courier-IMAP, which supplies both POP3 and IMAP
• OpenSSL
• famd, the file alteration monitor daemon

This is the Title of the Book, eMatter EditionCopyright © 2007 O’Reilly & Associates, Inc. All rights reserved.
20.2 Building a POP3 Mail Server | 363
See Recipe 20.3 for Debian instructions.
Install or upgrade OpenSSL and famd first.
Next, remove any installed MTAs and POP/IMAP servers. Look first for Sendmail, asit is still the default on a lot of installations. Go ahead and break dependencies,because Postfix will satisfy them.
Then stop any running processes belonging to the old MTA:
$ ps ax | grep sendmailroot 10204 0.0 0.7 5296 1980 ? S 19:27 0:00 sendmail:accepti$ su# kill 10204
Now install Postfix. If you build from sources, be sure to compile in SASL support.(See the SASL_README in the tarball.)
After installing Postfix, make a backup copy of /etc/postfix/main.cf:
# cp /etc/postfix/main.cf /etc/postfix/main.cf-old
Erase everything in the original, and copy in these lines. Be sure to enter filepathsand host/domain names appropriate for your system:
command_directory = /usr/sbinmail_owner = postfixdefault_privs = nobody# enter your domain name heremydomain = tuxcomputing.com# enter your own fully-qualified domain name heremyhostname = windbag.tuxcomputing.commyorigin = $mydomainalias_maps = hash:/etc/aliasesalias_database = hash:/etc/aliasesinet_interfaces = allmydestination = $myhostname, localhost.$mydomain $mydomainmynetworks_style = subnet
# very important! Courier must have maildirs, not mboxhome_mailbox = Maildir/mail_spool_directory = /var/mailmtpd_banner = $myhostname ESMTP $mail_namemailbox_size_limit = 0recipient_delimiter = +
Create aliases for root and postmaster in /etc/aliases:
# See man 5 aliases for formatroot:[email protected]:root

This is the Title of the Book, eMatter EditionCopyright © 2007 O’Reilly & Associates, Inc. All rights reserved.
364 | Chapter 20: Building a Postfix Mail Server
Then create the alias database:
# newaliases
and run the built-in syntax checker:
# postfix check
Some distributions start Postfix automatically after installation. To start it manually,use the postfix command:
# postfix start
If Postfix is already running, restart it:
# postfix reloadpostfix/postfix-script: refreshing the Postfix mail system
Then verify that Postfix is running:
$ ps ax | grep postfix26342 ? Ss 0:00 /usr/lib/postfix/master
Next, verify that the smtp daemon is working:
$ telnet localhost 25Trying 127.0.0.1...Connected to localhost.localdomain.Escape character is '^]'.220 windbag.test.net ESMTP Postfix (Libranet/GNU)EHLO windbag.test.net250-windbag.test.net250-PIPELINING250-SIZE 10240000250-VRFY250-ETRN250-XVERP250 8BITMIME^]telnet> quitConnection closed.
Now install Courier-IMAP. To install from RPMs, you’ll need courier-imap-commonand courier-imap-pop3. If you build from sources, be sure to read00README.NOW.OR.SUFFER.
After installation, generate the POP3 TLS/SSL certificate. First, edit /etc/courier/pop3d.cnf, entering your own site information:
[ req_dn ]C=USST=NML=AlbuquerqueO=mailserverOU=Automatically-generated POP3 SSL [email protected]

This is the Title of the Book, eMatter EditionCopyright © 2007 O’Reilly & Associates, Inc. All rights reserved.
20.2 Building a POP3 Mail Server | 365
Now generate the key:
# mkpop3dcertGenerating a 1024 bit RSA private key..........................................++++++..++++++writing new private key to '/usr/lib/courier/pop3d.pem'-----1024 semi-random bytes loadedGenerating DH parameters, 512 bit long safe prime, generator 2This is going to take a long time.....+.......+........+............+...+.......................................+............ ...subject= /C=US/ST=NM/L=Albuquerque/O=Courier Mail Server/OU=Automatically-generatedPOP3 SSL key/CN=windbag/[email protected]=May 20 18:08:13 2004 GMTnotAfter=May 20 18:08:13 2005 GMTMD5 Fingerprint=D4:A5:53:48:09:65:C4:F0:11:8F:31:9E:FB:9F:EB:8A#
Some distributions start Courier automatically after installation. Use these com-mands to start Courier manually, if necessary:
# /etc/init.d/courier-pop3d start# /etc/init.d/courier-pop3d-ssl start
Verify the filenames, as they vary on different distributions.
Now you have a fully functioning POP3 mail server.
DiscussionThe various Linux distributions customize Postfix and Courier in their own weird lit-tle ways, so be sure to verify filepaths and filenames.
If you’re used to having mail queued in /var/spool, you’re going to find that Courieris different. The mail queues are in each user’s home directory:
# ls /home/fooberDesktop Maildir# ls /home/foober/Maildircourierimapkeywords courierimapuiddb cur tmpcourierimapsubscribed courierpop3dsizelist new
New mail sits in /Maildir/new until the user retrieves it. This is configured in Postfix,in main.cf:
home_mailbox = Maildir/
A POP3 mail server can be any old Pentium, or even a 486. It’s best to put a mailserver on its own dedicated box. A mail server must be exposed to untrusted net-works, so anything on the same machine is exposed to some risk. Also, because thisconfiguration of Postfix uses system passwords, giving it its own box means thatemail accounts will have their own separate passwords. You don’t want users to havethe same passwords for email as for logging into their workstations or LANs, becausethat’s a big security hole.

This is the Title of the Book, eMatter EditionCopyright © 2007 O’Reilly & Associates, Inc. All rights reserved.
366 | Chapter 20: Building a Postfix Mail Server
When you generate the Courier SSL certificate, it is self-signed, which means no“trusted” third party vouches for the authenticity of your certificate. This is perfectlyokay for most uses. If you think you need a genuine, signed, commercially generatedSSL certificate from a vendor such as VeriSign or Thawte, it will cost you severalhundred dollars per year. An alternative is to check with your ISP or web host to seeif they offer lower-cost shared certificates.
See Also• Recipe 20.3, “Building a POP3 Mail Server on Debian,” for Debian instructions
• Local Courier documentation (/usr/share/doc/courier-doc)
• Postfix Basic Configuration (/usr/share/doc/postfix/html/basic.html)
• Courier-IMAP home page (http://www.inter7.com/courierimap.html)
• Postfix home page (http://www.postfix.org)
20.3 Building a POP3 Mail Server on Debian
ProblemYou want to run a Postfix/Courier POP3 server on Debian, and you need to knowthe Debian way of doing this.
SolutionDebian automates most of the process. Install or upgrade famd, OpenSSL, and Postfix:
# apt-get install famd openssl postfix postfix-doc postfix-tls
Debian will walk you through a basic Postfix configuration and start it up. Next,back up /etc/postfix/main.cf:
# cp /etc/postfix/main.cf /etc/postfix/main.cf-old
Erase everything in the original, and copy in these lines. Be sure to enter filepathsand host/domain names appropriate for your system:
command_directory = /usr/sbinmail_owner = postfixdefault_privs = nobody# enter your domain name heremydomain = tuxcomputing.com# enter your own fully qualified domain name heremyhostname = windbag.tuxcomputing.commyorigin = $mydomain
alias_maps = hash:/etc/aliasesalias_database = hash:/etc/aliases

This is the Title of the Book, eMatter EditionCopyright © 2007 O’Reilly & Associates, Inc. All rights reserved.
20.3 Building a POP3 Mail Server on Debian | 367
inet_interfaces = allmydestination = $myhostname, localhost.$mydomain $mydomainmynetworks_style = subnet
# very important! Courier must have maildirs, not mboxhome_mailbox = Maildir/mail_spool_directory = /var/mailmtpd_banner = $myhostname ESMTP $mail_namemailbox_size_limit = 0recipient_delimiter = +
Create a mail alias for root in /etc/aliases:
# See man 5 aliases for formatroot:[email protected]:root
Then create the alias database:
# newaliases
Run the built-in syntax checker:
# postfix check
Next, restart Postfix:
# postfix reloadpostfix/postfix-script: refreshing the Postfix mail system
Now install Courier:
# apt-get install courier-authdaemon courier-base courier-doc courier-pop courier-pop-ssl courier-ssl
Debian will automatically generate the keys and start the Courier daemons. How-ever, you should edit /etc/courier/pop3d.cnf, and manually generate a new certificatewith the updated data. Recipe 20.2 tells how to do this.
Discussionpostfix reload is the fastest, least intrusive way to activate changes to main.cf. Use itwhen the system is under load and you don’t want to disrupt service.
Always check the Debian packages search page, at http://packages.debian.org. Debianhas its own package naming conventions and tends to split up packages into manysmall components.
See Also• Recipe 20.2, “Building a POP3 Mail Server,” for manually generating a Courier
certificate
• The Debian packages search page (http://packages.debian.org)
• Postfix Basic Configuration (/usr/share/doc/postfix/html/basic.html)

This is the Title of the Book, eMatter EditionCopyright © 2007 O’Reilly & Associates, Inc. All rights reserved.
368 | Chapter 20: Building a Postfix Mail Server
• Local Courier documentation (/usr/share/doc/courier-doc)
• Recipe 20.4, “Testing the SMTP/POP3 Mail Server”
20.4 Testing the SMTP/POP3 Mail Server
ProblemYou want to verify that the various server components are working.
SolutionOur old friend telnet and our new friend openssl s_client will do the job. Test theSMTP server with telnet:
$ telnet localhost 25Trying 127.0.0.1...Connected to localhost.localdomain.Escape character is '^]'.220 windbag.test.net ESMTP Postfix (Libranet/GNU)ehlo windbag250-windbag.test.net250-PIPELINING250-SIZE 10240000250-VRFY250-ETRN250-XVERP250 8BITMIMEmail from: [email protected] Okrcpt to: [email protected] Okdata354 End data with <CR><LF>.<CR><LF>Date: Jan 15, 2004From: fooberReply-to: [email protected]: sixSubject: telnet testHi Carla,Did you get this?.250 Ok: queued as 6069F2290Cquit221 ByeConnection closed by foreign host.
Also test plain, unencrypted POP3 with telnet:
$ telnet localhost 110Trying 127.0.0.1...Connected to localhost.localdomain.

This is the Title of the Book, eMatter EditionCopyright © 2007 O’Reilly & Associates, Inc. All rights reserved.
20.4 Testing the SMTP/POP3 Mail Server | 369
Escape character is '^]'.+OK Hello there.user carla+OK Password required.pass sekritword+OK logged in.stat+OK 2 1275list+OK POP3 clients that break here, they violate STD53.1 6382 637.retr 1+OK 638 octets follow.Return-Path: <[email protected]>X-Original-To: [email protected]: [email protected]: from 192.168.1.100 (unknown [192.168.1.100]) by windbag.test.net (Postfix) with ESMTP id 409E722884 for <[email protected]>; Thu, 15 Jan 2004 15:29:54 -0700 (PDT)From: stinkpad <[email protected]>To: [email protected]: telnet testDate: Thu, 15 Jan 2004 15:29:50 -0700User-Agent: KMail/1.5.4MIME-Version: 1.0Content-Type: text/plain; charset="us-ascii"Content-Transfer-Encoding: 7bitContent-Disposition: inlineMessage-Id: <[email protected]>
Hi Carla,Did you get this?
.quit+OK Bye-bye.Connection closed by foreign host.
Test TLS/SSL support with openssl s_client. Use the POP3 mail commands:
$ openssl s_client -connect localhost:995CONNECTED(00000003)depth=0 /C=US/ST=NM/L=Albuquerque/O=Courier Mail Server/OU=Automatically-generatedPOP3 SSL key/CN=windbag/[email protected] error:num=18:self signed certificate...<many lines of certificate data and protocols>---+OK Hello there.user carla+OK Password required.

This is the Title of the Book, eMatter EditionCopyright © 2007 O’Reilly & Associates, Inc. All rights reserved.
370 | Chapter 20: Building a Postfix Mail Server
pass sekritword+OK logged in.
Continue just as you would with any POP3 session.
You can test client connectivity by hostname or IP:
$ telnet windbag 25$ telnet 192.168.1.5 110$ openssl s_client -connect windbag:995
DiscussionHere are some of the more common POP3 commands:
listShow a list of messages, by number, with the number of bytes in each message.
top msg linesDisplay the message header of message msg and display lines many lines. Forexample, top 3 5 displays the headers of message 3 and the first 5 lines of thebody of the message.
retr msgDisplay the message, selected by number (e.g., retr 2).
dele nDelete message number n.
rsetUndelete any messages that are marked for deletion.
quitDelete messages marked for deletion, and log out.
See Also• RFC 1939 for a complete description of POP commands
• This chapter’s “Introduction,” for a list of ports for the different mail protocols
• telnet(1)
20.5 Sending Internet Mail
ProblemHow do you configure Postfix to send Internet mail? You’ve set up the server, butmail isn’t flowing yet.

This is the Title of the Book, eMatter EditionCopyright © 2007 O’Reilly & Associates, Inc. All rights reserved.
20.6 Receiving Internet Mail | 371
SolutionThis is more complicated than it used to be, thanks to spammers. If your ISP doesnot require SMTP authentication, you can relay outbound mail via their SMTPserver. Add a relayhost directive to /etc/postfix/main.cf:
relayhost = isp.smtpserver.com
Use the SMTP server specified in your ISP account information.
If your ISP requires SMTP authentication, see Recipe 20.7.
DiscussionBeware of restrictive Terms of Service (TOS). They may forbid running servers of anykind. If your service provider does not allow you to run servers, you’ll either need tomove to a provider that does allow it or use a third-party service for “smart hosting”(a commercial SMTP relaying service).
Another option is to configure each individual mail client to use your ISP account foroutgoing mail, because most mail clients can be configured to remember the SMTPlogin. However, there are a couple of drawbacks to doing this:
• You won’t have any control over or logging of outbound mail.
• Internal mail won’t be delivered directly, but rather bounced all over the Internet.
See Also• Recipe 20.7, “Installing Cyrus-SASL for SMTP Authorization”
• The Postfix book (/usr/share/doc/postfix/html/index.html)
20.6 Receiving Internet Mail
ProblemYour nice new mail server is ready to go to work—how do you make it receive Inter-net mail?
SolutionYou need three things: a static IP, a registered domain name, and DNS records point-ing the world to your mail server. In your DNS configuration you need an A record

This is the Title of the Book, eMatter EditionCopyright © 2007 O’Reilly & Associates, Inc. All rights reserved.
372 | Chapter 20: Building a Postfix Mail Server
for the server IP, and an MX record for the mail server. This is what BIND entrieslook like:
$ORIGIN tuxcomputing.com.windbag A 10.11.12.23mx 10 windbag
djbdns entries look like this:
+www.tuxcomputing.com:[email protected]:10.11.12.23:a
See Chapter 24 for more on DNS.
DiscussionThere are many ways to manage DNS. Your ISP can do it, or you can use third-partyDNS services such as Dyndns.org or your domain name registrar. You can also runyour own public DNS server, and arrange with trusted friends to exchange secondaries.
See Also• Chapter 24, Managing Name Resolution
• The Postfix book (/usr/share/doc/postfix/html/index.html)
20.7 Installing Cyrus-SASL for SMTPAuthorization
ProblemYou want to add Cyrus-SASL to your mail server, so you can set up smtp-auth. Youwant your users to authenticate themselves, and you want Postfix to authenticate toan external relay.
SolutionRPM users need these packages:
• cyrus-sasl-2.x
• cyrus-sasl-plain-2.x
Debian users, see Recipe 20.8.

This is the Title of the Book, eMatter EditionCopyright © 2007 O’Reilly & Associates, Inc. All rights reserved.
20.7 Installing Cyrus-SASL for SMTP Authorization | 373
Before installing Cyrus-SASL, verify that your version of Postfix supports SASL andTLS. Run ldd on the smtpd executable to find out. Look for libsasl2, libssl, andlibcrypto:
$ ldd /usr/lib/postfix/smtpd... libssl.so.0.9.7 => /usr/lib/i686/cmov/libssl.so.0.9.7 (0x4006f000) libcrypto.so.0.9.7 => /usr/lib/i686/cmov/libcrypto.so.0.9.7 (0x4009e000) libsasl2.so.2 => /usr/lib/libsasl2.so.2 (0x4018f000)...
If Postfix links to these libraries, go ahead and install Cyrus-SASL. If it doesn’t, youhave two options:
• Rebuild Postfix from sources. Read the README and SASL_README files. Besure to install Cyrus-SASL first, before compiling Postfix.
• Replace your Postfix with an up-to-date RPM package that has everything built in.
After installing Postfix and Cyrus-SASL, start up saslauthd:
# /etc/init.d/saslauthd start
Now add these lines to main.cf:
smtpd_sasl_auth_enable = yessmtpd_sasl2_auth_enable = yessmtpd_sasl_security_options =noanonymousbroken_sasl_auth_clients = yessmtpd_sasl_local_domain =$myhostname
smtpd_recipient_restrictions = permit_sasl_authenticated permit_mynetworks reject_unauth_destination
and activate the changes:
# postfix reload
Then verify that Postfix sees the new SASL libraries:
$ telnet localhost 25Trying 127.0.0.1...Connected to localhost.localdomain.Escape character is '^]'.220 windbag.test.net ESMTP Postfix (Libranet/GNU)EHLO windbag.test.net250-windbag.test.net250-PIPELINING250-SIZE 10240000250-VRFY250-ETRN250-STARTTLS250-AUTH LOGIN PLAIN250-AUTH=LOGIN PLAIN

This is the Title of the Book, eMatter EditionCopyright © 2007 O’Reilly & Associates, Inc. All rights reserved.
374 | Chapter 20: Building a Postfix Mail Server
250-XVERP250 8BITMIME
The STARTTLS and AUTH lines are just what you want to see. Now you can moveon to Recipe 20.9 for the next step.
DiscussionYou can use AUTH LOGIN and PLAIN, because logins will be encrypted by TLS(see Recipe 20.9).
main.cf has over a hundred possible configuration options. Don’t go nuts; it’s not nec-essary to use all of them. Use the minimum needed to get the job done. You can checkout many sample configurations in /usr/share/doc/postfix/examples/sample-smtpd.cf.gz.
smtpd_recipient_restrictions can have multiple options separated by commas, eitherall on one line or broken up into multiple lines. Each line must start with whitespace.
See Also• /usr/share/doc/postfix/examples/, for descriptions of all the main.cf options
• /usr/share/doc/postfix/examples/sample-auth.cf.gz, for explanations of the authen-tication options
• The Postfix book (/usr/share/doc/postfix/html/index.html)
20.8 Installing Cyrus-SASL on Debian
ProblemYou need to know The Debian Way of adding Cyrus-SASL to your mail server.
SolutionFirst, install the SASL packages:
# apt-get install libsasl2 sasl2-bin libsasl2-modules
Then, edit /etc/default/saslauthd to look like this:
# This needs to be uncommented before saslauthd will be run automatically START=yes
# You must specify the authentication mechanisms# you wish to use.# This defaults to "pam" for PAM support, but may# also include

This is the Title of the Book, eMatter EditionCopyright © 2007 O’Reilly & Associates, Inc. All rights reserved.
20.8 Installing Cyrus-SASL on Debian | 375
# "shadow" or "sasldb", like this:# MECHANISMS="pam shadow"
MECHANISMS="pam"
Next, add these lines to main.cf:
smtpd_sasl_auth_enable = yessmtpd_sasl2_auth_enable = yessmtpd_sasl_security_options = noanonymousbroken_sasl_auth_clients = yessmtpd_sasl_local_domain =$mydomain
smtpd_recipient_restrictions = permit_sasl_authenticated permit_mynetworks reject_unauth_destination
and activate the changes:
# postfix reload
Then verify that Postfix is seeing the new libraries:
$ telnet localhost 25Trying 127.0.0.1...Connected to localhost.localdomain.Escape character is '^]'.220 windbag.test.net ESMTP Postfix (Libranet/GNU)EHLO windbag.test.net250-windbag.test.net250-PIPELINING250-SIZE 10240000250-VRFY250-ETRN250-STARTTLS250-AUTH LOGIN PLAIN250-AUTH=LOGIN PLAIN250-XVERP250 8BITMIME
The STARTTLS and AUTH lines are just what you want to see. Now you can moveon to Recipe 20.9 for the next step.
DiscussionYou can use AUTH LOGIN and PLAIN, because logins will be encrypted by TLS(see Recipe 20.9).
See Also• /usr/share/doc/postfix/examples/, for descriptions of main.cf options

This is the Title of the Book, eMatter EditionCopyright © 2007 O’Reilly & Associates, Inc. All rights reserved.
376 | Chapter 20: Building a Postfix Mail Server
• /usr/share/doc/postfix/examples/sample-auth.cf.gz, for explanations of the authen-tication options
• The Postfix book (/usr/share/doc/postfix/html/index.html)
20.9 Setting Up smtp-auth to AuthenticateUsers
ProblemYou want your users, especially remote users, to have to authenticate themselves toyour Postfix server to prevent unauthorized relaying.
SolutionYou’ll need four things:
• Cyrus-SASL2
• OpenSSL
• Postfix compiled to support Cyrus-SASL
• A server certificate and keys
See Recipe 20.7 if you have not installed Cyrus-SASL. When SASL is installed andworking, the next step is to generate an SSL server certificate. Find and enter the /ssl/misc directory:
# cd /usr/lib/ssl/misc# lsCA.pl c_info c_name der_chop CA.sh c_hash c_issuer demoCA
The script that generates the keys is CA.pl (or, you might see CA.sh, which is a wrap-per for CA.pl that adds a little extra functionality). Choose one and make a backupcopy:
# cp CA.sh CA.sh-old
Edit the script, adding the -nodes flag everywhere there is a $REQ line:
-newcert) # create a certificate $REQ -new -nodes -x509 -keyout newreq.pem -out newreq.pem $DAYS...-newreq) # create a certificate request $REQ -new -nodes -keyout newreq.pem -out newreq.pem $DAYS RET=$?...else echo "Making CA certificate ..."

This is the Title of the Book, eMatter EditionCopyright © 2007 O’Reilly & Associates, Inc. All rights reserved.
20.9 Setting Up smtp-auth to Authenticate Users | 377
$REQ -new -nodes -x509 -keyout ${CATOP}/private/$CAKEY \ -out ${CATOP}/$CACERT $DAYS
This eliminates the creation of a passphrase. You may not want to have to enter apassphrase every time the server restarts, or have an unattended reboot stall becauseit’s waiting for a passphrase. You may skip this step and use a passphrase; obvi-ously, using a passphrase increases security.
Now generate your new certificate:
# ./CA.sh -newca# ./CA.sh -newreq# ./CA.sh -sign
The result, after much output, is newreq.pem, newcert.pem, and demoCA/cacert.pem.Copy these to /etc/postfix:
# cp newcert.pem /etc/postfix/# cp newreq.pem /etc/postfix/# cp demoCA/cacert.pem /etc/postfix/
Next, add these lines to /etc/postfix/main.cf:
smtpd_use_tls = yessmtpd_tls_auth_only = yessmtpd_tls_key_file = /etc/postfix/newreq.pemsmtpd_tls_cert_file = /etc/postfix/newcert.pemsmtpd_tls_CAfile = /etc/postfix/cacert.pemsmtpd_tls_loglevel = 3smtpd_tls_received_header = yessmtpd_tls_session_cache_timeout = 3600stls_random_source = dev:/dev/urandom
Activate the changes:
# postfix reload
and test the server:
$ telnet localhost 25Trying 127.0.0.1...Connected to localhost.localdomain.Escape character is '^]'.220 windbag.test.net ESMTP Postfix (Libranet/GNU)EHLO windbag.test.net250-windbag.test.net250-PIPELINING250-SIZE 10240000250-VRFY250-ETRN250-STARTTLS250-XVERP250 8BITMIMESTARTTLSS: 220 Ready to start TLS

This is the Title of the Book, eMatter EditionCopyright © 2007 O’Reilly & Associates, Inc. All rights reserved.
378 | Chapter 20: Building a Postfix Mail Server
Now configure your user’s mail clients, and you’re done. Most mail clients can beconfigured to store the login and password, so all your users need to do is click thesend button.
DiscussionPostfix installations are pretty consistent across the various package formats andLinux distributions, but it’s still a good idea to verify all the filepaths in /etc/postfix/main.cf.
See Also• /usr/share/doc/postfix/examples/, for descriptions of the main.cf options
• /usr/share/doc/postfix/examples/sample-auth.cf.gz, for the explanations of theauthentication options
20.10 Using smtp-auth to Authenticate Postfixto Another Server
ProblemYou want to relay off your service provider’s SMTP server, but it requires a login andpassword. You already have smtp-auth set up and working for your users.
SolutionCreate or edit /etc/postfix/sasl_passwd, and store your login information in it:
mail.tuxcomputing.com carla:sekritword
Set restrictive file permissions:
# chown root:root /etc/postfix/sasl_passwd && chmod 600 /etc/postfix/sasl_passwd
Now convert it to a hashed DB:
# postmap hash:/etc/postfix/sasl_passwd
This creates /etc/postfix/sasl_passwd.db.
Add one more line to /etc/postfix/main.cf:
smtp_sasl_password_maps = hash:/etc/postfix/sasl_passwd
and activate the changes:
# postfix reload
Now Postfix will authenticate itself to your relay server.

This is the Title of the Book, eMatter EditionCopyright © 2007 O’Reilly & Associates, Inc. All rights reserved.
20.11 Configuring a Fully Qualified Domain Name | 379
Discussion/etc/postfix/sasl_passwd may have multiple entries for different hosts, as long as eachone has a different hostname:
mail.tuxcomputing.com carla:sekritwordsmtp.goodeats.com carla:sekkritwordmail.saddles.net horselady:secritword
See Also• /usr/share/doc/postfix/examples/, for descriptions of the main.cf options
• /usr/share/doc/postfix/examples/sample-auth.cf.gz, for explanations of the authen-tication options
• Recipe 20.7, “Installing Cyrus-SASL for SMTP Authorization”
• Recipe 20.9, “Setting Up smtp-auth to Authenticate Users”
20.11 Configuring a Fully Qualified Domain Name
ProblemYou’re not sure how to configure a fully qualified domain name on your system. Youknow there are several files to edit, but you aren’t quite sure what they are or what toput in them.
SolutionOn most Linux systems, you must edit /etc/hostname and /etc/hosts. /etc/hostnamesets only the system’s hostname:
windbag
/etc/hosts sets the domain name:
127.0.0.1 localhost.localdomain localhost192.168.1.5 windbag.test.net windbag
On Red Hat and Fedora, you must edit /etc/sysconfig/network instead of /etc/hostname:
HOSTNAME=windbag
Check your configurations as follows:
$ hostnamewindbag$ hostname --fqdnwindbag.test.net

This is the Title of the Book, eMatter EditionCopyright © 2007 O’Reilly & Associates, Inc. All rights reserved.
380 | Chapter 20: Building a Postfix Mail Server
$ dnsdomainnametest.net
You must reboot for hostname changes to take effect.
Discussion/etc/sysconfig/network and /etc/hostname are read at boottime to set the hostname.
You can change the domain name anytime and have it take effect by restarting net-working. On Debian, use:
# /etc/init.d/networking restart
On Red Hat and Fedora, use:
# /etc/init.d/network restart
However, this is not foolproof, because some applications will not be updated with anetworking restart. A reboot is usually best.
See Also• hosts(5), hostname(1)
20.12 Building an IMAP Mail Server
ProblemYour users are a footloose lot, and they want to be able to log into their mail serverfrom wherever they happen to be, see all their mail and folders, and not have toworry about having their mail scattered all over different PCs.
SolutionAn IMAP server is one way to meet this need. (Webmail is another; see Recipe 20.18.)If you have an RPM-based sytem, like Fedora, and followed Recipe 20.2, you have anIMAP server installed. Debian users (Recipe 20.3) need to install two additionalpackages:
# apt-get install courier-imap courier-imap-ssl
Next, generate your TSL/SSL key, then start up the server:
# mkimapdcert# /etc/init.d/courier-imap start# /etc/init.d/courier-imap-ssl start
Check your init scripts for the exact filenames, as these vary on different Linuxdistributions.

This is the Title of the Book, eMatter EditionCopyright © 2007 O’Reilly & Associates, Inc. All rights reserved.
20.12 Building an IMAP Mail Server | 381
Test it with telnet:
$ telnet localhost 143Trying 127.0.0.1...Connected to localhost.localdomain.Escape character is '^]'.* OK [CAPABILITY IMAP4rev1 UIDPLUS CHILDREN NAMESPACE THREAD=ORDEREDSUBJECTTHREAD=REFERENCES SORT QUOTA IDLE ACL ACL2=UNION STARTTLS] Courier-IMAP ready.Copyright 1998-2004 Double Precision, Inc. See COPYING for distribution information.a001 login carla sekritworda001 OK LOGIN Ok.a002 examine inbox* FLAGS (\Draft \Answered \Flagged \Deleted \Seen \Recent)* OK [PERMANENTFLAGS ( )] No permanent flags permitted* 0 EXISTS* 0 RECENT* OK [UIDVALIDITY 1085106842] Ok* OK [MYRIGHTS "acdilrsw"] ACLa002 OK [READ-ONLY] Oka003 logout* BYE Courier-IMAP server shutting downa003 OK LOGOUT completedConnection closed by foreign host.
To test your IMAP-over-TLS/SSL support, use:
$ openssl s_client -connect localhost:993
See RFC 3501 for a complete description of IMAP commands.
You now have a working IMAP server. See Recipe 20.13 for how to connect yourusers.
You must have the file alteration monitor daemon (famd) running, sothat Maildir folders will continually update themselves. famd is stan-dard on most Linux systems; run ps ax | grep famd to make sure it’srunning.
DiscussionYou’ll need something better than the antique Pentium you used in Recipe 20.2because an IMAP server requires more horsepower and lots more storage space thana POP3 server. And you definitely do not want to share the box—let the IMAP serverhave it all to itself. Because hardware requirements vary according to user demand,precise calculations are difficult. As a general rule, a 1.5-GHz CPU, 256 MB RAM,and a 30-GB drive can serve 100 users. Keep an eye on disk space, as that is usuallythe first to go.

This is the Title of the Book, eMatter EditionCopyright © 2007 O’Reilly & Associates, Inc. All rights reserved.
382 | Chapter 20: Building a Postfix Mail Server
See Also• Local Courier documentation (/usr/share/doc/courier-doc/htmldoc/imapd.html)
• RFC 3501, for a complete description of IMAP commands.
• Recipe 20.13, “Connecting Your Users”
20.13 Connecting Your Users
ProblemYou have your mail server up and running—now how do users connect to it?
SolutionAll you have to do is point their email clients to your server. Every mail client has adifferent setup menu, but they all need the same information:
• Login name
• Password
• Server name or IP address
• Encryption or no encryption
• Server port number
Figure 20-1 shows the Balsa Mail setup menu.
Most Linux mail clients autodetect encryption and automatically set the correct port.
DiscussionLinux is chock-full of nice mail clients: Mutt, Pine, Kmail, Balsa, Mozilla Mail, Evo-lution, and Sylpheed, to name a few. Mozilla Mail is a good choice for standardizingon mixed networks, as it runs on Linux, Windows, and Mac OS X.
See Also• Mozilla (http://mozilla.org)
• Thunderbird (http://www.mozilla.org/projects/thunderbird)
• Kmail (http://kmail.kde.org)
• Mutt (http://www.mutt.org)
• Evolution (http://www.novell.com/products/evolution)
• Balsa (http://www.newton.cx/balsa)

This is the Title of the Book, eMatter EditionCopyright © 2007 O’Reilly & Associates, Inc. All rights reserved.
20.14 Sharing IMAP Folders | 383
• Pine (http://www.washington.edu/pine)
• Sylpheed (http://sylpheed-claws.sourceforge.net)
20.14 Sharing IMAP Folders
ProblemYou want to set up shared folders on your IMAP server, and let your users createtheir own shared folders.
Figure 20-1. Balsa Mail configuration

This is the Title of the Book, eMatter EditionCopyright © 2007 O’Reilly & Associates, Inc. All rights reserved.
384 | Chapter 20: Building a Postfix Mail Server
SolutionUse Courier’s maildirmake command. First, as root, create a shareable Maildir withthe big -S flag:
# maildirmake -S /var/mail/sysadmins
Then create a shareable folder (yes, these are plain old Linux directories, but Couriercalls them folders) in the Maildir with the little -s flag. write gives read/write permis-sions to everyone:
# maildirmake -s write -f reports /var/mail/sysadmins
You can add another folder, with read permissions only, using:
# maildirmake -s read -f policies /var/mail/sysadmins
Note that maildirmake creates dot, or hidden, directories:
# ls -a /var/mail/sysadmins. .. .reports .policies cur new tmp
Permissions can be fine-tuned on the individual folders, just like with any Linuxdirectory. (See Recipe 9.7 to learn how to adjust permissions on shared directories.)To remove shared folders, just delete them.
Users can also share folders. Their shared folders remain in their own home directories:
$ maildirmake --add images=/var/mail/sysadmins $HOME/Maildir
Users may “unshare”, or break the link to the shared directory, with --del:
$ maildirmake --del images $HOME/Maildir
DiscussionIf you want a full-blown groupware/email server, it is possible to assemble all thepieces by hand from free/open source components. There are also a number of pre-fab Linux groupware packages available, some free of cost, some commercial. This isa small sampling—there are many more in various stages of development:
PHP GroupWarehttp://www.phpgroupware.org
OpenGroupwarehttp://www.opengroupware.org
The Kolab Projecthttp://kolab.org
SuSE OpenExchangehttp://www.suse.com

This is the Title of the Book, eMatter EditionCopyright © 2007 O’Reilly & Associates, Inc. All rights reserved.
20.15 Using Postfix’s Virtual Mailbox Domains | 385
SKYRiX Groupwarehttp://www.skyrix.com
Novell Linuxhttp://www.novell.com/linux
See Also• maildirmake(1)
20.15 Using Postfix’s Virtual Mailbox Domains
ProblemYou would like to host more than one domain on your Postfix server, or you want toget away from using Linux system accounts for your mail user accounts. That is,you’d like to be able to give users email accounts without having to create actualLinux accounts on your mail server. Giving out as few accounts as possible makesyour systems more secure.
SolutionUse Postfix’s virtual mailbox domains. This lets you create virtual mailboxes withouthaving to create system user accounts. Then set up your users’ logins in userdb inCourier, for either POP or IMAP.
First, add these lines to /etc/postfix/main.cf, substituting your own domain name ornames, and directories:
virtual_mailbox_domains = tuxcomputing.com test.net foober.comvirtual_mailbox_base = /var/mail/vhostsvirtual_mailbox_maps = hash:/etc/postfix/vmailboxvirtual_minimum_uid = 1000virtual_uid_maps = static:5000virtual_gid_maps = static:5000virtual_alias_maps = hash:/etc/postfix/virtual
Now edit or create /etc/postfix/vmailbox. In this file, you pair up your usernames withtheir local mail storage directories, which in this example are under /var/mail/vhosts:
[email protected] tuxcomputing.com/akkana/[email protected] tuxcomputing.com/dancer/[email protected] test.net/telsa/[email protected] test.net/telsa/[email protected] foober.com/valh/
# catch-all address for the domain- you'll be sorry,# you'll get nothing but spam and [email protected] foober.com/catchall

This is the Title of the Book, eMatter EditionCopyright © 2007 O’Reilly & Associates, Inc. All rights reserved.
386 | Chapter 20: Building a Postfix Mail Server
The trailing slashes indicate Maildirs. (Remove them to create mbox format, like inthe catchall example.) Then convert the file to a Postfix lookup table:
# postmap /etc/postfix/vmailbox
Now you need to create your users’ logins. This is done not in Postfix, but in Cou-rier. Create or edit /etc/courier/userdb. Add your new users to /etc/courier/userdb,using the following format. Be sure to insert a tab stop after the login name, and giveeach one a unique UID/GID:
telsa uid=1100gid=1100|home=/var/mail/vhosts/telsa|shell=/bin/bash|imappw=|pop3pw=
There must be no spaces anywhere on the line.
Now comes the tedious part. You need to generate a new password for each newuser, using userdbpw. This example creates md5-hashed passwords:
$ userdbpw -md5Password:Reenter password:$1$G41nVriv$GzWaLKidkoVIE2DxMxHBx1
Now copy this into /etc/courier/userdb:
telsa uid=1100gid=1100|home=/var/mail/vhosts/telsa|shell=/bin/bash|imappw=$1$G41nVriv$GzWaLKidkoVIE2DxMxHBx1|pop3pw=$1$G41nVriv$GzWaLKidkoVIE2DxMxHBx1
Don’t forget to write down your username/password pairs! When you’re finished,stop authdaemond, and convert /etc/courier/userdb file to a hashed database:
# /etc/init.d/courier-authdaemon stop# makeuserdb
Now configure Courier to use /etc/courier/userdb for authentication, in addition tosystem passwords. Do this in /etc/courier/authdaemonrc:
##NAME: authmodulelist:0## The authentication modules that are linked into# authdaemond. The# default list is installed. You may selectively# disable modules simply# by removing them from the following list. The# available modules you# can use are: authcustom authcram authuserdb authldap# authpgsql authmysql authpam
authmodulelist="authuserdb" "authpam"
Finally, restart authdaemonrc:
# /etc/init.d/courier-authdaemon start
Now your users can configure their mail clients, and you’re done.

This is the Title of the Book, eMatter EditionCopyright © 2007 O’Reilly & Associates, Inc. All rights reserved.
20.16 Creating a Mail List with couriermlm | 387
DiscussionAlways double-check filepaths, as there are some differences on the differentdistributions.
There are four possible services that you can give users access to in /etc/courier/userdb: systempw, pop3pw, esmtppw, and imappw. Only users with system accountscan use systempw. If you like, you may limit system users to mail service only byreplacing systempw with any of the other three options.
If you have many domains, you can list them in a text file, one domain per line, andpoint virtual_mailbox_domains to the file:
virtual_mailbox_domains = /etc/postfix/virtual_domains
Having Courier authenticate with both /etc/courier/userdb and /etc/passwd can reallyslow things down. You can migrate your existing users into /etc/courier/userdb tospeed up authentications. First, migrate your existing users:
# /usr/sbin/pw2userdb > oldusers.text
This dumps the contents of /etc/shadow into a text file, in the correct format for Cou-rier, like this:
carla uid=1000|gid=1000|home=/home/carla|shell=/bin/bash|systempw=$1$.Mi$1huUDUGHKJjs78475fhyXg2xtoFdm0|gecos=carla schroder,,,1000= carlawww-data uid=33|gid=33|home=/var/www|shell=/bin/sh|systempw=*|gecos=www-data33= www-datapostfix uid=102|gid=102|home=/var/spool/postfix|shell=/bin/false|systempw=!102= postfix
Take this and create or edit the file /etc/courier/userdb. Simply copy and paste theentries you want to use.
20.16 Creating a Mail List with couriermlm
ProblemYou want to set up some mail lists on your Postfix/Courier mail server.
SolutionYou’ll need couriermlm (Courier mailing list manager), dot-courier, and cron.
Users can create a list in any directory where they have write permissions. You mightwant to set up list directories for your users outside of their home directories, forexample in /var.

This is the Title of the Book, eMatter EditionCopyright © 2007 O’Reilly & Associates, Inc. All rights reserved.
388 | Chapter 20: Building a Postfix Mail Server
Run this command to create a directory for a new mailing list:
$ couriermlm create /var/lists/php_list [email protected]
This creates a directory chock-full of templates and subdirectories:
$ ls -xa php_list. ..adminrequest.tmpl archivebounces commandsconfsubj.tmpl digestsubj.tmplfetch.tmpl fetchsubj.tmplheaderadd help.tmplidxheader2html.tmpl idxheaderhtml.tmplidxheadertxt.tmpl idxsubject.tmplmodqueue modrejbody.tmplmodreject.tmpl modrejheader.tmplmodsubject.tmpl modtext.tmplmodtext2.tmpl optionssub.tmpl sub2.tmplsub3.tmpl sub4.tmplsub5.tmpl sublistsubreportfooter.tmpl subreporthdr.tmplsubreporthdr1.tmpl subreporthdr2.tmplsubreporthdr3.tmpl tmpunsub.tmpl unsub2.tmplunsub3.tmpl unsublistwarn1headers.tmpl warn1text.tmplwarn1text2.tmpl warn2msg.tmpl
Read the following template files, and edit them as necessary to suit your needs:
help.tmplThe message that Courier sends in response to help requests.
sub.tmplSubscription is a two-step process, requiring confirmation to minimize bogusand forged subscriptions. sub.tmpl is the first reponse to a subscription request.
sub.tmplThe final confirmation message, containing additional list instructions.
headeraddPut any additional mail headers you want on list messages here.
headerdelPut any mail headers you want deleted here.
If you’re running a public list and don’t want to expose subscribers’ personaladdresses to spammers, use headerdel and headeradd together:
# headerdelReply-To:From:

This is the Title of the Book, eMatter EditionCopyright © 2007 O’Reilly & Associates, Inc. All rights reserved.
20.17 Administering a couriermlm List | 389
# headeraddReply-To:[email protected]:[email protected]
Next, set up /etc/crontab to run couriermlm’s hourly and daily commands:
# m h dom mon dow user command@midnight alice couriermlm daily /var/lists/php_list@hourly alice couriermlm hourly /var/lists/php_list
Finally, create some dot-courier files to direct administrative list mails to the appro-priate user. These files go in the list manager’s home directory. In this example, [email protected] list is administered by user valorie. First, valorie creates /home/valorie/.courier-php. That tells the location of the php list:
/usr/bin/couriermlm msg /var/lists/php_list
Next is /home/valorie/.courier-php-owner:
And finally, /home/valorie/.courier-php-default:
/usr/bin/couriermlm ctlmsg /var/lists/php_list
This directs all the administrative list mail, such as subscribe/unsubscribe and helprequests, to the correct mail list.
DiscussionThe hourly and daily commands clean up any stale entries in the /var/lists/php_list/commands directory.
List users will use the following commands, in the list-command@domain format:
[email protected]@[email protected]
This is where those dot-courier files come into play, by directing these requests to theright places.
See Also• courier(8), dot-courier(5)
20.17 Administering a couriermlm List
ProblemYou need to know the basic list-maintenance commands, such as those for manuallyunsubscribing a user, viewing subscriber information, and setting list options.

This is the Title of the Book, eMatter EditionCopyright © 2007 O’Reilly & Associates, Inc. All rights reserved.
390 | Chapter 20: Building a Postfix Mail Server
SolutionThis command reference covers basic list chores.
To manually unsubscribe a user, use:
$ couriermlm unsub /var/lists/php_list [email protected]
To generate a subscriber list, use:
$ couriermlm export /var/lists/php_list > php_subscribers.txt
Use the following command to restore the subscriber list from a file, if it is ever dam-aged or lost:
$ couriermlm import php_subscribers.txt
To post a message to the whole list, use:
$ couriermlm msg /var/lists/php_list
To display a single subscriber’s record, use:
$ couriermlm info /var/lists/php_list [email protected]
This command sets the list as moderated, so that all posts must be reviewed by the listadmin before they are posted. Posts waiting for approval sit in the /var/lists/php_list/modqueue folder:
$ couriermlm set /var/lists/php_list POST=mod
The default is to allow only subscribers to post. You can open the list to the world:
$ couriermlm set /var/lists/php_list POST=all
By default, all messages are archived, and anyone can view them. This commandpurges archives after seven days and limits access to subscribers:
$ couriermlm set /var/lists/php_list PURGEARCHIVE=7 POSTARCHIVE=subscribers
This also shows how list options can be grouped into a single command.
DiscussionOnce a list is set up and running, there’s not much to do except keep an eye on yourusers. Watch for flamewars and spammers. It is good to have a list policy, with clearrules about behavior. Put this in sub2.tmpl, so that all new subscribers see it.
See Also• courier(8) and dot-courier(5), for additional commands and list options

This is the Title of the Book, eMatter EditionCopyright © 2007 O’Reilly & Associates, Inc. All rights reserved.
20.18 Squirreling Around with Webmail | 391
20.18 Squirreling Around with Webmail
ProblemYour remote users want even more freedom, and don’t want to be tied down to amail client. So you’d like to set up web access to email.
SolutionGive them Squirrelmail; then they can log in from any web browser, anywhere.
Prerequisites:
• A working IMAP server
• PHP4
• A working Apache web server
To install Squirrelmail simply copy the Squirrelmail files to your system. The usuallocation is wherever you store your other web files (e.g., /var/www/squirrelmail),though it really doesn’t matter where they go. Then run Squirrelmail’s configurationscript:
# /usr/sbin/squirrelmail-configure
This is for setting your own preferences, such as company name, color themes, andfilepaths.
Squirrelmail is simply a batch of PHP4 files, which means Apache does the real workand must be configured to support PHP4. In this example, the existing web site iswww.tuxcomputing.com, as this entry in httpd.conf shows:
### Section 2: 'Main' server configurationServerName www.tuxcomputing.comDocumentRoot /var/www
Open httpd.conf, and uncomment or create these entries:
LoadModule php4_module /usr/lib/apache/1.3/libphp4.so
# make sure index.php is included<IfModule mod_dir.c> DirectoryIndex index.html index.htm index.shtml index.cgi index.php</IfModule
AddType application/x-httpd-php .php AddType application/x-httpd-php-source .phps
Save your changes and restart Apache.
This is the Title of the Book, eMatter EditionCopyright © 2007 O’Reilly & Associates, Inc. All rights reserved.
392 | Chapter 20: Building a Postfix Mail Server
Next, create a soft link named /var/www/webmail to /usr/share/squirrelmail, or wher-ever your Squirrelmail directory is:
# ln -s /usr/share/squirrelmail /var/www/webmail
Now users can log in to their webmail at http://www.tuxcomputing.com/webmail.
DiscussionSquirrelmail is a PHP4 interface to Apache, not a standalone application. You’ll needApache knowledge.
As of this writing, there were still issues with PHP4 on Apache 2.x, so until those areresolved, Apache 1.3 is recommended.
If you want to enable http://webmail.tuxcomputing.com, instead of http://www.tuxcomputing.com/webmail, you’ll need a DNS entry pointing to it, and you’llhave to create a VirtualHost entry in httpd.conf. This example uses a name-based vir-tual host:
"NameVirtualHost *:80<VirtualHost *:80> ServerName webmail.tuxcomputing.net DocumentRoot /var/www/webmail</VirtualHost>
See Also• Local Squirrelmail documentation (/usr/share/doc/squirrelmail)
• Squirrelmail home page (http://www.squirrelmail.org)
• Chapter 22, Running an Apache Web Server
20.19 Table of SMTP Response Codes and SMTPCommands
Table 20-1 is a quick reference for the different SMTP response codes. Completeinformation about these is in RFC 2821. I recommend studying RFC 2821, as itdescribes every step of the SMTP transaction in detail. You can also see these codesin action during a telnet session, as in Recipe 20.4.
Table 20-1. Code categories
Code category Description
2xx Positive completion reply. The requested action has been successfully completed.
3xx Positive intermediate reply. Send more information.

This is the Title of the Book, eMatter EditionCopyright © 2007 O’Reilly & Associates, Inc. All rights reserved.
20.19 Table of SMTP Response Codes and SMTP Commands | 393
Table 20-2 lists the specific codes.
4xx Transient negative completion reply. The command was not accepted; please try again.
5xx Permanent negative completion reply. The command was not accepted. Go away and don’t try again.
Table 20-2. Specific codes
Code Description
211 System status or system help reply.
214 A help message for a human reader follows.
220 <domain> Service ready.
221 <domain> Service closing transmission channel.
250 Requested mail action okay, completed.
251 User not local; will forward to <forward-path>.
252 Cannot VRFY user, but will accept message and attempt delivery.
354 Start mail input; end with <CRLF>.<CRLF>.
421 <domain> Service not available, closing transmission channel.
450 Requested mail action not taken: mailbox busy or unavailable.
451 Requested action aborted: local error in processing.
452 Requested action not taken: mailbox full.
501 Syntax error, no parameters allowed.
502 Command not implemented.
503 Bad sequence of commands.
504 Command parameter not implemented.
521 <host> does not accept mail.
530 Must issue a STARTTLS command first. Encryption required for requested authentication mechanism.
534 Authentication mechanism is too weak.
538 Encryption required for requested authentication mechanism.
550 Requested action not taken: mailbox unavailable.
551 User not local; please try <forward-path>.
552 Requested mail action aborted: exceeded storage allocation.
553 Requested action not taken: mailbox name not allowed.
554 Transaction failed.
Table 20-1. Code categories (continued)
Code category Description

This is the Title of the Book, eMatter EditionCopyright © 2007 O’Reilly & Associates, Inc. All rights reserved.
394 | Chapter 20: Building a Postfix Mail Server
Table 20-3 lists the SMTP commands.
Table 20-3. SMTP commands
Command Description
HELLO (HELO) Identifies the sender-SMTP to the receiver-SMTP by hostname.
MAIL (MAIL) Identifies the sender, and begins the mail transaction.
RECIPIENT (RCPT) The name of the person to whom the message is addressed.
DATA (DATA) The message itself, containing the usual elements that you see in a mail client: From, To, Date, CC,Reply-to.
RESET (RSET) Aborts the current mail transaction. Any stored sender, recipients, and mail data are discarded, and allbuffers and state tables are cleared. The receiver must send an OK reply.
VERIFY (VRFY) Asks the receiver to confirm that the recipient has a mailbox on the system. Spammers like to exploitthis, so Postfix provides a way to disable it (Recipe 21.4).
NOOP (NOOP) Asks the receiver to send an OK response.
QUIT (QUIT) Requests that the receiver send an OK reply and then ends the transmission.

This is the Title of the Book, eMatter EditionCopyright © 2007 O’Reilly & Associates, Inc. All rights reserved.
395
Chapter 21 CHAPTER 21
Managing Spam andMalware
21.1 IntroductionSpam and malware really take the fun out of the Internet. It seems that no humaninvention, no matter how cool, is immune from being spoiled by idiots.
Malware is a general term that covers viruses, Trojan horses, worms, malicious exe-cutables on web pages, and any other kind of nasty that can infect a system from amail client or web browser. Currently, this means primarily Outlook, OutlookExpress, and Internet Explorer. Eliminating these from a Windows system goes along way toward making it less insecure.
This chapter covers adding a number of spam and virus-fighting tools to your Post-fix server: Clam Anti-Virus, SpamAssassin, DNS blackhole lists, and whitelists. Youcan mix and match to your heart’s content. Make sure you are running the latest ver-sions of everything—especially Postfix, which should be Version 2.0 or newer.
There are three ways to apply restrictions on incoming mail:
1. SMTPD restrictions
2. Header/body checks
3. Content filters
The farther down the chain you go, the more work is placed on the server. There arelimits to what can be effectively done at each level. Expect to invest a bit of time anddo some tweaking until you get it right.
Your basic strategy is:
• Protect your bandwidth.
• Protect your mail server from being overloaded.
• Protect your proxies and mail servers from being used to relay spam.
• Keep yourself from being a source of contagion.

This is the Title of the Book, eMatter EditionCopyright © 2007 O’Reilly & Associates, Inc. All rights reserved.
396 | Chapter 21: Managing Spam and Malware
The last is the most important. No one else cares how messed up your system is, aslong as you don’t become a source of contagion to the entire Internet.
It’s a ridiculous amount of effort to exert just to keep your inboxes reasonably free ofpestilence, but if you have any Windows hosts on your network, you have to do it.
Do you need to do all this if you are not running any Windows systems? You can prob-ably omit Clam Anti-Virus, though it doesn’t hurt to have it running. Linux isn’timmune from attack, though attacks via email viruses are highly unlikely. As of thiswriting, there are no significant Linux email viruses. Attacks on Linux systems usuallycome through the back door. An attacker has to find a way to gain access to the sys-tem, then gain enough privileges to commit mischief. Opening in document mode isthe Linux standard, so even if you’ve configured your mail client to associate file typeswith applications, you still can’t activate an executable directly from an email. And ifan ordinary user should activate a malicious email attachment, by saving it to a direc-tory, doing chmod +x, and then running it, it would still need root privileges to do any-thing significant. (Remember how Postfix insists that root’s mail goes to an alias?)
Furthermore, even if a Linux email virus managed to install and propagate itself andinfect other hosts, it would fizzle out pretty quickly. It simply would not find a warmwelcome, not the way Windows viruses do. Still, it never hurts to be careful. All ittakes is one evil genius to write a lethal exploit; armies of willing script kiddies willquickly take care of unleashing it on the world.
Again, taking care of the basics is fundamental:
• Use the minimum necessary privileges for the job—do not take the name of rootin vain.
• Remember that strong passwords are effective.
• Keep a tight leash on sudo users.
• Be careful with file ownerships and permissions.
See Also• Virus Library, for a comprehensive, easily searchable collection of viruses, Tro-
jan horses, worms, and so forth (http://www.viruslibrary.com)
• Security Focus, home of the BugTraq list and many more excellent resources(http://www.securityfocus.com)
• The SANS (SysAdmin, Audit, Network, Security) Institute (http://www.sans.org)

This is the Title of the Book, eMatter EditionCopyright © 2007 O’Reilly & Associates, Inc. All rights reserved.
21.2 Basic Checklist: Preparing to Build Spam Malware Defenses | 397
21.2 Basic Checklist: Preparing to BuildSpam Malware Defenses
ProblemYou administer a mixed LAN, with clients running Windows, Linux, and maybe afew other platforms as well. You’re most concerned about your Windows machines,because as much as you would like to lock them down in quarantine and deny themall network access to protect the rest of the LAN, it can’t be done. So how can youharden your LAN against email and web infection?
SolutionStart with your Windows hosts. Remove:
• Outlook
• Outlook Express
• Internet Explorer
Replace these with any of the following fine free email clients and web browsers:
• Eudora
• Pegasus
• Mozilla Mail
• Netscape Mail
• Opera Mail
• Opera web browser
• Mozilla web browser
• Netscape web browser
• Firefox web browser
You have now closed off the major malware ports of entry, and you can move on tothe next steps.
DiscussionLocking down Outlook/Outlook Express/Internet Explorer is theoretically possible,but in my estimation it’s too risky. If all you need are a mail client and a webbrowser, there are many first-rate alternatives. IE has fallen far behind other webbrowsers in functionality, so you’re not even getting a benefit for the increased risk.
This is the Title of the Book, eMatter EditionCopyright © 2007 O’Reilly & Associates, Inc. All rights reserved.
398 | Chapter 21: Managing Spam and Malware
If you need the groupware features of Outlook because you are running an MSExchange server, you might give Novell Evolution a test drive. It runs on Linux, soit’s not an option for your Windows hosts, but if you’re considering migrating somedesktops, or want to integrate your Linux users, it’s a great choice. It connects to anExchange server via the Evolution Connector, which is currently free from Novell.You’ll get all the features of Outlook and none of the vulnerabilities. See http://www.novell.com for more information.
SuSE OpenExchange is a fine candidate for a cross-platform, out-of-the box mail andgroupware server. Instead of using standalone mail clients, users can connect via awell-organized web interface, so you don’t have to worry about mail clients or clientcompatibility at all. It also supports all POP/IMAP clients, for those who cannot livewithout them. Because OpenExchange is assembled from standard free/open compo-nents, you can replicate it yourself if you have the know-how. (Chapter 20 tells howdo to some of this.)
If you want to standardize on a single web browser or mail client, look no furtherthan Mozilla. It is standards-compliant, fully featured, and runs on Windows, OS X,Linux, OS/2, Solaris, HPUX, AIX, and many more platforms.
Also, keep an eye on Novell. They appear to be serious about supporting Linux andabout developing good, enterprise-quality network integration and managementproducts.
See Also• Chapter 20, Building a Postfix Mail Server
• Securing Outlook, Part One: Initial Configuration (http://www.securityfocus.com/infocus/1648)
• Securing Outlook, Part Two: Many Choices to Make (http://www.securityfocus.com/infocus/1652)
• SuSE (http://www.suse.com/us)
• Novell Linux (http://www.novell.com/linux)
21.3 Safely Testing New UBE Controls in Postfix
ProblemYou want to try some new unsolicited bulk email (UBE) controls in Postfix, becauseyou want to reject as much noxious traffic as possible at the SMTP level, to mini-mize the load on your server. But you’re concerned about bouncing the wrong mes-sages and losing mail you want to receive.

This is the Title of the Book, eMatter EditionCopyright © 2007 O’Reilly & Associates, Inc. All rights reserved.
21.4 Basic UBE Configurations for Postfix | 399
SolutionPostfix has two ways of turning off bounces during testing: globally, and per configu-ration item. To disable rejects globally, add this line to /etc/postfix/main.cf:
soft_bounce = yes
This converts 5xx error codes to 4xx. Then you must monitor your logs to seeexactly what happens. (See Recipe 20.19 for a description of SMTP response codes.)
To configure individual configuration items, use the warn_if_reject qualifier:
smtpd_recipient_restrictions = reject_invalid_hostname, reject_non_fqdn_hostname, warn_if_reject reject_non_fqdn_sender,
Again, read your logs—Postfix will log a warning, but still deliver the message.
Always run postfix reload after making changes to main.cf.
DiscussionPostfix’s log files are must-reads for the mail admin at all times, and especially dur-ing testing.
Fending off unwanted traffic at the SMTP level is efficient, but it’s also error-prone,because there are so many misbehaving and misconfigured mail servers. The chancesare good that you’ll reject mail that you want to keep, so keep an eagle eye on thelogs so you know what’s going on. This is a quick, easily modifiable regexp to helpsearch for specific messages:
# egrep '(reject|warning|error|fatal|panic):' /var/log/maillog
See Also• RFC 2821—Simple Mail Transfer Protocol
• Postfix’s SMTPD_ACCESS_README and access(5)
• Postfix: The Definitive Guide, by Kyle D. Dent (O’Reilly)
21.4 Basic UBE Configurations for Postfix
ProblemYou want to block as much spam at the SMTP level as possible to minimize the loadon your server, so you need to know some basic checks to add to /etc/postfix/main.cf.

This is the Title of the Book, eMatter EditionCopyright © 2007 O’Reilly & Associates, Inc. All rights reserved.
400 | Chapter 21: Managing Spam and Malware
SolutionAdd these checks, or some of these checks, to /etc/postfix/main.cf:
smtpd_helo_required = yesdisable_vrfy_command = yes
smtpd_recipient_restrictions = reject_invalid_hostname, reject_non_fqdn_hostname, reject_non_fqdn_sender, reject_non_fqdn_recipient, reject_unknown_sender_domain, reject_unknown_recipient_domain, reject_unauth_pipelining, permit_mynetworks, reject_unauth_destination
Always run postfix reload after making changes to main.cf.
With the exception of the last three lines, which are safe and should always be used,you don’t have to use all of these directives. See the “Discussion” section of this rec-ipe to find out what the directives do—they are not specific to spammers, but willalso reject mail from misconfigured mail servers, which are all too common.
DiscussionThese directives are for Postfix version 2.0 and newer; the syntax for 1.x is different.It is important to keep Postfix upgraded to the latest stable version, to get securityand performance updates.
Be sure to follow Recipe 21.3 for the correct, nondestructive testing procedures.
Here’s a rundown of what the /etc/postfix/main.cf settings mean. To learn moreabout the SMTP commands and transaction sequence, read RFC 2821 and Recipe20.19.
smtpd_helo_required = yesRequire the client to send the HELO or EHLO command before sending theMAIL FROM or ETRN command. Many spammers play dumb tricks withHELO, so this will get rid of them.
disable_vrfy_command = yesDo not allow remote servers to verify local addresses. Only spammers care aboutthis.
smtpd_recipient_restrictions =This operates on the RCPT TO command. By default, Postfix delays all rejectactions until after RCPT TO, so for the sake of simplicity and clarity, you canput most of your UBE controls here. Postfix makes these checks, in order:

This is the Title of the Book, eMatter EditionCopyright © 2007 O’Reilly & Associates, Inc. All rights reserved.
21.4 Basic UBE Configurations for Postfix | 401
• smtpd_client_restrictions
• smtpd_helo_restrictions
• smtpd_sender_restrictions
• smtpd_recipient_restrictions
• smtpd_data_restrictions
Not surprisingly, these checks follow the order of SMTP transactions.
reject_invalid_hostnameReject when the client HELO/EHLO uses improper hostname syntax. Spam-mers often play tricks with HELO/EHLO.
reject_non_fqdn_hostnameReject when the fully-qualified domain name is not used. Spammers often use“localhost” or a fake IP address in place of the FQDN.
reject_non_fqdn_senderReject when the sender’s domain in MAIL FROM is not in FQDN form.
reject_non_fqdn_recipientReject when the address in the client RCPT TO command is not in FQDN form.
reject_unknown_sender_domainReject when the sender’s mail address has no DNS A or MX record; it’s proba-bly a fake.
reject_unknown_recipient_domainReject when the recipient mail address has no DNS A or MX record; it’s proba-bly a fake.
reject_unauth_pipeliningFoil spammers who would use pipelining to speed delivery of their garbage(especially dictionary attacks).
permit_mynetworksPermit when the client address matches any network listed in $mynetworks.
reject_unauth_destinationReject unless the recipient is in your domain. This is determined by checkingthat one of the following is true:
• RCPT TO matches $relay_domains or a subdomain
• RCPT TO matches $mydestination, $inet_interfaces, $proxy_interfaces,$virtual_alias_domains, or $virtual_mailbox_domains. This prevents somespoofing and all unauthorized relaying.
Running a mail server is a complex, tricky affair, and not all mail admins are as welltrained as they should be. Because it is common for mail servers to be misconfig-ured, and because Postfix can’t tell the difference between misconfigured servers andspammers, you may find that trying to implement UBE controls at this level is moretrouble than it’s worth.

This is the Title of the Book, eMatter EditionCopyright © 2007 O’Reilly & Associates, Inc. All rights reserved.
402 | Chapter 21: Managing Spam and Malware
See Also• RFC 2821, for a complete description of SMTP commands and codes
• Recipe 20.19, “Table of SMTP Response Codes and SMTP Commands”
• Recipe 21.3, “Safely Testing New UBE Controls in Postfix”
• “Postfix Configuration—UCE Controls” (http://www.postfix.org/uce.html)
• Postfix’s SMTPD_ACCESS_README and access(5)
• Chapter 11 of Postfix: The Definitive Guide
21.5 Creating Whitelists
ProblemBecause you are setting up all kinds of mail filtering and virus-scanning measures,you are worried about losing wanted mail. How can you make sure wanted mes-sages get through?
SolutionPostfix handles this with map files and the smtpd_sender_restriction directive in /etc/postfix/main.cf.
Put your wanted addresses in a plain text file, one per line, like this:
[email protected] [email protected] [email protected] OKwanteddomain.com OK.wanteddomain.com OKmychum@ OK
In this example, the text file is named /etc/postfix/whitelist. Now convert it to a nicefast indexed binary database file:
# postmap /etc/postfix/whitelist
Then add this line to /etc/postfix/main.cf:
smtpd_sender_restriction = check_sender_access hash:/etc/postfix/whitelist
Postfix supports three different database formats. To find out which one your sys-tem is using, do the following
$ postconf | grep database_typedefault_database_type = hash

This is the Title of the Book, eMatter EditionCopyright © 2007 O’Reilly & Associates, Inc. All rights reserved.
21.6 Using DNS Blackhole Lists | 403
DiscussionPostfix’s database files can be in one of three formats: hash, btree, or dbm. hash andbtree have .db extensions. dbm is split into two files, .pag and .dir. hash is usually theLinux default.
Setting up whitelists of important addresses is the first thing you should do whenyou’re setting up any kind of mail filtering. This is an efficient method for ensuringthat mail from people or domains that you want to receive mail from will getthrough.
The format of your whitelist is based on the /etc/postfix/access file. The check_sender_access directive compares the whitelist to the MAIL FROM command during theSMTP transaction (this command, of course, can be spoofed, but it’s still a usefulcheck). The example in this recipe demonstrates three types of address selection:
Everything from one user at one [email protected]
Everything from a single domainwanteddomain.com
Everything from a domain, including subdomains (note the leading dot).wanteddomain.com
Everything from a single user, from any domainmychum@
OK means accept the message.
See Also• RFC 2821, for a complete description of SMTP commands and codes
• Recipe 20.19, “Table of SMTP Response Codes and SMTP Commands”
• Postfix’s SMTPD_ACCESS_README and access(5)
• Chapter 11 of Postfix: The Definitive Guide
21.6 Using DNS Blackhole Lists
ProblemYou’re going nuts, because it seems like all the mail you receive from a certain ser-vice provider, or even an entire country, is nothing but spam. You have goodwhitelists in place, and you want to discard this garbage while wasting as few systemresources as possible.

This is the Title of the Book, eMatter EditionCopyright © 2007 O’Reilly & Associates, Inc. All rights reserved.
404 | Chapter 21: Managing Spam and Malware
SolutionPostfix makes it easy. Simply list your selected DNSRBLs (DNS blackhole lists) inmain.cf, under the smtpd_recipient_restrictions directive:
smtpd_recipient_restrictions =..... reject_rbl_client relays.ordb.org, reject_rbl_client list.dsbl.org, reject_rbl_client sbl.spamhaus.org
Make them the very last entries in smtpd_recipient_restrictions, if there are otherentries. smtpd_recipient_restrictions entries are processed in order, so you want yourwhitelists and other checks to operate first, to make sure wanted mail gets through.
DiscussionSelecting a DNSRBL is a process on which you should spend a bit of time. Read theirpolicies, and check out their user forums. Everyone has different criteria for listingand de-listing offenders. The Open Relay Database (http://www.ordb.org) is reliable,though spammers do not exploit open relays now as much as they used to. Spam-haus and Spamcop are fairly conservative; SPEWS (Spam Prevention Early WarningSystem) is the most hard-core and unforgiving. There are many others; start yourresearch with these three, and do a bit of Googling to find more. You won’t block allspam with blocklists, they’re just one tool in your kit.
The good part about DNSRBLs is that discarding traffic at the SMTP level places theleast load on your server. Spam floods have crashed many a server, or acted asdenial-of-service attacks. Heading ’em off at the pass conserves your bandwidth andsystem resources. The bad part is that it’s Draconian—you will lose legitimate mail.
Here’s a quick lesson in how DNSRBLs work. Depending on the criteria establishedby the DNSRBL maintainer, individual IP addresses or entire netblocks are added tothe blocklist. The idea is not to simply block traffic from spammers, because it isimpossible to block only spammers at the IP level. (It’s impossible to block onlyspammers at any level.) Spammers buy entire blocks of IP addresses, then shift theiroperations from one netblock to another, leading you in a frustrating game of“whack a mole.” There are two goals: to block unwanted traffic, and to put pressureon the service providers to get rid of the spammers. Blocklists are effective in bothrespects. If it were not for blocklists, spam would be even worse than it is now, ifthat’s conceivable.
Unfortunately, the effectiveness of DNSRBLs has been diluted by the proliferation ofcompromised Windows PCs. This has created a huge, distributed pool of spam-spewing proxies, so it’s harder to block spammers at any level.

This is the Title of the Book, eMatter EditionCopyright © 2007 O’Reilly & Associates, Inc. All rights reserved.
21.7 Rejecting Messages with Attachments | 405
If you expect to receive mail from strangers—for example, you have contact informa-tion on your web site for potential customers—don’t use blocklists. You’re better offrelying on SpamAssassin (see Recipes 21.9 and 21.10).
Spammers and service providers who are affected by DNSRBLs scream bloody mur-der, calling it an infringement of their free speech rights and all sorts of other non-sense. However, it’s your server and your rules, and they have no right to trespass.
See Also• Postfix’s SMTPD_ACCESS_README and access(5)
• The Spamhaus Project (http://www.spamhaus.org)
• SPEWS (http://spews.org)
• spamcop (http://www.spamcop.net)
• Open Relay Database (http://www.ordb.org)
21.7 Rejecting Messages with Attachments
ProblemYou want to block messages with certain attachments at the SMTP level.
SolutionUse Postfix’s mime_header_checks, using the following regexp:
# this must be one unbroken line/filename=\"?(.*)\.(bat|cmd|com|dot|exe|hta|scr|pif|vbe|vbs)\"?$/REJECT keep your malware off my network# this must be one unbroken line/^\s*Content-(Disposition|Type).*name\s*=\s*"?(.+\.(asd|hlp|ocx|reg|bat|c[ho]m|cmd|exe|vxd|pif|scr|hta|jse?|sh[mbs]|vb[esx]|ws[fh]|))"?\s*$/ REJECT Attachments that contain or end in "$3" are prohibited on this server."$2" is the name of the rejected file
Put this in a file and call it /etc/postfix/mime_header_checks.
Then add it to main.cf:
mime_header_checks = regexp:/etc/postfix/mime_header_checks
Remember to run postfix reload after changing main.cf.
Edit the list of file types to suit your own needs. The list in the example does notinclude any MS Office document file formats, such as .xls, .xlk, .doc, .wdb, .wri, .wrs,.ppt, and so forth; you may wish to add some of these.

This is the Title of the Book, eMatter EditionCopyright © 2007 O’Reilly & Associates, Inc. All rights reserved.
406 | Chapter 21: Managing Spam and Malware
DiscussionYou can, with one simple regexp, reject all messages with attachments:
/filename=\"/ REJECT all messages with attachments are rejected
Just keep in mind that this will also reject messages with Vcards, messages with GPGsignatures that are attached rather than inline, HTML messages that attach images asseparate files, and Outlook/Outlook Express messages that use MS-TNEF (MS-TNEF is useless to anyone not running Outlook/Outlook Express, because it’s a pro-prietary rich-text format that no one else can read). Keep in mind that even if youdon’t care about rejecting all these things, the senders will not know that their mes-sages were rejected, unless they read their mail logs.
Why list only Microsoft file types? That’s up to you—you can list anything youwant. Certainly, Windows is the hands-down winner at extending a warm, friendlywelcome to malware via email.
See Also• Postfix’s SMTPD_ACCESS_README, and access (5)
• Chapter 11 of Postfix: The Definitive Guide
• Microsoft Knowledge Base Article, 291369, for Microsoft’s own “Unsafe File List”
• Appendix C, Microsoft File Types
21.8 Setting Up Clam Anti-Virus on a PostfixServer
ProblemYou want a good anti-virus scanner on your Postfix mail server, to automaticallyscan all incoming mail and to reject infected mail.
SolutionUse Clam Anti-Virus and Amavisd-new on your Postfix server. Amavisd-new is a Perlwrapper that acts as an SMTP proxy, to manage the message flow between Clam AVand Postfix. Clam AV cannot directly scan incoming emails by itself.
Note that this is a radical departure from the previous recipes that describe how toset up UBE controls and whitelists in Postfix. All of that will now be handled byAmavsid-new, not Postfix.
RPM users need clamav and amavisd-new. Debian users need amavisd-new, clamav,clamav-base, clamav-daemon, and clamav-freshclam.

This is the Title of the Book, eMatter EditionCopyright © 2007 O’Reilly & Associates, Inc. All rights reserved.
21.8 Setting Up Clam Anti-Virus on a Postfix Server | 407
Back up your configuration files before making any changes. Then set up Amavisd-new. Create /var/log/amavis.log, and assign ownership to the “amavis” user andgroup, which should have been created by the package manager.
Next, edit /etc/amavis/amavisd.conf. In Section 1, set $mydomain and $myhostnameto your own values, and uncomment the following lines:
$forward_method = 'smtp:127.0.0.1:10025'; # where to forward checked mail$notify_method = $forward_method; # where to submit notifications
Disable virus quarantines in Section IV, because virus-infested messages will berejected at the SMTP level. There’s no point in saving them, as the vast majority areautogenerated with forged return addresses:
$QUARANTINEDIR = undef;$virus_quarantine_to = undef;
Also in Section IV, disable all auto-notifications to senders. Most return addressesare forged; it’s pointless to send out “Hey, you sent me a virus!” notices. This rejectsvirus-infested messages without notification of any kind:
$final_virus_destiny = D_DISCARD; # (defaults to D_BOUNCE)
Next, find Section VII and uncomment the Clam AV section. Comment out all virusscanners you are not using:
### http://www.clamav.net/['Clam Antivirus-clamd', \&ask_daemon, ["CONTSCAN { }\n", "/var/run/clamav/clamd.ctl"], qr/\bOK$/, qr/\bFOUND$/, qr/^.*?: (?!Infected Archive)(.*) FOUND$/ ],
Now make sure Amavisd-new is stopped, and check the configuration with the built-in debugger:
# /etc/init.d/amavis stop# amavis debug
This spits out a configuration summary; all you need to worry about are error mes-sages. Next, start it back up and connect with telnet to confirm that Amavisd-new isrunning:
# /etc/init.d/amavis start$ telnet 127.0.0.1 10024Trying 127.0.0.1...Connected to 127.0.0.1.Escape character is '^]'.220 [127.0.0.1] ESMTP amavisd-new service ready
Amvisd-new is running, so quit telnet:
^]telnet> quitConnection closed.

This is the Title of the Book, eMatter EditionCopyright © 2007 O’Reilly & Associates, Inc. All rights reserved.
408 | Chapter 21: Managing Spam and Malware
Next, configure Postfix to use Amavisd-new, which will now function as an SMTPproxy server. Add this to the end of /etc/postfix/master.cf:
smtp-amavis unix - - n - 2 smtp -o smtp_data_done_timeout=1200 -o disable_dns_lookups=yes127.0.0.1:10025 inet n - n - - smtpd -o content_filter= -o receive_override_options=no_unknown_recipient_checks,no_header_body_checks -o local_recipient_maps= -o relay_recipient_maps= -o smtpd_restriction_classes= -o smtpd_client_restrictions= -o smtpd_helo_restrictions= -o smtpd_sender_restrictions= -o smtpd_recipient_restrictions=permit_mynetworks,reject -o mynetworks=127.0.0.0/8 -o smtpd_authorized_xforward_hosts=127.0.0.0/8 -o strict_rfc821_envelopes=yes
Then add this line to /etc/postfix/main.cf:
content_filter = smtp-amavis:[127.0.0.1]:10024
And do a complete stop/start cycle for Postfix:
# /etc/init.d/postfix stop# /etc/init.d/postfix start
The final step is to make the “amavis” user the owner of Clam AV. It won’t workotherwise. First, open /etc/clamav/clamav.conf and /etc/amavis/amavisd.conf, andmake sure that amavisd.conf references the “LocalSocket” file:
## /etc/clamav/clamav.confLocalSocket /var/run/clamav/clamd.ctl
## /etc/amavis/amavisd.conf### http://www.clamav.net/['Clam Antivirus-clamd', \&ask_daemon, ["CONTSCAN { }\n", "/var/run/clamav/clamd.ctl"], qr/\bOK$/, qr/\bFOUND$/, qr/^.*?: (?!Infected Archive)(.*) FOUND$/ ],
Now you must make the “amavis” user the owner of all directories that Clam AVuses. In this example, that is:
• LogFile /var/log/clamav/clamav.log
• PidFile /var/run/clamav/clamd.pid
• DatabaseDirectory /var/lib/clamav/
For example:
# chown -R amavis:amavis /var/log/clamav/

This is the Title of the Book, eMatter EditionCopyright © 2007 O’Reilly & Associates, Inc. All rights reserved.
21.8 Setting Up Clam Anti-Virus on a Postfix Server | 409
Be careful! Only change directories that belong only to Clam AV; any files in shareddirectories must be changed individually. Now open /etc/clamav/freshclam.conf, anddo the same with any directories listed there. Finally, hunt down any files belongingto Clam AV in /etc/logrotate.d/. For example:
• /etc/logrotate.d/clamav-daemon
• /etc/logrotate.d/clamav-freshclam
The filenames may vary. Inside each file, find this line:
create 640 clamav adm
Change it to:
create 640 clamav amavis
Save your changes, and restart both clamd and freshclam. On Debian, use:
# /etc/init.d/clamav-daemon reload# /etc/init.d/clamav-freshclam reload
On Red Hat and Fedora, use:
# /etc/init.d/clamd reload# /etc/init.d/freshclam reload
And you’re done. Now you can start sending test messages and watching your logs.
DiscussionYou’ll save yourself a lot of work if you install from packages, rather than sources. Ifyou must install from sources, read all the documentation. You’ll have to manuallycreate all kinds of users, directories, and init scripts.
The -o content_filter= and -o smtpd_xxx_restrictions= directives in master.cf overridethe directives in /etc/postfix/main.cf. You do not want duplications, because they willeither waste system resources or create loops—and Clam AV, together with Spam-Assassin, will do a better, less error-prone job of filtering mail than the Postfix UBEchecks described in the previous recipes.
The two Clam AV components of greatest interest are clamd, the scanning daemon,and freshclam, which automatically fetches virus definition updates. These are con-figured in /etc/clamav/clamav.conf and /etc/clamav/freshclam.conf, respectively. Thedefaults should be fine, there really isn’t much to tweak, except that you should finda different update mirror for freshclam.conf, at http://www.clamav.net/mirrors.html.Be kind—don’t use the default mirror.

This is the Title of the Book, eMatter EditionCopyright © 2007 O’Reilly & Associates, Inc. All rights reserved.
410 | Chapter 21: Managing Spam and Malware
See Also• The Postfix FILTER_README, which describes how mail is moved between
Postfix and Amavisd-new in detail
• Local Amavisd-new documentation (/usr/share/doc/amavisd-new, amavisd-new(8), and /usr/share/doc/amavisd-new/README.postfix)
• Local Clam AV documentation (/usr/share/doc/clamav)
• Clam Anti-Virus (http://www.clamav.net)
• Amavisd-new (http://www.ijs.si/software/amavisd)
21.9 Setting Up SpamAssassin on Postfixwith Amavisd-new
ProblemYou know that UBE checks at the SMTP level, while useful and efficient, are limited,and you want something smart enough to shoot down spam without requiring a lotof monitoring and tweaking. It needs to integrate into your existing Postfix/Amavisd-new/Clam AV setup.
SolutionSpamAssassin is just what you want. Because this is going onto a system runningAmavisd-new, which acts as an SMTP proxy, you install SpamAssassin, then config-ure it in /etc/amavis/amavisd.conf. You won’t use /etc/SpamAssassin/local.cf.
To get started, install SpamAssassin, then edit /etc/amavis/amavisd.conf. In Section 1,comment out:
@bypass_spam_checks_acl = qw( . );
Section IV tells Amavisd-new what to do with messages marked as spam. This set-ting delivers them to the recipients:
$final_spam_destiny = D_PASS; # (defaults to D_REJECT)
This setting drops them at the server, with no notice to the sender:
$final_spam_destiny = D_DISCARD; # (defaults to D_REJECT)
Section VII configures SpamAssassin:
$sa_tag_level_deflt = -999; # add spam info headers if at, or above that level$sa_tag2_level_deflt = 5.0; # add 'spam detected' headers at that level$sa_kill_level_deflt = -999; # triggers spam evasive actions

This is the Title of the Book, eMatter EditionCopyright © 2007 O’Reilly & Associates, Inc. All rights reserved.
21.9 Setting Up SpamAssassin on Postfix with Amavisd-new | 411
# string to prepend to Subject header field when message exceeds tag2 level$sa_spam_subject_tag = '***SPAM*** ';
And finally, the “amavis” user must own SpamAssassin files:
# chown -R amavis:amavis /usr/share/spamassassin
DiscussionThe question of whether to drop spam at the server or pass it on to users is up toyou. If you allow delivery, users can easily set up filters in their mail clients to routethe spam to wherever they want to put it, filtering on the “***SPAM***” subject line.
A third option is to reject the spam, and also send a 5xx nondelivery message:
$final_spam_destiny = D_REJECT
This is the correct behavior for an MTA, but I don’t see any point in wasting band-width on SMTP messages to fake addresses just to adhere to protocol.
The fourth, and absolute worst, option is to bounce the spam. Since the vast major-ity of spammers use fake return addresses, and any tiny fraction who use honestreturn addresses won’t care, all this does is waste bandwidth and clog the Internetuselessly.
Postfix accepts mail on port 25, then forwards it to 127.0.0.1:10024 where Amavisd-new is listening. Amavisd-new puts SpamAssassin and Clam AV through their paces,then hands the mail back to the Postfix instance running on 127.0.0.1:10025. The sec-ond Postfix instance reinjects mail into the queue without any further interference.
If you miss your Postfix whitelists, which were overridden when Amavisd-new wasinstalled (see Recipe 21.8), you can reimplement them in /etc/amavis/amavisd.conf(Section V: Per-recipient and per-sender handling, whitelisting). However, I suggestgiving SpamAssassin and Clam AV a good test drive before adding more controls.Most likely they will do the best job, with the lowest error rate.
See Also• The SpamAssassin Wiki (http://wiki.apache.org/spamassassin/FrontPage), for
howtos and help
• Local Amavisd-new documentation (/usr/share/doc/amavisd-new, amavisd-new(8),and /usr/share/doc/amavisd-new/README.postfix)
This is the Title of the Book, eMatter EditionCopyright © 2007 O’Reilly & Associates, Inc. All rights reserved.
412 | Chapter 21: Managing Spam and Malware
21.10 Setting Up SpamAssassin WithoutAmavisd-new
ProblemYou’re not using Amavisd-new, so how can you use SpamAssassin with Postfix?
SolutionUse Courier-Maildrop to pass traffic between Postfix and SpamAssassin. Afterinstalling Courier-Maildrop, edit or create /etc/maildroprc, adding these lines:
if ( $SIZE < 26144 ){ exception { xfilter "/usr/bin/SpamAssassin" }}
if (/^X-Spam-Flag: *YES/){ exception { to "$HOME/Maildir/.junkmail/" }}else{ exception { to "$HOME/Maildir/" }}
The .junkmail folder, or whatever you want to call it, must already exist. $SIZE <26144 specifies a minimum message size to send to SpamAssassin; you can tweakthis to suit your needs.
Then add this line to /etc/postfix/main.cf, to tell Postfix to use Maildrop for deliveryto Linux system accounts:
mailbox_command = /usr/bin/maildrop -d ${USER}
Run postfix reload, and you’re finished.
The default SpamAssassin configuration is a good starting point; run it for a whilewithout changing anything. See the “Discussion” section of this recipe for a sampleconfiguration and explanations of the options.

This is the Title of the Book, eMatter EditionCopyright © 2007 O’Reilly & Associates, Inc. All rights reserved.
21.10 Setting Up SpamAssassin Without Amavisd-new | 413
DiscussionIf you’re hosting virtual domains on your Postfix server, don’t use the mailbox_commanddirective. Instead, add these lines to main.cf:
maildrop_destination_recipient_limit = 1virtual_transport = maildrop
Then add the following lines to /etc/master.cf:
maildrop unix - n n - - pipe flags=DRhu user=vhosts argv=/usr/bin/maildrop -d ${recipient}
There’s a tricky bit here, in user=vhosts. Maildrop must run as the same user thatowns the virtual mailboxes, which should be a unique user created just for the job. Itmust not be the “nobody,” “postfix,” or root user. (See Recipe 20.15.)
Restart Postfix, and you’re done.
Configuring SpamAssassin is pretty simple. The global configuration file is /etc/spamassassin/local.cf. Here is a sample configuration:
required_hits 8.0rewrite_subject 1use_terse_report 1report_safe 0skip_rbl_checks 0use_bayes 1auto_learn 1
Here’s a rundown of what the above options mean:
required_hits 8.0The higher the number, the fewer messages SpamAssassin will mark as spam.You can adjust this up or down as you get SpamAssassin trained.
rewrite_subject 1Adds “*****SPAM*****” to the subject line.
use_terse_report 1Use a shorter report format.
report_safe 0Adds SpamAssassin reports to the message headers, without altering the rest ofthe message. Set this to 2 if you have any Windows clients. Level 2 converts themessages to an attachment or type text/plain, which adds a level of protection.
skip_rbl_checks 0By default, SpamAssassin checks DNSRBLs; this setting turns them on. Set thisto 1 to turn them off if you are doing DNSRBL checks somewhere else.

This is the Title of the Book, eMatter EditionCopyright © 2007 O’Reilly & Associates, Inc. All rights reserved.
414 | Chapter 21: Managing Spam and Malware
use_bayes 1Use the built-in Bayes classifier. You definitely want this enabled; it is whatmakes SpamAssassin so smart.
auto_learn 1Feed high-scoring mails to the Bayes classifier.
Complete options are spelled out in perldoc Mail::SpamAssassin::Conf. That’s a com-mand, if you’re not familiar with Perldocs:
$ perldoc Mail::SpamAssassin::Conf
Perldocs are also available online and in man page format.
See Also• Postfix’s MAILDROP_README
• Mail::SpamAssassin::Conf(3)
• maildrop(1)

This is the Title of the Book, eMatter EditionCopyright © 2007 O’Reilly & Associates, Inc. All rights reserved.
415
Chapter 22 CHAPTER 22
Running an ApacheWeb Server
22.1 IntroductionThis chapter covers Apache 2.0. Apache 1.3 is the most widely used HTTP server inthe world; it’s dependable, robust, and extremely well documented. In fact, it’s sowell documented you don’t need me to rehash the same old stuff. Apache 2.0 is a sig-nificant upgrade from 1.3; architecturally, there are many changes and improve-ments, and it’s a bit easier to configure than 1.3. This chapter covers compilingApache from sources; hosting multiple domains; serving up pages in different lan-guages with Content Negotiation; using dynamic shared objects (DSOs), which areanalogous to loadable kernel modules; and various other Apache tasks.
This chapter does not cover scripting or writing web applications. Those are largetopics that are well taught by fine books such as these (all published by O’Reilly):
Apache Cookbook, by Ken Coar and Rich BowenApache: The Definitive Guide, Third Edition, by Ben Laurie and Peter LaurieJava Servlet and JSP Cookbook, by Bruce W. PerryJavaServer Faces, by Hans BergstenPerl Cookbook, Second Edition, by Tom Christiansen and Nathan TorkingtonPHP Cookbook, by David Sklar and Adam TrachtenbergTomcat: The Definitive Guide, by Jason Brittain and Ian F. DarwinUpgrading to PHP 5, by Adam TrachtenbergWeb Database Applications with PHP and MySQL, Second Edition, by Hugh E.Williams and David Lane
When you’re planning to build a web site, the first decision is what operating systemto run it on. Apache runs on Windows, Unix, OS/2, and even BeOS. Since this is aLinux book, let’s assume you’ll run Apache on Linux. Your remaining decisions are alittle harder:
• Use Apache 1.3, or Apache 2.x?
• Install from sources or packages?
• Self-host, or use a service provider?

This is the Title of the Book, eMatter EditionCopyright © 2007 O’Reilly & Associates, Inc. All rights reserved.
416 | Chapter 22: Running an Apache Web Server
Use Apache 1.3, or Apache 2.x?This is one of those “too many good choices” scenarios. Apache 1.3 is rock solid,well supported, and over-abundantly documented—a rare luxury in computing. It’salso endlessly extensible and customizable via add-on modules. “If it ain’t broke,don’t fix it” is still a good maxim, especially in computing.
On the other hand, Apache 2 is a significant departure from the architecture of Apache1.3. It’s faster, it’s more efficient, and it scales up a lot better than 1.3. The downside isthat 1.3 modules don’t work with 2.0 without being recompiled or, in some cases,rewritten. The good news is that it’s been around long enough to have a sizable num-ber of useful modules available and ready to go to work. And it’s only going to get bet-ter, as more developer energy is directed toward 2.0 and less toward 1.3.
Currently, the major remaining problem module is PHP. The maintainers of PHPwarn you to not use PHP and Apache 2.0 on a production system, but by the timeyou read this, PHP 5 should be production-ready. Why should you care about PHP?If you plan to serve only static pages, you don’t need it. However, if you want to gen-erate dynamic content and build web applications, it’s a good alternative to Perl, as itis a scripting language invented especially for web development. Learn all about it athttp://us3.php.net or in Apache: The Definitive Guide.
Apache 2.0 differencesThe most interesting changes to Apache 2.0 are its new multithreading architecture,which is configured using multiprocessing modules (MPMs), and a simplified config-uration file. Most of the confusing and redundant directives have been removed fromhttpd.conf, so it’s a lot easier to understand.
The default MPM is “Prefork.” If you wish to try one of the others, you need to selectit at compile time. These are the three MPM modes for Linux:
Prefork: The 1.3 modelA single parent process spawns child processes to handle requests. Spare chil-dren are kept sitting around just in case. Excess children are killed off after a pre-scribed length of time. (This is what the docs say. Really.) This is the 1.3 way ofdoing things. It permits using thread-unsafe libraries, so you can still use oldmodules that don’t support multithreading.
Worker: Hybrid multiprocess and multithreadsThis is a hybrid multiprocess multithreaded server. It uses threads to serverequests, and because threads use fewer system resources than processes, it canhandle a larger workload. Yet it retains much of the stability of a process-basedserver by keeping available multiple processes, each with many threads. Becausethreads share memory space, programs must be written to be “thread-safe.”

This is the Title of the Book, eMatter EditionCopyright © 2007 O’Reilly & Associates, Inc. All rights reserved.
22.1 Introduction | 417
PerChildA fixed number of processes spawn varying numbers of threads. This is the mostscalable option. Most radically, it allows daemon processes serving requests tobe assigned a variety of different user IDs, which presents some interesting possi-bilities for secure, high-performance virtual hosting. It is also the trickiestoption. If you are an ace programmer, Apache invites you to participate in test-ing and developing this module.
Prefork is the default, but users running high-demand servers might be interested intesting the Worker MPM. See http://httpd.apache.org/docs-2.0/mod/worker.html tolearn how to implement the Worker MPM.
There are also platform-specific MPMs. If you are running Apache on one of these,be sure to select the appropriate MPM for the operating system:
BeOSbeos
Netwarempm_netware
OS/2mpmt_os2
Windowsmpm_winnt
Install from Sources or Packages?Installing from packages is quickest, if you don’t mind being stuck with whatever thepackage maintainer decides you should have. But it is not the easiest option—all thedifferent distributions use different filenames and package names, so the Apachedocumentation doesn’t make sense until you figure out the differences.
Installing from sources is a bit more work: you need to manually create a startupscript, create an Apache owner and group, and set all of your compile-time options,including file locations. However, you have precise control over what goes in and,equally important, what is left out. And with Apache 2.0, it’s no longer necessary torecompile the binary when you wish to add or remove a module. A new feature isDynamic Shared Objects (DSO), which are analogous to loadable kernel modules.Simply add or remove the modules as you need, without touching the httpd binary.
Self-Host or Use a Service Provider?There are quite a number of hosting options to choose from. First, you can host yourweb server on a physically local machine, such as a machine in your home or office.This option offers convenience and control—if anything goes wrong, you’re rightthere to deal with it. On the other hand, maintenance, security, and service are all up

This is the Title of the Book, eMatter EditionCopyright © 2007 O’Reilly & Associates, Inc. All rights reserved.
418 | Chapter 22: Running an Apache Web Server
to you. And if your Internet connection goes down, there is no one but you to call upyour upstream provider and nag them to fix it. The biggest downside is that band-width is expensive.
Another option is to use a commercial web-hosting service, where you pay a monthlyfee for a certain amount of storage, bandwidth, and features on a shared server. Thiscan be a nice option, if you find a quality web host. Typically, you get rafts of fea-tures: webmail, FTP, MySQL, PHP, CGI, Perl, POP/IMAP, SpamAssassin, streamingmedia, forum software, and more. If you plan to host more than one web site, lookat CPanel reseller plans. CPanel is a web-based administration tool that is especiallygood for managing multiple sites. Shop carefully—the world is full of folks who getinto the business without any idea of what they are getting into. Check out the WebHosting Talk forums at http://www.webhostingtalk.com to learn about who’s goodand who’s scammy. Don’t go for the cheapest hosts—you can get good deals, butyou generally get what you pay for. There is no such thing as “unlimited band-width,” or any such nonsense.
The next option is to lease hardware and connectivity in a commercial data centerand to install and maintain all the software yourself. You should see some cost sav-ings for bandwidth, since you’ll be on a shared line. A good facility will have backuppower, redundant Internet connectivity, and good physical security. They will alsomonitor customers’ bandwidth and server usage, and keep a tight rein on hogs andservice abusers.
A shared server costs the least, but the disadvantages are obvious: you might not geta shell account, which means administration via a clunky web interface; and all ittakes is one dunce customer to goof up the entire box by running system-hoggingscripts or getting compromised. However, in a well-run data center, this can be acost-effective solution. Look for a service provider offering User-Mode Linux (UML)hosting; this quite effectively isolates the different users from each other, and every-one gets shell accounts.
A leased, dedicated server is usually expensive, but if the lease cost includes on-siteadministration, it can be a good deal. Hardware maintenance is the responsibility ofthe data center, which may be a real hassle-saver for you.
If you want a dedicated server and don’t want to share with other customers, usuallythe most cost-effective plan is to buy your own machine and rent rack space. Manydata centers offer on-site administration and hardware support on an as-needed basis.
Beware of weirdo bandwidth billing methods. Be very clear up front how you will becharged for your bandwidth usage. One common dodge is to play games with aggre-gate usage: you think you’re getting 1 gigabyte of data transfer per month, but theprovider might have sneaky daily or even hourly “burst” limits, and penalties forexceeding them. Another dodge is vague service-level agreements. These shouldspecify a guaranteed uptime and how quickly they will respond to an error ticket.

This is the Title of the Book, eMatter EditionCopyright © 2007 O’Reilly & Associates, Inc. All rights reserved.
22.2 Installing Apache 2.0 from Sources | 419
Make sure you have a written agreement that explicitly spells out every little thing,and if there is anything you don’t understand, don’t sign until they clarify it to yoursatisfaction.
Keep in mind that the more you want, the more it will cost—there are no free rides,and definitely be suspicious of too-good-to-be-true deals.
22.2 Installing Apache 2.0 from Sources
ProblemYou want to install Apache 2.0 from sources, so that you can customize it exactly theway you want. That means you need to know the configure options, and what mod-ules are available. You also want to take advantage of DSOs (Dynamic SharedObjects), so you can add or remove modules later without having to recompile thehttpd binary.
SolutionApache 2.0 installs via the usual configure-make-make install routine. However, ithas a large of number of compile-time options, so you’ll spend some time selectingthe ones you want. You’ll also need to know the defaults. The configuration belowshows a typical installation.
First, download and unpack the Apache tarball. (The current stable version ishttpd-2.0.50.)
Next, make a list of all the files on your system:
# find / | grep -v -e ^/proc/ -e ^/tmp/ -e ^/dev/ > apache2-preinstall.list
You’ll also make a post-install list, so you can diff the two lists and see exactly whatfiles Apache installed.
Change to the directory where you unpacked the tarball, and display all the configu-ration options:
# ./configure --help | less
The default is to put everything in /usr/local/apache2. This configuration puts thingsin more standard locations, and modifies the default modules slightly:
#./configure --prefix=/etc/httpd \--exec-prefix=/usr \--bindir=/usr/bin \--sbindir=/usr/sbin \--mandir=/usr/share/man \--sysconfdir=/etc/httpd/conf \--includedir=/usr/include/httpd \--libexecdir=/usr/lib/httpd/modules \
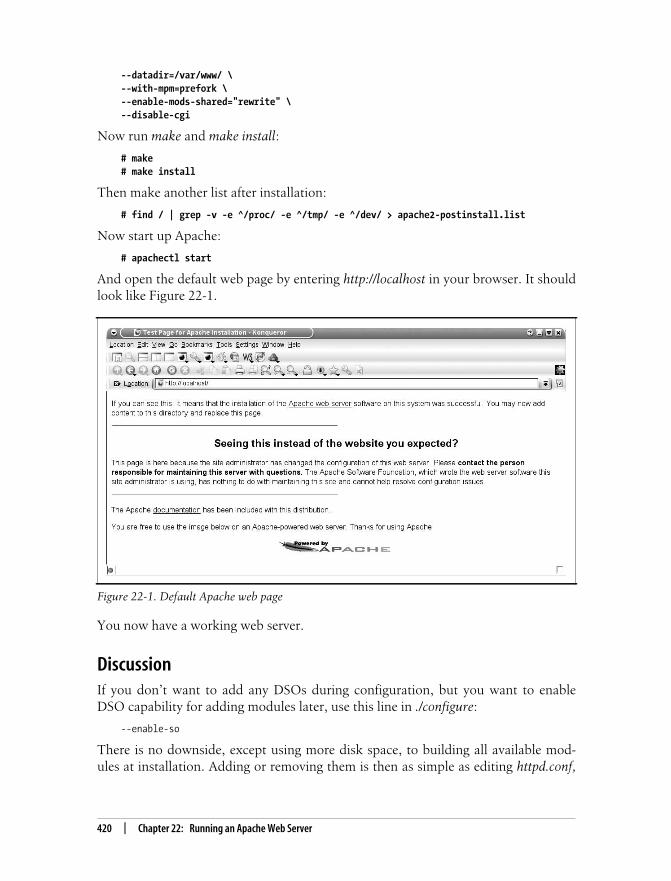
This is the Title of the Book, eMatter EditionCopyright © 2007 O’Reilly & Associates, Inc. All rights reserved.
420 | Chapter 22: Running an Apache Web Server
--datadir=/var/www/ \--with-mpm=prefork \--enable-mods-shared="rewrite" \--disable-cgi
Now run make and make install:
# make# make install
Then make another list after installation:
# find / | grep -v -e ^/proc/ -e ^/tmp/ -e ^/dev/ > apache2-postinstall.list
Now start up Apache:
# apachectl start
And open the default web page by entering http://localhost in your browser. It shouldlook like Figure 22-1.
You now have a working web server.
DiscussionIf you don’t want to add any DSOs during configuration, but you want to enableDSO capability for adding modules later, use this line in ./configure:
--enable-so
There is no downside, except using more disk space, to building all available mod-ules at installation. Adding or removing them is then as simple as editing httpd.conf,
Figure 22-1. Default Apache web page

This is the Title of the Book, eMatter EditionCopyright © 2007 O’Reilly & Associates, Inc. All rights reserved.
22.2 Installing Apache 2.0 from Sources | 421
then restarting Apache (see the next recipe). To build all modules at compile time,do this:
--enable-mods-shared=all
There are many RPMs and .debs for Apache, so you may install from packages if youprefer. A rather large problem you will encounter is that the various package maintain-ers use all kinds of different filenames and have their own ideas as to where Apache’sfiles should go. This isn’t too awful if your Linux distribution provides good documen-tation, like Red Hat and SuSE do. But if you don’t have good localized documentation,you’re going to spend a fair amount of time just trying to find things.
If you run ./configure again with new settings, be sure to run make clean first, or yourold configs will still be hanging around, getting in the way.
The above configuration does these things:
--prefix=/etc/httpd--exec-prefix=/usr
These set the default installation directories. Documentation and configurationfiles go into the Apache default directories in /etc/httpd, and executables go in /usr,if you do not specify a different path. This recipe specifies paths for all installationdirectories; it sets the defaults as a safety net to catch anything that might getmissed.
--bindir=/usr/bin--sbindir=/usr/sbin--mandir=/usr/share/man--sysconfdir=/etc/httpd/conf--includedir=/usr/include/httpd--libexecdir=/usr/lib/httpd/modules--datadir=/var/www/
Because Apache defaults to /usr/local/apache2 for everything, man pages andexecutables won’t be in your existing Path. This example puts everything in theusual Linux places. However, stuffing everything under /usr/local/apache2 makesit simple to delete the whole works and start over, which might be useful fortesting.
--with-mpm=preforkThis chapter’s “Introduction” describes the three Apache threading/process mod-els: Prefork, Worker, and PerChild. Prefork is similar to the traditional Apache 1.3model. This is the default, and it is the safe, conservative choice. You’ll still get thebenefit of the many improvements in Apache 2.0. The Worker and PerChildMPMs are for high-demand servers, and are still somewhat experimental.
--enable-mods-shared="rewrite"When you use enable-mods-shared, DSO capability is automatically included.This builds the module rewrite as a DSO instead of building it statically into the

This is the Title of the Book, eMatter EditionCopyright © 2007 O’Reilly & Associates, Inc. All rights reserved.
422 | Chapter 22: Running an Apache Web Server
httpd binary. rewrite lets you set up URL redirects; for example, when you over-haul a web site and want to set up automatic redirections from old URLs to newones. DSOs need a LoadModule directive in httpd.conf; rewrite looks like this:
LoadModule rewrite_module /usr/lib/httpd/modules/mod_rewrite.so
--disable-cgiThis server won’t be running scripts, so it doesn’t need CGI.
See Also• Chapter 4, Installing Programs from Source Code
• Complete configuration options (http://httpd.apache.org/docs-2.0/programs/configure.html)
22.3 Adding New Modules After Installation
ProblemYou configured your Apache server to support DSOs (Dynamic Shared Objects), andnow you want to add some additional modules. They might be Apache modules orthird-party modules.
SolutionFor this example, let’s say you’ve changed your mind and want to add mod_cgi, soyou can run scripts. No problem, because you remembered to enable DSO capabil-ity at installation (see the previous recipe). This is a built-in Apache module, so youmust run this command from the top level of your Apache build tree, installing themodule to the libexecdir you configured at installation:
# ./configure --prefix=/usr/lib/httpd/modules/ --enable-cgi=shared# make install
Then you must add the following directive to httpd.conf:
LoadModule rewrite_module /usr/lib/httpd/modules/mod_cgi.so
Restart Apache, and you’re done.
Adding a third-party module can be done in two ways. If you preserved your Apachebuild tree, use this syntax:
# ./configure --add-module=module_type:/mod_foo.c --enable-foo=shared# make install
Or use the apxs utility to build a third-party module outside of your build tree:
# apxs -c mod_foo.c# apxs -i -a -n foo mod_foo.la

This is the Title of the Book, eMatter EditionCopyright © 2007 O’Reilly & Associates, Inc. All rights reserved.
22.4 Setting Apache File Permissions and Ownership | 423
The real world, unfortunately, is not always this clear-cut. Many third-party Apachemodules have specialized configuration and installation options, so be sure to followthe module instructions.
Removing a module is as simple as commenting out its entry in httpd.conf, thenrestarting Apache.
DiscussionThere is a utility called ApacheToolbox that eases module management. It has nicemenus for checking off what you want to install, then it does the download andinstallation for you. Find it at http://www.apachetoolbox.com.
See Also• Recipe 22.5, “Accessing the Apache User’s Manual Locally”
• http://localhost/manual/dso.html
• http://localhost/manual/mod/
• The Apache 2.0 documentation (http://httpd.apache.org/docs-2.0)
22.4 Setting Apache File Permissionsand Ownership
ProblemYou want to be sure that file permissions on your Apache installation are sane andsecure.
SolutionFollow this checklist:
First, make sure that the httpd binary is owned only by root, is not writable, and isnot readable by non-root users:
# chown root:root /usr/sbin/httpd# chmod 511 /usr/sbin/httpd
Next, create an unprivileged user just for httpd:
# useradd -c "httpd owner" -d /dev/null -s /bin/false -u httpd
Open /etc/httpd/conf/httpd.conf, and configure httpd to run under this user. Look for“Section 2: ‘Main’ server configuration”:
User httpd

This is the Title of the Book, eMatter EditionCopyright © 2007 O’Reilly & Associates, Inc. All rights reserved.
424 | Chapter 22: Running an Apache Web Server
Next, create a unique user and group to own your web page directories; in thisexample “web”:
# groupadd -g 60 web# useradd -c "Web Server" -d /var/www/ -g web -s /bin/false -u web# chown -R web:web /var/www/http# chmod -R 755 /var/www/http
Remember to add users who are authorized to edit your web pages to the web group.Finally, restart Apache:
# apachectl restart
That takes care of the basics.
DiscussionThe httpd binary is owned by root, but it only runs with root permissions for longenough to launch child processes, which run under a user with minimal privileges.httpd does not touch the network at all; all the work is handled by its children. Thedefault is the nobody user—don’t use nobody, as it’s used far too often, and is afavored cracker target. Also, you never want to share a system user; always createunique users for your various daemons and servers.
You can use the usual Linux filesystem permissions to control which users haveaccess to your web page files and subdirectories.
Apache is a very secure application. The more typical places to find vulnerabilitiesare in the underlying operating system, or when you start adding server-side script-ing, adding web forms, and generating dynamic content with PHP, Perl, Python, andso on.
See Also• http://httpd.apache.org/docs-2.0/misc/security_tips.html
• Section 2.3 of Apache: The Definitive Guide
22.5 Accessing the Apache User’s Manual Locally
ProblemYou appreciate the fine job the Apache maintainers have done with the documenta-tion, and how it is nicely indexed on http://httpd.apache.org/docs-2.0/. But it surewould be handy to have a local copy, so you can depend on it being available.

This is the Title of the Book, eMatter EditionCopyright © 2007 O’Reilly & Associates, Inc. All rights reserved.
22.6 Setting Up a Simple Public Web Server | 425
SolutionWhen you install from sources, the Apache manual is installed into your --datadir. Ifyou configured your installation according to Recipe 22.2, this is /var/www/http/manual. You can read the manual pages by entering this directory, but the hyper-links won’t work. A nicer way to use it is to start up Apache, then read it in a webbrowser—simply open your browser and go to http://localhost/manual.
DiscussionIf you install Apache from packages, you’ll need a separate documentation package. OnDebian, it’s apache2-doc. RPM users need to look for apache2-manual or httpd-manual.
Examples of current versions are apache2-manual-2.0.50-3mdk.i586.rpm andhttpd-manual-2.0.50-2.1.i386.html.
See Also• http://httpd.apache.org/docs-2.0/
22.6 Setting Up a Simple Public Web Server
ProblemYou want to build a simple public web server for a single domain, serving up staticHTML pages.
SolutionAfter installing Apache 2.0, confirm that the location of your web site directory inhttpd.conf is set correctly and that the directory exists:
DocumentRoot /var/www/bratgrrl
Copy your web pages to your DocumentRoot directory (in this case /var/www/bratgrrl). Then start up Apache:
# apachectl start
Configure DNS to point to your web server, and you’re done.
DiscussionTo run a public web server, you need a registered domain name and a static IPaddress for your web server. It can be a public, routable IP, or a private IP behind a

This is the Title of the Book, eMatter EditionCopyright © 2007 O’Reilly & Associates, Inc. All rights reserved.
426 | Chapter 22: Running an Apache Web Server
NAT gateway. Yes, you can play fun DNS tricks on a dial-up account with a dynami-cally assigned IP using services such as dyndns.org, if your terms of service allow youto run servers and if you just want to run a pretend web site as a learning exercise.Don’t do this for a serious web site.
Hosts on your LAN can access your web site by either IP address or hostname:
http://windbaghttp://192.168.1.5
This is good way to test connectivity and to preview your web pages.
If you installed Apache from packages, look in /etc/init.d for the startup script. Itprobably has one of the following names.
# /etc/init.d/apache2# /etc/init.d/httpd# /etc/init.d/httpd2
Typically these are simple start/stop/restart/reload/force-reload scripts that verify filelocations and call apachectl. (Be aware that many distributions rename apachectl asapache2ctl.)
Be sure that your init script calls apachectl, and not the httpd binary. The Apachemaintainers recommend starting and stopping Apache with apachectl only:
As of Apache 2 it is recommended to use only the apachectl script for (re-)starting orstopping the server.
See Also• Chapter 24, Managing Name Resolution
• http://httpd.apache.org/docs-2.0/mod/core.html#documentroot
• http://localhost/manual/mod/core.html.en#documentroot
22.7 Redirecting URLs to a New Directory
ProblemYou’ve just given your web site a massive overhaul. It was a cluttered, disorganizedmess, so you rebuilt it from the ground up. But now all the links are different, so allthose bookmarks visitors have made to your pages, and all those links in online arti-cles and search engines are useless. What can you do about it?

This is the Title of the Book, eMatter EditionCopyright © 2007 O’Reilly & Associates, Inc. All rights reserved.
22.8 Giving Users Individual Web Directories | 427
SolutionAdd Rewrite directives to httpd.conf. This example redirects the old URLs to the newones:
RewriteEngine onRewriteRule ^/olddir/(.*)$ /newdir/$1
In plain English, this means that http://www.bratgrrl.com/olddir/, and every file anddirectory that follow olddir/, will be redirected to http://www.bratgrrl.com/newdir/.
DiscussionThis is a good basic Rewrite rule that takes care of one of the most common redirec-tion needs. As you can see, if you’re moving entire directories at a time, it’s fairlysimple. If you have bales of individual files going to different locations, you have a lotof rules to write.
See Also• The URL Rewriting Guide (http://localhost/manual/misc/rewriteguide.html)
22.8 Giving Users Individual Web Directories
ProblemYou want your users to have their own individual web directories that site visitorscan access via www.domain.com/~user, because this is the quickest and simplest wayto give users public web pages. You don’t need to mess with DNS or virtual hosts;just set up the user’s directory, and you’re done.
SolutionSet up your user directories in /var/www/users, or wherever you store your site files.Give each user his own subdirectory (e.g., /var/www/users/peters). Stick a copy of anyindex.html file in /peters, for testing. Then make this entry in httpd.conf:
UserDir /var/www/users
Restart Apache, and try this in a web browser:
http://localhost/~peters/
You should see your test index page.

This is the Title of the Book, eMatter EditionCopyright © 2007 O’Reilly & Associates, Inc. All rights reserved.
428 | Chapter 22: Running an Apache Web Server
DiscussionRemember to set the permissions on each user’s directory so that legitimate users canget in, and unauthorized users are kept out. Set ownership to the user and the user’spersonal group, mode 755, because web pages must be world-readable.
See Also• http://localhost/manual/howto/public_html.html
22.9 Starting Apache at Boot
ProblemOkay, it’s no big deal to type apachectl start. Still, you would like Apache to startautomatically at boot. You installed Apache from sources—where is the init script?
Solutionapachectl is your init script. Just drop a copy of it into /etc/init.d, or make a soft link,then add it to the runlevels in which you want it to start. (See Chapter 7 to learn howto configure runlevels.)
DiscussionDebian users can modify /etc/init.d/skeleton to create a startup script for any serviceor daemon.
See Also• http://localhost/manual/invoking.html
22.10 Hosting Multiple Domains with Apache
ProblemYou want to host several different domains on a single Apache server, sharing a sin-gle IP address. You’ve already registered all your domain names and have DNS inplace for each one.

This is the Title of the Book, eMatter EditionCopyright © 2007 O’Reilly & Associates, Inc. All rights reserved.
22.10 Hosting Multiple Domains with Apache | 429
SolutionUse Apache’s VirtualHost directives to set up name-based virtual host support. Hereis a sample httpd.conf entry for serving two different domains:
NameVirtualHost *:80
<VirtualHost *:80> ServerName www.tuxcomputing.com ServerAlias tuxcomputing.com *.tuxcomputing.com DocumentRoot /var/www/tuxcomputing ServerAdmin [email protected] </VirtualHost>
<VirtualHost *:80> ServerName www.bratgrrl.com ServerAlias bratgrrl.com *.bratgrrl.com DocumentRoot /var/www/bratgrrl ServerAdmin [email protected] </VirtualHost>
Each domain has its own separate root directory where the site files are stored. Thisallows you to easily set up subdomains, such as webmail.bratgrrl.com andwacko.games.tuxcomputing.com. However, this does not work by magic—you needto create DNS A records for each domain and subdomain.
Once you start using virtual hosts, each of your domains must have aVirtualHost directive. If you start out with a single domain, you’ll haveto create a VirtuaHost entry for it. VirtualHost directives override theglobal directives in httpd.conf. Almost any httpd.conf directive can beused in your VirtualHost stanzas, so you can customize each virtualhost as you need.
DiscussionName-based virtual hosting is the easiest way to serve up multiple domains from asingle Apache server. Configuring A records for a lot of subdomains can get a bitwearisome, but it’s better than using a domain wildcard. A domain wildcard allowsall traffic that includes your domain name to hit your servers. For example:
randomstuff.bratgrrl.comreally.weird.randomstuff.bratgrrl.com
Spammers will abuse a domain wildcard beyond belief, so you want to be careful toconfigure only your exact domain names in your DNS records. It is acceptable to usedomain wildcards in your VirtualHost directives, because only domain names explic-itly defined in DNS will ever see any traffic.

This is the Title of the Book, eMatter EditionCopyright © 2007 O’Reilly & Associates, Inc. All rights reserved.
430 | Chapter 22: Running an Apache Web Server
Here is what each directive does:
NameVirtualHost *:80This tells Apache to listen for requests for these virtual hosts on all networkinterfaces, on port 80. It is best to specify an IP address or, as in this case, a wild-card. Don’t use domain names, because the server will then have to do DNSlookups, which will slow it down. Never leave it blank. Any IP/port setting heremust also match the Listen directive. For example:
Listen 80Listen 192.168.1.5:8080
NameVirtualHost can use either of these. Remember that when you use a non-standard port, such as 8080, users must specify the port in their URLs:
http://www.games.tuxcomputing.com:8080
<VirtualHost *:80>This must match the NameVirtualHost values.
ServerName www.tuxcomputing.comThis should match a DNS A record.
ServerAlias tuxcomputing.com *.tuxcomputing.comHere you can define other server names; users can now connect towww.tuxcomputing.com, or tuxcomputing.com, or <any subdomain>.tuxcomputing.com. Note that every subdomain must have a specific DNS Arecord pointing to it—don’t use DNS wildcards! This is asking for trouble withspammers and other loathsome subhumans who infest the Internet, looking forthings like this to exploit.
DocumentRoot /var/www/tuxcomputingThis specifies the local directory where the site files are stored.
ServerAdmin [email protected] provides a contact address to which users can report problems.
See Also• http://localhost/manual/vhosts/name-based.html
• Chapter 4 of Apache: The Definitive Guide
22.11 Using Individual Log Files for Virtual Hosts
ProblemYour virtual hosts are pretty busy, and sorting out a single log file is getting difficult.How can you give each virtual host its own log file?

This is the Title of the Book, eMatter EditionCopyright © 2007 O’Reilly & Associates, Inc. All rights reserved.
22.11 Using Individual Log Files for Virtual Hosts | 431
SolutionAlter the httpd.conf entries for each virtual host so that they have their own log files:
<VirtualHost *:80> ServerName www.tuxcomputing.com ServerAlias tuxcomputing.com *.tuxcomputing.com DocumentRoot /var/www/tuxcomputing ErrorLog /var/www/tuxcomputing/logs error_log AccessLog /var/www/tuxcomputing/logs access_log combined ServerAdmin [email protected] </VirtualHost>
DiscussionNote that the AccessLog specifies a particular log format with the nickname “com-bined.” There are four ready-made LogFormat directives in httpd.conf:
LogFormat "%h %l %u %t \"%r\" %>s %b \"%{Referer}i\" \"%{User-Agent}i\"" combinedLogFormat "%h %l %u %t \"%r\" %>s %b" commonLogFormat "%{Referer}i -> %U" refererLogFormat "%{User-agent}i" agent
If these do not please you, you can easily create your own. See http://localhost/manual/mod/mod_log_config.html for a complete description of the available vari-ables. This is what the variables in the “combined” LogFormat mean:
%hRemote host
%lRemote logname, from identd
%uRemote user
%tTime
\"%rFirst line of request
\" %>sStatus—on redirections, this is the status of the original request
%bBytes sent, excluding HTTP headers
\"%{Referer}i\"Contents of the Referer line in the HTTP header
\"%{User-Agent}i\"Contents of the User-agent line in the HTTP header

This is the Title of the Book, eMatter EditionCopyright © 2007 O’Reilly & Associates, Inc. All rights reserved.
432 | Chapter 22: Running an Apache Web Server
See Also• http://localhost/manual/mod/mod_log_config.html
• Recipe 4.9 in Apache Cookbook
22.12 Keeping LAN Web Sites Off the Internet
ProblemYou have a personal web site on your LAN where you keep your calendars, docu-ments, and amusingly edited .jpgs of your coworkers. Or perhaps your company hasdepartmental web sites that are not meant to be exposed to the outside world. Eventhough your LAN is chock-full of firewalls and bristling with security, you want to besure that these web sites are not accessible outside the LAN.
SolutionThere are two different ways to do this, depending on the type of web site. For anApache virtual host or a standalone Apache web site, follow this recipe. For a UserDir-type site (described in Recipe 22.8), see Recipe 22.13.
Restricting access to your LAN, subnet, or certain domain names is done with sim-ple deny/allow access rules, filtering on IP address, like this:
<VirtualHost *:80> ServerName www.bratgrrl.com ServerAlias bratgrrl.com *.bratgrrl.com DocumentRoot /var/www/bratgrrl ServerAdmin [email protected] order deny, allow allow from 192.168.1. deny all </VirtualHost>
or using a domain name:
allow from oreilly.net
DiscussionMany businesses rely on all manner of internal web sites that are not for public con-sumption. Even with elaborate firewalls in place, it only takes a minute to add someextra insurance with access rules.
UserDir pages, which use URLs like oreilly.net/~carla, are protected at the directorylevel, rather than by the domain name (see the next recipe).
This is the Title of the Book, eMatter EditionCopyright © 2007 O’Reilly & Associates, Inc. All rights reserved.
22.13 Password-Protecting Individual Directories | 433
See Also• Chapter 5 of Apache: The Definitive Guide
• Recipe 22.13, “Password-Protecting Individual Directories”
22.13 Password-Protecting Individual Directories
ProblemYou don’t want to restrict access to an entire domain, just some pages in a particulardirectory. For example, you may have a UserDir-type web page (see Recipe 22.8)that you wish to protect, because it contains certain work documents that don’t needto be available to any old nosy coworker. You want to restrict access to you only, orperhaps to select other persons—how do you do this?
SolutionApache comes with some simple user authentication methods that operate on direc-tories: Basic and Digest. These are strictly lightweight security; don’t use them forpages containing very sensitive information, or for any kind of web site where moneyor customer data are involved. Basic and Digest are fine for use on a LAN, where allyou want to do is keep coworkers out of stuff that doesn’t concern them.
Basic sends passwords in cleartext, which are trivially easy to snoop, so this recipeuses Digest, which employs an MD5 hash.
Setting up user authentication on directories has two parts: creating a <Directory>section in httpd.conf, and creating a password file with htpasswd.
Let’s say you keep your calendars, contact lists, and important documents on http://oreilly.net/~michael. The real directory path is /var/www/users/michael. First, createyour <Directory> entry in httpd.conf:
<Directory /var/www/users/michael> AuthType Digest AuthName "Michael's Protected Files" AuthUserFile /etc/httpd/htpasswd/passwords Require user michael </Directory>
Now create your password file, which is already named above:
$ htpasswd -c /etc/httpd/htpasswd/passwords michaelNew password:Re-type new password:Adding password for user michael

This is the Title of the Book, eMatter EditionCopyright © 2007 O’Reilly & Associates, Inc. All rights reserved.
434 | Chapter 22: Running an Apache Web Server
The -c flag creates a new file. Now only Michael, or anyone with Michael’s pass-word, can access http://oreilly.net/~michael.
To allow other users in, create logins with htpasswd, omitting the -c flag:
$ htpasswd /etc/httpd/htpasswd/passwords maria
and change the “Require user” directive to:
Require valid-user
This will authorize any user in your password file.
DiscussionPay special attention to the AuthName directive. All directories with the same Auth-Name won’t need to reauthenticate you after you log in the first time. This is a time-saver but it’s also a security hole, so be sure to pay attention to your AuthNames.
What if you do not have access to httpd.conf, and you don’t want to continually pes-ter your hardworking Apache admin for changes and updates? Have your kindly,benevolent Apache admin set you up to use .htaccess, and then you can controlaccess yourself. .htaccess is for setting configurations on directories, rather thandomains.
The benevolent admin needs to make this entry in httpd.conf. This example enablesall users in /var/www/users to use .htaccess files:
<Directory /var/www/users> AllowOverride AuthConfig</Directory>
Make sure there is no AllowOverride None directive, which disables .htaccess.Remember to restart Apache after making changes to httpd.conf.
This particular configuration has the benefit of speeding up server performance byrestricting .htaccess to the /var/www/users directory. If .htaccess is enabled globally inhttpd.conf, like this:
AllowOverride AuthConfig
Apache will search all of its directories for .htaccess files, which can incur a signifi-cant performance hit.
Once the admin has made the above changes, Michael can create an .htaccess filecontaining the exact same directives as in the recipe above. He will put this file in histop-level directory; in this example, /var/www/users/michael.
This is the Title of the Book, eMatter EditionCopyright © 2007 O’Reilly & Associates, Inc. All rights reserved.
22.13 Password-Protecting Individual Directories | 435
Using Digest authentication comes with an additional benefit: it gives you anotherreason to get rid of Internet Explorer, which does not support it for URLs that usequerystring. These are URLs with question marks, like this:
http://catsearch.atomz.com/search/catsearch/?sp-a=sp1000a5a9&sp-f=ISO-8859-1&sp-t=cat_search&sp-q=apache&search=Go
That’s the URL you get when you go to http://linux.oreilly.com and do a search for“apache.” A plain ole static URL (such as http://linux.oreilly.com) usually works inIE, so it’s not an issue for simple, static web pages. Even so, IE is a huge security haz-ard, and a notorious non-supporter of web standards—if you needed another reasonto ditch it, here you go.
If you wish to standardize on a single web browser, the Mozilla browser supportsDigest authentication just fine, and it runs on many different platforms. It adheres toW3C standards and comes with all sorts of nice user features that IE does not, suchas tabbed browsing and meaningful cookie, pop-up, and password management.
Other excellent web browsers that are standards-compliant, are much more securethan IE, and have rafts of superior user features are Firefox, Amaya, Galeon, Kon-queror, Opera, and Netscape. Amaya is designed to be an easy-to-use editor as wellas a browser. Firefox, Amaya, Opera, and Netscape are cross-platform, available forLinux/Unix, Mac OS X, and Windows.
If you wish to use Basic authentication, which sends passwords in cleartext andworks in all browsers, see the “Authentication, Authorization and Access Control”page in the Apache manual.
For serious heavy-duty security, you need SSL. This is rather complex to learn andset up. To learn how to set up an Apache server using SSL for secure transactions,start at the Apache SSL/TLS Encryption section of the Apache manual at http://localhost/manual/ssl/. Then see Web Security, Privacy & Commerce, by SimsonGarfinkel (O’Reilly).
See Also• Authentication, Authorization and Access Control (http://localhost/manual/
howto/auth.html)
• Apache SSL/TLS Encryption (http://localhost/manual/ssl)
• W3C home page (http://www.w3.org)
• Web Security, Privacy & Commerce
This is the Title of the Book, eMatter EditionCopyright © 2007 O’Reilly & Associates, Inc. All rights reserved.
436 | Chapter 22: Running an Apache Web Server
22.14 Using robots.txt to Control Web Crawlers
ProblemYou like that search engines find your web sites, and index them, and make it easyfor visitors to find you. But some of them are driving you nuts by visiting too often,so you want to exclude them. Also, there are some directories or pages on your sitethat you don’t want indexed.
SolutionWrite a robots.txt file containing your restrictions, and place it in your root web sitedirectory. A robots.txt file looks like this:
# all spiders/bots/crawlers etc.# are not allowed to index these pagesUser-agent: *Disallow: /error/Disallow: /users/Disallow: /cgi-bin/Disallow: /*.doc$Disallow: /tmp/# exclude these ill-mannered bots that# suck up bandwidthUser-agent: BadBot/Disallow: /User-agent: VeryBadBot/Disallow: /
DiscussionThe two conventions used in a robots.txt file are User-agent and Disallow. Cruiseyour web logs to find specific user agents. Some examples are:
"GET /robots.txt HTTP/1.1" "http://www.whois.sc/" "SurveyBot/2.3 (Whois Source)""GET /foo.htm HTTP/1.0" "Googlebot/2.1 (+http://www.googlebot.com/bot.html)""GET /foo HTTP/1.0" "-" "msnbot/0.11 (+http://search.msn.com/msnbot.htm)"
The user agents are SurveyBot/, Googlebot/, and msnbot/. If you wished to namethem specifically, your entries would look like this:
User-agent: SurveyBot/Disallow: /cgi-bin/User-agent: msnbot/Disallow: /
Search engines may not behave in accordance with your robots.txt file. The majorones are pretty good, but there are many scammy ones that follow no rules. If thereare files you don’t want indexed, robots.txt is useful, but don’t make the mistake of

This is the Title of the Book, eMatter EditionCopyright © 2007 O’Reilly & Associates, Inc. All rights reserved.
22.15 Blocking Obnoxious Visitors | 437
thinking you can protect sensitive pages this way. Sensitive information should notbe on a public web site.
Keep an eye on your logs. If someone is really giving you fits, see the next recipe tolearn how to exclude them completely using Apache’s built-in access rules.
See Also• http://www.robotstxt.org, the authoritative source for information on bots and
robots.txt, including a database of web robots at http://www.robotstxt.org/wc/active/html/index.html
22.15 Blocking Obnoxious Visitors
ProblemYou’re getting pummeled by annoying site-scoopers, or search-engine bots, or othertroublemakers who are blowing your bandwidth allowance right out of the water.How can you block them from accessing your site?
SolutionUse Apache’s access controls in httpd.conf. Use this method to deny specific IPaddresses or hosts:
Order allow,denyAllow from allDeny from 12.34.56.78# this one keeps linking to our graphic imagesDeny from *.booger.baddomain.net# darned foo.com searchbot has been hammering usDeny from search.foo.com
DiscussionWhen reviewing your logs, it’s often an unpleasant surprise to see how much trafficis search-engine bots, or people grabbing your entire site with wget or other web sitesuckers. A lot of search-engine bots ignore robots.txt and crawl web sites as often andas thoroughly as they like. Automated tools are wonderful, but too many people turnthem loose on the Internet with little thought for the consequences.
To learn how to use Webalizer, a tool that will make your log analysis easier so thatyou can spot these troublemakers quickly, see Recipe 22.21.

This is the Title of the Book, eMatter EditionCopyright © 2007 O’Reilly & Associates, Inc. All rights reserved.
438 | Chapter 22: Running an Apache Web Server
See Also• http://localhost/manual/howto/auth.html
22.16 Making Custom Error Pages
ProblemWhen a visitor to your web site hits a bad link, you want her to see a nice, custom-ized error page with the same look as the rest of your site, instead of the defaultstern, cold Apache 404 page:
Not FoundThe requested URL /foo was not found on this server.Apache/2.0.50 (Unix) Server at http.bratgrrl.com Port 80
In fact, you would like your error pages to mirror the look of your web site and befriendly and informative.
SolutionCreate your custom page (in this example 404-custom.html), then set the ErrorDocu-ment directive in httpd.conf to point to this page:
ErrorDocument 404 /error/404-custom.html
The /error directory is the default location for error pages.
DiscussionDon’t change the default error pages that come with Apache. (Look in yourDocumentRoot directory to see the default error pages. In the examples in this chap-ter, that is /var/www/error.) You can customize these pages a bit, as discussed in thenext recipe, but for a major overhaul it is better to create new ones, because thedefault pages are internationalized. Even if you don’t want to use them now, youmight as well save them just in case. Apache can use these internationalized pages toautomagically deliver error messages in the language of your site visitors via ContentNegotiation (see Recipe 22.19).
To use the internationalized default error pages, open httpd.conf and find the follow-ing lines:
# The internationalized error documents require mod_alias, mod_include# and mod_negotiation. To activate them, uncomment the following 30 lines.
Then do what they say.

This is the Title of the Book, eMatter EditionCopyright © 2007 O’Reilly & Associates, Inc. All rights reserved.
22.18 Making Full-Length Directory Indexes | 439
Instead of serving up an error page, you may specify a simple message in httpd.conf:
ErrorDocument 403 "Nobody here, you go away now"
See Also• http://localhost/manual/mod/core.html.en#errordocument
22.17 Customizing Apache’s Default Error Pages
ProblemYou would like to use Apache’s default error pages, and you want to enable ContentNegotiation (discussed in Recipe 22.19) so that error messages will be delivered inthe language of your site visitors. But they are sure are stern and ugly—isn’t theresome way to dress them up, without breaking the page code?
SolutionThe Apache maintainers think of everything. In the examples used in this chapter,the default error pages are in /var/www/error. If you go to this directory, you’ll seethe /include directory. This contains three files: bottom.html, spacer.html, andtop.html. You may freely customize bottom.html and spacer.html with text, images,links, or whatever you desire.
DiscussionIt’s a nice service to your visitors to customize your error pages; it gives them usefulinformation, and lets them know where in cyberspace they are. If you’re thinking ofcompletely redesigning the pages, however, it’s best to create your own from scratch(see the previous recipe).
See Also• http://localhost/manual/content-negotiation.html
22.18 Making Full-Length Directory Indexes
ProblemYou have some pages that contain indexes of downloadable files. Apache displaysyour directories like this, chopping off the filenames:
Parent Directory 27-Jul-2004 09:39 - libpam-smbpass_3.0.5..> 27-Jul-2004 09:17 298k

This is the Title of the Book, eMatter EditionCopyright © 2007 O’Reilly & Associates, Inc. All rights reserved.
440 | Chapter 22: Running an Apache Web Server
libsmbclient-dev_3.0..> 27-Jul-2004 09:17 581k libsmbclient_3.0.5-1..> 27-Jul-2004 09:17 467k
How can you make it show the entire filename?
SolutionIn httpd.conf, find:
# IndexOptions: Controls the appearance of server-generated directory# listings.IndexOptions FancyIndexing VersionSort
and add the NameWidth directive:
IndexOptions FancyIndexing VersionSort NameWidth=*
Using the asterisk tells it to expand to the width of the longest filename. You mightwant to set a limit of something like 40 characters, to keep it readable in case a verylong filename slips in:
IndexOptions FancyIndexing VersionSort NameWidth=40
DiscussionYou can also configure this for individual virtual hosts; VirtualHost directives over-ride the global directives.
See Also• http://localhost/manual/mod/mod_autoindex.html
22.19 Using Content Negotiation to Deliver Pagesin Different Languages
ProblemYour web site visitors speak a number of different languages, and you would likeApache to recognize the correct language for each visitor and serve up pages in thatlanguage.
SolutionApache has all the tools to make this work on the server side. You need to supplypages translated into whatever languages you wish to serve. Then configure a typemap file to point to the different pages. This file must have a .var extension.

This is the Title of the Book, eMatter EditionCopyright © 2007 O’Reilly & Associates, Inc. All rights reserved.
22.19 Using Content Negotiation to Deliver Pages in Different Languages | 441
On the client side, your visitors need to configure their web browsers to have a lan-guage preference.
The default Apache index page is a good model to see how this works (seeFigure 22-1 in Recipe 22.2). Find your htdocs directory. This contains all the varia-tions of the default index.html:
/var/www/index.html.ca/var/www/index.html.cz.iso8859-2/var/www/index.html.de/var/www/index.html.dk/var/www/index.html.ee/var/www/index.html.el/var/www/index.html.en/var/www/index.html.es/var/www/index.html.et/var/www/index.html.fr
Now open the /var/www/index.html.var file:
URI: index.html.caContent-language: caContent-type: text/html
URI: index.html.cz.iso8859-2Content-language: csContent-type: text/html;charset=ISO-8859-2
URI: index.html.deContent-language: deContent-type: text/html
URI: index.html.dkContent-language: daContent-type: text/html
As you can see, all you need are the filepaths, a Content-language directive specifyingthe language, and the Content-type: text/html directive for each file.
The last entry in the file should function as a default, in case the Content Negotia-tion does not work. This should point to a page that has links to your index pages inthe various languages:
URI: fallback.htmlContent-type: text/html
Finally, this line needs to be uncommented in httpd.conf (which it should be bydefault):
AddHandler type-map .var

This is the Title of the Book, eMatter EditionCopyright © 2007 O’Reilly & Associates, Inc. All rights reserved.
442 | Chapter 22: Running an Apache Web Server
DiscussionMany multilanguage sites also have links to their various language pages on theirfront pages (for example, see http://httpd.apache.org/docs-2.0).
While Content Negotiation is an official part of the HTTP/1.1 standard, it is not uni-versally supported. Not all web browsers support it, and not all users bother to con-figure their browsers appropriately. Using Content Negotiation also slows downperformance. It’s a really nice feature, but if it bogs down your server too much, youmay as well stick to plain old links to your different language editions.
Figure 22-2 shows how to configure language preferences in Mozilla.
When the user of this browser visits an Apache-served web site that offers multilan-guage pages, she will automatically be served the French language pages. This iswhat Apache sees in the HTTP headers:
Accept-Language: fr; q=1.0, en; q=0.5
If there are no French-language pages, Apache will dish out the second choice,English. If the content negotiation fails, the visitor will get a 406 error:
Not AcceptableAn appropriate representation of the requested resource /foo/index.html could not befound on this server.Available variants:
Figure 22-2. Configuring language preferences in Mozilla

This is the Title of the Book, eMatter EditionCopyright © 2007 O’Reilly & Associates, Inc. All rights reserved.
22.20 Using Favicons | 443
index-en.htmlindex-fi.htmlindex-de.htmlindex-sv.html
Of course, you can create a custom 406 page to suit your needs (see Recipe 22.16).
See Also• RFC 2616, “Hypertext Transfer Protocol—HTTP/1.1”
• http://localhost/manual/content-negotiation.html
22.20 Using Favicons
ProblemAll of your favorite web sites use favicons—for example, http://www.freebsd.org has acute little devil that shows up in the URL bar of visitors’ browsers and in their book-marks. You want to make favicons for your web sites, too.
SolutionThis requires creating a favicon.ico image in the precisely correct format—it must bea real .ico file, not a renamed bitmap or .jpg—and adding some entries to httpd.confand to the headers of your web pages.
Your favicon must be 16 × 16 pixels in size, in 16 colors (4-bit), and be namedfavicon.ico. You need an image editor that is able to create .ico files, such as theGimp, Babygimp, or Kiconedit. Kiconedit is especially nice and easy to use, thoughyou’ll also need the base KDE installation to use it.
Once you have created your beautiful favicon.ico, store it in your root datadir, whichin the examples in this chapter is /var/www/. (See Recipe 22.2 to see a list of the con-figuration options used in this chapter.)
Next, add this entry to httpd.conf:
AddType image/x-icon .ico
Then add these lines to the headers of your web pages:
<link rel =icon href="/favicon.ico" type="image/x-icon"><link rel="shortcut icon" href="/favicon.ico" type="image/x-icon">
The first line will display your favicon next to the URL of your web site in your visi-tors’ web browsers, and the second line makes your favicon appear in visitors’bookmarks.

This is the Title of the Book, eMatter EditionCopyright © 2007 O’Reilly & Associates, Inc. All rights reserved.
444 | Chapter 22: Running an Apache Web Server
DiscussionIf you aren’t into creating your own favicons, a Google search for “favicon clip art”or “favicon gallery” will find you lots of ready-made icons to choose from.
If you are running virtual hosts, each one can have its own favicon. Just remember toadd the AddType image/x-icon .ico line to each VirtualHost directive.
See Also• Kiconedit (http://w1.1358.telia.com/~u135800018/prog.html#KICONEDIT)
• The Gimp (http://www.gimp.org)
• Babygimp (http://babygimp.sourceforge.net)
22.21 Viewing Apache Access Logs with Webalizer
ProblemCrawling through access_log is somewhat less than fun. It’s huge, it’s plain text, andyour eyes glaze over. Isn’t there some kind of nice graphical log viewer and analyzer,with colors and graphs?
SolutionUse Webalizer. Webalizer automatically creates HTML pages of hyperlinked colorgraphs, generated from your Apache access_log.
Download and install Webalizer in the usual manner; it comes in sources and pack-ages. After installation, test it with this command:
# webalizer /etc/httpd/logs/access_logWebalizer V2.01-10 (Linux 2.4.21) locale: CUsing logfile /etc/httpd/logs/access_log (clf)Creating output in /var/www/webalizerHostname for reports is 'windbag'Reading history file... /var/www/webalizer/ webalizer.histReading previous run data... webalizer.currentSaving current run data... [08/08/2004 15:31:06]Generating report for August 2004Generating summary reportSaving history information...107 records (97 ignored) in 0.15 seconds
Now enter /var/www/webalizer/index.html in a web browser, and you will see a pagelike Figure 22-3.

This is the Title of the Book, eMatter EditionCopyright © 2007 O’Reilly & Associates, Inc. All rights reserved.
22.21 Viewing Apache Access Logs with Webalizer | 445
This shows only a few days’ worth of activity, since this is from a web site createdjust for illustrating this chapter. As more history accumulates, you’ll be able to viewgraphs of nearly any statistic captured in your log, by months, days, and hours.
Now you should configure /etc/webalizer.conf. Make sure the filepaths are correct foryour system:
LogFile /etc/httpd/logs/access_logOutputDir /var/www/webalizerHistoryName /var/www/webalizer/webalizer.hist
You may specify only a single log file. Now you can generate an updated Webalizerpage simply by typing:
# webalizer
DiscussionThe LogFormat directives in httpd.conf control what data is passed to Webalizer:
LogFormat "%h %l %u %t \"%r\" %>s %b \"%{Referer}i\" \"%{User-Agent}i\"" combinedCustomLog logs/access_log combined
Figure 22-3. Viewing access_log with Webalizer

This is the Title of the Book, eMatter EditionCopyright © 2007 O’Reilly & Associates, Inc. All rights reserved.
446 | Chapter 22: Running an Apache Web Server
So if there is some information missing that you want to see, check your LogFormatdirectives. Webalizer also has some simple log filters for customizing what stats youwish to see; look in /etc/webalizer.conf.
See Also• http://localhost/manual/mod/mod_log_config.html
• webalizer(1)

This is the Title of the Book, eMatter EditionCopyright © 2007 O’Reilly & Associates, Inc. All rights reserved.
447
Chapter 23 CHAPTER 23
File and PrinterSharing, and Domain
Authenticationwith Samba
23.1 IntroductionSamba is used for providing file and print sharing and authentication services forWindows LANs, and for networking Windows with Linux/Unix. Samba functionsmuch like a Windows NT domain controller, if you prefer a domain-style LAN, oran ordinary Windows peer network, where all the hosts can directly share files andprinters with each other. It also functions nicely as a standalone file or print server,as part of a domain or workgroup.
You can mix Linux hosts into any of these scenarios: peer network, domain, or centralfile server. Files are easily shared between Linux and Windows. Sharing printers is a lit-tle trickier, but the combination of CUPS and Samba makes it much less painful.
As Windows NT4 Server nears the end of its support cycle (December 31, 2004),wise admins are migrating to Samba. It’s a perfect drop-in replacement for an NT4domain controller.
Samba server runs on every Unix variant, including Mac OS X. Any platform thatsupports the Common Internet System/Server Message Block (CIFS/SMB) protocol,such as VMS, AmigaOS, and NetWare, can be a Samba client.
Samba is now on version 3.x. If you’re still using 2.x, you really need to upgrade.Outwardly, 3.x looks the same—the configuration options are the same, and itinstalls the same way. But under the hood, it’s a beefier, much-improved engine.
Samba has another useful application that hardly anyone talks about: file sharingbetween Linux hosts. The Network File System (NFS) is the old standby for file shar-ing on Unix. It still does the job, but you ought to give Samba a try. It’s more secure,and easier to set up and use. It’s also quite a bit more flexible—users can updateshares and log on and off without giving Samba fits.
Samba’s configuration options are legion. The secret to Samba happiness is keep itsimple. Start small and slowly, and add configuration options only as you really needthem. Yes, the world is full of Samba geeks who love to show off their elaborate con-

This is the Title of the Book, eMatter EditionCopyright © 2007 O’Reilly & Associates, Inc. All rights reserved.
448 | Chapter 23: File and Printer Sharing, and Domain Authentication with Samba
figurations. You’re welcome to do the same, if that’s what you enjoy. But for simplyrunning nice, stable, reliable servers, complex configurations aren’t necessary.
Samba 3 is a big improvement over Samba 2. Some of the improvements in Samba 3are:
• Faster performance, especially on a 2.6 Linux kernel
• Native integration with Active Directory
• Support for Unicode character sets
Samba 3 cannot replace Active Directory; it does not have all the user, network,monitoring, and resource management tools that AD has. However, it can fit nicelyinto an Active Directory domain as a file server and be managed just like any otherActive Directory member. It’s a bit tricky to make it work, so I recommend practic-ing on a test network first. AD relies on Kerberos for authentication, so you’ll need agood understanding of Kerberos (refer to Chapter 6 in the excellent and thoroughThe Official Samba-3 HOWTO and Reference Guide—available for free on http://www.samba.org, or you can purchase a printed book).
Unicode support is a big deal, because it means users can store documents in lan-guages that don’t use the ASCII character set and retain filenames in their own lan-guages (Hebrew, Arabic, Russian, and so forth).
System RequirementsSamba doesn’t need the latest, greatest CPU. It does like a lot of RAM and fast diskI/O. How much you should invest in the hardware depends on how many users willbe hitting it, how much space you need for file storage, and how critical it is to keepit running. Since you wisely will not be running X on your Samba server, for a smallLAN—say, 50 users or less—an old Pentium 300 running a three-disk IDE RAID 5array, with 256 MB of RAM, makes a good, robust central file/print server. WithRAID 5, you get striping for speed and a parity check for data integrity. Of course,you can always use a nice SCSI array, if you want to spend the money. Linux sup-ports SCSI well, and you’ll get better performance and longer life.
The quick-and-dirty way to check your Samba server’s performance is with ping. Ifyou get ping times over 100 milliseconds, your server is getting too busy.
A Brief History of ProtocolsIt all started way back in the olden days at IBM and Sytec, with NetBIOS (NetworkBasic Input Output System). This provided the interface between applications andnetwork hardware. Then Microsoft tweaked it to allow file sharing over a LAN, pro-ducing the direct ancestor of CIFS/SMB. The original name was CIFS, then it becameSMB.

This is the Title of the Book, eMatter EditionCopyright © 2007 O’Reilly & Associates, Inc. All rights reserved.
23.2 Building a Simple Anonymous Samba File Server for Windows | 449
Then IBM made more improvements, and came out with NetBEUI (NetBIOSEnhanced User Interface), which allowed packets to be passed over Ethernet andToken Ring. Remember, in those days no one knew that Ethernet would becomequeen, so all these new network protocols were being invented and tested. NetBIOSand TCP/IP turned out to be a particularly effective team: NetBIOS shoveled LANpackets, and TCP/IP made packets routable, which meant they could travel overwide-area networks.
Somewhere along the way Microsoft added user authentication and serviceannouncements, so that connected hosts would announce their presence to eachother. “Yo! I’m here!” may not be the most elegant solution, but it’s practical.
Computer lore tells us that in the early 1990s, Andrew Tridgell, the primary authorof Samba, needed to network his own DOS and Unix boxes. Unsatisfied with theavailable tools, he invented Samba. And the rest is history.
23.2 Building a Simple Anonymous Samba FileServer for Windows
ProblemYou have a Windows LAN, and you want reliable file sharing without spending amint on a Windows server license, or having to upgrade hardware. Name resolution,TCP/IP, and Client for Microsoft Networks are installed and working, and all hostscan ping each other by either hostname or IP address. You don’t want to hassle withpasswords and permissions and all those dreadful things. You just want a nice, wide-open, anonymous file server so your users can store and retrieve files easily.
SolutionInstall Samba on a Linux machine designated to be the file server. Then create fileshares on the Samba server. Windows clients must all be members of the same work-group—in this chapter, the imaginatively named “workgroup.” The Windows cli-ents must have TCP/IP networking and Client for Microsoft Networks installed andworking.
If you install Samba from sources, there is a single source tarball, samba-latest.tar.gz,which you can get from http://www.samba.org.
RPM users need samba, samba-client, and samba-doc for the server.
Debian users need samba, samba-common, smbclient, and samba-doc.
After installation, create a directory on the Samba box to store your shared files, andpopulate it with some files for testing:
# mkdir -m 777 /sharedstuff

This is the Title of the Book, eMatter EditionCopyright © 2007 O’Reilly & Associates, Inc. All rights reserved.
450 | Chapter 23: File and Printer Sharing, and Domain Authentication with Samba
Then configure Samba for anonymous access. Back up your original /etc/samba/smb.conf, and replace it with this:
[global] workgroup = workgroup netbios name = windbag server string = anonymous lan file server security = share browseable = yes hosts allow = 192.168.1.
[share1] path = /sharedstuff comment = testfiles read only = No guest ok = Yes
Substitute your own workgroup name and subnet. The netbios name can be any-thing you want, up to 15 characters; this is what appears in Network Neighborhood/My Network Places. The share name must be no more than 12 characters.
Save and close smb.conf, then check for syntax errors with the following command:
$ testparm
It should not report any errors. If it does, check for typos and incorrect commandsyntax.
Now restart Samba, using:
# /etc/init.d/samba restart
On Red Hat or Fedora, use:
# /etc/init.d/smb restart
Always check your init.d filenames.
Now test to see if it’s working. On the Samba server, run this command to list theshares on the server. Hit Return when it asks you for a password, because there is nopassword:
$ smbclient -L windbagPassword:Domain=[WORKGROUP] OS=[Unix] Server=[Samba 3.0.5-Debian]
Sharename Type Comment --------- ---- ------- share1 Disk testfiles IPC$ IPC IPC Service (anonymous lan file server) ADMIN$ IPC IPC Service (anonymous lan file server)Domain=[WORKGROUP] OS=[Unix] Server=[Samba 3.0.5-Debian]
Server Comment --------- ------- WINDBAG anonymous lan file server

This is the Title of the Book, eMatter EditionCopyright © 2007 O’Reilly & Associates, Inc. All rights reserved.
23.2 Building a Simple Anonymous Samba File Server for Windows | 451
Workgroup Master --------- ------- WORKGROUP WINDBAG
The available shares are listed under “Sharename.” IPC$ and ADMIN$ are adminis-trative share protocols; they are not file shares.
If your Samba server is connected to the LAN, your other hosts will also be listedunder “Server.”
Open Network Neighborhood/My Network Places on a Windows PC, and yourWindows users will see “workgroup,” “windbag,” and “share1” on windbag. Theycan now easily fetch files from the share and store files on the share.
DiscussionIt may take a few minutes for Samba to broadcast itself to your network. If NetworkNeighborhood appears empty at first visit, give it a couple of minutes.
This is an insecure setup. Using the hosts allow directive limits access to your localsubnet, so there is a smidgen of protection from evil outside influences. But the fileson the share are wide open, and anyone can read, change, or delete them. This is thetype of setup a lot of users like, so here it is.
You can create a read-only share, so that users can fetch but not upload documents,with the writeable = no directive or the read only = yes directive in smb.conf, which-ever you prefer.
Share directives override global directives, and both override the defaults, which arelisted in smb.conf(5).
Your share names, which are enclosed in square brackets, can be no more than 12characters, including spaces. Anything longer than that will cause errors in Windows95/98/ME and Linux. [global], [homes], and [printers] are reserved share names withspecial meanings. Otherwise, share names can be anything you want.
Here are descriptions of some of the directives in smb.conf:
netbios name = windbagThis is the computer name that will appear in Network Neighborhood. Usingthe hostname keeps it simple, but you may use any name you like, up to 15characters.
server string = anonymous LAN file serverMake this anything you want; it should be descriptive enough to tell users whatthe server is for.

This is the Title of the Book, eMatter EditionCopyright © 2007 O’Reilly & Associates, Inc. All rights reserved.
452 | Chapter 23: File and Printer Sharing, and Domain Authentication with Samba
security = shareA single password applies to the entire share, so anyone who knows the pass-word can get in. If there is no password, anyone can access the share. In this rec-ipe, there is no password.
browseable = yesThis allows shares to be listed in LAN browsers such as Network Neighborhoodand LinNeighborhood.
See Also• smb.conf(5), an indispensible reference
• Chapters 2 and 12 of The Official Samba-3 HOWTO and Reference Guide (http://samba.org or the samba-doc package)
23.3 Building a Windows/Linux Peer Network
ProblemYou think an anonymous file server is nice, but even better is a peer-to-peer net-work, where users are able to share files directly with each other. You want yourWindows and Linux users to be able to do this without passwords or other impedi-ments—just click and go.
SolutionLinux hosts need only to install both the server and client components of Samba,then set up shares just like the Samba server in Recipe 23.2.
Your Windows hosts need to make sure that file sharing is enabled on their systems,and then set up their shared directories. Windows NT/2000 users need to enabletheir “guest” accounts to give outside users access to their shares. Windows XP usersmust enable sharing by running the Network Setup Wizard. Each PC must belong tothe same workgroup; in this chapter, that is “workgroup.”
Now your Windows hosts can simply browse Network Neighborhood/My NetworkPlaces to find all shared resources on the LAN. Linux users, refer to Recipes 23.17and 23.18 to learn how to connect to a Samba peer network.
DiscussionDon’t have NetBEUI or Novell Networking (IPX/SPX) installed, unless you are sureyou need them. They get in the way and slow down performance.

This is the Title of the Book, eMatter EditionCopyright © 2007 O’Reilly & Associates, Inc. All rights reserved.
23.4 Enabling File Sharing on Windows PCs | 453
When a PC first boots up, it can take a few minutes for its shares to be broadcast toeveryone, so have a little patience.
See Also• Recipe 23.2, “Building a Simple Anonymous Samba File Server for Windows”
• Recipe 23.4, “Enabling File Sharing on Windows PCs”
• Recipes 23.17 (“Connecting Linux Clients to a Samba File Server or Peer Net-work”) and 23.18 (“Connecting Linux Clients to Samba Workgroups withCommand-Line Tools”) for more information on file sharing with Linux hosts
• Chapter 3 of Using Samba
23.4 Enabling File Sharing on Windows PCs
ProblemYou need to know how to set up file sharing on Windows PCs, so that other users onyour LAN can access your shared files.
SolutionFollow this summary to learn how to enable file sharing on the various incarnationsof Windows.
To enable file-sharing on Windows 95/98/ME, go to Control Panel ➝ Network.Make sure that network cards are configured, TCP/IP Networking is installed, Cli-ent for Microsoft Networks is installed, and File and Printer Sharing are installed. Itshould look like Figure 23-1.
Click the “File and Print Sharing” button, and check the “share files” box.
Next, confirm that the hostname and workgroup are correctly configured, as inFigure 23-2. Finally, set “Share Level” access, as in Figure 23-3.
To create a shared directory, open Windows Explorer and right-click on the direc-tory to be shared, then left-click “Sharing.” “Sharing” will appear in this menu onlywhen file and printer sharing are enabled.
For Windows NT/2000, go to Settings ➝ Network and Dial-up Connections to ver-ify that TCP/IP Networking, Client for Microsoft Networks, and File and PrinterSharing For Microsoft Networks are all installed and configured. Right-click on“Local Area Connection,” then left-click “Properties” to see this (Figure 23-4).

This is the Title of the Book, eMatter EditionCopyright © 2007 O’Reilly & Associates, Inc. All rights reserved.
454 | Chapter 23: File and Printer Sharing, and Domain Authentication with Samba
Figure 23-1. Check that network cards are configured and the appropriate items are installed(Windows 95/98/ME)
Figure 23-2. Check the hostname and workgroup

This is the Title of the Book, eMatter EditionCopyright © 2007 O’Reilly & Associates, Inc. All rights reserved.
23.4 Enabling File Sharing on Windows PCs | 455
Confirm the workgroup name in Advanced ➝ Network Identification. Then go toControl Panel ➝ Administrative Tools ➝ Computer Management ➝ Local User andGroups ➝ Users. Double-click on “Guest,” and make sure the account is enabled(Figure 23-5).
Figure 23-3. Set “Share Level” access
Figure 23-4. Check the Network and Dial-up Connections settings (Windows NT/2000)
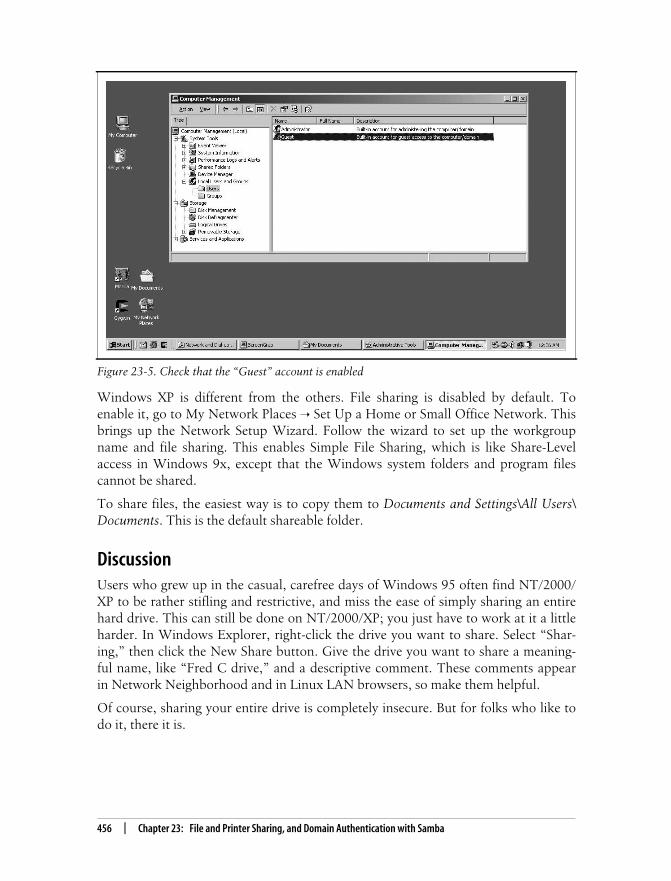
This is the Title of the Book, eMatter EditionCopyright © 2007 O’Reilly & Associates, Inc. All rights reserved.
456 | Chapter 23: File and Printer Sharing, and Domain Authentication with Samba
Windows XP is different from the others. File sharing is disabled by default. Toenable it, go to My Network Places ➝ Set Up a Home or Small Office Network. Thisbrings up the Network Setup Wizard. Follow the wizard to set up the workgroupname and file sharing. This enables Simple File Sharing, which is like Share-Levelaccess in Windows 9x, except that the Windows system folders and program filescannot be shared.
To share files, the easiest way is to copy them to Documents and Settings\All Users\Documents. This is the default shareable folder.
DiscussionUsers who grew up in the casual, carefree days of Windows 95 often find NT/2000/XP to be rather stifling and restrictive, and miss the ease of simply sharing an entirehard drive. This can still be done on NT/2000/XP; you just have to work at it a littleharder. In Windows Explorer, right-click the drive you want to share. Select “Shar-ing,” then click the New Share button. Give the drive you want to share a meaning-ful name, like “Fred C drive,” and a descriptive comment. These comments appearin Network Neighborhood and in Linux LAN browsers, so make them helpful.
Of course, sharing your entire drive is completely insecure. But for folks who like todo it, there it is.
Figure 23-5. Check that the “Guest” account is enabled

This is the Title of the Book, eMatter EditionCopyright © 2007 O’Reilly & Associates, Inc. All rights reserved.
23.5 Adding Authentication to a Samba Server | 457
See Also• Recipes 23.17, “Connecting Linux Clients to a Samba File Server or Peer Net-
work,” and 23.28, “Connecting Linux Clients to Samba Workgroups with Com-mand-Line Tools,” for information on LAN browsing with Linux hosts
• Chapter 3 of Using Samba
• Microsoft Knowledge Base Article 307874, for how to disable simplified sharingand set permissions on a shared folder in Windows XP; this also describes howto share a folder or a drive with other users
• Windows 95 Networking How-To Guide, a series of howtos that also apply toWindows 98 and ME (search for it on Google or Microsoft.com)
• Home and Small Office Networking with Windows XP, an excellent resource forusers who need some Windows networking howtos (search for it on Google orMicrosoft.com)
23.5 Adding Authentication to a Samba Server
ProblemYou are not comfortable with the freewheeling, wide-open methods of file sharingdescribed in the previous recipes. You want a nice central file server with all the sharestucked safely away on it, and you want to control who has access to the shares.
SolutionFirst of all, you must edit smb.conf to add user-level security and to require encryptedpasswords. (Both of these are the 3.0 defaults, but it’s always good to be explicit.)Then you must create Samba users with smbpasswd. Your Samba users must alsohave Linux system accounts on the server, so these must be created first. Both Win-dows and Linux users must have Samba accounts.
This example modifies the configuration from Recipe 23.2:
[global] workgroup = workgroup netbios name = windbag server string = lan file server security = user encrypt passwords = yes browseable = yes hosts allow = 192.168.1.
[share1] path = /sharedstuff comment = testfiles read only = No

This is the Title of the Book, eMatter EditionCopyright © 2007 O’Reilly & Associates, Inc. All rights reserved.
458 | Chapter 23: File and Printer Sharing, and Domain Authentication with Samba
Restart Samba after editing smb.conf.
Now you can create a Samba user and password:
# smbpasswd -a andrewNew SMB password:Retype new SMB password:Added user andrew.
Any users that you add with smbpasswd must already have systemaccounts on the Samba server. If they are not in /etc/passwd, you willget this error:
Failed to initialise SAM_ACCOUNT for user <foo>.Failed to modify password entry for user <foo>
Continue adding users and defining your shares. Don’t forget to write down thepasswords to give to your users.
DiscussionThis two-password-database clunkiness is due to the difference between Unix andWindows passwords, and the way each platform manages file permissions. They arevery different critters, so the smbpasswd file is a bridge between the two. The nextrecipe shows how to use mksmbpasswd to convert /etc/passwd to /etc/samba/smbpasswd.
Samba also supports XML, LDAP, and MySQL for password backends. SeeChapter 10 in The Official Samba-3 HOWTO and Reference Guide on samba.org fordetails.
See Also• smb.conf(5), smbpasswd(5), smbpasswd(8)
• Chapter 8, Managing Users and Groups
23.6 Batch-Converting System Users to SambaUsers
ProblemYou’re not too thrilled at the idea of manually creating Samba accounts for all ofyour users, like the previous recipe describes. Isn’t there a utility to make the conver-sion automatically?

This is the Title of the Book, eMatter EditionCopyright © 2007 O’Reilly & Associates, Inc. All rights reserved.
23.6 Batch-Converting System Users to Samba Users | 459
SolutionYes, sort of. Samba comes with the mksmbpasswd script, which converts all theentries in /etc/passwd to the correct smbpasswd format and copies them to /etc/samba/smbpasswd. It does not copy the passwords (it can’t, because they are encrypted andstored in /etc/shadow), so you still need to set these individually. The new accountsare disabled until you create passwords.
First, make a copy of /etc/passwd:
# cp /etc/passwd /etc/passwd-old
Now go through /etc/passwd-old and delete all the system user accounts, and anyusers you don’t want to use the Samba server. They don’t need to have Sambaaccounts; they’re just potential security holes. Next, make the conversion to /etc/samba/smbpasswd:
# cat /etc/passwd-old | /usr/sbin/mksmbpasswd > /etc/samba/smbpasswd
To activate the new Samba accounts, use smbpasswd:
# smbpasswd hennaNew SMB password:Retype new SMB password:
Don’t forget to write the passwords down to give to your users.
DiscussionThe usual advice is to run mksmbpasswd only once, to make the first conversion. Ifyou edit your working copy of /etc/passwd-old carefully, to avoid duplications, youcan use mksmbpasswd to append additional users, with the double angle brackets:
# cat /etc/passwd-old | /usr/sbin/mksmbpasswd >> /etc/samba/smbpasswd
Remember to preserve and protect your original copy of /etc/passwd.
See Also• mksmbpasswd(8), smbpasswd(5), smbpasswd(8)
• Chapter 10 of The Official Samba-3 HOWTO and Reference Guide

This is the Title of the Book, eMatter EditionCopyright © 2007 O’Reilly & Associates, Inc. All rights reserved.
460 | Chapter 23: File and Printer Sharing, and Domain Authentication with Samba
23.7 Managing Samba Logins fromWindows 95/98/ME
ProblemA charming Windows 95/98/ME gotcha is that it won’t let you send a Samba user-name—it asks only for a password, so you cannot log in as a different user. How doyou make it take both a Samba username and password?
SolutionWindows 95/98/ME sends Samba the Windows username. There is no way to sendSamba a different username than the one used to log into Windows. The simplestworkaround is to create a new account on Windows with the same name as yourSamba user and log in as that Windows user.
You can even do this on the fly, if you’re roaming around your workplace and log-ging in from random PCs. However, this creates a large security hole: Windows help-fully caches the Samba password, so you never need to trouble yourself with enteringit again—nor does anyone else who uses the same machine.
DiscussionYou can mitigate Windows 95/98/ME’s security deficiencies a wee bit by usingaccess control lists in smb.conf. See Recipe 23.9 to learn how to do this.
See Also• Recipe 23.9, “Controlling Share Access with Access Control Lists”
• Windows 95 Networking How-To Guide, a series of howtos that also apply toWindows 98 and ME (search for it on Google or Microsoft.com)
23.8 Dealing with Windows Encrypted PasswordConfusion
ProblemYou know that the default for Samba is to use encrypted passwords, and you alsoknow that some Windows versions support only cleartext, not encrypted pass-words. Samba must use either encrypted passwords or cleartext; it cannot use both.Which versions of Windows support what, and what is your best choice?

This is the Title of the Book, eMatter EditionCopyright © 2007 O’Reilly & Associates, Inc. All rights reserved.
23.9 Controlling Share Access with Access Control Lists | 461
SolutionThese versions of Windows support only cleartext, not encrypted passwords:
Windows 95 pre-OSR2Windows NT 3.xWindows NT4 pre-SP3
Fortunately, there is a patch available for Windows 95. See Microsoft KnowledgeBase Article 165403; you want the Vrdrupd.exe patch.
Up-to-date NT4 users are on SP6, so that leaves only Windows NT 3.x users out inthe cold. You can configure Samba to support cleartext passwords, if you really wantto. To do this, you must install Registry hacks on all the non-NT3 Windows clientsto enable them to use cleartext passwords. Editing the Windows Registry is alwaysperilous, and this may break other applications that depend on encrypted pass-words. The best advice is, don’t do it. But if you really really want to—say, if all youhave is a LAN populated by NT3 workstations—edit smb.conf to say encryptpasswords = no. Then see the /usr/share/doc/samba-doc/registry/ directory for a com-plete collection of prefab Windows Registry hacks for your non-NT3 hosts.
See Also• Microsoft Knowledge Base Article 256986, a description of the Microsoft
Windows Registry
23.9 Controlling Share Access with AccessControl Lists
ProblemYou would like to limit who can access a particular Samba share, either by usernameor group name.
SolutionUse the valid users directive in smb.conf, as follows:
[share1] path = /sharedstuff comment = testfiles read only = No valid users = andrew foober dana
Unix groups are indicated by a plus sign (+):
valid users = +sambausers

This is the Title of the Book, eMatter EditionCopyright © 2007 O’Reilly & Associates, Inc. All rights reserved.
462 | Chapter 23: File and Printer Sharing, and Domain Authentication with Samba
The groups must exist on the server, in /etc/group. They are ordinary Linux groups;you don’t need to create special Samba groups.
You may also exclude users or groups, using invalid users:
invalid users = root +wheel +bannedusers
Remember to restart Samba after changing smb.conf.
DiscussionIf you have no network information services (NIS) groups, use the plus sign to tellSamba to look only for Unix groups.
Using @ (for example, @bannedusers) tells Samba to first search the NIS database,then Unix.
To use only NIS groups, use the ampersand: &bannedusers.
See Also• smb.conf(5)
23.10 Creating Public Shares for Users
ProblemYou have several project teams or departments that would like to share files, so youwould like to create some Samba shares for them to use.
SolutionSimply create the shares, then use Samba’s access controls to control access to theshares:
[qa-group] comment = qa group's shared files path = /var/share/qagroup valid users = helix patti devdas @qausers browseable = yes writable = yes
DiscussionUsers who are authorized to access the share can freely upload and download docu-ments. You can set these shares to be non-browseable with browseable = no, so that

This is the Title of the Book, eMatter EditionCopyright © 2007 O’Reilly & Associates, Inc. All rights reserved.
23.11 Accessing Users’ Home Directories in Samba | 463
only valid users can see the shares. Extremely sensitive documents should not be on aSamba share; it’s better to use OpenSSH or rsync-over-ssh (see Chapters 16 and 17).
See Also• smb.conf(5)
23.11 Accessing Users’ Home Directories in Samba
ProblemYou want your users to be able to access their home directories on the Samba server,so they always have access to their personal files, no matter where they log in from.
SolutionAdd these lines to smb.conf:
[homes] comment = User's Home Directories valid users = %S browseable = No read only = No
Linux users can connect to their home directories with smbclient:
$ smbclient //windbag/homes -U <username> <password>
So, if user Andrew’s password is bigsecret, he can access his home directory asfollows:
$ smbclient //windbag/homes -U andrew bigsecret
Then use smbmount and smbumount to mount the share and make the files available(see Recipe 23.18).
smb4k and LinNeighborhood (discussed in Recipe 23.17) are excellent Linux graphi-cal browsers for accessing homes shares.
Windows users merely need to find the server in Network Neighborhood, then log inin the usual manner.
DiscussionBecause the homes shares are not browseable (browseable = No), they will not appearin any LAN browser until you log in. Then, only your home directory is displayed;you won’t see the other users’ directories. So users only need to know the name ofthe server, not the names of their shares.

This is the Title of the Book, eMatter EditionCopyright © 2007 O’Reilly & Associates, Inc. All rights reserved.
464 | Chapter 23: File and Printer Sharing, and Domain Authentication with Samba
valid users = %S means that all Samba users can get to their home directories. If youwish to restrict users, you may use the usual methods to grant or deny access to spe-cific users and/or groups:
valid users = andrew dana helen helixvalid users = +sambagroupinvalid users = daryl larry +badusers
See Also• smb.conf(5)
23.12 Building a Primary Domain Controllerwith Samba
ProblemYou want to set up a Samba primary domain controller for your LAN to providedomain authentication.
SolutionA domain controller provides a single central password database, so once users login, they have access to domain resources without having to reauthenticate them-selves as they access file or printer shares in the domain. The hardworking sysadmincan also easily lock out users, if necessary.
Because file and printer shares are configured centrally on the Samba server, accessto shares is easy to manage. Unlike in a peer network, the sysadmin has completecontrol of network shares.
Windows XP Home cannot join any domain—neither a Windowsdomain, nor a Samba domain. Windows NT 3.x does not supportencrypted passwords, so you cannot join NT 3.x clients to a normalSamba domain. The best choices for domain clients are Windows2000 and XP Pro.
There are five steps to the setup process:
1. Install Samba.
2. Configure smb.conf.
3. Create user and machine accounts.
4. Create directories.
5. Fire it up and connect clients for testing.

This is the Title of the Book, eMatter EditionCopyright © 2007 O’Reilly & Associates, Inc. All rights reserved.
23.12 Building a Primary Domain Controller with Samba | 465
Installing Samba is the easy part. You can install from sources or packages, whateveryou prefer.
Here is a complete, minimal smb.conf for your new domain controller. This config-ures authentication and users’ homes shares. It does not define file or printer shares.The workgroup name becomes your new domain name:
[global] workgroup = holstein netbios name = windbag server string = Samba PDC domain master = yes os level = 64 preferred master = yes local master = yes domain logons = yes logon script = netlogon.bat
security = user encrypt passwords = yes log file = /var/log/samba/log log level = 2 max log size = 50 hosts allow = 192.168.1.
[netlogon] comment = Network Logon Service path = /var/samba/netlogon guest ok = Yes browseable = No
[homes] comment = User's Home Directories valid users = %S browseable = no writeable = yes
See the “Discussion” section of this recipe for a copy of the logon script, netlogon.bat.
Save and close smb.conf, then run testparm to check for syntax errors:
# testparm
Then restart Samba.
Next, create these administrative groups, using system group numbers:
# groupadd -g 112 sadmins# groupadd -g 113 machines
Then create the netlogon directory:
# mkdir -m 0775 /var/samba/netlogon# chown root.sadmins /var/samba/netlogon

This is the Title of the Book, eMatter EditionCopyright © 2007 O’Reilly & Associates, Inc. All rights reserved.
466 | Chapter 23: File and Printer Sharing, and Domain Authentication with Samba
Each PC in your new Samba domain must have a machine account. First, createLinux accounts on the Samba server for every PC. The dollar sign indicates that thisis a “trust,” or machine, account:
# useradd -g machines -d /dev/null -c "stinkpad" -s /bin/false stinkpad$# passwd -l stinkpad$
Then add each account to the Samba password database. Leave the dollar sign offthe machine name:
# smbpasswd -a -m stinkpadAdded user stinkpad$.
Finally, create a root account on Samba with smbpasswd. You need this every timeyou join a new Windows NT/2000/XP machine to the domain, because you mustmake your first domain login as the Samba root user. Don’t forget to do this, or yourWindows NT/2000/XP PCs will not be able to join the domain.
Log in to the domain as soon as possible, in order to synchronize with the server andto prevent someone else from possibly hijacking the account. stinkpad and Sambawill exchange authentication tokens, so that Samba will always recognize stinkpad.That is where the “trust” happens.
The steps for joining clients running different versions of Windows to a Sambadomain are all different; see the next three recipes to learn how.
DiscussionThere are a couple of easy tests you can run to confirm that your Samba domain con-troller is working. First, always run testparm:
$ testparmLoad smb config files from /etc/samba/smb.confProcessing section "[netlogon]"Processing section "[homes]"Loaded services file OK.Server role: ROLE_DOMAIN_PDC
Server role: ROLE_DOMAIN_PDC is the line you want to see. Then run smbtree onthe server:
$ smbtree -Nadded interface ip=192.168.1.5 bcast=192.168.1.255 nmask=255.255.255.0Got a positive name query response from 192.168.1.5 ( 192.168.1.5 )Got a positive name query response from 192.168.1.5 ( 192.168.1.5 )HOLSTEINGot a positive name query response from 192.168.1.5 ( 192.168.1.5 ) \\WINDBAG Samba PDC
To test connectivity, run smbtree from another Linux host on the LAN.
This is a bare-bones configuration. You can easily add file and printer shares as youneed, just like for any Samba server.

This is the Title of the Book, eMatter EditionCopyright © 2007 O’Reilly & Associates, Inc. All rights reserved.
23.13 Connecting Windows 95/98/ME to a Samba Domain | 467
The netlogon share contains a script that is automatically downloaded to Windowsclients. It mounts the users’ homes shares on their local Z drives. This is the wholescript:
REM NETLOGON.BATnet use z: \\linux\samba /yes
Be sure to name it netlogon.bat, and store it in /var/samba/netlogon.
These are the directives that tell Samba it is a primary domain controller (PDC):
domain master = yesos level = 64preferred master = yeslocal master = yesdomain logons = yes
Remember, There Can Be Only One—don’t put two PDCs on the same domain, ornothing will work right. You may have multiple Samba file servers, but only onePDC.
See Also• smb.conf(5)
• Chapter 4 of The Official Samba-3 HOWTO and Reference Guide
23.13 Connecting Windows 95/98/MEto a Samba Domain
ProblemYour new Samba primary domain controller (PDC) is ready to roll—how do youconnect a Windows 95/98/ME client?
SolutionThis is the easiest one of all. First, be sure to log into Windows as the same useryou’re going to use to log into Samba. Next, confirm that networking is set up cor-rectly (see Recipe 23.14). Then, go to Control Panel ➝ Network ➝ Client forMicrosoft Networks ➝ Properties. Check “Logon to NT Domain.” Enter the domainname (holstein, in our example). Check “Logon and restore network connections.”Click OK, and it will ask you for your Windows CD. Reboot to activate the changes.After rebooting, you can log into the domain.

This is the Title of the Book, eMatter EditionCopyright © 2007 O’Reilly & Associates, Inc. All rights reserved.
468 | Chapter 23: File and Printer Sharing, and Domain Authentication with Samba
DiscussionRemember that the workgroup name in smb.conf is your new domain name.
See Also• Recipe 23.4, “Enabling File Sharing on Windows PCs,” for more information on
configuring Windows networking
• Chapter 3 of Using Samba
23.14 Connecting Windows NT/2000 Clientsto a Samba Domain
ProblemYour new Samba primary domain controller (pdc) is ready to roll—how do you con-nect a Windows NT/2000 client?
SolutionRemember that root user you created a Samba account for in Recipe 23.12? Nowyou’re going to use it. On Windows NT, go to Control Panel ➝ Network ➝ Identifi-cation ➝ Change. Select the Domain button and enter the domain name, which is theworkgroup name in smb.conf. Then select “Create a Computer Account in theDomain.” Finally, log into the domain as the Samba root user. This is necessary toinitialize the “trust” between the server and client machines.
On Windows 2000, right-click My Computer, click Properties, go to the NetworkIdentification tab, and click the Network ID button. This will open the NetworkIdentification Wizard, which will take you through all the necessary steps. Again,your first domain login must be as the Samba root user.
DiscussionRemember that the workgroup name in smb.conf is your new domain name.
After connecting successfully to a domain, you can initiate subsequent logins withCtrl-Alt-Del. Note that you can either log into the domain, or log into the localmachine without logging into a domain.

This is the Title of the Book, eMatter EditionCopyright © 2007 O’Reilly & Associates, Inc. All rights reserved.
23.15 Connecting Windows XP Clients to a Samba Domain | 469
See Also• Recipe 23.4, “Enabling File Sharing on Windows PCs,” for more information on
configuring Windows networking
• Chapter 3 of Using Samba
23.15 Connecting Windows XP Clients to a SambaDomain
ProblemYour new Samba primary domain controller (pdc) is ready to roll—how do you con-nect a Windows XP client?
SolutionFirst of all, you’d better have XP Pro, because XP Home cannot connect to anydomain (neither Windows nor Samba).
For XP Professional, you need to take some extra configuration steps, and also installa Registry hack. Here’s the procedure:
1. Open the Local Security Policy editor, at Administrative Tools ➝ Local SecurityPolicy.
2. Find “Domain member: Digitally encrypt or sign secure channel (always).”Disable it.
3. Find “Domain member: Disable machine account password changes.” Disable it.
4. Find “Domain member: Require strong (Windows 2000 or later) session key.”Disable it.
5. Look in /usr/share/doc/samba-doc/registry for WinXP_SignOrSeal.reg. Copy it toWindows, and apply it by double-clicking. Alternatively, you can edit the Regis-try by hand. Look for this key, and make sure the dword value is 0:
6. [HKEY_LOCAL_MACHINE\SYSTEM\CurrentControlSet\Services\Netlogon\Parameters]
7. “requiresignorseal”=dword:00000000
8. Now right-click My Computer, select Properties, then click the Network ID but-ton and run the Network Wizard.
For your first login to the domain, connect as the Samba root user (see Recipe 23.12).

This is the Title of the Book, eMatter EditionCopyright © 2007 O’Reilly & Associates, Inc. All rights reserved.
470 | Chapter 23: File and Printer Sharing, and Domain Authentication with Samba
DiscussionRemember that the workgroup name is your new domain name.
After connecting successfully to a domain, you can initiate subsequent logins withCtrl-Alt-Del. Note that you can either log into the domain, or log into the localmachine without logging into a domain.
See Also• Recipe 23.4, “Enabling File Sharing on Windows PCs,” for more information on
configuring Windows networking
• Chapter 3 of Using Samba, Second Edition
23.16 Enabling Roaming Profiles
ProblemYou move around a lot and log in from different machines, and you would like someway of having Samba present you with the same desktop environment. You’d like tohave all of your menus, shortcuts, and pretty backgrounds in place, just as thoughyou were chained to a single PC all day.
SolutionConfigure roaming profiles in smb.conf. Add these lines to the global section:
logon home = \\%L\%U\.profiles logon path = \\%L\profiles\%U
Next, create a profiles share:
[profiles] path = /var/profiles writeable = yes browseable = no create mask = 0600 directory mask = 0700
Make sure that /var/profiles, or whatever directory you want to use, exists and hasthese permissions:
# mkdir -m 1757 /var/profiles
Save your changes, and restart Samba. That’s all it takes—now you will be greetedby your familiar desktop environment no matter where you log in.

This is the Title of the Book, eMatter EditionCopyright © 2007 O’Reilly & Associates, Inc. All rights reserved.
23.17 Connecting Linux Clients to a Samba File Server or Peer Network | 471
Discussionlogon home is for Windows 95/98/ME. logon path applies to Windows NT/2000/XP.The variable-substitution macros automatically pick up your domain and username,so this is a nice generic configuration you can use anywhere.
The create mask and directory mask permissions ensure that only file owners will beable to read or write to their own profiles.
Profiles are enabled by default in Windows NT/2000/XP. To enable them in Win-dows 95/98/ME, go to Control Panel ➝ Passwords ➝ User Profiles tab. Check “Userscan customize their preferences and desktop settings.”
Enabling roaming profiles can cause problems. Profiles do not work consistentlybetween the different versions of Windows, so anyone who logs in from differentWindows systems will probably see some odd behavior. For example, changes madeto the Start menu or desktop shortcuts might not appear the same from everymachine used to log in. Also, if users accumulate a lot of files on their desktops,they’ll clog the network and take up a lot of space on the Samba server.
Having roaming profiles is nice, but not essential; they’re just cosmetic. If they aremore trouble than they’re worth, you may disable them in good conscience.
See Also• smb.conf(5)
23.17 Connecting Linux Clients to a Samba FileServer or Peer Network
ProblemThe Linux users on your LAN need to be able to access your Samba file server, orgain access to the domains or workgroups. And they want nice, simple-to-use graphi-cal LAN browsers for finding things.
SolutionLinux hosts need to have Samba installed (see Recipe 23.2). Then, there are severalgood graphical LAN browsers to choose from:
smb4kThis gets my vote as the best Linux graphical LAN browser. It has a nice, cleanappearance, and it’s easy to use. The one possible downside is that it requires

This is the Title of the Book, eMatter EditionCopyright © 2007 O’Reilly & Associates, Inc. All rights reserved.
472 | Chapter 23: File and Printer Sharing, and Domain Authentication with Samba
KDE, so if you’re not already a KDE user, you’ll need to install kdebase andKonqueror.
LinNeighborhoodThis is a nice, easy, point-and-click GUI frontend for Samba and smbmount. Lin-Neighborhood is independent of any window manager or desktop environment,so it will run in any X environment.
Konqueror, the KDE file managerEnter smb:// in the URL bar to show all available workgroups. Konquerordepends on LISA, the LAN information manager service, which is installed bydefault in most distributions. “lisa” packages are available in both .debs andRPMs, if you need to add it.
Nautilus, the Gnome file managerEnter smb:// in the URL bar to show all available workgroups.
DiscussionIf Linux users wish to share files, set up the shares like any Samba file server, as inRecipe 23.2. The client portion of Samba can be installed separately, for users whoonly need share access and don’t want to share files themselves.
If smb4k doesn’t automatically find your workgroup, go to Settings ➝ Configuresmb4k ➝ Network ➝ Network Search and click “smbclient.” The default isnmblookup, but smbclient often works better. See Figure 23-6 for a picture of smb4k.
Figure 23-6. The smb4k browser

This is the Title of the Book, eMatter EditionCopyright © 2007 O’Reilly & Associates, Inc. All rights reserved.
23.17 Connecting Linux Clients to a Samba File Server or Peer Network | 473
LinNeighborhood usually requires a bit of configuration. Go to Edit ➝ Preferences.Under the Scan tab, enter the name of your master browser, which in this chapter is“windbag.” On the Miscellaneous tab, you can enter a default username and selectyour default mount directory. This should be in your home directory, something like/home/carla/mnt. On the Post Mount tab, configure your default file manager. Besure to hit Save on every tab, and after you close the Preferences menu, click Edit➝ Save Preferences.
You can bring up a menu for logging in as different users on different shares simplyby clicking on the share you want.
Figure 23-7 shows LinNeighborhood in action. Every PC in your workgroup is dis-played. Double-click or right-click on the directory you want to use. This will open theMount dialog, which lets you use the default mount directory or specify a new one.
The nice thing about Konqueror and Nautilus is that you don’t need to explicitlymount the shares; you just manipulate the files as though they were stored locally.This can get tricky, though. For example, when you access a read-only share in Kon-queror, it appears to let you edit or add files to the share. But it’s an illusion—theydo not really get changed or added. You can save any changes to your local drive, butnot to the share.
Figure 23-7. The LinNeighborhood network browser

This is the Title of the Book, eMatter EditionCopyright © 2007 O’Reilly & Associates, Inc. All rights reserved.
474 | Chapter 23: File and Printer Sharing, and Domain Authentication with Samba
See Also• Smb4K—A SMB share browser for KDE (http://smb4k.berlios.de)
• LinNeighborhood (http://www.bnro.de/~schmidjo)
• Konqueror (http://www.konqueror.org)
• Nautilus (http://www.gnome.org/projects/nautilus)
23.18 Connecting Linux Clients to SambaWorkgroups with Command-Line Tools
ProblemGraphical LAN browsers, like the ones discussed in Recipe 23.17, are nice, but youreally want a command-line tool for browsing Samba shares and transferring files.You don’t always run an X session, or maybe you just prefer the console.
SolutionUse smbclient to list available shares and to transfer the files you want. Withsmbclient, you don’t need to mount shares to get or upload the files; it’s just likeusing File Transfer Protocol (FTP).
Another option is to use smbtree and smbmount/smbumount. smbtree is an ASCII-textLAN browser, so you don’t need to run X to use it. Use smbtree to display the hostsand shares in your workgroup, then use smbmount/smbumount to mount andunmount the shares you want to use.
DiscussionTo use smbclient, first give it the hostname of your Samba server to show a list ofshares:
$ smbclient -N -L windbag... Sharename Type Comment --------- ---- ------- share1 Disk testfiles share2 Disk more testfiles share3 Disk testfiles galore...
Then connect to the share you want:
$ smbclient -N //windbag/share1Domain=[WORKGROUP] OS=[Unix] Server=[Samba 3.0.5-Debian]smb: \>

This is the Title of the Book, eMatter EditionCopyright © 2007 O’Reilly & Associates, Inc. All rights reserved.
23.18 Connecting Linux Clients to Samba Workgroups with Command-Line Tools | 475
To list the files, use ls:
smb: \> ls. D 0 Sat Aug 14 16:47:24 2003 .. D 0 Sat Aug 14 16:46:14 2003 chatscripts D 0 Sat Aug 14 16:47:24 2003 calendar D 0 Sat Aug 14 16:47:05 2003
47838 blocks of size 65536. 17571 blocks available
Files are transferred by using the familiar old FTP commands:
smb: \> cd chatscriptssmb: \chatscripts\> ls. D 0 Sat Aug 14 16:47:24 2004 .. D 0 Sat Aug 14 16:47:24 2004 provider A 656 Tue Aug 19 15:14:46 2003
47838 blocks of size 65536. 17571 blocks availablesmb: \chatscripts\> get provider provider-copy
This command downloads the file provider to your local working directory andrenames it provider-copy. To upload the provider-copy file when you’re finished,without changing the name, use:
smb: \chatscripts\> put provider-copy
You can call up a list of commands with the question mark:
smb: \> ?
To terminate your session, use:
smb: \> quit
smbtree looks like this:
$ smbtree -NWORKGROUP \\WINDBAG anonymous lan file server \\WINDBAG\ADMIN$ IPC Service (anonymous lan file server) \\WINDBAG\IPC$ IPC Service (anonymous lan file server) \\WINDBAG\share2 shared filenthinngs \\WINDBAG\share1 testfiles \\STINKPAD lil black box \\STINKPAD\ADMIN$ IPC Service (lil black box) \\STINKPAD\IPC$ IPC Service (lil black box) \\POWERPC celeron \\POWERPC\IPC$ Remote Inter Process Communication \\POWERPC\PRINTER$
When you see the share you want, mount the share on your system with smbmount,using a directory created for this purpose, and mind your slashes:
$ mkdir samba$ smbmount //powerpc/c-win98 samba -o guest
This is the Title of the Book, eMatter EditionCopyright © 2007 O’Reilly & Associates, Inc. All rights reserved.
476 | Chapter 23: File and Printer Sharing, and Domain Authentication with Samba
To unmount the share when you’re finished, use:
$ smbumount samba
-o guest prevents Samba from asking for a password. Use this on anonymous sharesthat don’t need authentication. If a login is required, enter your username:
$ smbmount //windbag/andrew samba -o andrewadded interface ip=192.168.1.5 bcast=192.168.1.255 nmask=255.255.255.0Password:
smbmount must be SUID for ordinary users to be able to use it. If your installationdid not do this already, set the SUID bit this way:
# chmod +s smbmount
See Also• smbmount(8), smbumount(8), smbtree(1)
23.19 Connecting Linux Clients to a SambaDomain with GUI LAN Browsers
ProblemYou want to connect to a Samba domain with one of the nice graphical utilities inRecipe 23.17, but you don’t know how to send Samba your login and password.
SolutionWith Konqueror and Nautilus, all you need to do is browse the network. When youclick on the domain icon, a login box will pop up.
In smb4k, right-click on the domain you wish to access, then left-click “Authentica-tion.” This opens a login box that lets you log in as any Samba user.
In LinNeighborhood, right-click on the domain you wish to enter, then left-click“scan group as user.” This opens a login box that lets you log in as any Samba user.
See Also• Smb4K—A SMB share browser for KDE (http://smb4k.berlios.de)
• LinNeighborhood (http://www.bnro.de/~schmidjo)
• Konqueror (http://www.konqueror.org)
• Nautilus (http://www.gnome.org/projects/nautilus)

This is the Title of the Book, eMatter EditionCopyright © 2007 O’Reilly & Associates, Inc. All rights reserved.
23.20 Connecting Linux Clients to a Samba Domain with Command-Line Tools | 477
23.20 Connecting Linux Clients to a SambaDomain with Command-Line Tools
ProblemYou need to connect to a Samba domain—how do you send Samba your login andpassword with smbtree, smbclient, and smbmount?
SolutionYou can send the username and password of any Samba user with these commands.So you can view your homes share with smbtree, for example, even though it is notbrowseable, and then connect with smbclient:
$ smbtree -U andrewadded interface ip=192.168.1.5 bcast=192.168.1.255 nmask=255.255.255.0Password:Got a positive name query response from 192.168.1.5 ( 192.168.1.5 )Got a positive name query response from 192.168.1.5 ( 192.168.1.5 )Got a positive name query response from 192.168.1.5 ( 192.168.1.5 )HOLSTEINGot a positive name query response from 192.168.1.5 ( 192.168.1.5 ) \\WINDBAG Samba PDC \\WINDBAG\andrew User's Home Directories \\WINDBAG\ADMIN$ IPC Service (Samba PDC) \\WINDBAG\IPC$ IPC Service (Samba PDC)$ smbclient //windbag/andrew -U andrewPassword:Domain=[HOLSTEIN] OS=[Unix] Server=[Samba 3.0.5-Debian]smb: \>
Or, instead of using smbclient, you can mount the share with smbmount:
$ smbmount //windbag/andrew samba -o andrewadded interface ip=192.168.1.5 bcast=192.168.1.255 nmask=255.255.255.0Password:
To unmount it when you’re finished, use:
$ smbumount samba
DiscussionYou may also put your password on the command line, after your username, butthat exposes it to any snoopy eyeballs:
$ smbmount //windbag/andrew samba -o andrew bigsecret

This is the Title of the Book, eMatter EditionCopyright © 2007 O’Reilly & Associates, Inc. All rights reserved.
478 | Chapter 23: File and Printer Sharing, and Domain Authentication with Samba
See Also• smbmount(8), smbumount(8), smbtree(1)
23.21 Keeping Samba and Linux Passwordsin Sync
ProblemYour Samba users know they can use smbpasswd to change their own passwords, butwhen they do this, their Linux passwords on the Samba server do not change. Youwould like a method to keep them synchronized.
SolutionAdd these lines to the global section of smb.conf:
unix password sync = yespasswd program = /usr/bin/passwd %upasswd chat = "*Enter OLD password*" %o\\n "*Enter NEW password*" %n\\n "*Reenter NEWpassword*" %n\\n "*Password changed*"
This calls passwd to change the users’ passwords in /etc/passwd when they changetheir Samba passwords. passwd chat controls the change process and gives feedback.You can modify this to suit your own needs.
DiscussionThis is a one-way trip; it does not update the Samba passwords when users changetheir Linux passwords.
The macro substitutions used in passwd chat are these:
%u Username.
%o Old password.
%n New password.
\\n Newline, escaped. This breaks the passwd chat output into separate lines,instead of printing it all on one line.
For a complete list of Samba’s substitution macros, see smb.conf(5), in the “VariableSubstitutions” section.
See Also• smb.conf(5)

This is the Title of the Book, eMatter EditionCopyright © 2007 O’Reilly & Associates, Inc. All rights reserved.
23.22 Sharing Linux Printers with Windows | 479
23.22 Sharing Linux Printers with Windows
ProblemYou want your Windows users to have access to Linux-connected printers in yourSamba workgroups or domains.
SolutionYou need both CUPS and Samba to do this. Here’s what you need to do:
1. Install printers on your Linux boxes in the normal manner via CUPS (seeChapter 14).
2. Install CUPS on the Samba server.
3. Configure CUPS for Samba.
4. Create a printers share in smb.conf on the Samba server.
To configure CUPS for Samba, run the following command:
# ln -s `which smbspool` /usr/lib/cups/backend/smb
This example printers share shares all printers on the network:
[printers] comment = All Printers printing = cups printcap name = cups
Restart Samba after editing smb.conf.
Now Windows users can run the Add Printer Wizard to install printers from the net-work. They will need to install Windows drivers locally, so they will need WindowsCDs or driver installation disks.
DiscussionMake sure you create a printers share, not “printer”; printers is a special reservedSamba share, like homes and global.
When you install CUPS, be sure to include a complete complement of drivers byinstalling the Foomatic and Gimp-Print packages. Note that you can use a standaloneCUPS printer server, without Samba, for both Windows and Linux clients (seeChapter 14). However, you need Samba to make Windows printers available to Linux(see Recipe 23.23).
With CUPS, sharing printers is much easier than it was under the old System V orBerkely printing systems. You don’t have to mess about with raw queues or complexSamba shares. Just install them in the usual manner via CUPS, add the printers share

This is the Title of the Book, eMatter EditionCopyright © 2007 O’Reilly & Associates, Inc. All rights reserved.
480 | Chapter 23: File and Printer Sharing, and Domain Authentication with Samba
to Samba, and they will magically appear in Network Neighborhood on theWindows PCs.
See Also• Chapter 14, Printing with CUPS
• Recipe 23.23, “Sharing Windows Printers with Linux”
23.23 Sharing Windows Printers with Linux
ProblemYou run a mixed Windows/Linux LAN, and you want your Linux users to be able toprint to the Windows-connected printers.
SolutionYou need both CUPS and Samba to do this. Here’s what you need to do:
1. Install printers on your Windows boxes, and share them in the normal manner.
2. On Windows NT/2000/XP, make sure that the “guest” account is enabled, andmake sure that “Everyone” has permission to print to the shared printers.
3. Install CUPS on the Samba server (see Chapter 14).
4. Configure CUPS for Samba.
5. Create a printers share in smb.conf on the Samba server.
To configure CUPS for Samba, run the following command:
# ln -s `which smbspool` /usr/lib/cups/backend/smb
These lines in smb.conf share all printers on the network:
[printers] comment = All Printers printing = cups printcap name = cups
Restart Samba after editing smb.conf.
Next, install the Windows printers on the Samba server with CUPS. Open the CUPSweb interface (http://localhost:631/admin). Log in as root.
Click “Add Printer” and enter the printer name, which in this example is “Alps.”Enter the location and description, then go to the next window, which is the Devicewindow. Click on the drop-down menu, scroll to the bottom, and select “WindowsPrinter Via Samba.”

This is the Title of the Book, eMatter EditionCopyright © 2007 O’Reilly & Associates, Inc. All rights reserved.
23.24 Running Windows Applications on Linux with CrossOver Office | 481
In the next window, “Device URI for Alps,” enter the device URI. “Alps” is con-nected to powerpc on Windows 2000, so you must enter the “guest” username andhostname:
smb://guest@powerpc/alps
In the next two windows, select the printer driver.
Print a test page from the server. Then move to a Linux client and open the CUPSweb interface. If you configured CUPS correctly, the printer will appear. Print a testpage from the Linux client. Now any Linux client on the LAN can use this printer.
DiscussionPrinters connected to Windows 95/98/ME do not need a username, nor do they haveguest accounts. All you need to do is share the printer. Recipe 23.4 goes into moredetail on enabling sharing in the various Windows versions.
Note that you can use a standalone CUPS printer server, without Samba, for bothWindows and Linux clients (see Chapter 14). However, you need Samba to makeWindows printers available to Linux.
See Also• Recipe 23.4, “Enabling File Sharing on Windows PCs”
• Chapter 14, Printing with CUPS
23.24 Running Windows Applications on Linuxwith CrossOver Office
ProblemYou have Samba set up and running, and everything is working great. Users are shar-ing files, and networked printers are not being troublesome. But there’s still a glitchin the file sharing: incompatible file formats. Sure, OpenOffice does a good job ofconverting even complex MS Office documents. But it can’t convert Visual Basicscripts, or application interfaces written in Visual Basic. There’s no way to use AdobePhotoshop files in Linux, or Quicktime, or Windows Media Player.
Maybe someday you want to migrate all users away from MS Office and run a 100%Linux shop. Or maybe you’ll always have a mixed network, and you want your users tobe able to freely share files, whatever platform they are created on. Whatever your futureplans are, what can you do now to smooth over these file-format incompatibilities?

This is the Title of the Book, eMatter EditionCopyright © 2007 O’Reilly & Associates, Inc. All rights reserved.
482 | Chapter 23: File and Printer Sharing, and Domain Authentication with Samba
SolutionInstall CrossOver Office to allow your Linux users to run Windows applicationsdirectly on Linux. Installation is easy; this recipe uses the free CrossOver Office Stan-dard Edition demo to illustrate.
First, download your demo or purchased version. Then, to allow all users on yoursystem to use CrossOver Office, run the installation script as the root user:
# sh install-crossover-standard-demo-3.0.1.shVerifying archive integrity...OKUncompressing CrossOver OfficeStandard.......................................................................................................................................................................................................................install
This brings up the menu in Figure 23-8.
Click “Begin Install.” When the installation is nearly over, you’ll see the menu inFigure 23-9. Select “Exit now and allow individual users to install their own Win-dows applications.” This allows all users on the system to use CrossOver Office.
Next, as an ordinary user, run the setup program to install your chosen Windowsapplications. On KDE and Gnome, look in the start menu for Crossover ➝ OfficeSetup. This takes you through some basic system setup screens, then opens the menushown in Figure 23-10.
So all you need are your installation disks for your chosen Windows applications,and to click on “Install.” Follow the steps, and in short order your Windows pro-grams will be installed.
When your Windows programs need a reboot, CrossOver Office even emulates this,with Crossover ➝ Simulate Windows Reboot.
Figure 23-8. CrossOver Office setup menu

This is the Title of the Book, eMatter EditionCopyright © 2007 O’Reilly & Associates, Inc. All rights reserved.
23.24 Running Windows Applications on Linux with CrossOver Office | 483
The installer creates start menu entries in both KDE and Gnome, including entriesfor your installed Windows applications. If you are using a different window man-ager, see the “Discussion” section of this recipe about creating them manually.
DiscussionCrossOver Office by default installs into /opt/cxoffice, and users will have their own~/.cxoffice files, for customizing their CrossOver Office environments. Use these file-paths for manually creating menu entries in window managers other than KDE orGnome:
Help/opt/cxoffice/doc/index.html
CrossOver Office Setup/opt/cxoffice/bin/cxsetup
Reset CrossOver Office/opt/cxoffice/bin/cxreset
Figure 23-9. CrossOver Office installation

This is the Title of the Book, eMatter EditionCopyright © 2007 O’Reilly & Associates, Inc. All rights reserved.
484 | Chapter 23: File and Printer Sharing, and Domain Authentication with Samba
Simulate Windows Reboot/opt/cxoffice/bin/cxreboot
Uninstall CrossOver Office/opt/cxoffice/bin/cxuninstall
CrossOver Office is a great tool for the mixed LAN. You can run Windows applica-tions on Linux, and gain the benefit of a more stable, more secure operating system.Users won’t have to be retrained on native Linux applications. And you can save thecost of a Windows license.
Data migration is the biggest bottleneck when you’re considering migrating fromWindows to Linux. Microsoft Office users who have accumulated archives of cus-tom Visual Basic scripts and macros are probably not going to look forward to learn-ing new scripting languages, and doing everything over. If you are planning tomigrate users away from Windows to Linux, CrossOver Office lets you take yourtime, and make the move with minimal disruption.
Figure 23-10. CrossOver Office software installation

This is the Title of the Book, eMatter EditionCopyright © 2007 O’Reilly & Associates, Inc. All rights reserved.
23.24 Running Windows Applications on Linux with CrossOver Office | 485
CrossOver Office is not free of cost. The Standard edition is $39.95, and includes sixmonths of technical support. The Professional edition costs $74.95, and comes withone year of technical support. If you want multiple users on a single PC to use Cross-Over Office, the Professional edition is the better choice. It allows all applications tobe shared. The Standard edition requires a separation installation for each user’schosen Windows applications.
Currently, over 1,000 applications will install and run on CrossOver Office. Visit thecompatibility page at http://www.codeweavers.com/site/compatibility/ to look up spe-cific applications. Be warned that not all applications will run well, or have theirentire feature set supported. Even the officially supported applications may have ahiccup or two.
CrossOver Office officially supports:
Adobe Acrobat Reader 5.0Adobe Photoshop 6Adobe Photoshop 7Authorware Web PlayerCortona VRML ClientDCOM 95Dreamweaver MXFlash MXFlash PlayerInternet Explorer 6.0Lotus Notes 5Lotus Notes 6.5.1MDL ChimeMODPLugMicrosoft Excel Viewer 97/2000Microsoft Office 2000Microsoft Office 97Microsoft Office XPMicrosoft PowerPoint Viewer 97/2000Quick View PlusQuickBooks 2000Quicktime 6.3QuickenRealPlayer 8 BasicShockwave Player 8.5Superscape Viscape UniversalTrillianVP3 For Quicktime 5Windows Media Player 6.4

This is the Title of the Book, eMatter EditionCopyright © 2007 O’Reilly & Associates, Inc. All rights reserved.
486 | Chapter 23: File and Printer Sharing, and Domain Authentication with Samba
eFax Messengerebrary ReaderiPIX Netscape Plugin Viewer
CrossOver Office is an adaptation of WINE (Wine Is Not a Emulator). WINE has aprogram loader, which loads and executes your Windows binaries, and a set oflibraries that implements Windows API calls using their Unix or X11 equivalents.This enables running Windows programs on Linux without having to build a nativeLinux port. Because so many Windows applications are built with Windows tools,like Visual Studio, using the Microsoft Foundation Class Library, porting usuallymeans an extensive, if not complete, rewrite. Which most vendors and programauthors are understandably loathe to do. WINE enables running Windows binariesdirectly on Linux, with no rewriting or porting.
But, while development on WINE is rapid, it’s still a long way from being finished,or user-friendly. Much tweaking is needed to get individual programs running cor-rectly. CrossOver Office tunes WINE to run selected applications reliably, and pro-vides an easy-to-use interface for installing and removing Windows programs.
See Also• WINE home page (http://www.winehq.com/)
• CrossOver Office, by Codeweavers (http://www.codeweavers.com/site/products/)

This is the Title of the Book, eMatter EditionCopyright © 2007 O’Reilly & Associates, Inc. All rights reserved.
487
Chapter 24 CHAPTER 24
Managing NameResolution
24.1 IntroductionName resolution includes the Domain Name System (DNS) and hosts files. TheDynamic Host Configuration Protocol (DHCP) goes hand-in-hand with name resolu-tion. Name resolution resolves names to IP addresses, and DHCP takes over thetedious chore of assigning IP addresses to individual hosts. Servers need static IPaddresses. Workstations do just fine with dynamically assigned addresses—just plug’em in and let DHCP do the work.
DNS powers the Internet. All it does is name resolution, or translation of names tonumbers. As simple as the concept is, a huge infrastructure has evolved to imple-ment it. We could get along fine without DNS—after all, we’ve been using complexpostal mail addresses and phone numbers all of our lives. But there are many advan-tages to using name resolution. Several names can be mapped to a single IP address.Names are easier to remember. And we can indulge in giving our servers fancifulhostnames, like the names of Tolkien characters, or astronomical terms, or mytho-logical characters. (Okay, so that last one isn’t vitally important—but it is fun.)
Implementing DNSOne difficulty with learning to run a DNS server is that the vast majority of the docu-mentation is BIND-centric. Berkeley Internet Name Domain (BIND) is the oldest andmost widely used DNS server. It seems as though BIND is considered to be the DNSprotocol, rather than just an implementation of it.
This chapter contains recipes for two different DNS servers: BIND and djbdns. Ibelieve that djbdns is the superior choice. It’s modular, small, very fast, and verysecure. It’s also simple to configure and very dependable, because it runs from super-visory daemons that automatically restart it if it should die unexpectedly. Replicat-ing a djbdns server securely and efficiently is easy—you use standard Linux utilities

This is the Title of the Book, eMatter EditionCopyright © 2007 O’Reilly & Associates, Inc. All rights reserved.
488 | Chapter 24: Managing Name Resolution
such as rsync-over-ssh, which means you can easily set up authenticated datafiletransfers using SSH keys.
BIND has been around forever, and it is widely deployed. However, it’s one bigmonolithic program, so you cannot customize the installation to suit your needs.About all you can do is configure it differently for different uses, which is not com-pletely effective in shutting down the parts you don’t need. This presents securityrisks, and BIND has a long history of security problems. Furthermore, it uses oddproprietary methods for replicating zone files to backup servers (secondaries),instead of nice, reliable, standard Unix utilities. Even back in the days before rsync,there was no shortage of dependable methods for transferring files, so the reason forthe evolution of these BIND-specific file transfer protocols is a mystery.
Despite its drawbacks, BIND has the advantage in sheer volume of books and docu-mentation, with Cricket Liu’s books being the standards: the DNS & BINDCookbook and DNS and BIND, which is now on its fourth edition (both publishedby O’Reilly), are must-haves for the BIND admin.
A DNS GlossaryDNS refers to three things: the DNS protocol; name resolution; and the entire sys-tem that implements it, which consists of domain name registrars, root servers,authoritative servers, IANA and the regional Internet registries, ICANN, and all thecaching DNS servers that spread the load and keep things moving. Here are someterms to familiarize yourself with:
IANAInternet Assigned Numbers Authority. It all starts here—this is the group thatcoordinates the allocation of IP addresses worldwide. Both IPv4 and IPv6addresses are part of the brew now. IANA dispenses blocks of IP adresses to theRegional Internet registries:
APNIC (Asia Pacific Network Information Centre): Asia/Pacific RegionARIN (American Registry for Internet Numbers): North America and Sub-Saharan AfricaLACNIC (Latin American and Caribbean IP Address Registry):LatinAmerica and some Caribbean IslandsRIPE NCC (Réseaux IP Européens): Europe, the Middle East, Central Asia,and African countries located north of the equator
ICANNInternet Corporation for Assigned Names and Numbers. Among many otherduties, ICANN oversees domain name allocation and registration.
Root serversThere are 13 root DNS servers. Run the dig command with no options to gener-ate a list. All but three are hosted in the United States. However, the C, F, I, J,

This is the Title of the Book, eMatter EditionCopyright © 2007 O’Reilly & Associates, Inc. All rights reserved.
24.2 Enabling Local Name Resolution with hosts Files | 489
and K servers are geographically dispersed clusters using anycast, so the actualnumber of root servers is much larger, and they are distributed all over theplanet. anycast is a network addressing and routing scheme that routes data tothe nearest or best destination.
Authoritative server, or content serverThis is the DNS server controlled by you, the ace hostmaster for your domain,that contains all your name-to-IP address mappings. The root name servers donot store actual DNS records. All they do is point to authoritative name servers,or name servers that know the route to the authoritative name servers.
Caching server, or caching DNS resolverCaching servers make this huge amount of traffic and complexity manageable. Ifevery DNS request for a domain had to hit the authoritative server, the wholeworks would soon grind to a halt. This does not happen because the Internet isinfested with DNS caching servers. Caching servers are very hardworking—theyquery external servers to satisfy DNS requests, and they also store the results ofDNS lookups in memory, so that they can directly answer subsequent requests.
24.2 Enabling Local Name Resolutionwith hosts Files
ProblemYou want to set up name resolution on your LAN. Because you are not running anypublic services, you don’t want to mess with registered domain names; you want to usewhatever domain name you feel like inventing. You know that your invented domainname will not be valid outside your LAN, and that’s okay, because you are not run-ning any public services. Your network is stable and rarely changes, so it isn’t worthsetting up a DNS server; you just want to use nice, friendly hostnames on your LAN.
Or you are running public services, such as a mail or web server, and you are using athird-party DNS manager for your public services. Your LAN is small, so you don’twant to hassle with setting up a DNS server just for your LAN.
Or you have a registered domain name, and you are already running a DNS server,but you want to enter important machines in hosts files as a backup in case the DNSserver goes down.
SolutionUse hosts files. hosts files are the same on both Linux and Windows.

This is the Title of the Book, eMatter EditionCopyright © 2007 O’Reilly & Associates, Inc. All rights reserved.
490 | Chapter 24: Managing Name Resolution
On most Linuxes, you need to edit two files: /etc/hostname and /etc/hosts. In /etc/hostname, enter only the hostname of the machine:
windbag
On Red Hat and Fedora, you must edit /etc/sysconfig/network instead of /etc/hostname:
HOSTNAME=windbag
/etc/hosts sets the domain name. You must always have a localhost entry, then addthe IP address and the fully qualified domain name on a separate line:
127.0.0.1 localhost.localdomain localhost192.168.1.5 windbag.test.net windbag
Check your configurations:
$ hostnamewindbag$ hostname --fqdnwindbag.test.net$ dnsdomainnametest.net
You must reboot for hostname changes to take effect.
On Windows, set the hostname by right-clicking My Computer, left-clicking Proper-ties, and entering the name. The location of the hosts file varies; the quickest way tofind it is Start ➝ Search.
Every machine on the LAN must have an identical copy of the hosts file. When this isdone, everyone can ping each other by hostname, and applications like Samba thatrely on hostnames can be used.
Discussionhosts files are the original method for mapping hostnames to IP addresses. DNS wasinvented because managing more than a few hosts in hosts files quickly becomesdifficult.
Using hosts files still has a number of advantages:
• You’re not dependent on a single server.
• You can invent any old domain name you like, as long as you only need it foryour local network, so you don’t have to hassle with having a registered domainname.
• You can change domain names whenever you feel like it, which is handy for test-ing virtual Postfix and Apache domains.

This is the Title of the Book, eMatter EditionCopyright © 2007 O’Reilly & Associates, Inc. All rights reserved.
24.3 Setting Up a DHCP Server | 491
• If you use /etc/hosts only for servers, which need static IP addresses, you can putthe rest of your LAN on a DHCP server and not even bother with hosts entriesfor them (see Recipe 24.3).
Here is a sample hosts file. They look just the same on both Linux and Windows:
127.0.0.1 localhost.localdomain localhost192.168.1.5 windbag.test.net windbag192.168.1.6 powerpc.test.net powerpc192.168.1.10 stinkpad.test.net stinkpad
See Also• hosts(5)
24.3 Setting Up a DHCP Server
ProblemYou don’t want to hassle with configuring name resolution on workstations. Theydon’t need static IP addresses, so you want to set up a DHCP server to take care ofthem automatically.
SolutionInstall and configure dhcp. You can get the source tarball from http://www.isc.org.RPMs and Debian packages are also available; just look for packages named “dhcp.”Configure client PCs to point to your dhcp server, and you’re done.
DiscussionA dhcp server can feed all network configuration data to the clients. The configura-tion file is /etc/dhcpd.conf. Here is a sample configuration:
# /etc/dhcpd.confdefault-lease-time 259200;max-lease-time 518400;
subnet 192.168.1.0 netmask 255.255.255.0 { option subnet-mask 255.255.255.0; option broadcast-address 192.168.1.255; option routers 192.168.1.1; option domain-name "test.net"; range 192.168.1.50 192.168.1.100; option domain-name-servers 152.163.199.56, 198.83.210.28;}

This is the Title of the Book, eMatter EditionCopyright © 2007 O’Reilly & Associates, Inc. All rights reserved.
492 | Chapter 24: Managing Name Resolution
This is pretty straightforward. The lease times are in seconds, so the minimum andmaximum in this example are three days and six days. “Option routers” points toyour Internet gateway, or the gateway to the subnet. A pool of 50 addresses is madeavailable in the “range.” The name servers are either your own private caching serveror servers, or the name servers at your ISP.
This example uses private, nonroutable IPv4 (Internet Protocol Version 4) addresses.Here are the private IPv4 address classes, in both dotted-quad and Classless Inter-Domain Routing (CIDR) notation:
10.0.0.0 - 10.255.255.255 (10/8)172.16.0.0 - 172.31.255.255 (172.16/12)192.168.0.0 - 192.168.255.255 (192.168/16)
These are for use on private networks, so you’ll select your subnet ranges from these.See Section 2.2 of TCP/IP Network Administration, Third Edition, by Craig Hunt(O’Reilly) to learn more about IP addressing.
You’ve probably heard about IPv6, which is the next generation of IP addressing.IPv6 is not covered in this book; IPv4 is going to be with us for quite a while yet. Tolearn more about IPv6, start at http://www.iana.org/ipaddress/ip-addresses.htm.
See the next recipe to learn how to configure both Linux and Windows dhcp clients.
See Also• dhcp-options(5), dhcpd.conf(5), dhcpd(8)
• RFC 1918 Address Allocation for Private Internets
• TCP/IP Network Administration, Third Edition
24.4 Configuring dhcp Clients
ProblemYou need to know how to connect both your Linux and Windows client PCs to yournice new dhcp server, so that they will pick up their network assignments withoutyour lifting a finger.
SolutionIn Windows, open Control Panel ➝ Networking, then open the Properties box forTCP/IP. Check “Obtain an IP address automatically.”
It’s just as easy in Linux; the only hard part is that every distribution puts the configura-tion file in a different place. In Red Hat and Fedora, edit /etc/sysconfig/network-scripts/ifcfg-eth0 as follows:

This is the Title of the Book, eMatter EditionCopyright © 2007 O’Reilly & Associates, Inc. All rights reserved.
24.5 Adding Static Hosts to dhcp | 493
TYPE=EthernetDEVICE=eth0BOOTPROTO=dhcpONBOOT=yesDHCP_HOSTNAME=stinkpad
On Debian, edit /etc/network/interfaces as follows:
auto loiface lo inet loopbackauto eth0iface eth0 inet dhcp
DiscussionYou may wish to use a graphical configuration tool. On Red Hat and Fedora, usesystem-config-network. KDE and Gnome have their own GUI configuration tools (asdoes practically every Linux distribution), so you won’t be short of choices. Anotheroption is netGo, a system-independent network configuration utility that lets youcreate profiles for easily connecting to different networks
See Also• Documentation for your Linux distribution or your favorite window manager/
graphical enviroment
24.5 Adding Static Hosts to dhcp
ProblemYou have some servers or other machines to which you want to assign static IPaddresses. You can use /etc/hosts, but it’s a bit of bother to edit /etc/hosts on each ofthe zillion PCs you’re responsible for. Can you do it in dhcpd.conf?
SolutionYes, you surely can. You’ll need the MAC address of your network card, which youcan find with ifconfig:
$ /sbin/ifconfigeth0 Link encap:Ethernet HWaddr 00:03:6D:00:83:CF inet addr:192.168.1.5 Bcast:192.168.1.255 Mask:255.255.255.0 UP BROADCAST RUNNING MULTICAST MTU:1500 Metric:1.....
You want the HWaddr value.

This is the Title of the Book, eMatter EditionCopyright © 2007 O’Reilly & Associates, Inc. All rights reserved.
494 | Chapter 24: Managing Name Resolution
On Windows 95/98/ME, open a DOS prompt and run winipcfg. On NT/2000/XP,run ipconfig.
Make an entry in dhcpd.conf like this:
host mail1 { hardware ethernet 00:03:6D:00:83:CF; fixed-address 192.168.1.100; }
Note that multiple-line directives must be enclosed in curly braces.
Name servers have their own directive in dhcpd.conf, so they don’t need MACaddresses:
option domain-name-servers 192.168.1.10, 192.168.1.11
That’s all there is to it. Use this for any machine you wish to have a static IP address.
DiscussionYou can still use /etc/hosts for important servers, as a fallback for local users. Remem-ber, with /etc/hosts the network does not break when a single server goes down.
Every network card ever made has a unique 48-bit Media Access Control (MACaddress). The Institute of Electrical and Electronics Engineers, Inc. (IEEE) assigns thefirst 24 bits, then the manufacturer assigns the remaining 24 bits.
See Also• dhcp-options(5), dhcpd.conf(5), dhcpd(8)
24.6 Running a Public DNS Server
ProblemYou’re running mail, web, or other public servers, and you want to control yourDNS server yourself. You’re tired of waiting on third-party service providers, andwhy should you pay them for something you can do yourself? You want the flexibil-ity to set up your network however you please—maybe you want to own only a sin-gle public routable IP address and put all your servers behind a NAT firewall, ormaybe you want to put workstations and internal servers behind NAT and put yourpublic servers outside the firewall. However you elect to set up your network, youwant control of the name services.
So you’re ready to take the plunge and set up your own public DNS server.

This is the Title of the Book, eMatter EditionCopyright © 2007 O’Reilly & Associates, Inc. All rights reserved.
24.6 Running a Public DNS Server | 495
SolutionYou need five things:
• A static, public, routable IP address
• A registered name server
• A permanent Internet connection
• An ISP account that permits running servers
• Your actual server
After these items are in place, see the recipes in the rest of this chapter for configur-ing either a BIND or djbdns server.
DiscussionA static, routable IP address comes from your Internet service provider.
Your name server needs to be registered with your domain name registrar. If you havenot already registered a domain name, visit http://icann.org/registrars/accredited-list.htmlfor a list of ICANN-accredited domain name registrars. (This doesn’t guarantee thatyou’ll get good service, but they are official.) Figure 24-1 shows what the registrationform looks like at Dotster.
Figure 24-1. Dotster’s domain name registration form

This is the Title of the Book, eMatter EditionCopyright © 2007 O’Reilly & Associates, Inc. All rights reserved.
496 | Chapter 24: Managing Name Resolution
A DNS server doesn’t need much in the way of hardware or bandwidth. DNSrequests are very low-bandwidth; after all, a single UDP packet is all it takes to sat-isfy a request. Ideally, you’ll have enough RAM to keep all zone and cache data inmemory. If you run your DNS server on a Linux server without X, and without anyother services, something like an old P300 with 128 MB of RAM will handle a cou-ple hundred BIND zones just fine, and many hundreds of djbdns hosts. So, if youwere only managing the DNS for the little windbag.net network in this chapter, youcould easily piggyback onto a machine running other services.
See Also• djbdns documentation (http://cr.yp.to/djbdns.html)
• BIND 9 Administrator Reference Manual (http://www.bind9.net/Bv9ARM.html)
24.7 Installing djbdns
ProblemYou want to use djbdns to build a DNS server, and you need to know what to installand how to install it. There seem to be a lot of different pieces, and it’s a bit confusing.
SolutionYou need three source tarballs: daemontools, uscpi-tcp, and djbdns. Get these fromthe djbdns home page at http://cr.yp.to/djbdns.html.
After installation, you’re ready to start configuration, which is covered in the follow-ing recipes.
To install daemontools, follow these steps:
# mkdir -m 1755 /package# cd /package
Download and unpack the latest daemontools tarball into /package, as follows:
# tar xzvpf daemontools-0.76.tar.gz# cd admin/daemontools-0.76
To compile and set up the daemontools programs, use:
# package/install
Next, fetch the latest uspci-tcp tarball and install it:
# cd /usr/sources# tar xzvf ucspi-tcp-0.88.tar# cd ucspi-tcp-0.88# make# make setup check

This is the Title of the Book, eMatter EditionCopyright © 2007 O’Reilly & Associates, Inc. All rights reserved.
24.8 Moving tinydns’s and dnscache’s Logfiles | 497
It puts itself into /usr/local/bin.
Finally, fetch and install djbdns:
# tar xzvf djbdns-1.05.tar.gz# cd djbdns-1.05# make# make setup check
It puts itself into /usr/local/bin.
Now read the following recipes to learn how to use djbdns.
Discussiondaemontools is a suite of utilities for managing services. In these recipes, you’ll seesupervise, multilog, and svstat. supervise automatically restarts services if they dieunexpectedly. multilog is a nice log manager that automatically rotates log data, sothat logs don’t consume your disk space and you always have fresh data. svstat tellsyou the status of a service.
uspci-tcp takes the place of inetd and xinetd, for running djbdns and other DanBernstein programs. You don’t have to do anything other than install it.
djbdns is a suite of DNS programs. This chapter contains recipes for dnscache, thecaching/resolving DNS server, and tinydns, the authoritative DNS server.
See Also• Life with Djbnds (http://www.lifewithdjbdns.com)
• daemontools (http://cr.yp.to/daemontools.html)
• uspci-tcp (http://cr.yp.to/ucspi-tcp.html)
24.8 Moving tinydns’s and dnscache’s Logfiles
ProblemBy default, tinydns-conf and dnscache-conf put the logfiles in /etc/tinydns/log/mainand /etc/dnscache/log/main, which are not the usual places for logfiles. You wouldrather move them to /var/log, where they belong.
SolutionTo put the logfiles for tinydns in /var/log/tinydns, edit /etc/tinydns/log/run, as follows:
#!/bin/shexec setuidgid dnslog multilog t /var/log/tinydns

This is the Title of the Book, eMatter EditionCopyright © 2007 O’Reilly & Associates, Inc. All rights reserved.
498 | Chapter 24: Managing Name Resolution
Do the same for dnscache, editing /etc/dnscache/log/run, as follows:
#!/bin/shexec setuidgid dnslog multilog t /var/log/dnscache
See Also• How to install djbdns (http://cr.yp.to/djbdns/install.html)
24.9 Running a Local Caching Name Serverwith djbdns
ProblemYou want to set up a local djbdns caching name server just to serve your LAN. Thiswill speed up DNS lookups, which in turn will speed up web surfing, email, and allInternet services.
SolutionThe caching component of djbdns is dnscache. First, prepare your system by install-ing daemontools, uspci-tcp, and djbdns (see Recipe 24.7).
After installing everything, run a dnsip query to confirm that djbdns installedcorrectly:
$ dnsip www.oreillynet.com208.201.239.37 208.201.239.36
Now create two system users to own dnscache and dnslog. Call them anything youwant. In this example, they are simply “dnscache” and “dnslog”:
# useradd -d /dev/null -s /bin/false dnscache# useradd -d /dev/null -s /bin/false dnslog
Then configure the IP address and service directory for dnscache. This also assignsthe appropriate file ownerships:
# dnscache-conf dnscache dnslog /etc/dnscache 192.168.1.5
Create your “allow” list; this example permits your local subnet to use yourdnscache:
# touch /etc/dnscache/root/ip/192.168.1
Now start it up:
# ln -s /etc/dnscache /service
To verify that it’s running, use svstat:
# svstat /service/dnscache/service/dnscache: up (pid 6776) 30 seconds

This is the Title of the Book, eMatter EditionCopyright © 2007 O’Reilly & Associates, Inc. All rights reserved.
24.9 Running a Local Caching Name Server with djbdns | 499
To verify that it’s working, run dnsqr to query the local cache:
# env DNSCACHEIP=192.168.1.5 dnsqr a www.yahoo.com1 www.yahoo.com:193 bytes, 1+9+0+0 records, response, noerrorquery: 1 www.yahoo.comanswer: www.yahoo.com 286 CNAME www.yahoo.akadns.netanswer: www.yahoo.akadns.net 60 A 66.94.230.52answer: www.yahoo.akadns.net 60 A 66.94.230.48
Configure clients to point to your dnscache server (see Recipe 24.10), and you’refinished.
DiscussionA caching server, or caching DNS resolver, does two things: it answers DNS requestsby getting the information from other servers, and then it stores the results so that itcan answer future requests for the same information directly. The cache lives only inmemory, so restarting the cache’s process or rebooting wipes it all out.
A caching server and an authoritative DNS server should always be strictly sepa-rated. This means the IP address of your caching server should never match any IPaddresses listed in NS records. A few bad things can happen when you put themtogether:
• If an attacker seizes control of your DNS cache, the attacker can control not onlyyour incoming DNS data, but also your outgoing DNS data—which means hecan hijack your web sites, email, FTP, and any “secure” web-based applications.
• If your DNS cache suffers a Distributed Denial of Service (DDoS) attack, yourauthoritative server will also be pummeled, and you will have no DNS service.
RFC 2010 also advises keeping caching servers separate from authoritative servers:
Recursion is a major source of cache pollution, and can be a major drain on nameserver performance. An organization’s recursive DNS needs should be served by someother host than its root name server(s).
With BIND, you cannot separate the two. But you can with djbdns, as you will see inthe following recipes.
When you’re testing dnscache, and making changes and generally futzing around,sometimes you’ll find it won’t stay up:
# svstat /service/dnscache/service/dnscache: up (pid 6776) 1 seconds# svstat /service/dnscache/service/dnscache: up (pid 6781) 0 seconds
You probably have too many instances of it running. Try this:
# netstat -nap | grep ":53"tcp 0 0 127.0.0.1:53 0.0.0.0:* LISTEN 6327/dnscachetcp 0 0 192.168.1.5:53 0.0.0.0:* LISTEN 6129/dnscache

This is the Title of the Book, eMatter EditionCopyright © 2007 O’Reilly & Associates, Inc. All rights reserved.
500 | Chapter 24: Managing Name Resolution
udp 0 0 127.0.0.1:53 0.0.0.0:* 6327/dnscacheudp 0 0 192.168.1.5:53 0.0.0.0:* 6129/dnscache
Yep, that’s too many. You should have two instances only: listening on TCP port 53and UDP port 53. Do a killall supervise dnscache, give it a few seconds, then tryagain:
# svstat /service/dnscache/service/dnscache: up (pid 6776) 21 seconds# netstat -nap | grep ":53"tcp 0 0 192.168.1.5:53 0.0.0.0:* LISTEN 6776/dnscacheudp 0 0 192.168.1.5:53 0.0.0.0:* 6776/dnscache
That’s what you want to see.
Another common problem is having an old BIND server still running. There Can BeOnly One.
djbdns comes with a number of network querying and diagnostic utilities: dnsqr,dnstrace, dnsip, tinydns-get, dnsipq, dnsmx, and dnsname. See the links below to learnmore about them.
See Also• Command-line tools to look up DNS information (http://cr.yp.to/djbdns/tools.html)
• Command-line tools to debug DNS configuration (http://cr.yp.to/djbdns/debugging.html)
• There are several different ways to set up dnscache (http://cr.yp.to/djbdns.html)
• Life With djbdns, Simple Setup (http://www.lifewithdjbdns.com/#Simple%20setup)
24.10 Configuring Linux and Windows Clientsto Use Your Caching DNS Server
ProblemYour caching server is ready to go to work—how you do tell your Linux and Win-dows clients how to find it?
SolutionIf your clients are served by DHCP, you need to edit your DHCP configuration file topoint to your new name server (see Recipe 24.3).
Linux hosts with static IP addresses that are not served by DHCP configure theirname servers in /etc/resolv.conf. In this example, your name server is at192.168.1.200, so all you do is edit /etc/resolv.conf:
nameserver 192.168.1.200

This is the Title of the Book, eMatter EditionCopyright © 2007 O’Reilly & Associates, Inc. All rights reserved.
24.10 Configuring Linux and Windows Clients to Use Your Caching DNS Server | 501
The resolver queries the entries in order, so make this the first one if you have oth-ers. Typically, your ISP will list a primary and a secondary name server in youraccount information, so you can list these next:
nameserver 192.168.1.200nameserver 12.188.166.2nameserver 12.188.166.3
On Windows hosts with static IP addresses, find the menu for configuring InternetProtocol (TCP/IP) properties. In Windows 95/98/ME, go to Control Panel ➝ Net-work ➝ TCP/IP ➝ Properties. Go to the DNS Configuration tab, and there you are.
In Windows NT/2000/XP, go to Control Panel ➝ Network Connections. Right-clickLocal Area Connection, then select Internet Protocol (TCP/IP) ➝ Properties.
Whatever flavor of Windows you are using, the menu you want looks likeFigure 24-2.
DiscussionThat’s pretty much all you have to do; a DNS cache is low-maintenance. You mayenter up to three name servers on client machines.
Figure 24-2. Configuration menu for TCP/IP properties

This is the Title of the Book, eMatter EditionCopyright © 2007 O’Reilly & Associates, Inc. All rights reserved.
502 | Chapter 24: Managing Name Resolution
Make sure you do not give the entire Internet access to your caching server! This is abig security hole; plus, there’s no reason for you to provide caching for the masses.Recipes 24.9 tells how to avoid this.
Windows 2000/XP comes with its own built-in DNS cache. You didn’t know it wasthere, did you. You can view the contents of the cache with this command:
C:\> ipconfig /displaydns
To flush the cache, use:
C:\> ipconfig /flushdns
Flushing the cache is a quick way to get rid of stale data, such as when you change aserver’s IP address.
See Also• resolv.conf(5)
• “Get Started with Home Networking,” a good reference for all aspects of net-working Windows clients (search for it on Google or Microsoft.com)
24.11 Building a Public DNS Server with tinydns
ProblemYou’ve set up some servers (mail, web, FTP) that need to be accessible to the outsideworld. They need domain names, like www.oreilly.com, since you don’t want peopleusing IP addresses. You want to run your own DNS server to provide those names.You tried BIND, and it was just too complicated. Or you heard some scary talkabout BIND security problems. Whatever the reason, you’ve decided to use djbdns.So how do you make it go?
SolutionFirst, follow the preparatory steps in Recipe 24.6. Then follow these steps to installand set up tinydns, which is the authoritative DNS server component of djbdns. Ifyou are also running dnscache, it must not have the same IP address as tinydns. Thisis a very important security measure. Both dnscache and tinydns will fail silently ifyou do it anyway.
Follow the steps in Recipe 24.7 for djbdns installation. Then, create two systemusers, using any names you like. They will own the tinydns server, and the dnslog:
# useradd -d /dev/null -s /bin/false tinydns# useradd -d /dev/null -s /bin/false dnslog

This is the Title of the Book, eMatter EditionCopyright © 2007 O’Reilly & Associates, Inc. All rights reserved.
24.11 Building a Public DNS Server with tinydns | 503
Run tinydns-conf to create directories and set the IP address of the tinydns server. Listyour system users in the order shown here:
# tinydns-conf tinydns dnslog /etc/tinydns 208.201.239.36
Create a startup entry in service:
# ln -s /etc/tinydns /service
Wait a few seconds, then run svstat to verify that it started:
# svstat /service/tinydns/service/tinydns: up (pid 6811) 14 seconds
If tinydns won’t stay up continuously, check the logfile in /etc/tinydns/log/main/current. That will tell you where the problem is.
Now it’s time to create your host entries. This recipe shows how to create entriesusing the scripts that come with tinydns. In this example the domain name ispixels.net, which is duly registered with a domain name registrar. There are threehosts, shown in Table 24-1.
Create the host entries as follows:
# cd /service/tinydns/root# ./add-ns pixels.net 208.201.239.36# ./add-ns .239.201.208.in-addr.arpa 208.201.239.36# ./add-host parsley.pixels.net 208.201.239.36# ./add-host sage.pixels.net 208.201.239.37# ./add-host rosemary.pixels.net 208.201.239.38# ./add-alias ftp.pixels.net 208.201.239.37# ./add-alias www.pixels.net 208.201.239.38# make
That’s all it takes to build a tinydns server.
DiscussionThe previous commands inserted data into /etc/tinydns/root/data; here’s what it lookslike:
.pixels.net:208.201.239.36:a:259200
.239.201.208.in-addr.arpa:208.201.239.36:a:259200=parsley.pixels.net:208.201.239.36:86400=sage.pixels.net:208.201.239.37:86400=rosemary.pixels.net:208.201.239.38:86400
Table 24-1. pixels.net hosts
Address Hostname Role Alias
208.201.239.36 parsley DNS, mail
208.201.239.37 sage FTP ftp
208.201.239.38 rosemary Web server www

This is the Title of the Book, eMatter EditionCopyright © 2007 O’Reilly & Associates, Inc. All rights reserved.
504 | Chapter 24: Managing Name Resolution
+ftp.pixels.net:208.201.239.37:86400+www.pixels.net:208.201.239.38:86400
You typically configure djbdns by running configuration scripts, not by editing thedata file by hand. Here are the available configuration scripts:
add-hostCreates both an A (alias) record and a PTR (reverse pointer)
add-mxAdds a mail server
add-nsAdds a name server
add-aliasCreates an A record but not a matching PTR
add-childnsAdds a child name server—use this when you want to act like an ISP and hostother name servers
Here is a list of the leading symbols used by tinydns:
. (leading dot)Name server
=Both pointer (PTR) and A record
+A record
&NS and A records
@MX and A records
As you can see, tinydns thoughtfully calculates the time-to-live (TTL) values for you.The TTL tells caching servers, in seconds, how often they should come back torefresh their information. tinydns will continue to adjust these automatically; don’tworry about tweaking them manually.
You can edit the djbdns data file manually, if you want. You can add comments,change the order of the entries, whatever you like. The scripts are for convenience,and to ensure that each entry is in the correct format. Just remember to run makeevery time you make a change, to convert the file to /etc/tinydns/root/data.cdb.
The clear separation of functions is one of the strengths of djbdns. You do not wantyour caching server anywhere near your authoritative DNS server. In other words,the IP addresses listed in /etc/resolv.conf should never match any IP addresses listedin NS records. If your caching server is compromised and is running on the same IP

This is the Title of the Book, eMatter EditionCopyright © 2007 O’Reilly & Associates, Inc. All rights reserved.
24.12 Building a Private tinydns Server | 505
address as your DNS server, the attacker could misdirect all of your traffic, including“secure” web applications.
See Also• How to run a DNS server (http://cr.yp.to/djbdns/run-server.html)
24.12 Building a Private tinydns Server
ProblemYou’ve outgrown hosts files, so you want to use a DNS server for your LAN only.You won’t be providing any public services. How do you do this with tinydns?
SolutionSet up a dnscache server for your LAN, as in Recipe 24.9. Set up a tinydns server as inRecipe 24.11, and enter your internal hosts in /etc/tinydns/root/data.
Using the pixels.net domain to illustrate, the next step is to tell your local dnscache toquery your local, private tinydns server for your domain information. Create thesefiles using the IP address of your private tinydns server:
# echo 192.168.1.100 > /service/dnscache/root/servers/pixels.net# echo 192.168.1.100 > /service/dnscache/root/servers/0.168.192.in-addr.arpa
The dnscache user should own these files:
# chown dnscache: /service/dnscache/root/servers/pixels.net# chown dnscache: /service/dnscache/root/servers/0.168.192.in-addr.arpa
Next, restart dnscache:
# svc -t /service/dnscache
dnscache will now consult the local tinydns server for local addresses, and it will con-sult the /service/dnscache/root/servers/@ file for external addresses.
DiscussionYou can easily do this for multiple domains; just add more domain files to /service/dnscache/root/servers/.
You have to have officially registered domain names for this to work, even if you arenot running any public services. If you want the ability to invent whatever domainnames you want for your LAN, see Recipe 24.2.
Remember that dnscache and tinydns should be on separate machines. Always sepa-rate the caching/resolving server from the authoritative server. If you must put them

This is the Title of the Book, eMatter EditionCopyright © 2007 O’Reilly & Associates, Inc. All rights reserved.
506 | Chapter 24: Managing Name Resolution
on the same machine, give them separate IP addresses. tinydns can have 127.0.0.1,and dnscache can take the network IP address.
See Also• How to run a DNS server (http://cr.yp.to/djbdns/run-server.html)
24.13 Enabling Simple Load Balancingwith tinydns
ProblemYou have redundant mail, FTP, or web servers, and you would like to configurethem to automatically divide up the traffic load. For example, say you have a heavilytrafficked web site that uses three separate redundant Apache servers. How do youmake traffic automatically go to the least busy server?
SolutionDNS round-robin, or load balancing, is simple to implement. Just list all of your serv-ers in /etc/tinydns/root/data:
+www.pixels.net:208.201.239.37:86400+www.pixels.net:208.201.239.38:86400+www.pixels.net:208.201.239.39:[email protected]:208.201.239.37:a::[email protected]:208.201.239.37:b::86400
Discussiontinydns returns a set of up to eight random addresses for any single request. If anysingle server becomes unavailable, the client attempting to connect to the server willgo on to the next one in line.
See Also• How to balance load among many web servers (http://cr.yp.to/djbdns/
balance.html)

This is the Title of the Book, eMatter EditionCopyright © 2007 O’Reilly & Associates, Inc. All rights reserved.
24.14 Synchronizing with a Second tinydns Server | 507
24.14 Synchronizing with a Second tinydnsServer
ProblemYou have a second tinydns server offsite, as a backup. How do you keep it synchro-nized with your main tindydns server?
SolutionPlain old rsync-over-ssh does the job just fine. This simple script copies your DNSdata file to the backup, then runs make on the remote data file:
rsync -e ssh -az /etc/tinydns/root/data $backup-host:/etc/tinydns/root/datassh $backup-host "cd /etc/tinydns/root; make"
Replace $backup-host with the name or IP address of the remote server.
You can automate the entire process by adding these lines to /etc/tinydns/root/Makefile, so that when you run the make command on your primary server afterupdating /etc/tinydns/root/data, the backup will automatically be updated as well:
data.cdb: data /usr/local/bin/tinydns-data rsync -e ssh -az /etc/tinydns/root/data $backup-host:/etc/tinydns/root/data ssh $backup-host "cd /etc/tinydns/root; make"
DiscussionMoving plain old text files doesn’t require a lot of sophistication; rsync is a fine toolfor the job. You may schedule regular updates via cron, or add transport security andauthentication with encrypted ssh keys.
Your backup server can also function as your secondary DNS server. You can config-ure client PCs to use it, or register it just like your main DNS server for a publicauthoritative DNS server (see Recipe 24.6).
See Also• Chapter 16, Backup and Recovery
• Chapter 17, Remote Access

This is the Title of the Book, eMatter EditionCopyright © 2007 O’Reilly & Associates, Inc. All rights reserved.
508 | Chapter 24: Managing Name Resolution
24.15 Running a Local Caching Name Serverwith BIND
ProblemYou want to set up a local BIND caching name server for your LAN to speed up DNSlookups, which in turn will speed up all of your Internet services.
SolutionInstall BIND on a Linux machine with a static IP address. Be sure you get the latestversion, which is currently BIND 9.2.3. Don’t mess with older versions, as they arebuggy and exploitable. After installation, you’ll have four configuration files to editor create:
• named.conf
• named.root
• zone.localhost
• revp.127.0.0
In this recipe, all of these files are in /var/named, except for /etc/named.conf.named.conf is the standard name for BIND’s configuration file; all the others you canname to suit yourself. Here is a sample named.conf:
//BIND configuration file//named.conf for caching server
options {// where all zone files are directory "/var/named";// accept queries only from local subnet listen-on { 127.0.0.1; 10.11.12.1; }; allow-recursion { 127.0.0.0/8; 10.11.12.0/24; };};
zone "." IN { type hint; file "named.root";};
// location of the zone file for localhostzone "localhost" IN {

This is the Title of the Book, eMatter EditionCopyright © 2007 O’Reilly & Associates, Inc. All rights reserved.
24.15 Running a Local Caching Name Server with BIND | 509
type master; file "zone.localhost"; allow-update { none; };};
// reverse pointer file for localhostzone "0.0.127.in-addr.arpa" IN { type master; file "revp.127.0.0"; allow-update { none; };};
Now add named.root. This is the master list of the root name servers; simply fetch thecurrent version from ftp://ftp.internic.net/domain/named.root, and put it in /var/named.
Now create zone.localhost:
; zone.localhost; loopback/localhost zone file;$TTL 1D$ORIGIN localhost.@ IN SOA @ root ( 1 ; Serial 8H ; Refresh 15M ; Retry 1W ; Expire 1D) ; Minimum TTL IN NS @ IN A 127.0.0.1
Finally, create revp.127.0.0:
; revp.127.0.0; reverse pointers for localhost;$TTL 1D$ORIGIN 0.0.127.in-addr.arpa.@ IN SOA localhost. root.localhost. ( 1 ; serial 8H ; refresh 15M ; retry 1W ; expire 1D ) ; minimum IN NS localhost.1 IN PTR localhost.
Then start up BIND:
# /etc/init.d/named start
You now have a local caching name server. See Recipe 24.10 to learn how to con-nect client PCs to your caching server.

This is the Title of the Book, eMatter EditionCopyright © 2007 O’Reilly & Associates, Inc. All rights reserved.
510 | Chapter 24: Managing Name Resolution
Discussionnamed is short for “name daemon.”
BIND configuration files can grow and multiply like weeds, so using a naming con-vention like the one shown here will save your sanity. Zone files each start with“zone,” and reverse pointer files start with “revp.” You may call them anything youwant, as long as you use a consistent naming scheme.
You can use each one of these sample files exactly as they are shown. The onlychange you might need to make is the listen-on directive in named.conf—be sure touse your own network IP addresses. Leave localhost exactly as it is shown, unlessyou’re using some exotic networking voodoo, in which case you already know whatto do. Do not allow traffic from outside your network! There is no reason for you tosupply caching services to the world.
The named.root file does not change very often. Check it every few months just forkicks. You may call it anything you like, as long as you record the filename innamed.conf.
zone.localhost tells named that the address of localhost is 127.0.0.1.
revp.127.0.0 does the opposite of zone.localhost—it tells named that the hostnameassociated with the IP address 127.0.0.1 is localhost.
Paul Heinlein wrote much of the gnarly BIND stuff for this chapter. Thank you, Paul!You can find Paul on madboa.com.
See Also• named(8), named.conf(5)
• Chapter 6 of the Bind 9 Administrator’s Reference Manual (http://www.bind9.net/Bv9ARM)
24.16 Running a Private BIND DNS Server
ProblemYou’re tired of dinking around with /etc/hosts; you’re ready to implement somegrown-up name resolution on your LAN by installing a BIND DNS server. You onlywant this server to be available to your local users, providing both name-resolutionand caching services. It will not provide any public services.

This is the Title of the Book, eMatter EditionCopyright © 2007 O’Reilly & Associates, Inc. All rights reserved.
24.16 Running a Private BIND DNS Server | 511
SolutionSet up a caching name server according to Recipe 24.15. Then add zone blocks tonamed.conf to define the new zones for your LAN hosts, and construct the zone files.
Table 24-2 lists the five hosts on windbag.net.
Add these zone blocks to named.conf:
zone "windbag.net" IN { type master; file "zone.net.windbag";};
zone "12.11.10.in-addr.arpa" { type master; file "revp.10.11.12";};
Here is the actual zone file for windbag.net:
// zone.net.windbag// dns zone for for windbag.net;$ORIGIN windbag.net.$TTL 1D; any time you make a change to the domain, bump the; "serial" setting below. the format is easy:; YYYYMMDDI, with the I being an iterator in case you; make more than one change during any one day@ IN SOA parsley hostmaster ( 200405191 ; serial 8H ; refresh 4H ; retry 4W ; expire 1D ) ; minimum; parsley.windbag.net serves this domain as both the; name server (NS) and mail exchange (MX) NS parsley MX 10 parsley; define domain functions with CNAMEsftp CNAME sagewww CNAME rosemary
Table 24-2. Five hosts
Address Hostname Role Alias
10.11.12.1 parsley DNS, mail
10.11.12.2 sage FTP ftp
10.11.12.3 rosemary Web server www
10.11.12.4 thyme Workstation
10.11.12.5 cilantro Workstation

This is the Title of the Book, eMatter EditionCopyright © 2007 O’Reilly & Associates, Inc. All rights reserved.
512 | Chapter 24: Managing Name Resolution
; just in case someone asks for localhost.windbag.netlocalhost A 127.0.0.1; our hostnames, in alphabetical orderrosemary A 10.11.12.3sage A 10.11.12.2parsley A 10.11.12.1thyme A 10.11.12.4cilantro A 10.11.12.5
And finally, here are the reverse lookups for the domain in the revp.10.11.12 file:
; revp.10.11.12; reverse pointers for 10.11.12.0 subnet;$ORIGIN 12.11.10.in-addr.arpa.$TTL 1D@ IN SOA parsley.windbag.net. hostmaster.windbag.net. ( 200405190 ; serial 28800 ; refresh (8 hours) 14400 ; retry (4 hours) 2419200 ; expire (4 weeks) 86400 ; minimum (1 day) ); define the authoritative name server NS parsley.windbag.net.; our hosts, in numeric order1 PTR parsley.windbag.net.2 PTR sage.windbag.net.3 PTR rosemary.windbag.net.4 PTR thyme.windbag.net.5 PTR cilantro.windbag.net.
Save your changes and restart BIND:
# /etc/init.d/named restart
And there you are—a shiny new fully functioning DNS server for your LAN.
DiscussionThere’s a whole lot happening in these three files. First of all, putting each zone intoits own file is good organization. You may dump everything into a single zone file ifyou like, but you’ll find that it’s difficult to maintain.
In named.conf, the entries for windbag.net tell BIND that it is the authoritative serverfor windbag.net, and where to find the zone files.
The $origin directive is a nice timesaver. It lets you write:
$ORIGIN windbag.net.www CNAME rosemary
instead of:
www.windbag.net CNAME rosemary.windbag.net
This is the Title of the Book, eMatter EditionCopyright © 2007 O’Reilly & Associates, Inc. All rights reserved.
24.16 Running a Private BIND DNS Server | 513
$TTL 1D sets a default time-to-live value. Values can be in this format:
w For week
d For day
h For hour
m For minute
s For second
Individual entries may have their own TTL values:
rosemary 72h A 10.11.12.3
The TTL tells visitors how often to refresh their own caches. If your site is fairlystatic, set this to a higher value. If you’re making frequent changes, use a lower value.The lower the TTL, the more hits there will be on your server.
@ IN SOA parsley hostmaster means:
@This holds the same value as $ORIGIN.
INThis defines the address class; IN = Internet.
SOAStart of Authority; the beginning of a zone file. Only A records can be used asthe MNAME—don’t use CNAMEs.
The SOA has 10 fields. These are the primary domain name, zone class, and SOA,plus the following:
MNAMEThe master name server for the zone.
RNAMEThe email address of the domain admin.
Serial numberBIND converts zone files into a binary file format. When you make changes tothe zone file, you must also change the serial number, or BIND will not recog-nize the changes.
RefreshThis tells your slave, or secondary servers how often to check for updates.
RetryIf the master DNS server for the zone fails to answer a slave server’s request foran update, this tells the secondary server how often it should resend the request.
ExpireIf the master DNS server fails for a longer period of time, this tells the the sec-ondary server how to continue to use its existing data. After the expire time has

This is the Title of the Book, eMatter EditionCopyright © 2007 O’Reilly & Associates, Inc. All rights reserved.
514 | Chapter 24: Managing Name Resolution
passed, the data is considered stale and will not be used, at which time thedomain will no longer resolve. Hopefully your master server will be back onlinebefore this happens.
Minimum, or Negative-caching TTLNegative answers (such as when a requested record does not exist) should alsobe cached on nonauthoritative servers. Setting this value prevents your serverfrom getting hammered by a bunch of repeated requests in a short time. A com-mon use for this is when you are migrating to a new name server at a different IPaddress; setting a short value on the old server a few days before you take itoffline assures that your change will propagate quickly.
The next section contains resource records (RRs).
NS parsley and MX 10 parsley define your name server and mail server. If you havemore than one mail server for the domain, the number sets the priority. Lower num-bers are higher priority. Because $ORIGIN windbag.net. defines the domain name forthe whole record, these expand to ns.windbag.net and mx.windbag.net. Make note ofthe trailing dot—this is very important! That defines the qualified domain name. Ifyou leave it off, BIND will think it needs to append the domain name, so you’ll havesilliness like ns.windbag.net.windbag.net.
CNAME (canonical name) is an alias to an A record. Thus, a single A record canhave several aliases. You can use a CNAME to add subdomains for virtual web ormail hosting—for example, programmers.only.domain.com or webmail.domain.com.
Instead of using CNAMES, you may assign subdomains their own A records. Thismeans one less hit on your server per CNAME request, but it also means more workwhen you need to make changes. Endless debates rage over the use of CNAMEs; usewhat suits you.
“Canonical” is one of those weirdo geek words that defies a precise, logical defini-tion. In this context, “canonical name” means “an alias assigned to the true (canoni-cal) name of the server.”
And finally, we come to the A (alias) records. An A record is the primary address foreach of your hosts, the direct match of hostname to IP address.
Reverse pointers (RPTs) are technically not required, but in the real world so manyservers require them that you had better use them.
If things are not working right, chances are it’s a syntax error or a typo—mind yourdots and commas especially. There are two syntax checkers for BIND to help you;see the next recipe for details.
The other common error is not starting from A records. Every host must first have anA record. Then you can assign name servers, mail servers, and CNAMEs.

This is the Title of the Book, eMatter EditionCopyright © 2007 O’Reilly & Associates, Inc. All rights reserved.
24.18 Configuring a Public BIND DNS Server | 515
See Also• named(5), named(8)
• Section 6.3 of The Bind 9 Administrator’s Reference Manual (http://www.bind9.net/Bv9ARM.html)
• A named reference of TCP/IP Network Administration, by Craig Hunt (O’Reilly)
24.17 Checking Syntax
ProblemAll those BIND files! All those commas, and dots, and semicolons! It’s too easy tomake typos—is there a syntax-checker to help?
SolutionYes, in fact there are two. named-checkconf checks named.conf, and named-checkzoneis for your zone files. Use them like this:
# named-checkconf named.conf# named-checkzone windbag.net /var/named/db.zone.net.windbag
DiscussionNote that named-checkzone needs the zone name, as defined by the $ORIGIN direc-tive, and also its corresponding binary database file.
See Also• named-checkconf(8), named-checkzone(8)
24.18 Configuring a Public BIND DNS Server
ProblemYou’ve set up some servers (mail, web, FTP) that need to be accessible to the outsideworld. They need domain names, like www.oreilly.com, since you don’t want peopleusing IP addresses. You want to run your own DNS server to provide those names.Why? Perhaps you’re not convinced your ISP is reliable, or perhaps you just likethings under your own control. Or maybe you’re just a glutton for punishment.Whatever the reason, you’ve decided to use BIND. So how do you make it go?

This is the Title of the Book, eMatter EditionCopyright © 2007 O’Reilly & Associates, Inc. All rights reserved.
516 | Chapter 24: Managing Name Resolution
SolutionFollow the preparatory steps in Recipe 24.6. Table 24-3 shows the public servers forthis recipe.
First of all, BIND needs a named.conf file:
// named.conf for public services// at windbag.net
options { directory "/var/named"; allow-query { any; }; recursion no;};zone "." IN { type hint; file "named.root";};
zone "localhost" IN { type master; file "zone.localhost"; allow-update { none; };};
zone "0.0.127.in-addr.arpa" IN { type master; file "revp.127.0.0"; allow-update { none; };};zone "windbag.net" IN { type master; file "zone.net.windbag";};
zone "239.201.208.in-addr.arpa" { type master; file "revp.208.201.239";};
Next, fetch a current copy of named.root from ftp://ftp.internic.net/domain, and put itin /var/named.
Then create the zone files: zone.localhost, revp.127.0.0, zone.net.windbag, andrevp.208.201.239. You can copy zone.localhost and revp.127.0.0 from Recipe 24.15.
Table 24-3. Public servers
Address Hostname Role Aliases
208.201.239.45 catmint Public DNS
208.201.239.46 henbane Public FTP, WWW FTP, www

This is the Title of the Book, eMatter EditionCopyright © 2007 O’Reilly & Associates, Inc. All rights reserved.
24.18 Configuring a Public BIND DNS Server | 517
Here are sample zone.net.windbag and revp.208.201.239 files:
// zone.net.windbag// public dns zone for for windbag.net;$ORIGIN windbag.net.$TTL 1D; any time you make a change to the domain, bump the; "serial" setting below. the format is easy:; YYYYMMDDI, with the I being an iterator in case you; make more than one change during any one day@ IN SOA catmint hostmaster ( 200405191 ; serial 8H ; refresh 4H ; retry 4W ; expire 1D ) ; minimum; define the authoritative name server NS catmint; define domain functions with CNAMEsftp CNAME henbanewww CNAME henbane; our hostnames, in alphabetical ordercatmint A 208.201.239.45henbane A 208.201.239.46
And finally, here are the reverse lookups for the domain in the revp.208.201.239 file:
; revp.208.201.239; reverse pointers for 208.201.239 subnet;$ORIGIN 239.201.208.in-addr.arpa.$TTL 1D@ IN SOA catmint.windbag.net. hostmaster.windbag.net. ( 200405190 ; serial 28800 ; refresh (8 hours) 14400 ; retry (4 hours) 2419200 ; expire (4 weeks) 86400 ; minimum (1 day) ); define the authoritative name server NS catmint.windbag.net.; our hosts, in numeric order45 PTR catmint.windbag.net.46 PTR henbane.windbag.net.
Stuff all these files into /var/named and restart BIND:
# /etc/init.d/named restart
Your new DNS server is now in business.

This is the Title of the Book, eMatter EditionCopyright © 2007 O’Reilly & Associates, Inc. All rights reserved.
518 | Chapter 24: Managing Name Resolution
DiscussionRemember to use the syntax-checkers discussed in Recipe 24.17; the most commonBIND problems are caused by typos.
Never use the same BIND authoritative server for both private, internal hosts andpublic, external hosts. The outside world does not need a direct pipeline to worksta-tions, private servers, networked printers, or other internal resources.
Providing both private and public name services from the same DNS server is called“split horizon.” With older versions of BIND, which no one should be using any-way, it’s nearly impossible to implement a split horizon setup sanely. You’re betteroff having two completely separate servers.
BIND 9 introduces “views,” which are supposed to make it easier to implement asplit horizon setup. In my opinion, it’s still easier and more secure to use two sepa-rate BIND servers for private and public hosts. The easiest way of all is to use djbdns(see Recipes 24.11 and 24.12).
To learn more about BIND 9 views, see Chapter 10 of DNS and BIND, Fourth Edi-tion, by those masters of BIND, Paul Albitz and Cricket Liu (O’Reilly).
See Also• named(5), named.conf(8)
• Chapter 3 of The Bind 9 Administrator’s Reference Manual (http://www.bind9.net/Bv9ARM.html)
• Chapter 10 of DNS and BIND, Fourth Edition
• Appendix C of TCP/IP Network Administration, Third Edition
24.19 Building a BIND Secondary Server
ProblemYou have your public BIND server configured and running smoothly. Now you wantto have a secondary BIND server in place.
SolutionThere are four steps:
1. Configure the primary’s named.conf so that it will transfer zone file changes tothe secondary.
2. Configure the zone and reverse pointer files for the local domain so that the sec-ondary is listed as one of the authoritative name servers for the domain.

This is the Title of the Book, eMatter EditionCopyright © 2007 O’Reilly & Associates, Inc. All rights reserved.
24.19 Building a BIND Secondary Server | 519
3. Get a caching name server running on the host that will serve as secondary, andthen configure it so that it is aware of its role as secondary.
4. Update client configurations.
The first step is accomplished by adding an also-notify directive to the zone blocks innamed.conf on the primary. This example makes henbane the secondary to catmint(see Recipe 24.18):
zone "windbag.net" IN { type master; file "zone.net.windbag"; // tell henbane when changes get made also-notify { 208.201.239.46; }};
zone "239.201.208.in-addr.arpa" { type master; file "revp.208.201.239 "; also-notify { 208.201.239.46; }};
Next, add henbane as a second name server in zone.net.windbag:
// zone.net.windbag// public dns zone for for windbag.net........; define the authoritative name servers NS catmint NS henbane
Remember to advance your serial number after making changes to a zone file!
Don’t forget to add henbane to revp.208.201.239, and mind your trailing dots:
; revp.208.201.239; reverse pointers for 208.201.239 subnet........; define the authoritative name servers NS catmint.windbag.net. NS henbane.windbag.net.
Remember to advance your serial number!
That takes care of steps 1 and 2. To complete step 3, set up a caching name serveraccording to Recipe 24.15. Make it exactly the same. The only difference, other thanbeing on a different machine, is in named.conf on the secondary. You’ll add a typeslave directive for both the zone blocks:
// serve as secondary for windbag.net domainzone "windbag.net" IN { type slave; file "zone.net.windbag"; // where the primary nameserver lives

This is the Title of the Book, eMatter EditionCopyright © 2007 O’Reilly & Associates, Inc. All rights reserved.
520 | Chapter 24: Managing Name Resolution
masters { 208.201.239.45; }};
// serve as secondary for 208.201.239.45 net infozone "239.201.208.in-addr.arpa" { type slave; file "revp.208.201.239 "; masters { 208.201.239.45; }};
Restart BIND, add the second name server to your client PCs or DHCP server, andyou’re done.
DiscussionTo really be useful as a secondary, the server should be at a different physical loca-tion and not right next to your primary, as in this recipe. Exchanging secondarieswith friends is a good strategy, or you might get an account on a shared server in adata center; the cost is reasonable, and they have all the hardware and bandwidthheadaches. All you have to do is make sure your configurations are correct.
The also-notify directive insures that when changes are made to zone files on the pri-mary server, they will automatically be pushed out to the secondary. Remember toadvance your serial number, or nothing will happen!
See Also• named(5), named(8)
• Chapter 6 of The Bind 9 Administrator’s Reference Manual (http://www.bind9.net/Bv9ARM.html)
• Appendix C of TCP/IP Network Administration, Third Edition
24.20 Simple Load Balancing with BIND
ProblemYou have redundant mail, FTP, or web servers, and you would like to configurethem to automatically share the load during times of heavy traffic.
SolutionJust give them all A records, using the same server alias for each IP address:
ftp IN A 192.168.0.4 IN A 192.168.0.5 IN A 192.168.0.6www IN A 192.168.0.7

This is the Title of the Book, eMatter EditionCopyright © 2007 O’Reilly & Associates, Inc. All rights reserved.
24.21 Testing Your tinydns Server | 521
IN A 192.168.0.8 IN A 192.168.0.9mail IN A 192.168.0.10 IN A 192.168.0.11 IN A 192.168.0.12
An alternate trick with mail servers is to give them all the same priority:
IN MX 10 mail.mydomain.com.IN MX 10 mail1.mydomain.com.IN MX 10 mail2.mydomain.com.
....
mail IN A 192.168.0.4mail1 IN A 192.168.0.5mail2 IN A 192.168.0.6
DiscussionBecause of caching, you’ll never get a perfect balance, but it’s simple to set up, andworks pretty well.
See Also• Chapter 3 of The BIND 9 Administrator Reference Manual (http://www.bind9.net/
Bv9ARM.html)
24.21 Testing Your tinydns Server
ProblemYou want to check your tinydns configuration to see exactly what informationtinydns will provide in response to queries.
Solutiondjbdns comes with a number of useful querying utilities. Use tinydns-get to queryyour tinydns server. Run this command from the directory in which your data.cdb fileis located. First tell what type of server it is, then give the domain name:
$ tinydns-get mx pixels.net15 pixels.net:80 bytes, 1+0+1+0 records, response, authoritative, noerrorquery: 15 pixels.netauthority: pixels.net 2560 SOA a.ns.pixels.net hostmaster.pixels.net 1093229912 163842048 1048576 2560

This is the Title of the Book, eMatter EditionCopyright © 2007 O’Reilly & Associates, Inc. All rights reserved.
522 | Chapter 24: Managing Name Resolution
DiscussionThis is the quickest and easiest way to test your tinydns server. Run it every so oftenjust to keep an eye on it. tinydns is very reliable and secure, so odds are any prob-lems will be due to human error.
See Also• Command-line tools to look up DNS information (http://cr.yp.to/djbdns/
tools.html)
• Command-line tools to debug DNS configuration (http://cr.yp.to/djbdns/debugging.html)
24.22 Testing and Querying DNS Serverswith dig and dnstrace
ProblemYou want a utility for querying DNS servers; you want to be able to query specificservers for different record types, or make general queries that report all data for adomain. You are especially interested in what your servers are reporting to the world.You also want to trace all the upstream servers that affect the resolution of yourdomain name. And you are nosy about other people’s networks.
Solutiondig, the Domain Information Groper, can do pretty much any kind of DNS queryyou want. dnstrace is the best tool for tracking down possible upstream troubles,such as misconfigured DNS servers that report your domain information incorrectly.
This is probably the most common dig query; it retrieves the complete resourcerecord for a domain from the name servers specified in your resolv.conf file:
$ dig debian.org; <<>> DiG 9.2.4rc5 <<>> debian.org;; global options: printcmd;; Got answer:;; ->>HEADER<<- opcode: QUERY, status: NOERROR, id: 43802;; flags: qr rd ra; QUERY: 1, ANSWER: 1, AUTHORITY: 4, ADDITIONAL: 1
;; QUESTION SECTION:;debian.org. IN A
;; ANSWER SECTION:debian.org. 3600 IN A 192.25.206.10

This is the Title of the Book, eMatter EditionCopyright © 2007 O’Reilly & Associates, Inc. All rights reserved.
24.22 Testing and Querying DNS Servers with dig and dnstrace | 523
;; AUTHORITY SECTION:debian.org. 3600 IN NS saens.debian.org.debian.org. 3600 IN NS spohr.debian.org.debian.org. 3600 IN NS klecker.debian.org.debian.org. 3600 IN NS newsamosa.debian.org.
;; ADDITIONAL SECTION:newsamosa.debian.org. 3600 IN A 208.185.25.35
;; Query time: 383 msec;; SERVER: 12.169.174.2#53(12.169.174.2);; WHEN: Tue Aug 24 15:36:36 2004;; MSG SIZE rcvd: 146
It shows you three things:
• The QUESTION SECTION shows your inquiry.
• The ANSWER SECTION is your answer.
• The AUTHORITY SECTION lists the authoritative server(s) for the domain.
You can query the authoritative server for a domain directly. For example, to queryyour own authoritative server, you’d use:
$ dig @ns.pixels.net. pixels.net
You can also specify a particular record type (any, a, ns, mx, ptr, txt, cname, soa,hinfo, rp, sig, key, aaaa, or axfr) like this:
$ dig cname @ns.pixels.net. pixels.net
dnstrace, which comes with djbdns, searches for all DNS servers that can affect theresolution of your selected domain name, starting from the specified root server. Thiscan take a long time to run and may produce a lot of output, so the best thing to dois pipe it to a file, then run dnstracesort to format it nicely for reading:
$ dnstrace ptr www.bratgrrl.com a.root-servers.net > bratgrrl-trace.txt$ dnstracesort < bratgrrl-trace.txt | less
Use this to see if any DNS servers are not resolving your domain correctly, or to huntdown mysterious errors and timeouts. You can quickly grep any error messages onthe ALERT keyword:
$ cat bratgrrl-trace.txt | grep ALERT1:l.gtld-servers.net:net:192.52.178.30:ALERT:took more than 1 second1:h2.nstld.com:com:192.5.6.30:ALERT: query failed; connection refused1 ns1.reno.bfp.net 209.160.7.3 ALERT: query failed; timed out1 www.entero.net 192.216.155.10 ALERT: lame server; refers to entero.net
DiscussionLots of things can go wrong in the DNS world: timeouts, lame servers, even “mar-tians.” Timeouts are usually transient, caused by network problems or server down-time. Lame servers are a bigger problem. A lame server, or lame delegation, happens

This is the Title of the Book, eMatter EditionCopyright © 2007 O’Reilly & Associates, Inc. All rights reserved.
524 | Chapter 24: Managing Name Resolution
when an NS record points to an incorrect host. This means that DNS requests arebeing directed to a server that cannot answer them, so it wastes time and resources.
Because DNS is distributed, it may not matter if a server here or there is goofed up.But if you wish to contact the admin and correct the problem, you can run a whoison the domain to find out who to contact. The Internet is chock-full of misconfig-ured DNS servers. Use the -H option to turn off the deluge of legalese that accompa-nies a whois inquiry these days:
$ whois -H pixels.net
Sadly, most DNS troubles are local: a glitch in your network, or an error in the con-figuration.
You can use dig to query any DNS server—not just your local server and not justDNS servers. If a server can’t answer a dig request, it’s broken.
See Also• Command-line tools to debug DNS configuration (http://cr.yp.to/djbdns/
debugging.html)
• dig(1), whois(1)

This is the Title of the Book, eMatter EditionCopyright © 2007 O’Reilly & Associates, Inc. All rights reserved.
525
Appendix A APPENDIX A
Finding Linux Documentation
Linux Documentation on the WebLinux is truly a child of the Internet. Keeping up with advances, and finding docu-mentation, means becoming acquainted with search engines, and relevant Web sites.The first stop is the Web site of your Linux distribution. Look for online manuals,howtos, FAQs, knowledge bases, mail lists, and list archives. Most Linux distribu-tions are customized to some degree, so you’ll need to know your distro-specificquirks.
Next, visit the Web sites of the individual programs you are using, and look for theirmail lists, online documentation, and user communities.
Then there are a large number of general-interest Linux web sites, and online Linuxpublications. In this chapter are a number of resources I’ve found to be useful. Notethat many of these welcome contributions from readers and ordinary Linux users.Don’t be shy- share what you know.
As always, pay heed to proper netiquette. Search list archives before posting a ques-tion. If it’s been answered recently, or often, you’ll get yelled at. Mind your man-ners, and ignore trolls and rude people. Life is too short to waste in silly flame wars.
Linux Web SitesThe Linux Documentation Project
http://www.tldp.org/
IBM developerWorkshttp://www-106.ibm.com/developerworks/linux/
Librenixhttp://librenix.com/
O’Reilly Networkhttp://oreillynet.com/

This is the Title of the Book, eMatter EditionCopyright © 2007 O’Reilly & Associates, Inc. All rights reserved.
526 | Appendix A: Finding Linux Documentation
TuxMobilehttp://www.tuxmobil.org/howtos.html
Wireless LAN resources for Linuxhttp://www.hpl.hp.com/personal/Jean_Tourrilhes/Linux/
The Linux Kernel Archiveshttp://www.kernel.org/
Linux Gazettehttp://linuxgazette.net/
This is, as far as I know, the only group devoted to supporting women Linux users,and an excellent group it is. There are several great mailing lists, including Newchixfor newbies; courses on various subjects, such as programming, filesystems, and net-working; and there are even Linuxchix chapters all over the world, where people canmeet in the flesh. Yes, face-to-face, in person.
LinuxChixhttp://linuxchix.org/
O’Reilly’s Safari Bookshelf deserves a special mention. It’s an online, searchablelibrary of over 1,300 computer books. It includes books from many good publishers.Subscriptions are quite affordable. Take it for a test-drive with their two-week freetrial.
Safari Bookshelfhttp://safari.oreilly.com/
UsenetThere are dozens of Linux groups on Usenet. Try these for starters:
comp.os.linux.announcecomp.os.linux.hardwarecomp.os.linux.networkingcomp.os.linux.security
GoogleHow did we ever live without Google?
Google home pagehttp://google.com
Google Groups, a great searchable front-end to Usenethttp://groups.google.com/

This is the Title of the Book, eMatter EditionCopyright © 2007 O’Reilly & Associates, Inc. All rights reserved.
Books and Magazines | 527
Books and MagazinesFirst, check out any printed manuals for your Linux distribution. Red Hat andSuSE’s manuals, for example, are very good.
These are my choices for an essential Linux library:
• Linux in a Nutshell, by Ellen Siever
• Running Linux, by Matt Welsh, Matthias Kalle Dalheimer, Terry Dawson, LarKaufman
• Mastering Regular Expressions, by By Jeffrey E. F. Friedl
• Building Secure Servers with Linux, by Mick Bauer
• Linux Server Hacks, by Rob Flickenger
• Essential System Administration, by Æleen Frisch
• Linux Security Cookbook, by Daniel J. Barrett, Richard Silverman,
• Learning the bash Shell, Second Edition, by Cameron Newham, Bill Rosenblatt
• Linux Network Administrator’s Guide, by Olaf Kirch, Terry Dawson
• TCP/IP Network Administration, by Craig Hunt
• PC Hardware in a Nutshell, by Robert Bruce Thompson, Barbara FritchmanThompson
Magazines:• Linux Journal
• Linux Magazine
• SysAdmin Magazine
• Unix Review
You’ll notice there are no distribution-specific publications, and nothing for dum-mies or idiots. Just good, well-written, thorough Linux materials.

This is the Title of the Book, eMatter EditionCopyright © 2007 O’Reilly & Associates, Inc. All rights reserved.
528
Appendix BAPPENDIX B
Online References
Hardware Web SitesLinux FAQ
http://en.tldp.org/FAQ/Linux-FAQ/index.html
Linux Network Drivers at Scyld Computing Corporationhttp://www.scyld.com/network
Wireless LAN resources for Linuxhttp://www.hpl.hp.com/personal/Jean_Tourrilhes/Linux
Linux On Mobile Computershttp://tuxmobile.org/
Linux Deviceshttp://www.linuxdevices.com/
Linux USB Projecthttp://www.linux-usb.org/
Linux Firewirehttp://www.linux1394.org/
LinuxPrinting.orghttp://www.linuxprinting.org/
SANE - Scanner Access Now Easyhttp://www.sane-project.org/
Advanced Linux Sound Architecturehttp://www.alsa-project.org/
Open Sound System for Linuxhttp://www.4front-tech.com/linux.htmlOSS/
XFree86http://www.xfree86.org/

This is the Title of the Book, eMatter EditionCopyright © 2007 O’Reilly & Associates, Inc. All rights reserved.
Usenet | 529
Xouvert, a fork of XFree86, that aims for faster development, and better support ofmodern video cards
http://www.xouvert.org/
KernelTraphttp://kerneltrap.org/
Linux-Dell-laptopshttp://www.whacked.net/ldl/faq/
Debian-laptop mailing listhttp://lists.debian.org/debian-laptop/
Linmodemshttp://www.linmodems.org/
Hardware Guyshttp://www.hardwareguys.com
This is the companion site to the book PC Hardware in a Nutshell. It’s notLinux-oriented, but it’s a great resource all the same.
Usenetcomp.os.linux.hardwarecomp.os.linux.portablecomp.os.linux.powerpccomp.os.linux.xcomp.os.linux.alpha

This is the Title of the Book, eMatter EditionCopyright © 2007 O’Reilly & Associates, Inc. All rights reserved.
530
Appendix CAPPENDIX C
Microsoft File Types
MS Access Database Wiz. Template MDZMS Access Database/Template/Add. MDB, MDT, MDA, MDWMS Access Description File DESMS Access Menu File MNUMS Access Modem File MDMMS Archive MARMS Assembler Cross Reference CRF, REFMS Audio/Visual Interleave AVIMS Briefcase Database BFCMS Chat Animated Character AVBMS Clean Boot File CBMS ClipArt Gallery CAGMS Compatibility Database CATMS Compiler Compiled Source Code CODMS Debug Information File DBGMS Developer Studio Project File DSPMS Developer Studio Workspace DSWMS DOS Code Page Information CPIMS DOS Help HLPMS Draw Palette PALMS Excel Add-in File XLLMS Excel Backup XLKMS Excel Chart XLCMS Excel Dialogue XLDMS Excel Macro XLMMS Excel VBA Module XLVMS Excel Worksheet/Add-In/Templ. XLS, XLA, XLT, XLBMS Excel Workspace/Workbook XLWMS Find Saved Search FNDMS HyperTerminal Shortcut HTMS IE Cascading Style Sheet CSSMS IExplorer Connection Wizard ICWMS Image Color Matching Profile ICMMS Internet Explorer Cache DATMS Language Character Set NLSMS Linker Database ILKMS Midi Music RMIMS Money Data MNY

This is the Title of the Book, eMatter EditionCopyright © 2007 O’Reilly & Associates, Inc. All rights reserved.
Microsoft File Types | 531
MS Multi-Media Movie MMMMS Multiplan Spreadsheet COLMS Network Shortcut MCCMS Office Assistant Actor ACTMS Office Assistant Preview ACPMS Office Binder Doc/Temp OBDMS Office Binder Template OBTMS Office Binder Wizard OBZMS Outlook Message Store PSTMS Outlook Express Email Folder MBXMS Outlook Express Email Index IDXMS Outlook Express Email Tree NCHMS Outlook Express News Message NWSMS Paint Bitmap MSPMS Personal Address Book PABMS Pictures PCSMS PowerPoint Slides PPTMS PowerPoint Template POTMS Powerpoint Slideshow PPSMS Program Information PNFMS Project File MPPMS Query Database DBFMS Query Database Index MDXMS Rich Text Format Document RTFMS ScanDisk/CHKDSK Fragment File CHKMS Schedule+ Print File FMTMS Setup Wizard Dependency File DEPMS Spell Checker Dictionary DICMS Spelling Auto Correct List ACLMS Tip of the Day File TIPMS Visual BASIC Include File BIMS Visual C++ Compiled Resources RES, APS, RCTMS Visual C++ Debug File SBRMS Visual C++ Definition File DEFMS Visual C++ DLL Exports File EXPMS Visual C++ Interface Des Lang IDLMS Visual C++ Object Desc. Lang. ODLMS Visual C++ Precompiled Header PCHMS Visual C++ Program Database PDB, BSC, NCB, IDBMS Visual C++ Registry Source RGSMS Visual C++ Resource File RCMS Windows 3.1 True Type Font TTFMS Windows 3.x Logo LGOMS Windows 3.x Screen Grabber 2GR, 3GRMS Windows 3.x Screen Saver SCRMS Windows 3.x System Font FON, FOTMS Windows 95 Password List File PWLMS Windows 95 Plus! Palette PALMS Windows Address Book WABMS Windows Animated Cursor ANIMS Windows Audio Converter ACMMS Windows Bitmap BMPMS Windows Briefcase Document BFCMS Windows Cabinet Archive CAB

This is the Title of the Book, eMatter EditionCopyright © 2007 O’Reilly & Associates, Inc. All rights reserved.
532 | Appendix C: Microsoft File Types
MS Windows Calendar CALMS Windows Card File CRDMS Windows Clipboard File CLPMS Windows Control Panel Applet CPLMS Windows Cue Cards CUEMS Windows Cursor CURMS Windows Desktop Theme THEMEMS Windows Disk Map File DMFMS Windows Driver (16 bit) DRV, DLLMS Windows Driver (16 bit) EXE, VXD, SYS, DRVMS Windows Fax Cover CPE, CPDMS Windows Help Answer Wizard AWMS Windows Help Contents Table CNTMS Windows Help File HLPMS Windows Help Full Text Search FTSMS Windows Help Global Index GIDMS Windows Help Module CHM, CHI, CHQMS Windows Help Text Search TSCMS Windows Icon ICOMS Windows Install Script INSMS Windows Library (16 bit) DLL, DRV, VBX, EXEMS Windows Library (32 bit) DLL, TLS, OCX, CPLMS Windows MetaFile (placeable) WMFMS Windows Office Toolbar Button TBBMS Windows Password List PWLMS Windows Printer Driver WPDMS Windows Program (16 bit) EXE, MOD, BINMS Windows Program (32 bit) EXE, SCR, MOD, SYSMS Windows Program (WIN386) EXEMS Windows Program Group GRP, GRBMS Windows Program Information PIFMS Windows Registry DAT, DAOMS Windows Registry Import File REG, DATMS Windows Resource RESMS Windows Shortcut/Link LNKMS Windows Sound Mix MIXMS Windows SQL Application APPMS Windows Swap File SWPMS Windows True Type Font TTFMS Windows Type Library TLB, TWDMS Windows Uninstall Script ISUMS Windows Wave Sound WAVMS Windows Welcome Bitmap WBMMS Word for DOS Document DOCMS Word for DOS Font DATMS Word for DOS Printer Def. PRDMS Word for DOS Style Sheet STYMS Word for Macintosh Document MCWMS Word for Windows Document DOC, DOT, WIZ, WZS, WRIMS Word for Windows Template DOTMS Works Database WDBMS Works Document WPSMS Write Document WRI

This is the Title of the Book, eMatter EditionCopyright © 2007 O’Reilly & Associates, Inc. All rights reserved.
533
Appendix D APPENDIX D
Init Script for CVSD
#! /bin/sh# /etc/init.d/cvsd script for starting cvsd# copied from the Debian installation of CVSD# Copyright (C) 2002, 2003, 2004 Arthur de Jong## This program is free software; you can redistribute it and/or modify# it under the terms of the GNU General Public License as published by# the Free Software Foundation; either version 2 of the License, or# (at your option) any later version.## This program is distributed in the hope that it will be useful,# but WITHOUT ANY WARRANTY; without even the implied warranty of# MERCHANTABILITY or FITNESS FOR A PARTICULAR PURPOSE. See the# GNU General Public License for more details.## You should have received a copy of the GNU General Public License# along with this program; if not, write to the Free Software# Foundation, Inc., 59 Temple Place, Suite 330, Boston, MA 02111-1307 USA
CVSD_BIN=/usr/sbin/cvsdDESC="cvs pserver chroot wrapper"CVSD_CFG=/etc/cvsd/cvsd.conf
[ -x "$CVSD_BIN" ] || exit 0[ -f "$CVSD_CFG" ] || exit 0
PIDFILE=`sed -n 's/^ *PidFile *\([^ ]*\) *$/\1/p' < $CVSD_CFG`[ -n "$PIDFILE" ] && PFO="--pidfile $PIDFILE"
case "$1" instart) echo -n "Starting $DESC: cvsd" start-stop-daemon --start --quiet \ $PFO \ --exec $CVSD_BIN \ -- -f $CVSD_CFG \ || echo -n " already running"

This is the Title of the Book, eMatter EditionCopyright © 2007 O’Reilly & Associates, Inc. All rights reserved.
534 | Appendix D: Init Script for CVSD
echo "." ;;stop) echo -n "Stopping $DESC: cvsd" start-stop-daemon --stop --quiet \ $PFO \ --exec $CVSD_BIN \ || echo -n " not running" echo "." [ -n "$PIDFILE" ] && rm -f $PIDFILE ;;restart|force-reload) echo -n "Restarting $DESC: cvsd" start-stop-daemon --stop --quiet --retry 10 \ $PFO \ --exec $CVSD_BIN [ -n "$PIDFILE" ] && rm -f $PIDFILE start-stop-daemon --start --quiet \ $PFO \ --exec $CVSD_BIN \ -- -f $CVSD_CFG \ || echo -n " not restarted" echo "." ;;status) echo -n "Status of $DESC: " if [ -n "$PIDFILE" ] then if [ -f "$PIDFILE" ] then if kill -0 `cat $PIDFILE` > /dev/null 2>&1 then echo "running." exit 0 else echo "stopped." exit 1 fi else echo "stopped." exit 3 fi else if ps -ef | grep cvsd | grep -v grep > /dev/null 2>&1 then echo "probably running. (no PidFile in cvsd.conf)" else echo "probably not running. (no PidFile in cvsd.conf)" exit 3 fi fi ;;*)

This is the Title of the Book, eMatter EditionCopyright © 2007 O’Reilly & Associates, Inc. All rights reserved.
Init Script for CVSD | 535
echo "Usage: $0 {start|stop|restart|force-reload}" >&2 exit 1 ;;esac
exit 0


This is the Title of the Book, eMatter EditionCopyright © 2007 O’Reilly & Associates, Inc. All rights reserved.
537
We’d like to hear your suggestions for improving our indexes. Send email to [email protected].
Index
Symbols^ (caret), 70,v (comma v) suffix, 320$origin directive, 512
Numbers3D acceleration hardware, 262–265
enabling with XFree87/DRI, 262–264troubleshooting, 264
Aaccounts, disabling, 112addgroup command, 104, 116adduser command, 104, 107
performance in scripts, 107system users, creating with, 115
AGP (accelerated graphics port), 258video cards, 256
agpgart module, 264Alt-Fn keyboard commands, 258amavisd.conf file, 407, 408amavisd-new, 406
setting up SpamAssasin on Postfix, 410with Clam Anti-Virus on
Postfix, 406–410AMD processor performance ratings, 64anycast, 489Apache web servers, 415–446
access logs, viewing withWebalizer, 444–446
ApacheToolbox, 423Basic and Digest user authentication, 433
blocking obnoxious visitors, 437directory indexes, preventing
truncation, 439documentation, 424
for packages, 425DSO (Dynamic Shared Objects), 417
server configuration for, 420error pages, 438file permissions and ownership,
setting, 423httpd binaries, 423
hosting multiple domains, 428–430domains and VirtualHost
directives, 429hosting options, 417individual user web directories, 427init script for, 428installing 2.0 from source, 419–422
configuration, 421default installation directories, 421
installing, source versus packages, 417LAN web sites, isolating from the
Internet, 432deny/allow access rules, 432
logfiles for virtual hosts, 430MPMs, Linux, 416MPMs, non-Linux, 417multi-language page delivery via content
negotiation, 440–443Content-language directives, 441type map files, 440
new modules, adding, 422password-protecting individual
directories, 433–435

This is the Title of the Book, eMatter EditionCopyright © 2007 O’Reilly & Associates, Inc. All rights reserved.
538 | Index
Apache web servers (continued)redirecting URLs to new directories, 426simple public web servers, setting up, 425starting at boot, 428supported operating systems, 415user’s manual, local access of, 424using favicons, 443versions, 415
1.3 and 2.0 compared, 416VirtualHost directives, 429–432web crawler control with
robots.txt, 436–437apachectl, 426, 428apropos, 4apt-cdrom command, 37apt-get command, 34, 36, 38
-u flag, 42apt-get install command, 38
for package upgrades, 41apt-get remove command, 39apt-get source command, 40apt-get update, 39apt-proxy command, 49apt-proxy.conf, 50
adding your package cache to, 51asynchronous filesystems, 136atomic commits, 318authentication
authentication backends, 28ntpkeys scheme for timeservers, 358public-key authentication, 302Samba servers, adding to, 457smtp-auth on Postfix, 376–378
authenticating the Postfix server toother servers, 378
AuthName directive, 434authoritative servers, 489authorized_keys file, 306Automachron sntp client, 351automatic shutdown, 102autotext, creating with Vim
abbreviations, 79awk, sorting capabilities, 104
Bbackports, 40backup and recovery, 277–300
hard disks compared to tapes, 277Mondo Rescue (see Mondo Rescue)rsync (see rsync)tape backups, 277
backup servers,building with rsync, 281
bandwidth billing, 418Bash prompt, customization for ssh, 312binary-only drivers, 59BIND (Berkeley Internet Name
Domain), 487, 508–521BIND entries, 372building a secondary server, 518–520checking syntax, 515configuring a public DNS
server, 515–518load balancing, 520local caching servers, 508–510running a private server, 510–515
BitKeeper version control system, 318boot partition and journaling
filesystems, 138boot process, 89, 90
Apache web server startup, 428Debian boot disks, creating, 177default runlevel, changing, 93Red Hat boot disks, creating, 177(see also bootloaders)
bootloaders, 199–228boot partition, configuring, 210chain loading, 199dual-booting
Linux/Windows 95/98/ME, 214–216Linux/Windows NT/2000/XP, 216
GRUB (see GRUB)LILO (see LILO)MBR (Master Boot Record), 199
backing up, 228multiboot systems
Linux OSs, adding to, 206preparation, 205–206
b+trees, 136build commands, kernels, 165
2.6 version, 170bunzip2, 53
bunzip2 archives, unpacking, 55
Ccaching servers, 489, 499
BIND and, 508DNS servers, Linux and Window client
configuration, 500separation from DNS servers, 499
cat command for reassembly of largefiles, 193
CD drive information, displaying, 64CD-DA (Compact Disk Digital Audio)
format, 196

This is the Title of the Book, eMatter EditionCopyright © 2007 O’Reilly & Associates, Inc. All rights reserved.
Index | 539
CD/DVD recording, 179–198audio CDs for CD players, recording, 196bootable CDs, creating, 192CD Recordable FAQ and DVD FAQ, 182CD standards books, 181CD-RW disks, lifespan of, 190CD-RWs, erasing, 190CDs/DVDs, copying, 188data CDS, building file trees on, 187data CDs, making, 185–187data DVDs, recording, 194filesystem standards, 180hardware standards and
formats, 180–182large files, spanning over several
CDs, 193multisession data CDs, recording, 191SCSI addresses, finding for CD/DVD
writers, 182SCSI emulation, enabling for IDE/ATAPI
CD/DVD writers, 183write options, 181
CD-R, CD-RW, and CD-ROM hardwarestandards, 180
.cdr format, conversion to CD audio, 196cdrecord command, 183
blank option, 190CD/DVD copying, 188multisession options, 191-scanbus option, 182
chain loading, 199CheckInstall utility, 40, 56checkout command, 327chfn command, 109chgrp command, 134chkconfig utility, 97chmod command, 134, 138–142
numeric notation, 138chown command, 134, 142–143
batch operations using, 143chroot jail, 337ci -u command, 320CIFS/SMB file sharing protocols, 448Clam Anti-Virus scanner, 406–410classes utility (CUPS), 251co -l command, 320col command, 11command syntax, 3commit -m command, 329Common Unix Printing System (see CUPS)compiling programs, system preparation, 52config utility, 162
configuration filesamavisd.conf, 407, 408bashrc, prompt customization for
ssh, 312.config file and kernels, 163–165/courier/pop3d.cnf, 364.cvsrc, 344/etc/modules.conf, 184/etc/fstab, 148–150httpd.conf (see httpd.conf).joerc, 71.joercprefs, 72named root, 509named.conf, 508, 511ntp.conf, 348
adding access controls, 351/postfix/main.cf, 363
Cyrus-SASL, enabling in, 373mail checks, 400–402managing unsolicited bulk email, 399on Debian, 366setting up virtual mailbox
domains, 385rsyncd.conf, 285sshd_config, for X tunneling, 313.vimrc, 81XF86Config
editing, 261XV86Config, 260
consoles, using with X Windows, 258–260Content Negotiation, 442content servers, 489Content-language directives, 441Core Development Tools, 53Courier, maildirmake command, 384Courier-IMAP, 364
configuration file, 364cp command, 157CPanel, 418CPU information, displaying, 63cron and crontab files, 102CrossOver Office, 481–486Ctrl-Alt-Delete command, 100
disabling or controlling access to, 101Ctrl-Alt-Fn keyboard command, 258CUPS (Common Unix Printing System), 9,
241–254dedicated printer servers, building, 250distributed printing with classes, 251filters, 241networking printers, 242printer drivers, 241

This is the Title of the Book, eMatter EditionCopyright © 2007 O’Reilly & Associates, Inc. All rights reserved.
540 | Index
CUPS (Common Unix Printing System)(continued)
printer shares over mixed LANs withSamba, 250
printers, installing on a LinuxPC, 243–245
serving Linux clients, 246troubleshooting, 253users, restricting from printers and
classes, 252CVS, 318, 326–346
add subcommand with -kb flags, 340with -kkv flags, 341
binary files, storage, 340checkout command, 327command syntax, 327commit subcommand, 327
-m option, 329compared to RCS, 328configuring the working
environment, 344customizing, 344cvs init command, 331CVS Pservers, 337
mirroring, 339security concerns, 338
CVSD init script, 533–535cvsd utility, 337
installing from source, 337diff subcommand, 336environment variables, 344log subcommand, 335marking specific files as a set, 341owner and group creation, 330remove command, 329repositories
accessing remotely, 332adding new files to, 328administration files for, creating, 331anonymous read-only
repositories, 337deleting files from, 329local single-user, creating, 326–328mirroring, 339shared, creating, 330sharing between groups, 332storage size, calculating, 345
retrieving old files from, 335rtag subcommand, 343sandbox, 327stable and development project branches,
creating, 342status command, 329, 336
tags, 341update command, 329updating working files in a shared
project, 334file state codes, 334
working directory, 327Cygwin, 315Cyrus-SASL installation, 372
on Debian, 374
DDAC (digital-to-analog converter), 257daemontools, 496DAO (disc-at-once) write option, 182Debian, 34–51
apt-proxy.conf, 50boot disks, creating, 177building a local repository, 49cvsd utility, 337Cyrus-SASL, installing, 374debianutils package
mkboot utility, 177dependency conflicts, resolving, 47–48download sites and vendors, 35finding out what’s installed, 44–46getting software for, 35–37initialization, 90installing programs from non-Debian
repositories, 40loadable kernel modules, adding, 172managing runlevels, 94mirror sites, 36mirrors, 36packages, 35–51
installing, 38installing from CD-ROMs, 37maintaining package caches, 46package names compared to RPM
package names, 39package search page, 35removing, 39resolving dependencies, 47–48updating, 39upgrading, 41
POP3 mail servers, building, 366Courier, installing, 367Postfix configuration, 366postfix reload command, 367testing, 368
releases, 34codenames, 35running a mixed system, 43upgrading, 42

This is the Title of the Book, eMatter EditionCopyright © 2007 O’Reilly & Associates, Inc. All rights reserved.
Index | 541
runlevels, 91security updates, 37source, installing from, 40sources.list, editing, 36text and graphical login runlevels, 95timeservers, using with an intermittent
connection, 355user and group numbering, 105users, sorting human from system, 104
dedicated servers, 418delayed allocation, 137deny/allow access rules, 432dependencies, 14
failed dependencies, fixing, 24resolving in Debian packages, 47–48
device names for storage disks,finding, 152–154
DHCP (Dynamic Host ConfigurationProtocol), 487
dhcp clients, 492adding static hosts to, 493
DHCP servers, 491dig command, 354, 488
DNS servers, testing and querying, 522Direct Rendering Infrastructure (see DRI)directories, 155
copying, moving, and renaming, 157share setup with setgid, sticky bit, 144
disk geometry, displaying, 63disk partitions, creating with fdisk, 158–159disk quotas, 129display managers, 273djbdns, 487
djbdns entries, 372dnsip queries, 498guilding a public DNS server, 502installing, 496local caching nameservers,
running, 498–500dmesg, 60–62DNS (Domain Name System), 487
accredited domain name registrars, 495anycast, 489authoritative servers or content
servers, 489BIND (Berkeley Internet Name
Domain), 487blackhole lists, 403–405caching DNS resolvers, 499caching servers, 489djbdns (see djbdns)
DNS servers, 494testing and querying with dig and
dnstrace, 522glossary, 488implementation, 487private DNS servers, 510–515root servers, 488separation, DNS servers from caching
servers, 499dnscache-conf logfiles, 497DNSRBLs (DNS blackhole lists), 404dnstrace, 522documentation, 1–13
distributions, included in, 2graphical viewers, 2info command (see info command and
pages)keyword searches, 4man command (see man command and
pages)online resources, 2programs, finding all documentation
for, 11–13Domain Name System (see DNS)domain names, fully qualified,
configuring, 379domain wildcards, 429dpkg command, 34, 40
querying features, 44–46DRI (Direct Rendering Infrastructure), 257
3D hardware acceleration, enabling, 262presence in kernel, verifying, 265
drive partition information, displaying, 65drives, identifying, 63DSO (Dynamic Shared Objects), 417dual booting with Windows, 214–216DVD FAQ, 182DVD recording (see CD/DVD recording)DVD video, recording, and writing hardware
standards, 180dvd+rw-tools homepage, 196Dynamic Host Configuration Protocol (see
DHCP)Dynamic Shared Objects (DSO), 417
Ee2fsprogs package, 160edquota command, 129egrep command, 6El Torito filesystem standard, 180email (see mail)

This is the Title of the Book, eMatter EditionCopyright © 2007 O’Reilly & Associates, Inc. All rights reserved.
542 | Index
errors and failed dependencies, 24/etc/fstab configuration files, 148–150
automating mounting of filesystems onhard drives, 151
/etc/passwd files, vulnerability, 103Evolution Connector, 398Ext2 filesystem, 136
creating on new partitions, 159Ext3 filesystem, 137
creating on new partitions, 159extents, 136external fragmentation, 136
Ffailed dependencies error, 24famd, 362favicons, 443fdisk, 65–67, 158–159
finding partitions using, 151Fedora graphical login manager, 94FHS (Filesystem Hierarchy Standard), 132file attributes, 134file permissions, 134
defaults, setting with umask, 145setting, 138
file sharingenabling on Windows PCs, 453–457protocols, history of, 448Samba (see Samba servers)
file types, 135directory locations, 132
filescopying, moving and renaming, 157creating, 155large files, copying to multiple CDs, 193permissions and ownership
Apache web servers, setting for, 423changing, 142CVS owner and group, creating, 330SSH files, setting on, 316
filesystems, 132–138asynchronous filesystems, 136b+trees, 136chown, 142/etc/fstab, configuring with, 148–150Ext3 filesystem, 137extents, 136external fragmentation, 136FHS, 132inodes, 136internal fragmentation, 136internals, 135
JFS filesystem, 137journaling filesystems, 136Linux file types, 133logical blocks, 135logical volumes, 135metadata, 136mount command, 147mounting and unmounting on hard
drives, 151new partitions, creating on, 159partitioning criteria and, 133ReiserFS filesystem, 137required elements, Linux filesystem, 132umount command, 147XFS filesystem, 137
find command, 54and batch file ownership changes, 143for verifying ownership changes, 110
finddoc script, 11–13Foomatic, 242FreshRPMs, 29fsck command, 136fstab command, 152–154
Ggcc program, 53gdm, 96GECOS data, 107
modifying, 109getty, 259Gimp-Print, 242GNU
Arch version control system, 318binutils, 53coreutils, 53tar, 53
Google, 526GPU (graphics processing unit), 258Grand Unified Bootloader (see GRUB)graphical user interfaces (see GUIs)graphical viewers, 2grep command, 54groff command, 7groupadd command, 114groupdel command, 114groups, 103
adding and deleting members, 116batch addition of users to, 125
groupware, 398growisofs utility, 194grpck command, 118grpquota partition, 129

This is the Title of the Book, eMatter EditionCopyright © 2007 O’Reilly & Associates, Inc. All rights reserved.
Index | 543
GRUB (Grand Unified Bootloader), 199boot menu, creating, 211boot parameters, discovering from the
command shell, 208–210installing
grub-install script, 204without a floppy, 202–204
LILO, migration from, 200–202locking individual GRUB menu
entries, 219menu.lst, customizing, 212–214new kernels adding, 164password protecting system files, 218restoring to the MBR with Knoppix, 217splash images, creating, 220
Gtypist, 69GUIs (graphical user interfaces)
version identification, 255X Window System (see X Window
System)Xnets, 274–276X.org (see X.org windowing system)
gunzip, 53
Hhalt command, 100hard drive capacity, calculating, 66hard links, 135hardware, 58–67
binary-only drivers, 59CD/DVD standards and
formats, 180–182dmesg, hardware detection using, 60–62finding device names for mount and
fstab, 152–154HCLs (hardware compatibility lists), 58lspci, detecting with, 59PCI devices, detecting, 59/proc, hardware snapshots using, 62–65
Haugh, Julianne Frances, 103:help command (Vim), 87host-keys, 302
authentication, 302generating, 304storage, 303
hosts files, 487, 490httpd binary (Apache web servers), 424httpd.conf
LogFormat directives, 431Rewrite directives, 427VirtualHost directives, 429VirtualHosts logfiles, 431
IIANA (Internet Assigned Numbers
Authority), 488ICANN (Internet Corporation for Assigned
Names and Numbers), 488accredited domain name registrars, 495
id command, 106IDE devices
driver versions, displaying, 63hard drive data, displaying, 63listing, 61
ide-scsi pseudo-device driver, 184IMAP (Interactive Message Access
Protocol), 361IMAP folders, sharing, 383IMAP mail servers, building and
testing, 380info command and pages, 1, 8
printing info pages, 10selective printing, 11
init, 89runlevels, changing with, 92
init script, CVSD, 533–535initialization scripts, 89initrd image, creating, 176inittab file, default runlevels, 93inodes, 136int 0 command, 100internal fragmentation, 136Internet Explorer, security issues, 397, 435Internet mail (see mail)ipconfig, 494ISA devices, listing, 61ISO-9660 filesystem standard, 181ISPs (Internet Service Providers) Terms of
Service, 371
JJFS filesystem, 137
creating on new partitions, 160jfsutils package, 160
JOE (Joe’s Own Editor), 70–77commands, 70copying between two files, 73customizing, 71–74emulation modes, 70example, source code install, 55opening two windows in, 73searching and replacing, 74
.joerc file, 71
.joercprefs file, 72

This is the Title of the Book, eMatter EditionCopyright © 2007 O’Reilly & Associates, Inc. All rights reserved.
544 | Index
Joliet filesystem standard, 181journaling filesystems, 136
KK3b, 179kdm, 96kerneld, 172kernels, 161–178
2.4 version, 163–169adding features to, 163–167finding SCSI address CD and DVD
writers, 182IDE/ATAPI CD and DVD writers, 183latest stable version, upgrading to, 169removing unnecessary files, 167
2.6 versionbuilding, 170CD/DVD drives, 179new features, adding, 171xconfig and, 162
build commands, 165.config file, 163–165config utility, 162configuring, 162initrd image, creating, 176kernel build tree, 162kernel maintainers, 174kernel sources, 161kernel sources and /usr/src/linux, 165menuconfig utility, 162modification, 161multiple versions on one system, 165new loadable kernel modules,
adding, 172patches, removing, 175patching, 173–175
patch options, 174typical size, 168upgrading
2.4 to 2.6 and boot errors, 179xconfig, 162
keychain, 310keyword searches, command
documentation, 4kmod utility, 172Knoppix
boot loader restoration, using, 217booting, 229
creating a boot diskette, 231editing configuration files, 236installing software, 237
installing to hard disk, 239virus-scanning Windows PCs, 239
Konqueror, 2
Llanguage specific pages, serving through
content negotiation, 441LILO (Linux Loader), 199
boot diskette, creating, 226booting with, 221–224GRUB, migration to, 199–202journaling filesystems and, 138multiboot systems using for, 224multibooting Windows and Linux, 225new kernels adding, 164password-protection, 227
links, 135Linux
available mail clients, 382books and magazines, 527boot process, 90clients and caching DNS servers, 500Core Development Tools, 53default runlevel, changing, 93file types, 133HCLs (hardware compatibility lists), 58manual configuration of startup
services, 98online resources, 525
hardware, 528rebooting, 100runlevels, 90
changing, 91security vulnerabilities, 396shutdown, 100
automating, 102starting and stopping, 89–102
init, 89Usenet groups, 526video adapters, compatibility of, 256video, configuring (see video
configuration)X Windows, 94
Linux Disk Quota package, 129Linux Loader (see LILO)ln command, 98local caching name servers, running with
BIND, 508–510locate command, 6logfiles for VirtualHosts on Apache, 430logging out, ssh-agent shutdown, 311

This is the Title of the Book, eMatter EditionCopyright © 2007 O’Reilly & Associates, Inc. All rights reserved.
Index | 545
logical blocks, 135logical volumes, 135logins
display manager, changing, 273passwordless for cron jobs, 311using keychain, 310using ssh-agent, 308
lpr command, 10lsmod command, 264lspci command, 59, 266
MMAC (Media Access Control) addresses, 494mail, 361–394
clients, required connectioninformation, 382
protocols, 361ports for, 362
receiving, 371sending, 370servers, 361–394
configuring fully qualified domainnames, 379
enabling user connections, 382groupware/email servers, 384IMAP folders, sharing, 383IMAP mail servers, building and
testing, 380Postfix mail servers (see Postfix mail
servers)security (see security)SMTP response codes and
commands, 392–394webmail, 391whitelists, 402
mail transfer agents (MTAs), 361maildirmake command, 384make, 53
2.6 version kernel builds, 170kernel builds, 165
make uninstall command, 55malware, 395man command and pages, 1
command syntax, 3-f switch, 5finding, 4-Hmozilla option, 9lost man pages, finding, 5man -k, 4manpath, configuring, 7organization, 2–4
printing man pages, 9selective printing, 11
reading without a viewer, 6rebuilding the man database, 6-t option, 9
Mandrake graphical login manager, 94manpath command, 8map command (Vim), 80marks command (Vim), 83mass_passwd script, 118, 121–124, 125mass_useradd script, 118, 119–121MBR (Master Boot Record), 90, 199
backing up, 228GRUB boot loader, restoring with
Knoppix, 217MDA (mail delivery agent), 361meminfo, 63memory and swap information,
displaying, 63menuconfig utility, 162metadata, 136Microsoft file types, 530–532mime_header_checks, 405mkboot utility, 177mkdir command, 155mkinitrd command, 176mkisofs utility, 185
bootable CDs, making with, 192-graft-points option, 188growisofs frontend, 195multisession options, 191
modeless editors, 69Mondo Rescue, 277, 293–300
backups, verifying, 296bootable system restore CDs,
creating, 293–295bootable system restore DVDs,
creating, 296cloning Linux systems, 298mindi-kernel, using for “sane”
backups, 298Mondo disks, 299
selected file restores, 300system restores from, 299
monitoring a system in real time, 62Monotone version control system, 318Moolenaar, Bram, 78mount command, 147
CD/DVD writers mounting, 186filesystems on hard drives, 151finding device names for storage
disks, 152–154
This is the Title of the Book, eMatter EditionCopyright © 2007 O’Reilly & Associates, Inc. All rights reserved.
546 | Index
Mount Rainier ReWrite hardwarestandard, 180
Mozilla, 398mp3 format, 198
conversion to CD audio, 196mpg123 utility, 197MPMs (multiprocessing modules), 416
PerChild MPM (Apache 2.0), 417MTAs (mail transfer agents), 361MUA (mail user agent), 361multiboot systems with GRUB, 205–206
Linux OSs, adding to, 206Windows 95/98/ME, adding to, 214–216Windows NT/2000/XP, adding to, 216
multiboot systems with LILO, 224Windows and Linux, 225
multi-monitor displays, configuring, 266multiprocessing modules (MPMs), 416multisession write option, 182mv command, 157
Nname resolution, 487–524
DNS (see DNS)hosts files, 487
enabling local resolution with, 489named, 510named.conf file, 508, 511named.root file, 509NetBEUI (NetBIOS Enhanced User
Interface), 449NetBIOS (Network Basic Input Output
System), 448netGo, 493netsync protocol, 318network printers, sharing, 242, 246
over mixed LANS with Samba, 250troubleshooting, 253users, restricting, 252Windows clients without Samba, 249without name resolution, 247
nobody user, 116Novell Evolution, 398nroff command, 6NTFS filesystem, write access, 152ntp (Network Time Protocol), 347–360
ntp pools, 353classes, 353dig command, 354pinging timeservers, 354traceroute, 354
ntp.conf configuration file, 348
ntp.conf file, controlling timeserver accesswith, 351
configuration options, 352ntpd (Network Time Protocol daemon)
restart command and, 356ntpkeys authentication scheme, 358(see also timeservers)
ntp-keygen flags, 359null-passphrase keys, 311numeric notation for file permissions, 138
Oogg-vorbis format, 197
conversion to CD audio, 196oldconfig command, 171online resources, 525
hardware, 528Open Relay Database, 404OpenSSH, 301–316
CVS repositories, remote access, 332encryption and authentication, 301first-time setup, 302–304host-keys, 302
authentication, 302generating, 304storage, 303
keys, copying to authorized_keys file, 306logins
in to remote machines, 303passwordless for cron jobs, 311using keychain, 310
private keys, 301public keys, 302public-key authentication, 302, 305ssh-agent, 308
shutdown at logout, 311sshd, 301
starting and stopping, 302using multiple key pairs, 307using on Windows PCs, 314X, tunneling over SSH, 313(see also SSH)
openssl s_client, 369Orange Book, 181$origin directive, 512Oualline, Steve, 78Outlook and Outlook Express, security
concerns, 397ownership of files, changing, 142

This is the Title of the Book, eMatter EditionCopyright © 2007 O’Reilly & Associates, Inc. All rights reserved.
Index | 547
Ppackages
Apache web servers, documentationfor, 425
creating from source code, 56Debian (see Debian, packages)upgrades using apt-get install
command, 41(see also RPM)
partitions, 200boot partition configuration, 210fdisk, creating with, 158–159filesystems, creating on, 159information, displaying, 65
passwd command, 113-e option, 107
passwd file, vulnerability, 103passwords
managing, 113mass changing of, 124password file integrity, checking, 117
patches for kernels, installing, 173PCI bus, displaying connected devices, 59PerChild MPM (Apache 2.0), 417Pinfo, 2ping, 50
measuring timeserver distance with, 354PLD (Polished Linux Distribution), 16Polished Linux Distribution (PLD), 16pool.ntp.org, 349POP (Post Office Protocol), 361POP3 mail servers, 362–370
building, 362–368Courier-Imap, installing, 364on Debian, 366Postfix, installing, 363smtp daemon, verifying
operation, 364common commands, 370testing, 368
smtp with telnet and openssl s_client, 368
TLS/SSL support, 369unencrypted POP3 with telnet, 368
Postfix mail servers, 361–394authentication to other servers with
smtp-auth, 378Clam Anti-Virus scanner, 406–410configuration file, 363
enabling SASL, 373
couriermlm mailing lists, 387–390administration, 389creating, 387–389
Cyrus-SASL installation, 372verifying support, 373
database file formats, 403DNS blackhole lists, 403–405installing, 363Internet mail
sending, 370Internet mail, recieving, 371log files, 399messages with attachments, rejecting, 405mime_header_checks, 405POP3 mail servers (see POP3 mail servers)root and postmaster alias files and
database, 363SASL libraries, 373smtp daemon verification, 364smtpd_sender_restriction directive, 402SpamAssasin, setup, 410–414
using amavisd-new, 410starting, 364UBE (unsolicited bulk email)
controls, 398–402basic configurations, 399–402
user authentication withsmtp-auth, 376–378
virtual mailbox domains, 385–387(see also mail, servers)(see also security)
/postfix/main.cfmail checks, 400–402managing unsolicited bulk email, 399
poweroff command, 100ppid, 89pre (pre-release candidate) patches, 174Prefork MPM (Apache 1.3), 416printers
finding drivers for, 242installing, 243–245sharing over networks, 242, 246
mixed LANS with Samba, 250serving Windows clients without
Samba, 249troubleshooting, 253users, restricting, 252without name resolution, 247
(see also CUPS)private keys, 301
changing, 305

This is the Title of the Book, eMatter EditionCopyright © 2007 O’Reilly & Associates, Inc. All rights reserved.
548 | Index
/proc, 62–65cat utilities and, 65
program installation, 55ps command, finding a user’s processes, 111Pservers, 337
mirroring, 339using to build read-only CVS
repositories, 337pts, 260public DNS servers, 494
building with tinydns, 502public keys, 302public web servers, 425public-key authentication, 302, 305PuTTY, 315pwck command, 117Python finddoc script, 11–13
Qquota command, 129quotacheck command, 129
RRAMDAC (Random Access Memory
digital-to-analog converter), 257rc (release candidate) patches, 174RCS (Revision Control System), 318,
319–326, v (comma v) suffix, 320building simple local
repositories, 319–321checking out and checking in files, 320comments, 321displaying files without checking out, 322file versions, comparing, 322–323
file comparison symbols, 323managing system configuration
files, 324–326preserving working copies, 322retrieving older file revisions, 321rlog command, 321working and RCS directories, 319
rcsdiff command, 322Red Book, 181Red Hat
boot disks, creating, 177graphical login manager, 94groupadd command, 114initialization, 90loadable kernel modules, adding, 172
runlevels, 91managing, 97
user and group numbering, 105users, sorting human from system, 104(see also RPM)
redhat-config-xfree utility, 260Regional Internet registries, 488ReiserFS filesystem, 137
creating on new partitions, 159reiserfsprogs package, 160remote access, 301–316
OpenSSH (see OpenSSH)scp, 301sftp, 301ssh, 301SSH (Secure Shell) protocol, 301SSH-2, 301
remote X sessions, security of, 314removable media, mounting and
unmounting, 147remove command, 329repetitious typing, reduction with Vim
autotext, 79repquota command, 129restart command used with ntpd, 356Rewrite directives, 427RJOE, 70rjpm command, 16rlog command, 321rm command, 155rmdir command, 156robots.txt file, 436Rock Ridge filesystem standard, 181root privileges
su command, 126sudo command, 127–129
rpm command, 15-e option, 17-h option, 16-i option, 15--initdb option, 21--last option, 21-p switch, 20-q options, 18--rebuilddb option, 21--replacepkgs option, 24--test option, 16-U flag, 16(see also RPM (Red Hat Package
Manager))

This is the Title of the Book, eMatter EditionCopyright © 2007 O’Reilly & Associates, Inc. All rights reserved.
Index | 549
RPM (Red Hat Package Manager), 14–33CheckInstall utility, 16dependencies, breaking, 17dependencies, verifying, 25dependency resolvers, 15information, collecting from uninstalled
packages, 20information, collecting on installed
packages, 18–20installation problems, fixing, 24installing packages, 15public RPM archives, 25rebuilding the RPM database, 21recently installed packages, finding, 21removing packages, 17“RPM hell”, 15rpm queries that follow symlinks, 19rpmbuild package, 26rpm-orphan-find script, 22–24source packages, installing, 25
customizing build options, 26source-built libraries, tracking, 22–24upgrading packages, 16(see also rpm command)
RSA key pair generation, 306rsync, 277–293
anonymous public rsync servers,building, 285
automating over ssh backups, 288-av flag, 280backup servers, building, 281command options, 283configuration files, 285creating a message of the day, 291customizing filepaths, 290--cvs-exclude option, 340daemon, launching at startup, 286--delete flag, 280fine-tuning file selection, 287limiting bandwidth requirements, 289local file transfers and
synchronization, 278–280Pservers, mirroriing over SSH, 339rsync modules, securing, 284secure transfers with ssh, 280synchronizing tinydns servers, 507Windows clients, installing on, 290
runlevels, 90changing after boot, 91changing default runlevel, 93Debian, managing in, 94, 95Red Hat, managing in, 97
SSamba servers, 447–486
adding authentication to, 457anonymous file servers, building for
Windows, 449–452batch conversion of system users ot
Samba users, 458controlling share access with access
control lists, 461CrossOver Office, running Windows
applications with, 481–486enabling users’ home directory
access, 463Linux clients, connecting, 471–478
to file servers or peernetworks, 471–474
to Samba domains via command-linetools, 477
to Samba domains via GUI LANbrowsers, 476
to Samba workgroups viacommand-line tools, 474
Linux clients, sharing Windows printerswith, 480
logins from Windows 95/98/ME, 460passwords, Samba and Linux,
syncing, 478passwords, Windows, handling encrypted
and non-encrypted, 460primary domain controllers,
building, 464–467public shares for users, creating, 462roaming profiles, enabling, 470Samba versions 2.x and 3.x,
compared, 447Windows clients, connecting to Samba
domains, 467–47095/98/ME, 467NT/2000, 468XP, 469
Windows clients, sharing Linux printerswith, 479
Windows/Linux peer networks,building, 452
SAO (session-at-once) write option, 182Sarge, 34
sources.list, 36SASL (Simple Authentication and Security
Layer), 362scp, 301

This is the Title of the Book, eMatter EditionCopyright © 2007 O’Reilly & Associates, Inc. All rights reserved.
550 | Index
SCSI addresses, finding for CD/DVDwriters, 182
SCSI device information, displaying, 64SCSI devices, listing, 61SCSI emulation, enabling for IDE/ATAPI
CD/DVD writers, 183search engines, controlling server access
by, 436–437security, 103, 395–414
amavisd-new, 406Clam Anti-Virus scanner, 406–410Debian, updates for, 37defense checklist, 397DNS blackhole lists, 403–405fundamental precautions, 396GRUB, locking users from menu
entries, 219GRUB password protection, 218incoming mail, applying restrictions, 395LILO, password-protection of, 227messages with attachments, rejecting, 405nobody user, risk mitigation, 116ntp exploits, preventing, 358SpamAssasin, installing on
Postfix, 410–414SSL, 435UBE (unsolicited bulk email)
controls, 398–402basic configurations, 399–402
whitelists, creating, 402Windows hosts, modification, 397
ServerLayouts, 268–272choosing among at startup, 268–271setting a default, 271
servicesmanual start and stop, 99prioritization, 90startup services, manually configuring, 98
sessions, 191session write option, 181switching between console and X
Windows sessions, 258–260VIM, 84
setgid, 144setuid, security problems with, 144sftp, 301Shadow Suite, 103shared servers, 418shutdown, 100
automating, 102Sid, 34
sources.list, 36
Slackwaregraphical login manager, 94initialization, 90runlevels, 91users, sorting human from system, 104
slay program, 111SMTP (Simple Mail Transfer Protocol), 361
response codes and commands, 392–394smtp-auth, 372
authenticating Postfix servers to otherservers, 378
user authentication on Postfix, 376–378smtpd_recipient_restrictions directive, 404SOA (Start of Authority), 513soft links, 135software installation
RPM-based systems (see RPM)source-built systems, 14
source codecreating packages from
CheckInstall, using, 56generating file lists for easy uninstalls, 54installing from on Debian, 40installing programs from, 55programs, installing from, 52–57
system preparation, 52sox command, 196
-h option, 197spam prevention with DNS blackhole
lists, 403–405SpamAssasin, setting up on Postfix, 410–414
amavisd-new, using, 410Spamhaus and Spamcop, 404SPEWS (Spam Prevention Early Warning
System), 404split utility, 193Squirrelmail, 391SRAM (Static Random Access Memory), 258SRPM (source RPM), 25ssh, 277, 301
Bash prompt, customizing for, 312secure file transfers over rsync, 280
SSH (Secure Shell) protocol, 301file permissions, setting, 316X, tunneling over SSH, 313(see also OpenSSH)
ssh-agent, 308shutdown at logout, 311
sshd, 301starting and stopping, 302
ssh-keygen command, 304startup services, manually configuring, 98

This is the Title of the Book, eMatter EditionCopyright © 2007 O’Reilly & Associates, Inc. All rights reserved.
Index | 551
startx command, 94configuring, 272opening additional X sessions, 258
status command, 329su command, 126Subversion version control system, 318sudo command, 127–129supermount command, 195SuSE
graphical login manager, 94loadable kernel modules, adding, 172SuSE OpenExchange, 398users, sorting human from system, 104
symlinks, 90system-config-network graphical
configuration tool, 493system-config-xfree utility, 260
TTAO (track-at-once) write option, 182tape backups, 277tdfx module, 264telinit, 92Terms of Servic (TOS), 371text editors, 68–88
default editor, setting, 86Emacs, 68Joe (see Joe)vi and clones, 69Vim (see Vim)
third-party modules, installation, 172timeservers, 347–360
access controls adding, 351iptables,using, 352ntp.conf, using, 351
clients, connecting to a localtimeserver, 350
Windows clients, 351connecting over an intermittent
connection, 355Debian, utilities required for, 349etiquette, 347identifying connected time servers, 348local time servers, building, 348multiple local timeservers, setting up, 357
ntp.conf files for local servers, 357ntp (Network Time Protocol), 347ntp pools, choosing, 353
classes, 353dig command, 354pinging timeservers, 354traceroute, 354
ntp rpm versus xntp, 349ntp.conf configuration file, 348ntpd (Network Time Protocol
daemon), 347, 349ntpdate, 348
compared to ntpd, 347, 349ntpkeys authentication scheme, 358ntpq command, 348pool.ntp.org, 349public time servers, 348
time-to-live values, 513tinydns, 502–507
building a private server, 505building a public DNS server, 502–505load balancing, enabling, 506synchronizing with a second tinydns
server, 507testing a tinydns server, 521tinydns-conf logfiles, 497
TLS (Transport Layer Security), 362TOS (Terms of Service), 371touch command, 155traceroute, 50
measuring timeserver distance with, 354track write option, 181tty command, 259tty (virtual consoles), 258–260type map files, 440typing tutor utility (Gtypist), 69
UUBE (unsolicited bulk email) controls for
Postfix, 398–402basic configurations, 399–402
UDF (Universal Disk Format) filesystemstandard, 180
UID (user identification), 104batch change of file ownership using, 143changing without affecting login
name, 109umask, 145umount command, 147
“device is busy” error, 148uname command, 164, 167uninstalling source built programs, 55update command, 329
working files in a shared project, 334update-rc.d command, 95URLs (Uniform Resource Locators)
this book, xxiiUSB devices, listing, 61

This is the Title of the Book, eMatter EditionCopyright © 2007 O’Reilly & Associates, Inc. All rights reserved.
552 | Index
uscpi-tcp, 496Usenet groups, 526
hardware, 529useradd command, 103, 106
performance in scripts, 107system users, creating with, 115
userdel command, 110UserDir-type web sites, 427, 432
password-protecting, 433usermod command, 109users, managing, 103
adding users, 106–108batch addition of new users, 118–124batch addition of users to groups, 125deleting users, 110disabling accounts, 112
re-enabling, 112disk quotas, 129granting of root permissions, 127–129group members, adding and deleting, 116groups, adding, 114groups, deleting, 114killing user processes, 111password management, 113passwords, changing en masse, 124sorting human from system users, 104system groups, creating, 116system users, creating, 115user accounts, modifying, 109
owned files outside the homedirectory, 109
potential impacts, 110user’s UID and GID, finding, 105
/usr/source/linux and kernel sources, 165usrquota partition, 129
V:version command (Vim), 87version control systems, 317–346
atomic commits, 318commercial systems, 318CVS system (see CVS)free open source systems, 317RCS system (see RCS)uses, 317
vi text editor and clones, 69(see also Vim)
video configuration, 255–276login display manager, changing, 273multi-monitor displays, 266running multiple window managers with
Xnest, 274–276
startx, 272video acceleration hardware, 257,
262–265enabling, 262troubleshooting, 264
video adaptersinstalling, 260Linux compatiblility, 256
video cards, 256drivers, 257
X Window System version,determining, 255
XF86Config file, 260locating, 263
XF86Config fleediting, 261
Vim, 69, 77–85, 87autotext, creating with abbreviations, 79commands, mapping to keystrokes, 79compile-time options, 87customizing, 81editing modes, 69:help command, 87learning, 77navigation using marks, 83stored sessions, using, 84:version command, 87.vimrc file, 81vimtutor command, 77
virtual consoles (tty), 258virtual hosting, 429
logfiles for, 430virtual mailbox domains, 385
creating user logins in Courier, 386VirtualHost directives (Apache), 429–432virus prevention using Clam Anti-Virus
scanner, 406–410visudo utility, 127vmlinuz, 168
W.wav format, 197
conversion to CD audio, 196web browsers, 398
with Digest authentication support, 435web crawlers, controlling server access
by, 436–437web hosting, 417
dead links, preventing, 426user directories, setting up, 427
Web Hosting Talk forums, 418web servers (see Apache web servers)

This is the Title of the Book, eMatter EditionCopyright © 2007 O’Reilly & Associates, Inc. All rights reserved.
Index | 553
Webalizer, 444–446webmail, 391whereis -m command, 5whitelists, 402Windows
anonymous Samba file serversand, 449–452
clients and caching DNS servers, 500dhcp client configuration, 492file sharing, enabling, 453–457Microsoft file types, 530–532OpenSSH, running on, 314peer networks with Linux, building, 452printer networking without Samba, 249Samba domains, connecting to, 467–470
95/98/ME, 467NT/2000, 468XP, 469
security, improving, 395, 397sharing Windows printers with Linux
clients, 480spam proliferation and, 404static hosts, adding to dhcp, 493timeserver clients for, 351using Linux printers over Samba, 479Windows applications, running on
Linux, 481–486winipcfg, 494Woody, 34
sources.list, 36Worker MPM (Apache 2.0), 416
XX utilities, 260X Window System, 255
consoles, using with, 258–260SSH, tunneling over, 313starting and stopping sessions, 94terminology, 256version, determining, 255
xconfig utility, 162xdm, 96
XF86Config file, 260editing, 261
for multihead display, 266hardware video acceleration, 262locating, 263multiple ServerLayouts, 269ServerFlags, 271
xf86config utility, 261XFdrake utility, 260XFree86 utility, 261
3D hardware acceleration, enabling withDRI, 262
XFS filesystem, 137XFS filesystems
creating on new partitions, 160xfsprogs package, 160Xinerama, 266xinetd services, 97Xnest, 274–276X.org windowing system, 255
YYellow Book, 181Yelp, 2Yum (Yellow Dog Updater,
Modified), 28–33changing download sources, 29clean options, 32configuring, 29GPG keys, 28installed packages, retrieving information
about, 31installing, 28maintaining, 32mirrors, 29packages, installing and upgrading, 30packages, removing, 31querying commands, 32
Zzcat command, 6zless command, 6


About the AuthorCarla Schroder is a Linux and Windows sysadmin who laid hands on her firstcomputer on her 37th birthday. Her first PC was a Macintosh LC II. Next came anIBM clone, a 386sx running MS-DOS 5 and Windows 3.1, with a 14" color display,which was adequate for many pleasant hours of DOOM play. Then in 1997 shediscovered Red Hat 5.0, and had a whole new world to explore. She liked the clearseparation between the kernel, user-space, and graphical layers, the division of privi-leges, and found the Unix world to be sane and sensible.
Somewhere along the way she found herself doing freelance consulting for smallbusinesses and home users, doing a little bit of everything: pulling cable, buildingand repairing computers, training on a number of software applications, networking,building servers, and generally making things go. Users tended to like mixednetworks, throwing in Linux, Windows, and other platforms, so making these worktogether kept the work interesting.
Thanks to computers, the Internet, and DSL, Carla lives on a small horse ranch inthe middle of nowhere and works from home writing Linux how-tos for severalcomputer publications, consulting for small businesses, and teaching computerclasses to quilting grannies and other fun folks. Nothing beats a brisk round ofmanure-shoveling for toning the muscles and stimulating the brain. She writes forIBM Developerworks, various Earthweb.com and Jupitermedia.com publications,and Computer Bits magazine. She also has an official O’Reilly weblog athttp://weblogs.oreilly.com, where you may enjoy her deep thoughts and unfocusedramblings.
Carla has a theory that working with horses is great training for a system or networkadministrator, because just like users they can’t be forced to do anything, even whenit’s good for them. One must employ a canny mix of affection, guile, persuasion,psychology, and Mrs. Pasture’s horse cookies to train horses. She has not tried thecookies on human users, but food rewards are a proven training tool for all species.
Carla is living proof that you’re never too old to try something new, computers are aheck of a lot of fun, and anyone can learn to do anything.
ColophonOur look is the result of reader comments, our own experimentation, and feedbackfrom distribution channels. Distinctive covers complement our distinctive approachto technical topics, breathing personality and life into potentially dry subjects.
The image on the cover of Linux Cookbook depicts armament workers. In WorldWar I, women found opportunites in the workplace as skilled laborers in armamentfactories. A Women’s Bureau was created to protect the women’s jobs, but many

returned to the home when the soldiers returned at the war’s end. Women’s contri-bution in the workplace was an important element in the growing support forwomen’s suffrage, finally achieved in 1920 with the passing of the 20th Amendment.
During World War II, the number of women who found new jobs and responsibili-ties increased, with women filling the roles of journalist, nurse, and factory worker.The new wage laborers often found themselves working in poor conditions for lowpay. They also encountered discrimination, harassment, and resentment, but theystill made tremendous advances in the perception of women’s abilities. The image ofRosie the Riveter evokes the attitude of many of the newly empowered women, whotook a long-awaited opportunity to increase their strength and freedom.
Colleen Gorman was the production editor and proofreader, and Rachel Wheelerwas the copyeditor for Linux Cookbook . Genevieve d’Entremont and Claire Cloutierprovided quality control. Mary Agner and Meghan Lydon provided productionsupport. John Bickelhaupt wrote the index.
Emma Colby designed the cover of this book, based on a series design by HannaDyer and Edie Freedman. The cover image is a 19th-century engraving from Tradesand Occupations. Clay Fernald produced the cover layout with QuarkXPress 4.1using Adobe’s ITC Garamond font.
David Futato designed the interior layout. The chapter opening images are fromMarvels of the New West: A Vivid Portrayal of the Stupendous Marvels in the VastWonderland West of the Missouri River, by William Thayer (The Henry BillPublishing Co., 1888), and The Pioneer History of America: A Popular Account of theHeroes and Adventures, by Augustus Lynch Mason, A.M. (The Jones BrothersPublishing Company, 1884). This book was converted by Joe Wizda to FrameMaker5.5.6 with a format conversion tool created by Erik Ray, Jason McIntosh, Neil Walls,and Mike Sierra that uses Perl and XML technologies. The text font is LinotypeBirka; the heading font is Adobe Myriad Condensed; and the code font is Lucas-Font’s TheSans Mono Condensed. The illustrations that appear in the book wereproduced by Robert Romano and Jessamyn Read using Macromedia FreeHand MXand Adobe Photoshop CS. The tip and warning icons were drawn by ChristopherBing. This colophon was written by Colleen Gorman.
Copyright © 2022 FDOKUMEN