Let's create a bird! Step 1: Get a square piece of origami paper ...
9
‘Get Creative!’ How to… make an origami animal display for Key Workers! You will need: - Paper. Let’s create a bird! Step 1: Get a square piece of origami paper. Step 2: Fold the paper in half by folding the top corner to the bottom corner.
-
Upload
khangminh22 -
Category
Documents
-
view
1 -
download
0
Transcript of Let's create a bird! Step 1: Get a square piece of origami paper ...

‘Get Creative!’ How to… make an origami animal display for Key Workers!
You will need: - Paper.
Let’s create a bird!
Step 1: Get a square piece of origami paper.
Step 2: Fold the paper in half by folding the top corner to the bottom corner.
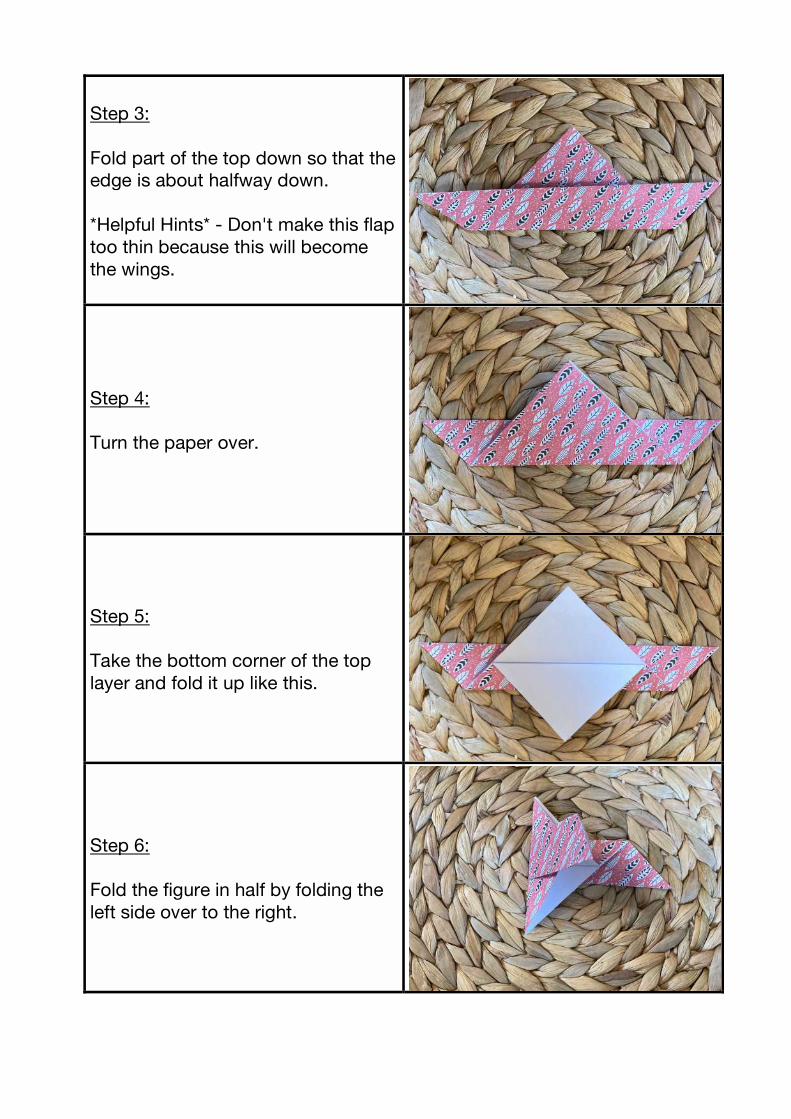
Step 3: Fold part of the top down so that the edge is about halfway down. *Helpful Hints* - Don't make this flap too thin because this will become the wings.
Step 4: Turn the paper over.
Step 5: Take the bottom corner of the top layer and fold it up like this.
Step 6: Fold the figure in half by folding the left side over to the right.

Step 7: Now fold that same flap back like this to make one of the wings.
Step 8: Fold the other wing back also.
Step 9: Push the center of the head in and flatten.
Step 10: And tada! You have yourself a bird.

Let’s create a penguin!
Step 1: Get a square piece of origami paper.
Step 2: Fold the paper in half, then unfold, this gives you a crease in the center to use as a guideline.
Step 3: Fold the bottom corner up like this. You have made a tail!
Step 4: Turn the paper over.

Step 5: Fold in the left and right sides like this. Look arms!
Step 6: Fold the top point down like this. This will be the head.
Step 7: Fold the penguin in half by raising the center crease up and folding the sides back.
Step 8: Pull the beak out and flatten the back of the head like this.

Step 9: And tada! You have yourself a penguin.
Let’s create a fox!
Step 1: Get a square piece of origami paper.
Step 2: Fold the paper in half by folding the lower left corner to the upper right corner.
Step 3: Fold the left corner to the right corner.

Step 4: Fold the bottom corner to the upper right corner.
Step 5: Turn it over.
Step 6: Fold the upper right corner to the lower left corner.
Step 7: Fold the entire left side just a bit before the center. *Helpful Hint* The farther towards the center you fold, the bigger the head will be.

Step 8: Grab the bottom corner of the outside flap and open. The fox's head will begin to fold down by itself. Magic!
Step 9: Go ahead and fold the head down.
Step 10: Fold the corner to create a little tail.
Step 11: Draw the face and you're all done. Tada!

Remember to help tidy away and make your display somewhere, so
people can see it!
Share your work with your teacher using your school’s online platform.
Most importantly have fun and stay
safe.
For more ideas…
Search - ‘How to Make Origami Animals’ on Swiggle.