Kronos Workforce Timekeeper System Training Manual
143
Kronos Workforce Timekeeper System Training Manual
-
Upload
khangminh22 -
Category
Documents
-
view
0 -
download
0
Transcript of Kronos Workforce Timekeeper System Training Manual

Kronos Workforce Timekeeper System
Training Manual

Training Presentation
- 1 -
Getting Started Logging On and Off
Logging on to the Workforce Timekeeper Application: Double Click on the KRONOS shortcut located on your desktop. The Kronos logon window will appear Enter your User Name (Campus Key) and Password Click on “LOG ON” button
After your successful log on, your customized view will be displayed in the Workforce Timekeeper application. Logon Time Limit If you are logged on for a period of time and the Workforce Timekeeper system detects no activity, a message appears, informing you that your session is about to time out. You must enter your password and click “Log On” to continue your session where you left off. After you enter your password, another message appears, “Your Logon was successful.”
Always Log Off Kronos and open a new Internet Explorer Session to work in another application.
Enter your Password (Passwords are case sensitive)
Click on LOG ON
USER NAME (Enter your Campus Key)

Training Presentation
- 2 -
Logging off Workforce Timekeeper Application When you finish using Workforce Timekeeper, you should save your edits and click Log Off. If you do not save your changes before clicking the Log Off button, the following occurs: A message warns you that you have unsaved data and you can choose to save the data or log out without saving your data.
Click on the Log Off link on the Workforce Timekeeper Navigation Bar at the left side of the screen.
Logon Page will be displayed, confirm that the message “You are now logged off” appears in the center of the screen.
LOG OFF LINK
Always Log Off using the Log Off Link -- DO NOT exit the application by clicking on the “Red X” at the upper right corner of the screen.

Training Presentation
- 3 -
Getting Around Workforce Timekeeper After you log on, a customized view of employee data and labor level information appears in the display window. The Labor Level information consist of 7 labor levels as displayed below:
Labor Levels Description 1 Company 2 Administration ID 3 Department ID 4 Account Code ID 5 Job Code 6 Record Number 7 Group ID
This display view is a Workforce Genie that summarizes and organizes information according to common tasks you perform on a regular basis. The view will display a maximum number of 1,000 employee records. The following illustration shows a sample Workforce Genie called “Quick Find”, which will always be your starting page.
Area Description
Navigation Bar Located on the left side of the page, the Navigation Bar contains links to all Workforce Timekeeper features you can access.
Header Located at the top of the page, the Header identifies the employees and time period you are currently viewing. This area also includes a menu of additional timekeeper tasks and launch buttons for quick access to other Workforce Timekeeper functions.
Workspace Located in the middle of the page, the Workspace contains detailed information about the employees and time period you are currently viewing.
Navigation Bar Header Launch ButtonsWorkspace

Training Presentation
- 4 -
Using the Launch Buttons
Depending on the rights granted to you in your access profile, up to four Launch Buttons appear in the upper-right corner of the workspace. Use these buttons to navigate from one component to another. For example, if one of the Workforce Genies is open in your workspace, you can select one or more employees and then click the Timecard launch button to open the selected employee timecards.
Selecting One or More Employees To display additional information about one employee from a Workforce Genie, double-click the employee name to open the employee’s timecard. Alternatively, you can select the employee name, and then click the Timecard, Schedule, People or Report launch buttons. To display additional information about more than one employee, hold down the Ctrl or Shift key and select multiple employee names. Then, click the applicable launch button. Depending on the launch button clicked, the Timecard, Schedule, or People Editor opens with the first employee of the group visible. For example, in the Timecard component, the name and ID of the first employee selected appears at the top of the timecard grid. To access other employees, either click the arrow buttons on the right side or the down arrows in the Name & ID boxes.

Training Presentation
- 5 -
Using the Tools in the Header The Header contains useful tools to help you access and filter data quickly and easily. The following illustration shows a sample header with these tools highlighted. The following table provides a description of each of the tools in the Header and how they can be used to access and filter data:
Tool Description
Show field
This field contains a list of filters that you can select to populate the workspace with information for a selected set of employees. In Workforce Timekeeper, these filters are called Hyper Find Queries.
Time Period field
This field contains a list of time intervals that you can select to populate the workspace with information for a specific date, range of dates, pay period or schedule period.

Training Presentation
- 6 -
Understanding Menus and Dialog Boxes The Workforce Timekeeper menu bar is located in the header of the workspace. For example, the following timecard contains seven menus: Save, Actions, Punch, Amount, Comment, Approvals, and Reports.
5vigating Workforce Timekeeper
When you click a menu name, a drop-down list of menu options appears. You can then select one of the options. The header for the timecard example shows the Actions menu with five options: Refresh, Refresh Data, Calculate Totals, Print, and Print Screen. For example, to view the most recent information from the database in the Visible timecard, select the Actions menu and click Refresh (Actions >Refresh).
Menu Options

Training Presentation
- 7 -
Using Online Help All components within Workforce Timekeeper include access to online Help:
Select the Help icon located in the upper-right corner of the workspace to
obtain help for the visible component.
Click the Help link at the bottom of the navigation bar.
Click the Help button in individual dialog boxes to obtain help about the visible dialog box.
After the online Help opens, you can navigate it by: • Selecting a topic from the left side of the workspace.
• Clicking a linked word.
• Selecting a topic from a Related Topics list.
• Clicking an entry in the index.
• Searching for a specific term.

Training Presentation
- 8 -
Timecards Each timecard has been customized with a specific Pay Rule to calculate the employee’s hours and to automatically deduct their designated meal break. The functions that users can perform within timecard editor are related to their individual access profiles. These functions include punch edits, pay code edits, pay code moves, adding comments, adding and deleting timecard rows, work rule and labor account transfers, calculating a timecard, and approving a timecard. The timecard editor window can be broken down into three sections. The upper portion of the window is the employee timecard and is where all of the edits are performed. The bottom left side of the window is referred to as the timecard tabs. This section will display information depending on the edits and actions performed on a timecard. At a minimum, users will see totals and schedules, accruals and the audit trail tab. The bottom right side of the window is the employee schedule.
Timecard Functions
Depending on individual access privileges, Users have the ability to perform several tasks on an employee timecard.
Add and Edit Employee Punches
Add Pay Code Amounts
Move Pay Code Amounts
Add a Comment to a Timecard
Perform an Account Code Transfer
Calculate a Timecard
Perform Historical Edits
Approve a Timecard

Training Presentation
- 9 -
Timecard Components
The following information describes each column:
The ERASE INFORMATION column contains icons that will allow you to erase information located on that row.
The INSERT ROW column or green drop down arrow will allow you to insert a new row. When adding a pay code and amount to a day with existing punches. Additional rows may need to be added to the timecard.
The DATE column will display each day of the time period that you have selected.
The PAY CODE column will allow you to enter a Pay Code into the timecard. Examples of Pay codes are ETO, Vacation, Personal, Sick, etc.
The AMOUNT column goes hand in hand with the pay code column. You must enter an amount of hours or dollars depending on the pay code.
The IN column will display the time that the employee punched in.
The TRANSFER column will show which account code that the employee has hours charged to other than the home account code.
The OUT column will display an out punch.
The SHIFT TOTAL column will display the total number of hours worked for each shift.
The DAILY TOTAL column will display the total number of hours worked for each day.
The CUMULATIVE column will display total hours combined for each day of the Pay Period.

Training Presentation
- 10 -
1
2 3
4
Scheduling Employees To achieve all the advantages of the Kronos Time and Attendance system, all employees, exempt and non-exempt, must be assigned a schedule. The schedules may be changed as needed. Schedule Editor To access the Scheduler, go to the Navigation bar and click on Scheduling >Schedule Editor.
All Home includes all the employees for whom the user has access. To view a specific group of employees or one employee:
1 Go to Show and make a selection from the drop down menu. 2 Choose the Time Period from the drop down menu.
3 The Time Period selected will display in the Range of Dates.
4 Click on the arrows to navigate from day to day or to jump from the beginning to
the end of the period.
Training Presentation
- 11 -
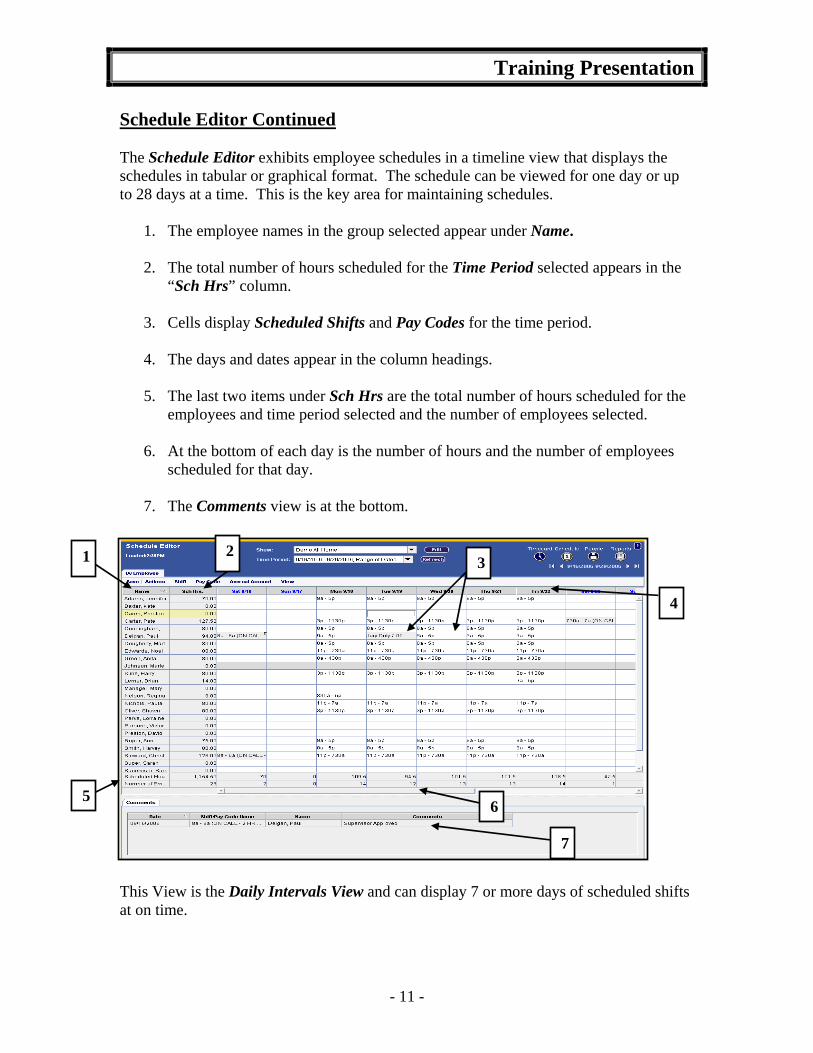
Schedule Editor Continued The Schedule Editor exhibits employee schedules in a timeline view that displays the schedules in tabular or graphical format. The schedule can be viewed for one day or up to 28 days at a time. This is the key area for maintaining schedules.
1. The employee names in the group selected appear under Name. 2. The total number of hours scheduled for the Time Period selected appears in the
“Sch Hrs” column.
3. Cells display Scheduled Shifts and Pay Codes for the time period.
4. The days and dates appear in the column headings.
5. The last two items under Sch Hrs are the total number of hours scheduled for the employees and time period selected and the number of employees selected.
6. At the bottom of each day is the number of hours and the number of employees
scheduled for that day.
7. The Comments view is at the bottom.
This View is the Daily Intervals View and can display 7 or more days of scheduled shifts at on time.
1
4
3
5 6
2
7

Training Presentation
- 12 -
SCHEDULE OUTLINE VIEW If more detail is needed when scheduling employees or viewing the Schedule Editor:
1. Click on View
2. Select 1 Hour Intervals
The One Hour Interval View displays even more day to day detail and is an effective tool for departments who have 24/7 coverage.
1
2
Training Presentation
- 13 -
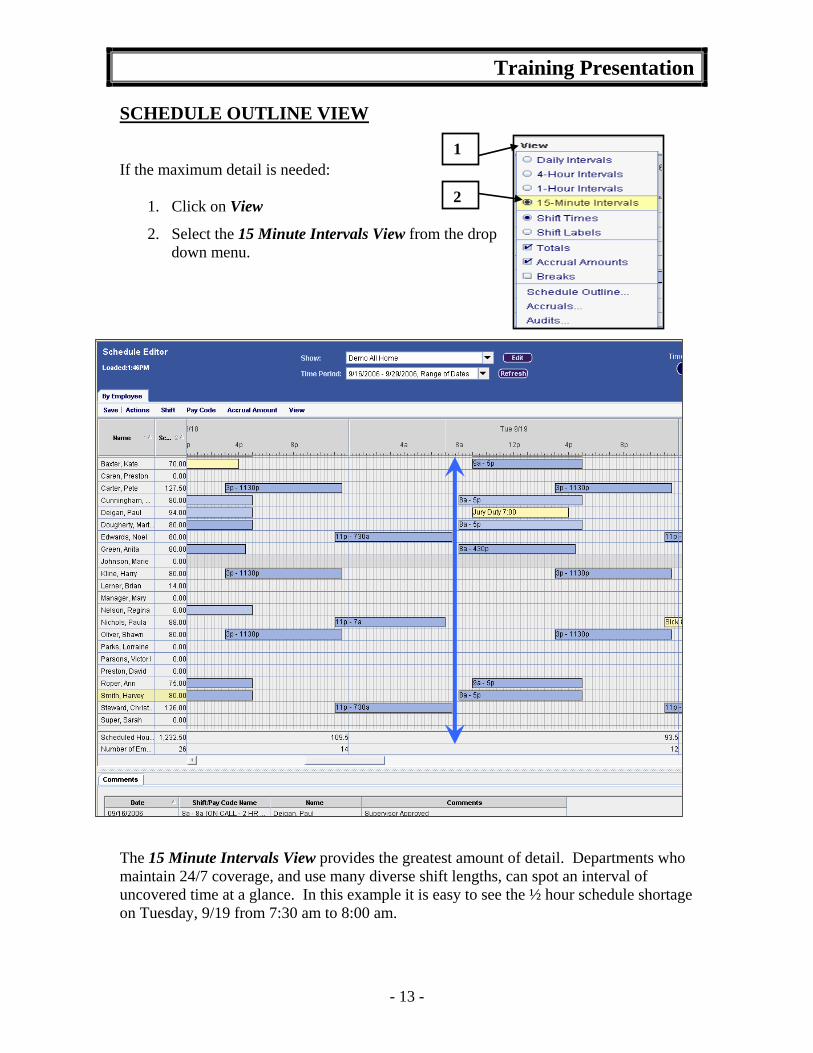
SCHEDULE OUTLINE VIEW If the maximum detail is needed:
1. Click on View
2. Select the 15 Minute Intervals View from the drop down menu.
The 15 Minute Intervals View provides the greatest amount of detail. Departments who maintain 24/7 coverage, and use many diverse shift lengths, can spot an interval of uncovered time at a glance. In this example it is easy to see the ½ hour schedule shortage on Tuesday, 9/19 from 7:30 am to 8:00 am.
1
2
Training Presentation
- 14 -
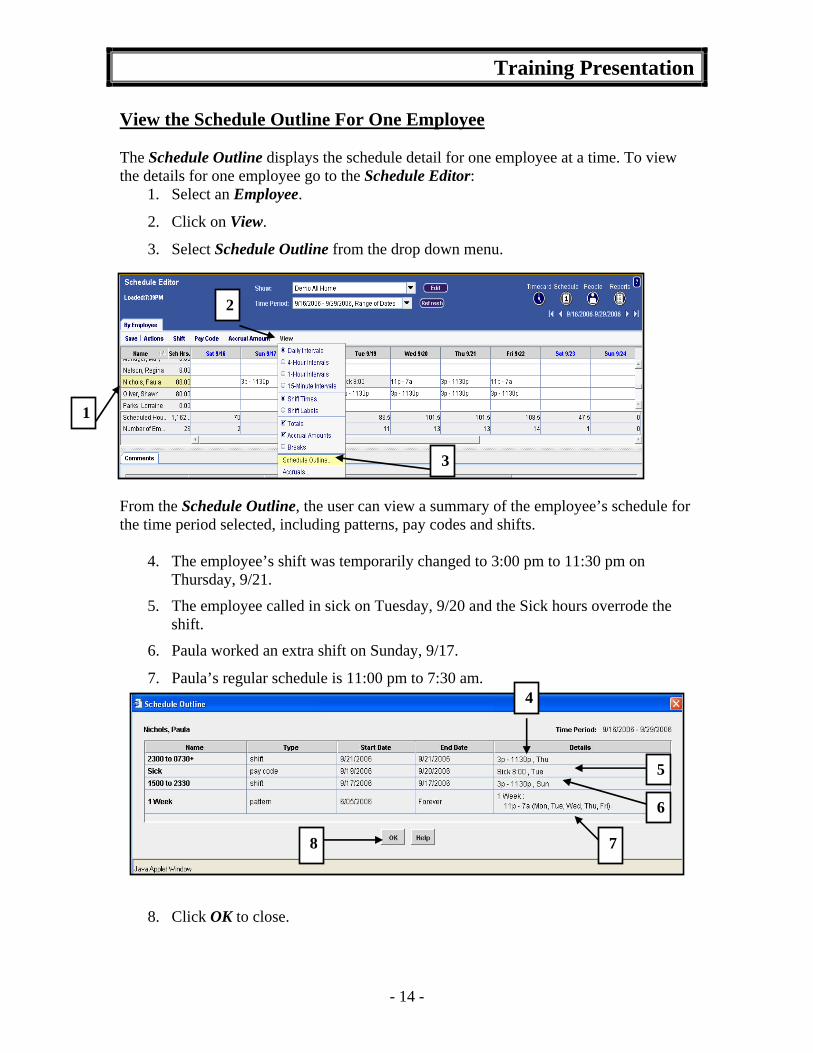
View the Schedule Outline For One Employee The Schedule Outline displays the schedule detail for one employee at a time. To view the details for one employee go to the Schedule Editor:
1. Select an Employee.
2. Click on View.
3. Select Schedule Outline from the drop down menu.
From the Schedule Outline, the user can view a summary of the employee’s schedule for the time period selected, including patterns, pay codes and shifts.
4. The employee’s shift was temporarily changed to 3:00 pm to 11:30 pm on Thursday, 9/21.
5. The employee called in sick on Tuesday, 9/20 and the Sick hours overrode the shift.
6. Paula worked an extra shift on Sunday, 9/17.
7. Paula’s regular schedule is 11:00 pm to 7:30 am.
8. Click OK to close.
2
1
3
4
6
7
5
8

Training Presentation
- 15 -
Audits To view additions or changes to an employee’s schedule, view the Audit Trail. The Audit Trail provides the ability to view all entries that were made to the schedule. To view the Audit trail:
1. Select the Employee.
2. Click on View at the menu bar.
3. Select Audit from the drop down menu.
4. At Type of Edit, click on the drop down menu bar to make a selection. For this example, All was selected.
This allows the user to view all entries to Kate’s schedule. The Audit displays the effective date, the type of entry, what was entered, Amounts, Comments and more. In addition, the Audit also displays the Edit date, Time and the Editor.
5. Click on OK
3
4
2
1
5
Training Presentation
- 16 -
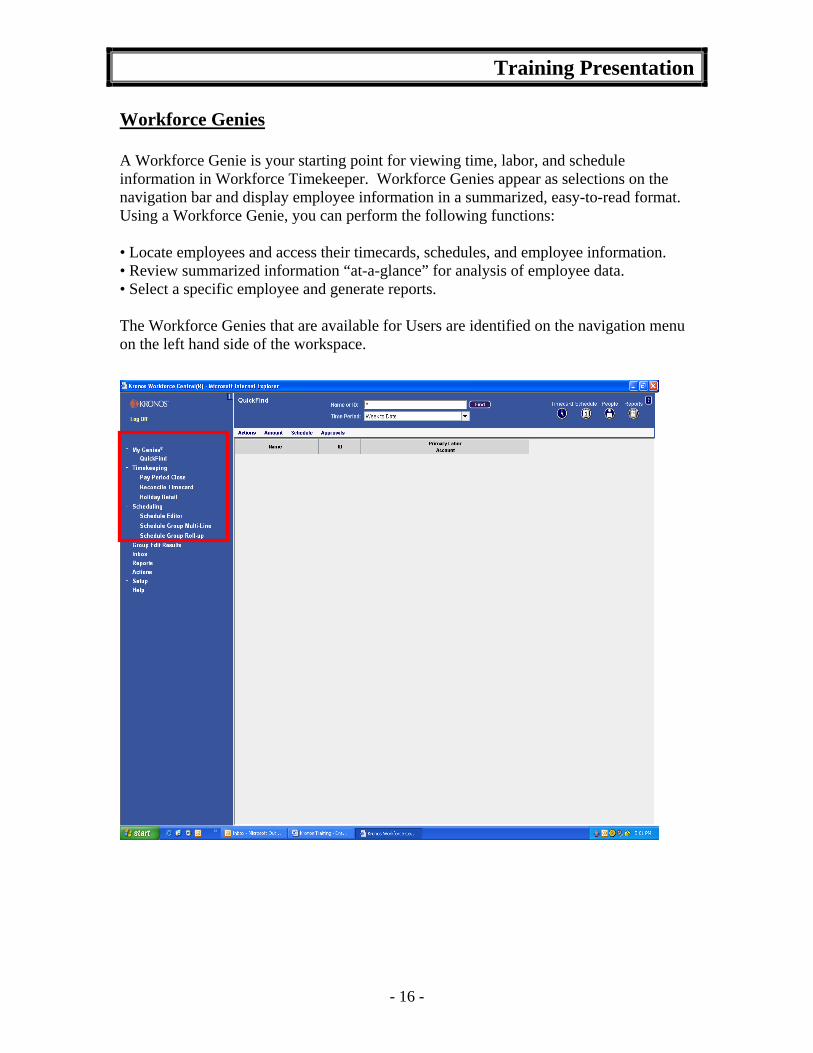
Workforce Genies A Workforce Genie is your starting point for viewing time, labor, and schedule information in Workforce Timekeeper. Workforce Genies appear as selections on the navigation bar and display employee information in a summarized, easy-to-read format. Using a Workforce Genie, you can perform the following functions: • Locate employees and access their timecards, schedules, and employee information. • Review summarized information “at-a-glance” for analysis of employee data. • Select a specific employee and generate reports. The Workforce Genies that are available for Users are identified on the navigation menu on the left hand side of the workspace.

Training Presentation
- 17 -
Hyper Find Queries Queries are the building blocks that are used to determine what type of information Users can view when selecting a Workforce Genie. You can then use a query in conjunction with a predefined Workforce Genie or a Report to further narrow the search for the information.
Types of Queries There are two types of hyperfind queries that can be used to assist Users in accessing employee information in the Workforce Timekeeper application. The two types of queries are:
Public Queries Personal Queries
Public Queries Public queries are available to all users who are granted rights to view reports or Genies. Public queries appear in boldface text in the list box as options within the Show field in the application. In the example below, there are numerous public queries available to the user.
Personal Queries The second type of query is called a personal query. A Personal Query is only accessible to the individual who created the query. When a user accesses the list box associated with the show field, any personal queries defined by the user will display in regular text.

Training Presentation
- 18 -
Reports The Report component, which is accessed from the Workforce Timekeeper Navigation Bar, enables users to select and run an existing report. When you run a report, the system extracts data from the database and formats it in rows and columns as a report. The Reports component provides a full listing of standard reports, all of which are sorted into six categories: Category Description Example Report All Alphabetical listing of all standard
reports Employee Currently Earning Time Report: lists employees who are currently punched in or earning time.
Accruals Information about accrual activity, balances, and projections (ETO, Vacation, Sick, Personal, Holiday)
Accrual Balances and Projection Report: shows accrual balances through a selected date including any future scheduled time off.
Detail Genie Employee specific information, available when you click the Reports launch icon from a detail Genie
Time Detail Report: displays punch, pay code, and transaction information for individual employees.
Roll Up Genie Summarizes information by labor account or schedule group, available when you click the Reports launch icon from a roll-up Genie
Hours by Labor Account Report: details the total hours by a specific set of employees based on their primary labor accounts.
Scheduler Detailed schedule information, available when you click the Reports launch icon from the Scheduler Editor
Schedule by Labor Account: shows weekly or monthly schedules for employees sorted by their primary labor accounts.
Timecard Time and attendance, accrual, and schedule information, available when you click the Reports launch icon from an employee’s timecard
Exceptions Report: shows absences and exceptions for selected employees for a specified time period.

Timecards
- 1 -
Pay Code List
Pay Codes Type Examples: When to use these pay codes Absent No Pay Hours Employee did not work and shouldn’t be paid (No available sick time or ETO time)
Adoption Hours Hours Employee uses a specific amount of hours for Adoption as approved by the HR Dept.
Advance Pay Previously Paid Hours Employee paid hours prior to this Pay Period and should not be paid in the Current Pay Period.
Blood Donor Hours Hours Hours granted to the employee for donating blood
Call In Hours Employee is Called In from Home to report to work while on scheduled On Call.
Certification Hours Hours for acquiring a Certification
Conference Outside Philadelphia Hours Hours to attend a Conference Outside the city limits of Philadelphia
Conference On Campus Hours Hours to attend a Conference On the Jefferson Campus
Conference In Philadelphia Hours Hours to attend a Conference within the city limits of Philadelphia
EIB (Extended Illness Bank) Hours Administered by HR after receiving approval from Matrix for an FMLA/NON FMLA Leave
ETO Scheduled Hours To be used when an ETO eligible employee schedules ETO time off according to departmental policy
ETO Unscheduled Hours To be used when and employee does not schedule according to departmental policy. This will show on the ‘Exception Report’ in Kronos
ETO FMLA Scheduled Hours Employee gives proper notice for their approved Intermittent FMLA.
ETO FMLA Unscheduled Hours Employee does not provide proper notice for their approved Intermittent FMLA
ETO Worker’s Compensation Hours Recorded for first 5 continuous calendar days an employee is absent due to work-related injury.
Excused Absence No Pay
Hours Employee’s absence approved ahead of time. (No available vacation or personal time)
Exempt Excess Hours Hours Exempt employee has worked in excess of their standard hours and HR has approved the hours to be paid
Exempt Excess Hours Sft Hours Exempt employee has worked in excess of their standard hours and HR has approved the hours and shift differential to be paid.
FMLA No Pay Hours Unpaid Hours charged to FMLA (Family Medical Leave Act) FMLA Personal Hours Personal hours used to pay the non ETO eligible employee for their FMLA (Family Medical
Leave Act) FMLA Personal SFT Hours Personal shift hours used to pay the employee for their FMLA (Family Medical Leave Act)
FMLA Sick Hours Sick hours used to pay the employee for their FMLA (Family Medical Leave Act)
FMLA Sick Sft Hours Sick shift hours used to pay the employee for their FMLA (Family Medical Leave Act)
FMLA Sick Family Hours Sick hours used to pay the employee for caring for a family member due to a FMLA (Family Medical Leave Act)
FMLA Sick Family SFT Hours Sick shift hours used to pay the employee for caring for a family member due to a FMLA (Family Medical Leave Act)
FMLA Vacation Hours Vacation hours used to pay the employee for their FMLA (Family Medical Leave Act)
FMLA Vacation SFT Hours Vacation shift hours used to pay the employee for their FMLA (Family Medical Leave Act)
Funeral Pay Hours Hours for attending a funeral of an immediate family member
Holiday Hours Hours paid for Jefferson approved Holidays
Holiday Shift Hours Hours paid at the Holiday Shift Rate
Holiday No Pay Hours Unpaid Holiday Hours
Holiday Premium Hours Hours paid at the Holiday Premium Rate
Holiday Premium SFT Hours Hours paid at the Holiday Premium Shift Rate
Holiday Premium Sft 15 Hours Hours paid at the Holiday Shift Differential Rate of 15% of the Hourly Rate of Pay.
Holiday Premium Sft 20 Hours Hours paid at the Holiday Shift Differential Rate of 20% of the Hourly Rate of Pay.
Holiday Worked (EX only) Hours Exempt employee works the holiday and defers the holiday to a later date

Timecards
- 2 -
Pay Code List
Pay Codes Type Examples: When to use these pay codes Holiday Worked (EX only) Shift Hours Exempt employee eligible for shift differential works the holiday and defers the holiday to a
later date Jury Duty Hours Hours to serve on Jury Duty
Military Hours Hours paid for Reserves or National Guard Training periods
On Call Hours Hours Hours paid for being On Call for a specific time period
Overtime Hours Hours paid at the Overtime Rate (1 ½ time hourly rate)
Paid Meeting Hours Hours paid for attending a Meeting
Personal Time Hours Hours paid using the employee’s available Personal Time
Personal Time Shift Hours Shift Hours paid using the employee’s available Personal Time
Regular Hours Hours paid at the Regular Hourly Rate of Pay
Shift 10 Hours Hours paid at the shift differential rate of 10% of the Hourly Rate of Pay
Shift 15 Hours Hours paid at the shift differential rate of 15% of the Hourly Rate of Pay
Shift 20 Hours Hours paid at the shift differential rate of 20% of the Hourly Rate of Pay
Shift OT Hours Shift Hours paid at the Shift Overtime Rate (1 ½ times shift rate)
Sick Hours Hours paid using the employee’s available Sick Time
Sick Sft Hours Shift Hours paid using the employee’s available Sick Time
Sick Family Hours Hours paid using the employee’s available Sick Time to care for a family member
Sick Family Sft Hours Shift Hours paid using the employee’s available Sick Time to care for a family member
Suspended No Pay Hours Employee is Suspended from their job without Pay
Travel Hours Hours paid for Travel Time when employee is Called Back In to work
Vacation Hours Hours paid using the employee’s available Vacation Time
Vacation Sft Hours Shift Hours paid with the employee’s available Vacation
Workers’ Comp Sick Hours Hours charged to Workers’ Compensation when the non ETO eligible employee is out of work due to a job related injury
Workers Comp TWD Hours Hours charged to Workers Compensation when the employee has returned on Transitional Work Duty.
ETO Sch Union Hours 1199C Use Only – For employees who schedule ETO time three weeks in advance.
Additional $ Money This code only to be used with Human Resource approval
On Call $ Money Total amount paid for On-Call hours
Honorarium$ Money Total amount paid to compensate for Honoraria
Increase$ Money Additional amount paid for working jobs with different rates of pay
JCHP Adjunct$ Money Total amount paid to Adjunct Teacher
Moonlighting$ Money Total amount paid for services performed outside normal duties
Medical Transcription$ Money Total amount paid for medical transcriptionists
Shift Diff $ Money Differential due for working ‘Special’ shifts – Human Resource approval is required to be given access to this code.
Uniform Allowance $ Money Total amount for Uniform expense reimbursements

Timecards
- 3 -
Pay Code List (Nursing Services Only)
Pay Codes Type Examples: When to use these pay codes Class Hours Hour for attending a business required Class
Excused Absence No Pay Hours Excused Absence and employee shouldn’t be paid
High Premium Call Hours Hours assigned to a special “On Call” Rate used by Nursing Services Hospital Acquired Disease Hours Hours paid for an excused absence due to hospital contamination
In Service Hours Hours paid while attending a training class
No Pay Hours Hours will not be paid.
One To One Hours Hours paid while assigned to individual Nursing assignments
Orientation Hours Hours paid while assigned to Nursing Orientation
Personal LOA No Pay Hours Hours for an approved unpaid Personal Leave of Absence Suspended With Pay Hours Employee is Suspended from their job with Pay
T1 - $3.00 Hours Total Hours at specific Tier Rate for Pool Nurses
T1 - $4.50 Hours Total Hours at specific Tier Rate for Pool Nurses
T1 - $5.00 Hours Total Hours at specific Tier Rate for Pool Nurses
T1 - $6.00 Hours Total Hours at specific Tier Rate for Pool Nurses
T1 - $7.50 Hours Total Hours at specific Tier Rate for Pool Nurses
T1 – 8.00 Hours Total Hours at specific Tier Rate for Pool Nurses
T1 - $9.00 Hours Total Hours at specific Tier Rate for Pool Nurses
T1 $10.00 Hours Total Hours at specific Tier Rate for Pool Nurses
T1 - $12.00 Hours Total Hours at specific Tier Rate for Pool Nurses
T1 - $15.00 Hours Total Hours at specific Tier Rate for Pool Nurses
Training Day Hours Hours paid for attending Training
Trauma Course Hours Hours paid for attending a business required Trauma Course NS Tier Pay Money Total Tier Rate Amount paid for hours worked as a Pool Nurse

Timecards
- 4 -
Timecard Indicators and Colors When viewing employee timecards, there are certain indicators that may display on the timecard that can be used as queues when performing edits. A listing of these indicators with examples can be found in the table below.
Indicator Color Code Description
Solid red cell Indicates that there is either a missed In punch or Out punch. Moving the mouse over the cell will provide more information.
Red outlined cell Indicates that there is an exception to the punch (Example: late in or early out). Moving the mouse over the cell will provide more information.
Yellow box inside a cell Indicates there is a comment associated with the contents of the cell.
Red outlined cell Yellow box inside cell
Indicates that there is an exception associated with the punch and a comment associated with the contents of the cell.
Red border around a date Indicates that it is an unexcused/unscheduled absence for the day.
Blue border around a date
Indicates that it is an excused/scheduled absence for the day.
Purple transaction (Phantom Punch)
Indicates the transaction was added to the timecard by the totalizer. If the cell is gray, the transaction cannot be edited.
X before a labor account Indicates that the account is not the home labor account that is being indicated in the transfer.
X after a date in schedule in bottom of timecard
Indicated that a transfer was made within the schedule
Gold bar at top of timecard workspace
Indicates that edits have not yet been saved

Timecards
- 5 -
Timecard Indicators and Colors (continued) If you place your cursor over the employee name, the system displays the employee’s Pay Rule, Primary Account(s), and Standard Hours (daily, weekly, and per pay period).

Timecards
- 6 -
Timecard Sample with Exception Messages
Late In – with exception hours
Early Out – within 6 minute rounding
Missed Punch
Early In – over 6 minute roundingperiod
Late Out – over 6 minute rounding period
Late In – over 6 minute rounding period with comment

Timecards
- 7 -
Editing Timecards
This chapter builds on the time entry procedures and focuses on the additional administrative tasks that the user may need to perform on employee timecards to ensure accuracy. Using the Timecard Editor window, the user can perform edits and approve employee data on a daily, weekly or pay period basis.
To access the Timecard Editor window:
1. Select the Quick Find Genie on the Navigation Bar. 2. Select the Time Period you want to view. 3. Click the Find button at the top of the workspace.
A listing of active employees assigned to your home labor account will display.
4. Highlight the Name of the Employee whose timecard you want to view.
5. Click the Timecard launch button to display the
employee timecard.
1
2 3
4
5

Timecards
- 8 -
Pay Code Edits – Entering Unscheduled Time Full Unscheduled Day Off
To enter a Pay Code Edit for a Full Unscheduled Day, such as Sick time or ETO Unscheduled:
1. Click the down arrow in the Pay Code column, and select the
appropriate time-off pay code in the drop-down list.
2. Enter the number of hours in the Amount column. 3. Click Save.
1 23

Timecards
- 9 -
Pay Code Edits – Entering Unscheduled Time
Partial Unscheduled Day Off (Example 1)
To enter a pay code edit for a partial unscheduled day, such as ETO Unscheduled or sick hours at the beginning of the shift:
1. Add a row by clicking the “Add Row” icon.
Remember you cannot have punches in the same row as
amounts. Add a row by clicking the Add Row icon
2. Click the down arrow in the Pay Code column, and select the
appropriate time-off pay code in the drop-down list.
3. Enter the number of hours in the Amount column.
4. Click Save.
1
4
23
Timecards
- 10 -
Pay Code Edits – Entering Unscheduled Time
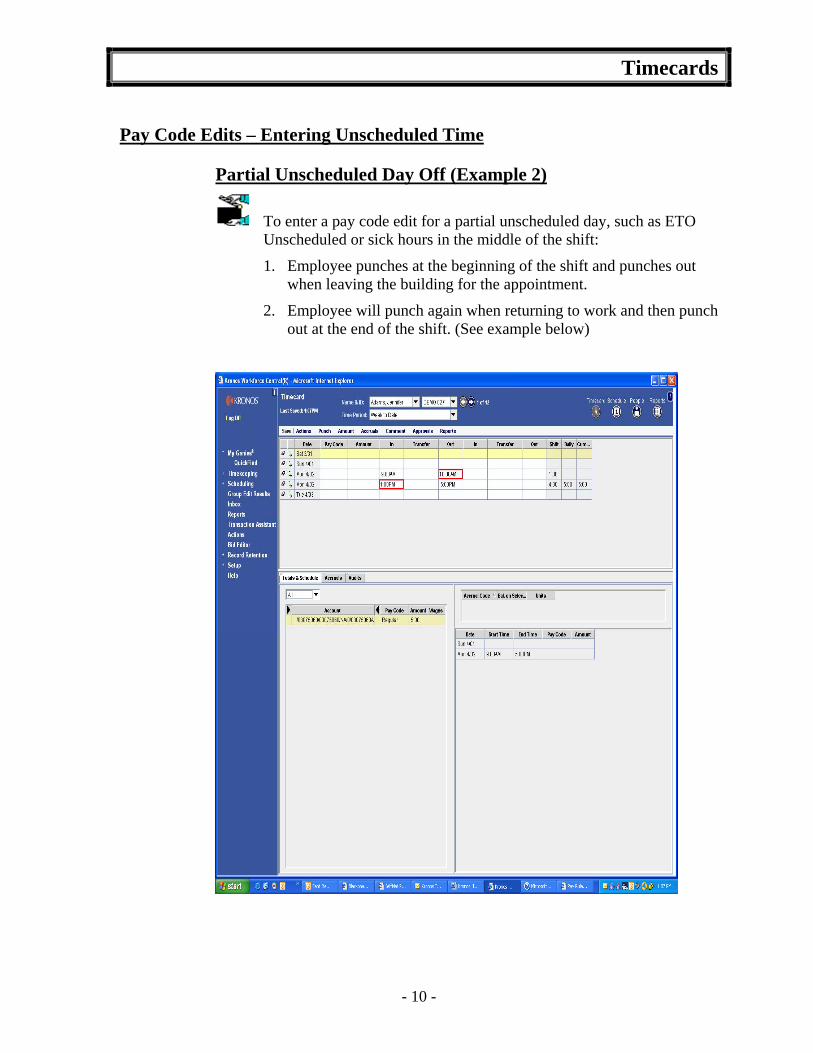
Partial Unscheduled Day Off (Example 2)
To enter a pay code edit for a partial unscheduled day, such as ETO Unscheduled or sick hours in the middle of the shift:
1. Employee punches at the beginning of the shift and punches out when leaving the building for the appointment.
2. Employee will punch again when returning to work and then punch out at the end of the shift. (See example below)

Timecards
- 11 -
Pay Code Edits – Entering Unscheduled Time
Partial Unscheduled Day Off (Example 2) - continued
3. Add a row by clicking the “Add Row” icon.
4. Click the down arrow in the Pay Code column, and select the appropriate time-off pay code in the drop-down list.
5. Enter the number of hours in the Amount column.
6. Click Save.
Remember you cannot have punches in the same row as
amounts. Add a row by clicking the Add Row icon
3
5
4
6

Timecards
- 12 -
Adding Employee Punches Sometimes it is necessary to add a punch to an employee timecard. For example it may be necessary to add a punch if an employee forgot to punch for the shift or lost a badge.
To Add a Punch to an employee timecard:
1. Place your cursor in the first “In” Cell that corresponds to the day you want to add the “In” punch and enter the “In” time for the shift.
Remember to enter AM or PM after the time.
2. Place your cursor in the first “Out” Cell that
corresponds to the day you want to add the “Out” punch.
Remember to enter AM or PM after the time.
3. From the Menu Bar, select Save.
1 2
3

Timecards
- 13 -
Editing Employee Punches In addition to adding punches to an employee timecard, you may also have to edit the existing information that appears on an employee timecard. Depending on the information, there are different ways to edit timecard data.
To Edit a Punch in or out time:
1. Place your cursor in the cell that requires the edit to the “In” time or
“Out” time and enter the new punch time.
Remember to enter AM or PM after the time.
2. From the Menu bar, select Save.
12

Timecards
- 14 -
Automatic Meal Deduction
The Jefferson Electronic Time and Attendance System has been configured to automatically deduct the amount of your daily scheduled meal break. This deduction will occur after the employee has worked 5 consecutive hours within the shift.
Example #1: Pete Carter is scheduled to work 3:00 P.M. until 11:30 P.M. with a 30 minute meal break.
Employee worked 8 ½ hours but the 30 minute meal break was automatically deducted from the timecard totals Regular Hours: 8:00 Shift 10 Hours: 8:00

Timecards
- 15 -
Automatic Meal Deduction (continued)
Example #2: Pete Carter is scheduled to work 3:00 P.M. until 11:30 P.M. with a 30 minute meal break. He starts his shift at 3:00 P.M. but gets sick and punches out at 6:00 P.M. Pete did not work 5 consecutive hours in his shift so the 30 minute meal deduction did not occur on his timecard.
Employee worked 3 consecutive hours which is less than the 5 consecutive hours required so the 30 minute meal deduction was not taken. Regular Hours: 3:00
Timecards
- 16 -
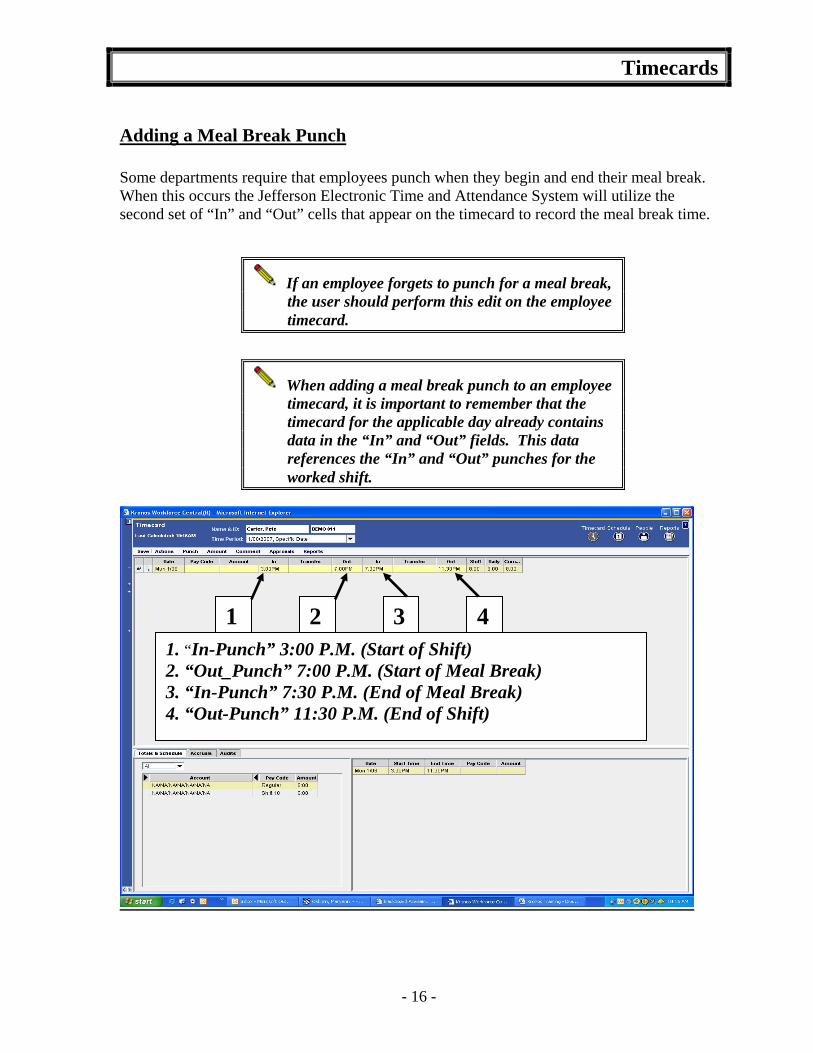
Adding a Meal Break Punch Some departments require that employees punch when they begin and end their meal break. When this occurs the Jefferson Electronic Time and Attendance System will utilize the second set of “In” and “Out” cells that appear on the timecard to record the meal break time.
If an employee forgets to punch for a meal break, the user should perform this edit on the employee timecard.
When adding a meal break punch to an employee timecard, it is important to remember that the timecard for the applicable day already contains data in the “In” and “Out” fields. This data references the “In” and “Out” punches for the worked shift.
1. “In-Punch” 3:00 P.M. (Start of Shift) 2. “Out_Punch” 7:00 P.M. (Start of Meal Break) 3. “In-Punch” 7:30 P.M. (End of Meal Break) 4. “Out-Punch” 11:30 P.M. (End of Shift)
1 2 3 4
Timecards
- 17 -
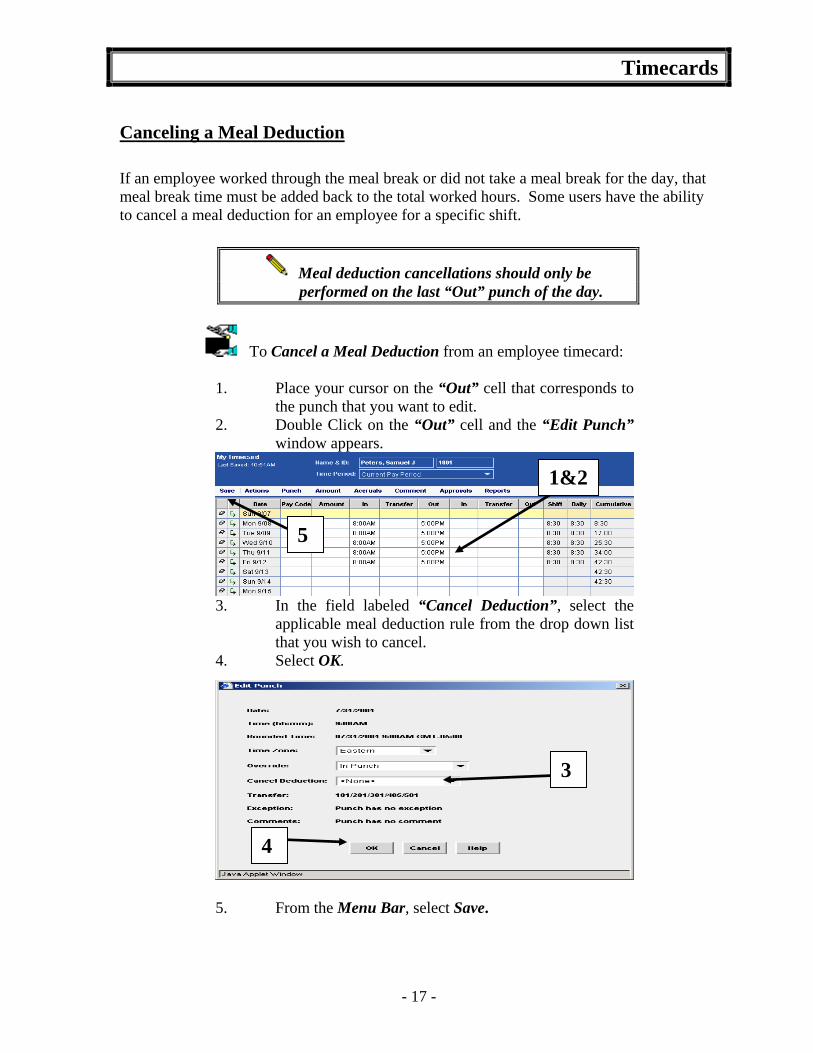
Canceling a Meal Deduction If an employee worked through the meal break or did not take a meal break for the day, that meal break time must be added back to the total worked hours. Some users have the ability to cancel a meal deduction for an employee for a specific shift.
Meal deduction cancellations should only be performed on the last “Out” punch of the day.
To Cancel a Meal Deduction from an employee timecard:
1. Place your cursor on the “Out” cell that corresponds to the punch that you want to edit.
2. Double Click on the “Out” cell and the “Edit Punch” window appears.
3. In the field labeled “Cancel Deduction”, select the
applicable meal deduction rule from the drop down list that you wish to cancel.
4. Select OK.
5. From the Menu Bar, select Save.
5
1&2
3
4
Timecards
- 18 -
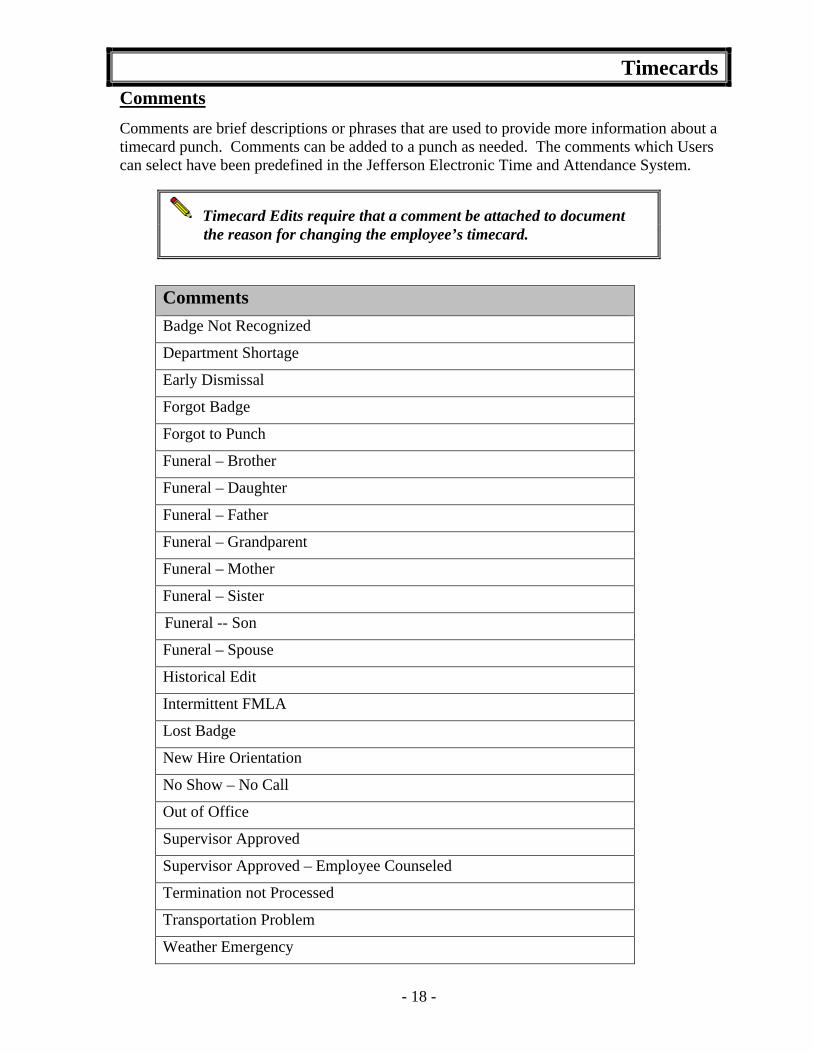
Comments Comments are brief descriptions or phrases that are used to provide more information about a timecard punch. Comments can be added to a punch as needed. The comments which Users can select have been predefined in the Jefferson Electronic Time and Attendance System.
Timecard Edits require that a comment be attached to document the reason for changing the employee’s timecard.
Comments Badge Not Recognized
Department Shortage
Early Dismissal
Forgot Badge
Forgot to Punch
Funeral – Brother
Funeral – Daughter
Funeral – Father
Funeral – Grandparent
Funeral – Mother
Funeral – Sister
– Funeral -- Son
Funeral – Spouse
Historical Edit
Intermittent FMLA
Lost Badge
New Hire Orientation
No Show – No Call
Out of Office
Supervisor Approved
Supervisor Approved – Employee Counseled
Termination not Processed
Transportation Problem
Weather Emergency

Timecards
- 19 -
Comments -- Attaching Comments to an Employee Punch
To Add a Comment to an Employee Punch:
1. Place your cursor in the cell where you want to attach a “Comment”.
2. From the Menu Bar, select “Comment”. The “Add Comment” window appears.
3. Highlight the “Comment” that should be associated with the punch.
4. Click OK.
You can select multiple comments by holding down the CTRL key while highlighting the applicable comments.
The cell on the timecard will contain a yellow icon indicating a comment is associated with the punch.
Deleting Comments from an Employee Punch Once a comment is associated to an employee punch, the comment can be deleted by selecting the comment in the comment tab and confirming the deletion of the comment. Once the comment is deleted, the yellow icon that was associated with the comment will disappear.
1 2
3
4

Timecards
- 20 -
Moving Pay Code Amounts Sometimes it may be necessary to move an amount (dollars or hours) from one pay code to another to correct a discrepancy or to account for something unexpected.
Suppose, for example, that in reviewing an employee timecard you notice that 8 hours of time is allocated to a pay code for Jury Duty. This comes to your attention because you know that you did not have anyone out for Jury Duty this pay period. When you ask the employee you discover that it was actually 8 hours of Personal Time. In order to make this correction on the employee timecard, you will have to move the 8 hours from the Jury Duty pay code to the Personal Time pay code.
To Move Pay Code Amounts:
Place your cursor in the cell that corresponds to the “Pay Code Amount” you wish to move. From the Menu Bar, select Amount>Move. The “Move Amount” dialog box appears. 1. In the field labeled “Pay Code”, select the correct Pay
Code from the list box. 2. In the field labeled “Amount”, enter the correct
amount. 3. In the field labeled “Effective Date”, enter the correct
date 4. In the field labeled “Transfer”, enter the account code
transfer if applicable. 5. In the field labeled “Comments”, enter a comment if
applicable. 6. Click OK.
From the Menu Bar, select Save.
The Moved Pay Code Amount displays in the Moved Amounts Tab in the timecard totals section of the timecard.
1
2
3
4
5
6

Timecards
- 21 -
Calculating a Timecard There are times when you edit punches or amounts on an employee timecard and it needs to be calculated so you can review the changes before saving the timecard.
To Calculate a timecard:
1. From the Actions menu, select Calculate Totals.
After the employee’s timecard is calculated, the timecard totals in the Totals and Schedule tab will change.
When you select this option, the system recalculates the timecard so that accurate totals are displayed on the employee timecard. Review the timecard totals and then Save.
To Save a timecard:
2. From the Menu bar, select Save.
1
2

Timecards
- 22 -
Account Code Transfers
Users can perform transfers so an employee’s hours within the same Company can be charged to a different account code that is not an employee’s primary labor account. The transfer can be for the entire shift, a portion of the shift or the total hours for the entire pay period.
NOTE: Account Code Transfers must be processed within the same Company. (Cost Centers are also known as Account Codes)
.
To perform a Labor Level Transfer (account code):
1. Place your cursor in the Transfer cell that corresponds to the hours that will be transferred to another account code.
2. Select the drop down arrow to display the information in the list box.
3. Select the Search option.
1 & 2
3

Timecards
- 23 -
Account Code Transfers (continued) The Select Transfer dialog box appears.
4. In the section of the window Labor Account, type the entire account code in the “Name or Description” box.
5. Click Search
6. Click on the new account code in “Available Entries” box
7. Click OK
Timecard View after Account Code Transfer
4 5
6
7
8 Regular Hours transferred to Account Code “03075100”

Timecards
- 24 -
Add Historical Edits A Historical Edit is a tool to be used to adjust an error or pay code from a previously signed off pay period in the Kronos system. For example, an employee had requested a ETO/Vacation day to be paid in the previous pay period. The timecard was approved and signed off without entering the ETO/Vacation day in the Kronos system. If the employee is able to wait for the ETO/Vacation day until the next pay check, the department administrator would then sign into the Jefferson Electronic Time and Attendance system and make the historical edit. In order to pay an employee in the current pay period for a vacation day not paid in the previous pay, perform a historical edit as follows:
From the navigation bar: 1. Select the Employee’s timecard in the Current Pay Period 2. Select Amount from the menu bar tab 3. Select Add Historical Amount from the drop down list
. Screen before Adjustment
12

Timecards
- 25 -
A new Window Box will appear (Add Historical Amount) to use for processing the adjustment. Follow these steps.
1. Click on the Historical Date drop down box and select the historical date from the calendar (actual adjustment date).
2. Select which Pay code you want to add from the drop down. 3. Enter the Amount of Hours you are adjusting in the next field.
The effective date of the adjustment is very important if you intend for the adjustment to be paid in the next pay check;
4. Enter the Current Pay Period End Date. 5. Select Include in totals for effective date 6. Select the Comment (Historical Edit) 7. Click OK. 8. Select Save from the menu bar
By following these steps, the historical amount you processed will be included in the employee’s next regular payroll payment. Sometimes you will need to make a Historical Adjustment to the employee’s timecard that will require an “Off Cycle” check. In this case, follow steps 1-4 from above. If the employee requires an “Off Cycle”, DO NOT CHECK the Include in totals for effective date (5). By checking this, the historical edit is made, but the adjustment will not be included with the current pay period. Click OK. Contact payroll with the proper off cycle documentation.
3
4
5
8
1
2
67

Timecards
- 26 -
Below the Timecard, in the lower left you will see a number of tabs. These enable you to view actions to the timecard. The tab at the lower left labeled Historical Amounts will display information about the historical edit. Select this tab and you will see all the information regarding the historical edit made to the employee’s timecard.
NOTE: When using either type of Historical Edit, it is important to note that the Current Account Code will be charged unless you perform an Account Code Transfer, or designate a different Account Code on the “Off-Cycle” Request Form. If the Account Code charged between the original pay period and the pay period in which the Historical Edit is performed is different, you may need to perform an Account Code Transfer.

Timecards
- 27 -
Move Historical Edit/Submitting an Hours Adjustment Form A Move Historical Edit is a tool to be used to adjust an error or pay code from a previously signed off pay period in the Jefferson Electronic Time and Attendance System. For example: an employee had requested an ETO Scheduled/Vacation day off. The day was paid as an ETO Unscheduled Day/Sick. The department Timekeeper or Editor would then sign into the Jefferson Electronic Time and Attendance System and make the Historical Edit. In order to correct this transaction, perform a Historical Edit as follows: From the navigation bar:
1. Select the Employee’s timecard in the Current Pay Period 2. Select Amount from the menu bar tab 3. Select Move Historical from the drop down list
Screen before Adjustment

Timecards
- 28 -
A new Window Box will appear (Move Historical) to use for processing the adjustment. Follow these steps:
1. Select which From: Pay Code (EIB/Sick) you want to add from the drop down box.
2. Select which To: Pay Code (ETO Scheduled/Vacation) you want to add from the drop down box.
3. Enter the Amount of (hh:mm) you are adjusting. 4. Do not check off any boxes – the employee was already paid for these
hours. 5. The Effective Date is the last day of the Current Pay Period. 6. The Historical Date is the date the error occurred. 7. Select the Comment (Historical Edit) and click OK. 8. Click OK. 9. Select Save from the menu bar.
By following these steps, the transaction that was processed incorrectly will be corrected right in the system. You now need to process a Hours Adjustment Form to add the accrued hours back (EIB /Sick) and to remove the accrued hours from the correct balance (ETO Scheduled/Vacation) in the PeopleSoft system.

Timecards
- 29 -
Move Historical Edit/No Hours Adjustment Form needed A new Window Box will appear (Move Historical) to use for processing the adjustment. Follow these steps:
1. Select which From: Pay Code (Regular) you want to add from the drop down box.
2. Select which To: Pay Code (ETO Schd/Unschd/EIB/Sick/Vacation) you want to add from the drop down box.
3. Enter the Amount of (hh:mm) you are adjusting. 4. Check off box to include in totals. 5. The Effective Date is the last day of the Current Pay Period. 6. The Historical Date is the date the error occurred. 7. Select the Comment (Historical Edit) and click OK. 8. Click OK. 9. Select Save from the menu bar.
By following these steps, the transaction that was processed incorrectly will be corrected right in the system. If the historical edit is being included in an employee’s paycheck (included in totals for effective date) and hours adjustment for is not required.

Timecards
- 30 -
Deleting A Historical Edit/Historical Move In the event that the adjustment for a historical edit/historical move was incorrect and the error is discovered before the current pay period is approved, the historical edit can be deleted.
From the navigation bar: 1 Select the Employee’s Timecard in the Current Pay Period 2 Select Amount from the menu bar tab 3 Select Delete Historical Amount from the drop down list 4 Click OK 5 Select the Save from the Menu Bar
123
5

Timecards
- 31 -
Timecard After Deleted Historical Edit/Historical Move
Note: The Historical Edit Tab is no longer visible.

Timecards
- 32 -
Timecard Editor Tab The Timecard Editor Workspace can be divided into two sections. Up to this point, most of the tasks described in this guide used the Timecard section of the Workspace. The additional section of the Workspace appears on the bottom of the Timecard. There are a total of eight (7) Tabs that can be displayed at the bottom of the Workspace. They are:
Totals & Schedules Tab
Accruals Tab
Audit Trail Tab
Sign-offs & Approvals Tab
Comments Tab
Moved Amounts Tab
Unprocessed Time Tab
The tabs that can appear are directly related to the edits and actions performed on a timecard.
Totals & Schedules Tab The first tab that appears on every employee timecard is the Totals & Schedules Tab. Here you can view information related to the totals that appear on the employee timecard and view start and end times for all schedules that appear on the employee timecard.
Viewing Totals The Timecard Totals display on the pane in the left side of the Timecard Tab Workspace. By using the scroll bar you can look through the information listed. The totals display by labor account and pay code. When Users load timecards for their employees, the totals are automatically calculated.

Timecards
- 33 -
Viewing Schedules The right hand side of the timecard workspace allows you to view the start and end time for all schedules for the timeframe displayed in the timecard.
When you select a cell in the timecard grid, the selected day and schedule is highlighted in “yellow” in the schedule view.
Schedule

Timecards
- 34 -
You can display a breakdown of timecard totals in a variety of ways. The display options are:
All Totals
Shift Totals
All Totals
Shift Totals

Timecards
- 35 -
Daily Totals
Cumulative Totals
Daily Totals
Cumulative Totals

Timecards
- 36 -
Accruals Tab The Accruals Tab allows you to view accrued hours (ETO, EIB, Holiday, Personal, Sick and Vacation) that belong to the employee whose timecard is displayed. The accrual balances for new employees will not display until the Probation Period has been completed.
NOTE: Accrual Totals are updated from PeopleSoft on a bi-weekly basis.
NOTE: You cannot Edit any of the information displayed on this Tab.
The Accrual Balances may display in PeopleSoft with a different balance than what is displayed in the Jefferson Electronic Time and Attendance System. The PeopleSoft System calculates the Accrual Balances in a “Tenths of an Hour” format and the Accrual Balances are displayed in the Jefferson Electronic Time and Attendance System in a “Minute” format. (Accrual Conversion Table on Page 36) EXAMPLE: PeopleSoft shows an ETO Balance of 84.20 (84 hours and 2 tenths)
Jefferson Electronic Time and Attendance System shows an ETO Balance of 84:12 (84 hours and 12 minutes)
Current ETO, EIB, Holiday, Personal, Sick and Vacation Totals
Projected Debits reflect future dated ETO, EIB, Holiday, Personal, Sick or Vacation scheduled hours
Projected Balance includes all future dated ETO, EIB, Holiday, Personal, Sick or Vacation

Timecards
- 37 -
Accrual Balance Conversion Table
Minutes % of an hour Minutes % of an hour
:01 0.02 :31 0.52
:02 0.03 :32 0.53
:03 0.05 :33 0.55
:04 0.07 :34 0.57
:05 0.08 :35 0.58
:06 0.10 :36 0.60
:07 0.12 :37 0.62
:08 0.13 :38 0.63
:09 0.15 :39 0.65
:10 0.17 :40 0.67
:11 0.18 :41 0.68
:12 0.20 :42 0.70
:13 0.22 :43 0.72
:14 0.23 :44 0.73
:15 0.25 :45 0.75
:16 0.27 :46 0.77
:17 0.28 :47 0.78
:18 0.30 :48 0.80
:19 0.32 :49 0.82
:20 0.33 :50 0.83
:21 0.35 :51 0.85
:22 0.37 :52 0.87
:23 0.38 :53 0.88
:24 0.40 :54 0.90
:25 0.42 :55 0.92
:26 0.43 :56 0.93
:27 0.45 :57 0.95
:28 0.47 :58 0.97
:29 0.48 :59 0.98
:30 0.50 :60 1.00

Timecards
- 38 -
Audit Trail Tab The Audit Trail Tab displays the date, time, and type of edit being performed. This tab also indicates changes made to labor accounts and work rules (from and to) as well as edits that are reclassified as pay code hours. If you need to know which user performed a specific edit, the Audit Trail tab displays by edit, the user, edit date and time, and the data source (where the entry was made – example: timecard). When viewing the tab, the user can filter the data by the type of edit or the data source.
No entries appear on this tab when initially opening an employee’s timecard. New audits are available for viewing only after an edit is saved. By default, the view display is defaulted to “All” for types of edits and also data sources.
Sorting Data in the Audits Trail Tab
You can sort the data by any of the column headings. Click the column heading cell on which to sort the data. One of two triangle icons appears.
Sorts the rows in ascending order.
Sorts the rows in descending order.

Timecards
- 39 -
Filtering Data – Type of Edits
The “Type of Edit” drop-down list allows you to select the type of edits that you want to view. Only rows that are grouped by the selected filter appear. Selections are:
All
Punch (Add/Edit/Delete)

Timecards
- 40 -
Filtering Data – Type of Edits (continued)
Pay code (Add/Edit/Delete)
Approvals/Sign-offs

Timecards
- 41 -
Filtering Data – Data Sources
The “Data Source” drop-down list allows you to select the type of data sources that you want to view. Only rows that are grouped by the selected filter appear. Selections are:
All
All Data Sources Shown
Data Source

Timecards
- 42 -
Filtering Data – Data Sources (continued)
Schedule Editor
Select “Data Sources only“ Schedule Editor
Displays Edits in Schedule Editor

Timecards
- 43 -
Filtering Data – Data Sources (continued)
Timecard
Displays Edits in Timecard Editor Only
Select “Data Sources only“ Timecard

Timecards
- 44 -
Comments Tab Any comments that are associated with a timecard transaction can be displayed in full by viewing the comments tab. If no transactions have comments associated with them, this tab will not display on the timecard.

Timecards
- 45 -
Moved Amounts Tab
If any pay code moves are performed on a timecard, the moved amounts tab will display the details associated with the pay code move as well as any comments that may be attached to the move. This tab will display on the timecard only if move amount transactions have been performed on the timecard.
Unprocessed Time Tab
Any edits that have been performed on an employee timecard that have been saved but due to connectivity issues, cannot be updated, will appear on the Unprocessed Time Tab. To resolve this problem go to the Menu Bar and select Actions and choose “Refresh” from the drop-down list.

Schedules
- 1 -
1
Schedule Patterns – New Employee Every employee must have a schedule. A Schedule Pattern is a combination of one or more shifts that repeat over a specified number of days or weeks. A pattern should be selected that matches the employee’s normal schedule. Changes can be made to a day or part of a day as necessary. Marie Johnson is new in the department and needs a Schedule Pattern. To assign a Schedule Pattern to an employee:
1. Go to the Navigation bar>Scheduling>Schedule Editor. 2. Select the Employee 3. Select the Day. 4. Click on the Shift menu. 5. Select Add Pattern from the drop down menu.
6. Enter a Work Start Date and a Pattern Start Date. 7. Marie will be working Monday through Friday from 8:30am to 4:30pm with an hour meal break and Forever is the End Date. 8. Click on Insert Pattern. 9. Select a Pattern from the drop down menu.
10. Click OK then Save!
3
2
6 7
9
4
8
10
5

Schedules
- 2 -
1
Schedule Patterns Edits Shawn Oliver has been working from 3pm to 11:30 pm for the past few years but at the beginning of the next pay period he will change to 3rd shift. We will end date the current schedule pattern and assign the new schedule pattern for the employee to reflect 3rd shift on Monday through Friday.
To end date the existing Schedule Pattern for an employee:
1. Go to the Navigation bar>Scheduling>Schedule Editor. 2. Click on Time Period and select `the Schedule Period when the schedule will end. 3. Select the Employee. 4. Select the Day. 5. Click on the Shift Menu. 6. Select Edit Pattern from the drop down menu. 7. Enter the End Date for the current Schedule Pattern. 8. Click OK 9. Save.
To assign the new Schedule Pattern for an employee:
10. Return to Schedule Editor and change the Time Period to the Schedule Period when the new Schedule Pattern will begin.
11. Repeat Steps 3 through 5 (shown above). 12. Select Add Pattern from the drop down menu.
3
2 4
5
6
7
11
10
8
9
12

Schedules
- 3 -
Schedule Patterns Edits (continued)
13. Enter the Work Start and Pattern Start date the new schedule will begin. 14. The End Date will be Forever. 15. Click on Insert Pattern. 16. Select a Pattern from the drop down list. 17. Click OK. 18. Save.
13 14
15
1617
18

Schedules
- 4 -
Entering a Shift Template A Shift Template contains a start and end time, but no date. So, it can be used over and over for many employees. When assigning a Shift Template, it is not necessary to re-enter details for the shift.
Regina Nelson has been scheduled for an 8 ½ hour shift on Monday from 8:30am to 5pm. Her 30 minute meal break, as defined by her Pay Rule, will automatically deduct from the total number of hours scheduled. The number of hours scheduled to actually work are displayed in the Sch Hrs column.
To enter a Shift Template: 1. Select the Employee. 2. Select the Day. 3. Click on the Shift menu bar. 4. Select Insert Template from the drop down menu. 5. Choose the appropriate shift from the list displayed. 6. Click OK. 7. Click on Save
NOTE: If a suitable shift to fit your needs is not listed, call the Payroll Office.
6
1
2
4
3
5
7

Schedules
- 5 -
Scheduling a Pay Code for a Full Day Pay codes may be entered for time off such as sick, vacation or personal time. Pay Codes may also be entered for work time exceptions, for example, attendance at a Conference. Dr. Dougherty attended a Conference in Washington DC on Tuesday. To schedule a Pay Code for that day, go to the Schedule Editor.
1. Select an Employee.
2. Select a Day.
3. Click on Pay Code.
4. Select Add from the drop down menu.
From the Pay Code Editor:
5. Scroll down and select the appropriate Pay Code from the drop down menu.
5
1 3
4
2

Schedules
- 6 -
Scheduling a Pay Code for a Full Day (continued) 6. Enter the number of hours and the start time. The employee will be at the
Conference for a whole day so select full sched day from the Amount drop down menu.
7. Check Override Shift and Whole Shift so that the Conference hours will override the employee’s regular shift
8. A Comment may be entered if applicable 9. Click OK.
Martin Dougherty’s schedule will display a Conference on Tuesday.
10. Save.
6
7
8
9
10
Note: In this example, Dr. Dougherty will be out for the whole shift, so the Conference Pay Code is replacing the regular shift. Failure to check off Override Shift would result in the employee being paid for both the Conference Pay Code and their regular shift.

Schedules
- 7 -
Scheduling a Pay Code for a Partial Day There are occasions that an employee will be paid a partial day or may need to leave due to illness or an emergency. Example #1, Anita’s schedule is 8:00am to 4:30 pm with a 30 minute meal break. She came back from lunch at 12:30pm and began to feel ill. Anita went home sick at 1:30 pm. To enter her partial Sick/ETO Unscheduled day:
1. Go to the Schedule Editor and select the Employee.
2. Select the Day.
3. Click on Pay Code.
4. Select Add from the drop down menu.
5. From the Pay Code Editor, enter an S at Pay Code to bring up a shorter list.
6. Scroll down to select the Sick/ETO Unscheduled Pay Code accordingly.
1 3
4
5 6
2

Schedules
- 8 -
Scheduling a Pay Code for a Partial Day (Continued) 7. In the Amount field, enter 3:00 Sick/ETO Unscheduled hours.
8. Enter the Start Time when the Sick/ETO Unscheduled Pay started.
9. Check the Override Shift and Partial Shift.
10. Enter a Comment if applicable.
11. Click on OK
12. Save
7
89
10
Anita’s hours appear on the Scheduler as scheduled work hours 8am to 1:30pm and 3 hours Sick/ETO Unscheduled which equals 8 and ½ hours. However, Jefferson Electronic Time and Attendance is configured to auto deduct a meal break at the fifth hour worked. When her 30 minute meal break is deducted she will have five hours worked and 3 hours Sick/ETO Unscheduled to equal her 8.0 hour schedule
12
Always check the total hours.
11
Schedules
- 9 -
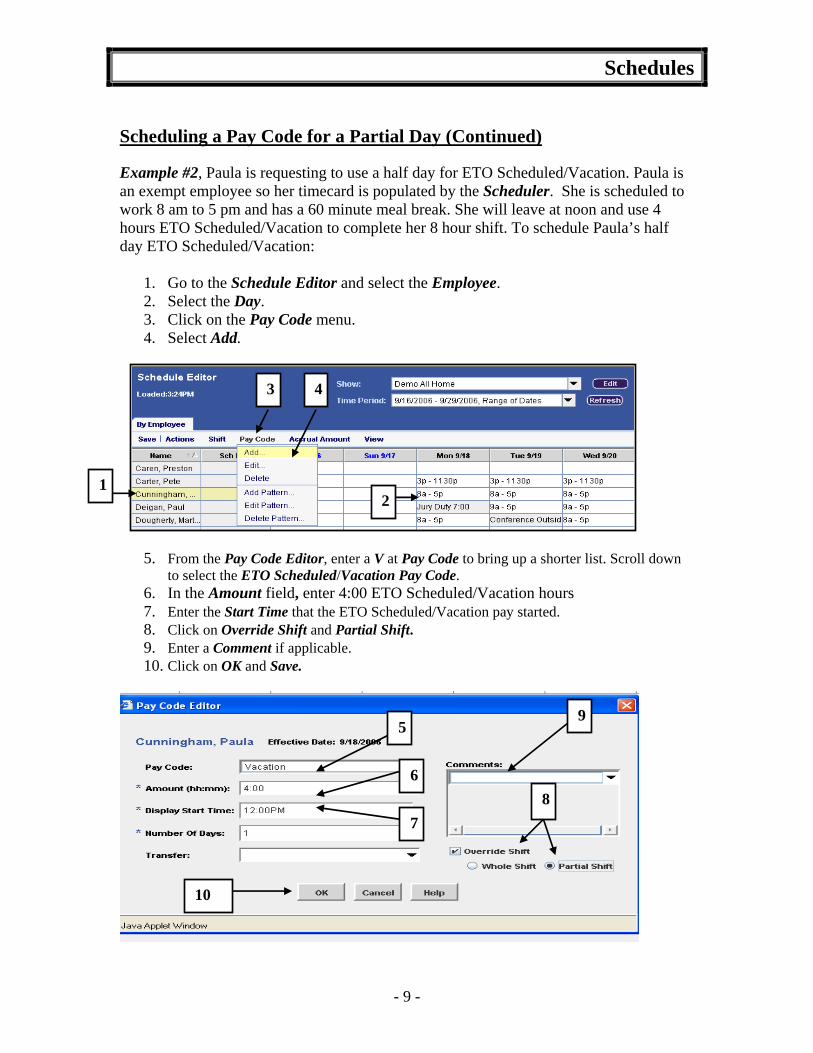
Scheduling a Pay Code for a Partial Day (Continued) Example #2, Paula is requesting to use a half day for ETO Scheduled/Vacation. Paula is an exempt employee so her timecard is populated by the Scheduler. She is scheduled to work 8 am to 5 pm and has a 60 minute meal break. She will leave at noon and use 4 hours ETO Scheduled/Vacation to complete her 8 hour shift. To schedule Paula’s half day ETO Scheduled/Vacation:
1. Go to the Schedule Editor and select the Employee. 2. Select the Day. 3. Click on the Pay Code menu. 4. Select Add.
5. From the Pay Code Editor, enter a V at Pay Code to bring up a shorter list. Scroll down
to select the ETO Scheduled/Vacation Pay Code. 6. In the Amount field, enter 4:00 ETO Scheduled/Vacation hours 7. Enter the Start Time that the ETO Scheduled/Vacation pay started. 8. Click on Override Shift and Partial Shift. 9. Enter a Comment if applicable. 10. Click on OK and Save.
1
3 4
5
8
9
7
6
2
10

Schedules
- 10 -
Scheduling a Pay Code for a Partial Day (Continued) Jefferson Electronic Time and Attendance is designed to auto deduct the meal break after 5 hours of work. Paula left at the 4th hour of work, so the meal break was not deducted. Jefferson Electronic Time and Attendance inserts the hour as a separate shift which must be deleted. To delete the extra hour:
11. Select the Shift to be deleted.
12. Click on Shift.
13. Select Delete from the drop down menu.
14. Save.
The Schedule now reflects an 8am to 12pm shift with 4 hours ETO Scheduled/Vacation for a total of 8 hours for the shift and 80 hours for the pay period.
Always check the total hours.
12
13 11
14

Schedules
- 11 -
Scheduling Account Code Transfers Anita Green has been asked to help in another department within the same Company from 9am to 3pm on Sunday. The hours will be charged to the other department.
Account Code Transfers must be processed within the same Company. (Cost Centers are also known as Account Codes).
To schedule Anita’s hours and Cost Transfer, go to the Shedule Editor:
1. Select the Employee. 2. Select the Day. 3. Click on the Shift menu. 4. Select Add.
The Shift Type defaults to Regular but since the employee’s hours will be charged to another cost center so go to Type and:
5. Select Transfer from the drop down menu.
1
2
3 4
5

Schedules
- 12 -
Scheduling Account Code Transfers (continued) To complete the schedule and cost transfer:
6. Enter the Start Time and End Time. - The End Date remains the same. 7. Click on Transfer. 8. Select Search from the drop down menu
9. Click on Account Code. A message will pop-up stating “Too many entries please refine
the search. 10. Click on OK.
9
10
6
7
8

Schedules
- 13 -
Scheduling Account Code Transfers (continued)
11. Type in the full Account Code/Cost Center at Name or Description. This may be
an eight number or a fourteen digit number for special purpose accounts or grant accounts. Type in all digits with no spaces.
12. Click on Search.
13. Click on the Account Code/Cost Transfer that is displayed under Available Entries.
14. The Account Code and description is displayed by Account Code ID.
15. Click OK.
Anita’s schedule and cost transfer is displayed in the Transfer cell and the hours worked will be charged to the cost center displayed.
Click OK and Save.
11 12
13
14
15

Schedules
- 14 -
Schedules and Termination Exempt employee timecards are populated by the Scheduler. Any hours and/or money on an employee’s timecard is passed to PeopleSoft and processed for payment to the employee. In the event that an employee has terminated, but the PAF information has not been processed, the employee will remain active in the Jefferson Electronic Time and Attendance System. Unless the Schedule is end dated the employee will be paid. To prevent the employee from being overpaid, the schedule must be end dated as of the effective date of termination. On August 20, Sarah Super submitted a letter stating that she was resigning effective September 22. However, Sarah’s information has not yet been updated in the HR/Payroll system so she is active in the Jefferson Electronic Time and Attendance System. Since Sarah is an exempt employee the Scheduler has already populated her timecard. The hours must be removed from the timecard.
The Schedule must be end dated effective September 22nd (the last worked day).
The employee would be paid 80 regular hours.

Schedules
- 15 -
Schedules and Termination (Continued) To end date the schedule:
1. Go to the Shift menu.
2. Select Edit Pattern.
At the Pattern Editor:
3. Enter the Termination Date in the End Date field. 4. Click on OK.
The Schedule has been updated to show shifts for only the 1st week of the Pay Period.
5. Save and Refresh the Timecard.
1
2
3
4
5

Genies and Queries
- 1 -
Detail Genie – displays time and labor data by employee. Information for each employee appears on a separate line, which lets you quickly identify individual issues. (Example: If you wanted to see all employee timecards in the current pay period that contain exceptions you could use the Reconcile Timecard)
Scheduling Genie – displays schedule data by employee. Information is presented in a timeline view to let you easily perform schedule edits. (Example: Schedule Editor)
Genies and Queries
- 2 -
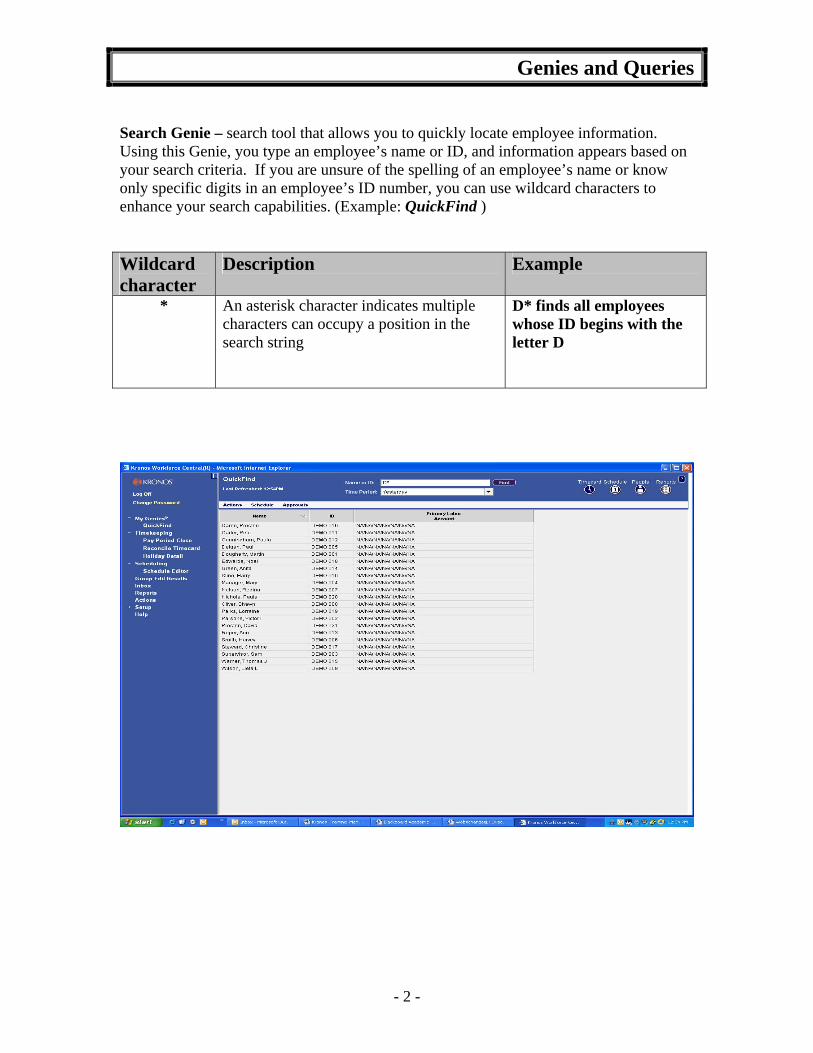
Search Genie – search tool that allows you to quickly locate employee information. Using this Genie, you type an employee’s name or ID, and information appears based on your search criteria. If you are unsure of the spelling of an employee’s name or know only specific digits in an employee’s ID number, you can use wildcard characters to enhance your search capabilities. (Example: QuickFind ) Wildcard character
Description Example
* An asterisk character indicates multiple characters can occupy a position in the search string
D* finds all employees whose ID begins with the letter D

Genies and Queries
- 3 -
Filtering Data in Genies When you use a Workforce Genie, you can filter the data that is displayed so that it answers the following questions: Who, When and What? The example below shows the Reconcile Timecard Genie, with the Workforce Genie components, that answer these questions, highlighted:
Component Question
Answered Description
Show Field Who The Show field lets you choose from a list of data filters (called HyperFind Queries) to select a specific set of employees to appear in the workspace of the Workforce Genie.
All Home: The All Home query displays your base group of employees – all employees that you can access.
Other Queries: All other queries are based on All Home, so the employees selected by other queries are a subset of All Home, filtered by additional criteria.
Time Period Field
When The Time Period field lets you choose from a list of time intervals to populate the workspace with information for a specific date, range of dates, pay period or schedule period.
Examples: Previous Pay Period, Current Pay Period, Next Pay Period, Today, Yesterday, Specific Date and Range of Dates.
Workspace What The workspace contains a pre-defined set of columns specific to the Workforce Genie selected. The information that appears in the workspace is filtered by the values selected in the Show and Time Period fields.

Genies and Queries
- 4 -
Refreshing and Sorting Data in a Genie A Workforce Genie lets you refresh and sort information. The following table lists the options you can use to display the latest information from the database and sort the columns to group together specific information. Action Description Refresh Click the Refresh button to display the most current
database information. This is important to ensure that you are viewing the most recent changes. NOTE: Last Refresh Time located in the upper left corner of the page identifies the most recent time you clicked Refresh.
Sort arrows and numbers Sort Arrows: Click the column headings to sort the data by the selected column. Clicking a column heading a second time reverses the sort order. A down arrow shows the sort as descending; an up arrow shows the sort as ascending. Sort Numbers: Click a second column heading to sort the display a second time according to the second column. The second column becomes the primary sort; and the first column becomes the secondary sort. A number appears in each column heading next to the up and down arrow to show which column is sorted on first and which column is sorted on second.
.

Genies and Queries
- 5 -
Workforce Genies
Exporting Genie information to an Excel File You can export the data in a Genie to an Excel spreadsheet.
1. To export the data in a Genie as a standard Excel file, choose Actions > Export to Excel from the Genie menu.
2. A pop-up screen will appear and you can choose to “Open the Excel File” or “Save the Excel File to a specific directory..
1
2

Genies and Queries
- 6 -
Below is a sample of the Genie data exported to an Excel File.
Name ID Primary Labor
Account
Adams, Jennifer DEMO 027 DJU/03075100/03075060/03075060/NA/0/03075060ABaxter, Kate DEMO 026 DJU/03075100/03075060/03075060/NA/0/03075060BJohnson, Marie DEMO 024 DJU/03075100/03075060/03075060/NA/0/03075060BLerner, Brian DEMO 022 DJU/03075100/03075060/03075060/NA/0/03075060ASuper, Sarah DEMO 023 DJU/03075100/03075060/03075060/NA/0/03075060B

Genies and Queries
- 7 -
Running Public Queries The Public Queries are customized queries that are available to all users to filter data in conjunction with running Genies or Reports. The Public Queries are shown in the drop down list under the Show field at the top of the screen. The “All Home” public query will display all the employees you have access to view. The display has a maximum number of 1,000 employee records. User with access to a department with over 1,000 employees will receive the below message:
Users with access to over 1,000 employees can utilize customized queries that would reduce the number of employees displayed to be within the 1,000 employee record limit. (Example: “Employees Last Name A-L” and “Employees Last Name M-Z”).
NOTE: The Jefferson Electronic Time and Attendance System is configured to display a maximum number of 1,000 employee records. Users with access to a department with over 1,000 employees can create queries to split the department in half so all their employees are accessible.

Genies and Queries
- 8 -
Running the Public Queries (continued)
1. Click on the Genie that you wish to use in the My Genies list on the left side of the screen. In the example below, the Reconcile Timecard Genie was selected.
2. Click on the Show drop down list to reveal a list of Public and Personal queries available to you. The Public queries are in “bold text”.
3. Click on the query that you want to run. 4. Click on Time Period to select specific timeframe.
The employees for whom you have security access to view and that meet the criteria of the query that you selected (for example, those employees assigned to the Test Group are displayed on the screen).
1
2
34

Genies and Queries
- 9 -
Creating a Personal Query The Query function enables the User to create a personal query to find specific employees or employee information based on the employee group that the user has received access to view. In this Example, Mary Manager has access to all the employees within Group ID 03075060A and 03075060B. Mary will create a personal query so she can view only the employees within Group ID 03075060B. To the left of your screen, go to the Navigation Bar:
1. SETUP – Common Setup 2. HyperFind Queries
1
Group ID 03075060A 2 employees Group ID 03075060B 3 employees
21

Genies and Queries
- 10 -
Creating a Personal Query (continued)
3. Then, from the Menu Bar across the top select “New”
4. Select General Information Filter (making sure it is expanded). Once General Information is expanded, select “Primary Account”
5. Click on radio button “GROUP ID” 6. Type Group ID in “Name or Description” field 7. Click on Search button 8. Highlight the Group ID – then click on “Add” button 9. Click on “Add” button and the Group ID field (right side) will show the
selected GROUP ID 03075060B
31
4
5
67
98

Genies and Queries
- 11 -
Creating a Personal Query (continued)
10. Click on “Add Condition” button to move the query condition to the “Selected Condition” box at the bottom of the screen. After clicking the Add Condition button, make sure the condition was added in the Selected Condition box at the bottom of your screen. (You may have to scroll down if the “Selected Conditions” box is no longer visible on the screen)
10

Genies and Queries
- 12 -
Creating a Personal Query (continued)
Next select: 11. Timekeeper Filter 12. Employee Status
Make sure the following radio buttons are highlighted: 13. Include 14. Active status 15. As of Today are all highlighted. 16. Click on Add Condition 17. After clicking the Add Condition button, make sure the condition was added
in the Selected Condition box at the bottom of your screen.
17
14
13
11 12 15 16

Genies and Queries
- 13 -
Creating a Personal Query (continued) Now it’s time to review and save your query. The query that you are creating is a Personal Query and will only be available to you. Review and Save Your Query
18. Click on the Test button to review the query results and then click on Red X to close screen.
19. Click on the “Save” option on the menu bar. 20. “Save Query As” window will appear and Name your query 21. A Description of the query can be added but this is optional. 22. Click OK
19
20
21 22
18
Genies and Queries
- 14 -
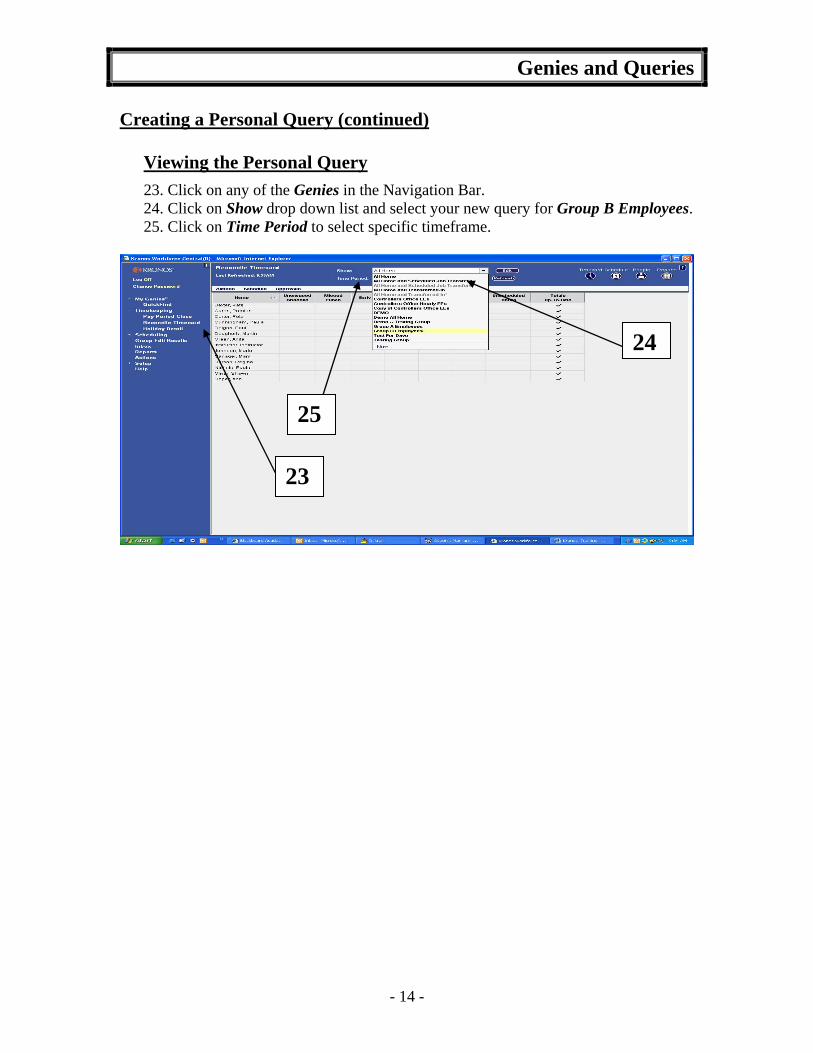
Creating a Personal Query (continued)
Viewing the Personal Query 23. Click on any of the Genies in the Navigation Bar. 24. Click on Show drop down list and select your new query for Group B Employees. 25. Click on Time Period to select specific timeframe.
23
24
25

Reports
- 1 -
Generating and Viewing Reports The Report function enables the User to run customized Reports for an individual employee, a selected group of employees or all of the employees that the user has access to view. The User can generate a Report for all of their employees by accessing the “All Home” public query. Also, a Report can be customized for one employee or a specific group of employees by running a personal query or highlighting the employees in one of the Genies prior to running the Report.
1. Go to the Navigation Bar and select the Report and the Report window will be displayed.
2. Expand the All folder to display the complete list of reports and select the report you need to run.
3. Click on the Show drop down list to reveal a list of public and personal queries available to you and select the query that you want to run. In this example, “All Home” was selected to include all the employees the user has access to view.
4. Click on the Time Period drop down list to select the pay period, range of dates or specific date for the report. In the example, “Current Pay Period” was selected.
5. Click on Run Report
1
2
3
5
4

Reports
- 2 -
Generating and Viewing Reports (continued)
6. The Check Run Status window will appear showing the Report Status “Waiting” which means the report is being processed.
7. Click on the Refresh Status option until the Status “Waiting” changes to Status “Complete.
8. Click on the View Report option to display the report
7
6
8

Reports
- 3 -
Generating and Viewing Reports (continued)
9. The report will be displayed and then select Print Icon on the tool bar
displayed above the report.
9

Reports
- 4 -
Report List Report Name Description Absent Employees This report displays employees who are absent and whether they are
excused or unexcused absences. Accrual Balances and Projections Displays the current balances, any future scheduled time takings and
projected balances from the selected employees. Accrual Detail Displays running accrual balances for each employee. Accrual Summary Displays starting accrual balances, takings/debits and the ending balance for
each accrual code in the selected time period. Actual vs. Scheduled by Job Displays individual employee and group summary actual, scheduled and
projected hours for a scheduled time period, sorted by job. Actual vs. Scheduled by Labor Account Displays individual employee and group summary actual, scheduled and
projected hours for a scheduled time period, sorted by labor account. Employee Hours by Job Reports hours/amounts for each job/pay code in which the employee accrual
hours. Provides totals for each employee and job per employee as well as grand totals.
Employee Hours by Labor Account Reports hours/amounts for each labor account/pay code in which the employee accrual hours. Provides totals for each employee and labor account per employee as well as grand totals.
Employee Schedule – Monthly Shows the monthly schedule of all the employees selected. The employee is sorted by job and displays 28 days.
Employee Schedule – Weekly Shows the weekly schedule of all the employees selected. The employee is sorted by job and displays 7 days.
Employee Transactions and Totals Displays pay code transactions data and totals by employee as well as grand totals.
Employees Currently Earning Time (On Premises)
Displays the employees who have an in-punch (or start time entered) and no out-punch (or no end time entered) between the time of the in-punch and the time the report is generated.
Exceptions Displays exceptions and comments attached to the start or end of a shift or meal, as well as unscheduled absences for each employee within the specific time period.
Hours by Job Displays money or hours for each location’s job in which the employee has accrued hours. The report totals money/hours for each location’s job by pay code.
Hours by Labor Account Displays money or hours for each labor account in which the employee has accrued hours. The report totals money/hours for each labor account by pay code.
Location Schedule – Monthly Shows employees schedules and open shifts for the scheduled locations. Employees and shifts are sorted by job and displays 28 days. Can be used as the post-schedule or for shift sign ups.
Location Schedule – Weekly Shows employees schedules and open shifts for the scheduled locations. Employees and shifts are sorted by job and displays 7 days. Can be used as the post-schedule or for shift sign ups.
Primary Account Detail Displays the history primary job/primary labor account assignments per employee for a specified time period with audit detail.
Schedule by Labor Account -- Monthly Shows a monthly schedule for the selected labor accounts. Display is sorted by labor account for 28 days.
Schedule by Labor Account -- Weekly Shows a weekly schedule for the selected labor accounts. Display is sorted by labor account for 7 days.
Time Detail Displays detailed data for each employee’s punches, durations and pay code edits. Summary data is displayed by employee, totaling time and money by labor level and pay code.
Timecard Audit Trail Displays audit information for specific timecard editor actions, including date and time of the action, who performed the action, and what information changed.

Delegating Authority
- 1 -
Delegate Authority Overview
When a manger expects to be unavailable (for example, on vacation), a delegate can be authorized to perform the manager’s tasks (such as approving timecards) in the Jefferson Electronic Time and Attendance System during the manager’s absence. The Delegate Authority can only be given to another User with a Manager’s Access Profile.
Delegating authority involves the following steps:
A. Identify a delegate who would be authorized to act in the Manager’s Role to approve timecards.
B. Contact the Delegate directly by telephone or email to confirm that the individual will be available to act in the Delegate capacity for a specific time period.
C. Enable and submit a Delegation of Authority Request in the Kronos System.
D. Confirm that a Delegation Acceptance Message has been received in the Kronos “In-Box” from the Delegate.
Enable and Submit a Delegation of Authority Request In this Example, Manager #1 (Mary Manager) wants to assign her Delegate Authority to Manager #2 (Martin Dougherty) for a 2 day period (1/25/07-1/26/07).
1. Click Actions on the navigation bar.
1

Delegating Authority
- 2 -
Enable and Submit a Delegation of Authority Request (continued)
2. Click Start Mgr Delegation Process. The system displays the Create
Delegation window. 3. Select the Manager who will act in your role by selecting a name from the
Delegate drop down list.
4. Enter the Start and End dates of the period when the individual should be authorized to act as your delegate. The start time is 12:01 a.m. on the Start Date, and the end time is 11:59 p.m. on the End Date.
5. Select “Delegation Manager” as the role. 6. Click Save & Close.
2 3
4
5 6

Delegating Authority
- 3 -
Enable and Submit a Delegation of Authority Request (continued)
7. Select the In Box on the Navigation bar to confirm that your delegation request has been processed under the “Tasks” tab.
7

Delegating Authority
- 4 -
Accepting a Delegation of Authority Request Manager #1 (Mary Manager) has requested that Manager #2 (Martin Dougherty) act as the manager’s delegate (to perform the manager’s tasks such as approving timecards). A delegation request has been delivered to Manager #2 (Martin Dougherty) in the Jefferson Electronic Time and Attendance “Inbox” under the “Tasks” tab. Before Manager #2 (Martin Dougherty) can act as a delegate and perform tasks in the manager’s role of Manager #1 (Mary Manager), the following steps need to be performed:
1. Select the Inbox on the Navigation Bar, and select the Tasks tab. A task item from the Manager #1 (Mary Manager) includes subject text “Start Mgr Delegation Process, Accept Delegation Form”.
2. Double-click the task item to displays the Accept Delegation window.
3. The Accept Delegation window shows the following information:
The individual who made the delegation request (Mary Manager) The time period during which you would have the authority to act in the
Delegator’s role. This authority would be from 12:01 a.m. on the Start Date until 11:59 p.m. on the End Date.
Select either “Accept Delegation” or “Decline Delegation” Click Save and Close
1
2
3
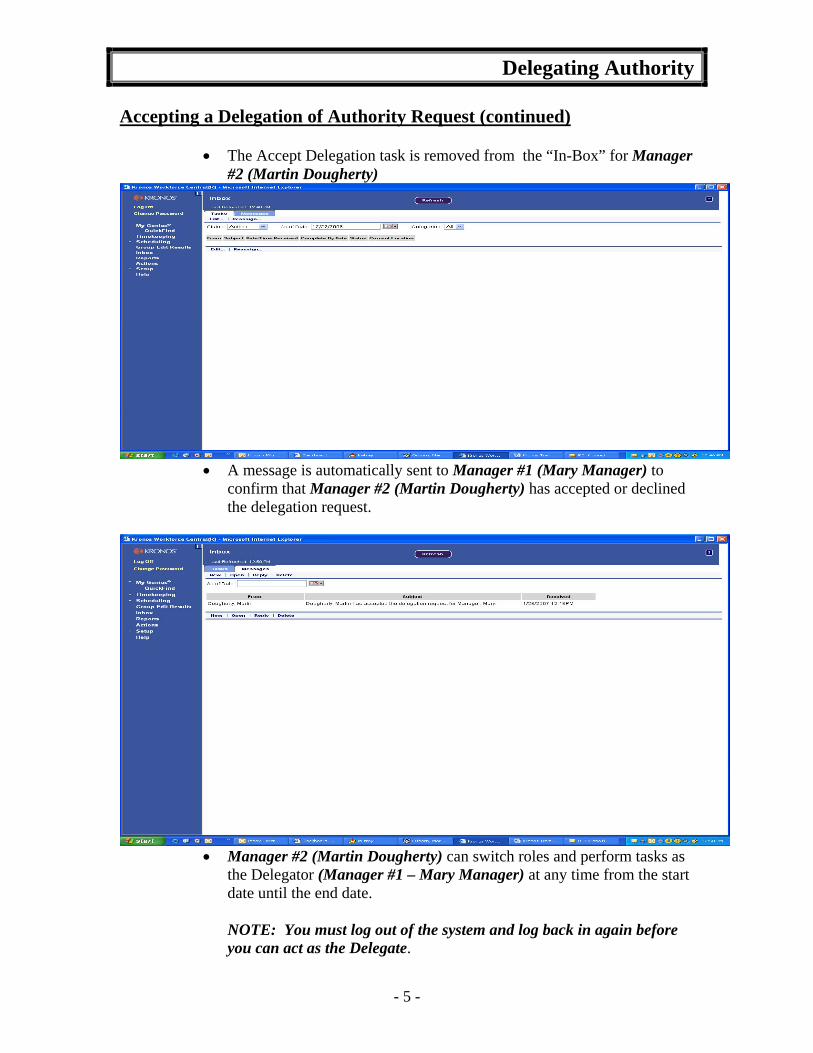
Delegating Authority
- 5 -
Accepting a Delegation of Authority Request (continued)
The Accept Delegation task is removed from the “In-Box” for Manager #2 (Martin Dougherty)
A message is automatically sent to Manager #1 (Mary Manager) to
confirm that Manager #2 (Martin Dougherty) has accepted or declined the delegation request.
Manager #2 (Martin Dougherty) can switch roles and perform tasks as
the Delegator (Manager #1 – Mary Manager) at any time from the start date until the end date.
NOTE: You must log out of the system and log back in again before you can act as the Delegate.

Delegating Authority
- 6 -
Switching Roles After you have accepted a delegation request, you can switch roles and perform tasks as the Delegator (Manager #1 – Mary Manager) at any time from the start date until the end date of the delegation period. If you have not logged out of the system since accepting the delegation request, log out of the system and log back in.
1. Switch Role indicator appears at the top of the Navigation Bar. When you log on to the system, the Switch Role indicator will always list your role as “Myself.” To continue using the system in your own role, do nothing in the Switch Roles area.
1

Delegating Authority
- 7 -
Switching Roles (continued)
2. Switch Role to perform tasks in the role of the Delegator, (Manager #1 – Mary Manager) whose request you accepted:
Click Switch Role. The Switch Role dialog is displayed. Select the Delegator whose tasks you want to perform. Click Switch Role on the menu bar.
2
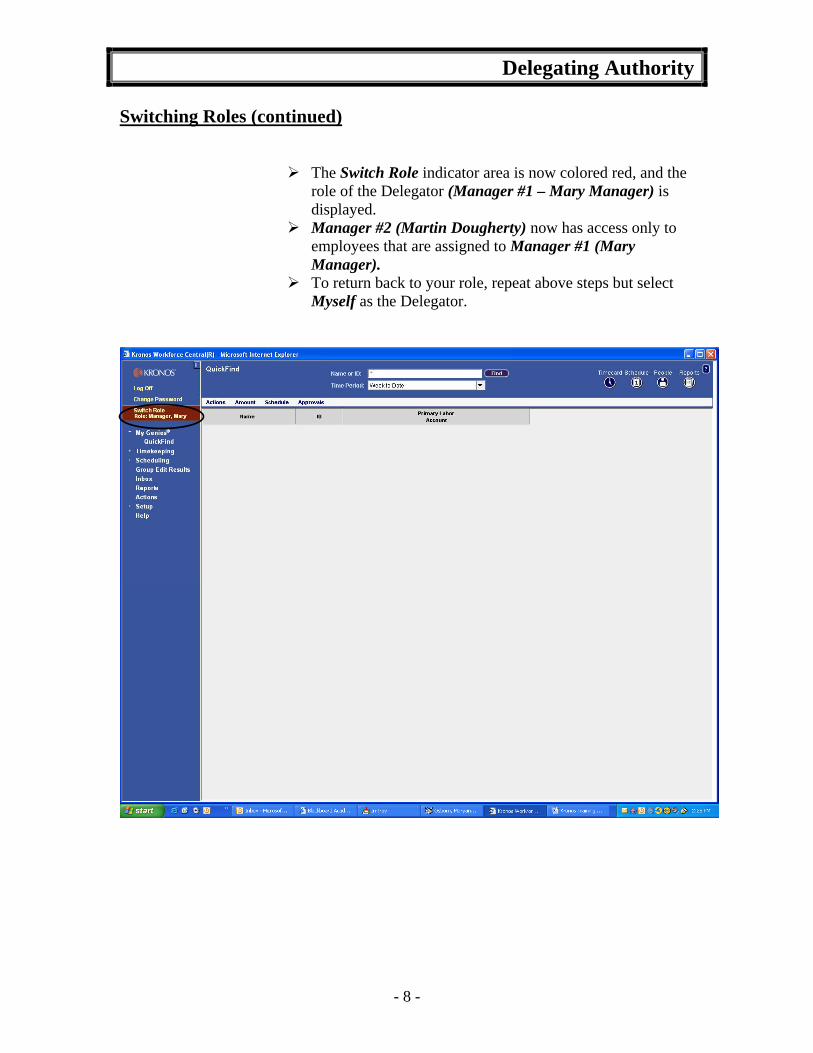
Delegating Authority
- 8 -
Switching Roles (continued)
The Switch Role indicator area is now colored red, and the role of the Delegator (Manager #1 – Mary Manager) is displayed.
Manager #2 (Martin Dougherty) now has access only to employees that are assigned to Manager #1 (Mary Manager).
To return back to your role, repeat above steps but select Myself as the Delegator.

Delegating Authority
- 9 -
Canceling or Deleting a Delegation Request You can cancel a delegation request that you have made. The process that you use depends on whether or not the delegate has already accepted the delegation request. Canceling a Delegation Request That Has Not Yet Been Accepted 1. Click the Inbox on the Navigation Bar, and select the Tasks tab. 2. Double click on the delegation task that needs to be deleted. 3. Click on Delete The Accept Delegation Task is removed from the Delegate’s Inbox.
1 2
3

Delegating Authority
- 10 -
Canceling a Delegation Request That Has Not Yet Been Accepted (continued) 5. The system sends a deletion message to the delegate.
5

Delegating Authority
- 11 -
Canceling a Delegation Request That Has Been Accepted 1. Click Actions on the navigation bar. 2. Click MgrDelegation. The system displays the Action screen. 3. Select Remove Existing Delegation 4. Click Next.
1
2
34

Delegating Authority
- 12 -
Canceling a Delegation Request That Has Been Accepted (continued) 5. Select the Delegation that needs to be cancelled. 6. Click Delete.
7. The Delete Confirm window will appear with a message “Delegation Deleted”.
5
6
7

Delegating Authority
- 13 -
Canceling a Delegation Request That Has Been Accepted (continued) 8. The system sends a deletion message to the delegate.
8

Approvals
- 1 -
Approving Employee Timecards The final step is to approve the timecards of all of your employees. Marking each timecard approved is your electronic signature. Before you mark an employee’s timecard approved you should review each timecard to ensure that the timecard reflects accurate hours worked.
1. Go to My Genies and select Pay Period Close. 2. Select the appropriate Pay Period. 3. Select Actions and choose Select All. 4. Click on the Timecard button 5. After you click the Timecard button the first employee timecard will appear on
the screen.
1
3
2 4

Approvals
- 2 -
Approving Your Employees Timecards (continued)
6. Verify that all of the time entered is correct and check the totals. 7. Select “Approvals” and then “Approve”using the Timecard navigation buttons.
8. The Sign Offs & Approval Tab will appear at the bottom of the timecard with
your approval. 9. Using the Timecard Navigation button, move on to the next employee.
7
8
9
6

Approvals
- 3 -
Approving Your Employees Timecards (continued)
After reviewing and individually approving all of the timecards you are now ready for the final steps of the process:
10. Go back to Pay Period Close. 11. Select Refresh. 12. Verify that your name is populated in the Managers Who Approved Timecard
column for all of your employees.
NOTE: Approvals not processed for the entire Pay Period will show as “(Partial)” in the Manager Approval columns. All Partial Approvals need to be removed and Approved again for the entire Pay Period.
12
10
11

Approvals
- 4 -
Performing Group Approvals Using A Genie A group approval can be utilized to approve a large group of employee timecards. Select the “Pay Period Close” Genie. Before you perform a group approval you should review each timecard to ensure that the timecard reflects accurate hours worked.
1. Go to My Genies and select Pay Period Close. 2. Select the appropriate Pay Period. 3. Select Actions and choose Select All. 4. Click on Approvals on the Menu Bar and select Approve.
1
4
2
3

Approvals
- 5 -
Performing Group Approvals Using A Genie (continued) 5. A Confirmation pop-up screen will appear - select Yes. 6. Select Refresh. 7. Verify that your name is populated in the Managers Who Approved Timecard
column for all of your employees.
5
6
7

Approvals
- 6 -
Removing a Timecard Approval In the event that you need to remove an approval, or edit a timecard that has already been approved:
1. Select Approvals and then “Remove Approval” using the Timecard navigation buttons.
2. The “Sign Offs & Approval Tab” will disappear at the bottom of the timecard and
additional timecard edits can be performed. 3. Verify your timecard totals. 4. Select “Approvals” and re-apply the “Approval” and the Sign Offs & Approval
Tab will return at the bottom of the timecard.
NOTE: After a timecard is approved, new timecard edits cannot be done unless the approval is removed.
12
3
4

Additional Information
- 1 -
Kronos System Support Contact Information Name E-Mail Address Telephone Extension JETA X3-8934 Dorothy Arroyo [email protected] X3-3140 Rena Hubbard [email protected] X3-5839 Shelley Johnson [email protected] X3-9688 Methodist Jennifer Cusato
Methodist 215-952-1278
Jefferson Electronic Time and Attendance System Support Web Site The Jefferson Electronic Time and Attendance Support Web Site is customized with 3 categories to provide the Jefferson Electronic Time and Attendance Users with additional information related to this application.
1. Announcements – Jefferson Electronic Time and Attendance Information Updates for the Users.
2. Documents – FAQs, Badge ID Replacement Form, Temporary Timesheet and Time and Attendance Policy
3. External Links – Jefferson Electronic Time and Attendance Home Page (Vendor’s Home Page) and Jefferson Electronic Time and Attendance HTML Remote Access (Off Campus Access to JETA)
http://www.jefferson.edu/kronos

Additional Information
- 2 -
Kronos Frequently Asked Questions How do I know if I am supposed to swipe in and out using the Jefferson Electronic Time and Attendance time clock? All hourly paid employees must swipe in and out at the time clock unless otherwise instructed by your supervisor. Am I supposed to use a specific clock to swipe in and out? Departments may require that specific clocks be utilized for employees. Your supervisor will provide special instructions if required. What should I do if my ID Badge does not work? Report the problem immediately to your Manager. A special ID Badge Replacement Form will have to be completed to procure a new badge. Do I have to pay to replace my ID badge if it does not work with the Jefferson Electronic Time and Attendance system? There is no charge to replace an ID badge due to time clock incompatibility. How early can I swipe in prior to the start of my shift? You may punch in up to 6 minutes prior to the start of your shift. The punch will round to the start of your shift. You may not punch in prior to 6 minutes without the approval of your supervisor. How late can I swipe in after the start of my shift? You may punch in up to 6 minutes after the start of your shift. Although you will not be docked for pay purposes, lateness may be counted against your lost time rate in accordance with Jefferson policy. Can I swipe out early at the end of my shift? You may punch out up to 6 minutes prior to the end of your shift. Although you will not be docked for pay purposes, early out punches may be counted against your lost time rate in accordance with Jefferson policy. How late can I swipe out after the end of my shift? You may punch out up to 6 minutes after the end of your shift. The punch will round to the scheduled end of your shift. You may not punch out after 6 minutes without prior approval from your supervisor. Do I have to swipe in and out for lunch or breaks? Individual departments may require that employees punch in and out for lunch. Please see your supervisor for specific instructions. What do I do if I forget to swipe in or out? Notify your Department Manager immediately.

Additional Information
- 3 -
Kronos Frequently Asked Questions Do I have to swipe in and out if I am called in on unscheduled days? Yes, you must punch in and out anytime you are called into work. How do I find out how much ETO, sick, vacation, or personal time I have? You may review your accrual balances at the time clock by pressing one of the function keys, and then swiping your ID badge. Is there a list of all Jefferson Electronic Time and Attendance pay codes with a description for each? Yes, a list of commonly used pay codes is available. See your Jefferson Electronic Time and Attendance User Training Manual. Is there a way to add comments to an employee timecard? Yes, standard comments have been developed to assist in identifying exceptions in an employee time card. See your Jefferson Electronic Time and Attendance User Training Manual. How often do I have to sign in to the Jefferson Electronic Time and Attendance System to review and edit time for my employees? Wherever possible, review of timecards in the Jefferson Electronic Time and Attendance system should be performed on a daily basis. When must I complete my approvals? All timecards must be reviewed and approved by Monday of the pay week by 12:00 PM. What happens if I forget to approve my department’s timecards? Will the employees still get paid? Yes, Payroll will process unapproved timecards but the Department Head will be notified of the incident. Can I access the Jefferson Electronic Time and Attendance system from off campus? Yes, if you have VPN or a Rap Account. How does employee information get into the Jefferson Electronic Time and Attendance system? How often is the system updated? Employee data is imported each day from the HR system. Any changes to employee data will be updated in the Jefferson Electronic Time and Attendance system daily. What happens if there are technical problems? Can my employees still swipe in and out? Dependent on the nature of the problem, employees may continue to punch in and out during any down periods. The time clocks store employee punch data for up to 48 hours. If the clock itself is defective, then punches may not be stored. Can I use the Jefferson Electronic Time and Attendance system to report on employee absences? Yes, queries and reports are available to assist in tracking any number of scenarios for management purposes.

Additional Information
- 4 -
Kronos Frequently Asked Questions Is there a way to schedule ETO, Vacation or Personal time in advance? Schedules are utilized in the Jefferson Electronic Time and Attendance system and can be future dated. What happens if I work more than one job? In one Jefferson Company? For your primary job you will swipe at the time clock, but when working your alternate job you will enter a specific pin number designated for that job. In multiple Jefferson companies? You will receive an ID badge for each company and swipe the badge assigned to that company. How does the Jefferson Electronic Time and Attendance System know how and when to pay me overtime? Overtime is automatically calculated in the Jefferson Electronic Time and Attendance system based on preconfigured rules which are compared to in and out punches. Can employees view their own records in the Jefferson Electronic Time and Attendance System? Can employees update their own records in the Kronos system? Management employees may be authorized by the department to view and edit their own time cards. Hourly employees generally do not have view access to their timecards, but may view punch data and accrual balances at the time clock. How are Exempt employees paid in the Kronos system? Exempt employees are paid according to the schedule entered into the Kronos system. Any non productive time, such as ETO, sick, vacation, or personal, must be adjusted in the schedule or time card. Can I swipe in or out for my co-workers? It is never permissible to punch in or out for any other employee. What if I work in an area where my badge does not work at the time clock? In the event that the ID badge cannot be read by the time clock due to ongoing problems, then the employee may utilize a “pin punch’ to punch in and out. The Payroll office can assist in coordinating this special arrangement. How is ETO, sick, vacation, and personal time calculated in the Kronos system? It is calculated in PeopleSoft and imported into Kronos on a bi-weekly basis. Can I enter ETO, sick, vacation, or personal time for an employee who does not have enough time accrued? Yes, except for Personal or Holiday time. For ETO, Vacation and Sick the maximum amount of negative hours is 12. It is only appropriate to enter hours against a negative balance if it has been determined that there is a discrepancy in the balance. Consult the Payroll office immediately to rectify the situation.

Additional Information
- 5 -
Kronos Frequently Asked Questions My employee will work a non routine schedule for the next few weeks. Can I enter this schedule in the Jefferson Electronic Time and Attendance system? Yes, the schedules can be assigned with a start and end date. What if an employee continually forgets to swipe in or out, or forgets their ID badge? This can be reported on in the Jefferson Electronic Time and Attendance System and then disciplinary action can be taken. How do I get access for my new employees? All employees automatically receive a time card in the Jefferson Electronic Time and Attendance system upon hire. For those employees needing online access to perform approvals or edits, complete a Jefferson Electronic Time and Attendance Security Form and submit it to the Payroll Office. Forms may be obtained from the Jefferson Electronic Time and Attendance website, by contacting the Payroll Office, or by submitting a Heat request.

Additional Information
- 6 -
Policy No: 200.18 Original Issue Date: 4/1/2007 Review Date: Revision Date: 04/09/2011 HUMAN RESOURCES POLICIES
Category: Human Resources Title: JEFFERSON 'S ELECTRONIC TIME AND
ATTENDANCE SYSTEMApplicability: Thomas Jefferson University Hospitals, Inc.
(TJUH), Thomas Jefferson University (TJU) Contributors/Contributing Departments:
Jefferson Time and Attendance “Jefferson” refers to Thomas Jefferson University, Jefferson University Physicians, and Thomas Jefferson University Hospitals, Inc., unless otherwise specifically noted. Jefferson utilizes an Electronic Time and Attendance System to track all time worked by employees and account for non-productive time paid. Jefferson’s Electronic Time and Attendance system will be utilized to record time for payroll purposes. ACCESS On line access to Jefferson’s Electronic Time and Attendance system will be granted upon submission of appropriate, approved Security Access Request Forms signed by the department head or designee. Inappropriate use of the system may result in suspension of system access and other disciplinary actions up to and including termination. EMPLOYEE TRAINING Any employee whose job requires access to Jefferson’s Electronic Time and Attendance system as an approver, scheduler, or editor, must attend formal training administered by Payroll ,prior to receiving access to the Electronic Time and Attendance System. WORK SCHEDULES All employees, both exempt and non-exempt, with the exception of JUP Physicians for the clinical portion of their compensation, must have a schedule in Jefferson’s Electronic Time and Attendance system.

Additional Information
- 7 -
TIME CLOCKS Time clocks may be installed so that employees have reasonable access to swipe in and out. Factors for the location of time clocks include:
Employee location Number of employees in a specific location Overall department business needs
ID BADGES The time clocks are configured to recognize the Jefferson Employee Identification Badge. Specifically, the magnetic stripe on the back of the badge will be read as the employee swipes at the clock. In the event that an employee badge is defective, a replacement badge must be procured at the Photo ID Center for the main campus, or the Methodist Security Office, as soon as administratively possible.
1. There will be no charge to the employee for the replacement of the ID badge if it is no longer readable due to normal use in the time clock.
2. The Supervisor will complete a “Badge Replacement Request Form” which must be taken to the Photo ID Center for the main campus or the Methodist Security Office by the employee.
It is also recognized that there may be circumstances where a magnetic stripe will be ineffective in such areas as Radiology, CAT Scan, MRI, etc. In these cases, a PIN number will be assigned to the employee who will swipe in at the time clocks utilizing this PIN number instead of swiping a badge.
Note: A defective badge attributable to ongoing magnetic stripe issues does not excuse hourly paid employees from swiping in at the time clocks. Such issues should be immediately brought to the supervisor’s attention and a replacement badge should be obtained.
UNAUTHORIZED TIME CLOCK ENTRIES Under no circumstances is it permitted that an employee may “swipe in or out” for another employee. This includes both badge swiping and PIN entry. Infractions will be subject to appropriate disciplinary action up to and including discharge. If an employee forgets to swipe, loses a badge, or is, for any reason, unable to swipe, he or she must contact their supervisor immediately. The supervisor will enter the information through the on-line system. Failure to swipe will be subject to appropriate disciplinary action, up to and including discharge.

Additional Information
- 8 -
TAMPERING WITH TIME CLOCKS Any employee who willfully and deliberately interferes with the operation of a time clock or causes damage by tampering with or destroying the time clock, will be subject to appropriate disciplinary action, up to and including discharge. EXEMPT EMPLOYEES Exempt employees will not swipe in and out at time clocks unless specifically required by Senior Management. Exempt employees will be notified regarding swiping requirements at the departmental level. Exempt employees will be paid for normal SCHEDULED hours, and not for additional hours worked unless the type of additional payment or the program for additional payment has been approved by the Chief Human Resources Officer. If not required to swipe, exempt employees will be paid according to schedules entered into Jefferson’s Electronic Time and Attendance system. The system is configured to populate the employee time card from the schedule entered for each employee. An employee’s scheduled lunch will be accommodated through Jefferson’s Electronic Time and Attendance system. Any non-productive time, such as sick, vacation, personal, funeral pay, etc, must be updated in Jefferson’s Electronic Time and Attendance system. Exempt employees may not be docked for time not worked that is less than a full week unless otherwise legally permitted in such cases where the employee may not have available sick, personal or vacation time. If the employee does have available sick, personal, or vacation time, it should be used to account for absences of full days or longer. In the event that the exempt employee does not have available sick, vacation, or personal time, the exempt employee will not be paid for these full day absences. Please refer to the Jefferson Weather Emergency policy for information on absences during a weather emergency. COMPENSATORY TIME OFF Non-exempt employees: Non-Exempt employees shall not receive Compensatory Time. EMPLOYEES REQUIRED TO SWIPE Swiping: All non-exempt employees (hourly paid and eligible for overtime) are required to:
Swipe in at the beginning of their assigned shift, and Swipe out at the end of their assigned shift.
Exempt employees may be required to swipe in and out upon notification from the department head.

Additional Information
- 9 -
Failure to swipe in and out in accordance with this policy will result in disciplinary action as follows: First Infraction Counseling Second Infraction Counseling Third Infraction Verbal Warning Fourth Infraction Written Warning Fifth Infraction Three (3) day unpaid suspension/Final Warning Sixth Infraction Termination MEAL BREAKS A meal break is defined as a minimum of 30 minutes of uninterrupted non productive time. In the event that this meal break is interrupted for work, the employee must be paid for the entire meal break period. It is the responsibility of the employee to notify a supervisor immediately if a meal break is interrupted for work. Specific pay rules will automatically deduct an employee’s lunch period from the shift. If the employee works during any portion of the meal break period, a cancellation of this auto-deduct rule must be entered and the employee must be paid for the entire meal break. Individual departments may require employees to swipe in and out for lunch and/or breaks, after review with Payroll and Human Resources. OVERTIME Overtime for non-exempt (hourly) employees will be paid in accordance with Jefferson policies that are consistent with applicable federal and state regulations. Jefferson’s Electronic Time and Attendance system has been configured to automatically calculate overtime. All overtime must be approved in advance by the department supervisor. Unauthorized Overtime In the event that an employee swipes in early, or out late, and the employee was actually working, the employee is to be paid for the additional time worked. However, if the time worked was not pre-approved, while the employee must be paid, he/she should be

Additional Information
- 10 -
counseled and any additional infractions of working without authorization will result in disciplinary action up to and including termination. The supervisor should note the infraction by utilizing the established “Comments” in Jefferson’s Electronic Time and Attendance system. ROUNDING PERIODS A standard rounding period has been instituted for Jefferson. Employees may swipe in up to 6 minutes prior to the start of the scheduled shift. This rounding period allows for the time between the employee “in swipe” and when the employee actually begins to work. It is expected that the employee will be at the workstation and ready to begin work at the start of the shift. Likewise, the standard rounding period applies to swiping in after the start of the scheduled shift. The employee’s pay will not be docked for late swipes within this rounding period. However, the lateness may be counted against the employee lost time rate per Jefferson Attendance Policy. It is imperative that the employee report any issues with swiping in or out immediately to their supervisor. Notations should be made utilizing the system defined “Comments” to explain any discrepancies that should be considered excused. The same rounding periods are in effect for “out swipes”. An employee may swipe out up to 6 minutes prior to the end of the scheduled shift. The employee’s pay will not be docked for early out swipes within the rounding period. However, the early out swipe may be counted against the employee lost time rate per Jefferson Attendance Policy. Likewise the standard rounding period applies to swiping out after the end of the scheduled shift. This time will not be included in the calculation of overtime. This rounding period allows for the time between when the employee stops working and the actual out swipe. It is expected that the employee will work the scheduled shift. Notwithstanding the rounding periods, non-exempt employees must be paid for all time worked. Supervisors must adjust the Time and Attendance System to reflect all time worked. PERSONAL TIME Eligibility - Eligible employees, as described in the Jefferson Benefits Eligibility Chart, will be awarded Personal Time to be used for Personal Time not worked. It is the responsibility of the department to ensure that employees do not use the personal time prior to the award date. All personal time not used by the end of the fiscal year (June 30), will be forfeited.

Additional Information
- 11 -
HOLIDAY TIME Eligibility - Eligible employees, as described in the Jefferson Benefits Eligibility Chart, will be awarded Holiday Time to be used for Holidays not worked. In order to be eligible for the paid holiday, non-exempt employees may not have unscheduled absences on the scheduled day immediately before or after the holiday. ADDITIONAL MONEY Human Resources must pre-approve any programs for the payment of additional moneys. This includes, but is not limited to, any payment for shift outside of normal shift differential in accordance with Jefferson Policies and payment for extra hours to exempt employees. The Additional Money code is never to be used for incentives or bonuses which must be processed directly through Human Resources and approved by the President in accordance with specific pre-approved incentive plans.
ADVANCE PAY
Advance pay will be granted only in extreme emergency and with written approval from a Senior Officer or designee.
ADJUSTMENTS TO EMPLOYEE RECORDS Data stored in Jefferson’s Electronic Time and Attendance system is the official Time and Attendance record for each employee. It is imperative that management personnel adhere to established Jefferson and departmental policies when utilizing Jefferson’s Electronic Time and Attendance system. The Audit Trail reports on all transactions, including the user and the actions taken. All departments are subject to both internal and external audits at any time without prior notice. Due to the real-time requirements of Jefferson’s Electronic Time and Attendance system, all employee HR transactions must be submitted timely. For example, transfers, leaves of absence, and returns from leaves all potentially affect the accuracy of the employee data in the Time and Attendance system and employee data is interfaced daily from the HR system. DOCUMENTATION AND DATA RETENTION It is the department’s responsibility to maintain all documentation for any transaction posted through Jefferson’s Electronic Time and Attendance System. This documentation should be standardized within the department and must be presented at any time upon request for inquiry or audit purposes. Failure to maintain and or provide documentation will result in suspension of system access.

Additional Information
- 12 -
MANAGER APPROVAL COMPLIANCE All management personnel who are responsible for the approval of electronic timecards must adhere to timelines established by the Payroll Department. All electronic timecards must be approved by noon on Monday of the pay week or other times as designated. In the event that approvals are not completed timely, the Payroll department will contact the responsible management personnel or appropriate backup. In the event that no approvals can be completed, the Payroll Office will process the electronic timecards as they exist at that time for payroll purposes. An email will be sent to the management personnel notifying them of the action that was taken. The Senior Officer responsible for the department will be copied on the email. If there are subsequent infractions, disciplinary action will be recommended, including the suspension of system access.
Original Issue Date: 4/1/2007 Revision Date(s): 2/1/2010, 05/25/2010, 04/09/2011 Review Date(s): Responsibility for maintenance of policy: Director of Operations, TJU Controller's
Office
(Signature on File)
Approved by: Richard J. Schmid Vice President for Finance/CFO

HTML Access
- 1 -
Accessing HTML Access
1. Kronos Log On Page will display and enter your Campus Key and Password. 2. Click Log On.
This access does not include Schedules
Home Page View After you log on, a Home Page will display the components of the Navigation Bar in a horizontal view. Click on the Launch Button to open the display view.
2
USER NAME (Enter Your Campus Key)
1
Enter Your Password (Passwords Are Case Sensitive)

HTML Access
- 2 -
The “Select An Action” drop down list contains all of the Menu Options.
Timecards To access the Timecard, click on the Timecard Launch Button in the upper right corner and the selected timecards will be displayed.
1. Pay Code Edits can be added to the timecard but cannot be deleted. To change a Pay Code or Hours Amount replace the original entry with the corrected Pay Code and/or Hours Amount and Save the modified entry.
2. Cancel Meal Deductions are made by adding a check mark( ) in the No Meal Box
Timecard and Reports Launch Buttons
1 2

HTML Access
- 3 -
Timecards (continued)
3. Comments can be added by clicking on the “Select an Action” drop down list. To display the Comment open the “Yellow” Comment Indicator displayed above the cell.
4. Account Code Transfers can be done by clicking on the “Transfer” field. The Transfer window will display the Job field but this cannot be updated, proceed to the Account Code ID field and enter the complete Account Code number and Click “OK”.
4
3

HTML Access
- 4 -
Timecards (continued)
5. Approvals can be added by clicking on the “Select an Action” drop down list. The Approval will display at the top of the time card.
Reports Link located in the upper right hand corner of the screen takes you to the Reports Page to run reports
Home Link located in the upper right hand corner of the screen takes you back to the Home Page to access the Navigation Bar
Log Off Link is in the upper right hand corner of the Home Page screen
5

Time Stamp
- 1 -
Time Stamp View
Log on to the Workforce Timekeeper Application: Double Click on the Internet Explorer located on your desktop. Go to My Favorites, then Jefferson Links, then Kronos Timekeeper The Kronos Logon window will appear Enter your User Name (Campus Key) and Password Click on “LOG ON” button
TimeStamp – Access to record hours worked when there is no timeclock terminal available. This access can be used on campus and/or remotely, as needed.
Enter your Password (Passwords are case sensitive)
Click on LOG ON
USER NAME (Enter your Campus Key)

Time Stamp
- 2 -
Time Stamp View (continued)
The Time Stamp View will display after you log on. The Navigation Bar on the left side of the screen consists of 3 links for specific
displays.
Time Stamp View – records the punch into the timecard. My Timecard – View of the timecard with punches and Accrual
Balances. My Reports – Generate reports (Accrual Balances and Projections and
Time Detail).
Click on the Record Time Stamp button. (This will record your punch in your timecard.

Time Stamp
- 3 -
Time Stamp View (continued)
Time Stamp View will now display the punch time that was recorded in the timecard.

Time Stamp
- 4 -
Time Stamp – My Timecard
Click on the Navigation Bar (My Timecard) on left side of screen to view your timecard.
Totals & Schedule Tab – lower bottom half of timecard displays the Timecard Totals and Assigned Schedule.
Click on Accrual Tab (at the lower left side of the timecard) to view your
Accrual Balances (Available Holiday, Personal, Sick and Vacation Hours).
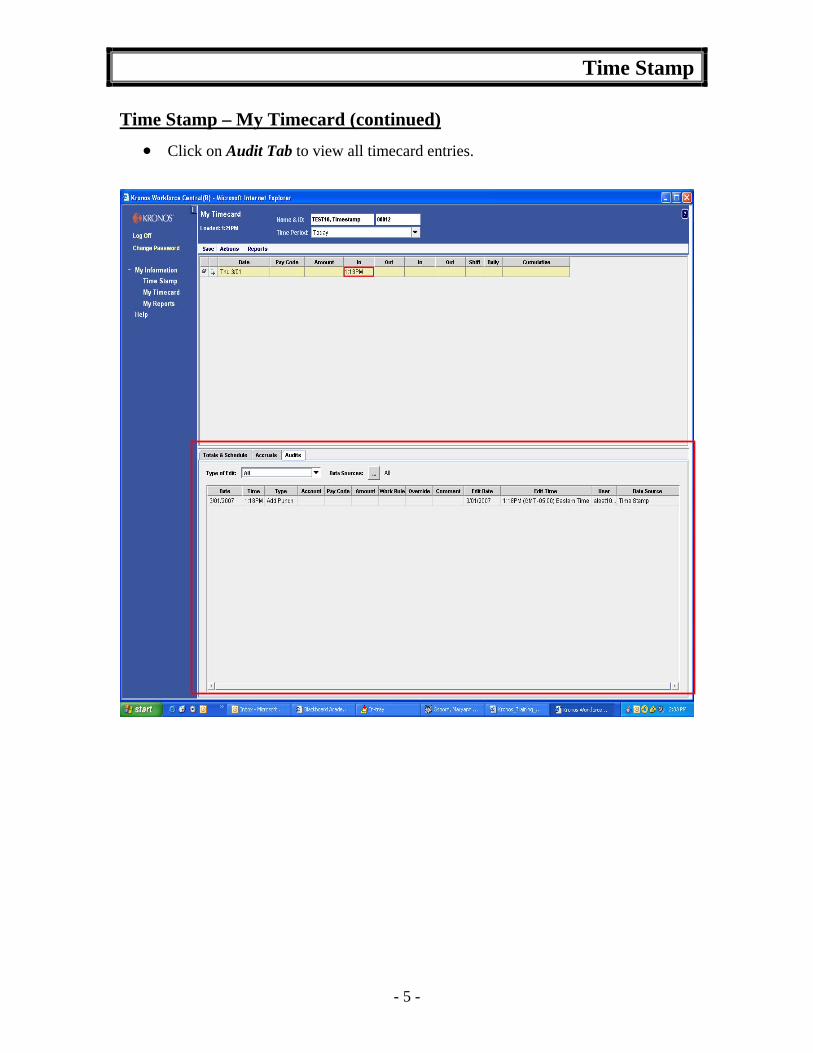
Time Stamp
- 5 -
Time Stamp – My Timecard (continued)
Click on Audit Tab to view all timecard entries.

Time Stamp
- 6 -
Time Stamp – My Reports
Click on the Navigation Bar (My Reports) on left side of screen to run a customized report to view your Accrual Balances or Timecard Detail.
Select the Report from the Available Reports box Click on the As Of drop down list to select the time period for the report. Click on View Report button Report will display on the screen. To print the Report type (CTRL P) and the Print window will display and click
on the Print button

Kronos 4500™ Badge Terminal
3
© 2004 Kronos Incorporated
Navigation Keys
Soft Keys
Indicator Lights 3:14 PM Wed Jan-28-2004
Sick
Vacation
Personal
Punch Status
Swipe your Employee Badge to record your punch
Accrual Balances (Soft Keys)
• Touch the specific “Accrual Soft Key” to check your accrual balance (Sick, Vacation, Personal) you want to view.
•Swipe your “Employee Badge”.
•Available “Accrual Balance” will be displayed on the screen.
Punch Status (Soft Key)
• Touch “Punch Status Soft Key” to view the last punch you recorded in the time clock.
•Swipe your “Employee Badge”.
•Your “Last Punch” will be displayed on the screen.
NOTE: Always Press the “Soft Key Buttons”before you “Swipe your Badge” to access Accrual or Punch information
ETOEIB

Glossary
- 1 -
Account Code The account that is assigned to an employee from PeopleSoft.
Unless allocated otherwise, any hours worked by an employee are automatically charged to this account.
Accrual Code These codes identify the types of accrual balances, such as ETO,
EIB, vacation, personal and holiday. Audit Trail Tab This tab lists all punches or amount entries made to an employee’s
timecard. This Tab is located at the bottom of the Timecard workspace
Automatic A specific amount of time automatically deducted from the Deduction timecard. (Example: Employee has a 1 hour meal break; the Kronos
System will deduct this amount on each scheduled work day). Break An amount of non-worked time for meals and work breaks. Canceled Removes the automatic deduction in the timecard for a Deduction specific date. Comment Descriptive text that can be associated with punches, pay code
edits and historical amounts. Current Pay The pay period that is still in progress, Jefferson’s Pay Schedule Period is biweekly. (See Pay Schedule) Data Source Displays the source of the entry or edit (Example: Timecard). Day Divide A parameter that establishes the exact moment that a payday
begins; the time of day when one day ends and the next begins. Jefferson’s day divide is midnight.
Deduction An amount of time that is subtracted from employee timecards. Device Groups A designated Time Clock or Group of Time Clocks that an
employee is authorized to utilize. Early In Employee punched in prior to the allowable grace period for start
time. EIB Extended Illness Bank is the accumulated sick time that an
employee has on April 21, 2012 and can only be used for short-term disability as described in this policy.

Glossary
- 2 -
Employee ID The nine digit number assigned in PeopleSoft by Human
Resources. ETO Earned Time Off is paid time that may be used by eligible
employees for any purpose the employee wishes, including vacations, unpaid holidays, illness or time away from work for personal or family matters.
Scheduled ETO: is use of ETO scheduled and approved by
supervisor in accordance with the employee’s departmental policy. Unscheduled ETO: is use of ETO that is not scheduled and
approved in accordance with the employee’s departmental policy. Exception A deviation from scheduled work hours, when employees do not
punch as expected. For example, if an employee is unscheduled from work or punches in late, the system records that exception in the database.
Historical Edit Pay Code and an amount adjustment made in a closed Pay Period. The adjustment can be paid with an off-cycle check or paid in the current pay period.
Holiday Identifies a Jefferson Holiday when employees do not work but are paid.
Holiday Premium When employee works actual or observed holiday and earns a different rate of pay. Hyper Find Displays Queries that you can use to find people who match a
specific or customized criteria. In Punch The time when an employee punches in at the Time Clock for the
start of the shift, or return from break.
Labor Account Use a labor account transfer if the employee is transferring to Transfers a different account code and the shift or shift segment should be charged to an account code other than that derived from the primary job.
Labor Levels Hierarchical categories that define an organization’s account structure. Jefferson uses Company, Admin ID, Department, Account Code, Job Code, Record Number, Group ID
Late In Employee punched in after the scheduled start time.

Glossary
- 3 -
Late Out Employee punched out after the allowable grace period for the end
of the scheduled shift. Missed In Punch The employee did not punch in for the start of the shift. Missed Out Punch The employee did not punch out at the end of the shift. Off Day A specific day when an employee is not scheduled to work. Out Punch The time when an employee punches out at the time clock for the
end of the shift. Overtime Rate at 1 ½ time the regular rate of pay based on the overtime rule
applicable to the employee. Password A string of characters that you use to keep your account secure.
All passwords are case sensitive. (Same password used with your campus key)
Pay Code A specific code used to organize time and money. Examples of
pay codes are Regular and Overtime. Pay Code Edit Adds or deletes time to or from a timecard without having punches
associated with the time. Pay Code edits can be performed in the timecard or the schedule. (Example: Add sick or vacation time to a timecard)
Pay Period The amount of time for which employees are paid regularly. Pay
Periods are Previous, Current or Next. Jefferson is on a bi-weekly pay period.
Pay Rule A rule that is assigned to an employee to calculate the employee’s
hours and to automatically deduct their designed meal break. Rounding A period of time, either before or after the in and out punch, when
the punch rounds to the start or end of the shift without financial penalty to the employee.
Schedule A single shift, a group of shifts, or a pattern that is assigned to an
employee or group of employees for specific dates. Schedule Edit A change made to an employee schedule; Example: the addition of
a pay code and amount for exception time.

Glossary
- 4 -
Schedule Pattern A combination of one or more shifts, pay codes, or both, that
repeats over specific days or weeks. (Example: 9am to 5pm, Monday through Friday)
Schedule Period The amount of time the schedule covers. A selection of Schedule
Periods can be chosen in the Schedule Editor such as Current Period, Previous Period, or Next Time Period.
Shift A span of time with a start time and an end time that an employee
is scheduled to work. (Example: 8:00 am to 5:00 pm) Timecard An official record of employee’s time worked and not worked as
displayed in the Jefferson Electronic Time and Attendance System. Timecard Edit A change made to an employee’s timecard; Example: the addition
of a punch or a labor account transfer. Transfer Time moved to a different Labor account such as a non-default
Account Code(s) or On Call hours. Unscheduled Employee was not scheduled to work, but punched in and/or out. User Name Identifies your access to the Jefferson Electronic Time and
Attendance System (Campus Key).