IS76 Beacon with Ferrite Antenna - TeleAlarm
10
__________________________________________________________________________________________________________________ Edition: June 2016 Document N°: F.01U.136.807 V3 Page 1 of 10 IS76 Beacon with Ferrite Antenna Installation Manual
-
Upload
khangminh22 -
Category
Documents
-
view
0 -
download
0
Transcript of IS76 Beacon with Ferrite Antenna - TeleAlarm
__________________________________________________________________________________________________________________ Edition: June 2016 Document N°: F.01U.136.807 V3 Page 1 of 10
IS76 Beacon with Ferrite Antenna Installation Manual

__________________________________________________________________________________________________________________ Edition: June 2016 Document N°: F.01U.136.807 V3 Page 2 of 10
Document No F.01U.136.807 V3 IS76 Beacon with Ferrite Antenna: Installation Manual Edition: June 2016 Editor: TeleAlarm SA All rights reserved. TeleAlarm SA reserves the right to make changes to the information contained in this document at any time without prior notice. Great care has been given to the contents of this document; however TeleAlarm SA cannot be held liable for the consequences of any errors or omissions contained herein or for consequential or incidental damages incurred as a result of acting on information contained in the document.
TeleAlarm SA Rue du Pont 23 CH-2300 la Chaux-de-Fonds Switzerland Phone +41 (0)32 911 11 11 Fax +41 (0)32 911 11 00 www.telealarm.com

__________________________________________________________________________________________________________________ Edition: June 2016 Document N°: F.01U.136.807 V3 Page 3 of 10
Content
Locator Function .................................................................................................................4 IS76 Beacon with Ferrite Antenna .......................................................................................4
IS76 Ferrite Antenna .......................................................................................................4 IS76 Ferrite Beacon Controller ........................................................................................5 System Supervision .........................................................................................................5
Features of the IS76 Beacon System ..................................................................................5 IS76 Ferrite Antenna ...........................................................................................................6 IS76 Beacon Controller .......................................................................................................6 Connection Compartment ...................................................................................................7 Enable Locator Function in NurseCall System ....................................................................7 Configuration and Wiring.....................................................................................................8 Ferrite Beacon Antenna ......................................................................................................9 Ferrite Beacon Controller ....................................................................................................9

__________________________________________________________________________________________________________________ Edition: June 2016 Document N°: F.01U.136.807 V3 Page 4 of 10
Locator Function The NurseCall system can be set to handle a Locator function. For this purpose, beacon mod-ules and antennas of type IS75 or IS76 need to be installed on doors or corridors in the building you want to supervise. When passing one of these modules the Wristband Transmitters of type S37L or the Pendant Transmitters of type S35L refresh the position information that is stored into them. When triggering an Alarm, the transmitters S37L and S35L do not only transmit the identification (who sent the alarm), but also the position of the last passed module (where has the alarm been triggered). At the arrival of a call, the information of the actual position is indicated additionally on the NurseCall units. This information can be made visible by pressing the yellow button on the NurseCall Main- or Relay Unit. “Locator” information block: 255 positions (POS: 000 - 254) can be differentiated. When passing beacon modules with position numbers 231 - 254 the transmitters S37L and S35L can send a call for help automat-ically without manual activation (wandering). Fixed transmitters that do not handle a Locator function (N46) are always indicated with the position 000.
IS76 Beacon with Ferrite Antenna The IS76 Beacon system consists of two elements: The IS76 Ferrite Antenna The IS76 Ferrite Beacon Controller
IS76 Ferrite Antenna
The IS76 Ferrite antenna has to be mounted on the place that has to be identified with a location beacon code. The antenna is well suited to be mounted in a vertical position on (or next to) a door frame. In some circumstances it may also be mounted horizontally. The IS76 Ferrite Antenna can be placed outdoors as well as indoors.
HELP A03
POS: 077

__________________________________________________________________________________________________________________ Edition: June 2016 Document N°: F.01U.136.807 V3 Page 5 of 10
IS76 Ferrite Beacon Controller The IS76 Ferrite Beacon Controller is necessary to drive the IS76 Ferrite Antenna. It connects to the mains power via an external power supply. Up to two IS76 Ferrite Antennas may be connected to the IS76 Beacon Controller, depending on the size of the passage that has to be covered with the beacon. The beacon location code is set-up on the IS76 Ferrite Beacon Controller. Contrary to the ferrite antenna, the IS76 Ferrite Beacon Controller has to be mounted indoors, in a well ventilated cool place.
Connection compartment
SupervisionSignal lamp(LED):
Figure 1
System Supervision The operation of the IS76 Beacon system is supervised. An eventual operation failure (bro-ken wire or overload) is indicated by the front panel LED and by the opening of a "normally closed" relay contact that is accessible from the terminal block. The supervision output may be connected to an RAC-type alarm transmitter which would transmit the beacon operation failure to the NurseCall System.
Features of the IS76 Beacon System Ferrite antenna offers a better defined capture range that is less dependent on the
surrounding building material The antenna may be installed in or outdoors Up to 230 user selectable position (location) codes (001 to 230) Up to 24 user selectable "Wandering" codes (231 to 254) Supervision of the beacon functionality
__________________________________________________________________________________________________________________ Edition: June 2016 Document N°: F.01U.136.807 V3 Page 6 of 10
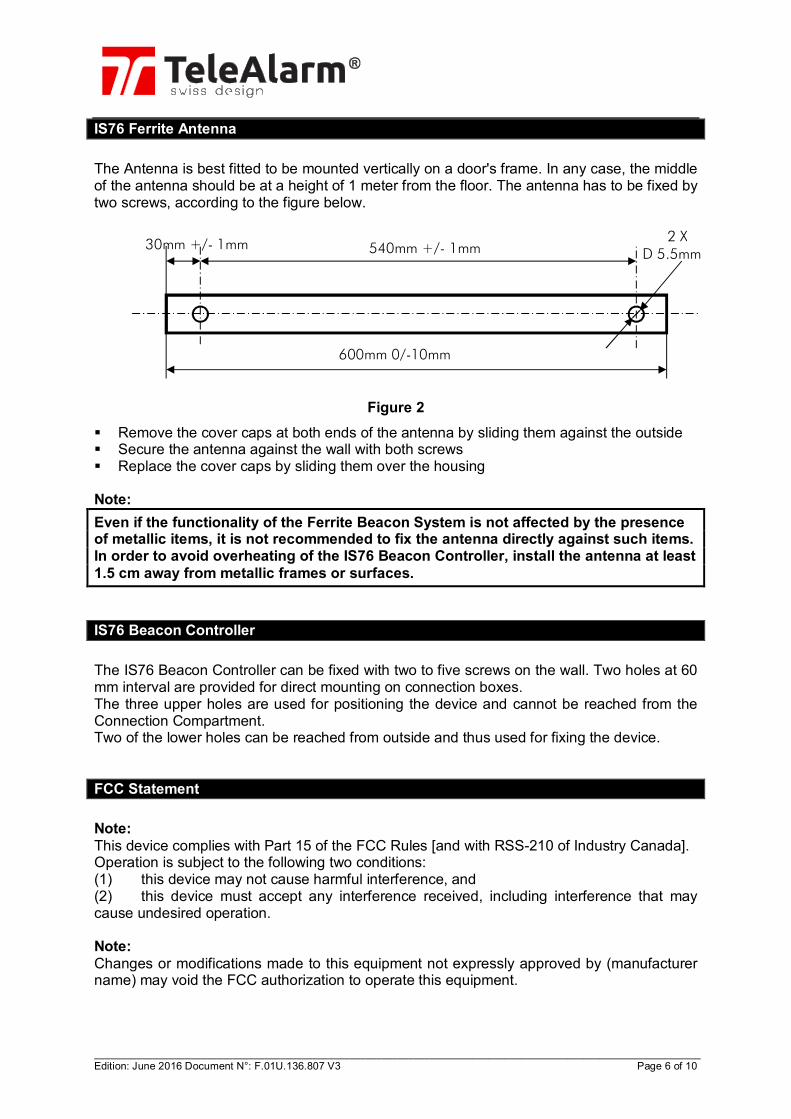
IS76 Ferrite Antenna The Antenna is best fitted to be mounted vertically on a door's frame. In any case, the middle of the antenna should be at a height of 1 meter from the floor. The antenna has to be fixed by two screws, according to the figure below.
Figure 2 Remove the cover caps at both ends of the antenna by sliding them against the outside Secure the antenna against the wall with both screws Replace the cover caps by sliding them over the housing Note: Even if the functionality of the Ferrite Beacon System is not affected by the presence of metallic items, it is not recommended to fix the antenna directly against such items. In order to avoid overheating of the IS76 Beacon Controller, install the antenna at least 1.5 cm away from metallic frames or surfaces.
IS76 Beacon Controller The IS76 Beacon Controller can be fixed with two to five screws on the wall. Two holes at 60 mm interval are provided for direct mounting on connection boxes. The three upper holes are used for positioning the device and cannot be reached from the Connection Compartment. Two of the lower holes can be reached from outside and thus used for fixing the device.
FCC Statement Note: This device complies with Part 15 of the FCC Rules [and with RSS-210 of Industry Canada]. Operation is subject to the following two conditions: (1) this device may not cause harmful interference, and (2) this device must accept any interference received, including interference that may cause undesired operation. Note: Changes or modifications made to this equipment not expressly approved by (manufacturer name) may void the FCC authorization to operate this equipment.
30mm +/- 1mm 540mm +/- 1mm 2 X D 5.5mm
600mm 0/-10mm

__________________________________________________________________________________________________________________ Edition: June 2016 Document N°: F.01U.136.807 V3 Page 7 of 10
53.880
131
13.1
Ø7.5
59.9
18.1
3.7
226
3.7
16
27
6.6
Figure 3
Important Note: In order to ensure proper cooling of the Beacon Controller, the unit needs to be in-stalled vertically in a well ventilated place (avoid to mount it in sealed boxes).
Connection Compartment All of the wiring and configuration functions such as: Connection of the IS76 Ferrite Antenna(s) Connection of the wired supervision output Setting of the Location identification code Can be carried out in the connection compartment. It is reached by taking off the lower part of the housing (see). This can be done even if the device is fixed on the wall. The connection cables can be channeled towards the outside through the hole next to the terminal blocks or downwards by breaking off part of the rear housing. Connection of the power supply can be done without taking off the lower part of the housing.
Enable Locator Function in NurseCall System In order to be operational, the Locator function has to be enabled in the NurseCall Main Unit (refer to section "Selection Locate Function YES or No" in the NurseCall User Manual)

__________________________________________________________________________________________________________________ Edition: June 2016 Document N°: F.01U.136.807 V3 Page 8 of 10
Configuration and Wiring
ON
+ + + + + + + +
128 64 32 16 8 4 2 1
1x1281x641x321x16
1x80x40x2
2480x1
++++++
=+
Position number:
Supervision Signal Lamp:Green: okRed: operation failure
Ferr
ite B
eaco
n A
nten
na A
Ferr
ite B
eaco
n A
nten
na B
*
Supe
rvis
ion
Out
put
Pow
er S
uppl
y 24
VD
C
Supervision ofBeacon A:
Supervision ofBeacon B:
Enabled
Disabled
*Antenna B is optionalIt is used to extend thecapture range on large(double) doors
RAC(optional)
Blue
*
Blue
*W
hite
*
Whi
te*
*Polarity ofthe antennaand the wiring has tobe respectedwhen twoantennas areused for thesame beaconlocation
AB*
Example above:
Notice: position numbers 21 and 42 cannot be used!

__________________________________________________________________________________________________________________ Edition: June 2016 Document N°: F.01U.136.807 V3 Page 9 of 10
Ferrite Beacon Antenna Housing Plastic case ASA for wall mounting L x H x P 600 x 30 x 30 mm Weight about 700 g Connecting cable 2 m "twisted pair" (may be extended up to 10 m)
Operation Range1
typ. 2.6 m
typ.
3.6
m
Antenna
1 When used in conjunction with S37L Wristband Transmitters of REV B and higher.
Ferrite Beacon Controller Housing Plastic case ASA For wall mounting (L x H x P) 133 x 82 x 26 mm Weight about 200 g AC Power supply (included) 100 – 240 VAC DC Power supply 22 - 24 VDC / max. 400 mA (1 antenna) Max. 800 mA (2 antennas) Frequency 68 kHz Supervision Output Relay Max. Switching power 125 VA / 60 W Max. Switching voltage 40 V DC Max. Switching current 2 A Technical data is subject to changes.

__________________________________________________________________________________________________________________ Edition: June 2016 Document N°: F.01U.136.807 V3 Page 10 of 10
FCC Statement for Class B digital device Note: This equipment has been tested and found to comply with the limits for a Class B digital de-vice, pursuant to Part 15 of the FCC Rules. These limits are designed to provide reasonable protection against harmful interference in a residential installation. This equipment generates, uses and can radiate radio frequency energy and, if not installed and used in accordance with the instructions, may cause harmful interference to radio communications. However, there is no guarantee that interference will not occur in a particular installation. If this equip-ment does cause harmful interference to radio or television reception, which can be deter-mined by turning the equipment off and on, the user is encouraged to try to correct the inter-ference by one or more of the following measures: • Reorient or relocate the receiving antenna. • Increase the separation between the equipment and receiver. • Connect the equipment into an outlet on a circuit different from that to which the receiver is connected. • Consult the dealer or an experienced radio/TV technician for help.