
Sl. No. Name of Insolvency Professional (IP) IP Registration ...
Upload
khangminh22Category
view
4download
0
IP Office Platform H.323 TelephoneInstallation
Release 11.1 FP2Issue 3
November 2021

© 2021, Avaya Inc.All Rights Reserved.
NoticeWhile reasonable efforts have been made to ensure that theinformation in this document is complete and accurate at the time ofprinting, Avaya assumes no liability for any errors. Avaya reservesthe right to make changes and corrections to the information in thisdocument without the obligation to notify any person or organizationof such changes.Documentation disclaimer“Documentation” means information published in varying mediumswhich may include product information, operating instructions andperformance specifications that are generally made available to usersof products. Documentation does not include marketing materials.Avaya shall not be responsible for any modifications, additions, ordeletions to the original published version of Documentation unlesssuch modifications, additions, or deletions were performed by or onthe express behalf of Avaya. End User agrees to indemnify and holdharmless Avaya, Avaya's agents, servants and employees against allclaims, lawsuits, demands and judgments arising out of, or inconnection with, subsequent modifications, additions or deletions tothis documentation, to the extent made by End User.Link disclaimerAvaya is not responsible for the contents or reliability of any linkedwebsites referenced within this site or Documentation provided byAvaya. Avaya is not responsible for the accuracy of any information,statement or content provided on these sites and does notnecessarily endorse the products, services, or information describedor offered within them. Avaya does not guarantee that these links willwork all the time and has no control over the availability of the linkedpages.WarrantyAvaya provides a limited warranty on Avaya hardware and software.Refer to your sales agreement to establish the terms of the limitedwarranty. In addition, Avaya’s standard warranty language, as well asinformation regarding support for this product while under warranty isavailable to Avaya customers and other parties through the AvayaSupport website: https://support.avaya.com/helpcenter/getGenericDetails?detailId=C20091120112456651010 under the link“Warranty & Product Lifecycle” or such successor site as designatedby Avaya. Please note that if You acquired the product(s) from anauthorized Avaya Channel Partner outside of the United States andCanada, the warranty is provided to You by said Avaya ChannelPartner and not by Avaya.“Hosted Service” means an Avaya hosted service subscription thatYou acquire from either Avaya or an authorized Avaya ChannelPartner (as applicable) and which is described further in Hosted SASor other service description documentation regarding the applicablehosted service. If You purchase a Hosted Service subscription, theforegoing limited warranty may not apply but You may be entitled tosupport services in connection with the Hosted Service as describedfurther in your service description documents for the applicableHosted Service. Contact Avaya or Avaya Channel Partner (asapplicable) for more information.Hosted ServiceTHE FOLLOWING APPLIES ONLY IF YOU PURCHASE AN AVAYAHOSTED SERVICE SUBSCRIPTION FROM AVAYA OR AN AVAYACHANNEL PARTNER (AS APPLICABLE), THE TERMS OF USEFOR HOSTED SERVICES ARE AVAILABLE ON THE AVAYAWEBSITE, HTTPS://SUPPORT.AVAYA.COM/LICENSEINFO UNDERTHE LINK “Avaya Terms of Use for Hosted Services” OR SUCHSUCCESSOR SITE AS DESIGNATED BY AVAYA, AND AREAPPLICABLE TO ANYONE WHO ACCESSES OR USES THEHOSTED SERVICE. BY ACCESSING OR USING THE HOSTEDSERVICE, OR AUTHORIZING OTHERS TO DO SO, YOU, ONBEHALF OF YOURSELF AND THE ENTITY FOR WHOM YOU AREDOING SO (HEREINAFTER REFERRED TO INTERCHANGEABLYAS “YOU” AND “END USER”), AGREE TO THE TERMS OF USE. IFYOU ARE ACCEPTING THE TERMS OF USE ON BEHALF ACOMPANY OR OTHER LEGAL ENTITY, YOU REPRESENT THATYOU HAVE THE AUTHORITY TO BIND SUCH ENTITY TO THESETERMS OF USE. IF YOU DO NOT HAVE SUCH AUTHORITY, OR IF
YOU DO NOT WISH TO ACCEPT THESE TERMS OF USE, YOUMUST NOT ACCESS OR USE THE HOSTED SERVICE ORAUTHORIZE ANYONE TO ACCESS OR USE THE HOSTEDSERVICE.LicensesTHE SOFTWARE LICENSE TERMS AVAILABLE ON THE AVAYAWEBSITE, HTTPS://SUPPORT.AVAYA.COM/LICENSEINFO,UNDER THE LINK “AVAYA SOFTWARE LICENSE TERMS (AvayaProducts)” OR SUCH SUCCESSOR SITE AS DESIGNATED BYAVAYA, ARE APPLICABLE TO ANYONE WHO DOWNLOADS,USES AND/OR INSTALLS AVAYA SOFTWARE, PURCHASEDFROM AVAYA INC., ANY AVAYA AFFILIATE, OR AN AVAYACHANNEL PARTNER (AS APPLICABLE) UNDER A COMMERCIALAGREEMENT WITH AVAYA OR AN AVAYA CHANNEL PARTNER.UNLESS OTHERWISE AGREED TO BY AVAYA IN WRITING,AVAYA DOES NOT EXTEND THIS LICENSE IF THE SOFTWAREWAS OBTAINED FROM ANYONE OTHER THAN AVAYA, AN AVAYAAFFILIATE OR AN AVAYA CHANNEL PARTNER; AVAYARESERVES THE RIGHT TO TAKE LEGAL ACTION AGAINST YOUAND ANYONE ELSE USING OR SELLING THE SOFTWAREWITHOUT A LICENSE. BY INSTALLING, DOWNLOADING ORUSING THE SOFTWARE, OR AUTHORIZING OTHERS TO DO SO,YOU, ON BEHALF OF YOURSELF AND THE ENTITY FOR WHOMYOU ARE INSTALLING, DOWNLOADING OR USING THESOFTWARE (HEREINAFTER REFERRED TOINTERCHANGEABLY AS “YOU” AND “END USER”), AGREE TOTHESE TERMS AND CONDITIONS AND CREATE A BINDINGCONTRACT BETWEEN YOU AND AVAYA INC. OR THEAPPLICABLE AVAYA AFFILIATE (“AVAYA”).Avaya grants You a license within the scope of the license typesdescribed below, with the exception of Heritage Nortel Software, forwhich the scope of the license is detailed below. Where the orderdocumentation does not expressly identify a license type, theapplicable license will be a Designated System License as set forthbelow in the Designated System(s) License (DS) section asapplicable. The applicable number of licenses and units of capacityfor which the license is granted will be one (1), unless a differentnumber of licenses or units of capacity is specified in thedocumentation or other materials available to You. “Software” meanscomputer programs in object code, provided by Avaya or an AvayaChannel Partner, whether as stand-alone products, pre-installed onhardware products, and any upgrades, updates, patches, bug fixes,or modified versions thereto. “Designated Processor” means a singlestand-alone computing device. “Server” means a set of DesignatedProcessors that hosts (physically or virtually) a software applicationto be accessed by multiple users. “Instance” means a single copy ofthe Software executing at a particular time: (i) on one physicalmachine; or (ii) on one deployed software virtual machine (“VM”) orsimilar deployment.License type(s)Designated System(s) License (DS). End User may install and useeach copy or an Instance of the Software only: 1) on a number ofDesignated Processors up to the number indicated in the order; or 2)up to the number of Instances of the Software as indicated in theorder, Documentation, or as authorized by Avaya in writing. Avayamay require the Designated Processor(s) to be identified in the orderby type, serial number, feature key, Instance, location or otherspecific designation, or to be provided by End User to Avaya throughelectronic means established by Avaya specifically for this purpose.Concurrent User License (CU). End User may install and use theSoftware on multiple Designated Processors or one or more Servers,so long as only the licensed number of Units are accessing and usingthe Software at any given time as indicated in the order,Documentation, or as authorized by Avaya in writing. A “Unit” meansthe unit on which Avaya, at its sole discretion, bases the pricing of itslicenses and can be, without limitation, an agent, port or user, an e-mail or voice mail account in the name of a person or corporatefunction (e.g., webmaster or helpdesk), or a directory entry in theadministrative database utilized by the Software that permits oneuser to interface with the Software. Units may be linked to a specific,identified Server or an Instance of the Software.Cluster License (CL). End User may install and use each copy or anInstance of the Software only up to the number of Clusters asindicated on the order, Documentation, or as authorized by Avaya inwriting with a default of one (1) Cluster if not stated.

Enterprise License (EN). End User may install and use each copy oran Instance of the Software only for enterprise-wide use of anunlimited number of Instances of the Software as indicated on theorder, Documentation, or as authorized by Avaya in writing.Named User License (NU). End User may: (i) install and use eachcopy or Instance of the Software on a single Designated Processor orServer per authorized Named User (defined below); or (ii) install anduse each copy or Instance of the Software on a Server so long asonly authorized Named Users access and use the Software asindicated in the order, Documentation, or as authorized by Avaya inwriting. “Named User”, means a user or device that has beenexpressly authorized by Avaya to access and use the Software. AtAvaya’s sole discretion, a “Named User” may be, without limitation,designated by name, corporate function (e.g., webmaster orhelpdesk), an e-mail or voice mail account in the name of a person orcorporate function, or a directory entry in the administrative databaseutilized by the Software that permits one user to interface with theSoftware.Shrinkwrap License (SR). End User may install and use the Softwarein accordance with the terms and conditions of the applicable licenseagreements, such as “shrinkwrap” or “clickthrough” licenseaccompanying or applicable to the Software (“Shrinkwrap License”)as indicated in the order, Documentation, or as authorized by Avayain writing.Transaction License (TR). End User may use the Software up to thenumber of Transactions as specified during a specified time periodand as indicated in the order, Documentation, or as authorized byAvaya in writing. A “Transaction” means the unit by which Avaya, atits sole discretion, bases the pricing of its licensing and can be,without limitation, measured by the usage, access, interaction(between client/server or customer/organization), or operation of theSoftware within a specified time period (e.g. per hour, per day, permonth). Some examples of Transactions include but are not limited toeach greeting played/message waiting enabled, each personalizedpromotion (in any channel), each callback operation, each live agentor web chat session, each call routed or redirected (in any channel).End User may not exceed the number of Transactions withoutAvaya’s prior consent and payment of an additional fee.Heritage Nortel Software“Heritage Nortel Software” means the software that was acquired byAvaya as part of its purchase of the Nortel Enterprise SolutionsBusiness in December 2009. The Heritage Nortel Software is thesoftware contained within the list of Heritage Nortel Products locatedat https://support.avaya.com/LicenseInfo under the link “HeritageNortel Products” or such successor site as designated by Avaya. ForHeritage Nortel Software, Avaya grants Customer a license to useHeritage Nortel Software provided hereunder solely to the extent ofthe authorized activation or authorized usage level, solely for thepurpose specified in the Documentation, and solely as embedded in,for execution on, or for communication with Avaya equipment.Charges for Heritage Nortel Software may be based on extent ofactivation or use authorized as specified in an order or invoice.CopyrightExcept where expressly stated otherwise, no use should be made ofmaterials on this site, the Documentation, Software, Hosted Service,or hardware provided by Avaya. All content on this site, thedocumentation, Hosted Service, and the product provided by Avayaincluding the selection, arrangement and design of the content isowned either by Avaya or its licensors and is protected by copyrightand other intellectual property laws including the sui generis rightsrelating to the protection of databases. You may not modify, copy,reproduce, republish, upload, post, transmit or distribute in any wayany content, in whole or in part, including any code and softwareunless expressly authorized by Avaya. Unauthorized reproduction,transmission, dissemination, storage, and or use without the expresswritten consent of Avaya can be a criminal, as well as a civil offenseunder the applicable law.VirtualizationThe following applies if the product is deployed on a virtual machine.Each product has its own ordering code and license types. Unlessotherwise stated, each Instance of a product must be separatelylicensed and ordered. For example, if the end user customer orAvaya Channel Partner would like to install two Instances of the
same type of products, then two products of that type must beordered.Third Party Components“Third Party Components” mean certain software programs orportions thereof included in the Software or Hosted Service maycontain software (including open source software) distributed underthird party agreements (“Third Party Components”), which containterms regarding the rights to use certain portions of the Software(“Third Party Terms”). As required, information regarding distributedLinux OS source code (for those products that have distributed LinuxOS source code) and identifying the copyright holders of the ThirdParty Components and the Third Party Terms that apply is availablein the products, Documentation or on Avaya’s website at: https://support.avaya.com/Copyright or such successor site as designatedby Avaya. The open source software license terms provided as ThirdParty Terms are consistent with the license rights granted in theseSoftware License Terms, and may contain additional rights benefitingYou, such as modification and distribution of the open sourcesoftware. The Third Party Terms shall take precedence over theseSoftware License Terms, solely with respect to the applicable ThirdParty Components to the extent that these Software License Termsimpose greater restrictions on You than the applicable Third PartyTerms.The following applies only if the H.264 (AVC) codec is distributed withthe product. THIS PRODUCT IS LICENSED UNDER THE AVCPATENT PORTFOLIO LICENSE FOR THE PERSONAL USE OF ACONSUMER OR OTHER USES IN WHICH IT DOES NOT RECEIVEREMUNERATION TO (i) ENCODE VIDEO IN COMPLIANCE WITHTHE AVC STANDARD (“AVC VIDEO”) AND/OR (ii) DECODE AVCVIDEO THAT WAS ENCODED BY A CONSUMER ENGAGED IN APERSONAL ACTIVITY AND/OR WAS OBTAINED FROM A VIDEOPROVIDER LICENSED TO PROVIDE AVC VIDEO. NO LICENSE ISGRANTED OR SHALL BE IMPLIED FOR ANY OTHER USE.ADDITIONAL INFORMATION MAY BE OBTAINED FROM MPEG LA,L.L.C. SEE HTTP://WWW.MPEGLA.COM.Service ProviderTHE FOLLOWING APPLIES TO AVAYA CHANNEL PARTNER’SHOSTING OF AVAYA PRODUCTS OR SERVICES. THE PRODUCTOR HOSTED SERVICE MAY USE THIRD PARTY COMPONENTSSUBJECT TO THIRD PARTY TERMS AND REQUIRE A SERVICEPROVIDER TO BE INDEPENDENTLY LICENSED DIRECTLY FROMTHE THIRD PARTY SUPPLIER. AN AVAYA CHANNEL PARTNER’SHOSTING OF AVAYA PRODUCTS MUST BE AUTHORIZED INWRITING BY AVAYA AND IF THOSE HOSTED PRODUCTS USEOR EMBED CERTAIN THIRD PARTY SOFTWARE, INCLUDINGBUT NOT LIMITED TO MICROSOFT SOFTWARE OR CODECS,THE AVAYA CHANNEL PARTNER IS REQUIRED TOINDEPENDENTLY OBTAIN ANY APPLICABLE LICENSEAGREEMENTS, AT THE AVAYA CHANNEL PARTNER’S EXPENSE,DIRECTLY FROM THE APPLICABLE THIRD PARTY SUPPLIER.WITH RESPECT TO CODECS, IF THE AVAYA CHANNELPARTNER IS HOSTING ANY PRODUCTS THAT USE OR EMBEDTHE H.264 CODEC OR H.265 CODEC, THE AVAYA CHANNELPARTNER ACKNOWLEDGES AND AGREES THE AVAYACHANNEL PARTNER IS RESPONSIBLE FOR ANY AND ALLRELATED FEES AND/OR ROYALTIES. THE H.264 (AVC) CODECIS LICENSED UNDER THE AVC PATENT PORTFOLIO LICENSEFOR THE PERSONAL USE OF A CONSUMER OR OTHER USESIN WHICH IT DOES NOT RECEIVE REMUNERATION TO: (I)ENCODE VIDEO IN COMPLIANCE WITH THE AVC STANDARD(“AVC VIDEO”) AND/OR (II) DECODE AVC VIDEO THAT WASENCODED BY A CONSUMER ENGAGED IN A PERSONALACTIVITY AND/OR WAS OBTAINED FROM A VIDEO PROVIDERLICENSED TO PROVIDE AVC VIDEO. NO LICENSE IS GRANTEDOR SHALL BE IMPLIED FOR ANY OTHER USE. ADDITIONALINFORMATION FOR H.264 (AVC) AND H.265 (HEVC) CODECSMAY BE OBTAINED FROM MPEG LA, L.L.C. SEE HTTP://WWW.MPEGLA.COM.Compliance with LawsYou acknowledge and agree that it is Your responsibility forcomplying with any applicable laws and regulations, including, but notlimited to laws and regulations related to call recording, data privacy,intellectual property, trade secret, fraud, and music performancerights, in the country or territory where the Avaya product is used.

Preventing Toll Fraud“Toll Fraud” is the unauthorized use of your telecommunicationssystem by an unauthorized party (for example, a person who is not acorporate employee, agent, subcontractor, or is not working on yourcompany's behalf). Be aware that there can be a risk of Toll Fraudassociated with your system and that, if Toll Fraud occurs, it canresult in substantial additional charges for your telecommunicationsservices.Avaya Toll Fraud interventionIf You suspect that You are being victimized by Toll Fraud and Youneed technical assistance or support, call Technical Service CenterToll Fraud Intervention Hotline at +1-800-643-2353 for the UnitedStates and Canada. For additional support telephone numbers, seethe Avaya Support website: https://support.avaya.com or suchsuccessor site as designated by Avaya.Security VulnerabilitiesInformation about Avaya’s security support policies can be found inthe Security Policies and Support section of https://support.avaya.com/security.Suspected Avaya product security vulnerabilities are handled per theAvaya Product Security Support Flow (https://support.avaya.com/css/P8/documents/100161515).TrademarksThe trademarks, logos and service marks (“Marks”) displayed in thissite, the Documentation, Hosted Service(s), and product(s) providedby Avaya are the registered or unregistered Marks of Avaya, itsaffiliates, its licensors, its suppliers, or other third parties. Users arenot permitted to use such Marks without prior written consent fromAvaya or such third party which may own the Mark. Nothingcontained in this site, the Documentation, Hosted Service(s) andproduct(s) should be construed as granting, by implication, estoppel,or otherwise, any license or right in and to the Marks without theexpress written permission of Avaya or the applicable third party.Avaya is a registered trademark of Avaya Inc.All non-Avaya trademarks are the property of their respective owners.Linux® is the registered trademark of Linus Torvalds in the U.S. andother countries.

Contents
Part 1: IP Office H323 Phone Installation.................................................................... 9Chapter 1: IP Office H.323 IP Phones.............................................................................. 10
What's New in this Release.............................................................................................. 11Supported H.323 IP Phones............................................................................................. 11System Capacity............................................................................................................. 12Phone Firmware.............................................................................................................. 13File Auto-Generation........................................................................................................ 14Simple Installation........................................................................................................... 14Installation Requirements................................................................................................. 16Licenses and Subscriptions.............................................................................................. 17Network Assessment....................................................................................................... 18Voice Compression Channels........................................................................................... 19QoS............................................................................................................................... 21Potential VoIP Problems.................................................................................................. 21User PC Connection........................................................................................................ 22Power Supply Options..................................................................................................... 23File Server Options.......................................................................................................... 24Control Unit Memory Cards.............................................................................................. 25Phone File Requests....................................................................................................... 26
File Auto-Generation.................................................................................................. 26Control unit memory card................................................................................................. 27Registration Blacklisting................................................................................................... 27Blocking Default Passcodes............................................................................................. 28
Chapter 2: Additional Phone Settings............................................................................ 2946xxspecials.txt............................................................................................................... 30NoUser Source Numbers................................................................................................. 31Configuring and editing file settings................................................................................... 31
Part 2: Basic Installation Process................................................................................ 33H.323 IP Phone Installation.................................................................................................... 33Chapter 3: Licenses and Subscriptions......................................................................... 35
Reserving Licenses......................................................................................................... 35Chapter 4: Enabling the H.323 Gatekeeper.................................................................... 37
Setting the RTP Port Range............................................................................................. 37Adjusting DiffServ QoS.................................................................................................... 39System Default Codecs................................................................................................... 39
Chapter 5: DHCP Settings................................................................................................ 41System DHCP Support.................................................................................................... 41System Site Specific Option Numbers............................................................................... 42
November 2021 IP Office Platform H.323 Telephone Installation 5Comments on this document? [email protected]

Changing the system's SSON settings.............................................................................. 42Chapter 6: File Server Settings........................................................................................ 44
Changing the file server settings....................................................................................... 45Phone File Server Settings............................................................................................... 46Creating/Editing the Settings File...................................................................................... 46Manually Editing the File.................................................................................................. 48Loading Software Files onto the System............................................................................ 48IP500 V2 Control Unit...................................................................................................... 49Using Embedded File Manager to Check/Upload Files....................................................... 49Manually Copying Files.................................................................................................... 50Loading Files onto a third Party Server.............................................................................. 51
Chapter 7: User and Extension Creation........................................................................ 52Default Extension Password............................................................................................. 52Manually Creating Users.................................................................................................. 53Manually Creating Extensions.......................................................................................... 53Selecting the required codec............................................................................................ 54Using Auto-Creation........................................................................................................ 55
Chapter 8: Connecting the phone................................................................................... 56Registering phone........................................................................................................... 57Listing Registered Phones............................................................................................... 58
Part 3: Optional Configuration...................................................................................... 59Chapter 9: Enabling RTCP Quality Monitoring.............................................................. 60
Enabling Telephone Quality Reporting............................................................................... 60Enabling System Quality Reporting................................................................................... 61Setting the Quality Alarm Levels....................................................................................... 62
Chapter 10: Screensaver.................................................................................................. 63Customizing screen saver settings.................................................................................... 64
Chapter 11: Backup/Restore Settings............................................................................. 65Specifying the BRURI Value............................................................................................. 66HTTP Authentication........................................................................................................ 66Manual Backup/Restore Control....................................................................................... 67Example File................................................................................................................... 67
Configuring IIS server................................................................................................ 68Configuring apache server......................................................................................... 69
Part 4: Advanced Installation Processes.................................................................. 70Chapter 12: Static Address Installation.......................................................................... 71
Installing static address for 1600 series phones................................................................. 71Static adress installation settings for 1600 phone series..................................................... 72Installing static address for 9600 series phones................................................................. 72Static adress installation settings for 9600 phone series..................................................... 73
Chapter 13: Remote H.323 Extensions........................................................................... 74
Contents
November 2021 IP Office Platform H.323 Telephone Installation 6Comments on this document? [email protected]

Customer Network Configuration...................................................................................... 75Configuring IP Office System............................................................................................ 76Phone Configuration........................................................................................................ 77
Chapter 14: VPN Remote Phones.................................................................................... 78Installation Documentation............................................................................................... 79Supported VPN remote Phone Firmware........................................................................... 79Configuring the IP Phone for VPN remote......................................................................... 80VLAN and IP Phones....................................................................................................... 80VLAN and DHCP............................................................................................................. 82Example setup - Overview............................................................................................... 83Example System Overview............................................................................................... 85
Chapter 15: Alternate DHCP Server Setup..................................................................... 87Alternate Options............................................................................................................ 87Checking for DHCP Server Support.................................................................................. 89Creating a Scope............................................................................................................ 89Adding a 242 option......................................................................................................... 91Activating the Scope........................................................................................................ 92
Chapter 16: SRTP Support............................................................................................... 93Enable System SRTP...................................................................................................... 93
Enabling system SRTP.............................................................................................. 94Disabling SRTP on an extension or line....................................................................... 94
Direct media................................................................................................................... 95Chapter 17: TLS Support.................................................................................................. 96
Changing the CRAFT Password....................................................................................... 97Adding the Identity Certificate........................................................................................... 97Downloading the identity certificate from a Linux based server............................................ 98Uploading a certificate to the server's trusted certificate store............................................. 98Enabling TLS on the IP Office........................................................................................... 99Enabling TLS on the telephone......................................................................................... 99Checking TLS Operation................................................................................................ 100
Part 5: Miscellaneous..................................................................................................... 101Chapter 18: Static Administration Options.................................................................. 102
Using Static Administration Options................................................................................ 102Entering administrative options in 1600 series phones................................................ 103Entering administrative options in 9600 series phones................................................ 103
Administrator Process Password.................................................................................... 104Enabling hub interface................................................................................................... 104
Enabling hub interface for 1600 series phones........................................................... 105Enabling hub interface for 9600 series...................................................................... 105
View details of phone..................................................................................................... 106View details of 1600 series phones........................................................................... 106Viewing details of 9600 series phones....................................................................... 107
Contents
November 2021 IP Office Platform H.323 Telephone Installation 7Comments on this document? [email protected]

Self-test procedure for 1600 series phones...................................................................... 108Self-test procedure for 9600 series phones...................................................................... 108Resetting a phone......................................................................................................... 109
Resetting 1600 series phone.................................................................................... 109Resetting 9600 series phone.................................................................................... 110
Clearing a Phone........................................................................................................... 110Clearing 1600 series phones.................................................................................... 110Clearing 9600 series phones.................................................................................... 111
Site Specific Option Number........................................................................................... 111SSON in 1600 series phones.................................................................................... 112SSON in 9600 phone series..................................................................................... 112
Chapter 19: Restart Senarios......................................................................................... 113Boot File Needs Upgrading............................................................................................. 114No Application File or Application File Needs Upgrading................................................... 114Correct Boot File and Application File Already Loaded...................................................... 115
Chapter 20: Resources................................................................................................... 116Documentation.............................................................................................................. 116
Finding documents on the Avaya Support website...................................................... 116Training........................................................................................................................ 116Viewing Avaya Mentor videos......................................................................................... 116Support......................................................................................................................... 117
Using the Avaya InSite Knowledge Base................................................................... 117
Contents
November 2021 IP Office Platform H.323 Telephone Installation 8Comments on this document? [email protected]

Part 1: IP Office H323 PhoneInstallation
November 2021 IP Office Platform H.323 Telephone Installation 9Comments on this document? [email protected]

Chapter 1: IP Office H.323 IP Phones
This documentation provides notes for the installation of supported Avaya IP phones onto an IPOffice system. It should be used in conjunction with the existing installation documentation for thoseseries of phones.
• DHCP versus Static IP Installation: Though static IP installation of H.323 IP phones ispossible, installation using DHCP is strongly recommended. The use of DHCP eases both theinstallation process and future maintenance and administration. For static installations,following a boot file upgrade, all static address settings are lost and must be re-entered.
• Network Assessment: High quality voice transmission across an IP network requires carefulassessment of many factors. Therefore:
- We strongly recommend that IP phone installation is only done by installers with VoIPexperience.
- The whole customer network must be assessed for its suitability for VoIP, before installation.Avaya will not support any installation where the results of a network assessment cannot besupplied. See Network Assessment on page 18 for further details.
Related linksWhat's New in this Release on page 11Supported H.323 IP Phones on page 11System Capacity on page 12Phone Firmware on page 13File Auto-Generation on page 14
November 2021 IP Office Platform H.323 Telephone Installation 10Comments on this document? [email protected]

Simple Installation on page 14Installation Requirements on page 16Licenses and Subscriptions on page 17Network Assessment on page 18Voice Compression Channels on page 19QoS on page 21Potential VoIP Problems on page 21User PC Connection on page 22Power Supply Options on page 23File Server Options on page 24Control Unit Memory Cards on page 25Phone File Requests on page 26Control unit memory card on page 27Registration Blacklisting on page 27Blocking Default Passcodes on page 28
What's New in this ReleaseThis manual includes the following changes introduced in IP Office Release 11.1:
• Subscription Mode Operation: IP Office systems can now run in subscription mode. In thatmode, the entitlement for IP phones to operate with the system is granted by association witha subscribed user rather than an extension license. Subscription mode only supports thefollowing Avaya H323 phones:
- 1600 Series: 1603IP/SW, 1608, 1608-I, 1616, 1616-I
- 3600 Series: 3641, 3645
- 3700 Series: 3720, 3725, 3730, 3735, 3740, 3745, 3749 - Connection via DECT R4 basestations.
- 9600 Series: 9608, 9608G, 9611G, 9621G, 9641G, 9641GS.
Related linksIP Office H.323 IP Phones on page 10
Supported H.323 IP PhonesThis documentation provides installation notes for the following Avaya phones. Other supportedAvaya H.323 IP phones, for example DECT R4 3700 Series phones are covered by separateinstallation documentation.
What's New in this Release
November 2021 IP Office Platform H.323 Telephone Installation 11Comments on this document? [email protected]

H.323 IP Phones PoE Class PC Port SubscriptionModeClass Idle
1600 Series 1603 2 4.4W - ✓
1603SW 2 4.4W ✓ ✓
1608 2 3.7W ✓ ✓
1616 2 2.7W ✓ ✓
9600 Series 9608 1 2.08W ✓ ✓
9611G 1 2.8W ✓ ✓
9621G 2 3.49W ✓ ✓
9641G 2 3.44W ✓ ✓
• 1603/1603SW - These phones require a PoE Splitter unit in order to use PoE.
Related linksIP Office H.323 IP Phones on page 10
System CapacitySystem capacity encompasses the number of configurable phone extensions and the number ofsimultaneous IP phone calls.
Extension CapacityThe maximum number of H.323 IP phones supported depends on the type of system.IP500 V2 systems support up to 384 extensions. To find the capacity for IP phones subtract thenumber of physical non-IP extensions ports in the system, ie. extension ports on the IP Officecontrol unit and any external expansion modules. Note however that these systems only support amaximum of 148 VCM channels which may also restrict the number of simultaneous VoIP calls,see below.For IP Office Server Edition systems, the IP extension capacity depends on the server type. Referto the Avaya IP Office™ Platform Guidelines: Capacity document.
Call CapacityThere are a number of situations where the IP500 V2 system needs to provide a voicecompression channel in order for an IP phone to make calls. These channels are provided byVoice Compression Modules (VCMs) installed in the system. The number of VCM channelsrequired and how long the channel is required depends on a number of factors.A simple summary is:
• A VCM channel is required during call setup.• The VCM channel is released if the call is to/from another IP device using the same
compression codec (the supported VCM codecs are G.711, G.729 and G.722).• The VCM channel is used for the duration of the call when the call is to/from/via a non-IP
device (extension or trunk line).
IP Office H.323 IP Phones
November 2021 IP Office Platform H.323 Telephone Installation 12Comments on this document? [email protected]

• It should be remembered that VCM channels are also used for calls from non-IP devices toIP lines if those are configured in the IP Office system (IP, SIP and SES lines).
• Calls from IP phones to the IP Office voicemail server use a VCM channel.Related links
IP Office H.323 IP Phones on page 10
Phone FirmwareThe firmware used by Avaya IP phones is upgradeable and different releases of firmware aremade available via the Avaya support website. However, H.323 IP phones used on a IP Officesystem must only use the firmware supplied pre-installed with the IP Office system or with its IPOffice Manager application. Other versions of IP Phone firmware may not have been testedspecifically with IP Office systems and so should not be used unless IP Office support isspecifically mentioned in the firmware's accompanying documentation.
The firmware consists of a number of different types of files:
File Type Descriptionxxupgrade files The first file that a phone requests when starting up is the xxupgrade file.
This file contains a list of the phone .bin files that are available as part of thefirmware set and the version numbers of those files. If the version of a filediffers from that which the phone already has loaded, the phone will requestthe new file.
During this process the phone may reboot after loading each file and thenrequest the xxupgrade.txt file again until it has updated all its firmware, ifnecessary. Separate files are provided for the different phone series. Forexample:
• 16xxupgrade.txt: This file lists the firmware files that 1600 Series phonesshould load.
• 96xxupgrade.txt: This file lists the firmware files that 9600 Series phonesshould load.
• 96x1Hupgrade.txt: This file list the firmware files that 9608, 9611, 9621,and 9641 phones should load.
.bin files Following the instructions in the xxupgrade.txt file, the phone will loadany .bin files it requires if their versions differ from that which the phone alreadyhas loaded.
.tar files Instead of the .bin file used by other phones, the 9600 Series phones use .tararchive files to download multiple files in a single step and then unpack the .tarfiles to load their contents.
Table continues…
Phone Firmware
November 2021 IP Office Platform H.323 Telephone Installation 13Comments on this document? [email protected]

File Type Description46xxsettings.txtfiles
The last line of the xxupgrade.txt file instructs the phone to load a46xxsettings.txt file. This is an editable file which can be used to adjustthe operation of the phones.
.lng files The firmware may include language files for use by 1600 Series and 9600Series phones. Which of these language files are loaded is set in the46xxsettings.txt file.
The phone firmware files are installed as part of the IP Office Manager application and are foundin the application's installation directory. By default, the directory is found at c:\Program Files\Avaya\IP Office\Manager.
The same firmware files can also be obtained directly from the software package used to install IPOffice Manager without having to perform the installation. The files are located in the \programfiles\Avaya\IPOffice\Manager sub-folder of the installation directory.
Note that these sets of files include .bin files that are also used for other devices including the IPOffice system itself.
Related linksIP Office H.323 IP Phones on page 10
File Auto-GenerationWhen the IP Office system is acting as the file server for the phones, it is able to auto-generatethe 46xxsettings.txt and .lng files used by the phones. It will do this if the requested file isnot physically present in the location where the system stores the firmware files. The system alsouses the user's configuration settings to auto-generate the phone user settings file.The system still auto-generates files even when HTTP redirection is used to load the 9608, 9611,9621, and 9641 .bin files from another file server.
Related linksIP Office H.323 IP Phones on page 10
Simple InstallationThe simplest installation has the IP Office system acting as the DHCP and file servers for all the IPphones registered with it.
IP Office H.323 IP Phones
November 2021 IP Office Platform H.323 Telephone Installation 14Comments on this document? [email protected]

This type of installation uses the following equipment:
• IP Office Server: The IP Office system performs a number of roles for the phones:
- DHCP Server: The IP Office system is acting as the DHCP server for the phones. TheDHCP response to the phones includes both IP address settings, details of the file serverto use as configured in the IP Office configuration and the systems on address as theH.323 gatekeeper for the phones. The IP Office DHCP function can be configured toprovide DHCP addresses only in response to requests from Avaya IP phones. This allowsan alternate DHCP server to be used for other devices that use DHCP.
- H.323 Gatekeeper: IP phones require an H.323 gatekeeper to which they register. Thegatekeeper then controls the connection of calls to and from the phone. In this and allscenarios the IP Office systems as the H.323 Gatekeeper.
- File Server: During installation the IP phones need to download firmware files from a fileserver. This is done using either HTTPS, HTTP or TFTP in that order (1600 and 9600Series phones do not support TFTP). The IP Office control unit memory card can be usedas the file source.
- IP500 V2 systems can act as the file server for up to 50 phones by using their ownmemory card. IP Office Server Edition systems can also act as the file server for up to 50phones. For larger numbers a separate 3rd-party HTTP server should be used.
- Backup/Restore Server: 1600 Series and 9600 Series phones can be configured tobackup and restore user and phone settings to a server. The address of this server is setseparately from that of the file server used for phone firmware though the same servermay be useable. The recommended method is to us the IP Office system as the server forthis function.
• Switches: The IP Office has a limited number of LAN connection ports, intended only toconnect itself to the existing data network. The addition of IP phones will require the networkto include additional port capacity.
• Power Supplies: Each H.323 IP phone requires a power supply. The IP Office system doesnot provide any power to IP phones. The phones can be:
- Power over Ethernet Supply: Most Avaya IP phones can be powered from an 802.3afPower over Ethernet (PoE) power supply. This can be done using PoE switches to supportmultiple phones or using individual PoE injector devices for each phone.
- Individual Power Supply Units: An individual power supply unit can be used with eachphone. This requires a power supply socket at each phone location. The type of power
Simple Installation
November 2021 IP Office Platform H.323 Telephone Installation 15Comments on this document? [email protected]

supply will depend on the type of phone. Note that phones using button modules mayneed to use an individual power supply unit rather than PoE.
Related linksIP Office H.323 IP Phones on page 10
Installation RequirementsTo install an IP phone on IP Office, the following items are required:
DescriptionNetwork Assessment A network assessment must be completed. Avaya will not support VoIP on a
network where a satisfactory network assessment has not been obtained.Extension Number andUser Details
A full listing of the planned extension number and user name details isrequired. The planned extension number must be unused and is requested bythe phone during installation.
Power Supplies Each phone requires a power supply. Avaya IP phones do not draw power fromthe IP Office. A number of options exist for how power is supplied to thephones and all the Avaya IP deskphones support Power over Ethernet (PoE).See Power Supply Options on page 23
LAN Socket An RJ45 Ethernet LAN connection point is required for each phone.Category 5 Cabling All LAN cables and LAN cable infrastructure used with H.323 IP phones should
use CAT5 cabling.LAN Cables Check that an RJ45 LAN cable has been supplied with the IP phone for
connection to the power supply unit. You may also need an additional RJ45LAN cable for connection from the power unit to the customer LAN. This willdepend on the type of power supply being used.
A further RJ45 LAN cable can be used to connect the user's PC to the LAN viathe IP phone (not supported on 4601, 4602, 5601 and 5602 H.323 IP phones).
Voice CompressionChannels
For IP500 V2 systems, the control unit must have voice compression channelsinstalled. Channels are required during the connection if calls involving IPphones and may also be required during the call. See Voice CompressionChannels on page 19 for full details.
DHCP Server The IP Office Unit can perform this role for all the phones. If another DHCPserver is used for the network, this may be able to do DHCP for the H.323 IPphones, see Alternate DHCP Servers . Also the IP Office system can beconfigured to only provide DHCP support to Avaya IP phones.
• Static IP addressing can also be used for IP phone installation if required.However that method of installation is not recommended.
Table continues…
IP Office H.323 IP Phones
November 2021 IP Office Platform H.323 Telephone Installation 16Comments on this document? [email protected]

DescriptionHTTP File Server A PC running the IP Office Manager application can perform this role for up to
5 H.323 IP phones. An IP Office control unit with a memory card can use thatmemory card as the source for up to 50 phones. The IP Office system can actas the file server for up to 50 IP phones. For larger numbers a separate 3rd-party HTTP server should be used.
H.323 Gatekeeper The IP Office system performs this role.Manager PC A Windows PC running IP Office Manager is required for IP Office
configuration changes. The PC should also have System Status Applicationand System Monitor installed.
IP Telephone Software The software for IP phone installation is installed into the IP Office Managerapplication's program folder as during the applications installation. It is alsoincluded as part of the IP Office Server Edition applications installation of the IPOffice application on the server.
Licenses andSubscriptions
For systems not running in subscription mode, each IP phones registered withthe system requires an license to operate. On subscriptions mode systems, theextension must be associated with a subscribed user. Refer to Licenses andSubscriptions
Backup/Restore Server The phones backup and restore various phone and user settings whenever theuser logs on or logs out. This uses files stored on a file server. This is notnecessarily the same server as used for the phone firmware files. The IP Officesystem's own file storage can be used for this function and is therecommended option.
Related linksIP Office H.323 IP Phones on page 10
Licenses and SubscriptionsSubscriptionsSystems running in subscription mode support extensions up to the total number of usersubscriptions available.
LicensesFor systems not running in subscription mode, licenses are required for each IP extension.
• On IP Office Server Edition systems, the user must be configured to a licensed user profilewith a user license such as the Basic User license. Unlicensed users cannot login to anextension.
• For Avaya phones, an Avaya IP Endpoint license is required for each phone. This includes all1600, 9600, IP DECT, DECT R4 and Spectralink.
• For non-Avaya IP phones, a Third-Party IP Endpoint license is required.- By default licenses are consumed by each Avaya IP phone that registers with the IP Office
in the order that they register. The license is released if the phone unregisters. However, it
Licenses and Subscriptions
November 2021 IP Office Platform H.323 Telephone Installation 17Comments on this document? [email protected]

is possible to reserve a license for particular phones in order to ensure that they phonesalways obtain a license. This is done through the Reserve Avaya IP Endpoint Licensesetting of each IP extension. On system's using WebLM licensing, this option is fixed toreserve a license.
- Avaya IP phones without a license are still be able to register but are limited to makingemergency calls only (Dial Emergency short code calls). The associated user is treated asif logged off and the phone displays "No license available". If a license becomes available,it is assigned to any unlicensed DECT handsets first and then to any other unlicensedAvaya phones in the order that the phones registered.
Related linksIP Office H.323 IP Phones on page 10Reserving Licenses on page 35
Network AssessmentThe IP Office system is a pure Voice over IP (VoIP) system. All trunks and telephone extensionsconnect to the system via the customers data network. It is therefore absolutely imperative that thecustomer network is assessed and reconfigured if necessary to meet the needs of VoIP traffic.
Warning:
When installing IP phones on a IP Office system, it is assumed by Avaya that a networkassessment has been performed. If a support issue is escalated to Avaya, Avaya may requestto see the results of a recent network assessment and may refuse to provide support if anetwork assessment with satisfactory results has not been performed.
Current technology allows optimally configured networks to deliver VoIP services with voice qualitythat matches that of the public phone network. However, few networks are optimally configuredand so care should be taken to assess the VoIP quality achievable within a customer network.
Not every network is able to carry voice transmissions. Some data networks have insufficientcapacity for voice traffic or have data peaks that will occasionally impact voice traffic. In addition,the usual history of growing and developing a network by integrating products from many vendorsmakes it necessary to test all the network components for compatibility with VoIP traffic.
A network assessment should include a determination of the following:
• A network audit to review existing equipment and evaluate its capabilities, including its abilityto meet both current and planned voice and data needs.
• A determination of network objectives, including the dominant traffic type, choice oftechnologies and setting voice quality objectives.
• The assessment should leave you confident that the network will have the capacity for theforeseen data and voice traffic.
IP Office H.323 IP Phones
November 2021 IP Office Platform H.323 Telephone Installation 18Comments on this document? [email protected]

Network Assessment TargetsThe network assessment targets are:
• Latency: Less than 180ms for good quality. Less than 80ms for toll quality. This is themeasurement of packet transfer time in one direction. The range 80ms to 180ms is generallyacceptable. Note that the different audio codecs used each impose a fixed delay caused bythe codec conversion as follows:- G.711: 20ms.- G.722: 40ms.- G.729: 40ms.
• Packet Loss: Less than 3% for good quality. Less than 1% for toll quality. Excessive packetloss will be audible as clipped words and may also cause call setup delays.
• Jitter: Less than 20ms. Jitter is a measure of the variance in the time for different packets inthe same call to reach their destination. Excessive jitter will become audible as echo.
• Duration: Monitor statistics once every minute for a full week. The network assessment mustinclude normal hours of business operation.
Related linksIP Office H.323 IP Phones on page 10
Voice Compression ChannelsCalls to and from IP devices can require conversion to the audio codec format being used by theIP device. For IP Office systems this conversion is done by voice compression channels. Thesesupport the common IP audio codecs G.711, G.722, and G.729a.
• For the IP500 V2 control units, channels can be added using IP500 VCM cards and IP500Combination Cards.
• IP Office Server Edition systems provide their own voice compression channels throughsoftware without requiring additional hardware.
The voice compression channels are used as follows:
Call Type Voice Compression Channel UsageIP Device to Non-IPDevice
These calls require a voice compression channel for the duration of the call. Ifno channel is available, busy indication is returned to the caller.
Table continues…
Voice Compression Channels
November 2021 IP Office Platform H.323 Telephone Installation 19Comments on this document? [email protected]

Call Type Voice Compression Channel UsageIP Device to IP Device Call progress tones (for example dial tone, secondary dial tone, etc) do not
require voice compression channels with the following exceptions:
• Short code confirmation, ARS camp on and account code entry tones requirea voice compression channel.
When a call is connected:
• If the IP devices use the same audio codec no voice compression channel isused.
If the devices use differing audio codecs, a voice compression channel isrequired for each.
Non-IP Device to Non-IP Device
No voice compression channels are required.
Music on Hold This is provided from the IP Office's TDM bus and therefore requires a voicecompression channel when played to an IP device.
Conference Resourcesand IP Devices
Conferencing resources are managed by the conference chip which is on theIP Office's TDM bus. Therefore, a voice compression channel is required foreach IP device involved in a conference. This includes services that useconference resources such as call listen, intrusion, call recording and silentmonitoring.
Voicemail Services andIP Devices
Calls to the IP Office voicemail servers are treated as data calls from the TDMbus. Therefore calls from an IP device to voicemail require a voicecompression channel.
Fax Calls These are voice calls but with a slightly wider frequency range than spokenvoice calls. IP Office only supports fax across IP between IP Office systemswith the Fax Transport option selected. It does not currently support T38.
T38 Fax Calls IP Office 5.0+ supports T38 fax on SIP trunks and SIP extensions. Each T38fax call uses a VCM channel.
Within a Small Community Network, a T38 fax call can be converted to a callacross an H.323 SCN lines using the IP Office Fax Transport Support protocol.This conversion uses 2 VCM channels.
In order use T38 Fax connection, the Equipment Classification of an analogextension connected to a fax machine can be set Fax Machine. Additionally, anew short code feature Dial Fax is available.
Note:
T3 IP devices must be configured to 20ms packet size for the above conditions to apply. If leftconfigured for 10ms packet size, a voice compression channel is needed for all tones and fornon-direct media calls.
Measuring Channel UsageThe IP Office system Status Application can be used to display voice compression channel usage.Within the Resources section it displays the number of channel in use. It also displays how oftenthere have been insufficient channels available and the last time such an event occurred.
IP Office H.323 IP Phones
November 2021 IP Office Platform H.323 Telephone Installation 20Comments on this document? [email protected]

For IP500 VCM cards, the level of channel usage is also indicated by the LEDs (1 to 8) on thefront of the IP500 VCM card.
Related linksIP Office H.323 IP Phones on page 10
QoSWhen transporting voice over low speed links it is possible for normal data packets (1500 bytepackets) to prevent or delay voice packets (typically 67 or 31 bytes) from getting across the link.This can cause unacceptable speech quality.
Therefore, it is vital that all traffic routers and switches in the network have some form of Quality ofService (QoS) mechanism. QoS routers are essential to ensure low speech latency and tomaintain sufficient audio quality.
IP Office supports the DiffServ (RFC2474) QoS mechanism. This is based upon using a Type ofService (ToS) field in the IP packet header. On its WAN interfaces, IP Office uses this to prioritizevoice and voice signalling packets. It also fragments large data packets and, where supported,provides VoIP header compression to minimize the WAN overhead.
Related linksIP Office H.323 IP Phones on page 10
Potential VoIP ProblemsIt is likely that any fault on a network, regardless of its cause, will initially show up as adegradation in the quality of VoIP operation. This is regardless of whether the fault is with the VoIPtelephony equipment. Therefore, by installing a VoIP solution, you must be aware that you willbecome the first point of call for diagnosing and assessing all potential customer network issues.
DescriptionEnd-to-End MatchingStandards
VoIP depends upon the support and selection of the same voice compression,header compression and QoS standards throughout all stages of the callsrouting. The start and end points must be using the same compressionmethods. All intermediate points must support DiffServ QoS.
Avoid Hubs Hubs introduce echo and congestion points. If the customer network requiresLAN connections beyond the capacity of the IP Office Unit itself, Ethernetswitches should be used. Even if this is not the case, Ethernet switches arerecommended as they allow traffic prioritization to be implemented for VoIPdevices.
Table continues…
QoS
November 2021 IP Office Platform H.323 Telephone Installation 21Comments on this document? [email protected]

DescriptionPower SupplyConditioning,Protection and Backup
Traditional phone systems provide power to all their attached phone devicesfrom a single source. In a VoIP installation, the same care and concern thatgoes into providing power conditioning, protection and backup to the centralphone system, must now be applied to all devices on the IP network.
Multicasting In a data only network, it is possible for an incorrectly installed printer or hubcard to multicast traffic without that fault being immediately identified. On aVoIP network incorrect multicasting will quickly affect VoIP calls and features.
Duplicate IPAddressing
Duplicate addresses is a frequent issue.
Excessive Utilization A workstation that constantly transmits high traffic levels can flood a network,causing VoIP service to disappear.
Network Access An IP network is much more open to users connecting a new device orinstalling software on existing devices that then impacts on VoIP.
Cabling Connections Technically VoIP can (bandwidth allowing) be run across any IP networkconnection. In practice, Cat5 cabling is essential.
Related linksIP Office H.323 IP Phones on page 10
User PC ConnectionTo simplify the number of LAN connections from the user's desk, it is possible to route their PCEthernet LAN cable via most Avaya IP phones.
The LAN cable should be connected from the PC to the socket with a PC symbol ( ) at the backof the IP phone. The PC's network configuration does not need to be altered from that which itpreviously used for direct connection to the LAN. This port supports 10/100Mbps ethernetconnections. Phones with a G suffix also support 1000Mbps Gigabit connections.
For phones without a PC port, a separate Gigabit Adapter (SAP 700416985) must be used. Thisdevice splits the data and voice traffic before it reaches the phone, providing a 10/100Mbps outputfor the phone and a 10/100/1000Mbps output for the PC. The adapter is powered from thephone's existing power supply. Refer to the "Gigabit Ethernet Adapter Installation and SafetyInstructions" (16-601543).
Related linksIP Office H.323 IP Phones on page 10
IP Office H.323 IP Phones
November 2021 IP Office Platform H.323 Telephone Installation 22Comments on this document? [email protected]

Power Supply OptionsEach H.323 IP phone requires a power supply. They do not draw power from the phone system.Listed below are the power supply options that can be used.
IEEE 802.3af is a standard commonly known as Power over Ethernet (PoE). It allows networkdevices to receive power via the network cable using the same wires as the data signals. All theAvaya H.323 IP phones supported on IP Office also support this standard.
Where a large number of phones is being installed, the use of PoE switches is recommended. Forother scenarios, individual PoE injector devices can be used to add PoE power support to thephone's LAN connection from a non- PoE switch.
H.323 IP Phones Supported Models 802.3af PoE ClassClass Idle
1600 Series 1603 2 4.4W1603W 2 4.4W1608 2 3.7W1616 2 2.7W
9600 Series 9608 1 2.08W9611G 1 2.8W9621G 2 3.49W9641G 2 3.44W
These 1603 and 1603SW phones require a separate PoE Splitter unit in order to use PoE.
Exceeding the Class limit of a PoE port or the total Class support of a PoE switch may causeincorrect operation.
Note that for phones being used with an add-on button module unit and other accessories thepower requirements are higher. For 9608, 9611, 9621, and 9641 phones, set the phone powerswitch to H and treat the phone as Class 3.
1600 Series PhonesThese phones can use either PoE as above or can be powered from using 1600 Series plug-toppower supply units (PSUs). Different models of PSU exist for the various type of mains poweroutlets in different countries. The PSU connects to the phone using a barrel connector under thephone.
9608, 9611, 9621 and 9641 PhonesThese phones only support a Power over Ethernet (PoE) connector. If not being supplied with aPoE switch, a separate Avaya Global Single Port PoE injector can be used for each phone.
Related linksIP Office H.323 IP Phones on page 10
Power Supply Options
November 2021 IP Office Platform H.323 Telephone Installation 23Comments on this document? [email protected]

File Server OptionsDuring installation and maintenance, the phones download various firmware files . In order to dothis, a phone requests files for an HTTPS server first. If it gets no response, it then tries to obtainthe files from an HTTP server. The address of the server to use is provided as part of the DHCPresponse that the phone received from the DHCP server. If the IP Office system is being used asthe DHCP server, the file server address is set as part of the IP Office configuration. For phonesinstalled using static addressing, the file server address is one of the addresses entered duringinstallation.
• Each phone will attempt to request files from the file server every time it is restarted.However, if the phone does not receive any response, it will continue restarting using theexisting files that it has in its own memory. Therefore there is no requirement for the fileserver to be permanently available after initial installation.
• The phones also use a server for the backup and restoration of user settings during phoneoperation. The address for this server is defined by a separate address set found in the46xxsettings.txt file. It is not necessarily the same server that is used for the phonefirmware. However, for IP Office operation, the address of the IP Office server isrecommended for use as the backup/restore file server.
The following options are available for the file server for IP phones being installed on an IP Officesystem.
File Server Up to XPhones
TFTP
(Port 69)
HTTP
(Port 80)
HTTPS
(Port 411)IP Office Manager
When running, IP Office Manager can act as aHTTP/TFTP server for file requests from IP phones.
5 ✓ ✓ -
IP500 V2 Memory Card
For IP Office control units fitted with a memory card,that card can be used to provided the software files.For IP500 V2 control units the System SD card is amandatory item and is pre-loaded with the phonefirmware files during card creation and upgrades.Various other files can be auto-generated by the IPOffice if not present on the memory card.
50 ✓ ✓ ✓
IP Office Server Edition/IP Office Select
For IP Office systems, the IP Office application canact as the file server. The phone firmware files areinstalled onto the server as part of the IP Officeinstallation. Various other files can be auto-generated by the IP Office if not present on thememory card.
1 - ✓ ✓
Table continues…
IP Office H.323 IP Phones
November 2021 IP Office Platform H.323 Telephone Installation 24Comments on this document? [email protected]

File Server Up to XPhones
TFTP
(Port 69)
HTTP
(Port 80)
HTTPS
(Port 411)3rd Party Software
3rd Party HTTP/TFTP file server software isavailable from many sources including Avaya.
- ✓ ✓ ✓
1 Within a IP Office Server Edition/IP Office Select network, the servers (other than an IP500 V2Expansion) can act as file server for the systems full capacity of phones. However, the rate atwhich updated firmware delivery is supported depends on the server type as follows. If upgradeperformance above these figures is required, an external HTTP/S file server can be used.
• Dell R240: 100 phones per 50 minutes.
• HP DL360G7: 200 phones per 50 minutes.
• Dell R640: 300 phones per 50 minutes.
• OVA: Up to 300 phones per 50 minutes.2 For IP Office Release 9.0, for IP Office systems acting as the file server, HTTP redirection canbe applied to redirect 9608, 9611, 9621 and 9641 phone requests for .bin files to a separate HTTPserver.
Related linksIP Office H.323 IP Phones on page 10
Control Unit Memory CardsThe memory card used with IP500 V2 systems can be used to store files including those used byAvaya IP Phones.
The IP500 V2 control unit requires a System SD card at all times. During creation of this card, afull set of IP Office firmware files including those used by Avaya IP phones is placed onto the card.
Testing the File ServerYou can use a web browser to perform a basic test of the file server. For example, if using HTTP,entering http://<server_address>/46xxsettings.txt should display the46xxsettings.txt file.
If using the IP Office system to auto-generate files, the settings file includes text indicating that itwas automatically generated by the system in response to the file request. This is useful to notonly check the file server operation but to also see the settings being supplied by the IP Officesystem.
Related linksIP Office H.323 IP Phones on page 10
Control Unit Memory Cards
November 2021 IP Office Platform H.323 Telephone Installation 25Comments on this document? [email protected]

Phone File RequestsWhen starting, most Avaya IP phones go through a process of requesting various files from a fileserver:
1. Usually this starts with a request an upgrade file. That file will indicate what firmware thephone should be running. If this differs from the firmware it is running, it will add thesoftware files listed to those it will download. The last line of the upgrade file tells thephone the name of settings file it should request.
2. The phone requests a settings file. This passes a large number of configuration settings tothe phone. It may also list additional files that the phone should request such as languagefiles and screen savers.
3. The phone requests additional files:
• Any firmware files indicated by the upgrade file.• Any additional files indicated by the settings file.• Any additional settings files.
4. The phone can also request a user settings file.
The above is just a general summary. Depending on the phone, the order of file request may vary.In addition, if requesting firmware for an upgrade, the phone may not request other files until thefirmware upgrade has been completed and it has restarted.
When the IP Office system is used as the file server, it has the ability to auto-generate many of thefiles requested by the phone.
Related linksIP Office H.323 IP Phones on page 10File Auto-Generation on page 26
File Auto-GenerationAvaya IP phones request a number of files from the file server when the phone is restarted. Forexample phone configuration and firmware files.
When using the IP Office system as the file server, when the phone requests a file, if that file is notavailable the system may auto-generate a file. The auto-generated file will use a combination ofdefault options and settings from the system configuration. Once supplied to the requesting phonethe auto-generated file is not retained on the system.
This feature is used for most of the file types except for actual firmware files(example .bin, .zip, .tar) and certificate files. If an actual file is uploaded to the system , auto-generation of that particular file stops.
Within the auto-generated 46xxsettings.txt file:
• Those settings based on IP Office configuration entries, for example language settings,appear in the sections labeled "AUTOGENERATEDSETTINGS".
IP Office H.323 IP Phones
November 2021 IP Office Platform H.323 Telephone Installation 26Comments on this document? [email protected]

• Those settings that remain the same for all IP Office systems using the same release ofsoftware appear in the section labeled "NONAUTOGENERATEDSETTINGS".
Testing the File ServerYou can use a web browser to perform a basic test of the file server. For example, if using HTTP,entering http://<server_address>/46xxsettings.txt should display the46xxsettings.txt file.
If using the IP Office system to auto-generate files, the settings file includes text indicating that itwas automatically generated by the system in response to the file request. This is useful to notonly check the file server operation but to also see the settings being supplied by the IP Officesystem.
Related linksPhone File Requests on page 26
Control unit memory cardThe memory card used with IP500 V2 systems can be used to store files including those used byAvaya IP Phones.
The IP500 V2 control unit requires a System SD card at all times. During creation of this cardusing IP Office Manager, a full set of IP Office firmware files including those used by Avaya IPphones is placed onto the card.
Related linksIP Office H.323 IP Phones on page 10
Registration BlacklistingThe IP Office system logs failed H323/SIP registration requests. Multiple failed attempts can leadto the extension and/or IP address becoming blocked for a period.
Blocking applies as follows:
Method DescriptionExtension Blocking Registration attempts to an existing extension using the wrong password are
blocked for 10 minutes after 5 failed attempts in any 10 minute period.IP Address Blocking Registration attempts to a non-existent extension or using the wrong password
of an existing extension are blocked for 10 minutes after 10 failed attempts inany 10 minute period.
Control unit memory card
November 2021 IP Office Platform H.323 Telephone Installation 27Comments on this document? [email protected]

When blocking occurs, the system generates an alarm in System Status Application and adds anentry to its audit log. A system alarm is also generated and can be output using any of thesupported system alarm routes (SMTP, SNMP, Syslog).
System Monitor can display details of blacklisted IP addresses and extensions, select Status >Blacklisted IP Addresses and Status > Blacklisted Extensions.
Related linksIP Office H.323 IP Phones on page 10
Blocking Default PasscodesAbout this taskFor IP Office R11.0 and higher, the default security settings block the use of default phonepasswords such as 0000 for extension registration.
Procedure1. Using IP Office Manager, access the system's security configuration.
2. On the General tab, clear Block Default IP Phone Passcodes checkbox.
3. Save the settings.
Related linksIP Office H.323 IP Phones on page 10
IP Office H.323 IP Phones
November 2021 IP Office Platform H.323 Telephone Installation 28Comments on this document? [email protected]

Chapter 2: Additional Phone Settings
The auto-generated 46xxsettings.txt settings files are suitable for most installations. However,in some scenarios it may be necessary to amend the value of the file settings or to add additionalsettings. This can be done in a number of ways:
• Using Static Files: Replace the auto-generated file with an actual file. The method is onlyrecommended for those experienced with the editing of Avaya phone settings files. The majordrawback is that you no longer benefit from the automatic changing of settings to matchchanges in the IP Office configuration. See Configuring and editing file settings on page 31.
• Use a settings file: If a file called 46xxsettings.txt is present on the system, then theauto-generated 46xxsettings.txt file instructs the phone to request that file. This allowsyou to upload a special file that contains any additional settings or override selected settings inthe auto-generated file. See 46xxspecials.txt on page 30.
• Use NoUser Source Numbers: There are a number of NoUser source number settings thatcan be used to add special values to the autogenerated settings file. See NoUser SourceNumbers on page 31.
Common Additional CommandsThe following are some of the frequently used additional commands. For full details of commandsavailable refer to the appropriate Avaya administrator's manual for the particular series of phones.
Description Setting File CommandPassword/CRAFT
Set the PROCPSWD specified in the auto-generated46xxsettings.txt file where X is the password. This is usefulscenarios such as TLS operation which cannot be enabled on phoneswith the default PROCPSWD.
SET PROCPSWD X
Administrators Password
Set the Vantage phone administrator password specified in the auto-generated 46xxsettings.txt file where X is the password.
SET ADMIN_PASSWORD X
Headset Operation
By default, the phone headset goes back on-hook when the other partydisconnects. Setting this source number changes that behavior so thatheadset remains off-hook when the other party disconnects.
SET HEADSYS 1
Table continues…
November 2021 IP Office Platform H.323 Telephone Installation 29Comments on this document? [email protected]

Description Setting File CommandBacklight Timer
Sets the timer in minutes for the phone backlight timer.
SET BAKLIGHTOFF 60
Screen Saver
This set of commands
1. Enable the screen saver
2. Set the name of screen saver to download
3. Sets the name of the current downloaded file to use.
SET SCREENSAVERONSET SCREENSAVER_IMAGEJ179scr_svr.jpgSETSCREENSAVER_IMAGE_DISPLAYJ179scr_svr
Background Image
This set of commands
1. Set the name of the background image to download
2. The name of the current downloaded file to use.
SET BACKGROUND_IMAGEJ179bck_grnd.jpgSETBACKGROUND_IMAGE_DISPLAYJ179bck_grnd
There are several NoUser source numbers used for remote extension. They operate differently inthat they change existing values in the auto-generated settings file given to a phone when thesystem detects that the phone requesting the file is a remote extension. See the "IP Office SIPPhones with ABSCE" manual.
Related links46xxspecials.txt on page 30NoUser Source Numbers on page 31Configuring and editing file settings on page 31
46xxspecials.txtFor systems using the auto-generated 46xxsettings.txt file, one option to add additional manualsettings is to use a file called 46xxspecials.txt. When such a file is added to the system, thecommand GET 46xxspecials.txt appears as the last line of the auto-generated46xxspecials.txt file requested by phones.
The 46xxspecials.txt file needs to be manually created and then placed on the phone fileserver. It can be a:
• Simple text file containing a single command
• Complex settings file with settings based on phone type, model, group, or model and group
To obtain an example of a complex structure, you can browse to http://<IPOffice>/46xxspecials.txt to obtain an auto-generated file. Save and edit that file before uploading itback to the system.
Related linksAdditional Phone Settings on page 29
Additional Phone Settings
November 2021 IP Office Platform H.323 Telephone Installation 30Comments on this document? [email protected]

NoUser Source NumbersMost values in the auto-generated settings file are based on settings taken from the IP Officesystem configuration. However, it may occasionally be necessary to add additional values to theauto-generated files. This can be done using the values entered as NoUser source numbers.
• Since these changes are applied to the values in the auto-generated 46xxsettings.txtfile, they are overridden by any setting entered in the 46xxsettings.txt file if present.
• There are a number of NoUser source number settings used for remote extensions. Theyoperate differently in that they change existing values in the auto-generated settings file givento a phone when the system detects that the phone requesting the file is a remote extension.Refer to the IP Office SIP Phones with ASBCE manual.
Example NoUser Source NumbersDescription
SET_46xx_PROCPSWD=X
This NoUser source number adds the command SET PROCPSWD X to theauto-generated settings file where X is the password set.
SET_ADMINPSWD=X This NoUser source number adds the command SET ADMINPSWD X to theauto-generated settings file where X is the password set.
SET_HEADSYS_1 This NoUser source number adds the command SET ADMINPSWD X to theauto-generated settings file.
SET_BAKLIGHTOFF=N This NoUser source number adds the command SET BAKLIGHTOFF N to theauto-generated settings file provided to a remote extension. N is the timeout inminutes.
Related linksAdditional Phone Settings on page 29
Configuring and editing file settingsAbout this taskMost Avaya IP phones download a settings file when restarted, This file contains a range ofsettings.
Note:Where possible that you use the IP Office system's as the file server and let it auto-generatethe settings files. This helps as the system automatically adjusts the settings provided tophones to match changes made in the system configuration.
NoUser Source Numbers
November 2021 IP Office Platform H.323 Telephone Installation 31Comments on this document? [email protected]

Procedure1. Browse to the system and enter the name of the particular phone settings file required, for
example http://192.168.42.1/46xxsettings.txt. The auto-generated file is displayed in thebrowser.
• Most Phones: 46xxsettings.txt• 1100/1200 Series: 11xxsettings.txt• H175: H1xxsettings.txt
2. Save the file as a local text file.
• To save the file using Chrome browser, right-click on the window and select Save As.
• To save the file using Explorer browser, select File > Save As.
• To save the file using Firefox browser, select Save Page As.
The downloaded file can now be edited using a text editor. The supported fields aredescribed in the appropriate administration manual for the phone series.
3. When completed, upload the file to the file server being used by the telephones.
4. Restart the phone or phones in order for them to reload their files including downloadingthe edited settings file.
Related linksAdditional Phone Settings on page 29
Additional Phone Settings
November 2021 IP Office Platform H.323 Telephone Installation 32Comments on this document? [email protected]

Part 2: Basic Installation Process
H.323 IP Phone Installation
The following is a summary of the major steps in the installation process. The recommendedinstallation method is to use DHCP where possible, to use the IP Office system as the file serverand to enable automatic user and extension creation.
DescriptionManager PC: Check that IP Office Manager, System Status Application and System Monitor
are installed and can be used to connect to the IP Office system. Verify that youcan receive the configuration from the system and send it back.
Voice CompressionChannels
For IP500 V2 systems, the control unit must be fitted with voice compressionchannels . Use either System Status Application (SSA) or System Monitorapplication to verify that the voice compression channels are available. SSA listthe Voice Compression Modules (VCM) channels on the Resources screen.The initial lines of Monitor output include the item VCOMP= which states thenumber of channels installed in the control unit.
Licenses orSubscriptions
Depending on the system's operating mode, each phone requires a license orsubscription. Phones without a license or subscription can register but will notoperate. See Licenses and Subscriptions on page 17.
H.323 GatekeeperSettings
The IP Office system has support for H.323 phones enabled by default.However, the setting should be checked.
DHCP Server Setting DHCP is the recommended method for installation of IP phones on a IP Officesystem. This requires a DHCP server configured to support IP phones. The IPOffice system can be used for this. If the customer want to use their own DHCPserver, it requires additional configuration
Phone File ServerSetting
If the IP Office system is being used for DHCP, it also needs to be configuredwith the address of the file server. Whichever installation method and file serveris selected, the phone firmware files need to be added to the files available onthe server.
Table continues…
November 2021 IP Office Platform H.323 Telephone Installation 33Comments on this document? [email protected]

DescriptionExtension and UserSettings
The IP Office system can be configured to automatically create user andextension entries in its configuration for each IP phone that is installed. Itautomatic creation is not used, entries must be manually created for eachextension and user before the phones are installed.
Phone Connections Once the steps above have been completed, the phones can be connected tothe network. If using DHCP, the phones will automatically obtain IP addressinformation and other settings and then start loading files. If not using DHCP, thephones will have to be taken through a manual process of entering the IPaddress information and settings.
Phone Registration Once the phones have downloaded all the files they require from the file server,they will attempt to register with the IP Office system. The phones will prompt forentry of the extension number that they should use.
Testing Operation of the phones should be tested by making a number of calls, includingexternal calls.
Post Installation If auto-creation was used for the extension and or user entries, those settingsshould be disabled after installation of all the phones is completed. This manualonly details the minimum user configuration necessary for installation. The newusers can now be fully configured to meet the customer requirements for thoseusers.
Basic Installation Process
November 2021 IP Office Platform H.323 Telephone Installation 34Comments on this document? [email protected]

Chapter 3: Licenses and Subscriptions
SubscriptionsSystems running in subscription mode support extensions up to the total number of usersubscriptions available.
LicensesFor systems not running in subscription mode, licenses are required for each IP extension.
• On IP Office Server Edition systems, the user must be configured to a licensed user profile witha user license such as the Basic User license. Unlicensed users cannot login to an extension.
• For Avaya phones, an Avaya IP Endpoint license is required for each phone. This includes all1600, 9600, IP DECT, DECT R4 and Spectralink.
• For non-Avaya IP phones, a Third-Party IP Endpoint license is required.- By default licenses are consumed by each Avaya IP phone that registers with the IP Office in
the order that they register. The license is released if the phone unregisters. However, it ispossible to reserve a license for particular phones in order to ensure that they phonesalways obtain a license. This is done through the Reserve Avaya IP Endpoint Licensesetting of each IP extension. On system's using WebLM licensing, this option is fixed toreserve a license.
- Avaya IP phones without a license are still be able to register but are limited to makingemergency calls only (Dial Emergency short code calls). The associated user is treated as iflogged off and the phone displays "No license available". If a license becomes available, it isassigned to any unlicensed DECT handsets first and then to any other unlicensed Avayaphones in the order that the phones registered.
Related linksIP Office H.323 IP Phones on page 10Reserving Licenses on page 35
Reserving LicensesAbout this taskThis particular process cannot normally be done until the extension entry has been created. Ifusing automatic extension creation (the default), this means that license reservation cannot bedone until after initial installation of the phone. However, consideration should be given to usingthis setting with any existing phones already installed in order to ensure that they retain theirlicenses if possible following the addition of other phones.
November 2021 IP Office Platform H.323 Telephone Installation 35Comments on this document? [email protected]

Licenses are normally automatically assigned to extensions in order of registration. Howeverexisting extensions can reserve a license in order to ensure they do not become unlicensed whennew extensions added to the system manage to register first following a system reboot.
• On system's using WebLM licensing, this option is fixed to reserve a license.• License reservation is not supported on subscription mode systems.
Procedure1. Using IP Office Manager, receive the configuration from the telephone system.
2. Select Extension and then select the H.323 extension.
3. Select the VoIP tab.
4. Set the Reserve License field to Reserve Avaya IP endpoint license.
5. Repeat the process for any other extensions for which you want to reserve the license.
6. Save the configuration.
Related linksLicenses and Subscriptions on page 17
Licenses and Subscriptions
November 2021 IP Office Platform H.323 Telephone Installation 36Comments on this document? [email protected]

Chapter 4: Enabling the H.323 Gatekeeper
About this taskSupport for H.323 telephones and lines is enabled by default. However, the settings should bechecked.
Procedure1. Using IP Office Manager, retrieve the configuration from the system.
2. Select System3. Select the LAN1 or LAN2 tab depending on which of the system's LAN interfaces you want
to use to support H.323 extensions.
4. Select the VoIP sub-tab.
5. Enable the H323 Gatekeeper Enable setting checkbox.
6. Save the configuration.
Related linksSetting the RTP Port Range on page 37Adjusting DiffServ QoS on page 39System Default Codecs on page 39
Setting the RTP Port RangeAbout this taskThe ports used for H.323 VoIP calls vary for each call. The range for the ports used can beadjusted in order to avoid conflict with other services. If the customer has any internal firewalls orsimilar equipment that applies port filtering or only forwards traffic based on the port used, therange set here must be allowed by those devices.
November 2021 IP Office Platform H.323 Telephone Installation 37Comments on this document? [email protected]

For each VoIP call, receive ports are selected from the range defined below. Even numbers in therange are used for the calls incoming Real-Time Transport Protocol (RTP) traffic. The same callsReal-Time Transport Control Protocol (RTCP) traffic uses the RTP port number plus 1, that is theodd numbers.It is recommended that only port numbers greater than or equal to 49152 but strictly less than65535 are used, that being the range defined by the Internet Assigned Numbers Authority (IANA)for dynamic usage.
Procedure1. Using IP Office Manager, retrieve the configuration from the system.
2. Select System3. Select the LAN1 or LAN2 tab depending on which of the system's LAN interfaces you want
to use to support H.323 extensions.
4. Select the VoIP sub-tab.
5. Check the Port Number Rangeshown in the RTP section. Remember that the matchingRTCP traffic uses the same range plus 1.
• Minimum: Default = 49152. Range = 1024 to 65280.
This sets the lower limit for the RTP port numbers used by the system. Choosing aminimum range of less than 1024 should only be done after careful analysis of theoverall configuration.
• Maximum: Default = 53246. Range = 1278 to 65534.
This sets the upper limit for the RTP port numbers used by the system. The gapbetween the minimum and the maximum must be at least 254. Choosing a minimumrange of less than 1024 should only be done after careful analysis of the overallconfiguration.
6. Save the configuration.
Related linksEnabling the H.323 Gatekeeper on page 37
Enabling the H.323 Gatekeeper
November 2021 IP Office Platform H.323 Telephone Installation 38Comments on this document? [email protected]

Adjusting DiffServ QoSAbout this taskDiffServ is used to apply different 'quality of service' tags to the voice (RTP) and control signal(RTCP) elements of a VoIP call. The IP Office system itself does not apply any different priority todata packets its receives or sends based on their tags. However, when being used in a networkwhere QoS is being used for prioritization by other devices, the IP Office's settings should be setto match those expected for voice calls and their associated controlsignalling.
Procedure1. Using IP Office Manager, retrieve the configuration from the system.
2. Select System3. Select the LAN1 or LAN2 tab depending on which of the system's LAN interfaces you want
to use to support H.323 extensions.
4. Select the VoIP sub-tab.
Check the DiffServ Settings that are being used by the system. Note that the two rowsare linked, the upper row shows the DiffServ values in Hex numbers, the lower row showsthe values in decimal. The hex values are equal to the decimal multiplied by 4. Either rowcan be used to set the required values.
5. Save the configuration.
Related linksEnabling the H.323 Gatekeeper on page 37
System Default CodecsAbout this taskBy default, all VoIP devices added to the IP Office configuration use the system's default codecpreferences. This is shown by the Codec setting on an IP trunk or extension being set to SystemDefault.
Adjusting DiffServ QoS
November 2021 IP Office Platform H.323 Telephone Installation 39Comments on this document? [email protected]

In addition to changing the default codec preference order for all VoIP trunks and extension, thecodec preferences used by a particular trunk or extension can be adjusted. However, the use ofthe common system settings ensures codec consistency between trunks and extensions.
Procedure1. Using IP Office Manager, retrieve the configuration from the system.
2. Select System3. Select the VoIP sub-tab.
The Default Selection section is used to set the default codec preference order. This isused by all IP (H.323 and SIP) extensions and lines on the system that have their CodecSelection setting set to System Default. This is the default for all new added IP extensionand lines.
The Available Codecs list shows which codecs the system supports. The codecs in thislist which enabled are those that can be used in other configuration forms including theadjacent default selection.
Warning:
Deselecting a codec in this list automatically removes it from all line and extensioncodec lists where it was being used.
4. Save the configuration.
Related linksEnabling the H.323 Gatekeeper on page 37
Enabling the H.323 Gatekeeper
November 2021 IP Office Platform H.323 Telephone Installation 40Comments on this document? [email protected]

Chapter 5: DHCP Settings
The recommendation for H.323 phone installation is to use DHCP, especially if a large number ofphones are being installed. Using DHCP simplifies both the installation and maintenance. There area number of options around which server is used for the DHCP support for the H.323 phones:
• If the IP Office system is to be used as a DHCP server for the network, use the processesbelow to check and configure the system's DHCP settings.
• If a separate DHCP server is used by the customer's network, that DHCP server may need tobe configured to support DHCP requests from IP phones
• The IP Office can be configured to only provide DHCP support for Avaya phones. That optioncan be used to allow it to be used in conjunction with a separate customer DHCP server. Thisremoves the need to configure the customer's DHCP server for IP phone support.
Warning:• Enabling an additional DHCP server in a network can cause connection issues for all
devices on the network. Ensure that you, the user, and the user's network administrator allagree upon the correct choice of DHCP server option.
Related linksSystem DHCP Support on page 41System Site Specific Option Numbers on page 42Changing the system's SSON settings on page 42
System DHCP SupportProcedure
1. Using IP Office Manager, retrieve the configuration from the system.
2. Select System3. Select the LAN1 or LAN2 tab depending on which of the system's LAN interfaces you want
to use to support H.323 extensions.
4. Select the LAN Settings tab
5. In Number of DHCP IP Addresses, set the value for the number of IP addresses thesystem can issue.
November 2021 IP Office Platform H.323 Telephone Installation 41Comments on this document? [email protected]

6. Under DHCP Mode select Server.7. Click Advanced. The Advanced settings allow adjustment of the DHCP setting including
adding multiple ranges of DHCP numbers that the IP Office system can support. Note thataddress ranges outside those of the system's own subnet may also require the creation ofappropriate IP routes to ensure traffic routing between the subnets.
Note:• Changes to the DHCP pools do not require a reboot of the IP Office system.
However, it causes a reboot of Avaya H323 and SIP telephones connected to thesystem. Non-Avaya IP phones are not rebooted but may need to be manuallyrestarted in order to obtain a valid address from the new pools configuration.
Select Apply to Avaya IP Phone Only checkbox.
The IP Office acts as a DHCP server for Avaya phones only. This option cannot beused if also supporting 1100 Series and 1200 Series phones.
8. Save the configuration.
Related linksDHCP Settings on page 41
System Site Specific Option NumbersWhen requesting address settings from a DHCP server, each phone also requests additionalinformation that the DHCP server may have by sending a Site Specific Option Number (SSON). Ifthe DHCP server has information matching the SSON, that information is included in the DHCPresponse.
1600 and 9600 Series phones use 242 as their default SSON. However, through the phone's ownmenus the SSON it uses can be altered . For those phones using the IP Office system for DHCP,the SSON numbers that the IP Office supports are set in the IP Office system's configuration. Thevalues used by the phones and supported by the IP Office system must match.
Related linksDHCP Settings on page 41
Changing the system's SSON settingsProcedure
1. Using IP Office Manager, retrieve the configuration from the system.
2. Select System
DHCP Settings
November 2021 IP Office Platform H.323 Telephone Installation 42Comments on this document? [email protected]

3. Select the LAN1 or LAN2 tab depending on which of the system's LAN interfaces you wantto use to support H.323 extensions.
4. Select the VoIP sub-tab.
5. Check that the site specific option number settings match those required for the phonesbeing supported. The default for 1600 and 9600 Series phones is 242.
6. Save the configuration.
Related linksDHCP Settings on page 41
Changing the system's SSON settings
November 2021 IP Office Platform H.323 Telephone Installation 43Comments on this document? [email protected]

Chapter 6: File Server Settings
As part of the installation process, the phone requests for files from a file server. Using DHCP,address of the file server is obtained as part of the DHCP response from the DHCP server. The fileserver address is entered into the phone as part of the static addressing process.
The file server options are:
• For IP500 V2 systems, the IP Office system's own memory card can be used as the source forthe files. This is the recommended option and can be used for up to 50 phones.
• For IP Office Server Edition systems, the system's own disk can be used as the source for thefiles used by the phones for the system' full supported phone's capacity.
• HTTP redirection can be used to allow a separate server to provide the binary files for 9608,9611, 9621 and 9641 phones whilst the IP Office system provides all other files.
• The IP Office Manager application can also act as a file server for up to 5 phones. If the optionsabove are not acceptable or do not match the capacity needs of the system, a 3rd party HTTPfile server is required. The necessary phone firmware files need to be loaded onto that server.
Port UsageThe port used by an IP phone to request files depends on the type of phone.
Port Usage Phones80 Unsecure: Phone firmware, settings and
user data.All
411 Secure: Settings, user data. 9608, 9611, 9621 and 9641 H.323Phones
443 Secure: Phone firmware, settings anduser data.
SIP Phones
8411 Unsecure: Phone firmware. H.323 Remote Phones
For most newer phones, the port to use can be indicated through the DHCP response or phonesettings file first given to the phone. If there is no response on that port the phone may fallback toone of the default port values. However, for some older legacy phones are hard-coded to fixed ports.
Related linksChanging the file server settings on page 45Phone File Server Settings on page 46Creating/Editing the Settings File on page 46Manually Editing the File on page 48Loading Software Files onto the System on page 48
November 2021 IP Office Platform H.323 Telephone Installation 44Comments on this document? [email protected]

IP500 V2 Control Unit on page 49Using Embedded File Manager to Check/Upload Files on page 49Manually Copying Files on page 50Loading Files onto a third Party Server on page 51
Changing the file server settingsAbout this taskIf the IP Office system is being used for DHCP support for the IP phones, various settings in the IPOffice system's configuration are used to set the file server addresses sent to the phones in theDHCP responses.
Procedure1. Using IP Office Manager, retrieve the configuration from the system.
2. Select System3. Select the System tab.
4. Check the Phone File Server Type setting. See Phone File Server Settings on page 46.
5. In Phone File Server Type set the settings as required. See Phone File Server Settings onpage 46 for details of the different settings usable.
6. For 9608, 9611, 9621 and 9641 phones select the HTTP Redirection option can be usedto send requests for phone binary files to the separate HTTP Server IP Address.
7. Enable the Use Preferred Phone Ports checkbox to reduce the use of the HTTP/HTTPSports configured in the system's security configuration (by default ports 80 and 443) forphone file requests.
• When the Use Preferred Phone Ports checkbox enabled, the Auto-generated phonesettings files for locale phones indicates port 8411 for HTTP and 411 for TLS.
• When the Use Preferred Phone Ports checkbox is cleared, the auto-generated phonesettings files provided by the system to locale phones indicate the ports 80/411 or80/443 depending on the phone type.
Auto-generated phone settings files provided by the system to remote phones indicatethe ports 8411/411 or 8411/443 depending on the phone type.
8. Enable the Avaya HTTP Clients Only chekbox to restrict the system to responding to filerequests from Avaya phones and applications only.
Note:
This option should not be used if the system is also supporting 1100 and or 1200Series phones.
9. Save the configuration.
Changing the file server settings
November 2021 IP Office Platform H.323 Telephone Installation 45Comments on this document? [email protected]

Related linksFile Server Settings on page 44
Phone File Server SettingsThe following settings are used for H323 phones requesting firmware files from the IP Officesystem:
Field DescriptionMemory Card(IP500 V2)
Disk (IP OfficeServer Edition)
Use the system's own memory. The system's IP address is provided as the TFTPand HTTP file server values in the DHCP response. This is the default setting.
Manager Use the IP Office Manager application as the TFTP and HTTP file server. This optionis only supported for a maximum of 5 IP phones. This option uses the separateManager PC IP Address set in the configuration. The default of 0.0.0.0 is used bythe system to broadcast for any available IP Office Manager application running onthe network. Note that by default the IP Office Manager option for TFTP support isdisabled (File > Preferences > Preferences > Enable BootP and TFTP Servers).
Custom This option uses the separate TFTP Server IP Address and HTTP Server IPAddress values set in the configuration as the files server addresses in the DHCPresponse given to phones.
Related linksFile Server Settings on page 44
Creating/Editing the Settings FileDuring installation, the phones request files first downloading an xxupgrade file from the fileserver. They then follow the instructions within that file to request further files if necessary. Variousdifferent xxupgrade files exist for the different phone series. These are provided as part of thephone firmware . The xxupgrade files should not be edited or changed in any way.
The last line of all the xxupgrade files instructs the phones to request the 46xxsettings.txtfile. This file can be used to set site specific settings for all the Avaya H.323 IP phones beingsupported on a particular site.
When using the IP Office system as the file server, the IP Office system will auto-create a suitable46xxsettings.txt file based on various IP Office system configuration settings. It will only dothis if there is no actual 46xxsettings.txt file available on the server.
File Server Settings
November 2021 IP Office Platform H.323 Telephone Installation 46Comments on this document? [email protected]

Dialing PrefixFor IP Office systems the addition or removal of dialing prefixes is done by the IP Office systemrather than individual phones, the use of enhanced dialing rules through the phone settings file isnot supported.
802.1Q TaggingUnless specifically required for the customer network, forIP Office operation it is recommendedthat ## SET L2Q 0 is changed to SET L2Q 2.
1600/9600 Series Phone LanguagesIn addition to English, the 1600 and 9600 phones can support up to 4 other languages. This isdone by the phones, which download the language files specified in the 46xxsettings.txt file.Currently 9 non-English language files are provided as part of the IP Office Manager installation.
Language 1600 File 9600 FileDutch mlf_dutch.txt mlf_9600_dutch.txtFrench Canadian mlf_french_can.txt mlf_9600_french_can.txtFrench mlf_french_paris.txt mlf_9600_french_paris.txtGerman mlf_german.txt mlf_9600_german.txtItalian mlf_italian.txt mlf_9600_italian.txtPortuguese mlf_portuguese.txt mlf_9600_portuguese.txtRussian mlf_russian.txt mlf_9600_russian.txtSpanish mlf_spanish.txt mlf_9600_spanish.txtSpanish (Latin American) mlf_spanish_latin.txt mlf_9600_spanish_latin.txt
The files to download to the phones are defined in the # SETTINGS1603, # SETTINGS1608 and# SETTINGS1616 sections of the 46xxsettings.txt file. To have the phone download alanguage file, remove the ## in front of one of the SET options and change the file name to matchthe required language. If using the IP Office system as the file server, the appropriate languagefiles based on the IP Office system configuration can be provided using file autogeneration
Backup/RestorePhones can use an HTTP server as a location to which the user's phone settings are backed upand restore when they log on or off the phone. See Backup/Restore Settings on page 65 for fulldetails.
ScreensaverYou can specify how many minutes before an idle phone displays a screensaver image and thename of the image file. See Screensaver on page 63.
Related linksFile Server Settings on page 44
Creating/Editing the Settings File
November 2021 IP Office Platform H.323 Telephone Installation 47Comments on this document? [email protected]

Manually Editing the FileProcedure
1. Locate the 46xxsettings.txt file on the file server.
2. Using a plain text editing tool, open the 46xxsettings.txt file.
3. Edit the file as required.
The file contains numerous comments and notes. Further details of the various settings arecontained in the appropriate Avaya LAN Administrator Manual for the type of phone. Notethat the files contain a wide range of settings used on other Avaya telephone systems thatmay not necessarily work or be supported with IP Office systems.
A # character at the start of a line is the command on that line.
Related linksFile Server Settings on page 44
Loading Software Files onto the SystemFor IP Office Server Edition systems, the phone firmware suitable for IP Office system operation isincluded as part of the IP Office system's installation onto the server. Therefore no further action isrequired if using the system as the file server for phone installation. The firmware is also includedas part of IP Office Manager and is copied onto the PC when IP Office Manager is installed. Noother firmware should be used with IP Office unless specifically documented. The firmwareinstalled can be checked and new firmware copied onto the telephone system's disk if necessary.
The phone firmware suitable for IP Office system operation is supplied as part of the IP OfficeManager software and is copied onto the PC when IP Office Manager is installed. No otherfirmware should be used with IP Office unless specifically documented.
There are a number of methods by which the firmware installed with IP Office can be copied ontothe telephone system's memory card. The method used depends mainly on the type of controlunit.
Warning:• A memory card should never be removed from a running system without either the card
or the system first being shutdown. IP Office Manager should be used to shutdown thememory card before it is removed from the system.
• For IP Office operation, only the phone .bin files need to be present on the memory card.Other files required by the phones are automatically generated by the system inresponse to requests from the phones.
Related linksFile Server Settings on page 44
File Server Settings
November 2021 IP Office Platform H.323 Telephone Installation 48Comments on this document? [email protected]

IP500 V2 Control UnitThe system's System SD card is used to store the files. This is a mandatory card that is present inall IP500 V2 systems. The firmware files are loaded onto the card in a number of ways:
• If the system was upgraded using the Recreate SD Card option in IP Office Manager, thefirmware is automatically copied onto the card as part of that process.
• If the system was upgraded using IP Office Manager's Upgrade Wizard, if the UploadSystem Files option was selected, the firmware is copied onto the card as part of thatprocess. The Upload System Files option is enabled by default.
If you think the correct files are not present, you can use the embedded file manager part of IPOffice Manager to check the files on the card and to copy the files onto the card if necessary.
Related linksFile Server Settings on page 44
Using Embedded File Manager to Check/Upload FilesAbout this taskEmbedded file manager allows you to remote see the files on the memory card used by thetelephone system. It also allows you to upload new files.
Procedure1. In IP Office Manager, select File > Advanced > Embedded File Management.
The Select IP Office menu is displayed.
2. Select the telephone system and click OK.
3. Enter the name and password for the system.
The contents of the memory card are displayed.
IP500 V2 Control Unit
November 2021 IP Office Platform H.323 Telephone Installation 49Comments on this document? [email protected]

4. Do one of the following:
• For IP500 V2 go to System SD > SYSTEM > PRIMARY.
• For IP Office Server Edition go to SYSTEM > PRIMARY5. To copy the files do any of the following:
• Drag from PRIMARY and drop on memory card.
• Go to File > Upload System Files > Upload Phone Files and select the file to copy.
The source files can be found on the IP Office Manager PC in C:\Program Files\Avaya\IPOffice\Manager\memory Cards\Common\system\primary.
Related linksFile Server Settings on page 44
Manually Copying FilesAbout this taskFiles can be copied onto the memory card by placing it into a PC with a suitable memory card slot.
Warning:• A memory card should never be removed from a running system without first being
shutdown using the process below.
Procedure1. Using IP Office Manager, select File > Advanced > Memory Card Command >
Shutdown.
Select IP Office menu is displayed.
File Server Settings
November 2021 IP Office Platform H.323 Telephone Installation 50Comments on this document? [email protected]

2. Select the telephone system and click OK.
3. Enter the name and password for the system.
4. You may be prompted for which card you want to shutdown. Select System and click OK.
5. On the back of the control unit, check that the LED for the memory card slot is off beforeremoving the memory card.
6. Place the card into the PC's memory card slot and examine the contents.
7. In IP500 V2 system, go to System SD > SYSTEM > PRIMARY.
The source files can be found on the IP Office Manager PC in C:\Program Files\Avaya\IP Office\Manager\memory Cards\Common\system\primary.
ResultWhen the card is reinserted into the system, card usage is automatically restarted.
Related linksFile Server Settings on page 44
Loading Files onto a third Party ServerThe phone firmware files are installed as part of the IP Office Manager application and are foundin the application's installation directory. By default, the directory is found at c:\Program Files\Avaya\IP Office\Manager.
The same firmware files can also be obtained directly from the software package used to install IPOffice Manager without having to perform the installation. The files are located in the \programfiles\Avaya\IPOffice\Manager sub-folder of the installation directory.
Note that these sets of files include .bin files that are also used for other devices including the IPOffice system itself.
Related linksFile Server Settings on page 44
Loading Files onto a third Party Server
November 2021 IP Office Platform H.323 Telephone Installation 51Comments on this document? [email protected]

Chapter 7: User and Extension Creation
When a new H.323 telephone registers with the system, the system can automatically create a newextension entry for the telephone in its configuration. It can also automatically create a new userentry for the telephone. Alternatively, if the phone registers using an extension number for whichentries already exist, those entries are used so long as no other phone is already using them.
For new installations, Auto-creation can be used to ease the addition of multiple phones. The auto-create options must be disabled after installation. If Auto-creation is not used, extension and userentries need to be manually added to the configuration before attempting to install the phones.
Related linksDefault Extension Password on page 52Manually Creating Users on page 53Manually Creating Extensions on page 53Selecting the required codec on page 54Using Auto-Creation on page 55
Default Extension PasswordAbout this taskRegistration of most SIP phones requires entry of a password. This can set through the system'sExtension Default Password setting. Alternatively, for a particular extension a specific passwordcan be set through the extension settings .The auto-create extension settings in a system cannot be enabled until this value is set. It is thenused as the password for any auto-created extensions.
Procedure1. Using either IP Office Manager or IP Office Web Manager in offline mode, load the system
configuration.
2. Select System or System Settings > System.
3. Select VoIP.
4. Select VoIP Security.
5. In the Extension Default Password section:
a. Click on the icon to view/hide the current password.
November 2021 IP Office Platform H.323 Telephone Installation 52Comments on this document? [email protected]

b. If required, change or remove the password.
The password can either be blank or between 9 to 13 digits (0-9) in length.
6. Save the settings.
Related linksUser and Extension Creation on page 52
Manually Creating UsersAbout this taskIf the Auto-create User option is not enabled , you must manually create a user entry for eachphone being installed. Use the procedure below to manually create an entry. It will also promptwhether a matching extension entry should also be created.
Procedure1. Using IP Office Manager, retrieve the configuration from the system.
2. To display the list of existing users, click User3. Right-click on the right-hand panel and select New.
a. In the User tab set the following:
• Name: Enter a name for the extension user. The name must be unique. If voicemailis in use, this name is used as the basis for a new mailbox with matching name.
• Extension: This must match the extension number.
b. Click OK.
IP Office Manager prompts to create a matching extension.
c. Select H.323 Extension and enter the phone password for the extension click OK.
4. Save the configuration.
Related linksUser and Extension Creation on page 52
Manually Creating ExtensionsAbout this taskIf the Auto-create Extn option is not enabled , you must manually create an extension entry foreach phone being installed. This can be done either as part of the process of manually creatingusers or it must be done separately using the process below.
Manually Creating Users
November 2021 IP Office Platform H.323 Telephone Installation 53Comments on this document? [email protected]

Procedure1. Using IP Office Manager, retrieve the configuration from the system.
2. To display the list of existing extensions, click Extension3. Click New.
4. In the Extn tab, set the following:
a. Extension ID: For a VoIP extension, enter any number so long as it is unique, i.e. notalready used by another extension.
b. Base Extension: Enter the extension number to assign to the phone. Again, this mustbe unique. This value is used to associate the extension with the user who has thesame extension number.
c. Phone Password: This is the password used to register the phone with the system. Ifnot set, the matching user's Login Code is used.
5. To add the new extension, click OK.
6. Save the configuration.
Related linksUser and Extension Creation on page 52
Selecting the required codecAbout this taskIf the Codec Selection is set to System Default, the extension uses the system codecpreferences . In most cases this is preferred and any changes required should be made at thesystem level to ensure consistency for all IP trunks and extensions.However, if required, the Codec Selection of each individual trunk and extension can be adjustedto differ from the system defaults.
Procedure1. Using IP Office Manager, retrieve the configuration from the system.
2. To display the extension's settings, click Extension.
3. Select the VoIP tab.
4. Change the Codec Selection to Custom.
The Unused and Selected lists can be used to select which codecs the device uses andtheir order of preference.
5. Save the configuration.
Related linksUser and Extension Creation on page 52
User and Extension Creation
November 2021 IP Office Platform H.323 Telephone Installation 54Comments on this document? [email protected]

Using Auto-CreationAbout this taskWhen installing a large number of phones, unless the configuration has been pre-built, auto-creation can be used to simplify the installation process. The auto-created users are automaticallylinked to the IP Auto-create user rights settings. By default that set of user rights has outgoingcalls barred.
• Auto Disablement of Auto Create: Leaving the auto-create extension and user settingsenabled is strongly deprecated. For Release 9.1 and higher, the system automaticallydisables the settings 24-hours after they are enabled.
• Not Supported with WebLM Licensing: The auto-create extension and user options are notuseable on systems configured to acquire licenses from a WebLM service.
Before you beginOn R11.0.4.0 and higher systems, set the Default Extension Password before enabling auto-creation.
Procedure1. Using IP Office Manager, retrieve the configuration from the system.
2. Select System3. Select the LAN1 or LAN2 tab depending on which of the system's LAN interfaces you want
to use to support H.323 extensions.
4. Select the VoIP sub-tab.
5. Set the Auto-create Extn and Auto-create User settings
Note:
It is necessary to manually create the extension entries and or manually create theuser entries before installing the phones.
On pre-11.0.4.0 systems, when Auto-create Extn is selected, set and confirm a password.The password is set as the Phone Password for any extensions created usingautocreation. The phone password is used for registration.
6. Save the configuration.
Related linksUser and Extension Creation on page 52
Using Auto-Creation
November 2021 IP Office Platform H.323 Telephone Installation 55Comments on this document? [email protected]

Chapter 8: Connecting the phone
About this taskIn this process the phone is connected to its power source and to the ethernet LAN. As soon as thephone is powered up it will start to request information.
Before you beginEnsure you have completed installation of the phone before starting to connect the phone.
Procedure1. Connect the network LAN cable to the data-in socket of the power supply being used for the
phone.
2. Connect the LAN cable supplied with the IP phone from the power supplies data and powerout socket to the socket with a LAN port at the back of the IP phone.
The phone's message indicator should glow red for a few seconds. The phone begins itssoftware loading process. After a short delay, the phone displays Initializing and thenLoading. The loading phase may take a few minutes.
• If the phone has an existing software boot file (ie. it has been previously installed), it loadsthat file and then display Starting.
3. If the phone displays No Ethernet, check the connection to the LAN.
The phone displays DHCP and a timer as it attempts to request an IP address and otherinformation from a DHCP server.
4. Press * whilst DHCP is displayed to switch to static address installation. See static addressinstallation.
After a few seconds, DHCP negotiation is completed. If the timer reaches more than 60seconds, it indicates an error in either the network or DHCP server configuration.
Once DHCP has completed successfully, the phone will request files from the file serverindicated in the DHCP response. The first file requested details the other files that the phoneshould also load. The phone makes its file request using HTTPS. If this fails it makes thesame request using HTTP. If that fails it makes a final request using TFTP. If all requests fora file fail, the phone fallbacks to using the current version of the file it has in its own memory.
The phone goes through a cycle of requesting files, loading files and then transferring thefiles into its flash memory.
Following file loading, the phone displays Ext. =. See Registering phone on page 57.
November 2021 IP Office Platform H.323 Telephone Installation 56Comments on this document? [email protected]

Related linksRegistering phone on page 57Listing Registered Phones on page 58
Registering phoneAbout this taskFor new phones and phones that have been reset, the phone requests an extension number.
• If auto-create is enabled the extension number used, if free, creates new extension and userentries in the IP Office configuration.
• If auto-create is not enabled, the extension number used must match a VoIP extension entrywithin the IP Office configuration, see Manually Creating Extensions on page 53.
Procedure1. In Extn enter the extension number the phone should use and press #.
Note:
The phone displays Wrong Set Type if you try to use the extension number of anexisting non-IP extension.
2. In Password, do any one of the following:
• If using auto-creation for a extension, enter the password that was specified whileenabling auto-create.
• If not using auto-create, enter the Phone Password as set in the system configurationfor the extension. If a Phone Password has not been set, the system checks againstthe matching user Login Code.
Note:
The system disables the use of default passwords, such as 0000 which is supportedby some phones. See Blocking Default Passcodes on page 28.
3. Test that you can make and receive calls at the extension.
Related linksConnecting the phone on page 56
Registering phone
November 2021 IP Office Platform H.323 Telephone Installation 57Comments on this document? [email protected]

Listing Registered PhonesAbout this taskThe System Monitor application can be used to check which phones are registered with thesystem.
Procedure1. Start System Monitor and connect to the IP Office system.
2. Select Status > H.323 Phone Status.
ResultSystem Monitor disaplys the phones registered and how many are currently waiting to register.The System > Print trace filter option must be selected to see these messages.The following appears as lines of the form:792ms PRN: GRQ from c0a82c15 --- RAS reaches the maximum capacity of 10; Endpoints registered 41
Related linksConnecting the phone on page 56
Connecting the phone
November 2021 IP Office Platform H.323 Telephone Installation 58Comments on this document? [email protected]

Part 3: Optional Configuration
November 2021 IP Office Platform H.323 Telephone Installation 59Comments on this document? [email protected]

Chapter 9: Enabling RTCP QualityMonitoring
Avaya IP phones support call quality monitoring. Enabling RTCP monitoring provides the systemwith measures of packet delay, packet loss and jitter. That information can be accessed using theSystem Status Application and System Monitor applications. The system can also be configured tooutput alarms when the call quality values exceed set levels.
The RTCP call quality reports can also be sent to the address of a third-party QoS monitoringapplication.
For IP Office Release 10.0 and higher, in addition to having the individual phones send RTCP callquality reports the system can also send RTCP reports for calls.
Related linksEnabling Telephone Quality Reporting on page 60Enabling System Quality Reporting on page 61Setting the Quality Alarm Levels on page 62
Enabling Telephone Quality ReportingAbout this taskEnabling RTCP call quality reporting from phones is done centrally from the system settings.
Procedure1. Using IP Office Manager, retrieve the configuration from the system.
2. Select System3. Select the LAN1 or LAN2 tab depending on which of the system's LAN interfaces you want
to use to support H.323 extensions.
November 2021 IP Office Platform H.323 Telephone Installation 60Comments on this document? [email protected]

4. Select the VoIP sub-tab.
5. Enable Enable RTCP Monitoring on Port 5005 checkbox.
By default the RTCP data is sent to the IP Office system. enter the address in the RTCPcollector IP address for phones for phones field send data to a specific address forcollection by a third-party QoS monitoring application.
6. Save the configuration.
Related linksEnabling RTCP Quality Monitoring on page 60
Enabling System Quality ReportingAbout this taskFor IP Office Release 10.0 and higher, in addition to having the individual phones send RTCP callquality reports , the system can also send RTCP reports for calls.
Procedure1. Using IP Office Manager, retrieve the configuration from the system.
2. Select System3. Select the Telephony tab and then the Telephony sub-tab.
4. Go to the RTCP Collector Configuration section.
a. Enable the Send RTCP to an RTCP Collector checkbox.
Enabling System Quality Reporting
November 2021 IP Office Platform H.323 Telephone Installation 61Comments on this document? [email protected]

b. In Server Address add the address of the third-party QoS monitoring application towhich the system sends RTCP reports.
c. In UDP Port Number enter the destination port. The default is 5005.
d. In RTCP reporting interval enter how frequently the system sends RTCP reports.
5. Save the configuration.
Related linksEnabling RTCP Quality Monitoring on page 60
Setting the Quality Alarm LevelsAbout this taskThe system can send call quality alarms to the System Status Application. It can also send thesame alarms to SNMP, emails or Syslog destinations. For details of how to configure these refer tothe IP Office Manager documentation. The settings below are used to set the levels which, ifexceeded, cause an alarm to be sent at the end of a call.
Procedure1. Using IP Office Manager, retrieve the configuration from the system.
2. Select System3. Select the System Events tab and then the Configuration sub-tab.
The QoS Parameters are used by the system to trigger alarms The default settings matchthe limits usually acceptable for good call quality
4. Save the configuration.
Related linksEnabling RTCP Quality Monitoring on page 60
Enabling RTCP Quality Monitoring
November 2021 IP Office Platform H.323 Telephone Installation 62Comments on this document? [email protected]

Chapter 10: Screensaver
After a set idle time, 9600 Series phones can display a screen saver image. Whilst the phoneremains idle, this image is moved to another random position on the screen every 5 seconds.
For phones being fully supported by the IP Office system, a default file is automatically provided bythe IP Office system by default. If otherwise:
• The timeout for the screensaver and the name of the image file are set through customizing the46xxsettings.txt file.
• The image file to use must be loaded onto the file server used by the phones.
The following are the image requirements
• Format: JPG images.
• Maximum Pixel Size: The image must be smaller than the screen size of the phone. If theimage is larger, it will not be displayed. When several types of phones are present using thesame image, the image must be below the size maximums of all the phone type. If using the46xxsettings.txt file to specify the screen saver settings, it is possible to specify a separateimage for each phone type.
Phone Maximum Size9611 160X1609621G 320X1609614G 320X240
• Color Displays: Color depth is 16 bit. A separate color image looks best.
• Non-Color Displays: Best results are achieved with a single grayscale logo image. 2 levels ofgrayscale are also supported.
• Transparency: To invoke a transparent background, use a background color of 0,255,0(brightest possible green).
The default IP Office settings use an image file called 96xxiposs.jpg. Using the embedded filemanager within IP Office Manager, replace the existing file in the system's /primary folder with yourcustom image. Reboot the phones in order for them to load the new image.
Related linksCustomizing screen saver settings on page 64
November 2021 IP Office Platform H.323 Telephone Installation 63Comments on this document? [email protected]

Customizing screen saver settingsAbout this taskDefault operation uses the single image 96xxiposs.jpg which you can replace with your ownimage. If using a customized 46xxsettings.txt file, you can implement set the idle timeout fordisplaying the screensaver and the image name.
Procedure1. Create a customer JPG file meeting the requirements.
For this example we used the file name logo.jpg.
2. Download the current 46xxsettings.txt file from the file server being used by thephones.
3. Add the following lines to the 46xxsettings.txt file:## SET SCREENSAVER filenameSET SCREENSAVER logo.jpg## SET SCREENSAVERON time in minutes before activatingSET SCREENSAVERON 40
• Using Separate Images for Each Phone Type
Added the above to the start of the file affects all types of phone. Adding differentsettings to each of the different MODEL4 sections of the file for each phone type allowsseparate images to be used for each phone type.
4. Upload the new files to the file server used by the phones.
5. Reboot the phones in order for them to load the new settings and image.
Related linksScreensaver on page 63
Screensaver
November 2021 IP Office Platform H.323 Telephone Installation 64Comments on this document? [email protected]

Chapter 11: Backup/Restore Settings
1600 and 9600 Series H.323 IP Telephones support using an HTTP server as the location to whichthey can backup and restore user-specific data. The address for this backup server is set separatelyfrom that of the file server used for phone firmware.
These options are used if the location of the HTTP server for backup/restore has been specified inthe phone 46xxsettings.txt file.
• The address of the HTTP server for backup/restore operation is separate from the address ofthe HTTP server used for phone firmware files downloads.
• The HTTP server being used for backup/restore will require configuration changes to allow thephones to send files to it.
• If the IP Office system is being used as the file server for phone installation, it can also be usedfor the phone backup and restore functions. That includes file auto-generation . When usingauto-generation, some settings within the restore file are based on the user's IP Office settings.This is therefore the recommended solution where possible.
Backup is used when the phone user logs out of the phone. During the log out process, the phonecreates a file containing the user specific data and sends that to the BRURI location. The file isnamed with the user's extension number as a prefix to _16xxdata.txt; for example,299_16xxdata.txt.
Restore is used when a user logs in at the phone. The phone sends a file request for theappropriate file based on the user's extension number. If the file is successfully retrieved the phonewill import the settings and, after a Retrieval OK message, continue as normal. If the file cannotbe retrieved, a Retrieval failed message is displayed and the phone will continue with itsexisting settings.
Related linksSpecifying the BRURI Value on page 66HTTP Authentication on page 66Manual Backup/Restore Control on page 67Example File on page 67
November 2021 IP Office Platform H.323 Telephone Installation 65Comments on this document? [email protected]

Specifying the BRURI ValueAbout this taskIf you are using the IP Office system as the file server it is recommended that you also use it asthe backup and restore server. This option requires no additional configuration. If there is no46xxsettings.txt file on the IP Office system, it will auto-generate the file when it is requestedby a phone and will include its own IP address as the backup/restore server address. If there is46xxsettings.txt file on the IP Office system, you can edit the backup/restore server addressmanually using the process below to set it to match the system's IP address.If you want to use another server, edit the BRURI value in the 46xxsettings.txt file. You willalso need to ensure that the server being used is configured to allow the uploading of files to thespecified folder on the server.
Procedure1. Open the 46xxsettings.txt file.
2. Locate the line containing the SET BRURI value.
3. If the line is prefixed with # characters, remove those and any spaces.
4. After SET BRURI, enter a space and then the address of the HTTP backup server:
• For example SET BRURI http://192.168.0.28• If necessary, specify the path to a specific server directory and/or include a specific port
number; for example: SET BRURI http://192.168.0.28/backups:8080.
Related linksBackup/Restore Settings on page 65
HTTP AuthenticationHTTP Authentication can be supported. If set it will be used for both the backup and the restoreoperations. The authentication credentials and realm are stored in the phone's programmable,non-volatile memory, which is not overwritten when new firmware is downloaded.
Both the authentication credentials and realm have a default value of null. If the HTTP serverrequires authentication, the user is prompted to enter new credentials using the phone. If theauthentication is successful, the values used are stored and used for subsequent backup andrestore operations.
Related linksBackup/Restore Settings on page 65
Backup/Restore Settings
November 2021 IP Office Platform H.323 Telephone Installation 66Comments on this document? [email protected]

Manual Backup/Restore ControlUsers can request a backup or restore using the AdvancedOptions Backup/Restore feature asdetailed in the user guide for the specific telephone model.
Related linksBackup/Restore Settings on page 65
Example FileThe following is an example of a backup/restore file for a 1600 Series phone user. Note thatvalues are not written unless the setting has been changed from its default.
If the backup and restore is being done using file auto-generation , those items indicated by * arecontrolled by values stored and supplied by the user's IP Office settings.
File Fields DescriptionABKNAME001=Extn201ABKNUMBER001=201ABKNAME002=Extn201adABKNUMBER002=201ABKNAME003=Extn203ABKNUMBER003=203Redial=0Call Timer=0Visual Alerting=1Call Log Active=1Log Bridged Calls=1Log Line Calls=1Log Calls Answered by Others=0Audio Path=2Personalized Ring=7Handset AGC=1Headset AGC=1Speaker AGC=1Error Tone=1Button Clicks=0Display Language=English
ABKNAMEmmmABKNUMBERmmm
These paired entries are used forpersonal contacts entered into thephone. The mmm value in eachpair in replace by a 3-digitnumber starting with 001. Thefirst line of the pair stores thecontact name, the second linestores the phone number for thecontact.*
LANGUSER Display language. The languagename is stored.*
LOGACTIVE Call log active on (1) or off (0).*LOGBRIDGED Log bridged calls on (1) or off
(0).*LOGLINEAPPS Log line calls on (1) or off (0).*LOGOTHERANS Log calls answered by others on
(1) or off (0).*OPTAGCHAND Handset Automatic Gain Control
on (1) or off (0).OPTAGCHEAD Headset Automatic Gain Control
on (1) or off (0).OPTAGCSPKR Speaker Automatic Gain Control
on (1) or off (0).OPTAUDIOPATH Audio Path.*
Table continues…
Manual Backup/Restore Control
November 2021 IP Office Platform H.323 Telephone Installation 67Comments on this document? [email protected]

File Fields DescriptionOPTCLICKS Button Clicks on (1) or off (0).*OPTERRORTONE Error Tone on (1) or off (0).*PERSONALRING Personalized Ring. A numeric
value (1 to 8) for the selected ringis stored.*
PHNREDIAL RedialPHNSCRONCALL Go to call screen on calling on (1)
or off (0).PHNSCRONALERT Go to call screen on ringing on (1)
or off (0).PHNTIMERS Call Timer on (1) or off (0).
✓
PHNVISUALALERT Visual alerting on (1) or off (0).
✓
Related linksBackup/Restore Settings on page 65Configuring IIS server on page 68Configuring apache server on page 69
Configuring IIS serverAbout this taskCreate a backup folder under the root directory of your web server. All backup files will be storedin that directory. For example, if your backup folder is C:/Inetpub/wwwroot/backup, the46xxsettings.txt file should have a line similar to SET BRURI http://www.example.com/backup.
Procedure1. Go to Start > Settings > Control Panel > Administrative Tools and select, depending on
the Windows version, Internet Information Services Manager or Internet InformationServices.
2. Right-click on the folder created for backup. Right-click on Default Web Site if there is nospecific backup directory.
3. Select Properties.
4. In the Directory tab, enable Write checkbox.
5. Follow this procedure to configure IIS 6.0 are:
a. Go to Start > Settings > Control Panel > Administrative Tools.
Backup/Restore Settings
November 2021 IP Office Platform H.323 Telephone Installation 68Comments on this document? [email protected]

b. Below Default Web Site, select Web Services Extensionc. Ensure that the WebDAV option is set to Allowed.
Related linksExample File on page 67
Configuring apache serverAbout this taskCreate a backup folder under the root directory of your Web server. Make the folder writable byeveryone. All backup files will be stored in that directory. For example, if the backup folder is C:/Program Files/ApacheGroup/Apache2/htdocs/backup, the 46xxsettings.txt fileshould have a line similar to SET BRURI http://www.example.com/backup.
Before you beginProcedure
1. Edit your Web server configuration file httpd.conf.
2. Uncomment the two LoadModule lines associated with DAV:
• LoadModule dav_module modules/mod_dav.so• LoadModule dav_fs_module modules/mod_dav_fs.so
Note:
If these modules are not available on your system (typically the case on some Unix/Linux Apache servers), you have to recompile these two modules (mod_dav &mod_dav_fs) into the server. Other ways to load these modules might be available.Check your Apache documentation at http://httpd.apache.org/docs/ for more details.
3. Add the following lines in the httpd.conf file:##WebDAV configuration#DavLockDB "C:/Program Files/Apache Group/Apache2/var/DAVLock"<Location />Dav On</Location>
Note:
For Unix/Linux Web servers the fourth line might look more like: DavLockDB/usr/local/apache2/var/DAVLock
4. Create the var directory and make it writable by everyone. Right-click Properties andselect Security > Add > Everyone > Full Control > .
Related linksExample File on page 67
Example File
November 2021 IP Office Platform H.323 Telephone Installation 69Comments on this document? [email protected]

Part 4: Advanced InstallationProcesses
November 2021 IP Office Platform H.323 Telephone Installation 70Comments on this document? [email protected]

Chapter 12: Static Address Installation
Static addressing is only necessary when a DHCP server is unavailable or not desired. For ease ofmaintenance and installation, ensure that a DHCP server used and avoid static addressing.Following any boot file upgrade of the phone's firmware, static address information may require re-installation.
Related linksInstalling static address for 1600 series phones on page 71Static adress installation settings for 1600 phone series on page 72Installing static address for 9600 series phones on page 72Static adress installation settings for 9600 phone series on page 73
Installing static address for 1600 series phonesProcedure
1. Complete the phone connection procedure and when DHCP is displayed press * to switchthe phone to static address instalation.
The phone displays sequence of settings and the existing value for each of those settings.
2. To accept the existing values, press # or enter a value and then press #. See Static adressinstallation settings for 1600 phone series on page 72.
Note:
If no values are changed, the phone displays No new values.
3. If the phone displays Enter power off the phone and on again.
Once all the values are entered or the existing values accepted the phone displays Savenew values?.
4. Press # to save the values.
Next stepsRegister the phone.
Related linksStatic Address Installation on page 71
November 2021 IP Office Platform H.323 Telephone Installation 71Comments on this document? [email protected]

Static adress installation settings for 1600 phone seriesSettings name DescriptionPhone This is the phone's IP address. To accept the current value, press # or enter a value
and then press #. If entering a new value, press the * key to enter a '.' characterbetween digits.
CallSv This is the address of the H.323 gatekeeper. For IP Office systems this is the IPaddress of the IP Office LAN.
CallSvPort This is the Gatekeeper transport layer port number. For Avaya IP phones the valueused should be 1719. To accept the current value, press # or enter a value and thenpress #.
Router This is the address of the phone's default IP gateway. For IP Office this is typicallythe IP address of the IP Office LAN. To accept the current value, press # or enter avalue and then press #.
Mask This is the phone's IP Mask (also called the subnet mask). The mask is used withthe IP address to indicate the phone's subnet. This should match the IP mask set forthe IP Office Unit.
FileSv This is the address of the file server from which the phone should request softwareand settings files. Enter the address of the TFTP or HTTP configured with the AvayaIP phone software file set.
802.1Q To change the setting press *. Press # to accept the value.VLAN ID For details of VLAN configuration see VLAN and IP Phones .
Related linksStatic Address Installation on page 71
Installing static address for 9600 series phonesProcedure
1. When * to program is displayed, press the * key.
2. When Enter code is displayed, enter the administrative procedures passcode and press#. The default passcode is CRAFT (27238).
3. Scroll the menu to ADDR and select this option to start the address procedure.
The list of required addresses is displayed. If any existing phone values is displayed.Otherwise if the phone is new or has been cleared, all the addresses are set to 0.0.0.0.
4. Set each address highlight the value to change and click Change. See static addressinstallation settings.
5. Enter the new address value and then select Save.
6. When all the values are set as required click Back and click Exit.
Static Address Installation
November 2021 IP Office Platform H.323 Telephone Installation 72Comments on this document? [email protected]

The phone restarts using the new values.
Next stepsRegister the phone.
Related linksStatic Address Installation on page 71
Static adress installation settings for 9600 phone seriesSettings name DescriptionPhone This is the phone's IP address. To accept the current value, press # or enter a value
and then press #. If entering a new value, press the * key to enter a '.' characterbetween digits.
Call Server This is the address of the H.323 gatekeeper. For IP Office systems this is the IPaddress of the IP Office LAN.
Router This is the address of the phone's default IP gateway. For IP Office this is typicallythe IP address of the IP Office LAN. To accept the current value, press # or enter avalue and then press #.
Mask This is the phone's IP Mask (also called the subnet mask). The mask is used withthe IP address to indicate the phone's subnet. This should match the IP mask set forthe IP Office Unit.
HTTP File Server This is the address of the HTTP file server from which the phone should requestsoftware and settings files.
HTTPS File Server This is the address of the HTTPS file server from which the phone should requestsoftware and settings files. The phone will attempt to use this address, if set, beforeusing HTTP.
802.1Q To change the setting press *. Press # to accept the value.VLAN ID For details of VLAN configuration see VLAN and IP Phones .VLAN Test When using VLAN, this is the time in seconds the phone will wait from a response
from the DHCP server in the VLAN before falling back to normal non-VLANoperation.
Related linksStatic Address Installation on page 71
Static adress installation settings for 9600 phone series
November 2021 IP Office Platform H.323 Telephone Installation 73Comments on this document? [email protected]

Chapter 13: Remote H.323 Extensions
For IP Office Release 8.0+, the configuration of remote H.323 extensions is supported withoutneeding those extensions to be running special VPN firmware. This option is intended for use in thefollowing scenario:
• The customer LAN has a public IP address which is forwarded to the IP Office system. Thataddress is used as the call server address by the H.323 remote extensions.
• The user has a H.323 phone behind a domestic router. It is assumed that the domestic routerallows all outbound traffic from the home network to pass through and allows all symmetrictraffic. That is, if the phone sends RTP/RTCP to a public IP address and port, it will be able toreceive RTP/RTCP from that same IP address and port. Configurations otherwise are notcovered by this documentation.
• The system can be configured to support remote H.323 extensions in the case where NAT isused in the connection path. This could be the case where the IP Office is located behind acorporate NAT/Firewall router and/or the H.323 phone is located behind residential NAT enablerouter. The use of this option and the interaction and configuration of external third partyelements is beyond the scope this help file.
• When the public IP address of the corporate router is unknown, you need to configure a STUNserver in the the IP Office LAN's Network Topology settings. Note however that this option isnot supported if the Firewall/NAT Type is set to Symmetric Firewall or Open Internet.
• Enabling the Allow Remote Extn option also makes visible the configuration of the RTP Portnumber Range (NAT) settings.
• Supported Telephones: Currently, remote H.323 extension operation is only supported with9600 Series phones already supported by the IP Office system.
• License Requirements: By default, only 4 users can be configured for remote H.323 extensionusage without needing licenses. Additional users can be configured if those additional usersare licensed and configured with either Teleworker or Power User user profiles.
November 2021 IP Office Platform H.323 Telephone Installation 74Comments on this document? [email protected]

Related linksCustomer Network Configuration on page 75Configuring IP Office System on page 76Phone Configuration on page 77
Customer Network ConfigurationThe corporate LAN hosting the IP Office system requires a public IP address that is routed to theLAN interface of the IP Office system configured for remote H.323 extension support.
STUN from the IP Office system to the Internet is used to determine the type of NAT being appliedto traffic between the system and the Internet. Any routers and other firewall devices between theH.323 phone location and the IP Office system must allow the following traffic.
Protocol Port DescriptionICMP - Incoming ICMP to the IP Office system's public IP address must be
allowed.UDP 1719 UDP port 1719 traffic to the IP Office system must be allowed. This is
used for H225 RAS processes such as gatekeeper discovery,registration, keepalive, etc. If this port is not open the phone will notbe able to register with the IP Office system.
TCP 1720 TCP port 1720 traffic must be allowed. This is used for H.225 (callsignalling). The address used can be adjusted using the Remote CallSignaling Port setting.
RTP Various The ports in the range specified by the system's RTP Port NumberRange (NAT) settings must be allowed.RTCP
UDP 5005 If the system setting Enable RTCP Monitoring on Port 5005 has beenenabled, traffic on this port must be allowed to include remote H.323extensions in the monitoring.
User Network ConfigurationIt is assumed that the domestic router allows all outbound traffic from the home network to passthrough and allows all symmetric traffic. That is, if the phone sends RTP/RTCP to a public IPaddress and port, the router allows it to receive RTP/RTCP from that same IP address and port.
Related linksRemote H.323 Extensions on page 74
Customer Network Configuration
November 2021 IP Office Platform H.323 Telephone Installation 75Comments on this document? [email protected]

Configuring IP Office SystemAbout this taskThis is a summary of the necessary IP Office system configuration changes. This section assumesthat you are already familiar with IP Office system and H.323 IP telephone installation
Before you beginIf more than 4 remote extension users are to be supported, the system must include availableTeleworker and or Power User licenses for those users.
Procedure1. In the System tab configure the following:
a. Go to System > LAN1 > LAN2 > VoIP.
b. Enable the H323 Gatekeeper Enable checkbox.
Note:
Due to the additional user and extension settings needed for remote H.323extension configuration, the extension and user entries for the remote H.323extensions and users are added manually.
c. Enable H.323 Remote Extn Enable.
d. Enter the required value in Remote Call Signaling Port.
The default value 1720 also matches the port used by internal extensions.
e. Set RTP Port number Range (NAT) to encompass the port range that should beused for remote H.323 extension RTP and RTCP traffic.
Note:
The range setup must provide at least two ports per extension being supported.
2. In Network Topology tab configure the following:
Note:
STUN can be used to determine the type of NAT/firewall processes being applied totraffic between the IP Office system and the Internet.
a. Go to Network Topology and set STUN Server IP Address to a known STUNserver.
b. Click OK
The Run STUN button is enabled.
c. Click Run STUN and wait while the STUN process is run.
The results discovered by the process is indicated by ! icons next to the fields.
d. If STUN reports the Firewall/NAT Type the network must be reconfigured.
Remote H.323 Extensions
November 2021 IP Office Platform H.323 Telephone Installation 76Comments on this document? [email protected]

Note:
Static Port Block, Symmetric NAT or Open Internet netowrk types are notsupported for remote H.323 extensions.
3. In User tab configure the following:
a. Go to the User tab set the User Profile to Teleworker or Power User.b. Enable Enable Remote Worker.
Related linksRemote H.323 Extensions on page 74
Phone ConfigurationThe phones do not require any special firmware. Therefore, they should first be installed asnormal internal extensions, during which they will load the firmware provided by the IP Officesystem.
Once this process has been completed, the address settings of the phone should be cleared andthe call server address set to the public address to be used by remote H.323 extensions.
It is assumed that at the remote location, the phone will obtain other address information by DHCPfrom the user's router. If that is not the case, the other address setting for the phone will need tobe statically administered to match addresses suitable for the user's home network.
Related linksRemote H.323 Extensions on page 74
Phone Configuration
November 2021 IP Office Platform H.323 Telephone Installation 77Comments on this document? [email protected]

Chapter 14: VPN Remote Phones
Avaya IP phones at remote locations can be connected to the IP Office system via IPSec VPNtunnels. This is supported for 4610SW, 4621SW, 5610SW and 5621SW phones. It is also supportedfor 9600 Series phones.
Additional components required for remote phones over VPN are:
• IP Office VPNremote Phone Firmware: This firmware is included with the IP phone firmwareset.
• VPN Security Gateway: The IP Office system does not support all the IPSec features neededfor VPNremote phones using its own IPSec tunnels. Therefore the VPN tunnel from remotephones must end at a suitable alternate VPN gateway device. The device must support one ofthe following methods:
- Avaya Gateways: Avaya security gateway devices (SG and VSU) use an Avaya proprietaryprotocol called
• CCD Avaya SG Series (4.6 firmware or higher)
• Avaya VSU Series (3.2 firmware or higher)
- Non-Avaya Gateways: Non-Avaya VPN gateways with IKE Extended Authentication (Xauth)with Pre-shared Key (PSK). Installation notes exist for the items listed below. This does notimply any recommendation of those devices by Avaya or preclude other devices.
Note:
Avaya cannot guarantee support for services through non-Avaya devices.
• Cisco VPN 300 Series Concentrators
November 2021 IP Office Platform H.323 Telephone Installation 78Comments on this document? [email protected]

• Cisco PIX 500 Series Security Appliances• Juniper Networks NetScreen Series VPN Devices• Juniper Networks Secure Services Gateway 500 Series• Juniper Networks Integrated Security Gateway (ISG) Series• Kentrox Q2300 VPN Router• Sonicwall Tz170 VPN Router• Netgear FVS338 VPN Router• Netgear FVX538 VPN Router• Adtran Netvanta 3305 VPN Router
Related linksInstallation Documentation on page 79Supported VPN remote Phone Firmware on page 79Configuring the IP Phone for VPN remote on page 80VLAN and IP Phones on page 80VLAN and DHCP on page 82Example setup - Overview on page 83Example System Overview on page 85
Installation DocumentationThis document only covers notes and differences specific to installation of VPNremote phoneswith IP Office. Then installation and configuration of Avaya VPNremote phones is covered in anumber of existing documents available from the Avaya support website (http://support.avaya.com). Refer to VPN Setup Guide for 9600 Series IP Telephonesdoc reference16-602968.
Related linksVPN Remote Phones on page 78
Supported VPN remote Phone FirmwareUnless otherwise advised, only the firmware provided on the IP Office Administrator ApplicationsDVD should be used for VPNremote phones connected to an IP Office. That firmware is testedwith the IP Office release for correct operation. The firmware is located in a zip file in the folder\bin\VPN Phone.
Whilst other VPNremote firmware releases may be made available by Avaya for download, thosefirmware release may not have been specifically tested with IP Office.
Installation Documentation
November 2021 IP Office Platform H.323 Telephone Installation 79Comments on this document? [email protected]

Related linksVPN Remote Phones on page 78
Configuring the IP Phone for VPN remoteAbout this taskIn addition, a VPN Phone Allowed checkbox option is present on the Extension > VoIP settingstab of IP extensions. The VoIP checkbox is used to indicate to the IP Office the extensions that areVPNremote and therefore require use of a license.
Procedure1. Using IP Office Manager, retrieve the configuration from the system.
2. Click Extension and select the entry for the IP extension.
3. Select VoIP tab.
4. Enable VPN Phone Allowed.
5. Click OK.
6. Repeat this for any other existing IP extensions that are going to be converted to VPNconnection.
7. Save the configuration.
Related linksVPN Remote Phones on page 78
VLAN and IP PhonesThe use of VLAN allows separate collision domains to be created on Ethernet switches. In thecase of IP Office and IP Phones the advantages are:
• It allows PCs to continue in the same IP subnet while IP Phones can use a new and separateIP addressing scheme.
• Broadcast traffic is not propagated between the PC data network and the IP Phones voicenetwork. This helps performance as otherwise broadcast traffic must be evaluated by allreceivers.
• VLAN networking and traffic prioritization at layer 2 are closely bound together in the same802.2 standard. It is therefore easier to maintain L2 QoS when using a VLAN.
VPN Remote Phones
November 2021 IP Office Platform H.323 Telephone Installation 80Comments on this document? [email protected]

The table shows the three ways in which VLAN can be deployed with an Ethernet Switch. The firsttwo methods require only elementary configuration, and since this document assumes both PCand IP Phones share the same Ethernet port, the focus will be the third method (overlapping).
Type Description Advantages DisadvantagesNo VLAN Both Voice and Data occupy the
same collision domainSimpleConfiguration
PC broadcast traffic adverseeffect on Voice traffic.
Requires two (2) ports per user;one for IP Phone and one for PC)
Physical VLAN Separate VLAN for data andvoice
Simpleconfiguration
Requires two (2) ports on switch;one for IP phone and one for PC
OverlappingVLAN
A single port on the switchcarrying both the IP Phones aswell as the PC traffic
Requires only asingle port forboth PC and IPPhone
PC broadcasttraffic cannotadversely effectVoice traffic
Complex configuration
Related linksVPN Remote Phones on page 78
VLAN and IP Phones
November 2021 IP Office Platform H.323 Telephone Installation 81Comments on this document? [email protected]

VLAN and DHCPThe use of VLAN has implications on DHCP if DHCP is being used for support of IP phones andor PCs. The table below details the available options when using a single port for PC and IPPhones on a VLAN enabled network.
DHCP Option DescriptionNone (Static addressing) Manual configuration of each IP PhoneSeparate DHCP Servers Two PCs, one for each VLANMultihomed DHCP Server A single PC with two NIC Cards; one for each VLANDHCP Relay The option must be supported by the Ethernet
switch
If using DHCP, when the IP phone starts it first makes a DHCP request without a VLAN tag.
• If the DHCP reply contains a new VLAN setting as part of the SSON scope, the phones willrelease all its existing IP address and makes a new DHCP request using the newly suppliedVLAN ID
If the IP Phone does not get a new VLAN ID, it will continue with the settings provided in theoriginal DHCP reply
A VLAN ID can also be passed to a phone through the settings file that it loads. Again the IPphone will release all its existing IP parameters and then make a new DHCP request using thenewly supplied VLAN ID.
In the example below, the when the IP phones receives a DHCP response from the DHCP serveron the data VLAN, that response contains the VLAN ID of the voice VLAN. The phone thenreleases the original data VLAN settings it obtained and sends a new DHCP request to the voiceVLAN.
Option Data VLAN DHCP Settings Voice VLAN DHCP SettingsIP Address 192.168.43.x 192.168.202.xMask 255.255.255.0 255.255.255.0Router 192.168.43.1 192.168.202.1SSON
Scope
L2Q=1, L2QVLAN=202,
VLANTEST=0
MCIPADD=192.168.202.1,MCPORT=1719,
HTTPSRVR=192.168.202.XVLANTEST=0
The VLANTEST parameter is the length of time the IP Phone should make DHCP requests in a VLAN (0means unlimited time).
Related linksVPN Remote Phones on page 78
VPN Remote Phones
November 2021 IP Office Platform H.323 Telephone Installation 82Comments on this document? [email protected]
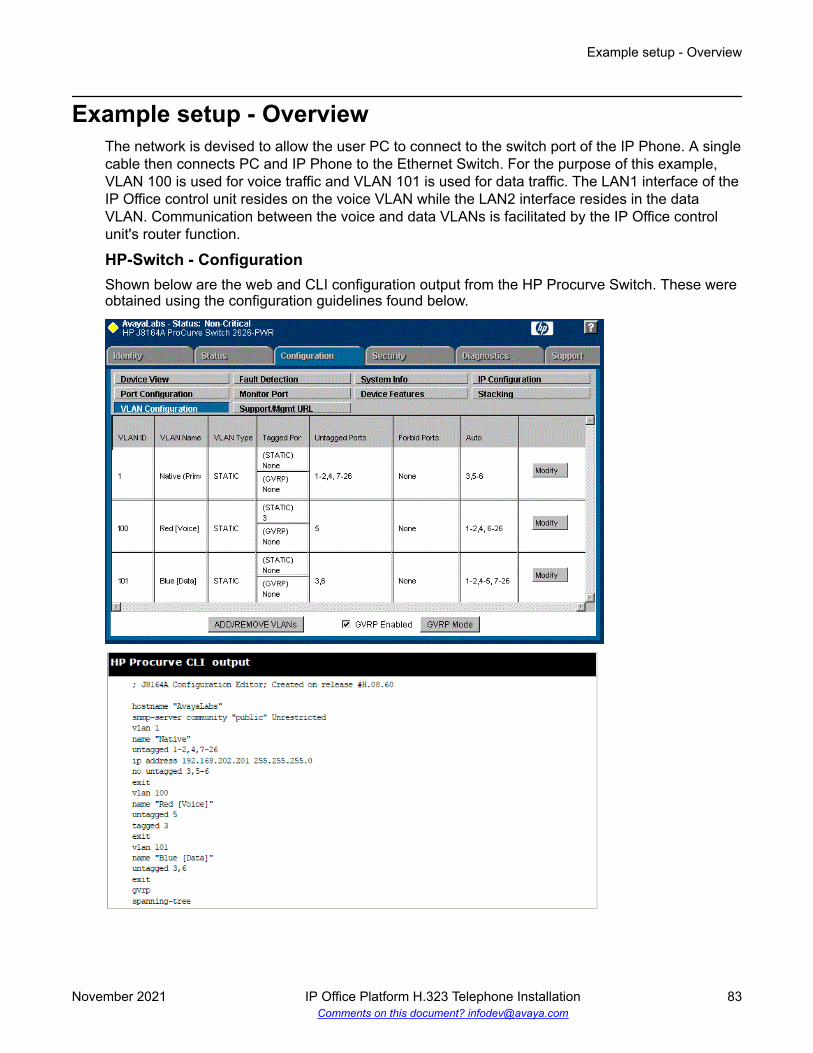
Example setup - OverviewThe network is devised to allow the user PC to connect to the switch port of the IP Phone. A singlecable then connects PC and IP Phone to the Ethernet Switch. For the purpose of this example,VLAN 100 is used for voice traffic and VLAN 101 is used for data traffic. The LAN1 interface of theIP Office control unit resides on the voice VLAN while the LAN2 interface resides in the dataVLAN. Communication between the voice and data VLANs is facilitated by the IP Office controlunit's router function.
HP-Switch - ConfigurationShown below are the web and CLI configuration output from the HP Procurve Switch. These wereobtained using the configuration guidelines found below.
Example setup - Overview
November 2021 IP Office Platform H.323 Telephone Installation 83Comments on this document? [email protected]

The table below summaries the HP configuration for ports and VLANs.
Port VLAN 100 Voice VLAN 101 Data Description3 Tagged Untagged This port was added to
both VLAN 100 andVLAN 101.
Note:
When adding port 3to VLAN 100 theMode option mustbe tagged, but itmust be untaggedwhen adding toVLAN 101.
5 Untagged - This port is included onlyin VLAN 100 and notincluded in VLAN 101.
The Mode option mustbe set to Untagged forport 5 in this VLAN.
6 - Untagged Port 6 is included only inVLAN 101 and notincluded in VLAN 100.
The Mode option MUSTbe set to Untagged inthis VLAN.
The operation of this network is dependant on the functionality defined in HP documentation.Specifically, HP refers to this type of VLAN operation as Overlapping VLAN.
Related linksVPN Remote Phones on page 78
VPN Remote Phones
November 2021 IP Office Platform H.323 Telephone Installation 84Comments on this document? [email protected]

Example System Overview
• IP Office Configuration: The table below details the configuration for IP Office. Additionalconfiguration is not required by IP Office in support of 802.1 tagging.
Option ValueIP Address LAN1 192.168.202.1IP Mask LAN1 255.255.255.0IP Address LAN2 192.168.43.1IP Mask LAN2 255.255.255.0Router 192.168.202.1Call Server 192.168.202.1
• IP Phone- Configuration: In the example below, the IP phone was configured with fixed IPaddressing.
Option ValueIP Address 192.168.202.50IP Mask 255.255.255.0Router 192.168.202.1Call Server 192.168.202.1VLANID 100
• VLAN Switch Configuration: The table below summaries the HP configuration for ports andVLANs.
Example System Overview
November 2021 IP Office Platform H.323 Telephone Installation 85Comments on this document? [email protected]

Port VLAN 100 Voice VLAN 101 Data3 Tagged Untagged5 Untagged -6 - Untagged
• The PC –Configuration: Shown below is the IP configuration of the PC1; no option in supportof 802.1p or 802.1q is enabled on the PC.
Option ValueIP Address 192.168.43.22IP Mask 255.255.255.0Router 192.168.43.1
SummaryFrom the port on which the PC and IP phone reside, you can receive two types of Ethernet frame(that is sent from Phone or PC):
• Tagged packets are sent by IP Phone.• Untagged packets are sent by PC.
When an untagged packet is sent by the PC attached to the IP Phone port, it will be propagatedonly to VLAN 101. This is because when we added the port 3 to VLAN 101 the Mode option wasspecified as untagged. While for the other VLAN (101) the option Tagged was selected for port 3in VLAN 101. Tagged packets will thereby go to VLAN 100 while the untagged will go to 101.When a packet originates from an IP Phone it is tagged. Since the option 'untagged' is selected forport 5 in VLAN 100, the 802.1 tag is removed before the switch forwards the packet to this port.Similarly, when an untagged packet is originated and sent by the IP Office, the switch will tag thepacket before forwarding LAN port 3.
Related linksVPN Remote Phones on page 78
VPN Remote Phones
November 2021 IP Office Platform H.323 Telephone Installation 86Comments on this document? [email protected]

Chapter 15: Alternate DHCP Server Setup
The recommended installation method for H.323 IP phones uses a DHCP server. This sectionoutlines by example, the basic steps for using a Windows server as the DHCP server for IP phoneinstallation. The principles of defining a scope are applicable to most DHCP servers.
You will need the following information from the customer's network manager:
• The IP address range and subnet mask the H.323 IP phones should use
• The IP Gateway address
• The DNS domain name, DNS server address and the WINS server address
• The DHCP lease time
• The IP address of the IP Office unit
• The IP address of the PC running Manager (this PC acts as a file server for the H.323 IPphones during installation)
Related linksAlternate Options on page 87Checking for DHCP Server Support on page 89Creating a Scope on page 89Adding a 242 option on page 91Activating the Scope on page 92
Alternate OptionsIn this document, all IP phone information is issued through the Scope and the Option 176 or 242settings. Depending on the DHCP server, other options may have to be used within the scope.
Option DescriptionOption 1 - Subnet maskOption 3 - Gateway IPAddress
If using more than one address, the total list can contain up to 255 total ASCIIcharacters. You must separate IP addresses with commas with no interveningspaces.
Table continues…
November 2021 IP Office Platform H.323 Telephone Installation 87Comments on this document? [email protected]

Option DescriptionOption 6 - DNS server(s)Address
If using more than one address, the total list can contain up to 127 total ASCIIcharacters. You must separate IP addresses with commas with no interveningspaces. At least one address in Option 6 must be a valid, non-zero, dotteddecimal address.
Option 15 - DNS DomainName
This string contains the domain name to be used when DNS names in systemparameters are resolved into IP addresses. This domain name is appended tothe DNS name before the IP telephone attempts to resolve the DNS address.Option 15 is necessary if you want to use a DNS name for the HTTP server.
Option 51 - DHCP LeaseTime
If this option is not received, the DHCP offer is not accepted. Avayarecommends a lease time of six (6) weeks or greater. If this option has a valueof FFFFFFFF hex, the IP address lease is assumed to be infinite as per RFC2131, Section 3.3, so that renewal and rebinding procedures are not necessaryeven if Options 58 and 59 are received. Expired leases cause Avaya IPTelephones to reboot.
• Provide enough leases so that an IP address for an IP telephone does notchange if it is briefly taken offline.
• DHCP standard states that when a DHCP lease expires, the device shouldimmediately cease using its assigned IP address. If the network hasproblems and the only DHCP server is centralized, the server is notaccessible to the given telephone. In this case the telephone is not usableuntil the server can be reached.
• Once assigned an IP address, the telephone continues using that addressafter the DHCP lease expires, until a conflict with another device is detected.The 1600 Series IP Telephone customizable parameter DHCPSTD allows anadministrator to specify that the telephone either:
- Comply with the DHCP standard by setting DHCPSTD to 1.
- Continue to use its IP address after the DHCP lease expires by settingDHCPSTD to 0. This is the default. If used, after the DHCP lease expires,the telephone sends an ARP Request for its own IP address every five (5)seconds. The request continues either forever, or until the telephonereceives an ARP Reply. After receiving an ARP Reply, the telephonedisplays an error message, sets its IP address to 0.0.0.0, and attempts tocontact the DHCP server again.
Option 52 - OverloadOption
If this option is received in a message, the telephone interprets the name andfile fields in accordance with IETF RFC 2132, Section 9.3, listed in Appendix B:Related Documentation.
Option 53 - DHCPMessage Type
Value is 1 (DHCPDISCOVER) or 3 (DHCPREQUEST).
Option 55 - ParameterRequest List
Acceptable values are: 1 (subnet mask), 3 (router IP address[es]), 6 (domainname server IP address[es]), 15 (domain name), NVSSON (site-specific optionnumber)
Option 57 - MaximumDHCP Message Size
Used by a DHCP client or server to specify the maximum size of DHCPmessage it is willing to accept.
Table continues…
Alternate DHCP Server Setup
November 2021 IP Office Platform H.323 Telephone Installation 88Comments on this document? [email protected]

Option DescriptionOption 58 - DHCP LeaseRenew Time
If not received or if this value is greater than that for Option 51, the defaultvalue of T1 (renewal timer) is used as per IETF RFC 2131, Section 4.5.
Option 59 - DHCP LeaseRebind Time
If not received or if this value is greater than that for Option 51, the defaultvalue of T2 (rebinding timer) is used as per IETF RFC 2131, Section 4.5
Note:
On H.323 IP phones, any Option 66 settings will be overridden by any TFTP entry in Option176. Using Option 66 as part of the Scope is useful if alternate Gatekeeper addresses arerequired in the Option 176 settings whilst keeping within the 127 character limit.
Related linksAlternate DHCP Server Setup on page 87
Checking for DHCP Server SupportProcedure
1. On the server, select Start > Programs > Administrative Tools > ComputerManagement.
2. Under Services and Applications in the Computer Management Tree, locate DHCP.
3. If DHCP is not present then you need to install the DHCP components. Refer to Microsoftdocumentation.
Next stepsIf the DHCP server role is supported, the first stage is to create a scope of addresses for use by IPphones.
Related linksAlternate DHCP Server Setup on page 87
Creating a ScopeAbout this taskA DHCP scope defines the IP addresses that the DHCP server can issue in response to DHCPrequests. Different scopes may be defined for different types of devices.
Procedure1. Go to Start > Programs > Administrative Tools > DHCP2. Right-click on the server and select New > Scope
Checking for DHCP Server Support
November 2021 IP Office Platform H.323 Telephone Installation 89Comments on this document? [email protected]

3. The scope creation wizard will be started, click Next.4. Enter a name and comment for the scope and click Next.5. Enter the address range to use, for example, from 200.200.200.1 to 200.200.200.15
(remember the host part cannot be 0).
6. Enter the subnet mask as either the number of bits used or the actual mask, for example,24 is the same as 255.255.255.0 and click Next.
7. You can specify addresses to be excluded. You can do this either by entering a range andclick Add.
You can enter the range as 200.200.200.5 to 200.200.200.7
Note:
You should exclude the IP Office from this range, as the DHCP Options in the IP Officeshould be disabled. This is only a recommendation. You can also accomplish this byleaving available addresses outside of the scopes range.
8. Click Next.9. Set the lease time for addresses.
If set too large, addresses used by devices no longer attached will not expire and beavailable for reuse in a reasonable time. This reduces the number of addresses availablefor new devices. If set too short, it will generate unnecessary traffic for address renewals.The default is 8 days.
10. Click Next.11. The wizard gives the option to configure the most common DHCP options. Select Yes and
then click Next.12. Enter the address of the gateway and click Add.
13. Click Next.14. Enter the DNS domain (eg. example.com) and the DNS server addresses and click Next.15. Enter the WINS server addresses and click Add and then click Next.16. You will then be asked if you wish to activate the scope. Select No and then click Next.17. Click Finish.
ResultThe new scope will now be listed and the status is set to Inactive.Having created the scope that will be used by the IP phones, a set of options need to be addedmatching the Site Specific Options Number (SSON) that the phones will use. The SSON used by1600 and 9600 Series phones by default is 242.
Related linksAlternate DHCP Server Setup on page 87
Alternate DHCP Server Setup
November 2021 IP Office Platform H.323 Telephone Installation 90Comments on this document? [email protected]

Adding a 242 optionAbout this taskIn addition to issuing IP address information, DHCP servers can issue other information inresponse to requests for different specific DHCP option numbers. The settings for each option areattached to the scope. 1600 and 9600 Series H.323 IP phones use SSON 242 to requestadditional information from a DHCP server. The option should include defining the address of thephone's H.323 gatekeeper (the IP Office) and the address of the HTTP file server.
Procedure1. Right-click on the DHCP server.
2. From the pop-up menu, select Predefined options.
3. Select Add.
4. Enter the following information:
a. In Name enter 16xxOptions.
b. In Data type enter String.
c. In Code enter 242.
d. In Description enter IP Phone settings.
5. Click OK.
6. In the string value field, enterMCIPADD=xxx.xxx.xxx.xxx,MCPORT=1719,HTTPSRVR=yyy.yyy.yyy.yyy,HTTPDIR=z, VLANTEST=0.
• The maximum string length is 127 characters. To reduce the length, the TFTP Serveraddress can be specified through attaching an Option 66 entry to the Scope. See Alternate Options on page 87.
MCIPADD= is the H.323 Gatekeeper (Callserver) address. Normally, this is the IP OfficeUnit's LAN1 address. You can enter several IP addresses, separating each by a commawith no space. This allows specification of a fallback H.323 gatekeeper. The phones willwait three (3) minutes before switching to the fallback and will not switch back when thefirst server recovers, until the phone is rebooted.
• MCPORT= the RAS port address for initiating phone registration. The default is 1719.
• HTTPSRVR= the HTTP file server IP address.
• HTTPDIR= the HTTP file directory where the IP phone files are located. This entry is notrequired if those files are in the server's root directory.
7. Click OK8. Expand the server by clicking on the [+] next to it.
9. Click on the scope you just created for the 1600 and 9600 phones.
Adding a 242 option
November 2021 IP Office Platform H.323 Telephone Installation 91Comments on this document? [email protected]

10. In the right-hand panel, right-click on the scope and select Scope Options.
11. In the general tab, make sure 242 is checked.
12. Verify the String value is correct and click OK.
Next stepsHaving created a 242 option and associated with the scope we want used by the IP phones, wenow need to activate the scope
Related linksAlternate DHCP Server Setup on page 87
Activating the ScopeThe scope can be manually activated by right-clicking on the scope, select All Tasks and selectActivate. The activation is immediate.
You should now be able to start installing H.323 IP phones using DHCP. If Manager is being usedas the HTTP or TFTP server, ensure that it is running on the specified PC.
Related linksAlternate DHCP Server Setup on page 87
Alternate DHCP Server Setup
November 2021 IP Office Platform H.323 Telephone Installation 92Comments on this document? [email protected]

Chapter 16: SRTP Support
For IP Office Release 9.1, SRTP is supported.
• Support IP Office Modes: SRTP is supported in all IP Office modes.• Supported Phones: It can be applied to SIP and H323 extensions. However, there may be
restrictions for some specific models of IP telephone.
- Supported for H323 on 9608, 9611, 9621 and 9641 Series telephones.- Supported for SIP on Avaya and 3rd-party telephones.
• Supported Trunks: It can be applied to all types of IP lines (SIP, SM and IP Office (SCN))except external H323 trunks.
• Licensing and Capacity: The use of SRTP does not require any licenses or subscription.However, the use of SRTP impacts on the call capacity of the system.
- For IP500 V2/IP500 V2A systems with IP500 VCM cards, those cards are used to supportSRTP and reduce the impact on the system call capacity. This does not apply to combinationcards.
Related linksEnable System SRTP on page 93Direct media on page 95
Enable System SRTPBy default, all IP extensions and lines are configured to automatically match the top-level systemsettings for SRTP, whether disabled or enabled. This simplifies enabling SRTP by ensuring that alldevices are using the same SRTP settings. Using this approach, once SRTP is enabled, the onlydevice level configuration required is to disable SRTP on those lines or devices for which it is notrequired.
The exception to the above is SIP lines for which SRTP is disabled by default. This is due to thelow number of SIP line providers who currently support SRTP. However, SIP lines can beconfigured to also match the system level settings if required.
Related linksSRTP Support on page 93Enabling system SRTP on page 94Disabling SRTP on an extension or line on page 94
November 2021 IP Office Platform H.323 Telephone Installation 93Comments on this document? [email protected]

Enabling system SRTPProcedure
1. Receive the configuration from the system.
2. Click System and select the VoIP Security tab.
3. For Media Security, select the level of STRP operation required:
Setting DescriptionDisabled STRP is not used for connections.Best Effort Support both RTP and SRTP. Use SRTP if matching SRTP settings can
be negotiated with the remote end. This requires the remote end tosupport srtp rfc5939 (capability negotiation for SRTP). Otherwise useRTP. Note that E129 phones does not support Best Effort.
Enforced Use SRTP only. The call is not allowed if the remote leg does not supportmatching SRTP.
Advanced Settings After selecting either Best Effort or Enforced as the STRP method, it isrecommended that all other SRTP settings are left at their defaults.
The default SRTP flags and crypto suite settings were chosen so thatthey work with all Avaya H323 and SIP devices. For example, themajority of Avaya implementations don’t support RTCP encryption andAvaya H323 phones only support the SHA_80 crypto suite.
4. Click OK.
Related linksEnable System SRTP on page 93
Disabling SRTP on an extension or lineProcedure
1. Click on Extension or Line and select the required extension or line.
2. Select the VoIP tab.
3. Change the Media Security setting to Disabled.
4. Click OK.
Next stepsRepeat for any other extension or line for which SRTP should not be used.
Related linksEnable System SRTP on page 93
SRTP Support
November 2021 IP Office Platform H.323 Telephone Installation 94Comments on this document? [email protected]

Direct mediaIf direct media is configured, the system tries to negotiate direct media between the call ends.When SRTP is involved, addition to checking for matching VoIP criteria (for example matchingcodec support), the system also checks for matching Media Security and media security advancedsettings (SRTP flags and crypto suites). Any incompatibility prohibits the call using direct media.
Calls between call legs set to different Media Security levels (Disabled, Best Effort or Enforced)will not use direct media.
Related linksSRTP Support on page 93
Direct media
November 2021 IP Office Platform H.323 Telephone Installation 95Comments on this document? [email protected]

Chapter 17: TLS Support
For IP Office Release 10 and higher, it is possible to use TLS for the connection of 9600 telephones.When enabled, TLS is used for the TCP RAS and call signalling between the telephone and the IPOffice system.
• Supported with the 9608, 9611, 9621 and 9641 models.
• Requires the phone to be running 6.6029 firmware or higher.
• Requires the telephone to use a non-default CRAFT password.
• The use of TLS by the system can be set as either optional or enforced.
Process Summary1. Customize the Craft process password2. Add the identity certificate3. Enable TLS on the IP Office system4. Enable TLS on the telephone
Additional NotesFor phones using TLS:
• HTTPS file server connection uses port 8411. File server need same certificate.• If remote and also using SRTP, the telephone uses port 8443 for backup/restore.
Related linksChanging the CRAFT Password on page 97Adding the Identity Certificate on page 97Downloading the identity certificate from a Linux based server on page 98Uploading a certificate to the server's trusted certificate store on page 98Enabling TLS on the IP Office on page 99Enabling TLS on the telephone on page 99Checking TLS Operation on page 100
November 2021 IP Office Platform H.323 Telephone Installation 96Comments on this document? [email protected]

Changing the CRAFT PasswordAbout this taskThe phone's TLS operation setting cannot be changed enabled if the telephones are using thedefault CRAFT process password. The password can be changed as follows:
Procedure1. If the telephones are downloading a 46xxsettings.txt file from a file server do the
following:
a. Add a SET PROCPSWD entry to the 46xxsettings.txt file followed by thepassword that should be used.
b. Reboot the phones to load the new settings.
2. If the telephones are using the IP Office auto-generated settings:
a. Receive the IP Office configuration and locate the NoUser user.b. In the Source Numbers tab, add SET_46xx_PROCPSWD followed by the new
password.
Note that the command is case sensitive.c. Save the configuration and reboot the system.
3. To view the auto-generated file setting:
a. Open browser and enter http://<server_address>/46xxsettings.txt .b. In file include a line starting SET PROCPSWD followed by the new password.
Related linksTLS Support on page 96
Adding the Identity CertificateBy default the IP Office root certificate is used. For an IP500 V2 this is its own self-signed securitycertificate and no further changes are required. For Linux based servers, it is necessary todownload the server's own self-signed certificate and then load that certificate into the IP Officeservice's trusted certificate store.
To use a third-party certificate, that certificate needs to be uploaded to the IP Office's trustedcertificate store.
The telephone is informed about which certificate to use by setting in the 46xxsettings.txt fileit receives. The following settings are used:
• SET TLSSRVRVERIFYID 1: This setting instructs the telephone to verify the TLS certificate.• SET TRUSTCERTS Root-CA-xxxxxxxx.pem: This setting indicate the name of the
security certificate that the telephone should request and load when starting.
Changing the CRAFT Password
November 2021 IP Office Platform H.323 Telephone Installation 97Comments on this document? [email protected]

When the IP Office receives a request for a certificate, it searches its trusted certificate store.If bytes 13-16 of the Public key of the root CA match the xxxxxxxx of the filename in therequest, then IP Office provides the root CA as an auto-generated file named Root-CA-xxxxxxxx.pem.
For systems using auto-generated files, the settings are added automatically. For otherinstallation, the settings must be manually added to the section of the 46xxsettings file intended for9608, 9611, 9621 and 9641 telephones.
Related linksTLS Support on page 96
Downloading the identity certificate from a Linux basedserver
About this taskProcedure
1. Browse to https://%3Cserver_address%3E:7071 and login to the server's web controlmenus.
Alternatively, login to the server's web management menus and then select Platform View.
2. Select the Settings tab and then select General.3. Locate the Certificates section.
4. In the Certified Authority Settings section, click Download (PEM-Encoded).Related links
TLS Support on page 96
Uploading a certificate to the server's trusted certificatestore
Procedure1. Start IP Office Manager.
2. Select File > Advanced > Security Settings3. Select the server and login.
4. Select System.
5. Select the Certificates tab.
6. In the Trusted Certificate Store section, click Add.
TLS Support
November 2021 IP Office Platform H.323 Telephone Installation 98Comments on this document? [email protected]

Related linksTLS Support on page 96
Enabling TLS on the IP OfficeAbout this taskThe IP Office system can use a number of TLS options.
Procedure1. Using IP Office Manager, load the server's configuration.
2. Select System.
3. Select LAN1 or LAN2 tab as appropriate and then select the VoIP tab.
4. The TLS operation is controlled by the H.323 Signalling over TLS field. Select the TLSmode required:
• Disabled: Do not use TLS. Phones configured for TLS fallback to normal TCPconnection.
• Preferred: Use TLS with telephones configured for TLS but also allow normal TCPconnections from other telephones.
• Enforced: Require TLS. Refuse connections from telephones not configured for TLS.Note that when this option is selected, the Remote Call Signaling Port is fixed to 1300.
5. Click OK.
6. Save the configuration changes and allow the system to reboot.
Related linksTLS Support on page 96
Enabling TLS on the telephoneAbout this taskThe TLS setting for the telephone is accessed through its Debug menu.
Note:When existing telephones upgrade to TLS capable firmware, the H.323 signalling over TLSsetting defaults to on. However, with systems not configured for TLS operation the telephonesfallback to using TCP connection.
Enabling TLS on the IP Office
November 2021 IP Office Platform H.323 Telephone Installation 99Comments on this document? [email protected]

Procedure1. Press MUTE followed by CRAFT process password and #.
The menu can be accessed on phones using the default CRAFT process password.However, in that case you can only view the settings, you cannot change them.
2. Scroll to and select DEBUG.
3. Scroll to H.323 Signalling over TLS.
4. Change the setting as required.
5. Click Save.
6. Click Exit.ResultThe phone is restarted using the new setting.
Related linksTLS Support on page 96
Checking TLS OperationThe use of TLS can be checked and confirmed as follows.
• System Status Application: The Extension details indicate the Layer 4 Protocol being usedby the extension connection. TLS is shown when TLS is used.
• System Monitor: Within monitor, select Status > H323 Phone Status. The Transportcolumnshows TLS for extensions using TLS for their connection.
Within monitor traces, H323 RAS Tx and Rx records indicate whether they are using TLS.Similarly, H323 CS and RAS records show the use of port 1300.
Related linksTLS Support on page 96
TLS Support
November 2021 IP Office Platform H.323 Telephone Installation 100Comments on this document? [email protected]

Part 5: Miscellaneous
November 2021 IP Office Platform H.323 Telephone Installation 101Comments on this document? [email protected]

Chapter 18: Static Administration Options
A number of settings can be altered through the phone after installation. These procedures shouldonly be used if you are using static address installation. Do not use these procedures if you areusing DHCP except if you are attempting to reassign a phone that has been previously staticallyinstalled.
To set parameters for all H.323 IP phones on a system, you can edit the 46xxsettings.txt scriptfile. However, values assigned through static administration override any set through the46xxsettings.txt file. They remain active for the IP phone until a new boot file is downloaded.
Related linksUsing Static Administration Options on page 102Administrator Process Password on page 104Enabling hub interface on page 104View details of phone on page 106Self-test procedure for 1600 series phones on page 108Self-test procedure for 9600 series phones on page 108Resetting a phone on page 109Clearing a Phone on page 110Site Specific Option Number on page 111
Using Static Administration OptionsThe method used to access static administration depends on the type of phone. Many of the staticadministration features are accessed using key sequences that begin by pressing either MUTE orHOLD. In recent firmware releases, preference has been given to using MUTE and some phones,for example the 1600 Series, only support MUTE.
Related linksStatic Administration Options on page 102Entering administrative options in 1600 series phones on page 103Entering administrative options in 9600 series phones on page 103
November 2021 IP Office Platform H.323 Telephone Installation 102Comments on this document? [email protected]

Entering administrative options in 1600 series phonesAbout this taskThis section describes how to enter data for the administrative options.
Procedure1. With the phone idle, press MUTE.
After pressing MUTE, if a valid button is not pressed within 6 seconds of the previousbutton the collected digits are discarded and the phone returns to idle.
2. Dial the administrative process password
3. Dial the digits for the required command followed by #.
• Attempts to enter invalid data are rejected and the phone emits an error beep.
• If a numeric digit is entered for a value or for a field of an IP address or subnet maskafter only a zero has been entered, the new digit will replace the zero.
• To go to the next step, press #.
Related linksUsing Static Administration Options on page 102
Entering administrative options in 9600 series phonesAbout this taskAdministrative procedures for 9600 Series phones can only be accessed by restarting the phone.
Procedure1. While the phone is on-hook and idle, press MUTE <password> #.
2. Scroll the menu to the action required and select it.
When the selected procedure is finished, the phone will return to the procedures menu.
3. When all the required procedures have been completed, press Exit.ResultThe phone restarts with new settings.
Related linksUsing Static Administration Options on page 102
Using Static Administration Options
November 2021 IP Office Platform H.323 Telephone Installation 103Comments on this document? [email protected]

Administrator Process PasswordAbout this taskAdministrative phone processes are protected by the use of a process password, also known asthe CRAFT password. The password can be changed from its default by specifying the new valuein the 46xxsettings.txt file.
Procedure1. If the telephones are downloading a 46xxsettings.txt file from a file server do the
following:
a. Add a SET PROCPSWD entry to the 46xxsettings.txt file followed by thepassword that should be used.
b. Reboot the phones to load the new settings.
2. If the telephones are using the IP Office auto-generated settings:
a. Receive the IP Office configuration and locate the NoUser user.
b. In the Source Numbers tab, add SET_46xx_PROCPSWD followed by the newpassword.
Note that the command is case sensitive.
c. Save the configuration and reboot the system.
3. To view the auto-generated file setting:
a. Open browser and enter http://<server_address>/46xxsettings.txt .
b. In file include a line starting SET PROCPSWD followed by the new password.
Related linksStatic Administration Options on page 102
Enabling hub interfaceThe hub interface is found on many Avaya IP phones which can be used for user PC connection .The hub interface is enabled by default.
Related linksStatic Administration Options on page 102Enabling hub interface for 1600 series phones on page 105Enabling hub interface for 9600 series on page 105
Static Administration Options
November 2021 IP Office Platform H.323 Telephone Installation 104Comments on this document? [email protected]
Enabling hub interface for 1600 series phonesProcedure
1. While the phone is on-hook and idle, press MUTE <password> INT # or MUTE<password> 468 #.
The phones port settings are shown in sequence. The options vary between differentmodels of phone.
• PHY2=This is the PC connection LAN socket marked as on the phone. Press 1 or 0 to enableor disable the hub interface respectively. To continue, press #.
• IR=This is the infrared (IR) port located on the front of some H.323 IP phones. Press 1 or 0to enable or disable the hub interface respectively. To continue, press #.
2. Press # to save the new values.
ResultNew values being saved is displayed and then the set returns to normal operation.
Related linksEnabling hub interface on page 104
Enabling hub interface for 9600 seriesProcedure
1. While the phone is on-hook and idle, press MUTE <password> #.
2. Scroll the menu to INT.
3. Select the port that you want to adjust. The options are Ethernet and PC Ethernet.4. Use the < and > buttons to scroll through the port's possible settings.
The additional option Disabled is available for the PC Ethernet port.
5. Press Save.
6. Select another procedure or press Exit to restart the phone.
Related linksEnabling hub interface on page 104
Enabling hub interface
November 2021 IP Office Platform H.323 Telephone Installation 105Comments on this document? [email protected]

View details of phoneYou can view a number of phone details. These are in addition to the other static address andlocal administration options which can also be used to review settings.
Related linksStatic Administration Options on page 102View details of 1600 series phones on page 106Viewing details of 9600 series phones on page 107
View details of 1600 series phonesProcedure
1. While the phone is on-hook and idle, press MUTE CRAFT VIEW # or MUTE 27238 8439#.
2. To display the details, press * at any time during viewing. The following settings aredisplayed:
Value DescriptionModel Shows the phones model number; for example, 4624D02A.Market Shows 1 for export or 0 for domestic (US). Not displayed on all phone
types.Phone SN Shows the phone's serial number.PWB SN Shows the phone's Printed Wiring Board Serial Number.PWB comcode Shows the PWB's comcode.MAC address Shows the phone's MAC address as paired hexadecimal numbers.L2 tagging Indicates whether L2 tagging is on, off or set to auto.VLAN ID Used for the phone. The default is 0.IP address The IP address assigned to the phone.Subnet mask The subnet mask assigned to the phone.Router The router address assigned to the phone.File server The address of the file server assigned to the phone.Call Server The address of the phone's H.323 Gatekeeper.802.1X The current setting for 802.1X operation if being used.Group This displays the group value set on the phone. Group values can be
used to control which options (both firmware and settings) a phonedownloads.
Protocol Display Default.Table continues…
Static Administration Options
November 2021 IP Office Platform H.323 Telephone Installation 106Comments on this document? [email protected]

Value Descriptionfilename1 Shows the name of the phone application file in the phone's memory.
These are values from within the boot file loaded and not the actual filename.
10MBps Ethernet
100Mbps Ethernet
Shows the speed of the detected LAN connection.
filename2 Shows the boot file name and level. These are values from within theboot file loaded and not the actual file name.
3. To end the procedure and restore the user interface to its previous state, press #.
4. To display the next value press *.
Related linksView details of phone on page 106
Viewing details of 9600 series phonesProcedure
1. While the phone is on-hook and idle, press MUTE <password> #.
2. Scroll the menu to VIEW and start the procedure.
Value DescriptionModel Shows the phone's model number; for example, 4624D02A.Phone SN Shows the phone's Serial Number.PWB SN Shows the phone's Printed Wiring Board Serial Number.PWB comcode Shows the PWB's comcode.MAC Shows the phone's MAC address as paired hexadecimal numbers.Group Shows the group value set on the phone. Group values can be used to
control which options (both firmware and settings) a phone downloads.Protocol Display Default.Application File Shows the name of the phone application file in the phone's memory.
These are values from within the boot file loaded and not the actual filename.
Ethernet Shows the speed of the detected LAN connection.Boot File Shows the boot file name and level. These are values from within the
boot file loaded and not the actual file name.Proxy Server Shows the details of the selected proxy server.Voice Language File The name of the language file the phone is using. This is blank when
using the phone's default language (English).
3. Press Back.
4. Select another procedure or press Exit to restart the phone.
View details of phone
November 2021 IP Office Platform H.323 Telephone Installation 107Comments on this document? [email protected]

Related linksView details of phone on page 106
Self-test procedure for 1600 series phonesProcedure
1. To start the IP phone self-test procedure, press MUTE <password> TEST # or MUTE<password> 8378 #.
The phone does the following:
• Each column of programmable button LEDs is lit for half a second from left to rightacross the phone, in a repeating cycle. The Speaker/Mute LED and the messagewaiting LED are also lit in sequence.
• Buttons (other than #) generate a click if pressed.
• Phones with displays show Self test #=end for 1 second after self-test is started.Then a block character (all pixels on) is displayed in all display character locations for 5seconds. Display of the block character is used to find bad display pixels.
• If self-test passes:Self test passed#=end
• If self-test fails:Self test failed#=end
2. To end the self-test, press #.
ResultThe phone returns to normal operation.
Related linksStatic Administration Options on page 102
Self-test procedure for 9600 series phonesProcedure
1. While the phone is on-hook and idle, press MUTE <password> #.
2. Scroll the menu to Test.3. Press Test again to confirm the action.
Static Administration Options
November 2021 IP Office Platform H.323 Telephone Installation 108Comments on this document? [email protected]

Related linksStatic Administration Options on page 102
Resetting a phoneResetting a phone resets all the system values and most of the system initialization values. Theprocedure does not affect user-specified data and settings (example Contact data, Optionssettings, login extension or password, and so on.). To remove all such data, refer to Clearing aPhone on page 110.
Related linksStatic Administration Options on page 102Resetting 1600 series phone on page 109Resetting 9600 series phone on page 110
Resetting 1600 series phoneProcedure
1. While the phone is on-hook and idle, press the following sequence MUTE <password>RESET #MUTE <password> 73738 #
Warning:
As soon as you press #, all static information is erased without any possibility ofrecovering the data.
2. To continue press #.
Whilst the system values are reset to their defaults, Resetting values is displayed.
Once the system values are reset, Restart phone? is displayed.
3. To end the procedure without restarting the phone, press *.
4. To restart the phone, press #.
The remainder of the procedure then depends on the status of the boot and applicationfiles. See Restart Senarios on page 113.
Related linksResetting a phone on page 109
Resetting a phone
November 2021 IP Office Platform H.323 Telephone Installation 109Comments on this document? [email protected]

Resetting 9600 series phoneProcedure
1. While the phone is on-hook and idle, press MUTE <password> #.
2. Scroll the menu and select Reset Values.
3. Press Reset to confirm the action.
ResultThe phone user settings are reset as the phone restarts.
Related linksResetting a phone on page 109
Clearing a PhoneClearing all system initialization values back to their default settings and deleting all user-specificdata is intended primarily for repair and for use when the phone is given to a new user. Thisreturns the phone near to its original, out-of-box state. The phone will yet retain the firmware files ithas already downloaded.
Note:
Some parameters, such as button clicks, error tones, and personalized ringing, may be set fora specific user via the MENU. These user settings will be restored when you register the userto the phone because those parameters are configured in IP Office. All other settings (forexample Contact data, Options settings, and so on.) is cleared from the phone.
Related linksStatic Administration Options on page 102Clearing 1600 series phones on page 110Clearing 9600 series phones on page 111
Clearing 1600 series phonesProcedure
1. While the phone is on-hook and idle, press the following sequence MUTE <password>CLEAR #.
MUTE <password> 25327 #2. To continue press #.
Static Administration Options
November 2021 IP Office Platform H.323 Telephone Installation 110Comments on this document? [email protected]

Warning:
As soon as you press #, all static information is erased without any possibility ofrecovering the data.
Whilst the system values are reset to their defaults, Clearing values is displayed.
ResultOnce all values are cleared, the phone restarts as if it is a new phone.
Related linksClearing a Phone on page 110
Clearing 9600 series phonesProcedure
1. While the phone is on-hook and idle, press MUTE <password> #.
2.
3. Scroll the menu and select Clear.4. Press Clear again to confirm the action.
ResultThe phone settings are cleared and the phone restarts.
Related linksClearing a Phone on page 110
Site Specific Option NumberThe Site Specific Option Number (SSON) is used by IP phones to request information from aDHCP server that is specific to the phones and not to other IP devices being supported by theDHCP server. The number must match a similarly-numbered 'option' set on the DHCP server thatdefines the various settings required by the phone.
The default SSON used by Avaya 1600 Series and 9600 Series phones is 242. For phones beingsupported by IP Office DHCP, the SSON used by the phone must match one of the site specificoption numbers set in the IP Office configuration
Warning:
Do not perform this if using static addressing. Only perform this procedure if using DHCPaddressing and the DHCP option number has been changed from the normal default.
Site Specific Option Number
November 2021 IP Office Platform H.323 Telephone Installation 111Comments on this document? [email protected]

Related linksStatic Administration Options on page 102SSON in 1600 series phones on page 112SSON in 9600 phone series on page 112
SSON in 1600 series phonesProcedure
1. While the phone is on-hook and idle, press MUTE <password> SSON # or MUTE<password> 7766 #SSON= is displayed followed by the current value.
2. Enter the new setting. This must be a number between 128 and 255.
3. To cancel this procedure, press * or press # to save the new value.
Related linksSite Specific Option Number on page 111
SSON in 9600 phone seriesProcedure
1. While the phone is on-hook and idle, press MUTE <password> #.
2. Scroll the menu to SSON and start the procedure.
3. Enter the new SSON number that the phone should use when it next restarts.
4. Press Save.
5. Select another procedure or press Exit to restart the phone.
Related linksSite Specific Option Number on page 111
Static Administration Options
November 2021 IP Office Platform H.323 Telephone Installation 112Comments on this document? [email protected]

Chapter 19: Restart Senarios
The sequence of the restart process depends on the version of the phone boot file alreadydownloaded to the phone as well as those on the file server. This appendix explains the differentscenarios possible.
All of the following start-up procedures involve the same initial steps as the phone negotiates withthe DHCP server and the file server.
1. After power is applied, the phone displays Restarting followed by Initializing2. When either the application file (if there is one) or the boot code is uncompressed into RAM,
Loading is displayed. Since this takes a while, asterisks, then periods, then asterisks aredisplayed on the second line to indicate that something is happening.
3. When control is passed to the code in RAM, Starting is displayed.
4. The phone detects and displays the speed of the Ethernet interface in Mbps (that is 10 or100). The message No Ethernet means the LAN interface speed cannot be determined. TheEthernet speed indicated is the LAN interface speed for both the phone and any attachedPC.
5. DHCP is displayed whilst the phone obtains an IP address and other information from theLAN's DHCP server. The number of elapsed seconds is incremented until DHCPsuccessfully completes.
• If the phone has been setup using static addressing (by pressing * when DHCP is shown),it will skip DHCP and use the static address settings it was given.
• Note that uploading a new boot file at any time erases all static address information.
6. Once DHCP has completed successfully, the phone requests files from the file serverindicated in the DHCP response. The first file requested details the other files that the phoneshould also load. The phone first makes its file request using HTTPS. If this fails it makes thesame request using HTTP. If that fails it makes a final request using TFTP. If all requests fora file fail, the phone fallbacks to using the current version of the file it has in its own memory.
7. After the upgrade script is loaded, the sequence depends on the status of the files currentlyheld in the phone's memory, compared to those listed in the upgrade script file.
Related linksBoot File Needs Upgrading on page 114No Application File or Application File Needs Upgrading on page 114Correct Boot File and Application File Already Loaded on page 115
November 2021 IP Office Platform H.323 Telephone Installation 113Comments on this document? [email protected]

Boot File Needs UpgradingHaving processed the upgrade script file, the software determines that the name of the boot codefile in the phone does not match that in the upgrade script. The script specifies the name of thenew file to load.
1. The phone displays the file name and the number of kilobytes loaded.
2. The phone displays Saving to flash while the new boot file is stored in its flashmemory. The percentage of the file stored and the number of seconds that have elapsedare shown. This will usually take longer than it took to download the file.
3. The phone displays Restarting as it prepares to reboot using the new boot file.
4. The phone displays Initializing.
5. While the new boot file is uncompressed into RAM, the phone displays Loading. Sincethis takes a while, asterisks, then periods, then asterisks are displayed on the second lineto indicate that something is happening.
6. When control is passed to the software that has just loaded, the phone displaysStarting.
7. The phone displays Clearing whilst the flash memory is erased in preparation forrewriting the code. The percentage of memory erased and number of elapsed seconds arealso shown.
8. Updating is displayed whilst the boot code is rewritten. The phone also displays thepercentage of boot code rewritten and the number of elapsed seconds.
9. When the new boot code has been successfully written into the flash memory, the phoneresets so that the status of the phone application files can be checked.
Related linksRestart Senarios on page 113
No Application File or Application File Needs UpgradingThis happens with normal application file upgrades. Having processed the upgrade script file, thesoftware determines that the name of the boot file in the phone is the correct version. It nextdetermines that the name of the application file does not match that stored in the phone.
1. The phone displays the required file name as it downloads the file from the TFTP server. Italso displays the number of kilobytes downloaded.
2. Saving to flash is displayed. The phone also displays the percentage of file storedand the number of seconds that have elapsed. This will usually take longer than it took todownload the file.
3. The phone is reset so that the new system-specific application file can be executed.
Restart Senarios
November 2021 IP Office Platform H.323 Telephone Installation 114Comments on this document? [email protected]

Related linksRestart Senarios on page 113
Correct Boot File and Application File Already LoadedThis happens with most normal restarts. Having processed the upgrade script file, the softwaredetermines that the name of the boot file in the phone and the phone application file match thosespecified in the upgrade script.
1. System-specific registration with the switch is started. The phone requests the extensionnumber it should use and the password.
• By default, the phone displays the last extension number it used. To accept, press #.
• Whilst a password request is shown, password verification is not performed except if theuser changes the extension number.
• The password is checked against is the extension's Phone Password stored in IPOffice Manager. If a Phone Password has not been set, the system will also check thematching user's Login Code. Pre-IP Office Release 9.0 systems only use the matchinguser's Login Code.
2. Upon completion of registration, a dial-tone is available on the phone if it has also beenable to obtain an extension license or user subscription.
Related linksRestart Senarios on page 113
Correct Boot File and Application File Already Loaded
November 2021 IP Office Platform H.323 Telephone Installation 115Comments on this document? [email protected]

Chapter 20: Resources
Documentation
Finding documents on the Avaya Support websiteProcedure
1. Go to https://support.avaya.com.
2. At the top of the screen, type your username and password and click Login.
3. Click Support by Product > Documents.
4. In Enter your Product Here, type the product name and then select the product from thelist.
5. In Choose Release, select the appropriate release number.
The Choose Release field is not available if there is only one release for the product.
6. In the Content Type filter, click a document type, or click Select All to see a list of allavailable documents.
For example, for user guides, click User Guides in the Content Type filter. The list onlydisplays the documents for the selected category.
7. Click Enter.
Training
Viewing Avaya Mentor videosAvaya Mentor videos provide technical content on how to install, configure, and troubleshootAvaya products.
November 2021 IP Office Platform H.323 Telephone Installation 116Comments on this document? [email protected]

About this taskVideos are available on the Avaya Support website, listed under the video document type, and onthe Avaya-run channel on YouTube.
• To find videos on the Avaya Support website, go to https://support.avaya.com/ and do one ofthe following:
- In Search, type Avaya Mentor Videos, click Clear All and select Video in the ContentType.
- In Search, type the product name. On the Search Results page, click Clear All and selectVideo in the Content Type.
The Video content type is displayed only when videos are available for that product.
In the right pane, the page displays a list of available videos.
• To find the Avaya Mentor videos on YouTube, go to www.youtube.com/AvayaMentor and doone of the following:
- Enter a key word or key words in the Search Channel to search for a specific product ortopic.
- Scroll down Playlists, and click a topic name to see the list of videos available for the topic.For example, Contact Centers.
Note:
Videos are not available for all products.
SupportGo to the Avaya Support website at https://support.avaya.com for the most up-to-datedocumentation, product notices, and knowledge articles. You can also search for release notes,downloads, and resolutions to issues. Use the online service request system to create a servicerequest. Chat with live agents to get answers to questions, or request an agent to connect you to asupport team if an issue requires additional expertise.
Related linksUsing the Avaya InSite Knowledge Base on page 117
Using the Avaya InSite Knowledge BaseThe Avaya InSite Knowledge Base is a web-based search engine that provides:
• Up-to-date troubleshooting procedures and technical tips
• Information about service packs
• Access to customer and technical documentation
Support
November 2021 IP Office Platform H.323 Telephone Installation 117Comments on this document? [email protected]

• Information about training and certification programs
• Links to other pertinent information
If you are an authorized Avaya Partner or a current Avaya customer with a support contract, youcan access the Knowledge Base without extra cost. You must have a login account and a validSold-To number.
Use the Avaya InSite Knowledge Base for any potential solutions to problems.
1. Go to http://www.avaya.com/support.2. Log on to the Avaya website with a valid Avaya user ID and password.
The system displays the Avaya Support page.3. Click Support by Product > Product-specific Support.4. In Enter Product Name, enter the product, and press Enter.
5. Select the product from the list, and select a release.6. Click the Technical Solutions tab to see articles.7. Select relevant articles.
Related linksSupport on page 117
Resources
November 2021 IP Office Platform H.323 Telephone Installation 118Comments on this document? [email protected]

Index
Special Characters_enable
system SRTP ................................................................93
Numerics46xxspecials.txt ................................................................... 30
Aactivating
scope ............................................................................ 92adding
242 option .....................................................................91indentity certificate ........................................................97
additional phonesettings ......................................................................... 29
adjustingdiffserv QoS ..................................................................39
AdminStatic ...........................................................................102
administrative options1600 series ................................................................. 1039600 series ................................................................. 103
administrator processpassword .................................................................... 104
alternateoptions .......................................................................... 87
application fileupgrading ....................................................................114
auto-generation ....................................................................14Avaya support website ....................................................... 117
Bbackup
settings ......................................................................... 65blocking
default passcodes .........................................................28boot file
upgrading ....................................................................114
Cchange
craft password .............................................................. 97changing
file server settings .........................................................45system SSON settings ..................................................42
channels .............................................................................. 19checking
checking (continued)DHCP server support ................................................... 89TLS operation ............................................................. 100
clearing1600 series phones .....................................................1109600 series phones .....................................................111phone ..........................................................................110
configuringapache server ...............................................................69file ................................................................................. 31IIS server ...................................................................... 68IP phone ....................................................................... 80IPO system ................................................................... 76VPN remote .................................................................. 80
connectingphone ............................................................................56
controlunit memory cards ........................................................ 25
control unitmemory card .................................................................27
correct boot fileapplication file ............................................................. 115
creatingsetting file ..................................................................... 46
customer networkconfiguration ................................................................. 75
customizingoperation .......................................................................64
Ddefault
extension password ......................................................52DHCP
Alternate server setup .................................................. 87settings ......................................................................... 41
direct media ......................................................................... 95disabling
SRTP ............................................................................ 94disabling on
extension ...................................................................... 94line ................................................................................ 94
downloadingindentity certificate ........................................................98
downloading fromlinux based server ........................................................ 98
Eediting
file ................................................................................. 31setting file ..................................................................... 46
enabling
November 2021 IP Office Platform H.323 Telephone Installation 119Comments on this document? [email protected]

enabling (continued)9600 series ................................................................. 105H.323 gatekeeper ......................................................... 37hub interface .......................................................104, 105RTCP quality monitoring ...............................................60system quality reporting ................................................61system SRTP ................................................................94telephone quality reporting ........................................... 60TLS on IPO ...................................................................99TLS on telephone ......................................................... 99
enteringadministrative options .................................................103
examplefile ................................................................................. 67
example setupoverview ....................................................................... 83
example systemoverview ....................................................................... 85
Ffile
auto-generation ............................................................ 26server ............................................................................24server settings .............................................................. 44
file server settings ................................................................46
HHTTP
authentication ............................................................... 66
IInSite Knowledge Base ......................................................117installation ............................................................................33
requirements .................................................................16installing
1600 series phones ...................................................... 719600 series phones ...................................................... 72static address ......................................................... 71, 72
introduction .......................................................................... 10IP500
control unit .................................................................... 49
Llicense
subscriptions ...........................................................17, 35listing
registered phones .........................................................58loading
files ............................................................................... 51software files .................................................................48
loading filesthird party server ...........................................................51
Mmanual
backup .......................................................................... 67manually
copying files ..................................................................50creating extensions .......................................................53editing file ..................................................................... 48
Nnetwork
assessment .................................................................. 18new
release .......................................................................... 11nouser
source ...........................................................................31
Ppc
connection .................................................................... 22phone
configuration ................................................................. 77file requests .................................................................. 26firmware ........................................................................13
potentialVoIP .............................................................................. 21
powersupply ........................................................................... 23
problems .............................................................................. 21
QQoS ......................................................................................21
Rregistering
phone ............................................................................57registration
blacklisting .................................................................... 27remote ..................................................................................74reserving
licenses .........................................................................35resetting
1600 series phone ...................................................... 1099600 series phone ...................................................... 110phone ..........................................................................109
restart .................................................................................113restore
control ...........................................................................67settings ......................................................................... 65
Index
November 2021 IP Office Platform H.323 Telephone Installation 120Comments on this document? [email protected]

Sscope ................................................................................... 89screen saver
settings ......................................................................... 64screensaver ......................................................................... 63selecting
codec ............................................................................ 54self-test procedure
1600 series phones .................................................... 1089600 series phones .................................................... 108
serveroptions .......................................................................... 24
settingquality alarm levels ....................................................... 62RTP port range ............................................................. 37
settingsscreen saver ................................................................. 64
simpleinstallation .....................................................................14
site specificoption number ............................................................. 111
sourcenumbers ........................................................................31
specifyingBRURI value .................................................................66
SRTP ................................................................................... 93SSON
1600 series phones .....................................................1129600 phone series ...................................................... 112
static addressinstallation .....................................................................71settings ................................................................... 72, 73
Static administration .......................................................... 102supply
options .......................................................................... 23support ............................................................................... 117supported
IP phones ......................................................................11VPN remote phone ....................................................... 79
systemcapacity ........................................................................ 12default codecs .............................................................. 39DHCP support .............................................................. 41
system sitespecific option numbers ................................................42
TTLS ...................................................................................... 96
Uuploading
certificate ...................................................................... 98user
extension creation ........................................................ 52
user (continued)pc ..................................................................................22
usingauto creation .................................................................55static administration options ....................................... 102
using embedded file managerupload files ................................................................... 49
Vvideos .................................................................................116view details
1600 series phones .................................................... 106phones ........................................................................106
viewing details9600 series phones .................................................... 107
VLANDHCP ........................................................................... 82IP Phones ..................................................................... 80
voicecompression ................................................................. 19
VPNremote phones ..............................................................78
Index
November 2021 IP Office Platform H.323 Telephone Installation 121Comments on this document? [email protected]
Copyright © 2022 FDOKUMEN