INSTRUCTOR'S MANUAL - JBLearning
371
NAVIGATE TRAINING MANUAL INSTRUCTOR’S MANUAL jblearning.com/navigate 1-978-443-5000 [email protected]
-
Upload
khangminh22 -
Category
Documents
-
view
3 -
download
0
Transcript of INSTRUCTOR'S MANUAL - JBLearning

NAVIGATE TRAINING MANUAL
INSTRUCTOR’S MANUAL
jblearning.com/navigate
1-978-443-5000
NAVIGATEUPDATEGUIDEThis guide serves as a reference of key menus, tools, and functions that have been changed and/or enhanced in the latest version of the Navigate learning management system, released on 7/27/2020.
The sections below display a before and after synopsis of each update you may find in the new platform.
Learn more about Navigate at:www.jblearning.com/navigate
Instructor Manual Table of Contents
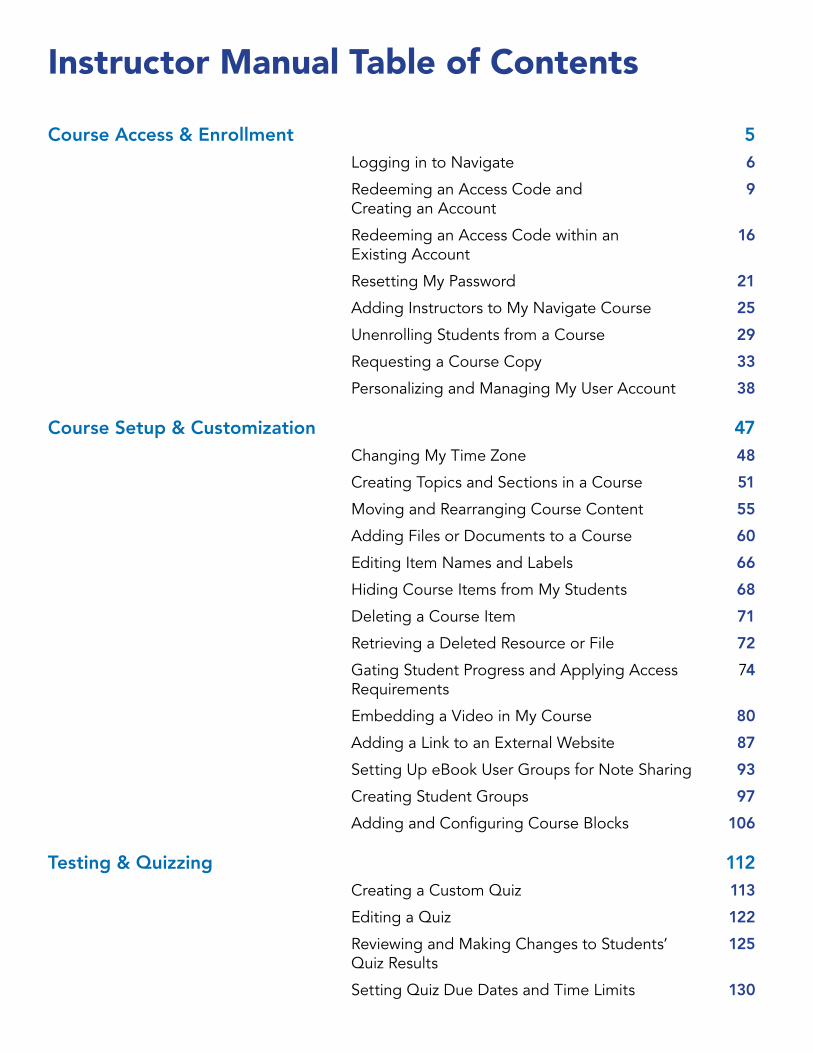
Course Access & Enrollment 5 Logging in to Navigate 6
Redeeming an Access Code and 9 Creating an Account
Redeeming an Access Code within an 16 Existing Account
Resetting My Password 21
Adding Instructors to My Navigate Course 25
Unenrolling Students from a Course 29
Requesting a Course Copy 33
Personalizing and Managing My User Account 38
Course Setup & Customization 47 Changing My Time Zone 48
Creating Topics and Sections in a Course 51
Moving and Rearranging Course Content 55
Adding Files or Documents to a Course 60
Editing Item Names and Labels 66
Hiding Course Items from My Students 68
Deleting a Course Item 71
Retrieving a Deleted Resource or File 72
Gating Student Progress and Applying Access 74 Requirements
Embedding a Video in My Course 80
Adding a Link to an External Website 87
Setting Up eBook User Groups for Note Sharing 93
Creating Student Groups 97
Adding and Configuring Course Blocks 106
Testing & Quizzing 112 Creating a Custom Quiz 113
Editing a Quiz 122
Reviewing and Making Changes to Students’ 125 Quiz Results
Setting Quiz Due Dates and Time Limits 130
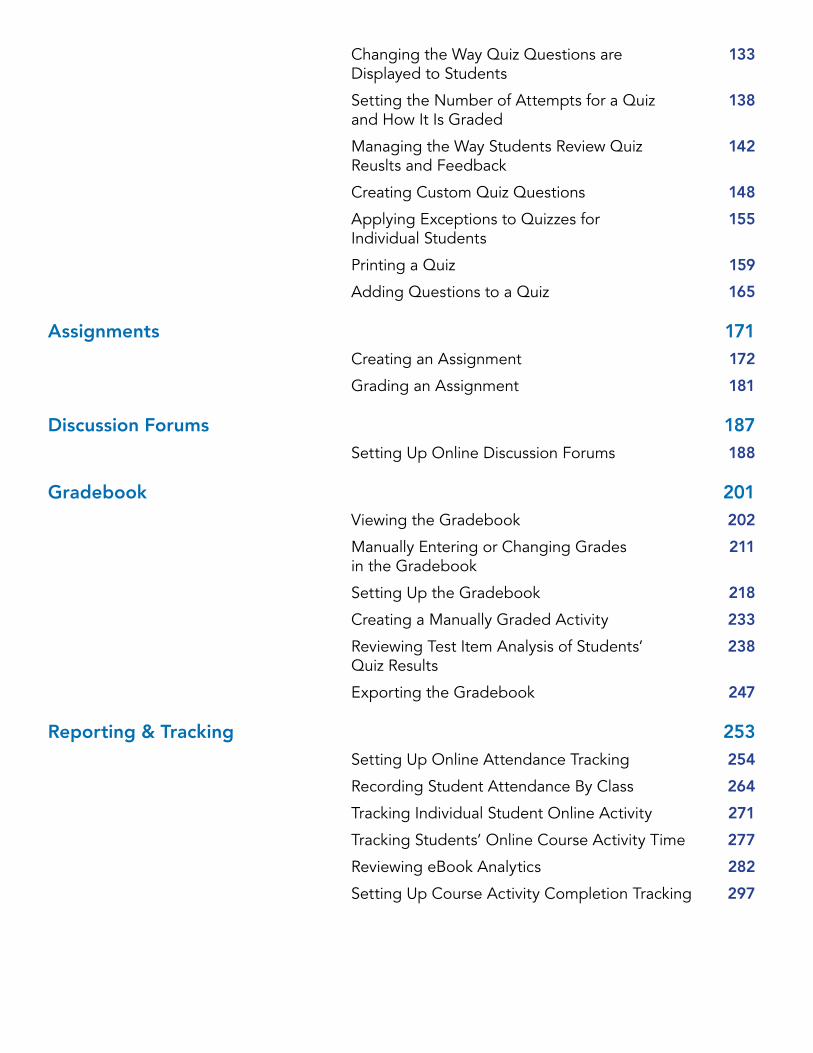
Changing the Way Quiz Questions are 133 Displayed to Students
Setting the Number of Attempts for a Quiz 138 and How It Is Graded
Managing the Way Students Review Quiz 142 Reuslts and Feedback
Creating Custom Quiz Questions 148
Applying Exceptions to Quizzes for 155 Individual Students
Printing a Quiz 159
Adding Questions to a Quiz 165
Assignments 171 Creating an Assignment 172
Grading an Assignment 181
Discussion Forums 187 Setting Up Online Discussion Forums 188
Gradebook 201 Viewing the Gradebook 202
Manually Entering or Changing Grades 211 in the Gradebook
Setting Up the Gradebook 218
Creating a Manually Graded Activity 233
Reviewing Test Item Analysis of Students’ 238 Quiz Results
Exporting the Gradebook 247
Reporting & Tracking 253 Setting Up Online Attendance Tracking 254
Recording Student Attendance By Class 264
Tracking Individual Student Online Activity 271
Tracking Students’ Online Course Activity Time 277
Reviewing eBook Analytics 282
Setting Up Course Activity Completion Tracking 297

Communications 313 Managing Course Notifications 314
Messaging Students 318
Posting Course Announcements 321
Using the Course Calendar 326
Setting Up a Live Course Chat 334
Special Course Resources 340 Reviewing and Analyzing Students’ Proficiency 341
with TestPrep
Using the eBook 354

COURSE ACCESS AND ENROLLMENT
This section provides guidance with accessing courses and enrolling/unenrolling instructors and
students in the course.

6
Technical Support: www.jblearning.com/techsupport | [email protected] | 1-978-443-5000 | M-F 8:30am – 8:00pm
Logging in to Navigate
1. Open a new window or tab in your web browser and navigate to www.jblearning.com in the web address field.
2. Next, click on the My Account link at the top-right of the page.

7
Technical Support: www.jblearning.com/techsupport | [email protected] | 1-978-443-5000 | M-F 8:30am – 8:00pm
3. A login page will open where you must enter your username and password in the fields provided before clicking the Log In button to proceed to your account page.

8
Technical Support: www.jblearning.com/techsupport | [email protected] | 1-978-443-5000 | M-F 8:30am – 8:00pm
4. Once you log in, you'll be directed to your account's homepage, which displays a list of your current active products/courses.

9
Technical Support: www.jblearning.com/techsupport | [email protected] | 1-978-443-5000 | M-F 8:30am – 8:00pm
Redeeming an Access Code and Creating an Account
Open your web browser and navigate to www.jblearning.com. We generally recommend using either Firefox or Chrome browsers for an optimal user experience.
From the Jones & Bartlett homepage, click the Redeem Code option from the right of the
horizontal menu at the top of the page.

10
Technical Support: www.jblearning.com/techsupport | [email protected] | 1-978-443-5000 | M-F 8:30am – 8:00pm
Proceed by reading the Terms and Conditions page that opens. Scroll down as necessary, then click the Agree button to continue.
The Redeem an Access Code page opens where you must enter your 10-digit code in the Access Code field, then click the Redeem button.
Agree button
Enter in 10-digit access code here
and then click “Redeem.”

11
Technical Support: www.jblearning.com/techsupport | [email protected] | 1-978-443-5000 | M-F 8:30am – 8:00pm
The code is processed, and a new optional Course ID field will open if applicable. Course IDs are required in the event you are enrolling in an instructor-led course.
• If you know your course ID at this time, you may enter it in the Course ID field provided.
• If not, you may leave it blank and click the Continue button as you can enroll in your course ID at any time.
• If your access code has unlocked multiple products requiring course IDs, this page will not appear, and you will instead be directed to the page in the next step (#6). The option for entering your course IDs is covered in Step 9c of this document.
If applicable, you may enter in your course ID at his time.
Course IDs must be retrieved from your instructor.

12
Technical Support: www.jblearning.com/techsupport | [email protected] | 1-978-443-5000 | M-F 8:30am – 8:00pm
3. A login page will open where you must enter your username and password in the fields provided before clicking the Log In button to proceed to your account page.

13
Technical Support: www.jblearning.com/techsupport | [email protected] | 1-978-443-5000 | M-F 8:30am – 8:00pm
Review and confirm your product information on the following page, then click the Confirm and create new account button.
On the next page, complete the fields required to create your personal user account, scrolling down as necessary. Please note, all fields under the Account Information and Contact Information sections are required unless otherwise identified as “Optional.”
Click to continue creating your account

14
Technical Support: www.jblearning.com/techsupport | [email protected] | 1-978-443-5000 | M-F 8:30am – 8:00pm
When you are done entering in the required details, click the Create Account button at the bottom of the page. Your My Account page will open, displaying your new product and Course ID if applicable.
To open your product, click on its name. This takes you to a launch page for the first time, displaying various options depending on your product type.
a. If you are accessing a standalone eBook, self-paced course, or if you previously entered your course ID during registration, you may click the red LAUNCH button to begin using your product.
Product name Course ID

15
Technical Support: www.jblearning.com/techsupport | [email protected] | 1-978-443-5000 | M-F 8:30am – 8:00pm
b. If you are accessing digital content independently and do not need to enroll in an instructor-led course, click the LAUNCH Open Enrollment Course button.
c. If you are enrolling in an instructor-led course and have not yet entered a course ID, you may use the gray Enter Course ID button on this page to enter it and enroll in your course. If you don’t know your Course ID, please consult your instructor or course administrator.

16
Technical Support: www.jblearning.com/techsupport | [email protected] | 1-978-443-5000 | M-F 8:30am – 8:00pm
Redeeming an Access Code within an Existing Account
Begin by navigating to www.jblearning.com. Click on the My Account link at the top of the page, and login to your User Account using your current user credentials.
Once you have logged into your account, click on the Redeem Code option at the top right of the page.

17
Technical Support: www.jblearning.com/techsupport | [email protected] | 1-978-443-5000 | M-F 8:30am – 8:00pm
Proceed by reading the Terms and Conditions page that opens. Scroll down as needed, then click the Agree button to continue.
The Redeem an Access Code page opens where you must enter your 10-digit code in the Access Code field, then click the Redeem button.
Enter in 10-digit access code here and then
click “Redeem.”

18
Technical Support: www.jblearning.com/techsupport | [email protected] | 1-978-443-5000 | M-F 8:30am – 8:00pm
The code is processed, and a new optional Course ID field will open if applicable. Course IDs are required in the event you are enrolling in an instructor-led course.
• If you know your course ID at this time, you may enter it in the Course ID field provided. • If not, you may leave it blank and click the Continue button as you can enroll in your course ID
at any time. • If your access code has unlocked multiple products requiring course IDs, this page will not
appear, and you will instead be directed to the page in the next step (#6). The option for entering your course IDs is covered in Step 9c of this document.
If applicable, you may enter in your course ID at his time.
Course IDs must be retrieved from your instructor. Course IDs
can also be added to your product later.

19
Technical Support: www.jblearning.com/techsupport | [email protected] | 1-978-443-5000 | M-F 8:30am – 8:00pm
Your account’s Products page will automatically refresh, displaying your new product and Course ID if applicable.
Click on the product name to open it. This takes you to a launch page for the first time, displaying various options depending on your product type.
a. If you are accessing a standalone eBook or self-paced course, or if you previously entered your course ID during registration, you may click the red LAUNCH button to begin using your product.
Product name Course ID

20
Technical Support: www.jblearning.com/techsupport | [email protected] | 1-978-443-5000 | M-F 8:30am – 8:00pm
b. If you are accessing digital content independently and do not need to enroll in an instructor-led course, click the LAUNCH Open Enrollment Course button.
c. If you are enrolling in an instructor-led course and have not yet entered a course ID, you may use the gray Enter Course ID button on this page to enter the course ID and enroll in your course. If you don’t know your course ID, please consult your instructor or course administrator.

21
Technical Support: www.jblearning.com/techsupport | [email protected] | 1-978-443-5000 | M-F 8:30am – 8:00pm
Resetting My Password
1. Open your web browser and navigate to www.jblearning.com in the web address field.
2. Next, click on the My Account link at the top-right of the page.

22
Technical Support: www.jblearning.com/techsupport | [email protected] | 1-978-443-5000 | M-F 8:30am – 8:00pm
3. On the login page that displays, click on the Forgot your password link next to the question mark icon to the right.
4. Enter the email address on your account in the field provided on the next page, then click the Reset button.

23
Technical Support: www.jblearning.com/techsupport | [email protected] | 1-978-443-5000 | M-F 8:30am – 8:00pm
5. Next, open your email account and find the message from [email protected] with “Password Reset” in the subject line. Click on the hyperlink included in this email to open the
Create your new password page.

24
Technical Support: www.jblearning.com/techsupport | [email protected] | 1-978-443-5000 | M-F 8:30am – 8:00pm
6. Enter a new password of your choice in both fields provided on the reset page that opens, then click the Reset button.
7. The My Account login page will now refresh, and you may enter your updated credentials to access your account.

25
Technical Support: www.jblearning.com/techsupport | [email protected] | 1-978-443-5000 | M-F 8:30am – 8:00pm
Adding Instructors to My Navigate Course
1. Once your colleagues have enrolled in your course ID as a student, the lead instructor must navigate to www.jblearning.com and login to their account.
2. Upon logging in, click on the Learners tab to view a roster of your courses’ enrolled users.

26
Technical Support: www.jblearning.com/techsupport | [email protected] | 1-978-443-5000 | M-F 8:30am – 8:00pm
3. Under the Learners tab, locate and click on the name of the instructor you would like to promote in the applicable course ID. You may use the search field or filter options at the top of the page to help locate them. In addition, clicking a column heading will sort the roster in alphabetical order by that column.

27
Technical Support: www.jblearning.com/techsupport | [email protected] | 1-978-443-5000 | M-F 8:30am – 8:00pm
4. Clicking on a user will display an enrollment page revealing their course access details. Under the Product Actions section here, you will find two options for granting the user instructor-level permissions in the course.
a. You may instate them as an instructor, granting the user the full editing rights to your course ID that you currently enjoy as the lead instructor.
b. Or you may promote them to a non-editing instructor role, providing them with read-only access to the full course without displaying as a student in the gradebook. This role is typically reserved for a Program Director, Department Chair, or course auditor.
28
Technical Support: www.jblearning.com/techsupport | [email protected] | 1-978-443-5000 | M-F 8:30am – 8:00pm
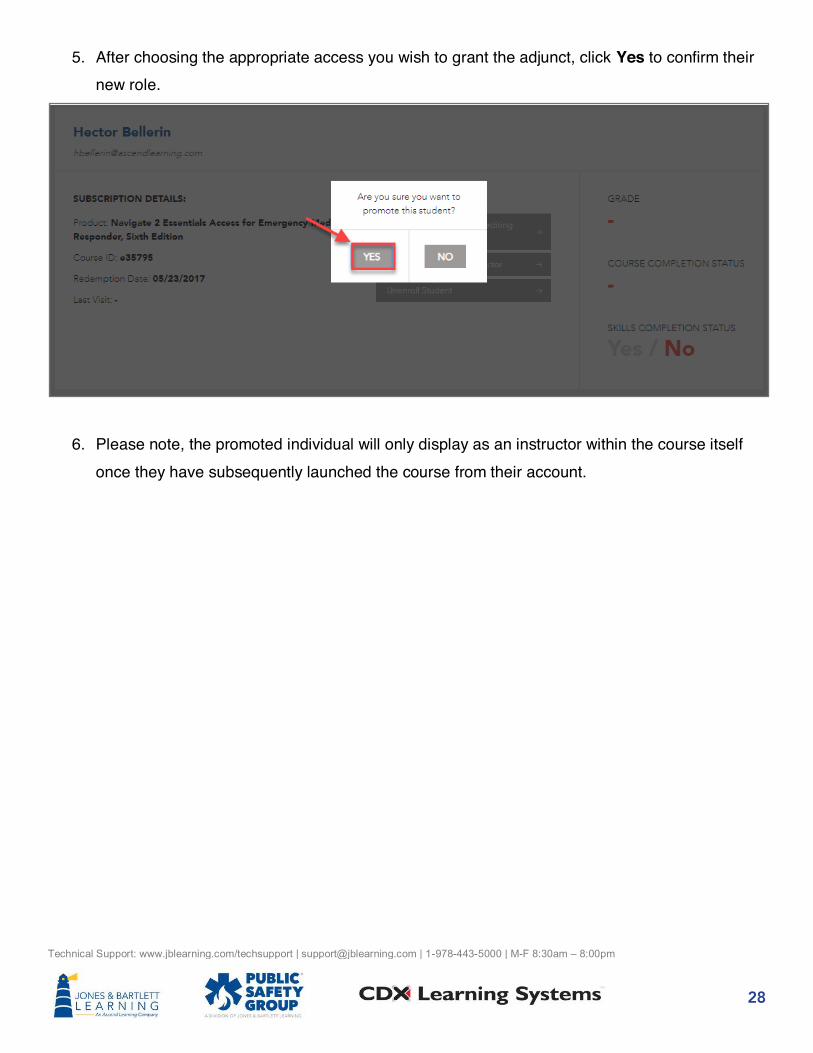
5. After choosing the appropriate access you wish to grant the adjunct, click Yes to confirm their new role.
6. Please note, the promoted individual will only display as an instructor within the course itself once they have subsequently launched the course from their account.

29
Technical Support: www.jblearning.com/techsupport | [email protected] | 1-978-443-5000 | M-F 8:30am – 8:00pm
Unenrolling Students from a Course 1. Begin by logging into your User Account at www.jblearning.com. 2. From within your account, click on the Learners Tab at the top of the page.

30
Technical Support: www.jblearning.com/techsupport | [email protected] | 1-978-443-5000 | M-F 8:30am – 8:00pm
3. This page displays all the users enrolled in your courses. Find the student who you want to unenroll and click on their name. You may use the filter options at the top of the list and click on any column heading to sort the list as needed to help locate them in your roster.
4. After opening the student’s enrollment page, click the Unenroll Student button to remove the
student from the Navigate course.
5. When the student next logs into their account, their access is no longer associated with the course ID from which they were unenrolled, and they will now have the option of entering a new course ID if they are required to switch to a different course.

31
Technical Support: www.jblearning.com/techsupport | [email protected] | 1-978-443-5000 | M-F 8:30am – 8:00pm
6. Unenrolling the student here will not automatically remove them or their records from your Navigate course Grader Report.
7. If you wish to also delete the student and their records from within your course, launch the course
ID and navigate to the Participants page through the Navigation Drawer to the left of the course page.
8. This will display the course roster listing all participants currently tracked in the course. To
permanently remove the student and their records from the course, click their corresponding Trash button underneath the Status column to the right.

32
Technical Support: www.jblearning.com/techsupport | [email protected] | 1-978-443-5000 | M-F 8:30am – 8:00pm
9. A popup window will display, asking you to confirm the removal of the student. Click Unenroll to remove the student from your course.

33
Technical Support: www.jblearning.com/techsupport | [email protected] | 1-978-443-5000 | M-F 8:30am – 8:00pm
Requesting a Course Copy
1. Begin by logging into your User Account at www.jblearning.com.
2. From your Products tab, click the course ID you would like to have copied.

34
Technical Support: www.jblearning.com/techsupport | [email protected] | 1-978-443-5000 | M-F 8:30am – 8:00pm
3. On the course launch page that opens, click on the Request course copy button directly underneath the Launch button. Please note, only the lead instructor of a course has access to the copy request function.
4. On the next page, complete all fields of the course copy Request form.

35
Technical Support: www.jblearning.com/techsupport | [email protected] | 1-978-443-5000 | M-F 8:30am – 8:00pm
5. The New Course Name field is where you must enter the preferred name that you would like to use for the course title. Please note, this title will only appear within the course itself and will not affect the standard course naming displayed within your account under the Products tab.
6. Next, enter the Course Start Date that applies to your copy.
Enter preferred naming here

36
Technical Support: www.jblearning.com/techsupport | [email protected] | 1-978-443-5000 | M-F 8:30am – 8:00pm
7. Finally, specify the number of course Copies you require. It is a recommended best practice to
use one course ID per student cohort or class.
8. When ready, click the Submit Course Copy Request button below.

37
Technical Support: www.jblearning.com/techsupport | [email protected] | 1-978-443-5000 | M-F 8:30am – 8:00pm
9. A popup window will display, which summarizes the information you have entered. If you are
satisfied with your submission, click the Confirm button to finalize your copy request.
10. Please allow 3-5 business days for your copy request to be fulfilled. You will receive a notification via email when your new course ID(s) is ready and available under your account Products tab.

38
Technical Support: www.jblearning.com/techsupport | [email protected] | 1-978-443-5000 | M-F 8:30am – 8:00pm
Personalizing and Managing My User Account. 1. When you log in to your user account, the account page Products tab opens by default. This tab
displays all courses, resources, and eBooks to which you currently have access.
2. The Active subtab lists all products that are currently available in a table displayed below.

39
Technical Support: www.jblearning.com/techsupport | [email protected] | 1-978-443-5000 | M-F 8:30am – 8:00pm
3. Immediately to its right, the Expired subtab displays any products for which your access has lapsed.
4. On the Expired subtab, you may use the Renew button to the right of an expired product to
repurchase and extend your access as needed.

40
Technical Support: www.jblearning.com/techsupport | [email protected] | 1-978-443-5000 | M-F 8:30am – 8:00pm
5. The Notifications tab is where you may review communications which contain important information about your current courseware.
6. Under your default active Products tab, you may use the Nickname column to assign a custom
name or label to any item of your choosing. Applying nicknames is an easy way to quickly pick out an eBook or specific course in the event you are teaching multiple classes or using several texts.

41
Technical Support: www.jblearning.com/techsupport | [email protected] | 1-978-443-5000 | M-F 8:30am – 8:00pm
7. To assign a nickname, click on the pencil icon to the right of the product name under the Nickname column.
8. A fillable field will open to the left of the pencil, where you may type in a name of your choosing.
When satisfied with the name, press the Enter key on your keyboard.
9. You may remove or change the assigned nickname at any time by repeating these same steps.

42
Technical Support: www.jblearning.com/techsupport | [email protected] | 1-978-443-5000 | M-F 8:30am – 8:00pm
10. If you wish to hide any product from view on your Products tab, begin by clicking the eye icon to its left. This will close the eye and gray-out the title of the course. Please note, you may designate multiple products for hiding at one time.
11. Once the product is selected to be hidden using the eye button, you must then click the
Show/Hide Products button at the top of your products table.

43
Technical Support: www.jblearning.com/techsupport | [email protected] | 1-978-443-5000 | M-F 8:30am – 8:00pm
12. Clicking this button will remove the hidden items from sight on your Products tab going forward. Please note, a hidden product will remain out of sight until it is manually unhidden.
13. To restore the item back to your products list, simply click the Show/Hide Products button again
for it to reappear. Then click the eye icon to its left to open it, ensuring the product remains unhidden in your subsequent sessions.

44
Technical Support: www.jblearning.com/techsupport | [email protected] | 1-978-443-5000 | M-F 8:30am – 8:00pm
3. A login page will open where you must enter your username and password in the fields provided before clicking the Log In button to proceed to your account page.
45
Technical Support: www.jblearning.com/techsupport | [email protected] | 1-978-443-5000 | M-F 8:30am – 8:00pm
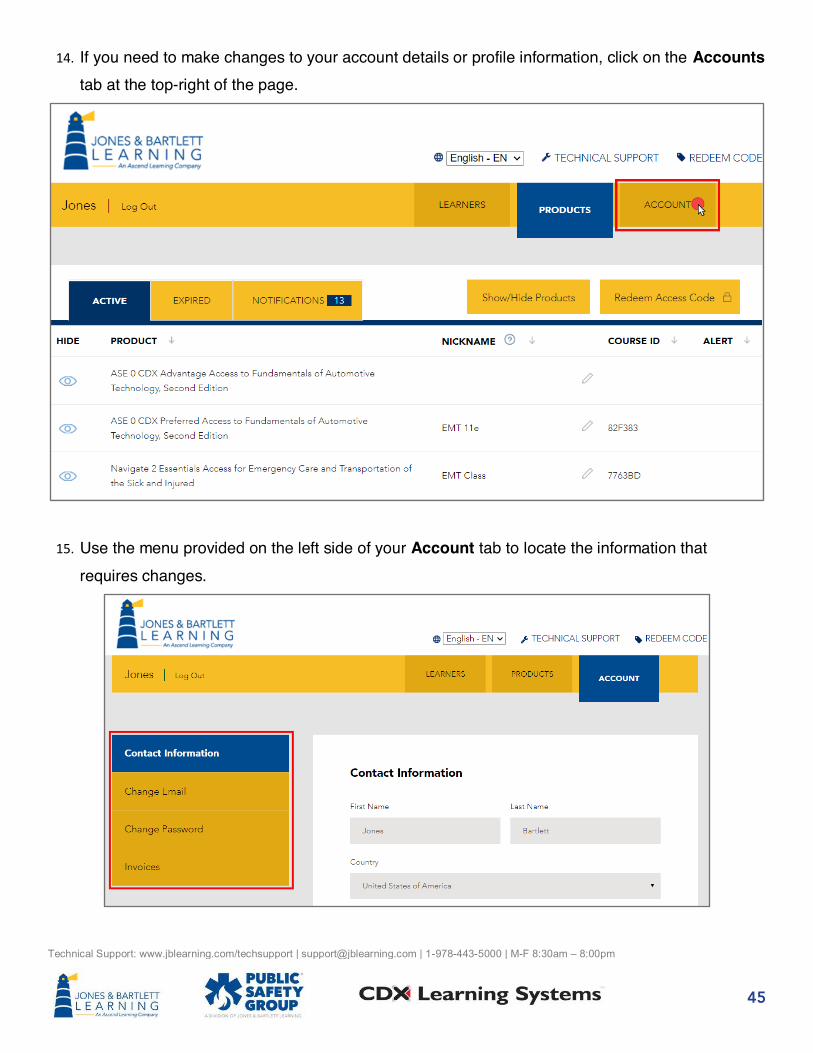
14. If you need to make changes to your account details or profile information, click on the Accounts tab at the top-right of the page.
15. Use the menu provided on the left side of your Account tab to locate the information that
requires changes.

46
Technical Support: www.jblearning.com/techsupport | [email protected] | 1-978-443-5000 | M-F 8:30am – 8:00pm
16. Then update the fields as needed before clicking the Save Changes button at the bottom of the page.

COURSE SETUP & CUSTOMIZATION
This section provides guidance with course setup and customization, such as adding files or documents to a
course, creating course topics and sections, embedding videos in a course, and more.

48
Technical Support: www.jblearning.com/techsupport | [email protected] | 1-978-443-5000 | M-F 8:30am – 8:00pm
Changing My Time Zone This document contains instructions for how to change the timezone setting of your
profile to ensure that the course clock in sync with your local time. Please note: The
default time zone setting for your profile is set to Eastern Standard Time (US).
. Your course time zone is set to Eastern Standard Time by default. If you are located in a different
time zone, you must adjust the time setting within your course to correctly align with time restrictions that may be applied by your instructor.
On the course homepage, begin by clicking on the profile picture button at the top right of the
screen. This will drop down a menu of options from which you should click Preferences.

49
Technical Support: www.jblearning.com/techsupport | [email protected] | 1-978-443-5000 | M-F 8:30am – 8:00pm
On the following page, look for the User account section and click on the first option here of Edit profile.
On the Edit profile page, scroll down until you find the Timezone setting. Click on the dropdown menu to the right of this label and select a location that matches your local time. Hint: The
options in this dropdown menu are in alphabetical order. Select a geographic location from this
list that matches your local timezone.

50
Technical Support: www.jblearning.com/techsupport | [email protected] | 1-978-443-5000 | M-F 8:30am – 8:00pm
When satisfied with your selection, scroll to the bottom of the page and click the Update profile button to save your changes.
Hover your mouse pointer over the My courses button in the Navigation drawer to the left of the page and click the name of your course in the dropdown menu to return to the course homepage.

51
Technical Support: www.jblearning.com/techsupport | [email protected] | 1-978-443-5000 | M-F 8:30am – 8:00pm
Creating Topics and Sections in a Course
1. On the course homepage, toggle on the course Edit Mode using the button at the top of the page.
2. The page will refresh, displaying all editing options. Scroll down to the bottom of the page and click the Add topics to the right.

52
Technical Support: www.jblearning.com/techsupport | [email protected] | 1-978-443-5000 | M-F 8:30am – 8:00pm
3. A popup window will display with a field in which you may enter the number of new topics you would like to create. When satisfied, click the Add topics button.
4. The page will refresh, displaying the new topics you have created. You may also use the Compass arrow to the left of the topic name to drag and drop the topic(s) to a preferred location within the course and begin adding your own files or resources to the topic as needed.

53
Technical Support: www.jblearning.com/techsupport | [email protected] | 1-978-443-5000 | M-F 8:30am – 8:00pm
5. Click on the topic name and use the Pencil icon to rename the topic as needed. Press Enter on your keyboard when finished.
54
Technical Support: www.jblearning.com/techsupport | [email protected] | 1-978-443-5000 | M-F 8:30am – 8:00pm
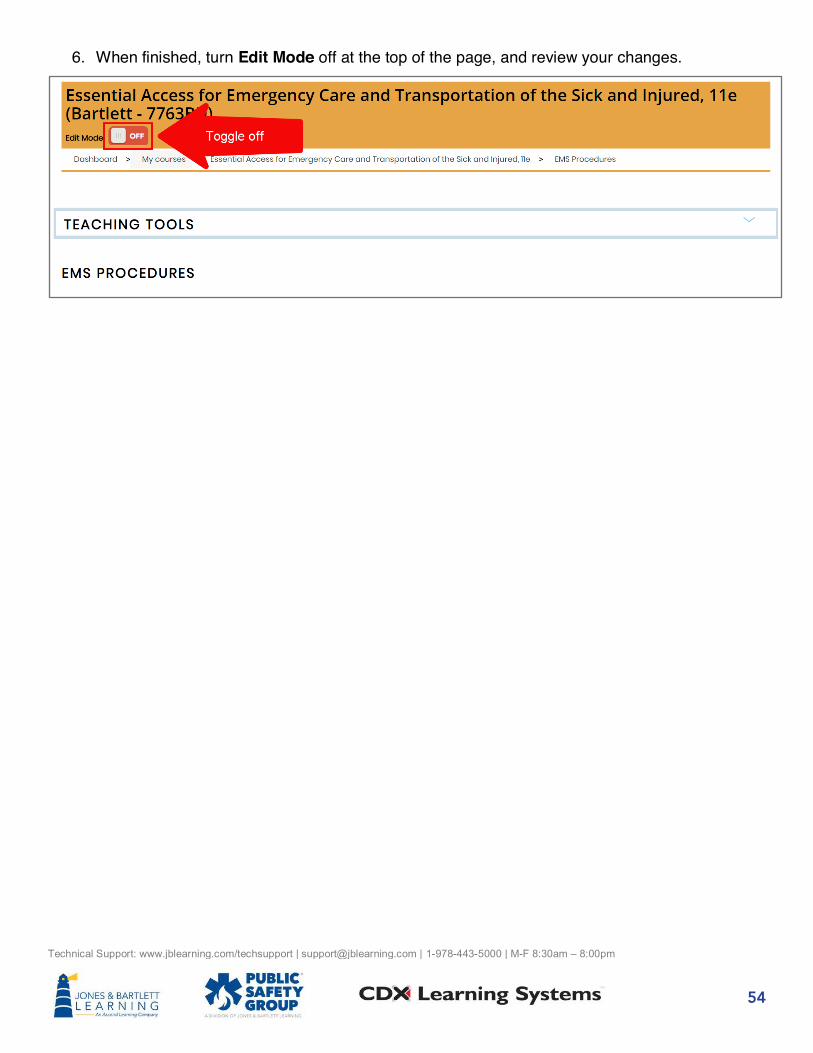
6. When finished, turn Edit Mode off at the top of the page, and review your changes.

55
Technical Support: www.jblearning.com/techsupport | [email protected] | 1-978-443-5000 | M-F 8:30am – 8:00pm
Moving and Rearranging Course Content
1. Begin by navigating to the course page for which you would like to relocate items. Then toggle on the course Edit Mode using the button at the top of the page.
2. Now, as you scroll down through the content, you will notice that a compass icon has appeared immediately to the left of each item.

56
Technical Support: www.jblearning.com/techsupport | [email protected] | 1-978-443-5000 | M-F 8:30am – 8:00pm
3. To move any individual item, click and hold on its compass icon, then drag it to the location you wish to move it and release the mouse button to nest it in its new place.
4. You may also indent any item by selecting the Edit option to its right and clicking Move right.

57
Technical Support: www.jblearning.com/techsupport | [email protected] | 1-978-443-5000 | M-F 8:30am – 8:00pm
5. Alternatively, if you are moving items a significant distance within the course, click once on the item in question’s compass icon to its left. This action will open a list displaying all the content found on this page in sequential order.

58
Technical Support: www.jblearning.com/techsupport | [email protected] | 1-978-443-5000 | M-F 8:30am – 8:00pm
6. Scroll down the list, if necessary, to find another item next to which you would like to place the item you are moving and click on it.

59
Technical Support: www.jblearning.com/techsupport | [email protected] | 1-978-443-5000 | M-F 8:30am – 8:00pm
7. The popup window will close, and you will now find that the item has been moved directly after the content piece you have just selected from the list.

60
Technical Support: www.jblearning.com/techsupport | [email protected] | 1-978-443-5000 | M-F 8:30am – 8:00pm
Adding Files or Documents to a Course
1. Begin by navigating to the page on which you would like to upload your own custom content.
2. At the top of this page, toggle on course Edit Mode.

61
Technical Support: www.jblearning.com/techsupport | [email protected] | 1-978-443-5000 | M-F 8:30am – 8:00pm
3. Next, locate the file on your computer desktop. Click and hold this file, then drag and drop it directly into the course page displayed in your browser. You may upload multiple files at a time as needed.
4. Please note, any content you add will automatically be populated at the bottom of the course page or topic section. You will need to manually move the file to its desired location after uploading it, if you wish to place it elsewhere.

62
Technical Support: www.jblearning.com/techsupport | [email protected] | 1-978-443-5000 | M-F 8:30am – 8:00pm
5. Alternatively, you may add files to the course by clicking the Add an activity or resource option under the section/chapter you wish to upload your content.

63
Technical Support: www.jblearning.com/techsupport | [email protected] | 1-978-443-5000 | M-F 8:30am – 8:00pm
6. In the window that pops up, scroll down under the Resources options, click the dial next to File, and click Add.

64
Technical Support: www.jblearning.com/techsupport | [email protected] | 1-978-443-5000 | M-F 8:30am – 8:00pm
7. On the following page, you may drag and drop your files from your desktop directly into the submission box. Or you may click the File picker button, click Choose File, and then click the Upload this file button.

65
Technical Support: www.jblearning.com/techsupport | [email protected] | 1-978-443-5000 | M-F 8:30am – 8:00pm
8. Adjust any additional settings you would like to apply to the content you have just added, then click the Save and return to course button at the bottom of the page.

66
Technical Support: www.jblearning.com/techsupport | [email protected] | 1-978-443-5000 | M-F 8:30am – 8:00pm
Editing Item Names and Labels
1. Navigate to the course page which contains the item that you would like to rename. Then toggle on the Course Edit mode using the button at the top of the page.
2. Scroll as needed to the item you wish to adjust and click the pencil button immediately to its right.

67
Technical Support: www.jblearning.com/techsupport | [email protected] | 1-978-443-5000 | M-F 8:30am – 8:00pm
3. This action will change the item’s naming into an editable field.
4. Proceed by implementing your changes here and then press the Enter key on your keyboard when satisfied.
5. You may continue to update as many additional names on the page as needed following these same steps.
6. When you are finished making your desired edits, toggle off the Course Edit Mode to avoid making any unwanted changes.

68
Technical Support: www.jblearning.com/techsupport | [email protected] | 1-978-443-5000 | M-F 8:30am – 8:00pm
Hiding Course Items from My Students
Navigate to the course page which contains the items you would like to hide, then toggle on the course Edit Mode by clicking this switch at the top of the page.
To the right of the item, locate and click the Edit menu. Then click the Hide option.

69
Technical Support: www.jblearning.com/techsupport | [email protected] | 1-978-443-5000 | M-F 8:30am – 8:00pm
Hiding an item will remove it from students’ view, both in the course and the gradebook (if it is a
graded activity). Students will be prevented from accessing or completing the hidden resource or activity until you choose to reveal it.
You may apply the Hide setting to any individual item or, to hide an entire topic full of content from the students, simply select the Hide option from the Edit menu of the applicable topic.

70
Technical Support: www.jblearning.com/techsupport | [email protected] | 1-978-443-5000 | M-F 8:30am – 8:00pm
When content is hidden, you will see that its title becomes opaque, and it displays a notice stating that it is hidden from your students. As an instructor, you may still access any hidden items as needed without ever revealing them to your students.
Should you decide to unhide any hidden item in the course, simply toggle on Edit Mode for the page displaying the hidden item, click the Edit menu to its right, and select the Show topic option to make it available again.

71
Technical Support: www.jblearning.com/techsupport | [email protected] | 1-978-443-5000 | M-F 8:30am – 8:00pm
Deleting a Course Item
Navigate to the course page which contains the items you would like to remove from the course. Then toggle on the course Edit Mode using the button at the top of the page.
Scroll as needed to locate the item you wish to delete. Then, to right the of the item, click on the Edit menu. Select the Delete option and confirm in the following warning that you want to permanently remove this item from the course.
Please note, if the item contains larger-sized files, it may take additional processing time before the item is removed from the course completely. All deleted items will be placed within the course’s Recycle bin for up to a week before being permanently removed.

72
Technical Support: www.jblearning.com/techsupport | [email protected] | 1-978-443-5000 | M-F 8:30am – 8:00pm
Retrieving a Deleted File or Resource
On the course homepage, begin by clicking on Actions button in the course-naming banner at the top of the page. From the resulting dropdown menu, select Recycle bin. Please note, you can only access the Recycle bin when you have deleted course files, and it is within a 7-day period following the deletion. You may also experience a slight delay from the time an item is deleted to when it appears in the Recycle bin.

73
Technical Support: www.jblearning.com/techsupport | [email protected] | 1-978-443-5000 | M-F 8:30am – 8:00pm
The Recycle bin page displays a table of all course resources that have been deleted within the previous 7 days. To restore any item listed to its original location within the course, click the up-arrow button to the right of the item under the Restore column. Please note, depending on the size of item, the restore process may take a few moments.
When the system has completed the restore, you will receive a confirmation page and then be able to find and access the restored item in its original location prior to deletion.
74
Technical Support: www.jblearning.com/techsupport | [email protected] | 1-978-443-5000 | M-F 8:30am – 8:00pm
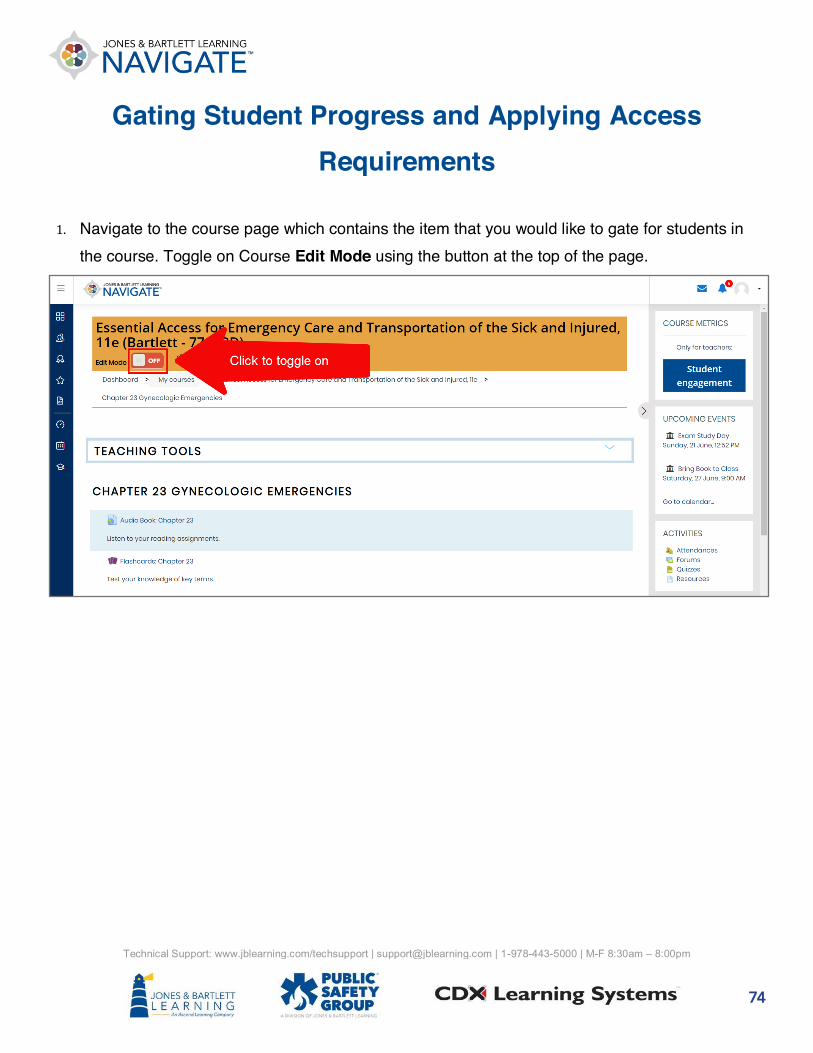
Gating Student Progress and Applying Access Requirements
Navigate to the course page which contains the item that you would like to gate for students in
the course. Toggle on Course Edit Mode using the button at the top of the page.

75
Technical Support: www.jblearning.com/techsupport | [email protected] | 1-978-443-5000 | M-F 8:30am – 8:00pm
Scroll to the activity or resource for which you wish to apply an access restriction. Then click on the Edit menu to its right and select Edit settings from the dropdown menu.
Access restrictions will always be found towards the bottom of the item’s settings page. Scroll to this section, labeled Restrict access, and click to expand it. Then click the Add restriction button to select your preferred gating method.

76
Technical Support: www.jblearning.com/techsupport | [email protected] | 1-978-443-5000 | M-F 8:30am – 8:00pm
You have several options for how you would like to apply access requirements to the course item. Please read the description of the access restrictions to its right for more information before choosing the type you would like to use. Please note that what appears in these restriction options may vary depending on your course settings.
Restriction types • A Date restriction allows you to apply an opening and/or end date and time to set a
period in which students may access the given item.

77
Technical Support: www.jblearning.com/techsupport | [email protected] | 1-978-443-5000 | M-F 8:30am – 8:00pm
• A Grade restriction will allow you to require that the students achieve a score of your choosing on a different course activity before they will be able to open this item.
• The User profile restriction can be used to restrict any student of your choosing from accessing the items.

78
Technical Support: www.jblearning.com/techsupport | [email protected] | 1-978-443-5000 | M-F 8:30am – 8:00pm
• And, if you wish to apply multiple restrictions, the Restriction set button will allow you to continue creating additional restrictions for the given item.
When satisfied with the restrictions you have applied, click the Save and return to course button at the bottom of the page.

79
Technical Support: www.jblearning.com/techsupport | [email protected] | 1-978-443-5000 | M-F 8:30am – 8:00pm
All course users will now see the information for these restrictions displayed under the title of the course item.

80
Technical Support: www.jblearning.com/techsupport | [email protected] | 1-978-443-5000 | M-F 8:30am – 8:00pm
Embedding a Video in My Course 1. From the course homepage, navigate to the course section where you would like to add the video
and toggle ON the course Edit Mode using the button at the top of the page.
2. After the page refreshes to reveal editing options, scroll as needed to find and select the Add an activity or resource link below the section’s contents.

81
Technical Support: www.jblearning.com/techsupport | [email protected] | 1-978-443-5000 | M-F 8:30am – 8:00pm
3. This action will open a popup window, listing the different Activity and Resource options available in the course. Under the Resources section, select the dial to the left of the Page option and click the Add button.
4. On the resulting settings page, proceed by entering an identifying name for the video in the Name field. You may also enter in a description in the Description field and choose whether to make this description visible on the course page by toggling the applicable checkbox directly below.

82
Technical Support: www.jblearning.com/techsupport | [email protected] | 1-978-443-5000 | M-F 8:30am – 8:00pm
5. Next, scroll to the Content section and click the first button at the top to Show/hide advanced buttons.
6. Then click the HTML button to the right of the new set of options that displays below.

83
Technical Support: www.jblearning.com/techsupport | [email protected] | 1-978-443-5000 | M-F 8:30am – 8:00pm
7. Open a new window or tab in your web browser and navigate to the webpage where your video is hosted. Look for and click the Share option, typically located below the video.

84
Technical Support: www.jblearning.com/techsupport | [email protected] | 1-978-443-5000 | M-F 8:30am – 8:00pm
8. Then click the Embed option as your preferred method to share and copy the HTML text code that is provided.

85
Technical Support: www.jblearning.com/techsupport | [email protected] | 1-978-443-5000 | M-F 8:30am – 8:00pm
9. Return to the tab or window of your course and paste the copied text direction into the Content field.
10. Toggle the page display options under the Appearance section as needed.
11. Finally, scroll to the bottom of the page and select the Save and display button to review your newly added video.

86
Technical Support: www.jblearning.com/techsupport | [email protected] | 1-978-443-5000 | M-F 8:30am – 8:00pm
12. If you would like to make further edits to the newly created page, such as a video caption, return to the Page settings using the Actions menu or gear icon and make changes to the Content section as desired.

87
Technical Support: www.jblearning.com/techsupport | [email protected] | 1-978-443-5000 | M-F 8:30am – 8:00pm
Adding a Link to an External Website 1. From the course homepage, navigate to the course section in which you would like to add the link
and toggle ON the course Edit Mode using the button at the top of the page.
2. After the page refreshes to reveal editing options, scroll as needed to find and select the Add an
activity or resource link below the section’s contents.

88
Technical Support: www.jblearning.com/techsupport | [email protected] | 1-978-443-5000 | M-F 8:30am – 8:00pm
3. This action will open a popup window listing the different Activity and Resource options available in the course. Under the Resources section, select the dial to the left of the URL option and click the Add button.
4. On the resulting settings page, proceed by entering the name which will display in the course
within the Name field.

89
Technical Support: www.jblearning.com/techsupport | [email protected] | 1-978-443-5000 | M-F 8:30am – 8:00pm
5. Next, select the URL or hyperlink you would like to incorporate and copy and paste it into the External URL field below.
6. Optionally, you may also enter in a description in the Description field and choose whether to
make this description visible on the course page by toggling the applicable checkbox directly below.
7. Use the Display dropdown menu within the Appearance section to determine how the external
website will open when it is clicked on by your students.

90
Technical Support: www.jblearning.com/techsupport | [email protected] | 1-978-443-5000 | M-F 8:30am – 8:00pm
• Automatic will typically launch the URL in the same window as the course immediately when it is clicked.
• Embed displays the linked URL page directly within the course itself.

91
Technical Support: www.jblearning.com/techsupport | [email protected] | 1-978-443-5000 | M-F 8:30am – 8:00pm
• New window opens the entered URL in a new page within the web browser when it is clicked from the course page where it displays.
• Open launches the URL immediately when it is clicked within the same window, taking the student away from the course and into the external site.

92
Technical Support: www.jblearning.com/techsupport | [email protected] | 1-978-443-5000 | M-F 8:30am – 8:00pm
• Finally, the In-popup option automatically opens the site in a new popup window of the web browser.
8. When satisfied with your selections, scroll to the bottom of the page and select the Save and
display button to review your newly added video.

93
Technical Support: www.jblearning.com/techsupport | [email protected] | 1-978-443-5000 | M-F 8:30am – 8:00pm
Setting Up eBook User Groups for Note Sharing
1. As an instructor, you have the option of sharing your eBook notes with your students or adjuncts
so that these display in their eBooks and can be viewed as they are reading. Your first step to begin sharing eBook notes is to create at least one eBook Group using the Manage eBook Groups tool found within the course’s Teaching Tools section.
2. After launching the Manage eBook Groups tool, click the Create Group button in the top-right of
the page.

94
Technical Support: www.jblearning.com/techsupport | [email protected] | 1-978-443-5000 | M-F 8:30am – 8:00pm
3. Enter in a naming of your choosing for the Group and click Submit.
4. The created Group will now display on your page. Next, click the Edit option to its right to begin
adding members.
5. On the Edit page, click the Add Members button to the right.

95
Technical Support: www.jblearning.com/techsupport | [email protected] | 1-978-443-5000 | M-F 8:30am – 8:00pm
6. Proceed by selecting all individuals with whom you would like to share eBook notes within the resulting popup window. When finished, click Done.
7. As you create notes in your eBook, you may now share them individually by clicking on the note to
open it and then selecting the Share button to the bottom right of the note window.
96
Technical Support: www.jblearning.com/techsupport | [email protected] | 1-978-443-5000 | M-F 8:30am – 8:00pm
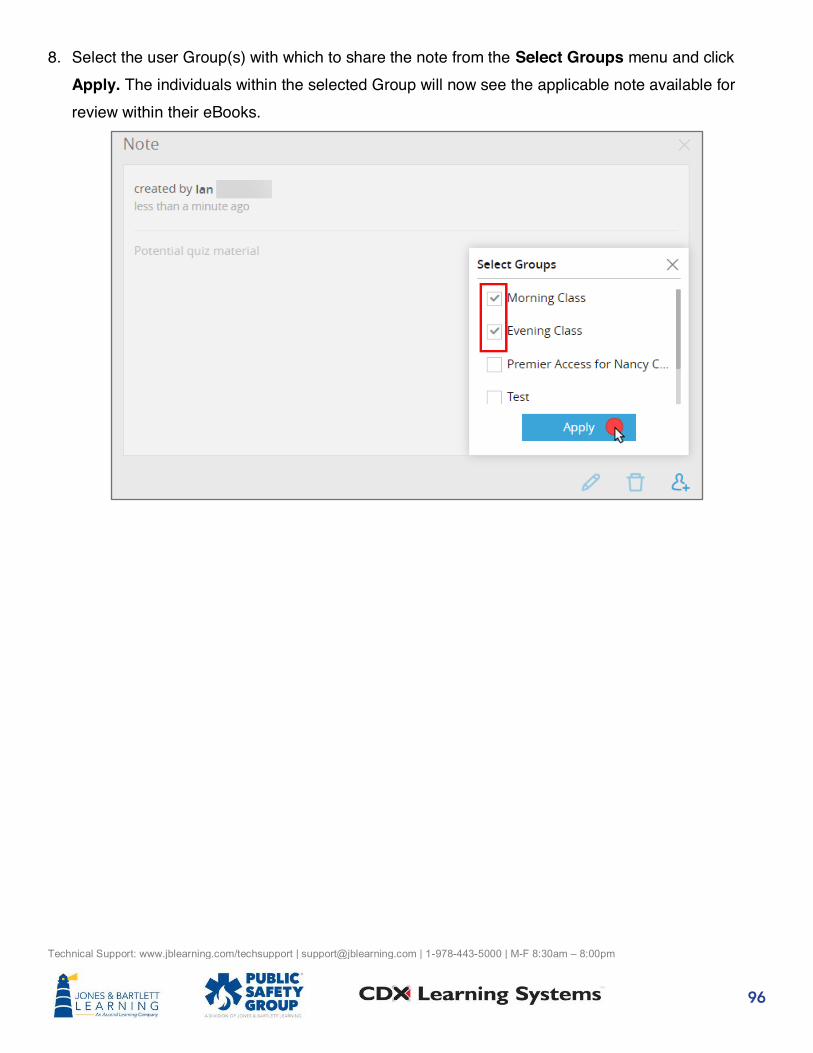
8. Select the user Group(s) with which to share the note from the Select Groups menu and click Apply. The individuals within the selected Group will now see the applicable note available for review within their eBooks.

97
Technical Support: www.jblearning.com/techsupport | [email protected] | 1-978-443-5000 | M-F 8:30am – 8:00pm
Creating Student Groups Please note: While the groups function is available, a recommended best
practice is to use a one course ID per student cohort approach.
First, you need to enable groups. From your course homepage, click the action button at the top, then choose Edit Settings.

98
Technical Support: www.jblearning.com/techsupport | [email protected] | 1-978-443-5000 | M-F 8:30am – 8:00pm
Scroll down to Groups and click to expand the section. To the right of Group Mode, choose either separate groups or visible groups. You can learn more about these options by clicking the question mark next to the dropdown.
Next, click Save and Display at the bottom of the page to save your settings and return to your course homepage.

99
Technical Support: www.jblearning.com/techsupport | [email protected] | 1-978-443-5000 | M-F 8:30am – 8:00pm
Then, from the course homepage, click the Participants link in the Navigate Drawer to the left-hand side.
You will be brought to a page listing all users currently enrolled in the course. From this page, click on the Actions button at the top-right, then select the Groups option from the menu dropdown.

100
Technical Support: www.jblearning.com/techsupport | [email protected] | 1-978-443-5000 | M-F 8:30am – 8:00pm
On the following page, click the Create group button towards the bottom-left of the page. You may need to scroll down to find this button.

101
Technical Support: www.jblearning.com/techsupport | [email protected] | 1-978-443-5000 | M-F 8:30am – 8:00pm
You must now enter a Group name in the field provided for how you would like the group to be displayed and tracked in the course. Other fields, such as Group description and New picture, are optional. Upon entering the desired information, click the Save changes button at the bottom of the page.
The Group you have just created will now be listed as an available group with which to assign participants in the course. To assign select students to this group, you must highlight its name in the Groups pickbox and then click the Add/remove users button to the bottom right of the page.

102
Technical Support: www.jblearning.com/techsupport | [email protected] | 1-978-443-5000 | M-F 8:30am – 8:00pm
The next page will display two pickbox fields. The one on the left shows you Group members who are added to the group, and the box on the right displays the Potential members of course enrollees available to add to the group.
Use your mouse pointer to select an individual you would like to add to this group. Please note, you may select multiple users at a time by holding down the Control button on your keyboard during your selections. After choosing the desired users’ names, click the Add button to assign them to the group.

103
Technical Support: www.jblearning.com/techsupport | [email protected] | 1-978-443-5000 | M-F 8:30am – 8:00pm
After clicking Add, you will see the student names move from the Potential members box to the Group members box, indicating that these students now belong to this group of participants.
When finished with your group additions, click the Back to groups button at the bottom of this page to continue to create groups as needed.

104
Technical Support: www.jblearning.com/techsupport | [email protected] | 1-978-443-5000 | M-F 8:30am – 8:00pm
You may also manage your groups at any time from this Groups page by selecting the group you need to adjust and clicking the Add/remove users button again. You may also edit any other component of the group setup by clicking the Edit group settings button or removing the group entirely by clicking Delete selected group.
After setting up your groups, you will have the option of filtering out the group’s results in your
gradebook.

105
Technical Support: www.jblearning.com/techsupport | [email protected] | 1-978-443-5000 | M-F 8:30am – 8:00pm
You can also create group overrides for quizzes or assignments in order to apply exceptions for a select group of students.
106
Technical Support: www.jblearning.com/techsupport | [email protected] | 1-978-443-5000 | M-F 8:30am – 8:00pm
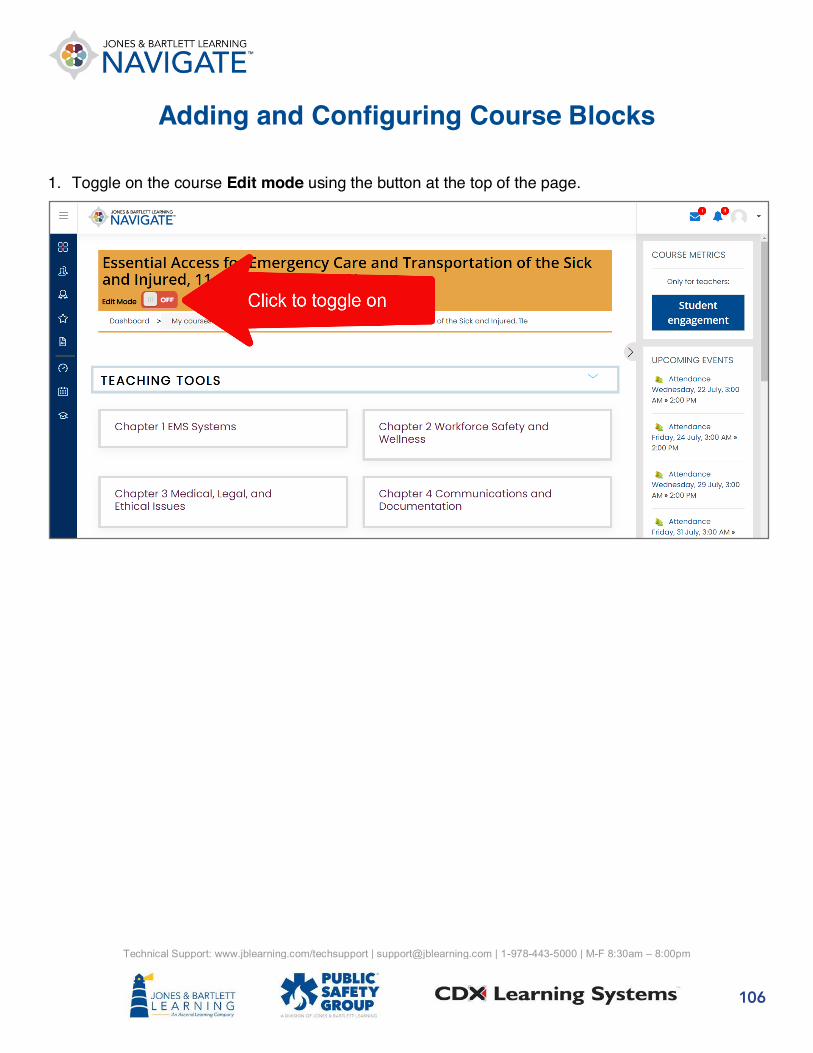
Adding and Configuring Course Blocks 1. Toggle on the course Edit mode using the button at the top of the page.

107
Technical Support: www.jblearning.com/techsupport | [email protected] | 1-978-443-5000 | M-F 8:30am – 8:00pm
2. Expand the Course blocks menu by clicking the menu’s arrow button on the right side of the page to review your current blocks.
3. To add a new block to the menu, click the Add a block button from your Navigation drawer to the left of the page.

108
Technical Support: www.jblearning.com/techsupport | [email protected] | 1-978-443-5000 | M-F 8:30am – 8:00pm
4. This action opens a popup window from which you may select the desired block to add. Please note, blocks that are already in place are not listed here.
5. The course blocks that we recommend adding to your course are:
• Course metrics – A reporting tool providing data of individual users’ time spent in the course, which is available to instructors only.
• Upcoming events – Displays a list of course activities and events scheduled to occur in the next three weeks.
• Activities – Filtered access to categorized course items such as Assignments, Forums,
Quizzes, and Resources.
• Administration – Quick access menu to your comprehensive course settings in one place.

109
Technical Support: www.jblearning.com/techsupport | [email protected] | 1-978-443-5000 | M-F 8:30am – 8:00pm
6. Once added, each block may be configured within its own settings. Click on the Settings button and then select Configure block from the dropdown menu to make any needed adjustments.

110
Technical Support: www.jblearning.com/techsupport | [email protected] | 1-978-443-5000 | M-F 8:30am – 8:00pm
7. Each block may also be placed by clicking and holding its move button, and then dragging and dropping it to its desired location.

111
Technical Support: www.jblearning.com/techsupport | [email protected] | 1-978-443-5000 | M-F 8:30am – 8:00pm
8. To delete a block, expand on the Settings option of the block and select the Delete block option.
9. Once you are satisfied with your adjustments, toggle off the course Edit Mode.

TESTING & QUIZZING This section provides guidance with creating, editing, and
reviewing quizzes, as well as setting due dates and time limits.

113
Technical Support: www.jblearning.com/techsupport | [email protected] | 1-978-443-5000 | M-F 8:30am – 8:00pm
Creating a Custom Quiz
Navigate to the topic within the course in which you would like to place your quiz or test.
Next, toggle on the course Edit Mode using the button at the top of the page. The page is now enabled for editing, so you can rearrange elements, add activities or resources, and make other changes.

114
Technical Support: www.jblearning.com/techsupport | [email protected] | 1-978-443-5000 | M-F 8:30am – 8:00pm
Scroll as needed to the bottom of the contents section and click Add an activity or resource.

115
Technical Support: www.jblearning.com/techsupport | [email protected] | 1-978-443-5000 | M-F 8:30am – 8:00pm
A window opens, listing all the activities or resources you can add, with the Quiz option under ACTIVITIES. Select the Quiz option and click Add. A new quiz page opens, with the General section open by default.

116
Technical Support: www.jblearning.com/techsupport | [email protected] | 1-978-443-5000 | M-F 8:30am – 8:00pm
The first field, Name, displays a Required icon, indicating that you must complete this field to create the quiz. Enter a name for the quiz in the Name field. Enter a description, if desired, in the Description field. Use the toolbar at the top of the Description field to format the text and add hyperlinks, images, videos, or other media. If you want the description to appear on the course page, click the Display description on course page checkbox to add a checkmark.
Continue by scrolling down the page and expanding each section on the quiz page to complete the desired fields as needed.
For instance, to set timing options, such as when students can begin attempting the quiz, when
they must complete it, and how long they are able to spend on each attempt, expand the Timing section. For each setting you wish to set, first click the Enable checkbox to its right, then make the desired changes.
117
Technical Support: www.jblearning.com/techsupport | [email protected] | 1-978-443-5000 | M-F 8:30am – 8:00pm
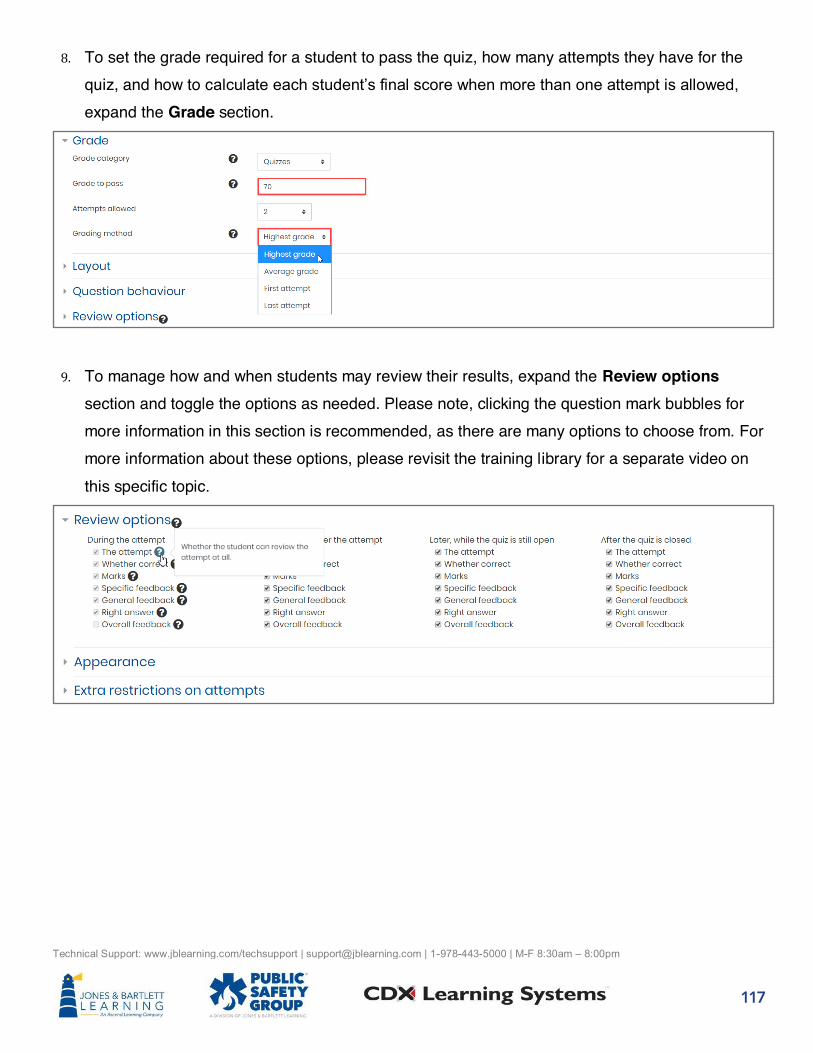
To set the grade required for a student to pass the quiz, how many attempts they have for the quiz, and how to calculate each student’s final score when more than one attempt is allowed,
expand the Grade section.
To manage how and when students may review their results, expand the Review options section and toggle the options as needed. Please note, clicking the question mark bubbles for more information in this section is recommended, as there are many options to choose from. For more information about these options, please revisit the training library for a separate video on this specific topic.

118
Technical Support: www.jblearning.com/techsupport | [email protected] | 1-978-443-5000 | M-F 8:30am – 8:00pm
Additional sections you can complete include: Section… Use to set… Layout How many questions should appear on each page of
the quiz, and how students can navigate through questions.
Question behavior Whether and how to provide feedback on student attempts on a question, whether to allow multiple attempts, whether to shuffle within questions, and whether each question builds on the previous one.
Review options What feedback students can see, such as marks or the right answer, and when they can view the feedback, such as while attempting a quiz, after completing it, or after the quiz closes.
Appearance Whether to show the user’s picture, how to display
decimal places in question grades, and whether to show blocks during attempts.
Extra restrictions on attempts
Password and security requirements for the quiz, including an enforced delay between attempts, browser security, and offline use with the mobile app.
Overall feedback Feedback for each grade boundary you wish to set, up to 8 boundaries.
Common module settings
Whether to show the quiz on the course page or hide it from students, whether to include an ID number, and whether to group the quiz (including the option to add group access restriction).
Restrict access Restrictions on activity completion (if a student must complete a prior activity in order to take the quiz), date, grade, user profile, and nested sets of additional restrictions.
Activity completion Whether to track completion of the quiz, and whether multiple conditions must be met before the quiz

119
Technical Support: www.jblearning.com/techsupport | [email protected] | 1-978-443-5000 | M-F 8:30am – 8:00pm
attempt is considered complete, such as a passing grade.
Tags Tags or labels for the quiz. Competencies Course competencies that are linked to the activity,
and whether to attach evidence, send for review, or complete the competency upon activity completion.
Once you’ve specified the desired settings for this quiz, click Save and display. The quiz page appears, displaying basic information about the quiz and a message that no questions have yet been added.
From there, click Edit quiz. A quiz content page will open, where you can add and work with questions.

120
Technical Support: www.jblearning.com/techsupport | [email protected] | 1-978-443-5000 | M-F 8:30am – 8:00pm
To the right of the page, click the blue Add button, then select your preferred method for selecting questions. Choose a new question if you want to create a new question from scratch, from question bank if you want to choose questions from the current course test bank, or a random question if you want to pull random questions from a specified category within the course test bank.
For additional help on adding questions, please review the separate Adding questions to a quiz guide.

121
Technical Support: www.jblearning.com/techsupport | [email protected] | 1-978-443-5000 | M-F 8:30am – 8:00pm
All questions you add will automatically be saved as they are populated to the body of the quiz. The Save button on the quiz page will only need to be selected in the event you choose to update the maximum grade field which limits the number of points the quiz is worth in the gradebook.
When you are satisfied with the questions you have added, you may return to any course page and continue your work.

122
Technical Support: www.jblearning.com/techsupport | [email protected] | 1-978-443-5000 | M-F 8:30am – 8:00pm
Editing a Quiz
1. Navigate to the course page where the quiz is located and click on it.
2. On the following page, click the gear icon to the right of the page. This will display a dropdown menu with a host of action items associated with the quiz. To adjust the quiz settings, select the Edit settings option.

123
Technical Support: www.jblearning.com/techsupport | [email protected] | 1-978-443-5000 | M-F 8:30am – 8:00pm
3. The settings page will load, enabling you to make any changes that are needed.
4. After making your changes, scroll down and select either the Save and display or Save and return to course buttons.
124
Technical Support: www.jblearning.com/techsupport | [email protected] | 1-978-443-5000 | M-F 8:30am – 8:00pm
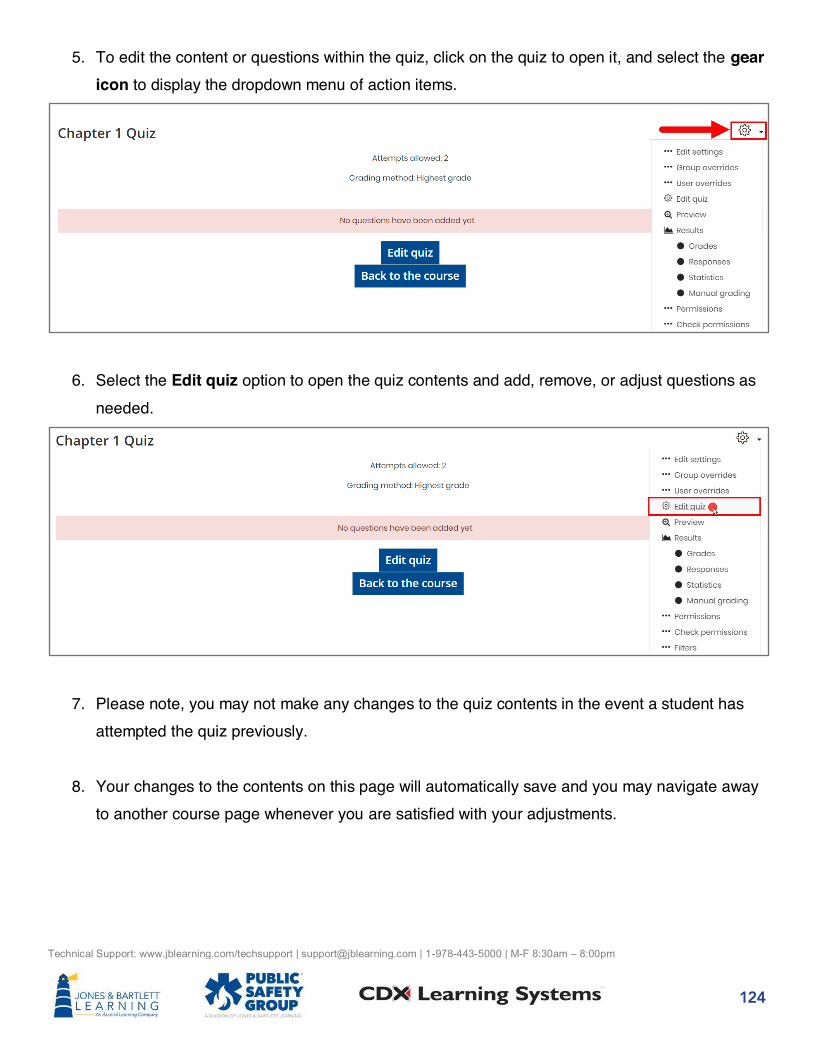
5. To edit the content or questions within the quiz, click on the quiz to open it, and select the gear icon to display the dropdown menu of action items.
6. Select the Edit quiz option to open the quiz contents and add, remove, or adjust questions as needed.
7. Please note, you may not make any changes to the quiz contents in the event a student has attempted the quiz previously.
8. Your changes to the contents on this page will automatically save and you may navigate away
to another course page whenever you are satisfied with your adjustments.

125
Technical Support: www.jblearning.com/techsupport | [email protected] | 1-978-443-5000 | M-F 8:30am – 8:00pm
Reviewing and Making Changes to Students’ Quiz Results
1. Begin by launching your course and navigating to the location of the quiz for which you would
like to review or make changes to the attempts, then click on the quiz to open it.
2. Click on the Actions menu in the righthand side of the quiz page and select the Results option from the dropdown menu displayed.

126
Technical Support: www.jblearning.com/techsupport | [email protected] | 1-978-443-5000 | M-F 8:30am – 8:00pm
3. On the following page, you may use settings in the What to include in the report and the Display options sections to customize your view if necessary. After that, scroll down and click Show report to apply your filters to the results displayed below.

127
Technical Support: www.jblearning.com/techsupport | [email protected] | 1-978-443-5000 | M-F 8:30am – 8:00pm
4. By default, you may immediately scroll further down this page without making any filter adjustments to see all your students’ attempts to date, including when the attempt was made,
how long they spent, their overall quiz grade, and the points they received for each question.
5. To make changes to an individual quiz attempt, click the Review attempt option under the applicable student’s name underneath the First name/surname column.

128
Technical Support: www.jblearning.com/techsupport | [email protected] | 1-978-443-5000 | M-F 8:30am – 8:00pm
6. This action opens the quiz exactly as it was attempted by the student, along with detailed information on how they answered each question. To add comments or modify the points received for a question, click Make comment or override mark below the applicable question.

129
Technical Support: www.jblearning.com/techsupport | [email protected] | 1-978-443-5000 | M-F 8:30am – 8:00pm
7. This action will open a popup window where, below the question, you may use the Comment and Mark fields respectively to enter a comment and/or change the points the student will receive for the given question.
8. When you’re finished with your changes, scroll down and click Save. You will return to the quiz details page, where you may continue to make additional changes or return to the course.

130
Technical Support: www.jblearning.com/techsupport | [email protected] | 1-978-443-5000 | M-F 8:30am – 8:00pm
Setting Quiz Due Dates and Time Limits
Begin by navigating to and clicking on the quiz you’d like to schedule or assign. On the next
page, click the Actions menu on the righthand side and select Edit settings from the dropdown menu.

131
Technical Support: www.jblearning.com/techsupport | [email protected] | 1-978-443-5000 | M-F 8:30am – 8:00pm
The quiz settings page will open, displaying parameters to manage how the quiz functions. To apply a deadline, set a window of opportunity in which students can complete the quiz, or apply any time limitations, then scroll down and expand the Timing section.
Choose a date and time for when students can first access the quiz by clicking the Enable checkbox to the right of the Open the quiz option, and then use the corresponding dropdown menus and/or calendar icon to select the desired timing.
When satisfied with the quiz opening time, click the Enable checkbox to the right of the Close the quiz setting on the next row and select the date and time you want to the quiz to be closed or locked, effectively applying a due date and time. Please note, you must always leave the Enable status box checked to apply the selected timing.

132
Technical Support: www.jblearning.com/techsupport | [email protected] | 1-978-443-5000 | M-F 8:30am – 8:00pm
You may also choose to apply a time limit to the quiz within the same Timing section of the quiz settings page. To do so, click the Enable checkbox to the right of the Time limit option and then use the applicable dropdown menus to specify the period of time in which your students must complete the quiz once they have opened it.
Next, you may adjust the automated action if and when the set limit expires before the student has completed their quiz. Use the When time expires dropdown to select your preference. We recommend leaving the default setting as Open attempts are submitted automatically, which means that the student’s quiz will automatically submit for them when the time limit expires so
that they will receive credit for their progress until that point.
When finished, scroll to the bottom of the page and select Save and return to course to return to your course homepage, or click the Save and display button to review the quiz and verify your settings changes.
133
Technical Support: www.jblearning.com/techsupport | [email protected] | 1-978-443-5000 | M-F 8:30am – 8:00pm
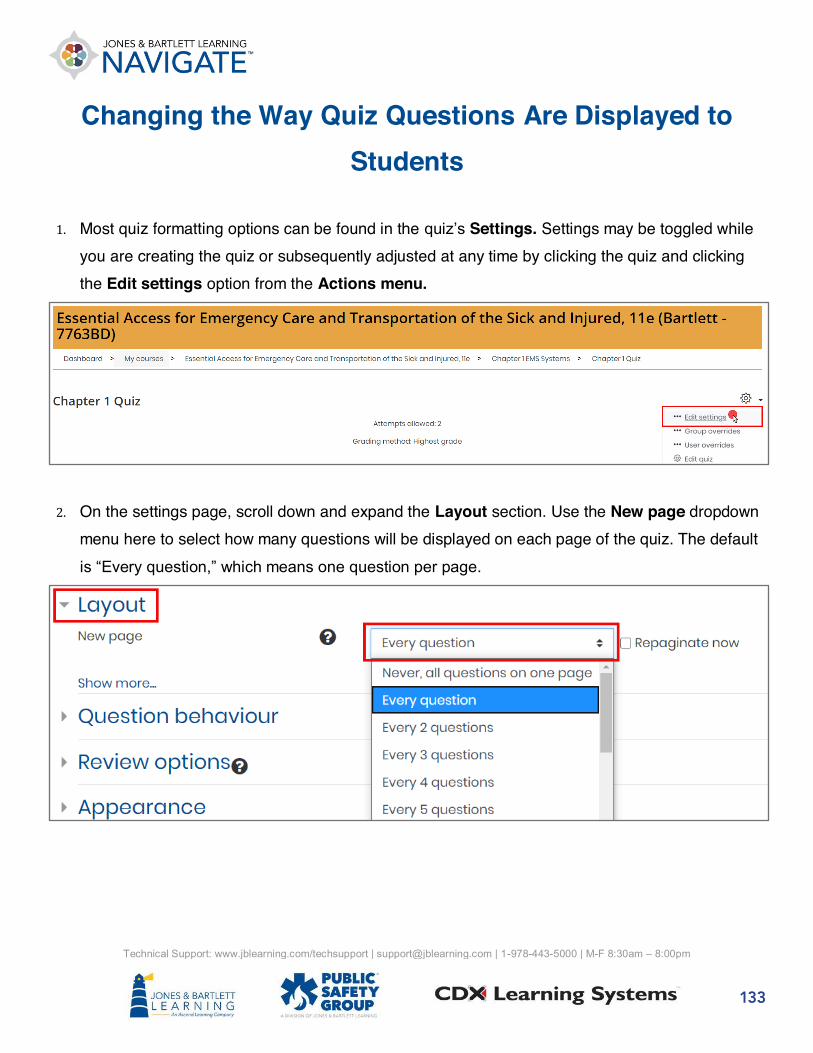
Changing the Way Quiz Questions Are Displayed to Students
Most quiz formatting options can be found in the quiz’s Settings. Settings may be toggled while
you are creating the quiz or subsequently adjusted at any time by clicking the quiz and clicking the Edit settings option from the Actions menu.
On the settings page, scroll down and expand the Layout section. Use the New page dropdown menu here to select how many questions will be displayed on each page of the quiz. The default is “Every question,” which means one question per page.

134
Technical Support: www.jblearning.com/techsupport | [email protected] | 1-978-443-5000 | M-F 8:30am – 8:00pm
To control how students can navigate between questions, click the Show more… link at the bottom of the Layout section to reveal the Navigation method dropdown menu.
Use the Navigation method dropdown to choose a preferred option of Free, meaning the students may skip and revisit questions, or Sequential, meaning the students must answer questions in the order they are received and cannot skip or revisit.

135
Technical Support: www.jblearning.com/techsupport | [email protected] | 1-978-443-5000 | M-F 8:30am – 8:00pm
If your quiz will contain multiple choice or matching questions, you may choose to automatically shuffle each question’s answer choices so that they appear in a random sequence for each
student attempt. To institute this behavior, expand the Question behavior section and adjust the dropdown menu for the Shuffle within questions setting to “Yes.”
When finished, scroll to the bottom of the quiz settings page and click Save and display to return to the quiz page or Save and return to course to apply your changes and return to the course homepage.

136
Technical Support: www.jblearning.com/techsupport | [email protected] | 1-978-443-5000 | M-F 8:30am – 8:00pm
You may determine whether to shuffle quiz questions by toggling the applicable setting within the Edit quiz page. The shuffle behavior is typically set when selecting which questions to include on the quiz and can be adjusted at any time. On the Quiz page, click the Actions menu to the top right and select the Edit quiz option.
To turn shuffling on, click the checkbox to the left of Shuffle so that it is checked. When Shuffle is enabled, each student attempt will see a different and random sequence of questions.

137
Technical Support: www.jblearning.com/techsupport | [email protected] | 1-978-443-5000 | M-F 8:30am – 8:00pm
If you want every student to receive the quiz questions in the same sequence for every attempt, ensure that the Shuffle option is deselected.

138
Technical Support: www.jblearning.com/techsupport | [email protected] | 1-978-443-5000 | M-F 8:30am – 8:00pm
Setting the Number of Attempts for a Quiz and How It Is Graded
Begin by navigating to and clicking on the quiz for which you would like to adjust permitted
student attempts. On the next page, click the Actions menu on the righthand side and select Edit settings from the dropdown menu.

139
Technical Support: www.jblearning.com/techsupport | [email protected] | 1-978-443-5000 | M-F 8:30am – 8:00pm
Scroll down the settings page and expand the Grade section.
If applicable, use the Grade category dropdown menu to select the category in your gradebook in which to locate the quiz to ensure it is appropriately calculated into the students’ total score. You may refer to the gradebook setup video in the Training Library for guidance on setting up your gradebook.

140
Technical Support: www.jblearning.com/techsupport | [email protected] | 1-978-443-5000 | M-F 8:30am – 8:00pm
The Grade to pass field is an option for you to assign a passing grade threshold to the quiz. Inputting a passing grade requirement here will display all failing students’ scores in the
gradebook as red and passing scores as green. A passing grade may also be used as part of completion tracking if you have enabled this feature within your course.
Within this section, you will also find an Attempts allowed option where you may use the respective dropdown menu to choose the desired number of tries that you want to allow each student for the quiz.

141
Technical Support: www.jblearning.com/techsupport | [email protected] | 1-978-443-5000 | M-F 8:30am – 8:00pm
In the event you allow your students more than 1 attempt, you should choose how their final grade for the quiz will be calculated across multiple attempts by using the Grading method dropdown.
When finished, scroll to the bottom of the page and select Save and return to course to return to your course homepage, or click the Save and display button to review the quiz and verify your settings changes.

142
Technical Support: www.jblearning.com/techsupport | [email protected] | 1-978-443-5000 | M-F 8:30am – 8:00pm
Managing the Way Students Review Quiz Results and Feedback
Begin by navigating to and clicking on the quiz you’d like to adjust review options for. On the next
page, click the Actions menu on the righthand side and select Edit settings from the dropdown menu.

143
Technical Support: www.jblearning.com/techsupport | [email protected] | 1-978-443-5000 | M-F 8:30am – 8:00pm
Scroll down the page and click to expand the Review options section. There are four checkbox lists where you may toggle on or off to manage the results and feedback that students are able to review and the timing for when they may do so.
The title above each column refers to the timing for when the selected feedback options below will apply. Each checkbox option represents the type of feedback that may enabled or disabled under the respective timing.
Timing of when selected information below is
shared
Specific details shared with students at the
listed time

144
Technical Support: www.jblearning.com/techsupport | [email protected] | 1-978-443-5000 | M-F 8:30am – 8:00pm
For example, During the attempt, or as students are actively completing the quiz, all feedback options are restricted by default. This is because in most testing instances instructors will not want students distracted with real-time results as they are completing a quiz.
The Immediately after the attempt and Later, while the quiz is still open columns can be used to limit the feedback students can review upon or after completing their quiz. Review options in the last column, After the quiz is closed, will only be available in the event you have applied a deadline for when the quiz closes in the Timing section.
Using each column in the Review options section, you may toggle precise feedback your students can see at the given times. By default, students may review their comprehensive results immediately after finishing the quiz.
Students have 2 minutes to review the selected results after completing the quiz
Students can review the
selected results until the quiz is
closed or locked
Feedback options are restricted by default

145
Technical Support: www.jblearning.com/techsupport | [email protected] | 1-978-443-5000 | M-F 8:30am – 8:00pm
If you have enabled a Close the quiz setting in the Timing section and would like your students to review feedback beyond this deadline, ensure that you have selected the applicable options under the After the quiz is closed column.
For more details about what each setting entails, click the question bubbles of the option.

146
Technical Support: www.jblearning.com/techsupport | [email protected] | 1-978-443-5000 | M-F 8:30am – 8:00pm
Scroll down the settings page to the Overall feedback section. Here, you have the option of
writing your own custom feedback for the students depending on their achieved score.
Enter the feedback you wish to automatically provide in the Feedback field, click the Add 3 more feedback fields button, and then specify the grade cutoff to define the bottom of the range for students who will receive this feedback.
Enter custom feedback

147
Technical Support: www.jblearning.com/techsupport | [email protected] | 1-978-443-5000 | M-F 8:30am – 8:00pm
In this example, all students who achieve a 90% or higher will receive the same feedback of “Excellent work!” Using the new fields added, we have also specified that students who achieve between an 80 and 90 will automatically receive the feedback of “Great job!”
When finished, scroll to the bottom of the page and select Save and return to course to return to your course homepage, or click the Save and display button to review the quiz and verify your settings changes.
Grade range for receiving feedback specified
148
Technical Support: www.jblearning.com/techsupport | [email protected] | 1-978-443-5000 | M-F 8:30am – 8:00pm
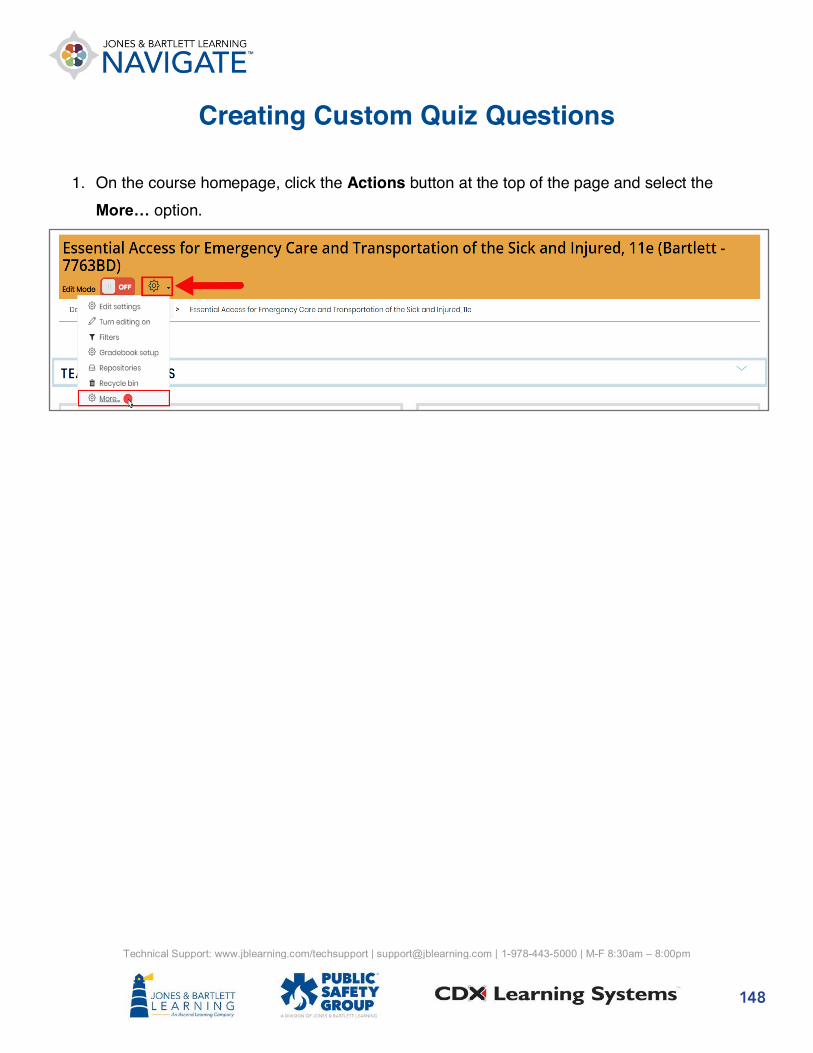
Creating Custom Quiz Questions
1. On the course homepage, click the Actions button at the top of the page and select the More… option.

149
Technical Support: www.jblearning.com/techsupport | [email protected] | 1-978-443-5000 | M-F 8:30am – 8:00pm
2. Your course administration page will open, displaying a series of course settings and action items. Scroll to the bottom of the page to the Question bank section and click Questions.
3. To help keep your custom questions organized and separate from the default course question bank, it is recommended that you store your custom questions in a custom category. To set up a category, click the Categories tab.

150
Technical Support: www.jblearning.com/techsupport | [email protected] | 1-978-443-5000 | M-F 8:30am – 8:00pm
4. Scroll down to the bottom of the Categories tab to the Add category section. Leave the parent category set to the default and enter in a title of your choosing in the Name field. Then click the Add category button below.
5. After the page refreshes, click back to the Questions tab.

151
Technical Support: www.jblearning.com/techsupport | [email protected] | 1-978-443-5000 | M-F 8:30am – 8:00pm
6. Use the Select a category dropdown menu to select your new custom question bank category, which will be listed at the bottom of the menu by default. This category will be where your custom question is found after you add it to a quiz.
7. Next, click the Create a new question… button.

152
Technical Support: www.jblearning.com/techsupport | [email protected] | 1-978-443-5000 | M-F 8:30am – 8:00pm
8. In the popup window, select the type of question you would like to create, then click Add.

153
Technical Support: www.jblearning.com/techsupport | [email protected] | 1-978-443-5000 | M-F 8:30am – 8:00pm
9. On the next page, populate the required fields marked with a red circle, along with other fields or options that may apply. The below example covers adding a true or false question.
10. When satisfied with the content of your question, click the Save changes button at the bottom of the page.

154
Technical Support: www.jblearning.com/techsupport | [email protected] | 1-978-443-5000 | M-F 8:30am – 8:00pm
11. Upon saving, you will be brought back to the Question bank page, which displays your new question. From here, you may select the magnifying glass to preview it.
12. You may also create your own custom questions while viewing the Quiz Edit page and selecting questions to include in the quiz. On the Edit Quiz page, click Add, select the new question option, and proceed by building your question.

155
Technical Support: www.jblearning.com/techsupport | [email protected] | 1-978-443-5000 | M-F 8:30am – 8:00pm
Applying Exceptions to Quizzes for Individual Students
Begin by navigating to and opening the quiz for which you would like to apply a student exception
or exemption. On the quiz page, click the Actions menu on the righthand side and select User Overrides from the resulting dropdown menu.
The following page displays any student exceptions currently applied and options for adjusting them. To create a new exception, click the Add user override button.

156
Technical Support: www.jblearning.com/techsupport | [email protected] | 1-978-443-5000 | M-F 8:30am – 8:00pm
Next, use the Override user dropdown selector to choose the student to whom you’d like to
apply your exceptions.

157
Technical Support: www.jblearning.com/techsupport | [email protected] | 1-978-443-5000 | M-F 8:30am – 8:00pm
Proceed by adjusting the options to apply exceptions for the selected student as needed. You may require that a unique password must be used by the student to access the quiz, set a quiz window of availability that applies to only the selected student, apply an individual time limit, and/or set an individual number of allowed attempts. If you are not sure what the original quiz settings are, click the Revert to quiz defaults button, and the options on the override page will reflect those currently applied to the quiz.
All settings chosen and saved here will
apply to the specified user only

158
Technical Support: www.jblearning.com/techsupport | [email protected] | 1-978-443-5000 | M-F 8:30am – 8:00pm
When satisfied with your selections, click the Save button or Save and enter another override to continue applying more exceptions to additional students.

159
Technical Support: www.jblearning.com/techsupport | [email protected] | 1-978-443-5000 | M-F 8:30am – 8:00pm
Printing a Quiz
1. Click on any topic in your course in which you would like to create your quiz. If your preference is to build a paper quiz only, you may hide or delete the quiz after you have built and printed it to ensure your students do not mistakenly complete it online.
2. Next, toggle on the Course Edit Mode using the button at the top of the page.

160
Technical Support: www.jblearning.com/techsupport | [email protected] | 1-978-443-5000 | M-F 8:30am – 8:00pm
3. Scroll down as needed and click the Add an activity or resource option to the bottom right of the topic’s content.
4. Select the Quiz option under Activities and then click the Add button.
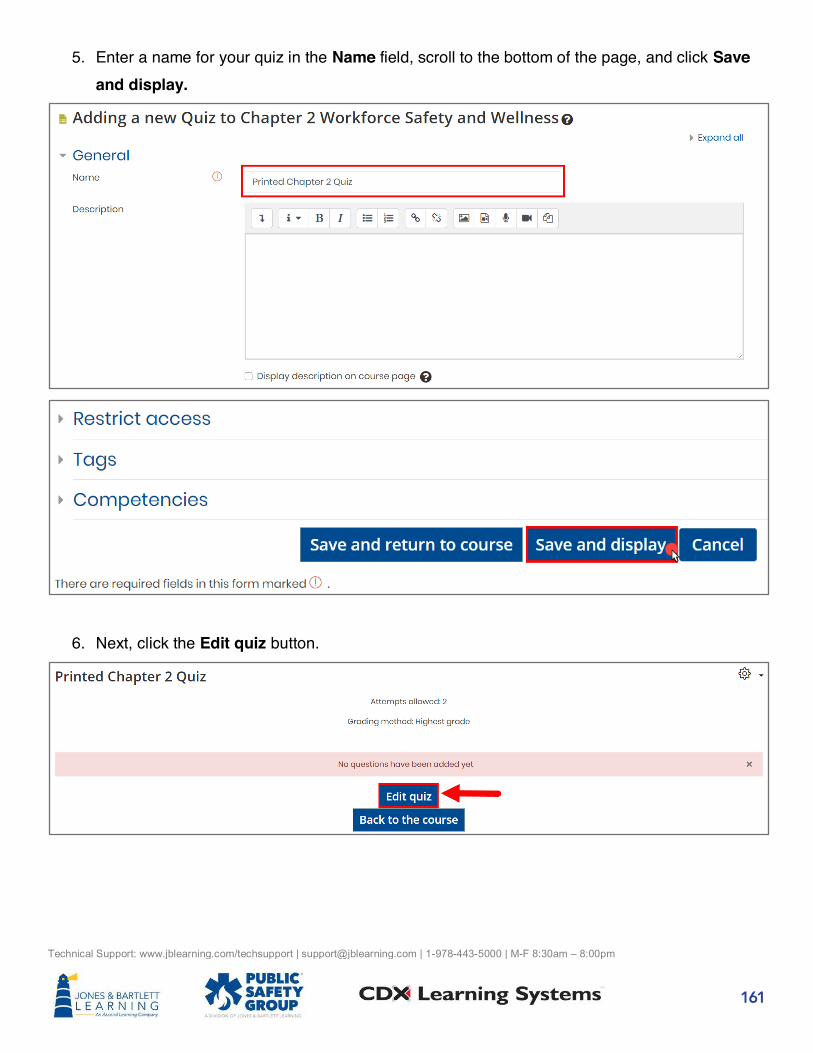
161
Technical Support: www.jblearning.com/techsupport | [email protected] | 1-978-443-5000 | M-F 8:30am – 8:00pm
5. Enter a name for your quiz in the Name field, scroll to the bottom of the page, and click Save and display.
6. Next, click the Edit quiz button.

162
Technical Support: www.jblearning.com/techsupport | [email protected] | 1-978-443-5000 | M-F 8:30am – 8:00pm
7. Proceed by clicking the Add button to the right to build out your quiz as needed.
8. Make sure that you leave the Shuffle checkbox deselected. Electing to shuffle questions here will print your quiz question numbers out of sequence. Instead, you may manually determine the sequence of questions using the compass arrow to the left of each question to drag and drop it as needed.

163
Technical Support: www.jblearning.com/techsupport | [email protected] | 1-978-443-5000 | M-F 8:30am – 8:00pm
9. When ready, select the name of your quiz from the breadcrumb trail of links at the top of the page to return to your quiz page.
10. Then click the Actions menu button and select the Paper quiz option.
11. You have two options for generating a printed version. You may print the quiz with or without an answer key. Please note, the printed version with an answer key will display individual answers immediately below each question and includes a separate page compiling all answers in one place.

164
Technical Support: www.jblearning.com/techsupport | [email protected] | 1-978-443-5000 | M-F 8:30am – 8:00pm
12. Click on the version you would like to print to automatically open a PDF of the quiz in your browser.
13. While you may use the print option in your browser to print the quiz at this time, your printout may have questions cut off midway between pages. We recommend that you select all questions displayed in the PDF and then copy and paste them into a word processing document. Then you may make spacing adjustments and include custom additions.

165
Technical Support: www.jblearning.com/techsupport | [email protected] | 1-978-443-5000 | M-F 8:30am – 8:00pm
Adding Questions to a Quiz
Begin by navigating to and clicking on the quiz for which you’d like to add questions. After the
quiz page loads, click the Edit quiz button at the bottom of the page. Please note, you will not be able to make any question changes to the contents if a student has previously completed the quiz.
To begin adding questions, click on the Add button to the right of the page. You have three different options from the resulting dropdown menu, including [add] a new question, [add] from question bank, and [add] a random question.

166
Technical Support: www.jblearning.com/techsupport | [email protected] | 1-978-443-5000 | M-F 8:30am – 8:00pm
Adding a new question will allow you to create a custom question from scratch. You may select the question type from the popup window and proceed by building the question. If you choose this option, make sure you save your custom questions to a category location in the course test bank where you may easily keep track of them.

167
Technical Support: www.jblearning.com/techsupport | [email protected] | 1-978-443-5000 | M-F 8:30am – 8:00pm
Using the [add] from question bank option will open a popup window where you may choose a test bank category from which to add questions by using the Select a category dropdown menu. Categories are typically organized by chapter, lesson, and/or assessment type. You can see how many questions are available in each category by viewing the number in the parentheses directly to its right. By default, all questions are unique to each category and do not repeat elsewhere in the test bank.
Selecting a category will display its question contents below in the same window. Use the checkboxes to the left of the questions to select them. To view a question in full detail, click the preview button or magnifying glass to its right.
Select the question
Preview the question

168
Technical Support: www.jblearning.com/techsupport | [email protected] | 1-978-443-5000 | M-F 8:30am – 8:00pm
To quickly select all questions on the page at one time, click on the Select all checkbox at the top of this list. When satisfied with your selections, scroll down and click the Add selected questions to the quiz button.
To add a specified number of questions to the quiz at random, choose the third Add option for [adding] a random question.
Select all questions on page

169
Technical Support: www.jblearning.com/techsupport | [email protected] | 1-978-443-5000 | M-F 8:30am – 8:00pm
Use the Category dropdown menu from the resulting popup window to select the bank’s
category from which you wish to draw the random questions. Then specify the number of questions you wish you to randomly select from the designated category by using the Number of random questions dropdown. Make sure you do not choose a number that exceeds the number of questions available in the selected category.
After making the desired selections, scroll down and click the Add random question button. Please note, any random question added functions as a placeholder for a question that will be randomly selected from the designated category for each student attempt. In other words, the questions will vary between attempts.
Target pool of questions
Number of questions to be added

170
Technical Support: www.jblearning.com/techsupport | [email protected] | 1-978-443-5000 | M-F 8:30am – 8:00pm
Continue adding questions to the quiz as needed using your preferred option. When finished, you may choose whether to shuffle the selected questions’ sequence within each individual attempt
by toggling the Shuffle checkbox. You may also Delete questions using the trash button to its right and drag and drop individual questions to adjust their sequence using the compass arrow its left. If you do rearrange question sequence, make sure you click the Repaginate button when done to evenly distribute them according to the quiz page settings.
The question contents of the quiz are automatically saved as they are added, and you may close out of Navigate to any other course page when finished.
Drag and drop Shuffle questions for every attempt
Delete question

ASSIGNMENTSThis section provides guidance with creating and grading
assignments in a course.

172
Technical Support: www.jblearning.com/techsupport | [email protected] | 1-978-443-5000 | M-F 8:30am – 8:00pm
Creating an Assignment
Begin by navigating to the course section or topic in which you wish to create the new assignment. Next, use the editing button at the top of the page to toggle ON Edit Mode.

173
Technical Support: www.jblearning.com/techsupport | [email protected] | 1-978-443-5000 | M-F 8:30am – 8:00pm
With course editing turned on, scroll as needed and click the Add an activity or resource option to bottom right.
In the pop-up window that appears, select the Assignment option at the top of the ACTIVITIES list and then click the Add button.

174
Technical Support: www.jblearning.com/techsupport | [email protected] | 1-978-443-5000 | M-F 8:30am – 8:00pm
The assignment’s settings page will open, displaying all parameters you will need to create your assignment. Start by entering a name in the Assignment name field.
Then, in the Description field underneath, enter in the details and requirements for this assignment to share with your students. If the assignment requires a separate template, worksheet, or other supporting files, these may be dragged and dropped from their location on your desktop directly into the Additional files assignment drop box. This action will upload your selected files and make them available on the Assignment page for your students.

175
Technical Support: www.jblearning.com/techsupport | [email protected] | 1-978-443-5000 | M-F 8:30am – 8:00pm
In the Availability section, you may use the dropdown menus to set the due date parameters that will apply to this assignment. Make sure you check the Enable box to the right of the setting to apply your date and time selections.
• The Allow submissions from is an option to prevent students from submitting their work until a date and time of your choosing.
• The Due date settings is used to determine when students are expected to submit their work. If enabled, this setting will not prevent students from submitting late work. However, it will identify which student submissions are past due.
• If you want to prevent students from submitting work that is past due, enable and
specify a Cut-off date. Please note, you may manually grant individual extensions when enabling a cut-off date.

176
Technical Support: www.jblearning.com/techsupport | [email protected] | 1-978-443-5000 | M-F 8:30am – 8:00pm
Use parameters within the Submission types section to apply any limitations on what files or work the student is allowed submit for the assignment, such as plain text versus file, number of files allowed, or even file formats.
Within the Submission settings section, find and use the Attempts reopened dropdown to determine the options you have when allowing students subsequent submissions for the same assignment.

177
Technical Support: www.jblearning.com/techsupport | [email protected] | 1-978-443-5000 | M-F 8:30am – 8:00pm
The Never option will only accept one submission from the student total, while setting it to Manually will enable you to grant any individual student a subsequent submission in the event their first attempt did not meet the assignment requirements. The Automatically reopened option will programmatically afford the student additional submission attempts in the event their achieved grade is below the passing grade required for the assignment. A passing grade for the assignment may be set within the Grade section of this page.
Provided you do not select the Never option from the Attempts reopened field, you may also specify the exact number of submission attempts afforded to the students within the Maximum attempts dropdown.

178
Technical Support: www.jblearning.com/techsupport | [email protected] | 1-978-443-5000 | M-F 8:30am – 8:00pm
Further down the settings page, the Grade section should be expanded and used to determine how the assignment will be graded. For example, you may prefer to use a Point or Scale grading approach in the Grade options.

179
Technical Support: www.jblearning.com/techsupport | [email protected] | 1-978-443-5000 | M-F 8:30am – 8:00pm
You may then use the Grade category to select the location within the gradebook to locate and score the aggregate of the assignment scores accordingly. This may be adjusted at any time in the future. If you would like to learn more about how to set up your gradebook, please review the gradebook setup video within our Training Library.
You have the option of applying a passing grade requirement in the Grade to pass. If applied, this will work in conjunction with the Automatically reopened attempts option previously discussed and/or will function as a quick visual indicator in your gradebook for students who have received either passing or failing scores.

180
Technical Support: www.jblearning.com/techsupport | [email protected] | 1-978-443-5000 | M-F 8:30am – 8:00pm
You may also set Blind marking to Yes if you wish to review student submissions anonymously as they are graded.
Once you are satisfied with the content and settings of your assignment, click the Save and return to course button at the bottom of this page or Save and display to preview your new assignment.
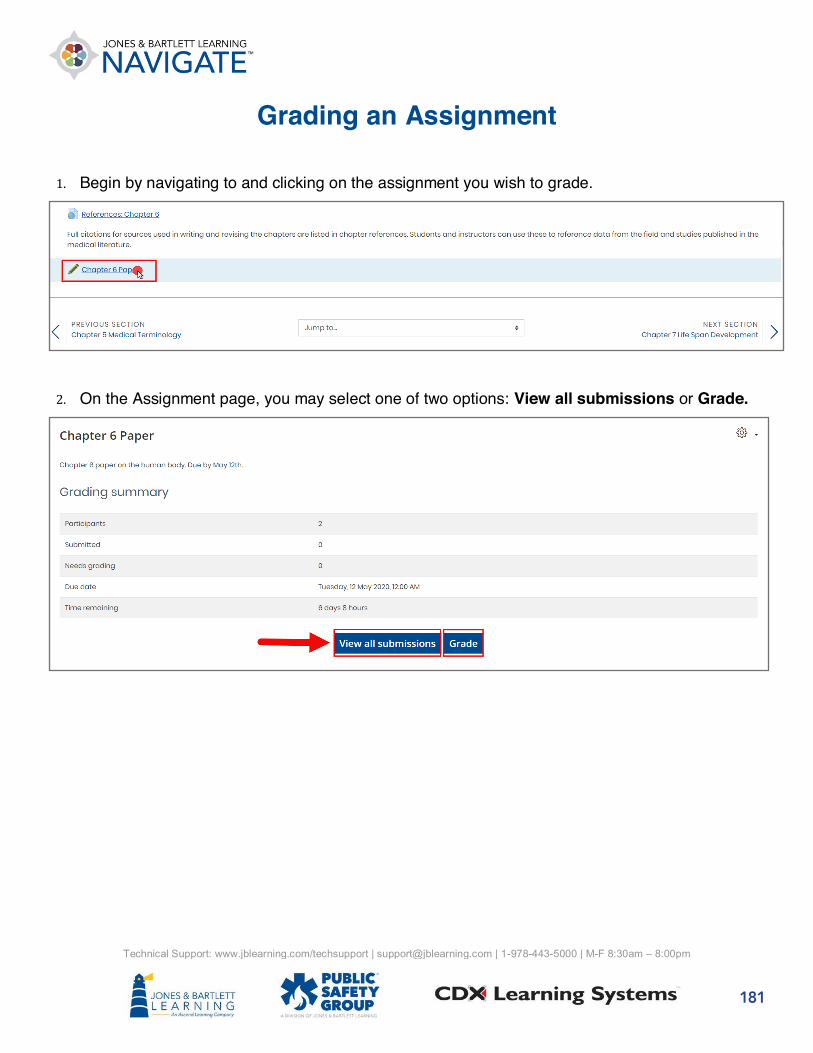
181
Technical Support: www.jblearning.com/techsupport | [email protected] | 1-978-443-5000 | M-F 8:30am – 8:00pm
Grading an Assignment
Begin by navigating to and clicking on the assignment you wish to grade.
On the Assignment page, you may select one of two options: View all submissions or Grade.

182
Technical Support: www.jblearning.com/techsupport | [email protected] | 1-978-443-5000 | M-F 8:30am – 8:00pm
Clicking View all submissions will display a list of students enrolled in your course, their submission status, and their submissions, which may be clicked on to download and review in the event student submitted their own files.
You may click on one student’s submission at a time to review, or you may use the Grading action dropdown menu to download all submissions at once.

183
Technical Support: www.jblearning.com/techsupport | [email protected] | 1-978-443-5000 | M-F 8:30am – 8:00pm
Alternatively, you may select any number of students by checking the pick boxes under the
Select column and using the With selected… dropdown menu to choose “Download selected
submissions.” Then click Go to only download submissions from the selected students.
Upon reviewing their work, you may then click the corresponding Grade button to enter or select a score for one student’s submission at a time.

184
Technical Support: www.jblearning.com/techsupport | [email protected] | 1-978-443-5000 | M-F 8:30am – 8:00pm
You may enter a grade for each student on this page by clicking on the Quick grading box under the Options section. After waiting for the page to refresh, enter in each student’s score
achieved before clicking the Save all quick grading changes button.

185
Technical Support: www.jblearning.com/techsupport | [email protected] | 1-978-443-5000 | M-F 8:30am – 8:00pm
Depending on your selections within the Submission settings for the Assignment, you may select students and use the With selected… dropdown to perform various actions, such as granting extensions or preventing subsequent submissions.

186
Technical Support: www.jblearning.com/techsupport | [email protected] | 1-978-443-5000 | M-F 8:30am – 8:00pm
Alternatively, clicking the Grade button on the assignment page will display a submission and grading page for one individual student at a time. On this page, you can download their file submission, then input their achieved score and any qualitative feedback needed before clicking Save and show next to move on to the next submission.

DISCUSSION FORUMSThis section provides guidance with setting up online
discussion forums within a course.

188
Technical Support: www.jblearning.com/techsupport | [email protected] | 1-978-443-5000 | M-F 8:30am – 8:00pm
Setting Up Online Discussion Forums
1. Navigate to the course topic or section in which you would like to locate the forum. Then use the button at the top of the page to toggle on the course Edit Mode.
2. Next, scroll as needed to find and select the Add activity or resource option at the bottom of the page contents.

189
Technical Support: www.jblearning.com/techsupport | [email protected] | 1-978-443-5000 | M-F 8:30am – 8:00pm
3. Under the Activities section of the resulting popup window, select the dial to the left of Forum and click the Add button below.
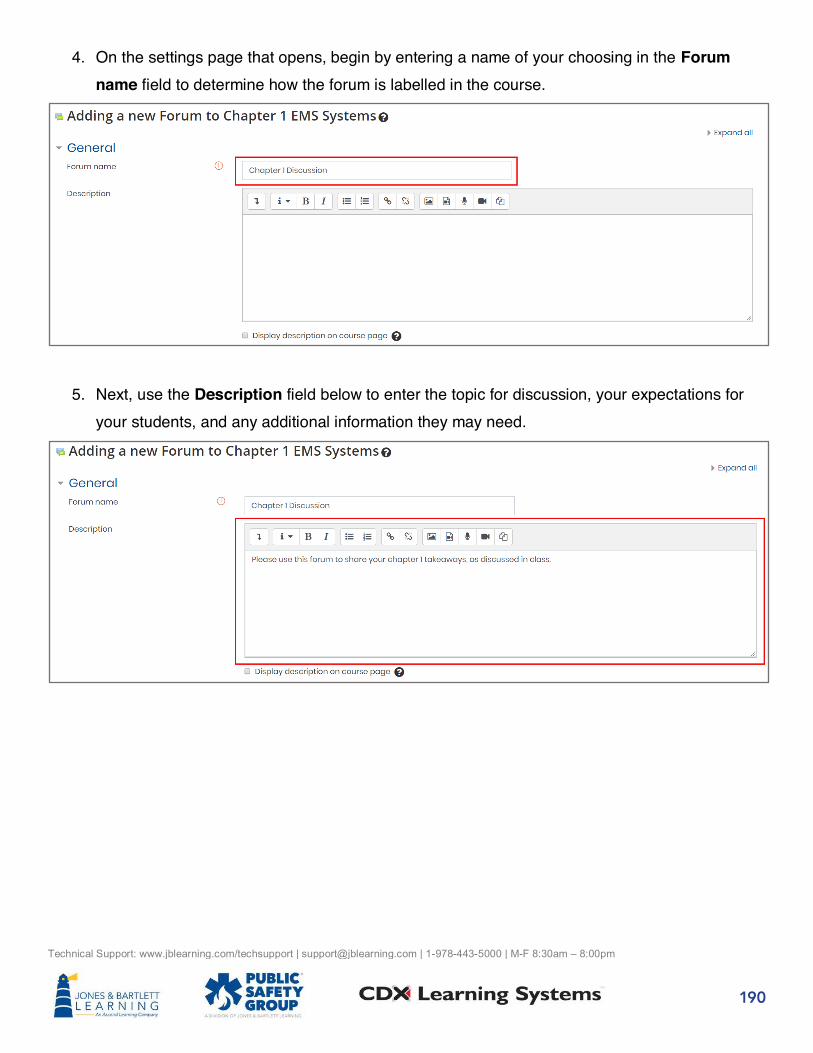
190
Technical Support: www.jblearning.com/techsupport | [email protected] | 1-978-443-5000 | M-F 8:30am – 8:00pm
4. On the settings page that opens, begin by entering a name of your choosing in the Forum name field to determine how the forum is labelled in the course.
5. Next, use the Description field below to enter the topic for discussion, your expectations for your students, and any additional information they may need.

191
Technical Support: www.jblearning.com/techsupport | [email protected] | 1-978-443-5000 | M-F 8:30am – 8:00pm
6. If you would like to display this text on the course page in line with the forum, check the Display description on course page box below.
7. Next, consider and use the Forum type dropdown menu to select the best format or type of online discussion in which your students will participate. There are five types of forums to choose from:
a. Standard forum for general use – An open forum where anyone can start a new discussion at any time.
b. A single simple discussion – A single discussion topic which everyone can reply to (this cannot be used with separate groups).
c. Each person posts one discussion – Allows each student to post exactly one new discussion topic, which everyone can then reply to in the course.
d. Q&A forum – Requires students to first post their perspectives before viewing other students’ posts.
e. Standard forum displayed in a blog-like format – An open forum where anyone can start a new discussion at any time, and in which discussion topics are displayed on one page with “Discuss this topic” links.

192
Technical Support: www.jblearning.com/techsupport | [email protected] | 1-978-443-5000 | M-F 8:30am – 8:00pm
8. Click the corresponding Question Mark bubble next to the Forum type setting for an explanation of each format option available before making your decision.
9. Students will be able to upload file attachments as part of their responses, if necessary. Review the settings in the Attachments and word count section to adjust any upload limitations you wish to set. If you have any specific word count requirements, you may also toggle on or off the Display word count setting here to help you quickly check your students’
responses as needed.

193
Technical Support: www.jblearning.com/techsupport | [email protected] | 1-978-443-5000 | M-F 8:30am – 8:00pm
10. Next, under the Subscription and tracking section, use the Subscription mode dropdown to determine how course participants may be notified of any forum activity by their peers. Click the Question mark help button next to it for an explanation of each subscription option.
11. Under the Discussion locking section, you have the option to automatically close the forum for any subsequent participation after a selected period of inactivity.

194
Technical Support: www.jblearning.com/techsupport | [email protected] | 1-978-443-5000 | M-F 8:30am – 8:00pm
12. Similarly, settings parameters under the Post threshold for blocking section may be adjusted as needed to manage how often students may contribute or participate in the discussion. For instance, you may set a maximum of 4 posts every 2 days per student.
13. Under the Grade section, you may use the Grade category dropdown to determine how to aggregate students’ forum scores in your gradebook, should you wish to make the forum a
graded activity. If you haven’t set up your gradebook yet, you may skip this step and revisit any
time in the future.

195
Technical Support: www.jblearning.com/techsupport | [email protected] | 1-978-443-5000 | M-F 8:30am – 8:00pm
14. Next, your grading approach to the forum is determined under the Ratings section. Forum grades will be calculated based on the ratings you apply to each student’s post. Use the
Aggregate type menu to choose your preference for how multiple ratings will be aggregated to reflect their final score in the gradebook.

196
Technical Support: www.jblearning.com/techsupport | [email protected] | 1-978-443-5000 | M-F 8:30am – 8:00pm
15. Then use the Scale settings to choose the type of rating method you wish to use when scoring students’ contributions to the discussion. For ease of use, the Point approach is recommended together with the default Maximum grade of 100.

197
Technical Support: www.jblearning.com/techsupport | [email protected] | 1-978-443-5000 | M-F 8:30am – 8:00pm
16. If you wish to leave the forum open to ongoing discussion, but also prefer to limit the scope of your grading to a specified time period aligned with expectations for the assignment, check the Restrict rating to items with dates in this range box and use the From and To time menus to define these limitations.
17. Adjust any other optional settings as needed, then scroll to the bottom of the page and click either the Save and return to course or Save and display button.

198
Technical Support: www.jblearning.com/techsupport | [email protected] | 1-978-443-5000 | M-F 8:30am – 8:00pm
18. If you set up a Forum to be graded and are ready to rate your students’ responses, navigate to
the forum’s location in the course and click on it. Please note, depending on the forum type
you selected, navigating through the responses will vary. In this example, we use a single simple discussion type.
19. Under the forum name, you may use the dropdown menu to adjust how your class’s responses
are displayed.

199
Technical Support: www.jblearning.com/techsupport | [email protected] | 1-978-443-5000 | M-F 8:30am – 8:00pm
20. If you have enabled Ratings for the forum, you will find the aggregation method you selected listed directly below each student’s response, followed by a dropdown menu displaying the
word Rate. Use this menu to apply the rating you wish to apply to the student’s contribution.
The rating will automatically apply to their score as it is selected and you may adjust the ratings at any time if necessary.
21. To the right of each student’s response, you will have an option for generating a permalink. When clicked, the post will highlight to the left, and the URL in your browser address bar will display a link which can be copied and pasted. This is a convenient way for you to save a link that takes you directly back to the targeted link, which may be helpful when sharing student responses with your adjuncts or with the rest of the class.

200
Technical Support: www.jblearning.com/techsupport | [email protected] | 1-978-443-5000 | M-F 8:30am – 8:00pm
22. The show parent option will jump you back to the original topic of the discussion thread, where you may also Edit, Delete, or Reply to the individual post as needed.

GRADEBOOKThis section provides guidance with setting up and managing the gradebook and gradebook activities.

202
Technical Support: www.jblearning.com/techsupport | [email protected] | 1-978-443-5000 | M-F 8:30am – 8:00pm
Viewing the Gradebook
1. After launching your course, click on the Grades link in the Navigation drawer on the left side of the course homepage.

203
Technical Support: www.jblearning.com/techsupport | [email protected] | 1-978-443-5000 | M-F 8:30am – 8:00pm
2. The gradebook opens in the Grader report view, displaying all students and assignments in a grid format. Participant names and email addresses appear vertically on the left, and assignments are listed horizontally across the top.

204
Technical Support: www.jblearning.com/techsupport | [email protected] | 1-978-443-5000 | M-F 8:30am – 8:00pm
3. You may click on any letters in the First name and Surname rows above the grid to filter the students displayed based on the selected parameters.
4. Click All in the same rows to remove the filter and display all students.

205
Technical Support: www.jblearning.com/techsupport | [email protected] | 1-978-443-5000 | M-F 8:30am – 8:00pm
5. Your course name is the default name of your gradebook displayed at top of the Grader report. If you create gradebook categories to group and/or weight specific course activities, these will be labeled horizontally across the top and list their child activities below.
6. The category totals will be displayed to the right of the graded items which they contain in a dedicated column, just as the Course total is revealed at the far right of the Grader report.

206
Technical Support: www.jblearning.com/techsupport | [email protected] | 1-978-443-5000 | M-F 8:30am – 8:00pm
7. You may collapse and expand any individual category’s items and/or total by clicking the
button immediately to the category title’s right. This can helpful in reducing the number of
graded items you must scroll through at a time. Please note, the collapsed view of a category will remain saved for your subsequent sessions and must be manually readjusted when required.

207
Technical Support: www.jblearning.com/techsupport | [email protected] | 1-978-443-5000 | M-F 8:30am – 8:00pm
8. Scrolling in search of specific results you need can become cumbersome. To the right of each student’s name, you will find two button options for individual grading review. The gradebook
button will open the User report for the student, which is the individual gradebook that the student sees.

208
Technical Support: www.jblearning.com/techsupport | [email protected] | 1-978-443-5000 | M-F 8:30am – 8:00pm
9. The pencil button to the right of the student’s name in the Grader report will open a Single view of that student’s scores automatically. The Single view is an easy way to review his/her
scores, and it provides the option of manually editing any scores as needed.

209
Technical Support: www.jblearning.com/techsupport | [email protected] | 1-978-443-5000 | M-F 8:30am – 8:00pm
10. After reviewing an individual’s User report or scores, you may return to the Grader report by clicking the respective tab at the top of the page.
11. The two tiers of tabs displayed across the top of the Grade page persist throughout the gradebook and provide options for navigating and managing it.

210
Technical Support: www.jblearning.com/techsupport | [email protected] | 1-978-443-5000 | M-F 8:30am – 8:00pm
12. Clicking on the activities themselves within the Grader report will bring you to directly to the item’s results page. For example, you may quickly review individual student quiz attempts by clicking on a graded quiz.
13. When you are finished viewing the Gradebook, click the course name at the top of the Navigation drawer to return to the homepage.

211
Technical Support: www.jblearning.com/techsupport | [email protected] | 1-978-443-5000 | M-F 8:30am – 8:00pm
Manually Entering or Changing Grades in the Gradebook
1. There are two options for manually adjusting or entering grades in the course’s gradebook.
Both are covered in this document.
2. On the course page, click the Grades button in the Navigation drawer on the left side of the screen.

212
Technical Support: www.jblearning.com/techsupport | [email protected] | 1-978-443-5000 | M-F 8:30am – 8:00pm
3. To make changes to the Grader report, click the Turn editing on button in the top-right corner of the page. The page will refresh and display editable fields for entering or changing each student’s score for any graded activity.

213
Technical Support: www.jblearning.com/techsupport | [email protected] | 1-978-443-5000 | M-F 8:30am – 8:00pm
4. Locate the grade you want to enter or change by scrolling vertically to locate the desired student’s name, then scroll horizontally to display the desired activity. Both the student name
column and activity name row remain fixed, so you always see the naming when scrolling to locate an individual grade. You may also click the letters to the right of First name or Surname at the top of the Grader report to help narrow your scope.

214
Technical Support: www.jblearning.com/techsupport | [email protected] | 1-978-443-5000 | M-F 8:30am – 8:00pm
5. To edit or enter a grade, click in the grade field for the desired student and activity, and type in the desired score.
6. When you are satisfied with your entries or changes, scroll to the bottom of the grader report, if necessary, and click Save Changes. Your changes will be saved to the gradebook.
7. Finally, click the Turn editing off button to close the editing mode.
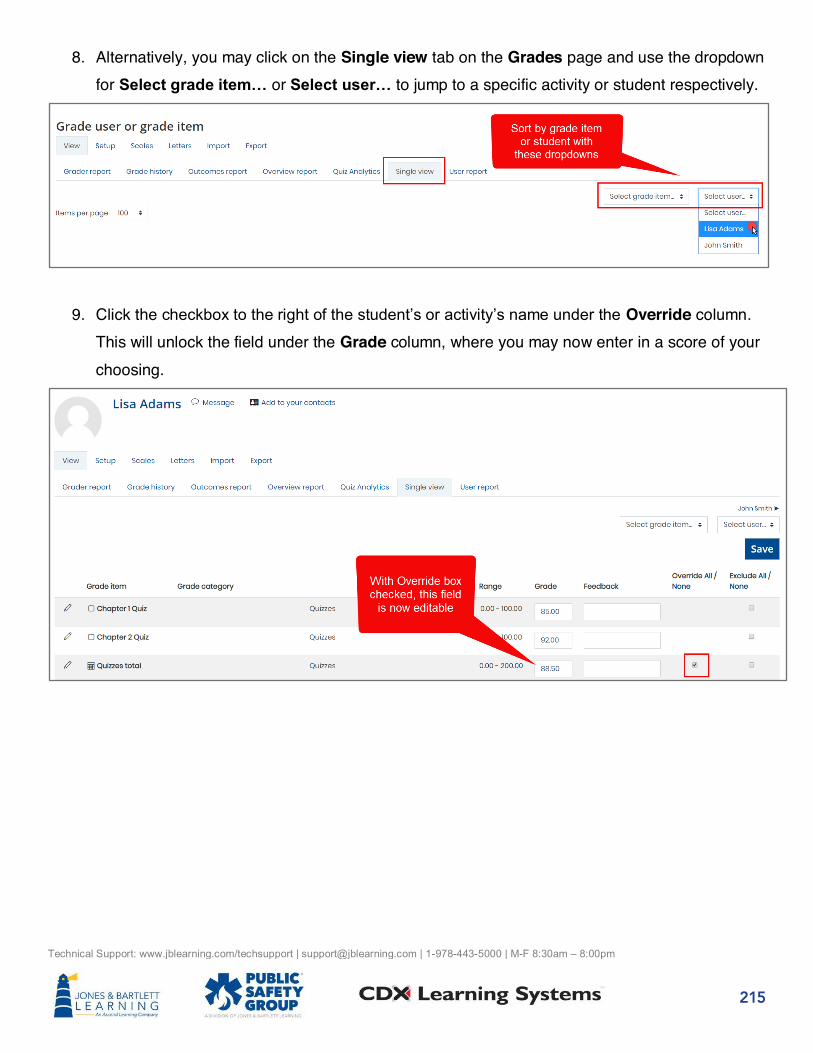
215
Technical Support: www.jblearning.com/techsupport | [email protected] | 1-978-443-5000 | M-F 8:30am – 8:00pm
8. Alternatively, you may click on the Single view tab on the Grades page and use the dropdown for Select grade item… or Select user… to jump to a specific activity or student respectively.
9. Click the checkbox to the right of the student’s or activity’s name under the Override column. This will unlock the field under the Grade column, where you may now enter in a score of your choosing.

216
Technical Support: www.jblearning.com/techsupport | [email protected] | 1-978-443-5000 | M-F 8:30am – 8:00pm
10. Continue to make any additional changes as needed and then click the Save button to apply your changes.
11. You may also choose to automatically assign a score to all students or activities on the page by scrolling down and checking the Perform bulk insert checkbox.

217
Technical Support: www.jblearning.com/techsupport | [email protected] | 1-978-443-5000 | M-F 8:30am – 8:00pm
12. Use the For dropdown menu to choose whether the change should apply to “empty grades”
only or “all grades,” enter the desired score in the Insert value field, and then click the Save button to apply your entry to the applicable students or activities on the page.

218
Technical Support: www.jblearning.com/techsupport | [email protected] | 1-978-443-5000 | M-F 8:30am – 8:00pm
Setting Up the Gradebook
From your course homepage, click the Grades button in the Navigation drawer to the left of the page.

219
Technical Support: www.jblearning.com/techsupport | [email protected] | 1-978-443-5000 | M-F 8:30am – 8:00pm
Once your Grader report page loads, click the Setup tab to customize how the gradebook is structured and how scores are aggregated.
On the Setup tab, graded items are organized within a grade folder or category labeled with the name of your course. Graded items display vertically on the left and show their corresponding settings options and assigned scores and/or weights under columns on the right.

220
Technical Support: www.jblearning.com/techsupport | [email protected] | 1-978-443-5000 | M-F 8:30am – 8:00pm
Begin by clicking the Edit menu under the Actions column to the right of the master course gradebook category at the top of the page and select Edit Settings.
This settings page is where you may enter a custom name for the gradebook category and choose the overall aggregation method you wish to use to calculate the total course score. Click the Aggregation dropdown menu to select how course activities and/or subcategories will be calculated. Use the Question bubble to the left of the dropdown for additional information on the aggregation types available.

221
Technical Support: www.jblearning.com/techsupport | [email protected] | 1-978-443-5000 | M-F 8:30am – 8:00pm
The recommended approach is Natural, meaning that the gradebook total is determined by the sum of all grade values, scaled by weight. In other words, each item will be naturally weighted in relation to others based on their maximum point value. While weighting is automatically and naturally assigned to begin with, you will always have the option to manually adjust any of the individual natural weights as needed under the Setup tab.
After selecting your preferred gradebook aggregation method, click the Show more… link below
this setting to determine whether to include empty grades in the overall gradebook calculation.
If you choose to Exclude empty grades by leaving the box checked, any course activities that students have not yet attempted will be omitted form the total course score. Please note, if you elect to include empty grades, student’s scores will be negatively impacted by any graded
activities for which they have not yet recorded a score.

222
Technical Support: www.jblearning.com/techsupport | [email protected] | 1-978-443-5000 | M-F 8:30am – 8:00pm
If you have elected to use a gradebook aggregation type that is not Natural, you may adjust the available parameters under the Category total settings section as needed.

223
Technical Support: www.jblearning.com/techsupport | [email protected] | 1-978-443-5000 | M-F 8:30am – 8:00pm
When satisfied, click the Save changes button to apply your settings and then click Continue to return to the Setup tab.

224
Technical Support: www.jblearning.com/techsupport | [email protected] | 1-978-443-5000 | M-F 8:30am – 8:00pm
You will see a Weights column to the right of the Setup tab listing the naturally assigned weights for each graded item. By default, weights are naturally adjusted against a 100-point scale and, unless customized, will automatically adjust accordingly as graded activities are added or removed.
Next, consider if you need to create distinct gradebook categories in which to group select graded items that in turn should collectively represent an assigned weighted portion of the overall course grade, such as class exams, quizzes, or homework. To create a Category, scroll down to the bottom of the gradebook setup page and click Add category.

225
Technical Support: www.jblearning.com/techsupport | [email protected] | 1-978-443-5000 | M-F 8:30am – 8:00pm
Enter a preferred name for the Category and then use the Aggregation dropdown menu to select how the activities within this individual category will be calculated. As for the overall gradebook aggregation, applying a Natural approach for the category is recommended.
Under the Category total section of the Category settings, choose to either automatically and naturally weigh this category against existing weights in the gradebook by default, or deselect the Weight adjusted checkbox and enter an assigned weight of your choosing to this category.

226
Technical Support: www.jblearning.com/techsupport | [email protected] | 1-978-443-5000 | M-F 8:30am – 8:00pm
When finished, click the Save changes button at the bottom of the page, then Continue after the gradebook recalculates.
Now, back on the Gradebook setup tab, you can identify your new Category by looking for the folder icon to the left of its name. You will also now find this new Category available for selection in the settings page of any graded course activity you subsequently create or edit to ensure it is aggregated in the appropriate grade category.

227
Technical Support: www.jblearning.com/techsupport | [email protected] | 1-978-443-5000 | M-F 8:30am – 8:00pm
You may move select items in or out of Categories at any time by checking the selection box to the right of the activity, or activities, under the Select column, scrolling to the bottom of the page, and using the Move selected items to dropdown menu at the bottom of the pages to select the appropriate Category. Upon selecting the parent category, your page will automatically refresh to reflect your changes.

228
Technical Support: www.jblearning.com/techsupport | [email protected] | 1-978-443-5000 | M-F 8:30am – 8:00pm
Alternatively, you may move any individual gradebook item by clicking the Arrow or Move button to its left. The Setup page will refresh, displaying slot locations above and below each gradebook item to which you may click to move the applicable item.

229
Technical Support: www.jblearning.com/techsupport | [email protected] | 1-978-443-5000 | M-F 8:30am – 8:00pm
When using the Natural aggregation approach, you can adjust any individual activities’ or
categories’ Weights at any time by clicking the checkbox to the left of its weight field to unlock it, entering in the desired value, and then clicking Save at the bottom of the page.
As you add more Categories and move activities into them, here are a few tips to help you visually track and validate your adjustments. The name of your course is the default name of your gradebook, always shown at the top of the Grade setup page. Any activity or category within your gradebook displays indented and underneath the course name.

230
Technical Support: www.jblearning.com/techsupport | [email protected] | 1-978-443-5000 | M-F 8:30am – 8:00pm
If you have Categories created within the Grader report, you can visually discern it and its contents by hovering your mouse pointer over the name of the Category. This highlights its border, revealing where it begins and ends in addition to the activities that it contains.
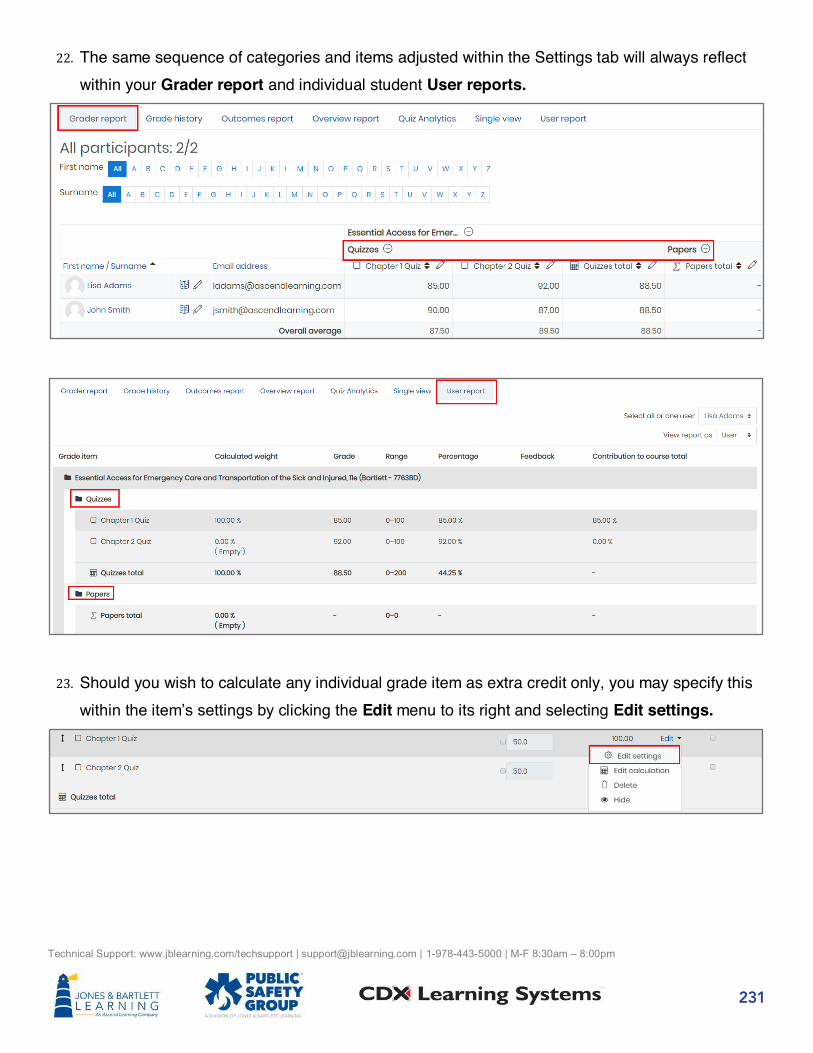
231
Technical Support: www.jblearning.com/techsupport | [email protected] | 1-978-443-5000 | M-F 8:30am – 8:00pm
The same sequence of categories and items adjusted within the Settings tab will always reflect within your Grader report and individual student User reports.
Should you wish to calculate any individual grade item as extra credit only, you may specify this within the item’s settings by clicking the Edit menu to its right and selecting Edit settings.

232
Technical Support: www.jblearning.com/techsupport | [email protected] | 1-978-443-5000 | M-F 8:30am – 8:00pm
Scroll as needed to the Parent category section and select the checkbox to the left of Extra credit. After you make this selection, the item’s maximum points or weight will not be included in
the gradebook’s or category’s total, and any achieved points on behalf of your students will be
considered as extra or bonus points.
The gradebook can be a complex tool to use. If you need further assistance, please do not hesitate to contact our Technical Support team.

233
Technical Support: www.jblearning.com/techsupport | [email protected] | 1-978-443-5000 | M-F 8:30am – 8:00pm
Creating a Manually Graded Activity
On the course page, click the Grades button from the navigation drawer. When the resulting Grader Report loads, click the Setup tab.

234
Technical Support: www.jblearning.com/techsupport | [email protected] | 1-978-443-5000 | M-F 8:30am – 8:00pm
Scroll to the bottom of the Grader report setup page and click the Add Grade Item button. The New grade item page will open, ready for you to name the new activity, specify how it is graded, and select a Category in which to place it within the Grader Report if applicable.
Enter a name for the activity in the Item name field.

235
Technical Support: www.jblearning.com/techsupport | [email protected] | 1-978-443-5000 | M-F 8:30am – 8:00pm
Use the Grade type dropdown menu to set your grading preference for the activity. Choose Value to assign a numerical point value, Scale to use a preset grade scale, or Text to provide feedback only.
Next, under the Parent category section, use the Grade category dropdown menu to assign the item to a specific Category if applicable.

236
Technical Support: www.jblearning.com/techsupport | [email protected] | 1-978-443-5000 | M-F 8:30am – 8:00pm
If you leave the Weight adjusted checkbox clear, the item grade will be assigned a natural weight calculated relative to other activities within the gradebook or selected category. If you click to add a checkmark, you can manually specify a value used to adjust the weighting.
When finished, click the Save changes button on this page.

237
Technical Support: www.jblearning.com/techsupport | [email protected] | 1-978-443-5000 | M-F 8:30am – 8:00pm
You will now find the manually graded activity listed as a grade column within your Grader Report, and you may turn editing on to manually enter or adjust scores as needed.

238
Technical Support: www.jblearning.com/techsupport | [email protected] | 1-978-443-5000 | M-F 8:30am – 8:00pm
Reviewing Test Item Analysis of Students’ Quiz Results
1. Begin by navigating to and clicking on the quiz for which you would like to review a statistical analysis.
2. On the Quiz page, click the Actions menu and look for the Results section. Click on the Statistics option from the dropdown menu.

239
Technical Support: www.jblearning.com/techsupport | [email protected] | 1-978-443-5000 | M-F 8:30am – 8:00pm
3. The statistics page displays, beginning with the Calculate statistics from option, which allows you to specify which quiz attempts to include in your analysis.
4. The Quiz information section below reveals a summary of the all scores achieved by the collective class so far. These statistics include figures such as the total number of graded attempts and student averages across the attempts.

240
Technical Support: www.jblearning.com/techsupport | [email protected] | 1-978-443-5000 | M-F 8:30am – 8:00pm
5. The Quiz structure analysis section displays a list of all questions attempted by your students for the quiz, along with pertinent data and analysis in a grid format.

241
Technical Support: www.jblearning.com/techsupport | [email protected] | 1-978-443-5000 | M-F 8:30am – 8:00pm
6. Importantly, the Question name column lists the body of each question, the Attempts column shows the collective number of times your students submitted an answer for the question, and the Facility Index column reveals the percentage of the submitted answers which were correct.
7. If you included randomly selected questions in the quiz, a placeholder for the randomly selected question is labeled as “Random.” This label is followed in parentheses by the test bank category from which it was selected.
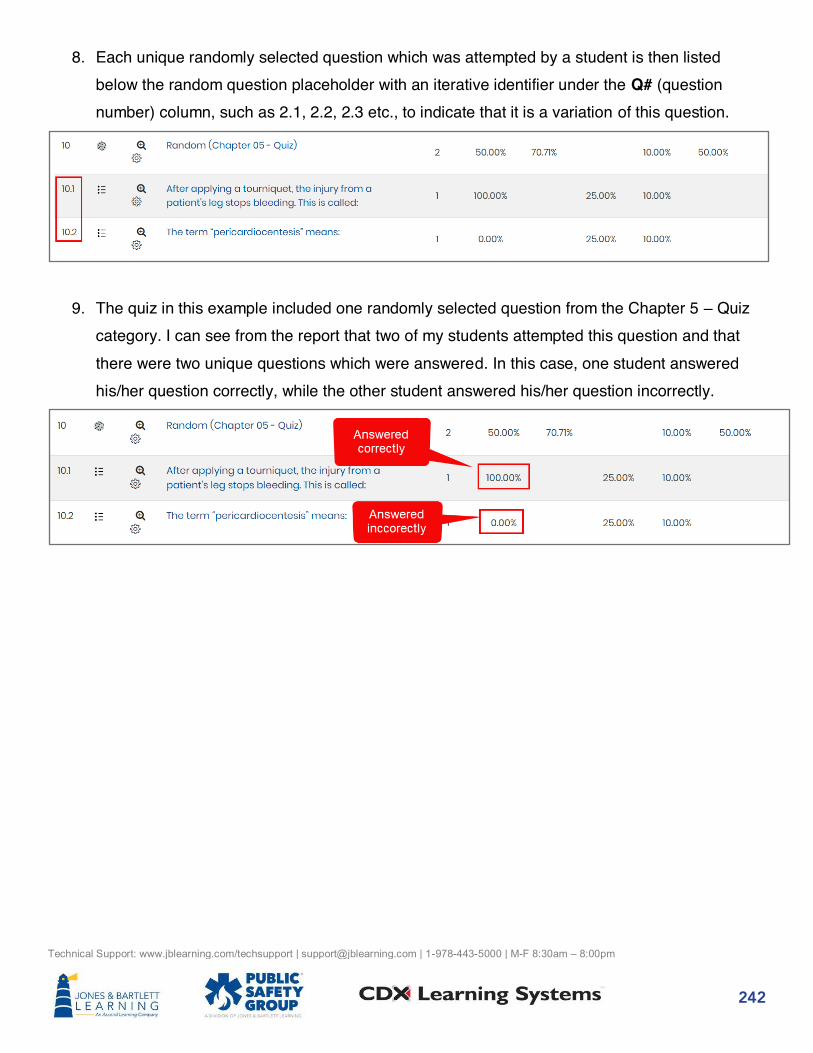
242
Technical Support: www.jblearning.com/techsupport | [email protected] | 1-978-443-5000 | M-F 8:30am – 8:00pm
8. Each unique randomly selected question which was attempted by a student is then listed below the random question placeholder with an iterative identifier under the Q# (question number) column, such as 2.1, 2.2, 2.3 etc., to indicate that it is a variation of this question.
9. The quiz in this example included one randomly selected question from the Chapter 5 – Quiz category. I can see from the report that two of my students attempted this question and that there were two unique questions which were answered. In this case, one student answered his/her question correctly, while the other student answered his/her question incorrectly.

243
Technical Support: www.jblearning.com/techsupport | [email protected] | 1-978-443-5000 | M-F 8:30am – 8:00pm
10. You may click on any individual question for additional class performance data for the specific item. The Question information section displays the question content, followed by the Question statistics section, which reveals the same calculations displayed for the question in the table shown on the Quiz statistics page.

244
Technical Support: www.jblearning.com/techsupport | [email protected] | 1-978-443-5000 | M-F 8:30am – 8:00pm
11. Below, in the Analysis of responses section, you will see data showing the count and frequency of the different responses that were submitted for this question.
12. The Model response column lists the available answer choices for the question. The adjacent Partial credit column reveals the credit given to the student based on any chosen answer.
13. Under the Count column, you will see the number of times each unique answer choice was submitted, while the Frequency column lists the percent of respondents in the class who selected each answer choice.

245
Technical Support: www.jblearning.com/techsupport | [email protected] | 1-978-443-5000 | M-F 8:30am – 8:00pm
14. Click the Back to main statistics report page link at the bottom of this page to return to the general quiz statistics and continue your analysis.
15. The graphical chart at the bottom of the Quiz statistics page reveals the Facility Index and Discriminative Efficiency for each question. Each statistic may be hidden or revealed in the chart by clicking on it from the graph key.

246
Technical Support: www.jblearning.com/techsupport | [email protected] | 1-978-443-5000 | M-F 8:30am – 8:00pm
16. Click the Show chart data link below the graph to reveal the same statistics shown in the graph in a numerical format below.
17. When finished, use the Navigation path at the top of the page to retrace your steps back to the quiz page, or click the course homepage button in the Navigation drawer to the left to return to the main course page.

247
Technical Support: www.jblearning.com/techsupport | [email protected] | 1-978-443-5000 | M-F 8:30am – 8:00pm
Exporting the Gradebook
1. Upon logging in, navigate to the gradebook by clicking the Grades button in the Navigation drawer.
2. Once your Grader report loads, click the Export tab.

248
Technical Support: www.jblearning.com/techsupport | [email protected] | 1-978-443-5000 | M-F 8:30am – 8:00pm
3. The Export tab displays options for specifying the export file format, selecting the grade items you wish to include, and making additional formatting decisions. Available file formats are displayed in tabs across the top. Grade items are listed under Grade items to be included, which is expanded by default.

249
Technical Support: www.jblearning.com/techsupport | [email protected] | 1-978-443-5000 | M-F 8:30am – 8:00pm
4. Choose the preferred file export format by clicking the desired tab. For example, to export to an Excel spreadsheet, click the Excel spreadsheet tab.

250
Technical Support: www.jblearning.com/techsupport | [email protected] | 1-978-443-5000 | M-F 8:30am – 8:00pm
5. Review the list under Grade items to be included and deselect any items you wish to exclude from the exported file.
6. You may scroll down and click the Select all/none link at the bottom of the list to quickly deselect all items and return to choose only those you wish you capture in the export.
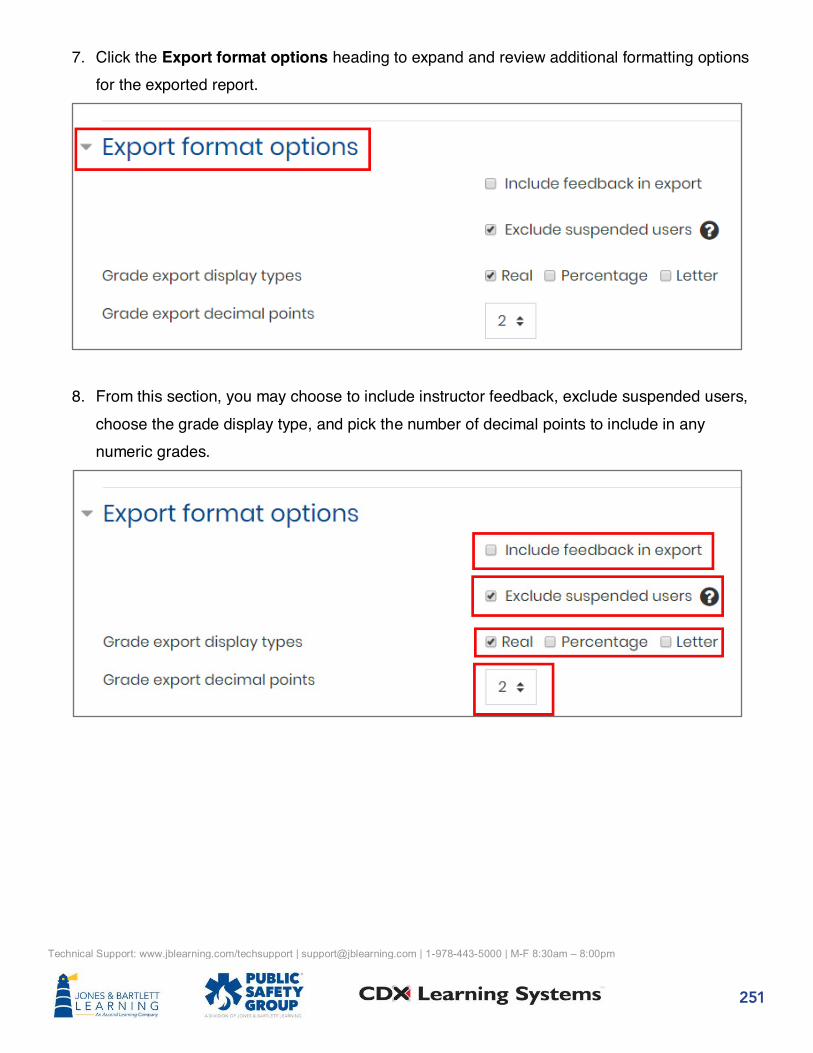
251
Technical Support: www.jblearning.com/techsupport | [email protected] | 1-978-443-5000 | M-F 8:30am – 8:00pm
7. Click the Export format options heading to expand and review additional formatting options for the exported report.
8. From this section, you may choose to include instructor feedback, exclude suspended users, choose the grade display type, and pick the number of decimal points to include in any numeric grades.

252
Technical Support: www.jblearning.com/techsupport | [email protected] | 1-978-443-5000 | M-F 8:30am – 8:00pm
9. When you are ready, click the Download button. Depending on your operating system and browser settings, the file may download automatically or a dialog box will open with options for specifying the save location.
10. When finished, click the course Homepage button in the Navigation drawer to return to your course.

REPORTING & TRACKING
This section provides guidance with all activities related to reporting and tracking in Navigate, such as setting up online
attendance tracking, record student attendance, tracking student course activity, and reviewing eBook analytics.

254
Technical Support: www.jblearning.com/techsupport | [email protected] | 1-978-443-5000 | M-F 8:30am – 8:00pm
Setting Up Online Attendance Tracking
1. Navigate to the course section in which you wish to house your Attendance activity and turn the course Edit Mode ON by toggling the button at the top of the page.
2. Scroll as needed to find the Add an activity or resource option and click on it.

255
Technical Support: www.jblearning.com/techsupport | [email protected] | 1-978-443-5000 | M-F 8:30am – 8:00pm
3. From the resulting popup window, select the Attendance option under ACTIVITIES and click Add.
4. The Attendance settings page will open, where you may choose the general rules for governing student tracking within the tool.

256
Technical Support: www.jblearning.com/techsupport | [email protected] | 1-978-443-5000 | M-F 8:30am – 8:00pm
5. Use the Grade section options to determine whether to incorporate student attendance as a graded component within the gradebook. Use the Type dropdown menu to select your preference and adjust the Maximum grade point value as desired.
6. Next, use the Grade category dropdown to select the appropriate category in your gradebook to track the Attendance component, if applicable. Please refer to the gradebook setup page for more information.
7. A passing grade may be specified in the Grade to pass field. This will function as a visual indicator in your gradebook, displaying all failing student grades for Attendance as red and passing scores as green.

257
Technical Support: www.jblearning.com/techsupport | [email protected] | 1-978-443-5000 | M-F 8:30am – 8:00pm
8. Under Common module settings, toggle the Availability dropdown menu to choose whether you would like to make the Attendance activity visible to or hidden from students in the course.
9. When satisfied with your selections, scroll down and click the Save and display button.
10. The next step will be to create the sessions for which you wish to record student attendance. Click the Add session tab at the top of the page.

258
Technical Support: www.jblearning.com/techsupport | [email protected] | 1-978-443-5000 | M-F 8:30am – 8:00pm
11. Use the Date fields within the Add session section here to pick the time and date of your first class, then use the Time fields to enter in a start and end time of the class.
12. You may then choose whether to automatically populate your students’ calendars with the
session(s) by toggling on or off the Create calendar event for session.
13. Next, the Multiple sessions section can be used to determine whether the session is recurring and, if so, when it repeats.
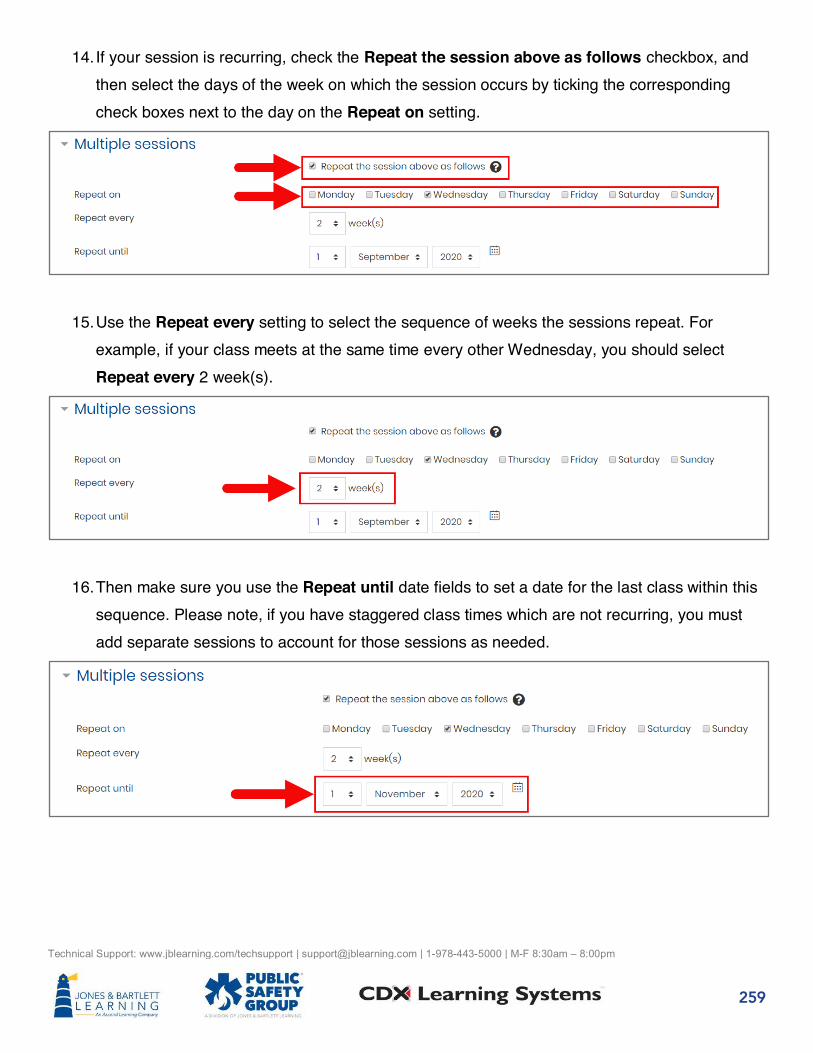
259
Technical Support: www.jblearning.com/techsupport | [email protected] | 1-978-443-5000 | M-F 8:30am – 8:00pm
14. If your session is recurring, check the Repeat the session above as follows checkbox, and then select the days of the week on which the session occurs by ticking the corresponding check boxes next to the day on the Repeat on setting.
15. Use the Repeat every setting to select the sequence of weeks the sessions repeat. For example, if your class meets at the same time every other Wednesday, you should select Repeat every 2 week(s).
16. Then make sure you use the Repeat until date fields to set a date for the last class within this sequence. Please note, if you have staggered class times which are not recurring, you must add separate sessions to account for those sessions as needed.

260
Technical Support: www.jblearning.com/techsupport | [email protected] | 1-978-443-5000 | M-F 8:30am – 8:00pm
17. Finally, choose whether students are to be responsible for recording their own attendance for the sessions using the Allow students to record own attendance checkbox. If you check the box, two more options will pop up.
• Automatic marking allows marking to be completed automatically. If “Yes” is selected,
students will be automatically marked depending on when a student first accesses the course. If “Set unmarked at end of session” is selected, any students who have not
marked their attendance will be set to the unmarked status selected. You may also leave this as “Disabled” if you do not wish to use automatic marking.

261
Technical Support: www.jblearning.com/techsupport | [email protected] | 1-978-443-5000 | M-F 8:30am – 8:00pm
• Student password, if set, requires students to enter a password of your choosing before they can set their own attendance for the session. If left empty, no password is required. You may also generate a random password by checking the appropriate box on the right of the password box.
• You can also check Automatically select highest status available if you wish for students to receive the highest grade possible for attendance.
18. Once you are satisfied with your settings, click Add.

262
Technical Support: www.jblearning.com/techsupport | [email protected] | 1-978-443-5000 | M-F 8:30am – 8:00pm
19. You will now see a list of all the individual class sessions generated under the Sessions tab.
20. Click on the Status set tab to review the default attendance tracking options to use for each student per session.

263
Technical Support: www.jblearning.com/techsupport | [email protected] | 1-978-443-5000 | M-F 8:30am – 8:00pm
21. You may make any custom adjustments to these options as needed by updating the applicable field and then clicking the Update button.
22. Navigate back to the Main Course Page and turn the course Edit Mode OFF by toggling the button at the top of the page. You may now access the Attendance activity listed in the course section in which it was created.

264
Technical Support: www.jblearning.com/techsupport | [email protected] | 1-978-443-5000 | M-F 8:30am – 8:00pm
Recording Student Attendance by Class
1. Before starting, make sure that you have set up your class sessions within the Attendance activity prior to recording student attendance for a class. Navigate to and click on the Attendance item within your course.
2. The Attendance tool will open on the Sessions tab by default, displaying all the current sessions for which you may track attendance.

265
Technical Support: www.jblearning.com/techsupport | [email protected] | 1-978-443-5000 | M-F 8:30am – 8:00pm
3. Use the timing buttons in the top-right of this tab to narrow the scope of the sessions you would like to view on the current page, and then use the Choose date button that appears to jump to the range of time for which you would like to view your available sessions.
4. Click on the Take attendance button to the right of the targeted session under the Actions column.

266
Technical Support: www.jblearning.com/techsupport | [email protected] | 1-978-443-5000 | M-F 8:30am – 8:00pm
5. A tracking page will display your current student roster and their respective attendance status options. Please note, while still applicable for recording student attendance, the following steps assume you have not made custom changes to the Status set tracking options.
6. As most students are likely to be Present for each class, begin by clicking the P (for Present) option next to the Set status for all users line item.

267
Technical Support: www.jblearning.com/techsupport | [email protected] | 1-978-443-5000 | M-F 8:30am – 8:00pm
7. This will automatically set each student’s status to recorded as Present. Next, scroll as needed to the students who are not Present and adjust their statuses as needed.
8. When finished, click the Save attendance button at the bottom of the page to save your tracking records for this session.

268
Technical Support: www.jblearning.com/techsupport | [email protected] | 1-978-443-5000 | M-F 8:30am – 8:00pm
9. The Sessions tab will reload, reflecting your recent changes.
10. You may adjust recorded attendance at any time by clicking directly on the session or selecting the Change attendance button to its right.
11. The Report tab will display a comprehensive Attendance report with filter buttons to conveniently display the specific records you would like to review.

269
Technical Support: www.jblearning.com/techsupport | [email protected] | 1-978-443-5000 | M-F 8:30am – 8:00pm
12. You may click on any individual session’s date displayed in the Report tab to adjust any records as needed.
13. In addition, the Export tab may be used to create an exportable digital copy of your Attendance report to print and/or store locally.

270
Technical Support: www.jblearning.com/techsupport | [email protected] | 1-978-443-5000 | M-F 8:30am – 8:00pm
14. You may adjust the settings on this tab to select specific students or date ranges to capture in the report, choose a desired file Format, and then click the OK button at the bottom of the page to download your custom report.

271
Technical Support: www.jblearning.com/techsupport | [email protected] | 1-978-443-5000 | M-F 8:30am – 8:00pm
Tracking Individual Student Online Activity
1. Outside of the Gradebook, your primary source of truth for all student online course activity are the course Logs. Course logs record individual actions taken by a student within your online course and provides the timing and type of activity. To access these logs, click the Actions menu button at the top of any course content page and select More… from dropdown list.
2. On the next page, click Logs under the Reports section.
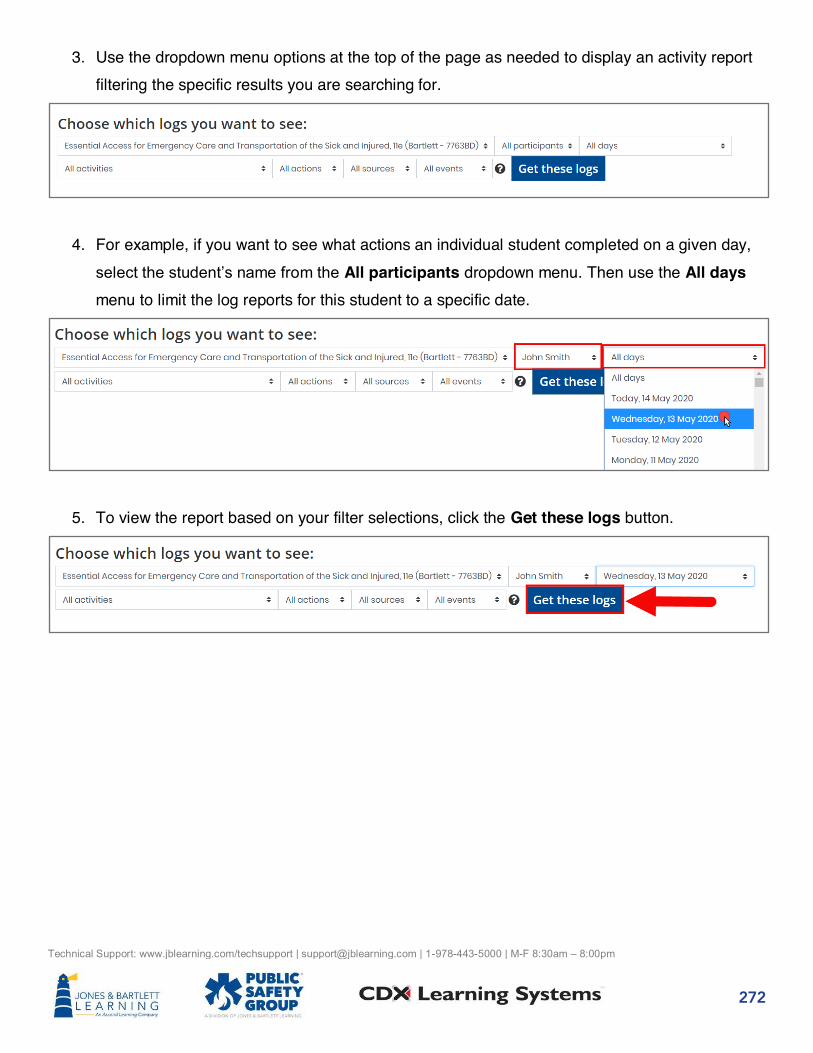
272
Technical Support: www.jblearning.com/techsupport | [email protected] | 1-978-443-5000 | M-F 8:30am – 8:00pm
3. Use the dropdown menu options at the top of the page as needed to display an activity report filtering the specific results you are searching for.
4. For example, if you want to see what actions an individual student completed on a given day, select the student’s name from the All participants dropdown menu. Then use the All days menu to limit the log reports for this student to a specific date.
5. To view the report based on your filter selections, click the Get these logs button.

273
Technical Support: www.jblearning.com/techsupport | [email protected] | 1-978-443-5000 | M-F 8:30am – 8:00pm
6. Course activity logs will display below, revealing details of each applicable action, such as when the action was taken under the Time column, the specific resource affected under the Event context column, the content type under the Component column, and details of what action was taken under the Event name and Description columns.
7. Your custom activity log reports generated here may be downloaded in a file type of your choosing using the Download button at the bottom of the page.

274
Technical Support: www.jblearning.com/techsupport | [email protected] | 1-978-443-5000 | M-F 8:30am – 8:00pm
8. Additional options for reviewing student activity are individual reports available within their Profiles. To find these, click the Participants button in the Navigation drawer to the right of the page.
9. Then click on the name of the student for whom you wish to review usage reports.

275
Technical Support: www.jblearning.com/techsupport | [email protected] | 1-978-443-5000 | M-F 8:30am – 8:00pm
10. Under the Reports section within the student Profile page, you may choose between either Today’s logs or All logs to review a visual chart that captures the number of student online student course actions for the given day or historically, respectively.
11. When viewing either chart, use your mouse to hover over any Hits to display the exact number of actions taken by the student online at the given time. This is an easy way to determine how active your student has been in the course and when their activity has occurred.

276
Technical Support: www.jblearning.com/techsupport | [email protected] | 1-978-443-5000 | M-F 8:30am – 8:00pm
12. You may click Show chart data below the graph to review the data in a report format as needed.
13. Use the breadcrumb trail of links at the top of the course report page to select the name of the student and return to their Profile.
14. Within the Profile Reports section, you will also find the Outline and Complete reports, both of which provide a comprehensive overview of course activities the individual student has completed since enrolling.

277
Technical Support: www.jblearning.com/techsupport | [email protected] | 1-978-443-5000 | M-F 8:30am – 8:00pm
Tracking Students’ Online Course Activity Time
1. From the course homepage, click on the Student engagement button from the Course Blocks tab on the right side of the page. Please note, this tab will need to be expanded to access the tool.
2. The next page will display the Course dedication configuration section, where you may customize the parameters used for capturing your students’ time.

278
Technical Support: www.jblearning.com/techsupport | [email protected] | 1-978-443-5000 | M-F 8:30am – 8:00pm
3. Start of the period is the date and time you would like to begin capturing student activity, and End of the period is the date and time you wish to stop capturing student activity in the report. The period between the two is a window of time in which student activity will be reported when the report is calculated.
4. The Limit between clicks setting enables you to define what is constituted as a single session of online activity in the report. For example, if the limit is set to 60 minutes, the report will display two distinct sessions of activity in the event a student has been active and then logged out or stepped away from their computer for a period of 60 minutes or more before returning, at which point the subsequent activity captured will report as a separate session.

279
Technical Support: www.jblearning.com/techsupport | [email protected] | 1-978-443-5000 | M-F 8:30am – 8:00pm
5. When satisfied with your settings, click the Calculate button to run the report.
6. The report will display below, revealing the length of time for which you have captured data next to Elapsed time, the Total dedication time all course participants have been active within the defined period, and the calculated average of activity per person, or Mean dedication.

280
Technical Support: www.jblearning.com/techsupport | [email protected] | 1-978-443-5000 | M-F 8:30am – 8:00pm
7. Below this section, you will find a list of course participants and their individual duration of online activity, or student engagement, within the defined time frame.
8. You may click on any individual’s name to gain further insight into their activity details,
including when their activity occurred and the duration of each of their sessions.

281
Technical Support: www.jblearning.com/techsupport | [email protected] | 1-978-443-5000 | M-F 8:30am – 8:00pm
9. You may download the results of your report at any time by clicking the Download in Excel Format button.

282
Technical Support: www.jblearning.com/techsupport | [email protected] | 1-978-443-5000 | M-F 8:30am – 8:00pm
Reviewing eBook Analytics
1. From your course homepage, click on the Grades option from the Navigation Drawer to the left of the page.
2. Next, under the default View tab, select the Additional Report subtab.

283
Technical Support: www.jblearning.com/techsupport | [email protected] | 1-978-443-5000 | M-F 8:30am – 8:00pm
3. Click on the Ebook Analytics option displayed below to launch the tool in a new window.

284
Technical Support: www.jblearning.com/techsupport | [email protected] | 1-978-443-5000 | M-F 8:30am – 8:00pm
4. Across the top of the page are the report filters. If you currently teach multiple courses, you may use the Select Book dropdown menu to choose a different eBook and the Select Group dropdown to capture data for specific groups of students which you may have created previously using the Manage eBook Groups tool.

285
Technical Support: www.jblearning.com/techsupport | [email protected] | 1-978-443-5000 | M-F 8:30am – 8:00pm
5. The Duration dropdown menu should be used to determine the period of time for which you wish to report the eBook usage date.
a. You may use the preset options by clicking one of Last 7 days, Month to Date, or Year to Date options
b. Alternatively, you may use the interactive calendar displayed by navigating to a start date of your choosing, clicking on it, and then finding and clicking on an end date. The days for which eBook data will be reported are then highlighted in gray.
c. When satisfied with your filter selections in the Duration dropdown, click Apply.
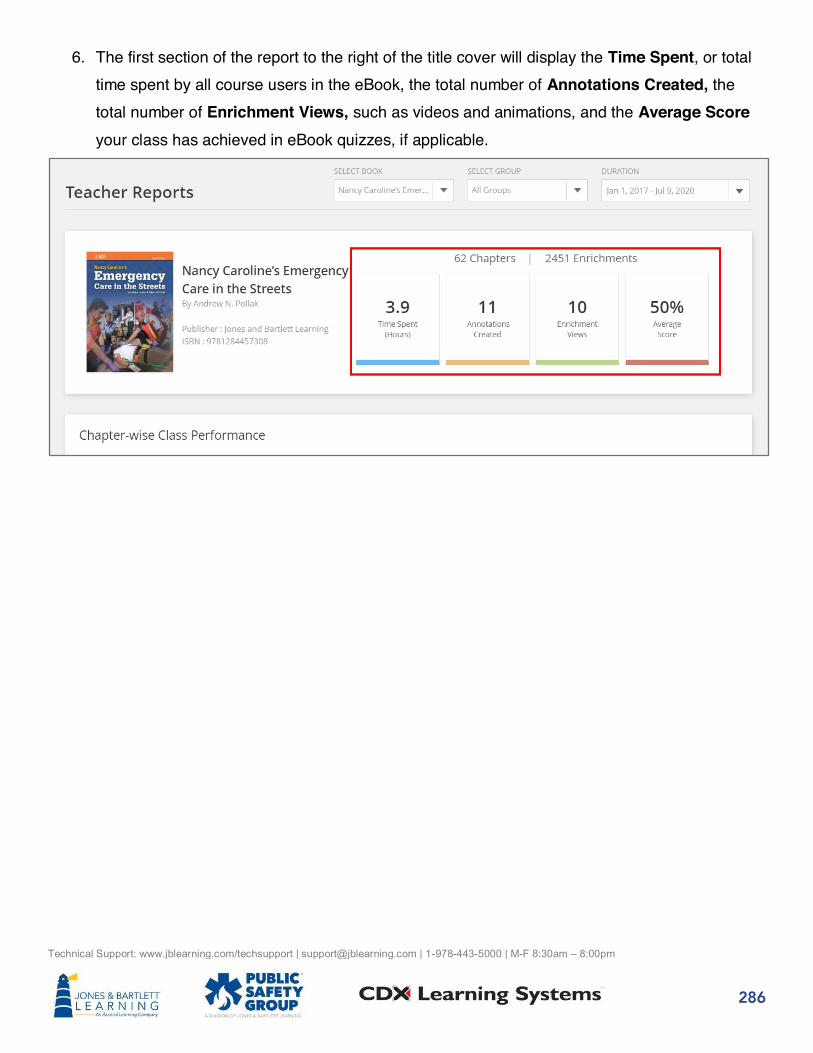
286
Technical Support: www.jblearning.com/techsupport | [email protected] | 1-978-443-5000 | M-F 8:30am – 8:00pm
6. The first section of the report to the right of the title cover will display the Time Spent, or total time spent by all course users in the eBook, the total number of Annotations Created, the total number of Enrichment Views, such as videos and animations, and the Average Score your class has achieved in eBook quizzes, if applicable.

287
Technical Support: www.jblearning.com/techsupport | [email protected] | 1-978-443-5000 | M-F 8:30am – 8:00pm
7. Below, the Chapter-wise Class Performance bar graph displays the average score your class has achieved in the given chapters, if applicable.

288
Technical Support: www.jblearning.com/techsupport | [email protected] | 1-978-443-5000 | M-F 8:30am – 8:00pm
8. You may hover your mouse over each bar to reveal the associated numerical data and click to reveal a new graph displaying individual student’s results.

289
Technical Support: www.jblearning.com/techsupport | [email protected] | 1-978-443-5000 | M-F 8:30am – 8:00pm
9. Click the Back button in the top right of the individual results graph to return to the original graph.

290
Technical Support: www.jblearning.com/techsupport | [email protected] | 1-978-443-5000 | M-F 8:30am – 8:00pm
10. Next, the Student-wise Class Performance chart displays average eBook quiz scores by student, if applicable. Like the above, these bars are also interactive and may be clicked to reveal a breakdown of each of the student’s attempts by chapter.
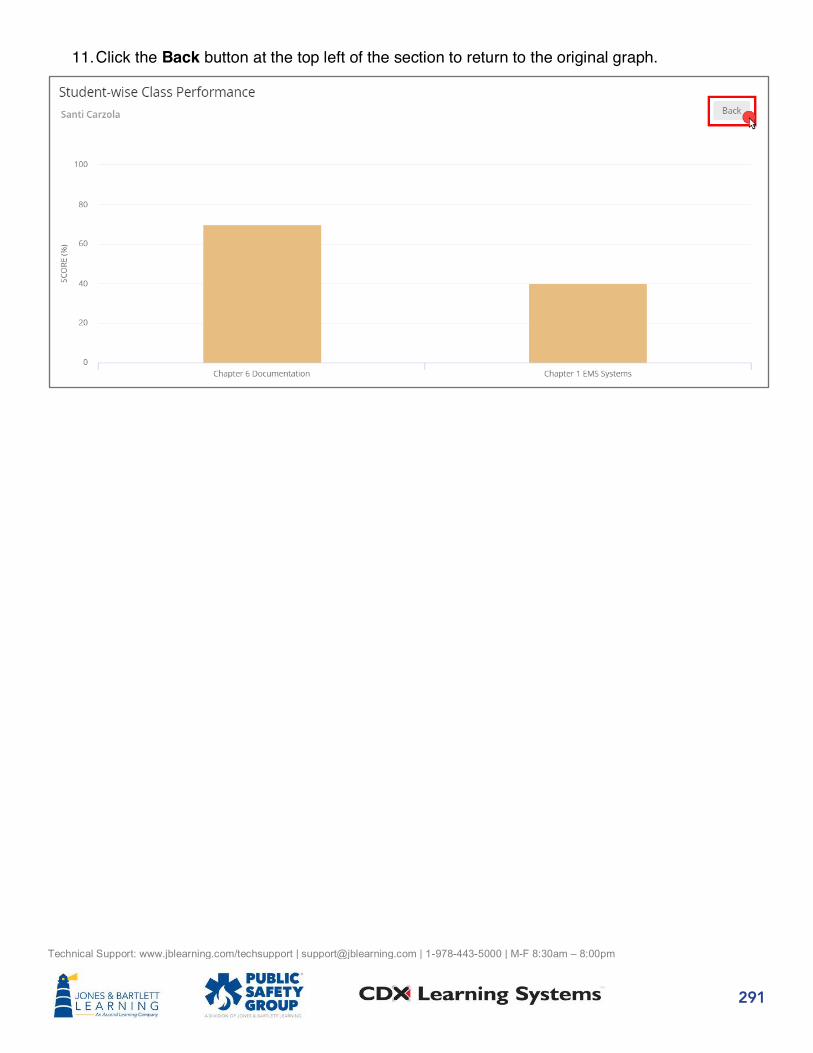
291
Technical Support: www.jblearning.com/techsupport | [email protected] | 1-978-443-5000 | M-F 8:30am – 8:00pm
11. Click the Back button at the top left of the section to return to the original graph.

292
Technical Support: www.jblearning.com/techsupport | [email protected] | 1-978-443-5000 | M-F 8:30am – 8:00pm
12. Finally, the Student Engagement to Performance Co-relation chart compiles each of your student’s reading time in correlation with their eBook quiz performance. Please note, if your
eBook does not include quizzes, the chart will only reveal time spent reading and engaging supplemental resources in the e-text.

293
Technical Support: www.jblearning.com/techsupport | [email protected] | 1-978-443-5000 | M-F 8:30am – 8:00pm
13. Hover over any of the student’s bars to reveal his or her numerical data and performance
score.

294
Technical Support: www.jblearning.com/techsupport | [email protected] | 1-978-443-5000 | M-F 8:30am – 8:00pm
14. If you have a large class and the graph is difficult to read, you may click, hold and drag-and-drop to zoom into any targeted section for a closer look.

295
Technical Support: www.jblearning.com/techsupport | [email protected] | 1-978-443-5000 | M-F 8:30am – 8:00pm
15. You may then click the Reset zoom button to return to your default view.

296
Technical Support: www.jblearning.com/techsupport | [email protected] | 1-978-443-5000 | M-F 8:30am – 8:00pm
16. Click the table button in the top right of the chart to change to a clean dashboard view which lists each student vertically and their respective activity data and scores horizontally.
17. When finished, you may close the report window and continue working in your course.

297
Technical Support: www.jblearning.com/techsupport | [email protected] | 1-978-443-5000 | M-F 8:30am – 8:00pm
Setting Up Course Activity Completion Tracking
1. Your first step will be to enable course completion tracking. On your course homepage, click the Actions menu button at the top and select Edit settings from the dropdown list.
2. Scroll down the Settings page that opens and expand the Completion tracking section.

298
Technical Support: www.jblearning.com/techsupport | [email protected] | 1-978-443-5000 | M-F 8:30am – 8:00pm
3. Then use the dropdown menu to the right of the Enable completion tracking option to select Yes.
4. Last, click the Save and display button at the bottom of the page to apply your changes. Completion tracking has now been enabled, allowing you to apply completion requirements to any individual activity and track your students’ progress.
5. Your next step will be to determine which course activities you would like to track for completion and to specify the requirements that students must meet to complete the tracked items. You have two options for applying activity completion conditions to course items. Your options include doing so within each individual items’ settings or using the Course Completion
settings page.

299
Technical Support: www.jblearning.com/techsupport | [email protected] | 1-978-443-5000 | M-F 8:30am – 8:00pm
6. Your most efficient option is the Course Completion page. To get here, click on the Actions menu at the top of your course page and select Course completion from the dropdown menu.
7. When the page loads, start by setting your preferred completion tracking defaults to use throughout the course under the Default activity completion tab. This will help save you time later by prefilling the activity completion settings for any new activity type you create.

300
Technical Support: www.jblearning.com/techsupport | [email protected] | 1-978-443-5000 | M-F 8:30am – 8:00pm
8. For example, to set completion tracking defaults for my quizzes, I can scroll down and select the checkbox to the left of Quizzes, then continue down the page and click the Edit button to set my default completion tracking parameters for any new quiz I create.

301
Technical Support: www.jblearning.com/techsupport | [email protected] | 1-978-443-5000 | M-F 8:30am – 8:00pm
9. The Completion tracking dropdown menu is used to determine how you want the item to be tracked for completion. Please note, completion tracking options will vary by resource or activity type.
10. When using the Students can manually mark the activity as completed approach, responsibility is always placed on the student to indicate they have viewed or completed the item by manually checking a box to its right on the course page.

302
Technical Support: www.jblearning.com/techsupport | [email protected] | 1-978-443-5000 | M-F 8:30am – 8:00pm
11. Your second option for Completion tracking is to Show activity as complete when conditions are met. This approach allows you to specify the conditions that must be satisfied for the student to be considered as having completed the activity.
12. If the course item is ungradable, such as a PDF, PowerPoint file, or external URL, your option for tracking completion is limited to Require view. As indicated, this means your students will be tracked as completing the item immediately upon opening it.

303
Technical Support: www.jblearning.com/techsupport | [email protected] | 1-978-443-5000 | M-F 8:30am – 8:00pm
13. If the course item is gradable, you may require that students must receive a grade to reflect that they have completed the assignment. To do so, click the checkbox to the right of the Require grade option to ensure Students must receive a grade to complete this activity.
14. In addition, you may use the Require passing grade checkboxes to mandate that the student must achieve a passing grade, set within the Grade section of the activity’s settings page, or
that they exhaust all available attempts allowed.

304
Technical Support: www.jblearning.com/techsupport | [email protected] | 1-978-443-5000 | M-F 8:30am – 8:00pm
15. If you wish to require that students complete an activity by a certain date and time, click the Enable checkbox next to the Expect completed on field and select your desired timing. The expected completion date functions as a soft deadline, as the due date will appear on the students’ calendar but will not prevent them from completing the assignment after or prior to the expected completion date.
16. When satisfied with your adjustments to the activity’s completion tracking defaults, click the
Save changes button to apply your preferences and continue setting other items’ defaults
completion settings as needed.

305
Technical Support: www.jblearning.com/techsupport | [email protected] | 1-978-443-5000 | M-F 8:30am – 8:00pm
17. You may also access and use the Bulk edit activity completion tab on this page to concurrently select one or more targeted course activities for which to bulk-adjust completion tracking requirements.
18. For example, I only want to ensure every student has taken their first two quiz assignments by September 1st. I will be applying hard deadlines to all subsequent quizzes, but I’d like to give
my students a little more flexibility at the start provided they complete the quizzes before my September 1st deadline.

306
Technical Support: www.jblearning.com/techsupport | [email protected] | 1-978-443-5000 | M-F 8:30am – 8:00pm
19. You may also set completion requirements for an individual item at any time within its Settings. Navigate to the location of a course item for which you wish to apply activity tracking to. Once you are on the page where it is located, turn on the course Edit mode using the button at the top of the page.
20. After the page refreshes, scroll to the item as needed, click the Edit menu to its right, and select Edit settings from the resulting dropdown menu.

307
Technical Support: www.jblearning.com/techsupport | [email protected] | 1-978-443-5000 | M-F 8:30am – 8:00pm
21. On the item’s Settings page, scroll down to and expand the Activity completion section.
22. After adjusting the activity completion settings as needed, click Save and return to course at the bottom of the page.

308
Technical Support: www.jblearning.com/techsupport | [email protected] | 1-978-443-5000 | M-F 8:30am – 8:00pm
23. When activity completion tracking has been applied, the course section or topic hosting the item being tracked will display a completion meter, revealing the student’s progress in
completing items being tracked within the given section. Please note, the meter displayed on the sections within your course will reflect your individual progress and not that of your students.
24. Within the topic itself, students will find a new column to the right named Your progress and checkboxes below revealing their completion status for the items. A solid checkbox denotes that the item is manually tracked for completion, and a checkered or dotted checkbox indicates the item is automatically tracked for completion.

309
Technical Support: www.jblearning.com/techsupport | [email protected] | 1-978-443-5000 | M-F 8:30am – 8:00pm
25. For a detailed report on students’ progress, you may refer to the course Activity Completion report. This report is accessed from the course homepage, where you can click the Actions menu and then select the More… option.
26. Under the Course administration tab that opens, find the Report section and click the last option of Activity completion.

310
Technical Support: www.jblearning.com/techsupport | [email protected] | 1-978-443-5000 | M-F 8:30am – 8:00pm
27. The course Activity report will open, presenting a comprehensive report of all course items that are tracked for completion and each student’s status against the respective requirements. The
report presents the students’ names and email addresses vertically on the left and displays the course item names that are being tracked for completion horizontally across the top. Together, these form a grid which you can use to track whether an activity has been completed by the individual student.
28. You may filter the report to individual students based on the first letters of their last and/or first names.

311
Technical Support: www.jblearning.com/techsupport | [email protected] | 1-978-443-5000 | M-F 8:30am – 8:00pm
29. As students complete tracked activities in the course, their respective checkboxes will be populated to reflect the activity’s completion status.
30. As an instructor, you may manually override any item’s completion status for a student by
clicking in the desired checkbox. This can be useful if you want to help students with their course progress by checking off items they have yet to address or if you need to indicate that the student must redo a task they had previously completed. Please note, overriding a student’s completion status will not automatically grant them a subsequent attempt on their
assignment or quiz. This must be done manually.

312
Technical Support: www.jblearning.com/techsupport | [email protected] | 1-978-443-5000 | M-F 8:30am – 8:00pm
31. Any overridden item will display with a red box indicating it has been manually updated.
32. You may also download this report at any time by selecting the file format of your preference.

COMMUNICATIONSThis section provides guidance with all communication-
related activities, including managing course notifications, messaging students, posting course announcements, using
the course calendar, and setting up course live chat.

314
Technical Support: www.jblearning.com/techsupport | [email protected] | 1-978-443-5000 | M-F 8:30am – 8:00pm
Managing Course Notifications
1. On the front page of the course, click the bell icon in the top right of the screen to open the notifications menu. Then click the gear icon in the top right to open the notification preferences.

315
Technical Support: www.jblearning.com/techsupport | [email protected] | 1-978-443-5000 | M-F 8:30am – 8:00pm
2. This page will display course notification options vertically on the left-hand side and two columns to the right, where you may toggle the individual notifications on or off to select how and when you receive them.
3. There are two methods of receiving notifications: within the course itself and through the email address listed on your account.

316
Technical Support: www.jblearning.com/techsupport | [email protected] | 1-978-443-5000 | M-F 8:30am – 8:00pm
4. For either notification method, you may also choose whether you would like to be notified when you are logged into the course and/or when you are offline.
5. For example, if you prefer not to receive email notifications when your students complete quizzes, but you would like to be notified in the course upon launching it, scroll to the quiz section and click the buttons to the right to reflect these preferences.
6. When satisfied with your changes, you may navigate away from this page at any time and your changes will automatically be saved.

317
Technical Support: www.jblearning.com/techsupport | [email protected] | 1-978-443-5000 | M-F 8:30am – 8:00pm
7. To return to the course homepage, find and select the My courses dropdown in the navigation drawer to the left of the page and click the name of your course.

318
Technical Support: www.jblearning.com/techsupport | [email protected] | 1-978-443-5000 | M-F 8:30am – 8:00pm
Messaging Students
On the course homepage, click on the Participants button from the Navigation Drawer on the left-hand side of the page.

319
Technical Support: www.jblearning.com/techsupport | [email protected] | 1-978-443-5000 | M-F 8:30am – 8:00pm
Next, choose the student you would like to send a message to by ticking the checkbox to left of the individual’s name under the Select column. Please note, you may select more than one student as your message recipients.
Below your class roster, click on the dropdown menu to the right of the With selected users… and choose the Send a message option.

320
Technical Support: www.jblearning.com/techsupport | [email protected] | 1-978-443-5000 | M-F 8:30am – 8:00pm
This action will promptly open a messaging popup window. Enter your message in the field provided, and then click the Send message to button when satisfied.
Your message recipient(s) will see a flashing red notification near their mailbox at the top right of
the course page . They may click on this icon at any time to open, read, and respond to your message.

321
Technical Support: www.jblearning.com/techsupport | [email protected] | 1-978-443-5000 | M-F 8:30am – 8:00pm
Posting Course Announcements 1. From the course homepage, expand the Teaching Tools topic at the top by clicking the
dropdown arrow to its right.
2. Then select the News forum item from the list displayed.
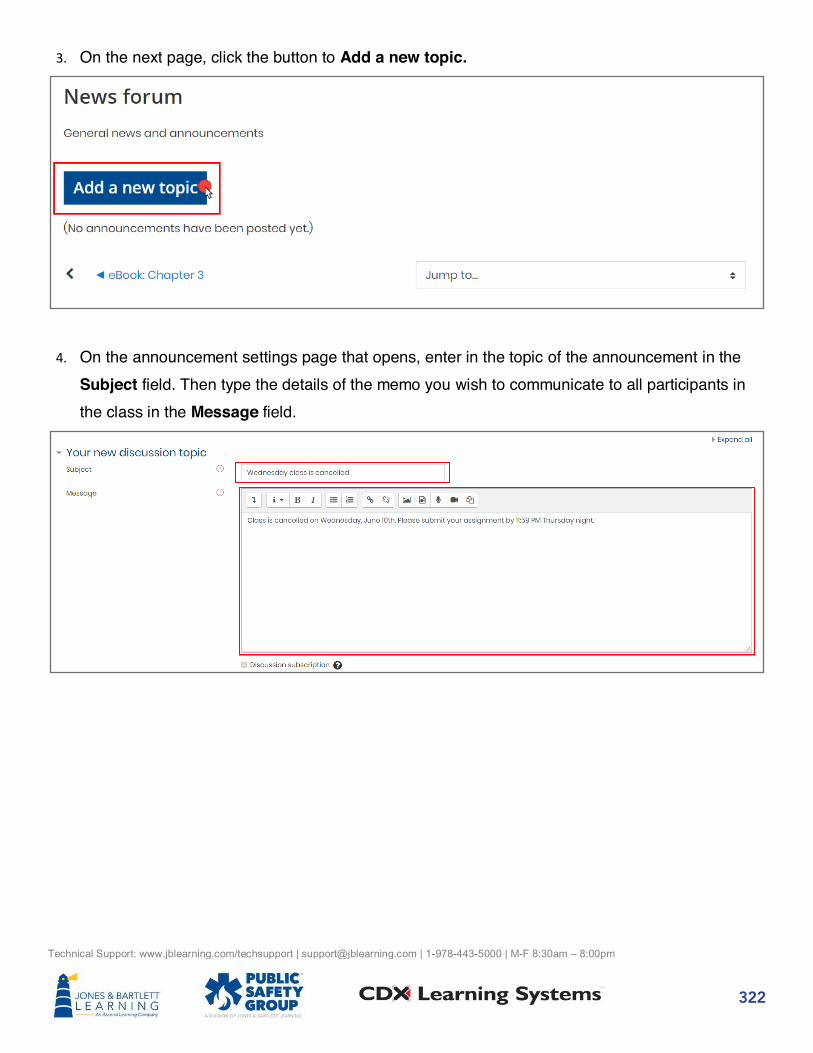
322
Technical Support: www.jblearning.com/techsupport | [email protected] | 1-978-443-5000 | M-F 8:30am – 8:00pm
3. On the next page, click the button to Add a new topic.
4. On the announcement settings page that opens, enter in the topic of the announcement in the
Subject field. Then type the details of the memo you wish to communicate to all participants in the class in the Message field.

323
Technical Support: www.jblearning.com/techsupport | [email protected] | 1-978-443-5000 | M-F 8:30am – 8:00pm
5. If you wish to attach or upload a file to be associated with this announcement, you may drag and drop the file from its location on your Desktop directly into the Attachment dropbox available on the course page.
6. You may post or plan to post multiple course announcements. In this case, you can always
ensure the latest post is pinned at the top of the announcements list by default by selecting the Pinned checkbox.

324
Technical Support: www.jblearning.com/techsupport | [email protected] | 1-978-443-5000 | M-F 8:30am – 8:00pm
7. When you post an announcement, the system will grant you an automatic grace period of 30 minutes in which you can make changes before notifying course participants of the new announcement. If you wish to bypass this grace period and notify participants immediately as you submit your post, check the box next to the Send forum post notifications with no editing-time delay option.
8. Under the Display period section, you may choose to select a specific length of time for which
you wish the announcement to be available for the course participants to view. To apply a date and time for when you would like your announcement to be visible, click the Enable checkbox next to Display start and then select the timing parameters.
9. If you wish to apply an expiration time and date for when the announcement should be
automatically removed from course participants’ view, click the Enable checkbox next to the Display end option and then select the desired timing.

325
Technical Support: www.jblearning.com/techsupport | [email protected] | 1-978-443-5000 | M-F 8:30am – 8:00pm
10. Once you are satisfied with your settings, click the Post to forum button.
11. Your announcement will go out either immediately or after 30 minutes (depending on whether
you checked the “no editing time delay” option during setup). The announcement will appear on
the news forum page after it is posted.

326
Technical Support: www.jblearning.com/techsupport | [email protected] | 1-978-443-5000 | M-F 8:30am – 8:00pm
Using the Course Calendar
1. On the course homepage, find and click the Calendar option from the Navigation Drawer on the left side of the page. This will bring you to your course calendar where you will see all scheduled events displayed.

327
Technical Support: www.jblearning.com/techsupport | [email protected] | 1-978-443-5000 | M-F 8:30am – 8:00pm
2. If you are currently enrolled in more than one course, you may use the Detailed month view for dropdown as needed to view all or only select course’s events.
3. Use the arrows in the upper left or right of the Calendar page to switch your view from month to month or jump to any date by clicking it from the MONTHLY VIEW block in the right-hand side bar.

328
Technical Support: www.jblearning.com/techsupport | [email protected] | 1-978-443-5000 | M-F 8:30am – 8:00pm
4. To add a custom course event, click the New Event button or simply click on any day. A New event popup opens, providing you with informational fields to complete for this event.
5. Begin by entering a name in the Event title field.

329
Technical Support: www.jblearning.com/techsupport | [email protected] | 1-978-443-5000 | M-F 8:30am – 8:00pm
6. Then use the Date options or calendar icon to its right to adjust the date and time for the event as needed.
7. Use the Type of event dropdown menu to determine who the event will apply or be visible to. A User event will function as a self-reminder and only be visible to you, whereas Course events will be shared with all enrolled users.

330
Technical Support: www.jblearning.com/techsupport | [email protected] | 1-978-443-5000 | M-F 8:30am – 8:00pm
8. When creating a Course event, you must use the resulting Course dropdown menu to confirm the course in which to create it. Please note, you may also create events that are specific to subsets within your cohort if you have created course Groups.
9. To specify more options, such as entering event details and setting its duration, click the Show more link and make the needed adjustments.

331
Technical Support: www.jblearning.com/techsupport | [email protected] | 1-978-443-5000 | M-F 8:30am – 8:00pm
10. When you are finished, click the Save button.
11. To view the details of your custom event and make any changes to it, click on the event as shown in the Calendar.

332
Technical Support: www.jblearning.com/techsupport | [email protected] | 1-978-443-5000 | M-F 8:30am – 8:00pm
12. Then click the Edit button to begin making your changes and click Save when finished.
13. To easily reschedule any event to a different date, hover your pointer over the event displayed until your mouse arrow changes to a compass arrow icon, then click and hold to drag the event to its new date.
14. Any time restrictions or deadlines applied to quizzes, assignments, or other course actives will automatically populate the respective items within your course calendar. Once populated, you may then conveniently drag and drop the activities as needed to make any date changes on the fly. Please note, drag and drop changes will only affect the activity’s date and not time.
Also note, while students’ calendars will reflect your date changes, they will not receive a
notification of the changes.

333
Technical Support: www.jblearning.com/techsupport | [email protected] | 1-978-443-5000 | M-F 8:30am – 8:00pm
15. To export the calendar details to your personal Google, Outlook, or other calendar application, click the Export Calendar button at the bottom of the calendar page. Specify which events to export and the desired time period (up to 60 days), then click the Export button. The exported calendar file is saved to your Downloads folder.
16. When you’re finished working in your calendar, click the course icon or your course name in the system drawer to return to your course front page.

334
Technical Support: www.jblearning.com/techsupport | [email protected] | 1-978-443-5000 | M-F 8:30am – 8:00pm
Setting Up a Live Course Chat
1. From the course homepage, navigate to the course section you wish to locate the live Chat activity. Then use the Edit Mode button at the top of the page to turn editing ON.
2. Then scroll down the page and click the Add activity or resource option below the page contents.

335
Technical Support: www.jblearning.com/techsupport | [email protected] | 1-978-443-5000 | M-F 8:30am – 8:00pm
3. From the resulting popup window, select the dial to the left of the Chat option and click the Add button.
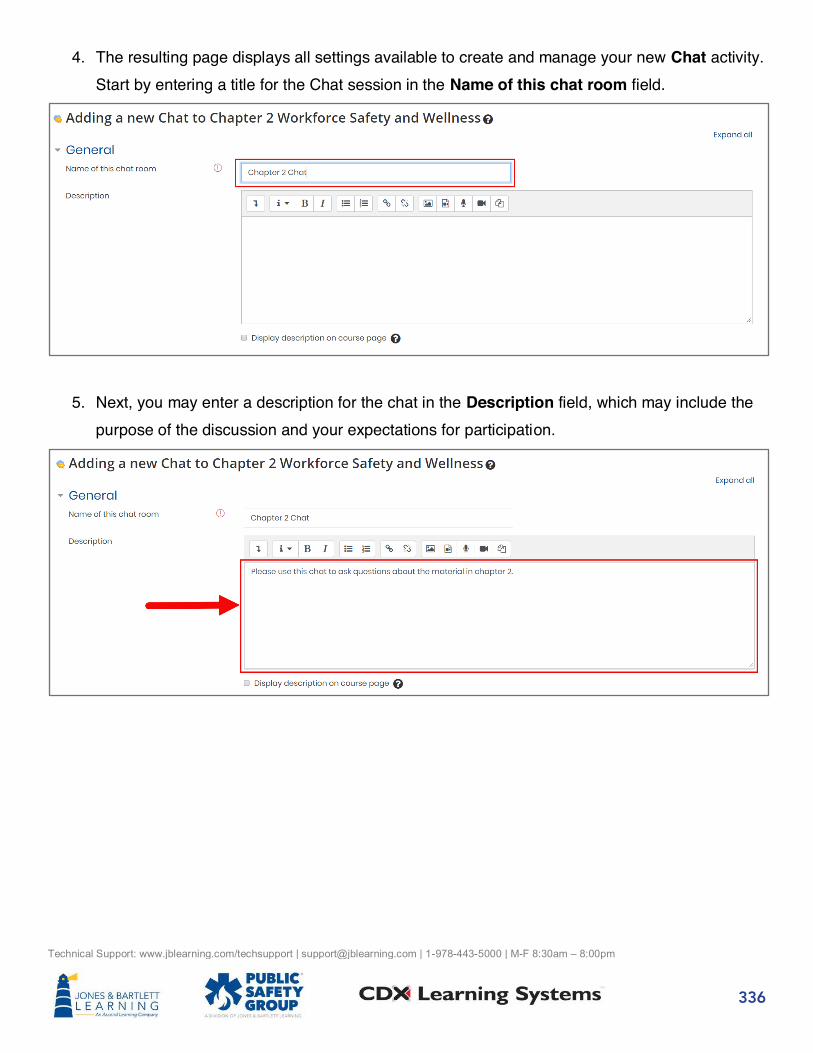
336
Technical Support: www.jblearning.com/techsupport | [email protected] | 1-978-443-5000 | M-F 8:30am – 8:00pm
4. The resulting page displays all settings available to create and manage your new Chat activity. Start by entering a title for the Chat session in the Name of this chat room field.
5. Next, you may enter a description for the chat in the Description field, which may include the purpose of the discussion and your expectations for participation.
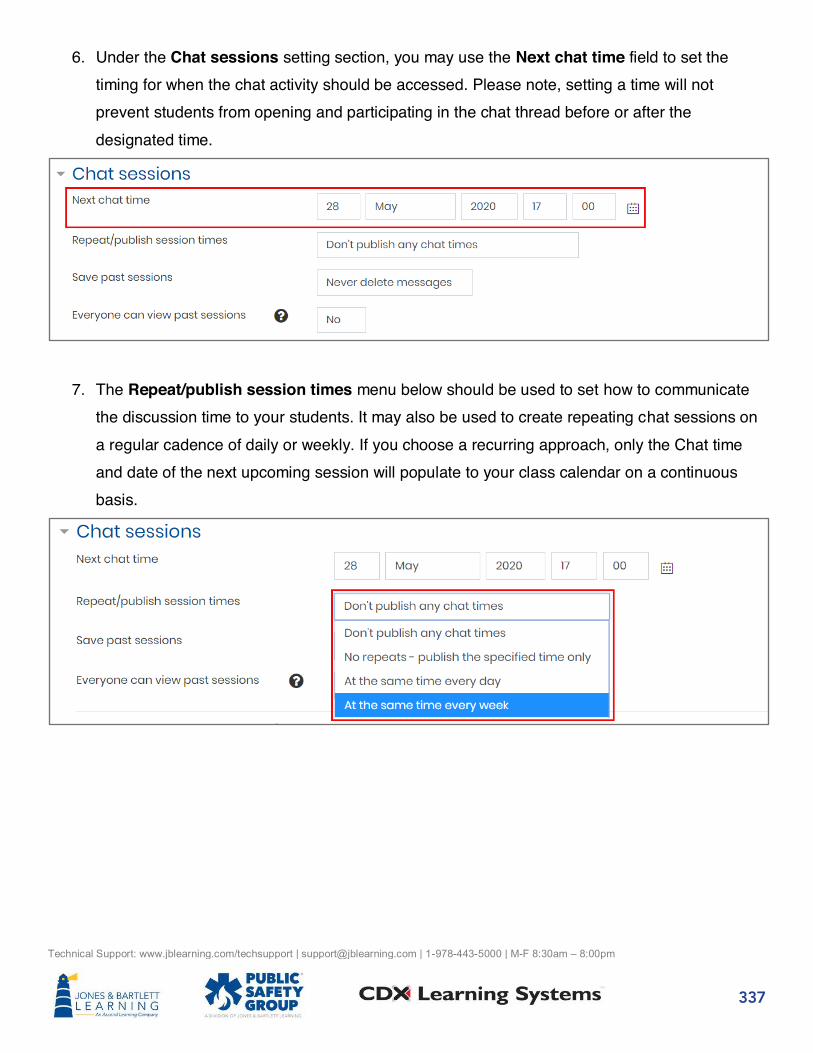
337
Technical Support: www.jblearning.com/techsupport | [email protected] | 1-978-443-5000 | M-F 8:30am – 8:00pm
6. Under the Chat sessions setting section, you may use the Next chat time field to set the timing for when the chat activity should be accessed. Please note, setting a time will not prevent students from opening and participating in the chat thread before or after the designated time.
7. The Repeat/publish session times menu below should be used to set how to communicate the discussion time to your students. It may also be used to create repeating chat sessions on a regular cadence of daily or weekly. If you choose a recurring approach, only the Chat time and date of the next upcoming session will populate to your class calendar on a continuous basis.

338
Technical Support: www.jblearning.com/techsupport | [email protected] | 1-978-443-5000 | M-F 8:30am – 8:00pm
8. Select a desired period of time for the Save past sessions menu if you wish to automatically remove a previous discussion from this chat room. If you want the chat room to retain all threads of participation, you may leave the default of Never delete messages.
9. When satisfied with your selections, scroll to the bottom of the page and click the Save and return to course or Save and display buttons.

339
Technical Support: www.jblearning.com/techsupport | [email protected] | 1-978-443-5000 | M-F 8:30am – 8:00pm
10. Chat activities may be launched and participated in at any time by you and your students
(unless it is subsequently hidden or restricted from students). There is no limit to how many separate Chat threads you may create within your course.

SPECIAL COURSE RESOURCES
This section provides guidance with learning how to use special course resources, such as the eBook and TestPrep.

341
Technical Support: www.jblearning.com/techsupport | [email protected] | 1-978-443-5000 | M-F 8:30am – 8:00pm
Reviewing and Analyzing Students’ Proficiency with TestPrep
1. Navigate to and launch TestPrep by clicking on the tool from its location in the course.
TestPrep will open in a new tab within your browser.
2. As an instructor, you have two options. You may review and track your students’ use of and
performance in the tool or you may use TestPrep in student mode.
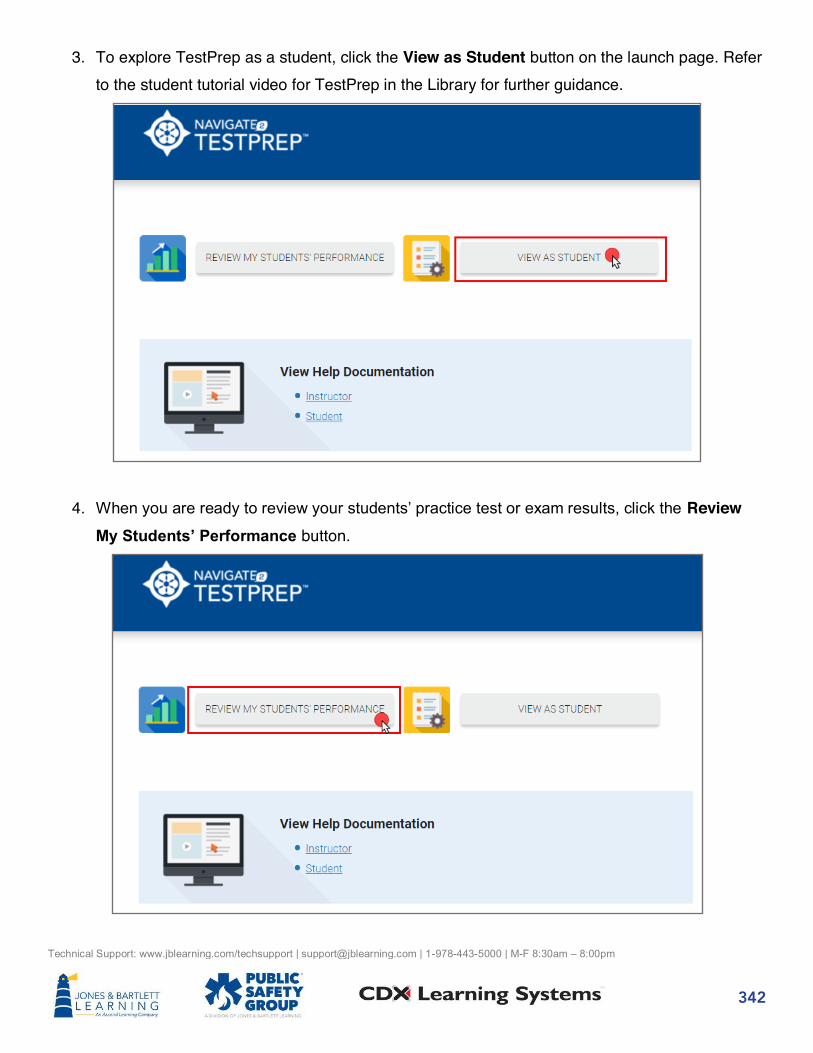
342
Technical Support: www.jblearning.com/techsupport | [email protected] | 1-978-443-5000 | M-F 8:30am – 8:00pm
3. To explore TestPrep as a student, click the View as Student button on the launch page. Refer to the student tutorial video for TestPrep in the Library for further guidance.
4. When you are ready to review your students’ practice test or exam results, click the Review My Students’ Performance button.

343
Technical Support: www.jblearning.com/techsupport | [email protected] | 1-978-443-5000 | M-F 8:30am – 8:00pm
5. The next page will display filter options across the top, followed by your students’ names and
performance in a table below. Please note, students who have not yet completed practice tests in the tool will not populate in the reports.
6. Begin by clicking the Edit filters option above the report section.

344
Technical Support: www.jblearning.com/techsupport | [email protected] | 1-978-443-5000 | M-F 8:30am – 8:00pm
7. Then use the dials under the filter criteria as needed to determine which results to include in the report below. If you wish to review individual student’s results, select the By Student dial. Then determine which practice test results to include in the report followed by the period of time to examine.
8. When satisfied with your filter selections, click the Show report button.
9. The table displays four columns, including each student’s last and first name, the number of
practice tests they have completed, and their average score across all practice tests.

345
Technical Support: www.jblearning.com/techsupport | [email protected] | 1-978-443-5000 | M-F 8:30am – 8:00pm
10. Click a student’s name to review their detailed results.
11. The student’s User Report page displays a Practice Test Review bar graph revealing the scores achieved on his/her previous 4 practice tests. Use your mouse pointer to hover over each test instance on the left to populate the Questions Attempted pie chart to the right to display the number of questions answered correctly, incorrectly, skipped, and/or not seen for that testing instance.

346
Technical Support: www.jblearning.com/techsupport | [email protected] | 1-978-443-5000 | M-F 8:30am – 8:00pm
12. Regardless of the testing modes you previously selected in the report’s filter options, you must
use the respective buttons to the right of the page to toggle between Practice Tests’ or Assessment Tests’ results. You cannot view both modes’ results simultaneously within the
same report.
a. When viewing student Practice Tests, the table below the charts displays columns for the timestamp of each practice test taken, the practice test mode chosen, the chapter or subject the questions were from, the student scores, their time spent on the test, and their average time spent answering each question.

347
Technical Support: www.jblearning.com/techsupport | [email protected] | 1-978-443-5000 | M-F 8:30am – 8:00pm
b. Click on any individual timestamp under the Test column for an itemized review of their results.
c. A second table lists each individual question attempted, whether it was answered correctly, its subject or chapter, the percent of the class who have answered the same question correctly, the student’s confidence rating if applicable, and the time they spent answering the question. Click on any individual question under the Item column to review the question as it was answered by the student.

348
Technical Support: www.jblearning.com/techsupport | [email protected] | 1-978-443-5000 | M-F 8:30am – 8:00pm
d. Then click Back to Reports to return to the results page.
e. A third and last Proficiency by Subject table at the bottom of the User Report page reveals the student’s performance by subject or chapter for the given practice test.

349
Technical Support: www.jblearning.com/techsupport | [email protected] | 1-978-443-5000 | M-F 8:30am – 8:00pm
f. When reviewing the student’s results for the comprehensive Assessment Tests, the first table below the charts will reveal the timestamp of their completed tests, their final score, time spent on the test, and their average time spent answering each question.
g. Click on any individual timestamp under the Test column for an itemized review of their results.

350
Technical Support: www.jblearning.com/techsupport | [email protected] | 1-978-443-5000 | M-F 8:30am – 8:00pm
h. A second table lists each individual question attempted, whether it was answered correctly, its subject or chapter, the time the student spent answering the question, and the average score of all students in the class who have answered the same question.
i. Click on any individual question under the Item column to review the question as it was answered by the student. If the item is not clickable, that indicates that the student never viewed the question before submitting the test.

351
Technical Support: www.jblearning.com/techsupport | [email protected] | 1-978-443-5000 | M-F 8:30am – 8:00pm
j. Click the Back to Reports button to return to the results page when finished.
k. Towards the bottom of the User Reports page, a third table will reveal the student’s
Proficiency by Subject based on this individual exam’s results. The information displayed in the table includes the Subject or chapter, the number of questions answered correctly and incorrectly, the percent of questions answered correctly, and the average proficiency of the class in the subject or chapter.

352
Technical Support: www.jblearning.com/techsupport | [email protected] | 1-978-443-5000 | M-F 8:30am – 8:00pm
13. To return to the TestPrep homepage, scroll up as needed and click the Back button in the top left of the page.
14. To review your overall classes’ performance by subject or chapter, click the Edit filters option and select the Subject dial. Then choose your preferences for the remaining filters and click Show Report.
15. The first column in the table below displays the subject or chapter, followed by the total number of questions answered correctly and incorrectly to date. The classes average score for the subject is shown under the last column.

353
Technical Support: www.jblearning.com/techsupport | [email protected] | 1-978-443-5000 | M-F 8:30am – 8:00pm
16. Click on any listed chapter to expand it and see a breakdown of the number of students whose scores are above, at, and below average for the class.
17. You may select the View option to the right of each of these brackets to view which individual students fall into the respective average juxtaposed with their average scores in the subject.

354
Technical Support: www.jblearning.com/techsupport | [email protected] | 1-978-443-5000 | M-F 8:30am – 8:00pm
Using the eBook 1. EBooks may be available as a standalone product launched directly either from within your user
account or from within your Navigate course by clicking on an eBook chapter link. 2. To open the eBook within a Navigate course, launch your course and click on a chapter for which
you want to open the eBook. Next, click on the eBook link displayed as part of the chapter’s
resources.

355
Technical Support: www.jblearning.com/techsupport | [email protected] | 1-978-443-5000 | M-F 8:30am – 8:00pm
3. Clicking the eBook chapter will load the first page of selected chapter in a new tab in your web browser. If this is your first time opening the eBook, take a moment to explore and learn about the features available using the tour overlay.
4. The Settings button in the top-right provides you with the option to expand or reduce text size to
suit your reading preference. To toggle the text size, click and drag the button on the scale left or right while viewing the text size in the preview section provided, then click Save to apply the adjusted size.

356
Technical Support: www.jblearning.com/techsupport | [email protected] | 1-978-443-5000 | M-F 8:30am – 8:00pm
5. The Print button may be used to print the desired pages of the chapter section you are viewing.
6. The Bookmark button is a tool used to save a reference point on the page, providing you with a
quick link to return to the exact location that was chosen. To create a bookmark, click the button first and then click on the desired location of the page to apply it.

357
Technical Support: www.jblearning.com/techsupport | [email protected] | 1-978-443-5000 | M-F 8:30am – 8:00pm
7. Next, click the Sync button at the top right of the page to save your progress.
8. The Listen button will enable the eBook screen-reader and highlight text as it is read aloud.

358
Technical Support: www.jblearning.com/techsupport | [email protected] | 1-978-443-5000 | M-F 8:30am – 8:00pm
9. The reading may be paused at any time using the Text-to-speech toolbar displayed at the top of the page. The Pointer button within the toolbar may be selected and then used to click on a specific sentence for it to be read aloud.
10. Use the Arrow buttons to the left and right of the page to navigate from page to page.

359
Technical Support: www.jblearning.com/techsupport | [email protected] | 1-978-443-5000 | M-F 8:30am – 8:00pm
11. Alternatively, you may use the Scrollbar at the bottom of the page to jump to any desired section of the eBook, and you can refer to the scrollbar as an indicator of your progress.
12. As you read, you may encounter underlined glossary terms within the text, which you can click on
to view their definition in the resulting popup window.

360
Technical Support: www.jblearning.com/techsupport | [email protected] | 1-978-443-5000 | M-F 8:30am – 8:00pm
13. Highlighting any section of text with your cursor will open an Annotation Toolbar, which may be used to highlight the eBook text or create either written or recorded audio notes.

361
Technical Support: www.jblearning.com/techsupport | [email protected] | 1-978-443-5000 | M-F 8:30am – 8:00pm
14. When you leave a note, the selected text will highlight in grey and will also display a notation icon at the beginning of the section, which indicates a note is available to review for the highlighted text. A note icon at the bottom of the left-hand toolbar will reveal the presence and number of notes created on a given page.
15. After creating annotations and before closing the eBook, it is important to click the Sync button at
the top right of the page to ensure all changes are saved for your next session.

362
Technical Support: www.jblearning.com/techsupport | [email protected] | 1-978-443-5000 | M-F 8:30am – 8:00pm
16. All supporting media resources (images, videos, animations, and audio) are embedded in-line with the text where applicable and may be launched or played with a click of your mouse.
17. Select titles have Knowledge Check questions in the concluding chapter sections. These
questions can be used to self-evaluate reading comprehension. Knowledge Checks are not graded and may be attempted an unlimited number of times.

363
Technical Support: www.jblearning.com/techsupport | [email protected] | 1-978-443-5000 | M-F 8:30am – 8:00pm
18. Select titles have a comprehensive eBook Quiz at the end of each chapter. This quiz allows five attempts total, the highest of which will report to the Navigate Gradebook.
19. The left side of the page hosts additional navigation tools.

364
Technical Support: www.jblearning.com/techsupport | [email protected] | 1-978-443-5000 | M-F 8:30am – 8:00pm
20. The Search option may be used to locate key terms found in the eBook text, enrichments (media), user annotations, or quizzes.
21. The Contents tab allows you to search a catalogue of eBook content and features.

365
Technical Support: www.jblearning.com/techsupport | [email protected] | 1-978-443-5000 | M-F 8:30am – 8:00pm
22. The My Stuff tab provides a catalogue of all your annotations, including all highlights and notes
taken. These may be browsed and clicked on to jump directly to them. You may also delete or
edit your annotations from this tab as needed.

366
Technical Support: www.jblearning.com/techsupport | [email protected] | 1-978-443-5000 | M-F 8:30am – 8:00pm
23. All annotations can be exported to an external document by clicking the Export button within the My Stuff tab. The file can be saved to your computer and/or printed.
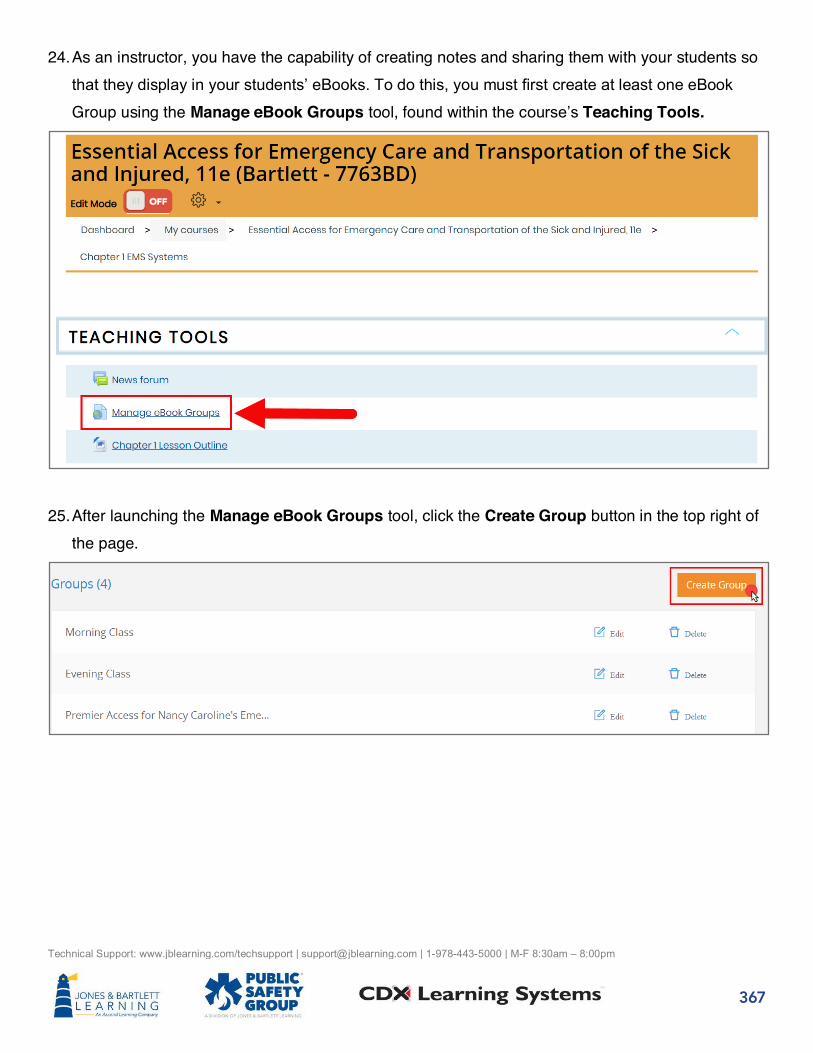
367
Technical Support: www.jblearning.com/techsupport | [email protected] | 1-978-443-5000 | M-F 8:30am – 8:00pm
24. As an instructor, you have the capability of creating notes and sharing them with your students so that they display in your students’ eBooks. To do this, you must first create at least one eBook
Group using the Manage eBook Groups tool, found within the course’s Teaching Tools.
25. After launching the Manage eBook Groups tool, click the Create Group button in the top right of
the page.

368
Technical Support: www.jblearning.com/techsupport | [email protected] | 1-978-443-5000 | M-F 8:30am – 8:00pm
26. Enter in a name of your choosing for the Group and click Submit.
27. The created Group will now display on your page. You must click the Edit option to its right to
begin adding members.
28. On the Edit page, click the Add Members button to the right.

369
Technical Support: www.jblearning.com/techsupport | [email protected] | 1-978-443-5000 | M-F 8:30am – 8:00pm
29. Proceed by selecting all individuals with whom you would like to share eBook notes within the resulting popup window. When finished, click Done.
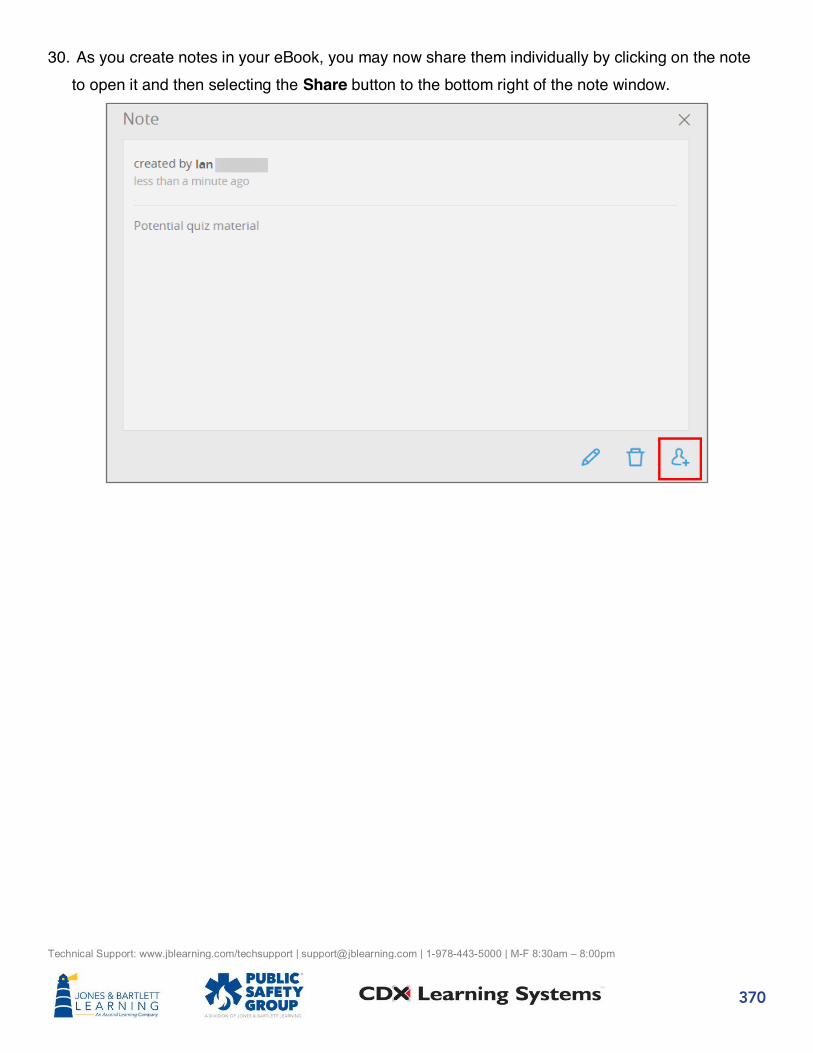
370
Technical Support: www.jblearning.com/techsupport | [email protected] | 1-978-443-5000 | M-F 8:30am – 8:00pm
30. As you create notes in your eBook, you may now share them individually by clicking on the note to open it and then selecting the Share button to the bottom right of the note window.

371
Technical Support: www.jblearning.com/techsupport | [email protected] | 1-978-443-5000 | M-F 8:30am – 8:00pm
31. Select the user Group(s) with which to share the note from the Select Groups menu and click Apply. The individuals within the Group will now see your selected note available in their eBooks.


![[Phillip C. Wankat] Instructor's Solution Manual - baixardoc](https://static.fdokumen.com/doc/165x107/63276b14cedd78c2b50d90d6/phillip-c-wankat-instructors-solution-manual-baixardoc.jpg)