Instruction Manual - Tgdd.vn
64
Thank you very much for purchasing the HITACHI refrigerator. for the correct usage. Instruction Manual Contents Preparation for Use Preparations before Use Operation Location of Food Storage Maintenance ( Vacuum compartment ) Parts Removal Troubleshooting 2 5 6 6 7 8 9 12 13 14 15 16 17 18 19 19 20 24 24 25 27 No Frost Refrigerator by well-trained maintenance worker Refrigerant For household use only R600a 24 Model 8 How to use Control panel 8 29 9 10 10 10 11 5 23 25 Warnings and Cautions for Safety Freezer Compartment Refrigerator Compartment Vegetable Compartment Vacuum Compartment How to use the Ice and Water Dispenser Other Function 30 Maintenance ( General Matter ) 22 Maintenance and Troubleshooting 11 Installation Before Use Optimal Food Storage Name and Function of Display, Button, Each Component Temperature Control Quick Freezing Quick Cooling Child Lock Energy Saving Door Alarm ECO Alarm Functions Vacuum How to use the Water Tank How to to use the Ice Dispenser How to use the Automatic Ice Maker How to use the Water Dispenser Maintenance How to remove parts Take urgent action when ice jams General Problems Ice Dispenser and Water Dispenser Vacuum Compartment Dew or Frost is generated 32 Seviece center R-SX800GPGV0 ................................ ....................................................... ...................................................................................... ...................................................................................... ................................................................ ...................................................... ...................................................... ........................................................ ................................................................ ............................................................................. ............................................................................. ............................................................................. .................................................................................... ............................................................................. ..................................... ........................................................................................ ........................................................... .................................................. ....................................................... ........................................................... ................. .................................................... .......................................... ................................. ........................................ .................................................................................. ........................................ ....................... .................................................................................. ............................................................... ..................................... ........................................................................ ........................................................................ ................................. ........................................................... ........................................................ ........................................................................... R-MX800GVGV0 R-MY800GVGV0 Before using this please read the instruction manual carefully Maintenance work must only be carried out at workshop
-
Upload
khangminh22 -
Category
Documents
-
view
3 -
download
0
Transcript of Instruction Manual - Tgdd.vn

Thank you very much for purchasing the HITACHI refrigerator.
for the correct usage.
Instruction Manual
ContentsPreparation for Use
Preparations before Use
Operation Location of Food Storage
Maintenance (Vacuum compartment )Parts Removal
Troubleshooting
2
566
7
89
12131415161718191920
2424
2527
No Frost
Refrigerator
by well-trained maintenance worker Refrigerant
For household use onlyR600a
24
Model
8
How to use Control panel
8
29
910101011
5
23
25
Warnings and Cautions for Safety
Freezer CompartmentRefrigerator CompartmentVegetable CompartmentVacuum CompartmentHow to use the Ice and Water Dispenser
Other Function
30
Maintenance (General Matter ) 22Maintenance and Troubleshooting
11
InstallationBefore UseOptimal Food Storage
Name and Function of Display,Button, Each ComponentTemperature Control
Quick FreezingQuick CoolingChild LockEnergy SavingDoor Alarm ECO Alarm FunctionsVacuum
How to use the Water TankHow to to use the Ice DispenserHow to use the Automatic Ice MakerHow to use the Water DispenserMaintenance
How to remove partsTake urgent action when ice jams
General ProblemsIce Dispenser and Water DispenserVacuum CompartmentDew or Frost is generated
32Seviece center
R-SX800GPGV0
................................
.......................................................
......................................................................................
......................................................................................
................................................................
......................................................
......................................................
........................................................
................................................................
.............................................................................
.............................................................................
.................................................................................................................................................................
.............................................................................
.....................................
........................................................................................
...........................................................
..................................................
.......................................................
...........................................................
.................
....................................................
..........................................
.................................
........................................
..................................................................................
........................................
.......................
..................................................................................
...............................................................
.....................................
........................................................................
........................................................................
.................................
...........................................................
........................................................
...........................................................................
R-MX800GVGV0R-MY800GVGV0
` `
Before using this please read the instruction manual carefully
Maintenance work must only be carried out at workshop

Warning
Caution
This pictograph indicates "There is high possibility of serious injury or death, if ignored".
This pictograph indicates "There is a high possibility of injury or damage to property if ignored".
When you install ... To avoid fire, electric shock, and injury.
Do not use a damaged or loose power plug or power outlet. This may cause fire or electric shock.
Do not cut, bend, fold the power cord to avoid fire and and electric shock.
Do not insert or remove the power plug with wet hands.
Do not splash water on or inside the refrigerator. This may impair electricity insulation causing
Do not disassemble, repair, or modify your
refrigerator by yourselves.
Please consult with a retailer if any repair is required.
If the supply cord is damaged,it must be replaced by the manufacturer, its service agent or similarly qualified persons in order to avoid a hazard.
Do not put water containers or foreign articles on the top of the refrigerator.
Opening and closing doors etc. may cause the articles on the top of the refrigerator may
fall down, resulting in injury.
Do not use the refrigerator in the atmosphere of flammable gas. Sparks from points of electrical contacts such as door switches may ignite a fire.
Be sure to unplug the power plug before maintaining the refrigerator. Be sure to hold the power plug to unplug.
Clean the dust on the power plug frequently with a dry cloth.
Unplug the power plug and wipe it with a dry cloth. An insulation failure due to moisture, when dust collects on the power plug, may cause fire.
Connect the power plug firmly to a power outlet with the cord running down.
Connection of the power plug with the ord running up could apply stress on the cord and cause electrical short or overheat, which could result in electrical shock or fire.Incomplete connection of the power plug couldresult in electrical shock or fire due to heat.
Power Cord and Power Plug ... To avoid fire, electric shock.
The symbols below are examples.This symbol is an alert mark.
This symbol indicates "prohibited".
This symbol indicates "necessary".
WARNING
RatedVoltage
During daily use ... To avoid fire, electric shock.
2
The following warnings and cautions are categorized by the level of possible harm or damage that may occur from ignoring directions.
The symbols are shown as below clearly showing the significance of directions.
■This refrigerator uses flammable refrigerants The symbol column below states the precautions on flammable refrigerants.
This symbol denotes the precautions on flammable refrigerants.
Do not use other electrical appliances in the food storage compartment,unless it is the type recommended by
the manufacturer.
Do not use mechanical devices or other means to accelerate the defrosting process,other than those recommended by the manufacturer.
electric shock or fire. This may also cause the gas leakage because of pipe rust.
■ Do not install the refrigerator in a place where itmay come in contact with water.
■ Do not install the refrigerator in a place exposed to rain.●This may impair electricity insulation and
cause electric shock or fire.
■
■
■
■
■
■
■
■
Ground this refrigerator to prevent electric shock and noise interference. Always ground this refrigerator and install earthleakage circuit breaker when using it in please with high himidity ormoisture. (Please consult with a retailer or Hitachi Service Center.)
Do not connect the wall outlet whose power capacity is less than the refrigerator's. Also, do not use power sourcesthat are not a rated voltage.●If a power source is shared with other appliances
using double or multipoint adapters, the adapter●
●
●
●
●
●
●●
●
●
●
Do not locate multiple portable socket-outletsor portable power supplies at the rear of the appliance.
■
■
■
■
■
■
■
Warnings and Cautions for Safety follow the warnings and cautions below and those given throughout this manual. To avoid harm to the user, other persons or damage to property,please read and

During daily use ... To avoid fire, electric shock.
■
■
Do not hang on the doors or step up on the various compartments.
Injury may be caused by the refrigerator tipping over or hands getting caught in door.
■Do not make an impact on the glass-made doors or shelves.
They are made of tempered glass; however, an excess impact may result in breakage, and is dangerous.
■Do not continue using the refrigerator with the Ice Bank being detached.
The Ice Dispenser mechanism revolves and may result in injury.
■Do not put your hands into the Ice Bank of the Ice Dispenser.
The Ice Dispenser mechanism revolves and may result in injury.
■Do not touch the mechanism of the automatic ice maker.
There is a danger of injury when the mechanism is working.
■ Do not damage the refrigerant circuit.If you happen to damage the refrigerant tube, stay away from the refrigerator and avoid using fire and electrical appliances.Open the window to ventilate and contact retailers or service center.
■
■
This appliance is not intended for use by persons (including children) with reduced physical, sensory or metal capabilities, lack of experience and knowledge, unless they have been given supervision or instructions concerning use of the appliance by a person responsible for their safety.
If you find something wrong with the refrigerator, immediately unplug and consult with the retailers.
When replacing the refrigerator interior lamp, unplug the power cord. Use the specified lamp and fix it firmly when replacing.
In the event of a flammable gas leak, do not touch the refrigerator and open windows to ventilation.
When discarding the refrigerator, remove the door gaskets.
To avoid a risk of an infant or child to be entrapped inside.
Medicines, chemicals, research and experimental substances should not be stored in the refrigerator.
Substances that require precise conditions for storage cannot be stored in a domestic refrigerator.
WARNING
When discarding the refrigerator
3
Follow the instructions of your region when discarding. This refrigerator uses R-600afor the refrigerant and cyclopentane for the blowing agent of the urethane heat insulation.
■ ■
■ ■
Children should be supervised to ensure thatthey do not play with the appliance.
Children getting inside may not be able to get out.Cleaning and user maintenance shall not be made by children without supervisor.
above and persons with reduced physical,sensory or mental capabilities or lack of experience and knowledge if they have
Staff kitchen areas in shops, offices and other working environments;Farm houses and by clients in hotels, motels and other residential type environments;Bed and breakfast type environments;Catering and similar non-retail applications.
■
This appliance can be used by children aged from 8 years and
When positioning the appliance, ensure the supply cord is not trapped or damaged.Do not locate multiple portable socket-outlets or portable power supplies at the rear of the appliance.
Ether, liquid propane gas, solvent,
cannot be stored in this refrigerator.Do not store anything that are generateheat or fire spark inside the refrigerator.
aerosol cans, etc. which is volatile
appliance in a safe way and understand the hazards involved.
refrigerating appliance. Children aged from 3 to 8 years are allowed to load and unload
■ Do not damage the refrigerant circuit. Keep ventilation openings in the appliance enclosure or in the built-in structure, clear of obstruction.
■
been given supervision or instruction concerning use of the
This appliance is intended to be used in household and similar applications such as

During daily use ...To avoid illness and injury.
■ Food and containers inside the freezer compartment should not be touched with wet hands.
● This may cause frost injury. (Especially in case of metal items.)
■ Do not hold the top, bottom and side of the doors when closing them.
● This may result in your fingers caught by the door edge.
■ If someone else is using the refrigerator, do not open or operate the control panel.
● Fingers may get caught in the spaces between the doors and may cause injury.
■ Do not use door handles when carrying the refrigerator.■ Never use the carrying handles to hang up with a chain hoist or similar machines.
■ On a floor that is easily scratched do move the refrigerator using the wheels at its base. The wheels may scratch the floor.
● For a floor that may be easily scratched, lay a protective mat , etc. .
■
■
Use the carrying handle when carrying the refrigerator.● Hold the carrying handles only. If you hold door handles, your hands may slip and may cause injury.● More than 4 persons should carry the refrigerator for safety reasons.● Carry it with the doors facing upward.Before carrying the refrigerator:● Take out the food items and ice cubes.● Dispose of the water in the evaporating tray located in the bottom of the refrigerator.● Place the protective mat or cloth on the floor on which you move.● Finally carry the refrigerator with the doors facing upward.
■ Secure the doors well with adhesive tapes so they do not open.■ If transporting in a vehicle, do not load the refrigerator on its side. This could damage the compressor.
■ Do not put your hands into the bottom surface of the refrigerator cabinet.
● When cleaning, putting your hands near the bottom surface of the refrigerator may result in injury by thin metal sheets.
■ Do not have your feet too close when opening the door of the refrigerator.
● When opening the door, your feet may be hit, resulting in injury.
■ Be sure to hold the handle firmly to open and close the door.
CAUTION
When moving or carrying ...To avoid damaging, wetting, soiling the floor or to avoid injury.
■ Do not store food or foreign articles in the Ice Bank of the Ice Dispenser. Also, be careful not to let them go in.
■ Do not put your fingers into the ice outlet , or do not touch the components around the opening.
4
■ Do not put bottles, etc. forcibly in the door pockets.
● This may cause bottles dropping down or door pockets coming off.
■ Do not store food which smells or food whose color is changed abnormal.
● Such an action may cause diseases.
■ Do not store glass bottles in the freezer compartment.
● Bottles may break by the contents freezing and cause injury.
■ Do not have food items protruding over the front edge of each shelf.
● Doors may not be closed properly or the door pockets may drop down. Injury may be caused from items like bottles falling and knocking over your feet.
Such as old cloth
Warnings and Cautions for Safetyfollow the warnings and cautions below and those given throughout this manual. To avoid harm to the user, other persons or damage to property,please read and

5Remove 2 screws (both sides)
Preparations before Use
Earthing cord
Earthing Terminal
Fix with earth screws
Installation
Without adjusting the legs, door height may not be level, or there may be abnormal vibration or noises depending on floor conditions. Follow the instructions below.
① Turn the adjustable legs to lower the adjustable legs until they touch the floor firmly.② Compare the height of left and right doors and
lower adjustable leg whose door height is lower than the other until the both door height become level. ● Turn the adjustable leg for 1 turn makes approx. 1 mm door height change. ● It will take several days until the legs fits the floor and the door height becomes stable.In case that the adjustable legs are difficult to turn: ● Remove 2 screws and then remove the adjuster cover. ● Insert a screw driver to a groove of the adjustable leg and turn.
4. Earthing wiring.
5. Adjusting the adjustable legs to keep the left/right refrigerator door level.
Ground this refrigerator to prevent electric shock and noise interference. Always ground this refrigerator when using it in places with high humidity or moisture. (Please consult with retailers.)
2. Install the refrigerator in the following place.Install on a rigid and level floor.● If you install on a such a floor, place a wood board (1cm thick) and place the refrigerator on the board.・In case that the floor may be deformed or floor color may be
changed due to a heat from the refrigerator. ・In case of soft or fragile floors on which the refrigerator might incline.
Do not install where the refrigerator is exposed on a direct sunlight or other heat sources.● Such circumstances may result in poor cooling performance or electricity costs increase.● Direct sunlight will cause discoloration of the plastic parts of the refrigerator.Install in a atmosphere which is dry or has air ventilation.● This helps to avoid rusting and keeps electricity costs down.* If you wish to install the refrigerator in a hot spring area exposed to sulfide gas, you may need to apply anti-rust treatment to the piping. Contact your dealer in advance. A failure caused by that gas damage will not be covered under guarantee.
3. Allow enough space to release heat.The refrigerator requires enough air ventilation space around the cabinet to have efficient cooling performance.● At least 5 cm space must be secured for the left/right, top and back side of the refrigerator to the wall. To ensure that the doors can open properly and fully, make sure that the following space is avilable. Please check the available space before installation.
Following shows the installation dimensions for this refrigerator. Be sure to check if you with refrigerator can pass the house doors.The refrigerator doors may have to be removed if the width or depth of the refrigerator are more than the width of the house doors.To remove the refrigerator door, please consult with the retailer.
1. Check the width of the doors of the house.
1 cm.
5 cm.
5 cm.
179.5 cm
Adjuster CoverAdjustable
Leg
■The left door is lower.
Lower the left adjustable leg
■The right door is lower
Lower the right adjustable leg
5 cm.
37 cm.
92 cm.
27 cm.
110 c
m.72
cm.
121.5
cm.
1
WARNINGDo not connect the ground line to a gas pipetelephone line or linghtning rod.
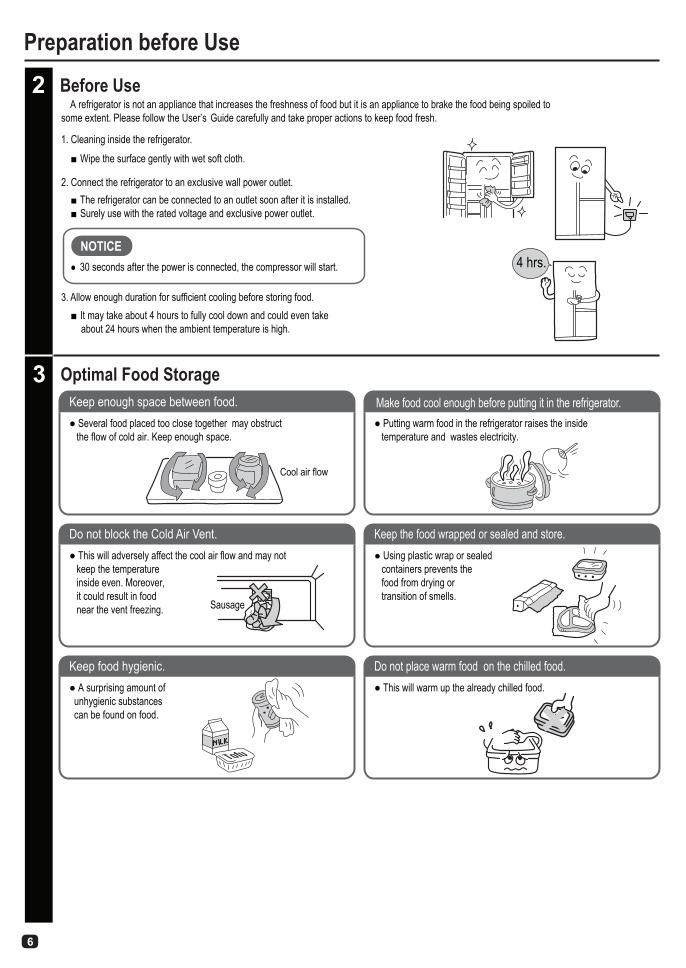
Before Use A refrigerator is not an appliance that increases the freshness of food but it is an appliance to brake the food being spoiled tosome extent. Please follow the User’s Guide carefully and take proper actions to keep food fresh.
1. Cleaning inside the refrigerator.
■ Wipe the surface gently with wet soft cloth.
2. Connect the refrigerator to an exclusive wall power outlet.■ The refrigerator can be connected to an outlet soon after it is installed.■ Surely use with the rated voltage and exclusive power outlet.
● 30 seconds after the power is connected, the compressor will start.
3. Allow enough duration for sufficient cooling before storing food.■ It may take about 4 hours to fully cool down and could even take about 24 hours when the ambient temperature is high.
Optimal Food StorageKeep enough space between food.● Several food placed too close together may obstruct the flow of cold air. Keep enough space.
Make food cool enough before putting it in the refrigerator.● Putting warm food in the refrigerator raises the inside temperature and wastes electricity.
Do not block the Cold Air Vent.● This will adversely affect the cool air flow and may not keep the temperature inside even. Moreover, it could result in food near the vent freezing.
Keep the food wrapped or sealed and store.● Using plastic wrap or sealed containers prevents the food from drying or transition of smells.
Keep food hygienic.● A surprising amount of unhygienic substances can be found on food.
Do not place warm food on the chilled food.● This will warm up the already chilled food.
6
4 hrs. NOTICE
Preparation before Use
2
3
Cool air flow
Sausage

7
Freezer Compartment -20℃~-18℃ Refrigerator Compartment 2℃~5℃
●
Location of Food Storage
Vegetable Compartment 4℃~7℃
Meats/processed meats Fishes and seafood
Beef/pork/chicken/ham/sausage/etc...
Salmon/Mackerel/seafoodboiled fish paste/etc...
Vegetables and fruits
Salad vegetables/bell pepper/apple/orange/kiwi/etc...
Coffee bean/tea leaf/dairy products/nuggets/etc...
Vegetables vulnerable to low temperatureSkin of the vegetables that are vulnerable to low temperature will sink or change the colors, please store them in vegetablecompartment. × × Egg plant/cucumber/roselle fruit/asparagus/ginger/sweet pepper/etc...
Food should be kept in a closed plastic bag.Store the food carefully because the bag will be swollenand press on other food.
Such as sausage and cheese in bags
Closed and sealed plastic containers. Please pick containers out carefully becausethe doors of the containers may be detached.
With the ability to prevent oxidation, the product can preserve the nutrients and tastes of food longer than conventional food conservationtechniques.
Be careful Be careful
Tea
COFFEE COFFEE
Cheese
sausage
Above temperatures are the approximate values in the conditions of outside temperature 32℃,the setting of the refrigerator compartment, freezer compartment while doors being closed and without food storage is shown in the table.Door pocket temperatures may be little higher than above temperatures.
NOTICE●
●The specification of your purchased model may be diffent from one of the above illustration.(Above illustration is based on the deluxe 3 door model.)●
For ice cude storage made by “Automatic Ice Maker”
●Storage of packed smallfood and drink suchas juice,milk,etc.
Refrigerator Door Pockets
●Refrigerator Shelves
Storage of sidedish,dessert,etc.
●Vegetable Door Pocket
Storage of packed smallfood and drinks suchas juice,milk,etc.
●Vegetable DrawerStorage of fruits and vegetable
● Storage of packed meat,fish,etc.Freezer Drawers
●
●
Storarage of packed smallfrozen foodNot recommended for longstorage, because temperaterrise causedby door openmay occur.
Freezer Door Pockets
Ice Bank
●Storage of frozen food and ice cream,etc.
Freezer Shelves
Cheese
●Warter Tank
Approx 5.0 L
Tank-full line
Vacuum CompartmentCheese/Fruits (1°C)Fish/Meat (-1°C)
-3°C~1°C -1°C~3°C Cheese
Food to be stored
Food not recommended to be stored
Food and containers should be stored wath care

The Control Panel is a touch panel made of glass. To change a setting, Just touch and switch the setting.
How to use Control panel
● Approximately 10 sec. after the end of operation, indicator LED become unlit. ● Respones of the touch panel may change depending on the surround ing temperature,humidity, physical condition of the user or operation
status of the adjoining electric product.● The panel may not respond if it is wet or dirty.
“Temperature Display”
“Temp. setting” button
Freezer/Refrigerator select button
“Quick Freezing” button
“Quick Cooling” button
“Child Lock” button“Automatic Ice Maker” button
“Energy Saving Display”
NOTICE
1
2
● If you unplug the power plug or a power failure occurs and then the refrigerator restarts, the temperature display and each setting will be automatically resumed.
Names and Function of Display, Button,Each Component.
8
● The initial temperature setting of the refrigerator compartment is 3 levels, and the freezer compartment is 3 levels.
The display is indicating the status of temperature setting.
Freezer Compartment
Touch “Select” button“ Freezer ” lamp light is on.
Touch “Temp.Control” button to setting
The display is indicating the status of temperature setting.
( Sound “ Pi ” )Cold
( Sound “ Pi ” )Coldest
( Sound “ Pi Pi ” )Normal
When the food is too cold For normal use. When cooling food morecoldly or quickly
Refrigerator Compartment
Touch “Select” button“ Refrigerator ”
lamp light is on.
Touch “Temp.Control”button to setting
temperature
Temperature Control● The temperatures displayed on the control panel, are targetted temperatures, and may not be actual. The actual temp erature is subject to food and ambient condition.
a temperature
“Ice Dispenser” Button (Crushed Ice)
“Ice Dispenser” Button (Cubes Ice)
“Water Dispenser” Button
“ Vacuum” Button
“Tank Empty ” Lamp
When storing neither frozen food nor ice cream.
( Sound “ Pi ” )Cold
When making ice quickly or making frozen food quickly. Or, a surrounding temperature is high and the Freezercompartment is not cold enough.
( Sound “ Pi ” )Coldest
For normal use.
( Sound “ Pi Pi ” )Normal
● The specification of your purchased model may be diffent from one of the above illustration.(Above illustration is based on the deluxe 3 door model.)

1
t
Other Functions
(Refrigeration compartment/ Freezer Compartment)
Touch “ Temp. Control” for 5 secondsuntil 1 “Peep” sound is heard.
Each time you touch the button, the corresponding indicator lamp changes in order shown below (9 steps).( Lighting Blinking Turned off )
Touch “Select” and “Temp control” to make as adjustment.
Pi ! Pi ! Pi ! Pi ! Pi ! Pi ! Pi ! Pi !Pi Pi!
Indicationlamp
Setting Cold ColdestNormal
Sound
2
9
● During "Quick Freezing", priority cooling of the freezer compartment will be done, Thus,try to avoid unnecessary opening and closing the doors not to have a temperature rise of the refrigerator compartment.● After "Quick Freezing" is automatically finished, if the button is pressed again ,the lamp will turn on, however, the next "Quick Freezing" operation will not start. After 60 minutes, the operation will be started again.● During defrost periods, even if "Quick Freezing" lamp is on, no operation will be made. After finishing the defrost operation, "Quick Freezing" will be automatically started.● Normaly, Lamp is off when no operation approximately 10sec. after the end of operation indicator LED become unlit.
When you wish to store frozen food at a lower temperature than usual ,use this button.
2. Touch "Quick Freezing” button, and start operation of "Quick Freezing".
3. Touch again "Quick Freezing, and stop the operation.
“Quick Freezing” corneris located on the center shelfinfront of freezer.
Pi!
Pipi!
Pipi!
Lamp lights off.
NOTICE
1. Put food on the Quick Freezing corner.
"Quick Freezing" will be finished automatically in approximately 2 hours.
Lamp lights on.
To set the fine adjustment of the temperature
“Quick Freezing”
Coldest Coldest
Cold Cold
Coldest Coldest
Cold Cold
Coldest Coldest
Cold Cold
Coldest Coldest
Cold Cold
Coldest
Cold
Setting
Lamp lights off.
To cancel the fine adjustment of the temperatureTouch “ Temp. Control ” button for 5 seconds until “PiPi!” sound is heard and you can set temperature by normal step (5 steps)
● This function is subjected to change according model type.
Touch “ Temp. Control ”for 5 seconds until 1 “PiPi!”sound is heard.
● Factory setting, the adjustment temperatrure by normal step (5 steps).PiPi!
NOTICE

9
3Other Functions
10
When you want to cool food or drinks quickly, use this function.
1. Put food on the quick cooling corner.
"Quick Cooling"is more effective if food is placed near the back wall of the refrigerator compartment.
2. Touch "Quick Cooling" button to start Operation.
Lamp lights on.
3. To stop this function before it is completed, touch "Quick Cooling" again.
Lamp lights off.
"Quick Cooling" will be finished automatically in approximately 90 minutes.
● During defrost period,"Quick Cooling "operation will stop even when the lamp lights on. After finishing its period, the operation will restart automatically.● Please note "Quick Cooling " mode will be released after power cut off or unplug.● Normaly, Lamp is off when no operation approximately 10sec. after the end of operation. indicator LED become unlit.
“Quick Cooling”
NOTICE
"Quick Cooling" corner is located on the upper part of the refrigerator compartment.
Pi! Pipi!
Pipi!
4You can prevent mischief of all the buttons on the control panel by children.
1. Touch "Child Lock" button for 5 seconds(to lock).
Lamp lights on.
2. To stop this function , Touch 5 seconds "Child Lock" again.
● When "Child Lock" is activated, other buttons will not be accepted even if you touch, but Auto Door of the touch operation is possible.NOTICE
Lamp lights off.
“Child Lock”
Peep! Pipi!
5
● If "Energy Saving" operation is working in high humidity environment, dew may appear on refrigeratorsurface.
CAUTION
“Energy Saving”
● In case the compartment temperature rises up, the operation will be back to
● After a long time operation of “Energy Saving”, in some cases, fatty ice cream, etc, ● If you Touch “Quick Feezing” or “Quick Cooling”
button during "Energy Saving " operation, “Energy Saving” operation will be done after “Quick Freezing” or “Quick Cooling” operation finished.
NOTICE
“Energy Saving” operation in this case.
Energy Saving
21
operation, lamp light is on.
Touch “Energy Saving” button for Start Energy Saving
operation, lamp light is off.
Touch “Energy Saving” button again for stop Energy Saving
Recommend to use this function in case of low storage volume, or a long vacation
PiPi!Pi!
● No ECO Monitoring sensor detection.● No door open.● No control panel operation.
■
may become soft. Please stop
a normal setting temporarily.
when the doors are not opened for long time.
Lamp lights off.

11
1. Keep Touching "Quick Freezing" button for approximately 5 seconds until the sound of "Peep!" is heared.
1. Keep Touching "Quick Freezing" button for approximately 5 seconds until the sound of "Pipi!" is heared.
● Upon shipment, the alarm and sound are set "ON".● In case of Door Alarm, Eco Alarm Display and each button operation sound was disactivated. If we unplugging and inserting the power plug or in the event of a power failure the refrigerator will still set the alarm and sound to "OFF".
To Disactivate Alarm and Sound To re-activate Alarm and Sound
Lamp lights on.
Lamp lights off.
NOTICE
Lamp lights on.
Peep!
1,2,3,4,5 Seconds
Pi!
1,2,3,4,5 Seconds
Pipi!
. . . .
Lamp lights off.
.
6
7The display switches in sequence as shown below every time the button is touched. The temperature is set to “-1°C ” at default.
Vacuum
After off vacuum function,the temperature will be autometically to default ( -1 °C )
will be turned off after about 40 seconds for
CAUTION The “Off” indicator lamp continues to be lit during the “Off”operation. The display
energy saving, but the function that is set once will remain effective.
If the door is left open for more than 1 minute, the alarm system will inform the user by the sound and digital display.Door Alarm: Informs by Peeppeeppeep sound.
Eco Alarm Display: Indicates the door opening state on the control panel.
Door Alarm and ECO Alarm Functions
Pi !Pi ! Pi Pi !
1. When in “Vacuum”“-1 °C”operation.
lights on.
2. 3.“ 1 °C”
Touch “Vacuum” for stopVacuum operation. “off ”
Touch “Vacuum” for startVacuum operation.
lights on. lights on.
Other Functions

● When closing the freezer doo
● The specification of your purchased model may be diffent from one of the above illustration.(Above illustration is based on the deluxe 3 door model.)
r, be sure that each freezer drawer is pushed all the way in. If the freezer door is closed while a drawer is still out, the freezer drawers might be damaged.
Freezer Drawers
■ The freezer drawers can store food separately according to size or way in which they are to be used.1. Upper / Middle Freezer Drawer for storing ice cream or freezer bags.2. Lower Freezer Drawer for storing large frozen food items.
CAUTION
CAUTION● To avoid smell transition of food, always either wrap meat or fish, or store it inside a freezer bag. Also, note that there are cases where fat in meat or fish causes the plastic refrigerator components to split.● When putting food into the freezer compartment, try not to strike the lamp cover with the food. The lamp cover might break.
12
Adjustable-height Shelves■ These shelves can be adjusted to match the height of your frozen food and the way in which they are to be used.
1. Remove the frozen food stored on the shelf.2. Lift the front of the shelf upward slightly, then pull the shelf out towards you.3. Adjust the shelf to the desired height, then push the shelf in until it reaches the back of the slot.
The 4 shelves in the upper part and the 3 drawers in the lower part of the freezer compartment allow you to organize your food by size and intended use.
Lamp CoverAutomatic Ice Maker
Freezer LED Lamp
Fixed Shelf
Upper Freezer Drawer
Middle Freezer Drawer
Lower Freezer Drawer
Adjustable-height ShelvesQuick Freezing Corner
Ice Bank
Door Pockets
Freezer Door
Notice
Freezer Compartment

13
■ Store eggs in the egg tray. (This tray holds up to 14 eggs.)
Egge Tray (Placed normally)
■ When turned over , The egg tray can be used as a pocket for small
items.
Egge Tray(Placed upside down)
Egg Tray
● Do not place moist food in front of the cold air outlet, as this may cause food to freeze. Moist food stored such that it comes into contact with the back left wall of the refrigerator might also freeze. Keep food slightly separated from the left side wall of the refrigerator.
● When putting food into the refrigerator, try not to strike the lamp cover with the food. The lamp cover might break. ● Let hot cooked food cool down before placing it into the refrigerator. The plastic components inside the refrigerator might be deformed.
CAUTION
■ The height of these shelves can be adjusted to match the height of your food and the way in which they are to be used.1. Remove all food stored on the shelf to be.2. Lift the front of the shelf upward slightly , then pull the shelf out towards you. 3. Adjust the shelf to the desired height, then push the shelf in until it reaches the back of the slot.
The upper part of this compartment has 2 shelves, and Vacuum Compartment You can separate food by size and the way in which it is to be used.
Quick Cooling Corner
Adjustable-height Shelves
Refrigerator Compartment LED Lamp
Door Pocket
Door Pocket
Door Pocket
Egg Tray(14 pcs)
Fixed Shelf Vacuum Compartment
● The specification of your purchased model may be diffent from one of the above illustration.(Above illustration is based on the deluxe 3 door model.)
Notice
Refrigerator Compartment
Adjustable-height shelves

14
■ This pocket is convenient for plastic bottles or temporarily stocking beer.
Door Pocket
Vegetable Drawers■ Upper Vegetable Drawers● Store partially used vegetables or small vegetables such as tomatoes or lemons. This drawer has a door, so it can be opened and closed easily.
● Store medium and large-sized vegetables such as cabbage and lettuce.
■ Middle and Lower Vegetable Drawers.
Vegetable Drawers (Middle/Lower)
Wrap vegetables in the following situations.● When storing strong-smelling vegetables or when you are worried that odors might spread to other food.● When storing partially used vegetables or fruits.● When you are concerned about condensation inside the drawer.● When there are few vegetables or many packaged vegetables.
● Depending on the amount and type of stored vegetables,condensation might form inside or on the ceiling of the vegetable drawers. Wipe off any condensation with a dry cloth if this becomes a concern.
NOTICE
● When closing the vegetable compartment door, be sure that all vegetable drawers are pushed all the way in. If the vegetable compartment door is closed when a drawer is pulled out, it might be damaged.
● Open and close the vegetable compartment door slowly. If you open or close this door with too much force, the plastic bottles or glass bottles in the door pocket might fall out.
CAUTION
CAUTION
Door
Upper Vegetable Drawer
Store vegetables efficiently according to their size and shape.The lower part has 3 drawers.
Upper Vegetable Drawer
Water Tank
Lamp Cover
Door Pocket
Middle Vegetable Drawer
Vegetable Compartment Door
Vegetable Compartment LED Lamp
Lower Vegetable Drawer
● The specification of your purchased model may be diffent from one of the above illustration.(Above illustration is based on the deluxe 3 door model.)
Notice
Vegetable Compartment (3 Door Model)

Handle1
2
1
2
“Whoosh” Door
CAUTION
WARNING
● Closing the door of the Refrigerator Compartment without locking the handle may damage parts or food or form a clearance between
● Vacuum pump will work when the door of the vacuum compartment and the lid of refrigerator are closed only.● When the vacuum pump starts working, there will be loud noise which is not unusual at all.● From the vacuum pump starts working until ther case becomes vacuumed, it takes around 2 minutes.● If the door of the vacuum box is opened before 2 minutes,You may not hear the ‘Push’ sound. Thus,please check the vacuum system after waiting for longer than 2 minutes.● Since the vacuum case generaters coolness indirectly, it needs more time to cool food than other cases.
Close
The hissing sound indicates that vacuum is being
Push the handle down to the end.If not,the case might not be vacuumed.
Do not put too much food or too many containersinto the vacuum case. If you do, you may not beable to pull the vacuum box out.
released. Thus, the Vacuum Compartment cannot be drawn out while the sound is heard. Draw it out after the sound is no
15
longer heard.
the doors, which reduces cooling performance.
(Sound)
Open/close vacuum compartmentOpen
Lift the handle to unlock.
Pull the Door out.
Push the vacuum compartment tothe end of the inside.
Push the handle down to lock the door.
Vacuum pump
Vacuum release valve(blue)
Handle
Vacuum Compartment (With Aluminum Tray)Handle
Lift the handle to unlock the valveand release the vacuum. You mighthear a hissing sound as air enters thecompartment
Vacuum Compartment (3 Door Model)

You can pour yourself a cold glass of water without having to open your refrigerator by simply filling the Water Tank with water and pushing the button. Furthermore, ice is automatically made in the Ice Bank, allowing you to dispense either cubed or crushed iceat the touch of a button.
● If the power cord is unplugged while the refrigerator is in use, or if there is a power failure, each component's functions will automatically be restored to the settings previously in place when the power is turned back on.● All the display lights turn on for approx. 5 seconds after the power cord is plugged in.●
●
●●●
The Automatic Ice Maker is set to operate when installed. And, the Ice Dispenser is set to make "Crushed Ice".
NOTICE
16
Do not store food or other objects other than ice made by the Automatic Ice Maker in the Ice Bank (located in the Ice Dispenser).Also, be sure not to place food or other articles into the ice tray, as doing so can cause a malfunction of the Ice Dispenser.Do not touch the Ice Level Sensing Lever in the Automatic Ice Maker, as doing so may cause an accident to occur.
CAUTION
Do not insert fingers into the ice outlet or touch any parts nearby. Your fingers may be pinched or otherwise injured. Do not use fragile glassware with the Automatic Ice Maker, as doing so could cause the glass to shatter, resulting in injury.
Please remove placed food from the vacuum box before disassembled.Please do not detach any part other than the one described in the instruction.
As for the disassembly installation of any part, please open the door of the refrigerator wider than 90 degrees. If you want to dissemble any part not described in the instrution for cleaning, please consult the business through the consultancy channels.
1 2
Be careful
Instructions for disassembly or assembly
3
Water Tray
Dispenser Lever
Ice Dispenser
Water tank
Ice Bank
Ice Level Sensing Lever
Automatic Ice Maker
Aluminum Tray Vacuum case
Install all parts by following the reverse steps of the disassembly procedure.
Lift the vacuum case higher.
Vacuum Compartment (3 Door Model)
How to use the ice and Water Dispenser
Handle
Lift the handle to unlock.

Fill the Water Tank (located in the Refrigerator Compartment) as follows.Note: Be sure to thoroughly wash the Water Tank before use for the first time.
How to use the Water Tank
17
Filling the Water Tank
Instructions for Normal Filling
Instructions for Removing the Water Tank and Filling
1. Open the lid and fill the water.
1. Remove the water tank.
3. Carry the water tank by the handle with care. 4. Insert the water tank until it passes the "Tank Position" line.
2. Open the lid and fill the water.
●
●
Hold the handle and pull the water tank towards yourself.
● When carrying the water tank, place one hand below the tank for horizontal stability.
● If the water tank is not inserted all the way, water will not be supplied to the Water Dispenser or Automatic Ice Maker. This will prevent these features from functioning properly.
Process complete.
Fill water not over the full line.
Close the lid to complete the filling process.
● Do not fill the Water Tank with anything other than water. (Filling the Water Tank with fluids such as juice, sports drinks, tea, or hot water can damage your refrigerator. The Water Tank can withstand temperatures up to 50
oC)
CAUTION
Juice TeaIsotonicdrink
Carbonateddrink
Mineral water Filtered water
Be careful, as the Ice Dispenser rotates and may cause injury to the fingers, etc.
WARNING
Do not insert hands into the bottom of the Ice Bank in the Ice Dispenser.Do not use the Ice Dispenser with the Ice Bank detached.When someone else is using the refrigerator, refrain from opening the door or using the control panel.
Do not let small children operate the dispenser, as this may result in injury. Do not hang on the Ice Bank. Do not disassembly, repair, or modify your refrigerator by yourselves. Please consult with a retailer if any repair or is required
Do not touch any of the mechanical parts of the Automatic Ice Maker. Since the Automatic Ice Maker rotates, there is a risk of injury to the fingers, etc.
●●●●●●●
"Tank Position" line
How to use lce and Water Dispenser

How to use the Ice Dispenser Ice Dispenser
Ice CubesFor large pieces of ice.(Dispense ice the way the Automatic Ice Maker makes it.)
1. Touch the "Cubes" button. 2. Press a cup against the Dispenser Lever to dispense ice cubes.
Ice CrushedFor finely crushed ice. (Crush the ice made by the Automatic Ice Maker and dispense it.)
1. Touch the "Crushed" button. 2. Press a cup against the Dispenser Lever to dispense crushed ice. Pi!
Lamp lights on.
18
utilizing the "Child Lock" feature is recommended.
Notice● When using the "Ice Dispenser" for the first time, discard the first 2 glasses of ice cubes for cleaning. ● Hold your cup high with respect to the Dispenser Lever so as to prevent ice from scattering. ● The Dispenser may be used even when the Automatic Ice Maker is not in operation. ● To prevent misuse of the buttons and of the Dispenser lever, and to prevent children from playing with the refrigerator, ● If the ice cubes in the Ice Bank are left unused for a long time, ice cubes may stick together and may form a big block of ice Therefore, it is recommended to use the Ice Dispenser as often as possible.● Ice in the Ice Bank may freeze together after a power failure due to a temporary increase in temperature within the refrigerator.If this happens, remove the Ice Bank, discard any remaining ice and thoroughly dry the Ice Bank. After it has dried, return it to its place in the refrigerator and make a new batch of ice. ● The Ice Dispenser will turn off temporarily if it is use continuously for more than approx. 16 seconds . In this case, the Dispenser Illumination will flash,
indicating that the Ice Dispenser stops operating. Remove your glass from the Dispenser Lever in order to let the system reset. After reseting, the Ice Dispenser shall be used again.
● The regular condition is recommended to use -18 ºC-19ºC, The freezer temperature is adjusted at -15ºC is inappropriate to put warm or too muchfood. Ice cube may stick together and may form a mass of ice. It is recommended to remove the mass of ice from the Ice Bank and Ice Dispenser Duct.
NOTICE
“Tank Empty” lamp
NOTICE
When the Water Tank becomes empty, the "Tank Empty" lamp automatically turns on. Refill the Water Tank when this happens.
● If the Water Tank is not placed into its proper position, the “Tank Empty” lamp will turn on even if the Water Tank is not empty. When this happens, adjust the position of the Water Tank and make sure that it is pushed all the way in.
● The lamp will temporarily turn off when the refrigerator compartment door is opened and closed, but will turn back on if the Water Tank is still empty.
Lamp lights on.
NOTICE● Germs can multiply quickly when filtered water, dechlorinated water, mineral water, or boiled water is used in the Water Tank. Be sure to thoroughly clean the Water Tank regularly. ● Change the water in the Water Tank once a week.● When not using the Water Tank for extended periods of time, thoroughly clean and dry the water tank and reinstall it to its place in the refrigerator. ● The capacity of the Water Tank is approx. 5 liters.
Pi!
Lamp lights on.
How to use lce and Water Dispenser

NOTICE
Ice Making Time
● When the door is frequently opened and closed● When a large amount of food is placed inside the refrigerator at the same time● After "Ice Tray Cleaning" has been run
● When there is a power outage● During winter, or when the surrounding temperature is low
Ice cannot be made until the interior of the refrigerator is sufficiently cool. It may take 24 hours or longer to make ice for the first time after installation. Normally, however, it only takes 2 to 3 hours to make 8(eight) ice cubes.
The Ice Preparation Time shown is the average time to make ice when the ambient temperature is 32°C and the door is not opened and closed.
When you wish to make ice especially quickly, use the "Quick Freezing" function.
Normal OperationQuick Freezing
Approx. 90 to 110 minutesApprox. 70 to 90 minutes
Approx. 160 cubes(maximum)
Ice Storage Capacity
The Ice Making Time will be longer in the following situations.
Ice Preparation Time ( 8 (eight) cubes / ice making cycle)
19
NOTICE
Water Dispenser
How to use the Water Dispenser
● Discard the first cup of water that is dispensed just after installation, as the system needs to rinse itself out.● It may take 24 hours or longer for the water in the Water Tank to cool sufficiently when the ambient temperature is high, such as during summer. Normally, the water (5 L in volume) can be chilled in 8 to 9 hours.● When you wish to have cold water quickly, use the Ice Dispenser to put ice in your cup, then dispense water using the Water Dispenser.● The Water Dispenser will turn off temporarily if used continuously for more than approx. 60 seconds. In this case, the Dispenser Illumination will lash, indicating that the Water Dispenser has been stopped. Remove your glass from the Dipenser Lever in order to let the system reset. After the reset, the Water Dispenser can be used again.
● Hold the cup up when pressing it against the"Dispenser Lever".
2. To dispense water, simply press a cup against the "Dispenser Lever".
1. Touch the "Water" button.
Pi!
● If the lamp is on, fill water.
If "Tank Empty” lamp is turned on.
Lamp lights on.
How to use the Automatic Ice MakerTurning on/off the Automatic Ice Maker Function
NOTICE ● If you do not intend to use the Automatic Ice Maker, manually cancel its operation.
First, check whether the Automatic Ice Maker is in operation.3. When restarting operation.1. When in operation. 2. To stop the operation, Touch
the "Ice Maker" button.
Pipi! Pi!
Lamp lights on.Lamp lights off.
Lamp lights on.
How to use lce and Water Dispenser

Water Tank
Maintenance
● If the Automatic Ice Maker is not set to "Stop," the water pump may make sounds occasionally. This is not a malfunction.
● Grasp the handle. To remove the lid, use your thumb to push the lid up.
● Slide the lid in back-end first in the direction of the arrows to close the lid.
In order to prevent grime and hard water stains from building up, make sure to rinse the Water Tank once a week.1. How to open the Cover.
2. How to Close the Cover.Handle
20
Handle
Case
Cover
Water TankWater Filter
Lid
● Do not use cleansers as this may damage the filter.
In order to prevent grime and hard water stains from building up,make sure to rinse the Water Filter once per week.
NOTICE
W
● Replace the Water Filter when it wears out. Water Filters need replacing every 3 to 4 years.
1. Pull the Case to remove it from the Cover. 2. Pull the tab to remove the Water Filter from the case.
Case
CoverTap
3. Use a soft sponge to clean the Water Filter.
CAUTION● Wait for 2 to 3 seconds before removing your cup from the dispensing area after dispensing water or ice. If you remove your cup without waiting, water or ice may fall into the Water Tray or on the floor. ● Dry any water that accumulates in the Water Tray with a dry cloth or remove the Water Tray and dispose of the water. Also, wipe up any water droplets on the surface of the door of the refrigerator with a dry cloth.
Wait 2 - 3 sec.
How to use lce and Water Dispenser

Ice Bank
Before performing maintenance, make sure that the refrigerator is unplugged.
1. Wipe the Ice Bank dry with a soft cloth.
1. Grasp the top of the Ice Bank with both hands. Then, lift it up and pull it towards yourself.
2. After removing the ice, wipe the Ice Bank with a soft cloth, being careful to remove any water in or on the Ice Bank.
If there are still ice cubes remaining in the Crusher Case in the reverse side of the Ice Bank, remove them using a spoon, etc..
Instructions for Regular Cleaning
Instructions for Removing and Cleaning the Ice Bank
Flapper
Blade
Crusher Case
21
If there is a gap, rotate the Auger 90 degrees and then install the Ice Bank.
3. When installing the Ice Bank, be sure that there is no gap at the bottom of the Ice Bank.
GAP
90
Before performing maintenance, make sure that the refrigerator is unplugged.Do not put your hands inside the Ice Bank. Do not use the Ice Dispenser when the Ice Bank is removed from the refrigerator. Do not disassemble, repair, or modify this equipment.When repairs are necessary, contact retailers or service center.
Do not touch the blades of the Ice Bank when it is removed. There is a risk of injury.
Auger
Crusher Case
NOTICE
1. To stop the operation, touch the "Ice Maker" button.
● If there are still ice cubes remaining in the Crusher Case in the reverse side of the Ice Bank, remove them using with a spoon, etc..
● When not using the Ice Dispenser for a long time, thoroughly clean and dry the Ice Bank and reinstall.
2. Remove ice in the Ice Bank, clean and dry the ice Bank and reinstall it to its place in the refrigerator.
● In this case, if ice is not removed from the Ice Bank, Ice cube may stick together cuasing the Ice Dispenser cannot operate.
Pipi!
Lamp lights off.
WARNING
●●●●●
Be careful, as the Ice Dispenser rotates and may cause injury.
CAUTION
How to use lce and Water Dispenser

22
How to Maintain Your Refrigerator 1 Unplug the power cord.2 Remove the food.3 Wipe the refrigerator clean.■ It is the best if smudges are wiped of f immediatel. It is also recommended to clean the areas of the refrigerator not clearly in view once a year.■ Use a soft cloth moistened with lukewarm water to wipe off smudges. For dif ficult to remove smudges, use a diluted, neutral kitchen detergent, and then wipe off the smudges using a cloth moistened with lukewarm water. ● The following parts can be cleaned with water:
■ Wipe with a soft, dry cloth. Be sure not to get water on the control panel, as it could become damaged.
1. Turn the leg adjuster to raise the refrigerator up off the floor. 2. Pull the refrigerator straight out toward you.
Control Panel
Door Gasket■ This area is prone to smudges, so be sure to wipe it thoroughly.
Door Surface■ To clean the door surface, wipe with
a soft cloth wetted with lukewarm water.
Drip Catcher■ Liquid that has accumulated here should be wiped away.
Back Panel, Floor of Refrigerator
● If the adjuster does not turn easily, use a screwdriver to turn it. If it still will not turn, then remove the leg cover and try again.
● For floors that are easily damaged, lay out a protective mat, or other protective material.
3. Wipe off the smudges on the back panel, walls, and floor of the refrigerator.● Due to the convection of air, this is a place where fine dust is likely to adhere.
Freezer Compartment● Adjustable-height Shelves● Fixed Shelf● Freezer Drawers● Door Pockets● Water Tray (Dispenser)
● Adjustable-height Shelves● Dairy Pocket● Door Pockets● Egg Tray
Vegetable CompartmentRefrigerator Compartment● Vegetable Drawers● Vegetable Drawer Door● Vegetable Drawers Cover● Door Pocket
Drip Catcher
Adjuster Cover
1. To remove the Water Tray, pull it forward. 2. To install the Water Tray, insert the tabs (2 tabs) on the back side first, then insert the tabs on the front side (3 tabs) securely.
Water Tray
● Wipe up any water or debris in the dispenser pit (especially the bottom) with a soft cloth.
If the Water Tray becomes soiled, remove it and rinse it off.
Tap
Booth
TapWater Tray
Maintainance (General Matter)

Plug the power cord into the outlet.■ Insert the power plug into the outlet securely, all the way to the end with the power cord facing downward.
● Even if the power plug is plugged in immediately after being unplugged, the compressor will not run for 5 minutes. However, if the inside is not cold, it will start running in approximately 30 seconds.● The evaporating tray for defrosting of this refrigerator does not need to be cleaned.
● Do not use the following : An alkaline or weak alkaline kitchen detergent, scouring powder, soap, petroleum, boiling water, scouring pads, acid, benzine, alcohol, or bleach (for details, see the Caution on the detergent package).● When any cooking oil, citrus fruit juice, or juice from any food pours on this refrigerator, wipe it off.● When using a chemical rag, be sure to heed the warnings for rag use.■ The doors, painted surfaces, and plastic parts may be scratched, or discolored by the chemical rag.
How to Maintain Your Refrigerator
1
2
3
1
2
34
Pull the vacuum box outIn order to take the products stored in vacuumbox , pull the vacuum box out.
For the following part, clean it with a piece of cloth soaked in warm water.
Aluminum tray Vacuum box gasket
Vacuum box gasket
Vaccum box Case
Gasket
Assembly of Vacuum Box Case
CAUTIONIf the detergent or any product other than warm water is used for cleaning Vacuum Box Gasket, there maybe effects in terms of deformation, color change or loss vacuum property.If Vacuum Box Gasket is dropping or Vacuum Box Door not well aligned, there may be the loss of vacuum property.
When Vacuum Box Gasket is dirty.
Disassembly of Vacuum Box Gasket out off Vacuum Box Case.Facing the Vacuum Box,twist the knob of the Vacuum Box Gasket on top right and carefully remove.
Knob
Wipe gently with sponge on the stainwith plain water. Don’t use any detergent.
Please clean Packing track also.Gasket track
Wipe water out with dry cloth and leavethe part until it is naturally dried.
Assemble Vacuum Box Gasket, twist the knob to align with the packing track, deliberately assemble.
Knob Gasket track
23
5 Return all parts to their original locations.6 Inspect and clean the power plug, cord and outlet.
■ Are there any cuts in the cord?■ Is the plug damaged or is the outlet loose and heating up excessively?● When there is a problem with the power cord, plug, or outlet, please consult the retailer or the service center.
■ If the power plug is plugged in with dust on the power cord, it can result in fire.● Remove all dust once a year and wipe with a dry cloth.
Inspection Refrigerator Care
4 If any droplets remain on the surface of the parts that have been washed , wipe them.
Onece a month
CAUTION
NOTICE
Maintainance (General Matter)
Maintainance (Vacuum compartment for 3 Door Model)
Take the Vacuum box to insert the vacuum compartment.And push the handle down to lock

How to remove parts
24
■ To remove drawers, pull them all the way out, then lift them upward.
Drawers
■ Push the lower right shaft backward, then push the entire right side to the back. Next, pull the left side forward towards yourself.
Upper Vegetable Drawer Door( 3 Door Model)
Door Pocket■ Gently tap the left and right of the bottom surface while pulling a pocket up to remove it. When installing the pockets, push it all the way down in a smooth, controlled manner.
■ To remove a shelf, lift it up slightly, then pull it towards you. To install a shelf, push it in until it comes into contact with the end of the slot.
Adjustable-height Shelves/Fixed Shelf (Freezer)
Replacing Lamp inside Refrigerator
■ When the interior lamp is damaged, please contact the Hitachi service centre or retailers for replacing the lamp to avoid injury
Cover LampWARNING
Do not remove the cover of interior lamp
Take urgent action when ice jams
How to remove a mass of ice from the Ice bank and Ice Dispenser Duct1. Remove the ice bank from the freezer door . If you cannot remove it, take the following steps.
1.1 Remove all ice cubes from the ice bank until only the ice mass remains.
1.2 Place a glass at the ice outlet of the ice dispenser booth.
Be sure to unplug the power cord before carrying out any maintenance. Failure to unplug the power cord can result in electric shock or injury.
WARNING
Parts Removal

25
How to remove a mass of ice from the Ice bank and Ice Dispenser Duct1.3 Gently pour warm water into the ice bank, continuing to do so until the tank can be removed.
2. Check the duct portion and the crusher case to be sure that there is no further icing or ice mass. If any should remain, remove it and clean the duct portion.Again if it is difficult to remove, pour warm water until the ice has melted enough to remove it, or in the case it is too hard to remove ice, dip the ice bank into water to melt the ice mass.
3. Check the crusher axle (Part of the motor box), make sure it is still correctly in place and not loose. If it is loose it is possible that a hole at the centre of the axle is deformed. In this case please contact your retailer or authorised service centre for assistance.4. Re-assemble the ice bank.5. Restart the refrigerator operation, and wait for a while until the freezer temperature reaches your desired setting. (The crusher must not be operated at temperatures above 0°C)6. Check the crusher operation, motor movement and lid on/off.
Crusher Case
Motor Box Motor BoxCrusher Axle a hole at center of Crusher Axle
Check the Following FirstGeneral Problems
If the refrigerator still does not operate properly, contact the retailer from where it was purchased.
● Is the power plug supplied ? ● Check the power supply at the wall outlet.● Make sure the power supply cord is plugged firmly.● Check the fuse box for blown fuse or tripped circuit breaker.
-
Problems Point to be checkedDoes not cool at all.
Detailed Check Points and Countermeasures Page
Parts Removal
Troubleshooting

● Confirm that the refrigerator was installed properly.
● Was the refrigerator just installed ?
● Check the inside of the refrigerator. ● Is there too much food in the refrigerator ?● Are there any hot items inside ?● Is the cold air outlet blocked by any food items ?
● Is the freezer compartment temperature set to level 1 or 2, and is the refrigerator compartment temperature set to level 1 or 2 ?
● Is your refrigerator in contact with direct sunlight ?● Is there a heat producing device such as a gas stove nearby ?● Is there sufficient open space around your refrigerator ?
● Up to approximately 4 hours is required until your refrigerator cools properly. In the summer, up to 24 hours may be required. 6
5
8
6
8
10
8
6
8
-
-
-
-
-
-
-
● Set the freezer compartment temperature to level 3, and set the refrigerator compartment to level 3.
● Set the temperature inside the freezer compartment to level 4 or 5 and inside the refrigerator compartment to level 4 or 5.● On very hot days, the cooling capacity could decrease, ice cream could become soft, and the temperature in the door pockets could increase.
● Is the door being opened frequently ?● Is the door touching food and not completely closing ?● Is there anything such as a plastic bag caught between the door gasket and the refrigerator main body, or are there any gaps?
● Is it a hot summer day ?
● Because the freezer compartment has priority to be cooled during "Quick Freezing" operation, the temperature inside the refrigerator compartment could increase.
● Is the temperature for the refrigerator compartment set to level 4 or 5 ?● Is the ambient temperature 5 ºC or less ?
● Is any moist food being stored such that it is touching the back left wall of the refrigerator compartment ?
● Has any moist food been placed in front of the cold air outlet or at the back of a refrigerator shelf ?
● Avoid opening and closing the door as much as possible.
● Moist food might freeze, so do not place it in front of the cold air outlet or at the back of a refrigerator compartment shelf.
● Change the temperature setting for the refrigerator compartment to level 3 or 2. When set to level 5 , food might freeze.● If the temperature in the refrigerator compartment is set to level 1 , food is less likely to freeze.
● Because the food is touching the freezer compartment partition whose tenperature is comparatively low, the food might freeze. Either increase the temperature setting or move the food away from the compartment partition a little.
● We recommend that you open and close the door quickly, and open and close it as little as possible.● Confirm that there are no gaps when the door is closed.● When the door is closed, be sure that no food or plastic bags are caught between the door and the refrigerator main body.
Problems Point to be checkedDoes not cool properly.
Food in the refrigeratorcompartmentand vegetable compartmentfreezes.
Condensation(or frost) is forming.
Water is collecting either inside the refrigerator or on the floor.
Detailed Check Points and Countermeasures Page
● When the humidity is so high, condensation might form on the outside of the unit, on the door gasket, or on the door. Also, after the door is opened and closed, the cold air might make the door surface fog up.
This is not unusual.● Is condensation forming on the vegetable compartment drawer ?
● Is the door opened for a long time or opened and closed frequently ?
● Is the door touching food, etc., and not closing completely ?
● Did any water in a plastic bottle spill ?
● If the door is not closed completely, condensation drips onto the inside of the refrigerator or on the floor. Please close the door completely.● Store bottled water so it does not spill.
● Is the door securely closed ? ● If there are any gaps between the door and the refrigerator main body, not only will the temperature inside increase, but condensation or frost could also form. Please close the door securely.
● Wipe it off with a dry cloth.● Condensation is less likely to form if the temperature setting for the freezer compartment is changed to level 3 or 2.
● This is because high humidity is maintained inside the drawer to prevent vegetables from drying out and to increase their life. Wipe with a dry cloth.
● Decrease the number of times the door is opened and closed, and open and close the door quickly.
General Problems
26
Troubleshooting

● Has strong-smelling food been put inside without being wrapped ?● Food smells like plastic.
● The deodorizing function will not remove all odor.● Either wrap or seal such foods.
● Sometimes the normal operating sound of the refrigerator gets louder.● A sound like running water is emitted.● A knocking sound.● A sound like something is boiling (a bubbling sound).● A sizzling sound like when meat is being cooked.● A sound like something stuck in a machine.● A whirring sound.● A cracking sound. (This is heard inside the refrigerator when the door is opened.● A hissing sound right after the door is closed. ● This is the sound of a temporary drop in air pressure when
the air that entered into the refrigerator is suddenly cooled.
● This is the sound of the plastic creaking due to a change in temperature (when the door is opened).
● After installation, the refrigerator operates at full power to cool its interior, so it will make a louder sound.● This is the sound of the cooling fluid (refrigerant) flowing through the cooling device. This sound might also be heard when the compressor has stopped.
● This is the sound of parts, such as the motor, which control the temperature inside the refrigerator running.
● This is because many plastic parts are used inside the refrigerator. As your food cools, the odor will gradually go away.
Unpleasantodor inside the refrigerator.
Ve ry weak electrical shock is felt when touching the main body.
The refrigerator is noisy.Some kind of soundis being made.(These sounds are not a sign of malfunction.)
Problem
27
The front and back of the refrigerator is warm. W arm wind blows out from the bottom.
● The heat exhaust pipe and fan release the heat inside the refrigerator, so they might become hot.
● The refrigerator occasionally accumulates static electricity, but this is not a safety concern.
● If this becomes an annoyance, earthing the refrigerator main body is recommended.
The door feels heavy when trying to open it right after being closed.
● This is caused by a temporary drop in air pressure due to the suddenly cooling of the air entering inside the refrigerator.
● The door might feel heavy for a moment, but it will soon feel normal again.
When one door is
The panel display keepschanging
● This indicates that the refrigerator is runnning is store-display mode. ● The refrigerator will not cool while running in store-display mode.● Turn off the store-display mode by.1. Power off and Power on the refrigerator again.2. After that the refrigerator will return to normal mode.
-
closed, the other door opens.
● The compartments are connected by a cold air pathway, so the air pressure from the closing of one door might cause the other door to open temporarily.
● Closing the doors slowly will eliminate this problem.
● The temperature in these locations might reach 50 ºC to 60 ºC immediately after your refrigerator is installed. This is not abnormal.
The refrigerator is noisy.
● Is the floor stable ?● Is there any object between the refrigerator leg and the floor where it is installed ?● Is the rear face touching a wall, etc. ?
● Did the leg adjuster cover come off ?
● Install the refrigerator on a stable, level floor, or in a place with a stable board under it.
● Install the refrigerator in a location with enough space around it.● Securely attach the leg adjuster cover.
5
5
-
-
-
-
-
-
-
-
-
5
6
-
5
18
-
-
-
-
8
10
17
● Are there ice cubes in the Ice Bank ?
● Is the “Child Lock” lamp on ?
● Is the “ Water” lamp is on to select water dispensing ?
● Is the “Ice Maker” lamp off ? ● Activate the Automatic Ice Maker and use this function. Check the “Ice Maker” lamp is on to make sure that the Automatic Ice Maker is activated.
● Fill up the Water Tank with water to the "Full" line. ● If there is enough water, Push the Water Tank into the "Tank Position".
● Is the “Tank Empty” lamp on ?
● Wait until ice cubes are made and try again.
● Reset the “Child Lock” function.
● Touch “Cubes” or “Crushed” button to select ice dispensing.
● Ged rid of the food or crushed ice by using a spoon, etc. Do not use your fingers, since the Ice Dispenser may revolve and result in injury.
● Is the water in the Water Tank frozen ?
● Is the ice dispensing duct is stopped up with food or fine crushed ice ?
● Take away these articles and store in other locations in the refrigerator.
● Are any other articles such as food, etc. than ice stored in the Ice Bank ?
● If frozen, set the temperature of the refrigerator compartment to level 1 or 2.
Ice is not dispensed.
Ice Dispenser and Water Dispenser
Point to be checked Detailed Check Points and Countermeasures PageGeneral Problems
Problem Point to be checked Detailed Check Points and Countermeasures Page
Troubleshooting

● Do ice cubes stick together in the Ice Bank ?
8
-
-
-
-
-
-
-
-
-
-
-
-
-
-
-
-
17
20
20
● Have the doors opened so often, or so much food have been stored a the same time ?
● Is the freezer compartment temperature adjusted to the higher temperature(level 2 or 1) than the standard position ?
● Have the refrigerator just been started up ?● Was there any power failure ?
● Remove the Ice Bank, discard the ice cubes ,and make new ones.
● Is the Ice Dispenser outlet stopped up with ice ? ● If the outlet is stopped up with ice, get rid of ice.
● Ice cannot be made if the interior of the refrigerator is not cooled down. It may take 24 hours to complete the first ice.
● Do not open the doors so often.● Keep the distance between one food item to another as much as possible.
● Set the freezer temperature to the lower position(level 3 or 4).
Ice is not dispensed.
Ice is not made quickly.
The ice cubes have projecting sections.
Ice cubes stick together in the Ice Bank.
Ice or water smells.
Even when “Crushed” is selected, not only crushed ice but also ice cubes(uncrushed ice) is dispensed.
● Is the ambient temperature low ? Is it a winter time ? ● If the ambient temperature is low just like winter, the ice making time can be longer.
● Is there any gap between the door gasket and refrigerator body ?
● Close the door completely , if there is a gap.
● The ice tray is grooved to have even water flow for all areas. Therefore this groove may make projecting sections.
● Was there any power failure ?● Have the doors been opened so often?
● Is there any gap between the door gasket and refrigerator body ?
● Is the water in the Water Tank enough ? If the water is not sufficient, the ice cubes may be smaller than usual and thus may not be crushed.● If the Ice Dispenser has not been used for a long time, the ice cubes may become samller and thus may not be crushed.
● If the water is not much, fill up the Water Tank with water upto the "Full" line.
● Due to unevenness of ice cubes, some small ice cubes will not be crushed and will be dispensed, however, this not an abnormal situation.
● Remove the Ice Bank ,discard old ice cubes ,and make new ice cubes again.
● Is the Water Tank or water purification Water Filter dirty ?
● In order to prevent grime and hard water stains from building up, make sure to rinse the Water Tank once a week.
● Is not the water or ice fresh ? ● Replace the water in the Water Tank once a week. And, first, discard the existing ice cubes , then make new ice cubes.
● Has the Ice Dispenser not been used for a long time ? ● If the Ice Dispenser is not used for a long time, the ice cubes may stick together. Therefore, it is recommended to use the Ice Dispenser as often as possible.
● Since the temperature of the freezer compartment rose, thus the ice cubes melted and stick together. Remove the Ice Bank , discard ice cubes ,and make new ice cubes again. And, make the door opening/closing frequency as little as possible.
● If there is a gap, the freezer compartment temperature may rise and the ice cubes may stick together. Close the door completely.
● “Cubes” were selected just before dispensing “Crushed” ice ?
● When switching from “Cubes” to “Crushed”, ice cubes instead of crushed ice may be dispensed for the first moment. On the other hand, when switching from“Crushed”to “Cubes”, crushed ice instead of ice cubes may be dispensed for the first moment. They are not abnormal.
● Is there stopped-up ice cubes in the ice crusher section (at the reverse bottom side of the Ice Bank) of the Ice dispenser and the flapper to feed ice to be crushed kept opened ?
● Remove the Ice Bank to get rid of the ice in the ice crusher.
● Has strong-smelling food been put inside without being wrapped ?
● When food with strong smell is stored, such food should be wrapped and sealed for storage.
28
Ice Dispenser and Water Dispenser Problem Point to be checked Detailed Check Points and Countermeasures Page
● To protect the electrical components, the system stops the operation for 20 minutes for cooling down. If the Ice- Dispenser is used during this period, the "Dispenser - Illumination" flashes to inform you of this temporary stop.
● Have you been using the Ice Dispenser for more than 1.5 minutes ?
21● If there is a gap at the bottom of the Ice Bank, remove the Ice Bank , rotate the “Auger” of the Ice bank for approx. 90 degrees and place the Ice Bank again.
Is the Ice Bank placed correctly ? Is there any gap between the bottom of the Ice Bank and the dispenser mechanism ?
Troubleshooting

29
Water from the Water Dispenser is not chilled.
● Has the water just been put into the Water Tank ? ● It may take 24 hours or even more to chill the water in the Water Tank completely ,if the ambient temperature is high in the summer seasons, etc.. However, it will just take 8 to 9 hours to chill the tank-full of water.
● If you need chilled water immediately, it is effective to put ice cubes into the glass by using the Ice Dispenser and then to use the Water Dispenser.
● When using the Water Dispenser, the water dispensed in the beginning is not chilled enough.
● Chilled water is supplied from the WaterTank in the refrigerator compartment through the tubes which is placed in the compressor compartment, the bottom of the cabinet, and the door. Therefore, the water in the beginning may not be chilled ,because that water was not in the cold sections, however, after dispensing half of glass of water, chilled water will be dispensed.
Water is not dispensed.
● Is the “Child Lock” lamp on ? ● Reset the “Child Lock” function.
● Is the water in the Water Tank frozen ? ● If frozen, set the temperature of the refrigerator compartment to level 1 or 2.
● Is the “Cubes”or“Crushed”lamp is on ? ● Touch the “Water” button to select dispensing water.
● Is the “Tank Empty” lamp on ? ● Fill up the Water Tank with water to the "Full" line. ● If there is water in the Water Tank, surely push the Water Tank
into the “Tank Position”.
● Has the Water Dispenser been used for more than 1 minute continuously ?
● If the Water Dispenser is used for approx. 1 minute, the system temporarily stop dispensing for the sake of safety in case ofa malfunction of dispenserswitch. The “Dispenser Illumination”
flashes to inform you of this case. To use again, release the glass from the Dispenser Lever.
1910
17
8
-
-
-
Ice Dispenser and Water Dispenser Problem Point to be checked Detailed Check Points and Countermeasures Page
-
-
23
23
23
・・・
Problem Point to be check Detailed Check Point and Countermeasure Page
In case of occurred these event,vacuum compartment might notbe operate.
● Is the Handle up? ● Push Handle down to the proper position.
● Has the Handle been pushed down to the end Gasket?
● If not, there is no vacuum. Push the Vacuum Box Case inside to the end and push the handle down to the proper position.
● Are Vacuum Box Gasket and Packing receiver dirty?
● If they are, clean them by wiping the stain out.
● Is Vacuum Box Gasket or vacuum valve (blue) detached or loose.?
Vacuum valve (blue)
● Deliberately attach Vacuum Box Gasket and Vacuum valve.
● Is there any bag that contains food or stain or debris or trash in or around Vacuum Box Gasket and Packing receiver?
Thread Trash
Is the gaskets adhered together,gently stretch it part before using the vacuumcompartment?
Gasket
● If there is any plastic bag that contains things inside, remove it. If the packings are attached to each other, the vacuum property will be lost.
● If the sides of gasket stick to each other, put them apart. If gasket is dirty, clean it.
Vacuum compartment
Troubleshooting

It is not known whetherit is in the vacuum state or not.
● If the is the ‘Whoosh’ sound during the opening, it is normal.
-
Problem Point to be check Detailed Check Point and Countermeasure Page● Has the Vacuum Box or R door been opened/closed?
● Since the Vacuum Pump is in the status of readiness for work, the absence of the ‘Whoosh’ sound is not unusual.
The Handle cannot be locked. ● Is there anything stored in the Packing or the inmost side of the Case?
● If there is, remove that thing.
Vacuum compartment
-
-
-
-The sound of Pump creatingthe vacuum state.
If the sound or the shakinghappens often, there may be something at the door or the packing may be dirty.
There is shaking “Bu Bu” sound from around Vacuum Box.
23
7
-
There is nothing wrong.
If there is plastic bag, remove it and cleanthe dirty Packing.
There are dews or wateraround the door or inside Vacuum Box.
Water in food and air can causediets inside because VacuumBox room is completely closed.
Anything that contains a lot of watershould be wrapped or covered. If thereare dews or water, wipe them witha piece of cloth soaked in warm water.
Things stored in VacuumBox are frozen.
Is there any vegetable that isvulnerable to low temperaturesuch as cucumber or tomatoinside?
Check the vegetables that are vulnerableto low temperature and move them tovegetable compartment.
30
The door of the freezercompartment was not leftopen temporarily?
Check that the wrapping paper of the food is not gettingcaught in order not to make gap between door anddoor gasket when you close the door.
When the door is opened frequently or if the dooris opened when the humidity around the refrigeratoris high, moisture in the air may be turned into somefrost or ice on the inner wall or component of thefreezer compartment, or around the air chanels.This is not a failure. Please try not to open the doortoo many times or for a long time. Also, please wipefrost or ice generated in the freezer compartment off
The door of the freezercompartment was notopened frequently or longertime than necessary?
Making extra ice by usingan additional ice-tray whichwas not originally installedin the refrigerator?
When the many containers in which water or liquid is storedare put in the same time, water or liquid may be evaporatedand turned into frost or ice on the wall or component of thefreezer compartment, or around the air channels. You cansuppress these frost and ice by putting lid to avoid evaporationPlease wipe frost and ice off with use of a dry cloth.
Frost or ice is generated inthe freezer compartment
with use of a dry cloth.
Possible causes and / or Recommened solutionsPlease check hereGeneral operation
The door of the refrigerator compartment was not leftopen temporarily?
Please check not to pinch the food or plastic bag betweenthe door and door frame when you close the door.
Dew or Frost is generated
Dew is generated in the refrigeratorcompartment
Troubleshooting

31
Dew or Frost is generated
Why Dew and Frost are generated?
When warm and humid air contacts something cold, dew is generated. For example, if you put some ice in the glass in your room,air around the glass will be cold down and some dew may be generated on the outer surface of the glass.
In the same way, when warm and humid air enters into the refrigerator at the door opening, the warm and humid air contacts coldinner wall and little dew may be generated.
Accordingly, if the door opening is too frequent or too long, dew will be accumulated at every door opening. In some cases, dew may be frozen to generate some frost or ice flakes in the freezer compartment.
Troubleshooting
Possible causes and / or Recommened solutionsPlease check hereGeneral operationWhen the door is opened frequently or if the door is openedwhen the humidity around the refrigerator is high, moisturein the air may be turned into some dew on the inner wall or
chilled air blow-off port. This is not failure . Please try not tocomponent of the refrigerator compartment, or around the
open the door too many times or for long time. Also, pleasewipe off the dew in the refrigerator compartment with adry cloth.
The humidity of the vegetable compartment is higher than othercompartments. Accordingly, depending on the amount or type ofthe vegetable, dew condensation may be generated on the plasticcase of vegetable compartment. However, this is not a failure.When you do not want to have this kind of dew, please warp your
happens many times, water may be accumulatedin the vegetable compartment. Please wipe the water off with a dry cloth.
When the humidity rises such as in rainy day, some dew many be generatethe outer surface of the refrigerator. Please wipe the dew off with a dry clot
When the temperature setting is set as “Coldest”, some dew may begenerated on the outer surface of the refrigerator. Please set thesetting as “Normal”. Also, please wipe dew off with use of a dry cloth.
The door of the refrigeratorcompartment was notopened frequently or longertime than necessary?
Storing many vegetablescontaining much water?
The volume of humidity aroundthe refrigerator is not high?
The temperature setting isnot set as “Coldest”?
Dew is generated in the refrigeratorcompartment
Dew is generated onouter surface of therefrigerator
vegetables in a plastic flim. Also,when the dew condensation

Troubleshooting
32
● Telephone numbers are subject to change without notice.
● When you request repair, please check the refrigerator well according to Trouble shooting on page 28-34. When still abnormal, Please contact the retailer or local Hitachi service center.
Service Center
Service Center TEL. No.
About Non-fluorocarbon refrigerator.● This refrigerator, including refrigerant and the heat insulator, is using hydrocarbon (non-fluorocarbon). The hydrocarbon is a material that does not rip up the ozone and have very little influence on global warming. It is the global environment concern material).● R600a refrigerant is flammable. But the refrigerant is sealed up by the refrigerate circuit, and never leaks by usual use. In case of the refrigerant circuit being damaged by any chance, please avoid the use of fire and electric product , open the window and ventilate. Afterwards, please contact Hitachi Service Center.
Severe warning signs for DisposalCyclopentane is used as in the insulation. The gases in insulation material require a special disposal procedure.Please contact your local authorities in regard to the environmentally safe disposal of this product.
This symbol mark means that used electrical and electronic products shall not be mixed with general household waste.Do not try to dismantle the system and unit by yourself as this could have harmful effects on your health and the environment.Refrigerators must be treated at a specialized treatment facility for recycling and recovery and shall not be disposed of in the municipal waste stream. Please contact the installer, dealer or local authority for more information.
● 1900 545 490
What to do in these situationsThis is not a malfunction of the refrigerator.
● The refrigerator is equipped with the dew prevention and heat radiation tubes. The back and side plates may be heated especially when starting up or if the door is frequently opened and closed.
● The two compartments are connected with an air duct. When closing one of the doors, the door may be opened by the air pressure through the duct.This is a normal phenomenon.● The sound like water flowing and boiling water is the sound of the cooling liquid (refrigerant).● A creaking sound comes from the storage compartment. It is the sound caused by friction of the parts due to temperature change.
The surface of the refrigerator is hotIf a door is shut, other doorsmay open.Does the refrigerator make any abnormal noise(sound)?
46-48 Xuan Dieu, Ward 4, Tan Binh District, Ho Chi Minh City

34
373838
39
4041
44454647
484950515152
5656
5759
56
40
40
61
4142424243
37
55
57
62
54
43
64
..................
.........................................
......................................................................................
..............................................................
...............................
................................................
..............................
......................................................
.............................................................
..........................................................
.........................................................................
.............................................................................
....................................................................................
.............................................................................
.....................................
...................................................................................
....................................................................................
..............................................................................
.......................................
..............................
.....................
.......................
...............
...............................................................................................
...............................................
.............
...................................................................
...............................................................
......................................................................
.....................................
.................................................................
......................................................
...................................................
..........................................................
..................................................................
` `
R-SX800GPGV0R-MX800GVGV0R-MY800GVGV0
Hướng dẫn sử dụngTủ Lạnh
Tên sản phẩm
Không đóng tuyết Chuẩn bị
Chuẩn bị trước khi sử dụngLắp đặt Trước khi sử dụngCách lưu trữ thực phẩm tối ưu
Vận hành Các ngăn trữ thực phẩm
Tên và Chức năng của Màn hình, Nút, Từng thành phần
Cách sử dụng chức năng lấy đá bên ngoài
Cách sử dụng chức năng lấy nước bên ngoàiBảo trì
Thay thế linh kiệnCách thay thế linh kiện
Các lỗi thông thườngLấy đá và nước bên ngoài
Bảo trì và Hướng dẫn giải quyết sự cố
Hướng dẫn giải quyết sự cố Xử lý khi đá bị kẹt
Cấp đông nhanhLàm lạnh nhanhKhoá trẻ emTiết kiệm điệnChuông báo và chức năng hiển thị
Các chức năng khác
Các khuyến cáo và lưu ý về an toàn
Ngăn đông Ngăn lạnhNgăn rau quả
Cách sử dụng chức năng lấy đá và nước bên ngoài
Nội Dung
Điều chỉnh nhiệt độ
Ngăn bảo quản chân không
Ngăn bảo quản chân không
Bảo trì (Qui trình chung)Bảo trì (Ngăn bảo quản chân không)
Đọng sương hoặc tuyết
Cách sử dụng Bảng điều khiển
Chân không
Cách sử dụng đổ nước vào hộc chứa
Cách sử dụng chức năng làm đá tự động
Trung tâm bảo hành
....................................................................................
.......................................................................
R600a
Sử dụng trong gia đình
Chất làm lạnh
Cảm ơn quí khách đã mua sản phẩm tủ lạnh Hitachi.Vui lòng đọc kỹ sách hướng dẫn này để sử dụng sản phẩm cho đúng cách.
Việc sửa chữa & bảo trì sản phẩm phải được thực hiện bởi các nhkỹ thuật đã được huấn luyện của Hãng.

34
Khuyến cáo
Lưu ý
K ý hiệu này hiển thị nguy cơ nguy hiểm cao có thể gây thương tích hoặc tử vong nếu không tuân thủ.
Ký hiệu này hiển thị nguy cơ gây thương tích hoặc hư hại cho sản phẩm nếu không tuân thủ.
Các ví dụ minh hoạ các ký hiệuHiển thị sự cảnh báo.
Hiển thị sự cấm/tuyệt đối không nên.
Hiển thị sự cần thiết/nên làm.
Khuyến cáo
Điện áp
■
■
■
.
mở cửa sổ

35
Khuyến cáo
■●●●●
●●

36
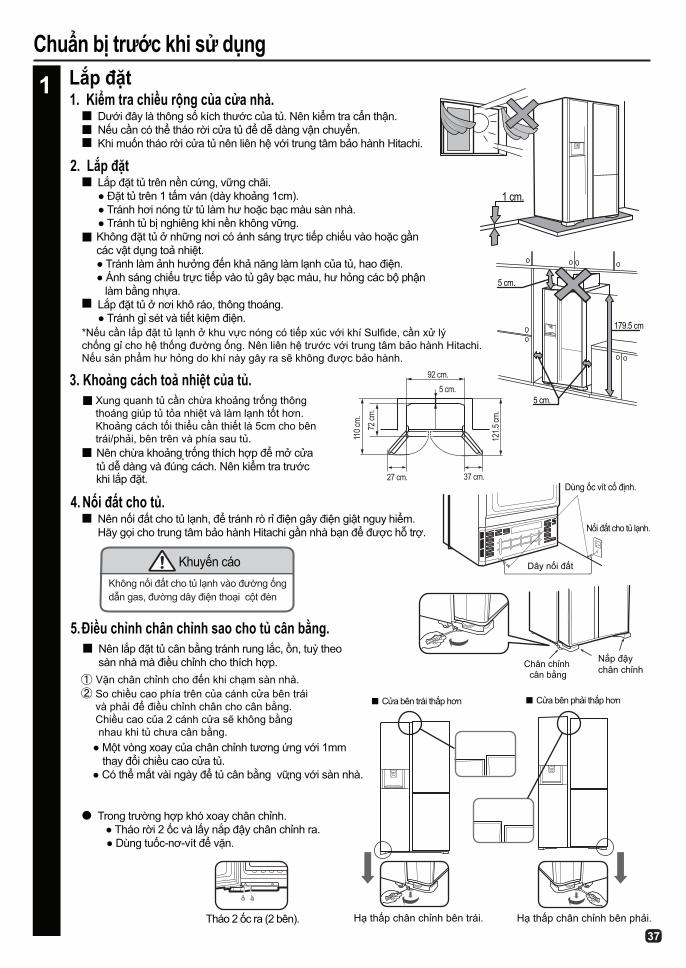
37
5 cm.
5 cm.
179.5 cm
5 cm.
37 cm.
92 cm.
27 cm.
110 c
m.72
cm.
121.5
cm.
1
1 cm.

38
2
3

39
-20℃~-18℃ 2℃~5℃
4℃~7℃
× ×
Tea
COFFEE COFFEE
Cheese
sausage
●
Cheese
●
-3°C~1°C -1°C~3°C Cheese
.
Khay đựng thực phẩm

1
2
40
Màn hình hiển thị trạng thái cài đặt nhiệt độ.
Màn hình hiển thị trạng thái cài đặt nhiệt độ.
(âm thanh “ Pi ” ) ( âm thanh “ Pi ” )(âm thanh “ Pi Pi ” )
( âm thanh “ Pi ” ) ( âm thanh “ Pi ” )( âm thanh “ Pi Pi ” )
Cách sử dụng Bảng điều khiểnTên và Chức năng của Màn hình, Nút, Từng thành phần.
Chú ý
Điều chỉnh nhiệt độ
Ngăn Đông
Ngăn lạnh
Sử dụng thông thường. Khi muốn thực phẩm trữ trong ngăn đông lạnh hơn hoặc lạnhnhanh hơn.
Khi trữ thực phẩm đônglạnh hoặc kem.
Sử dụng thông thường. Khi muốn làm lạnhmạnh hơn nhanh hơn.
Khi thực phẩm quá lạnh.

1
Pi ! Pi ! Pi ! Pi ! Pi ! Pi ! Pi ! Pi !Pi Pi!
2
41
Pi!
Pipi!
Pipi!
PiPi!
Thiết lập điều chỉnh nhiệt độ phù hợp( Ngăn mát/Ngăn đông )Cài đặt
( )
Lạnh Trung bình Lạnh nhất
Xóa điều chỉnh nhiệt độ phù hợp
Lạnh Lạnh Lạnh Lạnh Lạnh Lạnh Lạnh Lạnh Lạnh
Lạnh nhất Lạnh nhất Lạnh nhất Lạnh nhất Lạnh nhất Lạnh nhất Lạnh nhất Lạnh nhất Lạnh nhất
"Cấp đông nhanh"
1. Đặt thực phẩm ở khu vực Cấp đông nhanh
2. Nhấn nút "Quick Freezing" và bắt đầu vận hành chức năngcấp đông nhanh.
3. Nhấn lại nút "Quick Freezing"để dừng vận hành chức năng cấp đông nhanh.
Khu vực "Cấp đông nhanh"được đặt ở kệ chính ngay phía trước quạt ngăn đá.
Chế độ "Cấp đông nhanh" sẽ tựđộng hoàn tất trong khoảng 2 giờ.

3
42
Pi! Pipi!
Pipi!
4
Peep! Pipi!
5
21
PiPi!Pi!
90
Lưu ý
1. Nhấn giữ nút "Child Lock" trong 5 giây (để khóa) 2. Để dừng chức năng này, nhấn giữ nút "Child Lock" trong 5 giây một lần nữa.
Tiết kiệm năng lượng Có thể sử dụng chức năng này khi trữ ít thực phẩm, khi đi nghỉ dài ngày ■
●
● Cửa không mở● Bảng điều khiển không hoạt động.
Cảm biến nhận biết con người ECO không dò tìm.
Chạm “Energy Saving” bắt đầu vận hành(Đèn hiển thị sáng)
Khi muốn dừng chức năng này, nhấn lại nút “Energy Saving” (Đèn hiển thị tắt).
( đóng của tủ trong 1 thời gian dài)
● Nếu chế độ "Tiết kiệm năng lượng" hoạt động trong môi trường có độ ẩm cao, sương có thể xuất hiện trên bề mặt tủ lạnh.

43
Peep!
1,2,3,4,5
Pi!
1,2,3,4,5
Pipi!
. . . .
.
6
7
Pi !Pi ! Pi Pi !
1. 2. 3.
Chuông báo và chức năng hiển thịNếu để cửa tủ mở hơn 1 phút thì sẽ có âm thanh báo và hiển thị trên bảng điều khiển.
Cảnh báo cửa mở: tiếng PeepPeepPeepHiển thị báo Eco: chỉ báo tình trạng cửa mở trên bảng điều khiển
Thời gian cửa mởSau 1 phút PeepPeepPeep
PeepPeepPeepPeepPeepPeeps liên tục
Tất cả các đèn LED sáng
Âm thanh báo Hiển thị báo Eco
Sau 2 phútSau 3 phút
Cách tắt chuông báo Khởi động lại chuông báo
1. Nhấn giữ nút "Quick Freezing" trong khoảng 5 giây cho đến khi nghe tiếng "Peep"
1. Nhấn giữ nút "Quick Freezing" trong khoảng 5 giây cho đến khi nghe tiếng "Pipi!"
giây giây
● Chuông báo thường được cài đặt “Bật” khi xuất xưởng.● Khi mất điện chuông báo thường tự động bật lại.
Chân khôngMàn hình chuyển đổi theo trình tự như hiển thị bên dưới mỗi lần chạm vào nút. Ở chế độ mặc định, nhiệt độ được cài đặt ở mức “-1°C”.
(-1°C 2°C)+-Khi đang “Vacuum” sẽ bật sáng.
vận hành, “-1°C”(1°C 2°C)-+
Chạm “Vacuum” bắt đầu 1 °C vậnhành (“-1°C” Đèn hiển thị sáng) (-2°C~0°C)
Chạm “Vacuum” dừng Vacuum vận hành (“off ” Đèn hiển thị sáng)
Sau khi chức năng chân không tắt, nhiệt độ sẽ tự động trở về chế độ mặc định ( -1 °C )
Đèn báo hiệu "Tắt" tiếp tục sáng trong suốt quá trình "Tắt". Màn hình sẽ tắt sau 40s để tiết kiệm năng lượng, tuy nhiênchức năng đã cài đặt trước đó vẫn được hoạt động bình thường.

44
●
Lưu ý
Lưu ý

45
●
Lưu ý

46
■
Bảo quản rau quả theo kích thước và hình dáng
●
Lưu ý
Lưu ý

1
2
1
2
47
Handle
Lưu ý
Khuyến cáo
Bơm hút chân không
Tay cầm
Ngăn chân không(với khay nhôm)
Van tắt chếđộ chân không (màu xanh nước biển)Khi mở khóa bằng việc nâng tay cầm lên, van tắt chế độ chânkhông sẽ dừng chếđộ chân không bằng việc có tiếng"Push" vang lên
"Whoosh" Nắp hộp
Nâng tay cầm lên để mở khóaTay cầm
Ðẩy hộp ngăn chân không vào thật sâu
Vui lòng không để thực phẩm hoặcđồ vào hộp chân không quá nhiều. Nếu bạnđể quá nhiềuđồ, có thể sẽkhông kéo hộp chân không ra được.
Bơm chân không chỉ làm việc khi đãđóng nắp hộp ngăn chân không, khóa tay cầm và đóng cửa tủ lạnh. Khi bơm chân không bắtđầu làm việc, sẽ có tiếng kêu lên. Tiếngđó hoàn toàn không phải vấnđề gì bất bình thường của tủ.Từ lúc bơm chân không bắtđầu làm việc cho đến khi phía trong ngăn chuyển sang chếđộ chân không mất khoảng 2 phút, nếu mở nắp hộp ngăn chân không phải chờđủ hơn 2 phút.Nếu mở nắp hộp ngăn chân không trước 2 phút, có thể sẽ có tiếng "push" kêu lên. Vì thế nên kiểm tra hệ thống chânkhông sau khi chờ hơn 2 phút. Do ngăn chân không làm lạnh dựa vào nguyên lý làm lạnh gián tiếp nên thời gian làm lạnh lâu hơn ngăn khác.
Kéo Nắp hộp ra
Trong lúc vẫn còn nghe tiếng "Push", chếđộ chân không vẫn còn hoạtđộng. Vì thế không thể kéo nắp hộp ra được, vui lòng kéo nắp hộp ra khi tiếng "push" dừng lại hẳn.
Vui lòng đẩy hết mức tay cầm xuống, nếu đẩy không hết mức sẽ không tạochân không trong ngăn được.
Ðẩy tay cầm xuốngđể khóa nắp
Nếu đóng tủ lạnh trong khi chưa khóa nắp hộp chân không có thể sẽ làm cho các bộ phận hư hỏng.

●●●●
48
1 2
3
Phương pháp tháo rời hoặc lắpđặt.
Vui lòng mang phẩmđangđặt trên các bộ phận chuẩn bị tháo rời ra trước rồi bắtđầu tháo rời các bộ phận.thực Vui lòng không tháo các bộ phận nằm ngoài các bộ phậnđược giải thích ởđây.Khi bạn cần phải tháo các bộ phận không được chú thích ởđâyđể làm vệ sinh…vui lòng xin tư vấn từ bộ phậnkỹ thuật của chúng tôi.Khi tháo rời hay lắpđặt các bộ phận, vui lòng mở cửa tủ lạnh nhiều hơn một góc 90 độ.
Cẩn thận
Từ từ nâng phía trước của hộp ngăn chân không (Vacuum Case) lên để tháo lõi của nắp ngăn chân không ra.
Xê dịch nâng hộp ngăn chân không lên.
Vui lòng lắpđặt các bộ phận bằng việc thực hiện các bước ngược với việc tháo rời.
Khay Nhôm Hộp ngăn chân không
Tay cầm
.

49
●●●●●●●
Hướng dẫn cách cấp nước thông thường
Hướng dẫn cách tháo hộc và cấp nước
Đặt hộc chứa vào đúng vị trí.
Lưu ý

Pi!
50
Notice
Pi!

51
Pi!
Pipi! Pi!
90 1109070
Làm đá bình thường
Làm đá nhanh

●●
52
● Không sử dụng chất tẩy rửa vì có thể làm hỏng bộ lọc.
W
●
2 - 3
Đẩy nhẹ nắp vào sao cho vừa với khớp theo hình m i tên.Nếu chế độ làm đá tự động không được cài đặt “Ngừng” thì thỉnh thoảng bơm nước có thể gây ra tiếng kêu nhưng không phải là l i hư h ng.
Bạn nên vệ sinh lọc 1 tuần 1 lần để tránh bụi bẩn bám lại trên thành hộc chứa. 2. Đẩy nhẹ vòi phía trên để tháo lưới lọc ra.
3. Dùng miếng xốp, rửa nhẹ lưới lọc.1. Tháo hộc lọc ra kh i nắp đậy. Nắp đậy
Hộp lọc Vòi
Hãy thay lưới lọc khác khi lưới bị c , rách và nên thay lướ i lọc sau 3 hoặc 4 năm.

53
90
Auger
Pipi!
●●●●●
"Ice Maker" (Làm đá).
Hộp chứa đá bào
khe hở

54
Chấu gắn
Vị trí lấy đá
Chấu gắnKhay
Nắp điều chỉnh
.
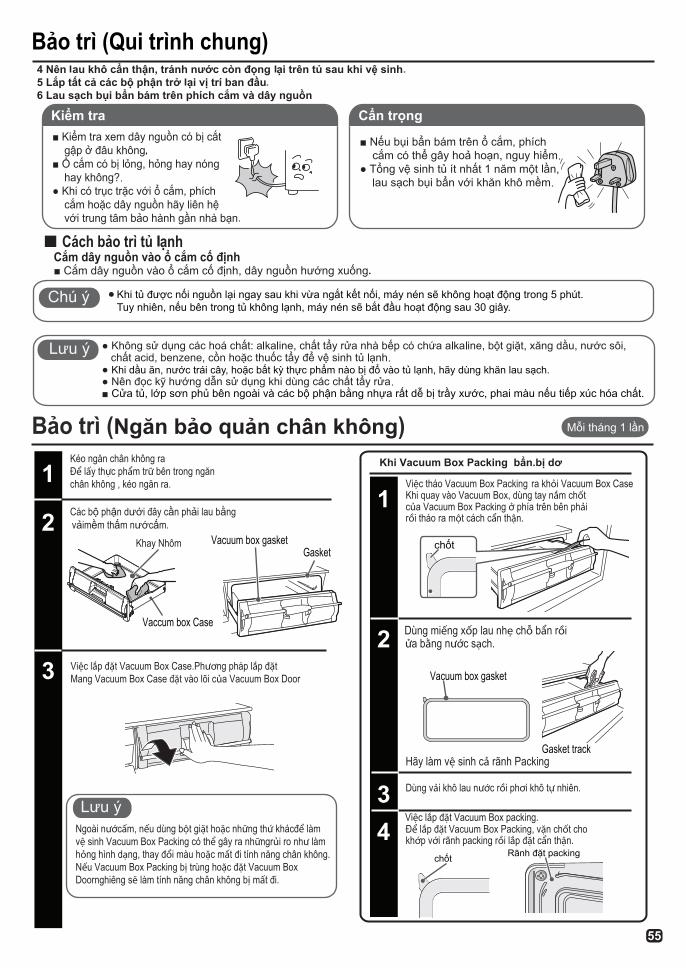
1
2
3
1
2
34
Các bộ phận dưới đây cần phải lau bằng
Vacuum box gasket
Vacuum box gasket
Vaccum box Case
Gasket
Ngoài nướcấm, nếu dùng bột giặt hoặc những thứ khácđể làm vệ sinh Vacuum Box Packing có thể gây ra nhữngrủi ro như làm hỏng hình dạng, thay đổi màu hoặc mất đi tính năng chân không.Nếu Vacuum Box Packing bị trùng hoặc đặt Vacuum Box Doornghiêng sẽ làm tính năng chân không bị mất đi.
Khi Vacuum Box Packing bẩn.bị dơ
Gasket track
55
Mỗi tháng 1 lần
.
Kéo ngăn chân không raĐể lấy thực phẩm trữ bên trong ngăn chân không , kéo ngăn ra.
vảimềm thấm nướcấm. Khay Nhôm
Việc lắp đặt Vacuum Box Case.Phương pháp lắp đặtMang Vacuum Box Case đặt vào lõi của Vacuum Box Door
Việc tháo Vacuum Box Packing ra khỏi Vacuum Box CaseKhi quay vào Vacuum Box, dùng tay nắm chốt của Vacuum Box Packing ở phía trên bên phảirồi tháo ra một cách cẩn thận.
chốt
Dùng miếng xốp lau nhẹ chỗ bẩn rồiửa bằng nước sạch.
Hãy làm vệ sinh cả rãnh Packing
Dùng vải khô lau nước rồi phơi khô tự nhiên.
Việc lắp đặt Vacuum Box packing.Để lắp đặt Vacuum Box Packing, vặn chốt cho khớp với rãnh packing rồi lắp đặt cẩn thận.
chốt Rãnh đặt packing

56
Đèn che
Cách tháo linh kiện
■
Không tháo nắp che đèn bên trong tủ

57
.
● ●●● -

58
38
37
40
38
40
42
40
38
40
-
-
-
-
-
-
-
●
●
●●
●
●
●
●
●
●
●
●
Mức 4 hoặc 5?Nhiệt độ môi trường xung quanh là 5oC hoặc thấp hơn?

59
50
42
49
40
-
-
-
-
-
-
-
-
-
-
-
37
37
37
38
37
-
Các lỗi thông thường
Mặt trước và sau tủ bị ấm, nóng. Luồng gió ấm thổi ra từ dưới chân tủ.
-

60
53
40
49
52
52

61
-
-
55
55
55
・・・
Khi mở, không có tiếng "Whoosh"
51
42
49
40
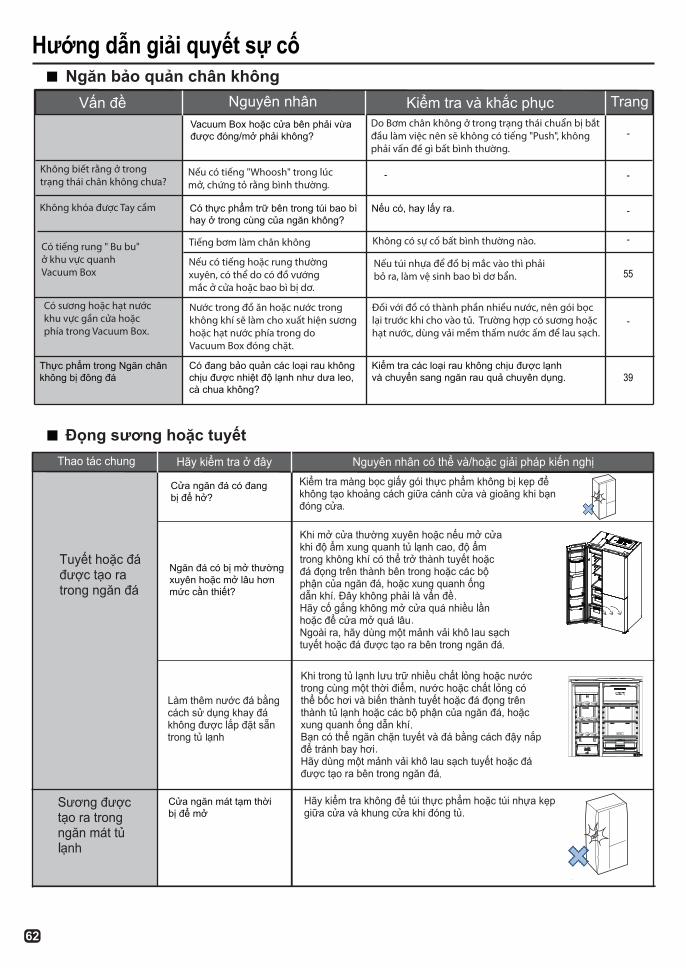
62
55
39
-
-
-
-
-Do Bơm chân không ở trong trạng thái chuẩn bị bắtđầu làm việc nên sẽ không có tiếng "Push", khôngphải vấn đề gì bất bình thường.
Nếu có tiếng "Whoosh" trong lúcmở, chứng tỏ rằng bình thường
-
Tiếng bơm làm chân không Không có sự cố bất bình thường nào.
Nếu có tiếng hoặc rung thườngxuyên, có thể do có đồ vướngmắc ở cửa hoặc bao bì bị dơ.
Nếu túi nhựa để đồ bị mắc vào thì phảibỏ ra, làm vệ sinh bao bì dơ bẩn.
Nước trong đồ ăn hoặc nước trongkhông khí sẽ làm cho xuất hiện sươnghoặc hạt nước phía trong doVacuum Box đóng chặt.
Đối với đồ có thành phần nhiều nước, nên gói bọclại trước khi cho vào tủ. Trường hợp có sương hoặchạt nước, dùng vải mềm thấm nước ấm để lau sạch.
Vacuum Box hoặc cửa bên phải vừa được đóng/mở phải không?
.
Có thực phẩm trữ bên trong túi bao bìhay ở trong cùng của ngăn không?
Nếu có, hay lấy ra.
Thực phẩm trong Ngăn chân không bị đông đá
Có đang bảo quản các loại rau không chịu được nhiệt độ lạnh như dưa leo, cà chua không?
Kiểm tra các loại rau không chịu được lạnhvà chuyển sang ngăn rau quả chuyên dụng.

63

1900 545 490
Thông tin về chất làm lạnh không chứa Fluorocarbon
46-48 Xuân Diệu , Phường 4 , Quận Tân Bình , Thành phố Hồ Chí Minh"