InfoPath with SharePoint 2013 How-To
460
-
Upload
khangminh22 -
Category
Documents
-
view
0 -
download
0
Transcript of InfoPath with SharePoint 2013 How-To


About This eBook
ePUB is an open, industry-standard format for eBooks. However, support of ePUB and its manyfeatures varies across reading devices and applications. Use your device or app settings to customizethe presentation to your liking. Settings that you can customize often include font, font size, single ordouble column, landscape or portrait mode, and figures that you can click or tap to enlarge. Foradditional information about the settings and features on your reading device or app, visit the devicemanufacturer’s Web site.
Many titles include programming code or configuration examples. To optimize the presentation ofthese elements, view the eBook in single-column, landscape mode and adjust the font size to thesmallest setting. In addition to presenting code and configurations in the reflowable text format, wehave included images of the code that mimic the presentation found in the print book; therefore, wherethe reflowable format may compromise the presentation of the code listing, you will see a “Click hereto view code image” link. Click the link to view the print-fidelity code image. To return to theprevious page viewed, click the Back button on your device or app.

InfoPath with SharePoint® 2013 How-To
Steven Mann
800 East 96th Street, Indianapolis, Indiana 46240 USA

InfoPath with SharePoint 2013 How-ToCopyright © 2014 by Pearson Education, Inc.
All rights reserved. No part of this book shall be reproduced, stored in a retrieval system, ortransmitted by any means, electronic, mechanical, photocopying, recording, or otherwise, withoutwritten permission from the publisher. No patent liability is assumed with respect to the use of theinformation contained herein. Although every precaution has been taken in the preparation of thisbook, the publisher and author assume no responsibility for errors or omissions. Nor is any liabilityassumed for damages resulting from the use of the information contained herein.ISBN-13: 978-0-672-33694-2
ISBN-10: 0-672-33694-4
Library of Congress Control Number: 2013944877Printed in the United States of America
First Printing: July 2013
Executive EditorGreg Wiegand
Executive EditorNeil Rowe
Development EditorMark Renfrow
Managing EditorSandra Schroeder
Project EditorSeth Kerney
Copy EditorKeith Cline
IndexerErika Millen
ProofreaderKathy Ruiz
Technical EditorJ. Boyd Nolan
Team CoordinatorCindy Teeters
Book DesignerMark Shirar
Compositor

BronkellaPublishing
Trademarks
All terms mentioned in this book that are known to be trademarks or service marks have beenappropriately capitalized. Pearson cannot attest to the accuracy of this information. Use of a term inthis book should not be regarded as affecting the validity of any trademark or service mark.
Warning and DisclaimerEvery effort has been made to make this book as complete and as accurate as possible, but nowarranty or fitness is implied. The information provided is on an “as is” basis. The author(s) and thepublisher shall have neither liability nor responsibility to any person or entity with respect to any lossor damages arising from the information contained in this book or from the use of the CD or programsaccompanying it.
Bulk Sales
Pearson offers excellent discounts on this book when ordered in quantity for bulk purchases orspecial sales. For more information, please contact:
U.S. Corporate and Government Sales 1-800-382-3419 [email protected] sales outside of the U.S., please contact:
International Sales +1-317-581-3793 [email protected]

Contents at a Glance
Introduction
Part I: Designing Forms for SharePoint
1 Use InfoPath Designer 2013
2 Create a SharePoint Form with InfoPath Designer
3 Use SharePoint Form Controls
4 Create SharePoint Form Rules
5 SharePoint Form Functions
6 Create SharePoint Form Page Designs and Views
7 SharePoint List Forms
8 Submit and Publish to SharePoint
Part II: Business Solutions
9 Use Data in SharePoint Forms
10 Use the InfoPath Form Web Part
11 Using Forms in SharePoint Workflows
12 Enhance the User Experience
13 Using Template Parts to Create Reusable Form Components
Part III: Technical Solutions
14 Customize a Document Information Panel Content Type
15 Leverage Visual Studio 2012 with InfoPath
16 Dynamically Populate a Repeating Table
17 Track Changes in a Form
18 Autogenerate Forms
Part IV: Administrative Aspects
19 Use Central Administration to Administer InfoPath Forms Services
20 PowerShell
21 Managing Form Permissions

Part V: Troubleshooting
22 General Form Issues
23 Resolve Deployment and Publishing Issues
24 Resolve Form Submission Issues
Part VI: Appendixes
A Auto-Increment Repeating Tables
B Upload File Attachments in Forms to a Document Library
C Add Picture Files to InfoPath
Index

Table of Contents
IntroductionOverview of This BookHow to Benefit from This BookWhat Is New in This Book?How to Continue Expanding Your Knowledge
Part I: Designing Forms for SharePoint
1 Use InfoPath Designer 2013Why Use an InfoPath Form?What Does InfoPath Do for My Lists?Why Use InfoPath Forms in Workflows?How Does InfoPath Integrate with My Data?InfoPath Versus Web Controls and Web PartsWhat Is the InfoPath Web Part?Getting Started
2 Create a SharePoint Form with InfoPath DesignerDesign a SharePoint Form Using the Blank Form TemplateAdd ControlsPreview Your FormName Your Data FieldsAdd Submit OptionsPublish Your FormUse Your Form in SharePointCreate a Form Library from InfoPathDesign a SharePoint Form Using the SharePoint Form Library Template
3 Use SharePoint Form ControlsWhat Are Input Controls?What Are Object Controls?What Are Container Controls?Drag Controls on Your FormAllow Users to Enter Text
Make a Text Box Read-Only

Make a Text Box MultilineAllow Users to Select a Single Selection from a List of ItemsAllow Users to Select Multiple Items from a List of ItemsAllow Users to Select an Optional Single ChoiceAllow Users to Select from Various OptionsAllow Users to Enter a Date/TimeAllow Users to Select a PersonAllow Users to Select from a SharePoint External Content TypeAllow Users to Initiate an ActionShow Optional Controls on Your FormAllow Users to Enter Multiple Instances of the Same FieldsAllow Users to Choose Which Set of Fields to UseMake a Control/Field Required
4 Create SharePoint Form RulesHide or Show Controls Based on a Selected OptionFormat an Entry Based on a ConditionImplement a Validation RuleAdd an Action Rule to a ButtonUse Rules for Form SubmissionUse Rules for Form LoadingValidate Data Entry Using Patterns
5 SharePoint Form FunctionsUse the SharePoint URL FunctionsCalculate a Future DateGet the Current SharePoint UserRemove Leading and Trailing Spaces from a Field ValueRemove All Spaces from an EntryDefault a Blank Amount to ZeroCalculate the Sum of All ItemsDetermine a Count of the Items EnteredObtain a Portion of an Entered StringObtain the Username from SharePoint Online (Office 365)Add Years to a Date Preserving the Month and Day
6 Create SharePoint Form Page Designs and Views

Change the Current View NameCreate a New ViewChange the Default ViewMake a View Read-OnlyPrevent a User from Selecting a ViewUse a View for PrintingUse a Different Layout for Your FormUse a Theme for Your FormAdd Headers/Footers to Your FormInsert a Table Layout into Your FormModify a Table Layout in Your Form
7 SharePoint List FormsUse a Form to Create a SharePoint ListModify the Form of an Existing SharePoint ListSet Your List Form Template Back to the Default Form
8 Submit and Publish to SharePointEnable Your Form for SubmissionConfigure Email SubmissionPublish Your Form to EmailConfigure SharePoint Library SubmissionPublish Your Form to a SharePoint LibraryUse Multiple Forms in SharePoint LibrariesConfigure Web Service SubmissionConfigure SharePoint Server Connection SubmissionModify the Available Menu Buttons During Form Submission
Part II: Business Solutions
9 Use Data in SharePoint FormsUse Data From a DatabaseConvert an InfoPath Connection to a SharePoint Connection FileUse Data From a SharePoint ListUse Data From a SharePoint Data Connection FileUse Data from a (SOAP) Web ServicePopulate a Drop-Down List with DataPopulate a Drop-Down List with Data Based on Another Selection (Cascading Drop-Down)

Display Data from a SharePoint ListDisplay a Repeating Table from a SharePoint ListLeverage External Data from a SharePoint External Content Type (Business Data Connectivity
Services)Leverage External Data from a REST Web Service
10 Use the InfoPath Form Web PartAdd an InfoPath Form Web Part to a SharePoint Web Part PageCreate a Master/Detail Display Form for SharePoint ListsExpose Form Fields as Web Part Connection ParametersCreate a Form to Send Data to Web Parts
11 Using Forms in SharePoint WorkflowsCreate a SharePoint Workflow for a Form LibraryInclude a Link to the Form in an EmailAdd a Task to the WorkflowPerform Workflow Actions Based on Form ValuesPerform One Workflow Action or Another (But Not Both)Get a User from a People/Group Picker ControlCustomize the Task FormAdd Form Parameters Used When Starting Your Workflow
12 Enhance the User ExperienceDisplay a Read-Only ValueCompact Sections of Fields/ControlsConfigure Dynamic SectionsMake Screen Tips Informative for ValidationNotify the User of Successful SubmissionCreate a Tabbed Navigation in Your FormUse Pictures as Choices
13 Using Template Parts to Create Reusable Form ComponentsCreate a New Template PartAdd Common Data ConnectionsAdd Common ControlsAdd Common FieldsSave Your Form Template PartAdd Your Template Part as a Custom Control

Use Your Template Part as a ControlChange the Name of Your Custom ControlChange the Icon of Your Custom Control
Part III: Technical Solutions
14 Customize a Document Information Panel Content TypeCreate the Document LibraryAdd Columns to Your DIPModify the DIP
15 Leverage Visual Studio 2012 with InfoPathAccess Your Form Within a Visual Studio SolutionCreate an InfoPath 2013 Add-InCreate a Custom Task Pane
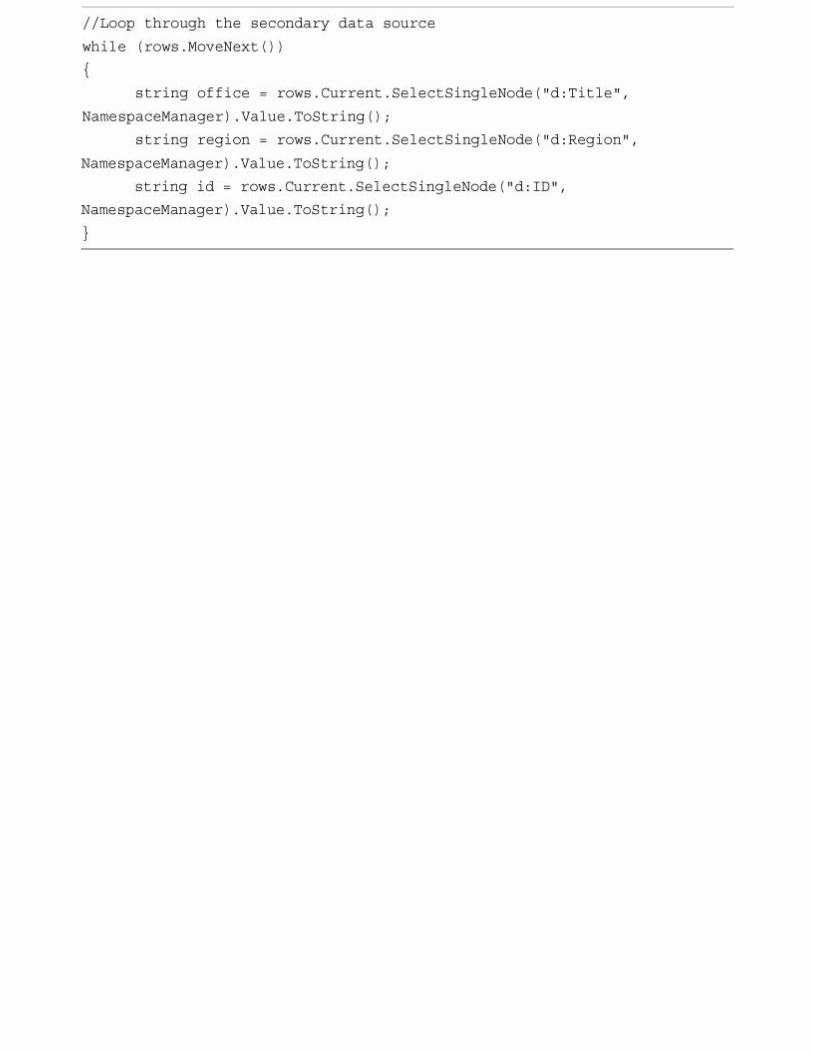
16 Dynamically Populate a Repeating TableSet Up the Initial FormCreate a Changed Event MethodCreate a Namespace VariableAccess the Secondary Data SourceLoop Through the Secondary Data SourcePopulate the Repeating TableClear Previous EntriesWhat Does the Final Solution Look Like?Implement a Nested Repeating Table Solution
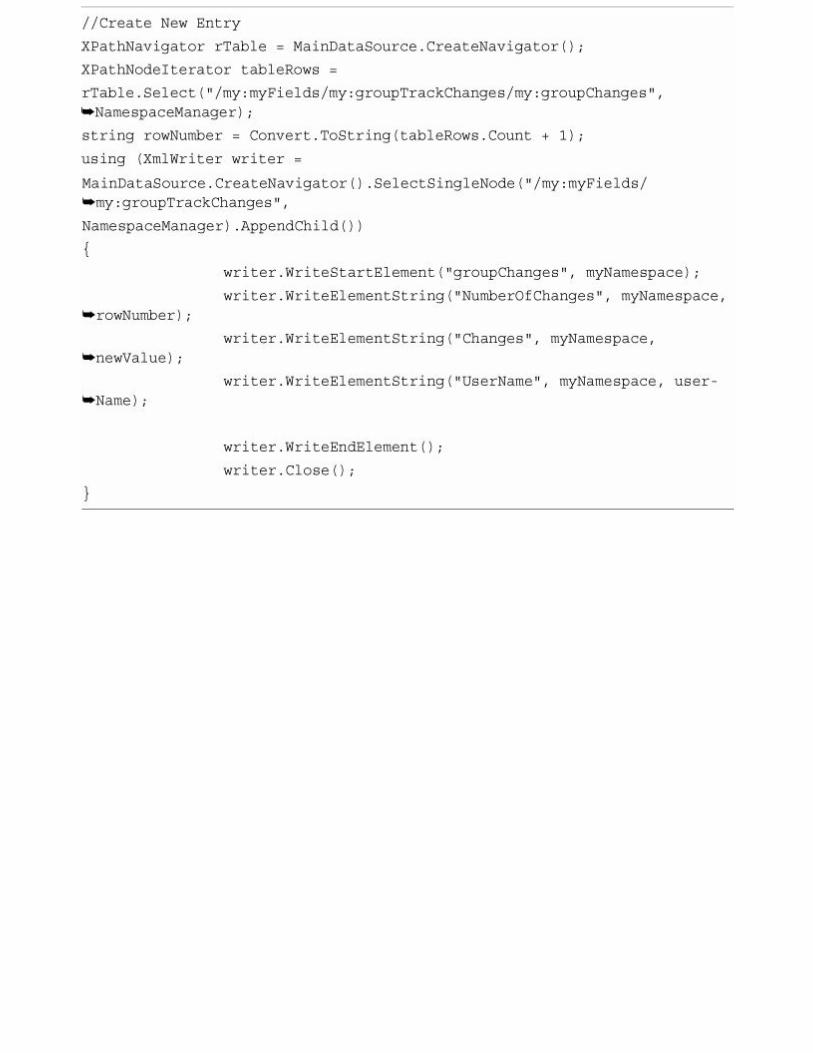
17 Track Changes in a FormSet Up the Form for Tracking ChangesAdd Changed Event Code for Tracking ChangesApply Rich Text to the EntryShow Only One Version at a TimeDisplay a Changes CounterDisplay the User Who Made the Modification
18 Autogenerate FormsCreate a Class Object of Your FormCreate Form Generation CodeUpload the Form Object to a Form Library

Part IV: Administrative Aspects
19 Use Central Administration to Administer InfoPath Forms ServicesAccess the InfoPath Form Services OptionsBrowser-Enable Form TemplatesThrottle Data Connection TimeoutsThrottle the Data Connection Response SizeModify Authentication SettingsConfigure Session StateUpload a Form Template
What Happens When a Form Is Uploaded?Manage Form Templates
What Happens When a Form Is Activated to a Site Collection?Enable the Web Service ProxyManage Data Connections
20 PowerShellAccess SharePoint 2013 Management ShellBrowser-Enable Form TemplatesThrottle Data Connection TimeoutsThrottle the Data Connection Response SizeModify Authentication SettingsConfigure Session StateEnable View StateVerify and Upload a Form TemplateUpload Multiple Form Templates at OnceActivate or Deactivate a Form to a Site CollectionRemove a Form from InfoPath Form ServicesQuiesce a Form from InfoPath Form ServicesEnable the Web Service Proxy
21 Managing Form PermissionsCreate Unique Permissions on a Form LibraryGrant Users PermissionsCreate a Permission Level for Your Form LibraryEdit a Group’s Permission LevelCreate a Submit-Only Permission Level

Part V: Troubleshooting
22 General Form IssuesResolve: Issue Accessing Data SourceResolve: SQL Credential IssueResolve: Business Data Connectivity Metadata Store Is Currently UnavailableResolve: Picker Issue Obtaining Business DataResolve: Missing Business Data Connectivity Services Client ComponentsResolve: SharePoint Designer Task List Creation ErrorResolve: Missing Programmability ComponentsResolve: Error Loading the FormResolve: Security Exception Using Code-Behind
23 Resolve Deployment and Publishing IssuesResolve: No File with URL in This WebResolve: Form Cannot Be Browser Enabled on Selected SiteResolve: Form Template Has Not Been Published
24 Resolve Form Submission IssuesTroubleshoot General Submission IssuesResolve: SharePoint Location Is Read-OnlyResolve: Document Library Already Contains a File with the Same NameResolve: Errors Submitting to a Web Service
Part VI: Appendixes
A Auto-Increment Repeating TablesUse the position() Function in a Calculated Value ControlUse the count() FunctionUse a Counter Field with Form Rules
B Upload File Attachments in Forms to a Document LibraryForm ScenarioSubmit Button and Code-Behind SetupEvent Handler CodeDeployment
C Add Picture Files to InfoPathAdd a Picture as a Resource FileUse a Resource File Picture

Index

About the Author
Steve Mann was born and raised in Philadelphia, Pennsylvania, where he still resides today. He isan enterprise applications engineer for Morgan Lewis and has nearly 20 years of professionalexperience. Steve graduated Drexel University in 1993.Steve has authored and coauthored several books related to the subject of SharePoint Server,PowerShell, managed metadata, and business intelligence. You can find Steve’s blog athttp://www.SteveTheManMann.com.

Dedication
In loving memory of my father, Robert Mann, who didn’tdeserve to go through what he did. It is hard to beat cancertwice and I am proud of him for being so brave the second
time around.
I love you dad!

Acknowledgments
Special thanks to Richard Phillips, one of my previous customers but now my manager, whochallenged me on InfoPath solutions within a SharePoint environment. Many ideas came from myexperiences building solutions for Rich.Also, thanks to Gerard Crockenberg, Cindy Mocharnuk, and Kristin Kaempf, who assisted in thetracking-changes ideas and implementation back in InfoPath 2007; this is still an awesome solution.Thanks to Pranab Paul, who works with Microsoft India as a consultant in Microsoft ConsultingServices, for allowing me to use his code for uploading file attachments from an InfoPath form(Appendix B).My SharePoint 2013 explorations were also made possible by the assistance of Alan Luu and BijuSamuel at Morgan Lewis. Thanks for helping with the environments and architecture, configuration,databases, and business intelligence installations.Finally, once again, thanks to Sams Publishing and Neil Rowe for making this book a reality and forgiving me the opportunity to share my ideas and solutions.

Tell Us What You Think!
As the reader of this book, you are our most important critic and commentator. We value your opinionand want to know what we’re doing right, what we could do better, what areas you’d like to see uspublish in, and any other words of wisdom you’re willing to pass our way.We welcome your comments. You can email or write us directly to let us know what you did or didn’tlike about this book—as well as what we can do to make our books stronger.Please note that we cannot help you with technical problems related to the topic of this book.When you write, please be sure to include this book’s title and author as well as your name and phoneor fax number. We will carefully review your comments and share them with the author and editorswho worked on the book.Email: [email protected]: Sams Publishing ATTN: Reader Feedback 800 East 96th Street Indianapolis, IN 46240 USA

Reader Services
Visit our website and register this book at informit.com/register for convenient access to any updates,downloads, or errata that might be available for this book.

Introduction
Overview of This BookWith the latest release of Microsoft SharePoint Server 2013, the entire Office platform has becomeeven more integrated than before. This does not leave out Microsoft InfoPath Designer 2013. Therehas been a close bond between SharePoint and InfoPath since the 2010 release.This book covers all the aspects within InfoPath and SharePoint 2013 that relate to creating anddeveloping business solutions. It is geared toward both technical and semi-technical professionalsand does not require a degree in computer programming.The scenario-based presentation of the material provides not only a great tutorial but also an in-depthreference for accomplishing integral InfoPath tasks within the SharePoint platform.
How to Benefit from This BookYou’ll find this book easy to read from cover to cover. The goal is to gain a full understanding ofInfoPath with SharePoint 2013. The overall content presents as a tutorial but also serves as goodreference material. Some material provides an overview of functionality or features, but most of thecontent is hands-on or provides a hands-on view.Keeping both beginners and experts in mind, this book provides both breadth and depth to the usageof InfoPath and shows you how to leverage it to create business solutions. We designed the content ofthis book to appeal to a wide audience at various technical levels:
Business analysts Information workers IT professionals IT developers Collaboration managers Content managers
You can access the code samples used in this book by registering on the book’s website athttp://informit.com/register. Go to this URL, sign in, and enter the ISBN to register (free siteregistration required). After you register, look on your Account page, under Registered Products, for alink to Access Bonus Content.
What Is New in This Book?Just like a fine wine, certain titles get better with age. When Steve Mann wrote the 2010 version ofthis book, he set out to provide a well-rounded how-to guide that provided in-depth knowledge ofworking with InfoPath and SharePoint, attempting to provide answers to everything you need to know.However, Steve kept notes from his experiences thereafter of ideas and procedures that were notcovered in the 2010 version. Based on these, Steve has expanded his treasure trove of InfoPath how-to nuggets in this edition using InfoPath Designer 2013 within a SharePoint 2013 environment.

How to Continue Expanding Your KnowledgeWe hope that this book provides foundational knowledge about InfoPath solutions with SharePoint2013 and that you find everything you need here. However, business requirements and changing needsusually require custom solutions that cannot all be possibly documented in one location.Therefore, the following resources are great ways to stay current and find additional answers ifnecessary:
Microsoft InfoPath Team Blog: http://blogs.msdn.com/infopath/Microsoft Office Developer Center: http://msdn.microsoft.com/en-us/office/default.aspxAuthor’s Blog: http://stevethemanmann.com/Email the author with any questions/issues: [email protected]

Part I: Designing Forms for SharePoint

Chapter 1. Use InfoPath Designer 2013
InfoPath is used to generate data entry forms for both the acquisition of information as well as storageof that information. With the 2013 release, you can now use InfoPath as an alternate way to presentSharePoint 2013 content within the web browser, thus enhancing the overall user experience. Usingforms with workflows can help manage and enforce business processes throughout an organization.As always, you may easily create a form that can be rendered within SharePoint to handle the dataentry of various business processes, such as a request for information, a suggestion box, or even asurvey or review. The form may be submitted and saved within a form library. Workflows may actupon the saved form and perform various actions and approval processes (using information from theunderlying libraries and lists).SharePoint lists have various views for entering, editing, and viewing information within those lists.Previously, these were all system-based pages for forms. In the 2013 platform, you can use InfoPathto modify or generate these list forms.InfoPath can also access data from various data sources, including SharePoint itself. This providesgreat extensibility and consistency in providing data entry forms to the business. (For example, whyrepeat the same business data all over the place when you can get it from a central line-of-businesssystem or SharePoint?)
Why Use an InfoPath Form?An InfoPath form is a structured document that allows all users to enter different information the sameway. The data entered into the form may be accessed and acted upon easily. This allows for theautomation of business processes using the SharePoint Server environment.Imagine using a Word document to handle requests. You would need a manual process of someonereading the document and then entering in the information into SharePoint or another system. Althoughthis could be automated using a custom Office solution, using InfoPath 2013 eliminates this need.
NoteFor the technical folks, InfoPath 2013 is a fancy XML viewer. The resultant file fromInfoPath is essentially a specialized Extensible Markup Language (XML) documentcontaining fields (metadata/schema) and values for those fields (data).
What Does InfoPath Do for My Lists?The main end-user storage within SharePoint is done through lists. Whether it be a document library,announcements, project status, or so on, they are all types of lists.SharePoint enables users to interact with lists for entering items, viewing items, or modifying items.This is all done through the web browser based on the structure of the list.In SharePoint 2013, the interface for interacting with these lists is done through forms. Therefore, youmay use InfoPath 2013 to customize these forms and enhance the user experience.In addition, you may modify the actual page used to render the form and use the InfoPath web part tofurther customize the overall presentation of that list.

Why Use InfoPath Forms in Workflows?Because each form submitted may contain different selections or entered fields, a workflow can lookat the InfoPath form entries and perform actions based on those entries.It is easier to have a submitted form living in a form library and having a workflow process aroundthat form than to submit emails with attachments and updates and—files get lost and nobody reallyknows where the latest version is located. InfoPaths forms provide a centralized location for theinformation being acted upon.
How Does InfoPath Integrate with My Data?InfoPath has the capability to receive and submit data to a variety of data sources. Therefore, you cancapitalize on business functions that already exist (such as web services) to display data and tointerface with custom-built databases or applications.For standard business processes, creating a full-fledged web application for small transactions canbe costly in resources and time. InfoPath 2013 combined with SharePoint 2013 makes it easier tocreate form-based interfaces that handle business data without full-time developers over engineeringyet another web application that needs to be maintained and managed by the IT department (seeChapter 9, “Use Data in SharePoint Forms”).
InfoPath Versus Web Controls and Web PartsIf you are a pro at ASP.Net and C#, you could easily generate web parts or web controls forSharePoint to create user inputs and display data from databases. With InfoPath, both developers andinformation workers can generate forms and data interfaces without writing code.You may still actually use code to further enhance an InfoPath form, but that is not required to takeadvantage of most of the great features in InfoPath 2013.
What Is the InfoPath Web Part?Microsoft Office SharePoint Server (MOSS) 2007 actually has a system-based InfoPath web part thatit used to render forms within the browser. However, because it is system based, it is hidden behindthe scenes and therefore isn’t available for general public consumption. SharePoint 2010 introducedthe InfoPath web part, which provides a user-based InfoPath web part that is available and ready touse and is still available in SharePoint 2013. The web part enables the rendering of InfoPath formswithin your SharePoint instance (see Chapter 10, “Use the InfoPath Form Web Part”).
Getting StartedTo get started using InfoPath 2013, you need Microsoft Office Professional Plus 2013. During theMicrosoft Office Professional Plus 2013 install, you have the option to choose InfoPath as one of theapplications that gets installed. Once installed, your Windows Programs menu will include two linksunder the Microsoft Office folder: Microsoft InfoPath Designer 2013 and Microsoft InfoPath Filler2013.This book covers the use of Microsoft InfoPath Designer 2013 because that instance of InfoPath 2013is the one which you use to design and create form templates. The Microsoft InfoPath Filler 2013instance is the local instance of InfoPath that you can use to fill out forms that are not rendered throughSharePoint (or a web browser).

For most, installing InfoPath 2013 locally on your computer provides you the necessary means ofaccomplishing the tasks covered in these chapters along with a SharePoint 2013 instance to publishthe resultant forms. However, when developing code-behind that references the SharePointassemblies, you must install InfoPath 2013 directly within a SharePoint environment such as a virtualmachine. The only solution in this book that requires you do that is the track changes solution outlinedin Chapter 17, “Track Changes in a Form”

Chapter 2. Create a SharePoint Form with InfoPath Designer
In This Chapter Design a SharePoint Form Using the Blank Form Template Add Controls Preview Your Form Name Your Data Fields Add Submit Options Publish Your Form Use Your Form in SharePoint Create a Form Library from InfoPath Design a SharePoint Form Using the SharePoint Form Library Template
This chapter shows you how to generate an InfoPath form for use in SharePoint. The followingchapters expand on the functionality and options available. This chapter serves as an end-to-endoverall guide to creating a form and publishing it to SharePoint. Other chapters may cover somedetails or steps in further detail.The first step to create SharePoint forms is to open InfoPath Designer. From there, you have a numberof options. When designing a new form, you have the following template options:SharePoint List: Use this template to generate an interface for interacting with a SharePoint list. Thegenerated form can create the actual list in SharePoint.SharePoint Form Library: Use this template to generate a form library that stores instances of yourform from user input. The content type of this form library is your form template.E-mail: Use this template to generate a form that can be used within emails.Blank Form: This is the base web browser form template used to generate SharePoint forms fromscratch.Blank Form (InfoPath Filler): This base client form template is used to generate forms that requireusers to have InfoPath installed locally on their computers. The forms created using this template arenot rendered in a web browser.Database: Use this template to quickly create a form based on a database table from Access or SQLServer.Web Service: Use this template to generate a form that queries a web service for information.XML or Schema: This template is used to easily replicate the data structure of an Extensible MarkupLanguage (XML) file or schema (XSD).Data Connection File: Use this template to quickly generate a form that uses a data connection filestored in SharePoint.Convert Existing Form: The name is confusing because you would think this is used to convert anexisting InfoPath form, but this template actually uses converters to import Microsoft Word or

Microsoft Excel documents and convert them into InfoPath forms.Document Information Panel: InfoPath now makes it easier to customize input into Officedocuments based on SharePoint columns. Use this template to generate the data entry portion of aMicrosoft Office document that is stored within a SharePoint library and contains additional fieldsfor user entry.Blank 2010 Form: Use this form to create a web-based InfoPath 2010 form.Blank 2010 Form (InfoPath Filler): Use this form to create a client-based InfoPath 2010 form. Usersneed InfoPath 2010 installed locally on their computers.
NoteThroughout this book, the terms InfoPath form and SharePoint form may be usedinterchangeably. A SharePoint form is essentially a web-enabled InfoPath form with theintention to be able to use the form in SharePoint.
Design a SharePoint Form Using the Blank Form Template
Scenario/Problem:You want to create a new form for user input to be used in SharePoint.
Solution: When you open InfoPath Designer 2013, you are automatically taken to the File, New page,as shown in Figure 2.1. Either double-click Blank Form or select the Blank Form button and click theDesign Form button to create a new blank form.

FIGURE 2.1 The New page provides templates for designing new forms.To design a simple form, follow these steps:
1. Click the Click to Add Title text that appears and enter a title for the form.2. Click in the bottom section of the form where it states Add Tables.3. Click the Insert ribbon bar menu and select the Two-Column 4 table in the Tables section. This
is a layout table that assists in aligning the labels and controls on your form.4. Click the File menu and then click Save.5. Enter a name for the form file and click OK. This saves a local copy of the form.
We now have a base form to which we can start adding controls, as shown in Figure 2.2.

FIGURE 2.2 Entering a title and adding a layout table to a form produces a base form.
Add Controls
Scenario/Problem:You need to add controls to a form for user entry.
Solution: Use the Controls section from the Home top ribbon bar.To add controls to your form, follow these steps:
1. Click the first Add Control cell in the layout table of the form.2. From the Home ribbon bar, locate the Controls section, as shown in Figure 2.3, and click Text
Box.

FIGURE 2.3 The Controls section displays the available controls that you can insert onto your form.
3. Click the Add label in the cell to the left of the text box and enter a label for this entry. Thistells the user what information to enter into the text box.
4. Repeat these steps for the remaining rows in the layout table. Your form should look similar toFigure 2.4.
FIGURE 2.4 Adding labels and controls to the form provides the basis for user data entry.
5. Click Save from the File menu to save your changes locally.

Preview Your Form
Scenario/Problem:You need to see how your form works before you publish it to SharePoint.
Solution: With your form open and saved, there are three ways to preview the contents: Press the F5 key. Click the magnifying glass icon at the very top of the InfoPath Designer application. Click the Preview Form button on the Home ribbon bar.
Your form will render in the InfoPath Filler version of the application, and you can view how itworks there, as shown in Figure 2.5.
FIGURE 2.5 Previewing your form shows you how the user will experience it.
Name Your Data Fields
Scenario/Problem:You want to give your fields meaningful names. By default, when adding controls to yourform, InfoPath names the fields that will store the data generically (that is, Field1, Field2,and so on).
Solution: Change the name of the each field by either right-clicking each control or right-clicking thefields in the Fields pane and selecting Properties. Enter a new name for the field name. Figure 2.6

provides an example.
FIGURE 2.6 Naming your fields appropriately makes them easier to identify and manage.
NoteTo be consistent, naming conventions should be established. Developers may use camelcase (for example, lastName, firstName), whereas business analysts might use Pascal case(for example, LastName, FirstName). There is no wrong or right answer as long aseveryone follows the same standards.
Add Submit Options
Scenario/Problem:You need to enable users to submit the form after they fill it out.
Solution: From the File menu, select Info. On the Info page, click the Submit Form button.Several options appear (as shown in Figure 2.7):
To Email: Submitting this form sends the contents in an email to a specified address. To SharePoint Library: Submitting this form sends the contents as a saved instance of the formin a SharePoint form library.

To Web Service: Submitting this form sends the form as XML to a web service. To SharePoint Server Connection: Submitting this form uses a specified data connectionstored in SharePoint to submit the data. Submit Options: If you are familiar with InfoPath 2010 or just want to take control of thesubmit options, use this item menu to just get down to business.
FIGURE 2.7 Submit options determine where and how a completed form will be submitted.
For this scenario, select To SharePoint Library. The Data Connection Wizard appears. For the form tobe submitted to that form library, you need to have a data connection to the SharePoint library in theform.You must specify a form library in SharePoint to submit the form; therefore, you might need to go toyour SharePoint site and create a new form library first. Enter the location of the form library in theDocument Library text entry. (Create a form library named SharePoint Forms for this example.)
TipYou can create the form library right from InfoPath, as explained in a later section.
Now that some of the grunt work has been done, we come to the most important part of the submissionto a document library: the filename. If you notice, by default, the filename is Form. That’s great. If youleave it like that, only one person can submit the form, it will be called Form.xsn in the form library,and no one ever can submit the form again. Let’s go home!You need to specify something dynamic or unique about the form instance the user is submitting. Thiscan be tricky. You must define a formula to implement this correctly, and although we haven’t stepped

through formulas yet, we are forced to do at least one here.The main ingredients for specifying the filename correctly deal with either entries in the form orentries in the form combined with a system function such as the date.For this example, we use the name the user entered in the form along with a date function. To do so,follow these steps:
1. Click the Function button to the right of the File Name text box. The Insert Formula dialogappears.
2. Click the Insert Function button and select the concat function. Click OK. The function insertsthree spots for you to modify.
3. Double-click the first entry and select the Name field from the field dialog that appears andclick OK.
4. Only select the next entry (don’t double-click) and replace it with “ – ”, including the quotationmarks.
5. Select the last entry and click the Insert Function button. Select Today from the Date category.6. Click OK.7. Remove the Double-Click to Insert Field text if it still appears. Click OK. Your formula should
now look similar to Figure 2.8.
FIGURE 2.8 Using a formula for the filename ensures that each instance is saved to a unique file.
8. Click Next. If you are prompted for credentials, enter them accordingly.9. Click Finish to save the connection in the form.

TipIf you use the now date function, the time component will be used in the filename, andeven if you select to overwrite existing files, the filename will never be the same (becausethe time changes every second). Avoid this, if possible, because every update generates anew file.
Publish Your Form
Scenario/Problem:You need to publish your form to SharePoint so that users can actually use it.
Solution: From the File menu, select Publish. On the Publish page, click the SharePoint Serverbutton.Clicking the SharePoint Server button, as shown in Figure 2.9, launches the Publishing Wizard.Follow these steps to publish using the wizard:
1. Enter your SharePoint site address, as shown in Figure 2.10.2. Click Next. The What Do You Want to Create or Modify? screen appears, as shown in Figure
2.11. Leave the defaults.3. Click Next. The What Do You Want to Do? screen appears.4. Select Update the Form Template in an Existing Form Library.5. Select the existing form library from the list, as shown in Figure 2.12. (To create a new form
library see the “Create a Form Library from InfoPath” section later in this chapter.)6. Click Next. Click Next. Click Publish. The form is published to your SharePoint form library.
FIGURE 2.9 Clicking SharePoint Server launches the Publishing Wizard.

FIGURE 2.10 Enter the location of your SharePoint site.
FIGURE 2.11 Leave the defaults.

FIGURE 2.12 Select Update the Form Template in an Existing Form Library.
TipAfter you have stepped through the publish process once, you can facilitate futurerepublishing of your form by using the Quick Publish button.
Use Your Form in SharePoint
Scenario/Problem:You need to test your published form in SharePoint.
Solution: Navigate to the form library you created in SharePoint and click the Add Document link.Your form should render in the browser, as shown in Figure 2.13. Enter some values in the text boxesand click the Submit button. An instance of the form is saved to your form library, as shown in Figure2.14. Notice the filename is using the formula we entered in our submit options.

FIGURE 2.13 Clicking the Add Document link opens a new instance of your form within the browser.
FIGURE 2.14 Submitting the form saves an instance of the form within the form library.
NoteWhen you use certain SharePoint site templates, such as the Blank Site template, theEnterprise features might not be enabled. You need to make sure that Enterprise featuresare enabled to publish the form as a browser-enabled form.

NoteThe Save and Save As buttons shown here allow the user to save the form using afilename. This circumvents the configured Submit button. Chapter 8, “Submitting andPublishing in SharePoint,” discusses how to change the buttons that appear.
Create a Form Library from InfoPath
Scenario/Problem:You need create a form library to publish and submit the form.
In the preceding section, you created the form library manually. By doing so, you understood wherethe InfoPath form was going to be published and submitted. When starting from scratch with the BlankForm template, you can use the Publish Form to a SharePoint Library option to create the form libraryand publish the form, but you also need to enter submit options after the form has been published.Therefore, you need to publish again after you have entered the submit options. It becomes a chicken-or-the-egg scenario.Nonetheless, if you create a form using the Blank Form template, you may create the form library tohouse it using the Publish Form to a SharePoint Library option, as follows:
1. From the File menu, select Publish. On the Publish page, click SharePoint Server (PublishForm to a SharePoint Library). The Publishing Wizard appears.
2. Enter your main SharePoint URL or the full site address where you want the form librarycreated and click Next.
3. Keep the defaults to create a form library and use the form in the web browser. Click Next.4. Select the Create a New Form Library option, as shown in Figure 2.15, and click Next.
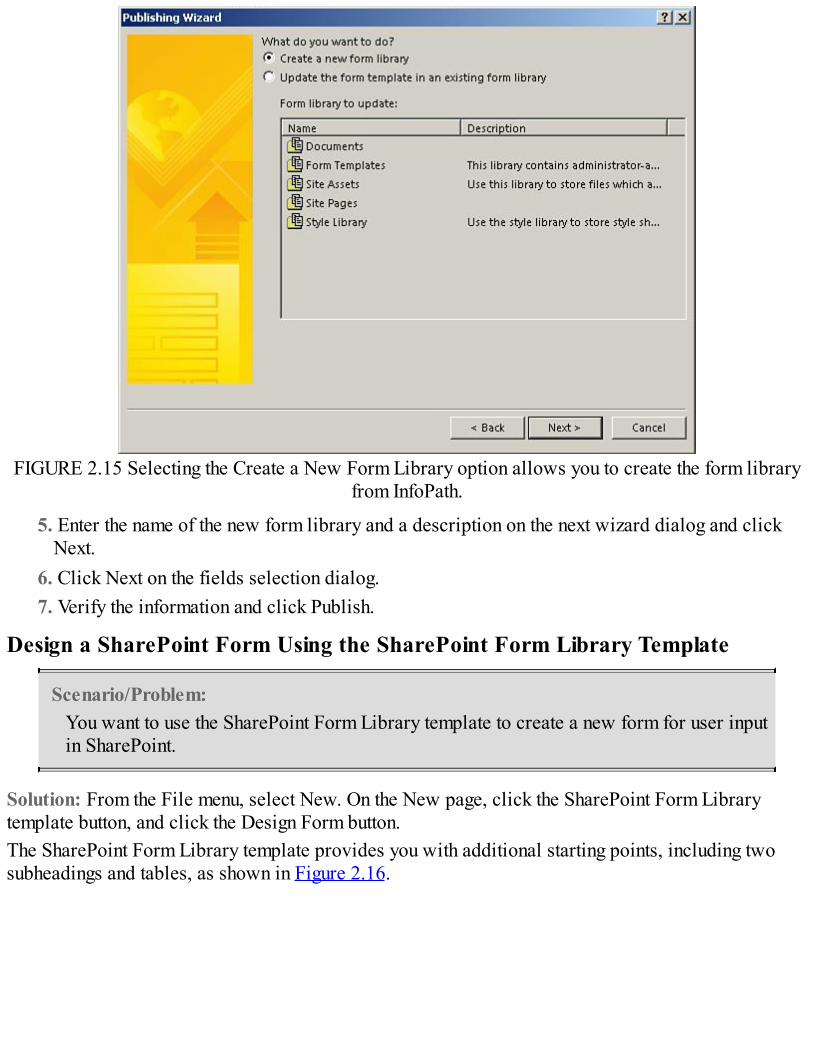
FIGURE 2.15 Selecting the Create a New Form Library option allows you to create the form libraryfrom InfoPath.
5. Enter the name of the new form library and a description on the next wizard dialog and clickNext.
6. Click Next on the fields selection dialog.7. Verify the information and click Publish.
Design a SharePoint Form Using the SharePoint Form Library Template
Scenario/Problem:You want to use the SharePoint Form Library template to create a new form for user inputin SharePoint.
Solution: From the File menu, select New. On the New page, click the SharePoint Form Librarytemplate button, and click the Design Form button.The SharePoint Form Library template provides you with additional starting points, including twosubheadings and tables, as shown in Figure 2.16.
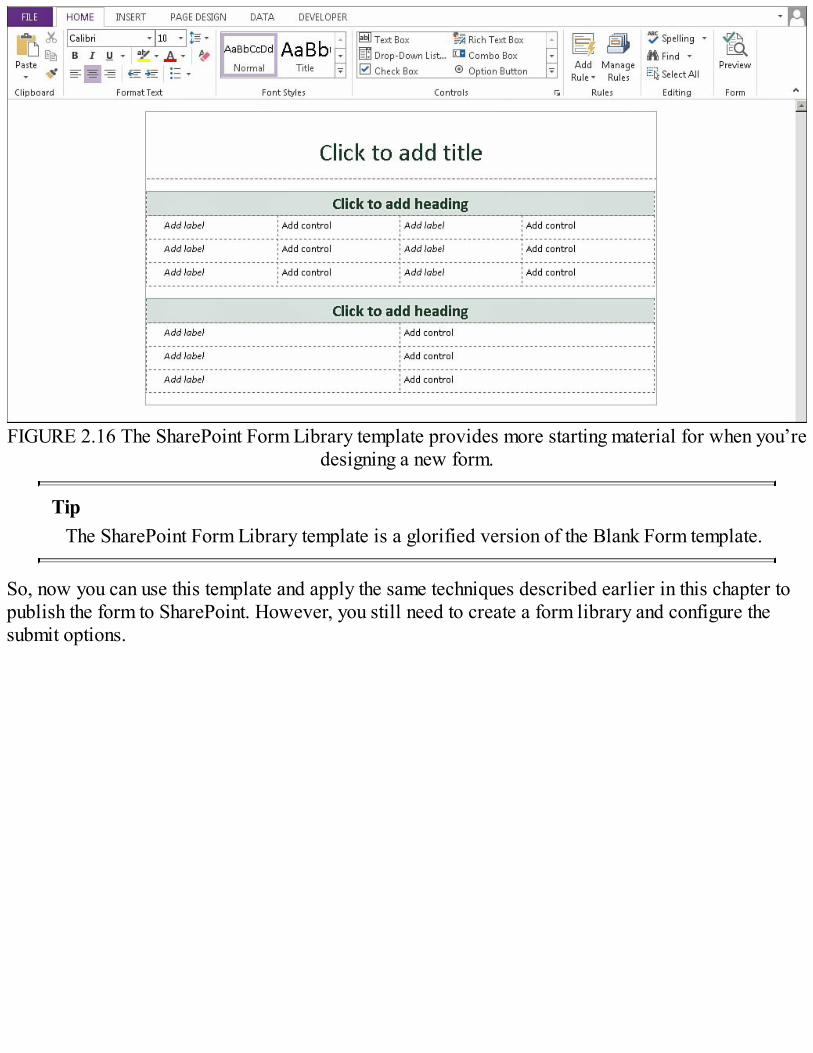
FIGURE 2.16 The SharePoint Form Library template provides more starting material for when you’redesigning a new form.
TipThe SharePoint Form Library template is a glorified version of the Blank Form template.
So, now you can use this template and apply the same techniques described earlier in this chapter topublish the form to SharePoint. However, you still need to create a form library and configure thesubmit options.

Chapter 3. Use SharePoint Form Controls
In This Chapter What Are Input Controls? What Are Object Controls? What Are Container Controls? Drag Controls on Your Form Allow Users to Enter Text Allow Users to Select a Single Selection from a List of Items Allow Users to Select Multiple Items from a List of Items Allow Users to Select an Optional Single Choice Allow Users to Select from Various Options Allow Users to Enter a Date/Time Allow Users to Select a Person Allow Users to Select from a SharePoint External Content Type Allow Users to Initiate an Action Show Optional Controls on Your Form Allow Users to Enter Multiple Instances of the Same Fields Allow Users to Choose Which Set of Fields to Use Make a Control/Field Required
Controls are items that you place on your forms to facilitate the data entry portion of the form. Somecontrols are what the user uses to enter the information (input controls), others are object controlssuch as a button, and yet other controls help contain others (container controls). All the controlsavailable when generating a SharePoint form can be rendered within a web browser, but somecontrols can be used only within the filler forms. Because this book is for SharePoint 2013, we focusonly on the controls that can be used within a web-based form.The controls in InfoPath 2013 are categorized as follows:
Input controls Object controls Container controls
This chapter briefly defines each of the controls in the preceding categories and describes variousoptions that apply to each.
What Are Input Controls?The input controls are used for data entry. They consist of a variety of types, including the following:Text box: The most common control is a text box and allows the user to enter any alphanumericcharacters. The data is stored as a string.

Rich-text box: An expansion of text box, this allows rich text to be entered. Rich text may beformatted with fonts and colors. The data is stored as Extensible Hypertext Markup Language(XHTML).Drop-down list: The drop-down list control displays a listing of available items that the user maychoose from. The underlying data has a display name and a value. The value is what is actually storedin the form. The data type can be any available data type but is usually a whole number (integer) thatmatches the identifier of the item that is selected.Combo box: This control is a combination of a drop-down list control and a text box. It displays alist of available items, but it also allows the user to enter a new value that might not be in the list tochoose from.Check box: The check box stores a Boolean value that equates to whether the box is checked orcleared. The states can be True/False or 1/0 (or Blank for either state).Option button: An option button is used in a set such that only one option may be selected within theset, with each having its own value. This is usually used when there are more than two options(otherwise a check box could be used) but not more than five or so (otherwise a drop-down listwould be warranted).Date picker: A date picker presents the user with a date entry mechanism along with a button to viewa monthly calendar. The data may be configured to store a text value, date value, or date and timevalue.Date and time picker: Similar to the date picker, but this control comes with another text box forselecting the time portion of the date and time value.Multiple-selection list box: Presents a list of items to the user that are available for selection andprovides a check box for each one, allowing more than one selection to be entered.List box: Presents a list of items that the user may choose from. Similar to a drop-down, but the usersees a window of available items. If there are more items that fit within the control, scrollbars appearso that the user may scroll through the available options.Bulleted list: Allows a user to enter one or more items in a bulleted list format. The data may bestored using any data type, but the default is a string.Numbered list: Allows a user to enter one or more items in a numbered list format. The data may bestored using any data type, but the default is a string.Plain list: Similar to the bulleted or numbered list, but there are no bullets or numbers. The data maybe stored using any data type, but the default is a string.Person/group picker: Allows for the selection of a specific user or group from SharePoint. The datastores a person entry, but the main component is the account of the user (for example,domain\username).External item picker: Allows for the selection of data items from an external content type that hasbeen configured in SharePoint using the Business Data Connectivity Services application.
What Are Object Controls?The object controls allow for items to be placed on the form to assist in the use of the form. Here arethe object controls available for a SharePoint form:

Button: A normal Windows-type button used for some configured action such as submitting the form.Picture button: A button that can present itself using a picture or icon. You can use this to enhancethe aesthetics of the form and thus improve the user experience.Calculated value: Presents a result from a formula on the form using functions and available formfields.File attachment: Enables the user to attach an external file to the form.Picture: Allows users to add pictures to your form. The picture file is either embedded in the form oris accessed through a link.Hyperlink: Displays a hyperlink that will launch a new browser window when clicked. The user canmodify the link on the form during data entry unless it is set to read-only.
What Are Container Controls?The container controls allow for the grouping and management of other controls. The containercontrols available in a SharePoint form are explained here:Section: The main container control that can contain one or more input, object, or other containercontrols.Optional section: This container does not display the controls within it unless the user is going to fillout the section (by clicking it).Repeating section: Allows for multiple instances of the contained controls.Repeating table: Allows for the data entry of multiple items that contain multiple columns.Choice group: A control that contains choice sections.Choice sections: These containers are used to optionally display sections (of controls) within achoice group.
Drag Controls on Your Form
Scenario/Problem:You cannot drag controls from the top ribbon bar onto your form.
Solution: Click the Controls Pane button on the Controls section of the Home ribbon bar to show theControls task pane as shown in Figure 3.1.
FIGURE 3.1 Clicking the Controls Pane button shows the Controls task pane.Using the Controls task pane, you can drag controls onto your form instead of selecting and area and

then clicking the control in the top ribbon bar as shown in Figure 3.2.
FIGURE 3.2 An easier way to add controls to your form is to drag them from the Controls task pane.
Allow Users to Enter Text
Scenario/Problem:You need the user to enter text into a field on your form.
Solution: Drag a text box control onto your form.The text box control allows the user to enter text (which is stored as a string) into a field.
Make a Text Box Read-OnlyTo make a text box read-only, follow these steps:
1. Right-click the text box control and select Text Box Properties to change the properties.2. Click the Display tab, as shown in Figure 3.3.

FIGURE 3.3 Checking the Read-Only check box locks your text box from data entry.
3. Check the Read-Only check box.4. Click OK.
Select this option if you want the text in the text box to be read-only. Use this only if you do not wantthe user to enter data into the field. In that case, the value of the text box should have a default value.This may be from a formula or from a data source field.
Make a Text Box MultilineIf you need to allow a user to enter multiple lines of text in a text box, you need to configure the textbox as a multiline text box.To make a text box multiline, follow these steps:
1. Right-click the text box control and select Text Box properties to change the properties.2. Click the Display tab.3. Check the Multi-Line check box.4. Click OK.
TipOnce a text box is set to multiline, it is a good idea to expand the text box on the form sothat users readily understand that multiple lines of text can or should be entered.

Allow Users to Select a Single Selection from a List of Items
Scenario/Problem:You need the user to choose only one item from a list of defined values.
Solution: Drag a drop-down list box, list box, or combo box onto your form.Any of the list box type controls allow you to display a set of values that the user may choose from.The controls in this section are considered single-select because they only allow one selected value.The values may be entered manually, from another source in the form, or from a data source. Wediscuss hooking up controls to data in Chapter 9, “Use Data in SharePoint Forms,” so for now let’senter values manually. To do this, follow these steps:
1. Drag a drop-down list box onto your form.2. Right-click the control and select Drop-Down List Box Properties. The Drop-Down List Box
Properties dialog appears, as shown in Figure 3.4.
FIGURE 3.4 From the Data tab on the Drop-Down List Box Properties dialog, you can populate yourlist with items.
3. Click the Add button and enter a value and a display name in the Add Choice dialog, as shownin Figure 3.5.

FIGURE 3.5 The Add Choice dialog allows you to add items to your list.
NoteThe example steps are for a drop-down list, but all list box type controls follow the sameconfiguration.
4. Repeat step 3 for additional items.5. Click OK.
TipIf there are many items to choose from, it is best to use the list box control and not a drop-down control.
Preview your form and you see that the drop-down list contains the items you entered, as shown inFigure 3.6.
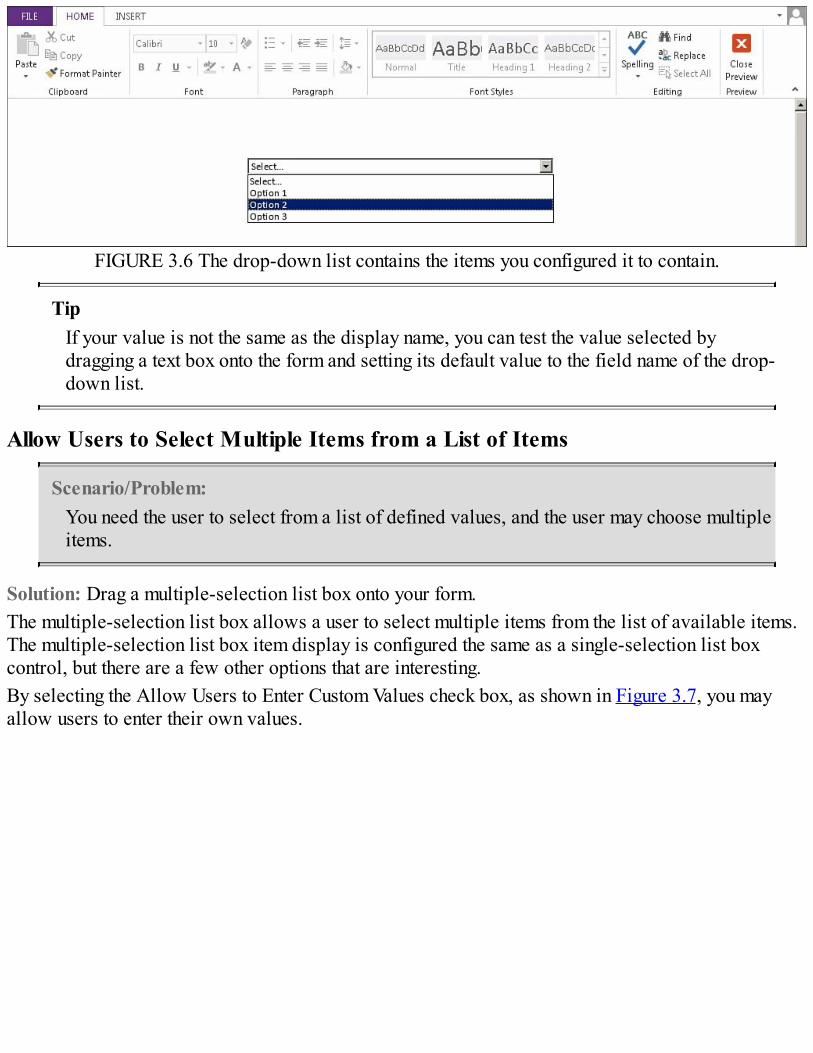
FIGURE 3.6 The drop-down list contains the items you configured it to contain.
TipIf your value is not the same as the display name, you can test the value selected bydragging a text box onto the form and setting its default value to the field name of the drop-down list.
Allow Users to Select Multiple Items from a List of Items
Scenario/Problem:You need the user to select from a list of defined values, and the user may choose multipleitems.
Solution: Drag a multiple-selection list box onto your form.The multiple-selection list box allows a user to select multiple items from the list of available items.The multiple-selection list box item display is configured the same as a single-selection list boxcontrol, but there are a few other options that are interesting.By selecting the Allow Users to Enter Custom Values check box, as shown in Figure 3.7, you mayallow users to enter their own values.

FIGURE 3.7 Check the Allow Users to Enter Custom Values check box if you want to allow users totype in a value to select.
To enforce that this field contains at least one value, check the At Least One Selection Is Requiredcheck box (also you may want to uncheck the default selection). When rendered, a red star willappear in the upper-right corner of the control area, as shown in Figure 3.8.
FIGURE 3.8 The red star in the list control indicates at least one selection is required.This differs from most controls, where you would select only the Cannot Be Blank option, asexplained in the “Make a Control/Field Required” section of this chapter.The Cannot Be Blank option on the multiple-selection list box control is used to enforce that thecustom value contains a value if selected, as shown in Figure 3.9.
FIGURE 3.9 Selecting Cannot Be Blank forces the custom entry to have a value.

TipIf you allow users to enter custom values, you should always select Cannot Be Blankregardless of whether at least one item needs to be selected. Otherwise, you might have ablank entry and not know whether the user forgot to, or just didn’t want to, enter a value.
Allow Users to Select an Optional Single Choice
Scenario/Problem:You need the user to select an optional single choice.
Solution: Drag a check box control onto your form.Use a check box when you have an optional value that the user can check off. The value is stored as aTrue/False (Boolean) data type.
TipThe field name that appears after placing a check box on your form is only a label and isnot the configured field name. Just select the field name (for example, field2) and type thetext the user should see.
To configure the check box properties, follow these steps:1. Drag a check box control onto your form.2. Right-click the control and select Check Box Properties. The Check Box Properties dialog
appears, as shown in Figure 3.10.
FIGURE 3.10 The check box properties allow you to configure the Boolean values.
3. Select the Checked option button if the check box should be checked by default.4. Select the value when the check box is cleared.

5. Select the value when the check box is checked.6. Click OK.
The values that you select may depend on how the consumer of the information will use those valuesor store them.
TipUse reverse logic (for example, Checked=FALSE, Cleared=TRUE) if the consumer isasking the opposite question. For example, the check box might be to receive emailnotifications, whereas the list or destination value might be a flag to not send notifications.
Allow Users to Select from Various Options
Scenario/Problem:You need the user to select an optional single choice from multiple selections.
Solution: Drag an option button control onto your form and select the number of options.When you select or drag an option button control onto your form, the Insert Option Buttons dialogappears, as shown in Figure 3.11.
FIGURE 3.11 Entering the number of option buttons to insert places that many controls on your form.Although this inserts multiple controls, they are all bound to the same field. The option that the userselects is the value that is entered in that field. The configuration for the option button is similar to thecheck box, but you need to configure each option button control.To configure the option buttons, follow these steps:
1. Drag an option button your form.2. Enter the number of option buttons. Click OK.3. Right-click the first option button and select Option Button Properties. The Option Button
Properties dialog appears, as shown in Figure 3.12.

FIGURE 3.12 From the Option Button Properties dialog, you can configure each option’s values.
4. Enter the value for the first option button.5. Check the This Button Is Selected by Default check box if you want this option button to be
automatically selected.6. Click OK.7. Repeat steps 3–6 for the other option buttons.
TipUse option buttons when you have a static list of three to five items to choose from. Toomany options would warrant a drop-down list. If you have only two options, considerwhether you can use a check box.
Allow Users to Enter a Date/Time
Scenario/Problem:You need the user to enter a date or date and time on your form.
Solution: Drag a date picker or date and time picker control onto your form.The date picker and date and time picker present a text box with a calendar button for the user toselect a date. The date and time picker displays an additional text box for the time component of thefield.The default data type for the date picker is date, but you may change this to date and time byconfiguring the properties and changing the data type, as shown in Figure 3.13.

FIGURE 3.13 You can add the time element to the field by changing the data type of the date picker.The date picker will still only show the date component to the user even if you change the data type,but the time component will be stored in the field. Figure 3.14 shows a form that demonstrates howeach control is rendered and what value is stored.
FIGURE 3.14 Using different date controls with different data types may or may not store the timevalue.
TipIf the consumer of the form stores the date entry as a string, you should switch your datecontrol’s data type to Text to avoid any parsing conflicts.
Allow Users to Select a Person
Scenario/Problem:You need to allow the user to select a SharePoint user in your organization
Solution: Drag a person/group picker control onto your form.The person/group picker allows the user of the form to select a person who is a user within yourSharePoint portal. The control presents a text box with an Address button and Check Names button

for selection of users and confirmation of user entry, respectively.This control has several configuration options. To configure the person/group picker control, followthese steps:
1. Right-click the person/group picker control on your form and select Person/Group PickerProperties.
2. Open the SharePoint Server tab and enter the URL of your main SharePoint site, as shown inFigure 3.15.
FIGURE 3.15 The SharePoint Server tab allows you enter the SharePoint site to select users.
3. Open the General tab. Here you have several options, as shown in Figure 3.16.
FIGURE 3.16 The General tab determines which people can be selected and whether multipleselections are allowed.
4. Select Allow Multiple Selections if the people/group picker should allow the user to select

more than one person or group.5. Select People and Groups if you want to allow the selection of both SharePoint users and
SharePoint groups.6. Select SharePoint Group and select a group from the drop-down to limit the SharePoint users
(or groups) that are available to be selected.7. Click OK.
Allow Users to Select from a SharePoint External Content Type
Scenario/Problem:You need to allow the user to select a value from a SharePoint external content type.
Solution: Drag an external item picker control onto your form.The external item picker enables you to configure a connection to an external content type inSharePoint. The external content type is created and managed by the Business Data Connectivityservices on your farm.The external item picker requires many configuration steps, as discussed in Chapter 9.
Allow Users to Initiate an Action
Scenario/Problem:You need to allow the user to click an object to perform an action.
Solution: Drag a picture button or button object control on to your form.The button object controls allow actions to occur when clicked by the user. The actions areconfigured using rules, which are discussed in Chapter 4, “Create SharePoint Form Rules.”
TipUse a picture button to enhance the aesthetics of your form.
You configure a picture button with an image. Alternatively, you may also configure a hover picturethat displays when users hovers over the button with their mouse. To configure pictures for yourimage button, follow these steps:
1. Right-click the picture button control on your form and select Picture Button Properties. ThePicture Button Properties dialog appears, as shown in Figure 3.17.

FIGURE 3.17 Configuring a picture button with a hover picture alerts the user that the image isclickable.
2. On the General tab in the Picture section, click the Browse button and select a picture file fromyour file system. Click Open.
3. In the Dynamic Behavior section, click the Browse button and select a picture file from yourfile system that will be displayed when the user moves the mouse over the button. Click Open.
4. Click OK.
NoteDon’t be alarmed by the name that is entered in the drop-down when you select an imagefile. InfoPath embeds the images into the form and designates a system name for them. SeeAppendix C, “Add Picture Files to InfoPath,” to learn how to show the actual imagefilename.
Show Optional Controls on Your Form
Scenario/Problem:You want to have optional controls display on the form but only if the user wants to enterthe optional information.
Solution: Drag an optional section control container onto your form. Add the controls/fields that areassociated with the optional section into the optional section control.

The optional section will, by default, show the controls it contains only if the user clicks thepresented link, as shown in Figure 3.18.
FIGURE 3.18 Clicking the Insert link displays the optional section to the user.
TipTo preserve screen real estate, use an optional section for items that will not be used oftenin the form. You may also modify the Click Here to Insert text by editing the SectionProperties.
Allow Users to Enter Multiple Instances of the Same Fields
Scenario/Problem:You want to enable users to enter multiple instances of information in a set of fields.
Solution: Drag either a repeating table or a repeating section control onto your form.The repeating table presents fields in one or more columns and allows the user to insert multiplerows for data entry into the table, as shown in Figure 3.19.
FIGURE 3.19 The repeating table allows the user to enter multiple rows of similar information.
The repeating section presents controls for user input and allows the user to add another instance ofthe section, as shown in Figure 3.20.

FIGURE 3.20 The repeating section replicates the controls for the user to create a new entry.
Allow Users to Choose Which Set of Fields to Use
Scenario/Problem:You need the user to select which section of controls/fields to fill out.
Solution: Drag a choice group control onto your form and enter controls into the choice sections.Choice sections must be contained within a choice group. If you attempt to drag a choice section ontoyour form, it will appear inside a new choice group. When you place a choice group onto your form,two choice sections are automatically placed within the container, as shown in Figure 3.21.
FIGURE 3.21 The choice group container allows multiple-choice sections.
When the default section is rendered on the form, the user may remove or replace it with another, asshown in Figure 3.22.

FIGURE 3.22 Using the section menu button, the user may replace the current section with another.
TipIf the user selects the Remove menu option, the entire section is removed from the form.There is no way for the user to bring it back. Therefore, it is a good idea to disable theRemove menu option.
To modify the menu items that appear within the choice section, follow these steps:1. Right-click the choice section and select Choice Section Properties. The Choice Section
Properties dialog appears.2. Click the Customize Commands button.3. Select an action, and then modify the text in the Command name box, as shown in Figure 3.23.
This is the text that appears in the section option menu.
FIGURE 3.23 Customizing the commands determines what actions the user will see and how theywill read.
4. Uncheck the Remove Action check box to disable the remove option. The Remove menu itemwill not appear when the user selects the option menu.
5. Click OK on the Section Commands dialog.6. Click OK on the Choice Sections Properties dialog.7. Repeat steps 1–6 for each additional choice section.
NoteThe Insert command is not applicable to the Choice section as the user is selectingbetween one of the available choices and not actually inserting a new instance of thesection.
Make a Control/Field Required
Scenario/Problem:You need to make sure the user enters a value or makes a selection for a particular field.
Solution: Check the Cannot Be Blank check box within the properties of the control.Within each control’s properties, on the Data tab, there is a Validation section that contains a checkbox labeled Cannot Be Blank. Checking this check box enforces the need for a selection or entry bythe user. The form will not be allowed to be submitted until an entry is made.

Chapter 4. Create SharePoint Form Rules
In This Chapter Hide or Show Controls Based on a Selected Option Format an Entry Based on a Condition Implement a Validation Rule Add an Action Rule to a Button Use Rules for Form Submission Use Rules for Form Loading Validate Data Entry Using Patterns
This chapter explains how to create rules and discusses various scenarios where rules apply. Usingrules in your SharePoint form helps bring your form to life and provides a more interactiveexperience with the user.Rules are ways you can add intelligence to your form without actually coding. Rules use conditions todetermine when they should function. The functioning of a rule is called an action.You may use rules to hide controls, sections, and so on based on certain conditions. You can also userules for custom validation. Adding actions to buttons involves rules, as well. Without rules, youwould need to be a .NET developer to handle even the simplest logic.
Hide or Show Controls Based on a Selected Option
Scenario/Problem:You need to hide or display controls based on a user selection.
Solution: Group the controls within a section and add a formatting rule to the section.This will probably be one of the first things you need to do on your form that requires a rule. It workssimilarly to an optional section, but you control when the section appears based on a user selection.Formatting rules not only apply to font styles but also have the option to hide a control or disable acontrol.For this scenario, we use a check box and a section of controls, as shown in Figure 4.1. When thecheck box is checked, we want show the controls; otherwise, they should be hidden.

FIGURE 4.1 Adding controls within a section assists in changing the visibility.Because we will be hiding or showing the section, we need to add the rule to the section, as follows:
1. Select the section of controls you want to hide and show.2. Click Manage Rules on the Home tab of the ribbon bar. The Rules pane appears, as shown in
Figure 4.2.

FIGURE 4.2 The Rules pane allows you to manage the rules for the selected control.
3. Click the New button and select Formatting from the drop-down list.4. Replace Rule 1 as the name with Hide.5. Under the Condition section, click the None link. The Condition dialog appears, as shown in
Figure 4.3.
FIGURE 4.3 Adding conditions builds the logic for your rule.
6. In the first drop-down, select Select a Field or Group. The Select a Field or Group dialogappears, as shown in Figure 4.4.

FIGURE 4.4 The Select a Field or Group dialog allows you to make selections outside of the sectioncontrol.
TipClick the Add button to string together multiple conditions together using AND or ORlogic. You cannot use parentheses, so it is better to use all ANDs or all ORs. You areallowed up to five condition entries.
7. Select the field that will control the visibility of the section. In this example, the check box isbound to the showSection field. Click OK.
8. In the third drop-down box of the Condition dialog, select FALSE. Your condition dialogshould now look like Figure 4.5. Click OK.
FIGURE 4.5 When the check box is not checked (FALSE), the condition will be met.
TipTo determine which conditions to enter, think about the action that will be taken and whenyou want that to occur. In this case, when the check box is not checked, we want to hidethe control. Because the formatting option is to Hide the Control (not Show the Control),think about when you want the section hidden.
9. Finally, back in the Rules pane, click the Hide This Control check box. Your rule should nowappear as in Figure 4.6.

FIGURE 4.6 The configured rule details appear in the Rules pane.Preview your form to test out the rule. The section should not appear at first. When you click thecheck box, the rule should kick in and a Controls section should appear.
TipUse the same logic to hide or show sections using other types of controls, such as anoption button or drop-down list.
Format an Entry Based on a Condition
Scenario/Problem:You want to change the font style of an entry based on that entered value.
Solution: Add a formatting rule to the control that is configured to change the font properties.A classic example that fits in this scenario is changing a negative number to a red color. Thereforelet’s use a text box that is used to enter numbers, as shown in Figure 4.7. The field is configured todisplay in Decimal format, and by clicking the Format button, you can change the display format toCurrency.

FIGURE 4.7 Configuring a text box as decimal allows for currency entry and display.To configure the formatting rule for the Amount field, follow these steps:
1. Select the Amount text box and click Manage Rules on the ribbon bar (from the Home tab). TheRules pane appears. (If the Rules pane is already shown, clicking Manage Rules again willclose it.)
2. Click New in the Rules pane and select Formatting.3. Click the None link in the Condition section. The Condition dialog appears.4. In the Condition dialog, select Is Less Than in the second drop-down.5. In the third drop-down, select Type a Number, and then enter 0 into the text box that appears
over the drop-down, as shown in Figure 4.8. Click OK.
FIGURE 4.8 Selecting Type a Number allows you to enter a value into the third entry box.
6. Back in the Rules pane, select the font color in the Formatting section, as shown in Figure 4.9.For this example, we change the font color to red.

FIGURE 4.9 In the Formatting section, you can specify which font styles will be applied.
7. Save and preview your form. Figure 4.10 shows a preview example.
FIGURE 4.10 Entering a negative value turns the font color to red.
Implement a Validation Rule
Scenario/Problem:You need to validate the entered value of a field.
Solution: Add a validation rule to the control/field.Let’s build upon the previous scenario. The form is a request form, so the amount has to be more than

zero (although showing a red negative number did look nice). You need to add a validation rule to theAmount field.
TipValidation rules prevent your form from being submitted with wrong values.
To make sure the value is greater than zero, follow these steps:1. Select the Amount text box and click Manage Rules on the ribbon bar (from the Home tab). The
Rules pane appears.2. Click New in the Rules pane and select Validation.3. Enter a new name for the rule.4. Click the None link in the Condition section. The Condition dialog appears.5. In the Condition dialog, select Is Less Than or Equal To in the second drop-down.6. In the third drop-down, select Type a Number, and then enter 0 into the text box that appears
over the drop-down. Click OK.7. Enter a screen tip, such as Amount must be greater than zero. Your rule configuration should
look similar to Figure 4.11.
FIGURE 4.11 Validation rules are applied based on the condition.

TipThe conditions for validation rules should be the ones that make the entry invalid. Reverselogic thinking applies here. In our example, we wanted values greater than zero, so weadded a validation rule for values that were less than or equal to zero.
8. Save and preview your form. Figure 4.12 shows a preview example.
FIGURE 4.12 Entering a value less than or equal to zero produces a validation error.
Add an Action Rule to a Button
Scenario/Problem:You need to perform an action when the user clicks a button.
Solution: Add an action rule to the button.An action rule, as its name implies, performs an action. This scenario uses a button control, but youmay apply action rules to other types of controls, as well.To add an action rule to a button, follow these steps:
1. Select the button on your form and click Manage Rules on the ribbon bar. The Rules paneappears.
2. Click New in the Rules pane and select Action.3. Enter a new name for the rule.4. Click Add and select an action to take, as shown in Figure 4.13.
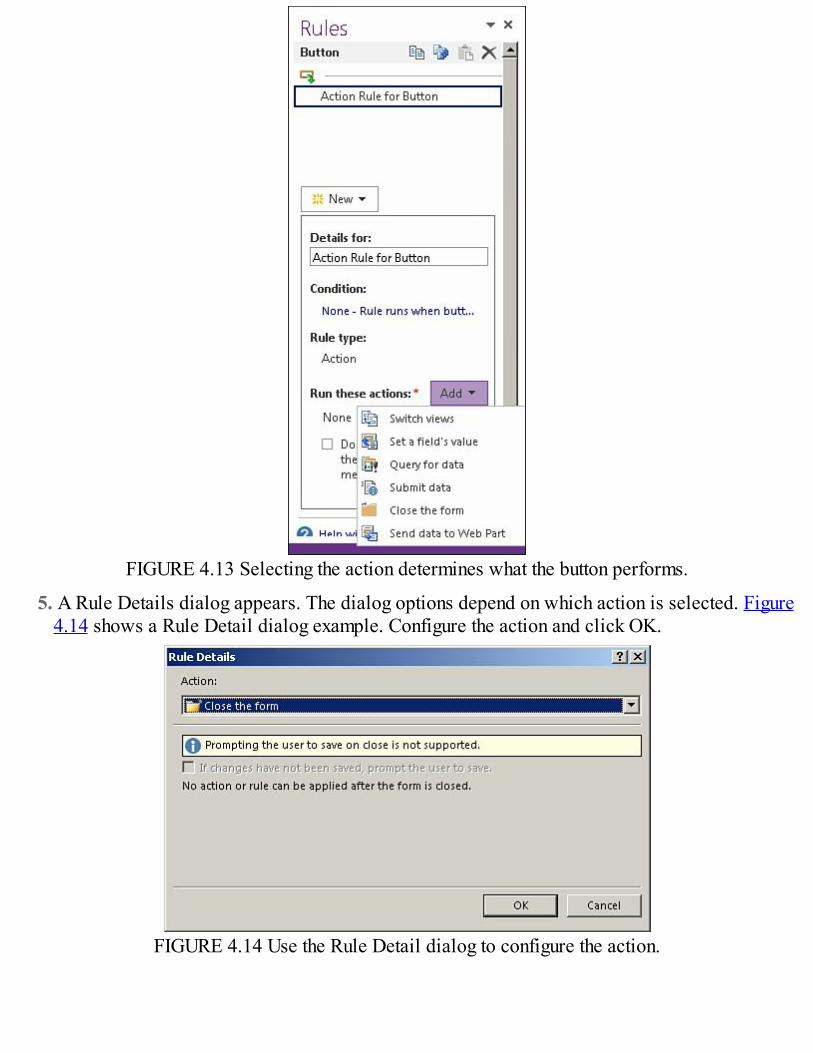
FIGURE 4.13 Selecting the action determines what the button performs.
5. A Rule Details dialog appears. The dialog options depend on which action is selected. Figure4.14 shows a Rule Detail dialog example. Configure the action and click OK.
FIGURE 4.14 Use the Rule Detail dialog to configure the action.

TipYou do not need to configure a condition on a button, because the rule is fired whenclicked. If you need a condition, think about moving that rule to the control or field that isinvolved.
Use Rules for Form Submission
Scenario/Problem:You want to perform actions during the submission of your form.
Solution: Configure submit options to use rules and then configure form submit rules.The form submit rules allow you to enter one or more rules (or actions) to handle the submission ofyour form instead of just letting the form get submitted using the Submit connection.Before you use the rules, you first need to configure the submit options in the form as follows:
1. On the Data ribbon bar, click Submit Options. The Submit Options dialog appears.2. In the Submit Options dialog, select the Perform Custom Actions Using Rules option, as shown
in Figure 4.15. (Make sure that the Allow Users to Submit This Form check box is checked.)
FIGURE 4.15 Submit Options allow you to configure the submission of the form.
3. For this example, click the Advanced button and change the After Submit option to Leave theForm Open, as shown in Figure 4.16.
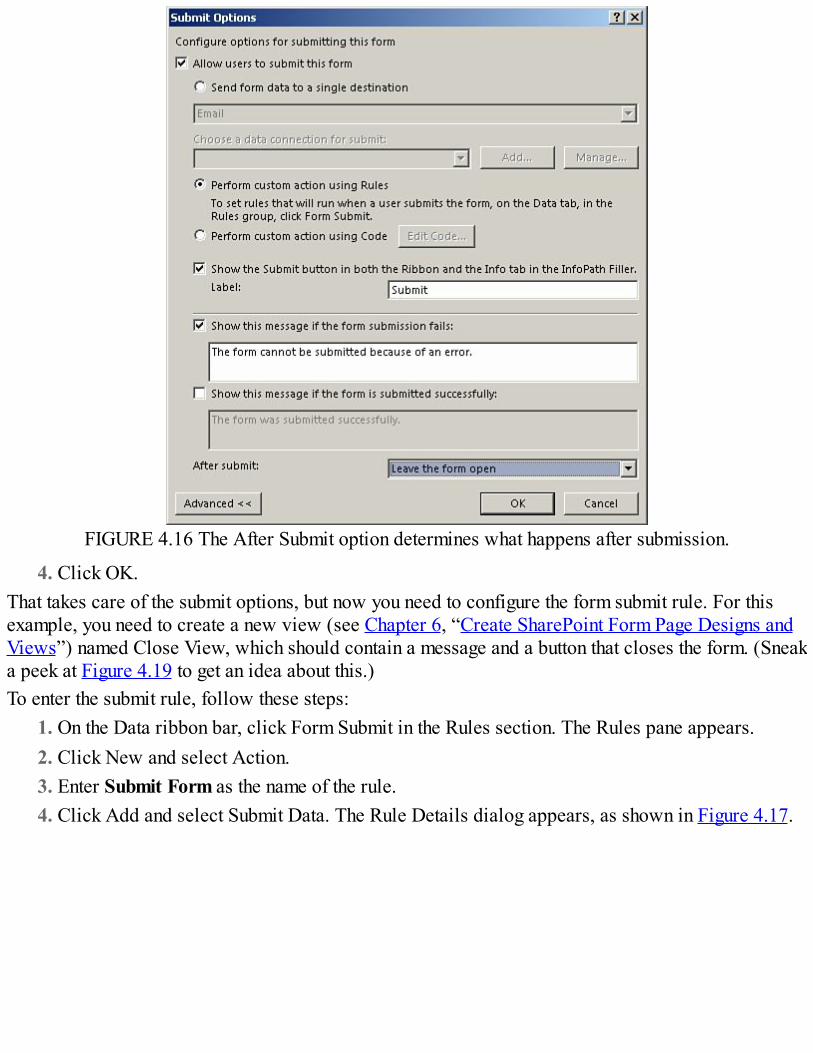
FIGURE 4.16 The After Submit option determines what happens after submission.
4. Click OK.That takes care of the submit options, but now you need to configure the form submit rule. For thisexample, you need to create a new view (see Chapter 6, “Create SharePoint Form Page Designs andViews”) named Close View, which should contain a message and a button that closes the form. (Sneaka peek at Figure 4.19 to get an idea about this.)To enter the submit rule, follow these steps:
1. On the Data ribbon bar, click Form Submit in the Rules section. The Rules pane appears.2. Click New and select Action.3. Enter Submit Form as the name of the rule.4. Click Add and select Submit Data. The Rule Details dialog appears, as shown in Figure 4.17.

FIGURE 4.17 Configuring the connection determines where it will be submitted.
5. Select the data connection to submit the form. (If you don’t have a data connection configured,see Chapter 2, “Create a SharePoint Form with InfoPath Designer,” for an example.) Click OK.
6. Click Add again to add another action. Select Switch Views. In the Rules Details dialog,change the view to Close View, as shown in Figure 4.18. Click OK.
FIGURE 4.18 Selecting a view determines which one will be displayed.
NoteThe Form Submit button on the Data tab on the ribbon will be disabled if the SubmitOptions are not set to Perform custom action using Rules.
7. Save and publish your form to SharePoint. After publishing your form to SharePoint, you maycreate a new instance and test the rules. Submitting the form saves a copy and displays the closeview, as shown in Figure 4.19.

FIGURE 4.19 Submitting the form saves an instance in the library and changes the view.
Use Rules for Form Loading
Scenario/Problem:You want to perform initial actions when the form is rendered.
Solution: Configure form load rules.The form load rules are executed when the form is loaded. If you need to set initial values or performother actions before the user enters data into your form, this is where those actions are configured.To add rules for form loading, follow these steps:
1. On the Data ribbon bar, click Form Load in the Rules section. The Rules pane appears.2. In the Rules pane, click New and select Action.3. Enter a name for your rule.4. Select the action you want to perform. The Rule Details dialog appears.5. Configure the rule details and click OK.6. Add a new rule or additional actions as needed.
Validate Data Entry Using Patterns
Scenario/Problem:You need to ensure that the entered value of a field (such as an email address or phonenumber) is properly formatted.
Solution: Use the pattern-matching condition in your rule.You can use built-in patterns to validate data entry on your form. Two of the most common ones, emailand URL, are available in the Add Rules shortcut menu items when a control is selected.When selecting a condition from the Add Rules menu, you must choose an action or formatting rule tocreate, as shown in Figure 4.20. The pattern-matching rule is created with two conditions, as shownin Figure 4.21.

FIGURE 4.20 Selecting the action or formatting from the side menu creates the rule.

FIGURE 4.21 Creating a rule from the Add Rules menu auto-populates the conditions and screen tip.
TipWhereas the Add Rules button allows you to quickly generate common rules, creatingrules from scratch helps you understand what you are creating; use the Add Rules button togenerate examples to learn from.
Click one of the conditions to see how they are configured. The Condition dialog shows bothconditions for the rule.Select the third drop-down (which currently shows URL) and select the Select a Pattern option.Bingo! The Data Entry Pattern dialog appears, as shown in Figure 4.22. It’s almost like finding ahidden treasure.

FIGURE 4.22 Configure the Data Entry Patterns dialog to define valid entries.
TipNotice the Field Is Not Blank condition. This ensures you are not complaining about anentry before anything has been entered. Although it might not be necessary in all cases, itdoes reduce potential user annoyance.
As you can see, six prebuilt patterns and an option to create a custom one are available. Use the InsertSpecial Character drop-down to assist in generating a custom pattern.For example, if you want to make sure a dollar amount is between $0.00 and $9.99 and is enteredwith the dollar sign, you can create the pattern $\d\.\d\d, as shown in Figure 4.23.
FIGURE 4.23 The Example line in the dialog helps you preview the pattern.

Chapter 5. SharePoint Form Functions
In This Chapter Use the SharePoint URL Functions Calculate a Future Date Get the Current SharePoint User Remove Leading and Trailing Spaces from a Field Value Remove All Spaces from an Entry Default a Blank Amount to Zero Calculate the Sum of All Items Determine a Count of the Items Entered Obtain a Portion of an Entered String Obtain the Username from SharePoint Online (Office 365) Add Years to a Date Preserving the Month and Day
This chapter explores the various functions that are available within InfoPath. Functions enable you tomanipulate, construct, or obtain data within your form. Functions can be used throughout InfoPath inthe following areas:
Default values for fields/controls Calculated value control Naming the form instance on submission Rules
Use the SharePoint URL Functions
Scenario/Problem:You need to obtain the SharePoint URLs where the form is published.
Solution: Use the built-in URL functions.The URL functions provide you with absolute SharePoint URLs for the following locations:
List URL: The SharePoint list URL where the form is published Server Root URL: The root SharePoint server URL Site Collection URL: The SharePoint site collection path where the form is published Site URL: The SharePoint site path where the form is published
Figure 5.1 shows the respective functions.

FIGURE 5.1 Selecting URL displays the available SharePoint URL functions.To demonstrate the differences in the functions and paths, an example form was published to a formlibrary, in a team site, located in a site collection within the /sites/ managed path of the root serversite collection. To make this easier, the form library exists athttp://sp2013/sites/SiteCollection/TeamSite and is named Form Library (for originality of course).When using the SharePoint URL functions on a form at the location described, you should see thefollowing values:
TipIf your form library exists in the root site collection, the values returned for the site, sitecollection, and root server would be the same.
List URL: http://sp2013/sites/SiteCollection/TeamSite/FormLibrary/ Server Root URL: http://sp2013/ Site Collection URL: http://sp2013/sites/SiteCollection/ Site URL: http://sp2013/sites/SiteCollection/TeamSite/
Let’s look at that example form in SharePoint (see Figure 5.2).

FIGURE 5.2 Using the SharePoint URL functions helps gain key path information.
TipSharePoint URL functions come in handy when using workflows or other areas where youneed to link to locations in your SharePoint portal.
Calculate a Future Date
Scenario/Problem:You need to automatically create a future date (such as a due date) that is x days fromtoday (or other date).
Solution: Use the addDays() with the today() function or a form date field.Date functions are common in business application forms, especially those involved in workflows. Tocalculate a date in advance, use the addDays function, which takes a date as the first parameter anda number of days as the second parameter.So, if you need to figure out 30 days from today, you use addDays(today(), 30), as shown inFigure 5.3.

FIGURE 5.3 Adding days to today produces the future date which is x days from now.If you have another date field on your form (in a date picker for example), you can easily use that asyour reference date rather than today() by inserting that field into the addDays() function, asshown in Figure 5.4.
FIGURE 5.4 Using a field value in the addDays() function produces a future date based on anotheruser entry.
Get the Current SharePoint User
Scenario/Problem:You need to know which SharePoint user is using the form.
Solution: Use the userName() function.The username() function returns the account name of the current SharePoint user. A great examplewhere this can be used is within a people/group picker control. The people/group picker control

produces a repeating Person group that contains fields related to the user account. You want to locatethe AccountID field, as shown in Figure 5.5.
FIGURE 5.5 Using the people/group picker produces a special repeating group of fields.
Set the default value of the AccountID field to username(), as shown in Figure 5.6.

FIGURE 5.6 Using the userName() will default the entry to the user filling out the form.
When the form is rendered, the people/group picker displays the current username in the text box, asshown in Figure 5.7.
FIGURE 5.7 The result of the userName() function is presented in the people/group picker.
Notice the name is in red. The account is not validated. This can be easily corrected by using theuserName() function again for the DisplayName field. You may also default the AccountType tothe text value of User. Figure 5.8 shows the results of the doing so.
FIGURE 5.8 Defaulting both the DisplayName and AccountID to userName() allows the useraccount to be validated.
TipWhen a SharePoint group is selected in the people/group picker, the AccountType is set toSharePointGroup. When an AD group is selected the AccountType is set toSecurityGroup. You may use this field to know what kind of account was entered.
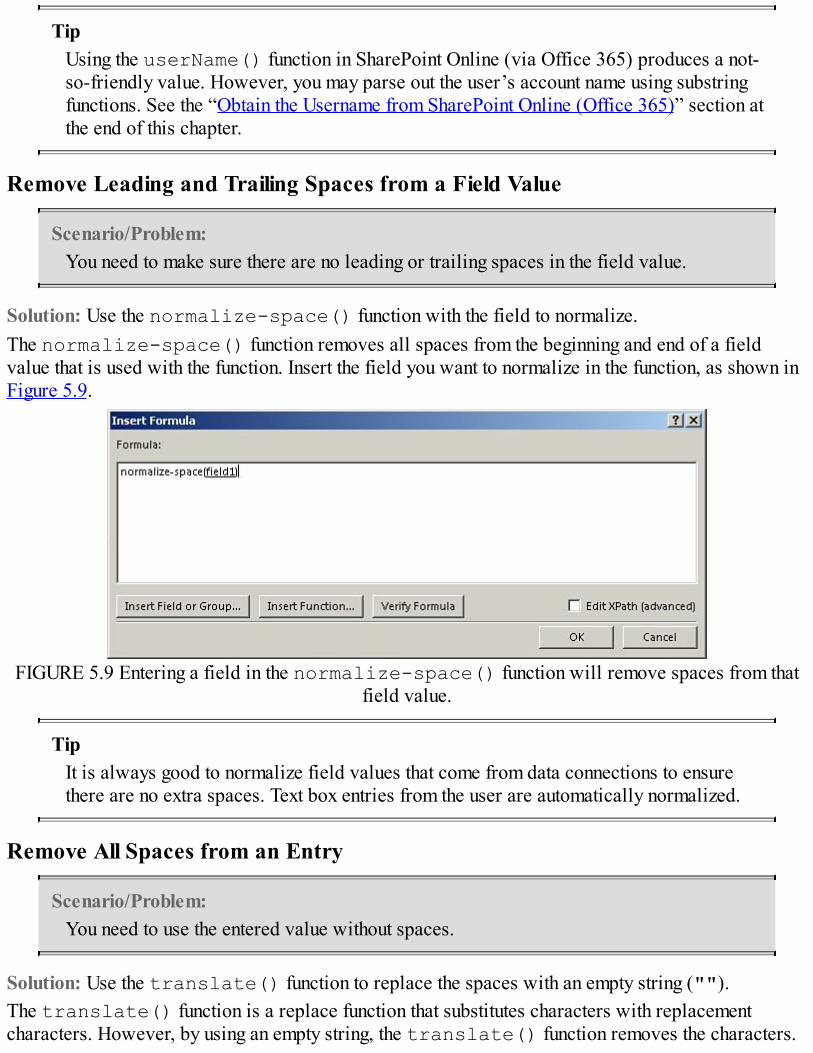
TipUsing the userName() function in SharePoint Online (via Office 365) produces a not-so-friendly value. However, you may parse out the user’s account name using substringfunctions. See the “Obtain the Username from SharePoint Online (Office 365)” section atthe end of this chapter.
Remove Leading and Trailing Spaces from a Field Value
Scenario/Problem:You need to make sure there are no leading or trailing spaces in the field value.
Solution: Use the normalize-space() function with the field to normalize.The normalize-space() function removes all spaces from the beginning and end of a fieldvalue that is used with the function. Insert the field you want to normalize in the function, as shown inFigure 5.9.
FIGURE 5.9 Entering a field in the normalize-space() function will remove spaces from thatfield value.
TipIt is always good to normalize field values that come from data connections to ensurethere are no extra spaces. Text box entries from the user are automatically normalized.
Remove All Spaces from an Entry
Scenario/Problem:You need to use the entered value without spaces.
Solution: Use the translate() function to replace the spaces with an empty string ("").The translate() function is a replace function that substitutes characters with replacementcharacters. However, by using an empty string, the translate() function removes the characters.

Therefore, to remove all spaces from a value, use the translate() function to find all spaces andreplace them with nothing, as shown in Figure 5.10.
FIGURE 5.10 Replacing a character with an empty string removes the occurrence of that character.
Figure 5.11 shows a preview of the results.
FIGURE 5.11 Using translate() to remove spaces sets the field to the entered text without thespaces.
Default a Blank Amount to Zero
Scenario/Problem:You need to ensure that at least a zero is entered into an Amount field and it is not leftblank.
Solution: Use the nz() function.The nz() function defaults a field value to zero if it is left blank. This comes in handy when youneed to calculate values or if a data connection can’t accept a blank value. Simply use the nz()function and insert the field that contains the value, as shown in Figure 5.12.

FIGURE 5.12 Using nz() ensures that the value will not be blank.Previewing the results is shown in Figure 5.13.
FIGURE 5.13 Leaving the Amount field blank makes the nz() function produce a zero.
TipUse the nz() function on a field itself instead of enforcing a rule or validation of cannotbe blank. This will be one less error the user can make, assuming that having a zero in thefield is an acceptable value.
Calculate the Sum of All Items
Scenario/Problem:You need to calculate a total sum for multiple numeric entries in your form.
Solution: Use the sum() function against the repeating group’s Amount field.The sum() function will total the values of entered within a group of fields. For this example, use arepeating table that contains request items. Each request item has an Item and ItemAmount field, asshown in Figure 5.14.

FIGURE 5.14 Creating a repeating group assists in performing math functions.I will set another field on the form to use the sum() function against the ItemAmount, as shown inFigure 5.15.

FIGURE 5.15 Using the sum() function against a repeating group’s amount field will total all valuesentered for each item.
Preview the form and enter values into the repeating table, as shown in Figure 5.16. The sum()function totals all amounts entered.
FIGURE 5.16 Entering items in the repeating table allows the sum() function to produce a runningtotal.
TipYou may use min(), max(), and avg() in the same way as sum(). The previewfigure in this section shows examples of their outputs.
Determine a Count of the Items Entered
Scenario/Problem:You need to know how many items have been entered into a repeating group.
Solution: Use the count() function against the repeating group’s amount field.The count() function returns the number of items entered within a repeating group. For count()to work, it must be applied to the repeating group, as shown in Figure 5.17.

FIGURE 5.17 Inserting the repeating group field into the count() function produces the number ofitems in the group.
Placing a field on the form that contains this function shows the number of items entered, as shown inFigure 5.18.
FIGURE 5.18 Entering new items into the repeating group increases the count.
NoteThe count() function will return how many items exist regardless if they containvalues.
Obtain a Portion of an Entered String
Scenario/Problem:You need to parse out or only grab a portion of an entered text value.

Solution: Use one of the substring() functions.The substring() functions enable you to grab a portion of the string value that was entered. Thefunctions available are as follows:
Substring(text, start position, character count): The substring() function returns thestring from the text field starting at the start position and ending based on the character count. Substring-After(text, find text): The substring-after() function returns the string inthe text field after the specified characters. Substring-Before(text, find text): The substring-before() function returns the stringin the text field before the specified characters.
You may also combine the substring() function with the string-length() function todetermine how many characters to return, as shown in Figure 5.19, which presents a formula forremoving the first three characters. Previewing the results of the substring() functions are shownin Figure 5.20.
FIGURE 5.19 Using string-length() with substring() allows you to strip off a beginningnumber of characters.

FIGURE 5.20 Using the substring() functions returns only portions of the entered value.
TipCombine the substring() functions together to achieve some fancy string parsing. Forinstance, to obtain SharePoint from the entered text in Figure 5.20, you can combinesubstring-after and substring-before: substring-before(substring-after(EnteredText, ";"), ";") as shown at thebottom of the figure.
Obtain the Username from SharePoint Online (Office 365)
Scenario/Problem:You want to retrieve the current user name in a form rendered in SharePoint Online (viaOffice 365).
Solution: Use the userName() function with the substring-after() function.The userName() function in SharePoint online returns a not-so-friendly string. However, thefriendly username is part of those characters. Therefore, you may use combined substring-after()functions to parse the friendly username, as shown in Figure 5.21.
FIGURE 5.21 Using combined substring-after() functions returns only the readableusername in SharePoint Online.
The formula used is as follows:Click here to view code image
substring-after(substring-after(userName(), "|"), "|")
If a domain name is used within the usernames, you can easily get the string after the occurrence of thebackslash (“\”) instead of nested inside the functions, as explained here.

Add Years to a Date Preserving the Month and Day
Scenario/Problem:You need to add a certain amount of years to a date but want to keep the same month andday.
Solution: Use the substring functions along with date functions.Simply adding 365 days for each year you need does not always produce the correct results becauseof leap years. Therefore, if your start date is 3/21/2013 and you need to add 5 years to produce3/21/2018, you need to use a formula:Click here to view code image
concat(string((substring-before(string(EnteredDate), "-") + Years)),"-", substring-after(EnteredDate, "-"))
Figure 5.22 shows an output example.
FIGURE 5.22 Using the formula to add years eliminates leap years.

Chapter 6. Create SharePoint Form Page Designs and Views
In This Chapter Change the Current View Name Create a New View Change the Default View Make a View Read-Only Prevent a User from Selecting a View Use a View for Printing Use a Different Layout for Your Form Use a Theme for Your Form Add Headers/Footers to Your Form Insert a Table Layout into Your Form Modify a Table Layout in Your Form
This chapter explores the various page design options available in InfoPath and how to createdifferent views. Several examples and scenarios throughout this book use views to change theappearance of the form.You can modify the page design of your form by using the Page Design and Layouts ribbon bars. ThePage Design bar includes Views, Page Layout, Themes, and Header/Footer options. The Layout barcontains options for modifying tables within the form.
Change the Current View Name
Scenario/Problem:You want to change the current view name.
Solution: Click the Properties button within the Views section on the Page Design ribbon bar, asshown in Figure 6.1.
FIGURE 6.1 Clicking Properties allows you to modify the view settings.

Clicking Properties displays the View Properties dialog box shown in Figure 6.2. Enter a new nameand click OK to change the name of the current view.
FIGURE 6.2 Entering a new name changes the current view’s name.
Create a New View
Scenario/Problem:You need to present an alternate view of your form to the user.
Solution: Click New View within the Views section on the Page Design ribbon bar.Clicking New View presents the Add View dialog, as shown in Figure 6.3. Enter a name and clickOK to create the new view.
FIGURE 6.3 Entering a name and clicking OK creates a new view.
TipCreate a new view to generate a print version of your form!

Change the Default View
Scenario/Problem:You want to switch the default view.
Solution: Select the view from the View drop-down and click Properties within the Views section onthe Page Design ribbon bar.The default view is the view of the form that will display when the user opens a new or existing form.From the View Properties dialog, check the Set as Default View check box, as shown in Figure 6.4, tomake the current view the default view.
FIGURE 6.4 Checking the Set as Default View check box makes the current view the default view.
NoteIf the view that you are editing is already the default view, the option to make it the defaultview will be disabled. Essentially, InfoPath won’t let there be a state where no view isthe default.

Make a View Read-Only
Scenario/Problem:You need to have a view in which users cannot make any changes.
Solution: From the View Properties dialog, click the Read-Only check box, as shown in Figure 6.5.
FIGURE 6.5 Checking the Read-Only check box locks the form and doesn’t allow any edits to occur.
TipA print view or confirmation view is a perfect candidate for being read-only.
Prevent a User from Selecting a View
Scenario/Problem:You don’t want a view to be available to the user.
Solution: From the View Properties dialog, unselect the Show on View Menu When Filling Out ThisForm option, as shown in Figure 6.6.

FIGURE 6.6 Unselecting the Show on the View Menu When Filling Out This Form option makes theview unavailable for user selection.
In addition to this option, if you don’t want the user to have the ability to select a view at all, followthese steps:
1. From the File menu, select Info, and then click the Form Options button.2. On the Form Options dialog, under the Web Browser category, uncheck the Views option
within the Show Commands section, as shown in Figure 6.7.

FIGURE 6.7 Unselecting the Views command option removes the ability for the user to change viewsof the form.
Use a View for Printing
Scenario/Problem:When printing your form, you always want a certain view to be used.
Solution: From the View Properties dialog, in the Print Settings tab, select your print view in theDesignate Print View section, as shown in Figure 6.8.

FIGURE 6.8 Designating a view for printing will ensure that the print view is always used.
TipUse the Print Multiple Views button at the bottom of the Print Settings tab to select morethan one view for printing. This proves useful when you need to print a summary page andthe actual details.
Use a Different Layout for Your Form
Scenario/Problem:You need to change the layout from the default layout when creating a new form.
Solution: Select a new layout from the Page Layout & Templates button on the Page Design ribbonbar.Several layouts are available for your new form, as shown in Figure 6.9. The default for a blank formis Title Only.

FIGURE 6.9 Selecting a page layout assists in the initial creation of your form.
TipBecause selecting a layout adds that selection to your form, you might find it easier toselect everything and delete it before applying a new template.
Use a Theme for Your Form
Scenario/Problem:You want to choose a nice colorful theme for your form.
Solution: Select a new theme from the Themes section of the Page Design ribbon bar, as shown inFigure 6.10.

FIGURE 6.10 Selecting a theme determines what background colors are used within your tables andform.
You have many different themes to choose from. The most important aspect is the background color ofthe tables that contain your controls and labels. This is represented in the bottom half of the themepreviews.
NoteUsing a custom table may not reflect a selected theme.
Add Headers/Footers to Your Form
Scenario/Problem:You need to add headers or footers to your form when the form is printed.
Solution: Click the Header & Footer button on the Page Design ribbon bar.The Header & Footer button is just a quick link to the View Properties, Print Settings tab. Click theHeader or Footer button on the dialog to modify the header or footer of the printed form, as shown inFigure 6.11.

FIGURE 6.11 Adding text and auto text to your header or footer provides additional information whenprinting your form.
TipUse the Insert Auto Text drop-down to insert page or time-related variables to your headeror footer. You can even add field values if needed!
Insert a Table Layout into Your Form
Scenario/Problem:You need to insert a table into your form.
Solution: From the Insert ribbon bar, choose a table layout from the Tables section, as shown inFigure 6.12.

FIGURE 6.12 Selecting a table layout helps implement the structure of your form.
Modify a Table Layout in Your Form
Scenario/Problem:You need to make modifications to a table in your form.
Solution: Use the Layout ribbon bar.The Layout ribbon bar contains a multitude of options for your form table, as shown in Figure 6.13.
FIGURE 6.13 The Layout ribbon bar enables you to make various table modifications.
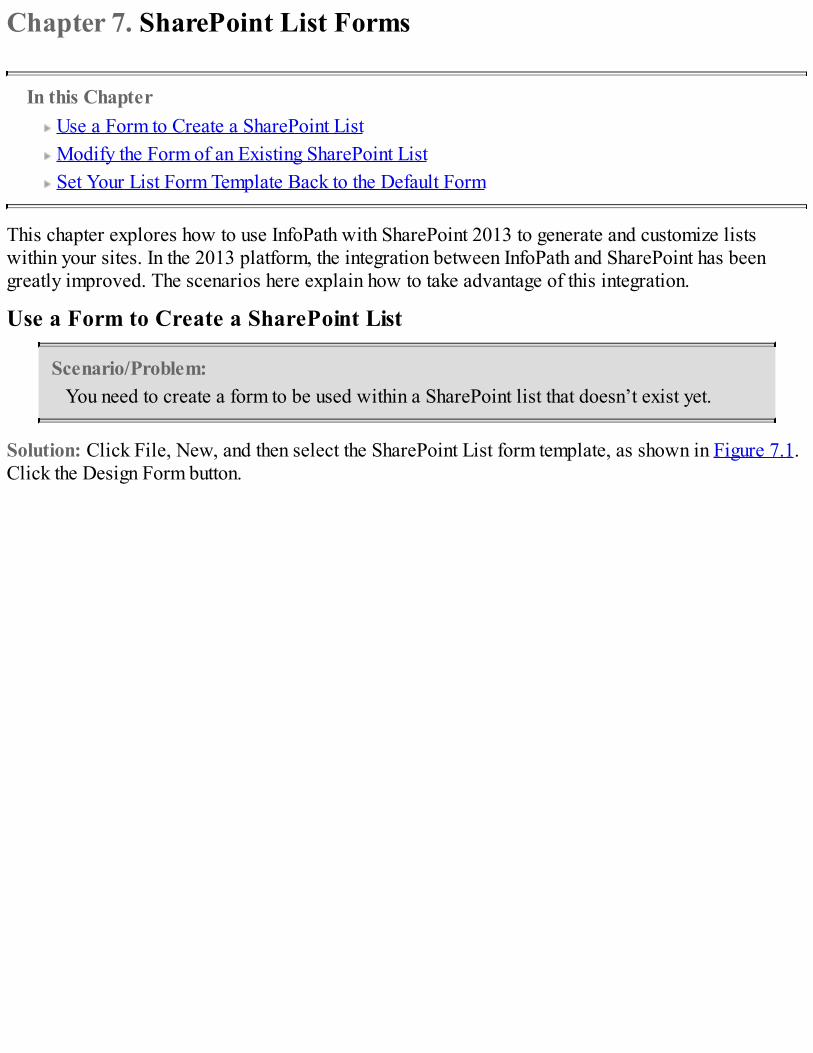
Chapter 7. SharePoint List Forms
In this Chapter Use a Form to Create a SharePoint List Modify the Form of an Existing SharePoint List Set Your List Form Template Back to the Default Form
This chapter explores how to use InfoPath with SharePoint 2013 to generate and customize listswithin your sites. In the 2013 platform, the integration between InfoPath and SharePoint has beengreatly improved. The scenarios here explain how to take advantage of this integration.
Use a Form to Create a SharePoint List
Scenario/Problem:You need to create a form to be used within a SharePoint list that doesn’t exist yet.
Solution: Click File, New, and then select the SharePoint List form template, as shown in Figure 7.1.Click the Design Form button.

FIGURE 7.1 Using the SharePoint List form template allows you to create the SharePoint list usingthe form.
Instead of having to create a list in SharePoint and then customizing the form, you may actually designa form and have it create the SharePoint list directly through InfoPath Designer. This aids instreamlining both the list and form creation.From the solution step, clicking the Design Form button initiates the Data Connection Wizard, asshown in Figure 7.2.

FIGURE 7.2 The Data Connection Wizard assists in creating a form for a SharePoint list.To configure the data connection using the wizard, follow these steps:
1. Enter the URL of your SharePoint site where you want the list created. Click Next.2. Enter the name of the list you want to create, as shown in Figure 7.3. Click Next.
FIGURE 7.3 Entering a list name will create a new list using that name.
3. (Optional) Check the Manage Multiple List Items check box to use the form to edit more than

one list item, as shown in Figure 7.4. Click Finish.
FIGURE 7.4 Selecting the Manage Multiple List Items option prepares the form to handle data frommore than one list item.
The form is generated, and the list is created with the main system default fields. You can see thefields in the Fields pane, as shown in Figure 7.5.

FIGURE 7.5 Creating the new list for the form generates the system default fields.You may add additional fields and controls to your form as needed for your list. The SharePoint listwill be updated, and any new fields will be created upon publishing. An example is shown in Figure7.6.
FIGURE 7.6 Adding new fields and controls updates the SharePoint list when publishing.To add additional fields and controls to your form, follow these steps:

1. From the File, Publish page, click SharePoint List to publish the form to SharePoint, as shownin Figure 7.7.
FIGURE 7.7 Publishing the form to the SharePoint list updates the list that was configured.
2. Navigate to the list in SharePoint and click Add New Item to review your form changes, asshown in Figure 7.8.

FIGURE 7.8 Adding a new item to the list uses your form to obtain the values of the list item.
TipUse the link in the publish confirmation message to easily navigate to the SharePoint list.
Modify the Form of an Existing SharePoint List
Scenario/Problem:You need to change the form that is used within an existing SharePoint list.
Solution: There are two ways that this may be accomplished. The first is to edit the form fromSharePoint, and the second is to open the form from InfoPath. You are still using InfoPath in bothcases.A great improvement in SharePoint 2013 is the ability to customize the form of a SharePoint list. Theintegration with InfoPath 2013 allows you to load the form for editing right from the SharePointribbon.To edit the form from SharePoint, follow these steps:
1. Navigate to the list in which you want to edit the form.2. On the List ribbon bar, click Customize Form, as shown in Figure 7.9.
FIGURE 7.9 Using the List ribbon bar allows you to edit the form for the current list.
3. Modify the form as desired and publish back to SharePoint.
TipAn alternative method from SharePoint is to click the Form Settings from the List Settingsadministration page.
To edit the form from InfoPath, follow these steps:1. From InfoPath Designer, click File, New.2. On the New page, select SharePoint List and click the Design Form button.3. Enter the SharePoint server URL on the Data Connection Wizard and click Next.

4. Select the Customize an Existing SharePoint List option and select the list you would like tomodify, as shown in Figure 7.10. Click Next.
FIGURE 7.10 Selecting the list opens the current list form template for modification.
5. Click Finish. The current list form opens in the designer.6. Modify the form as desired and publish back to SharePoint.
TipThese steps are similar to creating a new list except this time you are choosing to modifyan existing list.
Set Your List Form Template Back to the Default Form
Scenario/Problem:Your modified form didn’t turn out so well and you want to go back to the default systemform for that list.
Solution: Click Use the Default SharePoint Form option under Form Settings of the list.When you modify a list form, you do not need to live with it forever. Fortunately the system defaultform does not get overwritten or replaced. You can revert back to the default form for the list.The steps to set your list back are as follows:
1. Navigate to the list in SharePoint.2. On the List ribbon bar, click List Settings, as shown in Figure 7.11.
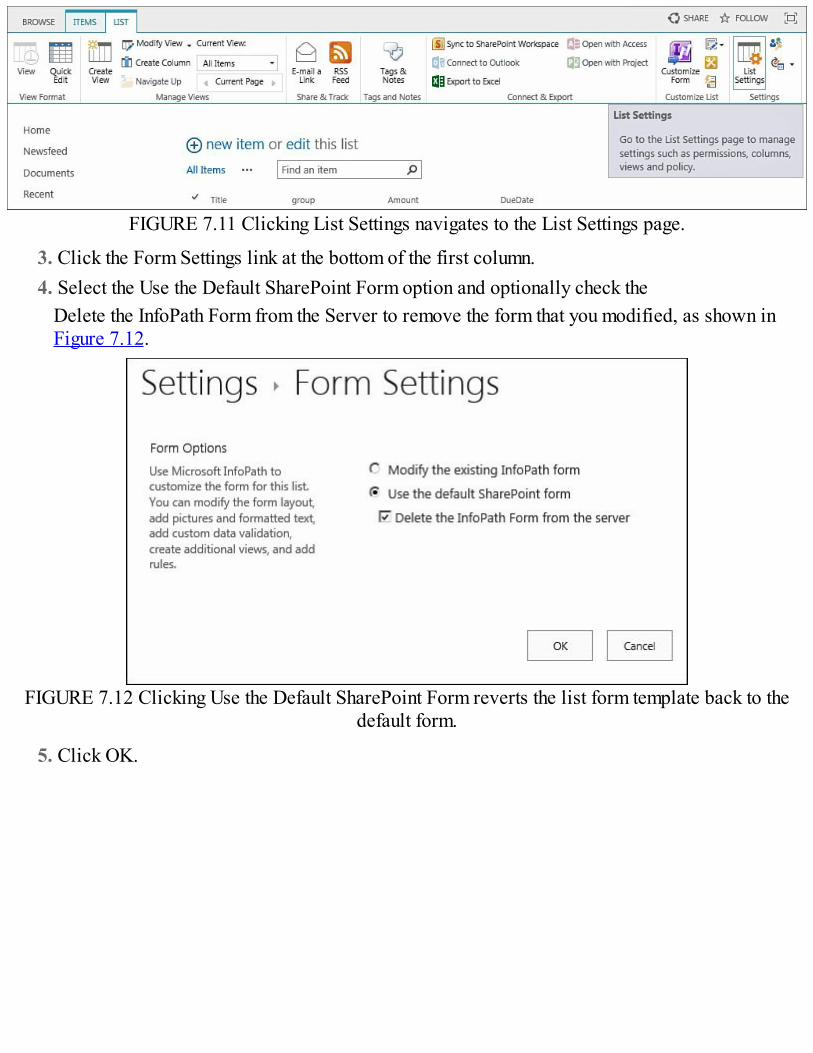
FIGURE 7.11 Clicking List Settings navigates to the List Settings page.
3. Click the Form Settings link at the bottom of the first column.4. Select the Use the Default SharePoint Form option and optionally check the
Delete the InfoPath Form from the Server to remove the form that you modified, as shown inFigure 7.12.
FIGURE 7.12 Clicking Use the Default SharePoint Form reverts the list form template back to thedefault form.
5. Click OK.

Chapter 8. Submit and Publish to SharePoint
In this Chapter Enable Your Form for Submission Configure Email Submission Publish Your Form to Email Configure SharePoint Library Submission Publish Your Form to a SharePoint Library Use Multiple Forms in SharePoint Libraries Configure Web Service Submission Configure SharePoint Server Connection Submission Modify the Available Menu Buttons During Form Submission
This chapter covers the various submission and publishing capabilities when using InfoPath 2013with SharePoint 2013. Although submitting and publishing are two different things, they are similar bythe fact that you are sending information to SharePoint in some fashion.The submit options are used to configure how the user will submit the form once it is completed. Thepublishing options are how you deploy your form for general use. We discussed some of this inearlier scenarios, so let’s cover all the options and steps here.
Enable Your Form for Submission
Scenario/Problem:You need to allow users to submit your form.
Solution: Click Submit Options and select the Allow User to Submit This Form option.The first step in configuring the submission of your form is to enable users to the submit form. To dothis, follow these steps:
1. Select the Data ribbon bar and click on the Submit Options button, as shown in Figure 8.1.
FIGURE 8.1 Clicking the Submit Options allows you to configure your form submission.
2. On the Submit Options dialog, check the Allow Users to Submit This Form option, as shown in

Figure 8.2.
FIGURE 8.2 Selecting Allow Users to Submit This Form enables form submission.
3. Configure the submission details accordingly (explained in this chapter).
Configure Email Submission
Scenario/Problem:You need your form to be submitted via email.
Solution: Click Submit Options and configure the Email settings.Continuing from the previous scenario, after you allow users to submit your form, the Send form to asingle destination becomes enabled. The first option is Email, so you don’t have to change anything inthe drop-down. However, you must choose a data connection to use with the Email submission.Chances are you don’t have one yet, so let’s create that now.
TipQuickly get to the email connection settings by clicking the To Email button from theribbon bar instead of Submit Options.
To configure the email connection, follow these steps:1. Click the Add button on the Submit Options dialog. The Data Connection Wizard for the email
connection appears, as shown in Figure 8.3.

FIGURE 8.3 Filling in the fields defines the email properties.
2. Enter values for at least the To and the Subject. Click Next.3. Choose Send Only the Active View of the Form and No Attachment, as shown in Figure 8.4.
Click Next.
FIGURE 8.4 Sending only the active view doesn’t require InfoPath Filler 2013.

NoteIf you submit the form as an attachment, the actual .xsn file will be attached to the email.The person receiving the form must have InfoPath Filler 2013 on their computer to openthe attached form.
4. Click Finish on the summary screen, as shown in Figure 8.5.
FIGURE 8.5 Clicking Finish creates your email submission data connection.
NoteTo submit using Email from SharePoint, you must enable and configure the Outgoing EmailSettings in SharePoint.
The email that is sent to the recipient has the form embedded, as shown in Figure 8.6.

FIGURE 8.6 Submitting via email embeds the form contents into the email body.
Publish Your Form to Email
Scenario/Problem:You need your form to be filled out via email.
Solution: Publish your form to users via email using the Email Publish option.In the previous scenario, the form was submitted via email. The form appeared as read-only andwasn’t filled out by the recipient. In this scenario, you want the users to fill out the form via email andsubmit from the email itself.To accomplish this, follow these steps:
1. From File, Publish, click the Email button, as shown in Figure 8.7.

FIGURE 8.7 Clicking the Email button allows you to publish the form to email recipients.
2. In the Publishing Wizard, enter a name for your form, as shown in Figure 8.8. Click Next.

FIGURE 8.8 Entering a friendly template name helps identify the form being published.
TipPublish your SharePoint forms (via email) to people who don’t have access to yourSharePoint site.
3. Click Next on the property promotion page.4. Click Publish. The form publishes to Outlook and a new email is presented with your form, as
shown in Figure 8.9.

FIGURE 8.9 The publishing to email process produces the actual email to send to recipients.
5. Enter the email addresses of the people to send this form to and click Send (just like a regularemail).
Your form email is sent to the users you specified. A user can fill out your form right within the email,as shown in Figure 8.10.

FIGURE 8.10 Publishing to email allows the users to fill out the form in the email itself.
Configure SharePoint Library Submission
Scenario/Problem:You need your form to be submitted and saved to a library on your SharePoint site.
Solution: Click Submit Options and configure the Document Library settings.Continuing from the enable form submission scenario, after you allow users to submit your form, theSend Form to a Single Destination option becomes enabled. Change the setting to SharePointDocument Library, as shown in Figure 8.11.

FIGURE 8.11 Selecting the SharePoint Document Library configures the form to submit to aSharePoint library.
Select a data connection that has been configured to a SharePoint library. If your form doesn’t haveone yet, you will need to configure a new SharePoint library connection.
TipQuickly get to the SharePoint library connection settings by clicking the To SharePointLibrary button from the ribbon bar instead of Submit Options.
To configure the SharePoint library connection, follow these steps:1. Click the Add button on the Submit Options dialog. The Data Connection Wizard for the
SharePoint library appears, as shown in Figure 8.12.

FIGURE 8.12 Entering the library URL and the form name tells InfoPath where to submit it and whatto name the (form) instance.
2. Enter the document library URL and a dynamic form name. (See Chapter 2, “Create aSharePoint Form with InfoPath Designer,” for a discussion on creating the formula for the formname.) Click Next.
3. Enter a name for the connection and select the Set as the Default Submit Connection option andclick Finish.
4. Back on the Submit Options dialog, make sure that your new connection is selected and clickOK.
Publish Your Form to a SharePoint Library
Scenario/Problem:You need your form to be filled out from a SharePoint library.
Solution: Publish your form to the SharePoint library.In the previous scenario you configured the submission of your form to a SharePoint library. Now youneed to publish your form to SharePoint (usually to the same library).To accomplish this, follow these steps:
1. From File, Publish, click the SharePoint Server button, as shown in Figure 8.13.

FIGURE 8.13 Clicking the SharePoint Server button allows you to publish the form to a SharePointlibrary.
2. In the Publishing Wizard, enter the location of the SharePoint library, as shown in Figure 8.14.Click Next.

FIGURE 8.14 Entering the URL of the library publishes your form to that library.
TipThe URL that you enter technically only needs to be the URL of the site that contains theform library where you want to publish your form.
3. Ensure that the browser option is checked and that Form Library is selected, as shown inFigure 8.15. Click Next.

FIGURE 8.15 Enabling the form to be filled out by the browser allows it to be rendered inSharePoint.
4. Select to either create a new form library or update an existing one, as shown in Figure 8.16.(See Chapter 2 for the scenario of creating a form library from InfoPath.) Click Next.
FIGURE 8.16 Updating the form template of the library replaces the default form with your form.

5. Select any fields to promote to the SharePoint library or used in a web part, as shown in Figure8.17. (These are explained in later sections/chapters.) Click Next.
FIGURE 8.17 Selecting fields promotes them as properties for external SharePoint use.
6. Verify the information and click Publish. Your form is published to the form library youselected.
7. Check the Open This Form Library check box and click Close.8. Click New Document to test your form in the browser, as shown in Figure 8.18.
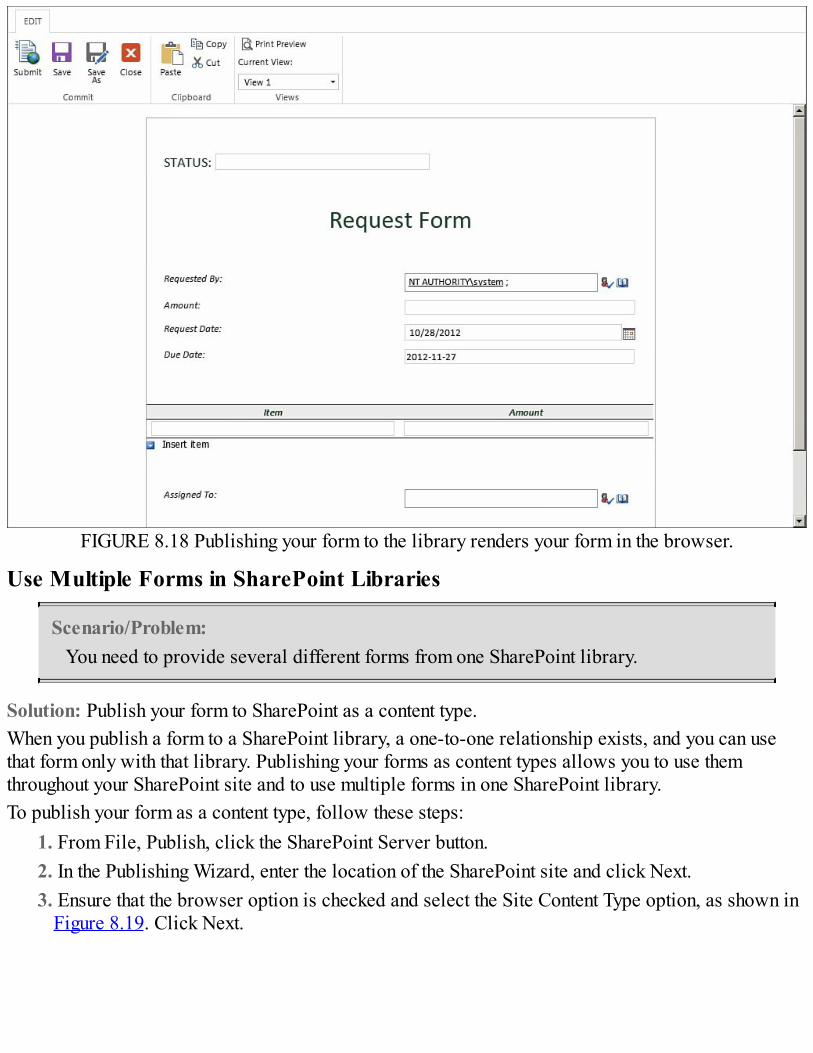
FIGURE 8.18 Publishing your form to the library renders your form in the browser.
Use Multiple Forms in SharePoint Libraries
Scenario/Problem:You need to provide several different forms from one SharePoint library.
Solution: Publish your form to SharePoint as a content type.When you publish a form to a SharePoint library, a one-to-one relationship exists, and you can usethat form only with that library. Publishing your forms as content types allows you to use themthroughout your SharePoint site and to use multiple forms in one SharePoint library.To publish your form as a content type, follow these steps:
1. From File, Publish, click the SharePoint Server button.2. In the Publishing Wizard, enter the location of the SharePoint site and click Next.3. Ensure that the browser option is checked and select the Site Content Type option, as shown in
Figure 8.19. Click Next.

FIGURE 8.19 Selecting Site Content Type publishes your form as a content type in your SharePointsite.
4. Select Create a New Content Type, as shown in Figure 8.20. Click Next.
FIGURE 8.20 Selecting Create a New Content Type allows you to configure the content type details.

5. Enter a name and description for the content type and click Next.6. Enter a location and name within a URL path to save the form template on your SharePoint
server, as shown in Figure 8.21. This is usually the form templates folder in your sitecollection.
FIGURE 8.21 Entering the URL path determines where the form template will be saved.
NoteEven though you are publishing your form as a content type, the form needs to be stored inSharePoint so that Forms Services can render new instances using the content type.
7. Click Next on the property promotion screen.8. Click Publish. The form is published as a content type to your SharePoint site.9. Click Close on the confirmation screen.
TipIf you promote fields as columns in your content type, those columns are added to yourlibrary when you add the content type to that library.
10. Navigate to a form library in SharePoint where you want to associate the form.11. From the Library top ribbon bar select Library Settings.12. On the Library Settings page, click Advanced Settings.13. Switch the Allow Management of Content Types option to Yes, as shown in Figure 8.22.

FIGURE 8.22 Switching the option to Yes allows you to add content types to the library.
14. (Optional) Click No on the Make “New Folder” command available. Click OK.15. Back on the Library Settings page, scroll down to the Content Types section and click the Add
from Existing Content Types link.16. Find and select the content type you published and click Add, as shown in Figure 8.23. Click
OK.

FIGURE 8.23 Adding a content type associates it with the SharePoint library.
TipNotice the description is the one you entered when creating the content type.
17. Back on the Library Settings page, scroll down to the Content Types section and click theChange New Button Order option to change the default content type.
18. Uncheck the default Form content type as visible and change your new content type to be in thenumber 1 position from top, as shown in Figure 8.24. Click OK.

FIGURE 8.24 Switching your content type to the top makes it the default content type.
19. Navigate back to the library and select the Files top ribbon menu.20. The New Document menu now contains your content type, as shown in Figure 8.25, using the
name and description you entered during the publishing process.
FIGURE 8.25 Clicking on the New Document drop-down displays the available content types foryour library.
21. Repeat steps 1–20 for additional forms.

Configure Web Service Submission
Scenario/Problem:You need your form to be submitted to a web service.
Solution: Click Submit Options and configure the Web Service settings.Continuing from the enable form submission scenario, after you allow users to submit your form, theSend Form to a Single Destination option becomes enabled. Change the setting to Web Service, asshown in Figure 8.26.
FIGURE 8.26 Selecting the Web Service option configures the form to submit to a web service.Select a data connection that has been configured to a web service. If your form doesn’t have one yet,you will need to configure a new web service connection.
TipQuickly get to the web service connection settings by clicking the To Other Locationsbutton and selecting To Web Service from the ribbon bar instead of Submit Options.
To configure the web service connection, follow these steps:1. Click the Add button on the Submit Options dialog. The Data Connection Wizard for the web
service appears, as shown in Figure 8.27.

FIGURE 8.27 Entering the web service URL accesses the web methods available for submission.
2. Enter the web service URL and click Next.
TipUse the SharePoint web services to automate operations from your form without usingcode!
3. Select the desired web method, as shown in Figure 8.28. Click Next.

FIGURE 8.28 Selecting the web method allows you to submit form fields to that method.
4. For each parameter of the web method, configure a mapping to a form field, as shown in Figure8.29. Click Next.
FIGURE 8.29 Mapping the fields to the web method parameters submits those values to the webservice.

TipBecause most web methods need parameters, it is a good idea to figure out whatparameters are needed ahead of time and at least create those fields on your form first.This makes the web service connection creation a bit easier.
5. Enter a name for the connection and click Finish.6. Back on the Submit Options dialog, ensure that the web service connection is selected. Click
OK.
Configure SharePoint Server Connection Submission
Scenario/Problem:You need your form to be submitted to an existing data connection in SharePoint.
Solution: Click Submit Options and configure the Data Connection settings.Continuing from the enable form submission scenario, after you allow users to submit your form, theSend Form to a Single Destination option becomes enabled. Change the setting to Connection from adata connection library, as shown in Figure 8.30.
FIGURE 8.30 Selecting the data connection library option configures the form to submit using anexisting connection on your SharePoint site.
Select a data connection that has been configured to a data connection file on your SharePoint site. Ifyour form doesn’t have one yet, you will need to configure a new SharePoint Server connection to thedata connection file.
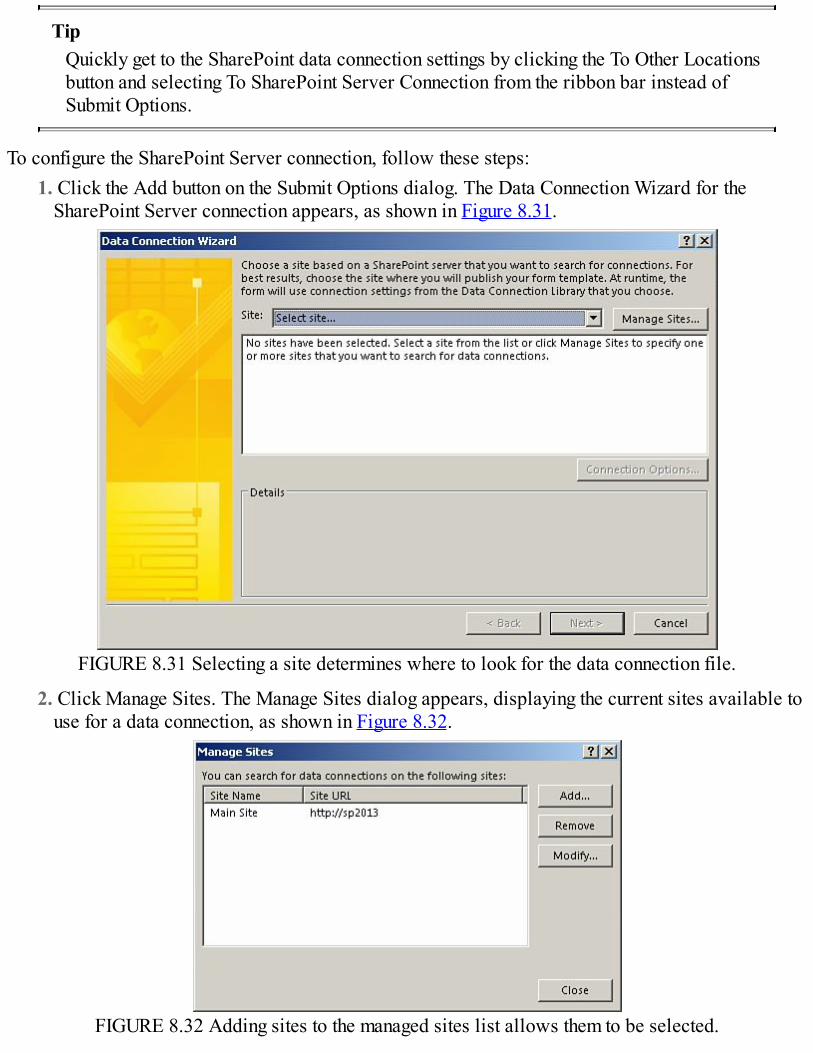
TipQuickly get to the SharePoint data connection settings by clicking the To Other Locationsbutton and selecting To SharePoint Server Connection from the ribbon bar instead ofSubmit Options.
To configure the SharePoint Server connection, follow these steps:1. Click the Add button on the Submit Options dialog. The Data Connection Wizard for the
SharePoint Server connection appears, as shown in Figure 8.31.
FIGURE 8.31 Selecting a site determines where to look for the data connection file.
2. Click Manage Sites. The Manage Sites dialog appears, displaying the current sites available touse for a data connection, as shown in Figure 8.32.
FIGURE 8.32 Adding sites to the managed sites list allows them to be selected.

3. Click Add and enter your main SharePoint site and display name, as shown in Figure 8.33.Click OK. Your site appears in the managed sites list. Click Close.
FIGURE 8.33 Entering a URL and display name enters the site into the Managed Sites list.
TipMake sure that your site has a data connections library with at least one data connectionfile. See Chapter 9, “Use Data in SharePoint Forms,” for instructions on creating a dataconnection file.
4. Back on the Data Connection Wizard dialog, select the managed site that you entered and selectthe data connection file. Click Next.
5. Depending on the type of data connection, you may need to configure the related settings. ClickNext.
6. Click Finish to generate the submit connection against the SharePoint Server connection file.
Modify the Available Menu Buttons During Form Submission
Scenario/Problem:You need to control which menu buttons display when the user is filling out your form.
Solution: Modify the web browser form options to hide or show the available menu items.The web browser form options allow you to control which menu commands are available to the userwhile they are filing out the form. For example, when using the submit options in your form (that is,you want the user to submit the form and not save it), you might not want to have the Save or Save Asoptions available to your user.The menu buttons either appear in the toolbar or ribbon bar depending on how your form is renderedin the browser. You may control where the toolbar appears if the ribbon bar is not available.To access and modify the web browser form options, follow these steps:
1. Select File, Info and click the Form Options button, as shown in Figure 8.34.

FIGURE 8.34 Clicking Form Options allows you to modify various settings specific to your form.
2. Select the Web Browser category, as shown in Figure 8.35.

FIGURE 8.35 Modifying the web browser options determines which commands are available.
3. Modify the settings accordingly. Click OK.
TipYou may uncheck the Show InfoPath commands option to completely hide all commands,but do this only if you have other buttons or controls that handle the submission or savingof your form.

Part II: Business Solutions

Chapter 9. Use Data in SharePoint Forms
In This Chapter Use Data From a Database Convert an InfoPath Connection to a SharePoint Connection File Use Data From a SharePoint List Use Data From a SharePoint Data Connection File Use Data from a (SOAP) Web Service Populate a Drop-Down List with Data Populate a Drop-Down List with Data Based on Another Selection (Cascading Drop-Down) Display Data from a SharePoint List Display a Repeating Table from a SharePoint List Leverage External Data from a SharePoint External Content Type (Business Data ConnectivityServices) Leverage External Data from a REST Web Service
This chapter explores the data integration points within InfoPath and explains how to utilize businessdata within your form controls and fields.One of the most compelling aspects of InfoPath with SharePoint 2013 is the ability to access and usebusiness data from various sources. Whether it’s to populate drop-downs or display information,InfoPath has the ability to integrate with data sources and bind fields or controls to the data elements.Instead of hard-coding values in your form, accessing centralized business data allows you todynamically populate options and selections without having to continually update and republish yourforms.
Use Data From a Database
Scenario/Problem:You need to use data from a SQL Server database in your form.
Solution: Create a data connection to the SQL Server database.InfoPath can access data from a SQL Server database, enabling you to capitalize on existing businessdata that may be stored in a central repository or data warehouse. Accessing the database informationrequires several steps, including creating a local data link file, the initial InfoPath connection, and theSharePoint Server data connection such that your form can access the data when rendered inSharePoint. Start with the first task, which is to create a local data link file.To create a local data link file, follow these steps:
1. On your desktop, right-click and select New, Text Document.2. Rename the text document to SQL Server.udl and click Yes on the warning about changing the

file extension. Your file should look similar to Figure 9.1.
FIGURE 9.1 Creating a local UDL file allows you to create the initial SQL Server connection.
3. Double-click the file to open the connection properties.4. On the Data Link Properties connection tab, select the database server from the drop-down,
enter the database credentials, and select the database, as shown in Figure 9.2. Select the AllowSaving Password option if you are using SQL Server authentication. Click OK.

FIGURE 9.2 Configuring the connection creates the local data link file for your SQL Server database.
NoteYou might have issues using Windows Authentication if the database server is not part ofthe SharePoint farm. The easier, streamlined option is to use SQL Server authenticationwith an account that has read privileges to the database you need to access. The passwordwill ultimately be stored in the connection file in SharePoint. Securing the dataconnections library is one way to keep it hidden.
Now that the data link file is created, you need to configure the InfoPath connection using that file. Todo this, follow these steps:
1. In InfoPath Designer, select the Data ribbon bar. Click the From Other Sources button andselect From Database, as shown in Figure 9.3.
FIGURE 9.3 Clicking the Database button allows you to create the appropriate data connection.
2. In the Data Connection Wizard dialog, click the Select Database button and navigate to the data

link file you created in the previous steps, as shown in Figure 9.4. Click Open.
FIGURE 9.4 Selecting the data link file allows you to configure the database connection.
3. Select a table from the database where you need to retrieve data, as shown in Figure 9.5. ClickOK.

FIGURE 9.5 Selecting a table determines where the data will come from.
4. Unselect any columns that you don’t need back in the wizard dialog, as shown in Figure 9.6.
FIGURE 9.6 Selecting the columns determines which data elements are retrieved.
5. You may add additional tables by clicking the Add Table button and selecting another table, asshown in Figure 9.7, and clicking Next.

FIGURE 9.7 Adding additional tables allows you to access more data from the same connection.
6. Remove any relationships that are not applicable, such as Name and Modified Date, as shownin Figure 9.8. Click Finish.
FIGURE 9.8 Selecting only the foreign key columns designates a relationship between the addedtables.
7. Back on the Data Connection Wizard dialog, click Next.

TipIn this example, only the ProductCategoryID matches between the two tables. If you leavethe other relationships, no data will be returned from the Product table.
8. You may optionally store a copy of the data in the form by checking the check box. Click Next.9. Enter a name for the data connection, as shown in Figure 9.9. If you are using the data for a
selection that is needed when the form is opened, leave the Automatically Retrieve Data optionchecked. Otherwise, you may uncheck it for quicker performance. Click Finish.
FIGURE 9.9 Entering a name for the connection stores the connection in InfoPath using that name.
The data connection is now available inside InfoPath. It will work locally, but when deployed toSharePoint, you could experience data access issues. This may be because of authentication or otheraccess issues. To use the database connection in SharePoint successfully, it is recommended that youconvert this connection to a centralized data connection file. The next section explains this process.
Convert an InfoPath Connection to a SharePoint Connection File
Scenario/Problem:You need to access your data connections from within SharePoint.
Solution: Select the data connection and click the Convert to Connection File button.Although this scenario is an extension of the previous scenario, the steps are the same for any type ofdata connection within InfoPath. To convert an InfoPath connection to a file in SharePoint, followthese steps:

1. Select the Data ribbon bar and select Data Connections.2. Select the data connection you want to convert and click the Convert to Connection File button,
as shown in Figure 9.10.
FIGURE 9.10 Selecting an InfoPath connection allows you to convert it to a connection file.
3. Enter the path and filename, as shown in Figure 9.11. Click OK.

FIGURE 9.11 Entering the full path and filename saves the connection file in the specified location.
TipLeaving the connection relative to the site collection means that you may publish yourform to a different environment and InfoPath will look in the same data connection libraryfor the same file. For example, if your production environment contains the connection fileat http://prodsp2010/dataconnections/productcategory.udcx, based on this scenario, youdo not need to change anything in your form.
4. Navigate to your data connections library in SharePoint and select Approve/Reject from theitem menu, as shown in Figure 9.12.

FIGURE 9.12 Selecting Approve/Reject allows you to change the approval status of the dataconnection.
5. Select the Approved option, as shown in Figure 9.13. Click OK.
FIGURE 9.13 Approving the data connection file allows it to be used within SharePoint.

TipSaving a new connection in the SharePoint sets the approval status to Pending. You maynot be able to use the connection or access data until the connection file has beenApproved.
Use Data From a SharePoint List
Scenario/Problem:You need to use data that is stored within an existing SharePoint list.
Solution: Create a data connection to the SharePoint list.A common data source for SharePoint forms is a SharePoint list. If the list contains business entitiesand is the main repository for those items, it only makes sense to leverage them within you form ifneeded.To access data from a SharePoint list in your form, follow these steps:
1. In InfoPath Designer, select the Data ribbon bar. Click the From SharePoint List button, asshown in Figure 9.14. The Data Connection Wizard appears.
FIGURE 9.14 Clicking the From SharePoint List button allows you to create the appropriate dataconnection.
2. In the Data Connection Wizard dialog, enter the URL of the SharePoint site that contains the listyou need to access, as shown in Figure 9.15. Click Next.

FIGURE 9.15 Entering the SharePoint site determines where to find the SharePoint list.
3. Select the SharePoint list from the available lists as shown in Figure 9.16. Click Next.
FIGURE 9.16 Selecting the list creates the connection for that list’s data.
4. Select the fields you would like to use in your form from the list and how the items should besorted, as shown in Figure 9.17. Click Next.

FIGURE 9.17 Selecting the list fields determines what item elements are retrieved.
5. Click Next on the Store a Copy screen.
TipIf the display name differs from the underlying list column name, you will see the displayname in parentheses.
6. Provide a connection name and click Finish.
Use Data From a SharePoint Data Connection File
Scenario/Problem:You need to use data in your form from a data connection file in SharePoint.
Solution: Create an InfoPath data connection to the SharePoint data connection file.Once you begin creating connections and converting them to SharePoint data connection files, chancesare you will have forms that need similar information (such as for standard business selections indrop-down controls) and therefore need to use a data connection file that you have already createdpreviously.
TipDon’t reinvent the wheel! Use already created SharePoint data connection files tostreamline form creation.

The whole idea of creating SharePoint connection files is for this purpose, so let’s connect a newform to an existing SharePoint data connection file:
1. In InfoPath Designer, select the Data ribbon bar. Click the From SharePoint Server button, asshown in Figure 9.18. The Data Connection Wizard appears.
FIGURE 9.18 Clicking the From SharePoint Server button allows you to leverage existing dataconnections in SharePoint.
2. In the Data Connection Wizard dialog, select the site from the drop-down, expand the DataConnections item, and select the desired data connection file, as shown Figure 9.19. Click Next.
FIGURE 9.19 Selecting the data connection determines which SharePoint data connection file to use.
TipIf your site doesn’t appear in the drop-down use the Manage Sites to add it to the list. SeeChapter 8, “Submit and Publish to SharePoint,” for more details on adding a new managedsite.
3. Click Next on the Store a Copy screen.

4. Provide a connection name and click Finish.
Use Data from a (SOAP) Web Service
Scenario/Problem:You need to use data that is returned from a web service.
Solution: Create a data connection to the web service.Many times an organization may isolate data layers by providing access to web services instead ofdirectly to the database. To access data from a SOAP-based web service in your form, follow thesesteps:
1. In InfoPath Designer, select the Data ribbon bar. Click the From Web Service button and selectFrom SOAP Web Service, as shown in Figure 9.20. The Data Connection Wizard appears.
FIGURE 9.20 Selecting the From SOAP Web Service allows you to create the appropriate dataconnection.
2. In the Data Connection Wizard dialog, enter the URL of the web service along with the ?WSDL suffix, as shown in Figure 9.21. Click Next.

FIGURE 9.21 Entering the web service URL accesses the available methods for data retrieval.
3. Select the web method you want to use to retrieve information, as shown in Figure 9.22. ClickNext.
FIGURE 9.22 Selecting the web method determines where the data will be coming from.

NoteIn this example, we use a SharePoint system web service. This is solely for examplepurposes. It is probably easier to get list items from a SharePoint List connection thanthrough the web service.
4. Enter sample values for the web service parameters so that InfoPath can understand what datato expect, as shown in Figure 9.23. Click Next.
FIGURE 9.23 Entering sample values assists in determining what data to expect.
5. Click Next on the Store a Copy screen.6. Provide a connection name and click Finish.
NoteThe SharePoint web services are being shown here for example purposes and may notexecute if all values are not provided.
Populate a Drop-Down List with Data
Scenario/Problem:You need to provide users a selection option based on a data source.
Solution: Configure the control to get choices from an external data source.Populating a drop-down list (or any other list-based control) is probably one of the most common

uses of external business data in SharePoint forms. Once a data connection has been established onyour form, using the data in a drop-down list is just a few clicks away.For this scenario, let’s use the SQL Server connection that we created in a previous scenario of thischapter. The first table was the ProductCategory, so let’s hook that up:
1. Drag a drop-down list control onto your form.2. Right-click the control and select the Drop-Down List Box Properties.3. Rename the field to ProductCategory and change the data type to Whole Number (Integer).4. In the List Box choices, select Get Choices from an External Data Source.5. In the Data Source drop-down, select the data source (ProductCategory in this example). The
Value and Display Name entries default to ProductCategoryID, as shown in Figure 9.24.
FIGURE 9.24 Selecting the data source determines which fields are available to bind to the control.
TipTypically, you want the Value of the selection to be the unique identifier column in thedatabase and to use the Name or Description field as the Display Name.
6. In the Display Name field, click the Field button and change the field to Name field, as shownin Figure 9.25. This is the field that is displayed to the user in the drop-down.
7. Click OK to save the property changes.

FIGURE 9.25 Configuring the display name determines which data element is displayed to the user.
TipUse the same configuration steps for other list-based controls, such as a list box.
Preview your form to test the drop-down population. Figure 9.26 shows an example.

FIGURE 9.26 Previewing your form shows that the drop-down is being populated with the configureddata.
Populate a Drop-Down List with Data Based on Another Selection (CascadingDrop-Down)
Scenario/Problem:You need to present the user with options in a drop-down based on a previous selection.
Solution: Filter the data that is displayed in the dependent drop-down list.When the available selections in one drop-down list depend on previous selections in another drop-down list, these are called cascading drop-downs. The values available in the dependent control arefiltered by some aspect of the other control’s selection.
TipUse the same concept for other controls and/or data sources.
Continuing with the previous scenario and our established SQL Server data connection, let’s add aProduct drop-down list to the form that presents the available products based on the Product Categoryselection, as shown in Figure 9.27. This is the dependent drop-down list.
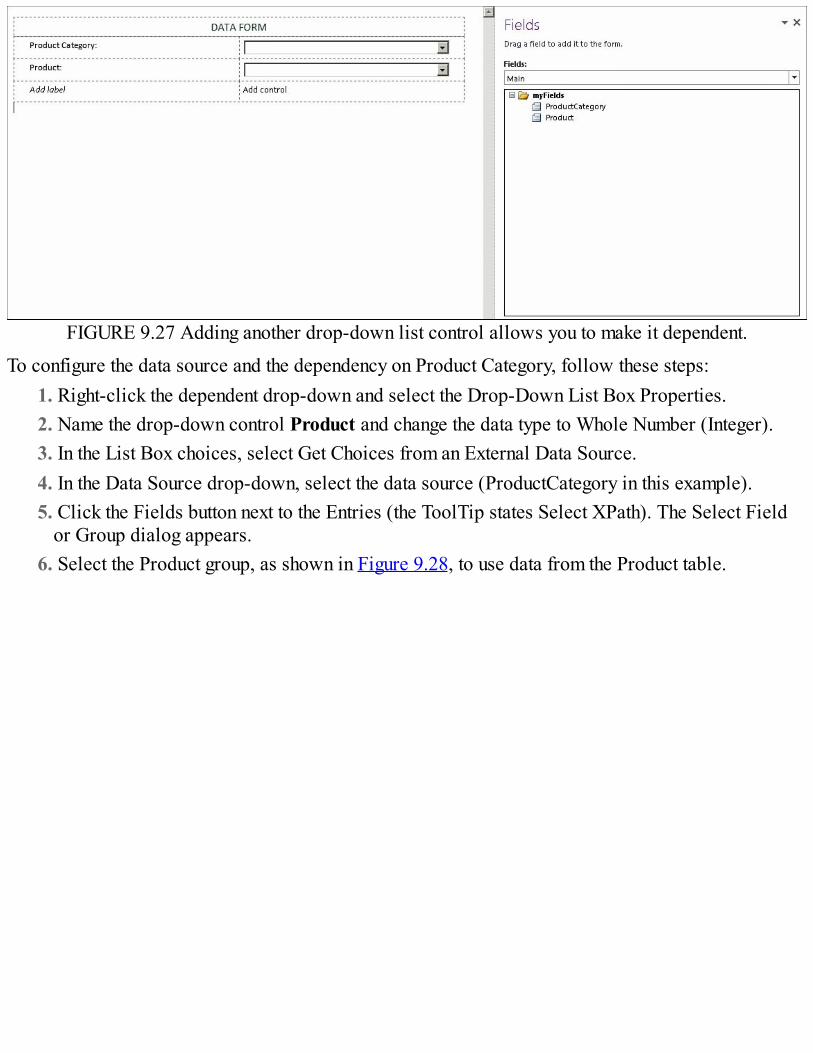
FIGURE 9.27 Adding another drop-down list control allows you to make it dependent.To configure the data source and the dependency on Product Category, follow these steps:
1. Right-click the dependent drop-down and select the Drop-Down List Box Properties.2. Name the drop-down control Product and change the data type to Whole Number (Integer).3. In the List Box choices, select Get Choices from an External Data Source.4. In the Data Source drop-down, select the data source (ProductCategory in this example).5. Click the Fields button next to the Entries (the ToolTip states Select XPath). The Select Field
or Group dialog appears.6. Select the Product group, as shown in Figure 9.28, to use data from the Product table.

FIGURE 9.28 Selecting the Product group allows you to use data from the Product table.
NoteThis example assumes that you added the Product table along with Product Category whencreating the SQL Server data connection. You may also use a separate data connection forthe Product table as long as the foreign key of ProductCategoryID matches the values inthe Product Category table.
7. Click the Filter button, and on the Filter Data dialog, click the Add button.8. In the first drop-down, choose the Select a Field or Group option and select
ProductCategoryID from the Product grouping, as shown in Figure 9.29 to ensure thedependency filters on the product category. Click OK.

FIGURE 9.29 Selecting the ProductCategoryID from Products ensures the dependency filters on theproduct category
9. In the last drop-down, select the Select a Field or Group option and select yourProductCategory field from the Main data connection, as shown in Figure 9.30, to connect thedependency to the ProductCategory selection. (You may need to change the data source at thetop of the dialog.) Click OK.
FIGURE 9.30 Selecting the ProductCategory field from makes the Product list dependent on thatselection.
The filter condition, which is the basis of the drop-down dependency, should look similar toFigure 9.31. Click OK.

FIGURE 9.31 Creating the filter condition provides the basis of the dependency between the drop-down lists.
10. Click OK on the Filter Data dialog.11. Click OK on the Select a Field or Group dialog.12. Click the Fields button next to the Value entry and select ProductID from the Product group.13. Click the Fields button next to the Display Name entry and select the Name from the Product
group. Your properties screen should look similar to Figure 9.32. Click OK.
FIGURE 9.32 Selecting the product fields allows the drop-down to be populated with the filteredproduct data.
Previewing your form shows that the available products in the drop-down are dependent on theproduct category that is selected as shown in Figure 9.33.

FIGURE 9.33 Selecting a product category determines which products appear in the products drop-down list.
If you select a product category and product but then change the product category, you may notice thata number appears in the product drop-down. This is the ID of the previous selection. Because theproduct category changes, so does the list of available products, and therefore the previous selectionis no longer a valid selection in the list.To clear this up, add a rule on the product category such that when that value changes, you clear theselected product, as follows:
1. Select the Product Category drop-down.2. Click the Add Rule button from the ribbon bar and select This Field Changes, Set a Field’s
Value, as shown in Figure 9.34, to set the condition of the rule.
FIGURE 9.34 Selecting the Add Rule items sets the condition of the rule.
3. On the Rule Details dialog, click the Fields button and select the Product field from the Maindata source, as shown in Figure 9.35, and leave the Value blank to clear the selected product.

Click OK.
FIGURE 9.35 Leaving the Value entry blank clears the Product field.
Now anytime the product category is changed, the product selection is cleared. This resolves thephantom number issue.
Display Data from a SharePoint List
Scenario/Problem:You need to present the user with options based on data in a SharePoint list.
Solution: Configure a control to use the SharePoint list data.In this scenario, we use SharePoint list data to display options to the user and to display additionalinformation from the list. For example purposes, we use a list of offices, as shown in Figure 9.36,because this is a central location that stores business data and helps leverage form options.

FIGURE 9.36 Using a central list that stores business data helps leverage form options.Leveraging the data in this list is accomplished by completing the following steps:
1. Configure a SharePoint List data connection to your list, as explained in previous scenarios ofthis chapter.
2. Drag a drop-down list onto your form and name the field Office.3. Drag a text box onto your form and name the field OfficeLocation. (This is another column in
the same list.)4. Right-click the Office drop-down list, and select the Drop-down List Box properties.5. Choose the Get Choices from an External Data Source, option and select the SharePoint List
data connection from the Data Source drop-down.6. Select the Value and Display Name fields, as shown in Figure 9.37, using the list item ID to
uniquely identify each entry. Click OK.

FIGURE 9.37 The internal list item ID uniquely identifies each list entry.
TipIt is a good idea to preview your form midway through to make sure things are hooked upand working correctly.
7. Right-click the OfficeLocation text box and select Text Box Properties.8. Click the Function button next to the Value entry.9. Click the Insert Field or Group button on the Insert Formula dialog.
10. Select the Office Location list column, as shown in Figure 9.38, to set the text box to displaythe location value. (You might need to switch the data source selection to the SharePoint Listdata connection.)

FIGURE 9.38 Selecting another list column sets the text box to display that value.
11. Click the Filter Data button and add a Filter condition such that the ID in the SharePoint List isequal to the value of the selected Office on your form, as shown in Figure 9.39. This determineswhich location value is shown in the text box. Click OK.
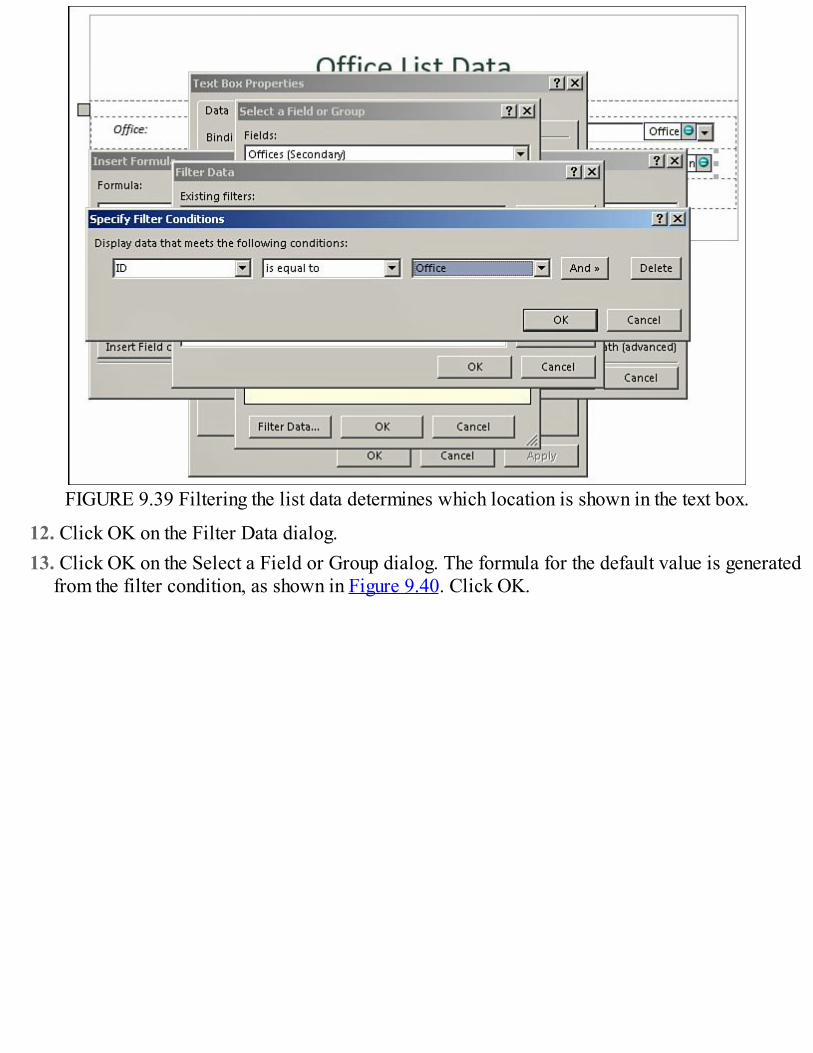
FIGURE 9.39 Filtering the list data determines which location is shown in the text box.
12. Click OK on the Filter Data dialog.13. Click OK on the Select a Field or Group dialog. The formula for the default value is generated
from the filter condition, as shown in Figure 9.40. Click OK.

FIGURE 9.40 Creating the filter condition generates the formula for the default value.
14. Click OK on the Text Box properties dialog.15. Previewing your form enables you to select a value from the list and have another value from
the same list item display in the text box, as shown in Figure 9.41.
FIGURE 9.41 Selecting a value from the list populates the text box with another value from the samelist item.
TipChange the text box properties to read-only and remove the borders/shading to use it fordisplay-only purposes as implemented in this example.

Display a Repeating Table from a SharePoint List
Scenario/Problem:You need to display multiple values from a SharePoint list.
Solution: Drag the SharePointListItem_RW group from the SharePoint List data connection onto yourform and select Repeating Table.That’s the easy answer, but we want to expand on that simple instruction. The Office list that we usedin the previous scenario has a Region column which is actually a lookup to another list. There is aRegion list that contains the available regions in which the offices exist. Therefore, only the list itemID of the Region list item is stored in the Region column of the Office list. (We uncover this in amoment.)For educational purposes, let’s drag the list group from the SharePoint List data connection onto theform and select Repeating Table, as shown in Figure 9.42.
FIGURE 9.42 Dragging a group from a data source onto your form allows you to generate a repeatingtable.
Previewing the form at this stage explains the Region relationship in which only the ID of the Regionis stored, as shown in Figure 9.43; the stored values are uncovered.
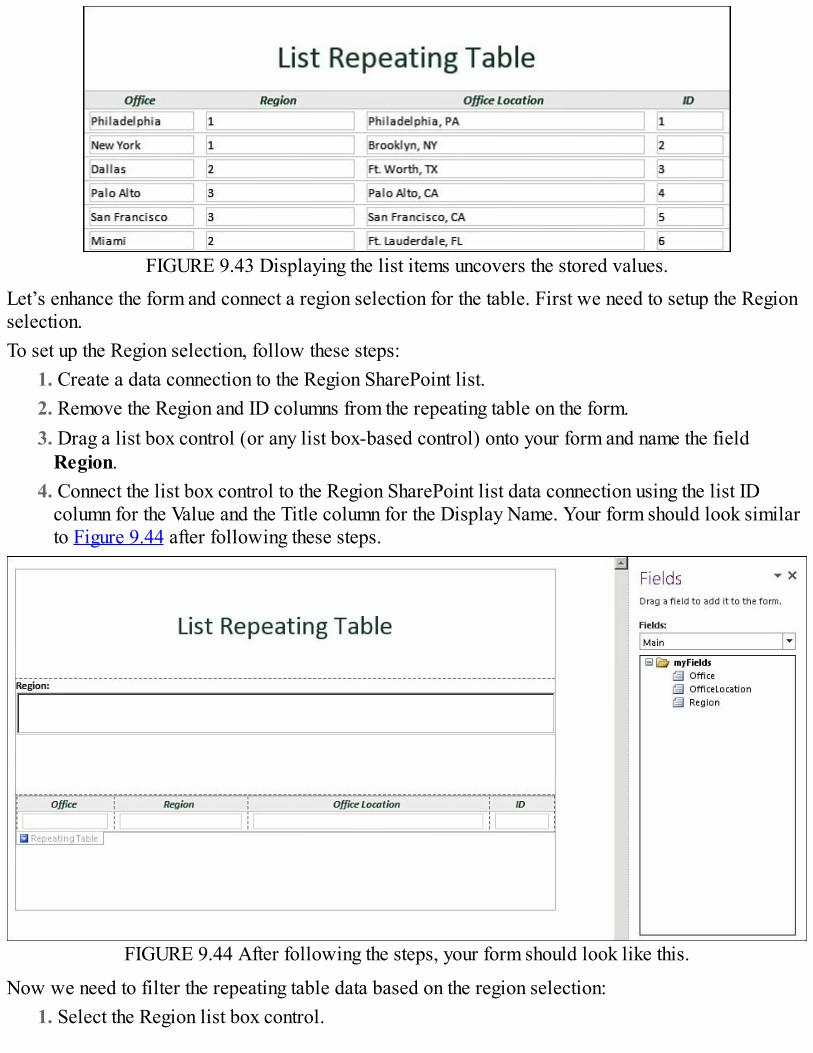
FIGURE 9.43 Displaying the list items uncovers the stored values.Let’s enhance the form and connect a region selection for the table. First we need to setup the Regionselection.To set up the Region selection, follow these steps:
1. Create a data connection to the Region SharePoint list.2. Remove the Region and ID columns from the repeating table on the form.3. Drag a list box control (or any list box-based control) onto your form and name the field
Region.4. Connect the list box control to the Region SharePoint list data connection using the list ID
column for the Value and the Title column for the Display Name. Your form should look similarto Figure 9.44 after following these steps.
FIGURE 9.44 After following the steps, your form should look like this.
Now we need to filter the repeating table data based on the region selection:1. Select the Region list box control.

2. Click Add Rule and select This Field Changes, Set a Field’s Value, as shown in Figure 9.45, tocreate the condition of the data rule which will filter the Office list data.
FIGURE 9.45 Adding a rule allows you to filter the Office list data.
TipThe best practice is to always filter data (if possible) when displaying multiple rows atone time, especially from a SharePoint list.
3. In the Rule Details dialog, click the Fields button next to the Field entry.4. Change the data source to the Office List connection.5. Expand the queryFields group and the SharePointListItem_RW group. Select the Region field,
as shown in Figure 9.46, to set the field’s value. Click OK.

FIGURE 9.46 Selecting the Region field allows you to set that field’s value.
6. Click the Function button next to the Value entry.7. Click the Insert Field or Group button.8. Select the Region field from your main data source to use the selected value of the region list
box, as shown in Figure 9.47. Click OK.

FIGURE 9.47 Selecting the form’s Region field allows you to use the selected value of the list box.
9. Click OK on the Insert Formula dialog. The formula is a period (.) because we are referencingthe value of the current control. We are adding the rule on the Region list box and setting thequery value to the value of the selected region, so your Rule Details should look similar toFigure 9.48.
FIGURE 9.48 Specifying the rule details sets the Region query field to the value of the selectedRegion.
10. Click OK. The Rules pane appears on the screen. We are already setting the query field valuein the rule, but we need to query the data to retrieve the proper SharePoint list items.
11. In the Rules pane, select Add, Query for Data, as shown in Figure 9.49, to add another action
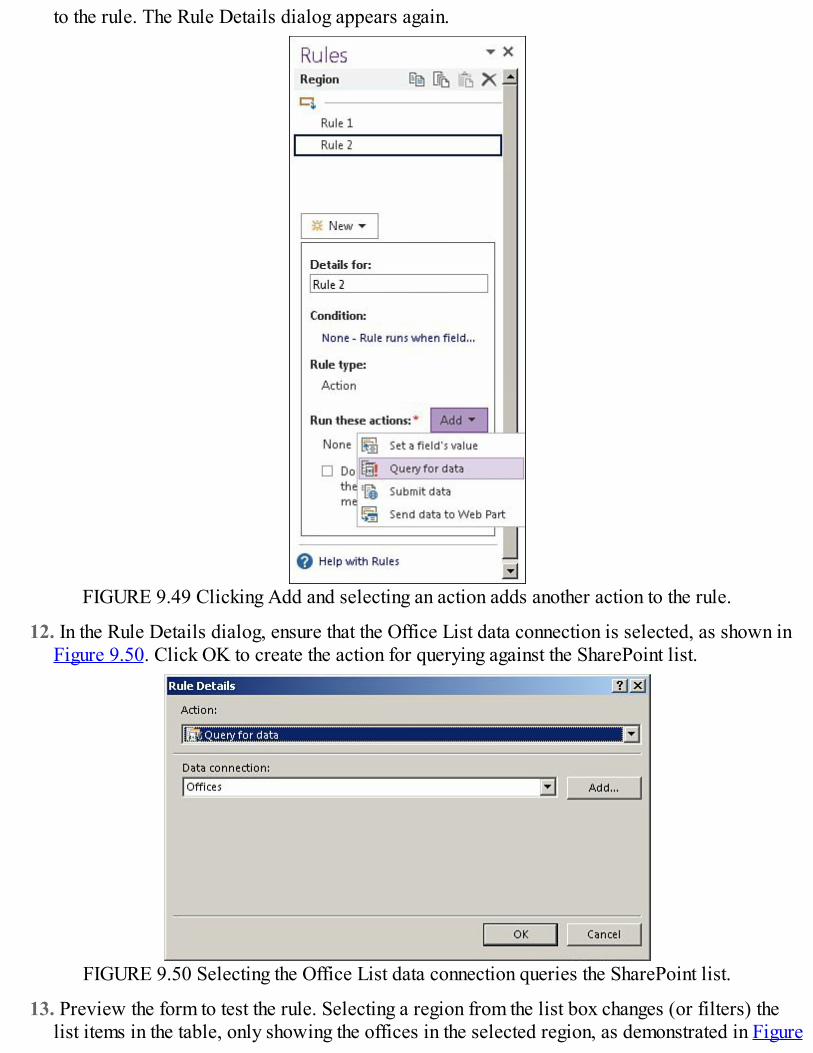
to the rule. The Rule Details dialog appears again.
FIGURE 9.49 Clicking Add and selecting an action adds another action to the rule.
12. In the Rule Details dialog, ensure that the Office List data connection is selected, as shown inFigure 9.50. Click OK to create the action for querying against the SharePoint list.
FIGURE 9.50 Selecting the Office List data connection queries the SharePoint list.
13. Preview the form to test the rule. Selecting a region from the list box changes (or filters) thelist items in the table, only showing the offices in the selected region, as demonstrated in Figure

9.51.
FIGURE 9.51 Selecting a region filters the items shown in the table.
TipDon’t want anything to show in the table until a region is selected? Modify the SharePointlist data connection (Data ribbon bar, Data Connections button) and uncheck theAutomatically Retrieve Data When Form Is Opened option.
Leverage External Data from a SharePoint External Content Type (BusinessData Connectivity Services)
Scenario/Problem:You need to allow the user to select an entity from an external content type.
Solution: Use the external item picker and configure to use the SharePoint external content type.External content types (ECTs) are managed by SharePoint using the Business Data ConnectivityServices (BCS) application. They may be generated by using Visual Studio 2012, SharePointDesigner 2013, or from an application definition file.To leverage external data from BCS in your form, follow these steps:
1. Drag an external item picker control onto your form.2. Right-click the control and select External Item Picker Properties.3. Click the General tab and enter the ECT values to access the external data, as shown in Figure
9.52. Here are explanations of the required fields:

FIGURE 9.52 Entering the ECT values allows you to access the external data.
ECT Namespace: The main SharePoint root that contains the external content typeECT Name: The name of the external content typeSystem Instance Name: The actual back-end system name or database nameFinder Name: The name of the method that returns all items (in SharePoint 2013, usually theReadList() method)Display Field Name: The external content type field name to display to the userDialog Title: The title of the Picker dialog that is shown to the user when they are selecting anexternal item
TipUse SharePoint Designer 2013 or Central Administration to assist in finding the values ofthe external content type.
4. Click the Other Settings tab.5. (Optional) Under Default, you may enter a default search term. If you leave this blank, all

values are returned when the Picker dialog appears.6. Change the Picker Mode option to Connect to External Data Source Through SharePoint, as
shown in Figure 9.53, such that the external data connection is handled through SharePoint.
FIGURE 9.53 Changing the Picker Mode allows your form to connect to external data throughSharePoint.
7. Click OK to save the external item picker properties.8. Publish the form to SharePoint to test. Preview mode won’t work because you are connecting
to the external content type through SharePoint.9. Click the Select External Item(s) button to confirm that a user can select an item from the
external content type.
NoteThe search items and display field in the Picker dialog depend on how the external contenttype was created and which filters were implemented on the finder method.

Leverage External Data from a REST Web Service
Scenario/Problem:You need to present users with data from a REST web service.
Solution: Configure the REST web service data connection and use rules to change the parameters.REST web services return Extensible Markup Language (XML) documents and take parametersthrough the URL query string. If you need the parameters to be dynamic, they may be changed by usingrules. This scenario steps through these processes.First let’s create a connection to the REST web service:
1. In InfoPath Designer, select the Data ribbon bar. Click the From Web Service button and selectFrom REST Web Service, as shown in Figure 9.54. The Data Connection Wizard appears.
FIGURE 9.54 Selecting the From REST Web Service allows you to create the appropriate dataconnection.
2. In the Data Connection Wizard dialog, enter the URL of the web service along with theappropriate query parameters to retrieve data based on the parameters.

NoteThis example uses a public REST web service from NOAA that is available through theInternet. You may use the same one to follow along:http://graphical.weather.gov/xml/sample_products/browser_interface/ndfdXMLclient.php?lat=38.99&lon=-77.01&product=time-series&begin=2004-01-01T00:00:00&end=2013-04-20T00:00:00&maxt=maxt&mint=mint.See http://www.weather.gov/forecasts/xml/rest.php for more information about availableweather-based REST web services (or to copy and paste sample URLs into your form).It is recommended to visit the site and grab the latest URL examples because these changeand you might experience difficulty entering the URL verbatim from this chapter.
3. Click Next. Enter a name for the data connection and click Finish.4. From the Data ribbon bar, click the Show Fields button. The Fields Pane appears.5. Switch the data source to the REST Web Service connection.6. Drag the “data” group onto the form, as shown in Figure 9.55, to examine what data comes
back from the web service.
FIGURE 9.55 Placing the data group onto your form allows you to examine the returned data from theweb service.
7. Preview the form to retrieve and display the data from the web service, as shown in Figure9.56.

FIGURE 9.56 Previewing the form retrieves and displays the data from the web service.It looks like we only need the temperature information, which is returning the high and the low for theday based on the passed-in ZIP code. Therefore, remove all the sections on the form and drag over thetemperature group such that we display only the information we need on the form. Optionally, removethe Time, Units, and Time Layout columns from the repeating table.Now let’s add some dynamics to the web service call. To do this, follow these steps:
1. Drag a drop-down list box (or list-based) control onto your form. Name the field City.2. Connect the list box to a data source or enter values for example purposes. Because the web
service takes in a ZIP code, you need the Value of the list box to be a ZIP code and the DisplayName to be a city name. Figure 9.57 demonstrates manually entered values for the list.

FIGURE 9.57 Entering manual entries allows the list box to be populated with available ZIPcodes/cities.
3. Select the City drop-down list and click Add Rule, This Field Changes, Query for Data.4. Select the REST Web Service on the Rule Details dialog and click OK. The Rules pane
appears on the screen.5. In the Rules Pane select Add and select Change REST URL, as shown in Figure 9.58, to add an
action that changes the URL parameters to the rule. The Rule Details dialog appears.

FIGURE 9.58 Adding a Change REST URL action allows the rule to change the URL parameters.
6. In the Rule pane, click the Function button. The resultant value for the URL needs to be a string.Therefore, we’ll use the concat function to construct a string using static text as well as the fieldvalue of City on the form.
7. Enter the concat function and usehttp://www.weather.gov/forecasts/xml/sample_products/browser_interface/ndfdXMLclient.php?zipCodeList= for the first value.
8. For the second value, click the Insert Field or Group button and select the City field from themain data source. Because the rule is on the City drop-down list, the field is represented as aperiod (.) in the formula.
9. Remove the hard-coded ZIP code from the text and use the remaining portion of the URL for thethird value in the concat() function (&product=time-series&begin=2004-01-01T00:00:00&end=2013-04-21T00:00:00&maxt=maxt&mint=mint). Your formula shouldlook similar to Figure 9.59. Essentially, we are constructing a URL string using form values inplace of hard-coded entries.

FIGURE 9.59 Using concat() constructs a URL string using form values.
TipClick Verify Formula to check your syntax!
TipUse the date functions to dynamically change the begin and end parameters in the URLexample.
10. Click OK on the Insert Formula dialog.11. Click OK on the Rule Details dialog.12. In the Rules pane, click the drop-down menu on the Change REST URL action and select move
up such that we change the URL first before querying the data source.13. Preview the form to test the functionality. When the city is changed, the web service is queried
and the new results are displayed as shown in Figure 9.60.

FIGURE 9.60 Changing the city dynamically changes the REST service call.
TipDon’t want anything to show in the table until a city is selected? Modify the REST webservice data connection (Data ribbon bar, Data Connections button) and uncheck theAutomatically Retrieve Data When Form Is Opened option.

Chapter 10. Use the InfoPath Form Web Part
In This Chapter Add an InfoPath Form Web Part to a SharePoint Web Part Page Create a Master/Detail Display Form For SharePoint Lists Use the Edit Form on the List Page Create a Custom List Page That Displays the List Item Form Expose Form Fields as Web Part Connection Parameters Create a Form to Send Data to Web Parts
This chapter explores the use of the InfoPath Form web part, which is available in SharePoint 2013.The InfoPath Form web part enables you to display an InfoPath form designed for SharePoint.Because it is a web part, you may use it to connect and send data between other web parts.Combining this functionality with list forms and list web parts opens the door for producing andproviding extensive functionality within SharePoint. Use the concepts in this chapter to further expandyour portal environment.
Add an InfoPath Form Web Part to a SharePoint Web Part Page
Scenario/Problem:You need to display an InfoPath form within a SharePoint web part page.
Solution: Edit the page, add the InfoPath Form web part, and configure.To add and configure an InfoPath Form web part on a SharePoint web part page, follow these steps:
1. Navigate to the SharePoint page and select Edit Page from the ribbon bar (or create a new webpart page).
2. Click Add a Web Part in the zone where you want the InfoPath Form web part.3. Select the Forms category and select InfoPath Form Web Part, as shown in Figure 10.1. Click
Add to add it to the selected zone.

FIGURE 10.1 Selecting InfoPath Form Web Part allows you to add it to your page.
4. From the web part item menu, select Edit Web Part, as shown in Figure 10.2, to open the toolpane.
FIGURE 10.2 Editing the web part opens the tool pane.
5. In the web part tool pane, select the form library that contains the form you want to display.

Make sure your form is selected in the Content Type drop-down, as shown in Figure 10.3.
FIGURE 10.3 Selecting the library and content type configures the form to be displayed.
TipAlthough it states that you may only select forms that have been published to a library orlist, you may also select forms that have been published as content types and added to thelibrary or list.
6. Click OK in the web part tool pane.7. Click Save on the ribbon bar (on the Page tab) to save the page.
Browsing the page displays the InfoPath form on the page itself. Clicking the Edit tab in the ribbonbar displays the InfoPath commands to the user, as shown in Figure 10.4.

FIGURE 10.4 Clicking the Edit tab displays the InfoPath commands available for the form.
TipThe same steps can be used for a wiki page. Just click the Web Part button on the Insertribbon bar menu for step 2.
Create a Master/Detail Display Form for SharePoint Lists
Scenario/Problem:You have two lists that are related and want to show the details all on one page.
Solution: Edit the display form of the parent list and add the related list.Revisiting the Office and Region lists from Chapter 9, “Use Data in SharePoint Forms,” each Officeentry has a region selection that is a lookup to the Region list. Therefore, you can modify the displayform for the Region list such that the corresponding offices are shown on the same page.To accomplish this, navigate to the parent list and follow these steps:
1. From the List ribbon bar, select the Modify Form Web Parts button and select (Item) DisplayForm, as shown in Figure 10.5, to edit the display form page. The display form is presented inedit mode.

FIGURE 10.5 Clicking Modify Form Web Parts allows you to edit the form pages.
NoteIf you did not customize the form of the list, the drop-down display only the default forms.
2. From the Insert ribbon bar, select Related List and click the related list to insert the details ontothe display form page, as shown in Figure 10.6.
FIGURE 10.6 Inserting a related list adds the details to the display form page.
3. On the Page ribbon bar, click Stop Editing to save your changes.4. Back in the Regions list, clicking a region opens the display form and shows the related
offices, as shown in Figure 10.7.

FIGURE 10.7 Viewing a region item displays the related offices.
TipIf you don’t want the lookup column to be displayed (because it shows the same entry foreach item), you can create a new view in the related list that doesn’t show the lookupcolumn and edit the related list web part to use that view.
Expose Form Fields as Web Part Connection Parameters
Scenario/Problem:You need fields from your form available for web part connectivity when using the formin an InfoPath Form web part.
Solution: Promote the fields in your form as SharePoint web part connection parameters.You have many opportunities to promote fields as parameters during publishing of the form orcreating a “send data to web part” rule action. However, at any time, you may promote fields as webparameters using the form options in InfoPath Designer, as follows:
1. From File, Info, click the Form Options button, as shown in Figure 10.8, to access the formsettings.

FIGURE 10.8 Clicking Form Options allows you to access the form settings.
2. Select the Property Promotion category in the Form Options dialog.3. Click Add in the bottom section and select a field from your form, as shown in Figure 10.9, to
use the field as a web part parameter. Select the parameter type and click OK to create the webpart parameter.

FIGURE 10.9 Selecting a field allows you to create the web part parameter.
4. All the fields listed in the box will be available for web part usage, as shown in Figure 10.10.Click OK to save the changes.

FIGURE 10.10 Clicking OK allows all fields listed to be used as web part parameters.
Create a Form to Send Data to Web Parts
Scenario/Problem:You want to provide the user with an input interface that will send the entered values toother web parts on your page.
Solution: Create a form with inputs and a button that sends data to the web part.With the InfoPath Form web part, you may create forms that are used solely for input purposes andsubmit the entered data as parameters to other web parts on the page. A simple example of this isusing a form to filter items displayed in a list.First let’s create the form:
1. Create a new form with a date picker control and a button. Name the date field DateSelectionand change the button label to Apply. Because this is for a web part, resize the form as shownin Figure 10.11.

FIGURE 10.11 Resizing the form prepares it for web part usage.
2. From File, Info, click the Form Options button.3. Select the Property Promotion category in the Form Options dialog.4. Click Add in the bottom section and select the Date field from your form. Select Output as the
parameter type and click OK to create the web part parameter.5. Click OK in the Form Options dialog.6. Click the Apply button and on the ribbon bar select Add Rule, When This Button Is Clicked,
Submit Data, as shown in Figure 10.12, to create a new button rule. The Rule Details dialogappears.

FIGURE 10.12 Clicking Add Rule creates a new button rule.
7. In the Rule Details dialog, change the Action to Send Data to Web Part, as shown in Figure10.13, such that the rule sends the parameters to a connected web part.
FIGURE 10.13 Changing the action allows the button to send data to a connected web part.
8. (Optional) Click the Property Promotion button to ensure the Date Selection field is beingpromoted as a SharePoint web part parameter.

9. Click OK.10. Publish the form to a SharePoint library or as a content type. If using a content type, add it to an
existing form library.Now you can create the page in SharePoint:
1. Create a new web part page in your SharePoint site.2. Add an InfoPath Form web part in one of the left web part zones and configure it to use the
form you created in the previous steps.3. Add a List View web part to the Body zone of the page by selecting a form library.4. From the InfoPath Form Web Part item menu, select Connections, Send Data To, List Name, as
shown in Figure 10.14, to create a web part connection between the web parts. The ChooseConnection dialog appears.
FIGURE 10.14 Sending data to the list web part creates a web part connection.
5. We are using the connection as a filter, so in the Choose Connection dialog, click the Configurebutton.
6. Select the Date column from the list web part in the Consumer Field Name, as shown in Figure10.15, to send the Date Selection as a filter to that field.

FIGURE 10.15 Selecting the consumer field determines the column that is to be filtered.
7. Click Finish.8. On the Page ribbon bar, click the Stop Editing button.9. Enter a date into the form and click Apply. The list only shows (filters) the items with a due
date of the entered date as shown in Figure 10.16.
FIGURE 10.16 Entering a date and clicking Apply filters the list.

Chapter 11. Using Forms in SharePoint Workflows
In This Chapter Create a SharePoint Workflow for a Form Library Include a Link to the Form in an Email Add a Task to the Workflow Perform Workflow Actions Based on Form Values Perform One Workflow Action or Another (But Not Both) Get a User from a People/Group Picker Control Customize the Task Form Add Form Parameters Used When Starting Your Workflow
This chapter explores workflow scenarios with InfoPath and SharePoint using SharePoint Designer2013 workflows. InfoPath may also be used in Visual Studio 2012 workflows, which are discussed inChapter 16, “Leverage Visual Studio 2012 with InfoPath,” within the more technical part of this book.One of the powerful uses of InfoPath with SharePoint 2013 is the ability to create forms that are usedin SharePoint workflows. Workflows help facilitate business processes. They are mostly centered onthe processing of information. InfoPath provides the vehicle for retrieving that information andmaking it useful within the workflow steps.
Create a SharePoint Workflow for a Form Library
Scenario/Problem:You need to create a workflow based on the submission of your form to a form library.
Solution: Use SharePoint Designer 2013 to create a new list workflow.SharePoint Designer 2013 enables you to easily create workflows against your form library. This isaccomplished by creating a new list workflow. To do this, follow these steps:
1. Launch SharePoint Designer 2013 and open your SharePoint site.2. Select Workflows from the Site Objects list within the left navigation pane.3. On the ribbon bar, click the List Workflows and select the form library that contains your form,
as shown in Figure 11.1, to create the workflow against that library.

FIGURE 11.1 Selecting the form library creates a workflow using that library.
NoteThis scenario provides a simple example to get started. The subsequent scenarios enhancethe workflow.
4. In the Create List Workflow dialog, enter a name and description to save the workflow, asshown in Figure 11.2. Step 1 appears in the main area.
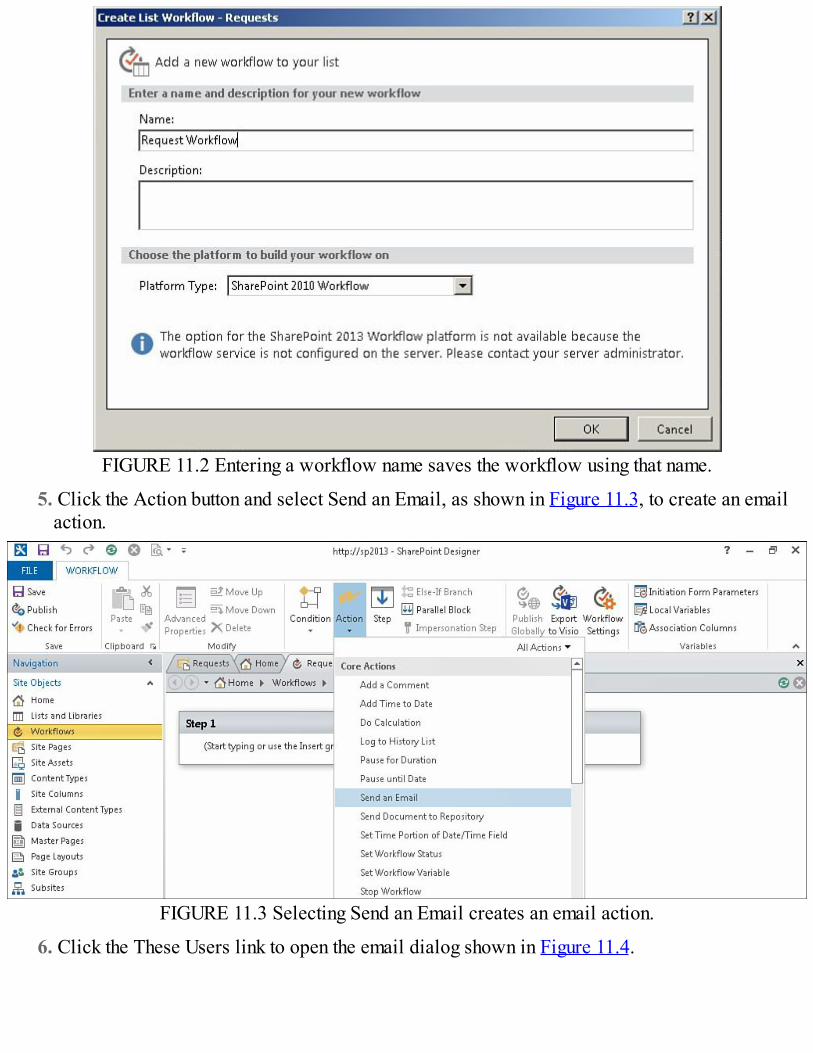
FIGURE 11.2 Entering a workflow name saves the workflow using that name.
5. Click the Action button and select Send an Email, as shown in Figure 11.3, to create an emailaction.
FIGURE 11.3 Selecting Send an Email creates an email action.
6. Click the These Users link to open the email dialog shown in Figure 11.4.

FIGURE 11.4 Clicking the These Users links opens the email dialog.
7. Click the address book button next to the To: entry and add the user who created the currentitem, as shown in Figure 11.5, to address the email to the user who submitted the form. ClickOK.
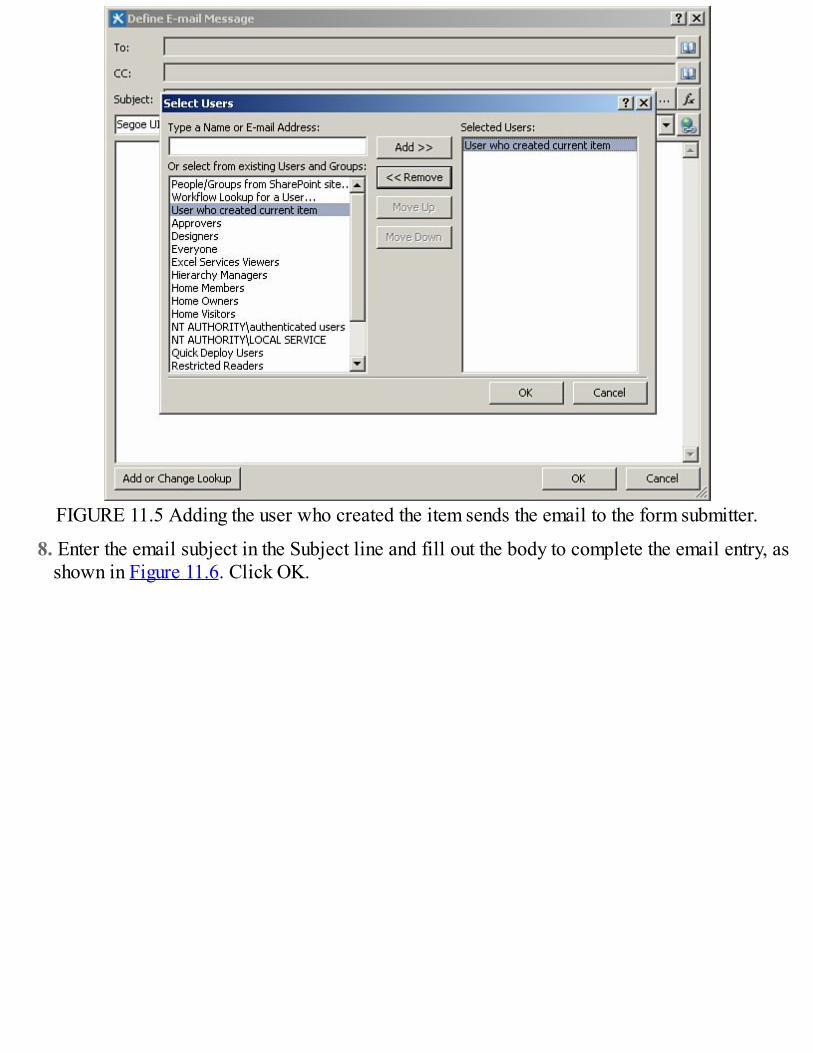
FIGURE 11.5 Adding the user who created the item sends the email to the form submitter.
8. Enter the email subject in the Subject line and fill out the body to complete the email entry, asshown in Figure 11.6. Click OK.

FIGURE 11.6 Entering a subject and filling in the body completes the email entry.
9. Click the workflow breadcrumb in the top of the main area next to Editor to display theworkflow settings.
10. Under Start Options, select the Start Workflow Automatically When an Item Is Created option,as shown in Figure 11.7, such that the workflow is kicked off when a user submits a new form.
FIGURE 11.7 Selecting the start options initiates the workflow upon form creation.
11. Click the Publish button on the ribbon bar to save and publish the workflow to the form library,as shown in Figure 11.8.

FIGURE 11.8 Clicking Publish saves and publishes the workflow to the form library.After you have published the workflow, navigate the form library and add a new document. Youshould receive an email with the subject and body that you configured. As noted in this scenario, theexample here is a simple one to get you started with workflows.
Include a Link to the Form in an Email
Scenario/Problem:You want to include a link to the form in an email from a workflow.
Solution: In the body of the email message, add a lookup.When sending an email to the originator of the form (such as in the preceding scenario) or to a personwho needs to handle the submitted form, it is always nice to include a link to the form such that theuser can easily navigate to the form instance and see the details.To do this, follow these steps:
1. In the email message dialog from the workflow action, click the Add or Change Lookup button.2. Ensure that the Data Source is the Current Item. Switch the Field from source entry to Encoded
Absolute URL to add the full path of the form into the email message, as shown in Figure 11.9.Click OK.
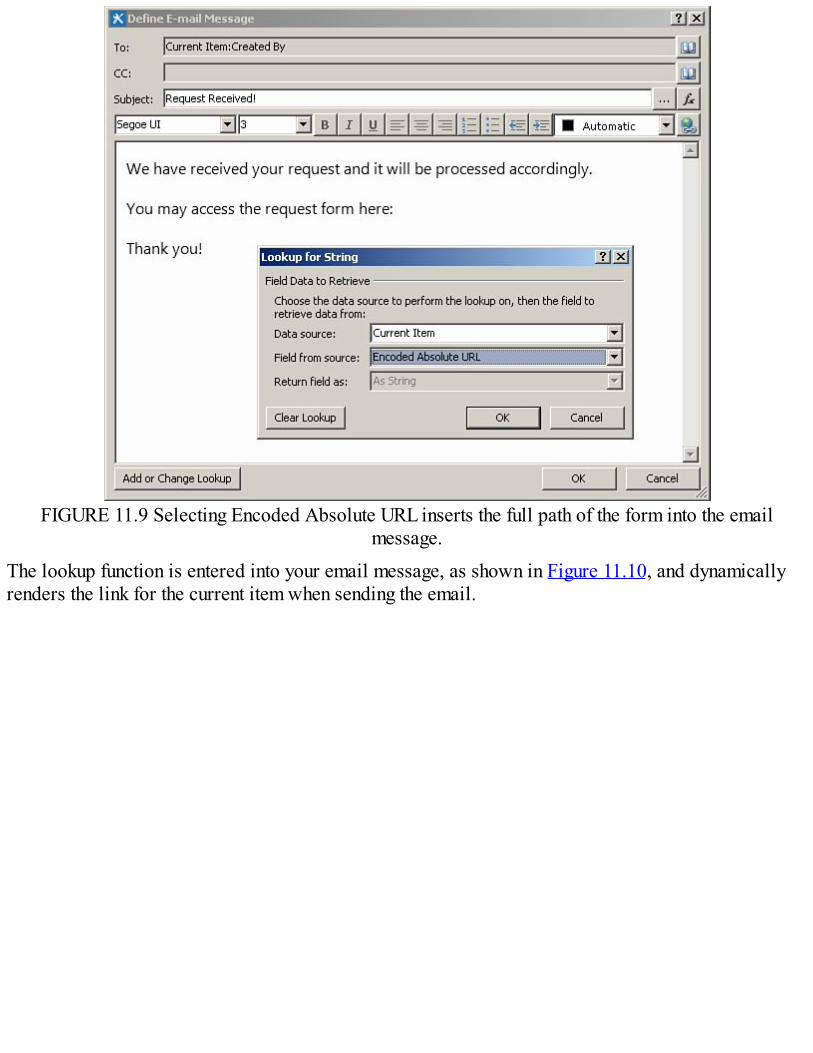
FIGURE 11.9 Selecting Encoded Absolute URL inserts the full path of the form into the emailmessage.
The lookup function is entered into your email message, as shown in Figure 11.10, and dynamicallyrenders the link for the current item when sending the email.

FIGURE 11.10 Adding the lookup function dynamically renders the value from the current item.
Add a Task to the Workflow
Scenario/Problem:You need to assign a task to a user after a form is submitted.
Solution: Add an Assign a To-Do Item action to your workflow step.A main component of workflow processes is taking action on the submitted form. This is easilyfacilitated by creating tasks and assigning them to users. To do this, follow these steps:
1. Click in the step in the workflow where you want to create a task item.
TipIf you select the entire step, the Conditions and Actions buttons are disabled. You need toclick into the step to add new conditions or actions.
2. Click the Action button on the ribbon bar and select Assign a To-Do Item, as shown in Figure11.11, to create the task item. The action is added to your step with links.

FIGURE 11.11 Selecting Assign a To-Do Item generates a task item.
3. Click the A To-Do Item link. The Custom Task Wizard dialog appears. Click Next.4. Enter a name for the new task title, as shown in Figure 11.12, and click Finish to create the new
task type.
FIGURE 11.12 Entering a name for the title creates a new type of task.

TipThis process is actually creating a new site content type and adds it to the tasks list ofyour SharePoint site.
5. Click the These Users link and select the user or users to assign the task. Click OK.The completed task action should look similar to Figure 11.13. Publish the workflow and navigate tothe form library. Fill out and submit a new form to test the workflow. A new task is created in theTasks list, as shown in Figure 11.14. Complete the task to complete the workflow.
FIGURE 11.13 Configuring the task and the users completes the task action.
FIGURE 11.14 Initiating the workflow creates a new task in the Tasks list.
TipThe workflow will not continue or complete until the task is completed.

Perform Workflow Actions Based on Form Values
Scenario/Problem:You need to perform actions in your workflow based on entered values of the form.
Solution: Add a condition to the workflow step.Many times you need to perform actions only if values entered on the form meet certain conditions.This can easily be implemented using conditions in your workflow.To perform an action based on a condition, follow these steps:
1. Click in the step in the workflow where you want to perform the conditional action.2. Click the Condition button on the ribbon bar and select If Current Item Field Equals Value, as
shown in Figure 11.15, to create the condition. The condition is added to your step with links.
FIGURE 11.15 Selecting a condition item adds the condition to the workflow step.
3. Click the field link and select a field from the form, as shown in Figure 11.16, to base thecondition on that field’s value. For this example, the Amount field is used.

FIGURE 11.16 Selecting a field bases the condition on that field’s value.
4. When using a numeric value field such as the Amount field in this example, you may change thecomparison details by clicking the Equals link, as shown in Figure 11.17. For this example,select the Is Greater Than comparison.
FIGURE 11.17 Clicking the Equals link allows you to change the comparison.
5. Click the Value link to enter the value to compare to the field value, as shown in Figure 11.18.For this example, we’ll check to see whether the amount is greater than $500 and enter 500 inthe text box.

FIGURE 11.18 Clicking the Value link allows you to enter a value to compare to the field value.
TipNotice the Function button next to the text box. Instead of hard coding a value, you mayenter a formula or other workflow value to produce a dynamic comparison.
6. Click in the row underneath the condition statement and enter Assign in the text box. Click themagnifying glass button or press the Enter key. A list of available actions appear in a drop-down, as shown in Figure 11.19.
FIGURE 11.19 Entering text and pressing Enter produces a list of available actions.
7. Select the Assign a To-Do Item option. For this example, we’ll need approval for requests thathave an amount over $500 before we continue with the normal workflow processes.
8. Click the A To-Do Item link. The Custom Task Wizard dialog appears. Click Next.9. Enter a name for the new task title, such as Approve Request, and click Finish to create the
new task type.10. Click the These Users link and select the user or users to assign the task. Click OK. The
workflow step should now look similar to Figure 11.20 and contain the completed conditionsuch that amounts over 500 need to be approved first via an approval task.

FIGURE 11.20 Completing the condition produces an approval task.
11. Publish the workflow.12. Navigate to the form library and submit a new document with a value that meets the condition.
The Approve Request task is created in the Tasks list and must be completed first, as shown inFigure 11.21.
FIGURE 11.21 Submitting a form with a value that meets the condition generates the approve task.
Perform One Workflow Action or Another (But Not Both)
Scenario/Problem:You need to perform either one action or another depending on a certain condition.
Solution: Add an else-if branch to the step.You may use the else-if branch to string together logic in your condition. The first application of thisfunctionality produces an Else section to your condition. This allows you to perform one action if acondition is met or otherwise perform another action.To apply the else-if branch to a condition, follow these steps:
1. Select an If condition in your step.2. Click the Else-If Branch button on the ribbon bar, as shown in Figure 11.22, to create the Else

section.
FIGURE 11.22 Clicking the Else-If Branch button adds an Else section to your condition.
3. Add actions to the Else section as needed.If you have an action defined already that needs to be in your Else section, simply select Move ActionUp from the item menu, as shown in Figure 11.23. You now have a complete if-else block of logic inthe workflow step, as shown in Figure 11.24.
FIGURE 11.23 Selecting Move Action Up moves the action into the Else section.
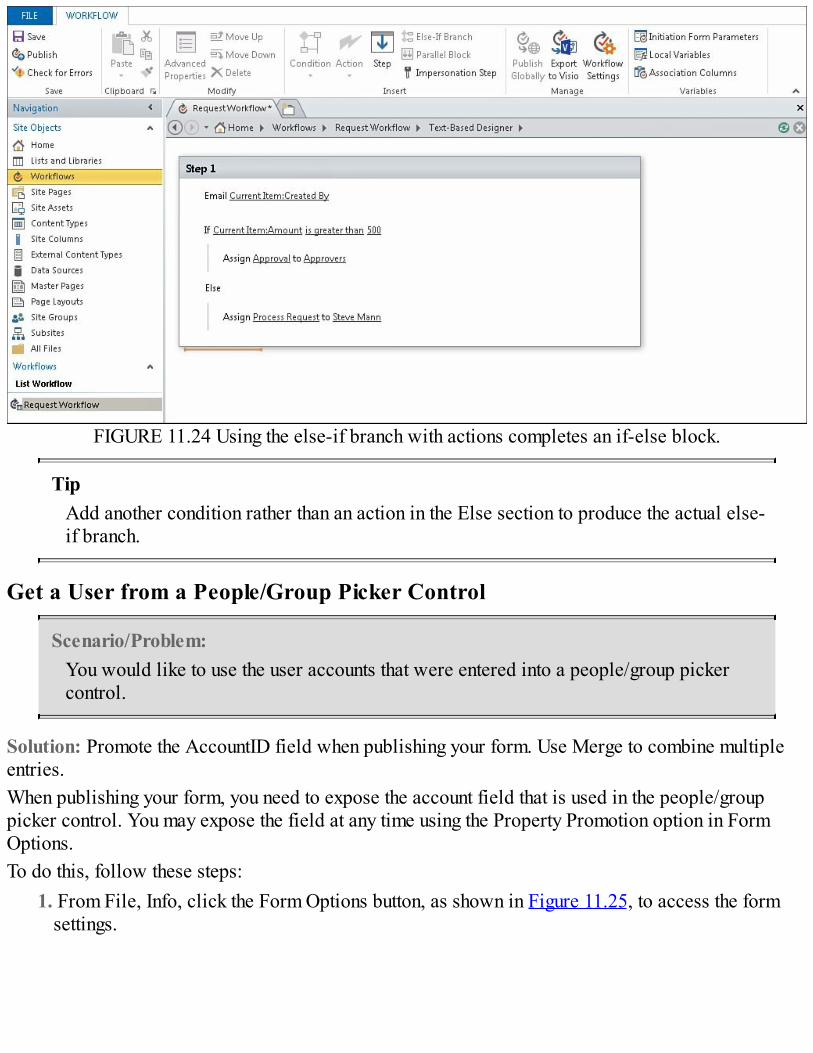
FIGURE 11.24 Using the else-if branch with actions completes an if-else block.
TipAdd another condition rather than an action in the Else section to produce the actual else-if branch.
Get a User from a People/Group Picker Control
Scenario/Problem:You would like to use the user accounts that were entered into a people/group pickercontrol.
Solution: Promote the AccountID field when publishing your form. Use Merge to combine multipleentries.When publishing your form, you need to expose the account field that is used in the people/grouppicker control. You may expose the field at any time using the Property Promotion option in FormOptions.To do this, follow these steps:
1. From File, Info, click the Form Options button, as shown in Figure 11.25, to access the formsettings.

FIGURE 11.25 Clicking Form Options allows you to access the form settings.
2. Select the Property Promotion category in the Form Options dialog.3. Click Add in the top section and select the AccountID from the Person group of your form, as
shown in Figure 11.26, to expose the field to the list and workflow.

FIGURE 11.26 Selecting a field allows you to expose it to your list and workflow.
4. If your people/group picker control allows multiple selections, select the Merge option. If yourpeople/group picker control doesn’t allow multiple selections, select the First option.
5. Click OK on the Select a Field or Group dialog.6. Click OK on the Form Options dialog.7. Publish your form.
TipIf your workflow is open in SharePoint Designer while making changes to the form or list,right-click the workflow tab and select Refresh such that the workflow recognizes anychanges.
In the workflow, you may now select users from the exposed field. This is usually accomplished byselecting Workflow Lookup for a User in the Select Users dialog, as shown Figure 11.27, and clickingAdd. Selecting the exposed field from the current item will use the accounts entered in thepeople/group picker, as shown in Figure 11.28.

FIGURE 11.27 Selecting Workflow Lookup for a User allows you to select a field that contains a useraccount.
FIGURE 11.28 Selecting the exposed field from the current item will use the accounts entered.
Customize the Task Form
Scenario/Problem:You would like to customize the system generated task form used in your workflow.
Solution: From the workflow properties screen, click the Task form in the Forms section. Modify theform, save it, and publish it back to SharePoint.
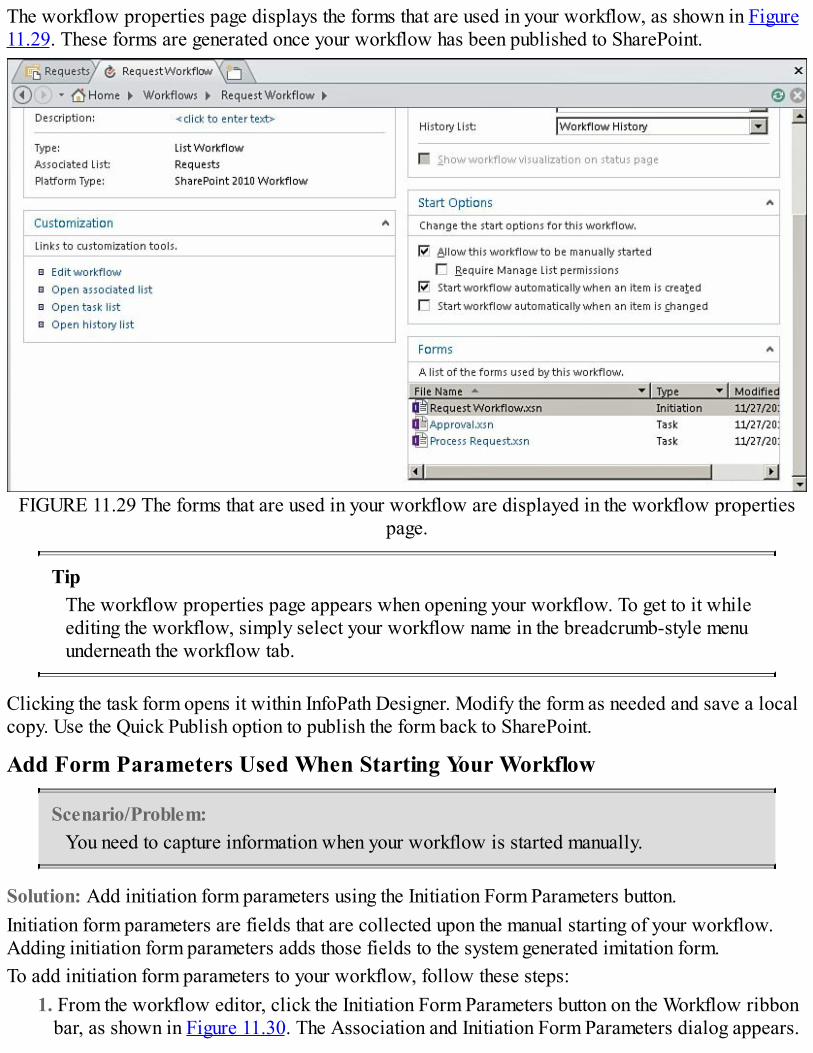
The workflow properties page displays the forms that are used in your workflow, as shown in Figure11.29. These forms are generated once your workflow has been published to SharePoint.
FIGURE 11.29 The forms that are used in your workflow are displayed in the workflow propertiespage.
TipThe workflow properties page appears when opening your workflow. To get to it whileediting the workflow, simply select your workflow name in the breadcrumb-style menuunderneath the workflow tab.
Clicking the task form opens it within InfoPath Designer. Modify the form as needed and save a localcopy. Use the Quick Publish option to publish the form back to SharePoint.
Add Form Parameters Used When Starting Your Workflow
Scenario/Problem:You need to capture information when your workflow is started manually.
Solution: Add initiation form parameters using the Initiation Form Parameters button.Initiation form parameters are fields that are collected upon the manual starting of your workflow.Adding initiation form parameters adds those fields to the system generated imitation form.To add initiation form parameters to your workflow, follow these steps:
1. From the workflow editor, click the Initiation Form Parameters button on the Workflow ribbonbar, as shown in Figure 11.30. The Association and Initiation Form Parameters dialog appears.
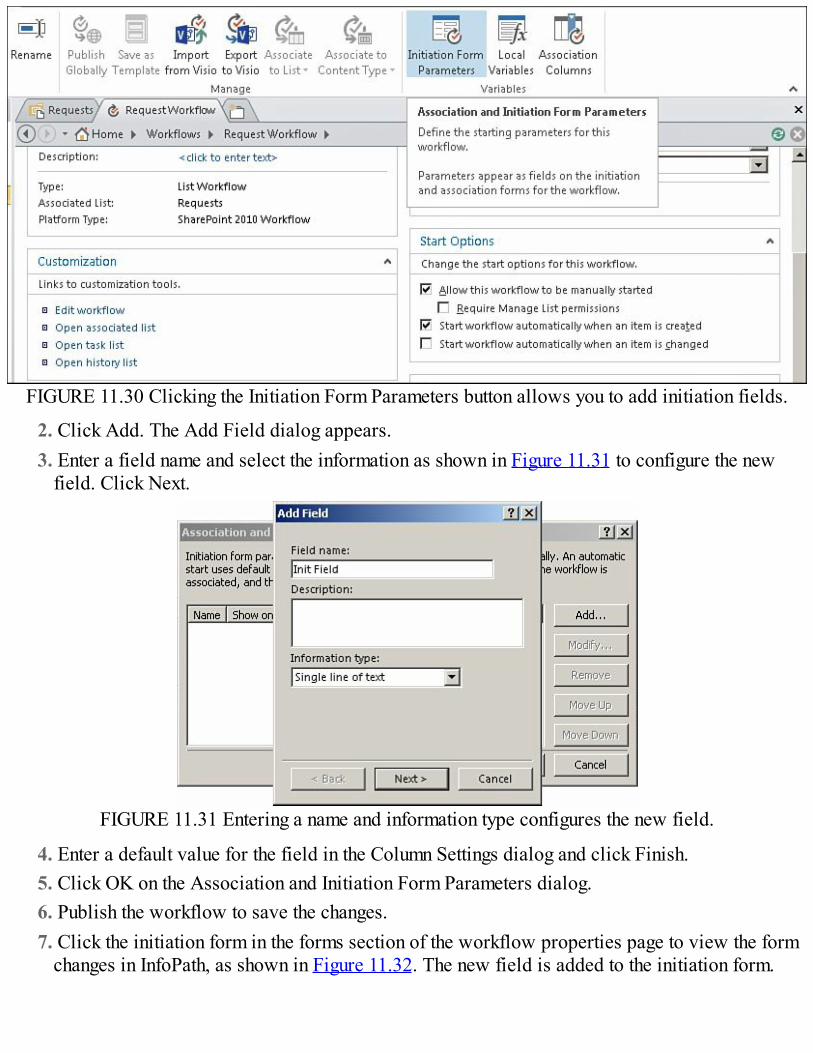
FIGURE 11.30 Clicking the Initiation Form Parameters button allows you to add initiation fields.
2. Click Add. The Add Field dialog appears.3. Enter a field name and select the information as shown in Figure 11.31 to configure the new
field. Click Next.
FIGURE 11.31 Entering a name and information type configures the new field.
4. Enter a default value for the field in the Column Settings dialog and click Finish.5. Click OK on the Association and Initiation Form Parameters dialog.6. Publish the workflow to save the changes.7. Click the initiation form in the forms section of the workflow properties page to view the form
changes in InfoPath, as shown in Figure 11.32. The new field is added to the initiation form.
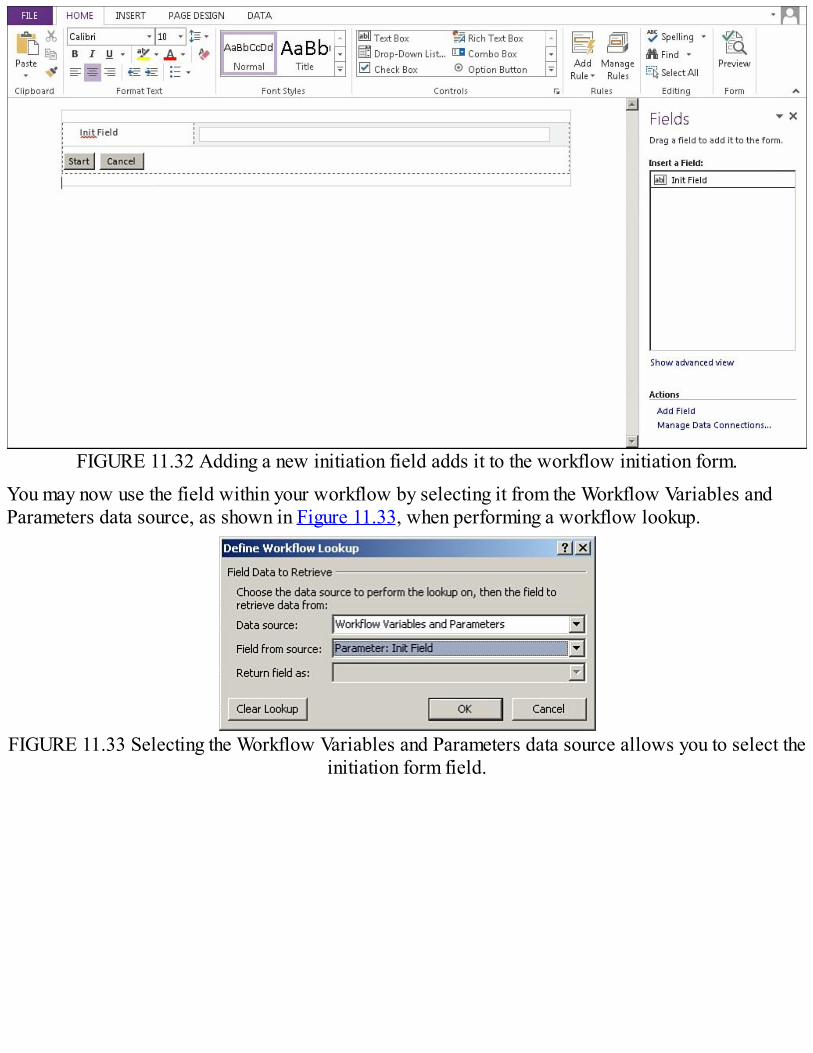
FIGURE 11.32 Adding a new initiation field adds it to the workflow initiation form.You may now use the field within your workflow by selecting it from the Workflow Variables andParameters data source, as shown in Figure 11.33, when performing a workflow lookup.
FIGURE 11.33 Selecting the Workflow Variables and Parameters data source allows you to select theinitiation form field.
Chapter 12. Enhance the User Experience
In This Chapter Display a Read-Only Value Compact Sections of Fields/Controls Configure Dynamic Sections Make Screen Tips Informative for Validation Notify the User of Successful Submission Create a Tabbed Navigation in Your Form Use Pictures as Choices
This chapter demonstrates ways to improve the user experience with your forms by leveragingInfoPath controls, functionality, and settings. Designing intuitive and easy-to-use forms facilitatestheir acceptance within an organization.
Display a Read-Only Value
Scenario/Problem:You have a read-only value to display on your form.
Solution: Display the value in a text box that is set to read-only and does not contain any borders orshading.When a read-only field is displayed in a text box, you obviously do not want the user to edit that field.You also do not want the user to think that they can edit that field. Therefore, it’s best to modify thetext box properties accordingly.To display a read-only value, follow these steps:
1. Right-click the text box that contains the read-only field on your form and select Text BoxProperties, as shown in Figure 12.1, to display the properties dialog.

FIGURE 12.1 Selecting Text Box Properties displays the Properties dialog.
2. Click the Display tab and check the Read-Only box, as shown in Figure 12.2, to make the textbox read-only. Click OK.
FIGURE 12.2 Checking the Read-Only box makes the text box read-only.
3. Right-click the text box again and select Borders and Shading, as shown in Figure 12.3, tomodify the borders and shading properties.

FIGURE 12.3 Selecting Borders and Shading allows you to modify the borders and shadingproperties.
4. On the Borders tab, click the None button to remove the borders from the text box, as shown inFigure 12.4.
FIGURE 12.4 Clicking the None button removes the borders from the text box.
5. Click the Shading tab and select No Color to remove any shading from the text box, as shownin Figure 12.5. Click OK.

FIGURE 12.5 Select No Color removes the shading from the text box.Previewing or rendering your form displays the field as read-only, as shown in Figure 12.6.
FIGURE 12.6 Rendering the form displays the field as read-only.
Compact Sections of Fields/Controls
Scenario/Problem:You have many related fields to present to the user and want to reduce the length of yourform.
Solution: Use a four-column table layout to compact the sections of similar fields.When you have sections of similar fields on your form, it is a recommended best practice to use oneof the four-column table layouts. To use a four-column table layout in your form or section, select theTables menu on the Insert ribbon bar and select one of the four-column layouts, as shown in Figure12.7.

FIGURE 12.7 Selecting a table layout inserts the table into your form or section.
Configure Dynamic Sections
Scenario/Problem:You have optional information that must be filled out only if another option is selected.
Solution: Create a rule to only show the optional sections when another field value is selected.Hiding or showing sections is another recommended method to enhance the user experience. Optionalor conditional fields should only be shown if needed. Although this can be implemented by usingoptional section controls, it is more aesthetic to use a check box to control the visibility of theoptional section.To do this, follow these steps:
1. On your form, add a check box control and a section control, as shown in Figure 12.8.(Optionally, you may add fields within the section, but that is not necessary to wire up the rule.)The check box will control the visibility of the section.
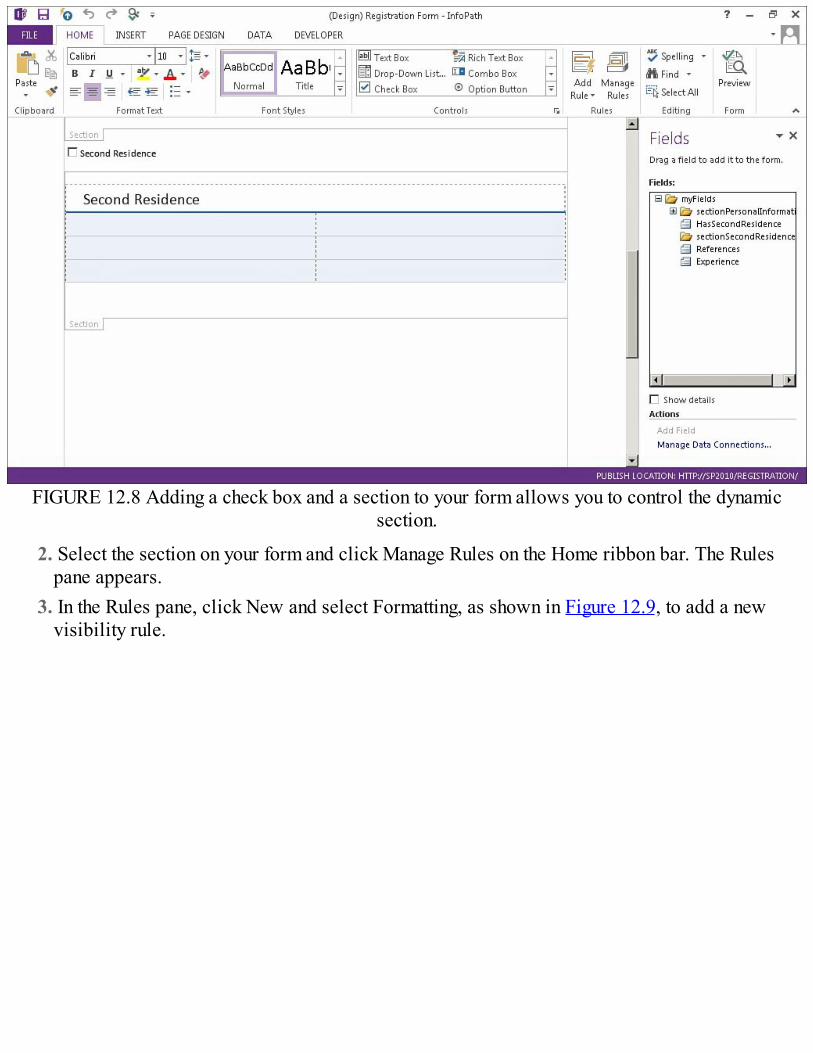
FIGURE 12.8 Adding a check box and a section to your form allows you to control the dynamicsection.
2. Select the section on your form and click Manage Rules on the Home ribbon bar. The Rulespane appears.
3. In the Rules pane, click New and select Formatting, as shown in Figure 12.9, to add a newvisibility rule.
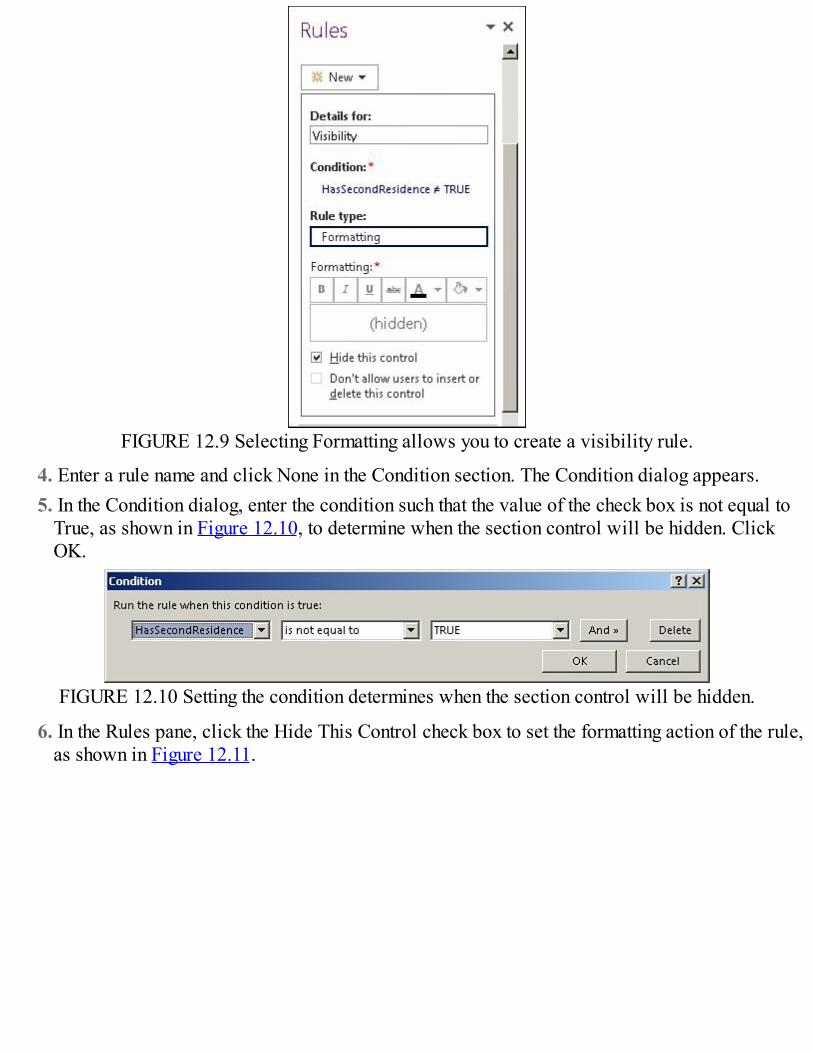
FIGURE 12.9 Selecting Formatting allows you to create a visibility rule.
4. Enter a rule name and click None in the Condition section. The Condition dialog appears.5. In the Condition dialog, enter the condition such that the value of the check box is not equal to
True, as shown in Figure 12.10, to determine when the section control will be hidden. ClickOK.
FIGURE 12.10 Setting the condition determines when the section control will be hidden.
6. In the Rules pane, click the Hide This Control check box to set the formatting action of the rule,as shown in Figure 12.11.

FIGURE 12.11 Checking Hide This Control configures the formatting action of the rule.
7. Preview your form to test the rule. Initially, the section is not visible, but if you check the checkbox, the conditional section appears, as shown in Figure 12.12.
FIGURE 12.12 Checking the check box displays the conditional section.
Make Screen Tips Informative for ValidationWhen using validation rules (see Chapter 4, “Create SharePoint Form Rules,” for creating rules), theentered values must conform to the configured pattern. If users do not know the format expected, theycan become frustrated, and you don’t want to leave them guessing.Therefore, it is a recommended best practice to include the required format (of the value) within the

screen tip to provide the user with the expected entry pattern, as shown in Figure 12.13.
FIGURE 12.13 Including the required format of the value provides the user with the expected entrypattern.
Notify the User of Successful Submission
Scenario/Problem:You want to notify the user that the form has been submitted successfully.
Solution: Use a confirmation view to notify the user of a successful submission.After submitting a form, the user may or may not know that the information has been successfullyreceived by SharePoint. Therefore, it is a best practice to create a confirmation view that is displayedafter form submission.To create and configure a confirmation view, you must first set up the submit options:
1. On the Data ribbon bar, click Submit Options. The Submit Options dialog appears.2. In the Submit Options dialog, select the Perform Custom Action Using Rules option, as shown
in Figure 12.14, to configure the submission of the form.
FIGURE 12.14 Submit options allow you to configure the submission of the form.
3. For this example, click the Advanced button and change the After Submit to Leave the FormOpen, as shown in Figure 12.15, to configure what occurs after submission.

FIGURE 12.15 The After Submit option configures what occurs after submission.
4. Click OK.That takes care of the submit options, but now you need to configure the form submit rule. For thisexample, you need to create a new view (see Chapter 6, “Create SharePoint Form Page Designs andViews”) named Confirmation View, which should contain a submit confirmation message and abutton that closes the form.To enter the submit rule, follow these steps:
1. On the Data ribbon bar, click Form Submit in the Rules section. The Rules pane appears.2. Click New and select Action.3. Enter Submit Form as the name of the rule.4. Click Add and select Submit Data. The Rule Details dialog appears, as shown in Figure 12.16,
which allows you to configure the connection.
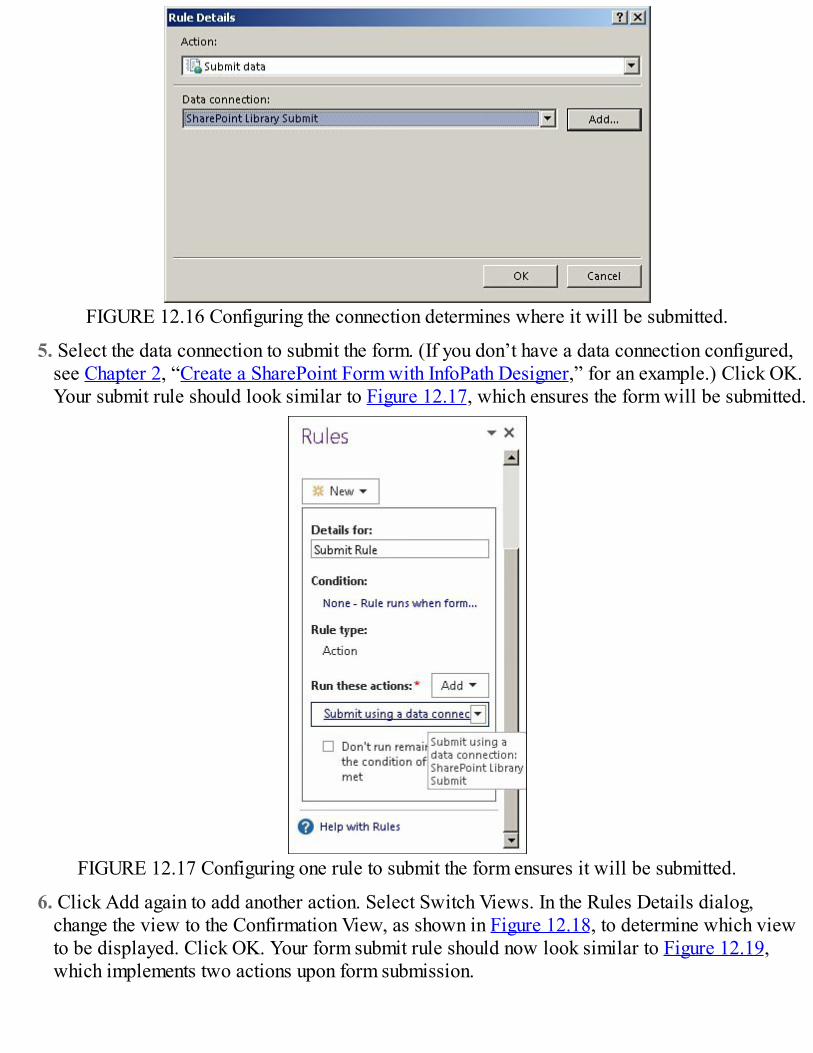
FIGURE 12.16 Configuring the connection determines where it will be submitted.
5. Select the data connection to submit the form. (If you don’t have a data connection configured,see Chapter 2, “Create a SharePoint Form with InfoPath Designer,” for an example.) Click OK.Your submit rule should look similar to Figure 12.17, which ensures the form will be submitted.
FIGURE 12.17 Configuring one rule to submit the form ensures it will be submitted.
6. Click Add again to add another action. Select Switch Views. In the Rules Details dialog,change the view to the Confirmation View, as shown in Figure 12.18, to determine which viewto be displayed. Click OK. Your form submit rule should now look similar to Figure 12.19,which implements two actions upon form submission.

FIGURE 12.18 Selecting a view determines which one will be displayed.
FIGURE 12.19 The form submit rule implements two actions upon form submission.
7. Save and Publish your form to SharePoint. Once your form is published to SharePoint, you maycreate a new instance and test the rules. Submitting the form displays the confirmation view, asshown in Figure 12.20.

FIGURE 12.20 Submitting the form displays the confirmation view.
Create a Tabbed Navigation in Your Form
Scenario/Problem:You want to provide a tabbed navigation for your form.
Solution: Use picture buttons and views to display different sets of fields in your form.When there are many different groups of unrelated entries in your form, it is recommended to createseparate views to handle the display and entry of each group of fields. An aesthetically pleasing wayto handle the switching between the views is through a tabbed navigation.The initial setup of the tabbed navigation requires the following:
1. Create a view in your form for each tab you will have.2. Create two image files for each tab, one for when the tab is selected and one when it is not
selected. The selected version will also be used for the hover picture.
TipUse PowerPoint 2013 to create the pictures for your picture buttons. Right-clicking aPowerPoint object allows you to save it as an external picture file!
3. Drag a picture button for each tab you will have onto your first view.4. Configure the first button to use the selected version of the first tab image.5. Configure the other buttons to use the nonselected version of the images as the picture and the
selected versions of the images as the hover picture. The initial setup should look similar toFigure 12.21.
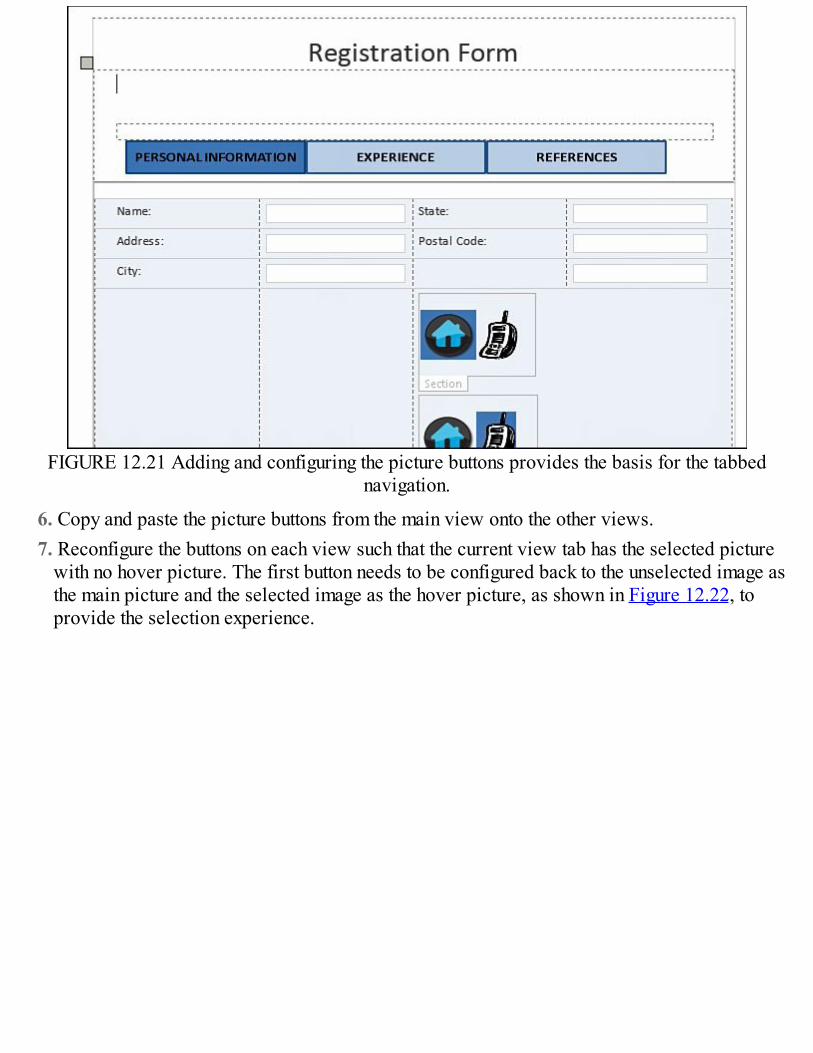
FIGURE 12.21 Adding and configuring the picture buttons provides the basis for the tabbednavigation.
6. Copy and paste the picture buttons from the main view onto the other views.7. Reconfigure the buttons on each view such that the current view tab has the selected picture
with no hover picture. The first button needs to be configured back to the unselected image asthe main picture and the selected image as the hover picture, as shown in Figure 12.22, toprovide the selection experience.
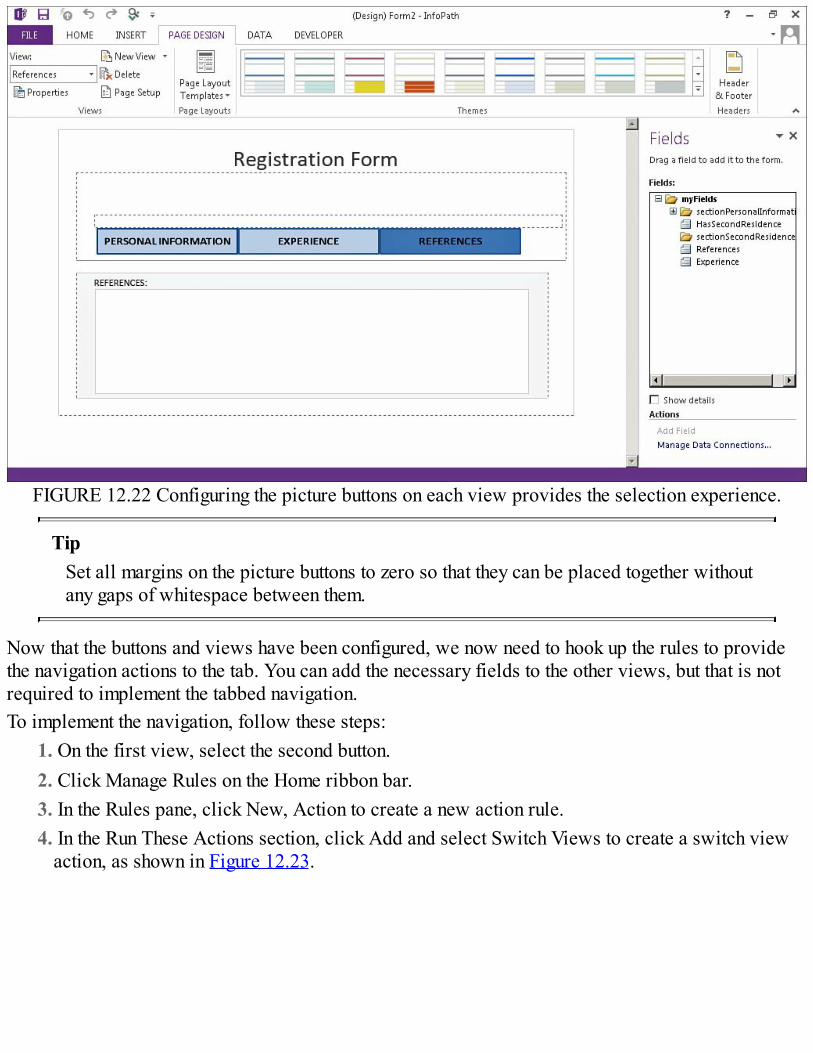
FIGURE 12.22 Configuring the picture buttons on each view provides the selection experience.
TipSet all margins on the picture buttons to zero so that they can be placed together withoutany gaps of whitespace between them.
Now that the buttons and views have been configured, we now need to hook up the rules to providethe navigation actions to the tab. You can add the necessary fields to the other views, but that is notrequired to implement the tabbed navigation.To implement the navigation, follow these steps:
1. On the first view, select the second button.2. Click Manage Rules on the Home ribbon bar.3. In the Rules pane, click New, Action to create a new action rule.4. In the Run These Actions section, click Add and select Switch Views to create a switch view
action, as shown in Figure 12.23.

FIGURE 12.23 Selecting Switch Views creates a switch view action.
5. In the Rule Details dialog, select the view that corresponds to the button, as shown in Figure12.24, such that when the button is clicked, the appropriate view is displayed. Click OK.
FIGURE 12.24 Selecting the view determines which view is displayed when the button is clicked.
6. Use the copy/paste buttons in the Rules pane (Figure 12.25) to copy the rule you just created.
FIGURE 12.25 Using the copy/paste buttons allows you to easily copy rules to other controls.
7. Select the next picture button and click the paste button in the Rules pane to paste a copy of therule.
8. Correct the name of the rule and click the Switch to View action link to change the view to thecurrent button view.
9. Switch to the other views of the form and paste the rule on the nonselected buttons. Change therule names and actions accordingly.
That’s it! Preview your form and click the buttons. The corresponding views display based on thebutton you click.
TipUse the button properties to make each button the same height and width. This provides asmoother transition between views.
Use Pictures as Choices
Scenario/Problem:You want to provide pictures as a choice mechanism on your form.
Solution: Use picture buttons within multiple sections to set the values and show the appropriateselections.Using picture buttons as options is a great way to jazz up your form and provide a great userexperience. This can be implemented using a picture button for each option within small sections thatare configured to display based on the selected option.To set this up, follow these steps:
1. First, add the field that will be the option and store the selected value. For example purposes, Iam adding a PhoneType field with a default value of Home, as shown in Figure 12.26.

FIGURE 12.26 Adding a field allows you to store the selected value.
2. The next step is to create image files for each option along with a selected version of the image(similar to the tabbed navigation scenario). For this example, I will use a home and a cellphone image.
3. For each option, create a new section in your form to house the picture buttons as shown inFigure 12.27. In my example, I created a sectionHomePhone and a sectionCellPhone.
FIGURE 12.27 Creating new sections for each option provides the housing of the picture buttons.
4. Create picture buttons inside each section using the selected version of the image for thecorresponding section as shown in Figure 12.28. This provides the selected appearance. In my

example, the selected home image is in the sectionHomePhone section, and the selected cellphone image is in the sectionCellPhone section.
FIGURE 12.28 Placing the selected images within the corresponding section provides the selectedappearance.
TipYou can use the Hover Picture settings here, too!
Now you need to set the actions of the picture buttons by adding the appropriate rules, as follows:1. In the first section, select a nonelected picture button. For my example, I selected the cell phone
image.2. Add a rule to the button with the Set a Field’s Value action and set the field for your choice to
the appropriate value, as shown in Figure 12.29. This is the value that will be set when thepicture button is clicked. For my example, I am setting the PhoneType to Cell.
FIGURE 12.29 Setting the field’s value changes the value when the button is clicked.
3. Repeat steps 1 and 2 for any other nonselected picture buttons in the first section.

4. Repeat steps 1–3 for each additional section. In my sectionCellPhone section, I selected thehome button and added the appropriate rule to set the PhoneType to Home.
The final set of steps involve creating formatting rules on each section, as follows:1. Select the first section and add a new formatting rule.2. Add a condition for the rule such that the field is not equal to the value that the section
represents, as shown in Figure 12.30, because we are going to hide the section. In my example,for sectionHomePhone, the condition is the PhoneType is not equal to Home.
FIGURE 12.30 Setting the condition hides the section when the field is not equal to the value.
3. Check the Hide This Control option in the rule under the Formatting section.4. Repeat steps 1–3 for each additional section.
Preview the form to test the implementation. Clicking a nonselected picture changes that button to theselected option, as shown in Figure 12.31.
FIGURE 12.31 Clicking a nonselected picture changes that button to the selected option.
TipUse a read-only text box to change the label of any dependent fields based on the selectedoption. In Figure 12.31, notice that the phone label now states Cell Phone.
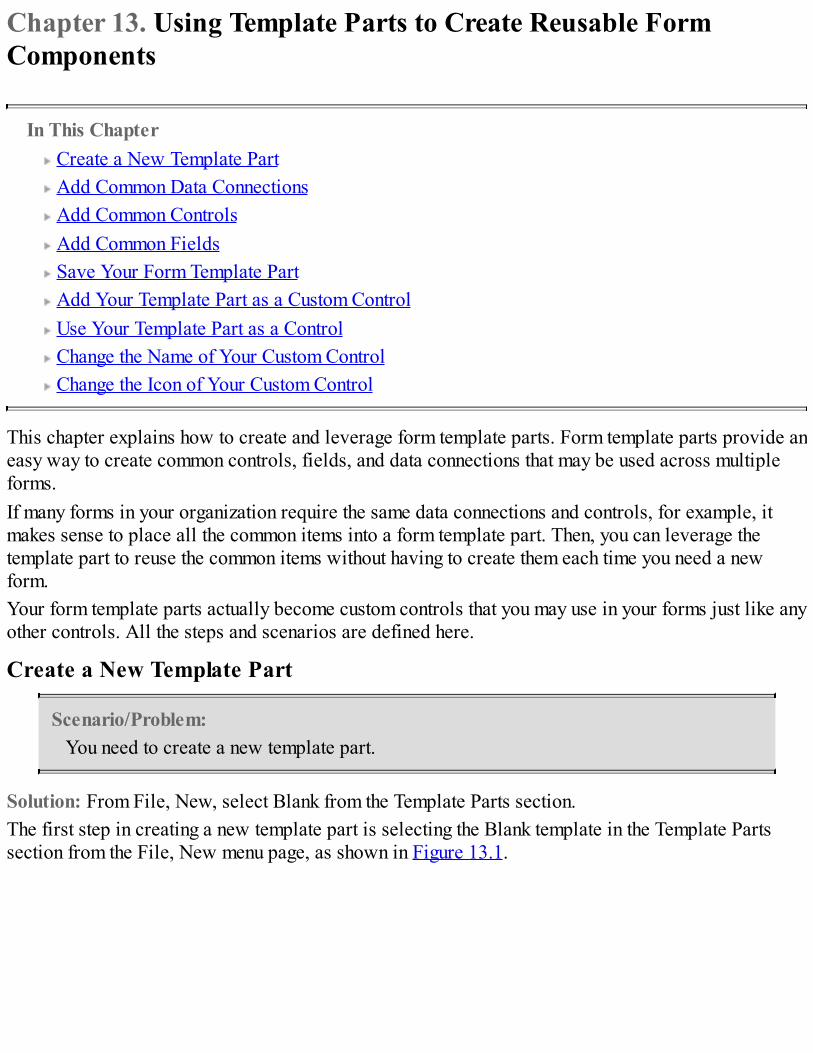
Chapter 13. Using Template Parts to Create Reusable FormComponents
In This Chapter Create a New Template Part Add Common Data Connections Add Common Controls Add Common Fields Save Your Form Template Part Add Your Template Part as a Custom Control Use Your Template Part as a Control Change the Name of Your Custom Control Change the Icon of Your Custom Control
This chapter explains how to create and leverage form template parts. Form template parts provide aneasy way to create common controls, fields, and data connections that may be used across multipleforms.If many forms in your organization require the same data connections and controls, for example, itmakes sense to place all the common items into a form template part. Then, you can leverage thetemplate part to reuse the common items without having to create them each time you need a newform.Your form template parts actually become custom controls that you may use in your forms just like anyother controls. All the steps and scenarios are defined here.
Create a New Template Part
Scenario/Problem:You need to create a new template part.
Solution: From File, New, select Blank from the Template Parts section.The first step in creating a new template part is selecting the Blank template in the Template Partssection from the File, New menu page, as shown in Figure 13.1.

FIGURE 13.1 Selecting the Blank template creates a new template part.
Add Common Data Connections
Scenario/Problem:You need to add data connections to your template part.
Solution: Use the Data ribbon bar menu to add the appropriate data connections.You may only add data connections to receive data and not to submit data. Adding data connections toyour template part is the same process as if you were using data connections in a SharePoint form. Itis best to leverage data connection files already created and deployed to your SharePoint site. SeeChapter 9, “Use Data in SharePoint Forms,” for more information about creating data connections.

TipIf you do not have data connection files available, it is best to create your dataconnections in the template part and then convert them to connection files.
Add Common ControlsAdd controls to your template part just as you would a SharePoint form. Use appropriate table layoutsaccordingly to arrange the controls on your template part.
Scenario/Problem:You need to add controls to your template part.
Solution: Use the Control box to add controls to your template part.
TipThe size of the template part will be the size of the resultant control on your SharePointforms. Use space sparingly.
Add Common Fields
Scenario/Problem:You need to add fields to your template part.
Solution: From the Fields pane, add new fields to your template part’s Main data structure.Sometimes you need to have fields that are not bound to controls in your template part. Add anyadditional fields to your main data source just as you would in normal SharePoint forms.
Save Your Form Template Part
Scenario/Problem:You need to save your form template part.
Solution: Select Save or Save As from the File menu.Saving your form template part creates a file with a .xtp2 extension. Click File, Save to save yourtemplate part. Enter a name and click OK, as shown in Figure 13.2.

FIGURE 13.2 Saving the form template part creates a .xtp2 file.Note that the template part is currently being saved as an InfoPath 2010 Web Browser Template Part.As of this writing, there is no option to save the template part as an InfoPath 2013 Web BrowserTemplate Part.
TipAfter your template part is ready for primetime, you might want to save it to a SharePointlibrary to share with your team.
Add Your Template Part as a Custom Control
Scenario/Problem:You want to make the form template part available for use.
Solution: Add your form template part as a custom control.After you have saved your template part, you may add it as one of the InfoPath controls such that eachtime you design a new form, your template part is available for use.To add your template part to InfoPath, follow these steps:
1. From InfoPath Designer, expand the Controls menu from the Home top ribbon bar.2. Select Add or Remove Custom Controls, as shown in Figure 13.3, to open the Add or Remove
Custom Controls dialog. The dialog appears as shown in Figure 13.4 and allows you to manage

your template parts.
FIGURE 13.3 Selecting Add or Remove Custom Controls opens the custom control dialog.
FIGURE 13.4 The custom controls dialog allows you to manage your template parts.
3. Click the Add button. The Add Custom Control Wizard appears, as shown in Figure 13.5, andsteps you through the template part addition.

FIGURE 13.5 Clicking Add invokes the Add Custom Control Wizard.
4. Leave the Template Part option selected and click Next.5. Browse to the xtp2 file you created when saving your template part and click Finish, as shown
in Figure 13.6, to add that part as a custom control.
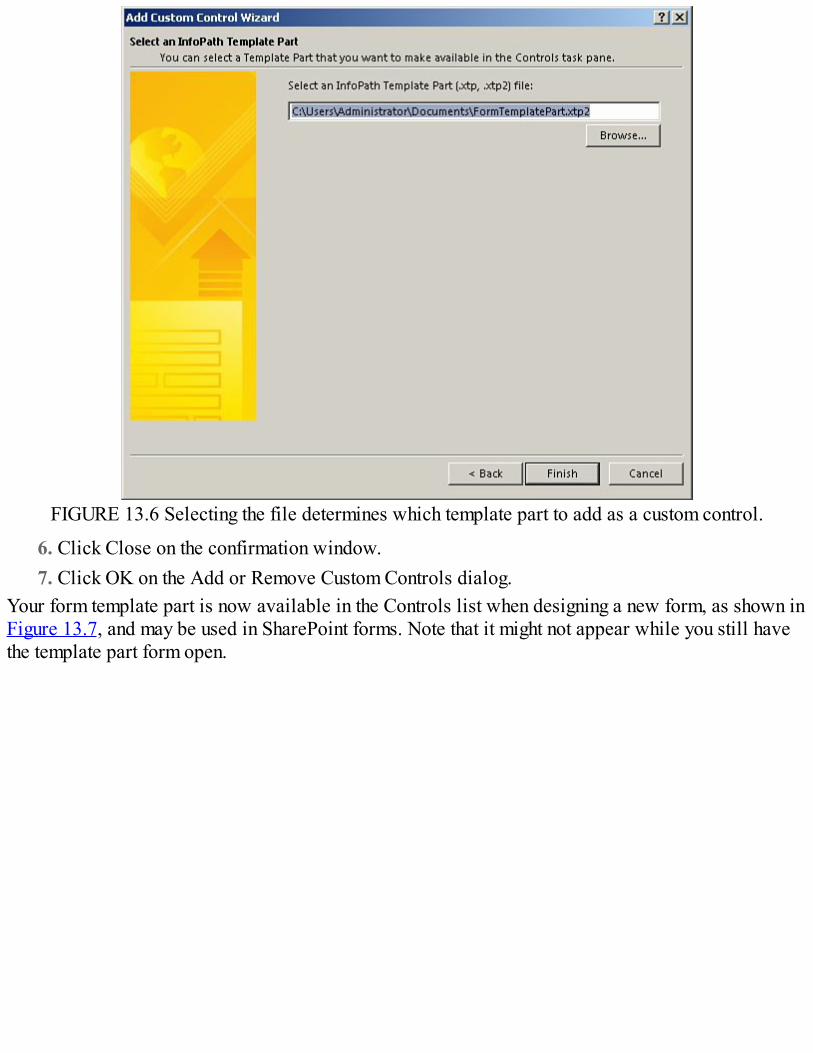
FIGURE 13.6 Selecting the file determines which template part to add as a custom control.
6. Click Close on the confirmation window.7. Click OK on the Add or Remove Custom Controls dialog.
Your form template part is now available in the Controls list when designing a new form, as shown inFigure 13.7, and may be used in SharePoint forms. Note that it might not appear while you still havethe template part form open.

FIGURE 13.7 Adding a template part displays it as an available control to be used in SharePointforms.
Use Your Template Part as a Control
Scenario/Problem:You want to use your form template part in a SharePoint form.
Solution: Drag your template part control onto your form.After you have added your template part as a custom control, you may use it like any other control.Dragging the template part onto your form adds the control to your form, as shown in Figure 13.8. Thecontrols and fields from your template part are added to the form, as well.

FIGURE 13.8 Dragging your template part onto your form adds the controls and fields.
TipIn your template part, you should rename the myFields main data source to the name ofyour template part such that when using it in a form the fields group is more descriptive.
Change the Name of Your Custom Control
Scenario/Problem:You want to change the name that appears in the Controls list for your form template part.
Solution: In your form template part, modify the template part properties.The custom control name defaults to the filename of your template part but often there are no spacesand it might not be the name you want displayed in the control box.To modify the custom control name used for your template part, follow these steps:
1. With your form template part file opened in InfoPath Designer, select File, Info to display theForm Information screen, as shown in Figure 13.9.

FIGURE 13.9 Select File, Info to display the Form Information screen.
2. Click the Template Part Properties button to display the Template Part Properties dialog.3. Enter a new name for the form template control, as shown in Figure 13.10, and click OK. This
determines what name appears in the controls box.
FIGURE 13.10 Entering a name for the template part determines the control name in the controls box.
4. Click File, Save to save the changes to your form template part file.
TipUse a control name that is descriptive and clear to others if you intend to share your formtemplate part.

NoteYou must remove the old template part custom control and add the new one to see thename changes.
Change the Icon of Your Custom Control
Scenario/Problem:You want to change the icon that appears in the Controls list for your form template part.
Solution: In your form template part, modify the template part properties.The custom control icon defaults to the InfoPath template part icon. Having several of these in theControls list could cause confusion (or just look boring).To modify the custom control icon that is used for your template part, follow these steps:
1. With your form template part file open in InfoPath Designer, select File, Info to display theForm Information screen.
2. Click the Template Part Properties button to display the Template Part Properties dialog.3. Click Browse to browse for a new picture file and click Open on the file dialog.4. Click OK on the Template Part Properties dialog.5. Click File, Save to save the changes to your form template part file.
NoteYou must remove the old template part custom control and add the new one to see the iconchanges.

Part III: Technical Solutions

Chapter 14. Customize a Document Information Panel ContentType
In This Chapter Create the Document Library Add Columns to Your DIP Modify the DIP
The Document Information Panel (DIP) is a form that appears within a Microsoft Office application(Excel, PowerPoint, or Word) when you are creating a new document for a SharePoint documentlibrary that contains custom columns. The DIP allows you to enter additional information about thedocument and have those values stored in the SharePoint document library.The DIP is actually part of the document content type used within the document library. Addingcolumns to your document library updates the DIP portion of the content type. Essentially, the DIP isan extension of the Excel, PowerPoint, or Word document itself.InfoPath Designer has a Document Information Panel template available for when designing a newform. Although this might make you think you can create a new DIP, the option is actually there tomodify an existing DIP. Because the DIP is part of the content type, it needs to be system generatedwithin the document library first before any modifications can be made.
Create the Document Library
Scenario/Problem:Create a library to store Office documents that can use the DIP.
Solution: In SharePoint, create a new document library that uses a Microsoft Office documenttemplate.Before you modify a DIP for your documents, you need a document library that stores the documents.The document template for the library needs to be one of the Microsoft Office document templates(Excel, PowerPoint, or Word), as shown in Figure 14.1.

FIGURE 14.1 Selecting a Microsoft Office template allows a DIP to be applied.
Add Columns to Your DIP
Scenario/Problem:You need to add the additional columns to be used in your DIP.
Solution: Modify the document library in SharePoint and add the additional columns.Because the DIP is used to display/enter the additional data you want to capture with the documents,you need to have columns in your library to store those values.To add these columns to your library, follow these steps:
1. Navigate to your document library in SharePoint.2. Click Library Settings on the Library ribbon bar, as shown in Figure 14.2, to manage the
library’s settings.

FIGURE 14.2 Clicking Library Settings allows you to manage the library’s settings.
3. On the List Information page, scroll down and click Create Column, as shown in Figure 14.3,to add a new column to the library.
FIGURE 14.3 Clicking Create Column allows you to add new columns to your document library.
4. Enter a name for the column and select the type of information. Click OK.5. Repeat steps 1 and 2 for additional columns. For example purposes, I created Office, Priority,
and Consider Draft columns.6. Navigate back to the document library.7. From the Documents ribbon bar, select New Document, as shown in Figure 14.4, to launch the
Microsoft Office application associated to the document library document type.

FIGURE 14.4 Clicking New Document launches the Office application associated to the documentlibrary.
The Office application launches and displays a blank new document. To show the DIP, follow thesesteps:
1. Click File and then select Info.2. Click the Properties drop-down and select Show Document Panel as shown in Figure 14.5. The
system-generated DIP appears at the top of the document, as shown in Figure 14.6. Verify thatthe DIP contains the additional columns you added to the library.

FIGURE 14.5 Selecting Show Document Panel displays the DIP in your document.

FIGURE 14.6 Creating a new document verifies that the added columns appear in the DIP.
NoteAny multiple-choice columns are displayed as drop-downs regardless of the selection inSharePoint, but you may modify the control inside the DIP to use different interfaces.
Modify the DIP
Scenario/Problem:You want to modify the system-generated DIP.
Solution: Open the DIP with InfoPath Designer.The first step in modifying a DIP is using the form template to create a new form to modify the DIP. Tomodify the DIP of a document library, follow these steps:
1. From the File, New page, select the Document Information Panel template, as shown in Figure14.7, to import an existing DIP for modification.
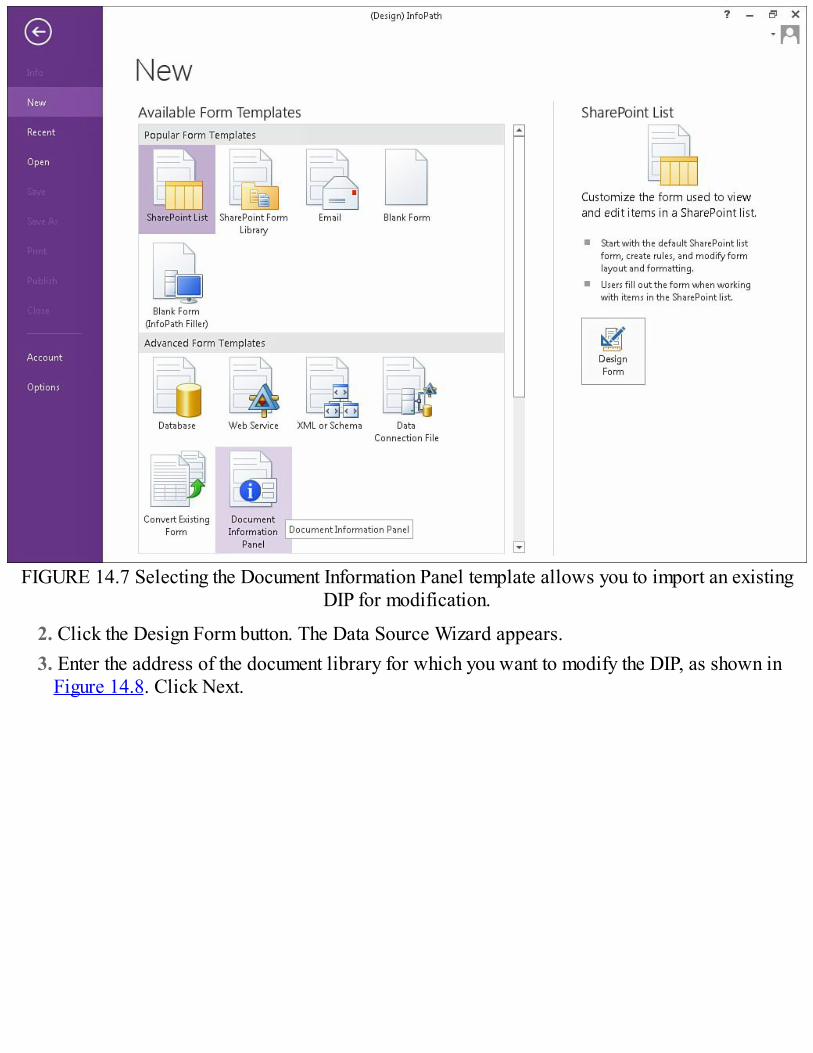
FIGURE 14.7 Selecting the Document Information Panel template allows you to import an existingDIP for modification.
2. Click the Design Form button. The Data Source Wizard appears.3. Enter the address of the document library for which you want to modify the DIP, as shown in
Figure 14.8. Click Next.

FIGURE 14.8 Entering the document library address determines which DIP to modify.
4. Select the content type in the library, as shown in Figure 14.9, to modify the DIP of thatdocument type. Click Next.
FIGURE 14.9 Selecting the content type modifies the DIP of that document type.
5. Click Finish. The system-generated DIP for the document library content type you selected isloaded into the designer, as shown in Figure 14.10.

FIGURE 14.10 Clicking Finish loads the DIP into the designer.
6. Modify the DIP inside the designer as needed.7. Click File, Info, and then click the Quick Publish button to publish your changes to the
document library. You need to save a local copy of the form before InfoPath allows you topublish the form.
TipAdd data connections to your DIP to populate drop-downs with dynamic data.
Publishing the new template updates the document content type in the document library. Adding a newdocument through the associated Office application renders your updated template as the documentinformation panel.

Chapter 15. Leverage Visual Studio 2012 with InfoPath
In This Chapter Accessing Your Form Within a Visual Studio Solution Create an InfoPath 2013 Add-In Create a Custom Task Pane
This chapter explores several ways to use Visual Studio 2012 with InfoPath. You can leverage VisualStudio 2012 to create solutions using an InfoPath form and to create application-level add-ins. Thecreation of Visual Studio solutions and the customization of Office products are broad subjects withinthemselves, and plenty of resources discuss these topics in great detail. The scenarios in this chapterprovide a primer for using Visual Studio 2012 with InfoPath but you might also need to install theVisual Studio Tools for Office 2013 to implement some of them.
Access Your Form Within a Visual Studio Solution
Scenario/Problem:You need to obtain the values entered into a form within a Visual Studio workflow.
Solution: Create a class based on your form and serialize an object.You may access the form contents within a workflow by creating an object of the form. To create anobject, you need to define a class that defines the structure of your form. Luckily, utilities areavailable to automatically generate this class for you.First you need the source files of your InfoPath form. There are two ways to accomplish this. Oneway is to export the source files from InfoPath, and the other is to just extract them from your formtemplate file.To export the source files of your form, follow these steps:
1. Open your form in design mode using InfoPath Designer 2013.2. Click File, Publish.3. Click the Export Source Files button, as shown in Figure 15.1. The Browse for Folder dialog
appears.
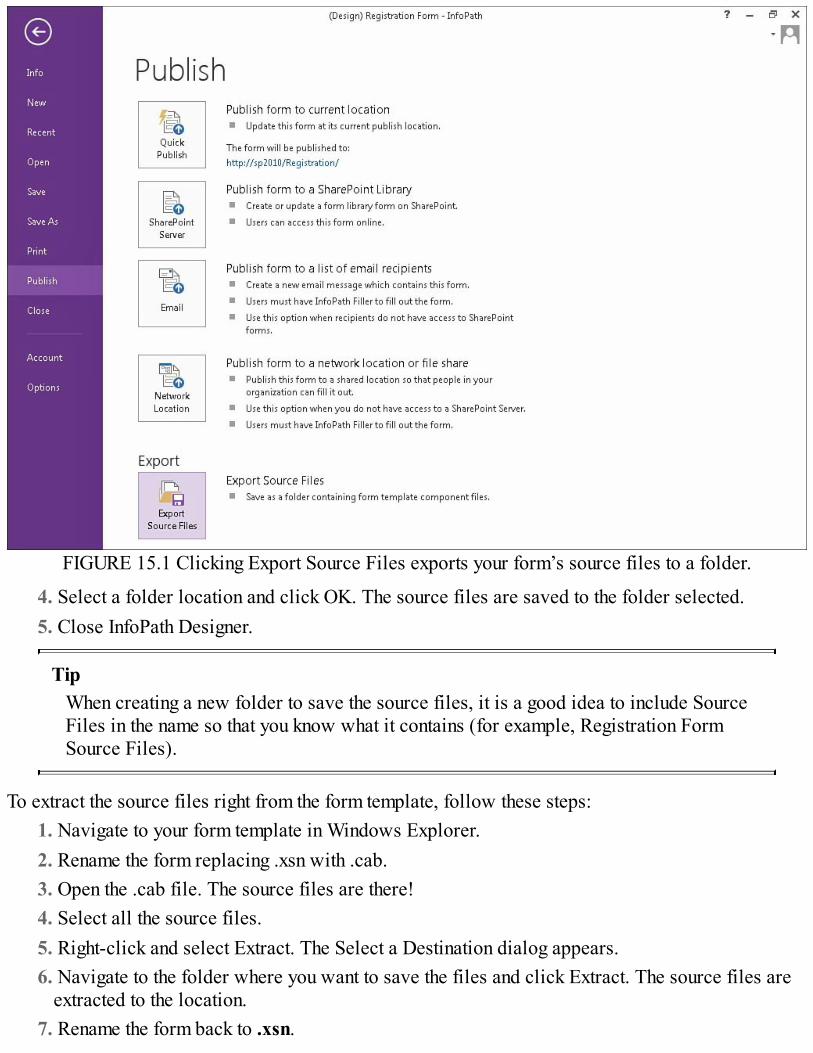
FIGURE 15.1 Clicking Export Source Files exports your form’s source files to a folder.
4. Select a folder location and click OK. The source files are saved to the folder selected.5. Close InfoPath Designer.
TipWhen creating a new folder to save the source files, it is a good idea to include SourceFiles in the name so that you know what it contains (for example, Registration FormSource Files).
To extract the source files right from the form template, follow these steps:1. Navigate to your form template in Windows Explorer.2. Rename the form replacing .xsn with .cab.3. Open the .cab file. The source files are there!4. Select all the source files.5. Right-click and select Extract. The Select a Destination dialog appears.6. Navigate to the folder where you want to save the files and click Extract. The source files are
extracted to the location.7. Rename the form back to .xsn.

The file that you are most interested in is the myschema.xsd file. This contains the XML definition ofyour form. Using the Visual Studio xsd.exe utility, you can easily generate a class file usingmyschema.xsd. To do this, follow these steps:
1. Open the Developer Command Prompt for VS2012 (Start, Microsoft Visual Studio 2012,Visual Studio Tools).
2. Navigate to the location of your form source files.3. Type xsd /c myschema.xsd and press Enter, as shown in Figure 15.2.
FIGURE 15.2 Using the xsd utility generates the class file.
NoteAt the time of this writing, the xsd utility could not generate code for all InfoPath controls.If you run into any problems, search for any patches or updates.
4. Back in Windows Explorer, rename the .cs file that was generated to your form name (forexample, RegistrationForm.cs).
5. (Optional) Copy the .cs file into your Visual Studio project folder.6. Add the .cs file to your Visual Studio project, as shown in Figure 15.3.

FIGURE 15.3 Adding the form .cs file to your project allows you to leverage the form class.
7. Add the namespace of your project to the form class file, as shown in Figure 15.4. Your formclasses must be in the same namespace to be accessed within the project code.

FIGURE 15.4 Placing the form classes into the namespace allows you to access the objects within theproject code.
Create an InfoPath 2013 Add-In
Scenario/Problem:You need to create an InfoPath 2013 add-in.
Solution: Use Visual Studio 2012 and create a new add-in project.You may use Visual Studio 2012 to create an InfoPath 2013 add-in that can be used within InfoPath.The add-in is an application-level add-in that customizes the InfoPath Designer experience. Twocommon uses of an InfoPath add-in are to customize the ribbon and generate a custom task pane.To create an InfoPath 2013 add-in, follow these steps:
1. Launch Visual Studio 2012.2. Click File, New, Project. The New Project dialog appears.3. Navigate to Office, 2013 from the left-side Installed Templates navigation.4. Select the InfoPath 2013 Add-In project template, as shown in Figure 15.5.
FIGURE 15.5 Selecting the project template generates an InfoPath 2013 add-in project.

5. Click OK.6. Add user controls or classes as appropriate; see the next section for an example.7. Build the add-in project. The add-in is generated.8. Open InfoPath Designer 2013.9. Click the COM Add-Ins button on the Developer ribbon. The add-in is available and installed,
as shown in Figure 15.6
FIGURE 15.6 Clicking COM Add-Ins shows the available and installed application add-ins.
Create a Custom Task Pane
Scenario/Problem:You need to create a custom task pane.
Solution: Use Visual Studio 2012 to create a new InfoPath add-in.To create a new task pane, follow the steps for creating a new InfoPath 2013 add-in. Then completethese steps:
1. Add a user control to your project.2. Add windows controls to your user control as needed. In this example, a user control named
CustomTaskPaneControl is used.3. Add any code to handle options or selections.4. In the ThisAddIn class, add private variables to handle the user control and custom task pane,
as shown in Listing 15.1.5. In the startup method of the ThisAddIn class, add code to instantiate the user control as a
custom task pane, as shown in Listing 15.2.
LISTING 15.1 Private Declarations
Click here to view code image
private CustomTaskPaneControl customTaskPaneControl; private Microsoft.Office.Tools.CustomTaskPane customTaskPane;

LISTING 15.2 Custom Task Pane Instantiation
Click here to view code image
customTaskPaneControl = new CustomTaskPaneControl();customTaskPane = this.CustomTaskPanes.Add(customTaskPaneControl,"Custom Task Pane"); customTaskPane.Visible = true;
6. Build the project, and then launch InfoPath Designer 2013. The custom task pane appears asshown in Figure 15.7.
FIGURE 15.7 Building a custom task pane add-in displays the user control in InfoPath.

Chapter 16. Dynamically Populate a Repeating Table
In This Chapter Set Up the Initial Form Create a Changed Event Method Create a Namespace Variable Access the Secondary Data Source Loop Through the Secondary Data Source Populate the Repeating Table Clear Previous Entries What Does the Final Solution Look Like? Implement a Nested Repeating Table Solution
This chapter is dedicated to the steps involved to dynamically populate a repeating table. Displayingdata from a data source in a repeating table is fairly straightforward using rules and filters. However,in this overall scenario, you need to populate a repeating group in your form with data from a datasource. The data is dependent on another selection in your form.Changing the selection in the form queries the data source based on that selection and populates arepeating table with the data. If the selection changes, the repeating table entries need to be clearedand repopulated with the new set of data.To clarify the data sources, the external data source is a secondary data source and the repeating tableis bound as a repeating group of fields in the main data source.I have also expanded these steps to include a more complicated scenario, where there a nestedrepeating table within the main repeating table.
Set Up the Initial Form
Scenario/Problem:Set up the initial form.
Solution: The initial form contains at least a selection field and a repeating group of fields topopulate. The selection field can be populated by a data source if required. A secondary data sourceexists to populate the repeating table.To set up the initial form, follow these steps:
1. Design a new form in InfoPath Designer 2013.2. Add a Drop-Down List control to the form and name the field accordingly (for the example, I
used selection.)3. Add a Repeating Table to the form selecting the number of columns as appropriate. Rename the
fields accordingly. For this example I kept the default of three columns and only renamed the
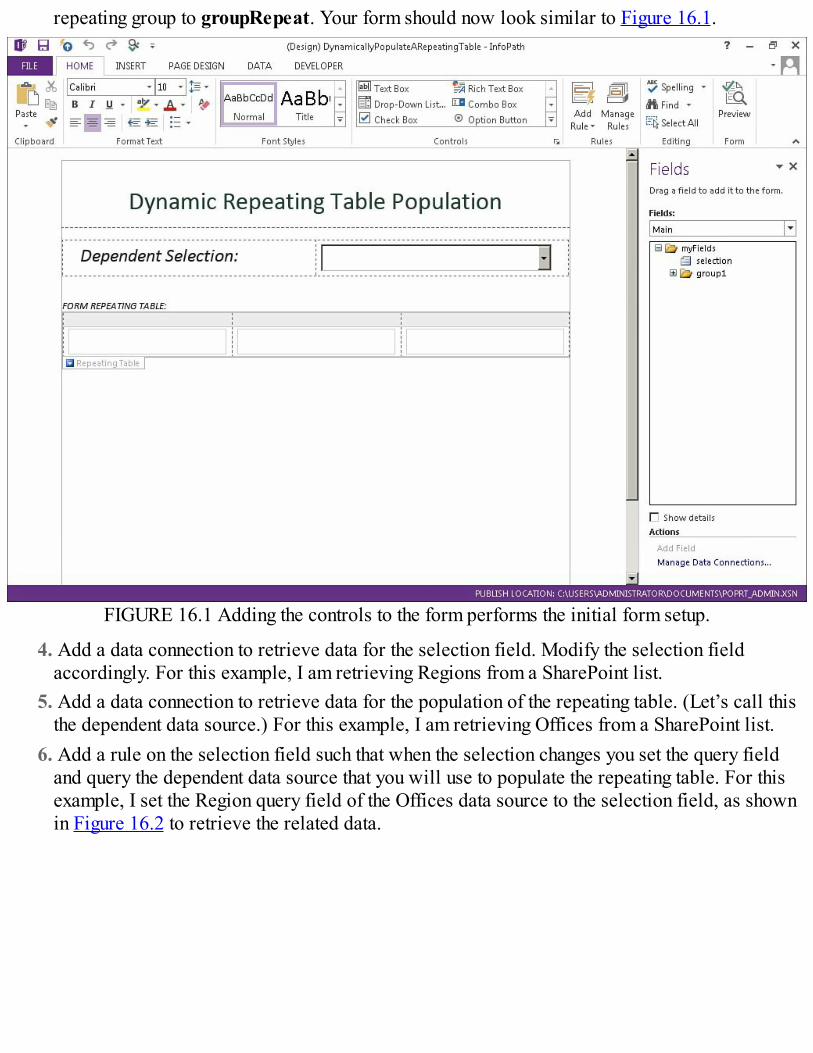
repeating group to groupRepeat. Your form should now look similar to Figure 16.1.
FIGURE 16.1 Adding the controls to the form performs the initial form setup.
4. Add a data connection to retrieve data for the selection field. Modify the selection fieldaccordingly. For this example, I am retrieving Regions from a SharePoint list.
5. Add a data connection to retrieve data for the population of the repeating table. (Let’s call thisthe dependent data source.) For this example, I am retrieving Offices from a SharePoint list.
6. Add a rule on the selection field such that when the selection changes you set the query fieldand query the dependent data source that you will use to populate the repeating table. For thisexample, I set the Region query field of the Offices data source to the selection field, as shownin Figure 16.2 to retrieve the related data.
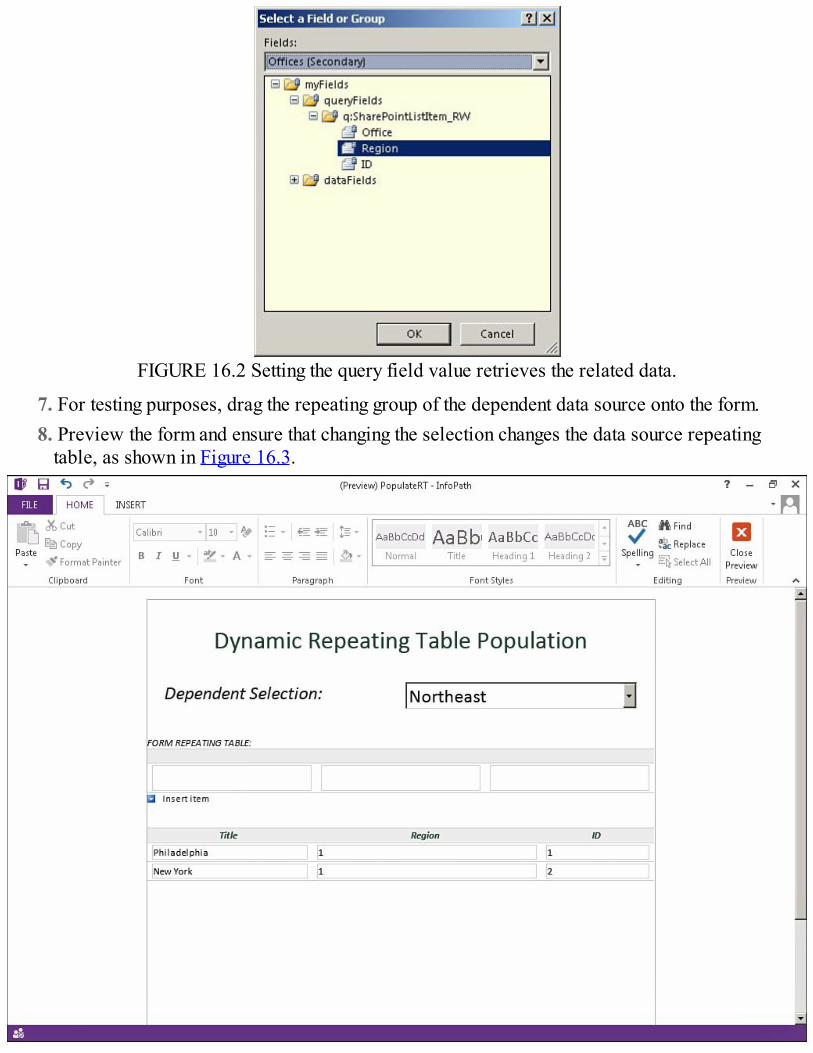
FIGURE 16.2 Setting the query field value retrieves the related data.
7. For testing purposes, drag the repeating group of the dependent data source onto the form.8. Preview the form and ensure that changing the selection changes the data source repeating
table, as shown in Figure 16.3.

FIGURE 16.3 Changing the selection field changes the data source repeating table.
So now the challenge is to place those entries of the dependent data source into the repeating table ofthe form.
Create a Changed Event Method
Scenario/Problem:Create a Changed Event method on a control.
Solution: Select the control and click on the Changed Event button from the Developer top ribbon barmenu.Creating any methods produces code-behind in your form. For the overall scenario of this chapter,you need to generate a changed event method and place the code within that method.For the example, select the drop-down list control and then click the Changed Event button from theDeveloper top ribbon bar menu to generate the code-behind method, as shown in Figure 16.4.
FIGURE 16.4 Clicking Changed Event generates the code-behind method.
NoteTo use code-behind you need Microsoft Office Visual Studio 2012 Tools for Applications(VSTA) installed. If you do not have this installed, you are prompted to download therequired installations.
The code is generated with an event handler declaration and a blank changed method, as shown inFigure 16.5.

FIGURE 16.5 Generating the code produces the event handler and changed method.
Create a Namespace Variable
Scenario/Problem:Create a namespace variable.
Solution: Declare a string variable and set that to the namespace using the NamespaceManagerobject.Coding with InfoPath involves using XML/XPath objects and methods as well as XPath expressions.A key element in using the XML/XPath methods is the namespace that is used for the XML dataretrieval. The NamespaceManager object allows you to lookup the namespace. By default thenamespace in InfoPath data is my.Because the namespace is used throughout various methods in this solution, the first line of code inthe changed method is a string variable declaration, as shown in Listing 16.1.
LISTING 16.1 Namespace Declaration
Click here to view code image

//Namespace variablestring myNamespace = NamespaceManager.LookupNamespace("my");
Access the Secondary Data Source
Scenario/Problem:Access the secondary data source.
Solution: Create data source and XPath objects using the secondary data source information.The next step in the overall solution is to declare objects based on the secondary data source. Youneed the name of the secondary data source and the XPath of the rows that are returned.To retrieve the XPath of the rows returned, follow these steps:
1. Switch over to your InfoPath form.2. In the Fields pane, switch the data source to the secondary data source. (For this example, it is
Offices.)3. Expand the datafields folder.4. Right-click the repeating group under the datafields folder and select Copy XPath to copy the
XPath string to the clipboard, as shown in Figure 16.6.

FIGURE 16.6 Selecting Copy XPath places the XPath string into the clipboard.
5. Switch back to the code-behind and paste the XPath into the code as needed.The secondary data source setup code is shown in Listing 16.2. Paste the XPath from these steps intothe XPathNavigator Select method. Place this block of code after the namespace variable.
LISTING 16.2 Secondary Data Source Setup
Click here to view code image
//Secondary data source setupDataSource ds = DataSources["Offices"];XPathNavigator domNav = ds.CreateNavigator();XPathNodeIterator rows =domNav.Select("/dfs:myFields/dfs:dataFields/d:SharePointListItem_RW",NamespaceManager);
Loop Through the Secondary Data Source
Scenario/Problem:Loop through the secondary data source.
Solution: Create a while loop to loop through the rows.The loop is the main component of populating the repeating table. You loop through the secondarydata source through the XPathNodeIterator collection (rows) that you defined in the previoussection, retrieving the values from each row. The code to perform this is shown in Listing 16.3. Placethis after the secondary data source setup. You add more code to the loop in the next section.
TipCheck the XPath of the secondary data source fields to determine how to call referencetheir nodes.
LISTING 16.3 Loop Through the Secondary Data Source
Click here to view code image
//Loop through the secondary data sourcewhile (rows.MoveNext()){ string office = rows.Current.SelectSingleNode("d:Title",NamespaceManager).Value.ToString(); string region = rows.Current.SelectSingleNode("d:Region",NamespaceManager).Value.ToString(); string id = rows.Current.SelectSingleNode("d:ID",NamespaceManager).Value.ToString();}

NoteThe variables defined in the loop should correspond to the fields that are returned fromthe secondary data source.
Populate the Repeating Table
Scenario/Problem:Populate the repeating table.
Solution: Use the XMLWriter to write the values from the secondary data source to the repeatinggroup in the form.The repeating table is actually part of the main data source, so you can access that and use theXMLWriter to write the field values from the secondary data source to the table.You will need the names of the groups and the fields that are bound to the repeating table in the form.In this example, the groups are group1, and groupRepeat and the fields are field1, field2, and field3.Place the code in Listing 16.4 within the while loop from the preceding section.
TipCopy the XPath from the repeating group to ensure that the correct path is entered.
LISTING 16.4 Populate the Repeating Table
Click here to view code image
//Populate the repeating tableusing (XmlWriter writer =MainDataSource.CreateNavigator().SelectSingleNode("/my:myFields/my:group1",NamespaceManager).AppendChild()){ writer.WriteStartElement("groupRepeat", myNamespace); writer.WriteElementString("field1",myNamespace,office); writer.WriteElementString("field2", myNamespace,region); writer.WriteElementString("field3", myNamespace,id); writer.WriteEndElement(); writer.Close();}
NoteThe order in which you write the values to the table should be the order that they appearin the main data source. Otherwise, you will receive a non-datatype schema validationerror.

Clear Previous Entries
Scenario/Problem:Clear previous entries.
Solution: Loop through the repeating table and clear the values.If you preview the form at this point, you will notice that every time you select a value from theselection drop-down, the repeating table is populated with more and more entries. You therefore needto clear any previous entries before the repeating table is populated. Place the code listed in Listing16.5 somewhere before the while loop.
LISTING 16.5 Clear Previous Entries
Click here to view code image
//Clear previous entriesXPathNavigator rTable = MainDataSource.CreateNavigator();XPathNodeIterator tableRows = rTable.Select(“/my:myFields/my:group1/my:groupRepeat”,NamespaceManager);if (tableRows.Count > 0){ for (int i = tableRows.Count; i > 0; i--) { XPathNavigator reTable = MainDataSource.CreateNavigator(); XPathNavigator reTableRows =reTable.SelectSingleNode(“/my:myFields/my:group1/my:groupRepeat[“ + i + “]”,NamespaceManager); reTableRows.DeleteSelf(); }}
What Does the Final Solution Look Like?After all of the code has been entered into the method properly, previewing the form populates therepeating table based on the selection in the drop-down, as shown in Figure 16.7.

FIGURE 16.7 Changing the selection populates the repeating table.Listing 16.6 provides the full code for the changed method.
LISTING 16.6 Full Change Method
Click here to view code image
public void selection_Changed(object sender, XmlEventArgs e) {
//Namespace variable string myNamespace = NamespaceManager.LookupNamespace("my"); //Clear previous entries XPathNavigator rTable = MainDataSource.CreateNavigator(); XPathNodeIterator tableRows= rTable.Select("/my:myFields/my:group1/my:groupRepeat", NamespaceManager); if (tableRows.Count > 0) {
for (int i = tableRows.Count; i > 0; i--) { XPathNavigator reTable = MainDataSource.CreateNavigator(); XPathNavigator reTableRows = reTable.SelectSingleNode("/my:myFields/my:group1/my:groupRepeat["+i + "]", NamespaceManager); reTableRows.DeleteSelf(); } } //Secondary data source setup DataSource ds = DataSources["Offices"]; XPathNavigator domNav = ds.CreateNavigator(); XPathNodeIterator rows =domNav.Select("/dfs:myFields/dfs:dataFields/d:SharePointListItem_RW",NamespaceManager);

//Loop through the secondary data source while (rows.MoveNext()) { string office = rows.Current.SelectSingleNode("d:Title",NamespaceManager).Value.ToString(); string region = rows.Current.SelectSingleNode("d:Region",NamespaceManager).Value.ToString(); string id = rows.Current.SelectSingleNode("d:ID",NamespaceManager).Value.ToString(); //Populate the repeating table using (XmlWriter writer =MainDataSource.CreateNavigator().SelectSingleNode("/my:myFields/ my:group1",NamespaceManager).AppendChild()) { writer.WriteStartElement("groupRepeat", myNamespace); writer.WriteElementString("field1", myNamespace, office); writer.WriteElementString("field2", myNamespace, region); writer.WriteElementString("field3", myNamespace, id); writer.WriteEndElement(); writer.Close(); } }
}
Implement a Nested Repeating Table Solution
Scenario/Problem:You have a nested set of data that needs to be displayed along with the main repeatingdata.
Solution: Add a nested loop within the main populating loop.To build upon the main solution in this chapter, you may have another level of information that needsto be retrieved into your main data structure. A nested repeating group structure may look similar tothat in Figure 16.8.

FIGURE 16.8 A nested repeating group example structure.For this scenario, I created a new list named Clients that has a lookup column to Offices and added itas a secondary data source to the InfoPath form. The Clients data source contains the Client Name(stored in Title), Address, and Phone fields, as shown in Figure 16.9. It also contains an office, whichis the ID of the office item selected in the list.

FIGURE 16.9 The Clients secondary data source contains various fields from the SharePoint list.For each office that is displayed, the form needs to display the associated clients. This can be easilydone by using a nested loop within the main population loop, as shown in Listing 16.7.
LISTING 16.7 Nested Population Loop
Click here to view code image
//Populate the repeating tableusing (XmlWriter writer =MainDataSource.CreateNavigator().SelectSingleNode("/my:myFields/my:group1",NamespaceManager).AppendChild()) { writer.WriteStartElement("groupRepeat", myNamespace); writer.WriteElementString("field1", myNamespace, office); writer.WriteElementString("field2", myNamespace, region); writer.WriteElementString("field3", myNamespace, id); //NESTED ROWS DataSource dsSub = DataSources["Clients"]; XPathNavigator navSub =dsSub.CreateNavigator().SelectSingleNode("/dfs:myFields/dfs:queryFields/q:SharePointListItem_RW/q:Office",NamespaceManager); navSub.SetValue(id); dsSub.QueryConnection.Execute(); XPathNavigator domNavSub = dsSub.CreateNavigator(); XPathNodeIterator rowsSub= domNavSub.Select("/dfs:myFields/dfs:dataFields/d:SharePointListItem_RW",NamespaceManager); //Loop through secondary data source and populate the repeatingtable

while (rowsSub.MoveNext()) { string clientName =rowsSub.Current.SelectSingleNode("d:Title",NamespaceManager).Value.ToString(); string address = rowsSub.Current.SelectSingleNode("d:Address",NamespaceManager).Value.ToString(); string phone = rowsSub.Current.SelectSingleNode("d:Phone",NamespaceManager).Value.ToString(); writer.WriteStartElement("groupNestedRepeat", myNamespace); writer.WriteElementString("nestedField1", myNamespace,clientName); writer.WriteElementString("nestedField2", myNamespace,address); writer.WriteElementString("nestedField3", myNamespace, phone); writer.WriteEndElement(); }
writer.WriteEndElement(); writer.Close(); }
The updated code creates a new data source for the clients and queries it based on the current officeID that is being processed from the main loop. Then, the nested (inner) loop loops through thereturned clients for the office and populates the nested repeating group structure with the name,address, and phone of the client.To create the new repeating table on the form, I selected the groupRepeat group from the Fields paneand dragged it onto the form. Several options appear, but I simply selected the Repeating Tableoption. I renamed the labels for the columns and removed the Field2 and Field3 columns because theyonly show IDs of the region and office anyway.After we run the form with the new code and data sources, selecting a region from the selection nowproduces a list of offices along with their associated clients, as shown in Figure 16.10.

FIGURE 16.10 The clients appear in the nested repeating table for each client.
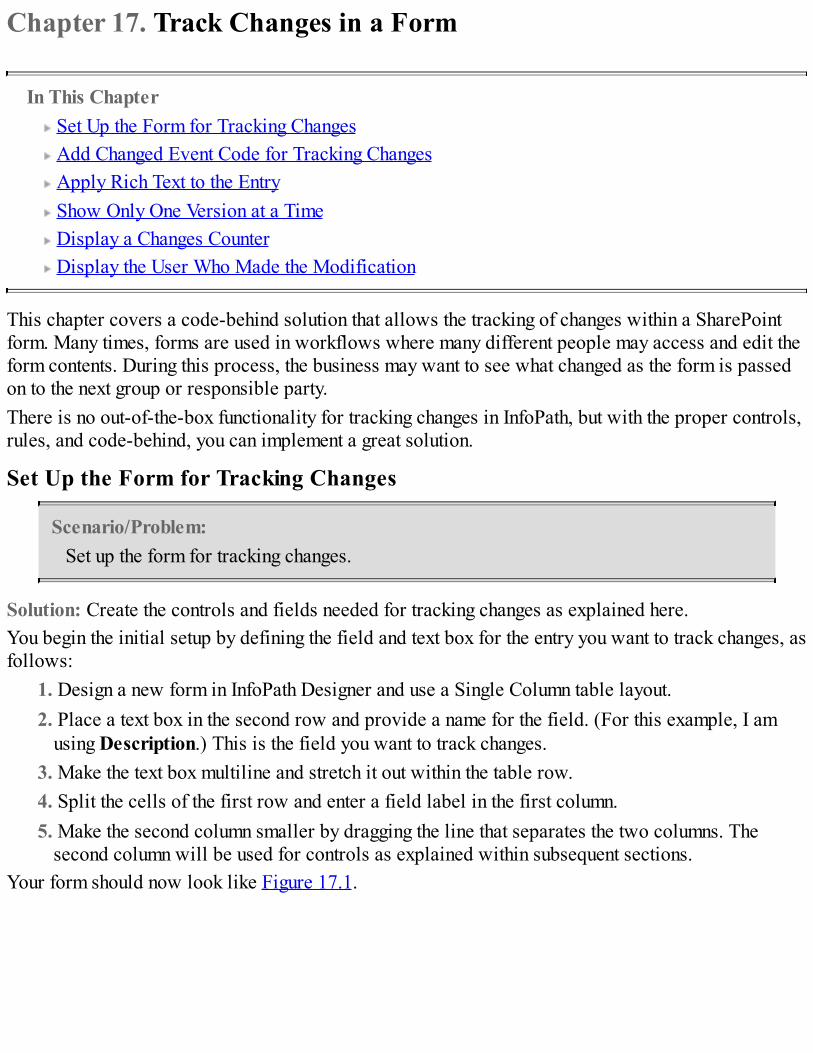
Chapter 17. Track Changes in a Form
In This Chapter Set Up the Form for Tracking Changes Add Changed Event Code for Tracking Changes Apply Rich Text to the Entry Show Only One Version at a Time Display a Changes Counter Display the User Who Made the Modification
This chapter covers a code-behind solution that allows the tracking of changes within a SharePointform. Many times, forms are used in workflows where many different people may access and edit theform contents. During this process, the business may want to see what changed as the form is passedon to the next group or responsible party.There is no out-of-the-box functionality for tracking changes in InfoPath, but with the proper controls,rules, and code-behind, you can implement a great solution.
Set Up the Form for Tracking Changes
Scenario/Problem:Set up the form for tracking changes.
Solution: Create the controls and fields needed for tracking changes as explained here.You begin the initial setup by defining the field and text box for the entry you want to track changes, asfollows:
1. Design a new form in InfoPath Designer and use a Single Column table layout.2. Place a text box in the second row and provide a name for the field. (For this example, I am
using Description.) This is the field you want to track changes.3. Make the text box multiline and stretch it out within the table row.4. Split the cells of the first row and enter a field label in the first column.5. Make the second column smaller by dragging the line that separates the two columns. The
second column will be used for controls as explained within subsequent sections.Your form should now look like Figure 17.1.

FIGURE 17.1 The multiline text box is the field in which InfoPath will track changes.
1. Drag a Repeating Section under the text box you added in the previous steps.2. Modify the properties of the Repeating Section and uncheck the Allow Users to Insert or Delete
the Sections option.3. In the Fields pane, rename the first group to groupTrackChanges.4. Rename the repeating group2 to groupChanges.5. Under the groupChanges add a field named NumberOfChanges and make its data type a
Whole Number (integer).6. Under the groupChanges add a field named Changes and make its data type Rich Text
(XHTML).7. Under the groupChanges add a field named UserName and leave its data type as Text (string).8. Drag the Changes field into the Repeating Section on the form.9. Resize the rich text box such that it is the same as the normal text box and make it read-only.
Your form should now look like Figure 17.2.

FIGURE 17.2 The repeating group will contain the changes made to the text box.
Add Changed Event Code for Tracking Changes
Scenario/Problem:Add changed event code for tracking changes to your field.
Solution: Select the field and click Changed Event from the Developer ribbon.The next step for tracking changes is to add the code-behind to facilitate the storing of the changes.The code executes when the text in the text boxes changes. To add the code-behind, follow thesesteps:
1. Select the field (Description in the example) on the form.2. From the Developer ribbon, click Changed Event. The code editor appears.3. Add the Microsoft.SharePoint assembly as a reference to the project, as shown in Figure 17.3.
This allows you to access a special difference utility.
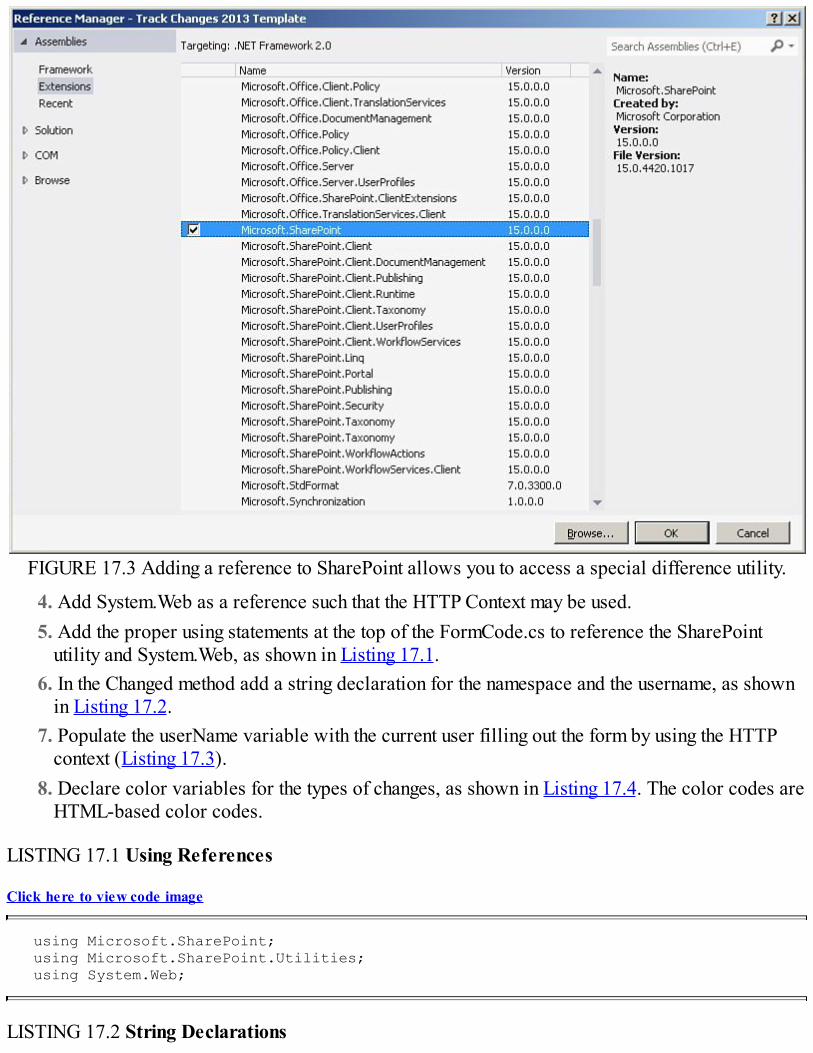
FIGURE 17.3 Adding a reference to SharePoint allows you to access a special difference utility.
4. Add System.Web as a reference such that the HTTP Context may be used.5. Add the proper using statements at the top of the FormCode.cs to reference the SharePoint
utility and System.Web, as shown in Listing 17.1.6. In the Changed method add a string declaration for the namespace and the username, as shown
in Listing 17.2.7. Populate the userName variable with the current user filling out the form by using the HTTP
context (Listing 17.3).8. Declare color variables for the types of changes, as shown in Listing 17.4. The color codes are
HTML-based color codes.
LISTING 17.1 Using References
Click here to view code image
using Microsoft.SharePoint;using Microsoft.SharePoint.Utilities;using System.Web;
LISTING 17.2 String Declarations

Click here to view code image
//Get namespacestring myNamespace = NamespaceManager.LookupNamespace("my");string userName = string.Empty;
LISTING 17.3 Populate userName
Click here to view code image
if (HttpContext.Current != null){ userName = HttpContext.Current.User.Identity.Name.ToString();}
LISTING 17.4 Color Variable Declarations
Click here to view code image
//Color Variablesstring changeColor = "#330066";string deleteColor = "#ff0000";string insertColor = "#008000";
TipDeclare the color variables as constants if you are tracking changes on multiple textboxes.
You will now use the SPDiffUtility provided by the SharePoint assembly to produce the track changesresults. This is facilitated by setting up the Open and Close tags using HTML strings and then callingthe Diff method from the utility. This code is shown in Listing 17.5. At this point, your changedmethod should look similar to Figure 17.4.
LISTING 17.5 SPDiffUtility Code
Click here to view code image
//Set the tagsSPDiffUtility.ChangeOpenTag = "<font color=\"" + changeColor + "\"xmlns=\"http://www.w3.org/1999/xhtml\">";SPDiffUtility.ChangeCloseTag = "</font>";SPDiffUtility.DeleteOpenTag = "<strike xmlns=\"http://www.w3.org/1999/xhtml\"><fontcolor=\"" + deleteColor + "\">";SPDiffUtility.DeleteCloseTag = "</font></strike>";SPDiffUtility.InsertOpenTag = "<font color=\"" + insertColor + "\"xmlns=\"http://www.w3.org/1999/xhtml\">";SPDiffUtility.InsertCloseTag = "</font>";//Get the changesstring newValue = SPDiffUtility.Diff(e.OldValue, e.NewValue, 255);

FIGURE 17.4 The SPDiffUtility produces the changed values based on the configured tags.Now you need to apply the new value to your form, which involves adding it to the repeating group.Add the code from Listing 17.6 to your method to facilitate this.The NumberOfChanges gets set to the number of rows, the Changes field takes the changes from theSPDiffUtility, and the UserName gets set to the user making the changes.
LISTING 17.6 Create New Entry
Click here to view code image
//Create New EntryXPathNavigator rTable = MainDataSource.CreateNavigator();XPathNodeIterator tableRows =rTable.Select("/my:myFields/my:groupTrackChanges/my:groupChanges",NamespaceManager);string rowNumber = Convert.ToString(tableRows.Count + 1);using (XmlWriter writer =MainDataSource.CreateNavigator().SelectSingleNode("/my:myFields/my:groupTrackChanges",NamespaceManager).AppendChild()){ writer.WriteStartElement("groupChanges", myNamespace); writer.WriteElementString("NumberOfChanges", myNamespace, rowNumber); writer.WriteElementString("Changes", myNamespace, newValue); writer.WriteElementString("UserName", myNamespace, user-Name);
writer.WriteEndElement(); writer.Close();}

TipMake sure that you write the elements in the same order as they appear in your repeatinggroup.
Before you preview the form, you need to change the security of the form, as follows:1. Select File, Info.2. Click the Form Options button. The Form Options dialog appears.3. In the Form Options dialog, select Security and Trust.4. Change the security level to Full Trust, as shown in Figure 17.5.
FIGURE 17.5 Changing the security allows the code to execute in the form.
5. Click OK.You also need to change the target framework to .NET Framework 4.5, like this:
1. Right-click the project name in the Solution Explorer window.2. Select Properties from the menu.3. On the Properties screen, select .NET Framework 4.5 from the Target Framework drop-down
list, as shown in Figure 17.6.

FIGURE 17.6 Modifying the target framework allows integration with SharePoint 2013.
4. Save the project.Preview your form and add some text into the first text box. Click anywhere outside of the text box totrigger the change. The repeating section gets a new entry. The entry shows the HTML and not the richtext. The next section shows you how to apply rich text to the entry.
Apply Rich Text to the Entry
Scenario/Problem:Following the procedures in the previous sections produces the change HTML but doesnot apply rich text formatting to the entry.
Solution: Add code to append the Changes value.The last section of code in the method creates the new entry but the Changes field only contains text.In order for the rich text to appear, the value needs to be appended to the Changes field. Add the codein Listing 17.7 to the bottom of your method.
LISTING 17.7 Apply Rich Text
Click here to view code image
//Apply Rich Text to new ElementXPathNavigator repTable = MainDataSource.CreateNavigator();XPathNodeIterator repTableRows =

repTable.Select("/my:myFields/my:groupTrackChanges/my:groupChanges",NamespaceManager);if (repTableRows.Count > 0){ int i = repTableRows.Count; repTable.SelectSingleNode("/my:myFields/my:groupTrackChanges/my:groupChanges[" + i+"]/my:Changes", NamespaceManager).SetValue(""); repTable.SelectSingleNode("/my:myFields/my:groupTrackChanges/my:groupChanges[" + i+"]/my:Changes", NamespaceManager).AppendChild(newValue);}
The code now produces the desired rich text within the rich text boxes, as shown in Figure 17.7.
FIGURE 17.7 Appending the value produces the desired rich text.
Show Only One Version at a Time
Scenario/Problem:The current solution displays the entered text and all the changes. You only want to showone version of the text at a time.
Solution: Create navigation controls and add formatting rules accordingly.It is now time to clean up the form such that only one text box is showing at a time. To do so, you firstyou need a field to keep a pointer of which version is being shown and add rules to hide the controls,as follows:

1. Create a new field under myFields named ViewChanges with a data type of Whole Number(integer) and a default value of -1.
2. Add a formatting rule on the groupChanges such that when the NumberOfChanges field is notequal to the ViewChanges field value, hide the control. This enables you to only show the entrythat is being viewed. Figure 17.8 shows an example.
FIGURE 17.8 Adding the formatting rule hides any entries that are not being viewed.
3. Add a formatting rule on the original field (Description) to hide the control when ViewChangesis less than or equal to the maximum NumberOfChanges and ViewChanges is not equal to -1(the default value), as shown in Figure 17.9. This determines when the text box is displayed.

FIGURE 17.9 Adding the formatting rule determines when the text box is displayed.
TipYou will need to use a formula for the maximum number of changes.
To produce the housing for the navigation controls, follow these steps:1. Add a new section control to the second column of the first row.2. Add a formatting rule to the section such that the control is hidden if ViewChanges is less than
2.3. Insert a Two Column 3 table layout into the section.4. Change the subheading to Change History.5. Select the first column in the first row. Right-click and select split cells. Click OK on the split
cells dialog.6. Select the entire middle row. Right-click and select Merge Cells.7. Remove the last row. Your section control should look like Figure 17.10.
FIGURE 17.10 Configuring the table layout produces the housing for the navigation controls.
TipChange the padding of the cell to allow the new section to take up most of the cell space.
Now you need to produce navigation controls to increment or decrement the ViewChanges value. Todo this, follow these steps:
1. In the Change History section control, add three picture buttons: one in each column that wassplit in the previous set of steps.
2. Add pictures to each button. The first one is a Previous button, the second one is a Next button,and the third one is an Edit button.
TipSharePoint has many images located in C:\Program Files\Common Files\MicrosoftShared\Web Server Extensions\15\TEMPLATE\IMAGES on any server that hasSharePoint installed. You can find standard icons for your picture buttons there!
3. Add an action rule to the Previous button to set ViewChanges equal to ViewChanges -1, asshown in Figure 17.11.

FIGURE 17.11 Adding the rule decrements the ViewChanges value when the button is clicked.
4. Add another action rule to the Previous button that sets the ViewChanges value to 2 based onthe condition that ViewChanges is less than 2, as shown in Figure 17.12. Because a blank rowis automatically entered in the repeating group upon form rendering, you want to stop at 2 suchthat the blank row is not shown.
FIGURE 17.12 Adding the stop rule makes sure that the ViewChanges value doesn’t become less than2.
5. Add an action rule to the Next button to increment ViewChanges by 1.6. Add an action rule to the Edit button setting the ViewChanges value equal to the maximum
NumberOfChanges value +1. You need to use a formula, as shown in Figure 17.13. Setting thisvalue greater than the number of changes enables the field text box to display (based on theprevious rules added to the text box).

FIGURE 17.13 Setting ViewChanges greater than the number of changes displays the field text box.
TipAdd formatting rules to the picture buttons to disable the controls when they are notapplicable.
You may optionally drag the ViewChanges field onto your form for debugging purposes. Previewingyour form shows one text box at a time. Using the buttons navigates through the previous changes, asshown in Figure 17.14.
FIGURE 17.14 Using the buttons navigates through the changes.

Display a Changes Counter
Scenario/Problem:The current solution does not provide any indication of the current change.
Solution: Add a field to the navigation control section to display the change number.A counter indicating a number for each change will help users navigate through them. To provide thisfunctionality, follow these steps:
1. Drag a text box onto the second row of the Change History section.2. Rename the field to DisplayChangesCounter.3. Set the default value equal to the concatenation of ViewChanges-1, the word of with padded
spaces, and the maximum NumberOfChanges value, as shown in Figure 17.15, to produce thechange counter display.
FIGURE 17.15 Concatenating the values produces the change counter display.Previewing your form now displays the change counter information, as shown in Figure 17.16,alerting users of the current change they are viewing.

FIGURE 17.16 The change counter alerts the user of the current change that is being viewed.
TipTo enhance the interface, make the DisplayChangesCounter text box read-only and removeany borders or shading. Change the alignment of the text to Center.
Display the User Who Made the Modification
Scenario/Problem:You need to display the user who made the modification.
Solution: Add a field to the form that displays the username of the current entry of the repeatinggroup.While navigating through the changes, users might find it helpful to see who has made a particularchange. To provide this functionality, follow these steps:
1. Drag a text box above the Description text box in main table row.2. Name the field userName.3. Make the text box read-only with no borders or shading.4. Set the value of the text box equal to the value of the UserName field in the repeating group.5. Before clicking OK, click the Filter Data button and add the filter condition of the
NumberOfChanges is equal to ViewChanges, as shown in Figure 17.17. This allows only the

UserName of the current entry to be displayed.
FIGURE 17.17 Filtering the data allows the current user name to be displayed.
6. Add a formatting rule on the text box such that it is hidden if ViewChanges is less than 2.That’s it! You need to publish the form as an Administrator Approved form and upload the formtemplate to InfoPath Forms Services. (See Chapter 19, “Use Central Administration to AdministerInfoPath Forms Services,” or Chapter 20, “PowerShell,” for more information on deployingAdministrator Approved forms.)
NoteBecause the HTTP Context is being used to provide the username, you cannot preview thischange. You must deploy the form to test the username implementation.
After you deploy the form, open a new instance of your form. Cycling through the changes displays theassociated username, as shown in Figure 17.18.
FIGURE 17.18 Cycling through the changes displays the user who made the change.

TipYou might need another field on your form to click into such that the change code executes.Otherwise, clicking Close and then Cancel will cause the change to be recognized.
TipInstead of tracking every change, you can place the same code into a different method (orremove the event handler statement in the InternalStartup() method) and call themethod on the submission of your form to only track the submitted changes.

Chapter 18. Autogenerate Forms
In This Chapter Create a Class Object of Your Form Create Form Generation Code Upload the Form Object to a Form Library
This chapter demonstrates how you may use Visual Studio to create an application that automaticallygenerates instances of InfoPath forms. The process involves creating a class object of your form,using code to create an instance of the form, and uploading it to a form library. You may use any datasource to retrieve the values for each form instance. In my real-life scenarios, I have simply usedcomma-separated files in which the business generated via Excel.
Create a Class Object of Your Form
Scenario/Problem:You need to instantiate an instance of your form for auto generation purposes.
Solution: Create a class based on your form and include within your application.To automatically generate form instances, you need to create instances of the form as an object. Tocreate an object, you need to define a class that defines the structure of your form. Luckily, utilitiesare available to automatically generate this class for you.First you need the source files of your InfoPath form. You can accomplish this in two ways. One wayis to export the source files from InfoPath, and the other is to just extract them from your formtemplate file.To export the source files of your form, follow these steps:
1. Open your form in design mode using InfoPath Designer 2013.2. Click File, Publish.3. Click the Export Source Files button, as shown in Figure 18.1. The Browse for Folder dialog
appears.

FIGURE 18.1 Clicking Export Source Files exports your form’s source files to a folder.
4. Select a folder location and click OK. The source files are saved to the folder selected.5. Close InfoPath Designer.
TipWhen creating a new folder to save the source files, it is a good idea to include SourceFiles in the name so you know what it contains (for example, Registration Form SourceFiles).
To extract the source files right from the form template, follow these steps:1. Navigate to your form template in Windows Explorer.2. Rename the form replacing .xsn with .cab.3. Open the .cab file. The source files are there!4. Select all the source files.5. Right-click and select Extract. The Select a Destination dialog appears.6. Navigate to the folder where you want to save the files and click Extract. The source files are
extracted to the location.7. Rename the form back to .xsn.

The file that you are most interested in is the myschema.xsd file. This contains the XML definition ofyour form. Using the Visual Studio xsd.exe utility, you can easily generate a class file usingmyschema.xsd. To do this, follow these steps:
1. Open a Visual Studio command prompt (Start, Microsoft Visual Studio 2012, Visual StudioTools).
2. Navigate to the location of your form source files.3. Type xsd /c myschema.xsd and press Enter, as shown in Figure 18.2.
FIGURE 18.2 Using the xsd utility generates the class file.
NoteAt the time of this writing, the xsd utility could not generate code for all InfoPath controls.If you run into any problems, search for any patches or updates.
4. Back in Windows Explorer, rename the .cs file that was generated to your form name (forexample, RegistrationForm.cs).
5. (Optional) Copy the .cs file into your workflow project folder.6. Add the .cs file to your Visual Studio project, as shown in Figure 18.3. I created a console
application project to handle this.

FIGURE 18.3 Adding the form .cs file to your project allows you to leverage the form class.
7. Copy the namespace of your project and paste it into your form class file, as shown in Figure18.4. Your form classes must be in the same namespace to be accessed within your auto-generation code.
FIGURE 18.4 Placing the form classes into the project namespace allows you to access the objectswithin the workflow code.

Create Form Generation Code
Scenario/Problem:You need to generate an instance of your InfoPath form.
Solution: Use a MemoryStream and a XmlTextWriter object to create an instance of your InfoPathform.The creation of an InfoPath form instance requires a MemoryStream and XmlTextWriterobject along with the appropriate code to create the form. This section describes all of the codeneeded to generate your InfoPath form.To generate an instance of your InfoPath form, follow these steps:
1. Create a MemoryStream object and XmlTextWriter object using using statements, asshown in Listing 18.1.
2. Next add code to define the namespaces of the form within the XmlTextWriter block asshown in Listing 18.2. The values of these are standard but you may find these by opening aninstance of your InfoPath form (XML file) that was saved to a form library.
3. Use the writer object to start the document and write the processing instructions as shown inListing 18.3. The processing instructions can also be found within the XML of an instance ofyour InfoPath form within a form library. I used a variable for the solution version because theform version could change as you make changes to the form.
4. Next, create an object from your form and populate the values as shown in Listing 18.4. Notethat any sections or groups (that is, folders in your data fields) need to be instantiated, as well,by creating a new instance of the section/ group object. For example purposes, hard-codedvalues are shown, but a typical scenario would entail looping through some sort of data sourceand dynamically populating the form data accordingly.
LISTING 18.1 Using a MemoryStream and XmlTextWriter
Click here to view code image
using (MemoryStream ms = new MemoryStream()){ using (XmlTextWriter writer = new XmlTextWriter(ms, Encoding.UTF8)) { }}
LISTING 18.2 Defining the Namespace Values of the InfoPath Form
Click here to view code image
// Define the namespace for the formXmlSerializerNamespaces myNamespace = new XmlSerializerNamespaces();myNamespace.Add("my","http://schemas.microsoft.com/office/infopath/2003/myXSD/2008-11-20T16:28:17");

myNamespace.Add("xsi", "http://www.w3.org/2001/XMLSchema-instance");myNamespace.Add("xhtml", "http://www.w3.org/1999/xhtml");
LISTING 18.3 Starting the Document with Processing Instructions
Click here to view code image
writer.WriteStartDocument();writer.WriteProcessingInstruction("mso-infoPathSolution","name=\"urn:schemas-microsoft-com:office:infopath:RegistrationForm:-myXSD-2008-11-20T16-28-17\" solutionVersion=\""+ solutionVersion + "\" productVersion=\"12.0.0.0\"PIVersion=\"1.0.0.0\" href=\"" +"http://sp2013/FormServerTemplates/RegistrationForm.xsn\"");
writer.WriteProcessingInstruction("mso-application","progid=\"InfoPath.Document\" versionProgid=\"InfoPath.Document.2\"");
LISTING 18.4 Creating the Form Object and Setting Values
Click here to view code image
FormCreation.myFields registrationForm = new myFields();
//Set form valuesregistrationForm.HasSecondResidence = false;registrationForm.sectionPersonalInformation = new sectionPersonalInformation();registrationForm.sectionPersonalInformation.Name = "Steve";
5. Once all the form properties are created and populated from the object standpoint, use aserializer object to serialize the form object instance and write the contents to the writer, asshown in Listing 18.5
LISTING 18.5 Serializing the InfoPath Form Object
Click here to view code image
XmlSerializer serializer = new XmlSerializer(typeof(FormCreation.myFields));serializer.Serialize(writer, registrationForm, myNamespace);
writer.WriteEndDocument();writer.Flush();writer.Close();
6. At the top of your method, declare a byte array and use this variable to store the memory steamwith code shown in Listing 18.6 placed outside the XmlWriter block but within theMemoryStream block.
LISTING 18.6 Storing the Memory Stream into a Byte Array

Click here to view code image
byte[] infoPathFormData = null;
infoPathFormData = ms.GetBuffer();ms.Close();
Now you may use the byte array to upload the created InfoPath form object to a form library. The nextsection describes these details.
Upload the Form Object to a Form Library
Scenario/Problem:You need to upload the form object byte array to a form library.
Solution: Use a WebClient object to upload the form object.Once you have the byte array of the InfoPath form (from the previous section), you may use aWebClient object to upload the object and create the actual instance of the InfoPath form. You canaccomplish this via code, as shown in Listing 18.7.
LISTING 18.7 Storing the Memory Stream into a Byte Array
Click here to view code image
// Upload the newly created InfoPath form to SharePointif (infoPathFormData != null && infoPathFormData.Length != 0){ using (WebClient client = new WebClient()) { // Set the credentials to be used for upload to SharePoint client.Credentials = CredentialCache.DefaultCredentials;
// Upload the newly created form to a SharePoint form library client.UploadData(formLibraryUrlPath+ "FormInstance.xml", "PUT", infoPathFormData); }}
The example uses a variable for the form library path, and although the name of the form instance ishard coded, this would be another area where the filename could be dynamic based on a data fieldvalue such as a name or identification code.

Part IV: Administrative Aspects
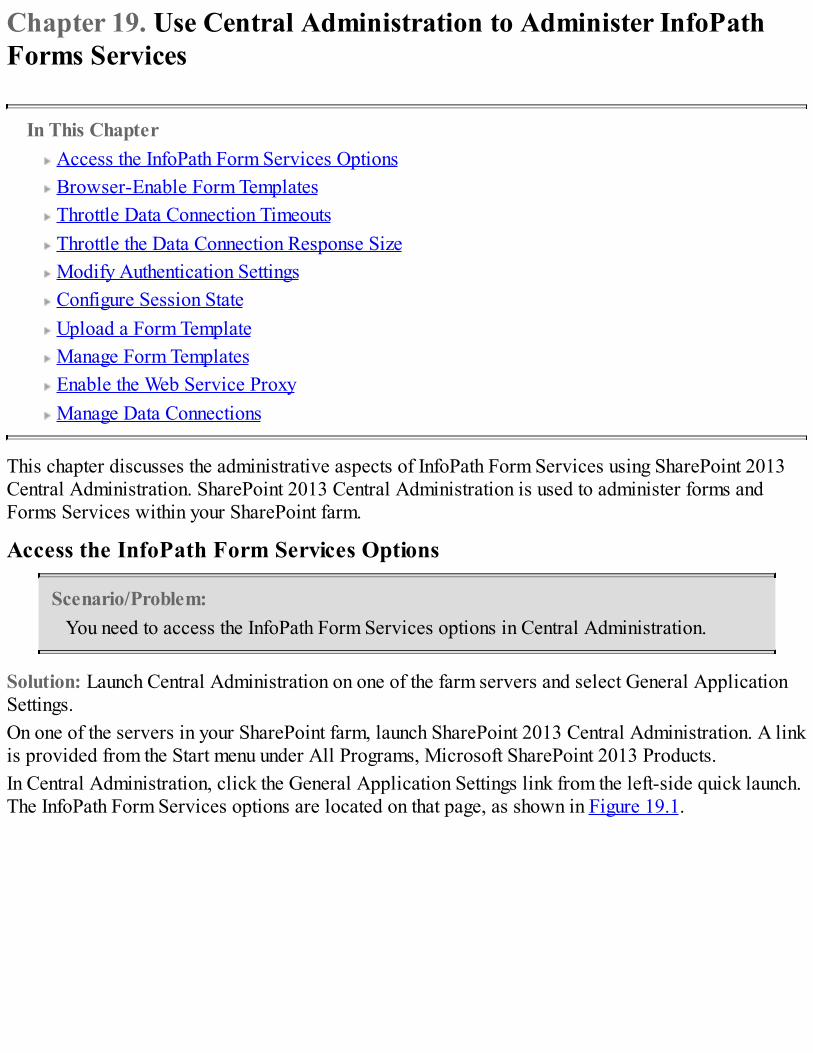
Chapter 19. Use Central Administration to Administer InfoPathForms Services
In This Chapter Access the InfoPath Form Services Options Browser-Enable Form Templates Throttle Data Connection Timeouts Throttle the Data Connection Response Size Modify Authentication Settings Configure Session State Upload a Form Template Manage Form Templates Enable the Web Service Proxy Manage Data Connections
This chapter discusses the administrative aspects of InfoPath Form Services using SharePoint 2013Central Administration. SharePoint 2013 Central Administration is used to administer forms andForms Services within your SharePoint farm.
Access the InfoPath Form Services Options
Scenario/Problem:You need to access the InfoPath Form Services options in Central Administration.
Solution: Launch Central Administration on one of the farm servers and select General ApplicationSettings.On one of the servers in your SharePoint farm, launch SharePoint 2013 Central Administration. A linkis provided from the Start menu under All Programs, Microsoft SharePoint 2013 Products.In Central Administration, click the General Application Settings link from the left-side quick launch.The InfoPath Form Services options are located on that page, as shown in Figure 19.1.
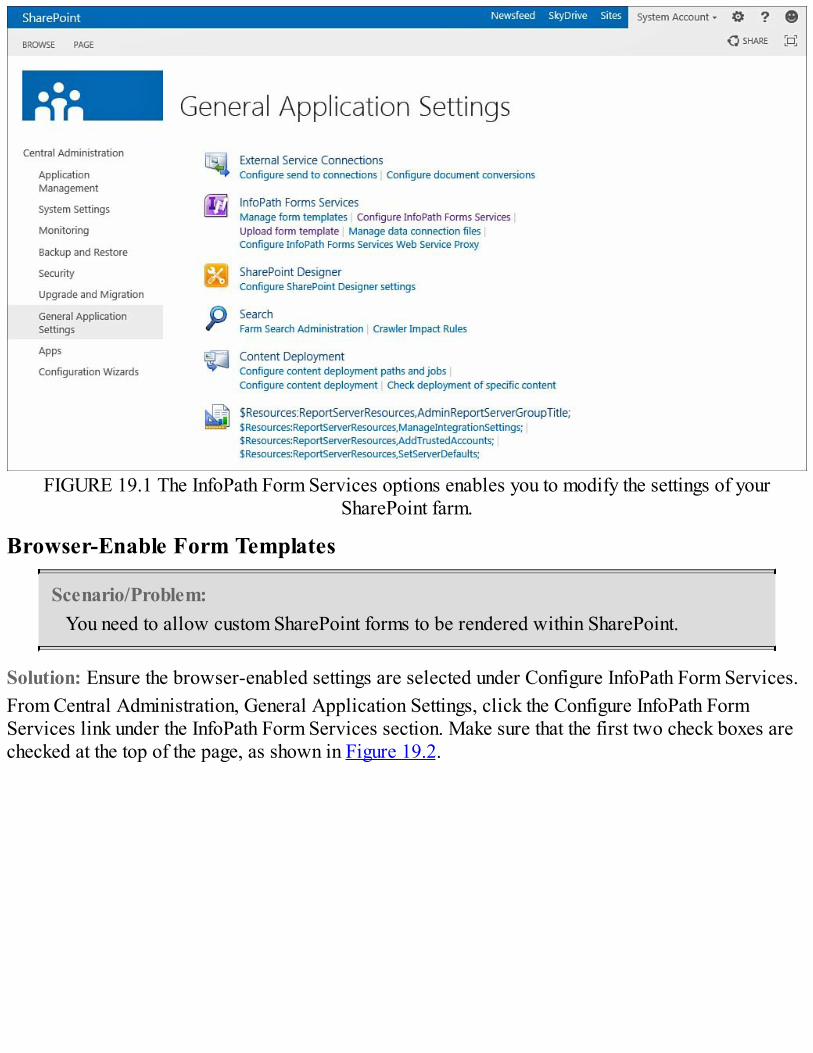
FIGURE 19.1 The InfoPath Form Services options enables you to modify the settings of yourSharePoint farm.
Browser-Enable Form Templates
Scenario/Problem:You need to allow custom SharePoint forms to be rendered within SharePoint.
Solution: Ensure the browser-enabled settings are selected under Configure InfoPath Form Services.From Central Administration, General Application Settings, click the Configure InfoPath FormServices link under the InfoPath Form Services section. Make sure that the first two check boxes arechecked at the top of the page, as shown in Figure 19.2.

FIGURE 19.2 Checking the browser-enabled options allows SharePoint forms to be published andrendered on your farm.
The first selection allows browser-enabled forms to be published to SharePoint, and the secondselection allows those forms to be rendered through the web browser.
Throttle Data Connection Timeouts
Scenario/Problem:You need to increase or decrease the data connection time out limit.
Solution: Enter the default and maximum timeout values within Configure InfoPath Form Services.Your form will attempt to connect and access data sources based on your configured data connections.If the data source is not accessible, busy, or down, InfoPath Forms Services needs a way to time outthe connection such that the form or the browser does not stop responding.From Central Administration, General Application Settings, click the Configure InfoPath FormServices link under the InfoPath Form Services section. Under the Data Connection Timeouts section,increase or decrease the values, as shown in Figure 19.3.

FIGURE 19.3 Setting the data connection timeout values determines how long InfoPath waits for dataactivity.
TipThe default values are usually acceptable entries and do not need to be modified.However, if you have some long-running data processes or connectivity issues, you maywant to increase these numbers slightly.
Throttle the Data Connection Response Size
Scenario/Problem:You need to increase or decrease the data connection response size.
Solution: Enter maximum response size value (in kilobytes) within Configure InfoPath FormServices.When connecting to data sources, you do not want to overload other systems. Limiting the responsesize determines how many kilobytes the data connection can process.From Central Administration, General Application Settings, click the Configure InfoPath FormServices link under the InfoPath Form Services section. Under the Data Connection Response Sizesection, increase or decrease the values, as shown in Figure 19.4.

FIGURE 19.4 Setting the response size value determines how many kilobytes the data connection canprocess.
TipThe default value of 1500KB is usually a good setting. You do not want to strain othersystems or databases. This also helps limit traffic on the network. Only increase this valueif you have a large form that submits a great deal of data.
Modify Authentication Settings
Scenario/Problem:Modify authentication settings.
Solution: Check or uncheck the authentication settings in Configure InfoPath Form Services.You have several data authentication options available that either allow or prohibit certain types ofdata connectivity, as follows:
HTTP Data Connections: Selecting this requires Secure Sockets Layer (SSL) encryptionwhen your form uses Hypertext Transfer Protocol (HTTP) authentication (such as whenaccessing a web service). Embedded SQL Authentication: Select this option if you have data connection files which

contain SQL database connection information including the username and password. Authentication to Data Sources: Select this option to allow custom forms to access datasources through data connection files. Cross-Domain Access: Select this option if your form needs to access data sources on adifferent domain than SharePoint.
To configure these settings, from Central Administration, General Application Settings, click theConfigure InfoPath Form Services link under the InfoPath Form Services section. Under theauthentication sections, check or uncheck the options, as shown in Figure 19.5.
FIGURE 19.5 Checking the authentication options permits InfoPath to use various types of dataconnections.
Configure Session State
Scenario/Problem:Configure session state settings.
Solution: Modify the session state settings in Configure InfoPath Form Services.When a user is filling out a SharePoint form, Form Services uses the SharePoint Server State serviceto manage user sessions. Transient data is stored within the session state.

Several settings are involved in the session state configuration: Number of Postbacks per Session: Usually, there should not be too much chatter between theform and InfoPath Forms Services. This setting prevents unintended postbacks or “out-of-control” communications. Number of Actions per Postback: There should only be a handful of actions per postback.Once again, this is prevent a form process from pegging server resources. Active Session Duration: By default, active sessions are terminated after 1,440 minutes whichessentially is 24 hours. This is more of a cleanup process than anything. Some forms may take along time to fill out depending on the information required, but 1 day should be plenty of time. Maximum Size of User Session Data: This determines how much data can be stored for theactive user session. The default is 4096KB, which equates to 4MB. This provides plenty ofroom to store user session data. Typical forms and user information should only take up severalkilobytes, if not bytes.
If the user session lasts too long or there too many postbacks to the server, the session is ended basedon the configured settings. All form data is lost, and the user must start over. This is done to preventunintended communication, limit network traffic, and limit system resource utilization.To configure these settings, from Central Administration, General Application Settings, click theConfigure InfoPath Form Services link under the InfoPath Form Services section. Under theThresholds and User Sessions sections, modify the values, as shown in Figure 19.6.
FIGURE 19.6 Modifying the thresholds and user session values configures the session state.
TipIf forms are constantly being filled out within your organization and are fairly lightweight,you might actually want to reduce some of these values to keep recycling the session stateand system resources. Another option is to use View State instead, which is only availableto configure using PowerShell. See Chapter 20, “PowerShell,” for more information aboutenabling view state using PowerShell.

Upload a Form Template
Scenario/Problem:You need to upload a form template to InfoPath Form Services.
Solution: Click the Upload Form Template link under the InfoPath Form Services section.Forms that have code-behind or that require Full Trust, cannot be published directly to SharePoint.These forms must be published to a network location and then uploaded to InfoPath Form Services.To upload a form to InfoPath Form Services, follow these steps:
1. Launch Central Administration.2. Click General Application Settings, and then click the Upload Form Template link under the
InfoPath Form Services section. The Upload Form Template page appears, as shown in Figure19.7.
FIGURE 19.7 The Upload Form Template page allows you to upload a form to InfoPath FormServices.
3. Click the Browse button to locate the form.4. (Optional) Click Verify to verify the form can be uploaded without any conflicts or errors.5. Leave the Upgrade Selection check box checked to upgrade any existing forms. If you uncheck
this option, the new form will replace any existing form.

6. Leave the Allow Existing Sessions to Complete option selected so that users are notinterrupted. Otherwise, select the Terminate option to, in effect, end all current user sessions.
TipTerminating existing sessions is harsh in a production environment and might cause userfrustration. It is always good practice to allow existing sessions to complete. Analternative option is to quiesce the form first, which allows all sessions to end but doesnot allow any new sessions to initiate.
What Happens When a Form Is Uploaded?When a form is uploaded, it generates a feature for your SharePoint farm. The feature files aregenerated in the SharePoint 14 hive (see the Note in this section) under TEMPLATES\FEATURES, asshown in Figure 19.8. The feature folder is prefixed with FT for form template.
FIGURE 19.8 Uploading a form generates a feature folder.The feature is deployed globally to your site collections and can be activated just like any otherfeature. The form feature appears in the Site Collection Features list, as shown in Figure 19.9.

FIGURE 19.9 The form feature is available as a site collection feature.
NoteEven though the SharePoint 2013 version is 15 and there is a 15 hive folder, as of thiswriting InfoPath Form Template features are still generated in the SharePoint 2010 14hive.
Manage Form Templates
Scenario/Problem:Manage form templates.
Solution: Click the Manage Form Templates link under the InfoPath Form Services section.After forms have been uploaded, you can manage them within the Manage Form Templates page.Selecting a form’s drop-down menu shows the various actions available, as shown in Figure 19.10.
FIGURE 19.10 You can manage each form by selecting the actions from its drop-down menu.The actions available are as follows:
View Properties: Displays all the information pertaining to the form. Activate to a Site Collection: When you upload a form, it generates and deploys a feature for

your form to each site collection in your farm. This action activates that feature on the sitecollection you choose. Deactivate from a Site Collection: This action deactivates the form feature of the selectedsite collection. Quiesce Form Template: This action halts the initiation of new form instances and allowsexisting user sessions to complete. Remove Form: This action deletes the form from InfoPath Forms Services.
TipRemoving a form does not remove the content type it generates. Make sure that the form isnot being used anywhere in SharePoint. Otherwise, errors will occur when SharePointtries to access the form template via the content type. (Hint: Remove the content type first,because SharePoint will notify if it is being used.)
What Happens When a Form Is Activated to a Site Collection?When a form is activated to a site collection, the site collection feature for the form is activated, asshown in Figure 19.11. The form is now available as a content type in your form library, as shown inFigure 19.12.
FIGURE 19.11 Activating a form activates the site collection feature.
FIGURE 19.12 Activating the site collection features allows the form to be used as a content type.
See the “Use Multiple Forms in SharePoint Libraries” section in Chapter 8, “Submit and Publish toSharePoint,” for more information about content types.
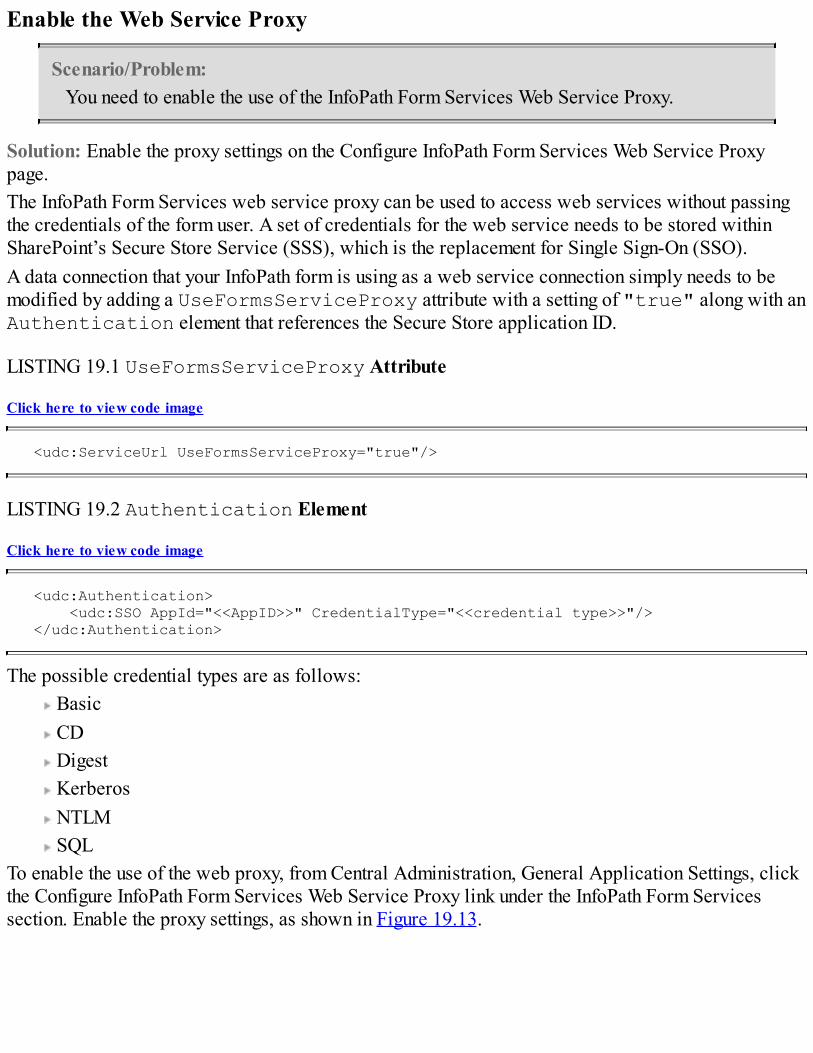
Enable the Web Service Proxy
Scenario/Problem:You need to enable the use of the InfoPath Form Services Web Service Proxy.
Solution: Enable the proxy settings on the Configure InfoPath Form Services Web Service Proxypage.The InfoPath Form Services web service proxy can be used to access web services without passingthe credentials of the form user. A set of credentials for the web service needs to be stored withinSharePoint’s Secure Store Service (SSS), which is the replacement for Single Sign-On (SSO).A data connection that your InfoPath form is using as a web service connection simply needs to bemodified by adding a UseFormsServiceProxy attribute with a setting of "true" along with anAuthentication element that references the Secure Store application ID.
LISTING 19.1 UseFormsServiceProxy Attribute
Click here to view code image
<udc:ServiceUrl UseFormsServiceProxy="true"/>
LISTING 19.2 Authentication Element
Click here to view code image
<udc:Authentication> <udc:SSO AppId="<<AppID>>" CredentialType="<<credential type>>"/></udc:Authentication>
The possible credential types are as follows: Basic CD Digest Kerberos NTLM SQL
To enable the use of the web proxy, from Central Administration, General Application Settings, clickthe Configure InfoPath Form Services Web Service Proxy link under the InfoPath Form Servicessection. Enable the proxy settings, as shown in Figure 19.13.

FIGURE 19.13 Checking the options enables InfoPath Form Services to use the web service proxy.
Manage Data Connections
Scenario/Problem:Manage data connections.
Solution: Click the Manage Data Connection Files link under the InfoPath Form Services section.Central data connection files can be managed within the Manage Data Connections Files page.Selecting a file’s drop-down menu shows the various actions available, as shown in Figure 19.14.

FIGURE 19.14 Each data connection can be managed by selecting the actions in its drop-down menu.The actions available are as follows:
Edit Properties: Displays the modifiable properties of the data connection files. Delete: Removes the data connection from the centrally managed data connections.
TipCommon practice is to use data connection files within the specific site collectionlibraries and not using centrally managed data connections. However, common dataconnection files can be easily managed using the InfoPath Forms Services data connectionrepository.

Chapter 20. PowerShell
In this Chapter Access SharePoint 2013 Management Shell Browser-Enable Form Templates Throttle Data Connection Timeouts Throttle the Data Connection Response Size Modify Authentication Settings Configure Session State Enable View State Verify and Upload a Form Template Upload Multiple Form Templates at Once Activate or Deactivate a Form to a Site Collection Remove a Form from InfoPath Form Services Quiesce a Form from InfoPath Form Services Enable the Web Service Proxy
This chapter discusses the administrative aspects of InfoPath Form Services through the use ofPowerShell. PowerShell is the replacement for the previous STSADM console application.SharePoint 2013 provides a PowerShell Management Console that loads all the SharePoint-relatedfunctions into memory, thus providing an easy-to-use command-line interface.
Access SharePoint 2013 Management Shell
Scenario/Problem:You want to access the SharePoint 2010 Management Shell.
Solution: On any SharePoint server in your farm, select the SharePoint 2013 Management Shellprogram from the Start menu.You can launch PowerShell and load the SharePoint module or just launch the SharePoint 2013Management Shell. Launching the SharePoint 2013 Management Shell makes it easier to usePowerShell commands for SharePoint/InfoPath administration.On any SharePoint server in your farm, select Start, All Programs, Microsoft SharePoint 2013Products, and then select the SharePoint 2013 Management Shell, as shown in Figure 20.1. ThePowerShell command prompt window loads, as shown in Figure 20.2.

FIGURE 20.1 Selecting the SharePoint 2013 Management Shell loads PowerShell with theSharePoint module.

FIGURE 20.2 Launching the SharePoint 2013 Management Shell loads the PowerShell commandprompt window.
From here, you can enter any commands presented in this chapter to facilitate the configuration ofInfoPath Form Services.
Browser-Enable Form Templates
Scenario/Problem:You need to allow custom SharePoint forms to be rendered within SharePoint.
Solution: Use the Set-SPInfoPathFormsService command.
TipTo disable the browser-enabled form templates, replace $true with $false.
From the PowerShell command prompt, enter the following:Click here to view code image

Set-SPInfoPathFormsService -AllowUserFormBrowserEnabling $true -AllowUserFormBrowserRendering $true
Throttle Data Connection Timeouts
Scenario/Problem:You need to increase or decrease the data connection timeout limit
Solution: Use the Set-SPInfoPathFormsService command with the data connection timeoutparameters.Your form will attempt to connect and access data sources based on your configured data connections.If the data source is not accessible, busy, or down, InfoPath Forms Services needs a way to time outthe connection such that the form or the browser doesn’t stop responding.Use the –DefaultDataConnectionTimeout and –MaxDataConnectionTimeoutparameters with the Set-SPInfoPathFormsService command to set the timeout values, asshown in Listing 20.1.
LISTING 20.1 Data Connection Timeout Command Line
Click here to view code image
Set-SPInfoPathFormsService –DefaultDataConnectionTimeout 15000 –MaxDataConnectionTimeout 25000
TipThe default values are usually acceptable entries and do not need to modified. However,if you have some long-running data processes or connectivity issues, you may want toincrease these numbers slightly.
Throttle the Data Connection Response Size
Scenario/Problem:You need to increase or decrease the data connection response size.
Solution: Use the MaxDataConnectionResponseSize parameter with the Set -SPInfoPathFormsService command.When connecting to data sources, you do not want to overload other systems. Limiting the responsesize determines how many kilobytes the data connection can process. You can modify the setting byusing the MaxDataConnectionReponseSize parameter with the number of kilobytes as shownin Listing 20.2.
LISTING 20.2 Data Connection Timeout Command Line

Click here to view code image
Set-SPInfoPathFormsService –MaxDataConnectionResponseSize 3000
TipThe default value of 1500KB is usually a good setting. You do not want to strain othersystems or databases. This also helps limit traffic on the network. Only increase this valueif you have a large form that submits a great deal of data.
Modify Authentication Settings
Scenario/Problem:You need to modify authentication settings.
Solution: Use the Set-SPInfoPathFormsService command with the appropriate parameters.Several data authentication options are available that either allow or prohibit certain types of dataconnectivity, as follows:
RequireSslForDataConnections: Set this option to true to require SSL encryption when yourform uses HTTP authentication (such as when accessing a web service). AllowEmbeddedSqlForDataConnection: Set this option to true if you have data connectionfiles which contain SQL database connection information including the username and password. AllowUdcAuthenticationForDataConnections: Set this option to true to allow custom formsto access data sources through data connection files. AllowUserFormCrossDomainDataConnections: Select this option if your form needs toaccess data sources on a different domain than SharePoint.
To configure these settings, use the Set-SPInfoPathFormsService command with the desiredparameters and settings, as shown in Listing 20.3.
LISTING 20.3 Authentication Settings Command Line
Click here to view code image
Set-SPInfoPathFormsService –RequireSslForDataConnections $true –AllowEmbeddedSqlForDataConnection $true –AllowUdcAuthenticationForDataConnections $true –AllowUserFormCrossDomainDataConnections $true
Configure Session State
Scenario/Problem:You want to configure session state settings.

Solution: Use the Set-SPInfoPathFormsService command with the appropriate parameters.When a user is filling out a SharePoint form, InfoPath Form Services uses the SharePoint Server Stateservice to manage user sessions. (You can switch this to View State using PowerShell; see the nextsection.) Transient data is stored within the session state.There are several settings involved in the session state configuration:
MaxPostbacksPerSession: There usually should not be too much chatter between the form andForms Services. This setting prevents unintended post-backs or “out-of-control”communications. MaxUserActionsPerPostback: There should be only a handful of actions per postback. Onceagain, this is to prevent a form process from pegging server resources. ActiveSessionTimeout: By default, active sessions are terminated after 1,440 minutes, whichessentially is 24 hours. This is more of a cleanup process than anything. Some forms may take along time to fill out depending on the information required, but one day should be plenty of time. MaxSizeOfFormSessionState: This determines how much data can be stored for the activeuser session. The default is 4096KB, which equates to 4MB. This provides plenty of room tostore user session data. Typical forms and user information should only take up severalkilobytes if not bytes.
If the user session lasts too long or there too many postbacks to the server, the session is ended basedon the configured settings. All form data will be lost, and the user will need to start over. This is doneto prevent unintended communication, limit network traffic, and limit system resource utilization.To configure these settings, use the Set-SPInfoPathFormsService command with the desiredparameters and settings, as shown in Listing 20.4.
LISTING 20.4 Session State Settings Command Line
Click here to view code image
Set-SPInfoPathFormsService –MaxPostbacksPerSession 100 –ActiveSessionTimeout 720
TipIf forms are constantly being filled out within your organization and are fairly lightweight,you might actually want to reduce some of these values to keep recycling the session stateas well as system resources. Another option is to use View State instead, as described inthe next section.
Enable View State
Scenario/Problem:Instead of using Session State, you would like to use View State.

Solution: Use the AllowViewState parameter with the Set-SPInfoPathFormsServicecommand.View State sessions (or Form View) store session data within the client browser, thus reducing loadon the database server. Although this assists in maximizing database performance, there is morebandwidth used in View State than in Session State. The maximum session size allowed in the ViewState is 40KB. If there is an instance where this limit is passed, the session automatically switchesback to Session State.To configure these settings, use the Set-SPInfoPathFormsService command with the –AllowViewState and -ViewStateThreshold parameters as shown in Listing 20.5.
LISTING 20.5 ViewState State Settings Command Line
Click here to view code image
Set-SPInfoPathFormsService –AllowViewState $true –ViewStateThreshold40961
TipYou can only modify this setting using the PowerShell command line. There are noequivalent options in Central Administration.
Verify and Upload a Form Template
Scenario/Problem:You need to verify and upload a form template to InfoPath Form Services.
Solution: Use the Test-SPInfoPathFormTemplate and Install-SPInfoPathFormTemplate PowerShell commands to verify and upload the form template.Forms that have code-behind or that require Full Trust permissions cannot be published directly toSharePoint. These forms must be published to a network location and then uploaded to FormServices. Before uploading, you should verify that the form is correct and can be installed.To verify a form template, use the following command:Click here to view code image
Test-SPInfoPathFormTemplate -Path "<<full path to InfoPath formtemplate>>"
To upload a form to InfoPath Form Services, use the following command:Click here to view code image
Install-SPInfoPathFormTemplate -Path "<<full path to InfoPath formtemplate>>"

TipUse the switch parameter –EnableGradualUpgrade with the Install-SPInfoPathFormTemplate to ensure that existing forms are upgraded.
Upload Multiple Form Templates at Once
Scenario/Problem:You have many form templates to upload to InfoPath Form Services but find it difficultperforming the same process for each one individually.
Solution: Pipe the paths of all form templates you want to upload to the Install-SPInfoPathFormTemplate command.You may upload multiple form templates by listing out each path separated by a comma and then usingthe pipe (|) to pass that list into the Install-SPInfoPathFormTemplate command, as shownin Listing 20.6.
LISTING 20.6 Multiple-Form Upload Command Line
Click here to view code image
"<<path of form 1>>", "<<path of form 2>", "<<path of form 3>>" |Install-SPInfoPathFormTemplate
Activate or Deactivate a Form to a Site Collection
Scenario/Problem:You need to activate or deactivate a form to a site collection.
Solution: Use the Enable-SPInfoPathFormTemplate or Disable-SPInfoPathFormTemplate commands.When you upload a form, it generates and deploys a feature for your form to each site collection inyour farm. Using the Enable-SPInfoPathFormTemplate command activates that feature onthe site collection you choose. Conversely, using the Disable-SPInfoPathFormTemplatecommand deactivates the form feature of the selected site collection.To activate a form to a site collection, use the following command:Click here to view code image
Enable-SPInfoPathFormTemplate -Identity "<<name of form template>>" -Site "<<URL of Site Collection>>"
To deactivate a form from a site collection, use the following command:Click here to view code image
Disable-SPInfoPathFormTemplate -Identity "<<name of form template>>"

-Site "<<URL of Site Collection>>"
Remove a Form from InfoPath Form Services
Scenario/Problem:You need to remove a form from InfoPath Form Services.
Solution: Use the Uninstall-SPInfoPathFormTemplate PowerShell command.Removing a form deletes the form from InfoPath Forms Services. It is no longer available on any sitecollection. To remove a form from InfoPath Form Services, use the following command:Click here to view code image
Uninstall-SPInfoPathFormTemplate -Identity "<<name of form template>>"
Quiesce a Form from InfoPath Form Services
Scenario/Problem:You need to quiesce a form from InfoPath Form Services.
Solution: Use the Stop-SPInfoPathFormTemplate PowerShell command.Quiescing a form will halt the initiation of new form instances and allow existing user sessions tocomplete. To quiesce a form from InfoPath Form Services, use the following command:Click here to view code image
Stop-SPInfoPathFormTemplate -Identity "<<name of form template>>"
Enable the Web Service Proxy
Scenario/Problem:You need to enable the use of the InfoPath Form Services web service proxy.
Solution: Use the Set-SPInfoPathWebServiceProxy command.The InfoPath Form Services web services proxy can be used to access web services without passingthe credentials of the form user. A set of credentials for the web service need to be stored withinSharePoint’s Secure Store Service (SSS), which is the replacement for Single Sign-On (SSO).A data connection file that your InfoPath form is using as a web service connection simply needs to bemodified by adding a UseFormsServiceProxy attribute with a setting of "true" along with anAuthentication element that references the Secure Store application ID.
LISTING 20.7 UseFormsServiceProxy Attribute
Click here to view code image
<udc:ServiceUrl UseFormsServiceProxy="true"/>

LISTING 20.8 Authentication Element
Click here to view code image
<udc:Authentication> <udc:SSO AppId="<<AppID>>" CredentialType="<<credential type>>"/></udc:Authentication>
TipRemoving a form does not always remove the content type it generates. Make sure theform is not being used anywhere in SharePoint. Otherwise, errors will occur whenSharePoint tries to access the form template via the content type. (Hint: Remove thecontent type first, as SharePoint will notify you if it is being used.)
The possible credential types are as follows: Basic CD Digest Kerberos NTLM SQL
To enable the use of the web proxy, use the following command:Click here to view code image
Set-SPInfoPathWebServiceProxy -Identity "<<URL of web application>>"-AllowWebServiceProxy $true
To enable SharePoint forms to use the web proxy, use the following command:Click here to view code image
Set-SPInfoPathWebServiceProxy -Identity "<<URL of web application>>"-AllowForUserForms $true
TipThe AllowWebServiceProxy setting needs to be set to true first beforeAllowForUserForms can be set to true. This is why the commands need to beseparated.

Chapter 21. Managing Form Permissions
In this Chapter Create Unique Permissions on a Form Library Grant Users Permissions Create a Permission Level for Your Form Library Edit a Group’s Permission Level Create a Submit-Only Permission Level
This chapter explores the administrative aspects of managing form permissions within SharePoint.The proper permissions determine who can access the forms and what kind of rights they have.Users/groups need a permission level that contains the Add Items permission such that they maysubmit a form or save a list item. The Edit Items permission is required if you need to allowusers/groups to edit existing items in the library or list. For general viewing of your forms or listitems, the View Items permission is needed.
Create Unique Permissions on a Form Library
Scenario/Problem:You have a form library that needs unique permissions.
Solution: Break inheritance from the parent site.The first level of permissions for your forms starts at the site level. When you create a new formlibrary, the library inherits the permissions of the site in which it was created. Therefore, to beginmanaging permissions of your forms, you first need to break inheritance from the site. To do this,follow these steps:
1. Navigate to your form library in SharePoint.2. From the Library ribbon, click the Shared With button, as shown in Figure 21.1, to manage the
form library’s permissions.
FIGURE 21.1 Clicking the Shared With button allows you to manage the form library’s permissions.
3. Click on the Advanced link from the Shared With dialog.4. On the Permissions screen, click Stop Inheriting Permissions from the Edit ribbon to break

inheritance from the parent site, as shown in Figure 21.2.
FIGURE 21.2 Clicking Stop Inheriting Permissions breaks inheritance from the parent site.
Grant Users Permissions
Scenario/Problem:You need to allow users to access your forms.
Solution: Add users to a group that has access to the form library.The best practice for managing permissions is to grant the permissions to groups and then add theappropriate users to those groups. This allows you to easily manage who has access to your formlibrary, because you only need to worry about the group access and not each individual user; if theuser is in the group, he or she has that group’s access level.To grant permissions on your form library after you have broken inheritance, click the GrantPermissions button on the Permission page, as shown in Figure 21.3.
FIGURE 21.3 Clicking Grant Permissions allows you to add users or groups to your form library.
Select the users within the Users/Groups box, click the Show Options link, and then select thepermission level they should be granted as shown in Figure 21.4. You may also grant the userspermissions directly by selecting the Grant Users Permission Directly option.

FIGURE 21.4 Adding a user to the group grants them the group’s permission.
TipCreate a new site-level group specifically for your forms library so that you do not needto give users permissions through the main site groups.
Create a Permission Level for Your Form Library
Scenario/Problem:You only want to provide the permissions necessary for your form library.
Solution: Create a custom permission level in the site and use that to grant users/ groups permissionsin your form library.Granting users/groups Contribute rights to your form library is a surefire way to allow them to read,add, and edit items. However, this permission level also allows the users to delete the items whichmay not be desired. Therefore, I recommend creating a custom permission level that contains only thepermissions needed on the form library. The permission level is created in the site but may be appliedwithin your form library permissions.To create a custom permission level, follow these steps:
1. Navigate to your root SharePoint site.2. From the Settings menu, select Site Settings. From the Site Settings screen, click Site
Permissions to access the Permissions page of the site, as shown in Figure 21.5.

FIGURE 21.5 Clicking Site Permissions accesses the Permissions page of the site.
3. On the Permissions page, click Permission Levels from the Edit ribbon, as shown in Figure21.6, to manage the site’s permission levels.
FIGURE 21.6 Clicking Permission Levels allows you to manage the site’s permission levels.
4. Click the Add a Permission Level link at the top of the page. The Add a Permission Level pageappears.
5. Enter a name for the permission level and select the appropriate permissions, as shown inFigure 21.7.

FIGURE 21.7 Selecting the permissions configures the custom permission level.
6. Click Create.The permission level is created, and now you may use that to grant users/groups custom permissionswithout using the system-based permission levels such as Contribute. See the next section for steps onapplying this level to your groups.
Edit a Group’s Permission Level
Scenario/Problem:You need to edit an existing group’s permission level within your form library.
Solution: Edit the group’s permissions from the library’s permissions page.Whether you created a custom permission level from the previous section or need to modify a group’spermissions, you can easily edit the assigned permission levels by following these steps:
1. Navigate to your form library.2. Click Library Permissions from the Library ribbon.3. Select a user or group and click the Edit User Permissions button, as shown in Figure 21.8, to
configure the assigned permission levels. The Edit Permissions dialog appears.

FIGURE 21.8 Clicking the Edit User Permissions button allows you to configure the assignedpermission levels.
TipSelect more than one user or group to modify the permission levels of multipleusers/groups simultaneously.
4. Select the desired permissions in the Choose Permissions section of the Edit Permissionsdialog, as shown in Figure 21.9, to configure the permission levels applied to the selecteduser/group.

FIGURE 21.9 Choosing the permissions configures the levels applied to the selected user or group.
NoteIn addition to the normal permissions used for Add Items, Edit Items, and so on, the ViewApplication Pages and Use Client Integration Features permissions are required in orderfor users to interact and use InfoPath forms within SharePoint 2013.
5. Click OK.
Create a Submit-Only Permission Level
Scenario/Problem:You want users to be able to submit a form but not be able to view or edit the form.
Solution: Add a permission level using a custom console application that only provides the AddItems permission.You might sometimes want users to be able to submit a form but not see any contents of the formlibrary (not even their own submission). Several business scenarios may require this (for example, asuggestion form).When you are creating a custom permission level from within SharePoint, selecting Add Itemsautomatically selects View Items. Unchecking View Items unchecks the Add Items. So, there seems tobe no way to have only the Add Items permission without the View Items permission.

You can, however, achieve this by using code within a Visual Studio console application or as aneasier alternative use PowerShell scripting. The console application should take three arguments: thesite collection URL, the name of the permission, and a description. These are the required variablesfor the permission code as shown in Listing 21.1. The code to perform the creation of the permissionis shown in Listing 21.2.
LISTING 21.1 Permission Variables
Click here to view code image
string siteCollectionURL = args[0]; string nameOfPermissionLevel = args[1]; string description = args[2];
LISTING 21.2 Creating the Permission
Click here to view code image
using (SPSite oSiteCollection = new SPSite(siteCollectionURL)){ using (SPWeb oWebsite = oSiteCollection.OpenWeb()) { if (!oWebsite.HasUniqueRoleDefinitions) { oWebsite.RoleDefinitions.BreakInheritance(true, true); }
SPRoleDefinition oRoleDefinition = new SPRoleDefinition(); oRoleDefinition.Name = nameOfPermissionLevel; oRoleDefinition.Description = description; oRoleDefinition.BasePermissions = SPBasePermissions.AddListItems &SPBasePermissions.ViewFormPages & SPBasePermissions.UseClientIntegration; oWebsite.RoleDefinitions.Add(oRoleDefinition); }}
Package the required code into a console application and compile the executable. Run the executableon one of your servers in the SharePoint farm. An example command line execution is as follows:Click here to view code image
createpermissionlevel.exe "http://sp2013 " "Submit Only" "Allowusers to only submit"
The new permission level is created, and you may now use that to create a Submit-Only permissionlevel. You may also perform the same operation using PowerShell as shown in Listing 21.3.
LISTING 21.3 PowerShell Commands for Submit Only Permission Level
Click here to view code image
$web = get-spweb "http://sp2013"$newroledef = New-Object "Microsoft.SharePoint.SPRoleDefinition"

$newroledef.Name = "Submit Only"$newroledef.Description = "Allow users to only submit a form but not viewor edit"$newroledef.BasePermissions = "AddListItems,ViewFormPages,UseClientIntegration"$web.RoleDefinitions.Add($newroledef)$web.Update()
NoteBecause the View Items permission is not assigned, you need to control the launching andclosing of the form such that SharePoint does not return to the form library where the formis submitted. You may experience errors otherwise.

Part V: Troubleshooting

Chapter 22. General Form Issues
In This Chapter Resolve: Issue Accessing Data Source Resolve: SQL Credential Issue Resolve: Business Data Connectivity Metadata Store Is Currently Unavailable Resolve: Picker Issue Obtaining Business Data Resolve: Missing Business Data Connectivity Services Client Components Resolve: SharePoint Designer Task List Creation Error Resolve: Missing Programmability Components Resolve: Error Loading the Form Resolve: Security Exception Using Code-Behind
This chapter explores various form issues that may arise during your SharePoint form developmentand suggests possible resolutions. Browse through all the troubleshooting chapters to learn thepotential pitfalls.
Resolve: Issue Accessing Data Source
Scenario/Problem:An error occurred when querying a data source.
Solution: Follow troubleshooting steps.Figure 22.1 shows one of the most common errors messages to receive; it means a problem existswith the data connection or data source itself.
FIGURE 22.1 Any issue with a data connection produces this error.
You can take several troubleshooting steps, as follows:1. Ensure that the data source is available and reachable.2. Make sure that the data connection file exists in the data connection library.
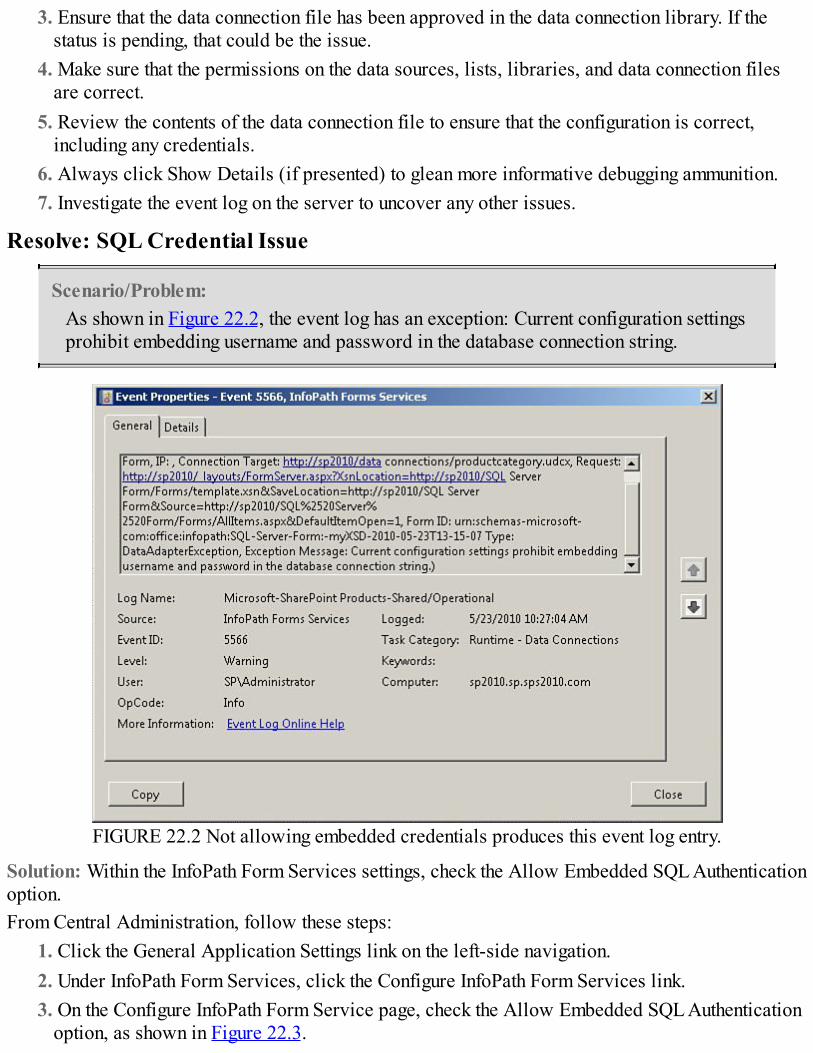
3. Ensure that the data connection file has been approved in the data connection library. If thestatus is pending, that could be the issue.
4. Make sure that the permissions on the data sources, lists, libraries, and data connection filesare correct.
5. Review the contents of the data connection file to ensure that the configuration is correct,including any credentials.
6. Always click Show Details (if presented) to glean more informative debugging ammunition.7. Investigate the event log on the server to uncover any other issues.
Resolve: SQL Credential Issue
Scenario/Problem:As shown in Figure 22.2, the event log has an exception: Current configuration settingsprohibit embedding username and password in the database connection string.
FIGURE 22.2 Not allowing embedded credentials produces this event log entry.
Solution: Within the InfoPath Form Services settings, check the Allow Embedded SQL Authenticationoption.From Central Administration, follow these steps:
1. Click the General Application Settings link on the left-side navigation.2. Under InfoPath Form Services, click the Configure InfoPath Form Services link.3. On the Configure InfoPath Form Service page, check the Allow Embedded SQL Authentication
option, as shown in Figure 22.3.

FIGURE 22.3 Checking the Allow Embedded SQL Authentication option resolves the exceptionerror.
4. Click OK.
Resolve: Business Data Connectivity Metadata Store Is Currently Unavailable
Scenario/Problem:You are in SharePoint Designer and you attempt to review the external content types toobtain connection information, but you receive a message stating that the Business DataConnectivity Metadata Store is currently unavailable.
Solution: Start the Business Data Connectivity Service on the server using Central Administration.
FIGURE 22.4 When the Business Data Connectivity Service is not started, you will receive thismessage in SharePoint Designer.
The Business Data Connectivity Service is probably not started on the server and therefore needs tobe started. To do this, follow these steps:
1. Open SharePoint 2013 Central Administration.2. Under System Settings, click the Manage Services on Server link.3. Find the Business Data Connectivity Service line and click the Start link, as shown in Figure
22.5.

FIGURE 22.5 Clicking the Start link starts the Business Data Connectivity Service.
Resolve: Picker Issue Obtaining Business Data
Scenario/Problem:You are previewing a form that contains an external content picker control. When youattempt to select an external item, an error message appears in the dialog stating that anerror occurred obtaining business data using the picker web service.
Solution: Publish your form to SharePoint and test the form within the browser.When you use an external item picker on a SharePoint form, the control is configured to connect to thedata source through SharePoint. Therefore, when attempting to preview the form, you receive amessage in the picker dialog, as shown in Figure 22.6.

FIGURE 22.6 Previewing an external item picker produces this error when configured to connectthrough SharePoint.
You need to publish the form to SharePoint and test the connection there because the control isconfigured to connect through SharePoint itself.
Resolve: Missing Business Data Connectivity Services Client Components
Scenario/Problem:When attempting to use the External Item Picker in InfoPath 2013, you receive a messagethat the Business Data Connectivity Services client components are not installed.
Solution: Install the Business Data Connectivity Services client components by changing the Office2013 installation from Programs and Features in the Control Panel.If your Office 2013 installation did not include the Business Data Connectivity Services clientcomponents, and you attempt to use the External Item Picker within InfoPath, a message appears, asshown in Figure 22.7.
FIGURE 22.7 If you do not have the BCS client components installed, this message displays.

To resolve this issue, follow these steps:1. Close InfoPath Designer 2013.2. Open the Control Panel.3. Click Programs and Features.4. Select the Microsoft Office 2013 entry and click Change.5. Keep Add or Remove Features selected and click Continue.6. On the Installation Options dialog, expand Office Shared Features.7. Click the drop-down item menu on the Business Connectivity Services entry and select Run
from My Computer, as shown in Figure 22.8.
FIGURE 22.8 Modifying the Business Connectivity Services component installs the Office SharedFeature.
8. Click Continue. The Business Connectivity Services client components are installed.9. Open InfoPath Designer 2013 and select the External Item Picker control to add to your form.
Ensure that the control is added without any error messages.

Resolve: SharePoint Designer Task List Creation Error
Scenario/Problem:You are creating a workflow in SharePoint Designer for your SharePoint form. Whilecreating a new task, you receive a message that the task list already exists.
Solution: Either you need to remove the existing task list or use a different name.When you are creating a new task, such as a to-do item, SharePoint Designer generates a content typewith the name you enter. Therefore, if you attempt to use the same name, a message appears, as shownin Figure 22.9.
FIGURE 22.9 Entering a task name that was already used produces this message.If the original content type is not being used by another workflow or process, remove the content typefrom your site and attempt to create the task item again. Otherwise, provide a different name for thetask.
Resolve: Missing Programmability Components
Scenario/Problem:You attempt to use the Code Editor or create an event for your form and you receive amessage that states that Microsoft Visual Studio Tools for Applications (VSTA) isrequired.
Solution: Install VSTA by clicking the Download link in the message.To produce code within your form, you need to have VSTA installed on your machine. This is notinstalled automatically during the Office 2013 installation (or InfoPath 2013 installation). You willreceive the error shown in Figure 22.10 if you do not have VSTA.
FIGURE 22.10 If you do have VSTA installed, you will receive this message when attempting tocreate code in your form.
To resolve this issue, follow these steps:1. Click the Download link within the error message.2. Select Run from download dialog.

3. Install all components that are downloaded.4. Open InfoPath Designer 2013 and click Code Editor on the Developer ribbon to ensure that you
are able to produce code and event handlers.
Resolve: Error Loading the Form
Scenario/Problem:In SharePoint, while you are attempting to create a new form, an error loading the formmessage appears. The form previously rendered and was working fine.
Solution: Remove the content type from SharePoint, redeploy the form, or activate it to the sitecollection.When a form is deployed as a content type either directly or through InfoPath Forms Services but thenthe form is removed or deactivated from the site collection, the content type still exists.Because the content type still exists, when you attempt to create a new document using the formcontent type, SharePoint cannot find the form template.If the form should no longer be used, make sure that you remove the content type from SharePoint sothat no reference exists to the deleted form. If the form is still being used, redeploy the form or ensurethat the form is activated on the site collection.
Resolve: Security Exception Using Code-Behind
Scenario/Problem:When previewing or rendering a form that contains code-behind, you receive a securityexception.
Solution: Change the form’s security setting to Full Trust.When your form needs to execute code and the security setting is not configured, you receive an errormessage similar to Figure 22.11.
FIGURE 22.11 Not setting a form’s security to Full Trust produces this security exception.
To resolve this issue, follow these steps:

1. Click File, Info.2. Click the Form Options button. The Form Options dialog appears.3. Select the Security and Trust category from the list on the left.4. Uncheck the Automatically Determine Security Level check box. The security-level options are
enabled.5. Select the Full Trust option.6. Click OK.

Chapter 23. Resolve Deployment and Publishing Issues
In This Chapter Resolve: No File with URL in This Web Resolve: Form Cannot Be Browser Enabled on Selected Site Resolve: Form Template Has Not Been Published
This chapter explores various issues that may arise during the deployment and publishing of aSharePoint form and suggests possible resolutions. You should browse through all the troubleshootingchapters to learn potential pitfalls.
Resolve: No File with URL in This Web
Scenario/Problem:You attempt to publish your form to a SharePoint location but receive an error that statesno file with URL in this web.
Solution: Correct the URL location and republish.When the path you enter does not exist within your SharePoint site, you receive a message similar toFigure 23.1.
FIGURE 23.1 Entering an invalid URL produces this error when publishing.
To resolve this issue, follow these steps:1. Click OK on the error message.2. Verify the URL entered.3. Go back through the Publishing Wizard to correct the form location.4. Continue with normal publishing procedures.
TipOpen your SharePoint site to verify the proper locations. Review the URL in the browser.In the example, FormTemplates was used. But when you navigate to the Form Templateslibrary on the site, the URL location is named FormServerTemplates.

Resolve: Form Cannot Be Browser Enabled on Selected Site
Scenario/Problem:You attempt to publish your form to SharePoint. The Publishing Wizard displays amessage informing you that the form cannot be browser enabled on the selected site.
Solution: Configure InfoPath Forms Services to allow browser-enabled forms.When browser-enabled forms are not enabled within InfoPath Form Services, the Publishing Wizarddisplays a message as shown in Figure 23.2.
FIGURE 23.2 The Publishing Wizard displays this message when browser forms are not enabled.To resolve this issue, follow these steps:
1. Launch SharePoint 2013 Central Administration.2. Click the General Application Settings link on the left-side navigation.3. Under InfoPath Form Services, click the Configure InfoPath Form Services link.4. On the Configure InfoPath Form Service page, check the User Browser-Enabled Form
Templates check boxes, as shown in Figure 23.3.

FIGURE 23.3 Checking the browser-enabled check boxes allows the form to be published andrendered as a SharePoint form.
5. Click OK.
Resolve: Form Template Has Not Been Published
Scenario/Problem:You attempt to upload your form template into InfoPath Forms Services but receive anerror stating that the form has not been published.
Solution: Publish the form as an administrator-approved form and upload the published version.When you are developing a form that will be uploaded into InfoPath Forms Services at the farm level,you must publish the form as an Administrator-Approved form. If you attempt to upload the formtemplate, you will receive the error shown in Figure 23.4.
FIGURE 23.4 Attempting to upload a form that needs to be Administrator-Approved.
You need to publish the form as an Administrator-Approved form using a network location or adifferent local location. Use the published version of the form to upload into InfoPath FormsServices.

Chapter 24. Resolve Form Submission Issues
In This Chapter Troubleshoot General Submission Issues Resolve: SharePoint Location Is Read-Only Resolve: Document Library Already Contains a File with the Same Name Resolve: Errors Submitting to a Web Service
This chapter explores various issues that may arise during the submission of a SharePoint form andsuggests possible resolutions. You should browse through all the troubleshooting chapters to learnabout potential pitfalls.
Troubleshoot General Submission Issues
Scenario/Problem:An error occurs when submitting a form.
Solution: Follow troubleshooting steps.There are many reasons why a form cannot be submitted. Several detailed errors are explained in thefollowing sections. However, you can take several general troubleshooting steps, as follows:
1. Ensure that the data source used for submission is available and reachable.2. Make sure that the data connection file exists in the data connection library.3. Make sure that the data connection file has been approved in the data connection library. If the
status is pending, that could be the issue.4. Make sure that the permissions on libraries, lists, and data connection files are correct.5. Review the contents of the data connection file to ensure the configuration is correct, including
any credentials.6. Always click Show Details (if presented in the error message box) to glean more informative
debugging ammunition.7. Investigate the event log on the server to uncover any other issues.
Resolve: SharePoint Location Is Read-Only
Scenario/Problem:Upon submission of a form to SharePoint, an error occurs explaining the form cannot besubmitted because the SharePoint location is read-only or you do not have permissions.
Solution: Verify that the user has permissions on the form library where the form is configured to besubmitted.

To successfully submit a form to a form library, the user must have Contribute permissions.Otherwise, the user receives a message similar to Figure 24.1.
FIGURE 24.1 Submitting to a form library without proper permissions produces this error.
Resolve: Document Library Already Contains a File with the Same Name
Scenario/Problem:Upon submission of a form to SharePoint, an error occurs explaining the document libraryalready contains a file with the same name.
Solution: Ensure that the submission data connection in your form is producing a unique form name orthat the submission allows overwriting existing forms.If the form does not use a unique name and the submission does not allow overwriting files, you willreceive an error similar to Figure 24.2 when attempting to submit a form twice.
FIGURE 24.2 Submitting to a form library with a form of the same name produces this error.

During the configuration of the submit data connection, to avoid any conflicts, ensure that the filenamebeing produced is unique. See Chapter 2, “Create a SharePoint Form with InfoPath Designer,” for adiscussion about using a filename formula.Also, if your process allows the resubmission of the same form, ensure that you check the AllowOverwrite If File Exists check box, as shown in Figure 24.3.
FIGURE 24.3 Check the Allow Overwrite If File Exists check box to allow a form to be resubmitted.
Resolve: Errors Submitting to a Web Service
Scenario/Problem:Upon submission of a form to a web service, you receive a SOAP error.
Solution: Follow the troubleshooting steps.Submitting data to a web service requires that all expected values be provided and in the correctformat. Otherwise, SOAP errors occur, as shown in Figure 24.4.

FIGURE 24.4 Submitting invalid data to a web service produces a SOAP error.To investigate and resolve SOAP errors, follow these steps:
1. Ensure that the web service is running. Open a web browser and attempt to reach the webservice.
2. Ensure that all the expected parameters are being submitted with data from your form.3. Ensure that the data types expected match with the data types from your form.4. Some data elements may need to be submitted as a string. Check the Submit Data as a String
check box, as shown in Figure 24.5.
FIGURE 24.5 Some form data elements may need to be submitted as a string.

Part VI: Appendixes
Appendix A. Auto-Increment Repeating Tables
This appendix outlines several options to produce an auto-incrementing value in a repeating table.This book’s downloadable content provides examples of these methods.
Use the position() Function in a Calculated Value ControlCreate a new column in your repeating table and add a Calculated Value control to the cell. If youattempt to enter position() into the XPath, you receive a message stating that it is not supported;technically it is. Therefore, use the function button to select count() and select a field or group.Right-click the control and select the Calculated Value properties option. Change the XPathexpression to position() and click OK.Preview your form. Entering new items auto-increments the counter/index column. This is the easiestand quickest way to simply show the row number. However, the calculated column is not part of thedata structure and therefore would not be saved in the form itself.
Use the count() FunctionIn this method of auto-incremental values, you use one of the fields in your repeating table as the rownumber counter. Use the count() function with the previous-sibling attribute of your row numberfield and add 1 to the default value of the field as shown here:Click here to view code image
count(preceding-sibling::*/RowNumber) + 1
Make sure that this value is not recalculated by unchecking the Refresh Value When Formula IsRecalculated check box. This method uses the number of current items as the row number and thatnumber is stored within the form because the field is part of the repeating group data structure.However, when removing items inline (prior to a save or submit), the row numbers do not shift andare persisted as the original numbering. For example, if three items are added the row numbers are 1,2, and 3. If the user removes the second item, the row numbers remaining are 1 and 3. This may beacceptable if the user is prevented from removing items after they are added.
Use a Counter Field with Form RulesA third option is to use a field in your form (that is not part of the repeating group) to store the runningtotal of rows and then use that value for any new items using rules. You accomplish this by firstcreating a new integer field in your form to store the row count, defaulting the value to 1. I namedmine RowCount.In your repeating table structure, add an integer field that stores the current row number. On my form Inamed this RowIndexNumber. Set the default value of this field equal to the RowCount field anduncheck the Refresh Value option.Add a rule on the RowIndexNumber field for when the field changes and select Set a Fields Value.The field is the RowCount field and the value should be set to the RowCount field +1.This works similar to the count() method described in the previous section. When removing items,however, the same effect of removing the row number occurs as in the count() method. Again, this

may be acceptable especially if the user is prevented from removing rows.

Appendix B. Upload File Attachments in Forms to a DocumentLibrary
This appendix presents a code-behind method that uploads an attached file to a separate documentlibrary when the form is submitted. The code here was adapted from Pranab Paul’s blog on MSDN.
Form ScenarioThe form used in this scenario contains a file attachment control with a field named fileAttach. Thereis also a button to be used as a submit button with and ID of SubmitButton.The user may upload a file to the form and then submit the form. There is a form library in SharePointto which to submit the InfoPath form instance, but there is also a document library in which the fileattached to the form needs to be uploaded. A data connection for submission has been created andpoints to the form library.The form contains code-behind and therefore must have Full Trust. It also must be published as anAdministrator-Approved form and then added to Form Services in SharePoint.
Submit Button and Code-Behind SetupThe custom submit button needs to have a rule added such that when the button is clicked the SubmitData action is executed. Also, in the button properties you need to click Edit Code to produce thebutton event handler and method in the code-behind:Click here to view code image
public void InternalStartup(){ ((ButtonEvent)EventManager.ControlEvents["SubmitButton"] ).Clicked += new ClickedEventHandler(SubmitButton_Clicked);}
public void SubmitButton_Clicked (object sender, ClickedEventArgs e){ // Write your code here.}
The code-behind project uses SharePoint functions and therefore needs a reference to theMicrosoft.SharePoint assembly. This is a similar requirement in the tracking changes solutiondescribed in Chapter 17, “Track Changes in a Form,” so you may refer to those steps to include theproper assembly reference in this file attachment solution.
Event Handler CodeWithin the button event handler (SubmitButton_Clicked) you need code to perform theretrieval of the attached file and the upload of that file to a document library. The code to perform thisis shown here:Click here to view code image
public void SubmitButton_Clicked(object sender, ClickedEventArgs e)

{XPathNavigator docXN = this.CreateNavigator();XPathNavigator opnXN = docXN.SelectSingleNode("/my:myFields/my:fileAttach",this.NamespaceManager);byte[] attachmentNodeBytes = Convert.FromBase64String(opnXN.ToString());
// Position 20 contains a DWORD indicating the length of the// filename buffer. The filename is stored as Unicode so the// length is multiplied by 2.int fnLength = attachmentNodeBytes[20] * 2;byte[] fnBytes = new byte[fnLength];
// The actual filename starts at position 24...for (int i = 0; i < fnBytes.Length; i++){fnBytes[i] = attachmentNodeBytes[24 + i];}
// Convert the filename bytes to a string. The string// terminates with \0 so the actual filename is the// original filename minus the last character !char[] charFileName = System.Text.UnicodeEncoding.Unicode.GetChars(fnBytes);string fileName = new string(charFileName);fileName = fileName.Substring(0, fileName.Length - 1);
// The file is located after the header, which is 24 bytes long// plus the length of the filename.byte[] fileContents = new byte[attachmentNodeBytes.Length - (24 + fnLength)];
for (int i = 0; i < fileContents.Length; ++i){fileContents[i] = attachmentNodeBytes[24 + fnLength + i];}string SiteURL = "http://SharePointRoot/DocumentLibrary/" + fileName;SPWeb site = new SPSite(SiteURL).OpenWeb();site.Files.Add(SiteURL, fileContents);
}
DeploymentAs mentioned earlier, you need to publish the form as an Administrator-Approved form and thenupload the form template to Form Services in SharePoint. Once you upload it to Form Services, youmay use the form as the content type in the desired form library.When a new form is instantiated and submitted, the form instance is saved in the form library youspecified in the data connection for submission, and the attached file is stored in the document libraryyou specified within the code-behind.

Appendix C. Add Picture Files to InfoPath
This appendix presents a method of adding pictures to your forms such that adding an image to apicture button maintains the name of the image file. Otherwise, when adding a picture to your form ora picture button, InfoPath creates a unique filename for the image file. This unique filename is madeup of letters and numbers and does not provide a friendly interface when attempting to select images.In either case, these images become embedded within the InfoPath form and the physical files existwith the.XSN package.
Add a Picture as a Resource FileTo add pictures to your form such that they may be used as picture buttons while maintaining thefilename, follow these steps:
1. From the Data top ribbon menu, click Resource Files, as shown in Figure C.1. The ResourceFiles dialog appears, shown in Figure C.2.
FIGURE C.1 Clicking Resource Files opens the Resource Files dialog.
FIGURE C.2 The Resource Files dialog allows you to add or remove files.
2. Click Add and select a picture file from your file system. Click Open. The file is added to thelist of resource files, shown in Figure C.3.
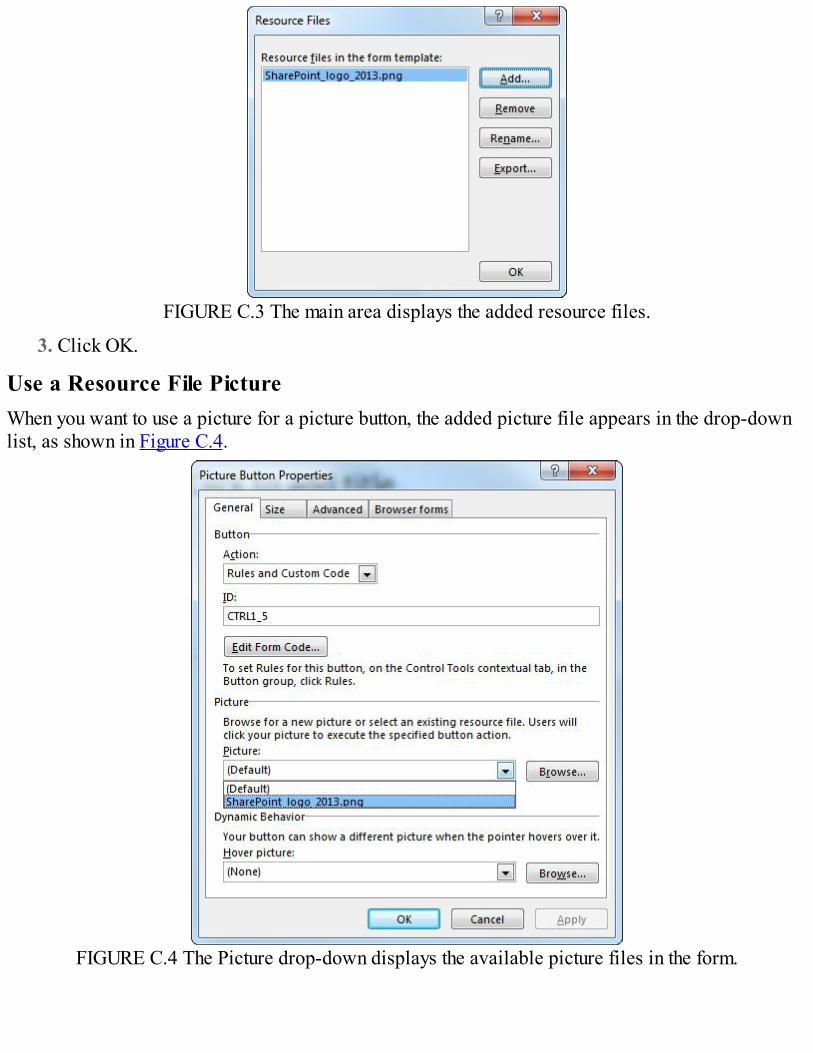
FIGURE C.3 The main area displays the added resource files.
3. Click OK.
Use a Resource File PictureWhen you want to use a picture for a picture button, the added picture file appears in the drop-downlist, as shown in Figure C.4.
FIGURE C.4 The Picture drop-down displays the available picture files in the form.

Index
Aaccessing data. See data, accessingaction rules, adding to buttons, 49-50actions
action rules, adding to buttons, 49-50Assign a To-Do Item, 170-171performing based on form values, 172-175performing either one action or another, 175-177
activating forms to site collection, 288-289Active Session Duration option, 273ActiveSessionTimeout setting, 286Add a Permission Level link, 296Add Choice dialog, 27Add Custom Control Wizard, 207Add Document link, 17Add Field dialog, 181Add or Change Lookup button, 168Add or Remove Custom Controls dialog, 207Add Rules button, 54Add View dialog, 73addDays() function, 59-60add-ins (InfoPath 3013), creating, 225-226advantages of InfoPath
data integration, 4for lists, 4in workflows, 4
Allow Embedded SQL Authentication option, 303Allow Overwrite If File Exists check box, 318AllowEmbeddedSqlForDataConnection option, 285AllowUdcAuthenticationForDataConnections option, 285AllowViewState parameter (Set-SPInfoPathFormsService), 287Approve Request task, creating, 170-171Assign a To-Do Item action, adding to workflows, 170-171Association and Initiation Form Parameters dialog, 181authentication settings, modifying
in Central Administration, 271-272
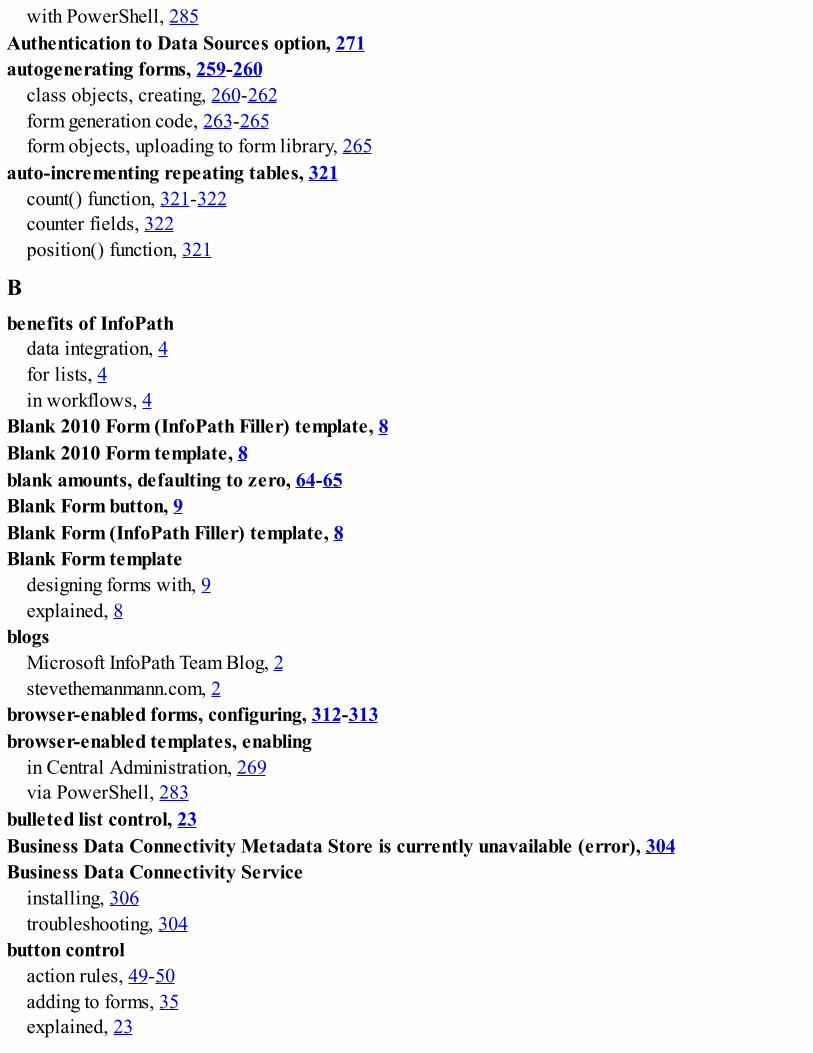
with PowerShell, 285Authentication to Data Sources option, 271autogenerating forms, 259-260
class objects, creating, 260-262form generation code, 263-265form objects, uploading to form library, 265
auto-incrementing repeating tables, 321count() function, 321-322counter fields, 322position() function, 321
Bbenefits of InfoPath
data integration, 4for lists, 4in workflows, 4
Blank 2010 Form (InfoPath Filler) template, 8Blank 2010 Form template, 8blank amounts, defaulting to zero, 64-65Blank Form button, 9Blank Form (InfoPath Filler) template, 8Blank Form template
designing forms with, 9explained, 8
blogsMicrosoft InfoPath Team Blog, 2stevethemanmann.com, 2
browser-enabled forms, configuring, 312-313browser-enabled templates, enabling
in Central Administration, 269via PowerShell, 283
bulleted list control, 23Business Data Connectivity Metadata Store is currently unavailable (error), 304Business Data Connectivity Service
installing, 306troubleshooting, 304
button controlaction rules, 49-50adding to forms, 35explained, 23

buttons. See specific buttons
Ccalculated value control, 23Cannot Be Blank option, 40cascading drop-down lists, 129-132Central Administration
authentication settings, modifying, 271-272browser-enabled templates, enabling, 269data connection response size, configuring, 270data connection timeouts, configuring, 269-270data connections, managing, 279form templates
managing, 276-277uploading, 273-275
InfoPath Form Services options, accessing, 268session state, modifying, 272-273web service proxy, enabling, 277-278
Changed Event methodadding for tracking changes, 246-249creating, 232selection_Changed code listing, 237-239
changes, tracking, 243-244Changed Event code, 246-249changes counter, 256-257formatting rules, 252initial setup, 244-245navigation controls, 253-255rich text, applying, 250-251usernames, displaying, 257-258
changes counter, 256-257changing. See modifyingcheck box control
adding to forms, 30-31explained, 22
Check Box Properties dialog, 30choice group control
adding to forms, 38-40explained, 24
Choice Section Properties dialog, 39

choice sections controladding to forms, 38-40explained, 24
class objects, creating, 260-262clearing previous entries, 237client components (Business Data Connectivity Service), installing, 306Column Settings dialog, 181columns, adding to DIP (Document Information Panel), 215-217COM Add-Ins button, 226combo box control, 22commands
Disable-SPInfoPathFormTemplate, 288-289Enable-SPInfoPathFormTemplate, 288-289Install-SPInfoPathFormTemplate, 287-288Set-SPInfoPathFormsService
authentication settings, modifying, 285browser-enabled templates, enabling, 283data connection response size, increasing/decreasing, 284-285data connection timeouts, increasing/decreasing, 284session state, modifying, 286view state, enabling, 287
Set-SPInfoPathWebServiceProxy, 290-291Test-SPInfoPathFormTemplate, 287-288Uninstall-SPInfoPathFormTemplate, 289
compacting sections of fields/controls, 187Condition button, 172Condition dialog, 43, 46, 55, 188conditions
adding to workflows, 172-175if-else branch, 175-177
Configure InfoPath Form Service page, 303, 313Configure the Data Entry Patterns dialog, 55configuring
authentication settingsin Central Administration, 271-272with PowerShell, 285
browser-enabled forms, 312-313data connection response size
in Central Administration, 270with PowerShell, 284-285

data connection timeoutsin Central Administration, 269-270with PowerShell, 284
dynamic sections, 187-189email submission, 91-93InfoPath Form web part, 152-154session state
in Central Administration, 272-273with PowerShell, 286
SharePoint Server connection submission, 107-109web service proxy, 277-278web service submission, 105-107
confirmation views, creating, 190-194connecting
to ECTs (external content types), 142-143to REST web services, 144-149to SharePoint connection files, 123-124to SOAP web services, 124-125to SQL Server database, 114-118
connection files, converting InfoPath connections to, 119-120container controls
choice groupadding to forms, 38-40explained, 24
choice sectionsadding to forms, 38-40explained, 24
optional sectionadding to forms, 37explained, 24
repeating sectionadding to forms, 37-38explained, 24
repeating tableadding to forms, 37-38explained, 24
section, 24content types
ECTs (external content types), 142-143publishing forms as, 101-104

controlsadding to forms, 10-11adding to template parts, 205bulleted list, 23button
adding to forms, 35explained, 23
calculated value, 23check box
adding to forms, 30-31explained, 22
choice groupadding to forms, 38-40explained, 24
choice sectionsadding to forms, 38-40explained, 24
combo box, 22compacting sections of, 187custom controls
adding template parts as, 206-208icons, changing, 211-212renaming, 210-211
date and time pickeradding to forms, 32-33explained, 23
date picker, 22dragging onto forms, 24drop-down list
adding to forms, 27-28explained, 22
explained, 21-22external item picker
adding to forms, 35explained, 23
file attachment, 23hyperlink, 23list box, 23making controls required, 40multiple-selection list box

adding to forms, 29-30explained, 23
numbered list, 23option button
adding to forms, 31-32explained, 22
optional sectionadding to forms, 37explained, 24
person/group pickeradding to forms, 34explained, 23
picture, 23picture button, 23plain list, 23repeating section
adding to forms, 37-38explained, 24
repeating tableadding to forms, 37-38explained, 24
rich text box, 22section, 24text box
explained, 22multiline text boxes, 26read-only text boxes, 25-26
using template parts as, 209Controls Pane button, 24Controls task pane, 24Convert Existing Form template, 8Convert to Connection File button, 119converting InfoPath connections to SharePoint connection files, 119-120count() function, 67, 321-322counter fields, 322counting items, 67Create List Workflow dialog, 164-166creating
class objects, 260-262confirmation views, 190-194

custom permission levels, 296custom task panes, 226-227data connections, 205document library, 214form library, 17-19forms
with Blank Form template, 9controls, 10-11fields, 12-13previews, 11publish process, 15-17with SharePoint Form Library template, 20submit options, 13-15
InfoPath 3013 add-ins, 225-226lists, 82-85namespace variables, 233-234permissions, 293-294submit-only permission level, 299-300tabbed navigation, 194-198template parts, 204views, 73workflows, 164-168
Cross-Domain Access option, 271current user, returning, 60-62custom controls
adding template parts as, 206-208icons, changing, 211-212renaming, 210-211
custom permission levels, creating, 296custom task panes, creating, 226-227Custom Task Wizard, 174customizing task forms, 180
Ddata, accessing
from ECTs (external content types), 142-143from REST web services, 144-149secondary data sources, 234from SharePoint connection files, 123-124from SharePoint lists, 120-122
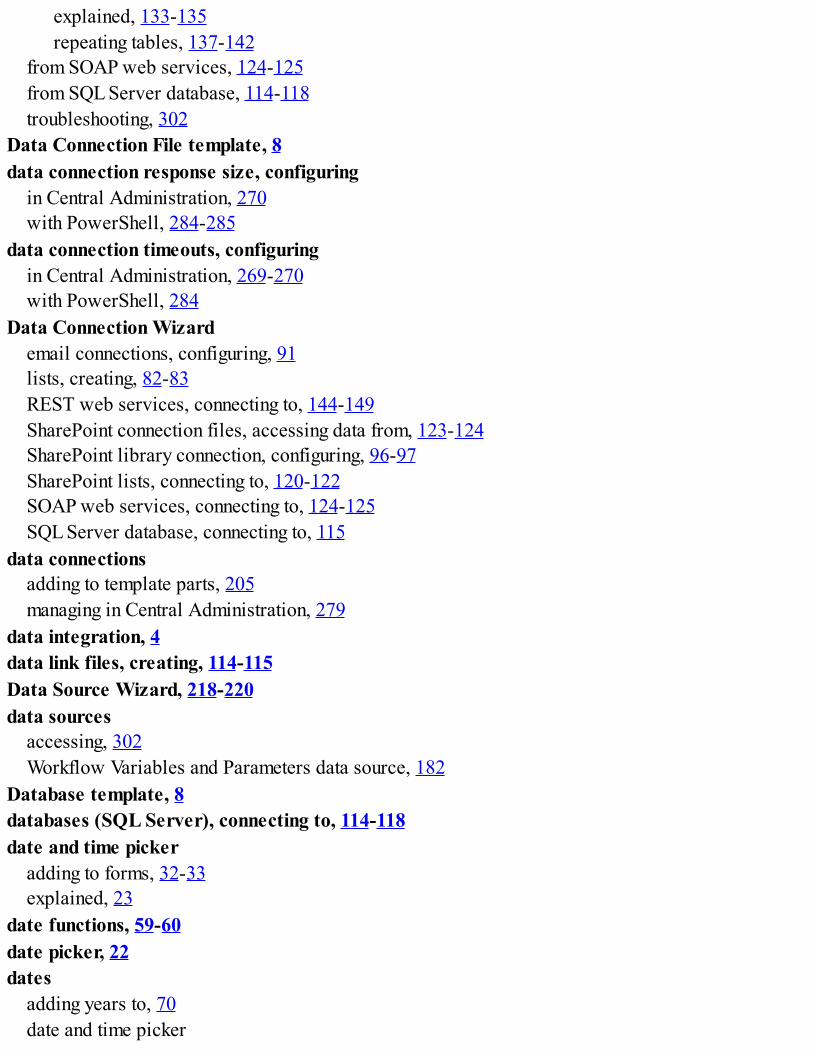
explained, 133-135repeating tables, 137-142
from SOAP web services, 124-125from SQL Server database, 114-118troubleshooting, 302
Data Connection File template, 8data connection response size, configuring
in Central Administration, 270with PowerShell, 284-285
data connection timeouts, configuringin Central Administration, 269-270with PowerShell, 284
Data Connection Wizardemail connections, configuring, 91lists, creating, 82-83REST web services, connecting to, 144-149SharePoint connection files, accessing data from, 123-124SharePoint library connection, configuring, 96-97SharePoint lists, connecting to, 120-122SOAP web services, connecting to, 124-125SQL Server database, connecting to, 115
data connectionsadding to template parts, 205managing in Central Administration, 279
data integration, 4data link files, creating, 114-115Data Source Wizard, 218-220data sources
accessing, 302Workflow Variables and Parameters data source, 182
Database template, 8databases (SQL Server), connecting to, 114-118date and time picker
adding to forms, 32-33explained, 23
date functions, 59-60date picker, 22dates
adding years to, 70date and time picker

adding to forms, 32-33explained, 23
date functions, 59-60date picker, 22future dates, calculating, 59-60
deactivating forms to site collection, 288-289decreasing
data connection response sizein Central Administration, 270with PowerShell, 284-285
data connection timeoutsin Central Administration, 269-270with PowerShell, 284
default form, setting lists to, 87-88default view, changing, 74deployment, troubleshooting, 311-312
form cannot be browser enabled on selected site, 312-313form template has not been published, 314no file with URL in this web, 311-312
Design Form button, 9, 218designing forms
with Blank Form template, 9with SharePoint Form Library template, 20
dialogs. See specific dialogsDIP (Document Information Panel), 213-214
columns, adding, 215-217document library, creating, 214modifying, 218-220
Disable-SPInfoPathFormTemplate commands, 288-289DisplayChangesCounter field, 256-257displaying
controls, 42-45data from SharePoint lists, 137-142
explained, 133-135repeating tables, 137-142
read-only values, 184-186Document Information Panel (DIP), 213
columns, adding, 215-217document library, creating, 214modifying, 218-220

template, 8document library, creating, 214document library already contains a file with the same name (error), 317-319dragging controls onto forms, 24Drop-Down List Box Properties dialog, 27drop-down lists
adding to forms, 27-28explained, 22populating, 126-132
dynamic sections, configuring, 187-189
EE-mail template, 8ECTs (external content types), accessing data from, 142-143Edit Permissions dialog, 297-298editing. See modifyingElse-If Branch button, 176email
email submission, configuring forms for, 91-93including links to forms in, 168publishing forms to, 93-95
Embedded SQL Authentication option, 271Enable-SPInfoPathFormTemplate command, 288-289enhancing user experience
confirmation views, 190-194dynamic sections, 187-189four-column table layout, 187picture buttons, 198-201read-only values, displaying, 184-186screen tips, 190tabbed navigation, 194-198
entry formatting with rules, 45-46errors. See troubleshootingevent handlers, SubmitButton_Clicked, 324-325Export Source Files button, 260exporting source files, 222, 260external content types (ECTs), accessing data from, 142-143external item picker, 23
adding to forms, 35troubleshooting, 305

users, getting from people/group picker control, 177-179
Ffields
adding to template parts, 205compacting sections of, 187counter fields, 322leading/trailing spaces, removing, 63making fields required, 40naming, 12-13promoting as web part connection parameters, 156validation rules
explained, 47-48screen tips, 190
file attachmentsexplained, 23uploading to document library, 323
deployment, 325event handler, 324-325form scenario, 323submit button, 323-324
filesdata link files, creating, 114-115file attachments, uploading to document library, 323
deployment, 325event handler, 324-325form scenario, 323submit button, 323-324
picture files, adding, 327-328SharePoint connection files
accessing data from, 123-124converting InfoPath connections to, 119-120
source files, exporting, 222, 260Filter Data button, 257Filter Data dialog, 130-131footers, adding to forms, 79form cannot be browser enabled on selected site (error), 312-313form library
creating, 17-19permissions, creating, 293-294

workflows for, 164-168form load rules, 53-54Form Options dialog, 76
form fields, promoting as web part connection parameters, 156Property Promotion category, 177-179Security and Trust category, 309Web Browser settings, 110-111
form parameters, adding to workflows, 181-182Form Services. See InfoPath Form Servicesform template has not been published (error), 314formatting rules
entry formatting, 45-46hiding/showing controls with, 42-45for tracking changes, 252
formsaccessing within Visual Studio 2012, 222-224activating/deactivating to site collection, 288-289autogenerating, 259-260
class objects, creating, 260-262form generation code, 263-265form objects, uploading to form library, 265
browser-enabled forms, configuring, 312-313controls. See controlscreating
with Blank Form template, 9controls, 10-11fields, 12-13previews, 11publish process, 15-17with SharePoint Form Library template, 20submit options, 13-15
designing, 9with Blank Form template, 9with SharePoint Form Library template, 20
DIP (Document Information Panel), 213-214columns, adding, 215-217document library, creating, 214modifying, 218-220
dynamic sections, 187-189emailing links to, 168

explained, 3-4fields
compacting sections of, 187leading/trailing spaces, removing, 63naming, 12-13promoting as web part connection parameters, 156validation rules, 47-48
form to send data to web parts, 158-160functions, 57-58
addDays(), 59-60count(), 67, 321-322normalize-space(), 63nz(), 64-65position(), 321substring(), 68-70substring-after(), 68-69substring-before(), 68substring-length(), 68sum(), 65-66today(), 59-60translate(), 63-64URL functions, 58-59userName(), 60-62, 69
InfoPath Form web part, 151-152adding to SharePoint web part page, 152-154form fields, promoting as web part connection parameters, 156master/detail display form, creating, 154-155sending data to, 158-160
layoutsheaders/footers, 79selecting, 77-78table layouts, 80themes, 78-79
listsaccq, 120-122creating, 82-85displaying data from, 133-142setting to default, 87-88
loadingwith rules, 53-54

troubleshooting, 308-309permissions, 293-294
creating on form library, 293-294custom permission levels, 296granting, 295group permissions, editing, 297-298submit-only permission level, creating, 299-300
picture files, adding, 327-328previewing, 11publishing, 15-17
to email, 93-95to SharePoint libraries, 96-104troubleshooting, 311-314
quiescing from InfoPath Form Services, 289read-only values, displaying, 184-186removing from InfoPath Form Services, 289rules
action rules, 49-50entry formatting, 45-46explained, 41-42form loading, 53-54form submission, 50-52hiding/showing controls with, 42-45pattern-matching conditions, 54-56validation rules, 47-48
screen tips, 190submitting
available menu buttons, 110-111email submission, 91-93enabling forms for submission, 90form submit rules, 50-52notifying users of successful submission, 190-194SharePoint library submission, 96-97SharePoint Server connection submission, 107-109submit options, adding to forms, 13-15submit-only permission level, creating, 299-300troubleshooting, 315-319web service submission, 105-107
tables. See tablestask forms, customizing, 180

template parts, 203-204controls, adding, 205creating, 204fields, adding, 205saving, 206
templates, 9Blank 2010 Form, 8Blank 2010 Form (InfoPath Filler), 8Blank Form, 8-9Blank Form (InfoPath Filler), 8browser-enabled templates, 269, 283Convert Existing Form, 8Data Connection File, 8Database, 8Document Information Panel, 8E-mail, 8managing in Central Administration, 276-277SharePoint Form Library, 8, 20SharePoint List, 8, 82-85unpublished templates, 314uploading with Central Administration, 273-275uploading with PowerShell, 288verifying, 287-288Web Service, 8XML or Schema, 8
testing, 17tracking changes, 243-244
Changed Event code, 246-249changes counter, 256-257formatting rules, 252initial setup, 244-245navigation controls, 253-255rich text, applying, 250-251usernames, displaying, 257-258
troubleshooting, 301-302Business Data Connectivity Service, 304-306data source access, 302external item picker issues, 305loading errors, 308-309missing programmability components, 308

security exception using code-behind, 309SharePoint Designer task list creation error, 307SQL credential issues, 303
validatingpattern-matching conditions, 54-56validation rules, 47-48
viewscreating, 73default view, changing, 74preventing users from selecting, 75-76printing, 77read-only views, 75renaming, 72
four-column table layout, 187Full Trust security setting, 309Function button, 173functions, 57-58
addDays(), 59-60count(), 67, 321-322normalize-space(), 63nz(), 64-65position(), 321substring(), 68-69, 70substring-after(), 68-69substring-before(), 68-69substring-length(), 68sum(), 65-66today(), 59-60translate(), 63-64URL functions, 58-59userName(), 60-62, 69
future dates, calculating, 59-60
GGrant Permissions button, 295granting permissions, 295group permissions, editing, 297-298
HHeader & Footer button, 79

headers, adding to forms, 79Hide This Control option, 189hiding controls with rules, 42-45HTTP Data Connections option, 271hyperlink control, 23
Iicons for custom controls, changing, 211-212if-else branch, applying to conditions, 175-177image buttons, 198-201image files, adding, 327-328increasing
data connection response sizein Central Administration, 270with PowerShell, 284-285
data connection timeoutsin Central Administration, 269-270with PowerShell, 284
InfoPath 3013 add-ins, creating, 225-226InfoPath connections, converting to SharePoint connection files, 119-120InfoPath Designer 2013
advantagesdata integration, 4for lists, 4in workflows, 4
compared to web parts/web controls, 5forms. See formsinstalling, 5
InfoPath Form Servicesoptions, accessing in Central Administration, 268quiescing forms from, 289removing forms from, 289web service proxy, enabling
in Central Administration, 277-278with PowerShell, 290-291
InfoPath Form web part, 5, 151-152adding to SharePoint web part page, 152-154form fields, promoting as web part connection parameters, 156master/detail display form, creating, 154-155sending data to, 158-160

InfoPath forms. See formsinitiation form parameters, adding to workflows, 181-182input controls
bulleted list, 23check box
adding to forms, 30-31explained, 22
combo box, 22date and time picker
adding to forms, 32-33explained, 23
date picker, 22drop-down list
adding to forms, 27-28explained, 22
external item pickeradding to forms, 35explained, 23
list box, 23multiple-selection list box
adding to forms, 29-30explained, 23
numbered list, 23option button
adding to forms, 31-32explained, 22
person/group pickeradding to forms, 34explained, 23
plain list, 23rich text box, 22text box
explained, 22multiline text boxes, 26read-only text boxes, 25-26
Installation Options dialog, 306installing
Business Data Connectivity Service client components, 306InfoPath Designer 2013, 5Visual Studio Tools for Applications (VSTA), 308

Install-SPInfoPathFormTemplate command, 287-288
J-K-LLayout ribbon bar, 80layouts
headers/footers, 79selecting, 77-78table layouts, 80-79themes, 78-79
leading spaces, removing, 63libraries
document library, creating, 214form library
creating, 17-19permissions, creating, 293-294workflows for, 164-168
SharePoint librariesmultiple forms in, 101-104publishing forms to, 96-104
uploading file attachments todeployment, 325event handler, 324-325form scenario, 323submit button, 323-324
uploading form objects to, 265Library Settings, 215links to forms, emailing, 168list box control, 23List URL, 58-59lists
accessing data from, 120-122advantages of InfoPath, 4bulleted list, 23creating, 82-85displaying data from
explained, 133-135repeating tables, 137-142
drop-down listadding to forms, 27-28explained, 22

drop-down lists, populating, 126-132list box, 23master/detail display form, creating, 154-155modifying, 86-87multiple-selection list box
adding to forms, 29-30explained, 23
numbered list, 23plain list, 23setting to default, 87-88task lists, troubleshooting, 307
loading formsrules, 53-54troubleshooting, 308-309
lookup functions, adding to email messages, 168looping through secondary data source, 235-236
MManage Form Templates link, 276Manage Site dialog, 108managing
data connections, 279form templates, 276-277
master/detail display form, creating, 154-155MaxDataConnectionResponseSize parameter, 284-285Maximum Size of User Session Data option, 273MaxPostbacksPerSession setting, 286MaxSizeOfFormSessionState setting, 286MaxUserActionsPerPostback setting, 286MemoryStream object, 263-265methods, Changed Event
adding for tracking changes, 246-249creating, 232selection_Changed code listing, 237-239
Microsoft InfoPath Team Blog, 2Microsoft Office Developer Center, 2Microsoft Office Visual Studio 2012. See Visual Studio 2012Microsoft Visual Studio Tools for Applications (VSTA), installing, 308missing programmability components, troubleshooting, 308Modify Form Web Parts button, 154

modifyingauthentication settings with PowerShell, 285available menu buttons during form submission, 110-111DIP (Document Information Panel), 218-220group permissions, 297-298icons for custom controls, 211-212list forms, 86-87session state
in Central Administration, 272-273with PowerShell, 286
table layouts, 80multiline text boxes, 26multiple templates, uploading, 288multiple-selection list box
adding to forms, 29-30explained, 23
Nnamespace variables, creating, 233-234naming
fields, 12-13template parts, 210-211
navigation controlstabbed navigation, 194-198for tracking changes, 253-255
nested population loop, 239-242New Project dialog, 225New View command, 73no file with URL in this web (error), 311-312normalize-space() functions, 63Number of Actions per Postback option, 272Number of Postbacks per Session setting, 272numbered list control, 23nz() function, 64-65
Oobject controls
buttonadding to forms, 35explained, 23

calculated value, 23file attachment, 23hyperlink, 23picture, 23picture button, 23
objects. See also object controlsclass objects, creating, 263-265form objects, uploading to form library, 265MemoryStream, 263-265WebClient, 265XmlTextWriter, 263-265
Option Button Properties dialog, 32option buttons
adding to forms, 31-32explained, 22
optional section controladding to forms, 37explained, 24
PPage Layouts & Templates button, 77-78page views. See viewspattern-matching conditions, adding to rules, 54-56people/group picker control, getting users from, 177-179Perform Custom Actions Using Rules option, 191permissions
creating on form library, 294custom permission levels, 296granting, 295group permissions, editing, 297-298submit-only permission level, creating, 299-300
person/group pickeradding to forms, 34explained, 23
pickers. See external item pickerpicture button control, 23Picture Button Properties dialog, 36picture buttons, 198-201picture control, 23picture files, adding, 327-328

plain list, 23populating drop-down lists, 126-132populating repeating tables, 229-230
Changed Event method, 232initial setup, 230-231namespace variables, 233-234nested population loop, 239-242previous entries, clearing, 237secondary data source
accessing, 234looping through, 235-236
selection_Changed method code listing, 237-239XMLWriter, 236-237
position() function, 321PowerShell, 281-282
authentication settings, modifying, 285browser-enabled templates, enabling/disabling, 283commands
Disable-SPInfoPathFormTemplate, 288-289Enable-SPInfoPathFormTemplate, 288-289Install-SPInfoPathFormTemplate, 287-288Set-SPInfoPathFormsService, 283-287Set-SPInfoPathWebServiceProxy, 290-291Test-SPInfoPathFormTemplate, 287-288Uninstall-SPInfoPathFormTemplate, 289
data connection response size, increasing/decreasing, 284-285data connection timeouts, increasing/decreasing, 284form templates
uploading, 288verifying, 287-288
formsactivating/deactivating to site collection, 288-289quiescing from InfoPath Form Services, 289removing from InfoPath Form Services, 289
session state, modifying, 286SharePoint 2013 Management Shell, accessing, 282view state, enabling, 287web service proxy, enabling, 290-291
Preview Form button, 11previewing forms, 11

previous entries, clearing, 237printing views, 77problems. See troubleshootingpromoting fields as web part connection parameters, 156Property Promotion category (Form Options), 177-179Publish button, 166publishing forms, 15-17
to email, 93-95to SharePoint libraries, 96-104troubleshooting, 311-312
form cannot be browser enabled on selected site, 312-313form template has not been published, 314no file with URL in this web, 311-312
Publishing Wizard, 15-17, 93-95, 312-313publishing workflows, 166
QQuick Publish button, 17, 219quiescing forms from InfoPath Form Services, 289
Rread-only SharePoint locations, troubleshooting, 316read-only text boxes, 25-26read-only values, displaying, 184-186read-only views, 75removing
forms from InfoPath Form Services, 289leading/trailing spaces, 63
renamingtemplate parts, 210-211views, 72
repeating section controladding to forms, 37-38explained, 24
repeating tablesadding to forms, 37-38auto-incrementing, 321
count() function, 321-322counter fields, 322position() function, 321

displaying from SharePoint lists, 137-142explained, 24populating, 229-230
Changed Event method, 232initial setup, 230-231namespace variables, 233-234nested population loop, 239-242previous entries, clearing, 237secondary data sources, 234-236selection_Changed method code listing, 237-239XMLWriter, 236-237
required controls/fields, setting, 40RequireSslForDataConnections option, 285resolving problems. See troubleshootingresource files, adding images as, 327-328Resource Files dialog, 327-328REST web services, accessing data from, 144-149rich text, applying to entries, 250-251rich text box control, 22RowCount field, 322Rule Details dialog, 50-52, 140-141, 158, 192rules
action rules, 49-50entry formatting, 45-46explained, 41-42form loading, 53-54form submission, 50-52hiding/showing controls with, 42-45pattern-matching conditions, 54-56submit rules, 192for tracking changes, 252validation rules
explained, 47-48screen tips, 190
Ssaving template parts, 206screen tips, 190secondary data source
accessing, 234
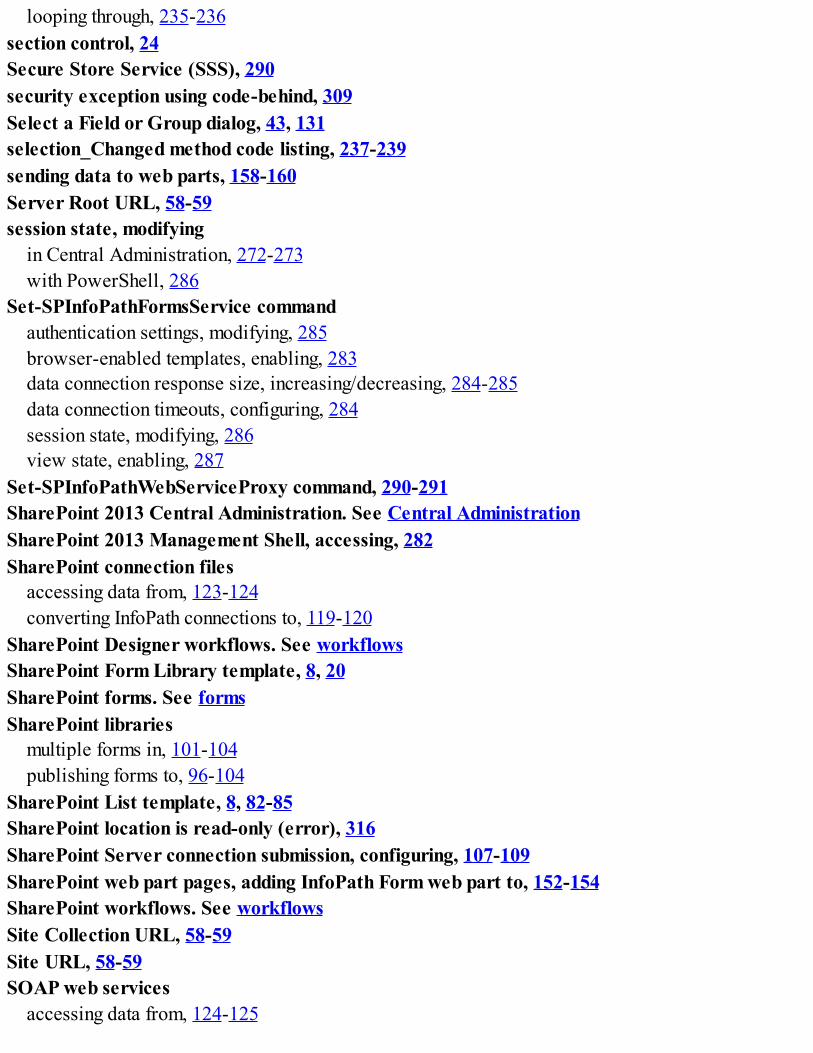
looping through, 235-236section control, 24Secure Store Service (SSS), 290security exception using code-behind, 309Select a Field or Group dialog, 43, 131selection_Changed method code listing, 237-239sending data to web parts, 158-160Server Root URL, 58-59session state, modifying
in Central Administration, 272-273with PowerShell, 286
Set-SPInfoPathFormsService commandauthentication settings, modifying, 285browser-enabled templates, enabling, 283data connection response size, increasing/decreasing, 284-285data connection timeouts, configuring, 284session state, modifying, 286view state, enabling, 287
Set-SPInfoPathWebServiceProxy command, 290-291SharePoint 2013 Central Administration. See Central AdministrationSharePoint 2013 Management Shell, accessing, 282SharePoint connection files
accessing data from, 123-124converting InfoPath connections to, 119-120
SharePoint Designer workflows. See workflowsSharePoint Form Library template, 8, 20SharePoint forms. See formsSharePoint libraries
multiple forms in, 101-104publishing forms to, 96-104
SharePoint List template, 8, 82-85SharePoint location is read-only (error), 316SharePoint Server connection submission, configuring, 107-109SharePoint web part pages, adding InfoPath Form web part to, 152-154SharePoint workflows. See workflowsSite Collection URL, 58-59Site URL, 58-59SOAP web services
accessing data from, 124-125

SOAP errors, 318-319source files, exporting, 222, 260spaces, removing
all spaces, 63-64leading/trailing spaces, 63
SPDiffUtility, 247-248SQL credential issues, troubleshooting, 303SQL Server database, connecting to, 114-118SSS (Secure Store Service), 290state
session state, modifyingin Central Administration, 272-273with PowerShell, 286
view state, enabling, 287stevethemanmann.com, 2Stop Inheriting Permissions option, 294strings, parsing portion of, 68-69submit button, 323-324Submit Form button, 13submit options
adding to forms, 13-15available menu buttons, 110-111email submission, 91-93enabling forms for submission, 90form submit rules, 50-52SharePoint library submission, 96-97SharePoint Server connection submission, 107-109web service submission, 105-107
Submit Options dialog, 50Allow Users to Submit This Form option, 90Data Connection settings, 107-109Document Library settings, 96-97Email settings, 91-93Perform Custom Actions Using Rules option, 191Web Service settings, 105-107
submit rules, 192submit-only permission level, creating, 299-300submitting forms
available menu buttons, 110-111email submission, 91-93

enabling forms for submission, 90form submit rules, 50-52notifying users of successful submission, 190-194SharePoint library submission, 96-97SharePoint Server connection submission, 107-109submit options, adding to forms, 13-15submit-only permission level, creating, 299-300troubleshooting, 315-316
document library already contains a file with the same name, 317-318errors submitting to a web service, 318-319general submission issues, 316SharePoint location is read-only, 316
web service submission, 105-107substring() function, 68-70substring-after() function, 68-69substring-before() function, 68substring-length() functions, 68sum() function, 65-66sums, calculating, 65-66
Ttabbed navigation, 194-198tables, 187
layoutsadding to forms, 79-80four-column table layout, 187modifying, 80
repeating tablesadding to forms, 37-38auto-incrementing, 321-322displaying from SharePoint lists, 137-142explained, 24populating. See populating repeating tables
task forms, customizing, 180task lists, troubleshooting, 307task panes, customizing, 226-227tasks, adding to workflows, 170-171Template Part Properties dialog, 210-211template parts, 203-204
adding as custom control, 206-208

controls, adding, 205creating, 204data connections, adding, 205fields, adding, 205icons, changing, 211-212renaming, 210-211saving, 206using as control, 209
templatesBlank 2010 Form, 8Blank 2010 Form (InfoPath Filler), 8Blank Form
designing forms with, 9explained, 8
Blank Form (InfoPath Filler), 8browser-enabled templates
enabling in Central Administration, 269enabling via PowerShell, 283
Convert Existing Form, 8Data Connection File, 8Database, 8Document Information Panel, 8E-mail, 8managing in Central Administration, 276-277SharePoint Form Library, 8SharePoint Form Library template, creating forms with, 20SharePoint List, 8, 82-85template parts, 203-204
adding as custom control, 206-208controls, adding, 205creating, 204data connections, adding, 205fields, adding, 205icons, changing, 211-212renaming, 210-211saving, 206using as control, 209
unpublished templates, 314uploading
with Central Administration, 273-275

with PowerShell, 288verifying, 287-288Web Service, 8XML or Schema, 8
testing forms, 17Test-SPInfoPathFormTemplate command, 287-288text boxes, 22
multiline text boxes, 26read-only text boxes, 25-26
themes, selecting, 78-79today() function, 59-60tracking changes, 243-244
Changed Event code, 246-249changes counter, 256-257formatting rules, 252initial setup, 244-245navigation controls, 253-255rich text, applying, 250-251usernames, displaying, 257-258
trailing spaces, removing, 63translate() function, 63-64troubleshooting
deployment, 311-312form submission, 315-316
document library already contains a file with the same name, 317-318errors submitting to a web service, 318-319general submission issues, 316SharePoint location is read-only, 316
forms, 301-302Business Data Connectivity Service, 304-306data source access, 302external item picker issues, 305loading errors, 308-309missing programmability components, 308security exception using code-behind, 309SharePoint Designer task list creation error, 307SQL credential issues, 303
publishing, 311-312form cannot be browser enabled on selected site, 312-313form template has not been published, 314

no file with URL in this web, 311-312
UUninstall-SPInfoPathFormTemplate command, 289uploading
file attachments to document library, 323deployment, 325event handler, 324-325form scenario, 323submit button, 323-324
form objects to form library, 265form templates
with Central Administration, 273-275with PowerShell, 288
URL functions, 58-59Use the Default SharePoint Form option, 87-88user experience enhancements
confirmation views, 190-194dynamic sections, 187-189four-column table layout, 187picture buttons, 198-201read-only values, displaying, 184-186screen tips, 190tabbed navigation, 194-198
userName() function, 60-62, 69usernames, obtaining, 69users
current user, returning, 60-62getting from people/group picker control, 177-179granting permissions to, 295notifying of successful submission, 190-194user experience enhancements
confirmation views, 190-194dynamic sections, 187-189four-column table layout, 187picture buttons, 198-201read-only values, displaying, 184-186screen tips, 190tabbed navigation, 194-198
usernames

displaying when tracking changes, 257-258obtaining, 69
utilitiesSPDiffUtility, 247-248xsd, 223-224, 261-262
Vvalidating forms
pattern-matching conditions, 54-56validation rules, 47-48
explained, 47-48screen tips, 190
variables, namespace variables, 233-234verifying form templates, 287-288View Properties dialog
Designate Print View section, 77Read-Only check box, 75Set as Default View check box, 74Show on View Menu When Filling Out This Form option, 75-76view name, 72
view state, enabling, 287views
confirmation views, creating, 190-194creating, 73default view, changing, 74preventing users from selecting, 75-76printing, 77read-only views, 75renaming, 72
Visual Studio 2012, 221-222accessing forms within, 222-224custom task panes, creating, 226-227InfoPath 3013 add-ins, creating, 225-226VSTA (Visual Studio 2012 Tools for Applications), 232
Visual Studio Tools for Applications (VSTA), 308VSTA (Visual Studio 2012 Tools for Applications), 232VSTA (Visual Studio Tools for Applications), 308
Wweb controls, compared to InfoPath, 5

web partscompared to InfoPath, 5InfoPath Form web part, 5, 151-152
adding to SharePoint web part page, 152-154form fields, promoting as web part connection parameters, 156master/detail display form, creating, 154-155sending data to, 158-160
web service proxy, enablingin Central Administration, 277-278with PowerShell, 290-291
Web Service template, 8web services
REST web services, connecting to, 144-149SOAP web services
connecting to, 124-125form submission errors, 318-319
web service submission, configuring, 105-107WebClient object, 265wizards
Add Custom Control Wizard, 207Custom Task Wizard, 174Data Connection Wizard
email connections, configuring, 91lists, creating, 82-83REST web services, connecting to, 144-149SharePoint connection files, accessing data from, 123-124SharePoint libray connection, configuring, 96-97SharePoint lists, connecting to, 120-122SOAP web services, connecting to, 124-125SQL Server database, connecting to, 115-118
Data Source Wizard, 218-220Publishing Wizard, 15-17, 93-95, 312-313
Workflow Variables and Parameters data source, 182workflows, 163-164
actionsAssign a To-Do Item, 170-171performing based on form values, 172-175performing either one action or another, 175-177
advantages of InfoPath, 4creating, 164-168
form parameters, adding, 181-182links to forms, emailing, 168publishing, 166task forms, customizing, 180tasks, adding, 170-171users, getting from people/group picker control, 177-179
X-Y-ZXML or Schema template, 8XmlTextWriter object, 263-265XMLWriter, 236-237xsd utility, 223-224, 261-262
years, adding to dates, 70
zero, defaulting blank amounts to, 64-65