IBM QRadar Vulnerability Manager Version 7.3.2
148
IBM QRadar Vulnerability Manager Version 7.3.2 User Guide IBM
-
Upload
khangminh22 -
Category
Documents
-
view
0 -
download
0
Transcript of IBM QRadar Vulnerability Manager Version 7.3.2

IBM QRadar Vulnerability ManagerVersion 7.3.2
User Guide
IBM
Note
Before you use this information and the product that it supports, read the information in “Notices” onpage 127.
Product information
This document applies to IBM® QRadar® Security Intelligence Platform V7.3.2 and subsequent releases unlesssuperseded by an updated version of this document.© Copyright International Business Machines Corporation 2012, 2019.US Government Users Restricted Rights – Use, duplication or disclosure restricted by GSA ADP Schedule Contract withIBM Corp.

Contents
Introduction........................................................................................................ vii
Chapter 1. What's new for users in QRadar Vulnerability Manager V7.3.2................1
Chapter 2. Installations and deployments.............................................................. 3Vulnerability processor and scanner appliance activation keys.................................................................4Vulnerability backup and recovery.............................................................................................................. 4Ports used for communication between QRadar and QRadar Vulnerability Manager managed hosts.....5Options for moving the vulnerability processor in your QRadar Vulnerability Manager deployment....... 5
Deploying a dedicated QRadar Vulnerability Manager processor appliance........................................6Moving your vulnerability processor to a managed host or console.....................................................7Verifying that a vulnerability processor is deployed............................................................................. 7Removing a vulnerability processor from your console or managed host............................................7
Options for adding scanners to your QRadar Vulnerability Manager deployment.....................................8Deploying a dedicated QRadar Vulnerability Manager scanner appliance...........................................9Deploying a vulnerability scanner to a QRadar console or managed host........................................... 9Scanning the assets in your DMZ......................................................................................................... 10Supported web browsers .................................................................................................................... 11
QRadar Vulnerability Manager high-availability scans............................................................................. 12Extending the QRadar Vulnerability Manager temporary license............................................................ 13QRadar Vulnerability Manager high-availability scans............................................................................. 13
Chapter 3. Overview of QRadar Vulnerability Manager.......................................... 15Vulnerability scanning............................................................................................................................... 15Categories of QRadar Vulnerability Manager vulnerability checks.......................................................... 15Checks made by QRadar Vulnerability Manager.......................................................................................16Vulnerability management dashboard......................................................................................................22
Reviewing vulnerability data on the default vulnerability management dashboard..........................22Creating a customized vulnerability management dashboard........................................................... 22Creating a dashboard for patch compliance........................................................................................22
Chapter 4. Vulnerability scanning setup and best practices...................................25Scan policy types....................................................................................................................................... 26Scan duration and ports scanning.............................................................................................................27Tune your asset discovery configuration.................................................................................................. 29Tune your asset discovery performance .................................................................................................. 29Web application scanning..........................................................................................................................30Scanner placement in your network......................................................................................................... 30Dynamic scanning......................................................................................................................................31Network bandwidth for simultaneous asset scans...................................................................................31Network interface cards on scanners....................................................................................................... 32Vulnerability management overview.........................................................................................................32Vulnerability scan notifications................................................................................................................. 33Triggering scans of new assets................................................................................................................. 33Configuring environmental risk for an asset............................................................................................. 34External scanning FAQ...............................................................................................................................35
Chapter 5. Scan configuration.............................................................................. 37Creating a scan profile............................................................................................................................... 37
Creating an external scanner scan profile........................................................................................... 38
iii

Creating a benchmark profile...............................................................................................................39Running scan profiles manually...........................................................................................................39Rescanning an asset by using the right-click menu option.................................................................40Scan profile details...............................................................................................................................40
Scan scheduling......................................................................................................................................... 41Scanning domains monthly..................................................................................................................42Scheduling scans of new unscanned assets....................................................................................... 42Reviewing your scheduled scans in calendar format..........................................................................43
Network scan targets and exclusions....................................................................................................... 44Excluding assets from all scans........................................................................................................... 45Managing scan exclusions....................................................................................................................45
Scan protocols and ports...........................................................................................................................45Scanning a full port range.................................................................................................................... 45Scanning assets with open ports......................................................................................................... 46
Configuring a permitted scan interval....................................................................................................... 47Scanning during permitted times.........................................................................................................48Managing operational windows........................................................................................................... 48Disconnecting an operational window.................................................................................................48
Dynamic vulnerability scans......................................................................................................................49Associating vulnerability scanners with CIDR ranges.........................................................................49Scanning CIDR ranges with different vulnerability scanners..............................................................50
Scan policies.............................................................................................................................................. 50Scan policy automatic updates for critical vulnerabilities.................................................................. 51Modifying a pre-configured scan policy...............................................................................................51Configuring a scan policy .....................................................................................................................52
Chapter 6. Management of false positives............................................................ 53How is the vulnerability scan result detected?.........................................................................................54Investigating a potential false positive from an authenticated scan....................................................... 55
Chapter 7. Authenticated patch scans.................................................................. 57Centralized credential sets........................................................................................................................58
Configuring a credential set................................................................................................................. 58Configuring Linux operating system public key authentication............................................................... 58Configuring an authenticated scan of the Linux or UNIX operating systems.......................................... 59Enabling permissions for Linux or UNIX patch scans............................................................................... 60
Chapter 8. Scanning on Windows-based assets.................................................... 63Configuring an authenticated scan of the Windows operating system....................................................64Remote Registry.........................................................................................................................................65Enabling remote registry access to assets on the Windows operating system.......................................65Assigning minimum remote registry permissions.................................................................................... 66Configuring WMI........................................................................................................................................ 66Setting minimum DCOM permissions........................................................................................................67Setting DCOM remote access permissions............................................................................................... 68Administrative shares................................................................................................................................ 68Enabling administrative shares................................................................................................................. 69Disabling administrative shares................................................................................................................ 69Manually configuring NTLMv2 authentication to prevent scan failures................................................... 69
Chapter 9. Vulnerability exception rules...............................................................71Applying a vulnerability exception rule..................................................................................................... 71Managing a vulnerability exception rule................................................................................................... 72Searching vulnerability exceptions........................................................................................................... 72
Chapter 10. Scan investigations........................................................................... 73Searching scan results...............................................................................................................................73
iv
Including column headings in asset searches.......................................................................................... 74Managing scan results............................................................................................................................... 74Republishing scan results..........................................................................................................................75Asset risk levels and vulnerability categories...........................................................................................75Asset, vulnerability, and open services data............................................................................................ 76Viewing the status of asset patch downloads...........................................................................................76Vulnerability risk and PCI severity............................................................................................................ 77Troubleshooting scan issues..................................................................................................................... 77Emailing asset owners when vulnerability scans start and stop..............................................................78
Chapter 11. Management of your vulnerabilities...................................................79Common Vulnerability Scoring System (CVSS).........................................................................................79Investigating vulnerability risk scores...................................................................................................... 80
Risk score details................................................................................................................................. 80Custom risk classification..........................................................................................................................81
Configuring custom risk scores for vulnerabilities.............................................................................. 81Searching vulnerability data...................................................................................................................... 82
Vulnerability quick searches................................................................................................................ 83Vulnerability search parameters..........................................................................................................84Saving your vulnerability search criteria..............................................................................................86Deleting saved vulnerability search criteria........................................................................................ 87
Vulnerability instances.............................................................................................................................. 87Network vulnerabilities..............................................................................................................................87Asset vulnerabilities.................................................................................................................................. 88Open service vulnerabilities...................................................................................................................... 88Investigating the history of a vulnerability................................................................................................88Reducing the number of false positive vulnerabilities..............................................................................88Investigating high risk assets and vulnerabilities.....................................................................................89Prioritizing high risk vulnerabilities by applying risk policies................................................................... 90Configuring custom display colors for risk scores.................................................................................... 91Identifying vulnerabilities with an BigFix patch........................................................................................91Identifying the patch status of your vulnerabilities..................................................................................91Removing unwanted vulnerability data.....................................................................................................92Configuring vulnerability data retention periods...................................................................................... 93
Chapter 12. Vulnerability remediation..................................................................95Assigning individual vulnerabilities to a technical user for remediation..................................................95Assigning a technical user as the owner of asset groups......................................................................... 95Configuring remediation times for the vulnerabilities on assigned assets.............................................. 97
Chapter 13. Vulnerability reports......................................................................... 99Running a default QRadar Vulnerability Manager report..........................................................................99Emailing assigned vulnerability reports to technical users...................................................................... 99Generating PCI compliance reports........................................................................................................100
Updating your asset compliance plans and software declarations..................................................101Creating a PCI compliance report......................................................................................................101
Including column headings in asset searches........................................................................................102
Chapter 14. Scanning new assets that communicate with the Internet................103Creating an asset saved search for new assets......................................................................................103Creating an on-demand scan profile.......................................................................................................103Creating a policy monitor question to test for Internet communication .............................................. 104Monitoring communication between new assets and the Internet....................................................... 105Configuring an offense rule to trigger a scan ......................................................................................... 105
Chapter 15. Security software integrations.........................................................107Integration with QRadar Vulnerability Manager..................................................................................... 107
v
Chapter 16. IBM BigFix integration.....................................................................109Interactions between IBM QRadar and IBM BigFix............................................................................... 111Configuring encrypted communication between IBM BigFix and QRadar.............................................112Configuring QRadar Vulnerability Manager to send vulnerability data to BigFix................................... 113Troubleshooting the BigFix and QRadar Vulnerability Manager integration..........................................115Disabling the BigFix and QRadar Vulnerability Manager integration .................................................... 118
Chapter 17. IBM Security SiteProtector integration............................................ 119Connecting to IBM Security SiteProtector.............................................................................................. 119
Chapter 18. Vulnerability research, news, and advisories................................... 121Viewing detailed information about published vulnerabilities...............................................................121Remaining aware of global security developments................................................................................121Viewing security advisories from vulnerability vendors......................................................................... 122Searching vulnerabilities, news, and advisories.....................................................................................122News feeds.............................................................................................................................................. 122
Chapter 19. IBM QRadar Vulnerability Manager Engine for OpenVAS NetworkVulnerability Tests.........................................................................................123About the QVM Engine for OpenVAS NVTs............................................................................................. 123About the Full Scan Plus policy............................................................................................................... 123Adding the Full Scan Plus scan policy to IBM QRadar Vulnerability Manager.......................................124Running a scan.........................................................................................................................................125Configuring a scan policy ........................................................................................................................125Creating a scan profile.............................................................................................................................125
Notices..............................................................................................................127Trademarks..............................................................................................................................................128Terms and conditions for product documentation.................................................................................128IBM Online Privacy Statement................................................................................................................ 129General Data Protection Regulation........................................................................................................129
Glossary............................................................................................................ 131A............................................................................................................................................................... 131C............................................................................................................................................................... 131D............................................................................................................................................................... 131E............................................................................................................................................................... 132F................................................................................................................................................................132H............................................................................................................................................................... 132I................................................................................................................................................................ 132N............................................................................................................................................................... 132O............................................................................................................................................................... 132P............................................................................................................................................................... 133R............................................................................................................................................................... 133S............................................................................................................................................................... 133T................................................................................................................................................................133U............................................................................................................................................................... 133V............................................................................................................................................................... 134
Index................................................................................................................ 135
vi

Introduction to IBM QRadar Vulnerability Manager
This information is intended for use with IBM QRadar Vulnerability Manager. QRadar VulnerabilityManager is a scanning platform that is used to identify, manage, and prioritize the vulnerabilities on yournetwork assets.
This guide contains instructions for configuring and using QRadar Vulnerability Manager on an IBMQRadar SIEM or IBM QRadar Log Manager console.
Intended audience
System administrators responsible for configuring IBM QRadar Vulnerability Manager must haveadministrative access to IBM QRadar SIEM and to your network devices and firewalls. The systemadministrator must have knowledge of your corporate network and networking technologies.
Technical documentation
For information about how to access more technical documentation, technical notes, and release notes,see Accessing IBM Security Documentation Technical Note (http://www.ibm.com/support/docview.wss?rs=0&uid=swg21614644).
Contacting customer support
For information about contacting customer support, see the Support and Download Technical Note(http://www.ibm.com/support/docview.wss?rs=0&uid=swg21612861).
Statement of good security practices
IT system security involves protecting systems and information through prevention, detection andresponse to improper access from within and outside your enterprise. Improper access can result ininformation being altered, destroyed, misappropriated or misused or can result in damage to or misuse ofyour systems, including for use in attacks on others. No IT system or product should be consideredcompletely secure and no single product, service or security measure can be completely effective inpreventing improper use or access. IBM systems, products and services are designed to be part of acomprehensive security approach, which will necessarily involve additional operational procedures, andmay require other systems, products or services to be most effective. IBM DOES NOT WARRANT THATANY SYSTEMS, PRODUCTS OR SERVICES ARE IMMUNE FROM, OR WILL MAKE YOUR ENTERPRISEIMMUNE FROM, THE MALICIOUS OR ILLEGAL CONDUCT OF ANY PARTY.
© Copyright IBM Corp. 2012, 2019 vii

viii IBM QRadar Vulnerability Manager: QRadar Vulnerability Manager
Chapter 1. What's new for users in QRadarVulnerability Manager V7.3.2
IBM QRadar Vulnerability Manager V7.3.2 addresses customer issues and includes performanceimprovements.
QRadar Vulnerability Manager V7.3.2 includes improvements to the method of calculating the estimatedtime to scan.
The Exception Rules table was streamlined to display only the most recently entered comment. To viewother comments, hover over the Comment column for the rule.
The processor no longer restarts during nightly backups or auto updates.
© Copyright IBM Corp. 2012, 2019 1

2 IBM QRadar Vulnerability Manager: QRadar Vulnerability Manager

Chapter 2. Installations and deploymentsDepending on the product that you install and whether you upgrade IBM QRadar or install a new system,the Vulnerabilities tab might not be displayed.
You access IBM® Security QRadar Vulnerability Manager by using the Vulnerabilities tab:
• If you install QRadar SIEM, the Vulnerabilities tab is enabled by default with a temporary license key.• If you install QRadar Log Manager, the Vulnerabilities tab is not enabled. You can purchase the license
for QRadar Vulnerability Manager separately and enable it by using a license key.
For more information about upgrading, see the IBM QRadar Upgrade Guide.
QRadar Vulnerability Manager license
To use QRadar Vulnerability Manager after an install or upgrade, you must upload and allocate a validlicense key. For more information, see the Administration Guide. The license for QRadar VulnerabilityManager license is applied and processed in real time to QRadar Vulnerability Manager scanned assetsthat have at least one IP address. The QRadar Vulnerability Manager scan must fall within the configuredretention time for the IP address of the asset.
1. From the Admin tab, click the Asset Profiler Configuration2. Find the Asset IP Retention (In Days) row to edit the asset IP retention value.3. Change the retention value or check that it is suitable for your needs. The default asset IP retention
value is 120 days.
QRadar Vulnerability Manager and QRadar Risk Manager licensesIBM QRadar Vulnerability Manager and IBM QRadar Risk Manager are combined into one offering andboth are enabled through a single base license. The combined offering provides an integrated networkscanning and vulnerability management workflow. With the base license, you are entitled to use QRadarVulnerability Manager to scan up to 256 assets. You can integrate QRadar Risk Manager with up to 50standard configuration sources. If you are entitled to either QRadar Vulnerability Manager or QRadar RiskManager, you are automatically entitled to the base license allowance for the other product. You requireextra licenses to scan more than 256 assets or to integrate with more than 50 configuration sources.
Vulnerability processing and scanning deployments
When you install and license QRadar Vulnerability Manager, a vulnerability processor is automaticallydeployed on your QRadar console. A processor is not automatically deployed if you use a softwareactivation key on your QRadar console.
The vulnerability processor provides a scanning component by default. If required, you can deploy morescanners, either on dedicated QRadar Vulnerability Manager managed host scanner appliances or QRadarmanaged hosts. For example, you can deploy a vulnerability scanner on an Event Collector or QRadarQFlow Collector.
If required, you can move the vulnerability processor to a different managed host in your deployment. Youmight move the processor to preserve disk space on your QRadar console.
Restriction: You can have only one vulnerability processor in your deployment. You can move thevulnerability processor only to a dedicated QRadar Vulnerability Manager processor appliance. You can'tadd a vulnerability processor to the QRadar Flow Processor 1728 appliance.
You can add the vulnerability processor to the following QRadar appliances: 600, 700, 8099, 8024, 8000,3124, 8026, 2100, 3199, 3126, 8021, and 3100.
© Copyright IBM Corp. 2012, 2019 3

Auto updates and vulnerability information
When you run the auto update, you get the most recent vulnerability metadata and scan tools that areavailable. Configure your auto updates through an internet connection or from a local offline server.Typically, vulnerability metadata and scan tools are updated weekly.
As a best practice, ensure that you run auto updates after you install a QRadar software update. Run autoupdate from the Admin tab, by clicking the Auto Update icon.
For more information about installing QRadar auto updates, see the IBM QRadar Administration Guide.
Related conceptsOptions for adding scanners to your QRadar Vulnerability Manager deploymentOptions for moving the vulnerability processor in your QRadar Vulnerability Manager deployment
Vulnerability processor and scanner appliance activation keysYou can scan and process your vulnerabilities by using dedicated QRadar Vulnerability Manager managedhost appliances.
When you install a processor or scanner managed host appliance, you must type a valid activation key.
For more information about installing a managed host appliance, see the Installation Guide for yourproduct.
The activation key is a 24-digit, four part, alphanumeric string that you receive from IBM. The activationkey specifies which software modules apply for each appliance type:
• The QRadar Vulnerability Manager processor appliance includes vulnerability processing and scanningcomponents.
• The QRadar Vulnerability Manager scanner appliance includes only a vulnerability scanning component.
You can obtain the activation key from the following locations:
• If you purchased a QRadar Vulnerability Manager software or virtual appliance download, a list ofactivation keys are included in the Getting Started document that is attached in a confirmation email.You can use this document to cross-reference the part number for the appliance that you are suppliedwith.
• If you purchased an appliance that is preinstalled with QRadar Vulnerability Manager software, theactivation key is included in your shipping box or CD.
Vulnerability backup and recoveryYou can use the backup and recovery capabilities in IBM QRadar SIEM to back up and restore IBMQRadar Vulnerability Manager vulnerability and configuration data.
When you install QRadar Vulnerability Manager, the QRadar SIEM nightly or on-demand backups includeQRadar Vulnerability Manager scan profiles, scan results, and configuration information.
You can configure data or configuration backups and recovery by using the Admin tab.
For more information about backup and recovery, see the IBM QRadar Administration Guide.
4 IBM QRadar Vulnerability Manager: QRadar Vulnerability Manager

Ports used for communication between QRadar and QRadar VulnerabilityManager managed hosts
QRadar Vulnerability Manager uses secure ports to connect to managed hosts.
Ports used for communication
The following table describes the ports that are used for secure communication between QRadar andQRadar Vulnerability Manager managed hosts.
Table 1. QRadar Vulnerability Manager communication ports
Communication Port Protocol
QRadar Console to QRadarVulnerability Manager processor
22, 9999, 8989, 8844 TCP
QRadar Console to QRadarVulnerability Manager scanner
22 TCP
QRadar Vulnerability Managerprocessor to QRadar Console
443 TCP
QRadar Vulnerability Managerscanner to QRadar VulnerabilityManager processor
9999 TCP
Options for moving the vulnerability processor in your QRadar VulnerabilityManager deployment
If required, you can move the vulnerability processor from your QRadar console to a dedicated QRadarVulnerability Manager managed host appliance.
For example, you might move your vulnerability processing capability to a managed host to minimize diskspace impact on your QRadar console.
Restriction: You can have only one vulnerability processor in your deployment. Also, you must deploy thevulnerability processor only on a QRadar console or QRadar Vulnerability Manager managed hostprocessor appliance.
To move the vulnerability processor, choose one of the following options:
Option 1: Deploy a dedicated QRadar Vulnerability Manager processor appliance
To deploy a processor appliance you must complete the followings tasks:
1. Install a dedicated QRadar Vulnerability Manager processor appliance.2. Add the managed host processor appliance to your QRadar Console by using the System and License
Management tool on the Admin tab.
When you select the managed host option, the processor is automatically removed from the QRadarconsole.
Option 2: Move the vulnerability processor from your console to your managed host
If the vulnerability processor is on your QRadar console, then later you can move your vulnerabilityprocessor to a previously installed QRadar Vulnerability Manager managed host processor appliance.
At any time, you can move the vulnerability processor back to your QRadar console.
Chapter 2. Installations and deployments 5
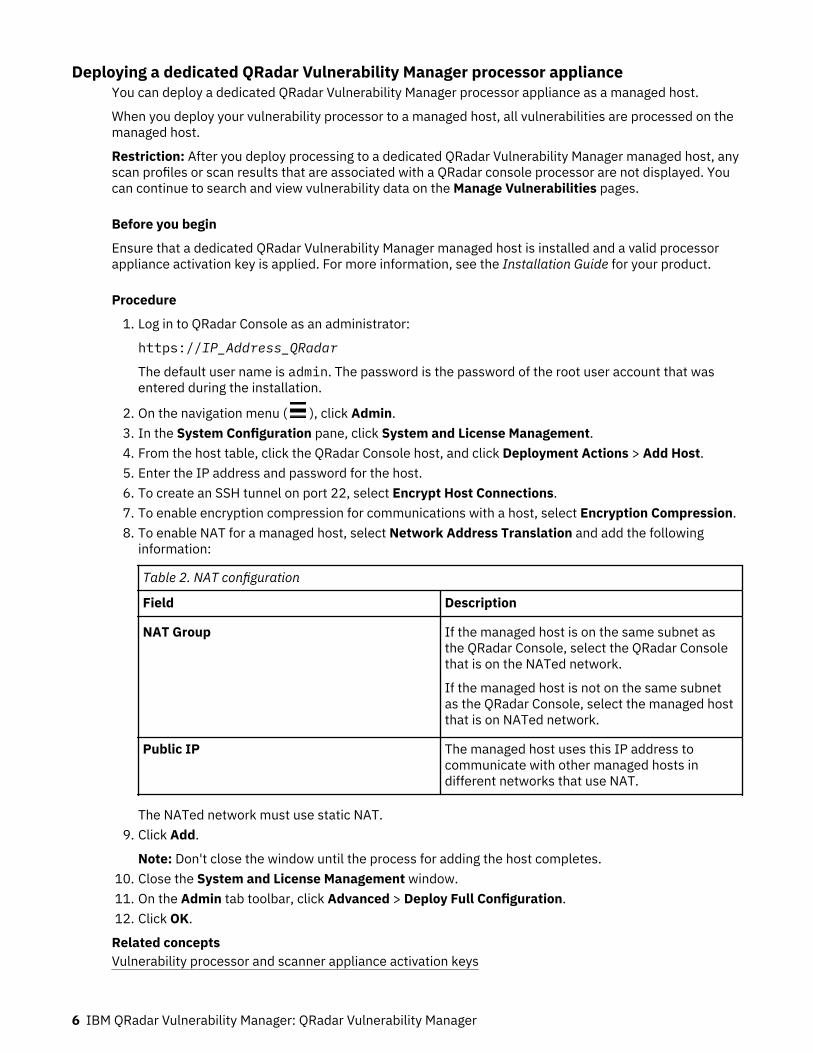
Deploying a dedicated QRadar Vulnerability Manager processor applianceYou can deploy a dedicated QRadar Vulnerability Manager processor appliance as a managed host.
When you deploy your vulnerability processor to a managed host, all vulnerabilities are processed on themanaged host.
Restriction: After you deploy processing to a dedicated QRadar Vulnerability Manager managed host, anyscan profiles or scan results that are associated with a QRadar console processor are not displayed. Youcan continue to search and view vulnerability data on the Manage Vulnerabilities pages.
Before you begin
Ensure that a dedicated QRadar Vulnerability Manager managed host is installed and a valid processorappliance activation key is applied. For more information, see the Installation Guide for your product.
Procedure
1. Log in to QRadar Console as an administrator:
https://IP_Address_QRadar
The default user name is admin. The password is the password of the root user account that wasentered during the installation.
2. On the navigation menu ( ), click Admin.3. In the System Configuration pane, click System and License Management.4. From the host table, click the QRadar Console host, and click Deployment Actions > Add Host.5. Enter the IP address and password for the host.6. To create an SSH tunnel on port 22, select Encrypt Host Connections.7. To enable encryption compression for communications with a host, select Encryption Compression.8. To enable NAT for a managed host, select Network Address Translation and add the following
information:
Table 2. NAT configuration
Field Description
NAT Group If the managed host is on the same subnet asthe QRadar Console, select the QRadar Consolethat is on the NATed network.
If the managed host is not on the same subnetas the QRadar Console, select the managed hostthat is on NATed network.
Public IP The managed host uses this IP address tocommunicate with other managed hosts indifferent networks that use NAT.
The NATed network must use static NAT.9. Click Add.
Note: Don't close the window until the process for adding the host completes.10. Close the System and License Management window.11. On the Admin tab toolbar, click Advanced > Deploy Full Configuration.12. Click OK.
Related conceptsVulnerability processor and scanner appliance activation keys
6 IBM QRadar Vulnerability Manager: QRadar Vulnerability Manager

Related tasksVerifying that a vulnerability processor is deployed
Moving your vulnerability processor to a managed host or consoleIf required, you can move your vulnerability processor between a QRadar Vulnerability Manager managedhost appliance and your QRadar console.
Before you begin
Ensure that a dedicated QRadar Vulnerability Manager managed host is installed and a valid processorappliance activation key is applied.
Procedure
1. On the navigation menu ( ), click Admin.2. Click System and License Management > Deployment Actions > Manage Vulnerability Deployment.3. Click Enable Processor.4. Select the managed host or console from the Processor list.
If your processor is on the managed host, you can select only the QRadar console.5. Click Save.6. On the Admin tab toolbar, select Advanced > Deploy Full Configuration.7. Click OK.
After you change your vulnerability processor deployment, you must wait for your deployment to fullyconfigure. In the Scan Profiles page, the following message is displayed: QVM is in the process ofbeing deployed.
Related conceptsVulnerability processor and scanner appliance activation keys
Verifying that a vulnerability processor is deployedIn IBM QRadar Vulnerability Manager, you can verify that your vulnerability processor is deployed on aQRadar console or QRadar Vulnerability Manager managed host.
Procedure
1. Log in to the QRadar console.
2. On the navigation menu ( ), click Admin.3. Click System and License Management > Deployment Actions > Manage Vulnerability Deployment.4. Verify that the processor is displayed on Processor list.
Removing a vulnerability processor from your console or managed hostIf required, you can remove the vulnerability processor from a QRadar console or QRadar VulnerabilityManager managed host.
Procedure
1. Log in to the QRadar console.
2. On the navigation menu ( ), click Admin.3. Click System and License Management > Deployment Actions > Vulnerability Deployment
Management.4. Click the Enable Processor check box to deselect it.5. Click Remove.
Chapter 2. Installations and deployments 7
6. Click Save.7. Close the System and License Management window.8. On the Admin tab toolbar, select Advanced > Deploy Full Configuration.9. Click OK.
Options for adding scanners to your QRadar Vulnerability Managerdeployment
If you have a large network and require flexible scanning options, you can add more scanners to your IBMQRadar Vulnerability Manager deployment.
Your QRadar Vulnerability Manager processor is automatically deployed with a scanning component. Bydeploying more scanners you can increase the flexibility of your scanning operations. For example, youcan scan specific areas of your network with different scanners and at different scheduled times.
Dynamic vulnerability scans
The vulnerability scanners that you deploy might not have access to all areas of your network. In QRadarVulnerability Manager you can assign different scanners to network CIDR ranges. During a scan, eachasset in the CIDR range that you want to scan is dynamically associated with the correct scanner.
To add more vulnerability scanners, choose any of the following options:
Deploy a dedicated QRadar Vulnerability Manager managed host scanner applianceYou can scan for vulnerabilities by using a dedicated QRadar Vulnerability Manager managed hostscanner appliance.To deploy a scanner appliance, you must complete the followings tasks:
1. Install a dedicated QRadar Vulnerability Manager managed host scanner appliance.2. Add the managed host scanner appliance to your QRadar Console by using the System and
License Management tool on the Admin tab.
Deploy a QRadar Vulnerability Manager scanner to your QRadar console or managed hostIf you move your vulnerability processor from your QRadar console to a QRadar Vulnerability Managermanaged host, you can add a scanner to your console.You can also add a vulnerability scanner to any of the following QRadar managed hosts: QRadarConsole, Event Processor, Flow Processor, Combo Processor, Event Collector, QFlow Collector, andData Node.
Note: The vulnerability scanner cannot be added to the App Host, App Node, and QRadar NetworkInsights.
Run an automatic update when you add a scanner or other managed host with scanning capabilities. Formore information about automatic updates, see the IBM Security QRadar Administration Guide.
Configure access to an IBM hosted scanner and scan your DMZYou can configure access to an IBM hosted scanner and scan the assets in your DMZ.
Related conceptsDynamic vulnerability scansIn IBM QRadar Vulnerability Manager, you can configure a scan to use certain vulnerability scanners forspecific CIDR ranges in your network. For example, your scanners might have access only to certain areasof your network.Related tasksAssociating vulnerability scanners with CIDR rangesIn IBM QRadar Vulnerability Manager, to do dynamic scanning, you must associate vulnerability scannerswith different segments of your network.Scanning CIDR ranges with different vulnerability scanners
8 IBM QRadar Vulnerability Manager: QRadar Vulnerability Manager
In IBM QRadar Vulnerability Manager, you can scan areas of your network with different vulnerabilityscanners.
Deploying a dedicated QRadar Vulnerability Manager scanner applianceYou can deploy a dedicated QRadar Vulnerability Manager managed host scanner appliance.
Before you begin
Ensure that a dedicated QRadar Vulnerability Manager managed host scanner appliance is installed and avalid appliance activation key is applied.
Procedure
1. On the navigation menu ( ), click Admin.2. Click System and License Management > Deployment Actions > Add Managed Host.3. Enter the Host IP address and password of the QRadar Vulnerability Manager managed host scanner
appliance.4. Click Add.
You must wait several minutes while the managed host is added.5. Close the System and License Management window.6. On the Admin tab toolbar, select Advanced > Deploy Full Configuration.7. Click OK.
Related conceptsVulnerability processor and scanner appliance activation keys
Deploying a vulnerability scanner to a QRadar console or managed hostYou can deploy a QRadar Vulnerability Manager scanner to a QRadar console or QRadar managed host.For example, you can deploy a scanner to a flow collector, flow processor, event collector, eventprocessor, or data node.
Before you begin
In an All-in-One deployment the controller is used as a built-in scanner. You cannot add a separatescanner appliance to a QRadar Console when the QRadar Vulnerability Manager processor is on theQRadar Console. In a non-All-in-One deployment it's a good practice to move the QRadar VulnerabilityManager processor to a dedicated appliance when you're scanning more than 50k assets.
To deploy a scanner on your QRadar console, ensure that the vulnerability processor is moved to adedicated QRadar Vulnerability Manager managed host appliance.
To deploy scanners on QRadar managed hosts, ensure that you have existing managed hosts in yourdeployment. For more information, see the Installation Guide for your product.
Procedure
1. On the navigation menu ( ), click Admin.2. Click System and License Management > Deployment Actions > Manage Vulnerability
Deployment.3. Click Add Additional Vulnerability Scanners.4. Click the + icon.5. From the Host list, select the QRadar managed host or console.
Restriction: You cannot add a scanner to a QRadar console when the vulnerability processor is onthe console. You must move the vulnerability processor to a QRadar Vulnerability Manager managedhost.
Chapter 2. Installations and deployments 9
6. Click Save.7. Close the System and License Management window.8. On the Admin tab toolbar, select Advanced > Deploy Full Configuration..9. Click OK.
10. Check the Scan Server list on the Scan Profiles Configuration page to ensure that the scanner isadded.
For more information, see “Creating a scan profile” on page 37.
What to do next
Run an automatic update after you add the scanner or other managed host with scanning capabilities.Alternatively, you can scan after the default daily scheduled automatic update runs. If the automaticupdates for other scanners are run earlier, then the automatic updates for all the scanners might not befully synchronized until the next daily update.
Related tasksMoving your vulnerability processor to a managed host or console
Scanning the assets in your DMZIn IBM QRadar Vulnerability Manager, you can connect to an external scanner and scan the assets in yourDMZ for vulnerabilities.
If you want to scan the assets in the DMZ for vulnerabilities, you do not need to deploy a scanner in yourDMZ. You must configure QRadar Vulnerability Manager with a hosted IBM scanner that is located outsideyour network.
Detected vulnerabilities are processed by the processor on either your QRadar console or QRadarVulnerability Manager managed host.
Procedure
1. Configure your network and assets for external scans.2. Configure QRadar Vulnerability Manager to scan your external assets.
Related informationQRadar Vulnerability Manager - New External Scan / DMZ Scan Addresses
Configuring your network and assets for external scansTo scan the assets in a DMZ network, you must configure your network and inform IBM of the assets thatyou want to scan.
About this taskTo scan assets in a DMZ network, you must complete the following steps:
1. Configure the network.2. Send required network specifics to the External Scanner Team.
Configuring the network
Procedure
1. Ensure that the QRadar Vulnerability Manager Processor has internet access to allow communicationwith the DMZ scanner.
Note: A static IP address is required.2. Ensure each asset that is to be scanned by the DMZ scanner has internet access.3. Configure an outbound firewall rule for port 443 to allow a connection to the DMZ scanner.
Tip: Incoming connections are not required.
10 IBM QRadar Vulnerability Manager: QRadar Vulnerability Manager

4. Whitelist external-scanner.qradar.ibmcloud.com on network intrusion detection systems toenable end-to-end certificate transparency between the QRadar Vulnerability Manager Processor andthe DMZ scanner.
Sending network specifics to the External Scanner Team
Procedure
Send the following network specifics to the External Scanner Team at [email protected] Description
Gateway IP address The External/Public IP of the QRadar Vulnerability Manager Processor (wherethe scan originates from). If you use a proxy server, provide the IP of the proxyserver instead.
Load balancers(optional)
If you employ load balancers, an explicit list or range of all load balancers isrequired.
IP address list/range The explicit list/range of all the assets to be scanned.
Restriction: DMZ/External scans do not complete successfully until the requested information is sent [email protected] and a confirmation email is received.
Related informationQRadar Vulnerability Manager - New External Scan / DMZ Scan Addresses
Configuring QRadar Vulnerability Manager to scan your external assetsTo scan the assets in your DMZ, you must configure QRadar Vulnerability Manager, by using the Systemand License Management tool on the Admin tab.
Procedure
1. On the navigation menu ( ), click Admin.2. Click System Configuration.3. Click System and License Management.4. From the Display menu, select Systems.5. Click Deployment Actions > Manage Vulnerability Deployment.6. Click Use External Scanner.7. In the Gateway IP field, enter an external IP address.
Restriction: You cannot scan external assets until your external IP address is configured. Ensure thatyou email details of your external IP address to IBM.
8. If your network is configured to use a proxy server, click Enable Proxy Server and enter the details ofyour server.
9. Click Save and then click Close.10. On the Admin tab toolbar, click Advanced > Deploy Full Configuration.11. Click OK.
Note: Authenticated scans are not conducted from the external scanner.
Related informationQRadar Vulnerability Manager - New External Scan / DMZ Scan Addresses
Supported web browsersFor the features in IBM QRadar products to work properly, you must use a supported web browser.
The following table lists the supported versions of web browsers.
Chapter 2. Installations and deployments 11

Table 3. Supported web browsers for QRadar products
Web browser Supported versions
64-bit Mozilla Firefox 45.8 Extended Support Release and later
64-bit Microsoft Internet Explorer with MicrosoftEdge mode enabled.
11.0, Edge 38.14393 and later
64-bit Google Chrome Latest
Security exceptions and certificates
If you are using the Mozilla Firefox web browser, you must add an exception to Mozilla Firefox to log in toQRadar SIEM. For more information, see your Mozilla Firefox web browser documentation.
If you are using the Microsoft Internet Explorer web browser, a website security certificate message isdisplayed when you access the QRadar SIEM system. You must select the Continue to this websiteoption to log in to QRadar SIEM.
Navigate the web-based application
When you use QRadar SIEM, use the navigation options available in the QRadar SIEM user interfaceinstead of your web browser Back button.
Enabling document mode and browser mode in Internet ExplorerIf you use Microsoft Internet Explorer to access IBM QRadar products, you must enable browser modeand document mode.
Procedure
1. In your Internet Explorer web browser, press F12 to open the Developer Tools window.2. Click Browser Mode and select the version of your web browser.3. Click Document Mode, and select the Internet Explorer standards for your Internet Explorer release.
QRadar Vulnerability Manager high-availability scansUse a QRadar high-availability (HA) deployment to maintain your vulnerability scanning schedule, if yourprimary QRadar deployment fails.
High-availability (HA) version 2 is supported in QRadar Vulnerability Manager.
You must use identical appliances with identical software configurations in your high-availability (HA)setup. For information about setting up a high-availability (HA) deployment, see the IBM QRadar HighAvailability Guide.
High availability (HA) scans
The following appliances are supported in a QRadar Vulnerability Manager high-availability (HA)deployment:
• Console• Scanner appliance (610)• Processor appliance (600)
Important notesTake note of the following information when you deploy high availability (HA) vulnerability scanning:
12 IBM QRadar Vulnerability Manager: QRadar Vulnerability Manager

• Cancel and restart any in-progress scans after a failover if the scans were in progress during thefailover.
• If you replace an appliance in your HA scanning environment, it might not appear in the deployment.You must re-add the appliance to the HA deployment, and then deploy changes.
• Use identical appliances and configurations in your high availability (HA) setup.• Auto updates do not resume after a failover. You must run an auto update in an uninterrupted active
setup.
Extending the QRadar Vulnerability Manager temporary license periodBy default, when you install IBM QRadar SIEM, you can see the Vulnerabilities tab because a temporarylicense key is also installed. When the temporary license expires, you can extend it for an extra fourweeks.
Procedure
1. On the navigation menu ( ), click Admin.2. Click the Vulnerability Manager icon in the Try it out area.3. To accept the end-user license agreement, click OK.
When the extended license period is finished, you must wait six months before you can activate thetemporary license again. To have permanent access to QRadar Vulnerability Manager, you mustpurchase a license.
QRadar Vulnerability Manager high-availability scansUse a QRadar high-availability (HA) deployment to maintain your vulnerability scanning schedule, if yourprimary QRadar deployment fails.
High-availability (HA) version 2 is supported in QRadar Vulnerability Manager.
You must use identical appliances with identical software configurations in your high-availability (HA)setup. For information about setting up a high-availability (HA) deployment, see the IBM QRadar HighAvailability Guide.
High availability (HA) scans
The following appliances are supported in a QRadar Vulnerability Manager high-availability (HA)deployment:
• Console• Scanner appliance (610)• Processor appliance (600)
Important notesTake note of the following information when you deploy high availability (HA) vulnerability scanning:
• Cancel and restart any in-progress scans after a failover if the scans were in progress during thefailover.
• If you replace an appliance in your HA scanning environment, it might not appear in the deployment.You must re-add the appliance to the HA deployment, and then deploy changes.
• Use identical appliances and configurations in your high availability (HA) setup.• Auto updates do not resume after a failover. You must run an auto update in an uninterrupted active
setup.
Chapter 2. Installations and deployments 13

14 IBM QRadar Vulnerability Manager: QRadar Vulnerability Manager
Chapter 3. Overview of QRadar Vulnerability ManagerIBM QRadar Vulnerability Manager is a network scanning platform that detects vulnerabilities within theapplications, systems, and devices on your network or within your DMZ.
QRadar Vulnerability Manager uses security intelligence to help you manage and prioritize your networkvulnerabilities. For example, you can use QRadar Vulnerability Manager to continuously monitorvulnerabilities, improve resource configuration, and identify software patches. You can also, prioritizesecurity gaps by correlating vulnerability data with network flows, log data, firewall, and intrusionprevention system (IPS) data.
You can maintain real-time visibility of the vulnerabilities that are detected by the built-in QRadarVulnerability Manager scanner and other third-party scanners. Third-party scanners are integrated withQRadar and include IBM BigFix®, Guardium®, AppScan®, Nessus, nCircle, and Rapid 7.
Note: Upon deployment, the QRadar Vulnerability Manager automatically updates the default BB:HostDefinition: VA Scanner Source IP building block to include the locations of all QVM processors. Thisbehavior is by design.
Unless otherwise noted, all references to QRadar Vulnerability Manager refer to IBM QRadar VulnerabilityManager. All references to QRadar refer to IBM QRadar SIEM and IBM QRadar Log Manager and allreferences to SiteProtector refer to IBM Security SiteProtector.
Vulnerability scanningIn IBM QRadar Vulnerability Manager, vulnerability scanning is controlled by configuring scan profiles.Each scan profile specifies the assets that you want to scan and the scan schedule.
Vulnerability processor
When you license QRadar Vulnerability Manager, a vulnerability processor is automatically deployed onyour QRadar console. The processor contains a QRadar Vulnerability Manager scanning component.
Deployment options
Vulnerability scanning can be deployed in different ways. For example, you can deploy your scanningcapability to a QRadar Vulnerability Manager managed host scanner appliance or a QRadar managed host.
Configuration options
Administrators can configure scans in the following ways:
• Schedule scans to run at times convenient for your network assets.• Specify the times during which scans are not allowed to run.• Specify the assets that you want to exclude from scans, either globally or for each scan.• Configure authenticated patch scans for Linux, UNIX, or Windows operating systems.• Configure different scanning protocols or specify the port ranges that you want to scan.
Categories of QRadar Vulnerability Manager vulnerability checksIBM QRadar Vulnerability Manager checks for multiple types of vulnerabilities in your network.
Vulnerabilities are categorized into the following broad categories:
• Risky default settings• Software features
© Copyright IBM Corp. 2012, 2019 15
• Misconfiguration• Vendor flaws
Risky default settings
By leaving some default settings in place, you can make your network vulnerable to attacks. The followingsituations are examples that can make your network vulnerable:
• Leaving sample pages or scripts on an IIS installation• Not changing the default password on a 3Com Hub/Switch• Leaving "public" or "private" as an SNMP community name on an SNMP enabled device• Not setting the sa login password on an MS-SQL server
Software features
Some software settings for systems or applications are designed to aid usability but these settings canintroduce risk to your network. For example, the Microsoft NetBIOS protocol is useful in internalnetworks, but if it is exposed to the Internet or an untrusted network segment it introduces risk to yournetwork.
The following examples are software features or commands that can expose your network to risk:
• ICMP time stamp or netmask requests• Sendmail expand or verify commands• Ident protocol services that identify the owner of a running process.
Misconfiguration
In addition to identifying misconfigurations in default settings, QRadar Vulnerability Manager can identifya broader range of misconfigurations such as in the following cases:
• SMTP Relay• Unrestricted NetBios file sharing• DNS zone transfers• FTP World writable directories• Default administration accounts that have no passwords• NFS World exportable directories
Vendor flaws
Vendor flaws is a broad category that includes events such as buffer overflows, string format issues,directory transversals, and cross-site scripting. Vulnerabilities that require a patch or an upgrade fix areincluded in this category.
Checks made by QRadar Vulnerability ManagerQRadar Vulnerability Manager uses a combination of active checks that involves sending packets andremote probes, and passive correlation checks. The QRadar Vulnerability Manager database coversapproximately 70,000 Network, OS, and Application layer vulnerabilities.
You can search the complete scanning library by CVE, date range, vendor name, product name, productversion, and exposure name from the Research window on the Vulnerabilities tab.
QRadar Vulnerability Manager tests
The following examples are some of the categories that QRadar Vulnerability Manager tests:
16 IBM QRadar Vulnerability Manager: QRadar Vulnerability Manager

• Database checks• Web server checks• Web application server checks• Common web scripts checks• Custom web application checks• DNS server checks• Mail server checks• Application server checks• Wireless access point checks• Common service checks• Obsolete software and systems
The following table describes some checks that are made by QRadar Vulnerability Manager.
Table 4. Types of QRadar Vulnerability Manager checks
Type of Check Description
Port scan Scans for active hosts and the ports and services that are open on eachactive host.
Returns MAC if the host is on the same subnet as the scanner.
Returns OS information.
Chapter 3. Overview of QRadar Vulnerability Manager 17

Table 4. Types of QRadar Vulnerability Manager checks (continued)
Type of Check Description
Web application scanning Checks each web application and web page on a web server by using thefollowing checks:
File upload
HTTP directory browsing
CWE-22 - Improper limitation of a path name to a restricted directory(path traversal)
Interesting file / seen in logs
Auto complete password in Browser
Misconfiguration in default files
Information disclosure
Unencrypted login form
Directory index-able: checks if the server directories can be browsed
HTTP PUT allowed: checks if the PUT option is enabled on serverdirectories
Existence of obsolete files
CGI scanning: common web page checks
Injection (XSS/script/HTML)
Remote file retrieval (server wide)
Command execution from remote shell
SQL injection, including authentication bypass, software identification,and remote source
Reverse tuning options, except for specified options.
Note: Authenticated web app scanning is not supported. For example, ifauthentication is required to access the site, you can't run web app tests.
OS User name and password disclosure
Access to file systems
Default user names and passwords
Privilege escalation
Denial of service
Remote command execution
Cross site scripting (Microsoft)
Database Exploits and open access to databases.
Default passwords
Compromised user names and passwords
Denial of service
Admin rights
18 IBM QRadar Vulnerability Manager: QRadar Vulnerability Manager
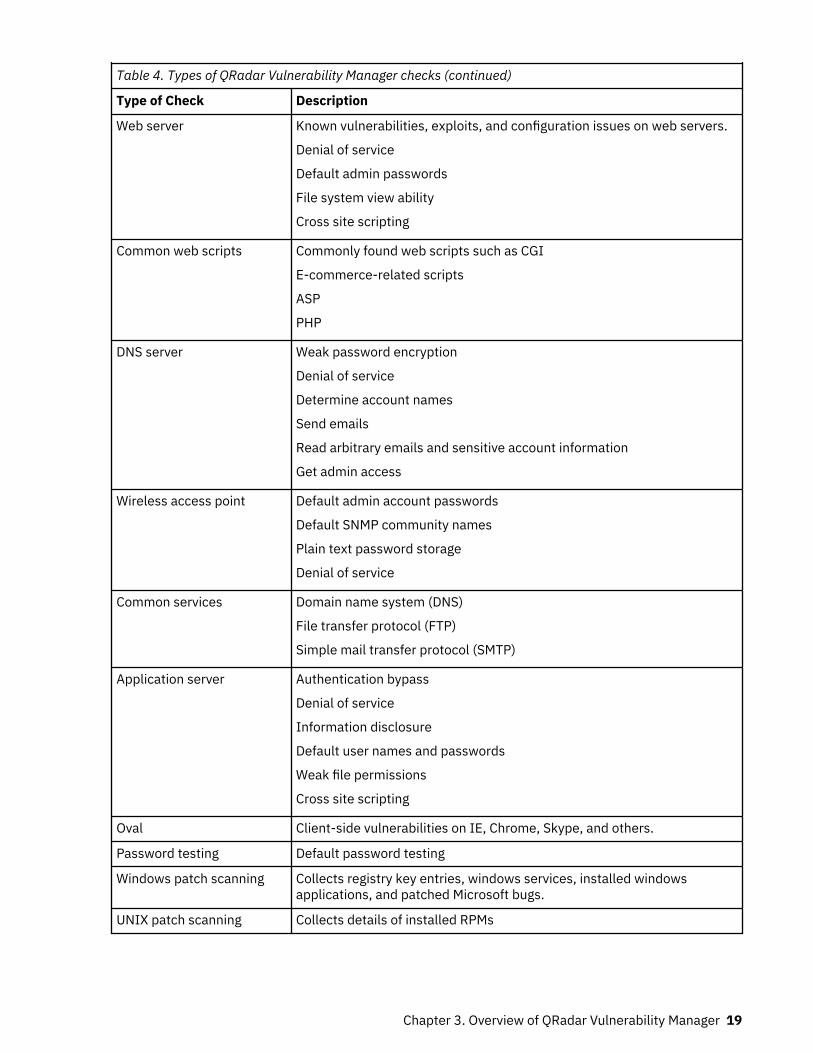
Table 4. Types of QRadar Vulnerability Manager checks (continued)
Type of Check Description
Web server Known vulnerabilities, exploits, and configuration issues on web servers.
Denial of service
Default admin passwords
File system view ability
Cross site scripting
Common web scripts Commonly found web scripts such as CGI
E-commerce-related scripts
ASP
PHP
DNS server Weak password encryption
Denial of service
Determine account names
Send emails
Read arbitrary emails and sensitive account information
Get admin access
Wireless access point Default admin account passwords
Default SNMP community names
Plain text password storage
Denial of service
Common services Domain name system (DNS)
File transfer protocol (FTP)
Simple mail transfer protocol (SMTP)
Application server Authentication bypass
Denial of service
Information disclosure
Default user names and passwords
Weak file permissions
Cross site scripting
Oval Client-side vulnerabilities on IE, Chrome, Skype, and others.
Password testing Default password testing
Windows patch scanning Collects registry key entries, windows services, installed windowsapplications, and patched Microsoft bugs.
UNIX patch scanning Collects details of installed RPMs
Chapter 3. Overview of QRadar Vulnerability Manager 19

Web application scanning
QRadar Vulnerability Manager uses unauthenticated scanning for core web application scanning. Thefollowing list describes QRadar Vulnerability Manager web vulnerability checks:
• SQL Injection Vulnerabilities
SQL injection vulnerabilities occur when poorly written programs accept user-provided data in adatabase query without validating the input, which is found on web pages that have dynamic content.By testing for SQL injection vulnerabilities, QRadar Vulnerability Manager assures that the requiredauthorization is in place to prevent these exploits from occurring.
• Cross-Site Scripting (XSS) Vulnerabilities
Cross-Site Scripting vulnerabilities can allow malicious users to inject code into web pages that areviewed by other users. HTML and client-side scripts are examples of code that might be injected intoweb pages. An exploited cross-site scripting vulnerability can be used by attackers to bypass accesscontrols such as the same origin policy. QRadar Vulnerability Manager tests for varieties of persistentand non-persistent cross-site scripting vulnerabilities to ensure that the web application is notsusceptible to this threat.
• Web Application Infrastructure
QRadar Vulnerability Manager includes thousands of checks that check default configurations, cgiscripts, installed and supporting application, underlying operating systems and devices.
• Web page errors
For in-depth web application scanning, QRadar Vulnerability Manager integrates with IBM SecurityAppScan to provide greater web application visibility to your vulnerabilities.
Network device scanning
QRadar Vulnerability Manager includes the following plug-ins that support scanning of network devices:
• SNMP
QRadar Vulnerability Manager supports SNMP V1 and SNMP V2. SNMP V3 is not supported. QRadarVulnerability Manager uses a dictionary of known community defaults for various SNMP-enableddevices. You can customize the dictionary.
• OVAL scanning
QRadar Vulnerability Manager uses OVAL to detect and report known vulnerabilities. The QRadarVulnerability Manager OVAL scanning plug-in currently works only with Cisco devices.
External scanner checks
The external scanner scans the following OWASP (Open Web Application Security Project) CWEs(Common Weakness Enumerations):
• Directory Listing• Path Traversal, Windows File Parameter Alteration, UNIX File Parameter Alteration, Poison Null Byte
Windows Files Retrieval, Poison Null Byte UNIX Files Retrieval• Cross-Site Scripting, DOM-Based Cross-Site Scripting• SQL Injection, Blind SQL Injection, Blind SQL Injection (Time Based)• Autocomplete HTML Attribute Not Disabled for Password Field• Unencrypted Login Request, Unencrypted Password Parameter• Remote Code Execution, Parameter System Call Code Injection, File Parameter Shell Command
Injection, Format String Remote Command Execution
20 IBM QRadar Vulnerability Manager: QRadar Vulnerability Manager

Database scanning
QRadar Vulnerability Manager detects vulnerabilities on major databases by using authenticated scanningof target hosts. In addition, QRadar Vulnerability Manager targets several databases by using plug-ins.
Operating system checks
Table 5. Operating system checks
Operating system Vulnerability scanning Patch scanning Configuration
Windows Yes Yes Yes
AIX® UNIX Yes Yes No
CentOS Linux Yes Yes No
Debian Linux Yes Yes No
Fedora Linux Yes Yes No
Red Hat Linux Yes Yes No
Sun Solaris Yes Yes No
HP-UX Yes Yes No
Suse Linux Yes Yes No
Ubuntu Linux Yes Yes No
CISCO No No No
AS/400® / iSeries No No No
OVALs and operating systems
OVAL definitions are supported on the following operating systems:
• Microsoft Windows 10• Microsoft Windows 8.1• Microsoft Windows 8• Microsoft Windows 7• Microsoft Windows Vista• Microsoft Windows Server 2016• Microsoft Windows Server 2012 R2• Microsoft Windows Server 2012• Microsoft Windows Server 2008 R2• Microsoft Windows Server 2008• Microsoft Windows Server 2003• CentOS versions 3 - 7• IBM AIX versions 4-7• RHEL versions 3 - 7• SUSE versions 10 - 11• Ubuntu versions 6-14• Red Hat 9• Solaris versions 2.6, 7 - 10
Chapter 3. Overview of QRadar Vulnerability Manager 21
Vulnerability management dashboardYou can display vulnerability information on your QRadar dashboard.
IBM QRadar Vulnerability Manager is distributed with a default vulnerability dashboard so that you canquickly review the risk to your organization.
You can create a new dashboard, manage your existing dashboards, and modify the display settings ofeach vulnerability dashboard item.
For more information about dashboards, see the Users Guide for your product.
Reviewing vulnerability data on the default vulnerability management dashboardYou can display default vulnerability management information on the QRadar dashboard.
The default vulnerability management dashboard contains risk, vulnerability, and scanning information.
You can configure your own dashboard to contain different elements like saved searches.
Procedure
1. Click the Dashboard tab.2. On the toolbar, in the Show Dashboard list, select Vulnerability Management.
Creating a customized vulnerability management dashboardIn QRadar you can create a vulnerability management dashboard that is customized to yourrequirements.
Procedure
1. Click the Dashboard tab.2. On the toolbar, click New Dashboard.3. Type a name and description for your vulnerability dashboard.4. Click OK.5. On the toolbar select Add Item > Vulnerability Management and choose from the following options:
• If you want to show default saved searches on your dashboard, select Vulnerability Searches.• If you want to show website links to security and vulnerability information, select Security News,
Security Advisories, or Latest Published Vulnerabilities.• If you want show information that is about completed or running scans, select Scans Completed or
Scans In Progress.
Creating a dashboard for patch complianceCreate a dashboard that shows the most effective patch to use to remediate vulnerabilities that are foundon the network.
Procedure
1. Click the Dashboard tab.2. On the toolbar, click New Dashboard.3. Type a name and description for your vulnerability dashboard.4. Click OK.5. On the toolbar, select Add Item > Vulnerability Management > Vulnerability Searches and choose
the default saved search that you want to show on your dashboard.6. On the header of the new dashboard item, click the yellow Settings icon.
22 IBM QRadar Vulnerability Manager: QRadar Vulnerability Manager

7. Select Patch from the Group By list and then select one of the following options from the Graph Bylist:
• If you want to see how many assets need to a have the patch applied, select Asset Count.• If you want to see the cumulative risk score by patch, select Risk Score.• If you want to see the number of vulnerabilities that are covered by a patch, select Vulnerability
Count.8. Click Save.9. To view vulnerability details on the Manage Vulnerabilities > By Vulnerability page on the
Vulnerabilities tab, click the View in By Vulnerability link at the bottom of the dashboard item.
Chapter 3. Overview of QRadar Vulnerability Manager 23

24 IBM QRadar Vulnerability Manager: QRadar Vulnerability Manager
Chapter 4. Vulnerability scanning strategy and bestpractices
Good planning is essential for the setup of a stable and efficient IBM QRadar Vulnerability Managerscanning system in your network.
Analyze your network structure, and determine the best scanning configuration for your network, fromboth a hardware and a scanning performance perspective.
Consider the following information, which includes best practices for setting up your QRadar VulnerabilityManager scanning deployment:
• Scan policy types
Choose the scan policy type that meets your scanning requirements and consider the time andresources that are required to complete the scan.
• Scan duration and ports to scan
Decide whether you need to scan all TCP and UDP ports. UDP ports take longer to scan than TCP ports.• Tune your asset discovery.
Tune your asset discovery to manage your asset discovery times and effectiveness.• Tune your asset discovery performance.
Adjust and optimize the speed and accuracy at which assets are discovered in your network.• Scanner placement in your network
Place scanners close to the assets that you are scanning, and be aware of the impact of network latencyon your scan times.
• Web application scanning
This scan can take a long time and be resource-intensive. If you don't need to run this scan as part of afull scan, you can exclude this scan.
• Dynamic scanning
You might save time by implementing dynamic scanning.• Network bandwidth setting
Adjust the network bandwidth setting according to your network bandwidth and the number of assetsthat you can scan concurrently.
• Network interface cards on scanners
Use network interface cards to segment your network scanning.• Vulnerability management for asset owners
Assign owners to your assets.• Notification of asset owners on the timing of scans.
Ensure that asset owners are aware of scan times.• Triggering scans of new assets
Trigger scans of new assets when they are added to the asset database.• Configure environmental risk for an asset
Use the CVSS Environmental Score to manipulate and prioritize the risk score on selected assets.• External scanning FAQs
What you need to know about setting up an external scan.
© Copyright IBM Corp. 2012, 2019 25

Scan policy typesIBM QRadar Vulnerability Manager provides several default scan policy types. You can also define yourown scans from the scan templates.
The following scan templates are the most commonly used templates:
Discovery scan policyDiscovers network assets, and then scans ports to identify key asset characteristics, such asoperating system, device type, and services. Vulnerabilities are not scanned.
A lightweight uncredentialed scan that searches an address space for active IP addresses, and thenscans their ports. It runs DNS and NetBIOS lookups to discover the operating system, open services,and network names.
If possible, run this uncredentialed scan weekly to provide good network visibility. This scan is mosthelpful for identifying new assets and changes to previously scanned assets.
Note: Use the assets seen in last 14 days but not scanned saved search from the Assets tab, toidentify new assets that QRadar passively discovered the last 14 days.
Full scan policyDiscovers network assets by using a fast scan port range. Runs a user-configurable port scan andunauthenticated scan of discovered services like FTP, web, SSH, and database. An authenticated scanis run when credentials are provided.
Runs the full suite of QRadar Vulnerability Manager tests.
A full scan has these phases:
1. Discovery scan.2. Uncredentialed scan.
Checks services that do not require credentials, for example, reading banners and responses forversion information, SSL certificate expiry, testing default accounts, and testing responses forvulnerabilities.
3. Credentialed scan.
QRadar Vulnerability Manager logs on to the asset and gathers information about the installedapplication inventory and required configuration, and raises or suppresses vulnerabilities.Credential scans are preferable to uncredentialed scans. Uncredentialed scans provide a usefuloverview of the vulnerability posture of the network. However, credentialed scanning is essentialfor a comprehensive and effective vulnerability management program.
You can't edit the build-in policies but you can copy them to create your own custom scan policy.
Tip: Full scans can sometimes lock some administration accounts, for example, SQL Server, whenQRadar Vulnerability Manager tests multiple default credentials on accounts. Turn off these logontests by taking the following steps:
a. Click the Vulnerabilities tab.b. From the Scan Policy window, click Scan Policies.c. Click the Full Scan policy, then click Edit.d. Click the Tools tab.
By default, the Included list is displayed.e. From the Filter menu, select Default Logons (Dos Risk).f. Click Exclude All to remove the check marks next to the items in the list.g. Click Save.h. Verify that the Default Logons (Dos Risk) tools are in the Excluded list.
26 IBM QRadar Vulnerability Manager: QRadar Vulnerability Manager
Run a full scan every 2-3 months for a detailed and accurate assessment of vulnerabilities in yournetwork. The full scan is resource-intensive so the scheduling and resource allocation is importantfor optimal performance.
Patch scan policyScouts the network to discover assets, and then runs a fast port scan and credentialed scan of theassets.
You use patch scans to determine which patches and products are installed or missing on thenetwork.
A patch scan has two main phases:
1. Discovery scan2. Credentialed scan
Run this credentialed scan every 1-4 weeks to determine what patches and products are installed ormissing on your network. The patch scan places only a minimal load on your network and activetesting is kept to a low level.
PCI scan policy
Scans all TCP and UDP ports 0-65535.
You are not required to scan all UDP ports for PCI compliance. Typically you scan the most commonUDP ports for PCI compliance but the list of ports might change slightly over time in accordance withPCI security standards.
If you scan all UDP ports, the scan might take a long time and not complete within the timeout periodon larger network segments, resulting in some Scan Interference Detected - ScanPotentially Incomplete vulnerability instances.
You can create your own custom PCI scan policy by copying this policy, renaming the policy, andmodifying the UDP scan ports according to your requirements.
Database scan policyScans database ports, 523, 1433, 1521, and 3306 for popular database services.
Use the uncredentialed database scan to scan ports DB2 (523), Microsoft SQL (1433), MySQL (3306),Oracle (1521), and Informix (1526 ), for popular database services.
Run this scan regularly if you have high database activity.
Related conceptsScan policies
Scan duration and ports scanningHow you manage your network scanning configuration is influenced by the number of assets in yournetwork, your network infrastructure, and the scan completion times.
It can take a long time to scan large network, so you need a scanning strategy that optimizes yourscanning resources.
Tip: It is always good practice to use operational windows to perform scans at times that don't overlapwith nightly backups or automatic updates.
Port scanning strategy
Your scanning strategy is influenced by the number of hosts that you want to scan, whether it's a class Cnetwork of 256 hosts, or a class B network of 65,536 hosts. Your overall scan time can be significantlyimpacted by increasing the number of hosts that you want to scan. To get the overall scan time to anacceptable range, and you can reduce the scan time per host.
Chapter 4. Vulnerability scanning strategy and best practices 27
For example, if you do a network discovery scan on a class B network and it takes 1 second for TCP portdiscovery, the following statements are true:
• Scanning one port on 65536 hosts at 1 second per host takes 18 hours.• If you scan one extra port on each of the 65536 hosts and allow 1 second per host, it takes an extra 18
hours to scan that extra port.
From the example, you can see the impact of adding one extra scanning port on a large network. If you'rescanning a large number of hosts, understand what services are important and are prone to high-riskvulnerabilities so that you can configure your scan policies appropriately at the discovery scan stage.Before you implement your scan policies, run test scans by using different scan polices, and estimate thetiming and the resources that are required to complete these scans.
Tip: The default QRadar discovery-scan policy runs a Nmap fast scan of TCP and UDP ports, and you canuse it to scan a smaller number of hosts.
UDP port scanning takes longer that TCP port scanning because it's a connectionless protocol. Scanningall UDP ports can take a long time and is resource-intensive. Consider whether you need to scan all UDPports or whether you scan these ports less frequently than TCP ports.
The following ports are some of the highest priority UDP ports that you need to consider scanningregularly:
• Authentication services such as RADIUS and Kerberos• Back doors and remote access applications• Backup applications• Database servers• DNS (Domain Name System)• NetBIOS and Common Internet File System (CIFS)• NFS (Network File System)• NTP (Network Time Protocol)• P2P (peer-to-peer) and chat applications• Routing protocols, including RIP (Routing Information Protocol)• RPC (Remote Procedure Call) and RPC endpoint mapping• SNMP (Simple Network Management Protocol) and SNMP trap• Syslog• TFTP (Trivial File Transfer Protocol)• VPNs, including Internet Security Association and Key Management Protocol (ISAKMP), Layer Two
Tunneling Protocol (L2TP), and (NAT Traversal) NAT-T.• Ports that are known to be associated with malicious activity.
Typical scan times
The following table gives information about scanning times.
Table 6. Scanning times for QRadar appliances
QRadar appliance Scan times
QRadar 2100/3100 All-in-One A default full scan of 2000-4000 assets takes 2-3days.
28 IBM QRadar Vulnerability Manager: QRadar Vulnerability Manager

Table 6. Scanning times for QRadar appliances (continued)
QRadar appliance Scan times
QRadar Vulnerability Manager on the followingmanaged hosts:
610
1200
1300
1400
1500
A default full scan of 2000-4000 assets takes 2-3days.
An offboard QRadar Vulnerability Managerprocessor on a managed host (600) is requiredwhen more than 50,000 assets are being scannedregularly or when scans are running for longperiods of time on the QRadar Console.
Tune your asset discovery configurationTune your asset discovery to manage your asset discovery times and effectiveness.
Tune your asset discovery from the Asset Discovery tab of your scan policy. You can use the defaultconfiguration as a fast and efficient way to discover your assets. ICMP pings and TCP SYN packets areenabled by default.
Use the following options to tune your asset discovery:
• Send ICMP pings.
Pings are sent to the IP addresses that are configured in the scan profile that uses this scan policy.• Send TCP SYN packets to ports.
This option is a reliable quick option that is enabled for preconfigured ports.• Send UDP packets to ports.
Select this option to send UDP packets to preconfigured ports. UDP is slower than TCP. If you send aUDP packet to an inactive IP address it might take several seconds to complete because of retries.
• Enable traceroute detection.
Traceroute detection requires more resources and scan times increase.• Enable ICMP detection.
ICMP detection requires more resources and scan times increase.• OS and service fingerprinting
Probe ports for OS and service information. If you select this option, scan times increase.
You can configure custom discovery options. The options that you choose depend on your requirementsand your network structure. Test various options to discover an optimum discovery configuration thatmatches your needs.
Tune your asset discovery performanceAdjust and optimize the speed and accuracy at which services are discovered on your assets.
Tune your discovery performance from the Discovery Performance tab of your scan policy. You can usethe default configuration as a fast and efficient way to discover your assets.
Use the following options to tune your asset discovery performance:
• Maximum retries
Scan times can increase when you increase Maximum retries number but when you set this number toolow, the accuracy of your scan results might be impacted.
Chapter 4. Vulnerability scanning strategy and best practices 29

• Minimum timeout interval
The scan timeout interval is reduced to the minimum level that is configured when the network isreliable.
• Initial timeout interval
Nmap adjusts the timeout value in response to previous probes. If latency increases, the timeout valueis increased. If you decrease both the initial timeout and the maximum timeout intervals too low, thescan times might be faster, but you risk having to retransmit.
• Scan delay
Use this setting to adjust the delay between scan probes. If your devices use rate limiting, then you cansynchronize the scan delay with the rate-limiting value to achieve the optimum scan times.
• Minimum packets per second
Nmap sends packets at the highest possible rate that your network tolerates, between the Minimumpackets per second rate and the Maximum packets per second rate.
• Maximum packets per second
By default, this field is empty because Nmap dynamically sets an appropriate packet speed for yournetwork. If you want, you can configure your own rate.
Web application scanningWeb scans can be slow when you have complex web applications. All ports that run HTTP or HTTPSservices, including Microsoft HTTP RPC ports, are scanned.
Part of a full scan or a web scan includes a phase that uses resource-intensive techniques that is similarto web crawling or spidering. If the scanner must crawl multiple web pages that have multiple links, thescan can be slow and demanding on your resources. Web scans look for web vulnerabilities, such asdetermining whether an HTTP server version has vulnerabilities, expired SSL certificates or weak SSLciphers. The web scan also looks for Open Web Application Security Project (OWASP) vulnerabilities suchas SQL injection, cross-site scripting (XSS), security misconfigurations.
If you don't need to scan your web applications, create a custom full scan policy, and exclude the http –CGI scanner scan tool that is on the Tools tab of your scan policy.
Scanner placement in your networkScan operations are more efficient when scanners have good connectivity to the assets that are scannedand are not obstructed by firewalls, or other devices that impact the flow of the scan data. You can deployan unlimited number of scanners in your network, but you must have a software license for every QRadarmanaged host that you deploy as a scanner.
Consider the following factors before you place scanners in your network:
• Avoid scanning assets through firewalls for the following reasons:
– Firewalls slows the scan, and block some ports that are required to complete the scan.– When you scan assets through a firewall, events are created in IBM QRadar and the EPS numbers
(events per second) are increased, which can impact your EPS license.– Stateful firewalls can cause QRadar to create assets erroneously. Stateful firewalls respond to out-of-
sequence TCP packets and that can make the scanner think that a host exists.• Do not scan over low-bandwidth WAN connections.• If the ping time from the scanner to the asset is over 40 ms, place the scanner closer to the asset.• Don't scan through a load balancer because it's more difficult for the scanner to manage the scan when
the network traffic is load balanced to different servers.
30 IBM QRadar Vulnerability Manager: QRadar Vulnerability Manager
• Avoid configuring your scanner to scan IP address ranges that you know are not used. During thediscovery phase of a scan, it takes longer for a scanner to determine that an IP address is not in usethan it does to determine whether an IP address is active.
• Deploy more scanners rather than run several concurrent scans from the same scanner. As you addmore concurrent scans to the same scanner, resources become stretched and each scan takes muchlonger.
Dynamic scanningUse dynamic scanning in IBM QRadar Vulnerability Manager to associate individual scanners with an IPaddress, CIDR ranges, IP address ranges, or a domain that you specify in the scan profile. Dynamicscanning is most beneficial when you deploy several scanners. For example, if you deploy more than 5scanners, you might save time by using dynamic scanning.
The benefits of implementing dynamic scanning depend on your network infrastructure and the numberof scanners that are available. For example, if you have 10 QRadar Vulnerability Manager scanners andyou don't use dynamic scanning, you must configure 10 individual scan jobs. QRadar VulnerabilityManager selects the appropriate scanner for each IP address that is scanned.
If dynamic scanning is used in your scan profile and you associate 2 scanners with one asset, the scannerthat includes the asset in the smallest matching subnet is prioritized to scan the asset first.
For example, your asset IP address is 10.2.2.3, and scanner A is assigned to the 10.2.2.0/24 CIDRaddress range, and scanner B is assigned to the 10.2.2.3/32 CIDR address. Scanner B is prioritized toscan the asset before scanner A because the subnet (/32) is a precise match for the asset.
Before you enable dynamic scanning, run test scans and then assess the impact on your networkresources, scan performance, and the scan times.
Related tasksCreating a scan profile
Network bandwidth for simultaneous asset scansBy adjusting the network bandwidth setting, you change the number of assets that can be scannedconcurrently and the number of vulnerability tools that can be used concurrently to scan the assets. Somescans use more vulnerability tools to scan, which impacts the number of assets that can be scannedconcurrently.
The network bandwidth setting ranges from a low setting of 200 Kbps to full setting of 5000 Kbps.Configure the bandwidth setting from the details tab of a scan profile. The default network bandwidthsetting is medium, which is 1000 Kbps.
Adjust the bandwidth, according to the following scenarios:
• Adjust the network bandwidth to 5000 Kbps (full) to patch scan up to 50 assets concurrently or keep at1000 Kbps (medium) to patch scan up to 10 assets concurrently.
• Use the 5000 Kbps (full) setting if your network has good bandwidth.• Do not use the 5000 Kbps setting over a slow WAN connection.• If you scan through a firewall and it's a log source, the scan traffic creates events, and you might have to
lower the network bandwidth to avoid exceeding your EPS (events per second) license threshold.
Related tasksCreating a scan profile
Chapter 4. Vulnerability scanning strategy and best practices 31
Network interface cards on scannersIn IBM QRadar Vulnerability Manager scanning is not dependent on the network interface cards (NICs)that are configured on the scanner appliance.
You can configure many NICs, although 4-5 is a typical configuration. QRadar Vulnerability Manager usesstandard TCP/IP protocols to scan any device that has an IP address. If multiple NICs are defined,scanning follows the standard networking configuration on an appliance.
If the target assets that you're scanning are in different networks, configure individual NICs to connect tothe different networks.
This segmentation of the networks by using NICs makes it possible for the scanner to connect directly todifferent networks. For example, one Ethernet interface might be configured to connect to the10.100.85.0/24 network and a second Ethernet interface might be configured to connect to the192.168.0.0/24 network.
Vulnerability management for asset ownersAssign owners to your assets so that your discovered vulnerabilities are assigned to the asset owners.The assigned vulnerabilities are assigned with a due date, which is calculated based on the risk level ofthe vulnerability.
Configure the remediation reports that you want to send to asset owners, by highlighting the followinginformation:
• The patches that they need to install.• The steps that are required to remediate the vulnerability.• The assets that have overdue vulnerabilities.• New vulnerabilities that were discovered since the last scan.
The standard remediation reports are available on the Email tab of the Scan Profile Configuration page.You can create extra customer reports by using QRadar Vulnerability Manager searches.
From the Reports tab, you can create a vulnerabilities report, and assign this report to a scan reportsgroup. You can configure recipients for this report in a scan profile, which can be seen in the AvailableReports window of the What to Email tab on the Scan Profile Configuration screen.
Use search criteria to ensure that your reports focus on the vulnerability remediation activities that yourequire to meet your specific business and compliance needs.
To make remediation report creation easier, use QRadar Vulnerability Manager to automatically createasset vulnerabilities and vulnerability reports for each asset owner from a single report definition.
When assets are rescanned, any remediated vulnerabilities are automatically detected and flagged asfixed. They are removed from reports and views, unless they are explicitly configured otherwise. Anyvulnerabilities that were previously fixed and are detected again are automatically reopened.
Related tasksAssigning a technical user as the owner of asset groupsEmailing asset owners when vulnerability scans start and stopEmail the configured asset technical owners to alert them of the scan schedule. You can also emailreports to asset owners.Searching vulnerability data
32 IBM QRadar Vulnerability Manager: QRadar Vulnerability Manager
Vulnerability scan notificationsTo avoid false alarms when scan activity is high, notify asset owners of the timing of scans.
Some QRadar Vulnerability Manager scan tools, such as web tools, can generate a large amount of traffic.For example, a web scan might send 500 HTTP requests per second to HTTP servers. If asset owners seean unusual amount of traffic, they might think that the asset that is being scanned is subject to a DOSattack or similar attack.
Configure scan profiles to send emails to asset owners and other interested parties before and after ascan so that asset owners are aware that a larger than usual amount of network traffic or load might occurin their network. Another way to make asset owners aware of asset scan times, is to agree to a scanningschedule with the asset owners.
Configure email notification from the Email tab of the scan profile.
Triggering scans of new assetsUse events that are processed by the custom rules engine (CRE) to trigger scans on new assets when theyare assigned new IP addresses.
Before you beginCreate a scan profile with the On Demand Scanning enabled.
Procedure
1. From the Log Activity tab, click Rules > Rules.You can also get to the rules menu from the Offenses and Network Activity tabs.
2. From the Actions menu, click New Event Rule.3. Click Events, and then click Next to continue.4. Add tests to your rule list.
a) Click the add icon (+) icon beside when the events were detected by one or more of these logsources test.
b) Click the add icon (+) beside when the event QID is one of the following QIDs test.c) Click the add icon (+) beside and when the source IP is one of the following IP addresses test.
5. In the Rule pane, edit each rule value.a) For the first rule, click these log sources and add the Asset Profiler item from the list.b) For the second rule, click QIDs, then search for QIDs that are described in the following table, and
add these QIDs to your rule.
Table 7. QID names and descriptions to add to rule
QID Name Description
68750030 IP Address Created This event occurs when a new IPaddress record is created for anasset.
68750013 Asset Created This event occurs when a new asset iscreated.
c) For the third rule, click and so it changes to and NOT, then click IP addresses and add 127.0.0.1
The following example is the output of this rule configuration:
and NOT when the source IP is one of the following 127.0.0.1
Chapter 4. Vulnerability scanning strategy and best practices 33

6. In the Apply text box, type a unique name for this rule, and leave Local as the default system setting,and then click Next.
7. In the Rule Response section, click Trigger Scan.a) From the Scan Profile to be used as a template menu, select the scan profile that you want to use.
You must select the On Demand Scanning option in the scan profile that you want to use with thisrule.
b) Click Source for the Local IPs to Scan option.c) Enter values for the Response Limiter setting.
Configure appropriate intervals to avoid a potential overload on your system.d) If you don't want to start watching events right away, clear the Enable Rule option and then click
Finish.
Configuring environmental risk for an assetUse the CVSS Environmental Score to manipulate and prioritize the risk score on selected assets. If youconfigure the CVSS, Weight & Compliance parameters for an asset, you can apply higher risk scores toassets that are more important or critical.
About this taskIf you have important or critical assets and less important assets with the same vulnerabilities, you canconfigure the CVSS Environmental Score on the important assets or critical assets to have a higher riskscore than the less important assets. By applying a higher risk score to your most important assets, youhighlight these important assets in your scan results.
Procedure
1. Click the Assets tab.2. On the navigation menu, click Asset Profiles.3. Double-click the asset that you want to edit, and then click Edit Asset.4. Click CVSS, Weight & Compliance in the Edit Asset Profile window.5. Configure the parameters in the CVSS, Weight & Compliance pane.
The following table lists the parameters for the CVSS, Weight & Compliance pane.
Parameter Description
Collateral Damage Potential The potential for loss of life or physical assetsthrough damage or theft of this asset, oreconomic loss of productivity or revenue. If youraise the Collateral Damage Potential, forexample, from Low to High, the calculated valuefor the CVSS Score increases.
The Collateral Damage Potential parameter isdirectly linked with the Weight parameter. If youchange one parameter the other parameter isimpacted.
Confidentiality Requirement The impact to confidentiality for this asset when avulnerability is exploited. If you raise theconfidentiality requirement, for example, fromLow to High, the calculated value for the CVSSScore increases.
34 IBM QRadar Vulnerability Manager: QRadar Vulnerability Manager

Parameter Description
Availability Requirement The impact to the asset's availability when avulnerability is successfully exploited. Attacksthat consume network bandwidth, processorcycles, or disk space impact the availability of anasset. If you raise the availability requirementsetting, for example, from Low to High, thecalculated value for the CVSS Score increases.
Integrity Requirement The impact to the asset's integrity when avulnerability is successfully exploited. Integrityrefers to the trustworthiness and guaranteedveracity of information. If you raise the integrityrequirement, for example, from Low to High, thecalculated value for the CVSS Score increases.
Weight The Weight is linked with the Collateral DamagePotential setting. If you select 10 for the Weightparameter the Collateral Damage Potentialchanges to High.
6. Click Save.
External scanning FAQScan the assets in your DMZ or network perimeter from the cloud by using an IBM hosted externalscanner. Run uncredentialed scans from outside your network to give you an added defense in protectingyour assets from an external attack.
What information do you need to provide?
You must email [email protected] with the following information:
• Your organization's external IP address.• If you use load balancers, you must provide the IP addresses that are used by the load balancers.• The IP address range of the assets in your DMZ.
Note: You must have a local installation of QRadar Vulnerability Manager.
Does the QRadar team verify the CIDR range that is provided?
The CIDR range is checked and ownership is verified before any scanning starts.
What is the impact of the external scan on servers such as web servers?
The scan is not intrusive but it places some load on your systems. Run the scan when the servers are nothighly active.
How are the scan results from the cloud sent to the QRadar Vulnerability Manager processor?
The external scanner sends scan results from the cloud to the QRadar Vulnerability Manager processorover a secure connection.
What is the role of App Scan in the external scanner?
The App Scan scans for cross-site scripting (XSS) and (Open Web Application Security Project) OWASPvulnerabilities on web servers. You must provide the names of any virtual domains.
Chapter 4. Vulnerability scanning strategy and best practices 35
Do your need to use an internal scanner to scan the DMZ in addition to the external scanner?Most network attacks come from the outside, so the external scanner targets all external attack surfacesfrom the perspective of an outsider.
It is good practice to run external scanning and internally-authenticated scanning in your DMZ becausefirewalls might restrict access to certain vulnerabilities, ports, services, and hosts.
If you use a load balancer for inbound traffic, the external scanner might have access to only one of theservers that are connected to the load balancer. In this case, you might need to configure an access routeso that the external scanner can scan all of the servers. Alternatively, you can use an internal scanner toscan these servers in your DMZ.
36 IBM QRadar Vulnerability Manager: QRadar Vulnerability Manager
Chapter 5. Scan configurationIn IBM QRadar Vulnerability Manager, all network scanning is controlled by the scan profiles that youcreate. You can create multiple scan profiles and configure each profile differently depending on thespecific requirements of your network.
Scan profiles
Use scan profiles to do the following tasks:
• Specify the network nodes, domains, or virtual domains that you want to scan.• Specify the network assets that you want to exclude from scans.• Create operational windows, which define the times at which scans can run.• Manually run scan profiles or schedule a scan to run at a future date.• Run, pause, resume, cancel or delete a single or multiple scans.• Use centralized credentials to run Windows, UNIX, or Linux operating systems.• Scan the assets from a saved asset search.
Related conceptsCentralized credential sets
Creating a scan profileIn IBM QRadar Vulnerability Manager, you configure scan profiles to specify how and when your networkassets are scanned for vulnerabilities.
Procedure
1. Click the Vulnerabilities tab.2. In the navigation pane, click Administrative > Scan Profiles.3. On the toolbar, click Add.
When you create a scan profile, the only mandatory fields are Name and IP Addresses on the Detailstab of the Scan Profile Configuration page. In addition, you can also configure the following optionalsettings.
• If you added more scanners to your QRadar Vulnerability Manager deployment, select a scannerfrom the Scan Server list. This step is unnecessary if you want to use dynamic scanning.
• To enable this profile for on-demand scanning, click the On Demand Scanning Enabled check box.
By selecting this option, you make the profile available to use if you want to trigger a scan inresponse to a custom rule event. It also enables on-demand vulnerability scanning by using theright-click menu on the Assets page.
• By selecting the Dynamic Server Selection check box, you can choose the most appropriatescanner that is available. Ensure that you define the scanners in the Administrative > Scannerspage.
Security profiles must be updated with an associated domain. Domain-level restrictions are notapplied until the security profiles are updated, and the changes are deployed.
• To scan your network by using a predefined set of scanning criteria, select a scan type from theScan Policies list.
• If you configured centralized credentials for assets, click the Use Centralized Credentials checkbox. For more information, see the IBM QRadar Administration Guide.
4. Click Save.
© Copyright IBM Corp. 2012, 2019 37

Related conceptsNetwork bandwidth for simultaneous asset scansBy adjusting the network bandwidth setting, you change the number of assets that can be scannedconcurrently and the number of vulnerability tools that can be used concurrently to scan the assets. Somescans use more vulnerability tools to scan, which impacts the number of assets that can be scannedconcurrently.Dynamic scanningUse dynamic scanning in IBM QRadar Vulnerability Manager to associate individual scanners with an IPaddress, CIDR ranges, IP address ranges, or a domain that you specify in the scan profile. Dynamicscanning is most beneficial when you deploy several scanners. For example, if you deploy more than 5scanners, you might save time by using dynamic scanning.Options for adding scanners to your QRadar Vulnerability Manager deploymentScan policiesDynamic vulnerability scansIn IBM QRadar Vulnerability Manager, you can configure a scan to use certain vulnerability scanners forspecific CIDR ranges in your network. For example, your scanners might have access only to certain areasof your network.Related tasksAssociating vulnerability scanners with CIDR rangesIn IBM QRadar Vulnerability Manager, to do dynamic scanning, you must associate vulnerability scannerswith different segments of your network.Rescanning an asset by using the right-click menu optionConfiguring a scan policyIn IBM QRadar Vulnerability Manager, you can configure a scan policy to meet any specific requirementsfor your vulnerability scans. You can copy and rename a preconfigured scan policy or you can add a newscan policy. You can't edit a preconfigured scan policy.
Creating an external scanner scan profileIn IBM QRadar Vulnerability Manager, you can configure scan profiles to use a hosted scanner to scanassets in your DMZ.
Before you begin
QRadar Vulnerability Manager must be configured with a hosted scanner. For more information, see“Scanning the assets in your DMZ” on page 10.
Procedure
1. Click the Vulnerabilities tab.2. In the navigation pane, click Administrative > Scan Profiles.3. On the toolbar, click Add.
When you create a scan profile, the only mandatory fields are Name and IP Addresses on the Detailstab of the Scan Profile Configuration page. To create an external scanner profile, you must also followthe remaining steps in this procedure.
4. Select an external scanner from the Scan Server list.5. Select Full Scan or Web Scan from the Scan Policies list.6. Click the Domain and Web App tab. In the Virtual Webs pane, enter the domain and IP address
information for the websites and applications that you want to scan.7. Click Save.
Note: Authenticated scans are not conducted from the external scanner.
38 IBM QRadar Vulnerability Manager: QRadar Vulnerability Manager
Creating a benchmark profileTo create Center for Internet Security compliance scans, you must configure benchmark profiles. You useCIS compliance scans to test for Windows and Red Hat Enterprise Linux CIS benchmark compliance.
Procedure
1. Click the Vulnerabilities tab.2. In the navigation pane, click Administrative > Scan Profiles.3. On the toolbar, click Add Benchmark.4. If you want to use pre-defined centralized credentials, select the Use Centralized Credentials check
box.
Credentials that are used to scan Linux operating systems must have root privileges. Credentials thatare used to scan Windows operating systems must have administrator privileges.
5. If you are not using dynamic scanning, select a QRadar Vulnerability Manager scanner from the ScanServer list.
6. To enable dynamic scanning, click the Dynamic server selection check box.
If you configured domains in the Admin > Domain Management window, you can select a domainfrom the Domain list. Only assets within the CIDR ranges and domains that are configured for yourscanners are scanned.
7. In the When To Scan tab, set the run schedule, scan start time, and any pre-defined operationalwindows.
8. In the Email tab, define what information to send about this scan and to whom to send it.9. If you are not using centralized credentials, add the credentials that the scan requires in the
Additional Credentials tab.
Credentials that are used to scan Linux operating systems must have root privileges. Credentials thatare used to scan Windows operating systems must have administrator privileges.
10. Click Save.
Related conceptsCentralized credential sets
Running scan profiles manuallyIn IBM QRadar Vulnerability Manager you can run one or more scan profile manually.
You can also schedule scans to run at a future date and time. For more information, see “Scanscheduling” on page 41.
Before you begin
Ensure that a vulnerability processor is deployed. For more information, see “Verifying that a vulnerabilityprocessor is deployed” on page 7.
Procedure
1. Click the Vulnerabilities tab.2. In the navigation pane, select Administrative > Scan Profiles.3. On the Scan Profiles page, select the check box on the row assigned to the scan profiles that you want
to run.
Note: To find the scan profiles you want to run, use the toolbar Name field to filter scan profiles byname.
4. On the toolbar, click Run.
By default, scans complete a fast scan by using the Transmission Control Protocol (TCP) and UserDatagram Protocol (UDP) protocol. A fast scan includes most ports in the range 1 - 1024.
Chapter 5. Scan configuration 39

Related conceptsScan profile detailsRelated tasksManaging scan results
Rescanning an asset by using the right-click menu optionIn IBM QRadar Vulnerability Manager, you can quickly rescan an asset by using the right-click option.
The right-click scan option is also available on the QRadar Offenses tab, and the QRadar Risk Managersub-net asset view.
Procedure
1. Click the Vulnerabilities tab.2. In the navigation pane, select Manage Vulnerabilities > By Asset.3. On the By Asset page, identify the asset that you want to rescan.4. Right-click the IP Address and select Run Vulnerability Scan.5. In the Run Vulnerability Scan window, select the scan profile that you want use when the asset is
rescanned.
The scanning process requires a scan profile. The scan profile determines the scanning configurationoptions that are used when the scan runs.
To view a scan profile in the Run Vulnerability Scan window, you must select the On DemandScanning Enabled check box in the Details tab on the Scan Profile Configuration page.
Important: The scan profile that you select might be associated with multiple scan targets or IPaddress ranges. However, when you use the right-click option, only the asset that you select isscanned.
6. Click Scan Now.7. Click Close Window.8. To review the progress of your right-click scan, in the navigation pane, click Scan Results.
Right-click scans are identified by the prefix RC:.
Related conceptsAsset vulnerabilities
Scan profile detailsIn IBM QRadar Vulnerability Manager, you can describe your scan, select the scanner that you want touse, and choose from a number of scan policy options.
Scan profile details are specified in the Details tab, in the Scan Profile Configuration page.
See especially the following options:
Table 8. Scan profile details configuration options
Options Description
Use CentralizedCredentials
Specifies that the profile uses pre-defined credentials. Centralized credentialsare defined in the Admin > System Configuration > Centralized Credentialswindow.
40 IBM QRadar Vulnerability Manager: QRadar Vulnerability Manager
Table 8. Scan profile details configuration options (continued)
Options Description
Scan Server The scanner that you select depends on your network configuration. Forexample, to scan DMZ assets, then select a scanner that has access to that areaof your network.
The Controller scan server is deployed with the vulnerability processor on yourQRadar console or QRadar Vulnerability Manager managed host.
Restriction: You can have only 1 vulnerability processor in your deployment.However, you can deploy multiple scanners either on dedicated QRadarVulnerability Manager managed host scanner appliances or QRadar managedhosts.
On DemandScanning
Enables on-demand asset scanning for the profile. Use the right-click menu onthe Assets page to run on-demand vulnerability scanning. By selecting thisoption, you also make the profile available to use if you want to trigger a scan inresponse to a custom rule event.
By enabling on-demand scanning, you also enable dynamic scanning.
Dynamic serverselection
Specifies whether you want to use a separate vulnerability scanner for each CIDRrange that you scan.
During a scan, QRadar Vulnerability Manager automatically distributes thescanning activity to the correct scanner for each CIDR range that you specify.
If you configured domains in the Domain Management window of the Admintab, you can also select the domain that you want to scan.
Bandwidth Limit The scanning bandwidth. The default setting is medium.
Important: If you select a value greater than 1000 kbps, you can affect networkperformance.
Scan Policies The pre-configured scanning criteria about ports and protocols. For moreinformation, see “Scan policies” on page 50.
Related conceptsDynamic vulnerability scansIn IBM QRadar Vulnerability Manager, you can configure a scan to use certain vulnerability scanners forspecific CIDR ranges in your network. For example, your scanners might have access only to certain areasof your network.Scan policiesRelated tasksCreating an on-demand scan profileTo trigger a scan in response to a custom rule event, configure an on-demand scan profile and enabledynamic scanning.
Scan schedulingIn IBM QRadar Vulnerability Manager, you can schedule the dates and times to scan your network assetsfor known vulnerabilities.
Scan scheduling is controlled by using the When To Scan pane, in the Scan Profile Configuration page. Ascan profile that is configured with a manual setting must be run manually. However, scan profiles that
Chapter 5. Scan configuration 41

are not configured as manual scans, can also be run manually. When you select a scan schedule, you canfurther refine your schedule by using operational windows to configure allowed scan times.
Choose one of the following scheduling options:
• Manual• Run Once• Daily• Weekly• Monthly• Advanced
Use cron expressions to create schedules, for example, 9:00 AM every Monday through Friday, or 3:30AM the first Friday of every month. Cron expressions give you the ability to create irregular scanschedules. Schedule a maximum of one scan per day.
Be aware of the impact of changes in Daylight Saving Time on your Run Once, Daily, Weekly, andMonthly scan schedules. For example, on the 27th of March 2016, clocks in the UK go forward by 1 hourat 1:00 AM, so any scans that are configured to run between 1:00 AM and 1:59 AM on the 27th of March2016 run between to 2:00 AM and 2:59 AM.
Advanced scan schedules that are configured to run between 1:00 AM and 1:59 AM on the 27th of March2016 are skipped and do not run. All subsequent scans run at the scheduled times.
Related tasksConfiguring a permitted scan intervalReviewing your scheduled scans in calendar format
Scanning domains monthlyIn IBM QRadar Vulnerability Manager, you can configure a scan profile to scan the domains on yournetwork each month.
Procedure
1. Click the Vulnerabilities tab.2. In the navigation pane, select Administrative > Scan Profiles.3. On the toolbar, click Add.
When you create a scan profile, the only mandatory fields are Name and IP Addresses on the Detailstab of the Scan Profile Configuration page. To set up monthly scans, you must also follow theremaining steps in this procedure.
4. Click the When To Scan pane.5. In the Run Schedule list, select Monthly.6. In the Start Time field, select a start date and time for your scan.7. In the Day of the month field, select a day each month that your scan runs.8. Click the Domain and Web App tab.9. In the Domains field, type the URL of the asset that you want to scan and click (> ).
10. Click Save.11. During and after the scan, you can monitor scan progress and review completed scans.
Scheduling scans of new unscanned assetsIn IBM QRadar Vulnerability Manager, you can configure scheduled scans of newly discovered, unscannednetwork assets.
42 IBM QRadar Vulnerability Manager: QRadar Vulnerability Manager

Procedure
1. Click the Assets tab.2. In the navigation pane, click Asset Profiles, then on the toolbar click Search > New Search.3. To specify your newly discovered, unscanned assets, complete the following steps in the Search
Parameters pane:a) Select Days Since Asset Found, Less than 2 then click Add Filter.b) Select Days Since Asset Scanned Greater than 2 then click Add Filter.c) Click Search.
4. On the toolbar, click Save Criteria and complete the following steps:a) In the Enter the name of this search field, type the name of your asset search.b) Click Include in my Quick Searches.c) Click Share with Everyone.d) Click OK.
5. Click the Vulnerabilities tab.6. In the navigation pane, select Administrative > Scan Profiles.7. On the toolbar, click Add.
When you create a scan profile, the only mandatory fields are Name and IP Addresses on the Detailstab of the Scan Profile Configuration page. To schedule scans for unscanned assets, you must alsofollow the remaining steps in this procedure.
8. In the Include Saved Searches pane, select your saved asset search from the Available SavedSearches list and click (>).
9. Click the When To Scan pane and in the Run Schedule list, select Weekly.10. In the Start Time fields, type or select the date and time that you want your scan to run on each
selected day of the week.11. Select the check boxes for the days of the week that you want your scan to run.12. Click Save.
For more information about using the Assets tab and saving asset searches, see the Users Guide foryour product.
Related tasksSearching vulnerability data
Reviewing your scheduled scans in calendar formatIn IBM QRadar Vulnerability Manager, the scheduled scan calendar provides a central location where youcan review information about scheduled scans.
Procedure
1. Click the Vulnerabilities tab.2. In the navigation pane, click Administrative > Scheduled Scans.3. Hover your mouse on the scheduled scan to display information about the scheduled scan.
For example, you can show the time that a scan took to complete.4. Double-click a scheduled scan to edit the scan profile.
Chapter 5. Scan configuration 43
Network scan targets and exclusionsIn IBM QRadar Vulnerability Manager, you can provide information about the assets, domains, or virtualwebs on your network that you want to scan.
Use the Details tab on the Scan Profile Configuration page to specify the network assets that you wantto scan.
You can exclude a specific host or range of hosts that must never be scanned. For example, you mightrestrict a scan from running on critical servers that are hosting your production applications. You mightalso want to configure your scan to target only specific areas of your network.
QRadar Vulnerability Manager integrates with QRadar by providing the option to scan the assets that formpart of a saved asset search.
Scan targets
You can specify your scan targets by defining a CIDR range, IP address, IP address range, or acombination of all three.
Domain scanning
You can add domains to your scan profile to test for DNS zone transfers on each of the domains that youspecify.
A host can use the DNS zone transfer to request and receive a full zone transfer for a domain. Zonetransfer is a security issue because DNS data is used to decipher the topology of your network. The datathat is contained in a DNS zone transfer is sensitive and therefore any exposure of the data might beperceived as a vulnerability. The information that is obtained might be used for malicious exploitationsuch as DNS poisoning or spoofing.
Scans that used saved asset searches
You can scan the assets and IP addresses that are associated with a QRadar saved asset search.
Any saved searches are displayed in the Asset Saved Search section of the Details tab.
For more information about saving an asset search, see the Users Guide for your product.
Exclude network scan targets
In Excluded Assets section of the Domain and Web App tab, you can specify the IP addresses, IPaddress ranges, or CIDR ranges for assets that must not be scanned. For example, if you want to avoidscanning a highly loaded, unstable, or sensitive server, exclude these assets.
When you configure a scan exclusion in a scan profile configuration, the exclusion applies only to the scanprofile.
Virtual webs
You can configure a scan profile to scan different URLs that are hosted on the same IP address.
When you scan a virtual web, QRadar Vulnerability Manager checks each web page for SQL injection andcross site scripting vulnerabilities.
Related tasksScanning CIDR ranges with different vulnerability scannersIn IBM QRadar Vulnerability Manager, you can scan areas of your network with different vulnerabilityscanners.Excluding assets from all scans
44 IBM QRadar Vulnerability Manager: QRadar Vulnerability Manager
In IBM QRadar Vulnerability Manager, scan exclusions specify the assets in your network that are notscanned.Scheduling scans of new unscanned assetsScanning domains monthly
Excluding assets from all scansIn IBM QRadar Vulnerability Manager, scan exclusions specify the assets in your network that are notscanned.
About this task
Scan exclusions apply to all scan profile configurations and might be used to exclude scanning activityfrom unstable or sensitive servers. Use the IP Addresses field on the Scan Exclusion page to enter the IPaddresses, IP address ranges, or CIDR ranges that you want to exclude from all scanning. To access theScan Exclusion page:
Procedure
1. Click the Vulnerabilities tab.2. In the navigation pane, click Administrative > Scan Exclusions.3. On the toolbar, select Actions > Add.
Note: You can also use the Excluded Assets section of the Vulnerabilities > Administrative > ScanProfiles > Add > Domain and Web App tab to exclude assets from an individual scan profile.
Managing scan exclusionsIn IBM QRadar Vulnerability Manager you can update, delete, or print scan exclusions.
Procedure
1. Click the Vulnerabilities tab.2. In the navigation pane, click Administrative > Scan Exclusions.3. From the list on the Scan Exclusions page, click the Scan Exclusion that you want to modify.4. On the toolbar, select an option from the Actions menu.5. Depending on your selection, follow the on-screen instructions to complete this task.
Scan protocols and portsIn IBM QRadar Vulnerability Manager, you can choose different scan protocols and scan various portranges.
You can configure your scan profile port protocols by using TCP and UDP scan options.
Configure scanning protocols and the ports that you want to scan on the Port Scan tab of an existing ornew scan policy configuration window.
Note: You can also configure port scanning from the How To Scan tab in the Scan Profile Configurationwindow but this option is only enabled for backwards compatibility. Do not use the How To Scan tab toconfigure new port scans.
Scanning a full port rangeIn IBM QRadar Vulnerability Manager, you can scan the full port range on the assets that you specify.
About this taskCreate a scan policy to specify the ports that you want to scan, and then add this scan policy to a scanprofile, which you use to run the scan.
Chapter 5. Scan configuration 45

Procedure
1. Click the Vulnerabilities tab.2. In the navigation pane, select Administrative > Scan Policies.3. On the toolbar, click Add to create a new scan policy or Edit to edit an existing policy.4. Click the Settings tab.
a) Enter a name and description for the scan policy.b) Select the scan type.
5. Click the Port Scan tab.6. In the Protocol field, select a protocol. The default values are TCP & UDP.
Note: UDP port scans are much slower than TCP port scans because of the way that UDP works. AUDP port scan can take up to 24 hours to scan all ports (1-65535) on an asset.
7. In the Range field, type 1-65535.
Restriction: Port ranges must be configured in dash-separated, comma-delimited, consecutive,ascending, and non-overlapping order. Multiple port ranges must be separated by a comma. Forexample, the following examples show the delimiters that are used to enter port ranges:(1-1024,1055, 2000-65535).
8. In the Timeout (m) field, type the time in minutes after which you want the scan to cancel if no scanresults are discovered.
Important: You can type any value in the range 1 - 500. Ensure that you do not enter too short atime, otherwise the port scan cannot detect all running ports. Scan results that are discovered beforethe timeout period are displayed.
9. Optional: Configure more options on the other tabs if you want to use the scan policy to completemore tasks.
10. Click Save.11. From the Scan Profiles page, create a new scan profile.
a) Add the scan policy that you saved.b) Configure the remaining parameters for the scan profile and save.c) From the Scan Profiles page, select the new scan profile, and then click Run on the toolbar to run
the scan.
For more information about creating a scan profile, see “Creating a scan profile” on page 37.
Note: You can also configure port scanning from the How To Scan tab in the Scan ProfileConfiguration window but this option is only enabled for backwards compatibility. Do not use theHow To Scan tab to configure new port scans.
Scanning assets with open portsIn IBM QRadar Vulnerability Manager, you can configure a scan profile to scan assets with open ports.
Procedure
1. Click the Assets tab.2. In the navigation pane, click Asset Profiles then on the toolbar, click Search > New Search.3. To specify assets with open ports, configure the following options in the Search Parameters pane:
a) Select Assets With Open Port, Equals any of 80 and click Add Filter.b) Select Assets With Open Port, Equals any of 8080 and click Add Filter.c) Click Search.
4. On the toolbar, click Save Criteria and configure the following options:a) In the Enter the name of this search field, type the name of your asset search.b) Click Include in my Quick Searches.
46 IBM QRadar Vulnerability Manager: QRadar Vulnerability Manager
c) Click Share with Everyone and click OK.5. Click the Vulnerabilities tab.6. In the navigation pane, select Administrative > Scan Profiles.7. On the toolbar, click Add.
When you create a scan profile, the only mandatory fields are Name and IP Addresses on the Detailstab of the Scan Profile Configuration page. To scan assets with open ports, you must also follow theremaining steps in this procedure.
8. On the Details tab, select your saved asset search from the Available Saved Searches list and click>.
When you include a saved asset search in your scan profile, the assets and IP addresses associatedwith the saved search are scanned.
9. Click the When To Scan pane and in the Run Schedule list, select Manual.10. Click the What To Scan pane.11. Click Save.
For more information about saving an asset search, see the Users Guide for your product.
What to do next
Perform the steps in the procedure, “Running scan profiles manually” on page 39.
Configuring a permitted scan intervalIn IBM QRadar Vulnerability Manager, you can create an operational window to specify the times that ascan can run.
About this task
If a scan does not complete within the operational window, it is paused and continues when theoperational window reopens. To configure an operational window:
Procedure
1. Click the Vulnerabilities tab.2. In the navigation pane, click Administrative > Operational Window.3. On the toolbar, click Actions > Add.4. Enter a name for the operational window in the Name field.5. Choose an operational window schedule from the Schedule list.6. Select the times when scanning is permitted.7. Select your timezone.8. If you selected Weekly from the Schedule list, then click the desired days of the week check boxes
in the Weekly area.9. If you selected Monthly from the Schedule list, then select a day from the Day of the month list.
10. Click Save.
Operational windows can be associated with scan profiles by using the When To Scan tab on theScan Profile Configuration page.
If you assign two overlapping operational windows to a scan profile, the scan profile runs from thebeginning of the earliest operational window to the end of the later operational window. For example,if you configure two daily operational windows for the periods 1 a.m. to 6 a.m. and 5 a.m. to 9 a.m.,the scan runs between 1 a.m. and 9 a.m.
Chapter 5. Scan configuration 47

For operational windows that do not overlap, the scan starts from the earliest operational windowand pauses if there's a gap between the operational windows, and then resumes at the beginning ofthe next operational window.
Scanning during permitted timesIn IBM QRadar Vulnerability Manager, you can schedule a scan of your network assets at permitted times,by using an operational window.
About this task
Tip: If you are applying the operational window to an authenticated patch scan, set the minimum windowto 4 hours.
Procedure
1. Click the Vulnerabilities tab.2. In the navigation pane, select Administrative > Operational Window.3. On the toolbar, select Actions > Add.4. Type a name for your operational window, configure a permitted time interval and click Save.5. In the navigation pane, select Administrative > Scan Profiles.6. On the toolbar, click Add.
When you create a scan profile, the only mandatory fields are Name and IP Addresses on the Detailstab of the Scan Profile Configuration page. To configure scanning during permitted times, you mustalso follow the remaining steps in this procedure.
7. Click the When To Scan tab.8. In the Run Schedule list, select Daily.9. In the Start Time fields, type or select the date and time that you want your scan to run each day.
10. In the Operational Windows pane, select your operational window from the list and click (>).11. Click Save.
Managing operational windowsIn IBM QRadar Vulnerability Manager, you can edit, delete, and print operational windows.
Remember: You can edit an operational window while it is associated with a scan profile.
Procedure
1. Click the Vulnerabilities tab.2. In the navigation pane, select Administrative > Operational Window.3. Select the operational window that you want to edit.4. On the toolbar, select an option from the Actions menu.5. Follow the instructions in the user interface.
Restriction: You cannot delete an operational window that is associated with a scan profile. You mustfirst disconnect the operational window from the scan profile.
Disconnecting an operational windowIf you want to delete an operational window that is associated with a scan profile, you must disconnectthe operational window from the scan profile.
Procedure
1. Click the Vulnerabilities tab.2. In the navigation pane, select Administrative > Scan Profiles.
48 IBM QRadar Vulnerability Manager: QRadar Vulnerability Manager
3. Select the scan profile that you want to edit.4. On the toolbar, click Edit.5. Click the When To Scan pane.6. Select the relevant option from the Run Schedule list as required.7. In the Name field, select the operational window that you want to disconnect and click (<).8. Click Save.
Dynamic vulnerability scansIn IBM QRadar Vulnerability Manager, you can configure a scan to use certain vulnerability scanners forspecific CIDR ranges in your network. For example, your scanners might have access only to certain areasof your network.
During a scan, QRadar Vulnerability Manager determines which scanner to use for each CIDR, IP address,or IP range that you specify in your scan profile.
Dynamic scanning and domains
If you configured domains in the Domain Management window on the Admin tab, you can associatescanners with the domains that you added.
For example, you might associate different scanners each with a different domain, or with different CIDRranges within the same domain. QRadar dynamically scans the configured CIDR ranges that contain theIP addresses you specify on all domains that are associated with the scanners on your system. Assetswith the same IP address on different domains are scanned individually if the CIDR range for each domainincludes that IP address. If an IP address is not within a configured CIDR range for a scanner domain,QRadar scans the domain that is configured for the Controller scanner for the asset.
Setting up dynamic scanning
To use dynamic scanning, you must do the following actions:
1. Add vulnerability scanners to your QRadar Vulnerability Manager deployment. For more information,see “Options for adding scanners to your QRadar Vulnerability Manager deployment” on page 8.
2. Associate vulnerability scanners with CIDR ranges and domains.3. Configure a scan of multiple CIDR ranges and enable Dynamic server selection in the Details tab of
the Scan Profile Configuration page.
Related conceptsOptions for adding scanners to your QRadar Vulnerability Manager deploymentScan profile detailsRelated tasksCreating an on-demand scan profileTo trigger a scan in response to a custom rule event, configure an on-demand scan profile and enabledynamic scanning.
Associating vulnerability scanners with CIDR rangesIn IBM QRadar Vulnerability Manager, to do dynamic scanning, you must associate vulnerability scannerswith different segments of your network.
Before you begin
You must add extra vulnerability scanners to your deployment. For more information, see “Options foradding scanners to your QRadar Vulnerability Manager deployment” on page 8.
Chapter 5. Scan configuration 49

Procedure
1. Click the Vulnerabilities tab.2. In the navigation pane, select Administrative > Scanners.
Attention: By default, the Controller scanner is displayed. The Controller scanner is part of theQRadar Vulnerability Manager processor that is deployed on either your QRadar Console or on adedicated QRadar Vulnerability Manager processing appliance. You can assign a CIDR range tothe Controller scanner, but you must deploy extra scanners to use dynamic scanning.
3. Click a scanner on the Scanners page.4. On the toolbar, click Edit.
Restriction: You cannot edit the name of the scanner. To edit a scanner name, click Admin > Systemand License Management > Deployment Actions > Manage Vulnerability Deployment.
5. In the CIDR field, type a CIDR range or multiple CIDR ranges that are separated by commas.6. Click Save.
Related conceptsOptions for adding scanners to your QRadar Vulnerability Manager deploymentRelated tasksCreating an on-demand scan profileTo trigger a scan in response to a custom rule event, configure an on-demand scan profile and enabledynamic scanning.
Scanning CIDR ranges with different vulnerability scannersIn IBM QRadar Vulnerability Manager, you can scan areas of your network with different vulnerabilityscanners.
Before you begin
You must configure your network CIDR ranges to use the different vulnerability scanners in your QRadarVulnerability Manager deployment. For more information, see “Options for adding scanners to yourQRadar Vulnerability Manager deployment” on page 8.
Procedure
1. Click the Vulnerabilities tab.2. In the navigation pane, select Administrative > Scan Profiles.3. On the toolbar, click Add.4. Click the Dynamic server selection check box.
If you configured domains in the Admin > Domain Management window, you can select a domainfrom the Domain list. Only assets within the domain you selected are scanned.
5. Add more CIDR ranges.6. Click Save.7. Click the check box on the row that is assigned to your scan on the Scan Profiles page and click Run.
Related tasksCreating an on-demand scan profileTo trigger a scan in response to a custom rule event, configure an on-demand scan profile and enabledynamic scanning.
Scan policiesA scan policy provides you with a central location to configure specific scanning requirements.
50 IBM QRadar Vulnerability Manager: QRadar Vulnerability Manager

You can use scan policies to specify scan types, ports to be scanned, vulnerabilities to scan for andscanning tools to use. In IBM QRadar Vulnerability Manager, a scan policy is associated with a scan profileand is used to control a vulnerability scan. You use the Scan Policies list on the Details tab of the ScanProfile Configuration page to associate a scan policy with a scan profile.
You can create a new scan policy or copy and modify a pre-configured policy that is distributed withQRadar Vulnerability Manager.
Pre-configured scan policies
The following pre-configured scan policies are distributed with QRadar Vulnerability Manager:
• Full scan• Discovery scan• Database scan• Patch scan• PCI scan• Web scan
A description of each pre-configured scan policy is displayed on the Scan Policies page.
Related tasksModifying a pre-configured scan policyIn IBM QRadar Vulnerability Manager, you can copy a pre-configured scan policy and modify the policy toyour exact scanning requirements.Configuring a scan policyIn IBM QRadar Vulnerability Manager, you can configure a scan policy to meet any specific requirementsfor your vulnerability scans. You can copy and rename a preconfigured scan policy or you can add a newscan policy. You can't edit a preconfigured scan policy.
Scan policy automatic updates for critical vulnerabilitiesAs part of IBM QRadar Vulnerability Manager daily automatic updates, you receive new scan policies fortasks such as detecting zero-day vulnerabilities on your assets.
Use scan policies that are delivered by automatic update to create scan profiles to scan for specificvulnerabilities. To view all scan policies on your system, go to Administrative > Scan Policies on theVulnerabilities tab.
You must not edit scan policies that are delivered by automatic update as your changes might beoverwritten by later updates. You can create a copy and edit it.
If you delete a scan policy that is delivered by automatic update, it can be recovered only by QRadarcustomer support.
Modifying a pre-configured scan policyIn IBM QRadar Vulnerability Manager, you can copy a pre-configured scan policy and modify the policy toyour exact scanning requirements.
Procedure
1. Click the Vulnerabilities tab.2. In the navigation pane, select Administrative > Scan Policies.3. On the Scan Policies page, click a pre-configured scan policy.4. On the toolbar, click Edit.5. Click Copy.6. In the Copy scan policy window, type a new name in the Name field and click OK.7. Click the copy of your scan policy and on the toolbar, click Edit.
Chapter 5. Scan configuration 51
8. In the Description field, type new information about the scan policy.
Important: If you modify the new scan policy, you must update the information in the description.9. To modify your scan policy, use the Port Scan, Vulnerabilities, Tool Groups, or Tools tabs.
Restriction: Depending on the Scan Type that you select, you cannot use all the tabs on the ScanPolicy window.
Configuring a scan policyIn IBM QRadar Vulnerability Manager, you can configure a scan policy to meet any specific requirementsfor your vulnerability scans. You can copy and rename a preconfigured scan policy or you can add a newscan policy. You can't edit a preconfigured scan policy.
Procedure
1. Click the Vulnerabilities tab.2. In the navigation pane, select Administrative > Scan Policies.3. On the toolbar, click Add.4. Type the name and description of your scan policy.
To configure a scan policy, you must at least configure the mandatory fields in the New Scan Policywindow, which are the Name and Description fields.
5. From the Scan Type list, select the scan type.
6. To manage and optimize the asset-discovery process, click the Asset Discovery tab.7. To manage the ports and protocols that are used for a scan, click the Port Scan tab.8. To include specific vulnerabilities in your patch scan policy, click the Vulnerabilities tab.
Note: The Vulnerabilities tab is available only when you select a patch scan.9. To include or exclude tool groups from your scan policy, click the Tool Groups tab.
Note: The Tool Groups tab is available only when you select a zero-credentialed full-scan or full-scanplus policy.
10. To include or exclude tools from a scan policy, click the Tools tab.
Note: The Tools tab is available only when you select a zero-credentialed Full Scan or Full Scan Pluspolicy.
Important: If you do not modify the tools or tool groups, and you select the Full option as your scantype, then all the tools and tool groups that are associated with a full scan are included in your scanpolicy.
11. Click Save.
52 IBM QRadar Vulnerability Manager: QRadar Vulnerability Manager

Chapter 6. False positives managementCommonly, false positives in vulnerability scanning occur when the scanner can access only a subset ofthe required information, which prevents it from accurately determining whether a vulnerability exists.
To help reduce the number of false positives, you must configure your scanners with the appropriatecredentials. The scans need access to all of the asset information required information from assets sothat you can accurately determine whether a vulnerability exists.
Why do false positives occur?
A false positive might occur when the scanner can read only the configuration information from servicebanners. For example, a scanner that reads an Apache banner can detect that only version 2.2.15 isinstalled from the HTTP banner, even when version 2.2.15-39 is also installed and that the versioncontains a software fix that was backported.
Another example is when the scanner reads the banner and detects the version of SSH that is installed,but can't detect the patch level or the operating system. If the scanner detects that SSH-2 is installed butcan't determine the operating system, the scanner can't accurately determine whether a vulnerabilityexists in some instances. The vulnerability might be correctly identified on one asset but is a false positiveon the other asset because SSH vulnerabilities on Red Hat SSH might not be the same for other Linuxoperating systems.
Why don't scanners retrieve all the required information
Vulnerability scanners can't always access the information that they need to accurately determinewhether a vulnerability exists. This limitation commonly results in false positives.Scanner can't authenticate
If the scanner can't authenticate on the end point, the scanner must rely on the limited information fromanonymous network services probing such as the information retrieved from reading banners.
Banners might contain incorrect versions and outdated patch-level information, which results in falsepositives. However, if the scanner can authenticate, it can determine the full version of the operationsystem and patch-level information, and then suppress any false-positive vulnerabilities.
Best practices about banners
Use these best practices about banners when you set up vulnerability scanning in your network:
• Don't include detailed or sensitive information in a banner because a hacker can get crucial informationabout the applications and services that are running on an asset and then use known vulnerabilities toexploit them.
• Know the type of information that is available anonymously in banners. Assess the likely attemptedattack vectors. This information is helpful for assessing your network security, and for gatheringnetwork information.
• Flag vulnerability information that is read from banners as false positives by tagging the vulnerability asan exception from tabs such as the Vulnerability Instances pane of the Asset Details window or theVulnerability History window.
• Tune scans by enabling or disabling tools in scan policies that can prevent these scans from starting.
Authenticated Windows based scan techniques
Authenticated Windows based scanning uses the following two techniques to detect vulnerabilities:
• Registry scanning where the scanner needs access to the registry.• OVAL scanning where WMI (Windows Management Instrumentation) must be configured correctly.
If either of these two techniques fail, then the scan result is prone to false positives.
© Copyright IBM Corp. 2012, 2019 53

You must enable the remote registry service for the scanner to access the registry.
Misconfiguration of WMI (Windows Management Instrumentation) can generate false positives.
Identify authentication failures
If a scan does not authenticate successfully, hover your cursor over the warning symbol see why the scanencountered issues. For example,The last scan of this asset failed STATUS_LOGON_FAILURE Therefore the vulnerability may not be accurate
Other examples of warnings messages include, SSH logon failure, remote registry servicenot started, and no WMI access.
Related conceptsScanning on Windows-based assetsQRadar Vulnerability Manager uses registry scanning and Open Vulnerability Assessment Language(OVAL) scanning to detect vulnerabilities on Windows-based assets. Use authenticated scans to detect allWindows vulnerabilities. Unauthenticated scans might not detect all Windows vulnerabilities.Related tasksConfiguring an authenticated scan of the Windows operating systemEnabling permissions for Linux or UNIX patch scansApplying a vulnerability exception rule
How is the vulnerability scan result detected?Determine whether the vulnerability scan result is generated from an authenticated scan or from ananonymous reading of a banner. Scan results that are generated form an anonymous reading of a bannerare more likely to be false positives.
Hover in the Details column of the vulnerability scan result for the asset to see how the vulnerability isdetected.
1. Click the Vulnerabilities tab.2. From the navigation menu, click Scan Results.3. Double-click a scan profile in the Name column.4. Click any row in the Vulnerability Instances column.5. Hover over a result in the Details column to see more details.
For example, the following details might be generated when the scanner reads a banner:SERVER: Apache/2.2.15(Red Hat)
Patch scans and false positives
Vulnerabilities that are detected from patch scans are unlikely to be false positives, except for WindowsKB updates. Windows updates, which are prefixed by a knowledge base number (KB) can be falsepositives when the WMI (Windows Management Instrumentation) phase of the Windows authenticatedscan fails.
Windows updates are superseded over time. For example, a current Windows KB supersedes the initialKB that addressed an original vulnerability fix. Superseding isn't an issue for recent Windows updates orwhen WMI or OVAL scanning is successful because the scan accounts for any newer updates.
54 IBM QRadar Vulnerability Manager: QRadar Vulnerability Manager
Investigating a potential false positive from an authenticated scanSometimes, an authenticated scan generates a false positive because the scan fails.
About this task
Research the vulnerability.
Procedure
1. Click the Vulnerabilities tab.2. From the navigation menu, click Scan Results.3. In the Scan results window, click a row in the Vulnerabilities column.4. Click the vulnerability that you want to investigate.5. Click the Plugin Details link to open the patching window for the vulnerability.6. Use the tabs to discover Oval Definition, Windows Knowledge Base, or UNIX advisory information
about the vulnerability.
• For vulnerabilities that are created from an Open Vulnerability and Assessment Language (OVAL)test, click the appropriate OVAL tab to see the criteria that QRadar Vulnerability Manager uses inthe test.
• For vulnerabilities that are created from an Windows KB registry scan, click the Windows KB tab toview the updates (KBs) that QRadar Vulnerability Manager associates with the vulnerability.
• For vulnerabilities that are created because of a missing RPM Package Manager (RPM), click theUnix tab. The displayed packages and revisions are checked against the appropriate operatingsystems releases.
Chapter 6. False positives management 55

56 IBM QRadar Vulnerability Manager: QRadar Vulnerability Manager
Chapter 7. Authenticated patch scansIn IBM QRadar Vulnerability Manager, you can scan for community names and run authenticated patchscans for Windows, Linux, and UNIX operating systems.
SNMP community names
You can scan your network assets by using SNMP community names. This function applies to SNMP V1and V2c.
When you scan assets, QRadar Vulnerability Manager authenticates by using the SNMP services that arefound and completes a more detailed vulnerability scan.
Windows patch scans
To scan Windows operating systems for missing patches, the remote registry access and Windowsmanagement instrumentation (WMI) must be enabled. If your Windows patch scan returns WMIconnectivity issues, you must configure your Windows systems.
To read WMI data on a remote server, you must enable the connections between your QRadar consoleand the server that you are monitoring. If the server is using a Windows firewall, then you must configurethe system to enable remote WMI requests.
If you are use a non-administrator account to monitor the Windows server, then you must enable theaccount to interact with Distributed Component Object Model (DCOM).
If the patch scan tool cannot connect to a Windows asset, a yellow triangular warning icon is displayednext to the asset in the scan results. The following vulnerability is raised: Local Checks Error.
Enabling some restrictions for unauthenticated RPC clients in your Windows Group Policy preventsQRadar Vulnerability Manager from running WMI queries when it scans a Windows server. When thisauthentication failure occurs, a yellow triangular warning icon is displayed next to the asset in the scanresults. For example, if you enable Restrict Unauthenticated RPC Client in Windows 2012, you canselect None, Authenticated, or Authenticated without exceptions from the menu. If you selectAuthenticated without exceptions, QRadar Vulnerability Manager cannot run WMI queries and is unableto complete the scan.
Secure Linux operating system authenticated scanning
To scan Linux operating systems by using secure authentication, you can configure public key encryptionbetween your console or managed host and your scan targets.
When secure authentication is configured, you do not need to specify a Linux operating system passwordin your scan profile.
You must configure public key authentication on every Linux operating system that you scan.
If you move your vulnerability processor to a dedicated vulnerability processor appliance, you mustreconfigure the secure authentication between the dedicated vulnerability processor appliance and thescan target.
If the patch scan tool cannot connect to a Linux asset, a yellow triangular warning icon is displayed nextto the asset in the scan results. The following vulnerability is raised: SSH Patch Scanning - FailedLogon.
Related tasksConfiguring Linux operating system public key authenticationConfiguring an authenticated scan of the Linux or UNIX operating systemsConfiguring an authenticated scan of the Windows operating system
© Copyright IBM Corp. 2012, 2019 57

Centralized credential setsWhen you run authenticated scans, you can use a central list that stores the login credentials for yourLinux, UNIX, or Windows operating systems. Your system administrator must configure the list ofcredentials.
An administrator can specify credentials for SNMP network devices and Linux, UNIX, or Windowsoperating systems. Therefore, a user who is responsible for configuring a scan profile does not need toknow the credentials of each asset that is scanned. Also, if the credentials of an asset change, thecredentials can be modified centrally rather than updating the scan profile.
Related tasksConfiguring an authenticated scan of the Linux or UNIX operating systemsConfiguring an authenticated scan of the Windows operating systemCreating a benchmark profileTo create Center for Internet Security compliance scans, you must configure benchmark profiles. You useCIS compliance scans to test for Windows and Red Hat Enterprise Linux CIS benchmark compliance.
Configuring a credential setIn IBM QRadar Vulnerability Manager, you can create a credential set for the assets in your network.During a scan, if a scan tool requires the credentials for a Linux, UNIX, or Windows operating system, thecredentials are automatically passed to the scan tool from the credential set.
Procedure
1. On the navigation menu ( ), click Admin.2. In the System Configuration pane, click Centralized Credentials.3. In the Centralized Credentials window, on the toolbar, click Add.
To configure a credential set, the only mandatory field in the Credential Set window is the Name field.4. In the Credential Set window, click the Assets tab.5. Type a CIDR range for the assets that you want to specify credentials for and click Add.
Users must have network access permissions that are granted in their security profile for an IPaddress or CIDR address range that they use or create credentials for in Centralized Credentials.
6. Click the Linux/Unix, Windows, or Network Devices (SNMP) tabs, then type your credentials.7. Click Save.
Configuring Linux operating system public key authenticationTo scan Linux operating systems by using secure public key authentication, you must configure your IBMQRadar console or managed host and the asset that you want to scan. When authentication is configuredyou can do authenticated scanning by specifying a Linux operating system user name, and not specifyinga password. QRadar supports both rsa and dsa for SSH key generation.
Before you begin
You must install a public and private key on a QVM scanner, and install the public key on the scan target.
A QVM scanner is automatically installed on a QVM processor host, and might also be installed on othermanaged hosts.
The user account on the scan target must have a login shell and must be capable of running thecommands that are required for a patch scan on the target. For more information, see “Enablingpermissions for Linux or UNIX patch scans” on page 60.
58 IBM QRadar Vulnerability Manager: QRadar Vulnerability Manager
This procedure describes how to configure a single public/private key pair and transfer them to a QVMscanner and scan target.
Procedure
1. Using SSH, log in to the QVM console as the root user.2. Generate a public key pair by typing the following command:
su -m -c 'ssh-keygen -t <key_type>' qvmuser
Note: <key_type> is either dsa or rsa.3. Accept the default file by pressing Enter.4. Accept the default passphrase for the public key by pressing Enter.5. Press Enter again to confirm.6. Copy the public and private keys to all managed hosts on which a QVM scanner is installed.
cd /home/qvmuser/.ssh
rsync -ogp id_<key_type> id_<key_type>.pub <IP address>:/home/qvmuser/.ssh
• Replace <key_type> with dsa or rsa.• Replace <IP address> with the IP address of the scanner and enter the root password when
prompted.
Note: The QVM processor includes a scanner. If the processor is not running on the QRadar console,you must also transfer the keys to the QVM processor.
7. Copy the public key to the scan target by typing the following command:
cd /home/qvmuser/.ssh
ssh-copy-id -i id_<key_type>.pub <user>@<IP address>
• <key_type> – dsa or rsa.• <IP address> – the IP address of the scan target.• <user> – the user on the scan target.
8. Type the user password for the scan target.9. Check that the qvmuser account on the QVM scanner can SSH to the scan target without a password
by typing the following command:
su -m -c 'ssh -o StrictHostKeyChecking=no <user>@<IP address> ls' qvmuser
• <IP address> – the IP address of the scan target.• <user> – the user on the scan target.
A list of the files in the user's home directory on the scan target is displayed.
What to do next
Create a scan profile in QRadar Vulnerability Manager with user name of the user on the scan targetwithout specifying a password and run a patch scan.
Related tasksConfiguring an authenticated scan of the Linux or UNIX operating systems
Configuring an authenticated scan of the Linux or UNIX operating systemsIn IBM QRadar Vulnerability Manager, you can configure an authentication scan of the Linux or UNIXoperating systems that are on your network. You can manually specify the credentials in the scan profileor use a credential set.
Chapter 7. Authenticated patch scans 59
Before you begin
To scan by using a credential list, you must first define a central list of the credentials that are required byyour operating systems. For more information, see “Configuring a credential set” on page 58.
Procedure
1. Click the Vulnerabilities tab.2. In the navigation pane, select Administrative > Scan Profiles.3. On the toolbar, click Add.
When you create a scan profile, the only mandatory fields are Name and IP Addresses on the Detailstab of the Scan Profile Configuration page. To configure an authenticated scan, you must also followthe remaining steps in this procedure.
4. Click Use Centralized Credentials to scan your Linux or UNIX operating systems.
If a credential set is not configured and you do not manually specify the credentials, the scan toolsrun but no credentials are passed in.
If QVM cannot find a centralized credential set for the hosts that you are scanning, it uses existingcredentials that you manually specify in the Additional Credentials tab.
5. Click the When To Scan tab.6. In the Run Schedule list, select Manual.7. Click the Additional Credentials tab.8. In the Linux/Unix Patch Scanning area, type the user name and password for the Linux or UNIX
hosts that you want to scan and click >.
A password is not required, if you configured secure public key authentication between your consoleand your scan target.
9. Click Save.10. In the Scan Profiles page, click Run.
Related conceptsCentralized credential setsRelated tasksConfiguring a credential setIn IBM QRadar Vulnerability Manager, you can create a credential set for the assets in your network.During a scan, if a scan tool requires the credentials for a Linux, UNIX, or Windows operating system, thecredentials are automatically passed to the scan tool from the credential set.Configuring Linux operating system public key authentication
Enabling permissions for Linux or UNIX patch scansNon-root user accounts must have the permissions to run the commands that QRadar VulnerabilityManager requires to scan for patches on Linux and UNIX computers.
About this task
Do the following tasks to verify that the user account that you use for scanning has the relevantpermissions for Linux or UNIX patch scanning,
Procedure
1. SSH to the asset.2. Run the following uname commands:
60 IBM QRadar Vulnerability Manager: QRadar Vulnerability Manager

uname -muname -nuname -suname -runame -vuname -puname -a
3. Depending on your operating system, run the following commands:
Table 9. Commands to run on your Operating System
Operating System Commands
Linux The following files contain the relevant content for your distribution:
/etc/redhat-release
/etc/SuSE-release
/etc/debian-version
/etc/slackware-version
/etc/mandrake-version
/etc/gentoo-version
For example, on Red Hat Enterprise Linux, use the commands:
ls /etc/redhat-releasecat/etc/redhat-release rpm -qa --qf '%{NAME}--%{VERSION}---%{RELEASE}\|%{EPOCH}--%{ARCH}---%{FILENAMES}--%{SIGPGP}---%{SIGGPG}\n' rpm -qa --qf '%{NAME}-%{VERSION}-%{RELEASE}|%{EPOCH}\n'
Solaris /usr/bin/svcs -a/usr/bin/pkginfo -x \| awk '{ if ( NR % 2 ) { prev = \$1 }else { print prev\" \"\$0 } }'/usr/bin/showrev -p/usr/sbin/patchadd -p/usr/bin/isainfo -b/usr/bin/isainfo -k/usr/bin/isainfo -n/usr/bin/isainfo -v
HP-UX /usr/sbin/swlist -l fileset -a revision/usr/sbin/swlist -l patch
AIX oslevel -rlslpp -Lc
ESX vmware -vesxupdate query --all. /etc/profile ; /sbin/esxupdate query –all
Tip:
As a best practice, turn off email notifications for the scan user account because email notificationmight interfere with the processing of scan results. View your operating system documentation fordetails about turning off email notifications for user accounts.
Chapter 7. Authenticated patch scans 61

62 IBM QRadar Vulnerability Manager: QRadar Vulnerability Manager
Chapter 8. Scanning on Windows-based assetsQRadar Vulnerability Manager uses registry scanning and Open Vulnerability Assessment Language(OVAL) scanning to detect vulnerabilities on Windows-based assets. Use authenticated scans to detect allWindows vulnerabilities. Unauthenticated scans might not detect all Windows vulnerabilities.
When are vulnerability data updates visible in QRadar?
Newly published vulnerabilities are visible on the QRadar Vulnerability Manager dashboard and in theresearch section of the Vulnerability tab in QRadar.
QRadar Vulnerability Manager gets daily vulnerability updates, which includes news, advisories, newlypublished vulnerabilities and their associated metadata, test data, and any new detection.
QRadar Vulnerability Manager systems are typically updated with the most recent vulnerabilities 2-3 daysafter they are announced.
What types of scanning methods are available?
The following list describes important points about scanning methods that are available to detectvulnerabilities on Windows-based assets:
Authenticated or unauthenticated scansYou must use authenticated scans to detect all Windows-based vulnerabilities. If you use anunauthenticated scan to detect Windows-based vulnerabilities, the results might not be complete andthey are prone to false positives.
Registry scansRegistry scanning is used to detect vulnerabilities on the Windows operating system.
• QRadar Vulnerability Manager uses the remote registry service and Windows ManagementInstrumentation (WMI) to retrieve information about installed KB service packs, installed software,and enabled services from the endpoints that it scans, and this information is correlated withvulnerability definitions.
• Each Windows vulnerability definition includes the Bulletin, KB, product, OS, service pack, andrequired Windows service.
Open Vulnerability Assessment Language (OVAL) scansOVAL (Open Vulnerability Assessment Language) scanning is used to detect vulnerabilities on theWindows operating system.
Open Vulnerability Assessment Language (OVAL) is a standard that is referenced when you do OVALtests for vulnerabilities and configuration tests on assets. The following list describes informationabout vulnerabilities and OVAL tests.
• Tests can include any combination of registry keys, registry key values, .dll and .exe versions,running services, presence of files.
• Each vulnerability definition is an XML logical expression that determines whether the system isvulnerable.
• All .exe and .dll versions are tested.• You can click the CVE link for a vulnerability to see whether it has an OVAL test, for example,
CVE-2013-3910 (https://web.nvd.nist.gov/view/vuln/detail?vulnId=CVE-2013-3910)• OVAL test definitions are available online at the Oval website, (https://oval.cisecurity.org/)• The OVAL test can override a generated vulnerability.
Windows OS patch scansWindows operating system patch scanning is an authenticated network-based method that is used tointerrogate the target computer for missing security-related software fixes and updates.
© Copyright IBM Corp. 2012, 2019 63
Patch scans do a limited Nmap port scan of ports, 22, 139, and 445, to determine whether the assetis a Windows or an UNIX asset. If the port scan discovers NetBIOS ports 139 or 445, it knows thatthese ports are from a Windows-based asset. The enum vulnerability tool is used to scan a Windowsasset.Patch scans are not intrusive, and they don't do any active vulnerability tests.Patch scans factor in superseded patches automatically.
It is possible to scan computers for Windows OS patches without configuring Windows ManagementInstrumentation (WMI) and Administrative Shares but the results are not complete and they are proneto false positives.
Configuration requirements for Windows-based asset scanningThe following list describes requirements that you must configure for Windows-based asset scanning:
• Configure remote registry access on the assets.• Configure Windows management instrumentation (WMI) on the assets.• To read WMI data on a remote server through a firewall, you must allow WMI requests through a
Windows firewall.• If you use a non-administrator account to monitor the Windows server, you must set minimum DCOM
permissions and grant DCOM remote access permissions for that non-administrator account.• Configure administrative shares on the assets.
Configuring an authenticated scan of the Windows operating systemIn IBM QRadar Vulnerability Manager, you can configure a scan of the Windows operating systems thatare installed on your network. You can manually specify the credentials in the scan profile or use acredential set.
If scanning is performed without administrative privileges, then QRadar Vulnerability Manager scans theremote registry for each installation on the Windows operating system.
Scanning without administrative privileges is incomplete, prone to false positives, and does not covermany third-party applications.
Before you begin
QRadar Vulnerability Manager uses standard Windows operating system remote access protocols that areenabled by default in most windows deployments.
Procedure
1. Click the Vulnerabilities tab.2. In the navigation pane, select Administrative > Scan Profiles.3. On the toolbar, click Add.
When you create a scan profile, the only mandatory fields are Name and IP Addresses on the Detailstab of the Scan Profile Configuration page. To configure an authenticated scan of the Windowsoperating system, you must also follow the remaining steps in this procedure.
4. Click Use Centralized Credentials to scan your Windows operating systems.
You must configure a credential set or manually specify credentials for hosts before scan tools thatrequire credentials can run.
If QVM cannot find a centralized credential set for the hosts that you are scanning, it uses existingcredentials that you manually specify in the Additional Credentials tab.
5. Click the When To Scan pane.6. In the Run Schedule list, select Manual.
64 IBM QRadar Vulnerability Manager: QRadar Vulnerability Manager

If you want the scan to run at a later time, choose from one of the available Run Schedule options.7. Click the Additional Credentials area.8. In the Windows Patch Scanning area, type the Domain, Username, and Password for the Windows
hosts that you want to scan and click (>).
The domain name that you type is your Windows domain, not an internet domain.9. Click Save.
10. In the Scan Profiles page, click Run.
Related conceptsCentralized credential setsAuthenticated patch scans
Remote RegistryThe Remote Registry service must be enabled and started and accessible from both the QRadarVulnerability Manager scanner appliance and the configured scanning user used in the scan profile.
If the remote registry cannot be accessed, windows patch scanning fails completely.
If QRadar Vulnerability Manager cannot access the remote registry, the scan results record the followingerror:
Local Checks Error – Remote Registry Service Not Running
In QRadar Vulnerability Manager version 7.2.3 and later, a yellow triangle icon is displayed next to theasset in the scan results.
The status of the remote registry service can be verified from the Administrative Control Panel underServices. Ensure that the following dependent services are started:
• Remote Procedure Call (RPC)• DCOM Server Process Launcher• RPC EndPoint Mapper
QRadar Vulnerability Manager can access the remote registry over the classic NetBIOS (ports 135, 137,139) or the newer NetBIOS over TCP (on port 445). Network or personal firewalls that block access toeither of these protocols prevents access to Windows patch scans.
Administrative user accounts have access to the remote registry by default. Non-administrative useraccounts do not have access to the remote registry. You must configure access.
Enabling remote registry access to assets on the Windows operating systemTo scan Windows-based systems, you must configure your registry.
Procedure
1. Log in to your Windows-based system.2. Click Start.3. In the Search programs and files field, type services and press Enter.4. In the Services window, locate the Remote Registry service.5. Right-click the Remote Registry service and click Start.6. Close the Services window.
Chapter 8. Scanning on Windows-based assets 65
Assigning minimum remote registry permissionsAdministrative user accounts have access to the remote registry by default. Non-administrative useraccounts do not have access to the remote registry. You must configure access.
Procedure
1. On the target Windows computer, create or designate a Local or Global User (example,"QVM_scan_user") and assign read-only Registry access to the non-administrative user account.
2. Log on to your Windows computer by using an account that has administrator privileges. Click Start >Run.
3. Type regedit.4. Click OK.5. Go to the key:
HKEY_LOCAL_MACHINE\SYSTEM\CurrentControlSet\Control\SecurePipeServers \winreg.
The permissions that are associated with this registry key control which users or group can access theregistry remotely from the network.
6. Highlight the winreg key and do one of the following steps:
• On Windows XP or later, click Edit > Permissions.• On Windows 2000, click Security > Permissions.
7. Give read-only access to the designated "QVM_scan_user" account.
On Windows XP, the ForceGuest setting is enabled by default when in workgroup mode. This settingmight cause access problems for WMI connections and shares access, other DCOM services, and RPCservices. You cannot disable the ForceGuest setting on Windows XP Home computers.
Configuring WMIQRadar Vulnerability Manager uses Windows Management Instrumentation (WMI) to locate and identifyversions of the installed .exe and .dll files on the target assets that are scanned.
About this task
Without the information that is provided by Windows Management Instrumentation (WMI), many third-party applications are missed. False positives that are detected during registry scanning (by using theremote registry service) cannot be identified or removed by QRadar Vulnerability Manager.
WMI is installed on all of modern Windows operating systems, such as Windows Vista, Windows 2008,Windows 2012, Windows 7, Windows 8, and Windows 8.1).
Remote WMI requests must be enabled and accessible by the scanning user on assets that are scanned.If WMI is not available, the following error is reported in the scan results:
Local Checks Error – Unable to Query WMI serviceMount Remote Filesystem
In QRadar Vulnerability Manager version 7.2.3 and above, a yellow triangle warning icon appears next tothe asset in the scan results.
To read WMI data on a remote server, a connection must be made from your management computer(where the monitoring software is installed) to the server that you are monitoring. If the target server isrunning the Windows Firewall (also called Internet Connection Firewall) which is installed on Windows XPand Windows 2003 computers, you must configure the firewall to allow remote WMI requests through. Toconfigure Windows Firewall to allow remote WMI requests, open a shell prompt and enter the followingcommand:
netsh firewall set service RemoteAdmin enable
66 IBM QRadar Vulnerability Manager: QRadar Vulnerability Manager
If your patch scan is not successful, do the following steps.
Procedure
1. On the target server, go to Control Panel > Administrative Tools > Computer Management.2. Expand Services and Applications.3. Right-click WMI Control and click Properties.4. Click the Security tab.5. Click Security.6. If necessary, add the monitoring user, and click the Remote Enable check box for the user or group
that requests WMI data. To add a monitoring user or group:a) Click Add.b) In the Enter the object names to select field, type the name of your group or user name.c) Click OK.
7. Click Advanced and apply to the root and sub name spaces.
Note: In some cases, you might also need to configure the Windows firewall and DCOM settings.
If you experience WMI issues, you can install the WMI Administrative tools from the Microsoft website.
The tools include a WMI browser that helps you connect to a remote machine and browse through theWMI information. These tools help you to isolate any connectivity issues in a more direct and simplerenvironment.
Setting minimum DCOM permissionsTo connect to a remote computer by using WMI, you must ensure that the correct DCOM settings andWMI namespace security settings are enabled for the connection.
About this task
To grant DCOM remote launch and activation permissions for a user or group, do these steps.
Procedure
1. Click Start > Run, type DCOMCNFG, and then click OK.2. In the Component Services dialog box, expand Component Services, expand Computers, and then
right-click My Computer and click Properties.3. In the My Computer Properties dialog box, click the COM Security tab.4. Under Launch and Activation Permissions, click Edit Limits.5. In the Launch Permission dialog box, if your name or your group does not appear in the Groups or
user names list, follow these steps:a) In the Launch Permission dialog box, click Add.b) In the Select Users, Computers, or Groups dialog box, add your name and the group in the Enter
the object names to select box, and then click OK.6. In the Launch Permission dialog box, select your user and group in the Group or user names box.7. In the Allow column under Permissions for User, select Remote Launch and select Remote
Activation, and then click OK.
Chapter 8. Scanning on Windows-based assets 67

Setting DCOM remote access permissionsYou must set up DCOM remote access permissions for certain users and groups.
About this task
If Computer A is connecting remotely to Computer B, you can set the remote access permissions onComputer B to allow a user or group that is not a member of the Administrators group on Computer B toconnect remotely to Computer B.
Procedure
1. Click Start > Run, type DCOMCNFG, and then click OK.2. In the Component Services dialog box, expand Component Services, expand Computers, and then
right-click My Computer and click Properties.3. In the My Computer Properties dialog box, click the COM Security tab.4. In the Access Permissions section, click Edit Limits.5. Configure one of the following users or groups to have remote access rights:
• In the Access Permission dialog box, select the ANONYMOUS LOGON name in the Group or usernames box. In the Permissions for ANONYMOUS LOGON area, select the Allow check box forRemote Access, and then click OK.
• In the Access Permission dialog box, select the Everyone name in the Group or user names box.In the Permissions for Everyone area, select the Allow check box for Remote Access, and thenclick OK.
• In the Access Permission dialog box, select the <QVM scan user> name in the Group or usernames box. In the Permissions for <QVM scan user> area, select the Allow check box for RemoteAccess, and then click OK.
Note: If you want to use the <QVM scan user> user account, you must create the user account beforeyou grant DCOM remote access rights. You must also configure WMI access (step 6) for this user.
Administrative sharesAll Windows computers have administrative shares, \\machinename\driveletter$ enabled,especially when they are part of a domain.
QRadar Vulnerability Manager uses administrative shares to detect vulnerabilities on the following limitedset of applications:
• Mozilla Firefox• Mozilla Thunderbird• Java™ FX• Apache Archiva• Apache Continuum• Google ChromePreferences
Administrative shares are not visible to non-administrative users, and some organizations disableadministrative shares or use non-administrative user accounts to scan. If administrative shares are notaccessible, QRadar Vulnerability Manager might miss vulnerabilities in the products in the preceding listor produce false positives. In general, QRadar Vulnerability Manager vulnerability tests use onlyadministrative shares as a last resort, and use registry scans and WMI.
68 IBM QRadar Vulnerability Manager: QRadar Vulnerability Manager
Enabling administrative sharesOn Windows Vista or later, administrative shares are disabled by default when in “workgroup” mode.
About this task
Enable administrative shares by using these steps:
Procedure
1. Click Start > Run and type regedit.2. Go to the key: HKEY_LOCAL_MACHINE\SOFTWARE\Microsoft\Windows\CurrentVersion\Policies
\System3. Right-click WMI Control and click Properties.4. Add a new DWORD named: LocalAccountTokenFilterPolicy5. Set the value to 1.
Disabling administrative sharesSome organizations do not want to enable administrative shares. However, when enable the remoteregistry service, the server service is started and administrative shares are enabled.
About this task
To disable administrative shares, modify the following registry key:
Procedure
1. Click Start > Run and type regedit.2. Go to the key: HKEY_LOCAL_MACHINE\SYSTEM\CurrentControlSet\Services\LanManServer\3. Set the AutoShareWks parameter to 0.
Note: This action does not disable the IPC$ share. Although this share is not used to access filesdirectly, ensure that anonymous access to this share is disabled. Alternatively, you can remove the IPC$ share completely by deleting it at start-up by using the following command:
net share IPC$ /delete
Use this method to remove the C$ and D$ shares also.
Manually configuring NTLMv2 authentication to prevent scan failuresYou must manually configure the credentialed scans that you run against assets that use Microsoft NewTechnology LAN Manager version 2 (NTLMv2) so that you can prevent the scans from failing.
About this task
When you run a credentialed scan against a Windows asset that uses the LAN Manager AuthenticationLevel of "Send NTLMv2 response only. Refuse LM and NTLM", some of the scan tools can failauthentication. A yellow warning triangle is displayed for the asset, and a local checks error vulnerabilityis raised. Running the scan multiple times can result in locking the user account out of the asset.
To prevent the scans that you run against assets that use NTMLv2 from failing, manually enable NTMLv2authentication in the following files on the QVM Scanner:
• /opt/qvm/etc/smb.conf• /opt/qvm/etc/smb.conf.smbv1
Chapter 8. Scanning on Windows-based assets 69
• /opt/qvm/etc/smb.conf.smbv2
Procedure
Open each of these files and add the following line: client ntlmv2 auth = yes
70 IBM QRadar Vulnerability Manager: QRadar Vulnerability Manager

Chapter 9. Vulnerability exception rulesIn IBM QRadar Vulnerability Manager, you can configure exception rules to minimize the number of falsepositive vulnerabilities.
When you apply exception rules to vulnerabilities, you reduce the number of vulnerabilities that aredisplayed in search results.
If you create a vulnerability exception, the vulnerability is not removed from QRadar VulnerabilityManager.
Viewing exception rules
To display vulnerability exceptions, you can search your vulnerability data by using search filters.
To view exception rules, click the Vulnerabilities tab, then click Vulnerability Exception in the navigationpane.
Tip: The Exception Rules table displays only the most recently entered comment. To view othercomments, hover over the Comment column for the rule.
Related tasksReducing the number of false positive vulnerabilities
Applying a vulnerability exception ruleIn IBM QRadar Vulnerability Manager, you can manually apply a vulnerability exception rule to avulnerability that you decide does not pose a significant threat.
If you apply an exception rule, the vulnerability is no longer displayed in QRadar Vulnerability Managersearch results. However, the vulnerability is not removed from QRadar Vulnerability Manager.
Procedure
1. Click the Vulnerabilities tab.2. In the navigation pane, click Manage Vulnerabilities > By Network.3. Search your vulnerability data. On the toolbar, click Search > New Search.4. Click the Vulnerability Instances column link.5. Select the vulnerability that you want to create an exception rule for.6. On the toolbar, select Actions > Exception.
7. In the Exception Rule field, select an expiry option.8. To provide a reason for the exception, select a reason from the Reason list.9. In the Assets field, select your target assets for the exception rule by choosing from the following
options:
• To apply the exception to all assets, select Exception vulnerability for all assets.• To apply the exception to a specific asset, select Exception for specific asset with current IP.
By default, the asset that is associated with the vulnerability that you selected in Step 5 isselected.
• To apply the exception to a specific IP address, CIDR, or network, enter the details, select yourdomain and click Add.
If you select a specific network from your network hierarchy, the exception applies only to the IPaddresses in that network. For example, if an IP address is assigned to two networks in the
© Copyright IBM Corp. 2012, 2019 71
network hierarchy, the exception does not apply to that same IP address in the second network,unless you specify it as an exception.
10. In the Notes field, enter comments in the Comments text box.11. Click Save or Cancel.
Related conceptsFalse positives managementCommonly, false positives in vulnerability scanning occur when the scanner can access only a subset ofthe required information, which prevents it from accurately determining whether a vulnerability exists.Related tasksSearching vulnerability data
Managing a vulnerability exception ruleIf you receive new information about a vulnerability, you can update or remove an existing vulnerabilityexception rule.
Procedure
1. Click the Vulnerabilities tab.2. In the navigation pane, click Vulnerability Exception.3. Click the vulnerability that you want to manage.4. On the toolbar, select an option from the Actions menu.
Important: If you delete a vulnerability exception rule, no warning is displayed. The vulnerability isimmediately deleted.
5. Click Save.
Searching vulnerability exceptionsIn IBM QRadar Vulnerability Manager, you can search your vulnerability data and filter the search resultsto display vulnerability exceptions.
Procedure
1. Click the Vulnerabilities tab.2. In the navigation pane, select Manage Vulnerabilities > By Asset.3. On the toolbar, select Search > New Search.4. To filter your vulnerability data to include vulnerability exceptions, from the Search Parameters pane,
select one of the following options:
• Include vulnerability exceptions
Displays all vulnerabilities, including vulnerabilities with an exception rule applied to them.• Only include vulnerability exceptions
Displays vulnerabilities only with an exception rule applied to them.5. Click Add Filter.6. Click Search.
72 IBM QRadar Vulnerability Manager: QRadar Vulnerability Manager

Chapter 10. Scan investigationsIn IBM QRadar Vulnerability Manager, you can investigate summary asset and vulnerability data for eachscan.
To investigate vulnerability scans, do the following tasks:
• Build and save complex vulnerability search criteria.• Investigate exploitation risk levels at a network, asset, and vulnerability level.• Prioritize your vulnerability remediation processes.
Scan results
You can use the Scan Results page to investigate the following information:
• The progress of a scan and the scanning tools that are queued and running.• The status of a scan. For example, a scan with a status of Stopped indicates that the scan completed
successfully or was canceled.• The degree of risk that is associated with each completed scan profile. The Score column shows the
Common Vulnerability Scoring System (CVSS) score for the completed scan profile. The CVSS base andtemporal score are included in the calculation of this score but the CVSS environmental score is notincluded in this calculation. The CVSS environmental score is incorporated in the Risk Score columnthat you can view in the Manage Vulnerabilities window.
• The total number of assets that were found by the scan.• The total number of vulnerabilities that were discovered by the completed scan profile.• The total number of open services that were discovered by the completed scan profile.
Note: Scan progress can indicate that the scan is 100% complete while the results are still processing. Tosee if processing is complete, hover over the progress bar.
Vulnerability counts
The Scan Results page shows Vulnerabilities and Vulnerabilities Instances.
• The Vulnerabilities column shows the total number of unique vulnerabilities that were discovered onall the scanned assets.
• When you scan multiple assets, the same vulnerability might be present on different assets. Therefore,the Vulnerability Instances column shows the total number of vulnerabilities that were discovered onall the scanned assets.
Searching scan resultsIn IBM QRadar Vulnerability Manager, you can search and filter your scan results.
For example, you might want to identify recent scans, scans on a specific IP address, or scans thatidentified a specific vulnerability.
About this task
Use the Name field on the Vulnerabilities tab to search results by scan profile name. To use moreadvanced criteria in your search, do the following:
Domain-level restrictions are not applied until the security profiles are updated with an associateddomain, and the changes are deployed.
© Copyright IBM Corp. 2012, 2019 73

Procedure
1. Click the Vulnerabilities tab.2. In the navigation pane, click Scan Results.3. On the toolbar, select Search > New Search.
To search your scan results, there are no mandatory fields. All parameters are optional.4. To show scan results for scans that completed within a recent number of days, type a value in the
Scan Run in the last days field.5. To show scan results for a specific vulnerability, click Browse in the Contains Vulnerability field.6. To show scan results for scans that were only scheduled, click Exclude on demand scan.7. Click Search.
Related conceptsScan schedulingIn IBM QRadar Vulnerability Manager, you can schedule the dates and times to scan your network assetsfor known vulnerabilities.
Including column headings in asset searchesLimit asset searches with filters that include custom asset profiles, name, vulnerability count, and riskscore.
Procedure
1. Click the Assets tab.2. In the navigation pane, click Asset Profiles, then on the toolbar click Search > New Search.3. In the field containing column names, in the field on the left, click the column headings you want to
include in your search, and click the arrow button to move the selected headings to field on the right.4. Click the up and down buttons to change the priority of the selected column headings.5. When the field on the right contains all the column heading that you want to search on, click Search.
Managing scan resultsIn IBM QRadar Vulnerability Manager, on the Scan Results page, you can manage your scan results andmanage the scans that are running.
Procedure
1. Click the Vulnerabilities tab.2. In the navigation pane, click Scan Results.3. If you want to rerun completed scans, select the check box in the rows assigned to the scans and click
Run.
A completed scan has a status of Stopped.4. To delete completed scan results:
a) On the Scan Results page, select the check box in the rows assigned to the scans results you wantto delete.
b) On the toolbar, click Delete.
If you delete a set of scan results, no warning is displayed. The scan results are immediatelydeleted.
Remember: When you delete a set of scan results, neither the scan data in the QRadar asset modelor the scan profile are deleted.
74 IBM QRadar Vulnerability Manager: QRadar Vulnerability Manager

5. To cancel a scan that is running:a) On the Scan Results page, select the check box in the rows assigned to the scans you want to
cancel.b) On the toolbar, click Cancel.
You can cancel a scan that has a status of Running or Paused.
After you cancel a scan, the status of the scan is Stopped.
Republishing scan resultsIf the asset model is not automatically updated with results from a completed scan, you can manuallyrepublish them from the Scan Results page.
About this task
If you did not select the Update Asset Model check box when you configured a scan profile, the scanresults aren't automatically published to the asset model. You can update the asset model manually withscan results for that profile.
Procedure
1. Go to Vulnerabilities > Scan Results2. Click the check box on the row that is assigned to the scan results that you want to republish.3. Click Republish on the Scan Results page toolbar and then click OK.
A red warning icon in the Type column indicates that the asset model is not updated with the selectedscan results. The red warning icon disappears after the republishing process is complete.
4. Move the mouse pointer over the Type column to view confirmation in the tooltip that the asset modelis updated for the selected scan results.
Note: You can republish multiple scan results at the same time. However, if you republish two sets ofscan results from the same profile, the asset model is updated with only the latest set of scan results.
If you configured automatic report generation on the Email tab of the Scan Profile Configurationpage, reports are generated and sent to the email addresses you configured when you republish scanresults.
Asset risk levels and vulnerability categoriesIn IBM QRadar Vulnerability Manager, you can investigate the exploitation risk level of your scannedassets on the Scan Results Assets page.
The Scan Results Assets page provides a risk and vulnerability summary for each of the assets that youscanned by running a scan profile.
Risk score
Each vulnerability that is detected on your network has a risk score that is calculated by using theCommon Vulnerability Scoring System (CVSS) base score. A high risk score provides an indication of thepotential for a vulnerability exploitation.
On the Scan Results Assets page the Score column is an accumulation of the risk score for eachvulnerability on an asset. The accumulated value provides an indication of the level of risk that isassociated with each asset.
To quickly identify the assets that are most at risk to vulnerability exploitation, click the Score columnheading to sort your assets by the risk level.
Chapter 10. Scan investigations 75

Vulnerability counts and categories
The Scan Results Assets page shows the total number of vulnerabilities and open services that werediscovered on every scanned asset.
To identify the assets with the highest number of vulnerabilities, click the Vulnerability Instancescolumn heading to order your assets.
The High, Medium, Low, and Warning columns group all vulnerabilities according to their risk.
The Policy Check Passed % and Policy Check Failed % columns display the percentage of policy checksthat the asset passed or failed in the benchmark scan. Click the values in these columns to see moreinformation on policy checks that passed or failed on the Scan Results Policy Checks page.
Asset, vulnerability, and open services dataIn IBM QRadar Vulnerability Manager, the Scan Results Asset Details page shows asset, vulnerability,and open services data.
By using the options on the toolbar, you can switch between viewing vulnerabilities and open services.
The Scan Results Asset Details page provides the following information:
• Summary information about the asset that you scanned, including the operating system and networkgroup.
• A list of the vulnerabilities or open services that were discovered on the scanned asset.• Various ways of categorizing and ordering your list of vulnerabilities or open services for example, Risk,
Severity, and Score.• A quick way to view open service or vulnerability information. On the toolbar, click Vulnerabilities or
Open Services.• An easy way to view detailed information about the asset that you scanned. On the toolbar, click the
Asset Details.• An alternative method of creating a vulnerability exception. On the toolbar, click Actions > Exception.
The caution icon indicates that the scan failed. Hover over the icon for additional details.
For more information about the Asset Details window, see the Users Guide for your product.
Related conceptsVulnerability exception rulesIn IBM QRadar Vulnerability Manager, you can configure exception rules to minimize the number of falsepositive vulnerabilities.
Viewing the status of asset patch downloadsView whether an asset has a pending patch download. If there are no pending downloads, the asset hasall available patches.
Procedure
1. Search for the asset that you want to confirm the patch status for.2. Click the Asset IP address to open the Asset Details window.3. Click Details > Properties to open the Asset Properties window.4. Click the Windows Patches arrow.5. View the patch status in the Pending column.
• True - the asset has pending patches to download.• False - the asset has no pending patch downloads.
76 IBM QRadar Vulnerability Manager: QRadar Vulnerability Manager

Vulnerability risk and PCI severityIn IBM QRadar Vulnerability Manager, you can review the risk and payment card industry (PCI) severityfor each vulnerability that is found by a scan.
You can review the following information:
• The risk level that is associated with each vulnerability.• The number of assets in your network on which the specific vulnerability was found.
To investigate a vulnerability, you can click a vulnerability link in the Vulnerability column.
Troubleshooting scan issuesTroubleshoot scanning issues in your network by investigating logs, error, and warning messages.
Slow response time from scanned hostDeploy the QRadar Vulnerability Manager scanning appliance relatively close to the assets that you arescanning. Use commands such as traceroute to ensure that packets are reaching the asset in less than 50ms; otherwise scans might take a long time.
Check status of scan tools
If your scans are running for a long time, and you want to know what tools are running, hover over thescan progress percentage on the scan results page to display a popup window, which shows you theactive tool.
Patch scan is not connecting to a Linux assetIf the patch-scan tool is not connecting to a Linux asset, a yellow triangular warning icon is displayed nextto the asset in the scan results.
You might see the SSH Patch Scanning - Failed Logon error message.
Validate the user name and password. If you are using public key encryption, check the public key.
To scan Linux operating systems by using secure authentication, configure public key encryption betweenyour console or managed host and your scan targets. Non-root user accounts must have the permissionsto run the commands that QRadar Vulnerability Manager requires to scan for patches on Linux and UNIXcomputers. For more information, see Chapter 7, “Authenticated patch scans,” on page 57.
Local checks error
If the patch scan tool cannot connect to a Windows asset, a yellow triangular warning icon is displayednext to the asset in the scan results.
You might see the Local Checks Error error message, which means that the authenticated scanfailed.
You can configure credentials in the scan profile or in centralized credentials. If the scanner is scanningWindows-based hosts, the following three windows services must be configured correctly:
• Remote registry• Windows Management Instrumentation (WMI)• Admin shares
For more information, see Chapter 8, “Scanning on Windows-based assets,” on page 63.
Same vulnerability titles for different KBs
If the KB for a bulletin is superseded by a KB in a future bulletin the vulnerability title does not change.
Chapter 10. Scan investigations 77

Stalled scan
If the scan is stalled or the scan is intermittent, an authorized user can log on to the scanner and verifythe connectivity with the scan processor. Check the QRadar Vulnerability Manager error logs forconnection errors.
UDP port scan takes a long time
If a scan policy is configured to scan all UDP ports, the scan might take a long time to complete,especially if the target host has several closed UDP ports. For PCI compliance scans, you are not requiredto scan all UDP ports. For more information, see “Scan duration and ports scanning” on page 27.
Number of assets scanned warning
If you see the following warning message on the Scan Results screen, your scan performance and scanresults are not affected:
WARNING: You have scanned <number> assets but are only licensed to scan <number> assets.License Update Required!
Note: You might need to check your QRadar Vulnerability Manager license to verify how many assets yourlicense permits you to scan.
Emailing asset owners when vulnerability scans start and stopEmail the configured asset technical owners to alert them of the scan schedule. You can also emailreports to asset owners.
Before you beginConfigure the system mail server and technical owners for assets. For more information, see the IBMQRadar Administration Guide.
Procedure
1. Click the Vulnerabilities tab.2. Click Administrative > Scan Profiles.3. On the row assigned to the scan you want to edit, select the check box and click Edit on the toolbar.4. In the What To Email area of the Email tab, select the appropriate check boxes.5. If you selected the Reports check box, in the Available Reports field, select the reports that you want
to email and click the arrow to move reports into the Selected Reports field.
Reports can be large. Confirm that the sent reports are not rejected by the recipient's email provider.6. In the Who to Email area, select the recipients that you want to receive the emails:
• To email the configured technical owners of the scanned assets, select the Technical Ownerscheck box. Technical owners receive emails about their assets only.
• To enter or select email addresses in the field, select the To Addresses check box. Select emailsand click Add Me to email the selected email recipients. Entered email addresses receive emailsand reports regarding all scanned assets.
7. Click Save.
78 IBM QRadar Vulnerability Manager: QRadar Vulnerability Manager
Chapter 11. Management of your vulnerabilitiesIn IBM QRadar Vulnerability Manager, you can manage, search, and filter your vulnerability data to helpyou focus on the vulnerabilities that pose the greatest risk to your organization.
The vulnerability data that is displayed is based on the vulnerability status information that is maintainedin the QRadar asset model. This information includes vulnerabilities that are found by the QRadarVulnerability Manager scanner and the vulnerabilities that are imported from external scanning products.
Manage your vulnerabilities to provide the following information:
• A network view of your current vulnerability posture.• Identify vulnerabilities that pose the greatest risk to your organization and assign vulnerabilities to
QRadar users for remediation.• Establish how widely your network is impacted by vulnerabilities and display detailed information about
the network assets that contain vulnerabilities.• Decide which vulnerabilities pose less risk to your organization and create vulnerability exceptions.• Display historical information about the vulnerabilities on your network.• Display vulnerability data by network, asset, vulnerability, open service, or vulnerability instance.
Common Vulnerability Scoring System (CVSS)The Common Vulnerability Scoring System (CVSS) is used to rate the severity and risk of computer systemsecurity.
CVSS is an open framework that consists of the following metric groups:
• Base• Temporal• Environmental
BaseThe base score severity range is 0 to 10 and represents the inherent characteristics of the vulnerability.The base score has the largest bearing on the final CVSS score, and can be further divided into thefollowing sub-scores:
• Impact
The impact sub-score represents metrics for confidentiality impact, integrity impact, and the availabilityimpact of a successfully exploited vulnerability.
• Exploitability
The exploitability sub-score represents metrics for Access Vector, Access Complexity, andAuthentication, and measures how the vulnerability is accessed, the complexity of the attack, and thenumber of times an attacker must authenticate to successfully exploit a vulnerability.
Temporal
The temporal score represents the characteristics of a vulnerability threat that change over time, andconsists of the following metrics:
• Exploitability
The availability of techniques or code that can be used to exploit the vulnerability, which changes overtime.
• Remediation Level
© Copyright IBM Corp. 2012, 2019 79
The level of remediation that is available for a vulnerability.• Report Confidence
The level of confidence in the existence of the vulnerability and the credibility of its technical details.
Environmental
The environmental score represents characteristics of the vulnerability that are impacted by the user'senvironment. Configure the following environmental metrics to highlight the vulnerabilities of importantor critical assets by applying higher environmental metrics. Apply the highest scores to the mostimportant assets because losses that are associated with these assets have greater consequences for theorganization.
• Collateral Damage Potential (CDP)
The potential for loss of life or physical assets through the damage or theft of this asset, or theeconomic loss of productivity or revenue.
• Target Distribution (TD)
The proportion of vulnerable systems in your user's environment.• Confidentiality Requirement (CR)
The level of impact to the loss of confidentiality when a vulnerability is exploited on this asset.• Integrity Requirement (IR)
This metric indicates the level of impact to the loss of integrity when a vulnerability is successfullyexploited on this asset.
• Availability Requirement (AR)
The level of impact to the asset's availability when a vulnerability is successfully exploited on this asset.
Related tasksConfiguring environmental risk for an assetUse the CVSS Environmental Score to manipulate and prioritize the risk score on selected assets. If youconfigure the CVSS, Weight & Compliance parameters for an asset, you can apply higher risk scores toassets that are more important or critical.
Investigating vulnerability risk scoresIn IBM QRadar Vulnerability Manager, you can investigate vulnerability risk scores and understand howeach score is calculated.
Procedure
1. Click the Vulnerabilities tab.2. In the navigation pane, click Manage Vulnerabilities.3. Click the Risk Score column to sort your vulnerabilities by risk.4. To investigate the risk score, hover you mouse on a vulnerability risk score.
Risk score detailsIn IBM QRadar Vulnerability Manager, vulnerability risk scores provide an indication of the risk that avulnerability poses to your organization.
Using IBM QRadar Risk Manager, you can configure policies that adjust vulnerability risk scores and drawattention to important remediation tasks.
80 IBM QRadar Vulnerability Manager: QRadar Vulnerability Manager

Risk Score
The Risk Score provides specific network context by using the Common Vulnerability Scoring System(CVSS) base, temporal, and environmental metrics.
When QRadar Risk Manager is not used to manage risk, the Risk Score column shows the CVSSenvironmental metric score with a maximum value of 10.
Risk adjustments
If IBM QRadar Risk Manager is installed and you configured vulnerability risk policies, then the riskadjustments are listed. The adjustments either increase or decrease the overall risk that is associatedwith a vulnerability.
Related conceptsIntegration with QRadar Vulnerability ManagerRelated tasksPrioritizing high risk vulnerabilities by applying risk policies
Custom risk classificationUse custom risk scores in QRadar Vulnerability Manager to classify vulnerabilities that pose the most riskto your organization. Custom risk classification allows you to override a vulnerability's risk with your ownrisk classification.
Based on your individual requirements, you might want to override a vulnerability's risk with your own riskclassification. A vulnerability that is classified as a high CVSS score by QRadar Vulnerability Manager maynot actually pose a serious risk for numerous mitigating factors. For example, if a CVSS 9.5 IPv6vulnerability is published, and an enterprise does not have any IPV6 infrastructure, then the high CVSSscore is not justified.
Configuring custom risk scores for vulnerabilitiesIn IBM QRadar Vulnerability Manager, you can add an internal custom risk score to vulnerabilities thatreflects the real risk to your organization.
Before you begin
Note:
A nightly auto update job runs to update all the custom risk fields. For reporting and saved searchpurposes, your custom risk changes will not come into effect right away. You can run the auto updatemanually to populate the custom risk information that is entered. Run auto update by clicking the AutoUpdate icon on the Admin tab.
Procedure
1. Click the Vulnerabilities tab.2. In the navigation pane, click Research > Vulnerabilities3. To assign an custom risk score to an asset, use the following steps:
a) Select a vulnerability and click Edit/Triage.b) Choose a custom risk type from the Custom Risk Assignment window:
• Blank: no change is made to custom risk, but a note is assigned.• Critical• High• Medium• Low
Chapter 11. Management of your vulnerabilities 81

• Warning• CVSS: the vulnerability has a custom risk set in accordance with the rules for the current CVSS
score.• Unassign: the vulnerability no longer has a custom risk level. Use this option to remove an
existing custom risk.c) Optional: Add a note by using the RTF text-box to reflect the vulnerability assignment. For example,
you could add a note to explain why you are changing the classification.d) Click Save.e) When a custom risk is created on any vulnerability, a new column called Custom Risk displays in
the Research Vulnerabilities screen.4. To view the custom risk details and note related to a custom risk assignment, double click the
Vulnerability in the Research Vulnerabilities screen.5. To search for vulnerabilities that have not yet been triaged, use the following steps:
a) In the navigation pane, click Research > Vulnerabilities.b) Click Search > New Search.c) In the Custom Risk Level section, select one of the following parameters to search on:
Table 10. Custom risk search parameters.
Custom Risk Search Type Description
All Vulnerabilities Returns all vulnerabilities regardless of whether a custom risk isassigned.
All triagedvulnerabilities
Returns all vulnerabilities with a custom risk assigned.
All not yet triagedvulnerabilities
Returns all vulnerabilities that do not have a custom risk assigned.
All vulnerabilitieswith the specificcustom risk level
Returns vulnerabilities that are filtered on the custom risk type thatis selected, for example, critical, high, or medium.
d) Click Search.6. Export a list of vulnerabilities from the Vulnerability List screen for audit or compliance purposes, by
using the following steps:a) In the navigation pane, click Research > Vulnerabilities.b) Select the export option required:
• Export to XML• Export to CSV
Searching vulnerability dataIn IBM QRadar Vulnerability Manager, you can identify important vulnerabilities by searching yourvulnerability data.
QRadar Vulnerability Manager provides various methods to search your data. You can search by network,by asset, by open service, or by vulnerability.
Default saved searches provide a fast method of identifying the risk to your organization. Saved searchesare displayed in the Available Saved Searches field on the Vulnerability Manager Search page.
82 IBM QRadar Vulnerability Manager: QRadar Vulnerability Manager

Before you begin
You must create a scan profile and scan your network assets.
Procedure
1. Click the Vulnerabilities tab.2. In the navigation pane, click Manage Vulnerabilities.3. On the toolbar, select Search > New Search.4. If you want to load a saved search, do the following steps:
a) Select a group from the Group list.b) In the Type Saved Search field, type the saved search that you want to load.c) From the Available Saved Searches list, select a saved search, and then click Load.d) Click Search.
5. If you want to create a new search, do the following steps in the Search Parameters pane:a) In the first list, select the parameter that you want to use.b) In the second list, select a search modifier. The modifiers that are available depend on the search
parameter that you select.c) In the third list, type or select the specific information that is related to your search parameter.d) Click Add Filter.
For example, to email the vulnerabilities that are assigned to a technical user, select Technical OwnerContact and provide an email address that is configured on the Vulnerability Assignment page.
6. Click Search.7. On the toolbar, click Save Search Criteria.
Important: Vulnerability reports use saved search information. If you want to create a report thatemails a technical user, you must save your search criteria.
Related conceptsVulnerability search parametersIn IBM QRadar Vulnerability Manager, you can search your vulnerability data and save the searches forlater use.
Vulnerability quick searchesSearch vulnerabilities by typing a text search string that uses simple words or phrases.
In IBM QRadar Vulnerability Manager, you can use quick searches to filter vulnerabilities on the MyAssigned Vulnerabilities and Manage Vulnerabilities pages.
Use the Quick Searches list to do a pre-configured vulnerability search.
Use the Quick Filter field to create your own vulnerability filters. Click Save Search Criteria to add yourvulnerability quick filters to the Quick Searches list.
Table 11. Vulnerability quick filter syntax guidelines
Description Example
Include any plain text that you expect to find invulnerability title, description, solution, concern,reference ID type, or reference ID value.
2012-3764
MS203
java
To search only the text in the vulnerability title,add :A to the search text string
PHP:A
Chapter 11. Management of your vulnerabilities 83
Table 11. Vulnerability quick filter syntax guidelines (continued)
Description Example
To search only the text in the vulnerabilitydescription, add :B to the search text string
cross-site scripting:B
To search only the text in the vulnerability externalreference type, add :C to the search text string
RedHat RHSA:C
Include wildcard characters. The search termcannot start with a wildcard.
SSLv*
Group terms with logical operators: AND, OR, andNOT (or !). To be recognized as logical operatorsand not as search terms, the operators must beuppercase.
PHP AND Traversal
XSS:A OR cross-site scripting:A
!MySQL
NOT MySQL
Related tasksSaving your vulnerability search criteria
Vulnerability search parametersIn IBM QRadar Vulnerability Manager, you can search your vulnerability data and save the searches forlater use.
The following table is not a complete list of vulnerability search parameters, but a subset of the availableoptions.
Select any of the parameters to search and display vulnerability data.
Table 12. Vulnerability search parameters
Option Description
Access Complexity The complexity of the attack that is required toexploit a vulnerability.
Access Vector The network location from where a vulnerabilitycan be exploited.
Asset saved search The host, IP address, or range of IP addressesassociated with a saved asset search.
For more information about saving asset searches,see the Users Guide for your product.
Assets with Open Service Assets that have specific open services. Forexample, HTTP, FTP, and SMTP.
Authentication The number of times an attacker mustauthenticate against a target to exploit avulnerability.
Availability Impact The level that resource availability can becompromised if a vulnerability is exploited.
Confidentiality Impact The level of confidential information that can beobtained if a vulnerability is exploited.
84 IBM QRadar Vulnerability Manager: QRadar Vulnerability Manager
Table 12. Vulnerability search parameters (continued)
Option Description
Days since asset found The elapsed number of days since the asset withthe vulnerability was discovered on your network.Assets can be discovered either by an active scanor passively by using log or flow analysis.
Days since associated vulnerability service traffic Displays vulnerabilities on assets with associatedlayer 7 traffic to or from an asset, based on theelapsed number of days since the traffic wasdetected.
Domain If you configured IBM QRadar for multi-domainsystems, use this option to specify the domain youwant to search for vulnerabilities.
By Open Service Search for vulnerabilities that are associated withparticular open services such as, HTTP, FTP, andSMTP.
External Reference of type Vulnerabilities that have an associated IBM BigFixFixlet. By using this parameter, you can show onlythose vulnerabilities without an available patch.
Impact The potential impact to your organization. Forexample, access control loss, downtime, andreputation loss.
Include early warnings Include newly published vulnerabilities that aredetected in your network and are not present inany scan results.
Include vulnerability exceptions Those vulnerabilities with an exception ruleapplied.
Integrity Impact The level to which system integrity might becompromised if a vulnerability is exploited.
Only include assets with risk Vulnerabilities that pass or fail specific risk policiesthat are defined and monitored in IBM QRadar RiskManager.
Note: You must monitor at least one question inthe Policy Monitor page on the Risks tab to usethis search parameter.
Only include assets with risk passed Vulnerabilities that pass specific risk policies thatare defined and monitored in QRadar RiskManager.
Only include early warnings Include only newly published vulnerabilities thatare detected in your network and are not present inany scan results.
Only include Vulnerability Exceptions Include only vulnerabilities with an exception ruleapplied in your search.
Overdue by Days Search for vulnerabilities that are overdue forremediation by a specified number of days.
Chapter 11. Management of your vulnerabilities 85
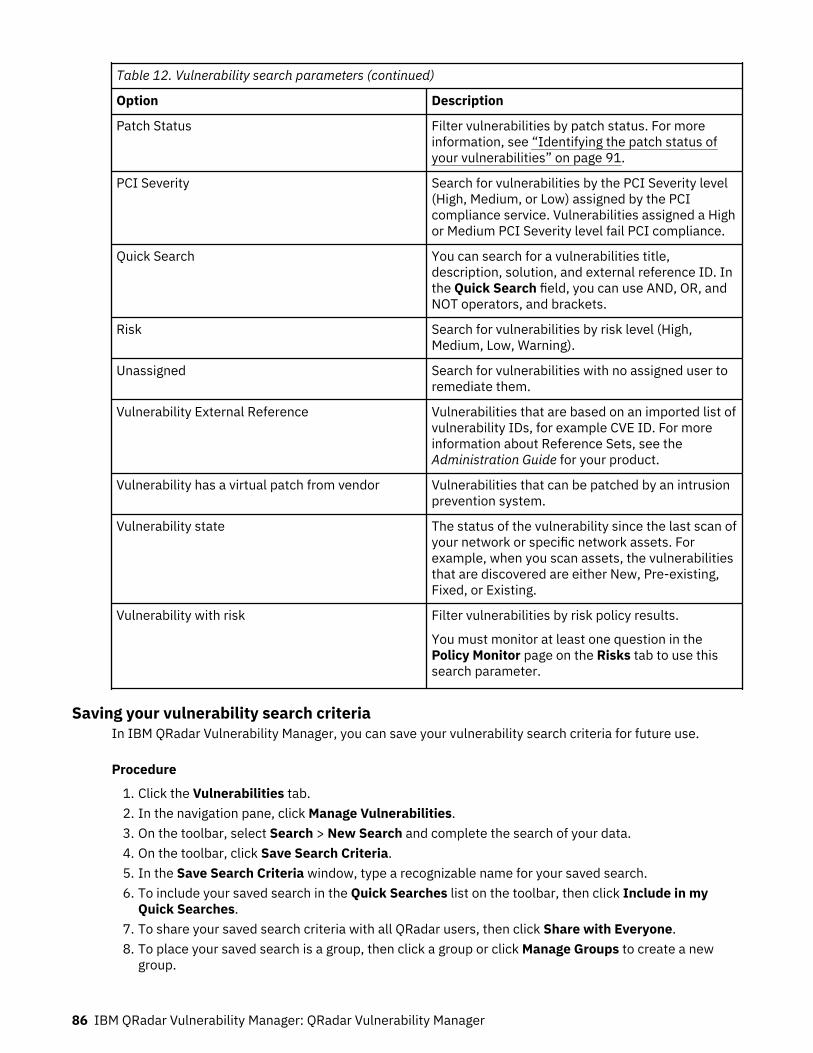
Table 12. Vulnerability search parameters (continued)
Option Description
Patch Status Filter vulnerabilities by patch status. For moreinformation, see “Identifying the patch status ofyour vulnerabilities” on page 91.
PCI Severity Search for vulnerabilities by the PCI Severity level(High, Medium, or Low) assigned by the PCIcompliance service. Vulnerabilities assigned a Highor Medium PCI Severity level fail PCI compliance.
Quick Search You can search for a vulnerabilities title,description, solution, and external reference ID. Inthe Quick Search field, you can use AND, OR, andNOT operators, and brackets.
Risk Search for vulnerabilities by risk level (High,Medium, Low, Warning).
Unassigned Search for vulnerabilities with no assigned user toremediate them.
Vulnerability External Reference Vulnerabilities that are based on an imported list ofvulnerability IDs, for example CVE ID. For moreinformation about Reference Sets, see theAdministration Guide for your product.
Vulnerability has a virtual patch from vendor Vulnerabilities that can be patched by an intrusionprevention system.
Vulnerability state The status of the vulnerability since the last scan ofyour network or specific network assets. Forexample, when you scan assets, the vulnerabilitiesthat are discovered are either New, Pre-existing,Fixed, or Existing.
Vulnerability with risk Filter vulnerabilities by risk policy results.
You must monitor at least one question in thePolicy Monitor page on the Risks tab to use thissearch parameter.
Saving your vulnerability search criteriaIn IBM QRadar Vulnerability Manager, you can save your vulnerability search criteria for future use.
Procedure
1. Click the Vulnerabilities tab.2. In the navigation pane, click Manage Vulnerabilities.3. On the toolbar, select Search > New Search and complete the search of your data.4. On the toolbar, click Save Search Criteria.5. In the Save Search Criteria window, type a recognizable name for your saved search.6. To include your saved search in the Quick Searches list on the toolbar, then click Include in my
Quick Searches.7. To share your saved search criteria with all QRadar users, then click Share with Everyone.8. To place your saved search is a group, then click a group or click Manage Groups to create a new
group.
86 IBM QRadar Vulnerability Manager: QRadar Vulnerability Manager

For more information about managing search groups, see the Administration Guide for your product.9. If you want to show the results of your saved search when you click any of the Manage
Vulnerabilities pages in the navigation pane, then click Set As Default.10. Click OK.
Deleting saved vulnerability search criteriaIn IBM QRadar Vulnerability Manager, you can delete your saved vulnerability search criteria.
Procedure
1. Click the Vulnerabilities tab.2. In the navigation pane, select Manage Vulnerabilities > By Network3. On the toolbar, select Search > New Search.4. On the Vulnerability Manager Search page, in the Available Saved Searches list, select the saved
search that you want to delete.5. Click Delete.6. Click OK.
Vulnerability instancesIn IBM QRadar Vulnerability Manager, you can display the vulnerabilities on each of the scanned assets inyour network. Each vulnerability might be listed multiple times because the vulnerability exists on severalof your assets.
If you configure third-party vulnerability assessment (VA) scanners, by using the QRadar Admin tab, thenthe vulnerabilities that are detected are automatically displayed in the By Vulnerability Instances page.
For more information about VA scanners, see the Administration Guide for your product.
The By Vulnerability Instances page provides the following information:
• A view of every vulnerability that was detected by scanning your network assets.• The risk that each vulnerability poses to the Payment Card Industry (PCI).• The risk that a vulnerability poses to your organization. Click the Risk Score column to identify the
highest risk vulnerabilities.• The name or email address of the user that is assigned to remediate the vulnerability.• The numbers of days in which a vulnerability must be remediated.
Related conceptsRisk score details
Network vulnerabilitiesIn IBM QRadar Vulnerability Manager, you can review vulnerability data that is grouped by network.
The By Network page provides the following information:
• An accumulated risk score that is based on the vulnerabilities that are detected on each of yournetworks.
• The number of the assets, vulnerabilities, and open services for each network.• The number of vulnerabilities that are assigned to a technical user and are overdue for remediation.
Chapter 11. Management of your vulnerabilities 87

Asset vulnerabilitiesIn IBM QRadar Vulnerability Manager, you can display summary vulnerability data that is grouped by eachscanned asset.
You can use the By Asset page to prioritize the remediation tasks for assets in your organization that posethe greatest risk.
The By Asset page provides the following information:
• An accumulated risk score that is based on the vulnerabilities that are detected on each of your assets.
Click the Risk Score column to sort your assets by their risk.• The number of asset vulnerabilities that are assigned to a technical user and are overdue for
remediation.
Open service vulnerabilitiesIn IBM QRadar Vulnerability Manager, you can display vulnerability data that is grouped by open service.
The By Open Service page shows an accumulated risk score and vulnerability count for each service inyour entire network.
Investigating the history of a vulnerabilityIn IBM QRadar Vulnerability Manager, you can display useful information about the history of avulnerability.
For example, you can investigate information about how the risk score of a vulnerability was calculated.You can also review information about when a vulnerability was first discovered and the scan that wasused to discover the vulnerability.
Procedure
1. Click the Vulnerabilities tab.2. In the navigation pane, click Manage Vulnerabilities.3. Search your vulnerability data.4. Click the vulnerability that you want to investigate.5. On the toolbar, select Actions > History.
Related tasksSearching vulnerability data
Reducing the number of false positive vulnerabilitiesIn IBM QRadar Vulnerability Manager, you can automatically create exception rules for vulnerabilities thatare associated with a specific type of server.
When you configure server types, QRadar Vulnerability Manager creates exception rules andautomatically reduces the vulnerabilities that are returned by searching your data.
Procedure
1. Click the Assets tab.2. In the navigation pane, select Server Discovery.
88 IBM QRadar Vulnerability Manager: QRadar Vulnerability Manager

3. To automatically create false positive exception rules for vulnerabilities on specific server types, fromthe Server Type list, select one of the following options:
• FTP Servers• DNS Servers• Mail Servers• Web Servers
It might take a few minutes for the Ports field to refresh.4. From the Network list, select the network for your servers.5. Click Discover Servers.6. In the Matching Servers pane, select the servers where the vulnerability exception rules are created.7. Click Approve Selected Servers.
Results
Depending on your server type selection, the following vulnerabilities are automatically set as falsepositive exception rules:
Table 13. Server type vulnerabilities
Server Type Vulnerability
FTP Servers FTP Server Present
DNS Servers DNS Server is Running
Mail Servers SMTP Server Detected
Web Servers Web Service is Running
Investigating high risk assets and vulnerabilitiesIn IBM QRadar Vulnerability Manager, you can investigate high risk vulnerabilities that might besusceptible to exploitation.
Procedure
1. Click the Vulnerabilities tab.2. In the navigation pane, click Manage Vulnerabilities.3. On the By Vulnerability Instances page, click the Risk Score column heading to sort the
vulnerabilities by risk score.4. To investigate the CVSS metrics that are used to derive the risk score, hover your mouse on the Risk
Score field.5. Identify the vulnerability that has the highest score and click the Vulnerability link.6. In the Vulnerability Details window, investigate the vulnerability:
a) To view the IBM Security Systems website, click the X-Force link.b) To view the National Vulnerability Database website, click the CVE link.
The IBM Security Systems website and National Vulnerability Database provide remediationinformation and details on how a vulnerability might affect your organization.
c) To open the Patching window for the vulnerability, click the Plugin Details link. Use the tabs todiscover Oval Definition, Windows Knowledge Base, or UNIX advisory information about thevulnerability. This feature provides information on how QRadar Vulnerability Manager checks forvulnerability details during a patch scan. You can use it to identify why a vulnerability was raised onan asset or why it was not.
Chapter 11. Management of your vulnerabilities 89

d) The Solution text box contains detailed information about how to remediate a vulnerability.
Related conceptsRisk score details
Prioritizing high risk vulnerabilities by applying risk policiesIn IBM QRadar Vulnerability Manager, you can alert administrators to high-risk vulnerabilities by applyingrisk policies to your vulnerabilities.
When you apply a risk policy, the risk score of a vulnerability is adjusted, which allows administrators toprioritize more accurately the vulnerabilities that require immediate attention.
In the following example, the vulnerability risk score is automatically increased by a percentage factor forany vulnerability that remains active on your network after 40 days.
Procedure
1. Click the Vulnerabilities tab.2. In the navigation pane, click Manage Vulnerabilities.3. On the toolbar, click Search > New Search.4. In the Search Parameters pane, configure the following filters:
a) Risk Equals Highb) Days since vulnerabilities discovered Greater than or equal to 40
5. Click Search and then on the toolbar click Save Search Criteria.
Type a saved search name that is identifiable in QRadar Risk Manager.6. Click the Risks tab.7. In the navigation pane, click Policy Monitor.8. On the toolbar, click Actions > New.9. In the What do you want to name this question field, type a name.
10. In the Which tests do you want to include in your question field, click are susceptible tovulnerabilities contained in vulnerability saved searches.
11. In the Find Assets that field, click the underlined parameter on the are susceptible tovulnerabilities contained in vulnerability saved searches.
12. Identify your QRadar Vulnerability Manager high risk vulnerability saved search, click Add, then clickOK.
13. Click Save Question.14. In the Questions pane, select your question from the list and on the toolbar click Monitor.
Restriction: The Event Description field is mandatory.15. Click Dispatch question passed events.16. In the Vulnerability Score Adjustments field, type a risk adjustment percentage value in the
Percentage vulnerability score adjustment on question fail field.17. Click Apply adjustment to all vulnerabilities on an asset then click Save Monitor.
What to do next
On the Vulnerabilities tab, you can search your high risk vulnerabilities and prioritize your vulnerabilities.
Related conceptsIntegration with QRadar Vulnerability ManagerRelated tasksSaving your vulnerability search criteria
90 IBM QRadar Vulnerability Manager: QRadar Vulnerability Manager
Configuring custom display colors for risk scoresConfigure custom color coding for IBM QRadar Vulnerability Manager risk scores to view color-coded riskscores in QRadar Vulnerability Manager interfaces.
Procedure
1. In IBM QRadar, select Vulnerabilities > Vulnerability Assignment > Risk Preferences.2. In the Greater than or equal to column, enter the minimum risk score value for High, Medium, Low,
and Warning.3. In the Color column, select or define a color to represent High, Medium, Low, and Warning risk scores.
Note: The colors that you apply do not change the default risk colors on the Scan Results page. TheScore column on the Scan Results page and the Scan Results Asset Details page uses default valuesand colors, which you cannot change.
Identifying vulnerabilities with an BigFix patchIn IBM QRadar Vulnerability Manager, you can identify the vulnerabilities that have an available fix.
After you identify your vulnerabilities that have an available fix, you can investigate detailed fixinformation in the Vulnerability Details window.
Procedure
1. Click the Vulnerabilities tab.2. In the navigation pane, click Manage Vulnerabilities.3. On the toolbar, select Search > New Search4. In the Search Parameters pane configure the following options:
a) In the first list select External Reference of type.b) In the second list select Equals.c) In the third list select IBM BigFix Patch.d) Click Add Filter.e) Click Search.
The By Vulnerability Instances page shows the vulnerabilities that have an available fix.5. Order your vulnerabilities according to their importance by clicking the Risk Score column heading.6. To investigate patch information for a vulnerability, click a vulnerability link in the Vulnerability
column.7. In the Vulnerability Details window, scroll to the bottom of the window to view the vulnerability patch
information.
The Site ID and Fixlet ID are unique identifiers that you use to apply vulnerability patches by usingIBM BigFix.
The Base column indicates a unique reference that you can use to access more information on aknowledge base.
Identifying the patch status of your vulnerabilitiesIn IBM QRadar Vulnerability Manager, you can identify the patch status of your vulnerabilities.
By filtering patched vulnerabilities, you can prioritize your remediation efforts on the most criticalvulnerabilities in your organization.
Chapter 11. Management of your vulnerabilities 91

Procedure
1. Click the Vulnerabilities tab.2. In the navigation pane, click Manage Vulnerabilities.3. On the toolbar, select Search > New Search.4. In the first list in the Search Parameters pane, select Patch Status.5. In the second list, select a search modifier.6. To filter your vulnerabilities according to their patch status, select one of the following options from
the third list:Option Description
Pending Downloads Select this option to show vulnerabilities that are scheduled to be patched
Pending Restart Select this option to shows vulnerabilities that are patched after the scannedasset is restarted
Fixed Select this option to show vulnerabilities that are patched by IBM BigFix
7. Click Add Filter.8. Click Search.
Related conceptsIBM BigFix integration
Removing unwanted vulnerability dataUse QRadar Vulnerability Manager vulnerability cleansing functionality to remove stale vulnerability datafrom the asset model.
About this task
Any one of the following scenarios might leave you with unwanted vulnerability data:
• Change of scanner type• Decommissioned assets• Change of IP address• Inaccurate or test scans
Important: After you remove vulnerability data for an asset or scanner type, it cannot be recovered.
Procedure
To remove unwanted vulnerability data, you have two options:
• Use the Actions > Clean Vulnerabilities (All) option on the Assets page to remove all vulnerabilitydata for a selected scanner type.
• Use the Actions > Clean Vulnerabilities (Asset) option on the Asset Details page to remove allvulnerability data for a particular asset with a selected scanner type.
92 IBM QRadar Vulnerability Manager: QRadar Vulnerability Manager
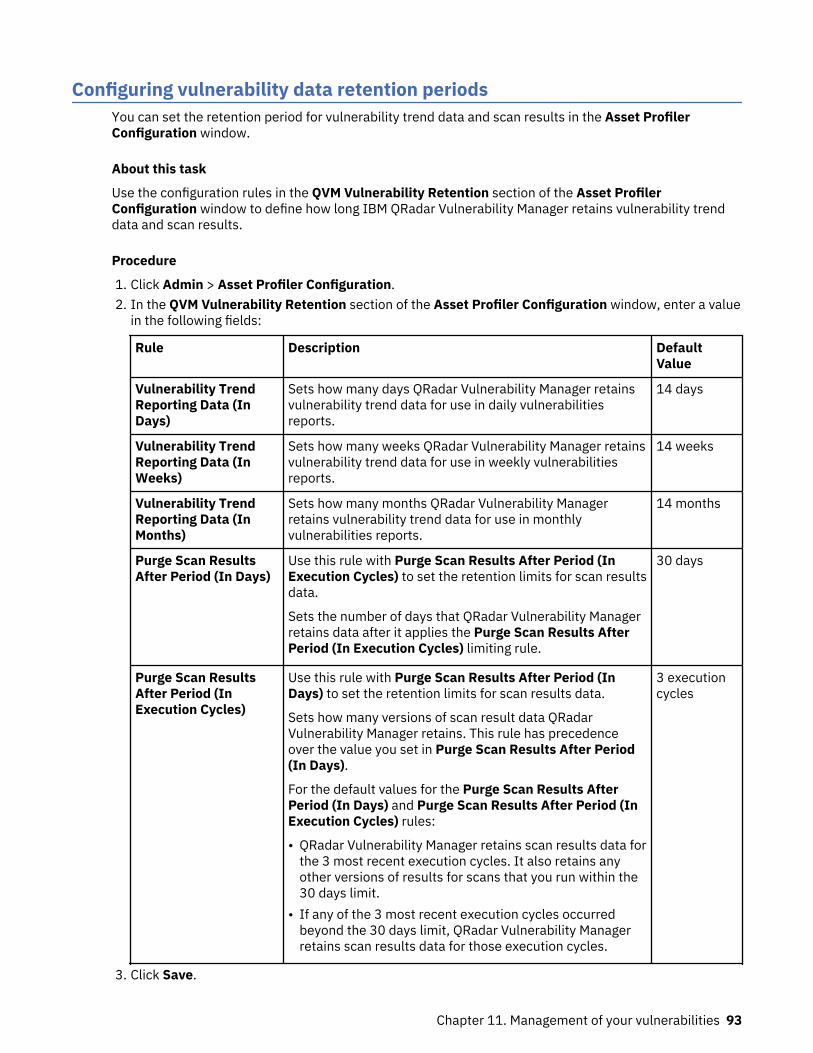
Configuring vulnerability data retention periodsYou can set the retention period for vulnerability trend data and scan results in the Asset ProfilerConfiguration window.
About this task
Use the configuration rules in the QVM Vulnerability Retention section of the Asset ProfilerConfiguration window to define how long IBM QRadar Vulnerability Manager retains vulnerability trenddata and scan results.
Procedure
1. Click Admin > Asset Profiler Configuration.2. In the QVM Vulnerability Retention section of the Asset Profiler Configuration window, enter a value
in the following fields:
Rule Description DefaultValue
Vulnerability TrendReporting Data (InDays)
Sets how many days QRadar Vulnerability Manager retainsvulnerability trend data for use in daily vulnerabilitiesreports.
14 days
Vulnerability TrendReporting Data (InWeeks)
Sets how many weeks QRadar Vulnerability Manager retainsvulnerability trend data for use in weekly vulnerabilitiesreports.
14 weeks
Vulnerability TrendReporting Data (InMonths)
Sets how many months QRadar Vulnerability Managerretains vulnerability trend data for use in monthlyvulnerabilities reports.
14 months
Purge Scan ResultsAfter Period (In Days)
Use this rule with Purge Scan Results After Period (InExecution Cycles) to set the retention limits for scan resultsdata.
Sets the number of days that QRadar Vulnerability Managerretains data after it applies the Purge Scan Results AfterPeriod (In Execution Cycles) limiting rule.
30 days
Purge Scan ResultsAfter Period (InExecution Cycles)
Use this rule with Purge Scan Results After Period (InDays) to set the retention limits for scan results data.
Sets how many versions of scan result data QRadarVulnerability Manager retains. This rule has precedenceover the value you set in Purge Scan Results After Period(In Days).
For the default values for the Purge Scan Results AfterPeriod (In Days) and Purge Scan Results After Period (InExecution Cycles) rules:
• QRadar Vulnerability Manager retains scan results data forthe 3 most recent execution cycles. It also retains anyother versions of results for scans that you run within the30 days limit.
• If any of the 3 most recent execution cycles occurredbeyond the 30 days limit, QRadar Vulnerability Managerretains scan results data for those execution cycles.
3 executioncycles
3. Click Save.
Chapter 11. Management of your vulnerabilities 93

94 IBM QRadar Vulnerability Manager: QRadar Vulnerability Manager
Chapter 12. Vulnerability remediationIn QRadar Vulnerability Manager, you can assign vulnerabilities to a technical user for remediation.
You can assign vulnerabilities to your technical user by using two methods.
• Assign individual vulnerabilities to a technical user for remediation.• Assign a technical user as the owner of asset groups
Note: A ticket that is closed and manually reopened displays a status of Reopened, which can't be closedby automatic remediation. A ticket that is manually reopened must be closed manually. If a scan profiledetects a vulnerability that has been closed, the ticket status is set to Opened. These tickets can beclosed by automatic remediation after the vulnerability is no longer detected in the scan profile.
Related tasksConfiguring remediation times for the vulnerabilities on assigned assets
Assigning individual vulnerabilities to a technical user for remediationIn IBM QRadar Vulnerability Manager, you can assign individual vulnerabilities to a QRadar user forremediation.
Procedure
1. Click the Vulnerabilities tab.2. In the navigation pane, select Manage Vulnerabilities.3. Search your vulnerability data.4. Select the vulnerability that you want to assign for remediation.5. On the toolbar, click Actions > Assign/Edit.6. Select a technical user from the Assigned User list.
You assign technical users on the Vulnerability Assignment page. For more information, see“Assigning a technical user as the owner of asset groups” on page 95.
7. In the Due Date list, select a future date when the vulnerability must be remediated.
If you do not select a date, the Due Date is set as the current date.8. In the Notes field, type useful information about the reason for the vulnerability assignment.9. Click Save.
Assigning a technical user as the owner of asset groupsIn IBM QRadar Vulnerability Manager, you can configure groups of assets and automatically assign theirvulnerabilities to technical users.
After you assign a technical user and scan the assets, all vulnerabilities on the assets are assigned to thetechnical user for remediation.
The remediation times for vulnerabilities can be configured using the Remediation Times option,depending on their risk or severity.
If you add a new asset to your network, and it is contained in a technical user's asset group,vulnerabilities on the asset are automatically assigned to the technical user.
You can automatically email reports to your technical users with the details of vulnerabilities that they areresponsible for fixing.
© Copyright IBM Corp. 2012, 2019 95

The Remediation Times, Schedule and Risk Preferences options are enabled only for administrativeusers, and non-administrative users who have no associated domain.
Before you begin
If you want to configure a group of assets that are identified by a saved asset search, you must searchyour assets and save the results.
For more information about searching assets and saving the results, see the User Guide for your product.
Procedure
1. Click the Vulnerabilities tab.2. In the navigation pane, click Vulnerability Assignment.3. On the toolbar, click Add.4. Type a name, email address, and CIDR range.
To automatically assign a technical user in the New Asset Owner window, the only mandatory fieldsare Name, Email, and CIDR. If multi-domain environments are enabled, select a domain associationfor that particular asset owner.
5. If you configured IBM QRadar for multiple domains, select the relevant domain from the Domain list.6. To filter the list of assets in your CIDR range by asset name, type a text string in the Asset Name
Filter field.7. To filter the list of assets in your CIDR range by operating system, type a text string in the OS Filter
field.8. To assign the technical user to the assets that are associated with a saved asset search, click Asset
Search. The Asset Search option is disabled if domains have been configured in the DomainManagement page.
9. Click Save.10. On the toolbar, click Remediation Times.
You can configure the remediation time for each type of vulnerability, depending on their risk andseverity.
For example, you might need high risk vulnerabilities to be fixed within 5 days.11. On the toolbar, click Schedule.
By default, the technical user contact for your assets is updated every 24 hours.
New assets added to your deployment and falling within the CIDR range that you specified areautomatically updated with the technical contact that you specified.
Important: The schedule applies to the associations you made between technical users and groupsof assets.
12. Click Update Now, to immediately set the owner of your assets.
Depending on the size of your deployment, it might take an extended time to update your assets.13. Click Save.
Any vulnerabilities that are already assigned to a technical user for remediation are updated with thenew technical user.
14. If vulnerabilities were not previously assigned to a technical user, you must scan the assets that youassigned to the technical user.
Important: Scanning the assets ensures that any vulnerabilities assigned to a technical user exist onthe asset.
96 IBM QRadar Vulnerability Manager: QRadar Vulnerability Manager
Configuring remediation times for the vulnerabilities on assigned assetsIn IBM QRadar Vulnerability Manager you can configure the remediation times for different types ofvulnerabilities.
Procedure
1. Click the Vulnerabilities tab.2. In the navigation pane, click Vulnerability Assignment.3. Select an assignment from the Asset Owners list.4. On the toolbar, click Remediation Times.5. Update the remediation times for vulnerabilities that are based on their risk and severity.6. Click Save.
Chapter 12. Vulnerability remediation 97

98 IBM QRadar Vulnerability Manager: QRadar Vulnerability Manager

Chapter 13. Vulnerability reportsIn IBM QRadar Vulnerability Manager, you can generate or edit an existing report, or use the report wizardto create, schedule, and distribute a new report.
QRadar Vulnerability Manager contains several default reports.
The report wizard provides a step-by-step guide on how to design, schedule, and generate reports.
For more information, see the IBM QRadar User Guide.
Emailing technical users with their assigned vulnerabilities that require remediation
When you assign vulnerabilities to a technical user for remediation, you can generate a report that emailsthe technical user.
The email contains information about the vulnerabilities that the technical user must remediate.
Generating PCI compliance reports
You can generate a compliance report for your PCI (payment card industry) assets.
The compliance report demonstrates that you took all the security precautions necessary to protect yourcritical assets.
Running a default QRadar Vulnerability Manager reportIn IBM QRadar Vulnerability Manager, you can run a default vulnerability management report.
Procedure
1. Click the Reports tab.2. From the list of reports, click the report that you want to run.
For example, you might want to show a report of your vulnerability overview for the last seven days.3. On the toolbar, select Actions > Run Report, then click OK.4. To view the completed report in a PDF format, click the icon in the Formats column.
Emailing assigned vulnerability reports to technical usersIn IBM QRadar Vulnerability Manager, you can send an assigned vulnerabilities report to the technicalcontact for each asset.
An emailed report reminds your administrators that vulnerabilities are assigned to them and requireremediation. Reports can be scheduled monthly, weekly, daily, or hourly.
Before you begin
You must complete the following tasks:
1. Assign a technical user as the owner of asset groups. For more information, see “Assigning a technicaluser as the owner of asset groups” on page 95
2. Scan the assets that you assigned the technical owner to.3. Create and save a vulnerability search that uses the Technical Owner Contact parameter as an input.
For more information, see “Searching vulnerability data” on page 82
© Copyright IBM Corp. 2012, 2019 99
Procedure
1. Click the Reports tab.2. On the toolbar, select Actions > Create.3. Click Weekly and then click Next.4. Click the undivided report layout that is displayed on the upper left section of the report wizard and
click Next.5. Type a Report Title.6. In the Chart Type list, select Asset Vulnerabilities and type a Chart Title.7. If a technical contact owner is responsible for more than five assets and you want to email all asset
information, increase the value in the Limit Assets To Top list.
Remember: By using the Assets tab, you must ensure that the same technical contact owner isassigned to each asset that they are responsible for.
8. In the Graph Type field, select AggregateTable.
If you select any value other than AggregateTable, the report does not generate a vulnerability sub-report.
9. In the Graph Content pane, click Search to Use and select your saved technical contact vulnerabilitysearch then click Save Container Details.
10. Click Next and select your report output type.11. In the report distribution section of the report wizard, click Multiple Reports.12. Click All Asset Owners.13. Click Load asset owners to display all list of the technical users contact details.
You can remove any technical users that you do not want to email with a list of assignedvulnerabilities.
14. On the Reports list, select the report that you created and on the toolbar, select Actions > RunReport.
Related tasksAssigning a technical user as the owner of asset groupsSearching vulnerability data
Generating PCI compliance reportsIn IBM QRadar Vulnerability Manager, you can generate a compliance report for your PCI (payment cardindustry) assets. For example, generate a report for assets that store credit card or other sensitivefinancial information.
The compliance report demonstrates that you took all the security precautions necessary to protect yourassets.
Procedure
1. Run a PCI scan for the assets in your network that store or process PCI information.
For more information, see “Creating a scan profile” on page 37.2. Update your asset compliance plans and software declarations.
Your compliance plan and software declarations are displayed in the special notes section of theexecutive summary.
For more information, see the PCI security standards for approved software vendors.3. Create and run a PCI compliance report for the assets that you scanned.
Related tasksCreating a scan profile
100 IBM QRadar Vulnerability Manager: QRadar Vulnerability Manager

Updating your asset compliance plans and software declarationsIn IBM QRadar Vulnerability Manager, if you want to generate a PCI compliance report for your assets,you must complete your attestations for each asset.
Your attestation of compliance is displayed on your PCI compliance report.
Procedure
1. Click the Assets tab.2. In the navigation pane, click Asset Profiles.3. On the Assets page, select the asset that you want to provide an attestation for.4. On the toolbar, click Edit Asset.5. In the Edit Asset Profile window, click the CVSS, Weight & Compliance pane.6. Complete the following fields. Use the hover help if you need assistance:
• Compliance Plan• Compliance Notes• Compliance Notes Declaration• Compliance Notes Description• Compliance Out Of Scope Reason
7. Click Save.
Creating a PCI compliance reportIn IBM QRadar Vulnerability Manager, you can create and run a PCI compliance report.
The PCI compliance report demonstrates that your assets involved in PCI activities comply with securityprecautions that prevent outside attack.
Before you begin
Ensure that you ran a PCI compliance scan.
Procedure
1. Click the Reports tab.2. On the toolbar, select Actions > Create.3. Click Weekly and then click Next.4. Click the undivided report layout that is displayed on the upper left section of the report wizard and
click Next.5. Type a Report Title.6. In the Chart Type list, select Vulnerability Compliance and type a Chart Title.7. In the Scan Profile list, select the scan profile for the assets that you scanned.
Attention: If no scan profile is displayed, you must create and run a PCI scan of the assets inyour network that store or process PCI information.
8. In the Scan Result list, select the version of the scan profile that you want to use.
Remember: To provide evidence of your compliance, you must select the Latest option in the ScanResult list. You can also generate a compliance report by using a scan profile that was run at anearlier date.
9. In the Report Type list, select a report type.
If you select Executive Summary, Vulnerability Details, or a combination of both, the attestation isautomatically attached to your PCI compliance report.
Chapter 13. Vulnerability reports 101
10. Complete the information in the Scan Customer Information and Approved Scanning VendorInformation panes.
Important: You must add a name in the Company field for both panes, as this information isdisplayed in the attestation section of the report.
11. Click Save Container Details and then click Next.12. Use the Report Wizard to complete your PCI compliance report.
Results
The report is displayed in the reports list and is automatically generated.
Note:
Some table columns in the resultant PDF document are not displayed when you create a PDF report withthe following parameters:
• Chart type - Vulnerabilities• Graph type - Table• Data to use - Current• Group by - Instance
The large number of table columns that cannot fit on a standard landscape US letter page causes thiserror to occur.
To avoid this issue, do not use PDF output for this type of report. View Vulnerabilities Reports that useGroup by Instance in a spreadsheet or XML format. To export the report, select XLS or XML as the reportformat in the Report Wizard.
Including column headings in asset searchesLimit asset searches with filters that include custom asset profiles, name, vulnerability count, and riskscore.
Procedure
1. Click the Assets tab.2. In the navigation pane, click Asset Profiles, then on the toolbar click Search > New Search.3. In the field containing column names, in the field on the left, click the column headings you want to
include in your search, and click the arrow button to move the selected headings to field on the right.4. Click the up and down buttons to change the priority of the selected column headings.5. When the field on the right contains all the column heading that you want to search on, click Search.
102 IBM QRadar Vulnerability Manager: QRadar Vulnerability Manager

Chapter 14. Scanning new assets that communicatewith the Internet
Use IBM QRadar Risk Manager to create offenses when new assets communicate with the Internet, whichtriggers a QRadar Vulnerability Manager scan of the assets.
To trigger scans of new assets that communicate with the Internet, follow these steps:
1. Create a saved search for new assets.2. Create an on-demand scan profile with dynamic scanning enabled.3. Create a QRadar Risk Manager policy monitor question to target the new assets from the asset saved
search.4. Monitor the QRadar Risk Manager policy monitor question.5. Edit the rule that is created by the offense.
Creating an asset saved search for new assetsCreate a saved search to capture the new assets that were added to the database within the number ofdays that you specify.
Procedure
1. Click the Assets tab.2. On the navigation menu, click Asset Profiles.3. Click Search > New Search.4. Add your search criteria in the Search Parameter(s) pane.
5. Select Days Since Asset Found, Less than or equal to, and then enter the number of days.
You can specify other criteria but the most important criteria is Days Since Asset Found.6. Click Add Filter.7. Click Search.8. Click Save Criteria.9. Enter a name for the search, and then click OK to save your search.
Creating an on-demand scan profileTo trigger a scan in response to a custom rule event, configure an on-demand scan profile and enabledynamic scanning.
Procedure
1. Click the Vulnerabilities tab.2. In the navigation pane, click Administrative > Scan Profiles.3. On the toolbar, click Add.4. Add a Name and IP Addresses on the Details tab.
You can use any IP address because this IP address is replaced when dynamic scanning is used.5. Select the On Demand Scanning Enabled check box6. Select the Dynamic Server Selection check box.
© Copyright IBM Corp. 2012, 2019 103

Use dynamic scanning in IBM QRadar Vulnerability Manager to associate individual scanners with anIP address, CIDR ranges, IP address ranges, or a domain that you specify in the scan profile. Dynamicscanning is most useful when you deploy several scanners.
7. Click Save.
Related conceptsDynamic vulnerability scansIn IBM QRadar Vulnerability Manager, you can configure a scan to use certain vulnerability scanners forspecific CIDR ranges in your network. For example, your scanners might have access only to certain areasof your network.Scan profile detailsRelated tasksAssociating vulnerability scanners with CIDR rangesIn IBM QRadar Vulnerability Manager, to do dynamic scanning, you must associate vulnerability scannerswith different segments of your network.Scanning CIDR ranges with different vulnerability scannersIn IBM QRadar Vulnerability Manager, you can scan areas of your network with different vulnerabilityscanners.
Creating a policy monitor question to test for Internet communicationCreate a QRadar Risk Manager policy monitor question to test for communication between new assetsand the Internet. The new assets are defined in an asset saved search.
Procedure
1. Click the Risks tab.2. On the navigation menu, click Policy Monitor.3. From the Actions menu, click New Asset Question.4. In the What do you want to name this question field, type a name for the question.5. From the Evaluate On list, select Actual Communication.6. From the Importance Factor list, select the level of importance you want to associate with this
question.7. Specify the time range for the question.8. From the Which tests do you want to include in your question field, select the add (+) icon beside
the following tests:
• have accepted communication to the internet• and include only the following asset saved searches
9. Configure the parameters for your tests in the Find Assets that field.a) Change the test to have accepted communication from the internet by clicking to.b) Click asset saved searches and then select your saved search.
10. To assign membership to this question, in the groups area, select the relevant check boxes.11. Click Save Question.
104 IBM QRadar Vulnerability Manager: QRadar Vulnerability Manager

Monitoring communication between new assets and the InternetConfigure the policy monitor question to generate an offense when an asset from the asset saved searchcommunicates with the Internet.
Procedure
1. Click the Risks tab.2. On the navigation menu, click Policy Monitor.3. Select the question that you want to monitor.4. Click Monitor.5. Select an interval from the Policy evalutation interval.6. Enter a name in the Event Name field.
If you select Ensure the dispatched event is part of an offense, the Event Name appears in theDescription field for an offense when you select All Offenses on the Offenses tab.
The name of the rule that is generated from an offense is Risk Question Monitor: <Event Name>. Thisformat for the offense name appears on the Offenses tab when an offense is generated.
7. Enter an event name description.8. In the Event Details section, select Ensure the dispatched event is part of an offense check box,
and (Correlate By: Asset) from the menu.9. In the Additional Actions section:
This option is helpful when you want to get a notification for the first event that is dispatched as anoffense. You can edit the rule that is generated from that offense to trigger a scan. If you don'twant to be notified about every event, after you configure the rule that is generated by the offense,you can turn off this notification.
• Send to SysLog
If you want the event to be logged, select this option.• Notify
If you want the event to appear in the System Notifications alert on the dashboard, select thisoption.
10. Select Enable the monitor results function for this question/simulation.11. Click Save Monitor.12. Click Submit Question.
Configuring an offense rule to trigger a scanTo trigger a scan of any assets that are communicating with the Internet, configure the rule that isgenerated by the offense.
Before you beginAn offense must be generated. You can generate the offense manually or wait for an asset tocommunicate with the Internet. To generate the offense, you can do any of the following steps:
• Generate an offense manually by temporarily connecting any new asset from the asset saved search tothe Internet.
• Search the rules on the Offenses tab and search for the rule after an offense is generated.• Enable email notification for the dispatched event that creates an offense. You can edit the rule when
you get this notification.
Chapter 14. Scanning new assets that communicate with the Internet 105
Procedure
1. Click the Offenses tab.2. On the navigation menu, click Rules.3. Use the search box on the toolbar to search for the rule.
The name of the rule is Risk Question Monitor : <Event Name>.
You can search by the Event Name, which is from the Monitor Question Results window.
The Event Name for an offense appears in the Description field when you select All Offenses.4. Double-click the rule name to open the Rule Wizard.5. Click Next.6. Configure the following settings:
a) Select the Ensure the detected event is part of an offense check box.b) Select Destination IP from the Index offense based on menu.c) Select the Send to Local SysLog check box.d) Select the Trigger Scan check box.e) Select the scan profile that you want to use from the Scan Profile to be used as a template menu.
You must select the On Demand Scanning option in the scan profile that you want to use with thisrule.
f) Click the Destination radio button for the Local IPs to Scan field.g) Enter values for the Response Limiter setting.
Configure appropriate intervals to avoid a potential overload on your system.h) If you don't want to activate this rule right away, clear the Enable Rule option and then click Finish.
106 IBM QRadar Vulnerability Manager: QRadar Vulnerability Manager

Chapter 15. Security software integrationsIBM QRadar Vulnerability Manager integrates with other security products to help you manage andprioritize your security risks. Integrations with other software extends the capabilities of QRadarVulnerability Manager.
Integration with QRadar Vulnerability ManagerIBM QRadar Vulnerability Manager integrates with IBM QRadar Risk Manager to help you prioritize therisks and vulnerabilities in your network.
You install QRadar Risk Manager as a separate appliance and then you add it to your QRadar SIEMconsole as a managed host by using the System and License Management tool on the Admin tab.
For more information about installing QRadar Risk Manager, see the IBM QRadar Risk ManagerInstallation Guide.
Risk policies and vulnerability prioritization
You can integrate QRadar Vulnerability Manager with QRadar Risk Manager by defining and monitoringasset or vulnerability risk policies.
When the risk policies that you define in QRadar Risk Manager either pass or fail, vulnerability risk scoresin QRadar Vulnerability Manager are adjusted. The adjustment levels depend on the risk policies in yourorganization.
When the vulnerability risk scores are adjusted in QRadar Vulnerability Manager, administrators can dothe following tasks:
• Gain immediate visibility of the vulnerabilities that failed a risk policy.
For example, new information might be displayed on the QRadar dashboard or sent by email.• Re-prioritize the vulnerabilities that require immediate attention.
For example, an administrator can use the Risk Score to quickly identify high-risk vulnerabilities.
If you apply risk policies at an asset level in QRadar Risk Manager, then all the vulnerabilities on thatasset have their risk scores adjusted.
For more information about creating and monitoring risk policies, see the IBM QRadar Risk Manager UserGuide.
© Copyright IBM Corp. 2012, 2019 107

108 IBM QRadar Vulnerability Manager: QRadar Vulnerability Manager
Chapter 16. IBM BigFix integrationIBM QRadar Vulnerability Manager integrates with IBM BigFix to help you filter and prioritize thevulnerabilities that can be fixed.
Why use BigFix capabilities with vulnerability management?
Previously known as IBM Security Endpoint Manager, BigFix provides shared visibility and controlbetween IT operations and security. BigFix applies Fixlets to high priority vulnerabilities that are identifiedand sent by QRadar Vulnerability Manager to BigFix. Fixlets are packages that you deploy to your assetsor endpoints to remediate specific vulnerabilities. You can simultaneously deploy Fixlets to many assetsor endpoints from the Manage Vulnerable Computers dashboard on the BigFix console.
Use the Manage Vulnerable Computers on the BigFix console to manage and control a network ofhundreds of thousands of assets or endpoints across a range of platforms and devices that are in anygeographical location.
How to remediate vulnerabilities with BigFix?
BigFix provides a dashboard that is integrated with QRadar Vulnerability Manager. Use this dashboard onthe BigFix console to view and remediate vulnerabilities that are detected and sent by QRadarVulnerability Manager.
To see QRadar Vulnerability Manager vulnerability data in the BigFix console, configure QRadarVulnerability Manager, and then configure BigFix to process the vulnerability data that is sent fromQRadar Vulnerability Manager. For information about configuring BigFix, see the IBM BigFix QRadar UserGuide.
How do QRadar Vulnerability Manager and BigFix work together?
QRadar Vulnerability Manager scans your assets or endpoints for vulnerabilities and assigns a risk score,which represents the risk level that a vulnerability poses to your organization. QRadar VulnerabilityManager uses the risk score parameter in the BigFix adapter to filter the high-risk vulnerabilities to sendto BigFix for remediation. QRadar Vulnerability Manager assigns a CVE ID to each vulnerability that itsends to BigFix.
Learn more about how vulnerability data is identified and handled:
The following list describes how vulnerability data that is identified by CVEs (Common Vulnerabilities andExposures) is handled by QRadar Vulnerability Manager and BigFix
• QRadar Vulnerability Manager sends only vulnerabilities that have CVE IDs to BigFix.• QRadar Vulnerability Manager sends all CVE IDs that are associated with a single vulnerability to BigFix.
Some vulnerabilities can have many CVE IDs.• QRadar Vulnerability Manager sends only the CVE with the highest risk score to BigFix when that CVE
shows two or more vulnerabilities.
For example, the following CVE ID, 2016-0015 shows two different vulnerabilities. Only the CVE withthe high-risk vulnerability is sent to BigFix.
{ Name: CVE-2016-0015 - MS16-007 - Microsoft - DirectShow - Code Execution IssueVulnerability ID: 169296 CVE: 2016-0015 Risk: High
Name: Microsoft Windows DirectShow code execution Vulnerability ID: 169243 CVE: 2016-0015
© Copyright IBM Corp. 2012, 2019 109

Risk: Medium }
BigFix receives the vulnerability data with risk scores and CVE IDs from QRadar Vulnerability Manager,which is visible on the BigFix Manage Vulnerable Computers dashboard. Use the Manage VulnerableComputers dashboard on the BigFix console to view and manage the vulnerabilities that are sent byQRadar Vulnerability Manager. BigFix remediates the high-risk vulnerabilities that it has a Fixlet® for byapplying a Fixlet directly to the asset or endpoint. QRadar Vulnerability Manager gets a vulnerability fixstatus update from BigFix Web Reports by using the SOAP API.
How to extend BigFix to QRadar Risk Manager?If you have a QRadar Risk Manager installation, you can use risk policies in QRadar Risk Manager tofurther refine your asset risk scores. When the risk policies that you define in QRadar Risk Manager eitherpass or fail, vulnerability risk scores in QRadar Vulnerability Manager are adjusted. You can reprioritize thevulnerabilities that require immediate attention. If you apply risk policies to assets in QRadar RiskManager, then the risk scores for all the vulnerabilities on that asset are adjusted. For more information,see the QRadar Risk Manager user guide.
Vulnerability remediation
Depending on whether you installed and integrated BigFix, QRadar Vulnerability Manager provides thefollowing information about your vulnerabilities.If BigFix is not installed
QRadar Vulnerability Manager provides daily updates about vulnerabilities for which a fix is available.
QRadar Vulnerability Manager maintains a list of vulnerability fix information. Fix information iscorrelated against the known vulnerability catalog.
Use search in QRadar Vulnerability Manager to identify vulnerabilities that have an available fix.
If BigFix is installedQRadar Vulnerability Manager also provides specific details about the vulnerability fix process. Forexample, a fix might be scheduled, or an asset might be already fixed.
The BigFix server gathers fix information from each of the BigFix agents. QRadar VulnerabilityManager gets updates on vulnerability fix information from the BigFix server at preconfigured timeintervals.
Use search in QRadar Vulnerability Manager to identify vulnerabilities that are scheduled to be fixed orare already fixed.
Integration components
A typical integrated deployment consists of the following components:
• IBM QRadar Console.• QRadar Vulnerability Manager.• BigFix server.• BigFix agent on each scan target in your network.
Related tasksIdentifying the patch status of your vulnerabilitiesRelated information
110 IBM QRadar Vulnerability Manager: QRadar Vulnerability Manager

Interactions between IBM QRadar and IBM BigFixBefore, you configure the integration between IBM QRadar and BigFix it's important to understand howthey interact with each other.
The following diagram shows a high-level overview of some interactions between QRadar and BigFix fromthe initial scan of assets, to remediation of vulnerabilities on the scanned assets.
Scanner
QRadar
BigFix
Assets or endpoints
Scans assets
Applies Fixlets
QRadar sends vulnerabilities
QRadar gets updates from BigFix
4
6
2
1
3
Console
7
8
5
9
Figure 1. QRadar Vulnerability Manager and BigFix interactions
The following list describes a broad outline of interactions between QRadar and BigFix from the initialscan for vulnerabilities to the remediation of those vulnerabilities:
1. QRadar Vulnerability Manager scanner completes an authenticated scan of assets to discovervulnerabilities. Only the vulnerabilities from assets that are configured in scan profiles that use Full,Patch, or PCI scan policies are eligible for processing by BigFix.
2. If a BigFix agent is installed on an asset QRadar Vulnerability Manager retrieves the BES agent ID fromthe asset when it detects vulnerabilities on the asset. The BES agent ID is the unique identifier that isused by BigFix to identify the asset and to remediate vulnerabilities on that asset. BigFix refers toQRadar assets as computers.
3. The scan results are updated in the QRadar asset model, which includes the BES agent ID from anyassets that have a BigFix agent. When the scan status in the scan profile displays a status ofprogress=100%, then the asset model is updated, and vulnerability data is sent to BigFix within 15minutes by default.
4. When the asset model is updated with the scan data, the BigFix adapter that is installed on the QRadarConsole receives the updated vulnerability data with risk scores from the asset model. The datacontains the BES agent ID. The BigFix adapter processes only vulnerability information from assetswhen a BES agent ID is included.
5. The vulnerability data that is sent to BigFix is filtered on the risk-score parameters that are configuredin the adapter properties file (/opt/qvm/adaptor/config/adaptor.properties) on the QRadarConsole. The default risk score is 0.0, which means that all vulnerabilities are sent to BigFix.
Chapter 16. IBM BigFix integration 111

6. The BigFix adapter uses the BigFix REST API to send the vulnerability information to BigFix and itcorrelates vulnerability CVEs with Fixlets. By default, data is sent to BigFix in 15-minute intervals.
7. The vulnerability information that is sent by the REST API is viewable on the BigFix ManageVulnerable Computers dashboard. You can deploy Fixlets to the assets with high-risk vulnerabilitiesfrom the BigFix Manage Vulnerable Computers dashboard. BigFix uses the BES agent ID as theunique reference for the asset when it applies Fixlets directly to the asset.
8. BigFix applies Fixlets to the assets that have vulnerabilities.9. The SOAP API (Web Reports) is used to get vulnerability patch status from BigFix. Use saved searches,
and filters from the Vulnerabilities tab to view this updated vulnerability information.
You must rescan the patched assets to update the asset model with the revised vulnerability status ofyour assets.
Configuring encrypted communication between IBM BigFix and QRadarFor IBM QRadar Vulnerability Manager to receive vulnerability fix status updates by using Web Reportsfrom IBM BigFix configure Transport Layer Security (TLS).
When QRadar Vulnerability Manager receives Fixlet status updates from BigFix, it uses the SOAP API forBigFix Web Reports to request updates by using queries that use the BigFix Relevance language. Thequeries are used to extract data from the in-memory BigFix Web Reports database. QRadar parses andsaves the data. You can use saved searches to view the BigFix updates in QRadar. BigFix doesn’t use WebReports TLS by default. You configure TLS communication and BigFix Web Reports.
Before you begin
The following components must be installed on your network:
• A BigFix server.• A BigFix Console.• A BigFix agent on each asset in your network that you scan.• An IBM QRadar Console.• A licensed installation of QRadar Vulnerability Manager.
You must have QRadar V7.2.6 or later with the most recent updates.
Note: To prepare for this integration, it is good practice to run Auto Update from the Admin tab to get themost recent scan tools.
Procedure
1. To configure TLS, complete the following steps:a) Download the public key certificate from BigFix to your QRadar Console by typing the following
command at the shell prompt of your QRadar Console.
openssl x509 -in <(openssl s_client -connect <bigfix ip address>:<port> -prexit 2>/dev/null) > /opt/qvm/iem/iem_cert.pem
Typically, BigFix listens on port 52312.b) To create a truststore in QRadar, type
the following command:
keytool -keystore /opt/qvm/iem/truststore.jks -genkey -aliasiem_webreports
c) Import the BigFix public key certificate to your QRadar truststore by typing the following command:
112 IBM QRadar Vulnerability Manager: QRadar Vulnerability Manager
keytool -importcert -file /opt/qvm/iem/iem_cert.pem -keystore /opt/qvm/iem/truststore.jks -storepass <your_truststore_password>-alias BigFix_webreports
d) At the Trust this certificate? prompt, type Yes.2. To configure TLS and BigFix Web Reports for QRadar Vulnerability Manager, complete the following
steps:a) Use SSH to log in to the QRadar console as the root user.b) Type ./iem-setup-webreports.pl and when prompted, type the host name, host port, user
name, and password for the BigFix server.
You can run this command from any directory. The files are created in the/opt/qvm/iem directory.c) At the Use SSL/TLS encryption? prompt, type the appropriate response.d) Follow the prompts.e) To view the contents of the webreports.properties file, type the following command at the
shell prompt:
more /opt/qvm/iem/webreports.properties
The webreports.properties file contains the allowed SSL/TLS transport protocols, for examplewebreports.tls.protocols=TLSv1.2 or a comma-separated listwebreports.tls.protocols=TLSv1.2,TLSv1.1
Verify that the following line contains a port number that follows the IP address:
webreports.endpoint=http://<IP_address>:<port>/webreports
If you want to use a different port, edit the /opt/qvm/iem/webreports.properties file andchange the port number.
Configuring QRadar Vulnerability Manager to send vulnerability data toBigFix
Install and configure the BigFix adapter on the QRadar Console to enable IBM QRadar VulnerabilityManager to send vulnerability data with risk scores to IBM BigFix.
Procedure
1. Log in to the QRadar Console as the root user.2. Configure the BigFix adapter setup:
a) Go to the /opt/qvm/adaptor/config directory and run the setup script: ./setup-adaptor.sh
b) Enter a new password to create the truststore that stores the BigFix server certificate.
The truststore is created in /opt/qvm/adaptor/truststore.jks
The following property files are created in the /opt/qvm/adaptor/config directory.
• adaptor.properties• adaptor-bigfix.properties• plugin-bigfix.properties
c) Verify that the plugin-bigfix.properties file has a TLS entry, for example, TLSv1.2 or acomma separated TLS list TLSv1.2,TLSv1.1,SSLv1.3
The first entry in the list is used to create the security context:bes.rest.allowed.protocols=TLSv1.2
d) At the prompts, provide details for the BigFix REST API server by entering the host name or IPaddress, user name, and password for the BigFix server.
Chapter 16. IBM BigFix integration 113

The user name and password that you enter are the same as the credentials that are used for theBigFix REST API. The REST API is used to send vulnerability data to BigFix.
e) Restart the asset profiler by typing the following command:
/opt/qradar/init/assetprofiler restart
To ensure optimum performance, don't restart the asset profiler when QRadar VulnerabilityManager scans are running, or when you are expecting vulnerability imports from a third-partyscanner.
The adaptor.properties is created. This file contains the configuration parameters for thevulnerability data that is sent to BigFix.
3. Verify that the setup process completed successfully:a) In the /opt/qvm/adaptor/config/adaptor.properties file, verify that these properties are
set:
qvm.adaptor.listener.enabled=true
qvm.adaptor.process.daemon=falseb) Set the risk score and asset update granularity in the adaptor.properties file by editing the
following properties:
Table 14. Adaptor properties and descriptions
Property name (API) Description
qvm.adaptor.minimum.vuln.riskscore=n
Defines the threshold for each vulnerability riskscore. Those vulnerabilities equal to or abovethe set value are sent to BigFix. For example, ifyou set the value to 5, vulnerabilities with riskscores equal to or above 5 only are sent toBigFix.
qvm.adaptor.minimum.asset.riskscore=n
The cumulative risk score of all thevulnerabilities that are on that asset.
Vulnerabilities on assets that have a score lessthan this value are not sent to BigFix, unless theasset has vulnerabilities equal to, or above theset value for minimum.vuln.riskscore.
Note: The minimum.vuln.riskscoreoverrides the minimum.asset.riskscore. Ifthe minimum.vuln.riskscore is set to 0,then all vulnerabilities are sent to IBM BigFix,regardless of the minimum.asset.riskscorevalue.
Use the minimum.asset.riskscoreparameter to capture vulnerabilities on assetswith multiple low-risk vulnerabilities that resultin a high cumulative risk score for an asset.When you set this value, you must be aware ofthe impact of the minimum.vuln.riskscorevalue on this setting.
114 IBM QRadar Vulnerability Manager: QRadar Vulnerability Manager

Table 14. Adaptor properties and descriptions (continued)
Property name (API) Description
qvm.adaptor.assetupdate.limit=n Defines how the BigFix dashboard dataresource is split. A split does not occur until allCVE IDs are populated for the last asset.
• For example,qvm.adaptor.assetupdate.limit=20,asset 1 has 19 CVE IDs, and asset 2 has 30CVE IDs. One data resource is generated andcontains both assets, with a total of 49 CVEIDs.
• For example,qvm.adaptor.assetupdate.limit=19,asset 1 has 19 CVE IDs, and asset 2 has 30CVE IDs. Two data resources are generated,each containing an asset.
qvm.adaptor.source.data.delay=n Defines how often data is sent to BigFix. Forexample, when n=15, then vulnerability data issent to BigFix every 15 minutes, if there isvulnerability data available to send to BigFix.
By editing the adaptor.properties file, the vulnerability data that you're sending to BigFix isfiltered.
c) Verify that the BigFix plugin configuration creates the following directories:
• /store/qvm/adaptor/data• /store/qvm/adaptor/bigfix
d) Verify that logging is enabled in the /opt/qvm/adaptor/log4j.xml file.
Log files are in the: /var/log/qvm-integration-adaptor.log and the /var/log/qvm-adaptor-cron.log files.
Note: If you don't download the certificate because the BigFix server is unreachable, the setupdoes not fail. You can download the certificate later by running the following command:
./install-cert.sh <truststore_location><truststore_password><truststore_IP_address: port>
For example, use the following command format:
./install-cert.sh /opt/qvm/adaptor/truststore.jks <abc3password><192.0.2.0>:<63455>
Troubleshooting the BigFix and QRadar Vulnerability Manager integrationTroubleshoot issues that might occur when you configure your BigFix and QRadar Vulnerability Managerintegration.
Troubleshooting contents
• “BigFix certificate is not imported because of a failed connection to the IBM BigFix server” on page 116• “Verify connectivity with IBM BigFix” on page 116• “Are the most recent scan tools installed?” on page 117• “Is the BigFix scan feature installed?” on page 117
Chapter 16. IBM BigFix integration 115

• “Password reset” on page 117• Password exception error• “Vulnerability scan data is not sent to BigFix” on page 117• “Is the asset model updated?” on page 118
BigFix certificate is not imported because of a failed connection to the IBM BigFix server
If the certificate is not imported to QRadar because of a failed connection to the BigFix server, you mightsee the following error message:
ERROR [TrustStoreConfig] Failed to configure trust store with peer certificates :
Connection timed out java.net.ConnectException: Connection timed out.
The configuration is successful, but the certificates are not present in the truststore.
You must manually load the certificates by doing the following steps when you have access to the BigFixserver.
1. Go to the /store/qvm/adaptor directory.2. Run the setup script: ./install-cert.sh <truststore_location><truststore_password><truststore_IP_address:port> The port is the port of service thatthe certificate belongs to.
Verify connectivity with IBM BigFix
To verify connectivity with IBM BigFix do these steps:
1. Type the following URL in a web browser:
https://IP_address or DNS_hostname for BigFix:8080/webreports?page=QNA2. Enter the following string on a single line at the command prompt:
(id of site of it,id of it,name of it,cve id list of it) of fixlets whose(cve id list of it as lowercase contains "cve") of bes sites
3. Click Evaluate
The following string is an example of the output for one result:
2, 104301, MS01-043: NNTP Service in Windows NT 4.0 Contains Memory Leak, CVE-2001-0543
The following table describes the breakdown of this result:
Table 15. Query result
Result Query parameter Description
2 (id of site of it) Fixlet site ID
104301 (id of it) Fixlet ID
MS01-043: NNTP Service inWindows NT 4.0 ContainsMemory Leak
(name of it) Fixlet name
CVE-2001-0543 (cve id list of it) CVE ID
116 IBM QRadar Vulnerability Manager: QRadar Vulnerability Manager

Are the most recent scan tools installed?
You must run auto updates to get the most recent scan tools for new installations of QRadar because theyare required for this integration to work. Run auto update from the Admin tab, by clicking the AutoUpdate icon.
For more information about installing QRadar auto updates, see the IBM QRadar Administration Guide.
Is the BigFix scan feature installed?
Run the following command to test whether BigFix scan feature is installed on QRadar:
grep -rl 'BIG_FIX_AGENT_ID' /opt/qvm
The following results are returned if the BigFix scan feature is installed:
• /opt/qvm/sys/perl/scanner/FusionVM/smb_patch_scanning.pm• /opt/qvm/bin/ssh/packages/bin/ssh-packages
If you don't see these files, run auto update from the Admin tab, by clicking the Auto Update icon.
Password reset
If your BigFix details change, you might need to change your password.
1. Edit the plugin-bigfix.properties file that is in the /opt/qvm/adaptor/config directory.2. Replace the following line:
_decrypt.bes.rest.password=lUb5qzr7FIVH+J319erc+g==
with the following line:
_encrypt.bes.rest.password=newpassword
where newpassword is your new password.3. Run the following script to encrypt your new password:
./password-property-encrypt.sh plugin-bigfix.properties
Password exception error in the /var/log/iem-cron.log file
You might see the following error in the in the /var/log/iem-cron.log file.Exception in thread "main" java.lang.NoClassDefFoundError:com.sun.org.apache.xerces.internal.dom.ElementNSImpl
This password exception error happens when the /opt/qvm/iem/webreports.properties file usesan invalid password.
To fix this error, at the shell prompt, run /opt/qvm/iem/iem-setup-webreports.pl and then enterthe correct password.
Vulnerability scan data is not sent to BigFix
Verify that the scanner can authenticate on the asset and access the required information.
1. Click the Vulnerabilities tab.2. In the scan name row, click the number in the Assets column.3. Hover over any warning symbols that appear in the column with the flag icon.4. Check any credential issues in the scan profile or check asset configuration issues that prevent the
scanner from accessing the required information.
Chapter 16. IBM BigFix integration 117
Is the asset model updated?
To verify that the asset model is updated with your scan results.
1. Click the Vulnerabilities tab.2. On the navigation menu, click Scan Results.
If you see a red warning triangle, the asset model is not updated with your scan results.
Disabling the BigFix and QRadar Vulnerability Manager integrationUse the following procedure if you want to disable the BigFix and QRadar Vulnerability Managerintegration.
Procedure
1. Log in to the QRadar Console as the root user.2. To disable the QRadar Vulnerability Manager adapter, type the following commands:
• systemctl stop qvmadaptor.timer• systemctl disable qvmadaptor.timer• systemctl daemon-reload
3. Type the following command to rename the /store/qvm/adaptor directory:mv /store/qvm/adaptor /store/BigFix.old/
4. Type the following command to restart the asset Profiler:systemctl restart assetprofiler
Tip: If you want to enable the BigFix integration again at another time, you can reverse the processabove.
118 IBM QRadar Vulnerability Manager: QRadar Vulnerability Manager

Chapter 17. IBM Security SiteProtector integrationQRadar Vulnerability Manager integrates with IBM Security SiteProtector to help direct intrusionprevention system (IPS) policy.
When you configure IBM Security SiteProtector, the vulnerabilities that are detected by QRadarVulnerability Manager scans are automatically forwarded to SiteProtector.
QRadar Vulnerability Manager forwards vulnerabilities from scan results that are tagged with ISS X-ForceIDs to IBM Security SiteProtector. QRadar Vulnerability Manager uses the MSL agent to forward thevulnerabilities.
Connecting to IBM Security SiteProtectorYou can forward vulnerability data from IBM QRadar Vulnerability Manager to IBM Security SiteProtectorto help direct intrusion prevention system (IPS) policy.
Procedure
1. On the navigation menu ( ), click Admin.2. Click System and License Management > Deployment Actions > Manage Vulnerability Deployment.3. Click Use SiteProtector.4. In the SiteProtector IP Address field, type the IP address of the IBM Security SiteProtector agent
manager server.
The default port for this connection is 3995.5. Click Save and then click Close.6. On the Admin tab toolbar, click Advanced > Deploy Full Configuration.7. Click OK.
What to do next
Scan your network assets to determine if the vulnerability data is displayed in your IBM SecuritySiteProtector installation.
© Copyright IBM Corp. 2012, 2019 119

120 IBM QRadar Vulnerability Manager: QRadar Vulnerability Manager

Chapter 18. Vulnerability research, news, andadvisories
You can use IBM QRadar Vulnerability Manager to remain aware of the vulnerability threat level andmanage security in your organization.
A vulnerability library contains common vulnerabilities that are gathered from a list of external sources.The most significant external resource is the National Vulnerability Database (NVD). You can researchspecific vulnerabilities by using a number of criteria for example, vendor, product, and date range. Youmight be interested in specific vulnerabilities that exist in products or services that you use in yourenterprise.
QRadar Vulnerability Manager also provides a list of security-related news articles and advisories,gathered from an external list of resources and vendors. Articles and advisories are a useful source ofsecurity information from around the world. Articles also help you to keep up-to-date with currentsecurity risks.
Viewing detailed information about published vulnerabilitiesIn IBM QRadar Vulnerability Manager, you can display detailed vulnerability information.
Using the Research Vulnerabilities page, you can investigate CVSS metrics and access information fromIBM X-Force® research and development.
Procedure
1. Click the Vulnerabilities tab.2. In the navigation pane, select Research > Vulnerabilities.3. If no vulnerabilities are displayed, select an alternative time range from the Viewing vulnerabilities
from list.4. To search the vulnerabilities, on the toolbar, select Search > New Search.5. Identify the vulnerability that you want to investigate.6. Click the vulnerability link in the Vulnerability Name column.
Remaining aware of global security developmentsIn IBM QRadar Vulnerability Manager, you can view security news from across the world to help keep youupdated about current security developments.
Procedure
1. Click the Vulnerabilities tab.2. In the navigation pane, click Research > News.3. If no news articles are displayed, select an alternative time range from the Viewing news from list.4. To search the news articles, on the toolbar, select Search > New Search.5. Identify the news article that you want to find out more about.6. Click the news article link in the Article Title column.
© Copyright IBM Corp. 2012, 2019 121
Viewing security advisories from vulnerability vendorsIn IBM QRadar Vulnerability Manager, you can view the vulnerability advisories that are issued bysoftware vendors. Use advisory information to help you identify the risks in your technology, andunderstand the implications of the risk.
Procedure
1. Click the Vulnerabilities tab.2. In the navigation pane, click Research > Advisories.3. If no advisories are displayed, select an alternative time range from the Viewing advisories from list.4. If you want to search the security advisories, on the toolbar, select Search > New Search.5. Click the advisory link in the Advisory column.
Each security advisory might include vulnerability references, solutions, and workarounds.
Searching vulnerabilities, news, and advisoriesIn IBM QRadar Vulnerability Manager, you can search the latest vulnerability news and advisories that areissued by software vendors.
Procedure
1. Click the Vulnerabilities tab.2. In the navigation pane, click one of the following options:
• Research > Vulnerabilities.• Research > News.• Research > Advisories.
3. On the toolbar, select Search > New Search.4. Type a search phrase in the Phrase field.5. If you are searching news items, select a news source from the Source list.6. In the By Date Range area, specify the date period for the news or advisory that you are interested in.7. If you are searching a published vulnerability, specify a vendor, product and product version in the By
Product area.8. If you are searching a published vulnerability, specify a CVE, Vulnerability, or OSVDB ID in the By ID
area.
News feedsUse the RSS Feeds dashboard items to see the latest IBM security news, advisories, publishedvulnerability information, and updates on scans that are completed or in progress.
The RSS Feeds dashboard items rotates the latest 10 news and scan results so that you don't need tosearch the Research or Scan Results pages on the Vulnerabilities tab for information.
On the Dashboard tab, use the Add Item > Reports > RSS Feeds menu to add RSS feeds to yourdashboard.
122 IBM QRadar Vulnerability Manager: QRadar Vulnerability Manager
Chapter 19. IBM QRadar Vulnerability ManagerEngine for OpenVAS Network Vulnerability Tests
The IBM QRadar Vulnerability Manager (QVM) Engine for OpenVAS Network Vulnerability Tests (NVT)implements the Full Scan Plus policy, which adds a deeper dimension to uncredentialed scanning.
About the QVM Engine for OpenVAS NVTsThe open source project OpenVAS provides about 50,000 individual Network Vulnerability Tests (NVTs)through their Community Feed. These NVTs are individual tests that can assess a vulnerability. The QVMEngine for OpenVAS NVTs provides the ability to run these tests as part of a QVM Scan.
Features
The QVM Engine for OpenVAS NVTs installs a new scan policy called Full Scan Plus, separate from yourexisting scan policies. Because it contains more vulnerability tests, extra time is required to run the scans.Previously configured scans use the Opencast Nets in addition to the capabilities of QRadar VulnerabilityManager.
The Full Scan Plus policy includes thousands of additional vulnerability tests provided by the OpenVASproject.
NVTs are updated nightly through existing automatic updates. No extra configuration is required.
Requirements
The QVM Engine for OpenVAS NVTs requires QRadar 7.3.1, Patch 3 or later with a QRadar VulnerabilityManager license.
Installation requires Console access and automatic updates. See “Adding the Full Scan Plus scan policyto IBM QRadar Vulnerability Manager” on page 124.
Frequently asked questions
Does the QVM Engine for OpenVAS NVTs allow importing vulnerabilities into QRadar VulnerabilityManager from a stand-alone OpenVAS deployment?
No. This plugin enables QVM to run OpenVAS Network Vulnerability Tests as part of QVM scans, but itis not designed to provide integration with a separately provided instance of OpenVAS.
Does the Full Scan Plus policy run only OpenVAS NVTs?No. The Full Scan Plus Policy uses a combination of QVM scanning tests with the NVTs for maximumcoverage.
About the Full Scan Plus policyFull Scan Plus executes the OpenVAS NVTs, as well as the tools of the existing Full Scan policy. As aresult, vulnerability detection is enhanced where unauthenticated scans are required and time permits torun those additional tests.
Note: You must install the Full Scan Plus policy RPM to use this scan policy.
The Full Scan Plus policy uses a daily updated feed of about 50,000 individual Network VulnerabilityTests (NVT) provided by the OpenVAS open source project.
By default, the policy discovers network assets by using a FAST scan port range. An authenticated scan isrun when credentials are provided.
© Copyright IBM Corp. 2012, 2019 123
A full scan has the following phases:
Scan type Description
Discovery scan. Discovers network assets, and then scans ports to identify key assetcharacteristics, such as operating system, device type, and services.Vulnerabilities are not scanned.
Uncredentialedscan
Checks services that do not require credentials, for example, reading banners andresponses for version information, SSL certificate expiry, testing default accounts,and testing responses for vulnerabilities.
Note: The most powerful feature of the Full Scan Plus scan is its comprehensiveuncredentialed scan, which runs more tests that the Full Scan, which are providedby the open source community. This scan is more detailed than the Full Scan but ittakes longer and uses more resources.
Run this scan during quiet periods in your network, ideally overnight or atweekends.
Credentialed scan QRadar Vulnerability Manager logs on to the asset and gathers information aboutthe installed application inventory and required configuration, and raises orsuppresses vulnerabilities.
Adding the Full Scan Plus scan policy to IBM QRadar Vulnerability ManagerTo add the Full Scan Plus scan policy to IBM QRadar Vulnerability Manager, you must download the QVMEngine for OpenVAS NVTs RPM Package Manager (RPM) from IBM® Fix Central and install it on your IBMQRadar Console.
Before you begin
• Ensure you have QRadar version 7.3.1, Patch 3 or later installed.• Ensure the QRadar Vulnerability Manager processor and scanner are enabled.
Procedure
1. Download the RPM from IBM Fix Central and save it in the /store/rpms directory on the Console.2. Type the following command to install the RPM on the QRadar Console:rpm -ivh /store/rpms/qvm-openvas-x.x-x.noarch.rpm
Note: In a High Availability environment, perform this step only on the primary console.3. Type the following command to enable the Full Scan Plus scan policy:/store/qvm/openvas/openvas_switch.sh enable
Note: Complete this step on the Console only. This step deploys the configuration to the entiresystem. No actions are required on Managed Hosts.
4. Run automatic updates by performing the following tasks:
a) On the navigation menu ( ), click Admin. to open the admin tab.b) In the System Configuration section, click Auto Update.c) Click Get New Updates.d) If new updates appear on the list, click Install > All Updates.
Important: You must trigger Auto Update to complete the installation of the Full Scan Plus policy. Atthis time, additional tools are downloaded and installed. The scan policy will be available in the UIafter this installation is complete. You must carry out this step, even if Auto Update has already run forthe current day.
124 IBM QRadar Vulnerability Manager: QRadar Vulnerability Manager

Running a scanFollow the steps below to run a scan with the Full Scan Plus policy.
Procedure
1. Configure the new Full Scan Plus policy as required.For instructions on configuring a scan policy, see below.
2. Create a Scan Profile and select Full Scan Plus, or the policy you created in Step 1 from the ScanPolicies menu.For instructions on creating a scan policy, see below.
Configuring a scan policyIn IBM QRadar Vulnerability Manager, you can configure a scan policy to meet any specific requirementsfor your vulnerability scans. You can copy and rename a preconfigured scan policy or you can add a newscan policy. You can't edit a preconfigured scan policy.
Procedure
1. Click the Vulnerabilities tab.2. In the navigation pane, select Administrative > Scan Policies.3. On the toolbar, click Add.4. Type the name and description of your scan policy.
To configure a scan policy, you must at least configure the mandatory fields in the New Scan Policywindow, which are the Name and Description fields.
5. From the Scan Type list, select the scan type.
6. To manage and optimize the asset-discovery process, click the Asset Discovery tab.7. To manage the ports and protocols that are used for a scan, click the Port Scan tab.8. To include specific vulnerabilities in your patch scan policy, click the Vulnerabilities tab.
Note: The Vulnerabilities tab is available only when you select a patch scan.9. To include or exclude tool groups from your scan policy, click the Tool Groups tab.
Note: The Tool Groups tab is available only when you select a zero-credentialed full-scan or full-scanplus policy.
10. To include or exclude tools from a scan policy, click the Tools tab.
Note: The Tools tab is available only when you select a zero-credentialed Full Scan or Full Scan Pluspolicy.
Important: If you do not modify the tools or tool groups, and you select the Full option as your scantype, then all the tools and tool groups that are associated with a full scan are included in your scanpolicy.
11. Click Save.
Creating a scan profileIn IBM QRadar Vulnerability Manager, you configure scan profiles to specify how and when your networkassets are scanned for vulnerabilities.
Procedure
1. Click the Vulnerabilities tab.
Chapter 19. IBM QRadar Vulnerability Manager Engine for OpenVAS Network Vulnerability Tests 125

2. In the navigation pane, click Administrative > Scan Profiles.3. On the toolbar, click Add.
When you create a scan profile, the only mandatory fields are Name and IP Addresses on the Detailstab of the Scan Profile Configuration page. In addition, you can also configure the following optionalsettings.
• If you added more scanners to your QRadar Vulnerability Manager deployment, select a scannerfrom the Scan Server list. This step is unnecessary if you want to use dynamic scanning.
• To enable this profile for on-demand scanning, click the On Demand Scanning Enabled check box.
By selecting this option, you make the profile available to use if you want to trigger a scan inresponse to a custom rule event. It also enables on-demand vulnerability scanning by using theright-click menu on the Assets page.
• By selecting the Dynamic Server Selection check box, you can choose the most appropriatescanner that is available. Ensure that you define the scanners in the Administrative > Scannerspage.
Security profiles must be updated with an associated domain. Domain-level restrictions are notapplied until the security profiles are updated, and the changes are deployed.
• To scan your network by using a predefined set of scanning criteria, select a scan type from theScan Policies list.
• If you configured centralized credentials for assets, click the Use Centralized Credentials checkbox. For more information, see the IBM QRadar Administration Guide.
4. Click Save.
Related conceptsNetwork bandwidth for simultaneous asset scansBy adjusting the network bandwidth setting, you change the number of assets that can be scannedconcurrently and the number of vulnerability tools that can be used concurrently to scan the assets. Somescans use more vulnerability tools to scan, which impacts the number of assets that can be scannedconcurrently.Dynamic scanningUse dynamic scanning in IBM QRadar Vulnerability Manager to associate individual scanners with an IPaddress, CIDR ranges, IP address ranges, or a domain that you specify in the scan profile. Dynamicscanning is most beneficial when you deploy several scanners. For example, if you deploy more than 5scanners, you might save time by using dynamic scanning.Options for adding scanners to your QRadar Vulnerability Manager deploymentScan policiesDynamic vulnerability scansIn IBM QRadar Vulnerability Manager, you can configure a scan to use certain vulnerability scanners forspecific CIDR ranges in your network. For example, your scanners might have access only to certain areasof your network.Related tasksAssociating vulnerability scanners with CIDR rangesIn IBM QRadar Vulnerability Manager, to do dynamic scanning, you must associate vulnerability scannerswith different segments of your network.Rescanning an asset by using the right-click menu optionConfiguring a scan policyIn IBM QRadar Vulnerability Manager, you can configure a scan policy to meet any specific requirementsfor your vulnerability scans. You can copy and rename a preconfigured scan policy or you can add a newscan policy. You can't edit a preconfigured scan policy.
126 IBM QRadar Vulnerability Manager: QRadar Vulnerability Manager

Notices
This information was developed for products and services offered in the U.S.A.
IBM may not offer the products, services, or features discussed in this document in other countries.Consult your local IBM representative for information on the products and services currently available inyour area. Any reference to an IBM product, program, or service is not intended to state or imply that onlythat IBM product, program, or service may be used. Any functionally equivalent product, program, orservice that does not infringe any IBM intellectual property right may be used instead. However, it is theuser's responsibility to evaluate and verify the operation of any non-IBM product, program, or service.
IBM may have patents or pending patent applications covering subject matter described in thisdocument. The furnishing of this document does not grant you any license to these patents. You can sendlicense inquiries, in writing, to:
IBM Director of Licensing IBM Corporation North Castle Drive Armonk, NY 10504-1785 U.S.A.
For license inquiries regarding double-byte character set (DBCS) information, contact the IBM IntellectualProperty Department in your country or send inquiries, in writing, to:
Intellectual Property Licensing Legal and Intellectual Property Law IBM Japan Ltd. 19-21, Nihonbashi-Hakozakicho, Chuo-kuTokyo 103-8510, Japan
INTERNATIONAL BUSINESS MACHINES CORPORATION PROVIDES THIS PUBLICATION "AS IS"WITHOUT WARRANTY OF ANY KIND, EITHER EXPRESS OR IMPLIED, INCLUDING, BUT NOT LIMITED TO,THE IMPLIED WARRANTIES OF NON-INFRINGEMENT, MERCHANTABILITY OR FITNESS FOR APARTICULAR PURPOSE. Some jurisdictions do not allow disclaimer of express or implied warranties incertain transactions, therefore, this statement may not apply to you.
This information could include technical inaccuracies or typographical errors. Changes are periodicallymade to the information herein; these changes will be incorporated in new editions of the publication.IBM may make improvements and/or changes in the product(s) and/or the program(s) described in thispublication at any time without notice.
Any references in this information to non-IBM websites are provided for convenience only and do not inany manner serve as an endorsement of those websites. The materials at those websites are not part ofthe materials for this IBM product and use of those websites is at your own risk.
IBM may use or distribute any of the information you provide in any way it believes appropriate withoutincurring any obligation to you.
Licensees of this program who wish to have information about it for the purpose of enabling: (i) theexchange of information between independently created programs and other programs (including thisone) and (ii) the mutual use of the information which has been exchanged, should contact:
IBM Director of LicensingIBM CorporationNorth Castle Drive, MD-NC119Armonk, NY 10504-1785US
Such information may be available, subject to appropriate terms and conditions, including in some cases,payment of a fee.
© Copyright IBM Corp. 2012, 2019 127
The licensed program described in this document and all licensed material available for it are provided byIBM under terms of the IBM Customer Agreement, IBM International Program License Agreement or anyequivalent agreement between us.
The performance data and client examples cited are presented for illustrative purposes only. Actualperformance results may vary depending on specific configurations and operating conditions..
Information concerning non-IBM products was obtained from the suppliers of those products, theirpublished announcements or other publicly available sources. IBM has not tested those products andcannot confirm the accuracy of performance, compatibility or any other claims related to non-IBMproducts. Questions on the capabilities of non-IBM products should be addressed to the suppliers ofthose products.
Statements regarding IBM's future direction or intent are subject to change or withdrawal without notice,and represent goals and objectives only.
All IBM prices shown are IBM's suggested retail prices, are current and are subject to change withoutnotice. Dealer prices may vary.
This information contains examples of data and reports used in daily business operations. To illustratethem as completely as possible, the examples include the names of individuals, companies, brands, andproducts. All of these names are fictitious and any similarity to actual people or business enterprises isentirely coincidental.
TrademarksIBM, the IBM logo, and ibm.com® are trademarks or registered trademarks of International BusinessMachines Corp., registered in many jurisdictions worldwide. Other product and service names might betrademarks of IBM or other companies. A current list of IBM trademarks is available on the Web at"Copyright and trademark information" at www.ibm.com/legal/copytrade.shtml.
Linux is a registered trademark of Linus Torvalds in the United States, other countries, or both.
UNIX is a registered trademark of The Open Group in the United States and other countries.
Java and all Java-based trademarks and logos are trademarks or registered trademarks of Oracle and/orits affiliates.
Microsoft, Windows, Windows NT, and the Windows logo are trademarks of Microsoft Corporation in theUnited States, other countries, or both.
Terms and conditions for product documentationPermissions for the use of these publications are granted subject to the following terms and conditions.
Applicability
These terms and conditions are in addition to any terms of use for the IBM website.
Personal use
You may reproduce these publications for your personal, noncommercial use provided that all proprietarynotices are preserved. You may not distribute, display or make derivative work of these publications, orany portion thereof, without the express consent of IBM.
128 Notices

Commercial use
You may reproduce, distribute and display these publications solely within your enterprise provided thatall proprietary notices are preserved. You may not make derivative works of these publications, orreproduce, distribute or display these publications or any portion thereof outside your enterprise, withoutthe express consent of IBM.
Rights
Except as expressly granted in this permission, no other permissions, licenses or rights are granted, eitherexpress or implied, to the publications or any information, data, software or other intellectual propertycontained therein.
IBM reserves the right to withdraw the permissions granted herein whenever, in its discretion, the use ofthe publications is detrimental to its interest or, as determined by IBM, the above instructions are notbeing properly followed.
You may not download, export or re-export this information except in full compliance with all applicablelaws and regulations, including all United States export laws and regulations.
IBM MAKES NO GUARANTEE ABOUT THE CONTENT OF THESE PUBLICATIONS. THE PUBLICATIONS AREPROVIDED "AS-IS" AND WITHOUT WARRANTY OF ANY KIND, EITHER EXPRESSED OR IMPLIED,INCLUDING BUT NOT LIMITED TO IMPLIED WARRANTIES OF MERCHANTABILITY, NON-INFRINGEMENT, AND FITNESS FOR A PARTICULAR PURPOSE.
IBM Online Privacy StatementIBM Software products, including software as a service solutions, (“Software Offerings”) may use cookiesor other technologies to collect product usage information, to help improve the end user experience, totailor interactions with the end user or for other purposes. In many cases no personally identifiableinformation is collected by the Software Offerings. Some of our Software Offerings can help enable you tocollect personally identifiable information. If this Software Offering uses cookies to collect personallyidentifiable information, specific information about this offering’s use of cookies is set forth below.
Depending upon the configurations deployed, this Software Offering may use session cookies that collecteach user’s session id for purposes of session management and authentication. These cookies can bedisabled, but disabling them will also eliminate the functionality they enable.
If the configurations deployed for this Software Offering provide you as customer the ability to collectpersonally identifiable information from end users via cookies and other technologies, you should seekyour own legal advice about any laws applicable to such data collection, including any requirements fornotice and consent.
For more information about the use of various technologies, including cookies, for these purposes, SeeIBM’s Privacy Policy at http://www.ibm.com/privacy and IBM’s Online Privacy Statement at http://www.ibm.com/privacy/details the section entitled “Cookies, Web Beacons and Other Technologies” andthe “IBM Software Products and Software-as-a-Service Privacy Statement” at http://www.ibm.com/software/info/product-privacy.
General Data Protection RegulationClients are responsible for ensuring their own compliance with various laws and regulations, including theEuropean Union General Data Protection Regulation. Clients are solely responsible for obtaining advice ofcompetent legal counsel as to the identification and interpretation of any relevant laws and regulationsthat may affect the clients’ business and any actions the clients may need to take to comply with suchlaws and regulations. The products, services, and other capabilities described herein are not suitable forall client situations and may have restricted availability. IBM does not provide legal, accounting orauditing advice or represent or warrant that its services or products will ensure that clients are incompliance with any law or regulation.
Notices 129
Learn more about the IBM GDPR readiness journey and our GDPR capabilities and Offerings here: https://ibm.com/gdpr
130 IBM QRadar Vulnerability Manager: QRadar Vulnerability Manager

Glossary
This glossary provides terms and definitions for the IBM QRadar Vulnerability Manager software andproducts.
The following cross-references are used in this glossary:
• See refers you from a non-preferred term to the preferred term or from an abbreviation to the spelled-out form.
• See also refers you to a related or contrasting term.
For other terms and definitions, see the IBM Terminology website (opens in new window).
“A” on page 131 “C” on page 131 “D” on page 131 “E” on page 132 “F” on page 132 “H” on page 132 “I”on page 132 “N” on page 132 “O” on page 132 “P” on page 133 “R” on page 133 “S” on page 133 “T” onpage 133 “U” on page 133 “V” on page 134
Aadvisory
A document that contains information and analysis about a threat or vulnerability.asset
A manageable object that is either deployed or intended to be deployed in an operationalenvironment.
CCDP
See collateral damage potential.CIDR
See Classless Inter-Domain Routing.Classless Inter-Domain Routing (CIDR)
A method for adding class C Internet Protocol (IP) addresses. The addresses are given to InternetService Providers (ISPs) for use by their customers. CIDR addresses reduce the size of routing tablesand make more IP addresses available within organizations.
clientA software program or computer that requests services from a server.
collateral damage potential (CDP)A measurement of the potential impact of an exploited vulnerability on a physical asset or on anorganization.
common vulnerability scoring system (CVSS)A scoring system by which the severity of a vulnerability is measured.
consoleA web-based interface from which an operator can control and observe the system operation.
CVSSSee common vulnerability scoring system.
DDNS
See Domain Name System.
© Copyright IBM Corp. 2012, 2019 131

DNS zone transferA transaction that replicates a Domain Name System (DNS) database.
Domain Name System (DNS)The distributed database system that maps domain names to IP addresses.
Eencryption
In computer security, the process of transforming data into an unintelligible form in such a way thatthe original data either cannot be obtained or can be obtained only by using a decryption process.
Ffalse positive exception rule
A rule specific to low-risk vulnerabilities that minimizes the volume of vulnerabilities that aremanaged.
HHA
See high availability.high availability (HA)
Pertaining to a clustered system that is reconfigured when node or daemon failures occur so thatworkloads can be redistributed to the remaining nodes in the cluster.
IInternet Protocol (IP)
A protocol that routes data through a network or interconnected networks. This protocol acts as anintermediary between the higher protocol layers and the physical network. See also TransmissionControl Protocol.
IPSee Internet Protocol.
Nnational vulnerability database (NVD)
A United States repository of standards-based vulnerability management data.NVD
See national vulnerability database.
Ooffense
A message sent or an event generated in response to a monitored condition. For example, an offensewill provide information on whether a policy has been breached or the network is under attack.
on-demand scanA scan that runs only when initiated by the user. The types of scans include full scans, discoveryscans, patch scans, PCI scans, database scans and web scans.
132 IBM QRadar Vulnerability Manager: QRadar Vulnerability Manager

operational windowA configured time period within which a scan is permitted to run.
PPayment Card Industry Data Security Standard (PCI DSS)
A worldwide information security standard assembled by the Payment Card Industry SecurityStandards Council (PCI SSC). The standard was created to help organizations that process cardpayments to prevent credit card fraud through increased controls around data and its exposure tocompromise. The standard applies to all organizations which hold, process, or pass cardholderinformation from any card branded with the logo of one of the card brands.
PCI DSSSee Payment Card Industry Data Security Standard.
PCI severity levelThe level of risk that a vulnerability poses to the payment card industry.
Rremediation process
A process of assigning, tracking, and fixing vulnerabilities that have been identified on an asset.
Sscan exclusion list
A list of assets, network groups, and CIDR ranges that are ignored by scans.scan profile
The configuration information that specifies how and when the assets on a network are scanned forvulnerabilities.
Simple Network Management Protocol (SNMP)A set of protocols for monitoring systems and devices in complex networks. Information aboutmanaged devices is defined and stored in a Management Information Base (MIB).
SNMPSee Simple Network Management Protocol.
TTCP
See Transmission Control Protocol.Transmission Control Protocol (TCP)
A communication protocol used in the Internet and in any network that follows the InternetEngineering Task Force (IETF) standards for internetwork protocol. TCP provides a reliable host-to-host protocol in packet-switched communication networks and in interconnected systems of suchnetworks. See also Internet Protocol.
UUDP
See User Datagram Protocol.
Glossary 133
User Datagram Protocol (UDP)An Internet protocol that provides unreliable, connectionless datagram service. It enables anapplication program on one machine or process to send a datagram to an application program onanother machine or process.
Vvulnerability
A security exposure in an operating system, system software, or application software component.
134 IBM QRadar Vulnerability Manager: QRadar Vulnerability Manager

Index
Aactivation keys
QRadar Vulnerability Manager 4QRadar Vulnerability Manager appliances 4
administrative shares 68, 69asset configuration
DMZ scanning 10Asset Profiler Configuration 93Asset scanning 32asset search filters
custom asset properties 74, 102asset vulnerabilities
analyzing 88authenticated scanning
Linux,UNIX 59
Bbackup and recovery
vulnerability data 4browser mode
Internet Explorer web browser 12
CCIDR ranges
scanning 44creating
benchmark scan profiles 39custom risk scores 81customized vulnerability dashboards
creating 22
Ddashboards
creating for vulnerability management 22displaying for vulnerability management 22information about vulnerability management 22
DCOM 67, 68default vulnerability management dashboard
displaying 22default vulnerability reports
running 99deployment
DMZ scanner 10, 11managed host processor 6managed host scanner 9QRadar Vulnerability Manager processor 7removing a vulnerability processor 7verifying the vulnerability processor 7
DMZscanning 10
DMZ scanningconfiguring QRadar Vulnerability Manager 11
DMZ scansasset configuration 10network configuration 10
document modeInternet Explorer web browser 12
domain scanningscheduling 42
domain scansconfiguring 42
Dynamic scanning 31
Eexception rules
manage 71managing 72
excluded scan targetsmanaging 45
executingscans 39, 40
Ffalse positive vulnerabilities
reducing 88
Gglossary 131
Hhigh risk assets and vulnerabilities
identifying 89high risk vulnerability reports
emailing 99
IIBM BigFix
integrating with QRadar Vulnerability Manager 112, 113,118integration 109vulnerabilities with patch available 91
IBM Security SiteProtectorconnecting to QRadar Vulnerability Manager 119integrating 119integration 119
install and deployQRadar Vulnerability Manager 3, 13
introduction viiIP addresses
scanning 44IP ranges
scanning 44
Index 135

LLinux
patch scanning 57
Mmanaged host
deploying a processor 6deploying a scanner 9installation and processor deployment 6
Managing vulnerabilities 32
Nnetwork administrator viinetwork configuration
DMZ scanning 10Network Interface Cards 32network vulnerabilities
reviewing 87new asset scans
scheduling 42, 43new features
version 7.3.2 user guide overview 1news articles
researching 121
Oopen port
scans 46open port scans
configuring 46open service vulnerabilities
analyzing 88operational window
removing from scan profile 48scans 48
operational windowscreating 47editing 48
Ppatch compliance dashboards
creating 22patch scanning
Linux 57UNIX 57Windows 57, 64
pending patch downloads 76permitted scan intervals
configuring 47managing 48
port range scansconfiguring 45
port rangesscanning 45
Purging vulnerability data 93
QQRadar managed host
deploying a scanner 9scanner deployment 9
QRadar Risk Managerintegration 107
QRadar Vulnerability Manageractivation keys 4connecting IBM Security SiteProtector 119DMZ scanner deployment 11DMZ scanning 10installation and deployment 3, 13integrating IBM BigFix 112, 113, 118overview 15
QRadar Vulnerability Manager applianceactivation keys 4
QRadar Vulnerability Manager processordeployment 7removal 7
QRadar Vulnerability Manager scannerdeployment 9
Rremote registry 66Remote scanners 30, 32risk score
color coding 91risk scores
investigating 80RSS 122
Ssaved vulnerability searches
deleting 87scan exclusions
creating 45managing 45
scan policies 51scan profile
configuration options 40scan profile details
configuring 40scan profiles
configuring 38creating 37, 38, 125excluding assets from scans 45port range scanning 45removing operational windows 48running manually 39, 40specifying scan targets 44
scan resultsmanagement of 74overview 73republishing 75searching 73
Scan results 93scan times 27Scan types
Discovery scan 26Full scan 26
136 IBM QRadar Vulnerability Manager: QRadar Vulnerability Manager

Scan types (continued)Patch scan 26
scanner type 92scanning
DMZ 10UNIX 57
scansexecuting 39, 40running 39, 40
scheduled scansnew unscanned assets 42, 43
security integrationsIBM BigFix 109IBM Security SiteProtector 119QRadar Risk Manager 107
security softwareintegrations 107
SNMP community namesscanning 57
Ttechnical owner asset details
configuring 101
UUNIX
patch scanning 57UNIX authenticated scans 60
Vvulnerabilities
assigning for remediationautomatically 95, 97manually 95
backup and recovery 4managing 79researching 121researching advisories 122risk score 80scanning 15, 37searching 83viewing history 88
vulnerability advisoriesreviewing 122
vulnerability datareviewing 76
vulnerability exception rulesapplying automatically 88creating 71
vulnerability exceptionsautomatic configuration 88searching 82
vulnerability historyviewing 88
vulnerability instancesanalyzing 87
vulnerability managementcreating a customized dashboard 22creating a patch compliance dashboard 22displaying the default dashboard 22
vulnerability management (continued)overview 15
vulnerability patch statusidentifying 91
vulnerability processoradding to deployment 7deploying on a managed host 5deploying to a QRadar console 7deploying to a QRadar Vulnerability Manager managedhost 7moving to a managed host 5removal 7verifying deployment 7
vulnerability remediationmanagement 95
vulnerability reportscreating and scheduling 101emailing 99pci compliance 100
Vulnerability reportsoverview 99
vulnerability researchoverview 121
vulnerability riskscoring vulnerabilities 80
vulnerability risk and pci severityreviewing 77
vulnerability risk levelsreviewing 75
vulnerability scanningscan profiles 37specifying scan targets 44
Vulnerability scanning 25–27, 30–32vulnerability scans
during permitted times 48email when scans start and stop 78excluding assets from scans 45open port scanning 46permitted scan intervals 47port ranges 45public key authentication 58UNIX authenticated scans 59
vulnerability searchparameters 84
vulnerability searchessaving criteria 86
Wwhat's new
version 7.3.2 user guide overview 1Windows
patch scanning 57Windows patch scanning 65–69Windows remote registry access
configuring 65Windows scanning
enabling remote registry access 65WMI 65, 66, 68
Index 137

138 IBM QRadar Vulnerability Manager: QRadar Vulnerability Manager


IBM®