HUNTING RIFLE - Pyramyd Air
12
HUNTING RIFLE TM .357 Electro-Pneumatic Intelligent Control TM PCP TM OWNER’S MANUAL BPE3571-515 Crosman Corporation • 7629 Rts. 5 & 20 • Bloomfield, NY 14469 800-7-AIRGUN • www.crosman.com READ ALL INSTRUCTIONS AND WARNINGS IN THIS MANUAL BEFORE USING THIS AIRGUN
-
Upload
khangminh22 -
Category
Documents
-
view
4 -
download
0
Transcript of HUNTING RIFLE - Pyramyd Air
HUNTING RIFLE
TM
.357
Electro-PneumaticIntelligent Control
TM
PCPTM
OWNER’SMANUAL
BPE3571-515
Crosman Corporation • 7629 Rts. 5 & 20 • Bloomfield, NY 14469800-7-AIRGUN • www.crosman.com
READ ALL INSTRUCTIONS AND WARNINGS IN THIS MANUAL BEFORE USING THIS AIRGUN
PERFORMANCEMany factors affect velocity, including brand of projectile, type of projectile, lubrication, barrel condition and temperature. Your airgun was designed to work with BENJAMIN®, and BENJAMIN® by NOSLER® ammunition. Use of other ammunition may cause your airgun to malfunction.
DO NOT RETURN THIS PRODUCT TO THE STORE.Our customer service representatives can help; contact us directly at 1-800-7AIRGUN (1-800-724-7486).For frequently asked questions go to www.crosman.com
REPAIR SERVICEIf your airgun needs repair, we recommend you take or send it to your nearest Crosman Authorized Service Station. DO NOT ATTEMPT TO DISASSEMBLE IT! Your airgun requires special tools and fixtures to repair it. Any disassembly or modification not performed by an Authorized Service Station will void the warranty.
A SPECIAL CUSTOMER SERVICE OFFERCrosman Authorized Service Stations will unjam your airgun at no cost during the warranty period.
LIMITED WARRANTYSee your Warranty card packed inside your new Benjamin® product for further instructions and length of warranty.This product is warranted to the retail consumer against defects in material and workmanship and is transferable. To register the serial number of your airgun, please return the airgun registration form. The warranty is not conditioned on the return of the card. Proof of original sales receipt is required to obtain services under this warranty.
WHAT IS COVEREDReplacement parts and labor. Transportation charges to consumer for repaired product.
WHAT IS NOT COVEREDTransportation charges to Authorized Service Station for product. Damages caused by abuse, modification or failure to perform normal maintenance. Any other expense. CONSEQUENTIAL DAMAGES, INCIDENTAL DAMAGES, OR INCIDENTAL EXPENSES, INCLUDING DAMAGE TO PROPERTY. SOME STATES DO NOT ALLOW THE EXCLUSION OR LIMITATION OF INCIDENTAL OR CONSEQUENTIAL DAMAGES SO THE ABOVE LIMITATION OR EXCLUSION MAY NOT APPLY TO YOU.
HOW TO OBTAIN WARRANTY PERFORMANCEU.S. Customers: Locate nearest service station (see www.crosman.com or call Crosman customer service at 800-724-7486 for list of stations). The service station will give you details of how to proceed with sending the item in for repair. You must contact the station prior to shipping your product.
Canadian Customers: Contact Gravel Agency, Quebec (866) 662-4869.
International Customers: Please return product to your nearest distributor. If you do not know your distributor, please call 585-657- 6161 and ask for our International Department for assistance.
IMPLIED WARRANTIESAny implied warranties including the implied warranties of merchantability and fitness for a particular purpose are limited in the duration to one year from the date of retail purchase. Some states do not allow limitations on how long an implied warranty lasts so the above limitations may not apply to you. To the extent any provision of this warranty is prohibited by federal, state or municipal law, which cannot be preempted, it shall not be applicable. This warranty gives you specific legal rights and you may also have other rights, which vary, from state to state.CROSMAN® and, BENJAMIN® are registered trademarks of Crosman Corporation in the State of New York.
Congratulations!You now own a Benjamin® Rogue™ .357 hunting rifle with ePCP™ technology.
Our dedicated Crosman design and manufacturing team carefully crafted this exciting new air rifle right here in Bloomfield, NY, with you in mind.
The Rogue .357 air rifle revolutionizes hunting with airguns by offering the most available shots from a charge. Ultimate versatility is provided by allowing YOU to choose the
type and size of game you wish to take. Whether you use it for hunting hogs, coyotes or raccoons, we’re confident your Rogue .357 air rifle will be as much a source of pride for
you as it is for all of us here at Crosman.
“TAKE IT OUTSIDE”™ and enjoy your Rogue .357. Safe shooting, and thank you for your continued support.
Explosion Danger. Do not attempt to ship a pressurized airgun. Always completely depressurize this airgun before shipping by any means. Failure to follow these instructions may result in serious injury or death.
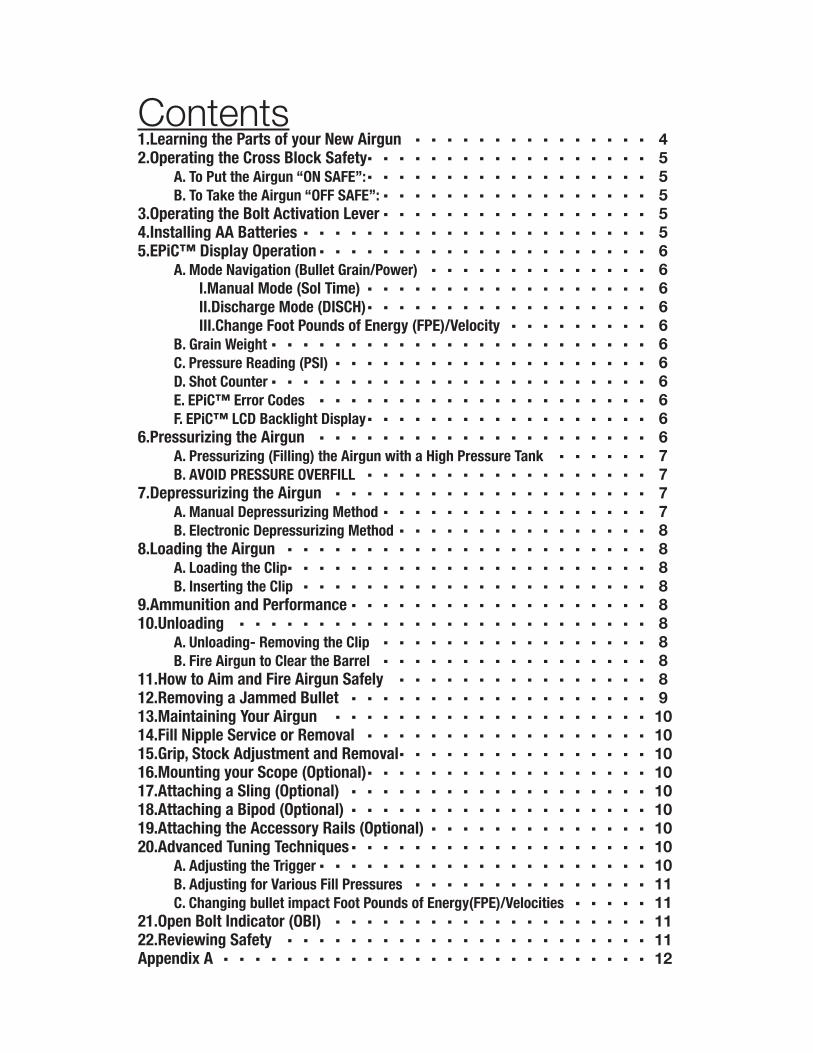
Contents1.Learning the Parts of your New Airgun 42.Operating the Cross Block Safety 5
A. To Put the Airgun “ON SAFE”: 5B. To Take the Airgun “OFF SAFE”: 5
3.Operating the Bolt Activation Lever 54.Installing AA Batteries 55.EPiC™ Display Operation 6
A. Mode Navigation (Bullet Grain/Power) 6I.Manual Mode (Sol Time) 6II.Discharge Mode (DISCH) 6III.Change Foot Pounds of Energy (FPE)/Velocity 6
B. Grain Weight 6C. Pressure Reading (PSI) 6D. Shot Counter 6E. EPiC™ Error Codes 6F. EPiC™ LCD Backlight Display 6
6.Pressurizing the Airgun 6A. Pressurizing (Filling) the Airgun with a High Pressure Tank 7B. AVOID PRESSURE OVERFILL 7
7.Depressurizing the Airgun 7A. Manual Depressurizing Method 7B. Electronic Depressurizing Method 8
8.Loading the Airgun 8A. Loading the Clip 8B. Inserting the Clip 8
9.Ammunition and Performance 810.Unloading 8
A. Unloading- Removing the Clip 8B. Fire Airgun to Clear the Barrel 8
11.How to Aim and Fire Airgun Safely 812.Removing a Jammed Bullet 913.Maintaining Your Airgun 1014.Fill Nipple Service or Removal 1015.Grip, Stock Adjustment and Removal 1016.Mounting your Scope (Optional) 1017.Attaching a Sling (Optional) 1018.Attaching a Bipod (Optional) 1019.Attaching the Accessory Rails (Optional) 1020.Advanced Tuning Techniques 10
A. Adjusting the Trigger 10B. Adjusting for Various Fill Pressures 11C. Changing bullet impact Foot Pounds of Energy(FPE)/Velocities 11
21.Open Bolt Indicator (OBI) 1122.Reviewing Safety 11Appendix A 12

4
Not a toy. This airgun is intended for adult use only. Misuse or careless use may cause serious injury or death. May be dangerous up to 1000 yards (915 meters).
Do not brandish or display this airgun in public—it may confuse people and may be a crime. Police and others may think it is a firearm. Do not change the coloration and markings to make it look more like a firearm. That is dangerous and may be a crime.
YOU AND OTHERS WITH YOU SHOULD ALWAYS WEAR SHOOTING GLASSES TO PROTECT YOUR EYES.
READ ALL INSTRUCTIONS BEFORE USING.
BUYER AND USER HAVE THE DUTY TO OBEY ALL LAWS ABOUT THE USE AND OWNERSHIP OF THIS AIRGUN.
THIS AIRGUN IS INTENDED FOR USE BY ADULTS ONLY
This product contains lead, a chemical known to the State of Cali-fornia to cause cancer and birth defects (or other reproductive harm.)
Explosion Danger. Use only compressed air or N2 (High pressure Nitrogen) in this airgun. Use of other gasses, including oxygen, can cause a fire or explosion that may result in serious injury or death.
Please read this owner’s manual completely and remember that an airgun is not a toy. Always carefully follow the safety instructions found in this owner’s manual and keep the manual in a safe place for future use. If you have any questions regarding the operation of your new airgun, please contact Crosman at 1-800-724-7486.
1. Learning the Parts of your New AirgunLearning the names and parts of your new airgun will help you understand your owner’s manual. (Fig. 1)
A. Bolt HandleB. Bolt Activation LeverC. ClipD. BarrelE. MuzzleF. Protective Cap For Fill NippleG. Fill NippleH. EPiC™ Display Screen (Fig. 2)I. Cross Block SafetyJ. TriggerK. Trigger GuardL. StockM. Battery Cavity
Caution: DO NOT SUBMERGE THIS AIRGUN IN WATER.Although the electronics in this airgun are designed to be protected from humidity and moist environments, submersion in water will cause damage. If the airgun becomes wet, do not operate the airgun. Remove the batteries immediately. Dry the airgun with a fan at room temperature in a dry environment for several days. Install new batteries before operation of the airgun.
Tools you will need If Following Advanced Tuning Techniques, Grip and Stock Removal or Battery Installation.
.0625 in. Allen Wrench.125 in. Allen Wrench
.1875 in. Allen Wrench (not included)Phillips Screw Driver (not included)
Reverse Side View
Fig. 1
5
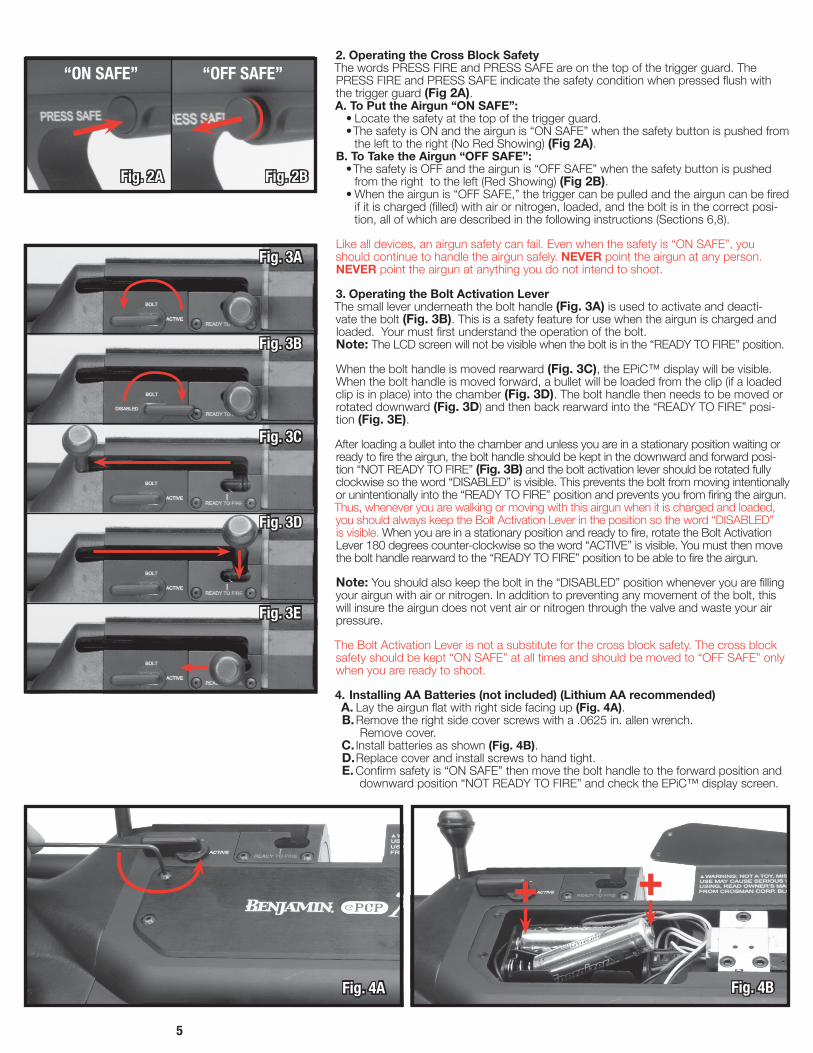
2. Operating the Cross Block SafetyThe words PRESS FIRE and PRESS SAFE are on the top of the trigger guard. The PRESS FIRE and PRESS SAFE indicate the safety condition when pressed flush with the trigger guard (Fig 2A).A. To Put the Airgun “ON SAFE”:
• Locate the safety at the top of the trigger guard.• The safety is ON and the airgun is “ON SAFE” when the safety button is pushed from
the left to the right (No Red Showing) (Fig 2A).B. To Take the Airgun “OFF SAFE”:
• The safety is OFF and the airgun is “OFF SAFE” when the safety button is pushed from the right to the left (Red Showing) (Fig 2B).
• When the airgun is “OFF SAFE,” the trigger can be pulled and the airgun can be fired if it is charged (filled) with air or nitrogen, loaded, and the bolt is in the correct posi-tion, all of which are described in the following instructions (Sections 6,8).
Like all devices, an airgun safety can fail. Even when the safety is “ON SAFE”, you should continue to handle the airgun safely. NEVER point the airgun at any person. NEVER point the airgun at anything you do not intend to shoot.
3. Operating the Bolt Activation LeverThe small lever underneath the bolt handle (Fig. 3A) is used to activate and deacti-vate the bolt (Fig. 3B). This is a safety feature for use when the airgun is charged and loaded. Your must first understand the operation of the bolt.Note: The LCD screen will not be visible when the bolt is in the “READY TO FIRE” position.
When the bolt handle is moved rearward (Fig. 3C), the EPiC™ display will be visible. When the bolt handle is moved forward, a bullet will be loaded from the clip (if a loaded clip is in place) into the chamber (Fig. 3D). The bolt handle then needs to be moved or rotated downward (Fig. 3D) and then back rearward into the “READY TO FIRE” posi-tion (Fig. 3E).
After loading a bullet into the chamber and unless you are in a stationary position waiting or ready to fire the airgun, the bolt handle should be kept in the downward and forward posi-tion “NOT READY TO FIRE” (Fig. 3B) and the bolt activation lever should be rotated fully clockwise so the word “DISABLED” is visible. This prevents the bolt from moving intentionally or unintentionally into the “READY TO FIRE” position and prevents you from firing the airgun. Thus, whenever you are walking or moving with this airgun when it is charged and loaded, you should always keep the Bolt Activation Lever in the position so the word “DISABLED” is visible. When you are in a stationary position and ready to fire, rotate the Bolt Activation Lever 180 degrees counter-clockwise so the word “ACTIVE” is visible. You must then move the bolt handle rearward to the “READY TO FIRE” position to be able to fire the airgun.
Note: You should also keep the bolt in the “DISABLED” position whenever you are filling your airgun with air or nitrogen. In addition to preventing any movement of the bolt, this will insure the airgun does not vent air or nitrogen through the valve and waste your air pressure.
The Bolt Activation Lever is not a substitute for the cross block safety. The cross block safety should be kept “ON SAFE” at all times and should be moved to “OFF SAFE” only when you are ready to shoot.
4. Installing AA Batteries (not included) (Lithium AA recommended)A. Lay the airgun flat with right side facing up (Fig. 4A).B. Remove the right side cover screws with a .0625 in. allen wrench.
Remove cover.C. Install batteries as shown (Fig. 4B).D. Replace cover and install screws to hand tight.E. Confirm safety is “ON SAFE” then move the bolt handle to the forward position and
downward position “NOT READY TO FIRE” and check the EPiC™ display screen.
Fig. 3A
Fig. 3B
Fig. 3D
Fig. 3E
Fig. 3C
Fig. 2A Fig. 2B
“ON SAFE” “OFF SAFE”
Fig. 4BFig. 4A

6
5. EPiC™ Display OperationThe EPiC™ display will not display information when the bolt is in the “READY TO FIRE” position. To view the display, you must have the bolt out of the “READY TO FIRE” posi-tion. If the bolt is in the “READY TO FIRE” position, move the bolt forward and move the bolt activation lever so the word “DISABLED” is visible and the bolt cannot move. The cross block safety should be “ON SAFE”. Critical halts are displayed when the bolt is in the fire position. See Appendix A.
The EPiC™ display (Fig. 5):1. Up Arrow Button2. Mode Button3. Down Arrow Button4. LCD Display Screen
a. Displays Operation Modes Manual (“SOL TIME”), Discharge (DISCH), Foot Pounds of Energy (FPE) (LOW, MEDIUM, or HIGH). (See Section 5)
b. Displays bullet weight in grains (gn)c. Displays air pressure in the airgun in pounds per square inch (PSI).d. Displays number of shots remaining (Shots)
A. Mode Navigation (Bullet Grain/Power)Press the “Mode” button on the EPiC™ display to move between the bullet grain weight and bullet power settings on the display. Use the Up and Down arrows to navigate with-in each display and push the “Mode” button to select the correct entry in each display.
Press the “Mode” button one time and the upper right hand portion of the display will blink. Press the Up and Down arrows to navigate to the desired value. Press the “Mode” button again to select the upper left hand portion of the display. Repeat the steps above for desired value. The modes are:I. Manual Mode (Sol Time) (Fig. 6A)
“SOL TIME” – The manual mode (Fig. 6A) uses eVALVE ™ technology to allow you to manage and calibrate air pressure to control the length of time (“Dwell time”) before the valve releases air or Nitrogen to discharge the bullet after the trigger is pulled. You can set the time from 10 to 8000 microseconds. This mode can be used to test various bul-lets for velocity and trajectory characteristics in this airgun.II. Discharge Mode (DISCH) (Fig. 6B)Airgun will not fire on discharge mode if the pressure is less than 1000psi
“DISCH” – The Discharge Mode (Fig. 6B) is to be used after the valve has not had a complete cycle and has not released all the air or nitrogen. Use this mode to discharge a bullet left in the barrel. Use of this mode resets the valve. This mode electronically vents the airgun of pressure with a 7000 microseconds discharge of air.
Performing the above procedure may exhaust air from the bar-rel at a high rate and fire a bullet from the airgun if one is in the barrel. Therefore, make certain the airgun is pointed in a SAFE DIRECTION. Failure to follow these instructions may result in serious injury or death.
III. Change Foot Pounds of Energy (FPE)/Velocity (“LOW” – “MED” – “HIGH”)These bullet power settings (Fig. 6C) adjust the muzzle velocity and, therefore, foot pounds of energy. Changing this setting changes the valve dwell time which adjusts the muzzle velocity. For example, if you intend to shoot 170 or 145 grain bullets on the HIGH setting, then you will need 2600 to 3000 PSI of pressure in the airgun. In contrast, if you intend to shoot 145 or 100 grain bullets on the LOW setting, then it is best to have 2500 PSI or less in the airgun. (See section 20C. and figure 21)B. Grain Weight (Fig. 6D)Pressing the “Mode” button twice will cause this display to blink. Use the Up and Down arrows to find the correct bullet weight of the bullet you are using. There are three preset weights: 100, 145, and 170 grains. Press the “Mode” button to select the correct weight. If you are using a bullet with a different weight, select the preset weight nearest to the weight of the bullet you are using.C. Pressure Reading (PSI)(Fig. 6E)The LCD will continuously display the pressure as PSI contained in the reservoir.D. Shot CounterThis displays the following information:
“X Shots”= This shows the approximate number of shots remaining based on PSI vs. power setting and bullet variables. You must press the “Mode” button after each shot to update this information.
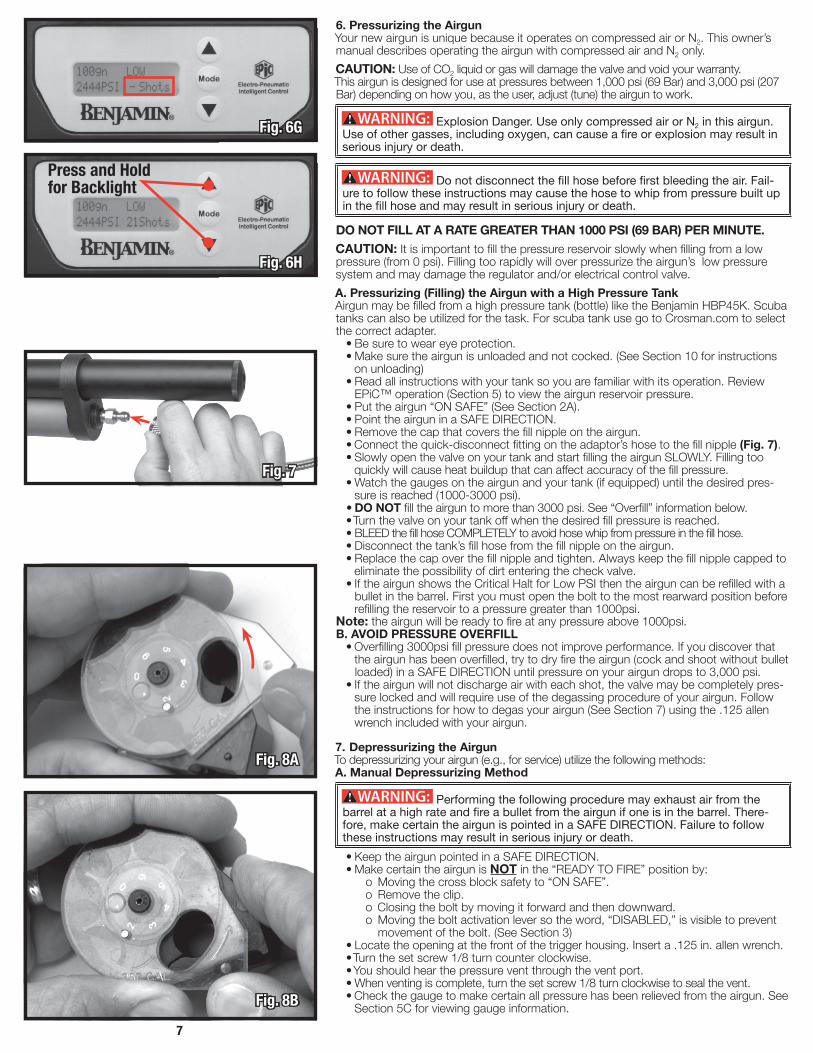
“+ Shots” (Fig. 6F) = This means your airgun will shoot with excessive velocity. To correct, lower your reservoir pressure (See Section 7) or choose a higher power or nearest grain weight setting.
“- Shots” (Fig. 6G) = This means your airgun will shoot with low velocity. To correct, raise your reservoir pressure by adding compressed air or N2 or choose a lower power setting.E. EPiC™ Error Codes:See appendix A for a list of critical halt error codes. (Page 12)F. EPiC™ LCD Backlight Display (Fig. 6H)To activate the LCD Backlight press both the up and down arrow keys at the same time until the backlight is active. The back light will help you see the LCD information in low light conditions. The backlight does consume significant battery life and should be used sparingly to conserve the batteries.
Fig. 6B
Fig. 6A
Fig. 6CFig. 6D
Fig. 6E
Fig. 6F
Electro-PneumaticIntelligent Control
TM
Fig. 5
7
6. Pressurizing the AirgunYour new airgun is unique because it operates on compressed air or N2. This owner’s manual describes operating the airgun with compressed air and N2 only.
CAUTION: Use of CO2 liquid or gas will damage the valve and void your warranty.This airgun is designed for use at pressures between 1,000 psi (69 Bar) and 3,000 psi (207 Bar) depending on how you, as the user, adjust (tune) the airgun to work.
Explosion Danger. Use only compressed air or N2 in this airgun. Use of other gasses, including oxygen, can cause a fire or explosion may result in serious injury or death.
Do not disconnect the fill hose before first bleeding the air. Fail-ure to follow these instructions may cause the hose to whip from pressure built up in the fill hose and may result in serious injury or death.
DO NOT FILL AT A RATE GREATER THAN 1000 PSI (69 BAR) PER MINUTE.CAUTION: It is important to fill the pressure reservoir slowly when filling from a low pressure (from 0 psi). Filling too rapidly will over pressurize the airgun’s low pressure system and may damage the regulator and/or electrical control valve.
A. Pressurizing (Filling) the Airgun with a High Pressure TankAirgun may be filled from a high pressure tank (bottle) like the Benjamin HBP45K. Scuba tanks can also be utilized for the task. For scuba tank use go to Crosman.com to select the correct adapter.
• Be sure to wear eye protection.• Make sure the airgun is unloaded and not cocked. (See Section 10 for instructions
on unloading)• Read all instructions with your tank so you are familiar with its operation. Review
EPiC™ operation (Section 5) to view the airgun reservoir pressure.• Put the airgun “ON SAFE” (See Section 2A).• Point the airgun in a SAFE DIRECTION.• Remove the cap that covers the fill nipple on the airgun.• Connect the quick-disconnect fitting on the adaptor’s hose to the fill nipple (Fig. 7).• Slowly open the valve on your tank and start filling the airgun SLOWLY. Filling too
quickly will cause heat buildup that can affect accuracy of the fill pressure.• Watch the gauges on the airgun and your tank (if equipped) until the desired pres-
sure is reached (1000-3000 psi).• DO NOT fill the airgun to more than 3000 psi. See “Overfill” information below.• Turn the valve on your tank off when the desired fill pressure is reached.• BLEED the fill hose COMPLETELY to avoid hose whip from pressure in the fill hose.• Disconnect the tank’s fill hose from the fill nipple on the airgun.• Replace the cap over the fill nipple and tighten. Always keep the fill nipple capped to
eliminate the possibility of dirt entering the check valve.• If the airgun shows the Critical Halt for Low PSI then the airgun can be refilled with a
bullet in the barrel. First you must open the bolt to the most rearward position before refilling the reservoir to a pressure greater than 1000psi.
Note: the airgun will be ready to fire at any pressure above 1000psi.B. AVOID PRESSURE OVERFILL
• Overfilling 3000psi fill pressure does not improve performance. If you discover that the airgun has been overfilled, try to dry fire the airgun (cock and shoot without bullet loaded) in a SAFE DIRECTION until pressure on your airgun drops to 3,000 psi.
• If the airgun will not discharge air with each shot, the valve may be completely pres-sure locked and will require use of the degassing procedure of your airgun. Follow the instructions for how to degas your airgun (See Section 7) using the .125 allen wrench included with your airgun.
7. Depressurizing the AirgunTo depressurizing your airgun (e.g., for service) utilize the following methods:A. Manual Depressurizing Method
Performing the following procedure may exhaust air from the barrel at a high rate and fire a bullet from the airgun if one is in the barrel. There-fore, make certain the airgun is pointed in a SAFE DIRECTION. Failure to follow these instructions may result in serious injury or death.
• Keep the airgun pointed in a SAFE DIRECTION.• Make certain the airgun is NOT in the “READY TO FIRE” position by:
o Moving the cross block safety to “ON SAFE”. o Remove the clip. o Closing the bolt by moving it forward and then downward. o Moving the bolt activation lever so the word, “DISABLED,” is visible to prevent movement of the bolt. (See Section 3)
• Locate the opening at the front of the trigger housing. Insert a .125 in. allen wrench.• Turn the set screw 1/8 turn counter clockwise.• You should hear the pressure vent through the vent port.• When venting is complete, turn the set screw 1/8 turn clockwise to seal the vent.• Check the gauge to make certain all pressure has been relieved from the airgun. See
Section 5C for viewing gauge information.
Fig. 6H
Press and Hold for Backlight
Fig. 6FFig. 6G
Fig. 7
Fig. 8A
Fig. 8B

8
B. Electronic Depressurizing Method
Performing the following procedure may exhaust air from the barrel at a high rate and fire a bullet from the airgun if one is in the barrel. There-fore, make certain the airgun is pointed in a SAFE DIRECTION. Failure to follow these instructions may result in serious injury or death.
• Move the cross block safety to “ON SAFE”.• Keep the airgun pointed in a SAFE DIRECTION.• Remove the clip.• Close the airgun bolt by moving it forward and then downward.• Set the power mode to “DISCH.” (See Section 5)• Move the bolt activation lever so the word, “ACTIVE,” is visible to allow movement of
the bolt. (See Section 3)• Move the bolt handle to the “READY TO FIRE” position.• Move the cross block safety to “OFF SAFE.”• Keep the airgun pointed in a SAFE DIRECTION.• Pull the trigger.• Check the pressure on the EPiC™ display. (See Section 5)• Cycle the bolt and fire the airgun in a SAFE DIRECTION until there is there is only
1000psi of air remaining in the airgun.
8. Loading the AirgunA. Loading the Clip
• Lift the clear cover over the catch point and rotate counter-clockwise in the direction of the arrow (Fig. 8A). Rotate clip cover all the way around to the backside of the catchpoint (Fig. 8B).
• Place a finger under the clip covering the hole, place the first bullet in the clip, nose first ( Fig. 8C). Make certain the bullet does not protrude, out the back of the clip. In the event the bullet does protrude simply push the bullet inward.
• After you fill the remaining slots in the clip, rotate the cover clockwise until it comes to rest at the catch point (Fig. 8D). The clip is now ready for use.
B. Inserting the ClipFollowing these directions will result in your airgun being loaded and ready to fire.
• Put the airgun “ON SAFE” (See Section 2) and point in a SAFE DIRECTION.• Pull the bolt back to the rearward position.• With the cover of the clip facing the butt of the airgun insert the clip from the left side
and push it inward until it snaps into place. (Fig. 9A-C)• Push the bolt forward fully and downward to chamber a bullet.
Double loading your airgun will prevent your airgun from working properly and may cause damage. If you encounter resistance do not force the bolt. You will need to open the bolt remove the clip and point the muzzle upward in a safe direction. Carefully shake the airgun and the second bullet will fall out of the breech. See section 21 OBI for instructions on determining if you’ve double loaded your airgun.
9. Ammunition and PerformanceYour airgun barrel is designed to work with the Benjamin® and Benjamin® by Nosler® bul-lets. Use of pure lead or lead alloy bullets in .356 to .358 diameter that are not designed for this type of barrel will not give good performance and may damage the barrel.
CAUTION: Using Copper jacket bullets will cause damage to the barrel of this airgun. Therefore, it is important you do not use copper jacketed bullets with this airgun.
10. Unloading A. Unloading- Removing the Clip
• Put the airgun “ON SAFE” (See Section 2A) and point in a SAFE DIRECTION• Move the bolt upward and to the rearward position.• Pull the clip upward, out of the receiver, while pushing with your thumb on the right
side of the clip.B. Fire Airgun to Clear the Barrel
• Follow the directions in step A.• Move the bolt to the “READY TO FIRE” position.• After aiming in a safe direction pull the trigger• Put the airgun on “ON SAFE” (See Section 2A).• The airgun is now ready for storing.
11. How to Aim and Fire Airgun Safely• ALWAYS POINT YOUR AIRGUN IN A SAFE DIRECTION. • DO NOT FIRE THIS AIRGUN INDOORS.• MAKE CERTAIN THERE IS SUFFICIENT PRESSURE TO FIRE THE AIRGUN PROP-
ERLY. THE LCD DISPLAY SHOULD INDICATE PRESSURE BETWEEN 1000 AND 3000 PSI.
• REVIEW ALL SAFETY INSTRUCTIONS. Section 22.• To Fire the airgun:
o Pressurize the airgun (See Section 6); o Cock the airgun by operating the bolt (See Section 3); o Load a bullet into the chamber (See Section 8); o Move the bolt into the “READY TO FIRE” position (See Section 3); o Move the safety to “OFF SAFE” (See Section 2); and o Pull the trigger
• You and others with you should always wear shooting glasses to protect your eyes.
Fig. 8C
Fig. 8D
Fig. 9A
Fig. 9B
Fig. 9C
9
• Do not shoot at hard surfaces or at the surface of water. The bullets may bounce off or ricochet and hit someone or something you had not intended to hit.
• Always choose your target carefully. It is best to only shoot at paper bulls eye targets that are attached to a safe backstop made of an energy absorbing material like dirt or sand.
• Your airgun is designed for target shooting and hunting and is suited for outdoor use only. Always remember to place your target carefully. THINK about what you will hit if you miss the target.
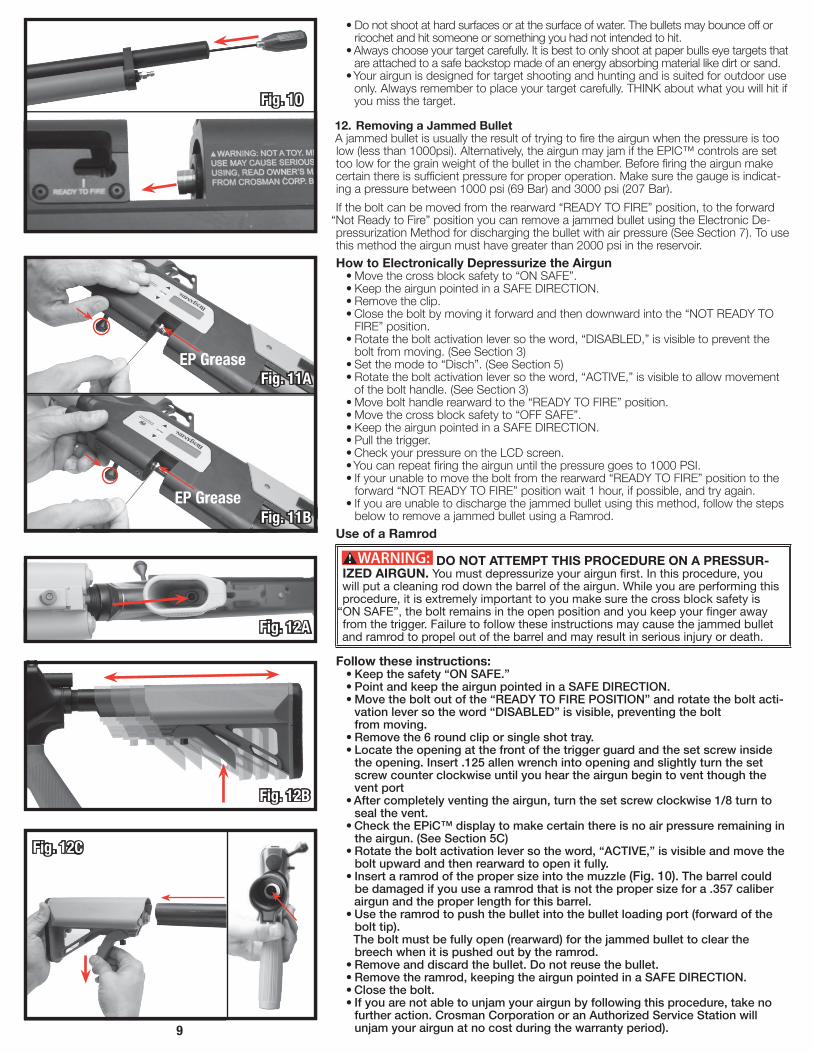
12. Removing a Jammed BulletA jammed bullet is usually the result of trying to fire the airgun when the pressure is too low (less than 1000psi). Alternatively, the airgun may jam if the EPIC™ controls are set too low for the grain weight of the bullet in the chamber. Before firing the airgun make certain there is sufficient pressure for proper operation. Make sure the gauge is indicat-ing a pressure between 1000 psi (69 Bar) and 3000 psi (207 Bar).
If the bolt can be moved from the rearward “READY TO FIRE” position, to the forward “Not Ready to Fire” position you can remove a jammed bullet using the Electronic De-pressurization Method for discharging the bullet with air pressure (See Section 7). To use this method the airgun must have greater than 2000 psi in the reservoir.
How to Electronically Depressurize the Airgun• Move the cross block safety to “ON SAFE”.• Keep the airgun pointed in a SAFE DIRECTION.• Remove the clip.• Close the bolt by moving it forward and then downward into the “NOT READY TO
FIRE” position.• Rotate the bolt activation lever so the word, “DISABLED,” is visible to prevent the
bolt from moving. (See Section 3)• Set the mode to “Disch”. (See Section 5)• Rotate the bolt activation lever so the word, “ACTIVE,” is visible to allow movement
of the bolt handle. (See Section 3)• Move bolt handle rearward to the “READY TO FIRE” position.• Move the cross block safety to “OFF SAFE”.• Keep the airgun pointed in a SAFE DIRECTION.• Pull the trigger.• Check your pressure on the LCD screen.• You can repeat firing the airgun until the pressure goes to 1000 PSI.• If your unable to move the bolt from the rearward “READY TO FIRE” position to the
forward “NOT READY TO FIRE” position wait 1 hour, if possible, and try again.• If you are unable to discharge the jammed bullet using this method, follow the steps
below to remove a jammed bullet using a Ramrod.
Use of a Ramrod
DO NOT ATTEMPT THIS PROCEDURE ON A PRESSUR-IZED AIRGUN. You must depressurize your airgun first. In this procedure, you will put a cleaning rod down the barrel of the airgun. While you are performing this procedure, it is extremely important to you make sure the cross block safety is
“ON SAFE”, the bolt remains in the open position and you keep your finger away from the trigger. Failure to follow these instructions may cause the jammed bullet and ramrod to propel out of the barrel and may result in serious injury or death.
Follow these instructions:•Keepthesafety“ONSAFE.”•PointandkeeptheairgunpointedinaSAFEDIRECTION.•Movetheboltoutofthe“READYTOFIREPOSITION”androtatetheboltacti-vationleversotheword“DISABLED”isvisible,preventingtheboltfrommoving.
•Removethe6roundcliporsingleshottray.•Locatetheopeningatthefrontofthetriggerguardandthesetscrewinsidetheopening.Insert.125allenwrenchintoopeningandslightlyturnthesetscrewcounterclockwiseuntilyouheartheairgunbegintoventthoughtheventport
•Aftercompletelyventingtheairgun,turnthesetscrewclockwise1/8turntosealthevent.
•ChecktheEPiC™displaytomakecertainthereisnoairpressureremainingintheairgun.(SeeSection5C)
•Rotatetheboltactivationleversotheword,“ACTIVE,”isvisibleandmovetheboltupwardandthenrearwardtoopenitfully.
•Insertaramrodofthepropersizeintothemuzzle(Fig.10).Thebarrelcouldbedamagedifyouusearamrodthatisnotthepropersizefora.357caliberairgunandtheproperlengthforthisbarrel.
•Usetheramrodtopushthebulletintothebulletloadingport(forwardofthebolttip).Theboltmustbefullyopen(rearward)forthejammedbullettoclearthebreechwhenitispushedoutbytheramrod.
•Removeanddiscardthebullet.Donotreusethebullet.•Removetheramrod,keepingtheairgunpointedinaSAFEDIRECTION.•Closethebolt.•Ifyouarenotabletounjamyourairgunbyfollowingthisprocedure,takenofurtheraction.CrosmanCorporationoranAuthorizedServiceStationwillunjamyourairgunatnocostduringthewarrantyperiod).
Fig. 10
Fig. 12A
Fig. 12B
Fig. 12C
Fig. 11A
Fig. 11B
EP Grease
EP Grease
10
13. Maintaining Your Airgun Apply a moly graphite Extreme Pressure (EP) grease to the sliding bolt mechanism every 3 months or 500 shots, whichever occurs first (Figs. 11A – B).Keep all petroleum-based lubricants away from the high pressure air fill nipple.Petroleum-based lubricants MUST NOT be introduced into the high pressure reservoir.
Explosion Danger. Do not introduce petroleum based products into the high pressure reservoir, or it may cause an explosion. Failure to follow the instructions may result in serious personal injury or death.
DO NOT MODIFY OR ALTER YOUR AIRGUN. Attempts to modify the airgun in any way inconsistent with this manual may make your airgun unsafe to use, cause serious injury or death, and will void the warranty. If you drop your airgun, visually check to see that it works properly before you use it again. If anything seems changed, like a shorter or weaker trigger pull, this may mean worn out or broken parts. Call Crosman customer service for assistance before using your airgun again.
14. Fill Nipple Service or RemovalIt is not suggested that you remove the fill nipple for any reason.If the fill nipple needs service or repair please return the airgun to Crosman® for repair.
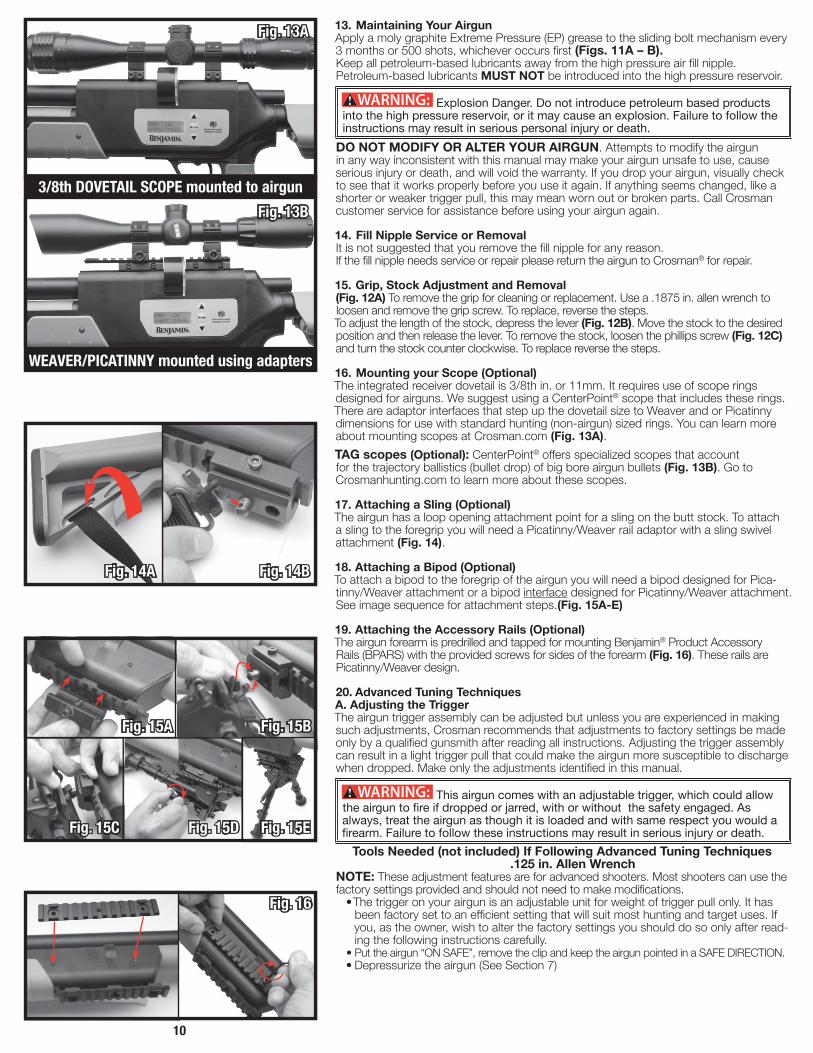
15. Grip, Stock Adjustment and Removal(Fig. 12A) To remove the grip for cleaning or replacement. Use a .1875 in. allen wrench to loosen and remove the grip screw. To replace, reverse the steps.To adjust the length of the stock, depress the lever (Fig. 12B). Move the stock to the desired position and then release the lever. To remove the stock, loosen the phillips screw (Fig. 12C) and turn the stock counter clockwise. To replace reverse the steps.
16. Mounting your Scope (Optional)The integrated receiver dovetail is 3/8th in. or 11mm. It requires use of scope rings designed for airguns. We suggest using a CenterPoint® scope that includes these rings. There are adaptor interfaces that step up the dovetail size to Weaver and or Picatinny dimensions for use with standard hunting (non-airgun) sized rings. You can learn more about mounting scopes at Crosman.com (Fig. 13A).
TAG scopes (Optional): CenterPoint® offers specialized scopes that account for the trajectory ballistics (bullet drop) of big bore airgun bullets (Fig. 13B). Go to Crosmanhunting.com to learn more about these scopes.
17. Attaching a Sling (Optional)The airgun has a loop opening attachment point for a sling on the butt stock. To attach a sling to the foregrip you will need a Picatinny/Weaver rail adaptor with a sling swivel attachment (Fig. 14).
18. Attaching a Bipod (Optional)To attach a bipod to the foregrip of the airgun you will need a bipod designed for Pica-tinny/Weaver attachment or a bipod interface designed for Picatinny/Weaver attachment. See image sequence for attachment steps.(Fig. 15A-E)
19. Attaching the Accessory Rails (Optional)The airgun forearm is predrilled and tapped for mounting Benjamin® Product Accessory Rails (BPARS) with the provided screws for sides of the forearm (Fig. 16). These rails are Picatinny/Weaver design.
20. Advanced Tuning TechniquesA. Adjusting the TriggerThe airgun trigger assembly can be adjusted but unless you are experienced in making such adjustments, Crosman recommends that adjustments to factory settings be made only by a qualified gunsmith after reading all instructions. Adjusting the trigger assembly can result in a light trigger pull that could make the airgun more susceptible to discharge when dropped. Make only the adjustments identified in this manual.
This airgun comes with an adjustable trigger, which could allow the airgun to fire if dropped or jarred, with or without the safety engaged. As always, treat the airgun as though it is loaded and with same respect you would a firearm. Failure to follow these instructions may result in serious injury or death.
Tools Needed (not included) If Following Advanced Tuning Techniques.125 in. Allen Wrench
NOTE: These adjustment features are for advanced shooters. Most shooters can use the factory settings provided and should not need to make modifications.
• The trigger on your airgun is an adjustable unit for weight of trigger pull only. It has been factory set to an efficient setting that will suit most hunting and target uses. If you, as the owner, wish to alter the factory settings you should do so only after read-ing the following instructions carefully.
• Put the airgun “ON SAFE”, remove the clip and keep the airgun pointed in a SAFE DIRECTION.• Depressurize the airgun (See Section 7)
Fig. 13A
Fig. 13B
3/8th DOVETAIL SCOPE mounted to airgun
WEAVER/PICATINNY mounted using adapters
Fig. 14A Fig. 14B
Fig. 15A Fig. 15B
Fig. 15C Fig. 15D Fig. 15E
Fig. 16
11
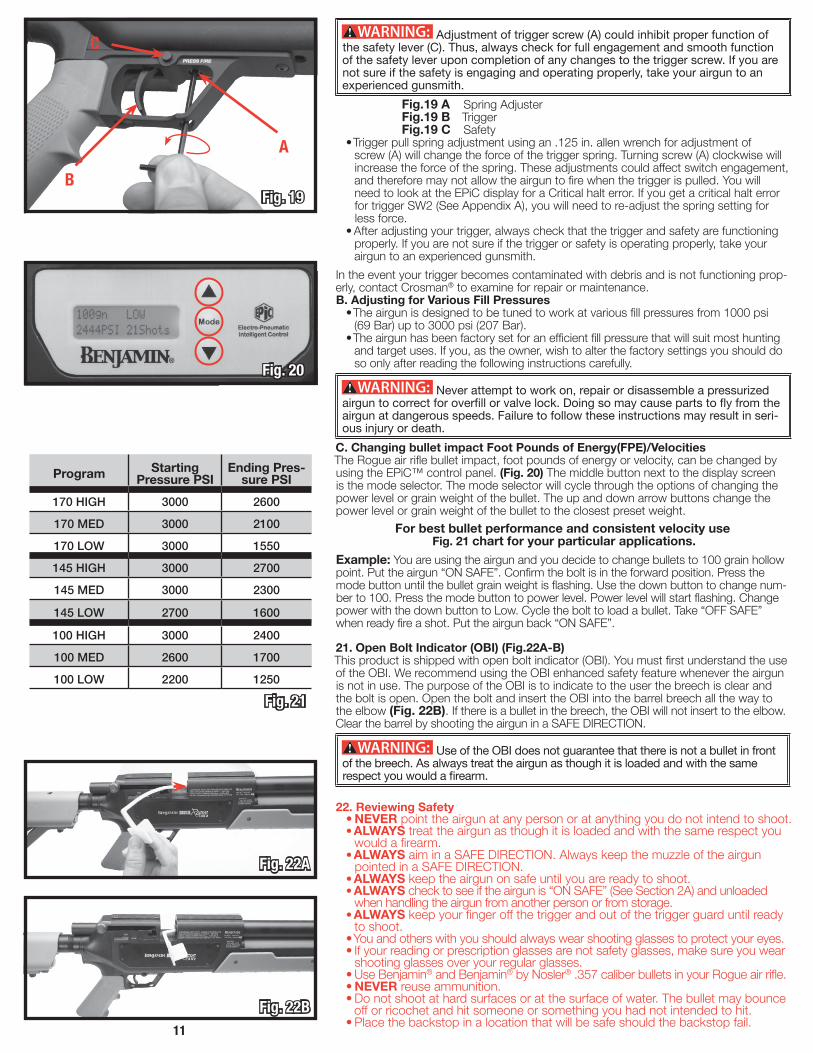
Adjustment of trigger screw (A) could inhibit proper function of the safety lever (C). Thus, always check for full engagement and smooth function of the safety lever upon completion of any changes to the trigger screw. If you are not sure if the safety is engaging and operating properly, take your airgun to an experienced gunsmith.
Fig.19 A Spring AdjusterFig.19 B TriggerFig.19 C Safety
• Trigger pull spring adjustment using an .125 in. allen wrench for adjustment of screw (A) will change the force of the trigger spring. Turning screw (A) clockwise will increase the force of the spring. These adjustments could affect switch engagement, and therefore may not allow the airgun to fire when the trigger is pulled. You will need to look at the EPiC display for a Critical halt error. If you get a critical halt error for trigger SW2 (See Appendix A), you will need to re-adjust the spring setting for less force.
• After adjusting your trigger, always check that the trigger and safety are functioning properly. If you are not sure if the trigger or safety is operating properly, take your airgun to an experienced gunsmith.
In the event your trigger becomes contaminated with debris and is not functioning prop-erly, contact Crosman® to examine for repair or maintenance.B. Adjusting for Various Fill Pressures
• The airgun is designed to be tuned to work at various fill pressures from 1000 psi (69 Bar) up to 3000 psi (207 Bar).
• The airgun has been factory set for an efficient fill pressure that will suit most hunting and target uses. If you, as the owner, wish to alter the factory settings you should do so only after reading the following instructions carefully.
Never attempt to work on, repair or disassemble a pressurized airgun to correct for overfill or valve lock. Doing so may cause parts to fly from the airgun at dangerous speeds. Failure to follow these instructions may result in seri-ous injury or death.
C. Changing bullet impact Foot Pounds of Energy(FPE)/VelocitiesThe Rogue air rifle bullet impact, foot pounds of energy or velocity, can be changed by using the EPiC™ control panel. (Fig. 20) The middle button next to the display screen is the mode selector. The mode selector will cycle through the options of changing the power level or grain weight of the bullet. The up and down arrow buttons change the power level or grain weight of the bullet to the closest preset weight.
For best bullet performance and consistent velocity use Fig. 21 chart for your particular applications.
Example: You are using the airgun and you decide to change bullets to 100 grain hollow point. Put the airgun “ON SAFE”. Confirm the bolt is in the forward position. Press the mode button until the bullet grain weight is flashing. Use the down button to change num-ber to 100. Press the mode button to power level. Power level will start flashing. Change power with the down button to Low. Cycle the bolt to load a bullet. Take “OFF SAFE” when ready fire a shot. Put the airgun back “ON SAFE”.
21. Open Bolt Indicator (OBI) (Fig.22A-B)This product is shipped with open bolt indicator (OBI). You must first understand the use of the OBI. We recommend using the OBI enhanced safety feature whenever the airgun is not in use. The purpose of the OBI is to indicate to the user the breech is clear and the bolt is open. Open the bolt and insert the OBI into the barrel breech all the way to the elbow (Fig. 22B). If there is a bullet in the breech, the OBI will not insert to the elbow. Clear the barrel by shooting the airgun in a SAFE DIRECTION.
Use of the OBI does not guarantee that there is not a bullet in front of the breech. As always treat the airgun as though it is loaded and with the same respect you would a firearm.
22. Reviewing Safety• NEVER point the airgun at any person or at anything you do not intend to shoot.• ALWAYS treat the airgun as though it is loaded and with the same respect you
would a firearm.• ALWAYS aim in a SAFE DIRECTION. Always keep the muzzle of the airgun
pointed in a SAFE DIRECTION.• ALWAYS keep the airgun on safe until you are ready to shoot.• ALWAYS check to see if the airgun is “ON SAFE” (See Section 2A) and unloaded
when handling the airgun from another person or from storage.• ALWAYS keep your finger off the trigger and out of the trigger guard until ready
to shoot.• You and others with you should always wear shooting glasses to protect your eyes.• If your reading or prescription glasses are not safety glasses, make sure you wear
shooting glasses over your regular glasses.• Use Benjamin® and Benjamin® by Nosler® .357 caliber bullets in your Rogue air rifle.• NEVER reuse ammunition.• Do not shoot at hard surfaces or at the surface of water. The bullet may bounce
off or ricochet and hit someone or something you had not intended to hit.• Place the backstop in a location that will be safe should the backstop fail.
Fig. 19
Fig. 20
Fig. 22B
Fig. 22A
Program Starting Pressure PSI
Ending Pres-sure PSI
170HIGH 3000 2600
170MED 3000 2100
170LOW 3000 1550
145HIGH 3000 2700
145MED 3000 2300
145LOW 2700 1600
100HIGH 3000 2400
100MED 2600 1700
100LOW 2200 1250
Fig. 21

12
• Your backstop should be checked for wear before and after each use. All backstops are subject to wear and will eventually fail. Replace your backstop if the surface is worn or damaged or if a ricochet occurs.
• DO NOT attempt to disassemble or tamper with your airgun. Use an Authorized Service Station. Using unauthorized repair centers or modifying the function of your airgun in any way may be unsafe and will void your warranty.
• Store airgun in a secure location.• Before you store your airgun, remove the clip, make sure there
is no bullet in the chamber (See Section 10).• Store this airgun charged with pressure to keep the valves
closed against dirt.• Whenever you store the airgun, make sure it is “ON SAFE”
(See Section 2A).
This airgun has been classified as an adult airgun and is recommended for adult use only. Because it is considered to be a special-purpose airgun, it is exempt from specific types of trigger pull, safety mechanism and drop tests.
SPECIFICATIONS
Mechanism Electronic and Pneumatic Length 48 inches
Capacity 330 cc Barrel 25 in.
Power source HPA Safety Trigger cross-block
Caliber/Ammunition .357 Cal. Velocity Up to 1000 FPS
Weight 9.5lbs FPE 75 to 200
Nosler is the registered trademark of Nosler Inc.
Appendix A
Error Message Meaning Suggested Action
MSG1: CRITICAL HALT TRIGGER ERROR
MSG2: (none)
1. The pre-trigger or trigger switch was acti-vated when the bolt was moved into the fire
position.
OR
2. The pre-trigger or trigger switch has failed.
1. Ensure that the trigger is not being depressed at all.
2. Return the airgun to Crosman Corp. for analysis and repair.
MSG1: CRITICAL HALT
MSG2: TRIGGER SW2 PROBLEM 1
The trigger switch has failed, making the unit inoperable.
Return the airgun to Crosman Corp. for analysis and repair. As an added precau-tion, refrain from placing the bolt into the fire position.
MSG1: CRITICAL HALT NO BULLET LOAD
MSG2: BULLET NOT CHAMBERED
The pre-trigger or trigger was engaged before the bolt was moved out of the fire position.
After every shot, the bolt must be cycled.
MSG1: CRITICAL HALT VERY HIGH PSI
MSG2: MANUALLY VENT THE TANK
1. The pressure in the tank is too high to safely fire a round.
OR
2. The pressure sensor in the airgun has failed.
1. Manually vent the tank to a pressure below 3200PSI before proceeding.
Follow Depressurizing procedure in Section 7B.
Return the airgun to Crosman Corp. for analysis and repair.
MSG1: CRITICAL HALT VERY LOW PSI
MSG2: REFILL THE TANK
1. The pressure in the tank is too low to safely fire a round.
OR
2. The pressure sensor in the airgun has failed.
1. Refill the tank to a safe level before proceeding. (See section 6)
2. Return the airgun to Crosman Corp. for analysis and repair.
MSG1: CANNOT PRODUCE SELECTED POWER
MSG2: PRESSURE TOO LOW FOR POWER SELECTED
1. The pressure in the tank is too low to safely fire a round.
OR
2. The pressure sensor in the airgun has failed.
1. Refill the tank to a safe level before proceeding.
2. Return the airgun to Crosman Corp. for analysis and repair.
MSG1: BATTERY WARNING REPLACE SOON
MSG2: FEWER THAN 3 SHOTS REMAIN
1. The battery voltage is approaching a limit that may produce inconsistent shots.
OR
2. The connection from the battery holder to the circuit board has been compromised.
1. Replace the batteries with 2 AA size. Lithium batteries are recommended.
2. Return the airgun to Crosman Corp. for analysis and repair.
Explosion Danger. Do not attempt to ship a pressurized airgun. Always completely depressurize this airgun before shipping by any means. Failure to follow these instructions may result in serious injury or death.