Representational Analysis of Business Process ... - CiteSeerX
Upload
khangminh22Category
view
2download
0
ibm.com/redbooks
Human-Centric Business Process Managementwith WebSphere Process Server V6
Martin KeenOmar Bahy
Waveney CrosonAndy Garratt
Ben KarchnerInes Lehmann
Frank NeumannLincoln Roach
Human task capabilities in WebSphere Process Server V6.0.2
Clients: Portal, Web services, Workplace Forms
Integration with content repositories
Front cover


Human-Centric Business Process Management with WebSphere Process Server V6
October 2007
International Technical Support Organization
SG24-7477-00

© Copyright International Business Machines Corporation 2007. All rights reserved.Note to U.S. Government Users Restricted Rights -- Use, duplication or disclosure restricted by GSA ADPSchedule Contract with IBM Corp.
First Edition (October 2007)
This edition applies to WebSphere Process Server V6.0.2.
Note: Before using this information and the product it supports, read the information in “Notices” on page xi.

Contents
Notices . . . . . . . . . . . . . . . . . . . . . . . . . . . . . . . . . . . . . . . . . . . . . . . . . . . . . . . xiTrademarks . . . . . . . . . . . . . . . . . . . . . . . . . . . . . . . . . . . . . . . . . . . . . . . . . . . xii
Preface . . . . . . . . . . . . . . . . . . . . . . . . . . . . . . . . . . . . . . . . . . . . . . . . . . . . . . xiiiThe team that wrote this book . . . . . . . . . . . . . . . . . . . . . . . . . . . . . . . . . . . . . xiiiBecome a published author . . . . . . . . . . . . . . . . . . . . . . . . . . . . . . . . . . . . . . xviiComments welcome. . . . . . . . . . . . . . . . . . . . . . . . . . . . . . . . . . . . . . . . . . . . xvii
Part 1. Overview . . . . . . . . . . . . . . . . . . . . . . . . . . . . . . . . . . . . . . . . . . . . . . . . . . . . . . . . . . . . 1
Chapter 1. Welcome to this book . . . . . . . . . . . . . . . . . . . . . . . . . . . . . . . . . . 31.1 An introduction to this book . . . . . . . . . . . . . . . . . . . . . . . . . . . . . . . . . . . . . 41.2 How to read this IBM Redbooks publication . . . . . . . . . . . . . . . . . . . . . . . . 4
Chapter 2. Overview of Human-Centric BPM . . . . . . . . . . . . . . . . . . . . . . . . 72.1 Business Process Management (BPM). . . . . . . . . . . . . . . . . . . . . . . . . . . . 8
2.1.1 Overview of BPM . . . . . . . . . . . . . . . . . . . . . . . . . . . . . . . . . . . . . . . . 82.1.2 Commonly used terminology. . . . . . . . . . . . . . . . . . . . . . . . . . . . . . . . 92.1.3 The role of the human in BPM . . . . . . . . . . . . . . . . . . . . . . . . . . . . . 10
2.2 IBM BPM solution . . . . . . . . . . . . . . . . . . . . . . . . . . . . . . . . . . . . . . . . . . . 112.2.1 WebSphere Business Modeler . . . . . . . . . . . . . . . . . . . . . . . . . . . . . 122.2.2 WebSphere Integration Developer . . . . . . . . . . . . . . . . . . . . . . . . . . 122.2.3 WebSphere Process Server . . . . . . . . . . . . . . . . . . . . . . . . . . . . . . . 132.2.4 WebSphere Business Monitor. . . . . . . . . . . . . . . . . . . . . . . . . . . . . . 132.2.5 Positioning IBM SOA and BPM. . . . . . . . . . . . . . . . . . . . . . . . . . . . . 14
2.3 Industry standards. . . . . . . . . . . . . . . . . . . . . . . . . . . . . . . . . . . . . . . . . . . 182.4 Methodologies . . . . . . . . . . . . . . . . . . . . . . . . . . . . . . . . . . . . . . . . . . . . . . 21
2.4.1 Process improvement methodology . . . . . . . . . . . . . . . . . . . . . . . . . 212.4.2 Process development life cycle. . . . . . . . . . . . . . . . . . . . . . . . . . . . . 24
2.5 Business drivers and benefits . . . . . . . . . . . . . . . . . . . . . . . . . . . . . . . . . . 262.5.1 Drivers in the marketplace . . . . . . . . . . . . . . . . . . . . . . . . . . . . . . . . 26
2.6 Human-centric BPM with WebSphere Process Server V6 . . . . . . . . . . . . 282.6.1 WebSphere Process Server V6 core capability . . . . . . . . . . . . . . . . 282.6.2 New, enhanced functions with WebSphere Process Server V6.0.2 . 292.6.3 Summary. . . . . . . . . . . . . . . . . . . . . . . . . . . . . . . . . . . . . . . . . . . . . . 33
Chapter 3. Business scenario used within this book . . . . . . . . . . . . . . . . 353.1 The human resources hiring scenario . . . . . . . . . . . . . . . . . . . . . . . . . . . . 36
3.1.1 Roles . . . . . . . . . . . . . . . . . . . . . . . . . . . . . . . . . . . . . . . . . . . . . . . . . 36
© Copyright IBM Corp. 2007. All rights reserved. iii

3.1.2 Organizational structure . . . . . . . . . . . . . . . . . . . . . . . . . . . . . . . . . . 383.1.3 Business items . . . . . . . . . . . . . . . . . . . . . . . . . . . . . . . . . . . . . . . . . 39
3.2 The HR hiring business process . . . . . . . . . . . . . . . . . . . . . . . . . . . . . . . . 393.2.1 The interviewing process . . . . . . . . . . . . . . . . . . . . . . . . . . . . . . . . . 403.2.2 The hiring process. . . . . . . . . . . . . . . . . . . . . . . . . . . . . . . . . . . . . . . 41
3.3 Human interaction in the HR hiring scenario. . . . . . . . . . . . . . . . . . . . . . . 43
Part 2. Implementing Human-Centric BPM . . . . . . . . . . . . . . . . . . . . . . . . . . . . . . . . . . . . . . 45
Chapter 4. WebSphere Business Modeler . . . . . . . . . . . . . . . . . . . . . . . . . 474.1 Modeling for Human-Centric BPM. . . . . . . . . . . . . . . . . . . . . . . . . . . . . . . 48
4.1.1 Overview of WebSphere Business Modeler features . . . . . . . . . . . . 484.1.2 Basic business modeling and modeling modes . . . . . . . . . . . . . . . . 544.1.3 Modeling for execution and monitoring . . . . . . . . . . . . . . . . . . . . . . . 55
4.2 Modeling the business scenario . . . . . . . . . . . . . . . . . . . . . . . . . . . . . . . . 574.2.1 The hiring process. . . . . . . . . . . . . . . . . . . . . . . . . . . . . . . . . . . . . . . 584.2.2 Importing supplied hiring process into WebSphere Business Modeler .
594.2.3 The Hiring process artifacts . . . . . . . . . . . . . . . . . . . . . . . . . . . . . . . 64
4.3 Export process for WebSphere Integration Developer . . . . . . . . . . . . . . . 884.3.1 Exporting the model for WebSphere Integration Developer . . . . . . . 894.3.2 Exported file and content . . . . . . . . . . . . . . . . . . . . . . . . . . . . . . . . . 91
Chapter 5. Using human tasks in WebSphere Process Server . . . . . . . . . 935.1 Prerequisites - what you need before reading this chapter . . . . . . . . . . . . 94
5.1.1 Knowledge prerequisites. . . . . . . . . . . . . . . . . . . . . . . . . . . . . . . . . . 945.1.2 Software prerequisites . . . . . . . . . . . . . . . . . . . . . . . . . . . . . . . . . . . 955.1.3 Scenario prerequisites . . . . . . . . . . . . . . . . . . . . . . . . . . . . . . . . . . . 96
5.2 Overview: using human tasks with WebSphere Process Server . . . . . . . 975.2.1 Types and implementations of human tasks. . . . . . . . . . . . . . . . . . . 975.2.2 The life cycle of a human task. . . . . . . . . . . . . . . . . . . . . . . . . . . . . . 99
5.3 Which feature you use to solve which problem . . . . . . . . . . . . . . . . . . . . 1035.4 Implementation plan . . . . . . . . . . . . . . . . . . . . . . . . . . . . . . . . . . . . . . . . 105
5.4.1 Infrastructure configuration plan . . . . . . . . . . . . . . . . . . . . . . . . . . . 1065.4.2 Iteration descriptions . . . . . . . . . . . . . . . . . . . . . . . . . . . . . . . . . . . . 1065.4.3 Implementation plan - iteration 1. . . . . . . . . . . . . . . . . . . . . . . . . . . 1075.4.4 Testing - iteration 1 . . . . . . . . . . . . . . . . . . . . . . . . . . . . . . . . . . . . . 107
5.5 Configuring the infrastructure . . . . . . . . . . . . . . . . . . . . . . . . . . . . . . . . . 1085.5.1 Confirming the correct installation of the software products . . . . . . 1085.5.2 Configuring the LDAP structure . . . . . . . . . . . . . . . . . . . . . . . . . . . 1085.5.3 Configuring the LDAP staff plug-in provider . . . . . . . . . . . . . . . . . . 1115.5.4 Adding the authentication alias . . . . . . . . . . . . . . . . . . . . . . . . . . . . 1205.5.5 Configuring security on the WebSphere Process Server . . . . . . . . 121
iv Human-Centric Business Process Management with WebSphere Process Server V6

5.6 Implementing the simple scenario (iteration 1) . . . . . . . . . . . . . . . . . . . . 1295.6.1 A brief overview of the cargo pattern . . . . . . . . . . . . . . . . . . . . . . . 1295.6.2 Importing the model from WebSphere Business Modeler. . . . . . . . 1315.6.3 Reviewing the imported model . . . . . . . . . . . . . . . . . . . . . . . . . . . . 1335.6.4 Implementing the CheckGrade business rule group . . . . . . . . . . . . 1355.6.5 Creating the first implementations of SendOffer,
CreateEmployeeRecords, and SendRejection . . . . . . . . . . . . . . . . 1385.6.6 Linking the HRSupport module to the hiring process . . . . . . . . . . . 1445.6.7 Updating the staff assignments in the human tasks . . . . . . . . . . . . 1465.6.8 Creating a Web service export for use by Web-service clients . . . . 1555.6.9 Deploying the modules to WebSphere Process Server . . . . . . . . . 1645.6.10 Testing the process with the BPC Explorer. . . . . . . . . . . . . . . . . . 165
5.7 Administering the simple scenario using the BPC Explorer . . . . . . . . . . 1855.7.1 BPC Explorer navigation tree . . . . . . . . . . . . . . . . . . . . . . . . . . . . . 1855.7.2 BPC Explorer customization . . . . . . . . . . . . . . . . . . . . . . . . . . . . . . 193
Chapter 6. Human task features introduced in WebSphere Process Server V6.0.2 . . . . . . . . . . . . . . . . . . . . . . . . . . . . . . . . . . . . . . . . . . . . . 203
6.1 Using the Human Task Manager Client Generator . . . . . . . . . . . . . . . . . 2046.1.1 Why use the generator . . . . . . . . . . . . . . . . . . . . . . . . . . . . . . . . . . 2046.1.2 Creating the clients for our sample scenario. . . . . . . . . . . . . . . . . . 2046.1.3 Testing our generated Web client . . . . . . . . . . . . . . . . . . . . . . . . . . 218
6.2 Using escalations . . . . . . . . . . . . . . . . . . . . . . . . . . . . . . . . . . . . . . . . . . 2236.2.1 Why use escalations . . . . . . . . . . . . . . . . . . . . . . . . . . . . . . . . . . . . 2246.2.2 Adding an escalation to our scenario . . . . . . . . . . . . . . . . . . . . . . . 2246.2.3 Configure WebSphere Process Server to send e-mail notifications 2316.2.4 Testing the escalation process . . . . . . . . . . . . . . . . . . . . . . . . . . . . 239
6.3 Using suspensions (follow-ups) - placing tasks on hold . . . . . . . . . . . . . 2446.3.1 Why use suspensions . . . . . . . . . . . . . . . . . . . . . . . . . . . . . . . . . . . 2446.3.2 Using suspended tasks in our scenario . . . . . . . . . . . . . . . . . . . . . 2456.3.3 The task suspension API . . . . . . . . . . . . . . . . . . . . . . . . . . . . . . . . 2466.3.4 Modify generated Web client code to add suspension functionality 2476.3.5 Testing the suspension functionality . . . . . . . . . . . . . . . . . . . . . . . . 255
6.4 Ad-hoc tasks . . . . . . . . . . . . . . . . . . . . . . . . . . . . . . . . . . . . . . . . . . . . . . 2576.4.1 Ad-hoc task . . . . . . . . . . . . . . . . . . . . . . . . . . . . . . . . . . . . . . . . . . . 2586.4.2 How it is different from a normal human task . . . . . . . . . . . . . . . . . 2586.4.3 Examples of ad-hoc tasks . . . . . . . . . . . . . . . . . . . . . . . . . . . . . . . . 2586.4.4 Ad-hoc examples in this book . . . . . . . . . . . . . . . . . . . . . . . . . . . . . 258
6.5 Using ad-hoc tasks - subtasks . . . . . . . . . . . . . . . . . . . . . . . . . . . . . . . . 2596.5.1 A subtask . . . . . . . . . . . . . . . . . . . . . . . . . . . . . . . . . . . . . . . . . . . . 2596.5.2 When you should use a subtask . . . . . . . . . . . . . . . . . . . . . . . . . . . 2596.5.3 Adding subtasks to our scenario . . . . . . . . . . . . . . . . . . . . . . . . . . . 2596.5.4 The subtask creation API . . . . . . . . . . . . . . . . . . . . . . . . . . . . . . . . 261
Contents v

6.5.5 Creating the subtask templates. . . . . . . . . . . . . . . . . . . . . . . . . . . . 2616.5.6 Creating the new subtask-aware client . . . . . . . . . . . . . . . . . . . . . . 2666.5.7 Testing the subtask functionality . . . . . . . . . . . . . . . . . . . . . . . . . . . 284
6.6 Using ad-hoc tasks - follow-ons . . . . . . . . . . . . . . . . . . . . . . . . . . . . . . . 2906.6.1 A follow-on task. . . . . . . . . . . . . . . . . . . . . . . . . . . . . . . . . . . . . . . . 2906.6.2 When you should use a follow-on task . . . . . . . . . . . . . . . . . . . . . . 2906.6.3 Adding follow-on tasks to our scenario . . . . . . . . . . . . . . . . . . . . . . 2916.6.4 The follow-on task creation API . . . . . . . . . . . . . . . . . . . . . . . . . . . 2916.6.5 Creating the follow-on task templates . . . . . . . . . . . . . . . . . . . . . . . 2916.6.6 Creating a new client for follow-on tasks. . . . . . . . . . . . . . . . . . . . . 2956.6.7 Testing the follow-on task scenario. . . . . . . . . . . . . . . . . . . . . . . . . 304
6.7 Using APIEvents . . . . . . . . . . . . . . . . . . . . . . . . . . . . . . . . . . . . . . . . . . . 3086.7.1 An API Event. . . . . . . . . . . . . . . . . . . . . . . . . . . . . . . . . . . . . . . . . . 3086.7.2 When you should use API Events. . . . . . . . . . . . . . . . . . . . . . . . . . 3086.7.3 Adding API Events to our scenario . . . . . . . . . . . . . . . . . . . . . . . . . 3096.7.4 Testing the API Event Handler . . . . . . . . . . . . . . . . . . . . . . . . . . . . 318
6.8 Using notifications . . . . . . . . . . . . . . . . . . . . . . . . . . . . . . . . . . . . . . . . . . 3196.8.1 A notification . . . . . . . . . . . . . . . . . . . . . . . . . . . . . . . . . . . . . . . . . . 3206.8.2 When you should use notifications . . . . . . . . . . . . . . . . . . . . . . . . . 3206.8.3 Using notifications and API Events together . . . . . . . . . . . . . . . . . . 3206.8.4 Adding notifications to our scenario . . . . . . . . . . . . . . . . . . . . . . . . 3216.8.5 Testing the notification event handler . . . . . . . . . . . . . . . . . . . . . . . 329
6.9 Using staff query post-processing . . . . . . . . . . . . . . . . . . . . . . . . . . . . . . 3306.9.1 Staff query post-processing . . . . . . . . . . . . . . . . . . . . . . . . . . . . . . 3306.9.2 When you should use staff query post-processing . . . . . . . . . . . . . 3306.9.3 Adding staff query post-processing to our scenario . . . . . . . . . . . . 3306.9.4 Testing the staff query post processing . . . . . . . . . . . . . . . . . . . . . 347
Part 3. Interaction services with WebSphere Process Server . . . . . . . . . . . . . . . . . . . . . 353
Chapter 7. J2EE and Microsoft .NET Web service clients . . . . . . . . . . . . 3557.1 Core technologies . . . . . . . . . . . . . . . . . . . . . . . . . . . . . . . . . . . . . . . . . . 356
7.1.1 Java 2 Platform Enterprise Edition (J2EE) . . . . . . . . . . . . . . . . . . . 3567.1.2 .NET platform . . . . . . . . . . . . . . . . . . . . . . . . . . . . . . . . . . . . . . . . . 3587.1.3 Interoperability approaches. . . . . . . . . . . . . . . . . . . . . . . . . . . . . . . 3607.1.4 Web services. . . . . . . . . . . . . . . . . . . . . . . . . . . . . . . . . . . . . . . . . . 361
7.2 WebSphere Process Server SOAP support for human task interaction . 3637.2.1 WebSphere Process Server Web services API . . . . . . . . . . . . . . . 3657.2.2 Export business processes as SOAP Web services. . . . . . . . . . . . 3817.2.3 Export the WSDL files from WebSphere Process Server . . . . . . . . 382
7.3 Development of a Java Web service client . . . . . . . . . . . . . . . . . . . . . . . 3867.3.1 Setup of the environment . . . . . . . . . . . . . . . . . . . . . . . . . . . . . . . . 3867.3.2 Create a new Web project in Rational Application Developer. . . . . 397
vi Human-Centric Business Process Management with WebSphere Process Server V6

7.3.3 Development of a Java Web service client using the specific Web services API . . . . . . . . . . . . . . . . . . . . . . . . . . . . . . . . . . . . . . . . . . 399
7.3.4 Enhancing the client using the generic Web services API . . . . . . . 4337.4 Development of a .NET Web services client . . . . . . . . . . . . . . . . . . . . . . 452
7.4.1 Create new Windows Application project in Microsoft Visual Studio4527.4.2 Examine URL of WebSphere Process Server WSDL file . . . . . . . . 453
7.5 Generating a C# Web service proxy . . . . . . . . . . . . . . . . . . . . . . . . . . . . 4557.5.1 Develop the .NET client . . . . . . . . . . . . . . . . . . . . . . . . . . . . . . . . . 4587.5.2 Testing the .NET Web service client . . . . . . . . . . . . . . . . . . . . . . . . 483
Chapter 8. WebSphere Portal Server . . . . . . . . . . . . . . . . . . . . . . . . . . . . . 4938.1 Portal architecture overview . . . . . . . . . . . . . . . . . . . . . . . . . . . . . . . . . . 494
8.1.1 Authentication and authorization. . . . . . . . . . . . . . . . . . . . . . . . . . . 4948.1.2 Portal engine and aggregation services . . . . . . . . . . . . . . . . . . . . . 4958.1.3 Portlet container . . . . . . . . . . . . . . . . . . . . . . . . . . . . . . . . . . . . . . . 4958.1.4 Portlet . . . . . . . . . . . . . . . . . . . . . . . . . . . . . . . . . . . . . . . . . . . . . . . 495
8.2 Portal, the managed mash-up . . . . . . . . . . . . . . . . . . . . . . . . . . . . . . . . . 4968.2.1 One application, many portlets . . . . . . . . . . . . . . . . . . . . . . . . . . . . 4978.2.2 Portlet life cycle . . . . . . . . . . . . . . . . . . . . . . . . . . . . . . . . . . . . . . . . 4988.2.3 Aggregation of relevant content through cooperation . . . . . . . . . . . 499
8.3 Process Portal . . . . . . . . . . . . . . . . . . . . . . . . . . . . . . . . . . . . . . . . . . . . . 5028.3.1 Process Portal . . . . . . . . . . . . . . . . . . . . . . . . . . . . . . . . . . . . . . . . . 5028.3.2 WebSphere Portal integration with WebSphere Process Server . . 504
8.4 Developing a Process Portal . . . . . . . . . . . . . . . . . . . . . . . . . . . . . . . . . . 5068.4.1 Implementing the hiring scenario with WebSphere Process Server and
WebSphere Portal . . . . . . . . . . . . . . . . . . . . . . . . . . . . . . . . . . . . . 5078.4.2 Developing the participating portlet . . . . . . . . . . . . . . . . . . . . . . . . . 5108.4.3 Developing the originating (kicker) portlet . . . . . . . . . . . . . . . . . . . . 525
8.5 Deploying process portlets to WebSphere Portal . . . . . . . . . . . . . . . . . . 5418.5.1 Installing the portlets . . . . . . . . . . . . . . . . . . . . . . . . . . . . . . . . . . . . 5418.5.2 Configuring the WebSphere Portal task pages . . . . . . . . . . . . . . . . 5428.5.3 Creating the candidate application page. . . . . . . . . . . . . . . . . . . . . 5468.5.4 Provisioning access to pages and portlets . . . . . . . . . . . . . . . . . . . 5468.5.5 Running the application. . . . . . . . . . . . . . . . . . . . . . . . . . . . . . . . . . 552
8.6 Reducing decision latency with data plus analysis . . . . . . . . . . . . . . . . . 5628.6.1 Is reducing decision latency new . . . . . . . . . . . . . . . . . . . . . . . . . . 5628.6.2 Business Process Management requirements for reducing decision
latency . . . . . . . . . . . . . . . . . . . . . . . . . . . . . . . . . . . . . . . . . . . . . . 5638.6.3 Not just for executives. . . . . . . . . . . . . . . . . . . . . . . . . . . . . . . . . . . 5638.6.4 Data plus analysis . . . . . . . . . . . . . . . . . . . . . . . . . . . . . . . . . . . . . . 564
Contents vii

Chapter 9. Workplace Forms . . . . . . . . . . . . . . . . . . . . . . . . . . . . . . . . . . . 5659.1 Introduction to Workplace Forms . . . . . . . . . . . . . . . . . . . . . . . . . . . . . . 566
9.1.1 IBM Workplace Forms Viewer. . . . . . . . . . . . . . . . . . . . . . . . . . . . . 5669.1.2 IBM Workplace Forms Designer . . . . . . . . . . . . . . . . . . . . . . . . . . . 5679.1.3 IBM Workplace Forms Server . . . . . . . . . . . . . . . . . . . . . . . . . . . . . 5689.1.4 Benefits of Workplace Forms with WebSphere Process Server . . . 569
9.2 Features and functionality . . . . . . . . . . . . . . . . . . . . . . . . . . . . . . . . . . . . 5709.2.1 Overview of supported technologies . . . . . . . . . . . . . . . . . . . . . . . . 575
9.3 Building the business scenario . . . . . . . . . . . . . . . . . . . . . . . . . . . . . . . . 5779.3.1 Designing the forms . . . . . . . . . . . . . . . . . . . . . . . . . . . . . . . . . . . . 5789.3.2 Implementing digital signatures. . . . . . . . . . . . . . . . . . . . . . . . . . . . 587
9.4 Workplace Forms integration with WebSphere Process Server . . . . . . . 5909.4.1 Create submission and edit properties . . . . . . . . . . . . . . . . . . . . . . 5909.4.2 Create schema instances . . . . . . . . . . . . . . . . . . . . . . . . . . . . . . . . 5919.4.3 Associate schema instances. . . . . . . . . . . . . . . . . . . . . . . . . . . . . . 5959.4.4 Create an XForms submission button. . . . . . . . . . . . . . . . . . . . . . . 5969.4.5 How to test you submission and fix problems . . . . . . . . . . . . . . . . . 5979.4.6 Further requirements. . . . . . . . . . . . . . . . . . . . . . . . . . . . . . . . . . . . 598
9.5 Alternative implementation approaches . . . . . . . . . . . . . . . . . . . . . . . . . 6019.5.1 Designing Forms options . . . . . . . . . . . . . . . . . . . . . . . . . . . . . . . . 6019.5.2 Creating an XML data model . . . . . . . . . . . . . . . . . . . . . . . . . . . . . 6029.5.3 Sign parts of the form . . . . . . . . . . . . . . . . . . . . . . . . . . . . . . . . . . . 6039.5.4 Creating an RSA signature . . . . . . . . . . . . . . . . . . . . . . . . . . . . . . . 6049.5.5 XForms Smartfill . . . . . . . . . . . . . . . . . . . . . . . . . . . . . . . . . . . . . . . 6049.5.6 Implementing zero footprint forms. . . . . . . . . . . . . . . . . . . . . . . . . . 605
Part 4. ECM integration and related Human-Centric BPM technologies . . . . . . . . . . . . . 607
Chapter 10. Integrating with content repositories . . . . . . . . . . . . . . . . . . 60910.1 Introducing content management systems . . . . . . . . . . . . . . . . . . . . . . 610
10.1.1 What is content data . . . . . . . . . . . . . . . . . . . . . . . . . . . . . . . . . . . 61010.1.2 Content management systems and product support . . . . . . . . . . 61110.1.3 DB2 Content Manager/WebSphere Process integration toolkit . . 613
10.2 Integrating content repositories, tasks, and processes . . . . . . . . . . . . . 61410.2.1 Service-oriented versus document-oriented perspective . . . . . . . 61510.2.2 Life cycle and domains of content data and business processes . 61710.2.3 Synchronizing content objects and tasks . . . . . . . . . . . . . . . . . . . 61910.2.4 Representing content in business processes . . . . . . . . . . . . . . . . 62010.2.5 Integration patterns . . . . . . . . . . . . . . . . . . . . . . . . . . . . . . . . . . . . 621
10.3 Interoperability between WebSphere Process Server and FileNet P8 . 62210.3.1 Accessing the FileNet P8 content engine . . . . . . . . . . . . . . . . . . . 62210.3.2 Triggering actions from content events (active content) . . . . . . . . 62410.3.3 Authentication and user repositories. . . . . . . . . . . . . . . . . . . . . . . 627
viii Human-Centric Business Process Management with WebSphere Process Server V6

10.3.4 FileNet P8 Web Services . . . . . . . . . . . . . . . . . . . . . . . . . . . . . . . 62910.3.5 FileNet P8 Portlets . . . . . . . . . . . . . . . . . . . . . . . . . . . . . . . . . . . . 63210.3.6 Topology . . . . . . . . . . . . . . . . . . . . . . . . . . . . . . . . . . . . . . . . . . . . 63310.3.7 Integrating with FileNet P8 BPM . . . . . . . . . . . . . . . . . . . . . . . . . . 633
10.4 Implementing the hiring scenario with WebSphere Process Server and FileNet P8. . . . . . . . . . . . . . . . . . . . . . . . . . . . . . . . . . . . . . . . . . . . . . . . 634
10.4.1 Content modeling for the employment application folder . . . . . . . 63510.4.2 Triggering a new hiring process from content events . . . . . . . . . . 64010.4.3 Accessing content services from a business process. . . . . . . . . . 67410.4.4 Building client user interfaces . . . . . . . . . . . . . . . . . . . . . . . . . . . . 68610.4.5 Displaying content data in BPC Explorer using Custom JSPs . . . 687
10.5 Adding Filenet P8 Portlets to WebSphere Portal Server. . . . . . . . . . . . 69710.5.1 Building a Portal-based client UI . . . . . . . . . . . . . . . . . . . . . . . . . . 708
Chapter 11. Related technologies . . . . . . . . . . . . . . . . . . . . . . . . . . . . . . . 72711.1 WebSphere Business Modeler Publishing Server. . . . . . . . . . . . . . . . . 728
11.1.1 How it relates to Human-Centric BPM . . . . . . . . . . . . . . . . . . . . . 72911.1.2 How it relates to the ITSO Corp scenario . . . . . . . . . . . . . . . . . . . 729
11.2 WebSphere Business Monitor. . . . . . . . . . . . . . . . . . . . . . . . . . . . . . . . 73011.2.1 How it relates to Human-Centric BPM . . . . . . . . . . . . . . . . . . . . . 73111.2.2 How it relates to the ITSO Corp scenario . . . . . . . . . . . . . . . . . . . 731
11.3 WebSphere Service Registry and Repository . . . . . . . . . . . . . . . . . . . . 73111.3.1 How it relates to Human-Centric BPM . . . . . . . . . . . . . . . . . . . . . 73211.3.2 How it relates to ITSO Corp scenario . . . . . . . . . . . . . . . . . . . . . . 733
11.4 Rational RequisitePro . . . . . . . . . . . . . . . . . . . . . . . . . . . . . . . . . . . . . . 73311.4.1 How it relates to Human-Centric BPM . . . . . . . . . . . . . . . . . . . . . 73411.4.2 How it relates to ITSO Corp scenario . . . . . . . . . . . . . . . . . . . . . . 735
Part 5. Appendixes . . . . . . . . . . . . . . . . . . . . . . . . . . . . . . . . . . . . . . . . . . . . . . . . . . . . . . . . 737
Appendix A. Additional material . . . . . . . . . . . . . . . . . . . . . . . . . . . . . . . . 739Locating the Web material . . . . . . . . . . . . . . . . . . . . . . . . . . . . . . . . . . . . . . . 739
Abbreviations and acronyms . . . . . . . . . . . . . . . . . . . . . . . . . . . . . . . . . . . 741
Related publications . . . . . . . . . . . . . . . . . . . . . . . . . . . . . . . . . . . . . . . . . . 743IBM Redbooks . . . . . . . . . . . . . . . . . . . . . . . . . . . . . . . . . . . . . . . . . . . . . . . . 743Online resources . . . . . . . . . . . . . . . . . . . . . . . . . . . . . . . . . . . . . . . . . . . . . . 744How to get Redbooks . . . . . . . . . . . . . . . . . . . . . . . . . . . . . . . . . . . . . . . . . . . 744Help from IBM . . . . . . . . . . . . . . . . . . . . . . . . . . . . . . . . . . . . . . . . . . . . . . . . 744
Index . . . . . . . . . . . . . . . . . . . . . . . . . . . . . . . . . . . . . . . . . . . . . . . . . . . . . . . 745
Contents ix

x Human-Centric Business Process Management with WebSphere Process Server V6

Notices
This information was developed for products and services offered in the U.S.A.
IBM may not offer the products, services, or features discussed in this document in other countries. Consult your local IBM representative for information about the products and services currently available in your area. Any reference to an IBM product, program, or service is not intended to state or imply that only that IBM product, program, or service may be used. Any functionally equivalent product, program, or service that does not infringe any IBM intellectual property right may be used instead. However, it is the user's responsibility to evaluate and verify the operation of any non-IBM product, program, or service.
IBM may have patents or pending patent applications covering subject matter described in this document. The furnishing of this document does not give you any license to these patents. You can send license inquiries, in writing, to: IBM Director of Licensing, IBM Corporation, North Castle Drive, Armonk, NY 10504-1785 U.S.A.
The following paragraph does not apply to the United Kingdom or any other country where such provisions are inconsistent with local law: INTERNATIONAL BUSINESS MACHINES CORPORATION PROVIDES THIS PUBLICATION "AS IS" WITHOUT WARRANTY OF ANY KIND, EITHER EXPRESS OR IMPLIED, INCLUDING, BUT NOT LIMITED TO, THE IMPLIED WARRANTIES OF NON-INFRINGEMENT, MERCHANTABILITY OR FITNESS FOR A PARTICULAR PURPOSE. Some states do not allow disclaimer of express or implied warranties in certain transactions, therefore, this statement may not apply to you.
This information could include technical inaccuracies or typographical errors. Changes are periodically made to the information herein; these changes will be incorporated in new editions of the publication. IBM may make improvements and/or changes in the product(s) and/or the program(s) described in this publication at any time without notice.
Any references in this information to non-IBM Web sites are provided for convenience only and do not in any manner serve as an endorsement of those Web sites. The materials at those Web sites are not part of the materials for this IBM product and use of those Web sites is at your own risk.
IBM may use or distribute any of the information you supply in any way it believes appropriate without incurring any obligation to you.
Information concerning non-IBM products was obtained from the suppliers of those products, their published announcements or other publicly available sources. IBM has not tested those products and cannot confirm the accuracy of performance, compatibility or any other claims related to non-IBM products. Questions on the capabilities of non-IBM products should be addressed to the suppliers of those products.
This information contains examples of data and reports used in daily business operations. To illustrate them as completely as possible, the examples include the names of individuals, companies, brands, and products. All of these names are fictitious and any similarity to the names and addresses used by an actual business enterprise is entirely coincidental.
COPYRIGHT LICENSE:
This information contains sample application programs in source language, which illustrate programming techniques on various operating platforms. You may copy, modify, and distribute these sample programs in any form without payment to IBM, for the purposes of developing, using, marketing or distributing application programs conforming to the application programming interface for the operating platform for which the sample programs are written. These examples have not been thoroughly tested under all conditions. IBM, therefore, cannot guarantee or imply reliability, serviceability, or function of these programs.
© Copyright IBM Corp. 2007. All rights reserved. xi

Trademarks
The following terms are trademarks of the International Business Machines Corporation in the United States, other countries, or both:
Redbooks (logo) ®Cool Blue™DB2 Universal Database™DB2®IBM®
Lotus®Rational®Redbooks®RequisitePro®Sametime®
Tivoli®WebSphere®Workplace™Workplace Forms™
The following terms are trademarks of other companies:
SAP, and SAP logos are trademarks or registered trademarks of SAP AG in Germany and in several other countries.
FileNet, and the FileNet logo are registered trademarks of FileNet Corporation in the United States, other countries or both.
Enterprise JavaBeans, EJB, Java, Javadoc, JavaBeans, JavaScript, JavaServer, JDBC, JSP, JVM, J2EE, Sun, and all Java-based trademarks are trademarks of Sun Microsystems, Inc. in the United States, other countries, or both.
Internet Explorer, Microsoft, SQL Server, Visio, Visual Basic, Visual C#, Visual Studio, Windows, and the Windows logo are trademarks of Microsoft Corporation in the United States, other countries, or both.
Intel, Intel logo, Intel Inside logo, and Intel Centrino logo are trademarks or registered trademarks of Intel Corporation or its subsidiaries in the United States, other countries, or both.
Linux is a trademark of Linus Torvalds in the United States, other countries, or both.
Other company, product, or service names may be trademarks or service marks of others.
xii Human-Centric Business Process Management with WebSphere Process Server V6

Preface
Using step-by-step examples, this IBM® Redbooks® publication shows how human-centric tasks can be added into a business process management solution, using WebSphere® Business Modeler to model the process, WebSphere Integration Developer to assemble it, and WebSphere Process Server to run it. This book also considers clients to human-centric business processes such as WebSphere Portal Server, Workplace™ Forms, and Web service interfaces. Finally, we discuss integration with content management systems such as FileNet®.
Part 1, “Overview” on page 1, of this book introduces Human-Centric BPM and describes the sample scenario used throughout the examples in this book.
Part 2, “Implementing Human-Centric BPM” on page 45, shows how to build processes with manual tasks in WebSphere Business Modeler V6.0.2. Additional chapters show how to use WebSphere Integration Developer and WebSphere Process Server to assemble and deploy these processes. New human-centric features of WebSphere Process Server V6.0.2 are discussed in detail in a separate chapter.
Part 3, “Interaction services with WebSphere Process Server” on page 353, discusses how to use WebSphere Portal Server, Workplace Forms™, and Web services as clients to human-centric business processes. The Web services chapter focuses on building services in Rational® Application Developer and Microsoft® .NET.
Part 4, “ECM integration and related Human-Centric BPM technologies” on page 607, shows how content repositories such as FileNet can interact with human-centric processes, and also discusses other related technologies and products.
The team that wrote this book
This book was produced by a team of specialists from around the world working at the International Technical Support Organization, Raleigh Center.
© Copyright IBM Corp. 2007. All rights reserved. xiii

Figure 1 From left-to-right: Omar, Martin, Lincoln, Frank, Ines, Andy, Waveney, and Ben
Martin Keen is a Senior IT Specialist at the ITSO, Raleigh Center. He writes extensively about WebSphere products, SOA, and Patterns for e-business. He also teaches IBM classes worldwide about WebSphere, SOA, and ESB. Before joining the ITSO, Martin worked in the EMEA WebSphere Lab Services team in Hursley, UK. Martin holds a bachelor’s degree in Computer Studies from Southampton Institute of Higher Education.
Omar Bahy is a Senior Software Engineer at the IBM Lab in Cairo. He holds a bachelor’s degree and a master’s degree in Software Engineering specializing in process management. Omar is a member of the Rational team focusing on Business Process Management and Rational Portfolio Manager deployment. Omar delivers ITSO workshops worldwide.
Waveney Croson is an IBM Certified IT Specialist in the IBM Software Group for WebSphere in the UK. She has more than 10 years of experience in the business process management field and has been with independent software vendors for 20 years, of which the last 7 years have been with IBM. Her areas of expertise include business process modeling and business integration.
Andy Garratt is a Certified Consulting IT Specialist working for IBM Software Services for WebSphere (ISSW) in the UK. He has 15 years of experience in software architecture, design, and development of large strategic IT projects using a wide variety of technologies. His areas of expertise include WebSphere SOA foundation software including WebSphere Process Server, SOA, business process integration, and enterprise resource planning (ERP) systems. Before joining IBM, Andy worked for a number of IBM Business Partners implementing large ERP systems across most of Europe. He holds a degree in Natural Sciences from the University of Durham and is an author of the IBM Redbooks publication Patterns: Building Serial and Parallel Processes for IBM WebSphere Process Server V6.
Ben Karchner is an undergraduate student at Penn State University. He is currently working toward a BS degree in Information Sciences and Technology.
xiv Human-Centric Business Process Management with WebSphere Process Server V6

His main focus is on the integration and application of information technology. He joined the IBM International Technical Support Organization as a Co-op Pre-professional IT Specialist.
Ines Lehmann is an IT Specialist for IBM Software Group Germany. She is currently part of the WebSphere Solution Center in the development laboratory in Boeblingen, Germany. In her current role Ines works with different customers on proof-of-concept projects dealing with the latest versions of WebSphere Process Server. She holds a degree in Business Information Systems from Reutlingen University. After her graduation, Ines joined IBM Global Business Services in 2005. During the last two years she has worked on different customer assignments in the financial services industry. Her areas of expertise include SOA solutions, WebSphere Process Server, WebSphere Portal Server, and Business Process Integration. Ines is a IBM Certified Database Associate and a IBM Certified Solution Developer for IBM WebSphere Portal and WebSphere Integration Developer.
Frank Neumann works as a software architect in the IBM development team for Business Process Choreographer, focusing on database access technologies and integration with content and portal systems. He joined the IBM workflow team in 1999 and worked both as a Software Developer for MQ Series Workflow and Team Leader in Business Process Choreographer development. Frank holds a master’s degree in Computer Science from the University of Karlsruhe, Germany.
Lincoln Roach is a Portal and Collaboration Architect with IBM Worldwide Technical Enablement at Research Triangle Park, in the US. He has over 20 years of consulting experience delivering business solutions for medium to large corporations in the financial, utility, and manufacturing industries. Lincoln is a Certified SOA Solution Designer and Certified Consulting IT Specialist with a focus on Process Portal. Lincoln holds a BS in Computer Science from Southern Connecticut State University, US.
Thanks to the following people for their contributions to this project:
Gerhard PfauIBM Development Lab Boeblingen, Germany
Kurt LindIBM Development Lab Boeblingen, Germany
Hans SchoenIBM Development Lab Boeblingen, Germany
Markus ReichartIBM Development Lab Boeblingen, Germany
Preface xv

Andreas SchoenIBM Development Lab Boeblingen, Germany
Hermann AkermannIBM Development Lab Boeblingen, Germany
Peter GerstlIBM Development Lab Boeblingen, Germany
Thomas WienerIBM Development Lab Boeblingen, Germany
Andreas NauerzIBM Development Lab Boeblingen, Germany
Andreas ArningIBM Development Lab Boeblingen, Germany
Stephen NowlandWebSphere Integration Solution Architect, IBM
Neil WarburtonIT Specialist, IBM Tivoli® Security Software
Hans SkalleIBM Software Group, WW Value Selling
Tilak MitraApplication Architect, IBM Global Business Services
Ashok IyengarIBM Software Group, Customer Solutions Development
Kyle Farnand
WebSphere Portal Solutions, Worldwide Technical Sales
Kim Clark
Software Services for WebSphere, UK
Peter Holdsworth
Software Services for WebSphere, UK
Paul Roubekas
Software Services for Federal, USA
xvi Human-Centric Business Process Management with WebSphere Process Server V6

Become a published author
Join us for a two- to six-week residency program! Help write a book dealing with specific products or solutions, while getting hands-on experience with leading-edge technologies. You will have the opportunity to team with IBM technical professionals, Business Partners, and Clients.
Your efforts will help increase product acceptance and customer satisfaction. As a bonus, you will develop a network of contacts in IBM development labs, and increase your productivity and marketability.
Find out more about the residency program, browse the residency index, and apply online at:
ibm.com/redbooks/residencies.html
Comments welcome
Your comments are important to us!
We want our books to be as helpful as possible. Send us your comments about this book or other IBM Redbooks in one of the following ways:
� Use the online Contact us review Redbooks form found at:
ibm.com/redbooks
� Send your comments in an e-mail to:
� Mail your comments to:
IBM Corporation, International Technical Support OrganizationDept. HYTD Mail Station P0992455 South RoadPoughkeepsie, NY 12601-5400
Preface xvii

xviii Human-Centric Business Process Management with WebSphere Process Server V6

Part 1 Overview
Part 1
© Copyright IBM Corp. 2007. All rights reserved. 1

2 Human-Centric Business Process Management with WebSphere Process Server V6

Chapter 1. Welcome to this book
This chapter provides guidance on how to get the most out of this book. It contains the following sections:
� An introduction to this book� How to read this IBM Redbooks publication
1
© Copyright IBM Corp. 2007. All rights reserved. 3

1.1 An introduction to this book
A warm welcome to this IBM Redbooks publication from the team that wrote its content. We gathered for five intensive weeks in Raleigh, North Carolina, USA, to create this book. We hope that you find it to be an insightful and useful read.
The motivation in writing this book was to show how human-centric processes are an important part of business process management, and how IBM WebSphere Process Server V6.0.2 provides a wealth of features for building these business processes. We also focus on how to interact with these processes running in WebSphere Process Server by building clients using WebSphere Portal Server, Workplace Forms, and Web services.
To help demonstrate these features, we provide a vast array of step-by-step examples showing how to implement these solutions. We based all of our examples around a fictitious organization called ITSO Corp. The examples in this book build a hiring business process for ITSO Corp, construct clients to interact with this business process, and demonstrate the use of a content repository.
We hope that you are able to use this book as a starting point for building your own human-centric business processes for deployment to WebSphere Process Server.
1.2 How to read this IBM Redbooks publication
This section describes how we structured this book and provides guidance on which chapters you should read.
Part 1: overviewPart 1 contains the following chapters:
� Chapter 1, “Welcome to this book” on page 3
This is the chapter that you are reading now.
� Chapter 2, “Overview of Human-Centric BPM” on page 7
This chapter introduces business process management, and the role human-centric processes play. This section introduces terminology and concepts that you need to understand in other chapters in this book.
� Chapter 3, “Business scenario used within this book” on page 35
This chapter describes the fictitious ITSO Corp company, and the hiring business process. If you plan to follow any of the step-by-step examples in
4 Human-Centric Business Process Management with WebSphere Process Server V6

this book, you should read this short chapter to become acquainted with our business scenario.
Part 2: implementing Human-Centric BPMThis part focuses on modeling, building, and deploying human-centric business processes. Part 2 contains the following chapters:
� Chapter 4, “WebSphere Business Modeler” on page 47
This chapter shows how WebSphere Business Modeler V6.0.2 can be used to model business processes, with an emphasis on human tasks. The model built in this chapter is exported for assembly in WebSphere Integration Developer and deployment to WebSphere Process Server.
� Chapter 5, “Using human tasks in WebSphere Process Server” on page 93
This chapter describes how to configure WebSphere Process Server to run business processes, including the configuration of security using LDAP. This section shows how to implement human tasks in WebSphere Integration Developer, and deploy and test them in WebSphere Process Server.
� Chapter 6, “Human task features introduced in WebSphere Process Server V6.0.2” on page 203
This chapter provides step-by-step examples on why and how to use the new human-centric features of WebSphere Process Server V6.0.2. Use this chapter to understand and implement the human task features in WebSphere Process Server that are of interest to you.
Part 3: interaction services with WebSphere Process ServerThis part focuses on how to interact with human-centric processes running in WebSphere Process Server by clients. Part 3 contains the following chapters:
� Chapter 7, “J2EE and Microsoft .NET Web service clients” on page 355
This chapter describes how to build Web service clients that use SOAP to communicate to human tasks and business processes running in WebSphere Process Server. A J2EE™ client is described using Rational Application Developer, and a Microsoft .NET client is described using Microsoft Visual Studio®.
� Chapter 8, “WebSphere Portal Server” on page 493
This chapter focuses on the Process Portal features of WebSphere Portal Server, showing how to build portals to initiate and interact with human-centric processes running in WebSphere Process Server.
� Chapter 9, “Workplace Forms” on page 565
This chapter demonstrates how IBM Workplace Forms can be used to initiate and interact with human-centric processes by sending form data from the
Chapter 1. Welcome to this book 5

Workplace Forms Viewer to the WebSphere Process Server using Web services.
Part 4: ECM integration and related Human-Centric BPM technologies
Part 4 contains the following chapters:
� Chapter 10, “Integrating with content repositories” on page 609
This chapter discusses how content stored in an enterprise content management (ECM) system can be integrated with business processes and human tasks in WebSphere Process Server.
� Chapter 11, “Related technologies” on page 727
This chapter introduces related technologies that can contribute to the enhancement of human-centric business process management.
6 Human-Centric Business Process Management with WebSphere Process Server V6

Chapter 2. Overview of Human-Centric BPM
In this chapter we introduce the concepts of Business Process Management, particularly in the context of human involvement in business processes.
This chapter describes:
� Some of the more common terms that are used around the subject today and also some of the key standards that have been adopted.
� The key components that make up the IBM BPM solution and the role that process plays in your overall SOA strategy.
� Techniques that can be used with Human-Centric BPM in order to maximize return on investment. These include process improvement methodology and process development life-cycle sections.
� Background information about the current pressures that businesses face, explaining some of the drivers causing the large amount of activity and investment in the area of business process management.
� The capabilities found in WebSphere Process Server V6.0.2, concentrating on the new functions that enhance human-centric functionality.
2
© Copyright IBM Corp. 2007. All rights reserved. 7

2.1 Business Process Management (BPM)
Business process management offers support for activities and the flow of information between those activities. These activities are of value to an organization, its stakeholders, and (where applicable) its customers.
The utilization of BPM leads to business innovation and optimization by implementing business strategy through modeling, developing, deploying, and managing business processes throughout their entire life cycle. A widely used example is supply chain management.
BPM acts as an enabler for the business in defining and implementing strategic business goals and then measuring and managing a company’s financial and operational performance against these goals.
Business process management provides a convergence of technologies that assists in business transformation by removing business and IT constraints, through integration and enhanced technology, helping to streamline the business. These capabilities provide tight integration of operational and analytical environments, business and IT environments, and strategy with daily operations.
2.1.1 Overview of BPM
To help define BPM, let us refer to a white paper on the subject: Exploring key facts about business process management with IBM WebSphere software By Michael Scheible, IBM Software Group, Boeblingen Development Lab, available at:
ftp://ftp.software.ibm.com/software/websphere/pdf/NEW_BPM_WhitePaper_WSW11279-USEN-00.pdf
There are two key elements in Michael Scheible’s definition that are very pertinent to the role people play and the business value that they add to successful BPM projects:
� “Combining software capabilities and business expertise to accelerate process improvement and facilitate business innovation”
� “Directing the deployment of resources from across the organization into efficient processes that create customer value”
Using techniques and methods described in this book, you can rapidly implement refined business processes that are beneficial to the business. This type of BPM initiative, including process improvement or process redesign, should not be confused with sizeable business process re-engineering initiatives.
8 Human-Centric Business Process Management with WebSphere Process Server V6

The benefits gained from those improved processes can be measured, analysed, and (where appropriate) used to move into a further process refinement exercise. These techniques are discussed in Business Process Management: Modeling through Monitoring Using WebSphere V6 Products, SG24-7148.
2.1.2 Commonly used terminology
Some terms that are commonly used to describe particular BPM implementations are:
� End-to-end
A business process that spans the enterprise and encompasses the whole of the process, for example, order handling. End-to-end processes usually include applications through process integration and generally more complex processes.
� Straight through processing
A highly automated business process intended to execute as smoothly as possible (for example, bank debit transaction).
� Departmental process
Usually simpler business processes within a single department (for example, Claims handling).
� Back office process
Increasingly becoming more complex processes, usually with a very good fit for a BPM solution and with high potential for reuse across departments (for example, HR Shared Services)
� Silo
A process constrained to working with one business application (for example, CRM workflow).
� Document centric
Driven by a document, often received and digitized at the start of the process (for example, credit card application).
Each of these terms can describe a particular type of BPM system, and there are many more terms in use. Critically, any of these could have, and do have, human tasks as part of the overall solution. This confirms the impact that humans still have in processes across an organization, in terms of breadth and depth. Examples range from a departmental holiday approval system through to a supply chain process involving all reaches of the organization, the customer, and extending to third parties.
Chapter 2. Overview of Human-Centric BPM 9

2.1.3 The role of the human in BPM
The human plays an important role in many of the different implementations of BPM systems. Even straight-through processing processes invariably have exceptions that cannot be handled automatically. Human interaction is still needed, even with the very capable fault handlers or compensation capability that currently exists.
The ability to automate as many of the tasks in a process as possible allows us to use our human resource community for those tasks that add real value, need the greatest attention, or demand innovative thinking. During the modeling phase we can identify and categorize tasks, allowing us to concentrate both our modelling effort and, at runtime, our human resource effort, in the most critical areas.
There are now very sophisticated work allocation mechanisms for human tasks. This means that we can target specific users, managers, and groups for any given task or activity. That way we can more fully utilize the knowledge, qualifications, and capability in our user community. This demands some additional effort at modelling time to understand the user base and document their associated skills. However, this does mean that we can then use more advanced, targeted work allocation methods in the future. The granularity of information readily available in this area varies from organization to organization, but consider information around seniority, security clearance, or other soft skills. This can be used to help us understand the finer details around our available human resources and so utilize them and maximize their capability appropriately.
If we consider the first few activities in a very simple expenses process (see Simple Expenses Process Figure 2-1) we can see examples of the various roles that humans play in a business process. We can see that the expense process is started by an incoming expense claim. In our case, this will have been completed by the person claiming the expenses.
Figure 2-1 Simple expenses process
10 Human-Centric Business Process Management with WebSphere Process Server V6

Using Figure 2-1 on page 10 as an example, we can see the types of role a human can play in a business process:
� Kicker
We can use the term kicker, as they have kicked off, or triggered, the process.
� Standard human task
The first task of the process, checking the claim, is a human activity. This is a typical human activity, as is the process claim task.
� Exception human task
The handle exception task is only performed 10% of the time in our process. It is still a human task, but performed by a more senior resource in this scenario, when the standard process path cannot be taken. The targeting of this type of task to the most appropriately qualified person is imperative. This exception patch, taken 10% of the time, is generally where we lose the most time and waste the most effort.
� Process administrator
There are other human roles, not shown in our scenario, but they include a process administrator, who is responsible for the expenses process. They ensure a smooth day-to-day running of the process via management and monitoring tools. It is a business-focused administrator ensuring that key performance indicators and business-based targets are being met or exceeded.
� BPM administrator
This administrator is more likely to have responsibility for many different business processes sharing the same BPM infrastructure. The BPM administer is focused on the smooth running of the BPM infrastructure and monitors at a more technical level. Also, he is involved in the deployment of new or revised business processes.
2.2 IBM BPM solution
This section is intended as a brief introduction to the main components in the IBM Business Process Management solution. You will find a summary here, links to reading material, and practical help for users of these components.
Chapter 2. Overview of Human-Centric BPM 11

The four key components in the IBM BPM solution are:
� WebSphere Business Modeler� WebSphere Integration Developer� WebSphere Process Server� WebSphere Business Monitor
Together these components offer a complete solution, capable of delivering tangible benefits to the business.
2.2.1 WebSphere Business Modeler
IBM WebSphere Business Modeler is targeted at business analysts to help capture business design. WebSphere Business Modeler can be used for documentation and supporting compliance purposes. It also provides a visual and textual representation of processes, information, organization, resources, classifiers, and business measurements that can be shared across an organization. If you have already invested some time in process mapping, you can import static diagrams that you have created previously in Microsoft Visio®. This allows you to progress from a basic mapping exercise, to process modelling in WebSphere Business Modeler.
WebSphere Business Modeler includes a simulation tool that enables analysis of processes and testing of how well processes will perform under different operating assumptions. You can use this analysis to refine and optimize business design. WebSphere Business Modeler is built on the Eclipse tool framework, which makes it easy to share information about your business design with other parts of your organization and the tools that they use. In particular, you can export a design into WebSphere Integration Developer and Rational Software Architect so that application developers can use it as a blueprint for designing process flows for automating business design.
Find more information about WebSphere Business Modeler see:
http://www.ibm.com/software/integration/wbimodeler/
2.2.2 WebSphere Integration Developer
WebSphere Integration Developer is an Eclipse-based tool designed to help create business process flows and their associated implementation components. WebSphere Integration Developer simplifies integration with its Service Component Architecture (SCA). SCA uses Business Process Execution Language for assembling business process tasks into workflows, which can then be deployed to WebSphere Process Server.
12 Human-Centric Business Process Management with WebSphere Process Server V6

WebSphere Integration Developer can directly import business models from the WebSphere Business Modeler. You can then use a wiring editor for assembling service components, for importing service interface definitions, and for setting binding policies to build SOA-enabled applications.
Find more information about WebSphere Integration Developer see:
http://www.ibm.com/software/integration/wid/
2.2.3 WebSphere Process Server
WebSphere Process Server is the primary hosting environment for business processing. Built on WebSphere Enterprise Service Bus, WebSphere Process Server includes support for both Web Services Business Process Execution Language (WS-BPEL) based process flows and business state machines. WebSphere Process Server also supports the integration of business rules in process and service selection. The process server is one of the key solutions in the IBM suite offering support for the Service Component Architecture SOA programming model.
WebSphere Process Server integrates with WebSphere Portal to deliver business process management through a portal. There is support for human tasks in a business process. Human tasks are defined as activities within the process definition that are carried out by users. This includes built-in support for task assignment, pick lists, scheduling, and escalation policies in case a task is not processed in a timely fashion.
Find more information about WebSphere Process Server see:
http://www.ibm.com/software/integration/wps/
2.2.4 WebSphere Business Monitor
WebSphere Business Monitor enables you to monitor business processes in real time, providing a visual display of business process status. WebSphere Business Monitor complements WebSphere Business Modeler. It helps in creating dashboards for visualizing the performance of a business, based on the key performance indicators that are identified in a business design.
You can use WebSphere Business Monitor to track time, cost, and resources used in processes. WebSphere Business Monitor provides tools that enable you to set situational triggers and notifications of potential bottlenecks or workload imbalances. Ultimately, WebSphere Business Monitor helps you better understand how your business design achieves your business objectives, and
Chapter 2. Overview of Human-Centric BPM 13

provides guidance about how to refine and optimize that business design in case goals are not being met.
Find more information about WebSphere Business Monitor see:
http://www.ibm.com/software/integration/wbimonitor/
2.2.5 Positioning IBM SOA and BPM
Establishing a service-oriented architecture can help prepare both IT and business processes for rapid change.
Even in the early stages of adopting an SOA, your organization will benefit from:
� Increased revenue
By creating new routes to market and new value from existing systems
� A flexible business model
By reacting to market changes more quickly
� Reduced risk and exposure
By improving visibility into business operations
� The gap bridged between what you want your business to accomplish and the infrastructure tools you need to get there
By improving communications between the line of business and IT
� Decreased development and deployment cycle times
By using pre-built, reusable services building blocks
� Reduced cycle times and costs
By moving from manual to automated transactions
� Adaptable, scalable solutions to complex business problems
By using best practices, such as layering and loosely coupled components
IBM SOA FoundationThe IBM SOA Foundation is an open, integrated solution, offering best practices and patterns that provide you with what you need to get you started with SOA. The SOA Foundation provides full support for the SOA life cycle through an integrated set of tools and runtime components that allow you to leverage skills and investments across the common runtime, tooling, and management infrastructure.
14 Human-Centric Business Process Management with WebSphere Process Server V6

The components are modular, allowing you to pick and choose the pieces you need to deliver an immediate impact, knowing that what you pick will work with pieces you add later on. In addition, the SOA Foundation is scalable, allowing you to start small and grow as fast as your business requires. The SOA Foundation provides extensive support for business and IT standards, facilitating greater interoperability and portability between applications. It can also help you leverage SOA to extend the value of the applications and business processes that are running your business today.
The IBM SOA Reference Architecture is shown in Figure 2-2.
The SOA reference architecture looks at the set of services that go into building an SOA. These capabilities can be implemented on a build-as-you-go basis allowing capabilities and project-level solutions to be easily added as new requirements are addressed over time.
Figure 2-2 The IBM SOA reference architecture
BPM plays an extremely important role in an enterprise’s adoption of a service-oriented architecture. The BPM solution available from IBM enables service-oriented, end-to-end process management for your organization based on SOA. Its SOA component applications enable businesses and organizations to plan, develop, implement, and improve their processes.
This solution lets organizations closely scrutinize costs, scheduling, resources, workflow, and other factors that affect the efficiency and viability of a given
Business Innovation & Optimization Services
Interaction ServicesAd hoc composition
User IntegrationDevice Integration
Process ServicesService Choreography
Business RulesStaff
Information ServicesMaster Data Management
Information IntegrationData Management
Interoperability
Partner ServicesPartner Management
ProtocolDocument Handling
Business App ServicesComponent
DataEdge
Access ServicesService Enablement
Object DiscoveryEvent Capture
Infrastructure Services
Build
Deployment
Asset Mgt.
Security
Policy
ITMonitoring
Dev
elop
men
t Ser
vice
s
IT S
ervi
ceM
anag
emen
tBusiness Modeling Business Monitoring Business Dashboards
Mediation ESB Registry Events
Workload Management Virtualization High Availability
Chapter 2. Overview of Human-Centric BPM 15

process. It also allows organizations to determine the most effective methods for revising and improving that process.
The following document describes the benefits of SOA. Importantly, it discusses the benefits of SOA when used in tandem with BPM, providing business agility through support for business processes.
ftp://ftp.software.ibm.com/software/soa/pdf/IBMQuocircaReport.pdf
The five entry points to SOAThe SOA entry points are people, process, information, connectivity, and reuse. These points are a means of easing entry into SOA, ensuring that you start with the most appropriate point for your business.
People, process, and information are the business-centric entry points. Connectivity and reuse are the IT-centric entry points. The entry points are shown in Figure 2-3.
Figure 2-3 The five entry points to SOA
“Technology is certainly key to a successful SOA integration, [but] it is the coalescence of the people, process and information [with] business insight and emerging best practices for overall organizational change through SOA."
16 Human-Centric Business Process Management with WebSphere Process Server V6

Any one of our five entry points can provide an effective and efficient way to get started with SOA (Figure 2-4):
� People: enables efficiency through interaction and collaboration
� Process: offers tools and services to help streamline business process management
� Information: enables access to complex, heterogeneous data sources
� Connectivity: links people, processes, and information for your business
� Reuse: extends the value of your previous asset investments
Figure 2-4 Defining the 5 entry points to SOA
Process entry pointThe process entry point is an excellent starting point for adopting an SOA strategy, because it builds on the SOA Foundation and it is one of the three business-centric entry points. This enables you to align your strategy and your business goals and to approach SOA from the BPM perspective. When you approach SOA from the point of a business process, you are in a position to
Speed to market with new productsSavings of 4M pounds to date, 1M pounds a quarter
Greater productivity and flexibility through targeted user interactions for improved operations and collaboration
Achieve business process innovation through treating tasks as modular services
Provide trusted information in business context by treating it as a service
Service-enable existing assets and fill portfolio gaps with new reusable services
Connect systems, users, and business channels based on open standards
ValueWhat is it? Customer
The 5 Entry Points
Automate thousands of transactions for lower cost and greater customer satisfaction using reusable services
Information reaches decision makers 70% faster by enabling LOBs to orchestrate modular services
Automated 80% of manual research process for underwriting. Offer as service to industry
Significantly reduced time/cost required to integrate older applications with new SAP modules
Chapter 2. Overview of Human-Centric BPM 17
make a compelling return on investment (ROI) case, for example, detailing the optimizations and envisaged benefits from implementing the business process.
There are a number of tools and techniques that allow you to arrive at the business case, or business value, expected in return for your investment. There are a number of sources that assist you with creating your business case. The following paper provides a good summary of some of the areas that BPM, in partnership with SOA, will address for you:
http://www-306.ibm.com/software/info/bpmsoa/pdf/UR-IBM-BPM_Business_Case-Final-1.pdf
One of the strengths of BPM supported by SOA is in the area of maximizing component reuse. IBM has a catalog of reusable components available to help speed up the overall project. They are available for a vast range of industries and include process components. The full catalog can be found at:
http://catalog.lotus.com/wps/portal/soaprocess
2.3 Industry standards
Support for standards is critical to any BPM solution and is an underpinning tenet of the IBM BPM solution. Three of the key standards are listed here along with summary information describing how the solution uses these standards.
� Business Process Execution Language (BPEL)
The current WS-BPEL 2.0 standard, commonly called BPEL, has been evolving for a number of years and was originally named BPEL4WS. OASIS is a non-profit, global consortium that drives the development, convergence, and adoption of e-business standards. They have committees for all of the different standards that they are responsible for. IBM jointly chair the OASIS committee for WS-BPEL. Further information about the definition of the standard can be found at the OASIS organization Web site. In April 2007, WS-BPEL 2.0 was ratified as an OASIS standard by the current members.
View the WS-BPEL V2.0 specification at:
http://www.oasis-open.org/specs/index.php#wsbpelv2.0
If we consider the industry standard from an IBM solution perspective, WebSphere Business Modeler can export a process model to WebSphere Integration Developer, for the Assembly phase. One element of that export is the BPEL for the process. From WebSphere Integration Developer the process can be deployed to WebSphere Process Server. This means that a process captured at the Model phase can be assembled and deployed, then executed as a BPEL process.
18 Human-Centric Business Process Management with WebSphere Process Server V6
The WS-BPEL 2.0 standard does not currently have any provision for supporting human interaction. It is more focussed on Web Services interaction with the business process. However, IBM, SAP® AG, and others, have proposed BPEL4People, an extension to support human tasks in BPM. Further information about the BPEL4People standard can be found in the following white paper:
http://www.ibm.com/developerworks/webservices/library/specification/ws-bpel4people/
� Business Process Modelling Notation (BPMN)
The Business Process Modeling Notation is a graphical notation that depicts the steps in a business process.
While WebSphere Business Modeler is not complete in the BPMN specification, it is based on BPMN. The BPMN organization has an active community and IBM is well represented in that community. By visiting the BPMN.org Web site you will see a statement with regard to the IBM planned implementation of the BPMN standard. The Web site also has useful BPMN assets and white papers available.
IBM is committed to BPMN, already supports many of its concepts, and is working towards complete support in a future release.
Since the inception of BPMN, IBM has driven its standardization and early development. IBM chaired the BPMN committee and authored the Version 1.0 specification. After BPMI merged with the OMG, IBM continued its leadership, chairing the committee that is developing Version 1.1. IBM also drafted the initial requirements for Version 2.0 and will lead its development. Version 2.0 will focus on aligning the process notation with other business modeling standards, such as business rules, goals, KPIs, UML, and organization structure.
http://www.bpmn.org/
� Unified Modelling Language (UML)
The Unified Modeling Language is the Object Management Group’s (OMG) most-used specification. It addresses the way that we model application structure, data structure, and architecture.
Chapter 2. Overview of Human-Centric BPM 19

The Model, Assemble, Deploy, Manage (MADM) life cycle with Build is shown in Figure 2-5.
Figure 2-5 Model, Assemble, Deploy, Manage life cycle with Build
If we consider the role that UML plays in a process development life cycle, we can consider the IBM MADM process development life cycle. This method provides for assembly of services to form an executable process. In some circumstances not all of those services will be already constructed and available to fully implement the BPEL model. In this case we need to build or construct new services.
If we consider the build phase from an IBM process development life cycle perspective, the process information is gathered and modeled in WebSphere Business Modeler. This includes information around the people, process, and information flowing through that process. The WebSphere Business Modeler project can then be opened in the Rational tooling, for example, Rational
Assemble & Deploy Manage
Architecture & Construction(Build)
UpdateLegacy
UpdateSAP
StartBatch
UpdateLegacy
UpdateSAP
StartBatch
Third PartyWeb Service
(Send customera checkbook)
OrderCreditCard
EmailNotification
Take Cashor Check
000
Customer Order00
00
Customer Order
PaymentMethod?
Customer Order
Customer Order
Swipe Card & Sign
0
Customer Order
00
Model
ifyMethod
CRMAccount Rep
(Create CustomerChecking Account)
CRMAccount Rep
(Create CustomerChecking Account)
20 Human-Centric Business Process Management with WebSphere Process Server V6

Software Architect, and the artifacts of the WebSphere Business Modeler project can then be viewed in UML form.
The support for the UML 2.0 standard and the sharing of the workspace enables us to provide the contract between the business modeler and the architect or developer. The architect can create the UML design model, referencing the business process model in UML, and then move on to create the required code.
Further information about the current UML specifications can be found at:
http://www.uml.org/
2.4 Methodologies
There are a vast array of methodologies and approaches associated with BPM. We look at two of them here, one addressing process improvement and the other a process development methodology.
2.4.1 Process improvement methodology
There are a number of process improvement methodologies currently in use. In our experience, Six Sigma, and in particular Lean Six Sigma, is the most prevalent. However, we are not making a recommendation for a specific methodology here.
Six SigmaSix Sigma has two key methodologies, DMAIC and DMADV. DMAIC is used to improve an existing business process. DMADV is used to create new product designs or process designs.
This methodology, although originally used in the manufacturing sector by GE and Motorola, is now seeing widespread use in utilities, retail, government, health care, pharmaceuticals, telecoms, and more. Considered the best practice by many, the Six Sigma approach is based on the statistical analyses of process errors and failures and their causes.
Note: There are a large number of other standards underpinning the overall BPM solution, but for further detailed investigation we recommend reviewing other WS-* standards at:
http://www.oasis-open.org/home/index.php
Chapter 2. Overview of Human-Centric BPM 21

Many companies are now investing in the training and skills necessary for their process specialists to achieve Six Sigma Black Belt certification. Many have Master Black Belts within their enterprise. IBM uses Lean Six Sigma extensively to support business transformation projects both across the IBM Corporation and in the customer base.
A large amount of resources are available on the Web detailing expected returns from Six Sigma projects, but the main areas of improvement commonly seen are:
� Higher customer satisfaction rates � Improved throughput� Reduced costs � Greater productivity
An example of using WebSphere Business Modeler with the Six Sigma methodology is shown in Figure 2-6. This figure shows the use of WebSphere Business Modeler with the Six Sigma methodology and highlights the steps followed with the Define, Measure, Analyze, Improve, Control methodology (DMAIC) and how the WebSphere Business Modeler supports the activities that facilitate that approach.
Figure 2-6 DMAIC with WebSphere Business Modeler
Cycle ofImprovement
Assess andAnalyze
3
Model Future State,Evaluate Options
4
Model Current Stateand Gather Data
2
Define and AlignObjectives
1
Implement andManage
5• Develop pilot and
implementation plans• Create measures• Assign technical
attributes• Implement, Monitor
performance
• Look for opportunities to automate (e.g., workflow, integration vs. re-keying)
• Model alternatives and rank by payback (use a simple matrix)
• Gather feedback on the proposed process
• Link to core process and/or key initiative
• Define improvement objective (e.g., "Reduce process cycle time by...")
• Model execption paths including required corrective action
• Gather and load cost and time (duration) data
• Classify activities (e.g., value add vs. rework)• Develop a simulation test plan• Simulate "As-Is" process to identify
bottlenecks and high cost areas• Prioritize improvement opportunities
22 Human-Centric Business Process Management with WebSphere Process Server V6

The Six Sigma process is built on the five DMAIC steps. The use of DMAIC with the IBM BPM solution components is described here:
1. Define:
– WebSphere Business Modeler serves as a repository of core and supporting processes and components such as sub-processes, activities, services, resources, and KPIs.
– This repository facilitates reuse and consistency and saves time across Six Sigma teams.
– Existing models and data serve as a basis for goal definition.
2. Measure:
– Representative time and cost data may be added to as-is models.
– Simulation then allows current performance to be evaluated; probabilities and distributions may be added.
– Exception path modeling allows the impact of defects to be better understood.
3. Analyze:
– Advanced simulation supports design of experiments/what if scenario testing (results are saved for comparison reporting).
– A rich set of reports and queries may be customized. Results may be exported.
– Activities may be classified (cause and effect, value add, regulatory, others as required) and reported/viewed.
4. Improve:
– Alternative to-be processes may be designed, simulated, and evaluated using dynamic case and comparative analysis.
– Results may be exported for additional analysis and graphing.
– BPEL and UML export facilitate IT handoff, reducing implementation cycle time (improved process).
5. Control:
– KPIs are defined in WebSphere Business Modeler and used by WebSphere Business Monitor.
– WebSphere Business Monitor captures events and data to drive and display real-time KPI performance.
– Notifications (defined in Modeler) alert process owners and manage escalation and resolution.
– Data captured sets up next as-is improvement cycle.
Chapter 2. Overview of Human-Centric BPM 23

Alternative approachIf you do not have Six Sigma skills in the organization there are a series of basic methods that you can follow as an alternative, well proven, pragmatic method. We can follow is the as-is, to-be, and implementation approaches to business process management projects:
� As-is
The as-is approach allows for information gathering, documentation, and understanding of the current process. If times, costs, revenue, and other quantifiable metrics are gathered, simulation of the as-is process model can be performed. An even greater understanding of the as-is process can then be achieved through interpretation and analysis of the simulation results.
� To-be
The to-be process can then be modeled, allowing for process improvements based on findings from information and analysis of the as-is process. The optimum to-be can be arrived at by comparing analysis figures from the as-is model and the proposed to-be model.
� Implementation
The next activity is to extend the to-be model with implementation information and then move forward into the process assembly phase.
2.4.2 Process development life cycle
The IBM process development life cycle supports the following major activities:
� Model
Capture, simulate, analyze, and optimize business models to reduce risk and increase flexibility.
� Assemble
Develop, assemble, and test integrated solution.
� Deploy
Direct deployment of models and policies to realize business intent.
� Manage
Manage the deployed models.
Note: In our experience, WebSphere Business Modeler fits particularly well with either of these approaches to process improvement.
24 Human-Centric Business Process Management with WebSphere Process Server V6

A key feature of the IBM business process life cycle is the linkage between the manage and the model life cycle stages. This functionality enables the delivery of runtime data and statistics into the process modeling environment. This allows for the completion of the analyses that drives iterative process re-engineering through a continuous business process improvement cycle.
This life cycle is commonly referred to as the MADM life cycle and is shown in Figure 2-7.
Figure 2-7 MADM process development life cycle
The process development life cycle should be supported by strong governance and well thought out best practices.
Often the human involvement in a business process is an area that is not maximized, and usually gains can be made quickly in improving productivity, reducing costs, better utilization of knowledge, and maximizing power user capability. In order to achieve this, some time and effort needs to be put in at the first stage of the MADM life cycle, modeling, to fully document and understand the people, organizational structure, and the roles played. A common approach is to start with the business process itself. The resources associated with the business process are critical and should be gathered as well.
DiscoverConstruct and testCompose
Gather requirementsModel and simulateDesign
Integrate peopleIntegrate processesManage and integrate information
Manage applications and servicesManage identity and complianceMonitor business metrics
Financial transparencyBusiness and IT alignmentProcess control
Note: If you are interested in exploring the bigger picture from an architectural perspective, for example, what other tools could be used to manage and support services, the following paper by Tilak Mitra is very worthwhile reading:
http://www-128.ibm.com/developerworks/library/ar-arprac1/#author
Chapter 2. Overview of Human-Centric BPM 25

2.5 Business drivers and benefits
This section is intended as an introduction to some of the key drivers that we come across in the marketplace. There are many and varied drivers that are causing businesses to implement BPM solutions. They vary dramatically across geography and industry, but there are a number of common strands that, in our experience, are visible across most sectors.
2.5.1 Drivers in the marketplace
We discuss here some of the more prevalent drivers in the BPM segment.
Regulatory complianceThe compliance requirement drives the need to have defined, repeatable processes with the appropriate reviews, checks, and balances in place. These processes need to be fully documented and available across the enterprise.The ramifications to a business of not being compliant can be finacially extremely punitive.
A few examples of the more common regulations that are currently prevalent are:
� Sarbanes-Oxley (SOX)� Basel II� Food and Drug Administration� Financial Services Authority� European Union� Health Insurance Portability and Accountability Act (HIPAA)
A good starting point for further reading around regulatory compliance can be sourced at:
http://www-306.ibm.com/software/info/features/compliance/main.html
Improve efficiencyThe drive to improve efficiency means that businesses are looking to make their processes as proficient as possible. This means that the modeling phase is extremely important, especially the analysis of the proposed to-be process and the detailed understanding of potential savings that it will provide. In our experience this part of the modelling phase does not see the effort and time dedicated to it that it demands or deserves. This means that costly alterations may be made further into the process development life cycle and that the financial benefit of process improvement is not fully maximized.
26 Human-Centric Business Process Management with WebSphere Process Server V6

Additionally, effort needs to be put in at the model stage to understand business goals and requirements and align those closely to key performance indicators (kpi) that will be monitored, measured, and analyzed at the manage stage.
Ensure knowledge and understandingThis is a driver that we see in very large enterprises or organizations where the organizational units, networks, and structures are more formal and also more extensive. We need to ensure that fully documented processes are available and understood by all. Importantly, at the process modeling phase full commitment must also be achieved across these large complex organizations. We need to ensure that processes are reviewed and agreed to by the relevant line of business owners, managers, and power users before opening them to the wider audience. This also assists us with the effort to enable cultural change in an organization.
Once agreed upon, the processes can be provided to the broader audience. This still occurs via paper, but much more often electronically via Internet or Intranet, and usually through a portal front-end.
Provide business continuityCritically, modeling the business process allows an enterprise to gather the information around a process from knowledge workers or power users and ensure that it is documented and maintained in the process model and its associated artifacts. An example is the ability to encapsulate business rules around a complex decision point in a process. This allows the business to enagage more users in that part of the process, removing points of reliance, often pinch points in the process. It also gives the business the ability to change those rules very quickly and regularly if needed.
Effect cultural changeThis has synergy with some of the previous drivers in the ease of sharing process information around the business and encouraging users to participate in the modeling of the process. They can be included in commenting and reviewing processes, and this assists in engendering a change in the cultural mindset of the user community.
If a more positive approach is required the business process can be enforced at run time through allocation, escalation, and effective day-to-day management of the process. Work allocation is just one example of how culture varies dramatically around the world. Some countries and enterprises prefer a pull approach where the user can select work, while other cultures and businesses favor a more stringent approach where work is allocated to specific users.
Chapter 2. Overview of Human-Centric BPM 27

Drive innovationHaving a greater understanding of the business and its component parts, people, systems, and so on, allows for more innovative thinking of how we do business. Having the visibility of what we are doing now, and with what resources, allows us to much more easily pose the what if? questions and analyze the likely results of posing the question.
2.6 Human-centric BPM with WebSphere Process Server V6
This section describes the core capability provided by WebSphere Process Server V6 and then moves on to detail new WebSphere Process Server V6.0.2 functionality, specifically in the area of human tasks.
2.6.1 WebSphere Process Server V6 core capability
This section describes core Human Task capability. This is a key component in the BPM offering, as shown in Figure 2-8.
Figure 2-8 Human tasks: a key service component
Human tasks are stand-alone components in WebSphere Process Server that you can use to assign work to employees or to invoke any other service. Additionally, the human task manager supports the ad hoc creation and tracking of tasks. You can use existing LDAP directories (as well as operating system repositories and the WebSphere user registry) to access staff information.
WebSphere Application Server ND (J2EE Runtime)
SOA Core Service ComponentArchitecture
BusinessObjects
Common EventInfrastructure
InterfaceMaps
BusinessObjectMaps
Relation-ships
DynamicService
Selection
SupportingServices
Mediation Flows(ESB)
HumanTasks
BusinessState
Machines
BusinessRules
BusinessProcesses
ServiceComponents
28 Human-Centric Business Process Management with WebSphere Process Server V6

WebSphere Process Server also supports multi-level escalation for human tasks including e-mail notification and priority aging. WebSphere Process Server includes an extensible Web client that you can use to work with tasks of processes. This Web client is based on a set of reusable JavaServer™ Faces (JSF) components that you can use to create custom clients or embed human task functionality into other Web applications.
2.6.2 New, enhanced functions with WebSphere Process Server V6.0.2
We now describe the new human task functionality available with WebSphere Process Server V6.0.2.
EscalationThere may be some points in the business process when an activity does not get finished, and so moves to a state of incomplete. We usually need to escalate this to a manager or administrator. We now have the capability to send an escalation such as a customized e-mail message or raise an additional work item. This means that we can alert the manager or administrator.
The e-mail functionality is especially beneficial when you are notifying users who only occasionally interact with the business process, and alerts them to the fact that they have a task to perform, in the form of an escalation. The e-mail can contain the escalated task name, the state that the task should have reached, and a description of the task.
Ad-hoc tasksThere are two types of ad-hoc tasks:
� Sub tasks
As part of the process you model predefined tasks for a given process. It may be that you cannot complete a task and move on to the next formal task in the process, and you now have the ability to perform a subtask. This is an additional task that will be performed. It can be started based on an available template or can be defined at run time. There can be more than one subtask for any given parent task. The parent task owner must then consolidate the information received from the subtasks back into the parent task. Escalation is still available on the parent task, and if the parent task fails to complete the owner can see that it is because we are still waiting for subtasks to complete. So the owner of the parent task still has responsibility for the completion of the parent task.
Chapter 2. Overview of Human-Centric BPM 29

� Follow-on tasks
The follow-on task is similar in concept to the subtask, however, the data in the follow-on task must match the data in the original task we are following on from. This time the original task is put into forwarded state and the original task owner does not get the response back at all. On completion of the follow-on task the process continues as usual. Also, the follow-on task can have its own escalation. So in this case the owner of the follow-on task has responsibility for completing the follow-on task.
Extended client type support through Web servicesThere are a wide range of client technologies supported, allowing us to get the right piece of work to the right person. It is now possible to use the Client APIs from a Web Service. This means that via a WebService API the client can interact with WebSphere or .NET
Generation of a JSP clientsThere is now a wizard to generate a JSP™ client for the human tasks. It is extremely easy to use and allows you to:
� Add a gif or jpg for your company logo.
� Nominate whether you are generating a local (to the process server) client or a remote client.
� Specifiy one of two given stylesheets (or create your own tailored stylesheet).
Your are then able to generate your JSP client. This allows rapid generation of clients to a specified stylesheet layout, saving a substantial amount of effort.
Remote clientsYou now have the choice of either a local or remote WebSphere Process Server client. This means that you can generate a client for deployment on the same server as the process run time or in a different server in the same cluster. This provides greater flexibility with regard to deployment architecture.
30 Human-Centric Business Process Management with WebSphere Process Server V6

Post-processing staff queryThe staff query returns a list of staff qualified to perform a specific task, for example, potential owners of a task. This is how we arrive at the list of staff pertinent to any given task. There are circumstances under which we may wish to alter this list of staff, either by adding to it or by removing people off the list. Some examples of its potential use are:
� A person is absent for a long period of time.
� For workload balancing, avoiding staff who are very busy, who have a substantial backlog. Targeting members of staff who have spare capacity, and so are under utilized.
� Merging staff from a source other than the directory the staff query is executed against.
� Based on interrogation of the business data in the process you would prefer, or not prefer, a certain user or group of users to handle this particular process instance.
The post-processing staff query allows you to achieve this. The plug-in allows you to add and delete users and groups from the query list resulting from the original staff query.
Enhanced BPC ExplorerThe BPC Explorer has been enhanced and has the following improvements:
� The BPC Explorer now shows a graphical view of processes.� Custom views can be created based on search definitions.� New enablement for state machines.
BPC ObserverBPC Observer is a Web application that generates reports about the execution of business processes and human tasks. The BPC Observer allows you to:
� Observe state and evolution of processes.
� Overall duration and actual work time of activities.
� Provide customizable reports and graphical charts of historical and accumulated data of processes.
� Retrieve statistical data on processes and activities via flexible drill downs.
Server controlled page flowThis is also known as single person workflow.
Server controlled page flow allows you to present the user with the page for the next task in the process. A common example would be a call center application,
Chapter 2. Overview of Human-Centric BPM 31

where the agent who answers the telephone may remain with the caller through a number of different business processes or business transactions.
This is an useful function, but there are points for consideration when employing this approach. These can include ramifications in the areas of audit and fraud within an enterprise. Many processes actually have the opposite requirement, which is that a number of different people are involved in any given business process to avoid such issues.
Improved task assignment/allocation Improvements have been made in the area of support for the group entity. The administrator can now construct a query that allows her to transfer work items, based on the results returned. This provides for much more efficient management of large groups of users.
Also, we can now allocate work to a group, but while specifying without named members of the group. This is useful for supporting the four eye principle (which is in fact the opposite requirement to the server controlled page flow mentioned previously). In this case we are ensuring that the person who performed the first task cannot perform the second task.
Integration to content solutionsWithin WebSphere Integration Developer there is now the ability to add an Information Service activities to a business process. This allows integration to IBM Information Server or access to SQL databases. This means that we can combine critical enterprise process data and content information at run time. This gives us the ability to offer the user a more complete, and richer, picture at process execution time. There are many examples of where this combination of structured and unstructured information is useful. They include:
� Insurance - claims� Automotive - configuration and ordering� Government - social security and benefits� Retail - new product introduction, catalog production
This approach enables us to maximize our document store and unstructured content within the enterprise, but architecturally we are able to maintain our adherence to the process-centric model and SOA.
Task suspension and resumptionThere are times within a business process when the task owner just cannot complete the task. This can happen because the user just does not have the information necessary to complete the task at that time. Additionally, it could be that we are waiting for a response back from someone, for example, a letter of acceptance or identification documents, before we can finally complete the task.
32 Human-Centric Business Process Management with WebSphere Process Server V6

We now have the capability to suspend a task and return to it later. Importantly, we can also schedule the task to be resumed at a time specified when we performed the suspend function. This offers support for the callback model, where the onus is on us as a business to call the customer back after an agreed period of time.
Binary attachments With WebSphere Process Server 6.0.2 it is now possible to add a binary attachment to a human task. This is achieved via an API call.
API eventsAn API event is triggered whenever a human task is modified or when the state of the task changes. The API event is invoked before the task is modified and before the API call returns. These are known as:
� Post event � Pre event
Custom notificationNotifications are a critical part of the human task escalation mechanisms around a task and its associated timings for completion. There are standard notifications that can be generated by the human task manager. These are notifications via the worklist or via e-mail.
With V6.0.2 you can create your own custom notification event handlers, so allowing you to use your own notification method.
2.6.3 Summary
In this chapter we introduced Business Process Management and the IBM solution. We also briefly covered some of the more relevant standards around BPM and the more prevalent methodologies. This was followed by a summary of the new functionality available with WebSphere Process Server 6.0.2 in the area of human tasks.
Chapter 2. Overview of Human-Centric BPM 33

34 Human-Centric Business Process Management with WebSphere Process Server V6

Chapter 3. Business scenario used within this book
This chapter describes the business scenario that we use in this book to demonstrate how to develop a human-centric business process and how to interact with human-centric processes using different types of clients.
Within this chapter the different roles that are involved in the hiring scenario, the organizational structure, the business items used within the process, and the business process itself are described. Thereafter an overview is given about the different ways of interaction using different client technologies and about the different human task features used within this book.
3
© Copyright IBM Corp. 2007. All rights reserved. 35

3.1 The human resources hiring scenario
This business scenario describes a fictitious company called ITSO Corp. Within ITSO Corp the human resources department is responsible for the hiring of prospective employees. In this scenario the focus is on the parts of the process that require a large amount of human interaction.
This section describes the roles of humans within ITSO Corp and interacting with ITSO Corp, the organizational structure within the company, and the business items used in the scenario.
3.1.1 Roles
A hiring process involves people that interact with the process in different roles. The following section gives a short overview of the roles of humans in the hiring scenario.
HR managerWithin ITSO Corp the HR manager Horace Marlin is responsible for the entire hiring process. Horace Marlin supervises several hiring specialists. Within the hiring process, the HR manager interviews applicants and is responsible for approving applicants applying for executive positions.
HR specialistHR specialists are responsible for processing job applications, except special applications that require the attention of a manager. The job of a hiring specialist includes the approval of regular applications and the communication with the applicant.
36 Human-Centric Business Process Management with WebSphere Process Server V6

ApplicantsAll people applying for a job at ITSO Corp take the role of an applicant. Applicants are required to provide a resumé. If an applicant passes the first interview with the division manager, an application form has to be provided.
Line managerA line manager is responsible for a certain department in the ITSO Corp department (for example, sales department). Whenever an job is vacant within the department of a line manager, the line manager can be involved in the job interviewing and hiring process. If an applicant gets hired, the line manager becomes the manager of the prospective employee.
Division managerA division manager supervises several line managers and is included in the interviewing and hiring process.
ITSO Corp administratorsThe ITSO Corp administrators are part of the IT department and are responsible for administering the IT landscape of ITSO Corp, which includes administrative tasks in the hiring process.
Chapter 3. Business scenario used within this book 37

3.1.2 Organizational structure
Figure 3-1 shows the organizational structure of ITSO Corp and the group of applicants that interact with ITSO Corp.
Figure 3-1 ITSO Corp organizational structure
Within the human resources department, there are several hiring specialists on the first level such as Harry Adams or Hilda Bratt. Harry Adams and his colleagues are managed by the hiring manager, Horace Marlin, on the second level.
Parallel to the hiring department there are several departments that are managed by a line manager (for example, Maggie Bartlett). Several line managers are supervised by the division manager, Michael Allan.
The last group of the ITSO Corp organizational chart is the administrator group, which is responsible for the IT systems of ITSO Corp.
Applicants applying for a job within ITSO Corp interact with the HR specialists and several other people within ITSO Corp.
HR Department
HR Specialists• Harry Adams• Hilda Bratt• Harriet Cork• Herbert Dodds
AdministratorsHR Manager• Horace Marlin
Line managers• Maggie Bartlett• Mary Clifton• Milicent Digweed
ITSO Corp CEO
Applicants
Division Manager• Michael Allen
38 Human-Centric Business Process Management with WebSphere Process Server V6

3.1.3 Business items
Within the hiring scenario several business items are used that provide the required data and information to the process and to the humans interacting with the process.
ApplicantThe applicant business item contains all required information about an applicant including his first and last name, address, social security number, telephone number, and date of birth.
JobThe job business item contains information such as the salary associated with a concrete job, the job position (for example, accounts division manager), and the job type. The job type tells you whether a job position is an executive or a regular position.
DocumentationThe documentation business item contains all documents and document references of an employee or applicant (for example, resumé, reference).
ApplicationThe application business item is a container comprising the applicant, job, and documentation business items. In addition, it contains information about approvals within ITSO Corp. If an application is processed by ITSO Corp, then one or more people have to approve the hiring of an applicant.
3.2 The HR hiring business process
The following section describes the overall human resource hiring scenario consisting of the interviewing and the hiring process. The interviewing process is not assembled in this book. To demonstrate the Human-Centric BPM aspects and possibilities, the hiring process is used.
In the following sections the interviewing and the hiring process are explained using diagrams that have been created using WebSphere Business Modeler.
Note: The creation and posting of job advertisements is not part of this scenario. Therefore, it is assumed that ITSO Corp already posted a job advertisement on the Internet.
Chapter 3. Business scenario used within this book 39

3.2.1 The interviewing process
The interviewing process covers all activities starting from receiving an application to the actual job interview. Figure 3-2 shows the first part of the interviewing process.
Figure 3-2 Business scenario - interviewing process part 1
Once the application arrives at the ITSO Corp Human Resources department, an HR specialist has to check the applicant’s resumé and decide whether the applicant should be invited to a job interview.
Assuming that the resumé of an applicant is interesting and appropriate, the HR specialist sends an invitation for a job interview to the applicant that can either be accepted or refused.
If the applicant accepts the invitation, the ITSO Corp division manager interviews the applicant and decides afterwards whether the applicant should be hired.
Figure 3-3 shows the second part of the interviewing process.
Figure 3-3 Business scenario - interviewing process part 2
1
1
2
5
3
4
40 Human-Centric Business Process Management with WebSphere Process Server V6

In Figure 3-3 on page 40 you can see that the hiring process is a sub-process of the interviewing process and is included in the interviewing process as a component.
The HR specialist sends a rejection letter to the applicant if the:
� The HR specialist decides based on the applicant’s resumé that he does not fit the requirements for a job interview (1).
� The HR manager decides that he does not want to hire the applicant based on the job interview (2).
The process finishes:
� If the applicant does not accept the invitation for a job interview (3).
� After sending a rejection letter to the applicant (4).
� After accomplishing the hiring process (see “The hiring process” on page 41) (5).
3.2.2 The hiring process
The hiring process covers the approvals for an applicant performed by the ITSO Corp human resource department, the mailing of offer and rejection letters, and the creation of employee records.
Figure 3-4 shows the first part of the hiring process.
Figure 3-4 Business scenario - hiring process part 1
Note: It is assumed that the applicant’s resumé is already in the system. The hiring process is triggered by the transmission of the application that an applicant has to fill out if he passed the interviewing process. The application could be transmitted using e-mail, a Web form, a letter, and so forth.
1
2
Chapter 3. Business scenario used within this book 41

When an application arrives, the first action is the checking of the grade of the application. Based on the result of this check either an approval for an executive application or an approval for a regular application is required. The executive approval has to be performed by the HR manager of ITSO Corp, whereas the approval for a regular application is performed by two different HR specialists (four-eye check).
An offer letter is sent to the applicant if:
� The HR manager approved an executive application (1).� Two different HR specialists approved a regular application (2).
The second part of the hiring process is shown in Figure 3-5.
Figure 3-5 Business scenario - hiring process part 2
A rejection letter is sent to the applicant if:
� The HR manager rejects an executive application (3).� The first HR specialist rejects a regular application (4).� The second HR specialist rejects a regular application (3).
Note: In Figure 3-4 no roles appear for the tasks approve application and four eye approval. The reason for this is that approve application and four eye approval are modelled as inline human tasks, whereas approve executive application is modelled as a standalone human task.
3
4
42 Human-Centric Business Process Management with WebSphere Process Server V6

The last part of the hiring process is shown in Figure 3-6.
Figure 3-6 Business scenario - hiring process part 3
If an applicant accepts an offer letter, a new employee record is created in the IT system of ITSO Corp.
The hiring process finishes, when:
� An applicant accepts an offer letter and an employee record has been created (5).
� An applicant declines an offer letter (6).
� A rejection letter is sent to an applicant after the hiring manager, the first HR specialist, or the second HR specialist does not approve the application (7).
3.3 Human interaction in the HR hiring scenario
The hiring process as part of the HR hiring scenario requires a high degree of human interaction. Therefore, this process is used throughout the book for demonstrating the human-related capabilities of the WebSphere Process Server.
Different clients and technologies are used to demonstrate the interaction between people and business processes. The different clients provide a variety of interaction possibilities for humans with the business process and allow the fulfillment of human tasks.
4
6
5
Chapter 3. Business scenario used within this book 43

Figure 3-7 gives an overview of the different client technologies that are used by people to interact with the hiring process.
Figure 3-7 Clients interacting with the hiring process
Each client uses some features of human tasks within the WebSphere Process Server. The human task features that are demonstrated in this book are:
� Ad-hoc tasks– Sub tasks– Follow-on tasks
� Escalation� Using different people for different tasks (four-eye principle)� Suspension and resumption of tasks� Custom e-mail notifications� Post-processing staff queries� API events� Generation of JSP clients� Notifications
J2EE Web Services
Client
.NET Web Services
Client
Hiring Process
Workplace Forms
WebSphere Portal
44 Human-Centric Business Process Management with WebSphere Process Server V6

Part 2 Implementing Human-Centric BPM
Part 2
© Copyright IBM Corp. 2007. All rights reserved. 45

46 Human-Centric Business Process Management with WebSphere Process Server V6

Chapter 4. WebSphere Business Modeler
This chapter provides an overview of the capabilities provided by WebSphere Business Modeler.
The practical part of this chapter focuses on the approach to modelling for human tasks, within the context of the HR Hiring business scenario, described in Chapter 3, “Business scenario used within this book” on page 35.
It is assumed that the ITSO Corp has been through a process improvement exercise. The HR Hiring process we model is the to-be process, arrived at by following a methodical approach to improvement or redesign.
4
© Copyright IBM Corp. 2007. All rights reserved. 47

4.1 Modeling for Human-Centric BPM
We introduce WebSphere Business Modeler in this section along with the business process we use as an example throughout this chapter.
All the key facets of WebSphere Business Modeler are described and this section primarily focuses on the modelling of human tasks within a business process
4.1.1 Overview of WebSphere Business Modeler features
The following section covers process modelling and highlights the artifacts captured in WebSphere Business Modeler.
Process modelingWebSphere Business Modeler facilitates the creation of visually composed business process models by dragging elements you need onto a modeling palette. A process flow is a sequence of tasks and decision elements with multiple branches, linked by connectors. A process can also contain other processes.
48 Human-Centric Business Process Management with WebSphere Process Server V6

WebSphere Business Modeler offers you the option of modeling your processes either in free-form or swimlane layout. The swimlane layout arranges elements in rows according to characteristics that you specify, such as organization unit, location, resource definition, classifier, or roles, as shown in Figure 4-1. The swimlane layout is an excellent way of engaging the line of business.
Figure 4-1 WebSphere Business Modeler - process diagram - Swimlane layout
Business item modelingProcess models can include any business document, work product, or commodity that is used for a particular business operation. You can model as a business item anything that is created, assembled, inspected, tested, modified, or worked on. Business items can also undergo changes as they are passed from one step to the next in your process models. For example, a job application could be specified as received, in progress, verified, and finally closed as it is passed from task to task in a particular process model.
Resource modelingUsing WebSphere Business Modeler, you can model each of your company’s resources, such as employees, computers, vehicles, or electricity. Any person, equipment, or material used to perform a task or a project can be represented and used in your process models. Depending on the level of complexity you require in your process models, you can also specify roles, costs, and timetables for your resources.
Chapter 4. WebSphere Business Modeler 49

Organization modelingAn organization is an entity where people cooperate to accomplish specified objectives. For example, an organization can be an enterprise, a company, or a factory. A typical company consists of one or more organizations. The larger the company, the more organizations it normally has. With WebSphere Business Modeler, you can model any identifiable organization within your business, such as companies, divisions, or departments. You can also save your organization definitions within a project in order to reuse and revise them as your organizations evolve.
Structure modelingStructures define the relationships between different entities in an organization. Using WebSphere Business Modeler, you can build structures to show how different types of business entities interact with one another in relationships of varying complexity, and allow for different relationships among the same divisions in the same company. For example, an HR department might occupy a
50 Human-Centric Business Process Management with WebSphere Process Server V6

certain position in a company’s organizational chart yet receive funding from one or more different departments in the company’s financial hierarchy. By modeling structures, you can define and illustrate these multiple and varied relationships in your company. See the ITSO Corp organization chart in Figure 4-2.
Figure 4-2 ITSO Corp - organizational structure
Business servicesWebSphere Business Modeler can import business services and business service objects that are defined in a WebSphere Service Registry and Repository server (described further in Chapter 11, “Related technologies” on page 727).
After you have imported the business services and business service objects, you can use them as part of your process-modeling exercise.
� Business services
WebSphere Business Modeler representations of WSDL (Web Services Definition Language) files
� Business service objects
WebSphere Business Modeler element representations of XSD (XML schema) files
Chapter 4. WebSphere Business Modeler 51

WebSphere Business Modeler can import both types of files so that you can add the information they contain to the processes you are modelling.
Very often when you are modeling a process, you encounter services and business objects that have already been implemented. Instead of modeling a representation of these elements, you can import their WSDL or XSD definitions. For simulations, you can modify these elements to add information such as costs, durations, interrupts, and resources.
AnalysisWebSphere Business Modeler provides static analysis and dynamic analysis functions that you can use to extract targeted information from one or more elements in your modeling project.
Static analysis can be performed against the contents of your WebSphere Business Modeler project, and there are many reports supplied. You perform dynamic analysis against the results of your simulation runs.
You can perform the following analyses:
� Resource roles analysis displays a list of resources and shows the associated roles for each resource.
� Type hierarchy analysis displays all occurrences of a specified organization definition within a set of structure definitions.
� Type instance matching analysis displays a specified type, such as a location definition or a business item, and all the instances (locations or business item instances) based on this type.
� Activity throughput analysis displays the productivity per time unit of activities in a process.
� Dynamic analysis provides information about the results of one or more process simulations based on specified attributes for a particular simulation profile. There are more than 20 types of dynamic analysis.
� Comparative analysis can be performed on the results of two different simulated process results. Typically, you compare the as-is process model to the to-be process model that you want to implement.
� Activity cost analysis displays the average costs for activity instances including the average revenue, execution cost, idle cost, allocated resource cost, total cost, and profit.
� Process instance resource allocation analysis displays the resources that are allocated per task instance, the allocation duration, the resource shortage, and resource costs.
52 Human-Centric Business Process Management with WebSphere Process Server V6

� Based on process cases, process cost analysis displays the average revenue, average execution cost, average idle cost, average allocated resources cost, and average profit for the process instances that match each case.
� Process cost comparison analysis displays process costs for two processes.
Process simulationProcess simulation provides a powerful animated method for analyzing a process by dynamically generating jobs and inputs that travel through one of the possible paths of the process model. Simulation output provides detailed information regarding resource utilization levels, as well as cost and cycle time calculations.
Simulation enables organizations to examine how a process will perform in response to variations of inputs to the process, just as in a real-life work environment. Simulation also provides the ability to vary process input volume over time by adjusting resources and current allocations. Simulation output provides detailed information regarding resource utilization levels and the results of cost and cycle-time calculations.
When you have completed modeling a business process, you can use WebSphere Business Modeler to simulate the running of the process. Simulation enables you to assess the performance of the process, generate statistics, and pinpoint potential areas of improvement. When you make changes to a process or to other model elements (such as available resources), you can then run a new simulation and perform a comparative analysis of the before and after simulation results to quantify the effects of the changes that you made. By doing this, you can assess the costs and benefits of making changes to your business processes.
ReportsWebSphere Business Modeler provides features to generate reports on a wide range of process data. Reports summarize different aspects of your business processes and you can easily include your data in spreadsheets, presentations, or print-outs. Available reports include:
� Weighted average reports � Simulation reports � Documentation reports � Procedure reports � Analysis reports
Chapter 4. WebSphere Business Modeler 53

Importing and exportingWebSphere Business Modeler provides wizards for importing existing models and definitions, and exporting models that you create for use with other applications and workflow runtime environments.
4.1.2 Basic business modeling and modeling modes
The vision of how a process should be captured and modeled tends to generate interesting discussion about how the process diagram is best represented. There are several roles involved, including line of business user, business analyst, architect, and application developer. Depending on available information, business analysts can model processes at a very high level of abstraction or at a very granular level in order to visually depict all of the steps that are required to perform a particular business process.
In contrast, technical resources tend to view a process in terms of what input and output both processes and tasks require, what services will be required, and what degree of human or application involvement is required to address a specific business requirement or an entire application. In order to satisfy different approaches to modeling business processes, WebSphere Business Modeler provides several different modeling modes. The mode you choose determines the level of detail you see in diagrams, dialogs, and wizards.
The mode used for this particular exercise is the WebSphere Process Server mode, which we describe here. For further information about all available modes please see Patterns: SOA Foundation - Business Process Management Scenario, SG24-7234.
This mode facilitates the work of technically experienced personnel who prepare models that will be used as the basis for general software application development. This mode is suited for resources working as a solution architect or IT architect.
The WebSphere Process Server mode applies a set of validation rules to the Advanced Business Modeling mode to support exporting the model into SCA, BPEL, WSDL, and XSD artifacts. The exported files are imported into WebSphere Integration Developer, where an implementation of the process can be assembled. The validation rules constrain the model to only elements and concepts supported by WebSphere Process Server V6.
Note: If you plan to use WebSphere Process Server as the runtime platform for models developed in WebSphere Business Modeler, you should begin modeling in this mode. This will avoid errors and lessen modeling effort.
54 Human-Centric Business Process Management with WebSphere Process Server V6

4.1.3 Modeling for execution and monitoring
WebSphere Business Modeler is a process-modeling tool for business process management, analysis, detailed reporting, and workflow integration. This section focuses on business modeling elements and their transformation into Web Services Business Process Execution Language (WS-BPEL) constructs that enable integration developers to implement the process for assembly in WebSphere Integration Developer and deployment in WebSphere Process Server.
Understanding the different modeling elements and their translation is an important step to ultimately understanding what elements are eligible candidates for modeling a WS-BPEL process. WebSphere Business Modeler provides an extensive variety of modeling elements and artifacts that are not supported in WebSphere Integration Developer. Further, to start modeling with WS-BPEL transformation in mind will limit the necessary rework efforts in WebSphere Integration Developer.
Artifacts generated after exportExporting a project, or specific elements of a particular project or catalog, in WebSphere Process Server (BPEL, WSDL, XSD, SCA) format produces several different artifacts and files. Each of these artifacts contains pertinent data that can be used collectively in a WS-BPEL process to define data inputs and outputs, service invocations using partner links, and control flow.
Process mappingA WebSphere Business Modeler process maps to a Business Process Execution Language (WS-BPEL) process and a top-level flow activity. The input and output criteria defined for a WebSphere Business Modeler process represent the entry and exit point of the process in WebSphere Integration Developer. The type of WS-BPEL activities that are generated to represent the input and output criteria depend on the type of operation set for the process in the technical attributes. The export supports two types of WS-BPEL operations:
� The request/response operation expects a request message and returns a response message back to the caller.
The generated WS-BPEL process might not be optimal.WS-BPEL processes, modeled in WebSphere Business Modeler, are designed to preserve the overall control flow, transition logic, and data (process and task level). As a result, the generated WS-BPEL is not intended to be fully optimized and requires refinement changes in WebSphere Integration Developer.
Chapter 4. WebSphere Business Modeler 55

� The one-way operation expects a request message but either has no response message or uses a callback-type response message.
Human task generationTasks are the basic building blocks representing activities in a process model. Each task performs some function. Visually, a task represents the lowest level of work you can portray in a process.
Tasks are atomic actions, meaning that they cannot be broken down any further, in contrast to processes, which may be decomposed into another flow.
A human task is, quite simply, a unit of work completed by a human. Quite often, this task involves the interaction with other services, and so becomes a task within a larger business goal.
The export generates two types of human tasks: an inline task or a human task component for the Human Task Manager (HTM), which is an SCA component that has the implementation type of human task.
To export as an inline task, in WebSphere Business Modeler the task must have a role requirement or an individual resource requirement. The requirement must use the predefined person or staff resource templates or a definition based on one of those templates.
To export as a human task component, the implementation type must be set to human task in the Technical Attributes view.
Technical attributesWebSphere Business Modeler provides technical attributes views to specify technical implementation details, which are used to implement a process, global task, or service in WebSphere Process Server. Solution architects or IT specialists can specify the details to reduce the refinement effort in WebSphere Integration Developer. The technical attributes enable you to specify the values used in the export in place of the generated default values.
You can specify different target namespaces, process names, and whether the process should be a persistent long-running flow or runs as a subprocess (child). On the interface level you define WSDL interface information, such as the namespace and the portType name. The Request/Response window enables you to define the type of operation, such as request response or one-way. On task level, the technical attributes let you select the component you want to use in WebSphere Integration Developer to implement the task.
56 Human-Centric Business Process Management with WebSphere Process Server V6

SCA component generationExporting a process from WebSphere Business Modeler generates an SCA component for each process, global task, local task, and service element that is not generated as an inline task. The generated component contains component references to create the component wiring information displayed in the Assembly Editor in WebSphere Integration Developer.
The technical attributes define a set of component properties including the implementation type of the component. The implementation type can be:
� State machine� Rule group� Human task� Java™� Process� Import - Web Service binding� Import - SCA binding� Import - JMS binding
If the technical attributes specify an implementation type, the export generates the default implementation based on the implementation type. The default implementation provides a starting point to implement the component. For a WebSphere Business Modeler process, the implementation type is always process.
In addition to generating components, the export also generates an SCA export for the global elements (process, global task, and service) because these elements are visible and may be used by other processes. This action ensures that the SCA components representing the global elements are visible between modules and that they can access each other.
4.2 Modeling the business scenario
Here we briefly describe the activities that make up the hiring process, introduced in 3.2.2, “The hiring process” on page 41.
We then move into details of the modeling artifacts and their associated attributes, as modeled in WebSphere Business Modeler.
If you are unfamiliar with WebSphere Business Modeler and the basic modelling skills, refer to Business Process Management: Modeling through Monitoring Using WebSphere V6.0.2 Products, SG24-7148.
Chapter 4. WebSphere Business Modeler 57

4.2.1 The hiring process
The hiring process for ITSO Corp will be modeled using the following activities:
� Process start.
A person applying for a job completes and submits a job application to ITSO Corp.
� Check grade.
The first activity in the process checks the grade for the position applied for. The check grade activity invokes a business rule. This rule determines, based on the position applied for and the salary, whether this particular job application is for an executive or for a non executive position.
� Executive position?
Here we make our split decision. This decision checks a marker field that is set by the check grade business rule.
� Approve standard application.
If it is decided that it is a non executive application, the application then moves onto the HR specialists group for the first application approval activity.
� First approval?
If the HR specialist approves the job application, the job application then moves on to another HR specialist in the group for a second approval activity.
� Four-eye approval.
An HR specialist, but not the same one that performed approve standard application, performs the second, or four-eye, approval.
� Offer job?
If the HR specialist rejects the job application, at the four-eye approval stage, the next activity will be the send rejection activity.
� Approve executive application.
If it is an executive job application the approval activity is performed by a division manager instead of an HR specialist.
If the job application is accepted by the division manager we move on to the send offer activity. No second or four-eye approval is required.
If the job application is rejected we move to the send rejection activity.
� Send offer.
The send offer activity allows us to send an offer out to the job applicant and await their response to the offer.
58 Human-Centric Business Process Management with WebSphere Process Server V6

� Create Employee records.
If the applicant accepts the job offer, we move on to the final activity for this process case, or path, and we create the new employee’s payroll record. If the applicant does not accept the job offer, the process finishes.
� Send rejection.
The send rejection is an activity that can reached by a number of paths, if at any time the job application is rejected.
� Process stop.
Here the hiring process finishes.
We are assuming that the analysis work has been completed and that the model we are implementing, a revised hiring process, has been understood, agreed upon, and communicated to all stakeholders.
4.2.2 Importing supplied hiring process into WebSphere Business Modeler
Listed below are the detailed steps for the importing of the hiring process model. You can import models or definitions from several different formats into WebSphere Business Modeler Version 6.0.2.
Note: For detailed instructions on how to create each of the elements described in following sections, refer to the help documentation included with WebSphere Business Modeler:
http://publib.boulder.ibm.com/infocenter/dmndhelp/v6rxmx/index.jsp
Chapter 4. WebSphere Business Modeler 59

Supported import formats are shown in Figure 4-3.
Figure 4-3 WebSphere Business Modeler - import
We import the hiring process that has already been modeled for you and exported as a WebSphere Business Modeler project .mar file.
The WebSphere Business Modeler project .mar file can be found in the sample code available with this book (see Appendix A, “Additional material” on page 739).
To import the .mar file, complete the following steps:
1. In the project tree, right-click and select Import. The Import wizard appears.
60 Human-Centric Business Process Management with WebSphere Process Server V6

2. Select WebSphere Business Modeler project and click Next (Figure 4-4).
Figure 4-4 Select WebSphere Business Modeler import option
Chapter 4. WebSphere Business Modeler 61

3. Click Browse to select the source directory that contains the file that you want to import (Figure 4-5).
Figure 4-5 Importing the model - source and destination
4. In the Files list, select the .mar file containing the project or element that you want to import. Select the HR Hiring .mar file.
5. Optionally select Overwrite existing elements to replace any of the elements with the same name as an element being imported. Otherwise, you will be warned when an element is about to be overwritten.
62 Human-Centric Business Process Management with WebSphere Process Server V6

6. In the Target project field, select an existing project from the drop-down list or click New to create a new project HR Hiring.
7. Click Next. Select the default Free-Form Layout, then click Finish.
8. The project is created and its name filled into the dialog. Click Finish to import the .mar file.
9. If there are any errors or warnings during the import process, click Details to read them.
The project files have been imported into the project you specified. The Project Tree view of the project is shown in Figure 4-6.
Figure 4-6 WebSphere Business Modeler - Project Tree
The following section describes the artifacts that make up the process.
Note: If you choose to overwrite a catalog, be aware that the entire catalog and all of its contents will be deleted and the contents of the new catalog will be imported instead.
Chapter 4. WebSphere Business Modeler 63

4.2.3 The Hiring process artifacts
The modeling diagram for the hiring process is shown in two parts in Figure 4-7 and Figure 4-8.
Figure 4-7 Hiring process - part 1
Figure 4-8 Hiring process - part 2
64 Human-Centric Business Process Management with WebSphere Process Server V6

Business itemsFor the hiring process example, the following business items are acted on in the process: Application (a composite business item that contains all of the information pertinent to the job application). The application business item is shown in Figure 4-9.
Figure 4-9 Application business item
Chapter 4. WebSphere Business Modeler 65

An Application is made up of:
� Applicant information (Figure 4-10)
– SSN - social security number– LastName - family name– FirstName - given name – MiddleInitial - initial – AptNo - apartment or house number– StreetAddress - street or road name– City - home town or city– State - mnemonic– ZipCode - zip code– HomePhone - home telephone number– DateOfBirth - date of birth
Figure 4-10 Applicant business item
66 Human-Centric Business Process Management with WebSphere Process Server V6

� Job information (Figure 4-11)
– Salary - expected salary for the position– Position - position or job – IsExecutive - marker for is this an executive position?
Figure 4-11 Job business item
� Document information (Figure 4-12)
– ContentID - reference to application content folder– Resume - reference to resume– Reference - reference to reference information– Signature - digital signature reference
Figure 4-12 Documentation business item
Chapter 4. WebSphere Business Modeler 67

� Additional decision markers (Figure 4-9 on page 65)
– FirstApproval - marker for first approval stage
– FinalApproval - marker for the final approval stage
– ApplicantAccept - marker for the acceptance of the position by the applicant
ResourcesAs part of our process documentation and analysis we need to document the resources used by that process. These include:
� Role� Resource� Timetable
Resources represent the people, equipment, or material used to perform a project or a task. Resources are represented by the following people roles in the hiring process:
� Division manager� HR manager� HR specialist � Line manager
The resources for the hiring project are shown in Figure 4-13.
Figure 4-13 Resources for the hiring project
68 Human-Centric Business Process Management with WebSphere Process Server V6

OrganizationsAdditionally, as part of our definition of the resources and organization that underpin our process we can define:
� Organization unit� Location � Structure
The organization model can be a very valuable and useful part of the process modelling stage. For our hiring process we have modelled a number of the organizational units and also the structure that they fit into. We have captured:
� ITSO Corp� Administrators� Division managers� HR managers� HR specialists� Line managers
The Organizations for the hiring project are shown in Figure 4-14.
Figure 4-14 Organizations for the hiring project
This has then allowed us to model the ITSO Corp organizational structure by dragging and dropping the organization units we modeled, onto the palette and wiring them together. See Figure 4-2 on page 51.
Note: The extensive import and export capability in WebSphere Business Modeler allows us to model artifacts once and then import them into new projects. This means that we can easily offer a ready populated WebSphere Business Modeler project to a new project team. The project could, for example, contain resources, organization, and business items.
Chapter 4. WebSphere Business Modeler 69

ProcessThis section discusses the construction of the process outlined in 4.2, “Modeling the business scenario” on page 57.
We consider the implementation of these activities within the hiring process. To aid us in our understanding, classifiers have been used to show the type of activity each task is.
We discuss each of the different implementation types here and explain the use in this scenario of the attributes under both the General and Technical Attributes tabs in WebSphere Business Modeler.
We can export files from WebSphere Business Modeler that can be imported into WebSphere Integration Developer to create an implementation for the WebSphere Process Server. We can select an entire project, a data catalog, a process catalog, a resource catalog, or an organization catalog with its contents, or a single process, global task, service, or business item. If you select a process, the process and any business items it references are also exported.
At this stage you should ensure that your WebSphere Business Modeler settings are set to a mode of WebSphere Process Server. This then shows us both the General tab and the Technical Attributes tab. It also ensures that the model is checked against the WebSphere Process Server prerequisites.
Mode can be set by clicking Modeling → Mode → WebSphere Process Server, as shown in Figure 4-15.
Figure 4-15 WebSphere Business Modeler - modes
From an implementation perspective we have to ensure that the parameters on the Technical Specification tab are set correctly for our hiring process. We set the following attributes (Figure 4-16 on page 71):
1. Set the operation type to One way operation to indicate that this process accepts a request message but does not return a response.
2. Set the operation name to Submit.
70 Human-Centric Business Process Management with WebSphere Process Server V6

Figure 4-16 Hiring process - Technical specification tab - Request
Check grade - business ruleA business rule is anything that captures and implements business policies and practices. A rule can enforce business policy, make a decision, or infer new data from existing data.
Note: Ensure that the operation name and input criteria name are not set to the same value, to avoid problems when exporting the model to WebSphere Process Server.
Chapter 4. WebSphere Business Modeler 71

The determine job grade business rule is shown in Figure 4-17.
Figure 4-17 Determine job grade business rule
We implement the task check grade for automatic evaluation as a rule group: For the check grade (business rule) we have simply completed the basic information — enough for us to document the rule in WebSphere Business Modeler and to allow the export to generate a skeleton SCA component in WebSphere Integration Developer for the rule group. The Word documentation of the business rule is attached to the hiring process in WebSphere Business Modeler. This means that any associated documentation is kept with the model and also published with the model if we are using WebSphere Business Modeler Publishing Server.
72 Human-Centric Business Process Management with WebSphere Process Server V6

See the documentation attached to the hiring process Specification tab in Figure 4-18.
Figure 4-18 Hiring process - attached documentation
Chapter 4. WebSphere Business Modeler 73

This means that we completed the following tabs within Attributes:
� General - Name & Description
The Check Grade, Attributes - General tab is shown in Figure 4-19.
Figure 4-19 Check Grade - Attributes - General tab
� Inputs
The Check Grade, Attributes - Inputs tab is shown in Figure 4-20.
Figure 4-20 Check Grade - Attributes - Inputs tab
74 Human-Centric Business Process Management with WebSphere Process Server V6

� Outputs
The Check Grade, Attributes - Outputs tab is shown in Figure 4-21.
Figure 4-21 Check Grade - Attributes - Outputs tab
� Classifier
The Check Grade, Attributes - Classifier tab is shown in Figure 4-22.
Figure 4-22 Check Grade - Attributes - Classifier
Chapter 4. WebSphere Business Modeler 75

Additionally, we completed the following tabs within the Technical Attributes View: The Check Grade, Technical Attributes View - Implementation tab, as shown in Figure 4-23.
Figure 4-23 Check Grade - Technical Attributes View - Implementation
Executive position? - decisionA decision routes inputs to one of several alternative outgoing paths. You can think of a decision as a question that determines the exact set of activities to perform during the execution of a process.
Decisions are flow control constructs rather than activities like tasks or processes. They have no costs or duration, and are used to show alternate paths from a preceding activity.
There are two types of decisions: simple decisions and multiple-choice decisions. In our process we use simple decisions.
A simple decision has one incoming branch with one input, and two outgoing branches with one output each. When the process is running, the process flow takes one outgoing branch if a certain condition is true, and the other branch if the same condition is false. The decision selects the outcome based on the incoming data.
The decision criteria, interrogating the result from the business rule invocation in check grade, is defined in Attributes → Output branches.
76 Human-Centric Business Process Management with WebSphere Process Server V6

The Executive Position?, Attributes - Output branches tab is shown in Figure 4-24.
Figure 4-24 Executive Position? - Attributes - Output branches
Note: We use a binary decision artifact for executive position, as shown in Figure 4-24 on page 77. We enter the criteria for the yes branch. As it as binary decision, WebSphere Business Modeler generates the no branch decision criteria for us automatically.
Chapter 4. WebSphere Business Modeler 77

Approve standard application - human task (inline)From a WebSphere Process Server (BPEL) perspective there are two types of human tasks: an inline task and a human task component for Human Task Manager (HTM), which is an SCA component that has the implementation type of human task.
� To export as an inline task, in WebSphere Business Modeler the task must have a role requirement or an individual resource requirement. The requirement must use the predefined person or staff resource templates or a definition based on one of those templates. For a role requirement of a task, the type must be specified as the predefined person or staff, or a resource definition based on the person or staff template.
� To export as a human task component, the implementation type must be set to human task in the technical attributes.
The approve standard application task is an example of an inline human task.
We completed the following tabs within the Attributes section:
� General
The Approve Standard Application - General tab is shown in Figure 4-25.
Figure 4-25 Approve Standard Application - General tab
78 Human-Centric Business Process Management with WebSphere Process Server V6

� Inputs
The Approve Standard Application - Inputs tab is shown in Figure 4-26.
Figure 4-26 Approve Standard Application - Inputs tab
� Outputs
The Approve Standard Application - Outputs tab is shown in Figure 4-27.
Figure 4-27 Approve Standard Application - Outputs tab
Chapter 4. WebSphere Business Modeler 79

� Resources
The Approve Standard Application - Resources tab is shown in Figure 4-28.
Figure 4-28 Approve Standard Application - Resources tab
� Classifier
The Approve Standard Application - Classifier tab is shown in Figure 4-29.
Figure 4-29 Approve Standard Application - Classifier tab
First approval? - decisionThe first approval decision is much the same as the executive position, apart from the decision criteria checking the FirstApproval marker.
80 Human-Centric Business Process Management with WebSphere Process Server V6

The First Approval? - Output branches tab is shown in Figure 4-30.
Figure 4-30 First Approval? - Output branches tab
Four-eye approval - human task (inline)The four-eye approval human task is exactly the same as the approve standard application (inline) human task.
Chapter 4. WebSphere Business Modeler 81

The Four Eye Approval - Resources tab is shown in Figure 4-31.
Figure 4-31 Four Eye Approval - Resources tab
Offer job? - decisionThe offer job decision is also much the same as the executive position, apart from the decision criteria checking the FinalApproval marker.
Note: In WebSphere Integration Developer this criteria is amended to the verb group members without named users. This ensures that we do not select the same HR specialist who completed the approve standard application activity.
82 Human-Centric Business Process Management with WebSphere Process Server V6

The Offer Job? - Output branches tab is shown in Figure 4-32.
Figure 4-32 Offer Job? - Attributes - output branches
Approve executive application - human task (SCA)The approve executive application task is an example of a human task with an SCA implementation.
The tabs that are completed differently for the SCA human task are in the Attributes tab, Resources, which for an SCA implementation is not applicable. However, we have completed the role requirement information, as we need this information for documentation, simulation, and analysis reasons.
Chapter 4. WebSphere Business Modeler 83

The Approve Executive Application, Attributes - Resources tab is shown in Figure 4-33.
Figure 4-33 Approve Executive Application - Attributes - Resources
We have also completed the Technical Attributes view, Implementation tab, in which we specify that it is a human task implementation.
The Approve Executive Application, Technical Attributes View - Implementation tab, is shown in Figure 4-34.
Figure 4-34 Approve Executive Application - Technical Attributes view - Implementation
84 Human-Centric Business Process Management with WebSphere Process Server V6

Send offer - SCAThe send offer task is implemented as an SCA component. The implementation attribute is set to Import - SCA binding.
The Send Offer, Technical Attributes View - Implementation tab, is shown in Figure 4-35.
Figure 4-35 Send Offer - Technical Attributes View - Implementation tab
Create employee records - SCAThe create employee records task is implemented as an SCA component. The implementation attribute is set to Import - SCA binding.
Note: If the Technical Attributes View tab is not visible, ensure that:
� You are in WebSphere Process Server mode.� You are highlighting the appropriate task.
If it is still not visible, toggle to another mode, then back to WebSphere Process Server mode. The Technical Attributes View should now be visible.
Chapter 4. WebSphere Business Modeler 85

Send rejection - SCAThe send rejection task is implemented as an SCA component. The implementation attribute is set to Import - SCA binding.
Other modelling artifacts usedOther modelling artifacts used are:
� Merge
Merge combines multiple processing paths, recombining alternative flows back into a single flow. Merges have multiple incoming branches and one outgoing branch and are used to recombine separate paths in a process flow. A merge is normally used after an exclusive decision. It runs whenever one of its incoming branches is satisfied. As soon as an input is received at a merge, it is immediately sent out as output.
� Connections
A connection is a link between two elements. Connections can be used to specify the chronological sequence of activities in a process. Each task, subprocess, decision, or other element passes control to the next task or element along a connection. You can also associate business items with connections to pass data from element to element. Each connection can only have one associated business item, but you can use multiple connections if you need to pass multiple business items between two elements.
� Stop
A stop node denotes the end of the process. Every process, subprocess, and loop must have a minimum of one stop node. When a flow reaches a stop node while the process is running, all flows in the process stop.
ClassifiersWith WebSphere Business Modeler we can classify process elements. We can create classifiers and then specify classifier values within those classifiers. There are predefined classifiers supplied with the tool:
� Quality control� Value added� Workflow
You can also associate colors with the classifier values and then swim lane or label the process elements in the diagram based on their classifier values.
86 Human-Centric Business Process Management with WebSphere Process Server V6

This is an excellent way of extending the information you can collect with WebSphere Business Modeler. The classifier can be used to collect any information you feel appropriate for your process, that cannot be collected appropriately elsewhere in the meta model. Examples we have seen used include:
� Soft skills� Regulatory compliance numbers� Associated form references
For the hiring process we have set up a classifier called task type and have specified three possible classifier values:
� Business rule� Human task� SCA
The hiring process classifier of task type is shown in Figure 4-36.
Figure 4-36 Hiring process - classifier of task type
Chapter 4. WebSphere Business Modeler 87

This allows us to color by the task type if required and show the classifier values as labels as well. The hiring process, swimlane, color, and label by task type are shown in Figure 4-37.
Figure 4-37 Hiring process - swimlane, color, and label by task type
4.3 Export process for WebSphere Integration Developer
When a process has been built in WebSphere Business Modeler, it can be exported, ready to be imported into WebSphere Integration Developer.
88 Human-Centric Business Process Management with WebSphere Process Server V6

4.3.1 Exporting the model for WebSphere Integration Developer
To export the model as BPEL perform these steps:
1. Select the HR Hiring project and select Export.
2. Select the type of export as WebSphere Process Server (Figure 4-38).
Figure 4-38 Export - Select format
Now we define exactly how we want to export the process.
3. If you specify a module or library project, the export process creates a folder that contains all of the project's file.
4. If you further specify a project interchange name, the export packages the folder into a ZIP file. The result will be a ZIP file in interchange format that can be imported into WebSphere Integration Developer as it is.
5. If you do not specify a module or library, the export process creates a set of folders with BPEL and WSDL files for the exported processes and XSD files for the business items used within the processes. The files are placed into sub folders based on the catalog hierarchy of the process and business items.
Restriction: If you have processes with errors in (in WebSphere Process Server modeling mode) you cannot export them. In this case you have to export selected elements (processes) that are free of errors.
Chapter 4. WebSphere Business Modeler 89

The WebSphere Business Modeler Export destination and source are shown in Figure 4-39.
Figure 4-39 Export - destination and source
6. Click Finish to export the process.
90 Human-Centric Business Process Management with WebSphere Process Server V6

4.3.2 Exported file and content
The exported project interchange file (HRPif.zip) contains all of the elements required for WebSphere Integration Developer. Inside the zip file, you find BPEL and WSDL files organized by process folders.
� There is one .bpel file for the business process.
� For each activity implemented with an Import - SCA Binding there is a .import and a .wsdl file.
� For the rule group activity there is a .brg, .brgt, .wsdl, and .component file. These files define that the component must be implemented using a business rule.
� For the SCA human task there is a .tel, component, and .wsdl file. This file defines the component as an SCA human task.
� For the two inline human tasks there are an .itel and a .wsdl file.
Notes:
� All spaces and special characters are removed from the generated names.
� The numbered suffixes may be different in your case. The numbers change when you copy or rename a process.
� The Businessitems.xsd file contains all the business items used in the process.
Chapter 4. WebSphere Business Modeler 91

92 Human-Centric Business Process Management with WebSphere Process Server V6

Chapter 5. Using human tasks in WebSphere Process Server
In this chapter we discuss the use of human tasks within WebSphere Process Server. We discuss the configuration of WebSphere Process Server for human tasks, types of human tasks provided by WebSphere Process Server, the differences between them, and when you should make use of each of them.
The sample scenario we build in this chapter is based around the fictitious ITSO Corp hiring scenario, described in Chapter 3, “Business scenario used within this book” on page 35.
This chapter contains the following sections:
� Figure 5.1 on page 94� Overview: using human tasks with WebSphere Process Server� Which feature you use to solve which problem� Implementation plan� Configuring the infrastructure� Implementing the simple scenario (iteration 1)� Administering the simple scenario using the BPC Explorer
5
© Copyright IBM Corp. 2007. All rights reserved. 93

5.1 Prerequisites - what you need before reading this chapter
We have a number of prerequisites for this chapter, described in this section. You do not need to have all of them to use this chapter effectively. In fact, you can read it with only a high-level previous knowledge of the areas that we cover.
Our examples assume some level of familiarity with the products and technologies involved, especially in areas that are not directly within the scope of this book (for example, creating databases or the basics of using the Eclipse environment).
5.1.1 Knowledge prerequisites
To follow the development examples, we assume that you are familiar with the basic concepts of using WebSphere Integration Developer, such as creating and managing modules and libraries, using assembly diagrams, working with business objects and interfaces, modifying BPEL flows and activities, building and deploying projects.
To follow the configuration examples, we assume that you are familiar with installing and configuring WebSphere Process Server to the extent of installing the software, installing a database, configuring the database, configuring the business process container, and the human task manager container. We also assume that you are familiar with the basics of the administration console.
To follow the testing plans, we assume that you have some familiarity with the BPC Explorer, for example, starting a new process from a template and listing tasks assigned to a user.
Do not let a lack of knowledge of any particular area of the products keep you from using this book effectively. For example, many WebSphere integration developers do not have detailed knowledge of how to install and configure WebSphere Process Server. Similarly, system administrators may have little knowledge of BPEL process diagrams. We discuss each of the concepts separately, while relating them to the overall scenario.
94 Human-Centric Business Process Management with WebSphere Process Server V6

5.1.2 Software prerequisites
In this chapter, we use the products shown in Figure 5-1. You do not need the exact versions of all of the products, although a version of WebSphere Process Server at V6.0.2 or later is required to follow the examples of the new V6.0.2 features.
Figure 5-1 Products used in this chapter
WebSphere Business Modeler 6.0.2.1 iFix2The use of WebSphere Business Modeler is discussed in Chapter 4, “WebSphere Business Modeler” on page 47.
WebSphere Process Server V6.0.2.1You need an installed instance of WebSphere Process Server. The operating system can be any that is supported by the product. For this book we use Microsoft Windows® 2003 Server.
We use a standalone instance of WebSphere Process Server, not the integrated test environment version that is included with WebSphere Integration Developer. This is so that our environment more closely matches that which is found in real installations.
Our installation is not clustered for simplicity and does not implement any of the more advanced WebSphere Process Server topologies. Additionally, we do not use WebSphere Enterprise Service Bus (for simplicity). The examples in this
WebSphereProcess Server
6.0.2.1
WebSphereIntegrationDeveloper6.0.2 iFix5
DB2 UDB8.2 FP17
(Database)
Tivoli DirectoryServer 6.0
(LDAP)
Client Client Client Client
WebSphereBusinessModeler
6.0.2.1 iFix2
Chapter 5. Using human tasks in WebSphere Process Server 95

book should work on most topologies. For more information about topologies see Production Topologies for WebSphere Process Server and WebSphere ESB V6, SG24-7413.
WebSphere Integration Developer V6.0.2 iFix5You need an installed instance of WebSphere Integration Developer on any supported operating system. In this book we use Microsoft Windows XP Professional.
LDAP (Tivoli Directory Server V6.0)We use an LDAP server to store the user IDs, groups, and relationships used in our human task examples. We also use LDAP when implementing security on WebSphere Process Server. In this book we use Tivoli Directory Server running on Linux®, but the examples are applicable to any LDAP provider.
If you do not have an LDAP server, you may be able to use operating system security or custom registries to implement security and staff resolutions. We discuss these options in this book, but all of the worked examples use LDAP, as we believe that this most closely resembles real installations.
Database (DB2 Universal Database V8.2 FP17)We use a stand-alone database in this book to support WebSphere Process Server. We do not configure the database any further than the minimum to ensure that WebSphere Process Server runs correctly. In this book we use DB2® Universal Database™ as the database, running on Microsoft Windows 2003 Server. However, any WebSphere Process Server supported database can be used.
5.1.3 Scenario prerequisites
In this book, as we are dealing with BPM, we use WebSphere Business Modeler to define the business process and business items. We then import our model into WebSphere Integration Developer and enhance it to make it implementable.
Even if you do not have (or intend to use) WebSphere Business Modeler, we recommend that you read the chapter in order to familiarize yourself with our business scenario, the data items, and the business process itself. This information is located in Chapter 4, “WebSphere Business Modeler” on page 47.
If you do not wish to start with WebSphere Business Modeler, we provide the information for you to build the process in WebSphere Integration Developer from scratch.
96 Human-Centric Business Process Management with WebSphere Process Server V6

Alternatively, in the additional material provided with this book (Appendix A, “Additional material” on page 739), we supply the code exported from WebSphere Business Modeler for you to import into your own WebSphere Integration Developer environment.
5.2 Overview: using human tasks with WebSphere Process Server
A human task is an activity that needs the interaction of a human user. Whenever it is not possible to code logic or to automate part of a process, a human task is the way to enable the staff of a company to interact with a business process.
5.2.1 Types and implementations of human tasks
There are two ways to implement a human task and three main types of task.
Implementations of human tasksHuman tasks can be implemented as:
� SCA (standalone) tasks. The task is defined without reference to a particular BPEL process.
� In-line (BPEL) tasks. The task is defined explicitly as part of a BPEL process. The task does not appear outside of the process and cannot be re-used.
The main differences are as follows:
� SCA tasks can be re-used across multiple processes. BPEL tasks are tied to a particular process.
� SCA tasks can be replaced by other SCA implementations, for example business rules, without altering the original process.
� SCA tasks only have access to the context information of the individual human task. BPEL tasks have access to the context information of the process and any other BPEL task within the same process (we use this ability for our four-eye check).
� BPEL tasks can be used for server-driven page flow applications using the completeAndClaimNext functionality. SCA human tasks are independent of each other.
� BPEL tasks are deleted when their parent process is deleted.
Chapter 5. Using human tasks in WebSphere Process Server 97

Types of human tasksThe three main types of human task are:
� Originating: human to machine� Participating: machine to human� Pure human: human to human
These tasks have the interaction patterns shown in Figure 5-2. Originating and participating tasks can be implemented as in-line tasks or SCA tasks. Pure human tasks are implemented as stand-alone tasks.
Figure 5-2 The interactions of the three main types of human tasks
Purely HumanTask
Purely HumanTask
Task
Par
ticip
ant
Inte
rface
Task
Par
ticip
ant
Inte
rface
Task
Orig
inat
orIn
terfa
ceTa
sk O
rigin
ator
Inte
rface
create
start
notify
query
claim
complete
ParticipatingTask
ParticipatingTaskTa
skS
ervi
ce In
terfa
ceTa
skS
ervi
ce In
terfa
ce
Task
Par
ticip
ant
Inte
rface
Task
Par
ticip
ant
Inte
rfaceinvoke
return
query
claim
complete
Service
OriginatingTask
OriginatingTask
create
start
notify
invoke
return
Ser
vice
Inte
rface
Ser
vice
Inte
rface
Task
Orig
inat
orIn
terfa
ceTa
sk O
rigin
ator
Inte
rface
Web serviceService
98 Human-Centric Business Process Management with WebSphere Process Server V6

5.2.2 The life cycle of a human task
The life cycle of a human task varies depending on its type and how the users interact with it. In general, the three types of task have the following life cycles:
� Participating task, shown in Figure 5-3� Originating task, shown in Figure 5-4 on page 100� Pure human task shown in Figure 5-5 on page 101
Figure 5-3 The participating task life cycle
Task Client
claim()save()complete()
Input data
Output/Fault data
Staff query
People Directory
LDAPWAS User Registry
Custom Registry
People Directory
LDAPWAS User Registry
Custom RegistryInactive Ready Claimed Finished
ParticipatingTask
Potential owners
Owner
Chapter 5. Using human tasks in WebSphere Process Server 99

Figure 5-4 The originating task life cycle
Input data
Output/Fault data
Staff query
Inactive Running Finished
Originatingtask
Process
Originator
Potential starter
People Directory
LDAPWAS User Registry
Custom Registry
People Directory
LDAPWAS User Registry
Custom Registry
Starter
RR
R
I
I
100 Human-Centric Business Process Management with WebSphere Process Server V6

Figure 5-5 The pure human task life cycle
Of course, the life cycle of a human task can be much more complex than this. As human tasks interact with people, the flexibility to change state, to undo a previous step, or to transfer a task from one person to another means that there is a large number of possibilities.
There is no perfect way to represent these, but one good way is by the use of a state diagram. In these diagrams, boxes represent the states that a human task can be in at any one time, and arrows show the valid transitions between the states.
claim()save()complete()
Input data
Output/Fault data
Staff query
Inactive Ready Claimed Finished
Pure HumanTask
Potential owners
People Directory
LDAPWAS User Registry
Custom Registry
People Directory
LDAPWAS User Registry
Custom RegistryOwner
Chapter 5. Using human tasks in WebSphere Process Server 101

There are two state diagrams that cover our human tasks — one for originating tasks (Figure 5-6) and one for participating and purely human tasks (Figure 5-7 on page 103).
Figure 5-6 Originating task state diagram
102 Human-Centric Business Process Management with WebSphere Process Server V6

Figure 5-7 Participating and pure-human task state diagram
5.3 Which feature you use to solve which problem
WebSphere Process Server provides a wide variety of human task capabilities. Not every implementation will need them all, and it is sometimes not obvious when some of them should be used. The matrix shown in Table 5-1 gives examples of where the various features can be used to fulfil project requirements.
Table 5-1 Requirements fulfilled by human task features
Requirement Human task feature
“I’ll call you back later.” Task suspension
“I’m busy - I need to delegate.” Ad-hoc follow-on task
“I need to ask for more information to allow me to complete this task.”
Ad-hoc sub-tasks
“I need two different people to look at this.” Inline task with context properties — the four-eye scenario
Chapter 5. Using human tasks in WebSphere Process Server 103

“I’m a manager constantly on the move. I need to be able to manage work from my mobile device.”
Escalation - custom e-mail notification
Custom clients via Web services
“Once I have my customer on the phone, I want to handle their transaction quickly and not have to hand them off to other agents.”
Server controlled page flow
“I need to offer my human-centric process within a business service for external business subscribers. I need this quickly and cheaply, but with the same quality of service as my internal customers.”
Extended client type support
Web service access to HTM API
“Can we not just make our offering look more tailored to fit each and every business customer we win?”
Generation and customization of JSP Clients
Integration with Portal. Workplace Forms, J2EE, .NET
“I need to make sure we use all of our available resources, all of the time.”
Post-processing staff query - load balancing for active users
“We have just merged with another company and need to start using their people as soon as possible.”
Post-processing staff query and custom staff resolution plug-ins
“If it is a high-value customer, I would rather use my security cleared team members to handle their business transactions.”
Post-processing staff query
“One of my best people is off long term. I need to make sure that I allocate his ongoing work to the rest of the team.”
Post-processing staff query
Administration and group re-allocation
“I am new into the team. If I have a problem handling this order, how do I know who took the order in the first place?”
Enhanced BPC Explorer
“I have strict audit regulations in place, and for all financial transactions must have a different team member perform each of the money transfer steps.”
Improved task assignment/allocation
HTM audit recording/CEI
Requirement Human task feature
104 Human-Centric Business Process Management with WebSphere Process Server V6

5.4 Implementation plan
In this section we outline our plan for implementing our example scenarios. We designed our example to enable us to demonstrate many of the human task features of WebSphere Process Server.
Although it is relatively simple, we still need a plan for how to implement it. We divide the plan into infrastructure, implementation sections, and testing sections,
“I want my local team managers to be responsible for their own teams’ statistics, so that I can concentrate on company-wide performance.”
BPC Observer
“We have a lot of paperwork associated with our business, and I cannot afford the time for people to go and find it every time they need to check something.”
Integration to content solutions such as FileNet
“I have a distributed workforce and especially many home workers. They all need to have access to the documents.”
Integration to content solutions such as FileNet
“I need to call that customer back, now. What time did they say was best?”
Task suspension and resumption
Suspension with duration or to calendar
“I could do with adding these notes I have just taken to the records, it would save us going through that conversation again next time.”
Binary attachments
“I could really do with getting in contact with the sales person via their PDA when this happens in the future.”
Custom notifications, API events
“My business is booming and I cannot afford down time or to slow my call center agents down in any way.”
Distributed topologies
Requirement Human task feature
Chapter 5. Using human tasks in WebSphere Process Server 105

5.4.1 Infrastructure configuration plan
Before we can build any artifacts, we need to make sure that we:
1. Describe our installation, topology, and assumptions.2. Configure the LDAP structure.3. Configure the human task staff plug-in provider.4. Configure security on the WebSphere Process Server.
5.4.2 Iteration descriptions
To enable us to have something running and tested as quickly as possible, we use iterative development to deploy a simple, agile solution first and enhance it with further iterations. This allows us to confirm that each part of the solution is executing correctly before moving on to the next.
Iteration 1A - simple scenarioThis is the simple scenario that enables us to create and deploy a process using human tasks. This iteration demonstrates the following features:
� In-line (BPEL) and standalone (SCA) human tasks� Using LDAP to define groups and individuals� The four-eyes checking process� Participating tasks
Iterations 2A-H - enhance the scenario with WebSphere Process Server advanced featuresWe enhance our scenario to include additional features. These are:
� Creating Web clients for human tasks using the client generator� Escalations� Suspensions� Follow-on tasks� Subtasks� API events� Notifications� Post-processing of staff queries
We discuss these features in Chapter 6, “Human task features introduced in WebSphere Process Server V6.0.2” on page 203.
Iterations 3A-EIn these iterations, we demonstrate the use of different clients for processing human tasks, including FileNet, WebSphere Portal, J2EE, .NET, and Workplace
106 Human-Centric Business Process Management with WebSphere Process Server V6

Forms. The use of the clients can be found in the remaining chapters of this book.
Iteration 4A - implement full services for the stubbed implementationsFinally, we need to convert our stubbed implementations of the SendOffer, SendRejection, and CreateEmployeeRecords services into real implementations. We do not cover this in this book, as these services are not concerned with human tasks, and their implementations are not defined in our business scenario, but this would be a logical iteration.
5.4.3 Implementation plan - iteration 1
To implement the process we complete the following steps:
1. Take the exported project interchange file from WebSphere Business Modeler defining the business process and import it into WebSphere Integration Developer.
2. Review the imported artifacts and assembly diagram and implement those components that are not defined in the model as stubs.
3. Review the human task components and configure where necessary.
4. Build and deploy the module.
5.4.4 Testing - iteration 1
To test the implementation:
1. Test the executive hire path.2. Test the standard hire path, including the four-eyes functionality.3. Troubleshoot the implementation.
Note: The iterations as listed do not need to be done in the order shown. Some do not need to be done at all, as there are no dependencies. For example, you do not need to develop a Portal client before you can develop a J2EE one. You also may wish to implement the clients before developing plug-ins for staff-query post-processing or API events.
The iterative approach is very useful, especially if WebSphere Process Server or its human task capabilities are new to you. You can make sure that each new functional area is working and tested before commencing the next.
Chapter 5. Using human tasks in WebSphere Process Server 107

5.5 Configuring the infrastructure
This section discusses the configuration of LDAP and security in WebSphere Process Server.
5.5.1 Confirming the correct installation of the software products
Before we begin, we need to have all of the software installed with the correct fix packs. This is outside the scope of this book, and you should reference your product installation documentation for the correct installation procedure and corresponding hardware and software requirements.
Before we begin this chapter, you should check that you have the following:
� WebSphere Process Server V6.0.2. In our book, we used V6.0.2 with the 6.0.2.1 updates. We assume that the human task container of WebSphere Process Server has been installed.
� A supported database with the WebSphere Process Server databases created on it. In our DB2 configuration we created databases for WPRCSDB and BPEDB, but these may differ depending on your installation and topology.
� A supported LDAP provider. This is not mandatory, as other registries such as a custom registry can be used, but our examples will use an LDAP.
For our examples, we deployed WebSphere Process Server, our database, and our LDAP on separate nodes. This is for clarity and to reflect a typical installation. Your deployment may differ.
5.5.2 Configuring the LDAP structure
In our examples we use LDAP to provide the registry of users, groups, relationships, and passwords needed for our scenario.
We use a simple LDAP structure to show the features of the human task manager. You may wish to use your own structure. That is fine as long as you implement the references to your users and groups in the WebSphere Integration Developer examples.
Note: If you install the V6.0.2.1 update, you need to install the critical fixes first.
108 Human-Centric Business Process Management with WebSphere Process Server V6

Our LDAP structure is shown in Figure 5-8 and Figure 5-9 on page 110. You may wish to compare this to the organization chart shown in Figure 4-2 on page 51, which shows the structure (created using WebSphere Business Modeler) in a more user-friendly format.
Figure 5-8 LDAP structure showing entries for people, together in their groups
topobjectclass
organizationobjectclass
o=itsocorp
topobjectclass
containerobjectclass
cn=People
wpsadmincn
topobjectclass
wpsadminsn
wpsgivenName
inetOrgPersonobjectclass
uid=wpsadmin
wasadmincn
topobjectclass
adminsn
wasgivenName
inetOrgPersonobjectclass
uid=wasadmin
itsoacn
topobjectclass
Asn
usergivenName
inetOrgPersonobjectclass
uid=itsoa
itsobcn
topobjectclass
bsn
usergivenName
inetOrgPersonobjectclass
uid=itsob
Administratorcn
topobjectclass
Administratorsn
AdministratorgivenName
inetOrgPersonobjectclass
uid=Administrator
manageracn
topobjectclass
AllenSn
MichaelgivenName
inetOrgPersonobjectclass
uid=managera
managerbcn
topobjectclass
Bartlettsn
MaggiegivenName
inetOrgPersonobjectclass
uid=managerb
managerccn
topobjectclass
CliftonSn
MarygivenName
inetOrgPersonobjectclass
uid=managerc
managerdcn
topobjectclass
DigweedSn
MillicentgivenName
inetOrgPersonobjectclass
uid=managerd
HRSpecialistdcn
topobjectclass
Brattsn
HildagivenName
inetOrgPersonobjectclass
uid=HRSpecialistb
HRSpecialistccn
topobjectclass
Corksn
HarrietgivenName
inetOrgPersonobjectclass
uid=HRSpecialistc
HRSpecialistdcn
topobjectclass
DoddsSn
HerbertgivenName
inetOrgPersonobjectclass
uid=HRSpecialistd
HRSpecialistacn
topobjectclass
Adamssn
HarrygivenName
inetOrgPersonobjectclass
uid=HRSpecialista
managerecn
topobjectclass
Marlinsn
HoracegivenName
inetOrgPersonobjectclass
uid=managere
Chapter 5. Using human tasks in WebSphere Process Server 109

Figure 5-9 The LDAP structure showing entries for groups, with their members
Our structure has a top-level organization named ITSOCORP with two containers below it: groups and people.
We build our LDAP structure using a .ldif file, which is a plain-text file containing details of the structure. The file is available with the additional material provided with this book (see Appendix A, “Additional material” on page 739). The file is imported into the LDAP server and creates the desired structure.
Consult your LDAP provider documentation for details on how to import a .ldif file if you wish to use the same structure as in our examples.
topobjectclass
organizationobjectclass
o=itsocorp
topobjectclass
containerobjectclass
cn=Groups
uid=wpsadmin, cn=People, o=itsocorpmember
topobjectclass
uid=Administrator, cn=People, o=itsocorpmember
uid=wasadmin, cn=People, o=itsocorpmember
groupOfNamesobjectclass
cn=Admnistrators
topobjectclass
uid=managera, cn=People, o=itsocorpmember
groupOfNamesobjectclass
cn=HiringManagers
uid=managerc, cn=People, o=itsocorpmember
topobjectclass
uid=managerd, cn=People, o=itsocorpmember
uid=managerb, cn=People, o=itsocorpmember
groupOfNamesobjectclass
cn=LineManagers
uid=HRSpecialistc, cn=People, o=itsocorpmember
uid=HRSpecialistb, cn=People, o=itsocorpmember
topobjectclass
uid=HRSpecialistd, cn=People, o=itsocorpmember
uid=HRSpecialista, cn=People, o=itsocorpmember
groupOfNamesobjectclass
cn=HRSpecialists
uid=userb, cn=People, o=itsocorpmember
topobjectclass
uid=usera, cn=People, o=itsocorpmember
groupOfNamesobjectclass
cn=Users
topobjectclass
uid=managere, cn=People, o=itsocorpmember
groupOfNamesobjectclass
cn=HR Managers
110 Human-Centric Business Process Management with WebSphere Process Server V6

5.5.3 Configuring the LDAP staff plug-in provider
We need to configure WebSphere Process Server to use LDAP as the staff registry. This is not compulsory, as custom registries or local OS security registries can be used. However, that is not covered in this book.
1. In the WebSphere Administrative Console, click Resources → Staff plug-in provider, as shown in Figure 5-10.
Figure 5-10 Selecting the staff plug-in provider
Chapter 5. Using human tasks in WebSphere Process Server 111

The Staff plug-in provider window is shown, as in Figure 5-11. Ensure that the scope of the provider is correct, as shown in the red circle. For a stand-alone environment, such as the one we use for our examples, the scope should be Node.
Figure 5-11 The staff plug-in provider page, with the scope highlighted
Note: In our examples we use the default cell name of WPSNode01Cell, the default node name of WPSNode01, and the default server name of server1. Your names may differ from those in our figures.
112 Human-Centric Business Process Management with WebSphere Process Server V6

2. Click LDAP Staff Plugin Provider.
The LDAP Staff Plugin Provider window is displayed (Figure 5-12).
Figure 5-12 The LDAP Staff PlugIn provider page
Chapter 5. Using human tasks in WebSphere Process Server 113

3. Click Staff plug-in configuration. The Staff plug-in configuration window is shown (Figure 5-13).
Figure 5-13 The Staff plug-in confirmation page
You can modify the sample configuration, but we recommend that you create a new one so that you can refer to the unchanged sample at any time. For our example we create a new configuration named ITSOLDAP.
To create a new configuration do the following:
1. Click New.
In the XSL Transform File window, use the Browse button or enter the path of the XSL transform file that you wish to use. The standard LDAP transformation file is located at:
${WBI_INSTALL_ROOT}/ProcessChoreographer/Staff/LDAPTransformation.xsl
Note: $(WBI_INSTALL_ROOT) is the location where you installed WebSphere Process Server. In our examples, we installed it at c:\ibm\procserver. We recommend that you use the predefined variable names, prefixed with the dollar sign ($) to avoid having to explicitly reference server path names. This means that you should type in ${WBI_INSTALL_ROOT} and not replace it with your own install path.
114 Human-Centric Business Process Management with WebSphere Process Server V6

2. Click Next. The new Staff plug-in configuration window is shown (Figure 5-14).
Figure 5-14 The new Staff plug-in configuration page
a. Enter a name for the staff plug-in. We chose ITSOLDAP for our example. You can also enter a description that is meaningful to you.
The JNDI name field is used to give a unique identifier to the staff plug-in configuration. We chose bpe/staff/itsoldap for our example.
b. Click Apply to apply the changes.
c. Click Save then Save again to save the changes to the master configuration.
Chapter 5. Using human tasks in WebSphere Process Server 115

Our example ITSOLDAP staff plug-in configuration looks like Figure 5-15. Note how the Custom Properties hyperlink only becomes active when the configuration is applied.
Figure 5-15 The ITSOLDAP Staff plug-in configuration
3. At this point we need to review the custom properties for the staff plug-in configuration. To do this, click the Custom properties hyperlink.
116 Human-Centric Business Process Management with WebSphere Process Server V6

The custom properties window is displayed. The window may not look exactly like Figure 5-16, as all of the properties are not yet filled in for a new configuration. The properties shown in Figure 5-16 are those that we defined for ITSOLDAP.
Figure 5-16 The ITSOLDAP custom properties page
Chapter 5. Using human tasks in WebSphere Process Server 117

4. Review Table 5-2 and update the custom properties window with values appropriate to your installation. Our example values are shown for comparison.
Table 5-2 The LDAP custom properties
Property Value
AuthenticationAlias This is used by WebSphere Process Server to log on to the LDAP server. Note that this is not the actual user ID for the server. This entry references an authentication alias that is held in the WebSphere Process Server system. You can enter any alias that you wish provided that you create it within WebSphere Process Server.
If your LDAP server allows anonymous login, you can leave this property blank.
In our example, we set this property to WPSNode01/ITSOLDAP Alias. This will reference the LDAP server user ID of cn=root.
AuthenticationType This indicates the type of login that WebSphere Process Server should use to connect to the LDAP server. We leave this blank, as it will then determine the correct method (simple or anonymous) based on the value entered in AuthenticationAlias.
BaseDN We set this to our organization DN, o=ITSOCORP. This should be set to the correct baseDN for your LDAP. A typical BaseDN may also be of the form dc=company, dc=com, or something similar. You are not restricted to the o= (organization) format.
CasesensitivenessForObjectclasses
We set this to false, so our examples treat ITSOA, ITSOa, and itsoa as the same entity.
Note that the property is called CasesensitivenessForObjectclasses, not CaseSensitivityForObjectclasses as you might expect.
ContextFactory We leave this as the default setting, com.sun.jndi.ldap.LdapCtxFactory.
118 Human-Centric Business Process Management with WebSphere Process Server V6

ProviderURL This is the IP address of the LDAP server, entered in the form ldap://servername:serverport.
In our example, our server is at IP address 9.42.170.182 and listening on port 339. Therefore, we set ProviderURL to ldap://9.42.170.182:339.
If your LDAP server is registered in DNS, you may wish to use the DNS name here instead of the dotted quad format for the server address.
SearchScope This tells WebSphere Process Server how far into your LDAP directory tree to search when resolving staff queries. We used the default of SubtreeScope. You may need to change this to match your LDAP directory structure.
additionalParameterName1 If you need to add additional parameters to enable successful searching of your LDAP directory, you can add them here. As we are using Tivoli Directory Server, we do not need any additional parameters, and we leave these blank. To determine whether you need any additional parameters, consult your LDAP provider documentation.
Note: The ProviderURL along with the other connection properties are not verified at the time they are entered. If you mistype the ProviderURL, BaseDN, or the AuthenticationAlias details, it will not become apparent until run time when WebSphere Process Server attempts to resolve a staff query against the LDAP server.
Property Value
Chapter 5. Using human tasks in WebSphere Process Server 119

5.5.4 Adding the authentication alias
In Figure 5-16 on page 117, we see how to define which AuthenticationAlias the staff plug-in configuration will use. This property is just a pointer to the actual AuthenticationAlias itself. We now need to set this up.
From the WebSphere Administration Console, click Security → Global Security → JAAS Configuration → J2C Authentication data. The J2EE Connector Architecture (J2C) authentication data entries window appears, as shown as in Figure 5-17.
Figure 5-17 The JCS Authentication data entries
Figure 5-17 shows that we have already created the WPSNode01/ITSOLDAP Alias entry.
1. To create a new entry, click New.
120 Human-Centric Business Process Management with WebSphere Process Server V6

2. When the Global security → J2EE Connector Architecture (J2C) authentication data entries → New page appears, enter the following:
– Name of the alias– The user ID to be used to log on to the LDAP server– The LDAP server password– A description
3. Click OK to create the alias.
5.5.5 Configuring security on the WebSphere Process Server
When using human tasks with WebSphere Process Server, you need to enable the WebSphere Process Server security. If security is not enabled, WebSphere Process Server does not require users to log on to the server, and therefore is not able to identify which users should be assigned to which tasks.
Note: In our example, the LDAP user is specified as a DN (that is, cn=root), rather than just the user name (root) itself. This is part of the LDAP authentication settings.
Important: The AuthenticationAlias name is of the form Node/AliasName. In our example this is WPSNode01/ITSOLDAP Alias.
When you create the AuthenticationAlias in WebSphere Process Server security, the node name will be automatically prepended to the name you supply. In our example, we type ITSOLDAP Alias and WebSphere Process Server automatically creates an entry of WPSNode01/ITSOLDAP Alias.
This authentication alias name must exactly match the one that you created in the Staff plug-in configuration property entry, as shown in Figure 5-17. Make sure that the node name and alias name both match.
Chapter 5. Using human tasks in WebSphere Process Server 121

In this section we show the basics of how to enable WebSphere Process Server security so that human tasks can be used.
1. To enable WebSphere Process Server security, from the WebSphere Administration Console, click Security → Global Security. The global security window is displayed, as in Figure 5-18.
Figure 5-18 The Global Security page
Note: When you make changes to security settings (for example, to turn the security on) you may need to restart the server for them to take effect.
If you make changes and nothing seems to happen, try restarting the server before investigating further.
122 Human-Centric Business Process Management with WebSphere Process Server V6

2. For our examples we set the properties shown in Table 5-3.
Table 5-3 Global Security properties
3. Once the properties have been set, click Apply.
Now that we have enabled the security to use LDAP, we need to configure the LDAP settings.
Property Value
Enable global security Check this check box. This turns on WebSphere Process Server security. When you check this check box, the Enforce Java 2 Security check box is checked as well. We unchecked the Enforce Java 2 Security check box for our examples, but you may need to have this checked if you are using this feature.
Cache timeout This value determines how long WebSphere Process Server will hold security credentials in a cache before making another lookup to the LDAP server.
The default for this value is 600 seconds, or 10 minutes. As we are going to be making a number of security changes for our examples, we have set this to the lowest allowed value of 30 seconds, so that any changes that we make are updated relatively quickly.
Every LDAP lookup in a production system is relatively costly, so the value should be tuned appropriately according to the number of users in the system.
Active authentication mechanism
This specifies the active authentication mechanism when security is enabled. We set this to the value of Lightweight Third Party authentication (LTPA).
Active user registry This specifies which user registry should be used when security is enabled. The user registry holds the users, passwords, and groups.
As we are using an LDAP server for our examples, we set this to Lightweight Directory Access Protocol (LDAP) user registry.
Chapter 5. Using human tasks in WebSphere Process Server 123

The LDAP User Registry window is shown, as in Figure 5-19.
Figure 5-19 The LDAP User Registry properties page
124 Human-Centric Business Process Management with WebSphere Process Server V6
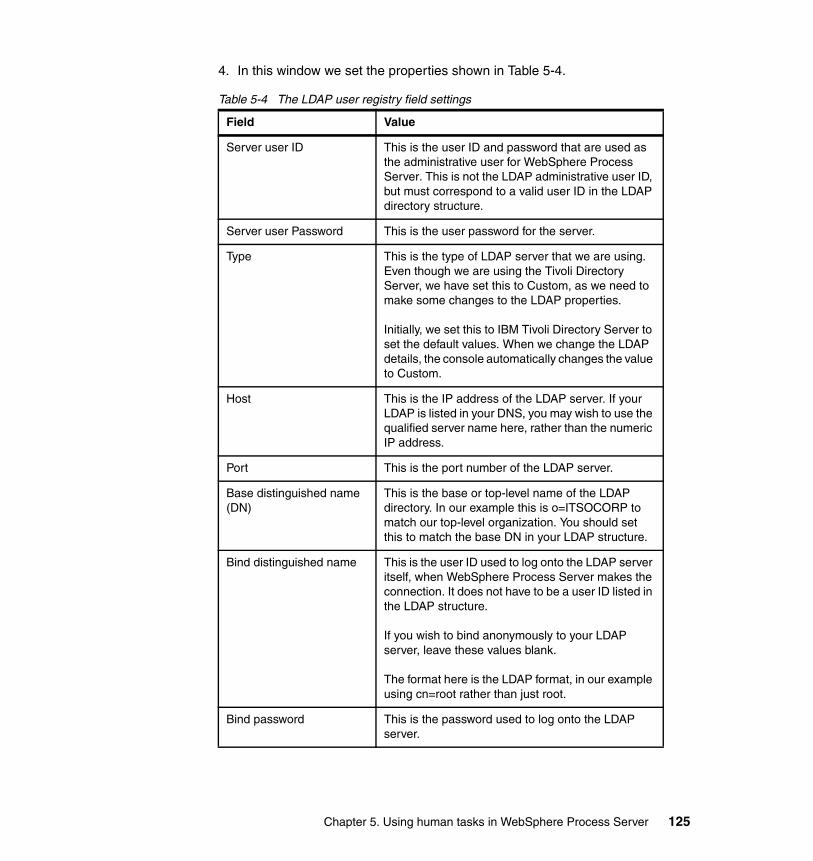
4. In this window we set the properties shown in Table 5-4.
Table 5-4 The LDAP user registry field settings
Field Value
Server user ID This is the user ID and password that are used as the administrative user for WebSphere Process Server. This is not the LDAP administrative user ID, but must correspond to a valid user ID in the LDAP directory structure.
Server user Password This is the user password for the server.
Type This is the type of LDAP server that we are using. Even though we are using the Tivoli Directory Server, we have set this to Custom, as we need to make some changes to the LDAP properties.
Initially, we set this to IBM Tivoli Directory Server to set the default values. When we change the LDAP details, the console automatically changes the value to Custom.
Host This is the IP address of the LDAP server. If your LDAP is listed in your DNS, you may wish to use the qualified server name here, rather than the numeric IP address.
Port This is the port number of the LDAP server.
Base distinguished name (DN)
This is the base or top-level name of the LDAP directory. In our example this is o=ITSOCORP to match our top-level organization. You should set this to match the base DN in your LDAP structure.
Bind distinguished name This is the user ID used to log onto the LDAP server itself, when WebSphere Process Server makes the connection. It does not have to be a user ID listed in the LDAP structure.
If you wish to bind anonymously to your LDAP server, leave these values blank.
The format here is the LDAP format, in our example using cn=root rather than just root.
Bind password This is the password used to log onto the LDAP server.
Chapter 5. Using human tasks in WebSphere Process Server 125
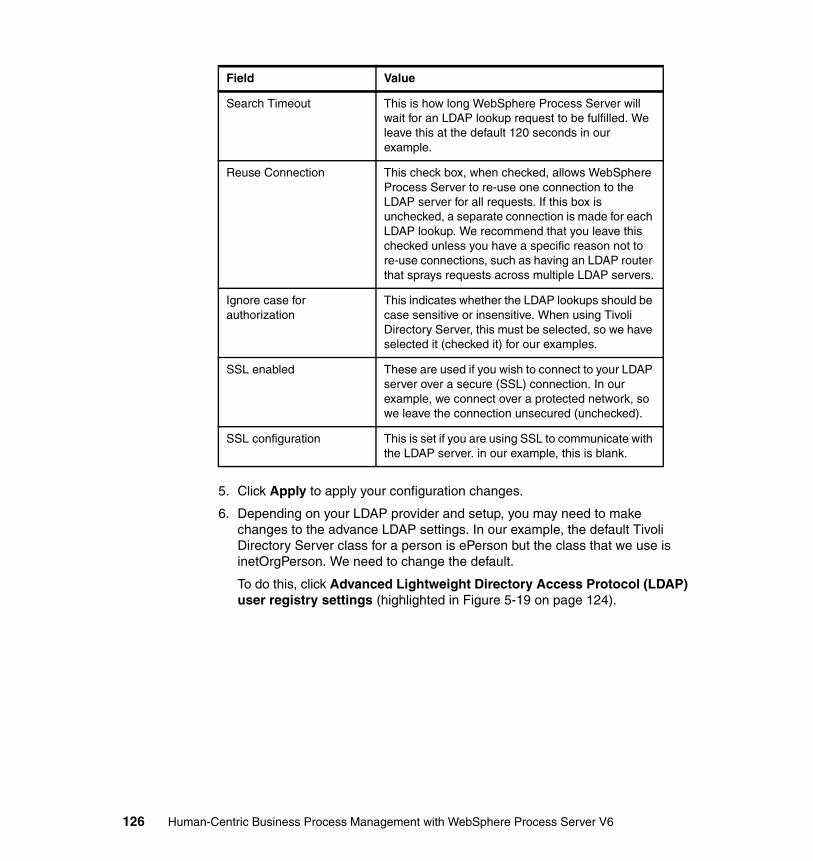
5. Click Apply to apply your configuration changes.
6. Depending on your LDAP provider and setup, you may need to make changes to the advance LDAP settings. In our example, the default Tivoli Directory Server class for a person is ePerson but the class that we use is inetOrgPerson. We need to change the default.
To do this, click Advanced Lightweight Directory Access Protocol (LDAP) user registry settings (highlighted in Figure 5-19 on page 124).
Search Timeout This is how long WebSphere Process Server will wait for an LDAP lookup request to be fulfilled. We leave this at the default 120 seconds in our example.
Reuse Connection This check box, when checked, allows WebSphere Process Server to re-use one connection to the LDAP server for all requests. If this box is unchecked, a separate connection is made for each LDAP lookup. We recommend that you leave this checked unless you have a specific reason not to re-use connections, such as having an LDAP router that sprays requests across multiple LDAP servers.
Ignore case for authorization
This indicates whether the LDAP lookups should be case sensitive or insensitive. When using Tivoli Directory Server, this must be selected, so we have selected it (checked it) for our examples.
SSL enabled These are used if you wish to connect to your LDAP server over a secure (SSL) connection. In our example, we connect over a protected network, so we leave the connection unsecured (unchecked).
SSL configuration This is set if you are using SSL to communicate with the LDAP server. in our example, this is blank.
Field Value
126 Human-Centric Business Process Management with WebSphere Process Server V6

The Advanced Lightweight Directory Access Protocol (LDAP) user registry settings page is shown, as in Figure 5-20.
Figure 5-20 The advanced LDAP settings page
The settings on the page depend on how your LDAP directory structure is set up. We took the default Tivoli Directory Server settings and modified the user filter to match our example structure.
By default, the user filter is defined for Tivoli Directory Server as (&(uid=%v)(objectclass=ePerson)). This means that the value supplied for the search (%v) is matched to the uid in the LDAP structure, and all of the results where the objectclass is ePerson are returned.
In our example, we do not use ePerson as an objectclass, we use inetOrgPerson instead. This means that we need to change our user filter to (&(uid=%v)(objectclass=inetOrgPerson)).
Chapter 5. Using human tasks in WebSphere Process Server 127

We left the other properties unchanged from the Tivoli defaults. We use cn= groupName and objectclass=groupOfNames to define a group, so we leave the group filter unchanged as (&(cn=%v)(|(objectclass=groupOfNames)(objectclass=groupOfUniqueNames)(objectclass=groupOfURLs))).
7. Once the correct values have been entered, click OK to accept the values.
8. The WebSphere Administrative Console prompts you to save the details to the master configuration. You should save the details and restart the server to enable security.
Security will only be enabled once the server is restarted. You can tell whether security is enabled, as the WebSphere Administrative Console will prompt you for a password when you sign in, rather than just a user ID.
Note: Once security has been enabled on WebSphere Process Server, you cannot stop the server without the correct security credentials. If you use the stopserver command or the start menu shortcut, it will no longer work.
To stop the server, add -username yourusername -password yourpassword to the end of the stopserver command string. For example:
stopServer server1 -username itsouser -password itsopassword
128 Human-Centric Business Process Management with WebSphere Process Server V6

Now that security is enabled, we can move on to develop and deploy our human tasks and business processes.
5.6 Implementing the simple scenario (iteration 1)
For our first iteration, we take the process model defined in the WebSphere Business Modeler chapter, import it into WebSphere Integration Developer, and add a small amount of implementation code to enable the model to be deployed to WebSphere Process Server.
The aim of this iteration is to deploy, run, and test a simple human task process to show some of the basic WebSphere Process Server functionality and to test that the infrastructure is correctly configured.
5.6.1 A brief overview of the cargo pattern
As we are importing our business process from WebSphere Business Modeler, we are using the cargo pattern for our BPEL process.
Tip: Once security is enabled on WebSphere Process Server, you need to log in using a user ID and password to access the WebSphere Administrative Console.
If you set up the security incorrectly, or forget the appropriate user ID or password, it is possible to find yourself locked out of the console, meaning that you cannot make any corrections to allow yourself back in.
If this happens, there is a way back (on distributed platforms):
1. At a command line, change to the $install_root/bin directory.2. Enter wsadmin -conntype NONE. A prompt of wsadmin> should appear.3. Enter securityoff (note that there is no space between security and off).4. Enter exit. You should now be back at your original command line.5. Restart the server.
Security is now off. You can now use the WebSphere Administrative Console without a user ID and password and correct any security settings.
This also shows the importance of fully securing the server, including the $install_root/bin directory, on a production installation of WebSphere Process Server.
Chapter 5. Using human tasks in WebSphere Process Server 129

WebSphere Business Modeler passes a business item between tasks in a business model, over the links between the tasks. It is not possible to change or mediate the business item between tasks, without adding an additional mapping task between the original tasks. Doing this increases the complexity of the model and detracts from the business focus of the process.
A way to address this problem is to use the cargo pattern. This means that a business process only uses one business item — the cargo item. This item contains all of the business data used by the process, often in a hierarchical format, as in our example of the applicant cargo item.
In a typical use of the cargo pattern, as in our example, the item is gradually filled with data as it moves through the process. In our example, the applicant cargo item is populated with the IsExecutive and Approvals flags as it moves through the process.
The WebSphere Business Modeler business item is imported as a WebSphere Process Server business object with the same structure, and the BPEL process uses the exact same pattern as the business model, passing the same variable between activities in the flow. The cargo pattern is very useful when it is desired that the WebSphere Process Server BPEL process stays as similar as possible to the WebSphere Business Modeler model.
The major disadvantage of the cargo pattern is that all of the activities, including service calls and human tasks, are invoked using the whole cargo object, in our case the whole applicant object. The reply to any request needs to pass back all of the data required by the process, whether it is relevant to the specific request or not. In our example, this is shown where the request for approval of an application must return all of the applicant details, as well as the data requested (the approval flag).
There are a number of methods to address this issue:
� In the service implementation, copy the request data to the reply data before populating the service-specific fields. We use this approach in our business rule.
� Use an additional component between the BPEL service reference and the actual service implementation interface. The component maps the process data format to the service implementation data format and stores the cargo data while the service request is fulfilled. When the reply is received, the additional component merges the service data with the cargo data and returns the whole cargo data to the process.
� Modify the BPEL process activities so that the reply uses an additional variable to the request. After the reply is received an additional assign activity is used to merge the reply variable data back to the main cargo variable.
130 Human-Centric Business Process Management with WebSphere Process Server V6

Using this approach, there is no need to modify any service implementations, but there is the drawback that the additional assign activities need to be added into the BPEL process each time it is imported from WebSphere Business Modeler.
5.6.2 Importing the model from WebSphere Business Modeler
At this point, we assume that the model has been exported from WebSphere Business Modeler as a project interchange file (PIF).
The PIF that we use for our examples is supplied in the additional material provided with this book (see Appendix A, “Additional material” on page 739).
To import the .pif file:
1. Start WebSphere Integration Developer and click File → Import.
2. At the dialog box, click Project Interchange.
3. Browse to the Project Interchange File .zip file. Our project interchange file is called PIF_Chapter5.zip.
4. Import the projects HRMod and HRLib (Figure 5-21). Do not import HRSupport.
5. Click Finish.
Figure 5-21 Importing the project interchange file from WebSphere Business Modeler
The project imports into the workspace. At this point, the process is not yet completely deployable. More work needs to be done in WebSphere Integration Developer before we can deploy it to WebSphere Process Server.
Chapter 5. Using human tasks in WebSphere Process Server 131

Tip: We recommend that you clean and rebuild the project following the import from WebSphere Business Modeler so that any errors and to-do activities are correctly flagged.
132 Human-Centric Business Process Management with WebSphere Process Server V6

5.6.3 Reviewing the imported model
After the import, the project tree looks like Figure 5-22.
Figure 5-22 The imported project tree
Chapter 5. Using human tasks in WebSphere Process Server 133

You can see that there are red crosses indicating errors with the CheckGrade business rule. This is because the details of the business rule have not been defined in WebSphere Business Modeler. We will define the business rule in WebSphere Integration Developer before we deploy the process.
We first review the assembly diagram for the module, which looks like Figure 5-23. By looking at the assembly diagram and the business process, together with the model, we can work out what we need to do to make the process deployable.
Figure 5-23 The imported assembly diagram
Note: There is no content under the Mapping folders, so we have collapsed these to save space in the figure.
Important: When importing a business model into WebSphere Integration Developer from WebSphere Business Modeler, some of the artifacts are named with a suffix of an underscore and a number.
As we have no duplicate artifact names in our example, and the numbers may vary in your implementation, we will not explicitly refer to the numbered artifacts. For example, we will refer to the artifact CheckGrade_01754086467 as CheckGrade.
134 Human-Centric Business Process Management with WebSphere Process Server V6

The process is:
� The CheckGrade business rule group does not have a rule destination specified (we see this from the red cross in the project tree and checking the reason for the cross under the Problems tab). We need to implement a rule set for this business rule to determine whether the applicant is applying for an executive position.
� The SendOffer, CreateEmployeeRecords, and SendRejection references are all implemented as SCA imports. We need to create implementations for these references. For our first iteration, we only create Java implementations of these references to show the process working. In subsequent iterations of a real project, we would enhance the implementations. As this is not the focus of this book, we do not do this in our examples.
� We also need to review the human tasks in the process. There are two types in our implementation — SCA and BPEL (in-line) tasks. Due to the nature of the modeler import, we need to modify some of the staff definitions to exactly match our LDAP implementation.
5.6.4 Implementing the CheckGrade business rule group
We need to implement some business rule logic for the CheckGrade business rule group. The logic evaluates whether the job is an executive position or a non-executive position. We do this by checking the job role and salary in the application. The logic is as follows:
1. Assume that the job is a non-executive position.
2. If the job title is AccountsDivisionManager, then the job is an executive position.
3. If the job title is AccountsLineManager and the job salary is greater than $100,000, then the job is an executive position.
In our example we implement the logic as a ruleset.
1. Open the CheckGrade rule group and click the Check Grad/Input operation (highlighted in red in our figure).
Note: In our example the business rule is kept simple, as this is not the focus of this book. We could implement the logic as a ruleset, a decision table, in Java, or by another method entirely.
Chapter 5. Using human tasks in WebSphere Process Server 135

2. Click the Enter Destination hyperlink in the Default Destination field (Figure 5-24). A pop-up menu is shown.
Figure 5-24 The CheckGrade rule group requiring a destination
3. From the pop-up menu, create a new rule set by clicking Create New. In our example, we name the rule set DetermineJobGrade.
4. Click Finish to open the rule-set editor.
136 Human-Centric Business Process Management with WebSphere Process Server V6

5. In the rule-set editor, add the rules as shown in Figure 5-25.
Figure 5-25 Creating the DetermineJobGrade rule set
In this rule set, we:
a. Copy the input data to the output data as we are using the cargo pattern (see 5.6.1, “A brief overview of the cargo pattern” on page 129).
b. Set the default value to false (that is, it is a non-executive job).
c. Check the division manager and line manager criteria. If either of these are met, we set the job grade to executive.
Chapter 5. Using human tasks in WebSphere Process Server 137

6. Save the rule set and close the rule set editor.
7. Confirm that the default destination for the CheckGrade rule group is now set to DetermineJobGrade.
8. Save the CheckGrade rule group.
At this point if you do not have WebSphere Integration Developer set to build automatically, you should rebuild the project. As the process and dependencies are now correct, there should be no more errors indicated by red crosses in the project tree.
The business rule is now complete.
5.6.5 Creating the first implementations of SendOffer, CreateEmployeeRecords, and SendRejection
In our first iteration we only implement minimal versions of the SendOffer, CreateEmployeeRecords, and SendRejection service calls. We implement them as simply as possible, using Java to write messages to SystemOut.log to indicate that the appropriate service call has been made.
We create a new standalone module with our iteration1 implementations, so that we can easily update them without affecting our main module when required.
If you wish, you can import this module ready-built from the additional material that is supplied with this book.
Creating the HRSupport moduleTo do this:
1. Create a new business integration project module named HRSupport.
2. Add HRLib as a project dependency, as we will re-use the business objects and interfaces. (To do this, right-click the HRSupport module and select Dependencies to open the dependency editor.)
Note: You may still see a red X. If this is the case, when you save the rule group and rebuild the project, the X should disappear as the rule group/rule set dependencies are resolved in WebSphere Integration Developer.
138 Human-Centric Business Process Management with WebSphere Process Server V6

3. Create three Java components in the assembly diagram (Figure 5-26). Name these:
– CreateEmployeeRecords– SendOffer– SendRejection
Figure 5-26 The HRSupport assembly diagram components - the interfaces already added but not the exports
4. Copy the following three interfaces from the HRMod module to the HRSupport module:
– CreateEmployeeRecords– SendOffers– SendRejection
5. Add one interface to each component, as shown in Table 5-5 and Figure 5-27 on page 140.
Table 5-5 Component to Interface map
Note: If you copy all of the interfaces together (that is to say, highlight them all and do one cut/paste operation), you may experience problems depending on your WebSphere Integration Developer patch level. If this happens, copy each interface individually.
Component Interface
CreateEmployeeRecords CreateEmployeeRecords
SendOffer SendOffer
SendRejection SendRejection
Chapter 5. Using human tasks in WebSphere Process Server 139

The components on the assembly diagram should look like Figure 5-27.
Figure 5-27 Assembly diagram showing the HRSupport components
6. Generate Java implementations for the components (right-click each component and click Generate Implementation).
7. Add code for the implementations. The code for our example implementations is shown in Example 5-1, Example 5-2 on page 141, and Example 5-3 on page 142.
Example 5-1 Implementation of the create employee records component
package sca.component.java.impl;
import commonj.sdo.DataObject;import com.ibm.websphere.sca.ServiceManager;
public class CreateEmployeeRecordsImpl {
public CreateEmployeeRecordsImpl() {super();
}
private Object getMyService() {return (Object) ServiceManager.INSTANCE.locateService("self");
}
public DataObject CreateEmployee(DataObject input) {//This is a simple 'stub' implementation to show that this service has been called//and to write out details of this service to Systemout.log
//Unique reference HRMSG001 is used so that we can search for this message
Tip: Hover over the I symbol on each component to check that the correct interface has been applied.
140 Human-Centric Business Process Management with WebSphere Process Server V6

System.out.println("###########################################################");System.out.println("# HRMSG001 - CreateEmployeeRecords component called #");System.out.println("# This component would normally create an employee record #");System.out.println("###########################################################");System.out.println("");System.out.println("Employee Details are:");System.out.println("SocialSecurity Number: "+input.getString("Applicant/SSN"));System.out.println("Last Name: "+input.getString("Applicant/LastName"));System.out.println("First Name: "+input.getString("Applicant/FirstName"));System.out.println("Middle Initial: "+input.getString("Applicant/MiddleInitial"));System.out.println("Apartment Number:"+input.getInt("Applicant/AptNo"));System.out.println("Street Address:"+input.getString("Applicant/StreetAddress"));System.out.println("City:"+input.getString("Applicant/City"));System.out.println("State: "+input.getString("Applicant/State"));System.out.println("ZipCode: "+input.getString("Applicant/ZipCode"));System.out.println("###########################################################");
//Return the input object as we are using the cargo pattern herereturn input;
}
}
Example 5-2 Implementation of the SendOffer component
package sca.component.java.impl;import commonj.sdo.DataObject;import com.ibm.websphere.sca.ServiceManager;
public class SendOfferImpl {
public SendOfferImpl() {super();
}
private Object getMyService() {return (Object) ServiceManager.INSTANCE.locateService("self");
}
public DataObject SendOffer(DataObject input) {//This is a simple 'stub' implementation to show that this service has been called//and to write out details of this service to Systemout.log
//Unique reference HRMSG002 is used so that we can search for this message
Chapter 5. Using human tasks in WebSphere Process Server 141

System.out.println("###########################################################");System.out.println("# HRMSG002 - SendOffer component called #");System.out.println("# This component would normally send a job offer to #");System.out.println("# the applicant #");System.out.println("###########################################################");System.out.println("");System.out.println("Employee Details are:");System.out.println("SocialSecurity Number: "+input.getString("Applicant/SSN"));System.out.println("Last Name: "+input.getString("Applicant/LastName"));System.out.println("First Name: "+input.getString("Applicant/FirstName"));System.out.println("Middle Initial: "+input.getString("Applicant/MiddleInitial"));System.out.println("Apartment Number:"+input.getInt("Applicant/AptNo"));System.out.println("Street Address:"+input.getString("Applicant/StreetAddress"));System.out.println("City:"+input.getString("Applicant/City"));System.out.println("State: "+input.getString("Applicant/State"));System.out.println("ZipCode: "+input.getString("Applicant/ZipCode"));System.out.println("");System.out.println("Job Details Are:");System.out.println("Position: "+input.getString("Job/Position"));System.out.println("Salary: "+input.getString("Job/Salary"));System.out.println("###########################################################");
//As this offer needs a decision, we will assume the employee always accepts hereinput.setBoolean("applicantAccept", true);
//Return the input object as we are using the cargo pattern herereturn input;
}
}
Example 5-3 Implementation of the SendRejection component
package sca.component.java.impl;
import commonj.sdo.DataObject;import com.ibm.websphere.sca.ServiceManager;
public class SendRejectionImpl {
public SendRejectionImpl() {super();
}
142 Human-Centric Business Process Management with WebSphere Process Server V6

private Object getMyService() {return (Object) ServiceManager.INSTANCE.locateService("self");
}
public DataObject SendRejection(DataObject input) {//This is a simple 'stub' implementation to show that this service has been called//and to write out details of this service to Systemout.log
//Unique reference HRMSG003 is used so that we can search for this message
System.out.println("###########################################################");System.out.println("# HRMSG003 - SendRejection component called #");System.out.println("# This component would normally send a rejection notice #");System.out.println("# to the applicant #");System.out.println("###########################################################");System.out.println("");System.out.println("Employee Details are:");System.out.println("SocialSecurity Number: "+input.getString("Applicant/SSN"));System.out.println("Last Name: "+input.getString("Applicant/LastName"));System.out.println("First Name: "+input.getString("Applicant/FirstName"));System.out.println("Middle Initial: "+input.getString("Applicant/MiddleInitial"));System.out.println("Apartment Number:"+input.getInt("Applicant/AptNo"));System.out.println("Street Address:"+input.getString("Applicant/StreetAddress"));System.out.println("City:"+input.getString("Applicant/City"));System.out.println("State: "+input.getString("Applicant/State"));System.out.println("ZipCode: "+input.getString("Applicant/ZipCode"));System.out.println("");System.out.println("Job Details Are:");System.out.println("Position: "+input.getString("Job/Position"));System.out.println("###########################################################");
//Return the input object as we are using the cargo pattern herereturn input;
}
}
Chapter 5. Using human tasks in WebSphere Process Server 143

8. Create SCA exports for the components (one for each component) by right-clicking each component using Generate Export → SCA Binding. The assembly diagram should look like Figure 5-28.
Figure 5-28 The completed HRSupport module assembly diagram with exports
The HRSupport module is now complete.
5.6.6 Linking the HRSupport module to the hiring process
Now that we have the HRSupport module to provide the capabilities we need to create an employee record, send a job offer, and send a rejection notice, we need to link it to our hiring business process.
In this section we link our imports in our HRMod assembly diagram to the exports in our HRSupport diagram. This use of SCA imports and exports, instead of placing all of the components in one module, offers us a number of benefits:
� Our process is somewhat separate from our supporting services and components. We can change one without affecting the other, as long as we do not change the interface.
� We can iteratively enhance our stub service components without changing the business process logic.
� We minimize any rework required if we change the business model in WebSphere Business Modeler and re-export to WebSphere Integration Developer. Any changes only affect the HRMod module.
Note: Our use of the cargo pattern does tie the external components to the same cargo object structure as the process. If the process needed additional objects or attributes on the cargo object structure, it would break the surrounding components. We could use maps and separate object models and namespaces to address this.
144 Human-Centric Business Process Management with WebSphere Process Server V6

We need to link each import to its corresponding export. To do this:
1. Open the HRMod assembly diagram.
2. Click the SendOffer import and click the Binding tab, as in Figure 5-29.
3. In the Module Name field, enter HRSupport.
4. Click the Browse button and click SendOfferExport from the dialog box.
5. Click OK.
The ExportName field should be set to SendOfferExport, as shown in Figure 5-29.
Figure 5-29 Binding the SendOffer import in the HRMod assembly diagram
6. Set the binding for CreateEmployeeRecords by clicking the CreateEmployeeRecords import and setting the module name to HRSupport and the export name to CreateEmployeeRecordsExport.
Chapter 5. Using human tasks in WebSphere Process Server 145

7. Similarly, set the binding for SendRejection by clicking the SendRejection import and setting the module name to HRSupport and the export name to SendRejectionExport.
8. Save the changes to the assembly diagram.
The HRMod process imports are now bound to the HRSupport module exports.
5.6.7 Updating the staff assignments in the human tasks
We have three human tasks in our process. In this section we need to review and update the staff assignments where necessary, as the assignments that we imported from the WebSphere Business Modeler may not exactly match our LDAP structure.
As one of our tasks is an SCA human task, the staff assignments are not defined within WebSphere Business Modeler. They must be defined in WebSphere Integration Developer.
146 Human-Centric Business Process Management with WebSphere Process Server V6

Updating the in-line (BPEL) human tasksFirst we review and update the in-line human tasks. There are two tasks, as shown in Figure 5-30 — the ApproveStandardApplication task and the FourEyeApproval task.
Figure 5-30 The hiring process BPEL diagram showing the in-line human tasks
Both of these tasks will be processed by the same group of people. The only difference is that the same person who processed the ApproveStandardApplication task is not allowed to process the FourEyeApproval task.
First, we update the ApproveStandardApplication task:
1. In the Business Integration view expand HRMod → Business Logic → Process and double-click Hiring to open the process in the Business Process Editor.
Note: We have moved some of the process activities in the BPEL to make it easier to read. We have not yet altered any of the activities themselves. The BPEL currently comes straight from the WebSphere Business Modeler import.
Chapter 5. Using human tasks in WebSphere Process Server 147

2. Click the Approve Standard Application human task activity and then the Details tab. The details tab looks as shown in Figure 5-31.
Figure 5-31 The details of the approve standard application task
The tab shows us that we are using the ApplicationVariable for both the input and output of the human task. (See 5.6.1, “A brief overview of the cargo pattern” on page 129.)
3. To access the human task itself, click the ApproveStandardApplication hyperlink, or click Open.
Note: The Details tab indicates that these details refer to a staff action and that the human task itself is actually accessed via the ApproveStandardApplication hyperlink.
This is an important distinction, as the staff action is what indicates which data is passed to and from the human task and also where the human task is called from in the BPEL process.
Also, when using in-line tasks, the human tasks themselves are not shown under the Human Tasks folder in WebSphere Integration Developer.
148 Human-Centric Business Process Management with WebSphere Process Server V6

The human task editor opens showing the ApproveStandardApplication human task, as in Figure 5-32.
Figure 5-32 The approve standard application human task editor
We need to make sure that we have the correct value for the JNDI name of staff plug-in configuration field. By default, the value is bpe/staff/userregistryconfiguration. We need to make sure that this matches the staff configuration that is set in our process server implementation.
In our example, this is set to bpe/staff/itsoldap. We discussed how we set this value in 5.5.3, “Configuring the LDAP staff plug-in provider” on page 111.
4. Set the JNDI name of staff plug-in configuration field to the appropriate value (for our example, set it to bpe/staff/itsoldap).
Chapter 5. Using human tasks in WebSphere Process Server 149

We now need to review the settings for the staff assignments. By default, the process imported from WebSphere Business Modeler only lists assignments for the potential owner, whereas WebSphere Integration Developer allows for further roles such as administrator, editor, or reader.
5. Click Receiver Settings → Potential Owner. The staff group tab displays, as in Figure 5-33.
Figure 5-33 Updating the potential owner in the human task editor
We want the potential owner of the task to be in the HR specialist group, as defined in our LDAP structure. We use the verb group members to select from an LDAP group.
150 Human-Centric Business Process Management with WebSphere Process Server V6

The imported value for the group name from WebSphere Business Modeler is Organizations/HR Specialists. This does not match our LDAP structure, which defines the HR specialists group as cn=HRSpecialists, cn=Groups, o=itsocorp.
6. Enter cn=HRSpecialists, cn=Groups, o=itsocorp into the Group Name field. This is the fully qualified LDAP distinguished name (DN) of our HRSpecialists group.
7. Enter true into the IncludeSubgroups field.
8. Save the ApproveStandardApplication human task.
Note on staff group verbs: The use of the word verb to indicate which staff group should be selected can be misleading. To clarify, it has nothing to do with the use of verbs in business graphs or with WebSphere Adapters.
A verb in the context of staff groups is used to define which selection criteria should be applied when deciding which staff members or groups to allocate to a particular task.
In our example scenario, we use the verb group members when we want to assign tasks to one of our LDAP groups, user by userID when we want to assign a task to an individual, and group members without named users when we want to assign a task to members of a group but without including certain people.
Each verb is mapped to a specific user repository query. In our example, each verb is mapped to an LDAP query coded using XML. These transformations are held in .xsl files and can be customized if needed. The default transformation for LDAP is held in the LDAPTransformation.xsl file. We configured this in 5.5.3, “Configuring the LDAP staff plug-in provider” on page 111, when we configured our ITSOLDAP provider.
Important: The distinguished name (dn) used in the Staff Group (Verb) field for a group must match the dn defined for that group in the LDAP directory exactly, including the order.
For example, cn=HRSpecialists, cn=Groups, o=itsocorp is not equal to cn=Groups, cn=HRSpecialists, o=itsocorp.
The staff group is defined by the full LDAP distinguished name (dn), not just the simple group name.
Chapter 5. Using human tasks in WebSphere Process Server 151

We also need to update the staff settings for the Four Eye Approval task. This task will be set up in the same way as for the Approve Standard Application task except that we will use the group members without named users verb to allow us to select all of the members of the HR specialists group except for the person who performed the approve standard application task.
9. In the four eye approval human task, set the JNDI name of the staff plug-in configuration field to the appropriate value (for our example, set it to bpe/staff/itsoldap).
10.Set the verb to be Group Members without Named Users.
11.Enter cn=HRSpecialists, cn=Groups, o=itsocorp into the Staff Group (Verb) field.
12.Enter true into the IncludeSubgroups field.
13.Enter %wf:activity(ApproveStandardApplication_Input).owner% into the NamedUsers field. (The template for this, %htm:task.owner%, is available from the list gadget attached to the field.)
14.Enter true into the IncludeSubgroups field.
We have now set up the four-eye approval task so that all members of the HR specialist group, with the exception of the owner of the approve standard application task, can approve it.
15.Save the four-eye approval task.
Note: The percentage signs (%) indicate a context variable that can be used to determine details of the process. This is one of the key differentiators between in-line (BPEL) tasks and SCA tasks. An SCA human task does not have access to these context variables.
In our example:
� wf refers to the current process or workflow.
� activity refers to a BPEL staff activity name. For us this is ApproveStandardApplication_Input.
� owner is the owner of the task.
So, our string %wf:activity(ApproveStandardApplication_Input).owner% indicates that we are referring to the owner of the task specified in the staff activity ApproveStandardApplication_Input in the current business process.
152 Human-Centric Business Process Management with WebSphere Process Server V6

Updating the SCA human tasksWe now need to update the ApproveExecutiveApplication human task. This is similar to updating the in-line (BPEL) tasks, but there are some differences.
1. In the HRMod project tree, double-click Business Logic and select Human Tasks → ApproveExecutiveApplication.
(SCA human tasks are shown in the project tree. The in-line (BPEL) tasks are not and are embedded in the BPEL process.)
2. The human task editor appears. Click the Details tab (Figure 5-34).
Figure 5-34 The human task editor for the ApproveExecutiveApplication task
3. Set the JNDI name of staff plug-in configuration field to the appropriate value (for our example, set it to bpe/staff/itsoldap).
Chapter 5. Using human tasks in WebSphere Process Server 153

You can see that the task has two receivers defined for it: Potential Instance Creator and Potential Owner. These receiving groups are currently defined to be everybody, which means that anyone can create this task and anyone can own or update it.
We are interested in the potential owner of the task, as we are using it as a participating task. We want to make the potential owner of the task a member of the HiringManagers group.
4. Click Potential Owner. The Staff Group tab displays (Figure 5-35).
Figure 5-35 Assigning the staff group (verb) to the ApproveExecutiveApplication human task
5. Set the staff group (verb) to be group members.
6. Set the GroupName to be cn=HiringManagers, cn=Groups, o=itsocorp.
154 Human-Centric Business Process Management with WebSphere Process Server V6

7. Set the IncludeSubgroups field to true.
We set the IncludeSubgroups to true, as we may wish to add additional detail to the LDAP grouping later. For our example, it does not matter if this is set to true or false, as our hiring managers will always be in the primary/parent group.
8. Save the updated ApproveExecutiveApplication human task.
5.6.8 Creating a Web service export for use by Web-service clients
Our business process is now complete, but can only be initiated by a client that can communicate using SCA. We want to be able to initiate the process using a Web service client communicating over HTTP. To enable this, we will add an HTTP export to our module.
As we wish to make a secure export, and have process server security turned on, we will also enable Lightweight Third-Party Authentication (LTPA).
1. Open the HRMod assembly diagram.
2. Right-click the Hiring process component and click Generate Export → Web Service Binding.
3. When the Transport Selection list appears, click soap/http (Figure 5-36).
Figure 5-36 The transport selection list box
Chapter 5. Using human tasks in WebSphere Process Server 155

The HiringExport1 export is added to the diagram (Figure 5-37).
Figure 5-37 The new HiringExport1 component
4. Save the assembly diagram and close the editor.
Now that we have the HTTP export, we need to add the LTPA authentication to it. As this is a Web service function rather than a business integration function, we need to change to the J2EE perspective.
5. Click Window → Open Perspective → Other.
6. When the Select Perspective list box opens, click J2EE and click OK.
156 Human-Centric Business Process Management with WebSphere Process Server V6

7. In the Project Explorer window, open the Web Services → Services folder (Figure 5-38).
Figure 5-38 The HiringExport in the J2EE view
8. Double-click the HiringExport1_HiringHttpService Web service deployment descriptor (highlighted) to edit it.
Chapter 5. Using human tasks in WebSphere Process Server 157

9. In the editor, click the Extensions tab (Figure 5-39).
Figure 5-39 The Web services editor extensions tab
10.Click Port Component Binding → HiringExport1_HiringHttpPort to highlight it.
11.While keeping Port Component Binding → HiringExport1_HiringHttpPort highlighted, click Request Consumer Service Configuration Details to open it, then click Required Security Token.
12.Click Add.
13.In the Required Security Token Dialog, enter LTPA into the Name field.
Note: The Add button will only be active if the Port Component Binding → HiringExport1_HiringHttpPort is selected and highlighted. If the Add button is grayed out, click Port Component Binding → HiringExport1_HiringHttpPort again.
158 Human-Centric Business Process Management with WebSphere Process Server V6

14.Select LTPAToken from the Token type list box (Figure 5-40).
Figure 5-40 Selecting the LTPA security
15.Click OK. The LTPA token appears in the Required Security Token box.
Chapter 5. Using human tasks in WebSphere Process Server 159

16.Click Caller Part to open the Caller Part section (Figure 5-41).
Figure 5-41 Opening the Caller Part section
17.In the Caller Part section, click Add.
18.When the Caller Part dialog appears, enter LTPA_Caller in the Name field.
160 Human-Centric Business Process Management with WebSphere Process Server V6
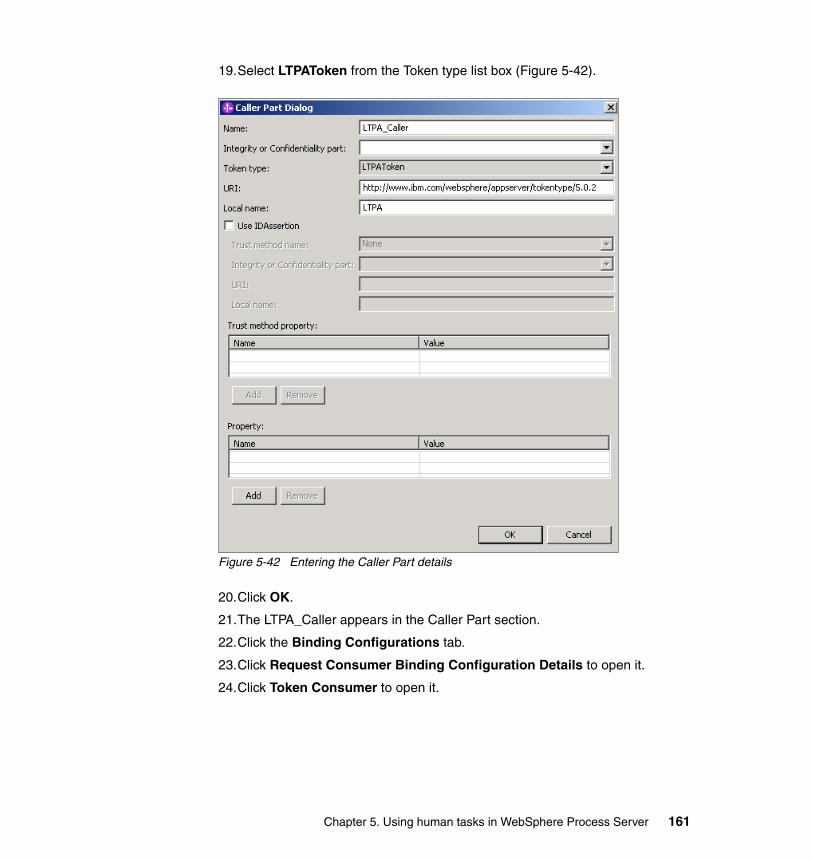
19.Select LTPAToken from the Token type list box (Figure 5-42).
Figure 5-42 Entering the Caller Part details
20.Click OK.
21.The LTPA_Caller appears in the Caller Part section.
22.Click the Binding Configurations tab.
23.Click Request Consumer Binding Configuration Details to open it.
24.Click Token Consumer to open it.
Chapter 5. Using human tasks in WebSphere Process Server 161

25.Click Add (Figure 5-43).
Figure 5-43 Adding the token consumer binding
162 Human-Centric Business Process Management with WebSphere Process Server V6

26.In the Token Consumer dialog (Figure 5-44), enter LTPA_Token_Con into the Token consumer name field.
Figure 5-44 The token consumer dialog
Chapter 5. Using human tasks in WebSphere Process Server 163

27.Select com.ibm.wsspi.wssecurity.token.LTPATokenConsumer from the Token consumer class list box.
28.Select LTPA from the Security token list box.
29.Select LTPA Token from the Value type list box.
30.Click OK. The LTPA_Token_con consumer appears in the token consumer section.
31.Save the settings and close the Web Service Editor.
The ApproveExecutiveApplication human task is now complete. Our first iteration process is now ready to deploy.
5.6.9 Deploying the modules to WebSphere Process Server
In this section we deploy our process modules to WebSphere Process Server. Once this is done, we can test our running process.
Both the HRMod and HRSupport modules need to be deployed together. How you do this is up to you. You should choose the method with which you are most familiar.
We do the following:
1. Check that there are no red crosses indicating errors in the projects.
2. Export the HRMod and HRSupport modules as .EAR files to a folder that is visible to WebSphere Process Server. (If .EAR is not shown as an export type, you may need to check the Show All check box.)
3. Log on to the WebSphere Administrative Console as an administrator (we use the wasadmin user ID).
4. Navigate to Applications → Enterprise Applications and click Install.
5. For both the HRMod and HRSupport modules, browse to the location of the relevant .EAR files.
Note: The changes that we have just made to add LTPA token security to the HiringExport1 Web service export can be overwritten by a project clean of the HRMod project. WebSphere Integration Developer will not warn you when this happens.
To avoid this, you may wish to back up the application.xml file that contains the deployment descriptor information. Alternatively, you may wish to develop and test you application without LTPA security, only adding it once functional testing is complete.
164 Human-Centric Business Process Management with WebSphere Process Server V6

6. Click Next, then Next, and Finish until the applications are installed. (When the list of numbered steps is displayed, you can skip directly to the last step and then click Finish.)
7. At the Enterprise Applications page, select the HRMod and HRSupport applications and click Start.
5.6.10 Testing the process with the BPC Explorer
For the purposes of testing our first iteration build, we use the BPC Explorer supplied with WebSphere Process Server. In later iterations, we show how to build custom clients that offer a more aesthetically pleasing interface to the user.
Creating the test planBefore we can test, we must have a test plan. The test cases that we use are shown in Table 5-6.
Table 5-6 Test plan cases
Testcase #
Description Standardapprovalrequest
Four-eyeapprovalrequest
Executiveapprovalrequest
Offer (O)reject (R)
1 � Executive position, approved by executive approval.
� Approval must only be by a HiringManager group member.
N N Y O
2 � Executive position, not-approved by executive approval.
� Rejection must only be by a HiringManager group member.
N N Y R
3 � Non-executive position, approved by standard approval, approved by four-eye approval.
� Standard approval must only be by an HR specialist group member.
� Four-eye approval must only be by an HR specialist group member who is not the same person who approved the standard approval.
Y Y N O
4 � Non-executive position, rejected by standard approval.
� Standard rejection must only be by an HR specialist group member.
Y N N R
Chapter 5. Using human tasks in WebSphere Process Server 165

Testing the first test case - executive application approvedTo run our test cases, we need to assume the roles of multiple people. We use multiple browser instances to log on to the BPC Explorer as multiple users.
We run the first test as follows:
1. Create a new instance of the process as user itsoa.
2. Review the process instance status and check who the next human task has been assigned to.
3. As user managera, we approve the executive application.
4. As user wasadmin, we review the process and check that it completed correctly.
To run the test case number one, we do the following:
1. Log in to the BPC Explorer as user itsoa.
5 � Non-executive position, approved by standard approval, rejected by four-eye approval.
� Standard approval must only be by an HR specialist group member.
� Four-eye rejection must only be by an HR specialist group member who is not the same person who approved the standard approval.
Y Y N R
Testcase #
Description Standardapprovalrequest
Four-eyeapprovalrequest
Executiveapprovalrequest
Offer (O)reject (R)
Important: When creating a list of potential users for a scenario, it is tempting to call them usera, userb, and so on. Do not do this.
WebSphere Process Server (in V6.0.2.1) will not make inter-component calls correctly with user names starting with the word user when security is enabled. We have used itsoa and itsob in our examples to avoid this.
For further information about this restriction, see Technote 1218713:
http://www.ibm.com/support/docview.wss?uid=swg21218713
Note: Typically, the BPC Explorer is located at:
http://WebSphere Process Server Name:9080/bpc
166 Human-Centric Business Process Management with WebSphere Process Server V6

2. Click My Process Templates. You should see the hiring template, as shown in Figure 5-45.
Figure 5-45 The hiring process template
3. Check the check box next to the hiring template and click Start Instance.
Chapter 5. Using human tasks in WebSphere Process Server 167

4. The Process Input Message page appears, as shown in Figure 5-46 on page 169.
Note: When the page first appears, the fields that you see in the figure will be blank. In this book we show you figures with input fields filled in with our example values, so that you can easily check your entries against ours if you wish.
168 Human-Centric Business Process Management with WebSphere Process Server V6

Figure 5-46 The test 1 input message
Chapter 5. Using human tasks in WebSphere Process Server 169

5. Enter the data as shown in Table 5-7. Most of the fields do not affect the process, but the Job.Salary and Job.Position fields should be entered as shown here because they drive the business rule that indicates whether the job is an executive position.
Table 5-7 Test data for test case 1
Note: The format of the date in the DateOfBirth field depends on the regional settings of your browser (not the settings of WebSphere Process Server).
In this book our regional settings are set to the US date format of m/d/y (month/day/year). When you see a date in the text, it will be listed in this format. You should enter dates in whatever format your browser expects. For example, the 25th of April 1976 would be shown as 4/25/1976 in a US browser, but a UK browser may show it as 25/4/1976 due to the regional settings being d/m/y.
Field Value
Process Name BPMTest01
Applicant.SSN 678901
Applicant.LastName Emett
Applicant.FirstName Ingrid
Applicant.MiddleInitial P
Applicant.AptNo 90
Applicant.StreetAddress Wilson Way
Applicant.City Orlando
Applicant.State FL
Applicant.ZipCode 32801
Applicant.HomePhone 555-555-0000
Applicant.DateOfBirth 11/25/1976
Job.Salary 150000
Job.Position Accounts Division Manager
170 Human-Centric Business Process Management with WebSphere Process Server V6

6. Click Submit. The process now starts. The business rule will check the position and indicate that the job is of type executive. The process will then call the ApproveExecutiveApplication human task and wait for it to be completed.
7. Click Process Instances → Started By Me.
8. The BPMTest01 process is shown. Click the BPMTest01 hyperlink.
9. Click the Activities tab. The tab looks as shown in Figure 5-47.
Figure 5-47 The activities tab for the BPMTest01 process
Here we can see that the CheckGrade business rule has run (finished) and that the ApproveExecutiveApplication activity is currently running.
10.On the left side of the page, click Task Instances → My Tasks.
Note: These are not all of the fields requested by the input message. This is a consequence of using the cargo pattern for the process (some of the fields will be populated later in the process — see 5.6.1, “A brief overview of the cargo pattern” on page 129) and also having fields defined that will be used for other iterations.
For example, even though the input message has a field IsExecutive to indicate whether this is an executive position, it does not actually affect the process, as the field is immediately updated by a business rule.
Chapter 5. Using human tasks in WebSphere Process Server 171

There are no tasks shown on the page after you click My Tasks, indicating that our test ApproveExecutiveApplication task is not assigned to user itsoa.
11.Click Task Instances → Administered By Me.
An instance of the ApproveExecutiveApplication task is displayed.
12.Click the ApproveExecutiveApplication hyperlink. The task instance looks like Figure 5-48.
Figure 5-48 The ApproveExecutiveApplication task instance for process BPMTest01
Here we can see that the task is a participating task, that the originator was user itsoa, and that there is currently no owner — it has not been claimed.
172 Human-Centric Business Process Management with WebSphere Process Server V6

13.Click the Staff tab. The page displays as in Figure 5-49.
Figure 5-49 The ApproveExecutiveApplication task instance staff tab
We can see that the task has a potential owner of managera. We can also see, by looking at the reason description that we (as itsoa) can see, the task because we are the administrator and the originator.
To work on and complete the task, we need to log in as managera.
14.Start a new instance of your browser and log in to the BPC Explorer as managera.
The ApproveExecutiveApplication task is displayed immediately upon login. We can now work on the task and complete it.
15.Check the check box next to the ApproveExecutiveApplication task and click Work On.
Chapter 5. Using human tasks in WebSphere Process Server 173

The task message is shown, as in Figure 5-50.
Figure 5-50 The work-on window for the ApproveExecutiveApplication task
We now need to fill in the required data and complete the task. Due to the way we have currently implemented the process and the associated interfaces, we need to copy all of the task input message data into the task output message fields, as well as set the approval field correctly.
174 Human-Centric Business Process Management with WebSphere Process Server V6

16.Copy the data in the fields shown in Table 5-8 into the task output message (but do not click the Complete button yet). Note that you need to enter true into the IsExecutive field.
Table 5-8 Data for the task output message
17.Enter true into the FinalApproval field.
18.Click Complete. The application is approved.
19.If, as user managera, you click Task Instances → My Tasks, you see that you no longer have any tasks to work on.
Field Value
Process Name BPMTest01
Applicant.SSN 678901
Applicant.LastName Emett
Applicant.FirstName Ingrid
Applicant.MiddleInitial P
Applicant.AptNo 90
Applicant.StreetAddress Wilson Way
Applicant.City Orlando
Applicant.State FL
Applicant.ZipCode 32801
Applicant.HomePhone 555-555-0000
Applicant.DateOfBirth 11/25/1976
Job.Salary 150000
Job.Position Accounts Division Manager
Job.IsExecutive true
Note: This is the FinalApproval field, not the FirstApproval field. If you enter true only into the first approval field, the process will issue a rejection, as the FinalApproval field is still false.
Chapter 5. Using human tasks in WebSphere Process Server 175

20.If we look at SystemOut.log we see that the SendOffer and CreateEmployeeRecords components have run, as shown in Example 5-4.
Example 5-4 SystemOut.log showing the output from SendOffer and CreateEmployeeRecords
00000075 SystemOut O ###########################################################00000075 SystemOut O # HRMSG002 - SendOffer component called #00000075 SystemOut O # This component would normally send a job offer to #00000075 SystemOut O # the applicant #00000075 SystemOut O ###########################################################00000075 SystemOut O 00000075 SystemOut O Employee Details are:00000075 SystemOut O SocialSecurity Number: 67891000000075 SystemOut O Last Name: Emett00000075 SystemOut O First Name: Ingrid00000075 SystemOut O Middle Initial: P00000075 SystemOut O Apartment Number:9000000075 SystemOut O Street Address:Wilson Way00000075 SystemOut O City:Orlando00000075 SystemOut O State: FL00000075 SystemOut O ZipCode: 3280100000075 SystemOut O 00000075 SystemOut O Job Details Are:00000075 SystemOut O Position: Accounts Division Manager00000075 SystemOut O Salary: 15000000000075 SystemOut O ###########################################################000000bd SystemOut O ###########################################################000000bd SystemOut O # HRMSG001 - CreateEmployeeRecords component called #000000bd SystemOut O # This component would normally create an employee record #000000bd SystemOut O ###########################################################000000bd SystemOut O 000000bd SystemOut O Employee Details are:000000bd SystemOut O SocialSecurity Number: 678910000000bd SystemOut O Last Name: Emett000000bd SystemOut O First Name: Ingrid000000bd SystemOut O Middle Initial: P000000bd SystemOut O Apartment Number:90000000bd SystemOut O Street Address:Wilson Way000000bd SystemOut O City:Orlando000000bd SystemOut O State: FL
Note: SystemOut.log is normally located in ${WAS_INSTALL_ROOT}/Profiles/Profile_Name/logs/Server_Name. It is not in ${WAS_INSTALL_ROOT}/logs.
176 Human-Centric Business Process Management with WebSphere Process Server V6

000000bd SystemOut O ZipCode: 32801000000bd SystemOut O ###########################################################
21.The task is now complete. If you log in as user itsoa you see that there are no processes originated by that user. As the process is complete, it is deleted from WebSphere Process Server.
Testing the second test case - executive application rejectedTesting the second test case is almost the same as testing the first test case. The only difference is that we set the FinalApproval field to be false when we work on and complete the ApproveExecutiveApplication human task.
In the second test case, when we check SystemOut.log, we see that the SendRejection component has run and that the SendOffer and CreateEmployeeRecords components have not, indicating that the process has followed the correct path.
Testing the third test case - standard application approved, four eye approvedIn this test case, we use a standard non-executive application. This means that the hiring process will follow the four-eyes approval path, requiring approval by two different members of the HRSpecialist group. It is important that we confirm that the person who approves the first human task is not also able to approve the four-eye check for the same job application.
We test the case using the following steps (details of the steps follow afterwards):
1. Using the BPC Explorer, log in as user itsoa and create a new instance of the hiring business process using the following test data.
Tip: If you wish to keep the completed processes in WebSphere Process Server so that you can view the activities once the processes are finished, do the following:
1. In WebSphere Integration Developer, open the hiring process in the BPEL editor.
2. Click the Details tab.
3. Uncheck the Automatically delete the process after completion check box.
4. Rebuild and redeploy the HRMod module.
Chapter 5. Using human tasks in WebSphere Process Server 177

2. Review the process instance status and check who the next human task has been assigned to. It should be assigned to members of the ITSpecialist group.
3. As user hrspecialista, log into the BPC Explorer and approve the standard application.
4. As user hrspecialista, we check that we are not assigned the four-eye check.
5. As user hrspecialistb, we approve the four-eye check.
6. We review to make sure that the process completed correctly.
To run the third test case, do the following:
1. Log in to the BPC Explorer as user itsoa and create a new instance of the hiring process with the data shown in Table 5-9.
Table 5-9 Test data for test case 3
2. Click Process Instances → Started By Me to view the BPMTest03 instance of the process.
3. Click the BPMTest03 process instance name and then the Tasks tab.
Field Value
Process Name BPMTest03
Applicant.SSN 123456
Applicant.LastName Adams
Applicant.FirstName Eve
Applicant.MiddleInitial J
Applicant.AptNo 12
Applicant.StreetAddress Dukes Drive
Applicant.City New York
Applicant.State NY
Applicant.ZipCode 10001
Applicant.HomePhone 555-111-4444
Applicant.DateOfBirth 10/31/1980
Job.Salary 50000
Job.Position Accounts Clerk
178 Human-Centric Business Process Management with WebSphere Process Server V6

You can see in Figure 5-51 that the approve standard application human task has been created, indicating that this is not an executive position.
Figure 5-51 BPMTest03 process instance showing the approve standard application human task
4. Click the Approve Standard Application task, then click the Staff tab. The staff details for the human task are shown in Figure 5-52.
Figure 5-52 The approve standard application staff allocations
The potential owners of the task are hrspecialista, hrspecialistb, hrspecialistc, and hrspecialistd — all the members of the HRSpecialists group. We need to
Chapter 5. Using human tasks in WebSphere Process Server 179

log in as one of them to work on the task. (You may also wish to log in to BPC Explorer as another user (for example, managera) to demonstrate that the potential task ownership is not everybody).
5. Log in to the BPC Explorer (or open a new browser session and then log in) as hrspecialista. The MyTasks page will show the ApproveStandardApplication task.
6. Check the check box next to the ApproveStandardApplication task and click Work On.
7. Similarly to test 1, copy the information from the task input message to the task output message. The information you need to copy is shown in Table 5-10. Do not click complete yet.
Table 5-10 Data that needs to be copied to the output message
Tip: If you have multiple browser windows open with multiple logins, it can be confusing to remember who is logged in where. To help you with this, WebSphere Process Server displays the logged-in user ID at the top left of the page, next to the word Welcome.
Field Value
Applicant.SSN 123456
Applicant.LastName Adams
Applicant.FirstName Eve
Applicant.MiddleInitial J
Applicant.AptNo 12
Applicant.StreetAddress Dukes Drive
Applicant.City New York
Applicant.State NY
Applicant.ZipCode 10001
Applicant.HomePhone 555-111-4444
Applicant.DateOfBirth 10/31/1980
Job.Salary 50000
Job.Position Accounts Clerk
Job.IsExecutive false
180 Human-Centric Business Process Management with WebSphere Process Server V6

8. Enter true into the FirstApproval field in the output message. This indicates that the first approval is successful.
9. Click Complete.
The user hrspecialista has completed the standard approval. This means that he cannot work on the four-eye approval. If you click My Tasks while logged on as hrspecialista, you will not see any tasks available to claim.
We now check the progress of the process:
1. Either log in to or return to a previous instance of BPC Explorer as user itsoa.
2. Click Process Instances → Started By Me. This lists the processes started by itsoa (in our case, it should list BPMTest03).
3. Click the process name BPMTest03, then click the Tasks tab.
Note: Unlike the approve executive application, the approval of a standard application is a two-part process. We need to set the FirstApproval field in this step. The FinalApproval field will be set using the four-eyes task.
As we are using the cargo pattern, we can physically set the final approval field to true here (although in a production scenario we would not allow that). This does not really matter, as the final approval value is not checked until after the four-eye check human task where it will be overwritten.
Chapter 5. Using human tasks in WebSphere Process Server 181
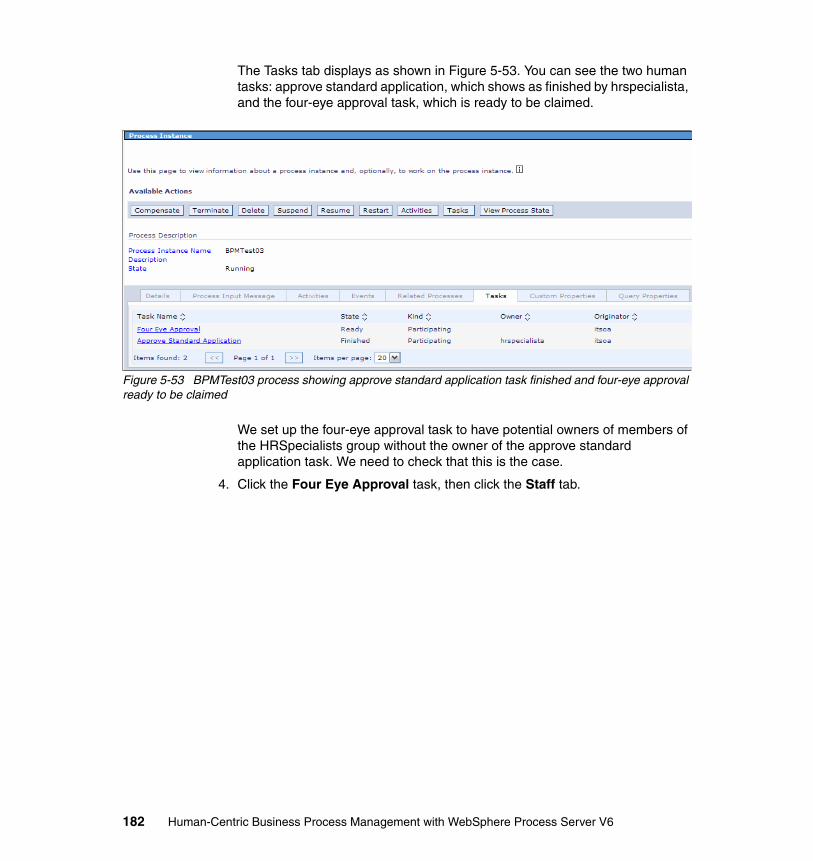
The Tasks tab displays as shown in Figure 5-53. You can see the two human tasks: approve standard application, which shows as finished by hrspecialista, and the four-eye approval task, which is ready to be claimed.
Figure 5-53 BPMTest03 process showing approve standard application task finished and four-eye approval ready to be claimed
We set up the four-eye approval task to have potential owners of members of the HRSpecialists group without the owner of the approve standard application task. We need to check that this is the case.
4. Click the Four Eye Approval task, then click the Staff tab.
182 Human-Centric Business Process Management with WebSphere Process Server V6

The staff tab shows, as in Figure 5-54. You can see that all of the members of the HRSpecialists group are shown (hrspecialistb, hrspecialistc, hrspecialistd) with the exception of hrspecialista— exactly as we wanted.
Figure 5-54 The four-eye approval task without user hrspecialista
We can now sign on as another hrspecialist (we choose hrspecialistb for convenience) and complete the task.
5. Log in to the BPC Explorer (or open a new browser session and then log in) as hrspecialistb and work on the four-eye approval task.
6. Copy the information from the task input message to the task output message. The information you need to copy is shown in Table 5-10 on page 180. Do not click complete yet.
7. Set the FirstApproval and FinalApproval fields to true.
8. Click Complete.
Eve Adams joins ITSOCorp as an accounts clerk. To check that the process has sent her an offer letter (by calling the SendOffer component) and created an employee record for her (by calling the CreateEmployeeRecords component), we check the SystemOut.log file.
Chapter 5. Using human tasks in WebSphere Process Server 183

The log looks as shown in Example 5-5.
Example 5-5 SystemOut.log SendOffer and CreateEmployeeRecords
00000095 SystemOut O ###########################################################00000095 SystemOut O # HRMSG002 - SendOffer component called #00000095 SystemOut O # This component would normally send a job offer to #00000095 SystemOut O # the applicant #00000095 SystemOut O ###########################################################00000095 SystemOut O 00000095 SystemOut O Employee Details are:00000095 SystemOut O SocialSecurity Number: 12345600000095 SystemOut O Last Name: Adams00000095 SystemOut O First Name: Eve00000095 SystemOut O Middle Initial: J00000095 SystemOut O Apartment Number:1200000095 SystemOut O Street Address:Dukes Drive00000095 SystemOut O City:New York00000095 SystemOut O State: NY00000095 SystemOut O ZipCode: 1000100000095 SystemOut O 00000095 SystemOut O Job Details Are:00000095 SystemOut O Position: Accounts Clerk00000095 SystemOut O Salary: 5000000000095 SystemOut O ###########################################################00000099 SystemOut O ###########################################################00000099 SystemOut O # HRMSG001 - CreateEmployeeRecords component called #00000099 SystemOut O # This component would normally create an employee record #00000099 SystemOut O ###########################################################00000099 SystemOut O 00000099 SystemOut O Employee Details are:00000099 SystemOut O SocialSecurity Number: 12345600000099 SystemOut O Last Name: Adams00000099 SystemOut O First Name: Eve00000099 SystemOut O Middle Initial: J00000099 SystemOut O Apartment Number:1200000099 SystemOut O Street Address:Dukes Drive00000099 SystemOut O City:New York00000099 SystemOut O State: NY00000099 SystemOut O ZipCode: 1000100000099 SystemOut O ###########################################################
Testing the fourth test case - standard application rejectedIn this test case, we reject the a non-executive application at the first approval.
184 Human-Centric Business Process Management with WebSphere Process Server V6

We use similar data to test case three, but we set the FirstApproval field to false when completing the approve standard application task.
The process should not create a four-eye approval task and the SystemOut.log file should only contain output from the SendRejection component.
Testing the fifth test case - standard application approved, four eye rejectedIn this test case, we approve the a non-executive application at the first approval, but reject it at the four-eye approval stage.
We use similar data to test case three, but we set the FinalApproval field to false when completing the four-eye approval task.
The SystemOut.log file should only contain output from the SendRejection component.
5.7 Administering the simple scenario using the BPC Explorer
In this section we explore the administration capabilities within the BPC Explorer. The BPC Explorer helps us manage business processes and is particularly useful when humans are an intrinsic part of the process.
5.7.1 BPC Explorer navigation tree
Here we describe the predefined, or out of the box, capability delivered with the BPC Explorer, with supporting examples from the hiring business scenario.
Chapter 5. Using human tasks in WebSphere Process Server 185

Process templatesThe process templates are:
� My Process Templates
From this view we can see a list of process templates. We can display information about the process template, view the structure of a process, navigate to running process instances, and start process instances. We choose View Structure as an example of the use of the My Process Templates view in Figure 5-55.
Figure 5-55 My process templates
186 Human-Centric Business Process Management with WebSphere Process Server V6

The resulting view structure for the process is shown in Figure 5-56.
Figure 5-56 My process templates - view structure
� State Machine Templates
The State Machine Templates view has exactly the same capability as My Process Templates, but for business state machines. We have not implemented any business state machines in the hiring scenario.
Process instancesThe process instances are:
� Started by me
The Started By Me view shows the process instances that we have started. From here we can monitor the progress of the process instance and list all of its activities and their related states, details of any related processes, and also tasks.
Hiring Receive
Check Grade
Approve Executive Application Approve Standard Application
Send Offer
Create Employee Records
Send Rejection Merge
Output
Four Eye Approval
Chapter 5. Using human tasks in WebSphere Process Server 187

Figure 5-57 shows an example of the activity information available from the Started By Me view.
Figure 5-57 Started By Me - activities view
188 Human-Centric Business Process Management with WebSphere Process Server V6

Another useful view is the process state, and as an example we use an active process instance of the hiring scenario. By hovering the mouse over any one of the artifacts we get a window pop up with further detailed information about that specific artifact. The example shown in Figure 5-58 is the check grade (business rule) activity.
Figure 5-58 Started by me - view process state
� Administered by me
The Administered By Me view allows us to work with processes that we are process administrator for. This means that we have an extensive list of administrative tools.
We are able to perform all of the actions that are available in the Started By Me view, and in addition we have the following actions against a process instance:
– Compensate – Terminate – Delete– Suspend
Hiring Receive
Check Grade
Approve Executive Application Approve Standard Application
Send Offer
Create Employee Records
Send Rejection Merge
Output
Four Eye Approval
NameCheck Grade
DescriptionAutomated Business Rule
State:Finished
Activated:6/5/07 3:32 PM
Chapter 5. Using human tasks in WebSphere Process Server 189

– Resume– Restart
� Critical processes
The Critical processes view allows us to work with processes that have failed activities. This view shows process instances that are in a running state that contain activities that are in a stopped state. We are able to perform all of the actions that are available in the Administered by me view.
� Terminated processes
The Terminated processes view allows us to work with those processes that are in the terminated state. We are able to perform all of the actions that are available in the Administered by me view.
� Failed compensations
This view shows any compensation actions that have failed.
� State machine instances
This view is used to work with process instances for business state machines. We have not implemented any business state machine processes as part of our hiring scenario.
Activity instancesThe activity instance is Failed activities. This view is used to work on failed activity instances.
Task templates The task template is My task templates. From this view we can see a list of task templates.
190 Human-Centric Business Process Management with WebSphere Process Server V6

We can display information about the task template and navigate to running process instances and start instances. “My Task templates” on page 191 shows an example of the available actions.
Figure 5-59 My Task templates
Task instancesThe task instances are:
� My tasks
From the My tasks view you can list all of the task instances that you are authorized to work with. You can then work on the task instance, release a task instance that you claimed, or transfer a task instance to another user.
� All tasks
You can use the All tasks view to work on tasks for which you do have access rights. The All tasks view shows all of the tasks for which you are either:
– Owner– Potential owner– Editor
You can then perform the same functions that are available from the My tasks view.
� Initiated by me
The Initiated by me view offers the same functionality as the My tasks and All tasks views, but only for those tasks that are either created or started by me.
Chapter 5. Using human tasks in WebSphere Process Server 191

� Administered by me
From this view you can administer tasks that you are authorized to administer. You can perform the following functions against a task:
– Start– Delete– Suspend– Resume– Terminate
An example of the Task instances administered by me view is shown in Figure 5-60 with the available actions highlighted.
Figure 5-60 Task instances administered by me
Additionally, for a selected work item you can see the details pertaining to the task:
– Owner– Potential owner– Originator– Administrator
192 Human-Centric Business Process Management with WebSphere Process Server V6

You can the also create new work items for a task, transfer a task, cancel a task, or delete a task. Figure 5-61 shows an example of the work items view.
Figure 5-61 Work Items view
� My escalations
The My escalations view shows all escalations for the user currently logged on.
5.7.2 BPC Explorer customization
When you are logged in to the BPC Explorer as an Administrator (such as wasadmin in our case), you can customize the BPC Explorer view.
Chapter 5. Using human tasks in WebSphere Process Server 193

We are able to customize the views that we see in the navigator (Figure 5-62).
Figure 5-62 Customize - views to display in the navigation tree
194 Human-Centric Business Process Management with WebSphere Process Server V6

We are also able to define a default login view. In Figure 5-63 we see the possible options for the default login view.
Figure 5-63 Customize - Select login view
We are able to define customized views for:
� Process templates� Process instances� Activity instances� Task templates� Task instances
They can also be tailored to meet our specified search criteria and to list our preferred properties.
Chapter 5. Using human tasks in WebSphere Process Server 195

In this example we create a customized view for our hiring process template. The definition of views for process templates is shown in Figure 5-64. We select all started instances of our hiring process template.
Figure 5-64 Define views for process templates - search properties
Once we have saved this view we see it in our Process Templates view, and if we use this view we see just the hiring process template we specified. This means that, using the customization described so far, we can offer the user a view of only the process templates we wish them to have access to.
196 Human-Centric Business Process Management with WebSphere Process Server V6

The customized process template view, hiring, is shown in Figure 5-65.
Figure 5-65 Customized process template view
If we have a large number of process templates we can use the custom properties of the process template search to further refine our selection. In the list properties for the search we are also able to tailor what view of the process template information we present to the user.
As another example, we can generate a custom view for process instances. Here we define a custom view, again called hiring, but this time it will show in the Activity Instances panel on the left. This view will show all staff activities for the hiring process, in all states.
Chapter 5. Using human tasks in WebSphere Process Server 197

The definition of the hiring activity instance view is shown in Figure 5-66.
Figure 5-66 Define views for activity instance templates - search properties
198 Human-Centric Business Process Management with WebSphere Process Server V6

For this customized view we have also specified exactly which columns to list in our view, and in which order. The selected columns for the list properties are shown in Figure 5-67.
Figure 5-67 Define views for activity instance templates - list properties
Chapter 5. Using human tasks in WebSphere Process Server 199

Once we have saved this new view we see it in the panel on the left of the BPC Explorer, and when we run it we see only staff activities for the hiring process. The properties are listed in our revised column order, as shown in Figure 5-68.
Figure 5-68 Hiring activity instance templates - results
200 Human-Centric Business Process Management with WebSphere Process Server V6

Only administrators are able to maintain these customized views. If we log on as a non-administrator user we can see the customized views and use them, but we are not able to maintain or delete them. If we do have administrator rights the following window shows how to maintain the customized views. We click the icon to the right of the customized list name and then a menu pops up. The maintenance menu is shown in Figure 5-69.
Figure 5-69 Customized views - how to delete and maintain views
So the customized view for my group of users could now look like Figure 5-70.
Figure 5-70 BPC Explorer - customized view
Chapter 5. Using human tasks in WebSphere Process Server 201

202 Human-Centric Business Process Management with WebSphere Process Server V6

Chapter 6. Human task features introduced in WebSphere Process Server V6.0.2
In this chapter we discuss more advanced aspects of using human tasks with WebSphere Process Server, including:
� Using the Human Task Manager Client Generator� Using escalations� Using suspensions (follow-ups) - placing tasks on hold� Ad-hoc tasks� Using ad-hoc tasks - subtasks� Using ad-hoc tasks - follow-ons� Using APIEvents� Using notifications� Using staff query post-processing
Each of these areas can be considered in its own right. It is not necessary to read the whole chapter to understand a specific function area.
This chapter assumes the availability of a secured WebSphere Process Server with the human task container configured, linked to an LDAP directory provider, and running the ITSOCorp Hiring business process as described in Chapter 5, “Using human tasks in WebSphere Process Server” on page 93.
6
© Copyright IBM Corp. 2007. All rights reserved. 203

6.1 Using the Human Task Manager Client Generator
In this section we discuss the use of the Human Task Manager client generator included with WebSphere Integration Developer V6.0.2. We generate Web clients for the human tasks used in our sample scenario and show the difference in functionality between the generated clients and the BPC Explorer.
6.1.1 Why use the generator
When using previous versions of WebSphere Integration Developer and WebSphere Process Server, it was up to the developer to create a human task client from scratch using the human task API if a non-BPC Explorer client was required. All of the coding had to be done by hand or using non-WebSphere Integration Developer tooling.
In Version 6.0.2 of WebSphere Integration Developer, a generator is included with the toolset to automatically create JSF-based Web clients. This allows for rapid prototyping of human task processes and produces easy-to-use clients for those who do not wish to use the BPC Explorer client.
6.1.2 Creating the clients for our sample scenario
To demonstrate the use of the generator, we use our sample ITSO Corp hiring scenario developed in Chapter 5, “Using human tasks in WebSphere Process Server” on page 93.
If you did not follow our example in the previous chapter and build your own version of the scenario, we have included our version in the additional material provided with this book for you to use (see Appendix A, “Additional material” on page 739).
In our example scenario, we have three human tasks that need clients:
� Approve executive application� Approve standard application� Four-eye approval
Using the generator, we can create one client for all three human tasks, or generate one client per task. In this example, we choose to generate one client for all three tasks.
204 Human-Centric Business Process Management with WebSphere Process Server V6

Generating the Web clientTo do this:
1. Open your integration module project that contains your human tasks in WebSphere Integration Developer (for our example scenario, this is the HRMod module).
2. Right-click the HRMod module then click Generate User Interfaces (Figure 6-1).
Figure 6-1 The Generate User Interfaces menu option
Note: It is possible to generate and use multiple Web clients for each human task. You may wish to provide a choice, to provide clients with different functionality for different roles or simply to skin clients to enable them to be re-used with a different look and feel. You can also use generated clients at the same time as the BPC Explorer.
Chapter 6. Human task features introduced in WebSphere Process Server V6.0.2 205

The User Interface Wizard for Human Tasks dialog appears (Figure 6-2).
Figure 6-2 The User Interface Wizard for Human Tasks dialog
All of the tasks defined in the module are listed, including which type of task they are. By default, all of the tasks are selected (checked). Leave these checked, as we wish to generate one client for all of our tasks.
Note: The generator can build clients that can handle both stand-alone (SCA) and in-line (BPEL) tasks.
206 Human-Centric Business Process Management with WebSphere Process Server V6

3. Click Next. The JSF Client Configuration dialog appears (Figure 6-3).
Figure 6-3 The JSF client configuration dialog
We have selected the which human tasks we want to include in our client. We now need to name our client and choose how it will look.
4. Enter HRWebClient into the Name of dynamic web project field. This is the name of the WebSphere Integration Developer project that will be generated to hold the Web client artifacts.
5. Click Browse and select a .jpg file to use as a company logo. This step is optional, as the client logo is not a mandatory part of the client. You may use our example logo supplied with the additional material included with this book if you do not have a suitable .jpg file.
Note: Do not use a .jpg file with spaces in the file name as the company logo. Otherwise, the image will not be displayed correctly.
Chapter 6. Human task features introduced in WebSphere Process Server V6.0.2 207

The Client location section allows us to choose whether we wish the client to be local to WebSphere Process Server (that is to say, that it will run on the same server or remote) running on a different server.
Depending on your topology, you may wish to run your Web clients that provide the GUI on a presentation layer, separated from the BP and HTM containers of WebSphere Process Server.
6. As our example architecture only has one WebSphere Process Server instance, we click the tasks reside on the same server (Local Client View) radio button in this section.
The Style Selection section offers a choice of two predefined styles, together with previews of both. The styles only affect the way that the client looks. The functionality is the same no matter which style is selected.
7. Select the style you prefer from the Style list box. We chose the Cool Blue™ style for our example.
8. Click Finish to generate the client (the generation process may take a few seconds).
9. The Client Generation Complete alert is displayed (Figure 6-4).
Figure 6-4 The client generation completed alert
This alert gives instructions as to how to deploy the Web client from within WebSphere Integration Developer to an attached WebSphere Process Server, usually the Integrated Test Environment. As we are using a stand-alone secured server, we deploy the project differently. Note also that
Note: The Provider URL field is only used if the “tasks reside on different servers / remote client view” option is selected. If you select this option, you should enter the IP address of the WebSphere Process Server that runs your human task container here, together with its bootstrap iiop port. This enables the generated client to locate the correct server.
208 Human-Centric Business Process Management with WebSphere Process Server V6

the URL for the client is not localhost, but is the IP address of the WebSphere Process Server itself.
10.Click OK.
The Web client is now generated as a WebSphere Integration Developer project. Next we must deploy it to WebSphere Process Server.
Deploying the Web client to WebSphere Process ServerThe generated Web client is not visible in WebSphere Integration Developer in the Business Integration view of the Business Integration perspective. This is because it is a Web project and not a business integration project. To view the project, we switch to the Physical Resources perspective.
1. Click the menu option Window → Show View → Physical Resources. You may see the alert shown in Figure 6-5. If you do, click OK. The warning appears as we are moving from working with business integration artifacts to Web page artifacts. Do not let the advanced users message keep you from using the client generator.
Figure 6-5 The Physical Resources View warning alert
The Physical Resources view is shown, as in Figure 6-6.
Figure 6-6 The Physical Resources view with the generated Web projects
You can see that we have two projects named HRWebClient and HRWebClientEAR. These projects are not visible in the Business Integration view. If your project seems to disappear at any point, check which view you are in by looking at the tab names.
Chapter 6. Human task features introduced in WebSphere Process Server V6.0.2 209

If we did not have security switched on our WebSphere Process Server, we could simply export the project as an .ear file as it is and deploy it. However, as our server is secured, we need to update our Web client project to describe how we wish it to interact with the WebSphere Process Server security configuration.
2. To configure the security information for our Web client double-click the HRWebClientEAR project to expand the project tree, then expand the META-INF folder (Figure 6-7) to show the application.xml file.
Figure 6-7 The expanded HRWebClientEAR project showing the application.xml file
The application.xml file is known as the Enterprise Application Deployment Descriptor, which contains information used when deploying the application to the server, rather than details of the application itself.
You do not need to understand everything that is contained in this file to follow our example.
The deployment descriptor contains the security configuration for our application (HRWebClient). We need to edit this before we deploy our
Note: You can switch between the Business Integration view and the Physical Resources view at any time just be clicking on the appropriate tab. The views both look at the same physical file system in your workspace. Any changes you make in one view will be reflected in the other.
Note: If you forget this step, the Web client will appear to run and will even prompt you to log in, but it will then issue a security error and not let you proceed further.
210 Human-Centric Business Process Management with WebSphere Process Server V6

application so that we integrate correctly with WebSphere Process Server’s security settings.
3. To edit the deployment descriptor, double-click the Application.xml file. The Application Deployment Descriptor editor opens (Figure 6-8).
Figure 6-8 The HRWebClientEAR deployment descriptor
Note: If you regenerate the Web client for any reason, you will need to re-apply the security configuration settings to the deployment descriptor, as they will be overwritten by the generator tool.
Chapter 6. Human task features introduced in WebSphere Process Server V6.0.2 211

4. Either click the Security tab or click Security Rules → Details. The security tab is displayed (Figure 6-9).
Figure 6-9 The deployment descriptor security tab
In our example, we wish to give access to our Web client to all authenticated users, that is, all of the users that we have defined in our LDAP structure. This is because, for simplicity, we have generated a single Web client for all of our human tasks.
We could choose to generate multiple clients, in multiple projects, and give them each separate security settings, for example, by group. The Security tab of the deployment descriptor allows multiple security configurations, depending on your needs.
By default, the Web client creates a single security role. We configure this role to be used by all authorized users. As this role is predefined by the generator, we can use the Gather button to add the role to the roles list.
212 Human-Centric Business Process Management with WebSphere Process Server V6

5. Click Gather. The CustomClientUser role is added to the security roles list (Figure 6-10).
Figure 6-10 The CustomClientUser role added to the security tab
6. Click the CustomClientUser role to select it. The previously greyed-out WebSphere Bindings section is enabled and the name and description of the CustomClientUser are filled in.
Chapter 6. Human task features introduced in WebSphere Process Server V6.0.2 213

7. Check the All authenticated users check box (Figure 6-11).
Figure 6-11 Checking the All authenticated users check-box
All authenticated users (that is to say, all those that are defined in our LDAP structure) are now assigned to the CustomClientUser role, and are allowed to run the Web-client application.
8. Save the changes to the deployment descriptor (Ctrl+S) and close the editor.
214 Human-Centric Business Process Management with WebSphere Process Server V6

We are now ready to deploy the Web client to the server. There are a number of ways to do this and you should choose your preferred method if you have one. If you are not familiar with deploying .ear files to WebSphere Process Server, we list one method that you can use.
To deploy our client to WebSphere Process Server, we did the following:
1. In WebSphere Integration Developer, click File → Export.
Note: The security permissions for our Web client do not override the security and staff verb permissions we defined for our business process and our human tasks.
Our Web client is a separate application in its own right and communicates with the WebSphere Process Server human task engine through the human task API, which requires security permissions itself.
Even if you allow a user access to the Web client, that user must still have permission to perform the desired action on the human task within WebSphere Process Server.
Using our process as an example, we have allowed any authenticated user access to the Web client application, but only HRSpecialist group members are allowed to approve standard applications. If a user who is not a member of the HRSpecialist group attempts to view the ApproveStandardApplication tasks, the WebSphere Process Server human task manager security will filter the request and return an empty task list.
Chapter 6. Human task features introduced in WebSphere Process Server V6.0.2 215

2. In the Export dialog, click EAR file then click Next (Figure 6-12).
Figure 6-12 The Export dialog
Note: You may have more or fewer options in the list of exports than in our figures. This depends on your WebSphere Integration Developer configuration. It does not matter how many options you have, as long as you can see and select the EAR file option.
216 Human-Centric Business Process Management with WebSphere Process Server V6

3. We are creating an .ear file to deploy from the HRWebClientEAR project. In the EAR Export dialog (Figure ), click the HRWebClientEAR project from the EAR Project list box.
4. Enter a directory location for the file to be exported to and a file name into the Destination field. We entered HRWebClient.ear.
Figure 6-13 Exporting the HRWebClient.ear file
5. Click Finish.
6. The HRWebClient.ear file can now be installed from the WebSphere Administrative Console. Do this using the Applications → Enterprise Applications → Install button. If you are unfamiliar with this, simply browse to the location of your .ear file and take all of the default options using the Next and Finish buttons.
7. Start the application from theWebSphere Administrative Console Applications → Enterprise Applications page by checking the check box next to the application name and clicking Start.
Note: Your path in the destination field will differ to that shown in our figure.
Chapter 6. Human task features introduced in WebSphere Process Server V6.0.2 217

Now that we have installed and started the Web client, we can use it with our example business process, human tasks, and test cases from Chapter 5, “Using human tasks in WebSphere Process Server” on page 93.
6.1.3 Testing our generated Web client
In this section we use our generated Web client to claim and complete human task instances from our business process. We will use test case 1 from 5.6.10, “Testing the process with the BPC Explorer” on page 165, which will create an approve executive application human task instance for us.
Our generated Web client is not a substitute for BPC Explorer. For example, it cannot start BPEL processes for us.
1. Using BPC Explorer and logged in as user itsoa, create a new process instance of the hiring process using the test case 1 data.
This will create the approve executive application human task, which needs to be claimed and completed by user managera as a member of the hiring managers group. To claim and complete this human task, we use our newly generated Web client.
2. Open a Web browser and navigate to the Web address of the generated Web client. In our example, this is http://ProcessServerName:9080/HRWebClient. The Web login page appears, as shown in (Figure 6-14).
Figure 6-14 The Web client login page
Troubleshooting tip: One of the most common reasons for a newly deployed application to appear not to work is for it to have been installed but not started. If your Web client appears not to be working, check that it has a green arrow next to its name in the Applications → Enterprise Applications page in the WebSphere Administrative Console.
218 Human-Centric Business Process Management with WebSphere Process Server V6

3. Enter the user name and password for test case 1 (user managera) and click Login. (The password is whatever is defined for user managera in your LDAP structure.)
4. The business user client opens (Figure 6-15).
Figure 6-15 The business user client
We want to show the list of tasks that we, as managera (shown in Figure 6-15), are potential owners for but have not yet claimed.
Note: Your browser may cache the login from the previous session. If you do not get prompted for a user name and password, confirm that you are logged in as managera. If you are logged in as another user, log out and log back in again as managera.
Chapter 6. Human task features introduced in WebSphere Process Server V6.0.2 219

5. Click Open. The My ToDo’s > Open page displays (Figure 6-16).
Figure 6-16 The My ToDo’s > Open page
We can see that the instance of the ApproveExecutiveApplication human task from our process has been assigned to us.
220 Human-Centric Business Process Management with WebSphere Process Server V6

6. Click ApprovedExecutiveApplication to show the task details. The task claim page appears (Figure 6-17) asking whether we wish to claim this task. Claiming a task is the equivalent of the work on action in the BPC Explorer.
Figure 6-17 The task detail page with the claim button
7. Click the Claim button. The task page opens showing both the existing input data and fields for us to enter the output data. Note how, for the output fields, boolean values have been transformed into check boxes.
Chapter 6. Human task features introduced in WebSphere Process Server V6.0.2 221

We still need to copy the data from the input to the output fields (Figure 6-18) in the same way as we did when using the BPC Explorer. In a real application we would write code to ensure that the data was pre-filled.
When we have done this we can complete the task or, if we wish, we can delay making the decision about whether to approve or not by using the save facility. We demonstrate the save facility in this example.
Figure 6-18 The output data copied from the input data (this is not the full page, the image has been cropped)
8. Click Save to save the data. The task is now saved and is still claimed by user managera. The task is now not listed under the open view. It is only visible using the claimed view.
222 Human-Centric Business Process Management with WebSphere Process Server V6

9. Click Claimed, then click the task name in the task list. The saved values from the output message are displayed.
10.Check the First Approval check box, then click Complete to complete the task.
The test is complete. If you wish to check the results in detail or run the other tests, refer to the test plan in 5.6.10, “Testing the process with the BPC Explorer” on page 165.
The generated Web client works in the same way as the BPC Explorer. It is possible to use both clients at the same time for different users. The effect on the human task instance is the same even though the interface is different.
6.2 Using escalations
An escalation is an alert that can be raised automatically when a human task has not been actioned in the specified amount of time. Escalations for human tasks are optional but are very useful to ensure that tasks do not go overdue or get forgotten.
In this section we add an escalation to our business process. We discuss how escalations are defined and managed and how to incorporate them into our example scenario so that you can try them out for yourself.
In our example, we send an e-mail as a notification that a task has been escalated. If you wish to follow our example, you will need an SMTP e-mail server, together with an e-mail address that you can send e-mail to. You will also need an e-mail client to retrieve the e-mail so that you can view the escalation.
If you do not have an e-mail server, you can still follow our example by sending an escalation notification as a work item rather than an e-mail. The effect is the same, it is just the transport that is different.
Note: The escalation time values in WebSphere Process Server human tasks are not the same as the task duration values. Although a human task may exceed its duration and so become due, this will not automatically trigger an escalation event if no escalation details have been defined.
If you wish a task to be escalated, you must explicitly define an escalation for it.
Chapter 6. Human task features introduced in WebSphere Process Server V6.0.2 223

6.2.1 Why use escalations
Escalations are used to allow WebSphere Process Server to automatically request action if a task has not been actioned in a specified amount of time. A typical example is to escalate a task to a supervisor or line manager if it is not claimed and completed in a certain amount of time.
Escalations can be set up to escalate a task to users or groups defined by any of the staff verbs and can use varying durations.
Escalations can be set up for tasks in any of the following three ways:
� Ready - If the task is not claimed in a certain time, it is escalated.
� Claimed - If a task is claimed, but not complete in a certain time, it is escalated.
� Subtask - If the subtasks of a task are not complete in a certain time, the task is escalated. Note that it is the parent task that is escalated, not the subtasks. For more information about subtasks, see 6.5, “Using ad-hoc tasks - subtasks” on page 259.
Tasks can have multiple escalations defined for them, including multiple escalations for each of the three escalation types. For example, if a task is not claimed within 24 hours, we could escalate it to supervisor. If it is still not claimed in 48 hours, we trigger another escalation to send it to a manager.
6.2.2 Adding an escalation to our scenario
In our example process, a standard application is processed by people who are members of the HRSpecialists group. Currently, there is no limit to the time that
Important: An escalation is raised for a task instance, for example, via an e-mail. Nothing actually happens to the task itself. An escalation does not reassign a task to the person to whom the escalation is sent. For example, if an employee is late with a human task assignment and the task is escalated to their manager, the manager may re-prioritize the employees’ work to allow them time to finish the task, or the manager may re-assign the task to another employee. It is rare that a manager would complete the task themselves.
Another way to look at this issue is through the value of the potential owner field of a human task. If a manager wished to work on the task himself, he would have to be in the potential owner list. This would mean that he would see all of his subordinates’ tasks in his own task list as well as their own. It is more typical to have a manager as the potential administrator of the task so that they can reassign as required.
224 Human-Centric Business Process Management with WebSphere Process Server V6

an application can wait to be processed. We add a condition that if an application has not been worked on in 24 hours, the application will be escalated to the HR manager by sending him an e-mail notifying him that action is required.
Given that we need to test the escalation process, for the purposes of our example, we reduce the time for escalation from 24 hours to two minutes, to avoid a long wait between test runs.
Configuring escalation for Approve Standard Application taskOur standard application task is assigned to the HRSpecialist group. We add an escalation so that if it is not claimed within two minutes, it is automatically escalated to a member of the HRManagers group.
We need to create an escalation that fires when the task is in the ready state before it is claimed. If the task is claimed within two minutes, there will be no escalation.
We create a ready escalation as follows:
1. Open the ApproveStandardApplication human task within the hiring business process.
Chapter 6. Human task features introduced in WebSphere Process Server V6.0.2 225

2. Click Escalation Settings → Ready, then click the + icon. A default escalation named Escalation1 is created underneath the Ready icon (Figure 6-19).
Figure 6-19 The Escalation1 ready escalation
If the Description tab is not highlighted. Click it to bring it to the front.
3. Enter a description into the Name field. We chose 2MinuteTimeout.
4. Click the Details tab.
226 Human-Centric Business Process Management with WebSphere Process Server V6

5. Enter the following into the fields listed in Table 6-1. The page looks like Figure 6-20 on page 229.
Table 6-1 The 2MinuteTimeout escalation values
Field Value in our scenario
Expected task state Claimed
This is the state that the task instance should be in when the escalation time is up. If it is not in this state, it will be escalated. For our example, if the task is not in the claimed state within 2 minutes, it will be escalated.
Duration until escalated 2minutes
This is the duration that WebSphere Process Server waits for the task instance to move out of the ready state. If the task instance is still in the ready state after this duration, it will be escalated.
There is no prompt box for the duration field. Some examples for values are shown in the shaded box below this table.
Important: 1 minute is entered as 1minutes with an s even though the duration is singular.
Notification type E-mail
This is how we wish to notify to a user that a task has been escalated to them. As the HRManager does not normally action human tasks, we will send an e-mail.
If the HR Manager usually actions tasks, it may be more appropriate to add the escalated task to his task list.
Alternatively, a custom notification can be developed. We discuss this further in 6.8, “Using notifications” on page 319.
If you do not have an SMTP e-mail server available to you and wish to follow our example, you may wish to set this value to work item. This will create an entry in the HRManager’s task list instead of sending an e-mail.
Chapter 6. Human task features introduced in WebSphere Process Server V6.0.2 227

E-mail message Default Message
We set this to the default message here. In , “Customizing the escalation e-mail” on page 241 we show you how to customize the e-mail message.
Duration until repeated Blank
If the first escalation produces no results, we can ask WebSphere Process Server to escalate again. For our example, a single escalation is sufficient.
Increase Priority No
In our example, we are not using task priorities, so we set this to no.
Note: The Duration until escalated field uses the WebSphere calendar syntax. A full discussion of this is outside the scope of this chapter, but the following may be helpful:
� There is no space between the number and the word, for example, 10minutes not 10 minutes.
� There is no national language support. The words are always in English.
� Duration words are seconds, minutes, hours, days, months, and years.
� Duration words are always plural: 1hours, not 1hour (note the s).
� You can have multiple words: 1hours 25minutes equals 85 minutes.
� There is no build-time validation. If your escalations are not working, this is a good place to start de-bugging.
� Although seconds can be specified, the escalation scheduler is not designed to be accurate to one second. We recommend that you keep your escalation durations to multiples of one minute.
Field Value in our scenario
228 Human-Centric Business Process Management with WebSphere Process Server V6

Figure 6-20 The escalation details tab
6. Click the Staff Group tab.
7. We wish to escalate to the HRManagers group, so we enter the full LDAP DN details for that group here, as shown in Figure 6-21. Enter cn=HRManagers, cn=Groups, o=itsocorp i n the Group Name field. Enter true in the IncludeSubgroups field.
Figure 6-21 The Staff Group tab for the 2MinuteTimeout escalation
Chapter 6. Human task features introduced in WebSphere Process Server V6.0.2 229

As we are escalating to the HRManager group, we wish to allow them to administer the task. We need to add the HRManager group as potential administrators.
8. Click Receiver Settings and then the administrator icon to add a potential administrator.
9. Click Administrator under the Staff Settings heading.
10.Select Group Members from as the Staff Group (Verb) list box.
11.Enter cn=HRManagers, cn=Groups, o=itsocorp in the Group Name field. Enter true in the IncludeSubgroups field, as shown in Figure 6-22. These are the same values that we entered in the 2MinuteTimeout escalation.
Figure 6-22 Adding HRManagers as administrators
Note: One of the most common ways to escalate is to escalate to a person’s manager. To do this, WebSphere Process Server provides the manager of employee verb.
As the task has not been claimed, we do not know whose manager to escalate to. Hence, we escalate to the manager of the group.
If we were adding a claimed escalation, we could use the context variables to escalate to the manager of the task owner, in a similar way that we used the task owner variable to create the four-eye task allocation.
Also, we can still escalate using manager of employee with claimed SCA (standalone) human tasks as, although the task has no visibility of the BPEL process context variables, it still has visibility of its own context variables, for example, task owner.
230 Human-Centric Business Process Management with WebSphere Process Server V6

12.Save the updated human task, rebuild the project, and redeploy to WebSphere Process Server.
6.2.3 Configure WebSphere Process Server to send e-mail notifications
We have configured our example escalation to send e-mail notifications. We must therefore configure WebSphere Process Server to allow it to send e-mail via an appropriate e-mail server.
To send e-mail, WebSphere Process Server uses SMTP. We must add the address of the SMTP server that we wish to use to the human task container configuration.
Configuring the human task containerWe first need to configure the human task container:
1. From the WebSphere Administrative Console, click Servers → Application Servers.
2. A list of servers is shown. Click your server name (in our case it is server1).
Chapter 6. Human task features introduced in WebSphere Process Server V6.0.2 231

3. Click Configuration → Human task container settings → Human task container (Figure 6-23).
Figure 6-23 The Human task container hyperlink (image cropped to fit on page)
232 Human-Centric Business Process Management with WebSphere Process Server V6

The Human task container configuration page is shown (Figure 6-24).
Figure 6-24 Configuring the human task container settings
4. Set the fields on the page as detailed in Table 6-2.
Table 6-2 The human task container field settings
Field Value
E-mail session JNDI name This is a read-only field, but you need to remember the name for when we configure the e-mail session.
Chapter 6. Human task features introduced in WebSphere Process Server V6.0.2 233

5. Click Apply.
6. Click Save to apply the changes and then Save to save them to the master configuration.
Enable Common Event Infrastructure logging
We are not using CEI in this book, so we set this to false (unchecked).
Enable audit logging true (checked)
We wish to log the audit data from the human tasks, so we set this to true.
Sender e-mail address [email protected]
This is the sender e-mail address that will appear in the from field of escalation e-mails.
Escalation URL prefix
Task URL prefix
Administrator URL prefix
Process Explorer URL prefix
Staff query refresh schedule
0 0 1 * * ?
This controls how often the staff query refreshes. We leave this at the default value, which is midnight of the first of each month.
Timeout for staff query result
3600
The time before staff queries expire in seconds. We leave this at the default of 1 hour.
Enable group work items true (Checked)
This enables the group work items.
Note: Enable group work items check box. Any applications that were written for a version before Version 6.0.2 that use one or both of the interfaces com.ibm.bpe.api.StaffResultSet or com.ibm.task.api.StaffResultSet should be modified in order to cope with group work items before group work items are enabled.
Field Value
234 Human-Centric Business Process Management with WebSphere Process Server V6

You need to restart WebSphere Process Server for the changes to take effect. You can do this after you have added the SMTP configuration if you prefer.
Adding the SMTP (e-mail) server configuration to WebSphere Process Server
To do this:
1. In the WebSphere Administrative Console, click Resources → Mail Providers → Built-in Mail Providers → Mail Sessions.
Chapter 6. Human task features introduced in WebSphere Process Server V6.0.2 235

2. Click the New button. The Mail Providers → Built-in Mail Provider → Mail Sessions → New page appears (Figure 6-25).
Figure 6-25 Configuring the ITSOMail session
236 Human-Centric Business Process Management with WebSphere Process Server V6

3. Fill in the fields as shown in Table 6-3. The values shown are those for our example installation and scenario. Yours may differ according to your WebSphere Process Server installation topology.
Table 6-3 The mail session fields for ITSOMail
Note: You may see the message:
Additional Properties for this object will not be available to edit until its general properties are applied by clicking on either Apply or OK.
This is just an informational message.
Field Value
Scope cells:WPSNode01Cell:nodes:WPSNode01
This will be read-only but should be correct.
Name ITSOMail
This is the administrative name - the one shown in the WebSphere Administrative Console.
JNDI Name mail/HTMNotification_WPSNode01_server1
This is the name that is used internally by WebSphere Process Server. This is the value that is linked to the human task configuration. See Figure 6-24 on page 233 and Table 6-2 on page 233
Description ITSO Mail provider SMTP
Any description is fine here
Category We leave this blank. This is an optional field if you wish to group mail sessions, The groups are user-defined as free text.
Mail Transport Host smtp.itso.ral.ibm.com
This is the IP address of your SMTP mail server. You should use your own IP address here, not ours.
Chapter 6. Human task features introduced in WebSphere Process Server V6.0.2 237

4. Click Apply.
5. Click Save to apply the changes and click Save to save them to the master configuration.
The mail session is now created, which links the SMTP mail server to WebSphere Process Server.
6. Restart WebSphere Process Server so that the changes take effect.
Mail Transport Protocol smtp
This is the only value available. SMTP is a standard mail transmission protocol.
Mail Transport User ID This is only required if your SMTP server requires user ID/password authentication, which is not very common. If in doubt, try leaving this blank.
Note that this is not the user ID that the e-mail will be sent from. That is set in the Mail From field.
Mail Transport Password Only enter a password here if you have filled in the Mail Transport User ID field.
Enable strict Internet address parsing
False (unchecked)
This is only used if you need to ensure that recipient addresses conform to the RFC822 mail standard.
Mail from [email protected]
This is the address that the mail is sent from— the value in the from field of the e-mail.
Mail store host Used when retrieving mail. We are only using WebSphere Process Server to send mail, so we do not need to fill this in.
Mail store protocol This is only required for receiving mail and not for sending mail, so we leave this blank.
Mail store user ID This is only required for receiving mail and not for sending mail, so we leave this blank.
Mail store password This is only required for receiving mail and not for sending mail, so we leave this blank.
Enable debug mode False (unchecked).
Field Value
238 Human-Centric Business Process Management with WebSphere Process Server V6

6.2.4 Testing the escalation process
To test the escalation process we use test case 4, as it is the simplest standard approval case. We start the process, review the human tasks, wait 2 minutes, and review the escalation. When the task is escalated, an e-mail is sent to the HRManager group.
Creating an escalated task instanceTo do this:
1. As user itsoa, start a new instance of the hiring process with the test case 4 data (Eve Adams, SSN 123456) using the BPC Explorer.
2. As user HRSpecialista, check that the human task has been created and is visible. You can use either the BPC Explorer or the generated Web client. Do not claim the task.
3. Wait at least 2 minutes for the task to escalate.
4. As user itsoa in the BPC Explorer, check the state of the task by clicking Task Instances → Administered by me.
Chapter 6. Human task features introduced in WebSphere Process Server V6.0.2 239

5. Click the task name, then the Details tab. The task should be escalated, as shown in Figure 6-26.
Figure 6-26 The escalated Approve Standard Application task
The task has been escalated. We can now check to see whether the HRManager has been informed by e-mail.
The e-mail has been sent to the group HRManagers. The only member of HRManagers in our LDAP directory is managere. The e-mail address of managere in our example is held in the LDAP record as mail: [email protected]. We therefore need to check the [email protected] inbox for new e-mails.
Note: If the task is not escalated, pressing the refresh button on the Web browser will not update the status. You must refresh the task list and then click the task name again to show the updated status.
Note: If you have multiple group members, the e-mail will be sent to all of them.
240 Human-Centric Business Process Management with WebSphere Process Server V6

We do not discuss the details of setting up an e-mail client here. You should use your preferred client. If you are not the administrator of your e-mail server, you may wish to have the escalation e-mails sent to your own mail account to make it easier for you to run our scenario.
6. Check the e-mail for the managere inbox. You should see an e-mail similar to Figure 6-27.
Figure 6-27 The standard escalation e-mail
Obviously, we should be able to make the e-mail look nicer than that. Using WebSphere Process Server V6.0.2, we can.
Customizing the escalation e-mailThe standard escalation e-mail can easily be personalized to either your preferences or the standards of your organization. To personalize the e-mail, we edit the escalation in the human task. Each escalation can have a different e-mail.
1. As we did in 6.2.2, “Adding an escalation to our scenario” on page 224, open the escalation details tab, as in Figure 6-20 on page 229.
Note: The reason that the %htm.task.description% and %htm:escalation.DisplayName% variable names are shown and not their values is that they are not defined or left blank.
Chapter 6. Human task features introduced in WebSphere Process Server V6.0.2 241

2. Click E-Mail Message → Edit. The e-mail definition editor opens (Figure 6-28).
Figure 6-28 The e-mail definition editor
The e-mail is written in HTML format (the same language that is used to write Web pages). WebSphere Integration Developer also allows you to use predefined variables to make the e-mail relevant to the task that it refers to. These variables are enclosed in percentage signs (%).
To insert a variable, place the cursor where you want it to be inserted, click the Add Variable button, and select the desired variable. Alternatively, you can type the variable name directly.
242 Human-Centric Business Process Management with WebSphere Process Server V6

You can edit the HTML directly in the editor itself, or cut and paste from another editor if you prefer. The Add Variable button can be used to prompt for WebSphere Integration Developer variable names.
The editor also provides a Preview tab. This shows what the e-mail will look like when the recipient sees it. Note that when using the Preview tab, the field names will not be resolved and their names will be shown.
We have provided a sample customized e-mail in Example 6-1. Customize it as you like.
Example 6-1 Our sample escalation e-mail
<html><head>Subject: Escalation of task %htm.task.name% to you</head><body lang=EN-US><div><p>The task '<b><span style='font-size:14.0pt'>%htm:task.name%</span></b>' with id '<b><span style='font-size:14.0pt'>%htm:task.instanceID%</span></b>' has been escalated to you because the expected state '<b><span style='font-size:14.0pt'>%htm:escalation.expectedTaskState%</span></b>' has not been reached in time. </p>
<p>This task is usually assigned to the HR specialists team. The list of people who are eligible to work on this task are: '%htm:task.potentialOwners%' </p>
<p>The task has the following description: </p><p><span style='font-size:14.0pt;color:red'>%htm:task.description%</span></p>
<p>The Applicant's details are:</p><DL>
Note: In addition to direct task-related variables, such as owner, the e-mail editor also allows access to the contents of the task message. In our case, this allows us to add the details of the application into the e-mail message.
To use this facility, click Add Variable → Part of the input variable of this human task and click the required part of the message.
For information about all task variables, refer to:
http://publib.boulder.ibm.com/infocenter/dmndhelp/v6rxmx/index.jsp?topic=/com.ibm.wbit.help.bpel.ui.doc/concepts/crepstff.html
Chapter 6. Human task features introduced in WebSphere Process Server V6.0.2 243

<DT>Social Security Number</DT><DD>'%htm:input.\Input/Applicant/SSN%'</DD><DT>First Name</DT><DD>'%htm:input.\Input/Applicant/FirstName%'</DD><DT>Last Name</DT><DD>'%htm:input.\Input/Applicant/LastName%'</DD></DL>
<p>The position details are:</p><DL><DT>Job Title</DT><DD>'%htm:input.\Input/Job/Position%'</DD><DT>Salary</DT><DD>'%htm:input.\Input/Job/Salary%'</DD></DL>
<p><span style='font-size:14.0pt;color:green'>The name of the Escalation is: %htm:escalation.name% and the escalation description reads: %htm:escalation.description%</span></p><p> </p><p><a href="%htm:escalation.instanceID%">Escalation details</a></p>
</div></body></html>
6.3 Using suspensions (follow-ups) - placing tasks on hold
Since V6, WebSphere Process Server allows you to suspend a human task. The task stays suspended until it is manually resumed.
In addition, since V6.0.2, WebSphere Process Server allows you to suspend a task until a predefined time, after which it will automatically resume.
6.3.1 Why use suspensions
Suspending a task is used when it cannot be completed at the time WebSphere Process Server creates it and places it into the ready state.
If a user has a large task list with many tasks that are ready but cannot be worked on immediately for business reasons (for example, not having the appropriate
Note: Even when a task is suspended, the escalation and expiration timers for the task are still active. If you have a task that escalates after five minutes and you suspend it for ten, it will still escalate whether suspended or not.
244 Human-Centric Business Process Management with WebSphere Process Server V6

data available), then the user must keep an alternate list outside of human task manager as to which tasks are due and which are not.
Another alternative is that the task needs actioning at a specific point in time. For example, in our scenario, when a manager calls a referee to take up an employment reference the referee may not be available to talk and requests that the manager calls back later in the week. The manager does not want to have the task in his task list until he needs to action it and suspends it until the time it needs to be done.
There are three ways to suspend a human task in WebSphere Process Server:
� Suspend with no duration - The task needs to be manually resumed.
� Suspend with duration - The task automatically resumes after a defined period.
� Suspend with duration and cancel claim - The task is suspended for the defined duration. After that time, the task is released from the person who claimed it and made available for other users.
6.3.2 Using suspended tasks in our scenario
We can suspend a human task using the BPC Explorer. It is simple: just select the task and click Suspend. To resume the human task later, click Resume.
To suspend a task for a specific duration, we need to use the human task manager API. This means that we will need a way of calling the API that is visible to our user.
For our example, we do not want to spend time coding a custom GUI from scratch. Therefore, we use our generated Web client and add another button, Suspend, which suspends the task for 2 minutes.
We hard code the value of 2 minutes to make the coding easier. This section is not a tutorial in how to write GUI Java code. If you have the knowledge to write your own GUI, we show you the API that you need to call to suspend tasks for user-defined durations.
Note: These three ways are only available using the EJB™ API at the time of writing. If you use the Web-service API, currently the suspend with no duration is available. This may change in future releases of WebSphere Process Server.
Chapter 6. Human task features introduced in WebSphere Process Server V6.0.2 245

6.3.3 The task suspension API
The suspension API is shown in Table 6-4. It operates using the HumanTaskManagerService, and all references to an individual task are indicated by the task ID (tkiid).
Table 6-4 The task suspension API
We use the suspendTask(TKIID tkiid, String duration) method and hard code the duration to 2minutes. This period is chosen for ease of testing. Normally tasks would be suspended for longer than that.
We do not code a resume method, as we will be able to wait for 2 minutes for the task to resume automatically. If you have an urgent need to resume a suspended task during testing, use the resume button in BPC Explorer.
Method Description
void suspendTask(TKIID tkiid) Suspends the task indefinitely - places it into the suspended state
void suspendTask(TKIID tkiid, String duration) Suspends the task for a specific duration - places it into the suspended state for that duration, after which it reverts to the claimed state
void suspendTask(TKIID tkiid, java.util.Calendar pointInTime)
Suspends the task until a specific point in time - places it into the suspended state until that time, after which it reverts to the claimed state
void suspendTaskWithCancelClaim(TKIID tkiid, String duration, boolean keepTaskData
Suspends the task for a specific duration - places it into the suspended state for that duration, after which it reverts to the ready state
This is different from the suspend method, as it automatically puts the task back into the pool for reallocation if it is not resumed within the specified duration.
void resumeTask(TKIID tkiid) Resumes a suspended task
Note: The suspension duration uses the WebSphere duration syntax. For details of this, see the box in 6.2.2, “Adding an escalation to our scenario” on page 224.
246 Human-Centric Business Process Management with WebSphere Process Server V6
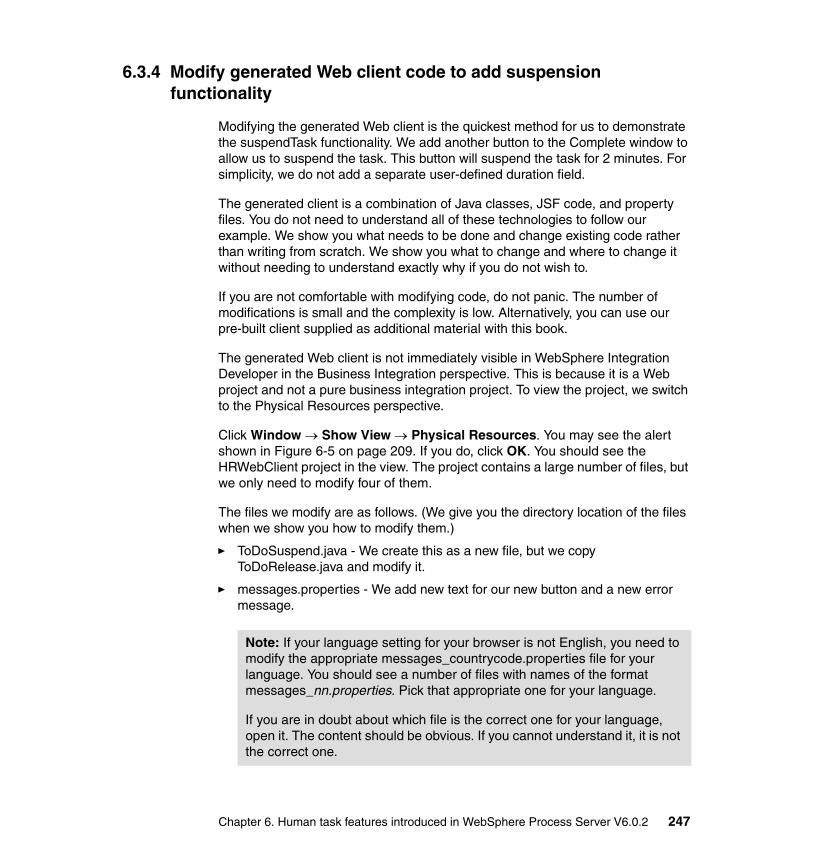
6.3.4 Modify generated Web client code to add suspension functionality
Modifying the generated Web client is the quickest method for us to demonstrate the suspendTask functionality. We add another button to the Complete window to allow us to suspend the task. This button will suspend the task for 2 minutes. For simplicity, we do not add a separate user-defined duration field.
The generated client is a combination of Java classes, JSF code, and property files. You do not need to understand all of these technologies to follow our example. We show you what needs to be done and change existing code rather than writing from scratch. We show you what to change and where to change it without needing to understand exactly why if you do not wish to.
If you are not comfortable with modifying code, do not panic. The number of modifications is small and the complexity is low. Alternatively, you can use our pre-built client supplied as additional material with this book.
The generated Web client is not immediately visible in WebSphere Integration Developer in the Business Integration perspective. This is because it is a Web project and not a pure business integration project. To view the project, we switch to the Physical Resources perspective.
Click Window → Show View → Physical Resources. You may see the alert shown in Figure 6-5 on page 209. If you do, click OK. You should see the HRWebClient project in the view. The project contains a large number of files, but we only need to modify four of them.
The files we modify are as follows. (We give you the directory location of the files when we show you how to modify them.)
� ToDoSuspend.java - We create this as a new file, but we copy ToDoRelease.java and modify it.
� messages.properties - We add new text for our new button and a new error message.
Note: If your language setting for your browser is not English, you need to modify the appropriate messages_countrycode.properties file for your language. You should see a number of files with names of the format messages_nn.properties. Pick that appropriate one for your language.
If you are in doubt about which file is the correct one for your language, open it. The content should be obvious. If you cannot understand it, it is not the correct one.
Chapter 6. Human task features introduced in WebSphere Process Server V6.0.2 247

� SharedConstants.java - We add new constants for our suspend function.
� ToDoComplete.jsp - We add our new button to the window in this file.
Creating ToDoSuspend.javaWe create this file to create a new Java class. Our new Java class, ToDoSuspend.java, will perform the actual suspension of the task. It is in this class that we write our API code.
To create ToDoSuspend.java, we copy ToDoRelease.java, as it has the nearest functionality to what we want to build. The ToDoRelease.java file has been generated by the user interface generator and already contains references to the human task service and task IDs. We just need to change the code that actually performs the release function, so that our new code performs the suspend function.
The ToDoRelease.java file is located in the project folder HRWebClient/JavaSource/com/ibm/wbit/tel/client/jsf/command.
1. Make a copy of ToDoRelease.java and name it ToDoSuspend.java in the same folder.
Note: If you are unfamiliar with Java or object-oriented languages in general, in this context it may help to think of a Java class as a program and the methods as subroutines or procedures.
This is a simplification and not entirely accurate but it may help you follow the examples.
In Java, a file ending in .java is a source file. The file with the same name but ending in .class is the corresponding object (compiled) file.
Note: You may see a red x against ToDoSuspend.java. This is because Java classes need to be defined in a file with the same name as the class, and we now have the copy of ToDoRelease in a file named ToDoSuspend. We will fix this.
248 Human-Centric Business Process Management with WebSphere Process Server V6

2. Double-click ToDoSuspend.java to open it in the editor. At this point, you have two options:
– Copy our example code from Example 6-2 into the editor and replace the code. If you do this, go to step 7 on page 251 after you paste the code.
– Modify the code line by line. We show you how to do this. If you choose this option, continue to the next step.
Example 6-2 The example ToDoSuspend.java class code
package com.ibm.wbit.tel.client.jsf.command;
import java.util.List;
import com.ibm.bpc.clientcore.ClientException;import com.ibm.bpc.clientcore.Command;import com.ibm.task.api.HumanTaskManagerService;import com.ibm.wbit.tel.client.jsf.bean.ToDoInstance;import com.ibm.wbit.tel.client.jsf.handler.ToDoMessageHandler;import com.ibm.wbit.tel.client.jsf.infrastructure.CommandException;import com.ibm.wbit.tel.client.jsf.infrastructure.ServiceFactory;import com.ibm.wbit.tel.client.jsf.infrastructure.SharedConstants;
public class ToDoSuspend implements Command, SharedConstants { private ToDoMessageHandler toDoMessageHandler; public String execute(List items) throws ClientException {
if (items != null) { HumanTaskManagerService htm; //we have only one selected Object obj = items.get(0); if (obj instanceof ToDoInstance) { ToDoInstance toDoInstance = (ToDoInstance) obj; try { htm = ServiceFactory.getInstance().getHumanTaskManagerService(); //New code for suspend htm.suspend(toDoInstance.getID(),"2minutes"); //New code for suspend } catch (Exception e) {
throw new CommandException(NLS_CATALOG, SERVICE_FAILED_TO_SUSPEND_HUMAN_TASK, null, e);
}
Chapter 6. Human task features introduced in WebSphere Process Server V6.0.2 249

} }
String lastList = toDoMessageHandler.getLastList();
if (lastList.equals(LIST_TODOS_UNDER_WORK)) { toDoMessageHandler.refreshUnderWorkList(); } return lastList; }
public boolean isMultiSelectEnabled() { return false; }
public boolean[] isApplicable(List arg0) { return null; }
public void setContext(Object ctx) {
toDoMessageHandler = (ToDoMessageHandler) ctx;
} }
3. First we correct the class name. Replace the line:
4. public class ToDoRelease implements Command, SharedConstants {
with:
public class ToDoSuspend implements Command, SharedConstants {
Now we need to replace the release functionality with the suspend functionality, using the suspend API. The release method CancelClaim and the suspend method are both part of the HumanTaskManagerService. At this point, htm is already an instance of HumanTaskManagerService, so we can swap the methods easily.
Note: We have removed most of the generated comments from the file shown in Example 6-2 for reasons of space. You may safely leave them in your copy of the code, or examine the logic with the comments in ToDoRelease.java.
250 Human-Centric Business Process Management with WebSphere Process Server V6

5. Replace the line:
htm.cancelClaim(toDoInstance.getID());
with:
htm.suspend(toDoInstance.getID(),"2minutes");
Next we update the error message that is shown in case of an exception. We create the new SERVICE_FAILED_TO_SUSPEND_HUMAN_TASK entry in the property file and shared resources file later.
6. Replace the line:
throw new CommandException(NLS_CATALOG, SERVICE_FAILED_TO_RELEASE_HUMAN_TASK, null, e);
with:
throw new CommandException(NLS_CATALOG, SERVICE_FAILED_TO_SUSPEND_HUMAN_TASK, null, e);
7. Save the code by pressing Ctrl+S and close the editor.
Adding new entries to messages.propertiesThe generated Web client holds all of the literal strings, or displayed text, in a properties file. This allows you to easily change the way text and messages are displayed on the window. It also allows us to change the language of the messages simply by pointing to another message file.
The messages.properties file is located in HRWebClient/JavaSource/com/ibm/wbit/tel/client/jsf/infrastructure.
1. Double-click the file to open it in the editor.
Note: If your language setting for your browser is not English, you may need to modify the appropriate messages_countrycode.properties file for your language. For example, if you have German installed, instead of modifying messages.properties you should modify messages_de.properties.
It is important that you only modify the text, not the name of the property (in capitals). It is easy to identify the names of the properties — they are in English and listed exactly as we show in our text. The descriptions vary depending on the language.
Chapter 6. Human task features introduced in WebSphere Process Server V6.0.2 251

2. At the end of the messages.properties file, add the text shown in Example 6-3.
Example 6-3 New lines to be added to the messages.properties file
# ==============================================================================# New for suspend human tasks# ==============================================================================SERVICE_FAILED_TO_SUSPEND_HUMAN_TASK = Failed to suspend the taskBUTTON_SUSPEND = Suspend
The BUTTON_SUSPEND entry sets the text that is shown on our new button. This is referenced in ToDoComplete.jsp.
The SERVICE_FAILED_TO_SUSPEND_HUMAN_TASK entry sets the text that will be displayed if this error message is shown. We referenced this description when we modified ToDoSuspend.java. We also need to add a new constant to SharedConstants.java to reference this new property name.
3. Save the messages.properties file by pressing Ctrl+S and close the editor.
Adding a new entry to SharedConstants.javaThe SharedConstants.java class holds many of the constant values used by the generated Web client. We need to add a new constant for our SERVICE_FAILED_TO_SUSPEND_HUMAN_TASK error message.
The SharedConstants.java file is located in HRWebClient/JavaSource/com/ibm/wbit/tel/client/jsf/infrastructure.
1. Double-click the file to open it in the editor.
2. After the linepublic static final String NAVIGATION_SEPARATOR= ">";in the SharedConstants.java file, add the text shown in Example 6-4.
Example 6-4 New lines to be inserted into SharedConstants.java
//New code for suspend action /** * Key available in message properties */ public final static String SERVICE_FAILED_TO_SUSPEND_HUMAN_TASK = "SERVICE_FAILED_TO_SUSPEND_HUMAN_TASK";
252 Human-Centric Business Process Management with WebSphere Process Server V6

Example 6-5 The last few lines of SharedConstants.java, showing the new code in the correct position - note closing brace ‘}’ in last line
/** * The separator for navigation */ public static final String NAVIGATION_SEPARATOR= ">"; //New code for suspend action /** * Key available in message properties */ public final static String SERVICE_FAILED_TO_SUSPEND_HUMAN_TASK = "SERVICE_FAILED_TO_SUSPEND_HUMAN_TASK";
}
3. Save the SharedConstants.java file by pressing Ctrl+S and close the editor.
Modifying ToDoComplete.jspThe ToDoComplete.jsp file controls what you see on the window when you claim a task using the generated Web client. We modify this file to add another button, Suspend, which will call our ToDoSuspend.java class.
The ToDoComplete file is located in HRWebClient/WebContent.
1. Double-click the file to open it in the editor.
Near the end of the file, there is a section that starts with the line <h:panelGrid styleClass="commandbar">. This is the section that defines the buttons on the page. You can see the Complete, Save, and Release button code already there.
We add the Suspend button by copying and modifying the Release button code.
Note: Do not add the line right at the end of the file. There is a closing brace (}) at the end that needs to be after the inserted lines. The last lines of the SharedConstants.java file should look like Example 6-5.
Chapter 6. Human task features introduced in WebSphere Process Server V6.0.2 253
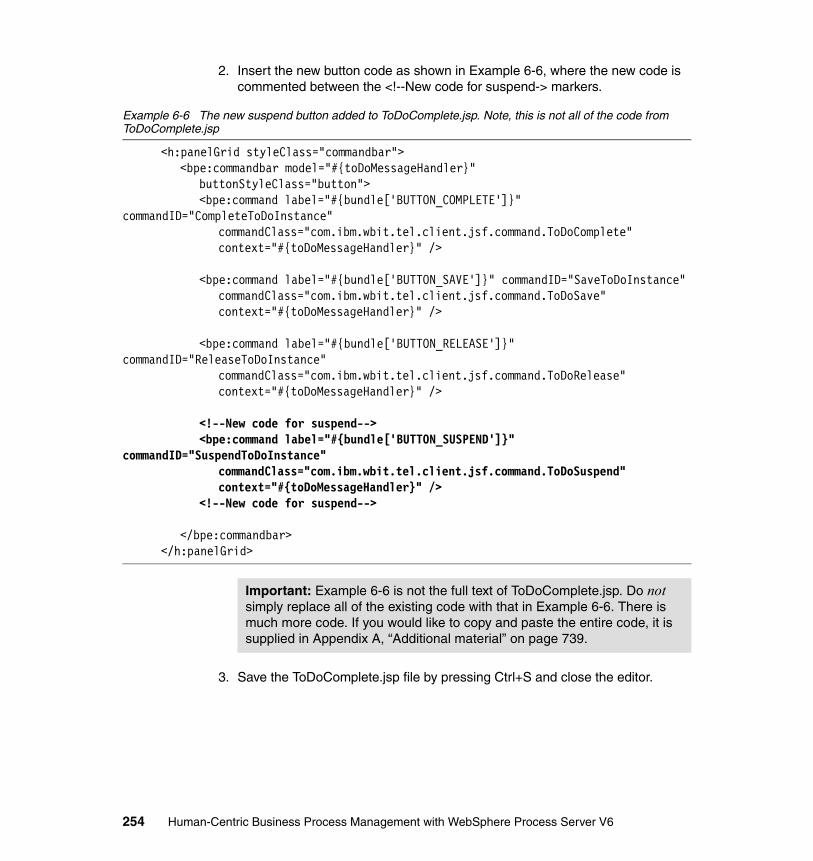
2. Insert the new button code as shown in Example 6-6, where the new code is commented between the <!--New code for suspend-> markers.
Example 6-6 The new suspend button added to ToDoComplete.jsp. Note, this is not all of the code from ToDoComplete.jsp
<h:panelGrid styleClass="commandbar"><bpe:commandbar model="#{toDoMessageHandler}"
buttonStyleClass="button"><bpe:command label="#{bundle['BUTTON_COMPLETE']}"
commandID="CompleteToDoInstance"commandClass="com.ibm.wbit.tel.client.jsf.command.ToDoComplete"context="#{toDoMessageHandler}" />
<bpe:command label="#{bundle['BUTTON_SAVE']}" commandID="SaveToDoInstance"commandClass="com.ibm.wbit.tel.client.jsf.command.ToDoSave"context="#{toDoMessageHandler}" />
<bpe:command label="#{bundle['BUTTON_RELEASE']}" commandID="ReleaseToDoInstance"
commandClass="com.ibm.wbit.tel.client.jsf.command.ToDoRelease"context="#{toDoMessageHandler}" />
<!--New code for suspend--><bpe:command label="#{bundle['BUTTON_SUSPEND']}"
commandID="SuspendToDoInstance"commandClass="com.ibm.wbit.tel.client.jsf.command.ToDoSuspend"context="#{toDoMessageHandler}" />
<!--New code for suspend-->
</bpe:commandbar></h:panelGrid>
3. Save the ToDoComplete.jsp file by pressing Ctrl+S and close the editor.
Important: Example 6-6 is not the full text of ToDoComplete.jsp. Do not simply replace all of the existing code with that in Example 6-6. There is much more code. If you would like to copy and paste the entire code, it is supplied in Appendix A, “Additional material” on page 739.
254 Human-Centric Business Process Management with WebSphere Process Server V6

Building and deploying the modified codeThe code that we have modified needs to be built (compiled) before we can deploy it. If you have autobuild switched on, this may already have happened. If not:
1. Select the HRWebClient project.2. Click the Project → Build Project menu.
When the project is cleaned and built, the HRWebClientEAR project can be deployed as before in the section on generating the Web client (see 1 on page 215). If you have already updated the deployment descriptor security configuration, there is no need to do it again unless you have regenerated the client. If in doubt, open the deployment descriptor (application.xml) and check that the correct security configuration is in place.
6.3.5 Testing the suspension functionality
We now test our new suspension functionality. We use the test data from test 1 and suspend the ApproveExecutiveApplication human task for two minutes. We have chosen the ApproveExecutiveApplication human task as, depending on which parts of our example you have implemented, you may already have escalations set on the ApproveStandardApplication human task and may wish to keep that functionality separate.
1. Log into the BPC Explorer as user itsoa and start an instance of the hiring process with the test 1 data. This creates an instance of the ApproveExecutiveApplication human task.
2. Log into the BPC Explorer as user wasadmin and click Task Instances → Administered by Me. The task instance is as shown in Figure 6-29. You can see that the task is not suspended at the moment.
Figure 6-29 The ApproveExecutiveApplication task - not suspended
Chapter 6. Human task features introduced in WebSphere Process Server V6.0.2 255

3. Log into the HRWebClient as managera. You should see the ApproveExecutiveApplication human task. Click the task name and then click the Claim button to claim the task. The new ToDoComplete page appears with our new Suspend button (Figure 6-30).
Figure 6-30 The new client with our new Suspend button
Unfortunately, the logic for validating the task output is still in place when the Suspend button is pressed, so copy the input data to the output data as in test 1.
256 Human-Centric Business Process Management with WebSphere Process Server V6

4. Click our new Suspend button. The task is now suspended for 2 minutes. You must check the status within 2 minutes, otherwise it reverts back to claimed status.
5. Go back to (or log in to) the BPC Explorer logged in as wasadmin and click Task Instances → Administered by Me. You should see the task as suspended (Figure 6-31).
Figure 6-31 The task in suspended state
6. Wait 2 minutes.
7. Again click Task Instances → Administered by Me to refresh the view. You should see the task as not suspended. The suspension duration is over.
The test is complete. We modified the user-generated client and suspended a task for 2 minutes.
6.4 Ad-hoc tasks
This section gives a brief overview of ad-hoc tasks.
Note: You can use the API to suspend tasks from many places, not just a human task client GUI. For example, if a customer uses your Web site to book a callback appointment, you could automatically create a task that is then suspended until the desired appointment time. At the correct time, it is then automatically assigned to an agent to call the customer.
Chapter 6. Human task features introduced in WebSphere Process Server V6.0.2 257

6.4.1 Ad-hoc task
An ad-hoc task is one that is not defined purely in the context of a business process. It can be created at run time, normally at the request of a user, depending on what the situation is.
6.4.2 How it is different from a normal human task
For a normal or predefined task, the task templates, together with all of the data structures, staff verb assignments, and escalation paths, have to be defined in WebSphere Integration Developer at design time. An ad-hoc task can be built purely at run time using the human task manager API.
Obviously, there are restrictions as to how ad-hoc a task can actually be. A user must have a sufficiently flexible human task client to allow her to create ad-hoc tasks. If the client only offers a choice of, for example, two types of ad-hoc tasks, then it is not as flexible as one that offers wizard-based ad-hoc creation. WebSphere Process Server does not provide a pre-built GUI that exposes ad-hoc tasks — you must add this functionality with a human task client.
Ad-hoc tasks do not appear as SCA components and are not defined as part of a BPEL process. They can be true dynamic runtime instances.
6.4.3 Examples of ad-hoc tasks
Examples of ad-hoc tasks are:
� A user receives some data in a spreadsheet and wishes to have data items approved by other staff members. A client reads the spreadsheet name/value pairs and creates an ad-hoc task with a runtime data structure to be forwarded for approval. The data structure is only known at runtime when the spreadsheet is received.
� A user has a task for which he requires further information before he can complete it. He decides to assign some of the work to coworkers to assist him to complete the task. He uses the ad-hoc functionality to create subtasks to assign the work.
� A user has a task to complete but he runs out of time. He uses an ad-hoc task to create a follow-on task to allow a coworker to take the work over.
6.4.4 Ad-hoc examples in this book
In this book we show two examples of using ad-hoc tasks, subtasks, and follow-on tasks.
258 Human-Centric Business Process Management with WebSphere Process Server V6

We make the examples easier to follow by using predefined task templates as a basis for our tasks. This does not fully demonstrate the ability to define a task purely at run time, but shows the general concepts without needing a large discussion of Java coding.
6.5 Using ad-hoc tasks - subtasks
In this section we discuss subtasks — what they are, when they are used, and how to use them with WebSphere Process Server. We also show an example of how to use subtasks from within our example scenario.
6.5.1 A subtask
A subtask is an ad-hoc task that is linked to a parent task. The subtask is an independent human task in its own right and can be treated as such using the usual techniques.
A subtask is linked to the parent task using a parent-child relationship. When a parent task has subtasks that are not yet complete, the parent task enters a sub-state of waiting for subtask (the original task remains in a state of claimed). When all of the subtasks are complete, the parent task moves out of the waiting for subtask state and returns to the claimed state, ready for completion.
6.5.2 When you should use a subtask
You should use a subtask when you need to assign part of a task to another person but still need to have responsibility for completing the primary task. This should not be confused with a follow-on task, which is used when either all or part of a task is delegated to another person along with the responsibility to complete the task.
� Subtask: Results come back to the primary task. The primary task is then completed
� Follow-on task: The primary task is completed. Additional work is then carried out by the follow-on task.
6.5.3 Adding subtasks to our scenario
In our scenario, we have the approve executive application human task. This task can either be completed immediately by the hiring manager or can require further
Chapter 6. Human task features introduced in WebSphere Process Server V6.0.2 259

information before the manager can make a decision as to whether to hire the applicant.
When the manager needs further information, subtasks can be created to assign work to subordinates. In our example, managera (the user ID of the hiring manager) assigns sub-tasks to line managers with the user IDs of managerb and managerc. When managerb and managerc have completed their assignments, managera can complete the primary task, having the requisite information already.
We generate another Web client for our scenario, which will only be valid for the Approve Executive Application human task. We then add buttons that create two subtasks:
� CheckReferences - a subtask for someone to check the employment references of the applicant
� CheckTeamCompatibility - a subtask for another employee to peer review the applicant to see whether the applicant’s personality would fit into the reviewer’s team.
Note: To minimize the amount of code we need to write, we create task templates for the subtasks using WebSphere Integration Developer. If most of the structure of the task is known at design time, then this is an effective way to define the needed subtasks graphically without having to build structures in code.
If the subtask was truly ad-hoc, for example, without any predefined data structure or more usually with no predefined staff allocation or escalation path, we could construct the template and model at run time with no predefined starting point.
260 Human-Centric Business Process Management with WebSphere Process Server V6

6.5.4 The subtask creation API
To create subtasks, we need to use the human task manager API. In our example, we use the method that takes the template name and namespace rather than the one that takes the model parameter. See Table 6-5.
Table 6-5 The subtask creation API
6.5.5 Creating the subtask templates
We create two standalone (SCA) pure human task templates within WebSphere Integration Developer: CheckReferences and CheckTeamCompatibility.
To minimize the amount of configuration and coding required for our example, we reuse the ApproveExecutiveApplication interface that is used for the ApproveExecutiveApplication human task. This interface contains all of the data that we need and is already pre-built, together with its data structures.
This approach is to keep our example simple. The inputs and outputs of a subtask do not have to be related in any way to the parent task. The structure of a subtask is completely independent from its parent.
To create the templates:
1. Open the HRMod project.
Method Description
TKIID createAndStartTaskAsSubTask( String templateName, String templateNamespace, String parentTaskID, ClientObjectWrapper inputMessage)
Creates a new subtask of parent task parentTaskID from template templateName with namespace templateNamespace. The method automatically starts the task and associates it with the parent task.
The input data for the subtask is contained in the inputMessage parameter.
TKIID createAndStartTaskAsSubTask( TaskModel taskModel, String applicationName, String parentTaskID, ClientObjectWrapper input)
Creates a new subtask based on the taskModel task model and applicationName.
Chapter 6. Human task features introduced in WebSphere Process Server V6.0.2 261

2. Create a new standalone human task by clicking New → Human Task and entering CheckReferences into the Name field.
3. Click Next. The Human Task: Select Type of Interaction wizard appears. A subtask can only be an originating or pure human task, so we need to choose one of these. As we do not wish the subtask to originate a new process, we choose a pure human task.
4. Click the Pure human task radio button, then click Next (Figure 6-32).
Figure 6-32 The human task wizard, showing our pure human task
5. As we are re-using the ApproveExecutiveApplication interface, click the Select an Existing Interface button.
Note: We encountered problems with creating messages in one module, using local EJB API calls, and passing these messages to another module. In case you encounter similar issues, you might want to consider placing the templates into a single module (as we do here) or using remote EJB calls.
262 Human-Centric Business Process Management with WebSphere Process Server V6

6. In the Interface list box, select ApproveExecutiveApplication. In the Operation list box, select ApproveExecutive (Figure 6-33).
Figure 6-33 Selecting an existing interface for our human task
7. Click Finish. Now we need to set up the staff resolution provider details and add potential creators, owners, and administrators to our new CheckReferences task.
8. With the new CheckReferences human task open, click the Properties → Details tab.
9. Enter staff/bpe/itsoldap in the JNDI name of staff plugin configuration field. This points the CheckReferences human task at our LDAP provider that we configured in 5.5.2, “Configuring the LDAP structure” on page 108.
We want to set managera as a potential instance creator, and managers b and c as potential owners for the CheckReferences task.
10.Click Originator settings → Staff settings → Potential Instance Creator.
11.In the Properties → Staff Group tab, click Users by user ID in the Staff Group (Verb) list box.
Chapter 6. Human task features introduced in WebSphere Process Server V6.0.2 263

12.Enter managera in the Parameters → UserID field (Figure 6-34).
Figure 6-34 Adding managera as a potential instance creator
13.Click Receiver settings → Staff settings → Potential Owner.
14.In the Properties → Staff Group tab, click Users by user ID in the Staff Group (Verb) list box.
15.Enter managerb in the Parameters → UserID field.
Note: Unlike when we entered groups, you do not need to specify fully qualified DN names for user IDs.
264 Human-Centric Business Process Management with WebSphere Process Server V6

16.Enter managerc in the Parameters → AlternativeID field (Figure 6-35).
Figure 6-35 Adding managerb and managerc as potential owners
17.Press Ctrl+S to save the updated human task and close the editor.
18.Create another pure human task named CheckTeamCompatibility in the same way as CheckReferences, using the same interfaces and operation, with managera as the potential instance creator but with managerd as the potential owner.
We now have the two task templates defined in the Project Explorer. To use them we need to put them into a deployable module. We put them onto the HRMod assembly diagram.
19.Open the HRMod assembly diagram.
Chapter 6. Human task features introduced in WebSphere Process Server V6.0.2 265
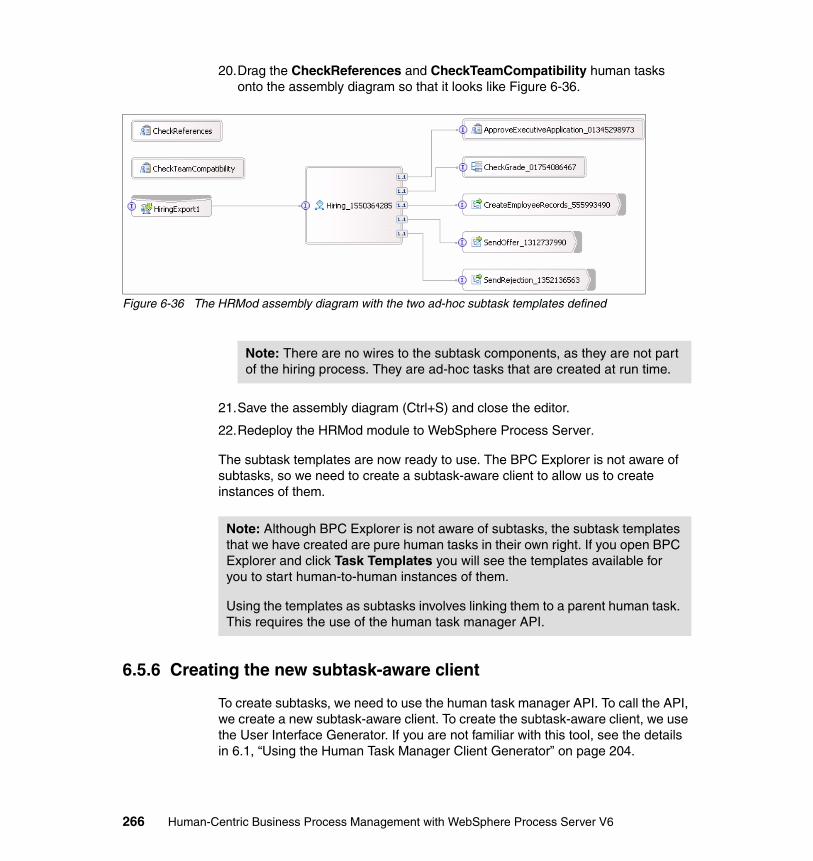
20.Drag the CheckReferences and CheckTeamCompatibility human tasks onto the assembly diagram so that it looks like Figure 6-36.
Figure 6-36 The HRMod assembly diagram with the two ad-hoc subtask templates defined
21.Save the assembly diagram (Ctrl+S) and close the editor.
22.Redeploy the HRMod module to WebSphere Process Server.
The subtask templates are now ready to use. The BPC Explorer is not aware of subtasks, so we need to create a subtask-aware client to allow us to create instances of them.
6.5.6 Creating the new subtask-aware client
To create subtasks, we need to use the human task manager API. To call the API, we create a new subtask-aware client. To create the subtask-aware client, we use the User Interface Generator. If you are not familiar with this tool, see the details in 6.1, “Using the Human Task Manager Client Generator” on page 204.
Note: There are no wires to the subtask components, as they are not part of the hiring process. They are ad-hoc tasks that are created at run time.
Note: Although BPC Explorer is not aware of subtasks, the subtask templates that we have created are pure human tasks in their own right. If you open BPC Explorer and click Task Templates you will see the templates available for you to start human-to-human instances of them.
Using the templates as subtasks involves linking them to a parent human task. This requires the use of the human task manager API.
266 Human-Centric Business Process Management with WebSphere Process Server V6

Generating the standard Web-clientWe first need to generate the standard Web client before we can customize it.
1. Right-click module HRMod and click Generate user interfaces.
2. When the User Interface Wizard for Human Tasks dialog appears, select only the ApproveExecutiveApplication human task, as shown in Figure 6-37.
Figure 6-37 Generating interface only for ApproveExecutiveApplication human task
3. Click Next.
4. Enter HRExecutiveWebClient in the Name of dynamic Web project field.
5. Enter the location of a suitable .jpg file to use as a company logo into the Company Logo field. (This field is optional if you do not have or wish to use a logo file.)
Chapter 6. Human task features introduced in WebSphere Process Server V6.0.2 267

6. Select local as the client location and IBM Style as the style (Figure 6-38). This differentiates it from the Cool Blue style client that we built before.
Figure 6-38 Configuring the Web client generator
7. Click Finish. The client generation complete alert will be shown. This may take a few seconds while the client generates. Click OK.
We now have the default client generated. If you wish, you can deploy and test it before we modify it further, but make sure that you update the deployment descriptor security configuration first.
To modify the client, we need to move to the Physical Resources view. See “Deploying the Web client to WebSphere Process Server” on page 209 for details on how to do this.
8. Configure the deployment descriptor security details in the HRExecutiveWebClientEAR project to allow all authenticated users to interact with our new HRExecutiveWebClient. This is done identically to the way we did for our HRWebClient. See “Deploying the Web client to WebSphere Process Server” on page 209 for details on how to do this.
268 Human-Centric Business Process Management with WebSphere Process Server V6

Modifying the clientThe generated client is made up of many files in many folders. We only need to change a few of them to add our subtask functionality. The files we modify are:
� ToDoCrtSubtasks.java - This is a new file, but we copy ToDoRelease.java and modify it.
� messages.properties - We add new text for our new button and a new error message.
� SharedConstants.java - We add new constants for our create subtasks function.
� ToDoComplete.jsp - We add our new button to the page in this file.
� ToDoInstance.java - This is the class that holds the list entry. We add a subtask property to this.
� ToDosUnderWork.jsp and ToDosOpen.jsp - These show the lists of claimed and open human tasks. We add another column to indicate whether the task is waiting for subtasks.
Creating ToDoCrtSubtasks.javaOur new Java class, ToDoCrtSubtasks.java, will create two new subtasks from the parent human task. It is in this class that we write our API code.
To create ToDoCrtSubtasks.java, we copy ToDoRelease.java, as it has the nearest functionality to what we want to build. The ToDorelease.java file has been generated by the user interface generator and already contains references to the human task service and task IDs. We just need to change the existing code that performs the release function, so that our new code performs the create subtasks function.
The ToDoRelease.java file is located in HRExecutiveWebClient/JavaSource/com/ibm/wbit/tel/client/jsf/command.
1. Make a copy of ToDoRelease.java and name it ToDoCrtSubtasks.java in the same folder.
2. Double-click ToDoCrtSubtasks.java to open it in the editor.
Note: If your language setting for your browser is not English, you need to modify the appropriate messages_countrycode.properties file for your language.
Note: You may see a red x against ToDoCrtSubtasks.java. We will fix this.
Chapter 6. Human task features introduced in WebSphere Process Server V6.0.2 269

3. We need to correct the class name. Replace the line:
public class ToDoRelease implements Command, SharedConstants {
with:
public class ToDoCrtSubtasks implements Command, SharedConstants {
We next need to replace the release functionality with our subtask creation functionality. As this is a simple example, we hard code the required parameters to show the use of the API. In a real project, most of the parameters would come from configuration files or variables.
4. Replace the line htm.cancelClaim(toDoInstance.getID());with the code between the //New code to create subtasks herecomments so the code looks like Example 6-7.
5. Add the new import com.ibm.task.api.*; line at the bottom of the imports section.
Example 6-7 The ToDoCrtSubtasks.java code
package com.ibm.wbit.tel.client.jsf.command;
import java.util.List;
import com.ibm.bpc.clientcore.ClientException;import com.ibm.bpc.clientcore.Command;import com.ibm.task.api.HumanTaskManagerService;import com.ibm.wbit.tel.client.jsf.bean.ToDoInstance;import com.ibm.wbit.tel.client.jsf.handler.ToDoMessageHandler;import com.ibm.wbit.tel.client.jsf.infrastructure.CommandException;import com.ibm.wbit.tel.client.jsf.infrastructure.ServiceFactory;import com.ibm.wbit.tel.client.jsf.infrastructure.SharedConstants;
//Added for subtask generationimport com.ibm.task.api.*;
/** * The ToDoCrtSubtasks uses the Human Task Manager API to release a previous claimed ToDo. * Please refer to the Human Task Manager API for more details. * The item provider for the ToDo to release is ToDoMessageHandler. */public class ToDoCrtSubtasks implements Command, SharedConstants { /** * Message Handler for open and under work ToDos.
270 Human-Centric Business Process Management with WebSphere Process Server V6

*/ private ToDoMessageHandler toDoMessageHandler; /** * Executes the release (cancel claim) command for the selected ToDo. * Exceptions to be shown in commandbar will be thrown as CommandException. * * @param items the list of selected items * @return next navigation route as defined in faces-config, may be overwritten by action of commandbar * @exception CommandException to be shown in commandbar * @see com.ibm.bpc.clientcore.Command#execute(java.util.List) */ public String execute(List items) throws ClientException {
if (items != null) { HumanTaskManagerService htm; //we have only one selected Object obj = items.get(0); if (obj instanceof ToDoInstance) { ToDoInstance toDoInstance = (ToDoInstance) obj; try { htm = ServiceFactory.getInstance().getHumanTaskManagerService();
//New code to create subtasks here String subtask1Name="CheckReferences"; String subtask2Name="CheckTeamCompatibility"; String taskNameSpace="http://HRMod"; //Get the client wrapper from the parent input //to create the subtask input TKIID parentTaskID=toDoInstance.getID(); ClientObjectWrapper taskCow = htm.getInputMessage(parentTaskID); //Create the first task as a subtask (CheckReferences) TKIID taskID = htm.createAndStartTaskAsSubTask( subtask1Name,taskNameSpace, parentTaskID, taskCow); //Create the second task as a subtask (CheckTeamCompatibility) taskID = htm.createAndStartTaskAsSubTask( subtask2Name,taskNameSpace, parentTaskID, taskCow); //New code to create subtasks here } catch (Exception e) {
Chapter 6. Human task features introduced in WebSphere Process Server V6.0.2 271
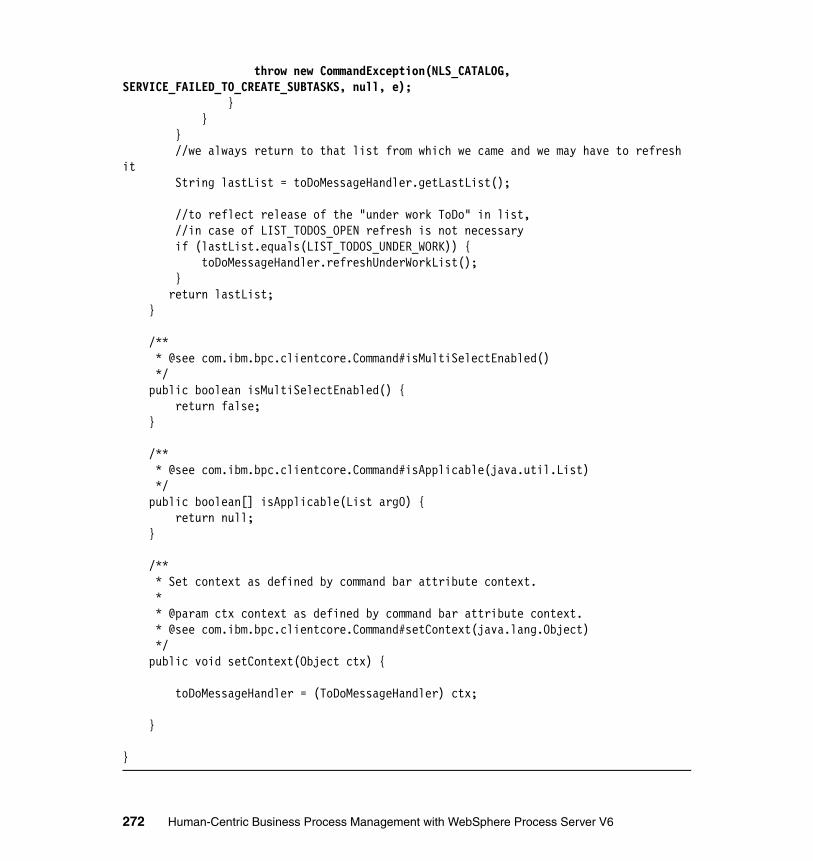
throw new CommandException(NLS_CATALOG, SERVICE_FAILED_TO_CREATE_SUBTASKS, null, e); } } } //we always return to that list from which we came and we may have to refresh it String lastList = toDoMessageHandler.getLastList(); //to reflect release of the "under work ToDo" in list, //in case of LIST_TODOS_OPEN refresh is not necessary if (lastList.equals(LIST_TODOS_UNDER_WORK)) { toDoMessageHandler.refreshUnderWorkList(); } return lastList; }
/** * @see com.ibm.bpc.clientcore.Command#isMultiSelectEnabled() */ public boolean isMultiSelectEnabled() { return false; }
/** * @see com.ibm.bpc.clientcore.Command#isApplicable(java.util.List) */ public boolean[] isApplicable(List arg0) { return null; }
/** * Set context as defined by command bar attribute context. * * @param ctx context as defined by command bar attribute context. * @see com.ibm.bpc.clientcore.Command#setContext(java.lang.Object) */ public void setContext(Object ctx) {
toDoMessageHandler = (ToDoMessageHandler) ctx;
} }
272 Human-Centric Business Process Management with WebSphere Process Server V6

6. Save the ToDoCrtSubtasks.java file (Ctrl+S) and close the editor.
Adding new entries to messages.propertiesThe generated Web client holds all of the literal strings, or displayed text, in a properties file. This allows you to easily change the way text or messages are displayed on the window. It also allows us to change the language of the messages simply by pointing to another message file.
The messages.properties file is located in HRExecutiveWebClient/JavaSource/com/ibm/wbit/tel/client/jsf/infrastructure.
1. Double-click the file to open it in the editor.
2. At the end of the messages.properties file, add the text shown in Example 6-3 on page 252.
Example 6-8 New lines to be added to the messages.properties file for the subtasks button
# ==============================================================================# Added for create subtasks button# ==============================================================================SERVICE_FAILED_TO_CREATE_SUBTASKS = Failed to create subtasks Task InstanceBUTTON_SUBTASKS = Create Subtasks TABLE_COL_WAIT_SUBTASK = Waiting for subtask?
The BUTTON_SUBTASKS entry sets the text that is shown on our new button. This is referenced in ToDoCrtSubtasks.jsp.
The SERVICE_FAILED_TO_CREATE_SUBTASKS entry sets the text that will be displayed if this error message is shown. We referenced this description when we modified ToDoCrtSubtasks.java. We also need to add a new constant to SharedConstants.java to reference this new property name.
The TABLE_COL_WAIT_SUBTASK entry shows the text for our new column indicating whether a task is waiting for a subtask.
3. Save the messages.properties file by pressing Ctrl+S and close the editor.
Note: If the language setting for your browser is not English, you need to modify the appropriate messages_countrycode.properties file for your language. For example, if you have German installed, instead of modifying messages.properties you should modify messages_de.properties.
It is important that you only modify the text, not the name of the property (in capitals). It is easy to identify the names of the properties. They are in English and listed exactly as we show in our text. The descriptions vary depending on the language.
Chapter 6. Human task features introduced in WebSphere Process Server V6.0.2 273

Adding a new entry to SharedConstants.javaThe SharedConstants.java class holds many of the constant values used by the generated Web client. We need to add a new constant for our SERVICE_FAILED_TO_CREATE_SUBTASKS error message.
The SharedConstants.java file is located in HRExecutiveWebClient/JavaSource/com/ibm/wbit/tel/client/jsf/infrastructure.
1. Double-click the file to open it in the editor.
2. After the linepublic static final String NAVIGATION_SEPARATOR= ">";in the SharedConstants.java file. Insert the text shown in Example 6-9.
Example 6-9 New lines to be added to SharedConstants.java
//Added for Create Subtasks button /** * Key available in message properties */ public final static String SERVICE_FAILED_TO_CREATE_SUBTASKS = "SERVICE_FAILED_TO_CREATE_SUBTASKS";
3. Save the SharedConstants.java file by pressing Ctrl+S and close the editor.
Modifying ToDoComplete.jspThe ToDoComplete.jsp file controls what you see on the window when you claim a task using the generated Web client. We modify this file to add another button, Create Subtasks, which calls our ToDoCrtSubtasks.java class.
The ToDoComplete file is located in HRExecutiveWebClient/WebContent.
1. Double-click the file to open it in the editor.
Near the end of the file, there is a section that starts with the line <h:panelGrid styleClass="commandbar">. This is the section that defines the buttons on the page. You can see the Complete, Save, and Release button code already there.
We add the Create Subtasks button by copying and modifying the release button code.
274 Human-Centric Business Process Management with WebSphere Process Server V6

2. Insert the new button code as shown in Example 6-10, where the new code is commented between the <!-- Added for new subtasks button --> markers.
Example 6-10 New code for create subtask button - note that this is all of the code in the ToDoComplete.jsp file, just the section where we have added our code
<h:panelGrid styleClass="commandbar"><bpe:commandbar model="#{toDoMessageHandler}"
buttonStyleClass="button"><bpe:command label="#{bundle['BUTTON_COMPLETE']}"
commandID="CompleteToDoInstance"commandClass="com.ibm.wbit.tel.client.jsf.command.ToDoComplete"context="#{toDoMessageHandler}" />
<bpe:command label="#{bundle['BUTTON_SAVE']}" commandID="SaveToDoInstance"commandClass="com.ibm.wbit.tel.client.jsf.command.ToDoSave"context="#{toDoMessageHandler}" />
<bpe:command label="#{bundle['BUTTON_RELEASE']}" commandID="ReleaseToDoInstance"
commandClass="com.ibm.wbit.tel.client.jsf.command.ToDoRelease"context="#{toDoMessageHandler}" />
<!-- Added for new subtasks button --><bpe:command label="#{bundle['BUTTON_SUBTASKS']}"
commandID="CrtSubtasksToDoInstance"commandClass="com.ibm.wbit.tel.client.jsf.command.ToDoCrtSubtasks"context="#{toDoMessageHandler}" />
<!-- Added for new subtasks button -->
</bpe:commandbar></h:panelGrid>
3. Save the ToDoComplete.jsp file by pressing Ctrl+S and close the editor.
We have completed the code modifications we need. Build and deploy the modified code as detailed in “Building and deploying the modified code” on page 255.
Modifying ToDoInstance.java fileThe ToDoInstance.java file is located in HRExecutiveWebClient/JavaSource/com/ibm/wbit/tel/client/jsf/bean.
There is an issue with some patch levels of WebSphere Process Server, in that there is a missing attribute entry for subtasks in the labels hashmap. Therefore,
Chapter 6. Human task features introduced in WebSphere Process Server V6.0.2 275

we need to change the ToDoInstance.java file to override the getLabels and isValid methods of the TaskInstanceBean class.
1. Double-click the file to open it in the editor.
2. After the insert lines, add the line import java.util.Locale; (as shown in Example 6-11).
3. Near the end of the file, before the final closing brace (}), insert the lines between the markers //Code added for subtasks, as shown in Example 6-11.
Example 6-11 ToDoInstance.java file - note that we have removed the comments from the original file to reduce the space taken in the book. You may safely leave any comments in the file
package com.ibm.wbit.tel.client.jsf.bean;
import java.util.HashMap;
import com.ibm.bpc.clientcore.DataObjectUtils;import com.ibm.task.api.QueryResultSet;import com.ibm.task.clientmodel.HTMConnection;import com.ibm.task.clientmodel.bean.TaskInstanceBean;import commonj.sdo.DataObject;
//Code added for subtasksimport java.util.Locale;
public class ToDoInstance extends TaskInstanceBean {
private HashMap inputValues = null;
private HashMap outputValues = null;
public ToDoInstance(QueryResultSet resultSet, HTMConnection htmConnection) { super(resultSet, htmConnection); }
public HashMap getInputValues() { return inputValues;
Note: If you are not familiar with Java, this may not mean much to you. Do not worry, it is not important for your understanding of human tasks that you follow this. Simply cut and paste the code shown in our example.
276 Human-Centric Business Process Management with WebSphere Process Server V6
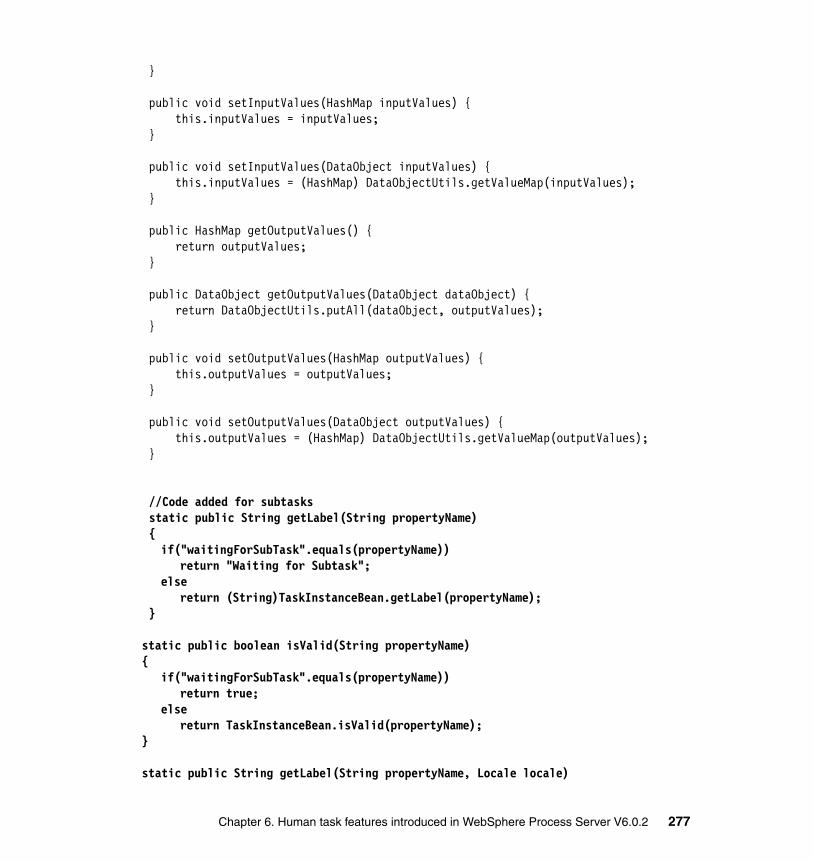
}
public void setInputValues(HashMap inputValues) { this.inputValues = inputValues; }
public void setInputValues(DataObject inputValues) { this.inputValues = (HashMap) DataObjectUtils.getValueMap(inputValues); }
public HashMap getOutputValues() { return outputValues; }
public DataObject getOutputValues(DataObject dataObject) { return DataObjectUtils.putAll(dataObject, outputValues); }
public void setOutputValues(HashMap outputValues) { this.outputValues = outputValues; }
public void setOutputValues(DataObject outputValues) { this.outputValues = (HashMap) DataObjectUtils.getValueMap(outputValues); }
//Code added for subtasks static public String getLabel(String propertyName) {
if("waitingForSubTask".equals(propertyName))return "Waiting for Subtask";
elsereturn (String)TaskInstanceBean.getLabel(propertyName);
}
static public boolean isValid(String propertyName) {
if("waitingForSubTask".equals(propertyName))return true;
elsereturn TaskInstanceBean.isValid(propertyName);
}
static public String getLabel(String propertyName, Locale locale)
Chapter 6. Human task features introduced in WebSphere Process Server V6.0.2 277

{if("waitingForSubTask".equals(propertyName))
return "Waiting for Subtask";else
return (String)TaskInstanceBean.getLabel(propertyName, locale);}
//Code added for subtasks }
4. Save the code (Ctrl+S) and close the editor.
Updating ToDosUnderWork.jsp fileThe ToDosUnderWork.jsp displays the list on window when you click Claimed. We add another column to the default list to indicate whether a task is waiting for subtasks.
In the file, you can see a series of columns already defined, for example, name, first activation time, and originator. We follow the pattern of how these columns are defined and add our new subtask column.
The ToDosUnderWork file is located in HRExecutiveWebClient/WebContent.
1. Double-click the file to open it in the editor.
2. Search for <h:panelGrid styleClass=”BackgroupSubViewMTD columns =”1”>.
3. After the line containing originator column, insert the line:
<bpe:column name=”waitingForSubTask” label=’#{bundle[‘TABLE_COL_WAIT_SUBTASK’]}” />
Note: Obviously, it is possible to make these windows much more sophisticated than our simple example shows. You could have drill-down buttons that show the subtasks, the status of the subtasks, who is working on them, and the data that has been entered into the subtasks.
All of this functionality is available with the human task API, but we chose to keep our example simple to make it easy to follow and to reduce the length of this section.
278 Human-Centric Business Process Management with WebSphere Process Server V6
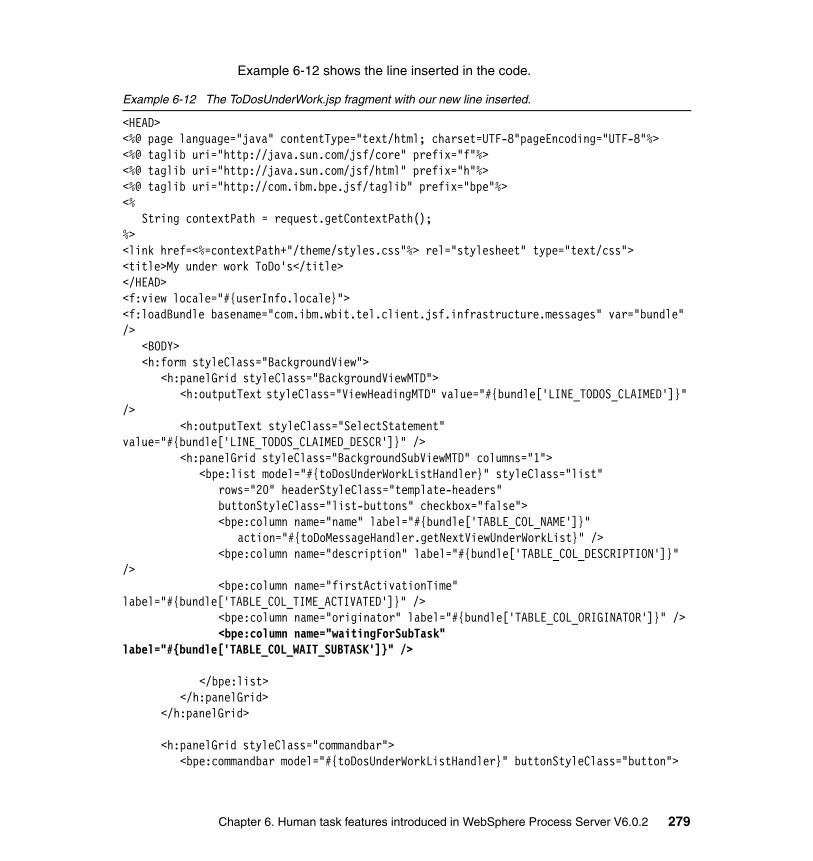
Example 6-12 shows the line inserted in the code.
Example 6-12 The ToDosUnderWork.jsp fragment with our new line inserted.
<HEAD><%@ page language="java" contentType="text/html; charset=UTF-8"pageEncoding="UTF-8"%><%@ taglib uri="http://java.sun.com/jsf/core" prefix="f"%><%@ taglib uri="http://java.sun.com/jsf/html" prefix="h"%><%@ taglib uri="http://com.ibm.bpe.jsf/taglib" prefix="bpe"%><%
String contextPath = request.getContextPath();%><link href=<%=contextPath+"/theme/styles.css"%> rel="stylesheet" type="text/css"><title>My under work ToDo's</title></HEAD><f:view locale="#{userInfo.locale}"><f:loadBundle basename="com.ibm.wbit.tel.client.jsf.infrastructure.messages" var="bundle" />
<BODY><h:form styleClass="BackgroundView">
<h:panelGrid styleClass="BackgroundViewMTD"><h:outputText styleClass="ViewHeadingMTD" value="#{bundle['LINE_TODOS_CLAIMED']}"
/><h:outputText styleClass="SelectStatement"
value="#{bundle['LINE_TODOS_CLAIMED_DESCR']}" /><h:panelGrid styleClass="BackgroundSubViewMTD" columns="1">
<bpe:list model="#{toDosUnderWorkListHandler}" styleClass="list"rows="20" headerStyleClass="template-headers"buttonStyleClass="list-buttons" checkbox="false"><bpe:column name="name" label="#{bundle['TABLE_COL_NAME']}"
action="#{toDoMessageHandler.getNextViewUnderWorkList}" /><bpe:column name="description" label="#{bundle['TABLE_COL_DESCRIPTION']}"
/><bpe:column name="firstActivationTime"
label="#{bundle['TABLE_COL_TIME_ACTIVATED']}" /><bpe:column name="originator" label="#{bundle['TABLE_COL_ORIGINATOR']}" /><bpe:column name="waitingForSubTask"
label="#{bundle['TABLE_COL_WAIT_SUBTASK']}" />
</bpe:list></h:panelGrid>
</h:panelGrid>
<h:panelGrid styleClass="commandbar"><bpe:commandbar model="#{toDosUnderWorkListHandler}" buttonStyleClass="button">
Chapter 6. Human task features introduced in WebSphere Process Server V6.0.2 279

<bpe:command label="#{bundle['BUTTON_REFRESH']}" commandID="RefreshToDosUnderWorkList"
action="#{toDoMessageHandler.refreshUnderWorkList}" /></bpe:commandbar>
</h:panelGrid>
<h:outputText styleClass="errorDetailsMessage"value="#{bundle['LINE_TODOS_NOT_VALID_ANYMORE']}"rendered="#{!toDoMessageHandler.underWorkToDoValid}" />
</h:form></BODY>
</f:view></HTML>
4. Save the file (Ctrl+S) and close the editor.
Updating ToDosOpen.jsp fileWe must do the same thing to the file ToDosOpen.jsp as we did to ToDosUnderWork.jsp.
Both files are in the same directory and require exactly the same changes. The code looks as shown in Example 6-13.
Example 6-13 ToDosOpen.jsp
<HTML>
<HEAD><%@ page language="java" contentType="text/html; charset=UTF-8" pageEncoding="UTF-8"%><%@ taglib uri="http://java.sun.com/jsf/core" prefix="f"%><%@ taglib uri="http://java.sun.com/jsf/html" prefix="h"%><%@ taglib uri="http://com.ibm.bpe.jsf/taglib" prefix="bpe"%><%
String contextPath = request.getContextPath();%><link href=<%=contextPath+"/theme/styles.css"%> rel="stylesheet" type="text/css"><title>My open ToDo's</title></HEAD><f:view locale="#{userInfo.locale}"><f:loadBundle basename="com.ibm.wbit.tel.client.jsf.infrastructure.messages" var="bundle" />
<BODY><h:form styleClass="BackgroundView">
<h:panelGrid styleClass="BackgroundViewMTD"><h:outputText styleClass="ViewHeadingMTD" value="#{bundle['LINE_TODOS_OPEN']}" />
280 Human-Centric Business Process Management with WebSphere Process Server V6

<h:outputText styleClass="SelectStatement" value="#{bundle['LINE_TODOS_OPEN_DESCR']}" />
<h:panelGrid styleClass="BackgroundSubViewMTD" columns="1"><bpe:list model="#{toDosOpenListHandler}" styleClass="list"
rows="20" headerStyleClass="template-headers"buttonStyleClass="list-buttons" checkbox="false"><bpe:column name="name" label="#{bundle['TABLE_COL_NAME']}"
action="#{toDoMessageHandler.getNextViewOpenList}" /><bpe:column name="description" label="#{bundle['TABLE_COL_DESCRIPTION']}"
/><bpe:column name="firstActivationTime"
label="#{bundle['TABLE_COL_TIME_ACTIVATED']}" /><bpe:column name="originator" label="#{bundle['TABLE_COL_ORIGINATOR']}" /><bpe:column name="waitingForSubTask"
label="#{bundle['TABLE_COL_WAIT_SUBTASK']}" />
</bpe:list></h:panelGrid>
</h:panelGrid>
<h:panelGrid styleClass="commandbar"><bpe:commandbar model="#{toDosOpenListHandler}"
buttonStyleClass="button"><bpe:command label="#{bundle['BUTTON_REFRESH']}"
commandID="RefreshToDosOpenList" action="#{toDoMessageHandler.refreshOpenList}" />
</bpe:commandbar></h:panelGrid>
<h:outputText styleClass="errorDetailsMessage"value="#{bundle['LINE_TODOS_NOT_VALID_ANYMORE']}"rendered="#{!toDoMessageHandler.openToDoValid}" />
</h:form></BODY>
</f:view></HTML>
Updating faces-config.xmlNow that we have updated the code that displays the columns, we need to update the query that provides the data from the human task database. We need to add the extra subtask column.
Chapter 6. Human task features introduced in WebSphere Process Server V6.0.2 281
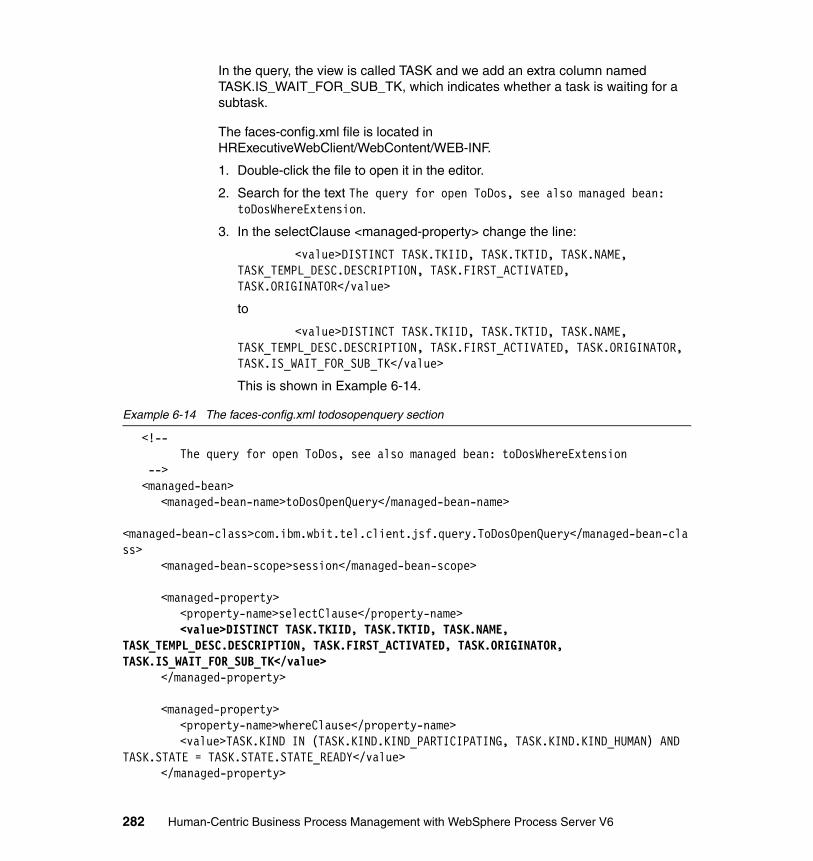
In the query, the view is called TASK and we add an extra column named TASK.IS_WAIT_FOR_SUB_TK, which indicates whether a task is waiting for a subtask.
The faces-config.xml file is located in HRExecutiveWebClient/WebContent/WEB-INF.
1. Double-click the file to open it in the editor.
2. Search for the text The query for open ToDos, see also managed bean: toDosWhereExtension.
3. In the selectClause <managed-property> change the line:
<value>DISTINCT TASK.TKIID, TASK.TKTID, TASK.NAME, TASK_TEMPL_DESC.DESCRIPTION, TASK.FIRST_ACTIVATED, TASK.ORIGINATOR</value>
to
<value>DISTINCT TASK.TKIID, TASK.TKTID, TASK.NAME, TASK_TEMPL_DESC.DESCRIPTION, TASK.FIRST_ACTIVATED, TASK.ORIGINATOR, TASK.IS_WAIT_FOR_SUB_TK</value>
This is shown in Example 6-14.
Example 6-14 The faces-config.xml todosopenquery section
<!-- The query for open ToDos, see also managed bean: toDosWhereExtension
--><managed-bean>
<managed-bean-name>toDosOpenQuery</managed-bean-name>
<managed-bean-class>com.ibm.wbit.tel.client.jsf.query.ToDosOpenQuery</managed-bean-class>
<managed-bean-scope>session</managed-bean-scope>
<managed-property><property-name>selectClause</property-name><value>DISTINCT TASK.TKIID, TASK.TKTID, TASK.NAME,
TASK_TEMPL_DESC.DESCRIPTION, TASK.FIRST_ACTIVATED, TASK.ORIGINATOR, TASK.IS_WAIT_FOR_SUB_TK</value>
</managed-property>
<managed-property><property-name>whereClause</property-name><value>TASK.KIND IN (TASK.KIND.KIND_PARTICIPATING, TASK.KIND.KIND_HUMAN) AND
TASK.STATE = TASK.STATE.STATE_READY</value></managed-property>
282 Human-Centric Business Process Management with WebSphere Process Server V6

<managed-property><property-name>orderClause</property-name><value>TASK.NAME, TASK.FIRST_ACTIVATED</value>
</managed-property>
<managed-property><property-name>threshold</property-name><value>50</value>
</managed-property>
<managed-property><property-name>connection</property-name><value>#{htmConnection}</value>
</managed-property></managed-bean>
4. Search for the text The query for under work ToDos, see also managed bean: toDosWhereExtension.
5. In the selectClause <managed-property> change the line:
<value>DISTINCT TASK.TKIID, TASK.TKTID, TASK.NAME, TASK_TEMPL_DESC.DESCRIPTION, TASK.FIRST_ACTIVATED, TASK.ORIGINATOR</value>
to
<value>DISTINCT TASK.TKIID, TASK.TKTID, TASK.NAME, TASK_TEMPL_DESC.DESCRIPTION, TASK.FIRST_ACTIVATED, TASK.ORIGINATOR, TASK.IS_WAIT_FOR_SUB_TK</value>
This is shown in Example 6-15.
Example 6-15 The under work query section shown in the changed selectClause
<!-- The query for under work ToDos, see also managed bean: toDosWhereExtension
--><managed-bean>
<managed-bean-name>toDosUnderWorkQuery</managed-bean-name>
<managed-bean-class>com.ibm.wbit.tel.client.jsf.query.ToDosUnderWorkQuery</managed-bean-class>
<managed-bean-scope>session</managed-bean-scope>
<managed-property><property-name>selectClause</property-name>
Chapter 6. Human task features introduced in WebSphere Process Server V6.0.2 283

<value>DISTINCT TASK.TKIID, TASK.TKTID, TASK.NAME, TASK_TEMPL_DESC.DESCRIPTION, TASK.FIRST_ACTIVATED, TASK.ORIGINATOR, TASK.IS_WAIT_FOR_SUB_TK</value>
</managed-property>
<managed-property><property-name>whereClause</property-name><value>TASK.KIND IN (TASK.KIND.KIND_PARTICIPATING, TASK.KIND.KIND_HUMAN) AND
TASK.STATE = TASK.STATE.STATE_CLAIMED</value></managed-property>
<managed-property><property-name>orderClause</property-name><value>TASK.NAME, TASK.FIRST_ACTIVATED</value>
</managed-property>
<managed-property><property-name>threshold</property-name><value>50</value>
</managed-property>
<managed-property><property-name>connection</property-name><value>#{htmConnection}</value>
</managed-property></managed-bean>
6. Save the file (Ctrl+S) and close the editor.
7. Deploy HRExecutiveWebClient to the WebSphere Process Server. We are now ready to test our subtask functionality.
6.5.7 Testing the subtask functionality
We now test the subtask functionality. We use the test data from test 1 to create an ApproveExecutiveApplication human task instance. We then use our newly created client to create two subtasks (CheckReferences and CheckTeamCompatibility) from the parent task (ApproveExecutiveApplication).
When our new subtasks have been created, we check that the status of the parent task changes to waiting for subtasks. We then complete the subtasks. At this point, the parent task will no longer be waiting for subtasks and we can complete the parent task.
284 Human-Centric Business Process Management with WebSphere Process Server V6

To run the test:
1. Log into the BPC Explorer as user itsoa and start an instance of the hiring process with the test 1 data (5.6.10, “Testing the process with the BPC Explorer” on page 165). This creates an instance of the ApproveExecutiveApplication human task.
2. As user managera, log onto our new HRExecutiveWebClient. The URL for this is:
http://ProcessServerIPAddress:9080/HRExecutiveWebClient
Our new executive Web client is shown.
3. Click Open. The open tasks view displays as shown in Figure 6-39. Note the extra column indicating that the ApproveExecutiveTask instance does not have any subtasks at the moment.
Figure 6-39 Our new HRExecutiveWebClient showing the Waiting for subtask indicator
4. Click the ApproveExecutiveApplication task.
5. Click the Claim button.
Chapter 6. Human task features introduced in WebSphere Process Server V6.0.2 285

Our new Create Subtasks button is shown on the Enter the values for the output data of your task page (Figure 6-40).
Figure 6-40 The HRExecutiveWebClient showing the new Create Subtasks button
6. Copy the input data to the output data then click Create Subtasks.
7. Click My ToDo’s → Claimed.
286 Human-Centric Business Process Management with WebSphere Process Server V6

The task list refreshes, as shown in Figure 6-41. Note that the status is now waiting for subtask.
Figure 6-41 The task list showing the task waiting for subtasks
We have now created two subtasks, CheckReferences and CheckTeamCompatibility. We can see these by going into the BPC Explorer.
8. Log into the BPC Explorer as managerb. The CheckReferences task is shown as assigned and ready to be claimed.
9. Log into the BPC Explorer as managerd. The CheckTeamCompatibility task is shown as assigned and ready to be claimed.
10.Log into BPC Explorer as managera. The ApproveExecutiveApplication task is shown.
11.Click Task Instances → Initiated by Me. The CheckReferences and CheckTeamCompatibility tasks are shown. From here you can monitor the progress of your subtasks and check the data that is returned to you. If you you, as mentioned earlier, you could develop a custom client that shows your subtasks in another manner.
12.Log into the BPC Explorer as managerb. The CheckReferences task is shown as assigned and ready to be claimed. Claim the task (click Work On).
13.Copy the input data to the output data. Enter Approved into the Documentation → Reference field.
14.Complete the task (click Complete).
15.Log into the BPC Explorer as managerd. The CheckTeamCompatibility task is shown as assigned and ready to be claimed. Claim the task (click Work On).
16.Copy the input data to the output data. Enter Team Approved into the Documentation → Reference field.
17.Complete the task (click Complete).
Chapter 6. Human task features introduced in WebSphere Process Server V6.0.2 287

The two subtasks are now complete.
18.Log into our new HRExecutiveWebClient as managera and click Claimed.
The task is shown as no longer waiting on subtasks (Figure 6-42).
Figure 6-42 The task with completed subtasks - no longer waiting for subtasks
19.Log into BPC Explorer as managera and click Task Instances → Initiated by Me. The two subtasks are shown. Note that they are in the status of Finished. They still appear in the view as, although they are finished, their parent task is still in status Claimed.
20.Click the CheckReferences task and click Task Output Message.
288 Human-Centric Business Process Management with WebSphere Process Server V6

The output data entered by managerb is shown (Figure 6-43).
Figure 6-43 The output data showing the documentation entry made by managerb
21.Review the output data of the CheckTeamCompatibility task and see the data entered by managerd.
As managera you can see the data that your subtasks have returned. You now have the data to make a decision.
Chapter 6. Human task features introduced in WebSphere Process Server V6.0.2 289

22.As managera, approve the executive application by setting the FinalApproval field to true and completing the ApproveExecutiveApplication task.
23.As managera, log into the BPC Explorer. Now you have completed your parent task. The subtasks no longer appear in the Initiated by me view. This happens automatically once the parent task is completed.
6.6 Using ad-hoc tasks - follow-ons
In this section we discuss follow-on tasks: what they are, how they differ from subtasks, when to use them, and how we can add a follow-on task to our example scenario so that you can try them for yourself.
6.6.1 A follow-on task
A follow-on task is an ad-hoc task that can be created at runtime in a similar way to a subtask — the difference being that a subtask is a child of a parent task. The parent task waits in the claimed-but-waiting-for-subtasks state until all of the subtasks are complete. After the subtasks are completed, the parent task can be completed.
With a follow-on task, the previous task is set to a status of forwarded and is completed. The follow-on task is then set to the ready state and is available to be claimed and completed. The previous task does not wait for the follow-on task, but the requestor of the previous task now waits for the follow-on task to be completed.
For example, suppose process A is waiting for task B to complete. A user completes task B but with a follow-on task C. Even though task B is completed, process A must now wait for task C before it can proceed.
Due to this pattern, a follow-on task must have the same outputs as its previous task, even though it may have different inputs.
6.6.2 When you should use a follow-on task
You may wish to consider using follow-on tasks in the following cases:
� A user runs out of time to complete a task. He may save the data he has so far and set up a follow-on task to another user.
� A task may have a planned follow-on where one user completes part of the task and a second user completes the remainder. This is similar to the routing-slip pattern.
290 Human-Centric Business Process Management with WebSphere Process Server V6

6.6.3 Adding follow-on tasks to our scenario
In our scenario we add a follow-on task capability to our ApproveExecutiveApplication client. As we wish to keep each function as independent as possible, we quickly generate a new Web client to approve the executive application and add a button to create a follow-on task.
We create an instance of the ApproveExecutiveApplication human task. The user (managera) reviews the application, realizes that one of his coworkers (managerb) already knows the applicant, and delegates the responsibility to her, together with a comment to that effect.
Once the follow-on task is created, the primary task is complete and forwarded. The hiring process is now waiting on the follow-on task and not the primary task. Managera’s involvement in the process is over. Responsibility passes to managerb. Once managerb approves or rejects the application, the hiring process continues in the same way as if managera had made the decision.
6.6.4 The follow-on task creation API
To create follow-on tasks, we need to use the human task manager API (Table 6-6).
Table 6-6 The follow-on task creation API
6.6.5 Creating the follow-on task templates
We create a standalone (SCA) task template within WebSphere Integration Developer. To minimize the amount of configuration and coding required for our example, we reuse the ApproveExecutiveApplication interface that is used for the
Method Description
void completeWithFollowOnTask( String tkiid, String followOnID, ClientObjectWrapper input)
Completes the task with the ID of tkiid, then creates a follow-on task with ID followOnID. The method assumes that both task instances already exist and just links them to each other.
void completeWithNewFollowOnTask( String tkiid, String name, String namespace, ClientObjectWrapper input)
Completes the task with the ID of tkiid, then creates a new task using the template defined by name and namespace.
void completeWithNewFollowOnTask( String tkiid, TaskModel taskModel, String applicationName, ClientObjectWrapper input)
Completes the task with the ID of tkiid, then creates a new task using the taskModel.
Chapter 6. Human task features introduced in WebSphere Process Server V6.0.2 291

ApproveExecutiveApplication human task. This interface contains all of the data that we need and is already pre-built, together with its data structures.
This approach is to keep our example simple. The output of a follow-on task must be the same as the parent task, but the input can be different.
To create the templates:
1. Open the HRMod project.
2. Create a new standalone (SCA) human task by clicking New → Human Task and entering HRFollowOn in the Name field.
3. Click Next (not Finish).
The Human Task: Select Type of Interaction wizard appears. A follow-on task can only be an originating or pure human task, so we need to choose one of these. As we do not wish the subtask to originate a new process, we choose a pure human task.
4. Click the Pure human task radio button, then click Next (Figure 6-44).
Figure 6-44 The human task wizard, showing a pure human task
5. As we are re-using the ApproveExecutiveApplication interface, click the Select an Existing Interface button.
292 Human-Centric Business Process Management with WebSphere Process Server V6

6. In the Interface list box, select ApproveExecutiveApplication. In the Operation list box, select ApproveExecutive (Figure 6-45).
Figure 6-45 Selecting an existing interface for our human task
7. Click Finish.
Now we need to set up the staff resolution details and add potential creators, owners, and administrator.
8. With the new HRFollowOn human task open, click the Properties → Details tab.
9. Enter staff/bpe/itsoldap in the JNDI name of staff plugin configuration field. This points the HRFollowOn human task at our LDAP provider that we configured in 5.5.2, “Configuring the LDAP structure” on page 108.
We want to set managera as a potential instance creator and managers b and c as potential owners for the HRFollowOn task.
10.Click Originator settings → Staff settings → Potential Instance Creator.
11.In the Properties → Staff Group tab, click Users by user ID in the Staff Group (Verb) list box.
Chapter 6. Human task features introduced in WebSphere Process Server V6.0.2 293

12.Enter managera in the Parameters → UserID field (Figure 6-46).
Figure 6-46 Adding managera as a potential instance creator
13.Click Receiver settings → Staff settings → Potential Owner.
14.In the Properties → Staff Group tab, click Users by user ID in the Staff Group (Verb) list box.
15.Enter managerb in the Parameters → UserID field.
16.Enter managerc in the Parameters → AlternativeID1 field (Figure 6-47).
Figure 6-47 Adding managerb and managerc as potential owners to the follow-on task
294 Human-Centric Business Process Management with WebSphere Process Server V6

17.Press Ctrl+S to save the updated follow-on human task and close the editor.
We now have the task template defined in the project explorer, but to use it as a follow-on task we need to put it into a deployable module. We place it onto the HRMod assembly diagram.
18.Open the HRMod assembly diagram.
19.Drag the HRFollowOnTask and human tasks onto the assembly diagram so that it looks like Figure 6-48.
Figure 6-48 The HRMod assembly diagram with the ad-hoc follow-on template defined
20.Save the assembly diagram.
21.Redeploy the HRMod module to WebSphere Process Server.
The follow-on template HRFollowOn is now ready to use. The BPC Explorer does not allow us to create follow-on tasks, so we need to create a client to allow us to create instances of them.
6.6.6 Creating a new client for follow-on tasks
To create a follow-on task, we need to use the human task manager API. To call the API, we create a new client. We generate a client fro the user interface generator and then modify it. If you are not familiar with this tool, see the details in 6.1, “Using the Human Task Manager Client Generator” on page 204.
Note: There are no wires to the ad-hoc component, as it is not part of the hiring process. If you have already created the subtask ad-hoc tasks, it is fine if you have them in the assembly diagram as well.
Chapter 6. Human task features introduced in WebSphere Process Server V6.0.2 295
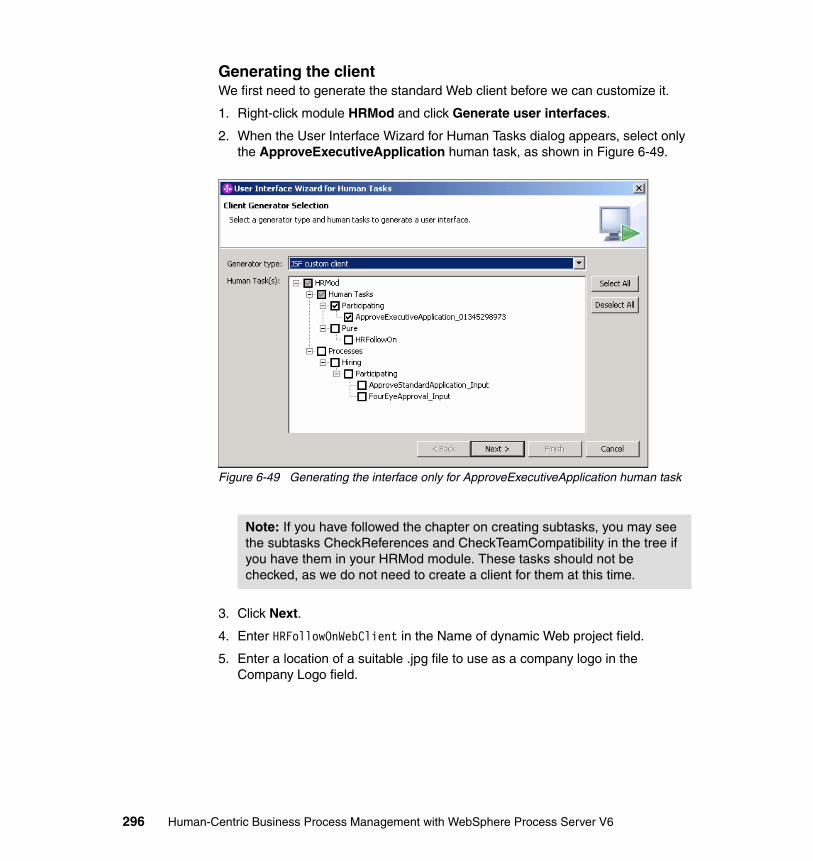
Generating the clientWe first need to generate the standard Web client before we can customize it.
1. Right-click module HRMod and click Generate user interfaces.
2. When the User Interface Wizard for Human Tasks dialog appears, select only the ApproveExecutiveApplication human task, as shown in Figure 6-49.
Figure 6-49 Generating the interface only for ApproveExecutiveApplication human task
3. Click Next.
4. Enter HRFollowOnWebClient in the Name of dynamic Web project field.
5. Enter a location of a suitable .jpg file to use as a company logo in the Company Logo field.
Note: If you have followed the chapter on creating subtasks, you may see the subtasks CheckReferences and CheckTeamCompatibility in the tree if you have them in your HRMod module. These tasks should not be checked, as we do not need to create a client for them at this time.
296 Human-Centric Business Process Management with WebSphere Process Server V6

6. Select local as the client location and IBM Style as the style (Figure 6-50).
Figure 6-50 Configuring the Web client generator to generate the follow on client
7. Click Finish. The client generation complete alert is shown, but this may take a few seconds while the client generates. Click OK.
We now have the default client generated. If you wish, you can deploy and test it before we modify it further, but make sure that you update the deployment descriptor security configuration first.
To modify the client, we need to move to the Physical Resources view. See “Deploying the Web client to WebSphere Process Server” on page 209 for details on how to do this.
8. Configure the deployment descriptor security details in the HRFollowOnWebClientEAR project to allow all authenticated users to interact with our new HRFollowOnWebClient. This is done identically to the way we did for our HRFollowOnWebClient. See“Deploying the Web client to WebSphere Process Server” on page 209 for details on how to do this.
Modifying the clientThe generated client is made up of many files. We only need to change a few of them to add our subtask functionality. The files we modify are as follows (we give the full path to each file when we detail the changes):
� ToDoFollowOn.java - This is a new file, but we copy ToDoRelease.java and modify it.
Chapter 6. Human task features introduced in WebSphere Process Server V6.0.2 297

� messages.properties - We add new text for our new button and a new error message.
� SharedConstants.java - We add new constants for our create follow-on task function.
� ToDoComplete.jsp - We add our new button to the page in this file.
Creating ToDoFollowOn.javaOur new Java class, ToDoFollowOn.java, creates a follow-on task from the parent human task. It is in this class that we write our API code.
To create ToDoFollowOn.java, we copy ToDoRelease.java, as it has the nearest functionality to what we want to build. The ToDoRelease file has been generated by the user interface generator and already contains references to the human task service and task IDs. We just need to change the code that actually performs the release function, so that our new code performs the suspend function.
The ToDoRelease.java file is located in HRFollowOnWebClient/JavaSource/com/ibm/wbit/tel/client/jsf/command.
1. Make a copy of ToDoRelease.java and name it ToDoFollowOn.java in the same folder.
2. Double-click ToDoFollowOn.java to open it in the editor.
3. We need to correct the class name. Replace the line public class ToDoRelease implements Command, SharedConstants {withpublic class ToDoFollowOn implements Command, SharedConstants {
We next need to replace the release functionality with our follow-on task creation functionality. As this is a simple example, we hard code the required parameters to show the use of the API. In a real project, most of the parameters would come from configuration files or variables.
Note: If your language setting for your browser is not English, you need to modify the appropriate messages_countrycode.properties file for your language.
If it cannot find a message in your messages_countrycode.properties file, WebSphere Process Server tries to read it from the default messages.properties file.
Note: You may see a red x against ToDoFollowOn.java. We will fix this.
298 Human-Centric Business Process Management with WebSphere Process Server V6

4. Replace the line htm.cancelClaim(toDoInstance.getID());with the code between the //New code to create follow-on task herecomments so the code looks like Example 6-16.
Example 6-16 The ToDoFollowOn.java code
/*** Sample program for use with the Product* Licensed Materials - Property of IBM* 5724-I66* (c) Copyright IBM Corp. 2006* */package com.ibm.wbit.tel.client.jsf.command;
import java.util.List;
import com.ibm.bpc.clientcore.ClientException;import com.ibm.bpc.clientcore.Command;import com.ibm.task.api.HumanTaskManagerService;import com.ibm.wbit.tel.client.jsf.bean.ToDoInstance;import com.ibm.wbit.tel.client.jsf.handler.ToDoMessageHandler;import com.ibm.wbit.tel.client.jsf.infrastructure.CommandException;import com.ibm.wbit.tel.client.jsf.infrastructure.ServiceFactory;import com.ibm.wbit.tel.client.jsf.infrastructure.SharedConstants;
// New code to create follow-on task here// just this import, more code laterimport com.ibm.task.api.*;
/** * The ToDoRelease uses the Human Task Manager API to release a previous claimed ToDo. * Please refer to the Human Task Manager API for more details. * The item provider for the ToDo to release is ToDoMessageHandler. */public class ToDoFollowOn implements Command, SharedConstants { /** * Message Handler for open and under work ToDos. */ private ToDoMessageHandler toDoMessageHandler; /** * Executes the release (cancel claim) command for the selected ToDo.
Chapter 6. Human task features introduced in WebSphere Process Server V6.0.2 299
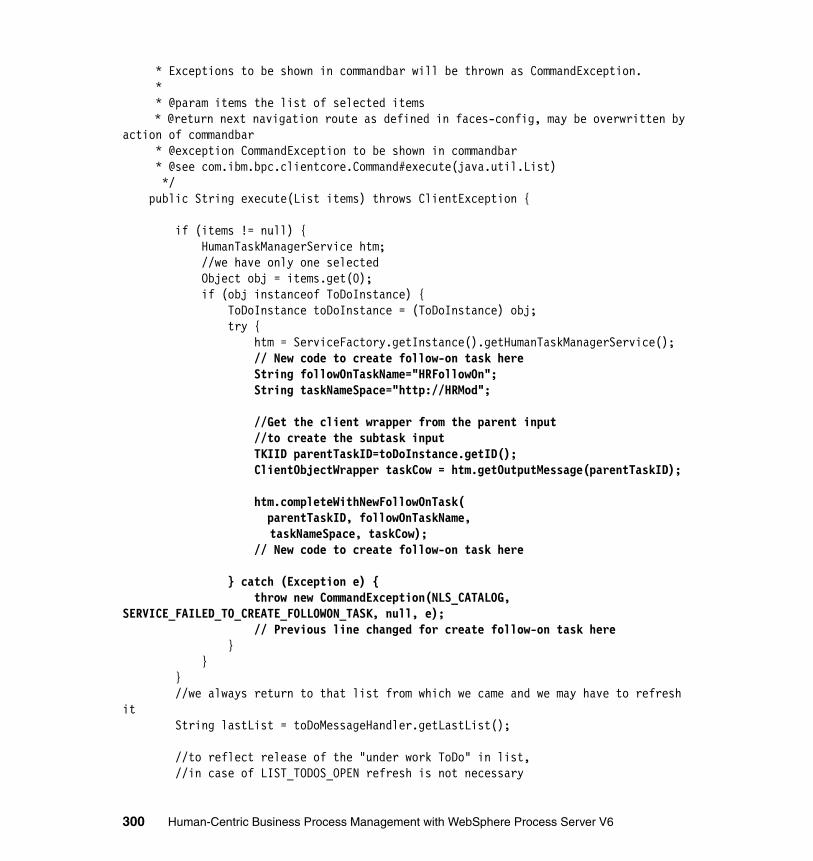
* Exceptions to be shown in commandbar will be thrown as CommandException. * * @param items the list of selected items * @return next navigation route as defined in faces-config, may be overwritten by action of commandbar * @exception CommandException to be shown in commandbar * @see com.ibm.bpc.clientcore.Command#execute(java.util.List) */ public String execute(List items) throws ClientException {
if (items != null) { HumanTaskManagerService htm; //we have only one selected Object obj = items.get(0); if (obj instanceof ToDoInstance) { ToDoInstance toDoInstance = (ToDoInstance) obj; try { htm = ServiceFactory.getInstance().getHumanTaskManagerService(); // New code to create follow-on task here String followOnTaskName="HRFollowOn"; String taskNameSpace="http://HRMod"; //Get the client wrapper from the parent input //to create the subtask input TKIID parentTaskID=toDoInstance.getID(); ClientObjectWrapper taskCow = htm.getOutputMessage(parentTaskID);
htm.completeWithNewFollowOnTask( parentTaskID, followOnTaskName,
taskNameSpace, taskCow); // New code to create follow-on task here
} catch (Exception e) { throw new CommandException(NLS_CATALOG, SERVICE_FAILED_TO_CREATE_FOLLOWON_TASK, null, e); // Previous line changed for create follow-on task here } } } //we always return to that list from which we came and we may have to refresh it String lastList = toDoMessageHandler.getLastList(); //to reflect release of the "under work ToDo" in list, //in case of LIST_TODOS_OPEN refresh is not necessary
300 Human-Centric Business Process Management with WebSphere Process Server V6

if (lastList.equals(LIST_TODOS_UNDER_WORK)) { toDoMessageHandler.refreshUnderWorkList(); } return lastList; }
/** * @see com.ibm.bpc.clientcore.Command#isMultiSelectEnabled() */ public boolean isMultiSelectEnabled() { return false; }
/** * @see com.ibm.bpc.clientcore.Command#isApplicable(java.util.List) */ public boolean[] isApplicable(List arg0) { return null; }
/** * Set context as defined by command bar attribute context. * * @param ctx context as defined by command bar attribute context. * @see com.ibm.bpc.clientcore.Command#setContext(java.lang.Object) */ public void setContext(Object ctx) {
toDoMessageHandler = (ToDoMessageHandler) ctx;
} }
5. Save the ToDoCrtSubtasks.java file (Ctrl+S) and close the editor.
Adding new entries to messages.propertiesThe generated Web client holds all of the literal strings, or displayed text, in a properties file. This allows you to easily change the way text or messages are displayed on the window. It also allows us to change the language of the messages simply by pointing to another message file.
Chapter 6. Human task features introduced in WebSphere Process Server V6.0.2 301

The messages.properties file is located in HRFollowOnWebClient/JavaSource/com/ibm/wbit/tel/client/jsf/infrastructure.
1. Double-click the file to open it in the editor.
2. At the end of the messages.properties file, add the text shown in Example 6-3 on page 252.
Example 6-17 New lines to be added to the messages.properties file for the follow-on button
# ==============================================================================# Added for create follow on button# ==============================================================================SERVICE_FAILED_TO_CREATE_FOLLOWON_TASK = Failed to create follow-on Task InstanceBUTTON_FOLLOWON = Create Follow-on Task
The BUTTON_FOLLOWON entry sets the text that is shown on our new button. This is referenced in ToDoComplete.jsp.
The SERVICE_FAILED_TO_CREATE_FOLLOWON_TASK entry sets the text that is displayed if this error message is shown. We referenced this description when we modified ToDoCrtFollowOn.java. We also need to add a new constant to SharedConstants.java to reference this new property name.
3. Save the messages.properties file by pressing Ctrl+S and close the editor.
Adding a new entry to SharedConstants.javaThe SharedConstants.java class holds many of the constant values used by the generated Web client. We need to add a new constant for our SERVICE_FAILED_TO_CREATE FOLLOWON_TASK error message.
The SharedConstants.java file is located in HRFOllowOnWebClient/JavaSource/com/ibm/wbit/tel/client/jsf/infrastructure.
1. Double-click the file to open it in the editor.
Note: If your language setting for your browser is not English, you need to modify the appropriate messages_countrycode.properties file for your language. For example, if you have German installed, instead of modifying messages.properties you should modify messages_de.properties.
It is important that you only modify the text, not the name of the property (in capitals). It is easy to identify the names of the properties. They are in English and listed exactly as we show in our text. The descriptions vary depending on the language.
302 Human-Centric Business Process Management with WebSphere Process Server V6

2. After the following line in the SharedConstants.java file, and then add the text shown in Example 6-18:
public static final String NAVIGATION_SEPARATOR= ">";
Example 6-18 New lines to be added to SharedConstants.java
//Added for Create FollowOn Task button /** * Key available in message properties */ public final static String SERVICE_FAILED_TO_CREATE_FOLLOWON_TASK = "SERVICE_FAILED_TO_CREATE_FOLLOWON_TASK";
3. Save the SharedConstants.java file by pressing Ctrl+S and close the editor.
Modifying ToDoComplete.jspThe ToDoComplete.jsp file controls what you see on the window when you claim a task using the generated Web client. We modify this file to add another button named Suspend, which calls our ToDoCrtFollowOn.java class.
The ToDoComplete file is located in HRFollowOnWebClient/WebContent.
1. Double-click the file to open it in the editor.
Near the end of the file, there is a section that starts with the line <h:panelGrid styleClass="commandbar">. This is the section that defines the buttons on the page. You can see the Complete, Save, and Release button code already there.
We add the Follow on button by copying and modifying the Release button code.
2. Insert the new button code as shown in Example 6-10 on page 275, where the new code is commented between the <!--New code for Follow On--> markers.
Example 6-19 Code for create follow on task - note that this is just the section where we added our code
<h:panelGrid styleClass="commandbar"><bpe:commandbar model="#{toDoMessageHandler}"
buttonStyleClass="button"><bpe:command label="#{bundle['BUTTON_COMPLETE']}"
commandID="CompleteToDoInstance"
Note: Do not add the line at the end of the file. There is a semicolon at the end. The last lines of the SharedConstants.java file should look like Example 6-9.
Chapter 6. Human task features introduced in WebSphere Process Server V6.0.2 303

commandClass="com.ibm.wbit.tel.client.jsf.command.ToDoComplete"context="#{toDoMessageHandler}" />
<bpe:command label="#{bundle['BUTTON_SAVE']}" commandID="SaveToDoInstance"commandClass="com.ibm.wbit.tel.client.jsf.command.ToDoSave"context="#{toDoMessageHandler}" />
<bpe:command label="#{bundle['BUTTON_RELEASE']}" commandID="ReleaseToDoInstance"
commandClass="com.ibm.wbit.tel.client.jsf.command.ToDoRelease"context="#{toDoMessageHandler}" />
<!-- Added for new follow on button --><bpe:command label="#{bundle['BUTTON_FOLLOWON']}"
commandID="CrtFollowOnToDoInstance"commandClass="com.ibm.wbit.tel.client.jsf.command.ToDoFollowOn"context="#{toDoMessageHandler}" />
<!-- Added for new follow on button -->
</bpe:commandbar></h:panelGrid>
3. Save the ToDoFollowOn.jsp file by pressing Ctrl+S and close the editor.
We have completed the code modifications we need. Build and deploy the modified code, as detailed in “Building and deploying the modified code” on page 255.
6.6.7 Testing the follow-on task scenario
To test the follow-on task scenario, we use test case 1 (5.6.10, “Testing the process with the BPC Explorer” on page 165) to create an ApproveExecutiveApplication human task. We then use our new client to complete the task and create a new follow-on task. We view the follow-on task and complete that.
1. Log into the BPC Explorer as user itsoa and start an instance of the hiring process with the test 1 data. This creates an instance of the ApproveExecutiveApplication human task.
2. Log into the HRFollowOnWebClient as managera. You should see the ApproveExecutiveApplication human task. Click the task name and then click Claim to claim the task.
304 Human-Centric Business Process Management with WebSphere Process Server V6

The new ToDoComplete page appears with our new Create Follow-on Task button (Figure 6-51).
Figure 6-51 The Create Follow-on Task Client
Chapter 6. Human task features introduced in WebSphere Process Server V6.0.2 305

Unfortunately, the logic for validating the task output is still in place when the Suspend button is pressed, so we need to copy the data before we press the button.
3. Copy the input data to the output data as in test 1.
Do not check the ApproveFinalApplication check box. We want to delegate the completion of this task.
4. Enter You know this person, please approve or not into the Documentation → Reference field.
5. Click our new Create Follow-on Task button. Our code in ToDoCrtFollowOn.java now runs. The code does two things:
– Completes our original task - the parent task– Creates a new follow-on task with the output of our original task
The HRFollowOnWebClient now does not show the original ApproveExecutiveApplication human task anymore, as it has been completed. The parent task was assigned to managera and is now complete. The new follow-on task is assigned to managerb or managerc and is only visible if we log on as them.
To check that our original task is complete, we need to log into BPC Explorer as managera and view the task.
1. Log into BPC Explorer as user managera.
2. Click Task Instances → Administered by Me to refresh the view. You should see the ApproveExecutiveApplication task with a status of Forwarded (Figure 6-52). You can also see the new HRFollowOn task that was created.
Figure 6-52 The ApproveExecutiveApplication and the corresponding follow-on task
3. Log into the BPC Explorer as user itsoa.
306 Human-Centric Business Process Management with WebSphere Process Server V6

4. Click Process instances → Administered by Me. Then click the process instance name and click Activities. The process activities are shown, as in Figure 6-53.
Figure 6-53 The activities page for the test hiring process
Note how the ApproveExecutiveApplication activity is still running, even though the ApproveExecutiveApplication human task is complete. As it has been forwarded to create a follow-on task called HRFollowOn, the process = waits for the follow-on task to complete and takes the output from the follow-on task, rather than the original task.
Notice how the ApproveExecutiveApplication activity is still running. When we create a follow-on task, the follow-on assumes the responsibility for completing the original task. The process waits for the follow-on to complete before continuing.
We now need to check that the follow-on task has been created correctly.
5. Log into the BPC Explorer as user managerb. The follow-on task that we created is shown.
6. Open the task by clicking HRFollowOn, then click Work On to claim the follow-on task.
7. Copy the input data to the output data and click Complete.
Chapter 6. Human task features introduced in WebSphere Process Server V6.0.2 307

At this point, the follow-on task is completed. The hiring business process continues as normal, in exactly the same way as if managera had completed the ApproveExecutiveApplication task without a follow-on. The fact that managera could choose whether to instantiate a follow-on task is a good example of using ad-hoc task creation.
The test is complete. We created a participating human task from a business process, completed it, and created a follow-on task. We then completed the follow-on task.
6.7 Using APIEvents
In the section we discuss the WebSphere Process Server human task manager API Events. We introduce the functionality and discuss the API itself and when API Events should be used.
We then add API Events to our example business process scenario to show how they can be used in a business situation and to give you a chance to try them out for yourself.
6.7.1 An API Event
A WebSphere Process Server human task manager API Event is an event that is triggered when a human task changes state or an activity is performed upon it, for example, before and after a task is claimed.
6.7.2 When you should use API Events
API Events are used in a similar way to database triggers. They can be used in many ways:
� As guard conditions. For example, if a task is requested to be completed and the data is not valid (or more usually no longer valid since the task was claimed), the completion request can be rejected.
� As access control. If the human task requires access to another document or system, we can use the API event to grant access when the task is claimed and to revoke access when the task is completed. For example, if the task is to review a job application we could enable access to the applicant’s resume only for the duration of the task.
� As a synchronization mechanism. The task may need to update data on a separate system when it is completed or a status may need to be placed on an item of master data when it is being reviewed, for example.
308 Human-Centric Business Process Management with WebSphere Process Server V6

� As a way of controlling user workload. If a user attempts to claim a task but has, for example, 20 tasks already claimed, it may be company policy that this user is becoming overloaded. The API event may be set to reject the user’s attempt to claim the task. Alternatively, it may notify the user’s manager that the user is not using the human task manager in the most efficient way, for example, by suspending the user’s tasks.
6.7.3 Adding API Events to our scenario
We add a simple event handler to show the use of the API events. We listen for the preClaim and postClaim events that are emitted when the ApproveExecutiveApplication is claimed.
Since we are writing our API event code in Java, we could do anything we want once we have detected the event. For simplicity, our example just writes out information to the log to show that the events have been detected.
Creating the plug-in event handler Java classTo actually handle the API Events, we need to create a plug-in event handler. This is a Java class that runs when the appropriate API Event triggers. Within the Java class, we can then code whatever logic we wish to use for the event.
Coding API Event handlers requires some knowledge of Java, but we keep our example simple, and you should be able to follow it even if you are not familiar with Java.
To create an API Event handler, you can either:
� Implement the interface com.ibm.task.spi.APIEventHandlerPlugin2.� Extend the default implementation com.ibm.task.spi.APIEventHandler.
We extend the com.ibm.task.spi.APIEventHandler default implementation.
We need to package our implementation as a Java archive (.jar) file. We use WebSphere Integration Developer to create this .jar file. Alternatively, you can obtain our pre-built .jar file from the additional material included with this book.
Note: The pre-action and post-action API events are similar to database triggers. If you want to call the human task manager from your Java class, do not use any of the functions that update the task contents, as this may result in a database deadlock.
Chapter 6. Human task features introduced in WebSphere Process Server V6.0.2 309

To create the .jar file, we first need to build a Java class to go in it. Our Java class contains the logic that copies the input data to the output data.
1. From within WebSphere Integration Developer, click File → New → Project. The New Project dialog is shown (Figure 6-54).
Figure 6-54 The New Project dialog with the Java Project wizard already selected
310 Human-Centric Business Process Management with WebSphere Process Server V6

2. Click Java → Java Wizard to select a Java project, then click Next. The Java settings dialog is shown (Figure 6-55).
3. Enter HRAPIEventHandler as the project name.
4. Click the Libraries tab and click Add External JARs.
5. Browse to the taskapi.jar file and select it. In our installation, the taskapi.jar file is located in ${install_root}\runtimes\bi_v6\lib\taskapi.jar.
Figure 6-55 The java settings dialog
Note: This file will only be available if you have installed the WebSphere Process Server integrated test environment (ITE) with WebSphere Integration Developer.
If you have not installed the ITE, you need to copy taskapi.jar from the ${WAS_INSTALL_ROOT}\lib folder of your WebSphere Process Server installation to a suitable location on your WebSphere Integration Developer workstation. You can then add the file using Add External JARs.
Chapter 6. Human task features introduced in WebSphere Process Server V6.0.2 311

6. Click Finish. You may see the alert shown in Figure 6-56.
Figure 6-56 The confirm perspective switch alert
7. If you see the confirm perspective switch, click Yes.
We now have a new Java project, which is displayed in the package explorer in the Java perspective (Figure 6-57).
Figure 6-57 The new HRAPIEventHandler project
Note: If you do not see the Confirm Perspective Switch dialog, you may need to switch to the Java perspective manually. To do this, click Window → Open Perspective → Java.
Note: You may have more or fewer projects in your explorer depending on your workspace and which examples you followed in this book. It does not matter if your project list does not look like our figure, as we are only concerned with the HRAPIEventHandler project at the moment.
312 Human-Centric Business Process Management with WebSphere Process Server V6

We now create our Java class.
1. Right-click the HRAPIEventHandler project and click New → Class.
2. The New Java Class wizard is shown, as in Figure 6-58.
Figure 6-58 The new Java class wizard showing the HRApproveExecApp class
3. In the Package field, enter com.ibm.itsocorp.HREventHandlers.
4. In the Name field, enter HRApproveExecApp.
5. In the Superclass field, enter com.ibm.task.spi.APIEventHandler.
6. Click Finish.
After a few seconds, the class source is created and the HRApproveExecApp.java editor opens.
Chapter 6. Human task features introduced in WebSphere Process Server V6.0.2 313
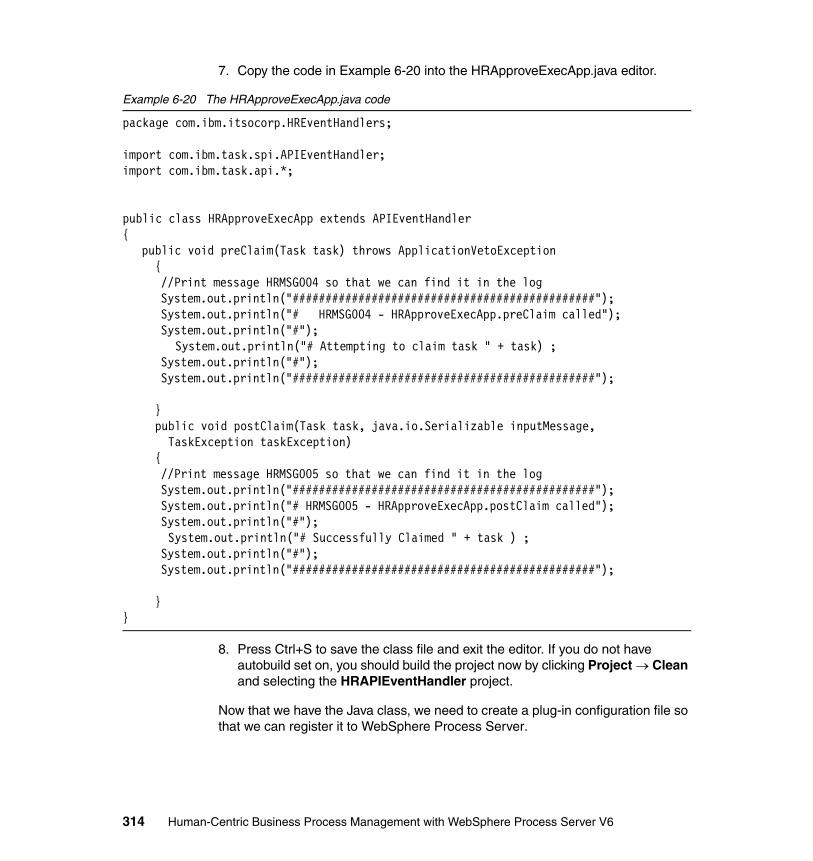
7. Copy the code in Example 6-20 into the HRApproveExecApp.java editor.
Example 6-20 The HRApproveExecApp.java code
package com.ibm.itsocorp.HREventHandlers;
import com.ibm.task.spi.APIEventHandler;import com.ibm.task.api.*;
public class HRApproveExecApp extends APIEventHandler {
public void preClaim(Task task) throws ApplicationVetoException {
//Print message HRMSG004 so that we can find it in the logSystem.out.println("##############################################");System.out.println("# HRMSG004 - HRApproveExecApp.preClaim called");System.out.println("#");
System.out.println("# Attempting to claim task " + task) ;System.out.println("#");System.out.println("##############################################");
} public void postClaim(Task task, java.io.Serializable inputMessage, TaskException taskException) {
//Print message HRMSG005 so that we can find it in the logSystem.out.println("##############################################");System.out.println("# HRMSG005 - HRApproveExecApp.postClaim called");System.out.println("#");
System.out.println("# Successfully Claimed " + task ) ;System.out.println("#");System.out.println("##############################################");
}}
8. Press Ctrl+S to save the class file and exit the editor. If you do not have autobuild set on, you should build the project now by clicking Project → Clean and selecting the HRAPIEventHandler project.
Now that we have the Java class, we need to create a plug-in configuration file so that we can register it to WebSphere Process Server.
314 Human-Centric Business Process Management with WebSphere Process Server V6

Creating the plugin-configuration fileWe create our plug-in configuration file in the same project as our Java class. The plug-in API states that the configuration file needs to be placed in the /META-INF/services directory within our project.
The API states that the configuration file needs to be called com.ibm.task.spi.PlugInNameAPIEventHandlerPlugin. We call our plug in HRAPIEventHandler.
1. Using the File → New → Folder menu, create a new folder called META-INF in the root of the HRAPIEventHandler project.
2. In the META-INF folder, create a folder called services.
3. In the services folder, using the File → New → File menu, create a new file called com.ibm.task.spi.HRAPIEventHandlerAPIEventHandlerPlugin.
You should now have a structure similar to that shown in Figure 6-59.
Figure 6-59 The configuration file in the META-INF/services folder
The com.ibm.task.spi.HRAPIEventHandlerAPIEventHandlerPlugin editor should already be open. If not, double-click the file name to open it.
Note: We kept our example simple to show how to add an API Event to WebSphere Process Server rather than showing how to code something that happens when the event triggers. When writing your own code, it is useful to note the following guidelines:
� Pre-event methods can throw an ApplicationVetoException to prevent the event from happening. This can be used as a guard condition, for example, to stop someone claiming an event by throwing ApplicationVetoException in the preClaim() method.
� Post-event methods cannot modify return values. This is because they are processed after the event and the values are set.
� Post-event methods cannot throw exceptions. Runtime exceptions are logged but are ignored.
Chapter 6. Human task features introduced in WebSphere Process Server V6.0.2 315

4. In the editor, copy the text shown in Example 6-21 into the file.
Example 6-21 The com.ibm.task.spi.HRAPIEventHandlerAPIEventHandlerPlugin file
com.ibm.itsocorp.HREventHandlers.HRApproveExecApp
5. Press Ctrl+S to save the file and close the editor.
We now have the Java class and the configuration file for our HRAPIEventHandler plug in. We need to place them in a .jar file.
Adding the jar file /project to the HRMod projectTo do this:
1. Right-click the HRMod project and click Open Dependencies.
Note: You must be in the Business Integration view of the Business Integration perspective to open the dependencies editor.
316 Human-Centric Business Process Management with WebSphere Process Server V6

The Dependencies dialog opens, as shown in Figure 6-64 on page 326. (We show it with the dependency already added.)
Figure 6-60 The HRMod dependencies dialog
2. Click Java → Add.
3. The Java project selection dialog appears. Click HRAPIEventHandler and then OK.
4. Press Ctrl+S to save the dependencies and close the dependency dialog.
Note: If the Java dependency list is not expanded, click Java to expand it.
Chapter 6. Human task features introduced in WebSphere Process Server V6.0.2 317

Registering the plug-in to the human taskAPI Event plug-ins can be registered on a number of levels:
� Task Model level - only for this human task model� Global level - all human tasks in the human task container� For ad-hoc tasks created at run time� For an existing running task at run time
We register our plug-in for our ApproveExecutiveApplication human task at the task model level.
1. If you are not already in the Business Integration perspective, switch to that perspective now (click Window → Open Perspective → Other → Business Integration and click OK) and click the Business Integration tab.
2. In the HRMod project, open the ApproveExecutiveApplication human task.
3. Open the Properties → Details tab.
4. Enter HRAPIEventHandler into the Event handler name field.
5. Save the human task (Ctrl+S) and close the editor.
The event handler is now registered to the ApproveExecutiveApplication task.
Deploying the plug-in to WebSphere Process ServerWe have embedded our plug-in .jar file into the HRMod project. We have also registered our plug-in with the ApproveExecutiveApplication task, also in the HRMod file.
Therefore, all we need to do to deploy our plug-in is to redeploy the HRMod module as usual. You do not need to reconfigure the plug-in to pick up the new version.
With the plug-in deployed, restart the human task container from the Administrative Console.
6.7.4 Testing the API Event Handler
Now that we have built an API event handler and deployed it to WebSphere Process Server, we need to test that it works.
We use test case 1 (5.6.10, “Testing the process with the BPC Explorer” on page 165) to create an ApproveExecutiveApplication human task instance. We then claim the task and check that our plug-in has run successfully.
1. As user itsoa, create an instance of the hiring process with the data for test case 1.
318 Human-Centric Business Process Management with WebSphere Process Server V6

2. Check the SystemOut.log process server log for any of our messages. There should be none.
3. Using either the BPC Explorer or one of the Web clients that we have created in this book, log in as user managera and claim the ApproveExecutiveApplication task.
4. Check the SystemOut.log process server log for any of our messages. You should see the HRMSG004 and HRMSG005 messages, as in Example 6-22, showing that our plug-in has run successfully.
Example 6-22 The output from the HRAPIEventHandler plug-in
00000072 SystemOut O ##############################################00000072 SystemOut O # HRMSG004 - HRApproveExecApp.preClaim called00000072 SystemOut O #00000072 SystemOut O # Attempting to claim task com.ibm.task.database.TaskImpl@af31d0f600000072 SystemOut O #00000072 SystemOut O ##############################################00000072 SystemOut O ##############################################00000072 SystemOut O # HRMSG005 - HRApproveExecApp.postClaim called00000072 SystemOut O #00000072 SystemOut O # Successfully Claimed com.ibm.task.database.TaskImpl@af31d0f600000072 SystemOut O #00000072 SystemOut O ##############################################
Now that the plug-in is associated with the task, to add any additional functionality is simply a matter of updating the HRApproveExecApp.java file with the required code, rebuilding the HRAPIEventHandler and HRMod projects, and finally redeploying the HRMod project.
We discussed the use of plug-ins to listen for human task manager API events. We now discuss using similar techniques to listen for notifications.
6.8 Using notifications
In this section we discuss WebSphere Process Server human task manager notifications, when they should be used, how we can add them to our scenario, and also how notifications compare to APIEvents.
Chapter 6. Human task features introduced in WebSphere Process Server V6.0.2 319

6.8.1 A notification
A notification is a method of indicating that an escalation has occurred. WebSphere Process Server has the following in-built methods of escalation notification:
� e-mail - An e-mail is sent to the person to whom the task has been escalated.� Work Item - A work item is created in the person’s work list.� Event - A notification event is sent.
When a notification event is sent, it must be received by a notification event handler. The event handler is a plug-in piece of Java code, which then handles the escalation notification.
6.8.2 When you should use notifications
Notifications are used when either an e-mail or work item is not a suitable notification event. For example, a notification could send a message over Short Message Service (SMS), via a pager, instant messaging, or some other proprietary mechanism.
A notification could even start a business process or call another WebSphere Process Server component to take action if a task is escalated. The possibilities are only limited by the Java code that is implemented.
6.8.3 Using notifications and API Events together
Both notifications and API Events can be used together, but there are some things that need to be remembered.
Only one plug-in event handler can be defined per task, but the plug-in can handle both API Events and notifications.
The full plug-in names are of the form:
� com.ibm.task.spi.PlugInNameNotificationEventHandlerPlugin for notifications� com.ibm.task.spi.PlugInNameAPIEventHandlerPlugin for API events
You can have two files in the same META-INF/services folder if you wish to put them in the same .jar file. Alternatively, you can implement the notification plug-in in one .jar file and the API event plug-in in another.
320 Human-Centric Business Process Management with WebSphere Process Server V6

6.8.4 Adding notifications to our scenario
For the sake of simplicity, ease of debugging and to reduce dependencies on your having read the section on APIEvents (6.7, “Using APIEvents” on page 308), we add a notification to the ApproveStandardApplication human task escalation.
If you have not implemented an escalation for the ApproveStandardApplication task, you need to add one. We show how to add a claim escalation in 6.2, “Using escalations” on page 223. We assume that there is an escalation active on the ApproveStandardApplication task. If you wish, you can import a project interchange file (.pif) with an escalation pre-built from the additional material provided with this book.
Creating the plug-in event handler Java classTo actually handle the notifications, we need to create a plug-in notification event handler. This is a Java class that runs when the appropriate notification triggers. Within the Java class, we can then code whatever logic we wish to use for the event.
Coding a notification handler is very similar to coding an APIEvent handler. We recommend that you read 6.7, “Using APIEvents” on page 308, for details of how to create an event handler. In this section we do not go through the process in as much detail as we did for API Events, as the steps are already documented.
To create an notification event handler, you can either:
� Implement the interface com.ibm.task.spi.NotificationEventHandlerPlugin.
� Extend the default implementation of com.ibm.task.spi.NotificationEventHandler.
We extend the com.ibm.task.spi.NotificationEventHandler default implementation.
We need to package our implementation as a Java archive (.jar) file. We use WebSphere Integration Developer to create this .jar file. Alternatively, you can obtain our pre-built .jar file in Appendix A, “Additional material” on page 739.
To create the .jar file, we first need to build a Java class to go in it. Our Java class contains a simple piece of code that writes out a notification to the system log.
1. Create a new Java project called HRNotificationHandler.
Note: As we are handling notifications here, rather than API events, there is no capability to veto or stop an escalation. The notification event is only fired once the escalation has been raised.
Chapter 6. Human task features introduced in WebSphere Process Server V6.0.2 321

2. The Java settings dialog is shown (Figure 6-61).
3. Click the Libraries tab and click Add External JARs.
4. Browse to the taskapi.jar file and select it. In our installation, the taskapi.jar file is located in ${install_root}\runtimes\bi_v6\lib\taskapi.jar.
Figure 6-61 Adding the taskapi. jar to the java buildpath
5. Click Finish to create the Java project. You may see the alert shown in Figure 6-62.
Figure 6-62 The confirm perspective switch alert
322 Human-Centric Business Process Management with WebSphere Process Server V6

6. If you see the confirm perspective switch, click Yes.
We now create our Java class.
7. Right-click the HRNotificationHandler project and click New → Class.
8. The New Java Class wizard is shown, as in Figure 6-63.
Figure 6-63 The New Java Class wizard showing the HRApproveStandardApp class
9. In the Package field, enter com.ibm.itsocorp.HRNotificationHandlers.
10.In the Name field, enter HRApproveStandardApp.
11.In the Superclass field, enter com.ibm.task.spi.NotificationEventHandler.
12.Click Finish.
Note: If you do not see the Confirm Perspective Switch dialog, you may need to switch to the Java perspective manually. To do this, click Window → Open Perspective → Java.
Chapter 6. Human task features introduced in WebSphere Process Server V6.0.2 323

After a few seconds, the class source is created and the HRApproveStandardApp.java editor opens.
13.Copy the code shown in Example 6-23 into the HRApproveStandardApp.java editor.
Example 6-23 The HRApproveStandardApp.java code
package com.ibm.itsocorp.HRNotificationHandlers;
import com.ibm.task.spi.NotificationEventHandler;import com.ibm.task.api.*;
public class HRApproveStandardApp extends NotificationEventHandler {
public void escalationNotification(Task task, Escalation escalation) {
//Print message HRMSG006 so that we can find it in the logSystem.out.println("##############################################");System.out.println("# HRMSG006 - HRApproveStandardApp.");System.out.println("# escalation notification called");System.out.println("#");System.out.println("# Task " + task + " has raised the following escalation: " +
escalation);System.out.println("#");System.out.println("##############################################");
}}
14.Press Ctrl+S to save the class file and exit the editor. If you do not have autobuild set on, you should build the project now by clicking Project → Clean and selecting the HRNotificationHandler project.
Now that we have the Java class, we need to create a plug-in configuration file so that we can register it to WebSphere Process Server.
Creating the plugin-configuration fileWe create our plug-in configuration file in the same project as our Java class. The plug-in API states that the configuration file needs to be placed in the /META-INF/services directory within our project.
324 Human-Centric Business Process Management with WebSphere Process Server V6

The API states that the configuration file needs to be called com.ibm.task.spi.PlugInNameNotificationHandlerPlugin. We call our plug in HRNotificationHandler.
1. Create a new folder called META-INF in the root of the HRNotificationHandler project.
2. In the META-INF folder, create a folder called services.
3. In the services folder, create a new file called com.ibm.task.spi.HRNotificationHandlerNotificationEventHandlerPlugin.
The com.ibm.task.spi.HRAPIEventHandlerAPIEventHandlerPlugin editor should already be open. If not, double-click the file name to open it.
4. In the editor, copy the text shown in Example 6-24 into the file.
Example 6-24 com.ibm.task.spi.HRNotificationHandlerNotificationEventHandlerPlugin file
com.ibm.itsocorp.HRNotificationHandlers.HRApproveStandardApp
5. Press Ctrl+S to save the file and close the editor.
We now have the Java class and the configuration file for out HRAPIEventHandler plug-in. We need to place them into a .jar file.
Adding the jar file /project to the HRMod projectTo do this:
1. Right-click the HRMod project and click Open Dependencies.
Note: You must be in the Business Integration view of the Business Integration perspective to open the dependencies editor.
Chapter 6. Human task features introduced in WebSphere Process Server V6.0.2 325

The dependencies dialog opens, as shown in Figure 6-64.
Figure 6-64 The HRMod dependencies dialog
2. Click Java → Add.
3. The Java project selection dialog appears. Click HRNotificationHandler and then OK.
4. Press Ctrl+S to save the dependencies and close the dependency dialog.
Note: You will only see the HRAPIEventHandler.jar file as a dependency if you have followed the APIEvents chapter. If it is not there, it is not a problem.
Note: If the Java dependency list is not expanded, click Java to expand it.
326 Human-Centric Business Process Management with WebSphere Process Server V6

Registering the plug-in to the human taskNotification plug-ins can be registered on a number of levels:
� Task Model level - only for this human task model� Global level - all human tasks in the human task container� For ad-hoc tasks created at run time� For an existing running task at run time
We register our plug-in for our ApproveStandardApplication human task at the task model level.
1. If you are not already in the Business Integration perspective, switch to that perspective now.
2. In the HRMod project, open the ApproveStandardApplication human task (this is located in the hiring BPEL process — remember to open the actual human task, not just the staff activity in the process).
Chapter 6. Human task features introduced in WebSphere Process Server V6.0.2 327

3. Open the Properties → Details tab (Figure 6-65).
Figure 6-65 Adding the event handler to the ApproveStandardApplication human task
4. Click Escalation1 under Escalation settings.
5. Select Event as the notification type.
6. Enter HRNotificationHandler into the Event handler name field.
7. Save the human task (Ctrl+S) and close the editor.
The event handler is now registered to the ApproveStandardApplication task.
328 Human-Centric Business Process Management with WebSphere Process Server V6

Deploying the plug-in to WebSphere Process ServerWe have embedded out plug-in .jar file into the HRMod project. We have also registered our plug-in with the ApproveStandardApplication task, also in the HRMod file.
Therefore, all we need to do to deploy our plug-in is to redeploy the HRMod module as usual — nothing plug-in-specific needs to be done.
6.8.5 Testing the notification event handler
Now that we have built a notification handler and deployed it to WebSphere Process Server, we need to test that it works.
We use test case 3 (5.6.10, “Testing the process with the BPC Explorer” on page 165) to create an ApproveStandardApplication human task instance. We then wait until it is escalated and check that our plug-in has run successfully.
1. As user itsoa, create an instance of the hiring process with the data for test case 3.
2. Wait for (at least) 2 minutes for the escalation to be raised. You can check whether the task has been escalated by using the BPC Explorer to check the task status.
3. Check the SystemOut.log process server log for any of our messages. You should see the HRMSG006 message, as in Example 6-25, showing that our plug-in has run successfully.
Example 6-25 The output from the HRNotificationHandler plug-in
0000009b SystemOut O ##############################################0000009b SystemOut O # HRMSG006 - HRApproveStandardApp.0000009b SystemOut O # escalation notification called0000009b SystemOut O #0000009b SystemOut O # Task com.ibm.task.database.TaskImpl@97a66928 has raised the following escalation: com.ibm.task.database.EscalationImpl@a8ff2f640000009b SystemOut O #0000009b SystemOut O ##############################################
Now that the plug-in is associated with the task, to add any additional functionality is simply a matter of updating the HRApproveStandardApp.java file with the required code, rebuilding the HRNotificationHandler and HRMod projects, and finally redeploying the HRMod project.
Chapter 6. Human task features introduced in WebSphere Process Server V6.0.2 329
6.9 Using staff query post-processing
In this section we discuss staff queries and the query result post-processing feature of WebSphere Process Server. We cover what is available and how and when to use it, and demonstrate an example using our scenario process.
6.9.1 Staff query post-processing
Staff query post-processing allows you to further refine the staff query once WebSphere Process Server has returned the initial results.
The post-processing plug-in receives the results of the initial staff query and returns the staff query with any updates made by the plug-in. For example, the initial staff query may return the users HRSpecialista, HRSpecialistb, HRSpecialistc, and HRSpecialistd. A custom post-processing plug-in may determine that HRSpecialistb has too many claimed tasks and should not be allocated any more. The plug-in would then return the list HRSpecialista, HRSpecialistc, and HRSpecialistd to WebSphere Process Server.
6.9.2 When you should use staff query post-processing
Typical examples of when you may consider staff query post-processing are:
� Load balancing - Remove users from the staff query result who already have a high workload, for example, those that already have more than five claimed tasks.
� Prefer active users - Assign work to people only who are currently logged on to the system. Note that the definition of logged on is not explicitly held within WebSphere Process Server.
� Advanced Substitution - Replace people with their substitutes or delegates.
6.9.3 Adding staff query post-processing to our scenario
In our scenario, the ApproveStandardApplication human task has a staff group verb to assign the task to the HRSpecialist group, as defined in our LDAP.
To demonstrate the staff query post-processing functionality, we decided that if an application was submitted by user itsob then the task could only be approved by user HRSpecialista.
We could not configure this using the human task editor, as we can only assign one staff verb to each human task template. Therefore we must use the
330 Human-Centric Business Process Management with WebSphere Process Server V6
post-processing capability of WebSphere Process Server to read the task initiator (starter) and change the staff assignments if it is set to itsob.
Creating the plug-in post-processing Java classTo perform staff query post processing, we need to create a plug-in query post processor.
This is a Java class that runs after the initial staff query runs. It is the results of the initial staff query that are passed to the Java class. Our post processor is not a replacement for the built-in query. Within our Java class, we can code whatever additional query logic we wish to apply to the result set.
Unlike the API event and notification plug-ins, we can only have one staff query post-processor plug, in that is configured at the level of the human task container. It is not possible to configure a post-processor per task model. If this functionality is required, it must be explicitly coded in the class and a switch/case style structure used to apply different processing per task model.
Coding a staff query post-processing plug-in is similar to creating the API Event and notification handler plug-ins, although we install it to WebSphere Process Server in a different way. We recommend that you read 6.7, “Using APIEvents” on page 308, for details of how to create a plug-in for WebSphere Process Server. In this section we do not go through the process in as much detail as we did for API Events, as some of the steps are already documented.
To create a staff query post processor, you must implement the com.ibm.task.spi.StaffQueryResultPostProcessorPlugin interface.
We need to package our implementation as a Java archive (.jar) file. We use WebSphere Integration Developer to create this .jar file. Alternatively, you can obtain our pre-built .jar file from the additional material included with this book.
To create the .jar file, we first need to build a Java class to go in it. Our Java class contains a simple piece of code that writes out a message to the system log so that we can easily check that our plug-in has run, as well as the main query update code.
1. Create a new Java project called HRPostProcessor.
Note: When you implement the interface, you must implement all of the method signatures of the processStaffQueryResult method (there are five altogether), even if you do not intend to use all of them. The simplest method of implementing a null signature is simply to return the original query, as we have done.
Chapter 6. Human task features introduced in WebSphere Process Server V6.0.2 331

2. The Java settings dialog is shown (Figure 6-66. Note that our figure shows it when we have completed the steps to add the required library.
Figure 6-66 Adding the taskapi. jar to the Java buildpath
As we are going to call the human task API, we need to add the WebSphere Process Server libraries that contain the API into our project build path.
3. Click the Libraries tab and click Add Library.
332 Human-Centric Business Process Management with WebSphere Process Server V6

4. Click WPS Server Target (Figure 6-67), then click Next.
Figure 6-67 Selecting the WPS Server Target library
Chapter 6. Human task features introduced in WebSphere Process Server V6.0.2 333

5. Check the Configure wps server classpath check box (Figure 6-68) and click Finish.
Figure 6-68 Selecting the option to configure the WPS server classpath
6. Click Finish to create the Java project. You may see the alert shown in Figure 6-69.
Figure 6-69 The confirm perspective switch alert
7. If you see the confirm perspective switch, click Yes.
Note: If you do not see the Confirm Perspective Switch dialog, you may need to switch to the Java perspective manually. To do this, click Window → Open Perspective → Java.
334 Human-Centric Business Process Management with WebSphere Process Server V6

We now create our Java class.
8. Right-click the HRPostProcessor project and click New → Class.
9. The New Java Class wizard is shown, as in Figure 6-70.
Figure 6-70 The new Java class wizard showing the HRUpdateResults class
10.In the Package field, enter com.ibm.itsocorp.HRQueryPostProcessor.
11.In the Name field, enter HRUpdateResults.
12.Click Finish. After a few seconds, the class source is created and the HRUpdateResults.java editor opens.
13.Copy the code in Example 6-26 into the HRUpdateResultsApp.java editor.
Example 6-26 The HRUpdateResults.java code
package com.ibm.itsocorp.HRQueryPostProcessor;import com.ibm.task.api.*;import com.ibm.task.spi.StaffQueryResultPostProcessorPlugin;import com.ibm.task.spi.UserData;
Chapter 6. Human task features introduced in WebSphere Process Server V6.0.2 335

import com.ibm.task.spi.StaffQueryResult;import com.ibm.task.spi.StaffQueryResultFactory;import java.util.*;
public class HRUpdateResults implements StaffQueryResultPostProcessorPlugin{
public StaffQueryResult processStaffQueryResult (StaffQueryResult originalStaffQueryResult, Task task, int role, Map context)
{//Print message HRMSG007 so that we can find it in the logSystem.out.println("##############################################");System.out.println("# HRMSG007 - HRUpdateResults.");System.out.println("# processStaffQueryResult called");System.out.println("# Method Signature 1");System.out.println("#");System.out.println("##############################################");
StaffQueryResult newStaffQueryResult = originalStaffQueryResult;
StaffQueryResultFactory staffResultFactory = StaffQueryResultFactory.newInstance();
//If the originator is itsob, the task is ApproveStandardApplication// and the role is potentialowner //restrict the staff assignment to HRSpecialista only
System.out.println("# Role="+role);System.out.println("# Potential Owner Role
"+com.ibm.task.api.WorkItem.REASON_POTENTIAL_OWNER);System.out.println("# Task Name "+task.getName());System.out.println("# Task Originator "+task.getOriginator());
if(role == com.ibm.task.api.WorkItem.REASON_POTENTIAL_OWNER &&"itsob".equals(task.getOriginator()) &&
"Hiring_1550364285$ApproveStandardApplication_0217913854".equals(task.getName())){
System.out.println("# Updating Users List");
UserData user = staffResultFactory.newUserData("hrspecialista",
336 Human-Centric Business Process Management with WebSphere Process Server V6

new Locale("en-US"), "hrspecialista");
ArrayList userList = new ArrayList();userList.add(user); newStaffQueryResult =
staffResultFactory.newStaffQueryResult(userList);} return(newStaffQueryResult);
}public StaffQueryResult processStaffQueryResult
(StaffQueryResult originalStaffQueryResult, TaskTemplate taskTemplate, int role, Map context)
{System.out.println("##############################################");System.out.println("# HRMSG007 - HRUpdateResults.");System.out.println("# processStaffQueryResult called");System.out.println("# Method Signature 2");System.out.println("#");System.out.println("##############################################");
return(originalStaffQueryResult);}
public StaffQueryResult processStaffQueryResult (StaffQueryResult originalStaffQueryResult, EscalationTemplate escalationTemplate, int role, Map context)
{System.out.println("##############################################");System.out.println("# HRMSG007 - HRUpdateResults.");System.out.println("# processStaffQueryResult called");System.out.println("# Method Signature 3");System.out.println("#");System.out.println("##############################################");
return(originalStaffQueryResult);
}
public StaffQueryResult processStaffQueryResult (StaffQueryResult originalStaffQueryResult, Escalation escalation,
Chapter 6. Human task features introduced in WebSphere Process Server V6.0.2 337

Task task, int role, Map context)
{System.out.println("##############################################");System.out.println("# HRMSG007 - HRUpdateResults.");System.out.println("# processStaffQueryResult called");System.out.println("# Method Signature 4");System.out.println("#");System.out.println("##############################################");
return(originalStaffQueryResult);
}
public StaffQueryResult processStaffQueryResult (StaffQueryResult originalStaffQueryResult, ApplicationComponent applicationComponent, int role, Map context)
{System.out.println("##############################################");System.out.println("# HRMSG007 - HRUpdateResults.");System.out.println("# processStaffQueryResult called");System.out.println("# Method Signature 5");System.out.println("#");System.out.println("##############################################");
return(originalStaffQueryResult);
}
}
Note: The line in bold references the name of the human task. When the human task is an in-line (BPEL) human task, the name that is used by the API is of the format ProcessName$HumanTaskName.
The numbers after the underscore in the process and human task names are generated from WebSphere Business Modeler. In your implementation, these numbers will probably be different. You should update them to match the names that you have.
338 Human-Centric Business Process Management with WebSphere Process Server V6

14.Press Ctrl+S to save the class file and exit the editor. If you do not have autobuild set on, you should build the HRPostProcessor project now.
Now that we have the Java class, we need to create a plug-in configuration file so that we can register it to WebSphere Process Server.
Creating the plugin-configuration fileWe create our plug-in configuration file in the same project as our Java class. The plug-in API states that the configuration file needs to be placed in the /META-INF/services directory within our project.
The API states that the configuration file needs to be called com.ibm.task.spi.PlugInNameStaffQueryResultPostProcessorPlugin. We will call our plug-in HRPostProcessor.
1. Create a new folder called META-INF in the root of the HRPostProcessor project.
2. In the META-INF folder, create a folder called services.
3. In the services folder, create a new file called com.ibm.task.spi.HRPostProcessorStaffQueryResultPostProcessorPlugin.
The com.ibm.task.spi.HRPostProcessorStaffQueryResultPostProcessorPlugin editor should already be open. If not, double-click the file name to open it.
Note: The case of our user hrspecialista is important when we use the API. If the case of your user name does not match, WebSphere Process Server will not recognize the user correctly.
Important: You may see the configuration file name described as being of the format com.ibm.task.spi.PlugInNameStaffQueryResultPostProcessingPlugin, with the word Processing not Processor.
The correct name is as we have used it in our book, that is to say, with the word Processor. Be careful if you copy the name from other sources. If the name of this file is incorrect, the plug-in will not be loaded and your post-processor will not run.
This also applies to the human task container property name referred to in “Registering the plug-in to the human task” on page 327. The property name is Staff.PostProcessorPlugin, not Staff.PostProcessing Plugin.
Chapter 6. Human task features introduced in WebSphere Process Server V6.0.2 339

The API states that the plug-in configuration file must contain the fully qualified name of the Java class that implements the plug in. In our example, this is com.ibm.itsocorp.HRQueryPostProcessor.HRUpdateResults.
4. In the editor, copy the text in Example 6-27 into the file.
Example 6-27 com.ibm.task.spi.HRPostProcessorStaffQueryResultPostProcessorPlugin file
com.ibm.itsocorp.HRQueryPostProcessor.HRUpdateResults
5. Press Ctrl+S to save the file and close the editor.
We now have the Java class and the configuration file for our HRPostProcessor plug-in. We need to place them into a .jar file.
Creating a .jar file to use as a shared resourceWe cannot embed the .jar file into a module as we did for API Events or notification handlers. We must create the .jar file and use it as a WebSphere Process Server shared library.
To create the .jar file:
1. Right-click the HRPostProcessor project, then click Export from the menu.
2. In the Export dialog, click JAR file to select it, then click Next.
340 Human-Centric Business Process Management with WebSphere Process Server V6

The JAR package specification dialog is shown (Figure 6-71). This is where we select that files we want to package into our .jar file.
Figure 6-71 The JAR export dialog showing our HRPostProcessor project selected
3. In the Select the resources to export box, check the check box next to the HRPostProcessor project and confirm that all of the boxes for the components under this project are checked.
4. Enter a file name and path for the .jar file. We chose HRPostProcessor.jar. Alternatively, click the Browse button to browse to a suitable location for the file. As long as you can copy the file into a location visible from WebSphere Process Server, you can save the file to any location.
5. Click Finish to create the .jar file.
Chapter 6. Human task features introduced in WebSphere Process Server V6.0.2 341

Creating the shared libraryNow that we have created the .jar file, we need to add it as a shared library into WebSphere Process Server. A shared library is one that is not linked to one particular module, and can be accessed by any application on the server.
We placed our .jar file in ${install_root}/itsolib so that it is inside the WebSphere Process Server installation tree but away from the other library files.
1. Copy the HRPostProcessor.jar file into the ${install_root}/itsolib folder.
2. Log into the WebSphere Administrative Console as an administrator.
3. Click Environment → Shared Libraries and click the New button. The Shared libraries page opens (Figure 6-72).
Figure 6-72 The new HRPostProcessor shared library
4. Enter HRPostProcessor into the Name field.
342 Human-Centric Business Process Management with WebSphere Process Server V6

5. Enter a description into the Description field. We chose Human task staff query post processor library.
6. Enter ${WAS_INSTALL_ROOT}/itsolib/HRPostProcessor.jar into the Classpath field.
7. Click OK to apply the changes.
8. Click Save then Save again to save the changes to the master configuration.
Linking the shared library to the human task containerNow that we have created our shared library, we need to link it to the human task container.
1. Log into the WebSphere Administrative Console as an administrator.
2. In the Applications → Enterprise applications page, click the application named TaskContainer_ nodename_servername.
Chapter 6. Human task features introduced in WebSphere Process Server V6.0.2 343

3. In the Enterprise Applications → TaskContainer_ nodename_servername page, click Libraries (Figure 6-73).
Figure 6-73 The Enterprise Applications →TaskContainer_ nodename_servername page
4. In the Enterprise Applications → TaskContainer_ nodename_servername → Library reference page, click Add.
344 Human-Centric Business Process Management with WebSphere Process Server V6

5. Select the HRPostProcessing library from the list box and click OK (Figure 6-74).
Figure 6-74 Selecting the HRPostProcessor shared library
6. Click OK, click Save, then click Save again to save the update to the master configuration.
Registering the plug-in to the human task containerPost-processing plug-ins can only be registered at one level: container level — all human tasks in the human task container.
To register our plug-in at the human task container:
1. Log into the WebSphere Administrative Console as an administrator.
2. Click Application servers → server_name → Human task container → settings → Human task container → Custom properties.
Chapter 6. Human task features introduced in WebSphere Process Server V6.0.2 345

The Custom Properties page is shown (Figure 6-75).
Figure 6-75 the human task container custom properties page
3. Click New.
4. The new property page is shown (Figure 6-76).
Figure 6-76 Adding the new Staff.PostProcessorPlugIn property
5. Enter Staff.PostProcessorPlugin into the name field.
346 Human-Centric Business Process Management with WebSphere Process Server V6

6. Enter HRPostProcessor into the Value field.
7. Enter a description into the Description field. We chose HR Post processor plugin.
8. Click OK to add the new custom property.
9. Click Save, then Save again to save your changes to the master configuration.
10.Restart the WebSphere Process Server so that the changes take effect.
6.9.4 Testing the staff query post processing
Now that we have built a staff query post-processing plug-in and deployed it to WebSphere Process Server, we need to test that it works.
We use test case 3 (5.6.10, “Testing the process with the BPC Explorer” on page 165) to create an ApproveStandardApplication human task instance. ApproveStandardApplication human tasks are normally handled by the HRSpecialist team, but we use the staff query post-processing functionality to change the assignments to just HRSpecialist if the originator is itsob.
When the standard staff query returns for the ApproveStandardApplication task, it lists those members of the HRSpecialists group who are potential owners of the task — in our case these are HRSpecialista, HRSpecialistb, HRSpecialistc, and HRSpecialistd.
1. As user itsoa, create an instance of the hiring process with the data for test case 3.
2. Check the SystemOut.log WebSphere Process Server log for any of our messages (search on HRMSG).
You should see the HRMSG007 message, as in Example 6-28 on page 348, showing that our plug-in has run successfully. Note that although the plug-in ran, it did not update the staff query, as our selection criteria were not met.
We can see that the plug-in ran twice, once for each of two roles. A role of 7 is to resolve the administrator, a role of 1 is for the potential owner. These roles are
Important: You may see the property name described as being Staff.PostProcessingPlugin, with the word Processing not Processor.
The correct name is as we have used it in our book, that is to say, Staff.PostProcessingPlugin. Be careful if you copy the name from other sources. If the name of this property is incorrect, the plug-in will not be loaded and your post-processor will not run.
Chapter 6. Human task features introduced in WebSphere Process Server V6.0.2 347
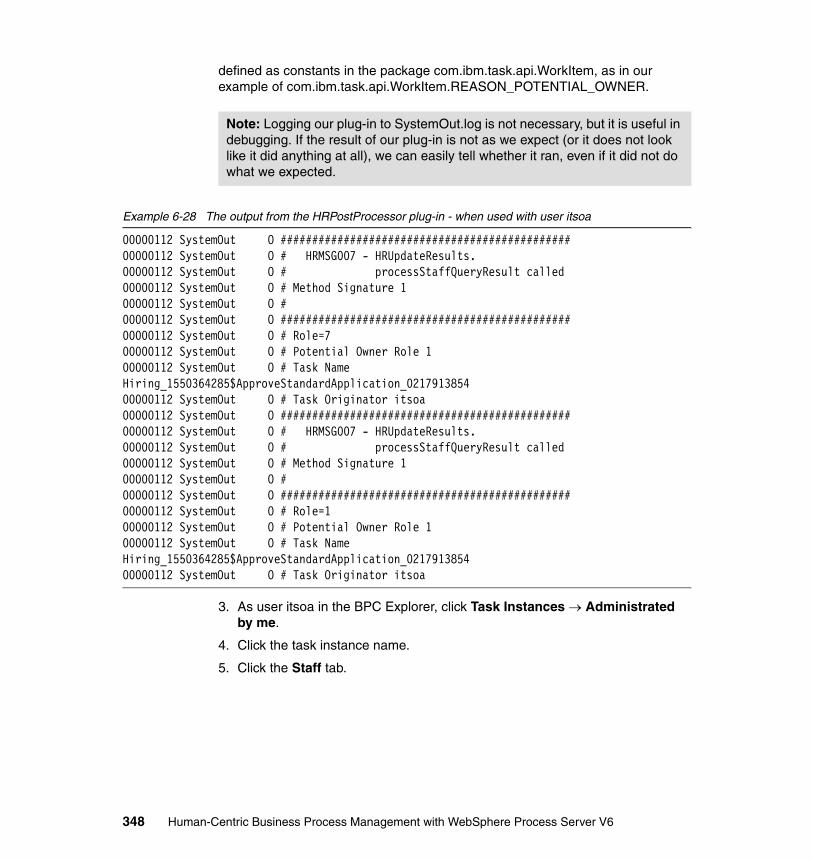
defined as constants in the package com.ibm.task.api.WorkItem, as in our example of com.ibm.task.api.WorkItem.REASON_POTENTIAL_OWNER.
Example 6-28 The output from the HRPostProcessor plug-in - when used with user itsoa
00000112 SystemOut O ##############################################00000112 SystemOut O # HRMSG007 - HRUpdateResults.00000112 SystemOut O # processStaffQueryResult called00000112 SystemOut O # Method Signature 100000112 SystemOut O #00000112 SystemOut O ##############################################00000112 SystemOut O # Role=700000112 SystemOut O # Potential Owner Role 100000112 SystemOut O # Task Name Hiring_1550364285$ApproveStandardApplication_021791385400000112 SystemOut O # Task Originator itsoa00000112 SystemOut O ##############################################00000112 SystemOut O # HRMSG007 - HRUpdateResults.00000112 SystemOut O # processStaffQueryResult called00000112 SystemOut O # Method Signature 100000112 SystemOut O #00000112 SystemOut O ##############################################00000112 SystemOut O # Role=100000112 SystemOut O # Potential Owner Role 100000112 SystemOut O # Task Name Hiring_1550364285$ApproveStandardApplication_021791385400000112 SystemOut O # Task Originator itsoa
3. As user itsoa in the BPC Explorer, click Task Instances → Administrated by me.
4. Click the task instance name.
5. Click the Staff tab.
Note: Logging our plug-in to SystemOut.log is not necessary, but it is useful in debugging. If the result of our plug-in is not as we expect (or it does not look like it did anything at all), we can easily tell whether it ran, even if it did not do what we expected.
348 Human-Centric Business Process Management with WebSphere Process Server V6

You can see (Figure 6-77) that the task has potential owners of hrspecialista, hrspecialistb, hrspecialistc, and hrspecialistd. These are the members of the HRSpecialists group, showing that the plug-in did not update the potential owners query.
Figure 6-77 The ApproveStandardApplication showing all the HR Specialist team
The steps are:
1. As user itsob, create an instance of the hiring process with the data for test case 3.
2. Check the SystemOut.log WebSphere Process Server log for any of our messages (search on HRMSG).
You should see the HRMSG007 message, as in Example 6-29, showing that our plug-in has run successfully. This time our success criteria were met, so the plug-in updates the staff results from the entire HRSpecialist team to just hrspecialista.
Example 6-29 The output from the HRPostProcessor plug-in - when used with user itsob
00000111 SystemOut O ##############################################00000111 SystemOut O # HRMSG007 - HRUpdateResults.00000111 SystemOut O # processStaffQueryResult called00000111 SystemOut O # Method Signature 100000111 SystemOut O #00000111 SystemOut O ##############################################00000111 SystemOut O # Role=700000111 SystemOut O # Potential Owner Role 1
Chapter 6. Human task features introduced in WebSphere Process Server V6.0.2 349

00000111 SystemOut O # Task Name Hiring_1550364285$ApproveStandardApplication_021791385400000111 SystemOut O # Task Originator itsob00000111 SystemOut O ##############################################00000111 SystemOut O # HRMSG007 - HRUpdateResults.00000111 SystemOut O # processStaffQueryResult called00000111 SystemOut O # Method Signature 100000111 SystemOut O #00000111 SystemOut O ##############################################00000111 SystemOut O # Role=100000111 SystemOut O # Potential Owner Role 100000111 SystemOut O # Task Name Hiring_1550364285$ApproveStandardApplication_021791385400000111 SystemOut O # Task Originator itsob00000111 SystemOut O # Updating Users List
3. As user itsob in the BPC Explorer, click Task Instances → Administrated by me.
4. Click the task instance name.
5. Click the Staff tab.
You can see (Figure 6-78) that the task now has only a potential owner of hrspecialista. As our plug-in has run successfully, it has changed the staff assignment from HRSpecialists to hrspecialista.
Figure 6-78 ApproveStandardApplication after out plug-in has updates the potential owners to just hrspecialista
350 Human-Centric Business Process Management with WebSphere Process Server V6

Now that the plug-in is associated with the human task container and the .jar is defined as a shared library, to change the functionality of the our staff query post processor, we need to change the Java code, re-export the .jar file, copy it into our shared library folder, and restart the server for the changes to take effect.
Chapter 6. Human task features introduced in WebSphere Process Server V6.0.2 351

352 Human-Centric Business Process Management with WebSphere Process Server V6

Part 3 Interaction services with WebSphere Process Server
Part 3
© Copyright IBM Corp. 2007. All rights reserved. 353

354 Human-Centric Business Process Management with WebSphere Process Server V6

Chapter 7. J2EE and Microsoft .NET Web service clients1
This chapter describes how to implement J2EE and .NET clients for WebSphere Process Server using the Web service API. These Web service clients are used to drive human tasks.
The basic concepts of J2EE, .NET, and Web services are introduced, and the SOAP support for human task interaction in WebSphere Process Server is described in detail.
Step-by-step instructions are then provided for building clients in a J2EE environment using Rational Application Developer, and for Microsoft. NET.
This chapter provides clients to the ITSO Corp hiring scenario, constructed in Chapter 5, “Using human tasks in WebSphere Process Server” on page 93.
1 Microsoft product figures reprinted with permission from Microsoft Corporation
7
© Copyright IBM Corp. 2007. All rights reserved. 355

7.1 Core technologies
The purpose of this section is to give an overview of the core technologies and platforms used for the development of Web service clients interacting with human-centric business processes. The core technologies covered in this chapter include the Java 2 Platform Enterprise Edition, the .NET platform, and Web services.
7.1.1 Java 2 Platform Enterprise Edition (J2EE)
The J2EE platform is a set of specifications published by Sun™ Microsystems covering the design, development, and deployment of multitier enterprise applications. The standard describes the following elements as integral parts of the J2EE architecture:
� J2EE platform
The J2EE platform provides the basis for J2EE applications that use the APIs defined by the J2EE specifications.
� J2EE compatibility test suite
Using the compatibility test suite, the compliance of a J2EE product with the J2EE specification can be validated.
� J2EE reference implementation
The reference implementation provides an operational definition of J2EE.
� J2EE blue prints
J2EE blue prints are best practices, design guidelines, patterns, and sample applications for the development of multitier J2EE applications.
356 Human-Centric Business Process Management with WebSphere Process Server V6

J2EE architectureThe J2EE architecture describes four different tiers, as shown in Figure 7-1. J2EE applications consist of several components that belong to different tiers and usually run on different machines.
Figure 7-1 J2EE architecture
Client tierThe components of the client tier are executed on the machine of the client. The most important components of the client tier are standalone Java application clients and HTML pages, but there are also other components like Applets or Midlets that belong to the client tier.
Web tierThe components of the Web tier include Java Beans, Java Server Pages (JSPs), and Servlets. These components reside in the Web container of a J2EE server (for example, WebSphere Application Server).
Business tierThe business tier contains Enterprise Java Beans (EJBs), including entity, session, and message-driven EJBs. The EJBs reside in the EJB container of a J2EE server (for example, WebSphere Application Server).
Client Tier
Web TIer
Enterprise Information System Tier
Business Tier
Databases Legacy Systems
ERP Systems
Enterprise Java BeansEnterprise Java BeansEnterprise Java Beans
Java BeansJava Server
Pages Servlets
Applicationclients
HTML pages
Chapter 7. J2EE and Microsoft .NET Web service clients 357

Enterprise information system tierThe enterprise information system tier supports access to information sources and external systems like databases, ERP systems, or older systems.
7.1.2 .NET platform
Microsoft describes .NET as “a set of Microsoft software technologies for connecting information, people, systems, and devices. It enables software integration through the use of XML Web services: small, discrete, building-block applications that connect to each other—as well as to other, larger applications—via the Internet.” See:
http://www.microsoft.com/learning/books/net/getstarted/default.mspx
The key values provided by .NET are the following:
� Encapsulation of the Windows operating system and its quality of service mechanisms within industry standard protocols, such as those involved in Web services and Web applications
� Provision of a runtime environment for application software with services like garbage collection, exception management, and namespace support
� Programming language independence
� Provision of an extensive framework of pre-built classes that perform
Note: For more information about the J2EE platform refer to the following sources:
� Redbook: Experience J2EE! Using WebSphere Application Server V6.1, SG24-7297
� Redbook: IBM WebSphere and Microsoft .NET Interoperability, SG24-6799
http://java.sun.com/javaee/
358 Human-Centric Business Process Management with WebSphere Process Server V6

Figure 7-2 shows the fundamental parts of the .NET platform.
Figure 7-2 .NET architecture
The fundamental parts are:
� Common language runtime (CLR)
The common language runtime sits on top of the operating systems and represents the core component of the .NET Framework. The common language runtime is the runtime environment and is responsible for the execution of .NET applications.
� Framework class library (FCL)
The framework class library is a powerful class library with an extensive amount of classes that can be used from any .NET application.
� Data and XML
ADO .NET as the successor of ADO is a class library that provides access to data stored in relational databases. XML classes support the processing of XML-based messages.
Note: The XML classes can be used for processing and converting the SOAP messages that are transferred between the Web service providers and consumers. See 7.5.1, “Develop the .NET client” on page 458, for the use of the XMLSerializer class.
Data and XML
Framework Class Library
Operating system
Common Language Runtime
ASP .Net Windows Forms
Common Language Specification
C# C++ J#C# JScript...
Chapter 7. J2EE and Microsoft .NET Web service clients 359

� ASP .NET
Within the application layer, ASP .NET, Web Forms, and Web services support the development of Web applications.
� Windows Forms
The second part of the application layer represent Windows Forms that support the development of Windows-based client applications.
� Common Language Specification
Currently the .NET platform supports more than 20 language. These languages follow the Common Language Specification (CLS), which is a set of common language features that compilers must support to target run time. The .NET Framework supports so many languages because each language compiler translates the source code into Microsoft intermediate language, which is CPU-independent.
7.1.3 Interoperability approaches
Interoperability between applications running on different platforms like Microsoft .NET and Java 2 Enterprise Edition can be achieved in numerous ways. The two basic types for interoperability are the service-oriented and the class level approach:
� Service-oriented interoperability approach
This approach uses Web service technologies for achieving interoperability by either exposing functionality from the J2EE platform to .NET or the other way around.
� Class-level interoperability approach
This approach achieves interoperability at the class level using porting, cross compilation, remote procedure calls, bridging, or messaging.
Interoperability between human-centric business processes running in WebSphere Process Server and clients interacting with these processes is achieved using the service-oriented approach. Web service interfaces are used by the client applications to communicate with the process.
Note: For more information about the J2EE platform refer to the following sources:
� Redbook: IBM WebSphere and Microsoft .NET Interoperability, SG24-6799
� Redbook: WebSphere and .NET Coexistence, SG24-7027
360 Human-Centric Business Process Management with WebSphere Process Server V6

Class-level interoperability approaches are not part of this book. For more information about interoperability approaches, refer to the following books:
� IBM WebSphere and Microsoft .NET Interoperability, SG24-6799
This book covers the service-oriented approach using Web services and class-level approaches including porting, cross compilation, remote procedure calls, bridging, and messaging and queueing.
� WebSphere and .Net Interoperability Using Web Services, SG24-6395
This book describes the service-oriented interoperability approach using Web services in detail.
7.1.4 Web services
Web services is a technology that enables the invocation of applications using Internet protocols and standards. Web services integrate applications (services) using Web technologies (the Internet and its standards) and play an important role within service-oriented architectures.
A major focus of Web services is to provide access to business functions or services over standard Internet protocols that are independent of platforms and programming languages. For this reason Web services are one approach for achieving interoperability.
Web services:
� Are self-contained.� Are self-describing.� Can be published, located, and invoked across the Web.� Are modular.� Are language-independent and interoperable.� Are inherently open and standard-based.� Are loosely coupled.� Are dynamic.� Provide programmatic access.� Provide the ability to wrap existing applications.� Build on proven, mature technologies.
Chapter 7. J2EE and Microsoft .NET Web service clients 361

In this chapter, Web service clients running on different platforms (J2EE and Microsoft .NET) are developed using the Web service interfaces provided by WebSphere Process Server. Therefore, the focus is on the role of Web services as part of service-oriented architectures.
Figure 7-3 shows the core elements of Web services and their relationships in a service-oriented architecture.
Figure 7-3 Web services in a service-oriented interoperability approach
The core technologies used for Web services are briefly described in the following section.
� Extensible Markup Language (XML)
The Extensible Markup Language is the markup language that is used for most of the specifications used for Web services like SOAP or WSDL. XML is a generic language that is used to describe any kind of content in a structured way.
UDDI
WSIL
RequestorWSDL
Provider
SOAPHTTP
References to service descriptors
Pointers to WSDL documents
Originates from
Legend
ClientWebservice
Discover
Publish
Discover
362 Human-Centric Business Process Management with WebSphere Process Server V6

� Simple Object Access Protocol (SOAP)
The Simple Object Access Protocol is a network, transport, and programming language and a platform-neutral protocol. SOAP allows clients to call remote services using XML as the message format.
� Web services Description Language (WSDL)
The Web services Description Language is an XML-based interface and implementation description language. Service providers use a WSDL document to specify operations a Web service provides and the data types of these operations. Additionally, the WSDL file contains the service access information.
� Web services Inspection Language (WSIL)
Just like the Web services Description Language, the Web service Inspection Language is XML-based. WSIL specifies how to locate Web services without the necessity of using UDDI.
� Universal Description, Discovery and Integration (UDDI)
UDDI is a client-side API and a SOAP-based server implementation that can be used to store and retrieve information on service providers and Web services.
For more information about Web services, refer to WebSphere Version 6 Web Services Handbook Development and Deployment, SG24-6461.
7.2 WebSphere Process Server SOAP support for human task interaction
Starting with Version 6.0.2, WebSphere Process Server provides two possibilities to interact with business processes and human tasks using SOAP:
� Generic interfaces for Web service clients (described in 7.2.1, “WebSphere Process Server Web services API” on page 365)
Note: For the development of Web service clients for WebSphere Process Server, you should have a good understanding of the following Web services related technologies:
� XML� SOAP� WSDL� WS-Security
Chapter 7. J2EE and Microsoft .NET Web service clients 363

The generic interface is provided by WebSphere Process Server and can be used by clients interacting with any human task or business process.
� Specific interfaces for a business process or task (described in 7.2.2, “Export business processes as SOAP Web services” on page 381)
In contrast to the generic interface, the specific interface is specific to a business process or task. An export with a Web service binding has to be created for the SCA component using WebSphere Integration Developer. A client that uses a specific interface can only interact with the component that has been exported.
In this book the use of both the generic and the specific API is shown in 7.3, “Development of a Java Web service client” on page 386. Besides the Java Web service client, the use of the generic API is also shown from a .NET Web service client, which is described in 7.4, “Development of a .NET Web services client” on page 452.
The question of when to use which API cannot be answered generically. The following points are indicators that can help decide which API to use:
� The specific Web service API
– Is easier to use, but provides less flexibility– Is appropriate for short-running or one-way, long-running processes
� The generic Web service API
– Is appropriate for all kinds of processes– Provides more flexibility– Is harder to use
Note: When using the specific Web service API for starting a long-running request/response process you have to consider that the client waits for the response of WebSphere Process Server and receives a time out. In this case you might consider either using the generic API or using an ASBO/GBO pattern.
364 Human-Centric Business Process Management with WebSphere Process Server V6

7.2.1 WebSphere Process Server Web services API
Since version 6.0.2, WebSphere Process Server supports a generic Web service API for accessing the business flow manager and the human task manager. Using this API, client applications running on different platforms like WebSphere and .NET can access business processes and human tasks via Web services (Figure 7-4).
Figure 7-4 WebSphere Process Server Web service API
Technically, operations of the EJB interface are rendered as Web service operations. However, the Web service interface is currently not as powerful as the EJB interface, as it does not support all the operations the EJB interface supports, and the operations itself are sometimes also not as powerful. An example is the suspend operation that is supported in both interfaces. The Web service interface allows suspending and resuming tasks, but it is not possible to suspend tasks for a given time, as it is using the EJB interface.
The Web services API provides two Web service interfaces:
� Business Flow Manager API for accessing business processes� Human Task Manager API for accessing human tasks
Client applications can use either or both of the Web service interfaces.
In the following sections descriptions of the Business Flow Manager (BFM) API and the Human Task Manager (HTM) API are given. The Java client developed in 7.3, “Development of a Java Web service client” on page 386, uses the Business Flow Manager API and the .NET client developed in 7.4, “Development of a .NET Web services client” on page 452 the Human Task Manager API.
WebSphere Application Server Network Deployment
WebSphere Process Server
WebSphere
Custom Web Services Client
.NET
Custom Web Services Client
Web
Ser
vice
In
terfa
ce
Business Process ChoreographerSOAP/HTTP, WS-Security
SOAP/HTTP, WS-Security
Chapter 7. J2EE and Microsoft .NET Web service clients 365

Business Flow Manager APIThe Business Flow Manager API provides a Web service interface that client applications can use to access business processes (short-running and long-running processes).
The operations that are available through the BFM API can be divided into the following groups:
� Querying and retrieving processes and activities� Invoking and sending messages to processes� Process life-cycle operations� Process repair� Stored queries operations� Input, output, and fault handling� Custom property operations
Table 7-1 gives an overview of the operations for querying and retrieving processes and activities.
Table 7-1 Query and retrieve processes and activities
Operation name Description Possible callers
query Retrieve a list of work items for the user. The number of tuples returned can be restricted by specifying a filter a or a threshold.
� Any authenticated user
queryAll Retrieve selected object properties/work items that are persistently stored in the database. The number of tuples returned can be restricted by specifying a filter, a starting tuple, or a threshold.
� System administrator� System monitor
queryProcessTemplates Retrieve the process templates that are stored in the database and belong to started applications. Only those process templates are returned that the user is authorized to see.
� Any authenticated user
366 Human-Centric Business Process Management with WebSphere Process Server V6

Table 7-2 on page 368 gives an overview of the operations invoking processes and sending messages to processes.
getProcessTemplate Retrieve a process template using its process template ID or name. If there are several process template with the same name, the template that is valid currently is returned.
� User that is authorized for the process template
getProcessInstance Retrieve a process instance in any state using its process instance ID.
� User with at least reader authority for the process instance
getActivityInstance Retrieve an activity instance in any state using its activity instance ID.
� User with at least reader authority for the activity instance
getStartActivities Retrieve the activities that can start a process instance from the specified process template (specified by its process template ID).
� User that is authorized for the process template
getWaitingActivities Retrieve the activities of a process instance that are in state waiting. The process instance is specified by its process instance ID.
� User that is authorized for the process instance
getActiveEventHandlers Retrieve the active event handlers of a process instance specified using its process instance ID.
� User with at least reader authority for the process instance
Operation name Description Possible callers
Chapter 7. J2EE and Microsoft .NET Web service clients 367

Table 7-2 Invoke and send messages to processes
Table 7-3 gives an overview of the life-cycle operations.
Table 7-3 Life-cycle operations
Operation name Description Possible callers
call Create and execute a microflow process instance derived from the specified process template. Optionally, an input message can be passed.
� All authenticated users
age Send a message to a process template specifying the namespace, port type, operation, and process template name. Process instances of long-running processes can be started using this operation.
� All authenticated users
Operation name Description Possible callers
suspend Suspend a process instance in state running or failing and its sub processes using its process instance ID.
� Process instance administrator
resume Resume a process instance and its sub processes in state suspended using its process instance ID.
� Process instance administrator
368 Human-Centric Business Process Management with WebSphere Process Server V6

Table 7-4 gives an overview of the operations for completing or retrying process instances.
Table 7-4 Process repair operations
forceTerminate Terminate a process that is currently in the state of running, suspended, or failed instance. This operation can also be used to terminate sub-processes, and any activities in the state of running, claimed, and waiting. If the invokeCompensation flag is set and compensation is defined, the process instance is compensated before terminating. The process instance goes to state terminated.
� Process instance administrator
restart Restart a process instance in state finished, terminated, compensated, or failed and its sub processes using its process instance ID.
� Process instance administrator
delete Delete a process instance in state finished, terminated, compensated, or failed and its sub processes using its process instance ID.
� Process instance administrator
Operation name Description Possible callers
forceRetry Force the repetition of a stopped activity instance using its activity instance ID.
� Process instance administrator
Operation name Description Possible callers
Chapter 7. J2EE and Microsoft .NET Web service clients 369

Table 7-5 on page 371 gives an overview of the operations for creating and querying stored queries.
forceRetryWithInput Force the repetition of a stopped activity instance using its activity instance ID. Optionally, an input message can be provided.
� Process instance administrator
forceComplete Force the completion of a stopped activity instance or a running activity instance that does not invoke a sub-process using its activity instance ID.
� Process instance administrator
forceCompleteWithOutput Force the completion of a stopped activity instance or a running activity instance that does not invoke a sub-process using its activity instance ID. An output message can be provided.
� Process instance administrator
forceCompleteWithFault Force the completion of a stopped activity instance or a running activity instance that does not invoke a sub-process specifying its activity instance ID and the result of user processing. If the user processing completed successfully, the activity instance goes in state finished. Otherwise, it goes to state failed.
� Process instance administrator
Operation name Description Possible callers
370 Human-Centric Business Process Management with WebSphere Process Server V6

Table 7-5 Stored queries operations
Table 7-6 on page 372 gives an overview of the operations for input, output, and fault handling.
Operation name Description Possible callers
createStoredQuery Create a query definition and specify the properties that are stored together with the query. If a system administrator calls this method, a stored query is created for public usage. Otherwise, it is created for private usage.
� All authenticated users
getStoredQuery Retrieve the definition of a stored query. The private stored query is returned in case a private stored query exists for the caller. Otherwise, the public stored query with the specified name is returned.
� All authenticated users
getStoredQueryNames Retrieve the names of public and private stored queries.
� All authenticated users
executeStoredQuery Call a stored query providing parameter values of the where-clause. The result only includes properties of objects the user has a work item for. This restriction does not apply to system administrator or system monitors.
� All authenticated users
deleteStoredQuery Delete a: � Public stored query
(task system administrator)
� Private stored query (otherwise)
� All authenticated users
Chapter 7. J2EE and Microsoft .NET Web service clients 371

Table 7-6 Input, output and fault handling
Operation name Description Possible callers
getInputMessageForProcessInstance
Retrieve the input message of a process instance in any state using its process instance ID.
� User with at least reader authority for the process instance
getInputMessageForActivityInstance
Retrieve the input message of an activity instance in state claimed, expired, failed, finished, terminated, ready, or stopped using its activity instance ID.
� User with at least reader authority for the activity instance
� User with at least reader authority for the process instance
getOutputMessageForProcessInstance
Retrieve the output message of a process instance in any state using its process instance ID.
� User with at least reader authority for the process instance
getOutputMessageForActivityInstance
Retrieve the output message of an activity instance in state claimed, expired, failed, finished, terminated, ready, or stopped using its activity instance ID.
� User with at least reader authority for the activity instance
� User with at least reader authority for the process instance
getFaults Retrieve the fault names defined for a activity instance in state claimed, expired, failed, finished, terminated, ready, or stopped using its activity instance ID.
� User with at least reader authority for the activity instance
� User with at least reader authority for the process instance
getFaultMessageForProcessInstance
Retrieve the fault message of a process instance in any state using its process instance ID.
� User with at least reader authority for the process instance
getFaultMessageForActivityInstance
Retrieve the fault message of an activity instance in state claimed, expired, failed, finished, terminated, ready, or stopped using its activity instance ID.
� User with at least reader authority for the activity instance
� User with at least reader authority for the process instance
372 Human-Centric Business Process Management with WebSphere Process Server V6
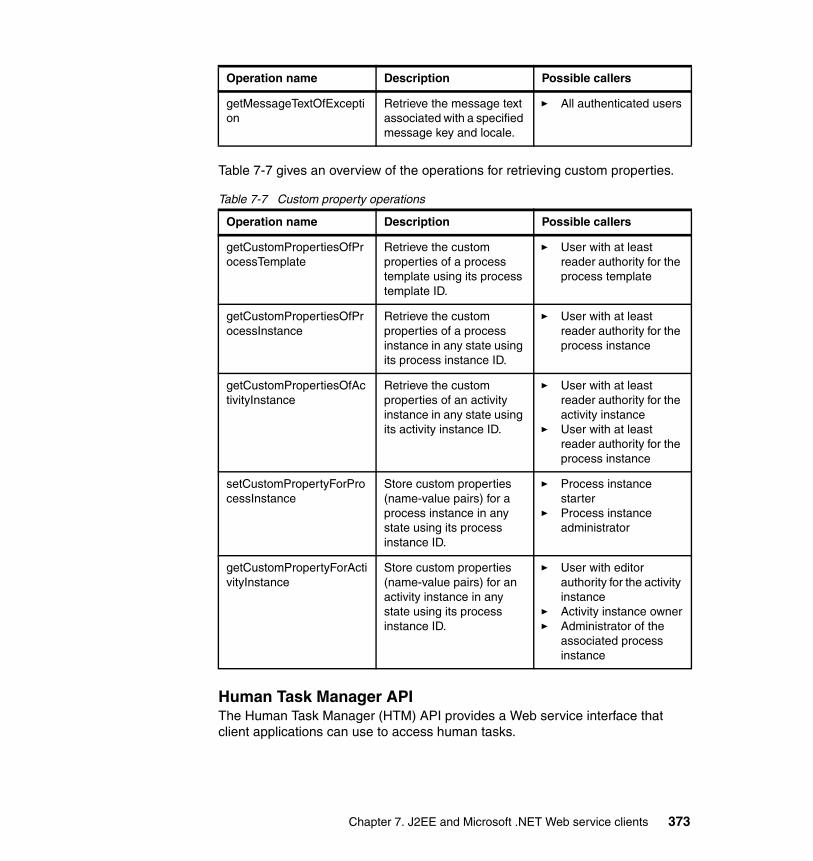
Table 7-7 gives an overview of the operations for retrieving custom properties.
Table 7-7 Custom property operations
Human Task Manager APIThe Human Task Manager (HTM) API provides a Web service interface that client applications can use to access human tasks.
getMessageTextOfException
Retrieve the message text associated with a specified message key and locale.
� All authenticated users
Operation name Description Possible callers
getCustomPropertiesOfProcessTemplate
Retrieve the custom properties of a process template using its process template ID.
� User with at least reader authority for the process template
getCustomPropertiesOfProcessInstance
Retrieve the custom properties of a process instance in any state using its process instance ID.
� User with at least reader authority for the process instance
getCustomPropertiesOfActivityInstance
Retrieve the custom properties of an activity instance in any state using its activity instance ID.
� User with at least reader authority for the activity instance
� User with at least reader authority for the process instance
setCustomPropertyForProcessInstance
Store custom properties (name-value pairs) for a process instance in any state using its process instance ID.
� Process instance starter
� Process instance administrator
getCustomPropertyForActivityInstance
Store custom properties (name-value pairs) for an activity instance in any state using its process instance ID.
� User with editor authority for the activity instance
� Activity instance owner� Administrator of the
associated process instance
Operation name Description Possible callers
Chapter 7. J2EE and Microsoft .NET Web service clients 373

The operations that are available through the HTM API can be divided into the following groups, which are very similar to the groups of the BFM API:
� Querying and retrieving tasks� Creating and starting tasks� Task life-cycle operations� Working with tasks and work items� Stored queries operations� Input, output, and fault handling� Custom property operations
Table 7-8 gives an overview of the operations for querying and retrieving tasks.
Table 7-8 Querying and retrieving task operations
Operation name Description Possible Callers
query Retrieve a list of work items for the user. The number of tuples returned can be restricted by specifying a filter, a starting tuple, or a threshold.
� Any authenticated user
queryAll Retrieve selected object properties/work items that are persistently stored in the database. The number of tuples returned can be restricted by specifying a filter, a starting tuple, or a threshold.
� System administrator� System monitor
queryTaskTemplates Retrieve the task templates that are stored in the database and belong to started applications. The returned number of task templates is restricted:� To the task templates
the user is allowed to start an instance
� By optionally specifying a threshold or a filter
� Any authenticated user
getTask Retrieve a task instance in any state using its task instance ID.
� User with at least reader authority for the task template
374 Human-Centric Business Process Management with WebSphere Process Server V6

Table 7-9 gives an overview of the operations for creating and starting tasks.
Table 7-9 Creating and starting tasks operations
getTaskTemplate Retrieve a task template using its task template ID.
� User with at least reader authority for the task template
getSubTaskIDs Retrieve the object IDs of all task instances that are subtasks of the specified task instance (specified by its task instance ID).
� User with at least reader authority for the task template
Operation name Description Possible Callers
createAndCallTask Create and synchronously execute an originating task instance. Optionally, an input message can be passed. The service that is called has to be a two-way operation.
� Potential instance creator of the task template
� Task template administrator
createAndStartTask Create and start a task instance. The caller becomes the originator of the task, and in case of an originating task becomes the starter of the task as well.
� Potential instance creator of the task template
� Task template administrator
Operation name Description Possible Callers
Chapter 7. J2EE and Microsoft .NET Web service clients 375

Table 7-10 gives an overview of the task life-cycle operations.
Table 7-10 Creating and task life-cycle operations
createAndStartTaskAsSubTask
Create and start a human-to-human or participating human task instance as a subtask of a specified human-to-human or participating parent task instance in state claimed using the parent task instances task instance ID. The parent task instance waits until all subtasks are completed. For the parent task, subtask creation has to be enabled. The caller becomes the originator of the task, and in case of an originating task he becomes the starter of the task as well.
� Potential instance creator or administrator of the subtask template
� Owner or administrator of the parent task instance
Operation name Description Possible Callers
suspend Suspend a human-to-human or participating human task instance in state ready or claimed using its task instance ID.
� Task instance owner� Task instance
administrator� Task instance
originator
resume Resume the execution of a suspended human-to-human or participating human task instance in state ready or claimed using its task instance ID.
� Task instance owner� Task instance
administrator� Task instance
originator
terminate Terminate a task instance in state ready, claimed, or running using its task instance ID.
� Task instance owner� Task instance
administrator� Task instance starter
Operation name Description Possible Callers
376 Human-Centric Business Process Management with WebSphere Process Server V6

Table 7-11 gives an overview of the operations for working with tasks and work items.
Table 7-11 Working with tasks and work items operations
deleteTasks Delete a task instance in state inactive, terminated, expired, finished, or failed using its task instance ID.
� User with administrative rights
� Task originator (can only delete inactive tasks)
Operation name Description Possible callers
claim Claim a human-to-human or participating human task instance in state ready using its task instance ID.
� Potential owner of task instance
� Task instance administrator
cancelClaim Cancel a claimed task instance using its task instance ID. The task instance returns to state ready.
� Task instance owner� Task instance
administrator
complete Complete a claimed task instance in state claimed using its task instance ID. The task instance goes to state finished or failed.
� Task instance owner� Task instance
administrator
completeWithOutput Complete a claimed task instance in state claimed using its task instance ID and pass the result of the user processing. The task instance goes to state finished or failed.
� Task instance owner� Task instance
administrator
completeWithFault Complete a claimed task instance in state claimed using its task instance ID and state the fault of the user processing. The task instance goes to state failed.
� Task instance owner� Task instance
administrator
Operation name Description Possible Callers
Chapter 7. J2EE and Microsoft .NET Web service clients 377

Table 7-12 on page 379 gives an overview of the stored queries operations.
completeWithNewFollowOnTask
Complete a claimed task instance and create and start a follow-on task (human or standalone human task) using its task instance ID. The task instance goes to state forwarded and, if specified, the reply handler is called when the last follow-on task finishes.
The input, output, and fault message definitions of the completed and the follow-on task have to be of the same type.
� Task instance owner� Task instance
administratorand
� Potential instance creator of the task template
� Task template administrator
createWorkItem Create a work item for a specified task or escalation instance using its task or escalation instance ID. A work item is created with a specified assignment reason for a specified user.
� Administrator for the creation of work items for escalation instances or active tasks.
� Originator of an inactive task
transferWorkItem Transfer a work item using the task or escalation instance ID.
� Task instance owner� Task instance
administrator� Task instance starter� Task instance
originator
deleteWorkItem Delete a work item using the task or escalation instance ID.
� Task originator (inactive tasks only)
� Task instance administrator
Operation name Description Possible callers
378 Human-Centric Business Process Management with WebSphere Process Server V6

Table 7-12 Stored queries operations
Operation name Description Possible Callers
createStoredQuery Create a query definition and specify the properties that are stored together with the query. If a system administrator calls this method, a stored query is created for public usage. Otherwise, it is created for private usage.
� All authenticated users
getStoredQuery Retrieve the definition of a stored query. The private stored query is returned in case a private stored query exists for the caller. Otherwise, the public stored query with the specified name is returned.
� All authenticated users
getStoredQueryNames Retrieve the names of public and private stored queries.
� All authenticated users
executeStoredQuery Call a stored query providing parameter values of the where-clause. The result only includes properties of objects the user has a work item for. This restriction does not apply to system administrator or system monitors.
� All authenticated users
deleteStoredQuery Delete a: � Public stored query
(task system administrator)
� Private stored query (otherwise)
� All authenticated users
Chapter 7. J2EE and Microsoft .NET Web service clients 379

Table 7-13 gives an overview of the operations for input, output, and fault handling.
Table 7-13 Input, output and fault handling
Table 7-14 on page 381 gives an overview of the operations of retrieving custom properties.
Operation name Description Possible callers
getInputMessage Retrieve the input message of a task instance in any state using its task instance ID.
� User with at least reader authority for the task instance
getOutputMessage Retrieve the output message of a task instance in any state using its task instance ID.
� User with at least reader authority for the task instance
setOutputMessage Store the output message of a task instance in state claimed into the database using its task instance ID. Any previously stored output or fault message will be deleted.
� Task instance owner� Task instance
administrator� Task instance editor
getFaultMessage Retrieve the fault message of a task instance in any state except inactive using its task instance ID.
� User with at least reader authority for the task instance
setFaultMessage Store the fault message of a human-to-human or participating human task instance in state claimed into the database using its task instance ID.
� Task instance owner� Task instance
administrator� Task instance editor
getMessageTextOfException
Retrieve the message text associated to a specified message key and locale.
� All authenticated users
380 Human-Centric Business Process Management with WebSphere Process Server V6

Table 7-14 Custom property operations
7.2.2 Export business processes as SOAP Web services
The second approach for accessing business processes or human tasks via Web services are Web service bindings.
Within the Service Component Architecture (SCA), exports define interactions between SCA modules and service requesters. By providing an export, SCA modules provide services to others. The interfaces of exports are the same or a subset of the interfaces of the component they are associated with. Export bindings define the way or mechanism that service requestors can use to access an SCA module.
Figure 7-5 shows the export and export bindings for service components.
Figure 7-5 Service component exports
Operation name Description Possible callers
getCustomPropertiesForTaskTemplate
Retrieve the custom properties of a task template using its task template ID.
� User with at least reader authority for the task template
getCustomPropertiesForTaskInstance
Retrieve the custom properties of a task instance in any state using its task instance ID.
� User with at least reader authority for the task instance
setCustomPropertiesForTaskInstance
Store custom properties (name-value pairs) for a task instance in any state using its object ID.
� Task instance owner� Task instance
administrator� Task instance editor� Task instance starter
esbBindingWebService
ServiceComponent
JMS
ExportI I
Service Component
Chapter 7. J2EE and Microsoft .NET Web service clients 381

Besides SCA and JMS bindings, Web service bindings are supported. Web service bindings provide access to the SCA module from Web services and support the SOAP/HTTP and the SOAP/JMS protocols.
Web service clients can use Web service exports of SCA modules to communicate with business processes and human tasks. In contrast to the generic Web service API provided by WebSphere Process Server (see “Use the specific Web service API to start an instance of the hiring process” on page 419), SCA exports are specific to SCA modules.
7.2.3 Export the WSDL files from WebSphere Process Server
This section describes how to export the WSDL files from WebSphere Process Server both for the Business Flow Manager (BFM) API and for the Human Task Manager (HTM) API. The BFM API provides functions for working with business processes and the HTM API provides functions for working with human tasks.
These WSDL files are used in the following sections for generating the proxies for the Java client and the .NET client.
To export the Business Flow Manager WSDL files:
1. In WebSphere Process Server start the WebSphere Administrative Console in a browser (https://<hostname>:9043/ibm/console).
2. Log in as an administrative user.
3. In the navigation pane, expand Applications → Enterprise Applications.
382 Human-Centric Business Process Management with WebSphere Process Server V6

4. Click BPEContainer_<nodename>_server1 (Figure 7-6).
Figure 7-6 WebSphere Administrative Console - Enterprise Applications
Chapter 7. J2EE and Microsoft .NET Web service clients 383

5. Under Additional Properties, click Publish WSDL files (Figure 7-7).
Figure 7-7 WebSphere Administrative Console - publish WSDL files
384 Human-Centric Business Process Management with WebSphere Process Server V6

6. On the next page, click the zip file name (for example, BPEContainer_Node01_server1_WSDLFiles.zip). This is shown in Figure 7-8.
Figure 7-8 WebSphere Administrative Console - download WSDL zip file
7. Save the zip file to the file system. You can chose a directory of your choice (for example, C:\WSDL). This is shown in Figure 7-9.
Figure 7-9 Save WSDL zip file
To export the Human Task Manager WSDL files:
1. Select Applications → Enterprise Applications.
2. Click TaskContainer_<nodename>_server1.
3. Under Additional Properties, click Publish WSDL files and click the zip file name on the next page.
Chapter 7. J2EE and Microsoft .NET Web service clients 385

4. Save the zip file to the file system. You can chose a directory of your choice (for example, C:\WSDL).
5. Log out from the administrative console and close the browser window.
6. In Windows Explorer navigate to the folder that contains the previously exported WSDL zip files (for example, C:\WSDL).
7. Extract both zip files to a folder of your choice (C:\WSDL).
The WSDL files of the WebSphere Process Server generic Web service API are now available on your local machine and can be used for generating the proxy clients.
7.3 Development of a Java Web service client
This chapter describes the development of a Java client that uses the specific and the generic Web service API provided by IBM WebSphere Process Server.
After an overview of the system, the security configuration in WebSphere Application Server is described followed by a description of how to exchange LTPA keys between WebSphere Application Server and WebSphere Process Server. For information about how to set up WebSphere Process Server refer to 5.5, “Configuring the infrastructure” on page 108. There the actual development of the Java Web service client is described in detail.
7.3.1 Setup of the environment
This section gives an overview of the environment used in our scenario and describes how to enable security on WebSphere Application Server and how to
Note: Both archives contain a file called BPCGen.xsd that is identical in both archives. When extracting the files of the second archive you can either overwrite the first file or not. As the file is identical, this does not matter.
Prerequisites: For the development of the Java Web service client using the generic interface for Web service clients provided by WebSphere Process Server, the following products have been used:
� Rational Application Developer v7.0.0.2� WebSphere Application Server v6.1.0.7� WebSphere Process Server v6.0.2.1
386 Human-Centric Business Process Management with WebSphere Process Server V6
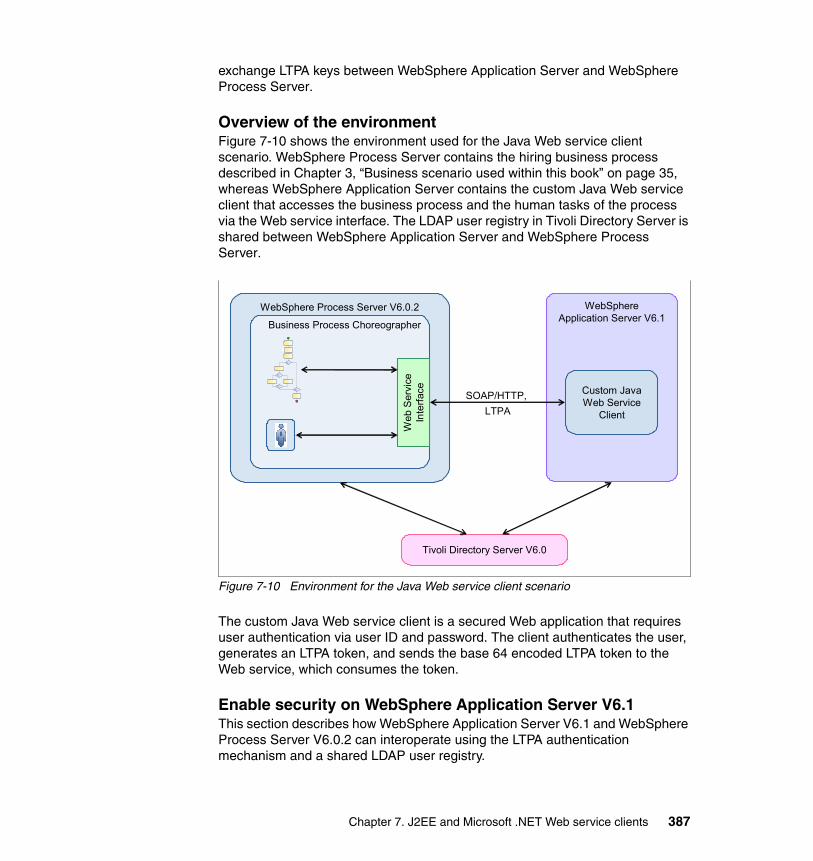
exchange LTPA keys between WebSphere Application Server and WebSphere Process Server.
Overview of the environmentFigure 7-10 shows the environment used for the Java Web service client scenario. WebSphere Process Server contains the hiring business process described in Chapter 3, “Business scenario used within this book” on page 35, whereas WebSphere Application Server contains the custom Java Web service client that accesses the business process and the human tasks of the process via the Web service interface. The LDAP user registry in Tivoli Directory Server is shared between WebSphere Application Server and WebSphere Process Server.
Figure 7-10 Environment for the Java Web service client scenario
The custom Java Web service client is a secured Web application that requires user authentication via user ID and password. The client authenticates the user, generates an LTPA token, and sends the base 64 encoded LTPA token to the Web service, which consumes the token.
Enable security on WebSphere Application Server V6.1This section describes how WebSphere Application Server V6.1 and WebSphere Process Server V6.0.2 can interoperate using the LTPA authentication mechanism and a shared LDAP user registry.
Tivoli Directory Server V6.0
WebSphere Process Server V6.0.2
Web
Ser
vice
In
terfa
ce
Business Process Choreographer
SOAP/HTTP, LTPA
WebSphereApplication Server V6.1
Custom JavaWeb Service
Client
Chapter 7. J2EE and Microsoft .NET Web service clients 387

To configure the LDAP user registry in the Integrated Solutions Console of WebSphere Application Server V6.1:
1. In the Integrated Solutions Console, expand Security → Secure administration, applications, and infrastructure.
2. In the User account repository section, select Standalone LDAP registry for Available realm definitions (Figure 7-11).
Figure 7-11 Integrated Solutions Console - Security
3. Click Configure.
388 Human-Centric Business Process Management with WebSphere Process Server V6

4. Under Additional Properties, click Advanced Lightweight Directory Access Protocol (LDAP) user registry settings (Figure 7-12).
Figure 7-12 Integrated Solutions Console - LDAP settings
Chapter 7. J2EE and Microsoft .NET Web service clients 389

5. Under General Properties, enter the following values (Figure 7-13):
– User filter:
(&(uid=%v)(objectclass=inetOrgPerson))
– Group filter:
(&(cn=%v)(|(objectclass=groupOfNames)(objectclass=groupOfUniqueNames)(objectclass=groupOfURLs)))
Figure 7-13 Integrated Solutions Console - LDAP settings
6. Click OK and save your changes to the master configuration.
7. In the Standalone LDAP registry window enter the following information (Figure 7-14 on page 392):
– Primary administrative user name: <administrative user> (for example, wasadmin).
390 Human-Centric Business Process Management with WebSphere Process Server V6

– Select Server identity that is stored in the repository and enter the following information:
• Server user ID or administrative user on a Version 6.0.x node: <user ID used for running WebSphere Application Server with security enabled>
• Password: <password for the administrative user>
– Host: <host IP address or host name of your LDAP server> (for example, 9.42.170.182).
– Port: <port of your LDAP server> (for example, 389).
– Base distinguished name (DN): <base DN of the directory server> (for example, o=ITSOCORP).
– Bind distinguished name (DN): <DN used by application server when binding to the directory service> (for example, cn=root).
– Bind password: <password used when binding to the directory service>.
Chapter 7. J2EE and Microsoft .NET Web service clients 391

Figure 7-14 Integrated Solutions Console - LDAP settings
8. Click OK and save your changes to the master configuration.
392 Human-Centric Business Process Management with WebSphere Process Server V6

9. In the Secure administration, applications, and infrastructure panel, check Enable administrative security.
10.Uncheck “Use Java 2 security to restrict application access to local resources.”
11.In the User account repository section, select Standalone LDAP registry as Available realm definitions and click Set as current (Figure 7-15).
Figure 7-15 Integrated Solutions Console - Security
12.Click Apply and save your changes to the master configuration.
Note: When you check Enable administrative security, Enable application security and Use Java 2 security to restrict application access to local resources are automatically checked.
Chapter 7. J2EE and Microsoft .NET Web service clients 393

Exchange LTPA keysIn the last section we configured WebSphere Application Server to use the same LDAP user registry as WebSphere Process Server. This section describes how to exchange the LTPA keys so that WebSphere Application Server and WebSphere Process Server can interoperate using the LTPA authentication mechanism.
To export the LTPA keys from WebSphere Application Server V6.1, follow these steps:
1. In the Integrated Solutions Console select Security → Secure administration, applications, and infrastructure.
2. Click Authentication mechanisms and expiration.
3. In the Key generation section, click Key set groups Figure 7-16).
Figure 7-16 Integrated Solutions Console - authentication mechanisms and expiration
Note: After the next restart of WebSphere Application Server the security settings are applied. From this moment you have to provide a user name and password when logging into the Integrated Solutions Console.
394 Human-Centric Business Process Management with WebSphere Process Server V6

4. Click the key set group name (for example, NodeLTPAKeySetGroup). See Figure 7-17.
Figure 7-17 Integrated Solutions Console - key set groups
Chapter 7. J2EE and Microsoft .NET Web service clients 395

5. In the Key generation section, uncheck Automatically generate keys (Figure 7-18).
Figure 7-18 Integrated Solutions Console - NodeLTPAKeySetGroup
6. Click OK and save your changes to the master configuration.
7. Navigate to Security → Secure administration, applications, and infrastructure → Authentication mechanisms and expiration.
396 Human-Centric Business Process Management with WebSphere Process Server V6

8. In the Cross-cell single sign-on section enter a password for encrypting the LTPA keys.
9. Enter the same password in the Confirm Password field to confirm the password.
10.Enter a fully qualified key file name (for example, C:\LTPA\keys).
11.Click Export keys.
To import the LTPA keys into WebSphere Process Server:
1. Copy the exported key file to the machine that hosts WebSphere Process Server.
2. In the WebSphere Administrative Console of WebSphere Process Server, expand Security → Global security → Authentication mechanisms → LTPA.
3. Enter the password used when exporting the keys in the Password and Confirm password field.
4. Enter the fully qualified key file name, click OK, and save your changes to the master configuration.
7.3.2 Create a new Web project in Rational Application Developer
To create a new Web project for the Web service client application:
1. In the J2EE perspective of Rational Application Developer, select File → New Project.
Chapter 7. J2EE and Microsoft .NET Web service clients 397

2. Select Web → Dynamic Web project (Figure 7-19).
Figure 7-19 Rational Application Developer - New Project wizard
3. Click Next.
398 Human-Centric Business Process Management with WebSphere Process Server V6

4. Enter JavaProcessStarter as the project name, select Faces Project as the configuration, and keep the default settings for the other field (Figure 7-20).
Figure 7-20 Rational Application Developer - New Dynamic Web Project wizard
5. Click Finish.
7.3.3 Development of a Java Web service client using the specific Web services API
This section describes the actual development of a Java Web service client for the hiring process that uses the specific Web services API.
Note: A dialog might appear asking you whether you want to switch to the Web perspective. In this case click No.
Chapter 7. J2EE and Microsoft .NET Web service clients 399

Import the hiring process WSDL fileTo import the WSDL file of the hiring process into the JavaProcessStarter Web project:
1. In the J2EE perspective of Rational Application Developer, select File → Import.
2. Select General → File System and click Next.
3. Click Browse next to the From directory field.
4. In the Import from directory wizard navigate to the folder where you have saved the exported WSDL files (for example, C:\WSDL).
5. Click OK.
6. In the Import wizard enable the check box next to the exported WSDL file from the hiring process (HiringExport1_HiringHttp_Service.wsdl).
7. In the Import wizard, click Browse next to the Into folder field.
8. Select JavaProcessStarter.
400 Human-Centric Business Process Management with WebSphere Process Server V6

9. Click OK (Figure 7-21).
Figure 7-21 Rational Application Developer - import hiring process WSDL file
10.Click Finish.
11.In the Project Explorer, expand the JavaProcessStarter project and double-click HiringExport1_HiringHttp_Service.wsdl to open the file.
12.Select the Source tab and search for soap:address.
13.In the location attribute of the soap:address tag, change the URL from http://localhost:9080/HRModWeb/sca/HiringExport1 to http://<your hostname>:<your port>/HRModWeb/sca/HiringExport1(for example, http://wps.itso.ral.ibm.com:9080/HRModWeb/sca/HiringExport1).
14.Select File → Save.
Chapter 7. J2EE and Microsoft .NET Web service clients 401

Generate the client classesThis section describes how to generate the Java proxy classes from the WSDL file imported in 7.3.4, “Enhancing the client using the generic Web services API” on page 433.
1. In the J2EE perspective of Rational Application Developer go to the Project Explorer and expand the JavaProcessStarter project.
402 Human-Centric Business Process Management with WebSphere Process Server V6

2. Right-click HiringExport1_HiringHttp_Service.wsdl and select Web services → Generate Client (Figure 7-22).
Figure 7-22 Rational Application Developer - Generate Client
3. In the Web service Client dialog click Next.
4. Check Define custom mapping for namespace to package and click Next.
5. Click Add in the Mapping pairs section.
Chapter 7. J2EE and Microsoft .NET Web service clients 403

6. In the Namespace column replace http://custom.namespace with http://Businessitems.
7. In the Package column replace custom.javapackage with com.ibm.itsocorp.proxy.businessitems.
8. Repeat steps 5 to 7 and use the namespace http://Processes/Hiring/HiringInterface and the package com.ibm.itsocorp.proxy.process (Figure 7-23).
Figure 7-23 Rational Application Developer - Namespace mapping
9. Click Finish.
Develop the user interfaceThis section describes how to implement the user interface of the client using the JavaServer Faces technology.
Note: If a warning appears asking whether overwriting should be enabled for the web.xml file, click Yes.
404 Human-Centric Business Process Management with WebSphere Process Server V6
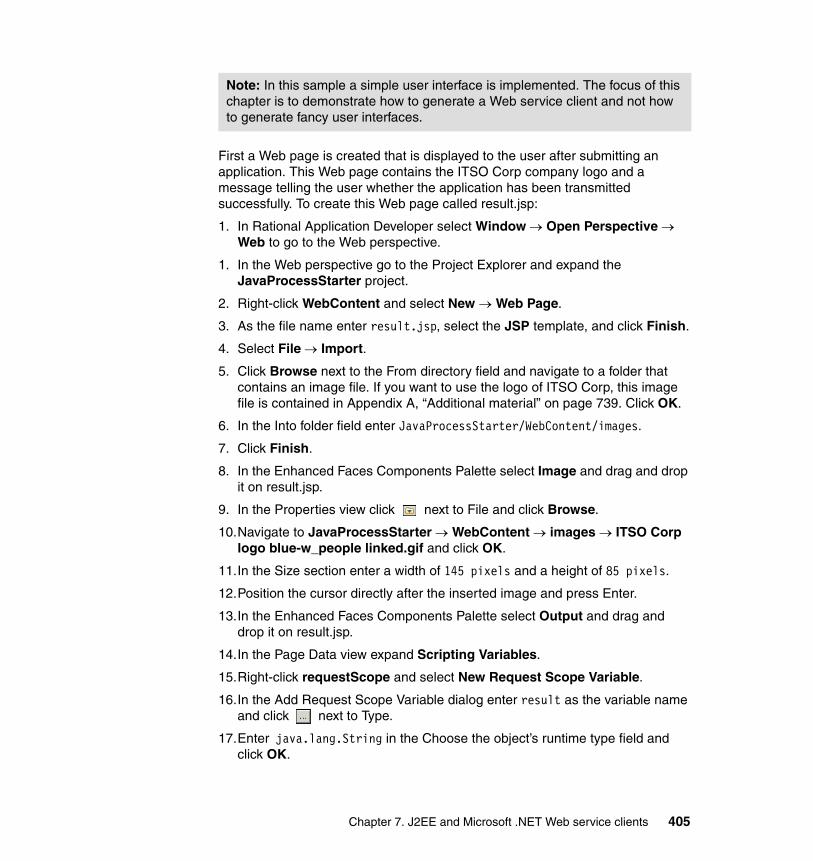
First a Web page is created that is displayed to the user after submitting an application. This Web page contains the ITSO Corp company logo and a message telling the user whether the application has been transmitted successfully. To create this Web page called result.jsp:
1. In Rational Application Developer select Window → Open Perspective → Web to go to the Web perspective.
1. In the Web perspective go to the Project Explorer and expand the JavaProcessStarter project.
2. Right-click WebContent and select New → Web Page.
3. As the file name enter result.jsp, select the JSP template, and click Finish.
4. Select File → Import.
5. Click Browse next to the From directory field and navigate to a folder that contains an image file. If you want to use the logo of ITSO Corp, this image file is contained in Appendix A, “Additional material” on page 739. Click OK.
6. In the Into folder field enter JavaProcessStarter/WebContent/images.
7. Click Finish.
8. In the Enhanced Faces Components Palette select Image and drag and drop it on result.jsp.
9. In the Properties view click next to File and click Browse.
10.Navigate to JavaProcessStarter → WebContent → images → ITSO Corp logo blue-w_people linked.gif and click OK.
11.In the Size section enter a width of 145 pixels and a height of 85 pixels.
12.Position the cursor directly after the inserted image and press Enter.
13.In the Enhanced Faces Components Palette select Output and drag and drop it on result.jsp.
14.In the Page Data view expand Scripting Variables.
15.Right-click requestScope and select New Request Scope Variable.
16.In the Add Request Scope Variable dialog enter result as the variable name and click next to Type.
17.Enter java.lang.String in the Choose the object’s runtime type field and click OK.
Note: In this sample a simple user interface is implemented. The focus of this chapter is to demonstrate how to generate a Web service client and not how to generate fancy user interfaces.
Chapter 7. J2EE and Microsoft .NET Web service clients 405

18.Click OK. Figure 7-24 shows the new request scope variable.
Figure 7-24 Page Data view - Scripting Variables
19.Select the result requestScope scripting variable in the Page Data view and drag and drop it onto the outputText field of result.jsp. Select File → Save.
In the next steps a second Web page is created that contains the fields the user has to fill out in order to submit his application:
1. In the J2EE perspective of Rational Application Developer go to the Project Explorer and expand the JavaProcessStarter project.
2. Right-click WebContent and select New → Web Page.
406 Human-Centric Business Process Management with WebSphere Process Server V6

3. As File Name enter index.jsp, select the JSP template, and click Finish (Figure 7-25).
Figure 7-25 New JSP file
In the next steps we create a JavaServer Faces managed bean and use it for populating the JSP files.
1. In Rational Application Developer switch to the Web perspective and double-click the index.jsp file.
2. In the Page Data view right-click Faces Managed Beans and click New → Faces Managed Beans.
3. In the Name field enter applicant.
4. Click next to the Class field.
Chapter 7. J2EE and Microsoft .NET Web service clients 407

5. Enter Applicant in the Choose a class field and select the Applicant class of the com.ibm.itsocorp.proxy.businessitems package in the matching types field (Figure 7-26).
Figure 7-26 Rational Application Developer - Create Faces Managed Bean
6. Click OK.
7. Ensure that the check box Make this JavaBean reusable (Make this JavaBean a Faces Managed Bean) is checked.
408 Human-Centric Business Process Management with WebSphere Process Server V6

8. For scope choose session (Figure 7-27).
Figure 7-27 Rational Application Developer - Create Faces Managed Bean
9. Click Finish.
10.In the Page Data view expand Faces Managed Beans.
11.Select applicant and drag and drop it onto the index.jsp.
12.In the Insert JavaBean dialog, select Inputting data so that input fields are created.
Chapter 7. J2EE and Microsoft .NET Web service clients 409

13.In the Fields to display box, deselect the following fields (Figure 7-28):
– dateOfBirth.minimalDaysInFirstWeek (int)– dateOfBirth.firstDayOfWeek (int)– dateOfBirth.lenient (boolean)– dateOfBirth.timeInMillis (long)– dateOfBirth.timeZone.DSTSavings (int)– dateOfBirth.timeZone.rawOffset (int)– dateOfBirth.timeZone.ID (java.lang.String)– dateOfBirth.timeZone.displayName (java.lang.String)
Figure 7-28 Rational Application Developer - Configure Data Controls
410 Human-Centric Business Process Management with WebSphere Process Server V6

14.Change the labels as shown in Table 7-15.
Table 7-15 Field labels
Old label New label
LastName: Last Name:
StreetAddress Street:
AptNo: Apartment Number:
FirstName: First Name:
Ssn: Social Security Number:
ZipCode: Zip Code:
MiddleInitial: Middle Initial:
HomePhone: Home Phone:
Time: Date of Birth:
Chapter 7. J2EE and Microsoft .NET Web service clients 411

15.Change the field order using the up arrow and down arrow buttons (shown in Figure 7-29). Figure 7-29 shows all enabled fields in the correct order.
Figure 7-29 Rational Application Developer - Configure Data Controls modified
16.Click Finish.
412 Human-Centric Business Process Management with WebSphere Process Server V6

17.The index.jsp file should now look as shown in Figure 7-30.
Figure 7-30 Rational Application Developer - index.jsp
18.Select File → Save to save the modifications of the index.jsp file.
The property date of birth of the faces managed bean application is of type java.util.Calendar. In order to be able to set the time field of the dateOfBirth Calendar property, it has to be either initialized, which would result in displaying a date in the input field when the user enters the page, or creating another value binding. In the next steps a request scope scripting variable is created for this purpose:
1. In Rational Application Developer switch to the Web perspective and double-click the index.jsp file.
2. In the Page Data view expand Scripting Variables.
3. Right-click requestScope and select New → Request Scope Variable.
4. In the Add Request Scope Variable dialog enter dateOfBirth as the variable name and click next to Type.
5. Enter java.util.Date in the Choose the object’s runtime type field and click OK.
6. Click OK.
Chapter 7. J2EE and Microsoft .NET Web service clients 413

7. Select the dateOfBirth requestScope scripting variable in the Page Data view and drag and drop it onto the date of birth input field of index.jsp.
8. Select the date of birth input field and open the Properties view.
9. Select Date/Time as the format and Custom as the type.
10.Click next to Pattern.
11.In the Pattern Builder select Date → MM/dd/yyyy and click OK.
12.Position the cursor directly after the date of birth input field and type (mm/dd/yyyy).
13.Select File → Save.
In the next steps we extend the JSP file by adding validators.
1. In the index.jsp file, select the input box for the last name.
2. Select the Properties view and expand h:inputText → Validation.
3. Enable the check box Value is required and enter the following values:
– Minimum length: 1– Maximum length: 30
4. Set the validation properties for the other input fields as shown in Table 7-16.
Table 7-16 Validation properties
Field Required Minimum length
Maximum length
Constraint
First Name Yes 1 30
Middle Initial No 0 1 Latin-1 alphabet only
Street Yes 1 30
Apartment number
Yes 1 9999 -
Zip Code Yes 5 5 Digits only
City Yes 1 30
State Yes 2 2 Latin-1 alphabet only
Social Security Number
Yes 6 6 Digits only
Home Phone Yes 1 30 Digits only
Date of Birth Yes 1900/01/01 now -
414 Human-Centric Business Process Management with WebSphere Process Server V6

The user interface now contains all required fields that contain information about the applicant. We now need to add two more fields that relate to the job the applicant is applying for. Therefore, we create another faces managed bean called job and add this bean to the index.jsp file:
1. In Rational Application Developer switch to the Web perspective and double-click the index.jsp file.
2. In the Page Data view select Faces Managed Beans → New → Faces Managed Beans.
3. In the Name field enter job.
4. Click next to the Class field.
5. Enter Job in the Choose a class field and select the Job class of the com.ibm.itsocorp.proxy.businessitems package in the matching types field.
6. Click OK.
7. Ensure that the check box Make this JavaBean reusable (Make this JavaBean a Faces Managed Bean) is checked.
8. For Scope select session (Figure 7-31).
Figure 7-31 Rational Application Developer - create job Faces Managed Bean
Chapter 7. J2EE and Microsoft .NET Web service clients 415

9. Click Finish.
10.In the Page Data view expand Faces Managed Beans.
11.Select job and drag and drop it onto the index.jsp directly after the Date of Birth field.
12.In the Insert JavaBean dialog, select Inputting data so that input fields are created.
13.For the Position field select Combo Box as Control Type.
14.Change the label Salary to “Expected Salary”.
15.In the Fields to display box, deselect the field isExecutive (java.lang.Boolean). See Figure 7-32.
Figure 7-32 Rational Application Developer - configure job data controls
16.Click Finish.
416 Human-Centric Business Process Management with WebSphere Process Server V6

17.Select the Position combo box and select the Properties view.
18.Click Add Choice four times and edit the values as shown in Table 7-17.
Table 7-17 Choice labels
Figure 7-33 shows the Properties view for the Position combo box.
Figure 7-33 Rational Application Developer - Position field properties
19.In the Properties view select h:selectOneMenu → Validation and check Value is required.
20.Select the Salary input field and expand h:inputText → Validation.
21.Check Value is required, enter a minimum length of 3, enter a maximum length of 8, and select Digits Only as the constraint.
22.Select File → Save to save the modifications of the index.jsp file.
In the next steps a navigation rule is created that links the Submit button of the index.jsp Web page to the result.jsp Web page:
1. Select the Submit button of the index.jsp file and open the Properties view.
2. Click Add Rule.
Label Value
Accounts Clerk Accounts Clerk
Accountant Accountant
Accounts Line Manager Accounts Line Manager
Accountant Division Manager Accountant Division Manager
Chapter 7. J2EE and Microsoft .NET Web service clients 417
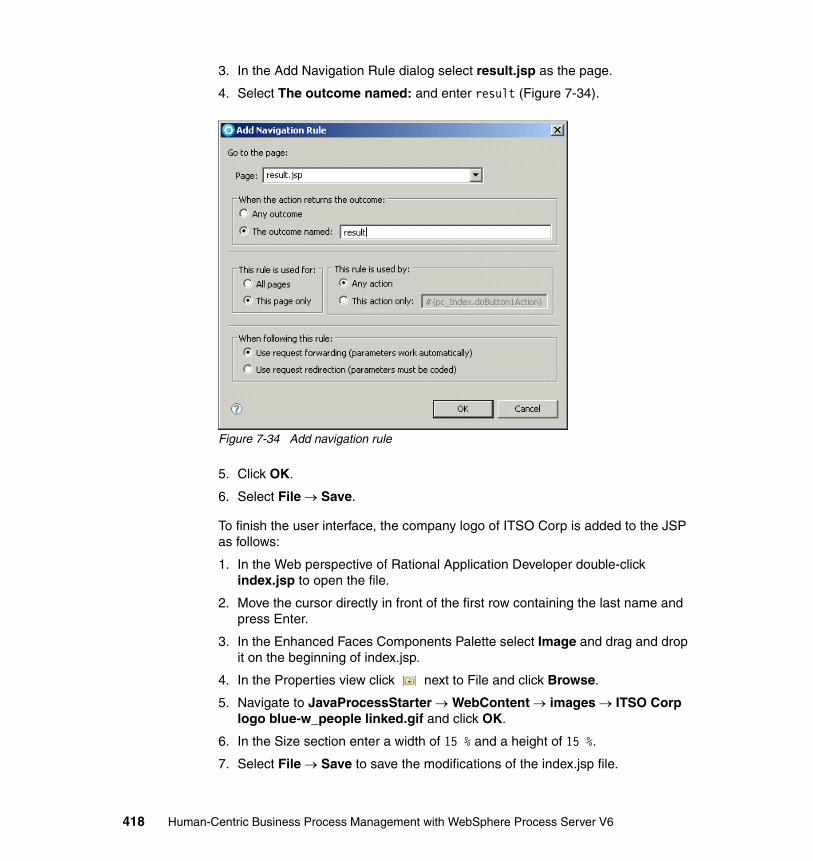
3. In the Add Navigation Rule dialog select result.jsp as the page.
4. Select The outcome named: and enter result (Figure 7-34).
Figure 7-34 Add navigation rule
5. Click OK.
6. Select File → Save.
To finish the user interface, the company logo of ITSO Corp is added to the JSP as follows:
1. In the Web perspective of Rational Application Developer double-click index.jsp to open the file.
2. Move the cursor directly in front of the first row containing the last name and press Enter.
3. In the Enhanced Faces Components Palette select Image and drag and drop it on the beginning of index.jsp.
4. In the Properties view click next to File and click Browse.
5. Navigate to JavaProcessStarter → WebContent → images → ITSO Corp logo blue-w_people linked.gif and click OK.
6. In the Size section enter a width of 15 % and a height of 15 %.
7. Select File → Save to save the modifications of the index.jsp file.
418 Human-Centric Business Process Management with WebSphere Process Server V6

Use the specific Web service API to start an instance of the hiring processTo start an instance of the hiring process, some lines of code have to be added to the Submit button. To call the specific Web service API:
1. In the Web perspective of Rational Application Developer, double-click index.jsp to open the file.
2. Select the Submit button and open the QuickEdit view.
3. Replace the code with the code shown in Example 7-1.
Example 7-1 Specific Web service API
try{Application application = new Application();Map session = getSessionScope();Applicant applicant = (Applicant)session.get("applicant");Job job = (Job) session.get("job");Calendar cal = new GregorianCalendar();Date dateOfBirth = (Date) getRequestScope().get("dateOfBirth");cal.setTime(dateOfBirth);applicant.setDateOfBirth(cal);
application.setApplicant(applicant);application.setJob(job);
HiringProxy proxy = new HiringProxy();Hiring hiring = proxy.getHiring();hiring.submit(application);getRequestScope().put("result", "Thank you for submitting your
application!");System.out.println("Hiring process has been started");
} catch (RemoteException e){e.printStackTrace();getRequestScope().put("result", "An error has occurred. Please
try again later!");}return "result";
4. In the Project Explorer view, expand JavaProcessStarter → Java Resources: src → pagecode → Index.java.
5. Double-click Index.java to open the file.
6. Right-click anywhere in the file and select Source → Organize Imports.
Chapter 7. J2EE and Microsoft .NET Web service clients 419

7. Select the following imports one at a time and click Next after selecting one import (the order of the imports may vary). After the last import click Finish.
– java.util.Date– java.util.Calendar– com.ibm.itsocorp.proxy.businessitems.Job– java.util.Map– java.util.GregorianCalendar– com.ibm.itsocorp.proxy.businessitems.Application
8. Click File → Save to save the modifications of the Index.java file.
Enable securityIn this section security is enabled on the Web application so that the users of the application have to authenticate before they can use the application.
To create a new J2EE Security Role, follow theses steps:
1. In Rational Application Developer switch to the J2EE perspective and expand the JavaProcessStarter project.
2. Double-click the Deployment Descriptor of the JavaProcess Starter Project to open this file.
3. In the editor of the Web Deployment Descriptor select the Security tab.
4. Click Add in the Security Roles section.
5. As the name enter WSClientUser and click Finish.
6. Click Add in the Security Constraints section.
7. As the constraint name enter WSClientConstraint and click Next.
8. As the resource name enter All pages.
9. Click Add in the Pattern section.
10.Enter the pattern /* to secure all pages of the Web application.
11.Click Finish.
12.Click Add in the Authorized Roles section to associate the resource to the J2EE security role.
13.As the description enter WSClientUser, check WSClientUser in the Role Name field, and click Finish.
420 Human-Centric Business Process Management with WebSphere Process Server V6

Figure 7-35 shows the security settings in the Web deployment descriptor.
Figure 7-35 Web deployment descriptor security settings
14.Click File → Save to save the changes.
In the next steps, the J2EE security role WSClient user is mapped to all authenticated users:
1. In Rational Application Developer switch to the J2EE perspective and expand the JavaProcessStarterEAR project.
2. Double-click the Deployment Descriptor of the JavaProcessStarterEAR project to open this file.
3. In the editor of the Enterprise Application Deployment Descriptor select the Security tab.
Chapter 7. J2EE and Microsoft .NET Web service clients 421

4. Click Gather to get a complete list of all J2EE security roles that are defined in the modules inside this EAR project (in this case it is only the JavaProcessStarter module).
5. Select WSClientUser and check All authenticated users (Figure 7-36).
Figure 7-36 Enterprise application deployment descriptor
6. Click File → Save to save the changes.
The next section describes how to enable Web service security for the Web application, which ensures that the credentials of the login dialog are passed to the secured Web service interface correctly. To enable Web service security:
1. In the J2EE perspective of Rational Application Developer expand the JavaProcessStarter project and double-click the Deployment Descriptor of the JavaProcessStarter project to open this file.
422 Human-Centric Business Process Management with WebSphere Process Server V6

2. In the editor of the Web Deployment Descriptor select the WS Extension tab.
3. In the Service References section select service/HiringExport1_HiringHttpService.
4. Expand Request Generator Configuration → Security Token and click Add in the Security Token section (Figure 7-37).
Figure 7-37 Web Deployment Descriptor - WS Extension
5. In the Security Token dialog enter LTPA as Name, select LTPAToken as Token type, and click OK (Figure 7-38).
Figure 7-38 Security Token dialog
Chapter 7. J2EE and Microsoft .NET Web service clients 423

6. In the editor of the Web Deployment Descriptor select the WS Binding tab.
7. In the Service References section select service/HiringExport1_HiringHttpService.
8. Expand Security Request Generator Binding Configuration → Token Generator and click Add in the Token Generator section (Figure 7-39).
Figure 7-39 Web Deployment Descriptor - WS Binding
9. Enter LTPATokenGenerator as Token generator name.
10.As Token generator class select com.ibm.wsspi.wssecurity.token.LTPATokenGenerator and select LTPA as security token.
11.Check Use value type and select LTPA Token as Value type.
12.As Call back handler select com.ibm.wsspi.wssecurity.auth.callback.LTPATokenCallbackHandler (Figure 7-40 on page 425).
424 Human-Centric Business Process Management with WebSphere Process Server V6

Figure 7-40 Token Generator dialog
13.Click OK.
Chapter 7. J2EE and Microsoft .NET Web service clients 425

14.Select File → Save.
Deploying the Java Web service clientThis section describes how to deploy the Java Web service client to WebSphere Application Server using the Rational Application Developer tooling.
1. In Rational Application Developer select Window → Show View → Servers.
2. Right-click anywhere in the Servers view editor and select New → Server.
Note: For more information about Web services security with WebSphere Application Server V6, refer to:
http://www.ibm.com/developerworks/websphere/techjournal/0607_desprets/0607_desprets.html
426 Human-Centric Business Process Management with WebSphere Process Server V6

3. Enter the host name or host IP address of your WebSphere Application Server and select WebSphere v6.1 Server (Figure 7-41).
Figure 7-41 Rational Application Developer - New Server
4. Click Next.
Chapter 7. J2EE and Microsoft .NET Web service clients 427

5. Check Security is enabled on this server and enter the user ID and password of the administrator (Figure 7-42).
Figure 7-42 Rational Application Developer - WebSphere Server Settings
6. Click Next.
428 Human-Centric Business Process Management with WebSphere Process Server V6
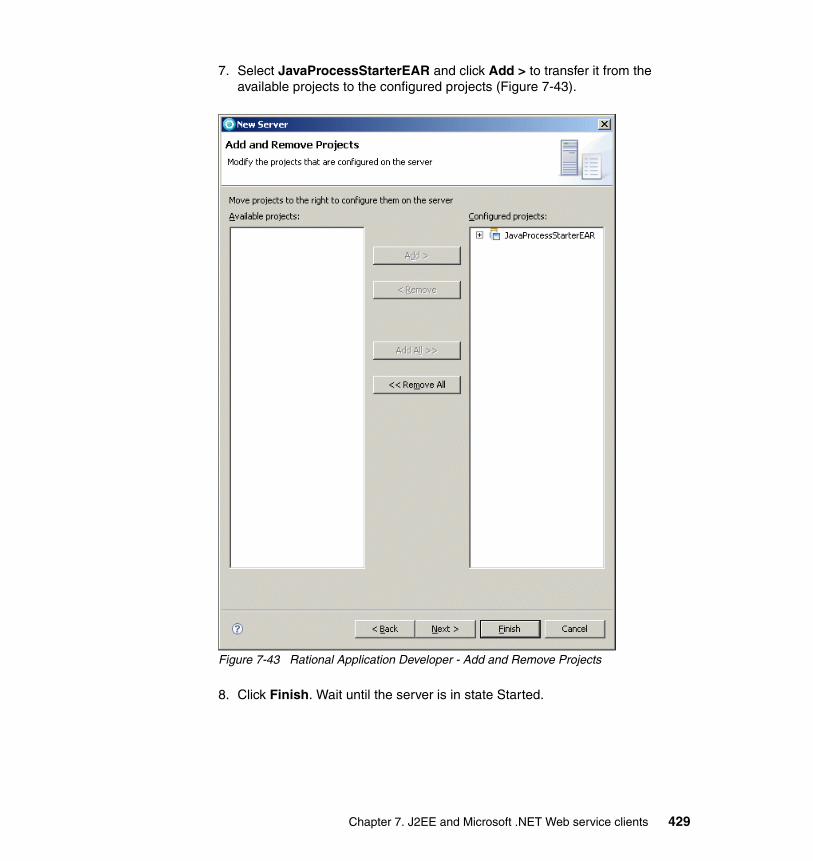
7. Select JavaProcessStarterEAR and click Add > to transfer it from the available projects to the configured projects (Figure 7-43).
Figure 7-43 Rational Application Developer - Add and Remove Projects
8. Click Finish. Wait until the server is in state Started.
Chapter 7. J2EE and Microsoft .NET Web service clients 429

Testing the Java Web service client
The Java client using the specific Web service API of the hiring process can now be tested.
1. Open a browser window and enter the following URL:
https://<your hostname>:<your port>/JavaProcessStarter/index.faces
2. As security is enabled for the application, the first request to a page of this application automatically launches a login dialog.
Note: Before testing the Java Web service client, make sure that the LTPA consumer settings on the hiring process are set as described in 5.6.8, “Creating a Web service export for use by Web-service clients” on page 155. These settings get overwritten when a clean is performed on the project in WebSphere Integration Developer. Therefore, it could easily happen that the settings get lost. In this case the specific interface used by the Java client will not work.
430 Human-Centric Business Process Management with WebSphere Process Server V6

Enter the user itsob and the corresponding password (Figure 7-44).
Figure 7-44 Java Web service client authentication
3. On the next Web page enter the values shown in Table 7-18.
Table 7-18 Test application (executive approval)
Name Value
Last Name: Emett
First Name: Ingrid
Middle Initial: P
Street: Wilson Way
Apartment Number: 90
Zip Code: 32801
City: Orlando
Chapter 7. J2EE and Microsoft .NET Web service clients 431

4. Click Submit (Figure 7-45).
Figure 7-45 Submit application
State: FL
Social Security Number: 678901
Home Phone: 555-555-0000
Date of Birth: 11/25/1975
Position: Accounts Division Manager
Expected Salary: 150000
Name Value
432 Human-Centric Business Process Management with WebSphere Process Server V6

Figure 7-46 shows the result page.
Figure 7-46 Submitted application
5. Log in BPC Explorer (http://<your hostname>:<your port>/bpc) as user itsob and check whether the previously started process instance turns up in Process Instances → Administered by me.
6. The application submitted by user itsob has to be approved by a manager. If you want to approve or reject the application, log in as managera in BPC Explorer and work on the task (for example, managera).
7.3.4 Enhancing the client using the generic Web services API
In this section the Java client using the specific Web service API is modified so that it uses the generic Web service API.
Set up Rational Application DeveloperIn the following section the settings for the generation of the Java proxy are adjusted.
Note: The decision as to whether an application needs executive approval is based on the job position and expected salary.
An executive approval is needed if:
� The job position equals accounts division manager.
� The job position equals accounts line manager and the expected salary is greater than or equal to $100,000.
In all other cases, a regular approval process is started.
Chapter 7. J2EE and Microsoft .NET Web service clients 433

To enable the code generation using the nowrapped style, follow these steps:
1. In Rational Application Developer, select Window → Preferences.
2. In the Preferences window, expand Web services → WebSphere.
3. Select JAX-RPC Code Generation.
4. Select the tab WSDL2Java.
5. Enable Use -noWrappedOperations for Skeleton Generation (Figure 7-47).
Figure 7-47 Rational Application Developer code generation settings
434 Human-Centric Business Process Management with WebSphere Process Server V6

Import WebSphere Process Server WSDL files to Web projectIn this section we import the files that we exported from WebSphere Process Server in 7.2.3, “Export the WSDL files from WebSphere Process Server” on page 382, into the Web project. The WSDL files are used for generating the Java proxy.
To import the files:
1. In the J2EE perspective of Rational Application Developer select File → Import.
Note: When selecting the Use -noWrappedOperations for Skeleton Generation option, beans are generated for the request and response messages. For more information about Web services preferences in Rational Application Developer, see:
http://www-128.ibm.com/developerworks/rational/library/07/0508_cui/
Chapter 7. J2EE and Microsoft .NET Web service clients 435

2. In the Import dialog, select General → File System (Figure 7-48).
Figure 7-48 Rational Application Developer - Import wizard
3. Click Next.
4. Click Browse next to the From directory field.
5. In the Import from directory wizard navigate to the folder where you have saved the exported WSDL files (for example, C:\WSDL).
436 Human-Centric Business Process Management with WebSphere Process Server V6

6. Further navigate to the sub directory BPEContainer_<nodename>_server1\b.jar\Meta-INF (Figure 7-49).
Figure 7-49 Rational Application Developer - Import from directory wizard
7. Click OK.
8. In the Import wizard enable the check box next to the META-INF directory and verify that Create selected folders only is enabled.
9. In the Import wizard, click Browse next to the Into folder field.
10.Select JavaProcessStarter (Figure 7-50).
Figure 7-50 Rational Application Developer - Import into folder wizard
11.Click OK.
Chapter 7. J2EE and Microsoft .NET Web service clients 437

12.Click Finish (Figure 7-51).
Figure 7-51 Rational Application Developer - Import wizard
Generate a Java client proxyIn this section the Java proxy is generated from the previously imported WSDL files. To generate the Java proxy:
1. In the J2EE perspective of Rational Application Developer expand JavaProcessStarter → wsdl → com → bpe → api → sca.
2. Right-click BFMWS.wsdl and select Web services → Generate Client.
438 Human-Centric Business Process Management with WebSphere Process Server V6

3. In the Web service Client wizard accept the default settings and click Finish (Figure 7-52).
Figure 7-52 Rational Application Developer - Web service Client wizard
4. If a warning appears asking to overwrite the web.xml file, click Yes (Figure 7-53).
Figure 7-53 Rational Application Developer - overwrite files warning
The Java proxy files are now available in the Java Resources folder of the JavaProcessStarter project.
Chapter 7. J2EE and Microsoft .NET Web service clients 439

Enable securityAccordingly for the proxy created in 7.3.3, “Development of a Java Web service client using the specific Web services API” on page 399, the security settings have to be adjusted so that the credentials are passed to the Web service interface:
1. In the J2EE perspective of Rational Application Developer expand the JavaProcessStarter project and double-click the Deployment Descriptor of the JavaProcessStarter project to open this file.
2. In the editor of the Web Deployment Descriptor select the WS Extension tab.
3. In the Service References section select service/BFMWSService.
4. Expand Request Generator Configuration → Security Token and click Add in the Security Token section (Figure 7-54).
Figure 7-54 Web Deployment Descriptor - WS Extension
440 Human-Centric Business Process Management with WebSphere Process Server V6

5. In the Security Token dialog enter LTPA1 as Name, select LTPAToken as Token type, and click OK (Figure 7-55).
Figure 7-55 Security Token dialog
6. In the editor of the Web Deployment Descriptor select the WS Binding tab.
7. In the Service References section select service/BFMWSService.
8. Expand Security Request Generator Binding Configuration → Token Generator and click Add in the Token Generator section (Figure 7-56).
Figure 7-56 Web Deployment Descriptor - WS Binding
9. Enter LTPATokenGenerator1 as Token generator name.
Chapter 7. J2EE and Microsoft .NET Web service clients 441

10.As Token generator class select com.ibm.wsspi.wssecurity.token.LTPATokenGenerator and select LTPA1 as security token.
11.Check User value type and select LTPA Token as Value type.
12.As Call back handler select com.ibm.wsspi.wssecurity.auth.callback.LTPATokenCallbackHandler (Figure 7-57 on page 443).
442 Human-Centric Business Process Management with WebSphere Process Server V6

Figure 7-57 Token Generator dialog
13.Click OK.
Chapter 7. J2EE and Microsoft .NET Web service clients 443

14.Select File → Save.
Extending the Java clientIn this section the index.jsp of the JavaProcessStarter Web service client is extended by adding a second button that calls the generic Web service API, whereas the first button calls the specific Web service API:
1. In the Web perspective of Rational Application Developer, expand JavaProcessStarter → Web Content and double-click index.jsp.
2. In the Palette view select Enhanced Faces Components → Button - Command and drag and drop it on the index.jsp directly after the Submit button.
3. Click the new button and open the Properties view.
4. Select hx:commandExButton → Display options and enter Submit (generic API) as Button label.
5. Select the button labeled Submit and change the Button label from Submit to Submit (specific API).
6. Select File → Save.
In the next steps a helper class is created for building the SOAP message:
1. In the Project Explorer expand JavaProcessStarter. Right-click Java Resources:src and select New → Class.
2. Enter com.ibm.itsocorp.helper as Package and SOAPHelper as Name.
3. Click Finish.
4. In the SOAPHelper class, add the two methods shown in Example 7-2 that are used to create the SOAP message using the Java Reflection API.
Example 7-2 Add Java bean to SOAP element
public SOAPElement addJavaBean2SOAPElement(IBMSOAPFactory factory, Object bean, SOAPElement parent) throws SOAPException, IllegalArgumentException, IllegalAccessException {
SOAPElement soapElement = null;
if (bean != null){Class clazz = bean.getClass();soapElement = factory.createElement(clazz.getSimpleName());
parent.addChildElement(soapElement);
444 Human-Centric Business Process Management with WebSphere Process Server V6

Field[] fields = clazz.getDeclaredFields();Field field = null;
for (int i = 0; i < fields.length; i++){field = fields[i];field.setAccessible(true);
if (field.getType().isPrimitive() || !(field.getType().getPackage() == clazz.getPackage())){
String strValue = "";if (field.getType() == Calendar.class){
Calendar cal = (Calendar)field.get(bean);SimpleDateFormat formatter = new
SimpleDateFormat("yyyy-MM-dd");strValue = formatter.format(cal.getTime());
} else {Object value = field.get(bean);if (value != null)strValue = value.toString();
}String name = field.getName();String capitalize = name.substring(0, 1).toUpperCase() +
name.substring(1);
SOAPElement s = factory.createElement(capitalize);s.addTextNode(strValue);
soapElement.addChildElement(s);} else {
Object newBean = field.get(bean);this.addJavaBean2SOAPElement(factory, newBean,
soapElement);}
}}
return parent;}
public SOAPElement getSOAPMessage(Applicant applicant, Job job) throws SOAPException, IllegalArgumentException, IllegalAccessException {
final String NAMESPACE = "http://Processes/Hiring/HiringInterface";
IBMSOAPFactory factory = (IBMSOAPFactory)
Chapter 7. J2EE and Microsoft .NET Web service clients 445

IBMSOAPFactory.newInstance();SOAPElement rootElement = factory.createElement("Submit", "p",
NAMESPACE);SOAPElement input = factory.createElement("Input");rootElement.addChildElement(input);
addJavaBean2SOAPElement(factory, applicant, input);addJavaBean2SOAPElement(factory, job, input);
return rootElement;}
Note: For converting a Java proxy object to a SOAP-Element, you can chose between the following options:
� Create the SOAP message programmatically (as shown in Example 7-2 on page 444).
� Create the SOAP message using a Document Object Model (DOM):
IBMSOAPFactory factory = (IBMSOAPFactory) SOAPFactory.newInstance();
SOAPElement soapElement = factory.createElementFromDOMElement( doc.getDocumentElement(), SOAPElement.class);
� Use the BOXMLSerializer class if your client is running within WebSphere Process Server:
private static ServiceManager mgr = ServiceManager.INSTANCE;private static BOFactory boFact = (BOFactory) mgr
.locateService("com/ibm/websphere/bo/BOFactory");private static BOXMLSerializer serializer = (BOXMLSerializer)
mgr.locateService("com/ibm/websphere/bo/BOXMLSerializer");SOAPElement soapElement = boFact.createElementFromXMLString(
dataObject.toString());
446 Human-Centric Business Process Management with WebSphere Process Server V6

5. Add the import statements shown in Example 7-3 after the package statement.
Example 7-3 Import statements
import java.lang.reflect.Field;import java.text.SimpleDateFormat;import java.util.Calendar;import javax.xml.soap.SOAPElement;import javax.xml.soap.SOAPException;import com.ibm.itsocorp.proxy.businessitems.Applicant;import com.ibm.itsocorp.proxy.businessitems.Job;import com.ibm.websphere.webservices.soap.IBMSOAPFactory;
6. Select File → Save.
To start an instance of the hiring process using the generic Web service API, some lines of code have to be added to the Submit (generic API) button. To call the generic Web service API follow these steps:
1. In the Web perspective of Rational Application Developer double-click index.jsp to open the file.
2. Select the Submit (generic API) button and open the QuickEdit view.
3. Replace the code with the lines of code shown in Example 7-4.
Example 7-4 Generic Web service API
BFMIFProxy proxy = new BFMIFProxy();
InboundOperationTemplateType[] startActivitiesResult = null;GetStartActivitiesResponse startActivitiesResponse = null;
QueryProcessTemplates parameters = new QueryProcessTemplates();parameters.setWhereClause("UPPER(PROCESS_TEMPLATE.NAME) LIKE \'HIRING%\'");
try {QueryProcessTemplatesResponse bfmResponse =
proxy.queryProcessTemplates(parameters);
// query the available process templatesProcessTemplateType[] templates =
bfmResponse.getProcessTemplate();String processTemplateId = null;
if (templates == null || templates.length == 0) {
Chapter 7. J2EE and Microsoft .NET Web service clients 447

System.out.println("No process templates found.");} else { System.out.println(templates.length +" process templates
found.");
// we assume there is only one template that fulfills the search critiera
processTemplateId = templates[0].getPtid();
// Retrieve the start activities of the process template.GetStartActivities startActivities = new GetStartActivities();startActivities.setPtid(processTemplateId);startActivitiesResponse =
proxy.getStartActivities(startActivities);startActivitiesResult =
startActivitiesResponse.getInboundOperationTemplate();
// for this template only one operation is expectedif ( startActivitiesResult != null &&
startActivitiesResult.length == 1 ) {
InboundOperationTemplateType inOp = startActivitiesResult[0];
System.out.println("PT name: " + inOp.getProcessTemplateName());
// Start an instance of this process templateSendMessageResponse response = null;
SendMessage sendInput = new SendMessage(); sendInput.setProcessTemplateName(
inOp.getProcessTemplateName());sendInput.setPortType(inOp.getPortType());sendInput.setOperation(inOp.getOperationName());
// get Input dataMap session = getSessionScope();Applicant applicant = (Applicant)session.get("applicant");Job job = (Job) session.get("job");job.setIsExecutive(Boolean.FALSE);Calendar cal = new GregorianCalendar();Date dateOfBirth = (Date)
getRequestScope().get("dateOfBirth");cal.setTime(dateOfBirth);applicant.setDateOfBirth(cal);
448 Human-Centric Business Process Management with WebSphere Process Server V6

// Create SOAP messageSOAPHelper helper = new SOAPHelper();SOAPElement soapMessage = helper.getSOAPMessage(applicant,
job);System.out.println(soapMessage.toString());sendInput.set_any(soapMessage);
System.out.println("Start Process using generic API ...");response = proxy.sendMessage(sendInput);System.out.println("Process started (piid: " +
response.getPIID());getRequestScope().put("result", "Thank you for submitting
your application!");
}}
} catch (Exception e) {e.printStackTrace();getRequestScope().put("result", "An error has occurred. Please
try again later!");}
return "result";
4. In the Project Explorer view, expand JavaProcessStarter → Java Resources: src → pagecode → Index.java.
5. Double-click Index.java to open the file.
6. Right-click anywhere in the file and select Source → Organize Imports.
7. Select javax.xml.soap.SOAPElement and click Finish.
8. Click File → Save to save the modifications of the Index.java file.
Build and run the enhanced Java Web service clientThe Java client using the specific Web service API of the hiring process or the generic Web service API can now be tested.
1. In the J2EE perspective of Rational Application Developer right-click JavaProcessStarterEAR in the Project Explorer and select Run As → Run on Server.
2. Choose an existing server and click Finish.
3. Open a browser window and enter the following URL:
https://<your hostname>:<your port>/JavaProcessStarter/index.faces
Chapter 7. J2EE and Microsoft .NET Web service clients 449

4. In the login dialog enter itsob as user and the corresponding password.
5. On the next Web page enter the values shown in Table 7-19.
Table 7-19 Test application (non-executive approval)
Name Value
Last Name: Adler
First Name: Ella
Middle Initial: L
Street: General Grove
Apartment Number: 34
Zip Code: 30303
City: Atlanta
State: GA
Social Security Number: 345678
Home Phone: 555-222-3333
Date of Birth: 12/25/1979
Position: Accountant
Expected Salary: 75000
450 Human-Centric Business Process Management with WebSphere Process Server V6

6. Click Submit (generic API), as shown in Figure 7-58.
Figure 7-58 Submit Application using the generic Web service API
7. After submitting the application, the result page is displayed to the user.
8. Log into BPC Explorer as an HR specialist (for example, hrspecialista) and process the task by either approving or rejecting the application. To do this you have to set the firstApproval attribute to true or false.
Note: The human task is escalated after 120 seconds. If the human task is not claimed within this time, it gets escalated to a manager.
Chapter 7. J2EE and Microsoft .NET Web service clients 451

7.4 Development of a .NET Web services client
This section describes the development of a .NET client that uses the generic Web service API provided by IBM WebSphere Process Server.
7.4.1 Create new Windows Application project in Microsoft Visual Studio
In this section a Visual C#® Windows Application project is created using Microsoft Visual Studio. To create the project for the .NET client, follow these steps:
1. In Visual Studio select File → New → Project.
2. In the New Project wizard, select Visual C# → Windows as Project type and Windows Application as Template.
Prerequisites: For the development of the .NET Web service client using the generic interface for Web service clients provided by WebSphere Process Server, the following products have been used:
� Microsoft Visual Studio 2005 (V8.0.50727.42)
� Microsoft .NET Framework V2.0.50727
� Web services Enhancements (WSE) 2.0 SP3 for Microsoft .NET Redistributable Runtime MSI
http://www.microsoft.com/downloads/details.aspx?familyid=8070e1de-22e1-4c78-ab9f-07a7fcf1b6aa&displaylang=en
� WebSphere Process Server v6.0.2.1
452 Human-Centric Business Process Management with WebSphere Process Server V6

3. Enter DotNetWSClient as Name and a file directory of your choice for Location (for example, C:\DotNetProjects\). See Figure 7-59.
Figure 7-59 Create new Windows application project
4. Click OK.
7.4.2 Examine URL of WebSphere Process Server WSDL file
In this section the URL of the WebSphere Process Server WSDL file is examined:
1. In 7.2.3, “Export the WSDL files from WebSphere Process Server” on page 382, the WebSphere Process Server WSDL files have been exported using the WebSphere Administrative Console.
2. In Windows Explorer navigate to the directory to which you unzipped the exported files (for example, C:\WSDL).
3. Further navigate to TaskContainer_<nodename>_server1.ear → h.jar → META-INF → wsdl → com → ibm → task → api → sca.
4. Open HTMWS.wsdl in a text editor (for example, Notepad).
Chapter 7. J2EE and Microsoft .NET Web service clients 453

5. Search for <soap:address and copy the URL of the location attribute (Figure 7-60).
Figure 7-60 Human Task Manager WSDL file
454 Human-Centric Business Process Management with WebSphere Process Server V6

6. Open a browser window, paste the URL, and add /wsdl at the end. The WSDL file is now displayed in the browser (Figure 7-61).
Figure 7-61 Human Task Manager WSDL file
7.5 Generating a C# Web service proxy
In this section a C# Web service proxy is generated using the Microsoft Visual Studio tooling. For the generation of the proxy, the URL of the Human Task Manager WSDL file examined in 7.4.2, “Examine URL of WebSphere Process Server WSDL file” on page 453, is used.
The generated proxy provides C# methods for accessing the Web service operations of the HTM Web service interface. Clients can use the HTM Web service interface, the BFM Web service interface, or both.
Chapter 7. J2EE and Microsoft .NET Web service clients 455

To generate the proxy, follow these steps:
1. In Microsoft Visual Studio, select Project → Add Web Reference.
2. In the Add Web Reference wizard, paste the URL determined in 7.4.2, “Examine URL of WebSphere Process Server WSDL file” on page 453 (for example, http://wps.itso.ral.ibm.com:9080/HTMIF_WPSNode01_server1/sca/com/ibm/task/api/sca/HTMWS/wsdl/com/ibm/task/api/sca/HTMWS.wsdl) and click Go (Figure 7-62).
Figure 7-62 Microsoft Visual Studio - Add Web Reference
3. Enter HTMWSProxy for Web reference name and click Add Reference.
In the next steps the Web service proxy is enabled for Web service security.
1. Select Project → Add Reference.
Note: These steps can only be performed if the Web service Enhancements (see prerequisites of this chapter) are installed.
456 Human-Centric Business Process Management with WebSphere Process Server V6

2. In the Add Reference dialog select Microsoft.Web.Services2 and click OK (Figure 7-63).
Figure 7-63 Microsoft Visual Studio - Add Reference
3. Select View → Object Browser and expand DotNetWSClient → DotNetWSClient.HTMWSProxy.
4. Right-click HTMWSService and select Go To Definition, which opens the file Reference.cs.
Chapter 7. J2EE and Microsoft .NET Web service clients 457

5. Change the superclass of the HTMWSProxy by replacing the string System.Web.Services.Protocols.SoapHttpClientProtocol with the String Microsoft.Web.Services2.WebServicesClientProtocol (Figure 7-64).
Figure 7-64 Microsoft Visual Studio - change superclass of HTM proxy
6. Select File → Save Web References\HTMWSProxy\Reference.cs.
7.5.1 Develop the .NET client
In this section the .NET Web service client is implemented using the generic Web service API. Therefore, several forms have to be created and several Web service operations of the Human Task Manager Web service API are called for processing human tasks.
Note: The Microsoft Web services Enhancements (WSE) add-on for Microsoft Visual Studio and the Microsoft .NET Framework supports the development of secure Web services and Web services clients. The superclass used in this sample is part of the WSE add-on.
Note: If the proxy is regenerated, the superclass has to be changed again.
458 Human-Centric Business Process Management with WebSphere Process Server V6

Modify the main formTo do this:
1. In the Solution Explorer, expand DotNetWSClient.
2. Double-click Form1.cs to open the file in Design view.
3. In the Solution Explorer, right-click Form1.cs and select Rename.
4. Enter MainForm.cs and press Enter.
5. In the Design view click somewhere on MainForm.
6. In the Properties go to Appearance → Text and enter ITSO Corp (Figure 7-65).
Figure 7-65 MainForm properties
7. Select View → Toolbox to open the Toolbox.
8. Select Label and click LogOnForm to create a label.
9. In the Properties view enter Work items: as Appearance → Text and lblWorkItems as Design → (Name).
10.In the Toolbox select CheckedListBox and drag and drop it on the MainForm.
11.In the Properties view enter cbWorkItems as Design → (Name).
12.From the Toolbox select Button and click MainForm to create the button.
Chapter 7. J2EE and Microsoft .NET Web service clients 459

13.In the Properties view enter Work on for Appearance → Text and btnWorkOn for Design → (Name).
14.Repeat steps 12 and 13 to create another button with the name Refresh and the text btnRefresh.
15.Resize the form and arrange the controls so that the form looks nice. The form should now look similar to the form shown in Figure 7-66.
Figure 7-66 MainForm
16.From the Toolbox select Timer and click MainForm in the editor.
17.In the Properties view enter timer10Sec for Name and enter 10000 for Interval. The timer is used for refreshing the list of work items every 10 seconds.
18.In the Properties view click to display the events that are available for the Timer and double-click Tick.
19.This opens the MainForm in the Code view and adds a method called timer10Sec_Tick to the MainForm class.
20.Enter the code shown in Example 7-5 in the timer10Sec_Tick method to refresh the workitem list whenever a timer event occurs (in our case every 10 seconds).
Example 7-5 MainForm - timer
updateWorkItemsList();
460 Human-Centric Business Process Management with WebSphere Process Server V6

21.In the Code view of MainForm modify the default constructor to display the MainForm centered on the window. The constructor is shown in Example 7-6.
Example 7-6 MainForm - default constructor
public MainForm(){
InitializeComponent();this.CenterToScreen();
}
22.Select File → Save MainForm.cs.
Create the LogOn formIn this section the LogOn form is created. When starting the client, this form is displayed showing input fields for the user name and password that are used for creating a user name token.
1. Select Project → Add Windows Form.
2. In the Add New Item dialog select Windows form as Template and enter LogOnForm.cs as Name.
3. Click Add.
4. Click the form and enter Log on as Appearance → Text in the Properties.
5. Select View → Toolbox to open the Toolbox.
6. Select Label and click LogOnForm to create a label.
7. In the Properties view:
– Enter For log on user ID and password are required! as Appearance → Text.
– Enter lblError as Design → (Name).
– Select Web → Red for Appearance → ForeColor.
– Select False for Behavior → Visible.
8. Select Label and click LogOnForm to create a label.
9. In the Properties view enter User ID: as Appearance → Text and lblUserId as Design → (Name).
10.Repeat steps 5 and 6 to create a label with the name lblPassword and the text Password:.
11.From the Toolbox select TextBox and click LogOnForm to create a text box.
12.In the Properties to Design → (Name) and enter tbUserId.
13.Repeat steps 8 and 9 to create another textbox named tbPassword.
Chapter 7. J2EE and Microsoft .NET Web service clients 461

14.From the Toolbox select Button and click LogOnForm to create the button.
15.In the Properties view enter Log on for Appearance → Text and btnLogOn for Design → (Name).
16.Repeat steps 12 and 13 to create another button with the name btnCancel and the text Cancel.
17.Resize the form and arrange the controls so that the form looks nice. The form should now look similar to the form shown in Figure 7-67.
Figure 7-67 LogOnForm
18.Select File → Save LogOnForm.cs.
19.Double-click the Log on button. This opens the LogOnForm in the Code view and adds a method called btnLogOn_Click to the LogOnForm class.
20.Enter the code shown in Example 7-7 in the btnLogOn_Click method of the LogOnForm class.
Example 7-7 LogOnForm class - Log on button
if (this.tbUserId.Text == null || this.tbUserId.Text.Length < 1){
this.lblError.Visible = true;this.tbUserId.Focus();
}else if (this.tbPassword.Text == null ||
this.tbPassword.Text.Length < 1){
this.lblError.Visible = true;this.tbPassword.Focus();
}else{
this.lblError.Visible = false;
462 Human-Centric Business Process Management with WebSphere Process Server V6

mainForm.setUserId(tbUserId.Text);mainForm.setPassword(tbPassword.Text);this.Hide();mainForm.Refresh();mainForm.doLogOn();this.Dispose();
}
21.Add the private attributes shown in Example 7-8 to the LogOnForm class.
Example 7-8 LogOnForm class - private attributes
private MainForm mainForm = null;
22.Replace the default constructor with the one shown in Example 7-9.
Example 7-9 LogOnForm - constructor
public LogOnForm(MainForm mainForm){
this.mainForm = mainForm;InitializeComponent();this.CenterToScreen();
}
23.In the Design view of LogOnForm double-click the Cancel on button. This opens the LogOnForm in Code View and adds a method called btnCancel_Click to the LogOnForm class.
24.Enter the code shown in Example 7-10 in the btnCancel_Click method of the LogOnForm class.
Example 7-10 LogOnForm class - Cancel button
mainForm.Dispose();
25.In the Design view of LogOnForm click the form.
26.In the Properties view click to display the events that are available for the LogOnForm.
Chapter 7. J2EE and Microsoft .NET Web service clients 463

27.Scroll down to the Behavior section and double-click FormClosed (Figure 7-68).
Figure 7-68 LogOnForm - Events
28.This opens the LogOnForm in the Code view and adds a method called LogOnForm_FormClosed to the LogOnForm class.
29.Enter the code shown in Example 7-10 on page 463 in the LogOnForm_FormClosed method.
30.Select File → Save LogOnForm.cs.
In the next steps the MainForm is changed so that the LogOnForm is displayed and focused when the application is started:
1. In the Design view of MainForm click the form.
2. In the Properties view click to display the events that are available for the MainForm.
3. Scroll down to the Behavior section and double-click Load.
4. This opens the MainForm in the Code view and adds a method called MainForm_Load to the MainForm class.
5. Enter the code shown in Example 7-11 in the MainForm_Load method to show the LogOnForm when the application is loaded.
Example 7-11 MainForm - form
logOnForm = new LogOnForm(this);logOnForm.Show();
6. In the Design view of MainForm click the form.
464 Human-Centric Business Process Management with WebSphere Process Server V6

7. In the Properties view click to display the events that are available for the MainForm.
8. Scroll down to the Focus section and double-click Activated.
9. This opens the MainForm in the Code view and adds a method called MainForm_Activated to the MainForm class.
10.Enter the code shown in Example 7-12 in the MainForm_Activated method to focus the LogOnForm whenever the application is activated.
Example 7-12 MainForm - focus
if (logOnForm != null){
logOnForm.Focus();}
11.Select File → Save MainForm.cs.
Create the username token for authenticationThis section shows how to create a username token for authentication.
1. In the Solution Explorer, expand DotNetWSClient and double-click MainForm.cs to open the MainForm.
2. Select View → Code to open the code view of the MainForm.
3. Add the private attributes shown in Example 7-13 to the MainForm class.
Example 7-13 MainForm class - private attributes
// HTM Web service proxyprivate HTMWSService htmProxy = new HTMWSService();
private String userId = "";private String password = "";private LogOnForm logOnForm = null;
4. Add the setUserId and setPassword methods to the MainForm class so that the password and user ID can be set from the LogOnForm using the code shown in Example 7-14.
Example 7-14 MainForm class - setter methods
public void setUserId(String userId){
this.userId = userId;}
Chapter 7. J2EE and Microsoft .NET Web service clients 465

public void setPassword(String password){
this.password = password;}
5. Add the doLogOn method that creates and sets the username token to the MainForm class. The code of the doLonOn method is shown in Example 7-15.
Example 7-15 Create username token
public void doLogOn(){
try{
// Clear the work itemsthis.cbWorkItems.Items.Clear();// Create and set a username tokenUsernameToken token = new UsernameToken(userId, password,
PasswordOption.SendPlainText);htmProxy.RequestSoapContext.Security.Tokens.Clear();htmProxy.RequestSoapContext.Security.Tokens.Add(token);
// query the user's work items to update the work item list updateWorkItemsList();this.Text += " - " + userId;timer10Sec.Start();
}catch (Exception exc){
Console.WriteLine(exc.Message);}
}
6. Add the name spaces shown in Example 7-16 to the MainForm class.
Example 7-16 MainForm - name spaces
using Microsoft.Web.Services2.Security.Tokens;using DotNetWSClient.HTMWSProxy;
466 Human-Centric Business Process Management with WebSphere Process Server V6

Query work itemsIn this section the MainForm is modified to show the user’s work items in the ready state in a list. Therefore the query operation of the HTM Web service interface is used.
1. In the Solution Explorer, double-click MainForm.cs.
2. Select View → Code.
3. Add the name space shown in Example 7-17 to the MainForm class.
Example 7-17 MainForm - name spaces
using System.Collections;
4. Add the private attribute shown in Example 7-18 to the MainForm class.
Example 7-18 MainForm - private attributes
private Hashtable workItems = null;
5. Add the updateWorkItemsList method shown in Example 7-19 to the MainForm. This method uses the query Web service operation of the Human Task Manager.
Example 7-19 MainForm - update work item list
private void updateWorkItemsList(){
String[][] workItemsResult = null;cbWorkItems.Items.Clear();
// set parameters for the queryquery query = new query();query.selectClause = "TASK.NAME,TASK.LAST_MODIFIED,TASK.TKIID";query.whereClause = "TASK.STATE = TASK.STATE.STATE_READY AND
(TASK.KIND = TASK.KIND.KIND_PARTICIPATING OR TASK.KIND = TASK.KIND.KIND_HUMAN) AND WORK_ITEM.REASON = WORK_ITEM.REASON.REASON_POTENTIAL_OWNER AND TASK.APPLIC_NAME='HRModApp'";
// call the query Web service methodqueryResponse response = htmProxy.query(query);workItemsResult = response.queryResultSet.result;
if (workItemsResult == null || workItemsResult.Length == 0){
Console.WriteLine("No available work items found.");
Chapter 7. J2EE and Microsoft .NET Web service clients 467

}else{
workItems = new Hashtable();// add entries to the work item checked listboxString nextItem = "";for (int i = 0; i < workItemsResult.Length; i++){
String[] resultStrings = workItemsResult[i];int begin = resultStrings[0].IndexOf("$") + 1;int end = resultStrings[0].LastIndexOf("_");nextItem = resultStrings[0].Substring(begin, end - begin);
if (resultStrings[1] != null){
nextItem += " (last modified: " + resultStrings[1].Replace("T", " ")
.Replace("Z", "") + ")";}cbWorkItems.Items.Add(nextItem);Console.WriteLine("tkiid: " + resultStrings[2]);workItems.Add(i, resultStrings[2]);
}}
}
6. Select File → Save MainForm.cs.
7. Open MainForm in the Design view by selecting View → Designer.
8. Double-click the Refresh button. This opens MainForm in the Code view and adds a method called btnRefresh_Click to the MainForm class.
9. Enter the code shown in Example 7-20 in the btnRefresh_Click method to update the list of work items when the users clicks the Refresh button.
Example 7-20 MainForm - Refresh button
updateWorkItemsList();
10.Select File → Save MainForm.cs.
Note: For more information about queries and the predefined views for queries, refer to:
http://publib.boulder.ibm.com/infocenter/dmndhelp/v6rxmx/topic/com.ibm.wsps.602.bpc.doc/doc/bpc/c6bpel_query.html
468 Human-Centric Business Process Management with WebSphere Process Server V6

Claim tasksIn this section the logic for the Work on button of the MainForm is added. When a user clicks the Work on button, the selected tasks are claimed using the claim operation of the HTM Web service interface. For each task a new form for approving the application is launched.
The response of the claim operation is the task’s input message. In the next steps a C# class is generated from the WSDL files contained in the library module of the hiring process. The generated classes are used for representing the message contents as business objects.
1. Export the library module of the hiring process from WebSphere Integration Developer as a zip file.
2. Extract the zip file to a directory of your choice (for example, C:\temp).
3. In Windows Explorer navigate to the directory used in step 2.
4. Copy <zip root>/HRLib/businessitems/businessitems.xsd and <zip root>/HRLib/processes/hiring/HiringInterface.wsdl to C:\temp\xsd).
5. Rename HiringInterface.wsdl to HiringInterface.xsd and open the file with an editor (for example, Notepad).
6. In the HiringInterface.xsd file delete all lines except the lines that are shown in the red box in Figure 7-69.
Figure 7-69 HiringInterface.xsd
7. Select File → Save.
Chapter 7. J2EE and Microsoft .NET Web service clients 469

8. Open a command window and navigate to <Install directory of Microsoft Visual Studio>\SDK\v2.0\bin (for example, C:\Program Files\Microsoft Visual Studio 8\SDK\v2.0\Bin).
9. Enter the following command xsd.exe and press Enter (Figure 7-70):
C:\temp\xsd\HiringInterface.xsd C:\temp\businessitems.xsd /classes /o:C:\temp
Figure 7-70 Generate businessitems C# class
10.In Microsoft Visual Studio select Project → Add Existing Item.
11.Navigate to C:\temp and select businessitems.cs.
12.Click Add.
In the next steps the logic of the Work on button is added.
1. In the Solution Explorer, double-click MainForm.cs.
2. Select View → Designer.
3. Double-click the Work on button. This opens the MainForm in Code view and adds a method called btnWorkOn_Click to the MainForm class.
4. Enter the code shown in Example 7-20 on page 468 in the btnWorkOn_Click method to claim the selected tasks.
Example 7-21 MainForm - Work on button
try{
if (cbWorkItems.CheckedItems.Count == 0){
Console.WriteLine("No work item has been selected");}else{
String tkiid = null;foreach (int i in cbWorkItems.CheckedIndices){
tkiid = workItems[i].ToString();
470 Human-Centric Business Process Management with WebSphere Process Server V6

// set input parameters for the claim Web service operationclaim claimInput = new claim();claimInput.tkiid = tkiid;
// call the claim Web service operation // (returns the task's input message)XmlElement response = htmProxy.claim(claimInput);Console.WriteLine("task " + tkiid + " claimed.");
if (response != null){
// convert the response data from XmlElement to the submit object
Submit submit = getSubmitFromXml(response);
ApproveApplicationForm approveAppForm = new ApproveApplicationForm(this, submit, response,
htmProxy, tkiid);approveAppForm.Show();
}}
}}catch (Exception exc){
Console.WriteLine(exc.StackTrace);}
5. The conversion between XML and the .NET object is handled by the method getSubmitFromXml, which uses the XMLSerializer class for deserialization. Add this method to the MainForm class.
Example 7-22 MainForm - getSubmitFromXml
public Submit getSubmitFromXml(XmlElement xmlEle){
Submit submit = new Submit(); try{
// Overwrite root element name and namespaceXmlAttributes attrs = new XmlAttributes();XmlAttributeOverrides xOver = new XmlAttributeOverrides();XmlRootAttribute xRoot = new XmlRootAttribute();xRoot.Namespace = xmlEle.NamespaceURI;xRoot.ElementName = xmlEle.LocalName;
Chapter 7. J2EE and Microsoft .NET Web service clients 471

attrs.XmlRoot = xRoot;xOver.Add(typeof(Submit), attrs);
XmlSerializer serializer = new XmlSerializer(submit.GetType(), xOver);
XmlReader xr = new XmlNodeReader(xmlEle);submit = (Submit) serializer.Deserialize(xr);}catch (Exception exc){
Console.WriteLine(exc.Message);}return submit;
}}
6. Add the name spaces shown in Example 7-23 to the MainForm class.
Example 7-23 MainForm - name spaces
using System.Xml;using System.Xml.Serialization;
7. Select File → Save MainForm.cs.
8. In the Solution Explorer, expand DotNetWSClient and double-click Program.cs.
Note: The interfaces of the different human tasks only differ in the root element name and namespace. In order to avoid generate the .NET classes for all interfaces, the XMLSerializer is used, using its capability of overwriting attributes. In this case the root element name and namespace are overwritten.
472 Human-Centric Business Process Management with WebSphere Process Server V6

9. When adding the generated classes to the project by importing the businessitems.cs file, a class called application has been added to the DotNetWSClient namespace. This causes compilation problems in the main method of the program class, as another application class is used there. Add the namespace System.Windows.Forms in front of the application objects, as shown in Figure 7-71.
Figure 7-71 Program
In the next steps the ApproveApplicationForm is created. This form shows the input data of the tasks and enables the user to complete a claimed task by either approving or rejecting the application, to cancel a claimed task (the task returns to the ready state), or to create a follow-on subtask.
1. In Microsoft Visual Studio, select Project → Add Windows Form.
2. In the Add New Item dialog select Windows form as Template and enter ApproveApplicationForm.cs as Name.
3. Click Add.
4. Click the form and enter Process Application as Appearance → Text in the Properties.
5. Select View → Toolbox to open the Toolbox.
6. Select Label and click ApproveApplicationForm to create a label.
7. In the Properties view enter Name: as Appearance → Text and lblName as Design → (Name).
Chapter 7. J2EE and Microsoft .NET Web service clients 473

8. Add the labels shown in Table 7-20 to the form by repeating steps 6 to 7 with the following values.
Table 7-20 ApproveApplication Form labels
9. In the Toolbox select TextBox and click ApproveApplicationForm to create a text box.
10.In the Properties view enter tbName as Design → (Name) and select True for Behavior → ReadOnly.
11.Add the labels shown in Table 7-21 to the form by repeating steps 9 to 10 with the following values.
Table 7-21 ApproveApplicationForm - text boxes
12.In the Toolbox select RichTextBox and click ApproveApplicationForm to create a rich text box.
13.In the Properties view enter rtbAddress as Design → (Name) and select True for Behavior → ReadOnly.
14.From the Toolbox select Button and click MainForm to create the button.
15.In the Properties view enter Approve for Appearance → Text and btnApprove for Design → (Name).
Name Text
lblAddress Address:
lblHomePhone Home Phone:
lblDateOfBirth Date of Birth:
lblSsn Social security number:
lblSalary Expected Salary:
lblPosition Position
Name ReadOnly
tbHomePhone True
tbDateOfBirth True
tbSsn True
tbExpectedSalary True
tbPosition True
474 Human-Centric Business Process Management with WebSphere Process Server V6

16.Repeat steps 14 and 15 to create the buttons shown in Table 7-22.
Table 7-22 ApproveApplicationForm - buttons
17.Resize the form and arrange the controls so that the form looks nice. The form should now look similar to the form shown in Figure 7-72.
Figure 7-72 ApproveApplicationForm
18.Select File → Save ApproveApplicationForm.cs.
19.Select View → Code and add the private attributes shown in Example 7-24.
Example 7-24 ApproveApplicationForm - private attributes
private MainForm mainForm = null;private Submit submit = null;private String tkiid = null;private HTMWSService htmProxy = new HTMWSService();XmlElement inputData = null;
Name Text
btnReject Reject
btnReturn Return task
Chapter 7. J2EE and Microsoft .NET Web service clients 475

20.Add the name spaces shown in Example 7-23 on page 472 to the MainForm class.
Example 7-25 ApproveApplication Form - name spaces
using DotNetWSClient.HTMWSProxy;using System.Xml;
21.Replace the default constructor with the constructor shown in Example 7-26.
Example 7-26 ApproveApplicationForm - constructor
public ApproveApplicationForm(MainForm mainForm, Submit submit, XmlElement inputData, HTMWSService htmProxy, String tkiid){
InitializeComponent();this.CenterToScreen();this.mainForm = mainForm;this.submit = submit;this.tkiid = tkiid;this.inputData = inputData;this.htmProxy = htmProxy;
Applicant app = submit.Input.Applicant;Job job = submit.Input.Job;
this.tbName.Text = app.FirstName + " " +app.MiddleInitial + " " +app.LastName;
this.rtbAddress.Lines = new String[] {app.AptNo + " " + app.StreetAddress, app.ZipCode + " " + app.City + " " + app.State};
this.tbHomePhone.Text = app.HomePhone;this.tbDateOfBirth.Text = app.DateOfBirth.ToShortDateString();this.tbSsn.Text = app.SSN.ToString();this.tbPosition.Text = job.Position;this.tbExpectedSalary.Text = job.Salary.ToString();
}
Complete tasksTo do this:
1. In the Design view of ApproveApplicationForm double-click the Approve button.
476 Human-Centric Business Process Management with WebSphere Process Server V6

2. This opens the ApproveApplicationForm in the Code view and adds a method called the btnApprove_Click to the ApproveApplicationForm class.
3. Enter the code shown in Example 7-27 in the btnApprove_Click method to approve a claimed task calling a method called completeTask and disposing the form.
Example 7-27 ApproveApplicationForm - approve task
completeTask(true);this.Dispose();
4. In the Design view of ApproveApplicationForm double-click the Reject button and enter the code shown in Example 7-28 to the btnReject_Click method.
Example 7-28 ApproveApplicationForm - reject task
completeTask(false);this.Dispose();
5. The completeTask method is called if a user clicks the Approve or the Reject button. The boolean parameter approve indicates whether the user approves or rejects the application. Add the method completeTask to the ApproveApplicationForm, as shown in Example 7-29.
Example 7-29 ApproveApplicationForm - complete task
void completeTask(bool approve){
// set input parameters for the completeWithOutput Web service operation
completeWithOutput completeOutput = new completeWithOutput();completeOutput.tkiid = this.tkiid;
if (inputData.LocalName.Contains("ApproveStandard")){
this.submit.Input.FirstApproval = approve;Console.WriteLine("firstapproval: " + approve);
}else{
this.submit.Input.FinalApproval = approve;Console.WriteLine("finalapproval: " + approve);
}
// create the output messageXmlElement element = mainForm.submitToXml(this.submit,
inputData.LocalName + "Response", inputData.NamespaceURI);
Chapter 7. J2EE and Microsoft .NET Web service clients 477

// set output message (xsd:any element)completeOutput.Any = element;completeWithOutputResponse response =
htmProxy.completeWithOutput(completeOutput);Console.WriteLine("Completed the task");
}
6. The output message used for completing the task is created by calling the submitToXml method of the MainForm class. Within this method the XMLSerializer is used for serializing the Submit object, making use of the overwriting capability so that the submit class can be used for all human tasks of the hiring process. Add the source code of this method, shown in Example 7-30, to the MainForm class.
Example 7-30 MainForm - submitToXml
public XmlElement submitToXml(Submit submit, String rootElementName, String rootElementNamespace){
XmlElement xmlElement = null;try{
XmlAttributes attrs = new XmlAttributes();XmlAttributeOverrides xOver = new XmlAttributeOverrides();XmlRootAttribute xRoot = new XmlRootAttribute();xRoot.Namespace = rootElementNamespace;xRoot.ElementName = rootElementName;attrs.XmlRoot = xRoot;xOver.Add(typeof(Submit), attrs);
XmlAttributes attrs2 = new XmlAttributes();XmlElementAttribute output = new XmlElementAttribute("Output",
typeof(Application));attrs2.XmlElements.Add(output);xOver.Add(typeof(Submit), "Input", attrs2);
XmlDocument doc = new XmlDocument();
MemoryStream ms = new MemoryStream();XmlWriter xtw = new XmlTextWriter(ms, null);XmlSerializer serializer = new XmlSerializer(typeof(Submit),
xOver);serializer.Serialize(xtw, submit);ms.Position = 0;
478 Human-Centric Business Process Management with WebSphere Process Server V6

doc.Load(ms);xmlElement = doc.DocumentElement;
}catch ( Exception exc){
Console.WriteLine(exc.Message);}return xmlElement;
}
7. Add the name space shown in Example 7-31 to the MainForm class.
Example 7-31 MainForm - namespace
using System.IO;
Cancel claimed tasksTo do this:
1. In the Design view of ApproveApplicationForm double-click the Return task button.
2. This opens the ApproveApplicationForm in the Code view and adds a method called btnReturn_Click to the ApproveApplicationForm class.
3. Enter the code shown in Example 7-32 in the btnReturn_Click method to cancel a claimed task.
Example 7-32 ApproveApplicationForm - return task button
cancelClaimedTask();this.Dispose();
4. In the Design view of ApproveApplicationForm click the form.
5. In the Properties view click to display the events that are available for the ApproveApplicationForm.
6. Scroll down to the Behavior section and double-click FormClosed.
7. This opens the ApproveApplicationForm in the Code view and adds a method called ApproveApplicationForm_FormClosed to the ApproveApplicationForm class. When the form is closed, the claimed task is returned in the ready state using the cancelClaimedTask method.
Chapter 7. J2EE and Microsoft .NET Web service clients 479

8. Enter the code shown in Example 7-33 in the ApproveApplicationForm_FormClosed method to cancel a claimed task.
Example 7-33 ApproveApplicationForm - form closed
cancelClaimedTask();
9. The implementation of the cancelClaimedTask method is shown in Example 7-34. Add this method to the ApproveApplicationForm class.
Example 7-34 ApproveApplicationForm - cancelClaimedTask
void cancelClaimedTask(){
// set input parameters for the cancelClaim Web service operationcancelClaim cancel = new cancelClaim();cancel.tkiid = this.tkiid;cancel.keepTaskData = true;
// call the cancelClaim Web service operation (returns the task's input message)
htmProxy.cancelClaim(cancel);Console.WriteLine("Task " + tkiid + " is in state ready again.");
}
Follow-on tasksTo do these:
1. In the Design view of ApproveApplicationForm select Button from the Toolbox and drag and drop it on the form.
2. In the Properties view enter References for Appearance → Text and btnCheckRefs for Design → (Name), and set Behavior → Visible to False.
3. Double-click References.
4. This opens the ApproveApplicationForm in the Code view and adds a method called btnCheckRefs_Click to the ApproveApplicationForm class.
480 Human-Centric Business Process Management with WebSphere Process Server V6

5. Enter the code shown in Example 7-35 in the btnCheckRefs_Click method to create and start a new follow-on task.
Example 7-35 ApproveApplicationForm - createFollowon
// create the output messageXmlElement element = mainForm.submitToInputXml(this.submit, "ApproveExecutive", "http://Processes/Hiring/ApproveExecutiveApplicationInterface");startFollowOnTask("CheckReferences", "http://HRMod", element);
6. Open the MainForm class and add the method called submitToInputXml, shown in Example 7-36.
Example 7-36 MainForm - submitToInputXml
public XmlElement submitToInputXml(Submit submit, String rootElementName, String rootElementNamespace){
XmlElement xmlElement = null;try{
XmlAttributes attrs = new XmlAttributes();XmlAttributeOverrides xOver = new XmlAttributeOverrides();XmlRootAttribute xRoot = new XmlRootAttribute();xRoot.Namespace = rootElementNamespace;xRoot.ElementName = rootElementName;attrs.XmlRoot = xRoot;xOver.Add(typeof(Submit), attrs);
XmlAttributes attrs2 = new XmlAttributes();XmlElementAttribute output = new XmlElementAttribute("Input",
typeof(Application));attrs2.XmlElements.Add(output);xOver.Add(typeof(Submit), "Output", attrs2);
XmlDocument doc = new XmlDocument();MemoryStream ms = new MemoryStream();XmlWriter xtw = new XmlTextWriter(ms, null);XmlSerializer serializer = new XmlSerializer(typeof(Submit),
xOver);serializer.Serialize(xtw, submit);ms.Position = 0;doc.Load(ms);xmlElement = doc.DocumentElement;
}
Chapter 7. J2EE and Microsoft .NET Web service clients 481

catch (Exception exc){
Console.WriteLine(exc.Message);}return xmlElement;
}
7. When clicking the References button, the method called startFollowOnTask is called to complete the task and start a new follow-on task. Add the code shown in Example 7-37 to the ApproveApplicationForm class.
Example 7-37 ApproveApplicationForm - startFollowOnTask
void startFollowOnTask(String name, String namespaceName, XmlElement message){
// set input parameters for the createAndStartTaskAsSubTask Web // service operationcompleteWithNewFollowOnTask followOnTask = new
completeWithNewFollowOnTask();followOnTask.tkiid = tkiid;followOnTask.name = name;followOnTask.namespaceName = namespaceName;followOnTask.Any = message;
// call the createAndStartTaskAsSubTask Web service operation // (returns the task's input message)htmProxy.completeWithNewFollowOnTask(followOnTask);Console.WriteLine("Task " + tkiid + " is completed (new follow-on
task).");this.Dispose();
}
8. At the end of the ApproveApplicationForm constructor add the code shown in Example 7-38, which displays the button only if it is an approval of an executive application using the getTask operation of the Human Task Manager interface.
Example 7-38 ApproveApplicationForm - constructor
getTask task = new getTask();task.tkiid = tkiid;getTaskResponse response = htmProxy.getTask(task);if (response.taskInstance.name.Contains("ApproveExecutive"))
this.btnCheckRefs.Visible = true;
482 Human-Centric Business Process Management with WebSphere Process Server V6

9. Select Build → Build Solution to build the solution.
7.5.2 Testing the .NET Web service client
In this section the .NET Web service client built in 7.5.1, “Develop the .NET client” on page 458, is tested in four test cases.
Start process instancesAs the .NET client does not support the creation of task instances of the hiring process, the instances have to be started by either using the BPC Explorer or any other client that supports the creation of process instances for the hiring process like the Java Web service client.
Create four process instances of the hiring process using a client of your choice as user itsoa. The input data is shown in Table 7-23.
Table 7-23 Test data
Test 1 Test 2 Test 3 Test 4
Last Name: Adler Burke Clay Dodge
First Name: Ella Frank Gail Hermione
Middle Initial: K L M N
Street: General Grove Crown Circle Rogers Road Limes Lane
Apartment Number:
13 34 56 78
Zip Code: 10002 30303 15204 90001
City: New York Atlanta Pittsburgh Los Angeles
State: NY GA PA CA
Social Security Number:
234567 345678 456789 567890
Home Phone: 555-111-5555 555-222-3333 555-333-2222 555-444-1111
Date of Birth: 04/11/1966 12/25/1979 11/27/1981 10/28/1981
Position: Accounts Clerk
Accountant Accounts Line Manager
Accounts Division Manager
Expected Salary:
50000 75000 101000 150000
Chapter 7. J2EE and Microsoft .NET Web service clients 483

Start the client applicationFor the tests, different people work with the process. Therefore, the client is started four times so that one can see the work items of the different roles at the same time.
1. In Windows Explorer, navigate to your .NET workspace and further navigate to \DotNetWSClient\DotNetWSClient\bin\Debug.
2. Double-click DotNetWSClient.exe to start the client and log in as hrspecialista.
3. Repeat step 2 three more times and log in as hrspecialistb, managera, and managerb.
4. You should now have four .NET clients running.
5. Assuming that there were no process instances running except the four started before, you should see two work items for hrspecialista and hrspecialistb and one work item for managera (Figure 7-73 on page 485).
Note: The heading of the window shows the user ID of the user.
484 Human-Centric Business Process Management with WebSphere Process Server V6

Figure 7-73 .NET clients
Chapter 7. J2EE and Microsoft .NET Web service clients 485

Test 1: approval of a standard applicationTo approve a standard application:
1. Select one work item as hrspecialista and click Work on to claim the task. The Window Process Application appears, displaying the applicants data (Figure 7-74).
Figure 7-74 Process Application form - standard approval
2. Every ten seconds the work item list is refreshed. If you wait, the second task of hrspecialistb disappears.
3. In the Process Application form click Reject to return the task. After some seconds or after clicking the Refresh button the task reappears in both hrspecialista’s and hrspecialistb’s work item lists.
4. Again, select one of the work items of hrspecialista and click Work on. This time click Approve to approve the application (first approval).
486 Human-Centric Business Process Management with WebSphere Process Server V6

5. As a result, hrspecialista now has only one work item, and hrspecialistb has the two work items shown in Figure 7-75.
Figure 7-75 Work item list - hrspecialistb
6. Select the work item called FourEyeApproval of hrspecialistb and click Work on.
7. Click Approve to approve the application (second approval — four-eye principle).
Chapter 7. J2EE and Microsoft .NET Web service clients 487

8. Both hrspecialista and hrspecialistb now have one work item called ApproveApplicationStandard (Figure 7-76).
Figure 7-76 Work item lists
9. An offer letter is sent to the applicant, and if she accepts the offer letter, an employee record is created and the applicant is hired.
Test 2: rejection of a standard applicationTo reject a standard application:
1. Select the work items of hrspecialistb and click Work on. In the Process Application Form click Reject to reject the application.
2. After the rejection of hrspecialistb, neither hrspecialista nor hrspecialistb have a work item left. A rejection letter is sent to the applicant.
488 Human-Centric Business Process Management with WebSphere Process Server V6

Test 3: approval of an executive applicationTo approve an executive application:
1. The work item list of managera shows two work items for the applications that require an executive approval (Figure 7-77).
Figure 7-77 Work item list - managera
2. Select one of the work items and click Work on.
3. In the Process Application form click Approve to approve the application (Figure 7-78).
Figure 7-78 Process Application form - executive approval
Chapter 7. J2EE and Microsoft .NET Web service clients 489

4. After approving, managera has only one work item left. An offer letter is sent to the applicant, and if she accepts the offer letter, an employee record is created and the applicant is hired.
Test 4: approval of an executive application with reference check
To approve an executive application with a reference check:
1. Select the work item of hrmanagera and click Work on.
2. In the Process Application form click Reference to initiate a reference check on the applicant. This completes this task and creates a new follow-on task.
3. After refreshing the work item lists, managera has no more work items left, but a new work item has been created for managerb called CheckReferences (Figure 7-79).
Figure 7-79 Work item list - managerb
Note: The Process Application form for the executive approval shows an additional button for a reference check. If the manager wants to have a check of the applicant’s references, the manager can create a follow-on task for this.
490 Human-Centric Business Process Management with WebSphere Process Server V6

4. Select the CheckReferences work item of managerb and click Work on (Figure 7-80).
Figure 7-80 Process Application form - check references
5. Click Approve.
6. After approving managerb has no more work items.
Note: The Process Application form for the CheckReferences now does not show the Reference button.
Chapter 7. J2EE and Microsoft .NET Web service clients 491

492 Human-Centric Business Process Management with WebSphere Process Server V6

Chapter 8. WebSphere Portal Server
This chapter discusses the value WebSphere Portal Server brings to a process-driven environment orchestrated by business processes and human tasks in WebSphere Process Server.
We describe how your business is able to reduce human decision latency through the synergy of WebSphere Portal’s most fundamental capabilities, aggregation and context sharing. Additionally, we discuss and describe WebSphere Portal as an interaction service provider to the businesses processes in WebSphere Process Server.
In this chapter the following topics are described:
� WebSphere Process Server and WebSphere Portal integration
� Reducing decision latency through the aggregation of relevant content
� Process portlet development with Rational Application Developer and business process artifacts from WebSphere Integration Developer
8
© Copyright IBM Corp. 2007. All rights reserved. 493

8.1 Portal architecture overview
Whether you are a growing startup or a Fortune 100 enterprise, providing the correct information to the correct people is fundamental to a successful business. Portal is the human interface engine behind this fundamental capability. As the presentation component of an enterprise’s architecture, it is a role player collaborating with security, information, and application services.
The WebSphere Portal architecture is shown in Figure 8-1.
Figure 8-1 WebSphere Portal architecture
8.1.1 Authentication and authorization
To support a variety of user populations, different kinds of portals can be implemented. The most discussed portal types are Business-to-Consumer, Business-to-Business, and Business-to-Employee. For the most part, Business-to-Consumer portals may have unknown or anonymous users. The others portal types typically require the users to identify themselves to gain access to secured corporate information.
Starting from your left, users are challenged by a security manager, like Tivoli Access Manager, to identify themselves and provide a secret key. Portal is in a
J2EEPortlet Container
Portlet API
Portlet Service Interface
Authorization
J2E
E A
uthe
ntic
atio
n
Portal Engine
Aggregation Services
Tran
scod
ing
Tran
slat
ion
Them
es/S
kins
Security andMemberServices
LDAP PortalDatabase
RemotePortlet
Request
1
2
3Internet or
IntranetContent
Cre
dent
ial V
ault
Con
tent
Acc
ess
Sear
ch
Portl
et D
ata
Col
labo
ratio
n
Web Services
JCA
JMS
EJB
JDBC
Human Services
Service Registry(remote portletWeb services)
EnterpriseData and
Applications
494 Human-Centric Business Process Management with WebSphere Process Server V6

trusted relationship with the security manager and accepts the authenticated user.
Now that the users are authenticated, portal determines the content they are authorized to access based on role and group membership.
8.1.2 Portal engine and aggregation services
Portals are aggregators. As such, a major focus of the portal engine is to dynamically construct the user interface. The portal engine assembles the user interface from two major areas: site branding and content delivered through portlets.
The look and feel are constructed from themes and skins to represent the company brand. A theme represents the fonts, colors, artwork, and navigation of the site. The skins represent the look of the area around content, specifically the artwork and the position of maximize and minimize window controls.
Aggregation services handle a variety of channels and are specific to each. In other words, what you are ultimately able to see is filtered by two things:
� Entitlements (what you have authorized access to)
� The authorized content’s (portlet) ability to render itself in markup usable by the requesting device (a PDA, for example)
8.1.3 Portlet container
The Portlet container provides life-cycle management and quality of service to portlets, in much the same way that an Enterprise JavaBean and Servlet container support their respective components. Additionally, it provides a common set of services to portlets.
8.1.4 Portlet
What is a portlet? The answer depends on who is asking the question:
� User: A portlet is content a user subscribes to, adds to his personal preferences, and configures to show preferred content.
� Content provider: A portlet is a means for making a user’s content available.
� Portal administrator: A portlet is a content container to which users can subscribe.
� Portal: A portlet is a component rendered into one of its pages.
Chapter 8. WebSphere Portal Server 495

� Technical: A portlet is collaboration JSPs/Servlet + Java code that runs on a portal server and provides content to be aggregated into portal pages.
The Portal engine and Portlet container, together with their respective services, make up the horizontal framework of the Portal infrastructure. Portlets, on the other hand, represent the vertical solution space through its Java-based framework, standardized through the Java Specification Request (JSR) 168. It is this Java component that represents specific back-end content or function by leveraging a variety of J2EE base services. The portlet generates markup (that is, HTML, WML, and so on) called a fragment (Figure 8-2). Since fragments do not contain page-level tags, it can be aggregated into a page with other portlet fragments. Portlet solutions are built through framework completion. Much like a marionette, the portlet’s behavior is orchestrated by Portal.
Figure 8-2 Example portlet
8.2 Portal, the managed mash-up
To a user, the Portal is a single point of access to the information and services required to inform or facilitate a job task. This is accomplished through the aggregation of relevant content sewn around a single context (a customer, an order number, or an applicant). Mash-ups, like portals, are aggregators. What we see happening in the mash-up world of the Web is Web (window) scraping, feed, and aggregated searches. This is a good enough start for the concept and
496 Human-Centric Business Process Management with WebSphere Process Server V6

technology for the masses. The enterprise, however, is challenged with regulations that control who sees what content and when. Does the company have a legal right to republish a piece of content? Fail to manage these requirements and the company runs the risk of a lawsuit or government fines.
Portal represents the managed mash-up that provides the controls and auditing that medium to large enterprises require as they conduct business. As the mash-up concepts and technologies evolve, WebSphere Portal will continue to evolve in its effort to provide flexible human interaction capability to the enterprise.
8.2.1 One application, many portlets
As you think through your application and the functions it provides, your typical mind set around the application interface is: what are the fields the user will require for this task? Where do I get or put the information in these fields? What are the functional controls required to perform a business service? While these are all valid question, a portal environment requires that you shift your mind set from full window to groupings of information and function. In a portal environment, a portlet encapsulates a single application function. Simply stated, portlet equals function.
Whatever the methodology used, function modularity has long been a guiding principle of application design. Be it classes, components, modules, or services, these functional groupings have strong internal cohesion, yet, protect external users from internal change. In the design of portal interfaces, one application is made up of many portlets. There is one portlet component for each application function.
What constitutes a function? Good question. For example, the customer portlet typically provides list and detail information about a customer of your business. The standard operations performed on a customer are Create, Read, Update, and Delete (CRUD). This is typical for entity-related information. Yet, the related, but separate, customer portfolio portlet would list the customer accounts and detail with the ability to transfer funds from one account to another.
With a set of portlets representing an application, administrators can compose new applications from existing portlets. In general, function from application A and B can be combined to develop a new application, C. By contrast, a single application, represented in a single portlet, severely restricts your ability to compose new applications, since you cannot separate the functions. Moreover, portal’s access control capability is scoped to pages, portlets, labels, and links. Specifically, it can grant a user or group access to a portlet, or deny access to a portlet. If the portlet represents an entire application, then you can only hope to have, or not have, access to that application.
Chapter 8. WebSphere Portal Server 497

The ramification of this design decision is felt through an addition or increase in the development of access control logic. After all, the business still needs to control who has access to what. You can work with the portal architecture by letting it provide access control, or shift the burden onto your development team to determine the user’s entitlements.
8.2.2 Portlet life cycle
While the portlet is a relatively new standard, the standards group has leveraged the years of J2EE component experience found in Servlets and Enterprise JavaBeans™ (EJBs). The portal container and component interface has learned much from others. Like other container-managed components, the portlet interface defines the phases for its life cycle:
� Initializing phase: instantiates the portlet and provides and opportunity for you to perform one-time setup operations
� Request processing phase: delivers user interaction requests to the portlet and provides an opportunity for you to perform data services request and markup generation
� Destruction phase: removes the portlet from memory, but not before giving you a final opportunity to clean up all of the resources setup in the initialization phase
While the initialization and destruction phases do what you would expect, the request processing phase has two phases of its own:
� Action phase: The portlet’s processAction method is called because the user has clicked a related control.
� Render phase: The portlet’s render method is called to generate the response markup fragment.
On a page with multiple portlets, the portlet’s control being clicked is always the first portlet called. Typically, service calls requesting or modifying data are performed in the action phase. A portlet performing a transfer funds transaction from one account to another must complete that transaction before other portlets can respond to the new balance. Once this transaction is completed on behalf of the user, the portal container asks all of the portlets on the page to generate response markup as part of its render phase (that is, doView method). This patterned behavior is leveraged by the portal framework to share information with other portlets on the page.
498 Human-Centric Business Process Management with WebSphere Process Server V6

8.2.3 Aggregation of relevant content through cooperation
So far we have discussed the design guidance of portlet equals function (see 8.2.1, “One application, many portlets” on page 497). This guidance results in many portlets providing different functions. However, without some shared business context, we end up with unrelated (stove-pipe) function on the page. This is of little value to a business user trying to get her work done. Moreover, it requires the user to enter the same information in multiple places. Knowing this, we are guided by the following principle: a portal application is the aggregation of relevant content sewn together by business context. Let us step back and look at this guidance. For the business user to complete a job task, the information must be relevant to the task, and relevant to other information on the page. The business context is further refined by the subject of the task. For example, the customer, employee, and order number are all representative of a business context subject. To realize this guidance, we must understand how two portlets on a page or across pages cooperate. In other words, share some business context information.
WebSphere Portal provides an inter-portlet communication service to facilitate information sharing between portlets. Let us examine the basic components of this critical service to better understand how it turns disparate function into a business-relevant application.
Property BrokerProperty Broker is the runtime service that enables two ore more portlets to share information. The portlets are loosely coupled through the service’s publish-and-subscribe model. By publishing to the Property Broker service, the source portlet makes the information it wants to share available to other portlets. The target portlet subscribes to the Property Broker service to consume contextual information like customer or order number.
PropertiesAs Property Broker matches source to target, the information being exchanged is defined in a property file. When a portlet is installed and activated, its properties are registered with Property Broker. This Web Services Description Language (WSDL) file is defined for each source and target portlet. The property file contains, among other things, meta-data about each property including its type, namespace, and direction.
Chapter 8. WebSphere Portal Server 499

� The type defines the is-a relationship from the business domain. For example, customer, employee, and order (Example 8-1).
� With so many independently developed portlets defining properties, we need a namespace to guarantee uniqueness between similar property type names.
� Direction indicates whether the property is being directed outbound (source) or inbound (target).
Example 8-1 Property file application ID type definition example
<types> <xsd:schema targetNamespace="http://www.ibm.com/wps/c2a/redbook/recruting"> <xsd:simpleType name="ApplicantIDType"> <xsd:restriction base="xsd:string"> </xsd:restriction> </xsd:simpleType> ...</types>
<message name="ApplicantRequest"> <part name="applicant_ID" type="tns: ApplicantIDType"/></message>
...<binding name="ApplicantBinding" type="tns:Applicant_Service"> <portlet:binding/> <operation name="applicant_detail"> <portlet:action name="applicantDetails" type="standard" caption="applicant.Details"
description="Get.details.for.specified.applicant.id" actionNameParameter="ACTION_NAME"/> <input> <portlet:param name="applicantId" partname="applicant_Id" caption="applicant.id"/> </input> <output></output> </operation></binding>...
500 Human-Centric Business Process Management with WebSphere Process Server V6

ActionsWhenever you interact with WebSphere Portal and click a control like submit, Portal maps this event to a portlet action. This behavior is part of Portal’s standard request processing phase. The cooperative portlet architecture leverages this patterned behavior to identify value changes in a property. This change event is then propagated, as actions, to interested portlets. In addition to defining the properties, the properties file identifies the associated actions a portlet will source and consume.
You will recall that Portal’s request processing has an action and render phase. During the action phase, the source portlet is given an opportunity to change its source data. For example, once the portlet has retrieved a new customer, it updates its customerID property managed by Property Broker. All interested parties are identified by Property Broker and subsequently notified. We are now looking at a new customer (7477). The action phase is complete after the last portlet has been notified. The portal can now move on to the render phase. In this phase all of the portlets are asked to produce response markup based on the business context they now have.
Wiring To this point we have described the development of portlets with the ability to cooperate by sharing information. This collaboration is facilitated by the Property Broker run time and the deployed property file. But wait a minute. We have one portlet producing a customer ID, and another portlet registering the ability to consume customer ID. How do they find each other? Yes, Property Broker is the match maker. But how does it know who wants to get into a relationship? Is the relationship solely based on common interest (customer ID)? While common interest is a fundamental requirement for portlets to collaborate, they will need a proper introduction. Wiring makes those introductions.
A wire is a persistent connection between portlets. The Portlet Wiring Tool is an administrative portlet used to create wired connections. It is this tool that gives users and administrators the ability to construct new applications at the glass. The tool ensures that the source and target portlets have matching information types, making sure that both parties have an interest in customer ID, for example.
The Portlet Wiring Tool lets the administrator select the following information:
� Source Portlet: The list of portlets providing property values.
� Sending: A list of properties available from the selected source portlet.
� Target Page: A list of available pages.
� Target Portlet: A list of portlets capable of consuming the selected property.
Chapter 8. WebSphere Portal Server 501

� Receiving: A list of properties matching the sending property selection.
� WireType: The wire can be public or personal. Public wires are available to everyone. Personal wires are private.
Using these components, WebSphere Portal is able to use independently developed portlets to provide a common business context and then render a relevant page of information. Moreover, adding or changing the content of the page does not break the cooperation between the current page members. This is the fundamental power of WebSphere Portal and integration at the glass.
8.3 Process Portal
In an On Demand business environment, efficient interaction of customers, employees, and suppliers is key to business success. Businesses need to enable these parties to seamlessly participate and collaborate in business processes to increase productivity. The human tasks within these business processes (for example, approving or reviewing requests) needs to be presented to the right people, at the right time, in a way that minimizes human decision latency. WebSphere Portal and WebSphere Process Server together represent a synergistic relationship know as Process Portal.
8.3.1 Process Portal
The process environment is continuously seeking improvement in its processes and efficiency in its execution. It is common to have hundreds, if not thousands, of automated machine-to-machine tasks being performed with little or no human interaction. However, people are an important part of any business equation, but being mindful of the motivation and focus on the process side of the enterprise results in better human interaction design.
A Process Portal is a portal in a process-driven environment. We know that the business process designers are motivated to keep things moving as quickly as possible. However, every now and then people have to get involved. This involvement falls into three categories:
� Regulatory: This human interaction is because of a state, federal, or policy requirement. The requirement for two separate individuals to review a decision (four eyes) is one example.
� No definitive rule (gray area): In this case there is no patterned decision-making process that drives a consistent business result. In fact, the day a consistent decision rule or process can be implemented is the day this human interaction gets absorbed by the business process engine. Exception
502 Human-Centric Business Process Management with WebSphere Process Server V6

handling is an example of a gray area. What do you do? The answer is that you notify a person about the issue.
� Data entry required: This could simply be a customer self-service channel (Web site or kiosk). Within the enterprise, information has been provided from a customer or partner in a form not currently automatable. In these cases, people get involved to key the data in.
A portal application is the aggregation of relevant content sewn together by business context. As the business analyst designs the to-be process from the as-is process, human tasks are being identified. This simplifies the life of the portal designer because the process has answered a fundamental question: Why are we on this page? Knowing why we have stopped for human interaction is powerful knowledge. Is there a decision to be made? If so, the process task tells us that a loan or hiring approval decision needs to be made. It also provides the business context information we require to deliver relevant information to the user.
Chapter 8. WebSphere Portal Server 503

8.3.2 WebSphere Portal integration with WebSphere Process Server
WebSphere Portal supports an inbox task model to deliver to-dos to specific roles. In other words, a business user is alerted to new assignments in his task-list portlet. The provided MyTasks portlet is accessible on what is known as the task-list-page. You can navigate directly to this page through the alert link at the top of the portal page (Figure 8-3).
Figure 8-3 Process Portal - task processing
While on the task-list-page, users can view, claim, and launch a task on a dynamic portal page. Claiming the task grants you ownership and removes it from the inbox of other members of the same role. Now that you own the task,
Alert
Task Page
Task List
504 Human-Centric Business Process Management with WebSphere Process Server V6

you can work the task by clicking its link. The link takes you to the task’s assigned task page, where the work can be completed. By completing this task, you allow the business process to continue onto its next activity, automated or human.
This task-oriented approach simplifies application design because each human-facing activity in your business process is associated with a task page definition. WebSphere Integration Developer defines the portal client with a unique name. Subsequently, the portal administrator tags a page with the same unique name. This is how a human task is mapped to a specific task page within WebSphere Portal. For the most part, the relationship between a human task and the task page definition is one-to-one (Figure 8-4). Additional pages can be launched programmatically through the DynamicUI API. This is the very API the MyTasks portlet uses to launch the task page.
Figure 8-4 Unique name linking a human task to a task page
WID
Portal
Chapter 8. WebSphere Portal Server 505

The content of the task page definition always contains a task processing portlet. This portlet retrieves the input message of a human activity, displays it to the user, provides shared business context to other portlets, obtains user input, and writes it back to the business process. Once again, an important part of this design is the supporting Context Portlets placed on the page. These portlets do not directly communicate with the process engine, but help to speed decision making by providing a richer context for the current task. It is this ability of WebSphere Portal to make disparate information sources contextually relevant that dramatically improves human decision latency.
8.4 Developing a Process Portal
WebSphere Portal V6.0.1 builds on the idea that Portals are the ideal interface for the human component of business processes. The portal displays visual prompts to notify users when they are assigned a new task. The prompt links users to the My Tasks (list) page, where they can view, claim, and launch a task on a dynamic portal page (see 8.3.2, “WebSphere Portal integration with WebSphere Process Server” on page 504). While WebSphere Process Server continues to evolve its support for people, the roles played by portlets, however, have remained constant. A process portal has two distinct portlet types:
� An originating portlet (process initiation): Sometimes called a kicker portlet, it is designed to start the business process by initiating an instance of a process template.
� A participating portlet (task processing): When the process has already been started, this portlet is responsible for retrieving the business message
Important: Always use Page Definition as the type in WebSphere Integration Developer. Selecting Page as the type will not launch the task page in WebSphere Portal.
Note: This section uses the ITSO Corp hiring scenario built in Chapter 5, “Using human tasks in WebSphere Process Server” on page 93.
Code and other resources for this chapter can be found in Appendix A, “Additional material” on page 739.
Important: This book requires that you have a running Process Portal configuration with WebSphere Process Server V6.0.2 and WebSphere Portal V6.0.1.
506 Human-Centric Business Process Management with WebSphere Process Server V6

(payload) from the Human Task Manager (HTM) and sharing business context with other portlets on the page.
While it is a viable option to develop process portlets that make direct use of process server APIs, we balance this approach with a walkthrough of updated capability in Rational Application Developer (RAD) for our implementation.
8.4.1 Implementing the hiring scenario with WebSphere Process Server and WebSphere Portal
ITSO Corp has improved the process it uses to hire new talent. This new process uses WebSphere Portal as its human interaction service.
Note: For additional details see the WebSphere Portal Info-center:
http://publib.boulder.ibm.com/infocenter/wpdoc/v6r0/index.jsp
Developing business processes that use WebSphere Portal V6 and WebSphere Process Server V6:
http://www.ibm.com/developerworks/websphere/library/techarticles/0611_roach/0611_roach.html
Chapter 8. WebSphere Portal Server 507

We pick up the requirements for the system at the hiring process. At this point, all of the applicants have been interviewed and a list of the final applicants are asked to complete a job application. Each job application is the input to the hiring process (Figure 8-5). The red highlighted areas are human tasks handled by WebSphere Portal to gain approval from HR personnel.
Figure 8-5 Business scenario - human tasks in the hiring process
Human tasks in this scenarioThe human task extends Web Services Business Process Execution Language (WS-BPEL) to support the interaction with people (staff) in a business process. There are two ways to use a human task in a business process. An in-line human task like approve standard application and a four-eye approval (eliminates the first approver from the final approver set), or as the implementation of an invoke activity, like the one you see in approve executive application (Figure 8-5).
Hiring Receive
Check Grade
Approve Executive Application Approve Standard Application
Send Offer
Create Employee Records
Send Rejection
Output
Four Eye Approval
Merge
508 Human-Centric Business Process Management with WebSphere Process Server V6

Solution portlets and their required process artifactsThe process is understood, and the human tasks being handled by WebSphere Portal have been identified. At this point, do we know why we are stopping the process? Yes, to determine whether ITSO Corp will hire a given applicant.
Executive positions require a single approver, but regular applicants require two approvers (four eyes). To do this, one participating portlet is built, RecruitmentApprovalParticipantPortlet, and one originating portlet, RecruitmentApplicantOriginatingPortlet.
The originating and participating portlets are JavaServer Faces portlets. Tools like application developer enable you to drop a JavaBean on the JavaServer Faces view to create a managed bean. The JavaServer Faces framework and Rational Application Developer tooling provide code to handle moving data in and out of your JavaBean.
To interact with the business process, the portlets utilize the Human Task Manager and Business Flow Manager APIs of WebSphere Process Server. These APIs require access to the business-object definition file (XML Schema Definition) and the business process-interface definition file (Web Services Description Language). These files are located in libraries of the completed business process. The process is packaged as an EAR file exported from WebSphere Integration Developer (HRModApp.ear). We require at least one library from the EAR file. The libraries you export are determined by the object and interface location choices made by the process designer. Using a tool like WinZip, locate and export one or both of these jar files:
� If the business process project has local definitions for interfaces and business objects, then export the jar file with a name pattern of applicationName.jar. In this example, HRModapp.jar.
� If the business process project uses a shared library exclusively for interfaces and business objects, then just the shared library is required (in this example, HRLib.jar). If not, then the shared library is in addition to applicationName.jar.
For our example, we require both HRModapp.jar and HRLIB.jar. Extract these jar files to a known directory to be imported into Application Developer.
Note: Rational Application Developer uses these files to generate the appropriate originating and participating Java classes used in your portlets. Record the location of these exported files.
Again, the example in this book only requires the HRLib.jar.
Chapter 8. WebSphere Portal Server 509

8.4.2 Developing the participating portlet
When the process has already been started, this portlet is responsible for retrieving the business message (payload) from the Human Task Manager (HTM) and sharing business context values with other portlets on the page.
Create the participant portlet projectWith the help of Rational Application Developer’s support for process portlets, the first thing we need to do is create a portlet project. To create RecruitmentApprovalParticipantPortlet:
1. If you have not already done so, open Rational Application Developer in a workspace of your choosing.
2. Click File → New → Portlet Project to begin defining your project.
If this is your first portlet, Rational Application Developer asks you to enable Portal Development. Click Yes.
3. Enter RecruitmentApprovalParticipantPortlet for Project name.
4. We define a JSR 168, faces portlet, so leave the remaining setting at their defaults.
510 Human-Centric Business Process Management with WebSphere Process Server V6

5. Click Show advanced settings. Click Next (Figure 8-6).
Figure 8-6 Rational Application Developer - Portlet Project
6. Click Next past the Project Facets dialog.
Chapter 8. WebSphere Portal Server 511

7. While we are not making any changes to the Portlet Settings page (Figure 8-7), it is important to note your options to add other content types and to customize the Java package, class, and super class. Click Next.
Figure 8-7 Rational Application Developer - Portlet Settings
8. Click Enable business process integration to unprotect its radio buttons.
512 Human-Centric Business Process Management with WebSphere Process Server V6

9. Click Add task processing to generate code supporting a participating portlet (Figure 8-8). Click Finish.
Again, if this is the first time you are developing portlets in Rational Application Developer or you initiated the project creation in another perspective, Rational Application Developer asks you to confirm the switch to the Web perspective. Click Yes.
Figure 8-8 Rational Application Developer - Advanced Settings
You have completed the creation of RecruitmentApprovalParticipantPortlet, the portlet project with a portlet of the same name. The Rational Application Developer wizard generated a portlet that needs some additional care to reach
Chapter 8. WebSphere Portal Server 513

its full potential as a portlet capable of handling human task information from the process server.
Importing required jar filesWhile the set of jars has been placed in the lib directory of the generated portlet, its scope is confined to JSF and task helper support (Figure 8-9).
Figure 8-9 Default Lib entries for the generated portlet
We need additional jar files to help us process the task. The additional jars come from two places:
� The WebSphere Process Server client directory has the jars required to access the Human Task Manager. However, these jar files are already part of a Process Portal environment. Moreover, Rational Application Developer has already added the appropriate libraries to the project class path. We mention them here to better your understanding of the environment. No action needs to be taken by you.
� The second set of jars are the jars you extracted from the process application EAR file (HRModapp.ear). These jar files need to be added to the portlets lib directory.
The quickest way to add these jar files to your portlet is by dragging them to the lib branch of your portlet (Figure 8-10 on page 515). While the Web App Libraries lists the jar files, you must drop (paste) them on the lib branch to get Rational
Note: The client JAR files for WebSphere Process Server (WPS) are located in the <WPS Home>/ProcessChoreographer/client folder.
514 Human-Centric Business Process Management with WebSphere Process Server V6

Application Developer to accept them. The jars listed in Table 8-1 are the additional libraries required for our process portlet.
Optionally, it is possible to import the jars by following these instructions:
1. Right-click lib in the Project Explorer tab.2. In the resulting Import dialog, click General → File System.3. Click Next.4. Click Browse to locate the directory containing the jar files.5. Click OK.6. Click the required jars in the right side pane.7. Click Create selected folders only.8. Click Finish.
Table 8-1 Additional jars added
Figure 8-10 The updated lib Web App Libraries
HRMod.jar
HRLib.jar
Chapter 8. WebSphere Portal Server 515

Developing access to the business process messageRational Application Developer’s support for JavaServer Faces enables you to drop a Java Bean, typically called a view bean on the canvas. You then bind the view bean attributes to user interface controls.
Using the businessitems.xsd available in HRLib.jar, we generated JavaBeans for the enclosed business objects:
� Application� Applicant� Documentation� Job
These JavaBeans have been provided with the additional materials of the book in businessitems-javabeans.jar, supported by xsd.bean.runtime.jar.
Add these jar files (Table 8-2) to the lib directory of the portlet (Figure 8-10 on page 515).
Table 8-2 The provided business items JavaBeans
However you choose to include these Java classes, our page view bean will be of businessitems type. To define the view bean:
1. With the RecruitmentApprovalParticipantPortlet’s JSP page open, right-click Page Bean in the Page Data tab.
businessitems-javabeans.jar
xsd.bean.runtime.jar
Note: We have included the businessitems-javabeans.jar to save you some time. However, you can generate your own JavaBeans with the XSD bean generator in Rational Application Developer.
516 Human-Centric Business Process Management with WebSphere Process Server V6

2. Click New → JavaBean (Figure 8-11).
Figure 8-11 Create page bean
3. In the resulting Add JavaBean dialog, enter applicantApprovalViewBean in the Name field.
4. Enter businessitems.Application in the Class field.
A view bean of type application is created and placed under page bean. Using the following instructions, bind the selected attributes to user interface controls:
1. Click applicantApprovalViewBean (businessitems), then drag it to the open JSP page.
2. On the resulting Insert JavaBean dialog, click Input Data.
3. The field names and associated control types defined in Table 8-3 should be the only fields checked. Click to uncheck all other fields.
Table 8-3 Mapped view bean attributes to controls
Note: businessitems is the Java package name containing the xsd generated Java classes.
Field name/label Control type
LastName Input field
FirstName Input field
MiddleInitial Input field
Ssn Input field
DateOfBirth → gregorianChange
Input field
StreetAddress Input field
Chapter 8. WebSphere Portal Server 517

AptNo Input field
State Input field
ZipCode Input field
HomePhone Input field
Position Combo box
Salary Input field
IsExecutive Check box
FinalApproval Check box
ApplicantAccept Check box
ContentID Input field
Field name/label Control type
518 Human-Centric Business Process Management with WebSphere Process Server V6
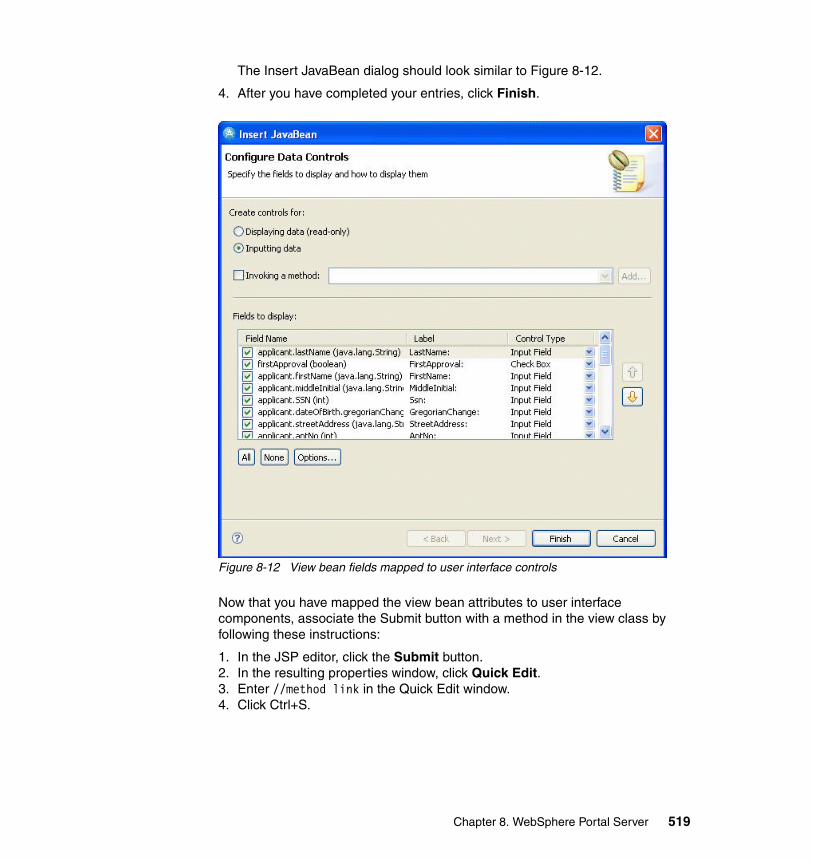
The Insert JavaBean dialog should look similar to Figure 8-12.
4. After you have completed your entries, click Finish.
Figure 8-12 View bean fields mapped to user interface controls
Now that you have mapped the view bean attributes to user interface components, associate the Submit button with a method in the view class by following these instructions:
1. In the JSP editor, click the Submit button.2. In the resulting properties window, click Quick Edit.3. Enter //method link in the Quick Edit window.4. Click Ctrl+S.
Chapter 8. WebSphere Portal Server 519

The button is now associated with a method in the view class. To enter code into the JSF view class, follow these instructions:
1. From the Project Explorer tab, double-click RecruitmentApprovalParticipantPortlet → Java Resources: src → pagecode → RecruitmentApprovalParticipantPortletView.java.
2. After the class opens in the edit window, enter the code in Example 8-2 to the getApplicantApprovalViewBean method. (The full source is available with the additional materials.)
The getSessionScope().get(TaskProcessingHelper.TASK_INPUT_MESSAGE) retrieves the task input message placed in the session by the process helper class. This is done in the processAction method of the portlet during task notification from the My Tasks portlet.
Example 8-2 Sample view bean code method retrieving the task message
public Application getApplicantApprovalViewBean() {
if (applicantApprovalViewBean == null) {applicantApprovalViewBean = new Application();applicantApprovalViewBean.setApplicant(new Applicant());applicantApprovalViewBean.setJob(new Job());applicantApprovalViewBean.setDocumentation(new
Documentation());try {
Object applicantApprovalMsg = getSessionScope().get(TaskProcessingHelper.TASK_INPUT_MESSAGE);
if (applicantApprovalMsg instanceof DataObject) {
DataObject root = (DataObject) applicantApprovalMsg;DataObject applicationMsg = root.getDataObject("Input");
// Application
applicantApprovalViewBean.setFirstApproval(applicationMsg.getBoolean("FirstApproval"));...
}
return applicantApprovalViewBean;}
3. Page down to update doButton1Action.
520 Human-Centric Business Process Management with WebSphere Process Server V6

4. Enter the code in Example 8-3 to process the task and close the page.
The two key methods here are the processTask() and closePage().
– The processTask method takes the updated output task message from the session and marks the task complete.
– The closePage is often called after the processTask to close the task page in WebSphere Portal.
Example 8-3 Button action method
public String doButton1Action() {// Type Java code that runs when the component is clicked// TODO: Return outcome that corresponds to a navigation rule
try { ...
//Complete taskObject applicantApprovalMsgOutput1 = getSessionScope().get( TaskProcessingHelper.TASK_OUTPUT_MESSAGE);root = (DataObject) applicantApprovalMsgOutput1;root.setDataObject("Output", applicationMsgOutput);
getSessionScope().put(TaskProcessingHelper.TASK_OUTPUT_MESSAGE,applicantApprovalMsgOutput1 );
((TaskProcessingHelper) getSessionScope().get(TaskProcessingHelper.TASK_PROCESSING_HELPER)).processTask();
((TaskProcessingHelper) getSessionScope().
get(TaskProcessingHelper.TASK_PROCESSING_HELPER)).closePage((ActionRequest) getFacesContext().getExternalContext().getRequest(),
(ActionResponse) getFacesContext().getExternalContext().getResponse());
}else System.out.println("Output Not instance of");
} ...
return "";}
Chapter 8. WebSphere Portal Server 521

Add JNDI binding for the Human Task ManagerTo do this:
1. In the Project Explorer tab, click WebContent → WEB-INF to view web.xml.
2. Double-click web.xml to open the Web Deployment.
3. In the resulting edit window, click the References tab at the bottom of the window.
4. If there is no Human Task Manager entry, click Add to open the Add Reference dialog (Figure 8-13).
Figure 8-13 Adding reference to HTM
5. Click EJB reference.
6. Click Next.
522 Human-Centric Business Process Management with WebSphere Process Server V6

7. Click Enterprise Beans not in the workspace (Figure 8-14).
8. Enter ejb/HumanTaskManagerEJB in the Name field.
9. Click Remote for the Ref Type.
10.Enter com.ibm.task.api.HumanTaskManagerHome for Home.
11.Enter com.ibm.task.HumanTaskManager for Remote.
Figure 8-14 Specifying binding for remote service
12.Click Next.
13.Enter a description, if you like, then click Finish.
Chapter 8. WebSphere Portal Server 523

14.Under the WebSphere Bindings control, enter corbaname:iiop:<fully qualified server name>:<port>#com/ibm/task/api/HumanTaskManagerHome (Figure 8-15).
Figure 8-15 Human Task Manager with remote JNDI binding
15.Click Save.
Export completed portlet from Rational Application DeveloperTo deploy a portlet to WebSphere Portal, it has to be packaged as a Web Application aRchive (WAR) file. Rational Application Developer uses an export process that produces a portlet WAR file. To do this, follow these instructions:
1. Right-click RecruitmentApprovalParticipantPortlet.
Note: For example:
corbaname:iiop:wps.itso.ral.ibm.com:2809#com/ibm/task/api/HumanTaskManagerHome
Check your WebSphere Process Server name space port for its setting. The default JNDI name space port is 2809.
524 Human-Centric Business Process Management with WebSphere Process Server V6

2. Click Export → WAR file.
3. Enter C:\myPortlets\RecruitmentApprovalParticipantPortlet.war (or a location of your choice).
4. Click Finish.
8.4.3 Developing the originating (kicker) portlet
Known as the kicker portlet, this portlet is designed to gather input data, then start the business process. The portlet identifies the process it wishes to start with a process template name.
Create the originating portlet projectExcept for the business process option and a name change, the steps for creating an originating portlet project are exactly the same as described in “Create the participant portlet project” on page 510. This time, without most of the figures, create a project for the originating portlet (RecruitmentApplicantOriginatingPortlet) using the following instructions:
1. Click File → New → Portlet Project to begin defining your project.
2. Enter RecruitmentApplicantOriginatingPortlet for Project name. We are creating a JSR 168 faces portlet and leave most of the options as their defaults.
3. Click Show advanced settings.
4. Click Next.
5. Click Next past the Project Facets dialog.
6. While we do not make any changes to the Portlet Settings page, it is important enough to note your options to add other content types and to customize the Java package, class, and super class. Click Next.
7. Click Enable business process integration to unprotect its radio buttons.
8. Click Add process initiation to generate code supporting an originating portlet.
Chapter 8. WebSphere Portal Server 525

9. Enter Hiring_1550364285 for Template name (Figure 8-16).
Figure 8-16 Advanced Settings
10.Click Finish.
You have completed the creation of the RecruitmentApplicantOriginatingPortlet project with a portlet of the same name. The Rational Application Developer wizard generated a portlet that needs additional care to reach its full potential as a portlet capable of initiating a process in the process server.
Note: Hiring_1550364285 is the template name of the process defined by HRModApp.ear. A process is programmatically started with the template name.
526 Human-Centric Business Process Management with WebSphere Process Server V6

Importing required jar filesWhile the set of jars has been placed in the lib directory of the generated portlet, the scope is confined to JSF and task helper support (Figure 8-17).
Figure 8-17 Default Lib entries for the generated portlet
We need additional jar files to help us initiate the task. The additional jars come from two places:
� The WebSphere Process Server client directory has the jars required to access the Business Flow Manager. However, these jar files are already part of a Process Portal environment. Moreover, Rational Application Developer has already added the appropriate libraries to the project class path. We mention them here to better your understanding of the environment. No action needs to be taken by you.
� The second jar is the one you extracted from the process application EAR file (HRModapp.ear). The interface and business objects used by the originating portlet can all be found in HRLib.jar. This is the only jar we need to include in the lib directory of the portlet.
Note: The client JAR files for WebSphere Process Server (WPS) are located in the <WPS Home>/ProcessChoreographer/client folder.
Chapter 8. WebSphere Portal Server 527

The quickest way to add HRLib.jar to your portlet is by dragging it to the lib branch of your portlet (Figure 8-18). While the Web App Libraries lists the jar files, you must drop (paste) them on the lib branch to get Rational Application Developer to accept them.
Optionally, it is possible to import the jar by following these instructions:
1. Right-click lib in the Project Explorer tab.2. In the resulting Import dialog, click General → File System. Click Next.3. Click Browse to locate the directory containing the jar file. Click OK.4. Click the required jar in the right side pane.5. Click Create selected folders only.6. Click Finish.
Figure 8-18 The updated lib Web App Libraries
Defining the business message as a managed beanAfter the project is created, the wizard opens the JSP file. If you have not explored other files, it is currently being displayed. Follow these instructions to create a managed message bean to bind user interface components to:
1. Click anywhere on the JSP view.
528 Human-Centric Business Process Management with WebSphere Process Server V6
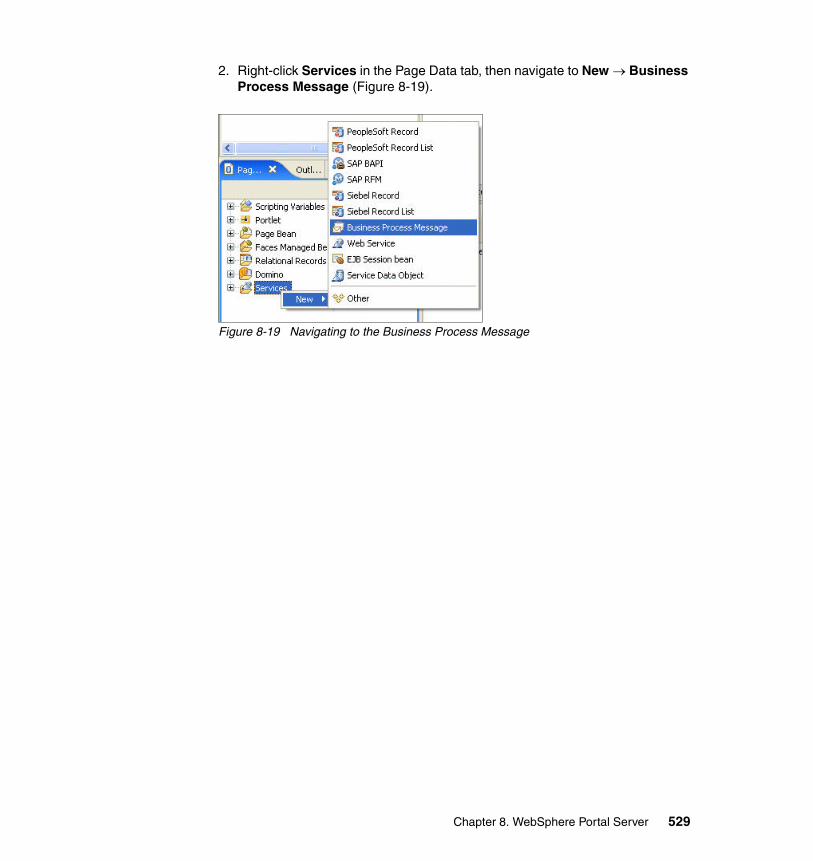
2. Right-click Services in the Page Data tab, then navigate to New → Business Process Message (Figure 8-19).
Figure 8-19 Navigating to the Business Process Message
Chapter 8. WebSphere Portal Server 529

The Rational Application Developer wizard needs to know about the interface used to initiate the business process along with its xsd-defined business object message (payload). To provide this information:
1. Click Browse to select the WSDL file.
2. Click processes/hiring/HiringInterface.wsdl in HRLib.jar.
Figure 8-20 Selected WSDL file containing the interface and business message
530 Human-Centric Business Process Management with WebSphere Process Server V6

3. After you have selected the appropriate WSDL file, click Next to specify the business message required (Figure 8-21).
Figure 8-21 Business message selection
4. Click Finish to generate the input message as a managed been.
Chapter 8. WebSphere Portal Server 531

Binding the business message to user interface controlsNow that submitRequestMsg is a Faces Managed Bean, we can bind its fields to user interface controls. The generated JSF code moves the data from and to the message bean. To begin binding our business message to input controls:
1. Click + submitRequestMsg to expand the newly created message in the Page Data tab (Figure 8-22).
Figure 8-22 New submitRequestMsg managed bean
2. Once open, click Input, then drag it to the blank JSP canvas.
3. On the resulting Insert Record dialog, click Creating a new record (Figure 8-23 on page 534).
4. Only click the field name and the control type that match the values in Table 8-4.
Table 8-4 Selected fields and their control type
Field name/label Control type
LastName Input field
FirstName Input field
MiddleInitial Input field
Ssn Input field
DateOfBirth Input field
StreetAddress Input field
532 Human-Centric Business Process Management with WebSphere Process Server V6

Remember, only the fields listed in Table 8-4 on page 532 need to be selected. To lessen the amount of layout work after the create, make sure that the order also matches the list.
AptNo Input field
City Input field
State Input field
ZipCode Input field
HomePhone Input field
Position Combo box
Field name/label Control type
Chapter 8. WebSphere Portal Server 533

Once you have completed the data entry (Figure 8-23), click Finish to bind input controls to the selected fields.
Figure 8-23 Field selections being bound to data entry controls
534 Human-Centric Business Process Management with WebSphere Process Server V6

The updated JSP view has all of the selected fields mapped to entries in the submitRequestMsg managed bean (Figure 8-24).
Figure 8-24 The fields selected are now bound to entry controls
While most of the fields take a string with no validation, we want to update the DateOfBirth and Position fields to control the user’s input. To make these updates:
1. Click DateOfBirth.
2. In the Properties tab, click Date/Time for Format (Figure 8-25).
3. Click Short (0/0/00) for Data style.
4. Click Show helper button to provide a calendar.
5. Click Show prompt character for the example mask.
Figure 8-25 Date of birth properties tab
Chapter 8. WebSphere Portal Server 535

With a valid date being assured, let us make our second change to position.
1. Click the Position combo box on the user interface.
2. In the Properties tab, click Add Choice for each entry listed in Table 8-5. The button is located on the right-hand side of the Properties tab.
Table 8-5 Valid choices for position
If you have not already done so, press Ctrl+S to save your changes.
To this point, we have associated the fields of an applicant’s online application form with fields of our business process message. This is accomplished by binding fields in the submitRequestMsg managed bean to visual controls like combo boxes and text controls. Once the data has been entered, our user needs the ability to submit the application data. We already have a Submit button control on the window. However, like the data controls, it needs to be bound to an action.
As the Business Process Message wizard parsed through the hiring interface, it generated a process initiation method called initiateProcess. We can associate (bind) the Submit button control to the initiateProcess method with the following instructions:
1. Click Submit to make it the current control.
2. Right-click initiateProcess.
Label Value
Accounts Clerk Accounts Clerk
Accountant Accountant
Accounts Line Manager Accounts Line Manager
Accounts Division Manager Accounts Division Manager
536 Human-Centric Business Process Management with WebSphere Process Server V6

3. Click Bind to ‘button1’ (Figure 8-26).
Figure 8-26 Binding a function to a button control
Check generated view codeFrom the start of this development effort, it is easy to forget that Rational Application Developer is one of the most capable Java development tools available. Rational Application Developer has generated all of the code and recompiled it in the background.
Depending on the complexity of the business message provided to us from the process team, Rational Application Developer can mistake one of the labels in the message as a concrete structure when it is simply an alias. To ensure that the message bean being initialized references fields and structures defined to exist at run time:
1. In the Page Data tab of your JSP page, right-click initiateProcess.
2. Click Edit Page Code Action to open the view class (RecruitmentApplicantOriginatingPortletView) file (Figure 8-27).
Figure 8-27 Edit menu for getSubmitRequestMsg
The Java editor opens and places the cursor on the initiateProcess method.
Chapter 8. WebSphere Portal Server 537

3. Page-up to locate the getSubmitRequestMsg method.
4. SubmitParameters is an alias of Input and needs to be removed. Using the code provided, modify your source to match Example 8-4.
5. After updating getSubmitRequestMsg, press Ctrl+S to save your changes.
Example 8-4 Updated getSubmitRequestMsg method in the view class
public Object getSubmitRequestMsg() {if (submitRequestMsg == null) {
submitRequestMsg = getSessionScope().get(ProcessInitiationHelper.PROCESS_INPUT_MESSAGE);
if (submitRequestMsg instanceof DataObject) {// initialize the embedded DataObject instances contained
within the messageDataObject root = (DataObject) submitRequestMsg;DataObject sdo0 = root.createDataObject("Input");root.set("Input", sdo0);DataObject sdo1 = sdo0.createDataObject("Applicant");sdo0.set("Applicant", sdo1);DataObject sdo2 = sdo0.createDataObject("Job");sdo0.set("Job", sdo2);DataObject sdo3 = sdo0.createDataObject("Documentation");sdo0.set("Documentation", sdo3);
} else {// initialization of complex message types based on
WISFMessage goes here}
}
return submitRequestMsg;}
Set the business flow manager home reference bindingWebSphere Process Server manages tasks waiting or being manipulated by a human interface service like WebSphere Portal through its Human Task Manager (HTM). On the other hand, this portlet (RecruitmentApplicantOriginatingPortlet) is, as the name reminds us, an originating or kicker portlet. Its role is to gather information and start the process. To start a process in WebSphere Process Server, the portlet calls on process server’s Business Flow Manager (BFM).
While the generated code and supporting helper classes encapsulate the interaction with BFM, the helper classes need to be told where to find the service.
538 Human-Centric Business Process Management with WebSphere Process Server V6

Follow these instructions to set the JNDI name binding for the Business Flow Manager Home:
1. In the Project Explorer tab, click WebContent → WEB-INF to view web.xml.
2. Double-click web.xml to open the Web Deployment Descriptor (Figure 8-28).
Figure 8-28 Location of web.xml file
3. In the resulting edit window, click the References tab at the bottom of the window.
4. Click EjbRef ejb/BusinessFlowManagerHome under in the References list.
Chapter 8. WebSphere Portal Server 539

5. Under the WebSphere Bindings control, enter corbaname:iiop:<fully qualified server name>:<port># com/ibm/bpe/api/BusinessFlowManagerHome (Figure 8-29).
6. Press Ctrl+S to save your changes.
Figure 8-29 Business Flow Manager Home binding
For the most part, those are the steps to produce an originating portlet with Rational Application Developer. While we did not write any code, the combination of JavaServer Faces and the portlet framework provides ample opportunity to hook in and enhance the portlets capabilities. You are encouraged to explore the possibilities these two frameworks provide.
Note: For example:
corbaname:iiop:wps.itso.ral.ibm.com:2809#com/ibm/bpe/api/BusinessFlowManagerHome
Check your WebSphere Process Server name space port for its setting. The default JNDI name space port is 2809.
540 Human-Centric Business Process Management with WebSphere Process Server V6

Export completed portlet from Rational Application DeveloperTo deploy a portlet to WebSphere Portal, it has to be packaged as a Web Application aRchive (WAR) file. Rational Application Developer uses an export process that produces a portlet WAR file. To do this:
1. Right-click RecruitmentApplicantOriginatingPortlet.
2. Click Export → WAR file.
3. Enter C:\myPortlets\RecruitmentApplicantOriginatingPortlet.war (or a location of your choice).
4. Click Finish.
8.5 Deploying process portlets to WebSphere Portal
While the design and development of the process portlets is fundamentally an IT development endeavor, deploying a portlet of any kind is a simpler administrative task. This section describes the basic administrative tasks required to:
� Deploy a portlet to WebSphere Portal.� Define a task page.� Add portlets to the task page.� Associate a task page with a human task.� Grant access to the task page and its portlets.
8.5.1 Installing the portlets
In 8.4, “Developing a Process Portal” on page 506, we described and developed two process portlets to support ITSO Corp’s new hiring process:
� Participating process portlet� Originating process portlet
Playing the role of the portal administrator, you now deploy these portlets:
1. Open a browser and log into WebSphere Portal as an administrator.
2. On the opening page click Launch → Administration.
3. Navigate to Manage Web Modules by clicking Portlet Management → Web Modules.
4. Click Install.
5. Click Browse and enter C:\myPortlets\RecruitmentApplicantOriginatingPortlet.war. Click Next.
6. Click Finish.
Chapter 8. WebSphere Portal Server 541

7. Repeat these steps to install RecruitmentApprovalParticipantPortlet.war.
8.5.2 Configuring the WebSphere Portal task pages
While task pages are defined and managed like other portal pages, they are unique in two ways:
� The are defined in under a specific Task Page Definitions label.
� The are only visible to authorized users when launched by the My Task portlet or programmatically through the DynamicUI service.
Important: While your runtime environment should have been installed, configured, and tested as a requirement of this book, configuring the My Tasks portlet is most often forgotten. You can confirm that it has been configured by clicking the Launch menu to see the My Tasks entry. If it is not there, then you have to run the WPSconfig utility with the task action-setup-process-integration to enable the functionality. The full command is as follows:
<WP_HOME>/config/WPSconfig action-setup-process-integration –DPortalAdminId=wpsadmin –DPortalAdminPwd=wpsadmin
Like the task processing portlet, the My Tasks portlet needs to know where to locate the Human Task Manager. This binding entry is set in WebSphere Portal’s configuration entry, WP-ConfigService. To make or confirm this configuration:
1. Log in to Application Server administration console on the WebSphere Portal machine (http://< PORTAL HOST NAME>:10003/admin). The default administration port is 10003. However, your port maybe different.
2. Click Resources → Resource Environment Providers.
3. In the resulting list, click WP_ConfigService.
4. On the Configuration tab, under Additional Properties, click Custom properties.
5. On the properties window, click processintegration.htmJndiName.
6. Enter corbaname:iiop:<PROCESS SERVER HOST NAME>:2809#com/ibm/task/api/HumanTaskManagerHome in the Value field (corbaname:iiop:wps.itso.ral.ibm.com:2809#com/ibm/task/api/HumanTaskManagerHome, for example.) Click OK.
7. Save your configuration and restart the server.
542 Human-Centric Business Process Management with WebSphere Process Server V6

Because the user never has to search for them, these just-in-time pages have the desired effect of reducing information overload by simply appearing as needed.
Creating the regular applicant approval task pageAs the WebSphere Portal administrator you have just installed a set of process portlets required for a new hiring function. Your next activity is to define the task pages associated with each human task of the business process. Follow these instructions to define new task pages:
1. If not already there, click Launch → Administration.
2. Navigate to Manage Pages by clicking Portal User Interface → Manage Pages).
3. Click Content Root.
4. Click Task Page Definitions (this may appear on page 2).
5. Click New Page.
6. Enter HR Applicant Approval in the Title field. Click OK.
7. Click the pencil of HR Applicant Approval to edit the page layout (Figure 8-30).
Figure 8-30 Edit the page layout
Chapter 8. WebSphere Portal Server 543

8. While a two-column layout is the default, you can choose any of the layouts seen at the top of Figure 8-31. Keep the default page layout.
Figure 8-31 Page layout editor
9. Click + Add portlets in the first column of the page layout editor.
10.Enter R in the Search field.
11.Click Search.
12.Click the RecruitmentApprovalParticipantPortlet portlet check box. Click OK.
13.The page will appear as it does in (Figure 8-31). Click Done.
544 Human-Centric Business Process Management with WebSphere Process Server V6

Linking the human task to the task pageNow that the page is configured the way you want it, recall that a task page has a unique name. The unique name is specified as part of the human task definition in WebSphere Integration Developer. While human tasks can have multiple client types, the portal client type carries a page definition with a unique name field (Figure 8-32). This unique name is the link between the human task in process server, and this task page in WebSphere Portal.
Figure 8-32 Human task definition WebSphere Integration Developer
To link the unique name specified in the human task to the task page just created:
1. From the administration page, navigate to Custom Unique Names by clicking Portal Settings → Custom Unique Names.
2. Click Pages.
3. Click the pencil on the left of HR Applicant Approval.
4. Enter wp.ApproveApplicant in the Unique name field. Click OK.
Chapter 8. WebSphere Portal Server 545

Create the executive candidate approval pageNow we must set up the Executive Candidate Approval task page. The following information is provided for you to define this new page:
� Task page name: Executive Candidate Approval
� Since the information communicated to the portal is the same, the portlet being placed on the page is the same: RecruitmentApprovalParticipantPortlet
� Task page unique name: wp.ApproveExecutiveApplicant
8.5.3 Creating the candidate application page
Now that you have two task pages, each with a participating portlet, you need an additional page containing an originating (kicker) portlet to start the process.
The application page is not a task page. The applicant uses this standard portal page to complete an online application. To create the application page:
1. From the administration page, navigate to Manage Pages by clicking Portal User Interface → Manage Pages.
2. Click Content Root → Home.
3. Click New Page.
4. Enter ITSOCorp Candidate Application in the Title field. Click OK.
5. Click the pencil of ITSOCorp Candidate Application to edit its page layout.
6. Click Add portlets in the first column of the layout page.
7. Type R in the Search field.
8. Click Search.
9. Click the RecruitmentApplicantOriginatingPortlet portlet check box. Click OK.
10.Click Done on the layout editor.
At this point, all of the required pages have been defined for our hiring application. While we have not placed much content on each page, we can begin to consider who will need to see this information.
8.5.4 Provisioning access to pages and portlets
Security experts say that the first line of defence is knowledge. A standard portal page is visible to authorized users and groups from their initial login. In contrast, even for authorized users, a task page is only visible when it is launched by the
546 Human-Centric Business Process Management with WebSphere Process Server V6

My Tasks portlet or through the Dynamic UI service. The existence of the page is unknown. Get assigned the write task and it reveals itself, but only for as long as it take to complete the task.
Provisioning access to the candidate application pageWhen a candidate is selected for an interview at ITSO Corp, the HR specialist schedules time for the candidate to complete an online application before the interview.
As the portal administrator, HR has asked you to set up the application page that candidates will use, under a specialist ID, to complete the application. To accomplish this task:
1. If not already there, click Launch → Administration.
2. Navigate to Resource Permissions by clicking Access → Resource Permissions.
3. Click Pages under Resource Types.
4. Click Content Root.
5. Click Home under Resources.
6. Click the key icon associated with ITSOCorp Candidate Application (Figure 8-33).
Figure 8-33 Resource permissions for application page
Note: For details on WebSphere Portal security, see the info-center:
http://publib.boulder.ibm.com/infocenter/wpdoc/v6r0/index.jsp
Chapter 8. WebSphere Portal Server 547

7. In the resulting ITSOCorp Candidate Application page, click the pencil icon associated with the user role.
8. In the resulting User role page, click + Add.
9. On the Add Role Members page, click All Authenticated Portal Users (Figure 8-34).
Figure 8-34 Adding all authenticated users to the user role of a page
10.Click OK and the Members in the Role is updated to include All Authenticated Portal Users.
11.To return to the ITSOCorp Candidate Application page, click ITSOCorp Candidate Application at the top of the page.
12.Click Apply to save changes.
13.Click OK on the dialog box.
Provisioning task page accessAs the portal administrator, you defined new content to support HR specialists and managers. You are now ready to grant the appropriate access control for each group. To accomplish this task:
1. If not already there, click Launch → Administration.
2. Navigate to Resource Permissions by clicking Access → Resource Permissions.
548 Human-Centric Business Process Management with WebSphere Process Server V6

3. Click Pages under Resource Types.
4. Click Content Root.
5. Enter t in the Search field.
6. Click Search.
7. Click Task Page Definitions on the resulting page.
Unless you have other task pages, you now see the two approval task pages created earlier (Figure 8-35).
8. Click the key icon associated with HR Applicant Approval.
Figure 8-35 Search results under task page definitions
9. In the resulting HR Applicant Approval page, click the pencil icon associated with the user role.
10.On the resulting User role page, click + Add.
11.Leaving the default in Search by, as All available, click Search.
Chapter 8. WebSphere Portal Server 549

12.The resulting page lists all of the user groups. Click HRSpecialists, HRManagers, and Hiring Managers (Figure 8-36).
Figure 8-36 Authorized groups
13.Click OK and the Members in the Role is updated to include the groups selected.
14.To return to the HR Applicant Approval page, click HR Applicant Approval at the top of the page.
15.Click Apply to save changes.
16.Click OK on the dialog box.
17.Repeat this process for the HR Executive Approval task page.
Provisioning portlet access Portlets on a page must represent content relevant to the task being performed by a user. Having access to a page does not mean that a group or user has
550 Human-Centric Business Process Management with WebSphere Process Server V6

access to the content (portlets) on that page. In certain business scenarios, managers have access to different or additional content on the same page as an employee.
The content we are considering is in support of ITSO Corp’s hiring process, specifically, the approval of applicants for hire. The administrative process is much the same as we performed to permission page access. The permissions are the same, but the resource is now a portlet. To accomplish this task, follow these instructions:
1. If not already there, click Launch → Administration.
2. Navigate to Resource Permissions by clicking Access → Resource Permissions.
3. Click Portlets under Resource Types.
4. In the resulting portlet list page, enter r in the Search field.
5. Click Search.
6. Click the key icon associated with RecruitmentApplicantOriginatingPortlet.
7. Click the pencil icon associated with the user role.
8. In the resulting User role page, click + Add.
9. We would like everyone to be able to complete an application. On the Add Role Members page, click All Authenticated Portal Users.
10.Click OK and the Members in the Role is updated to include All Authenticated Portal Users.
11.To return to RecruitmentApplicantOriginatingPortlet, click RecruitmentApplicantOriginatingPortlet at the top of the page.
12.Click Apply to save changes.
13.Click OK on the dialog box.
While almost anyone can fill out an application, not everyone is part of the hiring process. For this reason, we assign specific groups of users to the participating portlet, RecruitmentApplicantParticipantPortlet.
14.To return to the portlet list, click Portlets at the top of the page.
15.Click the key icon associated with RecruitmentApplicantParticipantPortlet.
16.Click the pencil icon associated with the user role.
17.In the resulting User role page, click + Add.
18.Leaving the default in Search by, as All available, click Search.
19.The resulting page lists all of the user groups. Click HRSpecialists, HRManagers, and Hiring Managers.
Chapter 8. WebSphere Portal Server 551

20.,Click OK and the Members in the Role is updated to include the groups selected.
21.To return to the click RecruitmentApplicantParticipantPortlet, click RecruitmentApplicantParticipantPortlet at the top of the page (Figure 8-37).
Figure 8-37 Member in the role User
22.Click Apply to save changes.
23.Click OK on the dialog box.
The portlets have been installed, the task pages defined with content added, and, finally, the correct people have access to the correct information.
8.5.5 Running the application
It has been months since the new human resources hiring process has been running in production. Things are going well and the system has helped ITSO Corp hire some outstanding employees. The feedback from HR specialists is positive and they report feeling more confident in their hiring decisions.
Ann, an HR Specialist, has been involved in the early interviews of Gail Clay, an accounting candidate. Gail has returned for a second interview and has been asked to fill out an application this time. Little does she know, this is a good sign — only candidates ITSO Corp is seriously interested in are asked to fill out an application.
552 Human-Centric Business Process Management with WebSphere Process Server V6
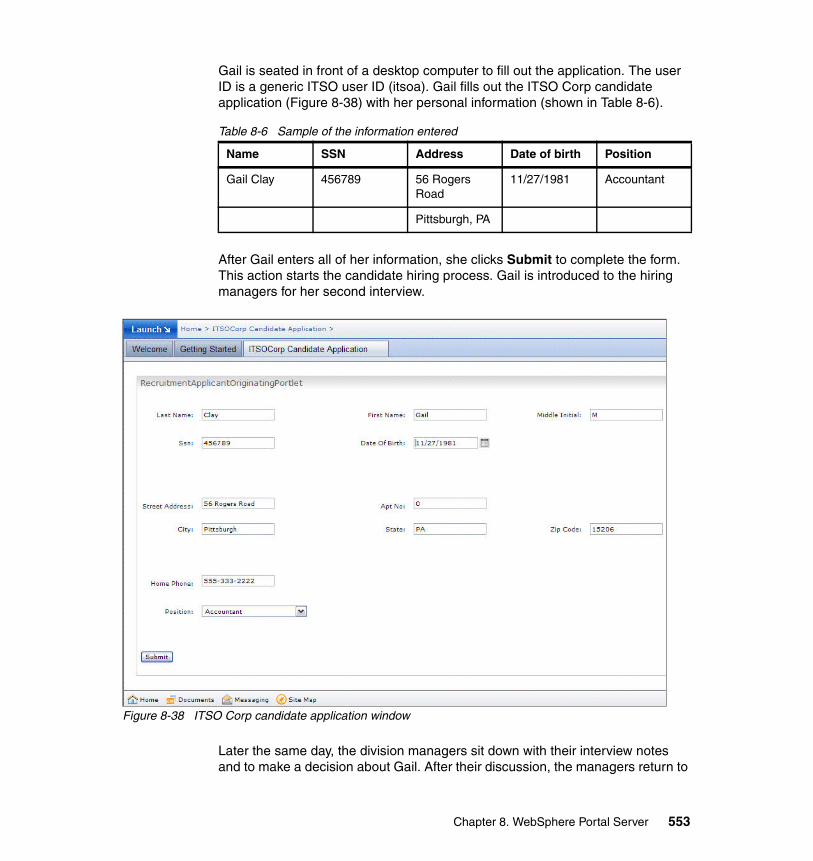
Gail is seated in front of a desktop computer to fill out the application. The user ID is a generic ITSO user ID (itsoa). Gail fills out the ITSO Corp candidate application (Figure 8-38) with her personal information (shown in Table 8-6).
Table 8-6 Sample of the information entered
After Gail enters all of her information, she clicks Submit to complete the form. This action starts the candidate hiring process. Gail is introduced to the hiring managers for her second interview.
Figure 8-38 ITSO Corp candidate application window
Later the same day, the division managers sit down with their interview notes and to make a decision about Gail. After their discussion, the managers return to
Name SSN Address Date of birth Position
Gail Clay 456789 56 Rogers Road
11/27/1981 Accountant
Pittsburgh, PA
Chapter 8. WebSphere Portal Server 553

their own offices. The first manager, manager A, has logged in to see waiting tasks. Clicking the link at the top of the portal page, the My Tasks page is displayed. Manager A claims the task by first clicking the task, then the Claim button (Figure 8-39).
Figure 8-39 Claiming a task
554 Human-Centric Business Process Management with WebSphere Process Server V6

After the task is claimed, the task returns with its link actionable (hot). Manager A clicks the link to work on the task (Figure 8-40). On the left-hand side of the task page, the manager sees the information Gail provided during her second interview. In the center, Gail’s years of service and potential compensation are compared to other candidates and employees. Finally, on the right, her education is compared in the same way, and indicate that Gail has a college degree.
Figure 8-40 First hiring manager approval
Manager A really likes Gail and recommends a salary of $101,000 dollars. Even after moving the cursor over the average for accountant candidates, he feel okay with the potential offer.
Chapter 8. WebSphere Portal Server 555

Manager A clicks First Approval and submits the offer. This action takes him back to My Tasks, and we can see that the inbox has one less entry (Figure 8-41).
Figure 8-41 My Tasks with one remaining task
The machine take the process over and determines that another approver has to agree to hire Gail. The process eliminates manager A from the potential final approvers and makes Gail’s offer available to them.
556 Human-Centric Business Process Management with WebSphere Process Server V6

Manager B logs in and checks the My Tasks page. There is a candidate awaiting a second approval. Manager B claims the work and opens the task page by clicking the link (Figure 8-42).
Figure 8-42 Four-eye approval task waiting
Chapter 8. WebSphere Portal Server 557

Manager B is now looking at the same data and analysis that manager A looked at. But wait, manager B is thinking about the accountant, John, that she hired with a compensation of $75,000 dollars. Gail has the same experience, education, and interpersonal skills that John has. Why is her compensation so much higher? (See Figure 8-43.)
Figure 8-43 Compensation analysis
558 Human-Centric Business Process Management with WebSphere Process Server V6

Manager B clicks the charting tab for Gail’s work history and education. These views clearly show that Gail would be paid $25,000 dollars more with the same background as John (Figure 8-44).
Figure 8-44 Final approval with alternative analysis views
Knowing that ITSO Corp has a long-standing commitment to equal opportunity in seeking and competing for the best talent in the today’s marketplace, manager B consults with manager A through Lotus® Sametime® and they agree to adjust the compensation offer to $78,000 for this candidate.
Chapter 8. WebSphere Portal Server 559

Manager B clicks the final approval and submits the offer. The task page closes and returns manager B to an empty My Tasks list (Figure 8-45).
Figure 8-45 All tasks completed
Once again, the process takes over to produce an offer letter that is mailed to Gail. Gail subsequently accepted the offer and is now a part of the ITSO Corp accounting team with John.
Where all of the new content comes fromIn the months since ITSO Corp’s IT department developed the initial set of originating and participating portlets, another team built portlets to analyze the compensation and experience of potential candidates. The portal administrator added them to the task page and wired the portlets with a comment context, candidate ID (SSN). The tools employed are WebSphere Portlet Factory and the WebSphere Dashboard Framework.
WebSphere Portlet Factory is an Eclipse base portlet design and development tool that accelerates portlet development. This wizard-driven tool can produce production-ready portlets with complex paging and tabbing functionality. WebSphere Portlet Factory is made up of builders and models:
� Builder
A builder is a highly adaptive software component that generates code (including Java, JSP, and XML) for specific application functionality. For example, WebSphere Portlet Factory provides builders that are as simple as automating the creation of the code to place a button on a portlet view (Web page).
WebSphere Portlet Factory includes many powerful builders like the View & Form Builder, which creates all the necessary variables, JSP, schemes, and
560 Human-Centric Business Process Management with WebSphere Process Server V6

Java code needed to create an entire application that retrieves and displays data from a data source (database, Web service, bean, variable, and so on).
Builders have easy-to-use, wizard-like user interfaces, which make it both fast and easy to develop applications. While wizards follow a waterfall pattern, builders can be used iteratively throughout the entire development process. You can always go back and change a builder’s input values and have the entire application update instantly.
� Model
A model is simply a set of calls to builders, which in turn generate the application components representing the behavior, structure, data, and presentation of the application. Under the covers, a model is simply an XML file containing a series of calls to builders. When you want to create a new application, you create a new model. You then add the appropriate builder calls to this model. In fact, a portlet can be comprised of more than one model promoting reuse and modularity.
� Service Provider Model
This is a model that you build to access backend system (that is, DB, SAP, and so on). This model is accessed using a Web service call.
� Service Consumer Model
A model you build to, like a portlet, that utilizes the provider model.
� Profile
A profile contains a set of parameters that vary the way an application behaves. Using profiles, you can leverage one model to automatically generate different variations of an application for different users, customers, or situations.
� Regeneration
When a model is regenerated, each builder in the model executes in sequence and creates the components of your application, such as JSP Pages or Java methods. During regeneration, profiles can feed different inputs to builders based on the user or situation, automatically creating custom applications on the fly. Regeneration is similar to the process of recalculating a spreadsheet, the difference being that the Factory regenerates application code, rather than a set of numbers.
� WebApp
The profile-specific instance of an application that is dynamically created by the regeneration engine is called a WebApp. Each builder, when called during regeneration, creates objects that are woven into the application, such as pages, buttons, variables, or methods. The regeneration engine creates the WebApp by combining the regeneration of a model with a unique instance of
Chapter 8. WebSphere Portal Server 561

profile data. The WebApp objects are then processed by the Portlet Factory’s execution engine to instantiate the executable J2EE application sessions.
� WebSphere Dashboard Framework
The WebSphere DashBoard Framework enhances the capabilities of WebSphere Portlet Factory by adding dashboard features like an alerting module, hi-fidelity charting and mapping, filtering, and a set of dashboard-specific builders.
8.6 Reducing decision latency with data plus analysis
Portals are recognized information integrators. However, this does not have to conflict with the business integration and process teams that seek low-to-zero latency through machine-to-machine interactions. In fact, Portal supports the same low-latency goals cherished by the business process management teams. While technology advances continue to improve in business processes distilling them down from weeks to days, days to hours, and hours to minutes, the human factor of the equation could use a little more focus. If machine-to-machine communication is asymptotic, then the speed at which people made decisions would be the limiting factor for some organizations and competitive advantage for others.
8.6.1 Is reducing decision latency new
The notion of reducing decision latency is not new. Most of us are familiar with executive dashboards, tracking sales, and key performance indicators of the business. And IT dashboards provide the status of running hardware and software systems. WebSphere Business Monitor marries the two spaces performing real-time tracking of business processes connected to the knowledge of where these processes are being run.
A good argument could be made that service-oriented architecture (SOA) is not new. But there are some new things about it, or the environment in which it operates has made its impact different — the broadest acceptance of standards. Interestingly enough, standards is another, not so new idea.
562 Human-Centric Business Process Management with WebSphere Process Server V6

8.6.2 Business Process Management requirements for reducing decision latency
Business Process Management professionals tell us that three things are required to reduce decision latency: the person needs to be alerted, informed, and guided. So an effective system or design would:
� Alert (notified) the user that a business event occurred requiring attention. In a traditional dashboard environment, this alert could range from flashing lights to calling your cell phone, e-mailing you, or both. It could be that inventory is low, a valued customer of the company just canceled an order, and so on.
� Inform the user with (relevant) information that is easily understood. If the information does not add value or is hard to understand, then it takes longer for action to be taken.
� Guide the user through potential actions to be taken to resolve the issue, for example, predetermined processes that get the correct people engaged and informed. From the user’s perspective, these are ad hoc actions they choose whether to invoke, for example, forming a follow-on task because you have been alerted about a canceled order.
8.6.3 Not just for executives
We already agree that the study and use of technology to reduce decision latency is not new. Like SOA, the business climate has forced business executives to do more with less. Yet, we continue to deliver value faster in an ecosystem of partners and customers around the globe. Dashboard technology has been used to assist executive decision making for many years. This subject, in fact, has been written about in hundreds of books. It is not our intention to even scratch the surface of this space. We do, however, want you to understand the value some of this technology brings to the decision-making process of front-line employees.
For our purposes, there are two major components to dashboard systems:
� Front-end user interface: with its almost effortless movement from data to charting
� Back-end analytics: with its data-gathering and number-crunching capabilities
At first glance, it is easy to say that the interface is nothing without the back-end analytics or that the interface is what makes the data easy to understand — it would just be rows and columns of numbers. After going back and forth, you realize they are better together than apart.
Chapter 8. WebSphere Portal Server 563

8.6.4 Data plus analysis
Like the dashboard system, there are many things that are better together. The whole is greater than the sum of its parts. WebSphere Portal enables you to reduce decision latency by aggregating data plus analysis. Providing data alone places the burden on the user to make business sense of the data being viewed. The conscientious person will go through her own process of analyzing the data by checking data points, probably on other systems in the company. Contrast this to a loan officer who has the customer’s application information, credit rating, and work history information, in addition to the bank’s historic analysis of how well it has done with customers with a similar credit rating, income, and work history. This loan officer is supported by analysis that is relevant to the task and supports the goals of the business. A quicker decision will be made because there is no need to search for data, or miss the fact that loan defaults are increasing and some sense of why.
The next time you design an enhancement to your business system, while you must think about the data required and how relevant it is the to task, make sure that the analysis that occurs with your employees is placed uniformly in front of every employee (Figure 8-46). Do that, and human decision latency is reduced. Do that, and your company becomes more efficient and makes it harder for its competitors to keep pace.
Figure 8-46 Data plus analysis
Data only Data plus Analysis
564 Human-Centric Business Process Management with WebSphere Process Server V6

Chapter 9. Workplace Forms
This chapter introduces IBM Workplace Forms as a front end to the proposed ITSO Corp business process built in Chapter 5, “Using human tasks in WebSphere Process Server” on page 93. This chapter implements a solution using Workplace Forms, integrating it with WebSphere Process Server. In doing so, this chapter covers the following points:
� Creating a Workplace Forms form� Implementing interface elements� Technologies supported by IBM Workplace Forms� Integration with WebSphere Process Server� Alternative implementation approaches
9
© Copyright IBM Corp. 2007. All rights reserved. 565

9.1 Introduction to Workplace Forms
Given the information-intensive nature of business, both documents and forms are essential components in driving and supporting all types of processes. Documents and forms include processes and procedures, regulatory requirements and compliance issues, and inter-agency/inter-departmental and constituent/customer communications. Document types range from spreadsheets to engineering drawings to Web information. They can come from desktop users or output from back-end systems such as Enterprise Resource Planning, content management, and older systems.
IBM Workplace Forms is composed of Viewer, Designer, and Server. These tools together allow you to create, fill, sign, and submit forms with great support of integration with your back-end processes.
9.1.1 IBM Workplace Forms Viewer
IBM Workplace Forms Viewer is a feature-rich desktop application used to view, fill, sign, submit, and route electronic forms (eForms), and is able to function on the desktop or within a browser. It enables full connectivity with real-time integration using Web services. The open standards framework of IBM Workplace Forms enables Workplace Forms Viewer to operate in portal or stand-alone environments, in online or offline modes, and as a plug-in for thin or rich-client browsers.
What is new in 2.7Workplace Forms Viewer includes new features and improvements, including:
� The Viewer now supports XFDL 7.1.
With the new support for XFDL7.1, users can now perform the following:
– Lay out content in tables and panes with greater precision.
– The table item has a new rowpadding option.
– The pane item has a new padding option.
– The itemlocation option has two new settings: expandwidth and expandheight.
Definition: A form is a mechanism for capturing data and represents a front end to a business process.
566 Human-Centric Business Process Management with WebSphere Process Server V6
– Most items have a new layoutflow option that lets you better control the default relative positioning of items, which is particularly useful for simplifying the layout of items within a table.
– Most items have a new display option that lets you effectively remove the items from all positioning calculations. For example, you can use this option to collapse a column of fields, collapse a details group, or otherwise dynamically change the layout of a form.
– Users can now create buttons that resemble hyperlinks. To support this feature, the behavior of buttons with transparent backgrounds has changed. Buttons with transparent backgrounds no longer have a press-in/pop-out animation, no longer change the background color when inactive, and no longer change the default border value of on. In addition, the button item has a new cursortype option that lets you set the cursor to a hand.
� The performance of the Viewer has been improved.
This benefits large, complex forms that contain XForms data models, particularly forms with computed format properties or large amounts of instance data bound to many user interface elements.
� The Viewer is now supported in Internet Explorer® 7.0 on Windows XP.
9.1.2 IBM Workplace Forms Designer
IBM Workplace Forms Designer is an easy-to-use eForm design environment that supports the drag-and-drop creation of precision forms with an open and accessible XML-schema-derived data model. IBM Workplace Forms Designer leverages open standards to deliver advanced forms-based business process automation solutions that integrate seamlessly across lines of business applications and IT infrastructure.
Note: For a complete list of XFDL versions supported by this version of the Viewer, see the detailed system requirements for Workplace Forms Viewer at:
http://www.ibm.com/support/docview.wss?rs=2357&uid=swg27008965
Note: For a complete list of supported hardware and software, see the detailed system requirements for Workplace Forms Viewer at:
http://www.ibm.com/support/docview.wss?rs=2357&uid=swg27008965
Chapter 9. Workplace Forms 567

We use Workplace Forms Designer extensively to build our electronic forms and integrate contents with WebSphere Process Server.
What is new in 2.7Workplace Forms Designer 2.7 has new features and improvements, including:
� The palette in Workplace Forms Designer provides greater flexibility for customization, including making the palette a fast view or a detached view.
� The properties view incorporates a search option to quickly find a property element.
� The new designer facilitates the accessibility of information, design documents, and tutorials.
� Support to create and edit forms in XFDL 7.0 or XFDL 7.1.
9.1.3 IBM Workplace Forms Server
IBM Workplace Forms Server enables the creation and delivery of XML forms applications. It provides a common, open interface to enable integration of eForms data with server-side applications using industry-standard XML schemas. IBM Workplace Forms Server also delivers a true zero-footprint solution, providing eForms to external users quickly and efficiently within a browser without requiring additional downloads or plug-ins. IBM Workplace Forms Server provides a low administration solution for data-capture requirements while supporting precise viewing and printing, automated validation, and the security and compliance capabilities of XML eForms.
What is new in 2.7The Forms Services Platform is a new collection of libraries that help you develop Workplace Forms applications and integrate Workplace Forms with other applications. The new feature highlights are:
� The Streaming API is a new set of functions designed specifically for running within a server environment.
� Improved hardware and software support.
Workplace Forms Server 2.7 now supports Internet Explorer 7.0 on Windows XP, FireFox 2.0 on Windows XP, and SUSE Linux Enterprise 9 on a 32-bit Intel®-based server. The Webform Server translator is now supported on WebSphere Application Server 6.1.
� Managed node support.
You can now install and run the Webform Server translator on a managed node.
568 Human-Centric Business Process Management with WebSphere Process Server V6

� Workplace Forms Server 2.7 performance improvements.
9.1.4 Benefits of Workplace Forms with WebSphere Process Server
This section introduces the benefits of using WorkPlace Forms as an electronic forms designer and viewer within the scope of its integration capabilities with WebSphere Process Server. These benefits become clearer later on when implementing the proposed ITSO Corp recruitment business process.
XML supportWorkplace Forms supports open technologies, which makes it easy to integrate with external systems.
Creating an XML Model allows you to separate the form’s data layer from the presentation (user interface) layer. This is very useful because rather than having to parse an entire XFDL form and then extract the user data you want to collect from the form, you can use the XML Model to define what data to prepopulate in the form and what user data to collect from the form. Furthermore, you can bind individual nodes in the XML Model to one or more XFDL items. This binding causes the layers to share data. If the value in one layer changes, the other layer is updated to mirror that change. Once submitted, the XML block that results from the XML Model can be easily integrated with other XML processors.
Data exchange with WebSphere Process ServerUsing standard technologies and preset wizards, you can easily create an instance from any WSDL file and use a button to call this Web service. You can create your own XSD or have Workplace Forms create the XSD for you. You can alternatively design starting from an existing XSD file.
You can perform the integration with WebSphere Process Server in three steps:
1. Define the data instance.
The first stage is to define the structure of the data instance. In this stage, you define the structure of the data instance by adding elements and attributes to it. You must thoroughly understand XML and the data structure you want to create to complete this stage.
2. Bind the data instance elements to the form.
The second stage is to bind the data instance to the form. This maps individual data elements to one or more form items, so that they share data.
Chapter 9. Workplace Forms 569

3. Set the submission rules.
Finally, you can define the submission rules for the instance if you intend to submit the data separately. These rules determine whether the form is filtered, and sets other submission-related properties.
Digital signaturesElectronic forms brings about the need to digitally sign electronic documents and forms. Digital signature are one secure way to do it. The certificate is a file that contains a unique code. This code is imprinted whenever the certificate is used to sign a document. This implies that all signatures can be traced back to a single certificate, which in turn can be traced back to a single individual. Digital certificates and digital signature, when combined with a process engine, provides a complete security and e-human task management solution.
The way digital signatures work is quite simple but effective. When a user signs a document, the document contents are hashed to produce a unique number. If the document was later on tempered with, the resulting hashing number is different and the signature is therefore invalid.
Digital signature are an essential tool when integrating with back-end systems. In most cases, especially if the front-end application is required to be publicly available, the connection channel with back-end systems is insecure. However, there is still a need to guarantee the authenticity of information being sent to the back-end system. This authenticity and integrity guarantee is provided by digital signatures.
Workplace Forms supports two types of digital signatures: RSA standard signatures and Entrust signatures.
An RSA Standard Signature is a widely used digital signature broadly supported by Public Key Infrastructure (PKI) and browser vendors. Entrust signatures are a standard developed by Entrust Inc. These signature are not widely adopted and they require additional software from Entrust Inc.
It is important to note that digital signatures incur a significant overhead in distributing and managing digital certificates. However, this overhead is justified when there is a need to implement tight security measures.
9.2 Features and functionality
This section starts by covering the major Workplace Forms interface components and basic functionality, and guides you through your first Workplace Forms
570 Human-Centric Business Process Management with WebSphere Process Server V6

project. Workplace Forms is an Eclipse-based tool. Familiarity with any Eclipse-based tool is an advantage.
User interfaceWhen you start Workplace Forms Designer, the user is prompted with a window to select the project’s workspace, as shown in Figure 9-1.
Figure 9-1 Workplace Selection
Once a workspace is selected, Workplace Forms Designer opens. The default perspective for Workplace Forms is the Designer perspective. You can change the perspective by clicking Windows → Open Perspective.
Chapter 9. Workplace Forms 571

Workplace Forms Designer interface looks like Figure 9-2.
Figure 9-2 Workplace Forms Designer Interface
Interface components and functionalityThis section introduces you to the basic functionality of important interface components.
572 Human-Centric Business Process Management with WebSphere Process Server V6

The Palette view allows you to create different forms components. Figure 9-3 illustrates the palette.
Figure 9-3 Designer’s palette
The palette allows you to select and drop various forms components onto the forms design view.
Chapter 9. Workplace Forms 573

The Properties view allows you to change element properties like color, layout, functionality, and more. A sample properties view is shown in Figure 9-4.
Figure 9-4 Properties view
Blue circles in the properties view indicates that the default values for that specific element have changed. You can easily return to the default value by clicking the blue circle. The color of the circle then changes to white, indicating that the default value is applied.
By default, the Properties view does not show advanced properties. To show advanced properties, click the down arrow, as illustrated in Figure 9-5.
Figure 9-5 Advanced Properties
Another important view in Workplace Forms Designer is the Enclosures view. This view allows you to enclose files within your form. For example, you can enclose data, attachments, JAR files, WSDL, and so forth. For example, the following steps guide you to add a Web service to a form:
1. In the Enclosures View, expand WSDL.
2. Right-click WebServices and choose Enclose WSDL File.
574 Human-Centric Business Process Management with WebSphere Process Server V6

3. In the Choose File window, browse to the WSDL file you want to enclose and then click Open. Figure 9-6 illustrates the Enclosure View with the WSDL file enclosed.
Figure 9-6 Enclosures view
It is a good practice to delete WSDL files once data instances of WSDL files have been created. This decreases the file size of the form.
To delete a WSDL file, follow these steps:
1. In the Enclosures view, select the WSDL file you want to delete.2. Right-click and choose Delete.
The Workplace Forms designer interface includes Navigator view that allows you to navigate the project forms and files, as well as the problems view that shows you any errors with the forms design or implementation.
Workplace Forms incorporates three different views of your form: Design, Source, and Preview view. These views allow you to view your form from three different perspectives.
The design view is where you design your forms, add elements, change element attributes, and add and remove attachments.
The Source view shows you the resulting XFDL file of your designed form. This view is editable.
The Preview view allows you to see how your designed form will be displayed when rendered by the form viewer or the client browser. To be able to use this view, you need to install Workplace Forms Viewer.
9.2.1 Overview of supported technologies
This section introduces the different technologies supported by IBM Workplace Forms. This section also draws guidelines of when a certain technology is recommended.
Chapter 9. Workplace Forms 575

XFormsIBM Workplace Forms supports the XForms standard. XForms offers the capability to separate the data layer from the representation layer of the form, allowing for independent manipulation of data and presentation layers.
You can use IBM Workplace Forms to create forms in XForms and XFDL technologies. An important question here is when to use XForms technology and when not to. Two common scenarios of when to use XForms are:
� Use XForms when integrating with technologies that already uses XML technology. In this case the integration is much more straightforward, and data can be exchanged directly with no need to device intermediate components.
� In cases of non-XML applications, you can still achieve value added from XForms because of the simplification obtained in copying data from one page to the other. Using data models makes it easy to extract the data for integration with back-end processing.
Follow these steps to create new Form with XForms support:
1. Click File → New → New Workplace Form to open the New Workplace Form window.
2. Select the project folder.
3. Type a file name. Click Next.
4. Within the Choose Template field, click Default Empty Form - XForms.
5. Click Finish.
When you add XForms support to an existing form that already contains XFDL items, it is important to note that the XFDL items are not automatically converted to XForms items.
Follow these steps to add XForms support to an existing form:
1. In the XForms view, right-click No Model Exists and click Add XForms Support.
2. An XForms model is added to the form and XForms elements are now available for you to use.
Note: You can add XForms support to a new as well as an existing form.
Note: To open the XForms view, click Windows → Show View → XForms.
576 Human-Centric Business Process Management with WebSphere Process Server V6

Extensible Forms Description Language (XFDL)XFDL was developed by UWI.Com and Tim Bray. XFDL is an application of XML that allows organizations to move their paper-based forms systems to the Internet while maintaining the necessary attributes of paper-based transaction records. XFDL was designed for implementation in business-to-business electronic commerce and intra-organizational information transactions. XFDL is a highly-structured XML protocol designed specifically to solve the body of problems associated with digitally representing paper forms on the Internet. The features of the language include support for a high-precision interface, fine-grained computations and integrated input validation, multiple overlapping digital signatures, and legally binding transaction records.
XFDL is an open standard, extensible, and document-centric. It combines data, logic, and presentation layer in a legally binding document. XFDL supports digital signatures to trace the identity of the signer on parts or all of the document. XFDL is ideal for high-value business transactions, regulated industries, and security-conscious organizations.
9.3 Building the business scenario
We build a Workplace Form application that collects user information required by ITSO Corp. The applicant fills out the application with the required information, signs the application using an electronic signature, and finally submits the application by invoking a WebSphere Process Server process. The solution is built using XForms, Web Service, SOAP, and XML technologies.
This section starts by designing the form pages and their interface elements, followed by enclosing the WSDL file and creating Web service instances. We then implement a digital signature. Finally, we create a new XForms submission and establish the integration with WebSphere Process Server.
Chapter 9. Workplace Forms 577

Appendix A, “Additional material” on page 739, includes the Workplace Forms form, the WSDL file, and the XSD file. These files are exported from IBM Workplace Forms V2.7 as a zipped file. Refer to 9.5, “Alternative implementation approaches” on page 601, if you choose to import the zipped file into your Workplace Forms Designer.
9.3.1 Designing the forms
This section covers the procedures followed in creating the forms for the ITSO Corp HR process.
ITSO Corp forms are composed of a five-page form. The first page is simply a welcome page introducing the user to the ITSO Corp employment procedure. The three following pages collect the candidate’s personal, address, and job information, respectively. The last page is for signing and submitting the form. We use IBM Workplace Forms Designer V2.7 to implement these forms.
The first step is to create a new Workplace Forms project:
1. Click File → New → Project.2. A New Project window opens. Select Project and click Next.3. Name the project in the Project name field and click Finish.
This creates a new project visible in the Navigator view. It is possible that you have more than one project in the same workspace visible in the navigator view.
We now create a new Workplace Form:
1. Right-click your new project, then select New → New Workplace Form.
2. A New Workplace window opens. Select the project where you want to place the Workplace Forms form.
3. Write the form name in the File name field and click Next.
4. On the choose template window, you can choose different choices for your new form. For the implementation of our scenario, choose Horizontal Tabbed Toolbar and click Finish.
Note: If you are using the material supplied with this book you should be able to load the Workplace Forms Pages by importing the .zip file into the Designer workspace. To import the .zip file, you must first create an empty project, then:
1. Click File → Import.
2. Expand General, select Archive File, and click Next.
3. Browse to the location of the zipped file on your file system, and click Finish.
578 Human-Centric Business Process Management with WebSphere Process Server V6

The wizard creates a nine-page form with navigation buttons placed to the left of the page and at the bottom. The wizard also created a top banner.
For the purpose of our business scenario, we created a welcome page and three pages to collect personal, address, and job information of the applicant, and a fifth page where the applicant can sign and submit the application. The remaining pages can be deleted. Figure 9-7 shows the welcome page after editing.
The design of these pages are quite straightforward. It is sufficient to give hints on how to design these pages. It is left as an exercise for the reader to design pages similar to the ones illustrated in Figure 9-7 through Figure 9-10 on page 583.
Figure 9-7 Welcome page
Hint: Do not delete unused Form pages until you finish with the whole design of all pages. It is easier to delete a page than to create a new one
Navigation Buttons
Enclosed Image
Additional Buttons
Application Navigation
Enclosed image
Chapter 9. Workplace Forms 579

The next page collects personal information. Edit your form page to look something like Figure 9-8.
Figure 9-8 Personal information page
Hints and tips for designing the Personal Information page:
� The banner contents do not change.
Update the banner contents in wizardpage1. The changes you make will show in all pages since the banner contents do not change.
� Use ready-made components for SSN and date of birth.
Workplace Forms provides ready-made components for date picker, social security numbers, and more. Explore these components on the palette and use them as appropriate.
Note: To place an image in your form, you have to enclose the image file in the enclosure view first.
Field (Input)
Date Picker (Input)
Label(Output)SSN Field of the form (###-##-###)
580 Human-Centric Business Process Management with WebSphere Process Server V6

The Address Information page collects address information and looks as illustrated in Figure 9-9.
Figure 9-9 Address Information
Hints and tips for designing the Personal Information page:
� Use items from the object library in the palette.
For example, the State field is a drop-down menu listing all U.S. states with abbreviations. The zip code is a U.S. zip code. The zip code field will turn red if an incorrect U.S. zip code is entered, but will not affect the form functionality.
Note: Palette components are supported by XForms. The ones that are labeled (Non-XForms) should only be used when the forms do not support XForms.
Chapter 9. Workplace Forms 581

� Attaching personal statement.
To create a button to attach, display, or extract a file:
a. Create a button and select it.
b. In the Properties view, expand General.
c. Click in the type value field and click one of the following:
• enclose: attaches a file to a form
• display: displays an attachment (in an application determined by the attachment’s MIME type)
• extract: extracts an attachment and saves it as a file
• remove: removes an attachment from a folder (if the attachment belongs to more than one folder) or from the form (if the attachment belongs to only one folder).
d. Expand the datagroup property.
e. Click within the Data Group Refs value field.
f. Click to add a datagroupref property.
g. In the datagroup ref value field, type the name of the folder that you want the action to access. Folder names can include uppercase letters, lowercase letters, numbers, and underscores.
h. To allow the action to access additional folders, click within the Data Group Refs value field and click to add additional datagroupref properties. Otherwise, to set up the button to display, extract, or remove a specific file that is already attached to the form, set data to the name of the attachment.
582 Human-Centric Business Process Management with WebSphere Process Server V6

The Job Information page (Figure 9-10) asks the applicant to enter his expected salary and desired position. The Is Manager field is a hidden field. It only appears in the design view. This means that it is not accessible for the applicant to update. This capability is useful in the following situations:
� If you want to have a field visible in the printed copy of the form, but not in the online version (for example, a field to display the date the form is printed)
� If you want to have additional information visible for the form designer only (information like considerations for forms updates or standards for forms design)
Figure 9-10 Job information
We created a data instance listing the currently available job, and linked these elements to the pop-up menu. Benefits of doing so are:
� We can easily update the job listing by updating the data instance.
� The data instance can be dynamically constructed based on computed fields or external data elements. Refer to Workplace forms help to learn about the computed field.
To create a data instance and link it to the pop-up menu:
1. Open the Instance view and create a new data instance. Name the instance Data, for example.
2. Create a new element. Right-click the newly created Data instance and select Add Element.
3. Repeat the previous step to create an element for each available position. Make sure that you name the four elements with the same name (tag, for example).
4. For each element, add text. Right-click the element and select Add Text.
5. Rename each text element with the Job title. For each text element, right-click and select Rename.
Invisible elements
Chapter 9. Workplace Forms 583

Your data instance should look like Figure 9-11.
Figure 9-11 Data Instance for available jobs
Once the data instance is created, we need to create a pop-up menu and associate the data elements with the pop-up menu:
6. Place a popup (select1) button on your canvas.
7. On the canvas, double-click the pop-up menu and give it a meaningful label, Positions, for example.
8. On the properties view of the pop-up menu, expand XForms(select1), expand itemset, expand value, and update the ref value to “.”.
9. Drag the data instance you created on the canvas on top of the pop-up menu.
The properties view of the pop-up menu should look similar to Figure 9-12.
Figure 9-12 Pop-up menu properties view
The last page is a Sign and Submit page. The important functionality in this page is the digital signature and the submission button. We implement a ClickWrap signature (9.3.2, “Implementing digital signatures” on page 587) and Web service calls to integrate with WebSphere Process Server (9.4, “Workplace Forms integration with WebSphere Process Server” on page 590).
584 Human-Centric Business Process Management with WebSphere Process Server V6

Enclosing Data, WSDL, and XSD filesWorkplace Forms works with a concept called enclosure, where in the enclosure view you attach files that will be used in your form. In our business scenario, we enclose an image file, a WSDL file, and an XSD file. Enclosing an image file allows you to place that image in your form. Enclosing WSDL and XSD allows us to create instances of the WSDL and schema files, respectively. Details of these steps are as follows.
To enclose an image file:
1. In the Enclosures view, expand Data.
2. Right-click the page you want to enclose the image to.
3. Browse to the location of where your image is stored and click Open. Select your image.
This completes the steps to enclose an image file. You can simply drag and drop the image from the enclosure view to where you want to place it on your form.
We also import the WSDL file exported from WebSphere Business Modeler.
To enclose a WSDL file:
1. On the Enclosures view, expand WSDL.
2. Right-click WebServices and click Enclose WSDL File.
3. Browse to the location of where your WSDL file is stored and click Open. Select your WSDL file.
You can enclose your XSD file in a similar manner.
Creating the WSDL instanceOnce the WSDL file has been enclosed, Workplace Forms needs to identify WSDL messages and create WSDL instances.
1. Open the Instances view.
2. On the Instances view tool bar, click the WSDL instance button to create a new instance from a WSDL Message, as in Figure 9-13.
Figure 9-13 Instances tool bar
Chapter 9. Workplace Forms 585

3. A WSDL Message window pops up, shown in Figure 9-14. Select both messages and click OK.
Figure 9-14 WSDL Message window
This creates two WSDL message instances visible in the Instance view.
Creating the Submit buttonThe Submit button allows the user to submit the completed form by e-mail or by HTTP. If you are in a server environment, HTTP is recommended. E-mail submission is useful when people submitting the form do not have access to Internet submission or when there is no server.
There are two ways to submit a form by e-mail: using the mail form button in the viewer tool bar, and by using a Submit button within the form. Our approach allows the user to submit a form by e-mail and the Internet from a Submit button within the form.
To create the Submit button, follow these steps:
1. Create a button on the form.2. In the Properties view, expand General.3. In the URL value field, type the URL or e-mail address to submit the form to.
586 Human-Centric Business Process Management with WebSphere Process Server V6

9.3.2 Implementing digital signatures
Digital signatures are a powerful security measure. The proposed business scenario requires the applicant to sign a form in two situations — when submitting a form for the ITSO Corp system, and when accepting a job offer if the candidate was provided with an offer.
This section guides you through implementing a digital signature to sign the full, or parts of, the application form.
Creating a Clickwrap signatureClickwrap allows a user to sign a document without having to have a digital certificate. While a Clickwrap signature is not a security tool, it still provides a measure of security due to an encryption algorithm. Clickwrap signatures provide the same tamper proofing as other signatures while not requiring any additional infrastructure such as a PKI system or Signature Pad hardware. For example, RSA Signatures, on the other hand, require digital certificates. In a typical organization, there will be an overhead incurred to distribute and manage digital certificates.
To create an Authenticated Clickwrap signature:
1. Add a button to the form.
2. Right-click the button and click Wizards → Signature Wizard.
Example: A URL with the format:
scheme://host.domain[:port]/path/filename
for files and applications (where scheme is http or https).
A URL with a mailto: format:
mailto:[email protected][email protected]&bcc=user3@ host.domain&subject=Timesheet&body=Form+is+attached
Note: You can specify the format in which the form is transmitted by selecting advanced properties and editing the transmit format field:
� application/vnd.xfdl transmits the form as an uncompressed xfdl file.
� application/vnd.xfdl;content-encoding="base64-gzip" transmits the form as a compressed XFDL file.
� application/x-www-form-urlencoded transmits the form as an HTML file.
Chapter 9. Workplace Forms 587

3. Under What does the signature sign?, click either of the following:
– The complete form: The signature button will sign the entire form. – Parts of the form: The signature button will sign part of the form.
4. Click Next.
5. Under What type of signature is it?, click Authenticated Clickwrap. Click Next.
6. Set the authenticated clickwrap signature details:
– Title: the title of the signing ceremony. This text describes the signing ceremony, the company, or the title of the agreement.
– Prompt: typically used to explain the signing ceremony to users.
– Main text: contains the main text of the agreement. For example, the text of a licensing agreement. You can add as much text as necessary to this parameter. The signing ceremony automatically displays scroll bars if the text is longer than the display field.
– Question: lets you prompt the user to ask from one to five questions that help establish the identity of the user.
– Default answer: These are the answers to the questions. To pre-populate the answer fields that are displayed when the user signs the form, enter the answers here. Otherwise, you can leave these fields blank.
– Signer: indicates which answer identifies the signer. Signer and secret cannot reference the same answer.
– Secret: indicates which answer contains the secret. Signer and secret cannot reference the same answer.
7. Click Finish.
Note: We implement a signature that signs the whole form. If you want to implement a signature that signs part of the form, refer to 9.5.3, “Sign parts of the form” on page 603.
Note: The signature, along with associated information, is part of the form. This means that if the form is signed in the preview view, it will remain signed in the designer view. This means that the signature is invalid if any changes are applied to the form. Therefore, make sure that you delete the signature before exiting the preview view of the form.
To delete a signature, click Signature → Delete.
588 Human-Centric Business Process Management with WebSphere Process Server V6

We implement a simple Clickwrap signature. Figure 9-15 shows the signing ceremony for this signature.
Figure 9-15 Click-Wrap Signing Ceremony
If you want to customize the button, add any of the following attributes to the signformat property:
1. echoPrompt: Use this to instruct the user to echo the echoText. Generally, if you include echoText, you might want to include the text Please type the following phrase to show that you understand and agree to this contract.
2. echoText: This is the actual text that the user should echo, or re-type. For example, I understand the terms of this agreement.
3. buttonPrompt: This is an instruction line that appears above the Accept and Reject buttons. The user must click the Accept button to sign, so the prompt might read Click Accept to sign this document. The default setting is Click the Accept button to sign.
4. acceptText: Sets the text that the Accept button displays. The default text is Accept.
5. rejectText: Sets the text that the Reject button displays. The default text is Not Accept.
6. readonly: Indicates which answers are read-only. This is useful if you pre-populated the answers and want to ensure that certain answers cannot be changed.
Note: By default, the user can delete a signature after signing a form. To prevent users from deleting a signature:
1. In the Properties view, expand Signature.
2. Add the following text to the end of the current signformat value:
delete="off"
Chapter 9. Workplace Forms 589
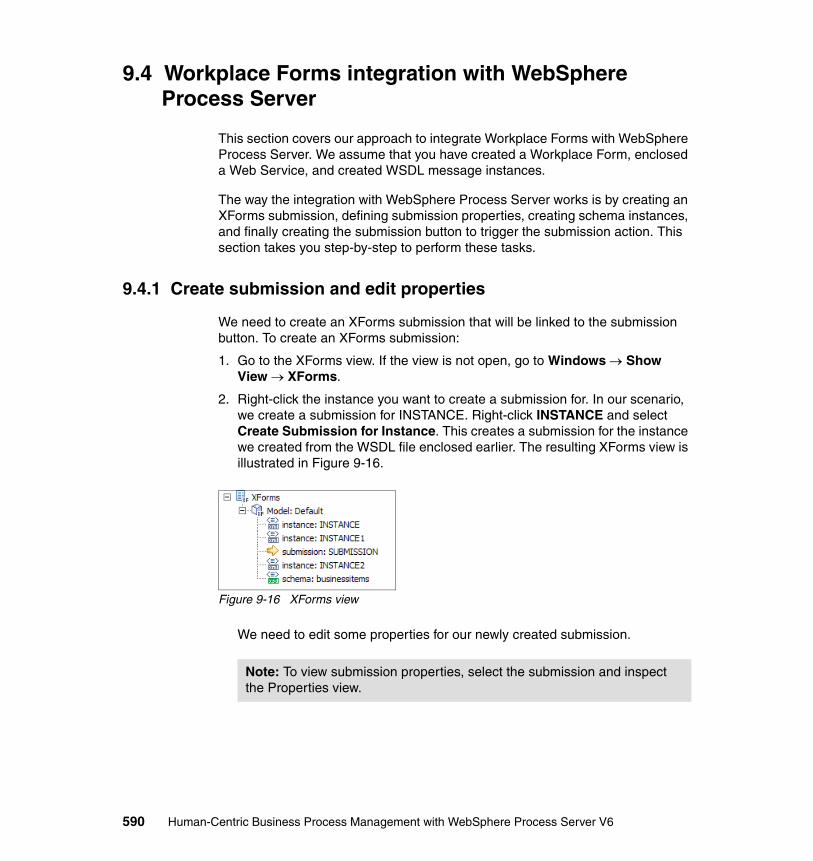
9.4 Workplace Forms integration with WebSphere Process Server
This section covers our approach to integrate Workplace Forms with WebSphere Process Server. We assume that you have created a Workplace Form, enclosed a Web Service, and created WSDL message instances.
The way the integration with WebSphere Process Server works is by creating an XForms submission, defining submission properties, creating schema instances, and finally creating the submission button to trigger the submission action. This section takes you step-by-step to perform these tasks.
9.4.1 Create submission and edit properties
We need to create an XForms submission that will be linked to the submission button. To create an XForms submission:
1. Go to the XForms view. If the view is not open, go to Windows → Show View → XForms.
2. Right-click the instance you want to create a submission for. In our scenario, we create a submission for INSTANCE. Right-click INSTANCE and select Create Submission for Instance. This creates a submission for the instance we created from the WSDL file enclosed earlier. The resulting XForms view is illustrated in Figure 9-16.
Figure 9-16 XForms view
We need to edit some properties for our newly created submission.
Note: To view submission properties, select the submission and inspect the Properties view.
590 Human-Centric Business Process Management with WebSphere Process Server V6

3. Expand XForms. Edit the values for action, method, mediatype, and replace as follows:
– Action: http://wps.itso.ral.ibm.com:9080/WPFTest001Web/sca/HiringExport2.
– Method: Post.
– Mediatype: Application/soap+xml; action=http://wps.itso.ral.ibm.com:9080:9080/WPFTest001Web/sca/HiringExport2
– Replace: INSTANCE
These settings point to an SCA Web services export defined in a WebSphere Process Server business process.
Your submission properties view should look like Figure 9-17.
Figure 9-17 XForms submission Properties view
9.4.2 Create schema instances
There are a few different ways to create your schema. You can have Workplace Forms create your schema automatically from your designed forms, generate schema instances from an enclosed schema file, or manually write the schema.
Note: You cannot edit Mediatype directly. Therefore, you have to go to the source view of the global page to edit this value manually.
Chapter 9. Workplace Forms 591

To implement our ITSO Corp schema:
1. Open the XFDL source file view.
a. Go to the Outline View and select Globalpage.
b. On your workspace view and click the Source tab.
This opens the source XFDL file for your design pages. The generated XFDL file is usually large in size, and it can be difficult to navigate and find what you look for in XFDL file.
2. Navigate to your soap Envelop. You can do this by two means:
– Search for the text: soap: Body xmlns:defaultns=”http://Processes/Hiring/HiringInterface”.
– In the outline view, browse to XFDL → globalpage → global → xformsmodels → xformsmodel → xforms:instance → soap:Envelop → soap:Body → Defaultns → InputApplication.
Note: You cannot generate schema instances from the schema file generated from WebSphere Business Modeler and WebSphere Integration Developer.
� Workplace Forms Designer cannot handle schema with relative schemaLocation attributes. The schema location must be absolute (for example, file:// url locations).
� The schema must have a single root node.
� The schema must ensure that the same prefixes are used for the same actual namespace.
� The schema cannot contain xsd:any type.
Hint: The generated XFDL file is usually large in length. These hints should help you navigate the file:
a. Open the Outline view and navigate the XFDL file from the Outline view.
When you select an element in the outline view, the corresponding text is highlighted in the XFDL file.
b. Click Edit → Find/Replace.
This opens the Find/Replace window. You can search and find the text you are looking for.
592 Human-Centric Business Process Management with WebSphere Process Server V6

3. Update your XFDL source as shown in Figure 9-18.
Figure 9-18 Source View for the XFDL file
Example 9-1 illustrates the update required for the XFDL source file.
Example 9-1 XFDL source
<soap:Body xmlns:defaultns="http://Processes/Hiring/HiringInterface"> <defaultns:InputCriterion> <InputApplication> <Employee> <SSN></SSN> <LastName></LastName> <FirstName></FirstName> <MiddleInitial></MiddleInitial> <AptNo></AptNo> <StreetAddress></StreetAddress>
Chapter 9. Workplace Forms 593

<City></City> <State></State> <ZipCode></ZipCode> <HomePhone></HomePhone> <DateOfBirth></DateOfBirth> </Employee> <Job> <Salary></Salary> <Position></Position> <IsExecutive></IsExecutive> </Job> </InputApplication> </defaultns:InputCriterion>
4. When you update the source XFDL file, the Outline view is updated and will look as in Figure 9-19.
Figure 9-19 Outline view of the updated XFDL file
594 Human-Centric Business Process Management with WebSphere Process Server V6
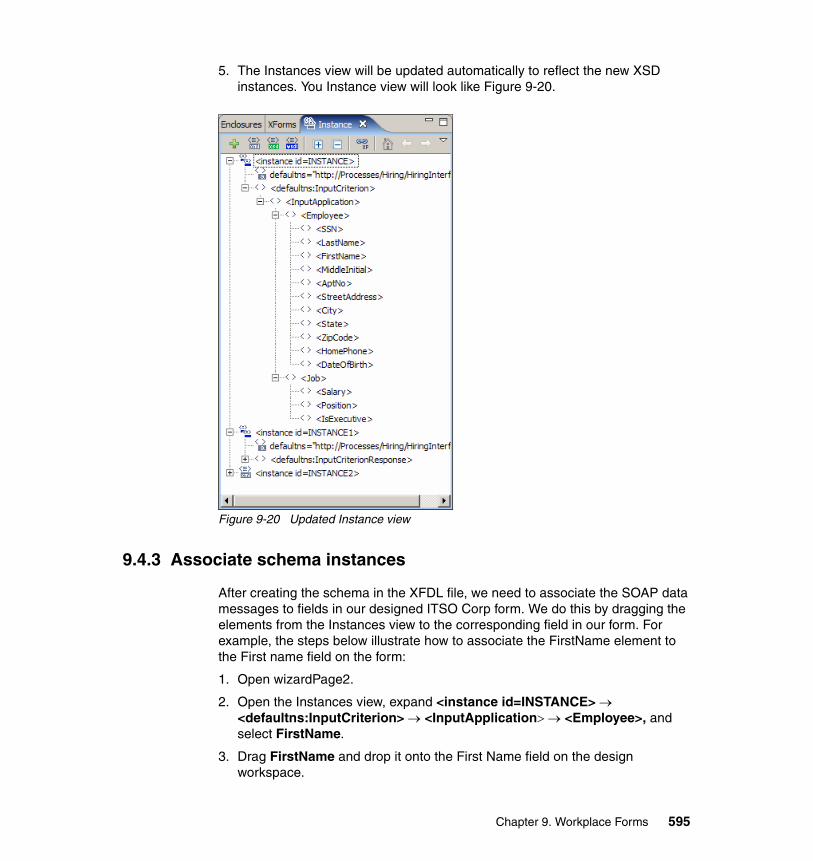
5. The Instances view will be updated automatically to reflect the new XSD instances. You Instance view will look like Figure 9-20.
Figure 9-20 Updated Instance view
9.4.3 Associate schema instances
After creating the schema in the XFDL file, we need to associate the SOAP data messages to fields in our designed ITSO Corp form. We do this by dragging the elements from the Instances view to the corresponding field in our form. For example, the steps below illustrate how to associate the FirstName element to the First name field on the form:
1. Open wizardPage2.
2. Open the Instances view, expand <instance id=INSTANCE> → <defaultns:InputCriterion> → <InputApplication> → <Employee>, and select FirstName.
3. Drag FirstName and drop it onto the First Name field on the design workspace.
Chapter 9. Workplace Forms 595

You will need to do the same for SSN, LastName, FirstName, MiddleInitial, AptNo, StreetAddress, City, State, ZipCode, HomePhone, DateOfBirth, Salary, and Position.
This completes the steps of associating schema elements to interface components.
9.4.4 Create an XForms submission button
This is the last and simplest step in the integration of Workplace Forms with WebSphere Process Server. We need to create a button to trigger the submission and call the Web Service.
1. Create a Submission button. On the palette, click the down arrow next to Button (Submit), as illustrated in Figure 9-21.
Figure 9-21 Create a Submit button
2. Select the button you just created.
3. In the Properties view, expand Xforms(submit).
4. In the Submission field, click the down arrow and select the name of the submission you created in 9.4.1, “Create submission and edit properties” on page 590. In our implementation, the submission is named SUBMISSION.
Hint: Workplace Forms has built-in palette elements for phone numbers, zip codes, address blocks, social security numbers, and so forth.
These elements can have automatic formatting check to minimize human errors in entering information.
Note: If your form has more than one submission, make sure that you select the correct submission action for each button.
596 Human-Centric Business Process Management with WebSphere Process Server V6

Your form is now integrated with WebSphere Process Server. You can test your implementation either by selecting the Preview tab in the workspace or by double-clicking the form XFDL source file. Either way, you have to have Workplace Forms Viewer installed on your workstation, unless you are implementing a zero footprint form. In this case, the form can be viewed in any browser.
9.4.5 How to test you submission and fix problems
In this section we introduce best practices for testing the integration with WebSphere Process Server. We also identify common problems and recommend resolution approaches.
Testing the integrationWe need to test that a process has started on WebSphere Process Server and that data is being sent and received by WebSphere Process Server as expected.
Start your implemented form either by opening the preview view of the form in the Workplace Forms Designer, or double-click the generated XFDL file in your workspace. Fill in the required data fields, sign the form, and click Submit. The Submit button should kick off the business process and send the data you entered for processing at the server side.
To test that a process has started, open the Business Process Choreographer. You should see a process started when you submit the form. To test how the data is being sent and received by the process server, check the process server log file SystemOut.log. Example 9-2 shows a sample and modified log file.
Example 9-2 Sample process server log file
########################################00000077 SystemOut 000000077 SystemOut 0 Applicatant Details are:00000077 SystemOut 0 Last Name: LastName00000077 SystemOut 0 First Name: FirstName00000077 SystemOut 0 MiddleInitial: B00000077 SystemOut 0 SocialSecurity Number: 99900000077 SystemOut 0 Apartment Number: 700000077 SystemOut 0 Street Address: StreetAddress00000077 SystemOut 0 City: City00000077 SystemOut 0 State: State00000077 SystemOut 0 ZipCode: 01003
Chapter 9. Workplace Forms 597

00000077 SystemOut 000000077 SystemOut 0 Job Details Are:00000077 SystemOut 0 Position: Positiom#####################################################
TroubleshootingIf your process does not start on the BPC Explorer, recheck the following:
1. Make sure that you have properly enclosed the WSDL file. Refer to “Enclosing Data, WSDL, and XSD files” on page 585.
2. Check that the WSDL instance is created in your Instance view. Refer to “Creating the WSDL instance” on page 585.
3. Make sure that your Submission button is calling the correct submission.
4. Check your submission properties. Make sure that the submission is associated with the correct WSDL message. Refer to “Create submission and edit properties” on page 590.
If your Workplace Forms data is not being transmitted at all, check the following:
� Maybe you have not created data instances (refer to 9.4.2, “Create schema instances” on page 591).
� If you have created data instances, you may not have linked data instances to Workplace Forms form elements. Refer to 9.4.3, “Associate schema instances” on page 595.
If the data is being transmitted partially, you need to check data instance associations as well as the WSDL file.
� Verify that your data association is complete (that is, every data instance on your instance view is linked to one, and only one, form element).
� Check the WSDL file. Verify that the WSDL file includes the correct SOAP messages.
9.4.6 Further requirements
The implementation of our ITSO Corp business scenario illustrates the standard way of integration. It is common that you will need to implement a variation of our business scenario, possibly add more functionality, store forms, print form copies, or restore previous form versions. This section addresses such requirements in further details.
598 Human-Centric Business Process Management with WebSphere Process Server V6

Workplace Forms as a task participantWe implemented our ITSO Corp scenario by having Workplace Forms initiate a process. In case we want to obtain managerial approval for the submitted applications, the manager in this case should log on to a Web application and click a link to open the Approval form. Alternatively, the form could be sent to the manager’s e-mail address upon its submission by the applicant. Upon receiving the form, the manager checks application status, and would then either approve or disapprove the application, sign his decision, and send the decision to the back-end system.
If you want to embed the Workplace Forms submitted application in a Web application, you must have the form saved on your server or storage facility. You then create a hyperlink pointing to the form location.
There are two ways you can submit the form by e-mail:
� Send the entire form as an e-mail attachment. This approach is presented in “Creating the Submit button” on page 586.
� Send a URL link to the form storage location.
When the manager receives the form, he clicks a button to check the status application. The button performs two actions:
� Opens a hidden page on the application form.
9.3.1, “Designing the forms” on page 578, describes tips on form design. Refer to Workplace Forms Designer help for detailed information about designing hidden elements.
� Retrieves application status from the back end system.
There are several ways to implement data retrieval:
� Data retrieval using servlets
To implement data retrieval using servlets, refer to IBM Workplace Forms 2.6: Guide to Building and Integrating a Sample Workplace Forms Application, SG24-7388.
� Data retrieval using Web services
This is the approach followed in this chapter.
� Data retrieval using SmartFill
Smartfill is best suited when the data resides at the client’s workstation. Smart fill is presented in 9.5.5, “XForms Smartfill” on page 604.
Chapter 9. Workplace Forms 599

Submit the entire Workplace FormIn some scenarios, it is required to submit the entire Workplace Form form, data and interface. Reasons to submit the whole form can be:
� To perform a review prior to submission� To obtain necessary signatures or approvals� To submit all of the forms for storage in back-end systems
When submitting the entire form and its data, size becomes an issue. Workplace Forms allow you to compress the forms and save space.
By default, when you save a form it is saved as an uncompressed XFDL file. You can set up your form so it is saved as a compressed XFDL file. Compressed XFDL files are compressed using a modified gzip format. This format is unique to Workplace Forms. You cannot view a compressed file in a text editor, but you can use the form in the viewer and the designer. Other compression software may not be able to decompress the forms. You can use an uncompressed file in the viewer, the designer, or a text editor.
To compress a form:
1. In the Outline view, expand globalpage and select Form Global.
2. In the top-right corner of the Properties view, click the small down arrow, and click Show Advanced Properties.
3. Expand Miscellaneous.
4. Click within the saveformat value field.
5. Type application/vnd.xfdl;content-encoding=“base64-gzip” and press Enter.
The next time that you save the form, it will be saved as a compressed XFDL file.
Recover to a previous version of a formYou can recover previous versions of a form by using local history. Local history is a local file source control mechanism. Each time you edit and save a file in the designer, a copy of it is saved. This lets you compare your current form to an older version, or replace the file with a previous version. Each version in the local history is identified by the date and time the file was saved. This is helpful if you delete a portion of your form that you want to restore, or to identify how your form has changed.
Note: For detailed information about local history, see the Comparing resources with local history in the Eclipse Workbench User Guide (Help Contents).
600 Human-Centric Business Process Management with WebSphere Process Server V6

To recover a previous version of a form:
1. Within the Design or Source editor, right-click Replace With and click Local History.
2. Select the version and click Replace.
3. You can also access local history for your file from the Navigator view. Right-click the desired file and click Compare With → Local History.
Defining additional elements format propertiesAdditional format properties enable you to define the data type, constraints, minimum and maximum length, checks, mandatory fields, messages, and specify presentation properties.
1. Select a data field within your form.
2. In the top-right corner of the Properties view, click the small down arrow, and click Show Advanced Properties.
3. Expand format. A list of additional format properties is shown and you can update the fields as appropriate to define additional formatting values.
9.5 Alternative implementation approaches
This section covers alternative approaches to implement the proposed ITSO Corp HR business process. Specifically, we present alternative approaches to design the forms, creating XML data models, data submission, and alternative digital signature technologies.
9.5.1 Designing Forms options
This section introduces three different approaches to design your forms using IBM Workplace Forms Designer:
� Designing a form from scratch
The most simple approach is to start by creating an empty form on the designer. Edit the empty form by placing elements on the canvas.
� Designing a form using Workplace Forms Wizards
This is the approach we followed to create our ITSO Corp HR form pages. Refer to 9.3.1, “Designing the forms” on page 578.
� Using scanned paper form
If you have a paper form and are recreating it in the designer, you can scan the form and use the scanned image as a background or template in the
Chapter 9. Workplace Forms 601

designer. The background image is only visible in the designer. It is not visible in the viewer and will not print.
To add a background image to a form:
1. Scan a form and save it in one of the supported formats: JPEG, PNG, BMP, GIF, or Sun Raster.
2. In the Outline view, expand the page you want to add a background image to and select Page Global.
3. In the Properties view, expand Appearance.
4. Click within the backgroundimage value field.
5. Type the path and file name for the image and press Enter.
6. Click within the backgroundimagealpha value field.
7. Type a value between 1 and 255 to set the transparency of the background image. One (1) represents the lightest image background, and 255 the darkest.
9.5.2 Creating an XML data model
To facilitate the integration with applications that supports XML technology (such as WebSphere Process Server), Workplace Forms allows you to create an XML model to separate the data from the form. Applications, specially those that support XML, can easily retrieve data from the embedded XML Data model.
XML data model contains three parts:
� Data instances are XML blocks that contains data for a specific purpose.
� Bindings define the relationship between the form elements and the data within XML data model.
� Submission rules define how data is transmitted when it is submitted for processing.
Workplace Forms allows you to create a complete data model from your existing form with zero effort. To do this, simply click the green plus sign in your Instance view to create a new data instance from the current document.
Note: You cannot create a data instance for a document where a data instance exists. Doing so could break all existing binds. To create a data instance based on your current document, you must first delete the existing data instances.
602 Human-Centric Business Process Management with WebSphere Process Server V6

The Instances view shows you the instance elements. If you click any element, the corresponding binding element on the form is highlighted.
In some cases, you may need to add additional elements and create the binding yourself. To do this, right-click the element and select Add element, then drag the element to the corresponding binding element on the form to create the binding for this new element.
9.5.3 Sign parts of the form
To create a button that signs parts of the form:
1. Right-click the Signature button and select Wizards → Signature Wizard.
2. Under what does the signature sign, select Parts of the form and click Next.
3. The next page allows you to select the items that you want to sign or the items that you do not want to sign. We select Items to sign and click Next.
4. The next window allows you to choose the pages that will be signed by the digital signature. For our scenario, select Wizardpage2, click the left arrow, and click Next.
5. Use the hand pointer illustrated in Figure 9-22 to select the items that the digital signature signs, and click Next.
6. Follow the steps to implement digital signature presented in 9.3.2, “Implementing digital signatures” on page 587.
Figure 9-22 Selecting elements to sign
Chapter 9. Workplace Forms 603

9.5.4 Creating an RSA signature
Our implementation utilized a Clickwrap signature (refer to 9.3.2, “Implementing digital signatures” on page 587). This section illustrates an alternative approach to implementing digital signatures. Namely, we present RSA signatures. The Generic RSA engine uses a standard encryption algorithm that supports both the Microsoft and Netscape signature engines. The Generic RSA signature uses digital certificates from either your Microsoft Internet Explorer or your Netscape certificate store.
To create a Generic RSA signature button:
1. Add a button to the form.2. Right-click the button and click Wizards → Signature Wizard.3. Under What does the signature sign?, click either of the following:
– The Complete form to sign the entire form– Parts of the form to sign parts of the form
4. Click Next.5. Under What type of signature is it?, click Generic RSA.6. Click Finish.
Refer to Workplace Forms Designer help for additional information about signature implementation.
9.5.5 XForms Smartfill
Smartfill automatically fills out portions of a form in the viewer. This is accomplished by storing commonly used information, such as the user’s name and address, on the user’s computer. The viewer can then access this information at any time, using it to automatically complete sections of forms that require it.
The first time the viewer opens a Smartfill form, the user submits instance data from the form, which is then saved as an XML file on the user’s computer.
Note: Workplace Forms supports the following types of signatures:
� Generic RSA signature� Entrust signature� Microsoft CryptoAPI signatures� Netscape signatures� Signature Pad signatures� Silanis signatures� Clickwrap signatures� Authenticated Clickwrap signatures
604 Human-Centric Business Process Management with WebSphere Process Server V6

Thereafter, each time the viewer encounters a new form that uses the same instance, the viewer retrieves the saved XML file and automatically completes that section of the form for the user.
By default, when data is returned by the submission, it replaces the submitted form. For example, when a user submits a form, the server often returns a reply that indicates that the submission was received. Generally, this notice entirely replaces the submitted form.
Instead of using Smartfill to simply replace the entire form, you can replace a single instance or even ignore the returned data. This is done using the submission’s replace property. This property indicates whether the returned data should replace the entire form, a data instance, or be ignored.
In order to use Smartfill, you need the following:
� XForms items to store the data inputted by the user.
� A data instance to store the Smartfill data.
� A submission to collect user data and then store it on the user’s local machine.
� A Submit button to trigger the submission of the user data to be stored.
� XForms items to display the data previously inputted by the user.
� A data instance identical to the form that submitted the Smartfill data.
� A submission to retrieve and display the data stored on the user’s local machine.
9.5.6 Implementing zero footprint forms
With an integrated zero-footprint solution, IBM Workplace Forms Server allows users to quickly and efficiently access, complete, and submit forms when using standard Web browsers, without requiring additional downloads or plug-ins. The zero-footprint solution can also be deployed as part of a hybrid solution with forms that support business processes requiring rich client functionality to support sophisticated digital signatures, offline use, or compliance requirements.
The Webform Server translates Workplace Forms forms (in XFDL format) and renders them in HTML or JavaScript™ format. This allows Web browser users to view and work with the forms, enter information into them, approve, sign, and submit the forms, all with no additional software required at the client end (although the Workplace Forms Viewer is also available to clients to provide a richer experience while working with forms). The Webform Server can then receive the completed forms in HTML, translate them back into XFDL, and pass them along to your application for further processing.
Chapter 9. Workplace Forms 605

606 Human-Centric Business Process Management with WebSphere Process Server V6

Part 4 ECM integration and related Human-Centric BPM technologies
Part 4
© Copyright IBM Corp. 2007. All rights reserved. 607

608 Human-Centric Business Process Management with WebSphere Process Server V6

Chapter 10. Integrating with content repositories
This chapter discusses how content stored in an enterprise content management (ECM) system can be integrated with business processes and human tasks in WebSphere Process Server.
Managing complex content data is a common requirement for human-centric business process applications where unstructured information, such as images or scanned papers, are presented to users in order to make decisions or approvals. Both the form and size of this kind of data and the management requirements (such as archiving in a compliant environment) exceed the data object capabilities built into the WebSphere Process Server programming model.
Business process management and content management are typically hosted on different systems. This chapter illustrates how to use SOA techniques to integrate loosely coupled content repositories with WebSphere Process Server.
While introducing general concepts for integrating with any enterprise content management systems in this book, we focus on IBM FileNet P8 V4 ECM for implementation examples and details. You can find code other resources supporting this chapter in Appendix A, “Additional material” on page 739.
10
© Copyright IBM Corp. 2007. All rights reserved. 609

10.1 Introducing content management systems
This section gives an overview of content management systems and related IBM products.
Content management helps you control your information in a secure, highly scalable, collaborative environment that satisfies compliance requirements. Enterprise content management systems handle content objects throughout their life cycle and support corporate governance.
Starting from capturing content objects (such as text documents) from an input channel, the enterprise content management system stores content objects in a controlled, secured, and compliant way and allows for quick and efficient retrieval.
Content objects can be stored in a structured way by aggregating multiple content objects in a folder or defining links and references between related content objects. Enhanced search capabilities permit complex queries based on automatically or manually derived content meta data.
Fine-grained security concepts using access control lists might be offered to control access to content objects. Authenticated users can be granted rights to read or update content objects or part of content objects (such as certain attributes).
State control in a content document’s life cycle may affect access rights. For example, a content management system might prevent users from changing documents in approved state.
Versioning allows you to store multiple versions of a content object in a controlled way and supports change management for documents.
Records management helps with compliance requirements by managing content according to retention policies.
Archiving as an integral component of modern enterprise content management systems allows to either manually or automatically move content to offline, long-term storage media (such as optical discs).
10.1.1 What is content data
In this book, the terms content data and content object denote structured or unstructured data that is created by electronic systems or human beings and that can be managed by a content management system.
610 Human-Centric Business Process Management with WebSphere Process Server V6

Structured content data includes data in a fixed format (such as a customer record in a relational database) where content attributes can easily be processed and made available for access and searches.
Unstructured content data (such as a video) requires manual or automatic preprocessing in case additional meta data attributes should be made available for further processing. For example, an optical character recognition (OCR) component might be used to extract certain fields from incoming fax documents and store the corresponding values along with the (binary) image of the document. Eight percent of enterprise data is said to be unstructured data. Modern content management systems can store and maintain a huge amount, and multiple versions, of this content data.
Examples of business content data include:
� E-mail� Forms� Scanned paper� Fax� Business documents� Invoice statement, reports� ERP, SCM, CRM data� Office documents and correspondence� Audio and video� XML documents� Web content
10.1.2 Content management systems and product support
This section introduces three content management systems.
IBM FileNet P8 ECMFileNet P8 Platform provides the baseline components for enterprise content management solutions, including the content engine, process engine, application engine, and rendition engine. These components address enterprise content management (ECM) and business process management (BPM) requirements.
The application engine is the FileNet P8 Platform component that hosts the Workplace Web application, Workplace Java applets, the process router, and application development tools. It is the presentation layer for both process and content. The application engine provides protection for user credentials that are passed between Workplace and the content engine.
In this book, we focus on the content engine, which is J2EE based and runs on a J2EE application server.
Chapter 10. Integrating with content repositories 611

FileNet P8 Workplace is a user Web application that provides access to the document management. Workplace also supports extended FileNet P8 capabilities such as forms management, records management, and portals.
FileNet P8 ECM offers both Java-based and .NET-based APIs for creating, accessing, and manipulating content data. The client application can choose which one to use when creating the Connection API object.
Java-based clients can choose between an EJB transport or the Content Engine Web Service (CEWS, based on SOAP) transport to the FileNet P8 Content Engine.
FileNet P8 documentation comes installed with the product and has more detailed information about the APIs and how to use them. Access the help pages using the following URL:
http://<hostname>:9080/ecm_help/directory/_start_here.htm
IBM DB2 Content Manager Enterprise Edition 8.3DB2 Content Manager is a scalable Enterprise Content Management system for digital data. The core components include:
� Library server to index and manage content (meta) data
� Resource managers that efficiently store and manage the (binary) content objects
� eClient, a browser-based thin client
� Client for Windows, a thick client following the client-server architecture
DB2 Content Manager offers both Java and Web services APIs that can be used to build custom applications or integrate with other components. An applet viewer can be integrated into Web applications and the DB2 Content Manager Portlets can be leveraged in an integrated Portal solution.
Tip: The URL mentioned above works only if the Application Server is running. However, you can also browse the FileNet P8 documentation offline if you point your browser to the directory where it is installed (for example, C:\P8Documentation\ecm_help\_start_here.htm).
Note: FileNet P8 supports multiple application server vendors as their underlying J2EE platform. In this book we refer to an installation based on WebSphere Application Server V6.0.2.
612 Human-Centric Business Process Management with WebSphere Process Server V6

IBM Information Integrator Content Edition 8.3 (IICE)Information Integrator Content Edition offers federation of multiple content management systems and makes them accessible in a common way.
Federated queries and check-in/out and modification for content metadata are provided through a common programming and user interface.
Connectors for leading content repositories (such as DB2 Content Manager and FileNet P8 Content Manager) are included.
Information Integrator Content Edition exposes a Web service interface that can be used with and called from WebSphere Process Server applications and also a viewer applet to display content objects in Web-based clients.
10.1.3 DB2 Content Manager/WebSphere Process integration toolkit
The integration toolkit comes as sample code with DB2 Content Manager 8.3. Details can be found on the IBM support Web site:
http://www.ibm.com/support/docview.wss?uid=swg24012019
The integration toolkit is provided to demonstrate both client aspects and bidirectional interaction between DB2 Content Manager and WebSphere Process Server.
It contains:
� An implementation of an service component architecture (SCA) component that interacts synchronously with DB2 Content Manager and offers simple services, such as retrieving an attribute of a content object or adding a document to a folder.
� An implementation of an SCA component that interacts asynchronously with DB2 Content Manager and offers a collection point service. The business process calls this service to wait for arrival of additional documents based on certain criteria. If these criteria are satisfied, an asynchronous response is sent back to the business process, which then continues navigating.
� An implementation sample for a JSP-based client that includes both workflow and content data. The DB2 Content Manager viewer applet is leveraged to
Note: For integration of DB2 Content Manager with WebSphere Process Server, see 10.1.3, “DB2 Content Manager/WebSphere Process integration toolkit” on page 613.
Chapter 10. Integrating with content repositories 613

display content data in the client application, based on an itemPID (the content identifier carried in the business process).
� A feature called combined query, which returns both workflow (task) and content data by combining the respective result sets.
� An auto claims sample process that demonstrates how the components of the integration toolkit can be used in a business scenario.
� An example of how DB2 Content Manager Web services can be called from a BPEL business process is shown in Figure 10-1. This is particularly interesting to build more complex services by service aggregation.
Figure 10-1 Architecture overview for DB2 Content Manager/WebSphere Process Server integration toolkit
10.2 Integrating content repositories, tasks, and processes
Content data, tasks, and processes can interact in several ways:
� A business process accesses content data for decisions based on content meta data. As an example, meta data of references in an employment
WebSphere Process Server
BPM engine
DB2 Content Manager
LSDBLSDB RMDBRMDB
Quick Start Client Content Viewer AppletContent Viewer Applet
BPEDBBPEDB
Content APIsContent APIsClaimsHandlingProcess
itemPid
CM Web ServicesCM Web Services
itemPid
File-based *)LDAP
CM-based
Staff Repository
Legend: = existing products = CM/BPC integration *) for testing and debbuging purposes
Integration ToolkitLibrary of content services
SCA components• CMServices• CollectionPointService
Interfaces• CMProcessInterface• ...
Business Objects• ItemRef• ...
614 Human-Centric Business Process Management with WebSphere Process Server V6

application folder is used in a hiring process to decide if additional approvals can be skipped.
� Changes in the content management system trigger processes. As an example, if a new employment application folder is created in the content management system, a new hiring business process starts.
� A unified client interface presents both task and associated content data. As an example, the hiring manager logs in to the enterprise’s portal to work on approval for new hires. Associated documents from an employment application folder are directly accessible from the task list.
The following sections introduces concepts and examples of how these interaction patterns can be implemented.
10.2.1 Service-oriented versus document-oriented perspective
In SOA terms, you build a business process application by orchestration of existing services.
The Service Component Architecture (SCA) defines a common programming model for component definition, interaction, and implementation.
Implementation types for an SCA component include business processes, tasks, state machines, Java components (POJOs - plain old Java objects), adapters, Web services, and more.
A component defines its interface, regardless of the concrete implementation type (that it exposes to consumer of the component) and its references (the services the component needs to work) in a common way, either using WSDL port types or a Java interface definition.
Since all components expose an interface, service aggregation can be a multi-level step where more complex services can be built on existing ones.
Chapter 10. Integrating with content repositories 615

In Figure 10-2 a business process comprised multiple activities, implemented as service invocations. The called services can be remote services, backend systems, other processes, or human tasks.
Figure 10-2 Service-oriented view of a business process
This powerful concept of service orientation can be translated to integration with content data as well. A modern content management system exposes services in a common, standardized way, for example, using a Web service interface.
A business process application invokes these services in the context of a BPEL process to, for example, access content meta data, perform searches, or trigger archiving of a document.
The business process is the driving factor and keeps track of the current state.
616 Human-Centric Business Process Management with WebSphere Process Server V6

The more traditional approach is a document-oriented perspective where the documents or folders are the objects of interest (document routing, see Figure 10-3). This is mainly derived from scenarios where a paperless office is implemented in a straightforward way, by replacing existing processes with electronic systems.
Figure 10-3 Classical document routing with process steps and inbox methaphor
Paper-based folders are replaced by electronic folders in a content management system and these folders contain documents, such as notes, forms, or images.
Individual users get an inbox containing all the folders they have to work on. Items in an inbox are sometimes called work items and can be routed to a subsequent step in a process or to other users.
The service-oriented perspective and document-oriented perspective are just two ways of describing the same thing. Most business scenarios can be implemented with systems supporting either terminology. The service-oriented approach might be more powerful, as it also allows including external services in a unified way and also typically provides additional quality of service for transactional interaction with other systems.
10.2.2 Life cycle and domains of content data and business processes
Both content data and business processes have (potentially independent from each other) life cycles, reflected in their states. Content data might be stored in a separate, remote Content Management system or as payload of a business
continue
Work List / Inbox
Process with steps
continue
xxxx
xxxx
Start
Chapter 10. Integrating with content repositories 617

process. See Table 10-1 for examples for both business process/human task and content state.
Table 10-1 Examples for process, task, and content states
When integrating content with business processes and tasks, these different states might interfere in several ways, similar to referential integrity constraints in a relational database system.
Examples for such interdependencies are:
� Claiming a human task (that is, checking a task out for working on it) puts a document into review state.
� Completing a human task puts a document into approved state.
� Deleting a business process archives the corresponding document.
� Deleting a content object deletes the corresponding business process.
� Creating a content object starts a business process.
Business process and human task states
Content object states
� Started� Ready� Claimed� Completed� Suspended� Terminated� Finished� Compensated� Deleted
� Created� Draft� Submitted� Reviewed� Revised� Approved� Published� Archived� Deleted
618 Human-Centric Business Process Management with WebSphere Process Server V6

Archiving of content objects can either be part of the business process (for example, by making an explicit service call) or part of overall content management document processing. See Figure 10-4 for an example of where the life cycle of a business process is part of the content object’s life cycle.
Figure 10-4 Content object life cycle
10.2.3 Synchronizing content objects and tasks
Changes in the business process and changes in the task state can affect associated content objects.
As an example, if an approver for a document is modeled as a human task in WebSphere Process Server, claiming and working on a task might require that this user has write access to the document to consider for the approval.
On the other hand, not all people that are potential owners for a task should be able to modify the associated document. Access control for content objects in content repositories is typically defined based on access control lists (ACLs).
If the task state changes from ready to claimed, a task API handler can be implemented that accesses the content repository and modifies the ACL for the associated accordingly. This requires that both WebSphere Process Server and the content repository use the same underlying user repository (for example, a common LDAP server) in order to have the same users and roles defined in both systems.
Chapter 10. Integrating with content repositories 619

10.2.4 Representing content in business processes
In order to associate content data with a business process, the following basic options exist (which can also be combined):
� Store content object with the business process.
The content object itself is stored either in its binary representation, as string or as XML document in a business process variable. This option is useful if the life cycles of the content object and the business process are the same and if the content object is not too big. Larger content objects stored in BPEL variables have considerable performance impact on long-running business processes since each navigation step has to serialize/deserialize message and variable data to/from the runtime database. A reasonable size limit for content objects in business processes is around 100 k.
The advantage of this option is that the entire content object is available in all steps of the process, and it can be sent to other services and rendered along with human tasks without having to access a content repository.
In particular, in conjunction with forms (which have an XML representation), this is an appealing option to integrate content data.
� Store reference to content object in a content repository.
A content repository typically creates a unique ID (content ID) for each content object. The string representation of this content ID is stored as a part of a BPEL variable in a business process. From a performance perspective of view, adding this content ID to a variable means almost no additional overhead.
The big advantage of storing content objects in a content repository includes more flexibility in the way data is structured and linked (for example, using folders for multiple content objects or hyperlinks between them). The enterprise content management system cares about all life cycle and compliance-related aspects.
User interfaces that want to display associated content data make service calls to the content repository to retrieve the actual content object.
To pass information from the content object to other services that cannot work with a content ID or simply has non access to the content repository, a service call to the content repository is required to materialize the content object.
Finally, decisions in a business process based on content meta data also require access to the content repository and referencing the content ID.
� Store content meta data.
Content objects typically comprise meta data (attributes) and the (binary) representation of the object. The business process defines a variable based on all or a subset of the meta data attributes. When starting the business
620 Human-Centric Business Process Management with WebSphere Process Server V6

process, the variable is initialized with the attributes of the associated content object.
For decisions based on meta data, no additional calls to the content repository are required, but the meta data values represent the state (snapshot) when the process has been started and might be outdated when evaluated in the business process. This is feasible for static data that does not change during business process execution on where a change does not have any negative impact.
Without an additional call to the content repository, the user interface can only display the attributes stored with the process.
If the original content object is a form, storing the meta data (field entries) can be sufficient if the user interface application packages the form layout information. In this case, the data stored with the business process (or human task) is used to fill the fields of the given form template.
See Table 10-2 for a summary of the options.
Table 10-2 Option summary for content representation in business processes
10.2.5 Integration patterns
One or more of the following integration patterns might be desired in an integrated solution for content data and business processes:
� Content events from the content management system to the business process system
� Instance-based correlation of content events and business process instances (for example, collection point)
� Business process decisions based on content meta data
� Queries combining task and content data
� Unified client user interface for both task and content data
Pro Con
Store content object with the business process (attachment).
� No content repository required
� Performance, size limitations
Reference to content object.
� Up-to-date data � Additional service calls for process and UI
Store content meta data. � Easy access in process
� Possibly out of sync data
Chapter 10. Integrating with content repositories 621

� Content management services called from a business process
10.3 Interoperability between WebSphere Process Server and FileNet P8
Bidirectional communication between WebSphere Process Server and FileNet P8 requires compatible programming models based on common standards.
This section explains which FileNet P8 content engine programming interfaces can be used to build an integrated solution with WebSphere Process Server.
Beyond service calls in either direction, authentication and users are important in the context of human-centric business processes and authorization across system components.
Finally, a topology section shows the system setup option with multiple servers we use in this book.
10.3.1 Accessing the FileNet P8 content engine
The FileNet P8 content engine APIs are platform-independent APIs for building applications that access and manipulate objects stored on a FileNet Content Engine server.
In FileNet P8 V4, the content engine is implemented in the context of an Enterprise Java Bean (EJB), running on a J2EE application server and accessible by the IIOP (Internet Inter-Orb Protocol) or T3 (BEA WebLogic’s binary client-server format) protocols. A Web service layer on top of the EJB implementation exposes a SOAP interface.
622 Human-Centric Business Process Management with WebSphere Process Server V6

The different API languages provide wrappers to access the EJB or Web service interface using remote calls (see Figure 10-5).
Figure 10-5 FileNet content engine and APIs
These are:
� Java API
The Java API can be configured to either use the EJB transport (IIOP/T3) or access the Web service interface. The core API classes are located in Jace.jar. Other JAR files are required depending on the application server platform and the transport.
For WebSphere Application Server V6 and EJB transport, the following jar files are required:
– Jace.jar– log4j-1.2.13.jar– j2ee.jar– management.jar– wssec.jar
A connection object in the API is used to establish a connection using the specified protocol and to point to a Uniform Resource Identifier (URI) where the FileNet content engine resides.
When using the EJB transport, Java Authentication and Authorization Service (JAAS) security authentication and client-initiated transactions are supported.
� .NET API
The .NET API has the same functionality as the Java API but always connects to the Web service API using SOAP messages.
FileNet Content Engine
FileNet Content Engine EJB
ObjectStore
Web Service interface
.NET API (4.0)WS Client (4.0) Java API (4.0)
SOAP SOAP IIOP
Chapter 10. Integrating with content repositories 623

� Web Services API
The content engine Web services (CEWS) provides access to the content engine based on the SOAP protocol.
The Web service interface does not support JAAS security authentication and client-initiated transactions.
� Workplace Application Engine UI Service API
The Workplace Application Engine UI Service is implemented as a servlet and provides about 30 operations (called commands) using HTTP requests. Responses for an operation are sent back to a URL that is passed as a parameter for the HTTP request.
This servlet can also be leveraged to display content (meta) data in its own application.
Authentication is supported by a user token concept.
10.3.2 Triggering actions from content events (active content)
Changes to content data stored in a content repository (so-called content events) can affect business processes in WebSphere Process Server in several ways:
� Creation of a new content object triggers the start of a business process
� Deletion of a content object terminates a corresponding business process
� Adding a document to a content folder signals a business process to continue processing
� Updating a content object triggers synchronization with content meta data stored in a process
FileNet P8 uses the term active content to describe similar interaction between the FileNet Content and the process engine.
The event framework introduces the event action and subscription concepts to invoke Java classes based on criteria defined for document classes.
Note: Refer to the FileNet P8 developer documentation for more versions, details, and options to access the content engine. For this book we provide a simplified view. We do not consider compatibility APIs for applications based on older versions and thick clients, and we do not discuss details of the .NET API.
624 Human-Centric Business Process Management with WebSphere Process Server V6

An event action in FileNet P8 describes a certain operation. It can be implemented as a Java class that implements the EventAction interface (see Example 10-1). It can also be script or a COM object.
An event action in Java can either be provided as a Java class or as a JAR file and is registered using the FileNet Enterprise Manager or programmatically through the FileNet P8 Content Engine API.
Example 10-1 API definition of the EventAction interface
package com.filenet.api.engine;...
public interface EventActionHandler {public abstract void onEvent(
ObjectChangeEvent objectchangeevent, Id id) throws EngineRuntimeException;}
A subscription is defined for a certain document or folder class. Based on the kind of the event, an event action is triggered. A subscription is defined using the FileNet Enterprise Manager or programmatically through the FileNet P8 Content Engine API.
Invoking SCA components in WebSphere Process ServerThe Service Component Architecture provides a universal model for business services. An SCA component is described by an interface (either Java based or WSDL based). Implementation types for an SCA component in WebSphere Process Server include business processes or human tasks. This section focuses on invoking business processes modeled in BPEL, but the introduced concepts can be applied to any other SCA implementation type as well.
An event action implementation class registered with FileNet P8 can be leveraged in several ways to interact with an SCA component in WebSphere Process Server (particularly with a BPEL SCA component):
� Invoking a Web service in WebSphere Process Server
You can export business process components as Web services, and these Web services can be invoked from any remote Web service client.
The event action implementation uses the Web service description in the resulting WSDL file to directly interact with a business process.
Note: Support for event actions in Java have been introduced in FileNet P8 V4. With earlier versions, another option might be to write a Visual Basic® Script module that accesses a database.
Chapter 10. Integrating with content repositories 625

Business process and human tasks are also accessible through a generic Web service API. New business processes can be started using the sendMessage() verb.
See Chapter 7, “J2EE and Microsoft .NET Web service clients” on page 355, for a detailed discussion on the Web service interfaces.
The benefit of invoking Web services as a content trigger is its straightforward implementation based on standards. A disadvantage might be the risk of losing content events if the target Web service is temporarily unavailable.
� Placing a JMS message into a queue for an SCA JMS export
The Java event action implementation can access the queue for the SCA JMS export and place a message that triggers the SCA component. If FileNet P8 and WebSphere Process Server are not linked to the same bus (and are not part of the same cell), additional messaging products, such as WebSphere MQ together with the JMS MQ binding must be used to send the message from the server hosting FileNet P8 to the one hosting WebSphere Process Server.
� Triggering an inbound adapter in an SCA module
The Java event action implementation writes information about the content event (and associated properties, if desired) to a potentially remote database. This data is polled by a JDBC™ inbound adapter and triggers the corresponding SCA component.
The JDBC adapter is a technology adapter that comes with WebSphere Integration Developer 6.0.2.
For details about the JDBC adapter, see the InfoCenter at:
http://publib.boulder.ibm.com/infocenter/dmndhelp/v6rxmx/topic/com.ibm.wsadapters602.jca_jdbc.doc/doc/stjdb_welcome.html
Note: The FileNet P8 Content Engine EJB runs with a PARENT_LAST classloader setting and comes bundled with its own Web services implementation stack (by Systinet). The event action implementations are called in the context of this EJB and are therefore not able to directly access the WebSphere Application Server Web services classes.
We also experienced problems when calling the WebSphere Process Server Web services with a Systinet-based Web client implementation.
Another option (not tried in the course of writing this book) is to delegate the Web service call to an EJB and call this EJB from the event action implementation.
626 Human-Centric Business Process Management with WebSphere Process Server V6

The benefit of this approach includes decoupling of the content management and business process system, as well as the ability to recover from outages of WebSphere Process Server.
10.3.3 Authentication and user repositories
Access to the FileNet P8 content engine is only allowed for authenticated users. Authentication makes sure that users are indeed the ones that they claim to be. In addition to authentication, authorization concepts are in place, which describe access rights to content objects.
Three protocol options are available to authenticate a user with the FileNet P8 content engine:
� Java authorization and authentication service (JAAS)
A client application obtains a JAAS subject with the user’s principal and credential before calling the FileNet P8 content engine. The client's JAAS subject is then transparently sent to the J2EE application server with each EJB call.
If the client application does not reside on the same application server with the FileNet P8 content engine, this requires a JAAS configuration and login module in the client’s application environment, as well as a common user repository (for example, an LDAP server).
JAAS is an option to achieve container-managed authentication and single sign-on for applications using the Java API.
� WS-Security
FileNet P8 supports user name tokens and Kerberos.
A user name token for a SOAP header created by WebSphere Application Server 6.0.2 might look as shown in Example 10-2.
Example 10-2 Username token in a SOAP header
<wsse:Security soapenv:mustUnderstand="1" xmlns:wsse="http://docs.oasis-open.org/wss/2004/01/oasis-200401-wss-wssecurity-secext-1.0.xsd"><wsse:UsernameToken><wsse:Username>administrator</wsse:Username><wsse:Password Type="http://docs.oasis-open.org/wss/2004/01/oasis-200401-wss-username-token-profile-1.0#PasswordText">xxxx</wsse:Password></wsse:UsernameToken></wsse:Security>
Chapter 10. Integrating with content repositories 627

The Web service layer in FileNet P8 reads this security token and performs a JAAS login using the application-server-specific JAAS login module.
Note that the user name and password are transported by default unencrypted. If not running in an isolated environment anyway, additional steps are required to prevent security attacks (for example, use HTTPS, timestamps, or a technique such as nonces).
� User tokens with Workplace Application Engine UI Service
Workplace can be configured to generate and accept FileNet P8 authentication tokens. When invoked by a call that includes a token, the Workplace Application Engine UI Service will respond without first displaying the Workplace sign-on page.
In order to work with the Workplace Application Engine UI Service, you typically retrieve a user token either through the Java API or calling the setCredentials command. This user token can then be used for authentication in subsequent calls to the servlet. It expires by default after about 15 minutes.
Table 10-3 gives an (again simplified) overview of options and restrictions when using the APIs described in 10.3.1, “Accessing the FileNet P8 content engine” on page 622.
Table 10-3 Authentication options for APIs
EJB Web Service WorkplaceUI service
Application managed
Programmatic JAAS login
WS-Security(username token, kerberos)
Servlet, user token
Container managed
EJB/Web Container JAAS login
N/A(WS-EAF)
N/A
Note: A single sign-on solution can also be implemented using WebSphere Portal. User credentials (Id, password) can be stored in so-called security vaults. These values are then used by a portlet to connect to a backend system without asking the user for an additional login. However, from a FileNet P8 API perspective, this is still application-managed authentication.
628 Human-Centric Business Process Management with WebSphere Process Server V6

10.3.4 FileNet P8 Web Services
FileNet’s Web services come in different versions and flavors and are provided by Systinet server components. Systinet is a software vendor and their server product offers solutions for building Java/J2EE Web services. The Systinet server comes installed with FileNet P8.
The context root for Web service-related services is by default located at:
http://<hostname>:9080/wsi/
In order to get the WSDL file with the Web service description:
1. Log into the Systinet Server’s console that hosts the Web services at:
http://<hostname>:9080/wsi/admin/console
Note: We have not been able to use FileNet P8 V4.0.0 Content Engine Web services directly with WebSphere Process Server 6.0.2.1.
There might, however, be ways that the Web services could be invoked using Web service support in WebSphere Application Server and leveraged in WebSphere Process Server.
Chapter 10. Integrating with content repositories 629

2. In the console (Figure 10-6), select /FNCEWS40SOAP/ in the WebServices tree on the left-hand side.
Figure 10-6 Systinet server admin console
630 Human-Centric Business Process Management with WebSphere Process Server V6

The invocation console (Figure 10-7) offers an easy way to test the Web services offered by the content engine and also shows a link where the WSDL files are located:
http://<hostname>:9080/wsi/FNCEWS40SOAP/wsdlhttp://<hostname>:9080/wsi/FNCEWS40SOAP/FNCEWS40.wsdl
Copy and paste these URLs into your browser to check out the available ports and operations.
Figure 10-7 Systinet Invocation Console
The Web service interface offers the following operations:
� ExecuteChanges� ExecuteSearch� GetContent� GetObjects� GetSearchMetadata
Chapter 10. Integrating with content repositories 631

10.3.5 FileNet P8 Portlets
FileNet P8 comes with the a set of portlets than can be configured to run either on WebSphere Portal Server or BEA Weblogic:
� Author portlet (see Figure 10-8) to operate on the content repository and add documents or folders, check in new document versions, or cancel a checkout
� Browse portlet to display content of a folder in the content repository
� Quick Search portlet (see Figure 10-9) to run a simple query against the content repository
� Inbox and Public Inbox portlets to interact with FileNet P8 BPM workflows
Figure 10-8 FileNet P8 Author Portlet in WebSphere Portal Server 6
Figure 10-9 FileNet P8 Quick Search Portlet in WebSphere Portal Server 6
A WebSphere Process Server process with a Portal user interface can take advantage of these portlets as supporting portlets for defined task processing pages.
632 Human-Centric Business Process Management with WebSphere Process Server V6

10.3.6 Topology
Figure 10-10 shows the topology we used when writing this book.
� WebSphere Process Server 6.0.2.1 is installed in a standalone profile.
� WebSphere Portal Server 6.0.1 is installed in a standalone profile and talks to WebSphere Process Server with the client installation.
� The FileNet P8 4.0 Platform runs on WebSphere Application Server 6.0.2 and also comes with a SQL Server™ database for the object store.
� DB2 UDB V9 is installed on a separate dedicated database server and connected from WebSphere Process Server and FileNet P8 (for emitting content events).
� IBM Tivoli Directory Server is used as the common LDAP and installed on a dedicated server.
Figure 10-10 The topology used for this book
10.3.7 Integrating with FileNet P8 BPM
FileNet P8 comes with its own set of business process management components, including process designer and runtime functions.
A hybrid BPM solution based on both WebSphere Process Server and FileNet P8 BPM components can be built using the respective Web service interfaces.
IBM Tivoli Directory Server(LDAP)
WebSphere Application Server 6.0.2
SQL Server
Content Repository Database Content Event DatabaseWPS Runtime Database
FileNet P8 4.0
WebSphere Application Server 6.0.2
WebSphere Process Server 6.0.2
DB2 UDB V9
WebSphere Application Server 6.0.2
WebSphere Portal Server 6.0.1
WPS
Client
Chapter 10. Integrating with content repositories 633

The BPEL concept of correlation sets is used to manage instance correlation for asynchronous invocations from WebSphere Process Server to FileNet P8 BPM and vice versa. A correlation set definition can be leveraged to identify an instance of a process by parts of a process message. Figure 10-11 shows a WebSphere Process Server on the left that invokes a FileNet P8 BPM process on the right and passes a message containing a unique claim ID. When the FileNet P8 BPM process responds back later, the returning message contains again the claim ID, which is used in WebSphere Process Server to address the right process instance.
Figure 10-11 Process interaction between WebSphere Process Server and FileNet P8
10.4 Implementing the hiring scenario with WebSphere Process Server and FileNet P8
For the scenario in this book, we model a folder class in FileNet P8 and demonstrate interaction between this content object, the hiring process, human tasks in the process, and the user interface.
Note: Interaction with FileNet P8 BPM is not the primary focus in this book.
FileNetP8FileNetP8Process ServerProcess Server
claimID
claimID
634 Human-Centric Business Process Management with WebSphere Process Server V6

For content representation (see 10.2.4, “Representing content in business processes” on page 620) we use a combined approach and store both the content ID reference and meta data with the business process.
10.4.1 Content modeling for the employment application folder
The content model used in this book assumes that folders of class EmploymentApplicationFolder are created that have properties such as the applicant’s name. The folder itself can contain multiple documents, such as a resume or a reference letter.
All folder properties start with Applicant to distinguish them from other properties in the system and to prevent confusion with similar attribute names defined for the business process.
Table 10-4 shows the subset of properties defined for the EmploymentApplicationFolder class.
Table 10-4
Folder properties Type Process input message attribute
ApplicantSalary Integer JobDetails/Salary
ApplicantPosition String JobDetails/Position
ApplicantSSN Integer EmployeeDetails/SSN
ApplicantLastName String EmployeeDetails/LastName
ApplicantFirstName String EmployeeDetails/FirstName
ApplicantMiddleInitial String EmployeeDetails/MiddleInitial
ApplicantAptNo Integer EmployeeDetails/AptNo
ApplicantStreetAddress String EmployeeDetails/StreetAddress
ApplicantCity String EmployeeDetails/City
ApplicantState String EmployeeDetails/State
ApplicantZipCode String EmployeeDetails/ZipCode
ApplicantHomePhone String EmployeeDetails/HomePhone
Chapter 10. Integrating with content repositories 635

With FileNet P8, definition of new document classes and properties is done in the FileNet Enterprise Manager. Folders can contain one or more objects that might be documents or folders. Folders are instances of the class folders or of one of its subclasses.
To define the properties listed in Table 10-4 on page 635:
1. Open Enterprise Manager → Object Store → your object store and right-click Property Templates. Click New Property Template and enter the property name (see Figure 10-12 for the ApplicantSSN attribute).
Figure 10-12 Creating a new property template for ApplicantSSN
ApplicantDateOfBirth Date EmployeeDetails/DateOfBirth
Folder properties Type Process input message attribute
636 Human-Centric Business Process Management with WebSphere Process Server V6

2. Click Next and enter the type for the property template (see Figure 10-13).
Figure 10-13 Specifying a type for property template ApplicantSSN
Chapter 10. Integrating with content repositories 637

3. Continue adding all properties listed in Table 10-4 on page 635. This leads you to a definition, as illustrated in Figure 10-14.
Figure 10-14 Property templates defined in the Enterprise Manager
638 Human-Centric Business Process Management with WebSphere Process Server V6

4. Create a new subclass for the existing folder class. Select Enterprise Manager → Object Store → your object store → Other Classes and right-click Folder. Click New Class and enter the name for the new EmploymentApplicationFolder class (see Figure 10-15). Click Next and continue assigning the property templates defined in the previous step. Keep the default settings for the rest of the dialog options and finish creation of the class.
Figure 10-15 Creating the new EmploymentApplicationFolder class
Chapter 10. Integrating with content repositories 639

The EmploymentApplicationFolder definition looks as in Figure 10-16 and is ready to be used.
Figure 10-16 Definition of the EmploymentApplicationFolder class
10.4.2 Triggering a new hiring process from content events
The hiring process of the scenario used in this book accepts an input message with data from the applicant and exposes service interfaces for other components (or even products).
In this chapter, a content event is used to kick off a new process instance of the hiring process. Other input channels might be forms, e-mail, fax, a Web page, or Java Message Service (JMS) messages.
Tying the content event with a business process eases application development. For example, a Web application that submits data solely has to implement access to the content repository and does not have to even know which business process should start upon submission.
The ASBO/GBO (application specific and generic business objects) pattern (for more details see Patterns: Building Serial and Parallel Processes for IBM WebSphere Process Server V6, SG24-7205) can be used to build multiple input channels that can trigger the hiring process and still have different business object or interface definitions.
640 Human-Centric Business Process Management with WebSphere Process Server V6

Decoupling the business process interface and data definition from triggering components is beneficial because changes in the triggering component do not affect the process, and it is more straightforward to add any new triggering components.
The following sections describe the approach with an inbound adapter in more detail.
Triggering an inbound JDBC adapterFigure 10-17 illustrates how creation of a new folder triggers an event action based on a subscription on the folder class.
Figure 10-17 Architecture for content events triggering a process through a JDBC adapter
The event action is implemented by a Java class and writes data into two database tables, FolderProperties and WBIA_JDBC_EventStore.
An inbound JDBC adapter regularly queries these database tables, creates a new business object, and then sends this business object to an interface map. Eventually the SCA component for the business process is invoked.
IBM Software Group
EmploymentApplicationFolderResumeReferences, …
Create a new folder object
Store
Filenet Content Repository
Subscription
Event Action
“Content Event” Database
WBIA_JDBC_EventStore
FolderProperties
1. Folder Attributes
2. "Create”Event
JDBC AdapterPoll Trigger
HiringProcess
Chapter 10. Integrating with content repositories 641

Creating the database and tables for events and folder dataYou can either use an existing database (such as the one you created for WebSphere Process Server) or create a dedicated new one to store information about new content events and folder property data.
For the description in this chapter, we create a new database CONTEVNT using a DB2 command-line prompt:
db2 create database CONTEVNT
The database must be accessible from a remote FileNet P8 system and should be highly available for a production environment to guarantee availability when new content events are created in FileNet P8.
We use an inbound JDBC adapter that expects by default data in a database table called WBIA_JDBC_EventStore. This table contains information about the event that occurred (see Table 10-5 for table layout and how we use the columns in our project).
The JDBC adapter can also be configured to run a custom query or a stored procedure. Because we use our own Java program to write data to the event table, we just use the given sample configuration.
Table 10-5 Database table WBIA_JDBC_EventStore
Note: We use a remote DB2 Universal Database V9 system. Other database systems might require different SQL syntax.
Note: A SQL sample script to create this database table is provided in the WebSphere Integration Developer 6.0.2 installation directory:
<installation directory>\ResourceAdapter\jdbc\samples\scripts\scripts_db2.sql
Column Type Description
event_id INTEGER NOT NULL GENERATED ALWAYS AS IDENTITY (START WITH 1, INCREMENT BY 1, NO CACHE)PRIMARY KEY
A unique number that is automatically generated by the database server.
642 Human-Centric Business Process Management with WebSphere Process Server V6
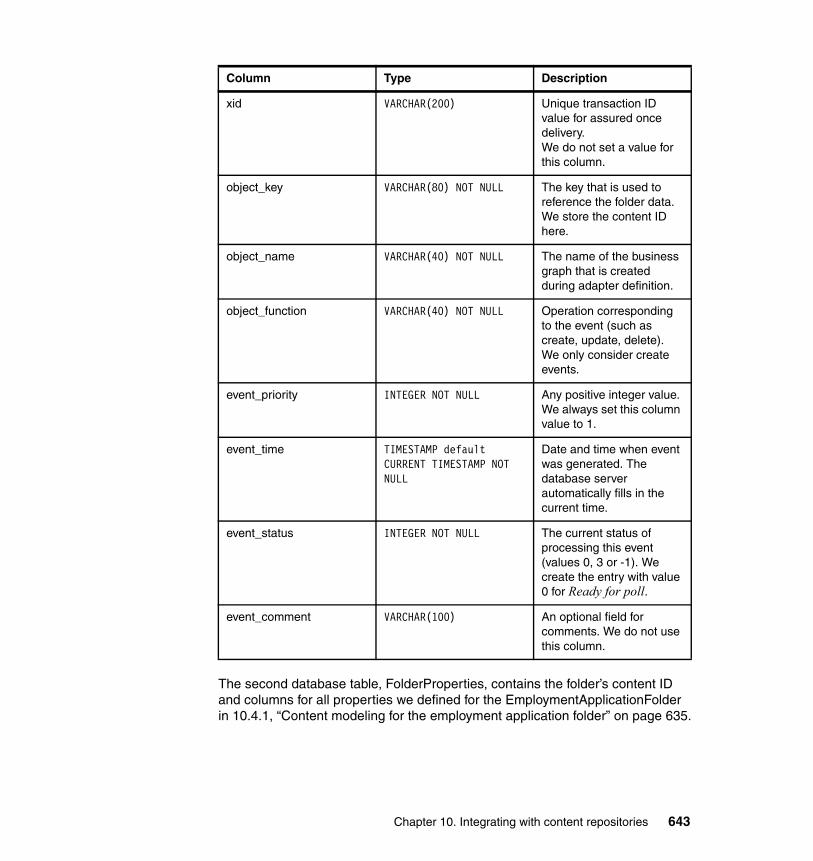
The second database table, FolderProperties, contains the folder’s content ID and columns for all properties we defined for the EmploymentApplicationFolder in 10.4.1, “Content modeling for the employment application folder” on page 635.
xid VARCHAR(200) Unique transaction ID value for assured once delivery.We do not set a value for this column.
object_key VARCHAR(80) NOT NULL The key that is used to reference the folder data. We store the content ID here.
object_name VARCHAR(40) NOT NULL The name of the business graph that is created during adapter definition.
object_function VARCHAR(40) NOT NULL Operation corresponding to the event (such as create, update, delete). We only consider create events.
event_priority INTEGER NOT NULL Any positive integer value. We always set this column value to 1.
event_time TIMESTAMP default CURRENT TIMESTAMP NOT NULL
Date and time when event was generated. The database server automatically fills in the current time.
event_status INTEGER NOT NULL The current status of processing this event (values 0, 3 or -1). We create the entry with value 0 for Ready for poll.
event_comment VARCHAR(100) An optional field for comments. We do not use this column.
Column Type Description
Chapter 10. Integrating with content repositories 643

Table 10-6 shows the layout of the FolderProperties table. Note that there is an implicit (not modeled) foreign key relationship between column object_key in WBIA_JDBC_EventStore and the primary key column ContentId in FolderProperties. Both tables, WBIA_JDBC_EventStore and FolderProperties, must reside in the same database.
Table 10-6 Database table FolderProperties
Column Type Description
ContentId VARCHAR(40) NOT NULL PRIMARY KEY
The content folder’s ID (retrieved from the FileNet content repository)
ApplicantSalary INTEGER EmploymentApplicationFolder property
ApplicantPosition VARCHAR(80) EmploymentApplicationFolder property
ApplicantSSN INTEGER EmploymentApplicationFolder property
ApplicantLastName VARCHAR(80) EmploymentApplicationFolder property
ApplicantFirstName VARCHAR(80) EmploymentApplicationFolder property
ApplicantMiddleInitial VARCHAR(5) EmploymentApplicationFolder property
ApplicantAptNo INTEGER EmploymentApplicationFolder property
ApplicantStreetAddress VARCHAR(80) EmploymentApplicationFolder property
ApplicantCity VARCHAR(80) EmploymentApplicationFolder property
ApplicantState VARCHAR(40) EmploymentApplicationFolder property
ApplicantZipCode VARCHAR(8) EmploymentApplicationFolder property
ApplicantHomePhone VARCHAR(20) EmploymentApplicationFolder property
ApplicantDateOfBirth DATE EmploymentApplicationFolder property
644 Human-Centric Business Process Management with WebSphere Process Server V6

You can use the SQL script snippet in Example 10-3 to create the FolderProperties table.
Example 10-3 SQL snippet to create FolderProperties table
CREATE TABLE FolderProperties ( ContentId VARCHAR(40) NOT NULL PRIMARY KEY, ApplicantSalary INTEGER, ApplicantPosition VARCHAR(80), ApplicantSSN INTEGER, ApplicantLastName VARCHAR(80), ApplicantFirstName VARCHAR(80), ApplicantMiddleInitial VARCHAR(5), ApplicantAptNo INTEGER, ApplicantStreetAddress VARCHAR(80), ApplicantCity VARCHAR(80), ApplicantState VARCHAR(20), ApplicantZipCode VARCHAR(8), ApplicantHomePhone VARCHAR(20), ApplicantDateOfBirth DATE );
Keep in mind that you have to use the same user ID to connect to the database tables that you used to create the tables.
Defining the DataSource in the application serversBoth WebSphere Process Server and FileNet P8 need access to the database that contains the tables created in “Creating the database and tables for events and folder data” on page 642.
1. Make sure that the jar files for the DB2 Universal JDBC driver (db2jcc.jar, db2jcc_javax.jar, and db2jcc_license_cu.jar) are accessible from the respective application server. We use the type 4 JDBC driver that does not need a DB2 runtime client installation in the application server machine. You can place the jar files into any directory. We choose <AppServer installation directory>\universalDriver\lib for this description.
2. In the WebSphere AdminConsole, create a DB2 Universal JDBC Driver Provider (XA) on the server or cluster level. For WebSphere Process Server, this provider already exists if you configured Business Process Choreographer to use a DB2 database. For the FileNet P8 Application Server, you have to create it and specify the path to the JDBC driver files.
3. Select Global security → J2EE Connector Architecture (J2C) authentication data entries to create a new J2EE authentication alias to connect to the CONTEVNT database. Name the authentication alias CONTEVNTUser and specify the user ID and password for the user you used to
Chapter 10. Integrating with content repositories 645

create the database tables in “Creating the database and tables for events and folder data” on page 642.
4. Create a new data source definition for the DB2 JDBC provider with the parameters in Table 10-7. Click Test Connection to test the connection to the CONTEVNT database and to verify than all parameters are correct.
Table 10-7 Data source parameters for the content event database
Creating an SCA module with a JDBC adapter In this section, we create a new SCA module that includes a JDBC adapter import to receive content events and translate them into a business object.
Following the application specific business object (ASBO)/generic business object (GBO) pattern, we take advantage of an interface map to describe how fields of the properties, delivered from the FileNet content event, map to the hiring process input message.
1. In WebSphere Integration Developer, create a new module and name it HRContentTrigger.
Data source attribute Value
Name. Data Source for Content Events
JNDI name. jdbc/CONTEVNT
Use this data source in container managed persistence (CMP).
Deselect check box.
Database name. CONTEVNT
Server name. Your database host name or IP address
Port number. 50000 (for default DB2 UDB installations)
Component-managed authentication alias.
CONTEVNTUser(Select from drop-down box.)
Authentication alias for XA recovery.
Component-managed authentication alias (Select radio button.)
Container-managed authentication. CONTEVNTUser (Select from drop-down box.)
646 Human-Centric Business Process Management with WebSphere Process Server V6

2. Switch to the J2EE perspective, right-click Connector Projects, and select Import → RAR File. In the Connector Import dialog, click Browse and select the JDBC adapter RAR file located in install directory\Resource Adapters\JDBC\deploy\CWYBC_JDBC.rar. Accept the defaults for the connector project name and make sure that you select the EAR file for the previously created HRContentTrigger module (see Figure 10-18). Click Finish. This creates a new connector project named CWYBC_JDBC.
Figure 10-18 Importing the JDBC adapter RAR file
3. In the project explorer, right-click CWYBC_JDBC and select Import → Import → File system to import the DB2 Universal JDBC driver JAR files (db2jcc.jar, db2jcc_javax.jar and db2jcc_license_cu.jar) into the project.
Right-click CWYBC_JDBC again and select Properties → Java Build Path → Libraries → Add Jars to add the imported JAR files to the build path.
Chapter 10. Integrating with content repositories 647

4. Switch back to the Business Integration perspective. From the main menu, select New → Enterprise Service Discovery (see Figure 10-19), click the entry for the JDBC EMD Adapter, and then click Next.
Figure 10-19 Import the JDBC resource adapter using enterprise service discovery
Note: You can also import the RAR file from the Enterprise Service Discovery dialog. However, because you need to have database access for further configuration steps in this dialog, you have to make sure that the database JDBC drivers are included in the connector project before you continue with this dialog. That is why we created the connector project beforehand and imported the JDBC driver files in the previous step.
648 Human-Centric Business Process Management with WebSphere Process Server V6

5. Fill in configuration values in Configure Setting for Discovery Agent dialog according to Table 10-8 on page 650. Note that we use the type 4 JDBC driver database URL syntax of the form jdbc:db2://<database hostname>:<port>/database name. Leave the rest of the input fields at their default values (see Figure 10-20) and click Next. This will connect to the specified database system. If you encounter an error message, most likely the database connection parameters need to be corrected.
Figure 10-20 Discovery agent properties
Chapter 10. Integrating with content repositories 649

Table 10-8 Configuration values
Input field name Value
Prefix Leave empty
Username User ID to access the content event tables in the database
Password Password for the above user ID
Database URL jdbc:db2://db2bpm.itso.ral.ibm.com:50000/CONTEVNT
JDBC Driver Class com.ibm.db2.jcc.DB2Driver
650 Human-Centric Business Process Management with WebSphere Process Server V6

6. In Find and Discover Enterprise Services dialog, leave the query at its default value and click Execute Query. Open the database object tree and select the FolderProperties table that we created in the database in “Creating the database and tables for events and folder data” on page 642. Click Add to Import List to add this table to the list of objects to be imported. Click Next.
Figure 10-21 Defining the database table for imported objects
7. The Configure Objects dialog asks for operations for the inbound and outbound adapter feature. We only need the create operation for the inbound adapter. Therefore, select Inbound for service type and remove both Update and Delete from the operations list. Leave the Namespace input field at its default and the BO location input field empty. Click Next.
Chapter 10. Integrating with content repositories 651

8. The Generate Artifacts dialog already comes with some prefilled input fields. Add values into input fields according to Table 10-9. Note that the authentication alias we defined in “Defining the DataSource in the application servers” on page 645 is prefixed with the application server’s node name. Click Finish. This completes the necessary modeling steps to include the JDBC inbound adapter to our project.
Table 10-9 Configuration values
Explore the assembly diagram that now has a new export component names JDBCInboundInterface and the Data Types section that has two new business object definitions, AdministratorFolderproperties and AdministratorFolderpropertiesBG (see Figure 10-22).
Figure 10-22 JDBC inbound adapter and generated business objects
9. We now create an import component for the hiring process that is invoked when the JDBC adapter receives a new content event from FileNet ECM.
Input field name Value
J2C Authentication Data Entry WPSNode01/CONTEVNTUser
DataSource JNDI Name jdbc/CONTEVNT
Event Table Name WBIA_JDBC_EventStore
Database Vendor DB2
652 Human-Centric Business Process Management with WebSphere Process Server V6

Because both the HRContentTrigger module and the hiring process module run on the same application server, we use an SCA import for the hiring process.
a. Make sure that you have the HRLib module with the shared artifacts in your workspace and that you added this module both as a Project reference and to the Java build path in the HRContentTrigger properties.
b. Make sure that you have the HRMod module with the hiring process definition and exports in your workspace. You do not need a reference for it in the HRContentTrigger module.
c. In the assembly diagram, right-click the panel and select Add → Import. Rename the import component to HiringProcess and assign interface Hiring to it by clicking the Add Interface icon close to the HiringProcess component.
d. Right-click the HiringProcess component again and click Generate Binding → SCA Binding.
e. Open the Binding properties panel for the HiringProcess component and click Browse. Select the SCA export named processes/hiring/Hiring_1550364285. This export name is defined in module HRMod. If it does not show up in your selection, verify that HRMod is in your workspace. You can also manually enter the module name (HRMod) and the export name (processes/hiring/Hiring_1550364285). Figure 10-23 shows the two components in the assembly editor.
.
Figure 10-23 Assembly diagram with JDBC export and hiring process import
10.Because the JDBCInboundInterface component has a different interface and business objects than the HiringProcess component, we add an interface map that describes how business object attributes are mapped.
a. In the assembly diagram, right-click the panel and select Add → Interface Map. Rename the interface map component to JDBCContent_To_Hiring.
b. Click the Add Interface icon and assign the JDBCHiringInterface. Click the Add Reference icon and assign the Hiring interface.
Chapter 10. Integrating with content repositories 653

c. Click and drag wires to connect components JDBCInboundInterface, JDBCContent_To_Hiring, and HiringProcess, as illustrated in Figure 10-24.
Figure 10-24 Assembly diagram with interface map
11.Right-click the JDBCContent_To_Hiring interface map component and click Generate Implementation. Confirm the default folder to store the interface map definition. This opens the interface map editor.
a. In the Operation Mappings panel, click and drag a connection from operation createContenttriggerAdministratorFolderproperties of JDBCInboundInterface to operation Submit of Hiring.
In the Parameter Mappings panel, click and drag a connection from the business object for the JDBC inbound adapter to the input object of the Submit operation. Click the parameter mapping type and change it from move to map (see Figure 10-25).
Figure 10-25 Interface map definition
654 Human-Centric Business Process Management with WebSphere Process Server V6

b. Select Details in the Properties panel and click New to create a new business object map. Name the business object map Content_To_Hiring. Click Next.
c. Select AdministratorFolderpropertiesBG as input and Application as output business object. Click Finish.
d. In the business object map editor, map all attributes of the AdministratorFolderproperties object to corresponding attributes in the application business object (see Figure 10-26). This completes the mapping from the application-specific business object sent by FileNet to the business object required for the hiring process.
.
Figure 10-26 Business object map from ASBO to GBO
12.Deploy the resulting J2EE application to WebSphere Process Server.
Chapter 10. Integrating with content repositories 655

13.Start the J2EE application and check that the log does not report any errors. You see an information message (as in Example 10-4) that indicates that the JDBC resource adapter is running and polling the defined database tables.
Example 10-4 Information message indicating that adapter is polling
00000095 ResourceAdapt I PollEventManagerWorker run() CWYBS0011I: Polling has started. UserAction=No action is required.
Implementing the FileNet P8 event actionThe following steps describe how to create a Java project that implements the EventAction interface and that writes corresponding entries to the database tables defined in “Creating the database and tables for events and folder data” on page 642. Whenever a new folder object of class EmploymentApplicationFolder is created, this event action is triggered.
1. In WebSphere Integration Developer, switch to the Java perspective and create a new Java project named WPSEventAction.
2. The implementation requires access to the FileNet P8 Content API JAR file (Jace.jar). In case you do not have the API JAR files installed on your machine, copy it from the FileNet P8 server installation.
Select Jace.jar as the external JAR file and add it as a library to Java project WPSEventAction.
3. From a WebSphere Application Server lib directory, select the JAR file j2ee.jar and add it as external JAR files for the Java project.
We need this JAR file for classes such as javax.naming.InitialContext and javax.sql.DataSource in our event handler implementation.
Note: A warning message might appear that says:
00000015 ConnectionFac W J2CA0294W: Deprecated usage of direct JNDI lookup of resource jdbc/CONTEVNT
Because we did not define a resource reference for the data source on an EJB or Web application, the JDBC adapter uses the direct JNDI name for the data source. This does not impact the adapter’s functionality.
Note: The application might fail to start if the common event infrastructure (CEI) is not setup properly. In this case, use the Admin Console to add com.ibm.j2ca.jdbc.cei.ResourceAdapter=off to your trace/log settings.
656 Human-Centric Business Process Management with WebSphere Process Server V6

4. Create a new class named WriteWPSEvent that implements com.filenet.api.engine.EventActionHandler (see Figure 10-27).
Figure 10-27 Creating a new event action class
Chapter 10. Integrating with content repositories 657

5. Implement the onEvent function according to Example 10-5. Note that for documentation purposes, exception and error handling are not shown in the code example. The code also assumes that this event action is associated with our EmploymentApplicationFolder document class.
a. The first lines retrieve the properties for the folder for which the event is triggered. The properties object is similar to a Java properties class, but contains typed information of a content object.
b. After a lookup for the data source, a JDBC connection is used to insert two rows into the database table: one into table FolderProperties and another into table WBIA_JDBC_EventStore.
Because we are running in the context of a global transaction, the order in which we insert these two rows is not important.
However, if you decide to insert the rows in another context with database connection setting autoCommit=on, then it is important that the entry for FolderProperties is written before WBIA_JDBC_EventStore. You have to make sure that the JDBC adapter can get to the corresponding FolderProperties entries when starting to process WBIA_JDBC_EventStore.
Example 10-5 The onEvent method
public void onEvent(ObjectChangeEvent event, Id id)throws EngineRuntimeException {
if (event.get_SourceObject() instanceof Folder) {Folder folder = (Folder) event.get_SourceObject();Properties folderProperties = folder.getProperties();
try {final InitialContext ctxt = new InitialContext();DataSource ds = (DataSource) ctxt.lookup("jdbc/CONTEVNT");Connection con = ds.getConnection();String contentId = folder.get_Id().toString();
// write folder property dataPreparedStatement pstmtFolderData =
con.prepareStatement("INSERT INTO FolderProperties(ContentId, ApplicantSalary, ApplicantPosition, ApplicantSSN, ApplicantLastName,
Note: object_name in table WBIA_JDBC_EventStore must contain the business graph name (AdministratorFolderpropertiesBG in our case), not the business object name (AdministratorFolderproperties).
658 Human-Centric Business Process Management with WebSphere Process Server V6

ApplicantFirstName, ApplicantMiddleInitial, ApplicantAptNo,ApplicantStreetAddress,ApplicantCity, ApplicantState,ApplicantZipCode, ApplicantHomePhone, ApplicantDateOfBirth)VALUES( ?,?,?,?,?,?,?,?,?,?,?,?,?,?)");
pstmtFolderData.setString(1, contentId);pstmtFolderData.setString(2,
folderProperties.getStringValue("ApplicantSalary"));pstmtFolderData.setString(3,
folderProperties.getStringValue("ApplicantPosition"));pstmtFolderData.setInt(4,
folderProperties.getInteger32Value("ApplicantSSN").intValue());
pstmtFolderData.setString(5, folderProperties.getStringValue("ApplicantLastName"));
pstmtFolderData.setString(6, folderProperties.getStringValue("ApplicantFirstName"));
pstmtFolderData.setString(7, folderProperties.getStringValue("ApplicantMiddleInitial"));
pstmtFolderData.setInt(8, folderProperties.getInteger32Value("ApplicantAptNo").
intValue());pstmtFolderData.setString(9,
folderProperties.getStringValue("ApplicantStreetAddress"));pstmtFolderData.setString(10,
folderProperties.getStringValue("ApplicantCity"));pstmtFolderData.setString(11,
folderProperties.getStringValue("ApplicantState"));pstmtFolderData.setString(12,
folderProperties.getStringValue("ApplicantZipCode"));pstmtFolderData.setString(13,
folderProperties.getStringValue("ApplicantHomePhone"));pstmtFolderData.setDate(14,
new java.sql.Date(folderProperties.getDateTimeValue("ApplicantDateOfBirth").getTime()));
pstmtFolderData.executeUpdate();pstmtFolderData.close();
// write event dataPreparedStatement pstmtEvent =
con.prepareStatement("INSERT INTO WBIA_JDBC_EventStore(object_key, object_name, object_function, event_priority, event_status ) VALUES( ?,?,?,?,? )");
pstmtEvent.setString(1, contentId);
Chapter 10. Integrating with content repositories 659

pstmtEvent.setString(2, "AdministratorFolderpropertiesBG");
pstmtEvent.setString(3, "Create"); // object functionpstmtEvent.setInt(4, 1); // event prioritypstmtEvent.setInt(5, 0); 0 = Ready for pollpstmtEvent.executeUpdate();pstmtEvent.close();con.close();
} catch (Throwable exc) {exc.printStackTrace();
}}
6. Export the Java project as a JAR file named WPSEventAction.jar.
Dealing with multiple resource managersAn event action in FileNet P8 is called either synchronously or asynchronously in the context of the FileNet P8 Content Engine EJB. The content engine interacts with its other relational databases (for example, for the object store) before or after the event action is called and WebSphere Application Server ties these resource interactions together into a global transaction.
Access to these databases is through data sources defined in WebSphere Application Server. We observed that FileNet P8 defines both an XA and a non-XA data source for access to the object store database and uses the non-XA data source in the context of the Content Engine.
As a consequence, accessing our CONTEVNT database in this context typically causes an exception saying that no additional resource manager is allowed to participate in the same global transaction.
Either of the following options solves this:
� Configuring FileNet P8 to use an XA data source for database access. If running on Microsoft SQLServer, this also includes enabling of SQLServer for XA transactions.
� Using the FileNet P8 database to store our content event tables. This way, there is only one (physical) connection to the database and no
Note: A more general implementation could either just send the contentId as part of a WebSphere Process Server event or could introspect the folder argument to figure out which properties it has, and then fill a corresponding database table accordingly.
660 Human-Centric Business Process Management with WebSphere Process Server V6

two-phase-commit protocol must be run. WebSphere Process Server and the JDBC adapter would then access this database.
� Enabling last participant support for the Content Engine EJB. This WebSphere extension setting permits one non-XA resource manager to participate in a global transaction together with other XA capable resource managers.
� Making the update to the content event tables in a separate transaction. This can be achieved, for example, by an EJB call with corresponding transaction qualifiers or by using the extension helper functions. For a production environment, this might not be a suitable option because this approach implies a risk that a database operation fails and the event action still completes successfully its transaction.
For this document, we choose to enable the last participant option for the FileNet P8 Content Engine.
1. Log into the admin console for the WebSphere Application Server that hosts the FileNet P8 installation.
2. Click Applications → Enterprise Applications and then click FileNetEngine in the list of installed enterprise applications.
3. Click Last participant support extension in the Additional Properties section.
4. Click the check box named Accept heuristic hazard (see Figure 10-28) and then click OK.
Figure 10-28 Last participant support setting for FileNet P8 Content Engine EJB
5. Save your changes and restart the application server.
Chapter 10. Integrating with content repositories 661
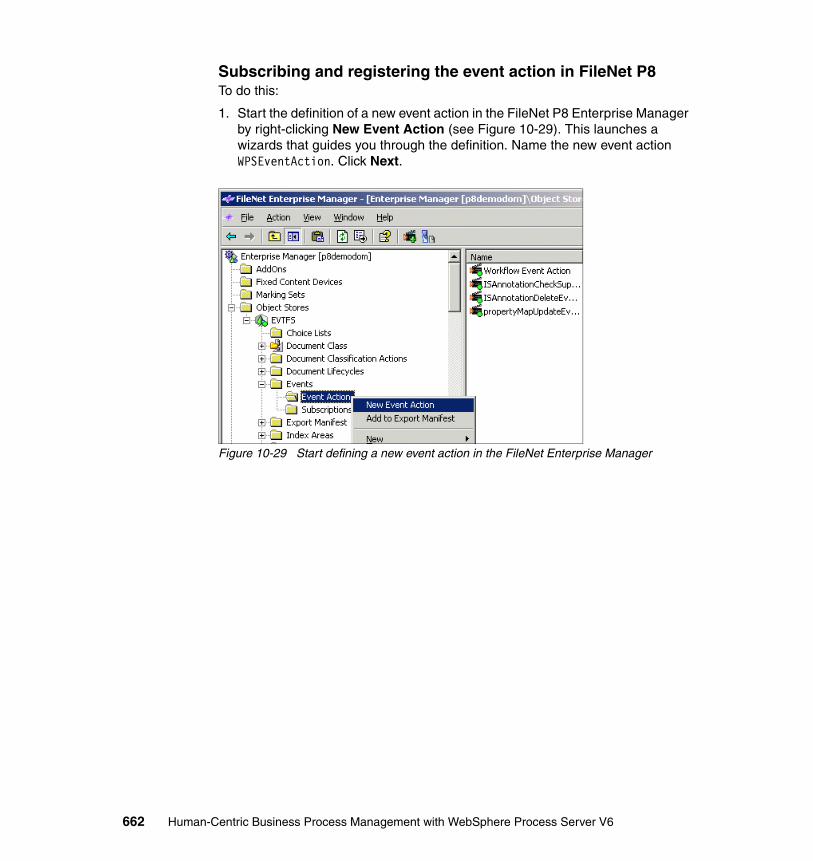
Subscribing and registering the event action in FileNet P8To do this:
1. Start the definition of a new event action in the FileNet P8 Enterprise Manager by right-clicking New Event Action (see Figure 10-29). This launches a wizards that guides you through the definition. Name the new event action WPSEventAction. Click Next.
Figure 10-29 Start defining a new event action in the FileNet Enterprise Manager
662 Human-Centric Business Process Management with WebSphere Process Server V6

2. On the next page, enter the name of the Java class created in “Implementing the FileNet P8 event action” on page 656 and make sure that you include the package name com.ibm.itsocorp.WriteWPSEvent (see Figure 10-30). Select Configure Code Module. This lets you enter the name of a JAR file in the next step. Click Next.
Figure 10-30 Specifying the event action handler class name
Chapter 10. Integrating with content repositories 663

3. Click Browse to select the location and name of the JAR file created in “Implementing the FileNet P8 event action” on page 656. We copied the JAR file WPSEventAction.jar from WebSphere Integration Developer to the FileNet P8 server into a directory named HumanBPM. Leave the Code Module Title field empty and click Next (see Figure 10-31).
Figure 10-31 Specifying the code module name for the event action class
4. Confirm the summary on the next page and click Finish. At this point, FileNet P8 checks whether the JAR file and class name you specified exist, and whether the implementation contains an event action. If you get an error in this step, verify that you spelled both the JAR file and the class name correctly, and that your implementation implements the EventActionHandler interface. If creation of the event action was successful, a dialog box (as in Figure 10-32) appears and the newly created event action is listed along with the existing event actions.
.
Figure 10-32 Confirmed event action creation
664 Human-Centric Business Process Management with WebSphere Process Server V6

5. The next step is to create a subscription for document folder class EmploymentApplicationFolder. This subscription links together operations for content objects of this document class and event actions that should take place. In our case, creation of a new document should trigger the WPSEventAction event action. Start creating the new subscription by right-clicking the EmploymentApplicationFolder class definition in the FileNet Enterprise Manager (see Figure 10-33).
Figure 10-33 Adding a new subscription for the EmploymentApplicationFolder class
6. A new wizard starts that guides you through the creation of a new subscription. Click Next and give the new subscription the name NewEmploymentApplication. Click Next.
Chapter 10. Integrating with content repositories 665

7. Confirm that this subscription should apply to all instances of class EmploymentApplicationFolder. Click Next.
8. On the next page of the wizard, you can select the events to subscribe to. For our scenario, we are primarily interested in events that are sent when a new folder is created. Select Creation Event in the Available Events list and click Add to move it to the Subscribed Event list (Figure 10-34). Click Next.
Figure 10-34 Specify the creation event as trigger
Note: The selected event type Creation Event corresponds to the Create string that we add as object_function in database table WBIA_JDBC_EventStore and to the Create operation that the JDBC adapter listens to.
Another scenario might be interested in Update Events or Deletion Events as well. In this case, the defined subscription would include these events, too, and the Java event action implementation would write corresponding operations to the WBIA_JDBC_EventStore database table.
That means that subscriptions and resulting operations in WebSphere Process Server can be combined and adapted to the individual needs. The next section outlines how this approach can be used to implement even more complex interaction patterns between content objects and business processes.
666 Human-Centric Business Process Management with WebSphere Process Server V6

9. Now, select the event action WPSEventAction, which we created before from the list of available event actions. This associates the subscription with the event action implementation and triggers our code when a new EmploymentApplicationFolder is being created (see Figure 10-35). Click Next.
Figure 10-35 Specifying the event action for a subscription
10.The next page offers additional properties (such as the option to invoke the event action synchronously or asynchronously). Asynchronous invocation is sufficient in our case and has less impact on FileNet’s Content Engine operation. Leave all the defaults as is and click Next to continue.
11.Confirm creation of the new subscription results in a message box such as Figure 10-36.
Figure 10-36 Confirmed subscription creation
Chapter 10. Integrating with content repositories 667

Testing the content triggerTo do this:
1. Log into the FileNet P8 Workplace application and click Add Folder.
2. In the window that opens (see Figure 10-37), click Change Class and select the EmploymentApplicationFolder class from the displayed document class hierarchy.
Figure 10-37 Changing document class for a new folder content object
668 Human-Centric Business Process Management with WebSphere Process Server V6

3. The entry fields change to the ones for the EmploymentApplicationFolder document class. Enter sample data as displayed in Figure 10-38. Click Next.
Figure 10-38 Entering sample data for an employment application folder
Chapter 10. Integrating with content repositories 669

4. On the next page, leave the security settings at their default values (see Figure 10-39) and click Finish.
Figure 10-39 Security default settings for a new folder
5. Confirm creation of the new folder and click OK.
670 Human-Centric Business Process Management with WebSphere Process Server V6

6. Log into BPC Explorer and search for started processes. Open the process input message to see both the data entered for the EmploymentApplicationFolder and the contentId generated by FileNet P8 (see Figure 10-40).
Figure 10-40 Process instance in BPC Explorer, triggered by FileNet P8
Receiving content events in a business process“Invoking SCA components in WebSphere Process Server” on page 625 explained how a content event can be used to start a BPEL business process.
Chapter 10. Integrating with content repositories 671

BPEL correlation sets are used to distinguish between initiating receive activities and non-initiating receive activities. Sending a message to a port defined by an initiating receive activity triggers a new business process. A non-initiating receive activity is used to receive a message for an already running business process instance.
Figure 10-41 shows a business process component in the assembly editor that has both an initiating (interface Hiring) and a non-initiating (interface ArrivingDocument) receive activity. Two exports (which might be triggered by an adapter) submit messages based on the respective interface.
Figure 10-41 Multiple interfaces for a business process
From a content event generation and handling perspective, it makes no difference if the message is sent to an initiating or a non-initiating receive activity.
672 Human-Centric Business Process Management with WebSphere Process Server V6

Figure 10-42 shows how correlation in the BPEL process takes place:
� The first receive activity in the process receives a message that contains (among other attributes) the content ID that is used for correlation.
� The second receive activity in the process receives another message that also comes with the content ID.
� A property ContentIDProperty and two property aliases are defined that point to the respective message.
� A correlation set based on this property ContentIDProperty is associated with both receive activities. The first (initiating) receive activity will set the correlation set property. The second (non-initiating) receive activity will use the ContentIDProperty to find the right process instance.
Figure 10-42 Correlation of two content events in a BPEL process
Implementing the collection point patternThe collection point pattern assumes certain criteria based on content objects in the content repository that needs to be satisfied before a business process can continue.
For example, consider our hiring process with an employment application folder stored in the content repository. This folder may contain documents submitted by
Start
Receive
Check if additionaldocs are required
contentIDFirstNameLastName
…
Variables
Notify applicant
ReceiveadditionalContentID
…
Property
ContentIDProperty
Content Event 1
Content Event 2
Property Alias
Property Alias
Chapter 10. Integrating with content repositories 673

the applicant, such as a resume or reference letters. It might be corporate policy that all applicants have to submit a school certificate as well. The business process then could implement a check if the school certificate is actually present in the current folder. If not, the applicant automatically receives an e-mail asking to hand it in later. The business process waits at this point until the additional document arrives.
One option to implement this pattern is by leveraging the correlation set feature in BPEL processes as discussed in “Receiving content events in a business process” on page 671. An event action implementation in the content repository can listen to both folder and document events and send content events containing the (common) folder content ID for correlation. The criteria for the collection point is then coded in the content repositories event action implementation.
Another more flexible option considers the collection point as business logic, and implements it as its own generic service that can be invoked in the SCA programming model. This service can be implemented either in the content repository or in the business process management system. Technically, it is beneficial to have such a service implementation as close to the event-emitting component as possible to allow for early filtering. Additional options and quality of service (such as a timeout parameter if the expected document does not arrive in the expected time frame) allow us to further enhance such a solution.
10.4.3 Accessing content services from a business process
In this section we access the FileNet P8 Content Engine in our WebSphere Process Server through a higher level or specific content service component. This content service component is implemented as an SCA POJO component and can be shared by multiple business processes or aggregated to get to additional services.
In many scenarios, it makes sense to have an additional abstraction layer between low-level service calls to the content repository and the business level model. As an example, a business process would not want to fill a complex SQL query structure each time it needs properties of a specific content repository folder. Instead, a dedicated getEmploymentApplicationFolderData service can be provided that offers an interface suitable for the business process domain.
In this section we demonstrate the technical foundation with an example that implements a service that runs an ad-hoc query again the FileNet P8 content repository and returns data from all present folders of class EmploymentApplicationFolder.
674 Human-Centric Business Process Management with WebSphere Process Server V6

This service is then invoked in a BPEL short-running process, and the returned attributes are printed. In a real business scenario, the business process could be used to send the retrieved data to a backend system for further processing (for example, sending mails or adding records in a CRM system).
Figure 10-43 shows the content service component that exposes the higher level (or specific) services to the business process, and itself accesses the content repository using one of the available generic APIs.
Figure 10-43 Accessing a content repository through a content service component
The following sections explain how to build a business integration module that contains both a content service component and a BPEL short-running process to query data from existing EmploymentApplicationFolder objects.
Defining the interface for the content service componentOur content service component should implement a single operation that takes the objectStore name as input and returns a list of data objects with content ID, first name, and last name for each EmploymentApplicationFolder class.
1. In WebSphere Integration Developer, create a new business integration module and name it ProcessEmploymentApplicationFolders.
IBM Software Group1..1
BPEL process andHuman tasks
EmploymentApplicationFolderResumeReferences, …
Content Repository
Content Services SCA ComponentI1..1
Chapter 10. Integrating with content repositories 675

2. Right-click Data Types and click New → Business Object in the Business Integration view to create the data object definition for EmploymentApplicationData according to Table 10-10. Then repeat the operation to create the data object definition for EmploymentApplicationFolders according to Table 10-11.
Table 10-10 Attributes of EmploymentApplicationData
Table 10-11 Attributes of EmploymentApplicationFolders
Your business object definition in WebSphere Integration Developer now looks as in Figure 10-44.
Figure 10-44 EmploymentApplicationFolders business object definition
3. Right-click Interfaces and click New → Interface in the Business Integration view to create an interface named EmploymentApplicationServiceInterface.
Attribute Type
contentID String
firstName String
lastName String
position String
Attribute Type
numberFolders Integer
folderData EmploymentApplicationData []
676 Human-Centric Business Process Management with WebSphere Process Server V6

4. Click the icon named Add Request Response Operation to add an operation named getEmploymentApplicationFolders with input parameter objectStore or type String and output parameter folder of type EmploymentApplicationFolders (see Figure 10-45).
Figure 10-45 Operation for EmploymentApplicationServiceInterface
5. Save your changes.
Building the content service componentWe choose a Java SCA component type to implement the interface we defined in “Defining the interface for the content service component” on page 675 because a code generator in WebSphere Integration Developer already creates the skeleton for our implementation. Therefore, we only have to add the required API calls to the content repository to complete our service component implementation.
1. In the Business Integration view, double-click Assembly Diagram to open the assembly editor for module ProcessEmploymentApplicationFolders.
2. Drag and drop the interface definition EmploymentApplicationServiceInterface from the Business Integration view to the assembly editor. Confirm to create a Component with no Implementation Type and click OK in the Component Creation dialog.
3. Click the component icon and rename the component to EmploymentApplicationService.
Chapter 10. Integrating with content repositories 677

4. Right-click Generate Implementation and click Java on the component icon (see Figure 10-46), and create the Java code in a new package named com.ibm.itsocorp. The Java editor opens and shows the generated source code com.ibm.itsocorp.EmploymentApplicationServiceImpl.
Figure 10-46 Generating the implementation for the content service component
5. Explore the generated source code for EmploymentApplicationServiceImpl and locate the method getEmploymentApplicationFolders (see Example 10-6), which needs to be implemented for our content service.
Example 10-6 Generated Java skeleton for service implementation
public DataObject getEmploymentApplicationFolders(String objectStore) {
//TODO Needs to be implemented.return null;
}
Accessing the FileNet P8 Java API over IIOPWe choose to access the FileNet P8 content engine through the Java API with an EJB (IIOP) transport because our setup shares a common user repository (IBM Tivoli Directory Server), and both FileNet P8 and WebSphere Process Server are installed on top of a WebSphere Application Server 6.0.2. This allows us to send valid LTPA tokens with each EJB call for authentication without the need to code additional application-based logins.
Other options include Web service calls or Java API with the Web service transport. See 10.3.1, “Accessing the FileNet P8 content engine” on page 622, for a general discussion on the available options.
678 Human-Centric Business Process Management with WebSphere Process Server V6

To use LTPA tokens, make sure that both application servers are enabled for LTPA (see Figure 10-47) and that you exchanged LTPA keys.
Figure 10-47 Enable LTPA
Chapter 10. Integrating with content repositories 679

The following steps describe how to add the required FileNet P8 API Jar files to our WebSphere Integration Developer project and how to use the FileNet P8 content engine API to retrieve data from folder classes EmploymentApplicationFolder.
1. Right-click ProcessApplicationFolder, click Import → File System, and locate the FileNet P8 content engine API JAR files on your system (see Figure 10-48). You might have to copy them from your FileNet P8 server to your workstation running WebSphere Integration Developer if you have not done this before. Click Finish.
Figure 10-48 Importing the FileNet P8 API JAR files
680 Human-Centric Business Process Management with WebSphere Process Server V6

2. WebSphere Integration Developer proposes to create two additional Java projects for the imported JAR files (see Figure 10-49). Click Yes for both the Jace.jar and log4j-1.2.13.jar dialog boxes.
Figure 10-49 Creating Java projects for the imported FileNet P8 JAR files
3. Open the generated Java code for EmploymentApplicationServiceImpl and replace the implementation of method getEmploymentApplicationFolders with the code in Example 10-7 on page 682.
a. A URI iiop://filenet.itso.ral.ibm.com:2809/FileNet/Engine is used with the connection object to tell the FileNet Java API that an IIOP transport (through the EJB) is to be used and where the remote server is located. Port 2809 is the WebSphere Application Server default bootstrap port.
Note: The URI string is used to invoke a JNDI lookup call for the referenced EJB. You can use the dumpnamespace tool to check whether the specified URI could be resolved on your WebSphere Process Server installation. For example, type:
dumpnamespace -host filenet.itso.ral.ibm.com
Look in the output for an entry of the FileNet P8 Content Engine home interface:
(top)/nodes/nodename/servers/server1/FileNet/Engine com.filenet.apiimpl.transport.ejbstubs.EngineHome
If you encounter problems that even the dumpnamespace tool cannot access the initial context of the remote FileNet server, check the host names assigned to both servers and, if necessary, add them to the respective etc/hosts files manually.
Chapter 10. Integrating with content repositories 681

b. The basic interaction with the FileNet P8 API is not the subject of this book, but you find detailed information (including Javadoc™ of the API objects) in the FileNet P8 documentation.
You have to retrieve a connection, domain, and object store object in order to run queries for the content objects stored in the object store.
We use a SQL query to select attributes Id, ApplicantFirstName, ApplicantLastName, and ApplicantPosition from documents of the EmploymentApplicationFolder folder class.
The query returns a RepositoryRowSet object that is processed through an iterator.
c. We use the BOFactory service to create data objects for EmploymentApplicationFolders and EmploymentApplicationData.
Properties of each row of the FileNet P8 result set are copied to an instance of EmploymentApplicationData.
Finally, the list and number of folder data is set in the resulting data object, EmploymentApplicationFolders.
Example 10-7 Implementation of FileNet P8 Java API calls in content service component
public DataObject getEmploymentApplicationFolders(String objectStore) {// URI to the FileNet P8 server, using the IIOP transportString uri = "iiop://filenet.itso.ral.ibm.com:2809/FileNet/Engine";Connection conn = Factory.Connection.getConnection(uri);Domain domain = Factory.Domain.getInstance(conn, null);ObjectStore os = Factory.ObjectStore.fetchInstance(domain,
objectStore, null);// SQL query to return data from EmploymentApplicationFolderSearchSQL sqlObject = new SearchSQL(
"SELECT Id, ApplicantFirstName, ApplicantLastName, " +"ApplicantPosition FROM EmploymentApplicationFolder");
SearchScope searchScope = new SearchScope(os);RepositoryRowSet rowSet = searchScope.fetchRows(sqlObject,
null, null, new Boolean(true));
// Use BOFactory to create the resulting data objectcom.ibm.websphere.bo.BOFactory bof =
(com.ibm.websphere.bo.BOFactory)com.ibm.websphere.sca.ServiceManager.INSTANCE.locateService("com/ibm/websphere/bo/BOFactory");
DataObject employmentApplicationFolders = bof.create("http://ProcessEmploymentApplicationFolders", "EmploymentApplicationFolders");
List folders = new ArrayList();
682 Human-Centric Business Process Management with WebSphere Process Server V6

// Process FileNet result setIterator it = rowSet.iterator();while( it.hasNext() ) {
DataObject employmentApplicationData = bof.create("http://ProcessEmploymentApplicationFolders", "EmploymentApplicationData");
RepositoryRow row = (RepositoryRow) it.next();Properties props = row.getProperties();employmentApplicationData.setString("contentID",
props.getIdValue("Id").toString());employmentApplicationData.setString("firstName",
props.getStringValue("ApplicantFirstName"));employmentApplicationData.setString("lastName",
props.getStringValue("ApplicantLastName"));employmentApplicationData.setString("position",
props.getStringValue("ApplicantPosition"));folders.add(employmentApplicationData);}
employmentApplicationFolders.setList("folderData", folders);employmentApplicationFolders.setInt("numberFolders",folders.size() );return employmentApplicationFolders;}
Invoking the content service component from a BPEL processWe are now ready to consume the implemented content service in a BPEL process:
1. Right-click Business Logic and click Process → New → Business Process in the Business Integration view to create a new business process. Name the process QueryEmploymentApplicationFolders and click Finish to accept all defaults.
Note: The FileNet P8 documentation says that you have to perform additional steps to configure JAAS authentication on the WebSphere Application calling a remote FileNet P8 server. We noticed that with LTPA token forwarding, these additional steps are not required in our setup.
Chapter 10. Integrating with content repositories 683

2. Use the BPEL editor to model a process, as depicted in Figure 10-50. It contains a sequence of four activities: receive, invoke, snippet, and reply.
Figure 10-50 QueryEmploymentApplicationFolders BPEL process
3. Drag and drop the EmploymentApplicationServiceInterface from the Business Integration view to the Reference Partners in the BPEL editor.
4. Click the + (Add Variables) icon next to the Variables panel in the BPEL editor to add a variable named EmploymentApplicationFolders of data type EmploymentApplicationFolders.
5. Select the GetEmploymentApplicationFolders invoke activity and set properties according to Figure 10-51. Note that we use variable Input1 (which stores the process input message) as input to the getEmploymentApplicationFolders operation. As a consequence, the objectStore name required by the service has to be passed as input to the process.
Figure 10-51 Properties of the invoke activity in the BPEL process
684 Human-Centric Business Process Management with WebSphere Process Server V6

6. Click snippet Print EmploymentApplicationFolders and use the visual editor (see Figure 10-52) to implement printing of the EmploymentApplicationFolders business object.
Note that you have to define the item type for the For Each graphical element to be of type EmploymentApplicationData.
Figure 10-52 Visual snippet to print EmploymentApplicationFolders
7. Switch to the assembly diagram and drag and drop the BPEL process from the Business Integration view into the assembly editor. Add a write to connect the reference of the process component with the interface of the content service component (see Figure 10-53).
Figure 10-53 Assembly diagram for BPEL process and content service component
8. Save all your files and deploy the resulting EAR file to WebSphere Process Server.
Chapter 10. Integrating with content repositories 685

Testing the process accessing the content service componentLog into the BPC Explorer and start a new instance of process QueryEmploymentApplicationFolders. Specify the FileNet P8 object store name (for example, EVTFS) as a value in the input message (see Figure 10-54). Click Submit.
Figure 10-54 Starting the process in BPC Explorer
Check the SystemOut.log file for the folder data we print in the BPEL visual snippet. Example 10-8 shows an example with three folders and corresponding data for Ella Adler, Fran Burke, and Eve Adams.
Example 10-8 EmploymentApplication folder data in SystemOut log
00000224 SystemOut O {DD183D3D-25DA-4612-882A-17BCADC6EC9A}00000224 SystemOut O Ella00000224 SystemOut O Adler00000224 SystemOut O Accounts Clerk00000224 SystemOut O {1DE5FEE6-910F-443D-B43D-3F57E6D77282}00000224 SystemOut O Fran00000224 SystemOut O Burke00000224 SystemOut O Accountant00000224 SystemOut O {C121C2A4-5085-4974-A2B4-B3D44EF33DD5}00000224 SystemOut O Eve00000224 SystemOut O Adams00000224 SystemOut O Accounts Clerk
10.4.4 Building client user interfaces
Client user interfaces for human-centric business processes that refer to content objects have to render both task data (hosted in WebSphere Process Server) and associated content object data (hosted in the content management system).
Section 10.2.4, “Representing content in business processes” on page 620, describes different ways of how content objects can be associated with business
686 Human-Centric Business Process Management with WebSphere Process Server V6

processes and human tasks. Except for the case where the entire content object is carried along with the business process (and no real integration with a content repository takes place), a client user interface has to interact with the content repository to dereference a content ID and display corresponding data. This data can include document/folder structure as well as content objects itself (such as a Microsoft Word document).
This section assumes that a content ID for a FileNet P8 folder object is stored as part of the input message for a human task instance in WebSphere Process Server.
Depending on the requirements for an integrated solution, a thin client (Web based), thick (J2EE) client, or portal-based solution is desired.
Depending on the user role, a generic admin client (such as the BPC Explorer) or a generated business user client is required.
For this book, we concentrate on integration into a JSP-based and a Portal-based application, and demonstrate this in the context of BPC Explorer, and in the context of the MyTasks portlets in WebSphere Portal server.
10.4.5 Displaying content data in BPC Explorer using Custom JSPs
Implementing a custom JSP is an easy way to show how associated content data can be rendered along with human task data.
In our scenario, the JSP extracts the contentID attribute from the application business object data that is passed as the human tasks’s input message. The FileNet P8 Workplace integration is used to display the corresponding EmploymentApplicationFolder for the applicant.
The described approach in this section can conceptually be applied to all Web-based applications that integrate WebSphere Process Server with FileNet P8.
We choose to show an integration with the BPC Explorer input message panel using a custom JSP because this environment already comes with access to human task message input data and therefore requires only a minimal amount of coding.
Chapter 10. Integrating with content repositories 687

For the implementation, we use the approve standard application task in the hiring process (see Figure 10-55) and add a custom JSP for the input message.
Figure 10-55 Approve Standard Application task in the hiring process
The steps are:
1. In the details panel of the inline human task approve standard application (shown in Figure 10-55), click Open to get to the human task editor.
Note: The Business Process Choreographer samples page contains a rich set of ready-to-use programming samples for interaction with the business flow manager and the human task manager:
http://publib.boulder.ibm.com/bpcsamp/index.html
Human Task Manager features → Custom JSP explains in detail how to create a custom JSP that can be used in the context of the BPC Explorer.
688 Human-Centric Business Process Management with WebSphere Process Server V6

2. Click the Business Process Choreographer icon in the Client settings section to add a new entry (see Figure 10-56). The Properties panel shows a table for JSP definition entries.
Figure 10-56 Adding a new client setting for the human task
3. Click Add in the Properties panel. In the JSP Definition dialog, select Input Message JSP type for the JSP type field and All for the Apply to field. Click New to create a new JSP.
Chapter 10. Integrating with content repositories 689

4. In the New JSP File dialog (see Figure 10-57), make sure that you select Create as JSP Fragment. The custom JSPs that run in the context of the BPC Explorer only need the JSP fragment code and cannot handle a full JSP. Select a folder location in the Web project that belongs to the business process module, in our case /HRModContentWeb/WebContent. Name the JSP ApproveStandardApplicationJSP.jsp. Make sure that you specify JSP as the file extension. The wizard generates (by default) a file with file extension JSPF, which is not listed in the human task editor. Click Finish.
Figure 10-57 Settings for the new JSP file
Note: For the content integration discussion in this chapter, we use a copy of the original process used in the previous chapters. This project copy is named HRModContent. The corresponding Web project is therefore named HRModContentWeb.
690 Human-Centric Business Process Management with WebSphere Process Server V6

5. Click OK in the JSP Definition dialog (see Figure 10-58) to complete creation of the new JSP.
Figure 10-58 Complete JSP definition
6. In the JSP editor, replace all of the existing code with the code shown in Example 10-13 on page 693.
a. Attribute messageMap contains a java.util.Map object that has all input message attributes as name/value pairs. The key values follow an XPath like syntax. In order to retrieve the content ID from the input message based on the application business object layout, we use /Input/Documentation/ContentID to get the string representation of this attribute and store it in a variable contentID. See Example 10-9 for the implementation.
Example 10-9 Accessing the message map and the contentID
java.util.Map msgMap = (java.util.Map)request.getAttribute("messageMap");
String contentID = (String) msgMap.get("/Input/Documentation/ContentID");
b. The next lines (Example 10-10) retrieve an encoded user token from FileNet P8 workplace. The user ID (HRSpecialistc) and password are hardcoded in the JSP. For production code, it might be suitable to use a generic user ID that has read-only access on the content objects and maintain this user’s ID and password encrypted in configuration element (for example, in a property file or a database table).
Example 10-10 Retrieving a user token from FileNet P8 Workplace
String userId = "Administrator";String password = password for Administrator;
Chapter 10. Integrating with content repositories 691

URL url =new URL("http","filenet.itso.ral.ibm.com",9080,"/Workplace/setCredentials?op=getUserToken&userId=" + userId + "&password=" + password + "&mode=encode");
URLConnection conn=url.openConnection();((HttpURLConnection)conn).setRequestMethod("POST");InputStream contentFileUrlStream=conn.getInputStream();BufferedReader br=new BufferedReader(new InputStreamReader(contentFileUrlStream));String token=br.readLine();
c. The following table definition has one row and two columns.
The left column is used to display input message data based on the application business object (such as name and address of the applicant).
Attributes are displayed in a nested table with one row for each attribute. The values are retrieved from the message map, again using the XPath like syntax. See Example 10-11 for an example of how to fill the table columns with the applicant’s last name data.
Example 10-11 Displaying last name of the applicant in a table
<TD>Last Name</TD><TD><% out.print(msgMap.get("/Input/Applicant/LastName"));%></TD>
d. The right column of the table uses an iFrame element to show the FileNet P8 Workplace folder content (see Example 10-12). Note that this Workplace command takes both the user token and the content ID we retrieved before. The object store name (EVTFS) is hardcoded but could also be implemented as a configurable parameter.
Example 10-12 iFrame element to show folder content data
<iframe src="http://filenet.itso.ral.ibm.com:9080/Workplace/integrationWebBasedCommand?_commandId=2040&ut=<%=token%>&objectStoreName=EVTFS&id=<%=contentID%>&objectType=folder" height="350" width="600" frameborder="0" scrolling="no"> Your browser does not support IFrames.</iframe>
Note: Not all Web browsers support the iframe element, which lets you embed an entire HTML document inside a main document. Another option is to create a HTML link using the same URL that opens in a new browser window.
692 Human-Centric Business Process Management with WebSphere Process Server V6

Example 10-13 Source code for custom JSP ApproveStandardApplication
<%@ page language="java" contentType="text/html; charset=ISO-8859-1" pageEncoding="ISO-8859-1" import="java.net.*,java.io.*"%>
<% java.util.Map msgMap =
(java.util.Map)request.getAttribute("messageMap"); // contentID associated with task String contentID = (String)
msgMap.get("/Input/Documentation/ContentID");
// userID and passwort to access FileNet P8 String userId = "Administrator"; String password = password for Administrator; // retrieve user token for subsequent workplace calls URL url =new URL("http","filenet.itso.ral.ibm.com",9080,
"/Workplace/setCredentials?op=getUserToken&userId=" + userId + "&password=" + password + "&mode=encode");
URLConnection conn=url.openConnection(); ((HttpURLConnection)conn).setRequestMethod("POST"); InputStream contentFileUrlStream=conn.getInputStream(); BufferedReader br=new BufferedReader(
new InputStreamReader(contentFileUrlStream)); String token=br.readLine(); %>
<TABLE border="0"><TBODY><TR>
<TD><BR/><B>Applicant Data</B><BR/><TABLE border="1" bgcolor="#eaeaff"> <TR>
<TD>First Name</TD><TD width="200px"><% out.print(msgMap.get("/Input/Applicant/FirstName"));%></TD><TR><TD>Middle Initial</TD><TD><%out.print(msgMap.get("/Input/Applicant/MiddleInitial"));%></TD><TR><TD>Last Name</TD><TD><% out.print(msgMap.get("/Input/Applicant/LastName"));%>
Chapter 10. Integrating with content repositories 693

</TD><TR><TD>AptNo</TD><TD><% out.print(msgMap.get("/Input/Applicant/AptNo"));%></TD><TR><TD>Street Address</TD><TD><% out.print(msgMap.get("/Input/Applicant/StreetAddress"));%></TD><TR><TD>Zip Code</TD><TD><% out.print(msgMap.get("/Input/Applicant/ZipCode"));%></TD><TR><TD>City</TD><TD><% out.print(msgMap.get("/Input/Applicant/City"));%></TD><TR><TD>State</TD><TD><% out.print(msgMap.get("/Input/Applicant/State"));%></TD> <TR><TD>HomePhone</TD><TD><% out.print(msgMap.get("/Input/Applicant/HomePhone"));%></TD><TR><TD>Date of Birth</TD><TD><% out.print(msgMap.get("/Input/Applicant/DateOfBirth"));%></TD>
</TABLE></TD><TD>
<iframe src="http://filenet.itso.ral.ibm.com:9080/Workplace/integrationWebBasedCommand?_commandId=2040&ut=<%=token%>&objectStoreName=EVTFS&id=<%=contentID%>&objectType=folder" height="350" width="600" frameborder="0" scrolling="no"> Your browser does not support IFrames.
</iframe></TD></TR>
</TBODY></TABLE>
694 Human-Centric Business Process Management with WebSphere Process Server V6

7. Save the JSP code and deploy the resulting EAR file in WebSphere Process Server.
8. Log into the BPC Explorer as a member of the HRSpecialist group (for example, HRSpecialista) and list your task. Make sure that you select a task where the process has an associated content ID. This is the case if the process has been started by a content event as described in 10.4.2, “Triggering a new hiring process from content events” on page 640.
See Figure 10-59 for a BPC Explorer page that shows our new custom JSP.
Figure 10-59 BPC Explorer custom JSP with task and content data
The embedded FileNet P8 Workplace page in Figure 10-59 provides a variety of interaction with the EmploymentApplication folder. Note that the user ID we used
Chapter 10. Integrating with content repositories 695

to log into the FileNet content repository must have appropriate rights to perform these operations:
� Add new documents to the folder.� Add new folders to the folder (nesting).� Explore the folder’s attributes (click Get Info button).
The sample EmploymentApplicationFolder in Figure 10-59 on page 695 contains three Microsoft Word documents: a letter, resume, and reference. Click the resume document to open the associated application on your machine (see Figure 10-60).
Figure 10-60 Applicant’s resume in Microsoft Word
696 Human-Centric Business Process Management with WebSphere Process Server V6

10.5 Adding Filenet P8 Portlets to WebSphere Portal Server
This section explains how to add the FileNet P8 Portlets to WebSphere Portal Server and make them available in Portal-based user interfaces.
The FileNet P8 Portlets do not expose a public interface for inter portlet communication. Therefore, they can serve as supporting portlets on a task page, but cannot directly communicate with a task processing page.
They require an initial login through FileNet P8 Workplace and use EJB transport to access FileNet P8 Content Engine.
Installing and configuring the FileNet P8 Portlets The FileNet P8 Portlets come as a separate install image. An installation wizard guides you through the necessary steps to configure and adapt the portlets to the target environment.
1. After confirming the license statement, specify a directory where the resulting WAR file should be created. You can choose any location in your file system, but it should be the final location that the WebSphere Portal is able to access. Click Next.
Note: We use WebSphere Portal Server 6.0.1, based on WebSphere Application Server 6.0.2 and a remote FileNet P8 4.0, based on WebSphere Application Server 6.0.2 that resides in a different cell.
Note: It is important that you run this wizard on your WebSphere Portal Server machine since the resulting WAR file contains references to the local file system.
Chapter 10. Integrating with content repositories 697

2. On the next page, select the target application server platform IBM WebSphere Application Server, Version 6.x (see Figure 10-61). Click Next.
Figure 10-61 Platform selection in P8 portlet install wizard
698 Human-Centric Business Process Management with WebSphere Process Server V6

3. On the next page, the only available transport option is EJB. Modify the URLs to have them pointing to your FileNet P8 server (see Figure 10-62). Double check the bootstrap port, which is by default 2809 for WebSphere Application Server. See “Accessing the FileNet P8 Java API over IIOP” on page 678 for details on how to check your installation. Click Next.
Figure 10-62 Transport protocol and URLs for P8 portlets
Chapter 10. Integrating with content repositories 699

4. Insert the URL where the FileNet P8 Workplace application is installed (see Figure 10-63). For WebSphere Application Server, the default port is 9080 and the context root is /Workplace. Use your Web browser and double check that you entered the correct URL by just copying it to the browser and verifying that the Workplace application shows up. Click Next.
Figure 10-63 Workplace URL in the P8 Portlet install wizard
5. On the next page, enter the process engine connection point name. For our installation, the name is region2. You can find the connection point name in the FileNet Enterprise Manager console under PE Connection Points (see Figure 10-64). Click Next in the installation wizard.
Figure 10-64 PE Connection Points in Enterprise Manager
700 Human-Centric Business Process Management with WebSphere Process Server V6

6. The following page shows information about the user token encryption file. The FileNet P8 Portlets use encrypted user tokens when communicating with the content engine.
The encryption file is expected in:
PortletInstallDirectory\Authentication\UTCryptoKeyFile.properties
Where PortletInstallDirectory is the directory you selected at the beginning of the installation process. Write this location down and click Next.
7. On the next page, check again that you specified the correct path where the P8 portlets should be installed, and then click Install to start the installation.
8. The installation process copies the required files and takes typically less than 5 minutes to complete. Click Finish on the summary page.
9. Copy the encryption file from your FileNet P8 installation (by default located in C:\Program Files\FileNet\AE\UTCryptoKeyFile.properties) to your WebSphere Portal Server machine into the directory specified above.
The FileNet P8 portlets (file p8portlets.war) are now ready to be deployed in WebSphere Portal Server.
Configuring JAAS login for WebSphere Portal ServerThe FileNet P8 portlets require a JAAS login module. The installation step in “Installing and configuring the FileNet P8 Portlets” on page 697 created a subdirectory that contains jaas.conf.WebSphere, a file defining the JAAS login module (such as FileNetP8) for the various protocols.
You have to edit the JVM™ settings of the WebSphere Application Server running Portal to include this configuration file.
Note: User tokens in FileNet P8 require that times for both the sending and receiving application server are the same.
You get an exception such as the following when logging into FileNet P8 Workplace in case there is an issue with time settings:
com.filenet.wcm.api.CannotDetokenizeException: Token date stamp is outside acceptable range.
Chapter 10. Integrating with content repositories 701

If you skip the following steps or entered the information incorrectly, the first access to the FileNet P8 Portlets results in exceptions such as the ones in Example 10-14.
Example 10-14 Exception if JAAS login module is not configured
javax.security.auth.login.LoginException: No LoginModules configured for FileNetP8at javax.security.auth.login.LoginContext.init(LoginContext.java:211)at javax.security.auth.login.LoginContext.<init>(LoginContext.java:426)at
com.filenet.apiimpl.core.UserPasswordToken.getSubject(UserPasswordToken.java:85)......com.filenet.api.exception.EngineRuntimeException: E_NOT_AUTHENTICATED: The user is not authenticated.
at com.filenet.apiimpl.core.UserPasswordToken.getSubject(UserPasswordToken.java:101)
The steps are:
1. Log into the Admin Console of the WebSphere Application Server that runs WebSphere Portal.
2. Expand Servers and click Application Servers → WebSphere_Portal. Note that a typical WebSphere Portal installation has two server instances installed (server1 and WebSphere_Portal) within a WebSphere Application Server profile. The Portlets and also the code accessing the FileNet P8 EJB reside on the WebSphere_Portal server.
3. Under Server Infrastructure, click Java & Process Management. Select Process Definition and then Java Virtual Machine.
702 Human-Centric Business Process Management with WebSphere Process Server V6

4. Edit the Generic JVM Arguments Field and add the following text at the end (see Figure 10-65):
-Djava.security.auth.login.config=PortletInstallPath\FileNet\Portlets\CEAPI\config\jaas.conf.WebSphere
Note that for Windows and a default installation, you have to replace Program Files with Progra~1, resulting in:
-Djava.security.auth.login.config=C:\Progra~1\FileNet\Portlets\CEAPI\config\jaas.conf.WebSphere
Click OK and then Save your changes.
Figure 10-65 JAAS configuration entry
5. Restart your WebSphere_Portal server for the changes to take effect.
Configuring security attribute propagation and identity assertionFor WebSphere Portal to send authentication information to the FileNet P8 server:
1. Log into the Admin Console of the WebSphere Application Server that runs WebSphere Portal.
2. Expand Servers and click Global Security. Make sure that LTPA is selected as the active authentication mechanism.
3. Expand Authentication Protocol in the Authentication section and click CSIv2 outbound authentication.
Note: JAAS login modules can also be configured using the WebSphere Application Server Admin Console.
Chapter 10. Integrating with content repositories 703

4. Select both check boxes for Identity assertion and Security attribute propagation (see Figure 10-66). Click OK and Save your changes.
Figure 10-66 Identity assertion settings on WebSphere Portal Server
5. Log into the Admin Console of the WebSphere Application Server that runs FileNet P8.
6. Expand Servers and click Global Security. Make sure that LTPA is selected as the active authentication mechanism.
7. Expand Authentication Protocol in the Authentication section and click CSIv2 inbound authentication.
704 Human-Centric Business Process Management with WebSphere Process Server V6

8. Select both check boxes for Identity assertion and Security attribute propagation and enter trusted user IDs to get access to the FileNet P8 server (see Figure 10-66 on page 704). For our LDAP configuration, a valid format for a trusted server IDs is for uid=wasadmin,cn=People,o=ITSOCorp. Multiple entries are separated with the pipe (|) symbol. Click OK and Save your changes.
Figure 10-67 Identity assertion settings on FileNet P8 Server
Note: A missing identity assertion or security attribute propagation flag typically results in an exception reported on the WebSphere Portal server as:
org.omg.CORBA.NO_PERMISSION: Subject is null. Authentication Failed. vmcid: 0x49424000 minor code: 300 completed: No
A missing or wrong list of trusted server IDs typically results in an exception reported on the FileNet P8 server as:
00000026 SASRas E JSAS0499E: [CSIServerRI.receive_request] The server ID that is received for identity assertion (uid=wasadmin,cn=People,o=itsocorp) does not match any of the configured and trusted server IDs (wrong trusted userIds).
Chapter 10. Integrating with content repositories 705

Installing the FileNet P8 Portlets in WebSphere Portal ServerThe next step is to install the FileNet P8 Portlets in WebSphere Portal Server:
1. Log in as an administrator and click Launch → Administration to get to the Administration panel.
2. Click Portlet Management → Web modules. In the Manage Web Modules window, click Install. Enter the path to file p8portlets.war, which you created in “Installing and configuring the FileNet P8 Portlets” on page 697 (see Figure 10-68). Click Next.
Figure 10-68 Installing the FileNet P8 Portlet WAR file
706 Human-Centric Business Process Management with WebSphere Process Server V6

3. Confirm the list of Portlets to install (see Figure 10-69). Click Finish.
Figure 10-69 FileNet P8 Portlets in the WAR file
4. Check that a confirmation text tells you Web module was successfully installed. The FileNet P8 Portlets are now ready to be placed on your Portal pages.
Chapter 10. Integrating with content repositories 707

After these steps, you can add the FileNet P8 Portlets to your portal pages (see Figure 10-70).
Figure 10-70 Browse, Quick Search, and Author portlets on a portal page
10.5.1 Building a Portal-based client UI
This section explains how to build a Portal-based client that integrates tasks in WebSphere Process Sever, portlets in WebSphere Portal Server, and content objects in FileNet P8.
For WebSphere Portal Server, we use the MyTask portlet to interact with tasks in WebSphere Process Server. The task input message contains the content ID that is used to show content (meta) data in the user interface.
Using an iFrame for FileNet P8 WorkplaceFirst, we use the same approach as with custom JSPs for BPC Explorer (10.4.5, “Displaying content data in BPC Explorer using Custom JSPs” on page 687): an
Note: We use Rational Application Developer 7.0 to build the Portlet and WebSphere Portal Server 6.0.1 with a WebSphere Process Server 6.0.2.1 client installation to communicate with a remote WebSphere Process Server 6.0.2.1.
708 Human-Centric Business Process Management with WebSphere Process Server V6

iframe element is added to a task processing portlet that shows associated content data.
Because the FileNet P8 Browse Portlet does not expose an interface for communication with other portlets, we cannot leverage it to show content in the context of a task processing portlet. However, we add the FileNet P8 Portlets that we made available in 10.5, “Adding Filenet P8 Portlets to WebSphere Portal Server” on page 697, as supporting portlets on the task page.
For the implementation, we use the approve standard application task in the hiring process (see Figure 10-71), modify the process, and add a portal client UI setting.
Figure 10-71 Approve standard application task in the hiring process
The steps are:
1. In the Details panel of the inline human task approve standard application (shown in Figure 10-71), click Open to get to the human task editor.
2. Click the Portal Client icon in the Client settings section to add a new entry (see Figure 10-72).
Figure 10-72 Client settings for Portal
Chapter 10. Integrating with content repositories 709

3. In the Properties for the new Portal Client definition select Page as the type and enter the StandardApprovalContentPage in the Unique name input field (see Figure 10-73). This unique name corresponds to a Portal page that we define later in this section.
Figure 10-73 Page definition for Portal Client
4. Save your changes and deploy the EAR file to WebSphere Process Server.
Note: You either have to replace you hiring process application created in the previous chapters or modify process and task names in the assembly editor to avoid your existing hiring process from being affected by this modified one.
710 Human-Centric Business Process Management with WebSphere Process Server V6

In Rational Application Developer, we create a corresponding Portlet that displays both task data and the corresponding content folder using FileNet P8 Workplace. For a detailed description of how to create task processing portlets, refer to Chapter 8, “WebSphere Portal Server” on page 493.
1. Create a new JSR 168 Portlet Project. Name the project StandardApprovalPortlet and name the Portlet Standard Approval Portlet (see Figure 10-74). Click Next.
Figure 10-74 Create a new JSR 268 Portlet in Rational Application Developer
Chapter 10. Integrating with content repositories 711

2. Leave the portlet settings on the next page as their default values and click Next.
3. On the Advanced Settings page, select Enable business process integration and Add task processing (see Figure 10-75). Click Finish.
Figure 10-75 Enable Portlet for business process integration and task processing
4. Edit the generated file StandardApprovalPortletView.jsp and replace the code between tags <f:view> and </f:view> with the code in Example 10-15.
a. First, we get the data object for the task input message. The selection in Figure 10-75 (enable business process integration) already triggered generated code that uses class TaskProcessingHelper to set a session attribute for the task input message. To get to the business object, we only have to access an attribute named com.ibm.portal.bp.TaskProcessingHelper.TASK_INPUT_MESSAGE.
b. For authentication with the FileNet P8 Workplace UI servlet, we send a HTTP request to the servlet to retrieve a user token based on the user ID and password we specified.
c. The following HTML code contains two nested tables and shows some of the applicant data from the input message as well as the iFrame for the FileNet P8 Workplace servlet.
Example 10-15 JSP code for the task processing portlet
<% commonj.sdo.DataObject bo = (commonj.sdo.DataObject)
renderRequest.getPortletSession().getAttribute(com.ibm.portal.bp.TaskProcessingHelper.TASK_INPUT_MESSAGE );
String userId = "administrator";String password = password for userId;java.net.URL url =new java.net.URL(
"http","filenet.itso.ral.ibm.com",9080,"/Workplace/setCredentials?op=getUserToken&userId=" + userId + "&password=" + password + "&mode=encode");
java.net.URLConnection conn=url.openConnection();
712 Human-Centric Business Process Management with WebSphere Process Server V6

((java.net.HttpURLConnection)conn).setRequestMethod("POST");java.io.BufferedReader br=new java.io.BufferedReader(new java.io.InputStreamReader(conn.getInputStream()));String token=br.readLine();%><TABLE border="0"><TBODY> <TR>
<TD> <BR/><B>Applicant Data</B><BR/> <TABLE border="1" bgcolor="#eaeaff">
<TR><TD>First Name</TD><TD width="200px"><%=bo.getString("input/Applicant/FirstName")%></TD><TR><TD>Middle Initial</TD><TD><%=bo.getString("input/Applicant/MiddleInitial")%></TD> <TR><TD>Last Name</TD><TD><%=bo.getString("input/Applicant/LastName")%></TD><TR><TD>AptNo</TD><TD><%=bo.getInt("input/Applicant/AptNo")%></TD><TR><TD>Street Address</TD><TD><%=bo.getString("input/Applicant/StreetAddress")%></TD><TR><TD>Zip Code</TD><TD><%=bo.getInt("input/Applicant/ZipCode")%></TD><TR><TD>City</TD><TD><%=bo.getString("input/Applicant/City")%></TD><TR><TD>State</TD><TD><%=bo.getString("input/Applicant/State")%></TD> <TR><TD>HomePhone</TD><TD><%=bo.getString("input/Applicant/HomePhone")%></TD>
</TABLE></TD><TD> <iframe
src="http://filenet.itso.ral.ibm.com:9080/Workplace/integrationWebBasedCommand?_commandId=2040&ut=<%=token%>&objectStoreName=EVTFS&id=<%=bo.getString("input/Documentation/contentID")%>&objectType=folder" height="350" width="600" frameborder="0" scrolling="no">
Your browser does not support IFrames. </iframe></TD>
</TR></TBODY></TABLE>
Chapter 10. Integrating with content repositories 713

d. Optional: Right-click the StandardApprovalPortlet project and select Import → Import → General → File System. Click Browse to select the directory where the data object definition (businessitems.xsd) in project HRLib is located (see Figure 10-76). Click Finish.
Figure 10-76 Importing businessitems.xsd from the HRLib project
5. Export you WAR file: right-click StandardApprovalPortlet and select Export → WAR, and name the file StandardApprovalPortlet.war.
6. Log into WebSphere Portal as an administrator and click Launch → Administration → Portlet Management → Web Modules. Click Install and specify the WAR file you exported in the previous step. Click Next.
Note: This section covers only the viewing part of the Portlet. In order to interact with the portlet, you have to add a button (such as Approve) that triggers completion of the task. For this, refer to 8.4, “Developing a Process Portal” on page 506.
Note: This step might only be required if you run WebSphere Portal 6.0.1 and WebSphere Process Server 6.0.2 in different cells.
714 Human-Centric Business Process Management with WebSphere Process Server V6

7. Click Finish on the summary page (see Figure 10-77).
Figure 10-77 Installing the Standard Approval Portlet in WebSphere Portal
8. Next we define the task page that is referenced by the unique name we specified in the human task and that holds both the Standard Approval Portlet as well as the FileNet P8 supporting portlets.
Click Launch → Administration → Portal User Interface → Manage Pages. Click Context Root. In the list of pages under Context Root, look for the Task Page Definitions page (you might have to move to the second page to see it). Click Task Page Definitions.
Chapter 10. Integrating with content repositories 715

9. Click New Page to create a new task page definition. Give it the title Standard Approval and click Finish (see Figure 10-78). Click OK.
Figure 10-78 Defining a new task page definition
716 Human-Centric Business Process Management with WebSphere Process Server V6

10.Click the Edit Page Layout icon for the Standard Approval page. This opens the layout editor for this page. Click Add Portlets in the left cell and add the Standard Approval Portlet. Click Add Portlets in the right cell and add the Author and Quick Search portlets (see Figure 10-79). Click Done.
Figure 10-79 Layout for task page including Standard Approval Portlet and supporting FileNet P8 portlets
11.Click Launch → Administration → Portal Settings → Custom Unique Names and then Pages. In the list of available pages, search for the Standard Approval page. Click the Edit unique name for page icon in the line for the Standard Approval page and then enter StandardApprovalContentPage as the unique name for the page (see Figure 10-80). Note that this is the page name we edited in Figure 10-73 on page 710.
Figure 10-80 Adding the unique page name for the Standard Approval page
Chapter 10. Integrating with content repositories 717

This completes installation and configuration of the portlets in WebSphere Portal. New task instances for approve standard application can now be processed by the MyTask portlet.
Testing the Standard Approval pageThis steps assumes that you already started a business process with a populated contentID attribute field. This can be done using the approach described in 10.4.2, “Triggering a new hiring process from content events” on page 640.
Go to Launch → MyTask and click the link of a claimed approve standard application task (see Figure 10-81).
Figure 10-81 My Tasks portlet with an Approve Standard Application task in claimed state
718 Human-Centric Business Process Management with WebSphere Process Server V6

A new Standard Approval task page opens (see Figure 10-82). You might have to click Click Here in the FileNet P8 Portlets to log into FileNet P8 Workplace if you have not done so previously in your session.
Note the Standard Approval Portlet on the left-hand side that contains applicant data from the input message and the iFrame element with associated content folder data for Eve Adams. The author and quick search portlets on the right-hand side can be used to add additional documents or search the content repository.
Figure 10-82 Standard Approval page with Standard Approval Portlet, Author, and Quick Search FileNet P8 Portlets
Using a Web Clipping Portlet for FileNet P8 WorkplaceWebSphere Portal comes with the capability to create Web Clipping portlets based on URLs. These portlets listen to DefaultPortletMessage and thereby allow for communication with other portlets.
Note: For this book, we focus in this section on the technical implementation details. The look-and-feel of the Standard Approval Portlet needs more improvements. For example, the FileNet P8 Workplace UI appearance can be configured and adopted to better fit in the look of the application.
Chapter 10. Integrating with content repositories 719

For integration with the FileNet P8 Workplace servlet, this opens another option to build a Portal-based user interface.
1. Create a new IBM Portlet project name the project StandardApprovalPortletClip and name the Portlet Standard Approval Portlet Clip (see Figure 10-83). Click Next.
Figure 10-83 Creating an IBM Portlet Standard Approval Portlet Clip
720 Human-Centric Business Process Management with WebSphere Process Server V6

2. Follow the steps in “Using an iFrame for FileNet P8 Workplace” on page 708 to complete creation of the portlet project. Particularly make sure that you select Enable business process integration and Add task processing.
3. Edit the generated file StandardApprovalPortletClipView.jsp and replace the code between tags <f:view> and </f:view> with the code in Example 10-16. This code snippet basically only retrieves the task input message from the session and displays it in a table.
Example 10-16 JSP code to display applicant data in the Portlet
<% commonj.sdo.DataObject bo = (commonj.sdo.DataObject)
request.getSession().getAttribute( com.ibm.wps.bp.WPTaskProcessingHelper.TASK_INPUT_MESSAGE );
%><B>Applicant Data</B><BR/><TABLE border="0" bgcolor="#eaeaff">
<TR><TD>First Name</TD><TD width="200px"><%=bo.getString("input/Applicant/FirstName")%></TD><TR><TD>Middle Initial</TD><TD><%=bo.getString("input/Applicant/MiddleInitial")%></TD><TR><TD>Last Name</TD><TD><%=bo.getString("input/Applicant/LastName")%></TD><TR><TD>AptNo</TD><TD><%=bo.getInt("input/Applicant/AptNo")%></TD><TR><TD>Street Address</TD><TD><%=bo.getString("input/Applicant/StreetAddress")%></TD><TR><TD>Zip Code</TD><TD><%=bo.getInt("input/Applicant/ZipCode")%></TD><TR><TD>City</TD><TD><%=bo.getString("input/Applicant/City")%></TD><TR><TD>State</TD><TD><%=bo.getString("input/Applicant/State")%></TD><TR><TD>HomePhone</TD><TD><%=bo.getString("input/Applicant/HomePhone")%></TD></TR>
</TABLE>
Chapter 10. Integrating with content repositories 721

4. Edit the generated file StandardApprovalPortletClipPortlet.java and add the code in to the setProperties method, as depicted in Example 10-17.
Example 10-17 Updating the Web Clip Portlet URL in StandardApprovalPortletClipPortlet
public void setProperties(PortletRequest request, PropertyValue[] properties) {WPTaskProcessingHelper taskProcessingHelper = getTaskProcessingHelper(request);if (taskProcessingHelper != null) {
try {taskProcessingHelper.setProperties(request, properties);
DataObject bo = (DataObject) request.getSession().getAttribute( WPTaskProcessingHelper.TASK_INPUT_MESSAGE );
String contentId = bo.getString("input/Documentation/contentID");
String userId = "administrator";String password = password for userId;URL url =new URL("http","filenet.itso.ral.ibm.com",9080,
"/Workplace/setCredentials?op=getUserToken&userId=" + userId + "&password=" + password + "&mode=encode");
URLConnection conn=url.openConnection();((HttpURLConnection)conn).setRequestMethod("POST");InputStream contentFileUrlStream=conn.getInputStream();BufferedReader br=new BufferedReader(new
InputStreamReader(contentFileUrlStream));String token=br.readLine();
String workplaceUrl = "http://filenet.itso.ral.ibm.com:9080/Workplace/integrationWebBasedCommand?_commandId=2040&ut="+token+"&objectStoreName=EVTFS&id="+contentId+"&objectType=folder";
getPortletConfig().getContext().send(null, new DefaultPortletMessage("restart_cliplet:" + workplaceUrl));
} catch (PortletException e) {if (getPortletLog().isErrorEnabled())
getPortletLog().error("Error on WPTaskProcessingHelper.setProperties(): " + e.getMessage());
} catch (Throwable exc ){
exc.printStackTrace();}
}}
722 Human-Centric Business Process Management with WebSphere Process Server V6

5. Export you WAR file: right-click the StandardApprovalPortletClip project and select Export → WAR. Name the file StandardApprovalPortletClip.war.
6. Log into WebSphere Portal as an administrator and click Launch → Administration → Portlet Management → Web Modules. Click Install and specify the WAR file that you exported in the previous step. Click Next.
7. Click Finish on the summary page.
8. Next we define a Web clipping portlet to hold the FileNet P8 Workplace UI content. Click Launch → Administration → Portlet Management → Web Clipping and then New Portlet.
9. Enter FileNet P8 Workplace as the name for the new portlet and the URL to your FileNet P8 Workplace, as shown in Figure 10-84. Click Next.
Figure 10-84 Creating a new Web clipping portlet
10.The content preview with the Workplace login panel appears. Note that while we added the URL to the Workplace servlet, this URL is changed by the implementation in our portlet Standard Approval Portlet Clip. Click Finish.
11.Next we define the task page that is referenced by the unique name we specified in for the human task and that holds both the Standard Approval Portlet as well as the FileNet P8 supporting portlets. Click Launch → Administration → Portal User Interface → Manage Pages. Click Context Root. In the list of pages under Context Root, look for the Task Page Definitions page (you might have to move to the second page to see it). Click Task Page Definitions.
Chapter 10. Integrating with content repositories 723

12.Click New Page to create a new task page definition. Give it the title Standard Approval Clip and click Finish. Click OK.
13.Click the Edit Page Layout icon for the Standard Approval Clip page. This opens the layout editor for this page. Select a layout with two rows and two cells for the first row. Click Add Portlets in the left top cell and add the Standard Approval Portlet Clip. Click Add Portlets and add the FileNet P8 Workplace Web clip portlet. Click Add Portlets in the second row and add the Author and Quick Search portlets (see Figure 10-85). Click Done.
Figure 10-85 Page layout for the Standard Approval Clip page
14.Click Launch → Administration → Portal Settings → Custom Unique Names and then Pages. In the list of available pages, search for the Standard Approval Clip page. Click the Edit unique name for page icon in the line for the Standard Approval Clip page and then enter StandardApprovalContentPage as the unique name for the page. Note that this is the page name we edited in Figure 10-73 on page 710.
This completes installation and configuration of the portlets in WebSphere Portal. New task instances for Approve Standard Application can now be processed by the MyTask portlet.
Note: If you followed the instructions in the previous section, you might already have a task page Standard Approval associated with this name. In this case, assign a new name to Standard Approval.
724 Human-Centric Business Process Management with WebSphere Process Server V6

Testing the Standard Approval Clip pageThis steps assumes that you already started a business process with a populated contentID attribute field. This can be done using the approach described in 10.4.2, “Triggering a new hiring process from content events” on page 640.
Go to Launch → MyTask and click the link of a claimed Approve Standard Application task (see Figure 10-81 on page 718).
A new task page Standard Approval Clip opens (see Figure 10-86). You might have to click Click Here in the FileNet P8 Portlets to log into FileNet P8 Workplace if you have not done so previously in your session.
Note the Standard Approval Portlet Clip on the left-hand, side which contains applicant data from the input message and the Web clip portlet with the associated content folder data for Eve Adams on the right. The author and quick search portlets at the bottom can be used to add additional documents or search the content repository.
Figure 10-86 Task page with FileNet Workplace in a Web Clipping portlet
Chapter 10. Integrating with content repositories 725

726 Human-Centric Business Process Management with WebSphere Process Server V6

Chapter 11. Related technologies
This chapter introduces related technologies that can contribute to the enhancement of human-centric business process management. Namely, we introduce the following tools:
� WebSphere Business Modeler Publishing Server� WebSphere Business Monitor� WebSphere Service Registry and Repository� Rational RequisitePro
11
© Copyright IBM Corp. 2007. All rights reserved. 727

11.1 WebSphere Business Modeler Publishing Server
WebSphere Business models are an excellent means of communication between the application developers, architects, and analysts on one side, and the business people on the other side. WebSphere Business models, in addition to their already apparent value (speeding the development and shortening the development schedule), play an important role in facilitating communications between different stake holders.
WebSphere Business Modeler Publishing Server elevates this role further by availing the business model to different participants at the same time. The business model can then be easily viewed and shared by different roles and individuals.
WebSphere Business Modeler Publishing Server provides a collaborative approach to modeling by allowing users to view, add comments on specific elements, ask questions, and reply to comments and questions.
WebSphere Business Modeler Publishing Server lets you:
� Understand and transform your business through superior business modeling, simulation, analysis, and collaboration capabilities.
� Achieve best-practice business model design through collaboration and consensus.
� Publish models to a Web-based environment for viewing, reviewing, and commenting amongst multiple reviewers, and where final versions may be stored.
� Extend the annotator and viewer roles to users who do not have the business modeler installed.
� Post models to a secure server, which now includes the Linux platform, with authorized access is through a Web browser.
728 Human-Centric Business Process Management with WebSphere Process Server V6

A sample WebSphere Business Modeler Publishing Server window is shown in Figure 11-1.
Figure 11-1 WebSphere Business Modeler Publishing Server
11.1.1 How it relates to Human-Centric BPM
WebSphere Business Modeler is the chosen tool to model and document our example business process. In our scenario, this is a straightforward task. In real projects, the model is significantly more complex with a considerable amount of modification and change to it throughout the requirement specification cycles and beyond. In many cases, businesses do not have a clear understanding of their business processes, and they discover these processes as the model is being built. It is also the case that businesses communicate their inter-departmental expectations using these business models.
As the complexity of the model grows, and as the participants and stake holders of the business model grow in number, the greater the need for the WebSphere Business Modeler Publishing Server. The publishing server allows users to view, ask questions, and post comments on the model in an online fashion.
11.1.2 How it relates to the ITSO Corp scenario
In our ITSO Corp hiring process implementation, the WebSphere Business Modeling Publishing Server could host the hiring process model to facilitate communication among different stake holders.
Chapter 11. Related technologies 729

11.2 WebSphere Business Monitor
WebSphere Business Monitor enables you to monitor business processes in real time. It provides a visual display of business process status with alerts and notifications to key users that facilitate continuous improvement of your business processes.
WebSphere Business Monitor:
� Is controlled through a customizable dashboard implemented as WebSphere Portal pages that are visually intuitive, featuring scorecards, key performance indicators, and gauges
� Puts you in control of reports filtering through the dashboard, which supports multidimensional analyses and reports with embedded business intelligence
� Offers customized analytic components that monitor existing business processes, as specified by the business user
� Includes the Adaptive Action Manager, which invokes selected real-time actions or sets of actions based on predefined rules and policies
� Integrates sophisticated business analysis with business processes and enhances innovation and optimization in key business processes
Figure 11-2 illustrates a sample Key Performance Indicator view from Monitor’s dashboard.
Figure 11-2 KPI view
730 Human-Centric Business Process Management with WebSphere Process Server V6

11.2.1 How it relates to Human-Centric BPM
WebSphere Business Monitor provides an insight into the process and visualization of the performance of business processes. It does this with the use of business measures and key performance indicators. The IBM WebSphere Business Monitor dashboard provides business users with a comprehensive set of graphs, reports, and services required to monitor and manage the health of business processes. The introduction of monitoring into BPM enables the organization to actively monitor processes, evaluate performance, and enhance business processes.
11.2.2 How it relates to the ITSO Corp scenario
WebSphere Business Monitor can be integrated to monitor the performance of the ITSO Corp hiring process. For example, WebSphere Business Monitor can provide one or more of the following capabilities to enhance our Human-Centric BPM solution for ITSO Corp hiring process:
� Monitor the number of applications submitted per day.
� Monitor the number of applications approved, reviewed, or accepted per month.
� Generate reports on the average wait time per applicant, per department, or per job type.
� Analyze applicants’ information and provide insights into the demography of applicants, age range per job type, or per job title.
� Can help ITSO Corp understand their business process at the run time, identify possible bottlenecks, and help suggest enhancements to the current as-is process.
11.3 WebSphere Service Registry and Repository
IBM WebSphere Service Registry and Repository is a tool that enables better management and governance of your services.
WebSphere Service Registry and Repository is an essential foundational component of a service-oriented architecture (SOA) implementation. WebSphere Service Registry and Repository enables you to store, access, and manage information about services and service interaction endpoint descriptions (referred to as service metadata) in an SOA. This information is used to select, invoke, govern, and reuse services as part of a successful SOA implementation.
Chapter 11. Related technologies 731

This service information includes Web services that implement Web Services Description Language (WSDL) interfaces with SOAP/HTTP bindings as well as a broad range of SOA services that can be described using WSDL, XML Schema Definition (XSD), and policy decorations, but might use a range of protocols and be implemented according to a variety of programming models.
WebSphere Service Registry and Repository includes:
� A service registry that contains information about services, such as the service interfaces, its operations, and parameters
� A metadata repository that has the robust framework and extensibility to suit the diverse nature of service usage
You can use WebSphere Service Registry and Repository to store information about services in your systems, or in other organizations' systems, that you already use, that you plan to use, or that you want to be aware of. For example, an application can check with WebSphere Service Registry and Repository just before it invokes a service to locate the most appropriate service that satisfies its functional and performance needs. This capability helps make an SOA deployment more dynamic and more adaptable to changing business conditions.
11.3.1 How it relates to Human-Centric BPM
It is rare that a business process is made up purely of human tasks. Most processes combine human tasks and tasks that invoke business services.
Within WebSphere Business Modeler, business services are model element representations of WSDL files, and business service objects are model element representations of XSD (XML schema) files. In many enterprises these are services and business objects that have already been implemented and have WSDL or XSD definitions. The WebSphere Service Registry and Repository can be searched from WebSphere Business Modeler, and these business service and business service objects can be populated directly. They can then be dragged and dropped from the WebSphere Business Modeler project tree onto the modeling palette.
732 Human-Centric Business Process Management with WebSphere Process Server V6

WebSphere Service Registry and Repository is a critical component in the governance and best practices embracing the model, assemble, deploy, and manage life cycle, as shown in Figure 11-3.
Figure 11-3 WebSphere Service Registry and Repository and the MADM life cycle
11.3.2 How it relates to ITSO Corp scenario
WebSphere Service Registry and Repository has not been used with the very simple ITSO Corp and the associated hiring process. In a real project WebSphere Service Registry and Repository is a key component underpinning the use of WebSphere Business Modeler and WebSphere Process Server to perform service lookups.
11.4 Rational RequisitePro
IBM Rational RequisitePro® is a requirements and use-case management tool for project teams who want to improve the communication of project goals, reduce project risk, and increase the quality of applications before deployment. Rational RequisitePro is primarily used by business analysts and requirements specifiers. Rational RequisitePro incorporates the following features:
� Uses advanced integration with Microsoft Word to provide a familiar environment for activities such as requirements definition and organization
WebSphere Service Registry and Repository
Publish Find Enrich GovernManage
Encourage ReuseFind and reuse services for building blocks for new composite applications.
Enhance ConnectivityEnable dynamic and efficient interactions between services at runtime.
Enable GovernanceGovern services throughout the service lifecycle
Publish Find
Enrich
Govern Manage
Help optimizeservice performanceEnable enforcement of policies. Versioning. Impact analysis
Chapter 11. Related technologies 733

� Incorporates a powerful database infrastructure with real-time Word document synchronization to facilitate requirements organization, integration, and analysis.
� Enables detailed attribute customization and filtering to maximize the informative value of each requirement
� Provides detailed traceability views that display parent/child relationships and show requirements that may be affected by upstream or downstream change
� Performs project version comparisons using XML-based project baselines
� Integrates with multiple tools in the IBM Software Development Platform to improve accessibility, communication, and traceability of requirements
Figure 11-4 shows a sample Rational RequisitePro view.
Figure 11-4 Rational RequisitePro
11.4.1 How it relates to Human-Centric BPM
Requirements management is one of the challenges that face software development for many reasons. Rational RequisitePro is a tool that manages requirements and supports integration with WebSphere Business Modeler. The
734 Human-Centric Business Process Management with WebSphere Process Server V6

integration allows you to link any requirement to certain model elements in WebSphere Business Modeler. This integration has many benefits. Some are:
� The integration allows you to better manage requirements.
By linking requirements to model elements, users can better track where requirements and elements originated from, and can find additional information more easily.
� The integration enhances managing changes in requirements.
Requirements change at different stages of software development. By linking requirements and business model elements, users can better manage change and communication in requirements.
� Requirements linkage can be carried across to use cases.
This approach links requirements to use cases generated in Rational Software Architect. This enhances requirements change management. The linkage verifies that the use case model satisfies the original system requirements.
11.4.2 How it relates to ITSO Corp scenario
Our ITSO Corp business scenario is simple compared to a standard business implementation. In a standard business implementation, Rational RequisitePro would be used to document requirements and communicate these requirements among business and development stakeholders. Requirements should be documented in parallel with building the business model, optionally implementing the integration of requirements to the business model.
Chapter 11. Related technologies 735

736 Human-Centric Business Process Management with WebSphere Process Server V6

Part 5 Appendixes
Part 5
© Copyright IBM Corp. 2007. All rights reserved. 737

738 Human-Centric Business Process Management with WebSphere Process Server V6

Appendix A. Additional material
This book refers to additional material that can be downloaded from the Internet as described below.
Locating the Web material
The Web material associated with this book is available in softcopy on the Internet from the IBM Redbooks Web server. Point your Web browser at:
ftp://www.redbooks.ibm.com/redbooks/SG247477
Alternatively, you can go to the IBM Redbooks Web site at:
ibm.com/redbooks
Select the Additional materials and open the directory that corresponds with the IBM Redbooks form number, SG247477.
A
© Copyright IBM Corp. 2007. All rights reserved. 739

740 Human-Centric Business Process Management with WebSphere Process Server V6

acronyms
ACL Access Control List
BFM Business Flow Manager
BPEL Business Process Execution Language
BPM Business Process Management
BPMN Business Process Modeling Notation
CEI Common Event Infrastructure
CEWS Content Engine Web Services
CLR Common language runtime
CLS Common Language Specification
CMP Container Managed Persistence
CRUD Create, Read, Update, and Delete
DMAIC Define, Measure, Analyze, Improve, Control methodology
DN Distinguished Name
DOM Document Object Model
ECM Enterprise Content Management
EJB Enterprise Java Bean
ERP Enterprise Resource Planning
FCL Framework Class Library
HTM Human Task Manager
ITE Integrated Test Rnvironment
J2C J2EE Connector Architecture
J2EE Java 2 Platform Enterprise Edition
JSF JavaServer Faces
JSP Java Server Pages
Abbreviations and
© Copyright IBM Corp. 2007. All rights reserved.
JSR Java Specification Request
LDAP Lightweight Directory Access Protocol
LTPA Lightweight Third-Party Authentication
MADM Model, Assemble, Deploy, Manage
OMG Object Management Group
PIF Project Interchange File
PKI Public Key Infrastructure
ROI Return on investment
SCA Service Component Architecture
SOA Service-oriented architecture
SOAP Simple Object Access Protocol
UML Unified Modeling Language
WAR Web Application aRchive
WSDL Web Services Description Language
WSE Web Services Enhancements
XSD XML Schema Definition
741

742 Human-Centric Business Process Management with WebSphere Process Server V6

Related publications
The publications listed in this section are considered particularly suitable for a more detailed discussion of the topics covered in this book.
IBM Redbooks
For information about ordering these publications, see “How to get Redbooks” on page 744. Note that some of the documents referenced here may be available in softcopy only.
� Best Practices for Using WebSphere Business Modeler and Monitor, REDP-4159
� Business Process Management: Modeling through Monitoring Using WebSphere V6.0.2 Products, SG24-7148
� Patterns: SOA Foundation - Business Process Management Scenario, SG24-7234
� Production Topologies for WebSphere Process Server and WebSphere ESB V6, SG24-7413
� WebSphere and .Net Interoperability Using Web Services, SG24-6395
� WebSphere Version 6 Web Services Handbook Development and Deployment, SG24-6461
� IBM WebSphere and Microsoft .NET Interoperability, SG24-6799
� WebSphere and .NET Coexistence, SG24-7027
� Experience J2EE! Using WebSphere Application Server V6.1, SG24-7297
� IBM Workplace Forms 2.6: Guide to Building and Integrating a Sample Workplace Forms Application, SG24-7388
� Patterns: Building Serial and Parallel Processes for IBM WebSphere Process Server V6, SG24-7205
© Copyright IBM Corp. 2007. All rights reserved. 743

Online resources
These Web sites are relevant as further information sources:
� WebSphere Process Server
http://publib.boulder.ibm.com/infocenter/dmndhelp/v6rxmx/index.jsp
� Business Process Choreographer examples
http://publib.boulder.ibm.com/bpcsamp/index.html
How to get Redbooks
You can search for, view, or download Redbooks, Redpapers, Technotes, draft publications and Additional materials, as well as order hardcopy Redbooks, at this Web site:
ibm.com/redbooks
Help from IBM
IBM Support and downloads
ibm.com/support
IBM Global Services
ibm.com/services
744 Human-Centric Business Process Management with WebSphere Process Server V6

Index
AActivity cost analysis 52activity instance 52, 190
average costs 52Activity throughput analysis 52Ad-Hoc task
Examples 258Ad-hoc task 29, 44, 257analysis functions 51Analysis reports 53API Event 33, 44, 105
handler 309, 318plug-ins 318
API state 315APIEvents 308APIs
See also Application programming interfacesApplication Server
profile 702appropriate messages_countrycode 247ArrayList 337, 682assembly diagram 94, 265
human tasks 266authenticated user 212, 495Authentication
alias 118, 120–121, 645–646, 652Component-managed 646
AuthorizationService 623
BBPC Explorer 31, 94, 177, 204
administration capabilities 185client 204resume button 246view 193
BPC Observer 31, 105bpe
column name 278command label 254
BPELflow 94See also Business Process Execution Language
© Copyright IBM Corp. 2007. All rights reserved.
BPM solution 7, 9Business Flow Manager (BFM) 509Business item 35–36, 49, 96, 130
XSD files 89Business item modeling 49business items 65business model 24, 728Business Process
Execution Language 12, 55Management 4, 7, 55Management professional 563Management requirement 563Message wizard 536Modeling Notation 19Modelling Notation 19
business process 4, 7, 27, 43, 48, 94, 96, 203, 502, 729
human involvement 25human tasks 48sophisticated business analysis 730staff activity ApproveStandardApplication_Input 152
Business Process Execution LanguageSee also BPEL
Business RuleWord documentation 72
business rule 13, 27, 58, 71, 130business scenario 5, 35, 47, 57, 551Businessitems.xsd 91
CCargo pattern 129
brief overview 129major disadvantage 130
catalog hierarchy 89CEI 104, 234, 656
See also Common Event InfrastructureCheck Grade 58, 74ClientObjectWrapper input 261Common Event Infrastructure 234, 656
See also CEIcomponent 15Create, Read, Update, and Delete (CRUD) 497
745

Custom Notification 33, 105, 227cycle time 14
DData object 675, 682Database
name 646, 649server 633, 642–643
DB2See also DB2 server
decision latency 493, 562–563Define, Measure, Analyze, Improve, Control (DMA-IC) 21Deployment
descriptor information 164distinguished name (DN) 118do not need (DN) 229Documentation reports 53Dynamic analysis 52
EEAR
files 164, 215Editor
human task 149–150, 153, 330, 688, 690, 709EJB
See also Enterprise JavaBeansemail 29Employee Record 41, 59, 141, 144enterprise content management (ECM) 6Enterprise JavaBeans 498
See also EJBEnterprise Service Bus 13, 95
See also ESBExecutive Application 42, 58, 166, 204, 508Executive Position 36, 58, 135, 509
binary decision artifact 77export
files 91Eye Approval
task 152
Ffinal approval stage 68FirstApproval field 175follow-on task 30, 106, 258, 295, 563
capability 291
creation API 291creation functionality 298scenario 304template 291
four-eye check 42, 97
HHealth Insurance Portability and Accountability Act (HIPAA) 26Hiring process 47, 144, 177, 218
modeling diagram 64new instance 178new process instance 218
hiring processadministrative tasks 37human tasks 508
HiringManagers group 154HR Applicant Approval
page 549HR hiring
business process 39scenario 43
HR Manager 36, 42, 68HR manager
interviews applicant 36HR Specialist 40, 58, 548
group 150team 349
HR specialistITSO Corp interact 38
HRManager 227HRMod module 139, 205HRMod project 153, 261
jar file 318HRSpecialist group 165, 215, 330HRSpecialists group 224HRSupport module 138HTTP
requests 624See also Hypertext Transfer Protocol
human task 5, 10, 42–43, 47, 56, 93, 203, 231, 318, 732
API 204assignment 224audit data 234changes state 308client 204client GUI 257
746 Human-Centric Business Process Management with WebSphere Process Server V6

component 56, 107container 108, 208container configuration 233container custom property 346container field setting 233container property name 339desired action 215editor 149, 265escalation 321escalation mechanism 33example 96implementation 84information 514instance 218manager 56, 108, 507, 509–510manager API 261, 266manager API event 319model 318multi-level escalation 29multiple web-clients 205name 338potential owner field 224process 97, 204service 248staff assignments 146staff details 179template 330web clients 106wizard 262
Human task generation 56human task manager
API 245, 258API event 308container 94
Human Task Manager (HTM) 56, 78Human-centric BPM
Modeling 48human-centric BPM 5, 7, 45, 48human-centric process 4, 35, 104
IIBM
Software Group 8Tivoli Directory Server 125, 633, 678
IBM Redbook 35IBM Software Group 8implementation type 56import
model 59IncludeSubgroups field 151, 229input data 137, 221, 517Input Field 168, 517installation
image 697wizard 697, 700
Integrated Test Environment (ITE) 208Interaction service 5interface
icon 653map 139, 641, 646, 653–654
IP address 119, 208ITSO Corp 4, 36, 47, 506, 729
accounting team 560administrator 37business scenario 735division manager interview 40hiring process 58HR manager 42Human Resources department 40ITSO Corp. 36organization chart 51organizational chart 38organizational structure 36, 69
JJ2EE
Connector Architecture 120–121, 645See also Java 2 Platform, Enterprise Edition
jar file 309, 509Java Build path 647, 653Java class 247–248, 509Java component 496Java Message Service 640Java Specification Request (JSR) 496JNDI name 115, 233, 524job application 36, 49JSP 30, 44, 59, 104, 248, 252–254, 269, 273–275, 278–280, 298, 302–304, 405–407, 409, 413–419, 444, 447, 496, 516–517, 519, 528, 532, 535, 537, 547, 560–561, 613, 687–691, 693, 695, 712, 721JSR 496, 510, 525, 711
Kkey performance indicator (KPI) 11, 562, 730
Index 747

LLDAP directory 28, 119, 240
structure 119top-level name 125tree 119
LDAP group 151LDAP provider 96LDAP server 96
password 121port number 125userid 118
LDAP structure 106, 212LDAP User
Registry properties screen 124Registry screen 124
Lightweight Directory Access Protocol (LDAP) 123, 203Lightweight Third Party authentication (LTPA) 123Line Manager 68, 224
MMapping
Process mapping 55merge 86messaging
instant 320META-INF folder 210model
export 89Model, Assemble, Deploy, Manage (MADM) 20Module
Name 145–146, 653, 664
NName
field 226, 517, 523, 545Name field 229
Staff.PostProcessorPlugin 346New
Server 426–427
OObject Management Group (OMG) 19operation name 70–71, 500Order Handling (Current) 86Organization modeling 50output data 137, 221
Pparent task 29, 224, 259peer 260plugin-configuration file 315portal client 107, 505Portal Server 4–5, 493, 496, 632–633, 687, 697, 701–706, 708Portlet 493portlet access 550portlets 495–502, 506–507, 509–510, 513–514, 540–541, 543–544, 546, 550–552, 560, 612, 632, 687, 697, 699, 701–703, 706–709, 711, 715, 717–719, 723–725Post Processing
Staff Query 104potential owner 150, 219Process cost analysis 53Process cost comparison analysis 53process instance 53, 171, 218
custom view 197Process instance resource allocation analysis 52process model 18, 48, 129Process modeling 48process portlet 515Process simulation 53process template 167, 506project interchange file 89project interchange file (PIF) 321Project Name 311, 399, 510, 525, 578, 647, 711, 720Project Tree view 60Property Broker
runtime 501service 499
Proxyobject 446
Pure Humantask 99, 261
QQuality of Service 104, 358, 617, 674
See also QoS
RRational
Application Developer 5, 355, 386, 397, 433–434, 493, 507, 509, 708, 711Software Architect 12, 20, 735
748 Human-Centric Business Process Management with WebSphere Process Server V6

Rational Application Developeroriginating portlet 540
Rational Application Developer (RAD) 507, 509Redbooks Web site 744
Contact us xviireference architecture 15related technology 6, 727remote client 30Reports 53
Analysis reports 53Documentation reports 53Procedure reports 53Simulation reports 53Weighted average reports 53
RequestgetAttribute 691, 693
Request/response operation 55requesters 381Resource modeling 49Resource Permissions 547Resource roles analysis 52Response
message 55–56, 435Return On Investment (ROI) 18revenue 14risk 14routingRule
group 57, 72, 91, 135–136, 138rule group 71rule-set editor 136runtime environment 358–359, 542
SSCA 12, 54–57, 72, 78, 83, 85–87, 91, 97–98, 106, 135, 140–142, 144, 146, 152–153, 155, 206, 230, 258, 261, 291–292, 364, 381–382, 401, 438, 453, 456, 591, 613, 615, 625–626, 641, 646, 653, 674, 677, 682
components 57, 258, 625SCA component generation 57SDO 140–142, 276, 712, 721Service Component
Architecture 13Service Component Architecture 12, 381, 615, 625
See also SCAService Oriented Architecture 15, 562
See also SOA
service-oriented architecturebenefits 14
service-oriented architecture (SOA) 731Servlet
container 495shared library 340, 342, 509SharedConstants.java file 252
last lines 253SIMPLE 10, 76, 105–106, 108, 118, 129, 135, 140–141, 143, 151, 185, 245, 261, 270, 278, 292, 298, 309, 315, 321, 331, 363, 405, 560, 570, 589, 601, 613, 632, 733, 735Simulation 53Simulation reports 53SIP method
INFO 18, 26, 507, 547, 696NOTIFY 227, 309, 503, 506OPTIONS 96, 195, 216–217, 249, 444, 446, 512, 525, 601, 620–621, 624, 627–628, 639, 674, 678REFER 8, 57, 59, 114, 134, 148, 223, 243, 270, 299, 358, 360–361, 363, 386, 426, 468, 578, 583, 588, 598–599, 601, 604, 612, 624, 686, 711, 714REGISTER 314, 318, 324, 327, 339, 345SUBSCRIBE 495, 499, 666UPDATE 108, 118, 138, 146–147, 152–154, 210, 240, 251, 268, 281, 297, 308–309, 331, 338, 345, 347, 349, 466–468, 497, 520, 535, 561, 580, 583–584, 593–594, 601, 610, 643, 651, 661, 666
SOA 7, 13–18, 32, 562–563, 609, 615, 731–732See also Service Oriented Architecturesee service-oriented architecture
social securitynumber 66
social security number 39, 66, 244, 411source portlet 499staff group 229Staff plug-in configuration
property entry 121screen 114
staff plug-in configurationfield 149
Staff Query 31, 106, 234Staff query
post processing 347StaffQueryResult originalStaffQueryResult 336Standard Application 204, 508
Index 749

Structure modeling 50Sub Task 29, 44subtasks 29, 106, 224
Ttaglib uri 279target portlet 499task 56task instance 52, 171–172, 224, 227task page 221, 286TASK.FIRS T_ACTIVATED 282TASK.ORIG INATOR 282TASK.TKTI D 282Technical attributes 56Technote 1218713 166To-be process 24toDoInstance.getI D 249Type hierarchy analysis 52Type instance matching analysis 52
UUnified Modelling Language (UML) 19Uniform Resource Identifier 623UPDATE 108, 118, 138, 146–147, 152–154, 210, 240, 251, 268, 281, 297, 308–309, 331, 338, 345, 347, 349, 466–468, 497, 520, 535, 561, 580, 583–584, 593–594, 601, 610, 643, 651, 661, 666User
information 577user Id 238, 263user IDs
fully qualified DN names 264
WWAR 524, 541WAS
See also WebSphere Application ServerWeb
deployment descriptor 420–421, 423–424, 440–441, 539
Web application 31, 387, 420, 422, 524, 541, 599, 611–612, 640, 656
archive 524, 541Web client 29, 204–205Web Service
Interface 365–366, 373, 387, 422, 440, 455, 467, 469, 613, 616, 623–624, 631
operations 365, 455, 458Web Services
Implementation 626Web Services Description Language 363, 499, 509, 732
See also WSDLweb.xml 404, 439, 522, 539WEB-INF 282, 522, 539WebSphere
Enterprise Service Bus 13, 95WebSphere Administrative 111WebSphere Application ServerWebSphere Business Integration Modeler 55
MappingFiles generated 55
BPEL 55WSDL 55XSD 55
WebSphere Business ModelerAnalysis
Activity cost analysis 52Activity throughput analysis 52Comparative analysis 52Dynamic analysis 52Process cost analysis 53Process cost comparison analysis 53Process instance resource allocation analy-sis 52Resource roles analysis 52Type hierarchy analysis 52Type instance matching analysis 52
WebSphere Business Modeller 12, 39, 47, 54, 95, 338, 728, 734
business models 13export capability 69exported project interchange file 107Technical Attributes tabs 70
WebSphere Business Monitor 12–13, 730WebSphere Integration Developer 5, 12–13, 18, 32, 54–55, 57, 70, 72, 82, 88–89, 91, 94–97, 107–108, 129, 204, 260–261, 469, 493, 505–506, 509, 545, 592, 626, 642, 646, 656, 664, 675–677, 680–681
business model 134business rule 134Human Tasks folder 148See also WIDtask template 291
WebSphere Portal 13, 106, 493
750 Human-Centric Business Process Management with WebSphere Process Server V6

WebSphere Process Server 4–7, 12–13, 18, 28–30, 33, 43–44, 54–56, 70–71, 78, 85, 89, 93–97, 103, 105–106, 108, 111, 121, 129, 203, 208, 258, 360, 362–365, 382, 386–387, 435, 446, 452, 493, 502, 504, 506–507, 509, 514, 527, 565, 568–569, 577, 584, 590–591, 596–597, 602, 609, 613–614, 619, 622, 624–627, 629, 632–634, 642, 645, 655, 660–661, 666, 674, 678, 681, 685–687, 695, 708, 710, 714, 733
post-processing capability 331query result post-processing feature 330
WebSphere Process Server (WPS) 95, 203, 353, 514WebSphere Service Registry 51, 731Weighted average reports 53WID 13
See also WebSphere Integration DeveloperWindows
2003 95–96XP 96, 567–568XP Professional 96
work item 193, 234WS-BPEL 13, 18–19, 55, 508WSDL
files 89, 91, 382, 384–386, 400, 435–436, 438, 453, 469, 575, 631, 732See also Web Services Description Language
WSDL portType generation 56
XXML
documents 611XML Schema
Definition 509, 732
Index 751

752 Human-Centric Business Process Management with WebSphere Process Server V6

Human-Centric Business Process M
anagement w
ith
Human-Centric Business Process M
anagement
with W
ebSphere Process Server V6
Human-Centric Business
Process Managem
ent with
WebSphere Process Server V6
Human-Centric Business Process M
anagement w
ith WebSphere

Human-Centric
Business Process M
anagement w
ith
Human-Centric
Business Process M
anagement w
ith


®
SG24-7477-00 ISBN 0738486787
INTERNATIONAL TECHNICALSUPPORTORGANIZATION
BUILDING TECHNICALINFORMATION BASED ONPRACTICAL EXPERIENCE
IBM Redbooks are developed by the IBM International Technical Support Organization. Experts from IBM, Customers and Partners from around the world create timely technical information based on realistic scenarios. Specific recommendations are provided to help you implement IT solutions more effectively in your environment.
For more information:ibm.com/redbooks
®
Human-Centric Business Process Management with WebSphere Process Server V6Human task capabilities in WebSphere Process Server V6.0.2
Clients: Portal, Web services, Workplace Forms
Integration with content repositories
Using step-by-step examples, this IBM Redbooks publication shows how human-centric tasks can be added into a business process management solution, using WebSphere Business Modeler to model the process, WebSphere Integration Developer to assemble it, and WebSphere Process Server to run it. This book also considers clients to human-centric business processes such as WebSphere Portal Server, Workplace Forms, and Web service interfaces. Finally, it discusses integration with content management systems such as FileNet.
Part 1 of this book introduces Human-Centric BPM, and describes the sample scenario used throughout the examples in this book.
Part 2 shows how to build processes with manual tasks in WebSphere Business Modeler V6.0.2. Additional chapters show how to use WebSphere Integration Developer and WebSphere Process Server to assemble and deploy these processes. New human-centric features of WebSphere Process Server V6.0.2 are discussed in detail in a separate chapter.
Part 3 discusses how to use WebSphere Portal Server, Workplace Forms, and Web services as clients to human-centric business processes. The Web services chapter focuses on building services in Rational Application Developer and Microsoft .NET.
Part 4 shows how content repositories such as FileNet can interact with human-centric processes, and also discusses other related technologies and products.
Back cover
Copyright © 2022 FDOKUMEN