HP Notebook PC Reference Guide
156
HP Notebook PC Reference Guide
-
Upload
khangminh22 -
Category
Documents
-
view
4 -
download
0
Transcript of HP Notebook PC Reference Guide

HP Notebook PC
Reference Guide

2 Reference Guide
Notice
This manual and any examples contained herein are provided “as is” and are subject to change without notice. Hewlett-Packard Company makes no warranty of any kind with regard to this manual, including, but not limited to, the implied warranties of merchantability and fitness for a particular purpose. Hewlett-Packard Co. shall not be liable for any errors or for incidental or consequential damages in connection with the furnishing, performance, or use of this manual or the examples herein.
Consumer transactions in Australia and the United Kingdom: The above disclaimers and limitations shall not apply to Consumer transactions in Australia and the United Kingdom and shall not affect the statutory rights of Consumers.
© Copyright Hewlett-Packard Company 2000–2001. All rights reserved. Reproduction, adaptation, or translation of this manual is prohibited without prior written permission of Hewlett-Packard Company, except as allowed under the copyright laws.
The programs that control this product are copyrighted and all rights are reserved. Reproduction, adaptation, or translation of those programs without prior written permission of Hewlett-Packard Co. is also prohibited.
Portions of the programs that control this product may also be copyrighted by Microsoft Corporation, SystemSoft Corp., Insyde Software Corporation, S3 Graphics Incorporated, and Adobe Systems Incorporated. See the individual programs for additional copyright notices.
This product incorporates copyright protection technology that is protected by method claims of certain U.S. patents and other intellectual property rights owned by Macrovision Corporation and other rights owners. Use of this copyright protection technology must be authorized by Macrovision Corporation and is intended for home and other limited viewing uses only unless otherwise authorized by Macrovision Corporation. Reverse engineering or disassembly is prohibited.
Microsoft®, MS-DOS®, and Windows® are U.S. registered trademarks of Microsoft Corporation. Pentium® and the Intel Inside logo are U.S. registered trademarks and Celeron™ and SpeedStep™ are U.S. trademarks of Intel Corporation. Adobe® and Acrobat® are trademarks of Adobe Systems Incorporated.
Hewlett-Packard Company
HP Notebook Customer Care
1000 NE Circle Blvd., MS 425E
Corvallis, OR 97330

Reference Guide 3
Important Safety Information
CAUTION To reduce the risk of fire, use only No. 26 AWG or larger telecommunications line
cord to connect a modem to the telephone wall jack.
When using your computer with a telephone connection, always follow basic safety precautions to reduce the risk of fire, electric shock, and injury to persons:
• Do not use this product with a telephone connection near water (for example, near a bathtub, sink, swimming pool, or in a wet basement).
• Avoid using a telephone connection (other than a cordless type) during an electrical storm. There may be a remote risk of electric shock from lighting.
• Do not use a telephone connection of any type to report a gas leak while in the vicinity of the leak.
• Use only the power cord and batteries indicated in this manual. Do not dispose of batteries in a fire. They may explode. Check with local codes for possible special disposal instructions.
HP Software Product License Agreement
Your HP product contains software programs. CAREFULLY READ THIS LICENSE AGREEMENT BEFORE PROCEEDING TO OPERATE THIS EQUIPMENT. RIGHTS IN THE SOFTWARE ARE OFFERED ONLY ON THE CONDITION THAT THE CUSTOMER AGREES TO ALL TERMS AND CONDITIONS OF THE LICENSE AGREEMENT. PROCEEDING TO OPERATE THE EQUIPMENT INDICATES YOUR ACCEPTANCE OF THESE TERMS AND CONDITIONS. IF YOU DO NOT AGREE WITH THE TERMS OF THE LICENSE AGREEMENT, YOU MUST NOW EITHER REMOVE THE SOFTWARE FROM YOUR HARD DISK DRIVE AND DESTROY THE MASTER DISKETTES, OR RETURN THE COMPLETE HP PRODUCT AND SOFTWARE FOR A FULL REFUND. PROCEEDING WITH CONFIGURATION SIGNIFIES YOUR ACCEPTANCE OF THE LICENSE TERMS.
UNLESS OTHERWISE STATED BELOW, THIS HP SOFTWARE LICENSE AGREEMENT SHALL GOVERN THE USE OF ALL SOFTWARE THAT IS PROVIDED TO YOU AS PART OF THE HP PRODUCT AND SHALL SUPERSEDE ANY OTHER SOFTWARE WARRANTY STATEMENT THAT MAY BE INCLUDED IN THIS HP PRODUCT OR MAY BE FOUND ONLINE.
Operating system and software applications by Microsoft are licensed to you under the Microsoft License Agreement contained in the Microsoft documentation or displayed on your screen when Microsoft Software Products are launched.

4 Reference Guide
For a PC supplied with a Microsoft operating system: When you start the PC and accept the Microsoft End-user License Agreement (“EULA”), your license rights are valid only if a Certificate of Authenticity (“COA”) label corresponding to your Microsoft operating system is provided with your PC. The COA label can usually be found on the bottom of the computer. If the COA label does not correspond to your Microsoft operating system or is missing, contact your HP reseller for details.
Other non-HP Software and Operating Systems are covered by the appropriate vendor license. The following License Terms govern the use of the HP software:
USE. Customer may use the software on any one HP product. Customer may not network the software or otherwise use it on more than one HP product. Customer may not reverse assemble or decompile the software unless authorized by law.
COPIES AND ADAPTATIONS. Customer may make copies or adaptations of the software a) for archival purposes or (b) when copying or adaptation is an essential step in the use of the software with an HP product so long as the copies and adaptations are used in no other manner.
OWNERSHIP. Customer agrees that he/she does not have any title or ownership of the software, other than ownership of the physical media. Customer acknowledges and agrees that the software is copyrighted and protected under the copyright laws. Customer acknowledges and agrees that the software may have been developed by a third party software supplier named in the copyright notices included with the software, who shall be authorized to hold the Customer responsible for any copyright infringement or violation of this Agreement.
PRODUCT RECOVERY CD-ROM. If your HP product was shipped with a product recovery CD-ROM or DVD: (i) The product recovery CD-ROM or DVD and/or support utility software may only be used for restoring the hard disk of the HP product with which the product recovery CD-ROM or DVD was originally provided. (ii) The use of any operating system software by Microsoft contained in any such product recovery CD-ROM or DVD shall be governed by the Microsoft License Agreement.
TRANSFER OF RIGHTS IN SOFTWARE. Customer may transfer rights in the software to a third party only as part of the transfer of all rights and only if Customer obtains the prior agreement of the third party to be bound by the terms of this License Agreement. Upon such a transfer, Customer agrees that his/her rights in the software are terminated and that he/she will either destroy his/her copies and adaptations or deliver them to the third party.
SUBLICENSING AND DISTRIBUTION. Customer may not lease, sublicense the software or distribute copies or adaptations of the software to the public in physical media or by telecommunication without the prior written consent of Hewlett-Packard.
TERMINATION. Hewlett-Packard may terminate this software license for failure to comply with any of these terms provided Hewlett-Packard has requested Customer to cure the failure and Customer has failed to do so within thirty (30) days of such notice.
UPDATES AND UPGRADES. Customer agrees that the software does not include updates and upgrades which may be available from Hewlett-Packard under a separate support agreement.

Reference Guide 5
EXPORT CLAUSE. Customer agrees not to export or re-export the software or any copy or adaptation in violation of the U.S. Export Administration regulations or other applicable regulation.
U.S. GOVERNMENT RESTRICTED RIGHTS. Use, duplication, or disclosure is subject to HP standard commercial license terms and for non-DOD Departments and Agencies of the U.S. Government, the restrictions set forth in FAR 52.227-19(c)(1-2) (June 1987) Hewlett-Packard Company, 3000 Hanover Street, Palo Alto, CA 94304 U.S.A. Copyright (c) 2000 Hewlett-Packard Company. All Rights Reserved. Customer further agrees that Software is delivered and licensed as “Commercial computer software” as defined in DFARS 252-227-7014 (June 1995) or as a “commercial item” as defined in FAR 2.101(a), or as “Restricted computer software” as defined in FAR 52.227-19 (or any equivalent agency regulation or contract clause), whichever is applicable. The Customer agrees that it has only those rights provided for such Software by the applicable FAR or DFARS clause or the HP standard software agreement for the product involved.
Support Policy for Support Pack of Operating Systems. HP provides end user support for HP PCs that use Microsoft Operating Systems, including its latest service packs. This support will be available within 30 days of the software being released.
Edition History
Edition 1 ........................................... October 2001
Edition 2 ............................................ March 2002
This manual is printed on recycled paper.


Reference Guide 7
Contents
Getting Started with Your HP Notebook .....................................................................11
Taking Inventory.........................................................................................................12
What’s in the box? ................................................................................................12
To buy accessories ................................................................................................13
To find more information......................................................................................13
Identifying Parts of the Notebook...............................................................................14
Front view .............................................................................................................14
Back view..............................................................................................................15
Bottom view..........................................................................................................16
Status lights ...........................................................................................................17
Multimedia buttons and status panel (selected models) ........................................19
Setting Up Your Notebook .........................................................................................20
Step 1: Install the battery.......................................................................................20
Step 2: Connect AC power....................................................................................22
Step 3: Connect a phone line.................................................................................23
Step 4: Turn on the notebook ................................................................................24
Step 5: Set up Windows ........................................................................................24
Step 6: Register your notebook .............................................................................25
To connect to the Internet......................................................................................25
Basic Operation ..............................................................................................................27
Operating Your Notebook...........................................................................................28
To turn the notebook on and off............................................................................28
To reset the notebook ............................................................................................29
To change the boot device.....................................................................................30
To use the touch pad .............................................................................................30
To use the Fn hot keys ..........................................................................................32
To use the One-Touch buttons ..............................................................................33
To use the Windows and Applications keys..........................................................34
To use the embedded keypad ................................................................................34
To use the Alt GR key...........................................................................................35
To adjust the display .............................................................................................35
To adjust the volume.............................................................................................36
To mute the notebook............................................................................................37
To optimize video performance ............................................................................37
Securing Your Notebook ............................................................................................38
To set up password protection...............................................................................38
To lock your computer ..........................................................................................39
To attach a security cable ......................................................................................39
To protect against viruses......................................................................................40
Working in Comfort with a Notebook PC ..................................................................41
Taking Care of Your Notebook ..................................................................................43
To protect your hard disk drive .............................................................................43

8 Reference Guide
To maintain your notebook ...................................................................................43
To safeguard your data..........................................................................................44
To extend the life of the display............................................................................44
To clean your notebook.........................................................................................44
Batteries and Power Management ................................................................................45
Managing Power Consumption...................................................................................46
How the notebook manages power automatically.................................................46
To manage power manually ..................................................................................48
Using Battery Power...................................................................................................49
To check battery status..........................................................................................49
To respond to a low-battery warning ....................................................................50
To recharge the battery..........................................................................................50
To replace the battery............................................................................................50
To get the most from your batteries ......................................................................51
To maximize processor speed ...............................................................................52
Modem and Network Connections................................................................................53
Using the Modem........................................................................................................54
To connect the modem ..........................................................................................54
To connect to the Internet......................................................................................56
To disconnect from the Internet ............................................................................56
To dial in to a network ..........................................................................................57
To change your modem settings............................................................................57
To send and receive e-mail....................................................................................58
To send and receive faxes .....................................................................................59
Connecting to a LAN..................................................................................................60
To connect to a LAN.............................................................................................60
Making Wireless Network Connections (selected models) ........................................61
To prepare for wireless LAN connections.............................................................61
To turn wireless LAN communication on and off.................................................62
Making Wireless Bluetooth Connections (selected models).......................................64
To turn Bluetooth communication on and off .......................................................64
To prepare for Bluetooth connections ...................................................................65
To work with Bluetooth devices ...........................................................................65
Add-On Devices ..............................................................................................................67
Using Plug-In Modules ...............................................................................................68
To replace a plug-in module..................................................................................68
To insert or remove a CD or DVD........................................................................70
To play audio CDs ................................................................................................72
To use the status panel (selected models)..............................................................73
To play DVD movies ............................................................................................74
To create or copy CDs...........................................................................................75
Connecting PC Cards..................................................................................................76
To insert or remove a PC Card..............................................................................76

Reference Guide 9
Connecting SD Cards and MMC Cards ......................................................................78
To insert or remove an SD Card or MMC Card....................................................78
Connecting External Devices......................................................................................80
To identify connectors for external devices ..........................................................80
To connect a printer or other parallel device.........................................................82
To connect an external keyboard or mouse...........................................................82
To connect a USB device ......................................................................................82
To connect a USB floppy disk drive .....................................................................83
To connect an audio device...................................................................................83
To use an external monitor....................................................................................84
To use a TV set as a monitor.................................................................................85
To connect an infrared device (selected models) ..................................................87
To use the port replicator ......................................................................................88
To connect an IEEE 1394 device ..........................................................................89
Installing Additional RAM .........................................................................................90
To install a RAM expansion module.....................................................................90
To remove a RAM expansion module ..................................................................91
To replace the system RAM module.....................................................................92
Replacing the Hard Disk Drive...................................................................................95
To replace the hard disk drive ...............................................................................95
To replace the hard disk drive holder....................................................................96
To prepare a new hard disk drive ..........................................................................96
Troubleshooting and Maintenance................................................................................97
Troubleshooting Techniques.......................................................................................98
Getting Assistance for Your Notebook.......................................................................99
To get help from HP Instant Support ....................................................................99
Audio problems.....................................................................................................99
CD and DVD problems ....................................................................................... 100
Display problems ................................................................................................ 101
Floppy disk drive problems................................................................................. 103
Hard disk drive problems .................................................................................... 103
Heat problems ..................................................................................................... 104
Infrared Problems................................................................................................ 104
Keyboard and pointing device problems............................................................. 104
LAN problems..................................................................................................... 106
Memory problems ............................................................................................... 106
Modem problems ................................................................................................ 107
One-Touch button problems................................................................................ 110
Parallel and USB problems ................................................................................. 111
PC card (PCMCIA) problems ............................................................................. 112
Performance problems ........................................................................................ 113
Power and battery problems................................................................................ 114
Printing problems ................................................................................................ 115
Startup Problems ................................................................................................. 116
Standby and resume problems............................................................................. 117
Wireless Problems............................................................................................... 117

10 Reference Guide
Testing the Hardware................................................................................................ 119
To run the e–Diagtools diagnostic test ................................................................ 119
Configuring the Notebook ........................................................................................ 121
To run the BIOS configuration utility ................................................................. 121
Reinstalling and Updating Software ......................................................................... 124
To recover the factory installation of your hard disk .......................................... 124
To replace damaged Recovery CDs or DVDs ..................................................... 125
To update the notebook BIOS............................................................................. 126
To update Windows drivers ................................................................................ 126
HP Support and Service............................................................................................... 127
Getting Assistance for Your Notebook..................................................................... 128
To get help from the web .................................................................................... 128
To contact HP for support or service................................................................... 129
To receive repair service ..................................................................................... 131
To prepare your notebook for shipment .............................................................. 132
Hewlett-Packard Limited Warranty Statement ......................................................... 133
Reference Information ................................................................................................. 135
Hardware Specifications ........................................................................................... 136
Modem Reference Information................................................................................. 139
Modem Reference (Ambit) ................................................................................. 139
Safety Information .................................................................................................... 144
Power cords......................................................................................................... 144
Ergonomics ......................................................................................................... 145
Battery safety ...................................................................................................... 145
Laser safety ......................................................................................................... 146
LED safety .......................................................................................................... 146
Exposure to radio frequency radiation ................................................................ 147
Regulatory Information............................................................................................. 148
U.S.A................................................................................................................... 148
Canada................................................................................................................. 149
European Union .................................................................................................. 149
International ........................................................................................................ 151
Index .............................................................................................................................. 153

Reference Guide 11
Getting Started with Your HP Notebook
Getting Started with Your HP Notebook Taking Inventory
12 Reference Guide
Taking Inventory
Congratulations! Your HP notebook computer sets a new standard in personal computing. Although compact and easy to carry, your notebook is made with the quality and attention to detail that are the hallmark of Hewlett-Packard.
Your notebook has several features that make it convenient to use:
• The power button provides convenient options for starting and stopping the notebook.
• The notebook includes a variety of connectors—USB, parallel, TV out, and IEEE 1394—that enable you to use it with a wide range of printers, drives, audio equipment, and other external devices.
In addition, most connectors are on or near the back of the notebook, keeping cables away from your working area.
• Selected models feature convenient dedicated volume controls and a mute button (with indicator) that lets you cut off all sound quickly when needed.
This manual shows how to set up and operate your notebook, as well as what to do if you run into trouble.
What’s in the box?
Your notebook is shipped with these items:
• Battery (installed).
• Plug-in drive module: CD, DVD, CD-RW, or DVD/CD-RW combo.
• Weight-saving module for the notebook’s drive module bay, to reduce travel weight.
• AC adapter and power cord.
• Quick Start sheet.
• Startup Guide.
• Recovery CDs or DVDs, for restoring Windows and all software included with your notebook.
• Microsoft Windows manual.
• Phone cord.
• USB-serial adapter.
In addition, your notebook includes a variety of preinstalled software. (The exact software installed depends on your particular notebook model.)

Getting Started with Your HP Notebook Taking Inventory
Reference Guide 13
To buy accessories
You can buy accessories for your notebook online. For the latest accessories and options, visit the HP Notebook web site at www.hp.com/notebooks.
HP currently offers a wide variety of accessories, such as the following:
• Port replicator.
• External USB floppy disk drive.
• AC adapters.
• 8-cell LiIon enhanced battery.
• Additional RAM.
• Ethernet, modem, LAN, and wireless LAN cards.
To find more information
The following table lists other sources of information about your notebook and related products.
Source Description and Location
Startup Guide This printed manual introduces your HP notebook computer, and contains setup instructions, basic operation guidelines, troubleshooting information, and warranty information.
Online Reference Guide
The Reference Guide is shipped on the notebook’s hard drive, and provides a complete source for operating and maintaining the notebook. Click Start, All Programs, HP Library, HP Notebook Reference Guide, or look on the Recovery CD or DVD in \hp\Library.
Online HP Notes For late-breaking information available after the manuals were completed, see the HP Notes—click Start, All Programs, HP Library, HP Notes, or look on the Recovery CD or DVD in \hp\Library.
Microsoft Windows manual
This is shipped with your notebook and contains information about using the version of Microsoft Windows shipped with your notebook.
HP Notebook Web Site
www.hp.com/notebooks. www.europe.hp.com/notebooks (European mirror).
HP Business Support Web Site
www.hp.com/go/bizsupport.

Getting Started with Your HP Notebook Identifying Parts of the Notebook
14 Reference Guide
Identifying Parts of the Notebook
Front view
1. One-Touch buttons (programmable).
2. Power button.
3. Keyboard status lights: Caps Lock, Num Lock, CD or DVD drive activity.
4. Touch pad/scroll pad on-off button (with on-off indicators on either side).
5. Left and right click buttons.
6. Touch pad.
7. Scroll pad.
8. Volume controls (selected models).
9. Mute button and indicator light (selected models).
10. Removable DVD or DVD/CD-RW drive.
11. CD/DVD eject button.
12. Speaker (one on each side).
13. Latch.
14. Built-in microphone.

Getting Started with Your HP Notebook Identifying Parts of the Notebook
Reference Guide 15
Back view
15. AC adapter jack.
16. Parallel port (LPT1) (colored burgundy). Use this port for a parallel printer or other parallel device.
17. External monitor (VGA) port (colored blue).
18. Universal serial bus (USB) ports (2).
19. S-video (TV out) port (colored yellow).
20. Reset switch.
21. Kensington lock slot (security connector).
22. LAN port and indicators.
23. Modem.
24. IEEE 1394 connector.
25. SD-MMC Card slot.
26. PC Card slot (Type II).
27. PC Card eject button.
28. Hard disk drive.
29. Wireless on-off button and indicator light (selected models).
30. External microphone jack (colored pink).
31. Headphones jack (colored green).

Getting Started with Your HP Notebook Identifying Parts of the Notebook
16 Reference Guide
Bottom view
32. Infrared port (selected models).
33. Battery.
34. CD/DVD drive latch.
35. RAM cover.
36. Battery latch.
37. Docking port.
38. Mini-PCI cover (no user-replaceable parts inside).
39. Hard disk drive retaining screws.
Getting Started with Your HP Notebook Identifying Parts of the Notebook
Reference Guide 17
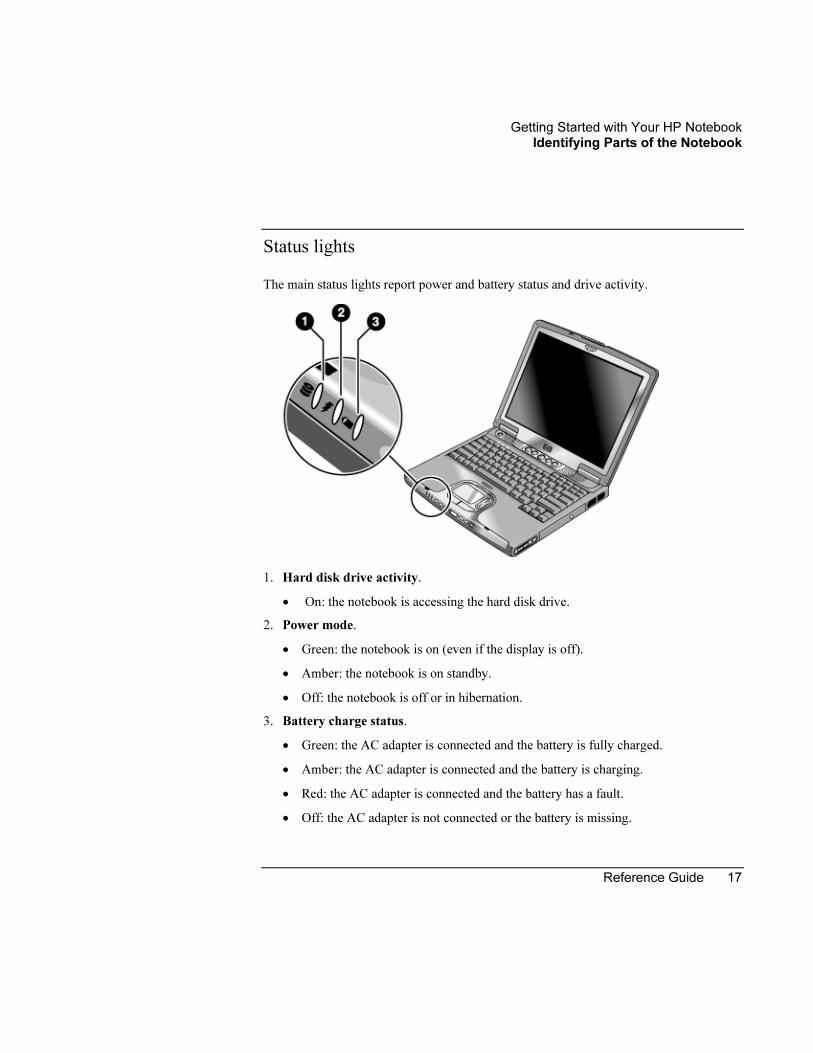
Status lights
The main status lights report power and battery status and drive activity.
1. Hard disk drive activity.
• On: the notebook is accessing the hard disk drive.
2. Power mode.
• Green: the notebook is on (even if the display is off).
• Amber: the notebook is on standby.
• Off: the notebook is off or in hibernation.
3. Battery charge status.
• Green: the AC adapter is connected and the battery is fully charged.
• Amber: the AC adapter is connected and the battery is charging.
• Red: the AC adapter is connected and the battery has a fault.
• Off: the AC adapter is not connected or the battery is missing.

Getting Started with Your HP Notebook Identifying Parts of the Notebook
18 Reference Guide
The keyboard status lights, located above the keyboard, indicate the states of keyboard locks and the CD player.
1. Caps Lock. Caps Lock is active.
2. Num Lock. Num Lock is active. (The Keypad Lock must also be on to use the embedded keypad.)
3. CD drive activity. The CD drive is active.

Getting Started with Your HP Notebook Identifying Parts of the Notebook
Reference Guide 19
Multimedia buttons and status panel (selected models)
1. MP3 player launch button.
2. Previous track.
3. Next track.
4. Status panel button.
5. Status panel.
6. Play/Pause.
7. Stop.
8. Multimedia power switch and indicator light—turns the CD player on and off. Works only when the notebook is off, on standby, or in hibernation.

Getting Started with Your HP Notebook Setting Up Your Notebook
20 Reference Guide
Setting Up Your Notebook
WARNING Improper use of keyboards and other input devices has been associated with
ergonomic injury. For information about reducing your risk, see “Working in
Comfort” in the online HP Library, or visit our ergonomics web site,
www.hp.com/ergo. For a summary about working with a notebook computer, see
“Working in Comfort with a Notebook PC” on page 41.
If you are using your notebook as your primary computer, or using it for extended
periods, you should use it with a full-size keyboard, monitor, and mouse. This can
reduce the risk of ergonomic injury. See “Working in Comfort” in the online HP
Library.
When you set up your notebook for the first time, you’ll need to install and charge the battery, connect the AC adapter and a phone line, turn on the notebook, run the Windows setup program, and register the notebook.
Step 1: Install the battery
WARNING Do not mutilate or puncture batteries. Do not dispose of batteries in fire, or they
can burst or explode, releasing hazardous chemicals. Rechargeable batteries must
be recycled or disposed of properly.
Your notebook is shipped with the battery installed. If the battery has been removed, install it as follows.

Getting Started with Your HP Notebook Setting Up Your Notebook
Reference Guide 21
• Insert the front end of the battery into the battery compartment on the bottom of the notebook, then press the back end in until the battery clicks into place.
To remove the battery
• Slide the battery’s release latch, then lift the battery out of its compartment.

Getting Started with Your HP Notebook Setting Up Your Notebook
22 Reference Guide
Step 2: Connect AC power
CAUTION Use only the HP AC adapter included with your notebook (or other approved 75-
watt adapter). Do not use a 60-watt adapter, such as HP F1454A or F1781A. Using
any other AC adapter could damage the notebook and may void your warranty—
see "Hewlett-Packard Limited Warranty Statement" on page 133.
• Plug in the AC adapter (its LED lights), then connect it to the AC adapter jack on the back of the notebook. The notebook’s battery then starts charging.
While the battery is charging, you can continue with step 3.

Getting Started with Your HP Notebook Setting Up Your Notebook
Reference Guide 23
Step 3: Connect a phone line
If your notebook does not include a built-in modem, you can skip this step. Also, if you prefer, you can instead connect to a PC Card modem or an external modem.
1. Make sure the telephone line is an analog line. You must not use a digital line. (Many office and some home lines are digital.)
2. Plug the telephone cord into the notebook’s modem jack, or the PC Card or external modem. Make sure the cord clicks into place.
3. Plug the other end of the cord into a telephone jack. If the plug on the phone cord doesn’t fit the jack, you may need to use an adapter.
For details about using the modem, see “Using the Modem” on page 54.

Getting Started with Your HP Notebook Setting Up Your Notebook
24 Reference Guide
Step 4: Turn on the notebook
• Press the power button above the keyboard. The notebook then boots up, and Windows starts automatically.
Note Your notebook comes with a factory-installed DVD, DVD/CD-RW, or similar drive. Before you turn on your notebook for the first time, make sure this drive is in place. This ensures that the system properly identifies the hardware already installed and loads the appropriate software.
Hint If your notebook does not turn on when operating on battery power, the battery may be out of power. Plug in the AC adapter and press the power button again. Leave the AC adapter plugged in for at least an hour.
Step 5: Set up Windows
Your notebook has Microsoft Windows XP preinstalled on its hard disk drive. The first time you turn on your notebook, the Windows Setup program runs automatically so you can customize your setup.
1. Follow the Setup program’s instructions as they appear on the screen.
2. If your notebook has a modem, check the modem’s country or region settings: click Start, Control Panel, Printers and Other Hardware, Phone and Modem Options. On the Dialing Rules tab, verify the settings for your location, or create a new location.
Note If you need the Windows XP Product ID code, you will find it on the bottom of the notebook.

Getting Started with Your HP Notebook Setting Up Your Notebook
Reference Guide 25
Step 6: Register your notebook
Be sure to register your notebook. Registering is free and fast, and ensures you will receive quicker, more personalized support. The information you provide during registration allows us to provide you with better products and services.
Registering your notebook does the following:
• Records your ownership of the notebook with Hewlett-Packard and provides access to service, support, and information.
• Records your ownership of the Windows XP operating system with Microsoft.
You can register while setting up Windows, or later in any of three ways: by modem, by phone, or by fax.
By modem
If you decide not to register while setting up Windows, or if your notebook does not have a built-in modem, you can register after you set up a PC card modem or an external modem—or you can register by phone or fax.
By phone
You can register by calling your HP Customer Care Center. See “To contact HP for support or service” on page 129 for the phone number.
By fax
If you have a printer connected to your notebook, you can print a registration form and fax it to HP. Double-click the HP Notebook Registration icon on the desktop, and print the registration form. You will find the fax number on the form.
To connect to the Internet
You can use the built-in modem, LAN port, or wireless LAN (if available on your notebook), to connect to the Internet. For details, see “Using the Modem” on page 54, “Connecting to a LAN” on page 60, or “Making Wireless Network Connections” on page 61.


Reference Guide 27
Basic Operation

Basic Operation Operating Your Notebook
28 Reference Guide
Operating Your Notebook
You can start and stop your notebook using its power button. However, at certain times you may want to use other methods to start or stop the notebook—depending on power considerations, types of active connections, and start-up time.
Note This manual describes your notebook in its original factory configuration, with all settings at their default values.
To turn the notebook on and off
Power mode To enter this mode To turn on again
On Power mode status light is green.
Press the power button.
Standby Maintains current session in RAM. Turns off the display and other components. Saves significant power. Restarts quickly. Restores network connections. Power mode status light is amber.
Click Start, Turn Off Computer, Stand By –or– press the power button –or– allow timeout.
Press the power button to quickly resume your session.
Hibernation Saves current session to disk, then turns off. Saves maximum power. Restores network connections. Power mode status light is off.
Click Start, Turn Off Computer, then press and hold Shift and click Hibernate –or– allow timeout.
Press the power button to resume your session.
Turn off Turns off without saving current session. Saves maximum power. At startup, resets everything, and starts a new session. Power mode status light is off.
Click Start, Turn Off Computer, Turn Off –or– press and hold the power button for four seconds (only if the Start menu procedure doesn’t work).
Press the power button to start with a new session.
You can customize the way these power modes work, and the ways you can put the notebook into them. See “Managing Power Consumption” on page 46.

Basic Operation Operating Your Notebook
Reference Guide 29
To reset the notebook
Occasionally, you may find that Windows or the notebook has stopped responding, and will not let you turn the notebook off. If this happens, try the following in the order listed.
• If possible, shut down Windows: press Ctrl+Alt+Del, then click Shut Down, Turn Off.
–or, if this fails–
• Press and hold the power button for about four seconds, until the display turns off. Press the power button again to restart.
–or, if this fails–
• Use a pen or straightened paper clip to press the reset switch on the back of the notebook, then press the power button to restart.

Basic Operation Operating Your Notebook
30 Reference Guide
To change the boot device
The notebook normally boots from its internal hard disk. You can also boot the notebook from an external USB floppy disk drive (optional accessory), the CD/DVD drive, or a local area network (LAN).
1. Click Start, Turn Off Computer, Restart.
2. When the HP logo appears, press Esc to display the Boot menu.
3. Use the arrow keys to select the boot device, and press Enter.
If you want to boot from a specific device whenever it is present, change the boot order using the BIOS configuration utility—see “To run the BIOS configuration utility” on page 121.
To use the touch pad
Your notebook includes a built-in touch pad, scroll pad, and click buttons.
1. Left click button—works like the left button on a standard mouse.
2. Right click button—works like the right button on a standard mouse.
3. Touch pad—pressure-sensitive pointing and clicking device.
4. Pad Lock button—turns the touch pad and scroll pad on and off.
5. Scroll pad—scrolls the contents of a window.
6. Pad Lock indicators (one on each side)—these light while the touch pad and scroll pad are enabled.

Basic Operation Operating Your Notebook
Reference Guide 31
You can customize the operation of many of these devices: you can change the click button and scroll pad actions, double-click speed, pointer speed, and more: click Start, Control Panel, Printers and Other Hardware, Mouse.
Note The touch pad and scroll pad are automatically disabled when the notebook is docked in a port replicator that has a PS/2 mouse connected.
Moving and selecting using the touch pad and click buttons
1. To move the pointer, move your thumb or finger across the touch pad.
2. Use the left and right click buttons, which function like the left and right buttons on a mouse, to make your selection. You can also tap the touch pad instead of clicking a button.
• To open an application, move the pointer over the icon and double-click the left button or tap the touch pad twice.
• To make menu selections, move the pointer to the menu item and click the left button or tap the touch pad.
• To open the shortcut menu for an item, move the pointer over the item and click the right button.
• To drag an item, move the pointer over the item. Press and hold the left button while you move the pointer to the new location, then release the button.
Scrolling with the scroll pad and touch pad
• To scroll vertically, move a finger up or down on the scroll pad.
• To scroll horizontally, move a finger left or right along the bottom edge of the touch pad.
You can customize the notebook’s scrolling features to best suit how you use your notebook: left-click the TouchPad icon in the taskbar, then click TouchPad Properties, Scrolling.
Disabling the touch pad and scroll pad
You may occasionally want to disable the touch pad and scroll pad, such as when you are entering text and do not want to move the cursor accidentally.
• To disable the touch pad and scroll pad, press the Pad Lock button (the Pad Lock indicators then turn off). To reenable the touch pad, press the Pad Lock button again.
Note Avoid using the touch pad when you press the Pad Lock button, or the Pad Lock button will not work properly.

Basic Operation Operating Your Notebook
32 Reference Guide
To use the Fn hot keys
The combination of the Fn key plus another key creates a hot key—a shortcut key sequence—for various system controls.
• To use a hot key, press and hold Fn, press the appropriate second key, then release both keys.
This hot key Does this
Fn+F1 Decreases the display brightness.
Fn+F2 Increases the display brightness.
Fn+F5 Toggles among the built-in display, an external display, and simultaneous display on both.
Fn+F8 Toggles the built-in keypad on and off. Does not affect an external keyboard. If Num Lock is on, the numeric functions are active; otherwise, cursor control is active (as marked on an external keyboard).
Fn+Num Lock
Toggles Scroll Lock on and off.
Fn+Page Up
Increases the volume (and turns audio on if muted).
Fn+Page Down
Decreases the volume.
Fn+Backspace Toggles the mute function on and off.
Fn+any One-Touch button Toggles the One-Touch button LEDs on and off (selected models).
External keyboards do not support Fn hot keys.

Basic Operation Operating Your Notebook
Reference Guide 33
To use the One-Touch buttons
Your notebook includes five One-Touch buttons that can start any application or open a document or web site with a single press. The buttons are pre-configured for specific applications, but you can set them to start any applications you want.
• Press the One-Touch button to open the corresponding application, document, or web site.
Note Pressing a One-Touch button resumes the notebook from standby or hibernation, or turns the notebook on. It does not, however, bypass any password protection.
Your computer is preconfigured to access the following services:
1. Outlook Express e-mail software.
2. HP TV Now.
3. Internet Browser.
4. HP Quick Lock.
5. Help and Support.
To reprogram a One-Touch button
1. Click Start, Programs (or All Programs), Hewlett-Packard, Notebook, HP One-Touch, HP One-Touch Configuration.
2. On the HP One-Touch tab, click the button you want to reprogram.
3. Type a label for the button, then select the application, document, folder, or web site you want the button to open.
4. If you want a label to appear onscreen when you press a One-Touch button, select that option on the Onscreen Display tab.

Basic Operation Operating Your Notebook
34 Reference Guide
To use the Windows and Applications keys
The Windows key brings up the Windows Start menu. This is the same as clicking the Start button on the taskbar.
The Applications key brings up the shortcut menu for the current application. This is the same menu that appears when you right-click while pointing at the application.
This key combination Does this
Windows key+E Runs Windows Explorer.
Windows key+F1 Runs Windows Help and Support.
Windows key+F Runs Windows Search dialog box.
Windows key+M Minimizes all displayed windows.
Shift+Windows key+M Returns all minimized windows to original size.
Windows key+R Runs the Windows Run dialog box.
To use the embedded keypad
Your notebook’s built-in keyboard includes an embedded keypad you can use to type numbers and arithmetic operators. The keys in this keypad are marked using blue characters.
• Press Fn+F8 to turn on the embedded keypad.
–or–
• Hold Fn while typing a key to turn the embedded keypad on temporarily.
When the embedded keypad is active, you can use Num Lock to change how the keypad functions:
• Num Lock on: The keys enter the numbers and arithmetic operator printed in light blue on the keyboard.
• Num Lock off: The keys move the cursor, as marked on an external keyboard.

Basic Operation Operating Your Notebook
Reference Guide 35
To use the Alt GR key
Non-U.S. keyboards have an Alt GR key to the right of the spacebar. This is a shift key that provides access to certain special keyboard characters.
• For a character in the lower-right corner of a key, press and hold Alt GR to type the character.
1. Shifted.
2. Unshifted.
3. Alt GR.
To adjust the display
Changing the brightness
• Press Fn+F1 or Fn+F2 to decrease or increase (respectively) the display’s brightness.
–or–
• Click Start, All Programs, Hewlett-Packard, Notebook, HP Display Settings. You can also add a display settings icon in the taskbar for quick access.
Hint To maximize your battery operating time, set the brightness to the lowest level you can view comfortably.
Changing display settings
You can customize a number of display settings for your notebook, such as color depth and screen area.
1. Click Start, Control Panel, Appearance and Themes, Display.
2. Click the Settings tab, then make the settings you want.
3. Click the Appearance tab to customize fonts, icons, menus, and other display elements used throughout Windows XP.

Basic Operation Operating Your Notebook
36 Reference Guide
The notebook has an LCD display, which behaves differently from a normal computer monitor. If you change the display resolution, the desktop changes size, but the objects on it do not. You normally won’t change the resolution except to use an external monitor.
Changing icon and label sizes
To quickly enlarge icons and labels on your screen when using a high-resolution display, use HP Desktop Zoom.
• Click Start, All Programs, Hewlett-Packard, Notebook, Desktop Zoom, Desktop Zoom. If this program is not installed on your notebook, you can download it from the HP Business Support web site (www.hp.com/go/bizsupport).
Using an external monitor
If you want, you can attach an external monitor to your notebook. See “To use an external monitor” on page 84.
To adjust the volume
From the notebook controls
• To increase the volume, press Fn+Page Up.
–or–
Press the rear volume control on the right side of the notebook (selected models).
• To decrease the volume, press Fn+Page Down.
–or–
Press the front volume control on the right side of the notebook (selected models).
In Windows
• Click the speaker icon in the taskbar, and drag the volume control bar up or down to adjust the volume.

Basic Operation Operating Your Notebook
Reference Guide 37
To mute the notebook
Your notebook provides several ways to mute its speakers without changing the volume setting. This can be handy when you want to block all speaker output regardless of what the notebook is doing.
• Press Fn+Backspace to toggle the mute function.
• Click the speaker icon in the taskbar, then click Mute.
• If your notebook includes a mute button (located on the notebook’s right side), press the button to toggle the mute function. The mute indicator lights when the speakers are muted.
To optimize video performance
Depending on how you use your notebook, you may want to increase the amount of memory it can access for video processing.
To increase video memory
1. Click Start, Control Panels, Appearance and Themes, Display, then click Advanced on the Settings tab.
2. On the S3Info Plus tab, set the video memory size. HP recommends 16 MB for most computer uses, and 32 MB if you run programs such as video games that make heavy use of the notebook’s video capabilities.
3. Restart the notebook for the changes to take effect.

Basic Operation Securing Your Notebook
38 Reference Guide
Securing Your Notebook
To set up password protection
You can protect your notebook from access by another user when you set up password protection, which is available through Windows and through the BIOS configuration utility. For complete protection, set passwords in Windows and through the BIOS configuration utility.
To cancel password protection, set an empty password.
BIOS configuration utility
1. Click Start, Turn Off Computer, Restart.
2. When the HP logo appears, press F2 to enter the BIOS configuration utility.
3. In the Security menu, enter or modify the Admin password or User password as needed—see “Security Menu” on page 122.
4. In the Exit menu, select Save and Reboot to save and exit the BIOS configuration utility.
Windows XP
1. Click Start, Control Panel, User Accounts, then select your account.
2. Click Create a Password, then set a password.
3. Click Start, Control Panel, Performance and Maintenance, Power Options.
4. On the Advanced tab, select the option to prompt for a password when the notebook resumes from standby.

Basic Operation Securing Your Notebook
Reference Guide 39
To lock your computer
To protect against unauthorized access or unauthorized undocking while your computer is running, lock the computer before leaving it unattended, or set up a screen saver with a password in Control Panel Display.
• Press the HP Quick Lock button—the five One-Touch buttons are located above the main keyboard.
–or–
Press CTRL+ALT+DEL and click Lock Computer. This option may not be available in all configurations.
To unlock the computer, follow your normal logon steps.
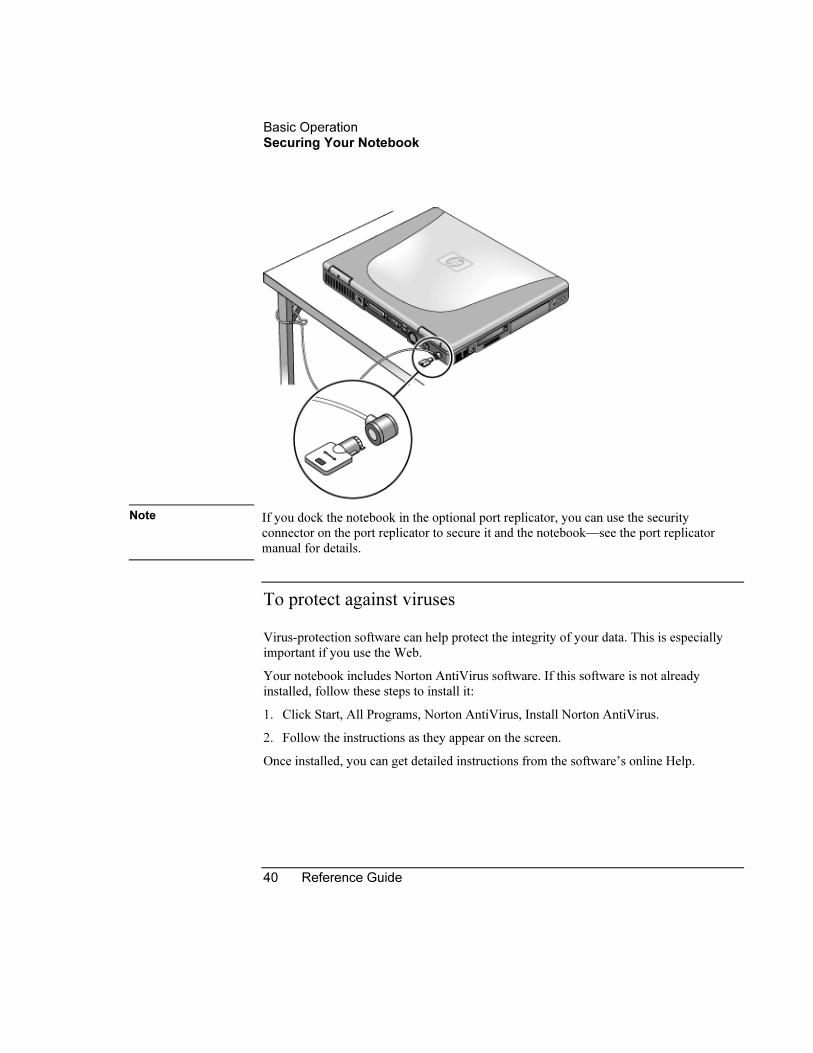
To attach a security cable
Your notebook includes a built-in connector you can use to secure the notebook with a cable and a lock (such as the Kensington MicroSaver lock system, available at many computer stores).
1. Wrap the cable around a secure object, such as a table leg.
2. Loop the cable to create a slip knot around the stationary object, and make sure it can’t slip off.
3. Insert the lock into the security connector on the back of the notebook, and release the key. Store the key in a safe place away from the notebook.
Basic Operation Securing Your Notebook
40 Reference Guide
Note If you dock the notebook in the optional port replicator, you can use the security connector on the port replicator to secure it and the notebook—see the port replicator manual for details.
To protect against viruses
Virus-protection software can help protect the integrity of your data. This is especially important if you use the Web.
Your notebook includes Norton AntiVirus software. If this software is not already installed, follow these steps to install it:
1. Click Start, All Programs, Norton AntiVirus, Install Norton AntiVirus.
2. Follow the instructions as they appear on the screen.
Once installed, you can get detailed instructions from the software’s online Help.

Basic Operation Working in Comfort with a Notebook PC
Reference Guide 41
Working in Comfort with a Notebook PC
WARNING Improper use of keyboards and other input devices has been associated with
ergonomic injury. For more information about reducing your risk, visit our
ergonomics web site at www.hp.com/ergo—or see “Working in Comfort” in the
online HP Library.
You can use your HP notebook computer virtually anywhere, anytime. The following recommendations should help you work more comfortably.
Note Note that if you are using your portable computer as your primary computer, or using it for extended periods, you should use it with a full-size keyboard, monitor, and mouse. This will give your portable computer the adjustability and comfort features of a desktop unit. Your computer offers quick, easy connections to these devices. More information on how to prepare your workspace environment and set up your HP equipment is available in Working in Comfort, which is preloaded on the hard disk in the HP Library and available on the Recovery CD or DVD in \hp\Library—as well as at www.hp.com/ergo.
Your Mobile Work Environment
• Use a chair that provides good support for your lower back. If an adjustable chair is not available, you can use a pillow or rolled-up towel to provide lower back support.
• Try to keep your thighs parallel to the floor and your feet flat on the floor. In a mobile environment, you can do this by using a phone book or briefcase to support your feet.
• Adjust the height of either your work surface or chair to keep your arms in a neutral position. Your arms should be relaxed and loose, elbows at your sides, with the forearms and hands parallel with the floor.
• Position your notebook computer display to minimize glare and reflection. For example, on an airplane, lower the window shade, or in a hotel room, draw the curtains. You also should maintain a comfortable viewing distance–approximately 40 to 60 cm (16 to 24 inches). Adjust the angle of your display to help keep your head angled slightly downward in a comfortable position.

Basic Operation Working in Comfort with a Notebook PC
42 Reference Guide
Using Your Mobile Computer
• Position the computer so your wrists and hands are in a neutral position. Your wrists should be as straight as possible and should not have to bend sideways or more than 10 degrees up or down. If your notebook computer does not have a built-in palm rest, you can use a rolled-up towel.
• Try to type as lightly as possible. The notebook keyboard requires little force to activate.
• Take frequent, short rest breaks–this is especially important in a mobile computing environment.
• Portable computers weigh between approximately 1.4 and 3.7 kilos (3 and 8 pounds). When traveling, be sure to carry your computer properly to minimize strain on your body. Shift the bag containing your notebook equipment frequently between your left and right hands and shoulders.

Basic Operation Taking Care of Your Notebook
Reference Guide 43
Taking Care of Your Notebook
Use the following recommendations to maintain your notebook during everyday use and prevent potential physical damage or data loss.
To protect your hard disk drive
Hard disk drives, as well as other internal components, are not indestructible and can be damaged by inappropriate handling and operation.
• Avoid bumps or jolts.
• Do not operate the notebook while traveling over bumpy terrain.
• Turn off the notebook or put it on standby or into hibernation before transporting it. This turns off the hard drive. A drop of a few inches onto a rigid surface while the hard drive is operating could destroy data or damage the drive.
• Carry the notebook in a padded case to protect against bumps and jolts.
• Set down the notebook gently.
To maintain your notebook
• Provide adequate ventilation around the notebook. Always set the notebook on a flat surface, so that air can flow freely around and underneath it.
• Always turn off the notebook or put it into hibernation before putting it in a carrying case or other enclosed space.
• Do not pick up or carry the notebook by its display.
• Observe the temperature limits and other specifications listed in “Hardware Specifications” on page 136. Do not use the notebook outside in the rain or snow (inclement weather). If the notebook is cold, warm it gradually to avoid condensation.

Basic Operation Taking Care of Your Notebook
44 Reference Guide
To safeguard your data
• Do not use the touch pad or activate any other device that interrupts operation while the system is starting or stopping.
• Back up your work regularly. Copy files to floppy, tape, CD-RW, or network drives.
• Use a virus-scanning program (such as the Norton AntiVirus program included with your notebook) to check the integrity of your files and operating system. Since new viruses appear frequently, you will also want to update the program’s virus definitions from time to time; updates are on the Web at www.symantec.com.
• Check your disk periodically using the Tools tab in the disk’s Properties window.
To extend the life of the display
• Set the display brightness to the lowest comfortable level (Fn+F1).
• When working at your desk, connect an external monitor and turn off the internal display (Fn+F5).
• If you are not using an external monitor, set the Turn off monitor timeouts (for both AC and battery operation) to the shortest comfortable interval.
• Avoid using a screen saver or other software that prevents the notebook from going on standby after a timeout period. If you use a screen saver, enable the option to shut off the display after a time delay.
• Do not disable the standby timeout.
• If you are using AC power and have no external monitor attached, put the notebook on standby or into hibernation when not in use.
To clean your notebook
You can clean your notebook with a soft cloth dampened with clean water or with water containing a mild detergent.
• Do not use an excessively wet cloth or allow water inside the case.
• Do not use any abrasive cleaners, especially on the display. Do not apply any cleaner directly to the display. Instead, apply the cleaner to a soft cloth and then gently wipe the display.
• You can clean the keyboard with a vacuum cleaner to remove accumulated dust.

Reference Guide 45
Batteries and Power Management

Batteries and Power Management Managing Power Consumption
46 Reference Guide
Managing Power Consumption
When you’re running your notebook on battery power, you will want to maximize operating time without compromising performance. Your notebook is designed to help you reduce power consumption and extend battery life without needing to turn it off.
• During idle periods, the notebook automatically enters power-saving modes after specified timeout periods. You can adjust these timeouts to suit your working habits.
• You can manually send the notebook into a power-saving mode at any time by pressing the appropriate key—see “To manage power manually” on page 48.
How the notebook manages power automatically
Your notebook automatically goes on standby or into hibernation and standby, and turns off the hard disk and display based on values set in Power Options in Control Panel.
Automatic action Occurs after… To resume…
Turns off hard disk. Turns off the hard disk drive. This is usually set to occur shortly after the display is turned off.
The hard disk is not accessed for the specified interval.
Begin using the notebook: the hard disk turns on when needed.
Turns off display. Turns off the display to conserve battery power and extend the life of the display.
No keyboard, pointing device, or other input activity occurs for the specified interval.
Press any key or move a pointing device to turn on the display.
Enters standby. Maintains your current session in RAM, and turns off the display and other components to conserve battery power.
No pointing devices are used, no disk drive is accessed, and no port is active for the specified interval.
Press the power button to resume your session.
Enters hibernation. Saves your current session to the hard disk, then turns off the notebook.
The notebook stays on standby for the specified interval.
Press the power button to resume your session.
Lowers CPU speed (Pentium models only). Switches to the lower CPU speed to use power more efficiently. See below.
The AC adapter is unplugged. Plug in the AC adapter.

Batteries and Power Management Managing Power Consumption
Reference Guide 47
CAUTION Make a habit of saving your work before allowing your notebook to go on standby. If
power is interrupted while the notebook is on standby, any information that was not
saved will be lost.
The notebook can also go on standby, into hibernation, or turn off if battery power reaches a critically low level. (See “To respond to a low-battery warning” on page 50.) If this happens, you will find on resuming that all your data has been saved, but some functions may be disabled. To resume normal operation, restore power by connecting an AC adapter or installing a charged battery, then turn the notebook off and restart it.
To set power management properties
You can adjust the periods of non-use after which your notebook automatically shuts down components or enters a power-saving mode. You can also save these settings as a power scheme.
In addition, you can specify how the notebook acts when battery power drops to low levels, and how it responds when you press the power button or close the lid.
1. Click Start, Control Panel, Performance and Maintenance, Power Options.
2. On the Power Schemes tab, enter the timeout settings you want. If you don’t want a particular timeout to occur, set the value to Never.
If you want to save the settings as a power scheme, click Save As and enter a name for the scheme.
3. Click the Alarms tab, and specify the actions the notebook takes when battery power drops to a low or critical level.
4. Click the Advanced tab, and set the actions the notebook takes when you close the lid or press the power button.
See Windows Help and Support for details.
CAUTION Do not disable hibernation support in the Power Options settings, or you will lose
any unsaved data if the notebook’s battery runs down completely.
Batteries and Power Management Managing Power Consumption
48 Reference Guide
Managing CPU power
If your notebook contains a multispeed processor with Intel SpeedStep Technology, the processor can automatically switch to lower, power-saving speeds or to higher-performance speeds according to its workload and power source.
You can customize SpeedStep to best suit your working environment: click Start, Control Panel, Performance and Maintenance, Power Options. On the Power Schemes tab, select a power scheme. This scheme automatically controls the processor speeds:
• The Max Battery scheme uses the lowest processor speeds while running on battery power, but uses medium and high processor speeds on AC power.
• The Portable/Laptop option uses medium and high processor speeds on battery and AC power.
• The Presentation option uses the lowest processor speeds on battery and AC power.
To manage power manually
In addition to allowing the notebook to enter its power-saving modes automatically, you can also put it into any of the following three modes whenever you need to.
Power mode Does this… Use when… To enter this mode…
Standby Maintains your current session in RAM, and turns off the display and other components.
You will be away from your notebook for up to several hours.
Click Start, Turn Off Computer, Stand By – or – press the power button.
Hibernation Saves the current session to disk, then shuts down. Provides maximum power savings while still allowing you to recover the current session.
You will be away from your notebook for a day or more, but want to continue your session.
Click Start, Turn Off Computer, then press and hold Shift and click Hibernate.
Off Turns off your notebook, providing maximum power savings. The current session will not be saved, and any unsaved data will be lost.
You’re done with your work.
Click Start, Turn Off Computer, Turn Off. – or – press and hold the power button for about four seconds. (Do this only if the Start menu procedure doesn’t work.)
You can also turn off the display by closing the lid.
In addition, you can configure the notebook so that closing the lid or pressing the power button puts the notebook on standby or into hibernation, or turns it off—see “To manage power manually” on page 48.

Batteries and Power Management Using Battery Power
Reference Guide 49
Using Battery Power
To check battery status
From the battery charge light
The battery charge light on the front of the notebook shows whether the notebook’s battery is charging or fully charged—see “Status lights” on page 17.
From the Windows taskbar
The Windows taskbar includes a power icon that provides detailed battery status information. The icon looks like a battery when AC is not connected.
If the icon does not appear, click Start, Control Panel, Performance and Maintenance, Power Options. On the Advanced tab, select to show the icon on the taskbar.
• Place the pointer over the power icon to display the remaining battery charge. This value is shown as either a percentage of charge remaining, or as time remaining.
• Double-click the power icon to open the Power Meter window.
• Click the power icon to display a menu of the available power schemes.
• Right-click the power icon to view the options for displaying power information.
From the Windows Control Panel
• Click Start, Control Panel, Performance and Maintenance, Power Options, then click the Power Meter tab to see the battery status. The Alarms and Advanced tabs provide additional Windows’ power-information options.
From the status panel
• Press the status panel button several times to display the percent charge remaining for the battery.

Batteries and Power Management Using Battery Power
50 Reference Guide
To respond to a low-battery warning
The notebook automatically alerts you when the battery power drops to a critically low level. If you do not restore power within a short time, the notebook then goes into hibernation.
Once the notebook goes into hibernation in this way, you won’t be able to turn it on again until you restore power by doing one of the following:
• Replace the battery with a charged one. See “Step 1: Install the battery” on page 20.
• Plug in the AC adapter.
Note If you plug in the AC adapter, you can continue to work while your battery recharges.
To recharge the battery
CAUTION The AC adapter is normally warm whenever plugged into an AC outlet. The
notebook is normally warm while recharging. Do not recharge the notebook in a
briefcase or other confined space, or its battery could overheat.
• To recharge the battery, plug the AC adapter into the notebook.
To get the longest operating time, wait until the battery’s charge is below 50% before recharging, then charge it fully (100%). Charging can take up to approximately 3 hours. You can continue working while the battery charges.
A fully charged battery can operate the notebook for up to approximately 3.5 hours, depending on your notebook’s model, power management settings, and level of use.
To replace the battery
For instructions on replacing the battery, see “Step 1: Install the battery” on page 20.

Batteries and Power Management Using Battery Power
Reference Guide 51
To get the most from your batteries
Follow these suggestions to make your battery’s power last as long as possible.
• Plug in the AC adapter, especially when using a CD, DVD, or similar drive, or any external connections such as a PC Card or a modem.
• Set the display brightness to the lowest comfortable level (Fn+F1).
• Put the notebook on standby whenever you are not using it for a short while.
• Put the notebook into hibernation whenever you want to save your current session, but will not be using the notebook for several hours.
• Set the automatic timeout settings to emphasize saving power. If your notebook has a dual-speed processor, use the lower speed on battery power (the default settings conserve battery power). See “How the notebook manages power automatically” on page 46.
• If your notebook has a wireless on-off button, turn off the wireless function when you’re not using it. Press the wireless on-off button so the light turns off.
• If you have an I/O PC Card—that is, a PC Card having an external connection, such as a network card—remove it when you’re not using it. Some I/O cards use significant power even while they’re inactive.
• If you work with an application that uses an I/O PC Card, exit the application when you finish using it.
• Install a different battery—see “Step 1: Install the battery” on page 20.
In addition, follow these suggestions to extend the life of your battery.
• Do not leave batteries unused for long periods. If you have more than one, rotate them.
• If you normally use AC power, make a practice of using the battery as your power source at least once a week.
• Unplug the AC adapter when the notebook is not in use.
• To preserve the life of a battery, be sure to charge it regularly.
• For long-term storage, the battery must be charged 20–50% to minimize capacity loss by self-discharge and to avoid deterioration of performance. Storing a fully charged battery can cause higher self-discharge and reduce its discharge capacity—even after recharging—as compared to a battery stored when charged 20–50%.

Batteries and Power Management Using Battery Power
52 Reference Guide
• To maintain maximum battery capacity and accuracy of the battery gauge, perform this calibration procedure every few months:
1. Click Start, Programs (or All Programs), Hewlett-Packard, Notebook, HP Battery Optimizer.
2. Follow the displayed instructions to test and condition your battery. The process could take 4-6 hours or more per battery. You can use the computer during the process. If you interrupt the process, the battery might be left with a low charge.
To maximize processor speed
If your notebook contains a multispeed processor with Intel SpeedStep Technology, the processor can automatically switch to lower, power-saving speeds or to higher-performance speeds according to its workload. See “How the notebook manages power automatically” on page 46.

Reference Guide 53
Modem and Network Connections

Modem and Network Connections Using the Modem
54 Reference Guide
Using the Modem
You can connect your notebook’s built-in modem or a PC Card or external modem to a telephone line and communicate with other notebooks throughout the world. You can explore the Internet, send and receive e-mail messages, and use your PC to send and receive faxes. Your notebook contains several software programs that work with your modem:
• Internet Explorer, for browsing the World Wide Web.
• Outlook Express, for sending and receiving e-mail messages.
• Windows XP Fax Services fax software for sending and receiving faxes.
The high-speed 56-Kbps modem in your notebook allows you to connect to any Internet Service Provider (ISP) or modem network that has V.90 interoperable modems. Check with your ISP for a list of telephone numbers that support V.90.
Note that the maximum speed for faxing is 14.4 Kbps. Even though the modem is capable of downloading at 56 Kbps, your ISP or modem network may not operate at this speed or support this technology. Please check with your service provider for details. Furthermore, transmission rates depend on the condition of the telephone line.
To connect the modem
CAUTION To reduce the risk of fire, use only No. 26 AWG or larger telecommunications line
cord to connect the modem to the telephone wall jack.
1. Make sure the telephone line is an analog line (sometimes called a data line). You must not use a digital line.
2. Connect the telephone cord to the built-in modem.

Modem and Network Connections Using the Modem
Reference Guide 55
3. Plug the other end of the phone cord into a telephone jack. If the plug on the phone cord doesn’t fit the jack, you may need to use an adapter.
4. Check your modem’s country or region settings: click Start, Control Panel, Printers and Other Hardware, Phone and Modem Options.
CAUTION Your built-in modem may not work with multiple phone lines or a private branch
exchange (PBX), cannot be connected to a coin-operated telephone, and does not
work with party lines. Some of these connections may result in excess electrical
voltage and could cause a malfunction in the internal modem. Check your
telephone line type prior to connecting your phone line.
Special restrictions in certain countries
• The pulse dialing feature may be disabled in certain countries, possibly because Loop Disconnect is not certified there. If pulse dialing is disabled, you should use tone dialing connections only.
• Many countries impose a blackout period after a modem repeatedly fails to connect to a service provider. The number of failed attempts and the period you must wait before trying again differ from country/region to country/region: check with your telephone company.
For example, if you are dialing from Italy and fail to connect to your server or cancel the connection, you must wait one minute before dialing that number again. If you dial before then, you will get an error message that says “delay.” After the fourth failed connection, you must wait one hour before trying the number again. If you dial before the hour is up, you will get a message that says “black list.”
• When using a modem in the Republic of South Africa, an external surge protector may be necessary in order to prevent notebook damage by lightning or other electrical surges. Connect any approved surge protector to the modem cable whenever you are using the modem.

Modem and Network Connections Using the Modem
56 Reference Guide
To connect to the Internet
Signing up with an Internet Service Provider
Before you can connect to the Internet, you need to set up an account with an Internet Service Provider (ISP). In some countries, Hewlett-Packard provides easy Internet signup so that you can connect quickly to an ISP.
1. Connect your modem—see the previous topic.
2. If available, double-click the Easy Internet Signup icon on the desktop. This launches the New Connection wizard, which helps you locate an ISP in your area, transfer an existing Internet account to this notebook, or set up an Internet connection manually.
–or–
If available, click Start, All Programs, Easy Internet Signup, and select one of the listed ISPs. This begins the registration process for the ISP you choose.
Connecting to the Internet
1. Click Start, Internet (Internet Explorer). For your first connection, you’ll be prompted for information about your connection.
2. Click the Connect button in the Network Connections window.
You can set the notebook to display a taskbar icon (two connected computers) whenever you have successfully connected to the Internet: click Start, Control Panel, Network and Internet Connections, Network Connections. Then right-click the connection, select Properties, and select the icon option.
To disconnect from the Internet
You remain connected to the Internet until you turn off the notebook, disconnect the phone line from the notebook, or give a command to hang up the connection.
• Double-click the connect icon in the taskbar, and click Disconnect. (You can enable this icon as described in “To connect to the Internet” on page 56.)
–or–
Click Start, Control Panel, Network and Internet Connections, Network Connections, then right-click the connection and select Disconnect.

Modem and Network Connections Using the Modem
Reference Guide 57
To dial in to a network
You can use the modem to dial in to a LAN (local area network) that supports dial-up connections. This gives you access to network resources from a remote location.
• See Windows Help for information about setting up and using dial-up network connections—click Start, Help and Support.
To change your modem settings
The modem is already set up to be compatible with telephone systems and modems in most areas. However, in some situations, you may have to change modem settings to match local conditions. If you have questions about local requirements, contact your telephone company.
• Control Panel. Click Start, Control Panel, Printers and Other Hardware, Phone and Modem Options to change many modem settings.
On the Modems tab click Properties to set connection speeds, or on the Dialing Rules tab click Edit to set dialing options.
• Communications software. Many communications applications provide options for controlling modem settings. See the help for your software.
• AT commands. You can control many aspects of modem operation using modem AT commands. AT commands are special strings of characters sent to the modem to set up specific conditions. Those command strings normally start with “AT”. For a list of AT commands for the built-in modem, see “Modem Reference Information” on page 139.
To send an AT command, open Phone and Modem Options in Control Panel. On the Modems tab, click Properties. You can type AT commands on the Advanced tab in the space for extra settings.

Modem and Network Connections Using the Modem
58 Reference Guide
To send and receive e-mail
Sending and receiving e-mail requires an e-mail account with an Internet Service Provider or with your company’s communications system. You can use Outlook Express (included with your notebook) or an e-mail system of your choice. This topic includes instructions for using Outlook Express.
To start Outlook Express
1. Click Start, E-mail (Outlook Express).
2. If you are not currently connected to the Internet, the Network Connections window appears. Choose Connect to connect to the Internet.
To send an e-mail message
1. In Outlook Express, click the Create Mail tool on the toolbar.
2. Fill in the information in the New Message window.
3. To send, click the Send button.
To receive e-mail messages
1. In Outlook Express, click the Send/Recv tool on the toolbar to have Outlook deliver new messages.
2. Click the Inbox folder to view the list of messages. Unread messages appear bold on the screen.
3. To view a message, click it once. (Or double-click to view the message in its own window.)

Modem and Network Connections Using the Modem
Reference Guide 59
To send and receive faxes
Sending and receiving faxes requires just a telephone connection—you don’t need an Internet connection. You can use the modem and the Fax Services software (including the Fax Console application) provided with Windows XP to send and receive faxes with your notebook.
To set up Fax Services
Before you can use Fax Services, you need to install it.
1. Click Start, Control Panel, Add or Remove Programs.
2. Click Add/Remove Windows Components, select Fax Services, and follow the instructions on the screen. You may need the Windows CD to complete installation.
To start the Fax Console application
• Click Start, All Programs, Accessories, Communications, Fax, Fax Console.
The first time you start Fax Console, the Fax Configuration Wizard steps you through the process of setting options and customizing the program for your personal use. Follow the onscreen instructions. If you’re not sure which setting to choose, accept the default choice.
To send a fax
• Click Start, All Programs, Accessories, Communications, Fax, Send a Fax, then follow the instructions that appear on the screen.
If instead you want to send a document as a fax, open the document in its application window, then open the Print dialog box. Change the selected printer to Fax, then print it.
To receive faxes
Faxes are automatically received when Fax Console is running in an open or minimized window. New faxes are indicated in the status box in the Fax Console window. To receive a fax manually, follow these steps.
• When a fax call is coming in, click Receive now on the Fax Console menu bar.
To view and print a fax
1. In the Fax Console tree, click Inbox, then double-click the fax you want to view.
2. Click the printer icon to print the fax.

Modem and Network Connections Connecting to a LAN
60 Reference Guide
Connecting to a LAN
Connecting to a local area network (LAN) gives you access to network resources, such as printers and file servers on your corporate network, and possibly to the Internet.
To connect to a LAN
1. Make sure the existing LAN supports Ethernet 10Base-T (10 Mbps) or 100Base-TX (100 Mbps) connections.
2. Plug the LAN cable (not supplied) into the built-in LAN port on the notebook. The cable must have an RJ-45 connector.
3. Windows XP automatically detects and sets up a LAN connection. To edit the settings, open Network Connections in Control Panel.
See Windows Help for information about setting up and using LAN connections—click Start, Help and Support. Contact your network administrator for network information.
Two lights next to the LAN port indicate the status of the connection: the green light indicates that a link is established to the network, and the yellow light indicates network activity.

Modem and Network Connections Making Wireless Network Connections (selected models)
Reference Guide 61
Making Wireless Network Connections (selected models)
If your notebook includes IEEE 802.11 wireless capabilities, you can connect by radio to a wireless local area network (LAN) and access computers and other resources on the network.
A wireless network provides all the functions of a typical “wired” network, but also provides for “roaming.” Since your notebook connects to the network by radio rather than through cables, you can move from place to place within the network—from your office to a conference room, for example—and remain on the network the entire time.
To prepare for wireless LAN connections
Before you can connect your notebook to a particular wireless network, you have to configure the notebook for the specific wireless connection.
Connecting to an existing wireless network
You can connect to an access point that gives you access to a local area network, or you can connect directly to other computers in an AdHoc network.
1. Right-click the wireless network connection icon in the taskbar, then select View Available Wireless Networks from the pop-up menu.
2. A list of available networks appears. Select the network you want, enter the encryption key if required, and click Connect.
If the network you want is not on the list, click Advanced, Configure, and enter the required network parameters. If the network is not using 802.1x authentication protocol, clear the automatic key option.
3. On the General tab, edit network settings as needed for your local network. See your network administrator. You can also display an icon in the taskbar when connected to a network.
4. Click OK to save the configuration. This network is added to your list of preferred networks.
The notebook automatically connects to the first preferred network that’s within range if wireless communication is turned on—see “To turn wireless LAN communication on and off,” below.

Modem and Network Connections Making Wireless Network Connections (selected models)
62 Reference Guide
Creating a new computer-to-computer network (AdHoc)
You can set up a new network available to other local computers.
1. Right-click the wireless network connection icon, then click Properties.
2. On the Wireless Networks tab, click Add to create a new network.
3. Type a unique name for the new network.
4. If you want to use encrypted communication, check the Data Encryption check box, and define the encryption key as follows:
• Key: ASCII passphrase or hexadecimal key string.
• Key format: ASCII for passphrase, hexadecimal for key string.
• Key length: smaller number for 64-bit encryption, larger number for 128-bit.
5. Mark the option to make this a computer-to-computer (adhoc) network.
6. Click OK to save the configuration. This network is added to your list of preferred networks and becomes available to other computers.
7. If you’re within range of infrastructure networks higher on the preferred list, click Advanced and select “Computer-to-Computer (ad hoc) networks only.”
To turn wireless LAN communication on and off
Important Wireless communication may be restricted in some situations or environments, such as when traveling in an airplane. If in doubt, be sure to ask for authorization before turning on your notebook’s wireless networking. In Italy, Singapore, and possibly other countries, you are required to purchase a license from the responsible authority before using the wireless function.
Turning on communication and making a connection
1. If your notebook isn’t on, turn it on.

Modem and Network Connections Making Wireless Network Connections (selected models)
Reference Guide 63
2. The wireless indicator light is lit whenever the wireless function is on. If the indicator isn’t lit, do one of the following:
Press the wireless on-off button on the left side of the notebook.
–or–
Click Start, Connect To, Wireless Network Connection.
–or–
Click Start, Control Panel, Network and Internet Connections, then double-click the wireless network connection icon.
If you’re within range of your wireless network, your notebook automatically connects. To check the status of your wireless connection, open Network Connections in Control Panel and double-click the connection.
Turning off communication and ending a connection
1. Important: close any files that reside on other network computers.
2. To turn off the wireless function without turning off your notebook, do one of the following:
Press the wireless on-off button.
–or–
Right-click the wireless network connection icon in the taskbar and select Disable.
Turning the notebook off or putting it on standby or into hibernation also turns off the wireless function.

Modem and Network Connections Making Wireless Bluetooth Connections (selected models)
64 Reference Guide
Making Wireless Bluetooth Connections (selected models)
If your notebook includes Bluetooth wireless capabilities, you can use it to make short-range radio connections to a wireless personal area network (WPAN), and access other Bluetooth-compatible devices, such as other computers, cell phones, and printers.
The Bluetooth function provides all the functions of a typical “wired” network, but also provides for “roaming.” Since your notebook connects to the network by radio rather than through cables, you can move from place to place within the network—from your office to a conference room, for example—and remain on the network the entire time.
To turn Bluetooth communication on and off
Important Wireless communication may be restricted in some situations or environments, such as when traveling in an airplane. If in doubt, be sure to ask for authorization before turning on your notebook’s wireless networking. In Italy, Singapore, and possibly other countries, you are required to purchase a license from the responsible authority before using the wireless function.
Turning on communication and making a connection
1. If your notebook isn’t on, turn it on.
2. The wireless indicator light is lit whenever the wireless function is on. If the indicator isn’t lit, press the wireless on-off button on the left side of the notebook.
Turning off communication and ending a connection
Turning off communication ends any connection you have open.
1. Important: close any files that reside on other network computers.
2. To turn off the wireless function without turning off your notebook, press the wireless on-off button.
Turning the notebook off or putting it into hibernation also turns off the Bluetooth function.

Modem and Network Connections Making Wireless Bluetooth Connections (selected models)
Reference Guide 65
To prepare for Bluetooth connections
Before you use your notebook to access other Bluetooth devices, you should configure it as follows:
1. Right-click the Bluetooth Connection Manager icon in the taskbar, and select Options.
2. On the General tab, give your notebook a unique name that will identify it to other Bluetooth users, and set the computer type to Notebook.
3. If required, click the Security tab, then select a security mode and enter a password.
4. Click the Send File tab. Specify where you want to store files you receive from other Bluetooth devices, and specify or create an electronic business card (or “vCard”).
5. Click OK to save the configuration.
Detailed instructions for these tasks are included in the Bluetooth online help.
To work with Bluetooth devices
Important Wireless communication may be restricted in some situations or environments, such as when traveling in an airplane. If in doubt, be sure to ask for authorization before turning on your notebook’s wireless networking. In Italy, Singapore, and possibly other countries, you are required to purchase a license from the responsible authority before using the wireless function.
Sending files or business cards to another Bluetooth device
1. Double-click the Bluetooth Connection Manager icon in the taskbar.
2. Click Refresh to locate the Bluetooth devices within range of your notebook, and select the device you want to send files to.
3. To send a file, click Send, File.
–or–
To send a business card, click Send, Business Card.

Modem and Network Connections Making Wireless Bluetooth Connections (selected models)
66 Reference Guide
Connecting to a serial printer or other serial Bluetooth device
You can connect applications on your notebook to Bluetooth serial devices—for example, you could print from a word processor to a Bluetooth serial printer.
1. Double-click the Bluetooth Connection Manager icon in the taskbar, then select Tools, COM Ports.
2. Note the port number (COMn) of the port through which you will connect to the Bluetooth serial device.
3. From your application, connect to the Bluetooth serial device using the port noted in step 2. When the Select Remote Device dialog appears, select the device you’re connecting to.
4. Click Connect.
If computers or other devices will be connecting to your notebook (that is, using your notebook as a host), right-click the Bluetooth Connection Manager icon in the taskbar, then select Open, Tools, COM Ports. The connecting devices must connect to the host port number COMn.
Making a dial-up connection
If you have a Bluetooth cellular phone, you can use it with your notebook to make a dial-up connection to the Internet. Before you can connect, create the dial-up connection as follows:
• Click Start, Control Panel, Network and Internet Connections, Network Connections, then click Create a New Connection. Use the 3Com Bluetooth DUN client as the device.
You can then connect to the Internet through your Bluetooth phone as follows:
1. Make sure your Bluetooth phone is available for connection—see the manufacturer’s instructions.
2. Double-click the Bluetooth Connection Manager icon in the taskbar, and select the Bluetooth phone from the list of devices.
3. Click Start, Connect To, and select the Bluetooth dial-up connection.

Reference Guide 67
Add-On Devices

Add-On Devices Using Plug-In Modules
68 Reference Guide
Using Plug-In Modules
You can use the plug-in module in your notebook:
• DVD drive (selected models).
• DVD/CD-RW combo drive (selected models).
• Weight-saving module (to reduce travel weight and protect your module bay).
To replace a plug-in module
CAUTION Before disconnecting a plug-in module, you must turn off the notebook—otherwise,
you could lose data and damage the equipment.
Handle and store a module carefully when it’s out of the notebook. Do not drop it
or apply excessive pressure to its surfaces—this could damage its internal
mechanisms. Do not touch the metallic pins on the notebook’s connectors or the
module connectors. Static electricity can damage internal components.
1. Turn off the notebook: click Start, Turn Off Computer, Turn Off.

Add-On Devices Using Plug-In Modules
Reference Guide 69
2. Slide the module release latch (on the bottom of the notebook) toward the back of the notebook.
3. Grasp the module and pull it out.
4. Slide the new module into the notebook until it clicks into place.
To save weight and protect the module bay when traveling, insert the weight-saving module provided with your notebook.

Add-On Devices Using Plug-In Modules
70 Reference Guide
To insert or remove a CD or DVD
CAUTION Do not remove a CD or DVD while the notebook is reading it. Otherwise, the
notebook could stop responding and you could lose data. Before opening the drive,
make sure the drive is not running by pressing the multimedia Stop button (if
available) or using the stop or eject control in your multimedia player software.
Be sure to press the CD or DVD onto the spindle. You can damage the disk or
drive if you just lay it on the tray.
1. Press the button on the face of the drive. (If you are using this drive for the first time, be sure to remove the cardboard packing insert.)
2. Place the disk into the drive (label facing up) and gently press down until the disk snaps onto the spindle.
–or–
Remove the disk.
3. Slide the tray back into the drive to close it.
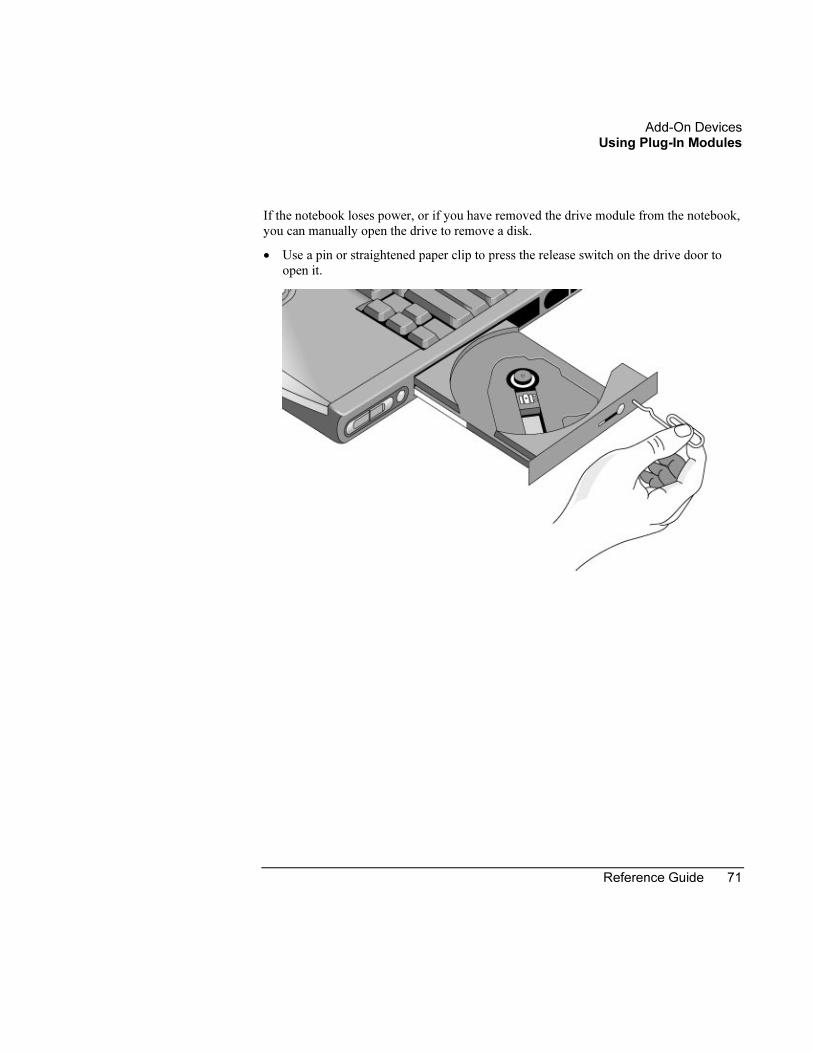
Add-On Devices Using Plug-In Modules
Reference Guide 71
If the notebook loses power, or if you have removed the drive module from the notebook, you can manually open the drive to remove a disk.
• Use a pin or straightened paper clip to press the release switch on the drive door to open it.

Add-On Devices Using Plug-In Modules
72 Reference Guide
To play audio CDs
If your notebook includes the multimedia buttons and status panel, you can use them to control the notebook’s DVD/CD-RW drive.
• If the notebook is turned on, you can use the multimedia buttons to control the Windows Media Player or MusicMatch Jukebox (depending on your notebook model) for playing CDs.
The MP3 button launches either MusicMatch Jukebox or Windows Media Player (depending on your notebook model), which you can use to play MP3 music files.
• If the notebook is on standby, in hibernation, or even turned off, you can still play audio CDs. Slide the multimedia power switch to the left to activate the player without turning on the notebook, then use the multimedia buttons to control play.
1. MP3 player launch button.
2. Previous track.
3. Next track.
4. Status panel button.
5. Status panel.
6. Play/Pause.
7. Stop.
8. Multimedia power switch and indicator light—turns the CD player on and off. Works only when the notebook is off, on standby, or in hibernation.
If your notebook does not include multimedia buttons, it must be running to play audio CDs—use software such as the Windows Media Player to play the CDs: click Start, All Programs, Windows Media Player.

Add-On Devices Using Plug-In Modules
Reference Guide 73
To use the status panel (selected models)
The notebook’s status panel can show the time and date, battery status, power status, and the status of the notebook’s CD player.
• Press the status panel button several times to display the information you want. The first press turns on the backlight. Subsequent presses cycle through the available information in the following order:
• Power status: ON, OFF, (standby), or (hibernate).
• Date.
• Time.
• Battery charge remaining (0 to 100%).
• CD player status (if CD player is running): shows the track number, play status (playing, paused, or stopped), and time counter.
1. Status panel button.
2. Status panel.
You can set the date and time displayed in the status panel by using the BIOS configuration utility—see “To run the BIOS configuration utility” on page 121.

Add-On Devices Using Plug-In Modules
74 Reference Guide
To play DVD movies
If your notebook came with a DVD drive, it also includes DVD player software that lets you play DVD movies.
• Click Start, All Programs, Multimedia, DVD Player, InterVideo WinDVD. (The name of the DVD player program can vary.)
–or–
Click Start, All Programs, Windows Media Player.
–or–
If your notebook includes the multimedia buttons and status panel, you can use them to control InterVideo WinDVD for playing DVDs—see “To play audio CDs” on page 72.
If you need to install the DVD player software, click Start, Run, type C:\HP\PROGRAMS\DVD\SETUP.EXE, and press Enter.
Important DVDs have regional codes embedded in their disk data. These codes prevent DVD movies from being played outside the region of the world in which they are sold. Most DVD drives let you change the region code only a limited number of times (usually no more than four). Please note that when you reach this limit, your last change to the region code will be hard-coded on the DVD drive, and will be permanent. Your
HP warranty does not cover the expense of correcting this situation.
Refer to the help for your DVD player software for details about setting region codes.
Note The DVD player in your notebook performs to high and advanced specifications. It would not benefit from the installation of a software program called “PC Friendly” that is included with many DVDs. HP recommends against installing PC Friendly on your notebook, as it can cause your DVD player to perform erratically and produce errors. If this happens, uninstall PC Friendly and restart your notebook.
If you want to play DVD movies on a TV, see “To use a TV set as a monitor” on page 85.

Add-On Devices Using Plug-In Modules
Reference Guide 75
To create or copy CDs
Your notebook includes software that lets you copy or create CDs.
• Click Start, All Programs, Multimedia, CD Writer, RecordNow. (The name of the CD-RW software can vary.)
–or–
Click Start, All Programs, Windows Media Player. You can also use Windows Explorer to create data CDs using the DVD/CD-RW drive.
If you need to install the DVD/CD-RW software, run Setup on the software CD or DVD.
Refer to the software’s help for details about creating or copying CDs. For best results use HP certified media. While other media may work, HP cannot guarantee compatibility.

Add-On Devices Connecting PC Cards
76 Reference Guide
Connecting PC Cards
The notebook’s PC Card slot is available for storing data and expanding the communication capabilities of the notebook. The notebook supports one standard Type II PC Card (PCMCIA and CardBus). Zoomed Video cards are not supported.
To insert or remove a PC Card
Inserting a PC Card
1. Hold the PC Card with its face up and its connector holes toward the card slot.
2. Slide the PC Card all the way into the slot, until its outer edge is flush with the casing of the notebook. Most cards are properly seated when the outer edge is flush with the casing of the notebook, but some cards are designed to protrude from the case.
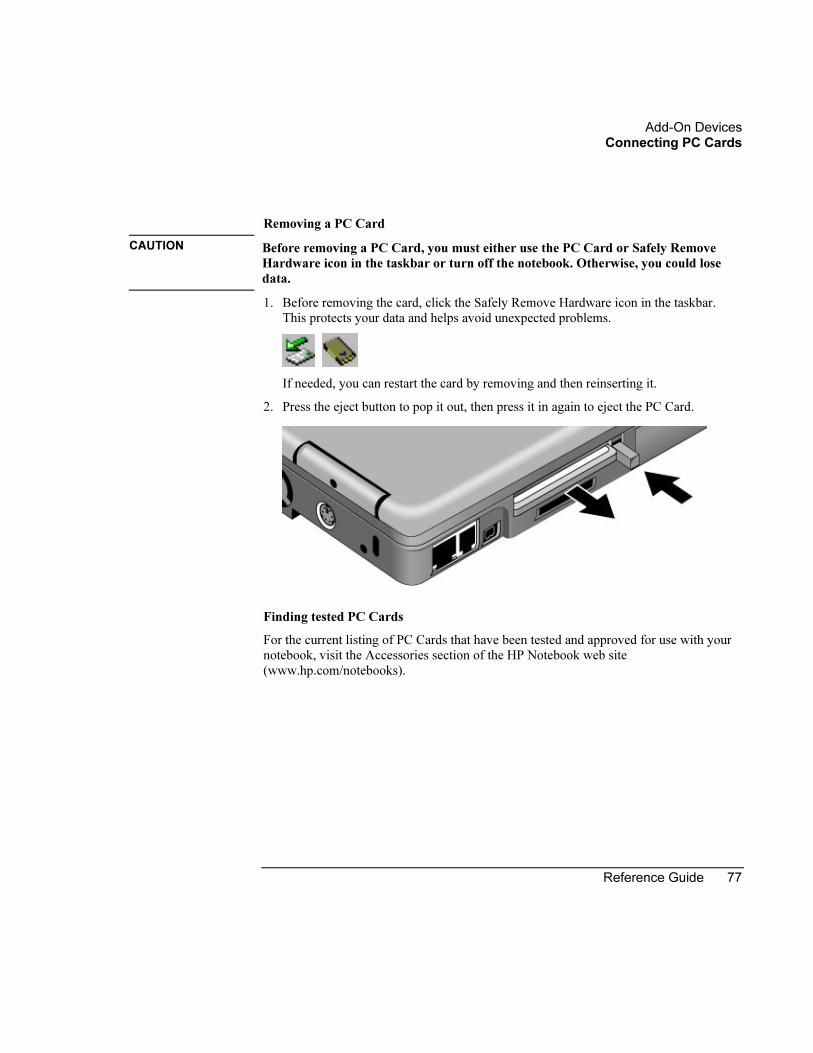
Add-On Devices Connecting PC Cards
Reference Guide 77
Removing a PC Card
CAUTION Before removing a PC Card, you must either use the PC Card or Safely Remove
Hardware icon in the taskbar or turn off the notebook. Otherwise, you could lose
data.
1. Before removing the card, click the Safely Remove Hardware icon in the taskbar. This protects your data and helps avoid unexpected problems.
If needed, you can restart the card by removing and then reinserting it.
2. Press the eject button to pop it out, then press it in again to eject the PC Card.
Finding tested PC Cards
For the current listing of PC Cards that have been tested and approved for use with your notebook, visit the Accessories section of the HP Notebook web site (www.hp.com/notebooks).

Add-On Devices Connecting SD Cards and MMC Cards
78 Reference Guide
Connecting SD Cards and MMC Cards
Your notebook supports Secure Digital™ cards (SD Cards) and MultiMediaCard cards (MMC Cards). The SD-MMC Card slot accepts these memory cards, which can be used with a variety of digital products such as PDAs, digital video camcorders, cellular phones, and digital music devices.
To insert or remove an SD Card or MMC Card
Inserting an SD Card or MMC Card
1. Hold the SD Card or MMC Card so that the contacts (metal surface) are face down.
2. Slide the card all the way into the SD-MMC Card slot, until it locks into place.

Add-On Devices Connecting SD Cards and MMC Cards
Reference Guide 79
Removing an SD Card or MMC Card
1. Gently press the card inward to release it. The card will pop out slightly.
2. Grasp the card and pull it out.
Finding tested SD Cards and MMC Cards
For the current listing of SD Cards and MMC Cards that have been tested and approved for use with your notebook, visit the Accessories section of the HP Notebook web site (www.hp.com/notebooks).

Add-On Devices Connecting External Devices
80 Reference Guide
Connecting External Devices
Your notebook’s connectors make it easy for you to use a wide variety of external devices:
• Printer or other parallel device.
• Universal serial bus (USB) devices.
• External keyboard and mouse.
• External monitor and television.
• Local area network (LAN).
• Audio devices such as external speakers, headphones, or stereo inputs.
• IEEE 1394 devices.
To identify connectors for external devices
The diagram below shows the connectors for external devices on the notebook.
Note Before you connect any device, check its documentation to see if you need to make any settings or adjustments to the equipment before using it. This might include setting switches to configure the equipment so that it will operate properly with your notebook and the software you plan to use.

Add-On Devices Connecting External Devices
Reference Guide 81
Locating connectors on the notebook
1. Parallel port (burgundy).
2. External monitor (VGA) port (blue).
3. Universal serial bus (USB) ports (2).
4. S-video (TV out) port (yellow).
5. LAN port and indicators.
6. Modem port.
7. IEEE 1394 port.
8. SD-MMC Card slot.
9. PC Card slot.
10. External microphone jack (pink).
11. Headphone jack (green).

Add-On Devices Connecting External Devices
82 Reference Guide
To connect a printer or other parallel device
The notebook’s parallel port uses a standard 25-pin connector, most commonly used for connecting dot-matrix, ink-jet, and laser printers.
• Connect the device’s parallel cable to the notebook’s parallel port (colored burgundy).
To connect an external keyboard or mouse
• Plug a USB mouse or keyboard into a USB port on the notebook.
In addition, if you dock the notebook in the optional port replicator, you can also connect a PS/2 keyboard or PS/2 mouse.
Note The notebook’s touch pad and scroll pad are automatically disabled when the notebook is docked in a port replicator with a PS/2 mouse connected.
Note USB keyboards do not support Fn hot keys.
To connect a USB device
The universal serial buses (USB) on the notebook provide a bi-directional serial interface for adding peripheral devices such as a mouse, keyboard, floppy drive, printer, scanner, or game controller on a single bus. USB-to-serial and USB-to-parallel port adapters are also available.
• Attach the device’s USB cable to a USB port. Windows automatically recognizes the USB device. Some USB devices can be connected to the notebook in series (called a daisy-chain connection).
Note If you have problems making this connection, contact the device manufacturer and the HP Business Support web site (www.hp.com/go/bizsupport) for the latest version of the driver for the device.

Add-On Devices Connecting External Devices
Reference Guide 83
To connect a USB floppy disk drive
If you have an optional floppy disk drive, you can connect it to your notebook’s USB port using the external floppy drive cable.
• Connect the cable from the USB floppy drive directly to the notebook’s USB port.
To connect an audio device
Your notebook includes a built-in microphone (at the top of the display) that you can use to record voice, sound, and music. You can also plug in headphones, external speakers, an external microphone, or a line in from a stereo or other audio device.
CAUTION The audio jacks are three-terminal stereo jacks. They are not compatible with two-
terminal mono plugs.

Add-On Devices Connecting External Devices
84 Reference Guide
• Attach the audio cable to the appropriate audio jack on the notebook. The headphone jack is colored green and the microphone jack is pink.
Note When you plug a device into the external microphone port, the built-in microphone automatically turns off.
To use an external monitor
You can connect your notebook to an external monitor and then use either display—or both displays at once.
To connect an external monitor
1. Connect the monitor cable from the monitor to the monitor port (colored blue) on the back of the notebook.
2. Connect the monitor to a power source and turn it on.
3. Press the power button to turn on the notebook.
To switch the display to the external monitor
• Press Fn+F5 to cycle through the display options: notebook display, external monitor, both.
–or–
Click Start, All Programs, Hewlett-Packard, Notebook, HP Display Settings, HP Display Settings. You can add a display settings icon in the taskbar for quick access.

Add-On Devices Connecting External Devices
Reference Guide 85
• If you need to use both displays at once, press Fn+F5 repeatedly until the image shows on both displays. However, by default, the image is limited to the maximum internal display available for your notebook (1024 x 768 pixels or 1400 x 1050 pixels, depending on your model), so at a higher resolution you will see only part of the desktop on both displays. This doesn’t happen if you use only the external monitor. If you need to increase the refresh rate on the external monitor, you can switch to only the external monitor, or make the internal or external monitor a “secondary” display:
1. Click Start, Control Panel, Appearance and Themes, Display.
2. On the Settings tab, click the Advanced button, then the S3Display or Monitor tab.
To adjust monitor resolution and other settings
1. Click Start, Control Panel, Appearances and Themes, Display.
2. On the Settings tab, adjust the Screen resolution. The internal display supports resolutions of up to 1024 × 768 (XGA displays) or 1400 × 1050 (SXGA+ displays). For a high-resolution external monitor, the notebook supports resolutions up to 1600 × 1200 resolution (16-bit).
To use a TV set as a monitor
You can connect a television set or other video device to your notebook to use as a display. The notebook’s built-in display automatically turns off when you use a TV set as a monitor.
To connect a TV set
You can connect a TV set using a standard S-video cable or a composite-video adapter with a standard RCA-type video cable.
1. Connect a video cable from the TV set to the notebook’s S-video port (colored yellow). (You don’t need to turn the notebook off to do this.)
2. Connect the TV set to a power source and turn it on.
Note The S-video port provides video output only. For audio output, use the headphone jack.

Add-On Devices Connecting External Devices
86 Reference Guide
To activate the TV display using HP TV Now
Your notebook includes an HP TV Now button that easily and automatically adjusts your notebook for optimal TV display. For example, the display time-out is disabled to prevent the screen from turning off while a movie is playing, the Power Scheme is set for Presentation mode, and the resolution is set to 800 x 600.
• Press the HP TV Now button. (The five One-Touch buttons are located above the main keyboard.)
To adjust the HP TV Now options, click Start, All Programs, Hewlett-Packard, Notebook, HP TV Now Options.
To deactivate the TV display using HP TV Now
To automatically return your notebook to its normal settings, do one of the following:
• Press the HP TV Now button.
–or–
• Click Start. Programs, Hewlett-Packard, Notebook, HP TV Now.
To customize the TV display
If you prefer to customize the display settings only (instead of using HP TV Now), you can Click Start, Control Panel, Appearance and Themes, Display. Click Advanced on the Settings tab, then activate the TV output on the S3Display tab. Follow the same procedure to return the settings to normal.
To play DVD movies on the TV
1. Connect the TV set (see “To connect a TV set” above).
2. Insert the DVD into the DVD drive.
3. Press the HP TV Now button to activate the TV display.

Add-On Devices Connecting External Devices
Reference Guide 87
To connect an infrared device (selected models)
If your notebook includes an infrared port—located on the front of the notebook—you can use it to provide serial communication between the notebook and other infrared devices, such as printers or other computers.
Using the infrared port
• Make sure the infrared ports of your notebook and the other device lie in as straight a line as possible. The two ports should be no more than 1 meter apart, with no obstructions between them. Sunlight, heat from nearby equipment, or other sources of infrared radiation can also cause transmission errors.
• To check the status of communications, click Start, Control Panel, Printers and Other Hardware, Wireless Link.
–or–
Move the pointer over the Wireless Link icon in the taskbar.
Disabling the infrared port
You should generally disable infrared communication when you aren’t using it.
1. Close any applications that are using infrared, and any folders on an infrared link.
2. Click Start, Control Panel, Printers and Other Hardware, Wireless Link.
3. On the Hardware tab, click Properties, and disable the device in the pull-down menu.
Printing to an infrared printer
• Install your printer and assign it to the notebook’s infrared port. You can then print from your applications as you would to any other printer.
Transferring files through an infrared connection
You can use your notebook’s infrared port to transfer files.
• Click Start, Control Panel, Printers and Other Hardware, Wireless Link.
See the Windows online help for instructions on using Wireless Link.

Add-On Devices Connecting External Devices
88 Reference Guide
To use the port replicator
You can use the optional port replicator to connect external components to your notebook.
For details about the port replicator and its use, refer to the manual that comes with it.
To connect to the port replicator
1. Plug in the AC adapter, then connect it to the rear of the port replicator. Make sure that the AC status light is on.
2. Align the notebook with the locator pins on the port replicator.
3. Press the notebook down until it clicks into place. Make sure that the dock status light is on.
4. Open the notebook and press the power button to turn it on.
When the notebook is docked, you can use the port replicator’s security connector to secure the notebook and port replicator. In this situation, the port replicator’s release tab does not work. See the port replicator manual for details.

Add-On Devices Connecting External Devices
Reference Guide 89
To disconnect from the port replicator
1. Press down the release tab on the right side of the port replicator.
2. Lift the notebook out of the port replicator.
To connect an IEEE 1394 device
Your notebook includes an IEEE 1394 port (located on the notebook’s left side). You can use it to connect devices such as audio and video equipment, disk drives, printers, and other computers.
• Attach the device’s cable to the IEEE 1394 port on the notebook’s left side. Windows automatically recognizes the device.
Note If you have problems making this connection, contact the device manufacturer and the HP Business Support web site (www.hp.com/go/bizsupport) for the latest version of the driver for the device.

Add-On Devices Installing Additional RAM
90 Reference Guide
Installing Additional RAM
Your notebook has no memory (RAM) built in, but has two slots for removable RAM modules: the system RAM slot beneath the keyboard (which contains a module installed at the factory), and an expansion slot on the bottom of the unit. You can use both of these slots to expand your unit’s RAM. Use DDR 266 SDRAM only.
You’ll need a small Phillips screwdriver for these procedures.
To install a RAM expansion module
To increase your notebook’s RAM, you can install a RAM module in the expansion slot on the bottom of the notebook.
CAUTION Your notebook’s chips are extremely sensitive to static electricity, and can be
permanently damaged by it. Handle the RAM module only by its edges. Before
installing the memory module, discharge your body’s static electricity by touching
the metal shielding around the connectors on the rear of the notebook.
1. Turn off the notebook: click Start, Turn Off Computer, Turn Off.
2. Important: unplug the AC adapter, if present, and remove the battery.
3. From the bottom of the notebook, loosen the screw holding the RAM cover (the cover retains the screw), and remove the cover.
4. Carefully insert the edge of the RAM module into the connector at about a 30° angle until it is fully seated. Then press down on both sides until the latches snap closed.
5. Replace the cover.
6. Insert the battery.
You can also replace the system RAM module beneath the keyboard—see “To replace the system RAM module” on page 92.

Add-On Devices Installing Additional RAM
Reference Guide 91
To remove a RAM expansion module
You may want to remove a RAM module so you can install a larger one.
CAUTION Your notebook’s chips are extremely sensitive to static electricity, and can be
permanently damaged by it. Handle the RAM module only by its edges. Before
installing the memory module, discharge your body’s static electricity by touching
the metal shielding around the connectors on the rear of the notebook.
1. Turn off the notebook: click Start, Turn Off Computer, Turn Off.
2. Important: unplug the AC adapter, if present, and remove the battery.
3. Turn the unit bottom-side up, loosen the screw holding the RAM cover (the cover retains the screw), and remove the cover.
4. Release the two latches at the sides of the RAM module, so the free edge of the module pops up.
5. Pull the module out of the connector.
6. Replace the cover.
7. Insert the battery.

Add-On Devices Installing Additional RAM
92 Reference Guide
To replace the system RAM module
If needed, you can replace your notebook’s system RAM module (under the keyboard) to increase the notebook’s RAM.
You’ll need a small Phillips screwdriver and a small flat-blade screwdriver for this procedure.
1. Turn off the notebook: click Start, Turn Off Computer, Turn Off.
2. Important: unplug the AC adapter, if present, and remove the battery.
3. Open the display so that it lays flat.
4. Remove the screws from the back of the display hinge covers.
5. Remove the plastic panel above the keyboard (containing the power button and One-Touch buttons). Use a small, flat-blade screwdriver to carefully pry up the right end of the panel above the Page Up key, then lift the end until the panel unsnaps.
CAUTION When removing the panel, be careful not to pull on the cable connecting the panel
to the notebook.
6. Carefully lift the panel to unsnap the latches above the middle One-Touch button and the F1 key, then lift the panel an inch or so off of the notebook.

Add-On Devices Installing Additional RAM
Reference Guide 93
7. Loosen the three screws holding the top of the keyboard. (The keyboard retains the screws.)
CAUTION When opening the keyboard, be careful not to pull on the cable connecting the
keyboard to the notebook.
8. Raise the top edge of the keyboard, then fold it onto the front of the case.
WARNING Do not touch the metal surfaces inside the notebook until they have cooled off.
They could be very hot if the notebook was running recently.
Do not touch the electronic components inside the notebook. Static electricity can
permanently damage them.

Add-On Devices Installing Additional RAM
94 Reference Guide
9. Release the two latches at the sides of the RAM module by pressing them outward, so that the free edge of the module pops up.
10. Pull the module out of the connector.
11. Carefully insert the edge of the new RAM module into the connector at about a 30° angle until it is fully seated. Then press down on both sides until the latches snap closed.
12. Move the keyboard back into position. Slide its front edge into the notebook’s case, then lower the top of the keyboard into place.
13. Retighten the three screws along the top of the keyboard.
14. Make sure the cable is securely connected to the plastic panel. If needed, press the connector into its socket until it clicks into place.
15. Bend the center of the panel upward slightly, insert the tabs on the ends of the panel into the slots in the notebook’s case, and fit the panel’s hinge covers over the hinges. Gently press the panel into place.
16. Reinstall the screws in the backs of the display hinge covers.
17. Reinstall the battery.

Add-On Devices Replacing the Hard Disk Drive
Reference Guide 95
Replacing the Hard Disk Drive
To replace the hard disk drive
You’ll need a small Phillips screwdriver for this procedure.
1. Unplug the AC adapter, if present, and remove the battery.
2. Remove both hard drive retaining screws from the bottom of the notebook.
3. Carefully pull the hard drive out of the notebook.
4. Gently slide the new drive into the hard drive compartment. Press firmly to make sure the connector seats properly.
5. Reinstall the hard drive retaining screws.
Important If you are installing a new hard disk drive, you should create a Utility partition on the drive before loading any software. See “To recover the factory installation of your hard disk” on page 124. If the notebook prompts you to activate Windows XP, follow the instructions that appear onscreen. The Windows XP Product ID code is located on the bottom of the notebook.

Add-On Devices Replacing the Hard Disk Drive
96 Reference Guide
To replace the hard disk drive holder
If you are installing a new hard drive that does not have a cover, you can remove the cover parts from the old hard drive. You’ll need a small Phillips screwdriver for this procedure.
1. Remove all four screws from the holder and drive case, then lift the drive out of the holder.
2. Insert the drive into the holder, then reinstall all four screws into the holder and drive case.
To prepare a new hard disk drive
When you install a new hard disk drive, you must prepare it to work with your notebook by installing the Windows software and operating system that were originally installed on your notebook. Do this using the Recovery CDs or DVDs that came with your notebook—see “To recover the factory installation of your hard disk” on page 124.
Note If the notebook prompts you to activate Windows XP, follow the instructions that appear onscreen. The Windows XP Product ID code is located on the bottom of the notebook.

Reference Guide 97
Troubleshooting and Maintenance

Troubleshooting and Maintenance Troubleshooting Techniques
98 Reference Guide
Troubleshooting Techniques
This section contains solutions to several types of problems you might experience while using your notebook. Try the solutions one at a time, in the order in which they are presented.
Here are some other sources of information for troubleshooting:
• Open the HP web-based troubleshooting tool: click Start, Help and Support, HP Instant Support. Search or browse the troubleshooting database for the information related to your problem.
• Click Start, Help and Support, Fixing a problem, and use the Windows troubleshooters.
• See the Microsoft Windows manual shipped with your notebook.
• For updated information, see the HP Notes in the online HP Library or on the Recovery CD or DVD in \hp\Library.
• Find technical tips and software updates for your notebook at the HP Business Support web site (www.hp.com/go/bizsupport).
• Test your notebook by running the e–Diagtools test program—see “Testing the Hardware” on page 119.
• Contact your dealer or Hewlett-Packard—see “To contact HP for support or service” on page 129. Please have your notebook with you when you call.
Note If the notebook prompts you to activate Windows XP, follow the instructions that appear onscreen. The Windows XP Product ID code is located on the bottom of the notebook.

Troubleshooting and Maintenance Getting Assistance for Your Notebook
Reference Guide 99
Getting Assistance for Your Notebook
To get help from HP Instant Support
To get online technical support for your notebook, click Start, Help and Support (or All Programs), HP Instant Support.
Audio problems
If no sound is audible
• Press Fn+Page Up several times.
• If available, press the rear volume control several times.
• Click the speaker icon on the taskbar, and make sure Mute is not checked and the Volume slider is not set to the bottom.
• If available, press the mute button on the right side of the notebook once or twice until the indicator light goes off.
If sound does not record
• Check the software controls for recording sound: click Start, All Programs, Accessories, Entertainment, Sound Recorder.
• In Volume Control, click Options, Properties, and make sure the microphone is enabled in the recording controls.
• Test the audio with the e–Diagtools diagnostics—see “Testing the Hardware” on page 119.
If you hear a loud high-pitched whine (feedback) from the speakers
• In Volume Control, try reducing the master volume.
• In Volume Control, click Options, Properties, and select the microphone option for the playback settings. Then in Volume Control, make sure the microphone is muted.
• Avoid using the built-in microphone and built-in speakers at the same time.

Troubleshooting and Maintenance Getting Assistance for Your Notebook
100 Reference Guide
CD and DVD problems
If you can’t boot from a CD in the DVD/CD-RW drive
• Make sure the CD is bootable, such as the Recovery CDs.
• Make sure DVD/CD-RW drive is selected as the boot device—see “To change the boot device” on page 30.
• Restart the notebook.
• Test the DVD/CD-RW drive with the e–Diagtools diagnostics—see “Testing the Hardware” on page 119.
If a CD or DVD plays erratically
• Dirt or smudges can cause a disk to skip. Clean the disk with a soft cloth. If the disk is badly scratched, it will probably have to be replaced.
• Some DVDs include software called “PC Friendly.” You generally should not install this software, as it can cause errors or erratic play. If needed, uninstall it and restart your notebook.
If a DVD movie stops playing in the middle
• You may have accidentally paused the DVD movie. Press the Play button to resume.
• The DVD may be double-sided. Open the DVD tray, and read the text near the center hole of the disk. If it says Side A, flip the disk over, close the tray, and press the Play button to continue playing the movie.
If you get a Region Code error when playing a DVD movie
• DVDs can have regional codes embedded in the disk data. These codes prevent DVD movies from being played outside the region of the world in which they are sold. If you get a Region Code error, you are trying to play a DVD intended for a different region.
Important: most DVD drives let you change the region code only a limited number of times (usually no more than four). Please note that when you reach this limit, your last change to the region code will be hard-coded on the DVD drive, and will be permanent. Your HP warranty does not cover the expense of correcting this
situation. Refer to the help for your DVD player software for details about setting region codes.

Troubleshooting and Maintenance Getting Assistance for Your Notebook
Reference Guide 101
If the notebook cannot read a CD or DVD
• For a single-sided CD or DVD, make sure the disk is placed in the drive with the label facing up.
• Clean the disk.
• Wait 5 to 10 seconds after closing the tray for the notebook to recognize the disk.
• Remove the disk from the drive, then restart the notebook.
• If you created the CD on a CD-RW drive module, try using a different media brand, such as the recommended HP C4403A (CD-R) or C4404A (CD-RW) media. Read and write quality may vary for other media.
If a DVD movie doesn’t fill the screen
• Each side of a double-sided DVD has a different format (standard or widescreen). In widescreen format, black bands appear at the top and bottom of the screen. To view the standard format, flip the disk over and play the other side.
If a DVD doesn’t play with two displays
• If both displays are active, press Fn+F5 to switch to one display.
• If you’re using both displays, the DVD image will not appear on any display set up as “secondary”. Click Start, Control Panel, Appearance and Themes, Display. Click Advanced on the Settings tab, then click the S3Display tab and change settings.
Display problems
If the notebook is on, but the screen is blank
• Move the mouse or tap the touch pad or scroll pad. This will wake the display if it is off.
• Try pressing Fn+F2 to increase the display brightness.
• Press Fn+F5 in case the internal display was disabled. (Do this three times to return to the state you started from.)
• If the notebook is cold, allow it to warm up.

Troubleshooting and Maintenance Getting Assistance for Your Notebook
102 Reference Guide
If the screen is difficult to read
• Try setting the display resolution to its default setting of 1024×768: click Start, Control Panel, Appearance and Themes, Display, Settings.
• Try adjusting the size of the desktop icons and labels—see “To adjust the display” on page 35.
If part of the Windows desktop is not visible and you have to scroll down to see the
taskbar, or does not fill the entire display and has a black border
• Your display resolution may be set incorrectly. Adjust the resolution as needed—see “To adjust the display” on page 35.
If an external display does not work
• Check the connections.
• Press Fn+F5 in case the external monitor was disabled. (Do this three times to return to the state you started from.)
• If you’re using a TV connected to the S-video port, you must activate the TV—see “To use a TV set as a monitor” on page 85.
• Test the display with the e–Diagtools diagnostics—see “Testing the Hardware” on page 119.
If one or more display pixels look bad
TFT display manufacturing is a highly precise but imperfect technology, and manufacturers cannot produce displays that are cosmetically perfect. Most, if not all, TFT displays exhibit some level of cosmetic imperfection. These cosmetic imperfections may be visible under varying display conditions, and can appear as bright, dim, or dark spots. This issue is common across all vendors supplying TFT displays in their products and is
not specific to the HP notebook display.
HP notebook TFT displays meet or exceed all HP standards for cosmetic quality of TFT displays. HP does not warrant that the displays will be free of cosmetic imperfections. TFT displays can have a small number of cosmetic imperfections and still conform to
HP’s cosmetic quality specifications, including the following:
• No more than 6 pixels remain on (always one color, such as white, red, green, or blue dots).
• No more than 6 pixels remain off (always dark).
• No more than a total of 8 pixels stuck on or off.
• No other stuck pixel within 15 mm of a stuck pixel.

Troubleshooting and Maintenance Getting Assistance for Your Notebook
Reference Guide 103
Contact HP Customer Care if you have a display quality problem and require a more comprehensive explanation of HP display quality—see “To contact HP for support or service” on page 129. We expect that over time the industry will continue to produce displays with fewer inherent cosmetic imperfections, and we will adjust our HP guidelines as these improvements are implemented.
Floppy disk drive problems
If a floppy drive connected to the USB port doesn’t work
• Make sure the drive is securely connected to the notebook.
• Restart the notebook: click Start, Turn Off Computer, Restart.
Hard disk drive problems
If the notebook’s hard drive doesn’t spin
• Make sure the notebook has power. If necessary, connect the AC adapter, and make sure it is fully plugged into a power source and into the back of the notebook.
• Remove and reinsert the hard drive—see “To replace the hard disk drive” on page 95.
If the hard disk makes a buzzing or whining noise
• Back up the drive immediately.
• See whether the noise is coming from elsewhere, such as the fan or a PC Card drive.
If files are corrupted
• Check the hard disk: open My Computer, select the disk you want to scan, click File, Properties, and use the Tools tab.
• Run the Norton AntiVirus program—see “To protect against viruses” on page 40.
• Test the hard disk drive with the e–Diagtools diagnostics—see “Testing the Hardware” on page 119.
• If necessary, format the hard disk and reinstall the original factory software—see “To recover the factory installation of your hard disk” on page 124.

Troubleshooting and Maintenance Getting Assistance for Your Notebook
104 Reference Guide
The hard drive’s reported capacity is less than its actual size
• The hard disk drive is preconfigured to allocate some space to diagnostic software, which is used in support and service of your notebook. This part of the hard drive is unavailable for other uses, and so is not included in the capacity of the hard drive as reported by Windows (My Computer, Properties).
Heat problems
Keep in mind that your notebook normally gets warm during routine operation. Charging the battery and running games and other programs that drive CPU usage toward 100% can further increase the notebook’s temperature.
If the notebook gets warmer than usual
• Always set the notebook on a firm, flat surface, so that air can flow freely around and underneath it.
• Make sure the air vents on the right side and back of the notebook are clear.
• Make sure the fan is working properly. If needed, test the fan’s operation—see “Testing the Hardware” on page 119.
Infrared Problems
If you have problems with infrared communication
• Make sure the line between the two infrared ports is not blocked, and that the ports face each other as squarely as possible. The ports should be no more than 1 meter apart, with no obstructions between them. Sunlight, heat from nearby equipment, and other sources of infrared radiation can also cause transmission errors.
• Make sure only one application is using the infrared port.
Keyboard and pointing device problems
If the pointer is difficult to control
• Adjust the pointer controls: click Start, Control Panel, Printers and Other Hardware, Mouse.

Troubleshooting and Maintenance Getting Assistance for Your Notebook
Reference Guide 105
If the touch pad or scroll pad doesn’t work
• Don’t use the touch pad or scroll pad while the notebook is rebooting or resuming. If this happens, try the following:
• Press any key on the keyboard.
• Put the notebook on standby, then resume operation.
• The touch pad and scroll pad are automatically disabled when the notebook is docked in a port replicator that has a PS/2 mouse connected.
• Restart the notebook: click Start, Turn Off Computer, Restart.
• Check settings: click Start, Control Pad, Printers and Other Hardware, Mouse, Scrolling.
• Test the keyboard and pointing devices with the e–DiagTools diagnostics—see “Testing the Hardware” on page 119.
If the embedded numeric keypad doesn’t work
• To type numbers, make sure Num Lock is on.
• Make sure the embedded Keypad Lock (Fn+F8) is on—or that you press and hold the Fn key to temporarily access the embedded keypad.
If you can’t type the euro symbol
• Hold Alt GR when you press the marked key.
• The euro symbol is not on the U.S. English keyboard. Make sure the embedded keypad is active (Fn+F8) and Num Lock is on, then hold Alt while typing 0128 on the numeric keypad.
• Support for the euro symbol requires software available from Microsoft. This software is installed in the factory software, but may not be included with retail Windows.
If a special feature on a USB mouse doesn’t work
• Make sure you installed any drivers included with the mouse.
• Restart the notebook, so that it will detect the mouse.

Troubleshooting and Maintenance Getting Assistance for Your Notebook
106 Reference Guide
LAN problems
If the built-in network adapter doesn’t connect to the LAN
• Check all cables and connections. Try connecting at a different network station, if available.
• If the green light next to the LAN port does not light, the LAN cable may not be connected to the network or the network may be down. Try connecting a different computer to the cable.
• Click Start, Control Panel, Network and Internet Connections, Network Connections. Make sure you have the correct clients and protocols installed.
• Make sure the LAN cable is Category 3, 4, or 5 for 10Base-T operation, or Category 5 for 100Base-TX operation. Maximum cable length is 100 meters (330 feet).
• Use the networking problems troubleshooter in Windows Help and Support.
• Click Start, Control Panel, Performance and Maintenance, System. On the Hardware tab, open the Device Manager. If the network interface is disabled, try to enable it. If it has a conflict, try disabling another device.
If you can’t browse My Network Places
• Click Start, Search to look for a computer.
If you can’t log in to Netware servers
• If a Netware server is using IPX/SPX protocol, you may need to force your frame type to match the server’s frame type. Check with your network administrator.
If the notebook stops responding after booting
• Check whether you have a TCP/IP network with no DHCP server. This can cause a long delay at startup because DHCP is enabled. Contact your network administrator to determine the proper TCP/IP configuration.
Memory problems
If a message says you are out of memory
• Make sure drive C is not running low on free space.

Troubleshooting and Maintenance Getting Assistance for Your Notebook
Reference Guide 107
• Use the memory troubleshooter in Windows Help and Support.
• If you are having memory problems while running MS-DOS programs, use the application and software problems troubleshooter in Windows Help and Support.
• Not all third-party memory cards have been tested for use with the notebook. Please check the HP Notebook web site (www.hp.com/notebooks) for a list of approved and tested memory cards.
• Test your notebook’s memory with the e–Diagtools diagnostics—see “Testing the Hardware” on page 119.
If memory doesn’t increase after adding RAM
• Make sure your notebook is using only DDR 266 RAM modules.
Modem problems
If the modem seems slow
• Check for excess static or noise on the line, which reduces the overall transmission speed. If necessary, contact your telephone company about fixing this type of problem.
• If you’re dialing internationally, line noise is often difficult or impossible to eliminate.
• If you have call-waiting, disable it—your telephone company can provide instructions.
• Eliminate extra connections in the line. If possible, connect directly to the wall jack.
• Try another telephone line, preferably one normally used for a fax machine or modem.
If the modem doesn’t dial or no dial tone is detected
• Check all cables and connections.
• Connect a standard telephone to the phone line and make sure the line is working.
• Make sure someone else isn’t using the same phone line.
• Try another telephone line, preferably one normally used for a fax machine or modem.
• If you’re in a foreign country/region, the dial tone may not be recognized by the modem. Click Start, Control Panel, Printers and Other Hardware, Phone and Modem

Troubleshooting and Maintenance Getting Assistance for Your Notebook
108 Reference Guide
Options. Select your modem on the Modems tab, then click Properties, Modem, and disable the option that waits for a dial tone.
• Many countries impose a blackout period after a modem repeatedly fails to connect to a service provider. The number of failed attempts and the period you must wait before trying again differ from country/region to country/region: check with your telephone company.
For example, if you are dialing from Italy and fail to connect to your server or cancel the connection, you must wait one minute before dialing that number again. If you dial before then, you will get an error message that says “delay.” After the fourth failed connection, you must wait one hour before trying the number again. If you dial before the hour is up, you will get a message that says “black list.”
If the modem dials incorrectly
• Check the telephone number you entered, including any digits required for outside access or long distance.
• In Control Panel, open Phone and Modem Options, and check the dialing options—look for duplicate digits for outside access or long distance.
• Make sure the number you’re calling isn’t busy.
• If you’re in a foreign country/region, the dial tone may not be recognized by the modem. Click Start, Control Panel, Printers and Other Hardware, Phone and Modem Options. Select your modem on the Modems tab, then click Properties, Modem, and disable the option that waits for a dial tone.
• If you have call-waiting, disable it—your telephone company can provide instructions.
If the modem dials but doesn’t connect
• Make sure you’re using an analog telephone line. You must not use a digital line. In a hotel, ask for a data line.
• Try another telephone line, preferably one normally used for a fax machine or modem.
• The modem at the other end may have a problem. Try dialing to a different modem.
If the modem will not connect at 56K speed
• The host modem may not support a 56K (V.90) connection speed.
• Connection speed depends on several factors, such as the condition of the telephone line. Try connecting another time.

Troubleshooting and Maintenance Getting Assistance for Your Notebook
Reference Guide 109
If the modem will not connect at any speed
• Make sure you’re using an analog telephone line. You must not use a digital line. In a hotel, ask for a data line.
• Make sure the telephone line goes directly from the notebook’s modem phone jack to the telephone jack on the wall.
• If you have a single telephone line for voice and modem use, make sure no one else is using the line and that the phone is not off the hook.
• Try another telephone line, preferably one normally used for a fax machine or modem.
• Contact your Internet Service Provider (ISP). It's possible that service may be unavailable temporarily or that your settings are incorrect.
• Restart your notebook and attempt another connection.
• Download the latest modem driver from the technical support area of the HP notebook web site (www.hp.com/notebooks).
• Run the modem diagnostics:
1. Click Start, Control Panel, Printers and Other Hardware, Phone and Modem Options.
2. Click the Modems tab, and select the modem you want to test.
3. Click Properties, Diagnostics, Query Modem.
If the modem isn’t detected
• Check the modem setup. In Control Panel, open Phone and Modem Options.
• Click Start, Control Panel, Performance and Maintenance, System. On the Hardware tab, open the Device Manager. If the modem is disabled, try to enable it. If it has a conflict, try disabling another device.
• If you’re running fax software using fax Class 2, try using Class 1.
If the modem dials but you can’t hear it
• If available, make sure the mute indicator is turned off. If it’s on, press the mute button.
• Check the speaker volume setting and mute setting.
• In Control Panel, open Phone and Modem Options. Select the modem and click Properties, then check the volume setting on the Modem tab.

Troubleshooting and Maintenance Getting Assistance for Your Notebook
110 Reference Guide
If the modem connects, but transferred data is bad
• In Control Panel, open Phone and Modem Options. Make sure the hardware settings match on sending and receiving modems.
If the modem causes an ERROR message
• A string of AT commands may contain an incorrect command. If you entered commands as extra settings for the modem in Control Panel or in your communications software, check the commands.
If the modem doesn’t fax
• If you’re using fax Class 2 in the fax software, try using Class 1.
• Close any other communications programs.
• If you’re faxing by printing from an application, make sure you’ve selected the fax printer.
• Try turning off power management features temporarily.
If the modem clicks repeatedly but doesn’t connect
• Make sure you’re using an analog telephone line. You must not use a digital line. In a hotel, ask for a data line.
• Check all cables and connections.
One-Touch button problems
If One-Touch buttons are not working properly
• Make sure the items associated with the buttons are the ones you want—see “To use the One-Touch buttons” on page 33.
If the onscreen display does not appear when pressing a One-Touch button
• Make sure the Onscreen Display is enabled—see “To use the One-Touch buttons” on page 33.

Troubleshooting and Maintenance Getting Assistance for Your Notebook
Reference Guide 111
Parallel and USB problems
If a USB mouse doesn’t work
• Make sure you followed the manufacturer’s installation instructions completely and have installed the mouse properly. If not, repeat the procedure.
• Make sure the port connection is secure.
• Put the notebook on standby, then resume.
• Restart the notebook.
• Check mouse settings in Control Panel.
• Check the port settings in Control Panel: click Start, Control Panel, Performance and Maintenance, System. On the Hardware tab, open the Device Manager, and double-click Universal Serial Bus Controllers.
If a USB modem doesn’t work properly
• See “Modem problems” on page 107.
• Make sure the port connection is secure.
• Use the modem troubleshooter (under Networking problems) in Windows Help and Support.
• Check the modem settings in Control Panel.
• Disable the internal modem:
1. Click Start, Control Panel, Performance and Maintenance, System. On the Hardware tab, open the Device Manager.
2. Double-click Modem to list the current modem devices.
3. Double-click the internal modem, then select the option to disable the modem.
• Check the port settings in Control Panel: click Start, Control Panel, Performance and Maintenance, System. On the hardware tab, open the Device Manager, then double-click Universal Serial Bus controllers.

Troubleshooting and Maintenance Getting Assistance for Your Notebook
112 Reference Guide
If the parallel port is not working
• Make sure the port connection is secure.
• Check the port settings in Control Panel: click Start, Control Panel, Performance and Maintenance, System. On the Hardware tab, open the Device Manager, and double-click Ports (COM & LPT).
• Test the ports with the e–Diagtools diagnostics—see “Testing the Hardware” on page 119.
If the USB port is not working
• Contact the vendor of the peripheral device—and the HP Notebook web site (www.hp.com/notebooks)—for the latest versions of the USB drivers and the driver for the device.
• Check the port settings in Control Panel: click Start, Control Panel, Performance and Maintenance, System. On the Hardware tab, open the Device Manager, and double-click Universal Serial Bus controllers.
• Test the USB port with the e–Diagtools diagnostics—see “Testing the Hardware” on page 119.
PC card (PCMCIA) problems
If the notebook doesn’t recognize a PC Card
• Remove and reinsert the PC Card.
• Put the notebook on standby, then resume.
• Restart the notebook.
• If the card requires an IRQ, make sure one is available. If necessary, set the IRQ to an unused value: click Start, Control Panel, Performance and Maintenance, System. On the Hardware tab, open the Device Manager, then view resources by type.
• Check the HP Business Support web site (www.hp.com/go/bizsupport) for information about installing certain PC Cards.
• Make sure your notebook supports the problem PC Card: check the HP Notebook web site (www.hp.com/notebooks) for a list of approved and tested PC Cards.
• Try the card in another computer to see whether the card functions properly.
• Test the PC Card with the e–Diagtools diagnostics—see “Testing the Hardware” on page 119.
Troubleshooting and Maintenance Getting Assistance for Your Notebook
Reference Guide 113
If an I/O card stops communicating properly
• The card may have been reset if your notebook went on standby or into hibernation, or turned off. Exit any applications, then remove and reinsert the card.
If a PC Card modem is not working
• Disable the internal modem:
1. Click Start, Control Panel, Performance and Maintenance, System. On the Hardware tab, open the Device Manager.
2. Double-click Modem, then double-click the internal modem.
3. Use the pull-down menu to disable the modem.
Performance problems
For best performance with Windows XP, your notebook should have at least 128 MB of memory (RAM).
If the notebook pauses or runs sluggishly
• This may be normal Windows behavior. Background processing can affect response time.
• Certain background operations (such as a virus-scanning program) can affect performance.
• Press Ctrl+Alt+Del to see if an application is not responding.
• Restart the notebook.
• Some file browsers respond slowly while processing graphics or waiting for broken network connections to time out.
• If the notebook’s hard disk drive frequently runs (as indicated by the hard drive light on the front of the notebook) while the notebook appears to be paused or running slowly, Windows is likely spending excess time writing to its swap file on the notebook’s hard disk. If this occurs frequently, consider installing additional memory.
• Check the amount of available free disk space. Delete temporary and unneeded files.
If the notebook stops responding
• Press Ctrl+Alt+Del to end the application that is not responding.

Troubleshooting and Maintenance Getting Assistance for Your Notebook
114 Reference Guide
• Press and hold the power button for at least four seconds to turn off and reset the notebook. Then press the power button again to turn the notebook back on.
• If nothing happens, use a pen or straightened paper clip to press the reset switch on the back of the notebook. Then press the power button to turn the notebook on.
Power and battery problems
If the notebook turns off immediately after it turns on
• Battery power is probably extremely low. Plug in the AC adapter or insert a charged battery.
If the notebook keeps beeping
• The notebook beeps repeatedly when battery power is low (you can set this option in Power Options in Control Panel). Save your work, turn off the notebook immediately, and insert a charged battery or plug in the AC adapter.
If the battery doesn’t charge
• Make sure the AC adapter is fully plugged into the power source and the notebook, and that the light on the adapter is on.
• If you’re using a power strip, remove the AC adapter from the power strip and plug it directly into a wall outlet.
• Make sure the battery is fully installed and locked in place.
• Move the notebook away from any nearby heat source. Unplug the AC adapter and allow the battery to cool down. If the battery gets too hot, it will not charge properly.
• If available, try another battery and AC adapter.
If the notebook has a short operating time
• Try conserving power using any of the suggestions listed in “To get the most from your batteries” on page 51.
• If you are running an application that has an automatic save feature (such as MS Word), disable this feature or increase the specified save time to reduce hard disk access.
• If the operating time has gradually become shorter and the battery is more than a year or two old, you may need to replace the battery.

Troubleshooting and Maintenance Getting Assistance for Your Notebook
Reference Guide 115
• Heavy modem use can affect battery operating time.
• PC Card use can affect battery operating time.
• The battery gauge may need to be calibrated. Restart the notebook, press F6 when the HP logo appears, and follow the instructions that appear onscreen. The process calibrates the battery, and requires four to five hours. You cannot use the notebook during this process.
If the Time Remaining for the battery seems incorrect
• The Time Remaining is an estimate based on the rate at which the notebook is using power at that instant. So, if you check the Time Remaining while the notebook is using a good deal of power (such as when reading from a CD or DVD), the value will likely show less time remaining than you really have, since you will probably later switch to tasks that require less power.
If the notebook doesn’t go on standby as expected
• If you have a connection to another computer, the notebook won’t go on standby if the connection is active.
• If the notebook is performing an operation, it normally waits for the operation to finish before going on standby.
If the notebook doesn’t automatically hibernate as expected
• Make sure hibernate support is enabled: click Start, Control Panel, Performance and Maintenance, Power Options, then click the Hibernate tab.
Also, check the Power Schemes tab. Make sure the hibernation timeouts for AC power and battery power are not set to Never.
Printing problems
Hint You can solve most printing problems by using the printing troubleshooter in Windows Help and Support.
If a printer doesn’t print
• Make sure the printer is on and has paper in it.
• Make sure you are using the correct printer cable or cable adapter, and that the cable is secure at both ends.
• Check for printer errors.

Troubleshooting and Maintenance Getting Assistance for Your Notebook
116 Reference Guide
If the left edge of printed output is missing
• Certain applications may not work properly with 600-dpi printers. If you’re using such a printer, try selecting a compatible printer driver for a 300-dpi printer. For example, if you were using a 600-dpi HP LaserJet printer, you might try using the HP LaserJet IIIsi driver (300 dpi).
If an infrared printer doesn’t print
• Make sure the printer is on and has paper in it.
• Check for printer errors.
• Make sure Windows is running; otherwise infrared printing is not available.
• See “Infrared Problems” on page 104.
Startup Problems
If the notebook doesn’t respond when you turn it on
• Connect the AC adapter.
• Reset the notebook by using a pen or straightened paper clip to press the reset switch on the back of the notebook. Then press the power button to turn the notebook on.
• Don’t use the touch pad while booting or resuming.
• If the notebook still doesn’t respond, remove the battery and AC adapter, and remove any PC Card. Then reset the notebook using the reset switch on the back of the notebook, replace the battery and plug in the AC adapter, and turn on the notebook by pressing the power button.
• If you still get no response, call HP for assistance.
If the notebook won’t boot from battery power
• Make sure the battery is properly inserted and fully charged. Check the battery’s charge by clicking the power icon in the taskbar, or using Power Options in Control Panel.
• If available, try another battery.

Troubleshooting and Maintenance Getting Assistance for Your Notebook
Reference Guide 117
If the notebook won’t boot from the floppy disk drive
• Make sure the drive is connected correctly—see “To connect a USB floppy disk drive” on page 83.
• Make sure the floppy disk drive is selected as the boot device—see “To change the boot device” on page 30.
If the notebook takes a long time to resume
• The notebook can routinely take a minute or more to resume if it has a network card installed. While the operating system is loading drivers and checking hardware and network connections, you will see a blinking cursor on your display. As soon as the hardware has been re-initialized, the Windows desktop will appear.
Standby and resume problems
If the notebook takes a long time to resume after being on standby
• The notebook can take a minute or longer to resume if a network card is installed. A blinking cursor appears on the display while the system is loading and checking hardware and network connections. As soon as the hardware is reinitialized, the Windows desktop appears.
If you have general problems resuming from standby or hibernation
• Close all applications before going on standby or into hibernation.
• If the problems appeared after you installed new software (including drivers, such as printer drivers), uninstall the software. Contact the software application or device vendor for additional support.
Wireless Problems
If you have problems with wireless communication
• Make sure the wireless indicator light is on.
• See “LAN problems” on page 106.

Troubleshooting and Maintenance Getting Assistance for Your Notebook
118 Reference Guide
If you have trouble connecting to another computer in My Network Places
• Wait a few minutes, then press F5 to refresh the list of computers on the network.
• Click Start, Search to locate the computer.
If you cannot connect to a particular computer on the network
• Make sure the computer is properly connected to the network.
• Make sure your TCP/IP setup is correct for your network: click Start, Control Panel, Network and Internet Connections, Network Connections. Contact your system administrator for the correct settings.
If the wireless link icon in the taskbar is red
• Make sure you are using the correct SSID and channel settings: click the wireless link icon in the taskbar and select Advanced Configuration. Contact your system administrator for the correct settings.
• Make sure you are in range of an access point (for an infrastructure connection) or other wireless computer (for an AdHoc connection).
You can connect, but the network is slow
• Check whether you might be in an area served by more than one wireless LAN. If so, the LANs could be interfering with each other.
• Move closer to the access point (for an infrastructure connection) or other wireless computer (for an AdHoc connection). You could be too far away for high-speed communication.
• Stop using any USB device that may be transferring large amounts of data, or adjust application settings to reduce the transfer rate.

Troubleshooting and Maintenance Testing the Hardware
Reference Guide 119
Testing the Hardware
The e–Diagtools hardware diagnostic program included with your notebook provides two levels of testing:
• Automated testing using its basic hardware test.
• Advanced testing using individual hardware tests.
The tests are designed to run after the system reboots. This ensures that the notebook will be in a predictable state, so the diagnostic program can properly test the hardware components. The tests are non-destructive and are intended to preserve the state of the notebook. The notebook reboots when you exit the program so drivers can be loaded.
To run the e–Diagtools diagnostic test
1. Restart the notebook: click Start, Turn Off Computer, Restart.
2. When the HP logo appears, press F10 to start the diagnostic test.
3. When the menu appears, press Enter to run e–Diagtools.
The first time you run the program, you are prompted to select the language for the program.
4. Follow the prompts to run e–Diagtools.
5. When the Configuration Description appears, verify the list of detected hardware.
6. Run the basic test. Press F2 to start the basic hardware test. The results appear when the test is complete.
7. If you intend to exit without running the advanced tests, press F4 and then F7 to view the Support Ticket. Press Esc and then F3 to exit.
8. Optional: Run the advanced tests. Press F2 to open the advanced test screen.

Troubleshooting and Maintenance Testing the Hardware
120 Reference Guide
9. Select and run the appropriate tests. Tests are listed only for detected hardware. Press the following keys to run tests:
F1 Displays help screen.
F2 Runs all marked tests.
Space or Enter
Marks or unmarks the highlighted test.
F12 Sets loop mode, where tests run until you hit ESC.
The support ticket is automatically updated after each run.
10. After each run, press F2 to go back to the advanced tests screen, press F4, F7 to view the support ticket, or press F3 to exit.
11. Optional: open the Support Ticket. In Windows, click Start, All Programs, Hewlett-Packard, Notebook, HP e–Diagtools, e–Diagtools for Windows.
12. Click View to display the Support Ticket.
13. To add information about your problem, click Comments and type the information, then click OK.
To save or print the Support Ticket, click Save As or Print.
To e-mail the Support Ticket to your support agent, click e-Mail. The first time you make an e-mail connection from this program, click Change Settings in the Connect window and enter the settings recommended by your support agent.
e–Diagtools for Windows can also update the version of e–Diagtools on your notebook’s hard disk. In e–Diagtools for Windows, use the e–Diagtools menu.
If you have trouble running e–Diagtools from the hard disk, you can also run it from the Recovery CD or DVD. Boot from disk 1 and select the diagnostics option.

Troubleshooting and Maintenance Configuring the Notebook
Reference Guide 121
Configuring the Notebook
To run the BIOS configuration utility
The BIOS (Basic Input and Output System) configuration utility enables you to make changes to the notebook’s system configuration, and to tailor the operation of your notebook to your individual work needs.
The settings made in the BIOS configuration utility generally control the notebook’s hardware, and so greatly affect how the notebook operates.
1. Restart the notebook: click Start, Turn Off Computer, Restart.
2. When the HP logo appears, press F2 to enter the BIOS configuration utility.
3. The pointing devices are not active in the BIOS configuration utility, so you will need to use the keyboard to navigate:
• Press the left and right arrow keys to move among menus.
• Press the up and down arrow keys to move among parameters in a menu.
• Press Enter to open the dialog for the current parameter, or to select the parameter.
• Press Tab or the left and right arrow keys to move among selections in a dialog.
• Press the up and down arrow keys to move through values for the setting.
• Press Enter to close the dialog and accept the settings.
4. After you select the options you want, use the Exit menu to exit the BIOS configuration utility.
The following tables describe the settings for BIOS version 1.00. If your BIOS version is different, some settings may differ from those shown or may be absent.

Troubleshooting and Maintenance Configuring the Notebook
122 Reference Guide
Startup Menu
Setting Description Default
Date and Time Sets the date using mm/dd/yyyy format and the time using 24-hour format. Value set takes effect immediately.
Boot Device Shows the order of boot devices, with “+” indicating a device category. Move the entries to change the order. If the notebook has more than one device in a category, you can select the one scanned. Internal LAN appears in the list only if a built-in LAN is present—it provides diskless boot from a network server.
1. Hard Disk 2. CD-ROM/DVD 3. Diskette A 4. Internal LAN
Localization Language Sets the language the BIOS uses. English
Components Menu
Setting Description Default
Keyboard Numlock Sets whether keyboard NUM LOCK is enabled at startup. Enabled
LCD Display on/off (selected models)
Enables the LCD status panel. Enabled
LCD Display Date/Time (selected models)
Sets the format for displaying the date and time on the LCD status panel.
mm/dd/yy hh:mm AM/PM
Security Menu
Setting Description Default
Set Admin Password Press Enter to set, change, or clear the administrator password, which protects BIOS settings. The password can have no more than 8 characters (0-9, A-Z), and cannot include special or accented characters. Also sets whether the password is required when the notebook boots, or to enter the BIOS configuration utility.
Enter
Set User Password Press Enter to set, change, or clear the user password. The password can have no more than 8 characters (0-9, A-Z), and cannot include special or accented characters. (The administrator password must be set first.) Also sets whether the password is required when the notebook boots, or to enter the BIOS configuration utility.
Enter

Troubleshooting and Maintenance Configuring the Notebook
Reference Guide 123
Exit Menu
Setting Description
Save and Reboot Saves changes, then exits and reboots.
Exit (No Save) Discards any changes made since last save, then exits and reboots. Does not affect password, date, or time changes.
Default Settings Restores default settings, and remains in Setup. Does not affect password, date, or time changes.
Restore Settings Discards any Setup changes made since last save, and remains in Setup. Does not affect password, date, or time changes.
Troubleshooting and Maintenance Reinstalling and Updating Software
124 Reference Guide
Reinstalling and Updating Software
You can use the Recovery CDs or DVDs to recover the original factory software for your notebook.
The Recovery CDs or DVDs also provide Windows drivers specific to your notebook to configure a custom system. You can find drivers in these locations:
• On your notebook’s hard drive under C:\hp\Drivers.
• On the Recovery CD or DVD under \hp\Drivers.
• On the HP Business Support web site (www.hp.com/go/bizsupport). This web site contains the latest updates of software drivers for different operating systems.
To recover the factory installation of your hard disk
You can use the Recovery CDs or DVDs to reinstall the original factory software on your notebook’s hard disk. You can also use the same process to create a larger Utility partition on your hard disk, or to create a Utility partition on a new hard disk. The hidden Utility partition contains the e–Diagtools diagnostic tests and stores hibernation data for operating systems that don’t provide hibernation.
CAUTION This procedure formats the notebook’s hard disk drive and erases all data on the
disk. After the hard disk is formatted, you’ll need to reinstall your applications.
Do not interrupt the following process or unplug the AC adapter until the process
is complete.
1. Important: back up all data from your hard disk. The following steps delete all data from the disk.
2. Connect the AC adapter to the notebook.
3. Insert the Recovery CD (disk 1) or DVD into the notebook’s DVD/CD-RW drive. If the notebook is turned off, use a pin or straightened paper clip to press the release switch on the drive door to open it.
4. Turn on or restart the notebook. If the notebook is running, click Start, Turn Off Computer, Restart.

Troubleshooting and Maintenance Reinstalling and Updating Software
Reference Guide 125
5. When the HP logo appears, press Esc to display the Boot menu.
6. Use the arrow keys to select the DVD/CD-RW drive as the boot device, and press Enter.
7. When the Recovery CD or DVD dialog box appears, follow the displayed instructions. If prompted, accept the recommended partition size. If you install the factory software, the recovery process can take up to 15 minutes.
If you want to create the Utility partition without installing the factory software, click Advanced and select not to install the operating system.
If your hard disk is partitioned into several drives, you can install the factory software on drive C without affecting other drives. Click Advanced and select to restore only the C partition.
8. Important: when prompted to reboot the notebook, press Ctrl+Alt+Del and follow any instructions that appear.
You can find more details about recovering the factory installation of Windows on the Recovery CDs or DVDs: the file readme.txt is in the root directory of each disk.
Note Windows XP supports the NTFS file system.
To replace damaged Recovery CDs or DVDs
If you lose or damage the Recovery CDs or DVDs, call the HP Customer Care Center for information about obtaining replacements. See “To contact HP for support or service” on page 129.

Troubleshooting and Maintenance Reinstalling and Updating Software
126 Reference Guide
To update the notebook BIOS
Hewlett-Packard may provide updates to the notebook’s BIOS to enhance the capabilities of your system. Check the HP Business Support web site (www.hp.com/go/bizsupport). Installation utilities and instructions will be provided with the updates.
To update Windows drivers
From time to time, HP releases updated versions of the drivers for your notebook. These updates are intended to fix any problems that could be encountered in the drivers, and to keep your notebook running smoothly. In addition, HP normally provides drivers for other versions of Microsoft Windows, in case you decide to install a different version of Windows.
• Download the latest drivers for your notebook from www.hp.com/go/bizsupport. Follow the instructions included with the drivers.

Reference Guide 127
HP Support and Service

HP Support and Service Getting Assistance for Your Notebook
128 Reference Guide
Getting Assistance for Your Notebook
To get help from the web
HP has several web sites on the Internet dedicated to providing information about HP notebook computers:
• HP Instant Support. To get online technical support for your notebook, click Start, Help and Support (or All Programs), HP Instant Support.
• HP Business Support web site. Get e-mail and telephone support information, technical information, and software updates.
www.hp.com/go/bizsupport
• HP Notebook computer web site. Get the latest information about technical support, plus information about warranty and support programs.
www.hp.com/notebooks

HP Support and Service Getting Assistance for Your Notebook
Reference Guide 129
To contact HP for support or service
HP Customer Care Centers will assist you free of charge during the term of the warranty (you are responsible for the telephone charges).
During the free assistance period, HP will assist with questions on these topics:
• Applications and operating systems included with your notebook.
• HP-described operation environments and conditions.
• HP accessories, HP upgrades, and basic operation and troubleshooting.
HP will not be able to help with questions about:
• Non-HP hardware, software, operating systems, or usage not intended for nor included (by HP) with the product.
• How to repair the product yourself.
• Product development or custom installations.
• Consulting.
To contact the HP Customer Care Center, visit the HP Business Support web site (www.hp.com/go/bizsupport) under “Contact HP.” You can find information for contacting the Customer Care Center by e-mail, as well as a current list of phone numbers. If your HP notebook product is not normally sold by HP in the country/region of use, you must call a Customer Care Center that supports your notebook model. Currently, service and support assistance is provided only in the following countries:
Pavilion Series Notebooks (limited to the following)
United States: +1 (970) 635-1000
France: +33 (0) 1 43 62 34 34
United Kingdom: +44 (0) 207 512 52 02

HP Support and Service Getting Assistance for Your Notebook
130 Reference Guide
Omnibook Series Notebooks
North America Africa/Middle East
United States +1 (970) 635-1000 Algeria, Morocco, +212-22404747
Canada +1 (905) 206-4663 and Tunisia (French)
Latin America Israel +972 (0) 9-952-4848
Mexico City +52-58-9922 Egypt +202-7956222
Mexico (outside Mexico City) +01-800-472-6684 South Africa (inside RSA) +086-000-1030
Puerto Rico +1-877-2320-589 South Africa (outside RSA) +27-11-258-9301
South America United Arab Emirates +971-4-883-8454
Argentina +0810-555-5520 (Arabic/English)
Brazil (São Paulo) +(11) 3747-7799 Europe
Brazil (outside São Paulo) +0800-15-7751 Austria (German) +43-810006080
Chile +800-360-999 Belgium (Dutch) +32 (0) 2-626-8806
Colombia +9-800-11-4726 Belgium (French) +32 (0) 2-626-8807
Peru +0-800-10111 Czech Republic +42 (0) 2-6130-7310
Venezuela +800-477-7777 Denmark (Danish/Swedish) +45-39-29-4099
Asia/Pacific English (from outside UK) +44 (0) 207-512-52-02
Australia +61-3-8877-8000 Finland (Swedish/English) +358 (0) 203-47-288
Hong Kong +852 800 96 7729 France +33 (0) 1-43-62-34-34
India +1-600-112267 Germany +49 (0) 180-52-58-134
Indonesia +62-21-350-3408 Greece +30 (1) 60-73-603
Japan (Navi. Dial) +0570-000-510 Hungary +36 (0) 1-382-1111
Japan (if Navi. Dial unavailable) +03-5344-7181 Ireland +353 (0) 1-662-5525
Korea (Seoul) +82-2-3270-0700 Italy +39-02-264-10350
Korea (outside Seoul) +080-999-0700 Netherlands +31 (0) 20-606-8751
Malaysia (Penang) +60-3-2695-2566 Norway (Norwegian/Swedish) +47-22-11-6299
Malaysia (outside Penang) +03-2695-2566 Poland +48-22-865-98-00
New Zealand +64-9-356-6640 Portugal +351-21-317-6333
People’s Republic of China +800-810-5959 Romania +40 (1) 315-44-42
Philippines +63-2-867-3551 Russia (Moscow) +7-095-797-3520
Singapore +65-272-5300 Russia (St. Petersburg) +7-812-346-7997
Taiwan +0800-010055 Spain +34-902-321-123
Thailand +66-2-661-4000 Sweden +46 (0) 8-619-2170
Vietnam +84 (0) 8-823-4530 Switzerland +41 (0) 848-80-11-11
Turkey +90-216-579-71-71
Ukraine +7 (380-44) 490-3520
United Kingdom +44 (0) 207-512-52-02

HP Support and Service Getting Assistance for Your Notebook
Reference Guide 131
For best service, have as much of the following information as possible when you call.
• Your notebook’s model and serial number.
• Your notebook’s operating system.
• Any messages displayed when the problem occurred.
• Were there any changes to the notebook, software, related hardware, or accessories before this occurred? Can you re-create the problem?
To receive repair service
If the HP notebook product is not normally sold by HP in the country/region of use, it must be returned for service to a country/region in which it is sold and supported.
If your notebook is under warranty. To receive warranty repair service for Omnibook or Pavilion Series notebook, contact the HP Customer Care Center—see “To contact HP for support or service” on page 129. The support technician will help qualify your unit for warranty repair based on the warranty applicable to your unit and original purchase date, and will provide you with repair processes. Warranty service may include the cost of shipping, handling, duties, taxes, freight, or fees to or from the service location.
Note Your HP notebook has regional support and service in selected countries, and it currently is supported only in the country/region in which it is purchased and marketed. If you are outside the country/region of purchase, you must cover the cost of shipping your notebook to the appropriate HP authorized repair site. If you are uncertain about the support available for your notebook, please contact our Customer Care Center—see “To contact HP for support or service” on page 129.
If your notebook is no longer under warranty. Contact an HP-Authorized reseller or the HP Customer Care Center—see “To contact HP for support or service” on page 129. The support provider will let you know about repair charges and processes.

HP Support and Service Getting Assistance for Your Notebook
132 Reference Guide
To prepare your notebook for shipment
See “To receive repair service,” above, to determine if your notebook must be sent in for service. If so, prepare your notebook for shipment as follows.
1. Important: Back up your hard disk drive. The hard disk may need to be replaced or reformatted while your notebook is being repaired.
2. Hewlett-Packard cannot guarantee the return of removable components. Please remove the following before you send your notebook for service:
• PC Cards.
• AC adapter and power cord.
• Any removable media, such as CDs, DVDs, or floppy disks.
• Any hardware not involved in the problem and not requested for repair.
3. When sending your notebook to Hewlett-Packard, please use the original product packaging or other substantial packaging in order to avoid damage to the unit in transit.
Note If the hard disk drive is defective, you will receive a replacement drive that is either unformatted or loaded with software for verification. You should restore the notebook’s original software using your Recovery CDs or DVDs (see “To recover the factory installation of your hard disk” on page 124) or other recovery method.

HP Support and Service Hewlett-Packard Limited Warranty Statement
Reference Guide 133
Hewlett-Packard Limited Warranty Statement
1. HP warrants to you, the end-user customer, that HP hardware, accessories, and supplies will be free from defects in materials and workmanship after the date of purchase, for the period specified in the Warranty Duration table below. HP Pavilion and Omnibook XE Series Notebooks typically come with a standard one-year warranty. Please see the Warranty Duration table for more details. If HP receives notice of such defects during the warranty period, HP will, at its option, either repair or replace products which prove to be defective. Replacement products may be either new or equivalent in performance to new.
2. HP warrants to you that HP software will not fail to execute its programming instructions after the date of purchase, for the period specified in the Warranty Duration table below, due to defects in material and workmanship when properly installed and used. If HP receives notice of such defects during the warranty period, HP will replace software which does not execute its programming instructions due to such defects.
3. HP does not warrant that the operation of HP products will be uninterrupted or error free. If HP is unable, within a reasonable time, to repair or replace any product to a condition as warranted, you will be entitled to a refund of the purchase price upon prompt return of the product.
4. HP’s limited warranty is valid in any country or locality where HP has a support presence for this product and where HP has marketed this product. The level of warranty service you receive may vary according to local standards. HP will not alter form, fit or function of the product to make it operate in a country/region for which it was never intended to function for legal or regulatory reasons.
5. Warranty does not apply to defects resulting from (a) improper or inadequate maintenance or calibration, (b) software, interfacing, parts, or supplies not supplied by HP, (c) unauthorized modification or misuse, (d) operation outside of the published environmental specifications for the product, or (e) improper site preparation or maintenance.

HP Support and Service Hewlett-Packard Limited Warranty Statement
134 Reference Guide
6. TO THE EXTENT ALLOWED BY LOCAL LAW, THE ABOVE WARRANTIES ARE EXCLUSIVE AND NO OTHER WARRANTY OR CONDITION, WHETHER WRITTEN OR ORAL, IS EXPRESSED OR IMPLIED AND HP SPECIFICALLY DISCLAIMS ANY IMPLIED WARRANTIES OR CONDITIONS OF MERCHANTABILITY, SATISFACTORY QUALITY, AND FITNESS FOR A PARTICULAR PURPOSE. Some countries, states, or provinces do not allow limitations on the duration of an implied warranty, so the above limitation or exclusion might not apply to you. This warranty gives you specific legal rights and you might also have other rights that vary from country/region to country/region, state to state, or province to province.
7. TO THE EXTENT ALLOWED BY LOCAL LAW, THE REMEDIES IN THIS WARRANTY STATEMENT ARE YOUR SOLE AND EXCLUSIVE REMEDIES. EXCEPT AS INDICATED ABOVE, IN NO EVENT WILL HP OR ITS SUPPLIERS BE LIABLE FOR LOSS OF DATA OR FOR DIRECT, SPECIAL, INCIDENTAL, CONSEQUENTIAL (INCLUDING LOST PROFIT OR DATA), OR OTHER DAMAGE, WHETHER BASED IN CONTRACT, TORT, OR OTHERWISE. Some countries, states or provinces do not allow the exclusion or limitation of incidental or consequential damages, so the above limitation or exclusion may not apply to you.
THE WARRANTY TERMS CONTAINED IN THIS STATEMENT, EXCEPT TO THE EXTENT LAWFULLY PERMITTED, DO NOT EXCLUDE, RESTRICT OR MODIFY AND ARE IN ADDITION TO THE MANDATORY STATUTORY RIGHTS APPLICABLE TO THE SALE OF THIS PRODUCT TO YOU.
Product Duration of Limited Warranty
HP Notebook with “1YR” or similar mark on serial-number label
1 year, or number of years marked.
HP Notebook with “90D” or similar mark on serial-number label
90 days or number of days marked.
HP Notebook accessories and batteries 1 year.
Non-HP accessories, Non-HP "Distributed by HP" accessories
Not warranted by HP. Refer to manufacturer's warranty.
HP Software, Microsoft Software 90 days.

Reference Guide 135
Reference Information

Reference Information Hardware Specifications
136 Reference Guide
Hardware Specifications
Because we are constantly improving our products, the specifications shown below are subject to change. For the latest specifications, see the HP Notebook web site (www.hp.com/notebooks).
Physical Attributes Dimensions: 14.1-in models: 318 × 273 mm (12.5 × 10.75 in). 15-in models: 330 × 278.3 mm (12.99 × 10.94 in). Thickness varies across unit. Weight varies with configuration, vendor components, and manufacturing options and processes. Minimum weight (14.1-in model): 2.7 kg (5.9 lb).
Processor and Bus Architecture
Intel Mobile Pentium 4 processor (starting at 1.5, 1.6, 1.7, 1.8 MHz and higher) with SpeedStep technology. 1.6-V core, 1.3-V external, low-power processor. 32-bit PCI bus.
Graphics 14.1/15-in XGA (1024x768) or 15-in SXGA+ (1400x1050) TFT LCD display. S3 Savage4 AGP4X 3D graphics. Supports 16 million colors and OpenGL graphics. Supports hardware acceleration for MPEG. Display driver supports MPEG2 overlay. Supports simultaneous LCD+CRT operation (same image on both displays). Integrated VGA. Up to 32-MB video memory (shared with system memory). Supports NTSC and PAL TV. Dual display for LCD and external monitor or TV. External color support: starting at 640 x 480, up to 1600 x 1200 display resolution.
Power Rechargeable 8-cell Lilon battery: 14.8 V, 3900 mAH. Battery life: up to 2.5 hours (varies with model and usage). Battery recharge (100%): up to approx. 3 hours with system off (varies with model). Low-battery warning. Standby/hibernate and resume capability. Universal AC adapter: 100–240 Vac (50/60 Hz) input, 19 Vdc output, 75 W, 3.95-amp, 387.5g, 127.3 mm x 51.5 mm x 29.3 mm.
Mass Storage 20- to 40-GB removable IDE hard disk drive.
CD/DVD drive 8X DVD or 8X8X24X8 DVD/CD-RW (or higher) removable drive.
RAM Two slots for DDR SDRAM expansion (PC-2100) up to 1024 MB (2x512MB). 266-MHz RAM bus.

Reference Information Hardware Specifications
Reference Guide 137
Audio System DirectSound. MIDI (playback) support. 16-bit, full duplex stereo sound through two built-in speakers with integrated acoustic chambers. 1.5 W per channel, 64 voices. Built-in microphone. Polk Audio certified on 15-in models (pavilion). Dedicated mute and volume controls (selected models). DVD/CD player (can play while notebook is on standby, in hibernation, or off). 3D-enhanced audio.
Communications 56 Kpbs Ambit modem. 10/100 LAN integrated.
Keyboard and Pointing Devices
87/88/91-key touch-type QWERTY keyboard with 101/102 key emulation. Embedded numeric keypad. 12 function (Fn) keys. 5 user-programmable One-Touch buttons. Touch pad with lock button and on-off indicator. Left and right click buttons, vertical scroll pad.
Input/Output 2 universal serial bus (USB) ports. 15-pin VGA video-out (blue) with DDC support. (Resolution up to 1600 × 1200 × 64K or 16M colors. Refresh rate of 60 to 85 Hz, depending on resolution and color depth.)RJ-45 LAN jack. 25-pin bi-directional high-speed ECP/EPP parallel (burgundy). S-video TV out (yellow). IEEE 1394 port. Docking port: supports optional simple port replicator. One DC-in jack. One microphone-in jack One headphone-out jack.
Expandability One Type II 16-/32-bit PC Card slot (3.3- and 5-V support). CardBus enabled. One integrated Secure Digital Multi-Media Card slot. Optional simple port replicator (selected models).
Security Features User and administrator passwords. DMI-accessible electronic serial number. Kensington MicroSaver lock slot.
Environmental Limits
Operating temperature: 0 to 40 °C (32 to 104 °F).
Operating humidity: 10 to 90 percent RH (0 to 40 °C).
Operating altitude: up to 10,000 ft (3000 m) at 25 °C (77 °F).
Storage (non-operating) temperature: –20 to 65 °C (–4 to 149 °F).

Reference Information Hardware Specifications
138 Reference Guide
Major ICs CPU: Intel Mobile Pentium 4 processor. North Bridge: VIA Pro Savage P4N266 South Bridge: VIA VT8233CE Display controller: S3 Savage 4 in North Bridge. Audio controller: VIA/Realtek ALC201 AC97 Codec. CD player controller: O2 OZ-163. LAN: Realtek RTL8100L. CardBus controller: ENE 1410 Keyboard/embedded controller: National NS87591. Super I/O: in South Bridge + VT1211. SD/MMC controller: W83L518D IEEE 1394 controller: VIA VT6306

Reference Information Modem Reference Information
Reference Guide 139
Modem Reference Information
You can customize the operation of your notebook’s modem using AT commands and S-registers. You can do this from Phone and Modem Options in Control Panel, from most communications software, or by using terminal mode in your software. See “To change your modem settings” on page 57.
Note You should have a good understanding of modems and how they operate before you change default settings.
This section contains summary information about AT commands, S-registers, and selected result codes for the built-in modem.
Modem Reference (Ambit)
In the following AT command table, default settings are shown in bold. All listed AT commands except A/ must be preceded by “AT.”
AT Commands (Ambit)
Command Function (Ambit)
Basic and Extended AT Commands
A/ Re-execute command (not preceded by AT)
A Go off-hook and attempt to answer a call
B0 Select V.22 connect @1200 bps
C1 Return OK message
Dn Dial modifier
E0 Turn off command echo
E1 Turn on command echo
H0 Initiate a hang-up sequence
H1 If on-hook, go off-hook and enter command mode
I0 Report modem speed
I1 Report chip set
I2 Report DSP code revision
I3 Report controller code revision
I4 Report manufacturer name
I5 Report board name
I6 Report OK
I7 Report OK
I9 Report data/TAM/handset/speakerphone
I10 Report DSP code details
I11 Report controller code details
I12 Report driver time stamp

Reference Information Modem Reference Information
140 Reference Guide
Command Function (Ambit)
L0 Set low speaker volume
L1 Set low speaker volume
L2 Set medium speaker volume
L3 Set high speaker volume
M0 Turn speaker off
M1 Turn speaker on during handshaking and turn speaker off while receiving carrier
M2 Turn speaker on during handshaking and while receiving carrier
M3 Turn speaker off during dialing and receiving carrier and turn speaker on during answering
N0 Turn off automode detection
N1 Turn on automode detection
O0 Go on-line
O1 Go on-line and initiate a long retrain sequence
O2 Go on-line and initiate a short retrain sequence
P Force pulse dialing
Q0 Allow result codes to DTE
Q1 Inhibit result codes to DTE
Sn Select S-Register n as default
Sn? Return the value of S-Register n
Sn=v Set default S-Register n to value v
T Force DTMF dialing
V0 Report short form result codes
V1 Report long form result codes
W0 Report DTE speed only
W1 Report line speed, EC protocol and DTE speed
W2 Report DCE speed only
X0 Report basic call progress result codes, i.e., Ok, Connect, Ring, No Carrier (also, for busy, if enabled, and dial tone not detected), No Answer and Error
X1 Report basic call progress result codes and connections speeds (Ok, Connect, Ring, No Carrier (also, for busy, if enabled, and dial tone not detected), No Answer, Connect XXXX, and Error
X2 Report basic call progress result codes and connections speeds, i.e., Ok, Connect, Ring, No Carrier (also, for busy, if enabled, and dial tone not detected), No Answer, Connect XXXX, and Error
X3 Report basic call progress result codes and connections rate, i.e., Ok, Connect, Ring, No Carrier, No Answer, Connect XXXX, Busy, and Error
X4 Report all call progress result codes and connections rate, i.e., Ok, Connect, Ring, No Carrier, No Answer, Connect XXXX, Busy, No Dial Tone and Error
Y0 Report OK
Y1 Report OK
Z0 Restore stored profile 0 after warm reset
Z1 Soft reset and restore stored profile 1 after warm reset
&C0 Soft reset and force RLSD active regardless of the carrier state
&C1 Allow RLSD to follow the carrier state
&D0 Modem ignores DTR
&D1 Modem enters command mode at DTR drop
&D2 Modem hangs up at DTR drop
&F0 Restore factory configuration 0
&F1 Restore factory configuration 1
&J0 Set S-Register response only for compatibility
&K0 Disable DTE/DCE flow control
&K3 Enable RTS/CTS DTE/DCE flow control

Reference Information Modem Reference Information
Reference Guide 141
Command Function (Ambit)
&K4 Enable XON/XOFF DTE/DCE flow control
&K5 Enable transparent XON/ XOFF flow control
&K6 Enable both RTS/CTS and XON/XOFF flow control
&L0 Report OK
&L1 Report OK
&M0 Report OK
&P0 Set 10 pps pulse dial with 39%/61% make/break
&P1 Set 10 pps pulse dial with 33%/67% make/break
&Q0 Report OK
&Q5 Report OK
&Q6 Report OK
&S0 Report OK
&T0 Terminate any test in progress
&T1 Initiate local analog loopback
&T2 Returns ERROR result code
&T3 Report OK
&T4 Report OK
&T5 Report OK
&T6 Report OK
&T7 Report OK
&T6 Report OK
&T7 Report OK
&T8 Report OK
&V Display current configuration and stored profiles
&W0 Store the current configuration as profile 0
&W1 Store the current configuration as profile 1
&Y0 Report OK
&Y1 Report OK
&Zn=x Store dial string x (up to 38 digits) to location n (0 to 3)
FAX Class 1
+Fclass=0 Select data mode
+Fclass=1 Select facsimile Class 1 mode
+Fclass=2 Select facsimile Class 2 mode
+FAE=0 Disable data/fax auto answer
+FAE=1 Enable data/fax auto answer
+FRH=n Receive data with HDLC framing: 3=V.21 channel 2, 300bps, 24=V.27ter 2400bps, 48=V.27ter 4800bps, 72=V.29 7200bps, 73=V.17 7200bps long, 74=V.17 7200bps short, 96=V.29 9600bps, 97=V.17 9600bps long, 98=V.17 9600bps short, 121=V.17 12000bps long, 122=V.17 12000bps short, 145=V.17 14400bps long, 146=V.17 14400bps short
+FRM=n Receive data: 24=V.27ter 2400bps, 48=V.27ter 4800bps, 72=V.29 7200bps, 73=V.17 7200bps long, 74=V.17 7200bps short, 96=V.29 9600bps, 97=V.17 9600bps long, 98=V.17 9600bps short, 121=V.17 12000bps long, 122=V.17 12000bps short, 145=V.17 14400bps long, 146=V.17 14400bps short
+FRS=n Receive silence, n×10 ms
+FTH=n Transmit data with HDLC framing: 3=V.21 channel 2, 300bps, 24=V.27ter 2400bps, 48=V.27ter 4800bps, 72=V.29 7200bps, 73=V.17 7200bps long, 74=V.17 7200bps short, 96=V.29 9600bps, 97=V.17 9600bps long, 98=V.17 9600bps short, 121=V.17 12000bps long, 122=V.17 12000bps short, 145=V.17 14400bps long, 146=V.17 14400bps short

Reference Information Modem Reference Information
142 Reference Guide
Command Function (Ambit)
+FTM=n Transmit data: 24=V.27ter 2400bps, 48=V.27ter 4800bps, 72=V.29 7200bps, 73=V.17 7200bps long, 74=V.17 7200bps short, 96=V.29 9600bps, 97=V.17 9600bps long, 98=V.17 9600bps short, 121=V.17 12000bps long, 122=V.17 12000bps short, 145=V.17 14400bps long, 146=V.17 14400bps short
+FTS=n Stop transmission and wait, n×10 ms
+F<cmd>? Return active configuration for command
+F<cmd>=? Return modem capabilities for command
FAX Class 2
+FMR? Request manufacturer identification
+FMDL? Identiry product model
+FREV? Identify product revision
+FDR Begin or continue phase C receive data
+FDT Transmit data
+FET=n Transmit page punctuation
+FK Terminate session
+FAXERR=n Report session error
+FBOR=n Data bit order: 0,2=direct, 1,3=reversed
+FCQ=0 Copy quality checking
+FCR=n Able to receive: 0=unable, 1=able
+FDCC=... DCE cabilities
+FDCS=... Current session results parameters
+FDIS=... Currest session capabilities parameters
+FLID=”xxx” Local ID string
+FPHCTO=n DTE phase C response timeout n×100ms
+FPTS=n Page transfer status
S-Registers (Ambit)
Register Function (Ambit) Range/units Default
S0 Rings to auto-answer 0-255/rings 0
S1 Ring counter 0-255/rings 0
S2 Escape character 0-255/ASCII 43
S3 Carriage return character 0-127/ASCII 13
S4 Line feed character 0-127/ASCII 10
S5 Backspace character 0-255/ASCII 8
S6 Wait time for dial tone 2-255/s 2
S7 Wait time for carrier 1-255/s 60
S8 Pause time for dial delay modifier 0-255/s 2
S9 Carrier detect response time 1-255/.1 s 6
S10 Carrier loss disconnect time 1-255/.1 s 100
S11 DTMF tone duration 50-255/.001 s 70
S12 Escape prompt delay 0-255/.02 s 50
S14 General bit mapped options status 138 (8Ah)
S16 Test mode bit mapped options status (&T) 0
S21 V.24/general bit mapped options status 52 (34h)
S22 Speaker/results bit mapped options status 117 (75h)
S29 Flash dial modifier time 0-255/10 ms 5
S37 Line connection speed 0
S41 General bit mapped options status 3 (03h)

Reference Information Modem Reference Information
Reference Guide 143
Register Function (Ambit) Range/units Default
S46 Data compression control 136, 138 138
S91 Data transmit level 6-15/dBm 10 (country dependent)
S92 Fax transmit attenuation level 6-15/dBm 10 (country dependent)
S95 Result code messages control 0
Selected Result Codes (Ambit)
Code Meaning
0 OK
1 CONNECT
2 RING
3 NO CARRIER
4 ERROR
5 CONNECT 1200
6 NO DIAL TONE
7 BUSY
8 NO ANSWER

Reference Information Safety Information
144 Reference Guide
Safety Information
Power cords
The power cord supplied with the notebook’s AC adapter should match the plug and voltage requirements for your local area. Regulatory approval for the AC adapter has been obtained using the power cord for the local area. However, if you travel to a different area or need to connect to a different outlet or voltage, you should use one of the power cords listed below. To purchase a power cord (including one for a country/region not listed below) or a replacement AC adapter, contact your local Hewlett-Packard dealer or Sales office. For any power cord with a fused plug, if you have to replace the fuse, be sure to install an approved fuse.
Country/Region Rated Voltage and Current HP Part Number
Canada Mexico Philippines Taiwan United States
125 Vac (3 A) 8120-6313
Europe Egypt Israel Saudi Arabia
250 Vac (2.5 A) 8120-6314
Hong Kong Singapore United Kingdom
250 Vac (2.5 A) 8120-8699
Australia New Zealand
250 Vac (2.5 A) 8120-6312
Japan 125 Vac (3 A) 8120-6316
India 250 Vac (2.5 A) 8120-0702
South Africa 250 Vac (2.5 A) 8120-6317
Argentina 250 Vac (2.5 A) 8120-8367
Chile 250 Vac (2.5 A) 8120-8452
People’s Republic of China 250 Vac (2.5 A) 8120-8373

Reference Information Safety Information
Reference Guide 145
Ergonomics
WARNING Improper use of keyboards and other input devices has been associated with
ergonomic injury. For information about reducing your risk, see “Working in
Comfort” in the online HP Library, or visit our ergonomics web site,
www.hp.com/ergo.
Battery safety
Note Use only the battery that came with your notebook, or an HP-approved replacement—see “To buy accessories” in the online Reference Guide.
• To avoid risk of fire, burns, or damage to your battery pack, do not allow any metal object to touch the battery contacts.
• Do not disassemble the battery. There are no serviceable parts inside. Do not dispose of the battery pack in fire or water.
• Handle a damaged or leaking battery with extreme care. If you come in contact with the electrolyte, wash the exposed area with soap and water. If it contacts the eye, flush the eye with water for 15 minutes and seek medical attention.
• Do not expose the battery pack to storage temperatures above 60 °C (140 °F).
• When the battery is not in use, store it in the battery pouch provided.
• When discarding a battery pack, contact your local waste disposal provider regarding local restrictions on the disposal or recycling of batteries.
• To obtain a replacement battery, contact your local dealer or HP sales office.
• Do not charge the battery pack if the ambient temperature exceeds 45 °C (113 °F).
• Replace only with the same or equivalent type battery pack recommended by the manufacturer.

Reference Information Safety Information
146 Reference Guide
Laser safety
The CD-ROM and DVD drives used with the computer are certified as a Class 1 laser devices according to the U.S. Department of Health and Human Services (DHHS) Radiation Performance Standard and International Standards IEC 825 / IEC 825-1 (EN60825 / EN60825-1). These devices are not considered harmful, but the following precautions are recommended:
• Ensure proper use by reading and following the instructions carefully.
• If the unit requires service, contact an authorized HP service center—see “To contact HP for support or service” on page 129.
• Do not attempt to make any adjustment of the unit.
• Avoid direct exposure to the laser beam—do not open the unit.
CLASS 1 LASER PRODUCT
LASER KLASSE 1
LED safety
The infrared port located on the front of the computer is classified as a Class 1 LED (light-emitting diode) device according to International Standard IEC 825-1 (EN60825-1). This device is not considered harmful, but the following precautions are recommended:
• If the unit requires service, contact an authorized HP service center—see “To contact HP for support or service” on page 129.
• Do not attempt to make any adjustment of the unit.
• Avoid direct eye exposure to the infrared LED beam. Be aware that the beam is invisible light and cannot be seen.
• Do not attempt to view the infrared LED beam with any type of optical device.
CLASS 1 LED PRODUCT
LEDSCHÜTZKLASSE 1 PRODUKT

Reference Information Safety Information
Reference Guide 147
Exposure to radio frequency radiation
The radiated output power of the IEEE 802.11 internal wireless radio is far below the FCC radio frequency exposure limits. Nevertheless, the wireless radio shall be used in such a manner that the potential for human contact during normal operation is minimized.
The internal wireless radio operates within guidelines found in radio frequency safety standards and recommendations, which reflect the consensus of the scientific community. HP therefore believes the internal wireless radio is safe for use by consumers. The level of emitted energy emitted is far less than the electromagnetic energy emitted by wireless devices such as mobile phones. However, the use of wireless radios may be restricted in some situations or environments, such as aboard airplanes. If you are unsure of restrictions, you are encouraged to ask for authorization before turning on the wireless radio.

Reference Information Regulatory Information
148 Reference Guide
Regulatory Information
This section presents information that shows how your notebook computer complies with regulations in certain regions. Any modifications to your computer not expressly approved by Hewlett-Packard could void the authority to operate the computer in these regions.
U.S.A.
This computer has been tested and found to comply with the limits for a Class B digital device, pursuant to Part 15 of the FCC Rules. These limits are designed to provide reasonable protection against harmful interference in a residential installation.
This computer generates, uses, and can radiate radio frequency energy. If not installed and used in accordance with the instructions, it may cause harmful interference to radio communications. However, there is no guarantee that interference will not occur in a particular installation. If this computer does cause harmful interference to radio or television reception (which can be determined by removing the unit’s battery and AC adapter), try the following:
• Reorienting or relocating the receiving antenna.
• Relocating the computer with respect to the receiver.
• Connecting the computer’s AC adapter to another power outlet.
Connections to Peripheral Devices
To maintain compliance with FCC Rules and Regulations, use properly shielded cables with this device.
For more information, consult your dealer, an experienced radio/television technician, or the following booklet, prepared by the Federal Communications Commission: How to
Identify and Resolve Radio-TV Interference Problems. This booklet is available from the U.S. Government Printing Office, Washington, DC 20402, Stock Number 004-000-00345-4. At the first printing of this manual, the telephone number was (202) 512-1800.

Reference Information Regulatory Information
Reference Guide 149
Declaration of Conformity (U.S.A.)
Responsible Party: Hewlett-Packard Company Mobil Computing Division 19310 Pruneridge Ave. Cupertino, CA 95014, U.S.A. +1 (650) 857-1501
declares that the product
Trade name: Hewlett-Packard Company
Product name: Laptop Computer
Model Number(s): HP OmniBook xt1000 series or HP Pavilion zt1000 series (1000 series means 1xxx numbers where x = 0-9)
complies with Part 15 of the FCC Rules.
Operation is subject to the following two conditions: 1. This device may not cause harmful interference, and 2. This device must accept any interference received, including interference that may cause undesired operation.
Canada
This digital apparatus does not exceed the Class B limits for radio noise emissions from digital apparatus as set out in the radio interference regulations of the Canadian Department of Communications. The internal wireless radio complies with RSS 210 of Industry Canada.
Le présent appareil numérique n’émet pas de bruits radioélectriques dépassant les limites applicables aux appareils numériques de Classe B prescrites dans le règlement sur le brouillage radioélectrique édicté par le Ministère des Communications du Canada. Le composant RF interne est conforme à la norme CNR-210 d’Industrie Canada.
European Union
The equipment has been approved in accordance with Council Decision 98/482/EC for pan-European single terminal connection to the public switched telephone network (PSTN) and to a radio-frequency wireless network. However, due to differences between the individual PST’s provided in different countries, the approval does not, of itself, give an unconditional assurance of successful operation on every PSTN network termination point.

Reference Information Regulatory Information
150 Reference Guide
In event of problems, you should contact your equipment supplier in the first instance. This equipment has been designed to work in all of the countries of the European Economic Area (Public Switched Telephone Networks). Network compatibility is dependent on internal software settings. Contact your equipment supplier if it is necessary to use the equipment on a different telephone network. For further product support, contact Hewlett-Packard—see “To contact HP for support or service” on page 129.
Die Geräte wurden gemäß Ratsentscheidung 98/482/EC für den Anschluss an eine einzelne Telefonbuchse im europäischen Raum (Public Switched Telephone Network) und drahtlose Funknetzwerke zertifiziert. In Anbetracht der Unterschiede zwischen den einzelnen Telefonnetzen bietet die Zertifizierung für sich genommen keine absolute Sicherheit, dass die Geräte bei Anschluss an jeder beliebigen Telefonbuchse funktionieren. Sollten Probleme auftreten, wenden Sie sich zunächst an den Gerätehersteller. Diese Geräte wurden zum Betrieb in allen Ländern der europäischen Wirtschaftsgemein-schaft entwickelt (Public Switched Telephone Networks). Die Kompatibilität zum Netz ist von internen Software-Einstellungen abhängig. Wenden Sie sich an den Geräteher-steller, wenn Sie die Geräte in einem anderen Telefonnetz einsetzen müssen. Weitere Informationen zur Unterstützung für das Produkt erhalten Sie bei Hewlett-Packard.
Cet équipement a été reconnu conforme aux décisions du Conseil 98/482/EC relatives à la connexion pan-européenne de terminal simple au réseau téléphonique public commuté (RTPC) et à un réseau sans fil RF. Cependant, des différences existant entre les RTPC nationaux présents dans les différents pays, cette homologation en elle-même ne garantit pas la réussite de toutes les opérations sur tous les points de terminaison du réseau téléphonique public commuté. En cas de problème, prenez contact avec le fournisseur auprès duquel vous vous êtes procuré votre équipement. Cet équipement a été conçu pour fonctionner dans tous les pays membres de la zone d'échange européenne (Réseaux Téléphoniques Public Commutés). La compatibilité entre réseaux dépend des paramètres internes du logiciel. Prenez contact avec le fournisseur auprès duquel vous vous êtes procuré votre équipement pour savoir s'il est préférable d'utiliser ce dernier sur un autre réseau téléphonique. Si vous souhaitez obtenir de l'aide, prenez contact avec Hewlett-Packard.
Questa apparecchiatura è stata approvata in conformità alla Decisione del Consiglio 98/482/EC che regolamenta, in seno all’Unione Europea, la connessione di singoli terminali alla rete telefonica pubblica commutata (PSTN) e alla rete wireless in radio frequenza. Tuttavia, a causa delle differenze esistenti tra i singoli servizi PSTN forniti nei diversi paesi, l’approvazione in sé stessa non rappresenta una garanzia assoluta di funzionamento su ogni singolo punto di terminazione della rete PSTN. In caso di problemi, per prima cosa rivolgersi al fornitore dell’apparecchiatura. Questa apparecchiatura è stata progettata per funzionare in tutti i paesi dell’Area

Reference Information Regulatory Information
Reference Guide 151
Economica Europea (reti telefoniche pubbliche commutate). La compatibilità della rete dipende dalle impostazioni interne del software. Rivolgersi al fornitore dell’apparecchiatura qualora sia necessario utilizzare quest’ultima su una rete telefonica diversa. Per ulteriore assistenza sul prodotto, contattare Hewlett-Packard.
International
Products sold internationally by Hewlett-Packard and its authorized dealers meet the specifications listed on the following pages.

Reference Information Regulatory Information
152 Reference Guide
Declaration of Conformity (according to ISO/IEC Guide 22 and EN 45014)
Manufacturer’s Name: Hewlett-Packard Company
Manufacturer’s Address: Hewlett-Packard Company Mobile Computing Division 19310 Pruneridge Ave. Cupertino, CA 95014, U.S.A.
declares that the product(s)
Product Name: Laptop Computer
Model Number(s): HP Omnibook xt1000 or HP Pavilion zt1000 (1000 series means 1xxx numbers where x = 9-0)
Product Options: All
conforms to the following Product Specifications:
Safety: IEC 60950: 1991 +A1, A2, A3, A4. EN60950: 1992 +A1, A2, A3, A4, A11 IEC 60825-1:1993 +A1 / EN 60825-1:1994 +A11 Class 1 (Laser/LED) GB4943: 1995
EMC: CISPR 22: 1997, EN 55022: 1998 Class B CISPR 24:1997 / EN 55024: 1998 IEC 61000-3-2:1995 / EN 61000-3-2: 1995 +A1: 1998 + A2: 1998 IEC 61000-3-3:1994 / EN 61000-3-3: 1995 GB9254: 1998 AS/NZS 3548: 1995 Rules and Regulations of Class B FCC Title 47 CFR, Part 15 Class B/ANSI C63.4: 1992
Telecom: Radio:
TBR 21: 1998, EG 201 121: 1998 Notified Body Number: 0682 Notified Body Address: CETECOM ICT Services GmbH, Untertuerkheimer Str.6-10, D-66117 Saarbruecken
Equipment Class 2
ETSI 300-826 General EMC requirements for Radio equipment ETSI 300-328 Technical requirements for Radio equipment.
Supplementary Information: The product herewith complies with the requirements of the R&TTE Directive 1999/5/EC and carries the “CE Marking” accordingly. This device complies with Part 15 of FCC rules. Operation is subject to the following two conditions: (1) this device may not cause harmful interference, and (2) this device must accept any interference received, including interference that may cause undesired operation. The HP F1454A and F1781A AC/DC adapter used with this product is designed to operate on all power systems, other than IT power systems.
Corvallis, OR, USA December 1, 2001
European Contact for regulatory topics only: Hewlett Packard GmbH, HQ-TRE, Herrenberger Straße 130, 71034 Böeblingen, Germany. Fax: +49 7031-143143).
USA Contact: Hewlett Packard Co., Corporate Product Regulations Manager, 3000 Hanover Street, Palo Alto, CA 94304. Phone: +1 (650) 857-1501.

Reference Guide 153
Index
A
AC adapter
compatibility, 22
connecting, 22
requirements, 144
accessories, 13
AdHoc wireless communication
(802.11) setting up network, 62
airplanes
wireless communication in, 62,
64, 65
Alt GR key, 35
antistatic precautions, 91
Applications key, 34
AT commands, 57, 139
audio
adjusting volume, 99
connecting devices, 83
troubleshooting, 99
B
battery
charge light, 49
charging, 50
checking status, 49, 73
extending life, 51
installing, 21
low power warning, 50
maintaining capacity, 52
operating time, 51, 114
removing, 21
replacing, 50
safety, 145
troubleshooting, 114
battery charge
status light, 17
BIOS
updating notebook, 126
BIOS configuration utility
using, 38, 121
black list (modem), 55, 108
blackout periods
modem, 108
Bluetooth
configuring, 65
dial-up network connections, 66
sending files, 65
serial connections, 66
tuning on, 64
turning off, 64
wireless, 64
boot device
selecting, 122
boot device selecting, 30
brightness
adjusting, 32, 35
C
Caps Lock, 18
Cardbus cards, 76, 78
cards (PCMCIA), 76, 78
CD/DVD drive
booting from, 30, 122
inserting disks, 70
on first startup, 24
removing disks, 70
status light, 18
CDs
checking play status, 73
creating or copying, 75
playing, 72
recommended media, 75
when notebook not on, 72
click buttons
configuring, 31
using, 30, 31
connecting
audio devices, 83
external monitor, 84
floppy drive, 83
IEEE 1394 devices, 89
infrared devices, 87
LAN, 60
parallel device, 82
port replicator, 88
to Internet, 56
USB devices, 82
wireless network (802.11), 61
connectors
notebook, 81
D
data
protecting, 44
DDR 226 RAM, 107
default settings, 28
diagnostics, 119
dial-up network connections
Bluetooth, 66
to LAN, 57
display
adjusting, 35
brightness, 32, 35, 44, 51
enlarging icons, 36
extending life, 44
external, 84
quality, 102
resolution, 36
secondary, 85
settings, 35
size of objects in, 36
taskbar icon, 35
timeouts, 44
troubleshooting, 101
turning off, 48
TV set, 85
docking
port replicator, 88
drivers
downloading, 126
drives
creating Utility partition, 125
hard drive holder, 96
replacing hard disk, 95
DVD drive
setting region code, 74, 100
troubleshooting, 100
DVDs
checking play status, 74
playing, 74
region code, 74, 100
E
e–Diagtools for Windows, 120
HP Customer Care, 129
sending and receiving, 58
encryption, 61
ergonomics, 20
euro symbol, 105
external devices
keyboard, 82
mouse, 82

154 Reference Guide
external devices
monitor, 84
F
F10 (diagnostics), 119
Fax Console, 59
Fax Services, 59
faxes, 59
printing, 59
receiving, 59
sending, 59
files
recovering, 124
floppy disk drive
booting from, 30
troubleshooting, 103
floppy disk drive (accessory)
booting from, 122
floppy drive
USB connection, 83
Fn key
+ Backspace (mute function), 32,
37
+ F1 (decrease brightness), 32,
34, 35
+ F2 (increase brightness), 32,
34, 35
+ F5 (display select), 32, 84
+ F8 (keypad), 32
+ Num Lock (Scroll Lock), 32
+ One-Touch button (One-Touch
button LEDs), 32
+ Page Down (decrease volume),
32
+ Page Up (increase volume), 32
external keyboards, 32
temporary keypad, 34
using, 32
H
hard disk drive
creating Utility partition, 125
holder, 96
maintaining, 43, 44
NTFS format, 125
protecting, 43
replacing, 95
status light, 17
troubleshooting, 103
Utility partition, 95
hardware specifications, 136
Hewlett-Packard support, 98
hibernation (power mode)
automatic, 46
entering, 28, 48
resuming from, 28, 117
hot keys, 32
HP Customer Care
contact by e-mail, 129
web site, 13
HP Desktop Zoom, 36
HP Instant Support, 98, 99
HP Library, 13
HP Notes, 13
HP Quick Lock, 39
HP TV Now, 86
I icons
enlarging display, 36
IEEE 1394
connecting devices, 89
infrared communication
connecting devices, 87
making connections, 87
printing, 87
setting up, 87
transferring files, 87
when not in use, 87
infrared port
safety, 146
installing original software, 124
Internet
connecting to, 25, 56
disconnecting, 56
Internet Explorer, 56
Internet Service Providers, 54, 56
inventory, 12
K
Kensington lock
attaching, 39, 40, 88
keyboard
embedded keypad, 34
ergonomic precautions, 20
euro symbol, 105
external, 82
non US, 35
opening, 90
status lights, 18
troubleshooting, 104
keyboards
external, 32
keypad
embedded, 34
keypad (embedded), 34
L
LAN
connecting to, 60
dialing, 57
indicator lights, 60
troubleshooting, 106
wireless, 61
laser safety, 146
license agreement, 3
lights
LAN port, 60
status, 17, 18
local area network (LAN)
booting from, 30, 122
locking (cable), 39, 40, 88
M
maintenance, 43
memory
adding, 90
DDR 226, 107
removing, 90, 91, 92
troubleshooting, 106
video, 37
modem
AT commands, 57, 139
black list, 55, 108
blackout periods, 108
built-in, 54
connecting, 23
connecting to Internet, 56
dial-up connection, 57
faxing, 59
sending e-mail, 58
settings, 57
software, 54
troubleshooting, 107, 108
monitor
external, 84
mouse
external, 82
troubleshooting, 104
movies (DVD), 74
MP3
launch button, 72
playing files, 72
multimedia buttons
power switch, 19
using, 72
when notebook not on, 72

Reference Guide 155
mute button/indicator, 37
mute function, 32, 37
N
network
LAN, See LAN
networks
connecting to, 60
Norton AntiVirus, 40
notebook
automatic power management, 46
changing BIOS settings, 38, 121
cleaning, 44
default settings, 28
maintaining, 43
overheating, 104
protecting, 43, 90, 104
registering, 25
resetting, 29
resuming, 28
setting up, 20
testing, 119
timeouts, 46, 47, 115
turning on and off, 24, 28
video performance, 37
NTFS format, 125
Num Lock, 18
O
One-Touch buttons
configuring, 33
LEDs, 32
onscreen labels, 33
troubleshooting, 110
using, 33
overheated notebook, 104
P
Pad Lock
button, 31
indicators, 30
using, 30
parallel devices (connecting), 82
parallel port
troubleshooting, 111
partition (Utility), 95, 124, 125
passwords
Admin, 38
in BIOS, 38
in Windows, 38
User, 38
when resuming, 38
PC Cards
inserting, 76, 78
removing, 77
saving power, 51
stopping, 77
tested, 77, 79
troubleshooting, 112
PCMCIA cards, 76, 78
phone line
connecting, 23, 54
requirements, 23
pointing devices
configuring, 31
port replicator
connecting, 88
power
connecting AC, 22
processor speed, 48
saving, 51
troubleshooting, 114
power button
using, 24
power cords, 144
power management
automatic, 46
schemes, 47
power mode
status light, 17
power modes
automatic, 46
entering, 28
hibernation, 28
standby, 28
printing
compatible printers, 82
infrared, 87
parallel connection, 82
troubleshooting, 115
processor speed, 48
maximizing, 52
protection
Kensington lock, 39, 40, 88
R
RAM
adding, 90
DDR 226, 107
removing, 90, 91, 92
recovering original software, 124
Recovery CD
diagnostics, 120
replacing, 125
using, 124
region code (DVDs)
setting, 74, 100
registration, 25
regulatory information, 148
reinstalling Windows, 124
repair service
obtaining, 98, 131, 132
shipment, 132
reset switch
using, 29
resetting
notebook, 29
resume
troubleshooting, 117
S
safety
battery use, 145
infrared port, 146
laser, 146
power cords, 144
wireless communication, 62, 64,
65
saving battery power, 51
scroll lock, 32
scroll pad
and port replicator, 31
configuring, 31
customizing, 31
disabling, 30, 31
scrolling, 31
using, 30
scrolling
customizing, 31
horizontal, 31
touch pad and scroll pad, 31
vertical, 31
secondary display, 85
security
anti-virus software, 40, 44
Kensington lock, 39, 40, 88
serial connections
Bluetooth, 66
service (repair), 98
software
license, 3
pre-installed, 12
sound
adjusting volume, 36
muting, 37
special characters, 35
specifications, 136
SpeedStep Technology, 48
standby (power mode)
and display life, 44
automatic, 46

156 Reference Guide
entering, 28
password on resuming, 38
resuming from, 28, 117
saving power, 51
troubleshooting, 117
when closing lid, 48
static electricity, 91
precautions, 90
status lights
battery charge, 17, 49
CD/DVD drive activity, 18
hard drive, 17
keyboard, 18
power mode, 17
status panel
setting time and date, 73
using, 73
Support Ticket, 120
S-video port
connecting TV, 85
System standby, 48
T
taskbar icons
display settings, 35
Safely Remove Hardware, 77
speaker, 36, 37
technical support, 99
temperature
limits, 137
timeouts
display, 44
notebook, 46, 47, 115
touch pad
and port replicator, 31
configuring, 31
customizing, 31
disabling, 30, 31
scrolling, 31
troubleshooting, 104
using, 30, 31
troubleshooting
audio, 99
battery, 114
display, 101
DVD drive, 100
floppy disk drive, 103
hard disk drive, 103
hibernation, 117
HP Instant Support, 98
information sources, 98
keyboard, 104
LAN, 106
memory, 106
modem, 107, 108
One-Touch buttons, 110
parallel port, 111
PC Card, 112
power, 114
printing, 115
resume, 117
resuming, 117
standby, 117
startup, 116
touch pad, 104
USB port, 111
wireless communication, 117
turn off, 48
TV set (as monitor), 85
U
USB
connecting devices, 82
port adapters, 82
troubleshooting port, 111
Utility partition
creating, 95, 124, 125
expanding, 124
V
ventilation, 43, 104
video memory, 37
virus protection
Norton AntiVirus, 40
volume
adjusting, 32, 36
taskbar icon, 36
troubleshooting, 99
W
warranty, 131
web sites
HP Customer Care, 13
HP Notebooks, 13
weight-saving module, 68, 69
Windows
documentation, 13
reinstalling, 124
setting up, 24
updating drivers, 126
Windows key
key combinations, 34
wireless communication
(802.11) AdHoc network, 62
(802.11) capabilities, 61
(802.11) connecting, 61
(802.11) status, 63
(802.11) turning off, 63
(802.11) turning on, 62
(Bluetooth) capabilities, 64
(Bluetooth) configuring, 65
(Bluetooth) turning off, 64
(Bluetooth) turning on, 64
indicator light, 63, 64
restrictions on use, 62, 64, 65
troubleshooting, 117