How to Pay with Registered User : e-Payment - GRAS ...
30
GRAS (Government Receipt Accounting System) Registered User Module 2020 DIRECTORATE OF ACCOUNTS AND TREASURIES, FINANCE DEPARTMENT,GOVERNMENT OF MANIPUR OCTOBER 2020
-
Upload
khangminh22 -
Category
Documents
-
view
0 -
download
0
Transcript of How to Pay with Registered User : e-Payment - GRAS ...
GRAS (Government Receipt
Accounting System)
Registered User Module
2020
DIRECTORATE OF ACCOUNTS AND TREASURIES, FINANCE DEPARTMENT,GOVERNMENT OF
MANIPUR
OCTOBER 2020
GRAS (Government Receipt Accounting System)
2
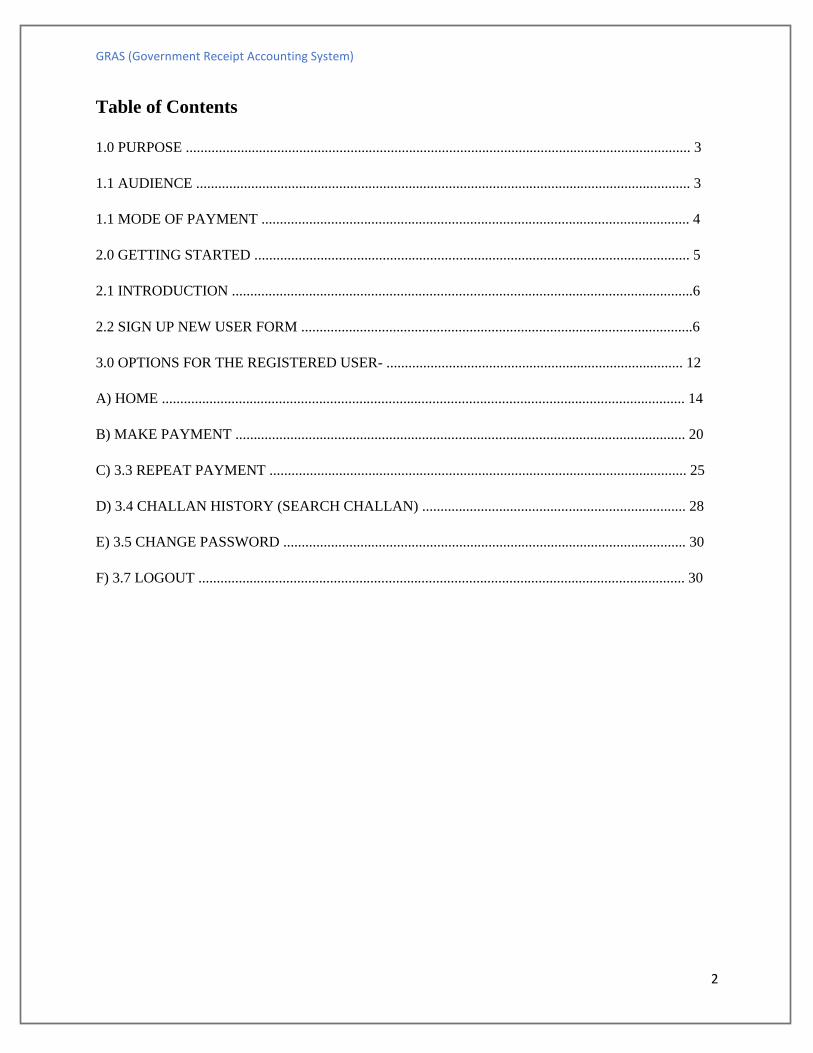
Table of Contents
1.0 PURPOSE .......................................................................................................................................... 3
1.1 AUDIENCE ....................................................................................................................................... 3
1.1 MODE OF PAYMENT ..................................................................................................................... 4
2.0 GETTING STARTED ....................................................................................................................... 5
2.1 INTRODUCTION ..............................................................................................................................6
2.2 SIGN UP NEW USER FORM ...........................................................................................................6
3.0 OPTIONS FOR THE REGISTERED USER- ................................................................................. 12
A) HOME ............................................................................................................................................... 14
B) MAKE PAYMENT ........................................................................................................................... 20
C) 3.3 REPEAT PAYMENT .................................................................................................................. 25
D) 3.4 CHALLAN HISTORY (SEARCH CHALLAN) ........................................................................ 28
E) 3.5 CHANGE PASSWORD .............................................................................................................. 30
F) 3.7 LOGOUT ..................................................................................................................................... 30
GRAS (Government Receipt Accounting System)
3
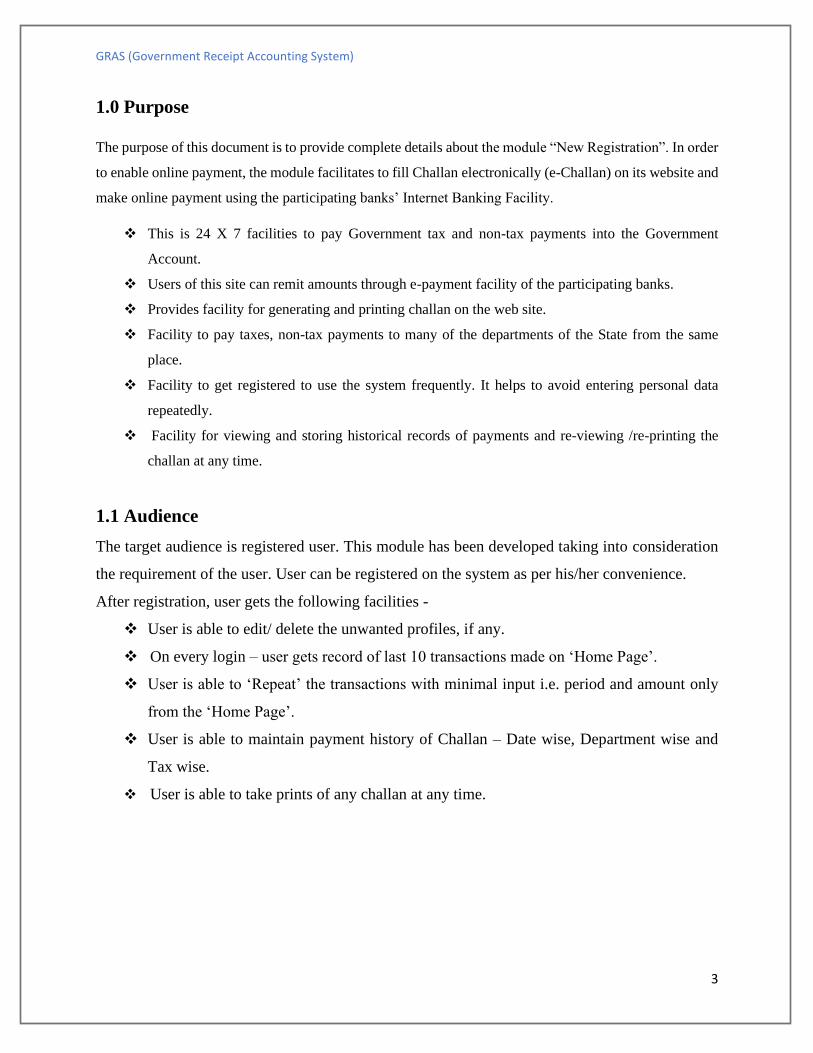
1.0 Purpose
The purpose of this document is to provide complete details about the module “New Registration”. In order
to enable online payment, the module facilitates to fill Challan electronically (e-Challan) on its website and
make online payment using the participating banks’ Internet Banking Facility.
❖ This is 24 X 7 facilities to pay Government tax and non-tax payments into the Government
Account.
❖ Users of this site can remit amounts through e-payment facility of the participating banks.
❖ Provides facility for generating and printing challan on the web site.
❖ Facility to pay taxes, non-tax payments to many of the departments of the State from the same
place.
❖ Facility to get registered to use the system frequently. It helps to avoid entering personal data
repeatedly.
❖ Facility for viewing and storing historical records of payments and re-viewing /re-printing the
challan at any time.
1.1 Audience
The target audience is registered user. This module has been developed taking into consideration
the requirement of the user. User can be registered on the system as per his/her convenience.
After registration, user gets the following facilities -
❖ User is able to edit/ delete the unwanted profiles, if any.
❖ On every login – user gets record of last 10 transactions made on ‘Home Page’.
❖ User is able to ‘Repeat’ the transactions with minimal input i.e. period and amount only
from the ‘Home Page’.
❖ User is able to maintain payment history of Challan – Date wise, Department wise and
Tax wise.
❖ User is able to take prints of any challan at any time.

GRAS (Government Receipt Accounting System)
4
1.3 Mode of Payment:
➢ E-Payment: It can be used to make direct payment to the Government using the banks’ Internet
payment facility.
Basic requirements for E- payment
❖ Internet Connection.
❖ User should have minimum knowledge of using browser for e- payment.
❖ User should have Internet enabled banking account for e- payment.
E-payment
❖ E- Payment is online method of govt. taxes and non-taxes payments process
❖ In e-payment user gets immediate receipt for the tax or non – tax payment made to the Government.
❖ User is required to have an Internet enabled banking account with any of the participating banks.

GRAS (Government Receipt Accounting System)
5
Getting Started

GRAS (Government Receipt Accounting System)
6
Introduction
This module is meant for registered users who want to use the system frequently. User is able to get
registered on the system after filling ‘New User Registration’ form. The user should approach portal and
select the New User Registration option given below in the Categories index menu. User gets the screen
for registration as described below.
Sign up New User Form
User has to fill the form (Fig 2.1) so that user is able to get registered on the system.

GRAS (Government Receipt Accounting System)
7
Fig 2.1
GRAS (Government Receipt Accounting System)
8
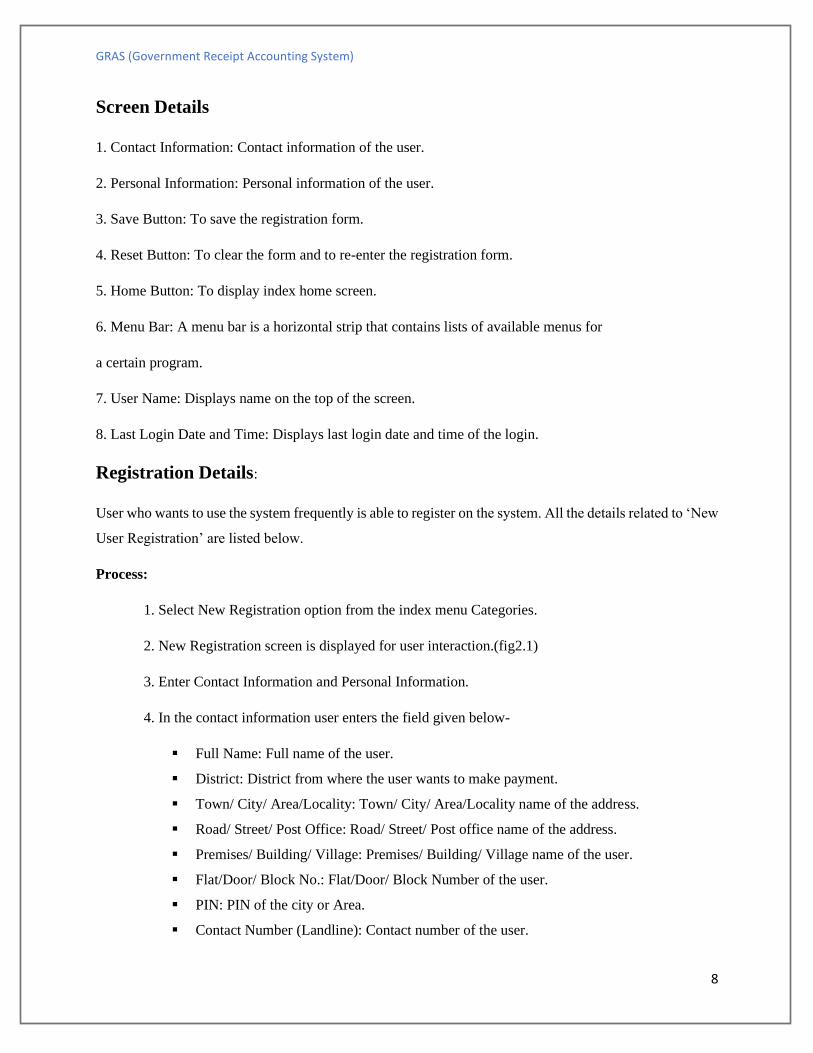
Screen Details
1. Contact Information: Contact information of the user.
2. Personal Information: Personal information of the user.
3. Save Button: To save the registration form.
4. Reset Button: To clear the form and to re-enter the registration form.
5. Home Button: To display index home screen.
6. Menu Bar: A menu bar is a horizontal strip that contains lists of available menus for
a certain program.
7. User Name: Displays name on the top of the screen.
8. Last Login Date and Time: Displays last login date and time of the login.
Registration Details:
User who wants to use the system frequently is able to register on the system. All the details related to ‘New
User Registration’ are listed below.
Process:
1. Select New Registration option from the index menu Categories.
2. New Registration screen is displayed for user interaction.(fig2.1)
3. Enter Contact Information and Personal Information.
4. In the contact information user enters the field given below-
▪ Full Name: Full name of the user.
▪ District: District from where the user wants to make payment.
▪ Town/ City/ Area/Locality: Town/ City/ Area/Locality name of the address.
▪ Road/ Street/ Post Office: Road/ Street/ Post office name of the address.
▪ Premises/ Building/ Village: Premises/ Building/ Village name of the user.
▪ Flat/Door/ Block No.: Flat/Door/ Block Number of the user.
▪ PIN: PIN of the city or Area.
▪ Contact Number (Landline): Contact number of the user.

GRAS (Government Receipt Accounting System)
9
▪ In the Contact number, user enters STD code (if user enters Phone number Field) Enter
Phone No. (Landline number): landline number of the user.
▪ Enter Mobile No.: Mobile number of the user.
▪ Email ID: E -mail Id of the user.
▪ Alternate Email ID: Alternate E -mail Id of the user if any.
▪ PAN: PAN (Permanent account number) of the user issued by income taxdepartment.
5. In the personal details user enters the fields given below-
• User Name: User can create any name of his choice; he desires to use that name login into
the system. The user needs to remember this name every time whenever he wants to access
his account on GRAS afterwards. The system autochecks the availability of that user name
and displays the same. If the user name chosen by the user is already taken before; the user
is prompted to choose another user name; till the time he chooses unique user name.
Note: Name should be in the small letters.
• Password: Appropriate password to login (User can create his own password for the login).
• Re-enter Password: Re-enter same password for confirmation.
• Security Question: Security question is used in case user forgets the user id and password;
to retrieve his account. User selects the question from the drop down list.
• Answer: Enter appropriate answer for that question in the given field.
• Word Verification: Recognize the word and enter in the given field .The System displays
some characters that the user has to enter in the text box provided.
6. After entering Contact information and Personal details user click on Save option to save the
entered information.
7. User can select Reset option to re-enter the registration form. On Reset, User gets blank form.
I.e. Fig 2.1. User can also select Home option to get home index screen.
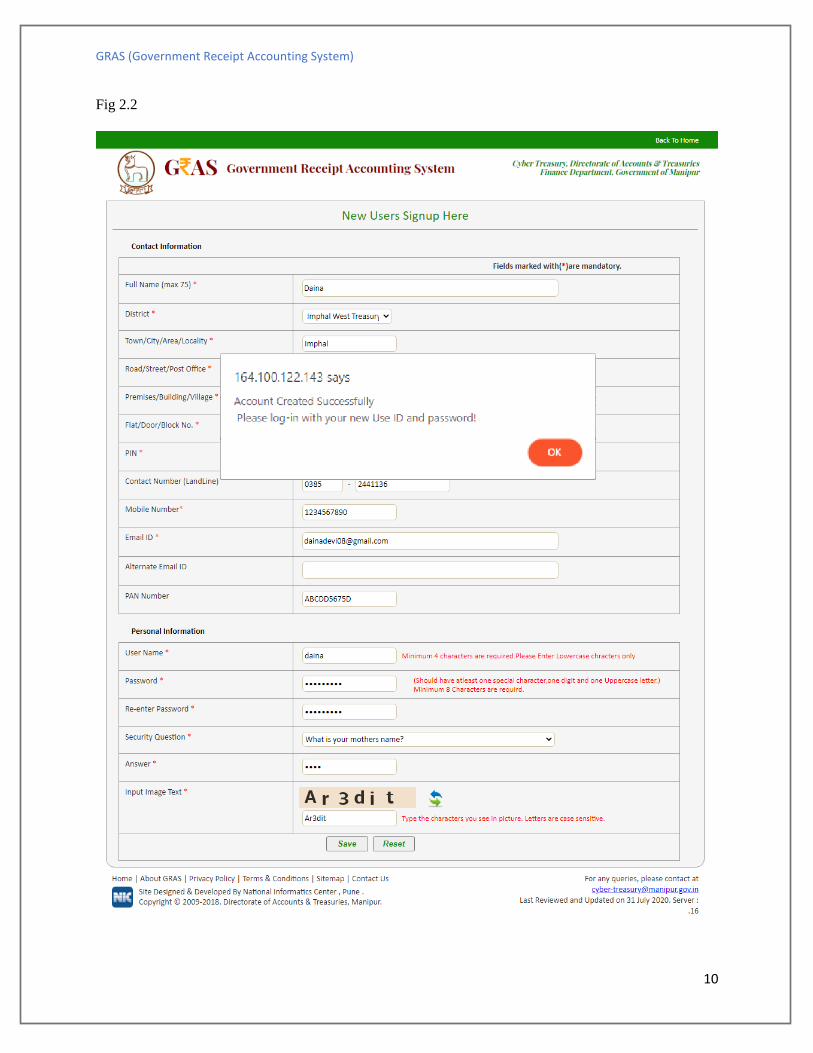
8. On selection of Save option user gets the following screen (fig 2.2)
9. User gets the confirmation message of successful account created.
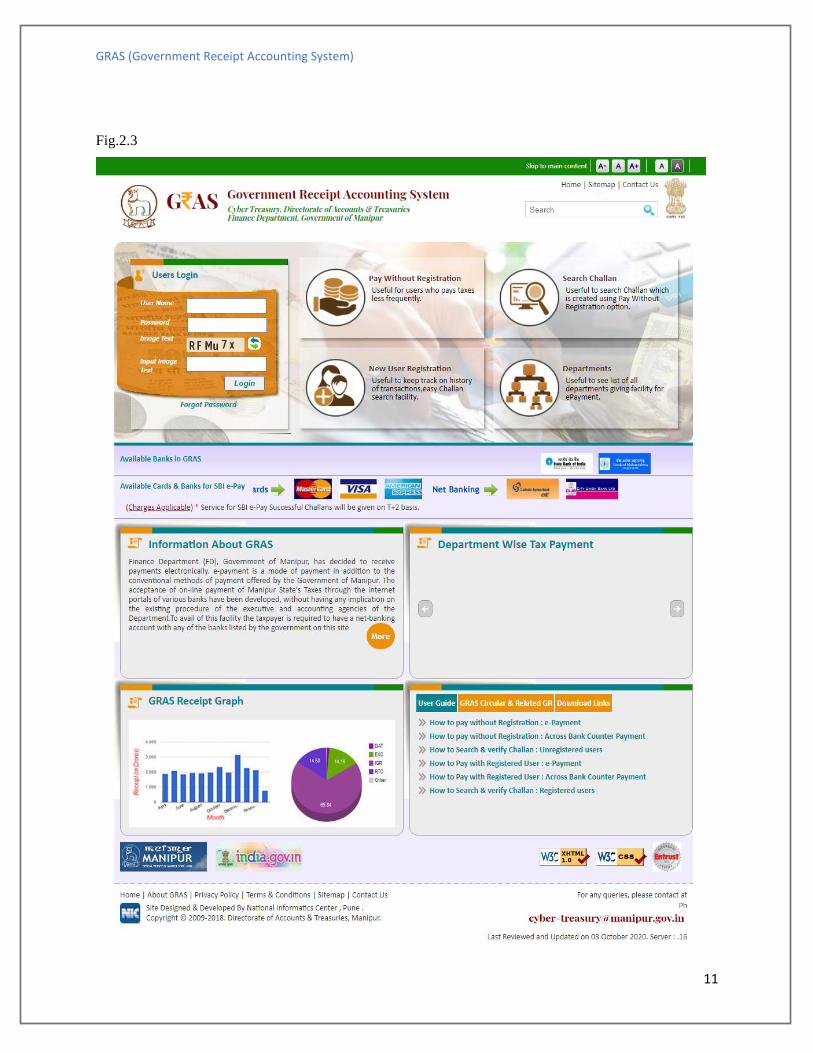
10. User selects Ok option .The following screen is displayed i.e. (fig 2.3)
GRAS (Government Receipt Accounting System)
10
Fig 2.2
GRAS (Government Receipt Accounting System)
11
Fig.2.3
GRAS (Government Receipt Accounting System)
12
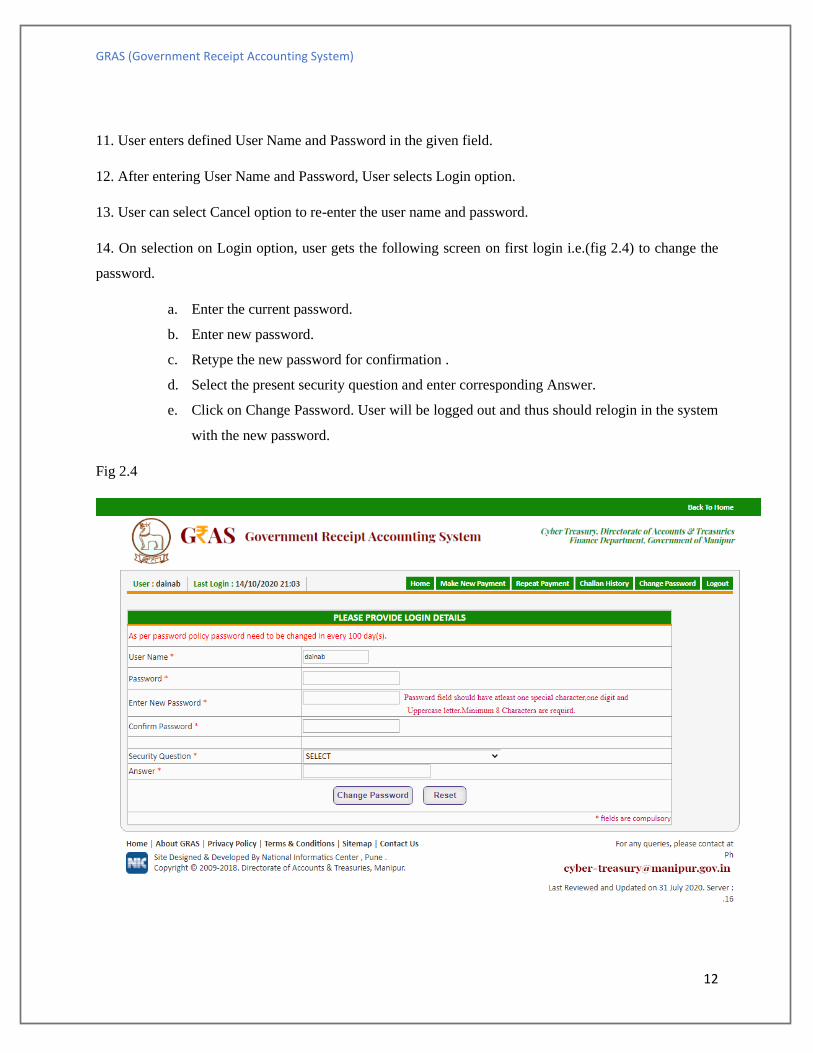
11. User enters defined User Name and Password in the given field.
12. After entering User Name and Password, User selects Login option.
13. User can select Cancel option to re-enter the user name and password.
14. On selection on Login option, user gets the following screen on first login i.e.(fig 2.4) to change the
password.
a. Enter the current password.
b. Enter new password.
c. Retype the new password for confirmation .
d. Select the present security question and enter corresponding Answer.
e. Click on Change Password. User will be logged out and thus should relogin in the system
with the new password.
Fig 2.4
GRAS (Government Receipt Accounting System)
13
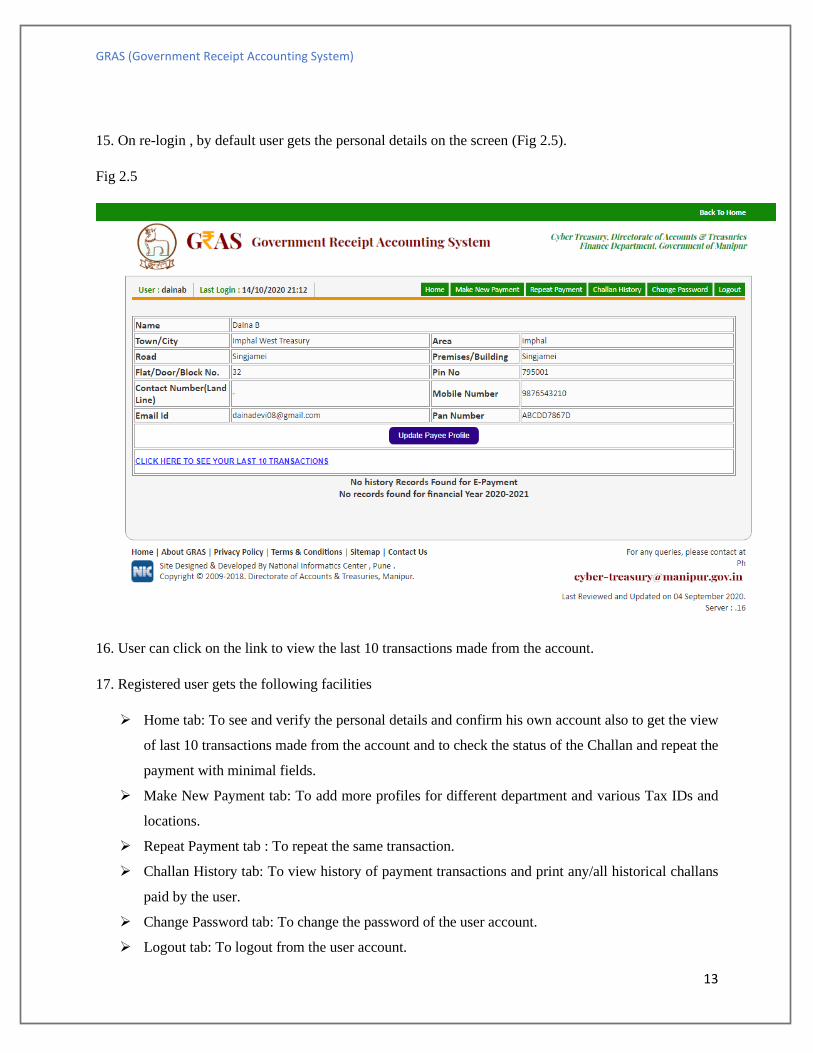
15. On re-login , by default user gets the personal details on the screen (Fig 2.5).
Fig 2.5
16. User can click on the link to view the last 10 transactions made from the account.
17. Registered user gets the following facilities
➢ Home tab: To see and verify the personal details and confirm his own account also to get the view
of last 10 transactions made from the account and to check the status of the Challan and repeat the
payment with minimal fields.
➢ Make New Payment tab: To add more profiles for different department and various Tax IDs and
locations.
➢ Repeat Payment tab : To repeat the same transaction.
➢ Challan History tab: To view history of payment transactions and print any/all historical challans
paid by the user.
➢ Change Password tab: To change the password of the user account.
➢ Logout tab: To logout from the user account.
GRAS (Government Receipt Accounting System)
14
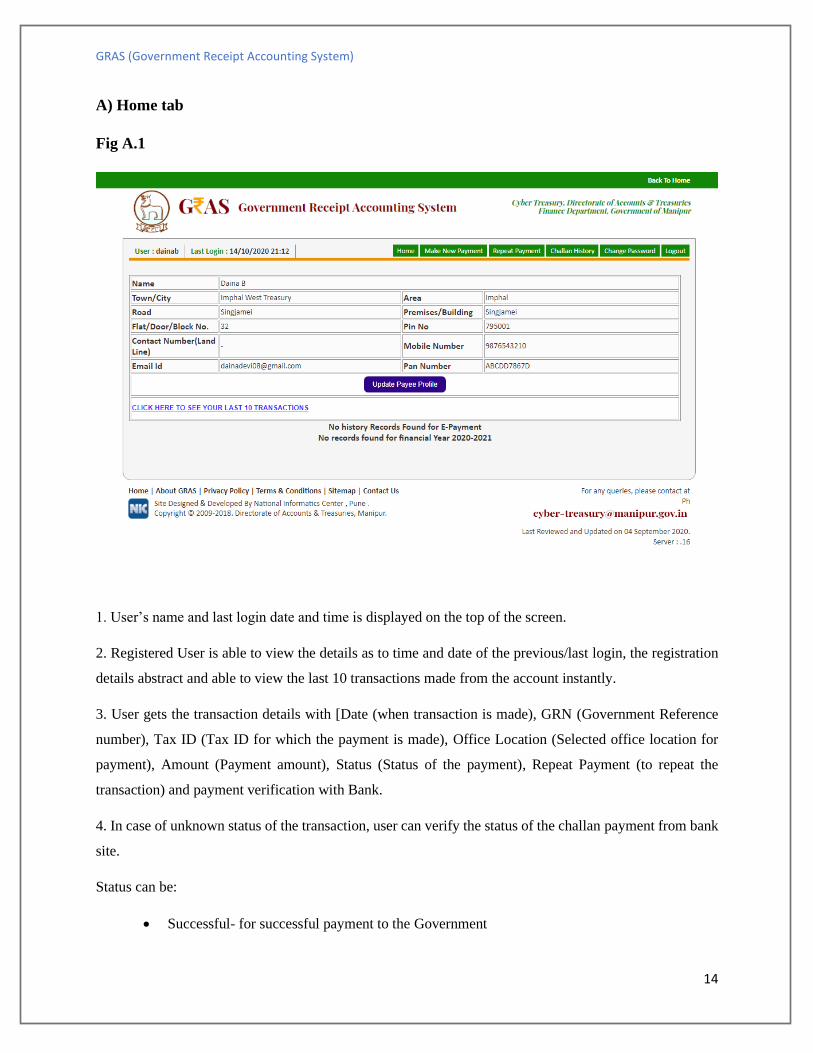
A) Home tab
Fig A.1
1. User’s name and last login date and time is displayed on the top of the screen.
2. Registered User is able to view the details as to time and date of the previous/last login, the registration
details abstract and able to view the last 10 transactions made from the account instantly.
3. User gets the transaction details with [Date (when transaction is made), GRN (Government Reference
number), Tax ID (Tax ID for which the payment is made), Office Location (Selected office location for
payment), Amount (Payment amount), Status (Status of the payment), Repeat Payment (to repeat the
transaction) and payment verification with Bank.
4. In case of unknown status of the transaction, user can verify the status of the challan payment from bank
site.
Status can be:
• Successful- for successful payment to the Government
GRAS (Government Receipt Accounting System)
15
• Failure- for unsuccessful transaction/non-transfer of payment to Government
• Pending- for pending the authorization at the banks’ side
• Verified at Bank- for Payment verified by Government at the banks’ side
• Verified at RBI- For Payment verified by Government at the RBI
User clicks on the GRN on the same screen and get the Challan in MTR Form Number-6.
4. User has facility to repeat the transaction. Against every transaction, the user has the option to repeat the
same transaction with minimal changes of Scheme code period and amount. The user simply clicks on the
‘Repeat’ option against the transaction that user desires to repeat on.
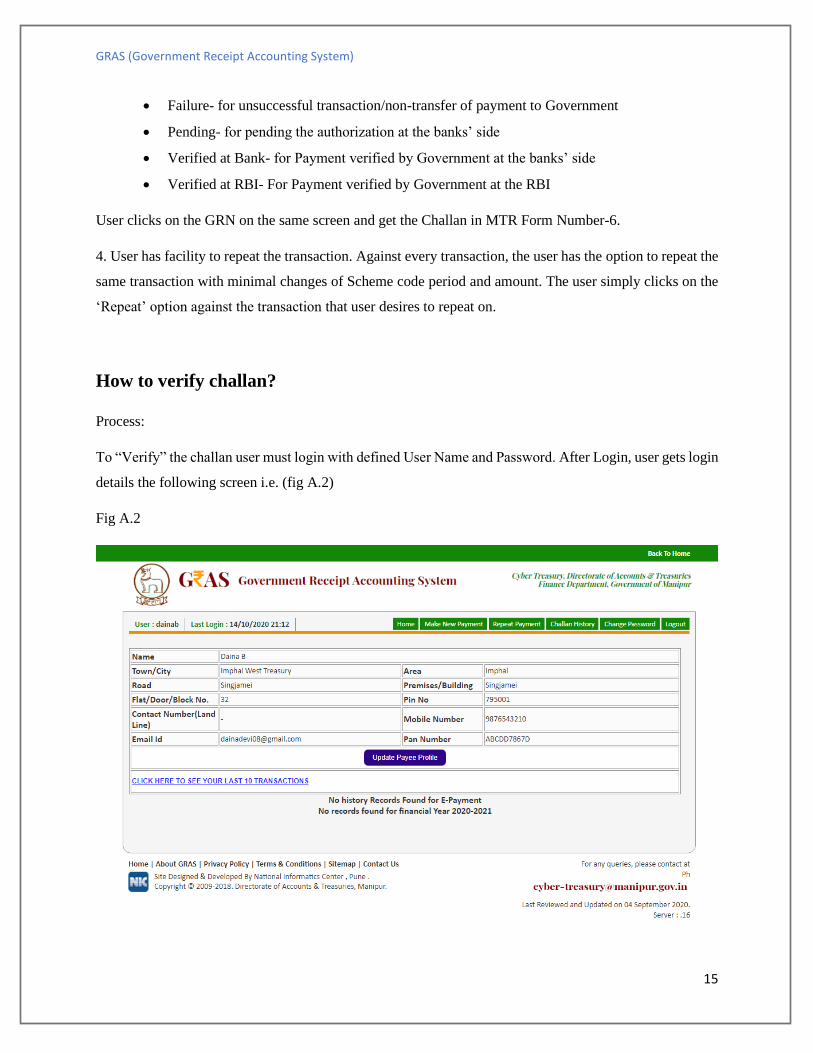
How to verify challan?
Process:
To “Verify” the challan user must login with defined User Name and Password. After Login, user gets login
details the following screen i.e. (fig A.2)
Fig A.2

GRAS (Government Receipt Accounting System)
16
To view last 10 transaction click on link “Click here to see last 10 transactions” user will get the screen
(Fig A.3)
Fig A.3
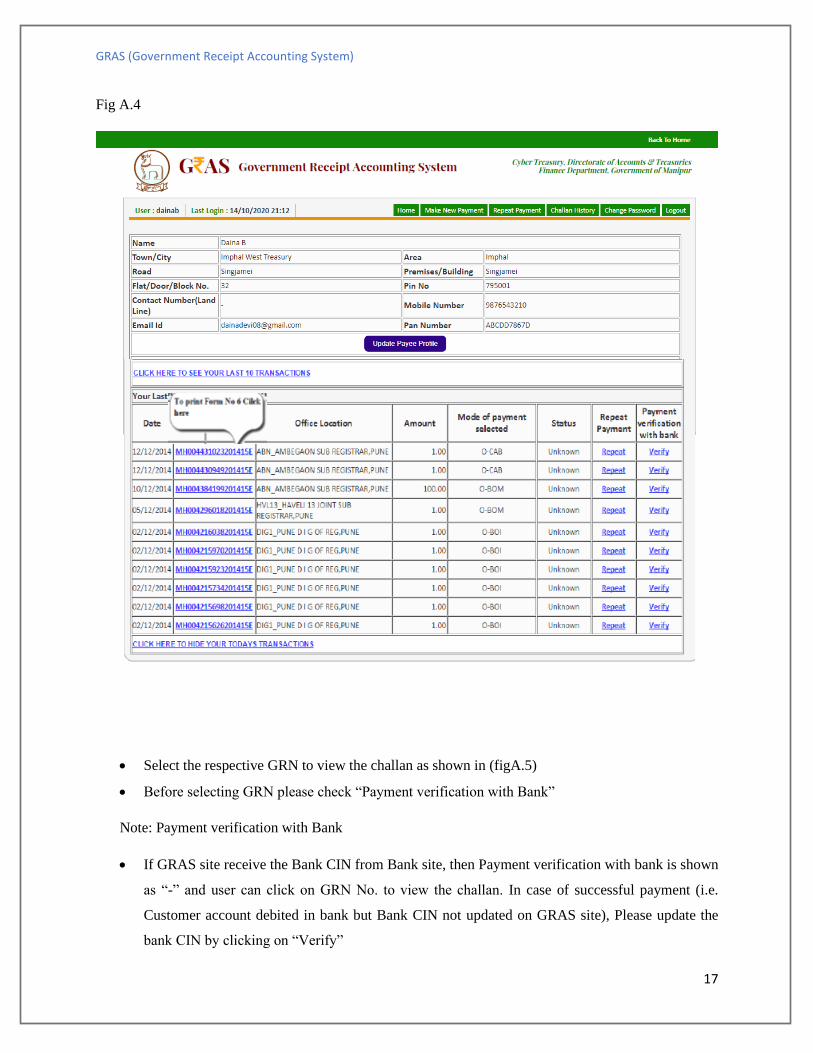
When user point the mouse pointer on GRN explanatory message is displayed as shown in (figA.4)
GRAS (Government Receipt Accounting System)
17
Fig A.4
• Select the respective GRN to view the challan as shown in (figA.5)
• Before selecting GRN please check “Payment verification with Bank”
Note: Payment verification with Bank
• If GRAS site receive the Bank CIN from Bank site, then Payment verification with bank is shown
as “-” and user can click on GRN No. to view the challan. In case of successful payment (i.e.
Customer account debited in bank but Bank CIN not updated on GRAS site), Please update the
bank CIN by clicking on “Verify”
GRAS (Government Receipt Accounting System)
18
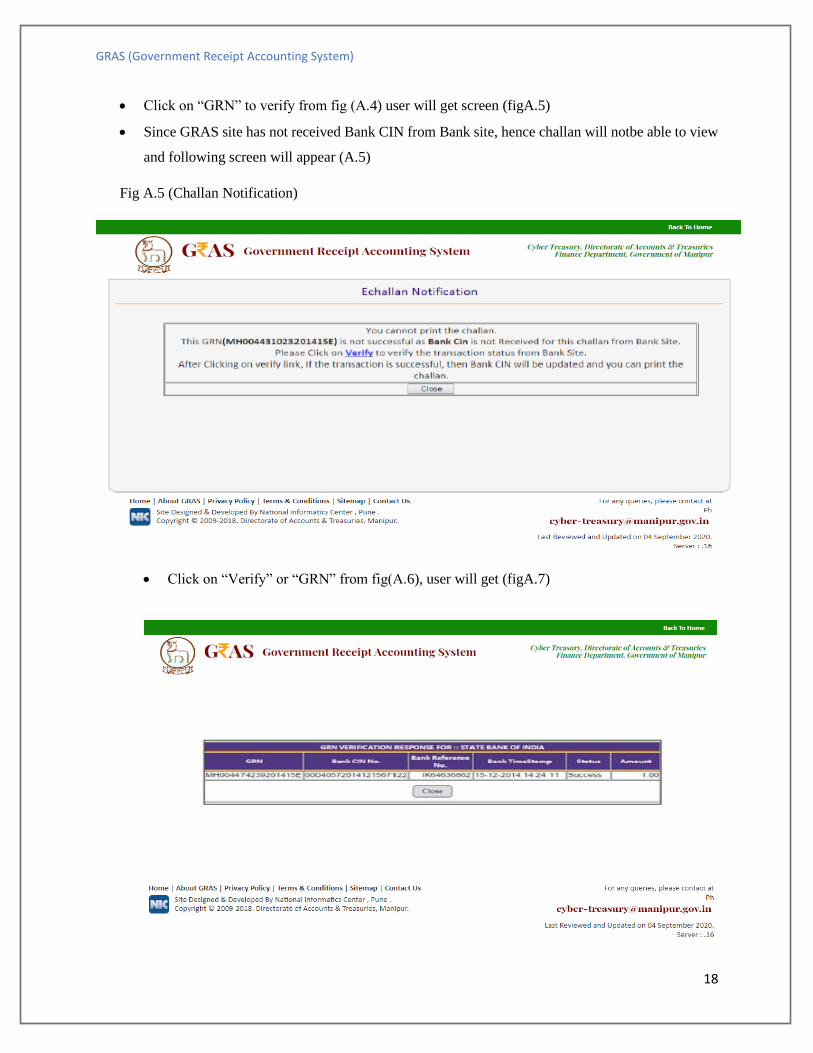
• Click on “GRN” to verify from fig (A.4) user will get screen (figA.5)
• Since GRAS site has not received Bank CIN from Bank site, hence challan will notbe able to view
and following screen will appear (A.5)
Fig A.5 (Challan Notification)
• Click on “Verify” or “GRN” from fig(A.6), user will get (figA.7)
GRAS (Government Receipt Accounting System)
19
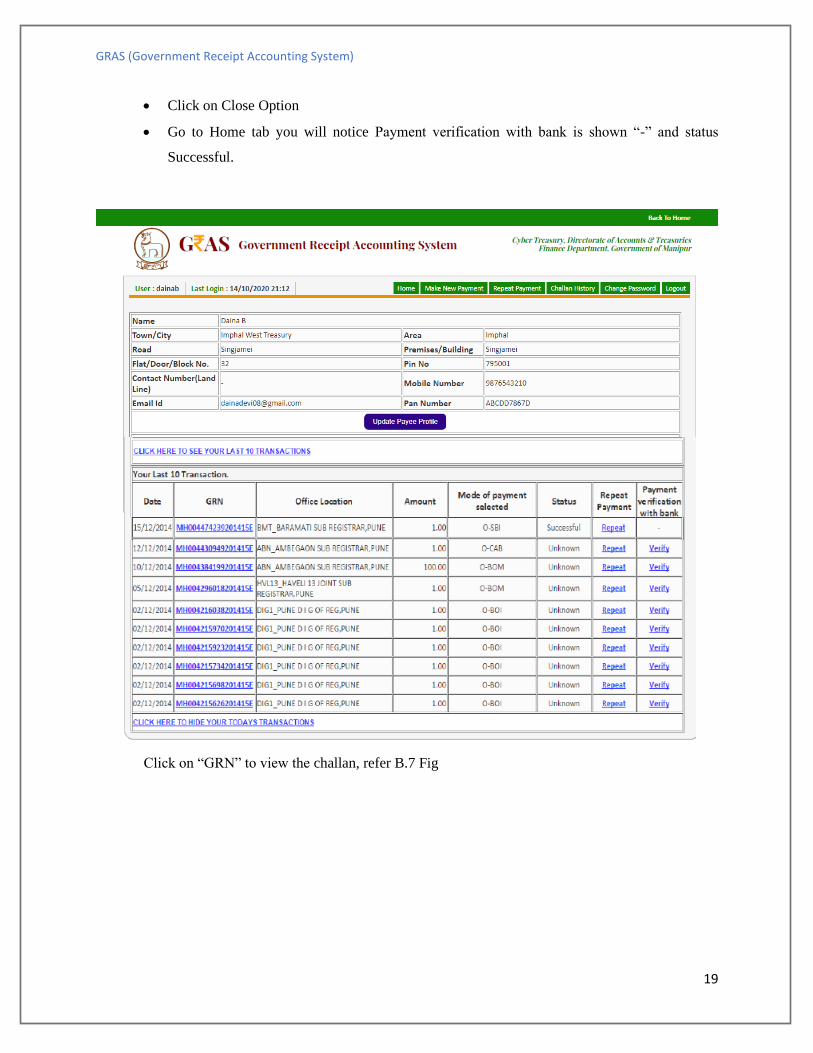
• Click on Close Option
• Go to Home tab you will notice Payment verification with bank is shown “-” and status
Successful.
Click on “GRN” to view the challan, refer B.7 Fig
GRAS (Government Receipt Accounting System)
20
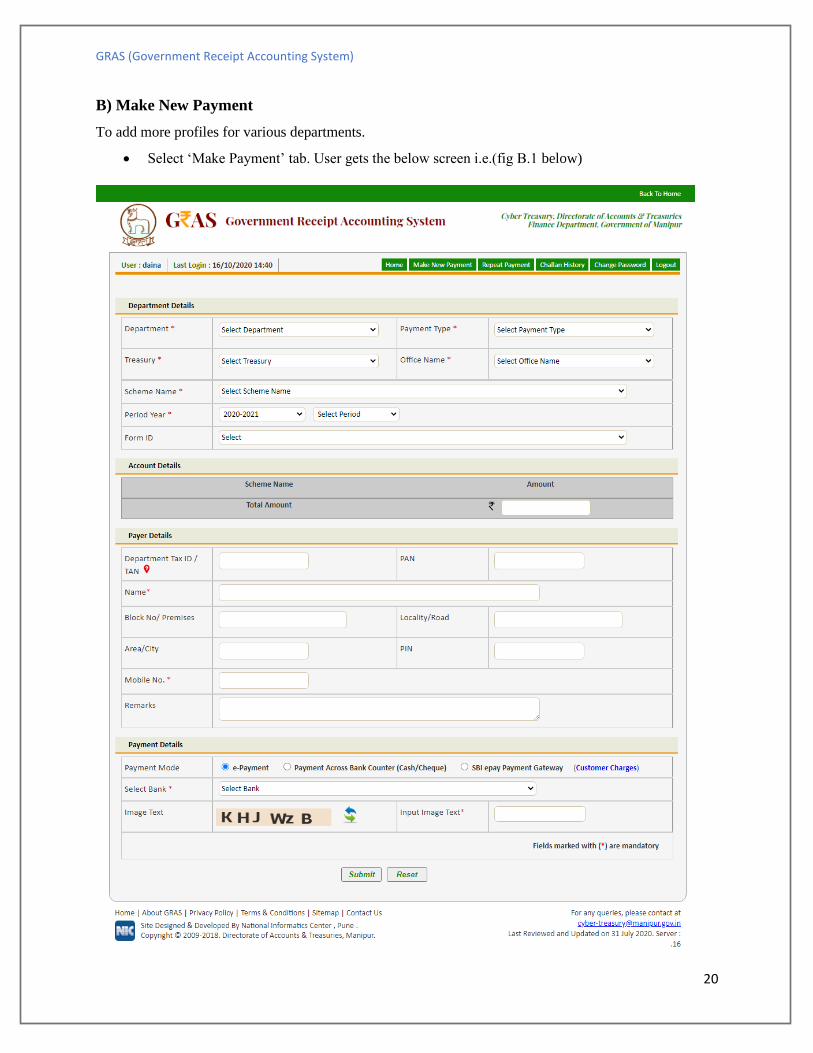
B) Make New Payment
To add more profiles for various departments.
• Select ‘Make Payment’ tab. User gets the below screen i.e.(fig B.1 below)
GRAS (Government Receipt Accounting System)
21
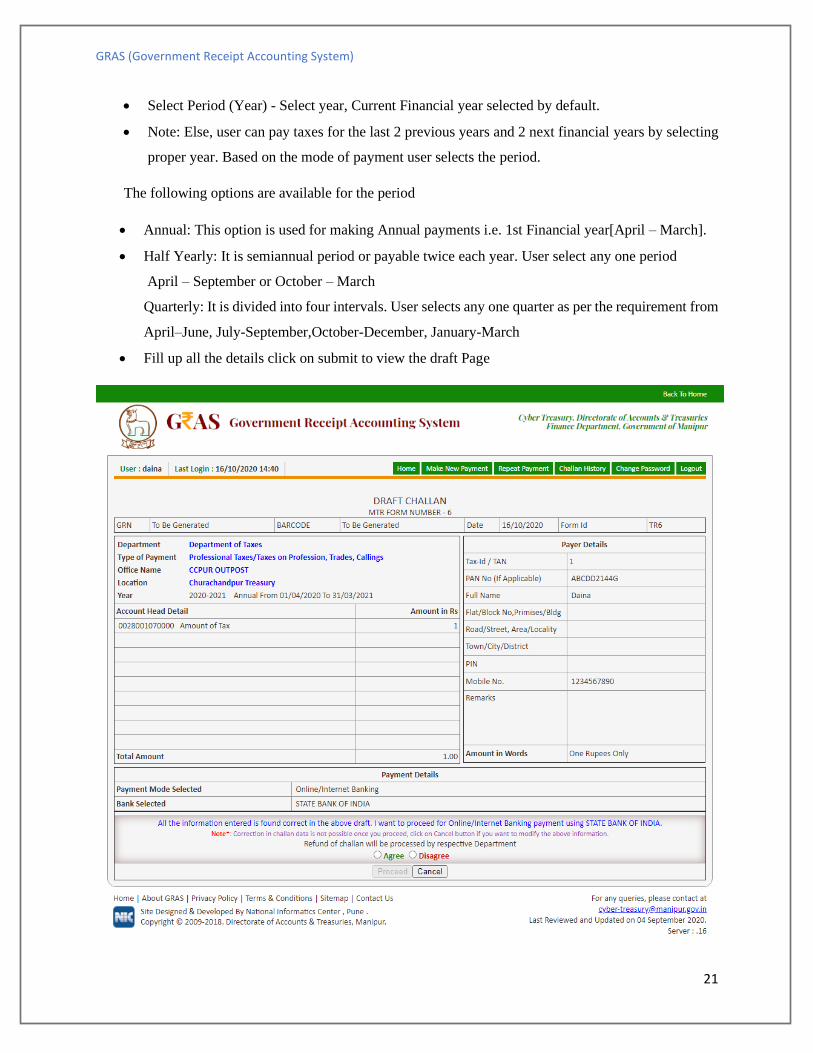
• Select Period (Year) - Select year, Current Financial year selected by default.
• Note: Else, user can pay taxes for the last 2 previous years and 2 next financial years by selecting
proper year. Based on the mode of payment user selects the period.
The following options are available for the period
• Annual: This option is used for making Annual payments i.e. 1st Financial year[April – March].
• Half Yearly: It is semiannual period or payable twice each year. User select any one period
April – September or October – March
Quarterly: It is divided into four intervals. User selects any one quarter as per the requirement from
April–June, July-September,October-December, January-March
• Fill up all the details click on submit to view the draft Page
GRAS (Government Receipt Accounting System)
22
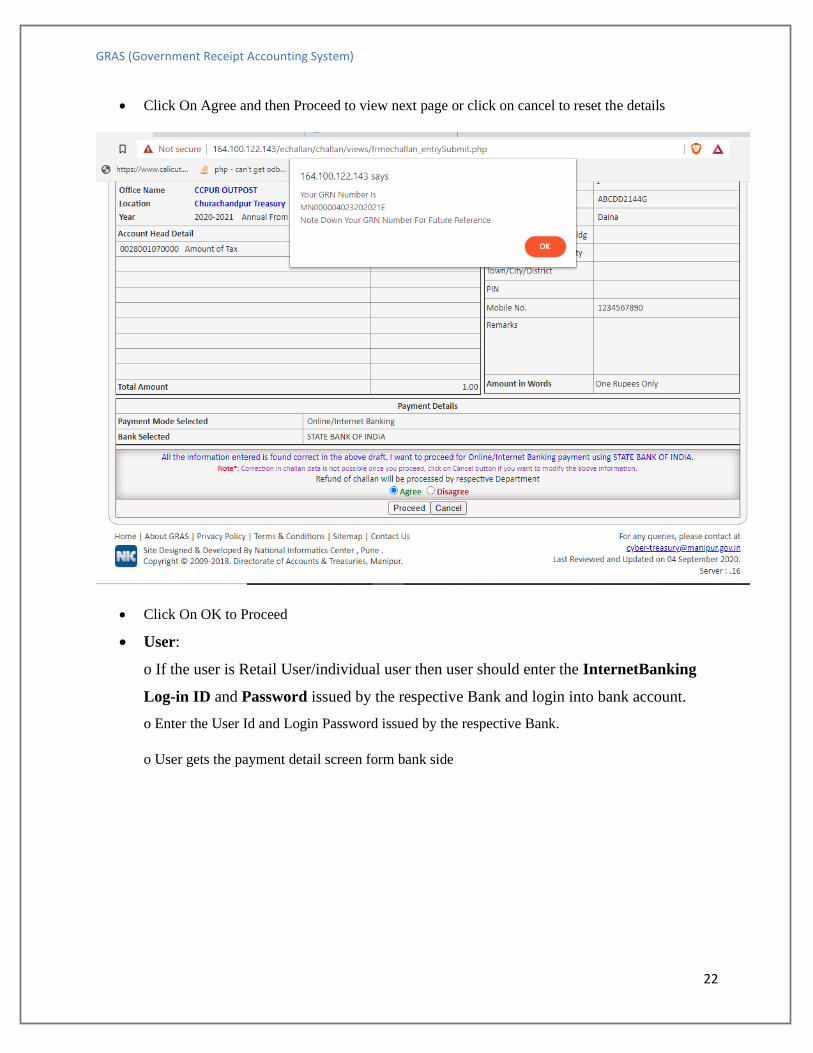
• Click On Agree and then Proceed to view next page or click on cancel to reset the details
• Click On OK to Proceed
• User:
o If the user is Retail User/individual user then user should enter the InternetBanking
Log-in ID and Password issued by the respective Bank and login into bank account.
o Enter the User Id and Login Password issued by the respective Bank.
o User gets the payment detail screen form bank side
GRAS (Government Receipt Accounting System)
23
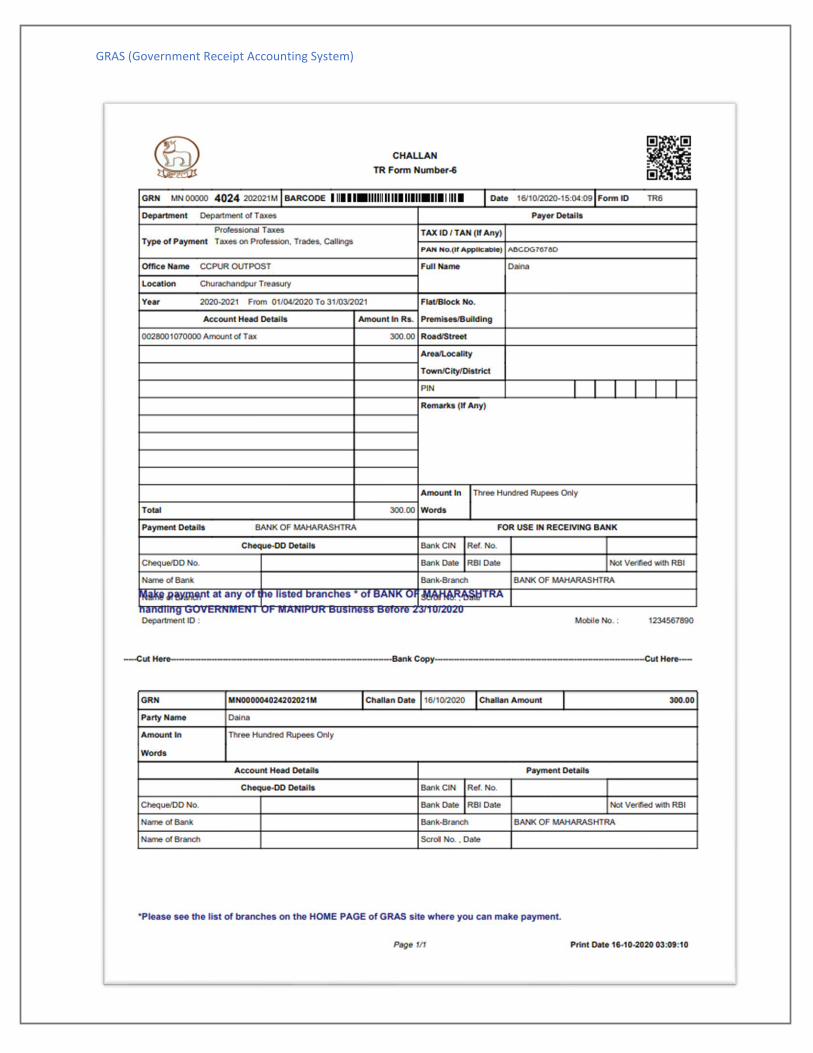
Bank Payment confirmation
After confirmation user will be redirected to the following challan format
GRAS (Government Receipt Accounting System)
24
GRAS (Government Receipt Accounting System)
25
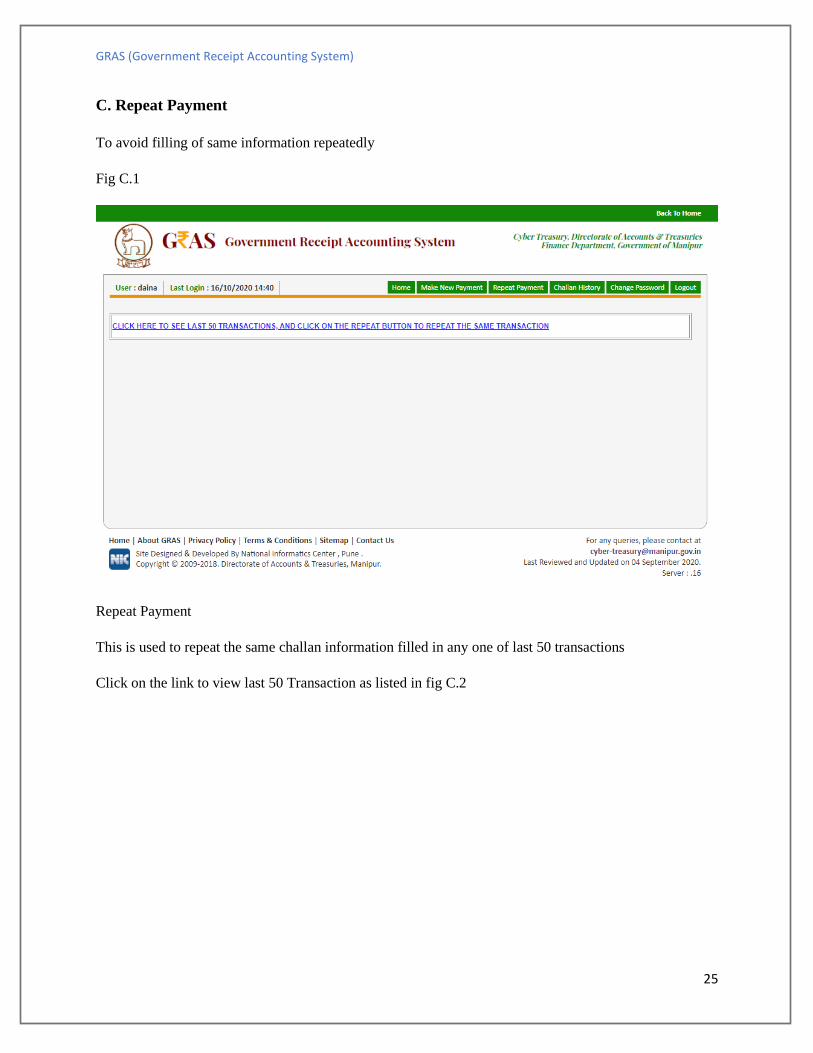
C. Repeat Payment
To avoid filling of same information repeatedly
Fig C.1
Repeat Payment
This is used to repeat the same challan information filled in any one of last 50 transactions
Click on the link to view last 50 Transaction as listed in fig C.2
GRAS (Government Receipt Accounting System)
26
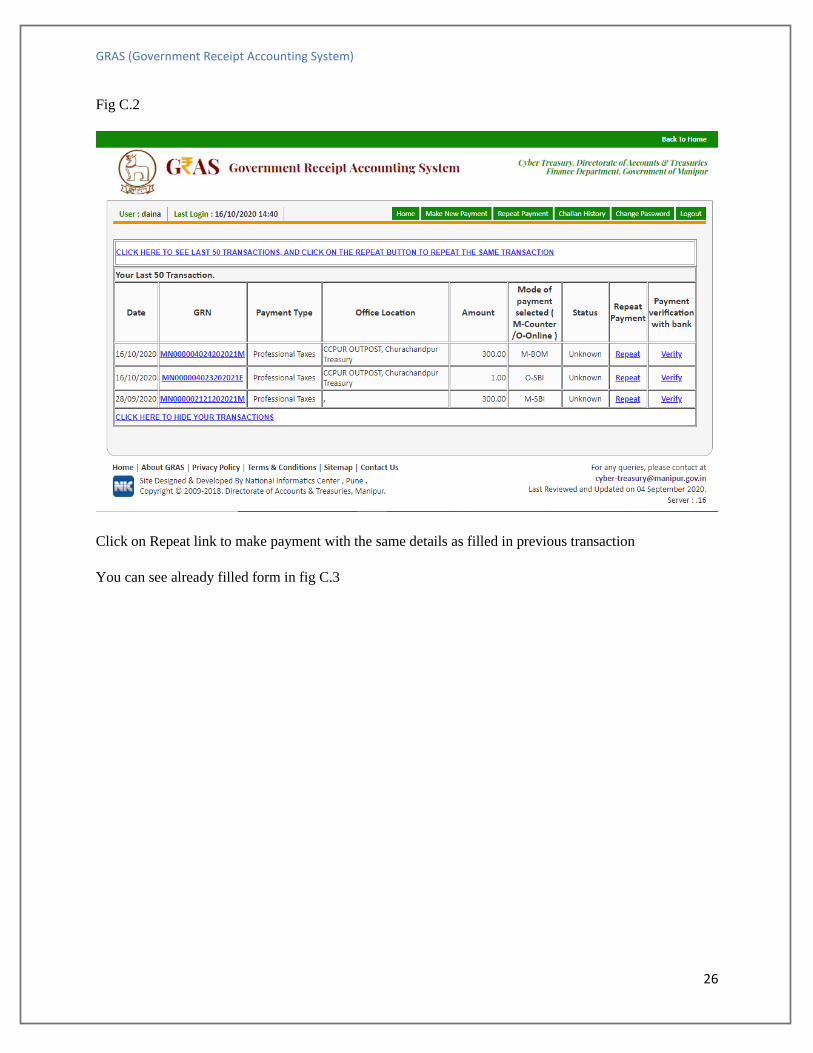
Fig C.2
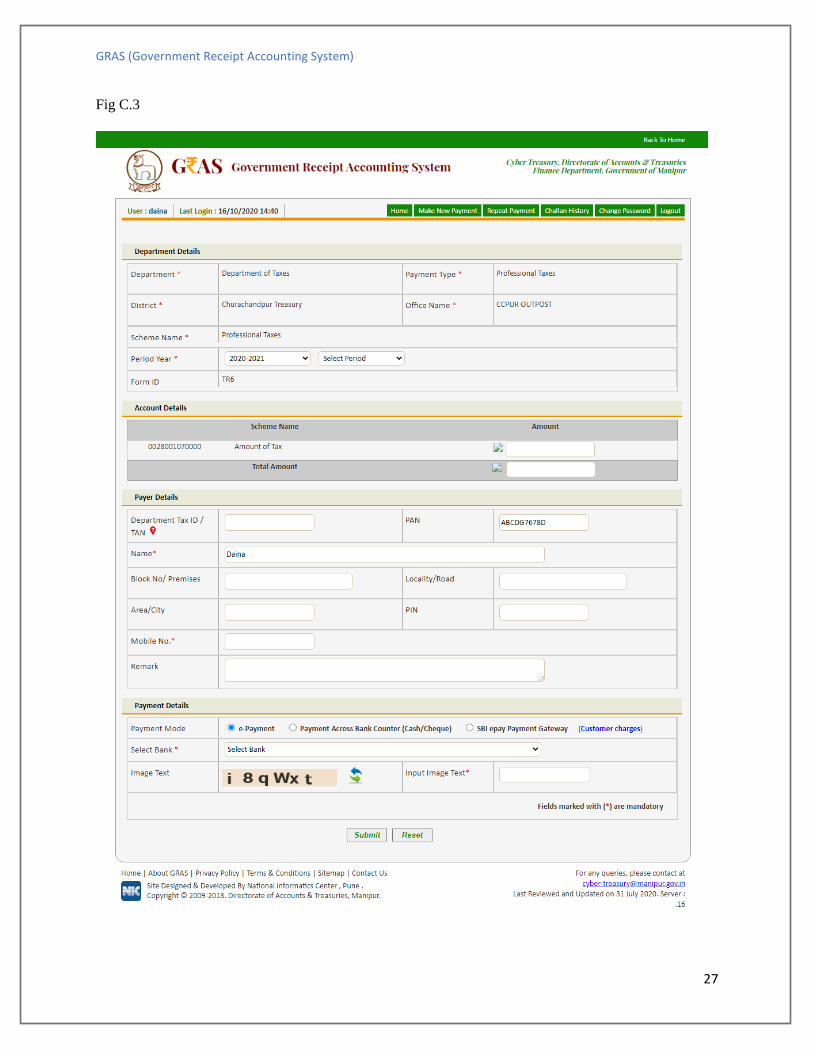
Click on Repeat link to make payment with the same details as filled in previous transaction
You can see already filled form in fig C.3
GRAS (Government Receipt Accounting System)
27
Fig C.3
GRAS (Government Receipt Accounting System)
28
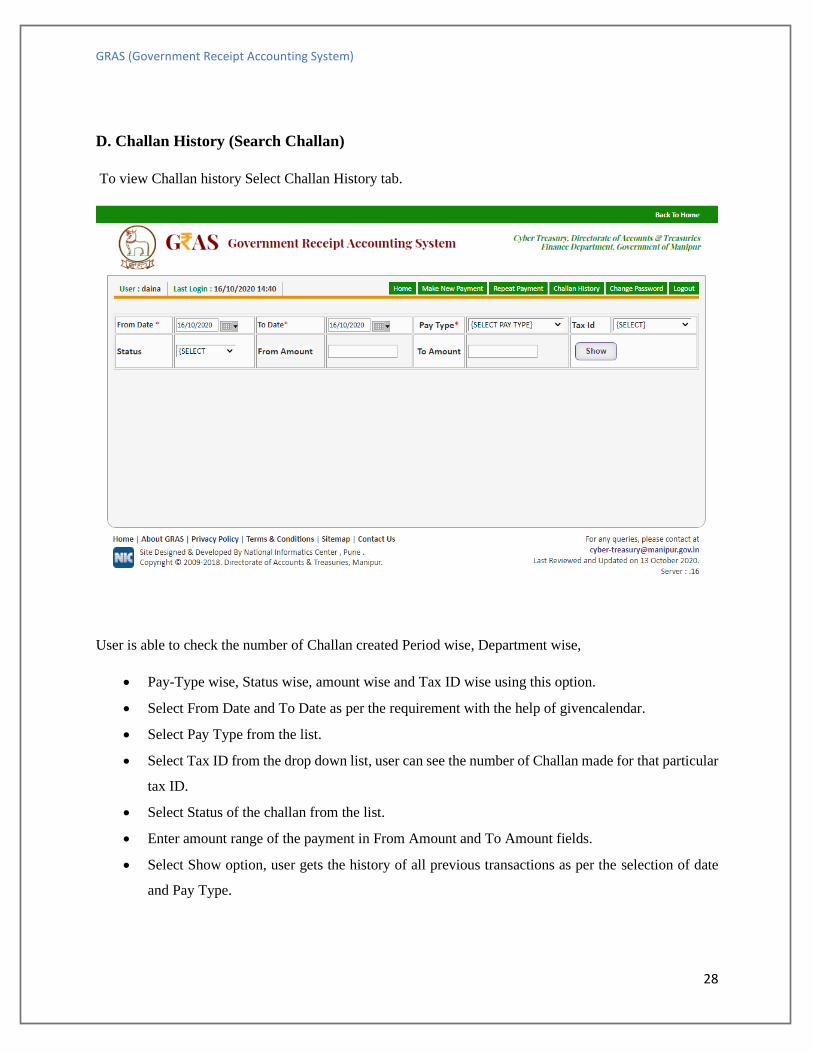
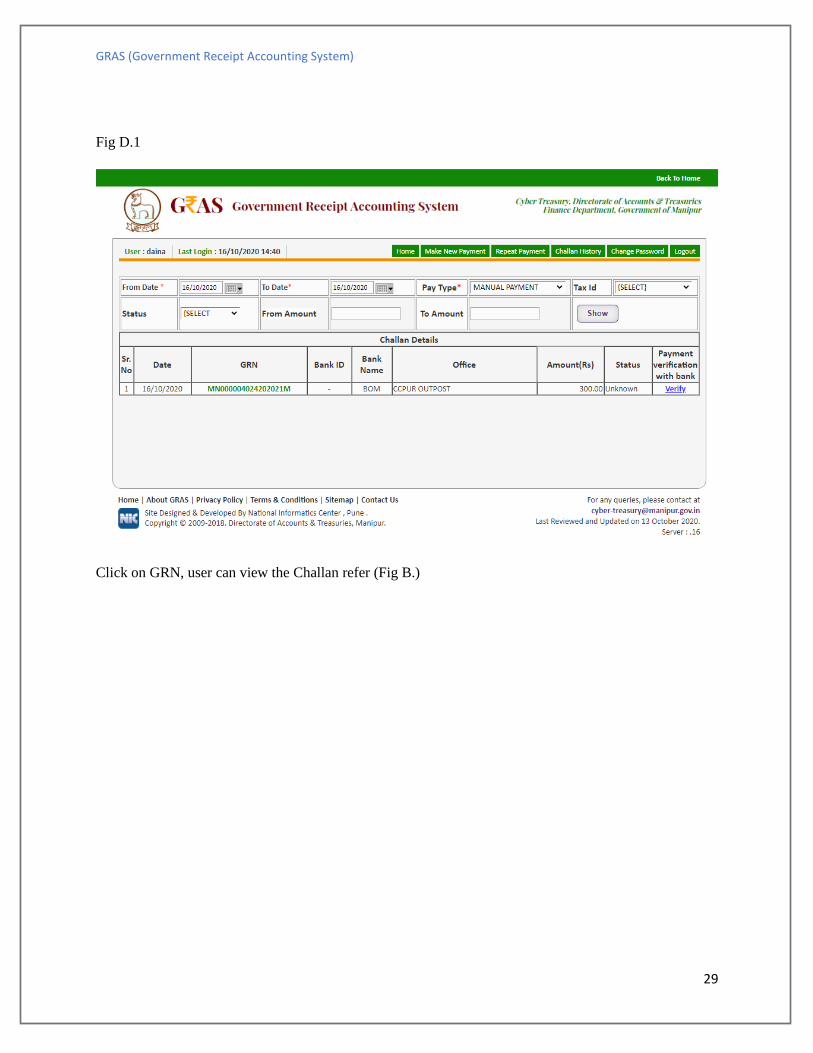
D. Challan History (Search Challan)
To view Challan history Select Challan History tab.
User is able to check the number of Challan created Period wise, Department wise,
• Pay-Type wise, Status wise, amount wise and Tax ID wise using this option.
• Select From Date and To Date as per the requirement with the help of givencalendar.
• Select Pay Type from the list.
• Select Tax ID from the drop down list, user can see the number of Challan made for that particular
tax ID.
• Select Status of the challan from the list.
• Enter amount range of the payment in From Amount and To Amount fields.
• Select Show option, user gets the history of all previous transactions as per the selection of date
and Pay Type.
GRAS (Government Receipt Accounting System)
29
Fig D.1
Click on GRN, user can view the Challan refer (Fig B.)
GRAS (Government Receipt Accounting System)
30
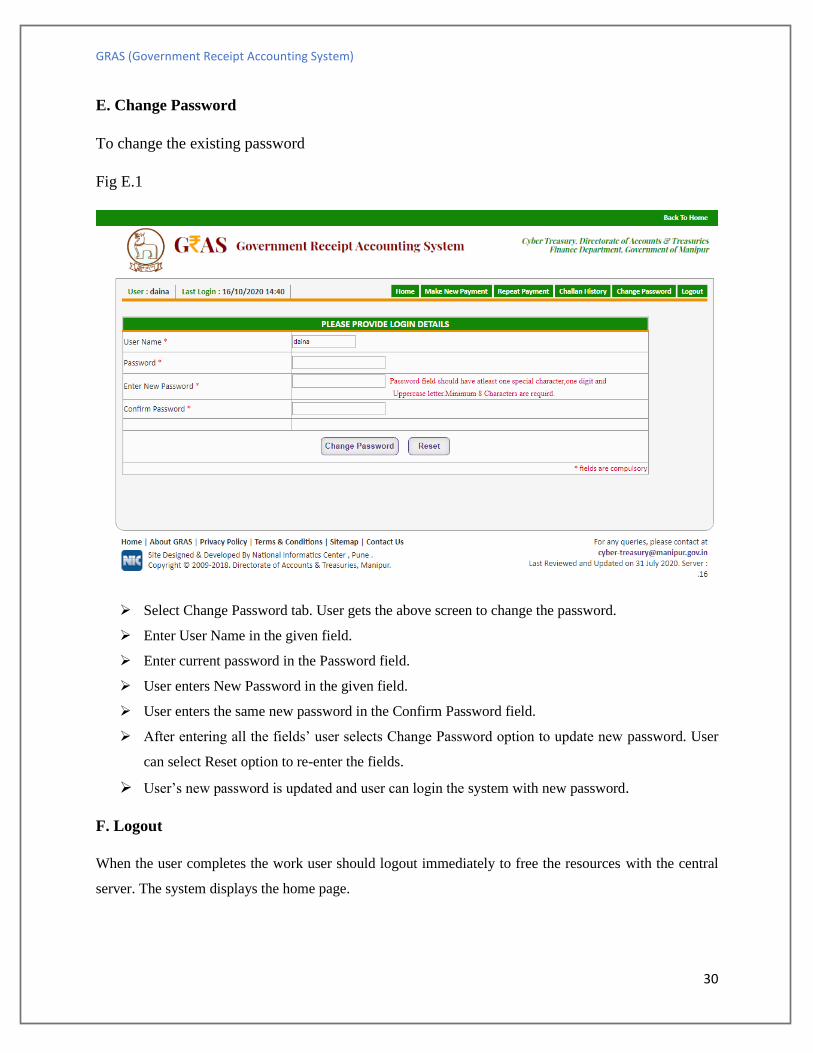
E. Change Password
To change the existing password
Fig E.1
➢ Select Change Password tab. User gets the above screen to change the password.
➢ Enter User Name in the given field.
➢ Enter current password in the Password field.
➢ User enters New Password in the given field.
➢ User enters the same new password in the Confirm Password field.
➢ After entering all the fields’ user selects Change Password option to update new password. User
can select Reset option to re-enter the fields.
➢ User’s new password is updated and user can login the system with new password.
F. Logout
When the user completes the work user should logout immediately to free the resources with the central
server. The system displays the home page.