high-altitude-ballooning-from-the-ground-up-and-back-again ...
17
9/12/2016 High Altitude Ballooning, From The Ground Up (and back again) | Dave Akerman http://www.daveakerman.com/?p=1732 1/17 High Altitude Ballooning, From The Ground Up (and back again) Posted on 15/02/2015 by dave High Altitude Ballooning makes for a challenging project that sometimes turns into an engrossing hobby. Whilst it’s not “rocket science” it does encompass a wide range of fields (sometimes literally) and there’s a lot to learn before you send your first flight up into the sky. A failed flight (and these can happen even to the most experienced) is a sad thing, but you can maximise your chances of success by following this guide, and remembering these 3 points: Do your research Do plenty of testing Do not rush Research is vital. Read up on existing projects – many people run blogs or have web sites showing how they developed their flights. The UKHAS wiki is invaluable and is probably the best single source of HAB information on the internet. Testing is vital. If you’re developing your own tracker hardware and/or software, then you have plenty more testing to do – does it work in the cold? does the software work across meridians? how long do the batteries last? Even if you buy a readymade radio tracker, you need to test your tracking setup and skills. Don’t leave that to the flight itself – it will all go terribly wrong. Do not rush. My very first flight took 5 months from the idea to the execution. Overall it was a success although some things did go wrong. Not many flights are perfect in every way, so please do everything you can to make your flight the best it can be. Do not set a launch date before you are ready – this is a tried and well tested method of ensuring failure. Overview High Altitude Ballooning is all about sending up a payload (containing tracking equipment and often sensors and/or cameras) to a high altitude. Typical flights get to 30km or so (about 100,000 feet), with the balloon expanding from a typical 1 metre or so diameter at ground level to 8 metres or so at altitude, where the latex gives way and the payload falls by parachute to the ground. Sounds simple, right? It is, but you probably have (and should have) many questions, for example where can I get one of these balloons? How much gas? How do I get that gas inside the balloon? How do I get permission for the flight? How can I tell it where it will land? How do I find it afterwards? Read on for the answers. Dave Akerman Dave’s World
-
Upload
khangminh22 -
Category
Documents
-
view
1 -
download
0
Transcript of high-altitude-ballooning-from-the-ground-up-and-back-again ...
9/12/2016 High Altitude Ballooning, From The Ground Up (and back again) | Dave Akerman
http://www.daveakerman.com/?p=1732 1/17
High Altitude Ballooning, From The Ground Up (and back again)Posted on 15/02/2015 by dave
High Altitude Ballooning makes for a challenging project that sometimes turns into an engrossing hobby. Whilstit’s not “rocket science” it does encompass a wide range of fields (sometimes literally) and there’s a lot to learnbefore you send your first flight up into the sky.
A failed flight (and these can happen even to the most experienced) is a sad thing, but you can maximise yourchances of success by following this guide, and remembering these 3 points:
Do your researchDo plenty of testingDo not rush
Research is vital. Read up on existing projects – many people run blogs or have web sites showing how theydeveloped their flights. The UKHAS wiki is invaluable and is probably the best single source of HAB informationon the internet.
Testing is vital. If you’re developing your own tracker hardware and/or software, then you have plenty moretesting to do – does it work in the cold? does the software work across meridians? how long do the batteries last? Even if you buy a readymade radio tracker, you need to test your tracking setup and skills. Don’t leave that tothe flight itself – it will all go terribly wrong.
Do not rush. My very first flight took 5 months from the idea to the execution. Overall it was a success althoughsome things did go wrong. Not many flights are perfect in every way, so please do everything you can to makeyour flight the best it can be. Do not set a launch date before you are ready – this is a tried and well testedmethod of ensuring failure.
OverviewHigh Altitude Ballooning is all about sending up a payload (containing tracking equipment and often sensorsand/or cameras) to a high altitude. Typical flights get to 30km or so (about 100,000 feet), with the balloonexpanding from a typical 1 metre or so diameter at ground level to 8 metres or so at altitude, where the latex givesway and the payload falls by parachute to the ground.
Sounds simple, right?
It is, but you probably have (and should have) many questions, for example where can I get one of these balloons? How much gas? How do I get that gas inside the balloon? How do I get permission for the flight? How can I tellit where it will land? How do I find it afterwards? Read on for the answers.
Dave AkermanDave’s World
9/12/2016 High Altitude Ballooning, From The Ground Up (and back again) | Dave Akerman
http://www.daveakerman.com/?p=1732 2/17
TrackingThis comes first because it’s the most important factor in recovering your payload. If tracking doesn’t workthen all you’ve done is launch a big fat party balloon.
The best method of tracking depends on where you are launching. Here I will concentrate on the UKHAS 70cmsystem because in the UK that is by far the best option as we have a wide tracking network that will help you trackduring your flight. There are however other options:
GSM/GPS trackers. These receive GPS data and they also connect to the GSM mobile phone network. Modelsvary but typically you call the number of the SIM card in the device, and it texts you back with its position. These are cheap and simple devices, however they very often do not work at all during a HAB flight. Sometimes they land outside GSM coverage (and remember that even if you have a phone signal, a device onthe ground next to you may not), or they get confused at altitude and never start working again. Overall theyseem to have about a 50% chance of working. That figure, in my opinion and I hope yours, is nowhere neargood enough.SPOT tracker. Similar idea, but using the Iridium satellite network instead of GSM. These devices are muchmore expensive, so if they fail then you have lost a lot more money than with a GSM tracker. They do fail,particularly if they land upside down, though I have no figures to quote. Another issue, and one that theyshare with GSM trackers, is that they do not work throughout the flight. GSM trackers will stop working at analtitude of a few hundred metres, and SPOT will work up to 12km, but even that accounts for less than half ofthe flight. So, sometime after launch, you will not know where your flight is. You won’t know when it hasburst, and you won’t have a live prediction of where it will land.APRS. This is an Amateur Radio system that can be used to track balloons, but with 2 restrictions. First,airborne amateur radio is not allowed in all countries (e.g. it is not allowed in the UK, but is in the USA). Second, you have to have an appropriate amateur radio licence. In the USA for example, the basic “TechnicianLicense” is enough, and you can then make use of the extensive APRS network in that country.UKHAS Radio Tracker. This system was developed in the UK, which now has a very extensive network oflistening stations, but it has been used in many other countries even by sole trackers (i.e. the person launchingis the only person receiving the signals). Trackers are now available online for purchase, or you can build andcode your own. This part is very rewarding, and it’s how I started on my first balloon flight. As well as thereward of knowing that your own hardware and software has been to “near space”, it slows down the processmeaning that you will have more time to do that research I mentioned.
UKHAS Radio Network
9/12/2016 High Altitude Ballooning, From The Ground Up (and back again) | Dave Akerman
http://www.daveakerman.com/?p=1732 3/17
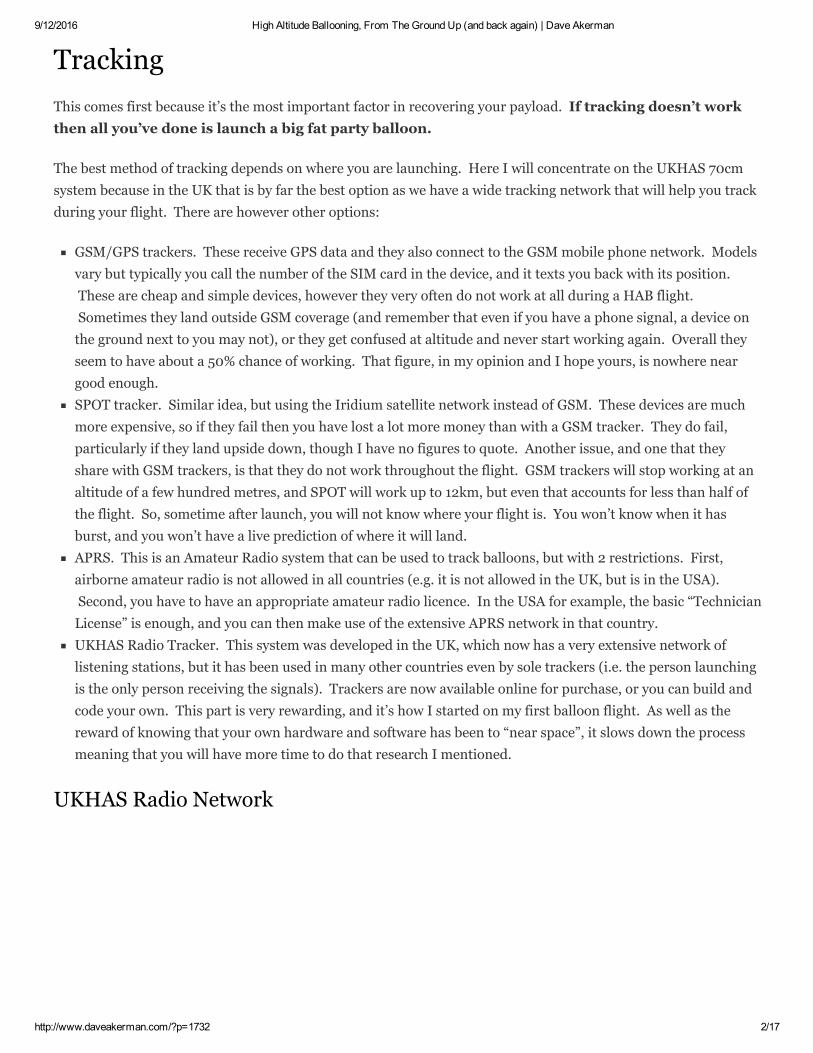
The above shows how the UKHAS system works. Your balloon carries a radio tracker that sends its position (andperhaps sensor data, or even images) down to the ground, where it is received by one or more listening stations. Istrongly recommend that you set up 2 such stations – one at a fixed location (e.g. launch site,home, school) and one in the chase car. In addition, if you are in a country where there are existinglisteners (the UK and Poland have good networks, and there are listeners in many other European countries) thenif you inform them of your flight, they will listen out for it. However do not rely on them – the responsibilityfor tracking your flight is your own. In many countries you will be the closest, and therefore most important,listener to the payload as it lands. Also, if you aren’t tracking at the launch site, you won’t know if the tracker isworking. Do not launch unless your tracker is working.
UKHAS Radio Tracker
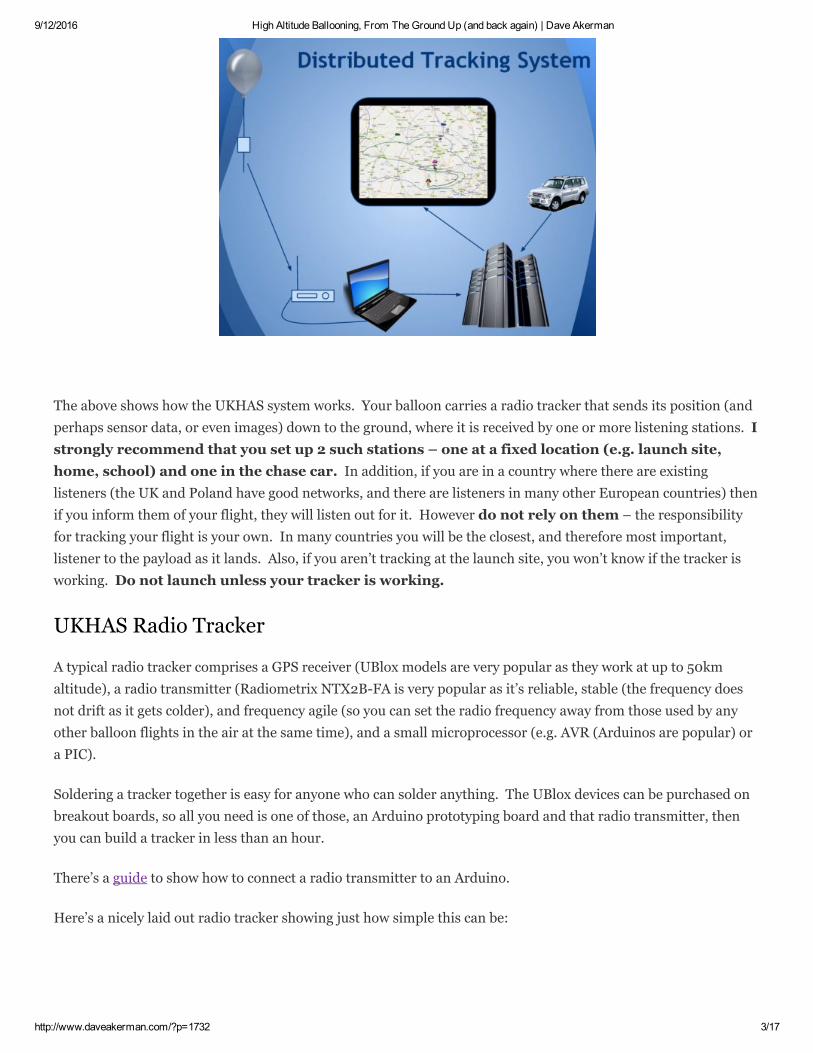
A typical radio tracker comprises a GPS receiver (UBlox models are very popular as they work at up to 50kmaltitude), a radio transmitter (Radiometrix NTX2BFA is very popular as it’s reliable, stable (the frequency doesnot drift as it gets colder), and frequency agile (so you can set the radio frequency away from those used by anyother balloon flights in the air at the same time), and a small microprocessor (e.g. AVR (Arduinos are popular) ora PIC).
Soldering a tracker together is easy for anyone who can solder anything. The UBlox devices can be purchased onbreakout boards, so all you need is one of those, an Arduino prototyping board and that radio transmitter, thenyou can build a tracker in less than an hour.
There’s a guide to show how to connect a radio transmitter to an Arduino.
Here’s a nicely laid out radio tracker showing just how simple this can be:
9/12/2016 High Altitude Ballooning, From The Ground Up (and back again) | Dave Akerman
http://www.daveakerman.com/?p=1732 4/17
UKHAS Receiving Station
As above, you should set up a station at a fixed location, plus a separate station in the chase car. You will need (foreach station):
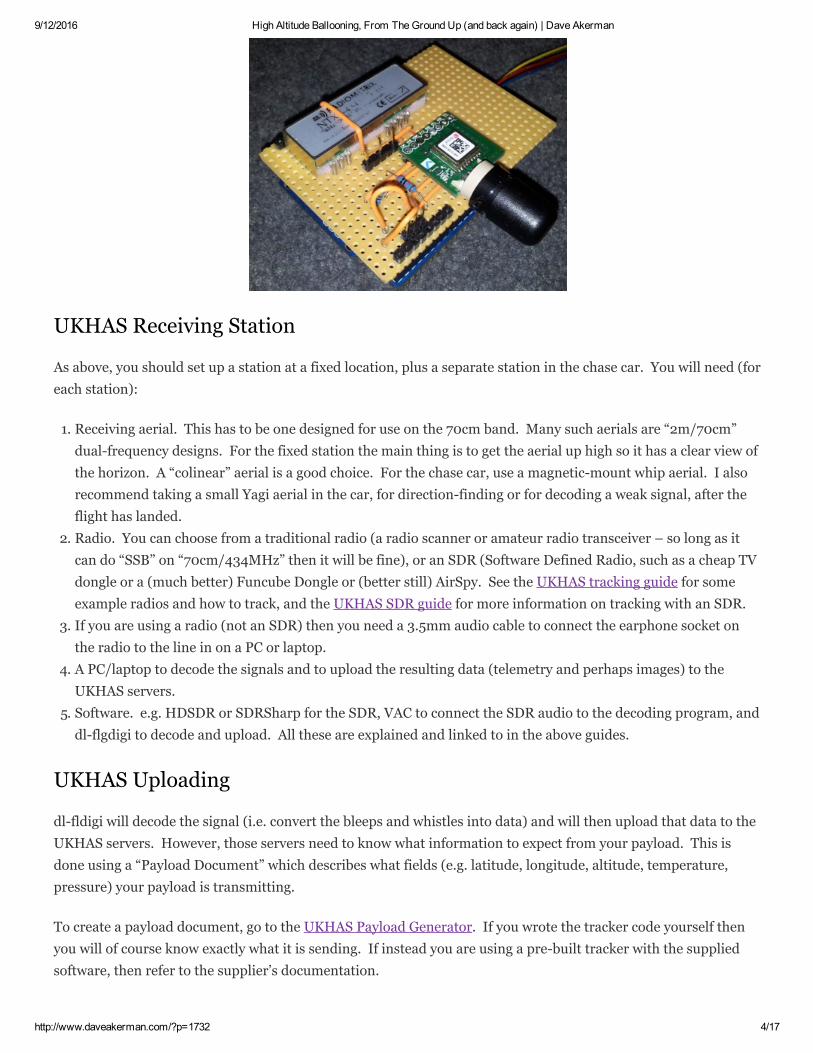
1. Receiving aerial. This has to be one designed for use on the 70cm band. Many such aerials are “2m/70cm”dualfrequency designs. For the fixed station the main thing is to get the aerial up high so it has a clear view ofthe horizon. A “colinear” aerial is a good choice. For the chase car, use a magneticmount whip aerial. I alsorecommend taking a small Yagi aerial in the car, for directionfinding or for decoding a weak signal, after theflight has landed.
2. Radio. You can choose from a traditional radio (a radio scanner or amateur radio transceiver – so long as itcan do “SSB” on “70cm/434MHz” then it will be fine), or an SDR (Software Defined Radio, such as a cheap TVdongle or a (much better) Funcube Dongle or (better still) AirSpy. See the UKHAS tracking guide for someexample radios and how to track, and the UKHAS SDR guide for more information on tracking with an SDR.
3. If you are using a radio (not an SDR) then you need a 3.5mm audio cable to connect the earphone socket onthe radio to the line in on a PC or laptop.
4. A PC/laptop to decode the signals and to upload the resulting data (telemetry and perhaps images) to theUKHAS servers.
5. Software. e.g. HDSDR or SDRSharp for the SDR, VAC to connect the SDR audio to the decoding program, anddlflgdigi to decode and upload. All these are explained and linked to in the above guides.
UKHAS Uploading
dlfldigi will decode the signal (i.e. convert the bleeps and whistles into data) and will then upload that data to theUKHAS servers. However, those servers need to know what information to expect from your payload. This isdone using a “Payload Document” which describes what fields (e.g. latitude, longitude, altitude, temperature,pressure) your payload is transmitting.
To create a payload document, go to the UKHAS Payload Generator. If you wrote the tracker code yourself thenyou will of course know exactly what it is sending. If instead you are using a prebuilt tracker with the suppliedsoftware, then refer to the supplier’s documentation.
9/12/2016 High Altitude Ballooning, From The Ground Up (and back again) | Dave Akerman
http://www.daveakerman.com/?p=1732 5/17
Once the payload document exists, and dlfldigi is decoding and uploading, then your payload should appear onthe live map. If it fails to appear, then probably the payload document is wrong – see the logtail which will showyou why.
Prior to your flight, create a Flight Document. This tells others where and when your flight will be, and allowsthem to easily set the correct radio frequency and decoding parameters for your flight.
Payload Design and BuildHere you can use your imagination to build something visually interesting, but remember the following keypoints:
1. Use plenty of insulation. 2cm is generally enough but use more for heavy payloads (though heavy payloads arediscouraged anyway) or 1cm for light payloads. Insulation does 3 things:A. Protects whatever your payload lands on (remember, it could be a car or person or greenhouse)B. Protects the tracker and cameras etc from that impactC. Protects the tracker and cameras from the cold
2. Suitable insulation can be purchased from some DIY stores or online at Hindleys. Choose from the lighter butsoft white expanded foam polystyrene, or the heavier but stiffer extruded foam polystyrene (easier to cutaccurately). Or, for small payloads, you can buy small polystyrene boxes or hollow polystyrene balls fromHobbycraft.
3. Make sure that anything inside the payload cannot move during flight. The burst and landing are both violentaffairs. If your payload can’t survive a fall down stairs, then it’s not going to survive a flight either.
4. The transmitting aerial should be on the underside of the payload container.5. The GPS aerial should be near the top of the container, with a clear view (one unobstructed by anything metalsuch as cameras or batteries) of the sky.
6. Design the container so that it’s easy to put the cameras inside. Some cameras, especially video cameras, havea limited run time and so there will be a time restriction between starting the camera and having to launch. Ifpossible arrange the payload so that the camera can be started after the payload is closed up for launch.
7. Keep the entire payload as light as practical.8. Try to keep heavy items to the bottom9. Try to keep it balanced – e.g. if you have 2 cameras put them on opposite walls10. Try to design in support lines to attach to the parachute, otherwise you’ll have to tape them on outside (ugly
and not as secure as embedding the lines in the walls, for example).
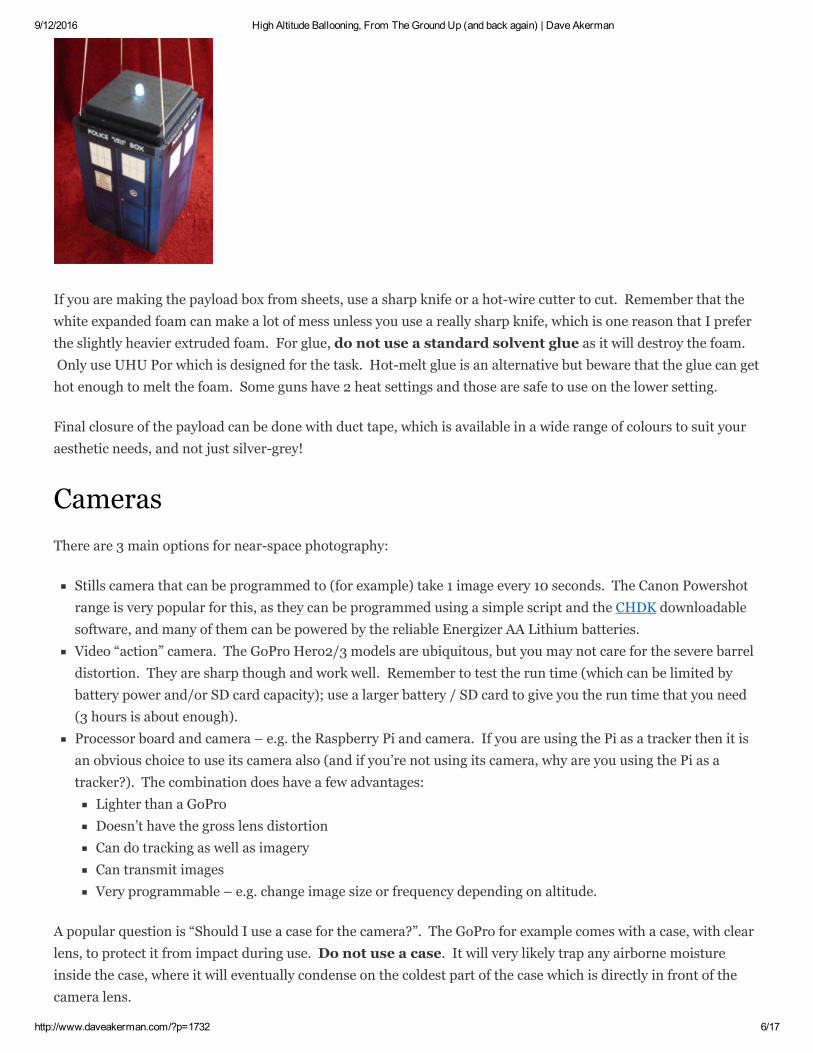
As an example, see my TARDIS payload, which included support lines embedded in the walls, heavy items(batteries) at the bottom, UHF aerial underneath and GPS aerial near the top. Everything fixed to the base, so thebatteries could be inserted and everything checked before the top (body) was put on.
9/12/2016 High Altitude Ballooning, From The Ground Up (and back again) | Dave Akerman
http://www.daveakerman.com/?p=1732 6/17
If you are making the payload box from sheets, use a sharp knife or a hotwire cutter to cut. Remember that thewhite expanded foam can make a lot of mess unless you use a really sharp knife, which is one reason that I preferthe slightly heavier extruded foam. For glue, do not use a standard solvent glue as it will destroy the foam. Only use UHU Por which is designed for the task. Hotmelt glue is an alternative but beware that the glue can gethot enough to melt the foam. Some guns have 2 heat settings and those are safe to use on the lower setting.
Final closure of the payload can be done with duct tape, which is available in a wide range of colours to suit youraesthetic needs, and not just silvergrey!
CamerasThere are 3 main options for nearspace photography:
Stills camera that can be programmed to (for example) take 1 image every 10 seconds. The Canon Powershotrange is very popular for this, as they can be programmed using a simple script and the CHDK downloadablesoftware, and many of them can be powered by the reliable Energizer AA Lithium batteries.Video “action” camera. The GoPro Hero2/3 models are ubiquitous, but you may not care for the severe barreldistortion. They are sharp though and work well. Remember to test the run time (which can be limited bybattery power and/or SD card capacity); use a larger battery / SD card to give you the run time that you need(3 hours is about enough).Processor board and camera – e.g. the Raspberry Pi and camera. If you are using the Pi as a tracker then it isan obvious choice to use its camera also (and if you’re not using its camera, why are you using the Pi as atracker?). The combination does have a few advantages:
Lighter than a GoProDoesn’t have the gross lens distortionCan do tracking as well as imageryCan transmit imagesVery programmable – e.g. change image size or frequency depending on altitude.
A popular question is “Should I use a case for the camera?”. The GoPro for example comes with a case, with clearlens, to protect it from impact during use. Do not use a case. It will very likely trap any airborne moistureinside the case, where it will eventually condense on the coldest part of the case which is directly in front of thecamera lens.
9/12/2016 High Altitude Ballooning, From The Ground Up (and back again) | Dave Akerman
http://www.daveakerman.com/?p=1732 7/17
Balloons and ParachutesBalloons come in various sizes and from 3 main manufacturers. For the widest choice and best service buy fromRandom Engineering.
All the above parachutes have loops at the top for attachment to the balloon. Choose the size using the calculatoron that page, aiming for a landing speed of 45 metres per second. You will need to know the payload weight,which you can estimate by adding together the weights of the heavier items and allowing 100g for the containerand duct tape.
The larger the balloon, the higher the flight will go and, usually, the further it will land from the launch site. Anything above 25km will get good photographs, and 30km is a good figure to aim for. A typical size might be a800g or 1000g balloon, but you should use the calculator to find out what size balloon you need for what altitude. Aim for an ascent rate of 56 metres per second, and remember that your payload weight should now include theweight of the parachute.
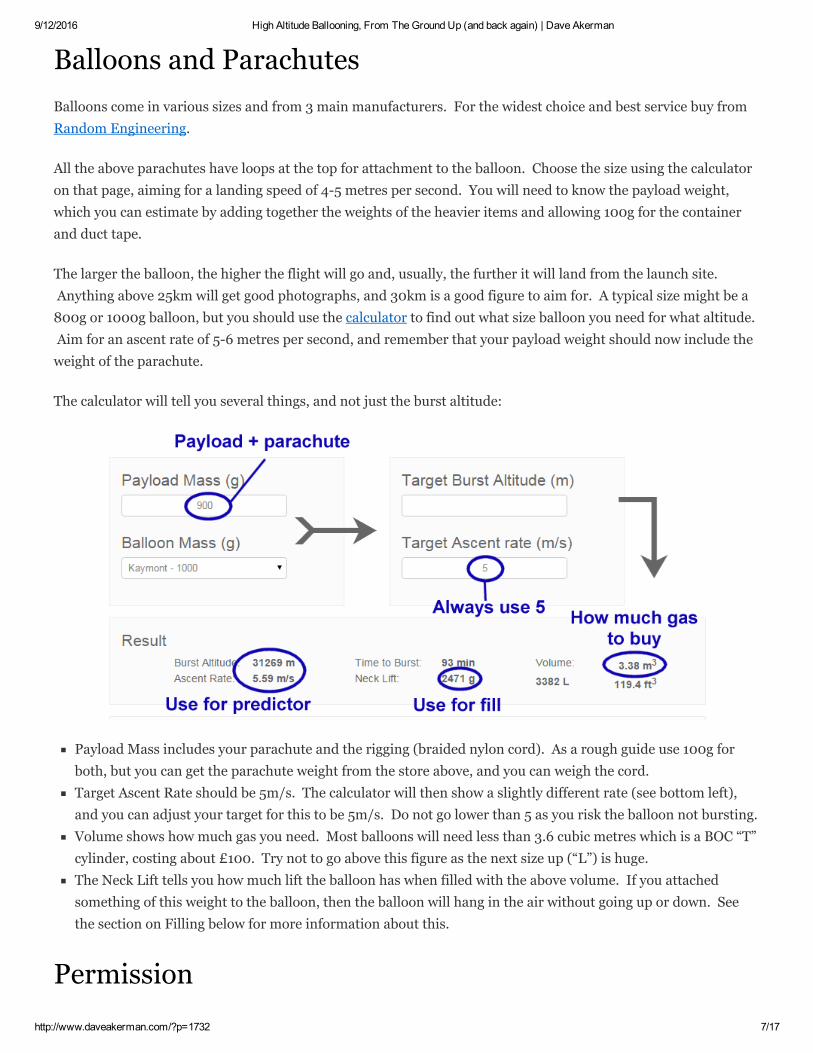
The calculator will tell you several things, and not just the burst altitude:
Payload Mass includes your parachute and the rigging (braided nylon cord). As a rough guide use 100g forboth, but you can get the parachute weight from the store above, and you can weigh the cord.Target Ascent Rate should be 5m/s. The calculator will then show a slightly different rate (see bottom left),and you can adjust your target for this to be 5m/s. Do not go lower than 5 as you risk the balloon not bursting.Volume shows how much gas you need. Most balloons will need less than 3.6 cubic metres which is a BOC “T”cylinder, costing about £100. Try not to go above this figure as the next size up (“L”) is huge.The Neck Lift tells you how much lift the balloon has when filled with the above volume. If you attachedsomething of this weight to the balloon, then the balloon will hang in the air without going up or down. Seethe section on Filling below for more information about this.
Permission
9/12/2016 High Altitude Ballooning, From The Ground Up (and back again) | Dave Akerman
http://www.daveakerman.com/?p=1732 8/17
In the UK, you must obtain permission from the CAA. No permission means no launch. Click here for moreinformation and a downloadable form.
The CAA request that you send the form in at least 28 days prior to launch, and I recommend that you do justthat. However you will not know at that point if you will be able to launch on the date you requested. So Irecommend the following:
1. Choose a launch site, If this is near an airport then you will either be denied permission, or it will come withrestrictions as to what time you can launch and/or in what direction the balloon must fly after launch. Irecommend you find a better launch site if this is likely!
2. Choose a date. Check online to see if there are any local airshows (these are, in my experience, the most likelyreason for denying permission).
3. If the date is at a weekend, request both Saturday and Sunday4. Fill in the form, and send to the CAA together with the required map.5. Wait6. About 6 days prior to launch, start checking the flight path predictions (see below) and the ground windpredictions (Wunderground is good for this). Do this each day.
7. In light of the above predictions, if you think that the flight will be able to go ahead, then send an email toAUSOPS at the CAA, a few days before the flight, referencing your application and confirming that you believethe flight is likely.
8. If instead you can see that the flight won’t be able to happen, let the CAA know at least 2 days before the flight(if the flight is at the weekend let them know by Thursday at the latest), so they don’t waste time processingyour request.
9. The last working day before launch, check the AIS site and/or notaminfo.com. Usually you will find out herethat your NOTAM has been issued, before the CAA permission certificate comes through.
10. My experience is that permission comes through late in the afternoon. I realise that you may become nervousthat nothing appears to be happening, but provided you sent in the confirmation email that I recommendedthen permission will be issued (this has been my experience anyway).
If permission does not arrive before the launch, do not launch. If the permission includes restrictions (e.g. on thewind direction) that you cannot meet, do not launch. Remember that obtaining permission is a critical safety stepin the process.
PredictionsEven with permission, you should only launch with a safe flight path. This primarily means having a landing areathat is well away from cities, large towns, airports or motorways. Remember that balloons may burst rather loweror higher than you planned for, due to manufacturing tolerances or your ability to fill the balloon with the correctamount of gas (see section on Filling below), so you should run predictions for early or late bursts as well as yourplanned burst altitude.
Also, do not plan a flight that lands close to the sea. No flight exactly follows the prediction. There are manyvariables such as the accuracy of the wind forecasts and (especially) the amount of gas put into the balloon, and asa rule of thumb I suggest you allow for a landing error of at least 5 mile radius, with an additional “distance from
9/12/2016 High Altitude Ballooning, From The Ground Up (and back again) | Dave Akerman
http://www.daveakerman.com/?p=1732 9/17
launch” error of 5% of the distance travelled. So a typical 100 mile flight would have a possible landing area ofapprox 10 miles long (in the distance travelled) by 5 miles wide (at right angles).
You can run a prediction online using the CUSF Flight Predictor. This works up to about 6 days prior to the flight,but generally does not start to be accurate until about 3 days prior. It is worth running a prediction every day upto launch, to gauge how much they change from day to day – if they don’t change much then you will know thatthe prediction is quite predictable, which is good.
Another thing to check is how much the prediction changes from hour to hour during the launch day. Launchesfrequently (in fact, almost always, run late) and you should run a prediction for 1 hour after launch, as well as atthe target launch time, to see if it changes much. A large change is bad because it makes the landing spot highlydependent on what time you launch.
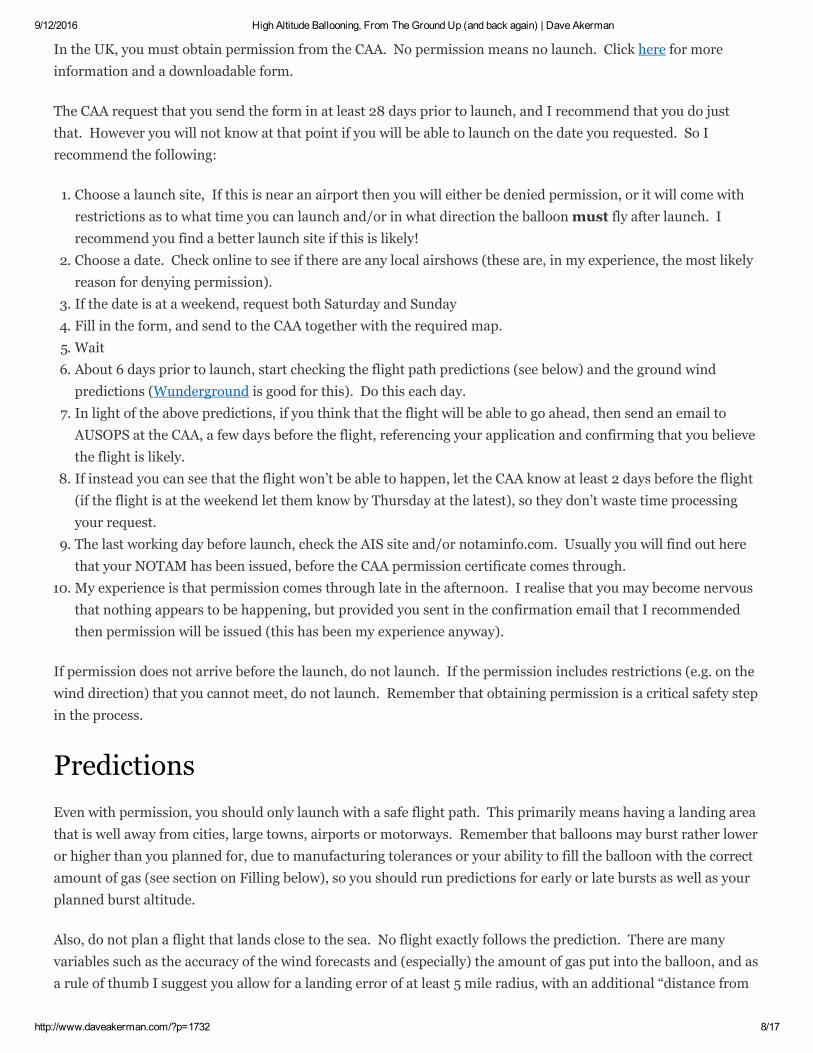
As you run predictions, you will probably notice that the balloon direction changes throughout the flight. This isbecause the wind travels in layers with different layers travelling in different directions and/or at different speeds. Generally, ground level winds travel from west to east, but of course any direction is possible. Higher level windstend, in the summer months, to travel from east to west meaning that your balloon will at some point reverse itsdirection. Here’s a typical example, with the flight travelling south, then east, then north, then west on the wayup, and then turning in the opposite direction during descent:
In the winter months, much depends on the jet stream. If you balloon hits this then it will be swept towards thecontinent at up to 200mph, making a UK landing impossible and recovery difficult.
Remember to run a final prediction soon before your launch, so you have the most accurate data.
Balloon Neck Lift
9/12/2016 High Altitude Ballooning, From The Ground Up (and back again) | Dave Akerman
http://www.daveakerman.com/?p=1732 10/17
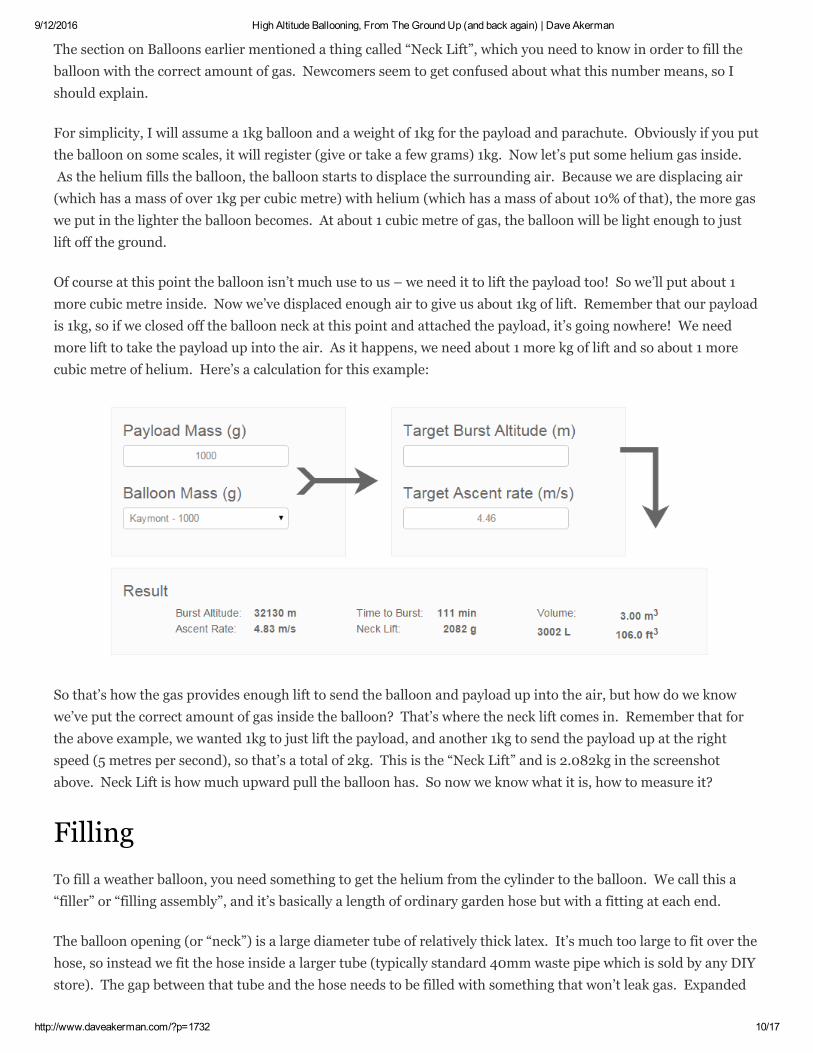
The section on Balloons earlier mentioned a thing called “Neck Lift”, which you need to know in order to fill theballoon with the correct amount of gas. Newcomers seem to get confused about what this number means, so Ishould explain.
For simplicity, I will assume a 1kg balloon and a weight of 1kg for the payload and parachute. Obviously if you putthe balloon on some scales, it will register (give or take a few grams) 1kg. Now let’s put some helium gas inside. As the helium fills the balloon, the balloon starts to displace the surrounding air. Because we are displacing air(which has a mass of over 1kg per cubic metre) with helium (which has a mass of about 10% of that), the more gaswe put in the lighter the balloon becomes. At about 1 cubic metre of gas, the balloon will be light enough to justlift off the ground.
Of course at this point the balloon isn’t much use to us – we need it to lift the payload too! So we’ll put about 1more cubic metre inside. Now we’ve displaced enough air to give us about 1kg of lift. Remember that our payloadis 1kg, so if we closed off the balloon neck at this point and attached the payload, it’s going nowhere! We needmore lift to take the payload up into the air. As it happens, we need about 1 more kg of lift and so about 1 morecubic metre of helium. Here’s a calculation for this example:
So that’s how the gas provides enough lift to send the balloon and payload up into the air, but how do we knowwe’ve put the correct amount of gas inside the balloon? That’s where the neck lift comes in. Remember that forthe above example, we wanted 1kg to just lift the payload, and another 1kg to send the payload up at the rightspeed (5 metres per second), so that’s a total of 2kg. This is the “Neck Lift” and is 2.082kg in the screenshotabove. Neck Lift is how much upward pull the balloon has. So now we know what it is, how to measure it?
FillingTo fill a weather balloon, you need something to get the helium from the cylinder to the balloon. We call this a“filler” or “filling assembly”, and it’s basically a length of ordinary garden hose but with a fitting at each end.
The balloon opening (or “neck”) is a large diameter tube of relatively thick latex. It’s much too large to fit over thehose, so instead we fit the hose inside a larger tube (typically standard 40mm waste pipe which is sold by any DIYstore). The gap between that tube and the hose needs to be filled with something that won’t leak gas. Expanded
9/12/2016 High Altitude Ballooning, From The Ground Up (and back again) | Dave Akerman
http://www.daveakerman.com/?p=1732 11/17
foam filler (also from a DIY store) is a common but rather messy choice. Or you can use a length of pipeinsulation (also from … OK you know), sealed at each end with silicone sealant (guess…). Try this guide for how tomake one.
The helium cylinder will come with a valve/regulator/filler that screws in to the top of the cylinder. There are 2designs of these device, but for either you should be able to squeeze the hose over the opening and fix it down witha combination of duct tape and hose clips.
Suppose that the filler assembly (see below) weighs 300g, and you want a neck lift of 2kg. If you can attachsomething weighing 1.7kg (2.0 – 0.3) to the top of the balloon filler, then when the balloon has the desired necklift (2kg) it will just be able to lift the filler (0.3kg) and added weight (1.7kg).
The one problem with the above is the wind. Any wind will try to move the balloon sideways. If you’re holding theballoon (to fill it) then the air going past the balloon will produce lift. If you measure the total lift then it willinclude this aerodynamic lift, so you can only measure the neck lift accurately when there is no wind. A slightwind is OK – carefully let go of the balloon and see if it goes up or down, before grabbing it quickly! Or wait forthe wind to stop or at least calm down enough for you to let go briefly.
As a rule of thumb, if the predicted winds are stronger than 10mph, postpone the launch.
Bill Of MaterialsThis is an approximate list, to use as a starting point. Don’t go buying anything until you have a goodunderstanding of the entire project. Some items (e.g. parachute, balloon) depend on the weight of many of theother items, so these should be the last things you buy and not the first. I often get emails asking me for a list ofitems to buy, and it’s an impossible question to answer. Moreover, it’s the wrong question – it should be “what doI need to learn to make my flight safe and successful?”, and everything else should follow from that.
That said, here’s a list to help you make your own list.
Tracker (or trackers – a backup is a good idea). I hope that you’re going to make your own radio tracker, inwhich case you need to buy:
UBlox GPS receiverRadiometrix NTX2B radio transmitterProcessor board (e.g. Arduino)Battery holderCoax cable for the radio aerial
A good place for GPS receivers, radios etc is HAB Supplies.
Or you can buy a readymade radio tracker (e.g. Pi In The Sky, HABduino)
A GSMGPS tracker is useful as a backup, or if you contact someone in UKHAS they may be willing tosupply a spare tracker – useful if you’ve built your own and don’t know for sure that it will work.
9/12/2016 High Altitude Ballooning, From The Ground Up (and back again) | Dave Akerman
http://www.daveakerman.com/?p=1732 12/17
Payload materials:Expanded or Extruded Foam Polystyrene (sheets or readymade ball or box or egg)
UHU Por glue
Duct Tape
Waterproof label with your name / phone number / email address
Flight Train:Balloon
Parachute
Cable Ties
Braided Nylon Cord
More Duct Tape
Tracking Base Station:PC or laptop with internet connection
Radio receiver (SDR or real one with audio cable)
Aerial (colinear or 1/4wave)
Coax cable from aerial to radio
Launch Kit
Ground sheet (tarpaulin)
Filler Assembly (waste pipe, insulation, silicone sealant, yet more duct tape)
Water bottle (to check the neck lift)
Water (for above)
Scales (to measure weight of said bottle of water)
Cable ties
Duct tape
Scissors
Wire Cutters
Gloves
Chase Car KitReceiving Station / Live Map:
Magmount aerialRadio (real (preferred) or SDR)Laptop or netbook or tablet or phone with decoding software3G connection (MiFi or a phone with 3G/WiFi tethering)
Car uploader – this puts your car on the live map so others can see where you are as well as the balloon. You can use a USB GPS on the laptop/netbook, or use a suitable program on a phone or tablet.Yagi aerial (for picking up a weak signal after the payload lands, or for directionfinding if it’s really weak)Wellies and/or walking bootsSat NavCar Chargers for Phone/Tablet/Netbook/Laptop/MiFi.Real map
Launch DaySo, the big day has come. Your tracker has been working for weeks now, and you’ve tested that you can track it onthe ground from a mile away. You have permission from the CAA and your flight predictions show a nice landingfar away from any hazards. Your base station is set up and you’re ready to put the kit in the car for the chase. You
9/12/2016 High Altitude Ballooning, From The Ground Up (and back again) | Dave Akerman
http://www.daveakerman.com/?p=1732 13/17
have the balloon, gas, filling rig, ground sheet, parachute, completed payload, cord and plenty of duct tape. You’vecreated both payload and flight documents, you’ve seen your balloon on the map, and you’ve alerted the other UKballoonists of your flight. You’re ready to launch!
Preparation
Get the car unloaded. Put a table up if you have one (much nicer to work on a table than the ground when yourputting the final touches to the payload, or getting your laptop tracking set up). Lay out the ground sheet and pegor put weights on the corners to stop it taking off. Put the cylinder and filler on the ground sheet, together withthe other items that the person filling the balloon will need.
Tracker
The tracker is the first thing to get working. Make sure that you can receive and decode the transmissions. Waittill it has a GPS lock. Make sure that you have internet connectivity and that the balloon has appeared on the livemap. Make sure you’re using new batteries and not ones you’ve been testing with!
Payload
Put the tracker inside the payload box, and connect the aerial to the tracker. Check the tracker is still working. Make sure all cameras have fresh / fully charged batteries. Make sure the SD cards are empty of all images! Startup the cameras, and photograph your contact label in case the label is lost during the flight but the camera isrecovered. Preferably put one label inside and another on the outside.
Start the cameras recording stills/video. Insert the cameras and close off the payload lid (fix it down with tape). Check that the tracker is still working and still has a GPS lock. Check that the cameras are still recording.
Payload TrainMeasure roughly 10 metres of braided nylon cord out. Tie one end to the top of the payload, and the other end tothe bottom of the parachute. Measure out another 5 metres of cord, and tie one end to the top of the parachute.
All knots should be pulled hard to make sure that they do not slip at all. Remember that these are the only thingsstopping you from dropping a payload from 30km up without a parachute. Put a piece of tape over each knot tostop it coming apart.
Put the free end of the top line (the one above the parachute) on the ground near to the person filling the balloon.
Balloon
Now it is time to fill the balloon. Remove it from the wrapper and lay it out on the ground sheet. Fit the fillerassembly to the helium cylinder and make sure it’s a tight fit. Open the cylinder valve.
Fit the balloon neck over your filler tube, leaving enough of the beck free for sealing later. Then tape down withduct tape over the end. Fit 2 cable ties to stop the balloon from escaping.
9/12/2016 High Altitude Ballooning, From The Ground Up (and back again) | Dave Akerman
http://www.daveakerman.com/?p=1732 14/17
Check the weight of your water bottle, making sure that it matches your neck lift calculation taking into accountthe weight of the filler. Attach the bottle to the filler with cable ties.
Open the gas valve and allow the balloon to fill. Fill until it can hold the water bottle in the air without the bottlecoming back down. If it’s windy, wait for a lull in the wind before doing this. If in doubt add more gas.
When you have enough gas, tie 2 cable ties around the neck of the balloon, about 1020mm apart. Get someone tocome over and help at this point. Tie the free end of the top line around the balloon. Cut off the cable tie ends andput tape over the knot and cut ends. Wrap the line around the cylinder or have someone hold it (they must weargloves) to stop the balloon escaping if you slip up. Have someone hold the balloon neck (where that line goes)whilst you remove the cable ties that are holding the balloon neck on the filler tube, and remove the tape. Fold theballoon neck back over itself, put on one more cable tie, cut off the loose end and tape over it.
Launching
First, check that the tracker still has a GPS lock and you are decoding the transmissions. Check that all camerasare still recording. Check that the payload train is tied together properly and that no idiot put the parachute onupsidedown.
If your CAA permission tells you to call Air Traffic Control for clearance, do that now. Follow their instructions(they may well ask you to wait for an aircraft to pass).
Have someone hold the payload.
Check the sky for planes – look and listen.
Start allowing the balloon to rise. Gloves are very, very important for this bit as you could get a bad cut from thenylon line. Lift the line up, keeping a good grip at all times, feeding the parachute through your hands and keepgoing till you are holding the payload.
Check the sky again.
Now it’s time to let go! So long as it’s not windy, then this is easy. If it is windy, you will find that the balloon isn’tabove you, but is about 15 metres away and possibly only a couple of metres above the ground. See if you can waitfor the wind to let up, at which point the balloon will start to rise. Start walking towards the balloon, and it shouldrise. Walk faster, allowing the balloon to rise till the line is almost vertical. You may well need to run at this point. Do not release until you can see that when you let go the payload will go up (or at least horizontally) and notdown into the ground!
Chasing
Once everything is packed up you can set off after the balloon. Generally, the best plan is to make sure you’re notfar from the balloon when it bursts. You may well be tempted to drive straight to the expected landing point, butthat’s generally a bad idea as you won’t know the landing area until after the burst.
9/12/2016 High Altitude Ballooning, From The Ground Up (and back again) | Dave Akerman
http://www.daveakerman.com/?p=1732 15/17
Whatever you do, try and be near the intersection of 2 major roads so that you can head off in any direction oncethe balloon has burst and the landing prediction starts to be more accurate.
You can then head for the expected landing point shown by the live map. Again, try to find a good road junction topark near. Or, if it’s a hilly area, the best idea is to get to the top of a nearby hill; this is much better than being ina valley where the radio signal is likely to cut off early.
RecoveryWhen the payload has landed, the signal will probably stop. If it hasn’t stopped, then either you managed to find aplace very close to the landing position (typically within 1 mile) or it’s in a tree!
If you don’t have a final position, then getting one is your absolute top priority. Drive to the latest payloadposition that you do have, or to the predicted landing spot (shown by the live map). Use the yagi aerial if thesignal is too weak to decode, or find a small hill to drive up. So long as you can get to within 1 mile of the payload,without a hill in the way, you should get a decodable signal.
Once you have the final position, write it down and tap it into a sat nav. Drive to the closest you can by road. Ifyou have a 3G signal, switch the live map to satellite view and see where the payload is and how you’re going to getthere. Or, use Back Country Navigator Pro on a tablet or phone, to view where you are and where the payload ison an Ordnance Survey map (download the map before the flight!).
Almost always, the flight will be on private land so you should always try and find the landowner and getpermission.
This entry was posted in Weather Balloon. Bookmark the permalink.
8 Responses to High Altitude Ballooning, From The Ground Up (and back again)
Pingback: Guide to High Altitude Ballooning | Raspberry Pi Pod
Matt Kingsnorth says:16/02/2015 at 1:49 am
Wow… We’re about half/twothirds of the way through that process. I’ve pulled most of the information together from awhole load of different sources. To have it all written down in one place like that is just brilliant! It’s helped me fill in some ofthe blanks and shown up a couple of things I didn’t even realise needed blanks..! Thanks Dave!
Reply
Doug Loughmiller, W5BL says:16/02/2015 at 4:42 pm
Hi Dave,

9/12/2016 High Altitude Ballooning, From The Ground Up (and back again) | Dave Akerman
http://www.daveakerman.com/?p=1732 16/17
I have been active in high altitude amateur radio balloon flights for roughly 10 years now. I have probably participated orsponsored about 30 launches. I just wanted you to know that your article is simply outstanding. Very well written andorganized. Your concise article covers it all. I have been thinking about writing a book on the topic to see if I could get itpublished by ARRL or some other amateur radio publishing house. You have set a high bar for me! I’m not sure I canmeasure up to the work you have done! ; I appreciate all of the work you have put into your article. Best of luck with youongoing activities. You can take a peek at the kinds of things our group undertake on our web site http://www.arbonet.net .73, Doug, W5BL
Reply
Joshua Bayfield says:16/02/2015 at 5:04 pm
Well, I see that this would be a difficult thing to accomplish being in a town literally just outside of Heathrow.
Reply
Frank MH, Germany says:05/12/2015 at 5:14 pm
Thanks for this worthfull instruction. All aspects are important:We launched a 300g balloon last weekend, and– DIDN´T “check that the cameras are still recording”– UNDERFILLED the balloon (512 g instead 580 g; ascent rate 3,5 m/sec)– OVERESTIMATED the descent rate (2 m/sec, predicted 5 m/sec)Results:Only 4 (!!!) min recording of mounting the material on the ground.380 km long distance flight4 h chase (one direction)over 800 km by car/11 hoursA bad experience, but we immediately added new ideas to our 4pagechecklist and made a new construction for the payloadbox (making the display of the camera visible after closing the construction).
Reply
Bill Harvey says:12/12/2015 at 4:48 pm
Dave;Sadly I was unable to come to the Sky Academy earlier in the year but am very keen to do a launch before July 2016 as aPrimary School or Pi Club project in North Devon. The information here is fantastic and will prove invaluable but the abilityfor additional Q&A would be most helpful. Would I be able to make contact with you via email or a Forum?We have a couple of Amateur Radio enthusiast at our local Pi Jam, who have helped me to better understand the trackingprocess and hardware involved.Keep up the great and inspiring work.
P.S. Love the Tardis (very detailed) – may copy that idea
Reply
gur says:27/02/2016 at 10:17 pm
9/12/2016 High Altitude Ballooning, From The Ground Up (and back again) | Dave Akerman
http://www.daveakerman.com/?p=1732 17/17
Dave Akerman
Hi David,
Thanks for so many amazing insights (basics, advanced, video, LoRa…endless knowledge and experience).Reading this as well as lots of other pulications of you and some great flight by you and Anthony (just ordered a bunch ofstuff from him).
I am abegineer, and taking this up for two classes (11 years old and 14 years old).
I was looking to build with them the HubDuino board, but apparently EAGLE 7.5 can’t create the Greber files. Seems like the“COILCRAFT_LPS4018” is the bad entitiy.Any chance you’ll post the grebbers to the git as well ?
(appologies, if this is not the right place to comment)ThanksGur
Reply
David Akerman says:27/02/2016 at 10:22 pm
Forwarded to Anthony as it’s his board design.
Reply
Proudly powered by WordPress.