
HEALTH & SAFETY MANUAL 2018
572
HEALTH & SAFETY MANUAL 2018
-
Upload
khangminh22 -
Category
Documents
-
view
2 -
download
0
Transcript of HEALTH & SAFETY MANUAL 2018

HEALTH & SAFETY
MANUAL 2018
HEALTH & SAFETY PROGRAM
_ _
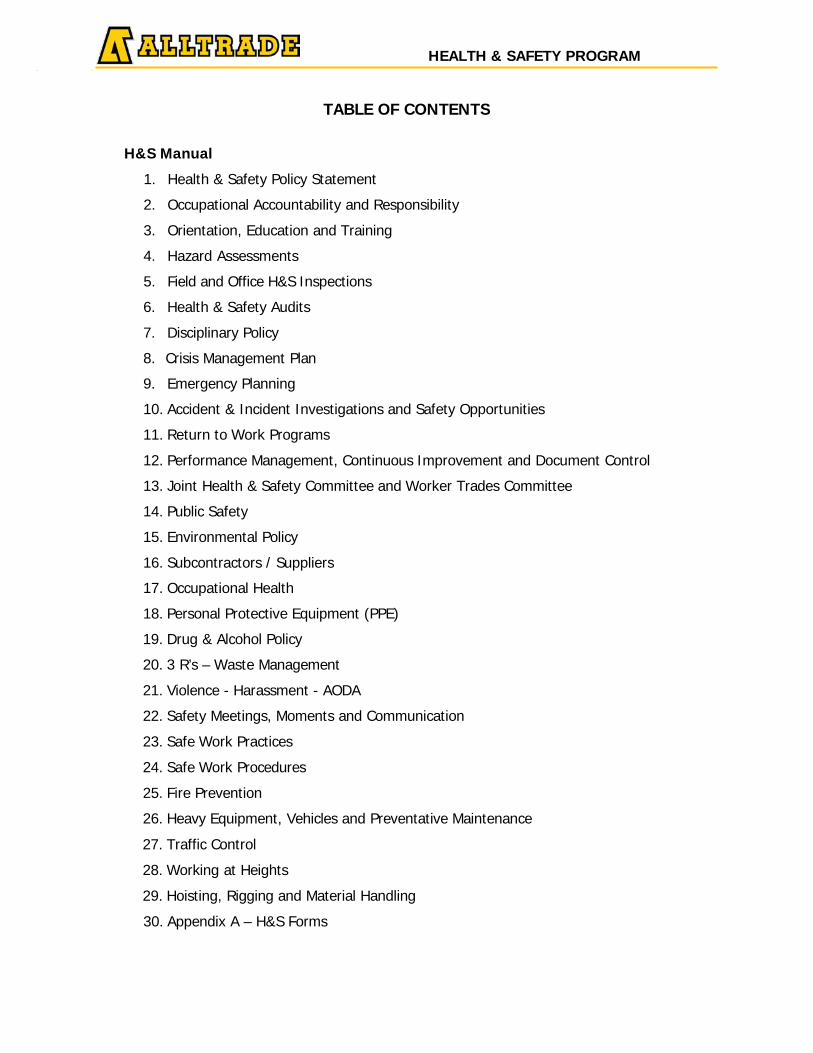
TABLE OF CONTENTS
H&S Manual
1. Health & Safety Policy Statement
2. Occupational Accountability and Responsibility
3. Orientation, Education and Training
4. Hazard Assessments
5. Field and Office H&S Inspections
6. Health & Safety Audits
7. Disciplinary Policy
8. Crisis Management Plan
9. Emergency Planning
10. Accident & Incident Investigations and Safety Opportunities
11. Return to Work Programs
12. Performance Management, Continuous Improvement and Document Control
13. Joint Health & Safety Committee and Worker Trades Committee
14. Public Safety
15. Environmental Policy
16. Subcontractors / Suppliers
17. Occupational Health
18. Personal Protective Equipment (PPE)
19. Drug & Alcohol Policy
20. 3 R’s – Waste Management
21. Violence - Harassment - AODA
22. Safety Meetings, Moments and Communication
23. Safe Work Practices
24. Safe Work Procedures
25. Fire Prevention
26. Heavy Equipment, Vehicles and Preventative Maintenance
27. Traffic Control
28. Working at Heights
29. Hoisting, Rigging and Material Handling
30. Appendix A – H&S Forms
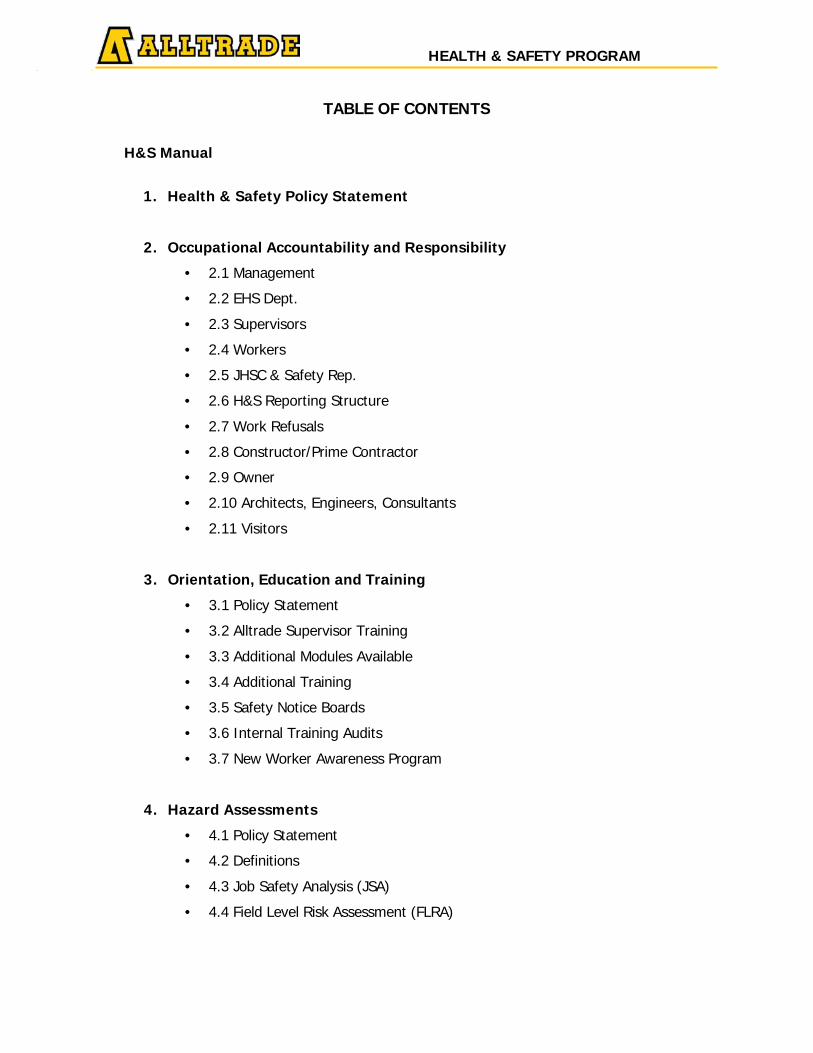
HEALTH & SAFETY PROGRAM
_ _
TABLE OF CONTENTS
H&S Manual
1. Health & Safety Policy Statement
2. Occupational Accountability and Responsibility
• 2.1 Management
• 2.2 EHS Dept.
• 2.3 Supervisors
• 2.4 Workers
• 2.5 JHSC & Safety Rep.
• 2.6 H&S Reporting Structure
• 2.7 Work Refusals
• 2.8 Constructor/Prime Contractor
• 2.9 Owner
• 2.10 Architects, Engineers, Consultants
• 2.11 Visitors
3. Orientation, Education and Training
• 3.1 Policy Statement
• 3.2 Alltrade Supervisor Training
• 3.3 Additional Modules Available
• 3.4 Additional Training
• 3.5 Safety Notice Boards
• 3.6 Internal Training Audits
• 3.7 New Worker Awareness Program
4. Hazard Assessments
• 4.1 Policy Statement
• 4.2 Definitions
• 4.3 Job Safety Analysis (JSA)
• 4.4 Field Level Risk Assessment (FLRA)
HEALTH & SAFETY PROGRAM
_ _
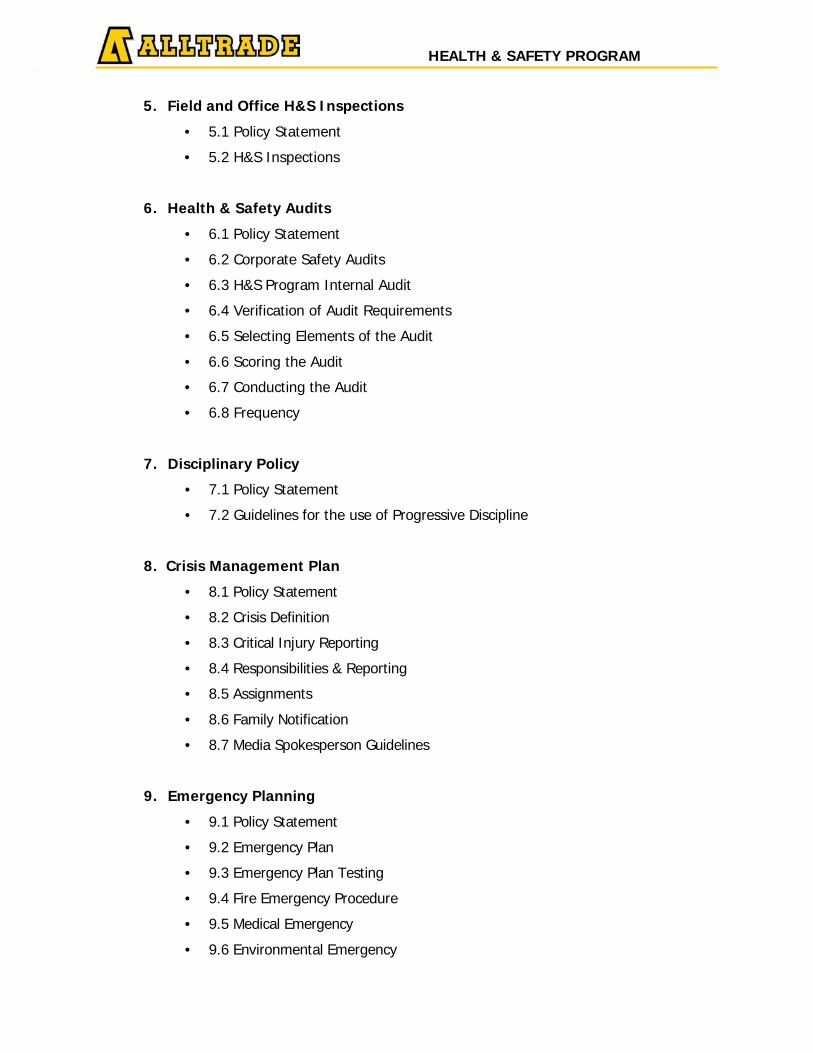
5. Field and Office H&S Inspections
• 5.1 Policy Statement
• 5.2 H&S Inspections
6. Health & Safety Audits
• 6.1 Policy Statement
• 6.2 Corporate Safety Audits
• 6.3 H&S Program Internal Audit
• 6.4 Verification of Audit Requirements
• 6.5 Selecting Elements of the Audit
• 6.6 Scoring the Audit
• 6.7 Conducting the Audit
• 6.8 Frequency
7. Disciplinary Policy
• 7.1 Policy Statement
• 7.2 Guidelines for the use of Progressive Discipline
8. Crisis Management Plan
• 8.1 Policy Statement
• 8.2 Crisis Definition
• 8.3 Critical Injury Reporting
• 8.4 Responsibilities & Reporting
• 8.5 Assignments
• 8.6 Family Notification
• 8.7 Media Spokesperson Guidelines
9. Emergency Planning
• 9.1 Policy Statement
• 9.2 Emergency Plan
• 9.3 Emergency Plan Testing
• 9.4 Fire Emergency Procedure
• 9.5 Medical Emergency
• 9.6 Environmental Emergency
HEALTH & SAFETY PROGRAM
_ _
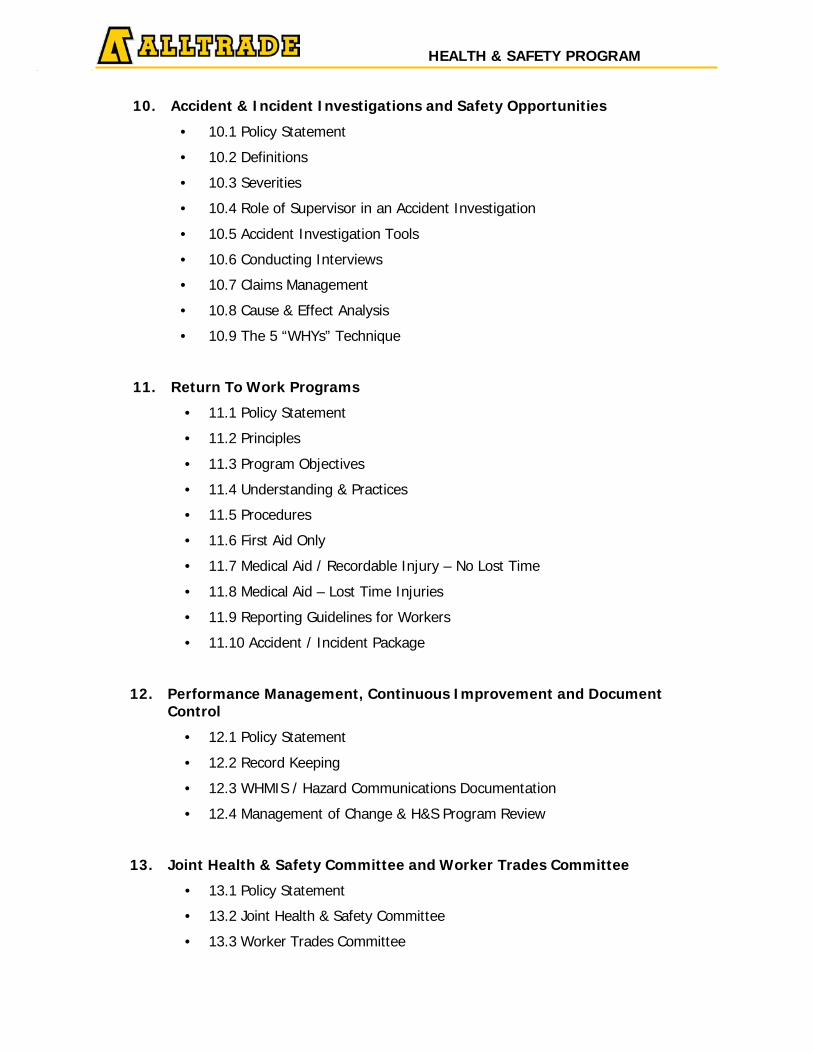
10. Accident & Incident Investigations and Safety Opportunities
• 10.1 Policy Statement
• 10.2 Definitions
• 10.3 Severities
• 10.4 Role of Supervisor in an Accident Investigation
• 10.5 Accident Investigation Tools
• 10.6 Conducting Interviews
• 10.7 Claims Management
• 10.8 Cause & Effect Analysis
• 10.9 The 5 “WHYs” Technique
11. Return To Work Programs
• 11.1 Policy Statement
• 11.2 Principles
• 11.3 Program Objectives
• 11.4 Understanding & Practices
• 11.5 Procedures
• 11.6 First Aid Only
• 11.7 Medical Aid / Recordable Injury – No Lost Time
• 11.8 Medical Aid – Lost Time Injuries
• 11.9 Reporting Guidelines for Workers
• 11.10 Accident / Incident Package
12. Performance Management, Continuous Improvement and Document Control
• 12.1 Policy Statement
• 12.2 Record Keeping
• 12.3 WHMIS / Hazard Communications Documentation
• 12.4 Management of Change & H&S Program Review
13. Joint Health & Safety Committee and Worker Trades Committee
• 13.1 Policy Statement
• 13.2 Joint Health & Safety Committee
• 13.3 Worker Trades Committee
HEALTH & SAFETY PROGRAM
_ _
14. Public Safety
• 14.1 Policy Statement
• 14.2 Definition
• 14.3 Public Relations
• 14.4 Public Hazard Control Chart
• 14.5 Accessibility Standard for Customer Service
• 14.6 Project Security
• 14.7 Theft Protection
15. Environmental Policy
• 15.1 Policy Statement
• 15.2 Pre-Construction
• 15.3 Water Quality & Sediment Retention
• 15.4 Waste Requiring Special Management
• 15.5 Discovery of Contaminated Spills
• 15.6 Work in Streams & Waterways
• 15.7 Hazardous Materials – Storage, Handling & Disposal
• 15.8 Burning & Forest Fire Prevention
• 15.9 Urban Forests- Tree Protection
• 15.10 Worker Education & Training
• 15.11 Material Safety Data Sheets/Safety Data Sheets (MSDS/SDS)
• 15.12 Environmental De-Mobilization
• 15.13 Energy Conservation & Carbon Emission Reduction
16. Subcontractors / Suppliers
• 16.1 Policy Statement
• 16.2 Subcontractor Environmental H&S Requirements
• 16.3 Subcontractors / Suppliers to Supervise their Employees
• 16.4 Subcontractor / Suppliers Prequalification
17. Occupational Health
• 17.1 Policy Statement
• 17.2 Worker Wellness
• 17.3 Cold Stress – Hypothermia
HEALTH & SAFETY PROGRAM
_ _
• 17.4 Frostbite
• 17.5 Personal Protective Equipment (PPE)
• 17.6 Footwear
• 17.7 Wind Chill
• 17.8 Working in Hot Environments Policy – Heat Stress Plan
• 17.9 Sun Exposure
• 17.10 Noise
• 17.11 Hazardous Substances – Procedure Format
• 17.12 Procedure for Cleaning up an Disposal of Bio-Hazardous Waste
• 17.13 Bio-Hazardous Waste – Syringes
• 17.14 Procedure for Handling & Disposal of Sharps
• 17.15 Hazardous Substances
• 17.16 PCBs – General Info
• 17.17 Lead
• 17.18 Silica
• 17.19 Animal & Insect Bites
• 17.20 Bed Bugs
• 17.21 Black Legged Tick Bites (Lyme Disease)
• 17.22 Molds
• 17.23 Animal Droppings – Histoplasmosis
• 17.24 Man-Made Vitreous Fibers
• 17.25 Ergonomics (Workplace)
• 17.26 Back Care
• 17.27 Sanitation, Lunchroom & Hygiene
• 17.28 High Bacteria from Lakes, Rivers & Standing Water
• 17.29 Hand Arm Vibration
• 17.30 Poison Ivy
• 17.31 Fatigue Management
18. Personal Protective Equipment (PPE)
• 18.1 Policy Statement
• 18.2 Personal Protective Equipment (PPE)
• 18.3 Basic Requirements
• 18.4 Safety Footwear
• 18.5 Hard Hats
HEALTH & SAFETY PROGRAM
_ _
• 18.6 Eye Protection
• 18.7 Hand & Arm Protection
• 18.8 High Visibility Clothing
• 18.9 Flame Resistant Coveralls
• 18.10 Glove Inspection (Electrical & Other Uses)
• 18.11 Hearing Protection
• 18.12 Respirators
• 18.13 Compressed Breathing Air
19. Drug & Alcohol Policy
• 19.1 Policy Statement
• 19.2 Workplace Specific Drug & Alcohol Policies
20. 3 R’s – Waste Management
• 20.1 Policy Statement
• 20.2 Source Separation Program
• 20.3 Hierarchy for Common Materials
21. Violence - Harassment - AODA
• 21.1 Policy Statement
• 21.2 Purpose
• 21.3 Standard
• 21.4 Definitions
• 21.5 Responsibilities
• 21.6 Training
• 21.7 Emergency Response Plan
• 21.8 Hazard Assessments
• 21.9 Risk Assessment Matrix
• 21.10 Special Considerations
• 21.11 Reporting
• 21.12 AODA Policy Statement
22. Safety Meetings, Moments and Communication
• 22.1 Policy Statement
• 22.2 Weekly Safety Meeting
• 22.3 Office Workplace
• 22.4 Communicating an Effective Safety Talk
HEALTH & SAFETY PROGRAM
_ _
• 22.5 Daily Tool Box Talks (FLRA)
• 22.6 Hazard Alerts
• 22.7 Safety Moments
23. Safe Work Practices
• 23.1 Policy Statement
• 23.2 Safe Work Practices
• 23.3 First Aid Training
• 23.4 First Aid Facilities
• 23.5 Ladders
• 23.6 Scaffolds – General Requirements
• 23.7 Scaffold Tagging
• 23.8 Ramps, Runways & Platforms
• 23.9 Compressed Gases – General Info
• 23.10 Compressed Gas Welding
• 23.11 Compressed Gas Cutting
• 23.12 Dismantling Equipment
• 23.13 Compressed Gas Equipment – Defective Equipment
• 23.14 Hose Inspection
• 23.15 Backfires & Flashbacks
• 23.16 Safe Handling of Compressed Gases
• 23.17 Cylinder Storage
• 23.18 Propane Cylinder Inspection
• 23.19 Temporary Heat
• 23.20 Tiger Torch
• 23.21 Storage & Handling of Propane
• 23.22 Locating of Buried Utilities
• 23.23 Excavating or Drilling Parallel with Existing Utilities
• 23.24 Working in the Vicinity of the “Right of Way of Pipelines”
• 23.25 Chain Saws
• 23.26 Welding (Electric Arc Process Equipment)
• 23.27 Electric Arc Process – Restrictions
• 23.28 Electric Arc Process – Precautions
• 23.29 Electric Arc Process – PPE
• 23.30 Weld Positioner
HEALTH & SAFETY PROGRAM
_ _
• 23.31 Defective Tools & Equipment Tagging
• 23.32 Hand Tools – Wrenches
• 23.33 Hand Tools – Hand Saws
• 23.34 Hand Tools – Hacksaws
• 23.35 Hand Tools – Non-Sparking
• 23.36 Hand Tools – Striking Tools
• 23.37 Hand Tools – Vises
• 23.38 Hand Tools – Pipe Tools
• 23.39 Hand Tools – Hammers
• 23.40 Powered Hand Tools – Basic Electrical Safety
• 23.41 Powered Hand Tools – Drills
• 23.42 Powered Hand Tools – Circular Saws
• 23.43 Explosive Actuated Fastening Tools
• 23.44 Powered Hand Tools – Air Powered
• 23.45 Powered Hand Tools – Portable Grinders
• 23.46 Powered Hand Tools – Bench & Pedestal Grinders
• 23.47 Wheel Mounting of Grinders
• 23.48 Blasting (Abrasive)
• 23.49 Lead Acid Batteries – Boosting
• 23.50 WHMIS 2015
• 23.51 Welding & Cutting Fumes
• 23.52 Internal Combustion Engines – Fumes
• 23.53 Internal Combustion Engines – Ventilation
• 23.54 Portable Generator
• 23.55 Housekeeping
• 23.56 Illumination / Task Lighting
• 23.57 Floor Openings & Guarding for Falling Material
• 23.58 Wall Openings
• 23.59 Roofs
• 23.60 Working Alone Best Practice
• 23.61 Working Alone
• 23.62 Man Basket / Derrick Trucks
• 23.63 Man Basket (Arial) Rescue
• 23.64 Vehicles
• 23.65 Defensive Driving
HEALTH & SAFETY PROGRAM
_ _
• 23.66 Winter Driving
• 23.67 Vehicles / Cell Phone Usage
• 23.68 Concrete / Asphalt Saw
• 23.69 Cleaning Solvent & Flammable Materials
• 23.70 Safe Disposal of Paint Cans Used for Daily Work Activities
• 23.71 All-Terrain Vehicle (ATV, Gator) Safety
• 23.72 Bear Awareness
24. Safe Work Procedures
• 24.1 Policy Statement
• 24.2 Confined Space Entry
• 24.3 Electrical, Mechanical & Other Energy Sources – Tag and Lock Out
• 24.4 Lock Out & Tag Out
• 24.5 Delinquent Locks
• 24.6 Turnovers
• 24.7 Operating Systems
• 24.8 Trenching & Excavations
• 24.9 Glove Inspection
• 24.10 Leather Protectors
• 24.11 Segregation of Hydrostatic / Pneumatic Test Zones
• 24.12 Working Over / Around Water
• 24.13 Working On or Near High Voltage Systems
• 24.14 Arc Flash
• 24.15 Pole Line Work
• 24.16 Pole Removal
• 24.17 Backyard Pole Procedure
• 24.18 Backhoe Pole Installation
• 24.19 Establishing Safe Work Zone – Flagging & Tagging
• 24.20 Asbestos – Hazardous Substance
• 24.21 Winter Preparedness
• 24.22 Lightning
• 24.23 Working on or Near Tracks
25. Fire Prevention
• 25.1 Policy Statement
• 25.2 Introduction
• 25.3 Definitions
HEALTH & SAFETY PROGRAM
_ _
• 25.4 Fire Tetrahedron
• 25.5 Fire Emergency Procedure
• 25.6 Fire Extinguishers
• 25.7 Portable Fire Extinguisher Inspection & Maintenance Procedure
• 25.8 Hot Work Permit
• 25.9 Temporary Heat
• 25.10 Smoking Near Flammables
• 25.11 Burning & Forest Fire Prevention
26. Heavy Equipment, Vehicles and Preventative Maintenance
• 26.1 Policy Statement
• 26.2 PPE & General Safety Awareness
• 26.3 Pre-Checks & Start-Ups
• 26.4 Equipment General Operating Procedures
• 26.5 Road Right of Way
• 26.6 Traffic Control Person
• 26.7 Road Construction Work
• 26.8 Working Near Overhead Power Lines – Guidelines
• 26.9 Working Near Live Pipelines, Buried Cable & Other Utilities
• 26.10 Safe Work Practice for Loading & Unloading Heavy Equipment
• 26.11 Tie Down Chain & Lever Binders
• 26.12 Heavy Equipment – Moving & Backing Up
• 26.13 Heavy Equipment Lifting Jacks & Support Stands
• 26.14 Working on Uphill / Downhill Grades
• 26.15 Spotters, General Requirements
• 26.16 Signals
• 26.17 Earthwork Equipment Operation
• 26.18 Backhoe Operation
• 26.19 Skid Steers
• 26.20 Equipment Operators Daily Log
• 26.21 Pick-up Trucks
• 26.22 Fueling Heavy Equipment
• 26.23 Working with Compressed Air Tools
• 26.24 Equipment Lock Out / Block Out Procedure
• 26.25 Forklifts & Related Equipment
HEALTH & SAFETY PROGRAM
_ _
• 26.26 Trucks – Loading & Unloading
• 26.27 Load Security
• 26.28 Trucks (Over 4500kgs/Yellow Sticker) – Daily Inspection
• 26.29 Fleet Vehicles – Maintenance
• 26.30 Crane Boom Inspection
• 26.31 Operator Competency Checklist
27. Traffic Control
• 27.1 Policy Statement
• 27.2 Ontario Traffic Control
• 27.3 Traffic Control on the Project
• 27.4 Traffic Control Persons
• 27.5 Definitions – Work Durations
• 27.6 Definitions – Roads
28. Working at Heights
• 28.1 Policy Statement
• 28.2 Working at Heights Requirements
• 28.3 General Info
• 28.4 Responsibilities
• 28.5 Fall Protection & Working Alone
• 28.6 Guardrails
• 28.7 Elevating Working Platforms (EWP) & Logs
• 28.8 Ladders
• 28.9 Scaffolds
• 28.10 Personal Fall Protection Equipment
• 28.11 Fall Protection Equipment Inspection
• 28.12 Training
• 28.13 Hazard Identification & Assessment – Fall Protection Plan
• 28.14 Calculating Fall Clearance
• 28.15 Rescue Planning
• 28.16 Definitions
HEALTH & SAFETY PROGRAM
_ _
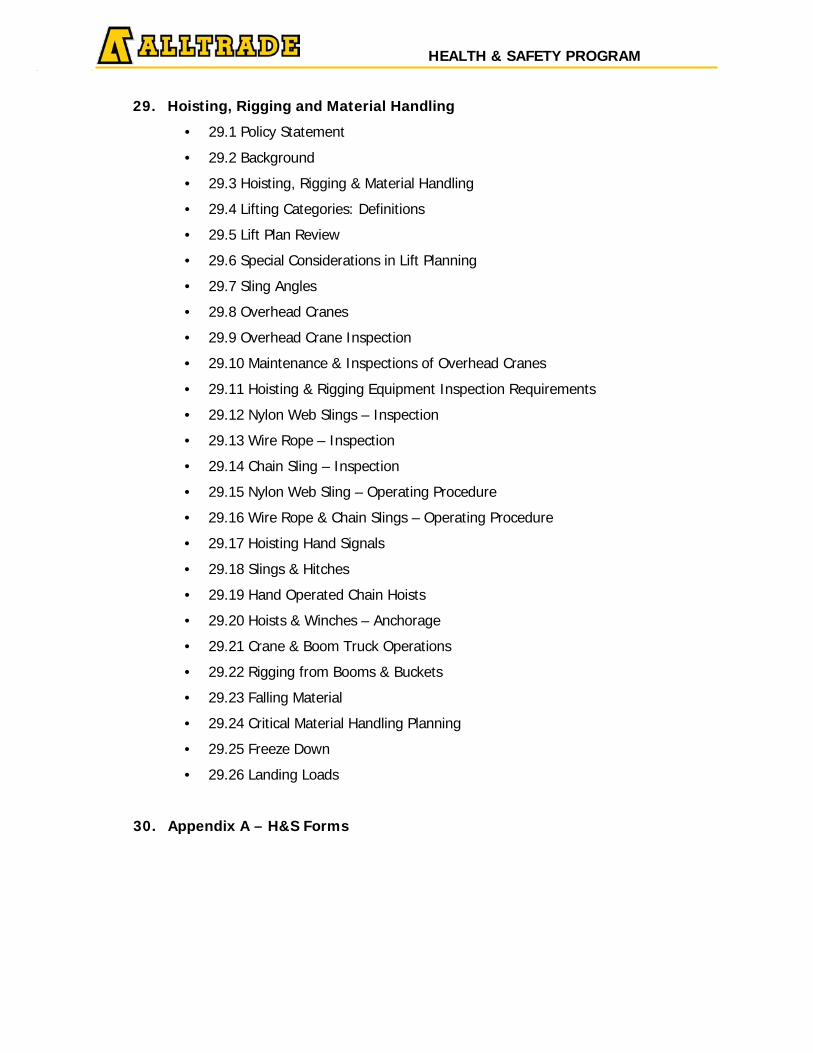
29. Hoisting, Rigging and Material Handling
• 29.1 Policy Statement
• 29.2 Background
• 29.3 Hoisting, Rigging & Material Handling
• 29.4 Lifting Categories: Definitions
• 29.5 Lift Plan Review
• 29.6 Special Considerations in Lift Planning
• 29.7 Sling Angles
• 29.8 Overhead Cranes
• 29.9 Overhead Crane Inspection
• 29.10 Maintenance & Inspections of Overhead Cranes
• 29.11 Hoisting & Rigging Equipment Inspection Requirements
• 29.12 Nylon Web Slings – Inspection
• 29.13 Wire Rope – Inspection
• 29.14 Chain Sling – Inspection
• 29.15 Nylon Web Sling – Operating Procedure
• 29.16 Wire Rope & Chain Slings – Operating Procedure
• 29.17 Hoisting Hand Signals
• 29.18 Slings & Hitches
• 29.19 Hand Operated Chain Hoists
• 29.20 Hoists & Winches – Anchorage
• 29.21 Crane & Boom Truck Operations
• 29.22 Rigging from Booms & Buckets
• 29.23 Falling Material
• 29.24 Critical Material Handling Planning
• 29.25 Freeze Down
• 29.26 Landing Loads
30. Appendix A – H&S Forms
HEALTH & SAFETY PROGRAM
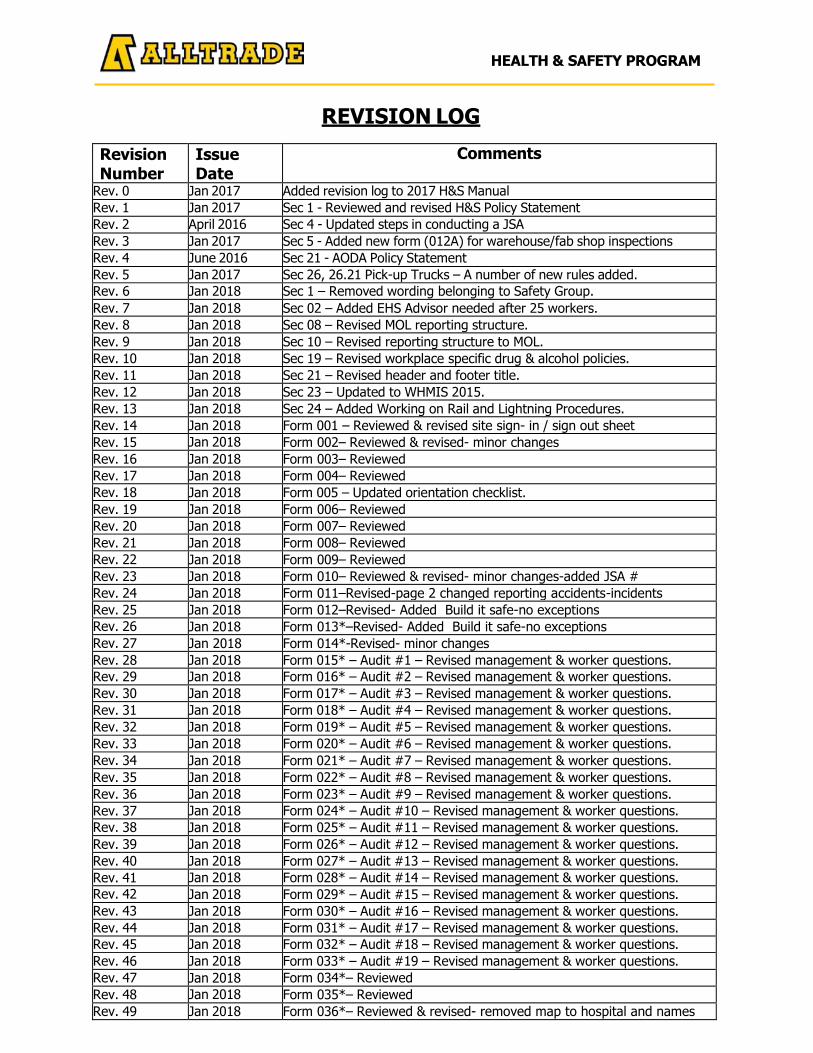
REVISION LOG
Revision Number
Issue Date
Comments
Rev. 0 Jan 2017 Added revision log to 2017 H&S Manual
Rev. 1 Jan 2017 Sec 1 - Reviewed and revised H&S Policy Statement
Rev. 2 April 2016 Sec 4 - Updated steps in conducting a JSA
Rev. 3 Jan 2017 Sec 5 - Added new form (012A) for warehouse/fab shop inspections
Rev. 4 June 2016 Sec 21 - AODA Policy Statement
Rev. 5 Jan 2017 Sec 26, 26.21 Pick-up Trucks – A number of new rules added.
Rev. 6 Jan 2018 Sec 1 – Removed wording belonging to Safety Group.
Rev. 7 Jan 2018 Sec 02 – Added EHS Advisor needed after 25 workers.
Rev. 8 Jan 2018 Sec 08 – Revised MOL reporting structure.
Rev. 9 Jan 2018 Sec 10 – Revised reporting structure to MOL.
Rev. 10 Jan 2018 Sec 19 – Revised workplace specific drug & alcohol policies.
Rev. 11 Jan 2018 Sec 21 – Revised header and footer title.
Rev. 12 Jan 2018 Sec 23 – Updated to WHMIS 2015.
Rev. 13 Jan 2018 Sec 24 – Added Working on Rail and Lightning Procedures.
Rev. 14 Jan 2018 Form 001 – Reviewed & revised site sign- in / sign out sheet
Rev. 15 Jan 2018 Form 002– Reviewed & revised- minor changes
Rev. 16 Jan 2018 Form 003– Reviewed
Rev. 17 Jan 2018 Form 004– Reviewed
Rev. 18 Jan 2018 Form 005 – Updated orientation checklist.
Rev. 19 Jan 2018 Form 006– Reviewed
Rev. 20 Jan 2018 Form 007– Reviewed
Rev. 21 Jan 2018 Form 008– Reviewed
Rev. 22 Jan 2018 Form 009– Reviewed
Rev. 23 Jan 2018 Form 010– Reviewed & revised- minor changes-added JSA #
Rev. 24 Jan 2018 Form 011–Revised-page 2 changed reporting accidents-incidents
Rev. 25 Jan 2018 Form 012–Revised- Added Build it safe-no exceptions
Rev. 26 Jan 2018 Form 013*–Revised- Added Build it safe-no exceptions
Rev. 27 Jan 2018 Form 014*-Revised- minor changes
Rev. 28 Jan 2018 Form 015* – Audit #1 – Revised management & worker questions.
Rev. 29 Jan 2018 Form 016* – Audit #2 – Revised management & worker questions.
Rev. 30 Jan 2018 Form 017* – Audit #3 – Revised management & worker questions.
Rev. 31 Jan 2018 Form 018* – Audit #4 – Revised management & worker questions.
Rev. 32 Jan 2018 Form 019* – Audit #5 – Revised management & worker questions.
Rev. 33 Jan 2018 Form 020* – Audit #6 – Revised management & worker questions.
Rev. 34 Jan 2018 Form 021* – Audit #7 – Revised management & worker questions.
Rev. 35 Jan 2018 Form 022* – Audit #8 – Revised management & worker questions.
Rev. 36 Jan 2018 Form 023* – Audit #9 – Revised management & worker questions.
Rev. 37 Jan 2018 Form 024* – Audit #10 – Revised management & worker questions.
Rev. 38 Jan 2018 Form 025* – Audit #11 – Revised management & worker questions.
Rev. 39 Jan 2018 Form 026* – Audit #12 – Revised management & worker questions.
Rev. 40 Jan 2018 Form 027* – Audit #13 – Revised management & worker questions.
Rev. 41 Jan 2018 Form 028* – Audit #14 – Revised management & worker questions.
Rev. 42 Jan 2018 Form 029* – Audit #15 – Revised management & worker questions.
Rev. 43 Jan 2018 Form 030* – Audit #16 – Revised management & worker questions.
Rev. 44 Jan 2018 Form 031* – Audit #17 – Revised management & worker questions.
Rev. 45 Jan 2018 Form 032* – Audit #18 – Revised management & worker questions.
Rev. 46 Jan 2018 Form 033* – Audit #19 – Revised management & worker questions.
Rev. 47 Jan 2018 Form 034*– Reviewed
Rev. 48 Jan 2018 Form 035*– Reviewed
Rev. 49 Jan 2018 Form 036*– Reviewed & revised- removed map to hospital and names
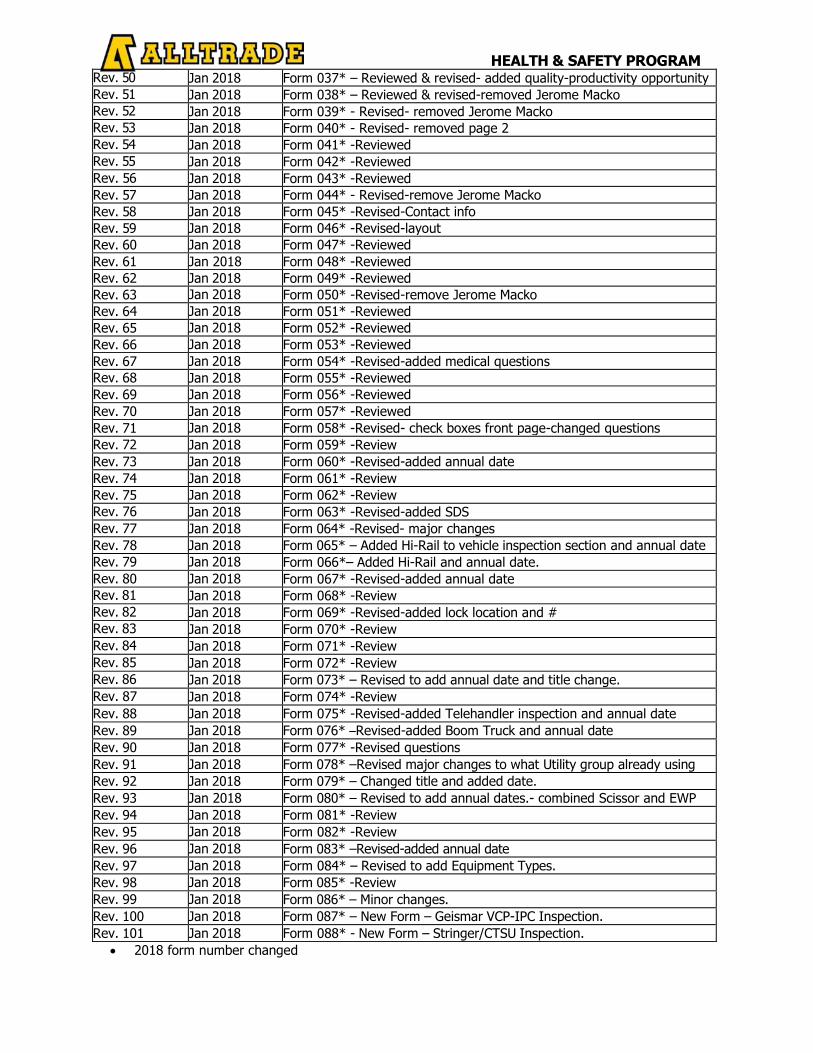
HEALTH & SAFETY PROGRAM
Rev. 50 Jan 2018 Form 037* – Reviewed & revised- added quality-productivity opportunity
Rev. 51 Jan 2018 Form 038* – Reviewed & revised-removed Jerome Macko
Rev. 52 Jan 2018 Form 039* - Revised- removed Jerome Macko
Rev. 53 Jan 2018 Form 040* - Revised- removed page 2
Rev. 54 Jan 2018 Form 041* -Reviewed
Rev. 55 Jan 2018 Form 042* -Reviewed
Rev. 56 Jan 2018 Form 043* -Reviewed
Rev. 57 Jan 2018 Form 044* - Revised-remove Jerome Macko
Rev. 58 Jan 2018 Form 045* -Revised-Contact info
Rev. 59 Jan 2018 Form 046* -Revised-layout
Rev. 60 Jan 2018 Form 047* -Reviewed
Rev. 61 Jan 2018 Form 048* -Reviewed
Rev. 62 Jan 2018 Form 049* -Reviewed
Rev. 63 Jan 2018 Form 050* -Revised-remove Jerome Macko
Rev. 64 Jan 2018 Form 051* -Reviewed
Rev. 65 Jan 2018 Form 052* -Reviewed
Rev. 66 Jan 2018 Form 053* -Reviewed
Rev. 67 Jan 2018 Form 054* -Revised-added medical questions
Rev. 68 Jan 2018 Form 055* -Reviewed
Rev. 69 Jan 2018 Form 056* -Reviewed
Rev. 70 Jan 2018 Form 057* -Reviewed
Rev. 71 Jan 2018 Form 058* -Revised- check boxes front page-changed questions
Rev. 72 Jan 2018 Form 059* -Review
Rev. 73 Jan 2018 Form 060* -Revised-added annual date
Rev. 74 Jan 2018 Form 061* -Review
Rev. 75 Jan 2018 Form 062* -Review
Rev. 76 Jan 2018 Form 063* -Revised-added SDS
Rev. 77 Jan 2018 Form 064* -Revised- major changes
Rev. 78 Jan 2018 Form 065* – Added Hi-Rail to vehicle inspection section and annual date
Rev. 79 Jan 2018 Form 066*– Added Hi-Rail and annual date.
Rev. 80 Jan 2018 Form 067* -Revised-added annual date
Rev. 81 Jan 2018 Form 068* -Review
Rev. 82 Jan 2018 Form 069* -Revised-added lock location and #
Rev. 83 Jan 2018 Form 070* -Review
Rev. 84 Jan 2018 Form 071* -Review
Rev. 85 Jan 2018 Form 072* -Review
Rev. 86 Jan 2018 Form 073* – Revised to add annual date and title change.
Rev. 87 Jan 2018 Form 074* -Review
Rev. 88 Jan 2018 Form 075* -Revised-added Telehandler inspection and annual date
Rev. 89 Jan 2018 Form 076* –Revised-added Boom Truck and annual date
Rev. 90 Jan 2018 Form 077* -Revised questions
Rev. 91 Jan 2018 Form 078* –Revised major changes to what Utility group already using
Rev. 92 Jan 2018 Form 079* – Changed title and added date.
Rev. 93 Jan 2018 Form 080* – Revised to add annual dates.- combined Scissor and EWP
Rev. 94 Jan 2018 Form 081* -Review
Rev. 95 Jan 2018 Form 082* -Review
Rev. 96 Jan 2018 Form 083* –Revised-added annual date
Rev. 97 Jan 2018 Form 084* – Revised to add Equipment Types.
Rev. 98 Jan 2018 Form 085* -Review
Rev. 99 Jan 2018 Form 086* – Minor changes.
Rev. 100 Jan 2018 Form 087* – New Form – Geismar VCP-IPC Inspection.
Rev. 101 Jan 2018 Form 088* - New Form – Stringer/CTSU Inspection.
2018 form number changed

HEALTH & SAFETY PROGRAM
HEALTH & SAFETY PROGRAM
_ _
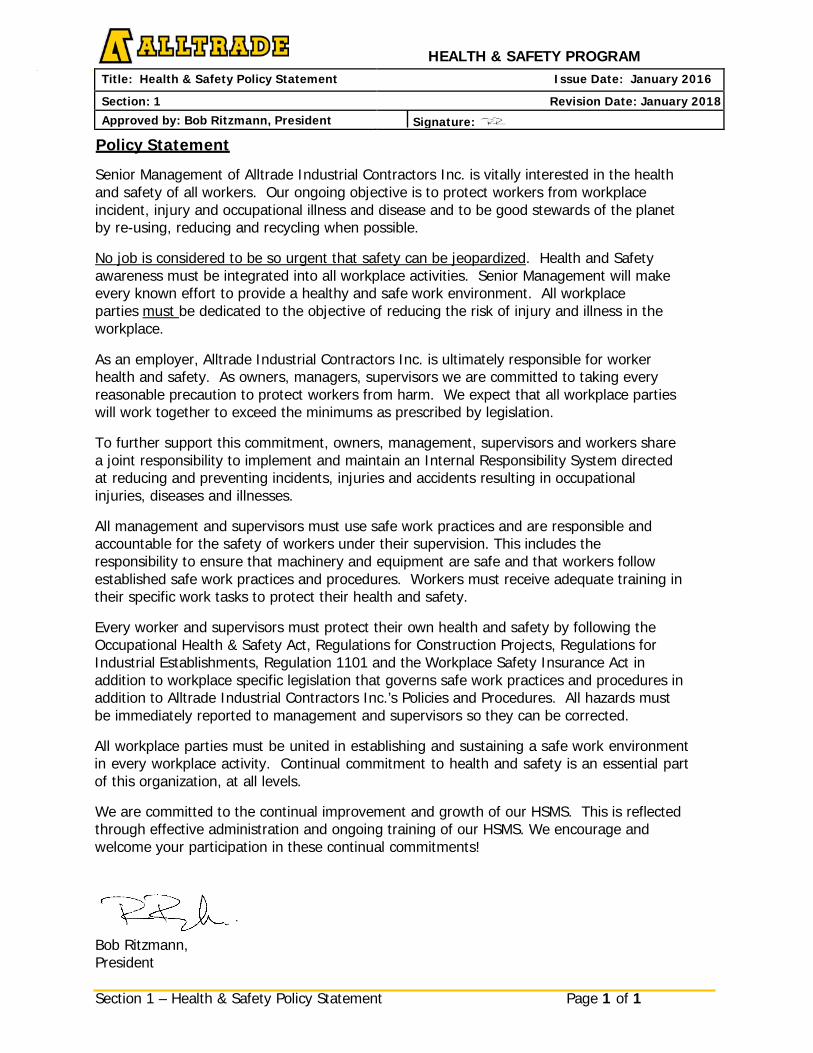
Policy Statement
Senior Management of Alltrade Industrial Contractors Inc. is vitally interested in the health and safety of all workers. Our ongoing objective is to protect workers from workplace incident, injury and occupational illness and disease and to be good stewards of the planet by re-using, reducing and recycling when possible.
No job is considered to be so urgent that safety can be jeopardized. Health and Safety awareness must be integrated into all workplace activities. Senior Management will make every known effort to provide a healthy and safe work environment. All workplace parties must be dedicated to the objective of reducing the risk of injury and illness in the workplace.
As an employer, Alltrade Industrial Contractors Inc. is ultimately responsible for worker health and safety. As owners, managers, supervisors we are committed to taking every reasonable precaution to protect workers from harm. We expect that all workplace parties will work together to exceed the minimums as prescribed by legislation.
To further support this commitment, owners, management, supervisors and workers share a joint responsibility to implement and maintain an Internal Responsibility System directed at reducing and preventing incidents, injuries and accidents resulting in occupational injuries, diseases and illnesses.
All management and supervisors must use safe work practices and are responsible and accountable for the safety of workers under their supervision. This includes the responsibility to ensure that machinery and equipment are safe and that workers follow established safe work practices and procedures. Workers must receive adequate training in their specific work tasks to protect their health and safety.
Every worker and supervisors must protect their own health and safety by following the Occupational Health & Safety Act, Regulations for Construction Projects, Regulations for Industrial Establishments, Regulation 1101 and the Workplace Safety Insurance Act in addition to workplace specific legislation that governs safe work practices and procedures in addition to Alltrade Industrial Contractors Inc.’s Policies and Procedures. All hazards must be immediately reported to management and supervisors so they can be corrected.
All workplace parties must be united in establishing and sustaining a safe work environment in every workplace activity. Continual commitment to health and safety is an essential part of this organization, at all levels.
We are committed to the continual improvement and growth of our HSMS. This is reflected through effective administration and ongoing training of our HSMS. We encourage and welcome your participation in these continual commitments!
Bob Ritzmann, President
Section 1 – Health & Safety Policy Statement Page 1 of 1
Title: Health & Safety Policy Statement Issue Date: January 2016
Section: 1 Revision Date: January 2018
Approved by: Bob Ritzmann, President Signature:
HEALTH & SAFETY PROGRAM
Section 2 – Occupational Accountability and Responsibility Page 1 of 6
Title: Occupational Accountability and Responsibility Issue Date: January 2016
Section: 2 Revision Date: January 2018 Approved by: Bob Ritzmann, President Signature:
Alltrade
The Officers of Alltrade shall take all reasonable precautions to ensure that Alltrade complies with all pertinent legislative requirements and standards in all Alltrade workplaces.
2.1 Management
Alltrade Management includes all senior management, project managers and other workplace managers. All management shall:
• Accept the responsibility for providing the leadership of the Health & SafetyProgram, for its effectiveness and improvement and for providing the propersafeguards required to ensure safe conditions
• Expert leadership in establishing goals and accountability for health andsafety performance
• Appoint competent personnel and ensure that they are familiar with the Health &Safety Program and complete Supervisor Competency – Annual Evaluation FormH&S_FORM_003
• Ensure supervisors have received the Alltrade Supervisor Training• Conduct the appropriate safety pre-planning activities with the support of the
EHS Department, supervisors and other relevant individuals• Ensure that a full time qualified H&S Advisor is on site when Alltrade has over
25 workers, or less if the client specifies• Review and appraise employees on safety performance• Develop and participate in review, training and support of the Health & Safety
Program• Bind subcontractors and suppliers contractually to the Health & Safety Program
and in conjunction with the Construction Manager evaluate their performance• Set a good example of safety at all times• Ensure the Respect in the Workplace policy is adhered to and all assessments are
completed
2.2 EHS Department
The EHS Department shall audit all Alltrade workplaces to ensure that all Alltrade Health & Safety policies, procedures, standards and all legislative requirements are implemented and shall also:
• Promote the highest standards of safety throughout Alltrade• Support the efforts of the Joint Health & Safety Committee/Worker Trades Committee,
or Health & Safety Representative to assure the highest standards of workplace healthand safety are observed
• Establish the administration necessary for execution of the safety program
HEALTH & SAFETY PROGRAM
Section 2 – Occupational Accountability and Responsibility Page 2 of 6
• Establish an evaluation process for determining program effectiveness• Provide direction and support for all supervisors regarding their responsibilities for
maintaining safety discipline• Ensure compliance with all Occupational Health & Safety legislation and
regulations• Actively participate in and support hands-on involvement with workplace safety• Set a good example of safety at all times• Manage all workers compensation claims• Ensure that a comprehensive review of the H&S program occurs on an annual
basis. The review will includes input from management, workers and applicablehealth and safety committees. Industry specific tools will be used ensuringAlltrade continues to maintain best of class practices and legislative compliance
• Participate and support “pre-planning” stages of projects• Ensure adherence to WSIB reporting policies
2.3 Supervisors
Supervisory personnel includes superintendents, general forepersons, and forepersons. The supervisor is responsible for the safety performance of project/plant operations. The supervisor shall:
• Know and enforce safety policy and rules, conduct and document safetyorientation for all new employees
• Ensure that Alltrade and subcontractors are in full compliance with applicablelegislated safe workplace standards and procedures contained in this manual.
• Communicate task, hazards and controls to all workers involved or affected withinthe scope of work
• Ensure that all required documentation of regulations and legislation includingOccupational Health & Safety regulations and the Alltrade Health & Safety Programis available in all Alltrade workplaces
• Ensure that all the hazards potential and existing, including but not limited tochemical and physical hazards are communicated to workers
• Ensure that workers are aware of any site specific hazards through orientation,training and the hazard assessment process (JSA’s, FLRA: see section: HazardAssessments)
• Ensure that workers use appropriate Personal Protective Equipment (PPE)• Work closely with the Joint Health & Safety Committee and Worker Trades
Committee, Health & Safety Representative and maintain a safe workenvironment including investigating work refusals if applicable
• Conduct weekly Safety Meetings to discuss workplace specificpreventative safety topics
• Ensure safety signage in the workplace is current and effective• Ensure tools and equipment are properly maintained and in safe working order by
a competent person
HEALTH & SAFETY PROGRAM
Section 2 – Occupational Accountability and Responsibility Page 3 of 6
• Conduct weekly inspections for hazards and correct unsafe acts and conditions.(see Section: Site Health & Safety Inspections)
• Investigate and report all accidents to the EHS Department (seeAccident/incident Investigation Section)
• Ensure governmental agencies receive complete cooperation• Prepare a workplace specific emergency plan and communicate emergency
procedures (see Section: Emergency Planning)• Deal with safety infractions of employees by
o Serving verbal or written directiveso Maintain records of infractions, warnings and directiveso Enact disciplinary measures up to and including dismissals (see Section:
Disciplinary Policy).• Report safety activities to EHS Department• Ensure all documentation is completed and distributed• Assess and plan their job tasks prior to commencing• Set a good example of safety at all times• Ensure workers understand the 4 “R’s”, Right to Know, Right to Participate, the
Right to Refuse Unsafe Work and the Right to Work in an Environment Free fromViolence and Harassment
• Ensure the appropriate mentorship / apprenticeship of young or new workers
2.4 Workers
Alltrade embraces the concept that all workers have the right to know about health and safety policies, procedures and requirements have the right to participate in the health and safety programs and have the right to refuse unsafe work.
All workers shall: • Report to work fit for duties• Comply with all Health & Safety policies, procedures, and regulations under the
applicable provincial legislation, the H&S Program and any customer specificregulations
• Contact supervisor with safety questions• Report all accidents, incidents, safety opportunities, unsafe conditions and
behaviours to their supervisor immediately• Cooperate and participate in modified return to work programs
2.5 Joint Health & Safety Committee (JHSC) Health & Safety Representative
The Joint Health & Safety Committee or Health & Safety Representative functions as a mechanism of cooperative effort between management and workers in all matters of Occupational Health & Safety in the workplace and shall:
HEALTH & SAFETY PROGRAM
Section 2 – Occupational Accountability and Responsibility Page 4 of 6
• Deal with issues and complaints regarding Workplace Health and Safety• Help identify hazards and ensure they are eliminated or guarded against• Ensure compliance with Health and Safety requirements in the workplace• Participate in inspections, inquiries, investigations and site audits• Advise on personal protective equipment• Make recommendations• Maintain records and minutes of committee meetings
See Section: Joint Health & Safety Committee/Worker Trades Committee. Health and Safety Representatives outside of the Joint Health and Safety Committee Structure
At a project or other workplace, where no JHSC is required and were the number of workers regularly exceed (five) 5, a health and safety representative member shall be selected by the workers on site or in the workplace. This health and safety rep is entitled to inspect the project/workplace. The inspection can be carried out (in the presence of) accompanied by the supervisor to ensure any issues are dealt with in a timely fashion.
The representative can request the following:
• Deal with issues and complaints regarding Workplace Health and Safety• Help identify hazards and ensure they are eliminated or guarded against• Ensure compliance with Health and Safety requirements in the workplace• Participate in inspections, inquiries and investigations• Advise on personal protective equipment• Make recommendations• Maintain records and minutes of committee meetings
2.6 Health and Safety Reporting Structure
The Internal Responsibility System (IRS) is used to address all Health and Safety concerns in the workplace. The system requires that all Health and Safety issues be dealt with internally through the co-operation between management and workers.
All health and safety concerns must be addressed and resolved. In most cases, the immediate supervisor shall make the appropriate changes in conditions or work methods to ensure Health and Safety of workers. More complex problems can be referred along the chain of command until Health and Safety concerns are rectified.
All supervisors are required to deal with Health and Safety concerns promptly and successfully. If any assistance is required, contact the EHS Department.
HEALTH & SAFETY PROGRAM
Section 2 – Occupational Accountability and Responsibility Page 5 of 6
2.7Work Refusals
Many Jurisdictions allow for the right to refuse unsafe work. Alltrade H&S Policy states that “every Alltrade employee has the right to work in a safe and healthy work environment.”
If a work refusal occurs, the following procedure shall be followed:
1. The Worker shall immediately inform their Supervisor of the circumstances andattempt to resolve the issue.
2. The Supervisor or the Worker shall contact a worker member of the Joint Healthand Safety Committee or Workers Health and Safety Representative if available.
3. As an alternative, if there is no Health and Safety Representative, the SiteSteward should be asked to participate.
4. The Supervisor shall also immediately contact the EHS Department for assistance.5. The investigation shall commence with the intent of finding a resolution.6. If no resolution can be found, contact the legislative authority to resolve the
issue.7. Document the findings using the Work Refusal Form H&S_FORM_004 and file in
the workplace for auditing purposes.
Note: At no time shall any disciplinary action or suspension be initiated against any worker because he/she has reason to believe an unsafe condition occurred and has refused work based on this assumption.
2.8 Constructor/Prime Contractor
• Ensure that all appropriate documentation for the start-up of a project has beenprocessed
• Ensure that the measures and procedures required by all legislative authoritiesare implemented; for example the Occupational Health and Safety legislation forConstruction projects and the Constructor/Prime Contractor’s own Health andSafety Program
• Ensure that employers and workers in the workplace comply with the Act andRegulations and the Constructor/Prime Contractor’s Health & Safety Program
2.9 Owner
• Determine before a project begins, whether any designated substances arepresent at the project workplace and shall prepare a list of all designatedsubstances that are present at the workplace
• includes the list of designated substances with the tender and ensure that theConstructor/Prime Contractor has received the total list prior to entering into abinding contract
HEALTH & SAFETY PROGRAM
Section 2 – Occupational Accountability and Responsibility Page 6 of 6
2.10 Architects, Engineers, Consultants
Architects, Engineers and Consultants are employers under the Occupational Health and Safety Act and as such are responsible for the Health and Safety of their employees. In addition, when within Alltrade workplaces, they are required to comply with the Alltrade Health & Safety Program.
2.11 Visitors
When on an Alltrade work site, visitors are expected to be in full compliance with applicable legislated safe workplace standards and in compliance with the standards and procedures contained in this manual.
Visitor must also: • Report to the job supervisor and obtain permission to visit the workplace prior to
entering the site and shall be escorted by a Alltrade representative at all times as well as sign in and out from site H&S_FORM_001
• Comply with any and all applicable legislative and Occupational Health & Safetyregulations
• Wear all required personal protective equipment• Report all injuries• Report any unsafe conditions or practices observed as soon as possible• Keep private vehicles away from the work area
Upon entry, each visitor to an Alltrade workplace must sign a Visitor Responsibility H&S_FORM_002 that is reviewed with the visitor by an Alltrade representative. Alltrade representative who escorts the visitor is responsible for the visitor while in the Alltrade workplace. If applicable, visitors must be informed of site emergency plans or workplace hazards that may be encountered.
Note: A visitor is typically classed as a supplier/salesman type individual. Subcontractors, Clients and Engineering Companies who visit projects to inspect, direct and/or manage work are required to take the regular site safety orientation training.

HEALTH & SAFETY PROGRAM _ _
Section 3 – Orientation, Education and Training Page 1 of 6
Title: Orientation, Education and Training Issue Date: January 2016
Section: 3 Revision Date: N/A
Approved by: Bob Ritzmann, President Signature:
3.1 Policy Statement
Alltrade recognizes that Orientation, Education, and Training of Alltrade’s workers are a vital part of the Health & Safety program. Alltrade will ensure that supervisory staff have the competency based knowledge and skills to instruct workers in safe work practices and procedures, to give Safety Talks and to meet ongoing requirements for safety instruction. Instruction will be provided to all workers. All workers are required to take training and comply with safe work policies, practices, and procedures. All visitors must be accompanied by an Alltrade Employee.
3.2 Alltrade Supervisor Training
Project Management will ensure that all Alltrade supervisors, or individuals that have direct control and authority over workers, will be orientated to their responsibilities as they pertain to fulfilling their roles as supervisor in regard to workplace health and safety and receive the Alltrade Supervisor Training program. This training consists of 11 modules that review the main policies and procedures contained within the H&S Manual.
The modules for field supervision are:
1. Health and Safety Systems 2. Occupational Responsibilities 3. Orientation, Education and Training 4. Hazard Assessments 5. Workplace Inspections, and Audits 6. Emergency Planning, Crisis Management and Fire Prevention 7. Accident, Incident and Safety Opportunity Investigation 8. Public Safety, Security and Environmental Protection 9. Personal Protective Equipment 10. Safe Work Practices and Procedures 11. Heavy Equipment, Vehicles and Preventative Maintenance
In addition, hazard specific training modules are available to supplement any additional training requirements of supervisors and other Alltrade personnel.
3.3 Additional Modules Available
• Confined Space • WHMIS 2015 • Transportation of Dangerous Goods (TDG) • WAH (Working at Heights) • Traffic Control
HEALTH & SAFETY PROGRAM _ _
Section 3 – Orientation, Education and Training Page 2 of 6
3.4 Additional Training
Additional Alltrade H&S education programs shall include, but not be limited to: • Employee orientation to H&S Program and to site specific regulations • Discussion of industry accident and Safety Opportunities, compliance and hazard
indicators • Safety Talks • An active poster and signage campaign to help make safety visible in the
workplace and to educate through visual information • First Aid, WHMIS 2015 / Hazard Communications training • Ongoing evaluation of training effectiveness and revision of training as necessary • Additional specialty training as required • Respect in the Workplace
NOTE: Orientation must be conducted for all employees and contractors. All employees and contractors must be orientated at least on a yearly basis. However, based on the degree of hazard and/or client policy, orientation can be conducted more frequent.
Supervisors must ensure that: • Workers are assessed to ensure they are “fit for duty” given their potential
essential job demands • Workers have provided records of training through the orientation as applicable
to their role or potential activity and that the Training Record H&S_FORM_006 has been completed
• Workers who are transferred from site to site receive site specific orientation • Workers complete the Participant Evaluation Form H&S_FORM_007
Procedure
1. All employees/subcontractors must receive orientation using the Orientation
Video or hard copy of the Power Point. 2. Employees/subcontractors will also complete the Orientation quiz.
3. The Supervisor and/or EHS Advisor will conduct the orientation
4. The Supervisor / Instructor will fill in the Orientation Checklist H&S_FORM_005, and have all participants acknowledge what has been reviewed during orientation.
5. The Supervisor / Instructor must give adequate answers to all questions.
6. The workers will complete the orientation and the quiz portion must be returned to the Supervisor who will attach it to the start form / site documentation after it has been signed and dated.
7. If the worker is identified as a new worker, complete the New Worker portion of the orientation.
8. Following orientation each employee will receive a sticker to attach to his/her hard hat.
HEALTH & SAFETY PROGRAM _ _
Section 3 – Orientation, Education and Training Page 3 of 6
3.5 Safety Notice Boards
Standard
Where appropriate, each project will display safety notice boards in a conspicuous location that will be visible or readily accessible to all workers on the project.
The purpose of the safety notice board is to display pertinent health and safety related information and material such as:
• Alltrade Safety Policy • Site Specific Emergency Plan (See Emergency Planning for more information) • JHSC Information • First Aid Locations and names of qualified First Aiders • PPE Policies • Alltrade and Site-Specific Rules • Government Inspection Forms • Fall Arrest Rescue Plans • Legislatively required documentation
3.6 Internal Training Audits
Standard
Alltrade is committed to ensure all H&S training is delivered to the highest standards. H&S training is a vital part of the H&S program as it sets the foundation of expectations and competency for all employees. Alltrade will periodically conduct training audits to ensure:
• All training material is adequately covered • All training takes place in an environment that is adequate for the material being
covered • All training is delivered by trained and competent person (this may include
meeting specific qualifications to conduct the training) • All training is delivered in a professional, respectful and appropriate manner
Procedure
1. The Auditor will notify the trainer(s) that the training session will be audited 2. The Auditor will complete the H&S Training Evaluation Audit H&S_FORM_008 in full 3. For any components graded lower than 3 (meets expectations) will be accompanied
by corrective action / coaching to improve the training 4. The auditor will hold a close out meeting with the trainer(s) and review all sections of
the audit providing positive examples and opportunities for improvement.
HEALTH & SAFETY PROGRAM _ _
Section 3 – Orientation, Education and Training Page 4 of 6
_ _
3.7 New Worker Awareness Program
Policy Statement Alltrade and its management teams are committed to ensuring New Workers have additional support and mentorship to protect them and their fellow workers from harm.
Definitions
A NEW WORKER is a worker who has less than 6 months industry experience.
Program Identifier A New Worker shall be visibly identified through the use of a different colored hardhat or sticker for the length of time they are in the program.
In the event a workplace or client has a similar program there may be alternative means of identification utilized. Consult with the EHS department for details or requirements.
Program Each new worker will be assigned a Supervisor who will act as a resource to help the new worker perform their work safely. The Supervisor will regularly evaluate the new worker for compliance with health, safety and environmental policies and procedures through informal observations and coaching. At no point will the New Worker be assigned a task requiring them to work alone.
Prior to the new worker performing any tasks, the Supervisor and New Worker will complete the New Worker Checklist. See H&S_FORM_009. It is the responsibility of the Supervisor to identify gaps in the knowledge and experience of the New Worker. The New Worker’s job tasks are to be listed in the table and any work restrictions, based on gaps in the knowledge and experience of the New Worker, should be detailed. The completed New Worker Checklist is to be signed by the Supervisor and New Worker, and a copy provided to each. Copies of the checklist must be maintained for auditing purposes.
Mentoring Process The Supervisor will act as the New Worker’s mentor. The Supervisor will work closely with the New Worker and observe their actions and behaviors to ensure tasks are being completed safely. The Supervisor will immediately correct any unsafe or at-risk behaviors by intervening and providing coaching and instruction as necessary.
All New Workers will be in the New Worker Program for 6 months unless the New Worker can demonstrate competency to their Supervisor before the 6-month period is complete. The Supervisor will evaluate the New Worker for Competency.
When the New Worker has been deemed competent by their Supervisor, they will be provided a standard Alltrade hard hat.

HEALTH & SAFETY PROGRAM _ _
Section 3 – Orientation, Education and Training Page 5 of 6
_ _
Duties
Supervisor • Ensure the New Worker receives and wears their different colored hard hat or
sticker; • Assume the role of a mentor for the New Worker; • Provide New Worker with an orientation of the work areas, tasks, known and
potential hazards and hazard controls that can affect the work of the New Worker;
• Lead by example. Be a role model for proper project planning, safe work practices, quality work, and good housekeeping;
• Instill a positive safety attitude in the New Worker by demonstrating correct work practices and procedures;
• Ensure all controls are evaluated and in place prior to New Worker starting work through Alltrade Hazard Assessments processes (JSA, FLRA);
• Observe New Worker actions and behaviors to ensure tasks are being completed safely;
• Immediately correct any unsafe behavior by intervening and providing appropriate coaching;
• identify any site or task specific training that must be added to Minimum New Worker Training Requirements;
• Ensure Minimum New Worker Training Requirements are completed, understood and followed by New Worker;
• Commend New Worker on safe work behaviors and actions; • Ensure the New Worker does not work alone and is readily accessible to
communicate with; • Ensure the New Worker Checklist is properly filled out, reviewed and competency
evaluation is completed to identify any gaps in the skills and knowledge of the New Worker as well as any restricted activities;
• Ensure the New Worker receive copies of the New Worker Checklist; • Ensure the original completed New Worker Checklist documentation is filed and
maintained for auditing purposes.
New Worker • Wear different colored hard hat or sticker; • Readily identify themselves as a New Worker in the New Worker Program; • Do not complete any task that you are not approved or qualified to perform; • Never work alone; • Ensure you have readily accessible communication with your Supervisor; • Ask questions if you are not sure about anything; • Stop their task if anything occurs that was not considered in the planning
process; • Ensure Minimum New Worker Training Requirements are completed, understood
and followed; • Understand and follow:
• Workers’ Rights – which includes; The right to know about workplace hazards; The right to participate in health and safety;
HEALTH & SAFETY PROGRAM _ _
Section 3 – Orientation, Education and Training Page 6 of 6
_ _
The right to refuse unsafe work; and The right to work in workplace free of violence and harassment.
• Worker Responsibilities – which includes; Report for work fit for duty; Comply with all health and safety rules and legislation for your
workplace; Contact your supervisor with health and safety questions; Report all accidents/incidents/safety opportunities or unsafe
behaviors to your supervisor immediately; Cooperate in any return to work programs; Wear all the personnel protective equipment (PPE) Provided; Obey all hazard indicators, signage and instructions in the
workplace; Do not engage in any horseplay, prank or physical horseplay;
• Training and Instruction Requirements– which includes;
Use of Electronic Devices; Hazard Awareness; Disciplinary Process.
Mandatory NEW WORKER Training Requirements
• Alltrade Orientation; • Alltrade New Worker Awareness Orientation; and • Site specific or task specific training if required.
Notification
When expressly required by client, prior to starting work, Alltrade shall notify the client if New Workers are present in the workplace.
Subcontractors
When expressly required by client, Alltrade’s subcontractors will manage their subcontractors in alignment with this New Worker Program.
HEALTH & SAFETY PROGRAM
Section 4 – Hazard Assessments Page 1 of 4
_ _
4.1 Policy Statement
Alltrade is committed to ensure that all tasks are assessed to identify known or potential hazards associated with the work. A Job Safety Analysis (JSA) H&S_FORM_010, and/or Field Level Risk Assessment (FLRA) H&S_FORM_011 will be utilized to identify hazards associated with the tasks undertaken by Alltrade employees to identify the hazards and controls necessary to perform the work safely. Managers, Supervisors, Joint Health and Safety Committees and workers as applicable should be involved in the development of the hazard assessment and must be reviewed with all workers performing the tasks.
4.2 Definitions
Hazard A hazard is something that has the potential to cause harm.
Risk Is the likelihood of harm to occur.
4.3 Job Safety Analysis
The purpose of a Job Safety Analysis (JSA) is to identify hazards or potential cause of accidents in each step of the operation and to develop solutions to eliminate or control these hazards. A JSA may be conducted for the following tasks:
• Confined Space entry • Locked-out systems • Work on high pressure liquids or gas systems • Hydro-testing at high pressures • Toxic or hazardous substances • Cutting into existing lines and tanks • Major traffic patterns • Excavations • Working at heights • Rigging and hoisting • Work with gases present • Demolition • Use of explosives • Work around high voltage power lines and bus bars • Exposing underground utilities • Working over or near water
Title: Hazard Assessments Issue Date: January 2016
Section: 4 Revision Date: April 2016
Approved by: Bob Ritzmann, President Signature:

HEALTH & SAFETY PROGRAM
Section 4 – Hazard Assessments Page 2 of 4
_ _
This list is not exclusive and may be supplemented according to site-specific requirements.
Steps in Conducting a Job Safety Analysis
1. Define the task – what is to be done/description. 2. Review previous JSA if any – have we done it before? 3. Identify the steps – what is to be done in order of execution. 4. Identify the hazards for each step. 5. Identify who or what could be harmed. 6. Give the task a Risk Rating = Consequence + Likelihood 7. Develop solutions to eliminate or control hazards in each step. 8. Review the Risk Rating after the control system has been implemented. 9. If Risk Rating is unacceptable review the solutions till Risk Rating is acceptable. 10. Agree who will implement the control system. 11. Document the JSA and discuss with the relevant personnel.
12. Educate workers regarding the hazard through a review of the JSA at safety meetings and FLRA daily meetings. Instruct workers on Safe work Practices and Procedures which are relevant to the hazard control are included with the JSA. Determine if a hazard can be solved by training and the type of training required
13. Identify high risk workers and tasks 14. If applicable, attach supporting practices and procedures
Suggested sources of information on potential hazards are:
• Reported industry accidents • Safety Opportunity data • Compliance & legislative requirements • Suggestions from the Joint Health & Safety Committee/Health & Safety
Representative and/or Worker Trades Committee
Key Questions to Ask
Materials
• Can a less hazardous or less costly material be used and still do the job? • Can materials be substituted that will last longer, resist corrosion, wear, shock,
abrasion, heat, etc.? • Are there materials that can do the job more easily and quickly?
Section 4 – Hazard Assessments Page 3 of 4
HEALTH & SAFETY PROGRAM
_ _
• Can material waste be reduced? • Is there a better work method or better way to store materials? • Is all material stored in a safe and stable fashion (e.g. piping)? • Is there a more efficient way to transport and handle materials? • Are there salvageable parts or leftovers that need to be separated? • Is material damage possible, preventable? • Is there excess material at the work site? Can it be better controlled? Is the
excess unsafe?
Tools and Equipment • Can other tools or equipment be used that will do the job more safely and
efficiently? • Are the tools subject to breakage or breakdown? Is such breakdown unsafe? • Can these tools be replaced? • Can tools or equipment be moved to be more efficient? • Is all equipment being utilized? • Is standby equipment necessary? • Can power tools be used instead of hand tools or vice versa? • Is additional lighting or similar support equipment required?
Personnel • Is there enough manpower to complete the job safely and efficiently? • Are specialty trades required? • Are there too many or too few workers from the standpoint of efficiency or safety? • When the job step is finished, is there something else that should be done to
improve work safety or efficiency? Example: cleaning, inspecting or servicing? • Is the time and method required to get workers to and from the work site
excessive? • Is access to the work site adequate and safe? • Are the right people assigned to the job? • Are all workers properly trained for their positions so they can perform their work
safely and efficiently? • Is further training required?
Job Methods
• Can a job step be eliminated by a change in job method? • Is there a particularly slow or difficult job step? • Can the step be improved by breaking it down into additional steps? • Where is the best location for doing various job steps? • Will pre-job planning and organizing benefit a particular job step? • Will pre-work training improve safety?
Section 4 – Hazard Assessments Page 4 of 4
HEALTH & SAFETY PROGRAM
__ __
• Can the job step be done safer and quicker by use of machines? • Will a change be cost effective without compromising safety? • What is the most efficient way to lay out cords, lights, or tools? • Are there hazards that raise the time required to do the job? • Can these be scheduled for shutdown removal or controlled?
4.4 Field Level Risk Assessment (FLRA)
The Field Level Risk Assessment (FLRA) provides a process for workers and supervisors to identify in the clearest manner possible the hazards of daily tasks and how to control or eliminate them from the activity.
It is designed to review the immediate task to be performed for potential health and safety hazards associated with the activity. This is a field level risk review not a JSA .If the task is complex enough that it warranted a JSA and/or Safe Work Practice and Procedure, this is the time to review those documents with all workers.
This process is to be reviewed with workers by their supervisor to identify job risk hazards and the appropriate controls. Any questions or concerns during the review by workers are to be addressed.
All workers present must acknowledge that they understand the tasks and controls to ensure their safety. At the end of the shift the supervisor will have all workers sign off that they reported all incidents. Any incidents or injuries during the day must be reported to supervisor prior to the sign off.
This assessment can be done on a daily basis or a ‘per task’ basis to deal with changing conditions of a construction site.
The FLRA cards can be utilized in a manner that is suitable for the work environment. This includes being conducted:
• Jointly – Supervisors and crew • Workers – Reviewed by Supervisor
There is one standard FLRA card that can be utilized for all construction activities.
HEALTH & SAFETY PROGRAM _ _
Section 5 – Field and Office H&S Inspections Page 1 of 2
Title: Field and Office H&S Inspections Issue Date: January 2016
Section: 5 Revision Date: January 2017
Approved by: Bob Ritzmann, President Signature:
5.1 Policy Statement
Alltrade will conduct documented workplace inspections for the purpose of identifying and correcting unsafe conditions and behaviour. The inspections will cover premises, job sites, buildings, temporary structures, excavations, tools, equipment, machinery, work methods, and practices. Safety Inspection forms are to be used as a guideline. Specific sites may have unique situations and potential hazards that may not be covered by this list.
5.2 Health & Safety Inspections
Planned inspections will occur weekly on construction projects and monthly at Industrial establishments such as: fabrication facilities, offices and warehouse settings. Supervisors, Joint Health & Safety Committee/Health & Safety Representatives and site H&S Advisors will be involved in workplace inspections.
Field Inspection H&S_FORM_012 will be used for all field work. The warehouse and fabrication shop will use H&S_FORM_013. Office Inspection H&S_FORM_014 will be used in the main office area only.
Health and Safety inspections will be supplemented by corporate safety audits (see Section: Health and Safety Audits).
All Health & Safety Inspection reports must be reviewed during Tool Safety Box Talks, Joint Health & Safety Committee Meetings, etc. All completed Health & Safety Inspection reports will be evaluated and monitored by project management and the Health and Safety Committees (if applicable) and filed with site safety documentation posted in the workplace.
Procedure
1. Review previous inspection records and note any commonly reported hazards. 2. Familiarize yourself with the type of workplace and unique hazards. 3. Use your eyes, ears and other senses to identify actual or potential problems as you
go about your inspection. Record the hazards on the H&S Inspection form. 4. When unsafe conditions are noted requiring immediate attention, correct the
situation immediately. 5. Look for basic causes of sub-standard conditions, practices and procedures. 6. Complete an inspection form(s). 7. Review findings with a Sr. member of site management 8. Follow-up with correction actions and sign-off when corrective actions are complete 9. Keep a copy of the report on the project site.
HEALTH & SAFETY PROGRAM _ _
Section 5 – Field and Office H&S Inspections Page 2 of 2
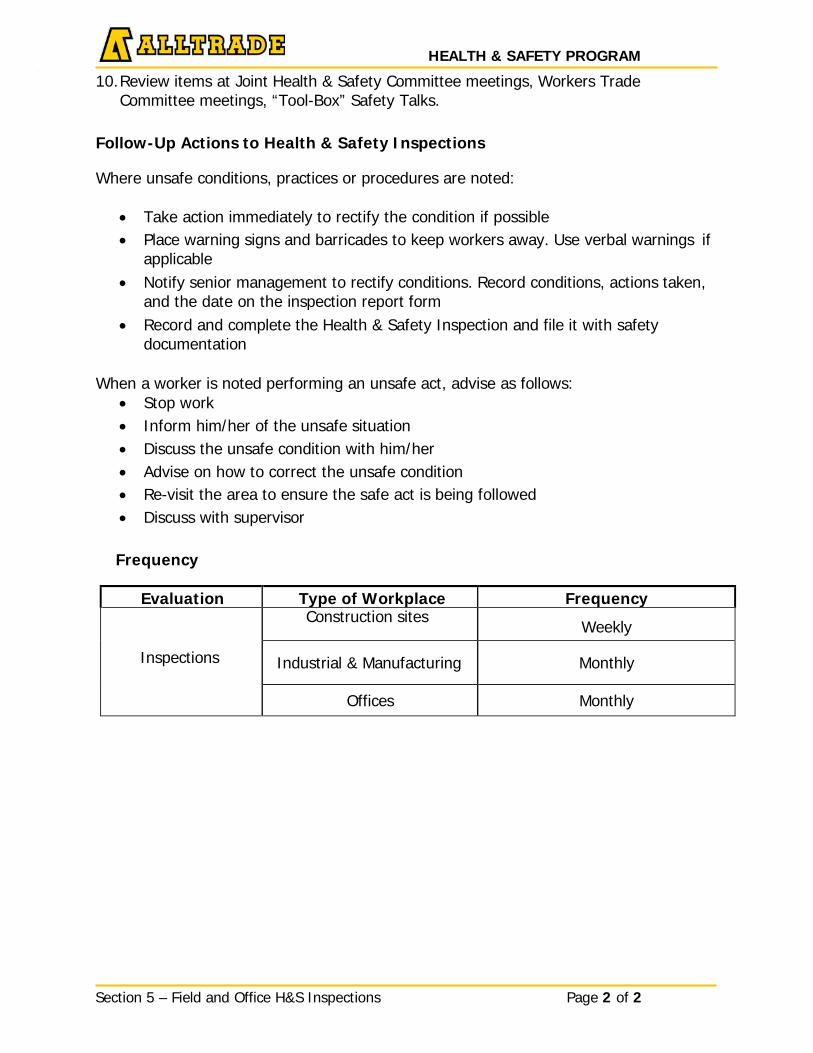
10. Review items at Joint Health & Safety Committee meetings, Workers Trade Committee meetings, “Tool-Box” Safety Talks.
Follow-Up Actions to Health & Safety Inspections
Where unsafe conditions, practices or procedures are noted:
• Take action immediately to rectify the condition if possible • Place warning signs and barricades to keep workers away. Use verbal warnings if
applicable • Notify senior management to rectify conditions. Record conditions, actions taken,
and the date on the inspection report form • Record and complete the Health & Safety Inspection and file it with safety
documentation
When a worker is noted performing an unsafe act, advise as follows: • Stop work • Inform him/her of the unsafe situation • Discuss the unsafe condition with him/her • Advise on how to correct the unsafe condition • Re-visit the area to ensure the safe act is being followed • Discuss with supervisor
Frequency
Evaluation Type of Workplace Frequency
Inspections
Construction sites Weekly
Industrial & Manufacturing Monthly
Offices Monthly

HEALTH & SAFETY PROGRAM _ _
Section 6 – Health & Safety Audits Page 1 of 4
Title: Health & Safety Audits Issue Date: January 2016
Section: 6 Revision Date: N/A
Approved by: Bob Ritzmann, President Signature:
6.1 Policy Statement
Alltrade Health and Safety Audits determine and evaluate the effectiveness of stated safety objectives, plans, and programs. Each workplace is required to conduct at least one safety audit per month. Each workplace is required to conduct and document site and equipment inspections as required by applicable safety and health codes.
6.2 Corporate Safety Audits
The EHS Department, managers and supervisors, Joint Health and Safety Committees will use this auditing method to determine the overall effectiveness of Health and Safety in Alltrade workplaces. There are 19 planned elements to the auditing program and one or more may be used depending on the situation to be evaluated.
6.3 H&S Program Internal Audit – Provincial Recognition Programs Qualified members of the EHS Department will conduct full H&S Management Systems audits in accordance with the requirements of the Provincial Recognition Programs Alltrade participates in. Each element of the respective Provincial program will be audited on an annual basis.
Internal auditors will be deemed qualified and competent upon completion of training requirements set out by the applicable Provincial Recognition Program. Only auditors that have deemed both qualified and competent shall conduct COR Program audits.
Deficiencies found during COR internal audits shall be addressed on Corrective Action plans. The Corrective Action Plans must be reviewed by EHS for appropriateness before implementation, and upon completion for adequacy in resolution.
Corrective Action Plans and final audit reports shall be reviewed during the annual H&S Program audit.
6.4 Verification of Audit Requirements Audit requirements will be verified through observations, documentation, interviews or a combination of all three methods.
Documentation reviews assess the content and completion of forms and records and should be completed prior to conducting interviews and observations. This will includes, but is not limited to, checking dates, frequency of completion, signatures, quality etc.
Interviews are used to measure employee understanding of the H&S program and their roles and responsibilities. Interviews shall be conducted one on one. The table below shows how many interviews must be completed for each audit.
HEALTH & SAFETY PROGRAM
Section 6 – Health & Safety Audits Page 2 of 4
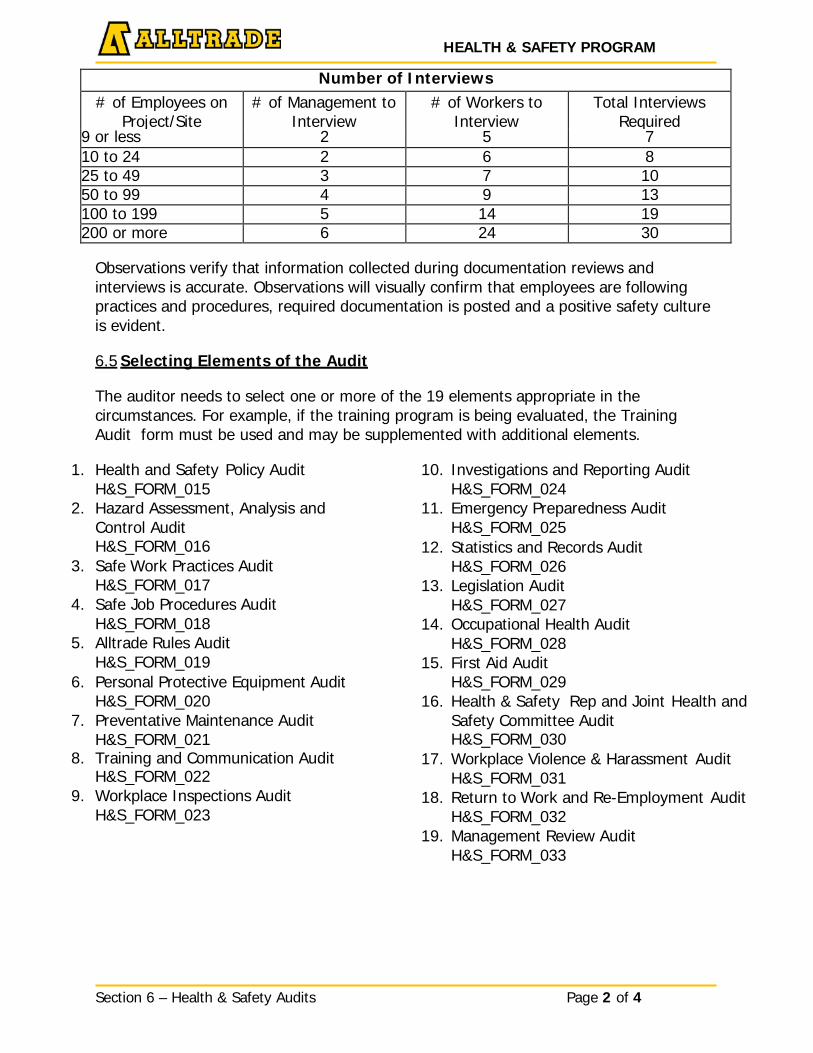
Number of Interviews # of Employees on
Project/Site # of Management to
Interview # of Workers to
Interview Total Interviews
Required 9 or less 2 5 7 10 to 24 2 6 8 25 to 49 3 7 10 50 to 99 4 9 13 100 to 199 5 14 19 200 or more 6 24 30
Observations verify that information collected during documentation reviews and interviews is accurate. Observations will visually confirm that employees are following practices and procedures, required documentation is posted and a positive safety culture is evident.
6.5 Selecting Elements of the Audit
The auditor needs to select one or more of the 19 elements appropriate in the circumstances. For example, if the training program is being evaluated, the Training Audit form must be used and may be supplemented with additional elements.
1. Health and Safety Policy AuditH&S_FORM_015
2. Hazard Assessment, Analysis andControl AuditH&S_FORM_016
3. Safe Work Practices AuditH&S_FORM_017
4. Safe Job Procedures AuditH&S_FORM_018
5. Alltrade Rules AuditH&S_FORM_019
6. Personal Protective Equipment AuditH&S_FORM_020
7. Preventative Maintenance AuditH&S_FORM_021
8. Training and Communication AuditH&S_FORM_022
9. Workplace Inspections AuditH&S_FORM_023
10. Investigations and Reporting AuditH&S_FORM_024
11. Emergency Preparedness AuditH&S_FORM_025
12. Statistics and Records AuditH&S_FORM_026
13. Legislation AuditH&S_FORM_027
14. Occupational Health AuditH&S_FORM_028
15. First Aid AuditH&S_FORM_029
16. Health & Safety Rep and Joint Health andSafety Committee AuditH&S_FORM_030
17. Workplace Violence & Harassment AuditH&S_FORM_031
18. Return to Work and Re-Employment AuditH&S_FORM_032
19. Management Review AuditH&S_FORM_033
HEALTH & SAFETY PROGRAM _ _
Section 6 – Health & Safety Audits Page 3 of 4
6.6 Scoring the Audit
The audit form(s) require yes or no answers. The results can be put into the formula below to calculate the percentage of compliance with audit standards. For calculation purposes, ignore the N/A responses. Additional comments can be added at the bottom of the forms.
Total Yes X 100 = % Yes Total Yes + Total No
6.7 Conducting the Audit
1. Review previous audits, inspections, Joint Health & Safety Committee Minutes, andother pertinent data relating to the area to be audited.
2. Identify locations, equipment, machinery, jobs, and tasks being initiated in theworkplace.
3. Look for the off-the-floor and out-of-the-way items. Look for things that you thinkwould be missed during regular inspections. Look for hazards particular to certain jobsor areas.
4. Systematically cover the whole area and pay particular attention to specific equipment,machinery, jobs, etc. that may have been associated with accident trends or havesevere loss potential.
5. When unsafe conditions requiring immediate attention are noted, corrective action mustbe carried out immediately. Defective tools, equipment and machinery must beremoved from service until the defect has been corrected. All unsafe conditions anddefective items must be recorded on the audit form, describing the items and theirlocations clearly.
6. Classify items according to their potential for injury or damage. This will lead to asystematic approach toward corrective action and follow-up.
7. Look for the root causes of sub-standard conditions, practices and procedures.8. Ensure all sections of the audit are complete and legible.
9. Copy all items from previous reports that have not been rectified, noting initial detectiondate.
10. Distribute copies of the audit as follows; EHS, Project Management, Posted at site andarchived.
11. File one copy in the workplace.
12. Audits and inspections shall be incorporated into weekly site safety meetings.
13. Copies of audits shall be kept on site, under the control of Alltrade site management.
HEALTH & SAFETY PROGRAM _ _
Section 6 – Health & Safety Audits Page 4 of 4
_ _
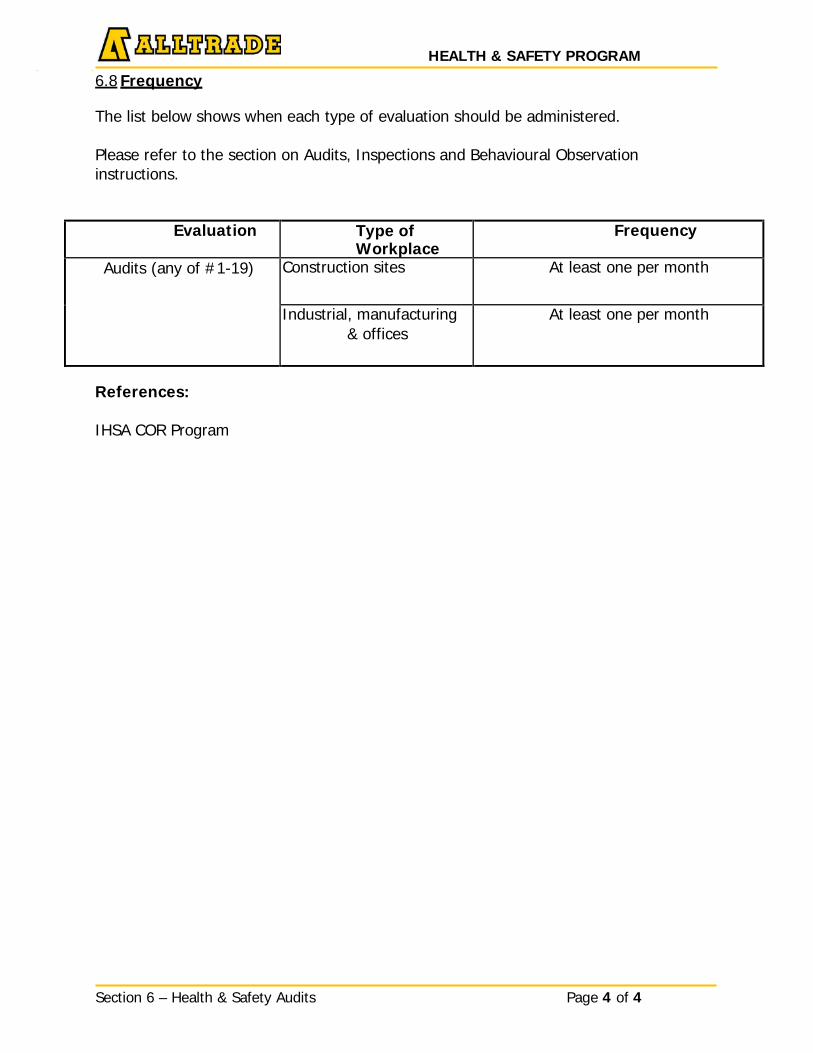
6.8 Frequency
The list below shows when each type of evaluation should be administered.
Please refer to the section on Audits, Inspections and Behavioural Observation instructions.
Evaluation Type of Workplace
Frequency
Audits (any of #1-19) Construction sites At least one per month
Industrial, manufacturing & offices
At least one per month
References:
IHSA COR Program
HEALTH & SAFETY PROGRAM _ _
Section 7 – Disciplinary Policy Page 1 of 2
Title: Disciplinary Policy Issue Date: January 2016
Section: 7 Revision Date: N/A
Approved by: Bob Ritzmann, President Signature:
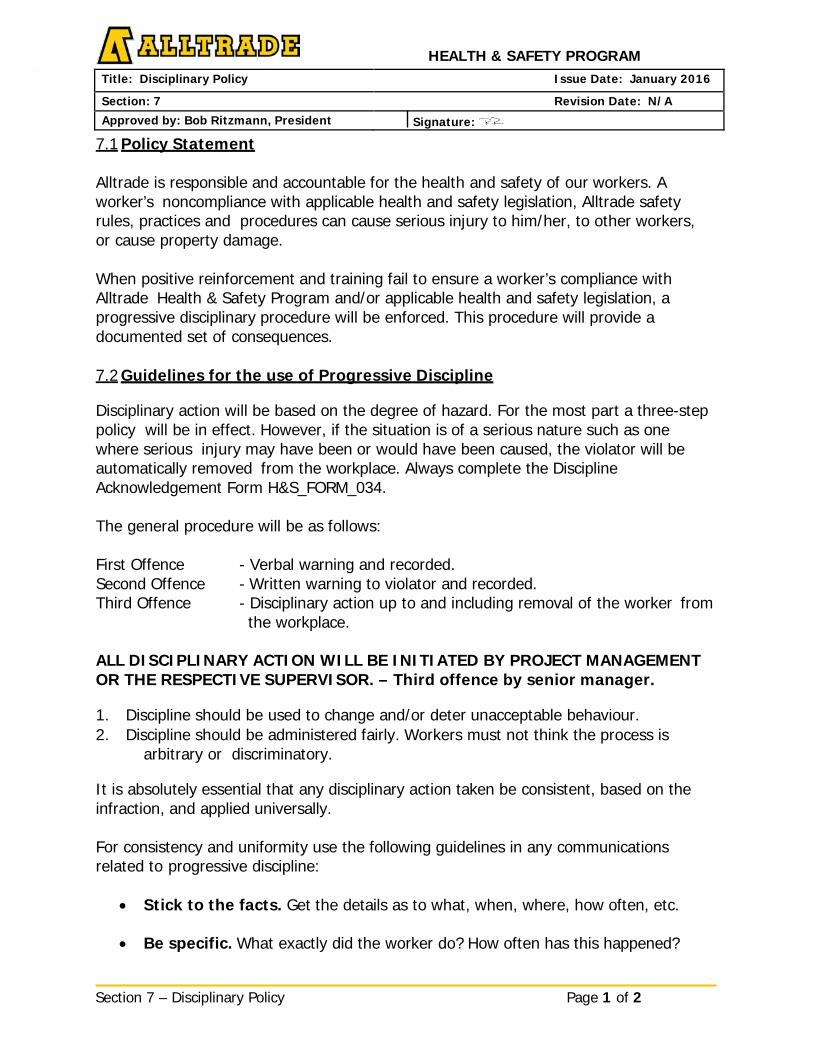
7.1 Policy Statement
Alltrade is responsible and accountable for the health and safety of our workers. A worker’s noncompliance with applicable health and safety legislation, Alltrade safety rules, practices and procedures can cause serious injury to him/her, to other workers, or cause property damage.
When positive reinforcement and training fail to ensure a worker’s compliance with Alltrade Health & Safety Program and/or applicable health and safety legislation, a progressive disciplinary procedure will be enforced. This procedure will provide a documented set of consequences.
7.2 Guidelines for the use of Progressive Discipline
Disciplinary action will be based on the degree of hazard. For the most part a three-step policy will be in effect. However, if the situation is of a serious nature such as one where serious injury may have been or would have been caused, the violator will be automatically removed from the workplace. Always complete the Discipline Acknowledgement Form H&S_FORM_034.
The general procedure will be as follows:
First Offence - Verbal warning and recorded. Second Offence - Written warning to violator and recorded. Third Offence - Disciplinary action up to and including removal of the worker from
the workplace.
ALL DISCIPLINARY ACTION WILL BE INITIATED BY PROJECT MANAGEMENT OR THE RESPECTIVE SUPERVISOR. – Third offence by senior manager.
1. Discipline should be used to change and/or deter unacceptable behaviour. 2. Discipline should be administered fairly. Workers must not think the process is
arbitrary or discriminatory.
It is absolutely essential that any disciplinary action taken be consistent, based on the infraction, and applied universally.
For consistency and uniformity use the following guidelines in any communications related to progressive discipline:
• Stick to the facts. Get the details as to what, when, where, how often, etc.
• Be specific. What exactly did the worker do? How often has this happened?
HEALTH & SAFETY PROGRAM _ _
Section 7 – Disciplinary Policy Page 2 of 2
Refer to previous actions taken or warnings issued.
• Indicate the planned disciplinary action. Advise the worker that if there is a recurrence, then more severe disciplinary action will be taken.
• Document. Send copies of all disciplinary notifications to the Superintendent,
Project Manager, Steward, and the EHS Department. If the Foreperson and/or Steward were present when the warning was given, this should be noted on the form.
• Ensure that Senior Management is aware of the information on the disciplinary
form BEFORE it is sent. If assistance is required, then contact the EHS Department.
Page 1 of 5 Section 8 – Crisis Management Plan
HEALTH & SAFETY PROGRAM
Title: Crisis Management Plan Issue Date: January 2016
Section: 8 Revision Date: January 2018
Approved by: Bob Ritzmann, President Signature:
8.1 Policy Statement
This plan covers internal procedures to address a crisis situation or a threat of one arising from Alltrade job sites, offices and premises.
A Crisis Management Plan is designed to maintain Alltrade's credibility and positive image with all of its identified audiences in the face of adversity.
It is essential to be prepared for every urgent situation or emergency in an organized and controlled fashion.
Our customers, employees, management, financial supporters, industry peers and others, should all feel we were well organized and handled the situation in a professional manner.
8.2 Crisis Definition
The dictionary defines “Crisis” as a turning point, time of danger or suspense. This could mean a situation or an unplanned event has occurred whereby an accident or incident has cause serious injury, property and/or structural damage.
It could also mean threats and similar situations that should be addressed immediately by police and/or other authorities.
Note: Please Do Not be tentative to initiate the crisis plan, it only means more assistance and help to deal with the situation.
8.3Critical Injury Reporting
If a person, whether a worker or not, has been critically injured or killed at the workplace, the employer and the constructor, if any, must immediately notify the Ministry of Labour Health & Safety Contact Centre, the joint health and safety committee (or health and safety representative) and the union, if there is one. This notice must be by telephone or other direct means. Within 48 hours, the employer must also notify, in writing, a director of the Ministry of Labour, giving the circumstances of the occurrence and any information that may be prescribed [section 51(1)]. “critically injured” means an injury of a serious nature that,
(a) places life in jeopardy, (b) produces unconsciousness, (c) results in substantial loss of blood,
Page 2 of 5 Section 8 – Crisis Management Plan
HEALTH & SAFETY PROGRAM _ _
(d) involves the fracture of a leg or arm but not a finger or toe, (e) involves the amputation of a leg, arm, hand or foot but not a finger or toe, (f) consists of burns to a major portion of the body, or (g) causes the loss of sight in an eye
NOTE: The EHS Department or designate will lead the notification of a Critical Injury to the MOL.
8.4 Responsibilities and Reporting 1. Most Senior Project/Workplace Manager
• Contact emergency services• Gather all available information (who, what, when, where, why & how)• Notify the EHS• Notify Senior Management• Inform any surrounding areas that may be affected by the incident.
2. EHS Department
• Initiate Investigation for all Injuries, Fatalities, Structural and Equipment Failure• Initiate preliminary report for Senior Management• Make contact with safety, police and environmental authorities
3. Project Management
• What happened? Who is involved? Where did it happen? When did it happen?• Why did it happen? How did it happen?• Notify the receptionist on how to route calls• Any injuries (public or workers)• Inform other sites if necessary
8.5 Assignments 1. Media Spokesperson – President or most senior person in Division
• Assemble necessary background facts (who, what, where, when, why and how)• Designate someone to screen media calls for the spokesperson (if possible).• Start media log.• Anticipate media questions, determine what information is to be released and
craft key messages before speaking to the media.• Write and get clearance for all releases.• When possible/applicable, advise reporters of time and place for future updates.• If you elect to give the media a tour, make certain that the area is safe (consult
EHS Department).• Follow-up all media inquiries, even when you can provide no new information.• Log each conversation with the date, time, reporter's name, publication/station,
information given.
Page 3 of 5 Section 8 – Crisis Management Plan
HEALTH & SAFETY PROGRAM _ _
2. Media Calls – Main Switchboard
• All calls are to be directed to the media spokesperson• Track and record all calls
All other Alltrade employee(s) who receive notification directly of a crisis situation, or a threat of one, should report the situation to their immediate supervisor immediately and should not attempt to deal with the situation themselves. Immediate supervisors should follow the protocol in this manual to deal such situations.
8.6 Family Notification - President
1. Fatality Notification – This is usually done by the police however should you becalled upon to do this please follow these guidelines.
• Determine where you will meet. Will the contact be at home, work, or school? Ifit's outside of the home, arrange with the relative's employer or school for aprivate place to meet. Verify that you are talking to the correct person, i.e.: "Areyou Sandy Johnson's sister?").
• Don't go alone. You'll need support as well so take a fellow employee, thesuperintendent, a friend of the worker, or Minister. Try to assess the stabilityand health of the relative. If the notification is likely to cause an immediatehealth problem, you may need to have a health care professional along.
• Obtain the full name, address of the deceased. Next, get the full name of thenext of kin and the relationship (wife, brother, mother, etc.). Gather allinformation relative to the cause so you can provide an explanation.
• Decide what you will say. There's no easy way to say that someone has died, sodon't try it. Speak simply and directly. Using terms like "mortally wounded" onlyconfuses people. While it's not necessary to be blunt or cold, at some point it'snecessary to say "dead" or "died". Example: "Mrs. Jones, there was a very badaccident this morning at the project. Charlie was moving a ladder and fell over aguardrail. The paramedics did everything they could, but he died instantly."
• Be prepared for emotions. There will be shock, denial, grief, numbness, anger atthe deceased, at you, at the medical staff, at other people. Let the relative venttheir feelings. Use common sense and do what seems appropriate at this time.Some people will appreciate a touch of a hand, others will not.
2. Non-Fatal – Critical Accident Notification• President, or member of senior management, will contact spouse/family in event
of critical or serious injury – can be assisted by EHS, etc.• Determine the extent and nature of the injuries.• Determine what hospital the person is being taken.• Call the family to explain only that there has been an accident and that the
employee has been injured.
Page 4 of 5 Section 8 – Crisis Management Plan
• If the injury appears to be serious and you are questioned, say "We can't be sureuntil we hear from a doctor."
• Arrange for transportation to the medical facility.• Arrange to have someone look after any young children.• Discourage them from driving themselves unless they absolutely insist.• If the victim's family is in need of money to cover small expenses, assist as
needed.3. General Comments on Notification
Always listen. The formula is 90% listening and 10% talking. If the relative needs to go to the hospital, funeral home, etc. you may offer to drive them or get them a cab. If there are children involved, help arrange for a sitter or a friend to look after them.
Note: When it's over. You've gone through an extremely stressful event. Take care of yourself now. Find someone to talk with about what you just went through.
_
8.7Media Spokesperson Guidelines 1. Prepare
• Get the facts. Understand what you are talking about• Determine ahead of time what information is to be released• (Usually the WHAT, WHERE & WHEN but not always the WHO, HOW or WHY)• Establish key messages – and write them down• Anticipate the media’s questions - and your answers
2. Be Honest• Never lie (sidestepping is okay – outright lies are not)• Never guess (if you don’t know the answer, find out before speaking)
3. Set Limits• Always remember, YOU are in charge of the interview (even though “they” are
asking the questions).• Never let media put words in your mouth (i.e. Always choose your own words).• Always know what info you are willing to release and what your limits are.• Expect the media to want:
- Details (how many injured, how seriously, their names, ages etc) - Impact (how long will the road/plant be closed? How many affected?) - Status (is there a police/fire/ministry investigation? Where does it stand?) - Direction (what happens now? What changes are likely? And - Conflict (who was at fault? Will there be charges?)
Stay Focused – Remember you are speaking for Alltrade (everything you say is quotable!)
• Be sure to get your key facts and message out early in every answer• Say what you want to say and then stop talking• Keep your key messages in front of you and return to them often
HEALTH & SAFETY PROGRAM
Page 5 of 5 Section 8 – Crisis Management Plan
_ _
Note: Never release the names of injured persons until their families are aware you are doing so!
4. Safety Overview for Media• Alltrade is very concerned about job-site safety. It is our first “corporate value”
and we have a well-established, comprehensive safety program.• Alltrade Safety Program is distributed and administered on all of our projects.• Safety posters are displayed at all job sites.• Alltrade requires safety meetings at each job-site for its employees and requires
attendance. We also request that a senior employee from each of our• Subcontractors attend, or hold their own meeting.• Alltrade employs a full time EHS department managed by a professional
certified safety expert. They focus on proactive safety techniques and instill astrong safety focus on all of our jobs with all of our employees.
• Alltrade meets or exceeds all local, regional, and national safety requirementsand standards.
HEALTH & SAFETY PROGRAM
HEALTH & SAFETY PROGRAM
Section 9 – Emergency Planning Page 1 of 6
Title: Emergency Planning Issue Date: January 2016
Section: 9 Revision Date: N/A
Approved by: Bob Ritzmann, President Signature:
9.1 Policy Statement
Alltrade is committed to having an Emergency Plan in place for each workplace to assist workers and the public to respond to any emergency situation. In the event of a crisis situation please refer to the Crisis Management section of this manual under “Crisis Management Plan”.
9.2 Emergency Plan
All workplaces require the Emergency Information Poster H&S_FORM_036: 1. A method for reporting the emergency2. A list of workers responsible in emergency situations and how to contact them3. A plan for incident investigation and correction of hazard4. A list of phone numbers for emergency and support services should be posted
Workplaces may also require: • A method for sounding the alarm• A description of potential emergencies• A map of the work place that shows evacuation routes and head-count location,
as well as the location of emergency equipment, first aid station, fire sprinklers,alarm pulls, and extinguishers
• Manager's routine for shutdown of the job• Responding to an emergency that may require rescue evacuation by trained
personnel• An evacuation, head-count and rescue plan
9.3 Emergency Plan Testing
At the discretion of the supervisor, emergency plan rehearsals may be held, use the Fire/Evacuation Drill Evaluation H&S_FORM_035. A rehearsal shall require:
1. Notification of emergency services, all supervisory personnel and possibly priornotification of all workers
2. A predetermined all-clear signal to allow rapid return to work3. An evaluation system to determine the effectiveness of the Emergency Plan (This is
usually only a stopwatch timing to determine evacuation time)
Note: Existing offices or buildings are required to conduct fire drills as per the local fire / building code. Consult with the EHS Department for further information.
HEALTH & SAFETY PROGRAM
Section 9 – Emergency Planning Page 2 of 6
Standard
An Emergency Plan is required in all Alltrade workplaces. All managers are required to ensure the Emergency Plan is current, in place and relevant to the specific scope of work.
Planning the Emergency Program
If the project is located within a plant which has an existing emergency and evacuation plan, the supervisors must learn it and establish only those procedures necessary to complement the plant system and ensure a complete Emergency Plan for the project site.
Guidelines for Preparing an Emergency Plan
All projects require an Emergency Plan. The magnitude and complexity of the plan depends on the size of the project/workplace. The plan can also be reviewed with local authorities. Required elements are:
1. A method for reporting the emergency generally telephone is the most effective.However, an alternative should exist (perhaps notification with the plant, or policenotification from the nearest available phone if the emergency disables the site'soffice phone lines).
2. A list of workers responsible in emergency situations and how to contact them.• This should be plainly posted and available.
3. A plan for incident investigation and correction of hazard.4. A list of phone numbers for emergency and support services
• This should be posted at all telephones.5. A method for sounding the alarm:
• In a major project a siren may be required but a small project may only requirean air horn or warning bell
6. A description of potential emergencies.• This is extremely important from an educational standpoint. Emergency
preparedness is essentially based on anticipating all possible crises
7. A map of the work place that shows evacuation routes and head count location, aswell as the location of emergency equipment, first aid station, fire sprinklers, alarmpulls, and extinguishers.• This should be designed at the start of the job and posted in the offices, lunch
rooms, tool cribs and first aid stations• For offsite locations, emergency equipment should be identified and reviewed
with workers prior to commencing work activities.8. Manager's routine for shutdown of the job
• This should be established to ensure that if a shutdown occurs no potentialhazard may be left (for example, an orderly shutdown ensures that tank valvesand electrical supplies to welders are closed and disconnected)
HEALTH & SAFETY PROGRAM
Section 9 – Emergency Planning Page 3 of 6
9. A system for communication, both internal and external• In most workplaces/projects, portable 2-way radios are used. Emergency alarms
are also considered to be communication devices and must be available. In theevent of an emergency, only designated spokespeople shall communicate withplant authorities, media and legislative authorities.
• For offsite locations, emergency equipment should be identified and the planshould be reviewed with workers prior to commencing work activities.
10. An evacuation, head-count and rescue plan• Rescues should only be attempted by trained persons and only if they do not risk
injury to themselves. External emergency services will be used in the eventrescue is required.
• Roll-call systems may vary, but generally each foreperson should count his/herworkers and report to the supervisor
Emergency Planning Update and Review
When workplace changes occur that may affect the existing Emergency Response Plan, the plan will be reviewed or updated to ensure any changes required are made. Workplace changes to consider as a requirement for review or update may include a new or different work activity, equipment or personnel or post incident.
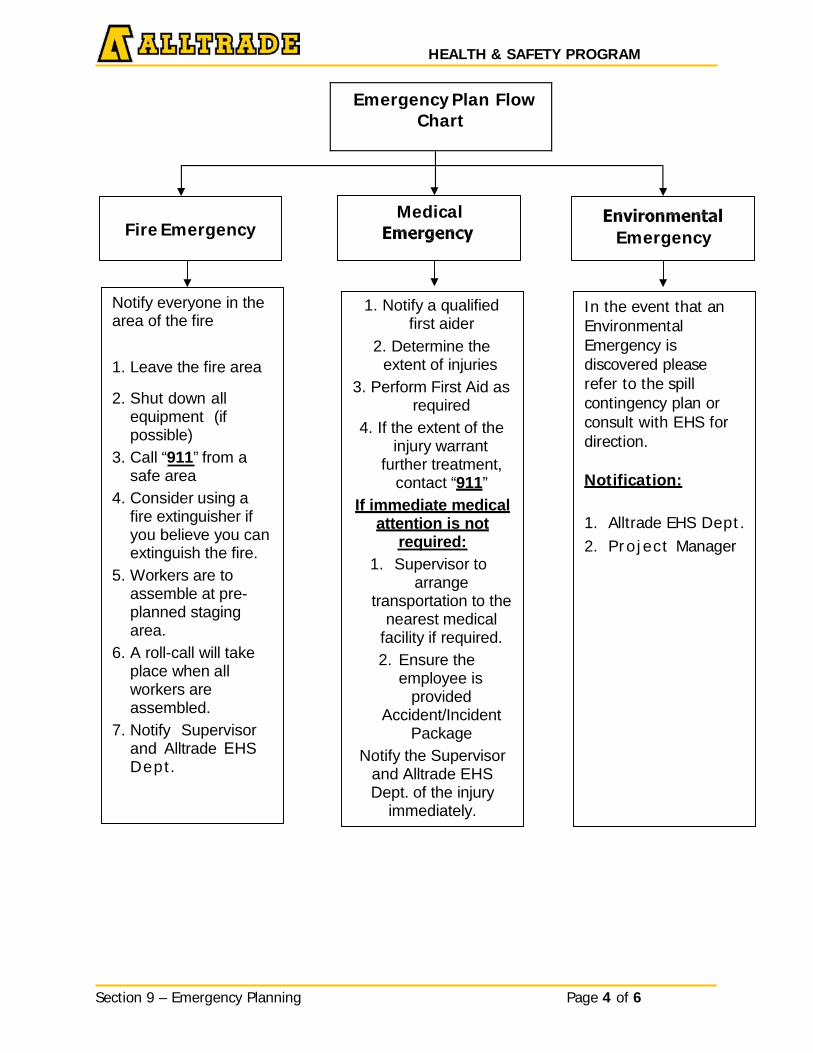
HEALTH & SAFETY PROGRAM
Section 9 – Emergency Planning Page 4 of 6
Emergency Medical
Notify everyone in the area of the fire
1. Leave the fire area
2. Shut down allequipment (ifpossible)
3. Call “911” from asafe area
4. Consider using afire extinguisher ifyou believe you canextinguish the fire.
5. Workers are toassemble at pre-planned stagingarea.
6. A roll-call will takeplace when allworkers areassembled.
7. Notify Supervisor and Alltrade EHS Dept.
Fire Emergency
Emergency Plan Flow Chart
In the event that an Environmental Emergency is discovered please refer to the spill contingency plan or consult with EHS for direction.
Notification:
1. Alltrade EHS Dept.2. Project Manager
1. Notify a qualifiedfirst aider
2. Determine theextent of injuries
3. Perform First Aid asrequired
4. If the extent of theinjury warrant
further treatment, contact “911”
If immediate medical attention is not
required: 1. Supervisor to
arrange transportation to the
nearest medical facility if required. 2. Ensure the
employee isprovided
Accident/Incident Package
Notify the Supervisor and Alltrade EHS Dept. of the injury
immediately.
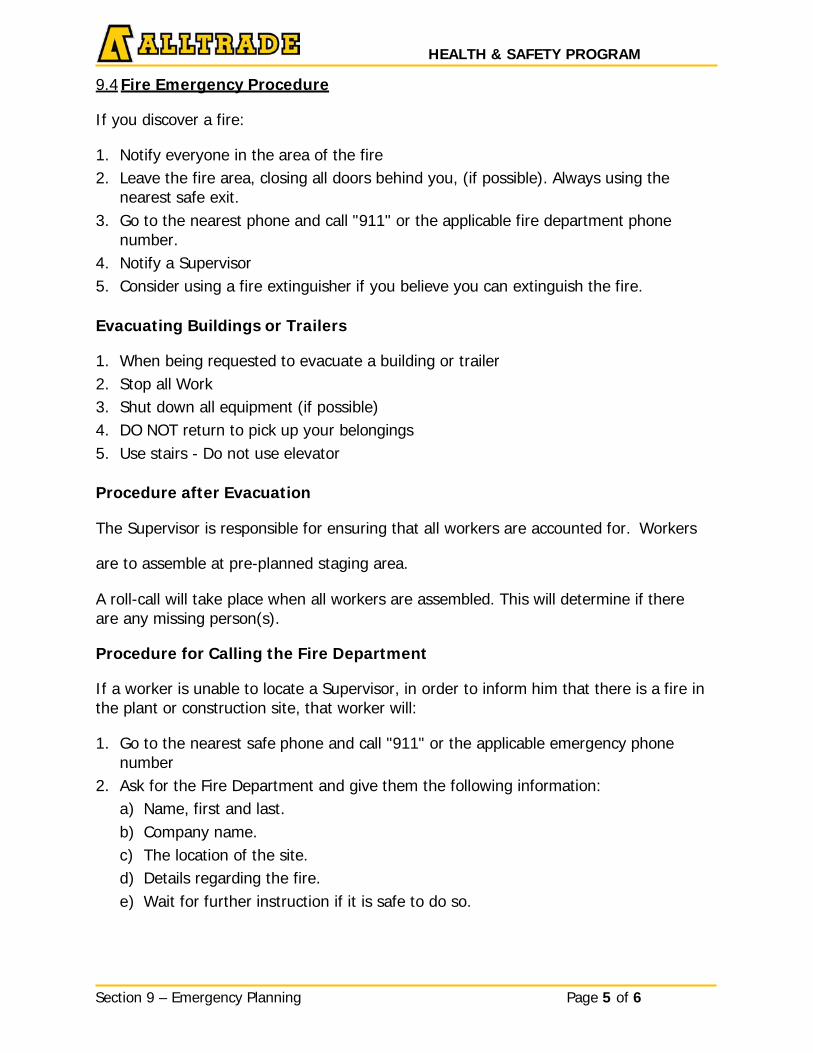
HEALTH & SAFETY PROGRAM
Section 9 – Emergency Planning Page 5 of 6
9.4 Fire Emergency Procedure
If you discover a fire:
1. Notify everyone in the area of the fire2. Leave the fire area, closing all doors behind you, (if possible). Always using the
nearest safe exit.3. Go to the nearest phone and call "911" or the applicable fire department phone
number.4. Notify a Supervisor5. Consider using a fire extinguisher if you believe you can extinguish the fire.
Evacuating Buildings or Trailers
1. When being requested to evacuate a building or trailer2. Stop all Work3. Shut down all equipment (if possible)4. DO NOT return to pick up your belongings5. Use stairs - Do not use elevator
Procedure after Evacuation
The Supervisor is responsible for ensuring that all workers are accounted for. Workers
are to assemble at pre-planned staging area.
A roll-call will take place when all workers are assembled. This will determine if there are any missing person(s).
Procedure for Calling the Fire Department
If a worker is unable to locate a Supervisor, in order to inform him that there is a fire in the plant or construction site, that worker will:
1. Go to the nearest safe phone and call "911" or the applicable emergency phonenumber
2. Ask for the Fire Department and give them the following information:a) Name, first and last.b) Company name.c) The location of the site.d) Details regarding the fire.e) Wait for further instruction if it is safe to do so.
HEALTH & SAFETY PROGRAM
Section 9 – Emergency Planning Page 6 of 6
Controlling and Identifying a Fire Hazard
All workers are responsible for reporting, controlling, or identifying a fire hazard on all Alltrade workplaces, e.g. No smoking around flammable liquids, not obstructing or blocking access or egress roads for safe evacuation.
Reports should be directed to the Supervisor.
Return spent fire extinguishers to your Supervisor for recharging.
Access for Fire Fighting Equipment and Vehicles
In order to provide a safe and unobstructed Fire Department access to the construction site, vehicles or equipment shall not be parked in fire routes or near fire hydrants unless approved by the Supervisor.
9.5 Medical Emergency
In the event that a medical emergency is encountered:
1. Notify a qualified First Aider2. Determine the extent of injuries,3. Perform First Aid as required4. If the extent of the injury warrants further treatment, contact site specific
Emergency Response Team (ERT) and/or go to the closest telephone and call 911
You will be required to give the following information:
1. Your Name2. Company Name3. The Location of the Site4. Details regarding then injury5. Wait for further instruction if required6. Continue first aid until help arrives7. If possible, have someone meet the emergency responders when they arrive on site
If immediate medical attention is not required:
1. Notify the Supervisor of the injury immediately2. Supervisor to arrange transportation to the nearest medical facility if required.
9.6 Environmental Emergency
In the event that an Environmental Emergency is discovered please refer to the Environmental Policy Section of this Manual.
HEALTH & SAFETY PROGRAM
Section 10 – Accident / Incident Investigations & Safety Opportunities Page 1 of 11
Title: Accident / Incident Investigations & Safety Opportunities Issue Date: January 2016
Section: 10 Revision Date: January 2018
Approved by: Bob Ritzmann, President Signature:
10.1 Policy Statement
Alltrade requires all employees to immediately report to their supervisor all accidents and incidents that result in injury or property damage and all safety opportunities with the potential for serious injury or property damage. Supervisors will report the accident promptly to the EHS Department to ensure timely submission to workers compensation authorities. Each incident will be analyzed to determine causes and contributing factors and these factors will be used to reduce or eliminate the risk of further incident.
10.2 Definitions and Reporting Requirements
An Accident is defined as an unplanned event that causes harm to people or damage to property. Accidents are defined as being one of the following:
A Loss Time Injury refers to any injury that prevents a worker from coming to work on the day following the day of the injury. Loss Time Injuries will be identified as one of the two following categories:
• Acute Loss Time Injury - Loss time from work due to a work-related injury andhas an identifiable event with an immediate result. There is an IMMEDIATE onsetof pain, IMMEDIATE time away from work (medically authorized), has anIMMEDIATE report of accident and IMMEDIATE medical attention was sought.
• Chronic Loss Time Injury – Loss time from work due to a work related injuryand has NO identifiable event or proof of accident. Will be a chronic injury if oneor more of the following apply; a delayed onset of pain, condition graduallyemerged over time, disablement that was the result of an unexpected result ofworking duties, has a pre-existing condition, there is a delay in seeking medicalattention and/or a delay in reporting the accident.
A Recordable Medical Aid (based on OSHA 300 Log) refers to any injury where the individual has been provided medical treatment by a medical practitioner or resulted in restricted duties outside of the individual’s normal trade or occupation. The treatment provided must be beyond First Aid as described below:
Procedures described as First Aid and not considered treatment includes the following:
• Visits to a doctor or health care professional solely for observing or counseling• Diagnostic procedures, including administering prescription medications that are
used solely for diagnostic purposes• Using non-prescription medications at non-prescription strength• Administering tetanus immunizations• Cleaning, flushing, or soaking wounds on the skin surface
HEALTH & SAFETY PROGRAM
Section 10 – Accident / Incident Investigations & Safety Opportunities Page 2 of 11
• Using wound coverings, such as bandages, Band-Aids, gauze pads, etc., or usingSteriStrips or butterfly bandages (other devices such as staples are consideredmedical treatment)
• Using hot or cold therapy• Using temporary immobilization devices while transporting an accident victim
(splints, slings, neck collars, or back boards)• Drilling a fingernail or toenail to relieve pressure, or draining fluids from blisters• Using eye patches• Using simple irrigation or a cotton swab to remove foreign bodies not embedded
in or adhered to the eye• Using finger guards• Using massages (physiotherapy or chiropractic care is considered medical
treatment)• Drinking Fluids to relieve heat stress
A Non-Recordable Medical Aid refers to an injury where an individual sought medical attention from a medical practitioner (MD, Chiropractor, Physiotherapist etc.) but no treatment beyond first aid was provided. A Non-Recordable Medical Aid will result in a report being issued to the Provincial / state workers compensation board on behalf of Alltrade.
A First Aid refers only to injuries that can be treated on the job without any days lost and do not result in any report being issued to the Provincial / state workers compensation board.
A Report Only event is where an individual has notified Alltrade of an event or condition but there is no first aid or treatment provided or requested.
Non-Occupational is an event or condition that is not work related. Discuss with the Alltrade Claims Department for appropriate classification.
An Incident is defined as property damage, but with no injury to workers. An example of an incident could be damaged equipment as a result of improper use. Incidents are investigated in the same manner as an accident resulting in an injury. The only difference between the two is that the incident did not involve injury to a worker.
A Safety Opportunity / Safety Opportunities is a situation in which no injury, treatment or damage occurred; but might have if conditions had been slightly different.
Safety Opportunities are warnings of accidents in the making. Accept the warnings and look for the causes to help prevent similar situations from developing. Remember that a Safety Opportunity is a sign that something is wrong. Ignoring the conditions that lead to near-accidents is an open invitation to a real accident. Once a Safety Opportunity occurs, report it immediately to the nearest Foreman or Supervisor. The potential for such incidents can exist in the workplace, so all employees- not just supervisors- must help identify them.
HEALTH & SAFETY PROGRAM
Section 10 – Accident / Incident Investigations & Safety Opportunities Page 3 of 11
• If the Safety Opportunity is a result of an unsafe condition, don’t continue to workunder that condition until the problem has been corrected and your supervisorgives you the okay to proceed.
• If the incident is a result of an unsafe act, be certain that everyone involved hasbeen made aware and corrective action is taken prior to continuing.
Alltrade has a Safety Opportunity report form H&S_FORM_037 that is to be filled out each time a Safety Opportunity occurs. This report can be completed by any worker who was directly involved or witnessed the Safety Opportunity occurring. Please ensure that blank copies of the Safety Opportunity report are available to all workers. Once the report is complete submit it in to the office. Superintendents will then review the reports and communicate them at the weekly toolbox talk.
Remember A SAFETY OPPORTUNITY IS A CHANCE TO CORRECT ANY UNSAFE ACT OR CONDITION
FROM OCCURRING AGAIN.
YOU CAN MAKE A DIFFERENCE. REPORT ALL SAFETY OPPORTUNITIES
A Recordable Injury – is an injury which requires the management and care of a patient to combat disease or disorder. A work-related injury that would be considered a recordable would be:
• Loss of consciousness• Days away from work• Restricted work activity or job transfer that would not allow a worker to perform
the typical duties of their trade / craft (please consult with the EHS Departmentfor further clarification on “Restricted Work”)
• Medical treatment beyond First Aid
The following are not considered medical treatments and are NOT recordable:
• Visits to a doctor or health care professional solely for observing or counseling• Diagnostic procedures, including administering prescription medications that are
used solely for diagnostic purposes; and• Any procedure that can be labeled First Aid.
The following types of treatment are considered first aid and are not to be marked as a Recordable or Medical Aid:
• Using non-prescription medications at non-prescription strength• Administering tetanus immunizations• Cleaning, flushing, or soaking wounds on the skin surface• Using wound coverings, such as bandages, Band-Aids, gauze pads, etc., or using
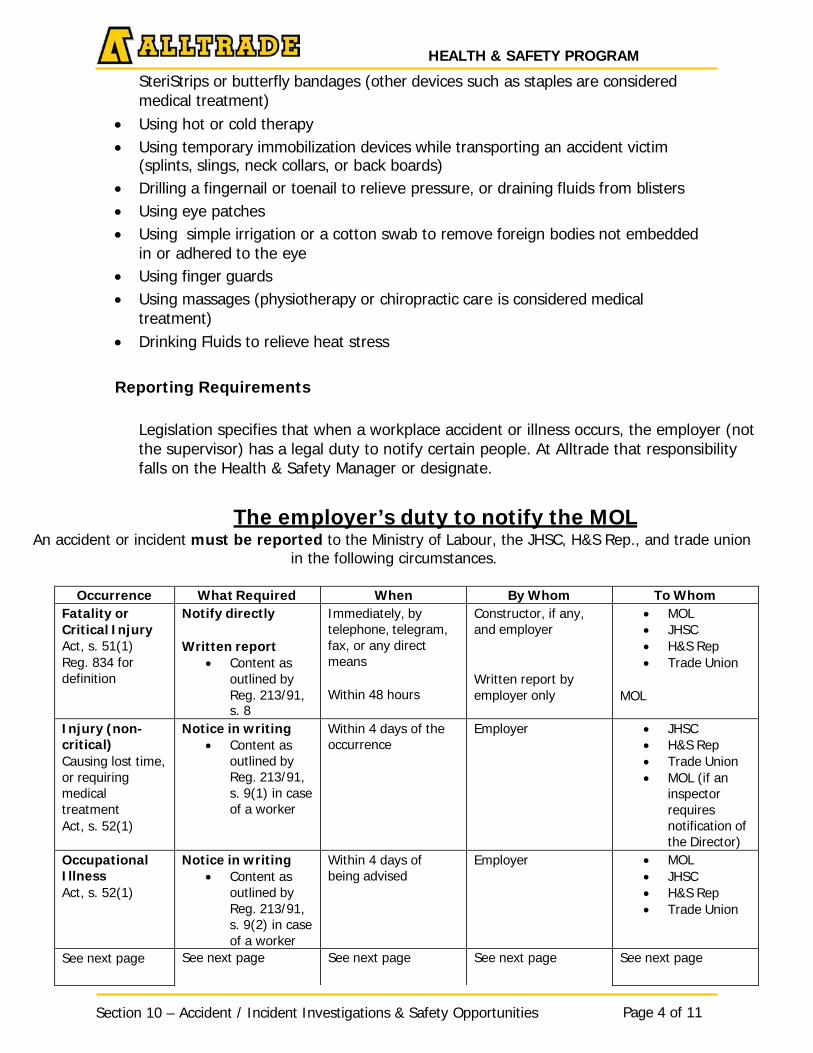
HEALTH & SAFETY PROGRAM
Section 10 – Accident / Incident Investigations & Safety Opportunities Page 4 of 11
SteriStrips or butterfly bandages (other devices such as staples are considered medical treatment)
• Using hot or cold therapy• Using temporary immobilization devices while transporting an accident victim
(splints, slings, neck collars, or back boards)• Drilling a fingernail or toenail to relieve pressure, or draining fluids from blisters• Using eye patches• Using simple irrigation or a cotton swab to remove foreign bodies not embedded
in or adhered to the eye• Using finger guards• Using massages (physiotherapy or chiropractic care is considered medical
treatment)• Drinking Fluids to relieve heat stress
Reporting Requirements
Legislation specifies that when a workplace accident or illness occurs, the employer (not the supervisor) has a legal duty to notify certain people. At Alltrade that responsibility falls on the Health & Safety Manager or designate.
The employer’s duty to notify the MOL An accident or incident must be reported to the Ministry of Labour, the JHSC, H&S Rep., and trade union
in the following circumstances.
Occurrence What Required When By Whom To Whom Fatality or Critical Injury Act, s. 51(1) Reg. 834 for definition
Notify directly
Written report • Content as
outlined by Reg. 213/91, s. 8
Immediately, by telephone, telegram, fax, or any direct means
Within 48 hours
Constructor, if any, and employer
Written report by employer only
• MOL• JHSC• H&S Rep• Trade Union
MOL
Injury (non- critical) Causing lost time, or requiring medical treatment Act, s. 52(1)
Notice in writing • Content as
outlined by Reg. 213/91, s. 9(1) in caseof a worker
Within 4 days of the occurrence
Employer • JHSC• H&S Rep• Trade Union• MOL (if an
inspectorrequiresnotification ofthe Director)
Occupational Illness Act, s. 52(1)
Notice in writing • Content as
outlined by Reg. 213/91, s. 9(2) in caseof a worker
Within 4 days of being advised
Employer • MOL• JHSC• H&S Rep• Trade Union
See next page See next page See next page See next page See next page
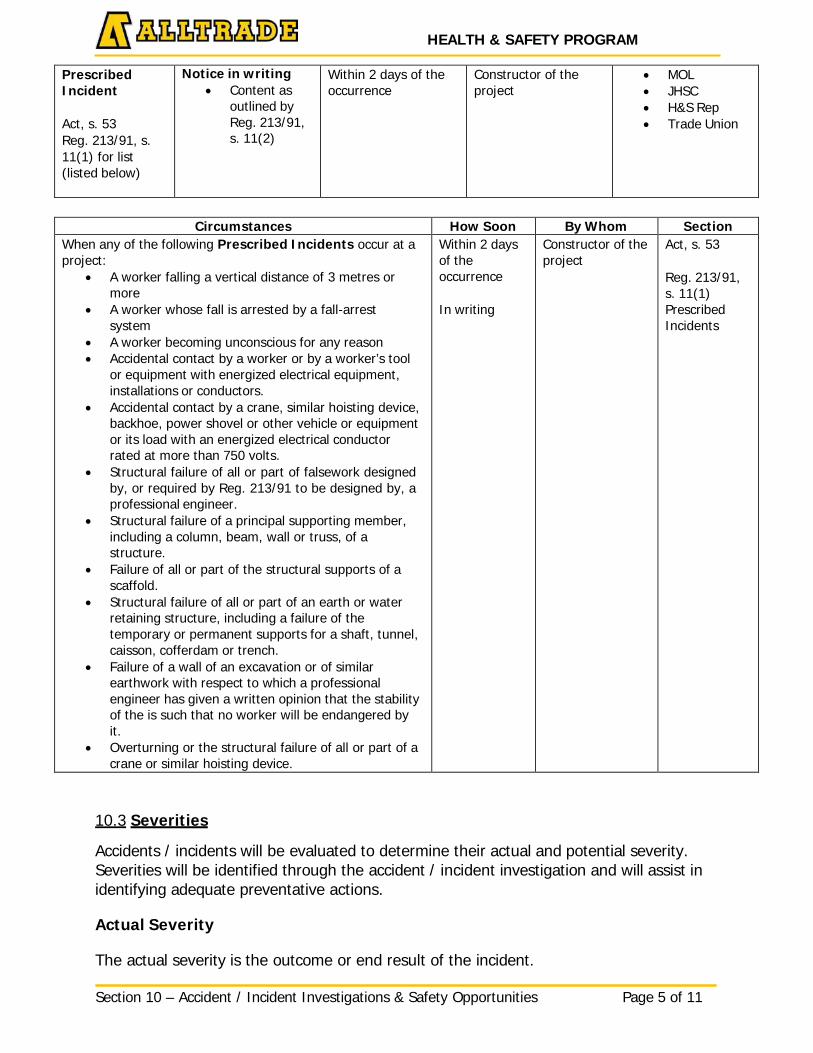
Section 10 – Accident / Incident Investigations & Safety Opportunities Page 5 of 11
HEALTH & SAFETY PROGRAM
_
Prescribed Incident
Act, s. 53 Reg. 213/91, s. 11(1) for list (listed below)
Notice in writing • Content as
outlined by Reg. 213/91, s. 11(2)
Within 2 days of the occurrence
Constructor of the project
• MOL• JHSC• H&S Rep• Trade Union
Circumstances How Soon By Whom Section When any of the following Prescribed Incidents occur at a project:
• A worker falling a vertical distance of 3 metres ormore
• A worker whose fall is arrested by a fall-arrestsystem
• A worker becoming unconscious for any reason• Accidental contact by a worker or by a worker’s tool
or equipment with energized electrical equipment,installations or conductors.
• Accidental contact by a crane, similar hoisting device,backhoe, power shovel or other vehicle or equipmentor its load with an energized electrical conductorrated at more than 750 volts.
• Structural failure of all or part of falsework designedby, or required by Reg. 213/91 to be designed by, aprofessional engineer.
• Structural failure of a principal supporting member,including a column, beam, wall or truss, of astructure.
• Failure of all or part of the structural supports of ascaffold.
• Structural failure of all or part of an earth or waterretaining structure, including a failure of thetemporary or permanent supports for a shaft, tunnel,caisson, cofferdam or trench.
• Failure of a wall of an excavation or of similarearthwork with respect to which a professionalengineer has given a written opinion that the stabilityof the is such that no worker will be endangered byit.
• Overturning or the structural failure of all or part of acrane or similar hoisting device.
Within 2 days of the occurrence
In writing
Constructor of the project
Act, s. 53
Reg. 213/91, s. 11(1)Prescribed Incidents
10.3 Severities
Accidents / incidents will be evaluated to determine their actual and potential severity. Severities will be identified through the accident / incident investigation and will assist in identifying adequate preventative actions.
Actual Severity
The actual severity is the outcome or end result of the incident.
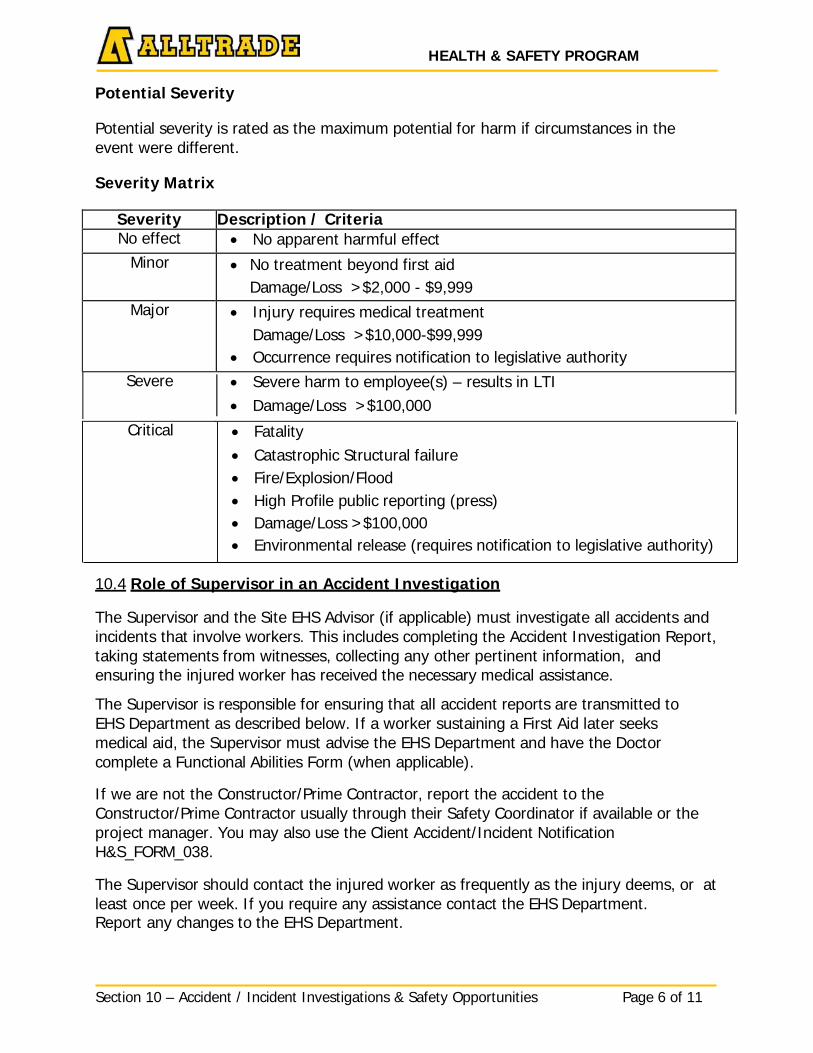
Section 10 – Accident / Incident Investigations & Safety Opportunities Page 6 of 11
HEALTH & SAFETY PROGRAM
Critical • Fatality• Catastrophic Structural failure• Fire/Explosion/Flood• High Profile public reporting (press)• Damage/Loss >$100,000• Environmental release (requires notification to legislative authority)
Potential Severity
Potential severity is rated as the maximum potential for harm if circumstances in the event were different.
Severity Matrix
10.4 Role of Supervisor in an Accident Investigation
The Supervisor and the Site EHS Advisor (if applicable) must investigate all accidents and incidents that involve workers. This includes completing the Accident Investigation Report, taking statements from witnesses, collecting any other pertinent information, and ensuring the injured worker has received the necessary medical assistance.
The Supervisor is responsible for ensuring that all accident reports are transmitted to EHS Department as described below. If a worker sustaining a First Aid later seeks medical aid, the Supervisor must advise the EHS Department and have the Doctor complete a Functional Abilities Form (when applicable).
If we are not the Constructor/Prime Contractor, report the accident to the Constructor/Prime Contractor usually through their Safety Coordinator if available or the project manager. You may also use the Client Accident/Incident Notification H&S_FORM_038.
The Supervisor should contact the injured worker as frequently as the injury deems, or at least once per week. If you require any assistance contact the EHS Department. Report any changes to the EHS Department.
Severity Description / Criteria No effect • No apparent harmful effect
Minor • No treatment beyond first aidDamage/Loss >$2,000 - $9,999
Major • Injury requires medical treatmentDamage/Loss >$10,000-$99,999
• Occurrence requires notification to legislative authoritySevere • Severe harm to employee(s) – results in LTI
• Damage/Loss >$100,000
Section 10 – Accident / Incident Investigations & Safety Opportunities Page 7 of 11
Procedure
1. The employee reports a work-related Accident.2. Administer First Aid if capable.3. Arrange transportation for injured employee to receive medical attention4. Give the Doctor a “Functional Abilities Form for Timely Return to Work” or equivalent to
complete (if applicable).5. Eliminate the hazard if possible or guard the accident scene as required. (Do not disturb
the accident scene if a worker is critically injured until permission is given bygovernmental authority, if applicable).
6. Investigate the cause of the accident and report findings in the Accident/incidentInvestigation Report. Ensure the accident investigation report is completed with all theinformation required. Additional blank sheets may be used as needed.
7. Send copy of accident investigation to EHS along with the “Functional AbilitiesForm or Form 8.”
8. Report all accident/incidents as follows:9. Lost Time Injuries are to be reported by telephone or email as soon as possible usually
the same day as follows:a. EHS Departmentb. Joint Health & Safety Committee/Health & Safety Rep and Trade Unionc. Project Managerd. Site Safety Coordinator if anye. Send your Accident Investigation Report to the EHS Departmentf. Critical Injury Report Form H&S_FORM_041 (if reportable to MOL)
Medical Aid accidents are to be reported by email, telephone and fax as soon as possible usually the same day as follows:
• Submit your Accident Investigation Report to the EHS Department• Project Manager• Joint Health & Safety Committee, if applicable
First Aids are to be reported by email or fax as follows: • EHS Department• Project Manager• Send your Accident Investigation Report to the EHS Department
Incidents (includes property damage, no injuries or treatment) & Safety Opportunities are to be reported by email or fax as follows:
• EHS Department• Project Manager
HEALTH & SAFETY PROGRAM
Section 10 – Accident / Incident Investigations & Safety Opportunities Page 8 of 11
Keep the report for your records at the workplace along with a copy of the functional abilities form, if applicable.
Report of Vehicle Accident(s) means an accident whereby a motor vehicle was involved. An Accident / Incident Report must be completed.
10.5 Accident Investigation Tools
To do an accident investigation the following tools may be needed: • Refer to Accident/incident Investigation procedure in this section• Instant camera, digital camera, video camera (film, disc)• 5 m (16 ft.) measuring tape• Writing materials• 1 roll of red barricade marking tape preferably marked “DO NOT ENTER”• “Other” as determined by scope of investigation
10.6 Conducting Interviews
Interview witnesses any other persons who have details about the accident. Interviews require you to be fair and open minded; look for facts, not someone to blame for the accident. During the interview you should:
• Put the individual at ease.• Keep the interview private.• Explain the purpose of the interview, e.g. to establish the facts, not to place
blame.
Obtain the individual's version of how and why the accident occurred. Don't look for confirmation of your own opinion and never argue with the interviewee. Ask questions that require more than a "yes or no" answer.
• Repeat the individual's story back once you have heard it. This is a good time to makenotes. Attempt to clear up factual consistencies. Do not make assumptions and use diplomacy and consideration to determine what occurred.
• Ask for suggestions for corrective action.• Let the individual know by what date the report will be completed.• Get a written statement from the individual or have the person sign
acknowledgement of your notes on the statement and attach it to theaccident/incident investigation report.
• End the interview by thanking the person.
Guidelines for Employee Interviews with Non-Alltrade Personnel
After an accident, safety violation, or other occurrence, non-Alltrade personnel may request to interview one or more of our employees. When this occurs, contact the EHS Department and make him/her aware of the details of the situation.
HEALTH & SAFETY PROGRAM
Section 10 – Accident / Incident Investigations & Safety Opportunities Page 9 of 11
Generally, an Alltrade representative should attend any such interviews with the employee.
Employees interviewed should: • Listen carefully to the questions before answering. Ask to have the question
repeated, if necessary. Ask for clarification if the question is ambiguous. • Answer the question directly and honestly. Do not volunteer any information not
asked for. Answer "yes" or "no" or if a narrative is required, briefly.• If you do not know the answer, say so. Do not assume or speculate facts or
conclusions in your answer.• Do not offer your opinion or respond to hypothetical questions. For example, do not
state whether you think a job, a person, a piece of equipment, an activity, etc., issafe or unsafe. Do not discuss whether you would have done anything differently,whether the accident could have been prevented, etc.
In the event of a serious accident, legal representation may be required as determined by the EHS Department.
10.7 Claims Management
In keeping consistent with the policy, Claims Management is paramount in ensuring workers who have sustained a work-related injury are treated with the appropriate medical assistance and timely documents submitted to the required legislative boards.
Effective claims management can reduce errors and omissions which in turn will be conducive to employees and supervisors on timely return to pre-accident work level. Through the proper guidelines and appropriate documentation, we want to ensure that:
• Alltrade pursues modified duties in all circumstances.• Alltrade initiates return to work plans and negotiates treatment• A claim is correctly established within legislated timelines.• The most cost-effective means of addressing the injury are established.• Alltrade Implements tools to reduce the time loss component of a claim.• Alltrade is frequently initiating and advocating for indicated cost relief measures.• Expediting any procedures or medical consultants through established affiliations.
Claims management is a timely process that takes commitment from all levels. From the time of worker injury to the return of pre-accident work level will depend on proper communication within Alltrade EHS Department and documentation.
Accident / Incident Package
Accident / Incident packages will contain the following documents that can be obtained from the EHS Department:
• Letter to Health Care Provider H&S_FORM_042• Accident / Incident Investigation Report H&S_FORM_039• Witness Statements H&S_FORM_040
HEALTH & SAFETY PROGRAM
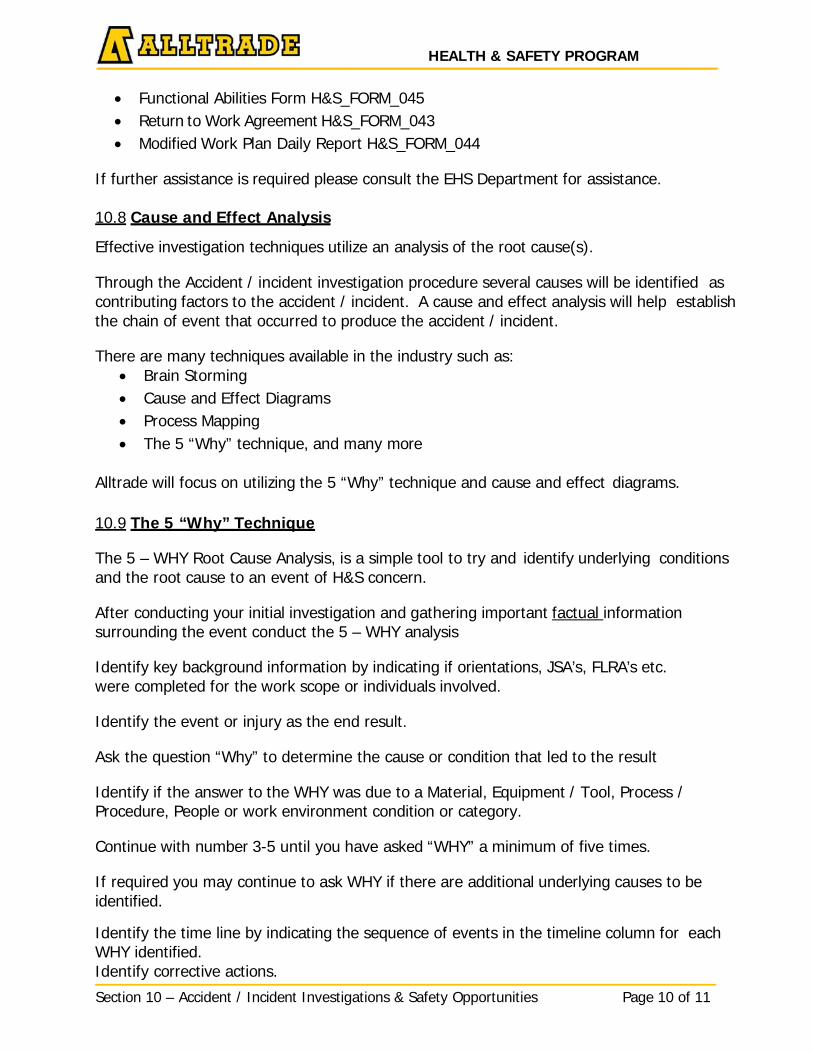
Section 10 – Accident / Incident Investigations & Safety Opportunities Page 10 of 11
• Functional Abilities Form H&S_FORM_045• Return to Work Agreement H&S_FORM_043• Modified Work Plan Daily Report H&S_FORM_044
If further assistance is required please consult the EHS Department for assistance.
10.8 Cause and Effect Analysis
Effective investigation techniques utilize an analysis of the root cause(s).
Through the Accident / incident investigation procedure several causes will be identified as contributing factors to the accident / incident. A cause and effect analysis will help establish the chain of event that occurred to produce the accident / incident.
There are many techniques available in the industry such as: • Brain Storming• Cause and Effect Diagrams• Process Mapping• The 5 “Why” technique, and many more
Alltrade will focus on utilizing the 5 “Why” technique and cause and effect diagrams.
10.9 The 5 “Why” Technique
The 5 – WHY Root Cause Analysis, is a simple tool to try and identify underlying conditions and the root cause to an event of H&S concern.
After conducting your initial investigation and gathering important factual information surrounding the event conduct the 5 – WHY analysis
Identify key background information by indicating if orientations, JSA’s, FLRA’s etc. were completed for the work scope or individuals involved.
Identify the event or injury as the end result.
Ask the question “Why” to determine the cause or condition that led to the result
Identify if the answer to the WHY was due to a Material, Equipment / Tool, Process / Procedure, People or work environment condition or category.
Continue with number 3-5 until you have asked “WHY” a minimum of five times.
If required you may continue to ask WHY if there are additional underlying causes to be identified.
Identify the time line by indicating the sequence of events in the timeline column for each WHY identified. Identify corrective actions.
HEALTH & SAFETY PROGRAM
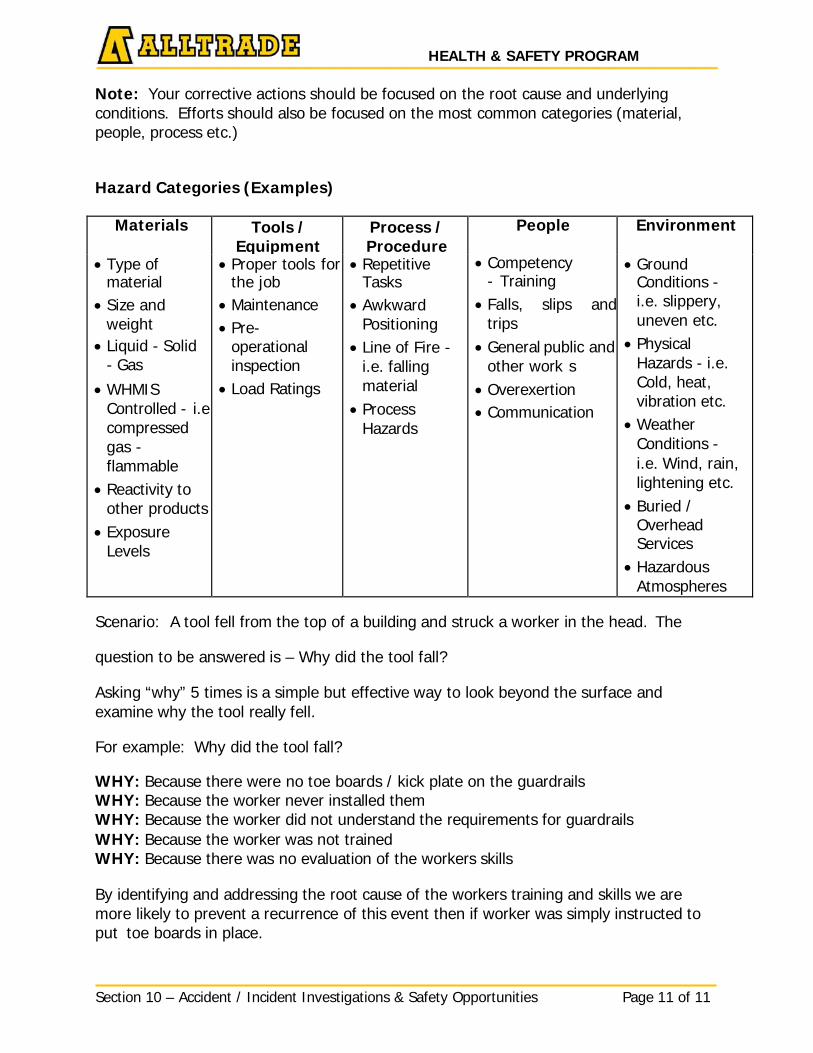
Section 10 – Accident / Incident Investigations & Safety Opportunities Page 11 of 11
Note: Your corrective actions should be focused on the root cause and underlying conditions. Efforts should also be focused on the most common categories (material, people, process etc.)
Hazard Categories (Examples)
Materials Tools / Equipment
Process / Procedure
People Environment
• Type ofmaterial
• Size andweight
• Liquid - Solid- Gas
• WHMISControlled - i.ecompressedgas -flammable
• Reactivity toother products
• ExposureLevels
• Proper tools forthe job
• Maintenance• Pre-
operationalinspection
• Load Ratings
• RepetitiveTasks
• AwkwardPositioning
• Line of Fire -i.e. fallingmaterial
• ProcessHazards
• Competency- Training
• Falls, slips and trips
• General public and other work s
• Overexertion• Communication
• GroundConditions -i.e. slippery,uneven etc.
• PhysicalHazards - i.e.Cold, heat,vibration etc.
• WeatherConditions -i.e. Wind, rain,lightening etc.
• Buried /OverheadServices
• HazardousAtmospheres
Scenario: A tool fell from the top of a building and struck a worker in the head. The
question to be answered is – Why did the tool fall?
Asking “why” 5 times is a simple but effective way to look beyond the surface and examine why the tool really fell.
For example: Why did the tool fall?
WHY: Because there were no toe boards / kick plate on the guardrails WHY: Because the worker never installed them WHY: Because the worker did not understand the requirements for guardrails WHY: Because the worker was not trained WHY: Because there was no evaluation of the workers skills
By identifying and addressing the root cause of the workers training and skills we are more likely to prevent a recurrence of this event then if worker was simply instructed to put toe boards in place.
HEALTH & SAFETY PROGRAM
HEALTH & SAFETY PROGRAM _ _
Section 11 – Return to Work Programs Page 1 of 6
Title: Return to Work Programs Issue Date: January 2016
Section: 11 Revision Date: N/A
Approved by: Bob Ritzmann, President Signature:
11.1 Policy Statement
Alltrade is committed to developing and maintaining a safe and healthy work environment and to providing a fair and consistent policy for rehabilitation of workers who have been injured at our workplace.
Alltrade will make every reasonable effort to provide accommodation to a worker who is impaired. The goal is to return workers as close as possible to their pre-accident earnings profile in meaningful and sustainable work.
An annual review and assessment of our Return to Work Program will be completed using industry specific tools and resources.
11.2 Principles
Alltrade’s principle goal in our Return to Work Policy is the effective management of a worker’s rehabilitation through a knowledgeable and cooperative approach.
Ensure that a worker receives prompt, effective, and timely access to services required to enhance and facilitate their rehabilitation.
Where the project or work location is unable to provide a suitable work assignment, an attempt will be made to place the worker in another department.
11.3 Program Objectives
1. Allow the worker’s return to the work force as soon as possible by: a. Encouraging active recovery b. Promoting timely identification of assistance required such as; medical
services, methods of accommodation and vocational rehabilitation services c. Helping maintain contact with co-workers d. Reducing the sense of estrangement from Alltrade e. Reducing the time needed for return to full work capacity f. Helping to maintain a sense of identity, self-respect, and value
2. Ensure that ongoing communication is maintained between all parties. 3. Ensure that all workers are treated fairly and consistently. 4. Promote greater health and safety. 5. Promote productivity and efficiency through the use of:
a. experienced trained workers b. a more efficient management of compensation costs
6. Ensure compliance with Human Rights legislation, workers' compensation legislation and other related legislation.

HEALTH & SAFETY PROGRAM _ _
Section 11 – Return to Work Programs Page 2 of 6
11.4 Understanding and Practices
Should a worker become unable to perform his/her regular duties due to a workplace injury, every reasonable effort will be made to place the worker in another position that they are capable of performing.
Alltrade and worker acknowledge the benefits of early rehabilitation planning to facilitate the medical and vocational recovery of an individual, thereby restoring the worker as close to their pre-accident earnings profile as possible.
Short-term action plans and long-term recovery plans of up to twelve (12) weeks will be used to accommodate an individual’s needs and to facilitate a safe return to work.
Workers, who have been deemed, by a qualified medical practitioner, temporarily or permanently impaired due to a workplace injury, will qualify for this assistance.
Note: Injuries requiring permanent accommodation will be reviewed and considered on a case by case basis.
During These Periods
• The worker will be considered to be on a medical recovery program and the
supervisor will be responsible for completion and submission of the Modified Weekly Report to the EHS Department.
• Cooperative plans will be developed to meet medical and workers compensation approval.
• Work will be modified to accommodate the individual’s needs and duties will be progressively restored as the worker recovers.
• Extensions will be granted where clear objectives are predictable and achievable. • The worker’s regular position may be temporarily filled. • The worker will receive full pay while active in the plan. • Upon completion of the recovery period, a determination of placement will take
into consideration the workers' compensation legislation, the Human Rights Code and the workers’ identified needs, if any.
11.5 Procedures
The Return to Work procedures are an extension of Alltrade’s H&S Program. The procedures are divided into three (3) sections that generally reflect the seriousness of the injury: 1. First Aid Only 2. Medical Aid / Recordable Injury – No Lost Time 3. Medical Aid – Lost Time Injuries
HEALTH & SAFETY PROGRAM _ _
Section 11 – Return to Work Programs Page 3 of 6
11.6 First Aid Only
Report All work-related injuries and complaints are to be reported promptly to the worker’s supervisor.
Assessment An assessment will be made by the supervisor and the worker to determine the necessity if any, for medical treatment.
Action 1. Where no medical treatment is considered necessary, the appropriate first aid will be
provided. 2. Ensure completion of accident/incident investigation report and forward it to the EHS
Department (see Section on Accident/incident Investigation for details). 3. Ensure the EHS Department is notified
Return to Work The worker is to return to his/her regular job where appropriate, with short-term and/or minor accommodations if required.
Follow Up The worker’s supervisor is to follow-up with the worker at appropriate intervals in order to ensure that there are no further difficulties.
11.7 Medical Aid / Recordable Injury– No Lost Time
*For Definition of a Recordable Injury see Section 10: Accident & Incident Investigations and Safety Opportunities.
Report All work-related injuries and complaints are to be reported to the worker’s supervisor.
Assessment An assessment will be made by the worker’s supervisor and the worker to determine the necessity if any, for medical treatment.
Action Provide First Aid treatment as necessary. Depending on the severity of the injury the worker’s supervisor will:
1. Make arrangements for safe transportation and accompany the worker to a local
medical clinic or hospital emergency or
Contact the worker’s family physician or the pre-determined Alltrade physician to arrange an appointment for the worker.
HEALTH & SAFETY PROGRAM _ _
Section 11 – Return to Work Programs Page 4 of 6
_ _
2. Ensure completion of:
• Accident/incident Investigation Report; • Functional Abilities Form or Form 8– to be completed by treating Doctor.
3. Letter to Health Care Provider H&S_FORM_042 4. Ensure the EHS Department is promptly notified 5. Forward a copy of (a) and (b) above H&S Department within 24 hours of the
time the accident is reported to the supervisor.
Review Findings
Case Planning for Minor Injuries The Supervisor will conduct a functional assessment together with the worker, by comparing the Physician’s Report and the worker’s personal assessment, with the physical demands of available tasks (work).
Return to Work The worker is to return to work as outlined in this action plan. The worker’s supervisor will brief coworkers where appropriate.
Follow Up The worker’s supervisor will monitor the worker’s progress and resolve any difficulties. Follow- up will continue until the worker has returned to their pre-injury job & reported full recovery.
11.8 Medical Aid – Lost Time Injuries
Report All work related injuries and complaints are to be reported to the worker’s supervisor.
Assessment An assessment will be made by the worker’s supervisor and the worker to determine the necessity if any, for medical treatment.
Action Provide First Aid treatment as necessary. Depending on the severity of the injury the worker’s supervisor will:
1. Make arrangements for safe transportation and accompany the worker to a local
medical clinic or hospital emergency or
Contact the worker’s family physician to arrange an appointment for the worker. 2. Ensure completion of:
a. Accident/incident Investigation Report; b. Functional Abilities Form or Form 8 – to be completed by treating Doctor.
HEALTH & SAFETY PROGRAM _ _
Section 11 – Return to Work Programs Page 5 of 6
_ _
3. Letter to Health Care Provider H&S_FORM_042 4. Ensure the EHS Department is promptly notified 5. Forward a copy of (a) and (b) above EHS Department within 24 hours of the
time the accident is reported to the supervisor.
Monitor
The Supervisor will maintain telephone and/or personal contact with the worker on a daily basis, depending on the nature and severity of the injury.
The Supervisor is also responsible to ensure that the daily modified report is completed and sent to the EHS Department on a weekly basis.
The worker is responsible to:
• Actively participate in all appropriate medical rehabilitation programs • Daily contact their supervisor • Advise the supervisor of any changes in physical condition • Meet with supervisor following medical appointments, where possible obtain all
Functional Abilities reports from the supervisor, provide them to the physician, and return them to the supervisor promptly
• Is required to cooperate and participate with the Modified Work Program • Advise their supervisor immediately of any difficulties with their Return to Work
Plan
Both the Worker and Alltrade EHS Department are responsible to maintain contact with workers' compensation authorities as required.
Review Findings
The treating physician, having knowledge of the Return to Work Program, will indicate the earliest date the worker is ready to return to work without risk to themselves or others.
The worker is to return the Functional Abilities report as soon as possible (the same day or next shift).
11.9 Reporting Guidelines for Workers
When an accident or injury occurs, the worker has certain obligations to meet in order to allow for a prompt, complete recovery and to allow for processing and recording relevant accident information.
If correct rehabilitation and reporting procedures are not followed, the worker’s compensation benefits may be denied, delayed, or suspended pending an investigation.
To ensure proper benefits entitlement, cooperation is mandatory and the following procedures must be followed:
HEALTH & SAFETY PROGRAM _ _
Section 11 – Return to Work Programs Page 6 of 6
_ _
1. Incidents and Accidents must be immediately reported to the supervisor. 2. An accident/incident report form must be completed by the supervisor. Witnesses
and circumstances surrounding the accident must be included.
3. Injured workers will need to get a copy of the Form 8 to be completed by the treating Doctor, and returned by the worker to their supervisor.
4. If the worker is required to remain off work for any period of time, they must
immediately notify the supervisor. The worker must contact the supervisor daily to advise them of progress and each medical visit will require a meeting with the supervisor to discuss progress.
5. The worker must notify their supervisor in advance of their anticipated return to work.
6. The worker is expected to cooperate fully in both medical and vocational rehabilitation.
11.10 Accident / Incident Package
Accident / Incident package will contain the following documents that can be obtained from the EHS Department:
• Letter to Health Care Provider H&S_FORM_042 • Accident / Incident Investigation Report H&S_FORM_039 • Witness Statements H&S_FORM_040 • Functional Abilities Form H&S_FORM_045 • Return to Work Agreement H&S_FORM_043 • Modified Work Plan Daily Report H&S_FORM_044
All forms relating to effective claims management can be obtained from the Accident / Incident and Safety Opportunity Investigations and Return to Work section of the program.
If further assistance is required please consult the EHS Department for assistance.
HEALTH & SAFETY PROGRAM _ _
Section 12 – Performance Management, Continuous Improvement and Document Control
Page 1 of 4
Title: Performance Management, Continuous improvement and Issue Date: January 2016 Document Control
Section: 12 Revision Date: N/A
Approved by: Bob Ritzmann, President Signa ture:
12.1 Policy Statement
Detailed, accurate, and careful documentation is an integral and essential aspect of Health & Safety Management. All Alltrade management must ensure that all pertinent documentation is filed in the workplace and readily available for auditing purposes.
12.2 Record Keeping
All workplace H&S data must be tracked including documentation on accidents, training, safety performance, environmental controls, and minutes of the Joint Health & Safety Committee meeting.
Note: All H&S Forms can be found in Appendix A.
For details on processing, maintaining and storage of these records, see the relevant sections in this H&S Management Manual.
12.3 WHMIS / Hazard Communications Documentation
WHMIS / Hazard Communications legislation requires that updated Material Safety Data Sheets (MSDS)/SDS be readily available in all our workplaces. Each workplace or department must be responsible to keep current MSDS/SDS sheets of all controlled products used in the workplace.
If MSDS/SDS sheets are not supplied with the products, they may be obtained by contacting the Product Supplier, Alltrade Tools & Equipment or EHS.
12.4 Management of Change and H&S Program Review
All employees, subcontractors, and suppliers in the workplace must protect the environment and their own health and safety, and that of co-workers, by working with the applicable legislative requirements and with the written safe work practices and procedures established by Alltrade. This will be achieved by setting clear goals and objectives and managing change to legislative, Alltrade or client requirements.
Clear goals and objectives are the framework in which Alltrade will evaluate the success of the H&S program and provide a structure for continuous improvement. A combined commitment from employees at all levels will ensure the success of the H&S program by utilizing the Internal Responsibility System.
HEALTH & SAFETY PROGRAM _ _
Section 12 – Performance Management, Continuous Improvement and Document Control
Page 2 of 4
Standard
A comprehensive review of Alltrade H&S program will occur on an annual basis. The review will include input from management, workers and applicable health and safety committees. If a change is required to Alltrade H&S program, a systematic process will be carried out similar to the annual review to ensure it is adequately evaluated and implemented as necessary.
Purpose
To ensure a process that will: • Utilize tools such as industry specific audits and benchmarking, as well as internal
audits, ensuring Alltrade continues to maintain best of class practices and legislative compliance
• Review current and potential legislative changes and their impacts • Conduct reviews using industry established audits will be completed by a trained
auditor and reviewed by senior management • Utilize the Internal Responsibility System • Focus on Best of Class practices and procedures • Strive for continuous improvement • Accomplish the companies number one core value of Safety First
Management of Change
Alltrade recognizes that management of change is required to ensure a consistent and successful approach to managing changes to Alltrade H&S program policies and procedures.
Change typically originates from, but is not limited to the following categories: • Legislative change • New or revised policy, procedure or practice • Additional site specific requirements
Legislative Change
In the event of a new legislative requirement Alltrade EHS will review the potential impact and requirement for change. If the change is required immediately the review and implementation procedure identified below will be followed.
If the legislative change does not require immediate action it will be reviewed in conjunction with the annual H&S program review.
New or Revised Policy or Procedure
A new or revised procedure may be developed based on changing work conditions, work types or lessons learned from past experience. If the change is required immediately the review and implementation procedure identified below will be followed.
HEALTH & SAFETY PROGRAM _ _
Section 12 – Performance Management, Continuous Improvement and Document Control
Page 3 of 4
If the new policy or procedure does not require immediate action it will be reviewed in conjunction with the annual H&S program review.
Site Specific Requirement or Change
A site specific requirement may be required due to client or owner requirements based on work location or activity. The requirement will be evaluated against existing Alltrade H&S program requirements. If the site specific requirement exceeds those set forth by Alltrade H&S program then the review and implementation procedure below will be followed.
If the site specific requirement does not meet existing requirements then Alltrade H&S program will be followed.
Review and Implementation Procedure
When a change has been identified the management of the change will be carried out as per this procedure:
1. Management will review the potential impact of this change a. Locations b. Documentation c. Training d. Work Process
2. Identify target audience and program implementation 3. Develop or modify existing policies, procedures and work instructions 4. Develop or modify existing training programs and communication tools 5. Deliver training or communication 6. Implement revised training and communication into Alltrade H&S program 7. Verify and monitor training or communication has been completed (training records)
Annual H&S Program Review
Alltrade will conduct an annual review of the H&S program to ensure it is in compliance with existing legislative requirements and implement best practices as deemed by Alltrade.
Review Procedure • Review previous years health and safety objectives • Review existing and new legislative requirements • Review industry trends regarding accidents and incidents • Review leading and trailing indicators • Audits and Inspections (Internal and External) • Safety Opportunities / Safety Opportunity Data • Training Requirements and Activity

HEALTH & SAFETY PROGRAM _ _
Section 12 – Performance Management, Continuous Improvement and Document Control
Page 4 of 4
_ _
• Trending • Serious incidents and injuries • Loss Time injuries • Medical Aids • First Aids • Gather information/suggestions for improvement of safe work practices and
procedures • Review ways to improve safety culture • Review each section of Alltrade H&S program to ensure it remains relevant and in
compliance based on the above
Setting Performance Objectives and Action Plans
The annual review process conducted by the EHS Department will identify key areas for improvement which are identified through the use of leading and trailing indicators.
Setting Performance Objectives
Performance objectives and action plans will meet the following criteria • Will be aligned with Corporate target and objectives • Will ensure legislative compliance • Will strive to best of class practices and procedures • Will includes recommendation from internal and external audits
Specific Performance Objectives
• Reduce Accident and incident frequency • Increase focus towards leading indicators; such as Safety Opportunity reporting • Improve supervisor training programs to reflect changes in practices and
procedures • Initiate intervention strategies
o Poster Campaigns o Develop new training programs o Create sub committees to address specific initiatives agreed upon during
review process
Approval of Performance Objectives and Goals
Performance objectives and other initiatives brought forth during the review process must have approval from EHS and Senior Management before being implemented.
HEALTH & SAFETY PROGRAM _ _
Section 13 – Joint Health & Safety Committee and Worker Trades Committee Page 1 of 4
Title: Joint Health & Safety Committee and Worker Trades Committee Issue Date: January 2016
Section: 13 Revision Date: N/A
Approved by: Bob Ritzmann, President Signature:
13.1 Policy Statement
Alltrade strongly encourages active participation of all employees in the prevention of accidents and the promotion of Occupational Health and Safety in the workplace. A joint Health and Safety program can only be successful when everyone in the workplace is committed to these responsibilities and therefore, Alltrade values active discussions and participation.
Alltrade is committed to promote and assist the Joint Health and Safety Committee and the committee members by providing such information, training, and assistance for the purpose of carrying out their responsibilities.
13.2 Joint Health & Safety Committee
The Occupational Health and Safety Act in some jurisdictions require that Constructor/Prime Contractor at a workplace/project must establish a Joint Health and Safety Committee.
In addition to this requirement if a Joint Health and Safety Committee is established a Worker Trades Committee may also be required.
In applicable jurisdictions, these guidelines will serve as terms of reference to project management in establishing Joint Health and Safety Committees and Worker Trades Committees; when we are the Constructor/Prime Contractor.
Structure of the Committee
1. The Joint Health and Safety Committee (referred to hereafter as “The Joint
Committee”) shall consist of four (4) members; two (2) members selected by the Constructor/Prime Contractor and two (2) members selected by the trades. Alternates may be allowed however, they shall only be used in emergency situation and with the approval of the Co- Chairpersons. Note: The number of people on The Joint Committee could increase depending on the population size of the workforce. All committee members shall be employed on the project workplace.
2. As a minimum, for construction projects The Joint Committee shall meet once every month, or as directed by legislation, on a regularly established schedule; predetermined and approved by the Joint Health and Safety Committee. Any changes to the meeting schedule must be approved by the co-chairpersons.
3. For industrial establishments, the Joint Committee shall meet on a regular basis, determined by the committee, in accordance with legislative requirements.
4. There shall be two (2) Co-Chairpersons; one (1) selected by the Constructor/Prime Contractor and one (1) selected from the workers, appointed for a definite period (to be determined by The Joint Committee) that shall alternate the chair at meetings.
HEALTH & SAFETY PROGRAM _ _
Section 13 – Joint Health & Safety Committee and Worker Trades Committee Page 2 of 4
5. A Co-Chairperson may, with the consent and approval of his/her counterpart, invite any additional person(s) to attend the meeting to provide additional information and comment, but they shall not participate in the regular business of the meeting.
6. Names and locations of all members of the Joint Health and Safety Committee shall be posted at designated locations determined by this committee. Some Jurisdiction requires representative to be selected from all trades, please consult the EHS Department.
Operation and Functions of the Committee
The Joint Health and Safety Committee established for the project will function independently and with complete autonomy from any in-plant Joint Health and Safety Committee.
The Joint Committee will not be empowered to amend, alter, subtract from, or add to any of the terms of any Collective Bargaining Agreement(s) or project contract. All workers will be encouraged to discuss their Occupational Health and Safety concerns with their immediate supervisor before bringing it to the attention of The Joint Committee.
The Joint Committee members will thoroughly investigate all unresolved Health and Safety concerns to get all the facts and will exchange these facts when searching for a resolution to the problem. All concerns will be reported in the minutes.
Medical or trade secret information will be kept confidential by all committee members.
The functions of The Joint Committee shall be as follows:
• Carry out site inspections as determined by the JHSC • Identify situations that may be a source of danger or hazard to workers • Make recommendations to the Constructor/Prime Contractor, employers and the
workers for the improvement of Health and Safety • Participate in the investigation of accidents and incidents • Review accidents and incidents and to assist in the prevention of a recurrence • Cause a Worker Trades Committee to be formed (if applicable) • Any other functions related to Health and Safety the committee deems necessary
Inspections
1. The Joint Committee members who represent workers shall designate one (1) of the members representing workers to inspect the physical condition of the workplace. The site safety coordinator/supervisor shall accompany the worker representative during the physical inspection.
2. The workplace, or a portion thereof, shall be inspected every month for construction projects and industrial establishments i.e. fabrication shops and yards.
HEALTH & SAFETY PROGRAM _ _
Section 13 – Joint Health & Safety Committee and Worker Trades Committee Page 3 of 4
3. All Occupational Health and Safety concerns raised during the physical inspection will be recorded on an appropriate workplace inspection form and signed by the members performing the inspection.
4. Concerns raised during this inspection that require prompt action will be immediately addressed and acted upon. This will be initiated by the site safety coordinator/supervisor and be directed by the project management with the assistance of the worker member of the Joint Committee.
5. All other Health and Safety issues will be dealt with through The Joint Committee.
JHSC Recommendation to Management – See H&S_FORM_047
The Constructor/Prime Contractor or his/her designate shall respond in writing within seven (7) working days on any written Joint Committee recommendation. The written response will include the Constructor/Prime Contractor’s assessment of the recommendation and specify what action will, or will not, be implemented as a result of the recommendation. Any proposed action shall include details of who will be responsible for such action and a time frame to rectify the situation. Internally this will be documented on the Management Response to Recommendations Form H&S_FORM_048.
JHSC Meeting Minutes – See H&S_FORM_046
1. The Joint Committee will designate a secretary for the meeting to take minutes and be responsible for having the minutes typed, circulated, and filed within one (1) calendar week of the meeting.
2. Minutes of meetings will be reviewed and edited where necessary by the Co- Chairpersons, then signed and circulated to all The Joint Committee members and a copy forwarded to the Constructor/Prime Contractor or project manager (or designate).
3. A copy of the minutes will also be posted in a conspicuous place at the workplace for the attention of other workers on the project.
4. Agenda items will be identified by a reference number and be readily available in a proper filing system.
Quorum
The Joint Committee shall have a quorum of (50% + 1) members present in order to conduct business. One (1) Co-Chairperson must be present in order to conduct business. The number of employer members shall not be greater than the number of worker members.
Meeting Agenda
1. The Co-Chairpersons will jointly prepare an agenda and forward a copy of the agenda to all Joint Committee members at least two (2) days in advance of the meeting.
HEALTH & SAFETY PROGRAM _ _
Section 13 – Joint Health & Safety Committee and Worker Trades Committee Page 4 of 4
_ _
2. The Joint Committee may only consider such Occupational Health and Safety issues as have been listed on the agenda, or have been agreed upon in advance by the two (2) Co- Chairpersons, unless in the opinion of the Co-Chair’s a condition exists that needs immediate attention.
3. All items raised from the agenda in meetings will be dealt with on the basis of consensus rather than by voting and formal motions will not be used. All items that are resolved or not will be reported in the minutes and unresolved items will be placed on the agenda for the next meeting.
Dispute Resolution
Items unresolved by The Joint Committee after two (2) regular scheduled meetings will be referred to a committee of senior management appointed by the Constructor/Prime Contractor and both Co-Chairpersons to attempt to resolve the outstanding issue. A written response shall be given to The Joint Committee by the next scheduled meeting.
13.3 Worker Trades Committee
A Worker Trades Committee is to be formed where necessary. The members of the Trades Committee shall be selected by the workers employed in the trades which the members are to represent. The size and makeup of this committee will be determined by the number of different trades on the project.
This committee will report through The Joint Health and Safety Committee.
Names and locations of all members of the Trades Committee shall be posted at designated locations determined by The Joint Health and Safety Committee.
Functions of the Worker Trades Committee
The function of the Worker Trades Committee shall be:
• To inform the health and safety committee of specific concerns relating to health
and safety of the workers employed in the trades at the workplace • Set priorities in these matters for the joint committee to address in a timely
fashion
HEALTH & SAFETY PROGRAM _ _
Section 14 – Public Safety Page 1 of 8
Title: Public Safety Issue Date: January 2016
Section: 14 Revision Date: N/A
Approved by: Bob Ritzmann, President Signature:
14.1 Policy Statement
Alltrade is fully committed to ensuring that public health and safety is not endangered or put at risk by any facet of Alltrade's work. Workers are familiar with safe work procedures and potential hazards; the public is not. Therefore, Alltrade shall take all reasonable precautions necessary to assure public safety in our workplaces.
Alltrade shall also ensure that workplaces, activities, and equipment are protected from public access. Good security and public protection measures ensure that both the public and Alltrade workers remain healthy and safe.
14.2 Definition
Public
Public is defined as all persons and property not affiliated with the construction project or workplace.
14.3 Public Relations
Depending on the location of the workplace and the nature of the work being performed; relations with the public will vary. The prime function of public relations is to provide information to assure the public of Alltrade's concern for public safety and respect for public concerns.
The public is commonly concerned with:
• Noise • Dust • Inconvenience • Vibrations • Housekeeping (workplace cleanliness) • Environmental issues • Hazards such as chemical spills, fumes etc. • Transportation in and out of the project • Public and private work area separation • Mud tracking on public ways • Appropriate signage with clear direction • Asphalt and concrete overspray
All public relations shall be handled by management at the head office or a specifically designated representative. Methods of public information handling may include:
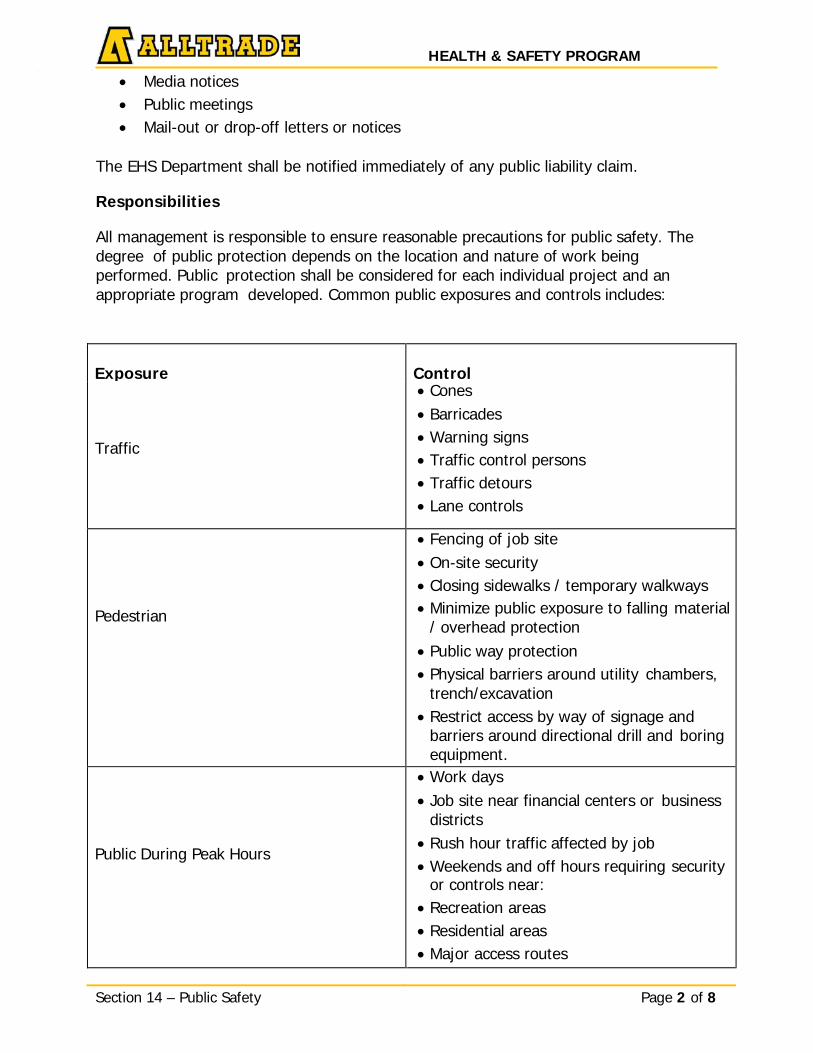
HEALTH & SAFETY PROGRAM _ _
Section 14 – Public Safety Page 2 of 8
• Media notices • Public meetings • Mail-out or drop-off letters or notices
The EHS Department shall be notified immediately of any public liability claim.
Responsibilities
All management is responsible to ensure reasonable precautions for public safety. The degree of public protection depends on the location and nature of work being performed. Public protection shall be considered for each individual project and an appropriate program developed. Common public exposures and controls includes:
Exposure
Control
Traffic
• Cones • Barricades • Warning signs • Traffic control persons • Traffic detours • Lane controls
Pedestrian
• Fencing of job site • On-site security • Closing sidewalks / temporary walkways • Minimize public exposure to falling material
/ overhead protection • Public way protection • Physical barriers around utility chambers,
trench/excavation • Restrict access by way of signage and
barriers around directional drill and boring equipment.
Public During Peak Hours
• Work days • Job site near financial centers or business
districts • Rush hour traffic affected by job • Weekends and off hours requiring security
or controls near: • Recreation areas • Residential areas • Major access routes
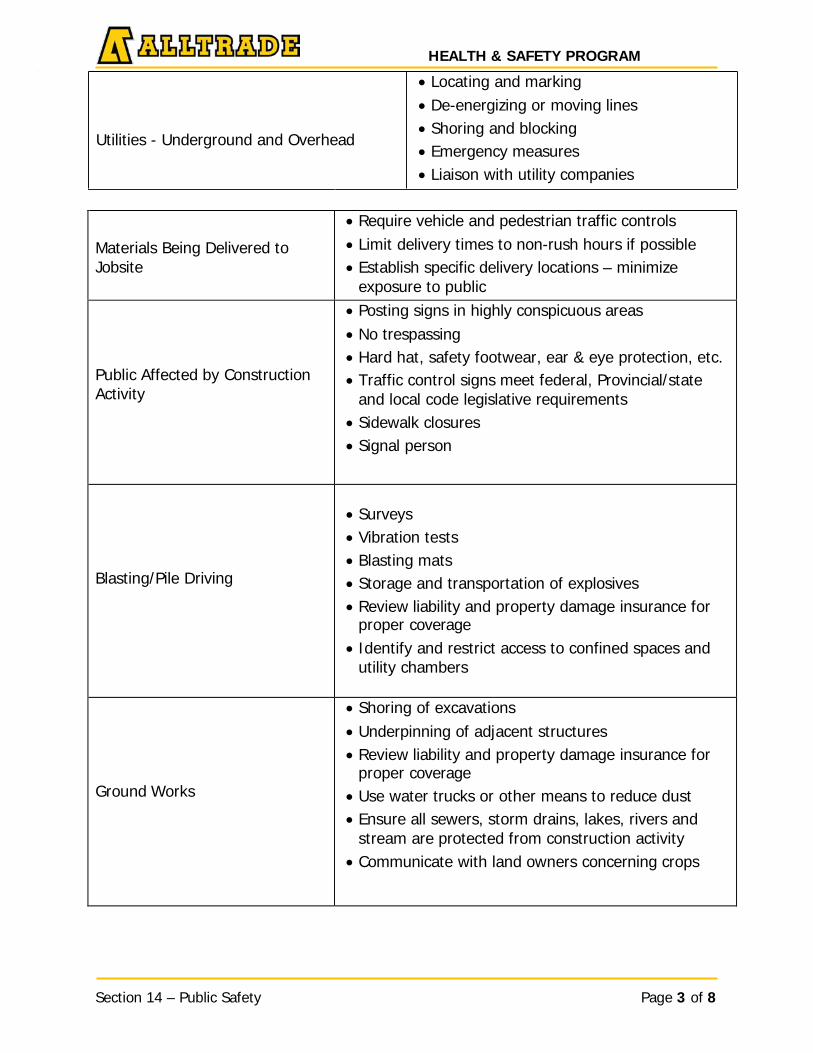
HEALTH & SAFETY PROGRAM _ _
Section 14 – Public Safety Page 3 of 8
Utilities - Underground and Overhead
• Locating and marking• De-energizing or moving lines• Shoring and blocking• Emergency measures• Liaison with utility companies
Materials Being Delivered to Jobsite
• Require vehicle and pedestrian traffic controls• Limit delivery times to non-rush hours if possible• Establish specific delivery locations – minimize
exposure to public
Public Affected by Construction Activity
• Posting signs in highly conspicuous areas• No trespassing• Hard hat, safety footwear, ear & eye protection, etc.• Traffic control signs meet federal, Provincial/state
and local code legislative requirements• Sidewalk closures• Signal person
Blasting/Pile Driving
• Surveys• Vibration tests• Blasting mats• Storage and transportation of explosives• Review liability and property damage insurance for
proper coverage• Identify and restrict access to confined spaces and
utility chambers
Ground Works
• Shoring of excavations• Underpinning of adjacent structures• Review liability and property damage insurance for
proper coverage• Use water trucks or other means to reduce dust• Ensure all sewers, storm drains, lakes, rivers and
stream are protected from construction activity• Communicate with land owners concerning crops
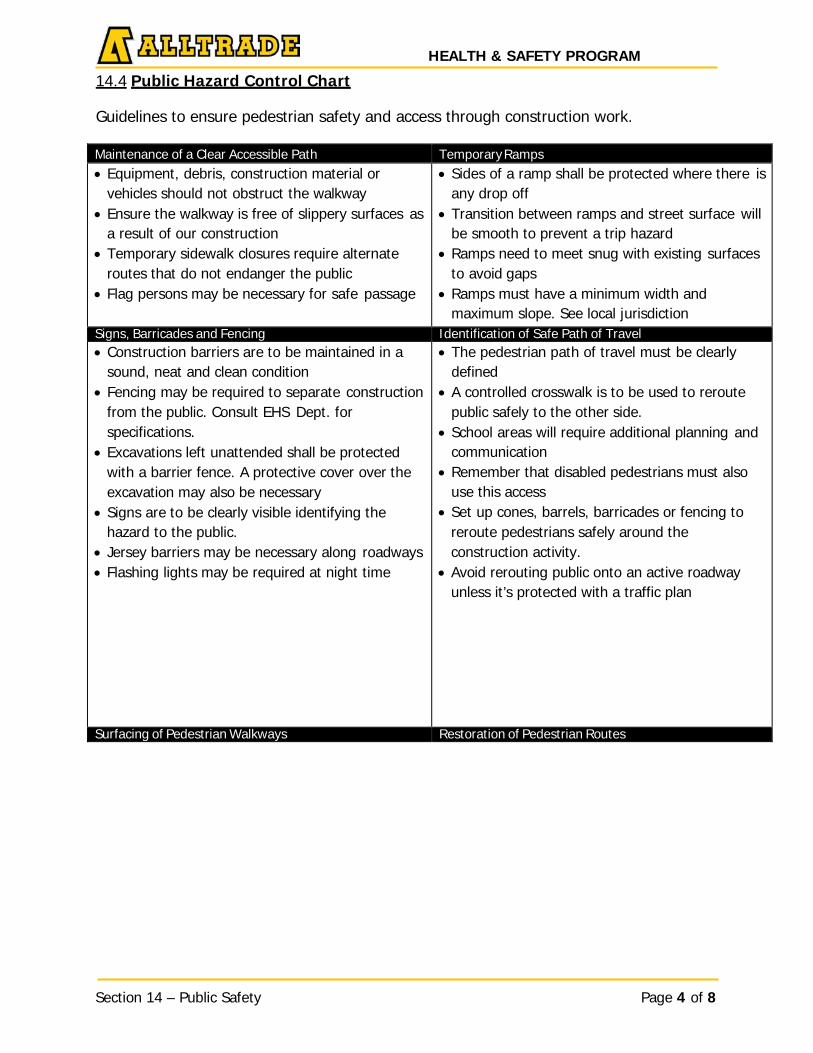
HEALTH & SAFETY PROGRAM
Section 14 – Public Safety Page 4 of 8
14.4 Public Hazard Control Chart
Guidelines to ensure pedestrian safety and access through construction work.
Maintenance of a Clear Accessible Path Temporary Ramps • Equipment, debris, construction material or
vehicles should not obstruct the walkway• Ensure the walkway is free of slippery surfaces as
a result of our construction• Temporary sidewalk closures require alternate
routes that do not endanger the public• Flag persons may be necessary for safe passage
• Sides of a ramp shall be protected where there isany drop off
• Transition between ramps and street surface willbe smooth to prevent a trip hazard
• Ramps need to meet snug with existing surfacesto avoid gaps
• Ramps must have a minimum width andmaximum slope. See local jurisdiction
Signs, Barricades and Fencing Identification of Safe Path of Travel • Construction barriers are to be maintained in a
sound, neat and clean condition• Fencing may be required to separate construction
from the public. Consult EHS Dept. forspecifications.
• Excavations left unattended shall be protectedwith a barrier fence. A protective cover over theexcavation may also be necessary
• Signs are to be clearly visible identifying thehazard to the public.
• Jersey barriers may be necessary along roadways• Flashing lights may be required at night time
• The pedestrian path of travel must be clearlydefined
• A controlled crosswalk is to be used to reroutepublic safely to the other side.
• School areas will require additional planning andcommunication
• Remember that disabled pedestrians must alsouse this access
• Set up cones, barrels, barricades or fencing toreroute pedestrians safely around theconstruction activity.
• Avoid rerouting public onto an active roadwayunless it’s protected with a traffic plan
Surfacing of Pedestrian Walkways Restoration of Pedestrian Routes
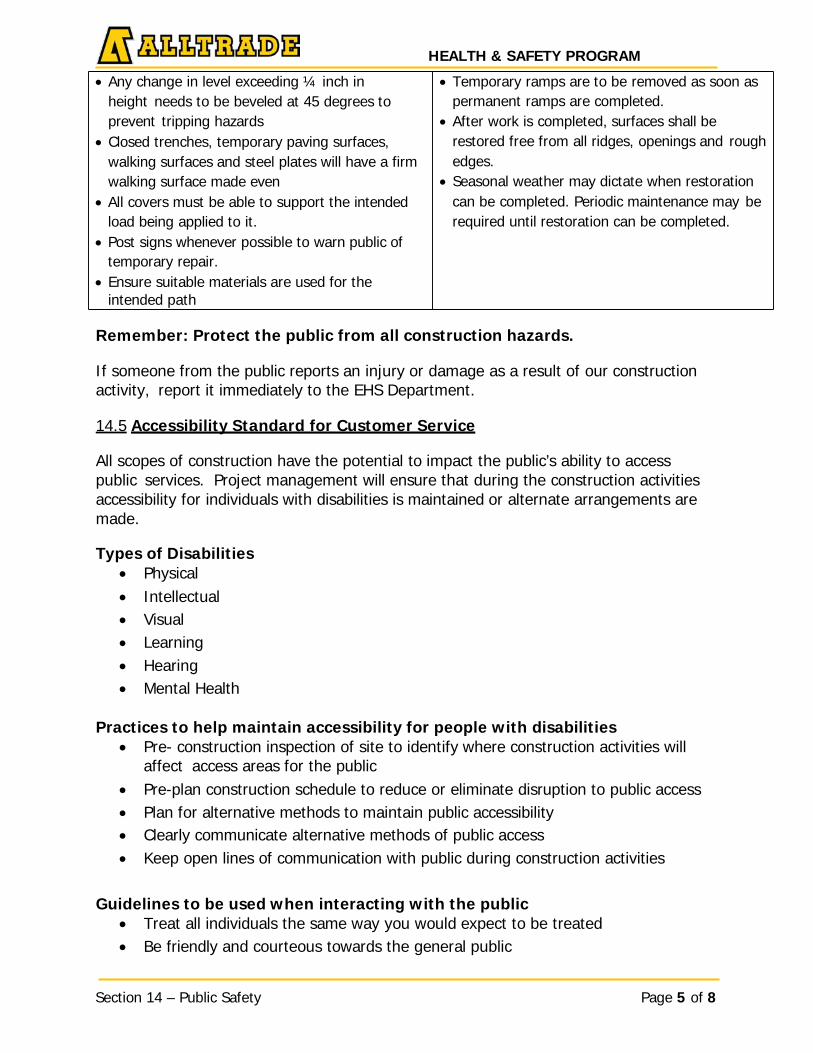
HEALTH & SAFETY PROGRAM
Section 14 – Public Safety Page 5 of 8
Remember: Protect the public from all construction hazards.
If someone from the public reports an injury or damage as a result of our construction activity, report it immediately to the EHS Department.
14.5 Accessibility Standard for Customer Service
All scopes of construction have the potential to impact the public’s ability to access public services. Project management will ensure that during the construction activities accessibility for individuals with disabilities is maintained or alternate arrangements are made.
Types of Disabilities • Physical• Intellectual• Visual• Learning• Hearing• Mental Health
Practices to help maintain accessibility for people with disabilities • Pre- construction inspection of site to identify where construction activities will
affect access areas for the public • Pre-plan construction schedule to reduce or eliminate disruption to public access• Plan for alternative methods to maintain public accessibility• Clearly communicate alternative methods of public access• Keep open lines of communication with public during construction activities
Guidelines to be used when interacting with the public • Treat all individuals the same way you would expect to be treated• Be friendly and courteous towards the general public
• Any change in level exceeding ¼ inch inheight needs to be beveled at 45 degrees toprevent tripping hazards
• Closed trenches, temporary paving surfaces,walking surfaces and steel plates will have a firmwalking surface made even
• All covers must be able to support the intendedload being applied to it.
• Post signs whenever possible to warn public oftemporary repair.
• Ensure suitable materials are used for theintended path
• Temporary ramps are to be removed as soon aspermanent ramps are completed.
• After work is completed, surfaces shall berestored free from all ridges, openings and roughedges.
• Seasonal weather may dictate when restorationcan be completed. Periodic maintenance may berequired until restoration can be completed.
HEALTH & SAFETY PROGRAM
Section 14 – Public Safety Page 6 of 8
• If a member of the public is encountered on our contract limits that requiresassistance; assist them to the best of your ability. Follow-up and revise publicsecurity measures
• If an individual is in a situation or potential situation where they are exposed todanger; communicate in a polite way what the danger is or could be
• Ensure public access ways are unimpeded ( stairs, ramps, sidewalks)• Do not block any equipment or devices available to assist a person with
disabilities without having made alternate, equal arrangements• Provide clear direction though signs, signals and verbal communication
Each site has specific requirements to ensure accessibility for people with disabilities is maintained. Contact the EHS Department for further assistance.
14.6 Project Security
The extent of project security will vary with the circumstances. Security shall be organized at the beginning of the project and monitored to ensure security is adequate through completion of the project.
Measures may include, but are not limited to:
• Equipment/Toolso Away from public accesso Storage areas/containers, bins, boxeso Fenced and securedo Area well illuminated
• Heavy and Mobile Equipmento Keys removed from equipmento Vehicles lockedo Protective covering(s) over glass panelso Key security (i.e., not just locking keys in portable office but possibly
having two individuals from the project take keys home at night)o Remove tire from generator, compressor and arrow board to prevent thefto Return rentals when they are no longer requiredo Have tools/equipment sent to a central lay down area on weekendso Do not leave equipment unattended and running
• Security Patrolso Public Protection – emergency panel posted with phone numbers
Police Fire protection Ambulance Hospital
HEALTH & SAFETY PROGRAM
Section 14 – Public Safety Page 7 of 8
o Private Protection - private security: If private security services are required only fully qualified, bonded,
and licensed companies shall be used. A certificate of insuranceand a hold harmless agreement must be obtained. Corporate shallprovide any agreements to be used with private securitycompanies. Corporate shall also provide a clear statement regardingdog patrols, police notification, intruder response, and othersecurity policies. These policies shall be established on a project byproject basis.
Project security is considered very important as poor security may allow the public to place itself at risk or in danger.
14.7 Theft Protection
Equipment theft is a major source of loss to all contractors. While insurance may offset some of the financial costs of the loss, many uninsured costs are paid by all contractors. These costs includes:
• Insurance deductibles,• Replacing depreciated items with new equipment,• Production delays,• Paperwork and time in reporting• Replacing stolen equipment
Most thefts occur in the evening, usually within an hour after the workday has ended, or on weekends. Most thieves will not try to steal if they cannot enter the site, load the equipment and be clear of the site within 10 minutes.
Good planning and programming are essential to construction – site security. Methods
to minimize theft: • Establish an inventory – control system for all equipment and tools• Implement a documented check – out/check- in system for all tools and
equipment• Lock and immobilize equipment during non-working hours• Lock and protect with an alarm system• Install padlock shields on storage trailers to make padlocks more tamper resistant
to bolt cutters• Stamp tools and equipment
Methods to maximize theft protection: • Avoid storing equipment off premises overnight unless it is in a secured area. If
equipment must be stored overnight, consider leasing or renting space at a secure facility
HEALTH & SAFETY PROGRAM _ _
Section 14 – Public Safety Page 8 of 8
_ _
• In high crime areas, consider hiring a security guard, or surveillance systems.Watch dogs can be used when accompanied by a trained handler
• Enclose equipment storage area with a security fence. Good security is anessential element in good site security
• Ask for a driver’s license and obtain a copy whenever anyone outside of theproject has approached you to remove equipment
• Keep equipment storage areas well-lit and free of hiding places such as trees,shrubbery, buildings or other visual obstructions. Nighttime lighting is essential.Lighting should be elevated to eliminate dark areas
• Ask equipment rental companies if their equipment has a tracking device installed• Install quality fencing with barb wire where necessary• Have alarms installed on fencing and buildings
HEALTH & SAFETY PROGRAM _ _
Section 15 – Environmental Policy Page 1 of 22
Title: Environmental Policy Issue Date: January 2016
Section: 15 Revision Date: N/A
Approved by: Bob Ritzmann, President Signature:
15.1 Policy Statement
Alltrade is committed to conducting its business activities in an environmentally responsible manner. Alltrade recognizes the value of sound environmental practices and the need to comply with all legislative requirements pertaining to the preservation of our environment. Preventative measures and engineering controls are essential in preventing environmental incidents, and preparedness is essential in minimizing the impact on the environment in the event that an unforeseen event occurs. The assessment and control of potential environmental concerns are essential to the maintenance and improvement of our natural world.
15.2 Pre-Construction
During the planning stage, Senior Management may complete a Preconstruction Environmental Checklist, see H&S_FORM_049. The checklist should identify:
• Aspect of the scope of work that represent a reasonable potential for adverse environmental impacts.
• Hazardous materials, reviewing MSDS/SDS and designating storage area and appropriate controls.
• Adjacent land uses that would be especially impacted from storm water runoff, receiving waters and storm and sewer drainage channels.
• Identify potential spills and release and ensure adequate and appropriate clean up supplies and equipment are available on or nearby the project.
Management must hold a pre-construction meeting with Subcontractors to review specific workplace rules related to control of hazardous materials, vehicle washing, housekeeping, inspection of erosion control measures, debris stockpiles, parking and vehicle maintenance areas.
The Preconstruction Environmental Checklist, H&S_FORM_049 must completed in consultation with the EHS Department to identify the need for any special permits, potential impacts on Earth, Air, Water as well as any specific requirements around Hazardous Material use, storage and disposal and Spill Prevention / Preparedness needs. Any areas identified during the preconstruction assessment as not having adequate controls in place must be addressed by Project Management before the project begins. This review is must also take into consideration any work performed by Subcontractors.
Subcontractors must adhere to the same high standards of environmental compliance as Alltrade. Subcontractors must inform Alltrade of all potentially hazardous materials that they may be bringing onto a site. Subcontractors must be able to respond to potential environmental issues related to their work activities. Subcontractors’ environmental responsibilities shall be stated contractually where appropriate.

HEALTH & SAFETY PROGRAM _ _
Section 15 – Environmental Policy Page 2 of 22
15.3 Water Quality and Sediment Retention (General)
The best management practices to prevent damage to water quality should be in place before evidence of erosion and runoff appears. Engineering controls to prevent runoff includes:
• Stabilized site entrance with mud pads, rock spall • Slope stabilization and/or roughing • Runoff diversion • Control volume and water runoff • Construction of sediment and retention ponds • Minimal site disturbance • Mulch and/or seeding disturbed area • Stockpile protection, covered with 6 mm plastic and secured , then circled at the
bottom to catch runoff • Minimizing the amount of time bare soil is exposed
To the extent possible, sediments should be contained on the site.
Whether engineering controls are temporary or permanent (for the duration of the project) it is essential that regular monitoring and maintenance be performed. Engineering controls should also be inspected and maintained after major storms or other changed conditions. Such maintenance should be assigned to a designated worker who has been trained in the implementation and maintenance of engineering controls.
Filter Fabric Fences
Filter fences are suitable to trap small quantities of eroded material but should not be used when the drainage is over one acre. This is unless the fencing in used in conjunction with another drainage system. Filter fabric fences if correctly installed and maintained will normally trap a higher percentage of sediment than other methods.
Procedure
• Fabric should be cut in a continuous roll and attached to metal supports on 1.8m (6’) centres
• Joints are best avoided. If unavoidable joints may be overlapped at least 150 mm (6”) or more
• Trenches should be 300mm x 200mm (12” x 8”) lined with fabric and filled with gravel
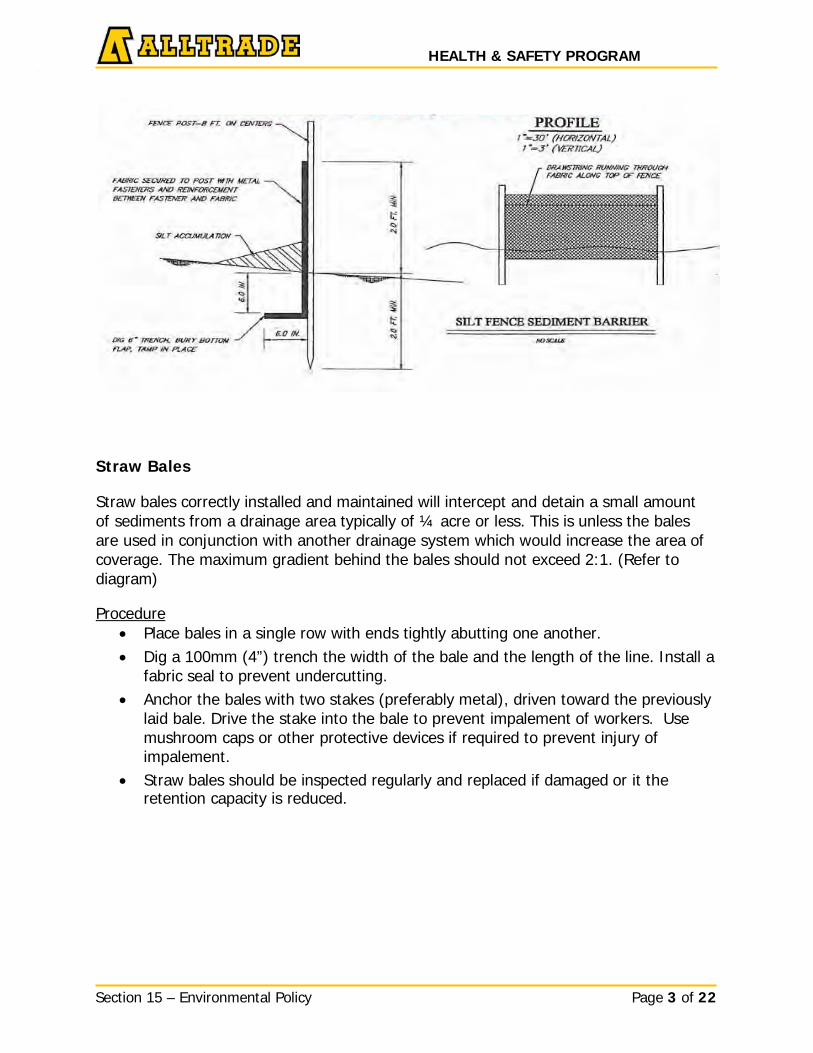
HEALTH & SAFETY PROGRAM _ _
Section 15 – Environmental Policy Page 3 of 22
Straw Bales
Straw bales correctly installed and maintained will intercept and detain a small amount of sediments from a drainage area typically of ¼ acre or less. This is unless the bales are used in conjunction with another drainage system which would increase the area of coverage. The maximum gradient behind the bales should not exceed 2:1. (Refer to diagram)
Procedure
• Place bales in a single row with ends tightly abutting one another. • Dig a 100mm (4”) trench the width of the bale and the length of the line. Install a
fabric seal to prevent undercutting. • Anchor the bales with two stakes (preferably metal), driven toward the previously
laid bale. Drive the stake into the bale to prevent impalement of workers. Use mushroom caps or other protective devices if required to prevent injury of impalement.
• Straw bales should be inspected regularly and replaced if damaged or it the retention capacity is reduced.
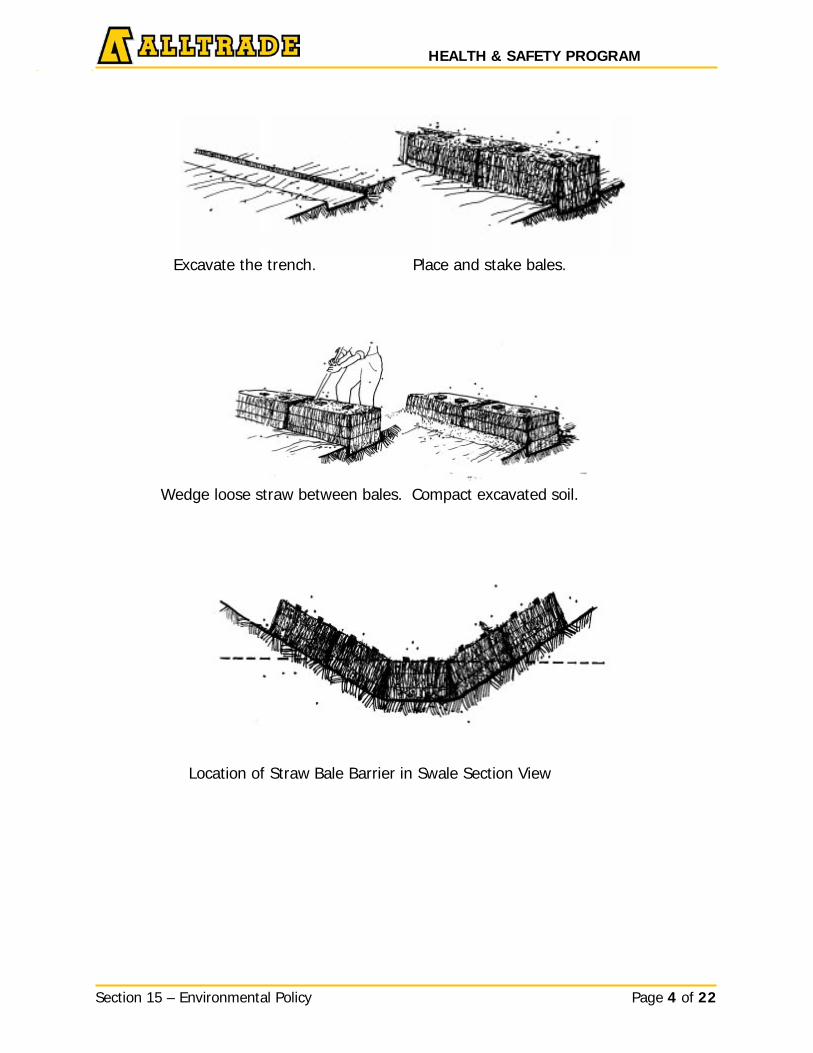
HEALTH & SAFETY PROGRAM _ _
Section 15 – Environmental Policy Page 4 of 22
_ _
Excavate the trench. Place and stake bales.
Wedge loose straw between bales. Compact excavated soil.
Location of Straw Bale Barrier in Swale Section View
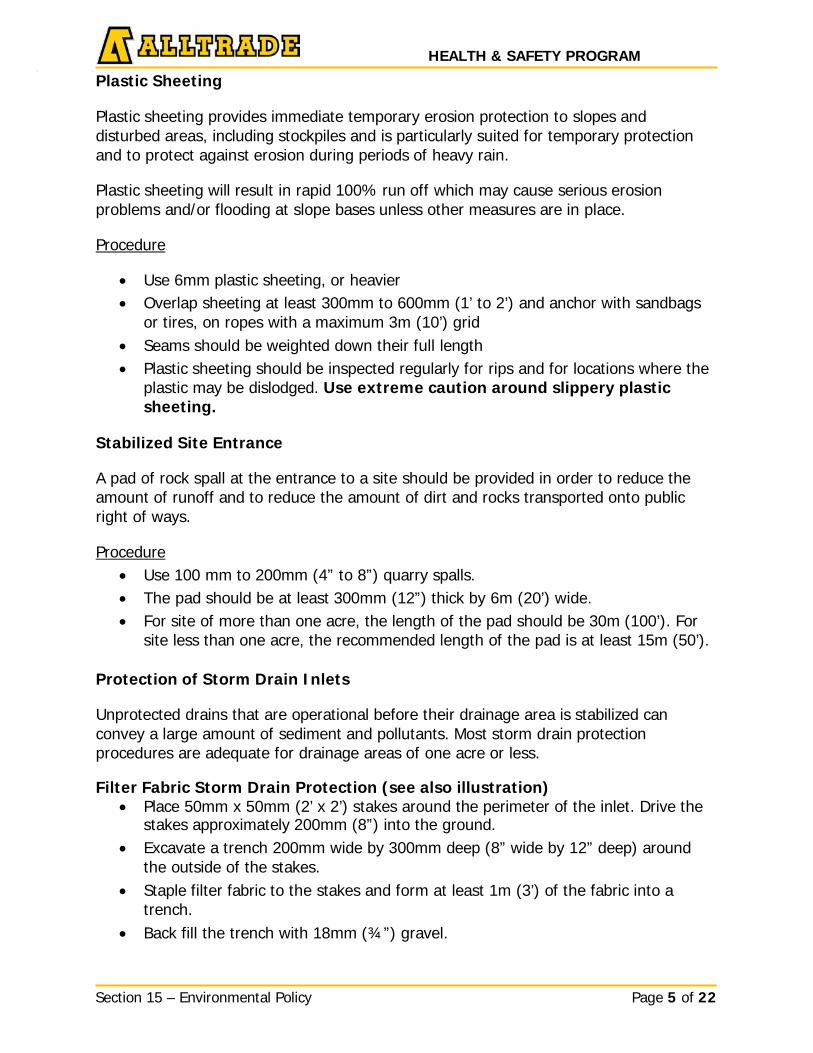
HEALTH & SAFETY PROGRAM _ _
Section 15 – Environmental Policy Page 5 of 22
_ _
Plastic Sheeting
Plastic sheeting provides immediate temporary erosion protection to slopes and disturbed areas, including stockpiles and is particularly suited for temporary protection and to protect against erosion during periods of heavy rain.
Plastic sheeting will result in rapid 100% run off which may cause serious erosion problems and/or flooding at slope bases unless other measures are in place.
Procedure
• Use 6mm plastic sheeting, or heavier • Overlap sheeting at least 300mm to 600mm (1’ to 2’) and anchor with sandbags
or tires, on ropes with a maximum 3m (10’) grid • Seams should be weighted down their full length • Plastic sheeting should be inspected regularly for rips and for locations where the
plastic may be dislodged. Use extreme caution around slippery plastic sheeting.
Stabilized Site Entrance
A pad of rock spall at the entrance to a site should be provided in order to reduce the amount of runoff and to reduce the amount of dirt and rocks transported onto public right of ways.
Procedure
• Use 100 mm to 200mm (4” to 8”) quarry spalls. • The pad should be at least 300mm (12”) thick by 6m (20’) wide. • For site of more than one acre, the length of the pad should be 30m (100’). For
site less than one acre, the recommended length of the pad is at least 15m (50’).
Protection of Storm Drain Inlets
Unprotected drains that are operational before their drainage area is stabilized can convey a large amount of sediment and pollutants. Most storm drain protection procedures are adequate for drainage areas of one acre or less.
Filter Fabric Storm Drain Protection (see also illustration)
• Place 50mm x 50mm (2’ x 2’) stakes around the perimeter of the inlet. Drive the stakes approximately 200mm (8”) into the ground.
• Excavate a trench 200mm wide by 300mm deep (8” wide by 12” deep) around the outside of the stakes.
• Staple filter fabric to the stakes and form at least 1m (3’) of the fabric into a trench.
• Back fill the trench with 18mm (¾”) gravel.
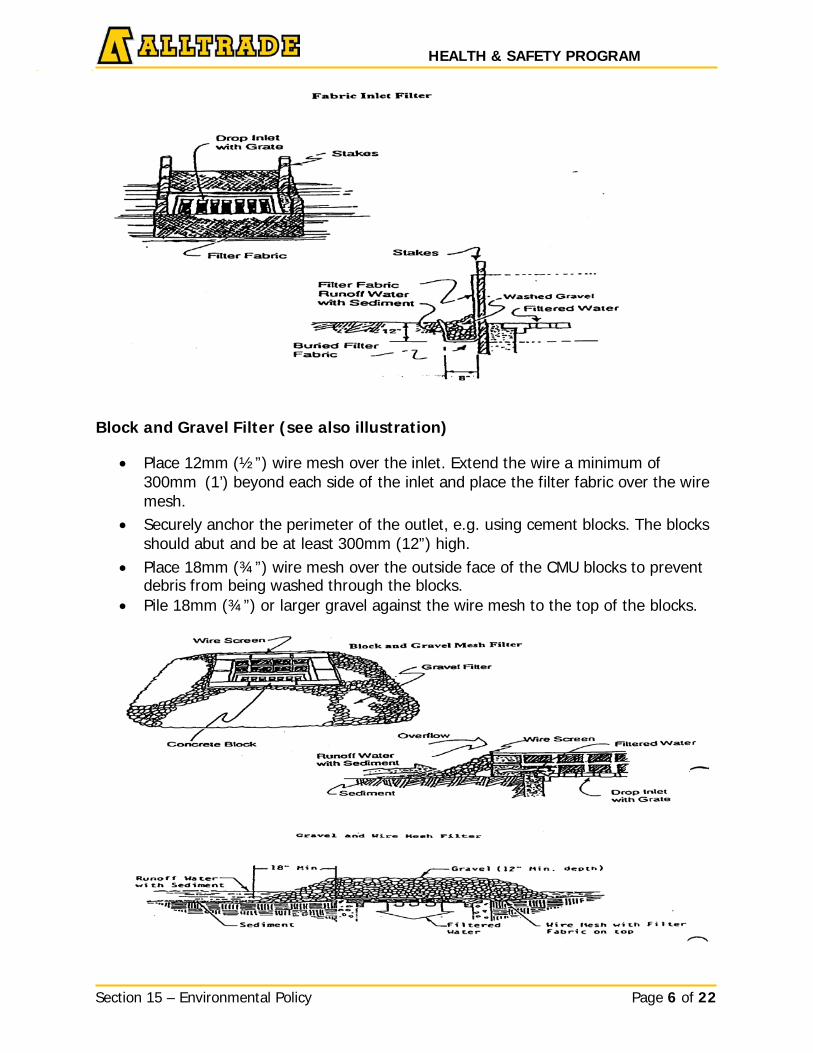
HEALTH & SAFETY PROGRAM _ _
Section 15 – Environmental Policy Page 6 of 22
_ _
Block and Gravel Filter (see also illustration)
• Place 12mm (½”) wire mesh over the inlet. Extend the wire a minimum of 300mm (1’) beyond each side of the inlet and place the filter fabric over the wire mesh.
• Securely anchor the perimeter of the outlet, e.g. using cement blocks. The blocks should abut and be at least 300mm (12”) high.
• Place 18mm (¾”) wire mesh over the outside face of the CMU blocks to prevent debris from being washed through the blocks.
• Pile 18mm (¾”) or larger gravel against the wire mesh to the top of the blocks.

HEALTH & SAFETY PROGRAM _ _
Section 15 – Environmental Policy Page 7 of 22
_ _
15.4 Wastes Requiring Special Management
Demolition and construction debris may contain products that are subject to special regulations. For example, mercury-containing fluorescent lamps, refrigerants containing chlorofluorocarbons (CFC’s), polychlorinated biphenyls (PCB’s) in electric light ballast; tile, roofing and other asbestos-based products, lead paint, silica powder and absorbent products contaminated with oils, hydraulic fluids and hazardous materials.
Storage and Disposal of Construction Debris
• Inspect products for hazardous warning labels. • Segregate potentially hazardous waste products from normal construction debris. • Choose storage areas at least 15m (50’) from any receiving waters. • Inspect material storage areas for signs of leaching. • Discharges from sandblasting, acid washing, painting, vehicle maintenance
should be contained and prevented from discharging into storm drains, sediment ponds or from leaving the site.
• Hazardous material storage areas should be isolated and contained to prevent leaching.
• Concrete truck rinsing areas should not be subject to surface water runoff, or be less than 15m (50’) from a storm drain, open ditch or receiving water.
15.5 Discovery of Contaminated Soils
Reclamation and/or construction activities in or around existing industrial facilities can pose the potential of the discovery of contaminated soils. There are potential health effects and risks due to unprotected exposure to site contaminants such as PCB’s, Volatile Organic Compounds, Mercury, Polycyclic & Aromatic Hydrocarbons and asbestos when activities occur in the soil or ground. Work is further complicated if contaminated soils are discovered as part of the tenant improvements when the public may be exposed.
Contaminated Soil Procedures
If contaminated soil is discovered before commencement or during work and Alltrade is not the cause of contamination, project management will notify the Owner that contaminated soils have been discovered. The Owner will then be responsible for identification, control, removal, and disposal.
We will cease work until it has been confirmed safe to continue.
• In cases where work by Alltrade is the cause of contaminated soil, and where the
contaminant can be positively identified (i.e. hydraulic oil, diesel fuel leaked from operating equipment), follow instructions as identified on the product MSDS/SDS in regard to Personal Protective Equipment and clean up and disposal procedures and complete an incident investigation and spill report as per section the incident investigation section of Alltrade H&S program.
HEALTH & SAFETY PROGRAM _ _
Section 15 – Environmental Policy Page 8 of 22
_ _
• If the contaminant cannot be identified, cordon off the area and contact the Alltrade EHS Department for assistance. The Alltrade EHS department will advise on appropriate sampling and testing protocols required to determine appropriate clean up and disposal procedures.
• Suspected contaminated soils must be isolated and steps taken immediately to isolate and protect the area.
• Do not rely on colour or odour to identify contaminate. • If contaminated soils are discovered in a trench, entry and work should be
treated as a confined space. • Work in the vicinity that may pose an additional hazard must be controlled. • Welding or hot work must be stopped until contaminate is identified. • All persons who come in contact with any suspected contaminate must report it
to the supervisor. • Workers required to work in the area shall wear appropriate PPE as identified by
the MSDS/SDS or as directed by the EHS Dept. • Vehicles must be prevented from spreading soils suspected of being
contaminated. • All contaminated soils must be placed in sealed containers (barrels, lined
dumpster/truck) or stockpiled in such a way as to prevent leaching. • The containers must be labeled as contaminated soils
• Project Management must arrange for shipping and disposal as outlined in “Disposal of Hazardous Materials”
• No eating, Drinking or smoking in the cordoned off areas • Workers must remove protective clothing before leaving the affected area and
thoroughly wash with soap and water before eating, drinking or smoking. • Continual air monitoring may be required dependent upon the contaminant to
monitor for explosive atmospheres or concentrations of contaminants at unacceptable levels. Contact EHS Dept. for guidance.
Collecting Soil Samples
Following relatively simple procedures, soil sampling may be conducted by a competent person on the site, as follows: 1. Prepare a map or sketch of the suspected contaminated area. 2. Select one or more representative samples and mark the sample sites on the map or
sketch. 3. Dig down at least 300mm (12”) and collect soil that is relatively free of rocks. 4. Put the soil sample in a clean 1.1 litre (1 qt.) glass container and identify the sample
site. 5. Transport the sample to a test facility.
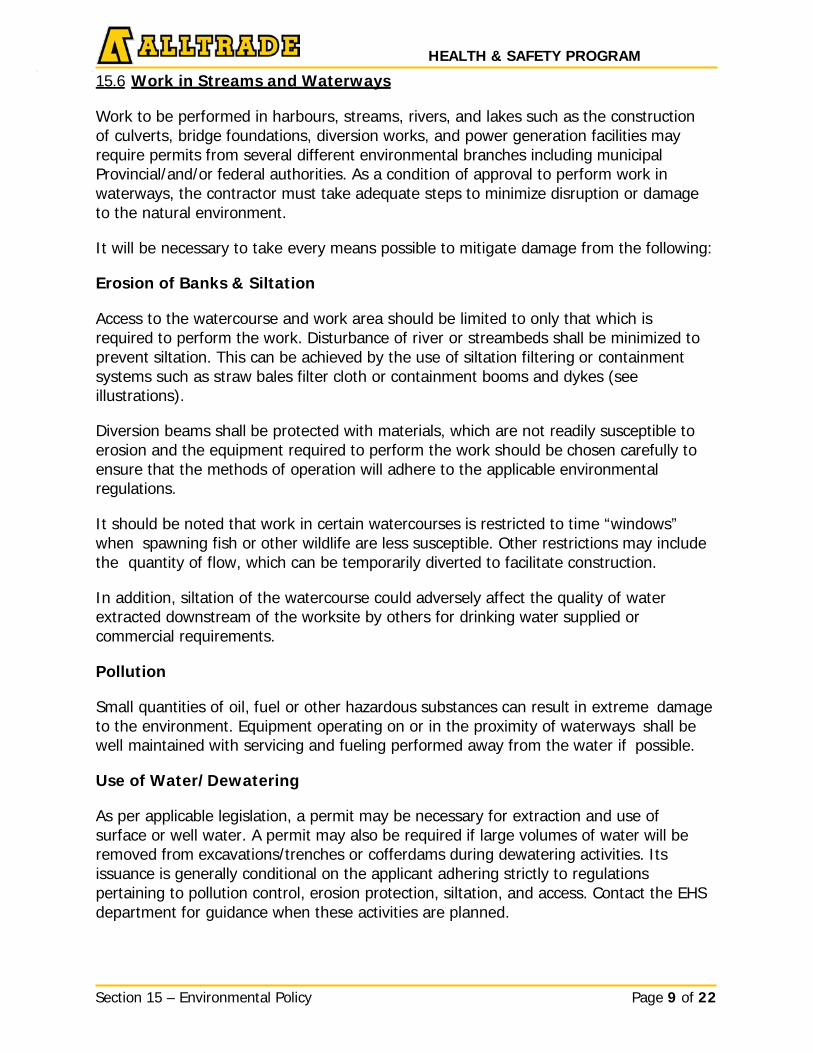
HEALTH & SAFETY PROGRAM _ _
Section 15 – Environmental Policy Page 9 of 22
_ _
15.6 Work in Streams and Waterways
Work to be performed in harbours, streams, rivers, and lakes such as the construction of culverts, bridge foundations, diversion works, and power generation facilities may require permits from several different environmental branches including municipal Provincial/and/or federal authorities. As a condition of approval to perform work in waterways, the contractor must take adequate steps to minimize disruption or damage to the natural environment.
It will be necessary to take every means possible to mitigate damage from the following:
Erosion of Banks & Siltation
Access to the watercourse and work area should be limited to only that which is required to perform the work. Disturbance of river or streambeds shall be minimized to prevent siltation. This can be achieved by the use of siltation filtering or containment systems such as straw bales filter cloth or containment booms and dykes (see illustrations).
Diversion beams shall be protected with materials, which are not readily susceptible to erosion and the equipment required to perform the work should be chosen carefully to ensure that the methods of operation will adhere to the applicable environmental regulations.
It should be noted that work in certain watercourses is restricted to time “windows” when spawning fish or other wildlife are less susceptible. Other restrictions may include the quantity of flow, which can be temporarily diverted to facilitate construction.
In addition, siltation of the watercourse could adversely affect the quality of water extracted downstream of the worksite by others for drinking water supplied or commercial requirements.
Pollution
Small quantities of oil, fuel or other hazardous substances can result in extreme damage to the environment. Equipment operating on or in the proximity of waterways shall be well maintained with servicing and fueling performed away from the water if possible.
Use of Water/Dewatering
As per applicable legislation, a permit may be necessary for extraction and use of surface or well water. A permit may also be required if large volumes of water will be removed from excavations/trenches or cofferdams during dewatering activities. Its issuance is generally conditional on the applicant adhering strictly to regulations pertaining to pollution control, erosion protection, siltation, and access. Contact the EHS department for guidance when these activities are planned.
HEALTH & SAFETY PROGRAM _ _
Section 15 – Environmental Policy Page 10 of 22
_ _
15.7 Hazardous Materials – Storage, Handling & Disposal
• Storage areas for fuel containers or other hazardous material shall be situated in a location that is not susceptible to accidental damage as a result of construction operations.
• All bulk storage for Hazardous liquids will be contained in tanks with double wall protection or have secondary containment adequate to hold the volume of product being stored.
• Spill kits will be maintained in close proximity to storage areas. • Adequate Fire Extinguishers will be located in close proximity to storage areas. • The areas shall be regularly inspected. • All leaks or spills shall be isolated, contained, and cleaned up. • Spills shall be reported immediately to the project manager. • Storage of fuel and other flammable or otherwise hazardous material shall be in
accordance with specific information provided on the product MSDS/SDS, client requirements workplace-specific and applicable regulations.
Handling
Any workers that are required to handle or otherwise work with Hazardous Materials must be:
• Trained in WHMIS 2015 • Must Review the MSDS/SDS for the product in use • Be made aware of the potential health effects from overexposure • Instructed on the Personal Protective Equipment required to prevent exposure • Instructed in the controls necessary for the safe use of the product • Instructed in contingency plans in the event of an uncontrolled release • Instructed in proper storage and disposal methods
Disposal
Disposal of Hazardous Materials/Waste is regulated by the applicable environmental authorities in the jurisdiction in which work is performed. Project management is responsible to ensure that all legislative requirements for the disposal of hazardous materials/waste are identified and followed including transportation.
General Requirements for Disposal
• All workers required to handle hazardous materials/waste must be trained on
handling and disposal requirements. • All waste storage areas must be configured to prevent leaking/leaching of
material. • Appropriate signage must be provided to identify the hazards.
HEALTH & SAFETY PROGRAM _ _
Section 15 – Environmental Policy Page 11 of 22
_ _
• Wastes must be segregated as per manufacturer’s requirements to preventreactive hazards (as per MSDS/SDS).
• Only licensed waste disposal contractors that have been prequalified may behired to remove and dispose of Hazardous materials/waste from the project.
• In client owned workplaces, all shipping of Hazardous Materials/waste must bepreapproved.
• All shipping documentation/manifests must be signed by a client representativeand copies kept by both Alltrade and client representatives.
• In Alltrade owned workplaces, only employees with Transportation of DangerousGoods qualifications may develop and sign shipping manifests. Copies of whichmust be maintained by the applicable project manager.
Waste Water Handling and Disposal
Standard
The content of any wastewater should be known before discharging. If the contents of the wastewater are hazardous (toxic, corrosive, flammable, etc.), the wastewater needs to be disposed of in a facility authorized to dispose of hazardous waste. All necessary precaution for the protection of employees who may have to handle waste water will be taken
Procedure • All disposal of waste water must be coordinated with the project owner. Disposal
must be in accordance with applicable permits issued for the project • Any employees involved in the disposal of wastewater will be trained on the
necessary precautions for safe handling and administrative requirements fordisposal
• Dependent upon characteristics of the waste water as identified by testingPersonal protective equipment such as face, hand, body/trunk protection,respiratory protection will be used as deemed necessary by the Supervisor
Consult the EHS Department for guidance in regard to testing and PPE selection.
Spill Contingency
Where the contract involves the supply and/or handling of fuel, oil, chemicals or other hazardous materials, the workplace/project shall ensure that an emergency clean-up program is in place in event of a spill. An overall spill contingency plan shall be prepared to cover the particulars of that project and shall include, but not be limited to the following:
• Identification of hazardous materials on site and review of the MSDS/SDS.• Establishment of a spill reporting process:
HEALTH & SAFETY PROGRAM _ _
Section 15 – Environmental Policy Page 12 of 22
_ _
o Ensure immediate safety of all persons in case of flammable or toxic spills.
o Advise immediate supervisor of incident who will in turn advise the ProjectManager.
o The Project Manager will notify the appropriate regulatory authority, EHSand/or the Project Owner.
o Identify areas with high potential for spill, i.e., fuel depots, oil storagetanks, etc.
• Methods of containment of facilities with the potential for spills, i.e. constructionof an impervious or concrete storage platform, earth containment dykes, andpolyethylene lined ditches or collection booms.
• Development of a spill response contingency plan, i.e., identify person or personsin charge of operation, formalization and posting step-by-step proceduresincluding agencies and telephone numbers to be notified, protective clothing andequipment to be used.
• Training of workers in spill containment and clean up.• Periodically inspect spill kits or emergency response items to maintain availability.• Review, amend, and update plan as required.
Emergency Response – Hazardous Material Spill
A spill is a discharge of a contaminated or hazardous material into the natural environment, from or out of a structure, vehicle or other containers which is abnormal in quality or quantity in light of the circumstances of the discharge.
Spills are defined under the Provincial/and/or federal Environment Acts as follows, but are not limited to:
• Spills from containers including drums and tanks• Spills from motor vehicle accidents• Spills resulting from breaks in hydraulic hoses or piping
In order to comply with these Acts, it is Alltrade’s responsibility to prevent spills and if a spill does occur, it is our responsibility to have the spill cleaned up and restore the environment to its original state where possible.
Notification
• Depending on the spill – the environmental authorities or other legislative bodyshall be notified (consult with the EHS Department)
• Alltrade Senior Management.
The Project Manager shall complete the Spill Report Form, H&S_FORM_050, within 24 hours of the occurrence and return to the EHS Department.
HEALTH & SAFETY PROGRAM
Section 15 – Environmental Policy Page 13 of 22
Note
In addition to completing the Hazardous Material Spill Report, a complete accident investigation shall be completed for major spills.
Follow accident investigation policy and procedures in this Manual (see Section: Accident/incident Investigation).
Initial Response
Alltrade has adopted the following response plan for all its worksites to reduce any effects of a spill.
• Immediately notify any personnel in the area of the spill and notify thesupervisor.
• The supervisor will immediately notify the EHS Department and if externalassistance is required the Local Environment Emergency Response Line (as perthe site emergency plan).
• Identify the source of the spill and the direction of flow.• Attempt to identify the spilled material prior to handling the material and attempt
to terminate the spill, only if it is safe and practicable to do so. If unsure of theidentification assume the spilled material is dangerous.
• Extinguish all sources of ignition.• Ensure the health and safety of workers in the immediate area of the spill. All
workers who are not involved in the spill containment or cleanup shall be keptaway from the spill area. Avoid skin or eye contact with the spilled material. Avoidthe area and stay upwind if fumes are present.
• Protect adjacent sensitive areas such as storm drains.
Secure the Site
• Stop construction activity in the area• Prevent access by unauthorized persons• Remove or disable potential sources of ignition (for fuel/oil spills)• Protect adjacent sensitive areas such as storm drains
Containing the Spill
On Land • Excavate a trench or construct a berm downhill of the spill.• The trench or berm should be lined with plastic if available.• Alternatively, absorbent booms can be placed downhill of the spill. However, the
booms will need to be monitored closely for seepage.• Once the spill is contained, the spilled product if quantities permit, can be
pumped to drums or to a tank.
HEALTH & SAFETY PROGRAM _ _
Section 15 – Environmental Policy Page 14 of 22
_ _
• If the spilled product is in a quantity that cannot be pumped, loose absorbentmaterial or absorbent pads should be placed on the product.
• Apply absorbent material from the downhill portion of the spill and work up to thesource.
• Loose absorbent material should be mixed into the spill with shovels.• Replace the absorbent as it is spent (usually indicated by a colour change in the
absorbent).• Spent absorbent should be placed in 205 litre (45 gallon) drums with removable
lids and with clamps until arrangements can be made for disposal.
In Snow
• Excavate the contaminated snow and place the snow in salvage drums or in alined lugger box.
• If the snow melts, apply absorbent material or pads to collect the spilled product.• The remaining water will require testing prior to disposal.
Into Water
• An absorbent boom shall be placed downstream of the entry point of the spill.• Once the boom contains the spill, it can be pumped into 205 litre (45 gallon)
drums or to a storage tank.• In still or slow moving water, it may be possible to deploy absorbent pads to
remove the spilled material as described in the “On Land” section above.
In/on Ice-Covered Water
• All attempts shall be made to prevent spills from entering ice-covered water.• If a spill to ice-covered water does occur, attempt to cut slots, angled to the
shore, downstream of the spill as required to collect the spilled product.• Apply a boom(s) or absorbent pads as “On Land” section above. If it is not safe
to cut ice, break up and remove the ice downstream of the spill and apply aboom(s) or absorbent pads as described in "On Land” section.
Spill Clean-up
• Transfer spilled substance to tanks or drums• Transfer contaminated soil/water to drums (small spill)• Create stockpiles of contaminated soils, protected to prevent leaching• Transfer used sorbents to drums
Note: Storage tanks and drums shall be stored on site in a secure or restricted area until arrangements can be made for the disposal of the contents.
Section 15 – Environmental Policy Page 15 of 22
HEALTH & SAFETY PROGRAM _ _
Waste Disposal
• In accordance with applicable legislation• Take samples for analysis• Arrange disposal through a licensed disposal/haulage agent• Ensure chain of custody and manifest documentation generated and retained
Disposal of Non-Hazardous Waste & Surplus Material
Water excavated materials should be disposed of in areas designated or approved by applicable government authorities. Contamination of surface and ground water as a result of the location or operation of the spoil site should be avoided.
Measures are to be taken to ensure that siltation and/or erosion of materials disposed or stockpiled does not occur. Temporary ditches, seeding or other siltation prevention methods outlined elsewhere readily prevent this.
Littering on the project will be prohibited. Collect and disposed of other waste and debris to an approved regulated landfill or incinerator. A permit may be required from the community receiving the waste material.
15.8 Burning and Forest Fire Prevention
Burning of construction refuse including but not restricted to trees, branches, waste wood, or construction materials shall only be undertaken in accordance with the conditions and requirements of a burning permit issued by the applicable authorities and shall, in all cases, comply with the requirements of applicable forest fire prevention practices.
Any burning shall comply with applicable fire codes for the area.
15.9 Urban Forests – Tree Protection
Standard
This guideline is established to protect our urban forests from damage during construction work activities.
Check with the local municipality for details within their jurisdiction.
Procedure
Establishing a Tree Protection Zone
The following chart shows minimum required distances for determining a Tree Protection Zone. Some trees and some site conditions may require a larger Tree Protection Zone.
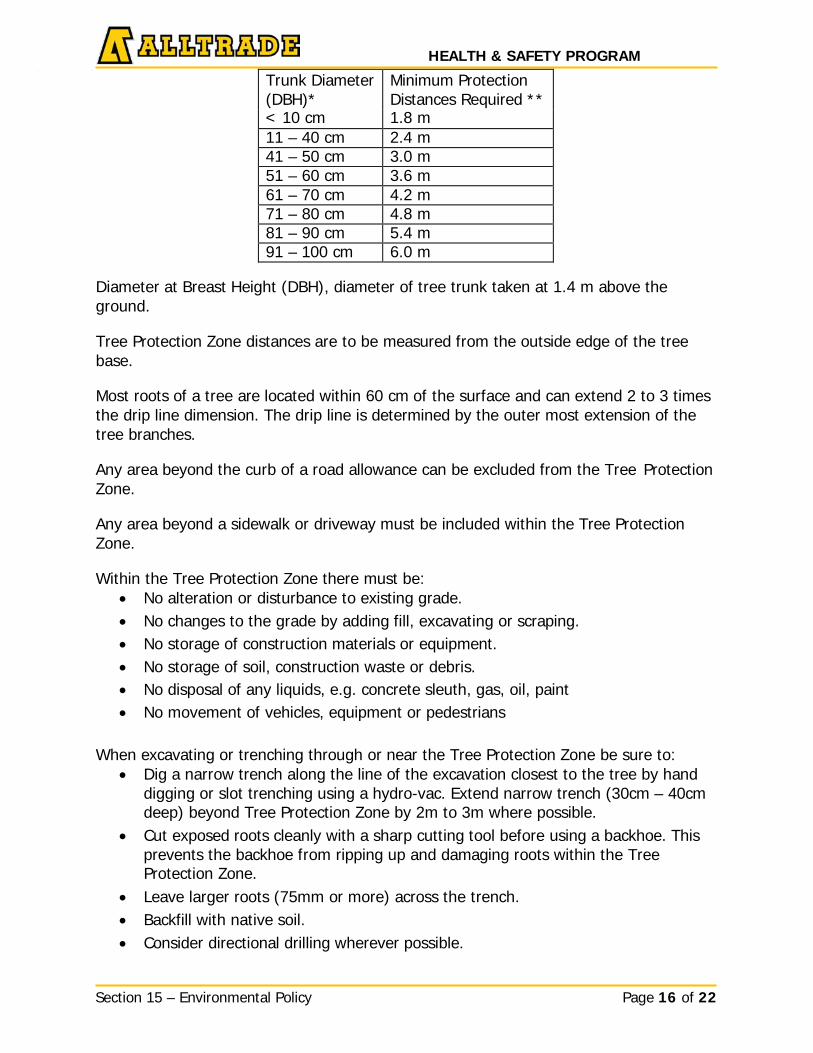
Section 15 – Environmental Policy Page 16 of 22
HEALTH & SAFETY PROGRAM _ _
Trunk Diameter (DBH)*
Minimum Protection Distances Required **
< 10 cm 1.8 m 11 – 40 cm 2.4 m 41 – 50 cm 3.0 m 51 – 60 cm 3.6 m 61 – 70 cm 4.2 m 71 – 80 cm 4.8 m 81 – 90 cm 5.4 m 91 – 100 cm 6.0 m
Diameter at Breast Height (DBH), diameter of tree trunk taken at 1.4 m above the ground.
Tree Protection Zone distances are to be measured from the outside edge of the tree base.
Most roots of a tree are located within 60 cm of the surface and can extend 2 to 3 times the drip line dimension. The drip line is determined by the outer most extension of the tree branches.
Any area beyond the curb of a road allowance can be excluded from the Tree Protection Zone.
Any area beyond a sidewalk or driveway must be included within the Tree Protection Zone.
Within the Tree Protection Zone there must be: • No alteration or disturbance to existing grade.• No changes to the grade by adding fill, excavating or scraping.• No storage of construction materials or equipment.• No storage of soil, construction waste or debris.• No disposal of any liquids, e.g. concrete sleuth, gas, oil, paint• No movement of vehicles, equipment or pedestrians
When excavating or trenching through or near the Tree Protection Zone be sure to: • Dig a narrow trench along the line of the excavation closest to the tree by hand
digging or slot trenching using a hydro-vac. Extend narrow trench (30cm – 40cm deep) beyond Tree Protection Zone by 2m to 3m where possible.
• Cut exposed roots cleanly with a sharp cutting tool before using a backhoe. Thisprevents the backhoe from ripping up and damaging roots within the TreeProtection Zone.
• Leave larger roots (75mm or more) across the trench.• Backfill with native soil.• Consider directional drilling wherever possible.

Section 15 – Environmental Policy Page 17 of 22
HEALTH & SAFETY PROGRAM _ _
Tree Protection Barriers
A tree protection barrier may be installed for trees on private property situated on or adjacent to construction site work or for protection of municipally owned trees. Consult with your jurisdiction for details.
• Tree Protection Barriers must be 2.8 m high (9.2 ft), plywood clad hoarding or anequivalent material.
• On a road allowance where visibility must be maintained tree protection barriersmay consist of 1.2 m (4 ft) high orange plastic web snow fence on a wooden 2” x4” frame.
• Where some excavated material or fill has to be temporarily located near a TreeProtection Barrier, plywood must be used to ensure no material enters the TreeProtection Zone.
• All supports and bracing should be outside the Tree Protection Zone. All suchsupports should minimize damage to roots. Underground utility locates must beobtained before support stakes are driven into the ground.
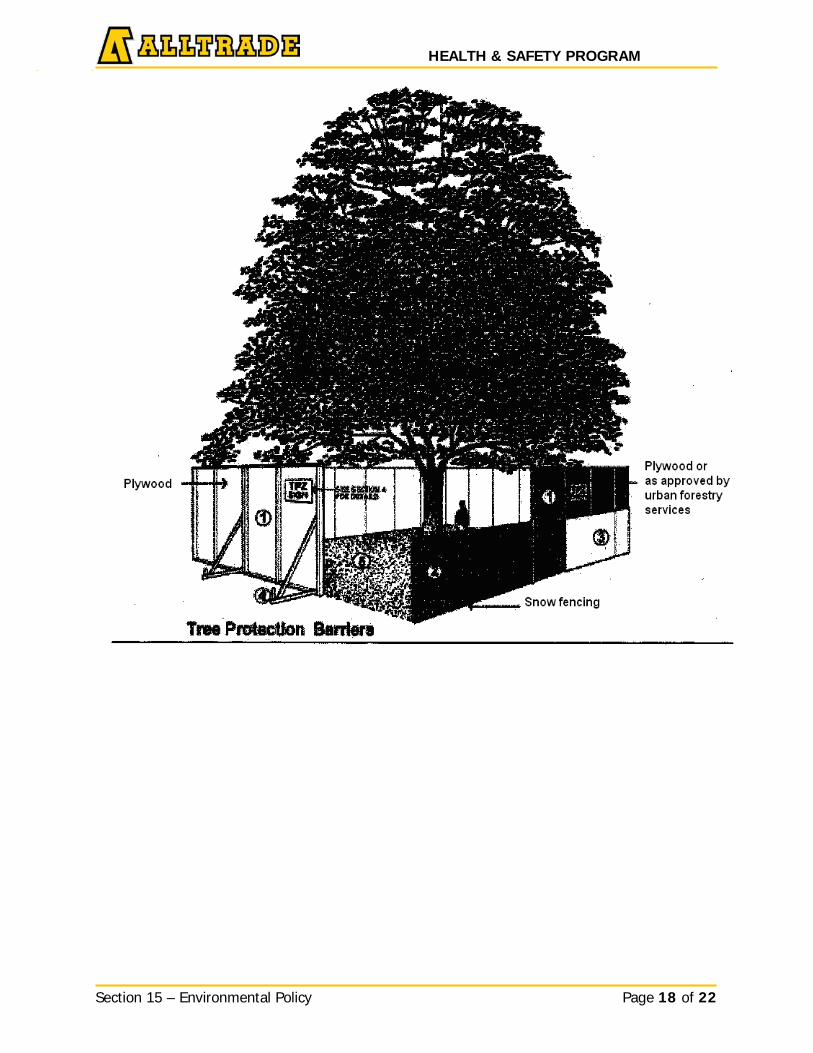
Section 15 – Environmental Policy Page 18 of 22
HEALTH & SAFETY PROGRAM _ _ _ _
Section 15 – Environmental Policy Page 19 of 22
HEALTH & SAFETY PROGRAM _ _ _ _
15.10 Worker Education and Training
Worker Education and Training Programs are intended to show workers how to understand and use the WHMIS/HazMat labels, MSDS/SDS, and other information.
General Training
• Information on supplier and workplace labels and what it means.• Information on the MSDS and what it means.• How chemicals enter the body and what effects they have on the body.• Principals for the control of hazardous materials, and procedures for their safe
use, handling, and storage.• Special procedures for use, and handling of hazardous materials in pipes, process
vessels, tanks, conveyor systems, etc.• How to deal with fugitive emissions, e.g. escaping fumes vapours, etc.• What to do in emergencies where hazardous materials are involved.
Specific Training
• What hazardous materials are present in the workplace, and where are theyused and stored?
• What levels of exposure to each hazardous material are being experienced byworkers?
• What kinds of controls are being used to isolate the materials from workers orworkers from the material and how effective are they?
• What are the existing procedures for disposal of hazardous wastes?• What are the details of emergency plans for dealing with spills, leaks, fires,
explosions?• Where and when is personal protective equipment used, how are workers trained
in its use and maintenance, and what are its limitations?
Planning, Delivery and Review of the Worker Education and Training
• Every worker education program must be workplace specific. In other words, itmust answer the questions outlined above in the section on contents of specificeducation.
• The worker must be able to apply the information from the program to protecthis/her own health and safety.
• There may have been changes in the process or other procedures involvinghazardous materials, or new information may have been discovered about ahazardous material. In all these situations a review and updates incorporated asrequired.
HEALTH & SAFETY PROGRAM _ _
Section 15 – Environmental Policy Page 20 of 22
_ _
15.11 Material Safety Data Sheets /Safety Data Sheets (MSDS/SDS)
The data sheet or MSDS/SDS is the backup to the label. The label alerts a worker with a brief profile of a hazardous material. The MSDS/SDS contains detailed information about the product.
The MSDS/SDS contains important added data on: • Health risks of exposure;• The safest method of using or storing and disposal of the material;• Protective measures for workers who may be exposed; and• Emergency procedures.
The format or design or order of the MSDS/SDS is not laid down in the law, but it must provide ten separate categories of information. The ten categories are listed and explained in the following.
MSDS Contents
Ten categories of information are required on a MSDS/SDS whether developed by the supplier, or the employer for workplace produced products. The categories are as follows: 1. Hazardous Ingredients2. Preparation Information3. Product Information4. Physical Data5. Fire or Explosion Hazard6. Reactivity Data7. Toxicological Properties8. Preventive Measures9. First Aid Measures10. Proper Disposal Methods
In addition to these categories, the supplier or employer must include any other hazard information of which he should be aware.
Much of the information provided in the MSDS/SDS is of technical nature, and is addressed primarily to engineers, occupational hygienists, fire fighters, emergency co-coordinators and others who may be directly involved in the planning of controls and procedures for the treatment of emergencies involving the material. All employees in the workplace should have an understanding of this information to protect their own health and safety.
Because the MSDS/SDS is an important starting point for developing a control program, it is important to understand the significance of the information contained in each category or section.
HEALTH & SAFETY PROGRAM _ _
Section 15 – Environmental Policy Page 21 of 22
_ _
Location of the MSDS/SDS
A MSDS/SDS for each hazardous material present in the workplace must be available at the worksite to be read by any worker who may be exposed to or a worker who would like to review a hazardous material. Usually, the information on a single hazardous material takes up more than one sheet of paper. Alltrade workplaces keep the sheets in a loose-leaf binder(s). The MSDS/SDS must also be available to members of the Joint Health and Safety Committee.
An MSDS/SDS may also be made available in electronic form via a computer terminal; provided the terminal is maintained in working order and workers are trained to use it. However, paper copies of the MSDS/SDS will be made available for anyone who requests it in that form.
Language of the MSDS/SDS
Each MSDS/SDS must be available in English and in any other language prescribed.
15.12 Environmental De-Mobilization
Alltrade’s sustainable environmental commitment must continue during the demobilization period on every project. The following safe work practice is designed to assist supervisors and educate workers in determining the proper disposal procedure for hazardous products during the demobilization period. The purpose of this practice is also to ensure all products whether destined for disposal or re-use are transported in accordance to the Transportation of Dangerous Goods Act and are disposed of according to the MSDS/SDS.
Supervisors must ensure that any product regulated by the Transportation Dangerous Goods Act is not placed or stored in any tool box, gang box or sea container destined for offsite shipping unless the truck/transport is licensed to haul hazardous waste accordingly.
Supervisors must also ensure that in the event that regulated goods are being transported that a qualified person is assigned the duties of preparing the Dangerous Goods and the associated paperwork for shipment.
Demobilization Preparation Steps • Establish a Hazardous Waste Drop off center where products can be placed onsite (if
possible). • Establish spill kits and fire extinguishers in close proximity of the drop-off area.• Review the MSDS/SDS for Regulatory Disposal procedure and the PPE use during
disposal. Train all workers to these steps.• Ensure all containers are marked with a proper WHMIS label.• Log all products destined for disposal, see Hazardous Waste Disposal Inventory
Form H&S_FORM_051.• Provide the MSDS/SDS for all hazardous waste products destined for disposal to
the licensed hauler.
HEALTH & SAFETY PROGRAM
Section 15 – Environmental Policy Page 22 of 22
15.13 Energy Conservation and Carbon Emission Reduction
Anti-Idling
Vehicle and equipment idling times will be reduced whenever possible in order to lower fuel consumption and subsequently, carbon emissions. Operators are to communicate with supervisors about the timing requirements of the equipment and turn equipment off where practical.
Cab Heaters
Operators are to make use of installed cab heaters over idling engines to provide heat into vehicles.
Engine Tracking Technology
Machinery and equipment may utilize tracking technology in order to ensure engines are running efficiently and properly.
Light Emitting Diode Lighting
Use Light Emitting Diode (LED) lighting over incandescent bulbs. LEDs unlike ordinary incandescent bulbs have no filament. They require less energy, produce less heat and last an average six times longer than incandescent bulbs.
Air Conditioning
Turn vehicle air-conditioning units off when not required. Air-conditioning systems draw loads from engines that reduce fuel economy and increase carbon emissions. Adjust room temperatures when possible to reduce electrical demands or diesel demands when in use of generators.
HEALTH & SAFETY PROGRAM _ _
Section 16 – Subcontractors / Suppliers Page 1 of 6
Title: Subcontractors / Suppliers Issue Date: January 2016
Section: 16 Revision Date: January 2018
Approved by: Bob Ritzmann, President Signature:
16.1 Policy Statement
Alltrade is committed to cooperating in safety, accident control and responsible environmental practices with all Subcontractors and Suppliers. Alltrade is concerned that those accidents involving Subcontractors or Suppliers can injure workers, have adverse environmental effects, cause job disruptions, and delays that impact Alltrade.
16.2 Subcontractor Environmental Health and Safety Requirements
Standard
All subcontractors, suppliers, and other contractors employed on an Alltrade project are responsible to ensure all work is carried out in compliance with, but not limited to the Occupational Health and Safety Act, Alltrade’s H&S Policies, and Client site specific policies as required.
Noncompliance
In the event of non-compliance with any of the above mentioned polices the following may occur:
• Subcontractors and all related work by their subcontractors/suppliers may besuspended
• Workers, supervisors, and contractors may be removed from the site• Contractors may be subject to monetary back charges that are associated with
the delays and completion of the work• Be responsible for any fines or charges levied against Alltrade due to the
legislative noncompliance• Notifications of non-compliance may be documented on the
Subcontractor/Supplier Health and Safety Order to Comply (H&S_FORM_053) orthe Subcontractor Clean Up Notification (H&S_FORM_052).
Documentation & Records of Training (ROT)
All subcontractors and suppliers must provide (at a minimum) the following documentation prior to arriving onsite:
• Health and Safety program• Certificate of good standing of insurance or the required compensation authority• Provide proof of workers compensation coverage in applicable jurisdictions• All MSDS/SDS for products expected to be used onsite during the scope of
work• Any forms as required for proof of registration with the applicable labour
authority• Proof of insurance- WSIB coverage
HEALTH & SAFETY PROGRAM _ _
Section 16 – Subcontractors / Suppliers Page 2 of 6
• Complete the Health and Safety Prequalification package• Site specific working at heights plan, or other specialized plans as required.
All contractors must supply proof of training for all workers prior to starting work. Workers unable to provide valid records of training will not be permitted to work. Examples of such documentation includes:
• Trades specific qualification or College of Trades Certificate (yearly)• WHMIS/2015 (yearly)• Working at Heights (every 3 years)• Specific Elevated Work Platform Training (every 3 years)• First Aid (every 3 years)• Forklift (every 3 years)• Confined Space (yearly)• Traffic Control (every 3 years)• Equipment Operating License (contact EHS department)• Other specific training as required• Alltrade general orientation and/or site orientation
Personnel Obligations
All subcontractors are to ensure that Alltrade is aware of all individuals onsite performing work at any given time using Site Sign In-Out (H&S_FORM_001). Subcontractors are obligated to ensure that there is a competent supervisor onsite to ensure all work is conducted in a safe manner and in compliance with Alltrade H&S policies and applicable legislative requirements.
All contractors, subcontractors, and suppliers are responsible to ensure all workers performing work are a competent worker, and ensure they have training to adequately perform their work and other functions as applicable.
Should a worker from a subcontractor be selected by the workers to participate in any joint health and safety committee, worker trades committee, or other safety committee as required, they are to ensure full cooperation with the required process.
Accident / Incident / Safety Opportunity
All subcontractors must notify Alltrade of any accident, incident, or Safety Opportunities that occurs on the day of the event.
• All contractors must conduct an accident/incident investigation and submit anadequate report within 24hours.
• The report must detail the cause of the accident/incident/safety opportunity,underlying causes that contributed and appropriate corrective actions that will beimplemented to prevent recurrence.
• Contractors must have an active Return to Work Program (modified duty) for anyindividual that may sustain an injury.
• Be held liable for any damage or cost associated with, or arising from theincident.
HEALTH & SAFETY PROGRAM
Section 16 – Subcontractors / Suppliers Page 3 of 6
Subcontractor Accident / Incident Occurrence Notice
Accidents / incidents that occur in Alltrade workplace, that are a result of, or involve, contractors and no Alltrade employees or property, require a documented report be submitted to Alltrade within 24 hrs.
Guidelines for Use
• The Subcontractor Accident / Incident Occurrence Notice is used to documentand identify key information regarding the incident for internalcommunicationprior to the submission of a formal report from the contractor.
• This report may also be used to communicate the fundamental informationregarding a subcontractor event to a client or Constructor / Prime Contractorwhere required.
Note: Subcontractors are not permitted to complete an investigation report using the standard Alltrade reporting forms or format.
Training & Orientation
All contractors, subcontractors, and suppliers are to participate in any orientation or training as may be required. Such training may include:
• H&S Program training• Site orientation• Specialized site, or in plant programs including, but not limited to: hazardous
substances, working at heights, confined space, infection control etc.
Personal Protective Equipment (PPE)
All contractors, subcontractors, and suppliers shall wear the mandatory PPE required on any project. At a minimum, all individuals shall wear:
• Basic clothing (full legged pants, and shirts with a sleeve)• CSA/ANSI approved work boots as applicable.• CSA/ANSI approved eye protection• CSA/ANSI approved head protection• Any other PPE as deemed necessary by the project or Alltrade
Equipment, Tools, Machinery
All contractors, subcontractors, and suppliers are responsible to ensure all equipment is safe for use. All equipment and machinery shall be operated in accordance with the applicable legislative requirements, manufactures guidelines, safe work practices and site specific policies. Any deviation of practice must be approved by a certified engineer, or approval from the manufacturer in writing.
HEALTH & SAFETY PROGRAM
Section 16 – Subcontractors / Suppliers Page 4 of 6
All equipment, tools and machinery shall be maintained as per manufacturer’s instructions. All equipment and machinery shall be safe for use, and in good operating condition. Any equipment over 10 HP, including vehicles, elevating work platforms, zoom boom, cranes, welders, etc. must have:
• Operators Manual• Maintenance records• Daily inspection records• Installation inspection by a qualified person if applicable
Any piece of equipment, machinery, or tool deemed not fit for use by Alltrade will be isolated, tagged, and or removed immediately from site.
Safe Work Procedures & Job Safety Analysis (JSA)
Contractors will be required to provide a safe work procedure and JSA for any high risk operation, or operations designated by Alltrade. JSA’S must be supplied to and reviewed by Alltrade before the work may commence. Operations requiring a JSA includes, but are not limited to:
• Confined Space Entry• Lock & Tag Out procedures• Use of highly toxic products (i.e. Solvents & oil base paints)• Live electrical work• Hoisting and rigging operations• Working near overhead power lines• Testing, commissioning, and shut down of pressurized systems• High pressure liquids/gas systems• Hydro testing/high pressure• Cutting into existing lines & tanks• Traffic control• Excavation• Working at Heights• Working with gases present• Demolition• Use of explosives• Working around water
Any such operation not able to provide such documentation upon request will be halted until they are in compliance with site policies.
Field Level Risk Assessment (FLRA) & Tool Box Talks
All contractors, subcontractors, and suppliers will be required to perform a Field Level Risk Assessment on a daily basis. The FLRA assessment will be provided to Alltrade and must be available upon request.

HEALTH & SAFETY PROGRAM
Section 16 – Subcontractors / Suppliers Page 5 of 6
All contractors, subcontractors, and suppliers must complete tool box talks on a weekly basis. Tool box talks may be on contractor specific work practices, or mandatory topics issued by Alltrade regarding site specific issues.
First Aid & Emergency Procedures
All contractors, subcontractors, and suppliers are responsible to ensure all regulations and policies regarding First Aid are adhered to. All contractors must have adequate First Aid supplies, and an approved person capable of performing First Aid.
All contractors, subcontractors, and suppliers are responsible to be familiar with, and adhere to emergency procedures.
By no means do these policies and obligations forfeit any additional obligations required by the Occupational Health and Safety Act and other legislated requirements as applicable.
Alltrade orientation to the Subcontractor/Supplier does not relieve the Subcontractor/Supplies of their obligation as an employer of their own employees to comply with all pertinent legislative requirements.
16.3 Subcontractors/Suppliers to Supervise their Employees
All Subcontractors/Suppliers must appoint a competent Supervisor who is employed by the Sub-Contractor to supervise their work.
Note: The number of Supervisors required is usually determined by a ratio of the number of workers per Supervisor. See applicable H&S legislation. If you need assistance, contact the EHS Department.
16.4 Subcontractor / Suppliers Prequalification
Policy Statement Alltrade is committed to cooperating with all subcontractors to ensure a safe and healthy working environment. Alltrade recognizes that an evaluation process is required to ensure that all subcontractors and suppliers working for Alltrade are capable of performing to any safety, health, and environmental standards that may be required.
Standard All subcontractors, suppliers, and other contractors employed on an Alltrade project are responsible to ensure all work is carried out in compliance with, but not limited to the occupational health and safety act, Alltrade H&S Policies, and client specific policies as required.
Management will ensure that any contracts or agreements entered into with subcontractors or suppliers are capable of performing to standards as required.
HEALTH & SAFETY PROGRAM
Section 16 – Subcontractors / Suppliers Page 6 of 6
Responsibilities
Management
Management is responsible to ensure that subcontractors and suppliers are evaluated / assessed prior to approving any work or agreement.
Agreements and contracts will only occur with subcontractors that have been given approval by Alltrade Purchasing Department.
HEALTH & SAFETY PROGRAM _ _
Section 17 – Occupational Health Page 1 of 57
Title: Occupational Health Issue Date: January 2016
Section: 17 Revision Date: N/A
Approved by: Bob Ritzmann, President Signature:
17.1 Policy Statement
Alltrade is committed to providing a safe and healthy workplace for its employees. Identifying and controlling health hazards in the workplace are essential to maintain the health and safety of our employees.
17.2 Worker Wellness
Alltrade recognizes the benefits of a healthy workforce and encourages and supports employees in achieving ownership for their physical, mental, and emotional well-being, resulting in improving overall health and wellness. Alltrade will promote and support healthy worker wellness initiatives in, and outside of work activities.
17.3 Cold Stress- Hypothermia
Cold stress or hypothermia can affect construction workers who are not protected against cold. The cold may result naturally from weather conditions or be created artificially, as in refrigerated environments.
Cold is a physical hazard in many construction workplaces. When the body is unable to warm itself, serious cold related illnesses and injuries may occur, leading to permanent tissue damage and even death.
The body tries to maintain an internal (core) temperature of approximately 37 0 C (98.6 0 F). This is done by reducing heat loss and increasing heat production. Under cold conditions, blood vessels in skin, arms and legs constrict decreasing blood flow to extremities. This minimizes cooling of the blood and keeps critical internal organs warm. At very low temperatures, however, reducing blood flow to the extremities can result in lower skin temperature and higher risk of frostbite.
Standard
All workers working in hot or cold environments must take all reasonable precautions to ensure that they are not being over exposed to cold and or heat. Wearing personal protective clothing, equipment and drinking water and other fluids will prevent such exposures.
Mild Hypothermia Early sign of hypothermia includes:
• Shivering • Blue lips and fingers • Poor coordination
HEALTH & SAFETY PROGRAM _ _
Section 17 – Occupational Health Page 2 of 57
Moderate Hypothermia
This stage includes: • Mental impairment • Confusion • Poor decision making • Disorientation • Inability to take precautions from the cold • Heart slows down • Slow breathing
In severe cases, hypothermia resembles death. Patients must be treated as though they are alive.
• Unconsciousness • Heart slows down to the point where pulse is irregular and/or difficult to find • No shivering • No detectable breathing
First Aid
• Stop further cooling of the body and provide heat to begin rewarming. • Carefully remove worker to shelter. Sudden movement or rough handling can
upset Heart - rhythm. • Keep worker awake • Remove wet clothing and wrap worker in warm covers • Rewarm neck, chest, abdomen and groin – but not extremities • Apply direct body heat or use safe heating devices • If the worker is conscious, give a warm sweet drink • Monitor breathing. Administer artificial respiration if necessary • Call for medical help or transport the worker carefully to nearest medical facility
17.4 Frostbite
Signs and Symptoms
Frostbite is a common injury caused by exposure to severe cold or by contact with extremely cold objects. Frostbite occurs more readily from touching cold metal objects than from exposure to cold air. This is due to the fact that heat is rapidly transferred from skin to metal. The body parts most commonly affected is the face, ears, fingers, and toes. When tissue freezes, blood vessels are damaged. This reduces blood flow and may cause gangrene.
HEALTH & SAFETY PROGRAM _ _
Section 17 – Occupational Health Page 3 of 57
Frostbite symptoms vary, are not always painful, but often includes sharp, prickling sensation. The first indication of frostbite is that the skin looks waxy and feels numb. Once the tissue becomes hard, the case is a severe medical emergency. Severe frostbite can result in blistering that usually takes about ten days to subside. Once damaged, tissue will always be more susceptible to frostbite in the future.
First Aid
Warm frostbitten area gradually with body heat; DO NOT RUB Don’t thaw hands or feet unless medical aid is distant and there is no chance of refreezing. Body parts are better thawed at a hospital Apply sterile dressing to blisters to prevent breaking Get medical attention
17.5 Personal Protective Equipment (PPE)
Clothing Clothing should be selected to suit the temperature, weather conditions (e.g. wind speed, rain), the level and duration of activity and job design. These factors are important to consider so that you can regulate the amount of heat and perspiration you generate while working. If the work pace is too fast or if the type and amount of clothing are not properly selected, excessive sweating may occur. The clothing next to your body will become wet and the insulation value of the clothing will decrease dramatically.
Clothing should be worn in multiple layers, which provides better protection than a single thick garment. Having several layers also gives you the option to open or remove a layer before you get too warm and start sweating or to add a layer when you take a break. Successive outer layers should be larger in size than the inner layer otherwise; the outermost layer will compress the inner layers and decrease the insulation properties of the clothing.
The inner layer should provide insulation and be able to “wick” moisture away from the skin to help keep it dry. Thermal underwear made from polyesters or polypropylene is suitable for this purpose.
The additional layers of clothing should provide adequate insulation for the weather conditions under which the work is being done.
For work in wet conditions, the outer layer of clothing should be waterproof. Where the work cannot be shielded from the wind an easily removable windbreak garment should be used.
Clothing should be kept clean se dirt fill air cells in fibers of clothing and destroys its insulating abilities.
Clothing must be kept dry; remove snow from clothing prior to entering heated shelters. If area is warm enough, perspiration should be allowed to escape by opening the neck, waist, sleeves, and ankle fasteners or by removing the outer layer.

HEALTH & SAFETY PROGRAM _ _
Section 17 – Occupational Health Page 4 of 57
_ _
17.6 Footwear
All footwear must conform to regulatory requirements.
Felt lined, rubber bottomed, leather topped boots with removable felt insoles are best suited for heavy work in the cold season. Leather boots can be waterproofed with some products that do not block the pores in the leather.
You may prefer to wear one pair of thick bulky socks or two pairs – one inner sock of silk, nylon or thin wool and a slightly larger, thick outer sock. Liner socks made from polypropylene will help keep feet dry and warmer by wicking sweat away from the skin. If work condition permit, have extra socks available so you can dry your feet and change socks during the day. Always wear the right thickness of socks for your boots. If they are too thick, the boots will be tight, and the socks will lose much of their insulating properties when they are compressed inside the boot.
17.7 Wind Chill
At any temperature, you feel colder as the wind speed increases. The combined effect of cold air and wind speed is expressed as “equivalent chill temperature” or simply “wind chill” temperature in degrees Celsius or Fahrenheit. It is essentially the air temperature that would feel the same on exposed human flesh as the given combination of air temperature and wind speed.
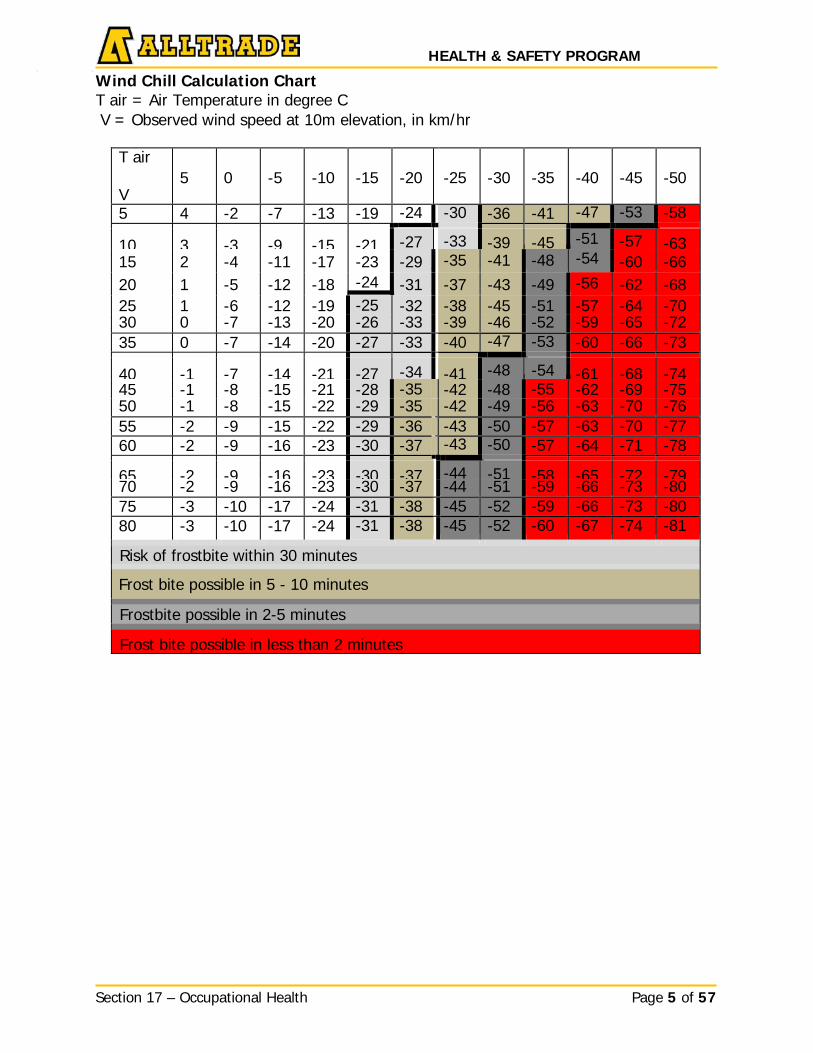
HEALTH & SAFETY PROGRAM _ _
Section 17 – Occupational Health Page 5 of 57
_ _
Wind Chill Calculation Chart T air = Air Temperature in degree C V = Observed wind speed at 10m elevation, in km/hr
T air
V
5
0
-5
-10
-15
-20
-25
-30
-35
-40
-45
-50
5 4 -2 -7 -13 -19 -24 -30 -36 -41 -47 -53 -58
10 3 -3 -9 -15 -21 -27 -33 -39 -45 -51 -57 -63 15 2 -4 -11 -17 -23 -29 -35 -41 -48 -54 -60 -66 20 1 -5 -12 -18 -24 -31 -37 -43 -49 -56 -62 -68 25 1 -6 -12 -19 -25 -32 -38 -45 -51 -57 -64 -70 30 0 -7 -13 -20 -26 -33 -39 -46 -52 -59 -65 -72 35 0 -7 -14 -20 -27 -33 -40 -47 -53 -60 -66 -73
40 -1 -7 -14 -21 -27 -34 -41 -48 -54 -61 -68 -74 45 -1 -8 -15 -21 -28 -35 -42 -48 -55 -62 -69 -75 50 -1 -8 -15 -22 -29 -35 -42 -49 -56 -63 -70 -76 55 -2 -9 -15 -22 -29 -36 -43 -50 -57 -63 -70 -77 60 -2 -9 -16 -23 -30 -37 -43 -50 -57 -64 -71 -78
65 -2 -9 -16 -23 -30 -37 -44 -51 -58 -65 -72 -79 70 -2 -9 -16 -23 -30 -37 -44 -51 -59 -66 -73 -80 75 -3 -10 -17 -24 -31 -38 -45 -52 -59 -66 -73 -80 80 -3 -10 -17 -24 -31 -38 -45 -52 -60 -67 -74 -81
Risk of frostbite within 30 minutes
Frost bite possible in 5 - 10 minutes
Frostbite possible in 2-5 minutes
Frost bite possible in less than 2 minutes

HEALTH & SAFETY PROGRAM _ _
Section 17 – Occupational Health Page 6 of 57
_ _
Work / Warm-up Schedule Guideline
Note: This schedule is a guideline only. Site specific conditions, work demands and PPE should be considered while determining exposure and break schedules.
Air No noticeable 8 km/h Wind 16 km/h wind 24 km/h Wind 32 km/h Wind Temp. C Sunny Sky
wind Max. Work Period
No. of Breaks
Max. Work Period
No. of Breaks
Max. Work Period
No. of Breaks
Max. Work Period
No. of Breaks
Max. Work Period
No. of Breaks
-26 to - 28 Normal 1 Normal 1 75
min. 2 55 min. 3 40
min. 4 -29 to - 31 Normal 1
75 min. 2
55 min. 3
40 min. 4
30 min. 5
-32 to - 34
75 min.
2
55 min.
3
40 min.
4
30 min.
5
Non - Emergency work should cease
-35 to - 37
55 min.
3
40 min.
4
30 min.
5
Non - Emergency work should cease
-38 to - 39
40 min.
4
30 min.
5
Non - Emergency work should cease
-40 to - 42
30 min.
5
Non - Emergency work should cease
-43 & below
Non - Emergency work should cease
Work / Warm-up Schedule for Outdoor Activities
This information applies to moderate - heavy physical work activity in any four hour period. At the end of the four hour period an extended break in a warm location is suggested. Warm-up breaks are assumed to provide 10 minutes in a warm environment. These guidelines apply to workers wearing dry clothing. Note:
• All temperatures are approximate • Number of breaks: This includes normal break after 2 hours and the number of
additional warm-up breaks needed.
Apply the schedule one step lower (towards colder temperatures) for work with limited to no physical activity. For example, at -35C with no noticeable wind the typical schedule would be 3 breaks minimum with a maximum work period of 55 minutes. If the work has limited to no physical activity apply the guidelines one level below at -38C for 4 breaks and maximum work period of 40 mins.
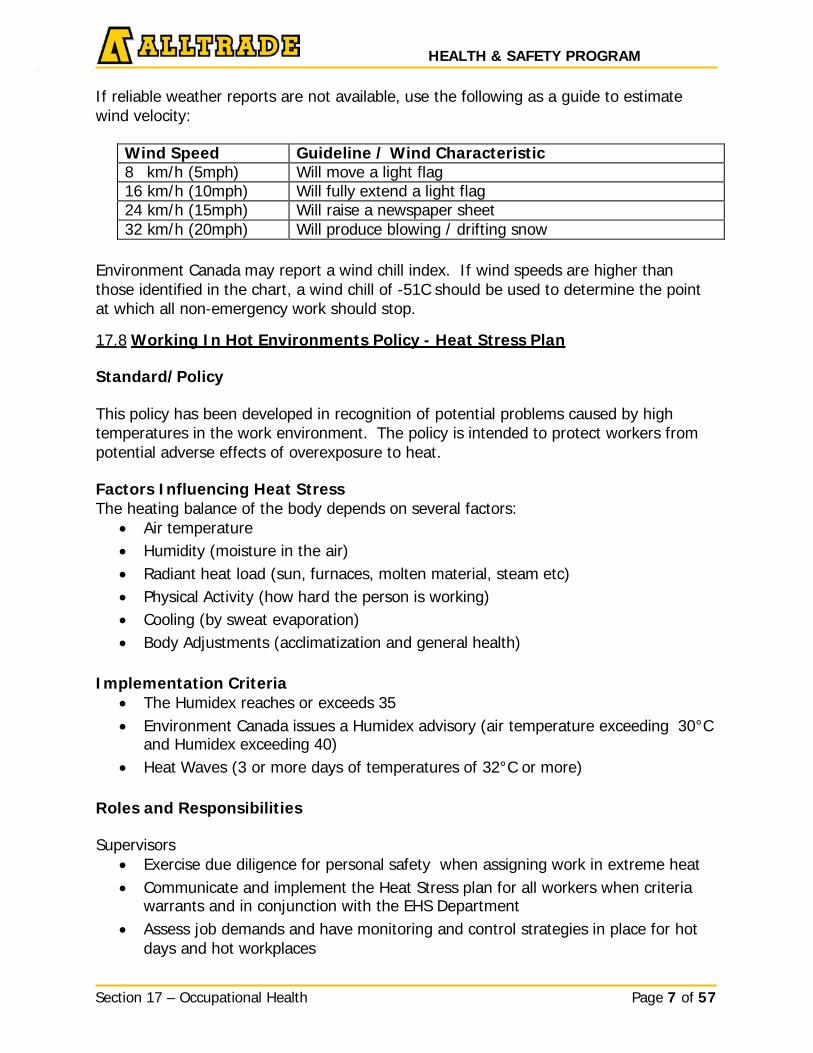
HEALTH & SAFETY PROGRAM _ _
Section 17 – Occupational Health Page 7 of 57
_ _
If reliable weather reports are not available, use the following as a guide to estimate wind velocity:
Wind Speed Guideline / Wind Characteristic 8 km/h (5mph) Will move a light flag 16 km/h (10mph) Will fully extend a light flag 24 km/h (15mph) Will raise a newspaper sheet 32 km/h (20mph) Will produce blowing / drifting snow
Environment Canada may report a wind chill index. If wind speeds are higher than those identified in the chart, a wind chill of -51C should be used to determine the point at which all non-emergency work should stop.
17.8 Working In Hot Environments Policy - Heat Stress Plan
Standard/Policy
This policy has been developed in recognition of potential problems caused by high temperatures in the work environment. The policy is intended to protect workers from potential adverse effects of overexposure to heat.
Factors Influencing Heat Stress The heating balance of the body depends on several factors:
• Air temperature • Humidity (moisture in the air) • Radiant heat load (sun, furnaces, molten material, steam etc) • Physical Activity (how hard the person is working) • Cooling (by sweat evaporation) • Body Adjustments (acclimatization and general health)
Implementation Criteria
• The Humidex reaches or exceeds 35 • Environment Canada issues a Humidex advisory (air temperature exceeding 30°C
and Humidex exceeding 40) • Heat Waves (3 or more days of temperatures of 32°C or more)
Roles and Responsibilities
Supervisors
• Exercise due diligence for personal safety when assigning work in extreme heat • Communicate and implement the Heat Stress plan for all workers when criteria
warrants and in conjunction with the EHS Department • Assess job demands and have monitoring and control strategies in place for hot
days and hot workplaces

HEALTH & SAFETY PROGRAM _ _
Section 17 – Occupational Health Page 8 of 57
_ _
• Ensure Workers are aware of o Factors which can predispose them to heat stress o The warning signs and symptoms of heat stress o The measures to be taken to protect against this hazard
EHS Department
• Provide worker information on heat stress hazards, including periodic safety talks on heat stress during hot weather or during work in hot environments.
• Monitor the workplace to determine when hot conditions arise • Act as a resource for Supervisors and Workers in regards to Working in Hot
Environments • Assist Supervisors in assessing the workplace for potential heat stress hazards
and provide advice on control strategies
• Provide assistance and advice on implementing the Heat Stress Policy. • Investigate and report all heat stress related illness as per H&S Manual
Workers
• Be familiar with heat stress hazards, predisposing factors and preventative measures
• Be alert to symptoms in themselves and others. • Seek advice from their medical practitioner if they have a chronic health condition
or are taking medications which may increase the risk of heat stress • Drink adequate amounts of water regularly to maintain fluid levels and avoid
dehydration • Avoid caffeinated beverages and alcohol when working in hot environments • Report all occurrences of heat stress related illness to their supervisor
immediately
Education and Information
Workers should be instructed regarding working in hot environments. Instruction should include:
• Knowledge of heat stress hazards • Recognition of risk factors, symptoms and health effects • Actions to be taken for controlling heat stress • First aid responses • Reporting procedures

HEALTH & SAFETY PROGRAM _ _
Section 17 – Occupational Health Page 9 of 57
_ _
First Aid and Emergency Response for Heat Illness
HEALTH EFFECT
CAUSES SYMPTOMS TREATMENT
Heat Rash Hot humid environment; plugged sweat glands
Red bumpy rash with itching
Change into dry clothes often and avoid hot environments. Rinse skin with cool water. Keep skin cool and dry.
Sunburn Over- exposure to the sun
Red, painful or blistering and peeling skin
If the skin blisters, seek medical aid. Use skin lotions and work in the shade.
Heat Cramps
Heavy sweating drains the body of salt.
Painful cramps in arms, legs, or stomach that occur suddenly at work or later at home. Heat cramps are a warning of other more serious heat- induced illnesses.
Move to a cool area; loosen clothing and drink an electrolyte-replacement beverage. If cramps are severe or don’t go away, seek medical aid.
Fainting Fluid loss and inadequate water intake
Sudden fainting after at least two hours of work; cool moist skin; weak pulse
GET MEDICAL ATTENTION. Assess need for CPR. Move to a cool area; loosen clothing; make person lie down; and if the person is conscious, offer sips of cool water. Fainting may also be due to other illness.
Heat Exhaustion
Fluid loss and inadequate salt and water intake causes the body’s cooling system to break down.
Heavy sweating; cool, moist skin; body temperature above 38 °; weak pulse; normal or low blood pressure; tired and weak, nausea and vomiting; very thirsty; panting or breathing rapidly; blurred vision
GET MEDICAL ATTENTION. This condition can lead to heat stroke, which can kill; move the person to a cool shaded area; loosen or remove excess clothing; provide cool water to drink; fan and spray with cool water
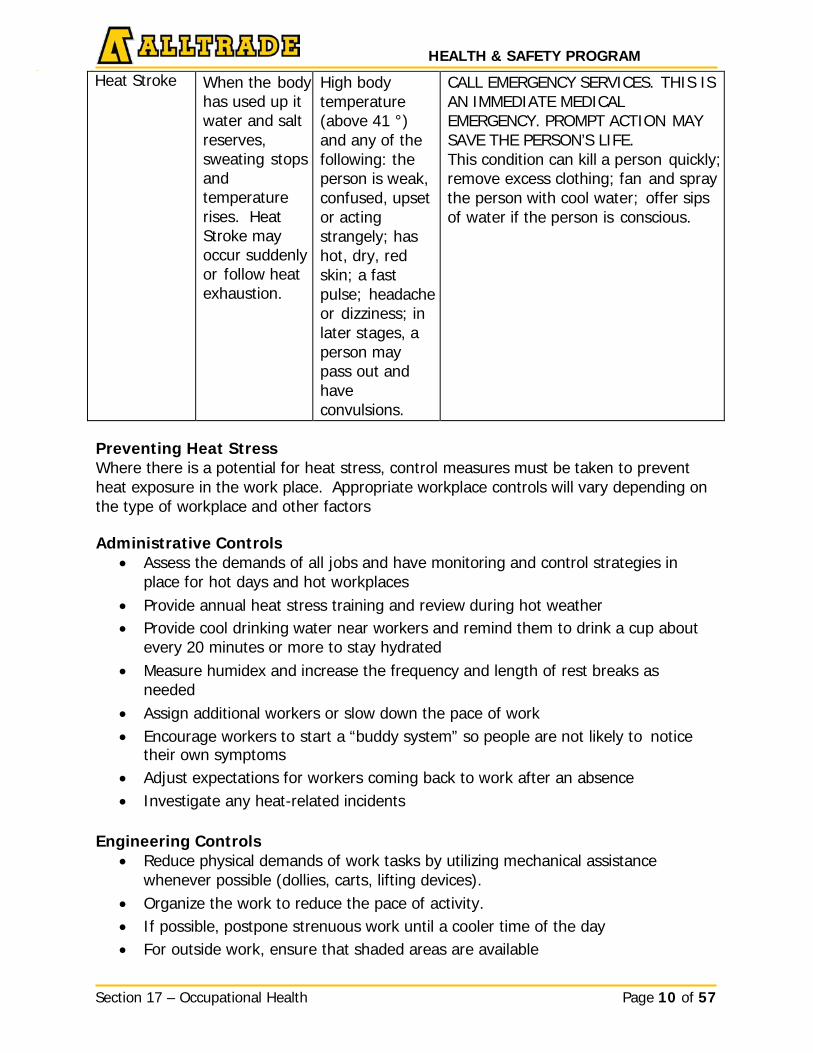
HEALTH & SAFETY PROGRAM _ _
Section 17 – Occupational Health Page 10 of 57
_ _
Heat Stroke When the body has used up it water and salt reserves, sweating stops and temperature rises. Heat Stroke may occur suddenly or follow heat exhaustion.
High body temperature (above 41 °) and any of the following: the person is weak, confused, upset or acting strangely; has hot, dry, red skin; a fast pulse; headache or dizziness; in later stages, a person may pass out and have convulsions.
CALL EMERGENCY SERVICES. THIS IS AN IMMEDIATE MEDICAL EMERGENCY. PROMPT ACTION MAY SAVE THE PERSON’S LIFE. This condition can kill a person quickly; remove excess clothing; fan and spray the person with cool water; offer sips of water if the person is conscious.
Preventing Heat Stress Where there is a potential for heat stress, control measures must be taken to prevent heat exposure in the work place. Appropriate workplace controls will vary depending on the type of workplace and other factors
Administrative Controls
• Assess the demands of all jobs and have monitoring and control strategies in place for hot days and hot workplaces
• Provide annual heat stress training and review during hot weather • Provide cool drinking water near workers and remind them to drink a cup about
every 20 minutes or more to stay hydrated • Measure humidex and increase the frequency and length of rest breaks as
needed • Assign additional workers or slow down the pace of work • Encourage workers to start a “buddy system” so people are not likely to notice
their own symptoms • Adjust expectations for workers coming back to work after an absence • Investigate any heat-related incidents
Engineering Controls
• Reduce physical demands of work tasks by utilizing mechanical assistance whenever possible (dollies, carts, lifting devices).
• Organize the work to reduce the pace of activity. • If possible, postpone strenuous work until a cooler time of the day • For outside work, ensure that shaded areas are available
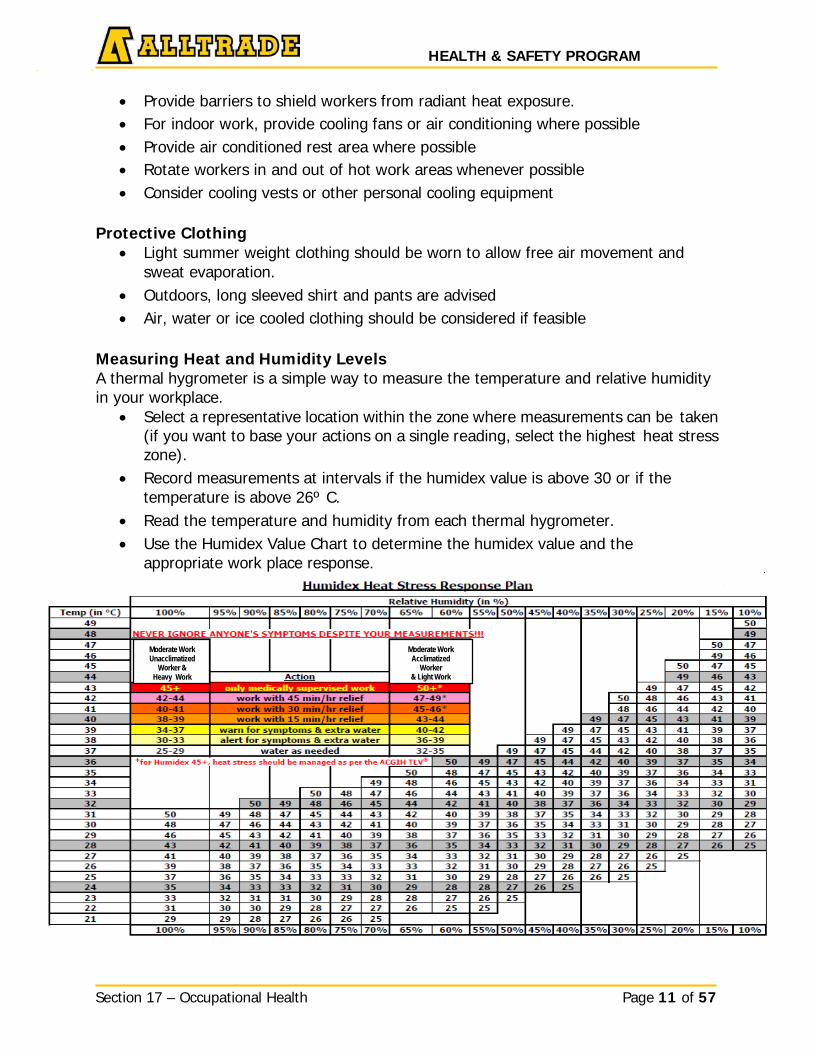
HEALTH & SAFETY PROGRAM _ _
Section 17 – Occupational Health Page 11 of 57
_ _
• Provide barriers to shield workers from radiant heat exposure. • For indoor work, provide cooling fans or air conditioning where possible • Provide air conditioned rest area where possible • Rotate workers in and out of hot work areas whenever possible • Consider cooling vests or other personal cooling equipment
Protective Clothing
• Light summer weight clothing should be worn to allow free air movement and sweat evaporation.
• Outdoors, long sleeved shirt and pants are advised • Air, water or ice cooled clothing should be considered if feasible
Measuring Heat and Humidity Levels A thermal hygrometer is a simple way to measure the temperature and relative humidity in your workplace.
• Select a representative location within the zone where measurements can be taken (if you want to base your actions on a single reading, select the highest heat stress zone).
• Record measurements at intervals if the humidex value is above 30 or if the temperature is above 26º C.
• Read the temperature and humidity from each thermal hygrometer. • Use the Humidex Value Chart to determine the humidex value and the
appropriate work place response.
Moderate Work Unacclimatized
Worker & Heavy Work
Moderate Work Acclimatized
Worker & Light Work
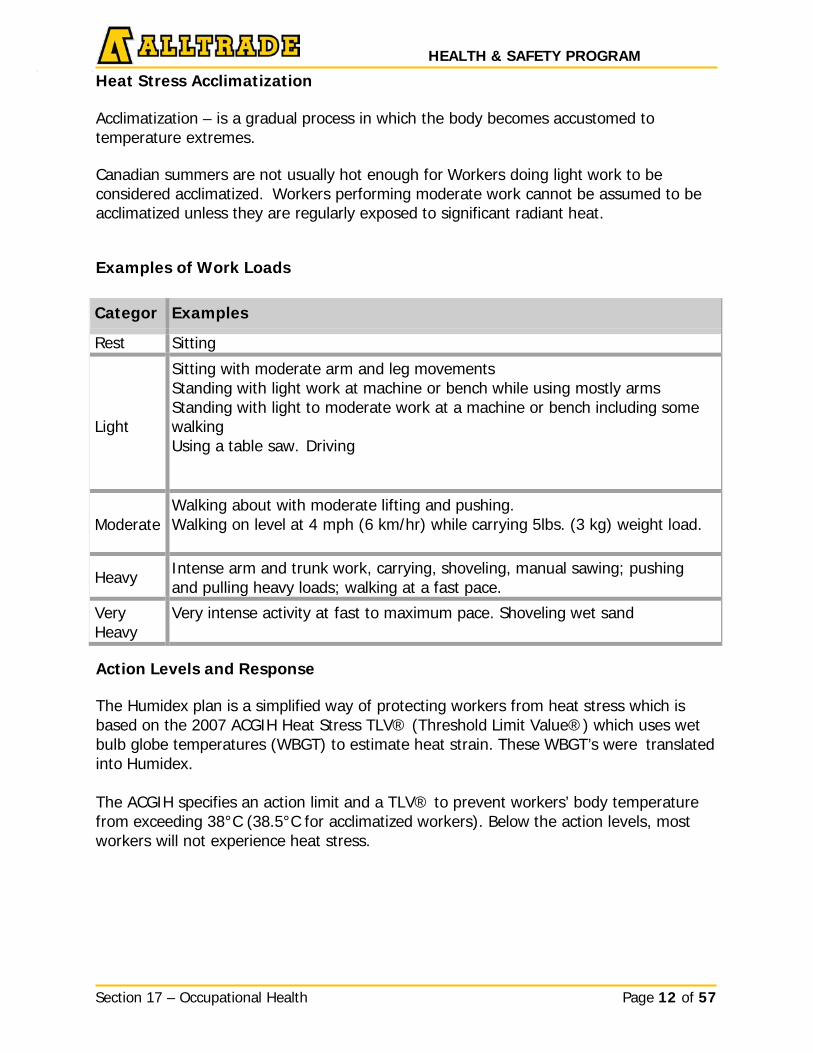
HEALTH & SAFETY PROGRAM _ _
Section 17 – Occupational Health Page 12 of 57
_ _
Heat Stress Acclimatization
Acclimatization – is a gradual process in which the body becomes accustomed to temperature extremes.
Canadian summers are not usually hot enough for Workers doing light work to be considered acclimatized. Workers performing moderate work cannot be assumed to be acclimatized unless they are regularly exposed to significant radiant heat.
Examples of Work Loads
Categor Examples
Rest Sitting Light
Sitting with moderate arm and leg movements Standing with light work at machine or bench while using mostly arms Standing with light to moderate work at a machine or bench including some walking Using a table saw. Driving
Moderate
Walking about with moderate lifting and pushing. Walking on level at 4 mph (6 km/hr) while carrying 5lbs. (3 kg) weight load.
Heavy Intense arm and trunk work, carrying, shoveling, manual sawing; pushing and pulling heavy loads; walking at a fast pace.
Very Heavy
Very intense activity at fast to maximum pace. Shoveling wet sand
Action Levels and Response
The Humidex plan is a simplified way of protecting workers from heat stress which is based on the 2007 ACGIH Heat Stress TLV® (Threshold Limit Value®) which uses wet bulb globe temperatures (WBGT) to estimate heat strain. These WBGT’s were translated into Humidex.
The ACGIH specifies an action limit and a TLV® to prevent workers’ body temperature from exceeding 38°C (38.5°C for acclimatized workers). Below the action levels, most workers will not experience heat stress.
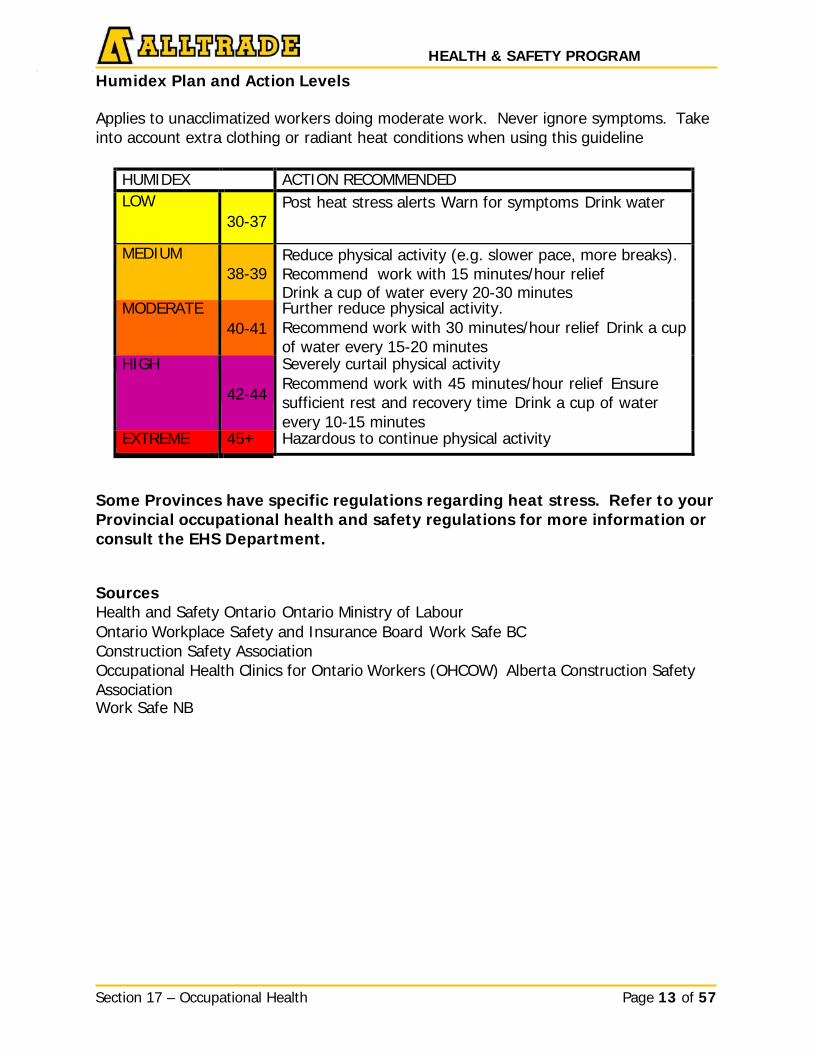
HEALTH & SAFETY PROGRAM _ _
Section 17 – Occupational Health Page 13 of 57
_ _
Humidex Plan and Action Levels
Applies to unacclimatized workers doing moderate work. Never ignore symptoms. Take into account extra clothing or radiant heat conditions when using this guideline
HUMIDEX ACTION RECOMMENDED LOW
30-37 Post heat stress alerts Warn for symptoms Drink water
MEDIUM 38-39
Reduce physical activity (e.g. slower pace, more breaks). Recommend work with 15 minutes/hour relief Drink a cup of water every 20-30 minutes
MODERATE 40-41
Further reduce physical activity. Recommend work with 30 minutes/hour relief Drink a cup of water every 15-20 minutes
HIGH 42-44
Severely curtail physical activity Recommend work with 45 minutes/hour relief Ensure sufficient rest and recovery time Drink a cup of water every 10-15 minutes
EXTREME 45+ Hazardous to continue physical activity
Some Provinces have specific regulations regarding heat stress. Refer to your Provincial occupational health and safety regulations for more information or consult the EHS Department.
Sources Health and Safety Ontario Ontario Ministry of Labour Ontario Workplace Safety and Insurance Board Work Safe BC Construction Safety Association Occupational Health Clinics for Ontario Workers (OHCOW) Alberta Construction Safety Association Work Safe NB
HEALTH & SAFETY PROGRAM _ _
Section 17 – Occupational Health Page 14 of 57
_ _
17.9 Sun Exposure
Standard
All workers exposed to the sun’s rays must be made aware of the harmful effects it could cause without proper protection.
Procedure
Tanning and burning are caused by ultraviolet rays from the sun. These rays cannot be seen or felt, but penetrate the skin and stimulate cells containing a brownish pigment called melanin. Melanin tries to protect the skin by absorbing and scattering ultraviolet rays.
To prevent skin damage caused by the sun review the following:
• Avoid overexposure to ultraviolet light. • Sun screens contain one or more protective chemicals that absorb and scatter
ultraviolet rays. These have a numerical rating system to indicate the specific amount of protection. The numbers, known as Sun Protection Factors (SPF), are listed on the product label. The higher the SPF number, the greater the protection. Although no sunscreen blocks UV radiation 100 percent.
• Sun screens are available in many forms including lotions, creams, gels, sprays, ointments and wax sticks. Besides sun screens use a lip balm with SPF of 15 or higher to protect your lips from sunburn.
• Sun screens should be applied 20 to 30 minutes before going out into the sun to allow time for the sun screen to start working. Apply liberally and reapply every 2 hours to provide maximum effectiveness. Do not use sunscreens to increase the time spent in intense sunlight or in place of protective clothing.
• Clothing provides protection from the sun and does not allow the UV rays to penetrate as easily.

HEALTH & SAFETY PROGRAM _ _
Section 17 – Occupational Health Page 15 of 57
_ _
17.10 Noise
Standard
All workers working in a noisy environment are required to use and wear hearing protection. Audiometric testing may be required based on the specific jurisdiction. If not certain please consult with the EHS Dept.
Procedure
Noise in excessive amounts is a known health hazard.
• Exposure to excessive noise leads to permanent hearing loss in most cases. • Employees exposed to noise levels greater than 85 dBA require adequate hearing
protection for the hazard.
Noise exposure guideline for work related activities at the operator position are:
Radial Saw 10" Steel Blade 90-95 Cut-Off Saw 8" Steel Blade 85 -95 Hand Grinder 6" Stone 101-105 Jackhammer 80 Lb 96-100 Chipping Air Hammer 106-110 Metal Cut-Off Saw 12" Fibre 111-115 Arc Welding 96-100 Automatic Welding 96-100 Explosive Actuated Tools Over 115 Sandblasting 96-100 Jumping Jack 111-115 Electric Drill 85 or under Portable Grinder 90-95 Crawler Loader 101-105 Rubber Tire Loader 96-100 Compressor (250 CFM) 101-106 Compressor (250 CFM) Silenced less than 85 Compressor (900 CFM) 106-110 Compressor (900 CFM) Silenced less than 85
Points to Remember • Clean plugs or muffs to prevent ear infection • Hearing protection makes it easier to converse in a noisy area • Dry cotton batten is no protection against noise • Wax impregnated cotton batten and ear plugs with metal inserts DO NOT WORK • Muffs are more effective than plugs • Plugs come loose if you talk or chew • Hypo-allergenic ear plugs are available to those who require it
HEALTH & SAFETY PROGRAM _ _
Section 17 – Occupational Health Page 16 of 57
_ _
17.11 Hazardous Substances – Procedure Format
Standard
Managers shall request from the EHS Department a written procedure when the workforce may be exposed to a designated substance.
Procedure
Note: Check with local jurisdictions on designated substances written procedures shall
include: 1. Name of the designated substance. 2. Known health hazards. 3. Engineering controls, work practices, hygiene practices and facilities to control work
exposure to the substance. a. Note: If you are regularly working extended hours (more than 8hrs) for the
day or shift contact the EHS Department ensure acceptable exposure limits are not exceeded.
4. Methods and procedures to monitor the concentration of the substance in workplace air.
Workers’ Records
Workers' records of exposure to the substance shall include: 1. Worker's name 2. Worker's date of birth 3. Worker's occupation 4. Respiratory equipment used 5. Monitoring results Workers’ records must be maintained by the employer and be available upon request by each worker's physician.
17.12 Procedure for Cleaning up and Disposal of Bio-Hazardous Waste
Standard
This procedure has been developed to protect employees when there has been exposure to bio-hazardous waste.
Definition
Bio-hazardous waste includes any infectious waste, or potentially infections substance such as blood or other human waste. Blood and human waste have the potential to spread infectious diseases like Hepatitis B, C and HIV. Even though uninfected blood is relatively safe to clean, all blood spills should be treated as infected.
HEALTH & SAFETY PROGRAM _ _
Section 17 – Occupational Health Page 17 of 57
_ _
Procedure
On a job site where bio-hazardous waste is discovered and could present a hazard to a worker this procedure may be followed.
Discovery of Bio-Hazardous Waste
• Restrict Access - Restrict access to the area by using barrier tape or other physical separation. Only authorized staff or service providers will be allowed to enter the restricted area.
• Notification – Notify the supervisor, who will notify the H&S department to determine if the clean-up process will be completed internally, or if an external service provider is required.
Clean-up and Disposal
• Personal Protective Equipment: Protection - An individual who cleans up blood and bodily fluid spills must wear personal protective equipment (PPE). Gloves, Disposable Tyvek Suit, masks or face shields are all acceptable and appropriate personal protective equipment to wear for exposure to blood and bodily fluids. A good practice is to double glove and wear an N-95 Mask.
• Barrier - Creating a barrier around the waste prevents it from spreading and contains it so that it can be cleaned. Barriers can be made of any absorbent material such as kitty litter, dirt, sand, sawdust or salt.
• Disinfect - Health hazards still exist even after the waste has been removed. Disinfecting the area is an important step. The supervisor will ensure the appropriate disinfecting product is used for the bio-hazardous waste. This will typically be bleach based cleaners. All cleaning tools should go through a disinfecting process or should be disposed of in appropriate biohazard waste containers or packaging.
• Broken Objects - Never pick up broken objects such as glass bottles by hand. It is strongly advisable for employees to use mechanical means to pick up all broken glassware. Use forceps, tongs, brooms and dustpans.
• Disposal - Never throw away broken glassware or sharp substances into general receptacles. Discard these items into “Sharps” containers or sealed, closable, puncture-resistant containers labeled with caution signs.
Ensure all disposable material is double bagged, and disposed of as per local requirements pertaining to bio-hazardous waste. Ensure everything has at least a double layer of containment, and is labeled with Biohazard Tag. Inform Personal at Waste Management what they are to receive so they can also take appropriate precautions.
A good practice is for all cleaning areas to have a Biohazard Kit made available to workers.
HEALTH & SAFETY PROGRAM _ _
Section 17 – Occupational Health Page 18 of 57
_ _
A Biohazard kit may include: • 1 Labeled Sealed HD Bag (or 5 Gal bucket) with Seal to show it has not been
opened. • 20 4x4 Absorbent pads, • 10 lb. Sack of kitty litter or other absorbent product. • 3 Tyvek Suits • 3 prs. Goggles • 1 box Nitrile or Latex Gloves • 6 prs. Booties • 1 Roll of Red Tape with Caution Tags • Roll of Duct Tape • 4 Laminated Biohazard Tags • 1 Sharpie Marker • 10 Garbage Bags, • 6 N-95 Masks • 3 Face Shields
Note: Kit contents should reflect the anticipated hazards based on site specific conditions.
17.13 Bio-Hazardous Waste - Syringes
Standard
This procedure has been developed to assist employees when discarded syringes are discovered on the project.
Procedure
On a job, site where discarded syringe/needle is discovered in a work area and may pose a hazard to a worker this procedure will be followed.
1. Determine if the location of the discarded syringe will pose a hazard to a worker on
the site. 2. If the syringe will not pose a hazard to a worker, it will be covered or guarded and
the supervisor will be notified. 3. If the syringe may pose a hazard to a worker, the supervisor will be notified
immediately.
HEALTH & SAFETY PROGRAM _ _
Section 17 – Occupational Health Page 19 of 57
_ _
Supervisor
Upon notification, the supervisor will:
1. Contact the owner of the work area for further instruction on the handling and disposal of bio hazardous waste
2. Notify Alltrade EHS Department to advise of the existence of bio hazardous waste on the project.
3. Should the owner or owners representative be unable to provide adequate procedures on the handling and disposal of the syringe, the supervisor or person designated by the supervisor will;
a. Refer to and follow the Sharps Procedure
Do not dispose of bio hazardous waste with regular garbage.
Should any worker suffer a wound involving bio hazardous waste, they should seek medical attention promptly. Advise EHS Department immediately.
17.14 Procedure for Handling and Disposal of Sharps
Objective
To reduce the risk of infection or injury by ensuring the safe disposal of sharps
Definition
Sharps are objects used for medical purposes that can penetrate the skin such as discarded needles or syringes with needles attached. These injuries can allow infections to enter the body. Infectious diseases such as Hepatitis B or C, HIV or Tetanus can enter this way.
Primary Risk Areas
Some work areas will have higher risk for discovery or exposure to sharps, for example; manholes, pipe clean outs, outfall areas when flushing sewer lines , removing pipe plugs, demolition/renovation (particularly hospitals/clinics etc) or clearing/surface preparation for excavation in out of the way locations/parks where litter from drug use may be a factor.
Supervisors
Should be able to assess and identify the potential for needle stick hazards in the workplace. Treat all needles as potentially contaminated or infectious.

HEALTH & SAFETY PROGRAM _ _
Section 17 – Occupational Health Page 20 of 57
_ _
Basic Prevention
• Workers should not put their hands in places they cannot see unless they are protected by puncture proof gloves. (see Glove Program)
• Do not work where there is insufficient light to see sharps or other hazards. • When disposing of sharps, workers must use a portable sharps disposal kit:
consisting of puncture resistant disposable gloves, tongs or pliers (made of material that is compatible with chlorine) and a labeled Sharps Container for the disposal of discarded needles).
• The container should be rigid walled and puncture resistant: A commercial Sharps Container is preferred. (see picture).
• Workers who could potentially be exposed should be trained on the safe disposal of needles or other sharps, inspection of the sharps container and clean up requirements.
• The potential for exposure to sharps should be identified on the JSA or FLRA card and reviewed with the crews prior to commencing work.
• All workers should be made aware of the location of the sharps response kit prior to commencing work.
Procedure for Disposing and Transportation of Sharps
• When disposing of sharps, bring the container to the needle – do not carry the needle over to the container.
• Use an appropriate implement (e.g. tongs or pliers) and wear disposable, puncture resistant gloves to handle sharps.
• Place the container for sharps disposal on a flat surface as close as possible to the needle. Open the lid of the container.
• Using the tongs, pick up the needle by the blunt end (plastic fitting). Holding the needle sharp tip down and away from your body, put the needle in the container for sharps disposal. If there is more than one needle, pick them up one at a time.
• Close the container securely. • Remove gloves by peeling them back from the top so they are inside out, then
dispose. • Wash hands with soap and water or if not available use hand sanitizer with 60%
alcohol or better.
Pre-Use Checks, Transportation and Disposal
Before using a Sharps container – ensure that the container • Is not punctured • Is not filled above the “full” line. DO NOT overfill. • Is not leaking or cracked • Closable lid is in good condition
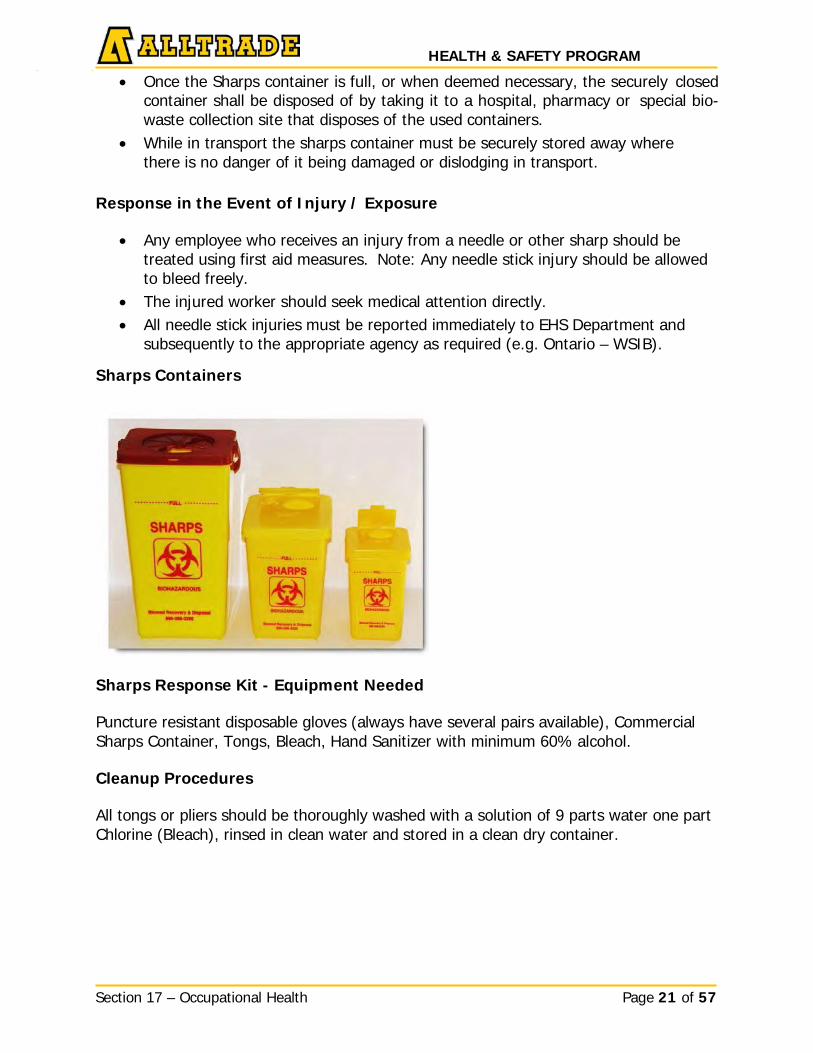
HEALTH & SAFETY PROGRAM _ _
Section 17 – Occupational Health Page 21 of 57
_ _
• Once the Sharps container is full, or when deemed necessary, the securely closed container shall be disposed of by taking it to a hospital, pharmacy or special bio- waste collection site that disposes of the used containers.
• While in transport the sharps container must be securely stored away where there is no danger of it being damaged or dislodging in transport.
Response in the Event of Injury / Exposure
• Any employee who receives an injury from a needle or other sharp should be
treated using first aid measures. Note: Any needle stick injury should be allowed to bleed freely.
• The injured worker should seek medical attention directly. • All needle stick injuries must be reported immediately to EHS Department and
subsequently to the appropriate agency as required (e.g. Ontario – WSIB).
Sharps Containers
Sharps Response Kit - Equipment Needed
Puncture resistant disposable gloves (always have several pairs available), Commercial Sharps Container, Tongs, Bleach, Hand Sanitizer with minimum 60% alcohol.
Cleanup Procedures
All tongs or pliers should be thoroughly washed with a solution of 9 parts water one part Chlorine (Bleach), rinsed in clean water and stored in a clean dry container.
HEALTH & SAFETY PROGRAM _ _
Section 17 – Occupational Health Page 22 of 57
_ _
17.15 Hazardous Substances
Standard Managers shall be aware of the existence of hazardous substances in the workplace and shall ensure compliance with pertinent regulations.
Procedure
Definition of Hazardous Substances Hazardous substances are defined biological, chemical, or physical agents in the workplace known to have adverse effects on human health and safety. These substances have legal status and are attached to legal exposure limits.
At date of issue, the following substances are legally designated as "controlled":
• Acrylonitrile • Lead • Asbestos • Mercury • Benzene • Silica • Coke Oven Emissions • Vinyl Chloride • Isocyanates • Asbestos on construction projects
and repair operations
Workers may be exposed to other hazardous substances (physical, chemical and biological). Workers and Supervisors should take appropriate measures to reduce, substitute, control or eliminate these hazards. Examples of such hazardous substances are formaldehyde, cadmium, chromium, coal tar, nickel, styrene, cold, heat, and noise.
Exposure means: inhaled, ingested, absorbed, injected. Contact the EHS Department for assistance.
17.16 PCBs – General Information
Standard
Workers involved in the handling of PCBs shall be familiar with their characteristics and the necessary safety precautions and training.
Procedure • PCB means polychlorinated biphenyls, manmade chemicals manufactured on a
large scale from 1929 until 1977. • PCBs are very stable, non-corrosive, relatively non-flammable, and insoluble in
water and have low vapour pressures. • PCBs are excellent in insulating and thermal properties. • Common past uses:
o Carbonless copying paper o Heat exchange fluids o Hydraulic fluids o In electrical transformers and capacitors
Section 17 – Occupational Health Page 23 of 57
HEALTH & SAFETY PROGRAM _ _
• "Askarel" is a generic term for PCBs used in electrical insulating liquids. Under arcing conditions, askarel produces a non-combustible hydrogen chloride gas with lesser amounts of combustible gases. Hydrogen chloride gas may threaten life even during short – term exposure.
• Identification of PCBs in Capacitors: o Practically ALL liquid - dielectric AC power capacitors manufactured
between 1930 and 1977 contain PCBs o PCB capacitors manufactured after 1978 are often marked "No PCBs" o Capacitors containing WEMCOL, FARADOL 100, DIELEKTRO II, or DPO do
not contain PCBs; assume that all others DO contain PCBs o Capacitors are usually hermetically sealed
• Common Brand Names for PCBs:
Apirolio Elemex Phenochlor Aroclor Eucarel Pydraul HY Asbestos Fenclor Pyralene Chlophen Hyvol Pyranol Chlorextol lor Pyroclor Chlorinol Inerteen Saf-T-Kuhl Diaclor Kanechlor Santotherm FR DK (decachlorodiaphenyl) Montar Sovol Dykanol No-flamol Therminol FR HT
• Health Effects of PCBs: o Enter human tissue by: inhalation, absorption or ingestion o Everyone is exposed to PCBs through the food chain o There is no evidence that low levels of exposure to PCBs is harmful to
health o Workplace exposure to PCBs has been virtually eliminated o Fires involving PCBs may produce furans and dioxins which are toxic o Brief exposures to small amounts of PCBs are not a serious health concern o It is not known whether PCBs are carcinogens (the scientific community is
divided on the issue). • Identification of PCBs in Transformers:
o Any transformer that was manufactured in North America WITH a conservator tank was NOT designed to use PCBs and probably contains mineral oil
o A transformer's nameplate, attached to the outside of the transformer casing, which has the designation O, ONS, ONAN, ONWF or any label beginning with O, is filled with mineral oil
o A transformer's nameplate which has the designation beginning with L, such as LNAN, LNAF, and LNWF etc. is filled with non-flammable or flame retardant liquid. MOST of these L transformers, manufactured before 1979, are PCB transformers

Section 17 – Occupational Health Page 24 of 57
HEALTH & SAFETY PROGRAM _ _
• Physi
• Environment Canada has developed a voluntary labeling system for PCB containers. These labels resemble a WHMIS / Hazard Communication label and have PCB in bold letters.
• Hydrogen chloride gas may threaten life even during short-term exposure.
PCBs – Personal Protective Equipment
Standard
All workers involved in the handling of PCBs shall wear the prescribed personal protective equipment.
Procedure
The following precautions are mandatory when handling PCBs:
• Gloves (any of these): o Butyl Rubber o Neoprene o Nitrile Rubber o Polyvinyl Alcohol (PVA) o Viton o Saranex o Teflon
• NEVER work with bare hands when handling PCBs. • If temperature exceeds 55°C (131°F) and there is the risk of vapour escaping into
the air, use self-contained breathing apparatus (SCBA) or supplied air respirators. • If temperature does not exceed 55°C (131°F) and there is no risk of inhaling
vapours (such as with hermetically sealed capacitors) no respiratory apparatus is required.
• If temperature does not exceed 55°C (131°F) and there is the risk of vapours escaping into the air (such as with transformers, tanks etc.) use full-face mask with organic vapour canisters.
• When handling PCBs, do not smoke, eat or drink before completely washing your hands and face.
• Dispose of protective equipment by placing it in the same container as the PCB waste when operation is completed. DO NOT ATTEMPT TO CLEAN PROTECTIVE EQUIPMENT FOR REUSE.
cal characteris Colour -
tics of Askarel: crystal clear to pale yellow
Density - denser than water Odor - bitter smell Texture - somewhat slippery Vapour - invisible
Section 17 – Occupational Health Page 25 of 57
HEALTH & SAFETY PROGRAM _ _
• If trichlorobenzene (a solvent) is present in the PCB apparatus, use a full-face mask with organic vapour canisters.
• If the possibility of PCB contact with body parts exists, wear coveralls composed of one of the materials listed under gloves. Rubber or PVA shoes or boot covers are recommended.
• One Class C 10 lb C02 fire extinguisher shall be located within 3 m (10’) of the work area when PCB facilities are being handled.
PCBs – Waste Storage
Standard
Various legislative publications such as, "Manual for the Management of Wastes Containing Polychlorinated Biphenyls (PCBs)" will be the reference documents for the acceptable means of PCB waste storage.
Procedure • The responsibility for PCB removal and storage is the owner/manager of the
facility. • Alltrade is not authorized to transport PCB waste on public property or roadways. • Alltrade is not authorized to attempt to destroy PCB waste. • The responsibility for the safe storage of PCB waste is the responsibility of the
owner.
17.17 Lead
Standard
The supervisor in consultation with the EHS Department will ensure that all necessary measures and procedures are taken to prevent worker exposure to Lead.
Routes of Entry
Lead may affect the health of workers if it is in a form that may be inhaled (i.e. airborne particles) or ingested.
Shortly after lead is inhaled or ingested, it can enter the bloodstream and travel to soft tissues (such as the liver, kidneys, lungs, brain, spleen, muscles, and heart). After several weeks, most of the lead moves into your bones and teeth and can be stored there for a long time.
Early signs of lead poisoning includes:
• Tiredness • Irritability • Muscle and joint pain • Headaches • Stomach aches and cramps
Section 17 – Occupational Health Page 26 of 57
HEALTH & SAFETY PROGRAM _ _
_ _
Harmful effects can follow a high exposure over a short period of time (acute poisoning), or long-term exposure to lower doses (chronic poisoning).
Workers that are exposed to lead may require additional health assessments and surveillance as per the jurisdiction. Consult with the EHS Department for specific programs and obligations.
Workplace Exposure and Monitoring
Work activities involving lead will be designed to ensure workers are not exposed beyond the occupational exposure limits for the jurisdiction.
Clients, or property owners, are obligated to inform Alltrade representatives of any existing hazardous materials, including lead in the workplace. This information should provide the details as to the amount and locations of lead in the workplace. This information will be required to determine worksite specific procedures for the handling, disturbance or removal of the lead or lead containing products.
In the event a worker suspects an unidentified product to contain lead, protect the area and contact your supervisor immediately.
Where work involving lead or lead contain products occurs, a monitoring process such as air sampling or particulate measurement will be required to monitor exposure levels. The specific monitoring process will be workplace specific.
Symptoms of Acute Lead Poisoning
Includes a metallic taste in the mouth and gastrointestinal symptoms such as vomiting, abdominal cramps, constipation, and diarrhea.
Symptoms of Chronic Lead Poisoning
Are more difficult to recognize because they are similar to many common complaints. However, severe chronic poisoning can lead to more characteristic symptoms, such as a blue line on the gums, wrist drop (the inability to hold the hand extended), severe abdominal pain and pallor.
Lead can also cause serious damage to a number of systems in the body including the blood, kidneys, gastro-intestinal, nervous and reproductive systems
General measures and procedures are suggested for all work with lead:
• Washing facilities consisting of a wash basin, water, soap and towels should be provided and workers should use these washing facilities before eating, drinking, smoking or leaving the project
• Workers should not eat, drink, chew gum or smoke in a work area
Section 17 – Occupational Health Page 27 of 57
HEALTH & SAFETY PROGRAM _ _
_ _
Dust and waste should be cleaned up at least daily and placed in a container that is: • Dust tight • Identified as containing lead waste • Cleaned with a damp cloth or a vacuum equipped with a HEPA filter immediately
before being removed from the work area • Removed from the workplace frequently and at regular intervals • The work area should be inspected at least daily to ensure that the work area is
clean • Compressed air or dry sweeping should not be used to clean up any lead-
containing dust or waste from a work area or from clothing
Dust Control Measures
Enclosed Work Areas: • The enclosure should be inspected for defects by a competent person; • Defects should be repaired before any work that would generate lead-containing
dust is carried out within the enclosure. • Air exhausted from an enclosed work area should pass through a dust collector
Burning, Welding or High Temperature Cutting of a Material with a Lead-Containing Coating:
• Local exhaust ventilation should be used where there is burning, welding or high temperature cutting of a material that has a lead-containing coating,
• The air velocity at any point in front of or at the opening of the ventilation hood should be sufficient to overcome opposing air currents and capture the contaminated air by causing it to flow into the hood.
• The air velocity at the source of the lead dust, fumes or mist should be at least 0.5 meters per second.
Air discharged from the local ventilation system should pass through a HEPA filter and be routed out of the workplace in a way that will prevent the return of the contaminants to the workplace.
Note: If local ventilation is not practicable, an appropriate respirator should be used. Please consult your EHS Department.
Removal of Lead-Containing Material with Power Tools
Where lead-containing material is being removed with power tools, the generation of airborne dust should be controlled by:
• An effective general or local exhaust ventilation system if the operation is carried on indoors
• If a general or local exhaust ventilation system is not practical, an appropriate respirator should be used.
Section 17 – Occupational Health Page 28 of 57
HEALTH & SAFETY PROGRAM _ _
_ _
Personal Protective Equipment Please contact your EHS Department for assistance and selection of the appropriate PPE.
17.18 Silica
Silica can be found in many forms on a construction project. In aggregates, concrete, cement products and other materials.
Standard
The supervisor in consultation with the EHS Dept. will ensure that all necessary measures and procedures are taken to prevent worker exposure to Silica.
Health Effects of Silica Exposure
Crystalline silica may be harmful following high exposure levels received over a period, ranging from a few weeks to years or after long-term exposures to lower levels.
The prolonged inhalation of air born dust containing crystalline silica may result in silicosis, a disease characterized by progressive fibrosis of the lungs. Silicosis is marked by shortness of breath and impaired lung function.
Crystalline silica inhaled in the form of quartz or cristobalite from occupational sources is carcinogenic to humans
In order for silica to be a hazard, silica-containing dust particles that are small enough to be inhaled (i.e. air born,) must get into the air.
Workers that are exposed to silica beyond the occupational exposure limits may require additional health assessments and surveillance as per the jurisdiction. Consult with the EHS Department for specific programs and obligations.
Dust Control Measures • The generation of airborne silica-containing dust should be controlled with a
mechanical ventilation system, wetting, or the use of a dust collection system. • If it is not practical to use mechanical ventilation, respiratory protections may be
used. Please consult your EHS department for guidance and assistance • If compressed air is being used to remove silica-containing dust outdoors,
workers within 25 meters of the work area who may be exposed to the dust must either be removed from the path of the dust cloud or provided with respirators
Indoor Operations • If sandblasting is being conducted indoors and persons other than those doing
the sandblasting may be exposed to silica-containing dust, the sandblasting area should be separated from the rest of the project by an enclosure that will confine the dust within the sandblasting area.
• Appropriate signage identifying the silica hazard should be posted.
Section 17 – Occupational Health Page 29 of 57
HEALTH & SAFETY PROGRAM _ _
_ _
Outdoor Operations • If sandblasting is being conducted outdoors and persons other than those doing
the sandblasting may be exposed to silica-containing dust, the work area should be identified by ropes or barriers located at least 25 meters from the sandblasting area, to prevent entry by workers not directly involved in the operation.
• If it is not possible to locate the ropes or barriers at least 25 meters from the sandblasting operation other control measures such as barricades and enclosures should be implemented.
• This will ensure that the sandblasting area is separated from the rest of the project by an enclosure that will confine the dust within the sandblasting area.
Enclosures
The following requirements should be met:
• Entry ways in the enclosure should be equipped with air locks, overlapping door tarps or doors;
• All openings and joints in the enclosure should be completely sealed; • The air pressure within the enclosure should be negative relative to the outside; • The air velocity within the enclosure shall be appropriate and pass each work; • The escape of abrasive and debris from the enclosure should be controlled at air
make-up points by the use of baffles, louvers, flap-seals and filters.
If the enclosure is located outdoors, these additional requirements should be met: • The enclosure should be made of windproof materials that are impermeable to
dust; • The enclosure should be supported by a structure that prevents more than minor
movement of the enclosure. Dust Control Measures
If an enclosure is used to protect other workers on the project from silica exposure, air exhausted from the enclosure should pass through a dust collector that can remove the particulate matter from the air at the volume and velocity at which it is moving.
Respirators
A worker operating an electric, pneumatic or gas powered cutting device in dry mortar, concrete or similar material or sandblasting will wear approved respiratory protection. For respirator selection, care, use and fit testing please consult with your EHS Department.
Clean-up
When an indoor sandblasting operation is completed, dust and waste should be cleaned up and removed by vacuuming with an HEPA-filter-equipped vacuum and wet sweeping or wet shoveling.

HEALTH & SAFETY PROGRAM _ _
Section 17 – Occupational Health Page 30 of 57
_ _
Personal Protective Equipment Code of Practice for Silica Dust
All employed will wear appropriate respiratory protection when exposed to airborne hazards that are determined to exist at the crusher plant site, in particular but not limited to, silica dust. The optimum functional protection for silica dust has been determined to be 3m 1620 or 8210-8511.
• Proper training in use and maintenance of the equipment must be received by
employees. • Masks must be fitted for proper wearing and employees must be trained in how
to fit and wear appropriate mask. • Employees will be tested to ascertain baseline exposure to each particular
airborne hazard. Special consideration will be given to any employee with preexisting sensitivity, disease, allergies or medical condition. Subsequent on- going testing will be done to ascertain high risk cases for health degradation.
• Discard filter masks after shift usage and start shift with a clean mask. • All employees that are required to work in areas considered high dust areas or the
work that is required will increase the amount if dusts are required to wear dust masks.
• Management and workers will conduct their work so as to minimize the amount of exposure to it in the following but not limited to manners:
o Setup equipment to minimize dust carried by prevailing winds to the workers if possible.
o Shorten the amount of time to do a task in a dust area as much as possible.
o Try to do cleanup on plant shut down times. o Clean equipment and power unites towers as much as possible to remove
dust (wear mask to do this) use cab filters. o Leave dust covered work clothes at work to minimize taking it home.
Alltrade supplied clothes that are contaminated should stay at work and by laundered from there.
o Use water sprayed systems and other methods to cut down on dust as much as possible.
o Maintain belt flashing and screens and conveyors as much as possible to eliminate sand and dust build-up around the equipment from spillage and debris.
o Shorten the drop distance of material coming off conveyors and screen decks as much as possible so transfer points do not contribute to dust.
o Close doors on power/tower shacks and make sure doors and windows seal properly to keep interiors dust free.
o Use air conditioning where possible to keep doors and windows sealed. o Rotate workers on jobs to minimize exposure.
• Post signs indicating silica dust is present in the high dust areas considered restricted and correct Personal Protective Equipment is required?
HEALTH & SAFETY PROGRAM _ _
Section 17 – Occupational Health Page 31 of 57
_ _
17.19 Animal and Insect Bites
Standard
All workers who are exposed to possible animal bites, insect bites, and insect stings need to be aware of the necessary precautions to be taken.
Procedure
Animal bites can be frightening, and in some cases, are medical emergencies. The most common bites are from household pets, with dogs, and cats causing the most. Dogs are more likely to bite than cats; however, cats are more likely to cause infection. Bites from non-immunized animals and wild animals carry the risk of rabies. Rabies is more common in raccoons, skunks, bats, and foxes than in cats and dogs.
• Determine if the outside pet shows signs of aggressive behavior and is on a
leash. • If the pet is determined to be aggressive, contact the home owner and ask for
the pet to be placed inside of the house until the work has been completed. This will allow you to focus, and be more efficient on the job. Do not attempt to complete the work if no home owner is available to control the pet. Never leave your comfort zone.
• Cats typically mind their own business and will watch from a distance. Dogs tend to be more curious. Large dogs can knock a human to the ground. Never approach an animal that is in the process of eating.
Bites
In some cases, the bite will not break the skin but may cause damage to underlying tissue and joints. If the skin is broken, there is the additional possibility of infection as well to tendons and nerves. Dogs have powerful jaws and can cause crushing injuries to muscles, tendons, ligaments, and nerves.
Signs of an infection includes:
• Warmth around the wound • Swelling • Pain • A pus discharge • Redness around the puncture wound • An inability to bend or straighten the finger • A loss of sensation over the tip of the finger
First Aid • Don’t put the bitten area into your mouth! You will just be adding the bacteria in
you.
HEALTH & SAFETY PROGRAM _ _
Section 17 – Occupational Health Page 32 of 57
_ _
• If the bite breaks the skin, treat it as you would a minor wound. Use soap and water or an antiseptic, or alcohol and cover it with a clean bandage.
• Get tetanus immunization as soon as possible. • If the bite creates a deep puncture or the skin is badly torn and bleeding, apply
pressure to control the bleeding and get medical attention right away.
Wild Animals • If you are bitten by a wild animal or snake, seek medical attention immediately.
Insect Bites
What is West Nile Virus?
West Nile virus is a mosquito-borne virus contracted by mosquitoes that feed on the blood of infected birds. The mosquito then passes the virus to a human host.
Avoiding Mosquito Bites
• Use insect repellent on exposed skin when you go outdoors. Use an insect repellent such as those with Deet, or oil of lemon eucalyptus.
• Get double protection by wearing long sleeves during peak mosquito biting hours, and spray repellent directly onto your clothes.
• Remove standing water that may be present around the jobsite.
Insect Stings
Nearly everyone has been stung by an insect at one time or another. It is an unpleasant experience that people hope not to repeat, but for the most people the pain is only temporary.
When the sting is caused by a honey bee, the stinger remains in the skin when the insect leaves because the stinger is barbed.
• Remove the stinger as quickly as possible because venom continues to enter the skin for about 45 to 60 seconds.
• Press hard down on your skin with your fingernail and scrape along the sting. If you don’t have fingernails, find something else to assist you.
• If the stinger can be removed within 15 seconds of the sting, the severity of the sting is reduced.
• After the stinger is removed, wash the wound.
NOTE: WASP AND HORNETS DO NOT LEAVE THEIR STINGERS IN YOU, SO THEY CAN STING REPEATEDLY.
A small percentage of the population is allergic to wasp or bee stings. If you suspect that you or a family member might be allergic, go to a physician for testing.
HEALTH & SAFETY PROGRAM _ _
Section 17 – Occupational Health Page 33 of 57
_ _
Signs and Symptoms: • Itchiness and hives over the whole body • Nausea, vomiting, diarrhea • Lightheadedness • Swelling of the eyelids, lips, or tongue • Difficulty breathing • Rapid heart beat • Loss of consciousness or seizures
People who are sensitive to stings should wear a Medic Alert Bracelet and carry an EpiPen containing preloaded Adrenaline. Be advised that even after an EpiPen has been administered, immediate emergency medical treatment is still necessary.
How to avoid being stung:
• Keep lids on trash cans at all times • Pay close attention to rotting logs or bushes. • Inspect trees prior to working in close proximity • Honeybees live in hives in old trees and are often found in clover • Wasps nest in sheltered places, such as eaves trough, shrubs, or wood piles. • Hornets’ nest in bushes or high in trees • Yellow Jackets nest under logs or rocks or in the ground and may emerge
through a small hole in the ground. 17.20 Bed Bugs
Bedbugs are small, wingless insects that feed on the blood of people and animals while they sleep. They are easily moved from room to room on infested objects. Bedbugs cannot easily climb metal or plastic surfaces and cannot fly or jump.
Adult bedbugs can be as long as 10 mm. They have an oval, broad, flat body and a short, broad head. Adult bedbugs are brown but darken to a blood red colour after feeding. Bedbugs prefer locations where they can hide easily and feed regularly, like sleeping areas. Their flattened bodies allow bedbugs to hide in extremely small locations: under wallpaper, behind picture frames, in electrical outlets, inside box springs, in mattress pads and in night tables.
A bedbug bite can take as long as 14 days to appear, depending on the person. While bites can happen anywhere on the skin, they are often found on the face, neck, arms, legs and chest.
Some people do not react at all to the bites, while others may have small skin reactions. In rare cases, some people may have severe allergic reactions. To avoid infection, try not to scratch the bites and keep the bite sites clean. Using antiseptic creams or lotions, as well as antihistamines, may help. Talk to your health care provider for advice.
HEALTH & SAFETY PROGRAM _ _
Section 17 – Occupational Health Page 34 of 57
_ _
Bed bugs are not known to spread disease however, infestations can be very difficult to eradicate.
Bedbugs can easily hide in luggage, clothing and other personal items, so taking a few precautions while travelling is a good way to keep them from coming home with you.
• Do a complete inspection of the room before bringing luggage or other items in. • Do not put your luggage on the bed. Place your luggage on a tile floor (like in
the bathroom), away from any upholstered (soft) surfaces or on the luggage stand once you have examined it.
• Inspect the sleeping area. Slowly lift up each corner of the mattress and examine the crease and tufts of the mattress and box spring, behind the headboard and the wall behind the bed, the pillows, bed coverings and bed skirt, the bed frame and legs. If you see one bed bug, there are likely to be many. Other signs that bed bugs are present includes tiny black spots on linens or furniture (excrement) and piles of light brown skin casings.
• Use a flashlight to inspect the inside of the closet, paying special attention to any cracks or crevices.
• If you find signs of bedbugs, notify the front desk and ask for another room, or stay somewhere else. If you change rooms in the same hotel, make sure your new room is not next to the possibly infested room.
If your work takes you into private homes or areas where bed bugs may be present, use the following common sense precautions.
• Seal any cloth duffels or tool bags in large white garbage bags. After leaving the residence, brush off all clothing. Change clothing immediately after work and wash and dry on high heat.
• Before bringing luggage into your home, place it on a hard surface away from any places bedbugs could crawl to and hide, and check it carefully.
• Unpack your clothing and check personal items (like hairbrush and cosmetic case).
• Wash all clothing and fabric items in hot water, regardless of whether you wore them or not.
• Dry non-washable items in the clothes dryer on the highest heat for 30 minutes. • Vacuum your luggage. Throw out the vacuum bag in a sealed garbage bag right
away. Wash any vacuum cleaner brush or nozzle attachments you used in hot water with detergent. For a bag less vacuum cleaner, empty the dust collector into a garbage bag, detergent.

HEALTH & SAFETY PROGRAM _ _
Section 17 – Occupational Health Page 35 of 57
_ _
17.21 Black Legged Tick Bites (Lyme Disease)
Ticks usually live in woods or tall grasslands. Ticks infected with bacterium can spread disease when they feed on blood from the host. Ticks cannot fly - they hang onto small bushes or tall grasses and are usually found close to the ground. They wait for an animal or person to pass near them and when the animals or person make contact, the ticks attach themselves to the skin to feed.
In Canada, there are two species of ticks known to transmit Lyme disease:
• The western blacklegged tick, which is known to be established in parts of southern British Columbia; and
• The blacklegged tick (often called a deer tick), which is known to be established in parts of southern and eastern Ontario, southeastern Manitoba and Nova Scotia.
These ticks vary in size and colour, depending on their age and whether they have been feeding. Before feeding, they are about 3-5 mm in length, and are red and dark brown in colour. Young ticks in the pre-adult stages are smaller and lighter-coloured. When they are full of blood, adult le ticks can be as large as a grape.
Risk of Exposure To Lyme Disease The risk of exposure to Lyme disease is highest in the regions (listed above) where blacklegged and western blacklegged ticks are established. However, migratory birds can carry these ticks to other parts of Canada and it is believed that the ticks may be establishing themselves in areas that are not identified yet.
The risk of contact with ticks begins in early spring when the weather warms up and lasts through to the end of fall. Ticks may also be active in winter in areas with mild temperatures (4°C and above) and no snow.
There is no evidence that Lyme disease can spread from person-to-person. Although cats and dogs can get Lyme disease, there is no evidence that they can pass the infection to people.
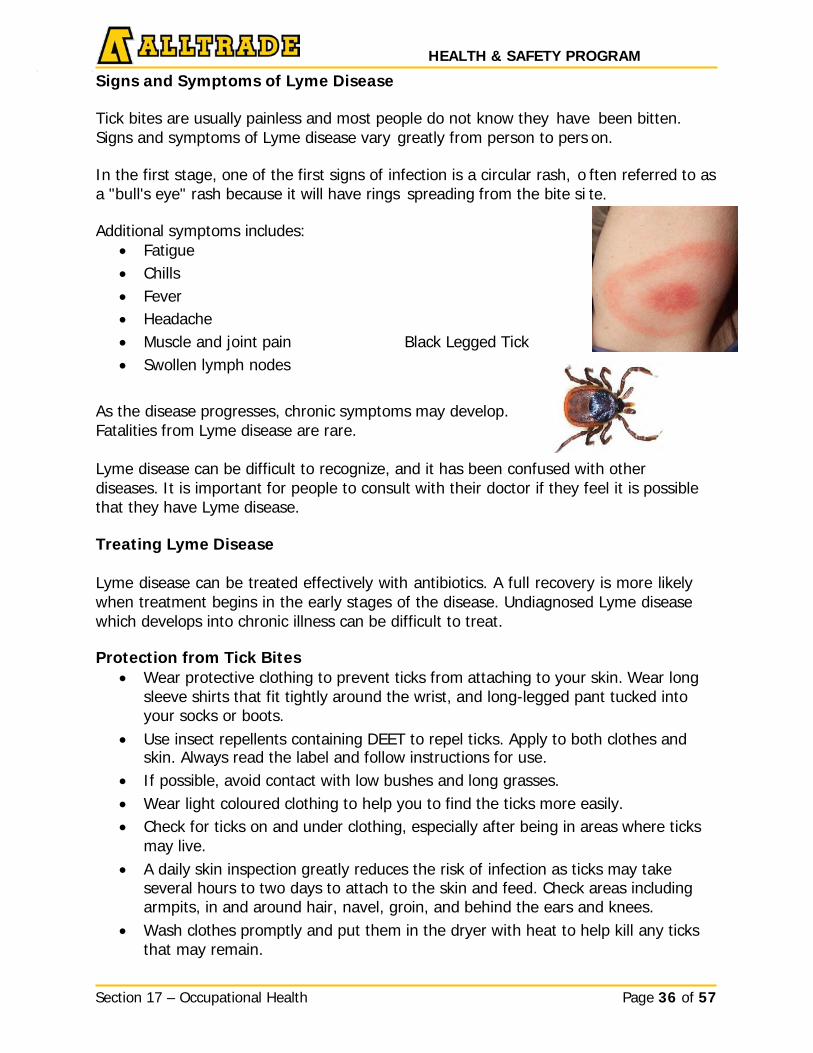
HEALTH & SAFETY PROGRAM _ _
Section 17 – Occupational Health Page 36 of 57
been bitten.
on. ften referred to as te.
_ _
Signs and Symptoms of Lyme Disease
Tick bites are usually painless and most people do not know they have Signs and symptoms of Lyme disease vary greatly from person to pers
In the first stage, one of the first signs of infection is a circular rash, o a "bull's eye" rash because it will have rings spreading from the bite si
Additional symptoms includes:
• Fatigue • Chills • Fever • Headache • Muscle and joint pain Black Legged Tick • Swollen lymph nodes
As the disease progresses, chronic symptoms may develop. Fatalities from Lyme disease are rare.
Lyme disease can be difficult to recognize, and it has been confused with other diseases. It is important for people to consult with their doctor if they feel it is possible that they have Lyme disease.
Treating Lyme Disease
Lyme disease can be treated effectively with antibiotics. A full recovery is more likely when treatment begins in the early stages of the disease. Undiagnosed Lyme disease which develops into chronic illness can be difficult to treat.
Protection from Tick Bites
• Wear protective clothing to prevent ticks from attaching to your skin. Wear long sleeve shirts that fit tightly around the wrist, and long-legged pant tucked into your socks or boots.
• Use insect repellents containing DEET to repel ticks. Apply to both clothes and skin. Always read the label and follow instructions for use.
• If possible, avoid contact with low bushes and long grasses. • Wear light coloured clothing to help you to find the ticks more easily. • Check for ticks on and under clothing, especially after being in areas where ticks
may live. • A daily skin inspection greatly reduces the risk of infection as ticks may take
several hours to two days to attach to the skin and feed. Check areas including armpits, in and around hair, navel, groin, and behind the ears and knees.
• Wash clothes promptly and put them in the dryer with heat to help kill any ticks that may remain.

HEALTH & SAFETY PROGRAM _ _
Section 17 – Occupational Health Page 37 of 57
_ _
• Carefully remove ticks found attached to the skin. Gently use fine pointed (needle-nose) tweezers to grasp head and mouth parts of the tick as close to the skin as possible. Pull slowly to remove the whole tick. Try not to squash or crush the tick this can help bacteria to get into the body.
• Keep the tick for testing by placing it in a small sealed container or double zip lock bags. Place a moist paper towel or tissue with the tick to help keep it alive. Dead ticks can be tightly sealed in rubbing alcohol. Bring the tick to your doctor.
• Wash affected area with soap and water or disinfect (with alcohol or household antiseptic) after removing ticks.
• Know how to identify ticks, and know the signs and symptoms of Lyme disease. • Contact a doctor immediately if you have an illness that resembles Lyme disease.
17.22 Molds
Standard
All employees should be aware of Molds and the effects of exposure.
Molds are microorganisms that produce thousands of tiny particles called spores as part of their reproductive cycle. Mold colonies are usually visible as colourful, woolly growths. They can be virtually any colour. When disturbed by air movement or handling, molds release theirs spores.
• Molds can be found almost anywhere. • Molds usually originate from outside sources such as soil and vegetation. • Molds prefer dark, moist environments and can grow at room temperature on
various construction materials including wallpaper, particleboard, ceiling tiles, drywall, and plywood.
Exposure • Construction workers can be exposed to toxic spores when working on buildings
with some sort of water damage from flooding, plumbing leaks, or leaks in the structure itself.
• In buildings with water damage or ongoing moisture problems, certain types of molds may reproduce to higher than normal levels and potentially cause health effects. Stachybotrys chart arum is of particular concern because it can be found in large colonies and can cause adverse health effects.
• Stachybotrys chart arum appears as small black patches and grows well on water-soaked cellulose material such as wallpaper, ceiling tiles, drywall, and insulation containing paper.
• In addition, construction personnel working in water-damaged buildings may be exposed to other types of toxic molds such as Fusarium, Aspergillus, and Penicillium.
Contact and Symptoms • Not all exposed workers will develop symptoms. • Once released, toxic spores known as mycotoxins must come into contact with
the skin or be inhaled before symptoms can develop.
HEALTH & SAFETY PROGRAM _ _
Section 17 – Occupational Health Page 38 of 57
_ _
• Exposure to toxic Molds may irritate skin, eyes, nose, and throat, resulting in allergy-like symptoms such as difficulty in breathing, runny nose, and watery eyes.
• Others symptoms have been reported such as fatigue and headache and asthmatic attacks.
• Toxic Molds must be removed. However, special control measures must first be implemented to prevent worker exposure and the spread of mold from one area to another.
• Personal Protective Equipment must be used as directed. Consult the EHS Department.
Note: If mold is discovered in a workplace the control and removal lies with the owner. Contact the EHS Department for further assistance.
17.23 Animal Droppings - Histoplasmosis
Standard
Use the following procedures for excavation in ground soils suspected of containing droppings from chickens, pigeons, and bats. Inhaling dust from droppings can cause serious lung infection called histoplasmosis.
Material & Equipment • Half mask respirator • High efficiency particulate aerosol (H.E.P.A.) filters • Disposable coveralls • Disposable work gloves • Disposable boot covers • Duct tape • Water
Procedure
1. Establish a work area protection zone. 2. In areas not suspected of containing the droppings of chicken’s etc., normal
excavation methods should be used. 3. Where work is to be performed in an area suspected of containing the droppings of
chicken’s etc., the following personal protective equipment must be worn: a. Hard hat b. Safety boots c. Eye protection d. Disposable coveralls e. Disposable boot covers f. Half mask respirator with H.E.P.A. filters, g. Disposable work gloves.
HEALTH & SAFETY PROGRAM _ _
Section 17 – Occupational Health Page 39 of 57
_ _
4. After putting on the personal protective equipment, and before commencing work, test the respirator for proper fit and seal the pant & sleeve cuffs of coveralls with duct tape.
5. When possible, moisten the ground with water prior to excavation. 6. Upon completion of the work, bag the coveralls, boot covers, gloves, and H.E.P.A.
filters and discard. 7. Wash respirator and place it in a sealed container for future use. 8. Rinse hand tools with water prior to storage.
Note: Use of compressed air tools should be limited to reduce the risk of airborne particles including histoplasmosis spores which are inhaled as dust into the lungs.
17.24 Man-Made Vitreous Fibers (MMVF)
Man-made vitreous fibers (MMVF) or synthetic vitreous fibers (SVFs) are a class of insulating materials. They are made primarily from glass, rock, slag or clay.
Standard
All workers handling or installing Man-Made Vitreous Fibers must take all reasonable precautions to ensure that they are not being exposed. Wearing personal protective clothing and equipment will prevent such exposures.
The Three General Categories
Fiber Glass:
• Glass Wool, • Continuous Filament
Mineral Wool:
• Rock Wool, • Slag Wool.
Re-factory Ceramic Fibers:
• Pure Oxides • Kaolin.
Where Used
Fiberglass
• Fiberglass is produced in two basic forms, wool fibers and textile fibers. • Thermal insulation, • Noise-control (acoustic) products, • Linings for air-handling ducts,
HEALTH & SAFETY PROGRAM _ _
Section 17 – Occupational Health Page 40 of 57
_ _
• Pipe insulation, • Air filters, • Homes • Refrigerators
Mineral Wool
• Mineral wool includes rock or stone wool and slag wool. • Materials are sprayed with lubricating oils and binders to reduce dustiness
(mineral wool generally contains a very high ratio of nonfibrous particles, or shot) and fiber breakage.
• Mineral wool applications are very similar to those of glass wool-thermal insulation, including fire protection, and acoustic insulation.
Refractory Ceramic Fiber Refractory ceramic fiber (RCF) is formulated to help control heat flow in high- temperature, industrial situations.
• Kaolin clay based products, for which the clay is obtained by mining. • Blends of alumina, silica, and refractory oxides (e.g. chromous and zirconia
oxides) • High-purity products that are a blend of purified alumina and silica and other
materials. • Used in high-temperature, industrial environments. • Blankets are used as furnace and kiln liners • Backup insulation to refractory brick, as soaking pit covers • Annealing welds • Loose RCF is used as a filler in packing voids and in expansion joints
Health Effects
Skin Irritation
SVFs may irritate the skin. This irritation is a mechanical reaction to sharp, broken ends of fibers that rub or become embedded in the outer layer of the skin and does not appear to be an allergic response. Typically, irritation does not persist and can be relieved by washing exposed skin gently with warm water and mild soap.
Upper Respiratory Tract Irritation
If large amounts of airborne fine fiber are released and improper work practices permit inhalation of the fibers, some workers may experience temporary upper respiratory irritation.

HEALTH & SAFETY PROGRAM _ _
Section 17 – Occupational Health Page 41 of 57
_ _
Preventative Exposure Measures
• Whenever possible, SVF products should be engineered and designed to limit their release of airborne dust.
• Manufacturing processes and engineering controls should be used to minimize airborne dust in the work environment.
• Approved respiratory protection and clothing that covers the skin as much as possible when handling or installing SVFs.
• Refer to MSDS/SDS for additional information.
17.25 Ergonomics (Workplace)
Standard
Ergonomics is the study of the interaction between work and people. Workers in many jobs are at risk for musculoskeletal disorders due to hazards or risk factors in the workplace. An MSD (Musculoskeletal Disorder) is an injury or disorder that occurs over time as a result of repetitive, forceful or awkward body movements or static or awkward postures. These activities can over time result in injury to the muscles and joints. Musculoskeletal Disorders
Musculoskeletal Disorder (MSD) is also known as Cumulative Trauma Disorder (CTD) and Repetitive Stress Injury (RSI). An MSD can damage muscles, tendons, and nerves of the neck, shoulder, forearm, hands, legs and back. Damage can also occur in other parts of the body. An MSD can cause pain, weakness, numbness or difficulty in grasping objects. Examples includes Back Pain, Carpal Tunnel Syndrome, Bursitis, Trigger Finger, Tendonitis and Rotator Cuff Disorder.
Symptoms of an MSD
• Pain • Swelling, inflammation • Numbness or tingling sensation • Decreased movement of a joint • Stiffness of body part • Symptoms worsen with time
Risk Factors of an MSD
Awkward or Static Posture (Prolonged or Frequent) An awkward body posture is any change from a neutral position e.g. bending, stooping, twisting, reaching above the shoulders, reaching behind and bending the wrist forward, backward or side to side.
HEALTH & SAFETY PROGRAM _ _
Section 17 – Occupational Health Page 42 of 57
_ _
Repetition Performing the same motion for too often, too quickly or for too long a period causes stress to joints and muscles. This type of work results in muscle and joint fatigue and can result in injury.
Contact Stress If the force required for completing the work overloads the muscles, joints and other soft tissues it can cause injury. Excessive force can be created by; long reaches, lifting heavy weights, improper gripping and excessive contact such as carrying a heavy coil of cable over one shoulder.
Local or Hand/Arm Vibration Risk depends on level and frequency of vibration, length of exposure and whether awkward postures are involved.
Cold Temperatures Flexibility is decreased, muscles do not work as efficiently. There is decreased blood flow to the muscles and joints.
Hot Work Environments Can lead to muscle fatigue due to dehydration and errors in how work is performed.
Work Organization and Work Methods Refers to work pacing, worker rotation and scheduling, potential complacency or monotony of tasks, physical and mental demands of the task, level of training and supervision.
Implementing Controls
General Principles 1. Use handling equipment when possible 2. Avoid lifting loads on or near the floor 3. Minimize working near the floor level 4. Move small weights often rather than heavy weights once 5. Regularly stretch muscles 6. Rotate workers to share monotonous, demanding or repetitive tasks
Specific Controls
Hand Tools
• Choose tools with vibration reducing features • Choose tools that are lighter and reduce hand torque and kickback • Make sure tools are balanced and do not require extra muscular effort • Choose tools with triggers that allow for multiple fingers • Inspect and maintain tools regularly. Replace old worn tools.
HEALTH & SAFETY PROGRAM _ _
Section 17 – Occupational Health Page 43 of 57
_ _
Pushing and Pulling • Make sure handles on carts are adjustable to allow for different worker heights • Use larger wheels on carts to reduce push or pull forces • Design work to avoid having to push or pull material up slopes or in crowded
spaces • Push rather than pull carts
Heavy, Frequent and Awkward Lifting
• Use mechanical aids to lift, lower objects/material • Keep loads close to the body • Split large loads into smaller loads • Plan lifting activities including clearing paths of obstacles and paying attention to
good housekeeping
Fixed or Awkward Postures • Adjust height of adjustable work stations • Use anti-fatigue matting • Place materials at suitable heights and bring closer to the actual work activity
area to avoid long reaches • When working in cramped positions, allow time to stretch and change position. • If possible use devices for overhead work.
Repetition
• Implement job rotation • increase variety of activities • includes flexibility and encourage micro breaks
Contact Stress
• Change or modify equipment • Use PPE i.e. knee pads, padded gloves • Change or modify work practice or work space to reduce contact with sharp or
hard edges, surfaces.
Cold Temperatures • Ensure workers wear appropriate outdoor clothing including well fitting, insulated
gloves • Store tools in warm area if possible while not using • Provide breaks in warm areas • Provide portable heating if practical • Encourage workers to stay hydrated
HEALTH & SAFETY PROGRAM _ _
Section 17 – Occupational Health Page 44 of 57
_ _
Warm Temperatures • Rotate workers to allow for cooling breaks • Encourage workers to stay hydrated
Work Organization and Work Methods
• Allow rest/recovery from demanding/repetitive tasks • Provide work variability • Ensure work pace and demands are appropriate • Provide training on MSDs, hazards and controls
Ergonomics for the Office Environment
Ergonomics can be defined as fitting the job to the worker. All workers are not the same size and everyone has different tolerances and limits. Ergonomics is applied to the design of workstations, work processes, equipment, and tools to fit the worker in order to minimize risk factors that may lead to musculoskeletal injury.
Proper Workplace and Workstation Design A properly designed workplace helps the worker maintain good body posture and minimizes forces on the body. The workstation should be appropriate for the job and the fit the worker’s body size and shape.
Standing at Work Generally the work surface should be at elbow height with the work placed in front of the worker so there is no need to twist or reach. Use of a footrail or footrest allows the worker to shift some of their body weight and rest muscles and joints. Anti-fatigue mats may provide cushioning for hard floors.
Sitting at Work Chair, desk, computer, or a workbench all affects the worker’s body position. The chair should be adjustable so that feet rest comfortably on the floor or on a footrest. Arrange workstation to allow proper back support. (I.e. position keyboard or monitor closer to user). Arm rests should be adjusted to support the forearms and prevent hunching.
“Ideal” Sitting Posture for Computer Work:
• Wrists: Naturally straight position; not bent up, down, or from side to side • Elbows: Bent between 90° and 100° (right angle), close to your body and
supported if possible • Shoulders: Relaxed (not slouched or raised) • Neck: Facing forward and not looking up, down, or to either side • Hips: Bent around 90° with your thighs roughly parallel to the floor • Low Back: Supported to maintain its natural curve • Knees: Bent at about 90° with enough space between the back of your knees
and the chair to place your fist • Feet: Placed flat on the floor or supported by a footrest.
HEALTH & SAFETY PROGRAM _ _
Section 17 – Occupational Health Page 45 of 57
_ _
Preventing MSD’s in the Office • Workers should stand up and get away from the desk and/or computer regularly
throughout the day. • Muscles work best when the body joints are in “neutral” positions. Workers
should not remain in any one position (seated or otherwise) for long periods of time.
• Getting up and walking around, even short distances, throughout the day helps to reduce stress by improving circulation in the muscles and the spine.
• Micro-breaks are useful to allow muscles and joints a rest. Other daily tasks, such as filing and delivering, can be done while taking a break away from the computer.
Chair Position
• Adjust the backrest so the low back support contacts the curve in the back and gives support in that area.
• Adjust armrests so that elbows can rest comfortably on the rests, and shoulders are level and relaxed
• Lower the seat pan so feet rest comfortably on the floor. • Chair height should be adjusted to allow for typing comfortably with “ideal” wrist
and arm positions. A footrest can be used if feet do not rest flat on the floor after chair adjustment.
Keyboard and Mouse
• Keyboard and mouse should be slightly below elbow level and close to the body. The mouse should be right beside the keyboard, and in front of the mousing hand.
• To reduce stress on the hand, try to use the mouse with the opposite hand. This reduces the stress placed on one arm and frees the dominant hand to perform other tasks.
• Try moving the arm and shoulder rather than only the hand when mousing.
Monitor and Document Holder • Document holders help keep papers vertical or angled so the neck does not have
to bend to read them. • The document holder should be the same distance from the eyes as the
computer screen. • The monitor and keyboard should be directly in front of the worker. • The top of the monitor and document holder should be around eye level when
sitting comfortably. • The monitor should be about arm’s length away at a comfortable reading
distance. • The monitor should be angled slightly up toward the eyes. Angling the monitor up
too high can increase glare.
HEALTH & SAFETY PROGRAM _ _
Section 17 – Occupational Health Page 46 of 57
_ _
• Eyesight naturally falls about 20° down from the horizontal, the top of the screen should be placed around eye level. Line of sight should naturally fall to the middle of the screen.
• If the worker wears bifocals or trifocals, it's especially important to properly adjust monitor height. Tilting the head back to view the screen through the lower portion of the glasses could lead to muscle fatigue in the neck and back. Instead, try lowering the monitor.
17.26 Back Care
Standard
Construction work puts physical stress on the body. About half of the back injuries are attributed to lifting excessive weight or lifting incorrectly and the rest are the result of slips, trips and falls. Most back injuries are the result of everyday wear and tear rather a single traumatic event.
Procedure
Exercise Program to protect your spine, the muscle supporting your back must be both strong and flexible. A pre-work stretching program is recommended. Warming up prepares your body for the physical work ahead and helps minimize the risk of injury.
The three essentials are Warm-up, Workout, and Cool-Down.
Remember – Check with your doctor before starting any exercise program.
• Workplace Posture
o Maintaining a proper posture is the most critical part of good back care. Using our muscular system to control posture minimizes the effects of everyday wear and tear on our spine. Any position held too long is not good for your back. Aches and pains from prolonged working postures are our body’s way of warning you to change position. If these warnings are continuously ignored, you will be vulnerable to low back injury.
• Lifting o A weight that is too heavy, lifting in awkward position, twisting your body
while lifting, or doing excessively heavy work are all common causes of low back problems. When lifting plan your move, size up the load and make sure your path is clear or get help if needed or use other material handling equipment if possible.
• Material Handling Equipment o Different types of equipment have been designed and manufactured to lift
and move loads of various shapes, sizes, and weights. This equipment can not only save time and labor – it can save your back.
HEALTH & SAFETY PROGRAM _ _
Section 17 – Occupational Health Page 47 of 57
_ _
• Hoisting or Moving Heavy Loads o Special equipment is often required to hoist or move heavy loads
manually. Devices from simple levers and rollers to more complicated chain hoists and derricks can handle loads that would otherwise be difficult to move. The mechanical advantage afforded by this equipment reduces the manual effort involved as well the risk of back injury.
17.27 Sanitation, Lunchroom and Hygiene
Standard
Adequate sanitation and hygiene facilities shall be provided at all workplaces as required by legislative standards. Consult the EHS Department.
Procedure
The constructor/prime contractor shall ensure that adequate sanitation and hygiene is available.
• Washroom and cleanup facilities shall be readily available and used as per the regulatory requirements in your area.
• Women and men shall have separate facilities. • Wash-up facilities with clean water, soap and individual towels shall be available
nearby on all projects. If no water is available, waterless soap is satisfactory. • A reasonable supply of fresh potable drinking water shall be supplied. Disposable
cups shall be made available. • Lunchrooms shall be kept in a clean, tidy condition. Your vehicle may be your
lunch area. • Care should be taken to ensure that work coveralls and other clothing do not
contaminate the lunch room area. • Perishable foods must not be allowed to accumulate in lunch rooms. • Lunch room fridges and microwaves must be used for food use only. • Proper hand hygiene should be encouraged in order to control the spread of
illness such as common colds, flu’s and gastro-intestinal infections. Using soap and lathering up is very important (rinsing hands in water only is not as effective. Hands should be washed for a minimum of 20 seconds - longer if the hands are visibly soiled. When there is no soap or water available, waterless hand cleaning sanitizers may be used. These solutions should be 60% alcohol or better.
• Proper sneeze/cough etiquette i.e. coughing or sneezing into your sleeve or into a tissue will also help control spread of illness in the workplace.
Note: When handling controlled products please consult the MSDS/SDS for cleanup procedures.
HEALTH & SAFETY PROGRAM _ _
Section 17 – Occupational Health Page 48 of 57
_ _
17.28 High Bacteria from Lakes, Rivers and Standing Water
Standard
Workers who work near or close proximity to Lakes and Rivers that contain high levels of Bacteria must take all reasonable precautions to prevent exposure.
Procedure
All workers who are required to work near or adjacent to water bodies that are known to have high concentration levels of bacteria during various construction activities must be aware of the potential health effects and risks to unprotected exposure to water.
The owner must disclose if there are any contaminates and if required conduct surface water sampling and provide a chemical data analysis.
Typically water that contains high levels of bacteria also generally contains contamination such as E coli, as well as pathogens such as giardia and cryptosporidium. Health effects can includes:
• Diarrhea • Irritation of upper respiratory tract • Eye, nose or throat infection • Skin ailments
Swallowing the water is the primary source of exposure to disease-causing microorganisms. However they may also enter through the ears, eyes, and nose or through broken skin.
The following procedures must be followed:
• Workers must avoid/eliminate unprotected contact with the water. • This also includes tools and material that have come in contact with the water.
Tools and equipment must be power washed using a water truck if it is exposed to the water or diluted in a solution mixed with bleach and water.
• If workers must contact the water or if equipment that has contacted the water they must be protected by some or all of the following personal protective equipment. Water proof rain suites, rubber gloves, eye protection, Tyvek suits and rubber safety boots.
All PPE that is exposed to the water must not leave site without being decontaminated by power washing with clean water first. This will prevent transporting contaminated clothing home. PPE must be cleaned as necessary and hanged to dry.
• There will be no smoking, chewing gum, eating or drinking during work that is
within close proximity to the creek. • Before coffee break, lunch, end of shift and using the toilet facilities all workers
HEALTH & SAFETY PROGRAM _ _
Section 17 – Occupational Health Page 49 of 57
_ _
are required to wash their hands thoroughly with soap and clean water and use disinfectant solution to prevent absorption, ingestion and contact with the body.
• There must be a wash station situated within a reasonable distance. The station must include: a labeled container with clean water, pump dispenser of liquid soap, pump dispenser of disinfectant solution (hand sanitizer), rolls of paper towels and a garbage bin.
• Warning signs must be posted along the water indicating “high levels of bacteria use proper PPE and hygiene”.
• If there are any concerns or further assistance is required please contact the EHS Department.
17.29 Hand-Arm-Vibration
Standard
All employees exposed to tools that vibrate need to be aware of Hand-Arm-Vibration Syndrome (HAVS) and the effects.
Hand-Arm-Vibration is the transfer of vibration from a tool to a worker’s hands and arms. The level of Hand-Arm-Vibration is determined by measuring the acceleration of the tool or object grasped by the worker.
Hand-arm vibration syndrome is a disease that involves circulatory disturbances, sensory and motor disturbances and musculoskeletal disturbances.
Exposure
Daily exposure to hand and arm vibration by workers who use vibrating tools powered by compressed air, gasoline or electricity (eg. powered hammers, jackhammers, chisels, chainsaws, sanders, grinders, riveters, breakers, drills, compactors, sharpeners and shapers) can cause physical damage to the hands and arms.
Symptoms
• Bluish discoloration (cyanosis) of the skin of fingers and hands. • Whitening (blanching) of fingertips after cold or damp exposure (known as
Raynaud’s phenomenon). • Numbness, with or without tingling happens, before, during or after blanching. • Attacks, more common in winter, but eventually may occur year round. • Palms of the hands are rarely affected. • Sense of touch and pain perception reduced, sometimes forever. • Decreased grip strength, and inability to sustain muscle power.
HEALTH & SAFETY PROGRAM _ _
Section 17 – Occupational Health Page 50 of 57
_ _
Prevention:
Reducing the incidence of HAVS requires numerous actions. Some recommendations to prevent HAVS are:
• Provide adequate rest breaks away from vibrating tools (e.g. Reduce exposure hours, decrease the number of days exposed to vibrating tool by job rotation).
• Follow manufactures instructions on proper use of equipment. (e.g. Do not remove hand grips on grinders).
• Design tools to minimize vibration. • Design tools to keep hands warm (e.g. Heated handles, relocate air vents). • Use ergonomic design to reduce grip force, awkward posture, etc. • Perform routine medical checks of those at risk. Record all signs and reported
symptoms. • Warn workers of health risks.
NOTE: There is no therapy at present for neurological symptoms other than removal from vibration exposure, but improved circulation may help with nerve recovery.
17.30 Poison Ivy
What causes poison ivy’s allergic reaction? – The reaction is caused by Urushiol which is the resin / oil found on poison ivy, oak and sumac plants. The oil can only be transferred by physical contact and is not airborne.
Poison Ivy is an example of occupational allergic contact dermatitis which is an allergic response to skin contact with some allergy-causing material. Allergic dermatitis can also occur in other places on the body that did not come in contact with the allergy- causing material.
Symptoms
Signs of poison ivy (allergic contact dermatitis) includes redness of the skin, blisters, scales or crusts. These symptoms may occur within a few hours of contact or up to 48 hours.
Protection
Protective clothing such as sleeves and gloves should be worn to aid in the prevention of skin contact.
Contact with Poison Ivy
Anyone coming into contact with poison ivy should wash the contaminated areas of the skin with soap and water.
Be cautious not to touch or rub other areas of the body such as the eyes prior to First Aid.

HEALTH & SAFETY PROGRAM _ _
Section 17 – Occupational Health Page 51 of 57
_ _
Procedure
1. Complete a FLRA (Field Level Risk Assessment) to determine if the above hazard exists.
2. Use the enclosed pictures to identify the plants in your work area. 3. If plants are present wear Tyvek sleeves and rubber gloves. 4. Ensure that while wearing these items you do not touch your face or exposed skin. 5. After the job has been completed, dispose of sleeves and rubber gloves in a garbage
bag. Identification
Poison Ivy is commonly confused with other plants. Here are the key differences to look for to distinguish poison ivy from its look a likes:
Poison ivy
• Three divided leaves • Center leaflet on a longer stalk • White, waxy berries along the stem • Leaves alternate on the stem • Erect shrub or climbing vine
Fragrant sumac
• Three divided leaves • Center leaflets not on a stalk • Red, fuzzy berries at the end of stem • Erect shrub

HEALTH & SAFETY PROGRAM _ _
Section 17 – Occupational Health Page 52 of 57
_ _
How to Identify Poison Ivy
Poison Ivy is often confused with another woody vine, Virginia Creeper (Parthenocissus quinquefolia). Notice how much bigger and lighter coloured the tendrils of Virginia Creeper are compared to the aerial roots of Poison Ivy. Both the vines shown blow are about as big around as your thumb, and were growing on the same tree.
Poison Ivy (don’t touch!) Virginia Creeper (OK to touch)
The fruits of Poison Ivy are grapelike clusters of tiny, white, pumpkin-like seeds with an off-white or pale yellow rind. The photo below was taken in mid-November and shows that the rind dries out and flakes off eventually. The fruits also contain urushiol, but that does not stop the birds from eating them! Flickers and other woodpeckers are fond of them, along with sapsuckers, thrushes, pheasants and quail. The rind provides food to the birds while the seeds usually pass on through their gut unharmed and, in this way, birds are the agent for dispersal of Poison Ivy seeds.

HEALTH & SAFETY PROGRAM _ _
Section 17 – Occupational Health Page 53 of 57
_ _
Poison Ivy Berries
Poison Ivy has compound leaves. That is, each leaf is made up of distt parts, called leaflets. In this case, there is one leaflet at the end of the leaf stalk (or petiole) and two leaflets opposite each other below the first. This is called a trifoliate pattern. The two lower leaflets have very short stalks and are often shaped like mittens, with a lobe on one side.
The shape, colour and texture of the leaflets are highly variable. These shown on the right have fairly smooth margins, but others may have rounded teeth or lobes.
HEALTH & SAFETY PROGRAM _ _
Section 17 – Occupational Health Page 54 of 57
_ _
17.31 Fatigue Management
Fatigue is a state of being tired. It can be caused by long hours of work, long hours of physical or mental activity, inadequate rest, excessive stress and combinations of these factors. The signs, symptoms and affect fatigue has on workers varies from one person to the next; however, fatigue may affect the individual worker’s ability to perform mental and physical tasks.
Some work environment or industries require extended hours of work which has the potential to expose employees to fatigue related hazards.
Fatigue is not hours of service; it is a complicated combination of many factors and it is manageable.
Fatigue Program (FMS)
The purpose of the FMS is to ensure that management, supervisors, and workers understand what fatigue is, how to recognize it, and how to proactively deal with it in the workplace. An effective FMS will includes awareness of and response to fatigue issues in the workplace.
Policy
Alltrade recognizes that fatigue is a factor that may affect a worker’s ability to perform mental and physical tasks.
It is the policy of Alltrade that it will train to the best of its ability, all management and supervisory personnel to recognize and respond to the signs and symptoms that might impair the worker’s performance due to fatigue. The supervisor will be responsible to make changes to work requirements if fatigue impairment signs are evident. All concerns should be communicated to management and changes documented, reviewed and followed-up. It is the responsibility of all workers to conduct themselves at work and in their lifestyle in such a manner that they present themselves each day for work in a fit and unimpaired/unfatigued condition.
Roles & Responsibilities
Management
• To ensure the FMS is implemented throughout Alltrade • Provide the necessary information about fatigue • Provide instruction and training • Communicate employer expectations • Monitor the effects of extended work hours • Support employees who are experiencing concerns with fatigue • Assist and advise line supervisors • Investigate any problems and/or concerns
HEALTH & SAFETY PROGRAM _ _
Section 17 – Occupational Health Page 55 of 57
_ _
• Inspect the workplace and review FMS with employees • Review the FMS Supervisors • Ensure all crew members understand the FMS • Conduct safety meetings discussing fatigue and the FMS • Promote the FMS • Ensure tasks are performed in safe and healthy manner • Be aware of the possible risks associated with extended hours and/or consecutive
days of work • Give workers as much notice as possible if extended hours are anticipated • Observe and record how individuals respond to extended hours • Recognize symptoms of fatigue • Get feedback from individual crew members and the crew as a whole • Take prompt action if a risk develops • Relay information to and from management & employees • Report any FMS problems, concerns and/or issues
Employees • Actively participate in FMS awareness • Recognize symptoms of fatigue • Promptly report any fatigue-related concerns • Report any individual medical or personal situations which may have an effect on
fatigue • Should get proper rest during time off • Identify personal stress and seek assistance if required
Hazard Assessment
Fatigue is considered a potential hazard and should be a consideration when developing work schedules, plans and hazard assessments.
Practices
Preventative Methods for Dealing with Fatigue
• Inform all workers of the FMS • Minimize extended hours of work when possible • Schedule rest days • Assess and control hazards and risks • Provide information and assistance • Recognize individual and crew fatigue • Give as much advance notice of extended hours as possible • Define whether the work is urgent or not
HEALTH & SAFETY PROGRAM _ _
Section 17 – Occupational Health Page 56 of 57
_ _
• Ensure crewmembers have access to food and water • Take short and frequent breaks • Solicit short-term help to minimize the need for extended hours • Have crewmembers rotate and perform various functions of short duration during
extended hours • Perform complex tasks earlier in the shift, if possible • After a long day, possibly start later the next day • Utilize the buddy system to facilitate fatigue awareness in the field • Account for employees returning from sickness, absences and/or modified work as
there is the potential for an earlier onset of fatigue • In conjunction with employees, identify health problems which may affect an
employee’s ability to work extended hours ie. diabetes • In remote locations consider travel time to and from work • Develop a method to track which employees are working extended hours and
monitor
Awareness Employees may be required to take part in FMS Awareness training, which will consist of review of some or all of the following aspects, depending upon the employee’s responsibilities.
• What is fatigue? • Signs, symptoms and consequences of fatigue • Roles and responsibilities • Preventative methods • Reporting procedures • Monitoring methods • Program review processes
Monitoring Methods
• Management/supervisors to monitor days off/consecutive days of work • Management/supervisors to monitor crew’s hours of work • Management/supervisors to determine the need for extended hours • Management/supervisors are to monitor crews when working extended hours, for
fatigue- related concerns • Managers/supervisors are to address crewmember concerns regarding working
extended hours • Management is to monitor supervisor-employee relationships • Ensure everyone is aware of FMS
HEALTH & SAFETY PROGRAM _ _
Section 17 – Occupational Health Page 57 of 57
_ _
FMS Review • Periodically review FMS Policy and Procedures
o New employee orientations o Annual safety meeting (with analysis from year-end) o Hazard assessments and Tool Box Meetings o By request
• Compare ratio of crews working extended hours to those who are not • Review and determine the reason and factors for working extended hours • Perform and review employee/supervisor ‘Extended Hours of Work’ survey • Review the effectiveness of the FMS Awareness program • Review the factors affecting the need for extended hours • Discuss possible alternatives to extended hours of work
Jurisdictional Requirements
Some jurisdictions and industries have specific legislation and guidelines regarding fatigue management that must be adhered to when developing a work schedule. These regulations or guidelines shall typically state the maximum amount allowable hours worked per day and the minimum rest period between shifts.
Please consult with the EHS Department for further information regarding fatigue management guidelines.
HEALTH & SAFETY PROGRAM _ _
Section 18 – Personal Protective Equipment (PPE) Page 1 of 14
Title: Personal Protective Equipment (PPE) Issue Date: January 2016
Section: 18 Revision Date: N/A
Approved by: Bob Ritzmann, President Signature:
18.1 Policy Statement
All workers must wear the basic requirements for personal protective equipment (PPE) in all Alltrade workplaces at all times. Supervisors will adequately assess the need for PPE and ensure it is supplied and worn when necessary. When additional personal protective equipment is required in the workplace, all workers shall comply with the requirements. Workers will be trained in the proper use of PPE and any worker failing to comply with PPE requirements will not be permitted into Alltrade workplaces.
18.2 Personal Protective Equipment (PPE)
Each worker must be: • Instructed in the proper use and maintenance of personal protective equipment. • Instructed when and why it is to be used. • Informed of its limitations. • Instructed when and how it is to be replaced. • Instructed to inform supervisors of any physical or medical limitations while
wearing the equipment. • Checked for proper fit.
18.3 Basic Requirements
• All safety equipment must meet CSA/OSHA/ANSI standards and shall carry markings, numbers, or certificates of approval. See table below for a guide to personal protective equipment.
• Hard hats are to be worn in accordance with pertinent safety standards. • Safety glasses shall be equipped with side shields and fit high enough on the
nose to adequately protect the eyes. • All prescription glasses shall meet all safety glass requirements including
permanently affixed side shields. • All PPE should be visually inspected prior to use and as per manufacturer
requirements. • Ear protection must be adequate and comfortable. • Safety footwear must be worn. • All eye and face protection must fit properly with appropriate head protection. • Safety harnesses and shock-absorbing lanyards are to provide maximum safety
and be as comfortable as practical. • High visibility vests must be worn in high traffic areas. • Basic clothing shall be worn by all workers (full legged pants and shirts with a
sleeve). Muscle shirts and shorts will not be permitted. Full body clothing may be required in certain jurisdictions.
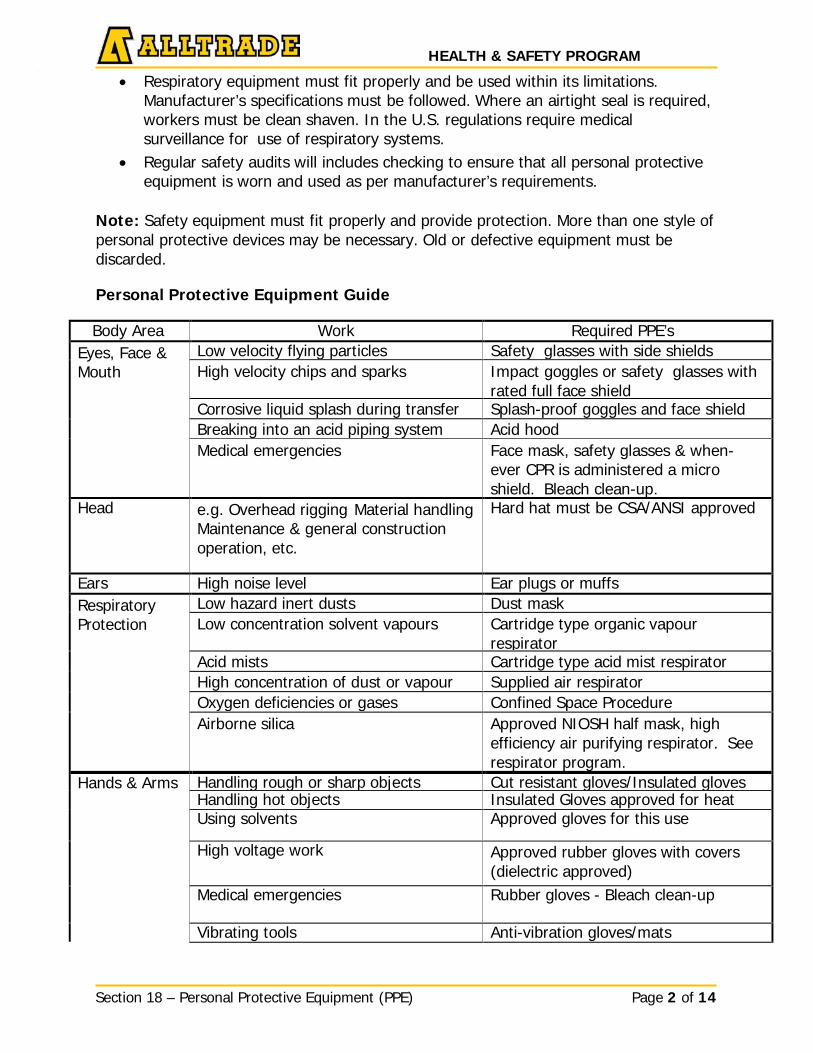
HEALTH & SAFETY PROGRAM _ _
Section 18 – Personal Protective Equipment (PPE) Page 2 of 14
• Respiratory equipment must fit properly and be used within its limitations. Manufacturer’s specifications must be followed. Where an airtight seal is required, workers must be clean shaven. In the U.S. regulations require medical surveillance for use of respiratory systems.
• Regular safety audits will includes checking to ensure that all personal protective equipment is worn and used as per manufacturer’s requirements.
Note: Safety equipment must fit properly and provide protection. More than one style of personal protective devices may be necessary. Old or defective equipment must be discarded.
Personal Protective Equipment Guide
Body Area Work Required PPE’s
Eyes, Face & Mouth
Low velocity flying particles Safety glasses with side shields High velocity chips and sparks Impact goggles or safety glasses with
rated full face shield Corrosive liquid splash during transfer Splash-proof goggles and face shield Breaking into an acid piping system Acid hood Medical emergencies Face mask, safety glasses & when-
ever CPR is administered a micro shield. Bleach clean-up.
Head e.g. Overhead rigging Material handling Maintenance & general construction operation, etc.
Hard hat must be CSA/ANSI approved
Ears High noise level Ear plugs or muffs Respiratory Protection
Low hazard inert dusts Dust mask Low concentration solvent vapours Cartridge type organic vapour
respirator Acid mists Cartridge type acid mist respirator High concentration of dust or vapour Supplied air respirator Oxygen deficiencies or gases Confined Space Procedure Airborne silica Approved NIOSH half mask, high
efficiency air purifying respirator. See respirator program.
Hands & Arms Handling rough or sharp objects Cut resistant gloves/Insulated gloves Handling hot objects Insulated Gloves approved for heat Using solvents Approved gloves for this use
High voltage work Approved rubber gloves with covers (dielectric approved)
Medical emergencies Rubber gloves - Bleach clean-up
Vibrating tools Anti-vibration gloves/mats
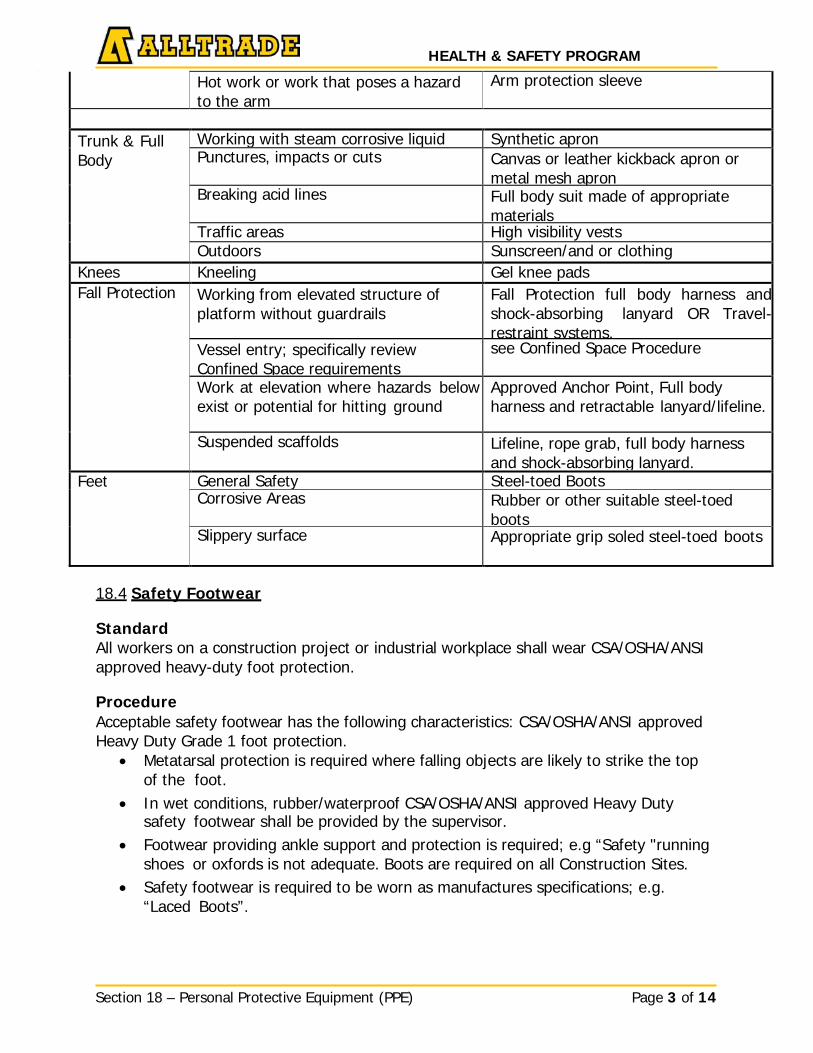
HEALTH & SAFETY PROGRAM _ _
Section 18 – Personal Protective Equipment (PPE) Page 3 of 14
Hot work or work that poses a hazard to the arm
Arm protection sleeve
Trunk & Full Body
Working with steam corrosive liquid Synthetic apron Punctures, impacts or cuts Canvas or leather kickback apron or
metal mesh apron Breaking acid lines Full body suit made of appropriate
materials Traffic areas High visibility vests Outdoors Sunscreen/and or clothing
Knees Kneeling Gel knee pads Fall Protection Working from elevated structure of
platform without guardrails Fall Protection full body harness and shock-absorbing lanyard OR Travel- restraint systems.
Vessel entry; specifically review Confined Space requirements
see Confined Space Procedure
Work at elevation where hazards below exist or potential for hitting ground
Approved Anchor Point, Full body harness and retractable lanyard/lifeline.
Suspended scaffolds Lifeline, rope grab, full body harness and shock-absorbing lanyard.
Feet General Safety Steel-toed Boots Corrosive Areas Rubber or other suitable steel-toed
boots Slippery surface Appropriate grip soled steel-toed boots
18.4 Safety Footwear
Standard All workers on a construction project or industrial workplace shall wear CSA/OSHA/ANSI approved heavy-duty foot protection.
Procedure Acceptable safety footwear has the following characteristics: CSA/OSHA/ANSI approved Heavy Duty Grade 1 foot protection.
• Metatarsal protection is required where falling objects are likely to strike the top of the foot.
• In wet conditions, rubber/waterproof CSA/OSHA/ANSI approved Heavy Duty safety footwear shall be provided by the supervisor.
• Footwear providing ankle support and protection is required; e.g “Safety "running shoes or oxfords is not adequate. Boots are required on all Construction Sites.
• Safety footwear is required to be worn as manufactures specifications; e.g. “Laced Boots”.
HEALTH & SAFETY PROGRAM _ _
Section 18 – Personal Protective Equipment (PPE) Page 4 of 14
_ _
18.5 Hard Hats
Standard All workers on a construction site shall wear appropriate head protection. In other Alltrade workplaces, appropriate head protection may be required as dictated by the situation.
Procedure Appropriate head protection is as follows:
• On a construction site all workers shall wear a CSA/OSHA/ANSI approved hard hat.
• The supervisor shall ensure the appropriate head protection is worn. • Where head protection is likely to be dislodged due to wind or working posture,
the supervisor shall ensure chin-straps are worn. • Where the danger of hair entanglement in machinery exists, the supervisor shall
ensure a hairnet shall be worn. • Head protection shall be replaced when the following defects occur:
o Cracks/gouges o Holes o Defective or broken liners o Damage due to paint or chemicals o When it is impossible to inspect a hard hat, it should be replaced. o Hard hat will be removed from service after severe impact
• All head protection shall be worn and maintained as per manufacturer specifications.
Inspection
Hard hats must be visually inspected to ensure there are no defects or damage that could affect the health and safety to the user.
Procedure 1. Visually inspect for cracking or gouging on both the inside and outside of the hat. 2. Check the structural integrity of the hat. There are many conditions such as hot /
cold, UV exposure or chemicals that could affect the lifespan of the hat. 3. Inspect the suspension to ensure to fabric components are not frayed or torn.
Ensure there are no cracks or defects in any plastic parts of the suspension.
Care and Storage
Through general use and exposure to contaminants or substances in a work area hard hats can experience a build-up of material that has the potential to hide any defects such as cracks or gouges.
HEALTH & SAFETY PROGRAM _ _
Section 18 – Personal Protective Equipment (PPE) Page 5 of 14
_ _
If there is a build-up of any material gently wash your hard hat with warm, mild soapy water. If there appears to be any deterioration of the integrity of the hard hat due to the material build- up (from chemicals etc.) remove the hard hat from service.
To ensure maximum protection and lifespan to the user hard hats should be stored in areas that are not subject to the following:
• Sunlight / UV radiation • Chemicals • Temperature extremes (hot and / or cold) • Impact from any object.
18.6 Eye Protection
Standard All workers shall wear the appropriate CSA/OSHA/ANSI approved eye protection with side shields required to prevent an eye injury. Where exposure to flying particles, splashes, and/or UV radiation exists, appropriate face protection will be worn.
Procedure Eye protection shall be worn at all times as follows:
• Ensure your safety glasses fit properly. Eye size, bridge size and temple length all varies. Safety glasses should be selected so that they provide optimal fit.
• Wear safety glasses so that the temples fit comfortably over the ears. The frame should be as close to the face as possible and adequately supported by the bridge of the nose.
• CSA/OSHA/ANSI approved safety glasses with side shields shall be worn by all workers at all times. Prescription eye protection must be CSA/OSHA/ANSI approved.
• Where experience indicates that safety glasses with side shields are not adequate to prevent eye injuries, tight fitting goggles shall be worn.
• Tight fitting goggles may be replaced by side-shielded safety glasses combined with a face shield in the following operations:
o Grinding/cutting o Spray painting o Chipping • For sandblasting operations, hoods with replaceable windows shall be worn. • Burning goggles are required for all gas welding and burning, number 3 shade
density minimum anti-scratch protection. • Handling of corrosive liquids requires tight fitting goggles without ventilation
holes. • Handling molten metals requires side-shielded safety glasses combined with full-
face shield. • Boosting batteries requires tight fitting goggles or side-shielded safety glasses
combined with full-face shield. • Face Shields used to protect from impact (grinding, chipping, arc flash, etc.) must
have the appropriate impact protection rating.
HEALTH & SAFETY PROGRAM _ _
Section 18 – Personal Protective Equipment (PPE) Page 6 of 14
_ _
18.7 Hand & Arm Protection
Standard Hand and arm protection suitable to the hazard shall be used.
Hand Protection
Procedure Hand protection shall be used as follows:
• Skin damage due to solvents, chemicals and other agents shall be prevented by
using the protective gloves or barrier cream required by the WHMIS 2015 / Hazard Communications MSDS/SDS.
• Dielectrically tested rubber gloves are required on all power line work and where there is possible contact with energized circuits. Gloves will need to be retested as per manufacturer requirements.
• Tool holders are required where the hazard of being struck by a driving force exists.
• Tag lines are required to control loads. Keep hands clear of loads and sling pinch points. Do not wrap tag lines around hands.
• Clamps shall be used to hold small pieces when using power tools. • Rings and other jewelry must be removed if there is a likelihood of entanglement. • Leather faced gloves are required when handling wire rope, sharp objects, or hot
metals. • Cut resistant gloves should be worn when working with sharp tools and materials • Anti-vibration gloves may be necessary with certain tooling/machinery. (refer to
hand arm vibration for more information)
Arm Protection
Long sleeves or arm protectors are required to protect the arm during hot work or other work that poses a risk of heat, burns, arc flash, flames or other thermal hazards.
18.8 High Visibility Clothing
Standard High Visibility Apparel must be worn when working in areas of vehicular or construction traffic and areas designated by the project superintendent. If being worn while directing traffic it must meet the requirements of the local jurisdiction.
PPE requirements for traffic control persons in ONTARIO
• Hard Hat meeting CSA/OSHA/ANSI shall be worn at all times • Safety boots meeting CSA/OSHA/ANSI • Fluorescent garment meeting these requirements:
HEALTH & SAFETY PROGRAM _ _
Section 18 – Personal Protective Equipment (PPE) Page 7 of 14
_ _
o Fluorescent blaze or international orange o Two retro-reflective fluorescent vertical yellow stripes on front. o Two retro-reflective fluorescent diagonal yellow stripes on the back o Vests must have adjustable fit and side and front tear-away features on
vests made of nylon o Eye protection
After Dark Retro-reflective silver stripes encircling each arm and leg and a tear away reflective vest shall be worn to increase visibility.
18.9 Flame Resistant Coveralls
Standard Flame resistant coveralls are required to be worn where there is the potential for flash fire.
Procedure Flame resistant clothing shall be worn as follows:
• Cutting and welding on live lines • Purging gas from a line • Within 5 meters of blowing gas • When plant systems have been altered by damage or hazardous environmental
changes • Abandoning mains or services • Cutting (hot or cold) on live pipelines • Until the pipe has been completely blown down and purged • In excavations/trenches where natural gas is present • During high volume tapping tee fusions • Welding on live, open end pipelines • Stopping and tapping operations • Gouging • Leak repair; or any other situation where potential for gas to blow or accumulate,
or of an accidental flash fire exists.
Note: Consult the EHS Department
Other requirements for the wearing of flame resistant clothing can be when working in refineries and similar workplaces.
Wearing Flame Retardant Clothing The garment is made of a material that will slow, terminate or prevent flaming combustion. Follow these simple steps to ensure you are adequately protected.
• Fasten the coveralls up the front

HEALTH & SAFETY PROGRAM _ _
Section 18 – Personal Protective Equipment (PPE) Page 8 of 14
_ _
• At the wrists • At the ankles • Tightly draw the hood to prevent escaping gases from accumulating inside the
coveralls. • Draw the hood over the head for added protection. • Flame resistant hoods or balaclavas must be worn underneath hard hats.
Protection The coveralls are designed to provide some degree of protection from a flash fire and give you time to escape the fire area.
They are not intended to protect from prolonged exposure to fire.
Note: Generally, coveralls provide more protection if worn over cotton or woolen clothing as opposed to synthetic fabric, like nylon or polyester.
Maintenance of Clothing The flame retardant coveralls are to be kept reasonably clean, free of oils, greases and other flammable items, and have not reached the point of serious deterioration. The supervisor shall ensure flame resistant clothing is changed as required.
If you wash your coveralls:
• Refer to manufacturer guidelines • Use cold water and usual laundry detergent • Do not wash with other light coloured clothing articles, se the material is not
colour- fast • Do not use bleach (bleach removes the flame retardant qualities) • Dry at a low temperature to prevent shrinking
Storage When not in use, store coveralls in a clean, dry place.
Note: Flame Resistant coveralls form a component to Arc Flash protection. Refer to Arc Flash guidelines for further information.
18.10 Glove Inspection (Electrical and Other Uses)
Standard Properly rated rubber gloves with leather protectors are required to be worn on all power line work and where there is any possible contact with energized circuits. Gloves must be maintained, inspected and tested as per local regulations and manufacturer’s requirements. Workers must be trained in the use care and storage of rubber gloves and protectors. Contact your EHS department for further information.
HEALTH & SAFETY PROGRAM _ _
Section 18 – Personal Protective Equipment (PPE) Page 9 of 14
_ _
Insulating Rubber Gloves • Proper care and use of the products are essential for the safety of the wearer. • Gloves must be inspected visually by the user at least once per day or prior to
each use. Inspection should include both the inside and outside surfaces. • Gloves can be damaged by many chemicals, especially petroleum-based products
such as oils, gasoline, hydraulic fluid, inhibitors, hand creams, pastes, and salves. If contact is made with these or other petroleum-based products, the contaminant should be wiped off immediately.
• During the inspection, check for: o Cuts or snags o See if the red or yellow inner layer shows through the black outer layer o Chemical deterioration, such as
Swelling Softness Hardening Stickiness
o Ozone deterioration o Sun checking.
• If any sign of damage or deterioration is found: o DO NOT use the gloves. o Return these gloves for replacement and/or retesting. o Gloves should be cleaned with a mild soap. After washing, rinse thoroughly
with clear water and air dry. • To inspect the inside of a glove:
o Place the glove on your hand. o Pull the cuff up over your fingers. o Holding the glove downward, grasp the cuff and twirl it upwards toward
your body to close the cuff. o Squeeze the rolled cuff into a U-shape to trap the air inside. o Pop out the fingers of the glove by squeezing the inflated glove. o Pay particular attention to areas between the fingers and in the thumb
crease. • To inspect the outside of a glove:
o Repeat the procedure above • Insulating Rubber Gloves must be retested as per the manufacture specifications.
Leather Protectors
• Rubber insulating gloves should always be used with leather protectors. • To inspect the leather protectors:
o Brush loose debris from the leather cover. o Look for metal particles, embedded wire, or abrasive materials which could
cause damage to the insulating rubber gloves.
HEALTH & SAFETY PROGRAM _ _
Section 18 – Personal Protective Equipment (PPE) Page 10 of 14
_ _
o Check protectors for saturation of products such as oil, grease, hydraulic fluid, or gasoline.
o Check that rubber insulating glove extends a minimum of 1” for each 10,000 volts above the top of the leather protectors, e.g. Class 2 rubber insulating gloves rated at 17,000 volts, extend a minimum of 2” above the leather protector.
• Leather protectors must be returned for replacement if damage or deterioration is evident.
• Leather protectors are to be used only with rubber insulating gloves. They are NOT to be used on their own as general work gloves.
• At the completion of each work day, or as required: o Separate the leather covers from the rubber gloves. o Rinse the rubber gloves in clean water, and allow to air dry prior to the
next use. o Talc will be provided for the wearer’s convenience. o Gloves should be stored in a protective bag when not being used.
See Arc Flash Section in Safe Work Procedures Section
18.11 Hearing Protection
Standard All workers shall use appropriate hearing protection in noisy environments.
Procedure Noisy environments are defined as:
• An area where the noise level is too high to allow conversation. • An area where the noise level exceeds 85 dBA. • When the exposure to noise exists, the supervisor shall ensure that
CSA/OSHA/ANSI approved ear plugs or a CSA/OSHA/ANSI approved ear muff is worn.
Symptoms of Excessive Noise
• Difficulty in making conversation • A ringing in the ears • Muffled sounds after leaving noisy area
Procedure
• Noise in excessive amounts is a known health hazard. • Exposure to excessive noise leads to permanent hearing loss in most cases. • Employees exposed to noise levels greater than 85 dBA require adequate hearing
protection for the hazard.
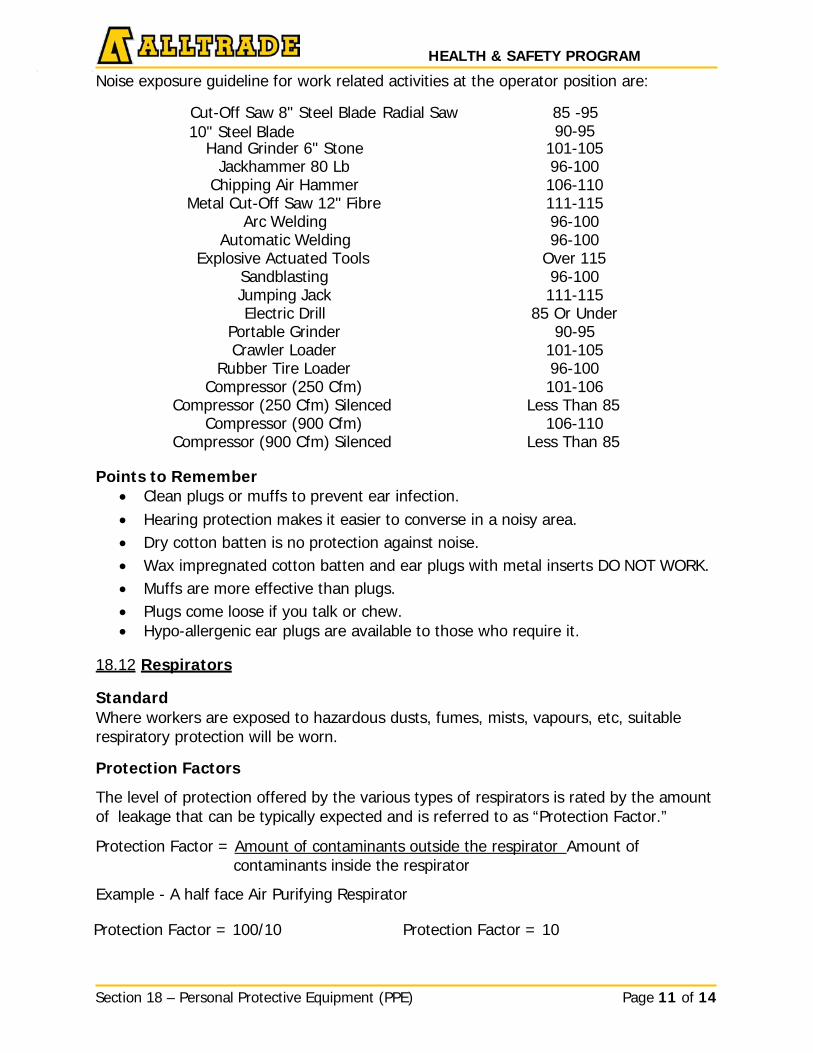
HEALTH & SAFETY PROGRAM _ _
Section 18 – Personal Protective Equipment (PPE) Page 11 of 14
_ _
Noise exposure guideline for work related activities at the operator position are:
Cut-Off Saw 8" Steel Blade Radial Saw 10" Steel Blade
85 -95 90-95
Hand Grinder 6" Stone 101-105 Jackhammer 80 Lb 96-100
Chipping Air Hammer 106-110 Metal Cut-Off Saw 12" Fibre 111-115
Arc Welding 96-100 Automatic Welding 96-100
Explosive Actuated Tools Over 115 Sandblasting 96-100 Jumping Jack 111-115 Electric Drill 85 Or Under
Portable Grinder 90-95 Crawler Loader 101-105
Rubber Tire Loader 96-100 Compressor (250 Cfm) 101-106
Compressor (250 Cfm) Silenced Less Than 85 Compressor (900 Cfm) 106-110
Compressor (900 Cfm) Silenced Less Than 85
Points to Remember • Clean plugs or muffs to prevent ear infection. • Hearing protection makes it easier to converse in a noisy area. • Dry cotton batten is no protection against noise. • Wax impregnated cotton batten and ear plugs with metal inserts DO NOT WORK. • Muffs are more effective than plugs. • Plugs come loose if you talk or chew. • Hypo-allergenic ear plugs are available to those who require it.
18.12 Respirators
Standard Where workers are exposed to hazardous dusts, fumes, mists, vapours, etc, suitable respiratory protection will be worn.
Protection Factors
The level of protection offered by the various types of respirators is rated by the amount of leakage that can be typically expected and is referred to as “Protection Factor.”
Protection Factor = Amount of contaminants outside the respirator Amount of contaminants inside the respirator
Example - A half face Air Purifying Respirator
Protection Factor = 100/10 Protection Factor = 10
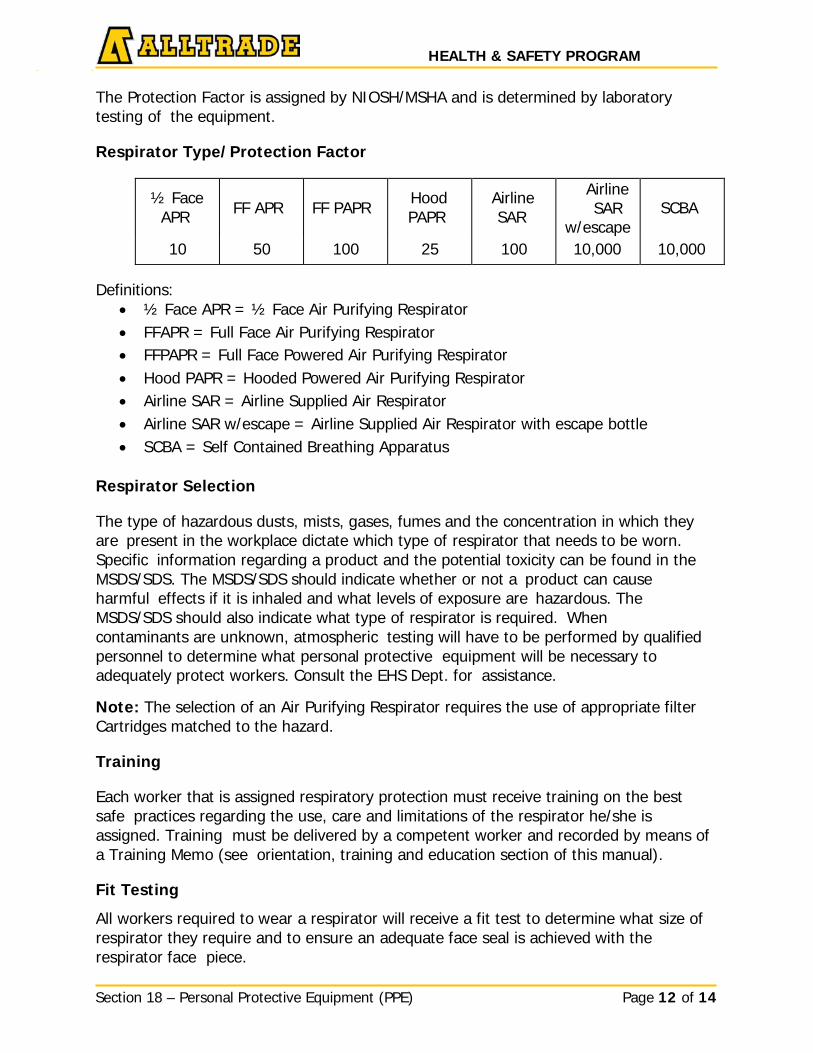
HEALTH & SAFETY PROGRAM _ _
Section 18 – Personal Protective Equipment (PPE) Page 12 of 14
_ _
The Protection Factor is assigned by NIOSH/MSHA and is determined by laboratory testing of the equipment.
Respirator Type/Protection Factor
½ Face APR
FF APR
FF PAPR
Hood PAPR
Airline SAR
Airline SAR
w/escape
SCBA
10 50 100 25 100 10,000 10,000
Definitions: • ½ Face APR = ½ Face Air Purifying Respirator • FFAPR = Full Face Air Purifying Respirator • FFPAPR = Full Face Powered Air Purifying Respirator • Hood PAPR = Hooded Powered Air Purifying Respirator • Airline SAR = Airline Supplied Air Respirator • Airline SAR w/escape = Airline Supplied Air Respirator with escape bottle • SCBA = Self Contained Breathing Apparatus
Respirator Selection
The type of hazardous dusts, mists, gases, fumes and the concentration in which they are present in the workplace dictate which type of respirator that needs to be worn. Specific information regarding a product and the potential toxicity can be found in the MSDS/SDS. The MSDS/SDS should indicate whether or not a product can cause harmful effects if it is inhaled and what levels of exposure are hazardous. The MSDS/SDS should also indicate what type of respirator is required. When contaminants are unknown, atmospheric testing will have to be performed by qualified personnel to determine what personal protective equipment will be necessary to adequately protect workers. Consult the EHS Dept. for assistance.
Note: The selection of an Air Purifying Respirator requires the use of appropriate filter Cartridges matched to the hazard.
Training
Each worker that is assigned respiratory protection must receive training on the best safe practices regarding the use, care and limitations of the respirator he/she is assigned. Training must be delivered by a competent worker and recorded by means of a Training Memo (see orientation, training and education section of this manual).
Fit Testing
All workers required to wear a respirator will receive a fit test to determine what size of respirator they require and to ensure an adequate face seal is achieved with the respirator face piece.
HEALTH & SAFETY PROGRAM _ _
Section 18 – Personal Protective Equipment (PPE) Page 13 of 14
_ _
Workers with beards, long sideburns, or heavy stubble may not wear respirators because the hair breaks the seal between the skin and the respirator mask.
Only facial hair that does NOT contact or break the respirator seal is permitted.
When wearing a full face respirator eyeglasses may not be worn as this will break the respirator seal. Breaking the seal means that the respirator mask will "leak" and will not provide the needed respiratory protection.
Contact the EHS Department for any questions regarding respirator fit or fit testing.
There are two basic types of fit testing, Quantitative and Qualitative. A Qualitative fit test will be performed. Contact the EHS for assistance. In order to ensure an effective face seal, you must be clean shaven.
Quantitative Fit Testing is carried out with a portable unit.
Respirator Fit Testing is performed by using a various number of mediums to give a basic “yes” or “no” indication of whether the wearer is achieving a proper fit. Some typical examples of qualitative fit testing are the use of banana oil, irritant smoke or bitter vapour. This testing must be performed by qualified personnel and recorded on a Respirator Qualitative Fit Test Record, see H&S_FORM_054.
Note: Please contact your EHS Department for assistance.
18.13 Compressed Breathing Air
Scope To outline the requirements of threshold limits of contaminants and the maintenance schedule for the paint barn compressed breathing air system and to protect workers using the compressed breathing air system hood from exposure to contaminants and hazardous inhalants.
Definitions Air Supplied Hood Means a hood respirator that is supplied from a remote source by means of a rigid or flexible pipeline.
Compressed Breathing Air Means normal air that is processed by the breathing air system that is delivered to the breathing zone and passes the sampling analysis as outlined in the CSA Z180.1 standard (or equivalent).
Breathing Air Systems Means the complete assembly of equipment such as compressor, purification compressors, purification agents and media, pressure regulators, safety devices, manifolds, pipelines to deliver pure, dry, breathable air to the end user.
HEALTH & SAFETY PROGRAM _ _
Section 18 – Personal Protective Equipment (PPE) Page 14 of 14
_ _
Contaminants Means material foreign to normal air of the lower atmosphere, such as scale or oil, or a material that, though customarily found in normal air of the lower atmosphere, has a known toxic property, e.g. carbon monoxide; or a material, such as water vapour, that can interfere with the operation of the respirator.
Purification System Means a mechanical, chemical or physical device such as condensers, filters, sorbents, catalysts, etc., that are used to remove contaminants from the compressed breathing air.
Respirator Means a device to protect the wearer from inhalation of hazardous atmospheres.
Procedure
• The breathing air will be tested on a yearly basis. For assistance please consult with the EHS Department. (CSA/NIOSH as applicable).
• The compressor is to be inspected and maintained as per the manufacturer’s instructions and logged.
• Supervisor or a competent person must inspect the system as often as required, e.g. manual/auto drain on line for condensate removal or check if accumulation has been removed; also, any smell should be reported to the supervisor for correction.
• All filters in the purification agents or media must be replaced as per the manufacturer’s recommendation or when the air sampling analysis has found the breathing air unacceptable.
• Repairs or alterations to the breathing systems shall be conducted by a competent person and following the CSA Z180.1 standard (or equivalent).
Reference: CAN3-Z180.1 - M85 Compressed Breathing Air MANN Sampling Instruction
HEALTH & SAFETY PROGRAM
_ _
19.1 Policy Statement
As a responsible employer, Alltrade Industrial Contractors Inc. has a compelling interest to establish programs to promote and enhance safety in the workplace. Alltrade Industrial Contractors Inc. has implemented this policy, directed at protecting the workplace environment and the health and safety of employees, co-workers, contractors, subcontractors and the general public. This policy combines drug and alcohol testing with education, supervisor training and access to assistance.
All Alltrade Industrial Contractors Inc. employees are expected to be fit for duty when reporting to work and must remain fit for the duration of the workday. This means that, employees must not be impaired by alcohol or illegal drugs. In the occurrence that an employee is taking prescription drugs prescribed by their doctor, the drugs must not inhibit their ability to perform their job functions.
Furthermore, employees may not have alcohol, illegal drugs or have drug paraphernalia in the work place. One objective of this policy for our employees and contractors is to minimize the risks associated with work performance in safety sensitive positions.
This policy requires drug and alcohol testing under certain conditions and restrictions regarding the use and/or possession of alcohol, drugs and prescription or over-the- counter medications, while on company sites.
For the purposes of this policy, “employee” is defined as: anyone employed by Alltrade Industrial Contractors Inc., its subsidiaries, or affiliates whether full-time, part-time or limited term. “Company sites” is defined as: any work site, including company vehicles and/or vehicles leased or rented for business purposes.
The use of illegal drugs or alcohol that results in absenteeism, tardiness, or poor work performance is subject to disciplinary action up to and including dismissal.
19.2 Workplace Specific Drug and Alcohol Policies
Alltrade Industrial Contractors Inc. employees are expected to be fit for duty when reporting to work and must remain fit for the duration of the workday. This means that, employees must not be impaired by alcohol or illegal drugs. In the occurrence that an employee is taking prescription drugs prescribed by their doctor, the drugs must not inhibit their ability to perform their job functions.
If an employee has a dependency to alcohol, legal or illegal drugs, the employee must disclose their dependency to Alltrade prior to a related drug or alcohol accident/incident occurring. If the employee discloses their dependency as stated above, then treatment assistance will be offered to the employee. If the employee does not disclose their dependency and is involved in an accident/incident which they are tested positive for drugs or alcohol that employee will be terminated.
Section 19 – Drug & Alcohol Policy Page 1 of 1
Title: Drug & Alcohol Policy Issue Date: January 2016
Section: 19 Revision Date: January 2018
Approved by: Bob Ritzmann, President Signature:
HEALTH & SAFETY PROGRAM _ _
Section 20 – 3 R’s – Waste Management Page 1 of 5
Title: 3 R’s – Waste Management Issue Date: January 2016
Section: 20 Revision Date: N/A
Approved by: Bob Ritzmann, President Signature: 20.1 Policy Statement
Alltrade recognizes that to operate our business that impinges upon certain aspects of the environment in a responsible and ethical manner, the need has arisen to plan and organize a pro-active and positive approach to dealing with environmental issues. It is the intention of SR management and personnel that they will adhere to this approach to the best of their abilities. The importance of reducing, reusing and recycling construction waste on our projects will be a focus of this proactive approach. The implementation of a waste management plan will put less stress on landfill sites and benefits such as preserving raw materials, protecting the environment and energy use will be realized.
20.2 Source Separation Program Each project must have a method of separating at a minimum, the 4 basic waste categories (if applicable):
• Wood • Corrugated cardboard • Steel and other metals • Drywall
Other materials that may also be included in a separation program, which should also be identified by the audit, can be:
• Rigid plastic, plastic film, and polystyrene packaging; • Wooden shipping pallets • Doors and hardware • Thermal insulation • Ceiling tiles • Architectural hardware such as curtain rods • Leftover paint • Carpeting, and hardwood flooring; and • Window glass
The processing of waste material may involve the compaction, size reduction and separation of materials. If you are crushing on site check to ensure that the local noise bylaws are being adhered too.
There are two primary methods to separate waste: • Onsite: Have separate bins designated for each material to be specifically
separated in their own container • Transfer station: Sometimes due to project size, cost etc. it is not practical to
have multiple waste bins onsite. It is also acceptable to send all waste to a transfer station where all waste is separated into the minimum 5 categories (cardboard, brick/concrete, steel, wood and drywall). However, if a project chooses to utilize a transfer station there must be supporting documentation

HEALTH & SAFETY PROGRAM _ _
Section 20 – 3 R’s – Waste Management Page 2 of 5
showing follow up that the transfer station is actually separating waste. This can be accomplished by a visit to the transfer station, or verification from the source receiving the separated waste etc.
Consider on-site conditions to determine the separation method and collecting, handling storing, and removing.
• Plan for bin size • Material type • Location of collection • Ensure the material is transferred on a regular basis so that housekeeping does
not become an issue. • Control where the material is to be collected and ensure it is not cross
contaminated by other products.
Hauling • Contact a hauler to remove all the waste generated material from the project • Ensure they provide you with all the appropriate documentation • All contracts with disposal companies should include the provision that all material
removed from site will go an approved facility and comply with legislated requirements.
The source separation program is key to maintaining reuse and recycling strategies onsite and must be posted in the workplace and communicated to all workers.
Subcontractors are required to adhere to source separation and plan objectives. If a subcontractor elects to utilize their own disposal bin onsite, they must provide Alltrade with a record of the disposal for documentation purposes.
Completion All documentation should be kept onsite for the duration of the project and maintained for at least five years with project documentation.
20.3 Hierarchy for Common Materials Types of Construction Waste Material
Wood Wood waste generally covers the following components:
• Pallets • Wood building material • Site excavation wood
Reduce:
• Review design of the project – for optimal use of the lumber, subflooring and sheathing.
• Provide detailed framing layouts to ensure accurate lumber ordering. • If possible have studs and joists precut to reduce on-site waste. • Plan for the salvage of demolition lumber. Contact companies that buy recovered
wood. • Use prefabricated wood, roof and floor systems where these products are
HEALTH & SAFETY PROGRAM _ _
Section 20 – 3 R’s – Waste Management Page 3 of 5
produced off site - centralize waste at the manufacturing location versus the project.
• Buy kiln dried lumber and store properly to reduce waste from warping and shrinking.
Reuse: • Organize a central cutting area – reusable cutoffs can be kept for bridging,
blocking and back framing. • Transport leftover lumber to other projects. • Reuse salvaged timbers and other dimensional lumber from demolition. • Send all pallets to a repair facility where they can be rebuilt for reuse.
Recycle: Wood can be re-cycled into products such as press wood, panel-board, chipboard, pressed logs, landscape covering, absorbent, etc.
• Hardwood can be recycled and used for central heating plants. • Most wood chippers/grinders accept wood embedded with nails, staples and
fasteners.
Disposal: • To discourage excessive dumping of wood products, certain landfills raise tipping
fees. In fact, many landfill operations will require that this material be brought to sorting and recycling facilities.
Ferrous and Non Ferrous Metals These types of waste products normally associated with construction activity are:
• Structural steel • Steel studs • Electrical products – cable trays, wire etc • Mechanical products – pipes, equipment, containers etc • Roofing products – metal flashing, siding etc • Re-bar
A variety of arrangements can be made with recyclers including having special containment equipment brought to the project to facilitate the collection process.
Reduce: • Order material efficiently to minimize waste. • Measure and cut material accurately. • Plan mechanical and electrical runs to reduce material. • Locate electrical panel near area of greatest need. • Keep accurate inventory of surplus material to reduce over-supply at future
projects.
Reuse: • Store cuttings in a central location for reuse. • Use surplus material for the projects
Recycle: • Scrap dealers pay for and recycle metals. Investigate pick-up and transport
options.
HEALTH & SAFETY PROGRAM _ _
Section 20 – 3 R’s – Waste Management Page 4 of 5
_ _
Disposal: • Most disposal facilities generally prohibit the disposal of large quantities of metal
products. Discuss with recycle scrap dealers.
Corrugated Cardboard
Most cardboard comes from packaging material. This product is readily recyclable.
Reduce: • Purchase materials in bulk to reduce packaging. • Require suppliers to deliver with minimal packaging. • Give preference to suppliers who will retrieve their material packaging.
Reuse: • Cardboard boxes can be used for material storage
Recycle: • Can be recycled into paperboard boxes, cores, and manufactured into new
corrugated boxes. • Other building material for example, roofing felt, fibreboard and floor underlay. • Many companies will provide storage bins on the project to collection purposes.
Disposal: • Bring to a recycling facility.
Drywall and Gypsum
Drywall is a significant contributor to the project waste stream.
Reduce: • Evaluate from plans to minimize cutting. • Purchase in stock sizes consistent with room dimensions.
Reuse: • Small pieces can be placed in the cavities of uninstalled interior wall panels.
(before this is done check with the local authorities to ensure this practice is acceptable)
• Check cut off pile before cutting pieces from a new sheet. Recycle:
• This product is difficult to recycle because it may be contaminated by paint, plaster, wallpaper, vinyl etc.
• There are special recycling facilities to accommodate used drywall and gypsum, check the local jurisdiction to ensure it is reasonable to use these facilities.
• Clean waste gypsum can be applied as soil abatement. Disposal:
• Although degradable, gypsum gives off hydrogen sulfide when breaking down. Disposal should occur only under proper conditions and approved facilities for this use.
HEALTH & SAFETY PROGRAM _ _
Section 20 – 3 R’s – Waste Management Page 5 of 5
_ _
Plastics and Vinyl
Sophisticated methods now allow for the recycling of all sorts of plastics for example, bags, drainage tiles, siding, traffic cones, floor tiles etc.
Reduce: • Where possible use plastic packaging. • Used standard dimensions to reduce cutting of plastic products, such as tiles,
siding etc. • Design plumbing runs to reduce the amount of pipe required.
Reuse: • PVC piping can be reused for plumbing on other projects. Check with local
authorities for specific requirements.
Recycle: • Recycling is complicated by the need to separate plastics. Contact your local
plastic recycler for assistance.
Disposal: • Plastic wastes are high in volume and they do not degrade in landfills. Additional
Environmental Practices includes:
Shops • Catches and collects all oils and fluids for proper disposal, recycling, or re-use
used oil is burned as alternative fuel in asphalt plants. • Crushes used oil filters to extract all oil, then sends filters for recycling of metal. • Uses biodegradable cleaners, degreasers, and detergents in normal shop usage
(eg. citrus cleaning products). • Sets up proper above-ground fuel storage and oil storage with containment dykes
surrounding them.
Supply Routes • Follow all rules and regulations pertaining to the transportation of dangerous
goods. • Follow proper reporting in case of spills and emergency response procedures. • Request owner/operators to monitor and maintain the condition of their vehicles
to manufacturer’s standards.
Materials • Use environmentally friendly materials wherever possible. • Follow proper procedures when handling hazardous goods. • Recycle and reuses materials whenever possible.
Service of Equipment
• Serviceman catch and collect all used fluids and equipment parts (filters) that can be recycled or reused.
HEALTH & SAFETY PROGRAM
Section 21 – Violence – Harassment - AODA Page 1 of 9
_ _
21.1 Policy Statement
Alltrade is committed to providing a safe and healthy workplace and will take all reasonable precautions to protect employees, subcontractors, visitors and the public from workplace violence and harassment.
Alltrade management is committed to providing a proactive approach to establish a safe and healthy work environment. This policy applies to all Alltrade employees, subcontractors, visitors, or other personnel while in an Alltrade workplace. All parties are expected to uphold this policy and participate in any efforts required to prevent workplace violence and harassment.
All employees, visitors and subcontractors are expected to conduct themselves so as to maintain a work environment that is safe, non- threatening and free of violence and harassment. To support this objective, it is required that employees take preventative action to ensure that risks to individual’s health and safety due to violations of this policy are eliminated or reported.
Every employee is entitled to a workplace free from violence and harassment. Alltrade will initiate an immediate investigation of any individual under the employment of Alltrade who subjects a co-worker, subcontractor, visitor or member of the public to an act of violence or harassment and enforce any disciplinary actions as required.
This policy prohibits all forms of inappropriate behaviour, bullying, harassment and violence (hereinafter referred to as a violation of “respect”) by management, supervisors, workers, subcontractors, suppliers and clients.
21.2 Purpose
The purpose of this policy is to establish the requirements to assess respect in the workplace, ensure adequate measures are established to report, investigate and deal with complaints regarding respect in the workplace and that employees are trained as to the procedures contained within this policy.
21.3 Standard
All Alltrade workplaces will ensure that hazards are assessed, adequate controls are established and all employees actively participate in the requirements under the respect in the workplace program. The policy statement will be posted in a conspicuous location and available to all workers. This policy will be reviewed annually by Sr. Management to ensure its effectiveness. Minutes of the review will be recorded.
Title: Violence – Harassment - AODA Issue Date: January 2016
Section: 21 Revision Date: January 2018
Approved by: Bob Ritzmann, President Signature:
HEALTH & SAFETY PROGRAM
Section 21 – Violence – Harassment - AODA Page 2 of 9
21.4 Definitions
Workplace Violence
Workplace violence is defined as the exercise of physical or psychological force by a person against a worker, in a workplace, that causes or could cause physical or psychological injury to a worker. This includes an:
• Attempt to exercise physical or psychological force against a worker in aworkplace, that could cause physical or psychological injury to the worker; and a
• Statement or behaviour that a worker could reasonably interpret as a threat toexercise physical or psychological injury to the worker.
Examples and signs of workplace violence includes:
• Verbally threatening a worker• Leaving threatening notes at or sending threatening emails to a workplace• Shaking a fist in a workers face• Wielding a weapon at work• Hitting or trying to hit a worker• Throwing an object at a worker• Sexual violence against a worker• Kicking an object the worker is standing on such as a ladder• Trying to rundown a worker using a vehicle or equipment
Workplace Harassment
Engaging in a course of vexatious comments and/or or conduct against a worker, in a workplace – behaviour that is known or ought to reasonably be known to be unwelcome.
Workplace harassment can involve unwelcome words or actions that are known or should be known to be offensive, embarrassing, humiliating or demeaning to a worker. It can also be behaviour that intimidates, isolates, or even discriminates against the targeted individual.
Workplace harassment often involves repeated words or actions, or a pattern of behaviours, against a worker in the workplace that are unwelcome.
This may include:
• Making remarks, jokes or innuendos that demean, ridicule, intimidate or offend• Displaying or circulating offensive pictures or materials in print or electronic form• Bullying• Repeated offensive or intimidating phone calls or e-mails• Inappropriate sexual touching, advances, suggestions or requests.• Display of pornographic, racist or offensive signs or images• Practical jokes that result in awkwardness or embarrassment• Unwelcome invitations or request, whether indirect or explicit
HEALTH & SAFETY PROGRAM
Section 21 – Violence – Harassment - AODA Page 3 of 9
Harassment may be based on, but not limited to: • Race or color• Religion or creed• Age• Sex (including pregnancy or childbirth)• Marital status• Physical/mental handicap or disability• Sexual orientation• Family status• National or ethnic origin (including linguist background)• Dependence on alcohol or drugs• Ancestry or place of origin• Political belief• Pardoned conviction/record of criminal conviction• Social condition/origin• Language
Bullying
Bullying is interpersonal hostility that is deliberate, repeated and sufficiently severe as to harm the targeted person’s health, safety or economic status. It is driven by the perpetrator’s (bully’s) need to control another individual, not by a legitimate business need.
The following types of behavior, where repeated or occurring as part of a pattern of behavior, could be considered bullying:
• Verbal abuse• Excluding/isolating employees• Psychological harassment• Intimidation• Gossiping/spreading rumors• Delegating impossible assignments
Note: The normal management practice of constructive criticism whether occurring on the job or during performance reviews does not constitute harassment unless any of the above conditions should occur.
21.5 Responsibilities
Employees Every employee is responsible to:
• Act in a manner that reflects this policy.• Treat co-workers, subcontractors, visitors and members of the public with respect• Report any violations of respect to their immediate supervisor• Advise management of any potential workplace hazards that may pose a risk to
maintaining a respectful workplace• Advise your supervisor of any personal circumstance that may create a hazard
for you, coworkers or members of the public
HEALTH & SAFETY PROGRAM
Section 21 – Violence – Harassment - AODA Page 4 of 9
• Clarify any questions or concerns regarding this policy with their supervisor• Cooperate with all investigations pertaining to this policy• Ensure at all times there is no impedance or retaliations towards any individual
cooperating or exercising their rights under this policy• Never make a false or malicious report under this policy• Ensure that any information acquired through investigations is kept private and
confidential
Workplace Management and Supervisors Managers and supervisors are responsible to:
• Assess the risks in the workplace• Take appropriate measures to prevent incidents• Promote a work environment consistent with this policy• Ensure that employees understand and comply with this policy and abide by
applicable legislation.• Report any formal complaints to their respective SR Manager for an investigation
in a timely manner• Ensure any employee reporting a violation of respect is kept safe and treated with
dignity respect through the investigation process
EHS Department
The EHS Department is responsible to: • Ensure this policy is communicated through orientation and other training
requirements • Ensure all parties are fulfilling their duties with respect to this policy• Assist in the notification or investigation of complaints as required• Manage any compensation claim arising out of a workplace incident
21.6 Training
Alltrade will ensure all parties are aware and have access to this policy and their responsibilities regarding respect in the workplace policies and programs. Orientation and review of this policy will form part of the employee file.
Employees at risk of a violation of respect in the workplace will be trained on how to recognize hazards, existing policies and practices in place to mitigate these hazards, reporting procedures and the means for summoning help when required.
21.7 Emergency Response Plans
Emergency response plans must be in place to ensure that those at risk for the potential for violence and harassment are able to summons help as required. The emergency response plan should reflect hazards and controls identified in the workplace specific hazard assessments.
HEALTH & SAFETY PROGRAM
Section 21 – Violence – Harassment - AODA Page 5 of 9
21.8 Hazard Assessments
The Company recognizes that violence and harassment are potential hazards that must be assessed with adequate controls established where required.
Workplaces are required to conduct a hazard assessment for their specific workplace. Prior to conducting a hazard assessment historical and geographical information must be considered. This may include:
• Utilizing employee surveys to gather information on past violations ofrespect whether experienced or witnessed
• Geographic respect in the workplace considerations (history of violence orharassment in the area surrounding the workplace)
• Reviewing accident reports and previous experiences in that particular workplace• Similar workplaces that may have encountered these situations in the past• Contacting union halls for background / historical information
Note: In regions where a Joint Health and Safety Committee is established the committee, or selected representatives must be involved in the hazard assessment process. Speak with the local Safety Representative for further clarification on legislative requirements.
A hazard assessment must be conduct to evaluate the following:
• General physical environment, and• The workplace activity
Physical Environment Hazard Assessment – See H&S FORM 056
This assessment will evaluate the physical conditions of the workplace. Physical conditions include the parking area, building interior and the physical workspace.
Workplace Activity Assessment – See H&S FORM 057
This assessment will evaluate the actual work activity and risk factors that may expose an employee to a hazardous situation that could lead to a violation of respect in the workplace.
Specific controls may need to be implemented for each workplace to ensure adequate measures are taken to protect employees from possible hazards.
Examples of hazardous activities include, but are not limited to:
• Working alone• Working with / direct handling of cash• Working in high crime areas• Working during the evening / night / early morning
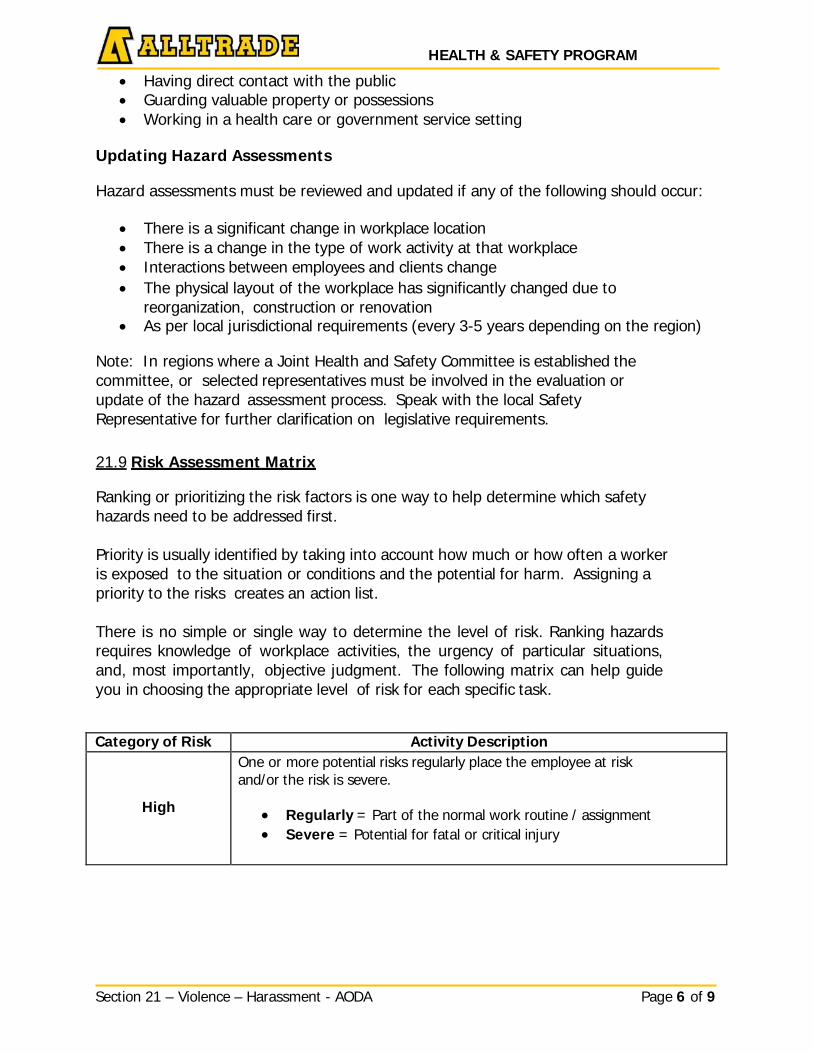
HEALTH & SAFETY PROGRAM
Section 21 – Violence – Harassment - AODA Page 6 of 9
• Having direct contact with the public• Guarding valuable property or possessions• Working in a health care or government service setting
Updating Hazard Assessments
Hazard assessments must be reviewed and updated if any of the following should occur:
• There is a significant change in workplace location• There is a change in the type of work activity at that workplace• Interactions between employees and clients change• The physical layout of the workplace has significantly changed due to
reorganization, construction or renovation• As per local jurisdictional requirements (every 3-5 years depending on the region)
Note: In regions where a Joint Health and Safety Committee is established the committee, or selected representatives must be involved in the evaluation or update of the hazard assessment process. Speak with the local Safety Representative for further clarification on legislative requirements.
21.9 Risk Assessment Matrix
Ranking or prioritizing the risk factors is one way to help determine which safety hazards need to be addressed first.
Priority is usually identified by taking into account how much or how often a worker is exposed to the situation or conditions and the potential for harm. Assigning a priority to the risks creates an action list.
There is no simple or single way to determine the level of risk. Ranking hazards requires knowledge of workplace activities, the urgency of particular situations, and, most importantly, objective judgment. The following matrix can help guide you in choosing the appropriate level of risk for each specific task.
Category of Risk Activity Description
High
One or more potential risks regularly place the employee at risk and/or the risk is severe.
• Regularly = Part of the normal work routine / assignment• Severe = Potential for fatal or critical injury
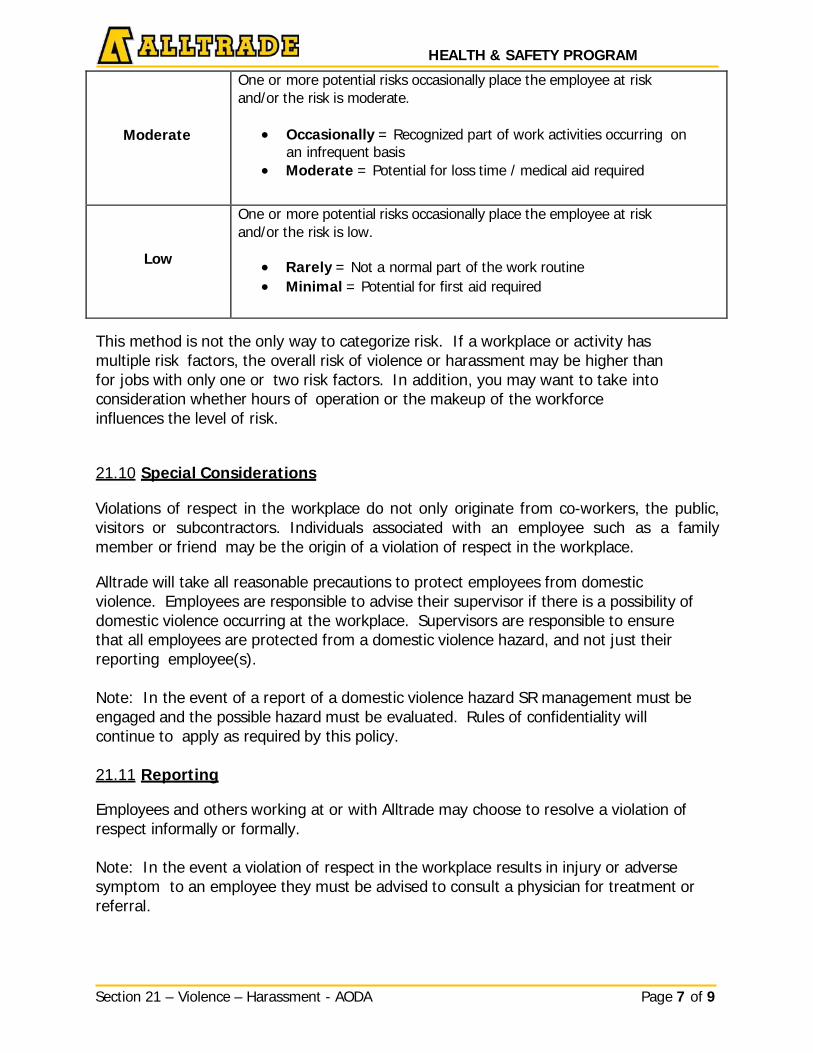
HEALTH & SAFETY PROGRAM
Section 21 – Violence – Harassment - AODA Page 7 of 9
Moderate
One or more potential risks occasionally place the employee at risk and/or the risk is moderate.
• Occasionally = Recognized part of work activities occurring onan infrequent basis
• Moderate = Potential for loss time / medical aid required
Low
One or more potential risks occasionally place the employee at risk and/or the risk is low.
• Rarely = Not a normal part of the work routine• Minimal = Potential for first aid required
This method is not the only way to categorize risk. If a workplace or activity has multiple risk factors, the overall risk of violence or harassment may be higher than for jobs with only one or two risk factors. In addition, you may want to take into consideration whether hours of operation or the makeup of the workforce influences the level of risk.
21.10 Special Considerations
Violations of respect in the workplace do not only originate from co-workers, the public, visitors or subcontractors. Individuals associated with an employee such as a family member or friend may be the origin of a violation of respect in the workplace.
Alltrade will take all reasonable precautions to protect employees from domestic violence. Employees are responsible to advise their supervisor if there is a possibility of domestic violence occurring at the workplace. Supervisors are responsible to ensure that all employees are protected from a domestic violence hazard, and not just their reporting employee(s).
Note: In the event of a report of a domestic violence hazard SR management must be engaged and the possible hazard must be evaluated. Rules of confidentiality will continue to apply as required by this policy.
21.11 Reporting
Employees and others working at or with Alltrade may choose to resolve a violation of respect informally or formally.
Note: In the event a violation of respect in the workplace results in injury or adverse symptom to an employee they must be advised to consult a physician for treatment or referral.
HEALTH & SAFETY PROGRAM
Section 21 – Violence – Harassment - AODA Page 8 of 9
Informal Resolution
Direct Approach
While harassment has no place in worker relations, it may well be unintentional. Silence can be, and often is, interpreted as acceptance. Therefore sometimes the best way of dealing with harassment may be to inform the harasser that the particular behavior is unwelcome and ask him/her to stop. Often a person may not be aware that his/her behavior is bothersome, and will change the behavior once they realize this.
Informal Intervention
It may be that communicating directly with the person is not enough, or that an employee feels unable to deal directly with the person. In that case, workers can speak to their supervisor, another supervisor or SR Management. The employee may ask the supervisor to help them write a letter, or to speak to the harasser on their behalf. Or, the employee may just want the manager to be present to offer support when they approach the person who has offended them.
If these attempts at informal resolution are not successful, employees may file a formal complaint. Depending on the nature/severity of the situation a worker may want to a file a formal complaint immediately. Formal Resolution
If the procedures described above are not appropriate or the behavior continues, employees should take their concerns to the supervisor to file a formal complaint. If they cannot discuss the issue with their supervisor, or are dissatisfied with the results, they should consult with their next highest level of management or SR Management.
1. Once a complaint is received, it will be kept strictly confidential. Alltrade will notdisclose the name of any complainant or alleged harasser or the circumstancesrelated to the complaint to any person except where disclosure is necessary toinvestigate the complaint or take corrective action with respect to the complaint orwhere required by law.
2. The investigator will collect information from the parties involved. Claimants shouldbe prepared to be specific, and it is recommended that a record of specific incidentsincluding dates, times, places, names (including witnesses) and other details arekept and presented along with the claim. The investigator will, with suitablesensitivity and the protection of the parties in mind, conduct interviews with allinvolved parties, and document all discussions. All parties will be instructed to keepconfidential any information discussed. All information will be kept in confidencethroughout the process to the extent practical and appropriate under thecircumstances.
3. The investigator will compile a report and recommend a solution. It will be reviewedby the SR Manager, who will then decide on the appropriate next steps.
HEALTH & SAFETY PROGRAM
Section 21 – Violence – Harassment - AODA Page 9 of 9
4. Once a decision has been reached it will be submitted to the responsible managerand delivered to the parties involved in as short a time as reasonably possible.
5. If no conclusive evidence is found to substantiate the claim, the claimant, theaccused and any witnesses involved will be informed. Those involved will also beinformed that the documentation on the incident will be retained by the SR Managerin a separate confidential file (not on the employee’s personnel file).
6. Regardless of the outcome of a complaint made in good faith, the employee lodgingthe complaint, as well as anyone providing information will be protected from anyform of retaliation by either co-workers or superiors.
Should a deliberately false claim be made against an individual, the person making the false claim will be subject to disciplinary action. Complaints that are made in bad faith are considered malicious or frivolous and will be handled accordingly.
All employees have the right to: • File a complaint with the Human Right Commission within their respective
jurisdiction. • Refuse unsafe work where there is danger of workplace violence.
Refer to the Respect in the Workplace Incident Report Form, H&S_FORM_054, for official reporting purposes.
21.12 AODA Policy Statement
In accordance with the Accessibility for Ontarians with Disabilities Act (AODA), Alltrade Industrial Contractors Inc. is committed to working to improve access and opportunities for customers with disabilities.
In fulfilling this commitment, we will strive to identify, remove and prevent barriers that might interfere with our ability to serve all customers, including those with disabilities.
We endeavor to serve our customers in a manner that reflects the principles of dignity, independence, integration and equal opportunity. Our commitment is to provide all customers including those living with disabilities the same opportunity to benefit from our goods and services.
All Management (including Senior Managers and Supervisors) functions will comply with Alltrade Industrial Contractors Inc.’s Accessibility of Ontarians with Disability Program requirements.
This policy responds to the needs of all who require our services and also applies to all Employees of Alltrade Industrial Contractors Inc.
HEALTH & SAFETY PROGRAM _ _
Section 22 – Safety Meetings, Moments and Communication Page 1 of 3
Title: Safety Meetings, Moments and Communication Issue Date: January 2016
Section: 22 Revision Date: N/A
Approved by: Bob Ritzmann, President Signature:
22.1 Policy Statement
Alltrade believes that we cannot meet our health and safety objectives without effective communication. Tool Box/Safety Talks are an essential aspect of opening the lines of communications in the workplace and communicating health and safety related information pertinent to the wellbeing of all workplace parties. These informal discussions are an opportunity for all attendees to voice their concerns about site health and safety conditions.
These meetings are also an opportunity for the supervisor to seek co-operation in eliminating any safety concern and/or relay the cause of any injuries, Safety Opportunities or other safety issues that have occurred. The use of Safety Moments to begin all meetings is an important step in maintain the focus of Alltrade First Core Value of Safety First. Hazard Alerts are an important aspect of communicating lessons learned and are designed to ensure that this important information is shared with those can benefit from the information.
22.2 Weekly Safety Meeting Weekly Safety Meeting must be conducted, and should be held, at the beginning of the first shift of each work week in an effort to ensure that all workers are focused and establish a commitment to work safely all week.
A list of safety talks are included on the Alltrade server, however, if any health & safety issue unique to your project arise and it is not covered herein, please review it in your Tool Box/Safety Talk, and suggest it to the EHS department for inclusion in the H&S Manual.
You can also refer to the Safe Work Practices, and Safe Work Procedures of this manual for additional information and guidance. Consult with your EHS Department for further information regarding talks and topics.
A Weekly Safety Meeting Form / Attendance, see H&S_FORM_058, must be signed by each employee attending for each meeting. This document must also include the date the meeting was held, the topics discussed and any concerns raised by employees. These concerns are to be shared with the appropriate Management Personnel as soon as possible for resolution.
22.3 Office Workplace Monthly Safety Talks are to be held with all Alltrade office personnel. Topics for Safety meetings in an office environment are included on the server for reference, however many other sources of topics exist. Also to be reviewed at these meetings are any updates provided by the facilities Joint Health and Safety Committee, the findings of any incident investigations that may have occurred within the facility, any applicable Hazard Alerts issued by the EHS Department, or any other relevant information.
HEALTH & SAFETY PROGRAM _ _
Section 22 – Safety Meetings, Moments and Communication Page 2 of 3
A Weekly Safety Meeting Form / Attendance, see H&S_FORM_058, must be signed by each employee attending for each meeting. This document must also include the date the meeting was held, the topics discussed and any concerns raised by employees. These concerns are to be shared with the appropriate Management Personnel as soon as possible for resolution
22.4 Communicating an Effective Safety Talk In order to ensure that workers are engaged and participate in the toolbox talk, the following guidelines have been provided for assistance.
Know and Understand the Material Being Delivered • Review the talk prior to communicating it to the workforce. This will help you to
anticipate possible questions and prepare for answers. • This will reduce the awkward feeling of reading a safety talk for the first time in
front of employees. • Be prepared to provide examples relating to your work environment. Workers
tend to listen more attentively when they can relate to the experience on the job.
Ensure All Employees are Present and Accounted For • Pay attention to possible side conversations. Be prepared to interrupt in order to
set the tone. • Employees receive no benefit showing up in the middle of a safety talk. Exercise
your authority to ensure that employees are responsible for attending the talk on time.
Participation • Engage employees by asking questions to the. If everyone is reluctant to speak,
ask someone directly to answer the question.
Remember: Never tell an employee who was brave enough to answer your question that they are wrong. Doing so will turn others off. Instead, say something like “that is partly right or you’re on the right track”. Then follow it up with a leading question to make it easier.
Stay Calm • If you don’t know the answer to a question, tell everyone that you will get back
to them with an answer. • Keep it simple and relate your personal experiences
Identify bad habits you may have while delivering a safety talk. Examples includes:
• Do you sway back and forth? • Do you tend to stare at one person the whole time? • Do you look down at the ground the whole time? • Are you too soft spoken for the employees to here you? • Are you too aggressive with your approach?
HEALTH & SAFETY PROGRAM _ _
Section 22 – Safety Meetings, Moments and Communication Page 3 of 3
Key points to remember • Relate the information towards field activities • Ensure the message is clear • Provide questions • Be prepared for possible questions • Provide examples • Generate interaction amongst the • Keep ensuring you have everyone’s attention • Don’t be afraid to move around the room • Take your time. Don’t rush through
22.5 Daily Tool Box Talks (FLRA’s) Daily tool box talks are done each day prior to commencing work activities. These talks are designed to:
• Review the task at hand • Review any practices / procedures that are to be followed • Review the FLRA card or other hazard assessments / analyses applicable to the
work • Review / discuss any ongoing or immediate issues or concerns
Attendance of these talks is typically captured through review of the FLRA or other daily documents.
22.6 Hazard Alerts Hazard alerts are a communication tool designed to create awareness about safety issues with the appropriate corrective actions. These alerts are typically developed due to a unique or repetitive event that has the potential to occur in other workplaces.
All Alltrade Hazard alerts will be developed and distributed through the corporate H&S department.
22.7 Safety Moments A safety moment can occur during any meeting, function or Alltrade event. Prior to beginning any meeting the chair or leader of the meeting is responsible to begin with a safety moment.
A safety moment is intended to focus the on a specific safety topic. This topic does not have to be related to specific construction / manufacturing activities but relevant to the time / place. For example, in November a safety moment discussion could be the use of winter tires on personal or Alltrade vehicles.
Safety moments are an important part in creating and maintaining a high level of safety culture in all that we do.
NOTE: See Alltrade server for all Safety Meeting Topics.
HEALTH & SAFETY PROGRAM _ _
Section 23 – Safe Work Practices Page 1 of 62
Title: Safe Work Practices Issue Date: January 2016
Section: 23 Revision Date: January 2018
Approved by: Bob Ritzmann, President Signature:
23.1 Policy Statement
Safe work practices cover typical daily activities in the workplace; such as use of tools, equipment, and vehicles and work methodology. Alltrade recognizes the importance of safe work practices in all our workplaces. It is imperative that all workers adhere to these practices to maintain a safe working environment.
23.2 Safe Work Practices
The safe work practices contained in this section are to be used as working guidelines; some jurisdictions may have variations to these practices. Review all pertinent requirements in your area.
Project managers are responsible to ensure that regulations and all applicable legislative requirements for the jurisdiction are met.
All Alltrade workers are required to maintain safe work practices in their workplace.
The best practices in this section are to achieve general compliance to safety requirements in construction, and industrial settings.
Project management and direct supervision play a major role to ensure that the internal responsibility system of informing, directing, and maintaining compliance to health & safety standards is always achieved in the workplace.
If the supervisor or manager is aware of a more convenient, more effective and efficient practice that does not compromise health & safety these practices may be substituted provided that they comply with all applicable legislative requirements.
23.3 First Aid Training
Standard At least one qualified First Aider may be required on each project or at each workplace. Further First Aid personnel may be required according to local OHS requirements and the risk of work.
A qualified First Aider is defined as - the holder of a valid Red Cross First Aid Certificate or its equivalent. Re-certification is typically every three years.
The name of the qualified First Aider shall be posted at the First Aid facilities and safety notice boards. First Aider certificates will also be posted.
The qualified First Aider does not have to be an Alltrade worker. However, he/she must be continually available to Alltrade workers.
HEALTH & SAFETY PROGRAM _ _
Section 23 – Safe Work Practices Page 2 of 62
23.4 First Aid Facilities
• A First Aid Kit must be conveniently located to ensure that it is adequately available to the workers on the project. If a vehicle is used to transport workers at site, then a First Aid Kit is also required.
• Supplies must be kept in a clean and dry location • First Aid Kits will be restocked as needed, • Be inspected at least monthly. See H&S_FORM_059. • The First Aid Facility shall be in the office or vehicle away from the construction,
repair, or demolition of a building. • All Alltrade trucks should be equipped with a first aid kit. • Emergency medical services may be required when working in remote locations. On
some projects the site / owner may establish onsite emergency medical services that must be used to provide first aid.
Note: First Aid for confined space entry means emergency first aid training with CPR.
23.5 Ladders
Standard Workers involved in the use of ladders shall be familiar with their characteristics and the necessary safety precautions.
Practice
• The ladders supplied must be in good safe working condition as recognized through
inspection, see H&S_FORM_060. • Any ladder, which becomes unsafe to use must be tagged and / or identified unsafe
for use and then reported to the supervisor, who will decide whether to arrange for repairs or destruction. Defective ladders should not be kept around the project, as they will eventually be used.
• Manufactured ladders are a uniform design. Job built ladders requires 300 mm (12") spacing for the rungs and 400 mm (16") spacing for side rails. Use 38 mm x 89 mm (2” x 4”) side rails up to 5.8 m (19'), 38 mm x 140 mm (2 x 6) side rails for ladders longer than 5.8 m (19').
• If used as a regular means of access: o Fasten securely in place; o Allow to extend at least 1 m (3') above landing area; o Allow at least 150 mm (6") toe space behind rungs; and o Keep a 1.8 m (6') clear area at bottom and top.
• When used as temporary access, a ladder must be either securely fastened in place or held by another worker. Maintain 3 point contact; always face the ladder, and only use for access / egress purposes.
• Aluminum, metal or conductive ladders must not be used in close proximity to energized equipment.
HEALTH & SAFETY PROGRAM _ _
Section 23 – Safe Work Practices Page 3 of 62
• Studies have shown that falls from ladders can result in serious injuries. Set them up securely and keep belt buckle inside side rails. Mount/dismount while facing the ladder.
• The base of the ladder should be angled 4:1 or 3:1. • When a stepladder is being used as a self-supporting unit, its legs shall be fully
spread and its spreader shall be locked and shall be level on solid ground. • Do not stand any higher than the second last rung of a stepladder. • A stepladder should be used only for short-term light duty work. Otherwise, use a
scaffold or man lift. • Workers working on ladders who are exposed to a fall hazard as specified in the PPE
section Fall Arrest must be protected by fall protection as outlined in Fall Arrest Practice.
• Only CSA Grade 1, Grade 2, or Job Built ladders will be allowed on a project.
Ladder Handling 1. Lay fully retracted ladder on its side on the ground, with fly-side facing away from
you, and ladder-feet behind you to your right.
2. Count the number of rungs on the base, note where the centre of the ladder is then walk along the ladder to the first base-rung past the centre.
3. With your body at right angles to the ladder, and without twisting or bending your
back, bend your knees and grasp one of the upper rails in each hand, right hand behind the left.
4. Straighten legs and stand, allowing arms to fully extend.
5. Walk forward carefully. If you need to turn, do so with your feet not your waist.
Raising/Lowering an Extension Ladder Get help raising any ladder that you do not feel comfortable raising/lowering alone.
1. Position the ladder fly side up, at right angles to the wall and with the top end of the
ladder approx. 3-feet from the wall.
2. While standing in front of, and facing, the top of the ladder, bend knees slightly, grasp and lift both base rails and straighten up, while retaining a loose grip on each rail.
3. Walk toward the centre (approx. Balance-point) of the ladder, while sliding your
hands along the rails. 4. Firmly grasp both rails and extend your arms to a full upright position.
5. Walk backwards towards, and rest the top of the ladder against, the wall.
HEALTH & SAFETY PROGRAM _ _
Section 23 – Safe Work Practices Page 4 of 62
__ __
6. Walk to a position immediately behind the ladder feet, and while bracing the ladder feet to keep them from moving, extend the fly to the appropriate height.
7. Grasp the ladder rails at waist height, lift the foot end clear of the ground then move
toward the wall until the long-leg on the set-up-assist label is vertical, or the foot of the ladder is 1- foot out from the wall for every 4-feet of height to the ladder support point.
8. If you are on a hard, clean, non-slip surface ensure that each rubber foot pad is
resting squarely, and evenly on the surface. 9. If you are on a soft, loose, or slippery surface, rotate each ladder foot until the
“picks” are behind the base rail and pointing down. Using your foot, on the bottom ladder rung, push each pick into the ground as far as possible.
23.6 Scaffolds - General Requirements
Standard Workers involved in the use of scaffolds shall be familiar with their characteristics and the necessary safety precautions. Please see attached scaffold checklist, see H&S_FORM_061.
Practice
• All scaffolding must have solid footing or anchorage capable of supporting the intended loads without settling or shifting.
• No objects such as barrels, bricks, blocks, boxes, etc. can be used in conjunction with a scaffold.
• Erection, alteration, or dismantling of a scaffold shall be supervised by a competent person.
• Scaffold planks shall be Construction Grade Spruce, Number 1 Grade Spruce, or stronger. [Actual size 50 mm x 3 m (2” x 10’) rough cut] Maximum span is 2.2 m (7’). Certified laminated planks (OHSA Burke) are available on request. Also, the planks must be secured to prevent movement (e.g. cleats, nails, or wire). See jurisdiction in your area.
• All fittings and gear shall be used. • When height of a scaffold exceeds three times the least lateral base dimension: • increase base lateral dimensions accordingly with outriggers, or • Tie securely into the structure every third lift • All scaffolding shall have perimeter guardrails, top rail at 1.1 m (42") high, a toe
board, and a mid-rail. If room does not permit railings, workers on the platform (minimum two planks) shall wear a full body safety harness and shock-absorbing lanyard secured to a solid part of the project.
• All scaffolding shall be fully planked; where this is not practical, workers shall wear a full body harness and shock-absorbing lanyard secured to a solid anchorage. Never less than two planks or 460 mm (18").

HEALTH & SAFETY PROGRAM _ _
Section 23 – Safe Work Practices Page 5 of 62
__ __
• Maximum space between planks is 13 mm (½ "). Planks from one scaffold to another must overlap by 300 mm (12") or more AND be secured to each other. Cover overlaps with plywood to reduce the trip hazard.
• Planks may extend over end supports 150 mm to 300 mm (6” to 12”). Planks must be cleated or otherwise secured.
• Scaffolds exceeding 15 m (50’) in height from its base support, or 10 m (30’) for tube, clamp-type scaffolds, or suspended scaffolds, shall be designed and inspected by a professional engineer prior to use.
• Scaffolds shall be erected level and plumb by means of screw jacks and base plates. Where ground deflection is possible, compaction is required followed by the use of mud sills.
• Screw jacks and base plates may be replaced by manufacturer supplied casters/wheels whose brakes will be applied at all times except when being moved.
• Running scaffold requiring anchorage due to its height shall be tied into the structure every 10 m (30’) horizontally or as applicable jurisdiction.
• Access to the scaffold platform shall be by properly sized ladder. • Rolling scaffolds shall not be moved with workers on board. • Rolling scaffolds must have brakes locked while a worker is on it. • Most manufactured tubular scaffolding with standard planking is rated for a capacity
of 11 kilo-newton’s (2,500 lbs) uniformly distributed and 2.6 kilo-newton (600 lbs) concentrated centre point loading. Refer to manufacturer instructions, or design requirements, to ensure the safe working load is not exceeded.
• Masonry units (bricks, blocks) are to be distributed evenly over the working platform of the scaffold. Loaded skids should be over top of the scaffold frame.
• The worker should check the scaffolding daily and defects are to be reported to the supervisor for correction. As a guideline, use scaffold checklist. Modify as required.
• Any hording affixed to any scaffold that may affect wind loading such as wood, wraps/tarps must be considered into the overall design of the scaffold. This material may also be required to be flame retardant pending the application. Please consult the EHS Dept.
Note: An engineered scaffold is not to be altered unless approved by the engineer that designed it.
Tie-Ins
Tie-ins anchor a scaffold to the structure it serves, preventing the scaffold from falling into or away from the structure. Tie-ins also improve the scaffolds lateral stability by bracing the structure.
Guidelines for tie-ins are 4.6 meter (15 ft) vertical and 6.4 meter (20) horizontal intervals Consult local requirements, design standards and engineering practices when using and installing tie-ins.
HEALTH & SAFETY PROGRAM _ _
Section 23 – Safe Work Practices Page 6 of 62
__ __
Hoarding
Hoarding refers to tarps or other material used to cover a scaffold. When hoarding is used, the stress on the ties stabilizing the scaffold increases due to wind loading. Guidelines for tie-ins for hoarded scaffolds are 3 meter (10 ft) vertical and 3 meter (10 ft) horizontal. Consult local requirements, design standards and engineering practices when installing hoarding. Note: Hoarding material may be required to be fire rated pending the activity being performed inside the hoarding. (Welding, burning etc) Base Plates Base-plates distribute concentrated leg loads over a larger area. They also connect scaffold standards and mudsills. They are attached usually with pins and locking devices. Base-plates usually have predrilled nail holes for attaching the plates to a mudsill. 23.7 Scaffold Tagging
Some workplaces may require the standard use of a scaffold tagging system to identify the status of use and last date of inspection. Where this is required the following practice is to be followed.
• Scaffolds must be inspected prior to initial use and at intervals not exceeding 7
calendar days. • Scaffolds are to be inspected by a competent worker who is experienced in the
erection of scaffolds. • Inspection of scaffolds must include - but is not limited to:
o Damage to frames, braces, base plates, clamps and other structural components Guardrail, mid-rail and toe boards condition
o Ladders and ladder gates/fences o Damage to hooks on manufactured platforms o Splits, warps, knots and dry rot in planks o Lamination defects in veneer planking o Compatibility of components o Proper amount and correct mix of components
Defective components found during any inspection or which have been identified through any other source must be removed and replaced immediately.
The results of the scaffold inspection are to be documented and displayed on a solid colour coded tag posted at each point of entry.
HEALTH & SAFETY PROGRAM _ _
Section 23 – Safe Work Practices Page 7 of 62
__ __
All scaffold tags will be of a solid red, yellow or green color with black lettering. GREEN or “Safe For Use” tags will be hung on scaffolds that have been inspected and are safe for use. YELLOW or “Caution – Potential Hazard” tags indicate that a scaffold is safe for use but there are some other hazards. The tag must identify the REASON for the caution and the POTENTIAL HAZARD RED or “Not Safe For Use” tags will be posted prior to initial inspection of a scaffold or when the scaffold has been deemed unsafe for use. The REASON must be written on the tag as: • Under Erection • Being Dismantled • Repairs Required • Overhead Protection Only
Scaffold tags shall display as a minimum: • Date of last inspection • Inspection expiry date (Next Inspection Due) • Inspected By – name and signature • Date erected • Duty rating • Possible hazards (Yellow tags only) • Scaffolds that have no tag displayed are deemed RED tagged and are NOT TO BE
USED Note: Please consult the EHS Department for further instruction and use. 23.8 Ramps, Runways and Platforms
Standard Temporary structures used for access shall be constructed, installed, and used so that an injury will not result.
Practice
• In general, a ramp, runway, or platform must be able to support 50 psf
(2.4kilonewtons) and be at least 460 mm (18” wide). This is roughly equivalent to two scaffold planks spanning no more than 2.4 m (8’ wide).
• Maximum gradient of slope = 1:3 Ramps that are not nearly horizontal need 19 x 38 mm (1" x 2”) cleats space regularly at 46 cm (18") securely nailed to the walking surface.
• Where there is danger from falling materials, a ramp, runway, or platform shall be covered by a canopy of adequate strength.
HEALTH & SAFETY PROGRAM _ _
Section 23 – Safe Work Practices Page 8 of 62
__ __
• Platforms have the same safety requirements as scaffold platforms - Safe Work Practices – Access Structures - Scaffolds
• If it is possible to fall a vertical distances of 2.4 m (8’) or into water from a ramp, runway, or platform, guardrails shall be erected.
• If a wheelbarrow or other similar conveyance is used on a ramp, runway, or platform AND if it is possible to fall, 1.2 m (4’) guardrails shall be installed.
23.9 Compressed Gases – General Information
Standard All workers involved in the use of compressed gases shall be familiar with their characteristics and the necessary safety precautions.
Practice The supervisor shall discuss the following general characteristics in crew safety meetings:
• Acetylene
o This highly flammable hydrocarbon fuel combines with oxygen to produce industry's hottest flame (5900 degrees Fahrenheit - 3255 degrees Celsius). The danger of explosion is high because the gas is very unstable. Acetylene cylinders are packed with a porous material saturated with acetone to make storage, transportation, and usage safe. Never use acetylene above 15 psig; alternatively, with copper and copper alloys.
• MAPP o Methylacetylene-propadiene can replace acetylene for most operations. MAPP
is very stable and has a very strong odor. MAPP can be used safely at higher pressures than acetylene.
• Hydrogen o The lightest gas known is highly flammable and burns in air with an almost
invisible blue flame. Hydrogen and oxygen combine to produce a cooler flame (4000 degrees Fahrenheit - 2200 degrees Celsius) than acetylene; so it is suitable for brazing aluminum, magnesium and in welding lead.
• Oxygen o The most important gas in the world. Oxygen is non-flammable but nothing
can burn without it. 21% oxygen supports normal combustion. Pure oxygen can cause spontaneous combustion when combined with grease or oil.
o Never use oxygen as a substitute for compressed air to operate pneumatic tools.
• Argon, Helium, Nitrogen, Carbon Dioxide o Good ventilation is required when using any gas. These gases at high
concentration cause asphyxiation. Apart from the hazard of rupturing cylinders these gases are non-hazardous, non-flammable and inactive.

HEALTH & SAFETY PROGRAM _ _
Section 23 – Safe Work Practices Page 9 of 62
__ __
23.10 Compressed Gas Welding
Standard All workers involved in the use of compressed gases for welding shall be familiar with their characteristics and the necessary safety precautions.
Practice
1. Locate cylinders away from sources of excessive heat or physical damage. They
should be secured upright in a cylinder truck or against a firm support. 2. Slightly open ("crack") and then close immediately the cylinder valves (except for
hydrogen gas) to blow out dust and foreign matter that could restrict the gas flow or damage the regulator seats. Stand to one side of the cylinder valve outlet when doing this.
3. Attach the oxygen and fuel gas regulators to their respective cylinders. Screw the nuts tightly with the proper wrench. Never force poorly fitting connections.
4. Make sure the pressure adjusting knobs or screws on the regulators are released. 5. Connect the green hose to the oxygen regulator and the red hose to the fuel gas
regulator. 6. Connect the hoses to the torch -- green hose to the oxygen inlet and red hose to the
fuel gas inlet. 7. Connect mixer and welding tip (or tip assembly) to torch handle. 8. Open the oxygen cylinder valve slowly and completely. 9. Open the fuel gas cylinder not more than one full turn. 10. Open the oxygen torch valve and turn the pressure adjusting screw on the oxygen
regulator to the desired pressure. Continue the oxygen purge for approximately ten seconds for each 30 m (100’) of hose. Close oxygen torch valve.
11. Open the fuel gas torch valve, turn the pressure adjusting screw on the fuel gas regulator to the desired pressure, and continue purging for ten seconds for each 30 m (100’) of hose. Close the fuel gas torch valve.
12. To light the torch, open the fuel gas torch valve 1/2 turns and immediately lights the tip with a spark lighter. DO NOT USE MATCHES OR LIGHTER. Open the fuel gas torch valve further until the flame is free of soot.
13. Open the torch oxygen valve and adjust until a neutral flame results. 14. To weld, wear snug fitting goggles with properly coloured and designed lenses and
follow MSDS for type of respiratory requirements. 15. Ensure a fire extinguisher of suitable size and classification is readily available during
all welding operations.
23.11 Compressed Gas Cutting
Standard All workers involved in the use of compressed gases for cutting shall be familiar with their characteristics and the necessary safety precautions.
HEALTH & SAFETY PROGRAM _ _
Section 23 – Safe Work Practices Page 10 of 62
_ _
Practice The practice for setting up to use cutting torches or cutting attachments is identical to procedure Compressed Gas Welding (Safe Work Practices – Compressed Gas Welding), except that when adjusting the oxygen regulator pressure (Step #10) both the torch oxygen valve and the cutting oxygen valve must be open.
23.12 Dismantling Equipment
Standard All workers involved in the use of compressed gases shall be familiar with safe dismantling practices.
Practice
1. Close the torch oxygen valve. 2. Close the torch fuel gas valve. 3. Close the fuel gas cylinder valve. 4. Close the oxygen cylinder valve. 5. Open the torch fuel gas valve and bleed the fuel gas line. Release the fuel gas
regulator knob. 6. Close the torch fuel gas valve. 7. Open the torch oxygen valve and bleed the oxygen line. Release the oxygen
regulator knob. 8. Close the torch oxygen valve. 9. Ensure a fire extinguisher of suitable size and classification is readily available during
all compressed gas cutting operations.
Note: Regulators and torches can now be disconnected or, if the shutdown is temporary, the torch can be hung in a safe place. Torch heads must never be locked in toolbox or left inside a confined space while still connected to the hose and bottle.
23.13 Compressed Gas Equipment - Defective Equipment
Standard All compressed gas equipment shall be free of defects when in use.
Practice
• Compressed gas equipment shall be inspected for defects prior to use. • Damaged, leaking torches, regulators, hose, and accessories must be taken out of
service. • Repairs may be made by authorized workers or replacements shall be supplied by
the supervisor. • Keep equipment clean by using oil-free rags. • Never oil any regulator or cylinder valve because of the likelihood of explosion/fire.
HEALTH & SAFETY PROGRAM
Section 23 – Safe Work Practices Page 11 of 62
__ __
• A soap bubble test must be conducted at the connection to ensure no leaks on compressed gas system. All associated gaskets are to be installed prior to test and use. (Ensure the soap does not have an oil, fat or grease base)
23.14 Hose Inspection
Routine hose inspection should be conducted by a competent operator to ensure safe operation of equipment.
The operator(s) should look for evidence of the following before use:
• Cracking on hose surface; • Deep cracks; • Exposed braiding; • Burns; • Separation of hose layers; • Bulges • Sponginess; • Degraded hose should be replaced with new hose of the proper grade for the application
While in use ensure:
• Hose is not to be subjected to sparks, hot metal or slag; • No sharp objects, kinks or sharp bends, tension, or strain; • Hose shall be kept from the path of heavy equipment and vehicle traffic; • Upon shutdown, or when equipment is used infrequently, all residual pressure shall
be safely released from the apparatus and hose.
23.15 Backfires and Flashbacks
Standard Flashback arrestor valves shall be installed on both hoses and at the torch end to prevent flashbacks or as per the manufacturer’s instruction.
Practice Backfires: • When flame burns back into tip • Accompanied by loud popping sound • Caused by touching tip to work • Caused by insufficient gas pressures
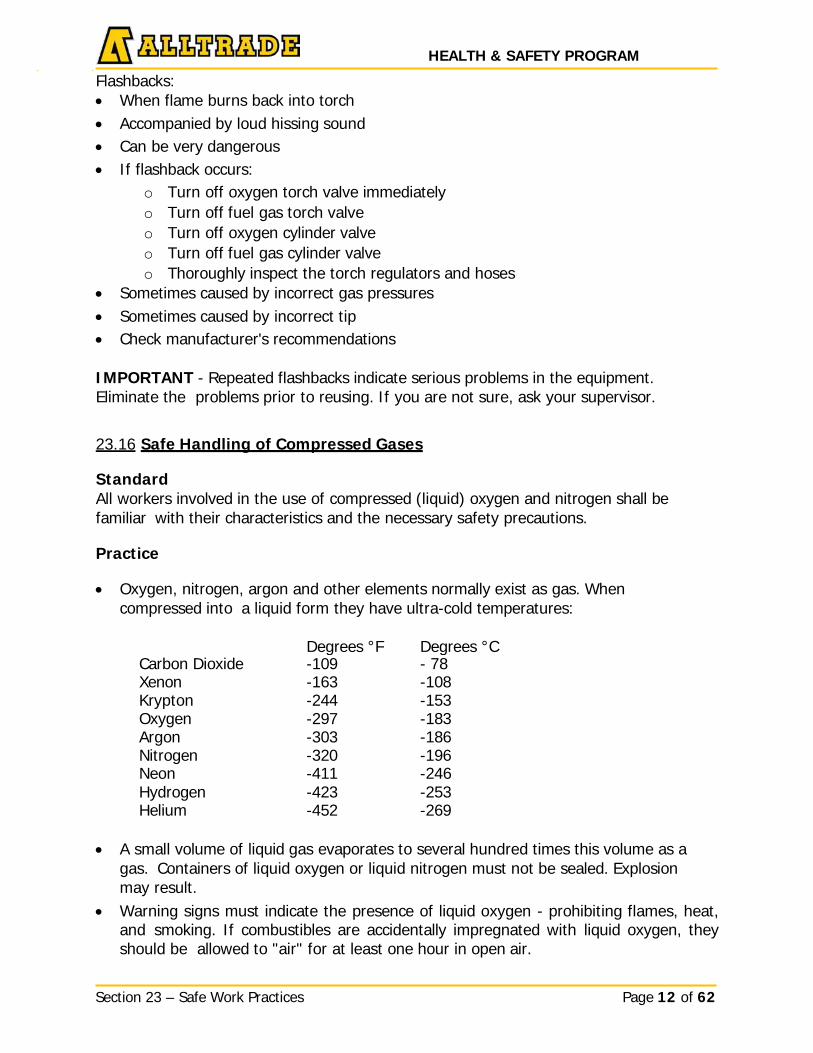
HEALTH & SAFETY PROGRAM
Section 23 – Safe Work Practices Page 12 of 62
__ __
Flashbacks: • When flame burns back into torch • Accompanied by loud hissing sound • Can be very dangerous • If flashback occurs:
o Turn off oxygen torch valve immediately o Turn off fuel gas torch valve o Turn off oxygen cylinder valve o Turn off fuel gas cylinder valve o Thoroughly inspect the torch regulators and hoses
• Sometimes caused by incorrect gas pressures • Sometimes caused by incorrect tip • Check manufacturer's recommendations IMPORTANT - Repeated flashbacks indicate serious problems in the equipment. Eliminate the problems prior to reusing. If you are not sure, ask your supervisor.
23.16 Safe Handling of Compressed Gases
Standard All workers involved in the use of compressed (liquid) oxygen and nitrogen shall be familiar with their characteristics and the necessary safety precautions.
Practice
• Oxygen, nitrogen, argon and other elements normally exist as gas. When
compressed into a liquid form they have ultra-cold temperatures:
Degrees °F Degrees °C Carbon Dioxide -109 - 78 Xenon -163 -108 Krypton -244 -153 Oxygen -297 -183 Argon -303 -186 Nitrogen -320 -196 Neon -411 -246 Hydrogen -423 -253 Helium -452 -269
• A small volume of liquid gas evaporates to several hundred times this volume as a gas. Containers of liquid oxygen or liquid nitrogen must not be sealed. Explosion may result.
• Warning signs must indicate the presence of liquid oxygen - prohibiting flames, heat, and smoking. If combustibles are accidentally impregnated with liquid oxygen, they should be allowed to "air" for at least one hour in open air.

HEALTH & SAFETY PROGRAM
Section 23 – Safe Work Practices Page 13 of 62
__ __
• Liquid oxygen, if accidentally spilled on asphalt, may cause an explosion spontaneously.
• Because of the potential for oxygen displacement, leading to asphyxiation, proper ventilation is the major precaution to take with liquid nitrogen.
• Evaporating liquid oxygen in a confined space or building will cause oil or grease to burn spontaneously.
• Contact with the skin causes a reaction similar to a burn. • The term "cryogenic" refers to very cold liquid gases. • Refer to product MSDS/SDS for specific personal protective equipment to be used
while handling, transporting or using the compressed gas. Example: Propane: When handling propane safety glasses, face shield, neoprene gloves (impermeable gloves), and coveralls are required. 23.17 Cylinder Storage
Standard
Compressed gas cylinders shall be stored so that no damage may occur.
Practice • Store oxygen and fuel cylinders at least 6 m (20’) apart. • If the above is not practical, separate oxygen and fuel gas cylinders by means of a
one- hour fire-resistant wall 1.5 m (5’) high. • Store oxygen and fuel gas cylinders on a fireproof surface outside. • Keep cylinders away from:
o Open flames o Electric arcs o Molten slag o Sparks o Exposure to sun
• Cylinders are not designed for temperatures above 54°C (130°F). • Keep cylinders at least 6 m (20’) from flammable materials:
o Paint o Oil o Solvents
• Identify storage areas. Clearly post "NO SMOKING". • Secure all cylinders upright. • Keep full and empty cylinders separated. • Close valves of empty cylinders and fit screw caps. Mark empties "MT" with chalk.
Empty cylinders must be moved outside as soon as disconnected. • Do not accept unmarked cylinders. All cylinders must have a WHMIS / Hazard
Communications label. • Provide adequate fire extinguishers within 10 m (30’) of cylinder storage areas. • Post signs to prohibit parking within 10 m (30 ‘) of a cylinder storage area.
HEALTH & SAFETY PROGRAM
Section 23 – Safe Work Practices Page 14 of 62
__ __
• The control valve of a storage cylinder for compressed gas, other than a cylinder connected to a regulator, supply line, or hose, shall be covered by a protective cap that is secured in its proper position.
23.18 Propane Cylinder Inspection
Standard Propane cylinders must be inspected to ensure they meet regulatory compliance.
Practice Cylinder inspections shall be documented on the Propane Cylinder Inspection Checklist, H&S_FORM_062.
23.19 Temporary Heat
Standard Temporary heat shall be arranged so that no danger of uncontrolled fire or atmospheric hazards exists.
Practice
• Combustibles such as tarpaulins, wood and flammable liquids will be positioned no
closer than 3 m (10’). If combustibles are in the direct flow of heat, no closer than 6 m (20’).
• Safety features on the heaters must be operating properly. Check this feature. Contact the manufacturer/supplier for further information.
• Heaters cannot be set on combustible materials and must be protected from damage due to overturning.
• The temptation is great to locate heaters near a means of access/egress because
fresh air is available for combustion. It is against the law to restrict access/egress with a portable heater.
• Fuel lines must be guarded to prevent accidental damage. • When open flame heaters are operating continuously, a designated person will be
assigned to inspect it periodically. • A viable means of extinguishing a fire must be readily available. • Familiarize yourself with the fuel source emergency shutoff. • Any temporary heating system requiring the use of propane requires special training
in propane handling (where legislated) Please contact your H&S Department for further details.
• Open flame heaters shall not be used as temporary heat in an occupied building. • When there are conditions that may cause an atmospheric hazard, consult the EHS
Department.
HEALTH & SAFETY PROGRAM
Section 23 – Safe Work Practices Page 15 of 62
__ __
23.20 Tiger Torch
Standard All Alltrade employees involved in the use of a tiger torch shall comply with the following safe work practice, to ensure the job is conducted in the safest manner possible. Practice
1. Ensure that you are acquainted with the safe operation of the equipment 2. Read the Owner’s Manual with special attention to the safe work practice Do’s
and Don’ts 3. Utilize Alltrade’s safe work procedure to compare against your FLRA card
identified hazards 4. Inspect torch, and affixed fuel source bottle 5. Conduct a leak test as follows:
a. Step 1: Close torch adjusting valve b. Step2: Slowly open the supply tank shut off valve c. Step 3: Test all connections for possible gas leaks using a leak test
solution, e.g.; (SNOOP) d. If a leak is found at the torch, adjust valve tighten the stem packing nut
clockwise. Slowly open the supply tank shut off valve and check for the leak again (repeat if necessary)
e. If a leak is found at the supply tank shut off valve close the shut off valve and retighten counterclockwise, Slowly open the valve and check for leaks (Repeat if necessary)
f. Make sure the gas supply line is long enough that there is no chance of misdirection of open flame to the gas supply tank (gas line should be 20” or more in length)
g. With both the supply valve and the torch adjustment valve in the off position clean the torch manifold out using a wire brush to ensure all debris has been removed
6. Hook up a suitable propane fuel supply a. Ensure that the fuel supply tanks are the equivalent of a 20 Ib certified
tank b. Place the supply tank in an area with no risk of open flame or spark c. The tank should never exceed 49 degrees Celsius. Store in a well
ventilated area away from any other flammable materials or heat source d. After assembling the gas line connections conduct leak test (See step 5
controls) e. Ensure fuel lines have regulators.
7. Ignite the torch a. Ensure that the gas supply tank is turned on. Turn the torch adjustment
valve ¼ turn and while facing the torch away from the operator ignite immediately using a striker. Always light the torch in a well ventilated area
HEALTH & SAFETY PROGRAM
Section 23 – Safe Work Practices Page 16 of 62
__ __
b. Never use a pocket lighter to light the torch. Always use a torch striker as your ignition source
c. Utilize flame retardant/resistant clothing if available as well as leather gloves
d. Light the torch away from any flammable materials, e.g ; oily rags, wood, etc
e. Always have a fully charged ABC fire extinguisher readily available. 8. Turn off the torch and put it away
a. Always give the torch end assembly time to cool off before storing indoors or near flammable material
b. Close the tank supply valve. Slowly open the torch valve assembly until all residual gas within the line has had time to escape
c. Fuel tanks should never be stored indoors and should be stored outdoors in compliance with legislative standards for the “Safe Storage of Liquefied Petroleum Gases”
d. Disassemble the torch and gas line away from the supply tank and place the plastic protective caps back onto the end of the hose assembly as well as the propane tank.
e. Never store the torch in an enclosed toolbox or cabinet attached to the propane bottle.
Torches are not to be used for heating of work areas or thawing of lines and equipment, etc., or when no one is present to monitor the usage. 23.21 Storage and Handling of Propane
Standard Propane shall be stored and handled to eliminate the possibility of damage to cylinders.
Practice
• Oxygen and fuel cylinders shall be stored separately in well ventilated areas away from excessive heat and physical hazards.
• When moving propane cylinders, the valve protective collar should not be used as a means of attachment to a hoist hook.
• Never use a sling to move cylinders, only a secure container. • Cylinders must be upright and securely tied to an immovable anchor point. • Cylinders should be stored in definitely assigned places away from elevators, stairs,
or walkways. • Avoid placing cylinders in an area where stray electricity or accidental arcing could
occur. • Check for and eliminate any gas leaks at cylinder valves, regulators, and connections.
Use a soapy water solution to check for leaks. • Leaking cylinders should be taken outdoors and clearly tagged. Return the cylinder to
the supplier when completely empty; it is illegal to ship a leaking cylinder.
HEALTH & SAFETY PROGRAM
Section 23 – Safe Work Practices Page 17 of 62
__ __
• The cylinder valve should be opened slowly. Stand to one side when opening a valve. • Cylinder valves should be closed at all times except when propane is actually being
used. • Mark empty cylinders "MT" with chalk. Spent cylinders must be moved outside as
soon as disconnected. • Propane is odorless so an additive smelling like "rotten cabbage" is introduced to
help detect leaks. • Propane used in temporary heating requires specific training in propane handling
(where legislated) Please contact your EHS department for further details. • Proper personal protective equipment must be worn. This includes the appropriate
eye protection, hand protection (impermeable) and a respirator where exposure is expected to surpass legislated limits.
23.22 Locating of Buried Utilities
Standard Workers are required to take all reasonable precautions necessary in order to expose any existing underground utility and to excavate in the vicinity of an underground utility. Contact the EHS Department if further information is required.
Identifying Boundary Limits of Locate Purpose To assist workers in identifying the excavation zone within the located area.
1. Request located area to extend to road edge whenever possible to allow for
unforeseen circumstances. 2. Once on the jobsite, visually identify all utilities within the dig area and beyond. 3. Cross reference visual findings against the provided locate sheets for accuracy. (If
there is any discrepancy, do not proceed. Follow up for clarification) 4. All employees are required to review all locate sheets within the dig area. 5. All hazards and controls need to be identified on the FLRA/JSA and
communicated to all workers 6. Visually identify the digging boundary limits 7. If digging is required outside the boundary limits, ensure that the located area is
extended prior to proceeding.
Practice
• Request for a utility locate before you dig. • Locate documentation must be current and specific to the scope of work. • Any outdated locate document must have a follow up locate. • Check with local jurisdiction for expiry dates. If locate marks are missing or unclear,
a follow up locate must be requested. • Obtain locates from a locate Alltrade or utility.
HEALTH & SAFETY PROGRAM
Section 23 – Safe Work Practices Page 18 of 62
__ __
• Locate documentation and markings must be reviewed with the excavation crew prior to digging, and copies of the locate sheets must be available to everyone at all times while on site. This includes the Drill crew.
• Utility locates are not intended to be shared. The locate sheets are specific to that company only.
• Policies and information regarding Private Utilities must be followed. Please refer to the Private Utilities portion of this section.
Note: If the owner is not aware of utilities or location therein, do not proceed. Limits of Approach to Existing Utility • Whenever the scope of work requires the excavation to cross any existing utility, the
utility must by exposed by hand digging, or vacuum excavation, within the limits of approach established by the utility.
• Hand excavate across the limits of approach in cuts of one foot in depth. At this point, mechanical equipment could be used to widen the hand dug trench to the depth of the hand excavation.
• Repeat until the utility is located. Industry practices recommend a one meter limit of approach for hand excavation of any utility; however check the locate sheet for the exact specifications.
• An approved non-conductive probe may be used to verify the depth of the utility. Note: If the utility cannot be found within the specified limit of approach, call for a follow up locate to assist you. Never dig outside the area covered by the locate sheet without obtaining a further locate. 23.23 Excavating or Drilling Parallel with Existing Utilities
Whenever the scope of work requires the excavation or drill shot to run parallel with existing utilities, visual verification must be completed to determine the exact location of the utility. Test holes shall be hand dug or use vacuum excavation for exact location and depth of cover. Refer to the following tables for the safe work practices.
Table 1
(Water and Sewer)
Any sewer or water running parallel within the boundary limit of approach (1 meter) must be visually verified by: • (Valve box, chamber manholes, daylighting by hand excavation or hydrovac). This
will be necessary at the beginning and end of the excavation or drill shot with a maximum separation of 75 meters between visual verifications.
• If the proposed running line is at the same depth within 1 meter of the sewer or water, then daylight as per
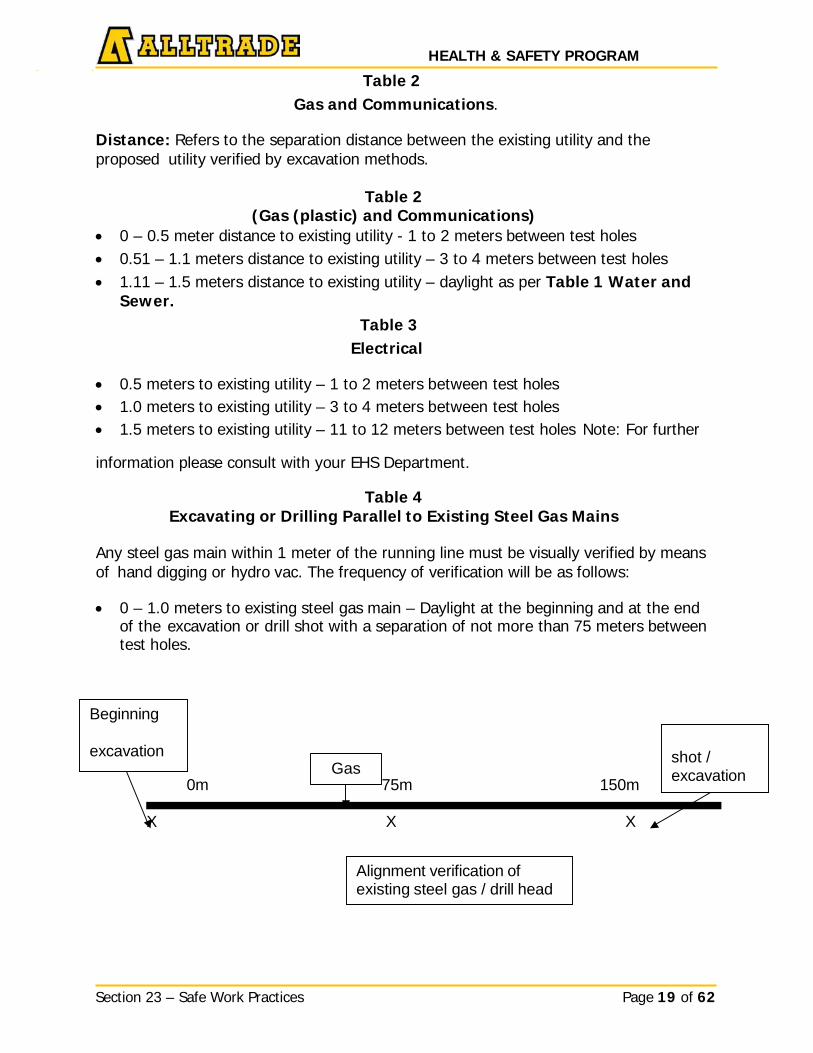
HEALTH & SAFETY PROGRAM
Section 23 – Safe Work Practices Page 19 of 62
__ __
Table 2 Gas and Communications.
Distance: Refers to the separation distance between the existing utility and the proposed utility verified by excavation methods.
Table 2 (Gas (plastic) and Communications)
• 0 – 0.5 meter distance to existing utility - 1 to 2 meters between test holes • 0.51 – 1.1 meters distance to existing utility – 3 to 4 meters between test holes • 1.11 – 1.5 meters distance to existing utility – daylight as per Table 1 Water and
Sewer. Table 3
Electrical
• 0.5 meters to existing utility – 1 to 2 meters between test holes • 1.0 meters to existing utility – 3 to 4 meters between test holes • 1.5 meters to existing utility – 11 to 12 meters between test holes Note: For further
information please consult with your EHS Department.
Table 4 Excavating or Drilling Parallel to Existing Steel Gas Mains
Any steel gas main within 1 meter of the running line must be visually verified by means of hand digging or hydro vac. The frequency of verification will be as follows:
• 0 – 1.0 meters to existing steel gas main – Daylight at the beginning and at the end
of the excavation or drill shot with a separation of not more than 75 meters between test holes.
Alignment verification of existing steel gas / drill head
Beginning
excavation
shot / excavation Gas
0m 75m 150m
X X X
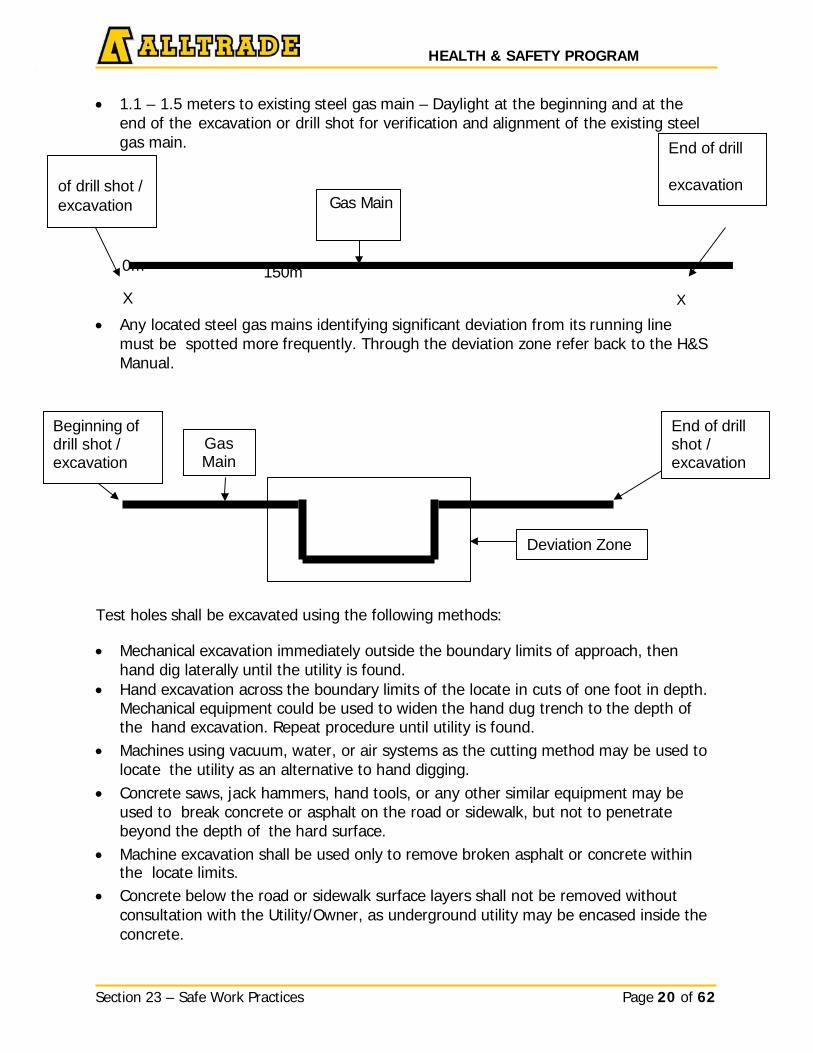
HEALTH & SAFETY PROGRAM
Section 23 – Safe Work Practices Page 20 of 62
End of drill
excavation
_ _
• 1.1 – 1.5 meters to existing steel gas main – Daylight at the beginning and at the
end of the excavation or drill shot for verification and alignment of the existing steel gas main.
of drill shot / excavation Gas Main
0m 150m
X X
• Any located steel gas mains identifying significant deviation from its running line must be spotted more frequently. Through the deviation zone refer back to the H&S Manual.
Test holes shall be excavated using the following methods:
• Mechanical excavation immediately outside the boundary limits of approach, then hand dig laterally until the utility is found.
• Hand excavation across the boundary limits of the locate in cuts of one foot in depth. Mechanical equipment could be used to widen the hand dug trench to the depth of the hand excavation. Repeat procedure until utility is found.
• Machines using vacuum, water, or air systems as the cutting method may be used to locate the utility as an alternative to hand digging.
• Concrete saws, jack hammers, hand tools, or any other similar equipment may be used to break concrete or asphalt on the road or sidewalk, but not to penetrate beyond the depth of the hard surface.
• Machine excavation shall be used only to remove broken asphalt or concrete within the locate limits.
• Concrete below the road or sidewalk surface layers shall not be removed without consultation with the Utility/Owner, as underground utility may be encased inside the concrete.
Beginning of drill shot / excavation
End of drill shot / excavation
Gas Main
Deviation Zone
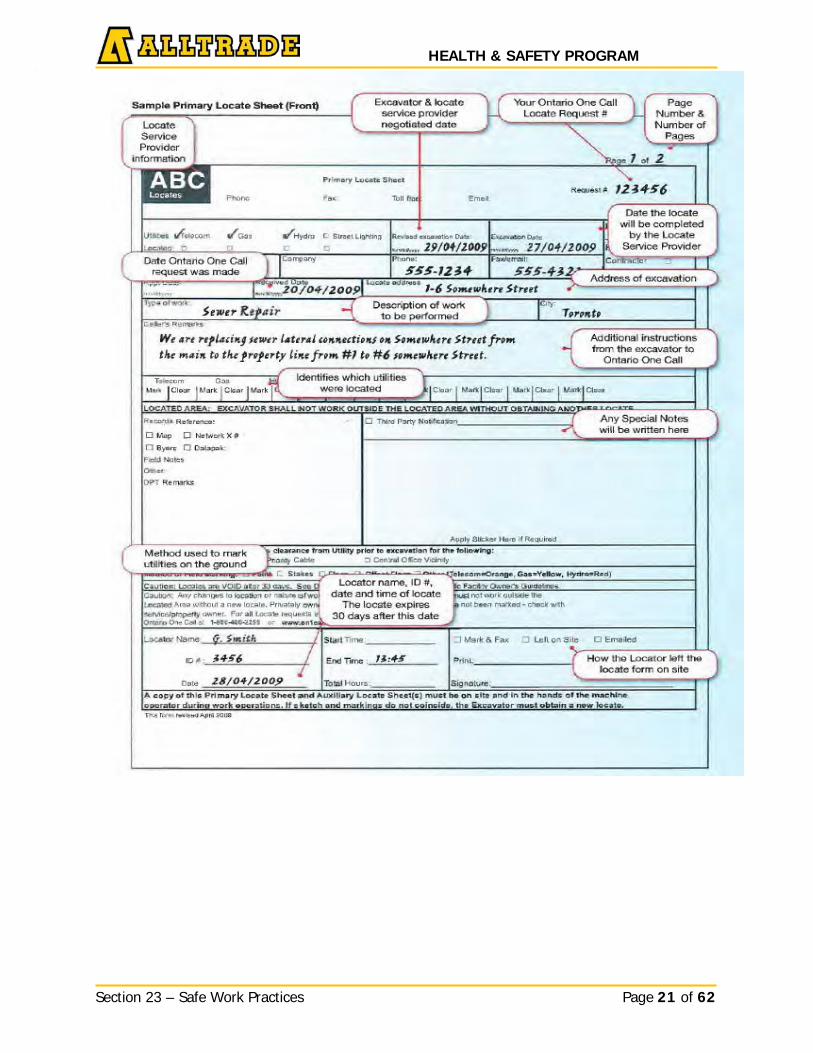
HEALTH & SAFETY PROGRAM
Section 23 – Safe Work Practices Page 21 of 62
_ _

HEALTH & SAFETY PROGRAM
Section 23 – Safe Work Practices Page 22 of 62
__ __
Sample Locate Sheet: 2 of 2

HEALTH & SAFETY PROGRAM
Section 23 – Safe Work Practices Page 23 of 62
_ _
Locate Colour Codes
HEALTH & SAFETY PROGRAM
Section 23 – Safe Work Practices Page 24 of 62
__ __
23.24 Working in the Vicinity of the “Right of Way of Pipelines”
Standard Workers are required to take all reasonable precautions necessary in order to maintain all safe work practices and safe working distances with existing pipelines. Contact the EHS Department if further information is required
General Requirements
• Alltrade will contact the pipeline company regarding right of way requirements
and special safety precautions and if possible have pipeline representative attend a preconstruction meeting to discuss activities in or around right of way.
o The preconstruction meeting should outline the pipeline requirements for The appropriate permitting process and documentation Notification and approval requirements prior to commencing any
activities or backfilling • No excavation, construction, grading or boring is permitted within 30 metres of the
right-of way without prior consent from the pipeline company. • No person shall operate a vehicle or mobile equipment across a pipeline unless first
obtaining consent from the pipeline company. • Submissions for construction plans are to be sent to the pipeline company for
formal approval prior to any crossing. • Alltrade will post warning signs and snow fence around the perimeter of the right of
way indicating restricted area. • Alltrade will apply for a locate request and be present on site when the pipeline is
located and know the meaning of the pipeline markers and their requirements. • Advance planning of any activities is a must. Advance notice must be given to the
pipeline company prior the commencement of the approved activities unless otherwise agreed on by the pipeline company.
• The pipeline company will be contacted before any changes to the scope of work or location.
• In the event of any damage or contact to the pipeline, all operations will stop work immediately and shut down all powered equipment and other sources of ignition and contact the pipeline company immediately.
• Alltrade may be required to follow more stringent requirements based on Legislative Authorities.
• Always follow the instructions of a pipeline representative and if more information is required contact the pipeline company for verification. Do not assume or put yourself at risk.
• Alltrade will require employees and operators to receive and understand the above requirements in the form of a tool box safety talk prior to commencing work.
For further information, contact the EHS Department.
HEALTH & SAFETY PROGRAM
Section 23 – Safe Work Practices Page 25 of 62
__ __
23.25 Chain Saws
Classification Gas, Electric and Pneumatic
Standard Workers involved in the use of gas, electric or pneumatic powered chain saws should be aware of the characteristics and the safety precautions related to the safe operation of this equipment. A chain saw is a high speed woodcutting tool; special precautions must be observed to reduce risk of injury. Careless or improper use of this tool can cause serious injury. Always refer to manufactures instruction manual.
Practice When chainsaws are used the supervisor must ensure that the workers are properly trained to operate this equipment. The following points should be discussed with the crew.
Health and Safety Requirements
Always wear proper PPE and never wear loose fitting clothing as they can become entangled by moving parts.
Regulations require that chain saws used on construction must be equipped with a chain brake. Make sure that the saw is equipped with a chain brake mechanism, and not simply a hand guard, which is similar in appearance.
Regulations require that chain saws used on construction must be equipped with “anti- kickback” chains, called safety chains by the manufacturers, these chains incorporate design features intended to minimize kickback while maintaining cutting performance.
Protective Clothing and Equipment
Eye protection in the form of plastic goggles is recommended. A face shield attached to the hard hat will not provide the total eye protection of close-fitting goggles.
Most chain saws develop a high decibel rating (between 95 and 115 dBA depending on age and condition). Hearing protection should be worn, especially during prolonged exposure, anything over 104 requires double.
Leather gloves offer a good grip on the saw, protect the hands, and absorb some vibration. Gloves with ballistic nylon reinforcement on the back of the hand are recommended.
Trousers or chaps with sewn-in ballistic nylon pads or similar protective clothing are required when using a chain saw.
HEALTH & SAFETY PROGRAM
Section 23 – Safe Work Practices Page 26 of 62
__ __
Kickback Kickback describes the violent motion of the saw that can result when a rotation chain is unexpectedly interrupted. The cutting chain’s forward movement is halted and energy is transferred to the saw, throwing it back from the cut toward the operator. Contact in this zone makes the chain bunch up and try to climb out of the track. This most often happens when the saw tip makes contact with something beyond the cutting area such as a tree branch, log, or the ground. How to minimize the risk of kickback • Use a low-profile safety chain • Run the saw at high rpm when cutting • Sharpen the chain to correct specifications • Set depth gauges to manufacturers’ settings • Maintain correct chain tension • Hold the saw securely with both hands • Don’t operate the saw when you are tired • Know where the bar tip is at all times • Don’t allow the cut to close on the saw • Do not operate a chain saw that is damaged Starting When starting, hold the saw firmly on the ground or other level support with the chain pointing away from your body and nearby obstructions. Use a quick, sharp motion on the starter pull (figure 159). Never “drop start” the saw. This leaves only one hand to control a running saw and has resulted in leg cuts. Use the proper grip. Site Hazards Ensure you have a clear work area, secure footing and in the event you are felling a tree a retreat path must be established. Take extra care when making pocket cuts. Start the cut with underside of the chain tip, then work the saw down and back to avoid contact with the kickback zone. An alternative such as a saber saw should be considered. Use chain saws only to cut wood. They are not designed to cut other materials. Be particularly careful to avoid contact with nails, piping, and other metallic objects. This is especially important when making a pocket cut through framing lumber such as a sub-floor or when cutting used lumber such as trench shoring, lagging, or blocking timbers.
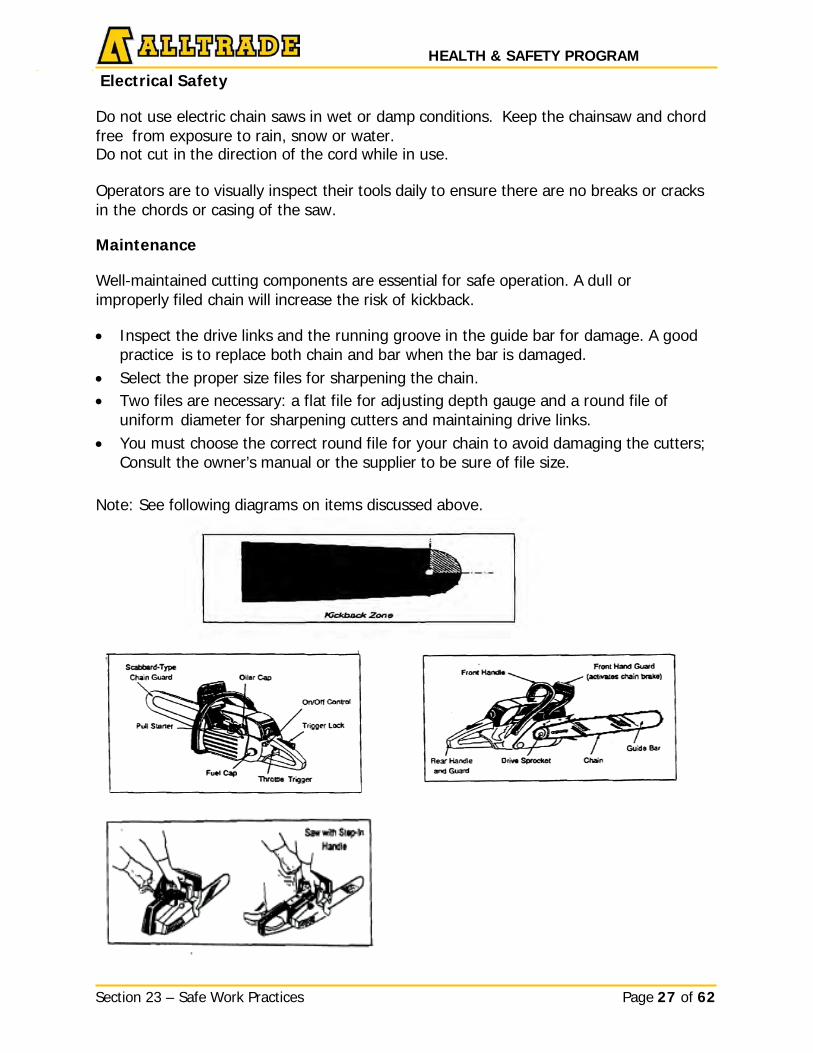
HEALTH & SAFETY PROGRAM
Section 23 – Safe Work Practices Page 27 of 62
__ __
Electrical Safety Do not use electric chain saws in wet or damp conditions. Keep the chainsaw and chord free from exposure to rain, snow or water. Do not cut in the direction of the cord while in use. Operators are to visually inspect their tools daily to ensure there are no breaks or cracks in the chords or casing of the saw. Maintenance Well-maintained cutting components are essential for safe operation. A dull or improperly filed chain will increase the risk of kickback. • Inspect the drive links and the running groove in the guide bar for damage. A good
practice is to replace both chain and bar when the bar is damaged. • Select the proper size files for sharpening the chain. • Two files are necessary: a flat file for adjusting depth gauge and a round file of
uniform diameter for sharpening cutters and maintaining drive links. • You must choose the correct round file for your chain to avoid damaging the cutters;
Consult the owner’s manual or the supplier to be sure of file size. Note: See following diagrams on items discussed above.

HEALTH & SAFETY PROGRAM
Section 23 – Safe Work Practices Page 28 of 62
_ _ 23.30
23.26 Welding (Electric Arc Process Equipment)
Standard All workers involved in the use of electric arc process equipment shall be familiar with its characteristics and necessary safety precautions.
Practice
• All equipment used in the process must be CSA / OSHA approved. • For safety and convenience, electrical supply lines to welding machines should be
controlled from individual cut-off switches. • Keep equipment and accessories safe from damage and in perfect running order. • Set up welding operations in a dry location, free from puddles of water or wet
ground. • Cables should not have repairs made any closer than 3 m (10’) from the electrode
holder. • Cables should be placed so tripping hazards are not created. • Loose connections at the machine, in the electrode holder or at the ground clamp will
cause loss of power, make for poor welds, and might even cause arcing sufficient to set off a fire.
• Electrodes shall be removed from the holder and disposed of immediately in a receptacle when the equipment is left unattended
• Holder must never be left lying overtop of compressed gas bottles. • The power supply to welding machines shall be shut off when work is stopped or
when equipment must be moved. • Overloading welding machines or forcing cables to carry currents beyond the rated
capacity causes overheating and reduces service life. • Daily checks of equipment for loose or corroded connections, cable damage, dirty or
defective jaws of electrode holders and ground clamps shall be conducted by the welder.
• Shades #12 and #14 have suitable optical density, transmit less light, and less infra- red, ultra-violet and violet rays; so, should be used in MIG or TIG welding.
• Ultra-violet rays can cause skin burning, tanning and "arc eyes.” Skin exposed for only 10 seconds will develop a "burn.” Dermatitis is not unusual when skin is repeatedly exposed to ultra-violet rays.
• Check MSDS/SDS of electrodes or material you are welding on for proper type of respiratory equipment.
• Wear cuff-less trousers to eliminate the danger of spatter and sparks being trapped. • CSA/ANSI approved safety glasses are recommended to be worn even under helmets
and face shields. • To protect others in the area, proper shielding screens are required for the welding
operations. • Dark woolen clothing or leather is recommended.
HEALTH & SAFETY PROGRAM
Section 23 – Safe Work Practices Page 29 of 62
__ __
• Keep work areas uncluttered and organized. • The supervisor shall (in order of preference):
o Eliminate the accumulation of fumes; o Provide adequate ventilation;
o Provide adequate respirators. • Other than routine adjustment, leave repairs of electrical equipment to experienced
electricians.
• Gasoline driven equipment must be operated only where the engine fumes can be
vented outdoors. Carbon monoxide exposure can be fatal. • Never switch the polarity with an electric welder in operation. Idle the machine or
switch it off for the change. • Make sure electrical equipment is grounded and connected to the proper receptacle. • Be sure the branch circuit, main disconnect switch or primary input circuit fuses are
removed before attempting any inspection or work on the inside of a welding machine.
• Placing the ON-OFF POWER switch on the welding machine in the OFF position does not remove voltage from the power terminals inside the machine.
23.27 Electric Arc Process - Restrictions
Standard Electric arc process equipment will not be used where people may be endangered.
Practice
• No welding shall be done in any areas where there may be flammable materials,
explosive gases, or vapors without authorization from supervisor. • No welding is to be done in any tank, pipeline, compartment, or container, which has
contained flammable material until it, has been purged, cleaned, and proven to be free of explosive vapors.
• Do not allow welding current to pass through: o Crane cables or slings o Oxygen, acetylene, or other compressed gas cylinders o Tanks or storage containers used for flammable liquids o Pipes carrying compressed air, steam, gases or flammable liquids o Conduits, chains, metal handrails or ladders
• Only qualified welders shall weld scaffold bracket clips, ear plates, erection nuts, and lifting lugs at the direction of a professional engineer.
HEALTH & SAFETY PROGRAM
Section 23 – Safe Work Practices Page 30 of 62
__ __
23.28 Electric Arc Process - Precautions
Practice
Welders shall observe the following safety precautions:
• Have a solid footing and remember that peripheral vision is diminished by welding shield.
• Store electrode holders where they cannot contact people, fuels, or compressed gas cylinders.
• Remove all electrodes from holders and disconnect the machine from power source when welding is stopped for any period of time such as breaks, etc.
• Burn electrodes to no less than 38mm to 50 mm (1½" to 2") in length. Burning them shorter damages the electrode holder.
• Keep electrodes and holder dry. If exposed to water or steam, dry thoroughly prior to use.
• Place electrode stubs in a noncombustible container to prevent slips and falls. • Utilize air currents to direct fumes away from you. • Shield yourself and passersby from stray radiation and flashes. • Guard or mark with chalk "Hot" any completed work. • Chip slag so that debris flies away from your body. • Wear gloves when changing electrodes. • Wear the appropriate PPE; consult the Safety Department for assistance. • Do not weld near or on degreasing operations or paints because of the formation of
hazardous gases.
23.29 Electric Arc Process - PPE
Standard Workers involved in the use of electric arc process equipment shall use proper protective equipment needed for eye and face protection.
Practice • The arc welding lens assembly consists of 3 parts:
o Outside: clear plastic or tempered glass o Centre: shade lens – filter o Inside: clear lens MUST be plastic
• Use gaskets provided with helmets or goggles. • Wear arc welding helmets for all arc welding or cutting operations. • Do not use gas welding goggles for arc welding. • Wear side-shielded safety glasses at all times, even under welding helmets. • The supervisor may replace side-shielded safety glasses with equivalent protection. • Replace pitted or cracked lenses.
HEALTH & SAFETY PROGRAM
Section 23 – Safe Work Practices Page 31 of 62
__ __
• Replace loose or damaged helmets; invisible and dangerous light rays (ultraviolet) can enter undetected.
• Contact lens users should prevent dust from entering eyes. Severe discomfort or eye damage results from particles lodging behind contact lenses.
• Refer to the respiratory protection guidelines for proper selection of respiratory protection.
• Ensure sturdy, opaque, or translucent (not clear) screens are erected to protect passersby.
• Screens should have a space of at least 50 cm (20") at bottom to permit ventilation.
Selection of shade numbers are as follows:
Welding Operation Suggested Shade Number
Torch Soldering 2 Torch Brazing 3 or 4 Oxygen Cutting
under 1" (25 mm) 3 or 4 1"-6" (25 to 150 mm) 4 or 5 over 6" (150 mm) 5 or 6
Gas Welding under 38-50 mm (1/8”) 4 or 5 3.2 - 12.7 mm (1/8” – ½”) 5 or 6 over 12.7 mm (1/2") 6 or 8
Shielded Metal - Arc Welding 2.5 - 4 mm (3/32" - 5/32") electrodes 10 4 - 6.4 mm (5/32" - 1/4") electrodes 12 over 1/4" (6.4 mm) electrodes 14
Gas Tungsten - Arc Welding
Gas Metal - Arc Welding 60-160A 11 160-250A 12 250-500A 14
Carbon - Arc Welding 14
23.30 Weld Positioner
Standard All workers utilizing a weld positioned will operate the positioned in the safest manner possible utilizing the safe work practice below. Weld positioner’s are among the highest percentage of accidents in a Fabshop environment, usually due to negligence. Proper counter weights, roller stand placement along with adequate clearance for any weld branches will ensure a safe and timely completion of task.
under 50A 10 50-150A 12 150-500A 14
HEALTH & SAFETY PROGRAM
Section 23 – Safe Work Practices Page 32 of 62
__ __
Practice
• Ask yourself the most important question, is it safer to roll or position weld a spool? If any doubt remains…….Position weld that spool!
• Inspection will take place on positioner and all equipment that is directly related to task. (ensure everything is in safe working order).
• Think ahead; make necessary adjustments to weld positioner height. Have jaws pinned for the correct diameter of pipe or fitting.
• Ensure adequate numbers of roller stands are used. • Ensure roller stands are placed where they will not meet obstruction. • Weight restrictions of roller stands and weld positioners should always be known and
selections of rolling aids should be made accordingly. • Roller stand wheels should be predetermined to cover up to 20% of the pipe and no
less than 15% of the pipe. • When the spool arrives at the positioner, it should come in without sway in a
balanced position ready to place and secure in jaws. • Fitting/Pipe face should be of equal and symmetrical proportion before securing. • When tightening jaws, ensure torque value is not exceeded! Over torqueing can lead
to catastrophic failure in chuck. • Counter weighting is mandatory; spool should be balanced at any degree on roller
stands. • In the event where only one roller stand can be used, it will then be mandatory for
the spool to be tied back to the positioner via come-along system. • It is the responsibility of user and supervisor to employ elbow clamp usage when it is
clearly safer to do so. • Before crane is dispatched, with slings left lose and with assistance, a minimum of 2
revolutions should be made to ensure stability in spool. • Get a second opinion from supervisor or EHS personnel if there is any concern with
regards to safe set up before starting task. 23.31 Defective Tools and Equipment Tagging
Practice
Employees are to inspect tools and equipment for any damage prior to each use to minimize the risk of injury while operating machinery, tools and equipment. Employees are to be properly trained to use the tools and equipment safely and have operator’s manual available for reference if required. If a tool or piece of equipment is found defective the following must take place:
• Immediately stop using the tool and shut off the equipment. • If a tool is defective, remove it from service, and tag it clearly “Out of service for
repair”. • Report it to your supervisor and return tool/equipment to appropriate tool crib or
shop and do not store with safe operating tools and equipment.
HEALTH & SAFETY PROGRAM
Section 23 – Safe Work Practices Page 33 of 62
__ __
• Replace or repair, damaged equipment immediately. • Do not use defective tools “temporarily” when tagged out of service. • Most procedures indicate that the only person who can remove the tag is the person
who attached it. • Only when it is determined that the tool or piece equipment is safe, can it be used
again. • Keep a record/log of all repairs. 23.32 Hand Tools - Wrenches
Practice
• With the correct jaw size and grip, a wrench does not slip. • Face an adjustable wrench forward. Pull with movable jaw towards you. Pushing on
a wrench is not recommended due to slippage problems. • Store wrenches in a tool box, rack, or tool belt. • Avoid the following unsafe practices:
o Using a pipe wrench on nuts or bolts. o Using a wrench on moving machinery o Using pliers instead of a wrench o Using a makeshift wrench o Using worn wrenches o Inserting a shim in a wrench for better fit o Striking a wrench with a hammer to gain more force o Increasing leverage by adding sleeve additions
• Use eye protection and protective gloves with wrenches
23.33 Hand Tools - Hand Saws
Practice
1. Select a saw of proper shape and size for stock being cut. 2. Choose a saw handle that keeps wrist in a natural position in the horizontal plane. 3. Check the stock being cut for nails, knots, and other features that may damage or
buckle the saw. 4. Start the cut carefully to prevent blade from jumping. Pull upward until blade bites. 5. Apply pressure on the down stroke only. 6. Support long stock in vise, clamp or with helper. 7. Keep teeth and blades properly set, sharpened and tightened. 8. Protect saw teeth when not in use. 9. Use eye protection with hand saws.
HEALTH & SAFETY PROGRAM
Section 23 – Safe Work Practices Page 34 of 62
__ __
23.34 Hand Tools - Hacksaws
Practice
1. Select correct blade for material being cut. 2. Secure blade with teeth facing forward. 3. Keep blade rigid and frame properly aligned. 4. Use strong steady strokes directed away from you. 5. Use entire length of blade in each cutting stroke. 6. Use light machine oil on the blade to keep it from overheating and breaking. 7. Cut hard materials more slowly than soft materials. 8. Clamp thin flat pieces. 9. Keep two hands on the hacksaw and adopt a solid stance. 10. Use eye protection and protective gloves with hacksaws.
23.35 Hand Tools – Non-Sparking
Standard Where isolation, ventilation, and purging of flammable atmospheres are inadequate to ensure a safe area, non-sparking tools shall be used.
Practice
• Non-sparking or spark resistant tools are made of light metals such as brass, bronze,
stainless steel, aluminum, beryllium, titanium, magnesium, and copper. • Remember that all metals are capable of producing a spark, but those listed above
can only do so in ideal circumstances. The hazard is reduced but not eliminated entirely.
• These hazards remain, even with non-sparking tools: o Ignition by friction or impact o Ignition by chemically generated spark
• Non-sparking tools cannot be certified as safe because of the surfaces they may strike, which then produce a spark.
• It is possible to certify an electric motor for work in hazardous locations. These motors are almost 100% unable to ignite an explosive atmosphere.
23.36 Hand Tools - Striking Tools
Practice • Striking tools may be cold chisels, punches or drift pins. • Hold the chisel, for shearing and chipping, at an angle allowing the level of the
cutting edge to lie flat against the shearing plane. • Punch and chisel holders are available to prevent accidentally striking the holding
hand.
HEALTH & SAFETY PROGRAM
Section 23 – Safe Work Practices Page 35 of 62
__ __
• Discard tools, which are bent, cracked, or chipped. • Redress burred or mushroomed heads. • Redress the cutting edge to its original shape. Grind to a slightly convex cutting
edge. • Avoid the following unsafe practices:
o Applying too much pressure to the head when grinding a chisel (the heat generated can remove the temper; immerse the chisel in cold water periodically when grinding)
o Using cold chisels for cutting or splitting stone or concrete o Using a chisel as a drift pin or punch o Holding a chisel while someone else strikes it (use tongs or holder)
• Wear eye protection when striking a chisel, punch, or drift pin.
23.37 Hand Tools - Vises
Practice
• Attach a vise securely. Place bolts in all the holes in the base of the vise. Use lock washers under the nuts.
• If the jaw of the vise projects slightly beyond the edge of the workbench, long work can be accommodated.
• Keep the work as close as possible to the jaws to reduce vibration. • Support long work rather than putting extra strain on the vise. • Clean and oil all moving parts. • Use jaw liners if the work may be damaged or marred. • Avoid these unsafe practices:
o Cutting into the jaws o Using a handle extension for extra leverage o Using the jaws as an anvil o Hammering to tighten the handle o Welding or brazing a vise
• Use eye protection suitable to the hazard.
23.38 Hand Tools - Pipe Tools
Practice
• Select a pipe wrench with sufficient capacity and leverage to do the job safely. • Use a pipe wrench to turn or hold a pipe. Using a pipe wrench to bend or lift a pipe
shortens its useful life. • Take the bite of a pipe wrench near the middle of the jaws. • Adjust the wrench grip to maintain a gap between the back of the hook jaw and the
pipe. This concentrates the pressure at the jaw teeth, producing the maximum gripping force.
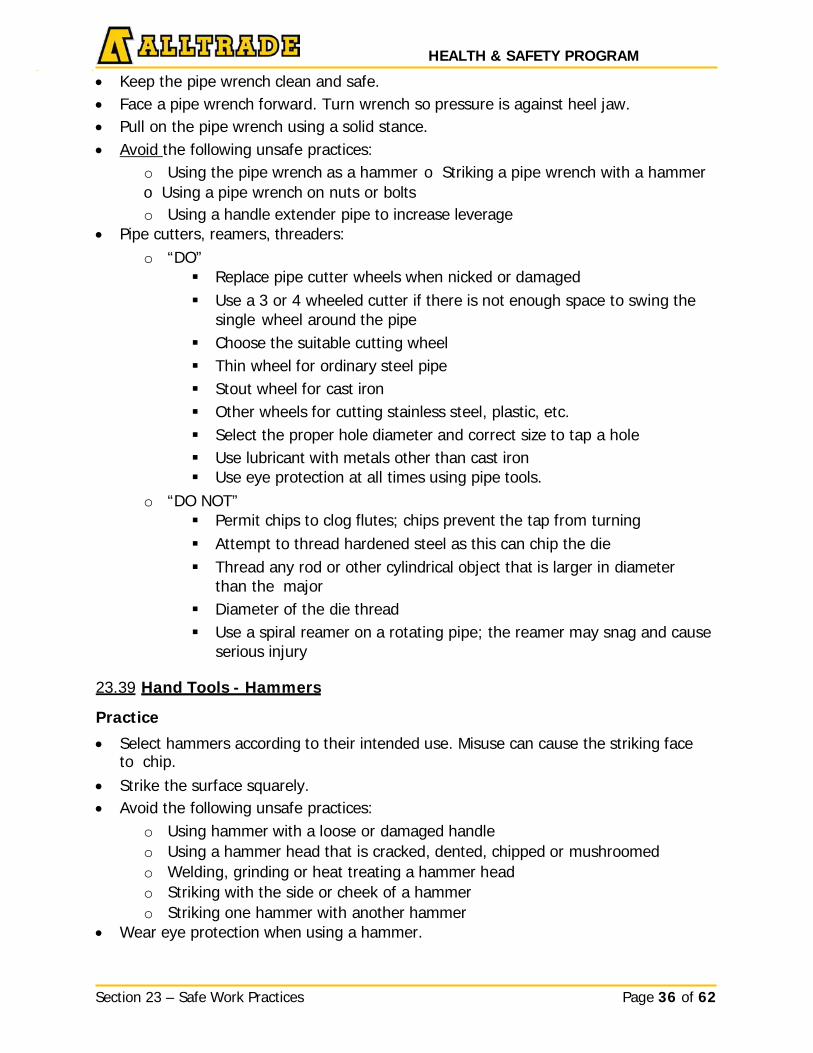
HEALTH & SAFETY PROGRAM
Section 23 – Safe Work Practices Page 36 of 62
__ __
• Keep the pipe wrench clean and safe. • Face a pipe wrench forward. Turn wrench so pressure is against heel jaw. • Pull on the pipe wrench using a solid stance. • Avoid the following unsafe practices:
o Using the pipe wrench as a hammer o Striking a pipe wrench with a hammer o Using a pipe wrench on nuts or bolts o Using a handle extender pipe to increase leverage
• Pipe cutters, reamers, threaders: o “DO”
Replace pipe cutter wheels when nicked or damaged Use a 3 or 4 wheeled cutter if there is not enough space to swing the
single wheel around the pipe Choose the suitable cutting wheel Thin wheel for ordinary steel pipe Stout wheel for cast iron Other wheels for cutting stainless steel, plastic, etc. Select the proper hole diameter and correct size to tap a hole Use lubricant with metals other than cast iron Use eye protection at all times using pipe tools.
o “DO NOT” Permit chips to clog flutes; chips prevent the tap from turning Attempt to thread hardened steel as this can chip the die Thread any rod or other cylindrical object that is larger in diameter
than the major Diameter of the die thread Use a spiral reamer on a rotating pipe; the reamer may snag and cause
serious injury 23.39 Hand Tools - Hammers
Practice
• Select hammers according to their intended use. Misuse can cause the striking face to chip.
• Strike the surface squarely. • Avoid the following unsafe practices:
o Using hammer with a loose or damaged handle o Using a hammer head that is cracked, dented, chipped or mushroomed o Welding, grinding or heat treating a hammer head o Striking with the side or cheek of a hammer o Striking one hammer with another hammer
• Wear eye protection when using a hammer.

HEALTH & SAFETY PROGRAM
Section 23 – Safe Work Practices Page 37 of 62
__ __
23.40 Powered Hand Tools – Basic Electrical Safety
Standard All electrical extension or power cords shall be maintained in good condition and grounded effectively.
Practice • Workers shall inspect for the following defects. Unsafe electrical tools and equipment
shall be taken out of service for repair or replacement. • All electrical extension or power supply cords must be approved for intended use and
location. • All electrical extension or power supply cords must be provided with grounding
conductor Light duty cords are not permitted. Replace with heavy duty power cords. • Power cords should not be tied in knots, which can cause short circuits. • Worn or damaged outer jackets shall be removed from service. • All electrical extension and power supply cords are to be fitted with approved cord
end attachment devices that are installed in an approved manner. • Eliminate "octopus" connections. • Broken three prong plugs shall be replaced. Check that the third prong is properly
grounded. • Ensure all electrical extension or power supply cords are maintained and protected
from physical or mechanical damage; keep power cords out of water and protect them from cutting due to traffic passing over by using conduit or placing planks alongside them.
• At temporary service panels, a tie bar is recommended so that cords will not be damaged when pulled out from a distance.
• With all electrical appliances or tools, disconnect from the power source prior to making adjustments.
• All tools are to be double insulated; the power cord must provide effective grounding.
• Switches should not be bypassed by connecting and disconnecting the power cord. • Test tools regularly for grounding with a continuity tester. • Suspend power cords where practical. This eliminates trip hazards etc. • Do not clean electric tools with flammable or toxic solvents. • Use a ground fault circuit interrupter (GFCI) outdoor or in wet locations. • Do not carry tools by the power cord. Damage could result. • Agents such as heat, water, oil, and chemicals can damage the insulation on cords
and tools. • Do not wear loose clothing, or jewelry while using revolving power tools. • When a tool or cord is defective, tag the item as such prior to sending it into the tool
crib for repair. If repairs are not possible on site, take the item out of service. • An approved ground fault circuit interrupter (GFCI) is to be used with any portable
generator. The GFCI must be plugged in as close to the tool as possible.
HEALTH & SAFETY PROGRAM
Section 23 – Safe Work Practices Page 38 of 62
_ _
NOTE: A GFCI and a Reset switch are not the same. A ground fault circuit interrupter will shut down power supply when stray current is detected from a faulty cord or tool. A reset switch only detects power surges.
23.41 Powered Hand Tools – Drills
Standard All workers involved in the use of electric drills shall be familiar with their characteristics and the necessary safety precautions.
Practice
• Safety glasses are required. When drilling overhead, tight fitting goggles are
required. • Keep drill vents clear to maintain adequate ventilation. • Use sharp drill bits. • Keep cords clear of the cutting area. • Disconnect power supply prior to changing or adjusting bit or attachments. • Tighten the chuck securely and remove the chuck key before starting drill. • Some things to avoid:
o Bent drill bits o Exceeding manufacturer's capacities o High speed steel (HSS) without cooling or lubricant o Reaching under stock being drilled o Use auxiliary handle for larger work or continuous operation.
• For continuous work in concrete or wood use appropriate respiratory protection. • The circular or rotating motion (torque) in tools such as drills can be transferred to
your hands if the bit becomes lodged in the work. Severe strains have resulted from sudden twists.
• The power switch or trigger should be "fail safe" so that it cannot be locked on. • Use a tool to clean up or debar. Many hand and finger injuries result from the
temptation to sweep away cuttings without skin protection. • Use a vise or clamp to hold small work. • Inspect tool at least daily before startup. Look for loose or damaged parts, adequate
lighting, lubrication, and material that could vibrate into your work area.
23.42 Powered Hand Tools – Circular Saws
Standard All workers involved in the use of circular saws shall be familiar with their characteristics and the necessary safety precautions.
HEALTH & SAFETY PROGRAM
Section 23 – Safe Work Practices Page 39 of 62
__ __
Practice • When using "skill saws" the following eye protection shall be used:
o Safety glasses or
o Tight fitting goggles • In confined areas (i.e. indoors), a nuisance dust mask shall be worn. • Use a sharp blade designed for the work. • Check the retracting lower blade guard frequently to make sure it works freely. • Allow saw to attain full speed prior to cutting. • Allow retracting lower blade guard to return to its seat before laying saw down. • Disconnect power supply prior to making adjustments or changing a blade. • Keep all cords clear of cutting area. • For safety, use two hands to control the saw; one on trigger switch and the other on
front knob handle. • Keep motor free of sawdust and chip accumulation. • Allow the blade to cut at high speed rather than forcing it. The few seconds saved by
forcing a cut are not worth the premature wear out of the saw. • Secure the work being cut to avoid movement. • Follow all manufacturer guidelines for safe use. • Some things to avoid:
o Fixing or holding open the retracting blade guard o Placing hand below work being cut o Over tightening the blade locking nut o Twisting the saw to change direction or check cut
• Always check work to be cut for nails or foreign objects. • Do not carry the saw with your finger on the trigger and power connected. • When ripping stock, use a wedge and guide that is clamped to the work. • Store the tool in a secure area to prevent damage or theft. • Do not use a circular saw above shoulder height.
23.43 Explosive Actuated Fastening Tools
Standard Workers involved in the use of explosive actuated fastening tools shall be familiar with their characteristics and the necessary safety precautions.
Practice • Operators of explosive actuated fastening tools shall be instructed in their proper and
safe use. • This training shall be given by the manufacturer or his authorized and qualified
agent. • The qualification card shall be carried by the operator at all times the tool is used by
the operator.

HEALTH & SAFETY PROGRAM
Section 23 – Safe Work Practices Page 40 of 62
__ __
• The following protective equipment is required by the operator at all times: o Hard hat o Safety glasses and face shield o Hearing protection
• Do not permit bystanders in the immediate vicinity of the work. • Care and servicing of tools:
o CLEAN and maintain in accordance with manufacturer's instructions o CHECK tool prior to each use o REMOVE defective tools from service o STORE tools and cartridges in a locked container
• Use of tools: o Use at 90° to work surface o Check the chamber to ensure barrel is clean and free of obstruction o Do not use in presence of flammable or explosive vapors o Do not place hand in front end (muzzle) of a loaded tool
• Use of projectile: o use only studs or nails provided by manufacturer of tool o ENSURE that base material can hold the projectile o LOAD tool immediately before use o don't leave tool unattended o if base material hardness is unknown, use a hand hammer to drive the
projectile as a test • Use of charge cartridges:
o use cartridges recommended by tool manufacturer] o cartridges are colour-coded for strength o make trial fixing with weakest cartridge o HOLD the tool in fixing position at least 15 seconds when too misfires o UNLOAD misfired cartridge with extractor tool and deposit into water o do not carry unfired cartridges in pockets o do not discard unfired cartridges carelessly
23.44 Powered Hand Tools – Air Powered
Standard Workers involved in the use of air powered hand tools shall be familiar with their characteristics and the necessary safety precautions.
Practice
• Air powered tools includes: o Nailing and stapling guns o Grinders o Drills o Jack hammers
HEALTH & SAFETY PROGRAM
Section 23 – Safe Work Practices Page 41 of 62
__ __
o Chipping hammers o Riveting hammers o Impact wrenches
• Air hoses: o PREVENT tripping hazards created by hose o Hose connections must fit properly and be secured by wire or chain o Install quick disconnects of a pressure release type rather than disengage
type; attach the male connector to the tool, not the hose o CHECK regularly for cuts, bulges, abrasions; replace if defective o TURN OFF air pressure when tool not in use o BLOW OUT airline prior to use
• Air pressure rating of air supply hoses must be at least 1035 kPa (150 psi) or 150% of the maximum pressure produced in the system, whichever is higher.
• Operation: o Post warning signs and shields if others may be affected by flying chips, dust
and noise o Support heavy tools to gain safe control of tool o Exercise care to protect hands, feet and body in case tool slips o Use hearing protection as required o Use gloves to assist in reducing hand/arm vibration
• Air cleaning: o Cleaning with compressed air is dangerous o Use pressures below 207 kpa (30 psi) at nozzle o Blowing debris from clothing using compressed air is forbidden
23.45 Powered Hand Tools – Portable Grinders
Standard Workers involved in the use of portable grinders shall be familiar with their characteristics and the necessary safety precautions.
Practice
• Follow the MSDS/SDS requirements when handling and using grinding wheels • An abrasive wheel can break, causing serious injury. • Clean and service grinders according to manufacturer's recommendations. • Grinders should not operate when unattended. "Dead man" or constant pressure
switches are required, as per manufacturer’s requirement. Grinders without trigger locks should be purchased when buying new equipment. Grinders manufactured with trigger locks should have locking devices removed by a competent person
• The following protection is required at all times when using a grinder: o Shielded safety glasses and face shield o Or tight fitting goggles
HEALTH & SAFETY PROGRAM
Section 23 – Safe Work Practices Page 42 of 62
__ __
o Metatarsal safety boots are advisable o Respiratory protection is advisable
• Wheel speed is related to safety. Excessive speeds cause vibration, rough operation, wheel breakup, and difficulty in controlling the tool.
• Run newly mounted wheels for one minute before grinding. • Inspect all wheels for cracks and defects prior to mounting. • Store grinders in a safe area • Do not grind near flammable materials. • Do not clamp portable grinders in a vise for grinding handheld work. • Do not force wheels onto a grinder or change mounting hole sizes. • Do not remove guards or handle. • Use appropriate disk size and RPM rating for grinder as per manufacturer guidelines. 23.46 Powered Hand Tools – Bench and Pedestal Grinders
Standard Workers involved in the use of bench and pedestal grinders shall be familiar with their characteristics and the necessary safety precautions.
Practice Supervisor shall discuss the following in crew safety meetings:
• Fasten bench and pedestal grinders securely. • Adjust tool rests to within 3 mm (1/8") of wheels when wheel is not moving. • Maintain 6 mm (¼ ") wheel exposure with a tongue guard or a movable guard. • Stand to one side of the grinder until operating speed is reached. • Bring work into contact with the grinding wheel slowly and smoothly avoid bumping. • Apply gradual pressure to allow the wheel to warm up slowly and evenly. • To prevent grooving, move the work back and forth across the wheel. • Match the abrasive quality of the wheel to the work. • Dress wheels regularly. Do frequent light dressings rather than heavy dressings. • Support dressing tool to apply leverage without undue effort. With revolving cutter
dressing tools, use the lugs as anchors. • Replace worn wheels when they cannot be dressed. • Operating speeds relate to safety. • Visually inspect wheels for possible damage prior to mounting. • Always wear eye and face protection when grinding.
Note: • Only use grinding wheels as per the manufacturers intended use • Do not use a wheel that has been dropped
HEALTH & SAFETY PROGRAM
Section 23 – Safe Work Practices Page 43 of 62
__ __
23.47 Wheel Mounting of Grinders
Standard Workers required to install wheels on portable grinders shall be trained by the supervisor in the correct and safe application of the tool.
Practice • Inspect the wheel and conduct a "ring test" prior to installation. "Ring test" means
listening for a ringing sound when the wheel is suspended from hole by pin or finger and tapped gently with a non-metallic tool (i.e. screw driver handle).
• "Ring test" does not apply to small wheels i.e. wheels less than 10 cm (4”) in diameter.
• Do not use wheels that sound dead or cracked. • Select wheels according to manufacturer's recommendation. • All abrasive wheels are fragile.
o Things to avoid: Dropping a wheel Piling other material on top of a wheel Transporting without protective padding
• Storage recommendations: o Store on edge in racks o Keep wheels away from excessive heat o Keep dry o Stack cylinder and straight cup wheels on the flat side on cardboard
23.48 Blasting (Abrasive)
Standard Workers involved in the use of abrasive blasting equipment shall be familiar with its characteristics and the necessary safety precautions.
Note: Silica products to be substituted whenever possible, consult EHS Department. Practice • Abrasive blast cleaning uses granular material to clean a surface. • Granules are pulverized releasing potential hazardous material into the air. • Blasting painted surfaces containing lead and z primer may release hazardous z
and/or chromates in respirable dust form. • To control the hazardous dust, several options are available:
o Local exhaust ventilation o Non-silica bearing blasting agents o Dust suppression using water mist o Rotate work assignments to reduce exposure o Respiratory protective equipment
HEALTH & SAFETY PROGRAM
Section 23 – Safe Work Practices Page 44 of 62
__ __
• Use the following protective equipment or as per directed by the manufacturer.Consult the EHS Department:
o Abrasive blasting hood with continuous airline respiratorso Leather jacket and trouserso Protective gloves with gauntletso CSA / OSHA approved safety bootso Ear plugs
• Blast machine shall be equipped with a remote control (dead man switch) that willenable the operator to shut off the machine at the nozzle.
23.49 Lead Acid Batteries – Boosting
Standard Workers involved in the boosting of lead acid batteries shall be familiar with their characteristics and the necessary safety precautions.
Practice
• The chemical reaction in lead acid batteries produces hydrogen gas, which is themost explosive gas known.
• To prevent the possibility of a spark when boosting, follow this practice:o Connect booster cable to positive terminal of dead batteryo Connect same booster cable to positive terminal of live battery o Connect otherbooster cable to negative terminal of live battery o Connect last clamp to metallic ground below dead battery
• Do not attempt to boost a frozen battery.• Always wear safety glasses and a face shield when boosting batteries.
23.50 WHMIS 2015
Purpose In order to maintain a safe and healthy workplace, exposure to hazardous materials that may cause injury or illness must be controlled when introduced into the workplace and proper information conveyed to workers about the safe handling, use and storage of such products, by use of the Global Harmonized System now referred to as WHMIS 2015 (previously known as WHMIS 1988).
Responsibilities
Managers Managers are responsible to ensure that all hazardous materials in the workplace are identified and that MSDS/SDS and supplier or workplace labels are available; and that all employees receive training enabling them to understand and apply the WHMIS 2015. Such training will be kept up-to-date and training will be conducted annually.
Section 23 – Safe Work Practices Page 45 of 62
HEALTH & SAFETY PROGRAM
Supervisors Supervisors are responsible for ensuring that MSDS/SDS are available for all hazardous products in the workplace, that supplier or workplace labels are affixed to containers of all hazardous materials, and that the required information on safe handling, use and storage of these products is available to and understood by all workers.
All Employees All employees are responsible for carrying-out control procedure requirements applicable to their work. All employees who receive instruction and training under this directive are responsible for complying with and protecting their health and safety, and the health and safety of others.
Information These procedures are to ensure that all workers who work with or who may be exposed to hazardous materials will be provided with instruction and training about the safe handling, use and storage of these products; and that all hazardous materials present in the workplace will be identified, and that unexpired Safety Data Sheets SDS will be available and supplier or workplace labels will be affixed to the containers of these products.
Procedures
1.0 Identification of Hazardous Materials All hazardous materials (as defined by Ont. Reg. 860– Workplace Hazardous Materials Information System – WHMIS) introduced, present, used or stored at the workplace shall be identified by the supervisor and an unexpired SDS must be available.
2.1 Labels and Safety Data Sheets (SDS) 2.2 Safety Data Sheets (SDS) - Are provided by manufacturers and/or suppliers of hazardous materials to individual workplaces and must be available to employers.
2.3 Supplier Labels - Are affixed on containers of controlled products that are shipped from manufacturers or suppliers to individual workplaces. These labels are affixed by the supplier/manufacturer.
2.4 3 Workplace Labels - Are required in the workplace once materials are removed from the supplier container and decanted into workplace containers. Any worker who decants a hazardous product must ensure that a workplace label is affixed onto the container. The information must be clearly and prominently displayed and must contain the following information:
o Product identifiero Hazard information/safe handling instructionso Reference to the SDS

Section 23 – Safe Work Practices Page 46 of 62
HEALTH & SAFETY PROGRAM
- Supervisors will ensure that no hazardous material shall be introduced, present, used or stored in the workplace unless the supplier or workplace label is affixed to the container of the controlled product and an unexpired SDS is available in the workplace. - Supervisors will ensure that the book of SDS is placed in a central location and available to all workers. SDS may be available in an electronic format
3.0 Storage All hazardous materials will be stored according to the requirements on the SDS.
4.0 Handling All workers must review the SDS to know the material they are working with, the proper handling procedure and the recommended protective equipment. Personal protective equipment must be worn as specified.
5.1 Training 5.2 1 WHMIS 2015 Training - Supervisors must ensure that all employees complete the WHMIS 2015 Training program enabling them to understand and apply the information on labels and SDS. Attendance and participation in instruction and training sessions is mandatory and will be documented.
5.3 2 Workplace Specific WHMIS 2015 Training - Supervisors will review the employee’s familiarity with WHMIS 2015 instruction and training on an annual basis. Upon completion of the course, a certificate will be issued and given. Workplace specific training must include:
o Instruction on the location of SDS in the workplace.o Review of the information contained on a SDSo Review of the information contained on a supplier and a workplace label.o Review of the requirement to affix workplace labels on decanted products.o Have workers locate several SDS for hazardous materials they work with.o Ask workers to find certain information (e.g., first-aid, protectiveequipment) on the SDS noted above.
5.4 3 WHMIS 2015 Training Evaluation/Refresher - WHMIS 2015 refresher training will be conducted every year or sooner if knowledge retention has been poor, a significant number of new products have been introduced or there have been changes to the WHMIS legislation.
6.0 Products Not Covered by WHMIS Requirements WHMIS requirements regarding identification (labeling) and SDS do not apply with respect to materials or products mentioned in clauses 4(2)(a) to (e) of WHMIS Regulation 860: - Explosives (Explosives Act); - Cosmetics, devices, drugs or food (Food and Drugs Act); - Control products (Pest Control Products Act); - Prescribed substances (Atomic Energy Control Act); or - Consumer products (packaged and labeled).
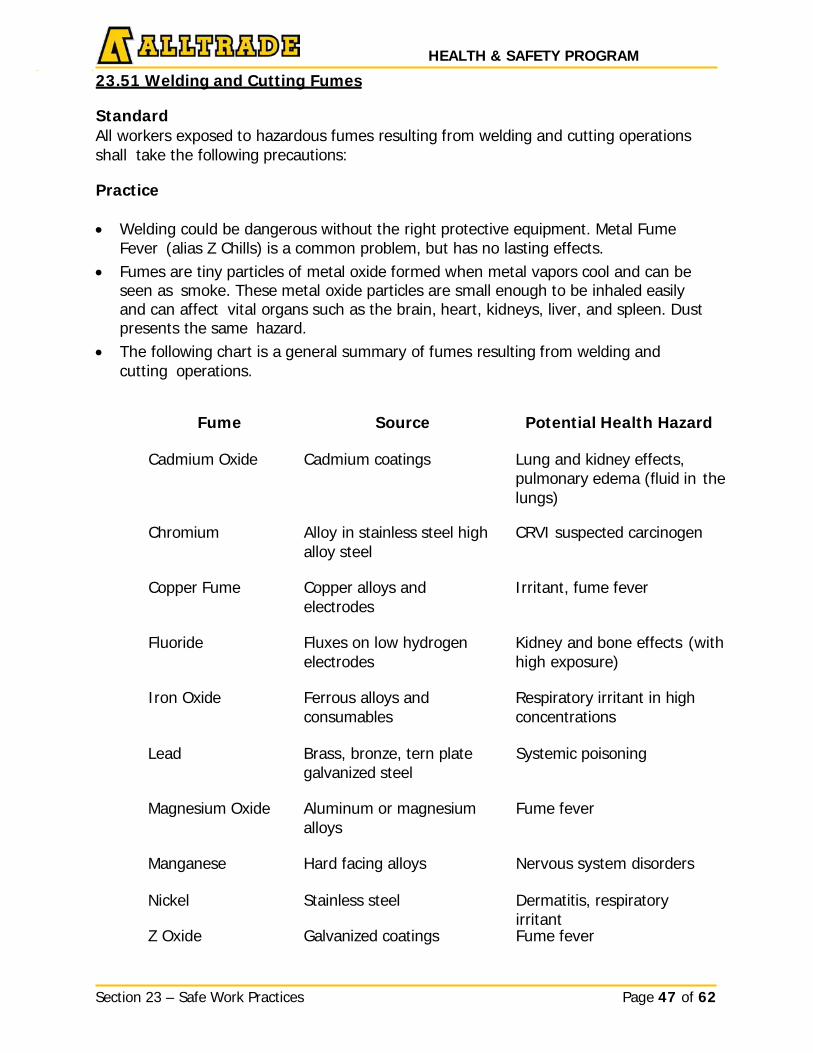
Section 23 – Safe Work Practices Page 47 of 62
HEALTH & SAFETY PROGRAM __ __
23.51 Welding and Cutting Fumes
Standard All workers exposed to hazardous fumes resulting from welding and cutting operations shall take the following precautions:
Practice
• Welding could be dangerous without the right protective equipment. Metal FumeFever (alias Z Chills) is a common problem, but has no lasting effects.
• Fumes are tiny particles of metal oxide formed when metal vapors cool and can beseen as smoke. These metal oxide particles are small enough to be inhaled easilyand can affect vital organs such as the brain, heart, kidneys, liver, and spleen. Dustpresents the same hazard.
• The following chart is a general summary of fumes resulting from welding andcutting operations.
Fume Source Potential Health Hazard
Cadmium Oxide Cadmium coatings Lung and kidney effects, pulmonary edema (fluid in the lungs)
Chromium Alloy in stainless steel high alloy steel
CRVI suspected carcinogen
Copper Fume Copper alloys and electrodes
Irritant, fume fever
Fluoride Fluxes on low hydrogen electrodes
Kidney and bone effects (with high exposure)
Iron Oxide Ferrous alloys and consumables
Respiratory irritant in high concentrations
Lead Brass, bronze, tern plate galvanized steel
Systemic poisoning
Magnesium Oxide Aluminum or magnesium alloys
Fume fever
Manganese Hard facing alloys Nervous system disorders
Nickel Stainless steel Dermatitis, respiratory irritant
Z Oxide Galvanized coatings Fume fever
Section 23 – Safe Work Practices Page 48 of 62
HEALTH & SAFETY PROGRAM __ __
• The gases of concern to welders are carbon monoxide, carbon dioxide, and oxides ofnitrogen. Ultra-violet light from the arc forms ozone and phosgene gas. Resultingconditions are irritation of the nose, throat, and lungs. Fresh air supply is needed.
• In tanks, welding operations can displace oxygen with gaseous by-products leadingto asphyxiation. Ventilation is called for.
• Using the shortest practical arc length cuts down the amount of fume and ultra-violetlight. Keeping the electrode and work as close as possible to 90 degrees reducesfumes considerably.
• A general principle for health protection points to the installation of ventilation andfume extraction equipment. Diluting contaminants to safe levels is the next efficientmeans of control.
• If the measures in #7 above are not possible, the welder should use a NIOSHapproved respirator.
• In the case of oxygen deficient atmospheres or toxic elements inside a tank, largepipeline, or other enclosed space, self-contained breathing equipment will beneeded.
23.52 Internal Combustion Engines – Fumes
Standard When internal combustion engines are located in a sheltered or enclosed area, there is always the possibility of fume and gas exposure in the workplace.
Practice
• Fumes caused by internal combustion are:o Carbon monoxide – deadly in high concentrationso Carbon dioxide – displaces oxygen in poorly ventilated areaso Hydrocarbons – irritants
• Most of the fumes from internal combustion rise and accumulate against the top orceiling of the enclosure.
• If the odour of internal combustion is noticeable, it should be reported to thesupervisor.
• Carbon monoxide poisoning has these symptoms:o Headacheso Tightness across the forehead and templeso Weariness, weakness, dizzinesso Nauseao Loss of muscular controlo Watering, stinging eyes
If any of these symptoms develop, get fresh air immediately.
Section 23 – Safe Work Practices Page 49 of 62
HEALTH & SAFETY PROGRAM __ __
23.53 Internal Combustion Engines – Ventilation
Standard When internal combustion engines are exhausted into a confined work area, the supervisor shall ensure that air quality is maintained at a healthy level.
Practice In order of priority, the supervisor shall take these precautions when internal combustion engine fumes accumulate in the work area:
• Fit a non-flammable flexible hose to the exhaust pipe of the engine taking fumes wellaway from the work area, preferably outdoors.
• Provide fans to dilute the exhaust fumes.• Conduct emissions test prior to use in enclosure.• Emission controls (scrubbers) are required on diesel powered equipment in enclosed
areas.
23.54 Portable Generator
Standard All portable generators shall be used so as not to pose an electrical, atmospheric, or explosion hazard.
Practice
• Inspect portable generators for damage or loose fuel lines that may occur duringtransportation.
• Only run generator in well ventilated area. Be aware of wind direction so that fumesare blown away from work area.
• Use ground fault circuit interrupters (GFCI) when using a generator• Never hook generators directly to the electrical system of a structure without a
transfer switch.• Before refueling shut the generator down and let it cool.• Never use a generator indoors.
Potential Injuries/incidents • Shocks from electrocution• Carbon monoxide poisoning from generators exhaust• Fires from fueling
Carbon Monoxide Hazards (CO)
Generator exhaust can very quickly produce high lives of CO fumes. Humans cannot smell or see CO, so you may be exposed without even realizing it. If you start to feel sick, dizzy, or weak while using a generator, get fresh air immediately - those symptoms are signs that you have inhaled high levels of CO fumes.

HEALTH & SAFETY PROGRAM
Section 23 – Safe Work Practices Page 50 of 62
_ _
The CO from generators can rapidly lead to full incapacitation and even death. If you experience serious symptoms, seek medical attention immediately and inform supervisor that CO poisoning is suspected.
23.55 Housekeeping
Standard Work surfaces shall be free of scrap and debris so tripping hazards can be eliminated. Improper storage of materials and cluttered work areas are not safe. To maintain a clean hazard free workplace, all s – management, supervision, and workers must co- operate.
Housekeeping Requirements
• Daily jobsite clean-up program• Disposal of rubbish• Individual clean-up duties for all workers• Materials piled, stacked, or otherwise stored not to permit tipping and/or collapsing• Materials stored away from overhead power lines• Work areas and access/egress routes must be kept tidy, well lit, and ventilated• Signs posted to warn workers of hazardous areas• 3 R’s• Coordinating with site owner, constructor/prime contractor for existing waste
management programs for disposal of waste or scrap material.
Practice
• Clear access/egress routes and work areas• Reusable material to be removed to a safe storage area,• Adequate illumination, and clean-up of debris• Keep stairs and landings clear and well lit• Provide warning signs• Secure material against the wind. After removing material, re-secure pile• Gather up and remove debris as often as required to keep work areas and
access/egress routes orderly• Keep equipment and the areas surrounding equipment clear of scrap and waste• Keep stairways, passageways and gangway free of materials, supplies and
obstructions at all times• Secure loose or light material stored on roof or on open floors to prevent blowing by
wind• Pick-up, store, or dispose of tools, materials or debris which may cause tripping or
other hazards
HEALTH & SAFETY PROGRAM
Section 23 – Safe Work Practices Page 51 of 62
__ __
• Before handling used lumber, remove or bend over protruding nails and chip awayhardened concrete
• Wear appropriate Personal Protective Equipment for the task• Do not permit rubbish to fall freely from any level of the project. Lower by means of
chute or other approved devices• All sub-trades are responsible for and are require to ensure that proper
housekeeping is maintained in the workplace
23.56 Illumination/Task Lighting
Standard Accidents can be attributed to poor lighting. Illumination in work areas shall be adequate for the task at hand.
Practice
• Poor quality illumination causing direct glare, reflected glare, dark shadows, and eyestrain should be a prime concern.
• Accidents are known to result from delayed eye adaptation when coming from brightsurroundings into dark areas. Keep doorways and other entries clear of trippinghazards that are momentarily invisible upon entry.
• Smoke, steam and other substances in the air should be ventilated to allow propervisibility.
• Where the possibility of sudden darkness due to power interruption exists, thesupervisor shall provide portable lights to permit safe egress from the work area.
• Temporary lights shall be fitted with bulb guards to prevent accidental breakage.• Florescent light tubes shall be stored in protective sleeves.• Always turn off lights prior to changing bulbs or tubes. Sudden surge of power while
inserting bulbs or tubes can, and has caused explosive results.• When using string lighting ensure all broken or missing bulbs are replaced to prevent
electrical hazards.
23.57 Floor Openings and Guarding for Falling Material
Standard Floor openings shall be identified and guarded. Guard for potential falling material.
Practice
• Floor holes from 25 mm to 300 mm (1" to 12") through which materials, but notpersons may fall shall be securely covered.
• Floor openings larger than 300 mm (12") through which materials and persons mayfall, shall be securely covered and marked “DANGER OPEN HOLE”.
• Acceptable floor opening covers are:o If in roadways, strong enough to support vehicular axles
HEALTH & SAFETY PROGRAM
Section 23 – Safe Work Practices Page 52 of 62
__ __
o If in aisles where workers walk shall not project more than 2.5 cm (1") abovethe walking surface
o Shall not be accidentally displaced• Stairway and ladder way floor openings shall be protected by a standard railing i.e.
1.1 m (42") high with a mid-rail and capable of resisting a lateral force of 200pounds.
• Guardrails consisting of a top rail 1.1 m (42”), mid rail, and toe board are to beprovided at the perimeter, open sides and ends of:
o Floor including the floor of a mezzanineo The surface of a bridgeo A concrete roof while the formwork remains in placeo A scaffold platform, work platform, runway, or ramp.
23.58 Wall Openings
Standard Wall openings shall be guarded to prevent accidental falls.
Practice
• Wall openings above or adjacent to dangerous equipment, chemical or acid tanks,degreasing units, and similar hazards shall be guarded with a guardrail using a toprail and mid rail and capable of resisting a lateral force of 200 pounds).
• Open-sided floors, platforms, or edges allowing a fall of 1.4 m (4’) shall be closedwith standard railings (unless covered by Section 1 above).
• Stair sets having four or more risers shall have standard railings.• Window wall openings, where the bottom of the opening is less than 900 mm (3’)
from the floor, require standard guardrails.• When guarding wall openings, standard railing may be replaced by grill work with
openings not more than 200 mm (8”), ONLY if a lateral force of 200 lbs can beresisted.
• Wall openings shall be protected with a standard railing, if they are 1 m (3’) high orless, and 450 mm (1.5’) or more wide.
23.59 Roofs
Standard Roofers and other workers shall be protected from falling.
Practice
• To warn workers when approaching the perimeter of an unprotected roof edge, aphysical barrier of wire, rope, chain, or wood fence can be used. The barrier will beinstalled 2 meters from the roof edge.
• A person specifically trained and dedicated to alert any person to the roof edge canbe used (roof monitor) however a physical barrier as discussed above is alsorequired.
HEALTH & SAFETY PROGRAM
Section 23 – Safe Work Practices Page 53 of 62
__ __
• The warning line shall be flagged at 2 meter intervals with high visibility material.• The line shall be supported such that its lowest point including sag is not less than
91.4 cm (36”) from the roof surface and its highest point is not more than 105 cm(42”) from the roof surface.
• If barriers are not practical, a fall arrest system shall be used.• A travel restraint system can also be used restricting worker access to the perimeter.During extreme heat/cold conditions refer to Occupational Health section
23.60 Working Alone Best Practice
Best practices for Working Alone includes:
• Management’s commitment to the health and safety of their employees• Assessing the hazards of the workplace.• Taking corrective actions or measures to prevent or minimize hazards or incidents for
occurring.• Training and educating workers so they can perform their jobs effectively and safely
with the measure that have been put into place.• Investigating an incident that has been reported by worker and following through
with measures that will prevent the incident form occurring again.• Re-evaluating current safety measures on a regular basis to ensure that these
measures work, taking into account any changes in your business operations.• Workers must have a system of communication that can always reach emergency
services. This could be a cell phone, 2 way radio (if someone is constantlymonitoring the channel), land phone line, etc.
23.61 Working Alone
When working alone or when you’re the only person on site working in an isolated area out of view from other workers.
• Ensure you have a designated contact—employer, supervisor, or someone else whoknows where you are and what you’re doing.
• Communicate regularly with your designated contact• Before beginning work, identify and eliminate, or control all hazards in the work area.• Inform the site supervisor (or someone who can call for help) that you are on site
and will check out with him or her when you leave.• Make other workers aware of your presence so they can check up on you.• With your designated contact, have a plan in case of emergency.• Use the Personal Checklist for Working Alone, H&S_FORM_064.
Working alone is prohibited where the work involves: • High voltage• Toxic chemicals

HEALTH & SAFETY PROGRAM
Section 23 – Safe Work Practices Page 54 of 62
__ __
• Confined spaces• Trenches• Working over/around water• Use of aerial devices/bucket trucks• Night time calls (i.e. highway maintenance)Employees Who Travel Alone
Some of the risk to workers who travel alone involves injuries from motor vehicle incidents. The risk is greater when workers cannot communicate in remote areas or unable summon help.
Equipment and Supplies – Well maintained vehicles prevent exposing employees to unnecessary risk. Appropriate first aid and emergency supplies must be provided.
Travel Plan – The supervisor will ensure that an appropriate system to communicate with the worker’s whereabouts is put in place.
23.62 Man Basket/ Derrick Trucks
Standard Workers involved in the operation Man Basket/Derrick Trucks shall be trained in its safe and proper use.
Practice
• Arial trucks shall be operated within:o The limitations of the manufacturer’s specificationso Current legislation; ando The “Safe Limits of Approach”.
• Arial trucks shall be dielectrically tested at 12 month intervals or as permanufacturer’s/ legislative requirements.
• Arial trucks shall be visually inspected for structural, mechanical and hydraulicdefects, including holding valve checks each day prior to equipment use.Inspections shall be performed in accordance with manufacturer’s specifications andcurrent legislation, and be documented using the Bucket Truck Inspection FormH&S_FORM_065.
• The area around the man basket / truck will be cordoned off as required to ensurethe work area is well defined to identify any potential hazards and protect fromunauthorized entry.
• Workers occupying the man basket shall maintain 100% tie off secured toengineered tie off point.
An approved control descent devise shall be carried on each Arial truck.
HEALTH & SAFETY PROGRAM
Section 23 – Safe Work Practices Page 55 of 62
_ _
23.63 Man Basket (Arial) Rescue:
• In the event that the occupant of the man basket suffers injury while aloft, the manbasket (boom) may be lowered by using the overriding lower controls.
• Before attempting to lower man basket (boom) determine that the unit is notenergized.
• Upon determination that it is safe to touch, move control switch on the control panelto the lower position. At that point the ground person can lower the man basketsafely to the ground.
When a worker may be required to self-rescue from a man-basket, specific equipment will be required:
• Full body harness equipped with a frontal D ring, Type D for descent• A controlled descent device attached to a rope specified for descent that extends to
the ground• Attachment hardware to attach full body harness to the controlled descent device.
Note: You must be trained on this equipment prior to using.
23.64 Vehicles • Assigned vehicles (Vans, Pickup Trucks) will be inspected on a weekly basis
documented on the Vehicle Inspection Form, H&S_FROM_066.• Pull over to a safe location and park the vehicle prior to using the computer.• Check your blind spots.• Maintain a safe driving distance between vehicles.• Be aware that road conditions will affect stopping distance.• Be aware that fatigue, distractions, and poor visibility can affect reaction time.• Ensure all windows and the windshield is free of ice and snow prior to traveling.
23.65 Defensive Driving
Defensive driving requires that you manage visibility, time and space while driving in traffic. This can help reduce the risk of a collision. All drivers must apply this formula to prevent accidents in spite of the actions of other drivers or the presence of adverse driving conditions. A defensive driver must be able to accurately predict the outcome of traffic situations in order to apply the defense in time to prevent an accident. Once you see the hazard and decide upon a defense, you must act immediately. Never assume that the condition will clear up. The sooner you act, the more time you will have to avoid the accident.
When practicable avoid driving in adverse weather conditions. Where this is not practicable, utilize defensive driving techniques to maintain overall safety.
HEALTH & SAFETY PROGRAM
Section 23 – Safe Work Practices Page 56 of 62
__ __
Defensive driving does not come easy. We must constantly improve our skills and observations and coordination. We must go over situations in our minds and plan our defenses. Seeing the hazard, knowing the defense and acting in time will keep us safe on the road.
Drivers must constantly process information to make accurate decisions. You can do this by: • Searching the roadway and off-road areas 20 to 30 seconds ahead for information
that can help plan a path of travel.
• Identify objects or conditions ahead that could interfere with the path of travel.
Once we see the hazard and decide upon a defense, we must act immediately. Never assume that the condition will clear up. The sooner you act, the more time you will have to avoid the accident. • Focus on the road and don’t become distracted by scenery or phones.• Keep a safe distance from other vehicles• Check your rear view mirror whenever slowing down and check your blind spot
before passing.• Stay within speed limit requirements, and adjust your speed for weather conditions.• Pay attention to signs such as speed limit, curves, bridge ahead, etc.
Other best practices for planning your trip safely includes: • Planning your travel route:
o Consider all stopping points when planning your route to minimize travel timeif practical
o Be aware of daylight and nightfall times to maximize daytime travel if practicalo Utilize maps or GPS as necessary to be familiar with the planned travel routeo If travelling long distances in a vehicle, ensure appropriate emergency kit
materials are availableo Make available a reliable means of communication in the event of an
emergencyo Advise others of your planned travel routeo Plan breaks and rest accordingly to avoid fatigue
23.66 Winter Driving
Perhaps the deadliest danger of all is "black ice." Black ice is ice which forms on a roadway, usually due to snow melting and re-freezing. Se it is almost invisible, drivers fail to recognize black ice conditions and may drive at normal speeds-often resulting in very serious accidents. Always be alert to the possibility of black ice when temperatures are near or below freezing. Pavement that looks dry but appears darker in color and dull-looking should alert you to the presence of black ice.
Failing to allow enough time to stop is a major cause of winter driving accidents. During slippery conditions stopping distances can triple.

HEALTH & SAFETY PROGRAM
Section 23 – Safe Work Practices Page 57 of 62
__ __
• Driving at a slower speed• Anticipating stops at traffic lights and intersections,• Applying brakes sooner than normal will help ensure accident-free stops. When
braking, brake carefully with short, rapid application of the brakes. Always allowplenty of extra space between you and other vehicles to minimize the need for quickstops.
Acceleration, turning, and passing also present dangers during winter. • Accelerate slowly to avoid loss of traction and subsequent loss of control• Turn slowly, with caution, to avoid sliding into a stationary object or the path of an
oncoming vehicle.
• Avoid sudden movements. Pass with care because passing lanes are not maintainedas well as driving lanes.
• Leave extra space between yourself and other vehicles so there's room to maneuverin case something goes wrong.
• During a skid, steer cautiously turn in the direction you want the car to go.
Here are some other tips you should remember for driving safely in winter: • Always use your seatbelt.• Turn on your headlights during adverse weather conditions. Overcast skies and
falling snow limit visibility. It is important to see and be seen.• Like all the signs say, bridges and overpasses freeze before the roadway. Use extra
caution on these.• Remember that driving in winter weather conditions causes physical and mental
fatigue and reduces reaction times. Get plenty of rest and adequate nutrition. Don'tdrive while you're sleepy or on medication that causes drowsiness.
• Prepare your vehicle well ahead of time. Check fluid levels, tire pressure, lights etc.as per the trip inspection. Failing to do proper trip inspections can and has led toaccidents.
• Avoid using your cell phone while driving. Distractions will reduce your responsetime.
23.67 Vehicles/ Cell Phone Usage
Safe Work Practices
Employees are prohibited from being distracted while driving, including eating, reading, and using electronic devices. To that end, employees are required to use a “hands-free” kit for use of a cellular phone or other mobile device while driving. The use of electronic devices for sending or checking email while driving is strictly prohibited by this policy and, in many jurisdictions, by applicable law.
Drive Defensively Not Aggressively
HEALTH & SAFETY PROGRAM
Section 23 – Safe Work Practices Page 58 of 62
__ __
23.68 Concrete / Asphalt Saw
Practice
• When ordering parts always includes model and serial number of unit.• Strictly follow the maximum RPM instructions for the type of blade you are using.• Safety guard must be in place – never change the size of guard and/or blade without
changing the belt drive on the machine – they are matched.• Do not use in flammable areas (sparks).• Use only in well-ventilated areas.• Keep all body parts away from moving parts and/or blade – no loose clothing.• Wear appropriate PPE (goggles, dust mask, hearing protection, hard hat and safety
boots).• Never leave a running machine unattended.• Never get in front of the direction of travel of the machine.• Never operate the machine alone.• Always check the lifting frame before lifting.• Check blade shaft RPM and match to type of blade being used.• Do not use damaged blades.• Inspect blades twice daily for wear and cracks and/or arbor damage.• Do not stand in line with the blade (flying debris).• Never twist or grind with a blade.• Use a blade shaft locking pin or backup wrench when changing blades. Refer to
Operator’s Manual Do’s and Don’ts
23.69 Cleaning Solvents and Flammable Materials
Cleaning solvents are used in day-to-day construction work to clean tools and equipment. Special care must be taken to protect the worker from hazards, which may be created from the use of these liquids. Wherever possible, solvents should be nonflammable and nontoxic.
The foreman must be aware of all solvents/flammables that are used on the job, and be sure that all workers who use these materials have been instructed in their proper use and any hazard they pose.
The following instructions or rules apply when solvents/flammables are used:
• Use non-flammable solvents for general cleaning.• When flammable liquids are used, make sure that no hot work is permitted in the
area.• Store flammables and solvents in special storage areas.

HEALTH & SAFETY PROGRAM
Section 23 – Safe Work Practices Page 59 of 62
__ __
• Check toxic hazards of all solvents before use (MSDS/SDS).• Provide adequate ventilation where all solvents and flammables are being used.• Use goggles or face shields to protect the face and eyes from splashes or sprays.• Use rubber gloves to protect the hands.• Wear protective clothing to prevent contamination of worker’s clothes.• When breathing hazards exist, use the appropriate respiratory protection.• Never leave solvents in open tubs or vats – return them to storage drums or tanks.• Ensure that proper containers are used for transportation, storage and field use of
solvents/flammables.• When transferring flammable substances between containers make sure the
containers are electrically bonded or grounded.• Where solvents are controlled products, ensure all employees using or in the vicinity
of use or storage area are trained and certified in the Workplace Hazardous MaterialsInformation System. Ensure all WHMIS requirements are met.
For further information see the appropriate current Occupational Health and Safety Regulation
23.70 Safe Disposal of Paint Cans Used for Daily Work Activities
• All empty spray paint cans will be placed back into the original box upside down.• Boxes will be stored at the respective yards. Once an amount has accumulated, an
outside agency will dispose of the paint cans safely.• Do not throw away spray paint cans. These cans will be recycled.
23.71 All-Terrain Vehicle (ATV, Gator) Safety
Standard
All Alltrade workers that operate an ATV must be familiar with the manufacture specifications of that ATV and any applicable legislation for the region where it will be used.
Operating an all-terrain vehicle within its limitations is essential. It's also important to be aware of the laws that apply when and where you may operate any ATV. Riding responsibly is important to your safety, your co-workers and the public.
Practice
• Read your owner's manual and follow all of its instructions and warnings.• Follow your ATV's warning labels.• Hard hats, safety glasses and any other construction PPE must be worn while
operating the equipment.• All riders are required to wear a seat belt if the vehicle comes equipped.

HEALTH & SAFETY PROGRAM
Section 23 – Safe Work Practices Page 60 of 62
__ __
• Ensure you are familiar with the vehicle and practice safe riding techniques at alltimes.
• Inspect the ATV before riding, as advised in the owner's manual (for example, checkyour tire pressure).
• Operate the ATV at reduced speeds on any project.• Use proper riding techniques to avoid losing control on hills, rough terrain and in
turns. Keep legs and arms inside.• Avoid paved surfaces whenever possible – pavement may seriously affect handling
and control.• It's preferred that any ATV (Gator) be equipped with roll over protection whenever
possible• If the ATV is designed for two or more riders, be aware of the following:
o The ATV will handle differently (cornering, braking, acceleration) compared toriding alone.
o Reduce speed and use extra caution.o Ask your passenger to get off and walk if conditions require
NEVER: • Operate an ATV that you are not familiar with or comfortable driving.• Operate or be a passenger on an ATV while under the influence of drugs or alcohol.• Drive too fast for your skills or the driving conditions.• Carry a passenger, unless your ATV was built for two people.• Overload your ATV beyond its maximum weight capacity.
23.72 Bear Awareness
For starters, you need to know that bear attacks in the wild are extremely rare. So take a deep breath and relax. Better? But there are some bear safety tips you can take away that will make you feel more relaxed and minimize your risk when you are traveling in areas that are home to bears.
Know Your Bears
Can you tell the difference between a black bear and a grizzly bear? Check out the main differences so you know what you're dealing with.
Grizzly Bear • Color: Range in color from black to light blonde. Mostly medium to dark brown in
color. The long hair usually have a lighter tip, hence they look "grizzled".

HEALTH & SAFETY PROGRAM
Section 23 – Safe Work Practices Page 61 of 62
__ __
• Size: Average 350-500 lbs. Larger grizzlies can reach 800 lbs!• Height: Stand around 3.3 ft; 6.5 ft at shoulder.• Shape: Look for a distinct shoulder hump.• Face: There's a depression between the eyes and end of nose, and they have short,
round ears.• Claws: Very long (2-4 in)• Prints: Minimal arc in toes, toe imprints are close together, and the claw leave long,
visible marks.Black Bear • Color: Range in color from black to light blonde. Many black bears have a lighter
patch on their chest, and reddish-colored bears are common in the west. • Size: Average 110-300 lbs. Large males can reach 400 lbs and be larger than a
grizzly.• Height: A little smaller, from 2.5-3 ft at shoulder. Around 5 ft standing.• Shape: No hump like the grizzly.• Face: A straight line runs between the forehead and end of nose. They have larger,
pointed ears.• Claws: Shorter (around 1.5 in)• Prints: Look for a large toe arc, toe imprints will be farther apart, and the claws
usually don't leave an impression
Campground and Picnic Area Precautions • Never cook or store food in or near your tent.• Hang food and other items with strong odors (i.e. toothpaste, bug repellent, soap,
etc.) out of reach of bears. Hang items at least 10ft above the ground and. If no treesare available, store your food in airtight or bear-proof containers.
• Change your clothing before you go to sleep; don't wear what you cooked in to go tobed and be sure to store smelly clothing along with your food/smelly items.
• Keep the area clean. Be sure to wash dishes, dispose of garbage, and wipe downtables.
• Burn garbage completely in a hot fire and pack trash out - don't bury it.
Backcountry and Trail Precautions • Don't surprise bears. If you're hiking, make your presence known. Make noise by
talking loudly, singing, or wearing a bell. • Keep in mind that bears tend to be more active at dawn and dusk so plan your hikes
accordingly.• Stay on marked trails and obey the regulations of the area you're hiking/camping in.• If you're hiking in bear country, keep an eye out for tracks, scat, digs, and trees that
bears have rubbed.• Leave your dog at home!
HEALTH & SAFETY PROGRAM
Section 23 – Safe Work Practices Page 62 of 62
__ __
If You Encounter a Bear • Remain calm and avoid sudden movements.• Give the bear plenty of room, allowing it to continue its activities undisturbed. If it
changes its behavior, you're too close, so back away.• If you see a bear but the bear doesn't see you, detour quickly and quietly.• If a bear spots you, try to get its attention while it is still farther away. You want it to
know you're human so talk in a normal voice and waive your arms.• Remember that a standing bear is not always a sign of aggression. Many times,
bears will stand to get a better view.• Throw something onto the ground (like your camera) if the bear pursues you, as it
may be distracted by this and allow you to escape.• Never feed or throw food to a bear.
If a Bear Charges • Remember that many bears charge as a bluff. They may run, then veer off or stop
abruptly. Stand your ground until the bear stops, then slowly back away. • Never run from a bear! They will chase you and bears can run faster than 30 mph.• Don't run towards or climb a tree. Black bears and some grizzlies can climb trees,
and many bear will be provoked to chase you if they see you climbing.• If you have pepper spray, be sure that you have trained with it before using it during
an attack.
HEALTH & SAFETY PROGRAM _ _
Section 24 – Safe Work Procedures Page 1 of 53
Title: Safe Work Procedures Issue Date: January 2016
Section: 24 Revision Date: January 2018
Approved by: Bob Ritzmann, President Signature:
24.1 Policy Statement
A safe work procedure includes activities that have been shown in the industry to have potentially serious consequences when performed improperly. Alltrade recognizes that these activities require stringent safe work procedures, and that these activities may be determined through job safety analysis. Alltrade requires all employees be trained in and use safe work procedures to assure safe completion of tasks. In addition, some jurisdictions may require a site-specific safety plan.
24.2 Confined Space Entry
Standard This Procedure has been developed to aid Alltrade employees in identifying and protecting themselves in the event of working in a confined space.
A confined space means a fully or partially enclosed space that is not both designed and constructed for continuous human occupancy and in which atmospheric hazards may occur because of its construction, location, contents, or because of the work that is done in it atmospheric hazards may occur.
Examples of Confined Spaces Common Hazards
Welding the interior of large pipe. Accumulation of welding fumes
Vessels Welding process may displace 02 and create CO
Pits
Possible spills of chemical leaking into pits
Excavations Leaking bottles 02, acetylene, nitrogen product heavier than air leaking in nearby pits
Confined Areas
Co-emitting internal combustion engines operating nearby.
Utility Maintenance Holes Accumulation of toxic and/or combustible fumes from ducts entering the chamber and water
The Permit System must be obtained separately for each job, location, person, and time. Permits are only good for the shift they were issued for. Confined Space Entry forms must be returned to the supervisor at the end of each shift.

HEALTH & SAFETY PROGRAM _ _
Section 24 – Safe Work Procedures Page 2 of 53
Note: The specific gravity of carbon monoxide (CO) is slightly lighter than air, and as such could be found at any level within a restricted/confined space. Be sure to sample every 3-feet of elevation, in the corners for CO and other contaminants are required.
Prior to entry into a confined space, a Confined Space Hazard Assessment, Confined Space Plan and Confined Space Entry is required. All these documents are known collectively as the Confined Space Entry Permit System see H&S_FORM_068. This permit system is available through the supervisor.
The “Permit System” must be accurately completed before entering into the confined space. If you require any assistance please contact the EHS Department.
Procedure
• No worker shall enter into a confined space or perform related work until they
have been trained on the permitting system. • The permitting system will include hazards associated with work inside the
confined space and safe work practices for working in confined spaces and performing related work.
• All training records shall be kept on the project and indicate who provided the training and date provided
• Access and egress from all accessible parts of the confined space is required prior to entry (e.g. a secured ladder).
• If a possibility exists for any unauthorized entry into a confined space, signs or barricades or both will be used to warn against unauthorized entry.
• All electrical and mechanical equipment attached to the process in the confined space must be isolated or disconnected from its power source and locked and tagged out.
• Any moving parts and other equipment that may store energy and have the capability of movement must be de-energized and blocked to prevent movement.
• No testing is permitted on any pipe when men are working inside (e.g. x-ray, die penetrant, etc.).
• All pipes and other supply lines to the confined space must be bled off of any residual energy and blanked off (with blinds sufficiently strong to withstand the line pressure and not susceptible to corrosion by materials in line).
• Prior to entry into a confined space, a competent person will perform adequate tests as often as necessary before and while a worker is in the confined space to ensure acceptable atmospheric levels are maintained.
• All permits are to be returned to the issuer (Supervisor) at the end of each shift.
• A confined space shall be entered when: o The Permitting System is complete and all workers have been instructed
as to the permitting system requirements
HEALTH & SAFETY PROGRAM _ _
Section 24 – Safe Work Procedures Page 3 of 53
o All workers entering in to the confined space are trained as to the hazards inside the confined space.
o The space is purged, continuously ventilated and continuously monitored as the case may be.
o All measures necessary to maintain a safe atmosphere have been taken.
o A trained worker is stationed outside the confined space. o Suitable arrangements have been made to remove the worker from the
confined space should he/she require assistance and a person adequately trained in artificial respiration is conveniently available.
• All work must cease and workers must evacuate when there is or is likely to be:
• Hazardous – gas, vapour, dust, mist or fume; or • An oxygen content of less than 19.5% or more than 22% at atmospheric
pressure • Whenever the alarm is sounded indicating a warning
Note: When a confined space cannot be purged of all atmospheric hazards due to the process or nature of work/equipment or confined space and Alltrade employees may be required to enter the space, the EHS Department shall be notified prior to any entry.
Responsibilities
Program Development and Administration
The confined space program, hazard assessments and entry procedures shall be developed by a qualified person. Qualified person indicates the individual has experience in the recognition, evaluation and control of confined space hazards and can satisfy one of the following requirements:
• Certified Industrial Hygienist (CIH) • Registered Occupational Hygienist (ROH) • Certified Safety Professional (CSP) • Canadian Registered Safety Professional (CRSP) • Professional Engineer (P.Eng.) • Experience working with confined space and has a combination of education
and training as deemed acceptable by the local jurisdiction
Stand By Attendant
1. Is stationed outside and near the confined space entrance 2. Maintains communication with the confined space worker at all times. 3. Is trained in the confined space entry permit system and first aid and
cardiopulmonary resuscitation.
HEALTH & SAFETY PROGRAM _ _
Section 24 – Safe Work Procedures Page 4 of 53
__ __
4. Is trained in the use of non-entry rescue equipment as per the “Confined Space Permit System” and work activity (consult with the safety department for further clarification).
5. Is provided with an alarm or similar device to summon adequate rescue 6. Ensure a means of emergency signal is available; fire extinguisher, mechanical
ventilation; emergency stretcher and SCBA are available if required for rescue as detailed in the plan. Mechanical ventilation or other adequate and consistent ventilation is supplied to the confined space at all times.
7. Ensure that a means of retrieval is available for the confined space worker, in the event of an emergency.
8. Obtain and post at the entrance to the confined space the “Confined Space Entry Permit System” from the supervisor, or have it available for inspection. Return permits to Supervisor at end of shift.
9. If worker reports headaches, dizziness, irritation or other ill-effects then stop work and assist worker in a non-entry rescue (do not go into the confined space
Note: Rescue considerations must be made prior to working in a confine space. Note: At no time will the Stand By Attendant enter into the confined space. The attendant’s role is to monitor the safety of workers inside the confined space, provide assistance and summon an adequate rescue response as required. Confined Space Worker
1. Ensure a “Confined Space Permit System” is posted at the entrance to the confined space.
2. You have signed the permit. 3. Ensure to wear and use in accordance with the designed and training all personal
protective equipment required while working inside the confined space. 4. Review to ensure that all energy systems are de-energized or lockout out and any
process equipment is blocked and blanked and secured against any movement or process material flow.
5. Wear other personal protective clothing and/or equipment required. 6. If compressed gas is required in the confined space:
a. The bottles are to be left outside the space b. Prior to entering a leak test is conducted on the equipment (torch and
hoses etc), 7. Ensure your equipment/tools are in good working condition prior to entry (e.g.
good insulation on welding electrodes and grounding on tools and equipment).
Supervisor
1. Ensure that the confined space entry system is initiated including the relevant training before allowing employees to enter into a confine space. When in doubt always contact the EHS Department for assistance.
HEALTH & SAFETY PROGRAM _ _
Section 24 – Safe Work Procedures Page 5 of 53
__ __
2. Prior to allowing any worker(s) to enter into the confined space, review with all workers all the information in the Confined Space Entry System including the hazard assessment, the plan, the rescue and permit.
3. Consult with the EHS Department for guidance as needed 4. Ensure this procedure is complied with and provide his/her workers with the
appropriate training. 5. All workers working in the confined space shall be trained as per the “Confined
Space Entry System” 6. React to any emergency 7. Maintain confined space entry permits for 1 year after entry
Coordination Document Standard A Coordination Document will be completed whenever multiple employers will enter the same confined space either simultaneously and/or consecutively. Employers performing related work around confined spaces must also be involved in this assessment. Purpose
• To ensure that all employers of workers in a confined space are aware of potential or existing hazards and any other hazards that may be introduced in to the confined space by any of the employers because of the nature of the work they are performing in the confined space.
• To ensure employers communicate with one another • To ensure employers fulfill their duties/responsibilities to their workers • To reduce duplication of with respect to plans, entry permits, etc • To ensure that workers of the various employers work in compliance with
confined space requirements
Responsibility
It is the role of the constructor / prime contractor to identify when the Multiple Employer Coordination Document is required and to ensure that confined space work activities that involve multiple employers is properly assessed to ensure that adequate plans are in place for the protection of workers. 24.3 Electrical, Mechanical and Other Energy Sources - Tag and Lock-Out
Standard The purpose of this procedure is to establish the requirements for the isolation of electrical, mechanical and other energy sources. Isolation shall be used to ensure the health and safety of workers where the unexpected start up or release of stored or residual energy could cause injury.
Six steps to effectively Lockout and Tag-out energy sources:
1. Identify all energy sources. 2. Isolate or neutralize all energy sources.
HEALTH & SAFETY PROGRAM _ _
Section 24 – Safe Work Procedures Page 6 of 53
__ __
3. Verify zero energy state. 4. Attach lockout devices and tags. 5. Complete work and remove locks. 6. Only power up or re-energize after everyone is clear. Procedure 1. The Electrical Supervisor involved in the electrical work, shall determine where
isolation of electrical sources is required. The supervisor involved in the isolation of mechanical energy sources shall determine where isolation of mechanical sources is required.
2. Workers and Supervisors involved with lockout / tag out must be trained in this procedure, and their roles & responsibilities as outlined in this procedure.
3. Notify all other supervision working in the vicinity of the systems requiring electrical or mechanical isolation.
4. The Electrical and/or Mechanical Supervisor shall test and try to engage the equipment to confirm the isolation
5. The Electrical Supervisor or Mechanical Supervisor shall tag and lock-out the disconnect device. The supervisor will maintain control using a scissor-type device (if required) or a lock box to allow for the multiple installations of locks for other trades.
6. ALL SUPERVISION of trades working on the isolated electrical or mechanical system shall ensure that each of their workers install locks and tags for their protection. If the same work continues into the next shift, the incoming crew shall follow the same procedure after the first crew has removed their locks.
24.4 LOCK-OUT & TAG-OUT
Lock-out Tag-out is required when equipment or tools and are being serviced or cleaned, the power to the equipment is shut off and the machine is made incapable of moving. All energy sources (electrical, hydraulic, pressure, etc.) are de-energized. The goal is to make sure no one is hurt while working on or near the machine.
Lock-out is meant to ensure that once the equipment is de-energized it stays that way. Lockout helps prevent someone from inadvertently energizing the equipment and causing injury or death.
Tag-out: Lock-out should be accompanied by a tag out. A tag, if required, must be attached to the lock indicating the name of the person working on the equipment and the date.
Electrical Isolation The ELECTRICAL CREW locks shall be the first on and the last off.
Mechanical Isolation The MECHANICAL CREW locks shall be the first on isolation, and last off.
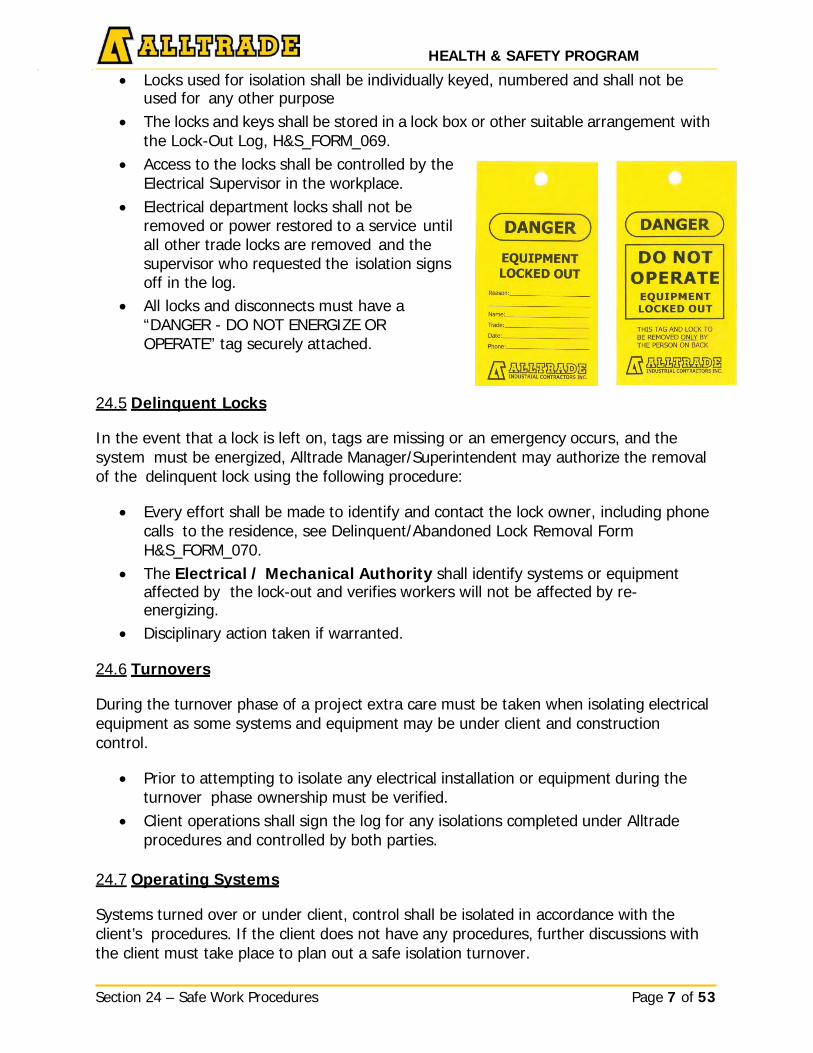
HEALTH & SAFETY PROGRAM _ _
Section 24 – Safe Work Procedures Page 7 of 53
__ __
• Locks used for isolation shall be individually keyed, numbered and shall not be used for any other purpose
• The locks and keys shall be stored in a lock box or other suitable arrangement with the Lock-Out Log, H&S_FORM_069.
• Access to the locks shall be controlled by the Electrical Supervisor in the workplace.
• Electrical department locks shall not be removed or power restored to a service until all other trade locks are removed and the supervisor who requested the isolation signs off in the log.
• All locks and disconnects must have a “DANGER - DO NOT ENERGIZE OR OPERATE” tag securely attached.
24.5 Delinquent Locks
In the event that a lock is left on, tags are missing or an emergency occurs, and the system must be energized, Alltrade Manager/Superintendent may authorize the removal of the delinquent lock using the following procedure:
• Every effort shall be made to identify and contact the lock owner, including phone
calls to the residence, see Delinquent/Abandoned Lock Removal Form H&S_FORM_070.
• The Electrical / Mechanical Authority shall identify systems or equipment affected by the lock-out and verifies workers will not be affected by re- energizing.
• Disciplinary action taken if warranted.
24.6 Turnovers
During the turnover phase of a project extra care must be taken when isolating electrical equipment as some systems and equipment may be under client and construction control.
• Prior to attempting to isolate any electrical installation or equipment during the
turnover phase ownership must be verified. • Client operations shall sign the log for any isolations completed under Alltrade
procedures and controlled by both parties.
24.7 Operating Systems
Systems turned over or under client, control shall be isolated in accordance with the client’s procedures. If the client does not have any procedures, further discussions with the client must take place to plan out a safe isolation turnover.
HEALTH & SAFETY PROGRAM _ _
Section 24 – Safe Work Procedures Page 8 of 53
__ __
24.8 Trenching and Excavations
Standard When workers are required to enter a trench or excavation, adequate precautions shall be taken to prevent injury. Consult your local jurisdiction for regulatory requirements.
Definitions
Excavation Means the removal of soil or other ground material where the resulting hole’s width exceeds the depth
Trench Means an excavation where the depth exceeds the excavation width.
Soil Types
Type 1 Soil Hard and very dense and can only be penetrated with difficulty by a small sharp object or mechanical equipment
Type 2 Soil Is very stiff, dense and can be penetrated with moderate difficulty. It will have a damp appearance after it is excavated.
Type 3 Soil Is stiff to firm and compact to loose in consistency or is previously excavated soil. It exhibits signs of surface cracking and water seepage. It has a low degree of internal strength.
Type 4 Soil Is soft to very soft and very loose in consistency. It has almost no internal strength and is wet or muddy. Sand would also fall into this category.
Any excavation containing more than one soil type will be classified as the type with the highest number.
Procedure
Use the following for excavations less than 1.2 m (4’) deep. If the jurisdiction of work requires a written checklist before workers enter excavations or trenches, regardless of the depth, then refer to Section B of this procedure.
A. Before a worker enters or conducts work in a trench, the supervisor or his/her
designate shall ensure that all applicable requirements have been met.
B. The supervisor shall visually inspect and ensure that: a) when a worker is in the trench, another worker is close at hand;
HEALTH & SAFETY PROGRAM _ _
Section 24 – Safe Work Procedures Page 9 of 53
__ __
b) underground utilities have been located and marked; c) the excavation/trench is kept reasonably free of water; d) a level area extending 1 m (3’) from each wall is clear of spoils, equipment
and materials; e) the walls of the excavation are supported and/or sloped to ensure
compliance with the applicable legislation and worker safety; f) every prefabricated, hydraulic or engineered support system is designed by
a professional engineer and the drawings are available for inspection; g) every prefabricated, hydraulic or engineered support system is installed,
removed and inspected as specified; h) means of access and egress are located at various locations in the
excavation/trench; and i) Ladders extend 1 m (3’) above the grade level. Use the following for
Excavations of more than 1.2 m (4’) deep.
1. When the excavation/trench exceeds 1.2 m (4’) in depth, the supervisor shall ensure that the Trenching & Excavation Checklist, see H&S_FORM_071, is completed.
2. All applicable requirements must be in place before a worker enters a trench or excavation.
The following procedure will be used to provide security to excavations that may be a hazard to pedestrians on a public way. 1. Before the excavation starts, establish a work area protection zone in accordance
with the Traffic Control Manual for Roadway Operations, Field Edition (for Ontario, or equivalent standard for outside Ontario).
2. Establish a work area protection zone for the protection of pedestrians and other users of the public way. Most common methods include the use of barricades and/or cones. Always ensure that a clear passage way is provided for the user of the sidewalk or similar walkway.
3. Excavate and perform the work in accordance with the procedures of the owner utility, applicable legislation, and Alltrade procedures.
4. If the excavation must be left open at the completion of the work day, the work crew must provide a secure physical barrier enclosing the excavation.
Trench Boxes Trench boxes are not usually intended to shore up or otherwise support trench walls. They are meant to protect workers in case of a cave-in. Design drawings and specifications for trench boxes must be signed and sealed by the professional engineer who designed the system and must be kept on site by the constructor. Boxes are normally placed in an excavated but unshored trench and used to protect personnel.
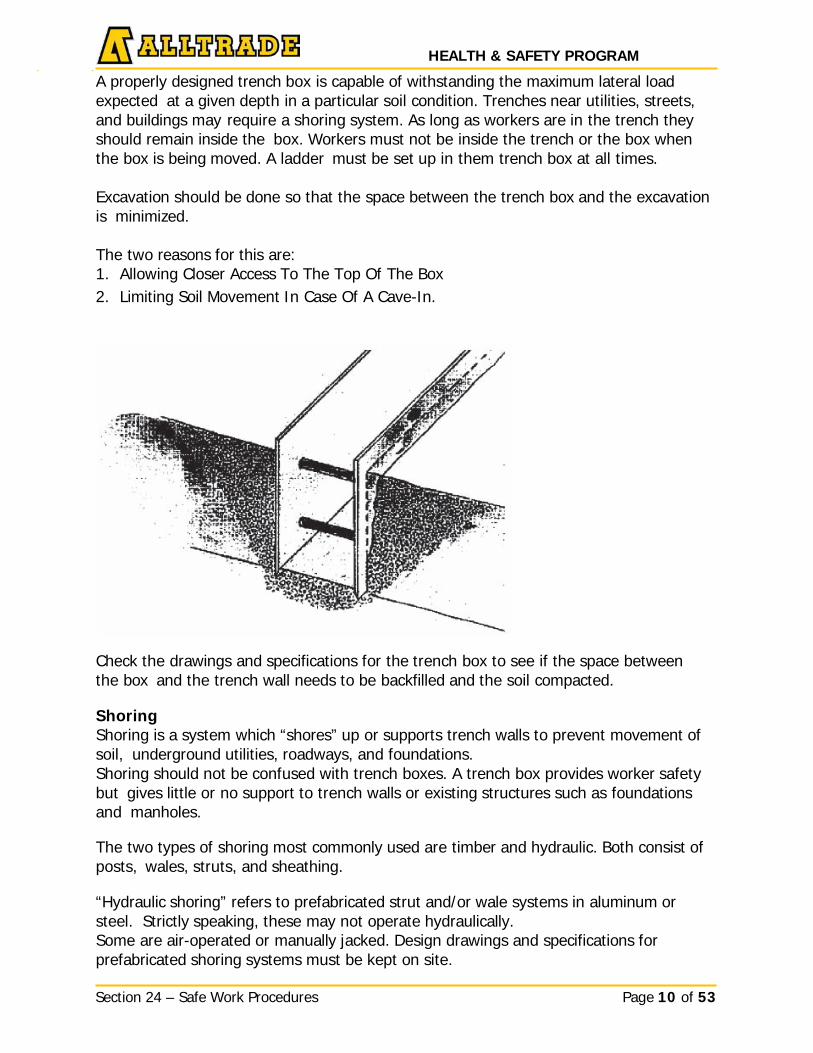
HEALTH & SAFETY PROGRAM _ _
Section 24 – Safe Work Procedures Page 10 of 53
__ __
A properly designed trench box is capable of withstanding the maximum lateral load expected at a given depth in a particular soil condition. Trenches near utilities, streets, and buildings may require a shoring system. As long as workers are in the trench they should remain inside the box. Workers must not be inside the trench or the box when the box is being moved. A ladder must be set up in them trench box at all times. Excavation should be done so that the space between the trench box and the excavation is minimized. The two reasons for this are: 1. Allowing Closer Access To The Top Of The Box 2. Limiting Soil Movement In Case Of A Cave-In.
Check the drawings and specifications for the trench box to see if the space between the box and the trench wall needs to be backfilled and the soil compacted. Shoring Shoring is a system which “shores” up or supports trench walls to prevent movement of soil, underground utilities, roadways, and foundations. Shoring should not be confused with trench boxes. A trench box provides worker safety but gives little or no support to trench walls or existing structures such as foundations and manholes. The two types of shoring most commonly used are timber and hydraulic. Both consist of posts, wales, struts, and sheathing. “Hydraulic shoring” refers to prefabricated strut and/or wale systems in aluminum or steel. Strictly speaking, these may not operate hydraulically. Some are air-operated or manually jacked. Design drawings and specifications for prefabricated shoring systems must be kept on site.
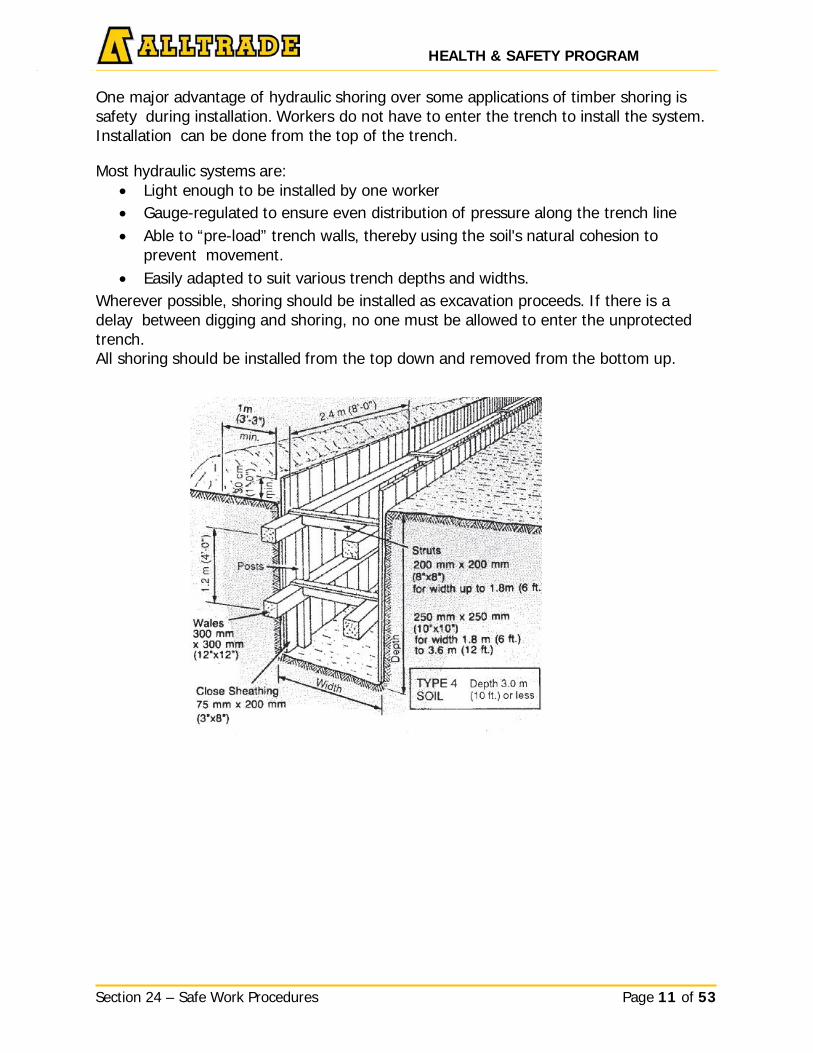
HEALTH & SAFETY PROGRAM _ _
Section 24 – Safe Work Procedures Page 11 of 53
One major advantage of hydraulic shoring over some applications of timber shoring is safety during installation. Workers do not have to enter the trench to install the system. Installation can be done from the top of the trench.
Most hydraulic systems are:
• Light enough to be installed by one worker • Gauge-regulated to ensure even distribution of pressure along the trench line • Able to “pre-load” trench walls, thereby using the soil's natural cohesion to
prevent movement. • Easily adapted to suit various trench depths and widths.
Wherever possible, shoring should be installed as excavation proceeds. If there is a delay between digging and shoring, no one must be allowed to enter the unprotected trench. All shoring should be installed from the top down and removed from the bottom up.
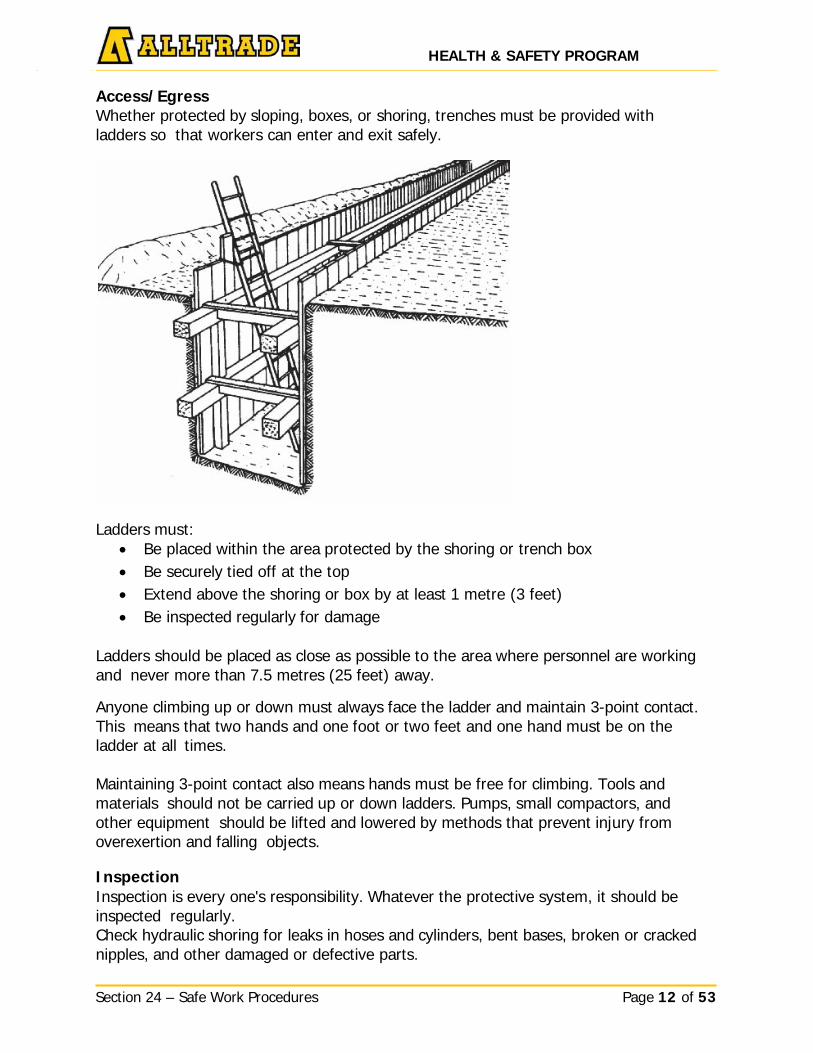
HEALTH & SAFETY PROGRAM _ _
Section 24 – Safe Work Procedures Page 12 of 53
Access/Egress Whether protected by sloping, boxes, or shoring, trenches must be provided with ladders so that workers can enter and exit safely.
Ladders must: • Be placed within the area protected by the shoring or trench box • Be securely tied off at the top • Extend above the shoring or box by at least 1 metre (3 feet) • Be inspected regularly for damage
Ladders should be placed as close as possible to the area where personnel are working and never more than 7.5 metres (25 feet) away.
Anyone climbing up or down must always face the ladder and maintain 3-point contact. This means that two hands and one foot or two feet and one hand must be on the ladder at all times.
Maintaining 3-point contact also means hands must be free for climbing. Tools and materials should not be carried up or down ladders. Pumps, small compactors, and other equipment should be lifted and lowered by methods that prevent injury from overexertion and falling objects.
Inspection Inspection is every one's responsibility. Whatever the protective system, it should be inspected regularly. Check hydraulic shoring for leaks in hoses and cylinders, bent bases, broken or cracked nipples, and other damaged or defective parts.
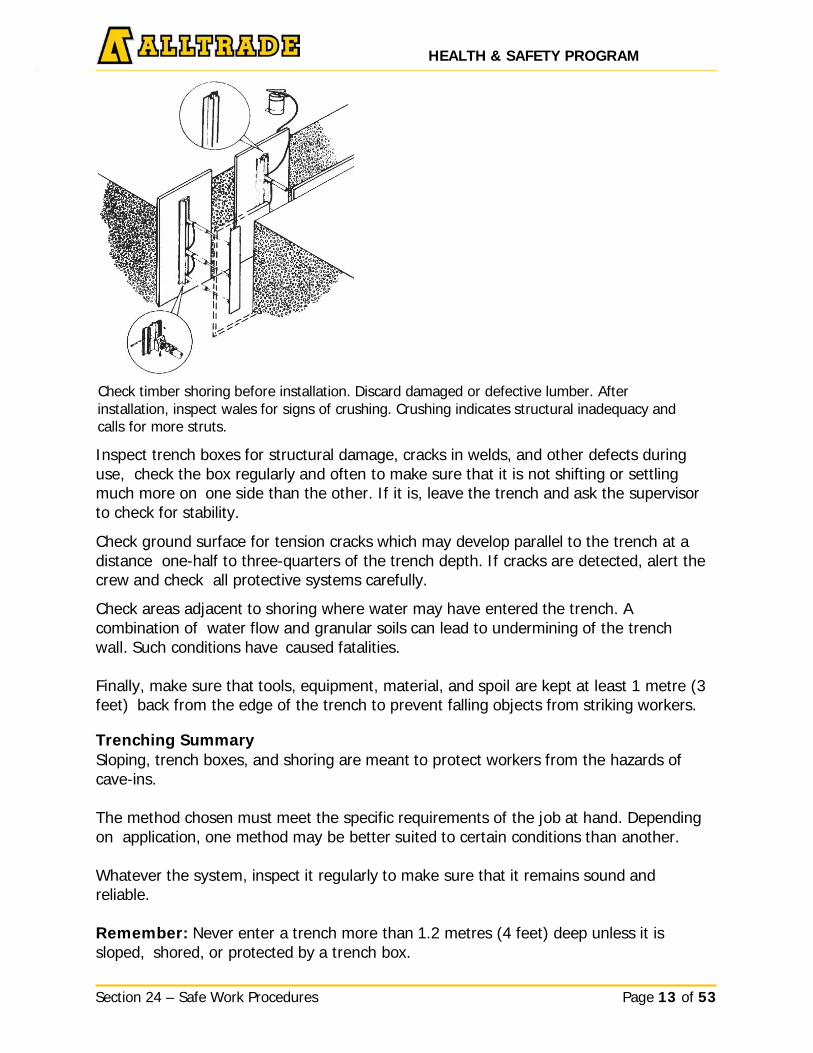
HEALTH & SAFETY PROGRAM _ _
Section 24 – Safe Work Procedures Page 13 of 53
Check timber shoring before installation. Discard damaged or defective lumber. After installation, inspect wales for signs of crushing. Crushing indicates structural inadequacy and calls for more struts.
Inspect trench boxes for structural damage, cracks in welds, and other defects during use, check the box regularly and often to make sure that it is not shifting or settling much more on one side than the other. If it is, leave the trench and ask the supervisor to check for stability.
Check ground surface for tension cracks which may develop parallel to the trench at a distance one-half to three-quarters of the trench depth. If cracks are detected, alert the crew and check all protective systems carefully.
Check areas adjacent to shoring where water may have entered the trench. A combination of water flow and granular soils can lead to undermining of the trench wall. Such conditions have caused fatalities.
Finally, make sure that tools, equipment, material, and spoil are kept at least 1 metre (3 feet) back from the edge of the trench to prevent falling objects from striking workers.
Trenching Summary Sloping, trench boxes, and shoring are meant to protect workers from the hazards of cave-ins.
The method chosen must meet the specific requirements of the job at hand. Depending on application, one method may be better suited to certain conditions than another.
Whatever the system, inspect it regularly to make sure that it remains sound and reliable.
Remember: Never enter a trench more than 1.2 metres (4 feet) deep unless it is sloped, shored, or protected by a trench box.
HEALTH & SAFETY PROGRAM _ _
Section 24 – Safe Work Procedures Page 14 of 53
__ __
Excavation Security
To ensure excavation security, follow the procedures below.
• All vertical supports will be of standard weight or heavy-duty T-bar.• Fencing will be 1.2 m (4’) wide orange PVC fence or similar construction, in good
condition.• T-bars will be driven into the ground, approximately .6 m (2’) deep, at the
corners of the excavation.• The edge of the excavation that borders onto the sidewalk, public or private, will
have T- bars driven into the ground at no more than 1 m (3’) intervals. T-bars of3 m (10’) lengths will be used at these points to ensure that they are securelydriven.
• The PVC fencing will be pulled snugly around the posts and securely attached tothe posts. As best as possible, the T-bar will extend to the full height of thefencing.
• If access to the excavation is required, e.g. Bell Line Splicer, an access point willbe provided at a corner or edge of the fence, which is not adjacent to thesidewalk.
• Before leaving the site, workers must test to ensure that the posts are secure andthe fence is snug.
• If the excavation is required to be left open and unattended, it will be theresponsibility of the supervisor to inspect the barrier fencing on a regular basis.When required, the fencing must be repaired to provide a secure physical barrierbetween the public way and the excavation.
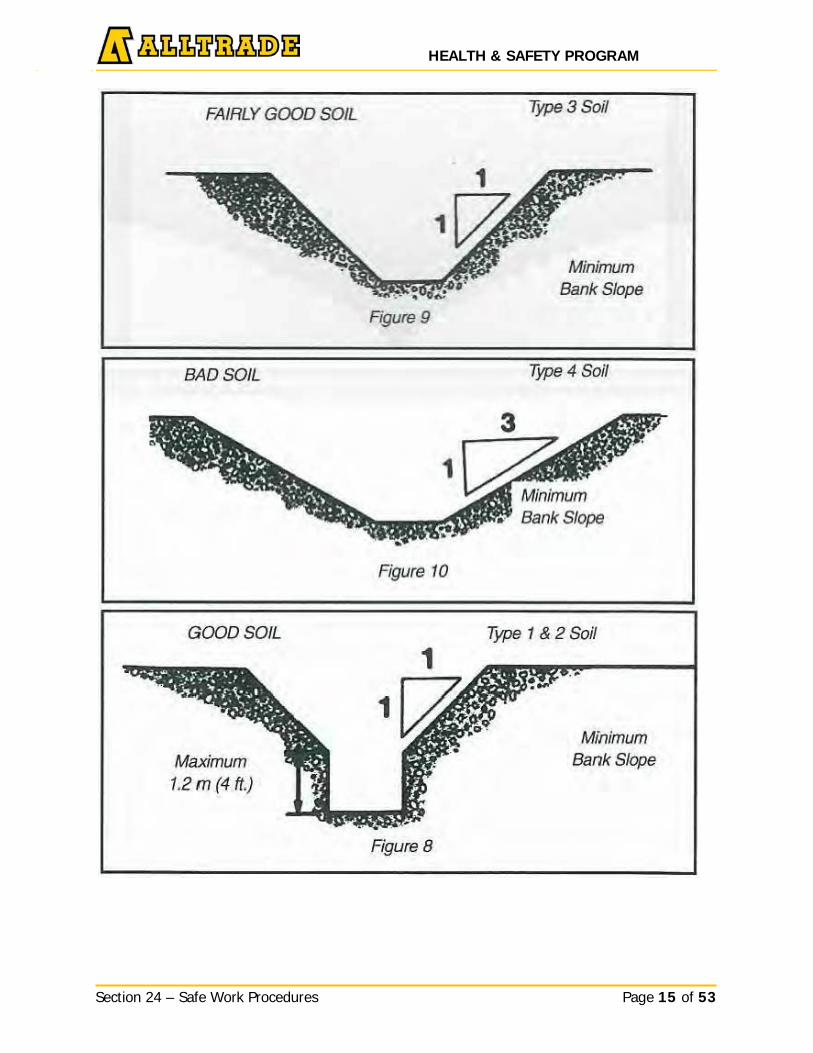
HEALTH & SAFETY PROGRAM _ _
Section 24 – Safe Work Procedures Page 15 of 53
_ _
HEALTH & SAFETY PROGRAM _ _
Section 24 – Safe Work Procedures Page 16 of 53
__ __
24.9 Glove Inspection
Insulating Rubber Gloves
• Proper care and use of the products are essential for the safety of the wearer.• Gloves must be inspected visually by the user at least once per day or prior to
each use. Inspection should include both the inside and outside surfaces.• Gloves can be damaged by many chemicals, especially petroleum-based products
such as oils, gasoline, hydraulic fluid, inhibitors, hand creams, pastes, and salves.If contact is made with these or other petroleum-based products, thecontaminant should be wiped off immediately.
• During the inspection, check for:o Cuts or snagso See if the red or yellow inner layer shows through the black outer layer
• Chemical deterioration, such as:o Swelling;o Softness; o Hardening; o Stickiness; o Ozone deterioration
• If any sign of damage or deterioration is found:o DO NOT use the gloves.o Return these gloves for replacement and/or retesting.o Gloves should be cleaned with a mild soap. After washing, rinse thoroughly
with clear water and air dry.• To inspect the inside of a glove:
o Place the glove on you hand,o Pull the cuff up over your fingers,o Holding the glove downward, grasp the cuff and twirl it upwards toward
your body to close the cuff.o Squeeze the rolled cuff into a U-shape to trap the air inside,o Pop out the fingers of the glove by squeezing the inflated glove,o Pay particular attention to areas between the fingers and in the thumb
crease.• To inspect the outside of a glove:
o Repeat the procedure aboveo Gloves must be retested on a regular schedule, even if unused. When
requested or if damaged or deteriorating, return gloves for retesting andcertification.
24.10 Leather Protectors
• Rubber insulating gloves should always be used with leather protectors.• To inspect the leather protectors:
1. Brush loose debris from the leather cover.
HEALTH & SAFETY PROGRAM _ _
Section 24 – Safe Work Procedures Page 17 of 53
__ __
2. Look for metal particles, embedded wire, or abrasive materials, whichcould cause damage to the insulating rubber gloves.
3. Check protectors for saturation of products such as oil, grease, hydraulicfluid, gasoline, or copperkote.
4. Check that rubber insulating glove extends a minimum of 1” for each10,000 volts above the top of the leather protectors, e.g. Class 2 rubberinsulating gloves rated at 17,000 volts, extend a minimum of 2” above theleather protector.
• Leather protectors must be returned for replacement if damage or deterioration isevident.
Leather protectors are to be used only with rubber insulating gloves. They are NOT to be used on their own as general work gloves.
At the completion of each work day, or as required: • Separate the leather covers from the rubber gloves.• Rinse the rubber gloves in clean water, and allow to air dry prior to the next use.• Talc will be provided for the wearer’s convenience.• Gloves should be stored in a protective bag when not being used.
24.11 Segregation of Hydrostatic/Pneumatic Test Zones
Standard Workers involved in the process of hydrostatic testing shall be familiar with the hazards associated with projectiles and the necessary safety precautions. All workers shall sign the Hydro testing Workers Acknowledgement and Checklist, see H&S_FORM_072.
Procedure The Supervisor in charge shall ensure the following procedure is addressed:
• Attempts should be made to conduct the test after or before shift hours.• If the test is urgent and is required to be completed as soon as possible, then the
area must be segregated by red “Danger Do Not Enter” tape. No entry tounauthorized personnel.
• Signs must be posted at adjacent doors and at the test zone depicting “Keep outHydrostatic/Pneumatic Test in Progress.”
• All potential projectiles must be pointed away from work zones. If this is notpossible, then a shield is required capable of stopping or preventing theprojectile from being launched at workers in the work area.
• When draining occurs, make sure the hose is long enough to reach a sewer drain.This will prevent freezing of our roads and walkways.
• All potential water leaks should be pointed away from the main electrical panel orthe panel should be protected from potential water leaks (e.g. plastic barrier).
• Verify test pressure with the QA Department if applicable and work within thosepressure.
• If stoppers or plugs are used the manufacture’s requirements are to be followed.
HEALTH & SAFETY PROGRAM _ _
Section 24 – Safe Work Procedures Page 18 of 53
__ __
24.12 Working Over/Around Water
Standard Construction over and around water presents dangers. Precautions specifically developed for such construction must be taken before work begins.
Procedure
• Warning signs shall be posted on the project to warn public and workers of thehazards around water (danger deep or icy water, keep out).
• Where there is current in the water, a line extending across the water, withfloating objects attached to it that are capable of supporting the heaviest personon site in case he/she falls into the water shall be installed.
• All workers must be alert and aware of their fellow workers at all times.• Workers in proximity to a water hazard who may drown will be protected by a
flotation device. This device will provide buoyancy adequate to keep a worker’shead above water, face up without effort by the worker (see requirementsbelow).
• All workers wearing a floatation device will visually inspect it to ensure it is freefrom defects prior to use.
• Before starting work each day a designated worker will make sure that, therescue equipment is as close to the work area as possible.
• Rescue equipment such as boats must be stored on or near the project ready foruse.
• All workers working at this location will be required to attend a safety orientationand safety meeting on the use of lifejackets, PPE.
• At least two workers will be appointed and trained for rescue procedure.• The names posted in the workplace.
Rescue Equipment
• A ring buoy attached to 15 meters (50 feet) of 9.5-millimeter diameter (5/8” dia)polypropylene rope.
• Lifejackets available for each person involved in the rescue.• A boat (where applicable) equipped with a motor if the water is likely to be rough
or swift.• A boat hook (which is a short shaft with a fitting on one end shaped to help in
rescuing a person or recovering an object.)• An ALARM (horn) system must be maintained to alert workers to the need for an
emergency rescue.

HEALTH & SAFETY PROGRAM _ _
Section 24 – Safe Work Procedures Page 19 of 53
__ __
Life Jacket / Personal Flotation Device (PFD) requirements
PFDs or Personal Flotation Devices must be Canadian Coast Guard, Department of Fisheries and Oceans approved or equivalent. The PFD information must state that it is designed to keep the wearer face up in the water.
Note: These are EXAMPLES of PFD’s intended to keep the wearer face up in the water; Actual styles may vary and change. Check with your local jurisdictions and EHS Department for further information.
Rescue Procedure 1. If a worker falls into the water--- SOUND ALARM---, two workers trained in rescue,
immediately put on life jackets and proceed to rescue worker. 2. Once the worker has been retrieved to shore, ensure there are no injuries and
perform first aid if necessary.3. If required prepare for medical attention and transportation to the hospital.4. Stay with the injured worker at all times and keep them calm.5. Ensure the worker is kept warm until the appropriate medical attention is given.
To eliminate any hazardous conditions and dangers associated with working around water the following safe work procedures are to be implemented.
Floating Work Platforms
When used on a construction project, rafts, scows, barges and similar vessels are considered work platforms. As such, they are subjected to certain requirements.
• Guardrails must be provided along open edges. The guard rails may be removedat the working side of the platform, provided workers are protected by alternate measures of fall protection.
• Workers on the floating platform must wear lifejackets. A life jacket providesenough buoyancy to keep the wearer’s head above water, face up, without effortby the wearer.
• Appropriate rescue measures must be prepared.
These are common features that help keep the wearer face up. Styles may vary by manufacturer.
HEALTH & SAFETY PROGRAM _ _
Section 24 – Safe Work Procedures Page 20 of 53
__ __
Transporting Workers by Boat
When navigating any waterway, boats and other floating vessels must comply with the legislative requirements. Consult the EHS Department.
Boats that are not longer than 6 meters (20 ft) must be equipped with at least: • One approved lifejacket for each person on board• One paddle or an anchor with at least 15m of cable, rope, or chain• One bailer or one manual pump• One class 5bc fire extinguisher if the craft has an inboard engine, fixed fuel tank• One sound signaling device
All powerboats require navigation lights if operated after sunset or before sunrise. All boats also require radio communication that is compatible to the radio used on site and or barge.
Spill Procedure
To prevent a spill or accident release of hazardous material and contamination of the water all heavy equipment and tools must be fueled on land. When in proper position and secured for work a floating platform must be surrounded by floating absorbent socks attached to the vessel in the event of an accidental release/spill. Additional socks and absorbent pads & waste containment disposal bags must be available on site.
24.13 Working On or Near High Voltage Systems
Standard
The following requirements apply to all work performed on or near High Voltage Electrical Systems and are applicable to all Alltrade and subcontractor employees.
All employees involved in high voltage work are required to follow the local Electrical Utility code within their jurisdiction. Workers must be qualified and competent to work on such systems.
Procedure
• Employees who work on a high voltage system must be supervised by acompetent, qualified supervisor who has proof of training in “Utility WorkProtection Code”.
• Only employees that are qualified electrical workers shall construct, install, alter,repair, or maintain high voltage electrical equipment or systems. Qualifiedelectrical workers shall be trained in the following:
o Use of special precautionary techniques,o Specific PPE requirements (e.g. Arc flash),o Insulating & shielding materials, and insulated tools
HEALTH & SAFETY PROGRAM _ _
Section 24 – Safe Work Procedures Page 21 of 53
__ __
• Employees working near high voltage electricity who are not qualified electricalworkers shall be provided training in the following:
o High Voltage Awarenesso Lock Out/Tag Outo Limits of Approacho Conductive Materials awareness
• A hazard assessment shall be conducted to identify and evaluate hazards beforeentering high voltage work areas. Safe work practices shall be employed toprevent electric shock or other injuries resulting from either direct or indirectelectrical contacts.
• A worker shall not approach high voltage electrical equipment within the safelimit of approach distance unless the equipment has been de-energized andlocked and tagged out.
• Any worker raising or lowering materials between the ground and an aerialdevice/boom trucks with the potential to conduct current will wear protectiverubber gloves no less than the class required for the protection against theminimum phase to phase voltage>750v on the pole/system being worked on.Refer to local legislation.
• The following work will require a JSA:o Installation of poles and equipment/hardwareo String of conductorso Energizing conductors
• Any employee required to work on an aerial high voltage system will be requiredto have an additional person with knowledge and experience of the work.
• If parts cannot be de-energized, tagging must be applied in any event and barrierssuch as insulated blankets must be used to protect against accidental contact. ArcFlash PPE must be worn. Contact the utility owner before work commences.
• Follow all rules governed by the Utility Owner and local legislation codes.
Note: Refer to working Near Overhead Power lines –Guidelines for Details on Limits of Approach.
24.14 Arc Flash
Standard Electrical Work exposes workers to the hazard of Shock, Electrocution, Arc Flash, Arc Blast and Fire. Adequate measures must be taken to prevent injury to workers from these hazards. Causes of these hazards includes, Accidental contact with energized parts, Inadequate short circuit ratings, tracking across insulation surfaces, Tools dropped on energized parts, Wiring errors, Contamination such as dust on insulating surfaces, Corrosion of equipment parts and contacts, Improper work procedures. Proper Work Procedures, Worker Competency, selection and use of Personal Protective Equipment and utilizing the correct tools and equipment are required to prevent injury during this type of work activity.
HEALTH & SAFETY PROGRAM _ _
Section 24 – Safe Work Procedures Page 22 of 53
__ __
Procedure
Establishing Work Zone Boundaries For the safety of employees performing electrical work, and those working around these activities, two types of work zone boundaries must be established, Arc Flash Boundary and Shock Hazard Boundaries.
Arc Flash Boundaries The Arc Flash Boundary is the linear distance to be maintained to prevent serious injury from potential arc flash.
An Arc Flash is a release of energy, caused by an electrical short circuit. An arc Flash ionizes in the air around the electrical equipment, making the air conductive. Other hazards include:
• Bright light,• Heat at more than 5000 degrees Celsius,• Noise in excess of 140 db,• Ionized gases,• Metal vapours,• Molten metal drops,• Shrapnel• Shock waves greater than 2000 lbs/ft.
An Arc Flash has four variables that determine the severity of the incident, • Voltage of the system,• Available fault current,• Clearing time of the protection device,• Distance from the point of energy release.
Electrical Systems <=600 Volts For electrical systems up to 600 Volts, the flash protection boundary shall be 4 ft. (1.2m.) (based on the product of clearing times of 6 cycles and available bolted fault current of 50 kA, or any combination not exceeding 300 kA cycles).
Electrical Systems >600 Volts For systems over 600 Volts, the flash protection boundary shall be established at a distance where the incident energy equals 1.2 cal/cm2. Calculations to determine Flash Protection
Boundaries must be performed by qualified personnel and should be under an engineer’s Supervision. Established Boundaries must be at a distance to ensure exposure is less than 1.2 cal/cm2.
Shock Hazard Boundary Two zones must be established within the Shock Hazard Boundary. The Limited Approach Zone, which may only be enter by qualified personnel and requires shock
HEALTH & SAFETY PROGRAM _ _
Section 24 – Safe Work Procedures Page 23 of 53
__ __
protection techniques and equipment. Also required to be established is the Prohibited Zone, in which only qualified personnel wearing the appropriate Personal Protective Equipment and trained in the associated hazards such as if to work on the equipment live. Establishment of these boundaries vary based on system voltage levels, and must be determined by qualified personnel.
Personal Protective Equipment Any employee performing live or potentially live electrical work shall wear adequate protection to prevent injuries from shocks and burns. Various types of personal protective equipment are required to provide adequate protection from shock hazard, such as properly rated Rubber Insulating Gloves (including leather protectors) and Grounding Mats. To adequately protect from burns, proper body and head protection must be selected. As previously identified, the amount of energy (cal./cm2) a worker may be exposed to in the event of a n Arc Flash ranges widely, therefore the level of protection required to protect from burns must be properly rated (Arc Thermal Protective Value or ATPV) for the circumstance.
See Table 1.1 for the Personal Protective Equipment requirements for each Hazard Category. Table 1.2 contains excerpts from CSA Z462 Table 4A: Hazard/risk category classifications and use of rubber insulating gloves and insulated and insulating hand tools – AC equipment. Hand Protection Specific requirements around selection, use and maintenance of Voltage Rated Gloves must be followed. Refer to Personal Protective Equipment in for more information.
Arm, Leg, Torso Protection Wearing of Fire Rated Clothing is required for certain tasks (see table 1.1 for hazard categories and protective clothing requirements) (see table 1.2 for examples of common tasks and their hazard category rating).
Note: Although whole body protection is provided by wearing Fire Rated Clothing, in some cases, the type of garments worn beneath this protective clothing must be also be rated. It is generally recommended that garments manufactured from 100 % cotton be worn, as blended materials have the potential to melt or catch fire more easily.
Face/Head Protection Properly rated face protection must also be selected. This can range from a properly rated full face shield, to whole head coverings (switching hoods). The ATPV varies and must be properly selected for the potential energy present. See table 1.1 for requirements. Approved Hard Hats must be worn at all times.
Hearing Protection Arc Blast can create noise in excess of 140 dba; hearing protection must also be worn. See Personal Protective Equipment Section for selection of hearing protection
Note: Contact EHS Department for assistance as required
HEALTH & SAFETY PROGRAM _ _
Section 24 – Safe Work Procedures Page 24 of 53
__ __
Table 1.1 Hazard Category/PPE Requirements
Note: Insulating Rubber gloves must be selected to adequately protect against potential voltages present. See Section on Personal Protective Equipment, Rubber Insulating Gloves for Proper Selection, Use, and Maintenance Requirements.
Hazard Risk Category
Clothing Description (typically number of clothing layers in parenthesis)
Minimum Clothing ATPV Rating (cal./cm2)
Face/ Head Protection
0 Non-Melting, Flammable Materials 4.5 oz. (1) N\A
CSA Approved Safety Glasses
1 FR Shirt and FR Pants 4 0-8 cal/cm2 rated full face shield
2
Cotton Underwear Plus FR Shirt and FR Pants (2)
8
0-8 cal/cm2 rated full face shield with guard or an arc flash hood
3
Cotton Underwear Plus FR Shirt and FR Pants plus FR Coveralls (3) 25
0-33 cal/cm2 arc flash hood
4
Cotton Underwear Plus FR shirt and FR Pants plus Double Layer Switching Coat and Pants (3)
40
0-40 cal/cm2 rated arc flash hood, plus FR rated Balaclava/ or, fully encapsulating FR rated hood
24.15 Pole Line Work
The following items must be inspected prior to any pole line work.
• Pole line condition• Strand tension• Bonding and grounding of suspension strand• Trees and tree limb obstruction• Location of slack for splicing• Clearances over roads and driveways• Particular attention must be given to joint use hazards, floating conductors,
deteriorated cross arms, etc. Any noted defects must be reported at once forrepair.
Climbers (Spurs) Maintenance
• Use climbers adjusted to correct size• Do not bend leg irons, bending could weaken metal
HEALTH & SAFETY PROGRAM _ _
Section 24 – Safe Work Procedures Page 25 of 53
__ __
• Inspect climbers; inspection items to consider;• Evidence of filing or reshaping must not be done• Fractured gaff or hairline crack• Loose gaffs• Nicks or depressions in the gaff due to impact with hard object• Ridge on gaff not straight• Dull gaff beyond restoration by means of honing• Broken or distorted gaff point• Plastic missing from gaff guard• Fractured sleeve or start of fracture• Broken or loose sleeve strap loop• Set screws loose on sleeve• Fractured leg iron or start of• Stirrup loop broken or loose• Straps worn through one layer of fabric• Defective strap buckles• Defective spring rings• Broken or loose rivets on straps or pads• Broken or torn loop on strap or pad• If defects are found climbers must be replaced
General requirements for wood pole climbing are as follows:
• CAN/CSA Z 259.3 Linesman Belt and Safety Strap shall be used or equivalentbody harness (work positioning). Check with your EHS Department
• All equipment must have dual action safety snaps• Each fall arrest component that has synthetic materials used in its construction
must have the “date in service” recorded.• CAN/CSA Standards no longer permit the use of leather for load bearing
components. Leather can still be used if it is laminated with manmade materialsconnecting load bearing components. Check with local jurisdictions
• Current legislative requirements state that a written rescue plan must be in place.• Fall restricting is a fall protection system that when worn properly will restrict the
workers fall to a distance of not more than .6 M (2 ft.)
Climbing of Stepped Poles
Precautions • Before climbing see that your hands and boots are free from slippery substances• Determine that the wooden step is firmly attached to pole and it is not cracked or
broken• Test each metal step as you grasp, to see it is firmly set in pole• In winter remove all snow and ice prior to usage
HEALTH & SAFETY PROGRAM _ _
Section 24 – Safe Work Procedures Page 26 of 53
__ __
Climbing Un-Stepped Poles
• Workers to be properly trained in climbing technique• Workers climbing equipment is in good condition
Precautions • Inspect pole from the ground, observe any badly deteriorated or badly spurred
sections, large knots and whether the pole is vertical or leaning. Also note attachments or fixtures which would interfere with climbing
• Where pole leans, climb on high side• Where pole is twisted, circle the pole to stay on high side
Joint Use Poles • Where pole is jointly used, sound judgment must be applied concerning work
positions to avoid entering the neutral space between power and telephone plants
Voltage Testers • Tester to be used to test for potential hazardous voltage on;• Vertical power ground wires• Vertical metallic power conduits• Street light fixtures joint use terminals• Any other location where foreign voltage is suspected.
Observations to be Made Before Climbing
• Examine pole for potential hazards• Vertical power ground wire• Vertical metallic power conduit street light fixture
If any of the following conditions exist DO NOT CLIMB:
• Improper clearance from power conductors or equipment• Dangling power wires• Arcing or sparking• Fire• WARNING; a hissing sound may indicate the presence of foreign potential in
excess of 10,000 v
Safeguards to be Taken Before Climbing Poles
• Do not climb a pole where suitable means for determining the condition of thepole and bracing are not available. If there is any question about the pole beingsufficiently strong to permit safe climbing and working, inform supervisorimmediately.
HEALTH & SAFETY PROGRAM _ _
Section 24 – Safe Work Procedures Page 27 of 53
__ __
Methods of Testing Poles
• The pike pole test consists of applying a series of pushes to a pole in order torock it moderately back and forth
• The hand liner test consists of applying a series of pulls to a pole withthe objective of rocking the pole back and forth
• The sounding test consists of applying blows with a hammer
Pole Top Rescue Procedure
1. Ascend to injured worker2. Choke nylon sling around pole3. Attach large carabineer4. Incorporate Munter Hitch (friction hitching) see illustration.5. Lower injured worker to ground.6. Administer first aid if required.
Rescue Equipment Required • Life line (dual lanyard attachment) for Linesman Body Belt/full body harness• Large carabineers• Short nylon sling (to wrap around pole)
Pole Line Anchors and Rods
Power installed screw anchors • Make sure the pins on the locking dog assembly are fully inserted. Push the drive-
end assembly into the locking dog assembly until a definite click of the locking pins is heard.
• Exercise caution when working near power lines and joint use poles. This alsoapplies to buried power services.
Lashed Aerial Cable • Cable placing should be done with the vehicle moving in the direction of traffic
whenever practical • Inspect cable reels for obstructions that might interfere with unwinding of cable• Control the rotation of the reel to prevent excessive free running of the reel or
excessive tension.• Inspect suspension strands for condition and proper size.• Avoid abrasion to cable sheath• Avoid sharp bends to cable.• Do not permit vehicular traffic to pass over cable• During lashing operation side pull is controlled by hand line 4 to 5 times the
distance the vehicle is from the pole line. Excessive side pull results in the strandbeing over tensioned.
HEALTH & SAFETY PROGRAM _ _
Section 24 – Safe Work Procedures Page 28 of 53
__ __
• Preview the proposed cable run to determine conditions that may be encounteredin the cable placing operation.
Suspension Strand
• Exercise caution when handling and stringing strand to protect both the publicand workers from mechanical or electrical hazards
• Factors governing desirable length of pull, interference with trees, interferencewith wires and cables, interference with traffic.
Cable and Strand Removal
• Special precautions and planning are required before start of work• The work area must be protected• Road crossing must be considered• Removal of strand across roadways, all traffic must be stopped.• Do not allow traffic to resume until strand/cable has been lowered and removed
from roadway
Pole Trailers
• Pole trailers are designed to transport poles only• Load trailer in such a way that 10-15% of the trailer weight bear down on truck
coupling hook• Whenever possible load trailer with derrick truck• Total weight should not exceed capacity of trailer• Bind poles front and back using load binders• When loads overhang red flagging shall be used• Lubricate all movable bolts and pins which require manipulation in the use of
trailer• Check electric brakes for proper operation• Test trailer lights• Examine safety chains for defects and ensure securely fastened to truck• Make certain that connecting pins which retain adjustable tongues, legs, etc. Are
held securely in position.• During loading and unloading, only workers directly involved should be in work
area. Those guiding poles should stand at the ends of the pole• Exercise caution when hauling trailer especially when turning and backing
Strand Pullers
• Strand pullers shall be inspected before each use to ensure that they are freefrom grease and other contaminants
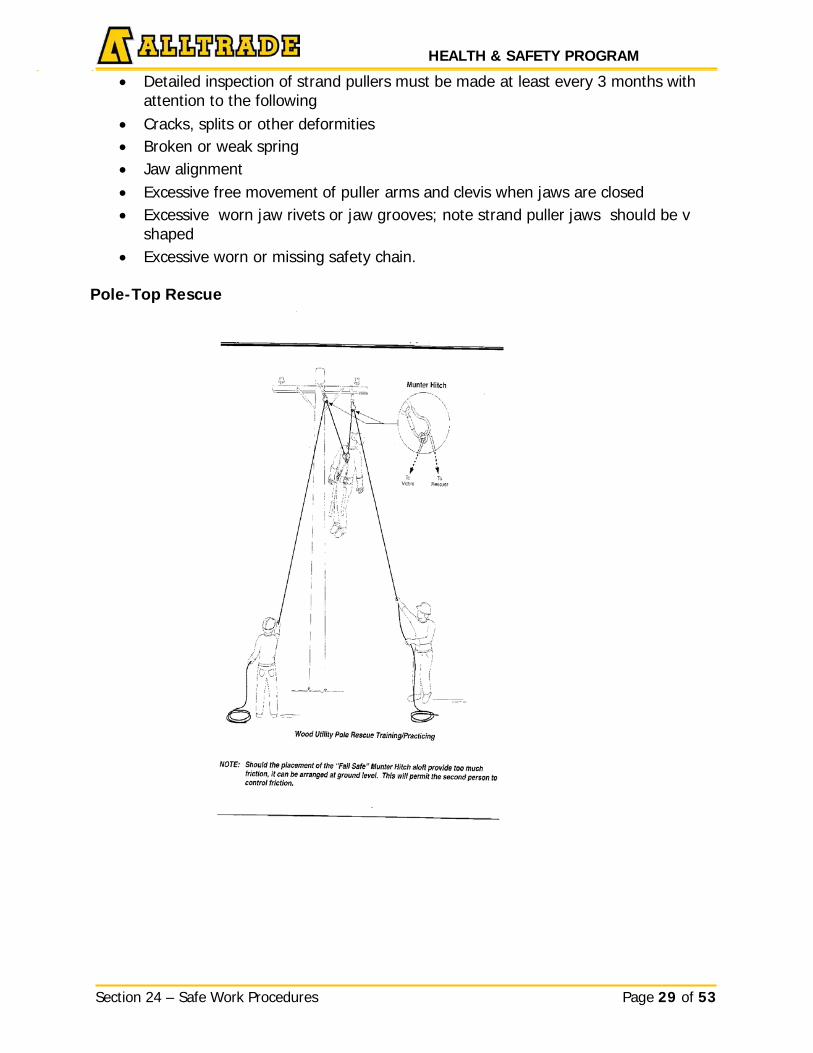
HEALTH & SAFETY PROGRAM _ _
Section 24 – Safe Work Procedures Page 29 of 53
__ __
• Detailed inspection of strand pullers must be made at least every 3 months withattention to the following
• Cracks, splits or other deformities• Broken or weak spring• Jaw alignment• Excessive free movement of puller arms and clevis when jaws are closed• Excessive worn jaw rivets or jaw grooves; note strand puller jaws should be v
shaped• Excessive worn or missing safety chain.
Pole-Top Rescue
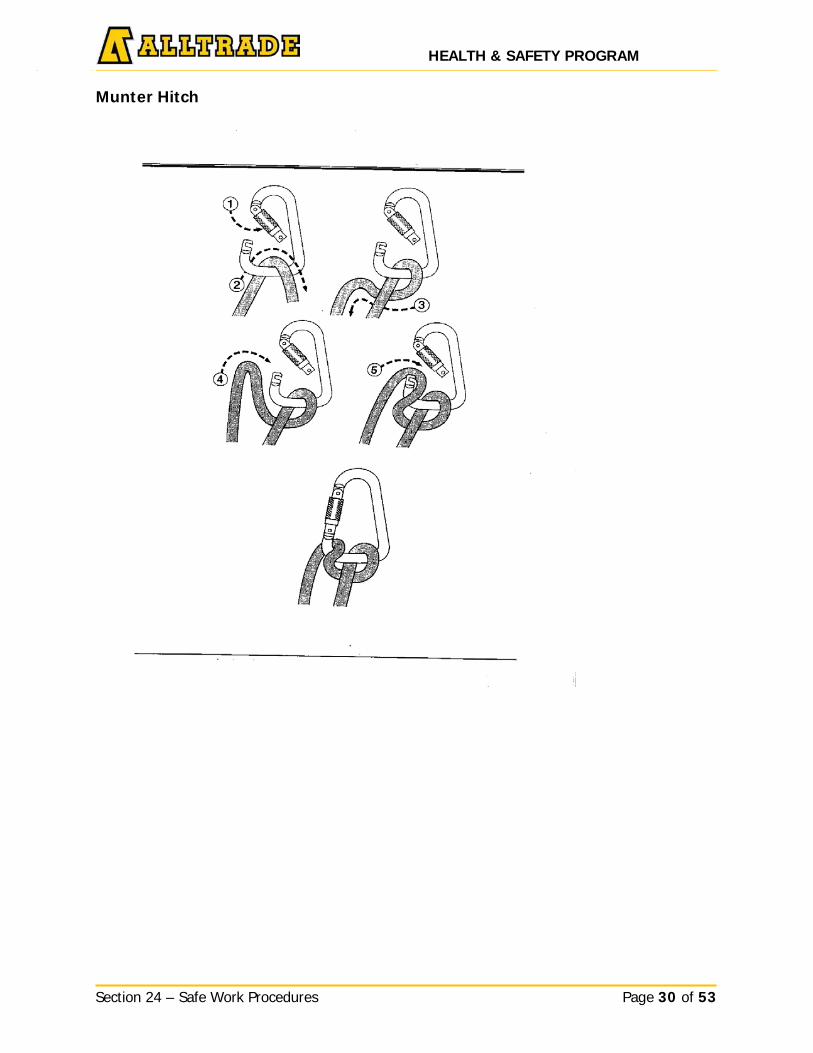
HEALTH & SAFETY PROGRAM _ _
Section 24 – Safe Work Procedures Page 30 of 53
Munter Hitch
HEALTH & SAFETY PROGRAM _ _
Section 24 – Safe Work Procedures Page 31 of 53
24.16 Pole Removal
Standard
Workers required to remove erected poles shall be experienced and familiar with the necessary safety precautions.
Procedure
• This Section describes several methods for use in the removal of poles• The conditions existing and the equipment which is available will determine the
method to be used.• Where possible do not leave holes open overnight. Holes which must remain
open must be properly barricaded.• All holes must be filled and tamped to prevent settling of the earth or paving.
Broken pavement and holes left in pavement must be repaired as soon aspractical.
• Where existing aerial services are close to a pole to be removed, extraprecautions must be exercised to maintain a safe clearance from these services.
• The pole shall be cut off at approx. 4'-6' above grade as to not interfere with anyoverhead utilities or obstructions.
• The attachment of a pulling line to the pole should be at a point above thebalance point of the pole. If there is any doubt of the attachment being abovethe balance point, support the pole with temporary guys arranged so as tocontrol the pole movement during the lowering operation. In most casestemporary guys attached to the lower section of the pole will provide bettercontrol of the pole and can be placed more conveniently than guys above thepulling line attachment. If there is any possibility that the pole will break at theground line the pole shall be cut off prior to removal; the pulling line attachmentmust be above the balance point of the section of the pole to be cut.
Pole Derrick Method
Note: DO NOT ATTEMPT TO PULL A POLE WITH A HYDRAULICALLY OPERATED DERRICK UNLESS THE POLE CAN BE HOISTED FREE OF RESISTANCE, A POLE PULLER MUST BE USED. DO NOT ATTEMPT TO SHAKE A POLE LOOSE WITH THE DERRICK BY RAPIDLY EXTENDING AND RETRACTING THE BOOM. ENSURE THAT THE DERRICK TRUCK IS INSPECTED USING THE RBD TRUCK INSPECTION, H&S_FORM_073.
Attachment of Winch Line
The winch line should be attached to the pole removed as shown in Fig.1. Be sure the hook is always hooked down over the line and a safety catch is operational (or other suitable equipment - shackle)
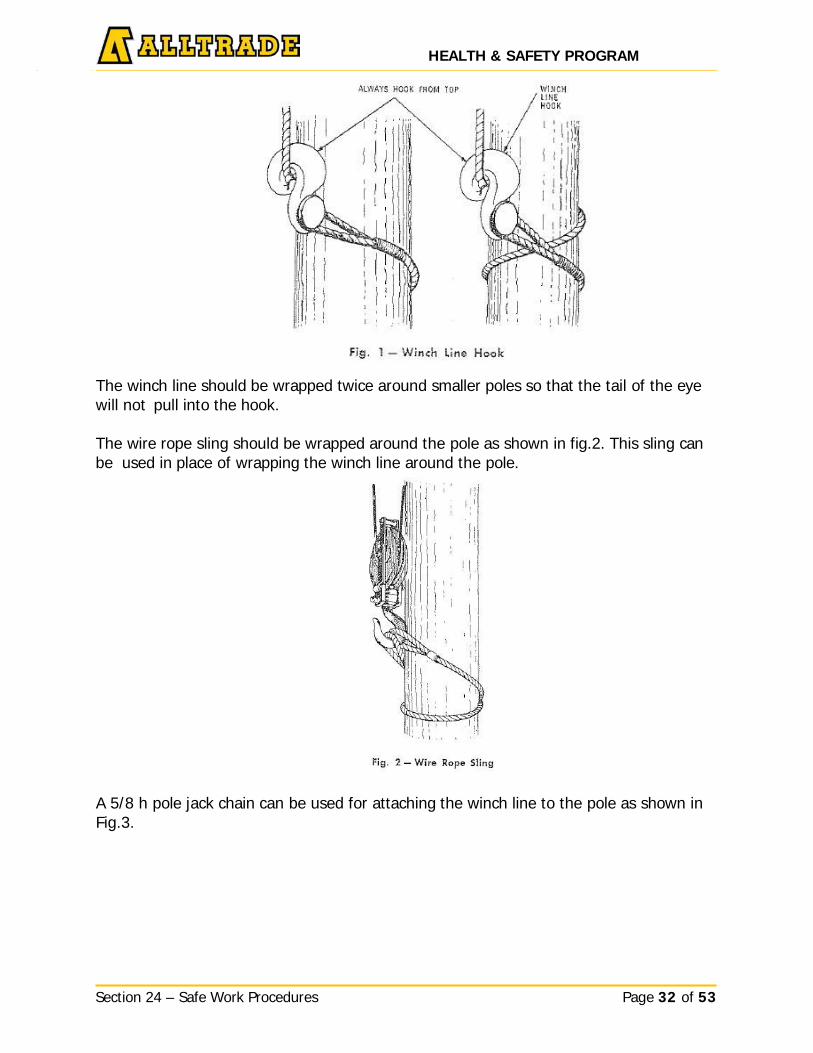
HEALTH & SAFETY PROGRAM _ _
Section 24 – Safe Work Procedures Page 32 of 53
The winch line should be wrapped twice around smaller poles so that the tail of the eye will not pull into the hook.
The wire rope sling should be wrapped around the pole as shown in fig.2. This sling can be used in place of wrapping the winch line around the pole.
A 5/8 h pole jack chain can be used for attaching the winch line to the pole as shown in Fig.3.
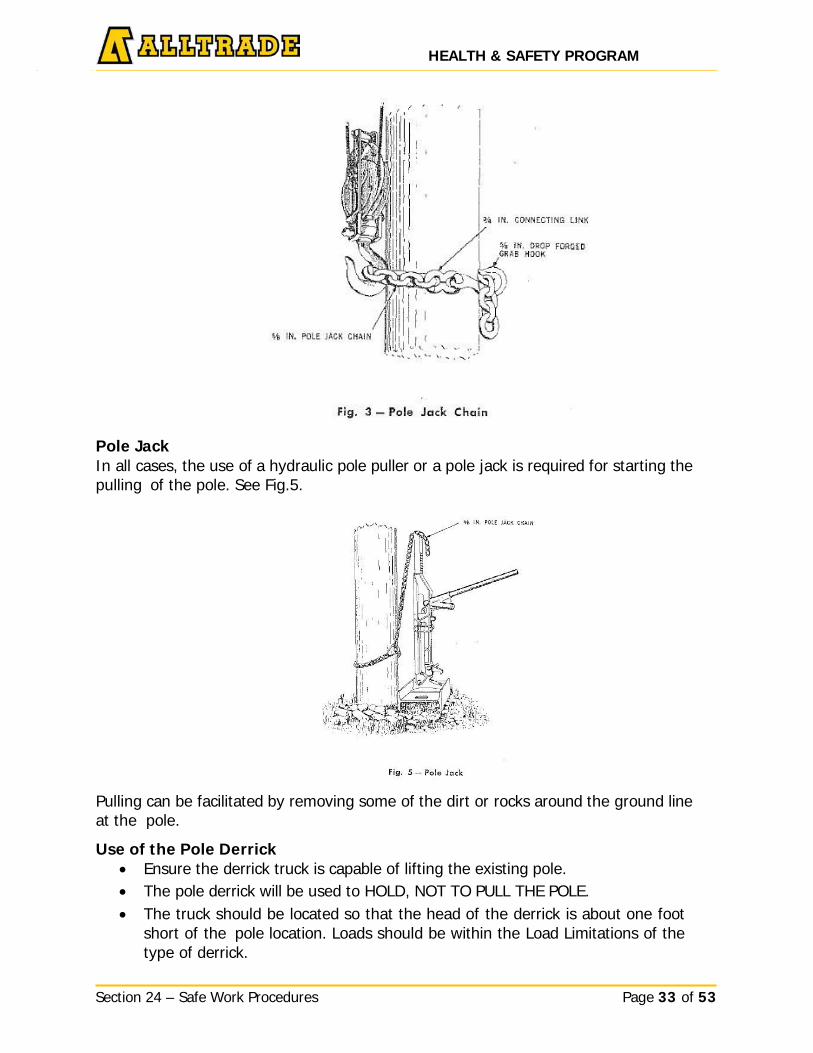
HEALTH & SAFETY PROGRAM _ _
Section 24 – Safe Work Procedures Page 33 of 53
Pole Jack In all cases, the use of a hydraulic pole puller or a pole jack is required for starting the pulling of the pole. See Fig.5.
Pulling can be facilitated by removing some of the dirt or rocks around the ground line at the pole.
Use of the Pole Derrick • Ensure the derrick truck is capable of lifting the existing pole.• The pole derrick will be used to HOLD, NOT TO PULL THE POLE.• The truck should be located so that the head of the derrick is about one foot
short of the pole location. Loads should be within the Load Limitations of thetype of derrick.
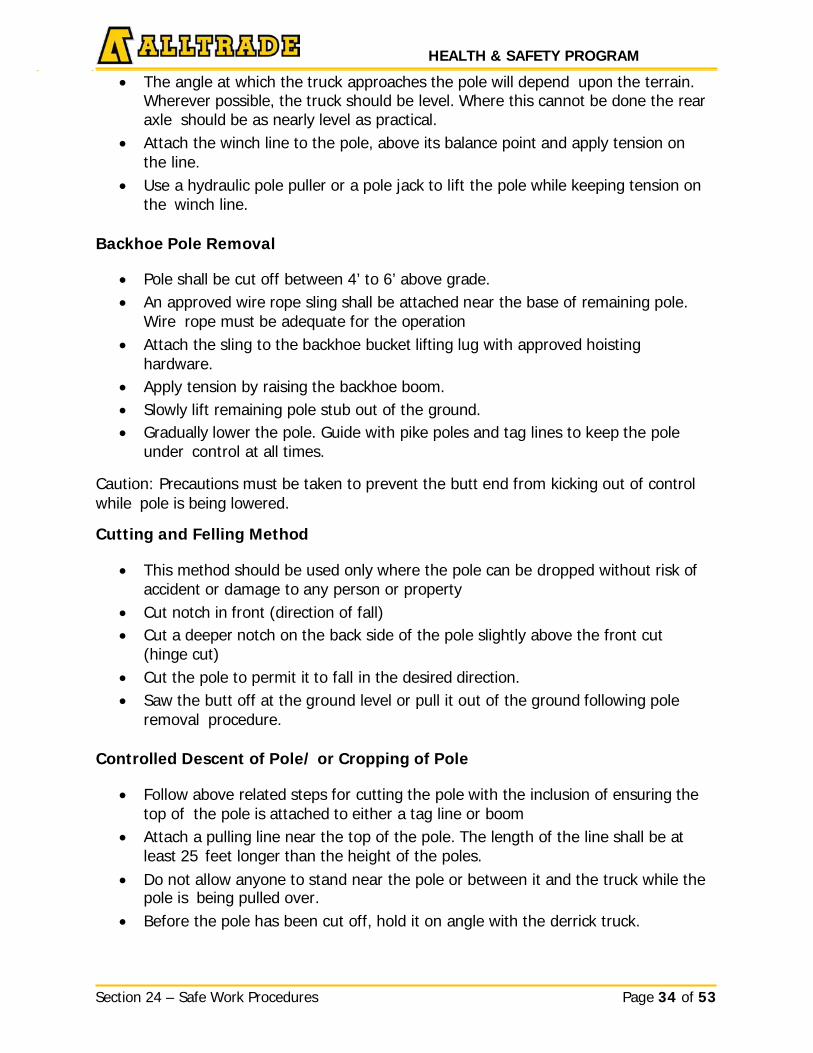
HEALTH & SAFETY PROGRAM _ _
Section 24 – Safe Work Procedures Page 34 of 53
__ __
• The angle at which the truck approaches the pole will depend upon the terrain.Wherever possible, the truck should be level. Where this cannot be done the rearaxle should be as nearly level as practical.
• Attach the winch line to the pole, above its balance point and apply tension onthe line.
• Use a hydraulic pole puller or a pole jack to lift the pole while keeping tension onthe winch line.
Backhoe Pole Removal
• Pole shall be cut off between 4’ to 6’ above grade.• An approved wire rope sling shall be attached near the base of remaining pole.
Wire rope must be adequate for the operation• Attach the sling to the backhoe bucket lifting lug with approved hoisting
hardware.• Apply tension by raising the backhoe boom.• Slowly lift remaining pole stub out of the ground.• Gradually lower the pole. Guide with pike poles and tag lines to keep the pole
under control at all times.
Caution: Precautions must be taken to prevent the butt end from kicking out of control while pole is being lowered.
Cutting and Felling Method
• This method should be used only where the pole can be dropped without risk ofaccident or damage to any person or property
• Cut notch in front (direction of fall)• Cut a deeper notch on the back side of the pole slightly above the front cut
(hinge cut)• Cut the pole to permit it to fall in the desired direction.• Saw the butt off at the ground level or pull it out of the ground following pole
removal procedure.
Controlled Descent of Pole/ or Cropping of Pole
• Follow above related steps for cutting the pole with the inclusion of ensuring thetop of the pole is attached to either a tag line or boom
• Attach a pulling line near the top of the pole. The length of the line shall be atleast 25 feet longer than the height of the poles.
• Do not allow anyone to stand near the pole or between it and the truck while thepole is being pulled over.
• Before the pole has been cut off, hold it on angle with the derrick truck.
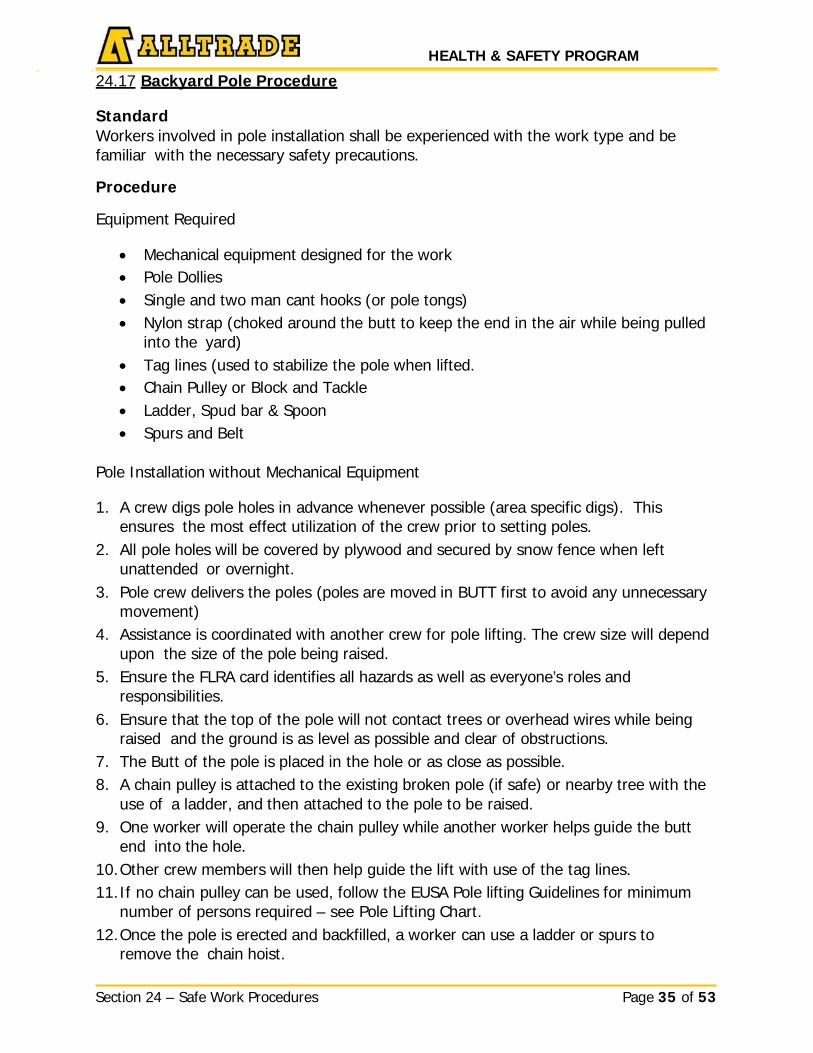
HEALTH & SAFETY PROGRAM _ _
Section 24 – Safe Work Procedures Page 35 of 53
__ __
24.17 Backyard Pole Procedure
Standard Workers involved in pole installation shall be experienced with the work type and be familiar with the necessary safety precautions.
Procedure
Equipment Required
• Mechanical equipment designed for the work• Pole Dollies• Single and two man cant hooks (or pole tongs)• Nylon strap (choked around the butt to keep the end in the air while being pulled
into the yard)• Tag lines (used to stabilize the pole when lifted.• Chain Pulley or Block and Tackle• Ladder, Spud bar & Spoon• Spurs and Belt
Pole Installation without Mechanical Equipment
1. A crew digs pole holes in advance whenever possible (area specific digs). Thisensures the most effect utilization of the crew prior to setting poles.
2. All pole holes will be covered by plywood and secured by snow fence when leftunattended or overnight.
3. Pole crew delivers the poles (poles are moved in BUTT first to avoid any unnecessarymovement)
4. Assistance is coordinated with another crew for pole lifting. The crew size will dependupon the size of the pole being raised.
5. Ensure the FLRA card identifies all hazards as well as everyone’s roles andresponsibilities.
6. Ensure that the top of the pole will not contact trees or overhead wires while beingraised and the ground is as level as possible and clear of obstructions.
7. The Butt of the pole is placed in the hole or as close as possible.8. A chain pulley is attached to the existing broken pole (if safe) or nearby tree with the
use of a ladder, and then attached to the pole to be raised.9. One worker will operate the chain pulley while another worker helps guide the butt
end into the hole.10. Other crew members will then help guide the lift with use of the tag lines.11. If no chain pulley can be used, follow the EUSA Pole lifting Guidelines for minimum
number of persons required – see Pole Lifting Chart.12. Once the pole is erected and backfilled, a worker can use a ladder or spurs to
remove the chain hoist.

Section 24 – Safe Work Procedures Page 36 of 53
HEALTH & SAFETY PROGRAM _ _
Note: If you are raising or removing a pole near hydro cables, follow the Overhead Electrical Awareness Guideline (EUSA). Contact the local hydro authority for assistance.
For further assistance, contact your EHS Department.
The chart below outlines the number of workers required to manually lift depending on the pole length. This chart is designed to ensure unnecessary stress and strain is not placed on the workers body.
Pole Lifting Chart Pole
Length M(ft.)
Number of Workers
Workers at Chain Hoist
Workers at BUTT
7.6 (25) 5 1 1 9.1 (30) 6 1 1 10.6 (35) 7 1 1 12.2 (40) 8 1 1 13.7 (45) 10 1 1 15.2 (50) 10 1 1
When there are not enough workers to erect a pole safely, a pole may be raised with a suitable block and tackle or chain pulley.
See next Page for Wooden Poles Data Chart
Note: These weights are approximate values and are not to be considered as exact measurements for hoisting purposes.
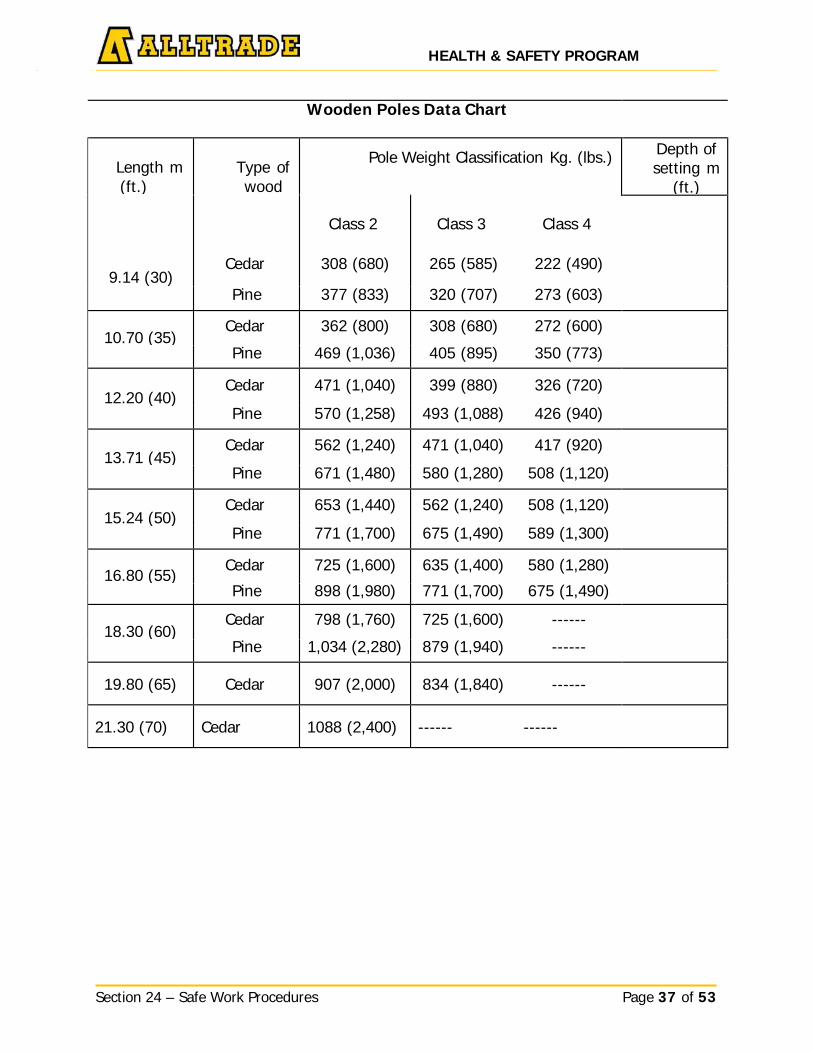
Section 24 – Safe Work Procedures Page 37 of 53
HEALTH & SAFETY PROGRAM _ _
Wooden Poles Data Chart
Length m (ft.)
Type of wood
Pole Weight Classification Kg. (lbs.) Depth of setting m
(ft.)
Class 2 Class 3 Class 4
9.14 (30) Cedar 308 (680) 265 (585) 222 (490)
Pine 377 (833) 320 (707) 273 (603)
10.70 (35) Cedar 362 (800) 308 (680) 272 (600)
Pine 469 (1,036) 405 (895) 350 (773)
12.20 (40) Cedar 471 (1,040) 399 (880) 326 (720)
Pine 570 (1,258) 493 (1,088) 426 (940)
13.71 (45) Cedar 562 (1,240) 471 (1,040) 417 (920)
Pine 671 (1,480) 580 (1,280) 508 (1,120)
15.24 (50) Cedar 653 (1,440) 562 (1,240) 508 (1,120)
Pine 771 (1,700) 675 (1,490) 589 (1,300)
16.80 (55) Cedar 725 (1,600) 635 (1,400) 580 (1,280)
Pine 898 (1,980) 771 (1,700) 675 (1,490)
18.30 (60) Cedar 798 (1,760) 725 (1,600) ------
Pine 1,034 (2,280) 879 (1,940) ------
19.80 (65) Cedar 907 (2,000) 834 (1,840) ------
21.30 (70) Cedar 1088 (2,400) ------ ------
Section 24 – Safe Work Procedures Page 38 of 53
HEALTH & SAFETY PROGRAM __ __
24.18 Backhoe Pole Installation
Standard Workers involved in pole installation shall be experienced with the work type and be familiar with the necessary safety precautions.
Procedure There will be instances where backhoes will be necessary to install poles based on geographic location. Backhoes will only be used as the preferred installation method if the following conditions are met:
• Poles to be installed are far enough off-road edge that a pole truck cannot reachthe area
• There are no buildings or businesses within the installation area• There are no members of the public or vehicular traffic within the surrounding
installation area• The terrain is too rough for a pole truck
Pole Installation with Backhoe
1. Ensure the work space is safe and clear for the preferred method2. Review the locate sheets prior to any digging.3. Spot existing utilities that are within the locate area4. Identify overhead obstructions such as hydro.5. Begin digging hole for new pole installation6. Set backhoe on solid ground prior to lifting pole7. Inspect lifting chains prior to lifting. Discard any defective chains8. Follow Alltrade's Rigging Safety procedure9. Place chain around pole for lifting (chain must be on high side of level)10. The backhoe operator needs to communicate with crew the lift approach, the work
area and the drop zone11. Ensure a spotter is controlling all persons from entering into the lift area and drop
zone.12. The backhoe will slowly raise the pole and line it up with the hole.13. Place the butt of the pole low and as close as possible to the hole14. One worker will assist guiding the pole butt into the hole with a 5/8" tag line.15. Backhoe will slowly raise the pole and lower it into the hole.16. Backfill around pole before the chain or sling is removed.17. Ensure good communication and hand signals
Note: If you are raising or removing a pole near hydro cables, follow the Overhead Electrical Awareness Guideline (EUSA). Contact the local hydro authority for assistance.
For further assistance, contact your EHS Department.
Section 24 – Safe Work Procedures Page 39 of 53
HEALTH & SAFETY PROGRAM __ __
24.19 Establishing Safe Work Zones - Flagging and Tagging
Standard Yellow or Red ribbon with proper identification tags will be used to create a warning barrier when hazards exist within that work area.
Procedure / Practice
• Determining the risk of a particular hazard within a work area will determine thecolor of ribbon used.
• The supervision/workers performing the work will be responsible for choosing thecolor of ribbon to be used and the right amount of area needed to adequatelysafe out the job area.
• Yellow ribbon shall be used to identify to others that hazards exist but are notconsidered to be of a critical nature but caution still needs to be taken within theribboned area.
• When an area is to be protected or hazards are identified as serious and couldcause severe injuries to those not directly involved in the work, Red ribbon willbe used.
• If Red ribbon is being used it shall fully surround the hazardous/protected area sothat no one can mistakenly enter the area.
• Where Yellow ribbon is being used it will be placed in such a way to warn peopleentering from any direction that hazards do exist in that work area.
• All flagging must be tagged on all sides with information of the time and date theribbon was placed, a contact number and/or person, and the reason for the areabeing ribboned off.
• All ribboning must be removed and disposed of at the end of the work day orwhen work is completed.
• In the case that Red ribbon is to be left up for a following shift, supervision of thefollowing shift shall be advised of the hazards within the ribboned area, taggingmust also be up dated to reflect these changes.
• Red ribbon shall not be removed by anyone outside of the crew that placed itunless two (2) acting supervisors take the responsibility to ensure it is safe to doso.
NOTE: When anyone is asking or invited to enter into a Red ribboned area and is not directly involved in the job under way they must read and sign onto the FLRA/JSA on the outside of the Red ribboning before entering. That person does not now have the right to come and go but must resign if gone for any period of time that the hazardous conditions may have changed.
Those entering or invited into a red ribboned area will be the responsibility of supervision of that job.
HEALTH & SAFETY PROGRAM
Section 24 – Safe Work Procedures Page 40 of 53
__ __
24.20 Asbestos - Hazardous Substance (Designated Substances where applicable)
General Information
Likely locations of asbestos are; Deck/structural fireproofing, pipe covering, AC valve insulation, gasket material, sprayed on fireproofing, floor tile, roofing felts, drywall joint filling compounds, boiler installations, electrical insulator boards whose manufacture and installation predate the early 1980’s. The owner of the premises containing asbestos is obligated to inform the Constructor/Prime Contractor as part of the bid process, that asbestos containing materials may be present.
Standard At no time will Alltrade employees engage in work activities involving handling or disturbance of friable asbestos containing materials. Workers who are required to remove, disturb, or install asbestos containing materials must be adequately trained in safe work practices, health effects, as well as use, care and limitations of Personal Protective Equipment.
Procedure
Note: Check with local jurisdictions on designated substances, for specific work procedures involving asbestos containing materials.
Managers shall consider the following prior to undertaking work with asbestos:
1. All asbestos related work should be sub-contracted out to reputable asbestosremoval Alltrade that has been prequalified (see section Subcontractor/Supplier) toperform asbestos handling/abatement activities.
2. All tasks where Alltrade employees may be exposed to airborne asbestos must beassessed and adequate work methods that address removal and cleanup activitieswill be developed in consultation with the Alltrade EHS Department. All employeesinvolved in this work activity, must be trained in the procedures to be followed.
3. These work activities will be designed to ensure workers are not exposed beyond theoccupational exposure limit as per the jurisdiction.
4. Alltrade employees required to handle, or that may be exposed to airborne Asbestosfibers must wear Respiratory protection. Protection must be adequate to preventexposures greater than permissible exposure levels, as specified in legislationapplicable to the local jurisdiction where the work will be performed. (See PersonalProtective Equipment Section for Guidance)
5. Alltrade employees required to handle or that may be exposed to airborne Asbestosfibers must wear impervious clothing (Tyvek coveralls) which must be removed,prior to leaving the exclusion area. A wash up area must be provided within or inclose proximity to the exclusion area and used by all employees leaving the workarea.
6. Disposal of asbestos containing material and impervious clothing shall be as follows;Double bag and seal in yellow plastic bags labeled “Caution Asbestos Dust Hazard”and have disposed of in accordance to local jurisdictional requirements ConsultAlltrade EHS Department prior to disposal of Asbestos containing waste & materials).
HEALTH & SAFETY PROGRAM
Section 24 – Safe Work Procedures Page 41 of 53
__ __
7. Likely locations of asbestos are:• Deck fireproofing• Pipe covering• Ac valve insulation• Gasket material• Sprayed on fireproofing• Vinyl asbestos floor tile• Asbestos roofing felts• Joint filling compounds• Asbestos boiler installations
8. The owner of the premises containing asbestos is obligated to inform the Constructorprior to the bid process.
Workers that encounter materials labeled as Asbestos Containing Material (ACM), or Presumed Asbestos Containing Material (PACM) will not disturb the material. If workers suspect material to contain asbestos they are to contact their supervisor.
Workers that are exposed to asbestos beyond the occupational exposure limits may require additional health assessments and surveillance as per the jurisdiction. Consult with the EHS Department for specific programs and obligations.
Health Effects of Asbestos
Chronic high-level exposure (beyond occupational exposure limits) to asbestos fibers increases the potential for an individual to develop specific cancers known to be associated with asbestos. Inhalation of these fibers is the primary cause of asbestos related disease.
Inhaled asbestos is associated with three primary diseases:
1. Asbestosis: Asbestos causes scarring of lung tissue that eventually restricts one'sability to inhale
2. Lung Cancer: Asbestos increases the risk of lung cancer, especially in combinationwith exposure to tobacco smoke.
3. Mesothelioma: Asbestos is thought to be the primary cause of this rare and deadlytype of cancer of the lung lining and chest wall
Direct Buried Duct – Suspected of Containing Asbestos
Procedure The following procedure is for removing direct buried or concrete encased fibre duct suspected of containing asbestos.
HEALTH & SAFETY PROGRAM
Section 24 – Safe Work Procedures Page 42 of 53
__ __
Identification Underground White Fibre Duct
Manufactured asbestos-cement products (also referred to as “Transit” products) were used from 1935 to 1970. The discovery of these conduits may occur during any conduit break out or demolition work.
Material & Equipment • 9 mm clear plastic bags• Disposable suits• 6 mm yellow plastic bags• Rags• Pail (5 gal.)• Mineral oil• Water• Water softener• Half-face respirators• High efficiency particulate aerosol (H.E.P.A), filters• Rubber gloves (disposable)• Disposable rubber boot covers• Work tent• Barriers• Caution tape• “Hazardous Asbestos Material” warning sign• H.E.P.A. vacuum cleaner• Duct tape
Asbestos Procedure
1. Establish a work area protection zone.2. Following normal work methods, remove the overburden to expose the duct or the
concrete encased duct structure.3. Following exposure of the concrete encased duct structure, use a hydraulic hammer
to begin removal of concrete from the duct.4. When duct is visible, determine if it is the fibre duct suspected of containing
asbestos.5. If it is a suspected asbestos fibre duct, set up a work tent around the work area and
post “Warning Asbestos Material” signs.6. In addition to the hard hat, safety boots, and eye protection, put on the following:
• Disposable suits (coveralls),• Half-mask respirator equipped with H.E.P.A filters,• Disposable rubber boot covers,
HEALTH & SAFETY PROGRAM
Section 24 – Safe Work Procedures Page 43 of 53
__ __
• Disposable rubber gloves,• Seal the cuffs (pants & sleeves) of the suits with duct tape.
7. If the duct structure is contained in concrete, use high-voltage gloves instead ofdisposable rubber gloves. Using the hydraulic hammer, continue to remove concretefrom the fiber duct.
8. Following removal of the concrete encasing the fibre duct, remove high voltagerubber gloves, dispose of leather covers as waste, and clean the rubber gloves. Puton disposable rubber gloves. Moisten the fibre duct by swabbing the surface with arag saturated with mineral oil. Used rags must be treated as asbestos waste.
9. Using a small hammer carefully break the fiber duct. Place the broken duct into a clear9 mm plastic bags and seal with duct tape. Place clear plastic bags in 6 mm yellowplastic bags and seal with duct tape.
10. Using H.E.P.A. vacuum, clean the sidewalk or roadway covered by the work tentVacuum the work area inside trench, around the duct.
11. Remove material from vacuum and dispose as asbestos waste.12. After removing and bagging the fiber duct, and cleaning the work area, wash all hand
tools with water to which a small amount of water softener was added. Rags generatedmust be considered asbestos waste.
13. Remove disposal rubber boot covers, disposable suits, and disposable gloves. Placein plastic bags containing asbestos waste.
14. Remove respirator. Detach filter and discard as asbestos waste. Rinse respirator inwater containing water softener.
15. Pass any contaminated wastewater generated during removal through an H.E.P.A.filter prior to disposal. Contaminated water is to be disposed of at the asbestoswaste dump.
16. Transport the 6 mm yellow bags of waste to a designated asbestos waste dumpsite.Ensure the load is secured and covered with tarp during transport.
17. Using normal work methods restore the duct bank.
Note: DO NOT USE compressed air tools during any of this work.
24.21 Winter Preparedness
Standard Alltrade is aware of and committed to controlling all workplace hazards that are associated with winter weather. Management will consider winter weather related hazards through the planning of the work and all other work activities and implement controls to maintain workplace safety.
Raise Awareness Prior to the winter months workplaces that may be affected by winter weather should consider raising awareness of potential hazards and prepare for work activities using the following best practices:
• Raise overall awareness of the potential hazards of winter season work andconditions.
HEALTH & SAFETY PROGRAM
Section 24 – Safe Work Procedures Page 44 of 53
__ __
• Provide comprehensive guidance on Winter Work awareness, preparedness andimplementation for management and supervisory personnel working withinAlltrade work areas, and for partner and contractor management personnelconducting activities under Alltrade stewardship.
• Create a selection of processes, practices, tools and equipment specifications thathave previously been successful in supporting winter workplace safety andhealth.
• Provide recommendations for the timing of pre-winter activities to allowworkplaces to prepare in advance for winter work.
• Promote a pre-season readiness process and a post-season review process toestablish the priorities for “this year’s” Winter Work program.
• Implement winter-weather campaigns to address ongoing hazards and seasonalchanges such as:
o Cold Stress Awarenesso Adapting your workplaceo Awareness and use of approved walkwayso Proper PPE
Responsibilities Project management will have overall responsibility and accountability to prepare and plan for winter conditions.
Planning the Work Working in winter weather creates unique hazards in each workplace and management will be responsible to take proactive steps to plan the work safely including, but not limited to:
• Ensure execution schedules are developed in a manner considering winterconditions and associated hazards
• Consider winter constructability issues in terms of equipment reliability andreduced productivity of personnel
• Be aware of work effectiveness between sheltered and non-sheltered work areas• Perform as much exterior work activity as possible during non-winter months• Assess subcontractor’s readiness for winter operations in accordance with site
expectations and plans• Prepare a site plan that will identify walkways, sand/salt locations• Prepare a snow removal plan that includes managing any ongoing freeze / thaw
cycles and the buildup of ice• Coordinate all winter wok plans with any site or client plans that may currently be
in place
Roadways/Walkways As the main focal points for snow removal activities, snow maintenance on roadways and walkways is best managed when appropriate planning has been put into place to
HEALTH & SAFETY PROGRAM
Section 24 – Safe Work Procedures Page 45 of 53
__ __
refine transit way layout and construction. Poor transit way planning can result in work inefficiencies without a snow-load, and work effectiveness can be impacted even more when snow removal activities on poorly planned roads/walks interfere with productivity. In preparation for winter work, planners should take the following points into consideration: Design of roadway/walkway routings (transit ways):
• Review work breakdown structure and identify work schedule (determining timingof onsite materials).
• Define size of working and lay down areas to accommodate tasks, consideringsnow management/clearance needs for winter work (adequate space between‘piles’/modules to permit snow clearing equipment to pass through area).
• Determine vehicular and pedestrian traffic needs.• Develop traffic flow patterns among work areas and identify main traffic routes
(primary and limited alternative routes allowing for both operational work andworker transit needs such as lunch rooms, sanitary facilities, warm up locations).
• Consider physical segregation of walkways and vehicle routes (along paralleltransit ways).
• Consider location, structure and building materials of personnel walkways,constructing walkways of level areas, free of water, use of gratings, expendedmetal walkways, raised walkways, etc. Plan walkways on level areas, free ofwater.
• Determine snow temporary/seasonal storage location and plan snow clearanceroutes to facilitate snow removal/storage.
• During pre-snowfall activities, observe workforce traffic flow, making routeadjustments (or enforce compliance) to established transit ways.
Marking delineation of approved transit ways: • Mark routing corners with permanent markers, taller than anticipated snowfall
(may be illuminated during hours of darkness). • Observe workforce traffic flow. Use barrier tape or rigid barriers to limit access to
alternate routes used by individuals (“shortcuts, goat paths”, etc.).• Evaluate opportunities to run service cabling/hoses parallel to approve transit
ways (may be suspended above ground/anticipated snowfall level if appropriatearrangements are made).
• Delineate and mark approved transit ways prior to first snowfall so that theworkforce can become used to the transit routes and continue to use them whensnow covered.
Building steps and entrances: • Plan for winter operations when constructing steps and entrances (selection of
appropriate material such as expanded metal grating, avoiding sheet steel or plywood surfaces)
• Provide handrails for stairways, even if only two or three steps.
HEALTH & SAFETY PROGRAM
Section 24 – Safe Work Procedures Page 46 of 53
__ __
• At or near each entrance, provide for storage or non-skid materials for tractionassistance during snowy or icy conditions.
• Provide for roof/overhead cover at the top level of the access stairways to keepthe area immediately in front of the doors clear of snow accumulation or iceslippery patches.
• Prior to first snowfall, place signage at the bottom of the entrance stepscautioning personnel to remove ice-grip footwear prior to entering the facility (orclimbing the stairs, depending upon the construction materials).
Snow clearance and transit way maintenance: • Ensure that the appropriate types of equipment and an adequate number of
personnel are assigned to snow clearing, including where necessary, designated workers on the current shift.
• Conduct a pre-snowfall survey of potential obstructions along each route, removewhere possible or establish a vertical visual marker where necessary.
• Where a day shift only is operated, establish a contract for pre-shift snow/iceclearance of designated transit ways.
• Where weather conditions require, provide for snow-clearing activities during theshift.
• During heavy snowfall, establish a traffic priority to snow clearance operations.• For locations employing 24-hour operations, where weather conditions allow, pre-
schedule snow clearing activities for designated times during the shift (mealbreaks, etc.).
• Consider ceasing work during in-shift snow clearing to avoid traffic conflict withnormal work flow and snow clearing activities (traffic conflict will enforce workersto create alternative pathways).
• Keep the route to the snow storage location free of traffic and obstructions tofacilitate effective snow removal.
• In periods of heavy snowfall, identify vehicle routes with secondary temporarymarkers to assist traffic flow and to assist snow clearance crews in identifyingthe routes.
• Where alternative non-approved transit routes become apparent, as soon aspossible establish or re-establish barriers to close that pathway.
• As working and lay down areas have been sized to accommodate snow clearing,during normal operations in snow enforce the restriction that no objects, tools ormaterials are permitted outside of the designated working or lay down areas.
Monitoring the Workplace In support of all winter preparedness activities the established programs, walkways, transit ways and overall site conditions must be continuously monitored. Workplace inspections and audits should include the winter preparedness plans and activities. Due to the nature of winter work and changing site conditions the site must be constantly monitored for:
HEALTH & SAFETY PROGRAM
Section 24 – Safe Work Procedures Page 47 of 53
__ __
• Any conditions or obstructions that would result in the workforce takingalternative or unclear pathways to get to their work location or complete theirwork
• Incorporate winter preparedness plans into work planning activities such as theFLRA or JSA
• Manage non-conformance to winter work plans similar to other H&S infractionsup to and including disciplinary action
• Encourage frequent reporting of unsafe conditions and or areas that should becordoned off
Lighting Depending upon the size of the workplace and the relative complexity of the roadway and walkway layout, roadway and task lighting must be appropriately positioned to maximize visibility, minimize ‘dark areas’ and identify specific hazards to vehicles or personnel.
• Once facility layout design has been completed, establish lighting requirements byconsidering planned work activities in periods of darkness or reduced visibility.
• Lighting must be assigned to illuminate vehicle critical intersections. This may beaccomplished through fixed area lighting or through lighting being assigned toilluminate the specific location.
• Fixed lighting for work areas, particularly around structures or field buildings, is tobe planned to reduce shadowing. Areas that are temporarily shadowed may beilluminated through the use of portable self-powered lighting sets/standards/
• Pre-plan the lighting needs prior to hours of extended darkness and arrange forthe necessary lighting equipment to be available in advance
Pedestrian and Traffic Interface Pedestrian and traffic control measures are important to increase safety awareness of both pedestrians and vehicle/mobile equipment operators. The following controls should be considered:
• Segregation of designated walkways and vehicle roadways.• Crosswalks to be clearly marked, visible and enforced.• Pedestrian/worker visibility (high visibility vests at all times when near traffic and
personal lights during hours of darkness).• Speed restrictions (may have to change with seasonal conditions, where snow
buildup reduces road clearance limits).• Safety barriers.• Restricted parking along roadsides and encroaching on walkways.• Roadside demarcation markers and marker visibility in winter.
• Flagmen/Route Spotters to work with moving machinery, check for snow-buriedequipment and other obstructions.
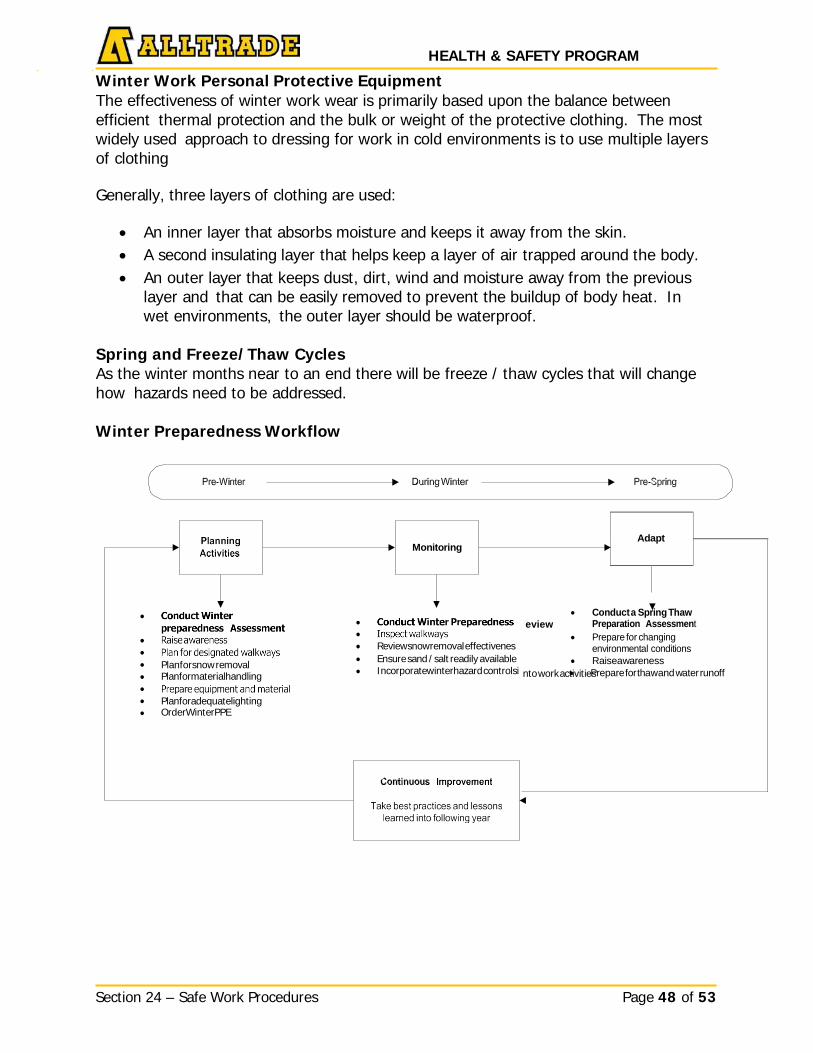
HEALTH & SAFETY PROGRAM
Section 24 – Safe Work Procedures Page 48 of 53
Monitoring
Planforsnow removal Planformaterialhandling
Reviewsnowremoval effectivenes Ensure sand / salt readily available Incorporatewinterhazard controlsi
Planforadequatelighting OrderWinterPPE
__ __
Winter Work Personal Protective Equipment The effectiveness of winter work wear is primarily based upon the balance between efficient thermal protection and the bulk or weight of the protective clothing. The most widely used approach to dressing for work in cold environments is to use multiple layers of clothing
Generally, three layers of clothing are used:
• An inner layer that absorbs moisture and keeps it away from the skin.• A second insulating layer that helps keep a layer of air trapped around the body.• An outer layer that keeps dust, dirt, wind and moisture away from the previous
layer and that can be easily removed to prevent the buildup of body heat. Inwet environments, the outer layer should be waterproof.
Spring and Freeze/Thaw Cycles As the winter months near to an end there will be freeze / thaw cycles that will change how hazards need to be addressed.
Winter Preparedness Workflow
Adapt
• Conduct a Spring Thaweview Preparation Assessment
• Prepare for changing environmental conditions
• Raiseawareness nto workact•ivitiePsrepareforthawand water runoff
Section 24 – Safe Work Procedures Page 49 of 53
HEALTH & SAFETY PROGRAM
24.22 Lightning
Purpose To ensure all employees are educated and prepared in the event of a lightning storm.
Standard This procedure applies to all employees of Alltrade at all work locations.
Lightning is an electrical discharge caused when static electricity builds up between positively and negatively charged areas such as between thunderclouds, or thunderclouds and the ground. Lightning can occur from cloud-to-cloud, within a cloud, cloud-to-ground, or cloud-to-air.
A cloud-to-ground lightning strike begins as an invisible channel of electrically charged air moving from the cloud towards the ground. When one channel nears an object on the ground, a powerful surge of electricity from the ground moves upwards to the clouds and produces the visible lightning strike. Lightning tends to strike higher ground and prominent objects, especially good conductors of electricity such as metal and water.
Lightning occurs in all thunderstorms; each year lightning strikes the Earth 20 milliontimes.
Most lightning fatalities and injuries occur when people are caught outdoors with noshelter.
Lightning can strike without rain actually falling. Lightning may strike several kilometers away. Precautions should be taken even if
the thunderstorm is not directly overhead. Do NOT wait for lightning to strike nearby before taking cover.
30-30 Rule
30 Seconds: Count the seconds between seeing the lightning flash and hearing the thunder clap. Each second represents about 300 meters. If this time is 30 seconds or less, then the lightning storm is less than 10km away and there is an 80% chance that the next strike will happen within that 10km. Seek shelter immediately. Preferably in a building, all- metal vehicle (not a convertible) or in a low-lying area.
30 Minutes: After seeing the last lightning flash or thunder clap, wait 30 minutes before leaving shelter. More than half of lightning deaths occur after the thunderstorm has passed. Stay in a safe area until you are sure the threat has passed.
In the event of a lightning and thunderstorm:
1. When a thunderstorm threatens, get inside a home or large building (That’s the bestchoice) or inside an all-metal (hard top) vehicle with the windows rolled up.
HEALTH & SAFETY PROGRAM
Section 24 – Safe Work Procedures Page 50 of 53
2. Stay away from windows, sinks, toilets, tubs, showers, electric boxes, outlets andappliances. Lightning can flow through these systems and “jump” to a person. 3. Do NOT take a shower or bath during a thunder & lightning storm.4. Unplug appliances if possible and avoid their use.5. If you are inside a vehicle during lightning avoid parking under trees or power lines thatmay topple over during a storm. Be aware of downed power lines that may be touching your vehicle. You are safe inside your vehicle however; you may receive a shock if you step outside.
Caught Outdoors
If outside, with no time to reach a safe shelter (building or vehicle) follow these rules:
a. Do NOT stand underneath a natural lightning rod: tall, isolated trees, towers,power lines, telephone poles etc.
b. AVIOD all unsafe shelters: metal objects such as power poles, fences, gates,bleachers, small sheds, partial shelters, electrical equipment, mowing and road machinery. AVIOD solitary trees, hilltops, water, open fields, high ground and caves.
c. Stay away from wire fences, clotheslines, metal pipes, rails and other metallicpaths which could carry lightning towards you.
d. If you are in a forest, seek shelter in a low area under a thick growth of shortertrees. Crouch down away from tree trunks. In open areas, seek shelter in low places such as a ravine or a valley.
e. Get out of and away from open water. Lightning can strike water and travel somedistance from its point of contact.
f. Get off of and away from motorcycles, scooters, mowing equipment, bicycles andmetal machinery.
g. Ensure all tools are put down. Holding something can make you the tallest objectand a target for lightning.
h. DO NOT stand in puddles even if you are wearing rubber boots.
i. If with a group ensure there are several meters between individuals to avoidlightning from jumping from person to person.
If you feel your skin tingle, your hair stands on end, and/or you hear “crackling noises” a strike may be about to happen. If outdoors, immediately remove metal objects (including baseball cap), and get into the lightning safety crouch.
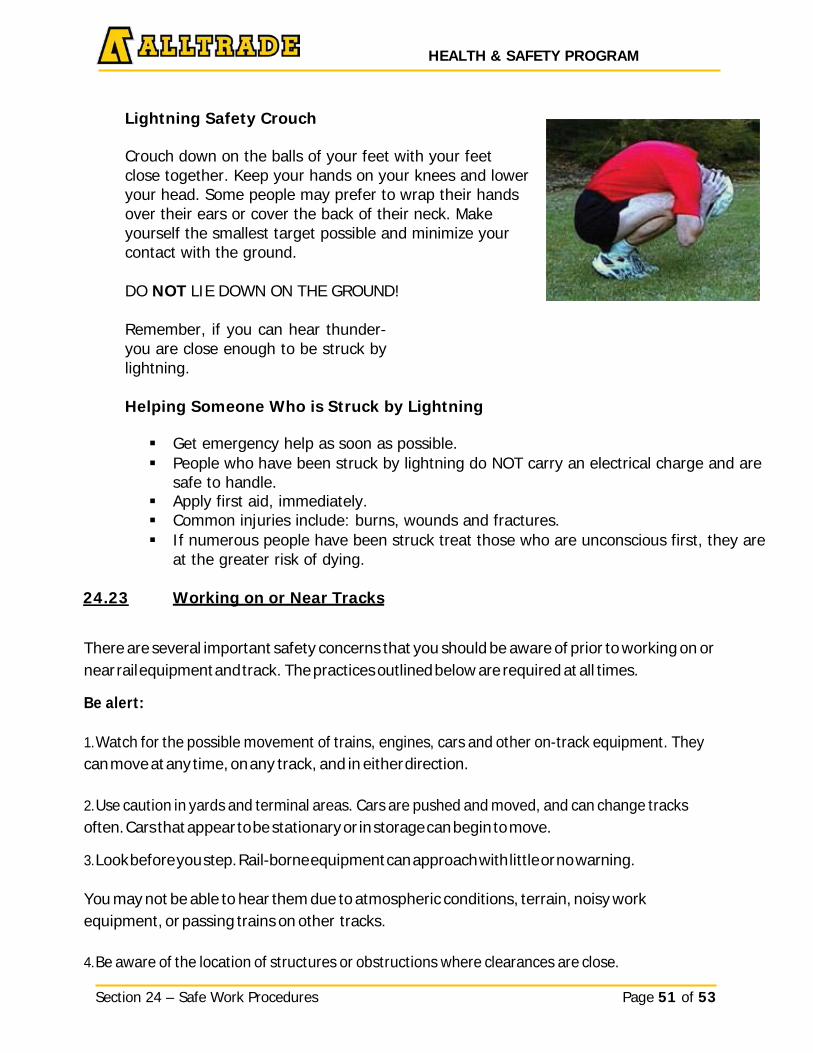
HEALTH & SAFETY PROGRAM
Section 24 – Safe Work Procedures Page 51 of 53
Lightning Safety Crouch
Crouch down on the balls of your feet with your feet close together. Keep your hands on your knees and lower your head. Some people may prefer to wrap their hands over their ears or cover the back of their neck. Make yourself the smallest target possible and minimize your contact with the ground.
DO NOT LIE DOWN ON THE GROUND!
Remember, if you can hear thunder- you are close enough to be struck by lightning.
Helping Someone Who is Struck by Lightning
Get emergency help as soon as possible. People who have been struck by lightning do NOT carry an electrical charge and are
safe to handle. Apply first aid, immediately. Common injuries include: burns, wounds and fractures. If numerous people have been struck treat those who are unconscious first, they are
at the greater risk of dying.
24.23 Working on or Near Tracks
There are several important safety concerns that you should be aware of prior to working on or near rail equipment and track. The practices outlined below are required at all times.
Be alert:
1. Watch for the possible movement of trains, engines, cars and other on-track equipment. Theycan move at any time, on any track, and in either direction.
2. Use caution in yards and terminal areas. Cars are pushed and moved, and can change tracksoften. Cars that appear to be stationary or in storage can begin to move.
3. Look before you step. Rail-borne equipment can approach with little or no warning.
You may not be able to hear them due to atmospheric conditions, terrain, noisy work equipment, or passing trains on other tracks.
4. Be aware of the location of structures or obstructions where clearances are close.
HEALTH & SAFETY PROGRAM
Section 24 – Safe Work Procedures Page 52 of 53
5. Never rely on others to protect you from train or car movement.
6. Make sure that your supervisor knows where you are.
Watch for tripping and slipping hazards:
1. Be aware that rails and ties can be slippery, and railway ballast can shift while walking on top of it.
2. Stay clear of tracks whenever possible.
3. Never stand, walk or sit on railway tracks, between the rails or on the ends of ties unless absolutelynecessary.
4. Never step, stand or sit on rails.
5. Do not occupy the area between adjacent tracks in multiple track territory when a train is passing.
6. Never stand on or foul the track when there is moving equipment.
7. Stand 20 feet away from the tracks if possible when rail equipment is passing through.
Stay away from trackside devices:
1. Stay away from track switches. Remotely operated switch points can move unexpectedly withenough force to crush ballast rock.
2. Stay away from any other railway devices you are unsure of.
When crossing railway tracks:
1. Watch for movement in both directions before crossing.
2. Watch for pinch points at switch locations.
3. If the tracks are clear, walk single file at a right angle to the rails.
4. Never step on the rail.
5. Never walk between the rails of any track.
6. Keep at least 15 feet away from the end of a car or locomotive to protect yourself from suddenmovement.
7. If crossing between two railcars, ensure there is at least 50 feet between them.

HEALTH & SAFETY PROGRAM
Section 24 – Safe Work Procedures Page 53 of 53
Crossing over Equipment
In some cases, you may have to cross over rail equipment. Always try to walk around; however, if you must cross over a car to apply or release a handbrake, be extremely careful and follow these instructions:
1. Never cross under equipment.
2. Never try to cross over moving equipment.
3. Always use safety devices such as ladders, handholds and crossover platforms.
4. Never put your feet on moveable machinery such as couplers, sliding sills or uncoupling levers.
5. Never step onto any part of the coupler or assembly, angle cock, air hose, wheel or truckassembly, train line or operating (uncoupling) lever.
6. Always keep “3-point contact” (e.g. two feet and one hand) with equipment and safety devices.
7. Do not stand, sit or walk on any part of equipment
8. When crossing in front of moving equipment, make sure you are far enough in front that the operatorcan see you
Obstructions can cause tripping hazards and derailments:
1. Keep tracks free of the accumulation of snow, ice, vegetation and debris. It is especiallyimportant to keep flange ways at road crossings free of ice and debris.
2. Remove any discarded banding used to support shipped products and other debris from the tracks.
3. Deliver maintenance materials to the work site as close to the actual work being doneas possible to reduce the risk of materials becoming track obstructions.
4. No equipment or tools should be placed on the rails. Power cords should be run under the tracks at alltimes.
5. Use “clean-as-you-go!” as your everyday work habit.
6. Ensure that the locations of pits or other in-ground hazards are properly marked.
HEALTH & SAFETY PROGRAM _ _
Section 25 – Fire Prevention Page 1 of 17
Title: Fire Prevention Issue Date: January 2016
Section: 25 Revision Date: N/A
Approved by: Bob Ritzmann, President Signature: 25.1 Policy Statement
Alltrade is committed to having a fire prevention plan in each workplace to assist workers and the public to respond to an emergency relating to fire.
25.2 Introduction
If ignition is not presented, there will be no fire. This, then is the line of first defense against fire in buildings, Although the National Building code (NBC) contains few restrictions regarding ignition of the building materials, the National Fire Code (NFC) does place limitations on the placement of textiles such as carpets, furniture, and drapery materials. Flammable liquids and gases are special cases and there are provisions for controlling their location. In general, however, it is difficult to predict where combustible materials might be located, particularly in large buildings.
Even buildings constructed of non-combustible materials will almost without exception contain materials that burn under certain circumstances. On the other hand, materials that are designated combustible according to tests may be out negligible significance in fires.
Wood is a good example of a common material for which fire performance is difficult to predict. It ignites if its surface reaches about 300C in the presence of a flame or perhaps 400-500 deg C in its absence, it may also ignite, however, at much lower temperatures if the time of exposure to heat is longer. Charring, a much above 100 C Table 1 defines the terms that are commonly used to describe the ignition process and its various aspects.
25.3 Definitions
Ignition The initiation of sustained combustion.
Combustibility Combustibility is a measure of how easily a substance will ignite due to fire or combustion.
Flammable and Combustible: What is the difference?
The distinction between flammable and combustible liquids is determined by how easily they ignite--in other words, their "flash point."
The flash point of a flammable or combustible liquid is the lowest temperature at which it gives off enough vapor to form an ignitable mixture with air and produce a flame when a source of ignition is present: Flammable liquids have flash points below 100°F and a vapor pressure at or below 40 pounds per square inch at 100°F
HEALTH & SAFETY PROGRAM _ _
Section 25 – Fire Prevention Page 2 of 17
Combustible liquids have flash points at or above 100°F. Flammable liquids ignite more readily than combustible ones. Flammable liquids also have the ability to vaporize and form flammable mixtures when exposed to air.
Ignitability The ease with which a material can reach the pint of combustion in a specified test regime. The relative ignitability of one material to that of other has meaning only for specified test condition and is not applicable to all test conditions or even to real fire.
Ignition Temperature The lowest temperature at which a sample of material will ignite spontaneously without a spark or flame. This value is often used to assess whether a material could have been a source of ignition. For liquids and gases, it is reasonably well-established characteristic of a substance, but it is less well defined for solids.
Flash Point The temperature at which a liquid or solid ignites and sustains combustion when a small flame is brought near the sample surface. There are several methods of measuring flash point, but they are not generally reliable enough to give the same results for the same material. Flash point is used most commonly to describe the hazard associated with storage of liquids; a flash pint of 0deg C, for example, indicates that the material will ignite in the presence of a small flame even when the temperature of the liquid is 0 deg C.
Lower Explosive Limit (LEL) The minimum concentration of gas in air at which explosion or flame propagation occurs when a heat source such as a spark is applied. This term is employed in the NFC in relation to ventilation systems in which combustible gases are expected to be a problem; for example, in paint spraying booths, dip tanks for finishing operations, and other special processes involving flammable liquids with substantial vapour pressures.
Cause of Ignition Flammable materials may ignite in many ways, some less so. Knowledge of the most important ignition scenarios is essential for designers seeking to reduce the likelihood of fire buildings. The common element is heat transfer. Heat may be transferred by radiation through space, by conduction, upon direct contact with a heat source, or by convection (where air, or other heated fluid, moves to carry heat from source to sample). All ignitions are caused by a version of heat transfer, although other factors may influence them.
Flames The most common ignition source is flame. A match flame transfers heat primarily by convection and may be simply represented in laboratory testing. Larger flames, 0.5m high or more, transfer heat primarily by radiative transfer and may ignite objects without coming into direct contact with them. The larger the flame the more probable radiative ignition becomes.
HEALTH & SAFETY PROGRAM _ _
Section 25 – Fire Prevention Page 3 of 17
Hot Surface Hot surface can also cause fire. A heated metal block can transfer sufficient heat (by conduction) to raise the temperature of some materials above their ignition temperature. The most common case of ignition by this means is probably the kitchen fire in which towel is ignited by contact with a cooking element.
Sparks Sparks generate very high temperatures in a very small space, but except when flammable gas mixtures are involved it is rare that a spar will cause ignition in the absence of other factors.
Exposure Time This can be critical. An intense heat source may cause a fire in a very short time, but so may a much less intense heat source over a longer period. Thus, fire in a waste paper basket may ignite a sofa very quickly, but a carelessly dropped cigarette may also cause ignition given more time.
Configuration It is difficult to ignite a sample in intimate contact with an efficient heat sink such as the metal hull of a ship in contact with the sea. At the other extreme is an insulated material that may not be able to dissipate heat sufficiently fast to prevent a temperature rise high enough to cause ignition. Thus, spontaneous combustion can occur by mild self- heating caused by very slow oxidation (as in coal dust) or the effects of biochemical attack (as in damp hay).
Secondary Ignition The propagation of fire beyond the site of primary ignition will almost inevitably involve secondary ignition of surrounding materials. Now the ignition source is most often larger than before and may present an exposure different from the original. A lit match may not set a room on fire, but if it ignites the contents of a waste paper basket the room may become vulnerable.
When a fire has generated sufficient heat to make the upper reaches of a room very hot, there can eventually be sufficient radiation from this hot layer to ignite essentially all of the remaining un-burnt materials in the area. This is termed flashover. Survival in the room would now not be possible.
Measurement of Ignition The results of tests related to other fire properties can provide useful information about the tendency of a material to ignite. In Canada, the surface flame spread test, or tunnel test, is designed to rate materials by their propensity to spread flame or generate smoke. This test also gives information on ignitability. A material with a high flame- spread rating by this test is often easy to ignite. No assurance can be given, however, that the relationship will always hold. The tunnel test results should therefore be used with considerable caution in predicting the ignition behaviour of materials.
HEALTH & SAFETY PROGRAM _ _
Section 25 – Fire Prevention Page 4 of 17
_ _
Consider, for example, how to rate a large wall hanging of textile fabric. A tunnel test may be of little value se the test uses long, thin samples (7.0 m by 0.66 m) attached horizontally to the roof of a test tunnel. A large flame is applied and the time taken for it to pass down the tunnel is measured. The conditions of burning are most unlike those to be expected of a textile hanging on a wall and probably represent a far less severe condition than the most likely fire scenario.
Laboratory versus Scenario Testing The majority of tests are tied to the definitions of ignition-related characteristics (for example, combustibility, flash point, and lower explosive limit, Table 1). Often it is not possible to identify all the factors involved in practical ignitions. Regulators rely mainly on the results of test procedures that simulate the actual application. These demonstrations, however, can be far more expressive than the more controlled, laboratory test procedures and they are often less informative.
Fire behaviour is influenced by so many uncontrolled variables that prediction is extremely difficult. A useful technique is the worst-case scenario. As serious a set of circumstances as can be envisaged is selected and material performance is probability that the material will perform well in less severe fire conditions. The technique, however, encourages expensive overdesign that results in unnecessary use of highly fire-resistant materials.
Alternative Strategies In addition to controlling ignition by material selection, the designer may use active or passive fire protection measures, or both.
Active Fire Protection Active techniques sense a primary ignition either manually or by automatic means to evoke a response. Automatic sprinkler systems are the most common. Where they are not desirable, substances that quench flames chemically may be used, for example, halon gases or dry powders. Carbon dioxide is also effective, displacing the oxygen necessary to sustain fire.
Passive Fire Protection Passive techniques rely on built-in fire protection measures and do not require activation. Fire-resistant compart-mentation of rooms, for example, is an important element of the fire protection of buildings.
Protective Coatings A very simple technique for protecting combustible material from unwanted ignition is to cover the surface with a non-combustible protection. Metal sheathing is used to protect some combustible insulation products. The wall closest to a wood stove installation should be protected from thermal radiation by a suitable non-combustible cover sheet. A similar form of protection is available for a wide variety of surfaces by applying a chemical coating (intumescent coating) like a paint; it has the useful property of expanding and hardening when exposed to heat, thus presenting a fire-resistant and heat-insulating barrier. This technique is used to protect combustible walls and to afford useful fire resistance to structural columns and non-combustible surfaces made of steel.
HEALTH & SAFETY PROGRAM _ _
Section 25 – Fire Prevention Page 5 of 17
_ _
Fire Retardants The addition of chemicals to combustible materials can control fire behaviour. Fire retardants may simply absorb heat, often by causing the liberation of steam from chemicals that contain water; alumina is often used in this way. Others may form a char through which heat has difficulty passing; many fire retardants containing phosphorus work in this manner. They may enhance melting at a low temperature, thus causing a material to flow away from a heat source; many additives to synthetic polymers have this effect. They may evolve a flame-inhibiting gas; poly (vinyl chloride) is a polymer containing chlorine that on heating liberates hydrogen chloride, a gas that inhibits combustion. Lastly, on heating they may assist the transformation of the material to a less flammable material, usually by cross-linking the polymer chains (from which many materials are made) into a hard, thermally resistant solid.
Material Location Unwanted ignitions are more than an engineering problem. Their control is a social problem too. Attitudes towards fire differ widely from one country to another. Canada, with one of the world’s worst fire loss records, could with advantage adopt some of the principles of fire protection used in other countries. Responsibility for the location of combustible materials is properly that of the building occupants, owners and users, se they are the prime risk takers. In some countries this responsibility is a civic duty, and any dereliction is a punishable offence; the owner of a building that suffers a fire may be prosecuted.
Conclusion Ignition prevention remains the primary means of avoiding fires. While no single method of evaluating materials is specifically directed to ignitability, the common fire test methods often provide useful indication of successful ignition control.
The damage caused by unwanted ignition can be minimized by appropriate choice and use of materials. Where caution outweighs cost, protection against the worst of all conceivable potential ignition cases should be considered. If material choice has been exhausted as a method of control, active and passive fire protection measures must be considered. The avoidance of fire is a social responsibility, and the cooperation of building occupants is the most powerful asset.
The following is a description of the three degrees of fire loading within the occupancy.
Light (Low) Fire Load: An Occupancy in which Class A combustible materials including furniture, window treatments and its contents is of minor quantity. Small amounts of Class B flammable liquids such as duplicating and cleaning solvents are included provided that they are kept in closed containers and stored properly.
Ordinary (Moderate) Fire Load: An occupancy in which Class A combustibles, Class B flammable liquids and Class C energized electrical equipment are in greater amounts than expected under a low hazard. These locations include dining areas, storage areas, parking garages and assembly halls.
HEALTH & SAFETY PROGRAM _ _
Section 25 – Fire Prevention Page 6 of 17
_ _
Extra (High) Fire Load: an occupancy in which the total amount of Class A combustibles, Class B flammable liquids and Class C energized electrical equipment present is over and above those classified as moderate hazard. These occupancies and areas includes laboratories, cooking areas, trade shops and warehouses.
25.4 Fire Tetrahedron
In order to understand how fire extinguishers work, you first need to know a little bit about fire.
Four things must be present at the same time in order to produce fire:
1. Enough oxygen to sustain combustion, 2. Enough heat to raise the material to its ignition temperature, 3. Some sort of fuel or combustible material, and 4. The chemical, exothermic reaction that is fire.
For many years the concept of fire was symbolized by the Triangle of Combustion and represented, fuel, heat, and oxygen. The fire triangle was changed to a fire tetrahedron to reflect this fourth element. A tetrahedron can be described as a pyramid which is a solid having four plane faces. Essentially all four elements must be present for fire to occur, fuel, heat, oxygen, and a chemical chain reaction. Removal of any one of these essential elements will result in the fire being extinguished.
The four elements are oxygen to sustain combustion, sufficient heat to raise the material to its ignition temperature, fuel or combustible material and subsequently an exothermic chemical chain reaction in the material. Each of the four sides of the fire tetrahedron symbolizes the Fuel, Heat, Oxygen and Chemical Chain Reaction. Theoretically, fire extinguishers put out fire by taking away one or more elements of the fire tetrahedron
Fire safety, at its most basic, is based upon the principle of keeping fuel sources and ignition sources separate.
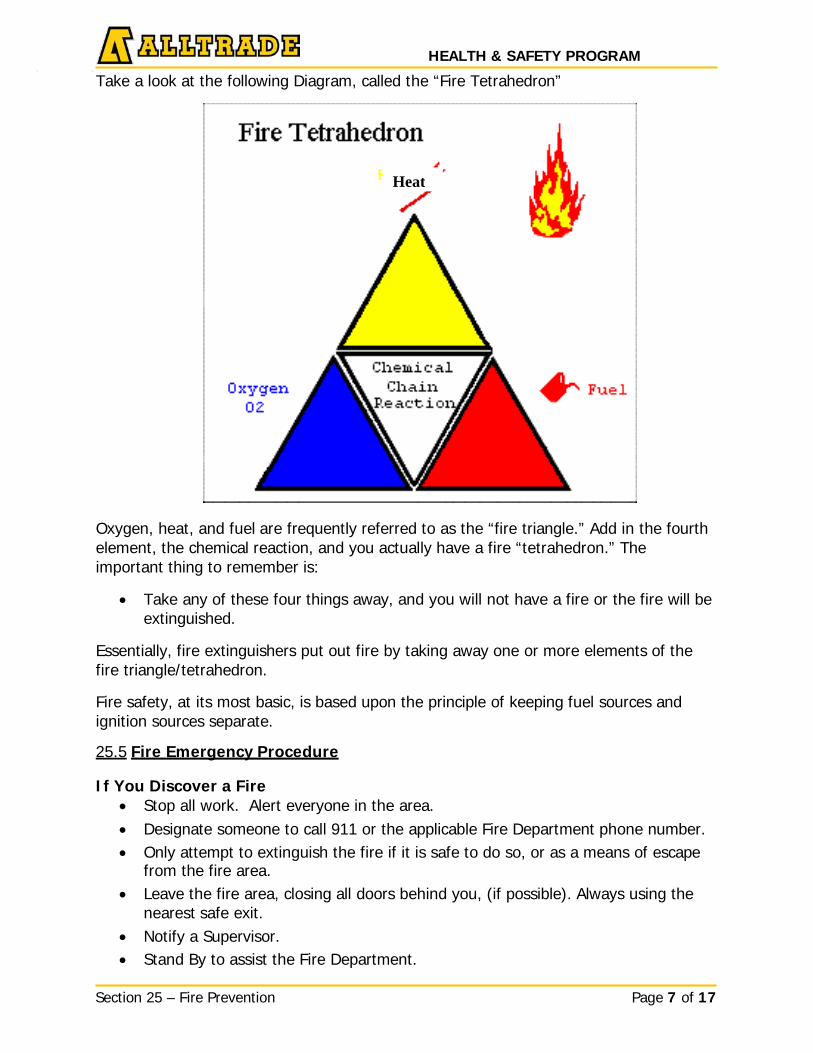
HEALTH & SAFETY PROGRAM _ _
Section 25 – Fire Prevention Page 7 of 17
_ _
Take a look at the following Diagram, called the “Fire Tetrahedron”
Oxygen, heat, and fuel are frequently referred to as the “fire triangle.” Add in the fourth element, the chemical reaction, and you actually have a fire “tetrahedron.” The important thing to remember is:
• Take any of these four things away, and you will not have a fire or the fire will be extinguished.
Essentially, fire extinguishers put out fire by taking away one or more elements of the fire triangle/tetrahedron.
Fire safety, at its most basic, is based upon the principle of keeping fuel sources and ignition sources separate.
25.5 Fire Emergency Procedure
If You Discover a Fire • Stop all work. Alert everyone in the area. • Designate someone to call 911 or the applicable Fire Department phone number. • Only attempt to extinguish the fire if it is safe to do so, or as a means of escape
from the fire area. • Leave the fire area, closing all doors behind you, (if possible). Always using the
nearest safe exit. • Notify a Supervisor. • Stand By to assist the Fire Department.
Heat
HEALTH & SAFETY PROGRAM _ _
Section 25 – Fire Prevention Page 8 of 17
_ _
Evacuating Work Areas (Buildings, Trailers, Site) When being requested to evacuate a work area:
• Stop all Work • Shut down all equipment (if possible) • DO NOT return to pick up your belongings • Use stairs - Do not use elevator
Procedure after Evacuation The Supervisor is responsible for ensuring that all workers are accounted for. Workers are to assemble at pre-planned staging area. A roll-call will take place when all workers are assembled. This will determine if there are any missing person(s).
Procedure for Calling the Fire Dept. 1. Go to the nearest safe phone and call "911" or the applicable emergency phone
number. 2. Ask for the Fire Dept. and give them the following information:
a. Name First and Last. b. Alltrade's name. c. The location of the site. d. Details regarding the fire. e. Wait for further instruction if it is safe to do so.
Controlling and Identifying a Fire Hazard All workers are responsible for reporting, controlling, or identifying a fire hazard on all Alltrade workplaces. Consider the following:
• No smoking around flammable liquids. • Do not obstruct access or egress roads. (Safe evacuation routes are to be clear). • Do not block fire cabinets or fire suppression equipment. • Return spent fire extinguishers to your Supervisor for recharging. • Reports are to be directed to Supervision for review.
Access for/to Fire Fighting Equipment and Vehicles In order to provide a safe and unobstructed Fire Department access to the construction site, vehicles or equipment shall not be parked in fire routes or near fire hydrants unless approved by the Supervisor.
In all offices, industrial settings and construction projects: • Ensure that all exits are clear of material and easily accessible. • Ensure that all Fire hose cabinets, stand pipes & wall mounted extinguishers are
easily accessible and not blocked with material or machinery (clear within 1 m. around and clear path to device).
• Ensure annual inspections of fire extinguishers. • Ensure all equipment has a minimum 5lb abc mounted on equipment in an
accessible location.
Section 25 – Fire Prevention Page 9 of 17
HEALTH & SAFETY PROGRAM _ _
The National Fire Protection Association (NFPA) classifies fires into five general categories (U.S.):
1. Class A fires are ordinary materials like burning paper, lumber, cardboard, plastics
etc. 2. Class B fires involve flammable or combustible liquids such as gasoline, kerosene,
and common organic solvents used in the laboratory. 3. Class C fires involve energized electrical equipment, such as appliances, switches,
panel boxes, power tools, hot plates and stirrers. Water can be dangerous extinguishing medium for class C fires because of the risk of electrical stock unless a specialized water mist extinguisher is used.
4. Class D fires involve combustible metals, such as magnesium, titanium, potassium and sodium as well as pyrophoric organometallic reagents such as alkyllithiums, Grignards and diethylz. These materials burn at high temperatures and will react violently with water; air, and/or other chemicals. Handle with care!!
5. Class K fires are kitchen fires; this class was added to the NFPA portable extinguisher Standard 10 in 1998. Kitchen extinguishers installed before June 30, 1998 are “grandfather” into the standard. This extinguisher is a wet chemical class.
25.6 Fire Extinguishers
A worker is not required to fight a fire. Only if his/her life is in danger should he/she proceed to try and extinguish a fire.
There are two points to remember before using a fire extinguisher to put out a fire:
• Know what is burning. • Know the class of fire extinguisher that is required.
Fire Extinguishing Equipment
Standard All workers shall be familiar with the use of fire extinguishing equipment in the work area.
Procedure
• These types of fire extinguishers are commonly found in construction areas:
Class A Water for wood, paper, etc. Class AB Foam for ordinary combustibles and flammable liquids Class B Dry chemical for flammable liquids Class BC Carbon Dioxide
Dry Chemical
for flammable liquids and live electrical equipment for flammable liquids and live electrical equipment
Class C Carbon Dioxide for electrical fires
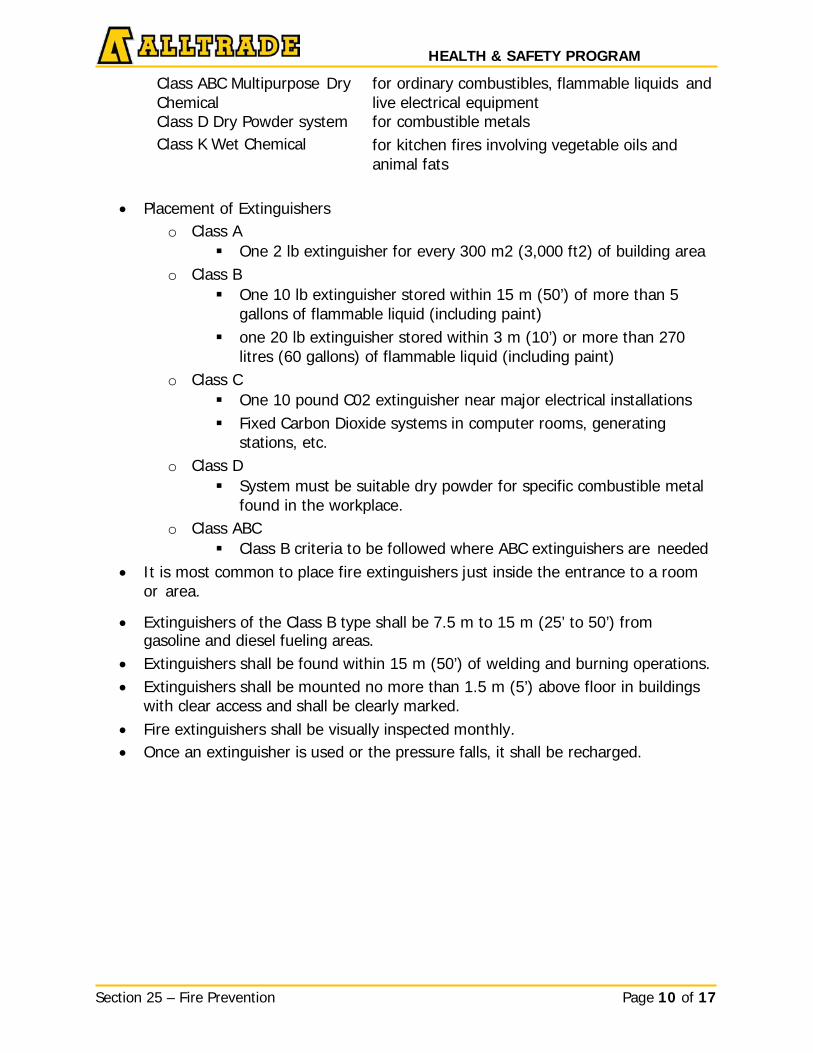
HEALTH & SAFETY PROGRAM
Section 25 – Fire Prevention Page 10 of 17
Class ABC Multipurpose Dry Chemical
for ordinary combustibles, flammable liquids and live electrical equipment
Class D Dry Powder system for combustible metals Class K Wet Chemical for kitchen fires involving vegetable oils and
animal fats
• Placement of Extinguisherso Class A
One 2 lb extinguisher for every 300 m2 (3,000 ft2) of building areao Class B
One 10 lb extinguisher stored within 15 m (50’) of more than 5gallons of flammable liquid (including paint)
one 20 lb extinguisher stored within 3 m (10’) or more than 270litres (60 gallons) of flammable liquid (including paint)
o Class C One 10 pound C02 extinguisher near major electrical installations Fixed Carbon Dioxide systems in computer rooms, generating
stations, etc.o Class D
System must be suitable dry powder for specific combustible metalfound in the workplace.
o Class ABC Class B criteria to be followed where ABC extinguishers are needed
• It is most common to place fire extinguishers just inside the entrance to a roomor area.
• Extinguishers of the Class B type shall be 7.5 m to 15 m (25’ to 50’) fromgasoline and diesel fueling areas.
• Extinguishers shall be found within 15 m (50’) of welding and burning operations.• Extinguishers shall be mounted no more than 1.5 m (5’) above floor in buildings
with clear access and shall be clearly marked.• Fire extinguishers shall be visually inspected monthly.• Once an extinguisher is used or the pressure falls, it shall be recharged.
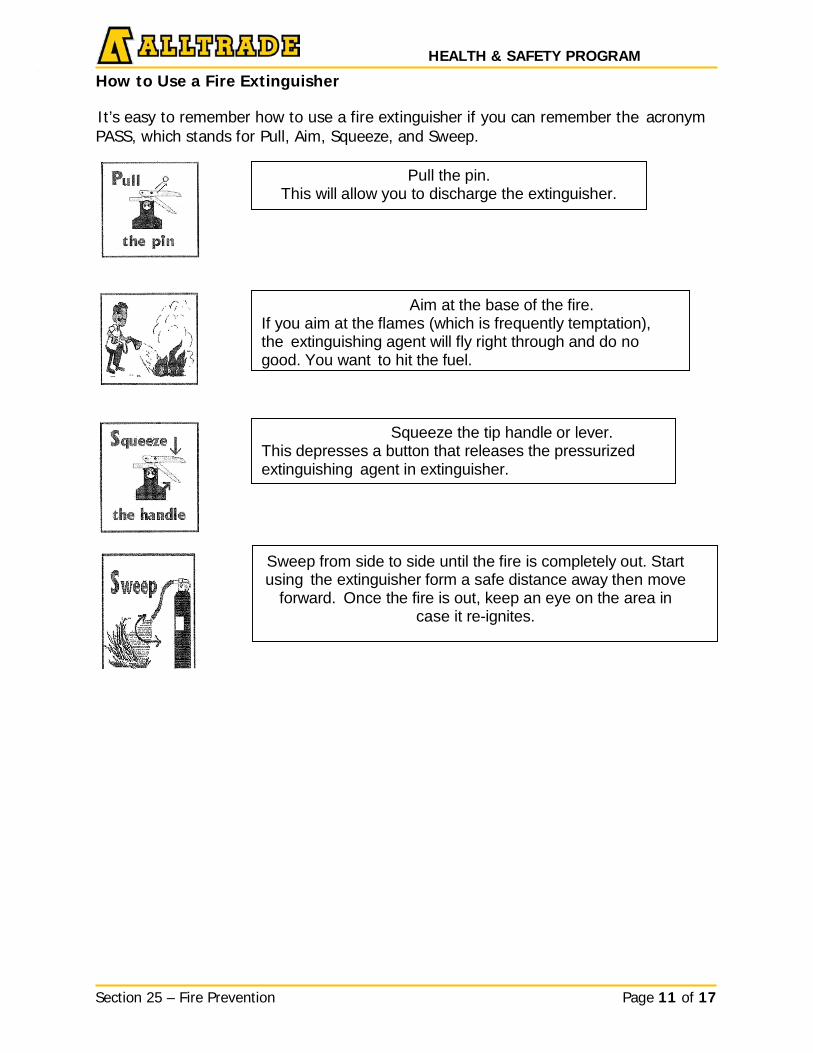
HEALTH & SAFETY PROGRAM _ _
Section 25 – Fire Prevention Page 11 of 17
How to Use a Fire Extinguisher
It’s easy to remember how to use a fire extinguisher if you can remember the acronym PASS, which stands for Pull, Aim, Squeeze, and Sweep.
Sweep from side to side until the fire is completely out. Start using the extinguisher form a safe distance away then move
forward. Once the fire is out, keep an eye on the area in case it re-ignites.
Squeeze the tip handle or lever. This depresses a button that releases the pressurized extinguishing agent in extinguisher.
Aim at the base of the fire. If you aim at the flames (which is frequently temptation), the extinguishing agent will fly right through and do no good. You want to hit the fuel.
Pull the pin. This will allow you to discharge the extinguisher.
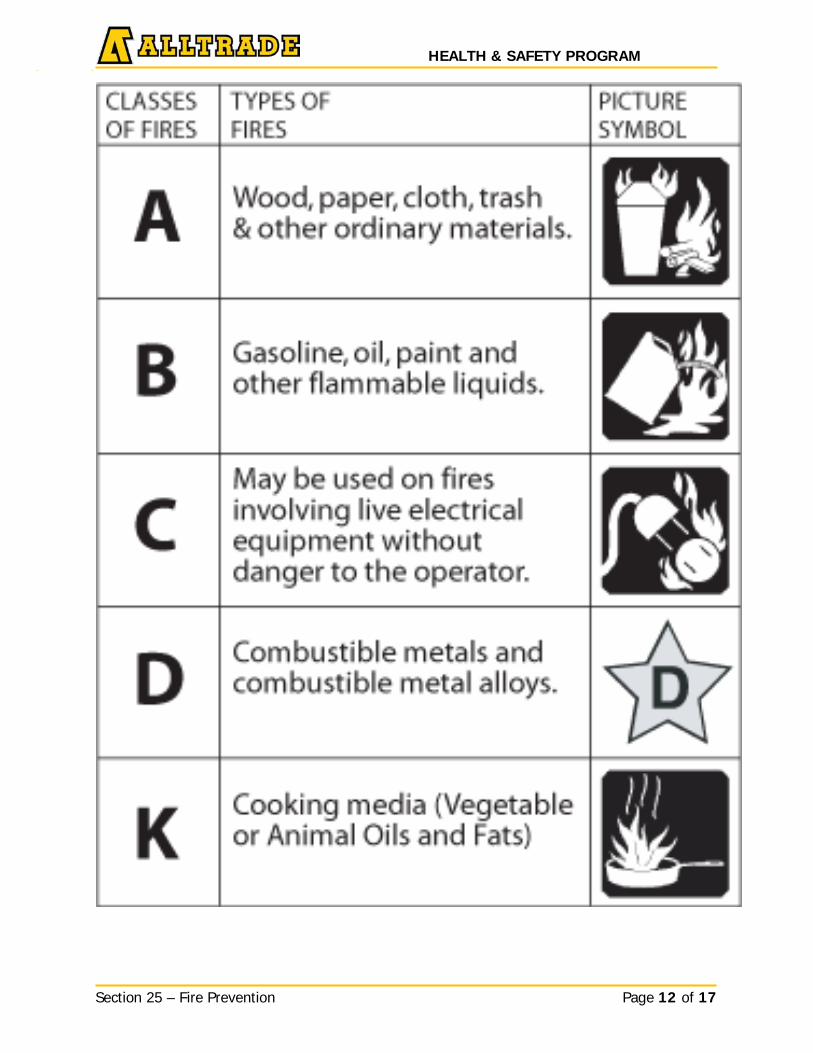
HEALTH & SAFETY PROGRAM _ _
Section 25 – Fire Prevention Page 12 of 17
_ _
HEALTH & SAFETY PROGRAM _ _
Section 25 – Fire Prevention Page 13 of 17
_ _
25.7 Portable Fire Extinguisher Inspection and Maintenance Procedure
Standard To establish standard procedures for the inspection and maintenance of portable fire extinguishers.
Policy Portable fire extinguishers will be inspected and maintained to ensure that they are properly located and operational in accordance with NFPA standards.
Procedure
Portable fire extinguishers will be inspected monthly. The inspection should include the following:
• Extinguishers are located in their designated location, are secured properly andare the proper type.
• Extinguishers are not obstructed with respect to access or visibility.• Extinguishers are examined for obvious physical damage, corrosion, leakage, or
clogged nozzles.• Legible operating instructions are on the extinguisher nameplate facing outward.• Seals and tamper indicators are not broken or missing.• Pressure-gauge readings or indicators are in operable ranges.
Annual maintenance will involve a thorough examination of the fire extinguisher shell and its external mechanical parts. The maintenance will include the following:
• All monthly inspection items.• Inspection of the hose and nozzle for cracks, blockages, or other damage.• Inspection of extinguisher shell for corrosion, dents, or other damage.• Carbon dioxide extinguishers are weighed to ensure no weight deviation greater
than 10%.
When inspection or maintenance of any extinguisher reveals a deficiency in operating condition, the following corrective actions are to be taken immediately.
• A spare extinguisher of the same type and equal or greater rating shall replacethe extinguisher.
• Defective extinguishers are to be marked as such and placed in an appropriateplace until repair and/or recharging is performed. A defective tag to identifyproblems will be attached.
Documentation of inspection and maintenance will be provided by maintaining the following records:
• A fire extinguisher inspection record tag is attached to each extinguisher andprovides the following information.
• The date the extinguisher was inspected.• The condition of the extinguisher.• The initials of the person performing the inspection.
HEALTH & SAFETY PROGRAM _ _
Section 25 – Fire Prevention Page 14 of 17
_ _
The fire extinguisher inspection record must indicate the date of the last charge; recharge and the last date of hydrostatic testing must be recorded.
If inspections and maintenance procedures are performed by outside vendors under contracts, an Alltrade Rep will obtain a copy of the annual inspection and maintenance report from the vendor and submit a copy of this report to the EHS Advisor by the end of contract and fiscal year to ensure compliance.
25.8 Hot Work Permit
Standard To prevent loss of life, personal injury, the loss of equipment or property damage resulting from fires or explosions at all Alltrade construction sites, and Fabrication shops.
Scope This procedure applies to all employees, and sub-contractors that perform work on Alltrade construction sites, and fabrication shops.
Definitions
Hot Work Any work involving burning, welding, grinding, heat treating, powder driven fasteners, hot riveting, spark producing tools, or hot surfaces (above 450 degrees Fahrenheit), heat treating pipe, cutting utilizing gases, or similar operations that produce / use a spark, flame or heat
Hot Work Permit A document issued for the purpose of authorizing hot work activity. This may be issued by Alltrade, or our client depending on specific contracts. See H&S_FORM_074.
Fire Watch The responsibility of watching the person performing the hot work, and the area in order to address any sparks or other sources that could cause a fire.
Fire Monitoring The responsibility of monitoring the area where the hot work took place after the hot work is completed. This is a minimum of 30 minutes after the completion of hot work. This may be longer on specific sites \ projects.
Responsibilities
Supervisors, Project Manager and Project Coordinators • Issue hot work permits to employees, & sub-contractors as required.• Verify that the conditions on the hot work permit have been met.• Maintain hot work equipment in safe operational condition.• Ensure that the conditions on the hot work permit are understood by those
performing the work.• Ensure there is a properly trained person designated to perform fire watch duties.
HEALTH & SAFETY PROGRAM _ _
Section 25 – Fire Prevention Page 15 of 17
_ _
• Train workers in the provisions of the hot work procedure and all requirements ofthe hot work permit
Workers Performing the Hot Work • Obtain hot work permit from their supervisor or designate prior to starting hot
work. • Review the hot work permit, and follow the precautions on the permit.• Ensure permit is posted at the hot work area.• Does not start any hot work prior to physically receiving the hot work permit in
their hand.• Ensure conditions of the permit have been met before starting hot work.• Uses the appropriate PPE.
Fire Watch • Ensure that adequate number and type of fire extinguishers are available, fully
charged, and inspected. • Is trained in their duties.• Know how to report a fire or other emergency.• Maintain the fire watch for the duration of the hot work, and for a minimum of 30
minutes after the completion of hot work.• Does not leave the hot work area unless relieved by another trained fire watch.• Ensures that the conditions of the Hot Work Permit are met at all times.• Use the appropriate PPE.
Sub-Contractors • Are to work in compliance with this procedure.
Hot Work Procedures
Exemptions
Hot Work Permits are not required when the hot work is being performed in industrial establishments designed for fabricating. Consult with the EHS Department for further information.
Note: Although a hot work permit is not required, adequate measures must still be taken. i.e. area clear of combustibles, fire extinguisher readily available, hot work area should be monitored after the completion of hot work for at least 30 minutes even though a dedicated Fire Watch is not required. Prohibited Hot Work Area
• Areas inside a confined space where explosive gases, vapours or dust exist overthe minimum acceptable limits as per local regulations.
• On metal walls, ceilings or roofs built of composite, combustible and sandwich-type panel construction, or having combustible covering.
• On containers where flammable liquids, solids or vapors may be present.• On pipe or beams that are in contact with combustible wall, ceilings, roofs or
partitions where heat can travel and cause ignition.
HEALTH & SAFETY PROGRAM _ _
Section 25 – Fire Prevention Page 16 of 17
_ _
Prior to Hot Work Beginning • JSA or FLRA must be completed prior to the job starting.• Trained Fire Watch is available.• Ensure that the work area within 10m (35ft) of the hot work has been:
o Cleared of combustible material or covered with fire blanket.o Combustible floors are either wetted down or covered with a fire blanket.o No flammable liquids or materials are present.o There are no atmospheric hazards such as vapors, mists, fumes, or dusts
present.o Obtain Hot Work Permit from Alltrade Supervisor or Client Representative.o Have the appropriate inspected fire extinguishers readily available at the
work face.
Note: A Hot Work Permit will be issued ONLY when the above-mentioned conditions are met.
During Hot Work • Fire watch will be present for the entire duration of hot work, including lunch and
breaks. • Hot Work Permit will be posted at the job site for the entire duration of hot work.• Fire extinguishing equipment will be maintained in close proximity to the hot work
for the entire duration. Note: Clients do not always allow for the use of theirfirefighting equipment.
• Hot Work area is to be kept clear of combustibles at all times.• Compressed Gas bottles are to be turned off and protective caps put back on
when not in use, and during lunch and breaks.• Conditions on the hot work permit are to be followed at all times.
After Hot Work is Complete • Fire watch must monitor for no less than 30 minutes after the hot work has been
completed. • Fire extinguishing equipment must remain at the hot work area until after the fire
watch has been relieved of their duties.• Hot Work Permit is to be returned to Alltrade or Client if applicable.
25.9 Temporary Heat
Standard Temporary heat shall be arranged so that no danger of uncontrolled fire exists.
Procedure
• Combustibles such as tarpaulins, wood and flammable liquids will be positioned nocloser than 3 m (10’). If combustibles are in the direct flow of heat, no closer than6 m (20’).
• Safety features on the heaters must be operating properly. Contact themanufacturer/supplier for further information.
HEALTH & SAFETY PROGRAM _ _
Section 25 – Fire Prevention Page 17 of 17
_ _
• Heaters cannot be set on combustible materials and must be protected fromdamage due to overturning.
• The temptation is great to locate heaters near a means of access/egress becausefresh air is available for combustion. It is against the law to restrict access/egresswith a portable heater.
• Fuel lines must be guarded to prevent accidental damage.• When open flame heaters are operating continuously, a designated person will
be assigned to inspect it periodically.• A viable means of extinguishing a fire must be readily available.• Familiarize yourself with the fuel source emergency shutoff.• Any temporary heating system requiring the use of propane requires special
training in propane handling (Where legislated) Please contact your EHSDepartment for further details.
• Open flame heaters shall not be used as temporary heat in an occupied building.
Note: Temporary heat must be by means of an approved heating device. Equipment such as hand-held torches etc. are not an acceptable means for providing temporary heat.
25.10 Smoking Near Flammables
Smoking near or during the dispensing of any flammable materials can have a devastating effect to a worker and your work place. It is imperative for workers who smoke to adhere to the following requirements.
1. Site specific or client Workplace Smoking Policy.2. Smoking Policy.3. No Smoking in all Identified areas. This includes all buildings, offices, site trailers,
building roofs, storage containers and any vehicle/equipment rented or owned with acab.
4. Never smoke during a refueling operation or within 10 feet of a Fuel Storage area.Examples; Compressed Gas storage, bulk storage.
25.11 Burning and Forest Fire Prevention
Burning of construction refuse including but not restricted to trees, branches, waste wood, or construction materials shall only be undertaken in accordance with the conditions and requirements of a burning permit issued by the applicable authorities and shall, in all cases, comply with the requirements of applicable forest fire prevention practices.
Any burning shall comply with applicable fire codes for the area.
HEALTH & SAFETY PROGRAM
Section 26 – Heavy Equipment, Vehicles and Preventative Maintenance Page 1 of 35
Title: Heavy Equipment, Vehicles and Preventative Maintenance Issue Date: January 2016
Section: 26 Revision Date: January 2017
Approved by: Bob Ritzmann, President Signature:
26.1 Policy Statement
Alltrade requires that all tools, equipment, and vehicles are maintained as per the manufacturer requirements. This will ensure proper procedures and standards are used when maintaining equipment in our workplaces.
Operators are to complete a safety circle check and report any equipment problems immediately to their supervisor. The supervisor shall make sure that such problems are attended to immediately by authorize mechanical personnel.
The heavy equipment information contained in this section is to be used as a working guideline. Always refer to the operator’s manual for specific information and maintenance schedules.
General heavy equipment operators must be competent, trained or knowledgeable in the specific equipment they operate either by unions, trade qualifications, 3rd party agencies or experience.
26.2 Personal Protective Equipment & General Safety Awareness
• Heavy equipment operators must wear hard hats when the equipment they are operating is not equipped with an enclosed cab.
• Hard hats are required any time operators get out of the cab. See Section 9 on Personal Protective Equipment.
• Seat belts are to be worn as per manufacturer specifications. • Always take time to make sure of footing. • Develop the 3-point contact habit (one hand and two feet or two hands
and one foot). • Don't jump off the machine. Don't get off the machine while it is in
motion. • Take care when dismounting equipment. • Be aware of your work area and the people in it. • Do not leave equipment running unattended. • Report all incident/accidents and safety opportunities to a supervisor.
26.3 Pre-Checks & Start-Ups
• Before starting equipment, complete the Equipment Operators Daily Inspection, conduct a visual inspection and check oil levels, tires, lights
HEALTH & SAFETY PROGRAM
Section 26 – Heavy Equipment, Vehicles and Preventative Maintenance Page 2 of 35
and backup horn. Add oil if required. • Disengage all drive mechanisms and clutches. • Start equipment. Warm up for approximately 30 minutes in cold weather,
15 minutes in warm weather. • Ensure buckets are lowered and brakes are applied.
26.4 Equipment General Operating Procedures
• Always operate equipment within the rated capacity and according to manufacturer instructions, as found in the operator's manual
• Ensure that the trailer deck and ramp are clear of snow and ice when loading or unloading equipment.
• Before mounting equipment, perform a walk-around and inspection. Report any safety defects and repair requirements to a supervisor.
• Always face equipment when mounting and dismounting. Make sure both hands are free to assist in climbing onto the equipment.
• Read and obey operator warning decals placed on equipment. • Make sure footwear is free from grease and dirt when climbing on and off
machines. • Use operator's manual start up and shut down procedures. • Use a signal person at all times when view is obstructed. • Operators shall be off the machine during servicing and repair procedures. • Operate equipment with lights on at all times. • When leaving machines, ensure you engage all safety brakes and lower all raised
components. • Do not allow anyone to ride on equipment that is not equipped to carry
passengers. • Use stabilizers when digging with rubber tired backhoe. • Do not overbalance machine when lifting or digging. • Do not use bucket as a "jack-hammer" – use the ripper. • Ensure work area is clear of persons and equipment. • Operate hydraulic controls smoothly. • Do not ride in the back of pickup trucks. • Obey speed limits and posted signs. • When passing other vehicles, use extreme caution. • For greater visibility, whenever possible, choose to make left hand turns rather
than right hand turns. • Always be aware of and maintain defensive driving techniques. • Do not use cell phones or other personal electronics while operating any
HEALTH & SAFETY PROGRAM
Section 26 – Heavy Equipment, Vehicles and Preventative Maintenance Page 3 of 35
equipment • No smoking in any equipment • Where there is a hazard of overhead hazards and falling material, equipment will
be equipped with a Falling Object Protective Structure (FOPS), designed and installed as per manufacturer’s requirements.
• Where there is a hazard of equipment overturn, equipment will be equipped with a Roll Over Protective Structure (ROPS), designed and installed as per manufacturer’s requirements.
26.5 Road Right of Way
1. Obtain necessary excavation permit from the jurisdictional authority. 2. Examine the nature of the traffic at the work site to fully understand the consequences
or proposed interruption. 3. Review time restrictions for closing or diverting traffic. 4. Place barricades and other warning signs as appropriate. 5. Assign traffic control persons to their duties (see Traffic control person section, below) 6. Bring in equipment and man power as necessary.
26.6 Traffic Control Person
1. Use personal protective equipment – (hard hat, high visibility safety vest, safety
footwear). 2. Check sign to ensure it can be seen clearly (colour and writing). 3. If using hand radio, check to ensure it is working. 4. Position yourself where you can be seen by project and road traffic. 5. Make sure you communicate with other traffic control persons on traffic movement. 6. Direct traffic. 7. Do not use personal electronics while directing traffic.
Note: See Traffic Control Section Traffic Control Plan.
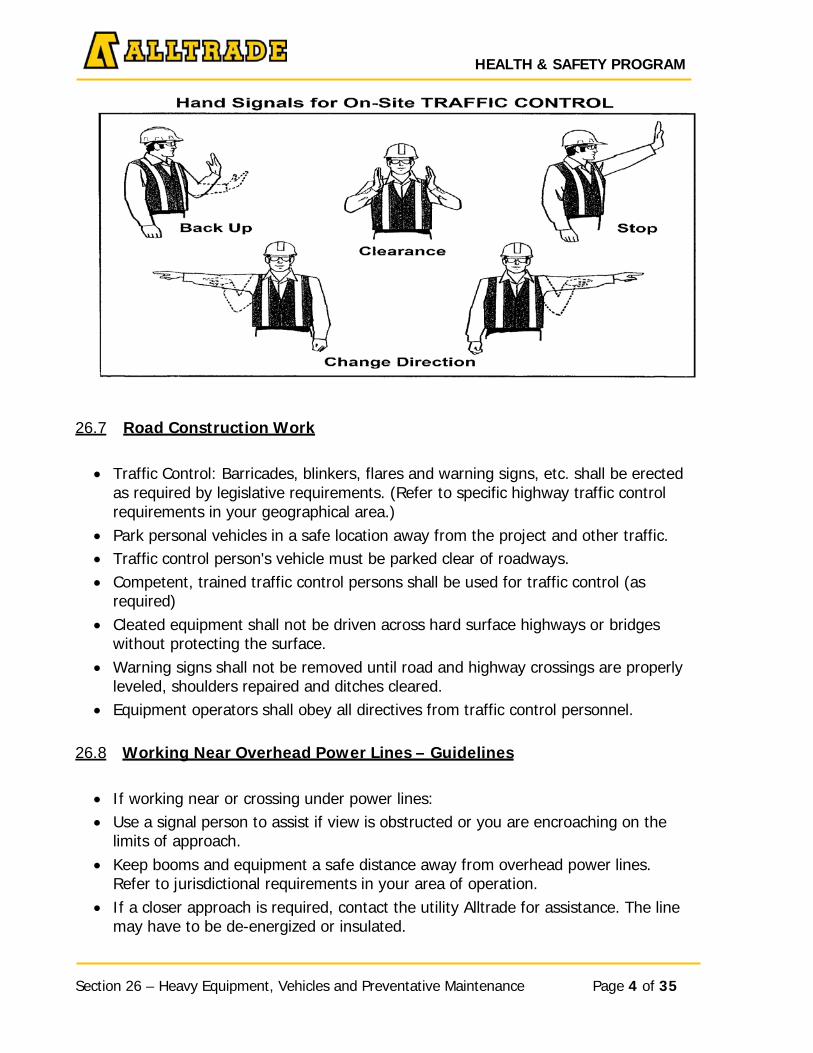
Section 26 – Heavy Equipment, Vehicles and Preventative Maintenance Page 4 of 35
HEALTH & SAFETY PROGRAM
26.7 Road Construction Work
• Traffic Control: Barricades, blinkers, flares and warning signs, etc. shall be erected as required by legislative requirements. (Refer to specific highway traffic control requirements in your geographical area.)
• Park personal vehicles in a safe location away from the project and other traffic. • Traffic control person's vehicle must be parked clear of roadways. • Competent, trained traffic control persons shall be used for traffic control (as
required) • Cleated equipment shall not be driven across hard surface highways or bridges
without protecting the surface. • Warning signs shall not be removed until road and highway crossings are properly
leveled, shoulders repaired and ditches cleared. • Equipment operators shall obey all directives from traffic control personnel.
26.8 Working Near Overhead Power Lines – Guidelines
• If working near or crossing under power lines: • Use a signal person to assist if view is obstructed or you are encroaching on the
limits of approach. • Keep booms and equipment a safe distance away from overhead power lines.
Refer to jurisdictional requirements in your area of operation. • If a closer approach is required, contact the utility Alltrade for assistance. The line
may have to be de-energized or insulated.

Section 26 – Heavy Equipment, Vehicles and Preventative Maintenance Page 5 of 35
HEALTH & SAFETY PROGRAM
• When digging near power poles, if the soil is hard, you may dig up to 5m away from the pole. In gravel or soft soil, the operator is to use his discretion. If cave- ins are being experienced, even up to 5m away from the pole, contact the power Alltrade and it will come out to secure the pole during the digging operation.
• Erect clearly visible warning signs advising of overhead power lines.
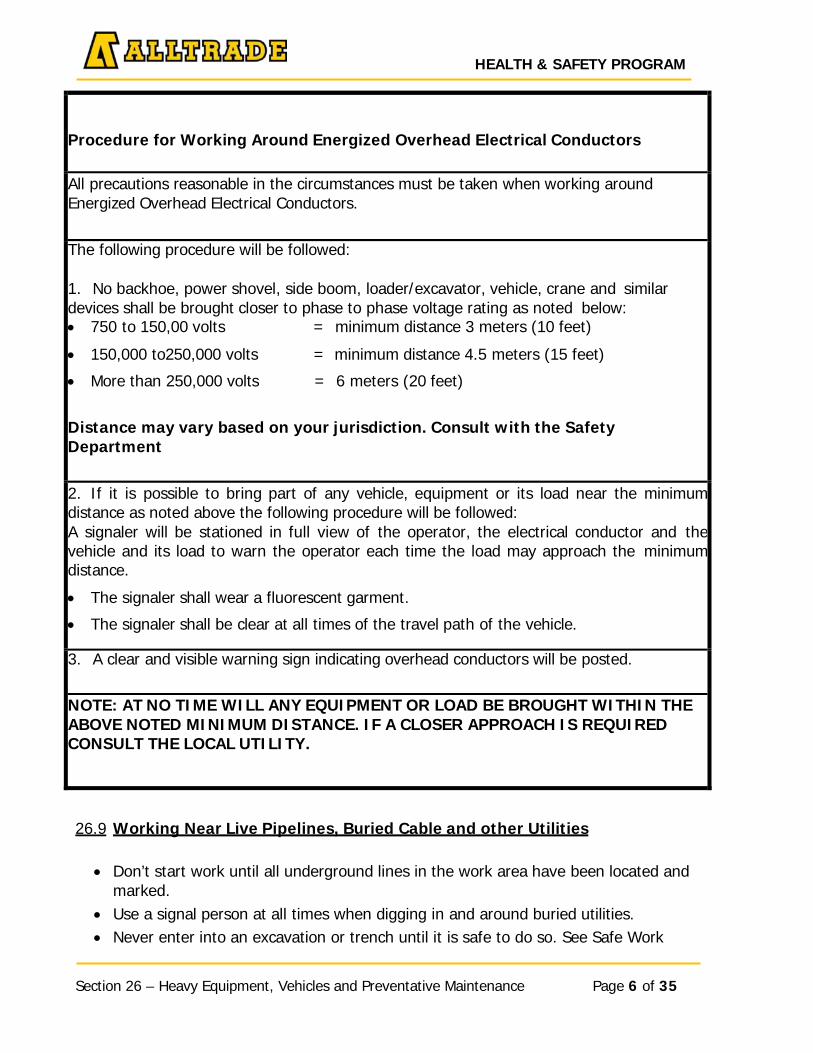
Section 26 – Heavy Equipment, Vehicles and Preventative Maintenance Page 6 of 35
HEALTH & SAFETY PROGRAM
Procedure for Working Around Energized Overhead Electrical Conductors
All precautions reasonable in the circumstances must be taken when working around Energized Overhead Electrical Conductors.
The following procedure will be followed: 1. No backhoe, power shovel, side boom, loader/excavator, vehicle, crane and similar devices shall be brought closer to phase to phase voltage rating as noted below: • 750 to 150,00 volts = minimum distance 3 meters (10 feet)
• 150,000 to250,000 volts = minimum distance 4.5 meters (15 feet)
• More than 250,000 volts = 6 meters (20 feet)
Distance may vary based on your jurisdiction. Consult with the Safety Department
2. If it is possible to bring part of any vehicle, equipment or its load near the minimum distance as noted above the following procedure will be followed: A signaler will be stationed in full view of the operator, the electrical conductor and the vehicle and its load to warn the operator each time the load may approach the minimum distance.
• The signaler shall wear a fluorescent garment.
• The signaler shall be clear at all times of the travel path of the vehicle.
3. A clear and visible warning sign indicating overhead conductors will be posted.
NOTE: AT NO TIME WILL ANY EQUIPMENT OR LOAD BE BROUGHT WITHIN THE ABOVE NOTED MINIMUM DISTANCE. IF A CLOSER APPROACH IS REQUIRED CONSULT THE LOCAL UTILITY.
26.9 Working Near Live Pipelines, Buried Cable and other Utilities
• Don’t start work until all underground lines in the work area have been located and
marked. • Use a signal person at all times when digging in and around buried utilities. • Never enter into an excavation or trench until it is safe to do so. See Safe Work
Section 26 – Heavy Equipment, Vehicles and Preventative Maintenance Page 7 of 35
HEALTH & SAFETY PROGRAM
Procedures, Section 24. • Any excavation or trench left unattended must be barricaded to prevent entry by
other workers and the public. 26.10 Safe Work Practice for Loading and Unloading Heavy Equipment
• Ensure the truck and trailer is compatible with the equipment being loaded. • Ensure the loading / unloading area is free of overhead wires, fire hydrants, poles • Ensure truck and trailers are parked on level ground. • Apply parking brakes on truck and trailers. • Ensure that the loading ramp or blocks are safe to use. • Ensure that the machine is lined up precisely with the deck. • Ensure that the operator can see the signal person clearly at all times. • Ensure that the deck is free of ice and snow to ensure traction. Use salt, sand or
shovel clean. • Ensure the trailer hitch at the front is not sustaining the weight of the equipment
while it’s being loaded. Place approved blocking under the trailer deck prior to loading.
• Only competent personnel may load or unload heavy equipment • Proceed to have the operator walk or drive the machine onto the deck under the
direction of the signal person. • Ensure the signal person is well clear of the machine • When the machine has been walked onto the deck, apply parking brakes. • Ensure all attachments are lowered and resting on the deck. • Ensure that engine is turned off as per procedure for stopping hot engines. • Ensure that proper chains and binders are used to secure the machine cover to the
deck. • Ensure the flags or lights are attached to machine if required. • Ensure there is no loose material or parts left unsecured on machine. • When unloading machines, reverse procedures.
Section 26 – Heavy Equipment, Vehicles and Preventative Maintenance Page 8 of 35
HEALTH & SAFETY PROGRAM
26.11 Tie Down Chain and Lever Binders Standard
Workers involved with securing equipment on floats for transportation shall be familiar with the necessary tools and safety precautions:
The following safe work practice is to be used whenever load lever binders are required.
Note: Load Lever Binders with stored energy are not to be used. Many workers in the industry have been injured. Use ratchet lever binders or soft release lever binders. Do not use cheater pipes.
• Ensure the load is positioned in centre of float • Ensure tie down chain is in good repair • Block any equipment capable of rolling during transporting • Ensure the necessary amount of tie downs are used to secure equipment. Check
with your local jurisdiction. • Ensure equipment is secured in place and all excess chain has been wrapped to
prevent dragging. Lever handles must be secured to prevent slippage of tension. • Drive a short distance and re-inspect load for slack. Any slack noticed will require
further tension. Note: Tie down chain shall not be used for hoisting under any circumstances. Only approved hoisting chain with load capacity tag shall be used.
26.12 Heavy Equipment – Moving & Backing Up
Operations involving heavy equipment should be planned to avoid backing the equipment as much as possible. In many operations, the awkward backing movement of this equipment is not always economically or environmentally possible.
Whenever the backward movement cannot be eliminated, the machine or equipment must be adapted for backing movements.
• Heavy construction equipment (wheeled vehicles) such as dump trucks, front-end
loaders, and cement trucks are equipped with special mirrors to help eliminate blind spots. Even with these seeing aids, there are still blind spots from the operator's control position.
• Blind spot diagrams for each type of construction equipment are available from the manufacturers showing what an operator can see toward the rear of the equipment he is operating. However, some heavy construction equipment has no view to the rear from the operator's position and requires a signal person for moving backwards.
Section 26 – Heavy Equipment, Vehicles and Preventative Maintenance Page 9 of 35
HEALTH & SAFETY PROGRAM
• Reverse alarms installed on construction equipment: the advantage of the reverse alarm is that any person close to the rear of this equipment is alerted to forthcoming rearward movement of the machine
• Avoid parking vehicles or placing material or equipment in areas where heavy construction equipment is operating.
• Do a circle check for obstacles before moving equipment. • Operators of heavy equipment must be capable of operating equipment and be
physically fit. • Operators must know the limitations of the equipment. • Only qualified operators shall move equipment. • If moving equipment after dark, make sure the white lights on the rear of the
machine are off, if so equipped. This will prevent the public traffic from thinking that the equipment is on-coming. Hazard lights should be on if so equipped.
• When required, follow the Safe Work Guidelines for operating on steep slopes and banks.
• If moving on steep grades, maintain a minimum of 500 meters spacing between each piece of equipment. If a steep grade is less than 500 meters in length, each piece of equipment should clear the bottom of the hill (with room to spare) before the next piece of equipment begins its descent down the hill. Closer spacing and/or passing may be permitted on level road surfaces – if traffic allows.
• When moving in a train on narrow roadways, maintain spaces between each piece of equipment, so that public vehicles may pull in after passing a piece of equipment.
• Never move equipment that is low on fuel, especially on hilly roads. 26.13 Heavy Equipment Lifting Jacks & Support Stands
Standard Any operation required to raise or support any type of heavy equipment for repairs or maintenance shall be done according to manufacture specifications or best practice.
Procedure
• All lifting jacks and support stands shall have its rated capacity legibly casted or
stamped on it in a place where it can be readily seen. • All shop built stands must be certified by a registered professional engineer and
safe working load visibly displayed. • Jacks and support stands should only be used on solid level ground.
Always verify that the stand is suitable means of support capable of holding the intended load.
HEALTH & SAFETY PROGRAM
Section 26 – Heavy Equipment, Vehicles and Preventative Maintenance Page 10 of 35
26.14 Working on Uphill / Downhill Grades
• Do a walk-around check before daily start-up. • Check all fluid levels; top them up if necessary. Why? Because with low fuel the
machine might stall, low brake fluid etc. • Check functioning of all systems (i.e. brakes, hydraulics, lights etc.). Consider
reducing ballast if necessary. • Know where ground personnel are at all times and where traffic is in relation to
work. • Wear appropriate P.P.E. • Wear seat belts • Before encountering a steep grade while still on level ground and stopped, shift to
an appropriate gear. If unsure, consult the Foreman/Superintendent. This information must be covered in training scenarios.
• Do not shift gears for any reason while operating on grades (up or down). • Never leave the operator’s seat while operating on grades. Except in an
emergency. • Check brakes, air pressure and gauges periodically (more often than you normally
would) to ensure proper operation. • Park on a flat area or cross slope if required. Set park brakes and block wheels if
necessary. 26.15 Spotters, General Requirements
Standard Applies to all equipment operating in close proximity to other vehicles, equipment, structures, material, or in congested areas where a spotter is needed to ensure safety of personal and prevention of damage.
Procedure
This procedure establishes the minimum safety requirements from all Employees and Contractors to follow while positioning/backing vehicles/equipment. The intent of this procedure is to prevent injuries and damage to property that could occur due to blind spots and undetected movement of personnel and equipment that result from unsafe vehicle/equipment positioning/backing practices. Where backing is unavoidable, spotters shall be used. When vehicle/equipment must negotiate forward turns with restrictive side clearances and where height clearances are uncertain, a spotter shall be used.

HEALTH & SAFETY PROGRAM
Section 26 – Heavy Equipment, Vehicles and Preventative Maintenance Page 11 of 35
Operator’s Responsibilities Prior to positioning/backing a vehicle/equipment the operator shall:
1. Complete a FLRA card (Field Level Risk Assessment) prior to staging equipment on
location and/or positioning/backing a vehicle/equipment. 2. Complete 360-degree walk around of the vehicle/equipment to determine if any
obstructions and potential hazards are present. 3. Clear the area of people and objects if possible. 4. Ensure overhead and side clearances are adequate. 5. Obtain guidance from a spotter to help position/backup the vehicle/equipment. 6. Make sure the spotter is aware of all obstacles identified during the initial “walk-
around” survey. 7. The operator will discuss the positioning/backing plan with the spotter before
proceeding. 8. The operator will establish hand signals with the spotter used for
positioning/backing up. 9. Operator to maintain line of site with spotter. 10. The operator shall stop the vehicle/equipment immediately prior to losing
sight of spotter. 11. The operator shall stop immediately if an emergency “stop” signal is
received from anyone in the area. Spotters Responsibilities
Prior to acting as a spotter for an operator moving a vehicle/equipment the spotter shall:
1. Complete a FLRA card (Field Level Risk Assessment) prior to participating in the staging of equipment on location and/or positioning/backing a vehicle/equipment.
2. Ensure that the hazards are reviewed on the operator's FLRA card and signed off. 3. The spotter will discuss the positioning/backing plan with the operator before
proceeding. 4. Hand signals will be agreed upon and understood prior to positioning/backing. 5. The spotter must remain visible to the operator at all times, never place
him/herself in the line of fire, and always ensure a safe escape route is available. 6. Ensure equipment operator is no closer than 1 meter (safe limit approach) from
any building, utility and other equipment. 7. Stay alert to recognize and deal with dangerous situations. 8. Wear reflective work wear with high visibility stripes at all times.
HEALTH & SAFETY PROGRAM
Section 26 – Heavy Equipment, Vehicles and Preventative Maintenance Page 12 of 35
9. Establish a position, clear of the reversing vehicle, whereby the spotter does not have to walk backwards while backing/positioning the vehicle/equipment.
10. Immediately signal the driver/operator to stop if any person or object enters the area behind the vehicle/equipment.
11. Signal the driver/operator to stop when the spotter must change positions while vehicle/equipment is reversing.
26.16 Signals
It is important that everyone understands exactly what's being done when moving a vehicle/equipment. This will ensure the safety of everyone involved in the operation. It is important all of the workers involved understand who is directing the move and the procedures to be followed.
It is also very important to designate one spotter so there is no confusion with the signaling procedures. The following represent seven (7) basic signals to assist in vehicle/equipment repositioning.
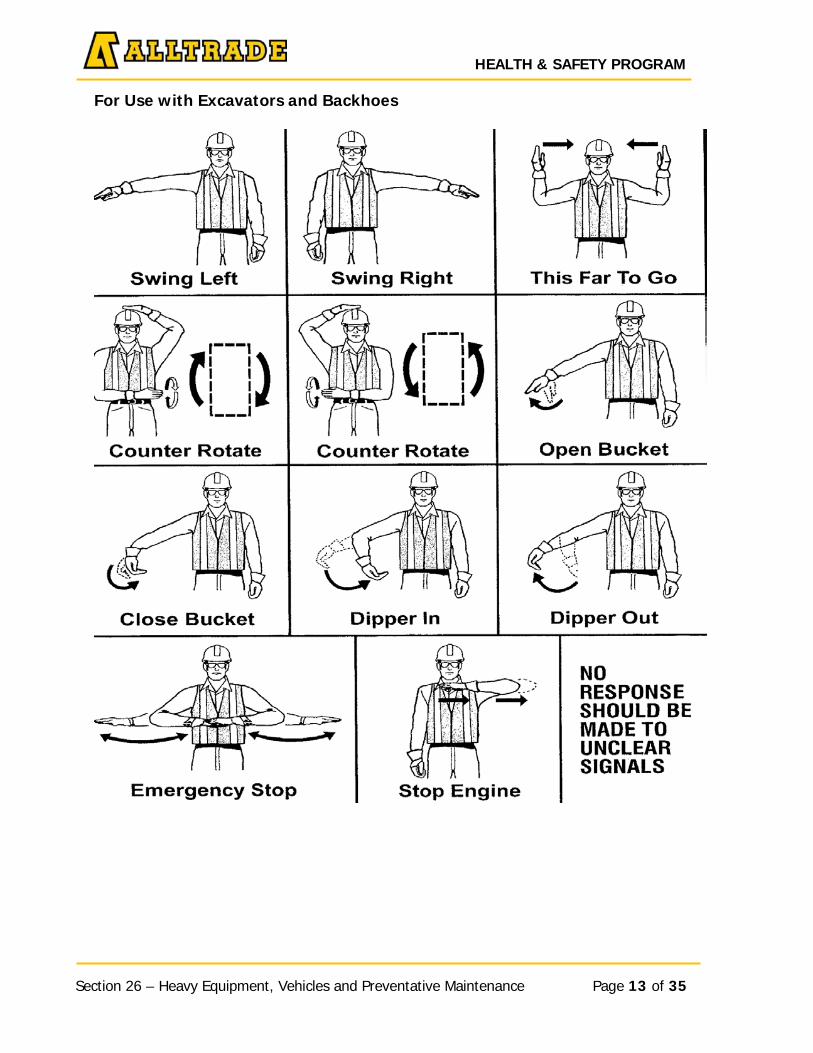
HEALTH & SAFETY PROGRAM
Section 26 – Heavy Equipment, Vehicles and Preventative Maintenance Page 13 of 35
For Use with Excavators and Backhoes
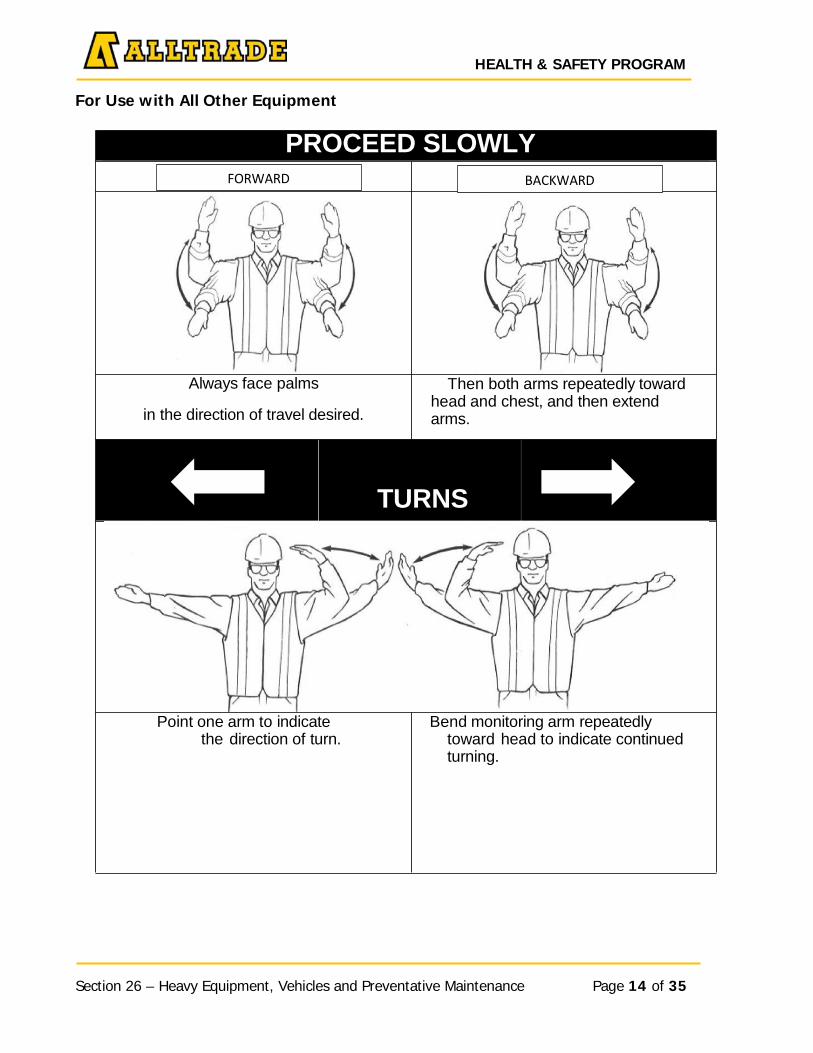
HEALTH & SAFETY PROGRAM
Section 26 – Heavy Equipment, Vehicles and Preventative Maintenance Page 14 of 35
For Use with All Other Equipment
FORWARD BACKWARD
Always face palms
in the direction of travel desired.
Then both arms repeatedly toward head and chest, and then extend arms.
TURNS
Point one arm to indicate the direction of turn.
Bend monitoring arm repeatedly toward head to indicate continued turning.
PROCEED SLOWLY
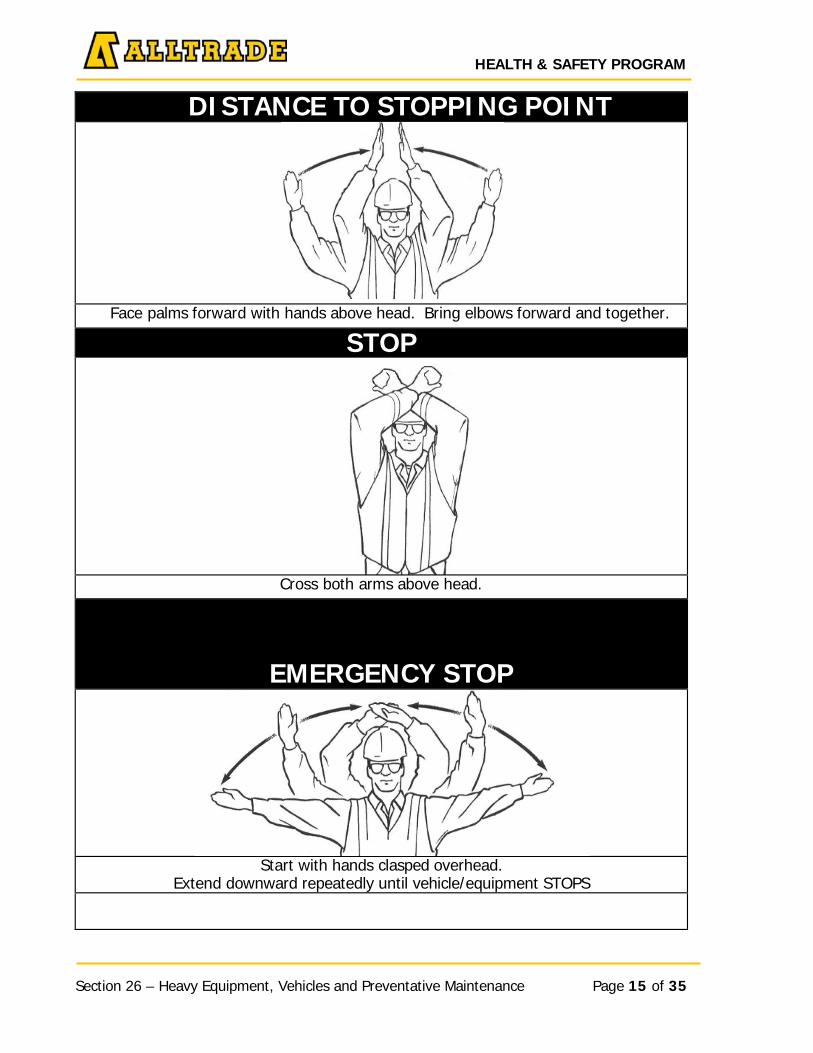
HEALTH & SAFETY PROGRAM
Section 26 – Heavy Equipment, Vehicles and Preventative Maintenance Page 15 of 35
DISTANCE TO STOPPING POINT
Face palms forward with hands above head. Bring elbows forward and together.
STOP
Cross both arms above head.
EMERGENCY STOP
Start with hands clasped overhead.
Extend downward repeatedly until vehicle/equipment STOPS
HEALTH & SAFETY PROGRAM
Section 26 – Heavy Equipment, Vehicles and Preventative Maintenance Page 16 of 35
26.17 Earthwork Equipment Operation
• Prior to any operation, read and understand the operations manual. • Know the hand signals and who gives them. Signals shall be given by only one
person. • It is the operator's responsibility to ensure all protective guards are securely in
place to protect against moving parts. • Machine must be equipped with a proper fire extinguisher. • Operator will remain seated while operating equipment. • Before moving the vehicle, the operator and signal man must ensure that no one
will be endangered. • Check for adequate tail swing clearance before operating. • Check for proper operation of all controls and protective devices while moving
slowly in an open area. • If a signal person is not present, the Float truck driver is responsible for ensuring
that a visual circle check of the machine being loaded is completed, and the area is free of people and obstacles.
• Keep other machines back away from edge of excavation when you are digging. • Before digging, know the exact location of buried pipes, cables, electrical, gas lines
etc. • When loading trucks, never swing over cab. • Back machine away from excavation before leaving the machine. • When parking the machine/equipment, attachments must be lowered before
leaving operator's station. 26.18 Backhoe Operation
1. Visually check the area of operation to ensure sufficient operating room – swing
room. (I.e. power lines, etc.) 2. Walk around the machine. Visually inspect for loose track, vandalism, oil leaks. 3. Check all fluid levels prior to starting. 4. Start the backhoe and let it warm up sufficiently before moving. 5. Check all gauges, lights and back up alarm. 6. When the backhoe is warmed up, check the operation of the bucket, boom, and
swing by tilting, raising and lowering, and swing respectively. 7. Lower the bucket and boom to the ground, engage the safety lever, and ensure
the machine is on level ground. Allow cool down time then shut off the engine. Close the door and lock the machine.
8. When the backhoe is warmed up, check the operation of the bucket, boom, and
HEALTH & SAFETY PROGRAM
Section 26 – Heavy Equipment, Vehicles and Preventative Maintenance Page 17 of 35
swing by tilting, raising and lowering, and swing respectively. 9. Allow cool down time and ensure the machine is on level ground before shutting
it off. 10. Lower the bucket and boom to the ground, engage safety lever, close the door,
and lock the machine. 26.19 Skid Steers
• Make sure machine is good repair. • Make sure bucket is down and park brake is on before getting off. • Use care and caution while operating on any slope, and keep bucket as low as
possible while doing so. • Know where all other machinery, obstructions, utilities and personnel are while
operating. • Never work on the machine with bucket in raised position without securely locking
it in that position. • No riders are allowed in the bucket. • Keep machine on all four wheels as much as possible (don’t stunt). • Keep bucket down at all times when moving machine to various places on the
jobsite. • Make sure back-up alarm is working properly. • Wear proper PPE • Wear your seatbelt
26.20 Equipment Operators Daily Log
Standard
Operators of heavy equipment are responsible to ensure their equipment has been inspected on a daily basis prior to use. The inspection will be conducted using the Equipment Operators Daily Log Book or equivalent inspection report.
Responsibilities
Supervisor The supervisor is to ensure the following:
• Issue Log books to equipment operators • That equipment operators are conducting daily inspections of their equipment • That defective equipment is removed from service so as not to pose a hazard to
HEALTH & SAFETY PROGRAM
Section 26 – Heavy Equipment, Vehicles and Preventative Maintenance Page 18 of 35
any employee, public or other materials and equipment • Report maintenance requirements to the appropriate personnel
Operator
The operator is responsible to ensure the following:
• Operators must complete the daily inspection of their equipment to ensure it is in good operation condition prior to use
• Identify any mechanical issue on the inspection card and notify their supervisor Procedure
• The equipment operator will inspect their equipment each day before use • The log must legible indicate any deficiencies (using an X), the operators name,
date. • The top carbonless copy sheet is turned in at the end of each shift to the
supervisor • Any equipment with deficiencies serious enough must be removed from service,
(lock out tag out may be required) until repaired • The supervisor will notify the appropriate mechanical personnel that service is
needed 26.21 Pick-up Trucks
Standard
These practices involve the more common safe driving practices used during the operation of a motor vehicle.
Alltrade is responsible to ensure employees are provided adequate instruction in correct driving protocols when driving vehicles on rural, private or lease roads. The driver of the vehicle has the responsibility to adjust their driving habits to conform to the existing road conditions.
Employees operating an Alltrade vehicle must have care and control of the vehicle at all times and obey the highway traffic act in your various jurisdictions and follow Alltrade policy on “vehicle rules”.
• All drivers/operators must have a valid driver’s license and will have their drivers
abstract reviewed. • Drivers will conduct an inspection prior to operating the vehicle and will follow
regular maintenance as per manufacturer’s guidelines.

HEALTH & SAFETY PROGRAM
Section 26 – Heavy Equipment, Vehicles and Preventative Maintenance Page 19 of 35
• Check all fluid levels; cooling systems, oil, and gas to be sure, they are acceptable levels for operation.
• Do not fuel while it is running. • Do a walk around to check tires, condition of the truck and that all cargo is
properly secured. • Seat belts must be worn. • Put vehicle in park and apply parking brake when stopping the vehicle. • The operator must not drive under the influence of drugs or alcohol. This
includes a) blood alcohol level above zero b) illegal drugs c) prescription medication that cause drowsiness or impairment.
• No Smoking in Alltrade vehicles • No use of hand held electronic devices (ex. Texting while driving) • Whenever possible drivers will pull-through or back into parking spaces. • All vehicle incidents must be reported immediately to the main office.
26.22 Fuelling Heavy Equipment
1. Ensure proper and operational fire extinguishers are on the fuel trucks and on
the heavy equipment. 2. No open flames or cigarettes are allowed in the area. 3. Park fuel truck on level ground. 4. The operator will activate all safety and emergency brakes and will lower all
hydraulic accessories such as blades, buckets, etc. 5. Shut off engine. 6. The person in charge of fueling will attach static ground to the unit being fueled.
Only then will refueling commence. 7. The operator will wait until the fuel person has cleared the area and gives the
operator an o.k. signal before restarting the machine and resuming his/her duties
8. Cellular telephones should be shut off while fueling. 9. Spill kits are to be made readily available.
Note: Do not fuel within 30m (100’) of any water shed.
Procedure
The storage and use of flammable and combustible liquids must meet the legislative requirements in your area. Gasoline and gas/oil mixtures are flammable liquids and diesel fuel is combustible liquid.
HEALTH & SAFETY PROGRAM
Section 26 – Heavy Equipment, Vehicles and Preventative Maintenance Page 20 of 35
Temporary construction site fuel storage tank requirements must meet legislative requirements to prevent contamination of surface water and groundwater. The following are industry best practices:
• All large fuel storage tanks must be double walled. • Tanks must be protected from physical damage that could include bumper
protection against vehicles and equipment. • Tanks must be substantially level. • Area around tanks must be free of combustibles. • Proper labeling of tanks is required. • Warning signs need to be posted indicating “No Smoking”. • All dispensing hoses must be inspected for leaks and protected from physical
damage. • Dispensing of flammables shall be by mechanical pump and self-closing valve.
Combustibles may be gravity dispensed if self-closing valve is used. • Spill kit containing absorbency material to ensure immediate cleanup of an
accidental spill is readily available. • Fire extinguisher to be mounted in immediate area. • Tanks must be located at least 15 feet from any building and/or property lines
including roads. • All tanks must have proper ventilation, spill warning device and an anti-backflow
device. • All fueling operations must be at minimum 30m (100ft) from any watershed. • All fuel storage areas must provide secondary containment.
26.23 Working with Compressed Air Tools
• Compressed air and compressed air tools shall be used with caution. • Pneumatic tools shall only be operated by competent persons who have been
trained in their use. • Compressed air must not be used for cleaning purposes to blow debris or clear dirt
from any worker's clothing. • Pneumatic tools shall never be pointed at another person. • All hose connectors must be of the quick disconnect pressure release type with a
"safety chain/cable." • Pneumatic power tools shall be secured to the hose or whip by some positive
means to prevent the tool from becoming accidentally disconnected. • Safety clips or retainers shall be securely installed and maintained on pneumatic
impact (percussion) tools to prevent attachments from being accidentally expelled.
HEALTH & SAFETY PROGRAM
Section 26 – Heavy Equipment, Vehicles and Preventative Maintenance Page 21 of 35
• Before making adjustments or changing air tools, unless equipped with quick- change connectors, the air shall be shut off at the air supply valve ahead of the hose. The hose shall be bled at the tool before breaking the connection.
• A proper pressure regulator and relief device must be in the system to ensure that correct desired pressures are maintained.
• The manufacturer's safe operating pressure for hoses, pipes, valves, filters and other fittings shall not be exceeded.
• The correct air supply hoses must be used for the tool/equipment being used. • Hoses must be checked on a regular basis for cuts, bulges or other damage.
Ensure that defective hoses are repaired or replaced. • The use of hoses for hoisting or lowering tools shall not be permitted. • The use of metal-reinforced hose shall be avoided near energized equipment.
When this type of hose must be used, proper clearances shall be maintained. • During operations using compressed air tools, be sure other workers in the area
are made aware of or have restricted access to the hazard area. • The equipment must be properly maintained according to the manufacturer's
requirements. • Follow the manufacturer's general instructions and comply with legislated safety
requirements.
26.24 Equipment Lock Out/Block Out Procedure
To effectively disable a piece of mobile equipment from accidentally starting the following guidelines should be followed. Review owner’s manual for specific information on the equipment being locked out.
1. Turn the machine ignition off. 2. Remove the key (if it has key ignition). 3. Close and lock the console if it has a cover and place the key in your pocket. 4. If the machine has a push button start, remove the battery ground cable. 5. Repair the machine. 6. After the repair, unlock the cover and replace the key. 7. If you require the machine running to test the repair, stand clear of any hazard
locations. Do not approach any moving part while it is running. 8. Blocking of hydraulic cylinders or any other piece of equipment with the potential
to move due to gravity. 9. Ensure tires are chalked to prevent unexpected movement.
HEALTH & SAFETY PROGRAM
Section 26 – Heavy Equipment, Vehicles and Preventative Maintenance Page 22 of 35
26.25 Forklifts and Related Equipment
Forklifts and related equipment fitted with forks or lifting devices are widely used in the industry to handle material. General guidance for material handling using this type of equipment is provided below.
Forklifts – Operator Qualifications Standard
Forklift trucks are to be operated by workers who are trained and competent to operate the equipment.
Procedure
1. The supervisor shall ascertain whether existing forklift operators have the
necessary experience and training to operate safely. 2. Those who need training shall be provided with training arranged by their
supervisor. 3. A certification card/letter shall be issued by the training agency. 4. Only those workers with certification card/letter or equivalent training may
operate forklifts. 5. Operators are to inspect their forklift daily to ensure it is in safe operating
condition. Report all unsafe issues to your supervisor. Do not operate an unsafe forklift.
6. Do not permit riders on any forklift. 7. Observe and obey the capacity of the forklift. 8. Place forks as far as possible under load. Drive with load against heel of rack
with mast tilted back. 9. Space forks properly to balance and support load. 10. Do not move loads that are poorly piled or stacked. 11. Carry load as low as possible. 12. Match speed to driving surfaces, load and workplace conditions. 13. Travel in reverse when load obstructs forward vision. 14. Watch for overhead obstructions. 15. Operate smoothly and slowly. 16. Park forklift with controls in neutral, brakes applied and forks on the ground
with the motor switch off. 17. Do not allow anyone to stand, walk, or work under elevated forks. 18. Operator restraint system (seat belt) shall be worn 19. When raising or lowering a load the forklift must be stationary
HEALTH & SAFETY PROGRAM
Section 26 – Heavy Equipment, Vehicles and Preventative Maintenance Page 23 of 35
Note: The forklift is not to be used as a work platform. Do not hoist any person on the forks.
Forklifts Inspection – See H&S_FORM_075 Standard
Operators of forklifts shall make a daily inspection of his machine prior to use.
Procedure
If any of the following components are defective, the operator shall immediately inform his supervisor.
Inspect general condition of forklift for cleanliness and loose parts, and complete the daily inspection, see H&S_FORM_075.
Forklifts - Propane Fuel (LPG) Standard
Workers involved in the use of liquid propane gas (LPG) forklifts shall be familiar with their characteristics and the necessary safety precautions.
Procedure
• LPG tanks must be laying down when in use to isolate the fuel from the relief
valve. • The proper and safe storage position for LPG tanks is upright and secure (outdoors
only). • Check to see that the locking pin engages into cylinder. • Handle cylinders gently; do not drop. Protect valve. • LPG is "cryogenic" and will freeze skin on contact; therefore, wear protective
gloves and safety glasses when making or breaking connections. Do this outside. Repairs to carburetor or fuel system must be done by authorized and qualified
• workers. • Change fuel tanks as follows:
o Close valve on cylinder o Run engine until it stops to empty system o Shut off engine o Open connecting nut with non-metallic tools o Disconnect hose o Disconnect holding straps o Remove empty cylinder o Place full cylinder into proper position o Connect holding straps
HEALTH & SAFETY PROGRAM
Section 26 – Heavy Equipment, Vehicles and Preventative Maintenance Page 24 of 35
o Tighten connecting nut (wiggle hose)
o Check to make sure gaskets are intact o Open valve on cylinder slowly and listen for leaks o Smell rotten cabbage - shut off cylinder valve o If valve leaks:
Once -re-follow procedure done Twice -change cylinder Three times -change hose
o Open valve slowly and fully o Check that hose is turned inwards secure hose downward o Start motor and resume operation.
• Refer to MSDS for proper storage, handling, PPE and First Aid information.
Forklifts - Batteries Standard Workers involved in the use of electric forklifts shall be familiar with batteries characteristics and the necessary safety precautions.
Procedure
• Batteries contain: o Sulphuric Acid o Electrolytes o Water o Explosive hydrogen and oxygen gas
• Batteries should be charged in an isolated, ventilated area equipped with an eyewash station.
• Handling battery acid: o Wear tight fitting eye protection, gloves, and coveralls o Pour acid into water;
never pour anything into acid o Do not use metallic containers or funnels for acid o Splashes destroy most materials o Flush eyes for at least 15 minutes with eye wash if splashed; GO TO
DOCTOR to be sure no permanent damage has occurred o Neutralize spills with baking soda o Rinse with clean water o Do not store acid near heat or sunlight o Refer to MSDS for proper storage, handling, PPE and First Aid information
• Exploding batteries: o Isolate batteries from sparks, flame, or any source of ignition o Shield eyes o Do not break live circuits at battery
HEALTH & SAFETY PROGRAM
Section 26 – Heavy Equipment, Vehicles and Preventative Maintenance Page 25 of 35
• Charging batteries: o Unplug the charger before attaching or removing clamp connections o Attach proper clamp to proper terminal (usually red + and black -) o Follow correct procedure (see Section 20: Safe Job Practices – Lead Acid
Batteries – Boosting) • Servicing batteries:
o Heck for worn cables, loose connections, corrosion, cracked cases/covers, loose hold downs or deformed terminal posts
o Replace worn parts o Tighten cable clamps with suitable wrench o Use a cable puller to remove clamps o Remove corrosion o Clean terminals with tapered brush o Use a battery carrier to lift a battery o Do not overfill cells
Forklifts Maintenance Standard
Forklift maintenance shall be performed by duly qualified mechanics with the necessary safety precautions in mind.
Procedure
1. Disconnect all batteries and propane before any work is done. 2. Clean up spilled oil or hydraulic fluid immediately. 3. Block forklift securely when removing wheels. 4. Support forklift hood in upright position or remove. 5. On LPG forklifts:
a. Shut off fuel valve b. Run engine until it stops c. Disconnect tank from hose
6. Check the operator's daily checklist for unreported defects. 7. Test by magnetic particle the main mast welds and forks annually. 8. Replace hoses, couplings, fittings, and connections according to manufacturer's
recommendations. 9. Do not work beneath unsupported forks.
HEALTH & SAFETY PROGRAM
Section 26 – Heavy Equipment, Vehicles and Preventative Maintenance Page 26 of 35
26.26 Trucks – Loading and Unloading
Standard
The driver of a truck shall ensure that the load is loaded, transported, and unloaded in a manner that will not cause harm to people, equipment, or materials.
Procedure
• All vehicles carrying loads shall have their load properly secured. • Loads, which project beyond the length of the vehicle, shall be marked with a red
flag or light. • Workers shall leave the cab of a truck while it is being loaded or unloaded. • No person shall mount or dismount a moving vehicle or piece of heavy equipment. • No material or equipment to be moved by crane, forklift, or similar device shall be
stored under or near energized electrical equipment.
26.27 Load Security Loading and securing your cargo/equipment incorrectly could lead to fines, property damage, injury or even fatality(s).
Loading
Factors affecting arrangement of load:
• Type of vehicle • Weight of load • Height of load • Width of load • Length of load
Arranging and Distributing Loads
Weight distribution of load affects the handling characteristics of the vehicle. The life of the vehicle’s tires, frame, springs and bearing can be greatly reduced by improper weight distribution.
Placement of Load
Heavy concentrated loads should be placed:
• Near the rear of the trailer • On its long side if possible • Over or just ahead of the rear axle • Load should be securely blocked to prevent from sliding forward
HEALTH & SAFETY PROGRAM
Section 26 – Heavy Equipment, Vehicles and Preventative Maintenance Page 27 of 35
An equal amount of weight is placed on all rear tires to prevent twisting and stress on the frame. Ensure that trailer is long enough for load.
Securing Load
The chosen load securement system must be appropriate for the loads:
• Size • Shape • Strength • Characteristics
Securement systems may include:
• Vehicle structure • Blocking and bracing • Tiedowns (Chains, Straps, Etc.)
General Requirements for Tiedowns
• Tiedowns must be designed and maintained to allow the driver to tighten them
(excluding Steel Strapping) • Edge protectors must be used where tiedowns could be cut or subject to abrasion
where in contact with load • Tiedowns must be firm and must not slip, loosen, unfasten, open or release while
the vehicle is in operation Tiedowns with the following defect must not be used:
• Chain containing cracked welds or links • Chains containing bent, twisted, stretched or collapsed links • Chains links weakened by gouges, nicks or pits • Chain incorrectly repaired • Chain links obviously worn or showing other visible evidence of loss of strength • Knots in any portion of chains, wire rope or webbing • Spread or distributing grab hooks • Cuts, slits, nicks in nylon webbing • Wire cable with missing strands • Anchor point which is weakened or shows loss of strength due to cracks, breaks or
distortion
HEALTH & SAFETY PROGRAM
Section 26 – Heavy Equipment, Vehicles and Preventative Maintenance Page 28 of 35
Light Weight or Fine Particle Material
• Load must be covered entirely by a tarpaulin or other covering so that none of the load can escape from the vehicle. Examples:
o Sawdust, shavings or woodchips o Sand o Salt o Granular o Recycled Asphalt Pavement (RAP)
• Do not use cell phones or other personal electronics while operating any equipment
• Never leave the seat of the machine while still in motion. A signal person will direct the driver.
_ _
26.28 Trucks (over 4500kgs/Yellow Sticker)– Daily Inspection Standard
All trucks shall be maintained in safe working order.
Procedure
The truck driver shall conduct a daily circle check of his vehicle prior to initial use inspecting the following areas where applicable:
• All lights and license plates • Engine oil level • Radiator coolant level • Tie rods • Tires and lug nuts • Any oil leaks • Transmission oil level • Fuel tank level and condition • Ride cylinders (struts) • Parking brake • Drive line • Steering cylinders • Air tanks • Windows and mirrors • Fire extinguisher shall be installed in all vehicles as per our client’s safety policy
HEALTH & SAFETY PROGRAM
Section 26 – Heavy Equipment, Vehicles and Preventative Maintenance Page 29 of 35
• Hydraulic tank and levels • Horn • Windshield wipers/washer fluid • Braking System
Management and operators are responsible to ensure operators of CVOR (commercial vehicle operator’s registration) or equivalent commercial vehicles operate as per allowable hours of service referring to your areas transportation enforcement requirements.
Note: Report any unsafe condition to your supervisor for corrective action.
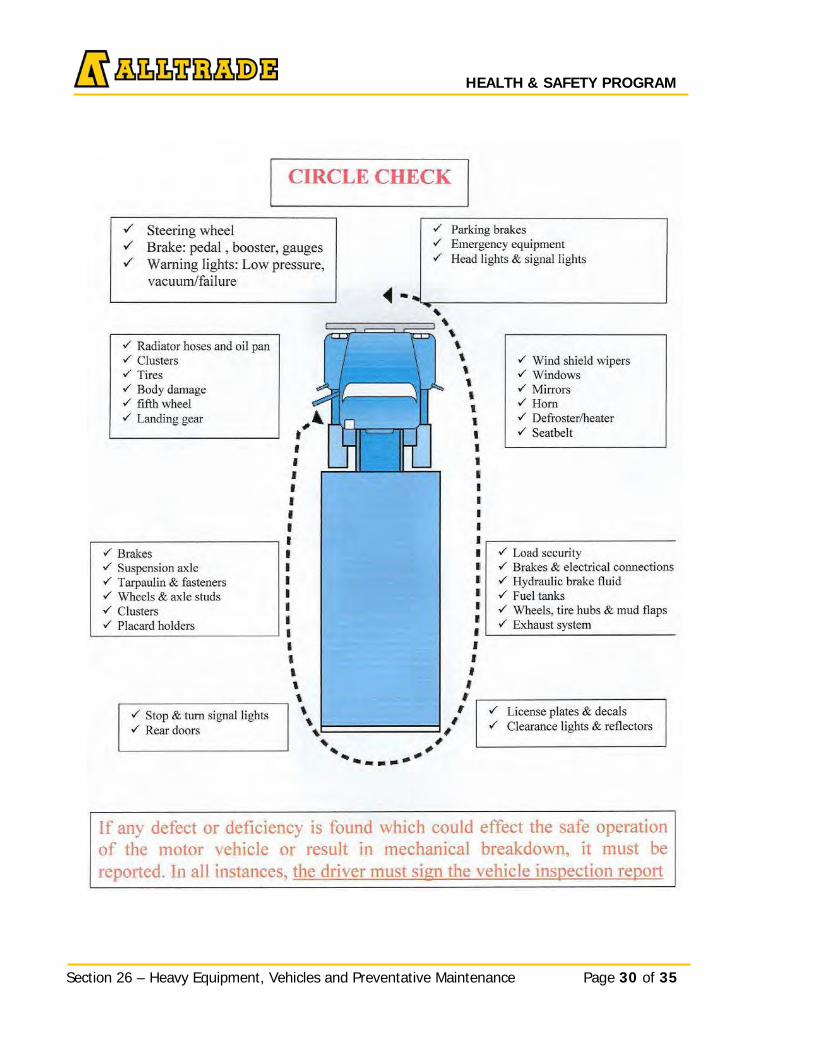
Section 26 – Heavy Equipment, Vehicles and Preventative Maintenance Page 30 of 35
HEALTH & SAFETY PROGRAM
HEALTH & SAFETY PROGRAM
Section 26 – Heavy Equipment, Vehicles and Preventative Maintenance Page 31 of 35
26.29 Fleet Vehicles – Maintenance
Standard Alltrade pick-up trucks and vans shall be maintained in safe working order.
Procedure
Regular Vehicle Inspection H&S_FORM_66 of Alltrade vehicles shall be done by the operator or other qualified person on a weekly basis as follows:
• All lights • Tires • Fluid leaks/levels • Emergency brake • Clean windows, good wipers/washer
It is the operator's responsibility to arrange for preventative maintenance:
• Oil and filter changes • Lubrication • Tightening of components • Engine tune • Brake jobs • Tire rotation/ replacement • Replacement of specific engine hoses • Radiator maintenance • Spring service for air conditioner
It is the operator's responsibility to arrange for demand maintenance:
• Light bulbs • Springs/suspension • Window glass • Wiper blades • Wiring • Gauges • Tires • Engine, transmission • Battery • Universal joints
HEALTH & SAFETY PROGRAM
Section 26 – Heavy Equipment, Vehicles and Preventative Maintenance Page 32 of 35
If major repair costs are anticipated discuss with your supervisor for direction.
Standard
Vehicles transporting dangerous goods shall have the proper placards and safety requirements in accordance with the applicable legislation.
Procedure
Operator of owned or leased vehicles shall:
• Determine the quantity of dangerous goods. • Consult the local jurisdiction for exact regulatory requirements. • Ensure all requirements are followed.
General Requirements
• The operator of the vehicle shall have proper TDG training and carry a valid
certified wallet card on his/her person. • A shipping document, must accompany the dangerous goods. The number of
dangerous goods being shipped must equal the number on the shipping document.
• Ensure that there is a fire extinguisher readily available • All items offered for transport must be in good condition • Do not ship material in damaged, rusted or leaky pails, drums, or damaged
seals • Do not ship damaged cartons
All dangerous goods must be identified in accordance with the appropriate labels Dangerous Goods are classed as follows:
• Class 1 - Explosive • Class 2 - Flammable and Non Flammable Gas • Class 3 - Flammable Liquid • Class 4 - Flammable Solid Class • Class 5 - Oxidizing Substance • Class 6 - Toxic Substance • Class 7 - Radioactive Materials • Class 8 - Corrosive Class • Class 9 - Miscellaneous Products, Substances or Organisms
HEALTH & SAFETY PROGRAM
Section 26 – Heavy Equipment, Vehicles and Preventative Maintenance Page 33 of 35
General Operation Procedure
• Only licensed and qualified operators who have been properly instructed may operate the controls.
• Operator must be familiar with operator manual supplied by the manufacture. Manual must be available in cab.
• Operator must complete the operator log book as required and the Boom Truck/Broderson Inspection H&S_FORM_076.
• All outriggers beams (if equipped) are to be fully extended and outriggers pads are to be placed on a solid footing or blocking. All wheels are to be clear of the ground.
• The boom angle, boom length, load radius and the rated capacity must be known by the operator.
• Boom Truck/Broderson must be set up level. • The lifting hook is directly above the load’s center of gravity. • Load weight must be known. • Rigging must be correct for the hoist. • Boom Truck/Broderson is set up level on firm, stable ground or blocking. • Boom Truck/Broderson controls should be moved smoothly and gradually to
avoid abrupt, jerky movements of the load. Slack must be removed from the slings and hoisting ropes before the load is lifted.
• Be sure that everyone in the immediate area is clear of the load and aware that a load is being moved.
• Do not make any lifts beyond the rated capacity of the crane, slings chains, rope slings, etc.
• Do not operate crane if the limit switches (if equipped) are out of order, or if ropes or other rigging show defects or wear.
• Make certain that before moving the load, load slings, load chains, or other lifting devices are fully seated in the saddle of the hook with the latch closed.
• At no time should a load be left suspended from the crane unless the operator is at the master switches or pushbutton with the power on.
• When two or more cranes are used in making one lift, there shall be only one designated signal person.
• Operator has total care and control of any lifts and there decision is final and must not be influence or pressured to make any pick he/she feels uncomfortable.
• Weather conditions should be considered when making a lift. • All Boom Truck/Broderson must be inspected yearly and recertified by a
competent professional engineer.
HEALTH & SAFETY PROGRAM
Section 26 – Heavy Equipment, Vehicles and Preventative Maintenance Page 34 of 35
26.30 Crane Boom Inspection A crane boom used for driving piles with a vibratory hammer must be inspected and certified by a professional engineer as safe for continued use
• As required by manufactures specification while it is in use; and • When not in use, before being returned to hoisting service.
A crane boom with a vibratory pile extractor must be inspected and certified by a professional engineer as safe for continued use
• As required by manufacturers specification while it is in use; and • When not in use, before being returned to hoisting service.
A crane boom used for dynamic compaction must be inspected and certified by a professional engineer as safe for continued use
• As required by manufactures specification while it is in use; and • Before it is returned to hoisting service.
The purpose of this procedure is to organize the timely cleanup of lost material on public roadways.
_
Procedure
When a spill occurs on the way to a jobsite/pit/quarry on a public roadway dispatch is to be notified immediately. The trucking manager/Supervisor will be informed of the situation and organize the cleanup effort. This material must have come from:
• One of our pit/quarry/job sites • A truck owned by Alltrade, or a hired truck working for Alltrade.
The Fleet shop will then be called to send a technician out to check/repair the vehicle to secure the remainder of the load.
26.31 Operator Competency Checklist
The Operator Competency Checklist H&S_FORM_077 can be used as a tool to review performance and verify knowledge in examining, starting, moving, operating, stopping and parking equipment. The purpose is to make it available for use as a document to record that an equipment operator is aware of the operating requirements of the piece of equipment they are expected to control in a safe manner on our projects.
All evaluators must be competent persons in the use of the equipment and the operations they are observing. Prior to conducting a review using the Competency Checklist the
HEALTH & SAFETY PROGRAM
Section 26 – Heavy Equipment, Vehicles and Preventative Maintenance Page 35 of 35
evaluator should verify that the worker has read the operator’s manual for the machine they will be using and that they have had any questions answered to ensure that that they fully understand it.
The evaluator should also take some time to ask the operator some questions about previous experience and to check that they know what they are talking about.
If after questioning them and having them demonstrate the safe operation of the equipment you have no concerns related to them being able to perform the tasks Alltrade is asking them to do then competency has been displayed.
If you have any concerns, then verification of competency is not possible and the supervisor would need to arrange for additional training through a competent operator as a mentor or another training resource.
HEALTH & SAFETY PROGRAM _ _
Section 27 – Traffic Control Page 1 of 8
Title: Traffic Control Issue Date: January 2016
Section: 27 Revision Date: N/A
Approved by: Bob Ritzmann, President Signature: 27.1 Policy Statement
Alltrade is fully committed to ensuring that its workers and public safety is not endangered or put at risk by vehicular traffic.
Our workers are familiar with safe work procedures as they apply to vehicle traffic control; the public is not. Therefore, Alltrade shall take all reasonable precautions necessary to ensure our workers and the public is protected from vehicular traffic.
Note: The traffic control program is a regulatory requirement.
The following program outlines the procedures established and approved for use in Ontario.
Please note there are additional traffic plans / accommodation strategies available in each region.
Please consult with your EHS Department for traffic plans in another region or for additional plans.
27.2 Ontario Traffic Control
Establishing and Setting Up Work Zone Traffic Control
1. Plan your set up and take down in advance. 2. Ensure that the proper traffic control plan and layout is selected, and workers have
signed Traffic Protection Plan H&S_FORM_078. 3. Traffic Protection Plan H&S_FORM_078, may be used for projects utilizing the
same or similar layout for multiple days. 4. All workers must wear proper personal protective equipment, including hard hat,
traffic garment (vest), safety boots and eye protection. 5. Inspect all traffic control equipment, barricades, stop/yield signs, markers and light
signals to ensure they meet local jurisdiction requirements. 6. Ensure that any nearby parking meters are covered to prevent vehicles from parking
in the work are before it is set up. 7. Work vehicles should be positioned upstream of the work area rather than
downstream, while setting up traffic control (between workers and the approaching traffic), so that their flashing lights and/or flashing arrows may indicate a visual presence and visual obstacle to drivers.
8. Assemble and disassemble traffic control devices away from the traveled portion of the roadway.
9. Minimize your exposure to traffic.
HEALTH & SAFETY PROGRAM _ _
Section 27 – Traffic Control Page 2 of 8
10. Make sure you are visible and conspicuous to oncoming traffic and construction vehicle operators.
11. Set up traffic control devices starting at the upstream end of the work zone. 12. Always face traffic when setting up work zone traffic control. 13. Plan an escape route in case traffic should unexpectedly invade your workspace.
Special alertness is advisable on curves, where a vehicle, if not steered properly around the curve, might continue in a straight line directly towards the work area or the worker.
14. Maintain a minimum usable lane width of 3.0 m in any traveled lane at all times. The lane should be all paved or all gravel. Avoid directing traffic onto a lane that is partly paved and partly gravel.
15. Ensure that traffic control devices are not obscured by objects such as vehicles, pole, trees, shrubs or other signs.
16. Ensure that any Traffic Control Persons (TCP) deployed are competent workers, shall not perform any other work while directing vehicular traffic, shall be positioned in such a way that he or she is endangered as little as possible by vehicular traffic and given adequate written and oral instruction, in a language that he or she understands, with respect to directing vehicular traffic, and those instructions shall include a description of the signals that are to be used
17. Cover signs and devices that are installed before they are required, using a suitable material. Remove the cover immediately before work at the worksite begins
18. Ensure the typical layout is implemented as approved, record this, and keep a copy available on site.
19. Machinery, equipment and material that is being used, left or stored where it may be a hazard to traffic on a public way shall be marked by flashing devices.
20. Always drive through the traffic control plan both ways to ensure it’s not confusing to motorists.
27.3 Traffic Control on the Project
All vehicles and heavy equipment operating on a project must do so in an organized and planned manner to prevent injury or equipment damage.
The following points shall be reviewed and appropriate measures taken to prevent injury and accidents:
• All vehicles shall obey and observe any posted speed limits • All heavy mechanized equipment and other vehicles shall be parked in an
approved designated area • The supervisor shall ensure that any operation of heavy equipment in reverse is
limited • If equipment is operated in a continuous operation such as building roads, pits
and quarries the area shall be designated and posted as a restricted area.
HEALTH & SAFETY PROGRAM _ _
Section 27 – Traffic Control Page 3 of 8
• If equipment must be operated in reverse a signal person shall assist the operator
• The signal person shall wear an approved reflective vest • The supervisor shall ensure that a procedure of communication is in place
between the signal person and the operator • The signal person shall not perform any other duties while acting as a signal
person • Appropriate signage shall be posted to advise of heavy equipment and vehicular
traffic
27.4 Traffic Control Persons
Standard To protect employees and the motoring public by regulating traffic flow through construction zones.
Procedure Traffic control persons (TCPs) must be given written and oral instructions regarding their duties.
A worker who is required to direct vehicular traffic shall:
• Be a qualified and competent person as per the local jurisdiction; • Not perform any other work while directing vehicular traffic; • Be positioned in such a way that he/she is endangered as little as possible by
vehicular traffic; • Be given adequate instructions and those instructions shall include a description
of the signals that are to be used; • Understand the construction activity within the traffic control zone; and • Have proof of training available upon request.
A Traffic Control Person must be able to:
• Protect construction workers and the motoring public; • Stop traffic whenever required by the progress of the work. Otherwise to keep
traffic moving at reduced speeds; • Allow construction to proceed safely and efficiently; and • Ensure that emergency traffic has priority over construction equipment.
PPE requirements for Traffic control persons must meet the specifications of the local jurisdiction.
Note: Refer to Book 7 Ontario Traffic Manual for Temporary Conditions for further information.
HEALTH & SAFETY PROGRAM _ _
Section 27 – Traffic Control Page 4 of 8
_ _
After Dark Retro-reflective silver stripes encircling each arm and leg and a tear away reflective vest shall be worn to increase visibility.
Before starting work, make sure that you know: • The type of construction you will be involved with. • The type of equipment to be used such as scrapers, compactors, trucks. • How the equipment will be operating e.g. crossing the road, backing up. • Whether you will need to protect workers setting up components of the traffic
control system such as signs, and cones. • Any special conditions such as forbidding work during rush hours. • How public traffic will flow along a two lane road, around curves or hills. In order
to reduce your exposure to vehicular traffic, follow these guidelines: • Stand the correct distance from the work area. You must refer to the traffic
control plan table in your jurisdiction. • Do not stand on the traveled portion of a roadway and always face oncoming
traffic. • Be alert at all times. Be aware of construction activity around you and oncoming
traffic on the roadway. • Stand alone. Don’t allow a group to gather around you. • Stand at your post. Sitting can be hazardous because your visibility is reduced
and the ability of a motorist to see you is reduced. • Adjust your distances to suit the road, weather, and speed conditions. Traffic
must have room to react to your directions to stop. A vehicle can take twice as long to stop on wet or icy roadways.
• Hills and curves call for three traffic control persons or some other means of communication. The job of the person in the middle is to relay signals between the other two. Refer to local jurisdiction for clarification when working on hills and curves.
• Once you have been assigned a traffic control position, look over the area for a method of escape in the event a motorist for some reason has disregarded your signals. If this should happen, protect yourself by moving out of the path of the vehicle and then warn the crew.
Signaling
• Hold your sign firmly in full view of oncoming traffic. • Give the motorist plenty of warning. Don’t show the STOP sign when the motorist
is too close. The average stopping distance for a vehicle traveling at 50km per hour (30 miles per hour) is 45metres (150 feet).
• When showing the SLOW sign, avoid bringing the traffic to a complete halt. When motorists have slowed down, signal them to keep moving slowly.
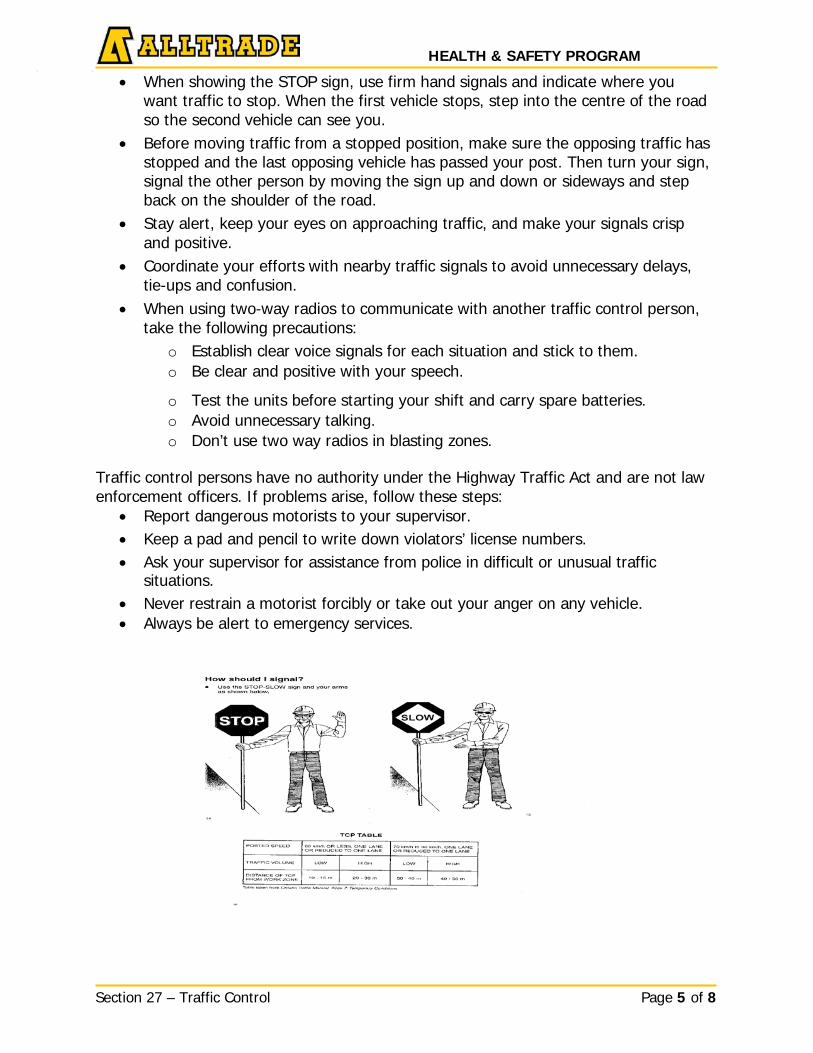
HEALTH & SAFETY PROGRAM _ _
Section 27 – Traffic Control Page 5 of 8
_ _
• When showing the STOP sign, use firm hand signals and indicate where you want traffic to stop. When the first vehicle stops, step into the centre of the road so the second vehicle can see you.
• Before moving traffic from a stopped position, make sure the opposing traffic has stopped and the last opposing vehicle has passed your post. Then turn your sign, signal the other person by moving the sign up and down or sideways and step back on the shoulder of the road.
• Stay alert, keep your eyes on approaching traffic, and make your signals crisp and positive.
• Coordinate your efforts with nearby traffic signals to avoid unnecessary delays, tie-ups and confusion.
• When using two-way radios to communicate with another traffic control person, take the following precautions:
o Establish clear voice signals for each situation and stick to them. o Be clear and positive with your speech.
o Test the units before starting your shift and carry spare batteries. o Avoid unnecessary talking. o Don’t use two way radios in blasting zones.
Traffic control persons have no authority under the Highway Traffic Act and are not law enforcement officers. If problems arise, follow these steps:
• Report dangerous motorists to your supervisor. • Keep a pad and pencil to write down violators’ license numbers. • Ask your supervisor for assistance from police in difficult or unusual traffic
situations. • Never restrain a motorist forcibly or take out your anger on any vehicle. • Always be alert to emergency services.
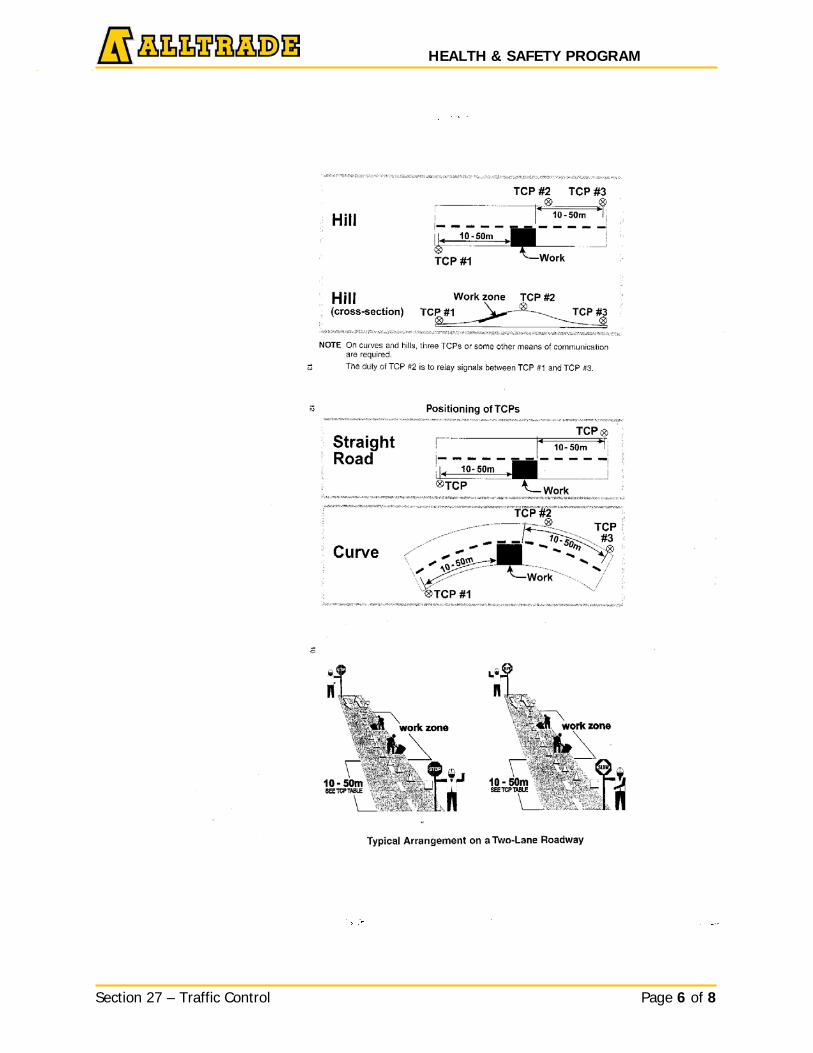
HEALTH & SAFETY PROGRAM _ _
Section 27 – Traffic Control Page 6 of 8
_ _
HEALTH & SAFETY PROGRAM _ _
Section 27 – Traffic Control Page 7 of 8
_ _
27.5 Definitions – Work Durations
Mobile Operations Work that is done while moving continuously, usually at speeds of 25 km/h or less, or with periodic stops that do not exceed a few minutes.
Very Short Duration Work that occupies a fixed location for up to 30 minutes, including set up and take down time.
Short Duration A work area that is continuously occupied by workers and/or equipment more than 30 minutes but less than one 24-hour period.
Long Duration Stationary work activities within 3 metres of a travelled lane, which requires a separate work, space for longer than 24 hours.
27.6 Definitions - Roads
Freeway Controlled access highway with a continuous dividing median with normal posted speed at 90 KM plus.
Highway Common or public highway, street, avenue, parkway, driveway, square, place, bridge, viaduct or trestle intended for and used by general public.
Public Way *Similar description to Highway, to which public has access by expressed or implied invitation.
Roadway The travelled portion of a highway.
Traffic Control on the Project
All vehicles and heavy equipment operating on a project must do so in an organized and planned manner to prevent injury or equipment damage.
The following points shall be reviewed and appropriate measures taken to prevent injury and accidents:
1. All vehicles shall obey and observe any posted speed limits. 2. All heavy mechanized equipment and other vehicles shall be parked in an
approved designated area. 3. The supervisor shall ensure that any operation of heavy equipment in reverse is
limited.
HEALTH & SAFETY PROGRAM _ _
Section 27 – Traffic Control Page 8 of 8
_ _
4. If equipment is operated in a continuous operation such as building roads, pits and quarries the area shall be designated and posted as a restricted area.
5. Signal persons shall wear an approved reflective vest. 6. The supervisor shall ensure that a procedure of communication is in place
between the signal person and the operator. 7. The signal person shall not perform any other duties while acting as a signal
person. 8. Appropriate signage shall be posted to advise of heavy equipment and vehicular
traffic.

HEALTH & SAFETY PROGRAM _ _
Section 28 – Working at Heights Page 1 of 9
Title: Working at Heights Issue Date: January 2016
Section: 28 Revision Date: N/A
Approved by: Bob Ritzmann, President Signature: 28.1 Policy Statement
All work at heights must be completed in a safe manner. Alltrade recognizes that training, planning and the proper equipment are fundamental in completing work at heights safely. Alltrade will ensure workers have adequate training on the equipment and devices used while working at heights, and that the work has been assessed for hazards and controls have been put in place.
28.2 Working at Heights Requirements
The following requirements will be implemented when working from heights. Fall Protection requirements may vary between jurisdictions and work location. Consult the supervisor.
Alltrade is committed to completing work at heights safely and will ensure that when working at heights the requirements set forth by the applicable legislative requirements are met or exceeded.
Fall Protection is the means or measures taken to ensure work is completed safely while working at height. This can include but not be limited to the use of guardrails, ladders, fall arrest systems, travel restraint, scaffolding or working on elevating work platforms.
A means of fall protection must be used when a worker may fall: • A vertical fall of 3m (10’) or more may occur;
o Note: In some jurisdictions and client workplaces the Occupational Safety Health Administration (OSHA) guidelines are observed with a 6’ height requirement. Consult with the H&S department for further information and instruction.
• A fall from a lesser height involves an unusual risk of injury, e.g. working above a tank, exposed re-bar or operating machinery, etc.;
• Operating elevating platforms
28.3 General Information • Travel Restraint Equipment must be CSA/OSHA/ANSI approved. Travel Restraint
Equipment, and Shock-Absorbing Lanyards and Lifelines must be attached to a secure part of the project.
• Scaffolding shall be erected by qualified workers and shall be erected as designed by the manufacturer.
• Where use of scaffolding is not possible, Fall Arrest Equipment will be used. Fall Arrest Equipment shall be CSA/OHSA/ANSI approved and shall be used in accordance with manufacturer instructions. Only one worker per lanyard and safety line is permitted.
• Materials and tools being stored must be 3m (10’) back from the edge except for tools being used and working quantities of materials. Proper lift ropes and containers are to be used for hoisting tools and equipment.
HEALTH & SAFETY PROGRAM _ _
Section 28 – Working at Heights Page 2 of 9
• Signs and barricades shall be used to notify and inform workers and the public of overhead work. If it is not possible to barricade as above, a watchman will be posted.
• 100% fall protection is required on elevating work platforms. A bull body harness and lanyard will be used while on an elevating work platform. The system used will be arranged so that the worker is not capable of striking the ground in the event of a fall.
• Instruction and implementation of these procedures shall be enforced by site supervision.
• Some typical fall hazards are: o Openings in elevated floors; o Erecting structural steel and equipment at heights; o Working above water or other liquid; o Working close to the edge of an elevated floor or roof, or etc.
28.4 Responsibilities
Supervisors It shall be the responsibility of the Supervisor to ensure that:
• The Fall Arrest Rescue Plan is current and specific to actual operation. Long duration projects must review the plan annually at a minimum;
• A Fall Protection Plan is implemented that meets the policy criteria; • All workers that require a Fall Protection Plan are instructed in proper execution
of the plan; and • A copy of training documentation will be filed at the project
Sub-Contractors It shall be the responsibility of Sub-Contractors to ensure that:
• Ensure all workers under his/her authority receive Fall Protection instruction; • Ensure training documentation is forwarded as requested; • Ensure that the required Safety Equipment is available; • Ensure that required Safety Equipment is regularly inspected and maintained;
and • Provide an inventory of Fall Protection Equipment available, if required and
ensure all workers under his/her authority adhere to the project Fall Protection Plan.
Workers Workers are responsible to:
• Receive instruction, and adhere to the Fall Protection Plan/Procedure and report to the Supervisor any non-compliance of the Fall Protection Plan/Procedure; and
• Report falls resulting in the worker’s fall being arrested • Ensure the fall arrest system in use prevents them from hitting the ground or
surface below
HEALTH & SAFETY PROGRAM _ _
Section 28 – Working at Heights Page 3 of 9
28.5 Fall Protection and Working Alone
Alltrade requires a minimum of 2 people to be present at all times when the use of a Travel Restraint or Fall Arrest System is required (buddy system).
28.6 Guardrails
Whenever possible, danger areas shall be protected by properly constructed guardrails.
• Guardrails shall be constructed around any open-sided floor, working platform, runway, walkway, or other surface to which a worker has access.
• Guardrails must be between 0.96 - 1.1m (38”-42”) high or as per the local
jurisdictional requirements.
• Guardrails shall have an intermediate rail and toe boards.
• Railings must be attached to the inside of posts.
• Posts must be spaced less than 2.4m (8’) apart.
• When Guardrails are temporarily removed to facilitate work, workers exposed to a fall hazard must be protected by other Fall Protection Systems. The Guardrails must be replaced when the unguarded area is left unattended and after the work is completed (if still required)
• Guardrails shall be designed to withstand all loads likely to be applied in any
direction.
Where it is not possible to install guardrails in a danger area, a Travel Restraint or Fall Arrest Protection Plan shall be used. Cable/Fence Guardrails must meet the requirements of the local jurisdiction.
28.7 Elevating Working Platforms (EWP) & Logs
Workers using elevating working platforms will be trained in its safe and proper use by the manufacturer or other approved designate (i.e. rental company, safety association etc.). The EWP operator will provide verification of training for the class of equipment used.
Guidelines
• EWP shall be equipped with a top rail, mid-rail and a toe board. • EWP shall be used only on smooth level surfaces. EWP’s used on uneven
surfaces must be rated accordingly and used as per the manufacturer instructions.
• EWP are to raise workers and light tools, not materials beyond its rated capacity. • Workers on EWP’s must be protected from falling. Protection will include a full
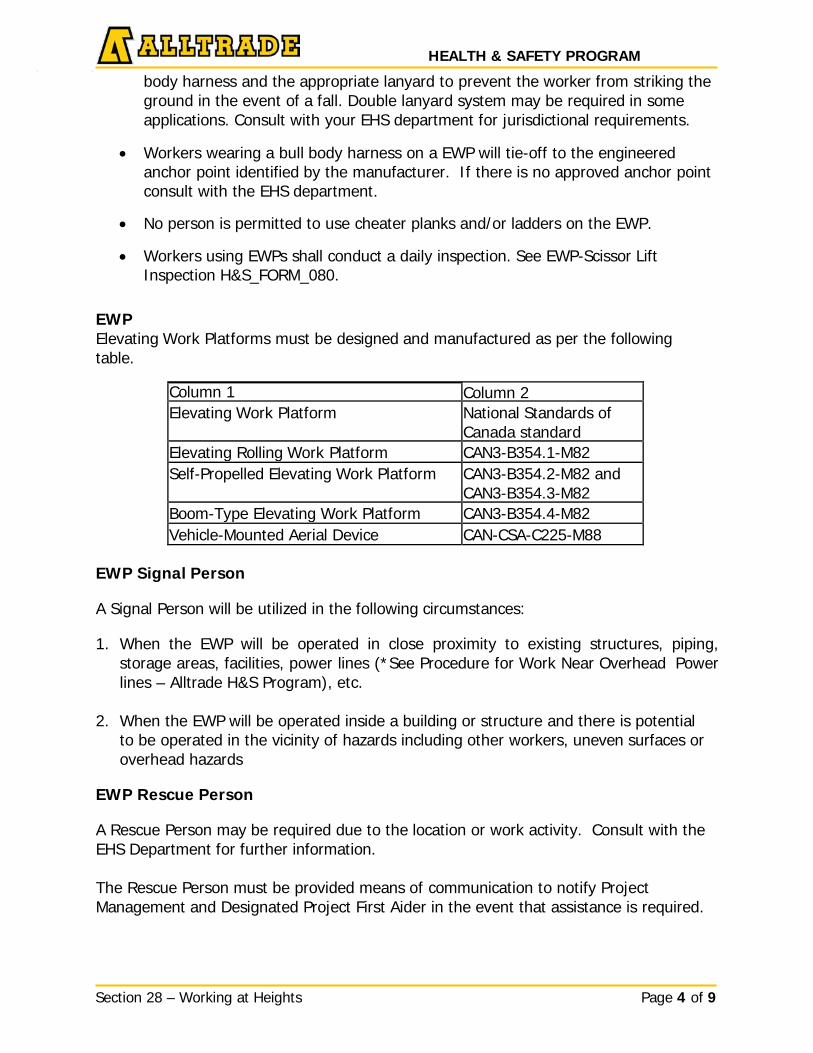
HEALTH & SAFETY PROGRAM _ _
Section 28 – Working at Heights Page 4 of 9
_ _
body harness and the appropriate lanyard to prevent the worker from striking the ground in the event of a fall. Double lanyard system may be required in some applications. Consult with your EHS department for jurisdictional requirements.
• Workers wearing a bull body harness on a EWP will tie-off to the engineered anchor point identified by the manufacturer. If there is no approved anchor point consult with the EHS department.
• No person is permitted to use cheater planks and/or ladders on the EWP.
• Workers using EWPs shall conduct a daily inspection. See EWP-Scissor Lift Inspection H&S_FORM_080.
EWP Elevating Work Platforms must be designed and manufactured as per the following table.
Column 1 Column 2 Elevating Work Platform National Standards of
Canada standard Elevating Rolling Work Platform CAN3-B354.1-M82 Self-Propelled Elevating Work Platform CAN3-B354.2-M82 and
CAN3-B354.3-M82 Boom-Type Elevating Work Platform CAN3-B354.4-M82 Vehicle-Mounted Aerial Device CAN-CSA-C225-M88
EWP Signal Person
A Signal Person will be utilized in the following circumstances:
1. When the EWP will be operated in close proximity to existing structures, piping, storage areas, facilities, power lines (*See Procedure for Work Near Overhead Power lines – Alltrade H&S Program), etc.
2. When the EWP will be operated inside a building or structure and there is potential
to be operated in the vicinity of hazards including other workers, uneven surfaces or overhead hazards
EWP Rescue Person
A Rescue Person may be required due to the location or work activity. Consult with the EHS Department for further information.
The Rescue Person must be provided means of communication to notify Project Management and Designated Project First Aider in the event that assistance is required.
HEALTH & SAFETY PROGRAM _ _
Section 28 – Working at Heights Page 5 of 9
_ _
A Rescue Person will be instructed in their responsibilities and emergency procedures prior to any work being performed utilizing a EWP. The Rescue Person will remain in close proximity and maintain visual and/or audible contact with workers while a EWP is in use.
Note: The Rescue Person may be identified through the site Fall Arrest Rescue Plan. Consult with the EHS Department for further information.
28.8 Ladders
All work involving the use of ladders will be in compliance with the standards set forth in Alltrade safe work practices for ladder use.
28.9 Scaffolds
All work involving the use of scaffolding (including suspended scaffolds) will be in compliance with the standards set forth in Alltrade safe work practices for scaffolds.
28.10 Personal Fall Protection Equipment
• A worker must use an approved Full Body Harness for Fall Arrest and Travel Restraint (CAN/CSA-Z259.10 – 06 or equivalent standard).
• Shock-Absorbing Lanyards must meet CSA Standard (CAN/CSA-Z259.11 – 05 or
equivalent standard) and, in combination with a Lifeline System, shall not allow a worker to fall more than 1.2m (4’).
• A personal Fall Arrest System with a Shock Absorber shall be so arranged that if
the worker falls, he/she will not hit the surface below.
• Where there is potential to sever, abrade, or burn a Safety Lanyard, the Lanyard must be made of an approved wire rope. A Shock Absorber must be used with such approved wire rope. Nomex/Kevlar Safety Harness may be required for workers in environments where falling is not the only hazard. Spark and slag from welding, cutting, burning, gouging, and smelting operations can quickly ruin standard nylon and polyester webbing normally used in the construction.
• When working around an energized conductor, a Non-Conductive Lanyard shall
be used. If, in addition there is potential to sever, abrade, or burn the Lanyard, then two Non-Conductive Lanyards shall be used, or another effective means of Fall Protection.
• Snap hooks must be self-locking.
• Carabiners must have an ultimate load capacity of 5000lbs and this must be
clearly shown along with a means of identifying the manufacturer on the device. A Carabiner must be secured to prevent inadvertent opening.

HEALTH & SAFETY PROGRAM _ _
Section 28 – Working at Heights Page 6 of 9
_ _
• A Lifeline, or Lanyard used without a Lifeline, must be secured to an anchor. A professional engineer must certify an Anchor Plate with multiple attachments in writing. An Anchor for a Vertical Lifeline or for a Lanyard used without a Lifeline must have an ultimate load capacity of at least 5000lbs in any direction required to resist a fall.
• All engineered drawings must be available onsite
28.11 Fall Protection Equipment Inspection
All workers who wear Fall Arrest Equipment shall visually inspect their equipment on a daily basis prior to use to ensure there are no tears, rips, burns, abrasions, or other factors that would affect the performance of the fall arrest equipment.
The fall protection equipment inspection report will be completed to document the inspection history. See H&S_FORM_081.
Note – Horizontal Life Lines (HLL) are a component of the fall protection system and must be inspected by a competent person as required by the manufacturer, jurisdiction, or site requirements.
28.12 Training
All personnel required to use Fall Protection Equipment must be trained in its use by a competent person and meet any applicable training program guidelines set forth by the jurisdiction.
Training should include the following components:
• A review of current legislation pertaining to fall protection and any workplace specific rules
• The types of fall protection that can be used to control a fall hazard • Identification of fall hazards; • Assessment and selection of appropriate equipment and anchors that the worker
may use; • Instructions for the correct use of connection hardware • Information about the effect of a fall on the human body, including:
o Maximum arresting force o The purpose of shock and energy absorbers; o Swing fall and o Free Fall
• Pre-use inspection requirements • Potential emergency response procedures to be used based on the fall protection
system in place • Practice in:
o Inspection, fitting, adjusting, and connection fall protection systems and components
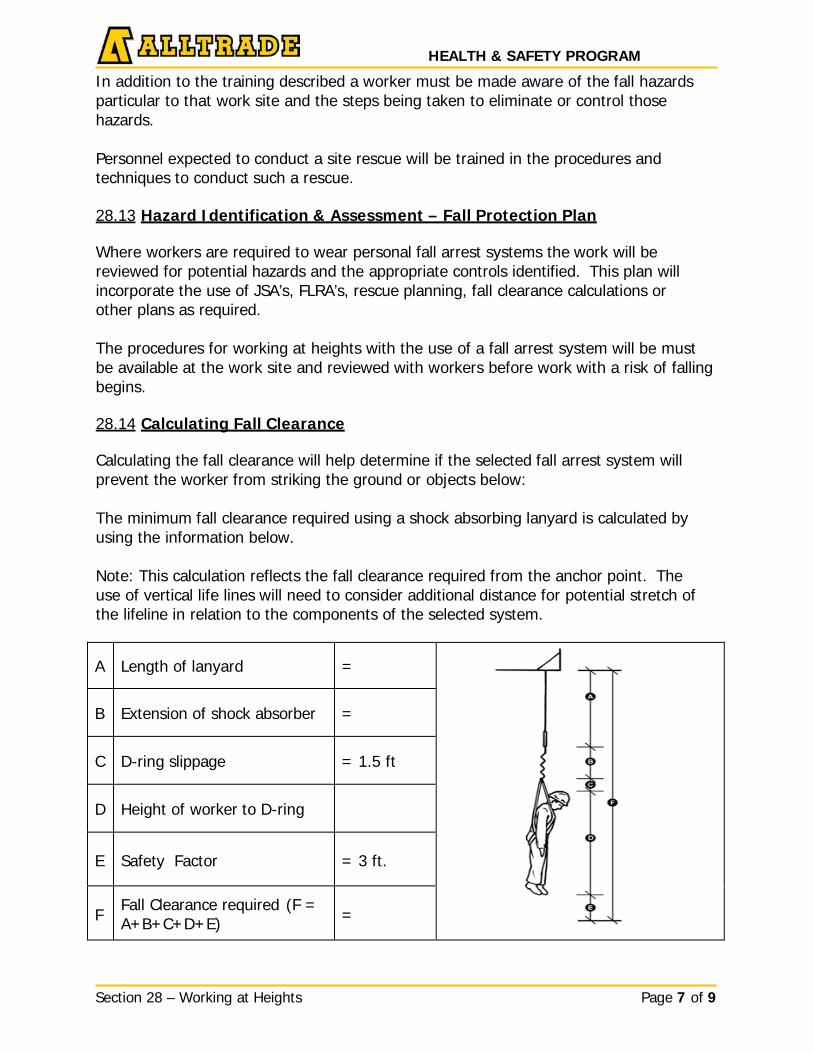
HEALTH & SAFETY PROGRAM _ _
Section 28 – Working at Heights Page 7 of 9
_ _
In addition to the training described a worker must be made aware of the fall hazards particular to that work site and the steps being taken to eliminate or control those hazards.
Personnel expected to conduct a site rescue will be trained in the procedures and techniques to conduct such a rescue.
28.13 Hazard Identification & Assessment – Fall Protection Plan
Where workers are required to wear personal fall arrest systems the work will be reviewed for potential hazards and the appropriate controls identified. This plan will incorporate the use of JSA’s, FLRA’s, rescue planning, fall clearance calculations or other plans as required.
The procedures for working at heights with the use of a fall arrest system will be must be available at the work site and reviewed with workers before work with a risk of falling begins.
28.14 Calculating Fall Clearance
Calculating the fall clearance will help determine if the selected fall arrest system will prevent the worker from striking the ground or objects below:
The minimum fall clearance required using a shock absorbing lanyard is calculated by using the information below.
Note: This calculation reflects the fall clearance required from the anchor point. The use of vertical life lines will need to consider additional distance for potential stretch of the lifeline in relation to the components of the selected system.
A Length of lanyard =
B Extension of shock absorber =
C D-ring slippage = 1.5 ft
D Height of worker to D-ring
E
Safety Factor
= 3 ft.
F
Fall Clearance required (F = A+B+C+D+E)
=
HEALTH & SAFETY PROGRAM _ _
Section 28 – Working at Heights Page 8 of 9
_ _
28.15 Rescue Planning
Where workers are required to wear fall arrest equipment the supervisor will ensure that a rescue plan is in place prior to the use of such equipment.
The rescue plan is to consider the types of fall arrest used, application and potential emergency situations.
Additional rescue planning may be necessary for unique situations and will be developed as part of the fall protection plan.
Items that can be considered as part of rescue planning:
• The use of elevating work platforms to reach workers at height • Equipment must be available • Rescue personnel must be trained and competed in the use of the equipment • Having Ladders on site that are capable of reaching a suspended worker • Equipping workers with leg loop extensions for their Full Body Harnesses, e.g.,
Suspension Relief Straps • Using Type 3 Self-Retracting devices that includes an integral hand winch that
allows the suspended worker to be raised upwards or lowered to safe ground. Use of this device does not require the suspended worker to be conscious
• Equipping workers in certain situations with self-rescue devices such as Specialized Descenders that allow the suspended worker to remove themselves from their Lanyard and descend to safe ground using one of these devices.
Fall Arrest Rescue Plan
The Fall Arrest Rescue Plan H&S_FORM_079 can be used to determine the rescue plan and rescue team members when fall arrest equipment is in use. Additional planning may be required for scenarios not covered by the Fall Arrest Rescue Plan.
28.16 Definitions
Fall Arrest System is a system that will stop a worker’s fall before the worker hits the surface below.
Fall Protection System includes the following when used to protect a worker from a fall hazard:
• Guardrails; • Full body safety harness with shock-absorbing lanyard & anchor point; • A Travel Restrain System • A Safety Net; • A Control Zone; • A Safety Monitor with a Control Zone; • An Elevated Work Platform; • A barrier constructed 2m back from an opening
HEALTH & SAFETY PROGRAM _ _
Section 28 – Working at Heights Page 9 of 9
_ _
A Travel Restraint System is a mechanism that restricts the movement of a worker on a work surface.
Personal Fall Protection System is an individual worker’s Fall Protection System, composed of a Shock Absorbing Lanyard, Full Body Safety Harness and Lifeline, and any other connecting equipment that is used to secure the worker to an individual anchor or to a lifeline system.
Unusual Risk of Injury from a fall means there are added danger from landing on operating machinery, in water, or into a vessel; as well as the usual danger of impact with a hard surface.
Control Zone means the area between an unguarded edge of a building or other opening and a barricade, which is set back 2m (6ft) from the edge or opening.
Danger Areas includes elevator shafts, floor openings, scaffolding, slab edge, roof tops, and other tops, and areas where a fall of 3m (10’) or more is possible.
EWP Signal Person A person who has full view of the intended path of travel and provides audible or hand signals to the Equipment Operator to assist in safe operation of the Equipment. A signal Person must be a competent person and is to be instructed in the hazards that may be encountered and the necessary controls including limits of approach to prevent injury or damage.
EWP Operator is a competent person who maintains valid proof of training for the classifications of mobile equipment to be operated.
EWP Rescue Person is a person trained in operating the equipment from the ground controls to safety lower the work platform to the ground when the controls in the work platform are not functioning correctly or where unforeseen conditions prevent the crew in the work platform to lower the work platform safely to the ground.
HEALTH & SAFETY PROGRAM _ _
Section 29 – Hoisting, Rigging and Material Handling Page 1 of 23
Title: Hoisting, Rigging and Material Handling Issue Date: January 2016
Section: 29 Revision Date: N/A
Approved by: Bob Ritzmann, President Signature:
29.1 Policy Statement Hoisting, rigging and material handling are essential tasks to Alltrade operations. Alltrade recognizes that these tasks can range from simple to complex and have a varying degree of risk. Alltrade will ensure that the individuals involved in hoisting, rigging and material handling operations are competent to perform such tasks.
29.2 Background Hoisting, rigging and material handling activities can encompass a variety of tasks. This section of Alltrade H&S program outlines the safe work practices and procedures required for but not limited to:
• Hoisting Equipment o Cranes, winches and hoists o Inspection requirements
• Rigging Hardware o Slings, chains, wire rope, hooks etc. o Rigging inspection
• Lift planning o Typical and complex lifts
• Material Handling o Equipment such as forklifts, concrete pump trucks, hydrovac, pile driving o Storage of material
29.3 Hoisting, Rigging and Material Handling Standard Only those qualified by knowledge, training, and experience shall perform Hoisting, Rigging and Material Handling activities.
29.4 Lifting Categories: Definitions
Typical or Common Lift A typical or common lift does not meet the Critical Load definitions as noted below. This includes routine or repetitive lift activities below 75% of the maximum capacity of the lifting device.
Critical Lift
• Tandem lift which requires multiple cranes, or two hooks on same crane and exceeds 75% crane capacity
• Centre of gravity is significantly off from center • Load is difficult to balance and secure (e.g., liquid filled container/vessel) • Load subjected to high winds or adverse weather conditions causing load
instability • Load must travel over operating equipment • Public at risk • See H&S_FORM_082 for Critical Lift Plan, if required
HEALTH & SAFETY PROGRAM _ _
Section 29 – Hoisting, Rigging and Material Handling Page 2 of 23
29.5 Lift Plan Review
If the Supervisor determines any of the following conditions apply to the proposed lift; then the Supervisor shall ensure an engineering review of the lift plan is performed.
• Two or more cranes are required to lift a load (mobile or fixed) and exceeds 75% crane capacity
• Sling angle to eye bolt is less than 45 degrees, or 30 degrees for other lifting equipment
• Lift may be subject to adverse weather conditions or high wind loads causing instability
• Load weight or centre of gravity is unknown and difficult to determine. • Lift will require the crane to be loaded to 95% of its capacity at any point in the
travel of the load. • Man basket attached to crane and worker must enter;
29.6 Special Considerations in Lift Planning
Crane or Load can swing within Limit of Approach of high voltage power lines. • Have alternate lift/swing positions have been examined • Is De-energizing lines/conductors feasible • Must use a dedicated signal person designated to watch line / conductor
clearance • Signal person shall be readily identifiable and able to communicate effectively
with the operator • If voltage of power line is known safe limit of approach can be determined • If voltage unknown either use maximum safe limit of approach or contact local
electrical authority
Lift on or over any type of live / process equipment or containers • Are the contents or function of the equipment or containers known • Ensure All workers clearly understand potential hazards • Facilities housing personnel must be vacated and flagged • Best and most practical crane communication signals to be used • A Designated channel/frequency is available for critical radio communication
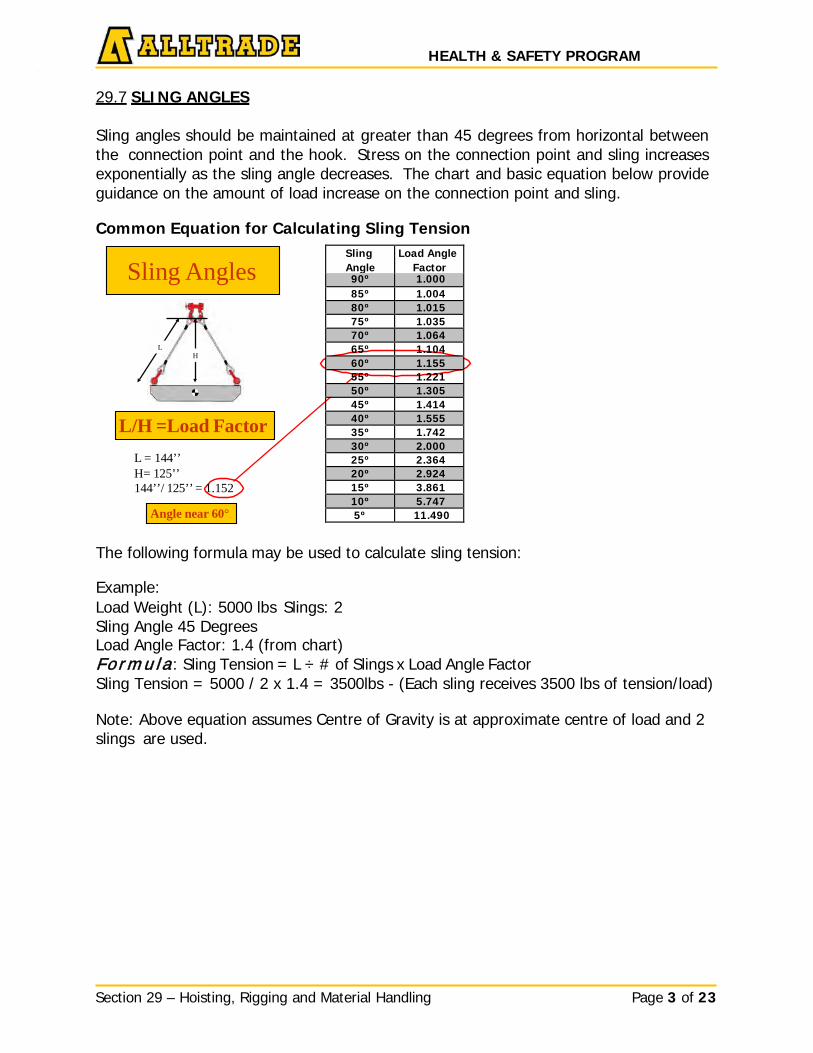
HEALTH & SAFETY PROGRAM _ _
Section 29 – Hoisting, Rigging and Material Handling Page 3 of 23
L H
L/H =Load Factor L = 144’’ H= 125’’ 144’’/ 125’’ = 1.152
29.7 SLING ANGLES
Sling angles should be maintained at greater than 45 degrees from horizontal between the connection point and the hook. Stress on the connection point and sling increases exponentially as the sling angle decreases. The chart and basic equation below provide guidance on the amount of load increase on the connection point and sling.
Common Equation for Calculating Sling Tension
Sling Angle
Load Angle Factor
90º 1.000 85º 1.004 80º 1.015 75º 1.035 70º 1.064 65º 1.104 60º 1.155 55º 1.221 50º 1.305 45º 1.414 40º 1.555 35º 1.742 30º 2.000 25º 2.364 20º 2.924 15º 3.861 10º 5.747 5º 11.490
The following formula may be used to calculate sling tension:
Example: Load Weight (L): 5000 lbs Slings: 2 Sling Angle 45 Degrees Load Angle Factor: 1.4 (from chart) Fo r m u l a : Sling Tension = L ÷ # of Slings x Load Angle Factor Sling Tension = 5000 / 2 x 1.4 = 3500lbs - (Each sling receives 3500 lbs of tension/load)
Note: Above equation assumes Centre of Gravity is at approximate centre of load and 2 slings are used.
Sling Angles
Angle near 60°
HEALTH & SAFETY PROGRAM _ _
Section 29 – Hoisting, Rigging and Material Handling Page 4 of 23
_ _
29.8 Overhead Cranes
Standard Only operators, qualified by knowledge, training, and experience to avoid endangering workers, equipment, or materials, shall operate overhead cranes of any types.
Procedure This procedure applies to tower cranes, overhead and gantry cranes, including semi- gantry, cantilever gantry, wall cranes, storage bridge cranes and other hoisting equipment that have the same fundamental characteristics.
Operations The operator of the overhead crane shall perform his/her duties as follows:
• Equipment shall be accessed and operated by a qualified operator or trainee that is under the direct supervision of the qualified operator (Check local jurisdictions requirements based on lifting capacity). Exception: Maintenance, test personnel and inspectors, when in the performance of their duties, shall be allowed access only after permission has been granted by the operator.
• The operator shall complete a pre-inspection checklist as per the manufacturer’s recommendation daily prior to use.
• The operator shall maintain full attention on the task being performed (e.g., no use of headsets, music).
• The operator shall ensure that hand signals used during the lift are understood and followed by all involved.
• No load in excess of the rated capacity shall be lifted. • Before leaving the crane or carrier unattended, the operator shall land any load,
place the controls or master switch in the off position and open the main line device of the specific crane or carrier.
• If the crane or carrier has been locked out or tagged out, only the person that locked out the device may remove the lock and tag. To remove an abandoned lock and tag refer to the Lockout/Tag out program in this section of the H&S Manual.
• For cab-operated equipment, make sure that all controls are in the "off" position prior to closing the line disconnects.
• During use of cab-operated equipment, if the power should fail, the operator shall turn off all controllers. Before restarting, the operator shall check the motion controls for proper direction to ensure controls are in the neutral position; and
• Persons boarding or leaving cab-operated equipment shall do so at the designated point of access or egress maintaining 3-point contact.
Attaching the Load Attaching the load shall be conducted as follows:
• Hoist chains or ropes shall be free of kinks or twists; • Hoist chains or ropes shall not be wrapped around the load; • The load shall be attached to the load block. • Prior to lifting the load, the operator shall make certain that the load, sling,
attachments, lifting devices and the load block are unobstructed and inspected.
HEALTH & SAFETY PROGRAM _ _
Section 29 – Hoisting, Rigging and Material Handling Page 5 of 23
_ _
Moving the Load Moving the load shall be conducted as follows:
• The person responsible for directing the lift shall make sure that the load is properly secured, balanced and positioned in the sling or other lifting device.
• The person responsible for directing the lift shall make another visual inspection of the hoist chain or rope to make sure there are no kinks or twists.
• The load block shall be brought over the load in a manner that will prevent swinging when lifting the load.
• Tag lines shall be utilized wherever practical. • Lift equipment shall not be used for side pulls. • The operator shall avoid lifting the load over people; • If the load being lifted approaches the rated load to be handled, the operator
shall test the brakes by lifting the load a few inches and applying the brakes; and • The load shall not be lowered below the point where there is less than two wraps
of rope on the hoisting drum, unless a lower limit device is provided. If a lower limit device is provided, no less than one wrap shall remain.
Parking the Load Parking the load shall be conducted as follows:
• The operator shall not leave a suspended load unattended; and • The load block of the hoist shall be raised above head level when not in use.
Hand Signals Hand signals shall be used unless the participants of the lift are equipped with telephones, radios or other equivalent means of communication.
29.9 Overhead Crane Inspection
The items identified below are a guideline for the inspections items on the Daily Overhead Crane Inspection Form, see H&S_FORM_083.
Supporting Structure
• Welds –Are there any cracks, excessive wear, etc.? • Bolts – Are there any loose or missing bolts?
Bridge • Trucks & Wheels
o Are there any odd noises? o Is the movement of trucks/wheels smooth? o Is the operation of bridge and trolley wheels smooth while in travel? o Do the wheels spin/slip during travel?
• Motor and Drive Train o When testing both the trolley motor & bridge motors do all functions work? o Is there any irregular noise?
• Brakes o Does the raise and lower function continue to travel after control buttons
are released?
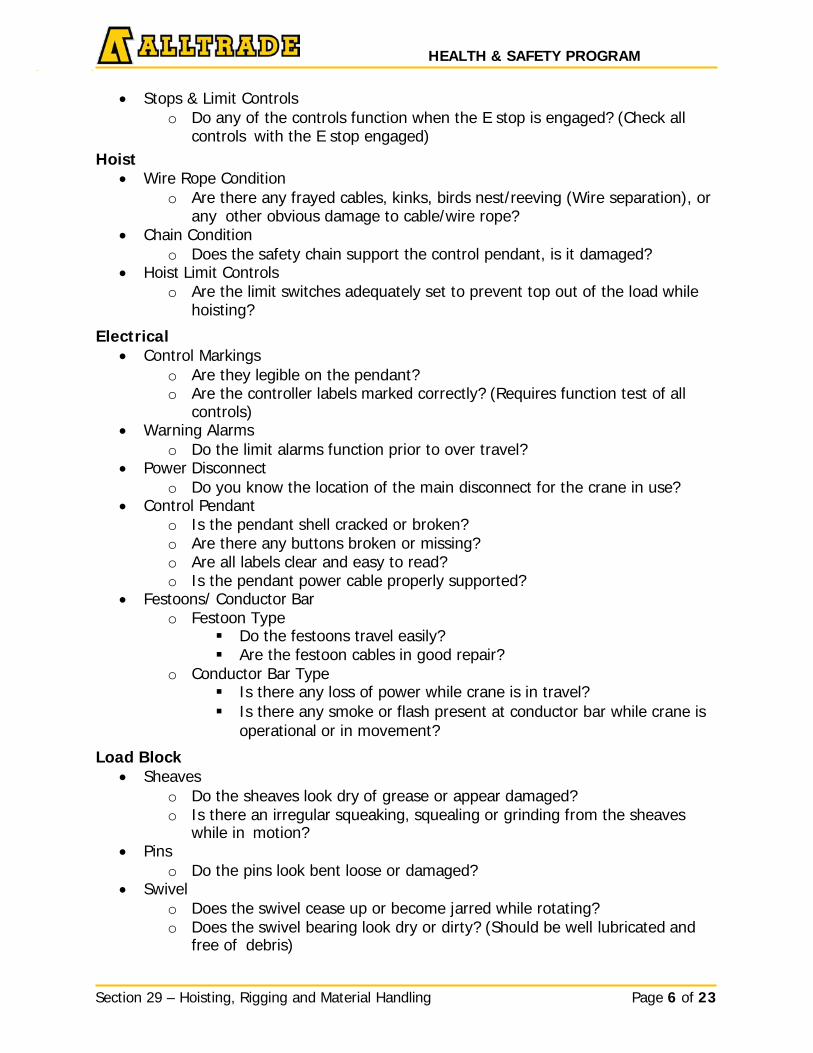
HEALTH & SAFETY PROGRAM _ _
Section 29 – Hoisting, Rigging and Material Handling Page 6 of 23
_ _
• Stops & Limit Controls o Do any of the controls function when the E stop is engaged? (Check all
controls with the E stop engaged) Hoist
• Wire Rope Condition o Are there any frayed cables, kinks, birds nest/reeving (Wire separation), or
any other obvious damage to cable/wire rope? • Chain Condition
o Does the safety chain support the control pendant, is it damaged? • Hoist Limit Controls
o Are the limit switches adequately set to prevent top out of the load while hoisting?
Electrical • Control Markings
o Are they legible on the pendant? o Are the controller labels marked correctly? (Requires function test of all
controls) • Warning Alarms
o Do the limit alarms function prior to over travel? • Power Disconnect
o Do you know the location of the main disconnect for the crane in use? • Control Pendant
o Is the pendant shell cracked or broken? o Are there any buttons broken or missing? o Are all labels clear and easy to read? o Is the pendant power cable properly supported?
• Festoons/ Conductor Bar o Festoon Type
Do the festoons travel easily? Are the festoon cables in good repair?
o Conductor Bar Type Is there any loss of power while crane is in travel? Is there any smoke or flash present at conductor bar while crane is
operational or in movement?
Load Block • Sheaves
o Do the sheaves look dry of grease or appear damaged? o Is there an irregular squeaking, squealing or grinding from the sheaves
while in motion? • Pins
o Do the pins look bent loose or damaged? • Swivel
o Does the swivel cease up or become jarred while rotating? o Does the swivel bearing look dry or dirty? (Should be well lubricated and
free of debris)
HEALTH & SAFETY PROGRAM _ _
Section 29 – Hoisting, Rigging and Material Handling Page 7 of 23
_ _
• Hook o Does the mouse (safety latch) stay open, or does it close completely? o Is the mouse spring damaged or missing? o Are there any cracks or damage to the hook?
29.10 Maintenance and Inspections of Overhead Cranes
Inspection Requirements Inspections are to be performed by a competent person. The log book is to be available to any person involved in the inspection, maintenance, and/or operation of the lifting equipment
Inspection Procedure
Cranes in Periodic Use A crane or overhead gantry that has not been used for a period of one month or more shall be inspected by the employee trained to use such equipment before each use and the focus for such an inspection is as follows:
1. Inspect all functional operating mechanisms; 2. Check for damage to or leaks from lines, tanks, valves, drain pumps, and air or
hydraulic systems; 3. Check the load hook for deformities or cracks; 4. Check all hoist chains for excessive wear, including end connectors. 5. Check all chains for kinks, twists and distorted links and stretches that are beyond
what is recommended by the manufacturer; and 6. Inspect the rope for damage such as kinks, cracks, cutting, bending, broken
wires, unraveling, corroded or improperly connected end connections.
Regardless of how often a crane or overhead gantry is used, the unit shall be inspected annually by an outside contractor qualified to inspect the unit. This inspection shall be done as per local jurisdictional requirements. The contractor shall document and provide the owner with a copy of the findings who will in turn provide copies to the EHS Department.
Maintenance Preventive maintenance shall be performed as prescribed by the manufacturer as detailed in the owner's manual. Maintenance of the units shall be performed by an outside contractor qualified to perform maintenance.
Adjustments and Repair Any unsafe condition noted during the inspection of the crane shall be repaired before the crane is used.
Training Employees required to operate overhead cranes shall be required to participate in and successfully complete the curriculum of a training program before assuming their responsibilities as per local jurisdiction requirements.
HEALTH & SAFETY PROGRAM _ _
Section 29 – Hoisting, Rigging and Material Handling Page 8 of 23
_ _
29.11 Hoisting and Rigging Equipment Inspection Requirements
Initial Inspection This inspection is done at the time the product is first received to ensure that damage has not occurred during shipment. Verify that the goods are in compliance with the specification of the purchase order. Verify that all inspection and maintenance records are with the equipment and up to date before putting the unit into service.
Pre-use Inspection This level of visual inspection should be done by the person handling the sling or device, or other specifically designated personnel. Hoisting Equipment Inspection Form, H&S_FORM_084 but Records are not required. a) Normal service – daily when in use b) Severe service – each use c) Special or infrequent service – as recommended by a qualified person before and after each use.
Periodic Inspection / Annual Inspection The periodic level of inspection is done by designated personnel at regular intervals. At a minimum this inspection must be carried out at the interval required by the manufacturer (Check manual for each piece of equipment)/ In addition the interval may be based upon the frequency of use, severity of service conditions, and information derived through the pre-use inspection process.
Inspection Records Inspection must be conducted by a competent person. Inspection records must be documented. Slings must be individually identified and condition of sling at the time inspection must be recorded. Records shall be available at site or available to site.
29.12 Nylon Web Slings – Inspection
Standard Workers involved in the use of nylon web slings shall be familiar with their characteristics and the necessary safety precautions.
Procedure The following defects seriously question the nylon web safety and are reason to remove the web from service:
• Nylon web slings that are cut, torn, frayed, burned, or otherwise worn are no longer trustworthy. It is not possible to calculate the strength left in damaged slings.
• Chemical action, heat, sunlight, and acid fumes discolour the nylon and indicate a loss in strength.
• When stitching is broken, the sling will not take the load evenly, but will put greater stress on the remaining stitching.
• Holes in the web where fibers are separated are cause for replacement. • Manufacturers tag must be legible and affixed to all slings.
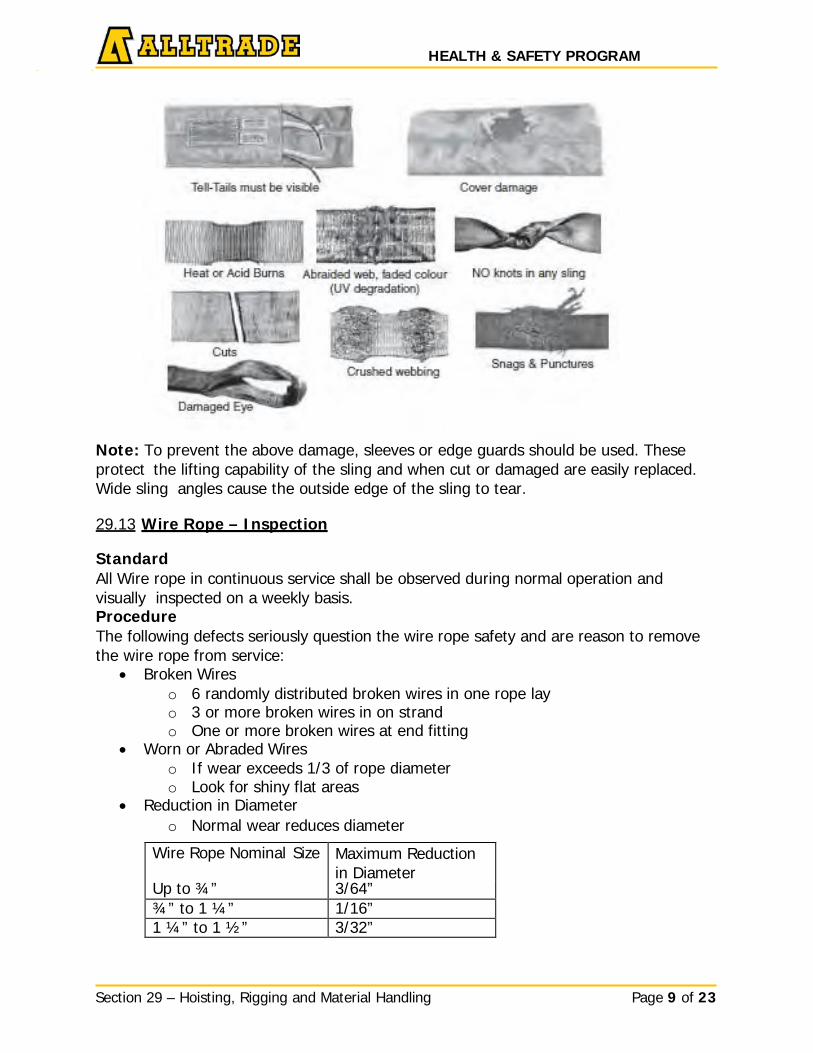
HEALTH & SAFETY PROGRAM _ _
Section 29 – Hoisting, Rigging and Material Handling Page 9 of 23
_ _
Note: To prevent the above damage, sleeves or edge guards should be used. These protect the lifting capability of the sling and when cut or damaged are easily replaced. Wide sling angles cause the outside edge of the sling to tear.
29.13 Wire Rope – Inspection
Standard All Wire rope in continuous service shall be observed during normal operation and visually inspected on a weekly basis. Procedure The following defects seriously question the wire rope safety and are reason to remove the wire rope from service:
• Broken Wires o 6 randomly distributed broken wires in one rope lay o 3 or more broken wires in on strand o One or more broken wires at end fitting
• Worn or Abraded Wires o If wear exceeds 1/3 of rope diameter o Look for shiny flat areas
• Reduction in Diameter o Normal wear reduces diameter
Wire Rope Nominal Size Maximum Reduction in Diameter
Up to ¾” 3/64” ¾” to 1 ¼” 1/16” 1 ¼” to 1 ½” 3/32”

HEALTH & SAFETY PROGRAM _ _
Section 29 – Hoisting, Rigging and Material Handling Page 10 of 23
_ _
• Stretch o If lay is visibly lengthened o Compare to new sling/wire rope o Caused by overloading
• Corrosion o Exterior rust, pitting, discoloration o Interior damage is hidden o Corrosion at base of end attachment
• Kinking o Permanent bend/dog o Caused by faulty handling
• Bird-caging o Permanent “see-through” distortion o Caused by sudden release of tension o Never returns to original shape
• Core Protrusion o Core is visible o Caused by shock-loading
• Bulges o Isolated increases in diameter o Caused by core slippage
• Poor Lubrication o If grooves are packed with hard grease or dirt o If possible, clean groves and re-lubricate o Results in internal friction and wear
• Fittings o Distorted hooks, tings, sleeves, thimbles o Discard if wear exceeds 10% of any dimension from new o Discard if hook opening has increased by 10% from new
• Unbalanced Wear • Hear Damage, Torch Burns, Electric Arc Strikes • Anti-Rotating Wire Rope
o Flex rope near ear and listen for clicking noise broken interior wires
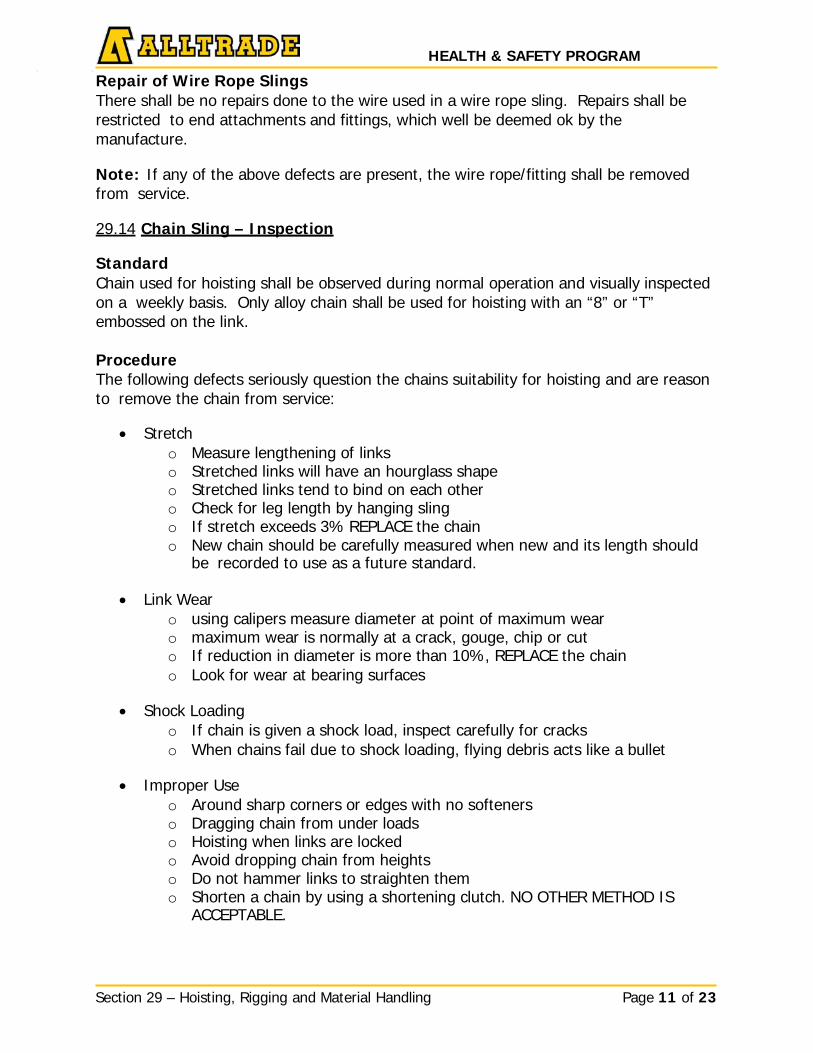
HEALTH & SAFETY PROGRAM _ _
Section 29 – Hoisting, Rigging and Material Handling Page 11 of 23
_ _
Repair of Wire Rope Slings There shall be no repairs done to the wire used in a wire rope sling. Repairs shall be restricted to end attachments and fittings, which well be deemed ok by the manufacture.
Note: If any of the above defects are present, the wire rope/fitting shall be removed from service.
29.14 Chain Sling – Inspection
Standard Chain used for hoisting shall be observed during normal operation and visually inspected on a weekly basis. Only alloy chain shall be used for hoisting with an “8” or “T” embossed on the link.
Procedure The following defects seriously question the chains suitability for hoisting and are reason to remove the chain from service:
• Stretch
o Measure lengthening of links o Stretched links will have an hourglass shape o Stretched links tend to bind on each other o Check for leg length by hanging sling o If stretch exceeds 3% REPLACE the chain o New chain should be carefully measured when new and its length should
be recorded to use as a future standard.
• Link Wear o using calipers measure diameter at point of maximum wear o maximum wear is normally at a crack, gouge, chip or cut o If reduction in diameter is more than 10%, REPLACE the chain o Look for wear at bearing surfaces
• Shock Loading
o If chain is given a shock load, inspect carefully for cracks o When chains fail due to shock loading, flying debris acts like a bullet
• Improper Use
o Around sharp corners or edges with no softeners o Dragging chain from under loads o Hoisting when links are locked o Avoid dropping chain from heights o Do not hammer links to straighten them o Shorten a chain by using a shortening clutch. NO OTHER METHOD IS
ACCEPTABLE.
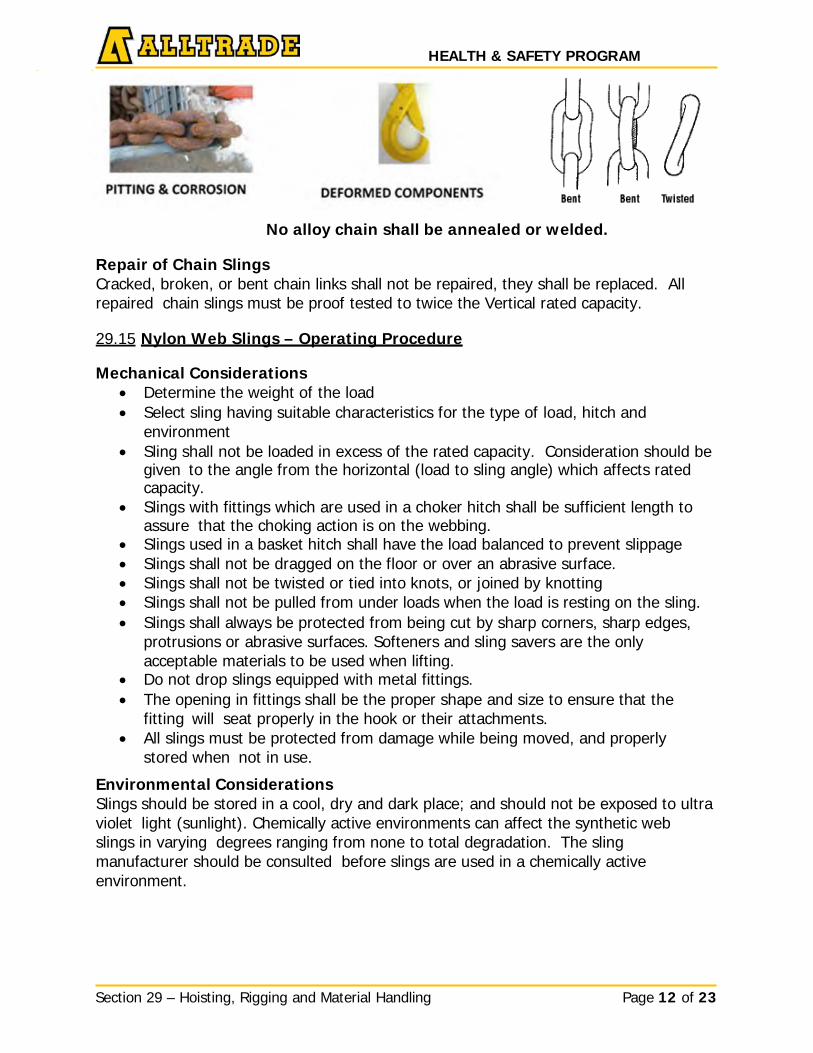
HEALTH & SAFETY PROGRAM _ _
Section 29 – Hoisting, Rigging and Material Handling Page 12 of 23
_ _
No alloy chain shall be annealed or welded.
Repair of Chain Slings Cracked, broken, or bent chain links shall not be repaired, they shall be replaced. All repaired chain slings must be proof tested to twice the Vertical rated capacity.
29.15 Nylon Web Slings – Operating Procedure
Mechanical Considerations • Determine the weight of the load • Select sling having suitable characteristics for the type of load, hitch and
environment • Sling shall not be loaded in excess of the rated capacity. Consideration should be
given to the angle from the horizontal (load to sling angle) which affects rated capacity.
• Slings with fittings which are used in a choker hitch shall be sufficient length to assure that the choking action is on the webbing.
• Slings used in a basket hitch shall have the load balanced to prevent slippage • Slings shall not be dragged on the floor or over an abrasive surface. • Slings shall not be twisted or tied into knots, or joined by knotting • Slings shall not be pulled from under loads when the load is resting on the sling. • Slings shall always be protected from being cut by sharp corners, sharp edges,
protrusions or abrasive surfaces. Softeners and sling savers are the only acceptable materials to be used when lifting.
• Do not drop slings equipped with metal fittings. • The opening in fittings shall be the proper shape and size to ensure that the
fitting will seat properly in the hook or their attachments. • All slings must be protected from damage while being moved, and properly
stored when not in use.
Environmental Considerations Slings should be stored in a cool, dry and dark place; and should not be exposed to ultra violet light (sunlight). Chemically active environments can affect the synthetic web slings in varying degrees ranging from none to total degradation. The sling manufacturer should be consulted before slings are used in a chemically active environment.

HEALTH & SAFETY PROGRAM _ _
Section 29 – Hoisting, Rigging and Material Handling Page 13 of 23
_ _
Style of Hitch to be Used Slings can be used in any of the three Hitches illustrated. Some slings are designed to be used in a specific hitch application only.
Control and Balance Use a hitch that will keep the load under control at all times and be sure the lifting device is directly over the center of gravity.
Type 1: Triangle & Choker (TC) - Hardware on each end produces the most effective choker hitch. Can also be used in vertical and basket hitches.
Type 2: Triangle & Triangle (TT) - Hardware on each end for use in basket or vertical hitch.
Type 3: Flat Eye & Eye (EE) - Popular, versatile sling used in vertical, choker & basket hitches. Easy to remove from underneath loads.
Type 4: Twisted Eye & Eye (EE) - Eyes turned at a right angle to sling body. Forms superior choker hitch & allows better fit on crane hook in basket hitch.
Type 5: Endless (EN) - Economical & adaptable sling with no fixed wear points. Used in all hitches.
Type 6: Reversed Eye (RE) - Extremely strong & durable for continuous &/or abusive applications. Wear pads on both sides of body.
HEALTH & SAFETY PROGRAM _ _
Section 29 – Hoisting, Rigging and Material Handling Page 14 of 23
_ _
29.16 Wire Rope and Chain Slings – Operating Procedure
Mechanical Considerations • Determine the weight of the load • Select proper wire or chain sling having suitable characteristics for the type of
load, hitch and environment. Only wire and chain slings with legible identification tags shall be used.
• Wire or Chain slings shall not be loaded in excess of the rated capacity. Consideration should be given to the angle from the horizontal (load to sling angle) which affects rated capacity.
• Only alloy chain shall be used for hoisting with an “8” or “T” embossed on the link.
• Wire or Chain slings with fittings which are used in a choker hitch shall be of sufficient length to assure that the choking action is on the sling and never on the fittings.
• Wire or Chain slings used in a basket hitch shall have the load balanced to prevent slippage.
• Wire or Chain slings shall not be twisted or tied into knots, or joined by knotting. • Wire or Chain slings shall not be pulled from under loads when the load is resting
on the sling. • Consideration shall be given to the distribution of load weight on a multi-legged
lift. • Make shift fasteners, hooks, or links formed from bolts, rods, et., or other such
components shall not be used • Mechanical coupling links shall not be used within the body of an alloy chain sling
to connect two pieces of chain • Horizontal sling angles less than 30 degrees shall not be used except as per
Engineering documentation. • Slings in contact with edges, corners, or protrusions should be protected with a
material of sufficient strength, thickness, and construction to prevent damage to the sling.
• The load applied to the hook should be centered in the base (bowl) of the hook to prevent point loading on the hook, unless the hook is designed for pointing loading.
Environmental Considerations
The strength of the chain slings or wire rope slings can be degraded by chemically active environments. This includes exposure to chemicals in the form of the solids, liquids, gases vapors or fumes. The sling manufacturer or qualified person should be consulted before slings are used in the chemically active environments. Sling shall be stored in an area where they will not be subjected to mechanical damage corrosive action, moisture, and extreme temperatures or kinking.
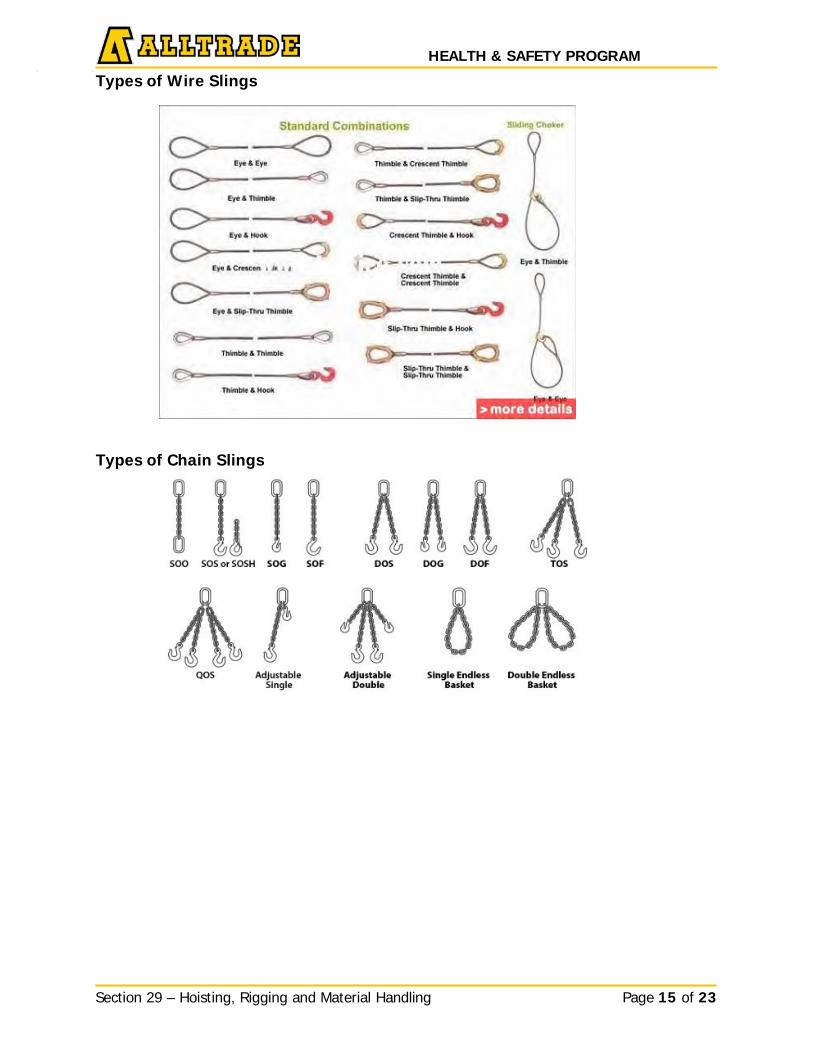
HEALTH & SAFETY PROGRAM _ _
Section 29 – Hoisting, Rigging and Material Handling Page 15 of 23
_ _
Types of Wire Slings
Types of Chain Slings
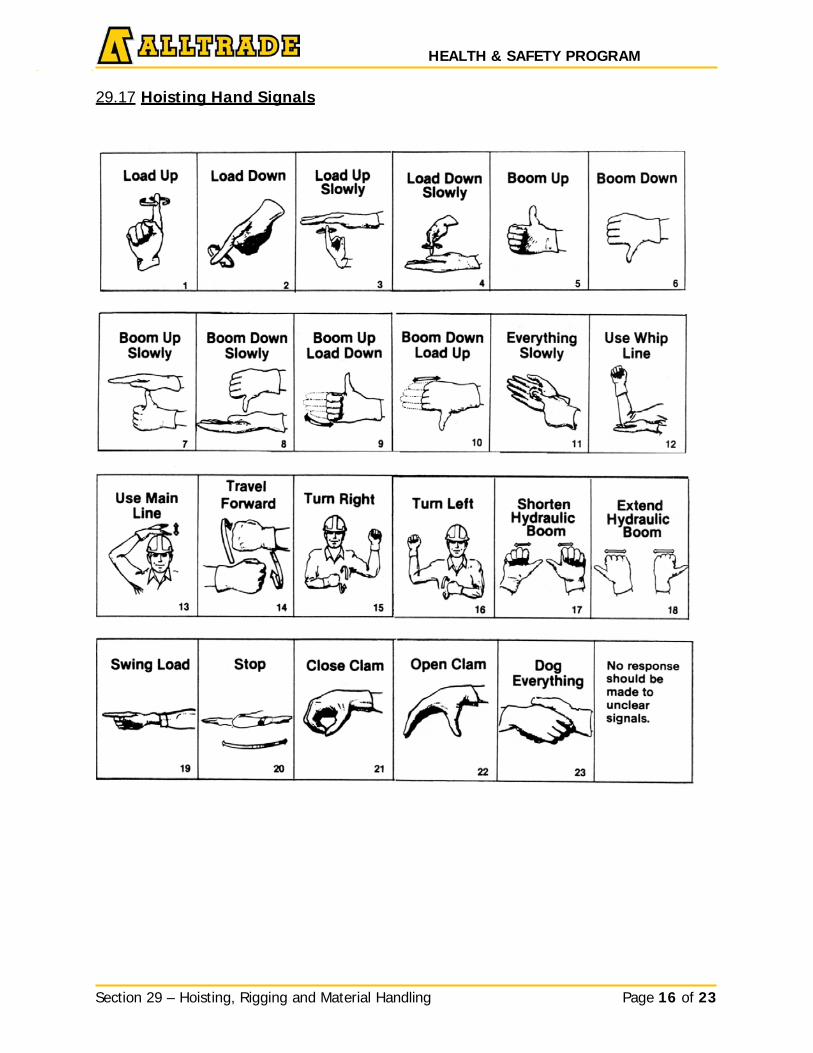
HEALTH & SAFETY PROGRAM _ _
Section 29 – Hoisting, Rigging and Material Handling Page 16 of 23
_ _
29.17 Hoisting Hand Signals
HEALTH & SAFETY PROGRAM _ _
Section 29 – Hoisting, Rigging and Material Handling Page 17 of 23
_ _
29.18 Slings and Hitches
Standard Workers involved in the use of chain, fiber rope, wire rope or nylon web slings shall be familiar with their characteristics and the necessary safety precautions. Procedure
• Safe working loads are reduced as legs are spread. When the angle formed by the spreader leg and the horizontal is 45°, the safe working load is reduced by 1/4.
• When a choker hitch is used, the safe working load is reduced by 1/4. • If a three-legged sling is used, the sling size selected should be based on a two-
legged sling (the third leg does not carry its share of the load). • If a four-legged sling is used, the two diagonally opposite legs take most of the
load. The remaining two only balance; therefore, select sling size based on a two-legged sling.
• Hoisting chains must be alloy steel stamped on links with a “T” or “8”. NO OTHER CHAIN IS ACCEPTABLE for hoisting purposes.
• An example of a field calculation for fiber rope safe working loads are: Manila – number of eighths in diameter x itself x 20 = SWL (pounds) i.e.3/4" manila 6 x 6 x 20 = 720 pounds Chart SWL = 1,080 pounds
• Polypropylene –number of eighths in diameter x itself x 40 = SWL (pounds) i.e.3/4" polypropylene 6 x 6 x 40 = 1,440 pounds Chart SWL -1,700 pounds
• Nylon –number of eighths in diameter x itself x 60 = SWL (pounds) i.e.3/4" nylon 6 x 6 x 60 = 2,160 pounds Chart SWL –2,800 pounds
• An example of field calculations for nylon web safe working load is .8 ton (1,600 pounds) per h of webbing. i.e.8" nylon web .8 x 8" = 6.4 tons (12,800 pounds) Many manufacturers chart SWL = 12,000-12,800 pounds
• Field calculation is never as accurate as manufacturer's specifications, but can serve as a quick guideline. The above filed calculation observes a 5 to 1 safety factor on new material on a straight pull.
29.19 Hand Operated Chain Hoists
Standard Workers involved in the use of chain hoists shall be familiar with their characteristics and the necessary safety precautions.
Procedure
• Manually operated chain hoists may be: o spur drive o geared endless chain operated o worm drive o geared (screw geared) endless chain operated o differential endless chain operated o lever operated
• The chain on these tools is a special case-hardened product. It is not marked as alloy chain with a “T” or “8”.
HEALTH & SAFETY PROGRAM _ _
Section 29 – Hoisting, Rigging and Material Handling Page 18 of 23
_ _
• Never choke the hoist chain. If a link is distorted, it may jam the mechanism. • Generally, endless chains hoists are used for hoisting and lever operated hoists
are used for both vertical and horizontal pulls. • Endless chain hoists are operated from below and the operator can control the
load. They are not provided with a control for free-chain operation and the hook is raised or lowered by pulling the operating chain.
• Worm-geared and differential hoists have sufficient internal friction to prevent "running away" when lowering loads.
• Spur-geared hoists are usually provided with a load brake in the mechanism. • Lever operated hoists are used extensively in construction and maintenance.
Capacities vary from 3/4 ton to 6 ton and they are available in a load-brake (friction disc) or a ratchet-and-pawl design.
• Ratchet-and-pawl types require very little attention; operation is not affected by oil or grease.
• Ratchet hoists are unsuitable where smooth operation is required and in tight quarters.
• When using a ratchet hoist, the load is held by the hand lever during lifting and lowering and, if accidentally released, the lever will swing back forcefully.
• Accidental release of the lever may result in self-ratcheting until the load bottoms. • The load-brake type depends on frictional resistance of the brake discs. The
brakes must be dry and free from oil and grease. Hoists must be kept clean and dry at all times.
• When the hoist is in the lower mode and is very lightly loaded, it is possible for it to release the load out of control if a buildup of dirt and grease inside the case has been permitted.
• Hoists in regular service should be dismantled, inspected, and overhauled by a competent person as per the MANUFACTURERS Requirements. These intervals vary between manufacturers. Ensure that the maintenance interval is known and maintenance window is sufficient before using the device.
• Verify specific requirements with manufacturers. • Chainfalls should not be used for long term securing of material as this may
surpass the maintenance interval. Use anchors, cabling or engineer approved supports for long term in place tie offs (eg. piping tied back for long term modifications / plant renovations or lay-up).
29.20 Hoists and Winches – Anchorage
Standard Workers involved in the use of hoists and winches shall be familiar with their characteristics and the necessary safety precautions. Procedure
• Anchorage points should be located as close to a perpendicular support as possible.
• Columns are generally not designed to withstand significant lateral forces. Because the member is already in compression, the effect of a small deflection is amplified and the column could buckle.

HEALTH & SAFETY PROGRAM _ _
Section 29 – Hoisting, Rigging and Material Handling Page 19 of 23
_ _
• Load beams near column or other vertical support points to minimize bending. If the beam is an “I” section, it may be necessary to weld stiffeners to the web to withstand the additional shear force applied.
• With open web steel joists, anchor load to the top chord. Only very light loads may be suspended from the bottom chord.
• On suspended pipe, use nylon web sling on pipe to distribute stress and protect finish. Determine capacity of pipe hangers from catalogue and ensure hanger anchors at least as strong.
• Expansion anchors in concrete depend on: o compressive strength of concrete o anchor diameter o depth of anchor is embedded o centre to centre spacing and edge distance
• Manufactured or engineered beam clamps are very secure anchors if used correctly:
o clamps should never be used on flange widths outside the specified range o most are designed for use at 90° to the flange o flanges that are wide and thin are subject to bending o the rating marked on the clamp does not necessarily apply to the beam
• Slings using the double-wrap basket hitch area preferred anchorage. Avoid sharp angles on the legs and always insert softeners at sharp bends.
• Lugs welded to a beam or column must be compatible with the member in metallic composition. The appropriate welding rod must also be used.
• Lugs should be welded to the centre line of the flange in line with the web. Avoid side loading on a lug.
29.21 Crane & Boom Truck Operations
General Operation Procedure • Only licensed and qualified crane operators who have been properly instructed
may operate the controls. • Operator must be familiar with operator manual supplied by the crane
manufacture. Manual must be available in cab. • Operator must complete the Operator Crane Log Book, which may include, but is
not limited to: o Crane Operation Daily Checklist o Monthly Crane Inspection Log o Record all maintenance on the Maintenance Logs as required.
• All outriggers beams (if equipped) are to be fully extended and outriggers pads are to be placed on a solid footing or blocking. All wheels are to be clear of the ground.
• The boom angle, boom length and the load radius and the crane rated capacity must be known by the operator.
• Crane must be set up level. • The lifting hook is directly above the load’s center of gravity. Load weight must
also be known. • Rigging is correct for the job. • Crane is set up level on firm, stable ground or blocking. (Crawler cranes).
HEALTH & SAFETY PROGRAM _ _
Section 29 – Hoisting, Rigging and Material Handling Page 20 of 23
_ _
• Crane controls should be moved smoothly and gradually to avoid abrupt, jerky movements of the load. Slack must be removed from the slings and hoisting ropes before the load is lifted.
• Be sure that everyone in the immediate area is clear of the load and aware that a load is being moved.
• Do don’t make any lifts beyond the rated capacity of the crane, slings chains, rope slings, etc.
• Do not operate crane if the limit switches (if equipped) are out of order, or if ropes show defects or wear.
• Make certain that before moving the load, load slings, load chains, or other lifting devices are fully seated in the saddle of the hook with the latch closed.
• At no time should a load be left suspended from the crane unless the operator is at the controls with the power on.
• When two or more cranes are used to make one lift. The design of the lift shall be engineered and communication shall occur through the designated signal person.
• Operator has total care and control of any lifts and their decision is final and must not be influence or pressured to make any pick he/she feels uncomfortable.
• Weather conditions should be considered when making a lift. • All cranes must be inspected yearly and recertified by a competent professional
engineer. • JSA shall be completed for critical lifts. • Load charts must be legible and visible to the operator at all times.
Note: Loads with friction such as buried pipe or poles buried in the ground must not be lifted by a crane under any circumstances. The load must be free of force to hoist.
29.22 Rigging from Booms and Buckets:
Attaching Rigging, Devices or Performing Hoisting from Forklifts, Telescoping boom Equipment, Backhoes and Excavators Rigging and hoisting from masts, forks, buckets or attached devices to lift trucks, telescoping boom equipment and excavation equipment can only be performed as per manufacturer’s instructions and identified attachment points. Buckets, forks, booms, hoists, telescoping booms and other load handling attachments must only be installed and used on mobile equipment as specified by the equipment manufacturer for use on that equipment.
The installation, inspection, testing, repair and maintenance and usage of a tool, machine, device attached to a piece of equipment must be carried out in accordance with the manufacturer's instructions by a qualified person and must otherwise meet regulations and standards for the jurisdiction in which it is to be used.
Note: Certain types of fork extensions may require engineering documentation prior to use.
Note: Cutting holes in forks or buckets for the purpose of rigging and hoisting or making similar alterations equipment is not permitted.
HEALTH & SAFETY PROGRAM _ _
Section 29 – Hoisting, Rigging and Material Handling Page 21 of 23
_ _
29.23 Falling Material
No material shall be stacked, piled, or stored within 1.8 meters (6 feet) of: • An opening in a floor or roof • The open edge of a floor or roof or balcony • Material or equipment used on work platforms, roofs, and other surfaces must be
adequately secured to prevent it from falling or tipping. • Where there is a risk of falling objects, overhead protection must be provided. If
this is not practical, the hazardous area must be barricaded with warning signs to prevent access. Entry must not take place in the area unless the overhead work is suspended.
• All materials must be adequately secured while being moved from one location to another.
• Special attention must be paid during structural steel erection. Nuts, bolts, and tools must be secured and properly stored at all times.
• Supervisors will evaluate the work and travel areas for open grating and falling material hazards. This evaluation will include but is not limited to:
o Erecting or dismantling scaffolds or work platforms o Moving material o Craning o Moving forklifts, hand carts, transport and work equipment o Performing housekeeping activities on the work site o Cutting and welding activities
To review for falling material hazards, use the Job Safety Assessment (JSA) procedure.
Note: See Working at Heights Section
29.24 Critical Material Handling Planning
Standard Competent workers qualified by knowledge, training, and experience to identify hazards and appropriate controls to avoid endangering workers, equipment, or materials, shall conduct Critical Material Handling Planning.
Competent workers shall evaluate potential material handling item(s) to determine the extent to which any of the following conditions may be a factor in the material handling, and based on this evaluation may designate the material to be moved using Critical Material Handling Planning:
Examples:
• Lifting of personnel using a Powered Lift Truck (PLT). • A load greater than 95% of the rated capacity of the PLT being used. • Travel/access routes to be used during transport, considering pathway, pathway
surface and impacts to load stability, intersections and potential for collisions, general pedestrian traffic, floor openings, edges of mezzanines, critical station equipment, obstructive structures, PPE exempt etc.
HEALTH & SAFETY PROGRAM _ _
Section 29 – Hoisting, Rigging and Material Handling Page 22 of 23
_ _
Critical Material Handling Plan Development A Critical Material Handling Plan form shall be completed prior to hoisting or moving. Competent workers shall evaluate the material handling environment and identify the following on the Critical Material Handling Plan form:
• Load weight, shape and dimensions. • Attachment points. • Specialized rigging requirements to secure the load. • Need to establish a Safe Work Area around the task.
o Note safe work area may be a safe zone around the material handling task that moves with the handling equipment and material (eg – escorting load on travelled area).
• Lay Down Area (confirm load will be adequately supported and blocked).
The competent worker shall identify path of travel for load on the Critical Material Handling Plan form which considers the following;
• Use of warning signs and barricades during travel and/or closure of route
pathways to personnel not involved in material handling task where warranted. • Use of signal person and/or flag person during travel. • Method of communication for personnel involved in the material handling. • Avoid material being moved over personnel. • Avoid material contacting operating equipment. • Surface Traction and Capacities (grating floors, floor rating, surface changes). • Avoid material handling around floor openings, mezzanine edges and mitigation
of potential for load / material to fall.
29.25 Freeze Down Environmental conditions must be considered when identifying hazards prior to hoisting any materials such as jersey barriers, pipe, lumber, skids, sea containers or equipment. Material that has been sitting on a surface where the “load” may be frozen down, which typically occurs during winter (freeze/thaw) conditions present unique hazards.
Unexpected resistance (from frozen loads or components) during hoisting or material moving operations can result in release of unexpected energy in an uncontrolled manner resulting in a high potential for injury or damage. Slings, chains, other rigging components or the load itself may break or shatter causing injury or damage.
Applying force to break loads free using other equipment may also apply uncontrolled/ uncalculated stress to points on the equipment, or material.
This also applies to existing buried pipelines that are required to be hoisted in order to tie into a new section of pipe.
The following safe work practices are necessary to ensure workers recognize freeze down / friction hazards and provide the controls required to prevent an incident/accident:
HEALTH & SAFETY PROGRAM _ _
Section 29 – Hoisting, Rigging and Material Handling Page 23 of 23
_ _
Prior to hoisting the object, it’s important to determine the following: • Is the object frozen to the ground? • What force will be applied to move the object from its friction state? • Is a dynamometer available on site or means to measure the potential force
applied when attempting to break the object free? • Do I have the necessary equipment and rigging to hoist the object? • Can engineering controls such as salt or heat be applied to dislodge the object
from the ground? • Do you need to dig further back on the pipe to release pressure?
If you cannot answer these questions, further planning will be necessary such as use of thawing equipment or tenting and heating to release the material from the frozen ground.
Prevention In order to eliminate or reduce the risk of uncontrolled force / energy caused by friction, apply the following controls:
• When storing equipment in potentially frozen conditions use plywood, 2x4’s or other material as a barrier between the equipment and ground.
• Conduct FLRA cards to ensure hazards have been identified and controlled. • All personnel not directly involved in the hoisting must be clear of the operation. • Use the right tools and rated equipment for the task. • Always remain clear of the line of fire • Be aware of the potential for stored energy in any load • Plan your work • Back out /stop when unsure or at the limit of the equipment
29.26 Landing Loads
Landing loads / material present potential danger both at the moment and afterwards. Always ensure that the area for landing the material has been inspected and secured and is able to support the load safely: Observe the following safe practices when landing or disengaging from load:
• Ensure chocks are available to land pipe and prevent rolling away. • Ensure dunnage is available in sufficient dimensions and strength to land the load
and safely extract forks or rigging components • Only land loads where the ground or surface can safely support the load without
settling or shifting. • Never stack multiple tiers of material unless the landing area can support the
cumulative weight over time (stacks may tip if they settle causing injury or damage
• Confirm the capacity or racks, decks and platforms (including trucks) before landing loads
• Use spotters to assist in the accurate and safe placement of loads whenever the operator does not have clear line of sight to all perspectives of the landing area.

HEALTH & SAFETY PROGRAM
HEALTH & SAFETY FORMS Issue Date: January 2016 Revision Date: January 2018
Health & Safety Forms
H&S Manual Section
Form Identifier Form Name
Section 2 H&S_FORM_001 SITE SIGN IN/OUT SHEET Section 2 H&S_FORM_002 VISITOR/NON-SITE PERSONEL RESPONSIBILITIES Section 2 H&S_FORM_003 SUPERVISOR COMPETENCY – ANNUAL EVALUATION FORMS Section 2 H&S_FORM_004 WORK REFUSAL FORM Section 3 H&S_FORM_005 ORIENTATION CHECKLIST Section 3 H&S_FORM_006 TRAINING RECORD Section 3 H&S_FORM_007 PARTICIPANT EVALUATION FORM Section 3 H&S_FORM_008 H&S TRAINING EVALUATION AUDIT Section 3 H&S_FORM_009 NEW WORKER CHECKLIST Section 4 H&S_FORM_010 JOB SAFETY ANALYSIS (JSA) Section 4 H&S_FORM_011 FIELD LEVEL RISK ASSESSMENT (FLRA) Section 5 H&S_FORM_012 FIELD INSPECTION Section 5 H&S_FORM_013 WAREHOUSE – FAB INSPECTION Section 5 H&S_FORM_014 OFFICE INSPECTION CHECKLIST Section 6 H&S_FORM_015 AUDIT #1 H&S POLICY Section 6 H&S_FORM_016 AUDIT #2 HAZARD ASSESSMENT, ANALYSIS & CONTROL Section 6 H&S_FORM_017 AUDIT #3 SAFE WORK PRACTICES Section 6 H&S_FORM_018 AUDIT #4 SAFE JOB PROCEDURES Section 6 H&S_FORM_019 AUDIT #5 COMPANY RULES Section 6 H&S_FORM_020 AUDIT #6 PERSONAL PROTECTIVE EQUIPMENT Section 6 H&S_FORM_021 AUDIT #7 PREVENTATIVE MAINTENANCE Section 6 H&S_FORM_022 AUDIT #8 TRAINING & COMMUNICATIONS Section 6 H&S_FORM_023 AUDIT #9 WORKPLACE INSPECTIONS Section 6 H&S_FORM_024 AUDIT #10 INVESTIGATIONS & REPORTING Section 6 H&S_FORM_025 AUDIT #11 EMERGENCY PREPAREDNESS Section 6 H&S_FORM_026 AUDIT #12 STATISTICS & RECORDS Section 6 H&S_FORM_027 AUDIT #13 LEGISLATION Section 6 H&S_FORM_028 AUDIT #14 OCCUPATIONAL HEALTH Section 6 H&S_FORM_029 AUDIT #15 FIRST AID AUDIT Section 6 H&S_FORM_030 AUDIT #16 H&S REP – JHSC Section 6 H&S_FORM_031 AUDIT #17 WORKPLACE VIOLENCE & HARRASSMENT-AODA Section 6 H&S_FORM_032 AUDIT #18 RETURN TO WORK & RE-EMPLOYMENT Section 6 H&S_FORM_033 AUDIT #19 MANAGEMENT REVIEW Section 7 H&S_FORM_034 DISCIPLINE ACKNOWLEDGEMENT Section 9 H&S_FORM_035 FIRE – EVACUATION DRILL EVALUATION Section 9 H&S_FORM_036 EMERGENCY INFORMATION FORM Section 10 H&S_FORM_037 SAFETY OPPORTUNITY – SAFETY SUGGESTION CARD Section 10 H&S_FORM_038 CLIENT ACCIDENT – INCIDENT NOTIFICATION Section 10 H&S_FORM_039 ACCIDENT – INCIDENT INVESTIGATION Section 10 H&S_FORM_040 WITNESSES STATEMENT Section 10 H&S_FORM_041 CRITICAL INJURY REPORT FORM
HEALTH & SAFETY PROGRAM
HEALTH & SAFETY FORMS Issue Date: January 2016 Revision Date: January 2018
Section 11 H&S_FORM_042 LETTER TO HEALTHCARE PROVIDER Section 11 H&S_FORM_043 RETURN TO WORK AGREEMENT Section 11 H&S_FORM_044 MODIFIED WORK PLAN DAILY REPORT Section 11 H&S_FORM_045 FUNCTIONAL ABILITIES FORM (FAF) Section 13 H&S_FORM_046 JHSC MEETING MINUTES Section 13 H&S_FORM_047 JHSC RECOMMENDATIONS TO MANAGEMENT Section 13 H&S_FORM_048 MANAGEMENT RESPONSE TO RECOMMENDATIONS Section 15 H&S_FORM_049 PRE-CONSTRUCTION ENVIRONMENTAL CHECKLIST Section 15 H&S_FORM_050 SPILL REPORT Section 15 H&S_FORM_051 HAZARDOUS WASTE DISPOSAL INVENTORY Section 16 H&S_FORM_052 SUBCONTRACTOR CLEAN UP NOTIFICATION Section 16 H&S_FORM_053 SUBCONTRACTOR – SUPPLIER H&S ORDER TO COMPLY Section 18 H&S_FORM_054 RESPIRATOR QUALITATIVE FIT TEST RECORD Section 21 H&S_FORM_055 VIOLENCE-HARASSMENT-AODA INCIDENT REPORT FORM
Section 21 H&S_FORM_056 PHYSICAL ENVIRONMENT HAZARD ASSESSMENT Section 21 H&S_FORM_057 WORKPLACE ACTIVITY ASSESSMENT Section 22 H&S_FORM_058 WEEKLY SAFETY MEETING FORM – ATTENDANCE Section 23 H&S_FORM_059 FIRST AID KIT INSPECTION RECORD Section 23 H&S_FORM_060 LADDERS INSPECTION Section 23 H&S_FORM_061 SCAFFOLD INSPECTION Section 23 H&S_FORM_062 PROPANE CYLINDER INSPECTION Section 23 H&S_FORM_063 SITE MSDS – SDS INDEX Section 23 H&S_FORM_064 PERSONAL CHECKLIST FOR WORKING ALONE Section 23 H&S_FORM_065 BUCKET TRUCK INPSECTION Section 23/26 H&S_FORM_066 VEHICLE INSPECTION Section 24 H&S_FORM_067 TRAILER INSPECTION Section 24 H&S_FORM_068 CONFINED SPACE PERMIT SYSTEM Section 24 H&S_FORM_069 LOCK OUT LOG Section 24 H&S_FORM_070 DELIQUENT – ABANDONED LOCK REMOVAL FORM Section 24 H&S_FORM_071 TRENCHING & EXCAVATION CHECKLIST Section 24 H&S_FORM_072 HYDROTESTING WORKERS ACKNOWLEDGEMENT Section 24 H&S_FORM_073 RBD TRUCK INSPECTION Section 25 H&S_FORM_074 HOT WORK PERMIT Section 26 H&S_FORM_075 FORKLIFT/TELEHANDLER INSPECTION Section 26 H&S_FORM_076 BOOM TRUCK – BRODERSON INSPECTION Section 26 H&S_FORM_077 OPERATOR COMPETENCY CHECKLIST Section 27 H&S_FORM_078 TRAFFIC PROTECTION PLAN Section 28 H&S_FORM_079 FALL ARREST RESCUE PLAN Section 28 H&S_FORM_080 EWP/SCISSOR LIFT INSPECTION Section 28 H&S_FORM_081 FALL PROTECTION INSPECTION Section 29 H&S_FORM_082 CRITICAL LIFT PLAN Section 29 H&S_FORM_083 OVERHEAD CRANE INSPECTION Section 29 H&S_FORM_084 HOISTING EQUIPMENT INSPECTION Section 23 H&S_FORM_085 EQUIPTMENT OVER 10 HP INSPECTION Section 23 H&S_FORM_086 EXCAVATOR/SKID-STEER INSPECTION Section 23 H&S_FORM_087 GEISMAR-VCP-IPC INSPECTION Section 23 H&S_FORM_088 STRINGER/CTSU INSPECTION
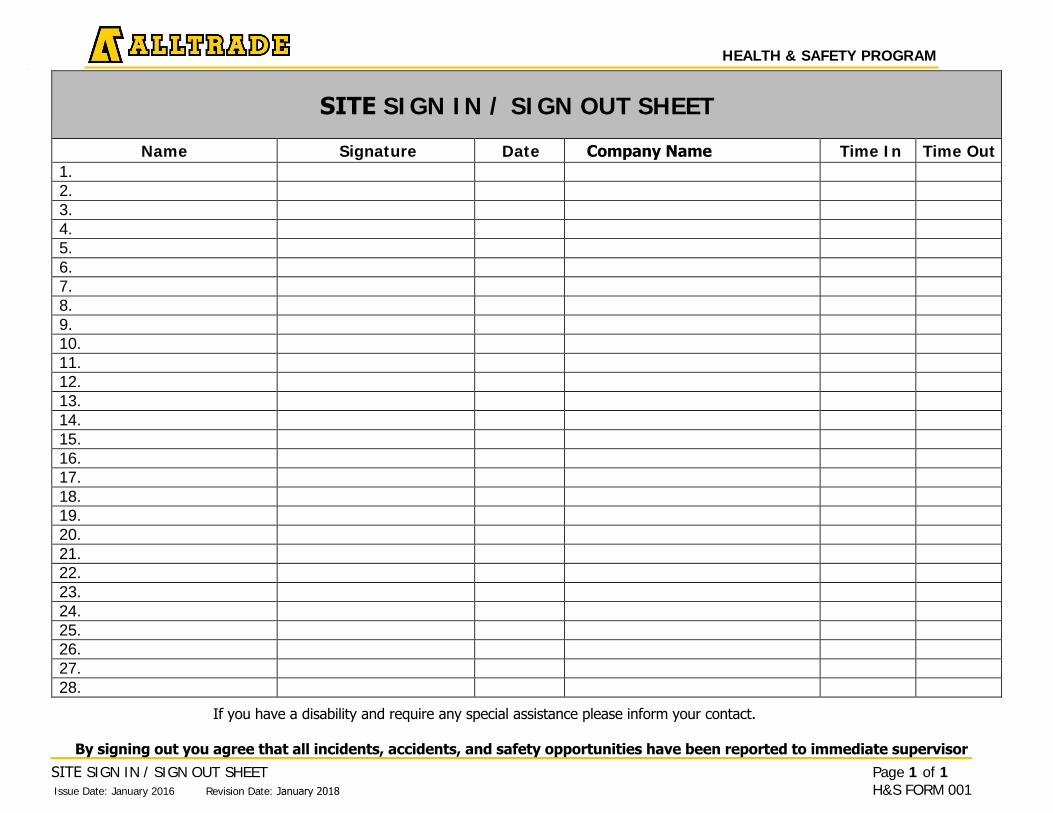
HEALTH & SAFETY PROGRAM _ _
SITE SIGN IN / SIGN OUT SHEET Page 1 of 1 Issue Date: January 2016 Revision Date: January 2018 H&S FORM 001
SITE SIGN IN / SIGN OUT SHEET
Name Signature Date Company Name Time In Time Out 1. 2. 3. 4. 5. 6. 7. 8. 9. 10. 11. 12. 13. 14. 15. 16. 17. 18. 19. 20. 21. 22. 23. 24. 25. 26. 27. 28.
If you have a disability and require any special assistance please inform your contact.
By signing out you agree that all incidents, accidents, and safety opportunities have been reported to immediate supervisor
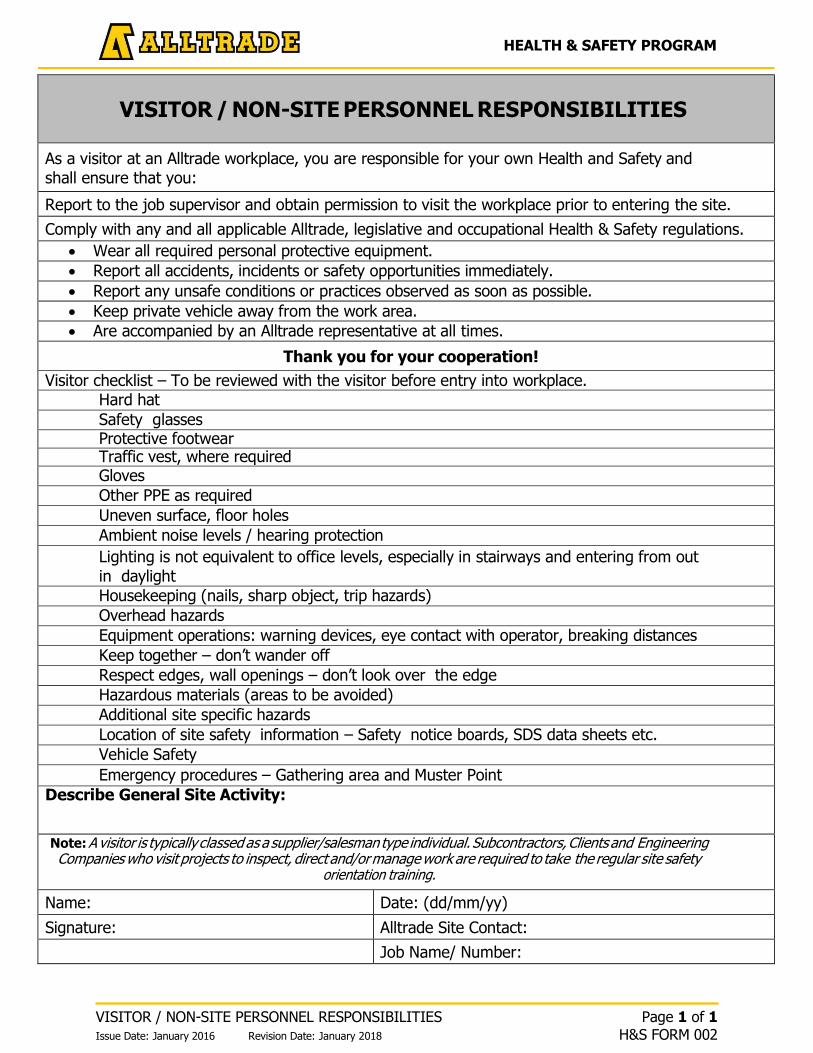
HEALTH & SAFETY PROGRAM
VISITOR / NON-SITE PERSONNEL RESPONSIBILITIES
As a visitor at an Alltrade workplace, you are responsible for your own Health and Safety and shall ensure that you:
Report to the job supervisor and obtain permission to visit the workplace prior to entering the site.
Comply with any and all applicable Alltrade, legislative and occupational Health & Safety regulations.
Wear all required personal protective equipment.
Report all accidents, incidents or safety opportunities immediately.
Report any unsafe conditions or practices observed as soon as possible.
Keep private vehicle away from the work area.
Are accompanied by an Alltrade representative at all times.
Thank you for your cooperation!
Visitor checklist – To be reviewed with the visitor before entry into workplace. Hard hat
Safety glasses
Protective footwear Traffic vest, where required
Gloves
Other PPE as required
Uneven surface, floor holes
Ambient noise levels / hearing protection
Lighting is not equivalent to office levels, especially in stairways and entering from out in daylight
Housekeeping (nails, sharp object, trip hazards)
Overhead hazards
Equipment operations: warning devices, eye contact with operator, breaking distances
Keep together – don’t wander off
Respect edges, wall openings – don’t look over the edge
Hazardous materials (areas to be avoided)
Additional site specific hazards
Location of site safety information – Safety notice boards, SDS data sheets etc.
Vehicle Safety
Emergency procedures – Gathering area and Muster Point
Describe General Site Activity:
Note: A visitor is typically classed as a supplier/salesman type individual. Subcontractors, Clients and Engineering Companies who visit projects to inspect, direct and/or manage work are required to take the regular site safety
orientation training.
Name: Date: (dd/mm/yy)
Signature: Alltrade Site Contact:
Job Name/ Number:
VISITOR / NON-SITE PERSONNEL RESPONSIBILITIES Page 1 of 1 Issue Date: January 2016 Revision Date: January 2018 H&S FORM 002
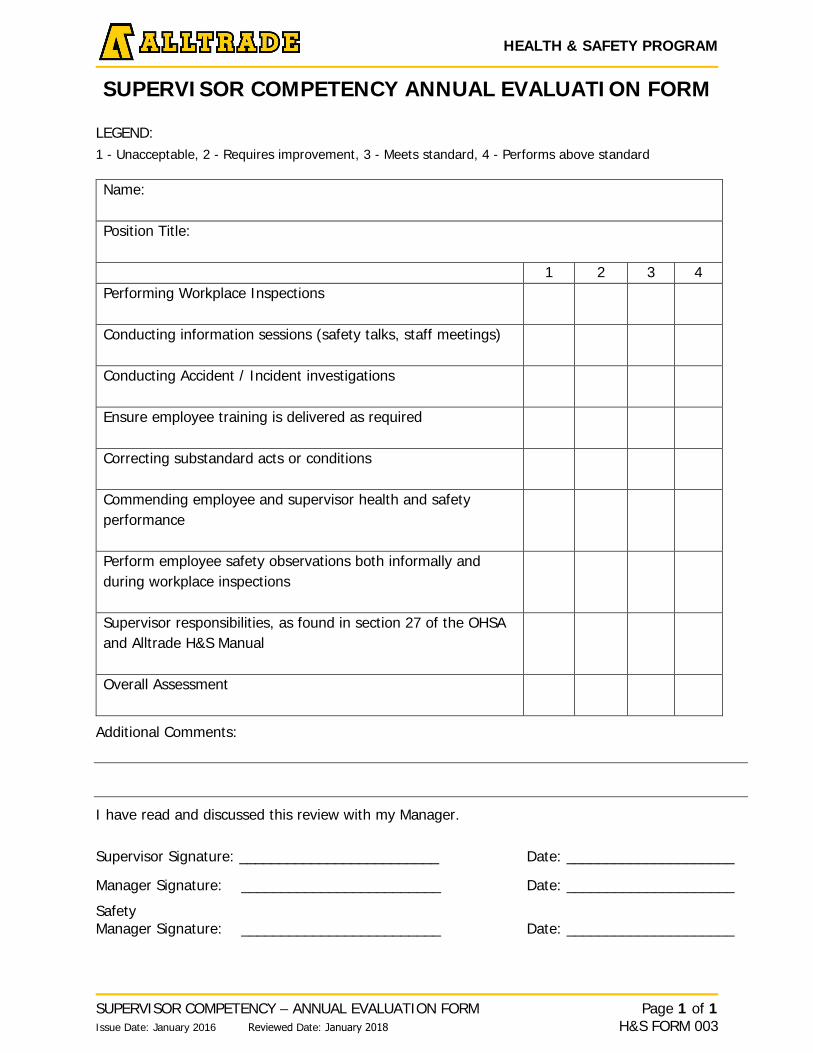
HEALTH & SAFETY PROGRAM
Page 1 of 1 SUPERVISOR COMPETENCY – ANNUAL EVALUATION FORM Issue Date: January 2016 Reviewed Date: January 2018 H&S FORM 003
SUPERVISOR COMPETENCY ANNUAL EVALUATION FORM
LEGEND: 1 - Unacceptable, 2 - Requires improvement, 3 - Meets standard, 4 - Performs above standard
Name:
Position Title:
1 2 3 4 Performing Workplace Inspections
Conducting information sessions (safety talks, staff meetings)
Conducting Accident / Incident investigations
Ensure employee training is delivered as required
Correcting substandard acts or conditions
Commending employee and supervisor health and safety performance
Perform employee safety observations both informally and during workplace inspections
Supervisor responsibilities, as found in section 27 of the OHSA and Alltrade H&S Manual
Overall Assessment
Additional Comments:
I have read and discussed this review with my Manager.
Supervisor Signature: _________________________ Date: _____________________
Manager Signature: _________________________ Date: _____________________
Safety Manager Signature: _________________________ Date: _____________________

HEALTH & SAFETY PROGRAM
WORK REFUSAL FORM Page 1 of 2 Issue Date: January 2016 Reviewed Date: January 2018 H&S FORM 004
WORK REFUSAL FORM
Worker Name: ________________________________ Date: __________________________
Supervisor: ____________________________________ Time Reported: _______________
Project Location: ______________________________________________________________
Worker Safety Representative: __________________________________________________
Section 1:
Describe Job Assigned: _______________________________________________________________________________________________________________________________________________________________________________________________________________________________________
Nature of Concern: _______________________________________________________________________________________________________________________________________________________________________________________________________________________________________
Section 2:
Supervisor Response: (please check appropriate answer)
A: Job is not safe: The Worker is re-assigned and the machine is to be locked and tagged out pending the completion of the recommendations listed below
B: The job is not safe: If it can be made safe by the recommendations list below
C: Job is felt to be safe: ___________________________________________________ (Explain what was done / different)
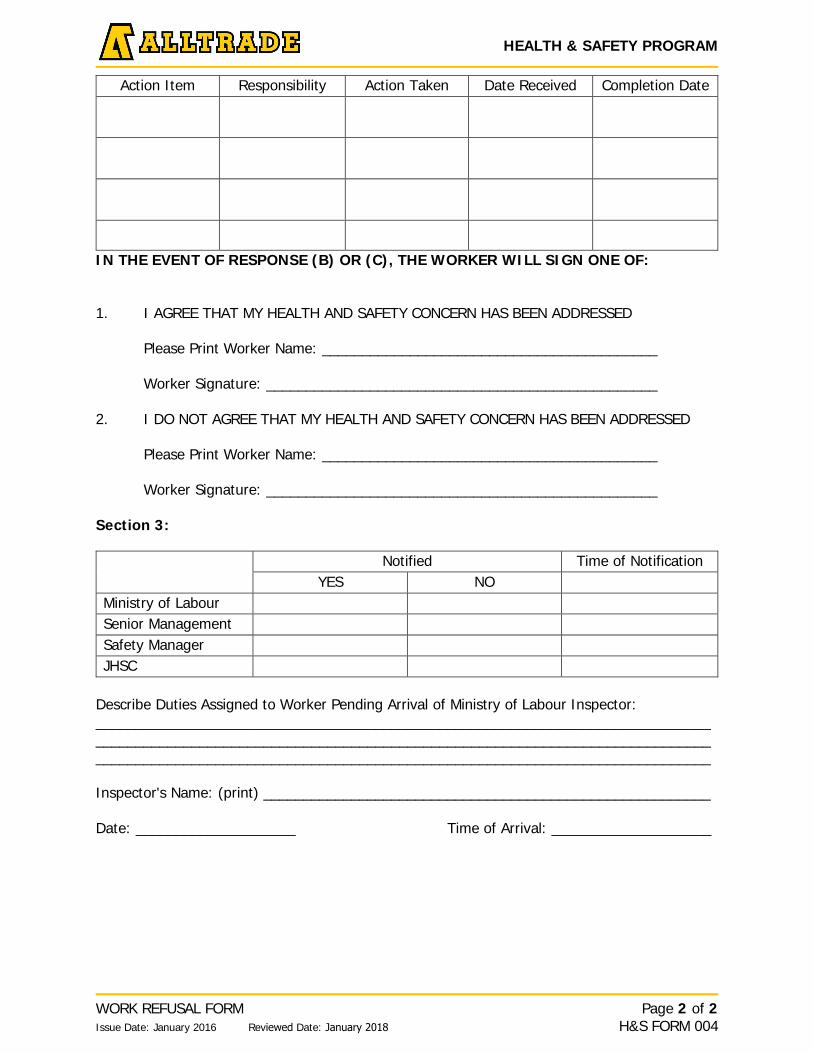
HEALTH & SAFETY PROGRAM
WORK REFUSAL FORM Page 2 of 2 Issue Date: January 2016 Reviewed Date: January 2018 H&S FORM 004
Action Item Responsibility Action Taken Date Received Completion Date
IN THE EVENT OF RESPONSE (B) OR (C), THE WORKER WILL SIGN ONE OF:
1. I AGREE THAT MY HEALTH AND SAFETY CONCERN HAS BEEN ADDRESSED
Please Print Worker Name: __________________________________________
Worker Signature: _________________________________________________
2. I DO NOT AGREE THAT MY HEALTH AND SAFETY CONCERN HAS BEEN ADDRESSED
Please Print Worker Name: __________________________________________
Worker Signature: _________________________________________________
Section 3:
Notified Time of Notification YES NO
Ministry of Labour Senior Management Safety Manager JHSC
Describe Duties Assigned to Worker Pending Arrival of Ministry of Labour Inspector: _______________________________________________________________________________________________________________________________________________________________________________________________________________________________________
Inspector's Name: (print) ________________________________________________________
Date: ____________________ Time of Arrival: ____________________
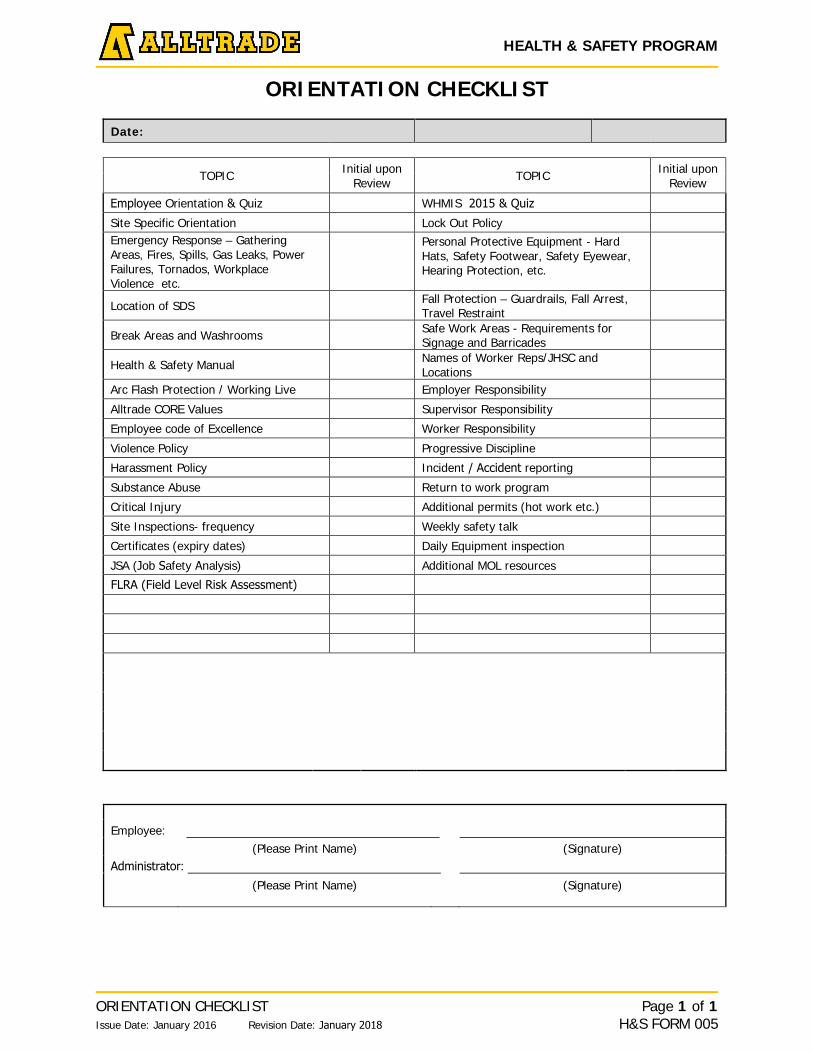
HEALTH & SAFETY PROGRAM
ORIENTATION CHECKLIST Page 1 of 1 Issue Date: January 2016 Revision Date: January 2018 H&S FORM 005
ORIENTATION CHECKLIST
Date:
TOPIC Initial upon Review TOPIC Initial upon
Review
Employee Orientation & Quiz WHMIS 2015 & Quiz
Site Specific Orientation Lock Out Policy Emergency Response – Gathering Areas, Fires, Spills, Gas Leaks, Power Failures, Tornados, Workplace Violence etc.
Personal Protective Equipment - Hard Hats, Safety Footwear, Safety Eyewear, Hearing Protection, etc.
Location of SDS Fall Protection – Guardrails, Fall Arrest, Travel Restraint
Break Areas and Washrooms Safe Work Areas - Requirements for Signage and Barricades
Health & Safety Manual Names of Worker Reps/JHSC and Locations
Arc Flash Protection / Working Live Employer Responsibility
Alltrade CORE Values Supervisor Responsibility
Employee code of Excellence Worker Responsibility
Violence Policy Progressive Discipline
Harassment Policy Incident / Accident reporting
Substance Abuse Return to work program
Critical Injury Additional permits (hot work etc.)
Site Inspections- frequency Weekly safety talk
Certificates (expiry dates) Daily Equipment inspection
JSA (Job Safety Analysis) Additional MOL resources
Employee: (Please Print Name) (Signature)
Administrator: (Please Print Name) (Signature)
FLRA (Field Level Risk Assessment)
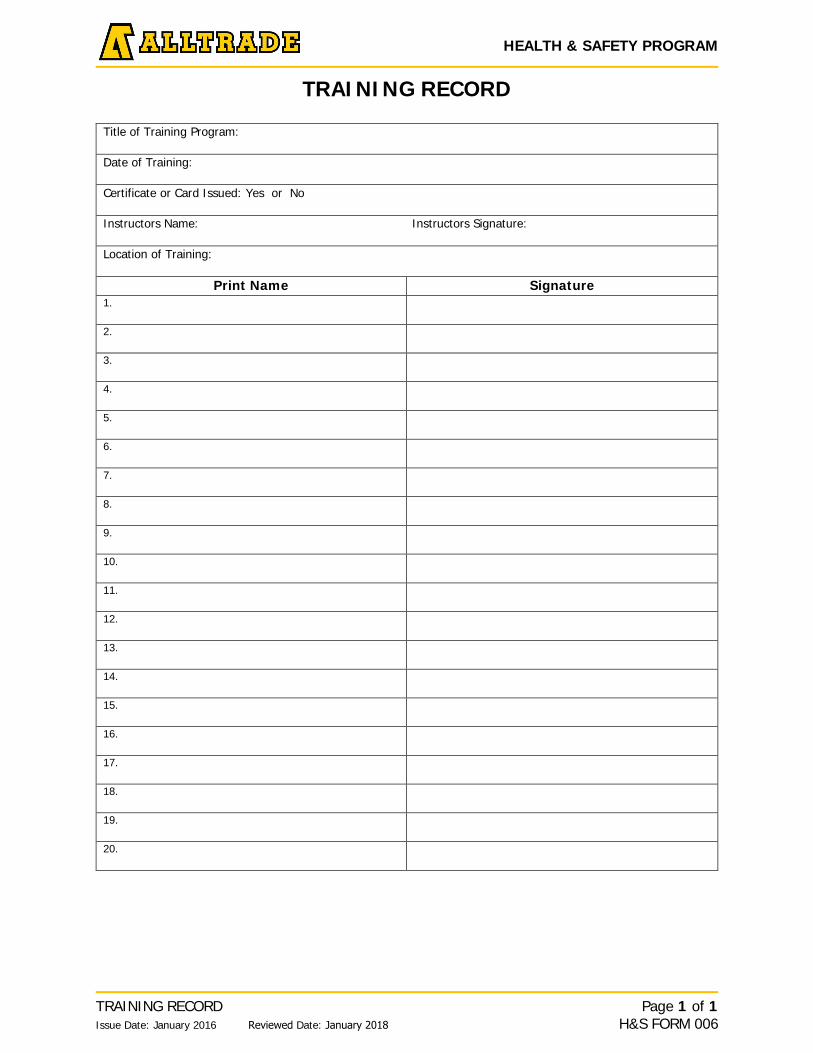
HEALTH & SAFETY PROGRAM
TRAINING RECORD Page 1 of 1 Issue Date: January 2016 Reviewed Date: January 2018 H&S FORM 006
TRAINING RECORD
Title of Training Program:
Date of Training:
Certificate or Card Issued: Yes or No
Instructors Name: Instructors Signature:
Location of Training:
Print Name Signature 1.
2.
3.
4.
5.
6.
7.
8.
9.
10.
11.
12.
13.
14.
15.
16.
17.
18.
19.
20.
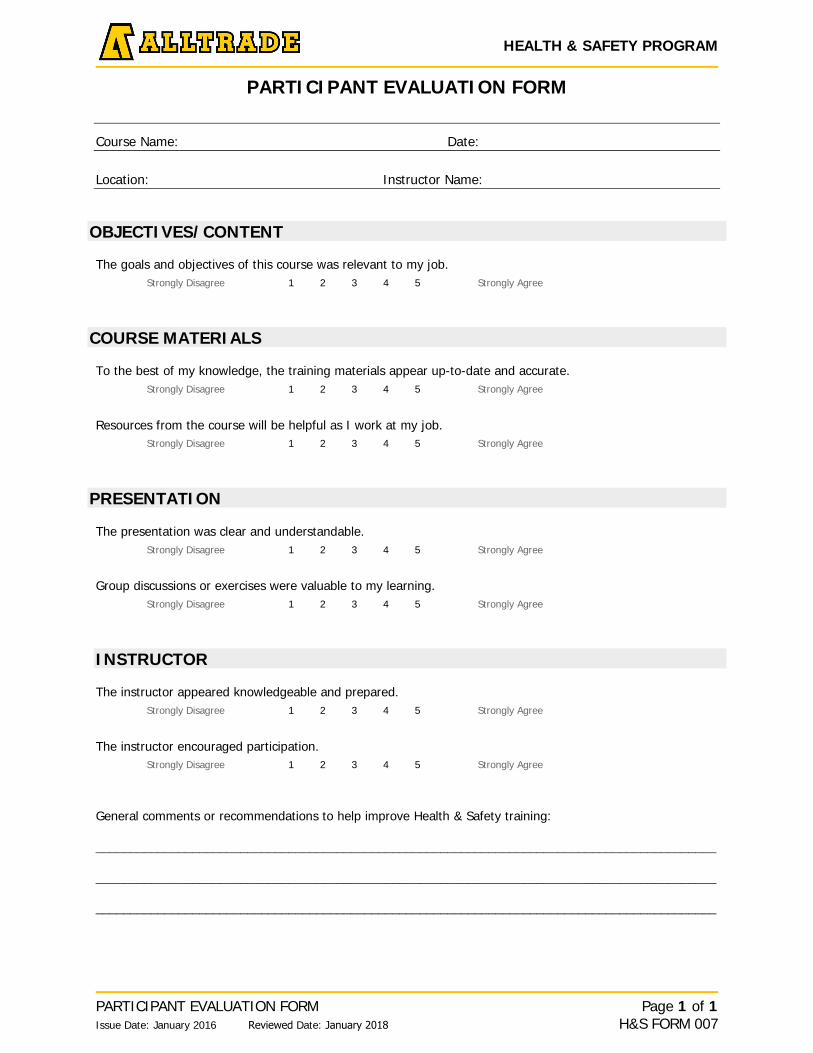
HEALTH & SAFETY PROGRAM
PARTICIPANT EVALUATION FORM Page 1 of 1 Issue Date: January 2016 Reviewed Date: January 2018 H&S FORM 007
PARTICIPANT EVALUATION FORM
Course Name: Date:
Location: Instructor Name:
OBJECTIVES/CONTENT
The goals and objectives of this course was relevant to my job. Strongly Disagree 1 2 3 4 5 Strongly Agree
COURSE MATERIALS
To the best of my knowledge, the training materials appear up-to-date and accurate. Strongly Disagree 1 2 3 4 5 Strongly Agree
Resources from the course will be helpful as I work at my job. Strongly Disagree 1 2 3 4 5 Strongly Agree
PRESENTATION
The presentation was clear and understandable. Strongly Disagree 1 2 3 4 5 Strongly Agree
Group discussions or exercises were valuable to my learning. Strongly Disagree 1 2 3 4 5 Strongly Agree
INSTRUCTOR
The instructor appeared knowledgeable and prepared. Strongly Disagree 1 2 3 4 5 Strongly Agree
The instructor encouraged participation. Strongly Disagree 1 2 3 4 5 Strongly Agree
General comments or recommendations to help improve Health & Safety training:
__________________________________________________________________________________________
__________________________________________________________________________________________
__________________________________________________________________________________________
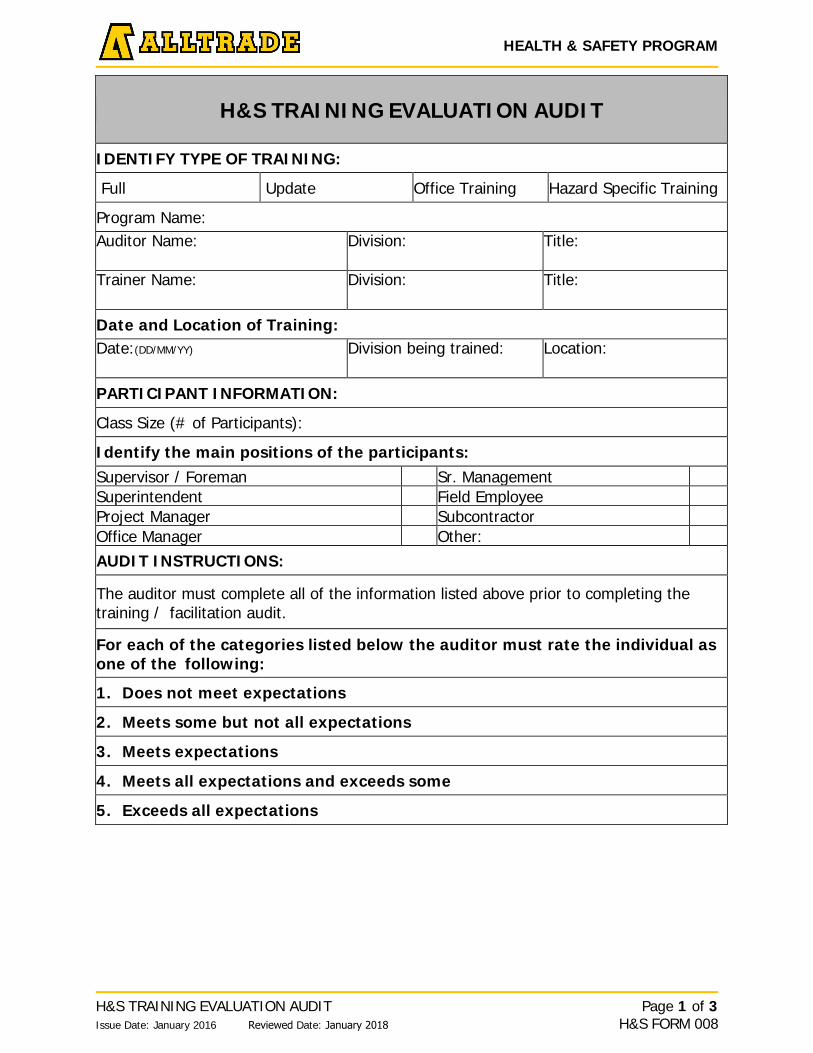
HEALTH & SAFETY PROGRAM
H&S TRAINING EVALUATION AUDIT Page 1 of 3 Issue Date: January 2016 Reviewed Date: January 2018 H&S FORM 008
H&S TRAINING EVALUATION AUDIT
IDENTIFY TYPE OF TRAINING:
Full Update Office Training Hazard Specific Training
Program Name: Auditor Name: Division: Title:
Trainer Name: Division: Title:
Date and Location of Training: Date:(DD/MM/YY) Division being trained: Location:
PARTICIPANT INFORMATION:
Class Size (# of Participants):
Identify the main positions of the participants: Supervisor / Foreman Sr. Management Superintendent Field Employee Project Manager Subcontractor Office Manager Other: AUDIT INSTRUCTIONS:
The auditor must complete all of the information listed above prior to completing the training / facilitation audit.
For each of the categories listed below the auditor must rate the individual as one of the following:
1. Does not meet expectations
2. Meets some but not all expectations
3. Meets expectations
4. Meets all expectations and exceeds some
5. Exceeds all expectations
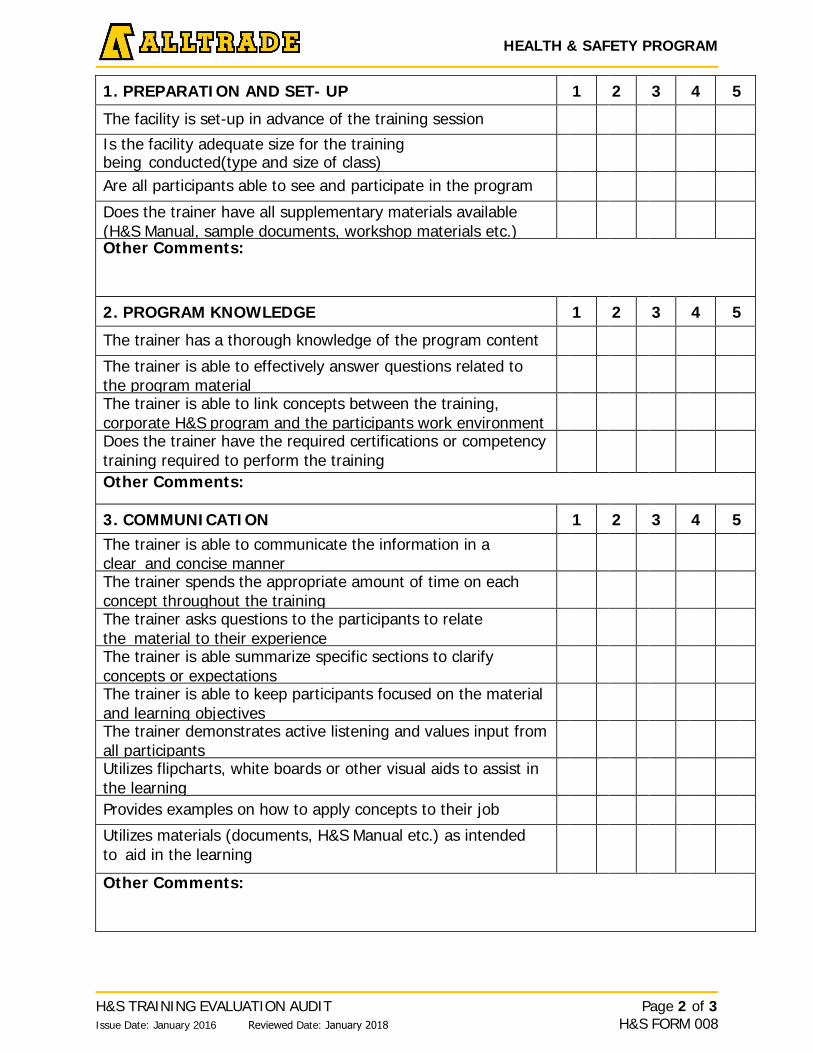
HEALTH & SAFETY PROGRAM
H&S TRAINING EVALUATION AUDIT Page 2 of 3 Issue Date: January 2016 Reviewed Date: January 2018 H&S FORM 008
1. PREPARATION AND SET- UP 1 2 3 4 5
The facility is set-up in advance of the training session
Is the facility adequate size for the training being conducted(type and size of class) Are all participants able to see and participate in the program
Does the trainer have all supplementary materials available (H&S Manual, sample documents, workshop materials etc.) Other Comments:
2. PROGRAM KNOWLEDGE 1 2 3 4 5
The trainer has a thorough knowledge of the program content
The trainer is able to effectively answer questions related to the program material The trainer is able to link concepts between the training, corporate H&S program and the participants work environment Does the trainer have the required certifications or competency training required to perform the training Other Comments:
3. COMMUNICATION 1 2 3 4 5 The trainer is able to communicate the information in a clear and concise manner The trainer spends the appropriate amount of time on each concept throughout the training The trainer asks questions to the participants to relate the material to their experience The trainer is able summarize specific sections to clarify concepts or expectations The trainer is able to keep participants focused on the material and learning objectives The trainer demonstrates active listening and values input from all participants Utilizes flipcharts, white boards or other visual aids to assist in the learning Provides examples on how to apply concepts to their job
Utilizes materials (documents, H&S Manual etc.) as intended to aid in the learning
Other Comments:
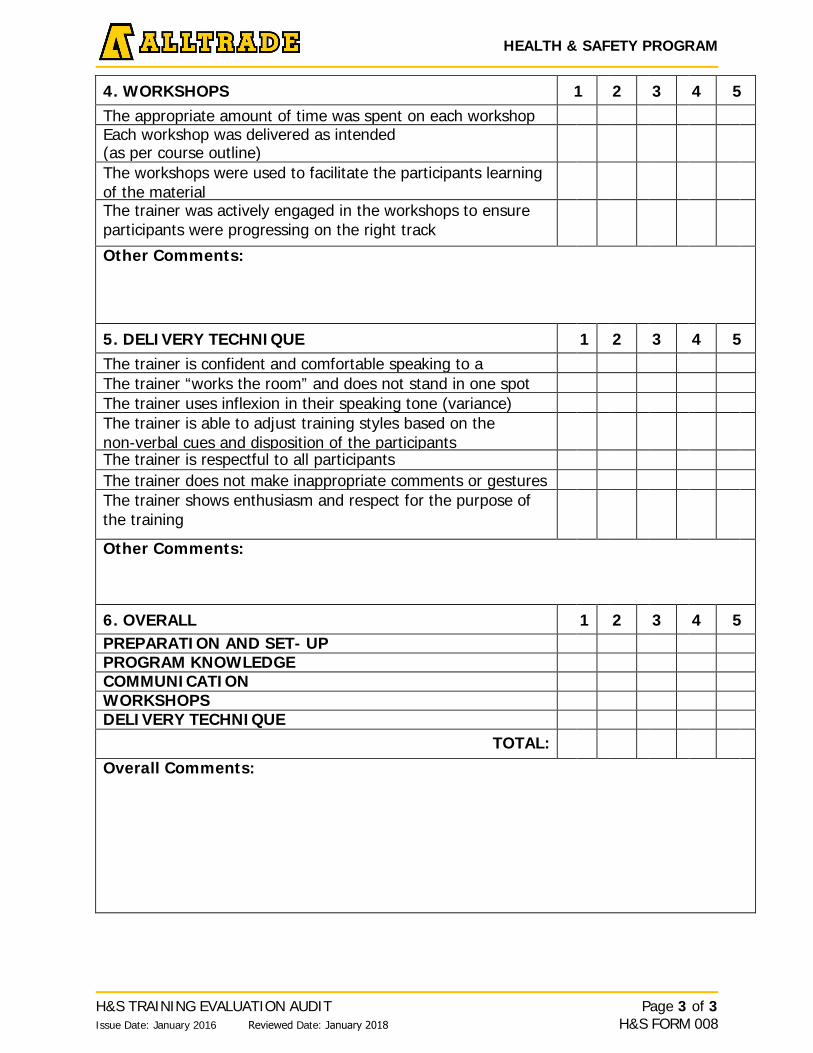
HEALTH & SAFETY PROGRAM
H&S TRAINING EVALUATION AUDIT Page 3 of 3 Issue Date: January 2016 Reviewed Date: January 2018 H&S FORM 008
4. WORKSHOPS 1 2 3 4 5 The appropriate amount of time was spent on each workshop Each workshop was delivered as intended (as per course outline) The workshops were used to facilitate the participants learning of the material The trainer was actively engaged in the workshops to ensure participants were progressing on the right track
Other Comments:
5. DELIVERY TECHNIQUE 1 2 3 4 5 The trainer is confident and comfortable speaking to a The trainer “works the room” and does not stand in one spot The trainer uses inflexion in their speaking tone (variance) The trainer is able to adjust training styles based on the non-verbal cues and disposition of the participants The trainer is respectful to all participants The trainer does not make inappropriate comments or gestures The trainer shows enthusiasm and respect for the purpose of the training
Other Comments:
6. OVERALL 1 2 3 4 5 PREPARATION AND SET- UP PROGRAM KNOWLEDGE COMMUNICATION WORKSHOPS DELIVERY TECHNIQUE
TOTAL: Overall Comments:
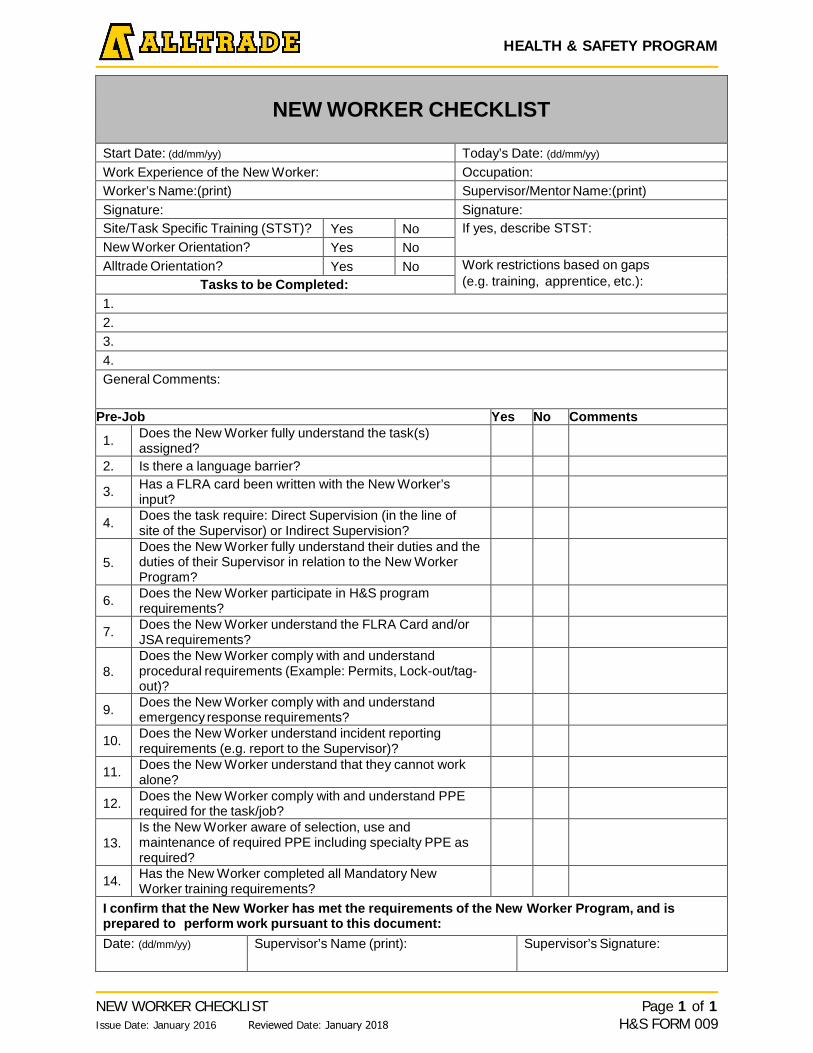
HEALTH & SAFETY PROGRAM
NEW WORKER CHECKLIST Page 1 of 1 Issue Date: January 2016 Reviewed Date: January 2018 H&S FORM 009
NEW WORKER CHECKLIST
Start Date: (dd/mm/yy) Today’s Date: (dd/mm/yy) Work Experience of the New Worker: Occupation: Worker’s Name:(print) Supervisor/Mentor Name:(print) Signature: Signature: Site/Task Specific Training (STST)? Yes No If yes, describe STST: New Worker Orientation? Yes No Alltrade Orientation? Yes No Work restrictions based on gaps
(e.g. training, apprentice, etc.): Tasks to be Completed: 1. 2. 3. 4. General Comments:
Pre-Job Yes No Comments
1. Does the New Worker fully understand the task(s) assigned?
2. Is there a language barrier?
3. Has a FLRA card been written with the New Worker’s input?
4. Does the task require: Direct Supervision (in the line of site of the Supervisor) or Indirect Supervision?
5. Does the New Worker fully understand their duties and the duties of their Supervisor in relation to the New Worker Program?
6. Does the New Worker participate in H&S program requirements?
7. Does the New Worker understand the FLRA Card and/or JSA requirements?
8. Does the New Worker comply with and understand procedural requirements (Example: Permits, Lock-out/tag- out)?
9. Does the New Worker comply with and understand emergency response requirements?
10. Does the New Worker understand incident reporting requirements (e.g. report to the Supervisor)?
11. Does the New Worker understand that they cannot work alone?
12. Does the New Worker comply with and understand PPE required for the task/job?
13. Is the New Worker aware of selection, use and maintenance of required PPE including specialty PPE as required?
14. Has the New Worker completed all Mandatory New Worker training requirements?
I confirm that the New Worker has met the requirements of the New Worker Program, and is prepared to perform work pursuant to this document: Date: (dd/mm/yy) Supervisor’s Name (print): Supervisor’s Signature:
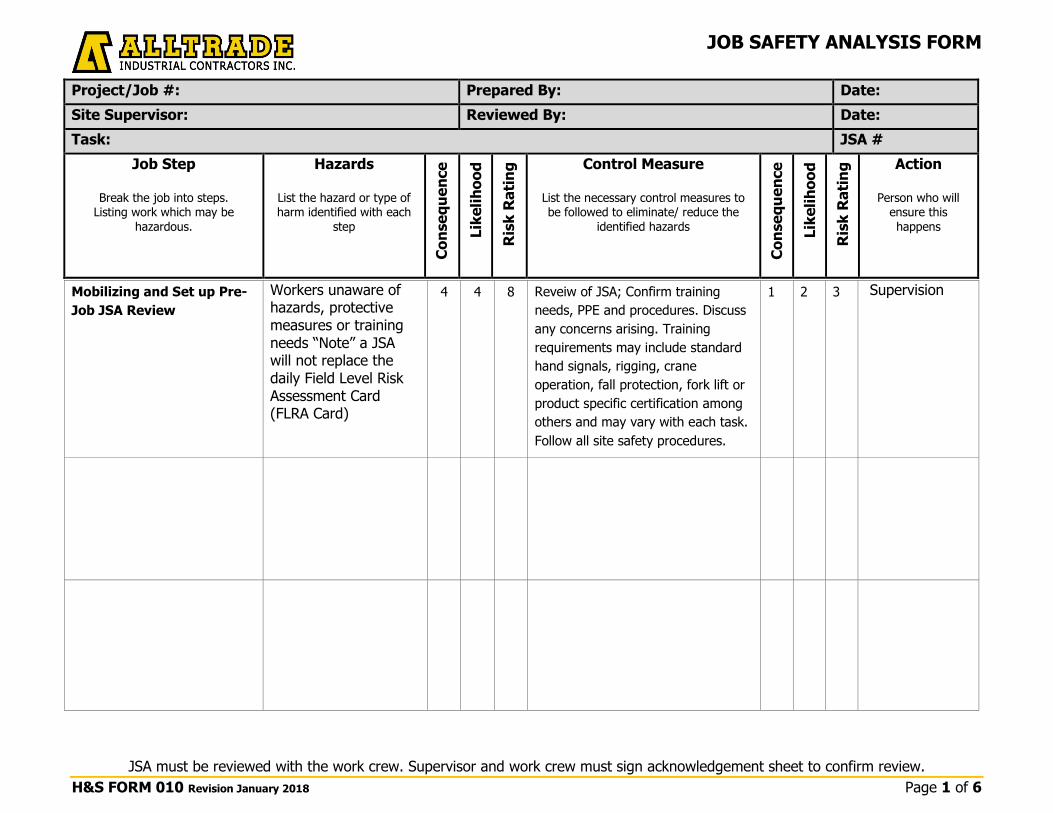
JOB SAFETY ANALYSIS FORM
Project/Job #: Prepared By: Date:
Site Supervisor: Reviewed By: Date:
Task: JSA #
Job Step
Break the job into steps. Listing work which may be
hazardous.
Hazards
List the hazard or type of harm identified with each
step
Co
nse
qu
en
ce
Lik
eli
ho
od
Ris
k R
ati
ng
Control Measure
List the necessary control measures to be followed to eliminate/ reduce the
identified hazards
Co
nse
qu
en
ce
Lik
eli
ho
od
Ris
k R
ati
ng
Action
Person who will ensure this happens
JSA must be reviewed with the work crew. Supervisor and work crew must sign acknowledgement sheet to confirm review.
H&S FORM 010 Revision January 2018 Page 1 of 6
Mobilizing and Set up Pre-
Job JSA Review
Workers unaware of hazards, protective measures or training needs “Note” a JSA will not replace the daily Field Level Risk Assessment Card (FLRA Card)
4 4 8 Reveiw of JSA; Confirm training
needs, PPE and procedures. Discuss
any concerns arising. Training
requirements may include standard
hand signals, rigging, crane
operation, fall protection, fork lift or
product specific certification among
others and may vary with each task.
Follow all site safety procedures.
1 2 3 Supervision
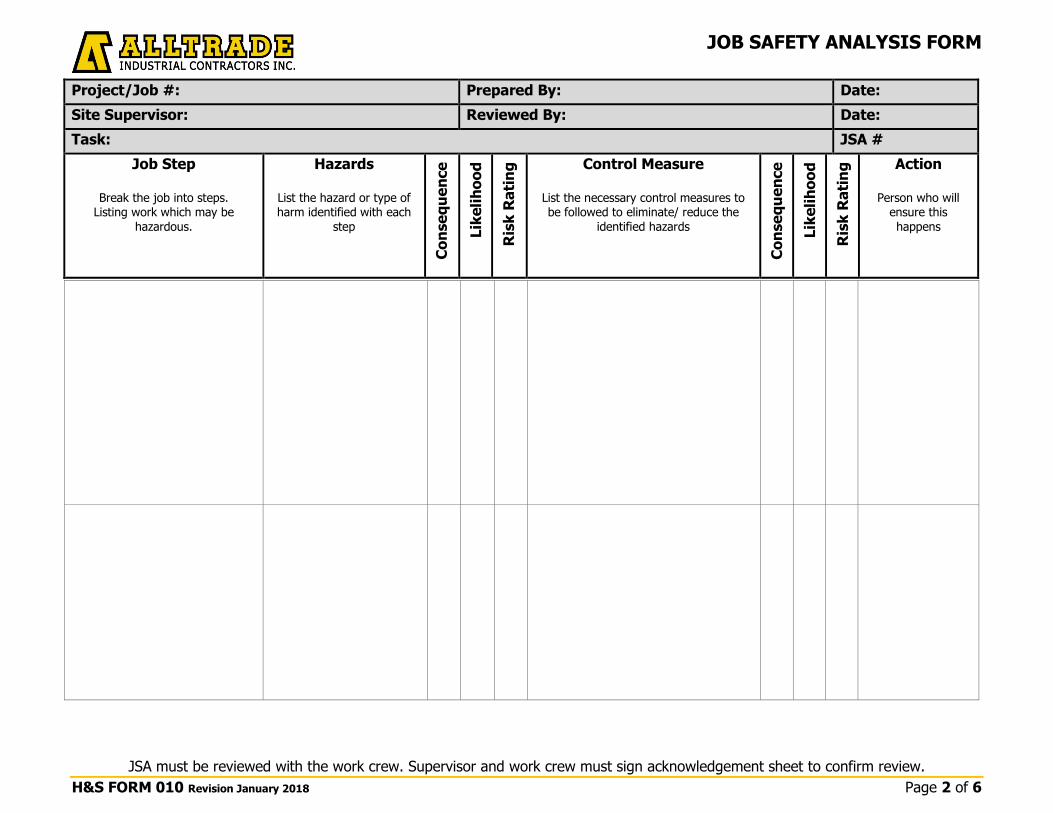
JOB SAFETY ANALYSIS FORM
Project/Job #: Prepared By: Date:
Site Supervisor: Reviewed By: Date:
Task: JSA #
Job Step
Break the job into steps. Listing work which may be
hazardous.
Hazards
List the hazard or type of harm identified with each
step
Co
nse
qu
en
ce
Lik
eli
ho
od
Ris
k R
ati
ng
Control Measure
List the necessary control measures to be followed to eliminate/ reduce the
identified hazards
Co
nse
qu
en
ce
Lik
eli
ho
od
Ris
k R
ati
ng
Action
Person who will ensure this happens
JSA must be reviewed with the work crew. Supervisor and work crew must sign acknowledgement sheet to confirm review.
H&S FORM 010 Revision January 2018 Page 2 of 6

JOB SAFETY ANALYSIS FORM
Project/Job #: Prepared By: Date:
Site Supervisor: Reviewed By: Date:
Task: JSA #
Job Step
Break the job into steps. Listing work which may be
hazardous.
Hazards
List the hazard or type of harm identified with each
step
Co
nse
qu
en
ce
Lik
eli
ho
od
Ris
k R
ati
ng
Control Measure
List the necessary control measures to be followed to eliminate/ reduce the
identified hazards
Co
nse
qu
en
ce
Lik
eli
ho
od
Ris
k R
ati
ng
Action
Person who will ensure this happens
JSA must be reviewed with the work crew. Supervisor and work crew must sign acknowledgement sheet to confirm review.
H&S FORM 010 Revision January 2018 Page 3 of 6

JOB SAFETY ANALYSIS FORM
Project/Job #: Prepared By: Date:
Site Supervisor: Reviewed By: Date:
Task: JSA #
Job Step
Break the job into steps. Listing work which may be
hazardous.
Hazards
List the hazard or type of harm identified with each
step
Co
nse
qu
en
ce
Lik
eli
ho
od
Ris
k R
ati
ng
Control Measure
List the necessary control measures to be followed to eliminate/ reduce the
identified hazards
Co
nse
qu
en
ce
Lik
eli
ho
od
Ris
k R
ati
ng
Action
Person who will ensure this happens
JSA must be reviewed with the work crew. Supervisor and work crew must sign acknowledgement sheet to confirm review.
H&S FORM 010 Revision January 2018 Page 4 of 6
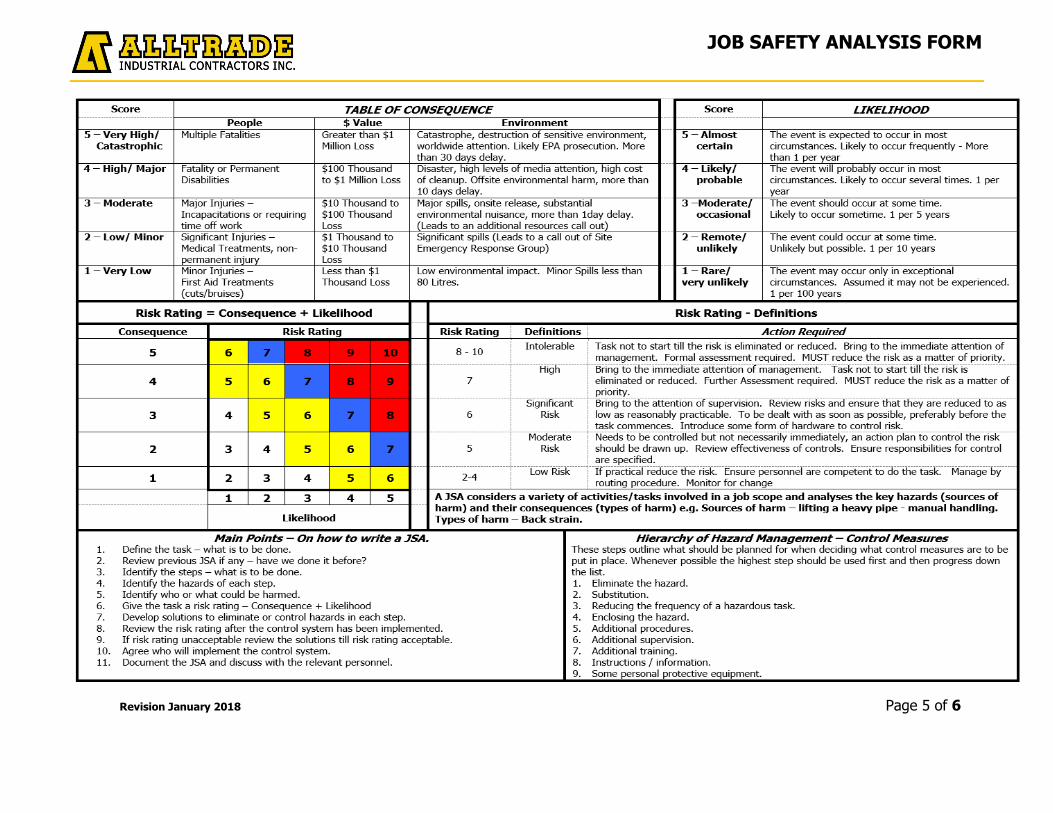
JOB SAFETY ANALYSIS FORM
Revision January 2018 Page 5 of 6
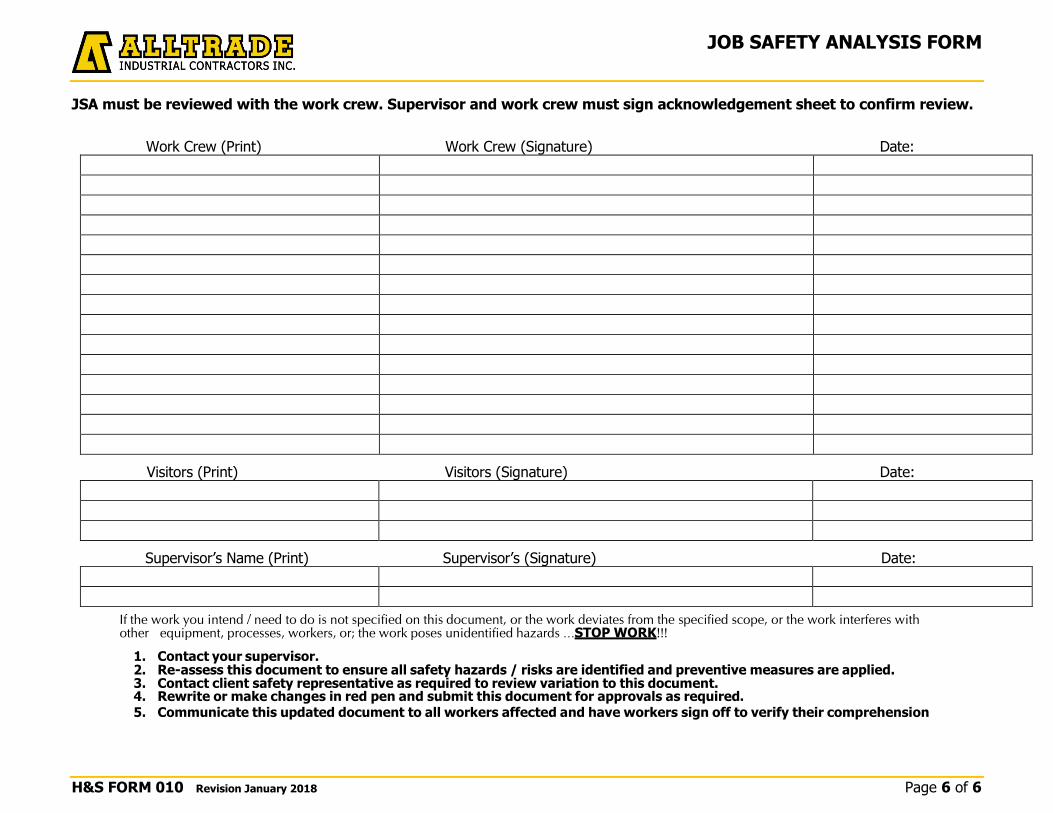
JOB SAFETY ANALYSIS FORM
H&S FORM 010 Revision January 2018 Page 6 of 6
JSA must be reviewed with the work crew. Supervisor and work crew must sign acknowledgement sheet to confirm review.
Work Crew (Print) Work Crew (Signature) Date:
Visitors (Print) Visitors (Signature) Date:
Supervisor’s Name (Print) Supervisor’s (Signature) Date:
If the work you intend / need to do is not specified on this document, or the work deviates from the specified scope, or the work interferes with other equipment, processes, workers, or; the work poses unidentified hazards …STOP WORK!!!
1. Contact your supervisor. 2. Re-assess this document to ensure all safety hazards / risks are identified and preventive measures are applied. 3. Contact client safety representative as required to review variation to this document. 4. Rewrite or make changes in red pen and submit this document for approvals as required. 5. Communicate this updated document to all workers affected and have workers sign off to verify their comprehension

Hazard
Project/ Job #:
Company:
FLRA (FIELD LEVEL RISK ASSESSMENT) Describe the task:
Station workers
Goggles
HAZARDS identify all In the list below circle (
Noise
Muffs
Employees trained
locks applied
Zero energy
Lock out log
installed
Hazard
w/cartridge respirator
Other
permit issued upright
material
Watch assigned
PPE (see burns)
used to
Burns coveralls
Hot work
Other Failure operator/rigger)
Pre use
components within load
rating Tag
JSA complete
Cuts gloves
Pre use
Spill
plan equipment
Employees trained on
Fume Other
Other
Other
Ergonomics elevation
Body
Task
Shoring
Trench box
(excavations
and provided
Other
Body
to work area/ slips/trips ramps
Work at
Lighting
Falling secured with
Material
rails No material
Equipment
Pre use
assigned Spotter
Other
Vibration
Low
tools rotation Spaces Procedures/ responsibilities
Permit equipment
available Means of
available Coordination performed
hazardous substances available
Hand
fume
Proper Storage/ disposal of
Other
FR Clothing
Shock
Lanyard
Respirator
Signage
JSA
work
Trucks Forklift/
Cranes
Scaffolds
Overexertion
One person lift
Other
/ / mm dd yy
Supervisor:
Issue Date: January 2016 Revision Date: January 2018 H&S FORM 011
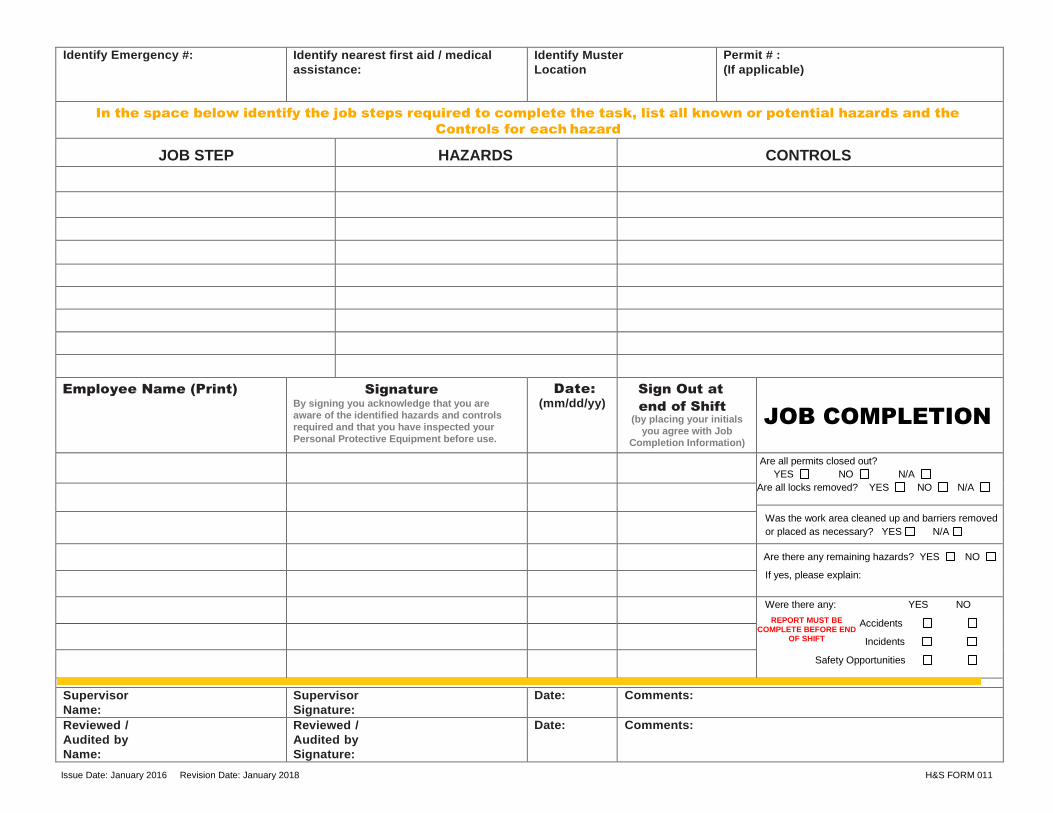
Identify Emergency #: Identify nearest first aid / medical assistance:
Identify Muster Location
Permit # : (If applicable)
In the space below identify the job steps required to complete the task, list all known or potential hazards and the
Controls for each hazard
JOB STEP HAZARDS CONTROLS
Employee Name (Print) Signature
By signing you acknowledge that you are aware of the identified hazards and controls required and that you have inspected your Personal Protective Equipment before use.
Date:
(mm/dd/yy) Sign Out at
end of Shift
(by placing your initials you agree with Job
Completion Information)
JOB COMPLETION
Are all permits closed out? YES NO N/A Are all locks removed? YES NO N/A
Was the work area cleaned up and barriers removed or placed as necessary? YES N/A
Are there any remaining hazards? YES NO
If yes, please explain:
Were there any: YES NO
Accidents
Incidents
Safety Opportunities
Supervisor Name:
Supervisor Signature:
Date: Comments:
Reviewed / Audited by Name:
Reviewed / Audited by Signature:
Date: Comments:
REPORT MUST BE COMPLETE BEFORE END
OF SHIFT
Issue Date: January 2016 Revision Date: January 2018 H&S FORM 011
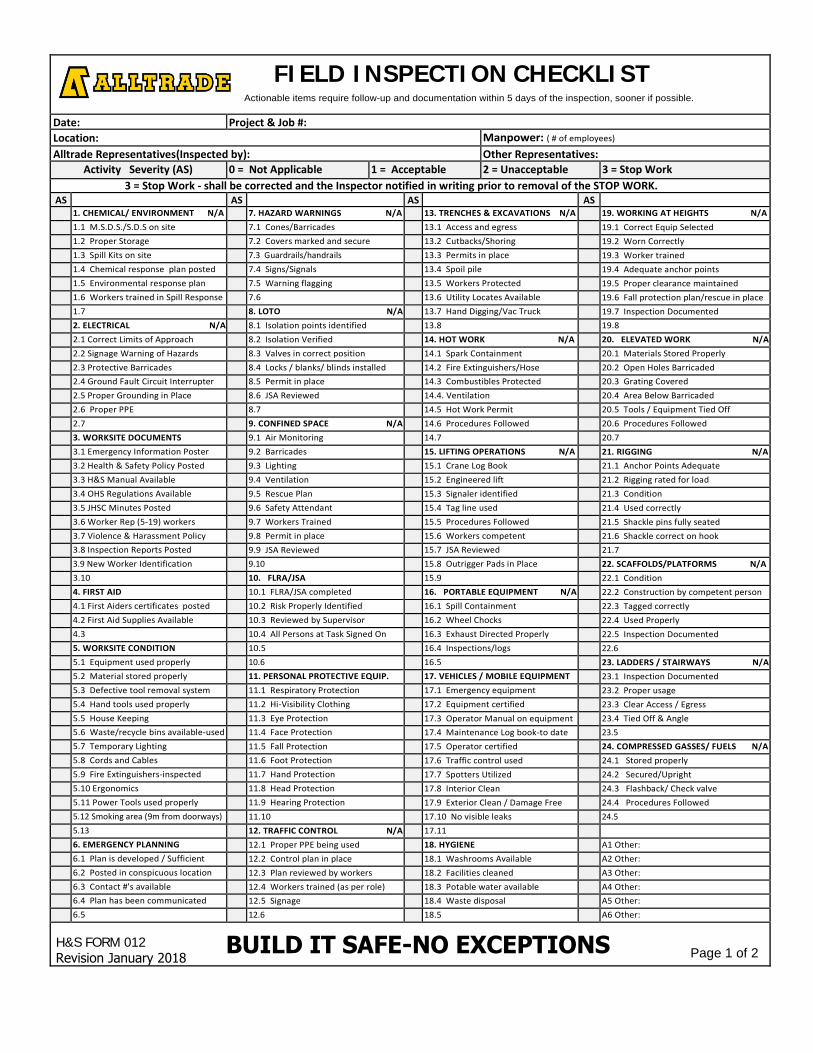
FIELD INSPECTION CHECKLIST Actionable items require follow-up and documentation within 5 days of the inspection, sooner if possible.
Date: Project & Job #: Location: Manpower: ( # of employees)
Alltrade Representatives(Inspected by): Other Representatives: Activity Severity (AS) 0 = Not Applicable 1 = Acceptable 2 = Unacceptable 3 = Stop Work
3 = Stop Work - shall be corrected and the Inspector notified in writing prior to removal of the STOP WORK. AS AS AS AS
1. CHEMICAL/ ENVIRONMENT N/A 7. HAZARD WARNINGS N/A 13. TRENCHES & EXCAVATIONS N/A 19. WORKING AT HEIGHTS N/A 1.1 M.S.D.S./S.D.S on site 7.1 Cones/Barricades 13.1 Access and egress 19.1 Correct Equip Selected 1.2 Proper Storage 7.2 Covers marked and secure 13.2 Cutbacks/Shoring 19.2 Worn Correctly 1.3 Spill Kits on site 7.3 Guardrails/handrails 13.3 Permits in place 19.3 Worker trained 1.4 Chemical response plan posted 7.4 Signs/Signals 13.4 Spoil pile 19.4 Adequate anchor points 1.5 Environmental response plan 7.5 Warning flagging 13.5 Workers Protected 19.5 Proper clearance maintained 1.6 Workers trained in Spill Response 7.6 13.6 Utility Locates Available 19.6 Fall protection plan/rescue in place 1.7 8. LOTO N/A 13.7 Hand Digging/Vac Truck 19.7 Inspection Documented 2. ELECTRICAL N/A 8.1 Isolation points identified 13.8 19.8 2.1 Correct Limits of Approach 8.2 Isolation Verified 14. HOT WORK N/A 20. ELEVATED WORK N/A 2.2 Signage Warning of Hazards 8.3 Valves in correct position 14.1 Spark Containment 20.1 Materials Stored Properly 2.3 Protective Barricades 8.4 Locks / blanks/ blinds installed 14.2 Fire Extinguishers/Hose 20.2 Open Holes Barricaded 2.4 Ground Fault Circuit Interrupter 8.5 Permit in place 14.3 Combustibles Protected 20.3 Grating Covered 2.5 Proper Grounding in Place 8.6 JSA Reviewed 14.4. Ventilation 20.4 Area Below Barricaded 2.6 Proper PPE 8.7 14.5 Hot Work Permit 20.5 Tools / Equipment Tied Off 2.7 9. CONFINED SPACE N/A 14.6 Procedures Followed 20.6 Procedures Followed 3. WORKSITE DOCUMENTS 9.1 Air Monitoring 14.7 20.7 3.1 Emergency Information Poster 9.2 Barricades 15. LIFTING OPERATIONS N/A 21. RIGGING N/A 3.2 Health & Safety Policy Posted 9.3 Lighting 15.1 Crane Log Book 21.1 Anchor Points Adequate 3.3 H&S Manual Available 9.4 Ventilation 15.2 Engineered lift 21.2 Rigging rated for load 3.4 OHS Regulations Available 9.5 Rescue Plan 15.3 Signaler identified 21.3 Condition 3.5 JHSC Minutes Posted 9.6 Safety Attendant 15.4 Tag line used 21.4 Used correctly 3.6 Worker Rep (5-19) workers 9.7 Workers Trained 15.5 Procedures Followed 21.5 Shackle pins fully seated 3.7 Violence & Harassment Policy 9.8 Permit in place 15.6 Workers competent 21.6 Shackle correct on hook 3.8 Inspection Reports Posted 9.9 JSA Reviewed 15.7 JSA Reviewed 21.7 3.9 New Worker Identification 9.10 15.8 Outrigger Pads in Place 22. SCAFFOLDS/PLATFORMS N/A 3.10 10. FLRA/JSA 15.9 22.1 Condition 4. FIRST AID 10.1 FLRA/JSA completed 16. PORTABLE EQUIPMENT N/A 22.2 Construction by competent person 4.1 First Aiders certificates posted 10.2 Risk Properly Identified 16.1 Spill Containment 22.3 Tagged correctly 4.2 First Aid Supplies Available 10.3 Reviewed by Supervisor 16.2 Wheel Chocks 22.4 Used Properly 4.3 10.4 All Persons at Task Signed On 16.3 Exhaust Directed Properly
22.5 Inspection Documented
5. WORKSITE CONDITION 10.5 16.4 Inspections/logs 22.6 5.1 Equipment used properly 10.6 16.5 23. LADDERS / STAIRWAYS N/A 5.2 Material stored properly 11. PERSONAL PROTECTIVE EQUIP. 17. VEHICLES / MOBILE EQUIPMENT 23.1 Inspection Documented 5.3 Defective tool removal system 11.1 Respiratory Protection 17.1 Emergency equipment 23.2 Proper usage 5.4 Hand tools used properly 11.2 Hi-Visibility Clothing 17.2 Equipment certified 23.3 Clear Access / Egress 5.5 House Keeping 11.3 Eye Protection 17.3 Operator Manual on equipment 23.4 Tied Off & Angle 5.6 Waste/recycle bins available-used 11.4 Face Protection 17.4 Maintenance Log book-to date 23.5 5.7 Temporary Lighting 11.5 Fall Protection 17.5 Operator certified 24. COMPRESSED GASSES/ FUELS N/A5.8 Cords and Cables 11.6 Foot Protection 17.6 Traffic control used 24.1 Stored properly 5.9 Fire Extinguishers-inspected 11.7 Hand Protection 17.7 Spotters Utilized 24.2 Secured/Upright 5.10 Ergonomics 11.8 Head Protection 17.8 Interior Clean 24.3 Flashback/ Check valve 5.11 Power Tools used properly 11.9 Hearing Protection 17.9 Exterior Clean / Damage Free 24.4 Procedures Followed 5.12 Smoking area (9m from doorways) 11.10 17.10 No visible leaks 24.5 5.13 12. TRAFFIC CONTROL N/A 17.11 6. EMERGENCY PLANNING 12.1 Proper PPE being used 18. HYGIENE A1 Other: 6.1 Plan is developed / Sufficient 12.2 Control plan in place 18.1 Washrooms Available A2 Other: 6.2 Posted in conspicuous location 12.3 Plan reviewed by workers 18.2 Facilities cleaned A3 Other: 6.3 Contact #'s available 12.4 Workers trained (as per role) 18.3 Potable water available A4 Other: 6.4 Plan has been communicated 12.5 Signage 18.4 Waste disposal A5 Other: 6.5 12.6 18.5 A6 Other:
H&S FORM 012Revision January 2018
BUILD IT SAFE-NO EXCEPTIONS Page 1 of 2
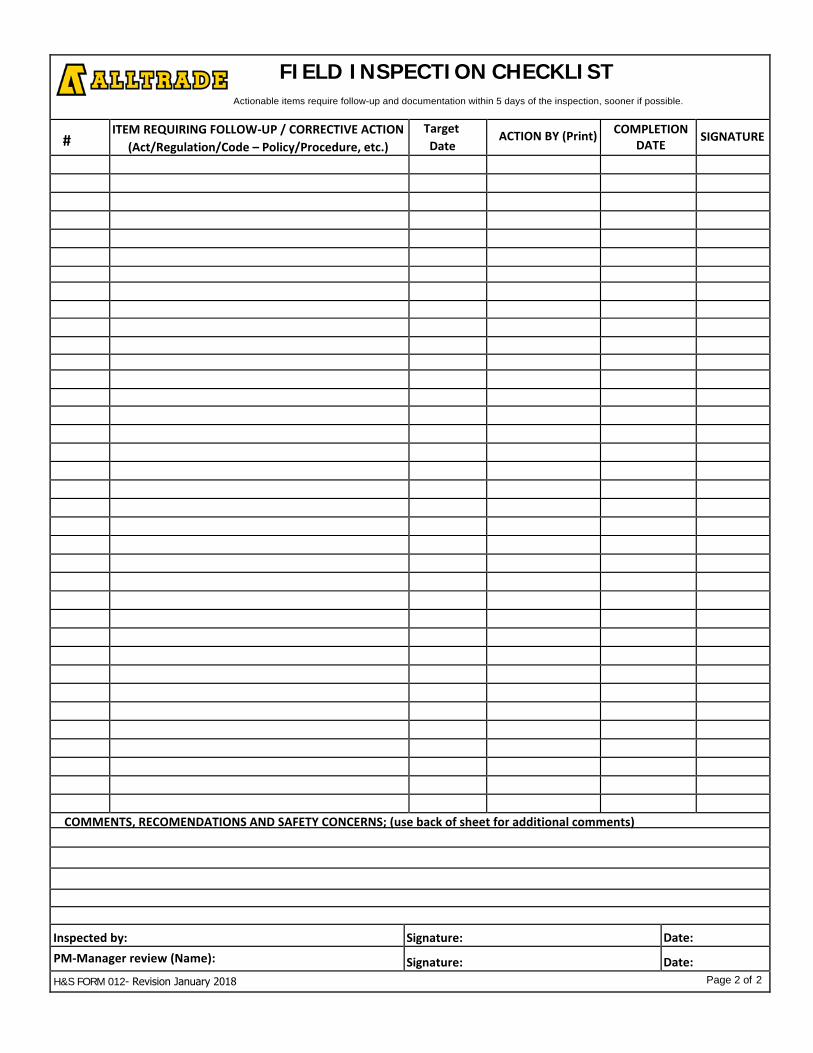
FIELD INSPECTION CHECKLIST Actionable items require follow-up and documentation within 5 days of the inspection, sooner if possible.
# ITEM REQUIRING FOLLOW-UP / CORRECTIVE ACTION
(Act/Regulation/Code – Policy/Procedure, etc.) Target Date
ACTION BY (Print) COMPLETION DATE
SIGNATURE
COMMENTS, RECOMENDATIONS AND SAFETY CONCERNS; (use back of sheet for additional comments)
Inspected by: Signature: Date: PM-Manager review (Name): Signature: Date: H&S FORM 012- Revision January 2018 Page 2 of 2
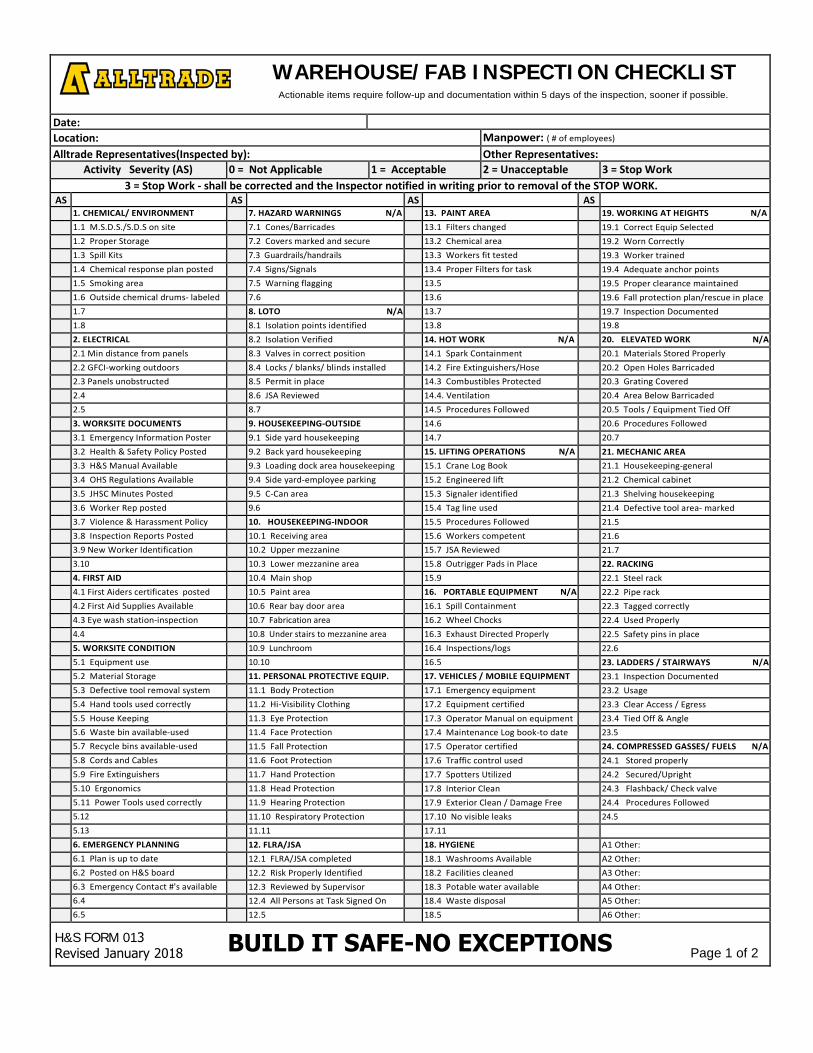
WAREHOUSE/FAB INSPECTION CHECKLIST Actionable items require follow-up and documentation within 5 days of the inspection, sooner if possible.
Date: Location: Manpower: ( # of employees)
Alltrade Representatives(Inspected by): Other Representatives: Activity Severity (AS) 0 = Not Applicable 1 = Acceptable 2 = Unacceptable 3 = Stop Work
3 = Stop Work - shall be corrected and the Inspector notified in writing prior to removal of the STOP WORK. AS AS AS AS
1. CHEMICAL/ ENVIRONMENT 7. HAZARD WARNINGS N/A 13. PAINT AREA 19. WORKING AT HEIGHTS N/A 1.1 M.S.D.S./S.D.S on site 7.1 Cones/Barricades 13.1 Filters changed 19.1 Correct Equip Selected 1.2 Proper Storage 7.2 Covers marked and secure 13.2 Chemical area 19.2 Worn Correctly 1.3 Spill Kits 7.3 Guardrails/handrails 13.3 Workers fit tested 19.3 Worker trained 1.4 Chemical response plan posted 7.4 Signs/Signals 13.4 Proper Filters for task 19.4 Adequate anchor points 1.5 Smoking area 7.5 Warning flagging 13.5 19.5 Proper clearance maintained 1.6 Outside chemical drums- labeled 7.6 13.6 19.6 Fall protection plan/rescue in place 1.7 8. LOTO N/A 13.7 19.7 Inspection Documented 1.8 8.1 Isolation points identified 13.8 19.8 2. ELECTRICAL 8.2 Isolation Verified 14. HOT WORK N/A 20. ELEVATED WORK N/A 2.1 Min distance from panels 8.3 Valves in correct position 14.1 Spark Containment 20.1 Materials Stored Properly 2.2 GFCI-working outdoors 8.4 Locks / blanks/ blinds installed 14.2 Fire Extinguishers/Hose 20.2 Open Holes Barricaded 2.3 Panels unobstructed 8.5 Permit in place 14.3 Combustibles Protected 20.3 Grating Covered 2.4 8.6 JSA Reviewed 14.4. Ventilation 20.4 Area Below Barricaded 2.5 8.7 14.5 Procedures Followed 20.5 Tools / Equipment Tied Off 3. WORKSITE DOCUMENTS 9. HOUSEKEEPING-OUTSIDE 14.6 20.6 Procedures Followed 3.1 Emergency Information Poster 9.1 Side yard housekeeping 14.7 20.7 3.2 Health & Safety Policy Posted 9.2 Back yard housekeeping 15. LIFTING OPERATIONS N/A 21. MECHANIC AREA
3.3 H&S Manual Available 9.3 Loading dock area housekeeping 15.1 Crane Log Book 21.1 Housekeeping-general 3.4 OHS Regulations Available 9.4 Side yard-employee parking 15.2 Engineered lift 21.2 Chemical cabinet 3.5 JHSC Minutes Posted 9.5 C-Can area 15.3 Signaler identified 21.3 Shelving housekeeping 3.6 Worker Rep posted 9.6 15.4 Tag line used 21.4 Defective tool area- marked 3.7 Violence & Harassment Policy 10. HOUSEKEEPING-INDOOR 15.5 Procedures Followed 21.5 3.8 Inspection Reports Posted 10.1 Receiving area 15.6 Workers competent 21.6 3.9 New Worker Identification 10.2 Upper mezzanine 15.7 JSA Reviewed 21.7 3.10 10.3 Lower mezzanine area 15.8 Outrigger Pads in Place 22. RACKING4. FIRST AID 10.4 Main shop 15.9 22.1 Steel rack 4.1 First Aiders certificates posted 10.5 Paint area 16. PORTABLE EQUIPMENT N/A 22.2 Pipe rack 4.2 First Aid Supplies Available 10.6 Rear bay door area 16.1 Spill Containment 22.3 Tagged correctly 4.3 Eye wash station-inspection 10.7 Fabrication area 16.2 Wheel Chocks 22.4 Used Properly 4.4 10.8 Under stairs to mezzanine area 16.3 Exhaust Directed Properly
22.5 Safety pins in place
5. WORKSITE CONDITION 10.9 Lunchroom 16.4 Inspections/logs 22.6 5.1 Equipment use 10.10 16.5 23. LADDERS / STAIRWAYS N/A 5.2 Material Storage 11. PERSONAL PROTECTIVE EQUIP. 17. VEHICLES / MOBILE EQUIPMENT 23.1 Inspection Documented 5.3 Defective tool removal system 11.1 Body Protection 17.1 Emergency equipment 23.2 Usage 5.4 Hand tools used correctly 11.2 Hi-Visibility Clothing 17.2 Equipment certified 23.3 Clear Access / Egress 5.5 House Keeping 11.3 Eye Protection 17.3 Operator Manual on equipment 23.4 Tied Off & Angle 5.6 Waste bin available-used 11.4 Face Protection 17.4 Maintenance Log book-to date 23.5 5.7 Recycle bins available-used 11.5 Fall Protection 17.5 Operator certified 24. COMPRESSED GASSES/ FUELS N/A5.8 Cords and Cables 11.6 Foot Protection 17.6 Traffic control used 24.1 Stored properly 5.9 Fire Extinguishers 11.7 Hand Protection 17.7 Spotters Utilized 24.2 Secured/Upright 5.10 Ergonomics 11.8 Head Protection 17.8 Interior Clean 24.3 Flashback/ Check valve 5.11 Power Tools used correctly 11.9 Hearing Protection 17.9 Exterior Clean / Damage Free 24.4 Procedures Followed 5.12 11.10 Respiratory Protection 17.10 No visible leaks 24.5 5.13 11.11 17.11 6. EMERGENCY PLANNING 12. FLRA/JSA 18. HYGIENE A1 Other: 6.1 Plan is up to date 12.1 FLRA/JSA completed 18.1 Washrooms Available A2 Other: 6.2 Posted on H&S board 12.2 Risk Properly Identified 18.2 Facilities cleaned A3 Other: 6.3 Emergency Contact #'s available 12.3 Reviewed by Supervisor 18.3 Potable water available A4 Other: 6.4 12.4 All Persons at Task Signed On 18.4 Waste disposal A5 Other: 6.5 12.5 18.5 A6 Other:
H&S FORM 013Revised January 2018 BUILD IT SAFE-NO EXCEPTIONS Page 1 of 2
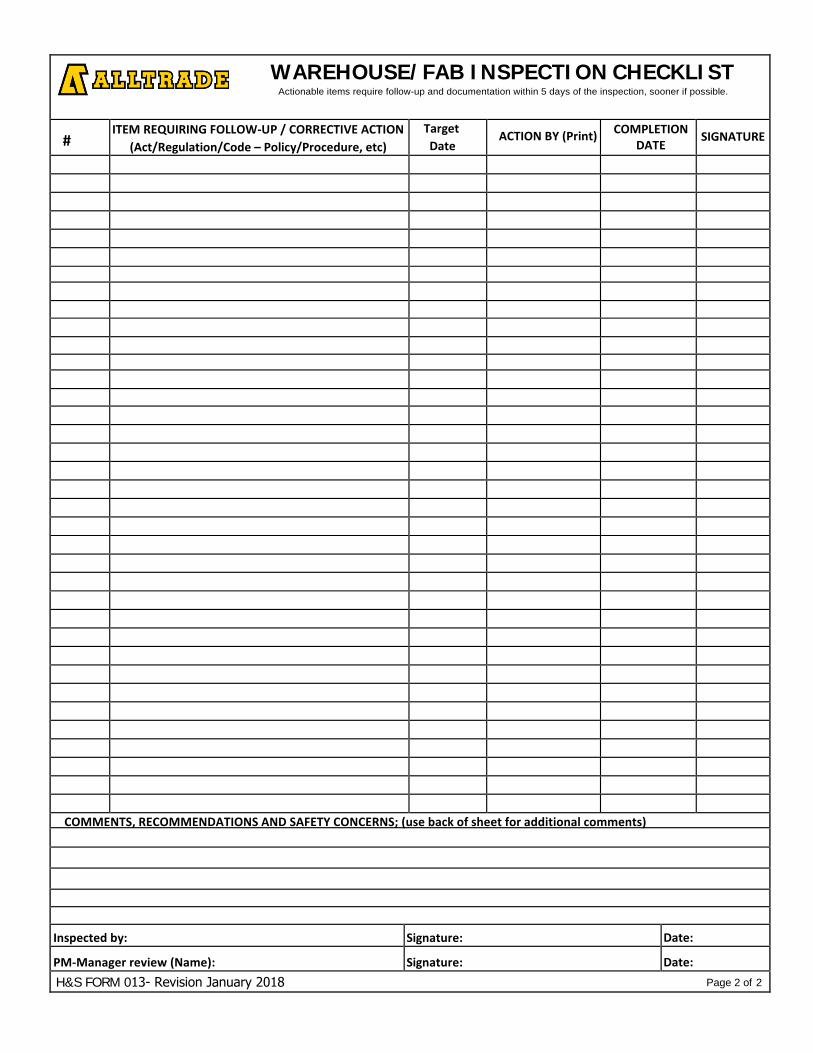
WAREHOUSE/FAB INSPECTION CHECKLIST Actionable items require follow-up and documentation within 5 days of the inspection, sooner if possible.
# ITEM REQUIRING FOLLOW-UP / CORRECTIVE ACTION
(Act/Regulation/Code – Policy/Procedure, etc) Target Date
ACTION BY (Print) COMPLETION DATE
SIGNATURE
COMMENTS, RECOMMENDATIONS AND SAFETY CONCERNS; (use back of sheet for additional comments)
Inspected by: Signature: Date:
PM-Manager review (Name): Signature: Date: H&S FORM 013- Revision January 2018 Page 2 of 2
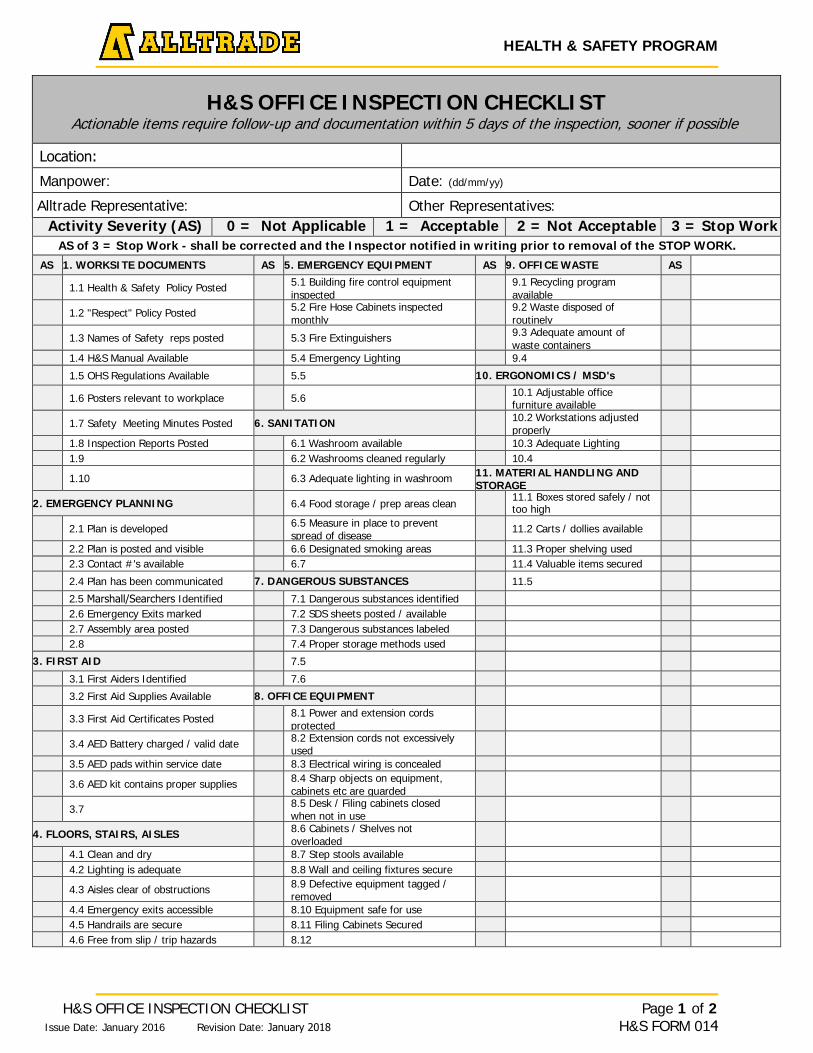
HEALTH & SAFETY PROGRAM
H&S OFFICE INSPECTION CHECKLIST Issue Date: January 2016 Revision Date: January 2018
Page 1 of 2 H&S FORM 014
H&S OFFICE INSPECTION CHECKLIST Actionable items require follow-up and documentation within 5 days of the inspection, sooner if possible.
Location:
Manpower: Date: (dd/mm/yy)
Alltrade Representative: Other Representatives: Activity Severity (AS) 0 = Not Applicable 1 = Acceptable 2 = Not Acceptable 3 = Stop Work AS of 3 = Stop Work - shall be corrected and the Inspector notified in writing prior to removal of the STOP WORK.
AS 1. WORKSITE DOCUMENTS AS 5. EMERGENCY EQUIPMENT AS 9. OFFICE WASTE AS
1.1 Health & Safety Policy Posted 5.1 Building fire control equipment inspected
9.1 Recycling program available
1.2 "Respect" Policy Posted 5.2 Fire Hose Cabinets inspected monthly
9.2 Waste disposed of routinely
1.3 Names of Safety reps posted 5.3 Fire Extinguishers 9.3 Adequate amount of waste containers
1.4 H&S Manual Available 5.4 Emergency Lighting 9.4
1.5 OHS Regulations Available 5.5 10. ERGONOMICS / MSD's
1.6 Posters relevant to workplace 5.6 10.1 Adjustable office furniture available
1.7 Safety Meeting Minutes Posted 6. SANITATION 10.2 Workstations adjusted properly
1.8 Inspection Reports Posted 6.1 Washroom available 10.3 Adequate Lighting 1.9 6.2 Washrooms cleaned regularly 10.4
1.10 6.3 Adequate lighting in washroom 11. MATERIAL HANDLING ANDSTORAGE
2. EMERGENCY PLANNING 6.4 Food storage / prep areas clean 11.1 Boxes stored safely / not too high
2.1 Plan is developed 6.5 Measure in place to prevent spread of disease
11.2 Carts / dollies available
2.2 Plan is posted and visible 6.6 Designated smoking areas 11.3 Proper shelving used 2.3 Contact #'s available 6.7 11.4 Valuable items secured
2.4 Plan has been communicated 7. DANGEROUS SUBSTANCES 11.5
2.5 Marshall/Searchers Identified 7.1 Dangerous substances identified 2.6 Emergency Exits marked 7.2 SDS sheets posted / available 2.7 Assembly area posted 7.3 Dangerous substances labeled 2.8 7.4 Proper storage methods used
3. FIRST AID 7.5
3.1 First Aiders Identified 7.6
3.2 First Aid Supplies Available 8. OFFICE EQUIPMENT
3.3 First Aid Certificates Posted 8.1 Power and extension cords protected
3.4 AED Battery charged / valid date 8.2 Extension cords not excessively used
3.5 AED pads within service date 8.3 Electrical wiring is concealed
3.6 AED kit contains proper supplies 8.4 Sharp objects on equipment, cabinets etc are guarded
3.7 8.5 Desk / Filing cabinets closed when not in use
4. FLOORS, STAIRS, AISLES 8.6 Cabinets / Shelves not overloaded
4.1 Clean and dry 8.7 Step stools available 4.2 Lighting is adequate 8.8 Wall and ceiling fixtures secure
4.3 Aisles clear of obstructions 8.9 Defective equipment tagged / removed
4.4 Emergency exits accessible 8.10 Equipment safe for use 4.5 Handrails are secure 8.11 Filing Cabinets Secured 4.6 Free from slip / trip hazards 8.12
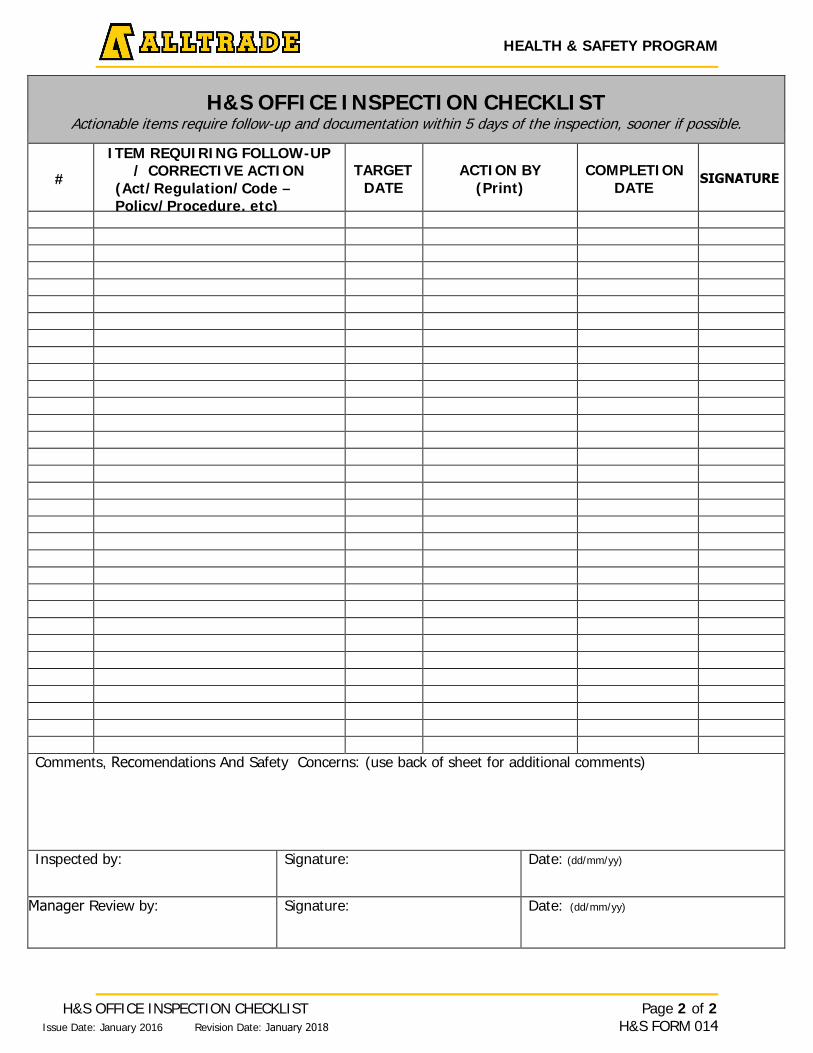
HEALTH & SAFETY PROGRAM
H&S OFFICE INSPECTION CHECKLIST Issue Date: January 2016 Revision Date: January 2018
Page 2 of 2 H&S FORM 014
H&S OFFICE INSPECTION CHECKLIST Actionable items require follow-up and documentation within 5 days of the inspection, sooner if possible.
#
ITEM REQUIRING FOLLOW-UP / CORRECTIVE ACTION
(Act/Regulation/Code – Policy/Procedure, etc)
TARGET DATE
ACTION BY (Print)
COMPLETION DATE
SIGNATURE
Comments, Recomendations And Safety Concerns: (use back of sheet for additional comments)
Inspected by: Signature: Date: (dd/mm/yy)
Manager Review by: Signature: Date: (dd/mm/yy)

HEALTH & SAFETY PROGRAM
Page 1 of 2 H&S FORM 015
HEALTH AND SAFETY POLICY AUDIT #1 Revision Date: January 2018 Issue Date: January 2016
HEALTH AND SAFETY POLICY AUDIT #1
Conducted by EHS Advisor, Supervisor, and/or Project Management, who may be accompanied by a Joint Health & Safety Committee Member, and/or Health & Safety Representative.
Note: File Audit on site and send to EHS for audit purposes.
Project: Job #: Location: Manpower: Audited By: Reviewed By: Signature: Signature: Inspection Date:(dd/mm/yy) Interview: # of Workers # of Managers
Item #
Corrective Action
Assigned To Corrective Action Completed (sign-off)
Date (dd/mm/yy)
NUMBER OF INTERVIEWS # of Employees on
Project/Site # of Management to
Interview # of Workers to Interview Total Interviews Required
9 or less 2 5 7 10 to 24 2 6 8 25 to 49 3 7 10 50 to 99 4 9 13
Place Additional Comments on Back
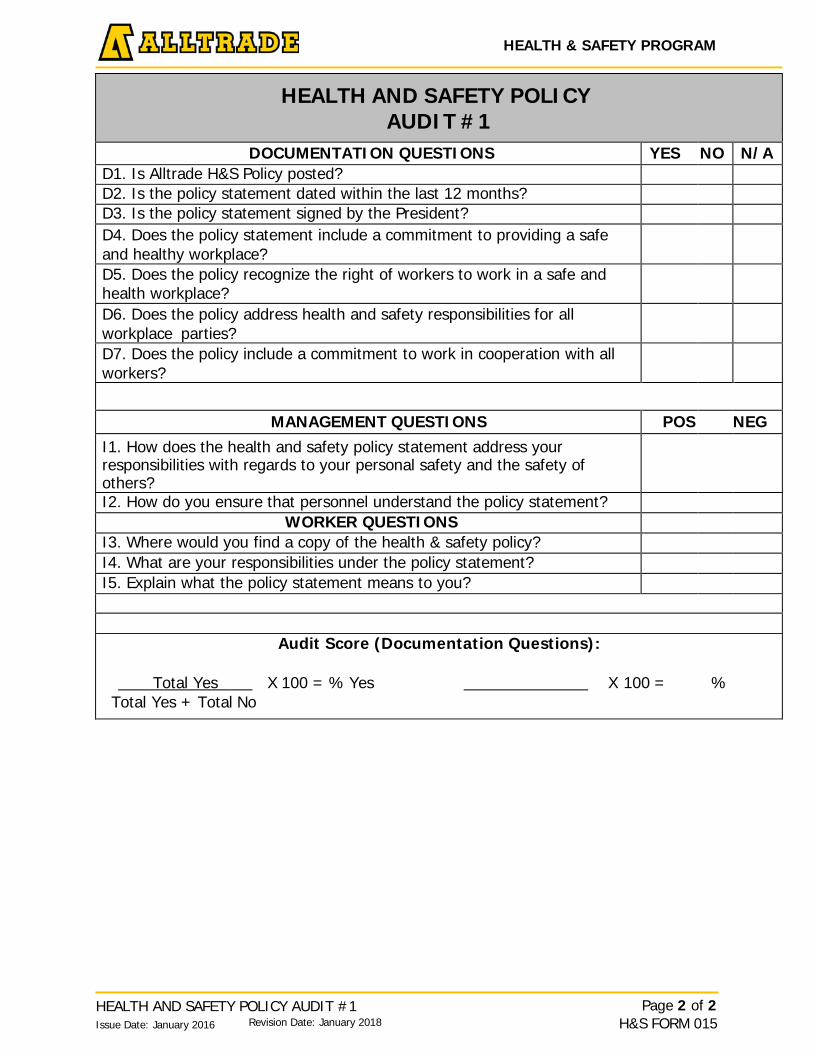
HEALTH & SAFETY PROGRAM
Page 2 of 2 H&S FORM 015
HEALTH AND SAFETY POLICY AUDIT #1 Revision Date: January 2018 Issue Date: January 2016
HEALTH AND SAFETY POLICY
AUDIT #1
DOCUMENTATION QUESTIONS YES NO N/A D1. Is Alltrade H&S Policy posted? D2. Is the policy statement dated within the last 12 months? D3. Is the policy statement signed by the President? D4. Does the policy statement include a commitment to providing a safe and healthy workplace?
D5. Does the policy recognize the right of workers to work in a safe and health workplace?
D6. Does the policy address health and safety responsibilities for all workplace parties?
D7. Does the policy include a commitment to work in cooperation with all workers?
MANAGEMENT QUESTIONS POS NEG I1. How does the health and safety policy statement address your responsibilities with regards to your personal safety and the safety of others?
I2. How do you ensure that personnel understand the policy statement? WORKER QUESTIONS
I3. Where would you find a copy of the health & safety policy? I4. What are your responsibilities under the policy statement? I5. Explain what the policy statement means to you?
Audit Score (Documentation Questions):
Total Yes X 100 = % Yes X 100 = % Total Yes + Total No

HEALTH & SAFETY PROGRAM
HAZARD ASSESSMENT, ANALYSIS & CONTROL AUDIT #2 Page 1 of 2 H&S FORM 016 Issue Date: January 2016 Revision Date: January 2018
HAZARD ASSESSMENT, ANALYSIS AND CONTROL AUDIT #2
Conducted by EHS Advisor, Supervisor, and/or Project Management, who may be accompanied by a Joint Health & Safety Committee Member, and/or Health & Safety Representative.
Note: File Audit on site and send to EHS for audit purposes.
Project: Job #: Location: Manpower: Audited By: Reviewed By: Signature: Signature: Inspection Date:(dd/mm/yy)
Interview: # of Workers # of Managers Item
# Corrective
Action Assigned To Corrective Action
Completed (sign-off) Date (dd/mm/yy)
NUMBER OF INTERVIEWS
# of Employees on Project/Site
# of Management to Interview
# of Workers to Interview
Total Interviews Required
9 or less 2 5 7 10 to 24 2 6 8 25 to 49 3 7 10 50 to 99 4 9 13
Place Additional Comments on Back

HEALTH & SAFETY PROGRAM
HAZARD ASSESSMENT, ANALYSIS & CONTROL AUDIT #2 Page 2 of 2 H&S FORM 016 Issue Date: January 2016 Revision Date: January 2018
HAZARD ASSESSMENT, ANALYSIS AND CONTROL AUDIT #2
DOCUMENTATION QUESTIONS YES NO N/A D1. Are written hazard assessments (FLRA/JSA) conducted as required? D2. Does the employer use an "ongoing" hazard assessment process? D3. Are appropriate personnel involved in the hazard assessment process? D4. Are site and job specific hazards clearly identified? D5. Are identified hazards prioritized by risk, potential for severity and frequency? D6. Is there a list of identified critical tasks? D7. Are controls developed for identified hazards? D8. Are controls implemented in a timely manner? D9. Are appropriate personnel informed of the control strategies? D10. Is there a program for pre-work safety orientation of all subcontractors? D11. Does Alltrade have a process for evaluating and monitoring subcontractors? D12. Does management support the process of ongoing hazard assessments? D13. Are supervisors signing off on FLRA cards? D14. Have workers been trained on the safe use and storage of hazardous materials? D15. Are controlled products properly stored and labelled?
MANAGEMENT QUESTIONS POS NEG I1. Are you involved in the hazard assessment process? If not, who is? I2. What is your role in supporting the process of ongoing hazard assessments?
WORKER QUESTIONS I3. Are you involved in the hazard assessment process? If not, who is?
Audit Score (Documentation Questions):
Total Yes X 100 = % Yes X 100 = % Total Yes + Total No

HEALTH & SAFETY PROGRAM
SAFE WORK PRACTICES AUDIT #3 Page 1 of 2 H&S FORM 017 Issue Date: January 2016 Revision Date: January 2018
SAFE WORK PRACTICES AUDIT #3
Conducted by EHS Advisor, Supervisor, and/or Project Management, who may be accompanied by a Joint Health & Safety Committee Member, and/or Health & Safety Representative.
Note: File Audit on site and send to EHS for Audit purposes.
Project: Job #: Location: Manpower: Audited By: Reviewed By: Signature: Signature: Inspection Date:(dd/mm/yy)
Interview:
# of Workers # of Managers Item
# Corrective
Action Assigned To Corrective Action
Completed (sign-off) Date (dd/mm/yy)
NUMBER OF INTERVIEWS # of Employees on
Project/Site # of Management to
Interview # of Workers to Interview Total Interviews Required
9 or less 2 5 7 10 to 24 2 6 8 25 to 49 3 7 10 50 to 99 4 9 13
Place Additional Comments on Back
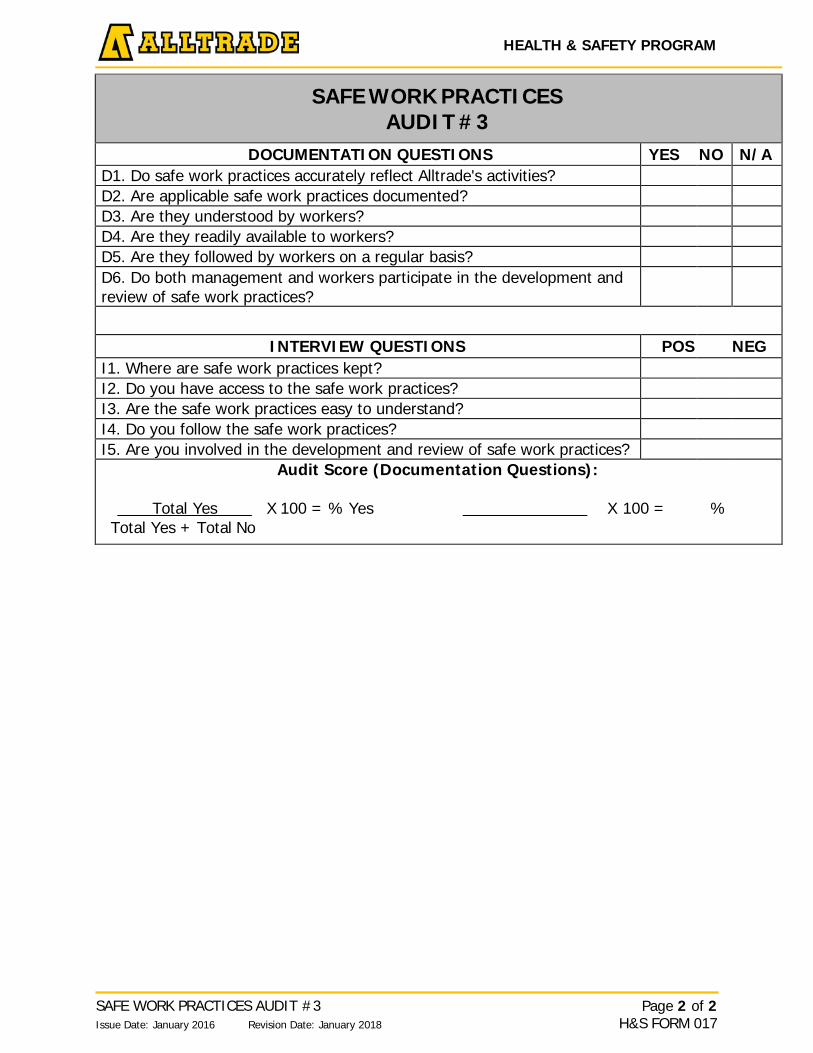
HEALTH & SAFETY PROGRAM
SAFE WORK PRACTICES AUDIT #3 Page 2 of 2 H&S FORM 017 Issue Date: January 2016 Revision Date: January 2018
SAFE WORK PRACTICES
AUDIT #3
DOCUMENTATION QUESTIONS YES NO N/A D1. Do safe work practices accurately reflect Alltrade's activities? D2. Are applicable safe work practices documented? D3. Are they understood by workers? D4. Are they readily available to workers? D5. Are they followed by workers on a regular basis? D6. Do both management and workers participate in the development and review of safe work practices?
INTERVIEW QUESTIONS POS NEG I1. Where are safe work practices kept? I2. Do you have access to the safe work practices? I3. Are the safe work practices easy to understand? I4. Do you follow the safe work practices? I5. Are you involved in the development and review of safe work practices?
Audit Score (Documentation Questions):
Total Yes X 100 = % Yes X 100 = % Total Yes + Total No
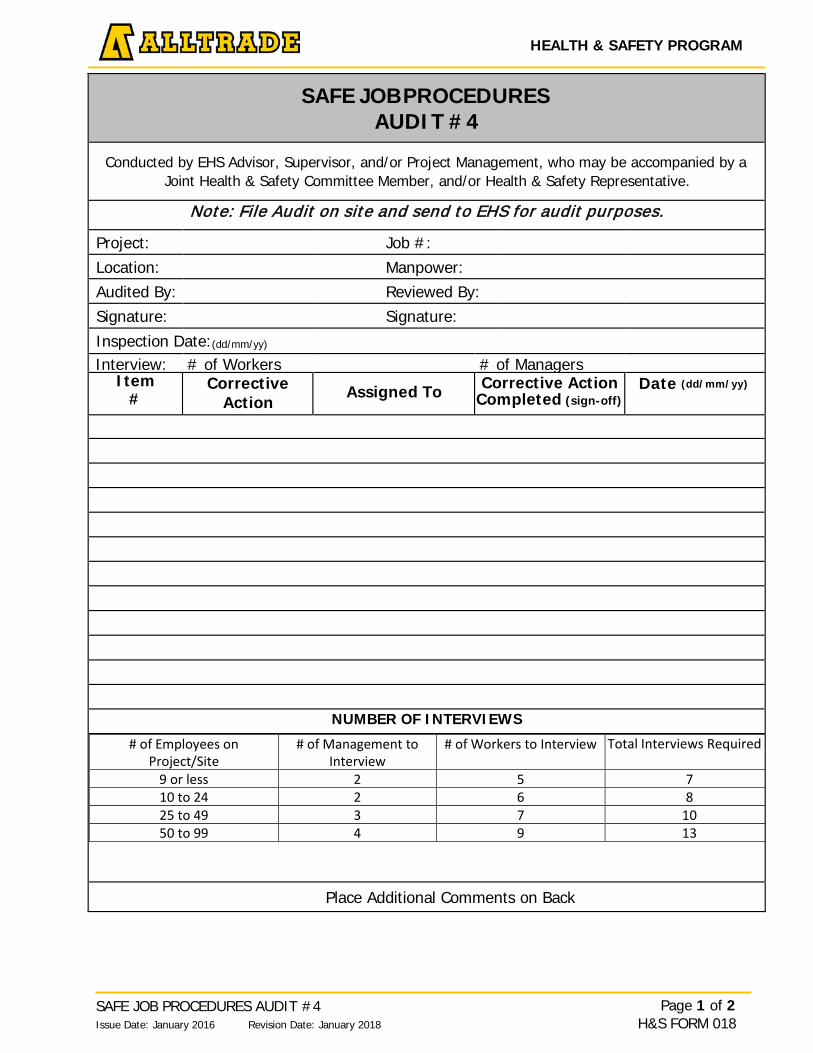
HEALTH & SAFETY PROGRAM
Page 1 of 2 H&S FORM 018
SAFE JOB PROCEDURES AUDIT #4 Issue Date: January 2016 Revision Date: January 2018
SAFE JOB PROCEDURES AUDIT #4
Conducted by EHS Advisor, Supervisor, and/or Project Management, who may be accompanied by a Joint Health & Safety Committee Member, and/or Health & Safety Representative.
Note: File Audit on site and send to EHS for audit purposes.
Project: Job #: Location: Manpower: Audited By: Reviewed By: Signature: Signature: Inspection Date:(dd/mm/yy)
Interview: # of Workers # of Managers Item
# Corrective
Action Assigned To Corrective Action
Completed (sign-off) Date (dd/mm/yy)
NUMBER OF INTERVIEWS
# of Employees on Project/Site
# of Management to Interview
# of Workers to Interview Total Interviews Required
9 or less 2 5 7 10 to 24 2 6 8 25 to 49 3 7 10 50 to 99 4 9 13
Place Additional Comments on Back
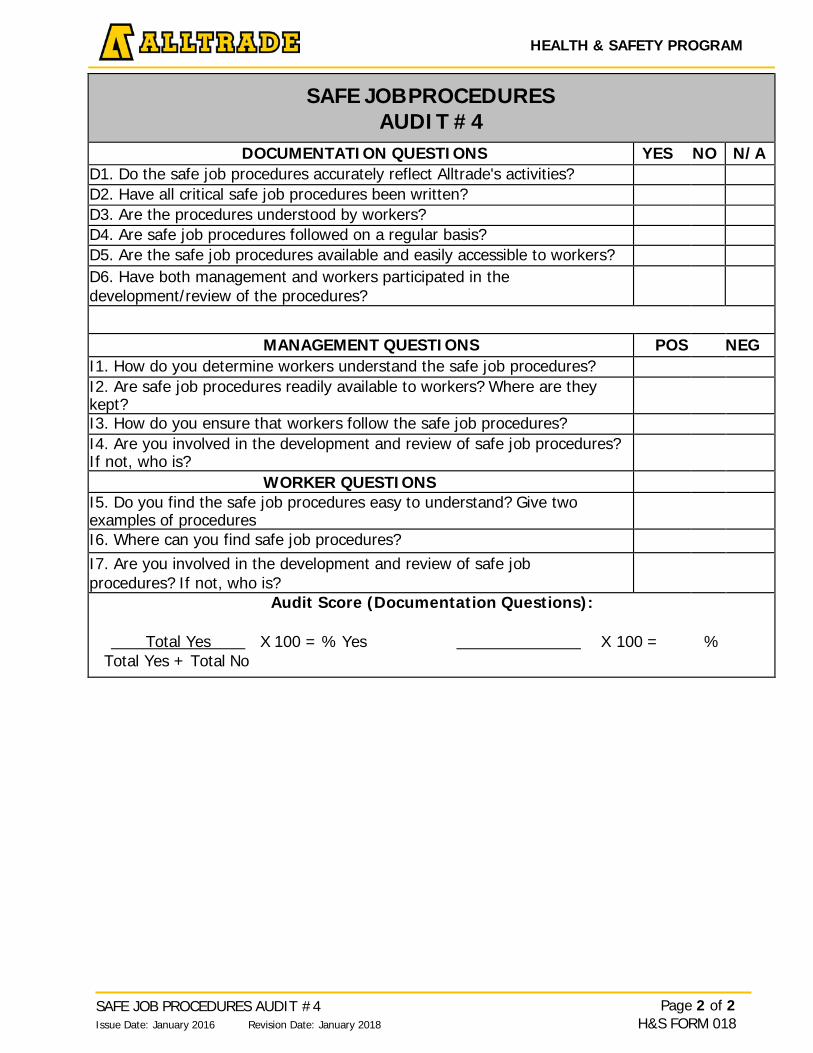
HEALTH & SAFETY PROGRAM
Page 2 of 2 H&S FORM 018
SAFE JOB PROCEDURES AUDIT #4 Issue Date: January 2016 Revision Date: January 2018
SAFE JOB PROCEDURES
AUDIT #4 DOCUMENTATION QUESTIONS YES NO N/A
D1. Do the safe job procedures accurately reflect Alltrade's activities? D2. Have all critical safe job procedures been written? D3. Are the procedures understood by workers? D4. Are safe job procedures followed on a regular basis? D5. Are the safe job procedures available and easily accessible to workers? D6. Have both management and workers participated in the development/review of the procedures?
MANAGEMENT QUESTIONS POS NEG I1. How do you determine workers understand the safe job procedures? I2. Are safe job procedures readily available to workers? Where are they kept?
I3. How do you ensure that workers follow the safe job procedures? I4. Are you involved in the development and review of safe job procedures? If not, who is?
WORKER QUESTIONS I5. Do you find the safe job procedures easy to understand? Give two examples of procedures
I6. Where can you find safe job procedures?
I7. Are you involved in the development and review of safe job procedures? If not, who is?
Audit Score (Documentation Questions):
Total Yes X 100 = % Yes X 100 = % Total Yes + Total No
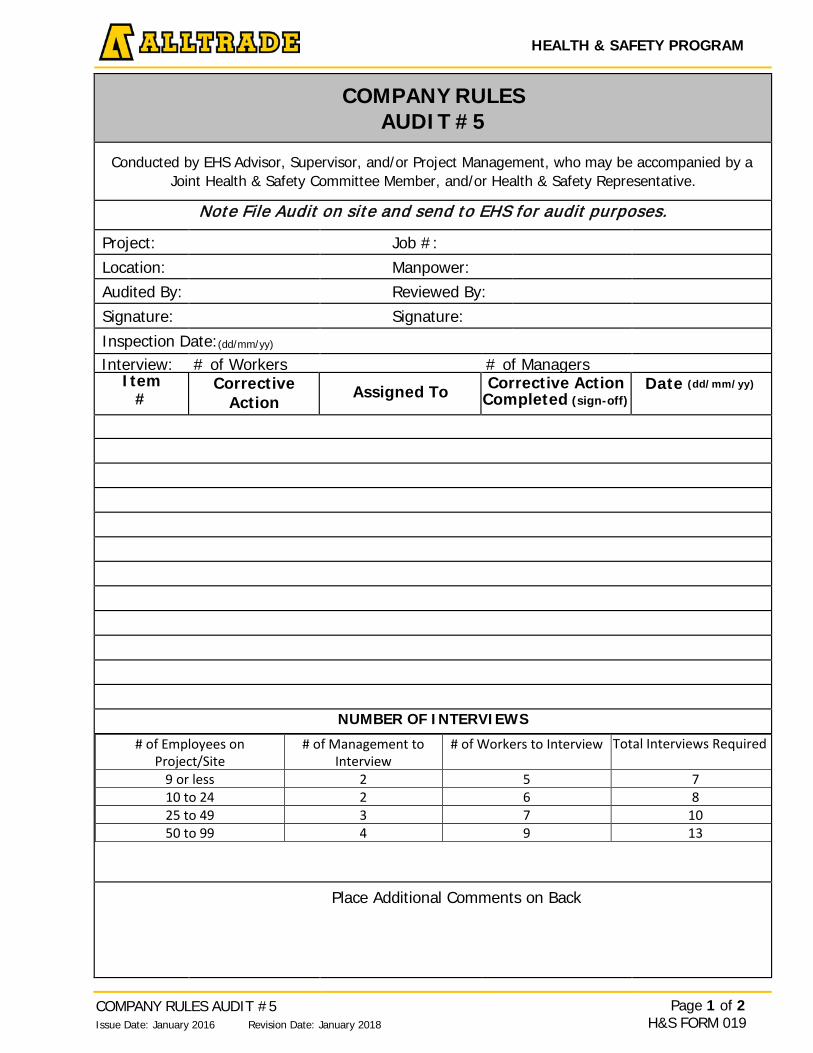
HEALTH & SAFETY PROGRAM
Page 1 of 2 H&S FORM 019
COMPANY RULES AUDIT #5 Issue Date: January 2016 Revision Date: January 2018
COMPANY RULES AUDIT #5
Conducted by EHS Advisor, Supervisor, and/or Project Management, who may be accompanied by a Joint Health & Safety Committee Member, and/or Health & Safety Representative.
Note File Audit on site and send to EHS for audit purposes.
Project: Job #: Location: Manpower: Audited By: Reviewed By: Signature: Signature: Inspection Date:(dd/mm/yy)
Interview: # of Workers # of Managers Item
# Corrective
Action Assigned To Corrective Action
Completed (sign-off) Date (dd/mm/yy)
NUMBER OF INTERVIEWS
# of Employees on Project/Site
# of Management to Interview
# of Workers to Interview Total Interviews Required
9 or less 2 5 7 10 to 24 2 6 8 25 to 49 3 7 10 50 to 99 4 9 13
Place Additional Comments on Back
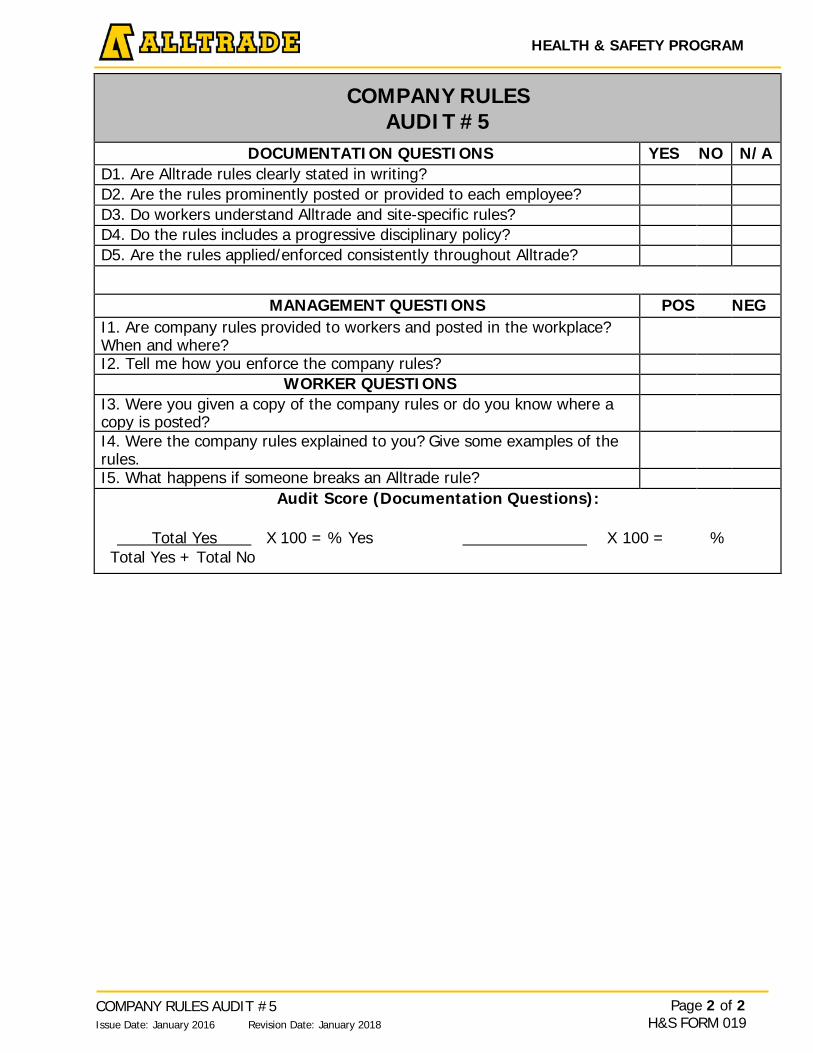
HEALTH & SAFETY PROGRAM
Page 2 of 2 H&S FORM 019
COMPANY RULES AUDIT #5 Issue Date: January 2016 Revision Date: January 2018
COMPANY RULES
AUDIT #5 DOCUMENTATION QUESTIONS YES NO N/A
D1. Are Alltrade rules clearly stated in writing? D2. Are the rules prominently posted or provided to each employee? D3. Do workers understand Alltrade and site-specific rules? D4. Do the rules includes a progressive disciplinary policy? D5. Are the rules applied/enforced consistently throughout Alltrade?
MANAGEMENT QUESTIONS POS NEG I1. Are company rules provided to workers and posted in the workplace? When and where?
I2. Tell me how you enforce the company rules? WORKER QUESTIONS
I3. Were you given a copy of the company rules or do you know where a copy is posted?
I4. Were the company rules explained to you? Give some examples of the rules.
I5. What happens if someone breaks an Alltrade rule? Audit Score (Documentation Questions):
Total Yes X 100 = % Yes X 100 = %
Total Yes + Total No
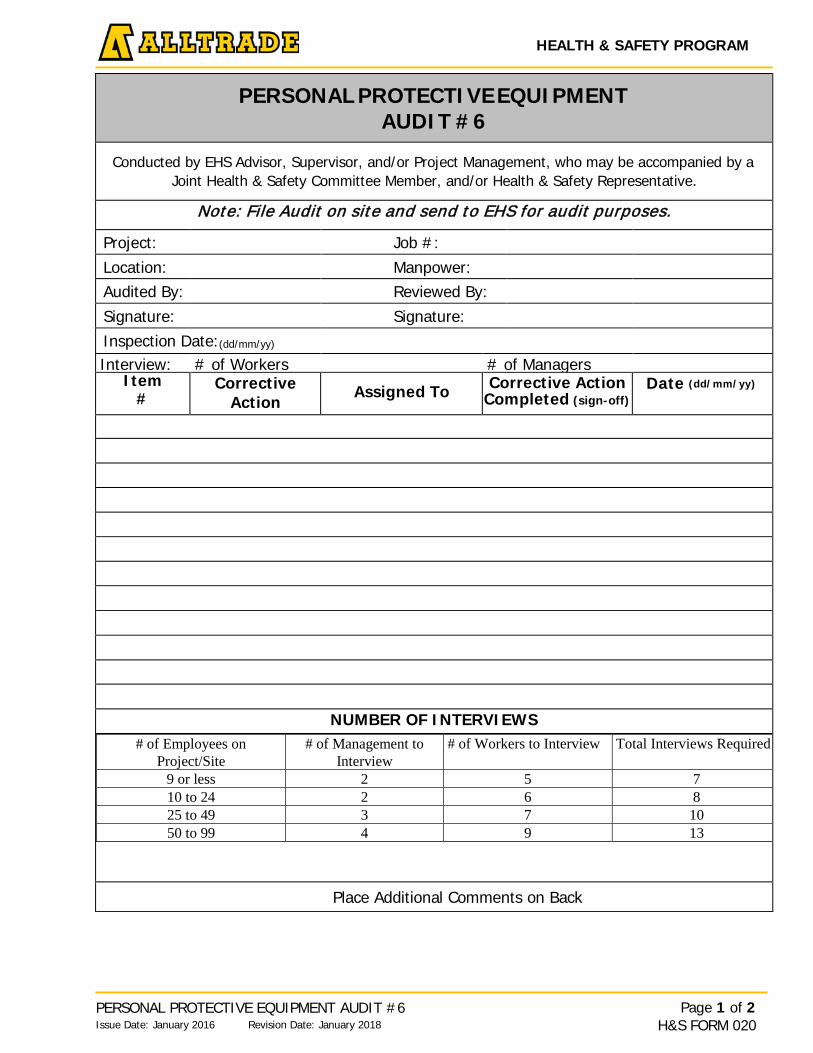
HEALTH & SAFETY PROGRAM
Page 1 of 2 H&S FORM 020
PERSONAL PROTECTIVE EQUIPMENT AUDIT #6 Issue Date: January 2016 Revision Date: January 2018
PERSONAL PROTECTIVE EQUIPMENT AUDIT #6
Conducted by EHS Advisor, Supervisor, and/or Project Management, who may be accompanied by a Joint Health & Safety Committee Member, and/or Health & Safety Representative.
Note: File Audit on site and send to EHS for audit purposes.
Project: Job #: Location: Manpower: Audited By: Reviewed By: Signature: Signature: Inspection Date:(dd/mm/yy)
Interview: # of Workers # of Managers Item
# Corrective
Action Assigned To Corrective Action
Completed (sign-off) Date (dd/mm/yy)
NUMBER OF INTERVIEWS # of Employees on
Project/Site # of Management to
Interview # of Workers to Interview Total Interviews Required
9 or less 2 5 7 10 to 24 2 6 8 25 to 49 3 7 10 50 to 99 4 9 13
Place Additional Comments on Back
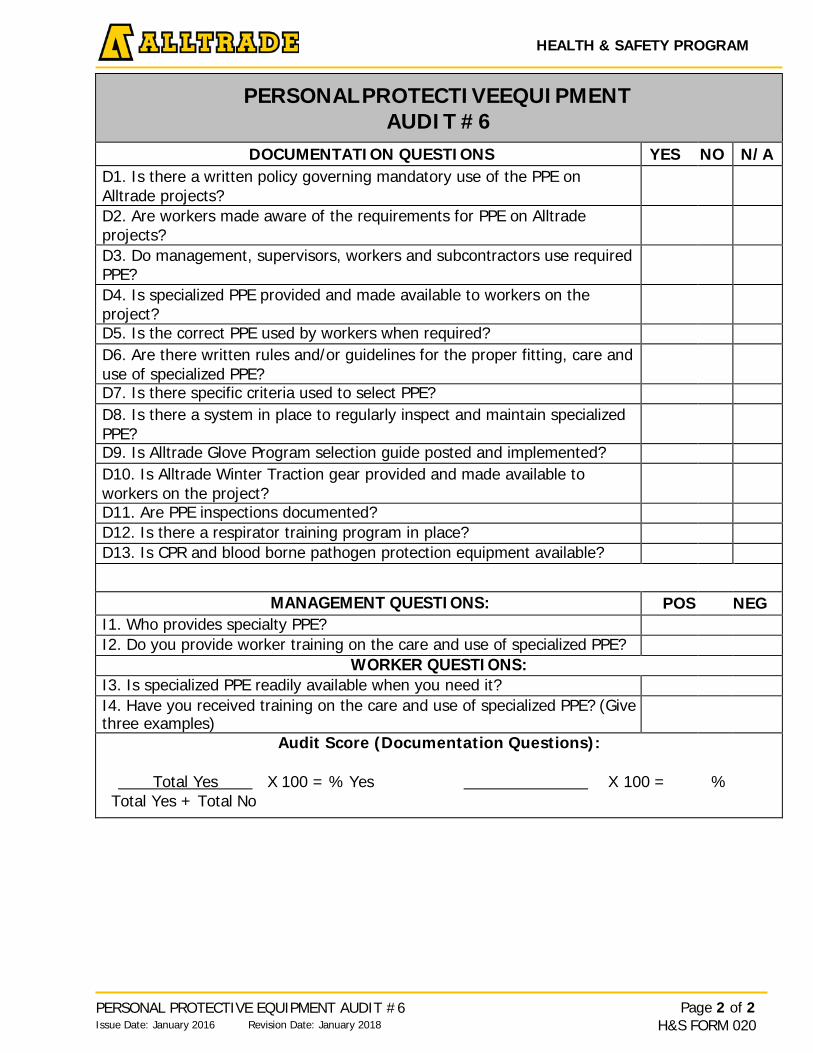
HEALTH & SAFETY PROGRAM
Page 2 of 2 H&S FORM 020
PERSONAL PROTECTIVE EQUIPMENT AUDIT #6 Issue Date: January 2016 Revision Date: January 2018
PERSONAL PROTECTIVEEQUIPMENT
AUDIT #6
DOCUMENTATION QUESTIONS YES NO N/A D1. Is there a written policy governing mandatory use of the PPE on Alltrade projects?
D2. Are workers made aware of the requirements for PPE on Alltrade projects?
D3. Do management, supervisors, workers and subcontractors use required PPE?
D4. Is specialized PPE provided and made available to workers on the project?
D5. Is the correct PPE used by workers when required? D6. Are there written rules and/or guidelines for the proper fitting, care and use of specialized PPE?
D7. Is there specific criteria used to select PPE? D8. Is there a system in place to regularly inspect and maintain specialized PPE?
D9. Is Alltrade Glove Program selection guide posted and implemented? D10. Is Alltrade Winter Traction gear provided and made available to workers on the project?
D11. Are PPE inspections documented? D12. Is there a respirator training program in place? D13. Is CPR and blood borne pathogen protection equipment available?
MANAGEMENT QUESTIONS: POS NEG I1. Who provides specialty PPE? I2. Do you provide worker training on the care and use of specialized PPE?
WORKER QUESTIONS: I3. Is specialized PPE readily available when you need it? I4. Have you received training on the care and use of specialized PPE? (Give three examples)
Audit Score (Documentation Questions):
Total Yes X 100 = % Yes X 100 = % Total Yes + Total No
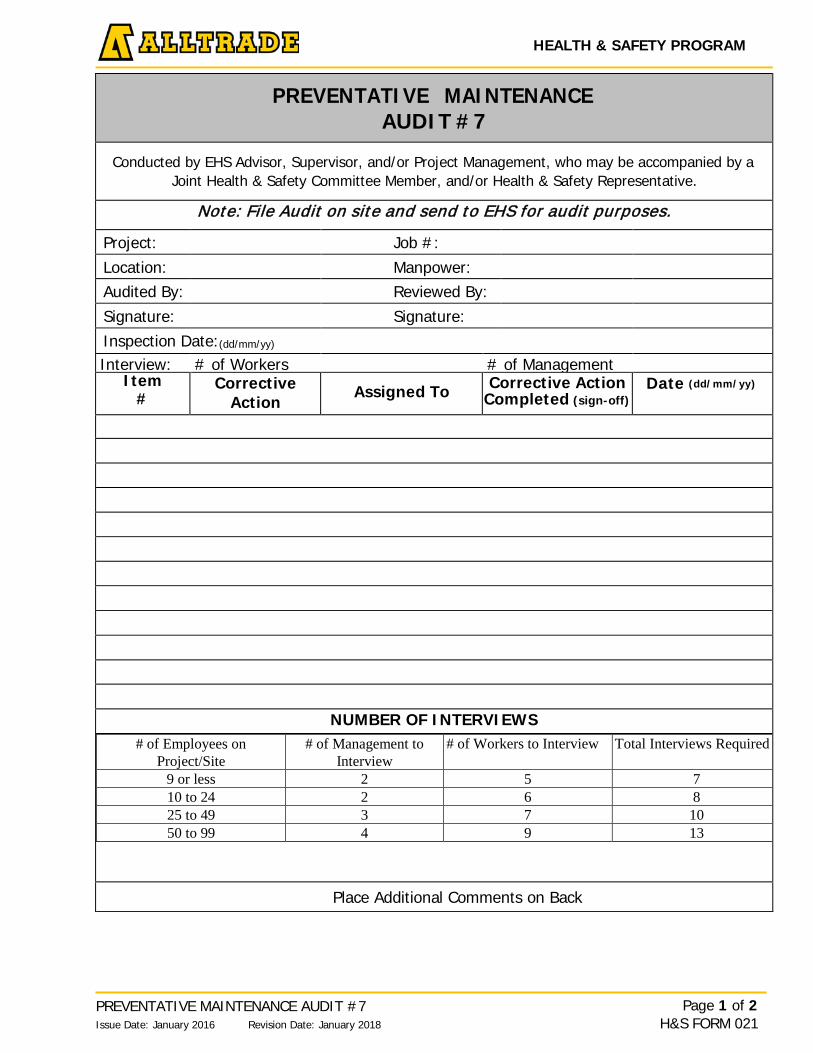
HEALTH & SAFETY PROGRAM
Page 1 of 2 H&S FORM 021
PREVENTATIVE MAINTENANCE AUDIT #7 Issue Date: January 2016 Revision Date: January 2018
PREVENTATIVE MAINTENANCE AUDIT #7
Conducted by EHS Advisor, Supervisor, and/or Project Management, who may be accompanied by a Joint Health & Safety Committee Member, and/or Health & Safety Representative.
Note: File Audit on site and send to EHS for audit purposes.
Project: Job #: Location: Manpower: Audited By: Reviewed By: Signature: Signature: Inspection Date:(dd/mm/yy)
Interview: # of Workers # of Management Item
# Corrective
Action Assigned To Corrective Action
Completed (sign-off) Date (dd/mm/yy)
NUMBER OF INTERVIEWS # of Employees on
Project/Site # of Management to
Interview # of Workers to Interview Total Interviews Required
9 or less 2 5 7 10 to 24 2 6 8 25 to 49 3 7 10 50 to 99 4 9 13
Place Additional Comments on Back
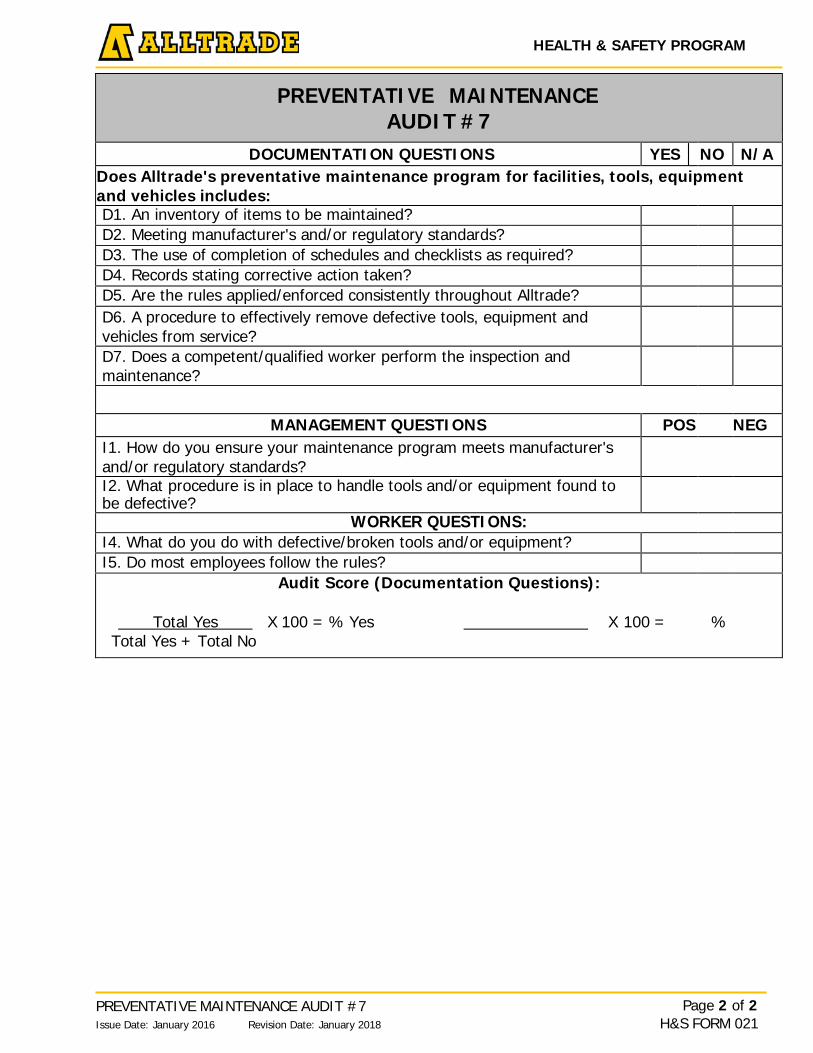
HEALTH & SAFETY PROGRAM
Page 2 of 2 H&S FORM 021
PREVENTATIVE MAINTENANCE AUDIT #7 Issue Date: January 2016 Revision Date: January 2018
PREVENTATIVE MAINTENANCE
AUDIT #7
DOCUMENTATION QUESTIONS YES NO N/A Does Alltrade's preventative maintenance program for facilities, tools, equipment and vehicles includes: D1. An inventory of items to be maintained? D2. Meeting manufacturer's and/or regulatory standards? D3. The use of completion of schedules and checklists as required? D4. Records stating corrective action taken? D5. Are the rules applied/enforced consistently throughout Alltrade? D6. A procedure to effectively remove defective tools, equipment and vehicles from service?
D7. Does a competent/qualified worker perform the inspection and maintenance?
MANAGEMENT QUESTIONS POS NEG I1. How do you ensure your maintenance program meets manufacturer's and/or regulatory standards?
I2. What procedure is in place to handle tools and/or equipment found to be defective?
WORKER QUESTIONS: I4. What do you do with defective/broken tools and/or equipment? I5. Do most employees follow the rules?
Audit Score (Documentation Questions):
Total Yes X 100 = % Yes X 100 = % Total Yes + Total No
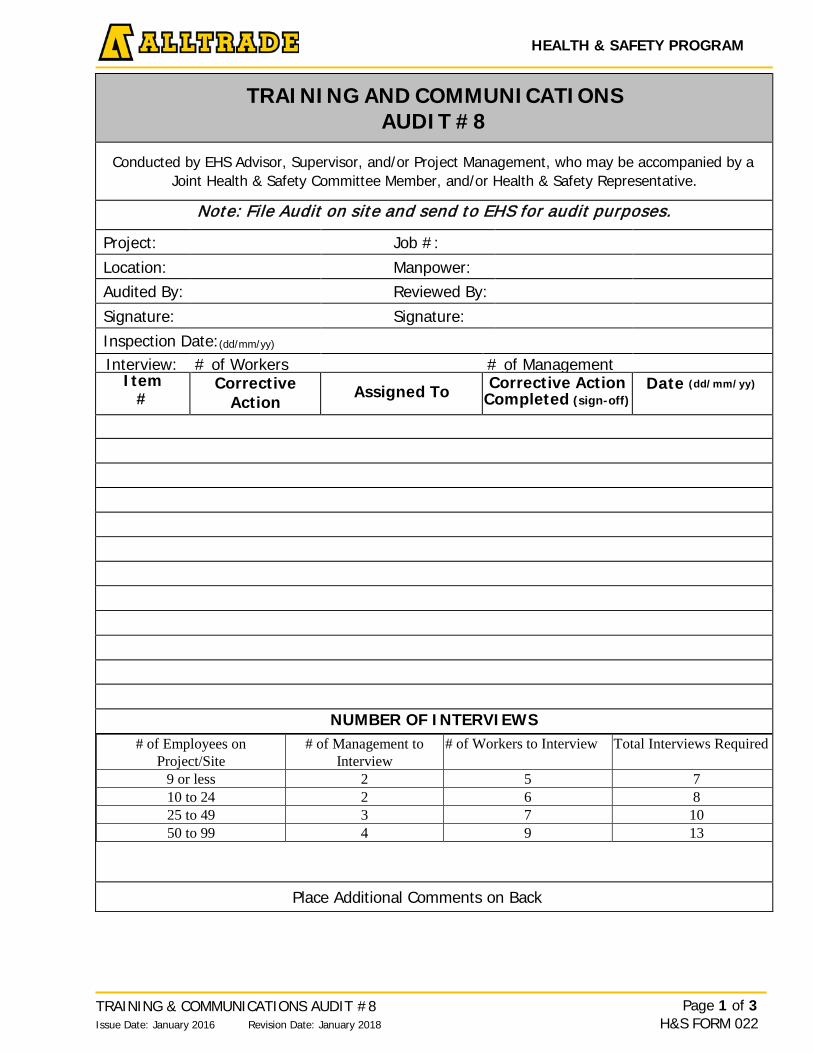
HEALTH & SAFETY PROGRAM
Page 1 of 3 H&S FORM 022
TRAINING & COMMUNICATIONS AUDIT #8 Issue Date: January 2016 Revision Date: January 2018
TRAINING AND COMMUNICATIONS AUDIT #8
Conducted by EHS Advisor, Supervisor, and/or Project Management, who may be accompanied by a Joint Health & Safety Committee Member, and/or Health & Safety Representative.
Note: File Audit on site and send to EHS for audit purposes.
Project: Job #: Location: Manpower: Audited By: Reviewed By: Signature: Signature: Inspection Date:(dd/mm/yy) Interview: # of Workers # of Management
Item #
Corrective Action
Assigned To Corrective Action Completed (sign-off)
Date (dd/mm/yy)
NUMBER OF INTERVIEWS # of Employees on
Project/Site # of Management to
Interview # of Workers to Interview Total Interviews Required
9 or less 2 5 7 10 to 24 2 6 8 25 to 49 3 7 10 50 to 99 4 9 13
Place Additional Comments on Back
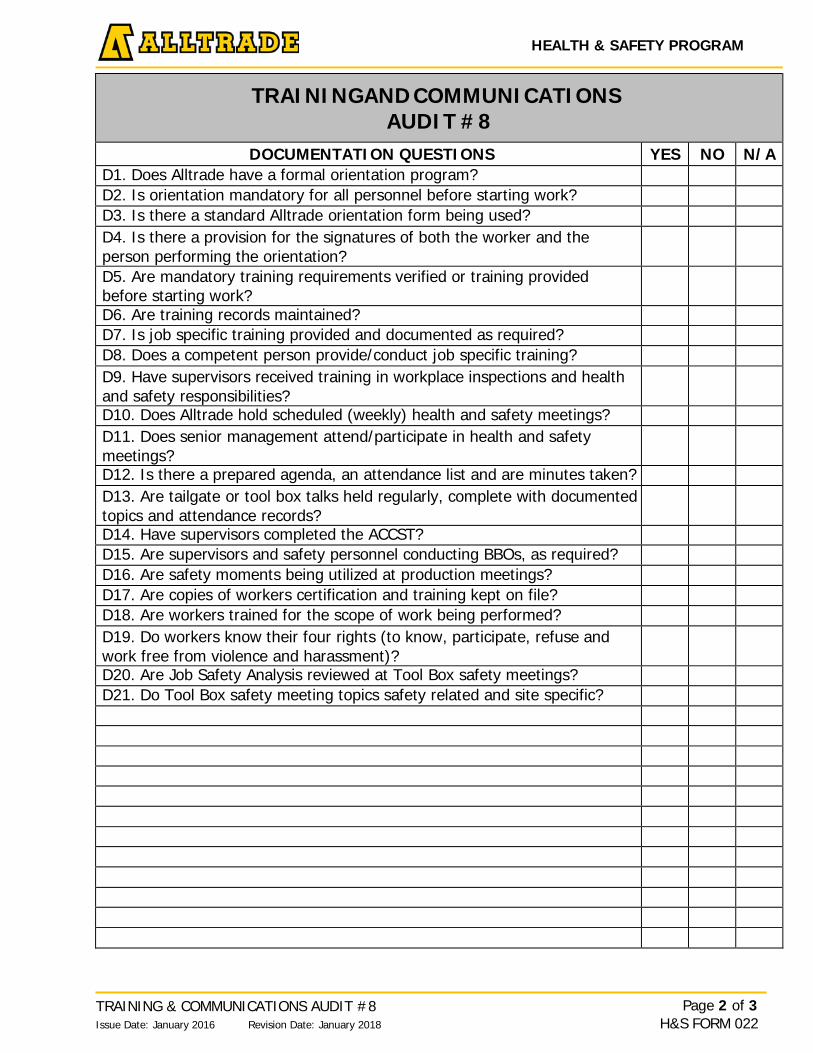
HEALTH & SAFETY PROGRAM
Page 2 of 3 H&S FORM 022
TRAINING & COMMUNICATIONS AUDIT #8 Issue Date: January 2016 Revision Date: January 2018
TRAININGAND COMMUNICATIONS
AUDIT #8
DOCUMENTATION QUESTIONS YES NO N/A D1. Does Alltrade have a formal orientation program? D2. Is orientation mandatory for all personnel before starting work? D3. Is there a standard Alltrade orientation form being used? D4. Is there a provision for the signatures of both the worker and the person performing the orientation?
D5. Are mandatory training requirements verified or training provided before starting work?
D6. Are training records maintained? D7. Is job specific training provided and documented as required? D8. Does a competent person provide/conduct job specific training? D9. Have supervisors received training in workplace inspections and health and safety responsibilities?
D10. Does Alltrade hold scheduled (weekly) health and safety meetings? D11. Does senior management attend/participate in health and safety meetings?
D12. Is there a prepared agenda, an attendance list and are minutes taken? D13. Are tailgate or tool box talks held regularly, complete with documented topics and attendance records?
D14. Have supervisors completed the ACCST? D15. Are supervisors and safety personnel conducting BBOs, as required? D16. Are safety moments being utilized at production meetings? D17. Are copies of workers certification and training kept on file? D18. Are workers trained for the scope of work being performed? D19. Do workers know their four rights (to know, participate, refuse and work free from violence and harassment)?
D20. Are Job Safety Analysis reviewed at Tool Box safety meetings? D21. Do Tool Box safety meeting topics safety related and site specific?
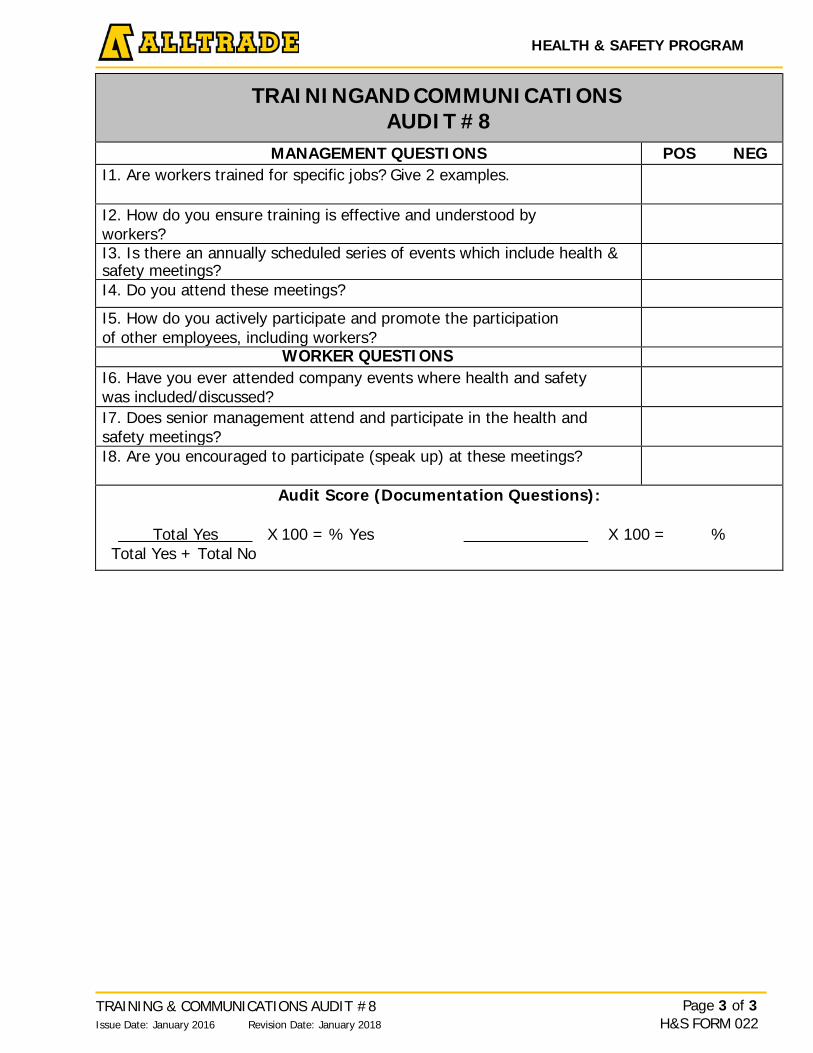
HEALTH & SAFETY PROGRAM
Page 3 of 3 H&S FORM 022
TRAINING & COMMUNICATIONS AUDIT #8 Issue Date: January 2016 Revision Date: January 2018
TRAININGAND COMMUNICATIONS
AUDIT #8
MANAGEMENT QUESTIONS POS NEG I1. Are workers trained for specific jobs? Give 2 examples.
I2. How do you ensure training is effective and understood by workers?
I3. Is there an annually scheduled series of events which include health & safety meetings?
I4. Do you attend these meetings?
I5. How do you actively participate and promote the participation of other employees, including workers?
WORKER QUESTIONS I6. Have you ever attended company events where health and safety was included/discussed?
I7. Does senior management attend and participate in the health and safety meetings?
I8. Are you encouraged to participate (speak up) at these meetings?
Audit Score (Documentation Questions):
Total Yes X 100 = % Yes X 100 = % Total Yes + Total No

HEALTH & SAFETY PROGRAM
Page 1 of 2 H&S FORM 023
WORKPLACE INSPECTIONS AUDIT #9 Issue Date: January 2016 Revision Date: January 2018
WORKPLACE INSPECTIONS AUDIT #9
Conducted by EHS Advisor, Supervisor, and/or Project Management, who may be accompanied by a Joint Health & Safety Committee Member, and/or Health & Safety Representative.
Note: File Audit on site and send to EHS for audit purposes.
Project: Job #: Location: Manpower: Audited By: Reviewed By: Signature: Signature: Inspection Date:(dd/mm/yy)
Interviews: # of Workers # of Management Item
# Corrective
Action Assigned To Corrective Action
Completed (sign-off) Date (dd/mm/yy)
NUMBER OF INTERVIEWS # of Employees on
Project/Site # of Management to
Interview # of Workers to Interview Total Interviews Required
9 or less 2 5 7 10 to 24 2 6 8 25 to 49 3 7 10 50 to 99 4 9 13
Place Additional Comments on Back
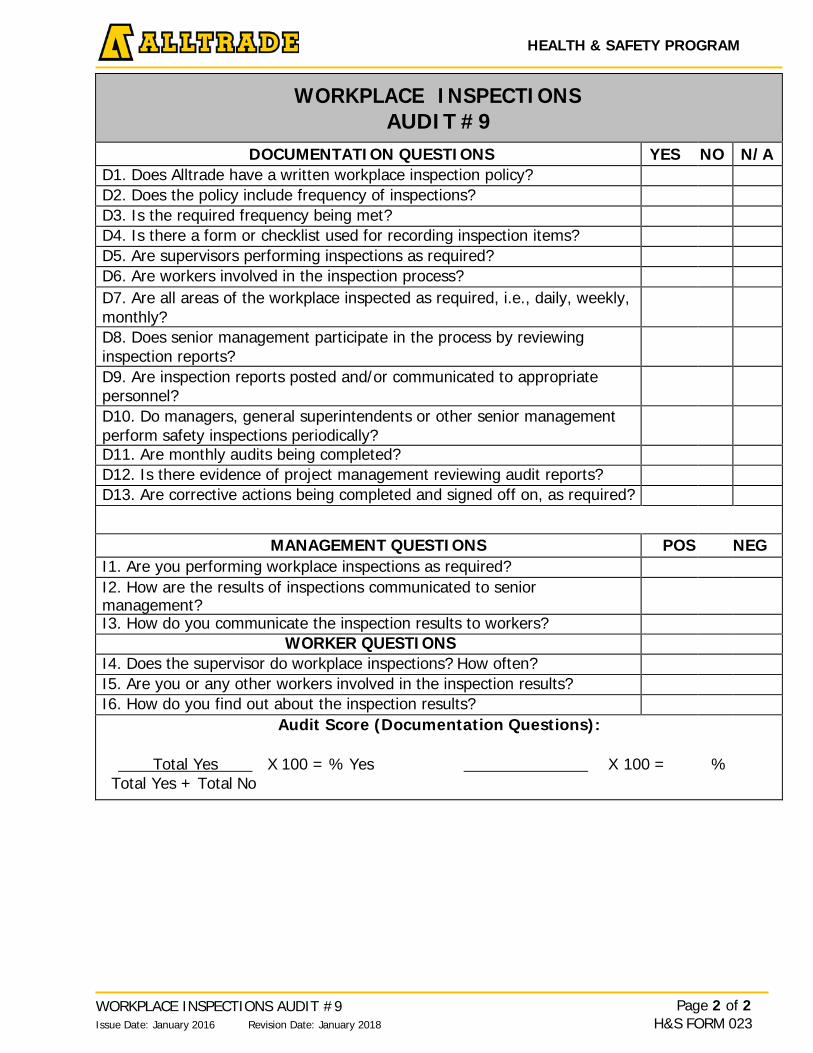
HEALTH & SAFETY PROGRAM
Page 2 of 2 H&S FORM 023
WORKPLACE INSPECTIONS AUDIT #9 Issue Date: January 2016 Revision Date: January 2018
WORKPLACE INSPECTIONS
AUDIT #9
DOCUMENTATION QUESTIONS YES NO N/A D1. Does Alltrade have a written workplace inspection policy? D2. Does the policy include frequency of inspections? D3. Is the required frequency being met? D4. Is there a form or checklist used for recording inspection items? D5. Are supervisors performing inspections as required? D6. Are workers involved in the inspection process? D7. Are all areas of the workplace inspected as required, i.e., daily, weekly, monthly?
D8. Does senior management participate in the process by reviewing inspection reports?
D9. Are inspection reports posted and/or communicated to appropriate personnel?
D10. Do managers, general superintendents or other senior management perform safety inspections periodically?
D11. Are monthly audits being completed? D12. Is there evidence of project management reviewing audit reports? D13. Are corrective actions being completed and signed off on, as required?
MANAGEMENT QUESTIONS POS NEG I1. Are you performing workplace inspections as required? I2. How are the results of inspections communicated to senior management?
I3. How do you communicate the inspection results to workers? WORKER QUESTIONS
I4. Does the supervisor do workplace inspections? How often? I5. Are you or any other workers involved in the inspection results? I6. How do you find out about the inspection results?
Audit Score (Documentation Questions):
Total Yes X 100 = % Yes X 100 = % Total Yes + Total No

HEALTH & SAFETY PROGRAM
Page 1 of 2 H&S FORM 024
INVESTIGATIONS & REPORTING AUDIT #10 Issue Date: January 2016 Revision Date: January 2018
INVESTIGATIONS ANDREPORTING AUDIT #10
Conducted by EHS Advisor, Supervisor, and/or Project Management, who may be accompanied by a Joint Health & Safety Committee Member, and/or Health & Safety Representative.
Note: File Audit on site and send to EHS for audit purposes.
Project: Job #: Location: Manpower: Audited By: Reviewed By:
Signature: Signature: Inspection Date:(dd/mm/yy) Interview: # of Workers # of Management
Item #
Corrective Action
Assigned To Corrective Action Completed (sign-off)
Date (dd/mm/yy)
NUMBER OF INTERVIEWS # of Employees on
Project/Site # of Management to
Interview # of Workers to
Interview Total Interviews Required
9 or less 2 5 7 10 to 24 2 6 8 25 to 49 3 7 10 50 to 99 4 9 13
Place Additional Comments on Back

HEALTH & SAFETY PROGRAM
Page 2 of 2 H&S FORM 024
INVESTIGATIONS & REPORTING AUDIT #10 Issue Date: January 2016 Revision Date: January 2018
INVESTIGATIONS ANDREPORTING
AUDIT #10
DOCUMENTATION QUESTIONS YES NO N/A D1. Does the employer have a written investigation policy and reporting procedures?
D2. Is the policy being followed? D3. Are standardized Alltrade investigation forms readily available and being used?
D4. Are workers aware of reporting procedures? D5. Have supervisors been trained in incident investigation procedures? D6. Are appropriate personnel involved in investigations? D7. Are safety opportunities being reported? D8. Are recommendations for prevention/remedial action implemented in a timely manner?
D9. Are corrective actions communicated to workers? D10. Are these corrective actions understood by personnel? D11. Does management follow up on accident/incident reports? D12. Are accident/injury reports sent to the safety in a timely manner?
MANAGEMENT QUESTIONS POS NEG I1. Does someone do an investigation when an incident occurs? Describe an investigation that was performed.
I2. Have you been trained how to investigate incidents, including your organization’s specific reporting procedures?
I3. Are near misses reported? Are preventative actions developed as a result?
I4. Are preventative actions implemented as soon as possible? I5. How do you let the workers know about the corrective and preventative actions that have been made?
WORKER QUESTIONS I6. Does someone do an investigation when an incident occurs? Describe an incident that was investigated.
I7. How do you report incidents and/or near misses? I8. Do you report near misses? Explain to whom you report and how.
I9. After an incident or near miss how soon after are changes made to correct the problem(s)? Give one example.
I10. How do you find out that an incident has occurred and what changes have been made?
Audit Score (Documentation Questions):
Total Yes X 100 = % Yes X 100 = % Total Yes + Total No
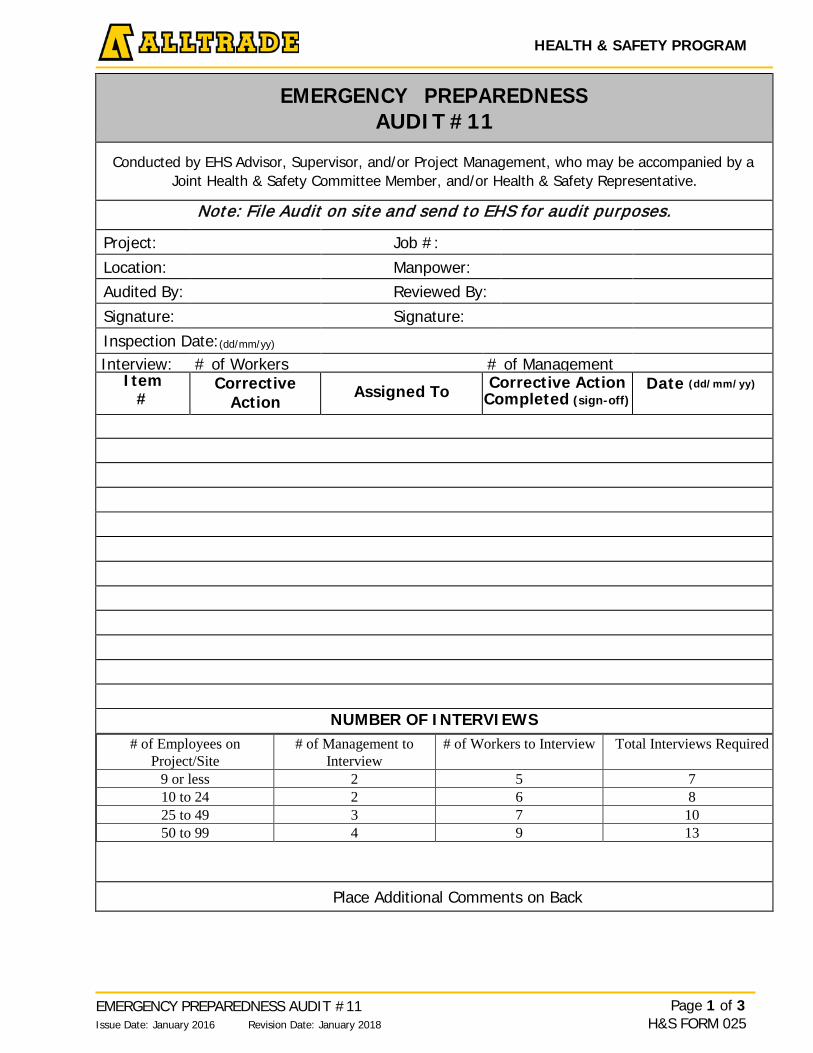
HEALTH & SAFETY PROGRAM
Page 1 of 3 H&S FORM 025
EMERGENCY PREPAREDNESS AUDIT #11 Issue Date: January 2016 Revision Date: January 2018
EMERGENCY PREPAREDNESS
AUDIT #11
Conducted by EHS Advisor, Supervisor, and/or Project Management, who may be accompanied by a Joint Health & Safety Committee Member, and/or Health & Safety Representative.
Note: File Audit on site and send to EHS for audit purposes.
Project: Job #:
Location: Manpower:
Audited By: Reviewed By:
Signature: Signature:
Inspection Date:(dd/mm/yy) Interview: # of Workers # of Management
Item #
Corrective Action
Assigned To Corrective Action Completed (sign-off)
Date (dd/mm/yy)
NUMBER OF INTERVIEWS # of Employees on
Project/Site # of Management to
Interview # of Workers to Interview Total Interviews Required
9 or less 2 5 7 10 to 24 2 6 8 25 to 49 3 7 10 50 to 99 4 9 13
Place Additional Comments on Back
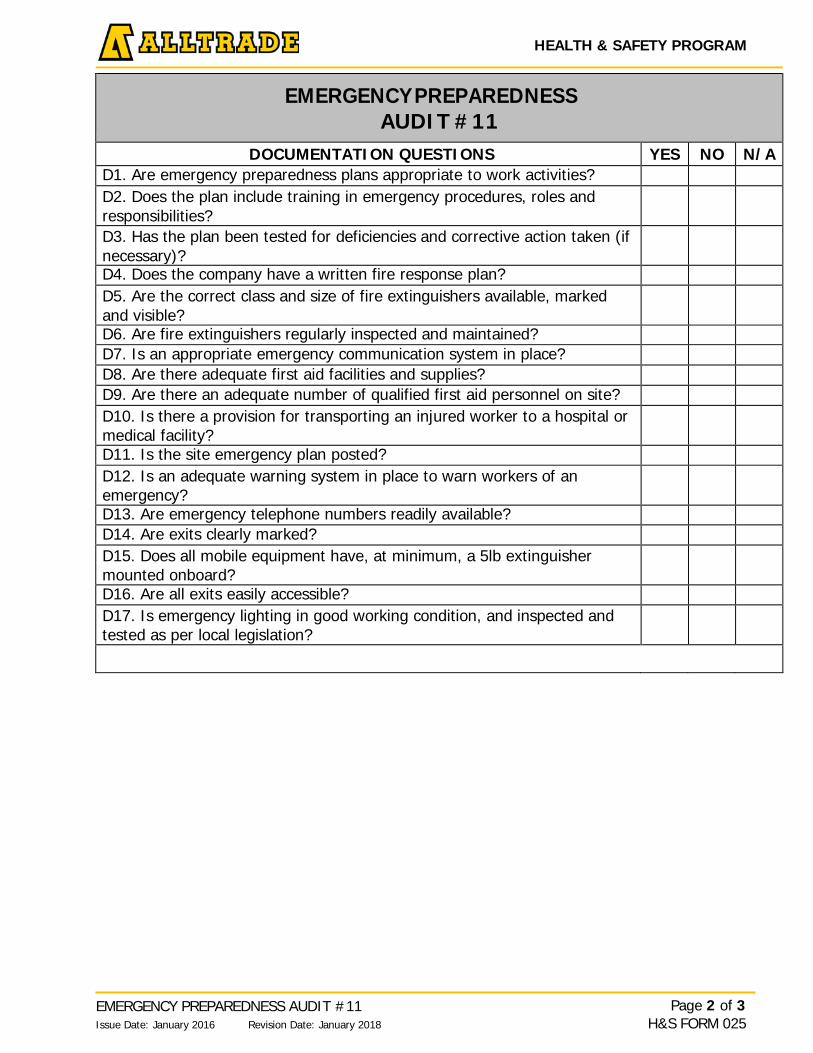
HEALTH & SAFETY PROGRAM
Page 2 of 3 H&S FORM 025
EMERGENCY PREPAREDNESS AUDIT #11 Issue Date: January 2016 Revision Date: January 2018
EMERGENCYPREPAREDNESS
AUDIT #11
DOCUMENTATION QUESTIONS YES NO N/A D1. Are emergency preparedness plans appropriate to work activities? D2. Does the plan include training in emergency procedures, roles and responsibilities?
D3. Has the plan been tested for deficiencies and corrective action taken (if necessary)?
D4. Does the company have a written fire response plan? D5. Are the correct class and size of fire extinguishers available, marked and visible?
D6. Are fire extinguishers regularly inspected and maintained? D7. Is an appropriate emergency communication system in place? D8. Are there adequate first aid facilities and supplies? D9. Are there an adequate number of qualified first aid personnel on site? D10. Is there a provision for transporting an injured worker to a hospital or medical facility?
D11. Is the site emergency plan posted? D12. Is an adequate warning system in place to warn workers of an emergency?
D13. Are emergency telephone numbers readily available? D14. Are exits clearly marked? D15. Does all mobile equipment have, at minimum, a 5lb extinguisher mounted onboard?
D16. Are all exits easily accessible? D17. Is emergency lighting in good working condition, and inspected and tested as per local legislation?
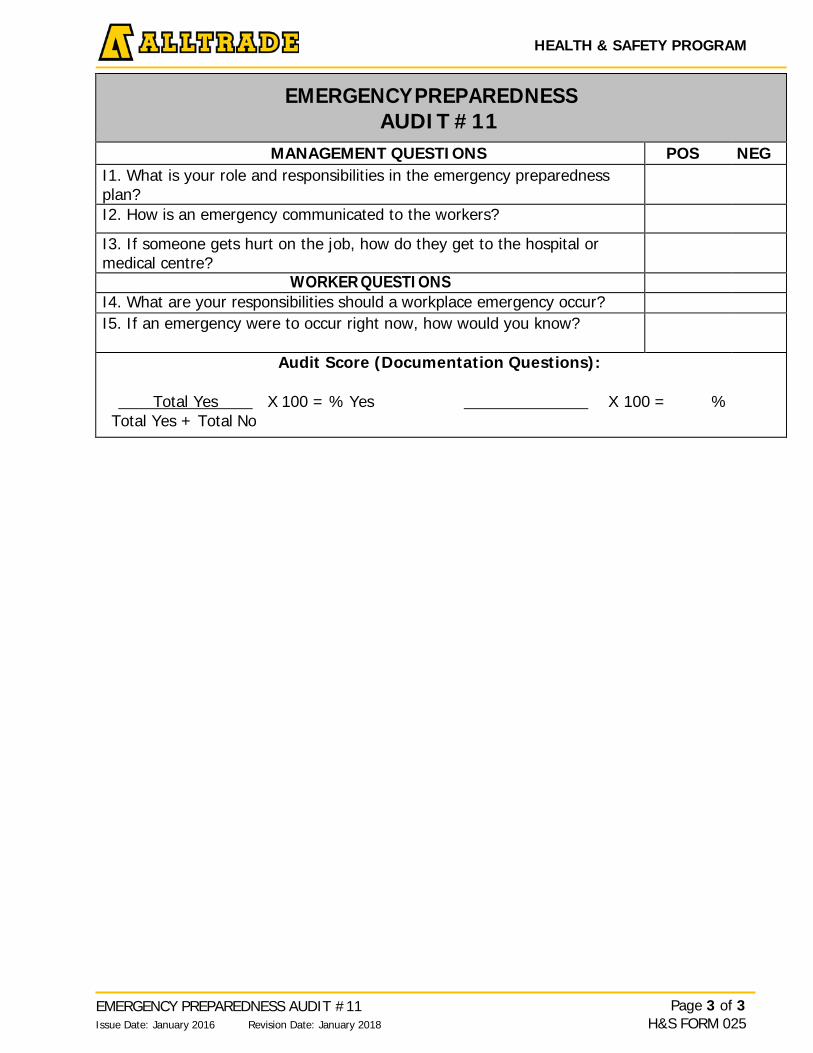
HEALTH & SAFETY PROGRAM
Page 3 of 3 H&S FORM 025
EMERGENCY PREPAREDNESS AUDIT #11 Issue Date: January 2016 Revision Date: January 2018
EMERGENCYPREPAREDNESS
AUDIT #11
MANAGEMENT QUESTIONS POS NEG I1. What is your role and responsibilities in the emergency preparedness plan?
I2. How is an emergency communicated to the workers?
I3. If someone gets hurt on the job, how do they get to the hospital or medical centre?
WORKER QUESTIONS I4. What are your responsibilities should a workplace emergency occur? I5. If an emergency were to occur right now, how would you know?
Audit Score (Documentation Questions):
Total Yes X 100 = % Yes X 100 = % Total Yes + Total No
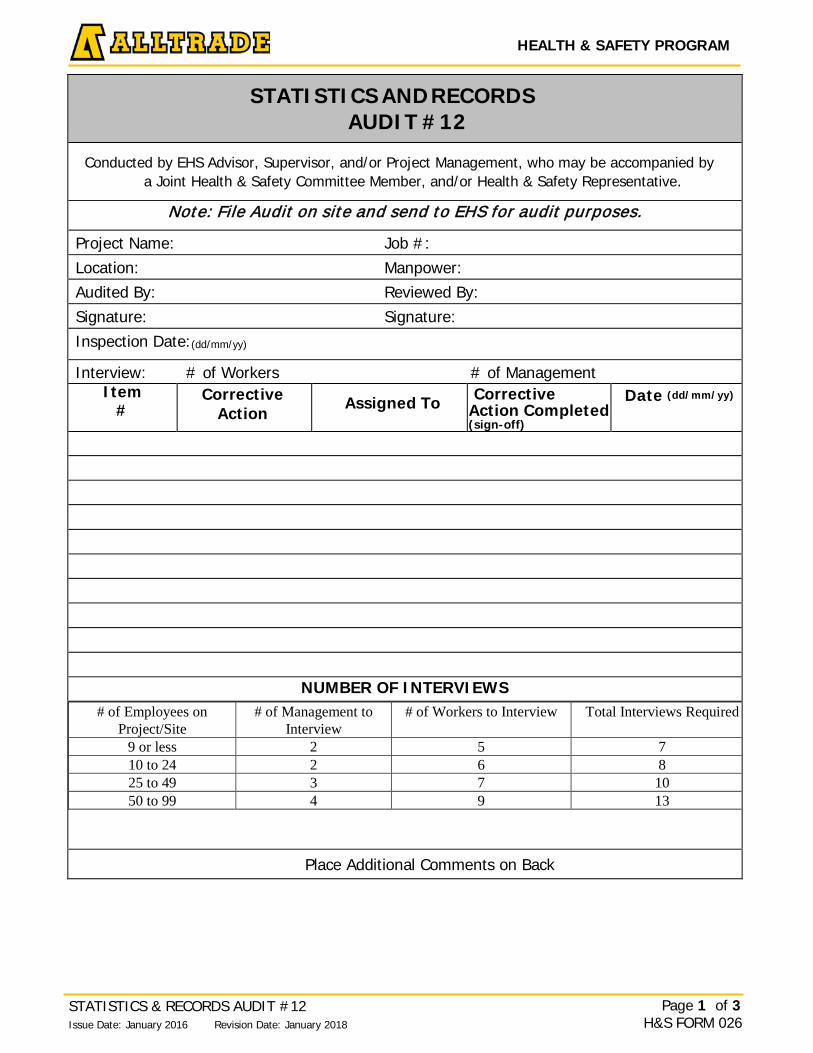
HEALTH & SAFETY PROGRAM
Page 1 of 3 H&S FORM 026
STATISTICS & RECORDS AUDIT #12 Issue Date: January 2016 Revision Date: January 2018
STATISTICS ANDRECORDS AUDIT #12
Conducted by EHS Advisor, Supervisor, and/or Project Management, who may be accompanied by a Joint Health & Safety Committee Member, and/or Health & Safety Representative.
Note: File Audit on site and send to EHS for audit purposes.
Project Name: Job #: Location: Manpower: Audited By: Reviewed By: Signature: Signature: Inspection Date:(dd/mm/yy)
Interview: # of Workers # of Management Item
# Corrective
Action Assigned To Corrective
Action Completed (sign-off)
Date (dd/mm/yy)
NUMBER OF INTERVIEWS # of Employees on
Project/Site # of Management to
Interview # of Workers to Interview Total Interviews Required
9 or less 2 5 7 10 to 24 2 6 8 25 to 49 3 7 10 50 to 99 4 9 13
Place Additional Comments on Back
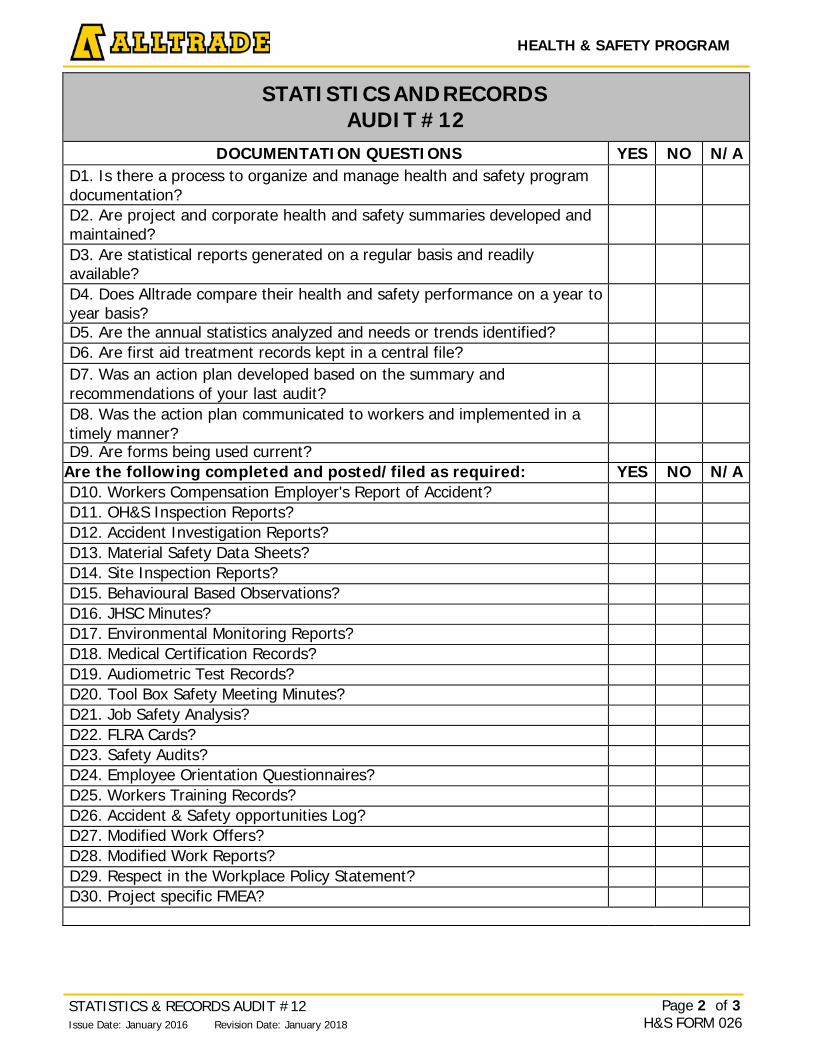
HEALTH & SAFETY PROGRAM
Page 2 of 3 H&S FORM 026
STATISTICS & RECORDS AUDIT #12 Issue Date: January 2016 Revision Date: January 2018
STATISTICS ANDRECORDS
AUDIT #12
DOCUMENTATION QUESTIONS YES NO N/A D1. Is there a process to organize and manage health and safety program documentation?
D2. Are project and corporate health and safety summaries developed and maintained?
D3. Are statistical reports generated on a regular basis and readily available?
D4. Does Alltrade compare their health and safety performance on a year to year basis?
D5. Are the annual statistics analyzed and needs or trends identified? D6. Are first aid treatment records kept in a central file? D7. Was an action plan developed based on the summary and recommendations of your last audit?
D8. Was the action plan communicated to workers and implemented in a timely manner?
D9. Are forms being used current? Are the following completed and posted/filed as required: YES NO N/A D10. Workers Compensation Employer's Report of Accident? D11. OH&S Inspection Reports? D12. Accident Investigation Reports? D13. Material Safety Data Sheets? D14. Site Inspection Reports? D15. Behavioural Based Observations? D16. JHSC Minutes? D17. Environmental Monitoring Reports? D18. Medical Certification Records? D19. Audiometric Test Records? D20. Tool Box Safety Meeting Minutes? D21. Job Safety Analysis? D22. FLRA Cards? D23. Safety Audits? D24. Employee Orientation Questionnaires? D25. Workers Training Records? D26. Accident & Safety opportunities Log? D27. Modified Work Offers? D28. Modified Work Reports? D29. Respect in the Workplace Policy Statement? D30. Project specific FMEA?
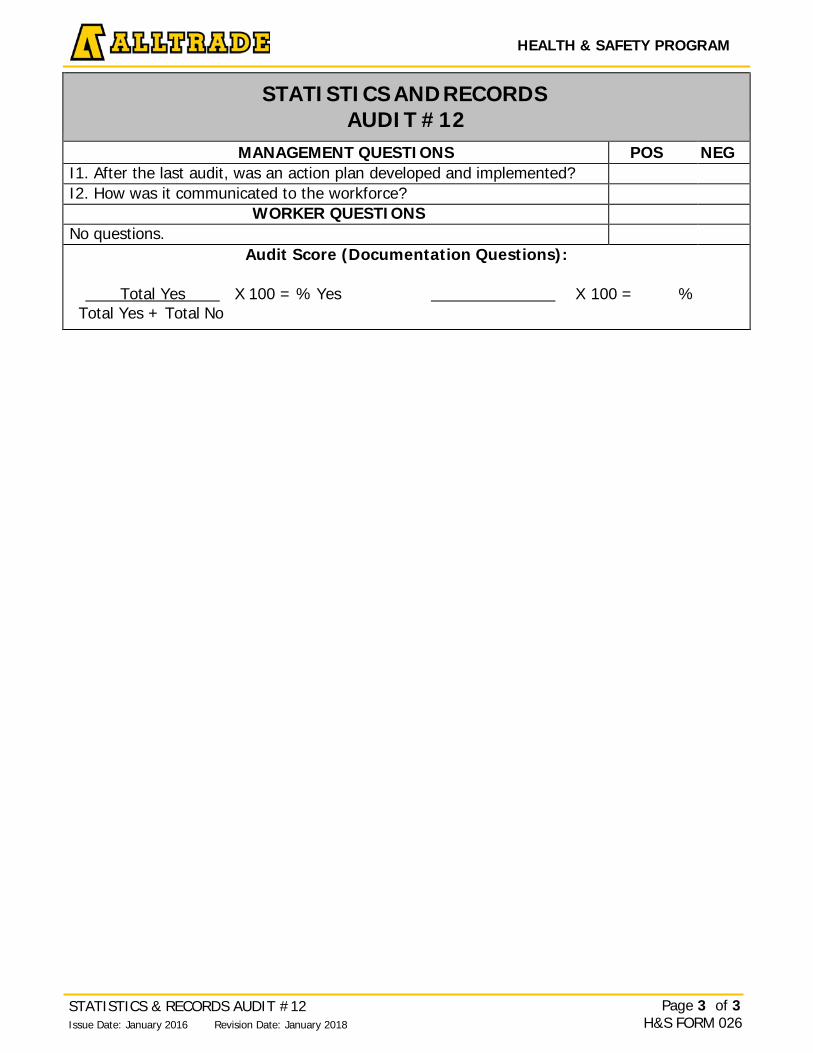
HEALTH & SAFETY PROGRAM
Page 3 of 3 H&S FORM 026
STATISTICS & RECORDS AUDIT #12 Issue Date: January 2016 Revision Date: January 2018
STATISTICS ANDRECORDS
AUDIT #12
MANAGEMENT QUESTIONS POS NEG I1. After the last audit, was an action plan developed and implemented? I2. How was it communicated to the workforce?
WORKER QUESTIONS No questions.
Audit Score (Documentation Questions):
Total Yes X 100 = % Yes X 100 = % Total Yes + Total No
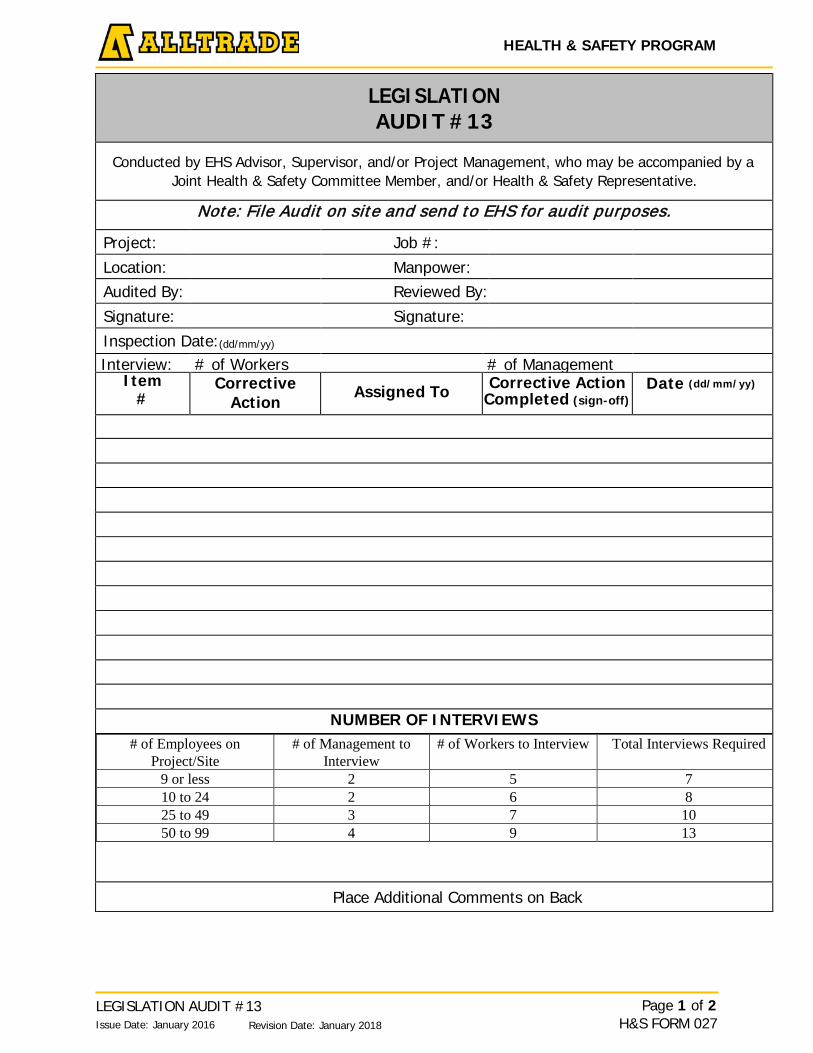
HEALTH & SAFETY PROGRAM
Page 1 of 2 H&S FORM 027
LEGISLATION AUDIT #13 Issue Date: January 2016 Revision Date: January 2018
LEGISLATION AUDIT #13
Conducted by EHS Advisor, Supervisor, and/or Project Management, who may be accompanied by a Joint Health & Safety Committee Member, and/or Health & Safety Representative.
Note: File Audit on site and send to EHS for audit purposes.
Project: Job #:
Location: Manpower:
Audited By: Reviewed By:
Signature: Signature:
Inspection Date:(dd/mm/yy) Interview: # of Workers # of Management
Item #
Corrective Action
Assigned To Corrective Action Completed (sign-off)
Date (dd/mm/yy)
NUMBER OF INTERVIEWS # of Employees on
Project/Site # of Management to
Interview # of Workers to Interview Total Interviews Required
9 or less 2 5 7 10 to 24 2 6 8 25 to 49 3 7 10 50 to 99 4 9 13
Place Additional Comments on Back
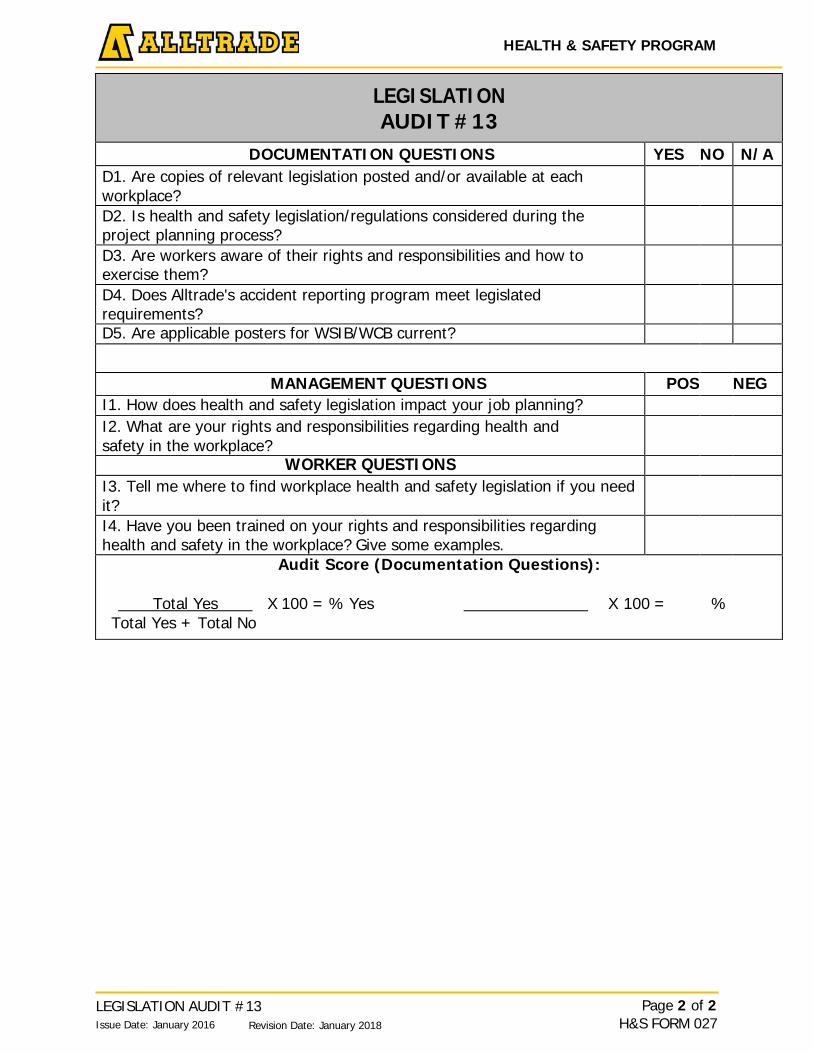
HEALTH & SAFETY PROGRAM
Page 2 of 2 H&S FORM 027
LEGISLATION AUDIT #13 Issue Date: January 2016 Revision Date: January 2018
LEGISLATION AUDIT #13
DOCUMENTATION QUESTIONS YES NO N/A D1. Are copies of relevant legislation posted and/or available at each workplace?
D2. Is health and safety legislation/regulations considered during the project planning process?
D3. Are workers aware of their rights and responsibilities and how to exercise them?
D4. Does Alltrade's accident reporting program meet legislated requirements?
D5. Are applicable posters for WSIB/WCB current?
MANAGEMENT QUESTIONS POS NEG I1. How does health and safety legislation impact your job planning? I2. What are your rights and responsibilities regarding health and safety in the workplace?
WORKER QUESTIONS I3. Tell me where to find workplace health and safety legislation if you need it?
I4. Have you been trained on your rights and responsibilities regarding health and safety in the workplace? Give some examples.
Audit Score (Documentation Questions):
Total Yes X 100 = % Yes X 100 = % Total Yes + Total No
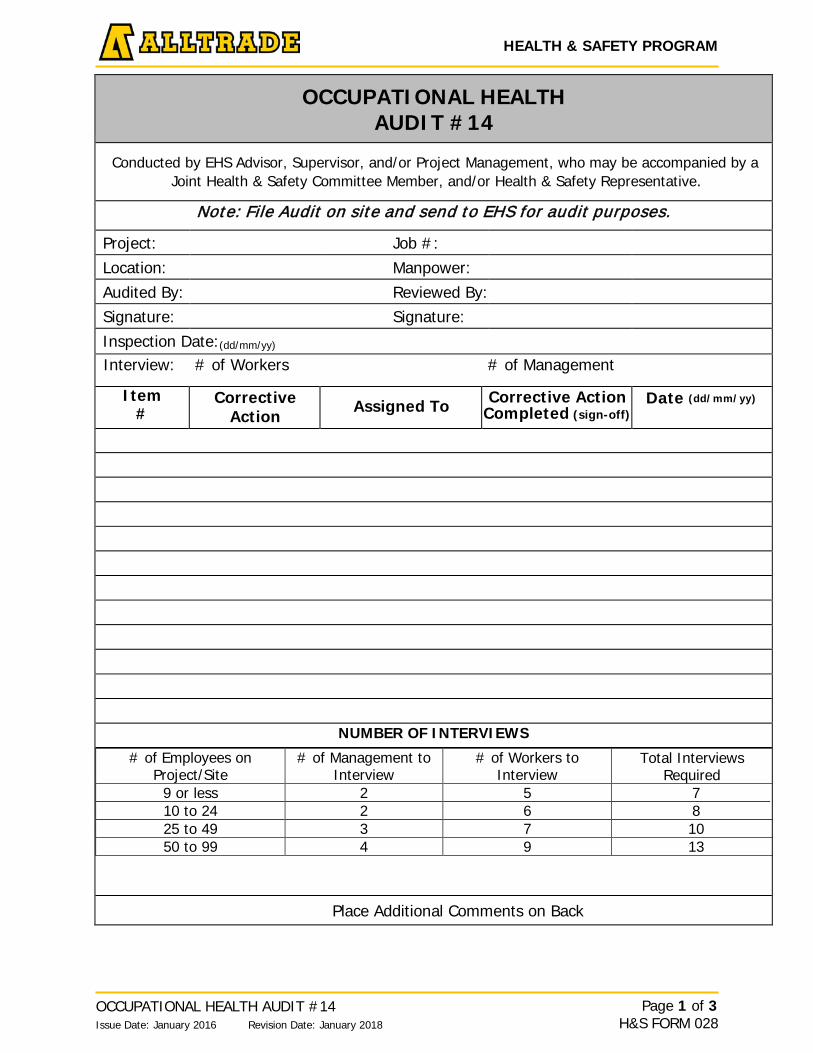
HEALTH & SAFETY PROGRAM
OCCUPATIONAL HEALTH AUDIT #14 Page 1 of 3 H&S FORM 028 Issue Date: January 2016 Revision Date: January 2018
OCCUPATIONAL HEALTH AUDIT #14
Conducted by EHS Advisor, Supervisor, and/or Project Management, who may be accompanied by a Joint Health & Safety Committee Member, and/or Health & Safety Representative.
Note: File Audit on site and send to EHS for audit purposes.
Project: Job #: Location: Manpower: Audited By: Reviewed By:
Signature: Signature: Inspection Date:(dd/mm/yy) Interview: # of Workers # of Management
Item #
Corrective Action
Assigned To Corrective Action Completed (sign-off)
Date (dd/mm/yy)
NUMBER OF INTERVIEWS
# of Employees on Project/Site
# of Management to Interview
# of Workers to Interview
Total Interviews Required
9 or less 2 5 7 10 to 24 2 6 8 25 to 49 3 7 10 50 to 99 4 9 13
Place Additional Comments on Back
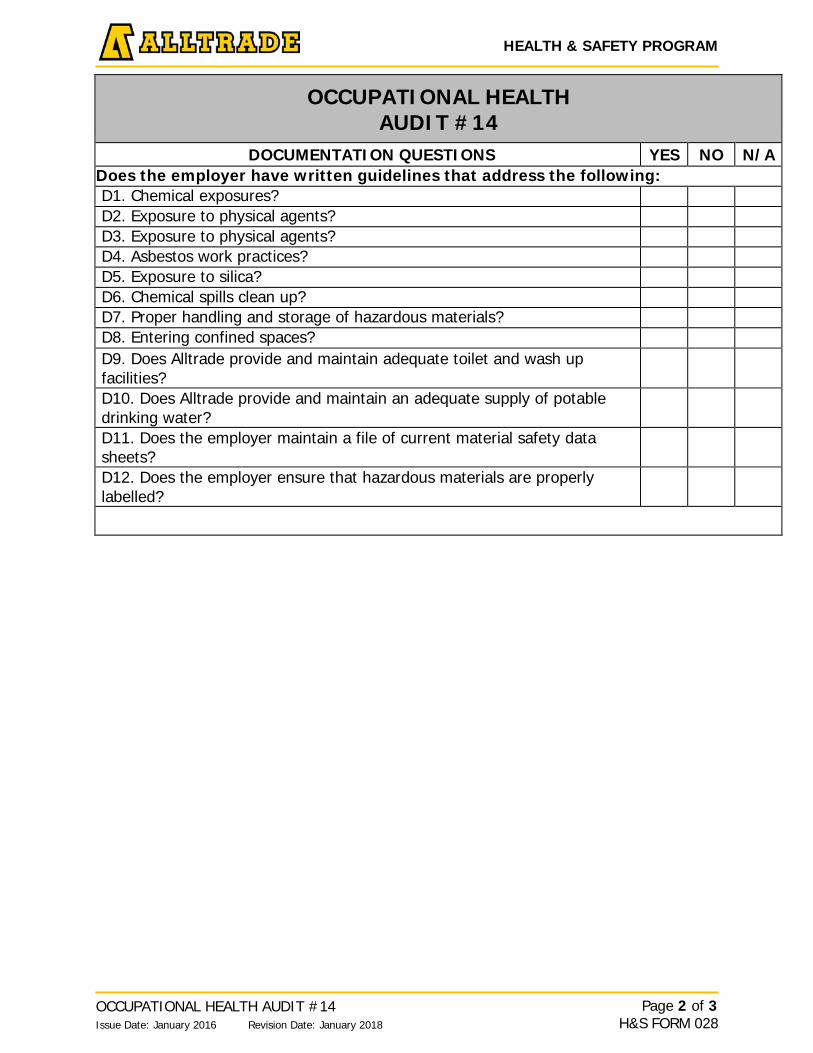
HEALTH & SAFETY PROGRAM
OCCUPATIONAL HEALTH AUDIT #14 Page 2 of 3 H&S FORM 028 Issue Date: January 2016 Revision Date: January 2018
OCCUPATIONAL HEALTH AUDIT #14
DOCUMENTATION QUESTIONS YES NO N/A Does the employer have written guidelines that address the following: D1. Chemical exposures?
D2. Exposure to physical agents?
D3. Exposure to physical agents?
D4. Asbestos work practices?
D5. Exposure to silica?
D6. Chemical spills clean up?
D7. Proper handling and storage of hazardous materials?
D8. Entering confined spaces?
D9. Does Alltrade provide and maintain adequate toilet and wash up facilities?
D10. Does Alltrade provide and maintain an adequate supply of potable drinking water?
D11. Does the employer maintain a file of current material safety data sheets?
D12. Does the employer ensure that hazardous materials are properly labelled?
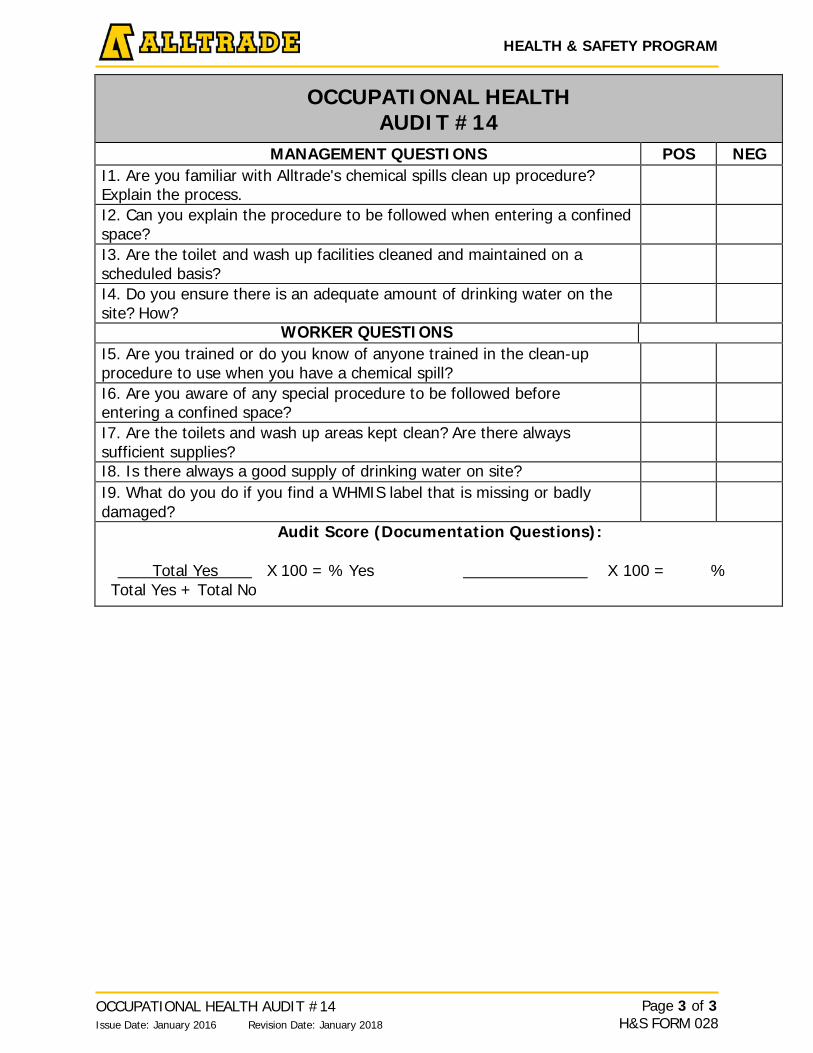
HEALTH & SAFETY PROGRAM
OCCUPATIONAL HEALTH AUDIT #14 Page 3 of 3 H&S FORM 028 Issue Date: January 2016 Revision Date: January 2018
OCCUPATIONAL HEALTH AUDIT #14
MANAGEMENT QUESTIONS POS NEG I1. Are you familiar with Alltrade's chemical spills clean up procedure? Explain the process.
I2. Can you explain the procedure to be followed when entering a confined space?
I3. Are the toilet and wash up facilities cleaned and maintained on a scheduled basis?
I4. Do you ensure there is an adequate amount of drinking water on the site? How?
WORKER QUESTIONS I5. Are you trained or do you know of anyone trained in the clean-up procedure to use when you have a chemical spill?
I6. Are you aware of any special procedure to be followed before entering a confined space?
I7. Are the toilets and wash up areas kept clean? Are there always sufficient supplies?
I8. Is there always a good supply of drinking water on site?
I9. What do you do if you find a WHMIS label that is missing or badly damaged?
Audit Score (Documentation Questions):
Total Yes X 100 = % Yes X 100 = % Total Yes + Total No

HEALTH & SAFETY PROGRAM
FIRST AID AUDIT #15 Issue Date: January 2016
Page 1 of 2 H&S FORM 029 Revision Date: January 2018
FIRST AID AUDIT #15
Conducted by EHS Advisor, Supervisor, and/or Project Management, who may be accompanied by a Joint Health & Safety Committee Member, and/or Health & Safety Representative.
Note: File on site and send to EHS for audit purposes.
Project: Job #: Location: Manpower: Audited By: Reviewed By: Signature: Signature: Inspection Date:(dd/mm/yy)
Interview: # of Workers # of Management Item
# Corrective
Action Assigned To Corrective Action
Completed (sign-off) Date (dd/mm/yy)
NUMBER OF INTERVIEWS
# of Employees on Project/Site
# of Management to Interview
# of Workers to Interview
Total Interviews Required
9 or less 2 5 7 10 to 24 2 6 8 25 to 49 3 7 10 50 to 99 4 9 13
Place Additional Comments on Back
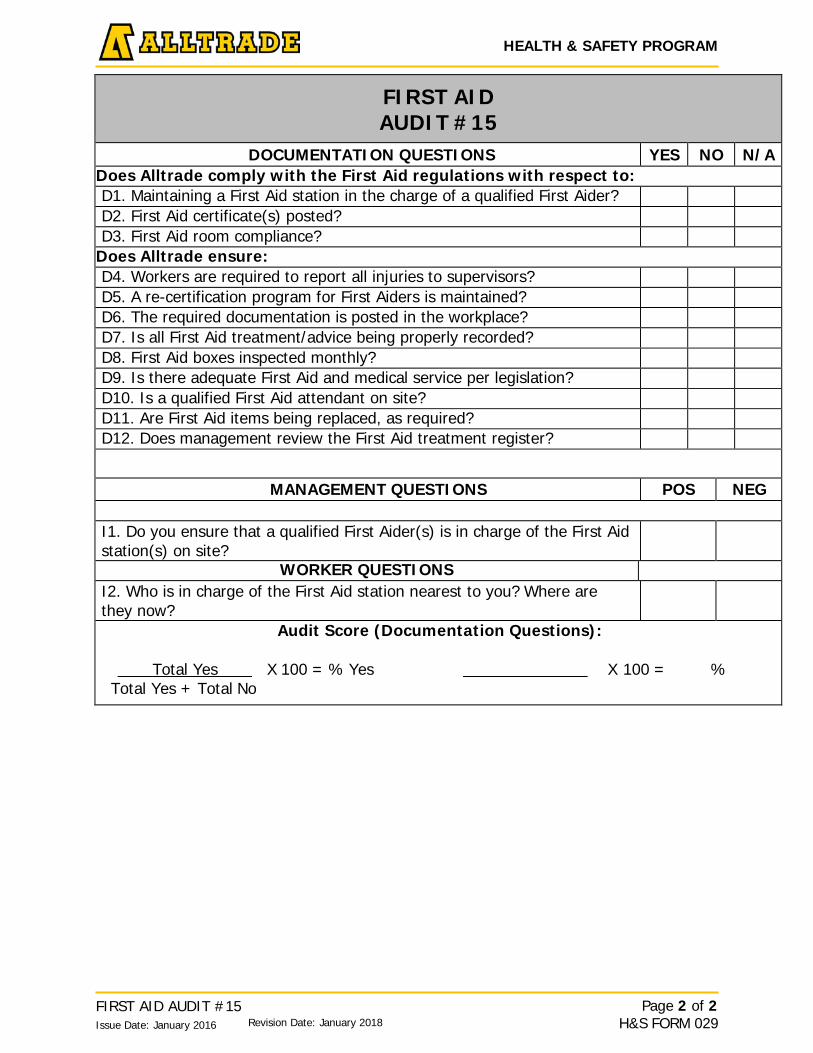
HEALTH & SAFETY PROGRAM
FIRST AID AUDIT #15 Issue Date: January 2016
Page 2 of 2 H&S FORM 029 Revision Date: January 2018
FIRST AID AUDIT #15
DOCUMENTATION QUESTIONS YES NO N/A Does Alltrade comply with the First Aid regulations with respect to: D1. Maintaining a First Aid station in the charge of a qualified First Aider?
D2. First Aid certificate(s) posted?
D3. First Aid room compliance?
Does Alltrade ensure: D4. Workers are required to report all injuries to supervisors?
D5. A re-certification program for First Aiders is maintained?
D6. The required documentation is posted in the workplace?
D7. Is all First Aid treatment/advice being properly recorded?
D8. First Aid boxes inspected monthly?
D9. Is there adequate First Aid and medical service per legislation?
D10. Is a qualified First Aid attendant on site?
D11. Are First Aid items being replaced, as required?
D12. Does management review the First Aid treatment register?
MANAGEMENT QUESTIONS POS NEG I1. Do you ensure that a qualified First Aider(s) is in charge of the First Aid station(s) on site?
WORKER QUESTIONS I2. Who is in charge of the First Aid station nearest to you? Where are they now?
Audit Score (Documentation Questions):
Total Yes X 100 = % Yes X 100 = % Total Yes + Total No
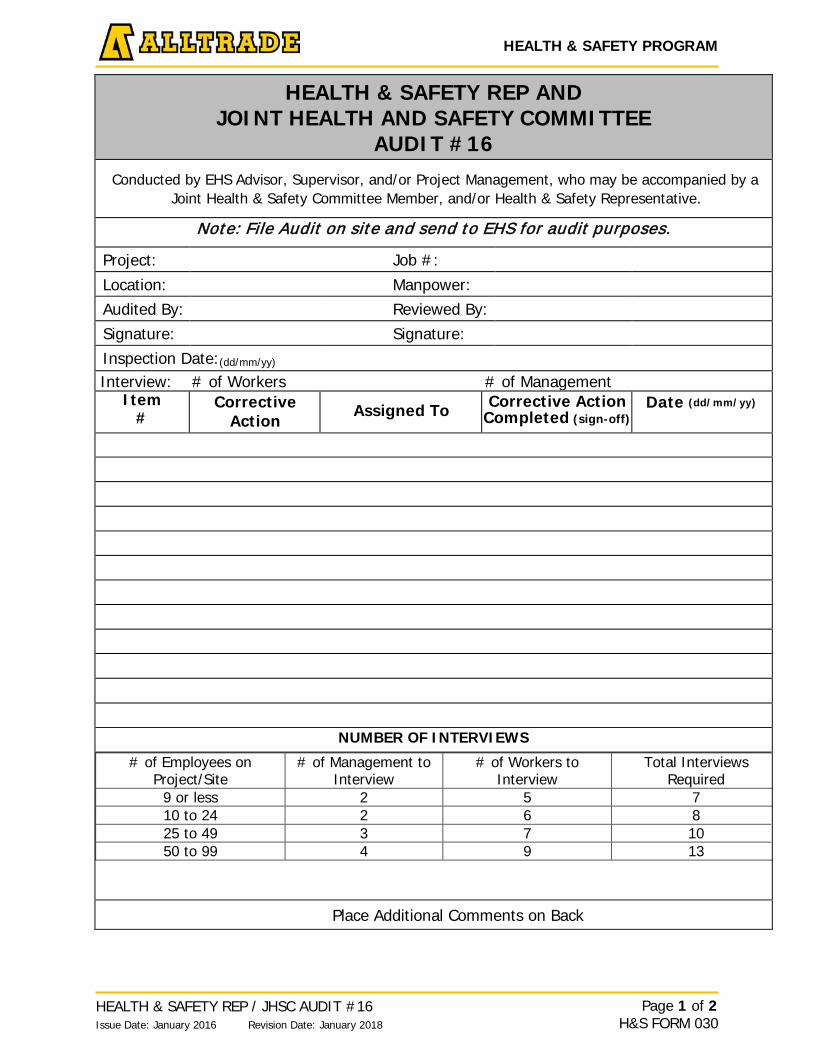
HEALTH & SAFETY PROGRAM
HEALTH & SAFETY REP / JHSC AUDIT #16 Page 1 of 2 H&S FORM 030 Issue Date: January 2016 Revision Date: January 2018
HEALTH & SAFETY REP AND JOINT HEALTH AND SAFETY COMMITTEE
AUDIT #16 Conducted by EHS Advisor, Supervisor, and/or Project Management, who may be accompanied by a
Joint Health & Safety Committee Member, and/or Health & Safety Representative.
Note: File Audit on site and send to EHS for audit purposes.
Project: Job #: Location: Manpower: Audited By: Reviewed By: Signature: Signature: Inspection Date:(dd/mm/yy)
Interview: # of Workers # of Management Item
# Corrective
Action Assigned To Corrective Action
Completed (sign-off) Date (dd/mm/yy)
NUMBER OF INTERVIEWS
# of Employees on Project/Site
# of Management to Interview
# of Workers to Interview
Total Interviews Required
9 or less 2 5 7 10 to 24 2 6 8 25 to 49 3 7 10 50 to 99 4 9 13
Place Additional Comments on Back
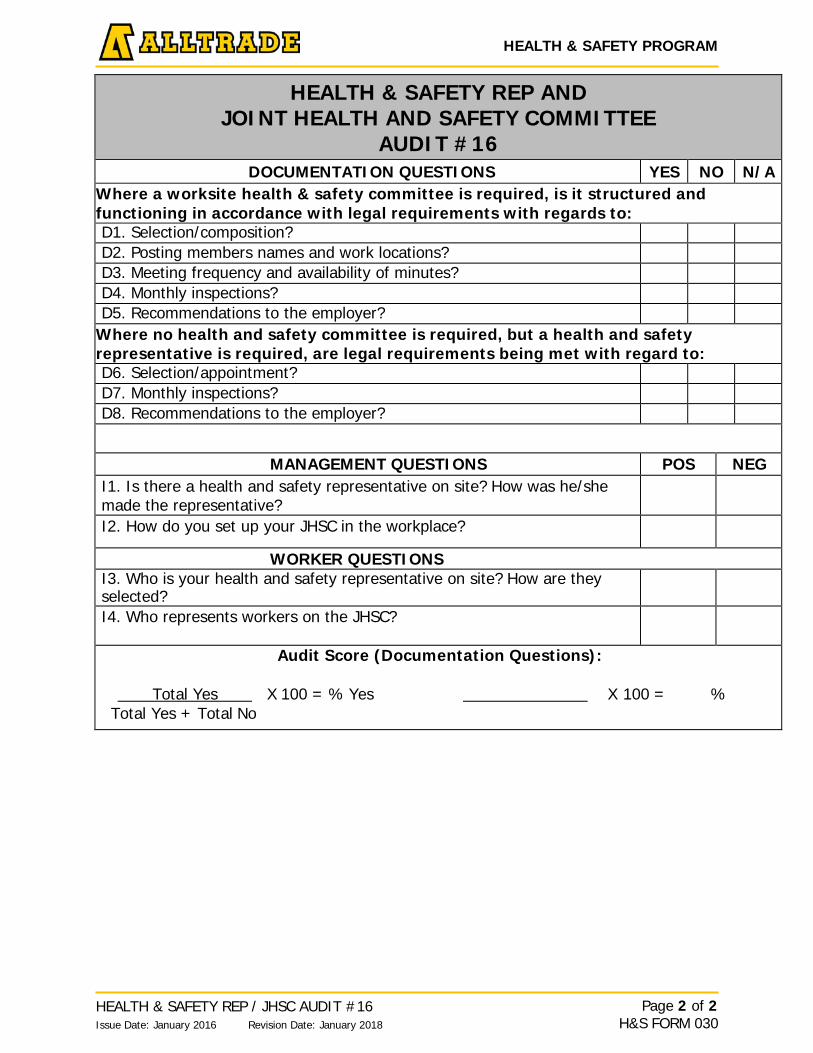
HEALTH & SAFETY PROGRAM
HEALTH & SAFETY REP / JHSC AUDIT #16 Page 2 of 2 H&S FORM 030 Issue Date: January 2016 Revision Date: January 2018
HEALTH & SAFETY REP AND JOINT HEALTH AND SAFETY COMMITTEE
AUDIT #16 DOCUMENTATION QUESTIONS YES NO N/A
Where a worksite health & safety committee is required, is it structured and functioning in accordance with legal requirements with regards to: D1. Selection/composition?
D2. Posting members names and work locations?
D3. Meeting frequency and availability of minutes?
D4. Monthly inspections?
D5. Recommendations to the employer?
Where no health and safety committee is required, but a health and safety representative is required, are legal requirements being met with regard to: D6. Selection/appointment?
D7. Monthly inspections?
D8. Recommendations to the employer?
MANAGEMENT QUESTIONS POS NEG I1. Is there a health and safety representative on site? How was he/she made the representative?
I2. How do you set up your JHSC in the workplace?
WORKER QUESTIONS I3. Who is your health and safety representative on site? How are they selected?
I4. Who represents workers on the JHSC?
Audit Score (Documentation Questions):
Total Yes X 100 = % Yes X 100 = % Total Yes + Total No
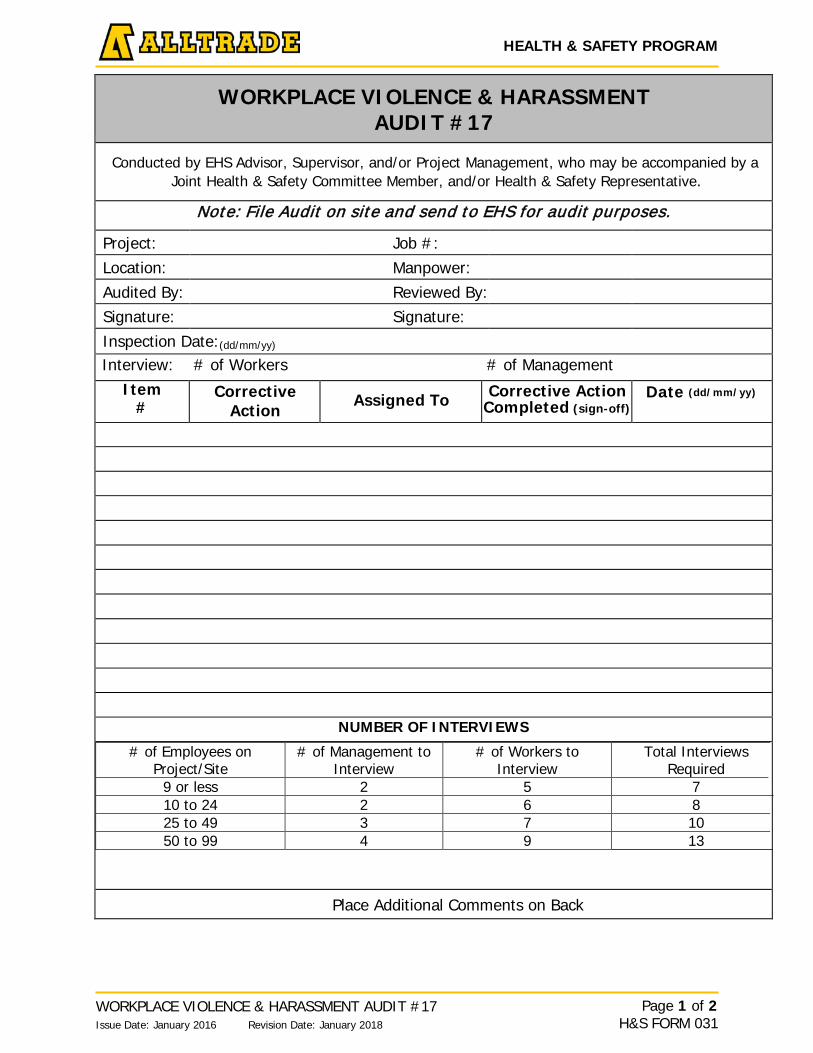
HEALTH & SAFETY PROGRAM
WORKPLACE VIOLENCE & HARASSMENT AUDIT #17 Page 1 of 2 H&S FORM 031 Issue Date: January 2016 Revision Date: January 2018
WORKPLACE VIOLENCE & HARASSMENT AUDIT #17
Conducted by EHS Advisor, Supervisor, and/or Project Management, who may be accompanied by a Joint Health & Safety Committee Member, and/or Health & Safety Representative.
Note: File Audit on site and send to EHS for audit purposes.
Project: Job #: Location: Manpower: Audited By: Reviewed By:
Signature: Signature: Inspection Date:(dd/mm/yy)
Interview: # of Workers # of Management Item
# Corrective
Action Assigned To Corrective Action
Completed (sign-off) Date (dd/mm/yy)
NUMBER OF INTERVIEWS
# of Employees on Project/Site
# of Management to Interview
# of Workers to Interview
Total Interviews Required
9 or less 2 5 7 10 to 24 2 6 8 25 to 49 3 7 10 50 to 99 4 9 13
Place Additional Comments on Back
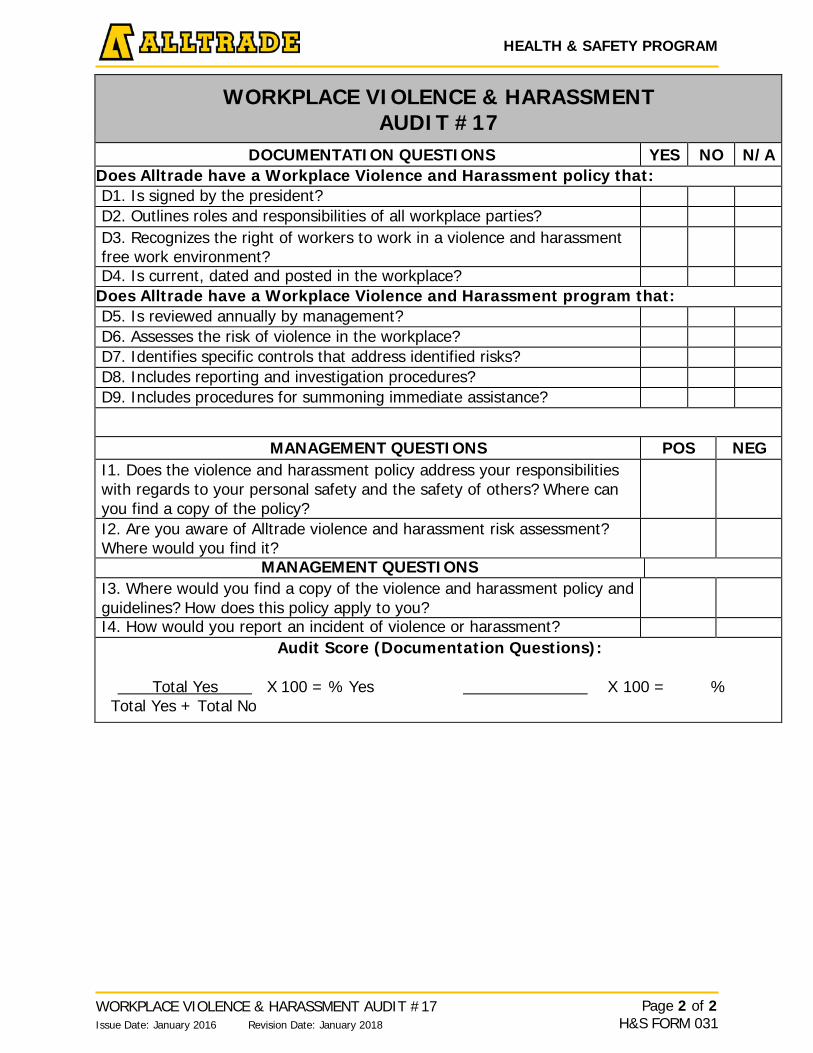
HEALTH & SAFETY PROGRAM
WORKPLACE VIOLENCE & HARASSMENT AUDIT #17 Page 2 of 2 H&S FORM 031 Issue Date: January 2016 Revision Date: January 2018
WORKPLACE VIOLENCE & HARASSMENT AUDIT #17
DOCUMENTATION QUESTIONS YES NO N/A Does Alltrade have a Workplace Violence and Harassment policy that: D1. Is signed by the president?
D2. Outlines roles and responsibilities of all workplace parties?
D3. Recognizes the right of workers to work in a violence and harassment free work environment?
D4. Is current, dated and posted in the workplace?
Does Alltrade have a Workplace Violence and Harassment program that: D5. Is reviewed annually by management?
D6. Assesses the risk of violence in the workplace?
D7. Identifies specific controls that address identified risks?
D8. Includes reporting and investigation procedures?
D9. Includes procedures for summoning immediate assistance?
MANAGEMENT QUESTIONS POS NEG I1. Does the violence and harassment policy address your responsibilities with regards to your personal safety and the safety of others? Where can you find a copy of the policy?
I2. Are you aware of Alltrade violence and harassment risk assessment? Where would you find it?
MANAGEMENT QUESTIONS I3. Where would you find a copy of the violence and harassment policy and guidelines? How does this policy apply to you?
I4. How would you report an incident of violence or harassment?
Audit Score (Documentation Questions):
Total Yes X 100 = % Yes X 100 = % Total Yes + Total No

HEALTH & SAFETY PROGRAM
RETURN TO WORK & RE-EMPLOYMENT AUDIT #18 Page 1 of 3 H&S FORM 032 Issue Date: January 2016 Revision Date: January 2018
RETURN TO WORK AND RE-EMPLOYMENT AUDIT #18
Conducted by EHS Advisor, Supervisor, and/or Project Management, who may be accompanied by a Joint Health & Safety Committee Member, and/or Health & Safety Representative.
Note: File Audit on site and send to EHS for audit purposes.
Project: Job #: Location: Manpower: Audited By: Reviewed By: Signature: Signature: Inspection Date:(dd/mm/yy) Interview: # of Workers # of Management
Item #
Corrective Action
Assigned To Corrective Action Completed (sign-off)
Date (dd/mm/yy)
NUMBER OF INTERVIEWS
# of Employees on Project/Site
# of Management to Interview
# of Workers to Interview
Total Interviews Required
9 or less 2 5 7 10 to 24 2 6 8 25 to 49 3 7 10 50 to 99 4 9 13
Place Additional Comments on Back
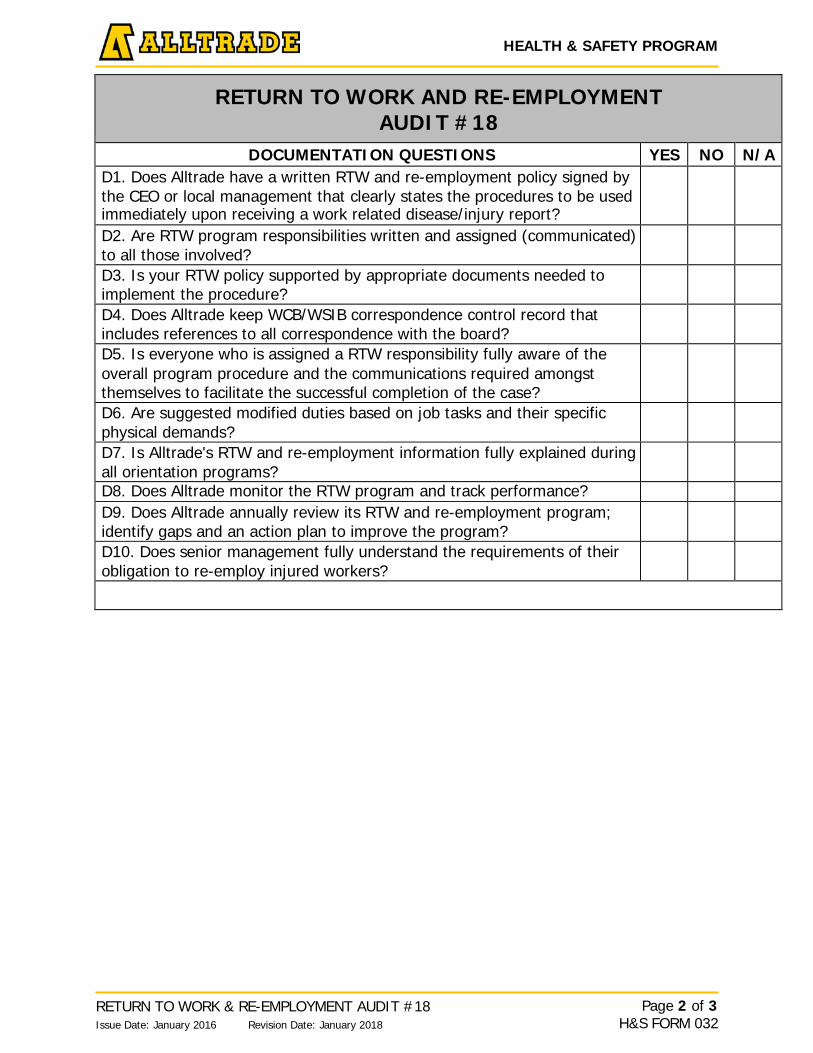
HEALTH & SAFETY PROGRAM
RETURN TO WORK & RE-EMPLOYMENT AUDIT #18 Page 2 of 3 H&S FORM 032 Issue Date: January 2016 Revision Date: January 2018
RETURN TO WORK AND RE-EMPLOYMENT AUDIT #18
DOCUMENTATION QUESTIONS YES NO N/A D1. Does Alltrade have a written RTW and re-employment policy signed by the CEO or local management that clearly states the procedures to be used immediately upon receiving a work related disease/injury report?
D2. Are RTW program responsibilities written and assigned (communicated) to all those involved?
D3. Is your RTW policy supported by appropriate documents needed to implement the procedure?
D4. Does Alltrade keep WCB/WSIB correspondence control record that includes references to all correspondence with the board?
D5. Is everyone who is assigned a RTW responsibility fully aware of the overall program procedure and the communications required amongst themselves to facilitate the successful completion of the case?
D6. Are suggested modified duties based on job tasks and their specific physical demands?
D7. Is Alltrade's RTW and re-employment information fully explained during all orientation programs?
D8. Does Alltrade monitor the RTW program and track performance?
D9. Does Alltrade annually review its RTW and re-employment program; identify gaps and an action plan to improve the program?
D10. Does senior management fully understand the requirements of their obligation to re-employ injured workers?
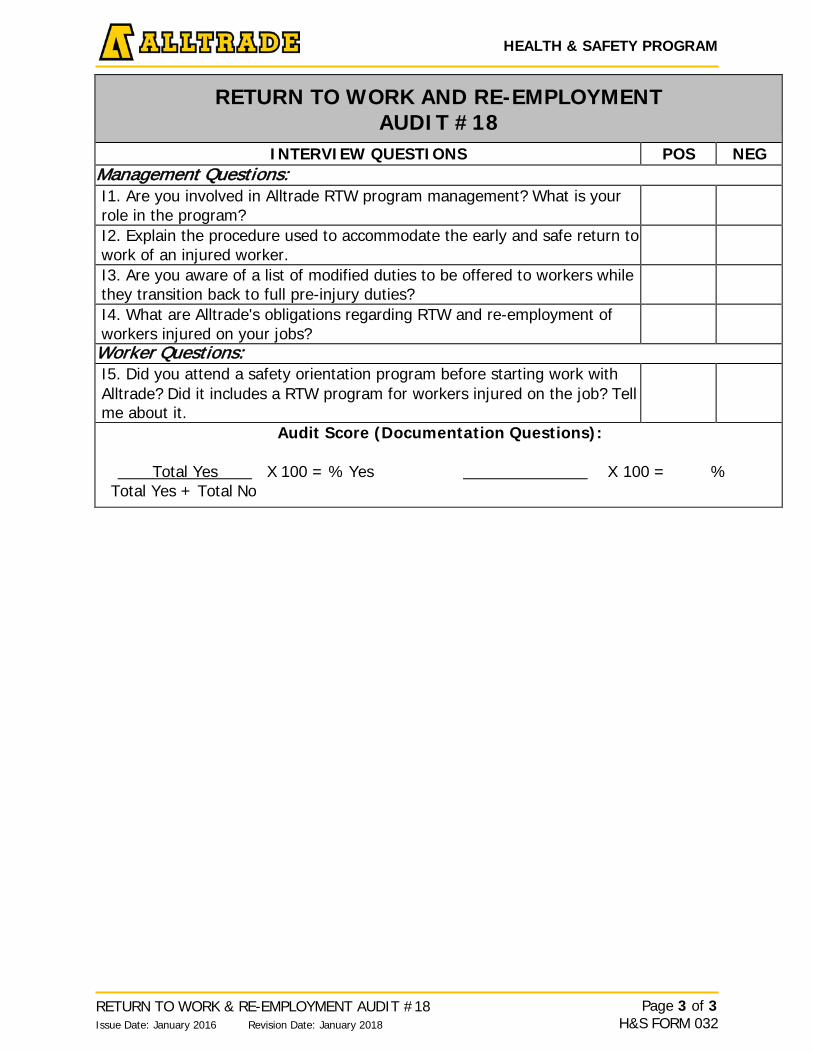
HEALTH & SAFETY PROGRAM
RETURN TO WORK & RE-EMPLOYMENT AUDIT #18 Page 3 of 3 H&S FORM 032 Issue Date: January 2016 Revision Date: January 2018
RETURN TO WORK AND RE-EMPLOYMENT AUDIT #18
INTERVIEW QUESTIONS POS NEG Management Questions: I1. Are you involved in Alltrade RTW program management? What is your role in the program?
I2. Explain the procedure used to accommodate the early and safe return to work of an injured worker.
I3. Are you aware of a list of modified duties to be offered to workers while they transition back to full pre-injury duties?
I4. What are Alltrade's obligations regarding RTW and re-employment of workers injured on your jobs?
Worker Questions: I5. Did you attend a safety orientation program before starting work with Alltrade? Did it includes a RTW program for workers injured on the job? Tell me about it.
Audit Score (Documentation Questions):
Total Yes X 100 = % Yes X 100 = % Total Yes + Total No
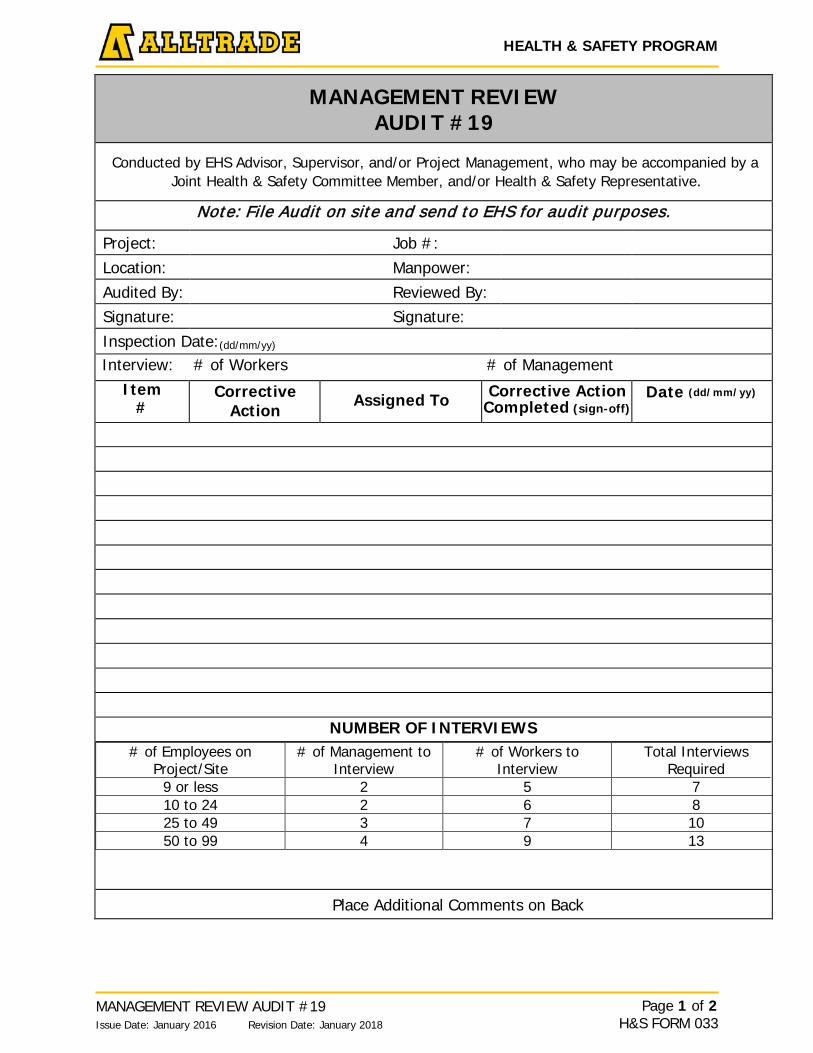
HEALTH & SAFETY PROGRAM
MANAGEMENT REVIEW AUDIT #19 Page 1 of 2 H&S FORM 033 Issue Date: January 2016 Revision Date: January 2018
MANAGEMENT REVIEW AUDIT #19
Conducted by EHS Advisor, Supervisor, and/or Project Management, who may be accompanied by a Joint Health & Safety Committee Member, and/or Health & Safety Representative.
Note: File Audit on site and send to EHS for audit purposes.
Project: Job #: Location: Manpower: Audited By: Reviewed By: Signature: Signature: Inspection Date:(dd/mm/yy)
Interview: # of Workers # of Management Item
# Corrective
Action Assigned To Corrective Action
Completed (sign-off) Date (dd/mm/yy)
NUMBER OF INTERVIEWS # of Employees on
Project/Site # of Management to
Interview # of Workers to
Interview Total Interviews
Required 9 or less 2 5 7 10 to 24 2 6 8 25 to 49 3 7 10 50 to 99 4 9 13
Place Additional Comments on Back
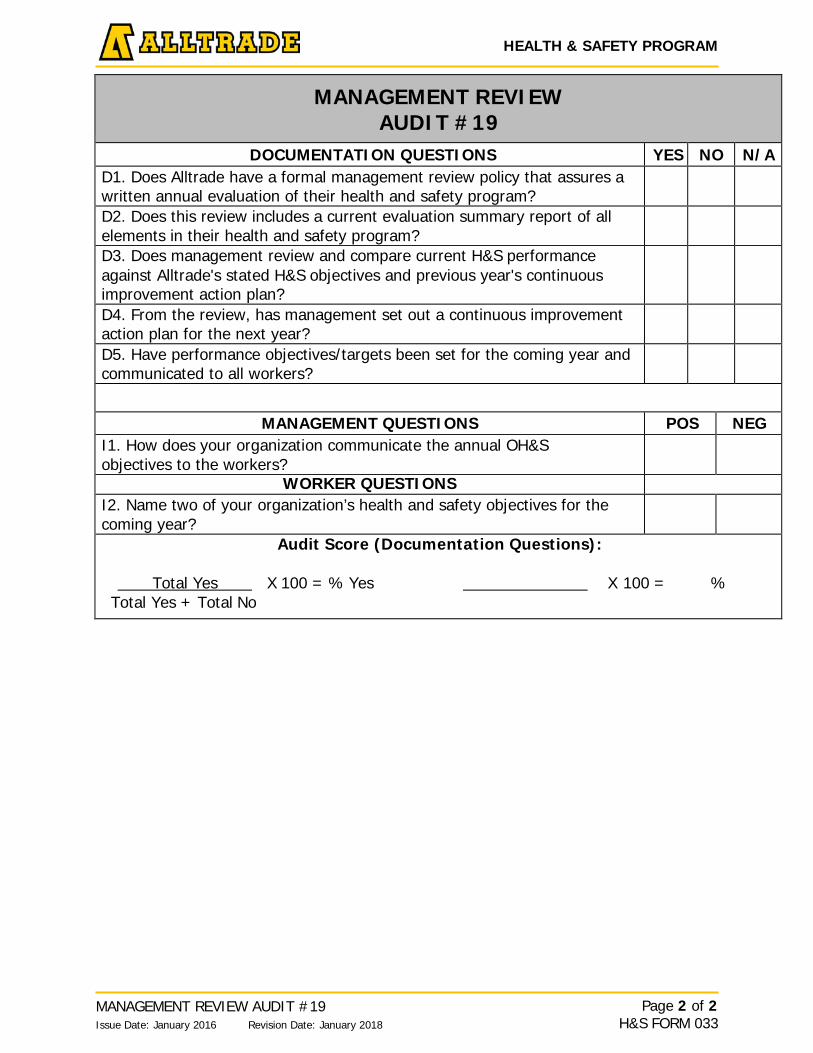
HEALTH & SAFETY PROGRAM
MANAGEMENT REVIEW AUDIT #19 Page 2 of 2 H&S FORM 033 Issue Date: January 2016 Revision Date: January 2018
MANAGEMENT REVIEW AUDIT #19
DOCUMENTATION QUESTIONS YES NO N/A D1. Does Alltrade have a formal management review policy that assures a written annual evaluation of their health and safety program?
D2. Does this review includes a current evaluation summary report of all elements in their health and safety program?
D3. Does management review and compare current H&S performance against Alltrade's stated H&S objectives and previous year's continuous improvement action plan?
D4. From the review, has management set out a continuous improvement action plan for the next year?
D5. Have performance objectives/targets been set for the coming year and communicated to all workers?
MANAGEMENT QUESTIONS POS NEG I1. How does your organization communicate the annual OH&S objectives to the workers?
WORKER QUESTIONS I2. Name two of your organization’s health and safety objectives for the coming year?
Audit Score (Documentation Questions):
Total Yes X 100 = % Yes X 100 = % Total Yes + Total No
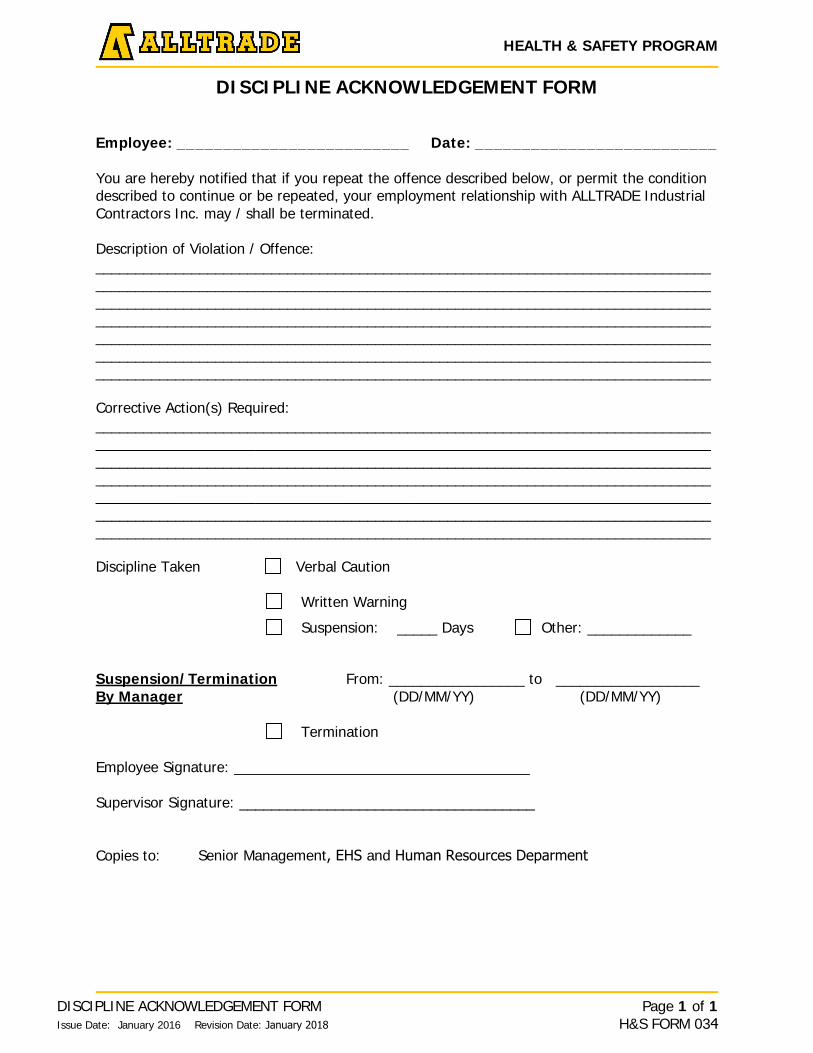
HEALTH & SAFETY PROGRAM
DISCIPLINE ACKNOWLEDGEMENT FORM Issue Date: January 2016 Revision Date: January 2018
Page 1 of 1 H&S FORM 034
DISCIPLINE ACKNOWLEDGEMENT FORM
Employee: _________________________ Date: __________________________
You are hereby notified that if you repeat the offence described below, or permit the condition described to continue or be repeated, your employment relationship with ALLTRADE Industrial Contractors Inc. may / shall be terminated.
Description of Violation / Offence: ___________________________________________________________________________________________________________________________________________________________________________________________________________________________________________________________________________________________________________________________________________________________________________________________________________________________________________________________________________________________________________________________________________________________
Corrective Action(s) Required: __________________________________________________________________________________________________________________________________________________________ _________________________________________________________________________________________________________________________________________________________________________________________________________________________________________________________________________________________________________________________________________________________________________________________________
Discipline Taken Verbal Caution
Written Warning
Suspension: _____ Days Other: _____________
Suspension/Termination From: _________________ to __________________ By Manager (DD/MM/YY) (DD/MM/YY)
Termination
Employee Signature: _____________________________________
Supervisor Signature: _____________________________________
Copies to: Senior Management, EHS and Human Resources Deparment
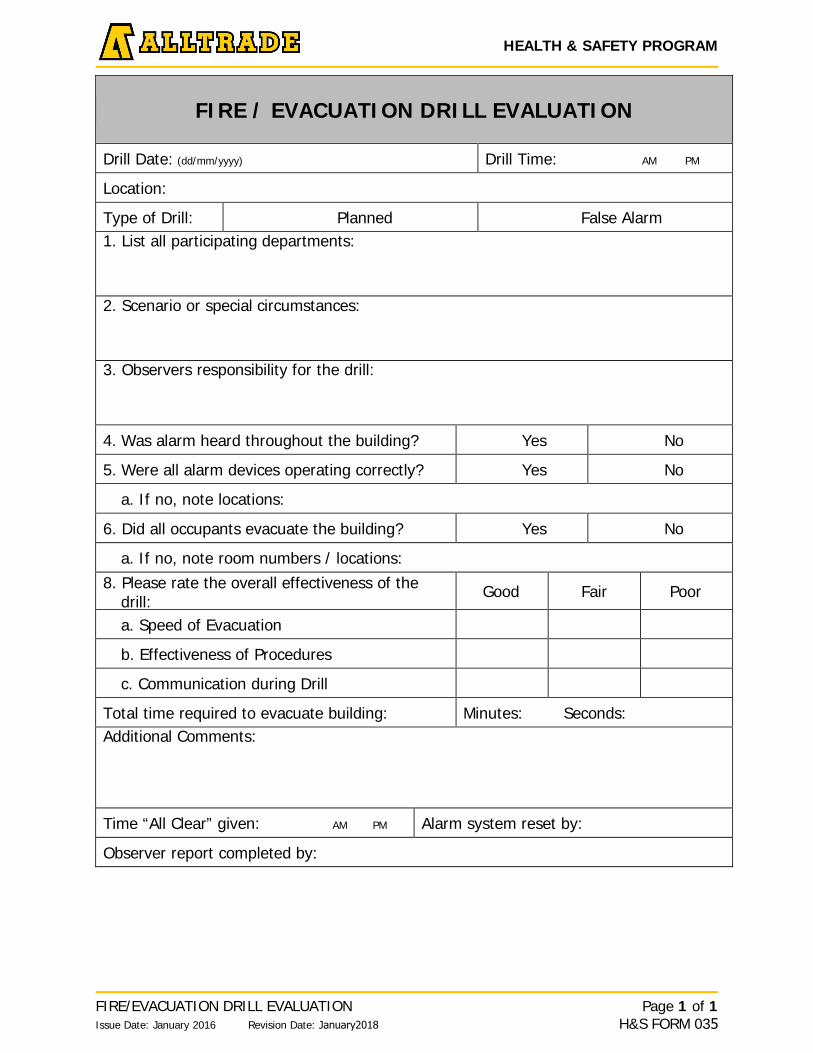
HEALTH & SAFETY PROGRAM
FIRE/EVACUATION DRILL EVALUATION Issue Date: January 2016 Revision Date: January2018
Page 1 of 1 H&S FORM 035
FIRE / EVACUATION DRILL EVALUATION
Drill Date: (dd/mm/yyyy) Drill Time: AM PM
Location:
Type of Drill: Planned False Alarm 1. List all participating departments:
2. Scenario or special circumstances:
3. Observers responsibility for the drill:
4. Was alarm heard throughout the building? Yes No
5. Were all alarm devices operating correctly? Yes No
a. If no, note locations:
6. Did all occupants evacuate the building? Yes No
a. If no, note room numbers / locations:8. Please rate the overall effectiveness of the
drill:Good Fair Poor
a. Speed of Evacuation
b. Effectiveness of Procedures
c. Communication during Drill
Total time required to evacuate building: Minutes: Seconds: Additional Comments:
Time “All Clear” given: AM PM Alarm system reset by:
Observer report completed by:
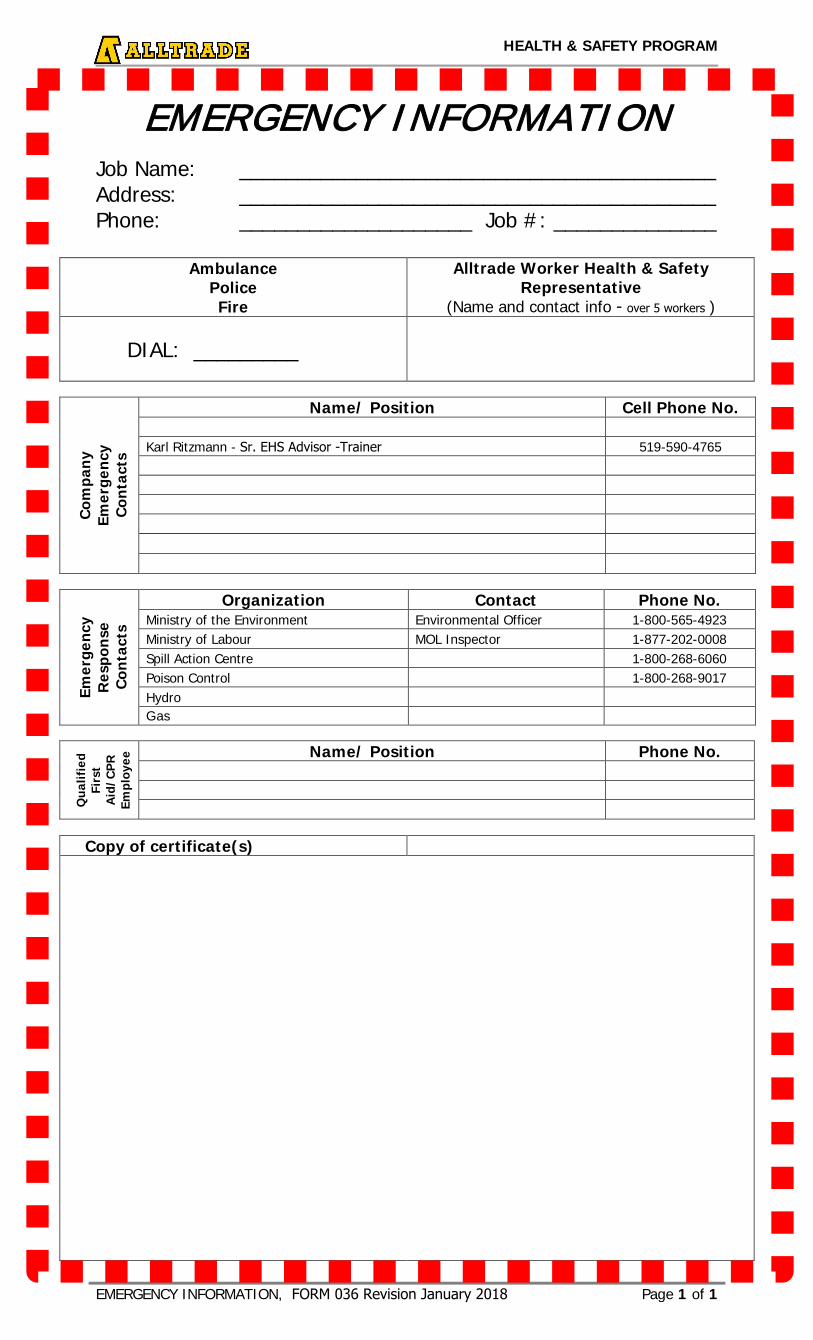
HEALTH & SAFETY PROGRAM
EMERGENCY INFORMATION, FORM 036 Revision January 2018 Page 1 of 1
EMERGENCY INFORMATION Job Name: _________________________________________ Address: _________________________________________ Phone: ____________________ Job #: ______________
Ambulance Police Fire
Alltrade Worker Health & Safety Representative
(Name and contact info - over 5 workers )
DIAL: _________
Copy of certificate(s)
Com
pan
y
Emer
genc
y C
onta
cts
Name/ Position Cell Phone No.
Karl Ritzmann - Sr. EHS Advisor -Trainer 519-590-4765
Emer
genc
y R
espo
nse
C
onta
cts
Organization Contact Phone No. Ministry of the Environment Environmental Officer 1-800-565-4923Ministry of Labour MOL Inspector 1-877-202-0008Spill Action Centre 1-800-268-6060Poison Control 1-800-268-9017Hydro Gas
Qua
lifie
d Fi
rst
Aid
/CP
R
Empl
oyee
Name/ Position Phone No.

D ate:
Division Industrial Energy Shops Other
( ) ( ) ( ) ( )
Company:
Project:
Opportunity / Suggestion
Safety Opportunity
First Name(optional):
Last Name(optional):
Description of work activity:
Supervisor(Optional):
Job #:
Entry can be Anonymous
H&S FORM 037 Rev1/QC_FORM_006.3 Rev1
Quality Suggestion Quality Opportunity
Safety Suggestion
Productivity Opportunity Productivity Suggestion
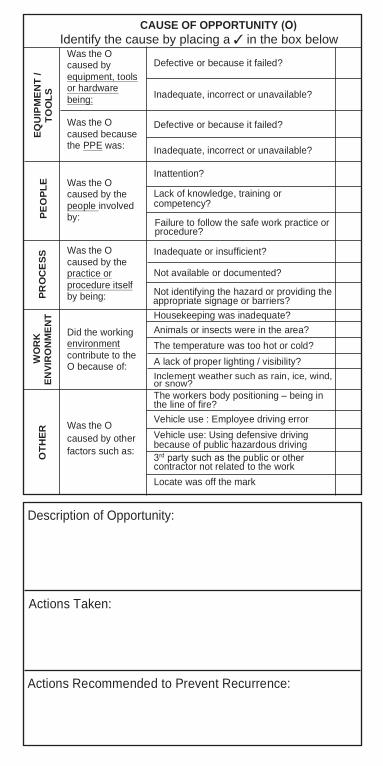
CAUSE OF OPPORTUNITY (O)Identify the cause by placing a ✓ in the box below
EQU
IPM
EN
T /
TOO
LS
Was the O caused by equipment, tools or hardware being:
Defective or because it failed?
Inadequate, incorrect or unavailable?
Was the O caused because the PPE was:
Defective or because it failed?
Inadequate, incorrect or unavailable?
PEO
P LE Was the O caused by the people involved by:
Inattention?
Lack of knowl edge, training or competency?
Failure to follow the safe work practice or procedure?
PRO
CE
SS Was the O
caused by the practice or procedure itself by being:
Inadequate or insufficient?
Not available or documented?
Not identifying the hazard or providing the appropriate signage or barriers?
WO
RK
EN
VIR
ON
ME N
T
Did the working environment contribute to the O because of:
Housekeeping was inadequate? Animals or insects were in the area?
The temperature was too hot or col d?
A lack of proper lighting / visibility?Inclement weather such as rain, ice, wind, or snow?
OTH
ER
Was the O caused by other factors such as:
The workers body positioning – being in the line of fire? Vehicle use : Employee driving error Vehicle use: Using defensive driving because of public hazardous driving
contractor not related to the work Locate was off the mark
Description of Opportunity:
Actions Taken:
Actions Recommended to Prevent Recurrence:
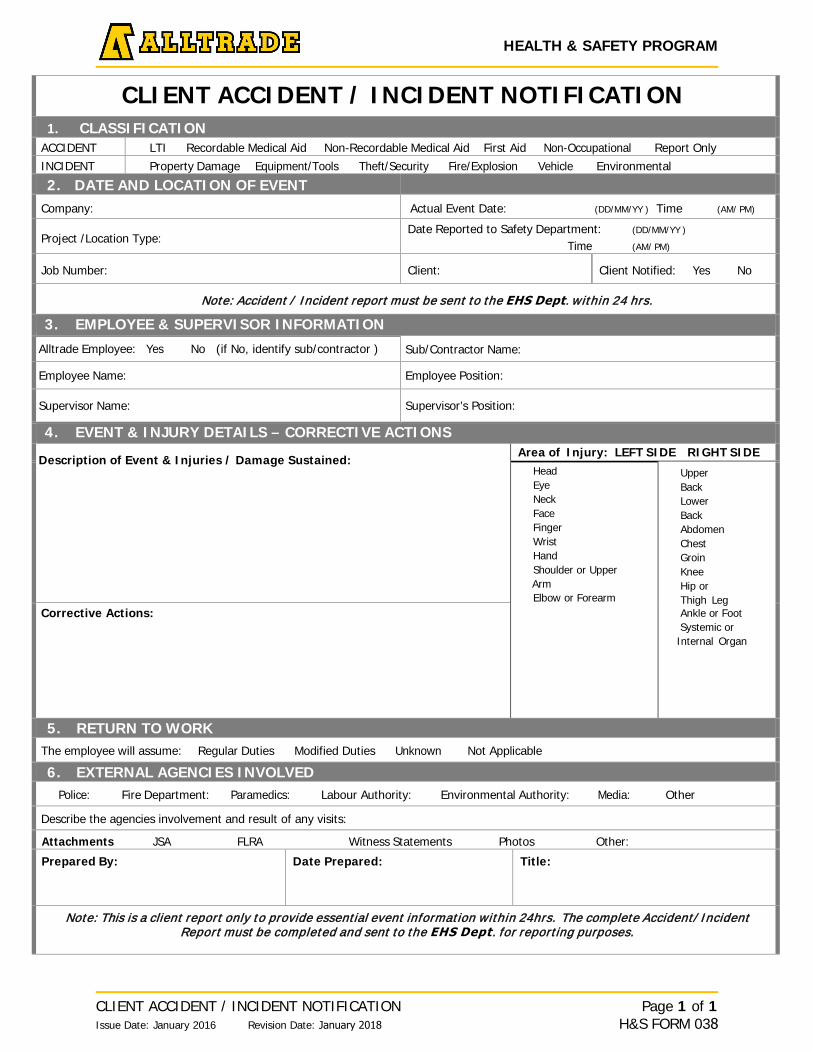
HEALTH & SAFETY PROGRAM
CLIENT ACCIDENT / INCIDENT NOTIFICATION Issue Date: January 2016 Revision Date: January 2018
Page 1 of 1 H&S FORM 038
CLIENT ACCIDENT / INCIDENT NOTIFICATION 1. CLASSIFICATION
ACCIDENT LTI Recordable Medical Aid Non-Recordable Medical Aid First Aid Non-Occupational Report Only INCIDENT Property Damage Equipment/Tools Theft/Security Fire/Explosion Vehicle Environmental 2. DATE AND LOCATION OF EVENT
Company: Actual Event Date: (DD/MM/YY ) Time (AM/ PM)
Project /Location Type:Date Reported to Safety Department: (DD/MM/YY )
Time (AM/ PM)
Job Number: Client: Client Notified: Yes No
Note: Accident / Incident report must be sent to the EHS Dept. within 24 hrs. 3. EMPLOYEE & SUPERVISOR INFORMATION
Alltrade Employee: Yes No (if No, identify sub/contractor ) Sub/Contractor Name:
Employee Name: Employee Position:
Supervisor Name: Supervisor’s Position:
4. EVENT & INJURY DETAILS – CORRECTIVE ACTIONS
Description of Event & Injuries / Damage Sustained: Area of Injury: LEFT SIDE RIGHT SIDE
Head Eye Neck Face Finger Wrist Hand Shoulder or Upper Arm Elbow or Forearm
Upper Back Lower Back Abdomen Chest Groin Knee Hip or Thigh Leg Ankle or Foot Systemic or
Internal Organ
Corrective Actions:
5. RETURN TO WORKThe employee will assume: Regular Duties Modified Duties Unknown Not Applicable
6. EXTERNAL AGENCIES INVOLVEDPolice: Fire Department: Paramedics: Labour Authority: Environmental Authority: Media: Other
Describe the agencies involvement and result of any visits:
Attachments JSA FLRA Witness Statements Photos Other:
Prepared By: Date Prepared: Title:
Note: This is a client report only to provide essential event information within 24hrs. The complete Accident/ Incident Report must be completed and sent to the EHS Dept. for reporting purposes.
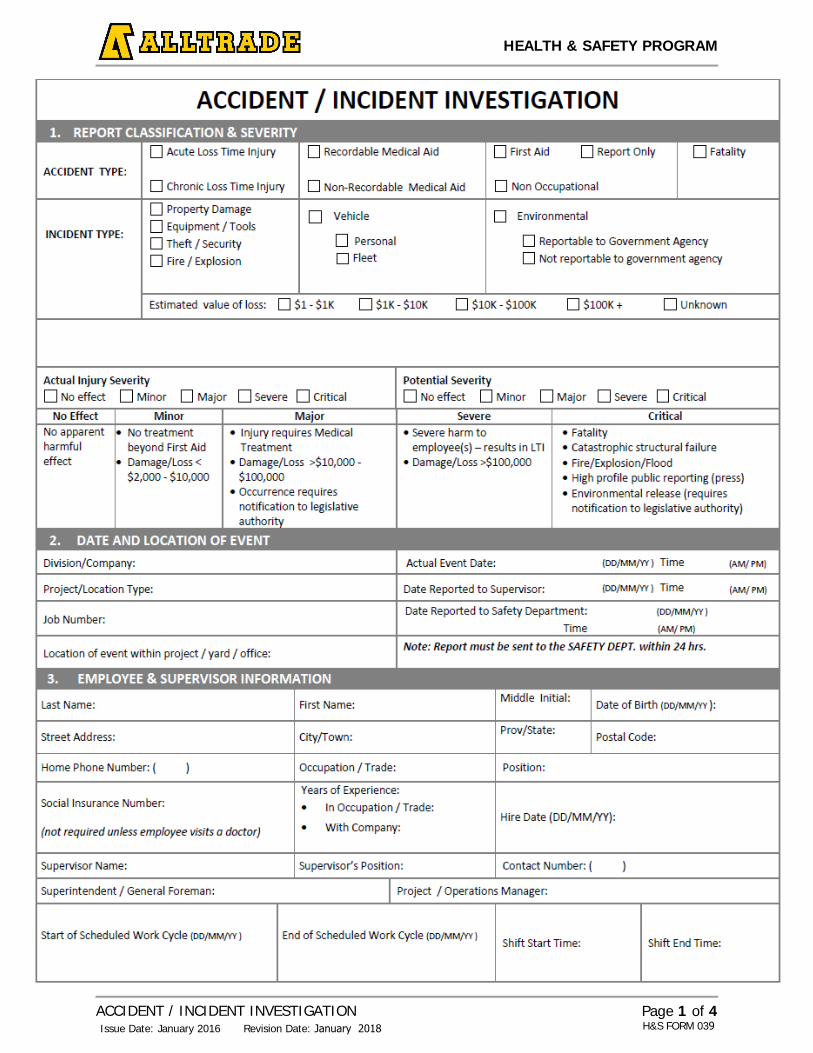
HEALTH & SAFETY PROGRAM
Page 1 of 4 ACCIDENT / INCIDENT INVESTIGATION Issue Date: January 2016 Revision Date: January 2018 H&S FORM 039
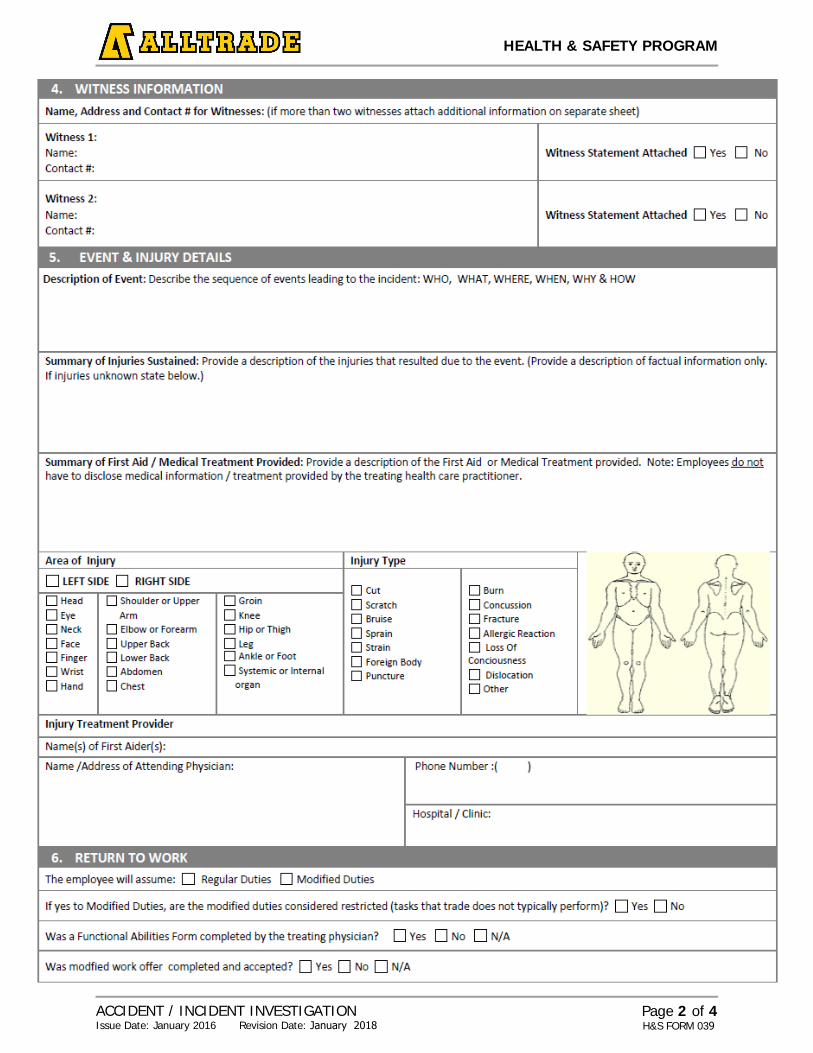
HEALTH & SAFETY PROGRAM
Page 2 of 4 ACCIDENT / INCIDENT INVESTIGATION Issue Date: January 2016 Revision Date: January 2018 H&S FORM 039
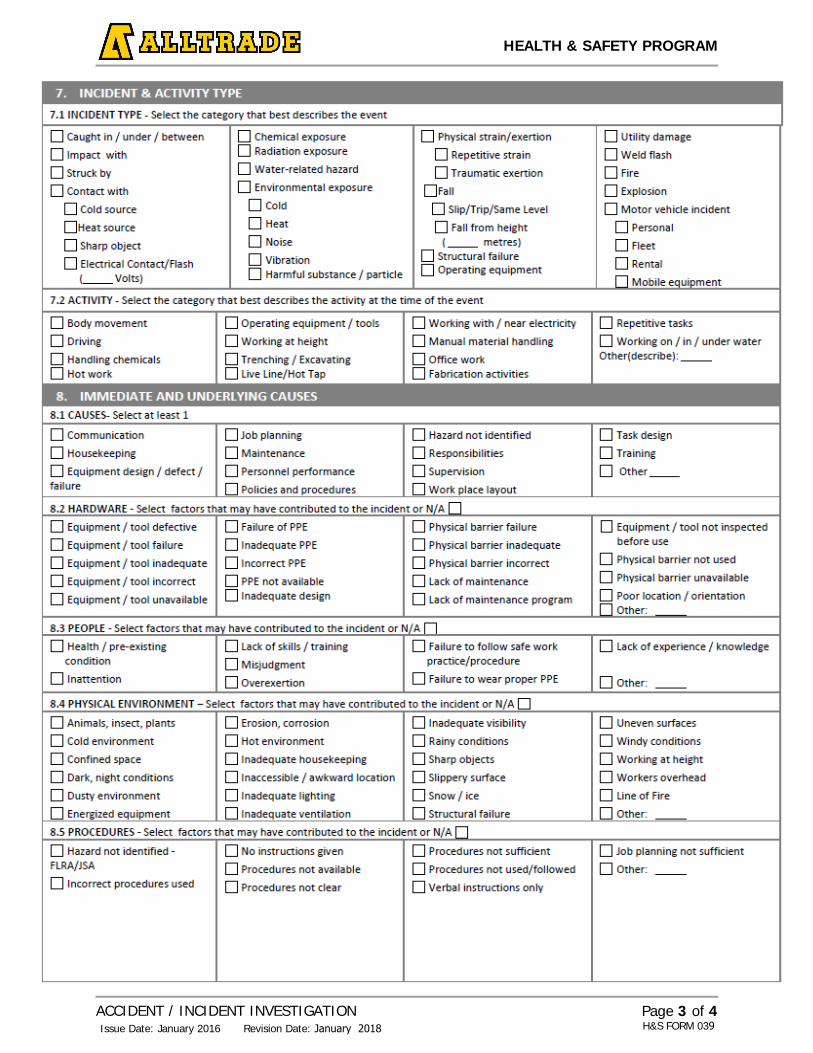
HEALTH & SAFETY PROGRAM
Page 3 of 4 ACCIDENT / INCIDENT INVESTIGATION Issue Date: January 2016 Revision Date: January 2018 H&S FORM 039
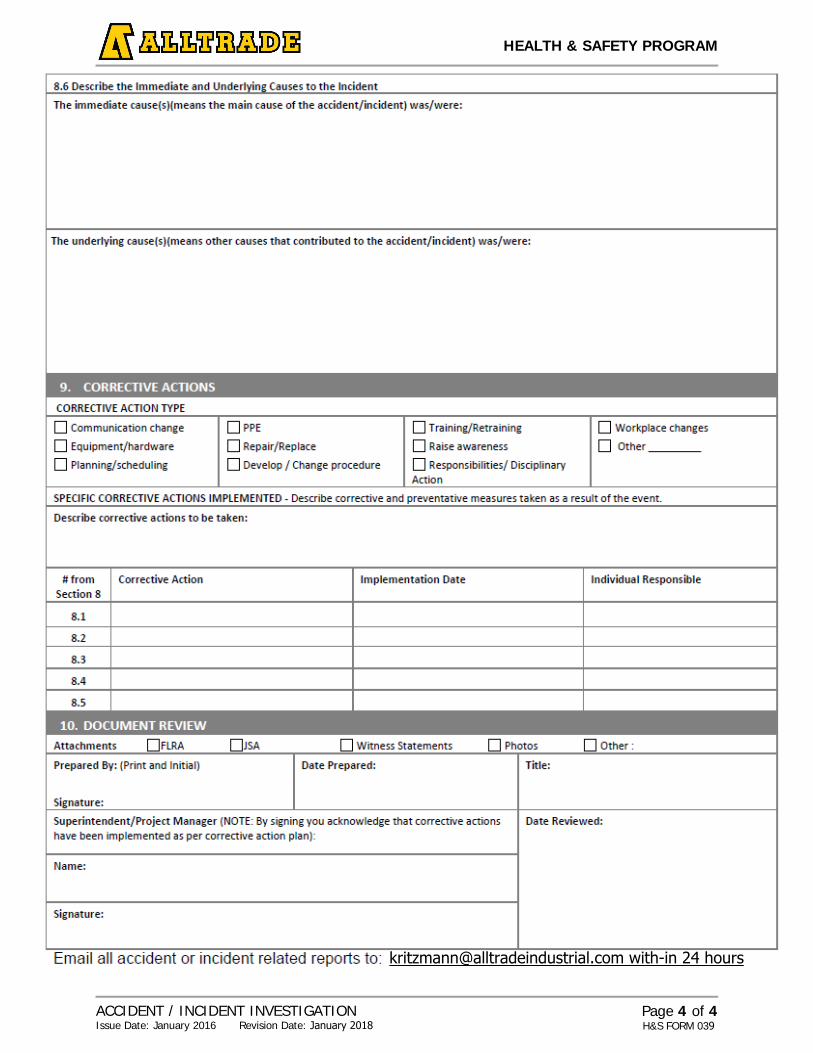
HEALTH & SAFETY PROGRAM
Page 4 of 4 ACCIDENT / INCIDENT INVESTIGATION Issue Date: January 2016 Revision Date: January 2018 H&S FORM 039
[email protected] with-in 24 hours
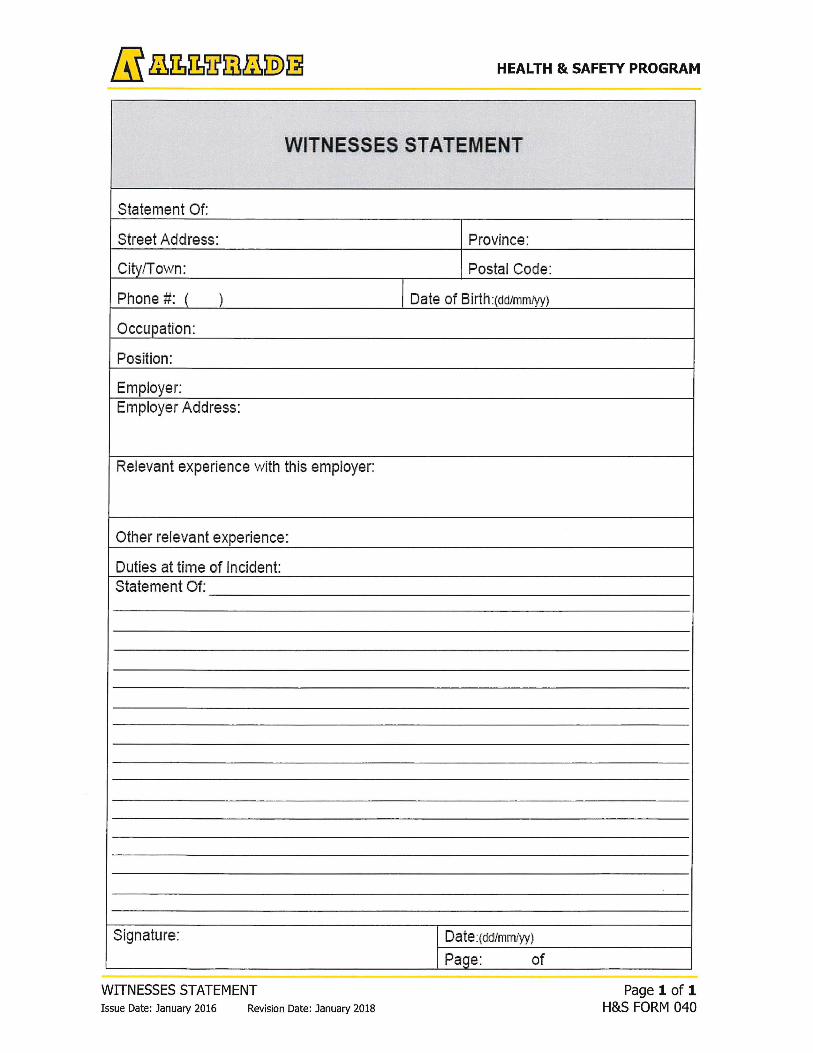
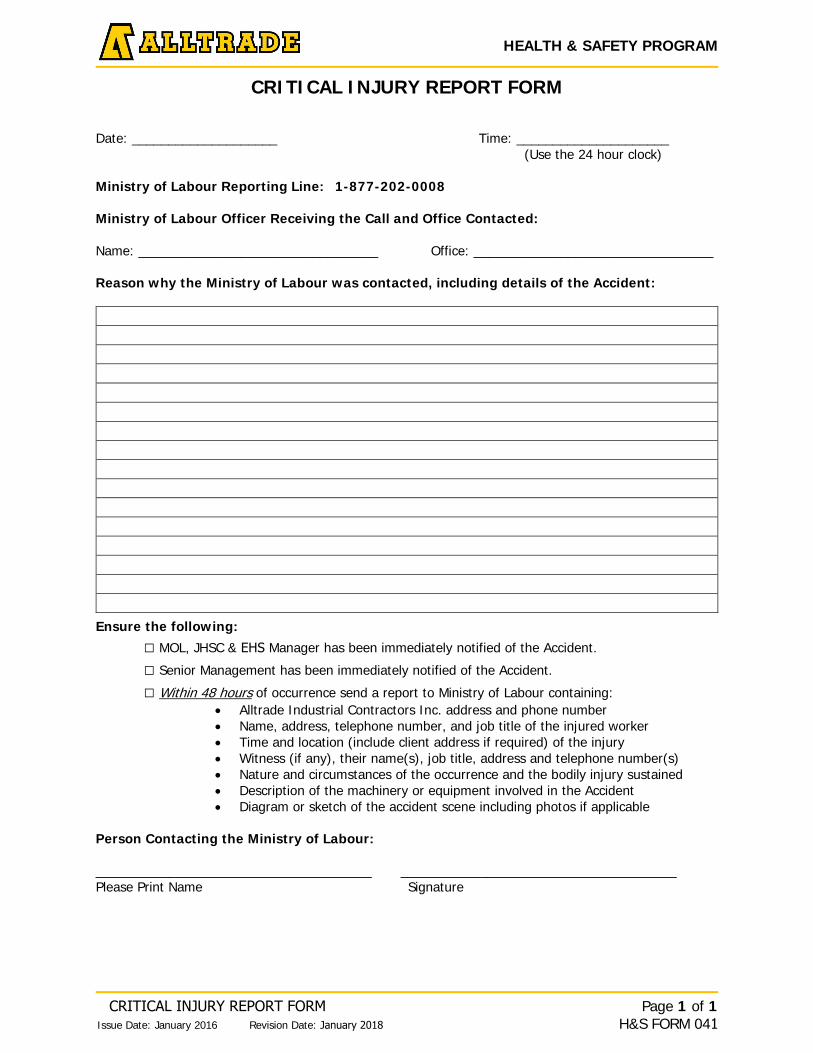
HEALTH & SAFETY PROGRAM
CRITICAL INJURY REPORT FORM Issue Date: January 2016 Revision Date: January 2018
Page 1 of 1 H&S FORM 041
CRITICAL INJURY REPORT FORM
Date: ____________________ Time: _____________________ (Use the 24 hour clock)
Ministry of Labour Reporting Line: 1-877-202-0008
Ministry of Labour Officer Receiving the Call and Office Contacted:
Name: _________________________________ Office: _________________________________
Reason why the Ministry of Labour was contacted, including details of the Accident:
Ensure the following: □ MOL, JHSC & EHS Manager has been immediately notified of the Accident.
□ Senior Management has been immediately notified of the Accident.
□ Within 48 hours of occurrence send a report to Ministry of Labour containing:• Alltrade Industrial Contractors Inc. address and phone number• Name, address, telephone number, and job title of the injured worker• Time and location (include client address if required) of the injury• Witness (if any), their name(s), job title, address and telephone number(s)• Nature and circumstances of the occurrence and the bodily injury sustained• Description of the machinery or equipment involved in the Accident• Diagram or sketch of the accident scene including photos if applicable
Person Contacting the Ministry of Labour:
______________________________________ ______________________________________ Please Print Name Signature
JeromeM
Typewritten Text
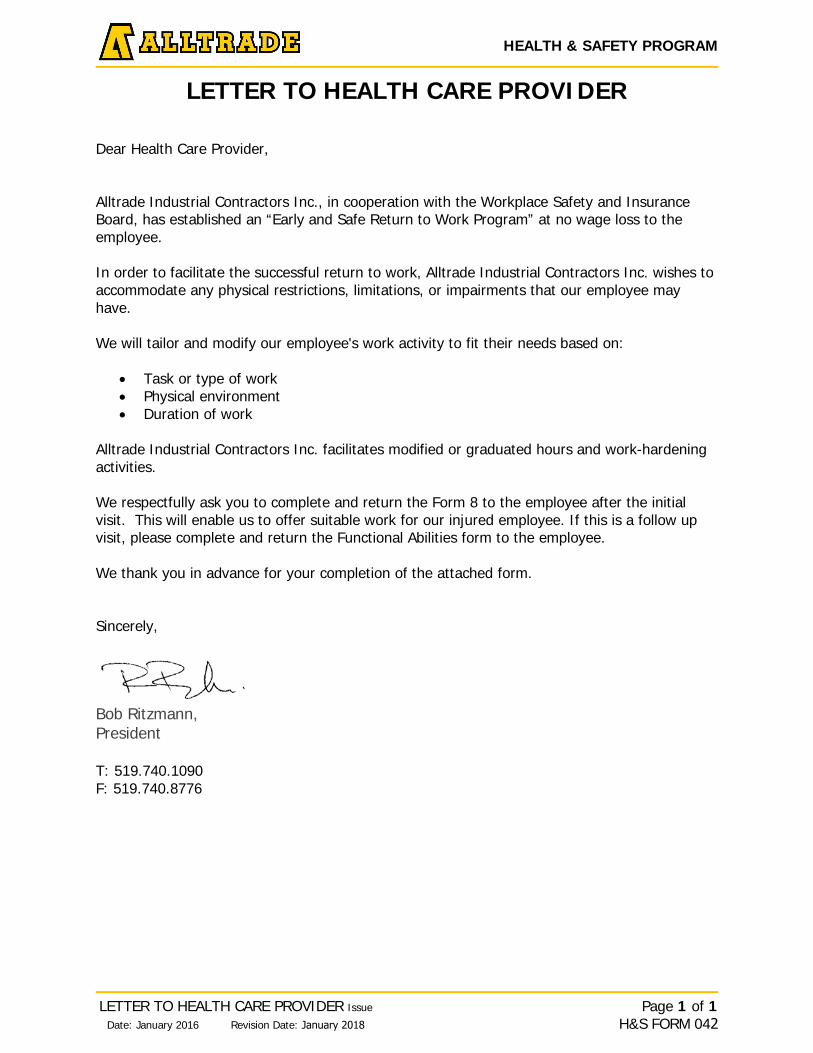
HEALTH & SAFETY PROGRAM
LETTER TO HEALTH CARE PROVIDER Issue
Date: January 2016 Revision Date: January 2018
Page 1 of 1 H&S FORM 042
LETTER TO HEALTH CARE PROVIDER
Dear Health Care Provider,
Alltrade Industrial Contractors Inc., in cooperation with the Workplace Safety and Insurance Board, has established an “Early and Safe Return to Work Program” at no wage loss to the employee.
In order to facilitate the successful return to work, Alltrade Industrial Contractors Inc. wishes to accommodate any physical restrictions, limitations, or impairments that our employee may have.
We will tailor and modify our employee's work activity to fit their needs based on:
• Task or type of work• Physical environment• Duration of work
Alltrade Industrial Contractors Inc. facilitates modified or graduated hours and work-hardening activities.
We respectfully ask you to complete and return the Form 8 to the employee after the initial visit. This will enable us to offer suitable work for our injured employee. If this is a follow up visit, please complete and return the Functional Abilities form to the employee.
We thank you in advance for your completion of the attached form.
Sincerely,
Bob Ritzmann, President
T: 519.740.1090 F: 519.740.8776
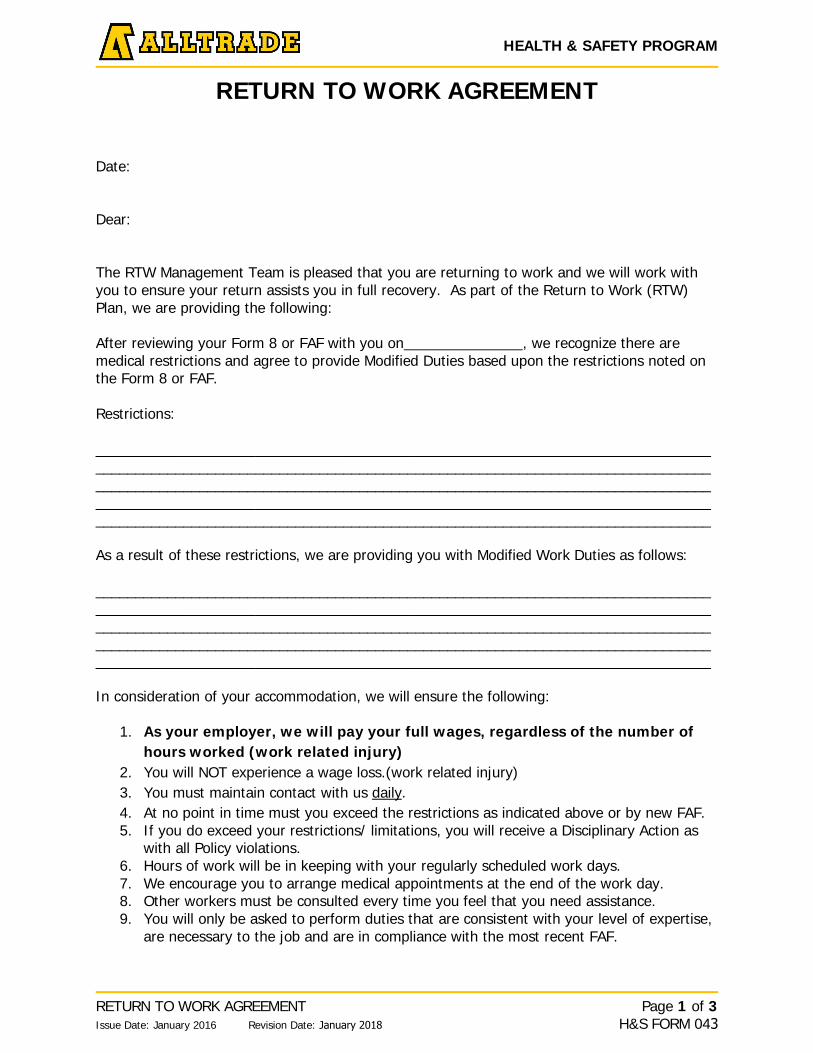
HEALTH & SAFETY PROGRAM
RETURN TO WORK AGREEMENT Issue Date: January 2016 Revision Date: January 2018
Page 1 of 3 H&S FORM 043
RETURN TO WORK AGREEMENT
Date:
Dear:
The RTW Management Team is pleased that you are returning to work and we will work with you to ensure your return assists you in full recovery. As part of the Return to Work (RTW) Plan, we are providing the following:
After reviewing your Form 8 or FAF with you on , we recognize there are medical restrictions and agree to provide Modified Duties based upon the restrictions noted on the Form 8 or FAF.
Restrictions:
_________________________________________________________________________________________________________________________________________________________________________________________________________________________________________________________________________________________________________________________________________________________________________________________________
As a result of these restrictions, we are providing you with Modified Work Duties as follows:
_______________________________________________________________________________________________________________________________________________________________________________________________________________________________________ __________________________________________________________________________________________________________________________________________________________
In consideration of your accommodation, we will ensure the following:
1. As your employer, we will pay your full wages, regardless of the number ofhours worked (work related injury)
2. You will NOT experience a wage loss.(work related injury)3. You must maintain contact with us daily.4. At no point in time must you exceed the restrictions as indicated above or by new FAF.5. If you do exceed your restrictions/ limitations, you will receive a Disciplinary Action as
with all Policy violations.6. Hours of work will be in keeping with your regularly scheduled work days.7. We encourage you to arrange medical appointments at the end of the work day.8. Other workers must be consulted every time you feel that you need assistance.9. You will only be asked to perform duties that are consistent with your level of expertise,
are necessary to the job and are in compliance with the most recent FAF.
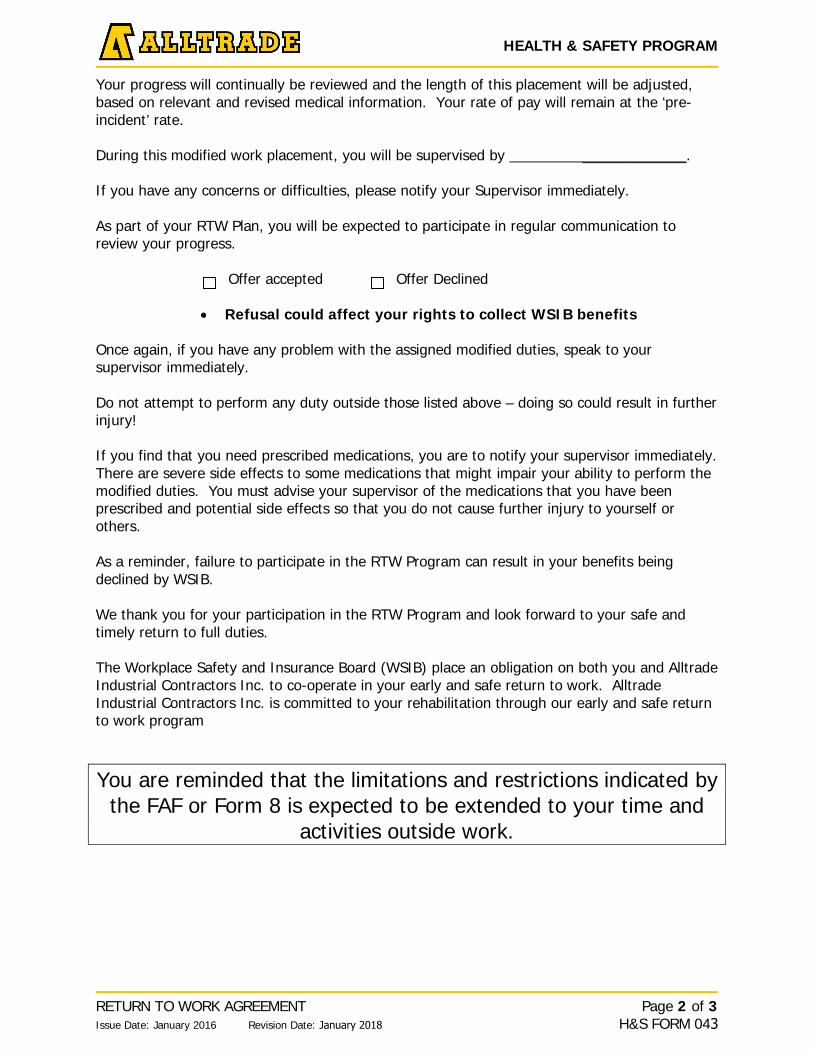
HEALTH & SAFETY PROGRAM
RETURN TO WORK AGREEMENT Issue Date: January 2016 Revision Date: January 2018
Page 2 of 3 H&S FORM 043
Your progress will continually be reviewed and the length of this placement will be adjusted, based on relevant and revised medical information. Your rate of pay will remain at the ‘pre-incident’ rate.
During this modified work placement, you will be supervised by _____________.
If you have any concerns or difficulties, please notify your Supervisor immediately.
As part of your RTW Plan, you will be expected to participate in regular communication to review your progress.
Offer accepted Offer Declined
• Refusal could affect your rights to collect WSIB benefits
Once again, if you have any problem with the assigned modified duties, speak to your supervisor immediately.
Do not attempt to perform any duty outside those listed above – doing so could result in further injury!
If you find that you need prescribed medications, you are to notify your supervisor immediately. There are severe side effects to some medications that might impair your ability to perform the modified duties. You must advise your supervisor of the medications that you have been prescribed and potential side effects so that you do not cause further injury to yourself or others.
As a reminder, failure to participate in the RTW Program can result in your benefits being declined by WSIB.
We thank you for your participation in the RTW Program and look forward to your safe and timely return to full duties.
The Workplace Safety and Insurance Board (WSIB) place an obligation on both you and Alltrade Industrial Contractors Inc. to co-operate in your early and safe return to work. Alltrade Industrial Contractors Inc. is committed to your rehabilitation through our early and safe return to work program
You are reminded that the limitations and restrictions indicated by the FAF or Form 8 is expected to be extended to your time and
activities outside work.
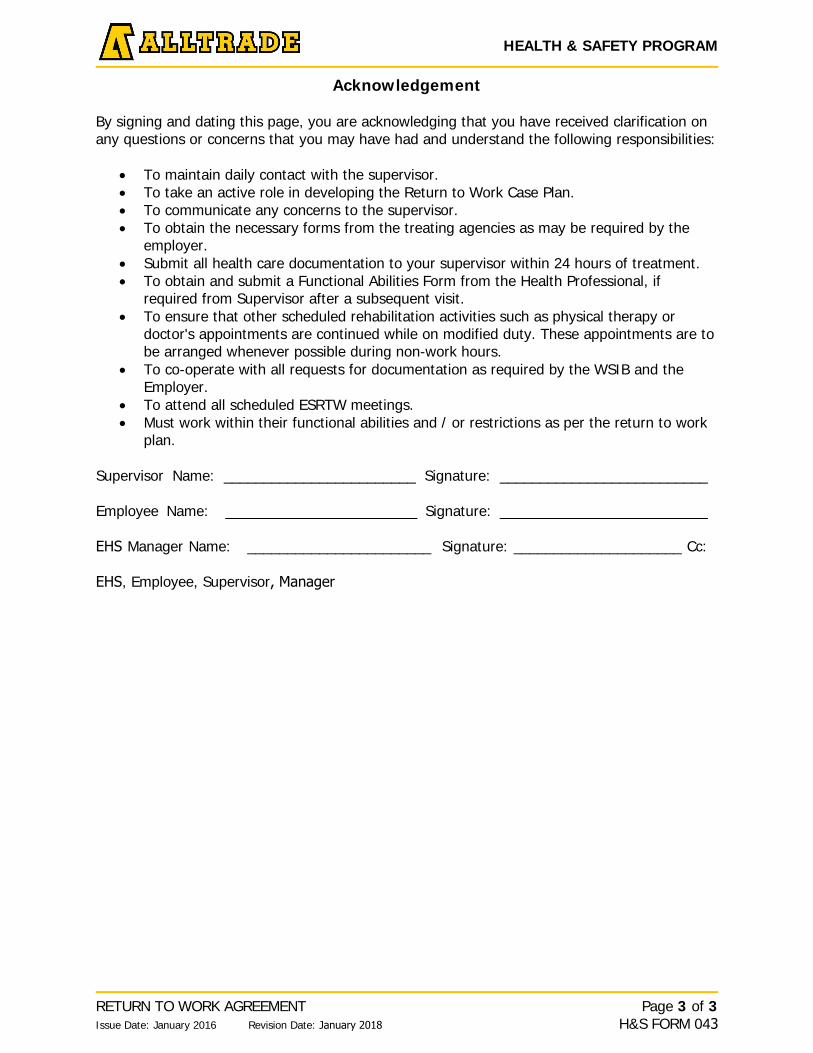
HEALTH & SAFETY PROGRAM
RETURN TO WORK AGREEMENT Issue Date: January 2016 Revision Date: January 2018
Page 3 of 3 H&S FORM 043
Acknowledgement
By signing and dating this page, you are acknowledging that you have received clarification on any questions or concerns that you may have had and understand the following responsibilities:
• To maintain daily contact with the supervisor.• To take an active role in developing the Return to Work Case Plan.• To communicate any concerns to the supervisor.• To obtain the necessary forms from the treating agencies as may be required by the
employer.• Submit all health care documentation to your supervisor within 24 hours of treatment.• To obtain and submit a Functional Abilities Form from the Health Professional, if
required from Supervisor after a subsequent visit.• To ensure that other scheduled rehabilitation activities such as physical therapy or
doctor's appointments are continued while on modified duty. These appointments are tobe arranged whenever possible during non-work hours.
• To co-operate with all requests for documentation as required by the WSIB and theEmployer.
• To attend all scheduled ESRTW meetings.• Must work within their functional abilities and / or restrictions as per the return to work
plan.
Supervisor Name: ________________________ Signature: __________________________
Employee Name: ________________________ Signature: __________________________
EHS Manager Name: _______________________ Signature: _____________________ Cc:
EHS, Employee, Supervisor, Manager
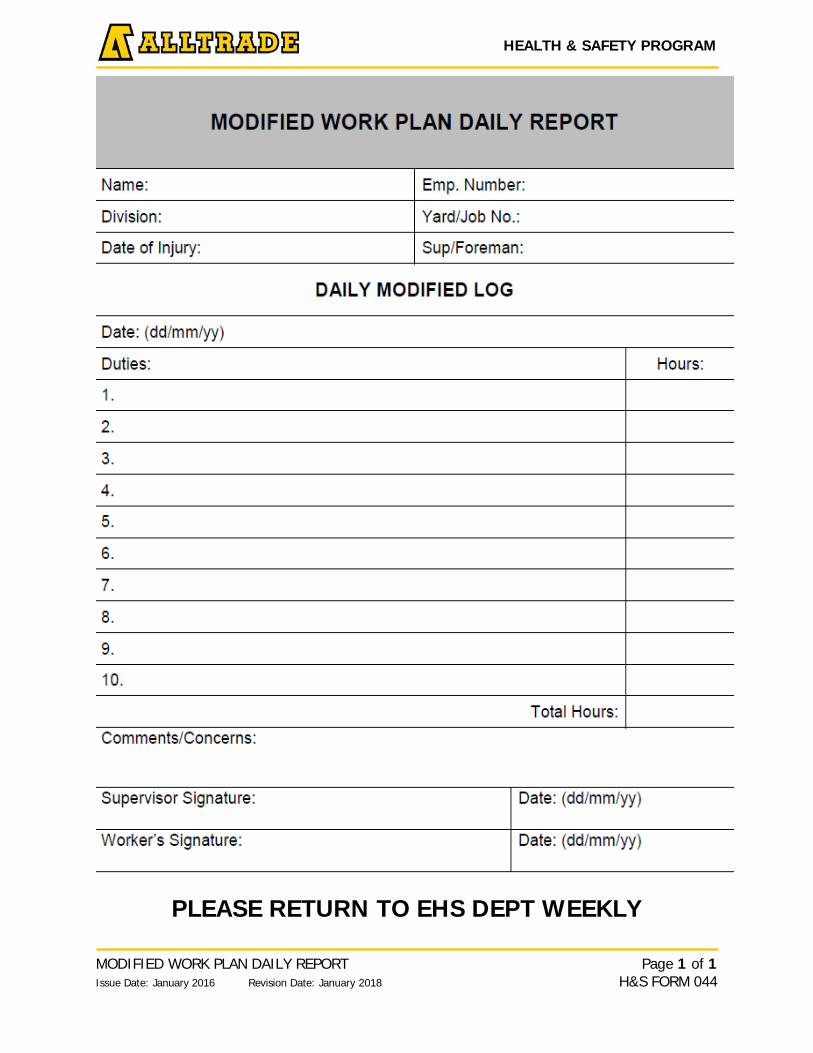
HEALTH & SAFETY PROGRAM
PLEASE RETURN TO EHS DEPT WEEKLY
MODIFIED WORK PLAN DAILY REPORT Page 1 of 1 Issue Date: January 2016 Revision Date: January 2018 H&S FORM 044
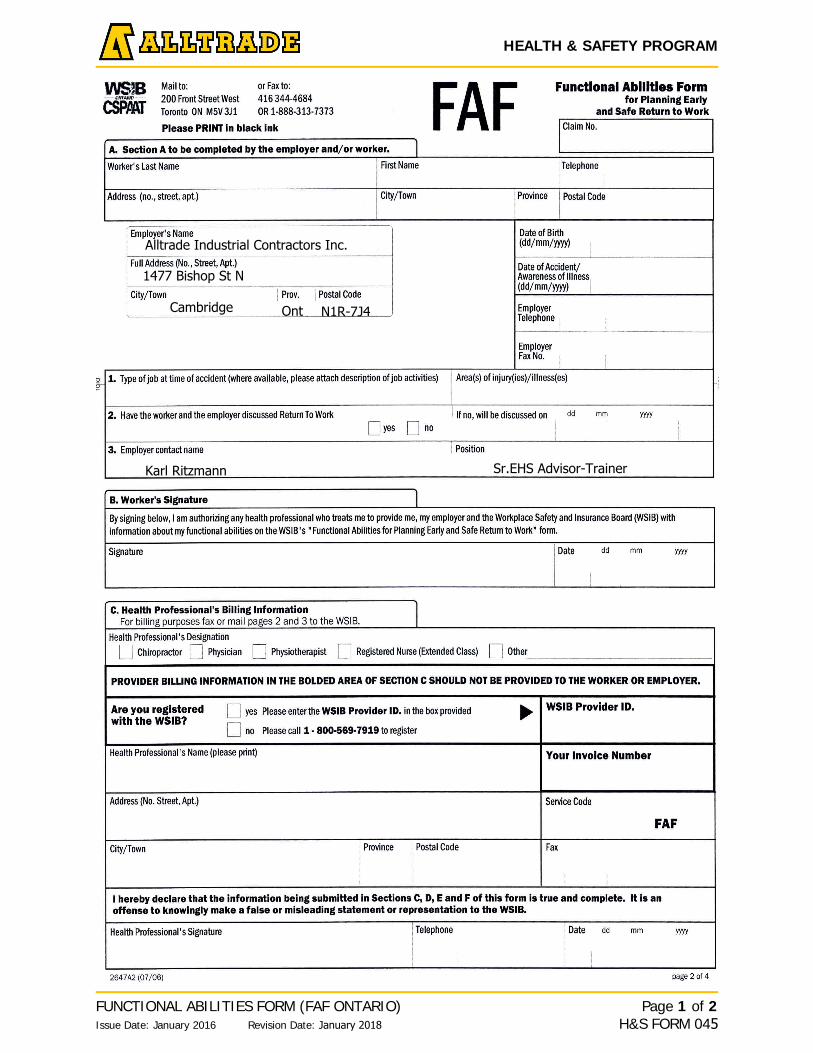
HEALTH & SAFETY PROGRAM
FUNCTIONAL ABILITIES FORM (FAF ONTARIO) Issue Date: January 2016 Revision Date: January 2018
Page 1 of 2 H&S FORM 045
Alltrade Industrial Contractors Inc.
1477 Bishop St N
Cambridge Ont N1R-7J4
Karl Ritzmann Sr.EHS Advisor-Trainer
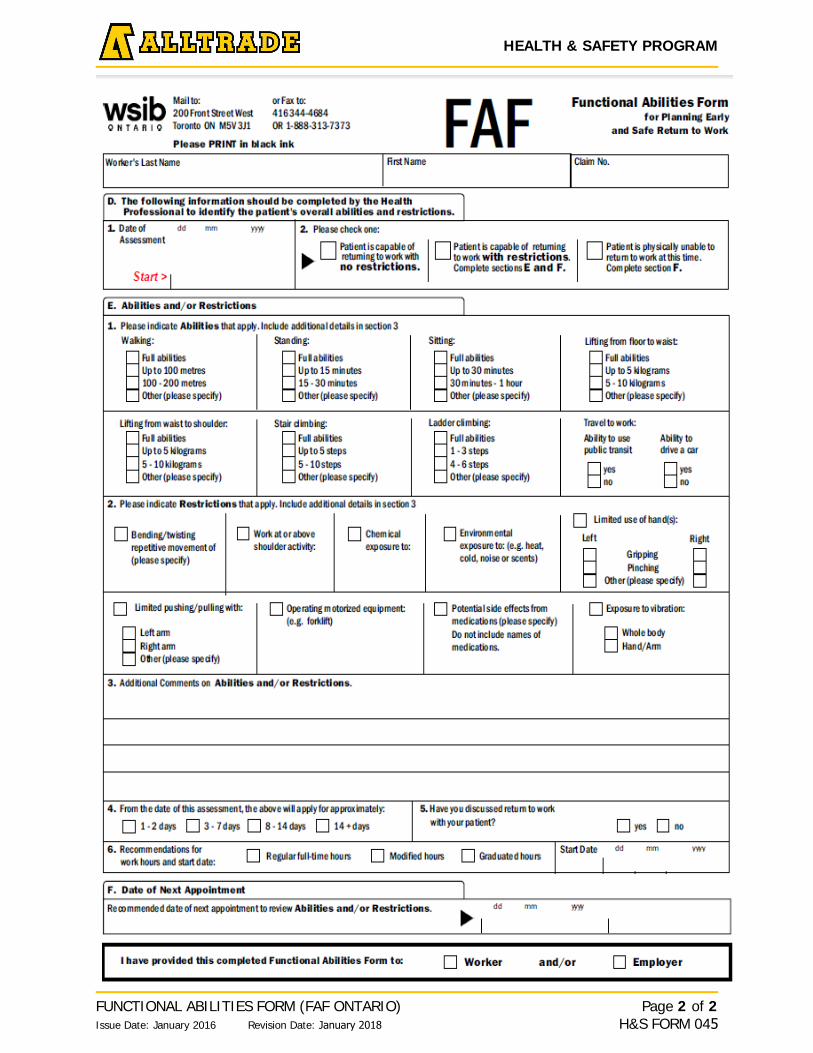
HEALTH & SAFETY PROGRAM
FUNCTIONAL ABILITIES FORM (FAF ONTARIO) Issue Date: January 2016 Revision Date: January 2018
Page 2 of 2 H&S FORM 045
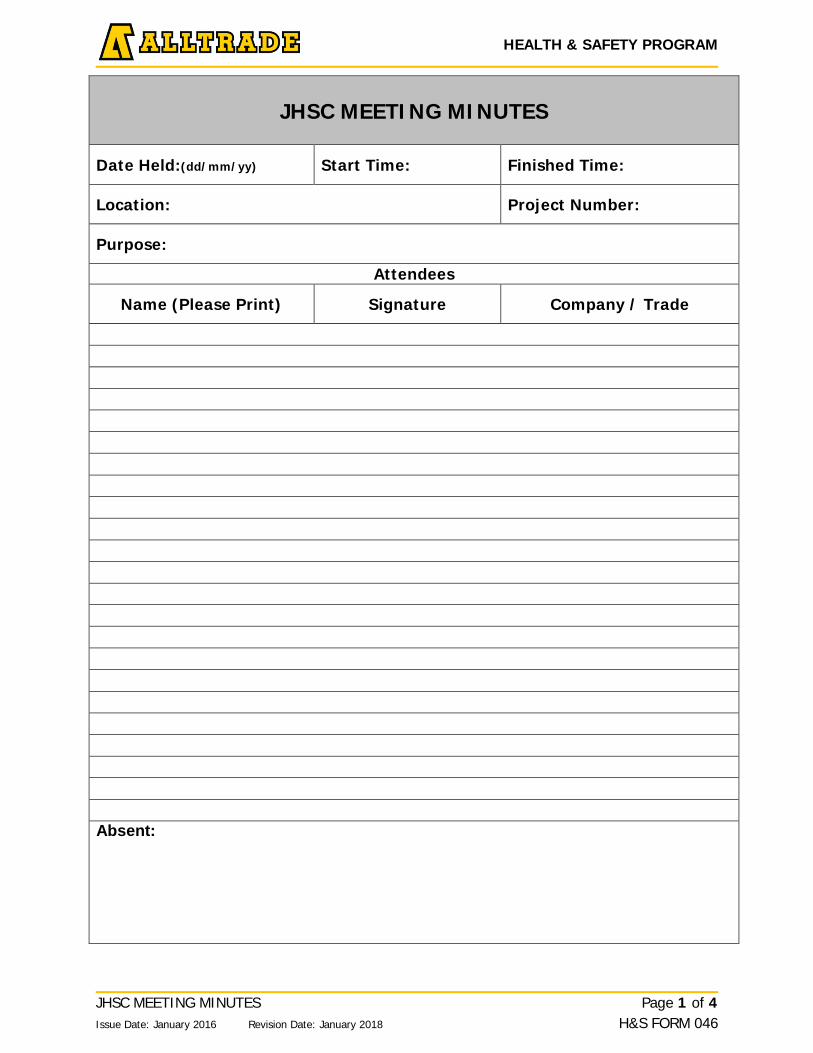
JHSC MEETING MINUTES Page 1 of 4 Issue Date: January 2016 Revision Date: January 2018 H&S FORM 046
HEALTH & SAFETY PROGRAM
JHSC MEETING MINUTES
Date Held:(dd/mm/yy) Start Time: Finished Time:
Location: Project Number:
Purpose:
Attendees
Name (Please Print) Signature Company / Trade
Absent:
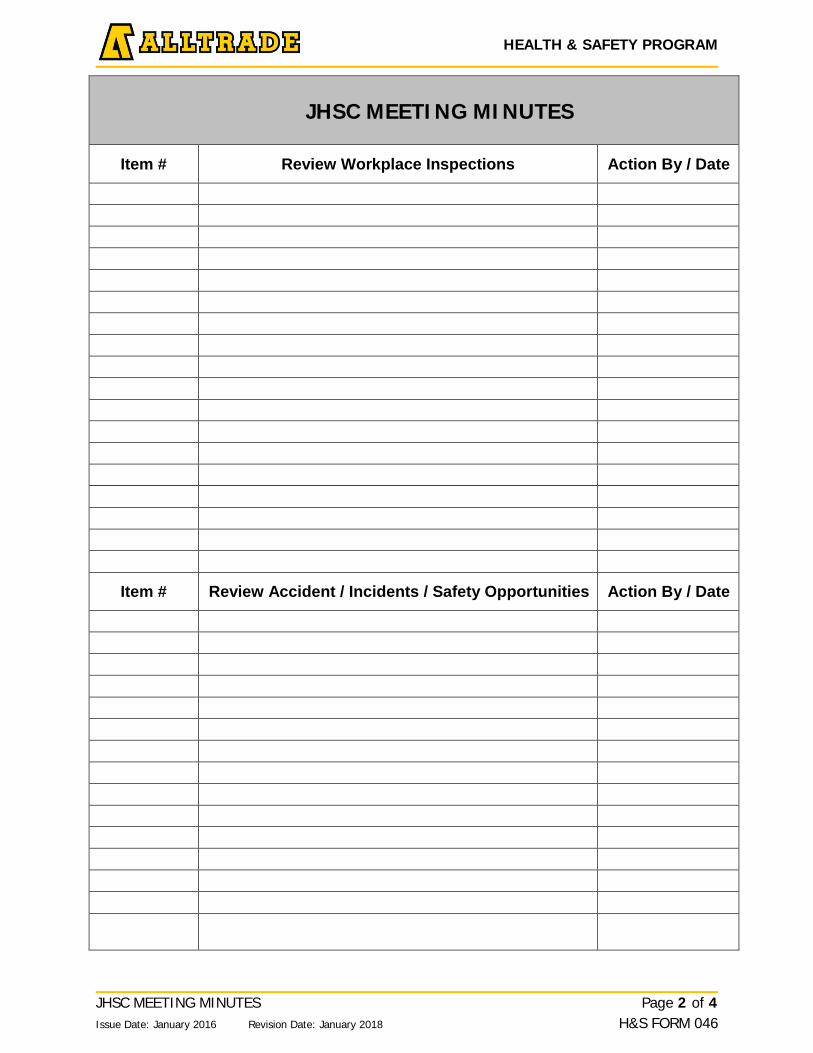
JHSC MEETING MINUTES Page 2 of 4 Issue Date: January 2016 Revision Date: January 2018 H&S FORM 046
HEALTH & SAFETY PROGRAM
JHSC MEETING MINUTES
Item # Review Workplace Inspections Action By / Date
Item # Review Accident / Incidents / Safety Opportunities Action By / Date
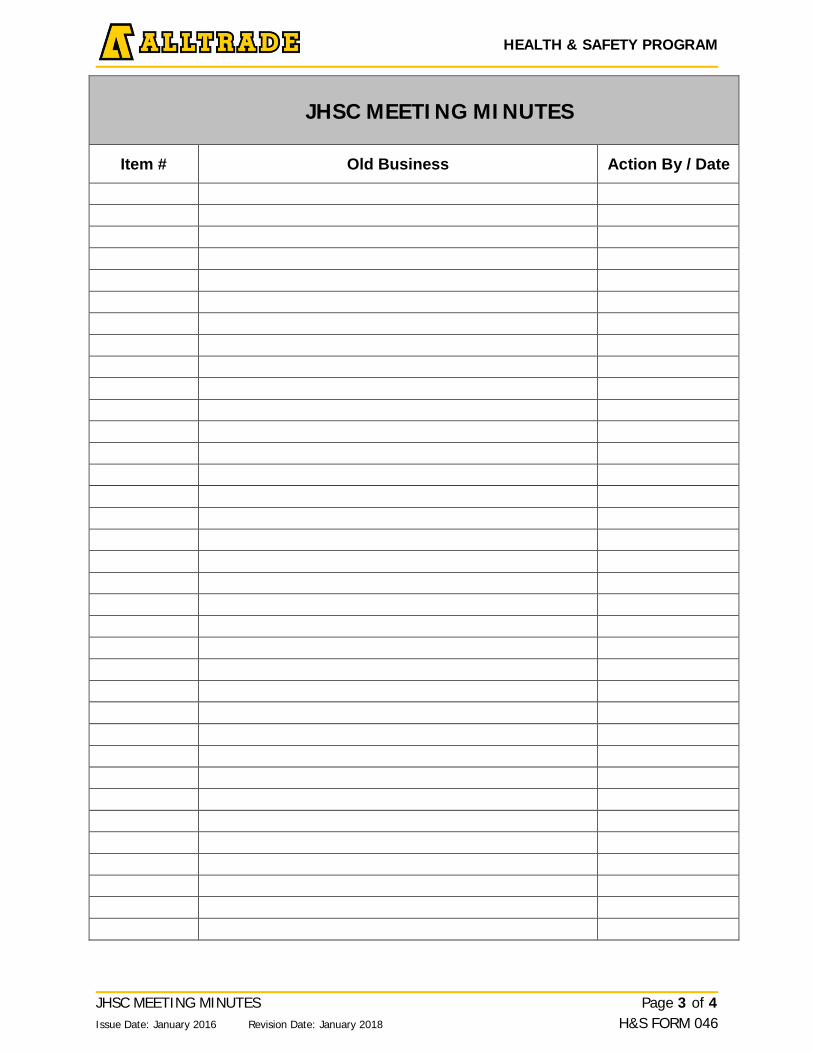
JHSC MEETING MINUTES Page 3 of 4 Issue Date: January 2016 Revision Date: January 2018 H&S FORM 046
HEALTH & SAFETY PROGRAM
JHSC MEETING MINUTES
Item # Old Business Action By / Date

JHSC MEETING MINUTES Page 4 of 4 Issue Date: January 2016 Revision Date: January 2018 H&S FORM 046
HEALTH & SAFETY PROGRAM
JHSC MEETING MINUTES
Item # New Business Action By / Date
Recorded By Date: (dd/mm/yy)
Signatures: Management
Signatures: Co-Chair:
Next Meeting:
Date: Time: Location:
:

HEALTH & SAFETY PROGRAM
JHSC RECOMMENDATION TO MANAGEMENT Issue Date: January 2016 Revision Date: January 2018
Page 1 of 1 H&S FORM 047
JOINT HEALTH & SAFETY COMMITTEE RECOMMENDATIONS TO MANAGEMENT
Facility: _______________________ Date(s):___________________
RE: __________________________
Reasons for recommendation:___________________________________________________________________________________________________________________________________________________________________________________________________________________________________________________________________________________________________________________________________________________________________________________
Requirements for implementation (supporting documentation may be attached):_________________________________________________________________________________________________________________________________________________________________________________________________________________________________________________________________________________________________________________________________________________________________________________________
Date presented to management: _________ / _______________ /____________ Day Month Year
(The date of this recommendation becomes the reference number)
___________________________ ___________________________
Management Worker
Recommendation presented to: _______________________________________
Expected date of response: _________ / _______________ /____________ Day Month Year
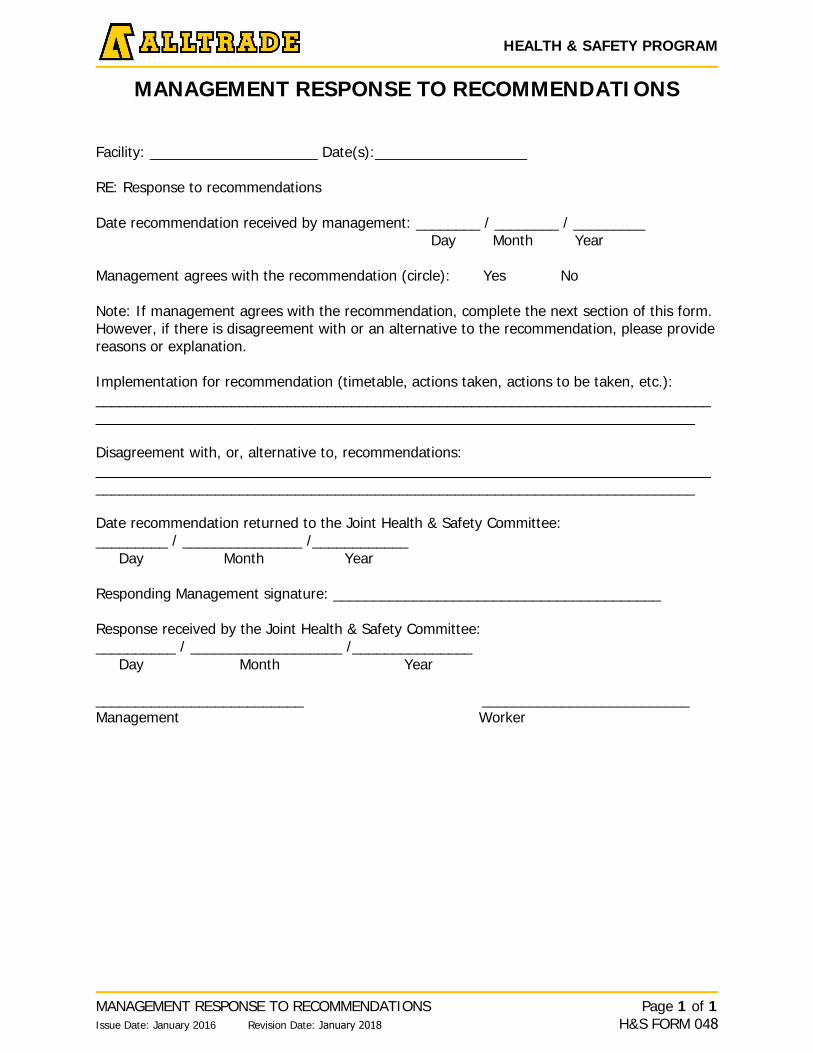
HEALTH & SAFETY PROGRAM
MANAGEMENT RESPONSE TO RECOMMENDATIONS Issue Date: January 2016 Revision Date: January 2018
Page 1 of 1 H&S FORM 048
MANAGEMENT RESPONSE TO RECOMMENDATIONS
Facility: _____________________ Date(s):___________________
RE: Response to recommendations
Date recommendation received by management: ________ / ________ / _________ Day Month Year
Management agrees with the recommendation (circle): Yes No
Note: If management agrees with the recommendation, complete the next section of this form. However, if there is disagreement with or an alternative to the recommendation, please provide reasons or explanation.
Implementation for recommendation (timetable, actions taken, actions to be taken, etc.): ________________________________________________________________________________________________________________________________________________________
Disagreement with, or, alternative to, recommendations: ________________________________________________________________________________________________________________________________________________________
Date recommendation returned to the Joint Health & Safety Committee: _________ / _______________ /____________
Day Month Year
Responding Management signature: _________________________________________
Response received by the Joint Health & Safety Committee: __________ / ___________________ /_______________
Day Month Year
__________________________ __________________________ Management Worker

HEALTH & SAFETY PROGRAM
PRECONSTRUCTION ENVIROMENTAL CHECKLIST Issue Date: January 2016 Revision Date: January 2018
Page 1 of 3 H&S FORM 049
PRECONSTRUCTION ENVIRONMENTAL MANAGEMENT REVIEW (CHECKLIST)
Conducted by EHS Advisor, Supervisor, and or Project Management.
Note: File Audit on site and send to EHS for audit purposes.
Project Name: Job #:
Location: Projected Manpower:
Completed By: Reviewed By:
Signature: Signature:
Date:(dd/mm/yy) Time:
Item # Actions Requested Assigned To Corrective Actions
Completed (Sign-off)
Date (dd/mm/yy)
General Comments:
Jurisdiction:
Nearest Emergency (911) Medical & Spill Response Team:
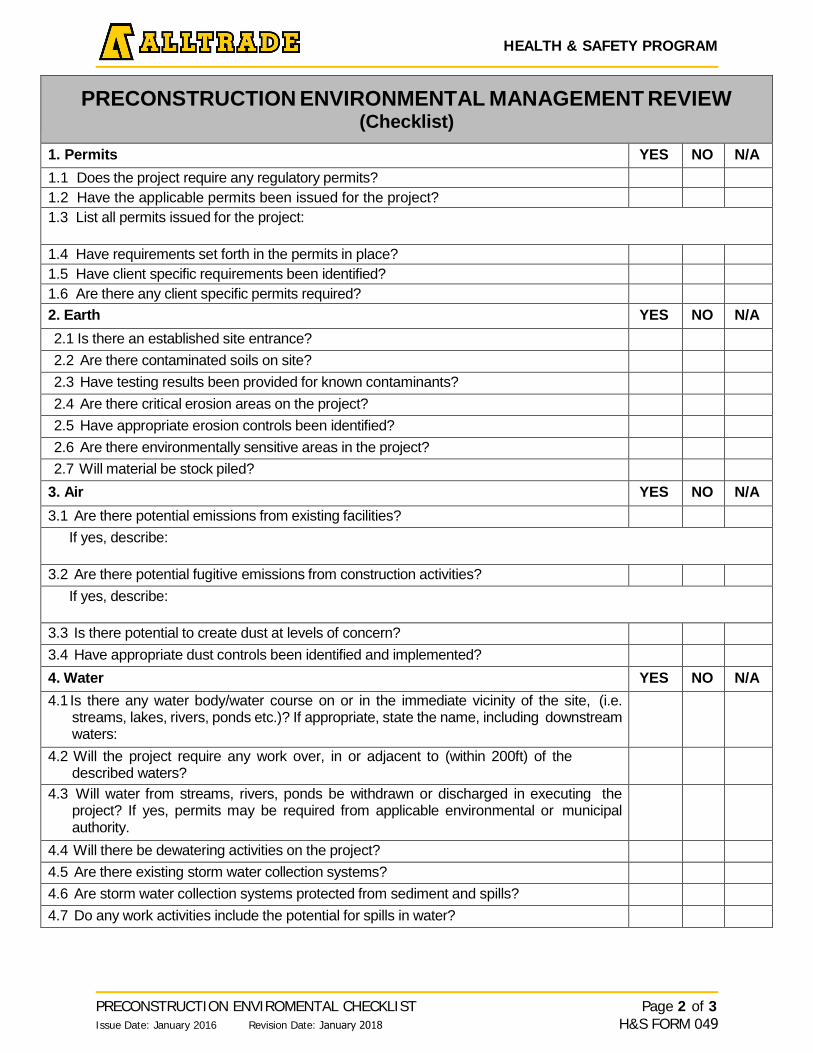
HEALTH & SAFETY PROGRAM
PRECONSTRUCTION ENVIROMENTAL CHECKLIST Issue Date: January 2016 Revision Date: January 2018
Page 2 of 3 H&S FORM 049
PRECONSTRUCTION ENVIRONMENTAL MANAGEMENT REVIEW (Checklist)
1. Permits YES NO N/A 1.1 Does the project require any regulatory permits? 1.2 Have the applicable permits been issued for the project? 1.3 List all permits issued for the project:
1.4 Have requirements set forth in the permits in place? 1.5 Have client specific requirements been identified? 1.6 Are there any client specific permits required? 2. Earth YES NO N/A
2.1 Is there an established site entrance? 2.2 Are there contaminated soils on site? 2.3 Have testing results been provided for known contaminants? 2.4 Are there critical erosion areas on the project? 2.5 Have appropriate erosion controls been identified? 2.6 Are there environmentally sensitive areas in the project? 2.7 Will material be stock piled?
3. Air YES NO N/A
3.1 Are there potential emissions from existing facilities? If yes, describe:
3.2 Are there potential fugitive emissions from construction activities? If yes, describe:
3.3 Is there potential to create dust at levels of concern? 3.4 Have appropriate dust controls been identified and implemented? 4. Water YES NO N/A 4.1 Is there any water body/water course on or in the immediate vicinity of the site, (i.e.
streams, lakes, rivers, ponds etc.)? If appropriate, state the name, including downstream waters:
4.2 Will the project require any work over, in or adjacent to (within 200ft) of the described waters?
4.3 Will water from streams, rivers, ponds be withdrawn or discharged in executing the project? If yes, permits may be required from applicable environmental or municipal authority.
4.4 Will there be dewatering activities on the project? 4.5 Are there existing storm water collection systems? 4.6 Are storm water collection systems protected from sediment and spills? 4.7 Do any work activities include the potential for spills in water?

HEALTH & SAFETY PROGRAM
PRECONSTRUCTION ENVIROMENTAL CHECKLIST Issue Date: January 2016 Revision Date: January 2018
Page 3 of 3 H&S FORM 049
5. Noise YES NO N/A
5.1 Will work on the project create excessive noise/community impact? 5.2 Indicate the hours of the day that noise will be generated on the project: From:
To: 5.3 Will noise exceed allowable levels and timeframes as specified in local noise
bylaws?
6. Hazardous Material Handling and Storage YES NO N/A
6.1 Will hazardous materials be stored on the project? 6.2 Are MSDS’s up to date and readily available for hazardous materials that will stored
on site? 6.3 Are hazardous material storage areas established? 6.4 Are appropriate containment measures in place for all hazardous material
storage? 6.5 Is applicable warning signage in place for all hazardous material storage? 6.6 Are hazardous storage areas located a minimum of 200ft from all waterways? 6.7 Have designated fuelling and maintenance areas been established a minimum of 200
ft from all waterways?
7. Spill Prevention and Preparedness YES NO N/A
7.1 Do all stationary powered equipment (i.e. generators, welding machines, etc.) have adequate secondary containment?
7.2 Do all bulk liquid storage tanks (i.e. fuel tanks, flushing fluid etc.) have secondary containment?
7.3 Are bulk storage tanks adequately protected from vehicular traffic? 7.4 Is there a preventive maintenance program in effect for all mobile equipment? 7.5 Do properly qualified operators perform daily inspections of all mobile
equipment? 7.6 Has the appropriate type and quantity of spill response equipment been
provided? 7.7 Have appropriate spill contingency plans been developed? 7.8 Has a spill response coordinator and team been identified? 7.9 Have the spill response coordinator and team been trained on their respective roles
and the contingency plan? 7.10Have the appropriate reporting protocols for spills been established?
This checklist is intended to supplement rather than replace, an erosion control plan approved by local authorities. In the event of a conflict, the most stringent standards will apply.
Keep a copy of this checklist on site.
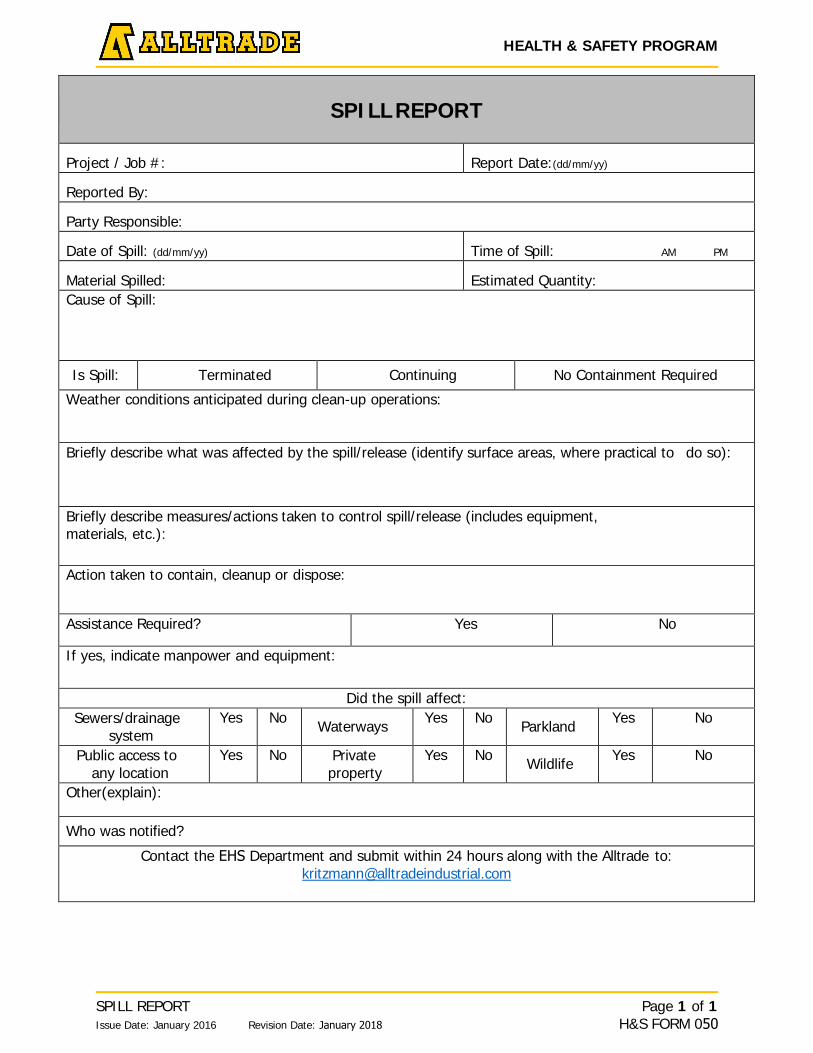
HEALTH & SAFETY PROGRAM
SPILL REPORT Issue Date: January 2016 Revision Date: January 2018
Page 1 of 1 H&S FORM 050
SPILL REPORT
Project / Job #: Report Date:(dd/mm/yy)
Reported By:
Party Responsible:
Date of Spill: (dd/mm/yy) Time of Spill: AM PM
Material Spilled: Estimated Quantity: Cause of Spill:
Is Spill: Terminated Continuing No Containment Required
Weather conditions anticipated during clean-up operations:
Briefly describe what was affected by the spill/release (identify surface areas, where practical to do so):
Briefly describe measures/actions taken to control spill/release (includes equipment, materials, etc.):
Action taken to contain, cleanup or dispose:
Assistance Required? Yes No
If yes, indicate manpower and equipment:
Did the spill affect: Sewers/drainage
system Yes No Waterways Yes No Parkland Yes No
Public access to any location
Yes No Private property
Yes No Wildlife Yes No
Other(explain):
Who was notified?
Contact the EHS Department and submit within 24 hours along with the Alltrade to: [email protected]
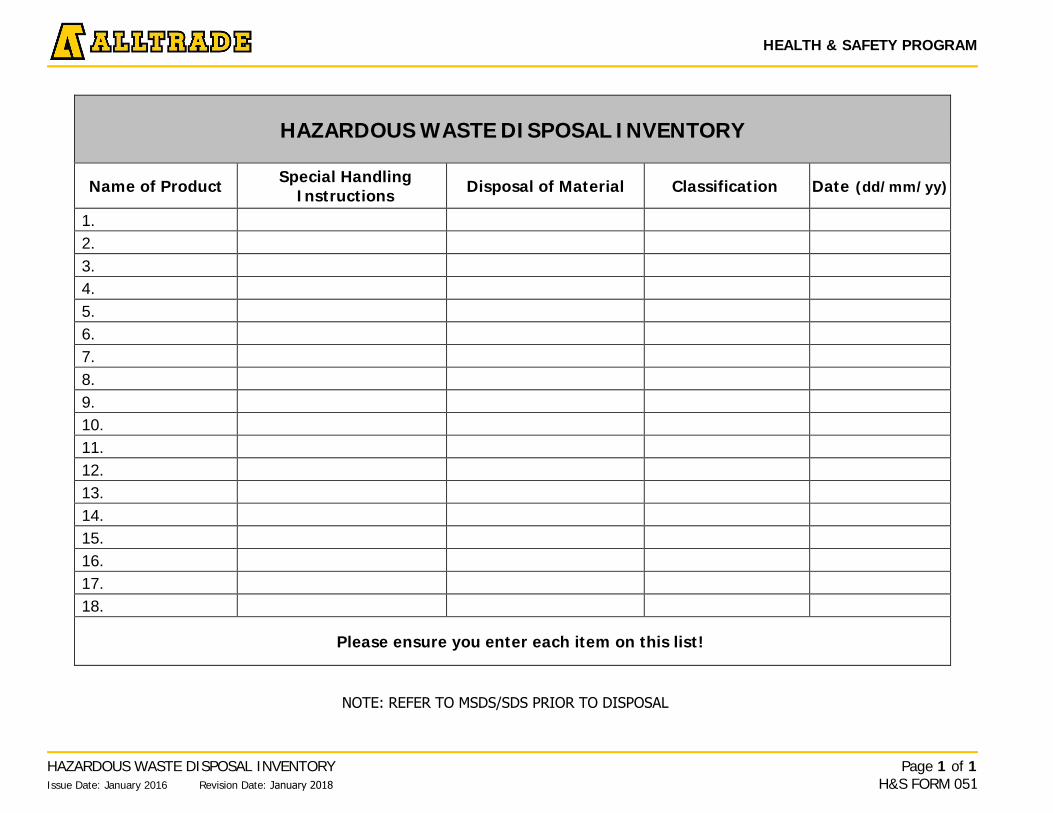
HEALTH & SAFETY PROGRAM
HAZARDOUS WASTE DISPOSAL INVENTORY Issue Date: January 2016 Revision Date: January 2018
Page 1 of 1 H&S FORM 051
HAZARDOUS WASTE DISPOSAL INVENTORY
Name of Product Special Handling Instructions Disposal of Material Classification Date (dd/mm/yy)
1. 2. 3. 4. 5. 6. 7. 8. 9. 10. 11. 12. 13. 14. 15. 16. 17. 18.
Please ensure you enter each item on this list!
NOTE: REFER TO MSDS/SDS PRIOR TO DISPOSAL

HEALTH & SAFETY PROGRAM
SUBCONTRACTOR CLEAN UP NOTIFICATION Issue Date: January 2016 Revision Date: January 2018
Page 1 of 1 H&S FORM 052
SUBCONTRACTOR CLEAN-UP NOTIFICATION
Good attention to housekeeping will eliminate many unsafe conditions that includes tripping hazards and unsafe material storage. Additionally, a clean project allows for better organization of the work activity.
Alltrade requires that all sub trades comply with all clean-up requirements to ensure housekeeping is maintained at the highest standard on the project.
Date: (dd/mm/yy) Time:
Name of Subcontractor:
Project Location: Project #: You are hereby notified and required to clean-up and remove all garbage, trash and debris connected with your work. Areas requiring attention are:
Manager/Superintendent: Date: (dd/mm/yy) Time:
Note: Failure to comply w ill result in the cleanup being performed by others w ith a charge back to your company.
Subcontractor Follow Up:
The areas described above have been cleaned up: Yes Signature: Date: (dd/mm/yy) Time:
Comments:
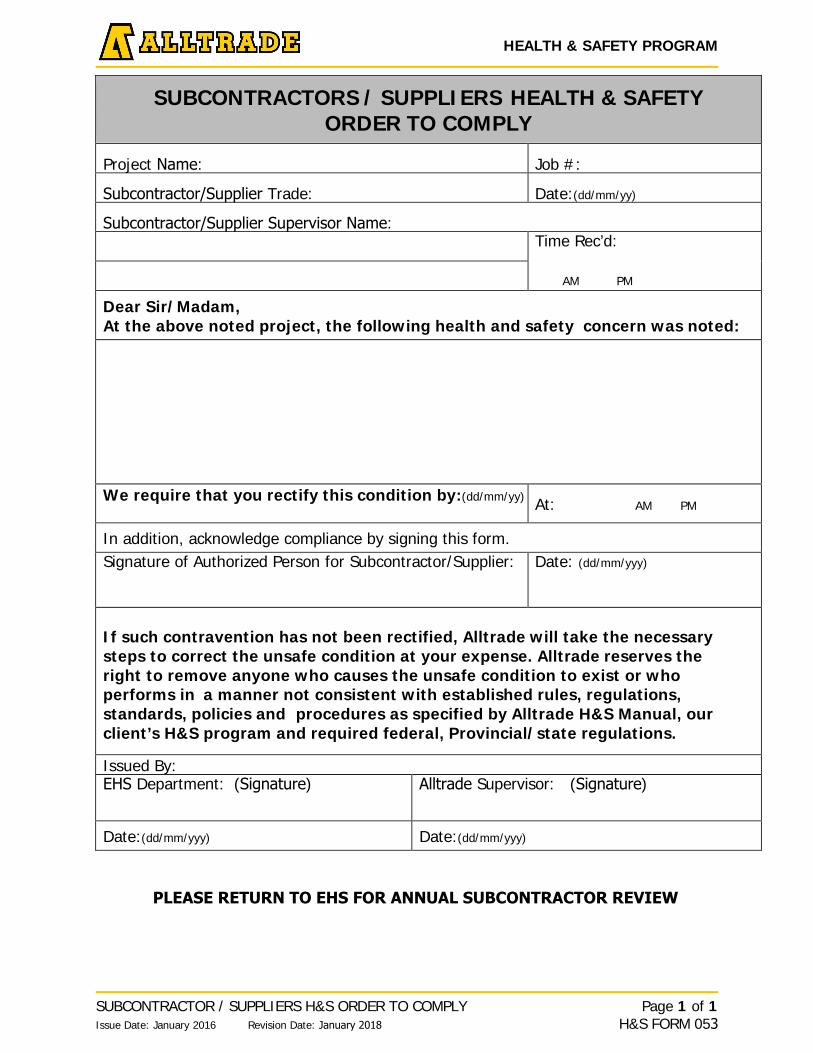
HEALTH & SAFETY PROGRAM
SUBCONTRACTOR / SUPPLIERS H&S ORDER TO COMPLY Issue Date: January 2016 Revision Date: January 2018
Page 1 of 1 H&S FORM 053
SUBCONTRACTORS / SUPPLIERS HEALTH & SAFETY ORDER TO COMPLY
Project Name: Job #:
Subcontractor/Supplier Trade: Date:(dd/mm/yy)
Subcontractor/Supplier Supervisor Name:
Time Rec’d:
AM PM Dear Sir/Madam, At the above noted project, the following health and safety concern was noted:
We require that you rectify this condition by:(dd/mm/yy) At: AM PM
In addition, acknowledge compliance by signing this form. Signature of Authorized Person for Subcontractor/Supplier: Date: (dd/mm/yyy)
If such contravention has not been rectified, Alltrade will take the necessary steps to correct the unsafe condition at your expense. Alltrade reserves the right to remove anyone who causes the unsafe condition to exist or who performs in a manner not consistent with established rules, regulations, standards, policies and procedures as specified by Alltrade H&S Manual, our client’s H&S program and required federal, Provincial/state regulations.
Issued By: EHS Department: (Signature) Alltrade Supervisor: (Signature)
Date:(dd/mm/yyy) Date:(dd/mm/yyy)
PLEASE RETURN TO EHS FOR ANNUAL SUBCONTRACTOR REVIEW
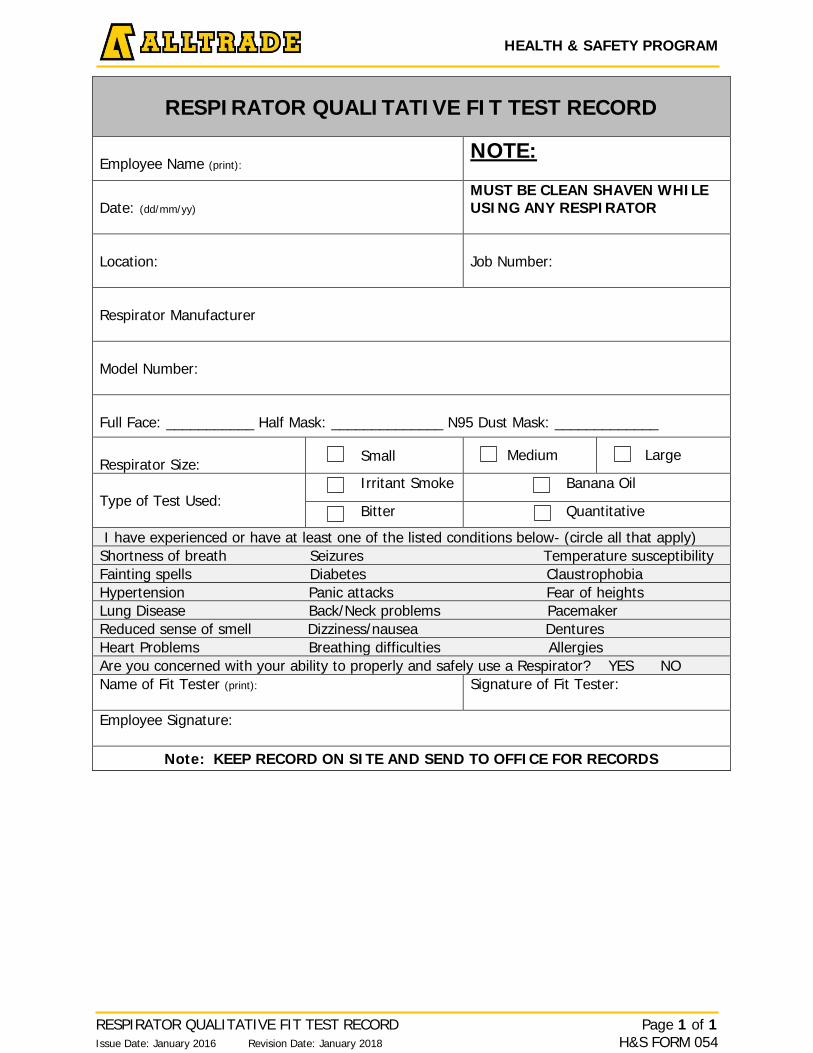
RESPIRATOR QUALITATIVE FIT TEST RECORD
Employee Name (print):
NOTE:
Date: (dd/mm/yy)
MUST BE CLEAN SHAVEN WHILE USING ANY RESPIRATOR
Location:
Job Number:
Respirator Manufacturer Model Number: Full Face: ___________ Half Mask: ______________ N95 Dust Mask: _____________
Respirator Size: Small Medium Large
Type of Test Used:
Irritant Smoke Banana Oil
Bitter Quantitative
I have experienced or have at least one of the listed conditions below- (circle all that apply) Shortness of breath Seizures Temperature susceptibility Fainting spells Diabetes Claustrophobia Hypertension Panic attacks Fear of heights Lung Disease Back/Neck problems Pacemaker Reduced sense of smell Dizziness/nausea Dentures Heart Problems Breathing difficulties Allergies Are you concerned with your ability to properly and safely use a Respirator? YES NO Name of Fit Tester (print):
Signature of Fit Tester:
Employee Signature:
Note: KEEP RECORD ON SITE AND SEND TO OFFICE FOR RECORDS
RESPIRATOR QUALITATIVE FIT TEST RECORD Page 1 of 1 Issue Date: January 2016 Revision Date: January 2018 H&S FORM 054
HEALTH & SAFETY PROGRAM
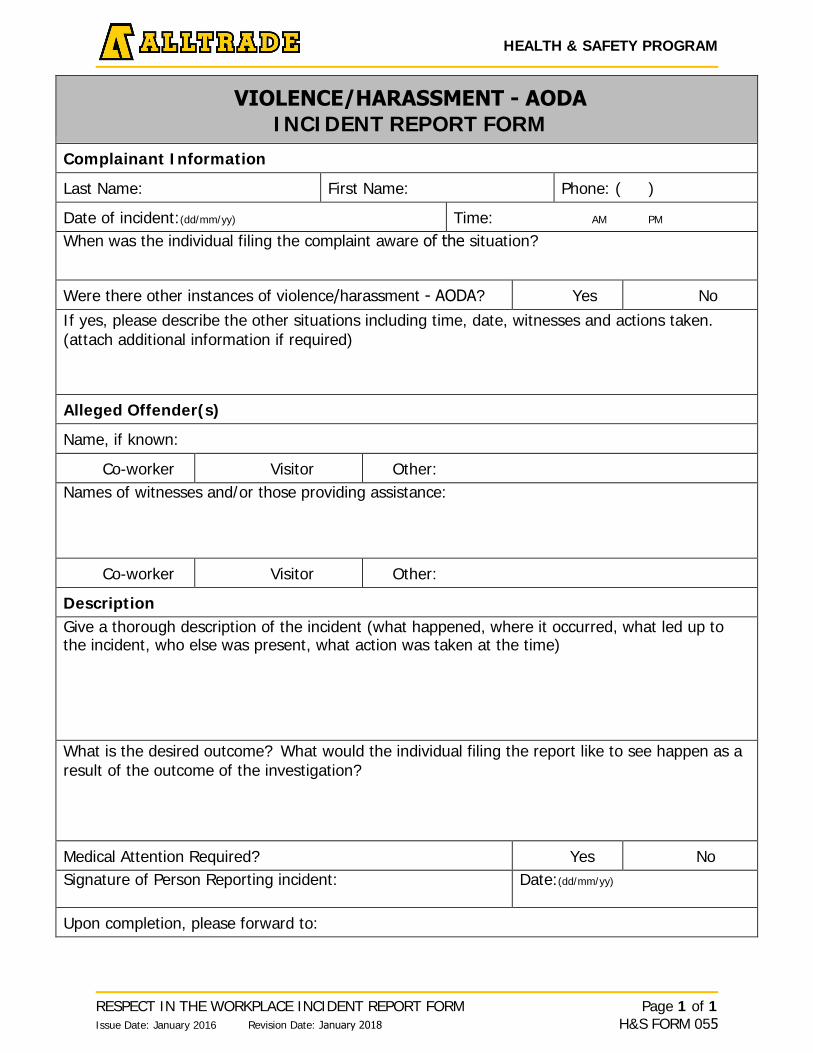
HEALTH & SAFETY PROGRAM
RESPECT IN THE WORKPLACE INCIDENT REPORT FORM Issue Date: January 2016 Revision Date: January 2018
Page 1 of 1 H&S FORM 055
VIOLENCE/HARASSMENT - AODA INCIDENT REPORT FORM
Complainant Information
Last Name: First Name: Phone: ( )
Date of incident:(dd/mm/yy) Time: AM PM
When was the individual filing the complaint aware of the situation?
Were there other instances of violence/harassment - AODA? Yes No If yes, please describe the other situations including time, date, witnesses and actions taken. (attach additional information if required)
Alleged Offender(s)
Name, if known:
Co-worker Visitor Other: Names of witnesses and/or those providing assistance:
Co-worker Visitor Other:
Description Give a thorough description of the incident (what happened, where it occurred, what led up to the incident, who else was present, what action was taken at the time)
What is the desired outcome? What would the individual filing the report like to see happen as a result of the outcome of the investigation?
Medical Attention Required? Yes No Signature of Person Reporting incident: Date:(dd/mm/yy)
Upon completion, please forward to:

HEALTH & SAFETY PROGRAM
PHYSICAL ENVIRONMENT HAZARD ASSESSMENT Issue Date: June 2016 Revision Date: January 2018
Page 1 of 6 H&S FORM 056
PHYSICAL ENVIRONMENT HAZARD ASSESSMENT
Note: File inspection on site and send to EHS for audit purposes.
Project Name: Job Number:
Location:
Inspected By:
Reviewed By:
Date: Time:
Corrective Actions / Follow - Up
Item # Corrective Action Corrective Action Completed (sign-off)
Date (dd/mm/yy)
General Comments:

HEALTH & SAFETY PROGRAM
PHYSICAL ENVIRONMENT HAZARD ASSESSMENT Issue Date: June 2016 Revision Date: January 2018
Page 2 of 6 H&S FORM 056
PHYSICAL ENVIRONMENT HAZARD ASSESSMENT
1.0 Parking Lot Yes No N/A Existing Controls
Actions Required Y/N
If yes then note in report summary
Yes No 1.1 Are the entrances and exits well marked? 1.2 Does the lot have signs with security reminders?
(e.g., ‘lock your car,’ ‘security patrolled’) 1.3 Is there enough lighting? 1.4 Are emergency assistance alarms clearly marked? 1.5 Do pass cards control access to the lot? 1.6 Have vehicles been stolen from the parking lot? 1.7 Have vehicles been broken into?
2.0 Around the Outside of the Building (Perimeter) Yes No N/A Existing Controls
Actions Required Y/N
If yes then note in report summary
Yes No
2.1 Is your workplace near any buildings or businesses that are at risk from violent crime (eg,bars, banks)?
2.2 Do violent, criminal, drunk, or drugged persons ever come into your building?
2.3 Is your building located in a high-crime area? 2.4 Are there signs of vandalism? 2.5 Are you isolated from other buildings? 2.6 Is there graffiti on the building walls?
2.7
Are garbage areas, external buildings, or equipment that employees use: -in an area with good visibility?-close to the main building with no possiblehiding places?
2.8 Is your building shared with other businesses? 2.9 If yes, is entry to your area(s) controlled? 2.10 Is there a system to alert employees if intruders
enter? 2.11 Are offices designed so that public and private
spaces are clearly identified? 2.12 Do you use coded cards or keys to control access to
the building or to certain areas within the building? 2.13 Is there a system in place to limit the number
of keys/entry cards given out? 2.14 Do you change locks/codes immediately if
Keys /cards are lost or misplaced?
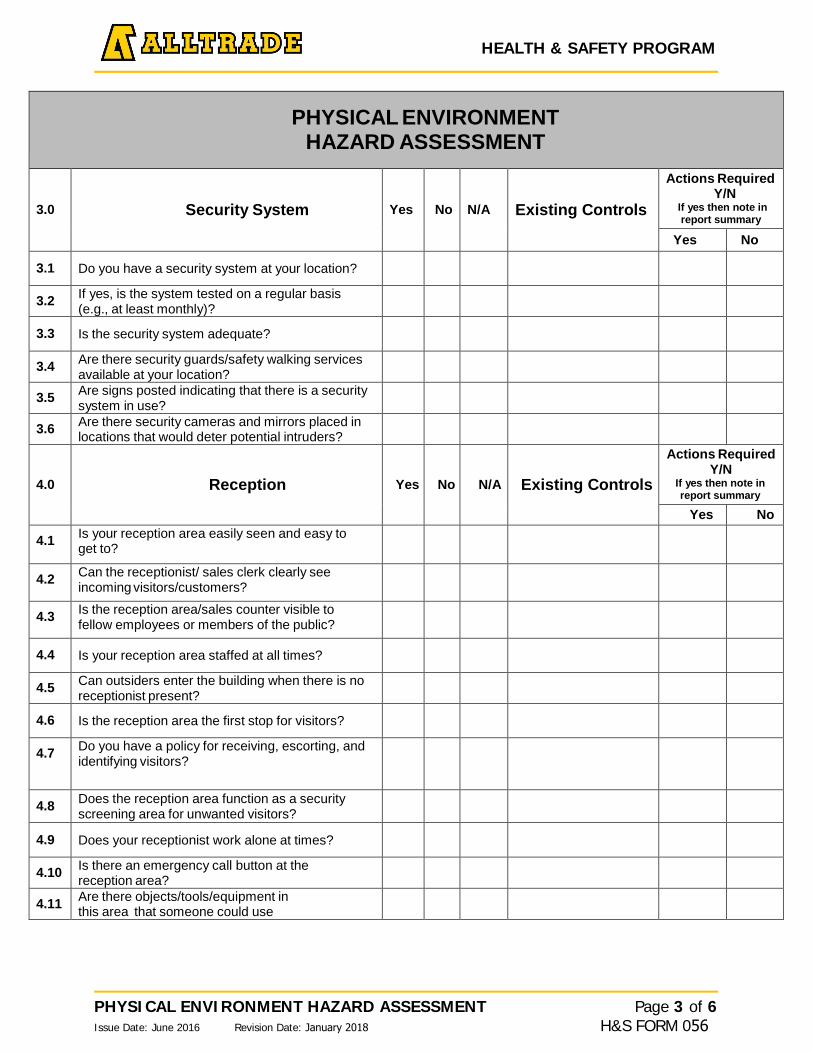
HEALTH & SAFETY PROGRAM
PHYSICAL ENVIRONMENT HAZARD ASSESSMENT Issue Date: June 2016 Revision Date: January 2018
Page 3 of 6 H&S FORM 056
PHYSICAL ENVIRONMENT HAZARD ASSESSMENT
3.0 Security System Yes No N/A Existing Controls
Actions Required Y/N
If yes then note in report summary
Yes No
3.1 Do you have a security system at your location?
3.2 If yes, is the system tested on a regular basis (e.g., at least monthly)?
3.3 Is the security system adequate?
3.4 Are there security guards/safety walking services available at your location?
3.5 Are signs posted indicating that there is a security system in use?
3.6 Are there security cameras and mirrors placed in locations that would deter potential intruders?
4.0 Reception Yes No N/A Existing Controls
Actions Required Y/N
If yes then note in report summary
Yes No 4.1 Is your reception area easily seen and easy to
get to?
4.2 Can the receptionist/ sales clerk clearly see incoming visitors/customers?
4.3 Is the reception area/sales counter visible to fellow employees or members of the public?
4.4 Is your reception area staffed at all times?
4.5 Can outsiders enter the building when there is no receptionist present?
4.6 Is the reception area the first stop for visitors?
4.7 Do you have a policy for receiving, escorting, and identifying visitors?
4.8 Does the reception area function as a security screening area for unwanted visitors?
4.9 Does your receptionist work alone at times?
4.10 Is there an emergency call button at the reception area?
4.11 Are there objects/tools/equipment in this area that someone could use
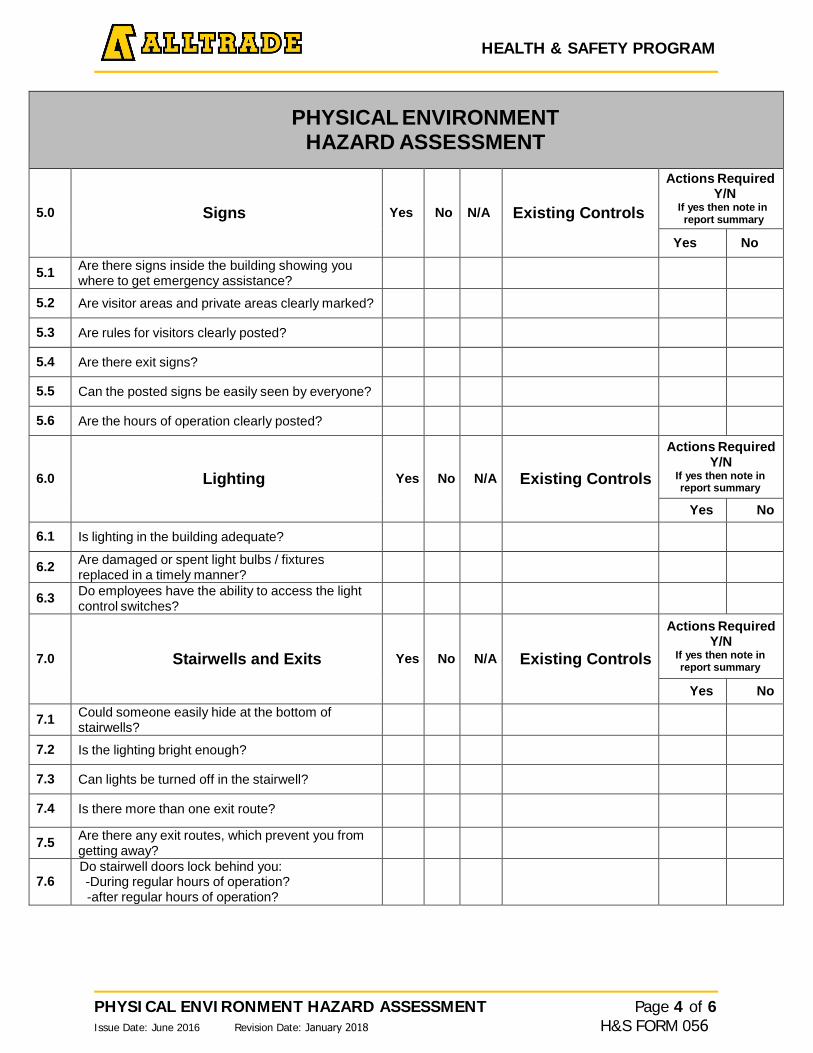
HEALTH & SAFETY PROGRAM
PHYSICAL ENVIRONMENT HAZARD ASSESSMENT Issue Date: June 2016 Revision Date: January 2018
Page 4 of 6 H&S FORM 056
PHYSICAL ENVIRONMENT HAZARD ASSESSMENT
5.0 Signs Yes No N/A Existing Controls
Actions Required Y/N
If yes then note in report summary
Yes No
5.1 Are there signs inside the building showing you where to get emergency assistance?
5.2 Are visitor areas and private areas clearly marked?
5.3 Are rules for visitors clearly posted?
5.4 Are there exit signs?
5.5 Can the posted signs be easily seen by everyone?
5.6 Are the hours of operation clearly posted?
6.0 Lighting Yes No N/A Existing Controls
Actions Required Y/N
If yes then note in report summary
Yes No
6.1 Is lighting in the building adequate?
6.2 Are damaged or spent light bulbs / fixtures replaced in a timely manner?
6.3 Do employees have the ability to access the light control switches?
7.0 Stairwells and Exits Yes No N/A Existing Controls
Actions Required Y/N
If yes then note in report summary
Yes No
7.1 Could someone easily hide at the bottom of stairwells?
7.2 Is the lighting bright enough?
7.3 Can lights be turned off in the stairwell?
7.4 Is there more than one exit route?
7.5 Are there any exit routes, which prevent you from getting away?
7.6 Do stairwell doors lock behind you: -During regular hours of operation?-after regular hours of operation?
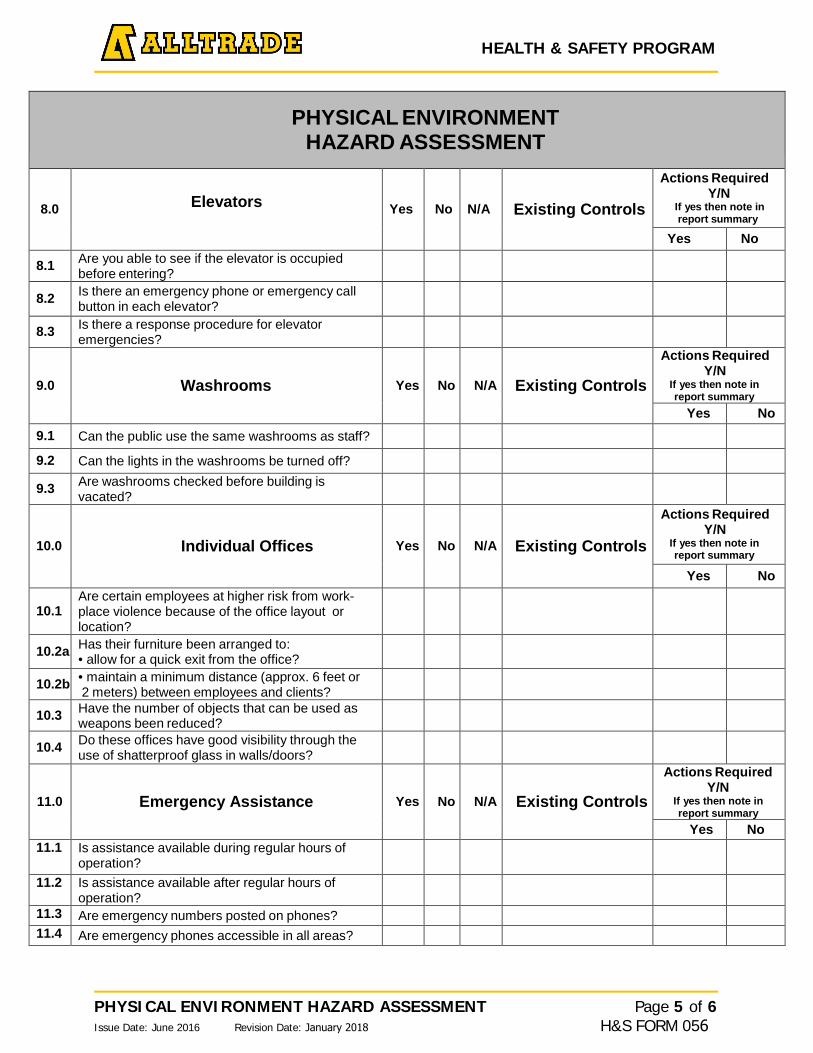
HEALTH & SAFETY PROGRAM
PHYSICAL ENVIRONMENT HAZARD ASSESSMENT Issue Date: June 2016 Revision Date: January 2018
Page 5 of 6 H&S FORM 056
PHYSICAL ENVIRONMENT HAZARD ASSESSMENT
8.0 Elevators Yes No N/A Existing Controls
Actions Required Y/N
If yes then note in report summary
Yes No
8.1 Are you able to see if the elevator is occupied before entering?
8.2 Is there an emergency phone or emergency call button in each elevator?
8.3 Is there a response procedure for elevator emergencies?
9.0 Washrooms Yes No N/A Existing Controls
Actions Required Y/N
If yes then note in report summary
Yes No 9.1 Can the public use the same washrooms as staff? 9.2 Can the lights in the washrooms be turned off?
9.3 Are washrooms checked before building is vacated?
10.0 Individual Offices Yes No N/A Existing Controls
Actions Required Y/N
If yes then note in report summary
Yes No
10.1 Are certain employees at higher risk from work- place violence because of the office layout or location?
10.2a Has their furniture been arranged to: • allow for a quick exit from the office?
10.2b • maintain a minimum distance (approx. 6 feet or2 meters) between employees and clients?
10.3 Have the number of objects that can be used as weapons been reduced?
10.4 Do these offices have good visibility through the use of shatterproof glass in walls/doors?
11.0 Emergency Assistance Yes No N/A Existing Controls
Actions Required Y/N
If yes then note in report summary
Yes No 11.1 Is assistance available during regular hours of
operation? 11.2 Is assistance available after regular hours of
operation? 11.3 Are emergency numbers posted on phones? 11.4 Are emergency phones accessible in all areas?
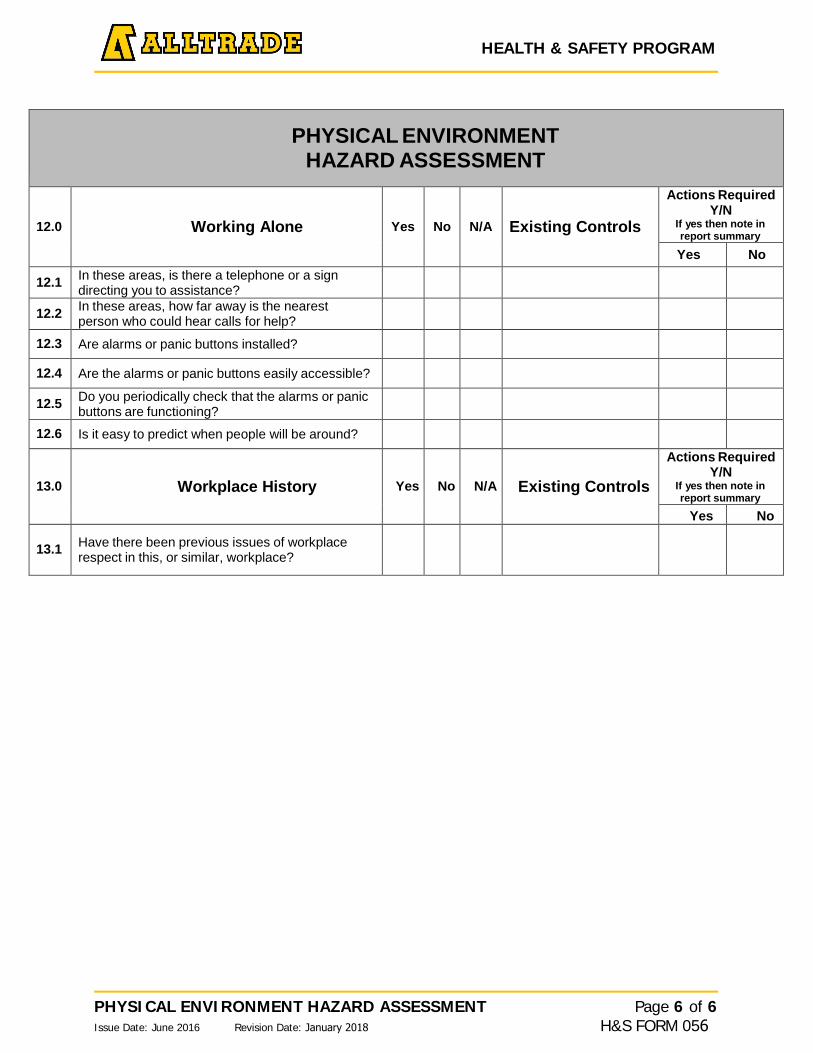
HEALTH & SAFETY PROGRAM
PHYSICAL ENVIRONMENT HAZARD ASSESSMENT Issue Date: June 2016 Revision Date: January 2018
Page 6 of 6 H&S FORM 056
PHYSICAL ENVIRONMENT HAZARD ASSESSMENT
12.0 Working Alone Yes No N/A Existing Controls
Actions Required Y/N
If yes then note in report summary
Yes No
12.1 In these areas, is there a telephone or a sign directing you to assistance?
12.2 In these areas, how far away is the nearest person who could hear calls for help?
12.3 Are alarms or panic buttons installed?
12.4 Are the alarms or panic buttons easily accessible?
12.5 Do you periodically check that the alarms or panic buttons are functioning?
12.6 Is it easy to predict when people will be around?
13.0 Workplace History Yes No N/A Existing Controls
Actions Required Y/N
If yes then note in report summary
Yes No
13.1 Have there been previous issues of workplace respect in this, or similar, workplace?
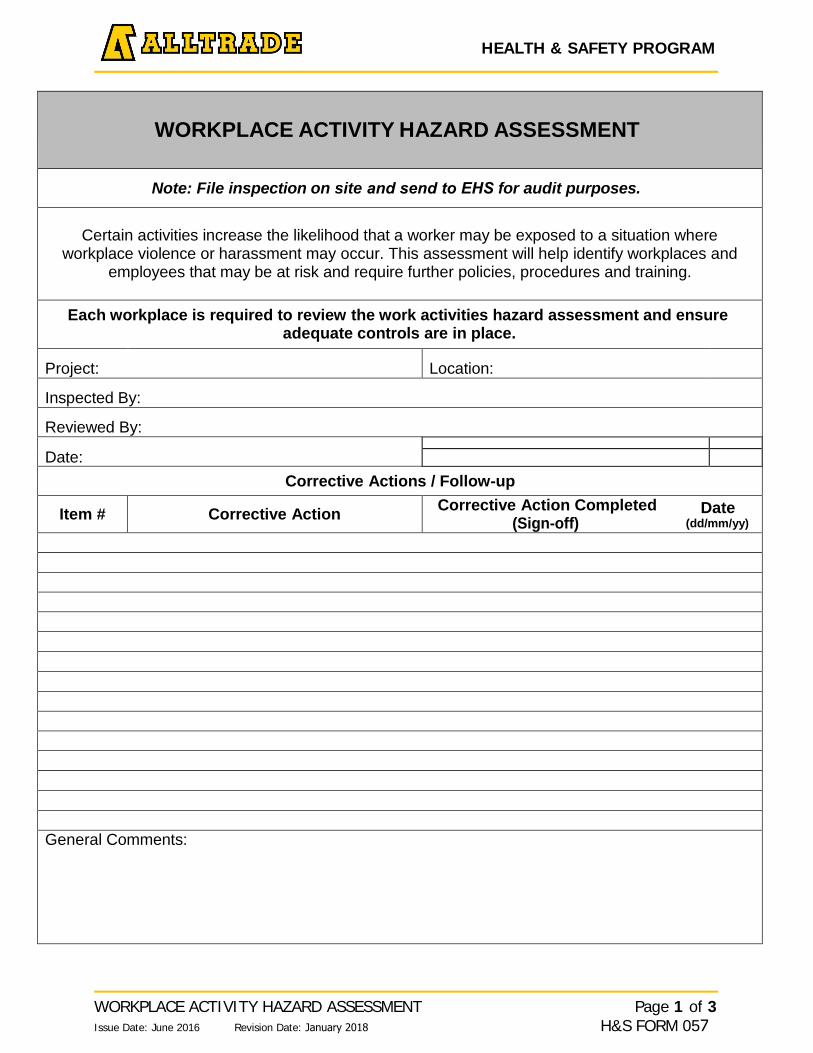
HEALTH & SAFETY PROGRAM
WORKPLACE ACTIVITY HAZARD ASSESSMENT Issue Date: June 2016 Revision Date: January 2018
Page 1 of 3 H&S FORM 057
WORKPLACE ACTIVITY HAZARD ASSESSMENT
Note: File inspection on site and send to EHS for audit purposes.
Certain activities increase the likelihood that a worker may be exposed to a situation where workplace violence or harassment may occur. This assessment will help identify workplaces and
employees that may be at risk and require further policies, procedures and training.
Each workplace is required to review the work activities hazard assessment and ensure adequate controls are in place.
Project: Location:
Inspected By:
Reviewed By:
Date:Corrective Actions / Follow-up
Item # Corrective Action Corrective Action Completed Date (Sign-off) (dd/mm/yy)
General Comments:
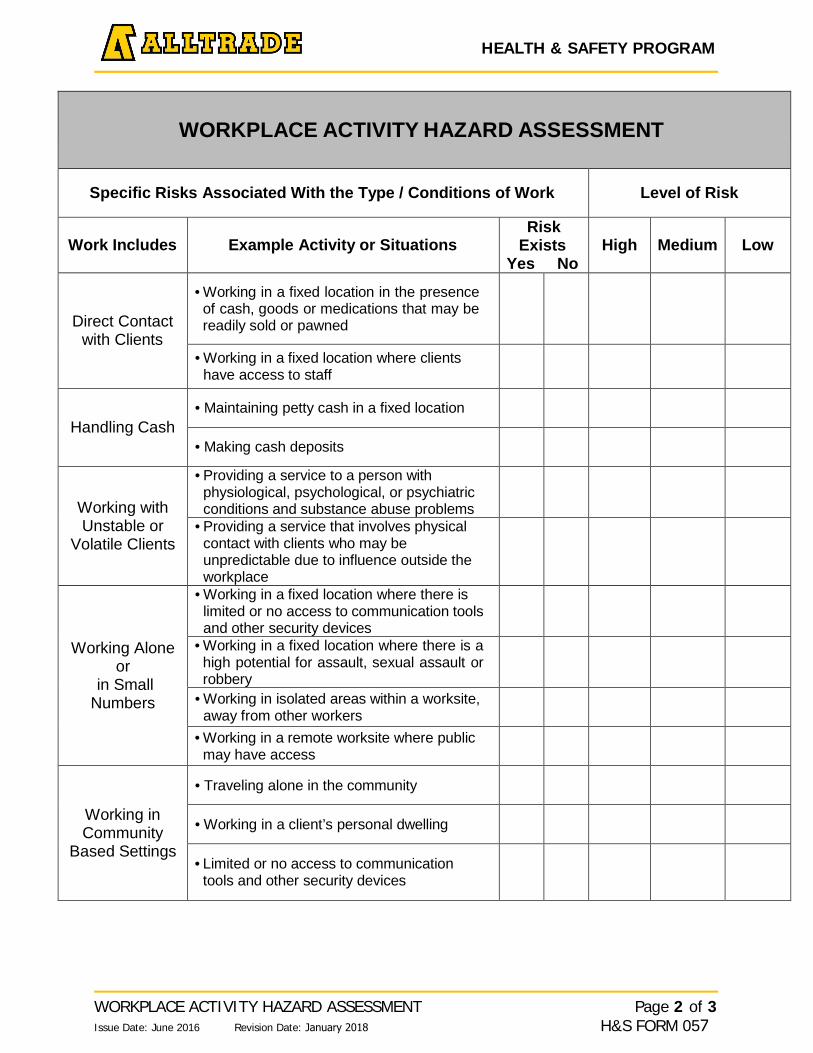
HEALTH & SAFETY PROGRAM
WORKPLACE ACTIVITY HAZARD ASSESSMENT Issue Date: June 2016 Revision Date: January 2018
Page 2 of 3 H&S FORM 057
WORKPLACE ACTIVITY HAZARD ASSESSMENT
Specific Risks Associated With the Type / Conditions of Work Level of Risk
Work Includes Example Activity or Situations Risk
Exists Yes No
High Medium Low
Direct Contact with Clients
• Working in a fixed location in the presenceof cash, goods or medications that may bereadily sold or pawned
• Working in a fixed location where clientshave access to staff
Handling Cash • Maintaining petty cash in a fixed location
• Making cash deposits
Working with Unstable or
Volatile Clients
• Providing a service to a person withphysiological, psychological, or psychiatricconditions and substance abuse problems
• Providing a service that involves physicalcontact with clients who may beunpredictable due to influence outside theworkplace
Working Alone or
in Small Numbers
• Working in a fixed location where there islimited or no access to communication toolsand other security devices
• Working in a fixed location where there is ahigh potential for assault, sexual assault orrobbery
• Working in isolated areas within a worksite,away from other workers
• Working in a remote worksite where publicmay have access
Working in Community
Based Settings
• Traveling alone in the community
• Working in a client’s personal dwelling
• Limited or no access to communicationtools and other security devices
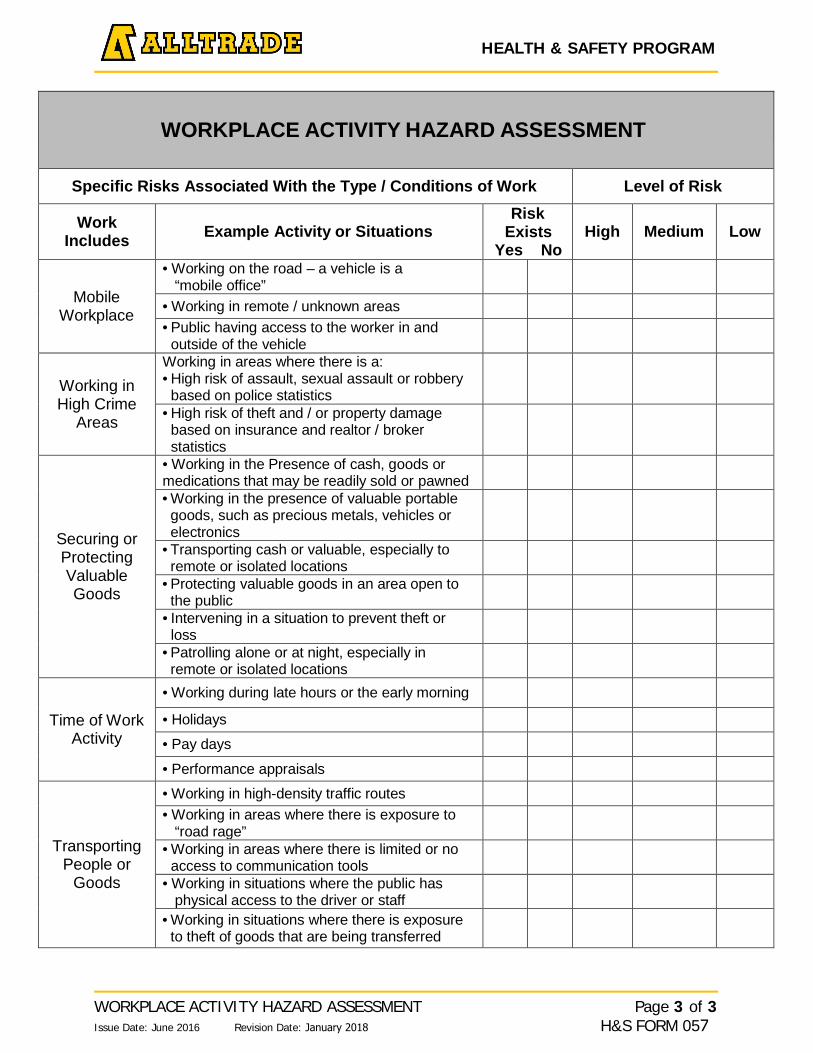
HEALTH & SAFETY PROGRAM
WORKPLACE ACTIVITY HAZARD ASSESSMENT Issue Date: June 2016 Revision Date: January 2018
Page 3 of 3 H&S FORM 057
WORKPLACE ACTIVITY HAZARD ASSESSMENT
Specific Risks Associated With the Type / Conditions of Work Level of Risk
Work Includes Example Activity or Situations
Risk Exists
Yes No High Medium Low
Mobile Workplace
• Working on the road – a vehicle is a“mobile office”
• Working in remote / unknown areas• Public having access to the worker in and
outside of the vehicle
Working in High Crime
Areas
Working in areas where there is a: • High risk of assault, sexual assault or robbery
based on police statistics• High risk of theft and / or property damage
based on insurance and realtor / brokerstatistics
Securing or Protecting Valuable Goods
• Working in the Presence of cash, goods ormedications that may be readily sold or pawned• Working in the presence of valuable portablegoods, such as precious metals, vehicles orelectronics
• Transporting cash or valuable, especially toremote or isolated locations
• Protecting valuable goods in an area open tothe public
• Intervening in a situation to prevent theft orloss
• Patrolling alone or at night, especially inremote or isolated locations
Time of Work Activity
• Working during late hours or the early morning
• Holidays
• Pay days
• Performance appraisals
Transporting People or
Goods
• Working in high-density traffic routes• Working in areas where there is exposure to
“road rage”• Working in areas where there is limited or no
access to communication tools• Working in situations where the public has
physical access to the driver or staff• Working in situations where there is exposureto theft of goods that are being transferred
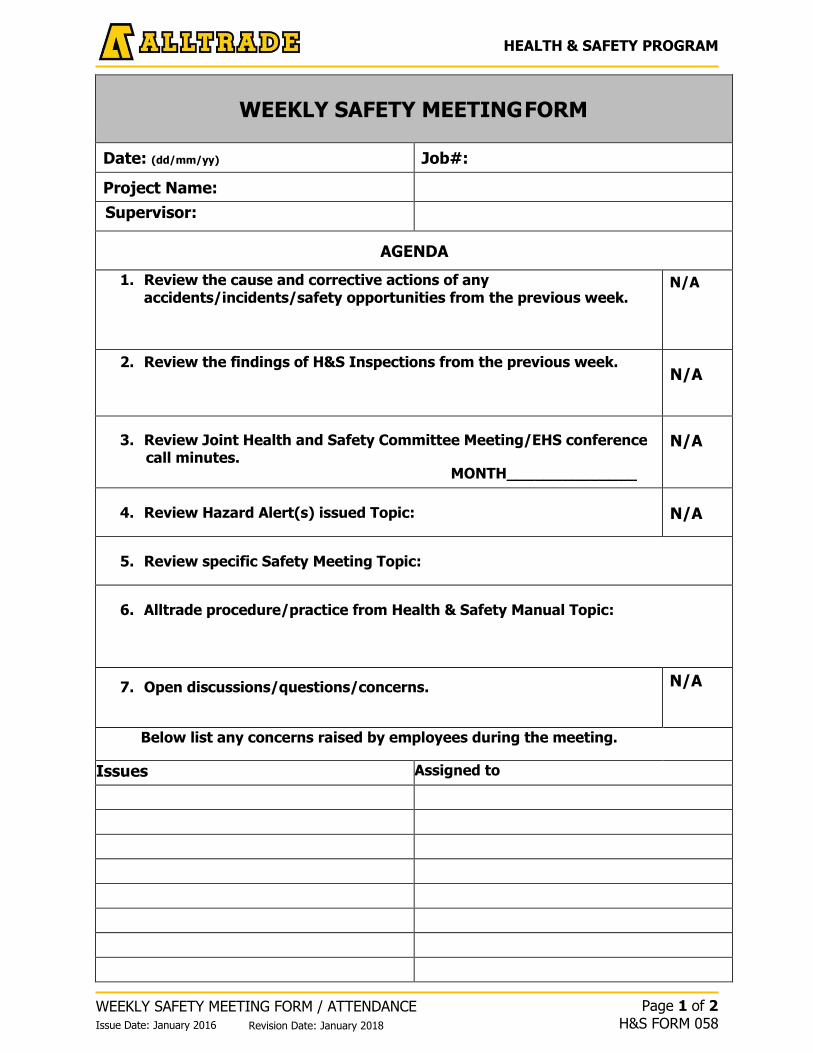
HEALTH & SAFETY PROGRAM
WEEKLY SAFETY MEETING FORM / ATTENDANCE Page 1 of 2 H&S FORM 058 Issue Date: January 2016 Revision Date: January 2018
WEEKLY SAFETY MEETING FORM
Date: (dd/mm/yy) Job#:
Project Name:
Supervisor:
AGENDA
1. Review the cause and corrective actions of anyaccidents/incidents/safety opportunities from the previous week.
N/A
2. Review the findings of H&S Inspections from the previous week.N/A
3. Review Joint Health and Safety Committee Meeting/EHS conferencecall minutes.
MONTH______________
N/A
4. Review Hazard Alert(s) issued Topic: N/A
5. Review specific Safety Meeting Topic:
6. Alltrade procedure/practice from Health & Safety Manual Topic:
7. Open discussions/questions/concerns. N/A
Below list any concerns raised by employees during the meeting. RESOLUTION
Issues Assigned to
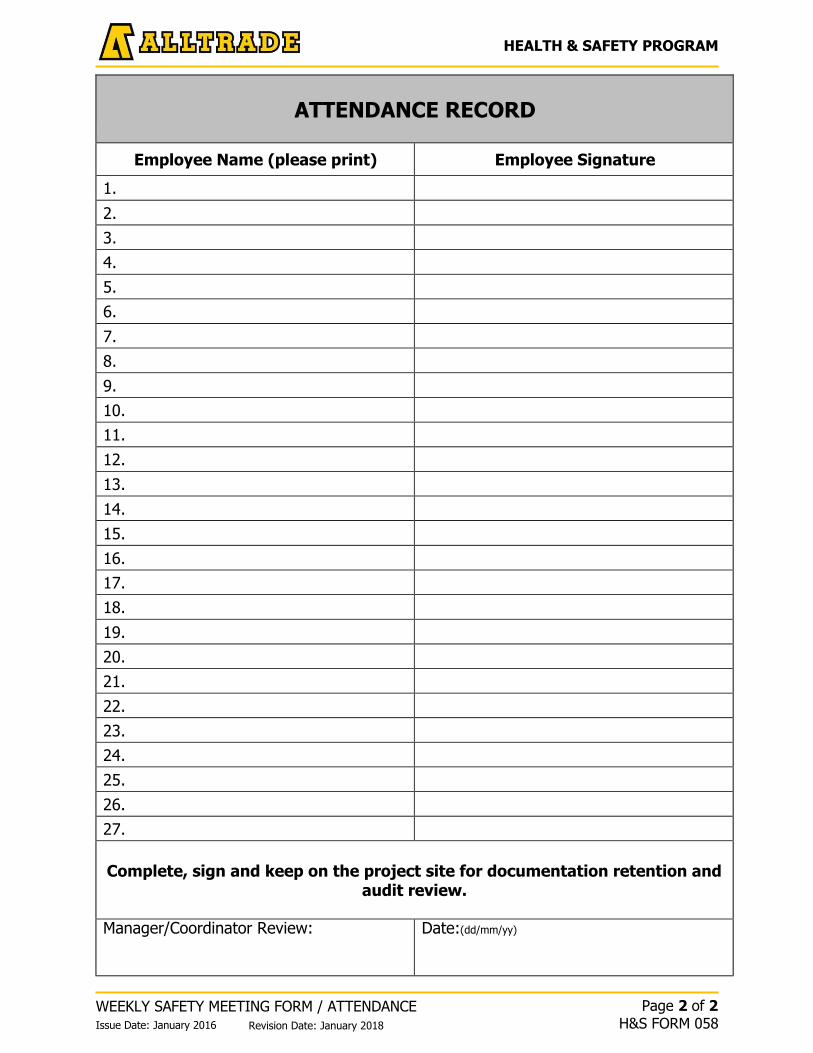
HEALTH & SAFETY PROGRAM
WEEKLY SAFETY MEETING FORM / ATTENDANCE Page 2 of 2 H&S FORM 058 Issue Date: January 2016 Revision Date: January 2018
ATTENDANCE RECORD
Employee Name (please print) Employee Signature
1.
2.
3.
4.
5.
6.
7.
8.
9.
10.
11.
12.
13.
14.
15.
16.
17.
18.
19.
20.
21.
22.
23.
24.
25.
26.
27.
Complete, sign and keep on the project site for documentation retention and audit review.
Manager/Coordinator Review: Date:(dd/mm/yy)
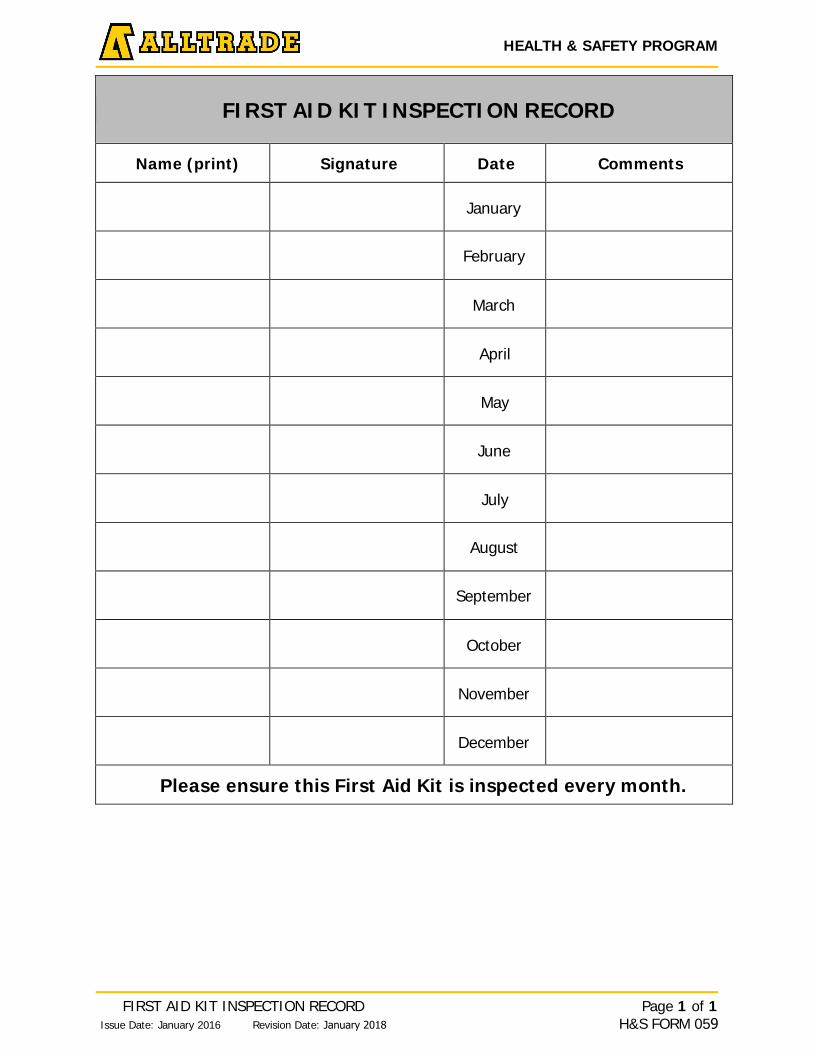
HEALTH & SAFETY PROGRAM
FIRST AID KIT INSPECTION RECORD Issue Date: January 2016 Revision Date: January 2018
Page 1 of 1 H&S FORM 059
FIRST AID KIT INSPECTION RECORD
Name (print) Signature Date Comments
January
February
March
April
May
June
July
August
September
October
November
December
Please ensure this First Aid Kit is inspected every month.
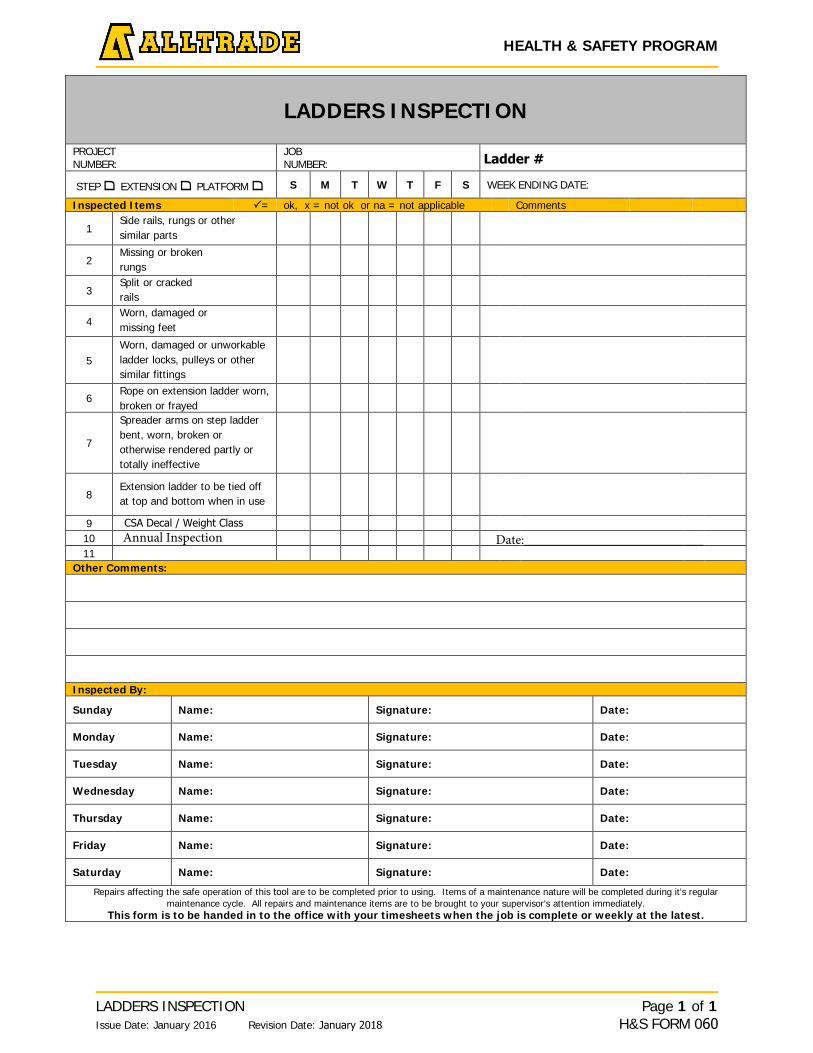
HEALTH & SAFETY PROGRAM
LADDERS INSPECTION Issue Date: January 2016 Revision Date: January 2018
Page 1 of 1 H&S FORM 060
LADDERS INSPECTION
PROJECT NUMBER:
JOB NUMBER: Ladder #
STEP ם EXTENSION ם PLATFORM ם S M T W T F S WEEK ENDING DATE:
Inspected Items = ok, x = not ok or na = not applicable Comments
1 Side rails, rungs or other similar parts
2 Missing or broken rungs
3 Split or cracked rails
4 Worn, damaged or missing feet
5 Worn, damaged or unworkable ladder locks, pulleys or other similar fittings
6 Rope on extension ladder worn, broken or frayed
7
Spreader arms on step ladder bent, worn, broken or otherwise rendered partly or totally ineffective
8 Extension ladder to be tied off at top and bottom when in use
9 10 11
Other Comments:
Inspected By:
Sunday Name: Signature: Date:
Monday Name: Signature: Date:
Tuesday Name: Signature: Date:
Wednesday Name: Signature: Date:
Thursday Name: Signature: Date:
Friday Name: Signature: Date:
Saturday Name: Signature: Date:
Repairs affecting the safe operation of this tool are to be completed prior to using. Items of a maintenance nature will be completed during it's regular maintenance cycle. All repairs and maintenance items are to be brought to your supervisor's attention immediately.
This form is to be handed in to the office with your timesheets when the job is complete or weekly at the latest.
CSA Decal / Weight ClassAnnual Inspection Date:___________________________

HEALTH & SAFETY PROGRAM
SCAFFOLD INSPECTION Issue Date: January 2016 Revision Date: January 2018
Page 1 of 1 H&S FORM 061
SCAFFOLD INSPECTION
Project: Job #:
Location: Date: (DD/MM/YY)
Time: AM PM Yes No
1. Scaffold erection coordinated by a competent worker2. Have scaffold tags been inspected and dated by a competent person?3. Scaffold square, straight and plumb in all directions4. All scaffold components present, tight and secure5. No tubes or members over extended and hazardous6. Base plates and crews firmly supported on all legs – mudsills.
All legs firmly supported by base plates or screw jacks.7. Tower tied to rigid support as specified8. Platform planking cleated on underside at each end9. Platform planking tied down securely10. Platform planking maximum span 2.3 meters (7') for heavy duty and
3.1 meters (10') for others11. Vertical ladder securely fastened in place12. Guardrails in place
a) top railb) mid railc) toe board
13. Warning devices/signs provided if erected over walkways orroadways (flashing lights, reflective tape streamers or area is roped off)
14. Minimum clearance from overhead power lines maintained as perapplicable legislation
15. Rolling scaffold wheel brakes locked and outriggers extended tomaintain maximum height of three times the smallest base dimension
16. Separate ladders being used for scaffold access17. Scaffold constructed and maintained according to certified engineered
drawings18. Certified / Engineered drawings available onsite for reviewComments:
Inspector: Print: Sign:
Supervisor: Print: Sign:
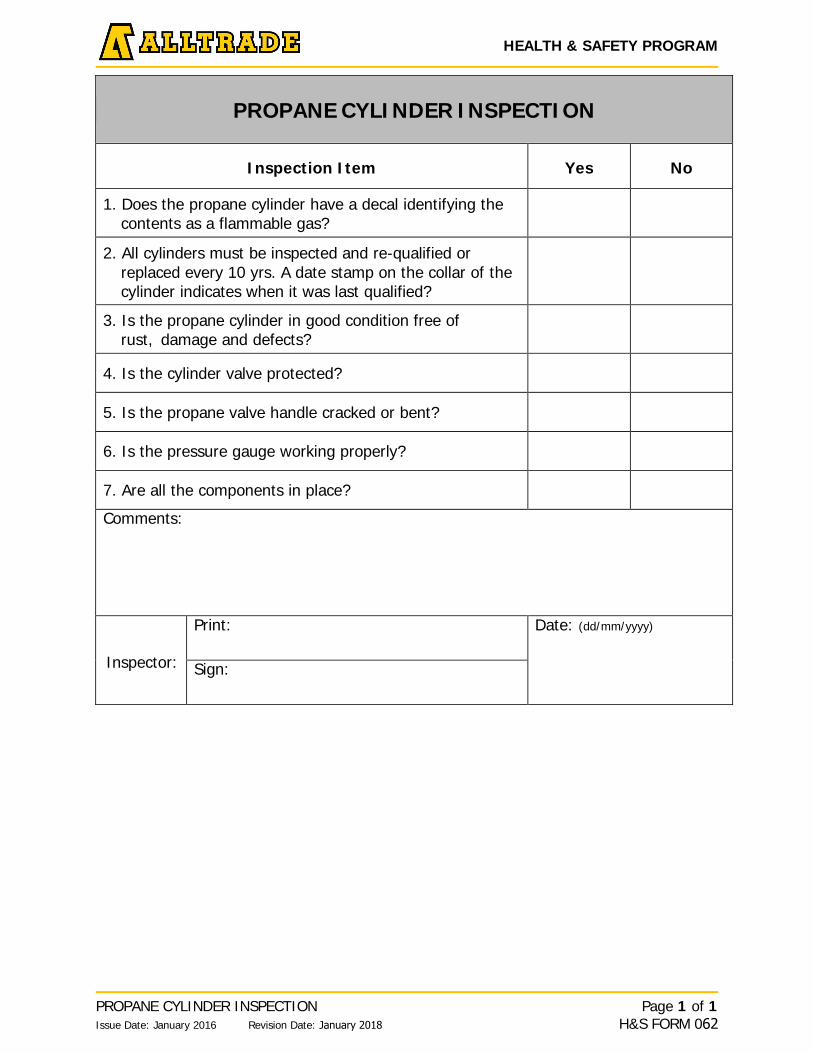
HEALTH & SAFETY PROGRAM
PROPANE CYLINDER INSPECTION Issue Date: January 2016 Revision Date: January 2018
Page 1 of 1 H&S FORM 062
PROPANE CYLINDER INSPECTION
Inspection Item Yes No
1. Does the propane cylinder have a decal identifying thecontents as a flammable gas?
2. All cylinders must be inspected and re-qualified orreplaced every 10 yrs. A date stamp on the collar of thecylinder indicates when it was last qualified?
3. Is the propane cylinder in good condition free ofrust, damage and defects?
4. Is the cylinder valve protected?
5. Is the propane valve handle cracked or bent?
6. Is the pressure gauge working properly?
7. Are all the components in place?
Comments:
Inspector:
Print: Date: (dd/mm/yyyy)
Sign:
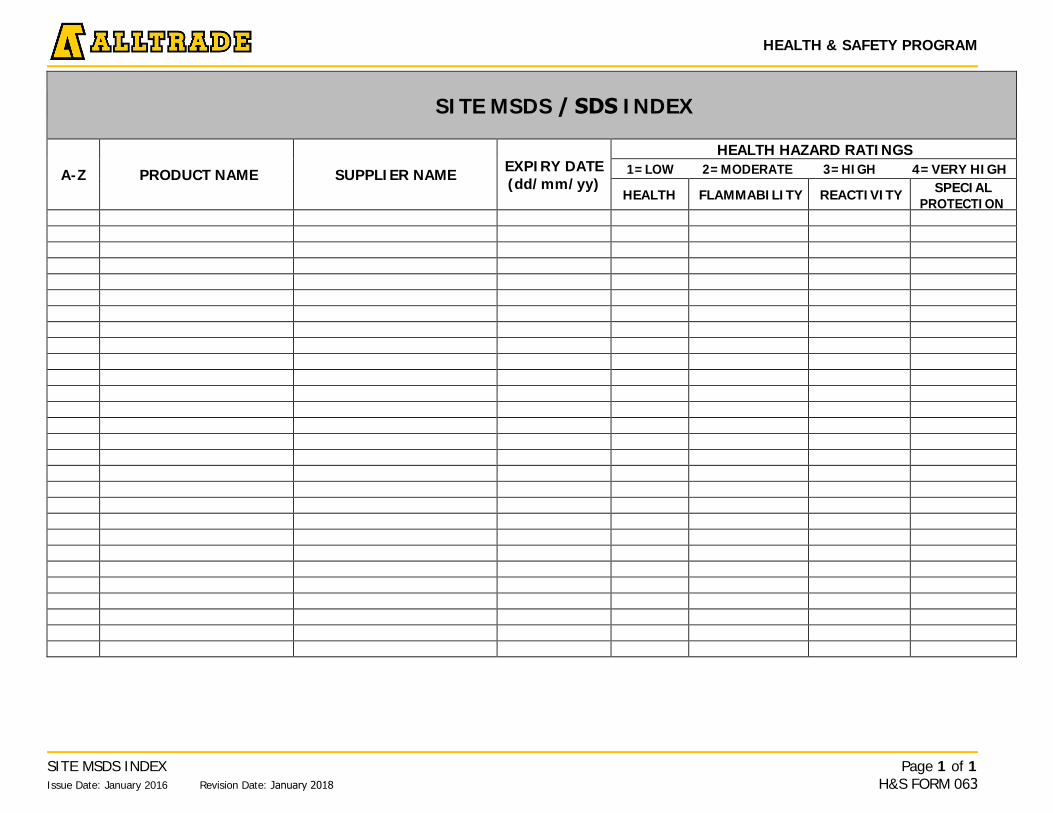
HEALTH & SAFETY PROGRAM
SITE MSDS INDEX Issue Date: January 2016 Revision Date: January 2018
Page 1 of 1 H&S FORM 063
SITE MSDS / SDS INDEX
A-Z PRODUCT NAME SUPPLIER NAME EXPIRY DATE (dd/mm/yy)
HEALTH HAZARD RATINGS 1=LOW 2=MODERATE 3=HIGH 4=VERY HIGH
HEALTH FLAMMABILITY REACTIVITY SPECIAL PROTECTION
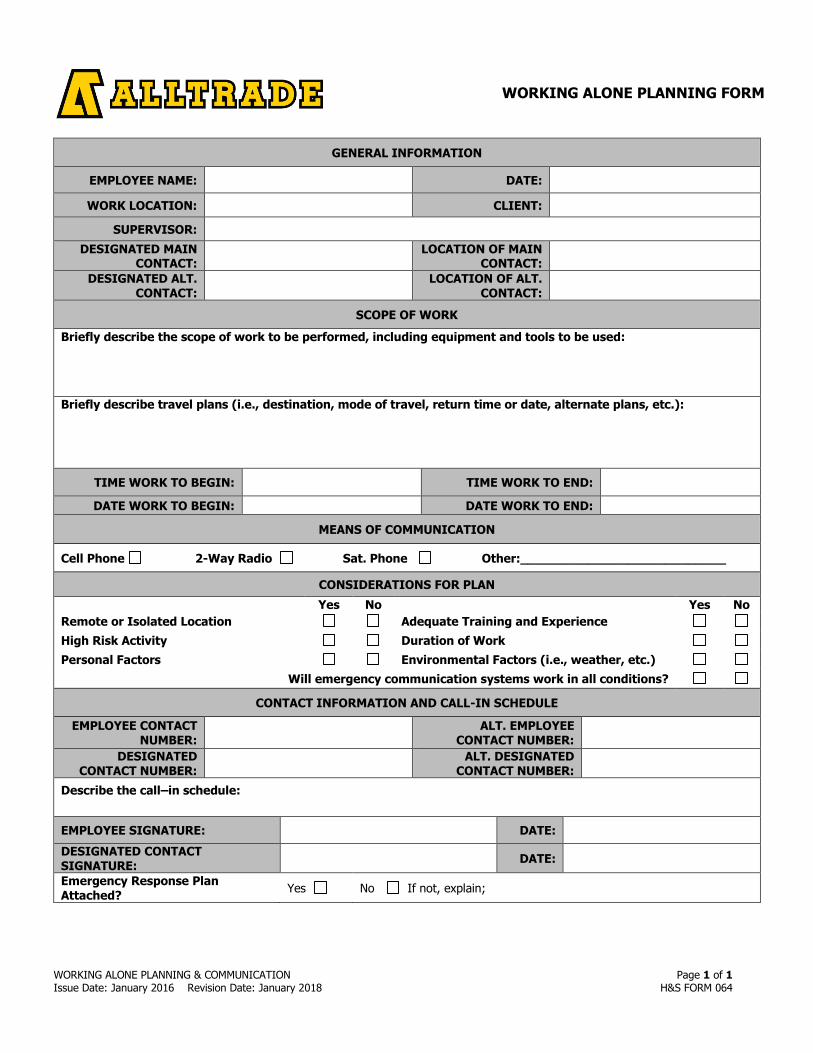
WORKING ALONE PLANNING FORM
WORKING ALONE PLANNING & COMMUNICATION Page 1 of 1 Issue Date: January 2016 Revision Date: January 2018 H&S FORM 064
GENERAL INFORMATION
EMPLOYEE NAME: DATE:
WORK LOCATION: CLIENT:
SUPERVISOR:
DESIGNATED MAIN CONTACT:
LOCATION OF MAIN
CONTACT:
DESIGNATED ALT. CONTACT:
LOCATION OF ALT.
CONTACT:
SCOPE OF WORK
Briefly describe the scope of work to be performed, including equipment and tools to be used:
Briefly describe travel plans (i.e., destination, mode of travel, return time or date, alternate plans, etc.):
TIME WORK TO BEGIN:
TIME WORK TO END:
DATE WORK TO BEGIN: DATE WORK TO END:
MEANS OF COMMUNICATION
Cell Phone 2-Way Radio Sat. Phone Other:___________________________
CONSIDERATIONS FOR PLAN
Yes No Yes No
Remote or Isolated Location Adequate Training and Experience
High Risk Activity Duration of Work
Personal Factors Environmental Factors (i.e., weather, etc.)
Will emergency communication systems work in all conditions?
CONTACT INFORMATION AND CALL-IN SCHEDULE
EMPLOYEE CONTACT NUMBER:
ALT. EMPLOYEE
CONTACT NUMBER:
DESIGNATED CONTACT NUMBER:
ALT. DESIGNATED
CONTACT NUMBER:
Describe the call–in schedule:
EMPLOYEE SIGNATURE: DATE:
DESIGNATED CONTACT SIGNATURE:
DATE:
Emergency Response Plan Attached?
Yes No If not, explain;
BUCKET TRUCK INSPECTION
BUCKET TRUCK #: HOUR/METER/KMS: JOB NUMBER:
MAKE & MODEL: S M T W T F S WEEK ENDING DATE:
Inspected Items = ok, x = not ok or na = not applicable Comments 1 PTO operation (RPM) 2 Operator’s Manual 3 Review/update log book 4 Structural & mounting (welds) 5 Extension / pad pin wear 6 Hydraulic cylinder and hoses 7 Level gauge 8 Wood pads secure 9 Reservoir level & oil condition 10 Hydraulic cylinders/pumps/hoses 11 Rotation stop 12 Spill kit 13 Tie down boom 14 Emergency descent device 15 Hinge & pivot points(clearance) 16 Leveling system/mount & ops 17 Check valve operation 18 Drives cables & sheaves 19 Material boxes latches/doors
20 Bucket dump mechanism
21 Bucket rotator
22 Di-electric annual Date: ______________________________
23 Structural annual Date: ______________________________
Hi-Rail Items = ok, x = not ok or na = not applicable Comments 24 Hydraulic Hoses secure 25 All threaded fasteners secure 26 Wheel flange condition 27 Wheel end play 28 All controls functioning 29 Hi-rail annual Date: ______________________________
Other Comments
Inspected By:
Sunday Name: Signature: Date:
Monday Name: Signature: Date:
Tuesday Name: Signature: Date:
Wednesday Name: Signature: Date:
Thursday Name: Signature: Date:
Friday Name: Signature: Date:
Saturday Name: Signature: Date:
Repairs affecting the safe operation of this piece of equipment are to be completed prior to using. Items of a maintenance nature will be completed during its regular maintenance cycle. All repairs and maintenance items are to be brought to your supervisor's attention immediately.
This form is to be handed in to the office with your timesheets when the job is complete or weekly at the latest.
BUCKET TRUCK INSPECTION Issue Date: January 2016 Revision Date: January 2018
Page 1 of 1 H&S FORM 065
HEALTH & SAFETY PROGRAM
VEHICLE INSPECTION VEHICLE NO.: ODOMETER: JOB NUMBER:
MAKE & MODEL: S M T W T F S WEEK ENDING DATE: Safety Items = ok, x = not ok or na = not applicable Comments 1 Fire Extinguisher 2 First Aid Kit 3 Seat Belts 4 Windshield & Wipers 5 Side & Back Windows 6 Mirrors 7 Horn 8 Head Lights 9 Turn Signal Lights 10 Four Way Signal Lights 11 Brake Lights 12 Interior Lights & Gauges 13 Ownership Certificate 14 Insurance Certificate 15 Licence Plates 16 Load Secured 17 Service & Parking Brakes 18 Tires 19 Rims & Lugs 20 Steering 21 Engine Oil Level 22 Coolant Level 23 Windshield Washer Fluid 24 Fluid Leaks 25 Annual Inspection (over 4500 kg) Date:_____________________________________ Hi-Rail = ok, x = not ok or na = not applicable Comments 26 Hydraulic hoses secure 27 All threaded fasteners secure 28 Wheel flange condition 29 Wheel end play 30 All controls functioning 31 Hi-rail annual Date:_____________________________________ Other Comments: (any vehicle damage, etc.)
Inspected By:
Sunday Name: Signature: Date:
Monday Name: Signature: Date:
Tuesday Name: Signature: Date:
Wednesday Name: Signature: Date:
Thursday Name: Signature: Date:
Friday Name: Signature: Date:
Saturday Name: Signature: Date:
Repairs affecting the safe operation of this piece of equipment are to be completed prior to using. Items of a maintenance nature will be completed during it's regular maintenance cycle. All repairs and maintenance items are to be brought to your supervisor's attention immediately.
This form is to be handed in to the office with your timesheets when the job is complete or weekly at the latest.
VEHICLE INSPECTION Issue Date: January 2016 Revision Date: January 2018
Page 1 of 1 H&S FORM 066
HEALTH & SAFETY PROGRAM
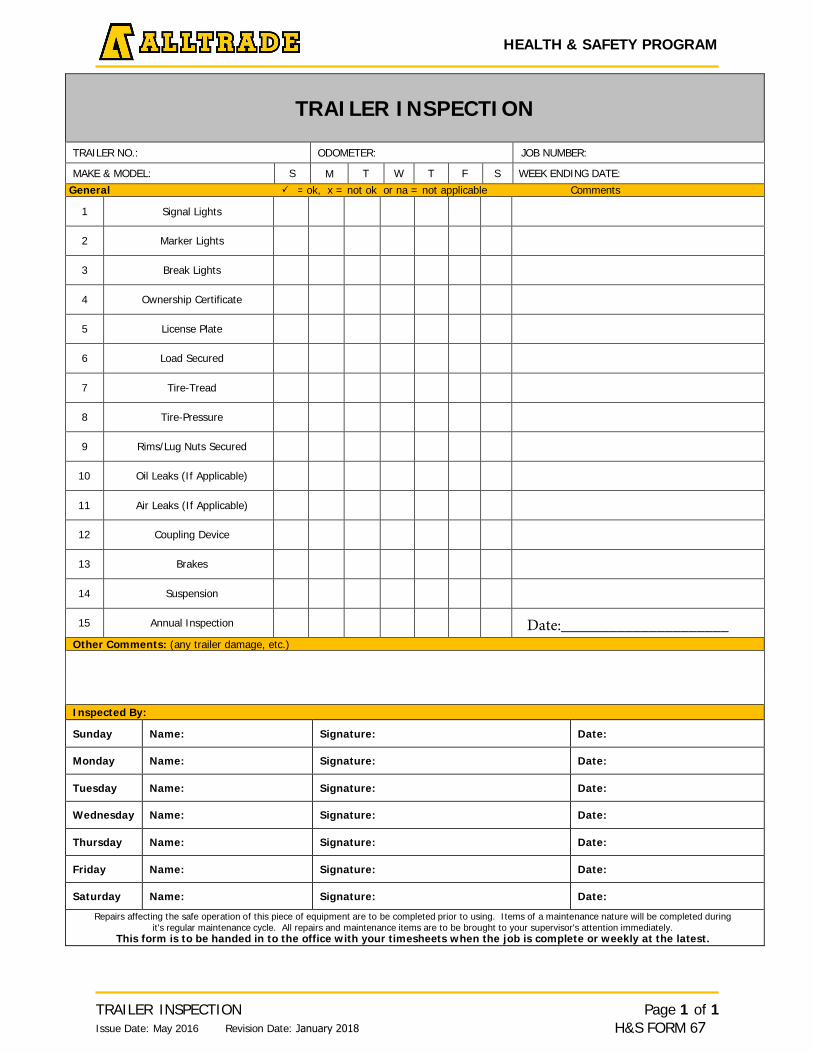
HEALTH & SAFETY PROGRAM
TRAILER INSPECTION
TRAILER NO.: ODOMETER: JOB NUMBER:
MAKE & MODEL: S M T W T F S WEEK ENDING DATE: General = ok, x = not ok or na = not applicable Comments
1 Signal Lights
2 Marker Lights
3 Break Lights
4 Ownership Certificate
5 License Plate
6 Load Secured
7 Tire-Tread
8 Tire-Pressure
9 Rims/Lug Nuts Secured
10 Oil Leaks (If Applicable)
11 Air Leaks (If Applicable)
12 Coupling Device
13 Brakes
14 Suspension
15 Annual Inspection
Other Comments: (any trailer damage, etc.)
Inspected By:
Sunday Name: Signature: Date:
Monday Name: Signature: Date:
Tuesday Name: Signature: Date:
Wednesday Name: Signature: Date:
Thursday Name: Signature: Date:
Friday Name: Signature: Date:
Saturday Name: Signature: Date:
Repairs affecting the safe operation of this piece of equipment are to be completed prior to using. Items of a maintenance nature will be completed during it's regular maintenance cycle. All repairs and maintenance items are to be brought to your supervisor's attention immediately.
This form is to be handed in to the office with your timesheets when the job is complete or weekly at the latest.
TRAILER INSPECTION Issue Date: May 2016 Revision Date: January 2018
Page 1 of 1 H&S FORM 67
Date:_____________________
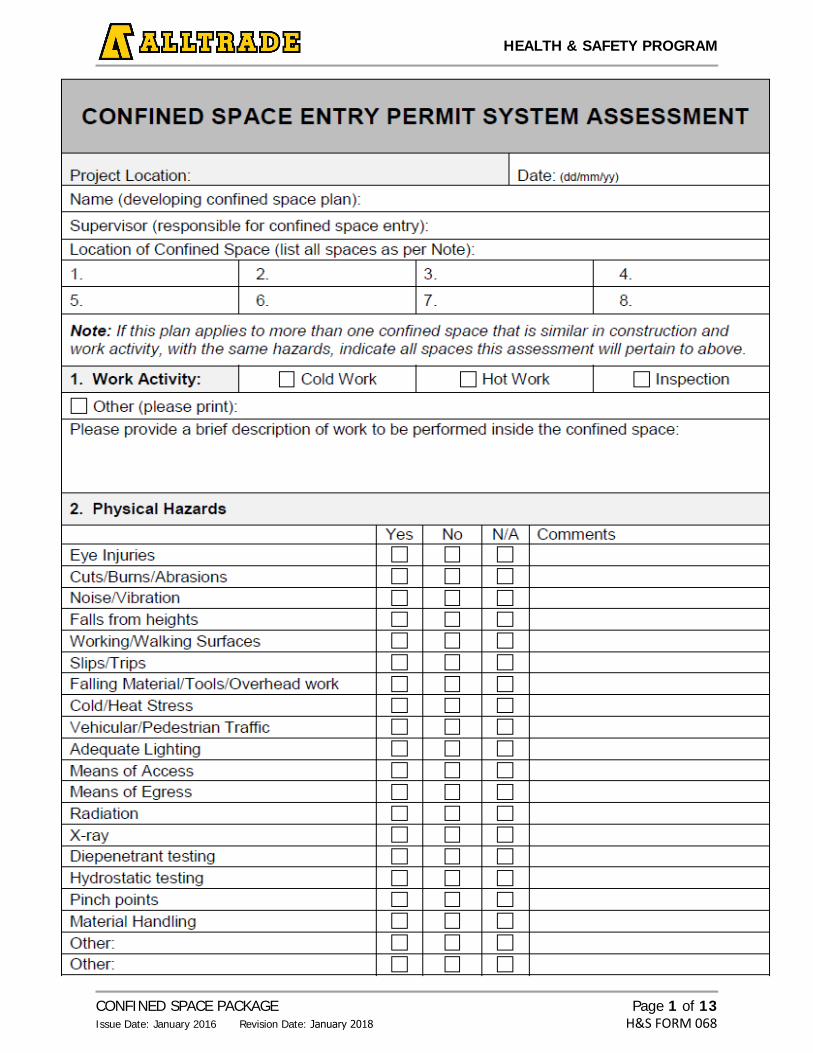
HEALTH & SAFETY PROGRAM
CONFINED SPACE PACKAGE Issue Date: January 2016 Revision Date: January 2018
Page 1 of 13 H&S FORM 068

HEALTH & SAFETY PROGRAM
CONFINED SPACE PACKAGE Issue Date: January 2016 Revision Date: January 2018
Page 2 of 13 H&S FORM 068
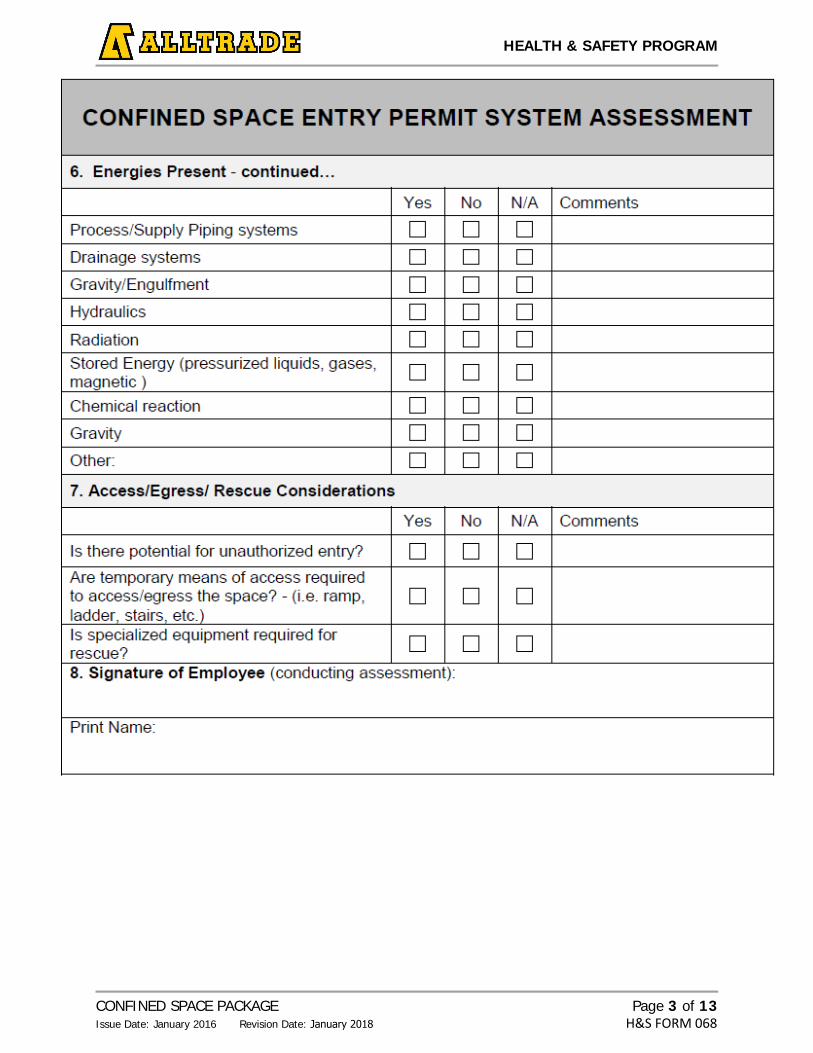
HEALTH & SAFETY PROGRAM
CONFINED SPACE PACKAGE Issue Date: January 2016 Revision Date: January 2018
Page 3 of 13 H&S FORM 068
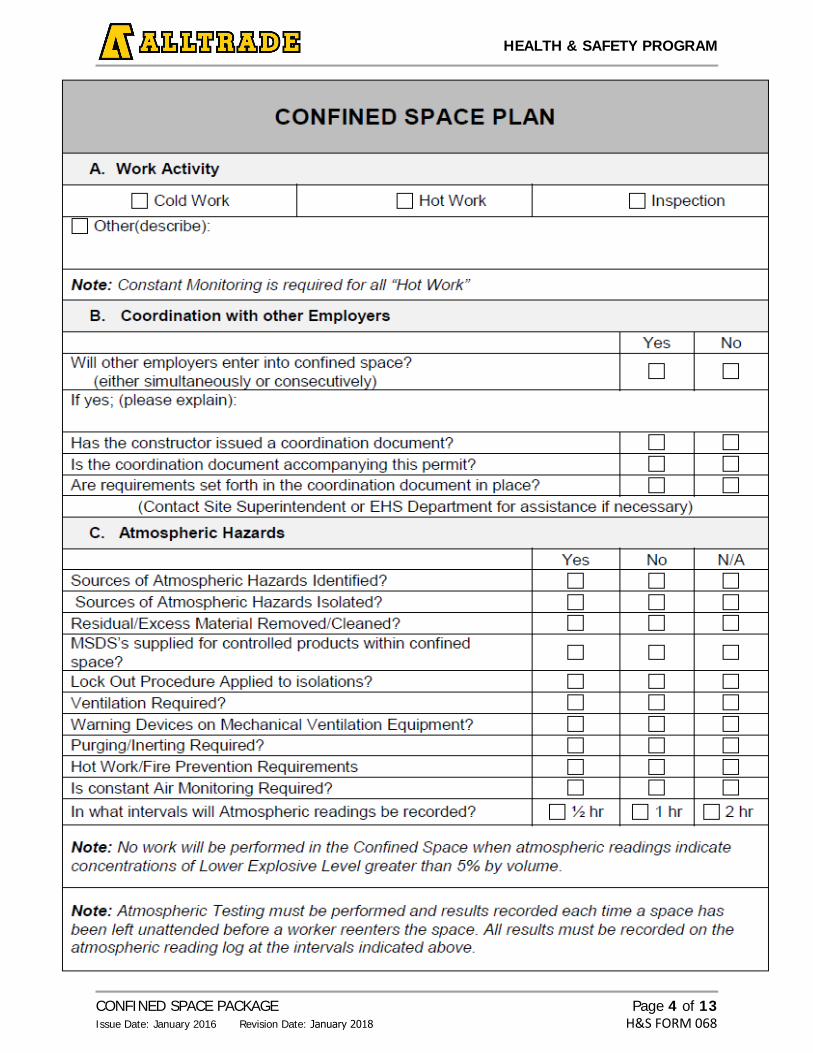
HEALTH & SAFETY PROGRAM
CONFINED SPACE PACKAGE Issue Date: January 2016 Revision Date: January 2018
Page 4 of 13 H&S FORM 068
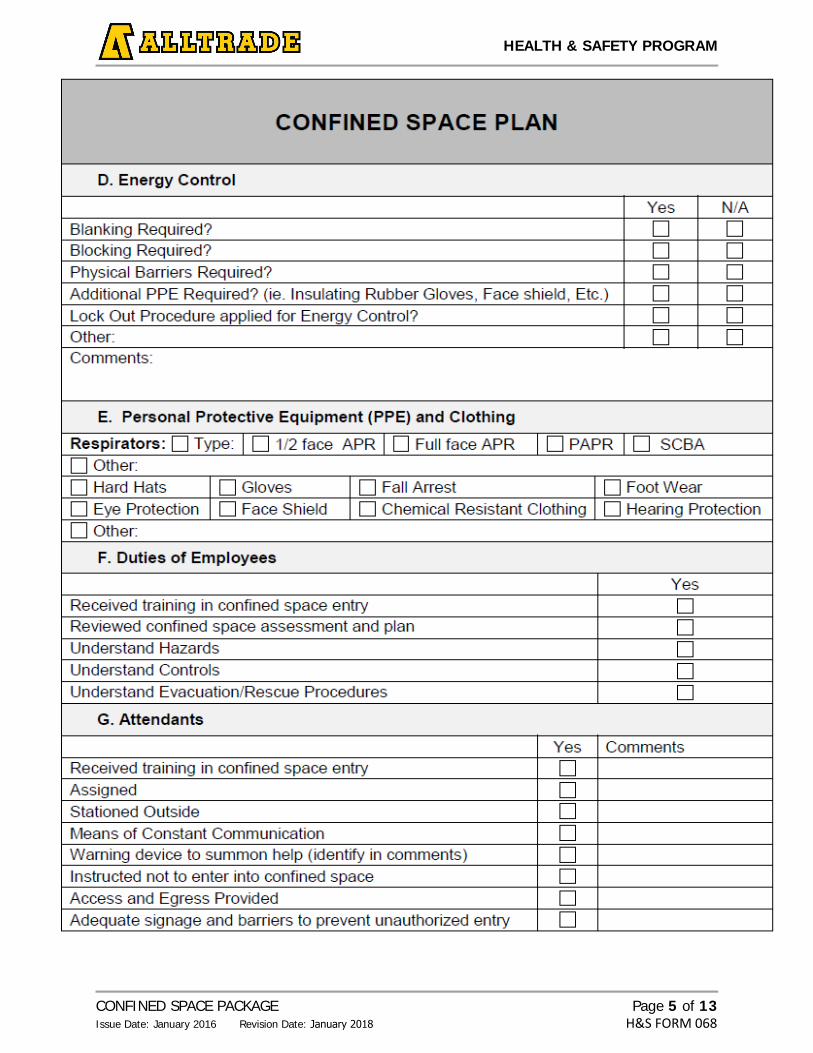
HEALTH & SAFETY PROGRAM
CONFINED SPACE PACKAGE Issue Date: January 2016 Revision Date: January 2018
Page 5 of 13 H&S FORM 068
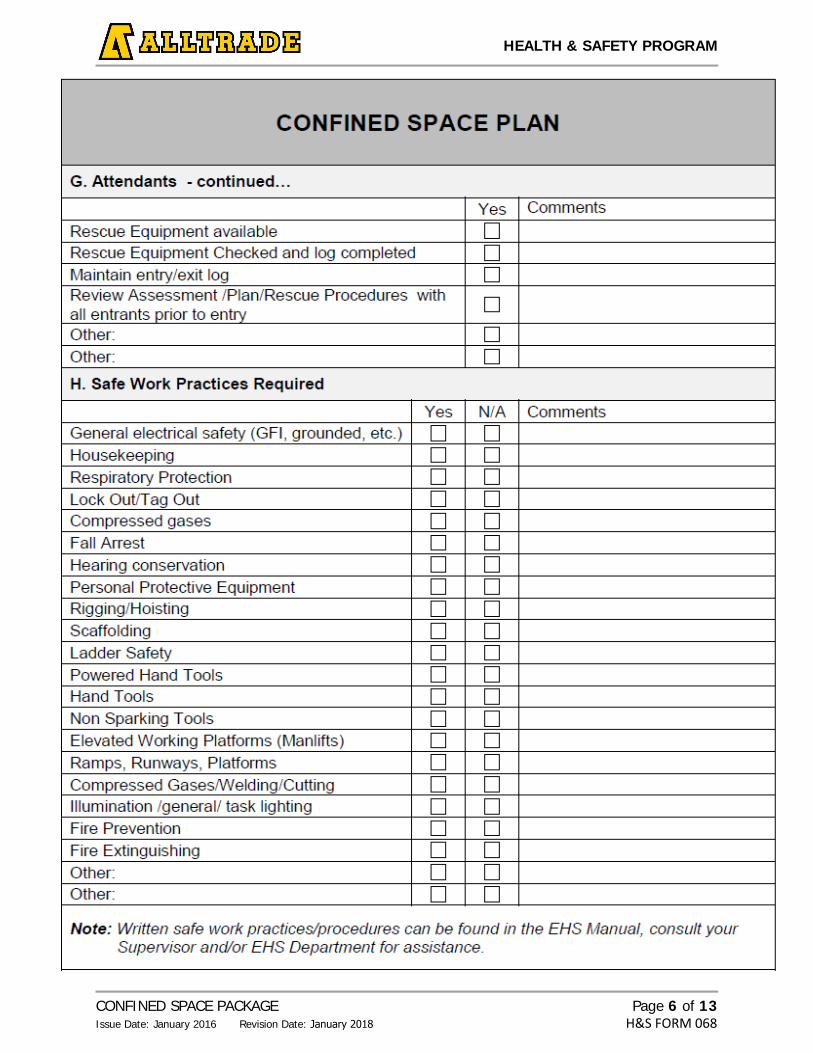
HEALTH & SAFETY PROGRAM
CONFINED SPACE PACKAGE Issue Date: January 2016 Revision Date: January 2018
Page 6 of 13 H&S FORM 068
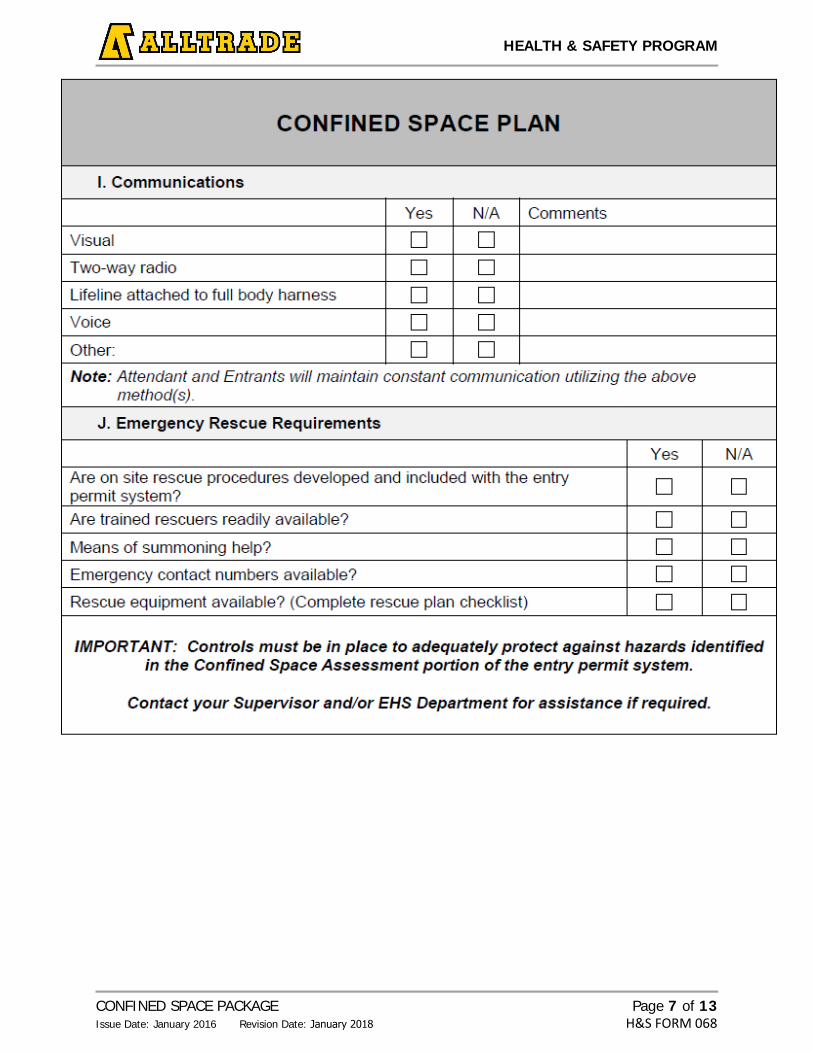
HEALTH & SAFETY PROGRAM
CONFINED SPACE PACKAGE Issue Date: January 2016 Revision Date: January 2018
Page 7 of 13 H&S FORM 068
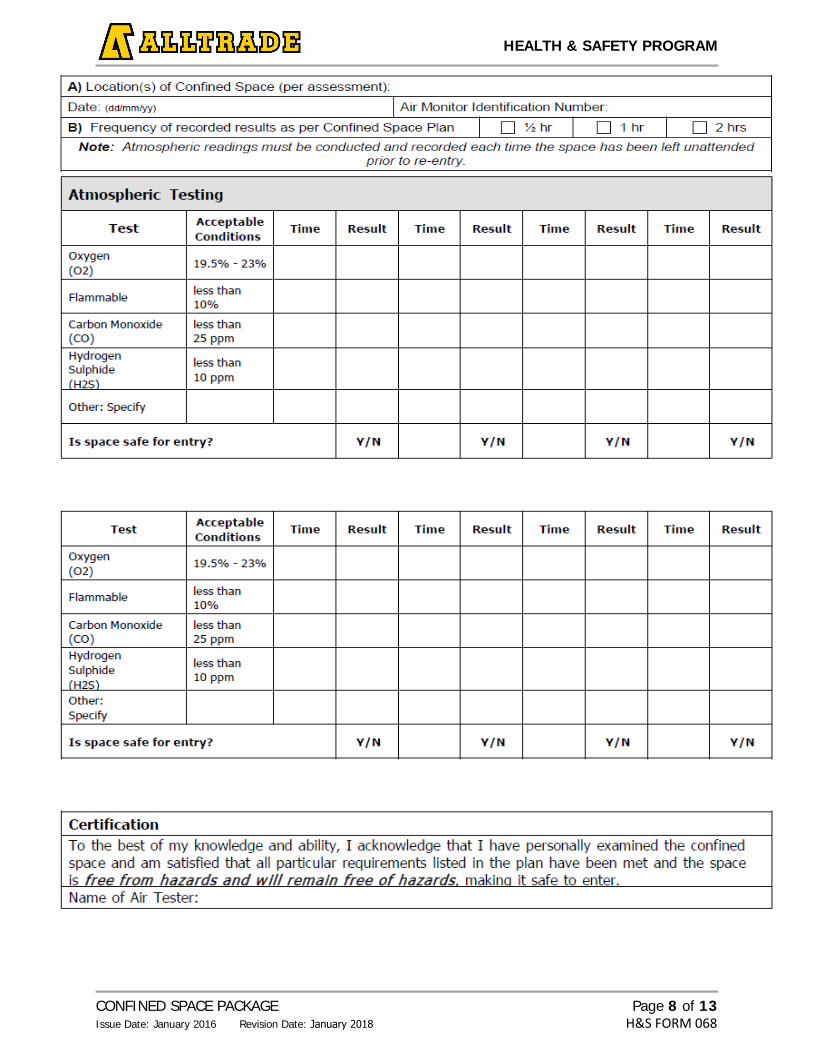
HEALTH & SAFETY PROGRAM
CONFINED SPACE PACKAGE Issue Date: January 2016 Revision Date: January 2018
Page 8 of 13 H&S FORM 068
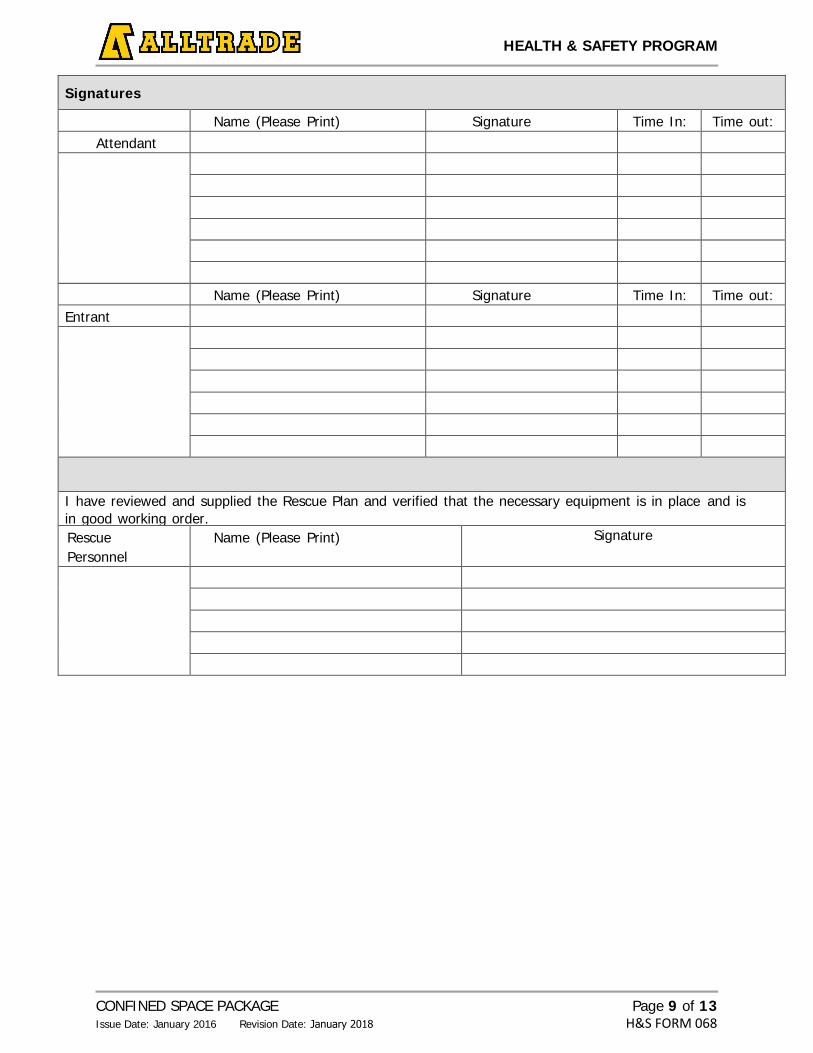
HEALTH & SAFETY PROGRAM
CONFINED SPACE PACKAGE Issue Date: January 2016 Revision Date: January 2018
Page 9 of 13 H&S FORM 068
Signatures
Name (Please Print) Signature Time In: Time out: Attendant
Name (Please Print) Signature Time In: Time out: Entrant
I have reviewed and supplied the Rescue Plan and verified that the necessary equipment is in place and is in good working order. Rescue Personnel
Name (Please Print) Signature
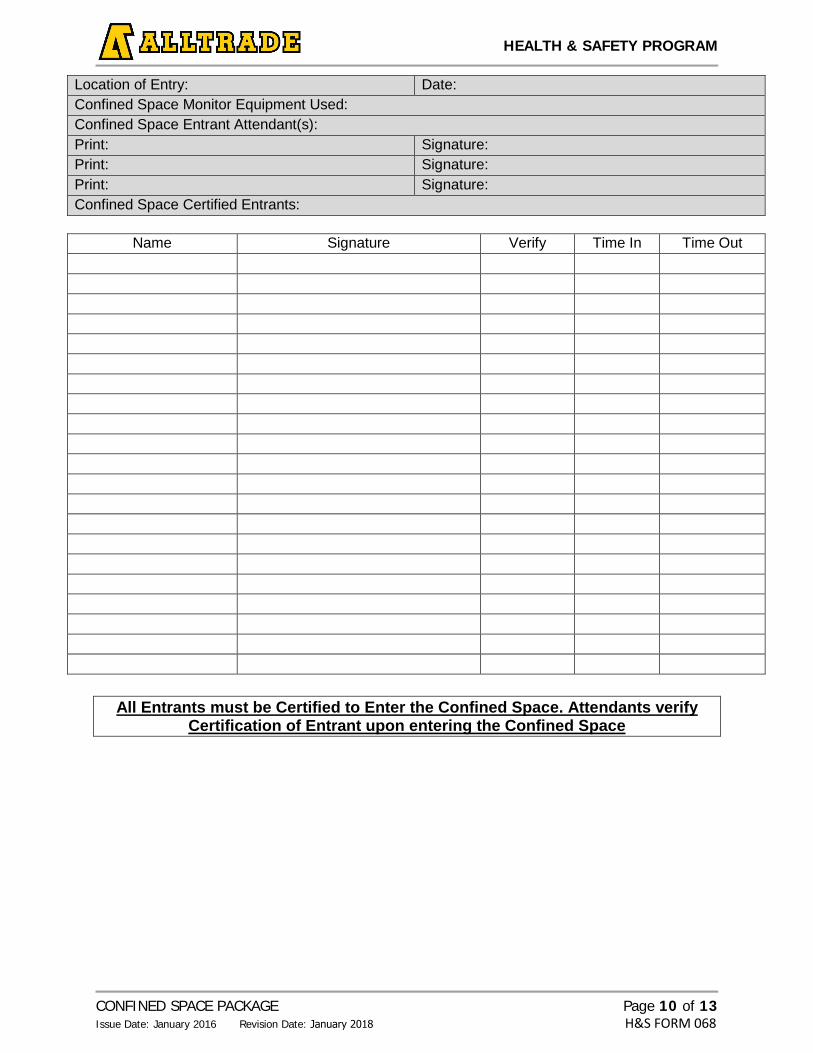
HEALTH & SAFETY PROGRAM
CONFINED SPACE PACKAGE Issue Date: January 2016 Revision Date: January 2018
Page 10 of 13 H&S FORM 068
Location of Entry: Date: Confined Space Monitor Equipment Used: Confined Space Entrant Attendant(s): Print: Signature: Print: Signature: Print: Signature: Confined Space Certified Entrants:
Name Signature Verify Time In Time Out
All Entrants must be Certified to Enter the Confined Space. Attendants verify Certification of Entrant upon entering the Confined Space
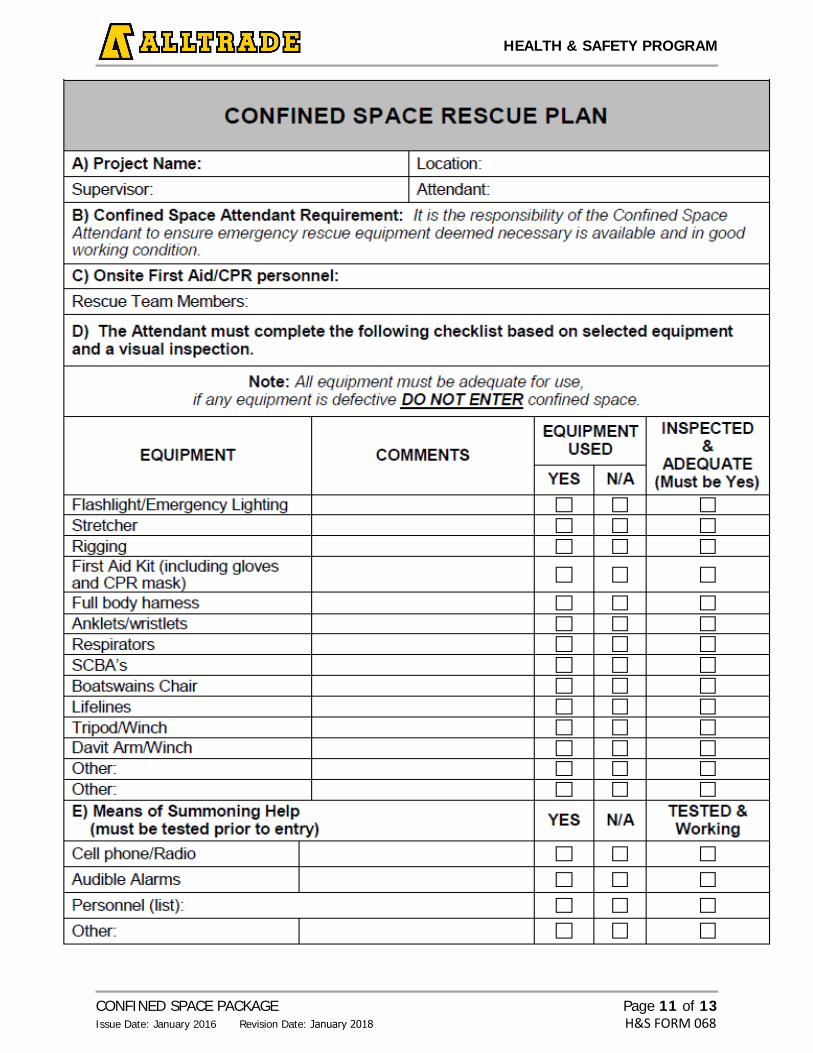
HEALTH & SAFETY PROGRAM
CONFINED SPACE PACKAGE Issue Date: January 2016 Revision Date: January 2018
Page 11 of 13 H&S FORM 068
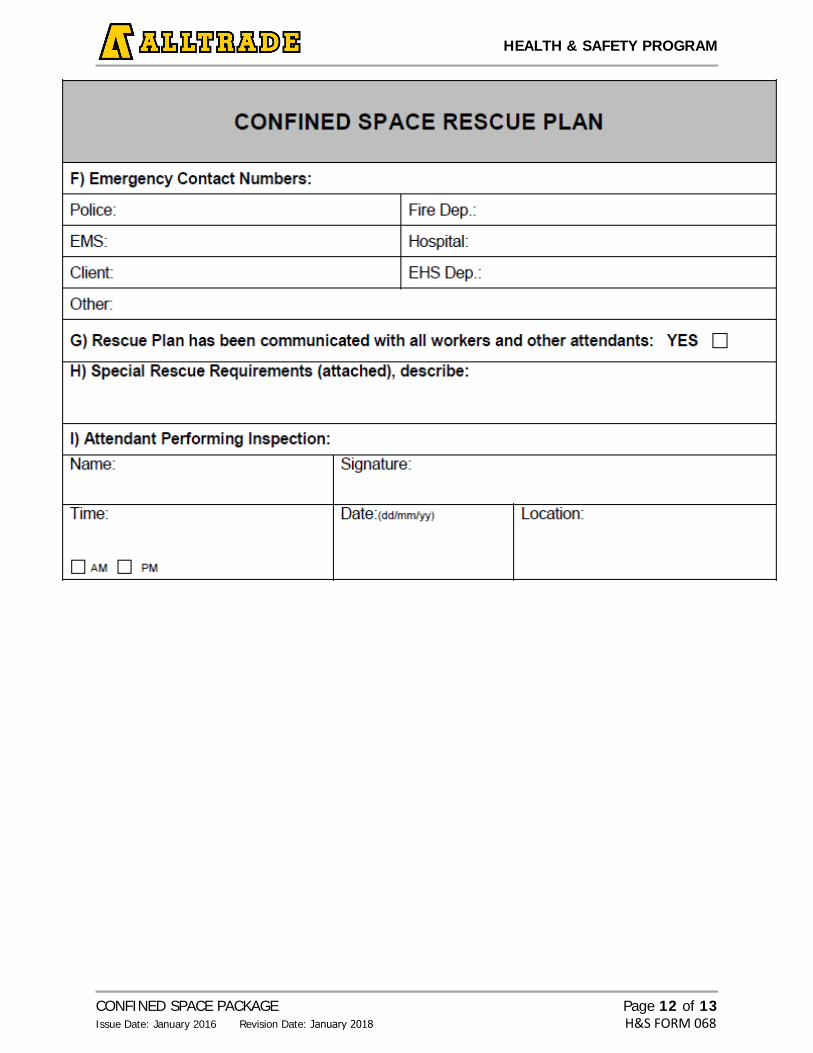
HEALTH & SAFETY PROGRAM
CONFINED SPACE PACKAGE Issue Date: January 2016 Revision Date: January 2018
Page 12 of 13 H&S FORM 068
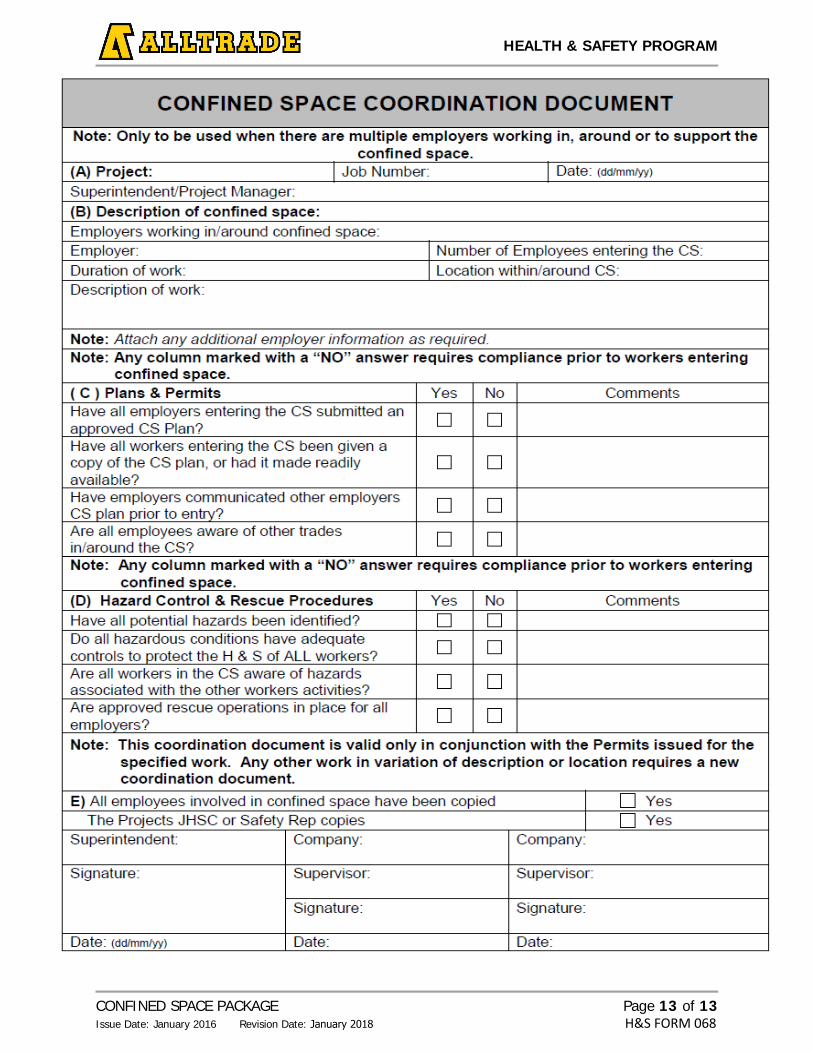
HEALTH & SAFETY PROGRAM
CONFINED SPACE PACKAGE Issue Date: January 2016 Revision Date: January 2018
Page 13 of 13 H&S FORM 068
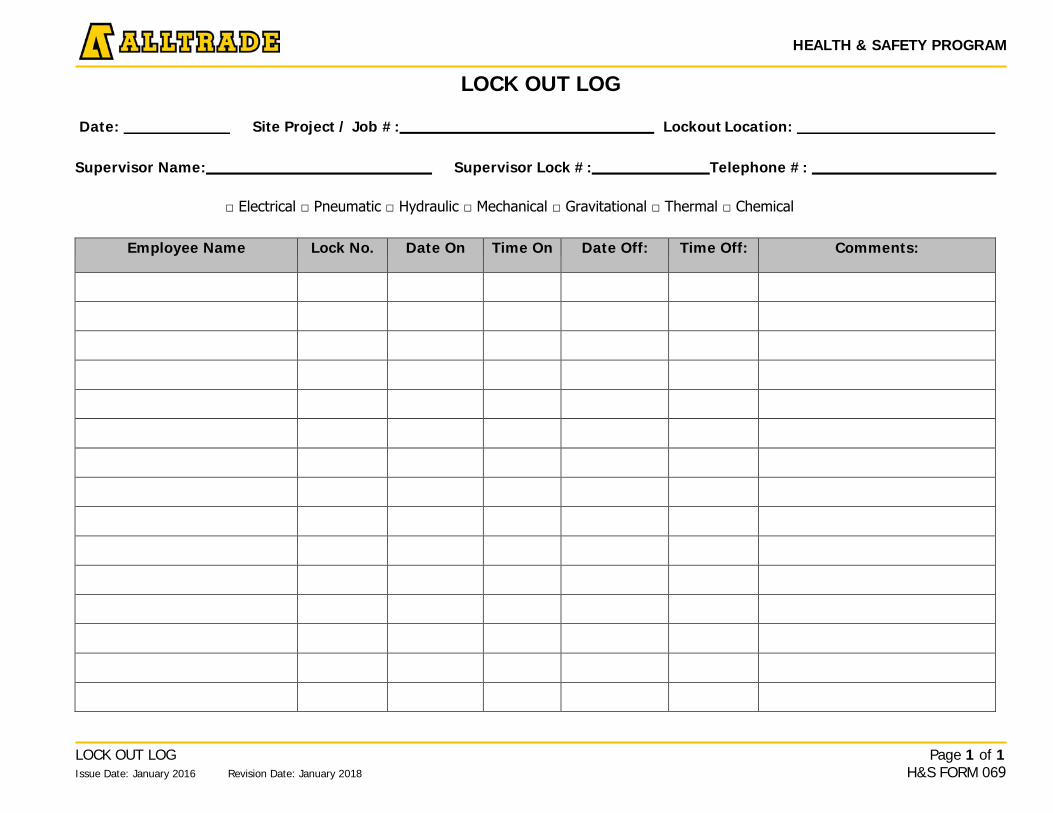
LOCK OUT LOG
Date: Site Project / Job #: Lockout Location:
Supervisor Name: Supervisor Lock #: Telephone #:
□ Electrical □ Pneumatic □ Hydraulic □ Mechanical □ Gravitational □ Thermal □ Chemical
Employee Name Lock No. Date On Time On Date Off: Time Off: Comments:
LOCK OUT LOG Issue Date: January 2016 Revision Date: January 2018
Page 1 of 1 H&S FORM 069
HEALTH & SAFETY PROGRAM
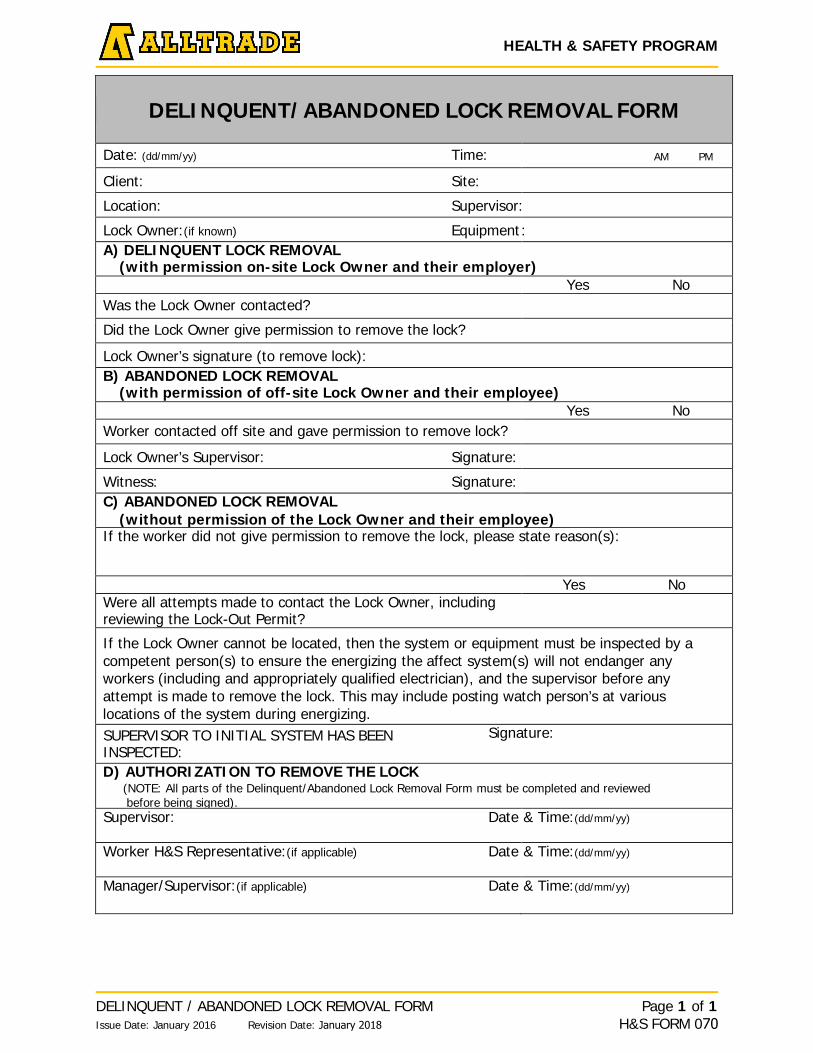
HEALTH & SAFETY PROGRAM
DELINQUENT / ABANDONED LOCK REMOVAL FORM Issue Date: January 2016 Revision Date: January 2018
Page 1 of 1 H&S FORM 070
DELINQUENT/ABANDONED LOCK REMOVAL FORM
Date: (dd/mm/yy) Time: AM PM
Client: Site:
Location: Supervisor:
Lock Owner:(if known) Equipment : A) DELINQUENT LOCK REMOVAL
(with permission on-site Lock Owner and their employer)Yes No
Was the Lock Owner contacted?
Did the Lock Owner give permission to remove the lock?
Lock Owner’s signature (to remove lock): B) ABANDONED LOCK REMOVAL
(with permission of off-site Lock Owner and their employee)Yes No
Worker contacted off site and gave permission to remove lock?
Lock Owner’s Supervisor: Signature:
Witness: Signature: C) ABANDONED LOCK REMOVAL
(without permission of the Lock Owner and their employee)If the worker did not give permission to remove the lock, please state reason(s):
Yes No Were all attempts made to contact the Lock Owner, including reviewing the Lock-Out Permit?
If the Lock Owner cannot be located, then the system or equipment must be inspected by a competent person(s) to ensure the energizing the affect system(s) will not endanger any workers (including and appropriately qualified electrician), and the supervisor before any attempt is made to remove the lock. This may include posting watch person’s at various locations of the system during energizing. SUPERVISOR TO INITIAL SYSTEM HAS BEEN Signature: INSPECTED: D) AUTHORIZATION TO REMOVE THE LOCK
(NOTE: All parts of the Delinquent/Abandoned Lock Removal Form must be completed and reviewedbefore being signed).
Supervisor: Date & Time:(dd/mm/yy)
Worker H&S Representative:(if applicable) Date & Time:(dd/mm/yy)
Manager/Supervisor:(if applicable) Date & Time:(dd/mm/yy)
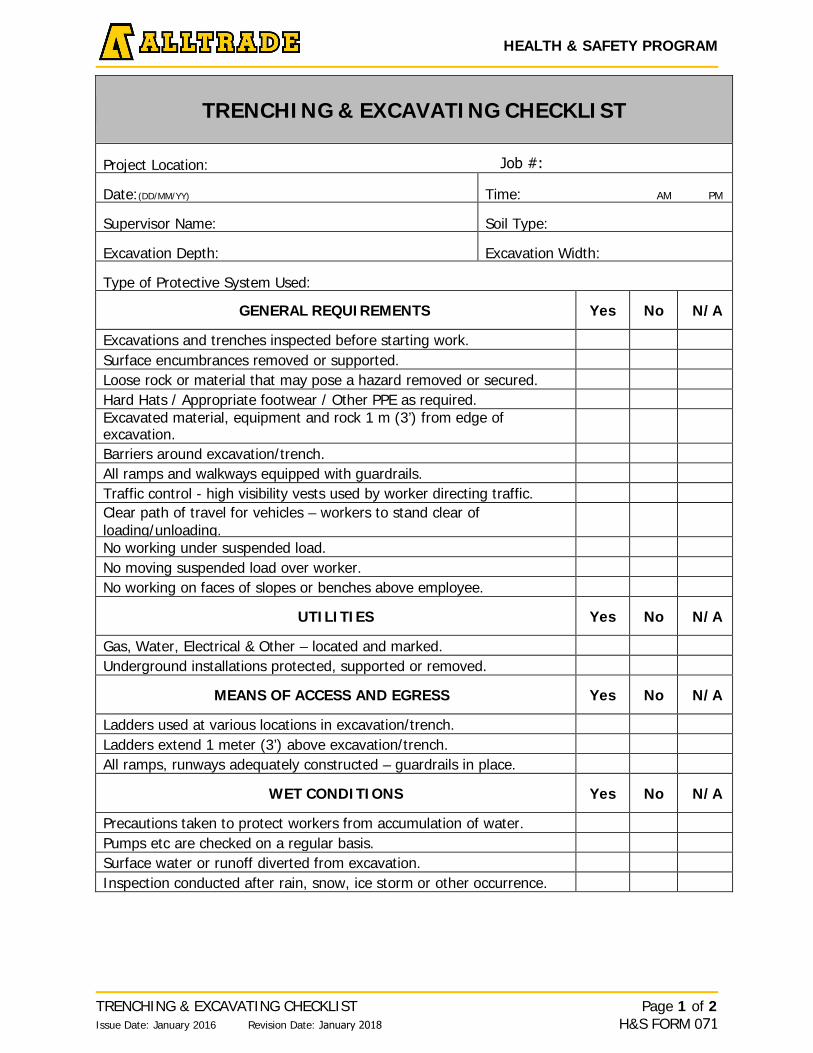
HEALTH & SAFETY PROGRAM
TRENCHING & EXCAVATING CHECKLIST Issue Date: January 2016 Revision Date: January 2018
Page 1 of 2 H&S FORM 071
TRENCHING & EXCAVATING CHECKLIST
Project Location:
Date:(DD/MM/YY) Time: AM PM
Supervisor Name: Soil Type:
Excavation Depth: Excavation Width:
Type of Protective System Used:
GENERAL REQUIREMENTS Yes No N/A
Excavations and trenches inspected before starting work. Surface encumbrances removed or supported. Loose rock or material that may pose a hazard removed or secured. Hard Hats / Appropriate footwear / Other PPE as required. Excavated material, equipment and rock 1 m (3’) from edge of excavation. Barriers around excavation/trench. All ramps and walkways equipped with guardrails. Traffic control - high visibility vests used by worker directing traffic. Clear path of travel for vehicles – workers to stand clear of loading/unloading. No working under suspended load. No moving suspended load over worker. No working on faces of slopes or benches above employee.
UTILITIES Yes No N/A
Gas, Water, Electrical & Other – located and marked. Underground installations protected, supported or removed.
MEANS OF ACCESS AND EGRESS Yes No N/A
Ladders used at various locations in excavation/trench. Ladders extend 1 meter (3’) above excavation/trench. All ramps, runways adequately constructed – guardrails in place.
WET CONDITIONS Yes No N/A
Precautions taken to protect workers from accumulation of water. Pumps etc are checked on a regular basis. Surface water or runoff diverted from excavation. Inspection conducted after rain, snow, ice storm or other occurrence.
Job #:
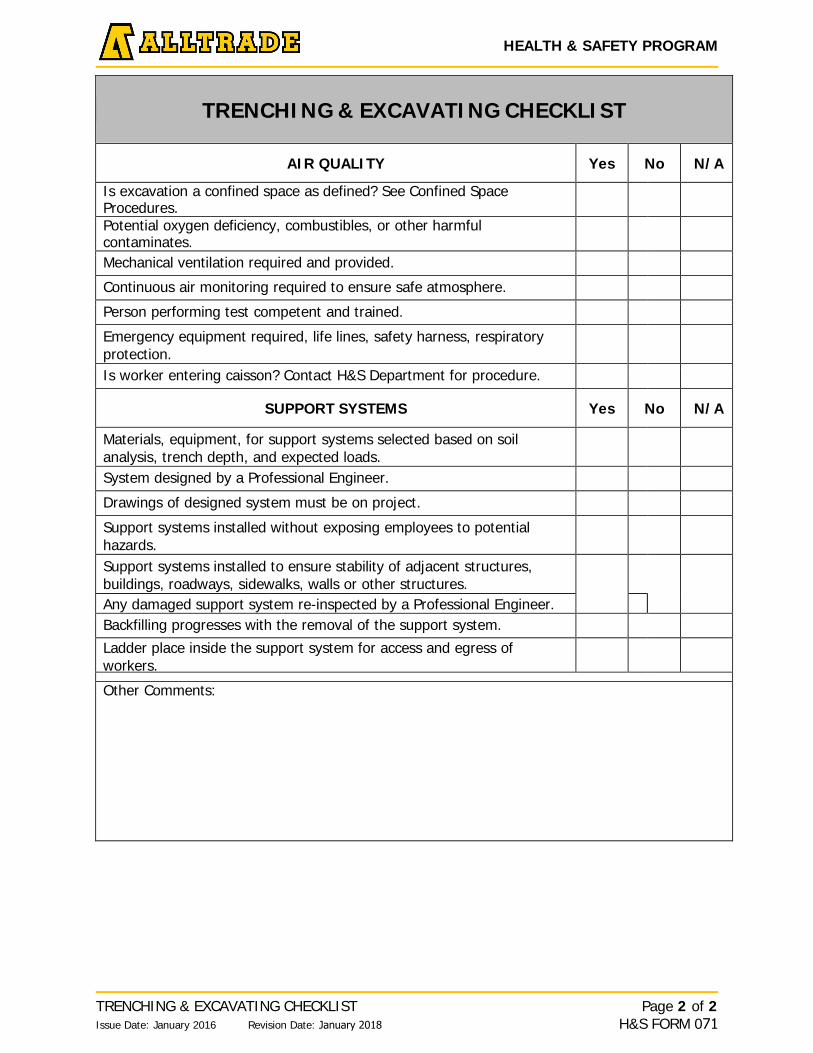
HEALTH & SAFETY PROGRAM
TRENCHING & EXCAVATING CHECKLIST Issue Date: January 2016 Revision Date: January 2018
Page 2 of 2 H&S FORM 071
TRENCHING & EXCAVATING CHECKLIST
AIR QUALITY Yes No N/A
Is excavation a confined space as defined? See Confined Space Procedures. Potential oxygen deficiency, combustibles, or other harmful contaminates. Mechanical ventilation required and provided.
Continuous air monitoring required to ensure safe atmosphere.
Person performing test competent and trained.
Emergency equipment required, life lines, safety harness, respiratory protection. Is worker entering caisson? Contact H&S Department for procedure.
SUPPORT SYSTEMS Yes No N/A
Materials, equipment, for support systems selected based on soil analysis, trench depth, and expected loads. System designed by a Professional Engineer.
Drawings of designed system must be on project.
Support systems installed without exposing employees to potential hazards. Support systems installed to ensure stability of adjacent structures, buildings, roadways, sidewalks, walls or other structures. Any damaged support system re-inspected by a Professional Engineer. Backfilling progresses with the removal of the support system.
Ladder place inside the support system for access and egress of workers.
Other Comments:
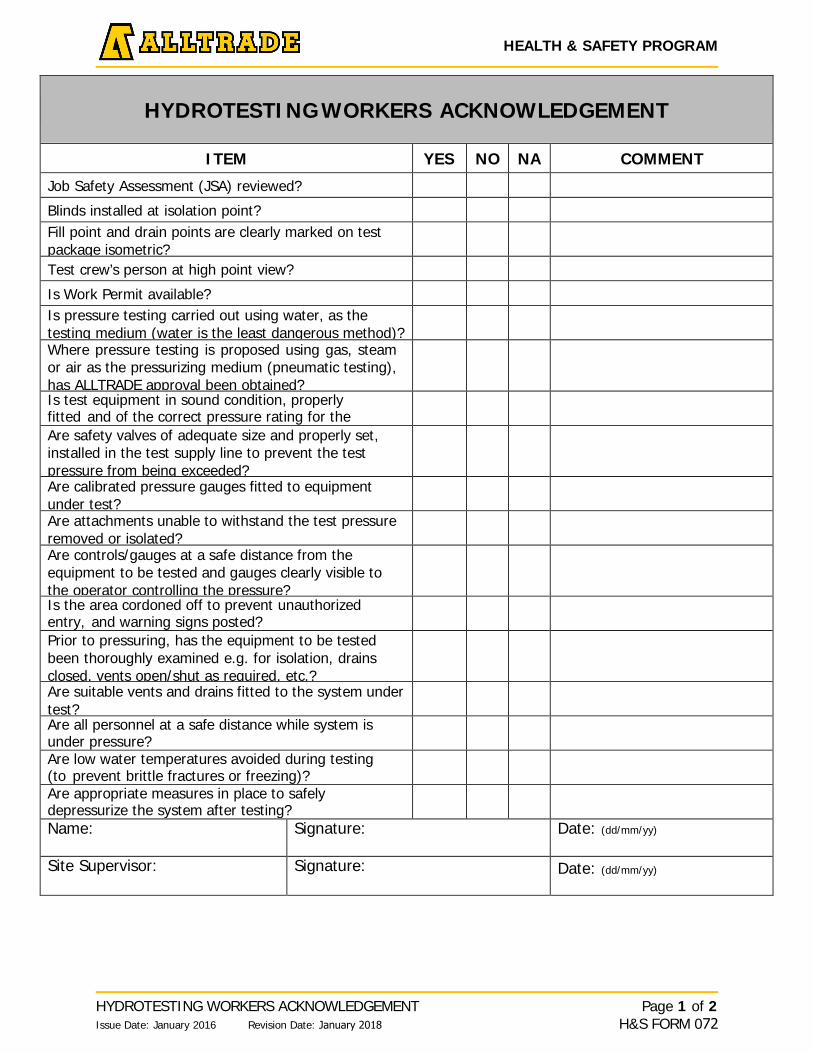
HEALTH & SAFETY PROGRAM
HYDROTESTING WORKERS ACKNOWLEDGEMENT Issue Date: January 2016 Revision Date: January 2018
Page 1 of 2 H&S FORM 072
HYDROTESTING WORKERS ACKNOWLEDGEMENT
ITEM YES NO NA COMMENT
Job Safety Assessment (JSA) reviewed?
Blinds installed at isolation point? Fill point and drain points are clearly marked on test package isometric? Test crew’s person at high point view?
Is Work Permit available? Is pressure testing carried out using water, as the testing medium (water is the least dangerous method)? Where pressure testing is proposed using gas, steam or air as the pressurizing medium (pneumatic testing), has ALLTRADE approval been obtained? Is test equipment in sound condition, properly fitted and of the correct pressure rating for the
Are safety valves of adequate size and properly set, installed in the test supply line to prevent the test pressure from being exceeded? Are calibrated pressure gauges fitted to equipment under test? Are attachments unable to withstand the test pressure removed or isolated? Are controls/gauges at a safe distance from the equipment to be tested and gauges clearly visible to the operator controlling the pressure? Is the area cordoned off to prevent unauthorized entry, and warning signs posted? Prior to pressuring, has the equipment to be tested been thoroughly examined e.g. for isolation, drains closed, vents open/shut as required, etc.? Are suitable vents and drains fitted to the system under test? Are all personnel at a safe distance while system is under pressure? Are low water temperatures avoided during testing (to prevent brittle fractures or freezing)? Are appropriate measures in place to safely depressurize the system after testing? Name: Signature: Date: (dd/mm/yy)
Site Supervisor: Signature: Date: (dd/mm/yy)
HEALTH & SAFETY PROGRAM
HYDROTESTING WORKERS ACKNOWLEDGEMENT Issue Date: January 2016 Revision Date: January 2018
Page 2 of 2 H&S FORM 072
HYDROTESTING WORKERS ACKNOWLEDGEMENT
NAME SIGNATURE DATE (dd/mm/yy)
Project / Job #:
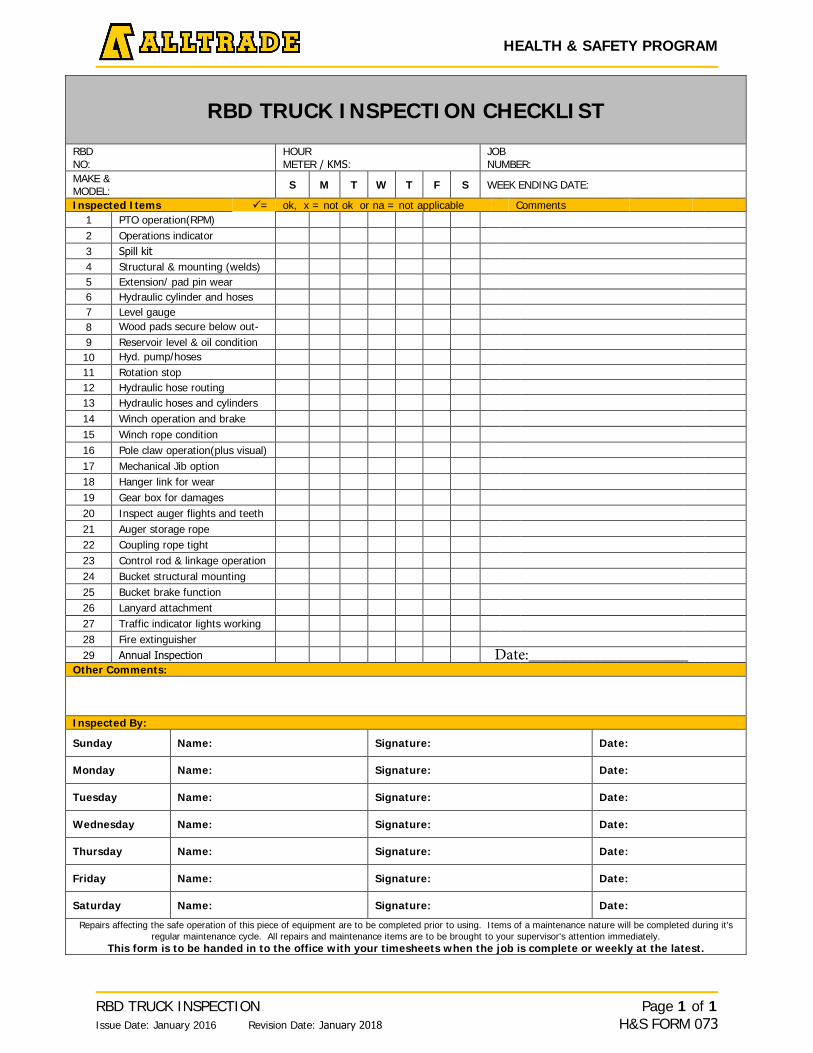
HEALTH & SAFETY PROGRAM
RBD TRUCK INSPECTION Issue Date: January 2016 Revision Date: January 2018
Page 1 of 1 H&S FORM 073
RBD TRUCK INSPECTION CHECKLIST
RBD NO:
HOUR METER / KMS:
JOB NUMBER:
MAKE & MODEL: S M T W T F S WEEK ENDING DATE:
Inspected Items = ok, x = not ok or na = not applicable Comments 1 PTO operation(RPM) 2 Operations indicator 3 Spill kit 4 Structural & mounting (welds) 5 Extension/ pad pin wear 6 Hydraulic cylinder and hoses 7 Level gauge 8 Wood pads secure below out-
9 Reservoir level & oil condition 10 Hyd. pump/hos
es
11 Rotation stop 12 Hydraulic hose routing 13 Hydraulic hoses and cylinders 14 Winch operation and brake 15 Winch rope condition 16 Pole claw operation(plus visual) 17 Mechanical Jib option 18 Hanger link for wear 19 Gear box for damages 20 Inspect auger flights and teeth 21 Auger storage rope 22 Coupling rope tight 23 Control rod & linkage operation 24 Bucket structural mounting 25 Bucket brake function 26 Lanyard attachment 27 Traffic indicator lights working 28 Fire extinguisher 29 Annual Inspection
Other Comments:
Inspected By:
Sunday Name: Signature: Date:
Monday Name: Signature: Date:
Tuesday Name: Signature: Date:
Wednesday Name: Signature: Date:
Thursday Name: Signature: Date:
Friday Name: Signature: Date:
Saturday Name: Signature: Date:
Repairs affecting the safe operation of this piece of equipment are to be completed prior to using. Items of a maintenance nature will be completed during it's regular maintenance cycle. All repairs and maintenance items are to be brought to your supervisor's attention immediately.
This form is to be handed in to the office with your timesheets when the job is complete or weekly at the latest.
Date:____________________
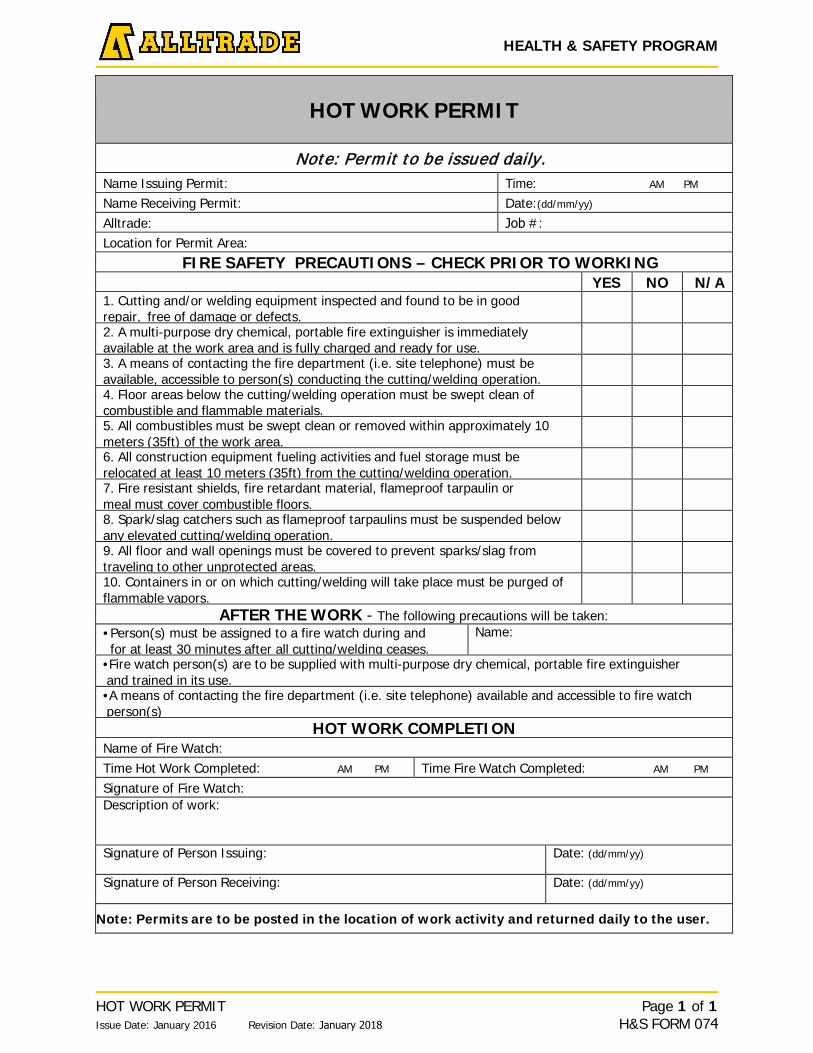
HEALTH & SAFETY PROGRAM
HOT WORK PERMIT Issue Date: January 2016 Revision Date: January 2018
Page 1 of 1 H&S FORM 074
HOT WORK PERMIT
Note: Permit to be issued daily. Name Issuing Permit: Time: AM PM
Name Receiving Permit: Date:(dd/mm/yy)
Alltrade: Job #: Location for Permit Area:
FIRE SAFETY PRECAUTIONS – CHECK PRIOR TO WORKING YES NO N/A
1. Cutting and/or welding equipment inspected and found to be in goodrepair, free of damage or defects.2. A multi-purpose dry chemical, portable fire extinguisher is immediatelyavailable at the work area and is fully charged and ready for use.3. A means of contacting the fire department (i.e. site telephone) must beavailable, accessible to person(s) conducting the cutting/welding operation.4. Floor areas below the cutting/welding operation must be swept clean ofcombustible and flammable materials.5. All combustibles must be swept clean or removed within approximately 10meters (35ft) of the work area.6. All construction equipment fueling activities and fuel storage must berelocated at least 10 meters (35ft) from the cutting/welding operation.7. Fire resistant shields, fire retardant material, flameproof tarpaulin ormeal must cover combustible floors.8. Spark/slag catchers such as flameproof tarpaulins must be suspended belowany elevated cutting/welding operation.9. All floor and wall openings must be covered to prevent sparks/slag fromtraveling to other unprotected areas.10. Containers in or on which cutting/welding will take place must be purged offlammable vapors.
AFTER THE WORK - The following precautions will be taken: • Person(s) must be assigned to a fire watch during andfor at least 30 minutes after all cutting/welding ceases.
Name:
•Fire watch person(s) are to be supplied with multi-purpose dry chemical, portable fire extinguisherand trained in its use.•A means of contacting the fire department (i.e. site telephone) available and accessible to fire watchperson(s)
HOT WORK COMPLETION Name of Fire Watch: Time Hot Work Completed: AM PM Time Fire Watch Completed: AM PM
Signature of Fire Watch: Description of work:
Signature of Person Issuing: Date: (dd/mm/yy)
Signature of Person Receiving: Date: (dd/mm/yy)
Note: Permits are to be posted in the location of work activity and returned daily to the user.
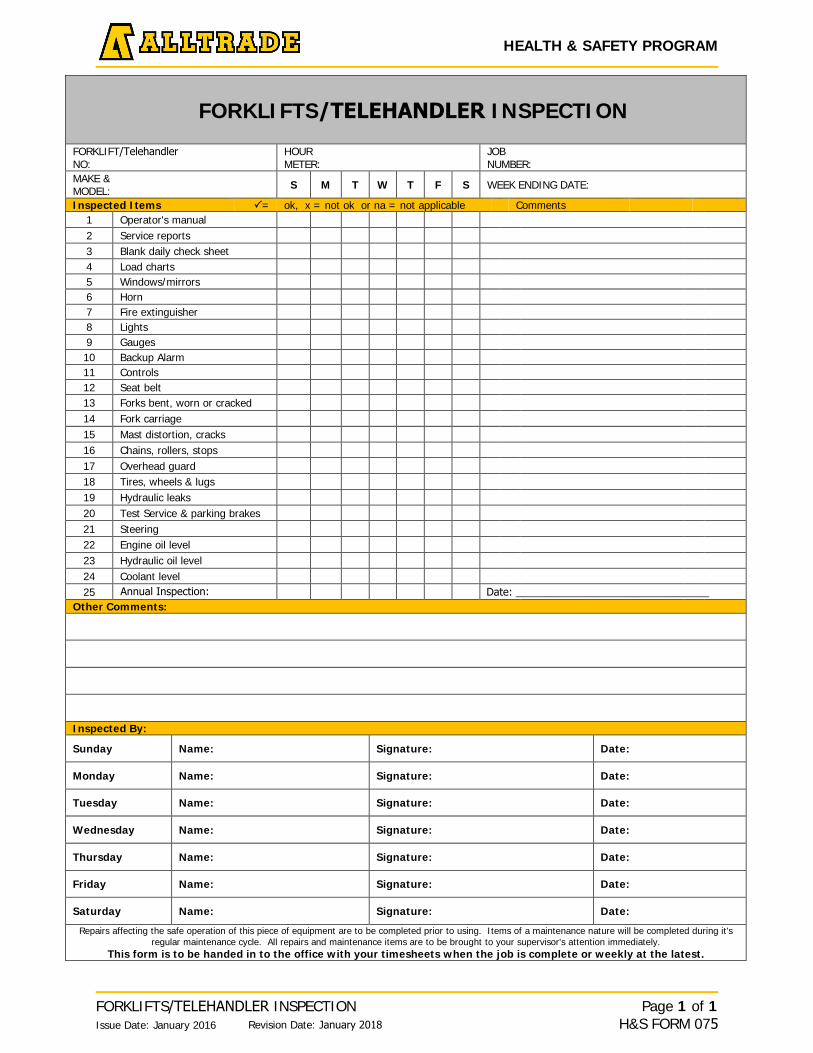
HEALTH & SAFETY PROGRAM
FORKLIFTS/TELEHANDLER INSPECTION Issue Date: January 2016 Revision Date: January 2018
Page 1 of 1 H&S FORM 075
FORKLIFTS/TELEHANDLER INSPECTION
FORKLIFT/Telehandler NO:
HOUR METER:
JOB NUMBER:
MAKE & MODEL: S M T W T F S WEEK ENDING DATE:
Inspected Items = ok, x = not ok or na = not applicable Comments 1 Operator's manual 2 Service reports 3 Blank daily check sheet 4 Load charts 5 Windows/mirrors 6 Horn 7 Fire extinguisher 8 Lights 9 Gauges 10 Backup Alarm 11 Controls 12 Seat belt 13 Forks bent, worn or cracked 14 Fork carriage 15 Mast distortion, cracks 16 Chains, rollers, stops 17 Overhead guard 18 Tires, wheels & lugs 19 Hydraulic leaks 20 Test Service & parking brakes 21 Steering 22 Engine oil level 23 Hydraulic oil level 24 Coolant level 25
Other Comments:
Inspected By:
Sunday Name: Signature: Date:
Monday Name: Signature: Date:
Tuesday Name: Signature: Date:
Wednesday Name: Signature: Date:
Thursday Name: Signature: Date:
Friday Name: Signature: Date:
Saturday Name: Signature: Date:
Repairs affecting the safe operation of this piece of equipment are to be completed prior to using. Items of a maintenance nature will be completed during it's regular maintenance cycle. All repairs and maintenance items are to be brought to your supervisor's attention immediately.
This form is to be handed in to the office with your timesheets when the job is complete or weekly at the latest.
Annual Inspection: Date: _________________________________
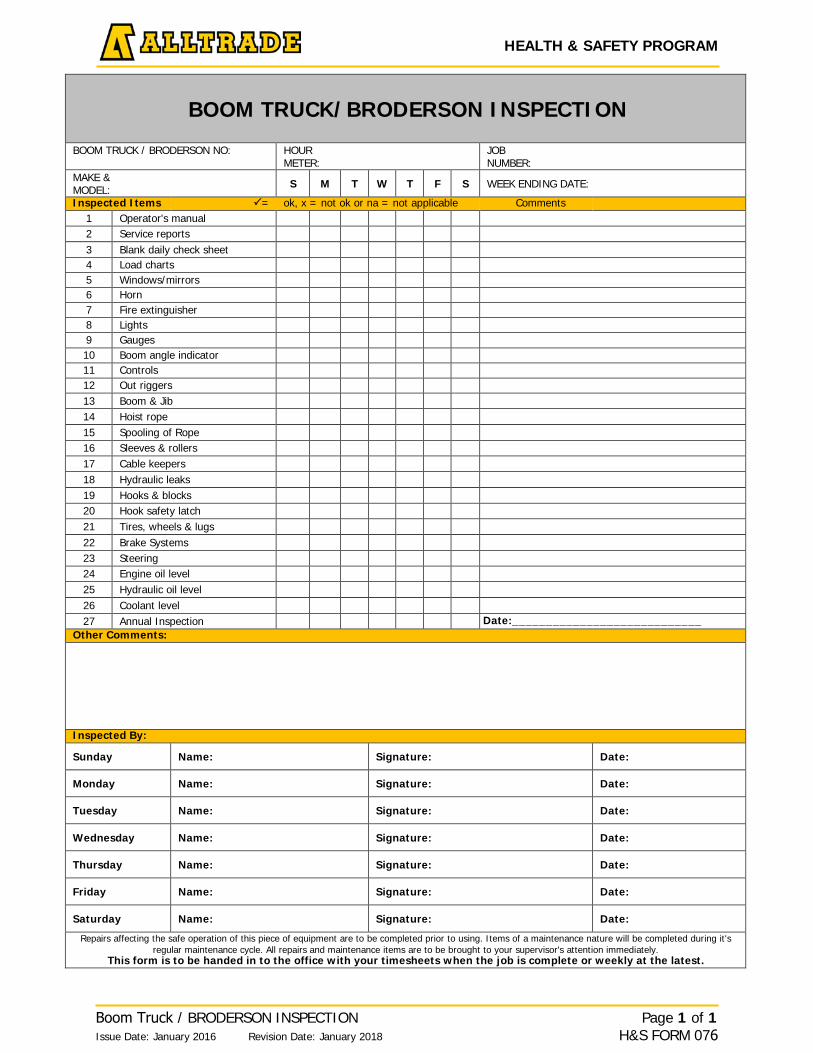
BOOM TRUCK/BRODERSON INSPECTION
BOOM TRUCK / BRODERSON NO: HOUR METER:
JOB NUMBER:
MAKE & MODEL: S M T W T F S WEEK ENDING DATE:
Inspected Items = ok, x = not ok or na = not applicable Comments 1 Operator's manual 2 Service reports 3 Blank daily check sheet 4 Load charts 5 Windows/mirrors 6 Horn 7 Fire extinguisher 8 Lights 9 Gauges 10 Boom angle indicator 11 Controls 12 Out riggers 13 Boom & Jib 14 Hoist rope 15 Spooling of Rope 16 Sleeves & rollers 17 Cable keepers 18 Hydraulic leaks 19 Hooks & blocks 20 Hook safety latch 21 Tires, wheels & lugs 22 Brake Systems 23 Steering 24 Engine oil level 25 Hydraulic oil level 26 Coolant level 27 Annual Inspection Date:____________________________
Other Comments:
Inspected By:
Sunday Name: Signature: Date:
Monday Name: Signature: Date:
Tuesday Name: Signature: Date:
Wednesday Name: Signature: Date:
Thursday Name: Signature: Date:
Friday Name: Signature: Date:
Saturday Name: Signature: Date:
Repairs affecting the safe operation of this piece of equipment are to be completed prior to using. Items of a maintenance nature will be completed during it's regular maintenance cycle. All repairs and maintenance items are to be brought to your supervisor's attention immediately.
This form is to be handed in to the office with your timesheets when the job is complete or weekly at the latest.
Boom Truck / BRODERSON INSPECTION Issue Date: January 2016 Revision Date: January 2018
Page 1 of 1 H&S FORM 076
HEALTH & SAFETY PROGRAM

HEALTH & SAFETY PROGRAM
OPERATOR COMPETENCY CHECKLIST Issue Date: January 2016 Revision Date: January 2018
Page 1 of 1 H&S FORM 077
OPERATOR COMPETENCY CHECKLIST Date: _____________________
Worker Name: ______________________
Evaluators Name: ___________________
Jobsite Name: _____________________
Jobsite Number: ___________________
MEETS EXPECTATIONS
NEEDS ADDITIONAL TRAINING
N/A COMMENTS
1
A thorough inspection is completed prior to work commencing and equipment checklist is filled out correctly
2 Operator demonstrates good housekeeping practices
3 3 point contact used when mounting & dismounting
4 All required PPE worn for the work being done and when outside of equipment
5
The Operator reassessed scope of work prior to commencement, fills out their FLRA card and has signed onto all applicable hazard assessments
6 Starts and stops equipment according to procedures as outlined in Operator manual and site requirements.
7 Operator has an awareness of Safe fueling procedures
8
Maintains awareness of spotter and good communication with ground personnel and equipment operating in the immediate area
9
The Operator is aware of all the controls and their function, blind spots as well as the overall limitations, dimensions, load ratings and weight of the equipment
10 The Operator understands the safe operations of this piece of equipment
11
The Operator shows awareness of the proper use of wheel chocks and the proper location for lock and tag out of this equipment
The following sign off indicates that the employee understands the safe work procedures for
operating a _____________________________________ safely.
Employees Signature: _________________________________ Date: ____________________
Evaluators Signature: _________________________________ Date: ____________________
Supervisors Signature: ________________________________ Date: ____________________
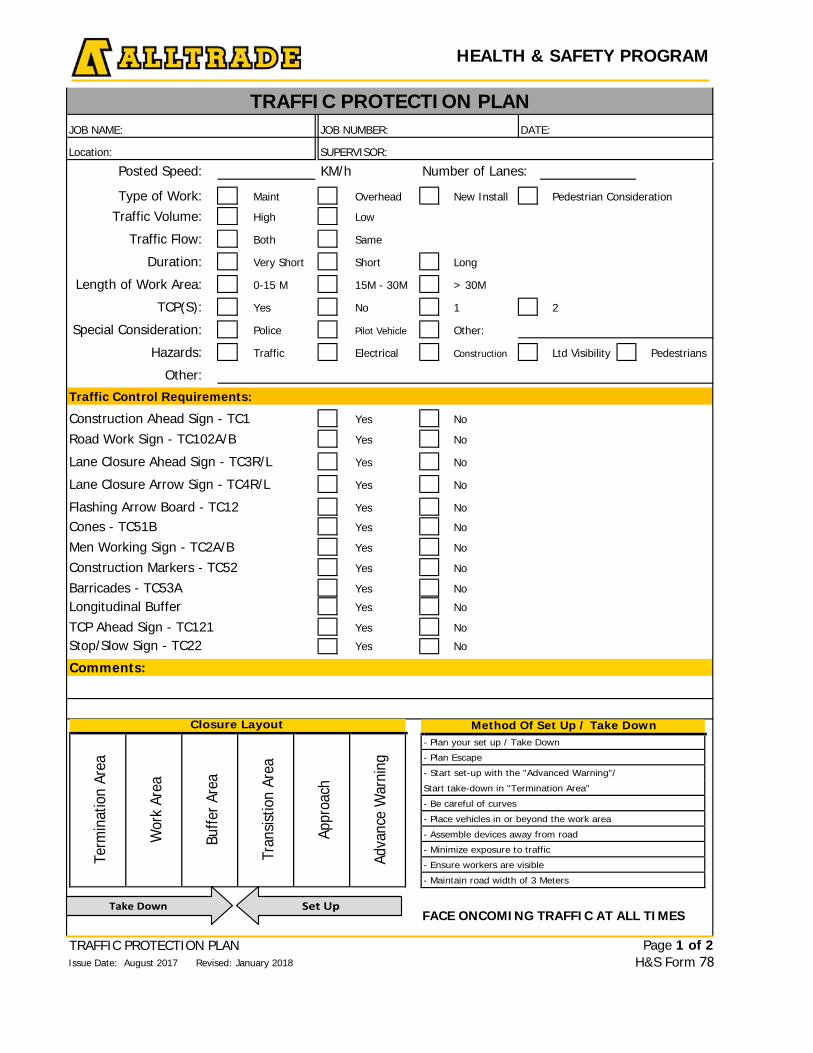
HEALTH & SAFETY PROGRAM
Posted Speed: KM/h Number of Lanes:
Type of Work: Maint Overhead New Install
Traffic Volume: High Low
Traffic Flow: Both Same
Duration: Very Short Short Long
Length of Work Area: 0-15 M 15M - 30M > 30M
TCP(S): Yes No 1 2
Special Consideration: Police Pilot Vehicle Other:
Hazards: Traffic Electrical Construction Ltd Visibility Pedestrians
Other:
Yes No
Yes No
Yes No
Yes No
Yes No
Yes No
Yes No
Yes No
Yes No
Yes No
Yes No
Yes No
Comments:
FACE ONCOMING TRAFFIC AT ALL TIMES
TRAFFIC PROTECTION PLAN
Pedestrian Consideration
JOB NAME:
Location:
DATE:
SUPERVISOR:
Longitudinal BufferBarricades - TC53AConstruction Markers - TC52
JOB NUMBER:
TRAFFIC PROTECTION PLANIssue Date: August 2017 Revised: January 2018
Page 1 of 2 H&S Form 78
Men Working Sign - TC2A/BCones - TC51BFlashing Arrow Board - TC12
Lane Closure Arrow Sign - TC4R/L
Traffic Control Requirements:
Lane Closure Ahead Sign - TC3R/L
Road Work Sign - TC102A/BConstruction Ahead Sign - TC1
Stop/Slow Sign - TC22TCP Ahead Sign - TC121
Closure Layout
Term
inat
ion
Area
Wor
k Ar
ea
Buffe
r Are
a
Tran
sistio
n Ar
ea
Appr
oach
Adva
nce
War
ning
Take Down Set Up
Method Of Set Up / Take Down - Plan your set up / Take Down
- Plan Escape
- Start set-up with the "Advanced Warning"/
Start take-down in "Termination Area"
- Be careful of curves
- Place vehicles in or beyond the work area
- Assemble devices away from road
- Minimize exposure to traffic
- Ensure workers are visible
- Maintain road width of 3 Meters
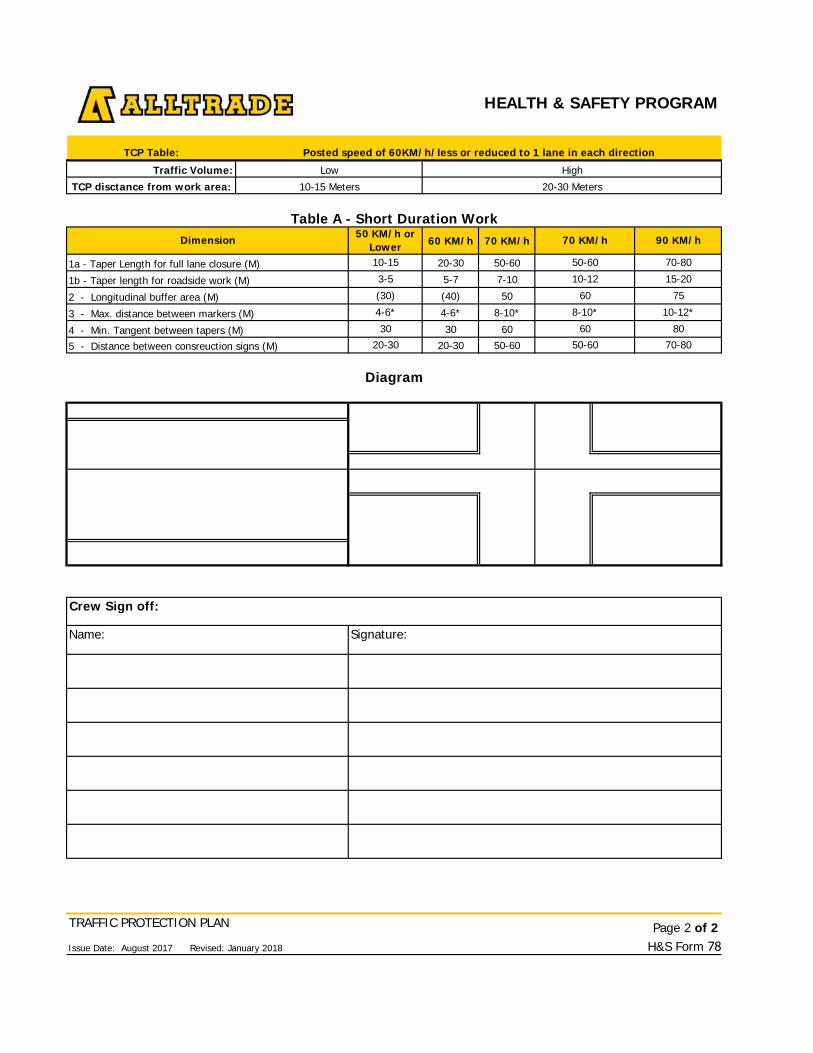
60 KM/h 70 KM/h
20-30 50-60
5-7 7-10
(40) 50
4-6* 8-10*
30 6020-30 50-60
TRAFFIC PROTECTION PLAN
Issue Date: August 2017 Revised: January 2018
10-12*
8070-80
8-10*
6050-60
Diagram
Name: Signature:
Crew Sign off:
2 - Longitudinal buffer area (M) 75
50 KM/h or Lower10-15
3-5
(30)
70 KM/h
50-60
10-12
60
3 - Max. distance between markers (M)
4 - Min. Tangent between tapers (M)5 - Distance between consreuction signs (M)
30
4-6*
20-30
Traffic Volume:
TCP Table: Posted speed of 60KM/h/less or reduced to 1 lane in each direction
Low
10-15 Meters
High
20-30 Meters
HEALTH & SAFETY PROGRAM
Page 2 of 2H&S Form 78
Table A - Short Duration WorkDimension
1a - Taper Length for full lane closure (M)
1b - Taper length for roadside work (M)
90 KM/h
70-80
15-20
TCP disctance from work area:
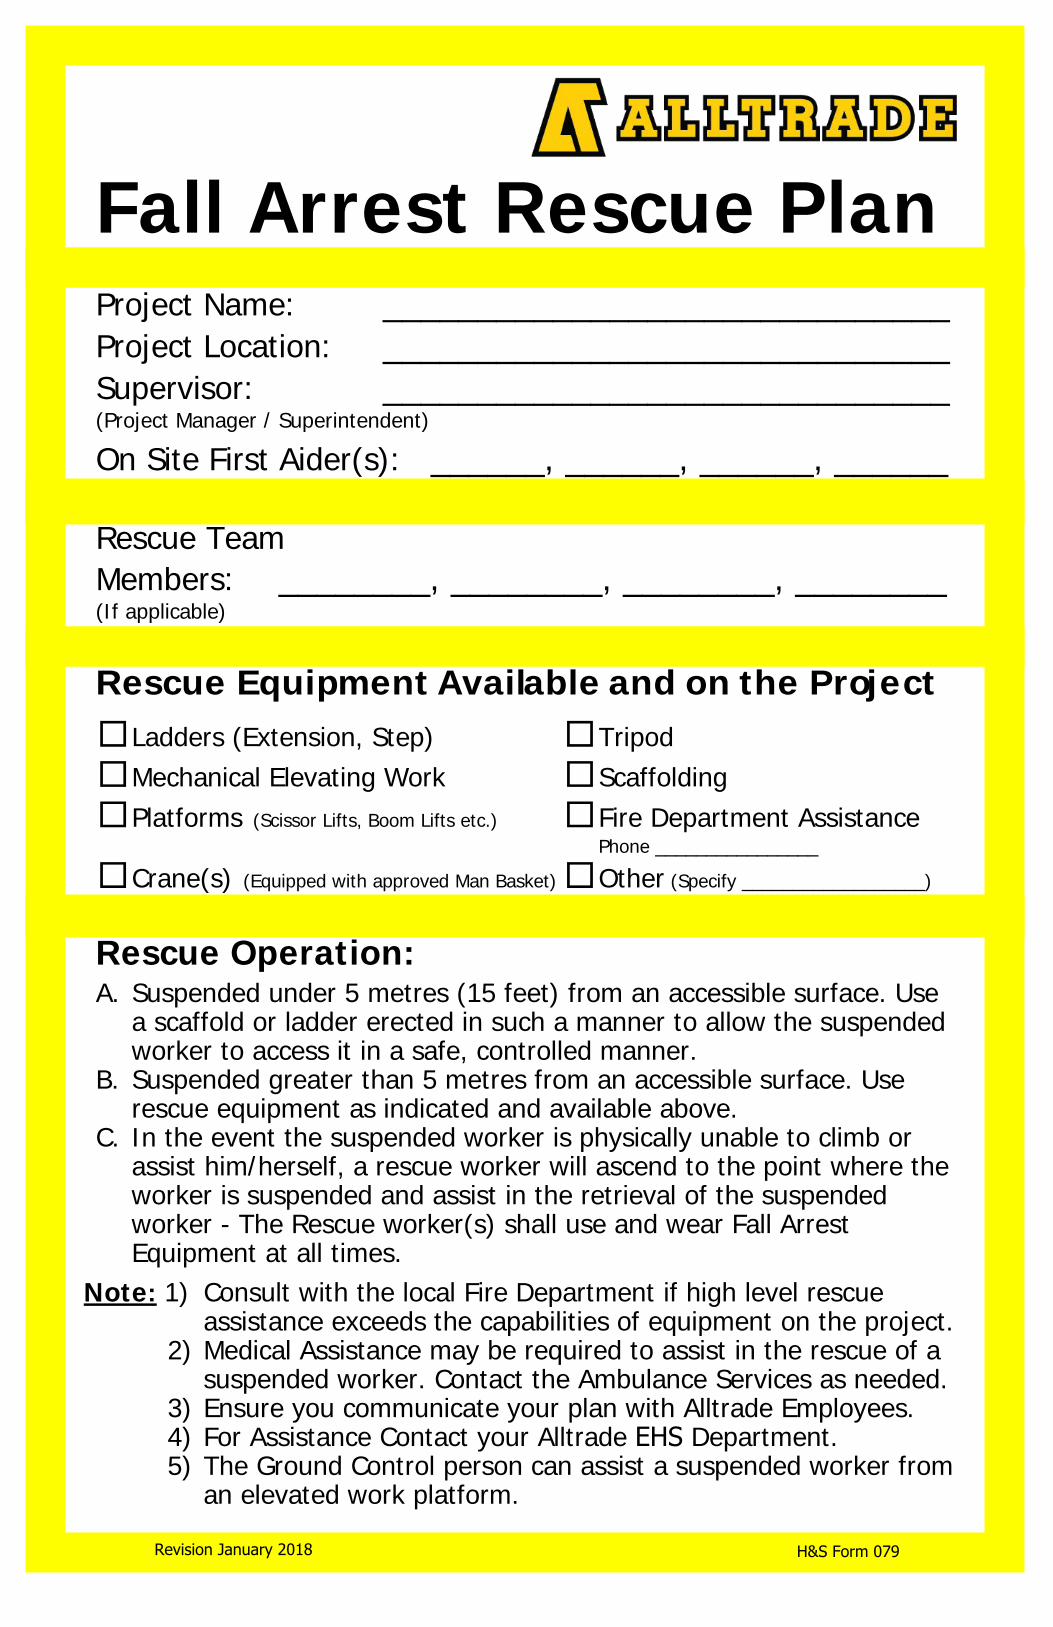
Fall Arrest Rescue PlanProject Name: ______________________________ Project Location: ______________________________ Supervisor: ______________________________ (Project Manager / Superintendent)
On Site First Aider(s): ______, ______, ______, ______
Rescue Team Members: ________, ________, ________, ________ (If applicable)
Rescue Equipment Available and on the Project □ Ladders (Extension, Step) □ Tripod□ Mechanical Elevating Work □ Scaffolding□ Platforms (Scissor Lifts, Boom Lifts etc.) □ Fire Department Assistance
Phone ________________
□ Crane(s) (Equipped with approved Man Basket) □ Other (Specify __________________)
Rescue Operation: A. Suspended under 5 metres (15 feet) from an accessible surface. Use
a scaffold or ladder erected in such a manner to allow the suspendedworker to access it in a safe, controlled manner.
B. Suspended greater than 5 metres from an accessible surface. Userescue equipment as indicated and available above.
C. In the event the suspended worker is physically unable to climb orassist him/herself, a rescue worker will ascend to the point where theworker is suspended and assist in the retrieval of the suspendedworker - The Rescue worker(s) shall use and wear Fall ArrestEquipment at all times.
Note: 1) Consult with the local Fire Department if high level rescue assistance exceeds the capabilities of equipment on the project.
2) Medical Assistance may be required to assist in the rescue of asuspended worker. Contact the Ambulance Services as needed.
3) Ensure you communicate your plan with Alltrade Employees.4) For Assistance Contact your Alltrade EHS Department.5) The Ground Control person can assist a suspended worker from
an elevated work platform.
Revision January 2018 H&S Form 079
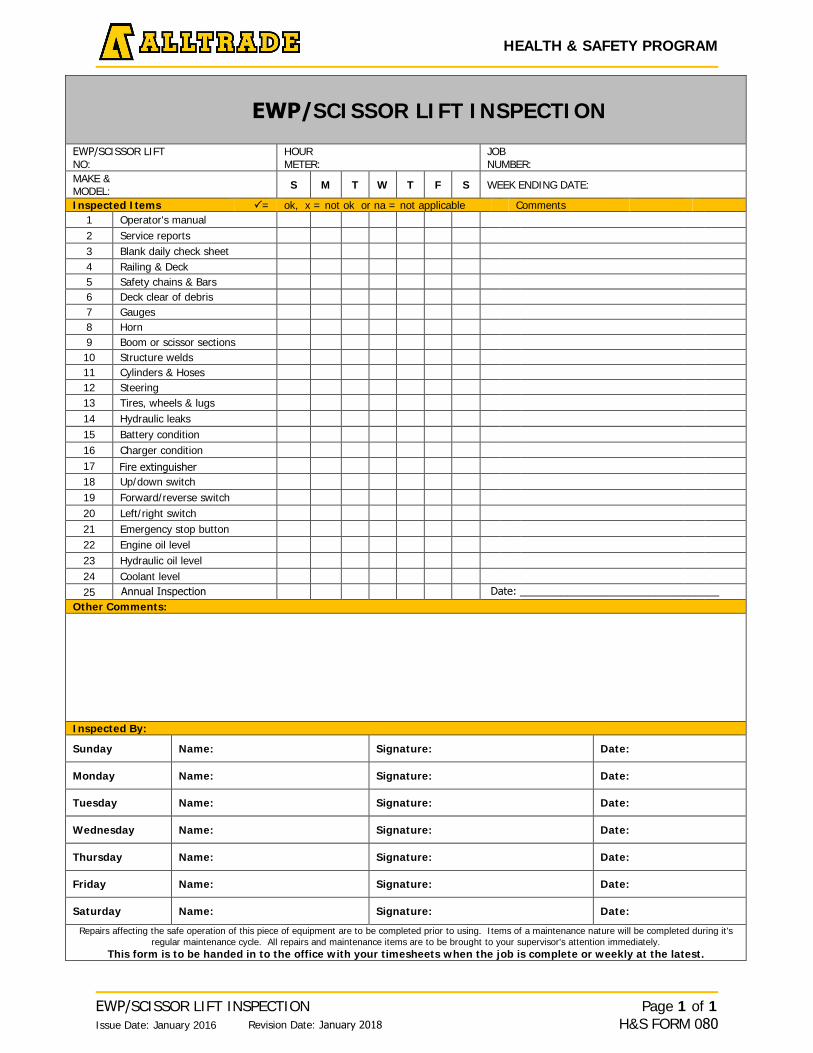
HEALTH & SAFETY PROGRAM
EWP/SCISSOR LIFT INSPECTION Issue Date: January 2016 Revision Date: January 2018
Page 1 of 1 H&S FORM 080
EWP/SCISSOR LIFT INSPECTION
EWP/SCISSOR LIFT NO:
HOUR METER:
JOB NUMBER:
MAKE & MODEL: S M T W T F S WEEK ENDING DATE:
Inspected Items = ok, x = not ok or na = not applicable Comments 1 Operator's manual 2 Service reports 3 Blank daily check sheet 4 Railing & Deck 5 Safety chains & Bars 6 Deck clear of debris 7 Gauges 8 Horn 9 Boom or scissor sections 10 Structure welds 11 Cylinders & Hoses 12 Steering 13 Tires, wheels & lugs 14 Hydraulic leaks 15 Battery condition 16 Charger condition 17 18 Up/down switch 19 Forward/reverse switch 20 Left/right switch 21 Emergency stop button 22 Engine oil level 23 Hydraulic oil level 24 Coolant level 25
Other Comments:
Inspected By:
Sunday Name: Signature: Date:
Monday Name: Signature: Date:
Tuesday Name: Signature: Date:
Wednesday Name: Signature: Date:
Thursday Name: Signature: Date:
Friday Name: Signature: Date:
Saturday Name: Signature: Date:
Repairs affecting the safe operation of this piece of equipment are to be completed prior to using. Items of a maintenance nature will be completed during it's regular maintenance cycle. All repairs and maintenance items are to be brought to your supervisor's attention immediately.
This form is to be handed in to the office with your timesheets when the job is complete or weekly at the latest.
Annual Inspection Date: __________________________________
Fire extinguisher
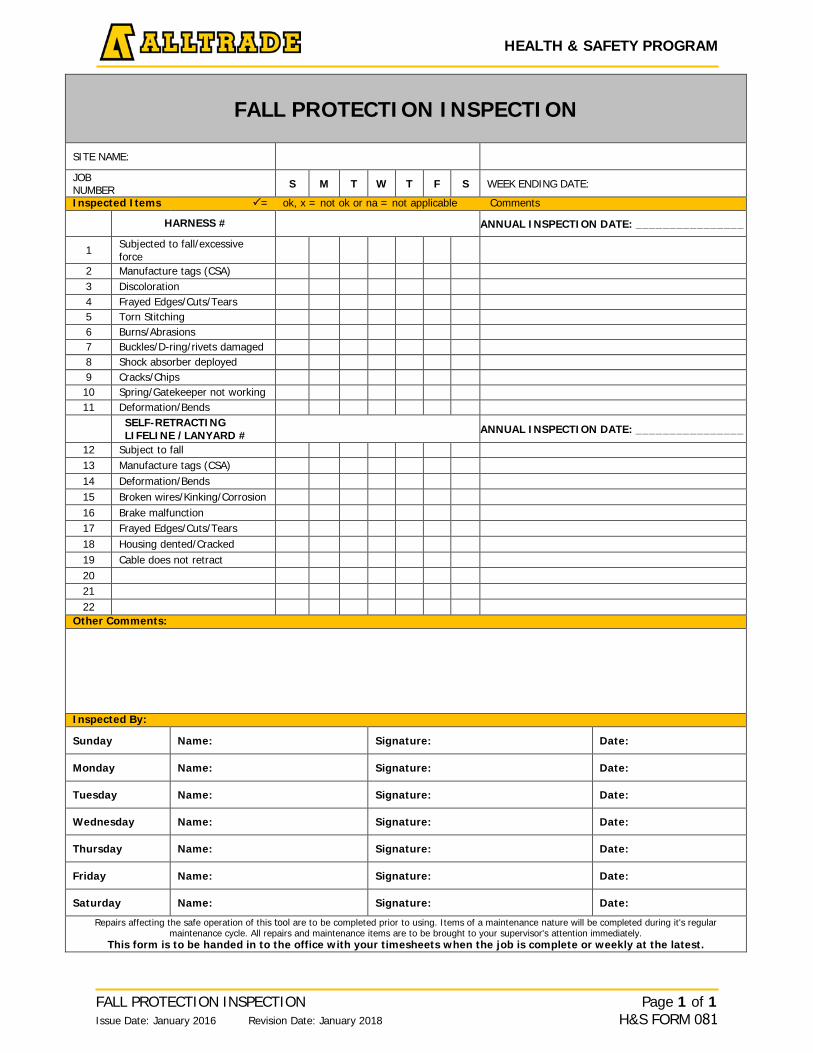
FALL PROTECTION INSPECTION
SITE NAME:
JOB NUMBER S M T W T F S WEEK ENDING DATE:
Inspected Items = ok, x = not ok or na = not applicable Comments
HARNESS # ANNUAL INSPECTION DATE: ________________
1 Subjected to fall/excessive force
2 Manufacture tags (CSA) 3 Discoloration 4 Frayed Edges/Cuts/Tears 5 Torn Stitching 6 Burns/Abrasions 7 Buckles/D-ring/rivets damaged 8 Shock absorber deployed 9 Cracks/Chips 10 Spring/Gatekeeper not working 11 Deformation/Bends
SELF-RETRACTING LIFELINE /LANYARD # ANNUAL INSPECTION DATE: ________________
12 Subject to fall 13 Manufacture tags (CSA) 14 Deformation/Bends 15 Broken wires/Kinking/Corrosion 16 Brake malfunction 17 Frayed Edges/Cuts/Tears 18 Housing dented/Cracked 19 Cable does not retract 20 21 22
Other Comments:
Inspected By:
Sunday Name: Signature: Date:
Monday Name: Signature: Date:
Tuesday Name: Signature: Date:
Wednesday Name: Signature: Date:
Thursday Name: Signature: Date:
Friday Name: Signature: Date:
Saturday Name: Signature: Date:
Repairs affecting the safe operation of this tool are to be completed prior to using. Items of a maintenance nature will be completed during it's regular maintenance cycle. All repairs and maintenance items are to be brought to your supervisor's attention immediately.
This form is to be handed in to the office with your timesheets when the job is complete or weekly at the latest.
FALL PROTECTION INSPECTION Issue Date: January 2016 Revision Date: January 2018
Page 1 of 1 H&S FORM 081
HEALTH & SAFETY PROGRAM
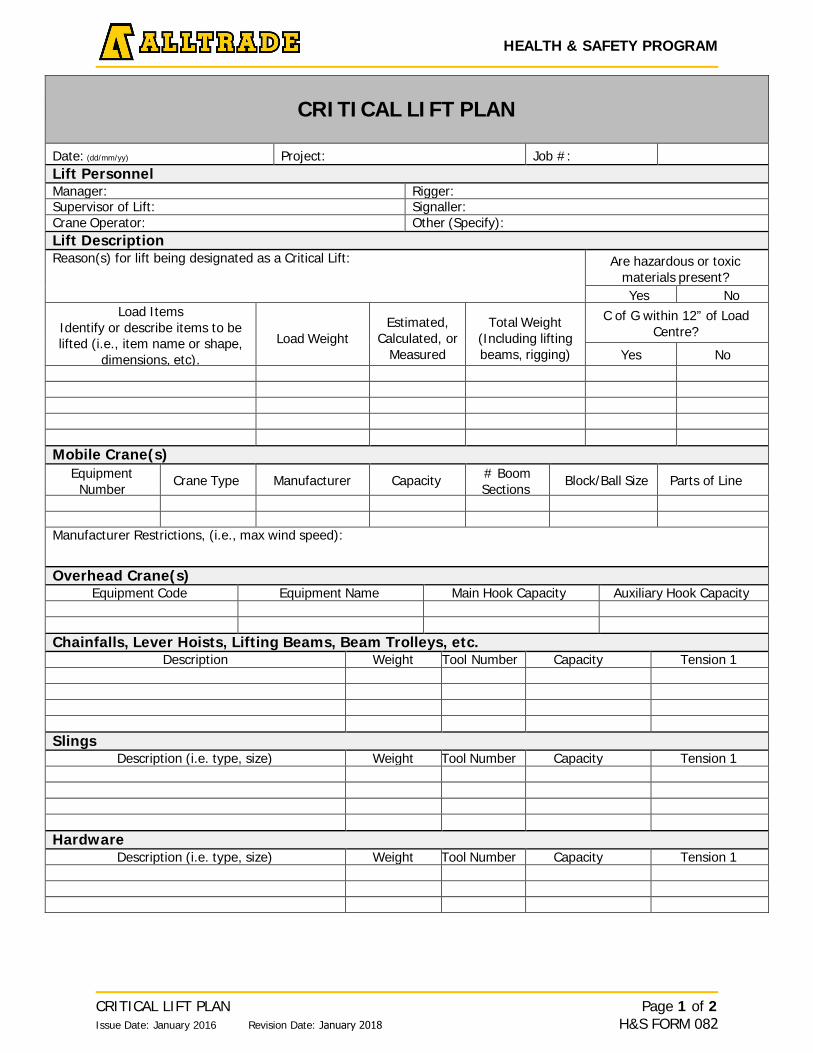
HEALTH & SAFETY PROGRAM
CRITICAL LIFT PLAN Issue Date: January 2016 Revision Date: January 2018
Page 1 of 2 H&S FORM 082
CRITICAL LIFT PLAN
Date: (dd/mm/yy) Project: Job #: Lift Personnel Manager: Rigger: Supervisor of Lift: Signaller: Crane Operator: Other (Specify): Lift Description Reason(s) for lift being designated as a Critical Lift: Are hazardous or toxic
materials present? Yes No
Load Items Identify or describe items to be lifted (i.e., item name or shape,
dimensions, etc). Load Weight
Estimated, Calculated, or
Measured
Total Weight (Including lifting beams, rigging)
C of G within 12” of Load Centre?
Yes No
Mobile Crane(s) Equipment
Number Crane Type Manufacturer Capacity # Boom Sections Block/Ball Size Parts of Line
Manufacturer Restrictions, (i.e., max wind speed):
Overhead Crane(s) Equipment Code Equipment Name Main Hook Capacity Auxiliary Hook Capacity
Chainfalls, Lever Hoists, Lifting Beams, Beam Trolleys, etc. Description Weight Tool Number Capacity Tension 1
Slings Description (i.e. type, size) Weight Tool Number Capacity Tension 1
Hardware Description (i.e. type, size) Weight Tool Number Capacity Tension 1
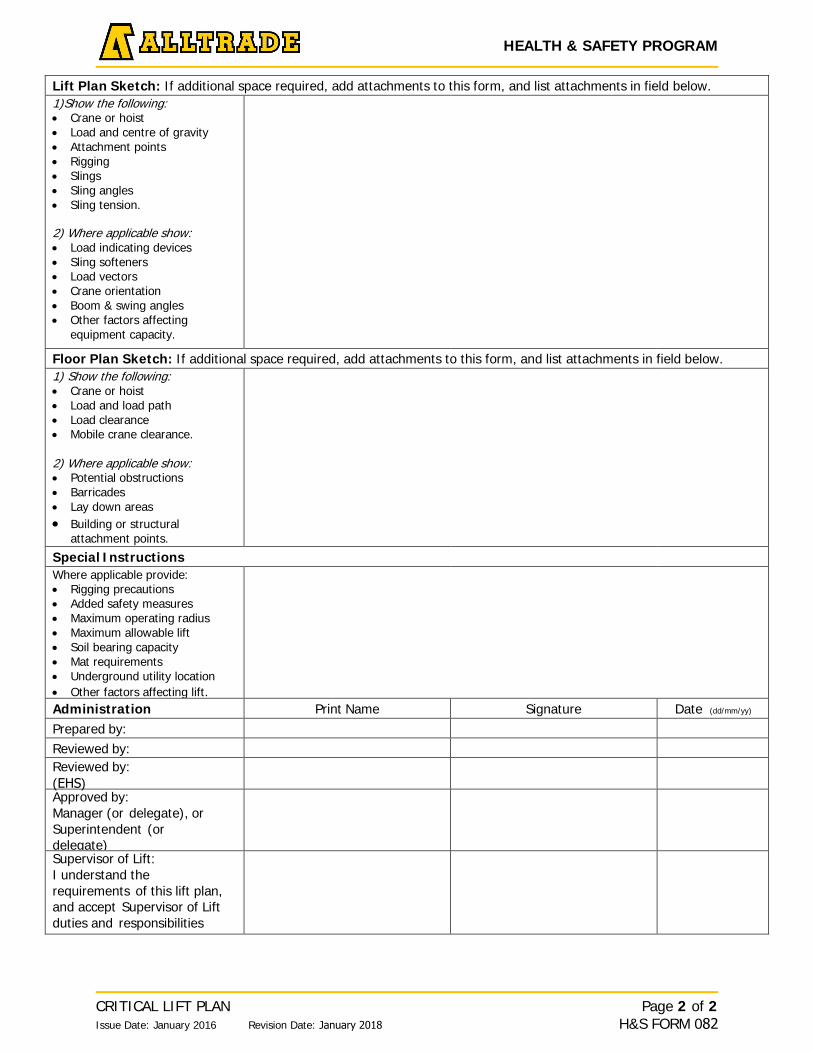
HEALTH & SAFETY PROGRAM
CRITICAL LIFT PLAN Issue Date: January 2016 Revision Date: January 2018
Page 2 of 2 H&S FORM 082
Lift Plan Sketch: If additional space required, add attachments to this form, and list attachments in field below. 1)Show the following: • Crane or hoist• Load and centre of gravity• Attachment points• Rigging• Slings• Sling angles• Sling tension.
2) Where applicable show: • Load indicating devices• Sling softeners• Load vectors• Crane orientation• Boom & swing angles• Other factors affecting
equipment capacity.
Floor Plan Sketch: If additional space required, add attachments to this form, and list attachments in field below. 1) Show the following: • Crane or hoist• Load and load path• Load clearance• Mobile crane clearance.
2) Where applicable show: • Potential obstructions• Barricades• Lay down areas• Building or structural
attachment points.
Special Instructions Where applicable provide: • Rigging precautions• Added safety measures• Maximum operating radius• Maximum allowable lift• Soil bearing capacity• Mat requirements• Underground utility location• Other factors affecting lift.Administration Print Name Signature Date (dd/mm/yy) Prepared by: Reviewed by: Reviewed by: (EHS) Approved by: Manager (or delegate), or Superintendent (or delegate) Supervisor of Lift: I understand the requirements of this lift plan, and accept Supervisor of Lift duties and responsibilities
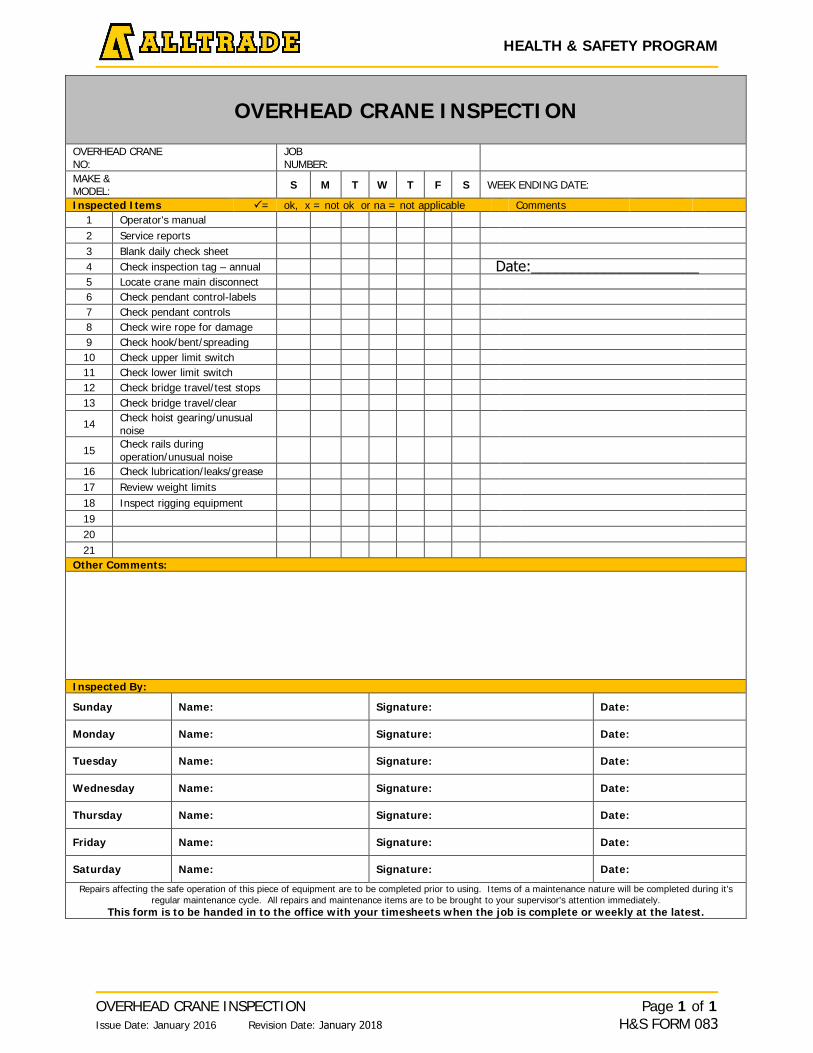
HEALTH & SAFETY PROGRAM
OVERHEAD CRANE INSPECTION Issue Date: January 2016 Revision Date: January 2018
Page 1 of 1 H&S FORM 083
OVERHEAD CRANE INSPECTION
OVERHEAD CRANE NO:
JOB NUMBER:
MAKE & MODEL: S M T W T F S WEEK ENDING DATE:
Inspected Items = ok, x = not ok or na = not applicable Comments 1 Operator's manual 2 Service reports 3 Blank daily check sheet 4 Check inspection tag – annual 5 Locate crane main disconnect 6 Check pendant control-labels 7 Check pendant controls 8 Check wire rope for damage 9 Check hook/bent/spreading 10 Check upper limit switch 11 Check lower limit switch 12 Check bridge travel/test stops 13 Check bridge travel/clear
14 Check hoist gearing/unusual noise
15 Check rails during operation/unusual noise
16 Check lubrication/leaks/grease 17 Review weight limits 18 Inspect rigging equipment 19 20 21
Other Comments:
Inspected By:
Sunday Name: Signature: Date:
Monday Name: Signature: Date:
Tuesday Name: Signature: Date:
Wednesday Name: Signature: Date:
Thursday Name: Signature: Date:
Friday Name: Signature: Date:
Saturday Name: Signature: Date:
Repairs affecting the safe operation of this piece of equipment are to be completed prior to using. Items of a maintenance nature will be completed during it's regular maintenance cycle. All repairs and maintenance items are to be brought to your supervisor's attention immediately.
This form is to be handed in to the office with your timesheets when the job is complete or weekly at the latest.
Date:_____________________

HOISTING EQUIPMENT
Project Name: Job #: Physical Condition Equipment Type
E=Excellent G=Good F=Fair P=Poor 01=Synthetic Web Sling
02=Wire Rope Sling
03=Chain Sling
04=Round Sling
05=Spectra Sling
06 = Chain Fall
07 = Other
Note: All Inspections must be completed by a competent person.
Item #
Serial # Manufacturer Physical
Condition Equip Type
Inspected By Inspection Date Removed from Service
Reason Date
HOISTING EQUIPMENT INSPECTION Issue Date: January 2016 Revision Date: January 2018
Page 1 of 1 H&S FORM 084
HEALTH & SAFETY PROGRAM
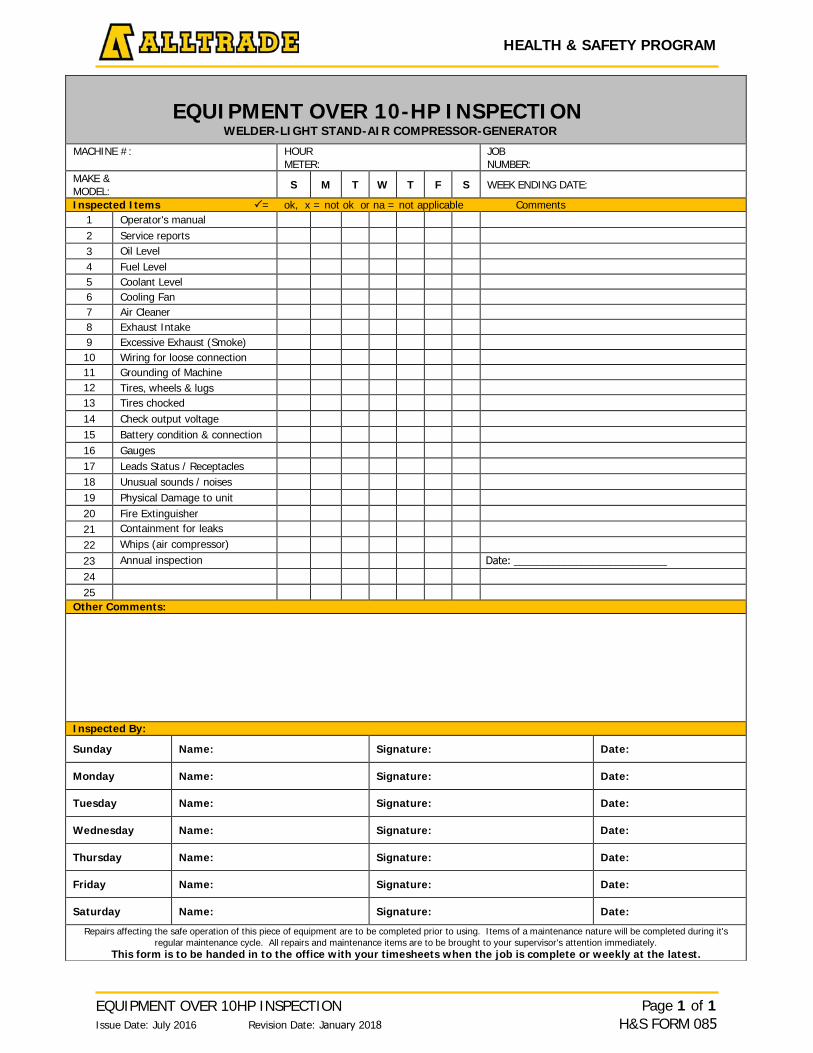
EQUIPMENT OVER 10HP INSPECTION Issue Date: July 2016 Revision Date: January 2018
HEALTH & SAFETY PROGRAM
Page 1 of 1 H&S FORM 085
EQUIPMENT OVER 10-HP INSPECTION WELDER-LIGHT STAND-AIR COMPRESSOR-GENERATOR
MACHINE #: HOUR METER:
JOB NUMBER:
MAKE & MODEL:
S M T W T F S WEEK ENDING DATE:
Inspected Items = ok, x = not ok or na = not applicable Comments 1 Operator's manual 2 Service reports 3 Oil Level 4 Fuel Level 5 Coolant Level 6 Cooling Fan 7 Air Cleaner 8 Exhaust Intake 9 Excessive Exhaust (Smoke) 10 Wiring for loose connection 11 Grounding of Machine 12 Tires, wheels & lugs 13 Tires chocked 14 Check output voltage 15 Battery condition & connection 16 Gauges 17 Leads Status / Receptacles 18 Unusual sounds / noises 19 Physical Damage to unit 20 Fire Extinguisher 21 Containment for leaks 22 Whips (air compressor)
23 Annual inspection 24 25
Other Comments:
Inspected By:
Sunday Name: Signature: Date:
Monday Name: Signature: Date:
Tuesday Name: Signature: Date:
Wednesday Name: Signature: Date:
Thursday Name: Signature: Date:
Friday Name: Signature: Date:
Saturday Name: Signature: Date:
Repairs affecting the safe operation of this piece of equipment are to be completed prior to using. Items of a maintenance nature will be completed during it's regular maintenance cycle. All repairs and maintenance items are to be brought to your supervisor's attention immediately.
This form is to be handed in to the office with your timesheets when the job is complete or weekly at the latest.
Date: ___________________________
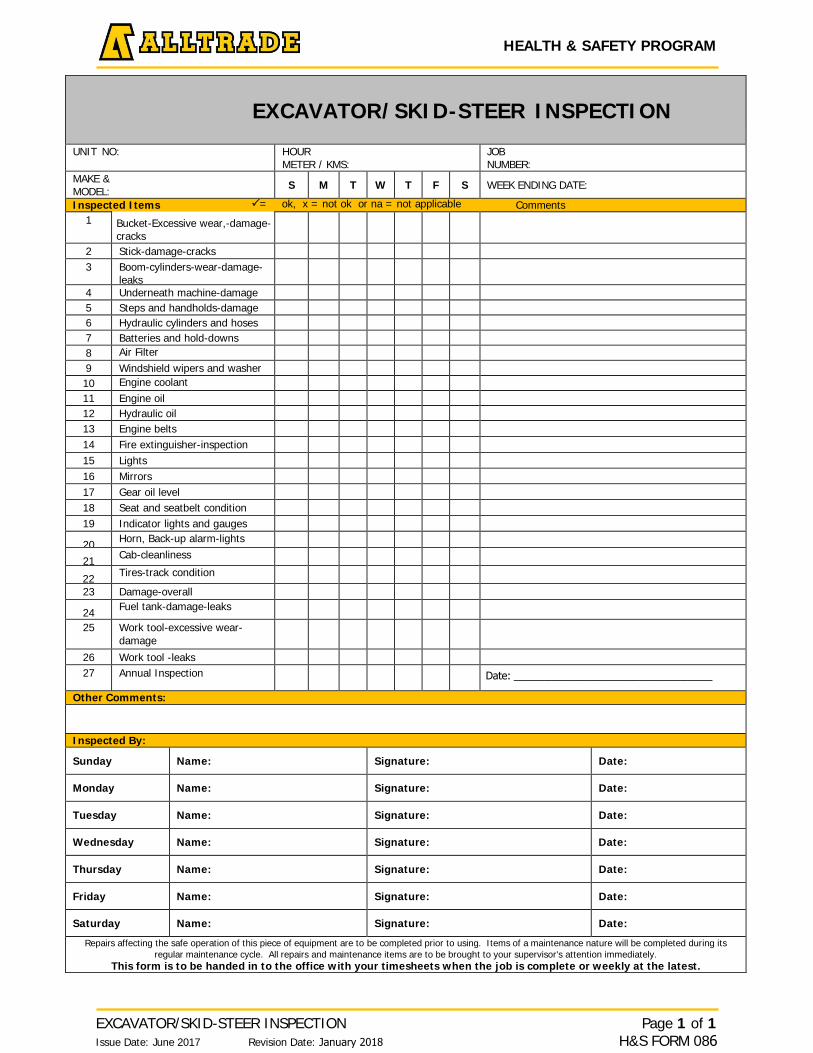
HEALTH & SAFETY PROGRAM
EXCAVATOR/SKID-STEER INSPECTION
UNIT NO: HOUR METER / KMS:
JOB NUMBER:
MAKE & MODEL: S M T W T F S WEEK ENDING DATE:
Inspected Items = ok, x = not ok or na = not applicable Comments 1 Bucket-Excessive wear,-damage-
cracks 2 Stick-damage-cracks 3 Boom-cylinders-wear-damage-
leaks 4 Underneath machine-damage 5 Steps and handholds-damage 6 Hydraulic cylinders and hoses 7 Batteries and hold-downs 8 Air Filter 9 Windshield wipers and washer 10 Engine coolant 11 Engine oil 12 Hydraulic oil 13 Engine belts 14 Fire extinguisher-inspection 15 Lights 16 Mirrors 17 Gear oil level 18 Seat and seatbelt condition 19 Indicator lights and gauges
20 Horn, Back-up alarm-lights
21 Cab-cleanliness
22 Tires-track condition
23 Damage-overall
24 Fuel tank-damage-leaks
25 Work tool-excessive wear-damage
26 Work tool -leaks 27 Annual Inspection
Other Comments:
Inspected By:
Sunday Name: Signature: Date:
Monday Name: Signature: Date:
Tuesday Name: Signature: Date:
Wednesday Name: Signature: Date:
Thursday Name: Signature: Date:
Friday Name: Signature: Date:
Saturday Name: Signature: Date:
Repairs affecting the safe operation of this piece of equipment are to be completed prior to using. Items of a maintenance nature will be completed during its regular maintenance cycle. All repairs and maintenance items are to be brought to your supervisor's attention immediately.
This form is to be handed in to the office with your timesheets when the job is complete or weekly at the latest.
EXCAVATOR/SKID-STEER INSPECTION Issue Date: June 2017 Revision Date: January 2018
Page 1 of 1 H&S FORM 086
Date: ___________________________________
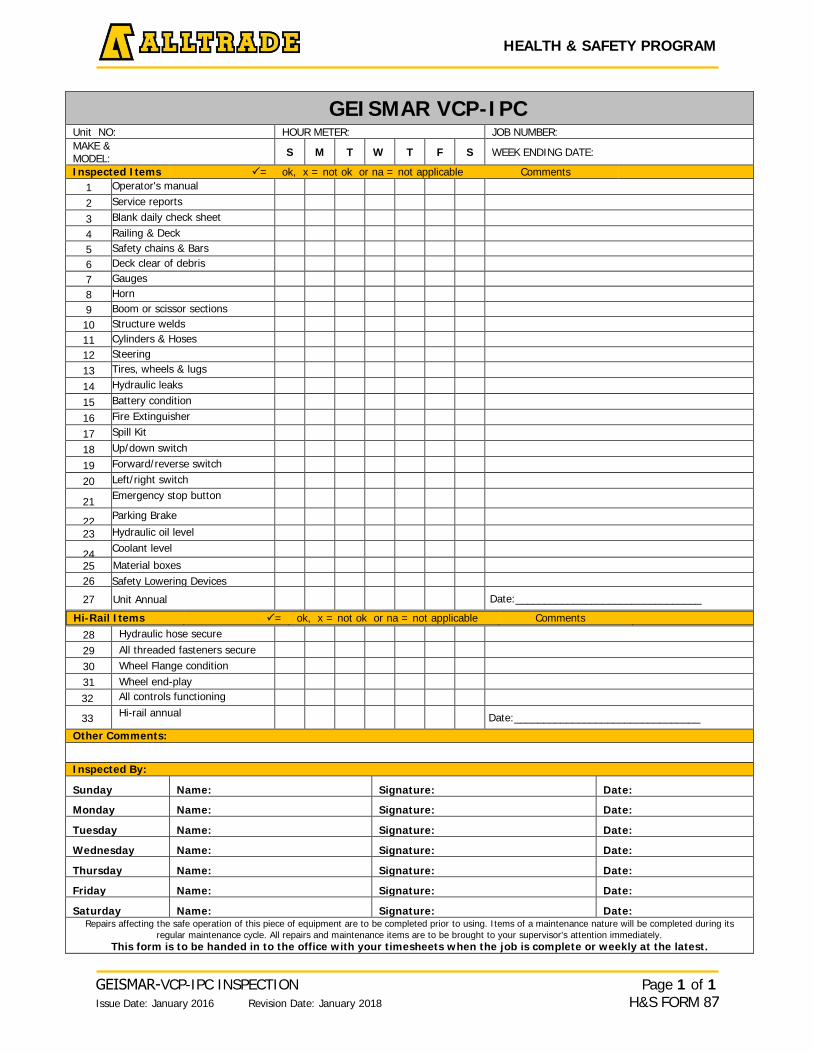
HEALTH & SAFETY PROGRAM
GEISMAR VCP-IPC Unit NO: HOUR METER: JOB NUMBER: MAKE & MODEL: S M T W T F S WEEK ENDING DATE:
Inspected Items = ok, x = not ok or na = not applicable Comments 1 Operator's manual
2 Service reports
3 Blank daily check sheet
4 Railing & Deck 5 Safety chains & Bars 6 Deck clear of debris 7 Gauges 8 Horn 9 Boom or scissor sections 10 Structure welds 11 Cylinders & Hoses 12 Steering
13 Tires, wheels & lugs
14 Hydraulic leaks
15 Battery condition
16 Fire Extinguisher
17 Spill Kit
18 Up/down switch
19 Forward/reverse switch
20 Left/right switch
21 Emergency stop button
22 Parking Brake
23 Hydraulic oil level
24 Coolant level
25 Material boxes 26 Safety Lowering Devices
27 Unit Annual Date:________________________________
Hi-Rail Items = ok, x = not ok or na = not applicable Comments
28 Hydraulic hose secure
29 All threaded fasteners secure 30 Wheel Flange condition
31 Wheel end-play
32 All controls functioning
33 Hi-rail annual Date:________________________________
Other Comments:
Inspected By:
Sunday Name: Signature: Date:
Monday Name: Signature: Date:
Tuesday Name: Signature: Date:
Wednesday Name: Signature: Date:
Thursday Name: Signature: Date:
Friday Name: Signature: Date:
Saturday Name: Signature: Date: Repairs affecting the safe operation of this piece of equipment are to be completed prior to using. Items of a maintenance nature will be completed during its
regular maintenance cycle. All repairs and maintenance items are to be brought to your supervisor's attention immediately. This form is to be handed in to the office with your timesheets when the job is complete or weekly at the latest.
GEISMAR-VCP-IPC INSPECTION Issue Date: January 2016 Revision Date: January 2018
Page 1 of 1 H&S FORM 87
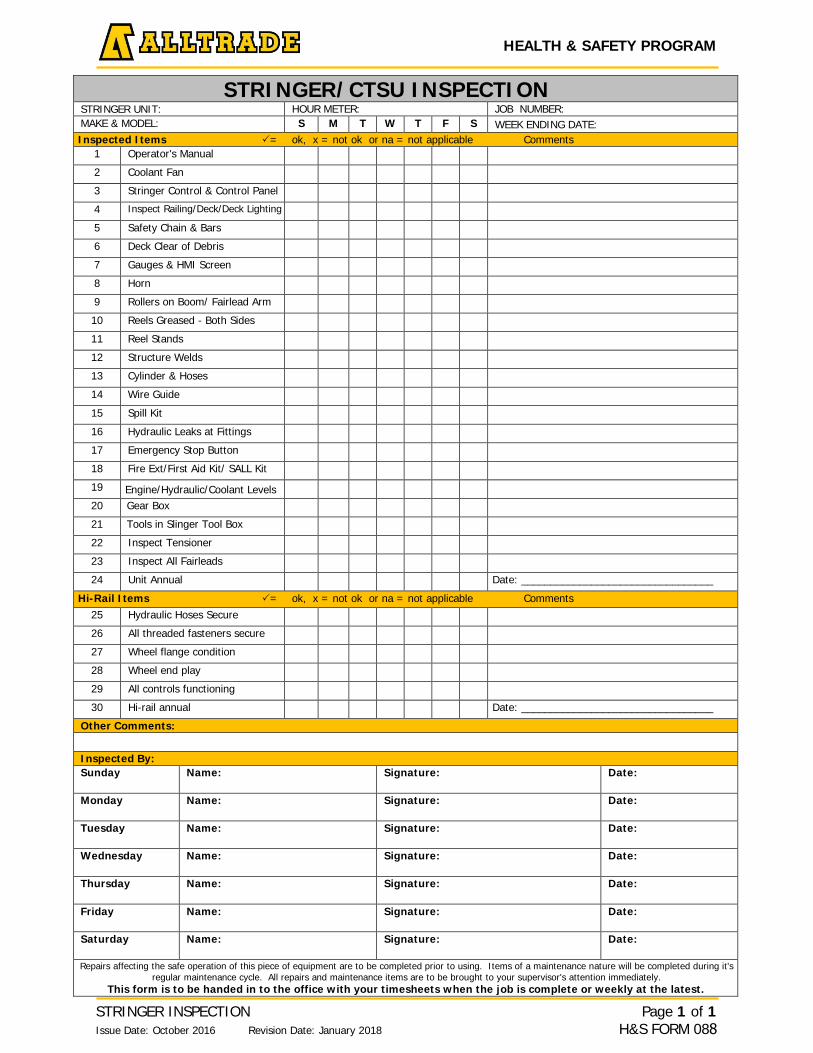
HEALTH & SAFETY PROGRAM
STRINGER/CTSU INSPECTION STRINGER UNIT: HOUR METER: JOB NUMBER: MAKE & MODEL: S M T W T F S WEEK ENDING DATE: Inspected Items = ok, x = not ok or na = not applicable Comments
1 Operator's Manual
2 Coolant Fan
3 Stringer Control & Control Panel
4 Inspect Railing/Deck/Deck Lighting 5 Safety Chain & Bars
6 Deck Clear of Debris
7 Gauges & HMI Screen 8 Horn
9 Rollers on Boom/ Fairlead Arm 10 Reels Greased - Both Sides 11 Reel Stands
12 Structure Welds
13 Cylinder & Hoses 14 Wire Guide 15 Spill Kit
16 Hydraulic Leaks at Fittings 17 Emergency Stop Button 18 Fire Ext/First Aid Kit/ SALL Kit 19 Engine/Hydraulic/Coolant Levels 20 Gear Box 21 Tools in Slinger Tool Box 22 Inspect Tensioner 23 Inspect All Fairleads 24 Unit Annual Date: _________________________________
Hi-Rail Items = ok, x = not ok or na = not applicable Comments 25 Hydraulic Hoses Secure
26 All threaded fasteners secure
27 Wheel flange condition
28 Wheel end play
29 All controls functioning
30 Hi-rail annual Date: _________________________________ Other Comments:
Inspected By: Sunday Name: Signature: Date:
Monday Name: Signature: Date:
Tuesday Name: Signature: Date:
Wednesday Name: Signature: Date:
Thursday Name: Signature: Date:
Friday Name: Signature: Date:
Saturday Name: Signature: Date:
Repairs affecting the safe operation of this piece of equipment are to be completed prior to using. Items of a maintenance nature will be completed during it's regular maintenance cycle. All repairs and maintenance items are to be brought to your supervisor's attention immediately.
This form is to be handed in to the office with your timesheets when the job is complete or weekly at the latest.
STRINGER INSPECTION Issue Date: October 2016 Revision Date: January 2018
Page 1 of 1 H&S FORM 088