oxy trị liệu & rối loạn co2 máu - oxygen therapy & hyper ...
Upload
khangminh22Category
view
1download
0
Hệ thống xử lý máu tự động Reveos®
Hướng dẫn vận hành - Phiên bản 1.1

Hướng dẫn vận hànhHệ thống xử lý máu tự động
Reveos® Phiên bản 1.1
Part No. 986351-536B Reorder No. 988024-002B
2019-11

©2019 Terumo BCT, Inc.
Reveos được đăng ký thương hiệu của Terumo BCT, Inc.
Terumo BCT là thương hiệu được đăng ký của Terumo Corporation.
Microsoft, Internet Explorer, Silverlight, SQL Server, và Windows là các thương hiệu được đăng ký hoặc các thương hiệu của Microsoft Corporation ở Mỹ và/ hoặc các nước khác.
Hệ thống xử lý máu tự động Reveos® có thể được bảo hộ bởi một hoặc một vài bằng sáng chế sau:
Mỹ: 7235041; 7279107; 7347932; 7396451; 7413665; 7497944; 7648639; 7674221; 7708889; 7766809; 7819793; 7833185; 8070665; 8120760; 8173027; 8236184; 8277406; 8287742, 8540614; 8337380; 8366086; và 8840535
Các bằng sáng chế nước ngoài đối ứng:
Đức: 60037918.3; 60318418.9; 60322600.0; 60331794.4; 60340696.3; 602005018443.0; 602005033803.9; 602006007917.6; 602007020019.9; 602007025628.3; 602007027066.9; và 602010015953.1
Anh: 1494735; 1627651; 1640027; 1709983; 1736187; 1920792; 2091593; và 2509655
Nhật: 4376635; 4800617; 4938465; 4960349; 5038150; 5204166; 5161301; 5175184; 5259595; 5405313; 5410470; 5519050; và 5554778
The Task Scheduler Manager Wrapper Software (Copyright 2003-2010 David Hall) IS PROVIDED “AS IS” WITHOUT WARRANTY OF ANY KIND, EXPRESS OR IMPLIED, INCLUDING BUT NOT LIMITED TO THE WARRANTIES OF MERCHANTABILITY, FITNESS FOR A PARTICULAR PURPOSE AND NONINFRINGEMENT. IN NO EVENT SHALL THE AUTHORS OR COPYRIGHT HOLDERS BE LIABLE FOR ANY CLAIM, DAMAGES OR OTHER LIABILITY, WHETHER IN AN ACTION OF CONTRACT, TORT OR OTHERWISE, ARISING FROM, OUT OF OR IN CONNECTION WITH THE SOFTWARE OR THE USE OR OTHER DEALINGS IN THE SOFTWARE.
Terumo BCT, Inc.10811 W. Collins AvenueLakewood, Colorado 80215USAUSA Phone: +1.877.339.4228Phone: +1.303.231.4357USA Fax: +1.866.715.6768Fax: +1.303.542.5215
Terumo BCT Europe N.V.Ikaroslaan 411930 ZaventemBelgiumPhone: +32.2.715.05.90Fax: +32.2.721.07.70
TERUMOBCT.COM

Mục lục
1: Giới thiệuHệ thống xử lý máu tự động Reveos ............................................................................................... 1-2
Đối tượng người đọc..................................................................................................................................... 1-2
Quy ước tài liệu ..................................................................................................................................... 1-3
Định nghĩa về Lưu ý, Thận trọng, Cảnh báo .................................................................................................. 1-4
Định nghĩa về trang và màn hình...................................................................................................................... 1-4
Cảnh báo và thận trọng ............................................................................................................................. 1-4
Gửi trả sản phẩm đã qua sử dụng................................................................................................................................. 1-6
2: Tổng quan hệ thốngTổng quan hệ thống Reveos ............................................................................................................................... 2-2
Tổng quan quy trình phân tách của hệ thống Reveos .............................................................................. 2-2
Tổng quan phần mềm quản lý hệ thống Reveos ........ ..............................................................................2-2 Thành phần thiết bị Reveos............................................................................................................................... 2-3
Biểu tượng và phím màn hình cảm ứng thiết bị Reveos.......................................................................... 2-5
Nguồn nước làm mát bên ngoài.............................................................................................................. 2-14
Các kiểm tra hệ thống....................................................................................................................................... 2-15
Điều hướng phần mềm quản lý hệ thống Reveos .............................................................................................2-16 Ô chọn, menu thả xuống, phím radio và băng chuyền......................... ...................................................... 2-19
Thêm và chỉnh sửa thông tin .................................................................................................................... 2-20
3: Vận hành hệ thốngTổng quan trước khi vận hành........................................................................................................................... 3-2
Cài đặt và di chuyển thiết bị .................................................................................................................... 3-3
Lắp đặt hệ thống Reveos ......................................................................................................................... 3-3
Di chuyển thiết bị.................................................................................................................................... 3-3
Bật nguồn thiết bị Reveos................................................................................................................................. 3-5
Kiểm tra hệ thống.................................................................................................................................... 3-5
Tắt nguồn thiết bị Reveos.................................................................................................................................. 3-5
Reveos® Automated Blood Processing System Operator's Manual for Version 1.1 i

Xác minh thiết bị đang trực tuyến...................................................................................................................... 3-6
Chọn quy trình cho thiết bị................................................................................................................................. 3-6
Nhập thông tin mã vạch vào thiết bị .................................................................................................................. 3-7
Quét mã vạch........................................................................................................................................... 3-7
Nhập thông tin bằng tay........................................................................................................................... 3-10
Xem lại và xóa mã vạch ..................................................................................................................................... 3-11
Nạp kít túi máu ................................................................................................................................................. 3-13
Nạp túi đối trọng ............................................................................................................................................... 3-21
Quản lý quy trình ............................................................................................................................................. 3-23
Kết thúc quy trình ................................................................................................................................. 3-25
Chỉ số lượng thu tiểu cầu........................................................................................................................ 3-26
Tháo kít túi máu ............................................................................................................................................... 3-27
Tháo túi đối trọng ............................................................................................................................................ 3-29
4: Báo động và Xử lý lỗiBáo động và Xử lý lỗi ....................................................................................................................................... 4-2
Cảnh báo và báo động .................................................................................................................................... 4-4
5: Bảo trì hệ thốngBảo trì định kỳ................................................................................................................................................... 5-2
Vệ sinh định kỳ................................................................................................................................................ 5-3
Quy trình vệ sinh định kỳ........................................................................................................................ 5-3
Vệ sinh vết máu tràn ........................................................................................................................................ 5-6
Quy trình vệ sinh vết máu tràn................................................................................................................ 5-6
Quy trình kiểm tra thiết bị đã khô ................................................................................................................... 5-11
Chạy Quy trình kiểm tra thiết bị đã khô .................................................................................................. 5-11
Thông tin dịch vụ.............................................................................................................................................. 5-12
Dịch vụ bảo trì .................................................................................................................................................... 5-13
6: Cấu hình phần mềm quản lý hệ thống ReveosTruy cập phần mềm và xem thông tin phiên bản ............................................................................................. 6-2
Mở phần mềm quản lý hệ thống Reveos................................................................................................... 6-2
Đăng nhập phần mềm quản lý hệ thống Reveos........................................................................................ 6-2
Đăng xuất phần mềm quản lý hệ thống Reveos........................................................................................ 6-2
Thay đổi mật khẩu..................................................................................................................................... 6-3
Xem thông tin phiên bản phần mềm ...................................................................................................... 6-3
Cấu hình thiết bị Reveos trong phần mềm quản lý hệ thống Reveos............................................................... 6-4
Cấu hình cơ sở.................................................................................................................................................... 6-5
Tạo cơ sở..................................................................................................................................................... 6-5
Chỉnh sửa cơ sở.......................................................................................................................................... 6-6
ii Reveos® Automated Blood Processing System Operator's Manual for Version 1.1

Xóa cơ sở............. ...................................................................................................................................... 6-6
Thiết bị kết hợp......................................................................................................................................... 6-6
Cấu hình ứng dụng............. ............................................................................................................................... 6-7
Chỉ định phân quyền......................................................................................................................................... 6-9
Nhóm....................................................................................................................................................... 6-9
Người dùng.............................................................................................................................................. 6-11
Cấu hình thiết bị chung.................................................................................................................................... 6-15
Cấu hình thiết bị đơn lẻ.................................................................................................................................... 6-17
Cấu hình định nghĩa mã vạch... ...................................................................................................................... 6-19
Tạo mã vạch............................................................................................................................................. 6-19
Chỉnh sửa mã vạch................................................................................................................................. 6-20
Xóa mã vạch............................................................................................................................................. 6-20
Cấu hình quy trình........................................................................................................................................... 6-21
Tạo quy trình........................................................................................................................................... 6-21
Chỉnh sửa quy trình................................................................................................................................ 6-23
Thiết bị kết hợp....................................................................................................................................... 6-23
7: Tìm kiếm và báo cáoTab báo cáo........................................................................................................................................................ 7-2
Tổng quan về báo cáo........................................................................................................................................ 7-3
Quản lý báo cáo................................................................................................................................................. 7-4
Cấu hình báo cáo....................................................................................................................................... 7-4
Tạo và đặt lịch báo cáo tổng quát .............................................................................................................. 7-4
Tạo và lưu một báo cáo tổng quát chưa được đặt lịch.............................................................................. 7-6
Tạo và đặt lịch báo cáo truy vấn tùy biến ................................................................................................. 7-7
Tạo và lưu báo cáo truy vấn tùy biến chưa được đặt lịch.......................................................................... 7-8
Chỉnh sửa báo cáo.................................................................................................................................... 7-8
Xóa báo cáo............................................................................................................................................... 7-9
Chạy báo cáo............................................................................................................................................. 7-9
Chế độ xem lịch................................................................................................................................................ 7-11
Tải xuống một báo cáo từ chế độ xem lịch....... ...................................................................................... 7-11
Báo cáo sơ bộ............... ..................................................................................................................................... 7-12
Xem đồ thị .............................................................................................................................................. 7-13
Xem chi tiết............................................................................................................................................. 7-20
Tìm kiếm ID hiến máu..................................................................................................................................... 7-23
Reveos® Automated Blood Processing System Operator's Manual for Version 1.1 iii

8: Thông số kỹ thuật hệ thốngThông số kỹ thuật hệ thống................................................................................................................................ 8-2
Thông tin tương thích điện từ............................................................................................................................ 8-4
Biểu tượng và chứng nhận.................................................................................................................................. 8-9
Bảng chú thích
iv Hướng dẫn vận hành Hệ thống xử lý máu tự động Reveos® - Phiên bản 1.1

1Giới thiệu
Hướng dẫn vận hành Hệ thống xử lý máu tự động Reveos® - Phiên bản 1.1 1-1

Hệ thống xử lý máu tự động Reveos
Chỉ định sử dụng thiết bị ReveosThiết bị Reveos được định tự động tách các đơn vị máu toàn phần thành các thành phần máu.
Chỉ định sử dụng của phần mềm quản lý hệ thống Reveos Phần mềm quản lý hệ thống Reveos là phần mềm ứng dụng, quản lý các quy trình và xử lý dữ liệu của hệ thống Reveos.
Chỉ định sử dụng của kít túi máu Reveos Kít túi máu Reveos được chỉ định để thu nhận một đơn vị máu toàn phần và điều chế đơn vị máu đó trên thiết bị Reveos để sản xuất ra các thành phần máu.
Đối tượng người đọcHướng dẫn này dành cho các cá nhân của trung tâm máu, người thực hiện việc tách máu toàn phần bằng Hệ thống xử lý máu tự động Reveos. Hướng dẫn này cũng dành để đào tạo, báo cáo, quản lý và quản lý chất lượng.
Cuốn sách này sẽ hướng dẫn sử dụng Hệ thống xử lý máu tự động Reveos để tách máu toàn phần thành các thành phần máu. Đồng thời giải thích cách để phản hồi các thông điệp của hệ thống như cảnh báo và báo động, cũng như làm thế nào để bảo dưỡng và làm sạch hệ thống.
Các cá nhân thực hiện quy trình, bảo dưỡng, sửa chữa và thay thế linh phụ kiện trên hệ thống Reveos phải nắm rõ các mục liên quan trong cuốn hướng dẫn này. Cần phải được đào tạo trước khi sử dụng hệ thống Reveos.
Giới thiệu
1-2 Hướng dẫn vận hành Hệ thống xử lý máu tự động Reveos® - Phiên bản 1.1

Quy ước tài liệuHướng dẫn này sử dụng các quy ước để giúp người đọc nhận diện các thông tin. Phần này sẽ mô tả các quy ước đó.
Danh sách được đánh sốDanh sách được đánh số cho biết các hoạt động tuần tự
Dấu chấm đầu dòngCác dấu chấm đầu dòng (•) cho biết các mục trong danh sách là không theo thứ tự.
Văn bản in đậm và in nghiêngVăn bản in đậm được sử dụng như sau: • Tiêu đề chường và đầu mục• Tiêu đề các hình• Tiêu đề các bảng biểu• Lưu ý, thận trọng, cảnh báo• Các yếu tố liên quan đến hệ thống, như:
– Các phím– Các lựa chọn khác
• Các yếu tố liên quan đến phần mềm quản lý hệ thống Reveos, như:– Menu– Lệnh menu– Tiêu đề trang nhiệm vụ– Tiêu đề hộp thoại– Các Tab
– Các phím– Các lựa chọn khác
Văn bản in nghiêng được sử dụng như sau:• Văn bản mà người dùng để nhập vào các trang hoặc web browser của phần mềm
quản lý hệ thống Reveos• Tiêu đề các cuốn sách, hướng dẫn
Quy ước tài liệu
Hướng dẫn vận hành Hệ thống xử lý máu tự động Reveos® - Phiên bản 1.1 1-3

Định nghĩa về Lưu ý, Thận trọng, Cảnh báoCác ví dụ dưới đây sẽ nói rõ thể nào là Lưu ý, Thận trọng và Cảnh báo xuất hiện trong tài liệu này:
Lưu ý: Nhấn mạnh các chi tiết quan trọng.
Thận trọng: báo cho người dùng biết khả năng xảy ra sự cố với thiết bị liên quan đến việc sử dụng thiết bị hoặc sử dụng không đúng. Các vấn đề gồm lỗi hoạt động, lỗi thiết bị, hư hỏng liên quan đến máy hoặc các tài sản khác. Tuyên bố thận trọng gồm các biện pháp phòng ngừa cần phải thực hiện để tránh nguy cơ.
Cảnh báo: Thông báo người dùng các nguy cơ, hậu quả nghiêm trọng hoặc các điều kiện có thể dẫn đến những phản ứng bất lợi, thương tích hoặc tử vong cho người bệnh hoặc người dùng. Đối với sản phẩm là phần mềm máy tính, cảnh báo sẽ thông báo người dùng các điều kiện có thể dẫn đến mất dữ liệu, vi phạm bảo mật hoặc hỏng thiết bị. Một cảnh báo bắt đầu bằng việc ghi rõ các nguy cơ tiềm ẩn ngay lập tức và cung cấp các thông tin để tránh, nếu có thể.
Định nghĩa về Trang và màn hình Các ví dụ dưới đây sẽ nói rõ thuật ngữ “trang” và “màn hình” được sử dụng như thế nào khi đề cập đến phần mềm thiết bị và phần mềm ứng dụng.• “Trang” đề cập đến một trang trong phần mềm quản lý hệ thống
Reveos.• “Màn hình” đề cập đến màn hình cảm ứng trên thiết bị ReveosCảnh báo và thận trọng
Cảnh báo1. Không sử dụng các quy trình vận hành và bảo dưỡng nào khác với các quy trình đã được
Terumo BCT công bố. Không sử dụng các thiết bị phụ kiện không được Terumo BCT gợi ý.Nếu không có thể dẫn đến thương tích hoặc tử vong.
2. Thiết bị Reveos được chỉ định để xử lý máu toàn phần của người. Nếu thiết bị được sử dụngkhác với chỉ định của Terumo BCT, cơ chế bảo vệ trong thiết bị có thể bị hỏng.
3. Không sử dụng các vật liệu sau cho hệ thống:• Vật liệu dễ cháy, nổ• Vật liệu gây phản ứng hóa học mạnh.
4. Chỉ sử dụng phích cắm và bộ điều hợp nguồn do Terumo BCT chỉ định. Việc sử dụng cácphích cắm khác hoặc dây không đủ tiêu chuẩn có thể làm hỏng thiết bị hoặc gây hại cho cơthể.
5. Không sử dụng cơ chế hàn của thiết bị Reveos khi đang mở nắp thiết bị. Nếu nắp thiết bịđang được mở, hãy hàn thủ công các ống dây với máy hàn bên ngoài.
6. Tất cả cả bucket phải có túi máu hoặc túi đối trọng trước khi bắt đầu quy trình. Nếu cácbucket không được tải đủ, có thể dẫn dến rò rỉ chất lỏng.
Giới thiệu
1-4 Hướng dẫn vận hành Hệ thống xử lý máu tự động Reveos® - Phiên bản 1.1

Thận trọng1. Không cắm nguồn thiết bị trước khi bảo dưỡng thiết bị để tránh điện giật hay làm hỏng thiếtbị.
2. Luôn duy trì chu vi tối thiểu 52 mm (6 in) hoặc khoảng trống quanh thiết bị. Không đặtthiết bị ở khoảng trống quá xa mức cần thiết.
3.
4.
5.
6.
7.
8.
9. dùng quá nhiều chất lỏng lên các cảm biến, vì có thể làm hỏng thiết bị.Chỉ dùng khăn mềm, khăn hoặc bông tăm có tẩm cồn.
10. Nếu thấy dịch chất lỏng (dịch màu xanh) bất cứ ở đâu bên trong thiết bị, không sử dụng thiếtbị và liên hệ với đại diện kỹ thuật được ủy quyền của Terumo BCT.
11. Nếu thiết bị Reveos hoặc phụ kiện được kết hợp thành một hệ thống bên ngoài trách nhiềmấy thuộc về đơn vị lắp đặt.
12. Hệ thống Reveos không được thiết kế hoặc chỉ định như một phần của hệ thống lớn hơn.
13. Không chạy quy trình nếu các tấm phía ngoài bị tháo ra khỏi thiết bị.
Quy ước tài liệu
Hướng dẫn vận hành Hệ thống xử lý máu tự động Reveos® - Phiên bản 1.1 1-5

Gửi trả thiết bị đã sử dụngNếu vì bất cứ lý do gì phải gửi trả thiết bị về Terumo BCT, Inc., cần một thư ủy quyền cho hàng hóa gửi trả (số RGA) từ Terumo BCT trước khi gửi hàng.
Có thể nhận được hướng dẫn về vệ sinh và vật liệu, bao gồm các thùng vận chuyển thích hợp, dán nhãn thích hợp và số RGA từ Phòng Đảm bảo Chất lượng BCT của Terumo.
TRÁCH NHIỆM CỦA CƠ SỞ CHĂM SÓC SỨC KHỎE LÀ NHỮNG CHUẨN BỊ CẦN THIẾT VÀ XÁC ĐỊNH SẢN PHẨM TRƯỚC KHI GỬI TRẢ.
Vui lòng liên lạc với đại diện địa phương để có được các thông tin liên quan đến hàng hóa gửi trả và khiếu nại sản phẩm.
Giới thiệu
1-6 Hướng dẫn vận hành Hệ thống xử lý máu tự động Reveos® - Phiên bản 1.1

2Tổng quan hệ thống
Hướng dẫn vận hành Hệ thống xử lý máu tự động Reveos® - Phiên bản 1.1 2-1

Tổng quan hệ thống Reveos Hệ thống Reveos tự động xử lý tách các thành phần máu từ máu toàn phần. Hệ thống bao
gồm: • Thiết bị tách thành phần máu tự động Reveos• Phần mềm ứng dụng quản lý hệ thống Reveos• Kít túi máu Reveos
Tổng quan quy trình phân tách của hệ thống ReveosMáu toàn phần được rút từ người hiến đi vào kít túi máu Reveos. Máu toàn phần được chuyển đến cơ sở để xử lý. Ở cơ sở, người vận hành sẽ đặt 4 bộ kít túi máu vào thiết bị Reveos, đóng nắp thiết bị và ấn nút trên màn hình cảm ứng để bắt đầu quy trình xử lý. Khi quy trình bắt đầu, các sự kiện sau sẽ xảy ra:
1. Rô to bắt đầu quay.
2. Máu toàn phần được tách thành các thành phần máu.
3. Ở bucket đầu tiên, huyết tương, tiểu cầu và bạch cầu tồn dư được ép vào các túi thànhphẩm tương ứng, tùy theo protocol được áp dụng.
4. Bước 3 được lặp lại với đơn vị máu toàn phần còn lại trong các bucket khác.
5. Khi việc áp đã hoàn tất, các van sẽ hàn ống dây nối với túi thành phẩm.
6. Khi quy trình tách thành phần máu hoàn tất, nắp thiết bị sẽ tự động mở.
Thông tin của mỗi quy trình sẽ được hiển thị trên màn hình cảm ứng. Thông tin này được chuyển tới phần mềm quản lý Hệ thống Reveos. Quản trị viên hệ thống có thể truy cập thông tin và chạy các báo cáo bằng phần mềm quản lý hệ thống Reveos.
Tổng quan phần mềm quản lý hệ thống ReveosPhần mềm quản lý hệ thống Reveos là một phần mềm ứng dụng, quản lý các quy trình và dữ liệu của sản phẩm. Dữ liệu này tự động được chuyển từ thiết bị Reveos sang phần mềm quản lý hệ thống Reveos.Phần mềm quản lý hệ thống Reveos cho phép người dùng thực hiện các chức năng sau: • Cấu hình thiết bị Reveos• Xác định người dùng và phân quyền• Cấu hình mã vạch và quy trình• Ghi và truy xuất quy trình, dữ liệu sản phẩm• Tìm kiếm thông tin đã nhập vào phần mềm quản lý hệ thống Reveos.• Tạo và lập lịch các báo cáoPhần mềm quản lý hệ thống Reveos cho phép chuẩn hóa công việc, nhằm đáp ứng yêu cầucủa cơ sở. Phần mềm quản lý Reveos được lắp bởi đại diện của Terumo BCT. Hãy liên hệ với đại điện của Terumo BCT nếu có bất kỳ thắc mắc nào liên quan đến việc lắp đặt và bảo dưỡng phần mềm.
Tổng quan hệ thống
2-2 Hướng dẫn vận hành Hệ thống xử lý máu tự động Reveos® - Phiên bản 1.1

Thành phần thiết bị ReveosHình 2-1, Hình 2-2, Hình 2-3, Hình 2-4, Hình 2-5, và Hình 2-6 minh họa các thành phần chính của thiết bị
Hình 2-1: Mặt trước thiết bị Reveos
1 Nắp thiết bị2 Phím nguồn3 Phím dừng4 Màn hình cảm ứng 5 Máy quét mã vạch 6 Ngăn kéo7 Bánh xe
Hình 2-2: Chi tiết bánh xe phía trước
1 Nút vặn2 Chân máy3 Bánh xe
Thành phần thiết bị Reveos
Hướng dẫn vận hành Hệ thống xử lý máu tự động Reveos® - Phiên bản 1.1 2-3
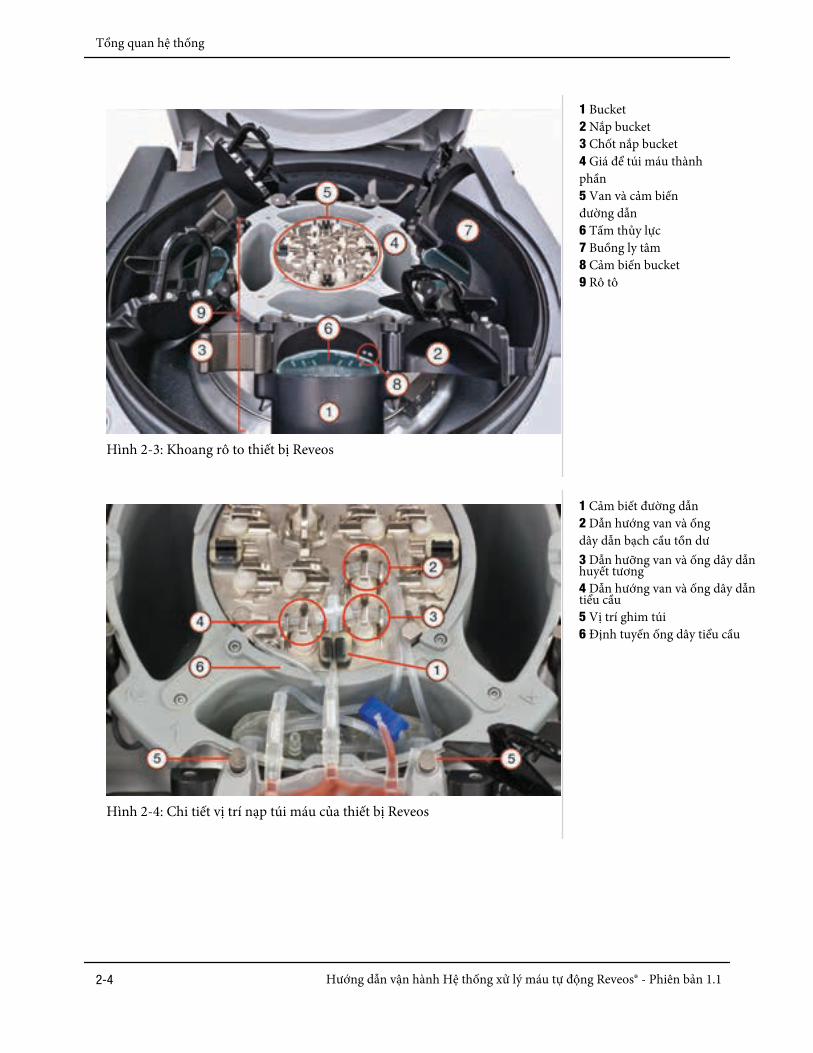
Hình 2-3: Khoang rô to thiết bị Reveos
1 Bucket2 Nắp bucket3 Chốt nắp bucket4 Giá để túi máu thành phần5 Van và cảm biến đường dẫn6 Tấm thủy lực7 Buồng ly tâm8 Cảm biến bucket9 Rô tô
Hình 2-4: Chi tiết vị trí nạp túi máu của thiết bị Reveos
1 Cảm biết đường dẫn2 Dẫn hướng van và ống dây dẫn bạch cầu tồn dư 3 Dẫn hưỡng van và ống dây dẫn huyết tương4 Dẫn hướng van và ống dây dẫn tiểu cầu5 Vị trí ghim túi6 Định tuyến ống dây tiểu cầu
Tổng quan hệ thống
2-4 Hướng dẫn vận hành Hệ thống xử lý máu tự động Reveos® - Phiên bản 1.1

Hình 2-5: Chi tiết van hàn và dẫn ống dây
1 Van hàn2 Dẫn ống dây
Hình 2-6: Chi tiết đầu nối chữ thập trong kít túi máu
1 Ridge2 Ống dẫn tiểu cầu3 Ống phân tách máu4 Ống dẫn huyết tương5 Ống dẫn bạch cầu tồn dư
Biểu tượng và các phím màn hình cảm ứng thiết bị Reveos Bảng dưới dây liệt kê và mô tả từng phím chức năng và biểu tượng trên màn hình cảm ứng thiết bị Reveos. Biểu tượng và phím bấm được sắp xếp theo thời điểm chúng xuất hiện đầu tiên trong một quy trình. Nếu mục đích của một biểu tượng hoặc một phím thay đổi theo màn hình, sau đó nó sẽ được liệt kê riêng theo từng mục đích.
Bảng 2-1: Phím và biểu tượng màn hình nhập mã vạch
Phím/ Biểu tượng Tên Mô tả
Thanh tiêu đề Hiển thị tên của quy trình được chọn như đã được xác định trong phần mềm quản lý hệ thống Reveos • Nếu thanh tiêu đề màu xám nhạt, nghĩa là quy
trình chưa được thực hiện.
• Nếu thanh tiêu đề màu xanh lá cây, nghĩa làquy trình đang được thực hiện
Phím SelectProcedure (chọn quy trình)
Khi chạm vào, màn hình chọn quy trình sẽ hiện ra
Thành phần thiết bị Reveos
Hướng dẫn vận hành Hệ thống xử lý máu tự động Reveos® - Phiên bản 1.1 2-5

Bảng 2-1: Phím và biểu tượng màn hình nhập mã vạch (tiếp theo)
Phím/ Biểu tượng Tên Mô tả
Biểu tượng đang thực hiện
Xuất hiện khi thiết bị Reveos đang cập nhật thông tin quy trình được chuyển từ phần mềm quản lý hệ thống Reveos.
Biểu tượng cần quét Cho biết mã vạch liên quan chưa được quét.
Biểu tượng người vận hành
Hiển thị ID người vận hành
Biểu tượng máy quétmã vạch
Cho biết máy quét mã vạch được gắn với thiết bị Reveos.
Biểu tượng online Xuất hiện ở góc trên bên phải của màn hình cảm ứng khi thiết bị đang giao tiếp với phần mềm quản lý hệ thống Reveos.
Biểu tượng offline Xuất hiện ở góc trên bân phải cảu màn hình cảm ứng khi phần mềm quản lý hệ thống Reveos không được kết nối hoặc không giao tiếp với thiết bị.
Phím Keyboard (bàn phím)
Khi chạm vào phím này, màn hình nhập bằng bàn phím sẽ hiển thị, để nhập dữ liệu bằng tay. Lưu ý: Màn hình nhập bằng bàn phím sẵn sàng khi nó đã được cấu hình trong phần mềm quản lý hệ thống Reveos.
Tổng quan hệ thống
2-6 Hướng dẫn vận hành Hệ thống xử lý máu tự động Reveos® - Phiên bản 1.1

Bảng 2-1: Phím và biểu tượng màn hình nhập mã vạch (tiếp theo)
Phím/ Biểu tượng Tên Mô tả
Sơ đồ bucket Cho biết tình trạng của từng bucket khi nạp. Mỗi góc phần tư là 1 trong 4 bucket của thiết bị Reveos. • Nếu góc phần tư đó xanh, nghĩa là kít túi máu
đã được quét và được nạp vào.
• Nếu góc phần tư đó nâu, ngha là túi đối trọngđược quét và nạp vào.
• Nếu góc phần tư đó vàng, nghĩa là bucket đóchưa được kích hoạt, túi đối trọng phải đượcquét và nạp vào. Các van sẽ vẫn đóng.
Một vòng tròn xuất hiện quanh con số sau khi người vận hành đã đóng nắp bucket. Điều này cho biết mã vạch đã được gán cho bucket đó. Sau khi mã vạch đã được gán cho từng bucket, chạm vào góc phần tư đó sẽ hiển thị màn hình thông tin mã vạch khác.
Phím Whole Blood(máu toàn phần)
Đại diện cho túi máu toàn phần. Khi chạm vào phím này, màn hình thông tin mã vạch khác sẽ xuất hiện.
Phím RBC (hồng cầu)
Đại diện cho túi hồng cầu. Khi chạm vào phím này, màn hình thông tin mã vạch khác sẽ xuất hiện
Phím Plasma (huyết tương)
Đại diện cho túi huyết tương. Khi chạm vào phím này, màn hình thông tin mã vạch khác sẽ xuất hiện
Phím Platelet(tiểu cầu)
Trong quy trình tách 3 thành phần máu, phím này đại diện cho túi đơn vị tiểu cầu tạm thời. Khi chạm vào phím này, màn hình thông tin mã vạch khác sẽ xuất hiện Lưu ý: Biểu tượng này không xuất hiện trên màn hình cảm ứng trong quy trình tách 2 thành phần.
Phím Back (trở lại)
Khi chạm vào phím này, việc quét ID người vận hành bị xóa và hiển thị màn hình ID người vận hành. Việc quét túi máu và túi đối trọng sẽ không bị xóa.
Biểu tượng hoàn tấtviệc quét
Cho biết mã vạch liên quan đã được quét.
Thành phần thiết bị Reveos
Hướng dẫn vận hành Hệ thống xử lý máu tự động Reveos® - Phiên bản 1.1 2-7

Bảng 2-1: Phím và biểu tượng màn hình nhập mã vạch (tiếp theo)
Phím/ Biểu tượng Tên Mô tả
Số quét Là số mã vạch đã được quét.
Phím Skip (bỏ qua)
Cho phép người vận hành bỏ qua lần quét tiếp theo trên màn hình nhập mã vạch. Đặc điểm này có thể được cấu hình trong phần mềm quản lý hệ thống Reveos, cho phép người vận hành bỏ qua một hoặc tất cả các lần quét còn lại. Nếu đặc điểm này không được kích hoạt trong phần mềm quản lý hệ thống Reveos, người vận hành không thể bỏ qua bất kỳ việc quét mã vạch nào.
Bảng 2-2: Phím và biểu tượng màn hình thông tin mã vạch khác.
Phím/ Biểu tượng Tên Mô tả
Biểu tượng bucket Con số gắn với biểu tượng này cho biết bucket đã được chọn.
Biểu tượng máy quétmã vạch
Con số gắn với biểu tượng này cho biết số lần quét đã hoàn tất với bucket được chọn. Việc quét túi đối trọng không bao gồm.
Biểu tượng bỏ qua Con số gắn với biểu tượng này cho biết số lần quét đã được bỏ qua với bucket được chọn.
Biểu tượng quét bổ sung
Cho biết mã vạch bổ sung đã được quét cho bucket được chọn. Màn hình mã vạch khác hiểnthị lên tới 7 mã vạch.
Phím Delete Barcodes (xóa mã vạch)
Khi chạm vào phím này, mọi mã vạch cho bucket được chọn hoặc mọi mã vạch không được gán bị xóa
Phím Continue(tiếp tục)
Khi chạm vào phím này, sẽ quay trở về màn hình nhập mã vạch.
Tổng quan hệ thống
2-8 Hướng dẫn vận hành Hệ thống xử lý máu tự động Reveos® - Phiên bản 1.1

Bảng 2-3: Phím và biểu tượng màn hình chọn quy trình
Phím/ Biểu tượng Tên Mô tả
Phím Procedure Name (tên quy trình)
Khi chạm vào phím này, nghĩa là chọn quy trình liên quan• Nếu phím màu trắng và vòng tròn bên trái
trống, nghĩa là quy trình hiện tại chưa đượcchọn.
• Nếu phím này xanh và vòng tròn bên trái đầy,nghĩa là quy trình hiện tại đã được chọn làmquy trình kích hoạt.
Phím Cancel (hủy)
Khi chạm vào phím này, nghĩa là hủy mọi lựa chọn đã thực hiện trên màn hình chọn quy trình và trở về màn hình trước đó.
Phím Continue (tiếp tục)
Khi chạm vào phím này, nghĩa là đồng ý với lựa chọn đã thực hiện trên màn hình chọn quy trình.
Thanh trượt Khi chạm vào thanh này, nghĩa là trượt qua các quy trình trên màn hình chọn quy trình.
Bảng 2-4: Phím và biểu tượng màn hình nhập liệu bằng bàn phím
Phím/ Biểu tượng Tên Mô tả
Phím Delete(Xóa)
Khi chạm vào phím này, nghĩa là xóa các ký tự trên màn hình đã nhập bằng bàn phím.
Phím Space (Cách)
Khi chạm vào phím này, nghĩa là nhập một khoảng trống giữa các ký tự trên màn hình nhập bằng bàn phím.
Phím Continue (tiếp tục)
Khi chạm vào phím này, nghĩa là chấp nhận thông tin đã nhập trên màn hình nhập bằng bàn phím.
Biểu tượng nhậplần đầu
Cho biết bạn đã nhập tay mã vạch của quy trình lần đầu và bạn phải nhập lại mã vạch này do nó được đánh dấu như "critical" trong phần mềm quản lý hệ thống Reveos. Xem :Nhập thông tin bằng tay" ở trang 3-10.
Thành phần thiết bị Reveos
Hướng dẫn vận hành Hệ thống xử lý máu tự động Reveos® - Phiên bản 1.1 2-9

Bảng 2-4: Phím và biểu tượng màn hình nhập liệu bằng bàn phím (tiếp theo)
Phím/ Biểu tượng Tên Mô tả
Biểu tượng nhập lần 2 Cho biết bạn đang nhập lại mã vạch của quy trình bằng tay do nó được đánh dấu là "critical" trong phần mềm quản lý hệ thống Reveos. Xem "Nhập thông tin bằng tay" ở trang 3-10.
Phím Shift (chuyển)
Khi chạm vào phím này, nghĩa là thay đổi chữ biết hoa và viết thường.
Lưu ý: Màn hình nhập liệu bằng bàn phím mặc định hiển thị chữ viết hoa.
Bảng 2-5: Phím và biểu tượng màn hình nạp túi máu toàn phần
Phím/ Biểu tượng Tên Mô tả
Phím Close Valves (đóng van)
Khi chạm vào phím này, nghĩa là đóng các van trên ống dây dẫn (cùng lúc). Các van phải được đóng trước khi đầu nối dễ vỡ được làm vỡ.
Biểu tượng đang thực hiện
Cho biết thiết bị hiện đang đóng các van trên đường ống dẫn.
Biểu tượng làm vỡ đầu nối dễ vỡ
Nhắc nhở người vận hành làm vỡ đầu nối dễ vỡ giữa túi máu toàn phần và đầu nối chữ thập trên mỗi kít túi máu.
ID hiến máu Hiển thị ID hiến máu, nếu được quét. Việc quét mã vạch xuất hiện trên mọi màn hình của quy trình phân tách.
Tổng quan hệ thống
2-10 Hướng dẫn vận hành Hệ thống xử lý máu tự động Reveos® - Phiên bản 1.1
Bảng 2-5: Phím và biểu tượng màn hình nạp túi máu toàn phần (tiếp theo)
Phím/ Biểu tượng Tên Mô tả
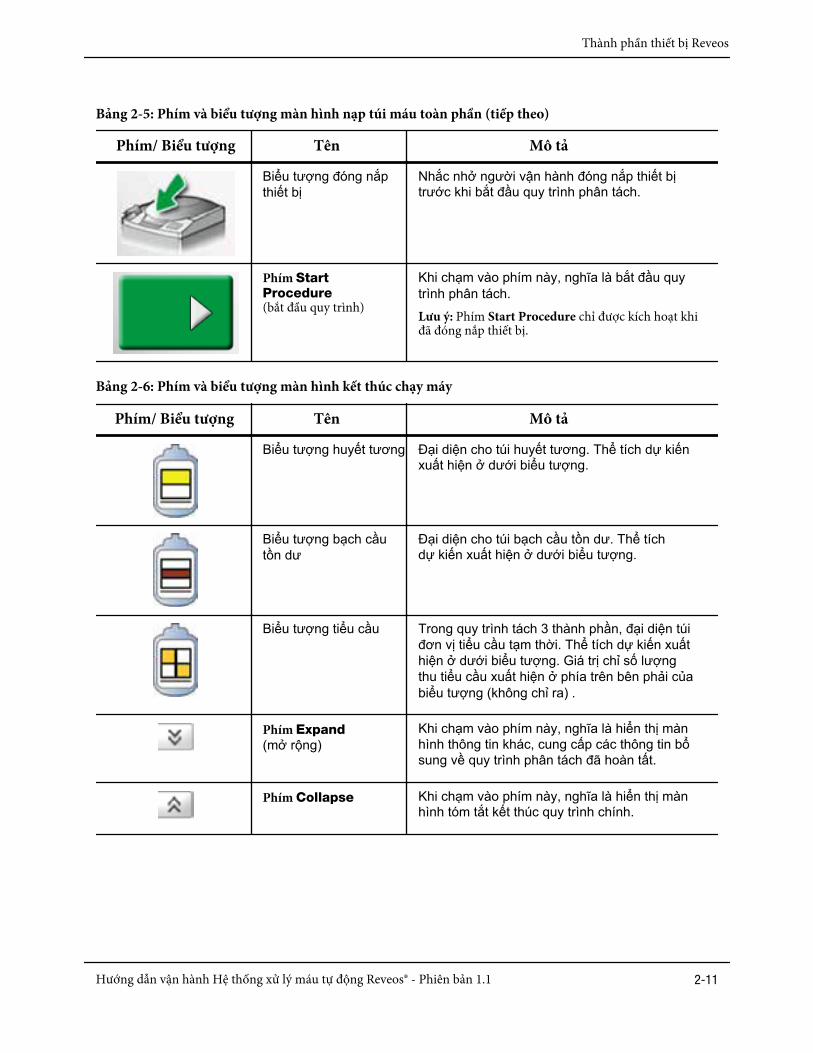
Biểu tượng đóng nắp thiết bị
Nhắc nhở người vận hành đóng nắp thiết bị trước khi bắt đầu quy trình phân tách.
Phím Start Procedure (bắt đầu quy trình)
Khi chạm vào phím này, nghĩa là bắt đầu quy trình phân tách. Lưu ý: Phím Start Procedure chỉ được kích hoạt khi đã đóng nắp thiết bị.
Bảng 2-6: Phím và biểu tượng màn hình kết thúc chạy máy
Phím/ Biểu tượng Tên Mô tả
Biểu tượng huyết tương Đại diện cho túi huyết tương. Thể tích dự kiến xuất hiện ở dưới biểu tượng.
Biểu tượng bạch cầutồn dư
Đại diện cho túi bạch cầu tồn dư. Thể tích dự kiến xuất hiện ở dưới biểu tượng.
Biểu tượng tiểu cầu Trong quy trình tách 3 thành phần, đại diện túi đơn vị tiểu cầu tạm thời. Thể tích dự kiến xuất hiện ở dưới biểu tượng. Giá trị chỉ số lượng thu tiểu cầu xuất hiện ở phía trên bên phải của biểu tượng (không chỉ ra) .
Phím Expand (mở rộng)
Khi chạm vào phím này, nghĩa là hiển thị màn hình thông tin khác, cung cấp các thông tin bổ sung về quy trình phân tách đã hoàn tất.
Phím Collapse Khi chạm vào phím này, nghĩa là hiển thị màn hình tóm tắt kết thúc quy trình chính.
Thành phần thiết bị Reveos
Hướng dẫn vận hành Hệ thống xử lý máu tự động Reveos® - Phiên bản 1.1 2-11

Bảng 2-6: Phím và biểu tượng màn hình kết thúc chạy máy (tiếp theo)
Phím/ Biểu tượng Tên Mô tả
Phím Next Procedure (quy trình tiếp theo)
Khi chạm vào phím này, nghĩa là thoát khỏi màn hình tóm tắt kết thúc quy trình và đi đến màn hình nhập mã vạch để chuẩn bị cho quy trình sau. Phím Next Procedure kích hoạt sau khi mở nắp thiết bị.
Lưu ý: Khi đã chạm vào phím Next Procedure, nghĩa là không thể truy cập dữ liệu quy trình phân tách từ màn hình tóm tắt kết thúc quy trình lâu hơn được nữa.
Biểu tượng số quy trình Cho biết số ID duy nhất gắn với quy trình hiện tại.
Biểu tượng tên thiết bị Cho biết tên thiết bị sử dụng cho quy trình hiện tại. Lưu ý: Tên thiết bị được cấu hình trong phần mềm quản lý hệ thống Reveos.
Bảng 2-7: Các thanh tiêu đề cảnh báo và báo động
Biểu tượng Tên Mô tả
Thanh tiêu đề báo động Hiển thị số báo động và thông điệp hệ thống có liên quan.
Thanh tiêu đề cảnh báo Hiển thị số cảnh báo và thông điệp hệ thống có liên quan.
Biểu tượng phần mềm quản lý hệ thống ReveosBảng dưới đây liệt kê và mô tả các phím, biểu tượng trong phần mềm quản lý hệ thống Reveos.
Bảng 2-8: Phím và biểu tượng phần mềm quản lý hệ thống Reveos.
Phím/ Biểu tượng Tên Mô tả
Biểu tượng lỗi Xuất hiện cạnh thông tin không chính xác của phần mềm quản lý hệ thống Reveos.
Phím Donation ID Search (tìm kiếm ID lần hiến máu)
Xuất hiện trên cùng bên phải các trang của phần mềm quản lý Reveos. Ấn phím để tìm kiếm cơ sở dữ liệu của ID lần hiến máu đã nhập và thanh tìm kiếm.
Biểu tượng báo cáo hoàn tất
Cho biết đã tạo báo cáo thành công
Tổng quan hệ thống
2-12 Hướng dẫn vận hành Hệ thống xử lý máu tự động Reveos® - Phiên bản 1.1

Bảng 2-8: Phím và biểu tượng phần mềm quản lý hệ thống Reveos (tiếp theo)
Phím/ Biểu tượng Tên Mô tả
Biểu tượng báo cáođang tiến hành
Cho biết báo cáo hiện đang được tạo
Biểu tượng báo cáo không thành công
Cho biết không thể tạo báo cáo
Biểu tượng báo cáo đãđược đặt lịch
Cho biết báo cáo đã được đặt lịch cho tương lai.
Biểu tượng báo cáo đãđược hủy
Cho biết đã hủy báo cáo đã được đặt lịch
Chỉ thị Custom Query Report (báo cáo truy vấn tùy chỉnh)
Hiển thị lần và tên của báo cáo truy vấn tùy chỉnh ở chế độ xem lịch. Nhấn hai lần chỉ thị này để mở báo cáo ở chế độ xem chi tiết.
Chỉ thị Insight Report (báo cáo tổng quát)
Hiển thị lần và tên của báo cáo tổng quát ở chế độ xem lịch. Nhấn hai lần chỉ thị này để mở báo cáo ở chế độ xem đồ thị.
Phím Details View (xem chi tiết)
Khi ấn phím này, dữ liệu từ báo cáo tổng quát sẽ hiển thị ở định dạng bảng.
Phím Chart View (xem biểu đồ)
Khi ấn phím này, dữ liệu đã chọn từ báo cáo tổng quát sẽ hiển thị ở dạng bảng hoặc biểu đồ.
Phím Print (In)
Khi ấn phím này ở chế độ xem biểu đồ, sẽ mở ra một hộp thoại in các biểu đồ đang hiển thị
Phím Export (Kết xuất)
Khi ấn phím này ở chế độ xem chi tiết báo cáo, sẽ mở ra hộp thoại tải file.
Thành phần thiết bị Reveos
Hướng dẫn vận hành Hệ thống xử lý máu tự động Reveos® - Phiên bản 1.1 2-13

Nguồn nước mát bên ngoàiThiết bị Reveos yêu cầu nguồn nước mát bên ngoài, đáp ứng yêu cầu kỹ thuật sau:
Lưu ý: Tùy vào môi trường hoạt động, có thể sử dụng một nguồn nước mát bên ngoài hoạt động ngoài các thông số kỹ thuật này. Liên hệ với đại diện dịch vụ của Terumo để được hướng dẫn thêm.
Bảng 2-9: Thông số nguồn nước mát bên ngoài
Thông số Giá trị
Dịch Phải sử dụng nước khử ion đã lọc hoặc nước cất đã lọc. Nước phải được lọc với lưới lọc 80 hoặc nhỏ hơn. Ethylene glycol hoặc propylene glycol có thể được thêm vào với nồng bộ lên đến 30% trọng lượng. Không sử dụng nước máy.
Nhiệt độ nguồn nước vào 2 °C đến 10 °C (36 °F đến 50 °F)
Lưu lượng nhỏ nhất 4 lít/phút/ 1 thiết bị
Áp suất nước vào 3.5 bar đến 6.5 bar (50 psi đến 95 psi)
Vui lòng liên hệ với đại diện kỹ thuật của Terumo BCT để có thêm thông tin hoặc đặt thêm ống dây, đầu nối.
Tổng quan hệ thống
2-14 Hướng dẫn vận hành Hệ thống xử lý máu tự động Reveos® - Phiên bản 1.1

Kiểm tra hệ thốngKhi bật nguồn thiết bị, hệ thống sẽ tiến hành một loạt các kiểm tra và hiệu chuẩn tất cả các van. Mất một lúc để tiến hành các kiểm tra này.
Tên nhóm kiểm tra Chức năng được kiểm tra
Kiểm tra tự chẩn đoánHệ thống tiến hành các kiểm tra này mỗi khi bật nguồn thiết bị.
• Kiểm tra khóa nắp thiết bị và chức năng
• Kiểm soát rô to và chức năng
• Tốc độ rô to và nguồn điện
• Áp lực nước
• Giao tiếp hệ thống
Kiểm tra vận hànhHệ thống tiến hành các kiểm tra này trong khi vận hành, ly tâm, phân tách và ép
• Áp lực
• Lưu lượng nước
• Vị trí chất lỏng
• Hiệu chuẩn cảm biến ống dây, bucket
• Cảm biến rung
• Tình trạng các van
• Cảm biến nhiệt độ
• Khóa cửa rô to
• Phát hiện rò rỉ
Theo dõi liên tụcHệ thống theo dõi những chức năng khác nhau trong khi thực hiện quy trình và có báo động nếu kết quả nhưng như mong muốn.
• Giao tiếp giữa thiết bị và phần mềmquản lý hệ thống Reveos.
• Tốc độ rô to
• Vị trí nắp đậy
• Khóa nắp đậy
• Việc đóng nắp trong khi vận hành
• Cảm biến các chốt của bucket
• Phát hiện rò rỉ trong rô to
• Nhiệt độ thiết bị
• Nhiệt độ nguồn nước vào
• Độ rung
• Nút dừng hoạt động
• Vị trí của chất lỏng
Kiểm tra hệ thống
Hướng dẫn vận hành Hệ thống xử lý máu tự động Reveos® - Phiên bản 1.1 2-15

Điều hướng phần mềm quản lý hệ thống ReveosPhần mềm quản lý hệ thống Reveos cung cấp đa phương thức điều hướng nhằm giúp bạn tìm ra các thông tin để làm việc hiệu quả.
Sử dụng tab, menu, danh sách nội dung và các phím để điều hướng qua các trang của phần mềm quản lý hệ thống Reveos. Có thể xem hoặc sử dụng các trang theo phân quyền truy cập. Phần này mô tả chức năng của từng yếu tố.
Công cụ điều hướng được dùng trong phần mềm quản lý hệ thống ReveosMỗi trang sẽ hiển thị thanh điều hướng ở trên cùng, với các tab để truy cập các trang của phần mềm quản lý hệ thống Reveos. Ở mỗi trang, có các thanh menu, danh sách nội dung, mục, phần và các phím. Mỗi chi tiết được đánh nhãn như Hình 2-7 và được mô tả trong bảng 2-10.
1
2
3 4
5
6
Hình 2-7: Trang của phần mềm quản lý hệ thống Reveos có công cụ điều hướng được xác định
Tổng quan hệ thống
2-16 Hướng dẫn vận hành Hệ thống xử lý máu tự động Reveos® - Phiên bản 1.1

Bảng 2-10: Mô tả từng trang phần mềm quản lý hệ thống Reveos
Tên Mô tả
1 Các tab Các tab cho phép người dùng điều hướng qua các ứng dụng. Các tab dưới đây xuất hiện trên cùng mỗi trang. • Home hiển thị phiên bản và tạo số của
phần mềm. Đây là trang mặc định sau khingười dùng đã đăng nhập.
• Configuration cho phép người dùng cấuhình tổng quan hệ thống (xem Chương 6,"Cấu hình phần mềm quản lý hệ thốngReveos")
• Reports cho phép người dùng quản lý,xem và chạy các báo cáo (xem Chương 7,"Tìm kiếm và báo cáo")
2 Thanh menu Danh sách này được đặt phía bên trái các trang của phần mềm quản lý hệ thống Reveos. Tất cả các mục đều được điền sẵn và gắn với các tab tương ứng
3 Danh sách nội dung Danh sách này được đặt bên phải của thanh menu. Nó gắn với mục của thanh menu đã chọn. Các mục trong danh sách nội dung khác nhau tùy thuộc vào mục nào được chọn trong thanh menu.
4 Chi tiết Phần này, ở bên phải của danh sách nội dung, gồm thông tin liên quan đến menu hoặc danh sách nội dung được chọn.
5 Các phím Các trang của phần mềm gồm các phím New, Edit, Delete, Save, và/ hoặc Cancel ở dưới cùng của mỗi trang. Phím Log In xuất hiện ở trang đăng nhập. Phím Run Now xuất hiện ở một vài trang báo cáo. Các phím được mô tả chi tiết tại Bảng 2-11.
6 Tìm kiếm ID hiến máu Ô nhập liệu này cho phép người dùng tìm kiếm ID hiến máu.
Lưu ý: Không phải tất cả các tab, menu hoặc mục trong danh sách nội dung đều hiện mọi lúc. Mỗi người dùng chỉ nhìn thấy các trang và các phím mà họ được phép nhìn hoặc sử dụng.
Điều hướng phần mềm quản lý hệ thống Reveos
Hướng dẫn vận hành Hệ thống xử lý máu tự động Reveos® - Phiên bản 1.1 2-17

Các phímCác phím dưới đây xuất hiện ở một vài trang qua phần mềm quản lý hệ thống Reveos. Mỗi phím hoạt động cùng một cách ở mọi trang mà nó xuất hiện.
Bảng 2-11: Các phím và mô tả phần mềm quản lý hệ thống Reveos.
Phím Chức năng
New (thêm mới) Ấn phím này để lưu mới
Edit (sửa) Ấn phím này để sửa thông tin đang tồn tại
Delete (xóa) Ấn phím này để xóa thông tin Lưu ý: Các thông tin được xóa sẽ được lưu trong cơ sở dữ liệu nhưng người dùng không thể truy cập.
Deactivate (bất hoạt) Ấn phím này để bất hoạt người sử dụng. Người sử dụng sẽ không còn trong danh sách người dùng được kích hoạt và không thể truy cập phần mềm quản lý hệ thống Reveos. Lưu ý: Khi người dùng bị bất hoạt, họ sẽ được xóa khỏi danh sách và có thể được kích hoạt trở lại bất cứ khi nào bởi quản trị viên.
Restore (khôi phục) Ấn phím này để kích hoạt trở lại người dùng đã bị bất hoạt hoặc loại khỏi danh sách người dùng.
Save (lưu) Ấn phím này để lưu trữ thông tin
Cancel (hủy) Ấn phím này để hủy hoạt động đã bắt đầu nhưng chưa được lưu.
Log In (đăng nhập) Ấn phím này sau khi đã nhập tên người dùng và mã đăng nhập phần mềm.
Run Now (đang vận hành) Phím này xuất hiện ở trang báo cáo tổng quát và trang báo cáo truy vấn tùy chỉnh. Nó chỉ hiển thị cho những người truy cập báo cáo. Ấn phím này để chạy báo cáo theo yêu cầu.
OK Phím này xuất hiện trong một vài hộp thoại. Ấn phím này khi bạn muốn xác nhận thông điệp hoặc việc nhập dữ liệu bằng tay.
Unlock (mở khóa) Ấn phím này để mở khóa người dùng trên trang người dùng. Người dùng có thể bị khóa khỏi phần mềm quản lý hệ thống Reveos nếu họ cố gắng đăng nhập nhiều lần hơn cho phép.
Tổng quan hệ thống
2-18 Hướng dẫn vận hành Hệ thống xử lý máu tự động Reveos® - Phiên bản 1.1

Ô chọn, menu thả xuống, các phím radio và băng chuyềnCác trang của phần mềm quản lý hệ thống Reveos sử dụng liên kết của các ô chọn, các menu thả xuống, các phím radio và băng chuyền. • Các ô chọn cho phép tạo lựa chọn. Để chọn một mục, ấn vào ô chọn và dấu chọn sẽ xuất
hiện. Để xóa đánh dấu này, ấn vào ô chọn, khi đó dấu chọn sẽ mất.• Menu thả xuống cho phép chọn các mục thông tin đang có.• Các phím radio cho phép chỉ chọn một phương án trong danh sách.
1
2
3
Hình 2-8: Ví dụ cho các phím radio, menu thả xuống và ô chọn
1 Các phím radio 2 Menu thả xuống3 Ô chọn
• Các công cụ điều hướng băng chuyền cho phép luân phiên các lựa chọn mà không phải thoátkhỏi trang. Băng chuyền xuất hiện ở trang quy trình.
Hình 2-9: Ví dụ băng chuyền trên trang quy trình
Điều hướng phần mềm quản lý hệ thống Reveos
Hướng dẫn vận hành Hệ thống xử lý máu tự động Reveos® - Phiên bản 1.1 2-19

Bổ sung và điều chỉnh thông tinNgười dùng có thể truy cập toàn bộ chức năng phần mềm quản lý hệ thống Reveos, có thể bổ sung các thông tin mới và điều chỉnh các thông tin đang tồn tại trong phần mềm quản lý hệ thống Reveos. Khi thêm một bản ghi mới hoặc điều chỉnh bản ghi hiện tại, người dùng có thể điều hướng ra khỏi trang bằng cách ấn phím Save (lưu) hoặc Cancel (hủy).
Tổng quan hệ thống
2-20 Hướng dẫn vận hành Hệ thống xử lý máu tự động Reveos® - Phiên bản 1.1

3Vận hành hệ thống
Reveos® Automated Blood Processing System Operator's Manual for Version 1.1 3-1

Tổng quan trước khi vận hànhCác bước dưới đây cung cấp toàn bộ các nhiệm vụ được thực hiện bởi người vận hành trong khi chuẩn bị:1. Chọn quy trình. Xem "Chọn quy trình cho thiết bị" ở trang 3-6.2. Quét mã ID người vận hành, nếu được nhắc. Xem "Nhập thông tin mã vạch vào hệ thống" ở
trang 3-7.3. Quét mã vạch được yêu cầu cho kít túi máu hoặc túi đối trọng. Xem "Nhập thông tin mã vạch
vào hệ thống" ở trang 3-7.4. Nạp kít túi máu hoặc túi đối trọng. Xem "Nạp kít túi máu" ở trang 3-13 hoặc "Nạp túi đối
trọng" ở trang 3-21.5. Chốt nắp bucket6. Lặp lại bước 3, 4 và 5 tới khi cả 4 bucket đã được nạp đủ.
Lưu ý: Tất cả các bucket phải có một kít túi máu hoặc túi đối trọng trước khi bắt đầu quy trình. Nếu không nạp đủ tất cả các bucket thì sẽ làm rò rỉ chất lỏng.
7. Ấn phím Close Valves để đóng các van8. Làm vỡ đầu nối dễ vỡ trên mỗi kít túi máu.9. Đóng nắp thiết bị.10. Ấn phím Start Procedure để bắt đầu quy trình.
Vận hành hệ thống
3-2 Hướng dẫn vận hành Hệ thống xử lý máu tự động Reveos® - Phiên bản 1.1

Cài đặt và di chuyển thiết bị
Lắp đặt hệ thống ReveosHướng dẫn để mở thùng và lắp hệ thống Reveos có sẵn trong thùng vận chuyển. Đại điện dịch vụ được ủy quyền của Terumo BCT sẽ mở thùng và lắp hệ thống, thực hiện các kiểm tra lắp đặt.
Thận trọng: Luôn duy trì chu vi tối thiểu là 152mm (6 in) hoặc khoảng trống quanh thiết bị. Không đặt ở khoảng trống lớn hơn so với yêu cầu
Di chuyển thiết bịThiết bị Reveos có các bánh xe. Trước khi di chuyển thiết bị, chắc chắn sàn nhà phẳng và khô. Không cần đặt phẳng thiết bị sau khi di chuyển nếu mặt sàn nằm trong phạm vi yêu cầu về độ dốc sàn đặt nếu tại Bảng 8-2.
Nếu cần di chuyển thiết bị ở khoảng cách dài hoặc trên bề mặt không bằng phẳng, hãy liên hệ đại điện của Terumo BCT.
Sau khi di chuyển thiết bị, chắc chắn nó được cắm vào nguồn điện được bảo vệ RCCD (GFCI)-8-1 trước khi bật nguồn. Xem bảng 8-1 để biết thêm thông tin.
Mở khóa các bánh xe1. Xoay núm ngược chiều kim đồng hồ đến khi chân đỡ nâng cao khỏi mặt sàn, như Hình 3-1.
Hình 3-1: Bánh xe chưa được khóa có chân đỡ nâng cao khỏi mặt sàn.
2. Lặp lại bước 1 với các bánh xe khác trước khi đẩy thiết bị.
Cài đặt và di chuyển thiết bị
Hướng dẫn vận hành Hệ thống xử lý máu tự động Reveos® - Phiên bản 1.1 3-3

3. Chắc chắn thiết bị lăn trên các bánh xe đã được mở khóa. Nếu không, tiếp tục nâng các chân tới khithiết bị lăn được dễ dàng.Khóa các bánh xe1. Xoay núm ngược chiều kim đồng hồ tới khi các chân đỡ chạm xuống sàn một cách
chắc chắn, như Hình 3-2.2. Lặp lại tương tự với bánh xe phía trước
Hình 3-2: Bánh xe đã khóa với chân đỡ chạm sàn.
3. Chắc chắn mặt sàn quanh thiết bị khô ráo và các bánh xe được khóa trước khi vận hành.
Vận hành thiết bị
3-4 Hướng dẫn vận hành Hệ thống xử lý máu tự động Reveos® - Phiên bản 1.1

Bật nguồn thiết bị Reveos
Lưu ý: Kích hoạt nguồn nước mát bên ngoài trước khi bật nguồn hệ thống.
1. Chắc chắn đúng dây nguồn thiết bị và cắm vào đúng nguồn điện. Xem "Thông số kỹ thuậthệ thống" ở trang 8-2 để biết thêm thông tin.2. Chắc chắn mọi bucket và cảm biến dòng trống.
3. Bật nguồn thiết bị bằng cách ấn công tắc nguồn ở phía trên bên phải của thiết bị.
Khi thiết bị hoàn tất việc khởi động, sẽ hiển thị màn hình nháy hệ thống.
Hình 3-3: Màn hình nháy hệ thống Reveos
Lưu ý: Nếu không xuất hiện màn hình nháy, tắt nguồn thiết bị rồi bật lại.
Các kiểm tra hệ thốngHệ thống tiến hành các kiểm tra tự hiệu chuẩn khác nhau khi khởi động và tự theo dõi trong suốt quy trình. Nếu hệ thống phát hiện điều kiện nào cần chú ý, nó sẽ có cảnh báo hoặc báo động, tùy theo mức độ nghiêm trọng. Xem "Các kiểm tra hệ thống" ở trang 2-15 để biết thêm thông tin.
Tắt nguồn thiết bị ReveosTắt nguồn thiết bị bằng cách ấn công tắc ở phía trên bên phải thiết bị. Có thể tắt nguồn thiết bị bất cứ khi nào. Nếu thiết bị đang chạy quy trình, nên ấn phím dừng trước khi tắt nguồn thiết bị.
Bật nguồn thiết bị Reveos
Hướng dẫn vận hành Hệ thống xử lý máu tự động Reveos® - Phiên bản 1.1 3-5

Xác minh rằng thiết bị đang trực tuyến (Online)
Sau khi xuất hiện màn hình nháy, màn hình nhập mã vạch sẽ xuất hiện trên màn hình cảm ứng. Màn hình chọn quy trình cho phép chọn quy trình muốn thực hiện. Để truy cập màn hình này, ấn phím Select Procedure trên màn hình nhập mã vạch. Bảng 2-3 sẽ mô tả các phím và biểu tượng xuất hiện trên màn hình chọn quy trình. Tiến hành các bước sau nếu cần thay đổi quy trình được liệt kê ở thanh tiêu đề của màn hình nhập mã vạch. Mặt khác, đến mục "Nhập thông tin mã vạch vào thiết bị" ở trang 3-7. Để thêm quy trình mới hoặc điều chỉnh quy trình. Để thêm quy trình mới hoặc điều chỉnh quy trình hiện tại, tham khảo "Tạo quy trình" ở trang 6-21 và thiết lập các cập nhật cần thiết cho phần mềm quản lý hệ thống Reveos. Mọi thông tin cấu hình quy trình được tạo trong phần mềm quản lý hệ thống Reveos.1. Ấn phím Select Procedure để hiển thị màn hình chọn quy trình.2. Chọn quy trình mong muốn từ danh sách.
Hình 3-4: Màn hình chọn quy trình với quy trình đã được chọn
Biểu tượng đang trong quy trình được hiển thị khi nạp quy trình. 3. Ấn phím Continue để trở về màn hình nhập mã vạch.
Vận hành hệ thống
3-6 Hướng dẫn vận hành Hệ thống xử lý máu tự động Reveos® - Phiên bản 1.1
Kiểm tra biểu tượng Online, ở góc trên bên phải của màn hình cảm ứng, để chắc chắn thiết bị Reveos đang giao tiếp với phần mềm quản lý hệ thống Reveos. (Xem Bảng 2-1). Nếu thiết bị đang online, mọi dữ liệu quy trình sẽ được chuyển tới phần mềm quản lý hệ thống Reveos vào cuối mỗi quy trình. Nếu thiết bị offline, biểu tượng offline sẽ xuất hiện ở góc trên bên phải của màn hình cảm ứng. (Xem bảng 2-1). Khi thiết bị ngoại tuyến, người vận hành vẫn có thể chạy quy trình. Tuy nhiên, thông tin quy trình sẽ không được chuyển tới phần mềm quản lý hệ thống Reveos tới khi thiết bị kết nối trực tuyến trở lại. Khi offline, thiết bị sẽ bị giới hạn chức năng. Nếu thiết bị offline, xác minh có kết nối ethernet giữa thiết bị và máy tính vận hành phần mềm quản lý hệ thống Reveos.
Chọn quy trình cho thiết bị

Nhập thông tin mã vạch vào thiết bịHình 3-5 và Hình 3-6 là màn hình nhập mã vạch, cho phép quét hoặc nhập tay các thông tin như ID người vận hành và các mã vạch khác, trước khi bắt đầu một quy trình. Xem bảng 2-1 để mô tả các phím và biểu tượng xuất hiện ở màn hình nhập mã vạch.
Hình 3-5: Màn hình nhập mã vạch yêu cầu quét ID người vận hành
Hình 3-6: Màn hình nhập mã vạch với yêu cầu quét túi máu toàn phần.
Sử dụng máy quét mã vạch đi kèm thiết bị để quét các mã vạch yêu cầu. Để nhập tay các thông tin được yêu cầu, ấn biểu tượng Keyboard đặt ở phía dưới bên phải của màn hình cảm ứng.
Các phần dưới đây sẽ giải thích một cách chi tiết từng phương pháp nhập thông tin
Quét mã vạchMàn hình cảm ứng sẽ nhắc bạn quét các mã vạch cho quy trình. Con số và thứ tự các mã vạch được yêu cầu là khác nhau theo mỗi quy trình. Tất cả các mã vạch và thứ tự nhập được cấu hình trong phần mềm quản lý hệ thống Reveos. Từ màn hình nhập mã vạch, hoàn tất các bước dưới đây để nhập mã vạch vào thiết bị Reveos:
Nhập thông tin mã vạch vào thiết bị
Hướng dẫn vận hành Hệ thống xử lý máu tự động Reveos® - Phiên bản 1.1 3-7

1. Nếu thệ thống nhắc nhở nhập mã vạch ID người vận hành, hãy quét nó bằng thiết bị quét mã vạch.
Lưu ý: Nếu muốn nhập tay các thông tin thay vì quét, xem "Nhập thông tin bằng tay" ở trang 3-10. Bàn phím phải được khả dụng trong phần mềm quản lý hệ thống Reveos để thực hiện tính năng này.
Lưu ý: Phím Skip sẽ không xuất hiện nếu các mã vạch chỉ ra được cấu hình là "critical" ("quan trọng") trong phần mềm quản lý hệ thống Reveos. Các mã vạch quan trọng không thể bỏ qua.
1 2
3
4
Hình 3-7: Ví dụ màn hình mã vạch nhắc nhập ID người vận hành
1 Phím chọn quy trình2 Biểu tượng Online3 Phím bỏ qua4 Bàn phím (hiển thị nếu được cấu hình trong phần mềm quản lý hệ thống Reveos)
Nếu quy trình được cấu hình như thường lệ trong phần mềm quản lý hệ thống Reveos, thiết bị sẽ nhắc nhập mã vạch ID hiến máu toàn phần như Hình 3-8.
Lưu ý: Nếu đang sử dụng túi đối trọng, quét mã vạch trên túi đối trọng lúc này
Hình 3-8: Màn hình nhập mã vạch nhắc nhập ID hiến máu toàn phần
Vận hành hệ thống
3-8 Hướng dẫn vận hành Hệ thống xử lý máu tự động Reveos® - Phiên bản 1.1

2. Quét mã vạch cần thiết bằng máy quét mã vạch như được biết ở màn hình chạm.
Màn hình cảm ứng xác nhận các mục quét mã vạch thành công bằng đánh dấu màu xanh.Nếu túi đối trọng được quét, tất cả các ô chọn liên quan đến bucket đó, sẽ tự động được đánhdấu chọn màu xám.
Lưu ý: Không tháo túi máu thành phần khi đang quét mã vạch.
3. Quét mọi mã vạch bổ sung ở túi ban đầu như hiển thị trên màn hình cảm ứng. Mọi việc quét mãvạch được cấu hình trong phần mềm quản lý hệ thống Reveos. Để bỏ không quét mã vạch, ấnphím Skip. Sẽ có dấu chọn màu xám.
Lưu ý: Mọi mã vạch được cấu hình là "critical" trong phần mềm quản lý hệ thống Reveos phải được quét trước khi bắt đầu quy trình, cho dù thiết bị có cấu hình cho phép bỏ qua việc quét một mã vạch nào đó.
Thiết bị Reveos cũng có thể nhắc quét mã vạch các túi tiếp theo. Màn hình cảm ứng hướng dẫn bạn qua các lần quét đã được cấu hình.
Sau khi đã hoàn tất việc quét mã vạch cho bucket, nạp kít túi máu hoặc túi đối trọng vào buclet tương ứng. Xem "Nạp kít túi máu" ở trang 3-13 hoặc "Nạp túi đối trọng" ở trang 3-21 để được hướng dẫn cách nạp kít túi máu hoặc túi đối trọng.
Nếu ấn phím Back, nghĩa là chỉ xóa bản quét ID người vận hành. Tất cả bản quét các mã vạch khác được lưu lại. Để xem lại hoặc xóa các mã vạch, xem "Xem lại xóa mã vạch" ở trang 3-11.
Biểu đồ bucket trên màn hình nhập mã vạch cho biết tình trạng của bucket. • Nếu bucket màu xanh, nghĩa là túi máu toàn phần đã được quét và được nạp.• Nếu bucket màu xám, nghĩa là túi đối trọng đã được quét và được nạp.• Nếu bucket màu vàng, nghĩa là bucket chưa khả dụng và phải quét túi đối trọng và nạp
vào. Các van vẫn sẽ được đóng.
Nhập thông tin mã vạch vào thiết bị
Hướng dẫn vận hành Hệ thống xử lý máu tự động Reveos® - Phiên bản 1.1 3-9

Nhập tay các thông tinẤn phím Keyboard trên màn hình để nhập thông tin bằng bàn phím trên màn hình cảm ứng. Màn hình này chỉ khả dụng khi được bật trong phần mềm quản lý hệ thống Reveos.
1. Để truy cập màn hình nhập bằng bàn phím, ấn phím Keyboard trên màn hình nhập bằng bànphím. Xem Hình 3-5.
Lưu ý: Hiển thị mặc định của màn hình nhập bằng bàn phím là chữ viết hoa. Ấn phím Shift để chuyển đổi từ chữ hoa sang chữ thường.
Hình 3-9: Màn hình nhập bằng bàn phím hiển thị chữ viết hoa.
2. Nhập các ký tự mã vạch khi chúng xuất hiện trên mã vạch bạn đang nhập. Tất cả các ký tựđều phân biệt chữ hoa, chữ thường. Chuyển chữ hoa sang chữ thường nếu cần.
3. Ấn phím Continue khi đã nhập đúng tất cả các ký tự.
Lưu ý: Nếu quét mã vạch được đánh dấu "critical" ở phần mềm quản lý hệ thống Reveos, bạn sẽ cần nhập mã vạch 2 lần để xác minh tính chính xác.
4. Lặp lại bước 2 và 3 để nhập các mã vạch bổ sung
Vận hành hệ thống
3-10 Hướng dẫn vận hành Hệ thống xử lý máu tự động Reveos® - Phiên bản 1.1

Xem lại và xóa mã vạchBất cứ khi nào khi đang nhập mã vạch, người vận hành có thể xem lại và/ hoặc xóa mã vạch đó.
Xem lại mã vạch liên quan đến túi máu và/ hoặc bucketKhi mã vạch một túi máu hoặc túi đối trọng đã được nhập vào, việc quét mã vạch sẽ xuất hiện ở dưới cùng màn hình. Nếu nhiều mã vạch đã được quét, mã vạch cuối cùng đã quét là mã vạch duy nhất xuất hiện ở dưới cùng màn hình. Tuy nhiên, tất cả việc quét mã vạch được lưu trong thiết bị. Việc quét mã vạch không được gán cho bucket tới khi bucket được nạp, nắp bucket được đóng và chốt. Sau khi bucket đã đóng, mã vạch được gắn với bucket và xuất hiện vòng tròn quanh số bucket trên biểu đồ bucket như Hình 3-10.
Hình 3-10: Màn hình nhập mã vạch cho biết việc quét mã vạch gắn với bucket 1.
Khi chạm vào bucket để xem việc quét mã vạch liên quan, màn hình Thông tin mã vạch khác xuất hiện. Nếu đã quét các mã vạch mà không liên quan đến bucket, bạn có thể vẫn xem lại việc quét mã bằng cách chạm vào túi máu để xem màn hình thông tin mã vạch khác. Việc quét mã vạch không gán cho bucket tới khi chốt của nắp bucket được đóng lại.
Màn hình thông tin mã vạch khác chỉ ra tất cả các mã vạch được gắn với bucket được chọn hoặc tất cả các lần quét chưa được gán. Thông tin trên màn hình sẽ như sau: • Biểu tượng bucket với số tương ứng cho biết việc quét được gán cho bucket. Dòng chữ
“Unassigned scans” (việc quét không được gán) cho biết việc quét này không gán cho bucket.• Số ở bên phải của biểu tượng Máy quét mã vạch là số của mã vạch kít túi máu đã được quét
cho bucket được chọn hoặc số của mã vạch kít túi máu chưa được gán.• Số ở bên phải của biểu tượng Bỏ qua là số của lần quét mã vạch bị bỏ qua. .• Mã vạch có cả chữ và số và được liệt kê trên màn hình. Mã vạch bị bỏ qua sẽ không xuất
hiện.• Dòng chữ “Counterbalance bag” (túi đối trọng) cho biết túi đối trọng đã được quét.
Xem lại và xóa mã vạch
Hướng dẫn vận hành Hệ thống xử lý máu tự động Reveos® - Phiên bản 1.1 3-11

Hình 3-11: Màn hình thông tin mã vạch khác.
Màn hình thông tin mã vạch khác có thể chứa tới 7 mã vạch. Các mã vạch bổ sung có thể được quét và lưu lại, nhưng không xuất hiện trên màn hình thông tin mã vạch khác. Nếu có nhiều hơn 7 mã vạch gán cho bucket hoặc có dòng chữ “Unassigned scans” (việc quét không được gán), biểu tượng sẽ xuất hiện.
Xóa mã vạch đã gán cho túi máu và/ hoặc bucketĐể xóa các mã vạch, ấn phím Delete barcodes trên màn hình thông tin mã vạch khác. Việc này sẽ xóa các mã vạch đã được gán cho bucket cũng như các mã vạch không được gán.
Lưu ý: Phím Delete barcodes chỉ hiện lên khi mở nắp bucket.
Vận hành hệ thống
3-12 Hướng dẫn vận hành Hệ thống xử lý máu tự động Reveos® - Phiên bản 1.1

Nạp kít túi máuKhi nạp kít túi máu, luôn đặt nó vào bucket theo hướng phía trước bạn
Lưu ý: Không xử lý máu dưới 2 giờ sau khi thu nhận
Lưu ý: Trước khi nạp kít túi máu vào bucket, chắc chắn ống dây lấy máu đã được hàn cách túi máu toàn phần khoảng 0.5cm đến 3.0 cm (0.2 in đến 1.2 in).
Lưu ý: Bộ phát hiện rò rỉ được đặt trong buồng ly tâm gần phía trước thiết bị. Nếu chạm vào bộ phát hiện rò rỉ khi đang nạp, thiết bị sẽ phát ra cảnh báo. Xem "Cảnh báo và báo động thiết bị Reveos" ở trang 4-4 để biết thêm thông tin.
Tiến hành các bước sau để nạp kít túi máu và thiết bị Reveos:1. Tách túi máu toàn phần khỏi bộ túi
Hình 3-12: Túi máu toàn phần được tách khỏi bộ túi
2. Đóng kẹp trên ống dây lọc hồng cầu3. Để bộ lọc phía sau các túi đã được xếp thành 1 bộ và đặt chúng vào giá đặt túi máu thành
phần. Các túi máu được nạp đúng cách với bộ lọc được đặt gần tâm thiết bị như Hình3-13. Chắc chắn ống dây không bị xoắn gập.
Hình 3-13: Đặt bộ lọc khi đang nạp
Nạp kít túi máu
Hướng dẫn vận hành Hệ thống xử lý máu tự động Reveos® - Phiên bản 1.1 3-13

Hình 3-14: Túi máu được đặt vào trong giá đặt túi máu thành phần
4. Đặt túi máu toàn phần vào bucket tương ứng với nhãn hướng về phía bạn.
Lưu ý: Nhẹ nhàng ép túi máu toàn phần xuống để đảm báo nó được đặt chắc chắn trong bucket.
Hình 3-15: Túi máu toàn phần trong bucket
5. Cố định toàn bộ túi máu bằng cách đặt cả hai lỗ gài túi lên các vị trí ghim túi tương ứng.
Hình 3-16: Lỗ gài túi được gắn lên các vị trí ghim túi
Vận hành hệ thống
3-14 Hướng dẫn vận hành Hệ thống xử lý máu tự động Reveos® - Phiên bản 1.1

6. Nạp phần dưới cùng của đầu nối chữ thập vào đường dẫn ống dây ngay phía trên cảm biếndòng. Đầu nối chữ thập được nạp đúng khi nó chạm với cảm biến dòng.
7. Nạp ống dây giữa đầu nối dễ vỡ và đầu nối chữ thập vào cảm biến dòng. Để nạp ống dâyđúng cách, có thể sử dụng chuyển động flossing hoặc ấn ống dây vào cảm biến dòng.
1 Đầu nối chữ thập chạm cảm biến dòng2 Ống dây được nạp vào cảm biến dòng.
Hình 3-17: Ống dây được nạp vào cảm biến dòng với đầu nối chữ thập chạm vào cảm biến dòng
8. Nạp ống dây dẫn bạch cầu qua đường dẫn hướng van và ống dây dẫn bạch cầu
Hình 3-18: Ống dây dẫn bạch cầu được nạp vào đường dẫn hướng van và ống dây dẫn bạch cầu
Nạp kít túi máu
Hướng dẫn vận hành Hệ thống xử lý máu tự động Reveos® - Phiên bản 1.1 3-15
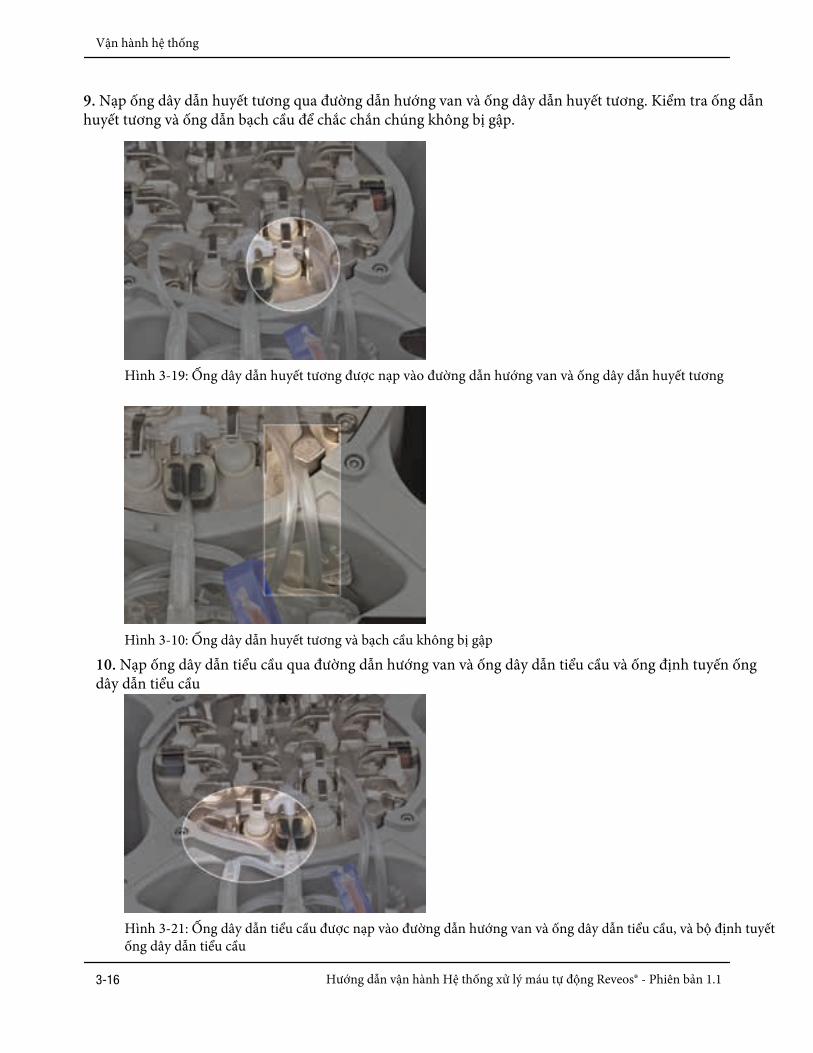
9. Nạp ống dây dẫn huyết tương qua đường dẫn hướng van và ống dây dẫn huyết tương. Kiểm tra ống dẫnhuyết tương và ống dẫn bạch cầu để chắc chắn chúng không bị gập.
Hình 3-19: Ống dây dẫn huyết tương được nạp vào đường dẫn hướng van và ống dây dẫn huyết tương
Hình 3-10: Ống dây dẫn huyết tương và bạch cầu không bị gập
10. Nạp ống dây dẫn tiểu cầu qua đường dẫn hướng van và ống dây dẫn tiểu cầu và ống định tuyến ốngdây dẫn tiểu cầu
Hình 3-21: Ống dây dẫn tiểu cầu được nạp vào đường dẫn hướng van và ống dây dẫn tiểu cầu, và bộ định tuyết ống dây dẫn tiểu cầu
Vận hành hệ thống
3-16 Hướng dẫn vận hành Hệ thống xử lý máu tự động Reveos® - Phiên bản 1.1

11. Đảm bảo các ống dây được gắn hoàn toàn vào các cảm biến dòng.
Hình 3-22: Các ống dây được gắn hoàn toàn và các cảm biến dòng
12. Kiểm tra bằng mắt thường các ống dây để chắc chắn mọi đường dẫn đều được nạp đúng vàođường dẫn hướng van và ống dây tương ứng.
Hình 3-23: Khu vực nạp kít túi máu đúng cách.
Đảm bảo hai đầu nối dễ vỡ thẳng hàng ở vị trí song song
Hình 3-24: Các đầu nối dễ vỡ thẳng hàng trên kít túi máu
Nạp kít túi máu
Hướng dẫn vận hành Hệ thống xử lý máu tự động Reveos® - Phiên bản 1.1 3-17

13. Bóp nhẹ hai bên túi toàn phần trước khi đóng nắp bucket để đảm bảo túi máu toàn phần không cản trở việc chốt nắp bucket.
Hình 3-Người vận hành bóp hai bên túi máu toàn phần trước khi đóng nắp bucket
14. Đóng và chốt nắp bucket, đảm bảo các đầu nối dễ vỡ vẫn thẳng hàng. Nếu các đầu nối thẳng hàng,thì mới dễ dàng đóng nắp bucket và ống dây mới khít với đường dẫn ống trên nắp bucket. Sau khi đãchốt nắp bucket, góc phần tư của sơ đồ bucket trên màn hình sẽ chuyển xanh
Hình 3-26: Ống dây trong đường dẫn ống dây trên nắp bucket
15. Dùng tay quay rô to 1/4 vòng để nạp kít túi máu tiếp theo.16. Lặp lại bước 1 đến bước 15 để nạp bucket khác.
Lưu ý: Nếu nạp ít hơn 4 kít túi máu, cần quét và nạp túi đối trọng vào bucket trống còn lại. Xem "Nạp túi đối trọng" ở trang 3-21.
Cảnh báo: Mọi bucket phải có kít túi máu hoặc túi đối trọng đã được nạp trước khi bắt đầu quy trình. Nếu không nạp đủ các bucket, có thể làm rò rỉ chất lỏng.
Vận hành hệ thống
3-18 Hướng dẫn vận hành Hệ thống xử lý máu tự động Reveos® - Phiên bản 1.1

17. Đảm bảo đã hoàn tất việc nạp đủ 4 bucket trước khi đi đến bước 18.
Hình 3-27: Thiết bị Reveos đã được nạp đủ 4 kít túi máu
18. Ấn phím Close Valves trên màn hình nạp để đóng tất cả các van
Hình 3-28: Phím Close Valves
Hệ thống hiển thị biểu tượng Đang thực hiện khi đang đóng các van. Sau đó sẽ hiển thị màn hình bắt đầu quy trình, nhắc bạn làm vỡ các đầu nối dễ vỡ.
Hình 3-29: Màn hình bắt đầu quy trình nhắc làm vỡ các đầu nối dễ vỡ
Lưu ý: Không làm vỡ đầu nối dẫn đến túi hồng cầu.
Nạp kít túi máu
Hướng dẫn vận hành Hệ thống xử lý máu tự động Reveos® - Phiên bản 1.1 3-19

19. Làm vỡ đầu nối dễ vỡ bên dưới đầu nối chữ thập ở ống dây của mỗi kít túi máu. Đảm bảo các đầu nối đó vỡ hoàn toàn.
Hình 3-30: Các đầu nối dễ vỡ được làm vỡ hoàn toàn
20. Kiểm tra bằng mắt buồng ly tâm và lấy ra các vật thể nào bị lỏng21. Đóng nắp thiết bị tới khi nó được chốt lại
Sau khi đóng nắp thiết bị, phím Start Procedure được kích hoạtXem "Quản lý quy trình" ở trang 3-23 để có thêm thông tin cho việc bắt đầu quy trình.
Vận hành hệ thống
3-20 Hướng dẫn vận hành Hệ thống xử lý máu tự động Reveos® - Phiên bản 1.1

Nạp túi đối trọngTất cả 4 bucket phải được nạp đủ trước khi chạy máy. Nếu không có đủ 4 đơn vị máu để xử lý, thì phải nạp đủ mỗi bucket rỗng còn lại bằng một túi đối trọng. Khi nạp hai túi đối trọng, nạp túi này đối diện với túi khác trong buồng ly tâm, trong bucket 1-3 hoặc bucket 2-4.
Lưu ý: Phải quét túi đối trọng trước khi đóng bucket.
Lưu ý: Bộ phát hiện rò rỉ được đặt trong buồng ly tâm gần phía trước thiết bị. Nếu bộ phát hiện rò rỉ bị chạm phải khi đang nạp, thiết bị sẽ phát ra cảnh báo. Xem "Cảnh báo và báo động thiết bị Reveos" để biết thêm thông tin.
Bộ túi đối trọng gồm 3 phần: túi đối trọng cho bucket, túi đối trọng cho túi máu thành phần và tab.
1 Túi đối trọng cho bucket2 Túi đối trọng cho túi máu thành phần3 Tab
Hình 3-31: Bộ túi đối trọng
Nạp túi đối trọng
Hướng dẫn vận hành Hệ thống xử lý máu tự động Reveos® - Phiên bản 1.1 3-21

Hoàn tất các bước sau để nạp túi đối trọng: 1. Đặt túi đối trọng cho bucket vào bucket và túi đối trọng cho túi thành phần vào giá đỡ túi máuthành phần
Hình 3-32: Gắn bộ túi đối trọng vào thiết bị
2. Ấn đầu ngang của tab vào đường dẫn ống dây ngay phía trên cảm biến dòng.3. Ấn phần hẹp của tab vào cảm biến dòng
Hình 3-33; Túi đối trọng có tab đã được nạp vào cảm biến dòng
4. Đóng và chốt nắp bucket.5. Lặp lại bước 1 đến 4 để nạp đủ các bucket rỗng.
Vận hành hệ thống
3-22 Hướng dẫn vận hành Hệ thống xử lý máu tự động Reveos® - Phiên bản 1.1

Quản lý quy trình
Bắt đầu quy trìnhẤn phím Start Procedure khi nó đã được kích hoạt trên màn hình cảm ứng, như Hình 3-34
Hình 3-34: Màn hình cảm ứng thiết bị Reveos với phím Start Procedure đã được kích hoạt
Theo dõi tiến trình thực hiệnSau khi bắt đầu quy trình, hệ thống sẽ theo dõi khoảng thời gian để hoàn tất quy trình. Màn hình tiến hành quy trình, như Hình 3-35, sẽ cập nhật định kỳ tới khi kết thúc quy trình.
1
2 3
4
5
Hình 3-35: Màn hình tiến hành quy trình
1 Con số này hiển thị ID hiến máu của mỗi thiết bị trong mỗi bucket. Nếu số ID hiến máu không hiển thị, nghĩa là bucket đã nạp một túi đối trọng hoặc mã vạch ID hiến máu đã không được quét khi nạp bucket. 2 Tem thời gian cho biết lượng thời gian đã trôi qua từ khi bắt đầu quy trình.3 Biểu tượng vòng tròn trắng cho biết các thành phần máu đã được tách trong túi máu toàn phần. 4 Biểu tượng vòng tròn xanh cho biết việc ép các thành phần máu đang bắt đầu. 5 Khi góc phần tư của sơ đồ bucket chuyển xanh, nghĩa là việc ép trong bucket đã hoàn tất.
Quản lý quy trình
Hướng dẫn vận hành Hệ thống xử lý máu tự động Reveos® - Phiên bản 1.1 3-23

Lưu ý: Khi góc phần tư không có màu gì, nghĩa là việc ép cho bucket đó chưa xong. Nếu góc phần tư có màu xám, nghĩa là túi đối trọng đã được nạp vào. Nếu góc phần tư đó chuyển màu vàng, nghĩa là đơn vị máu có vấn đề khi ép và chất lượng sản phẩm không thể xác định.
Dừng quy trìnhCó thể ấn phím dừng bất cứ khi nào.
Hình 3-36: Phím dừng trên thiết bị Reveos
Bất cứ khi nào cũng có thể ấn phím dừng, sẽ có báo động xảy ra.
Nếu ấn phím dừng trong khi nạp (trước khi phím Start Procedure xuất hiện), thiết bị sẽ hủy mọi mã vạch đã nhập.
Nếu ấn phím dừng khi đang chạy máy, trước khi nắp thiết bị tự động mở, quy trình bị ngắt quãng và sẽ có báo động. Màn hình cảm ứng sẽ xuất hiện màn hình tóm tắt kết thúc quy trình và hiển thị thể tích thành phần được phát hiện.
Nếu ấn phím dừng, thiết bị sẽ không hoàn tất quy trình và các van sẽ không hàn bất kỳ ống dây nào. Người vận hành phải kẹp và/ hoặc hàn các ống dây trước khi tháo các kít túi máu ra khỏi thiết bị.
Vận hành hệ thống
3-24 Hướng dẫn vận hành Hệ thống xử lý máu tự động Reveos® - Phiên bản 1.1

Kết thúc quy trìnhKhi đã hoàn tất quy trình, thiết bị sẽ hàn ống dây và cài đặt lại bơm thủy lực. Nắp thiết bị tự động mở. Màn hình tóm tắt kết thúc quy trình ban đầu, như Hình 3-37 sẽ xuất hiện trên màn hình cảm ứng nhưng nó sẽ bị bất hoạt tới khi bucket mở.
Hình 3-37: Màn hình tóm tắt kết thúc quy trình chưa kích hoạt
Mỗi bucket có một màn hình tóm tắt kết thúc quy trình riêng, nó sẽ được kích hoạt khi bucket tương ứng mở. Màn hình này cho biết lượng sản phẩm ước tính cho số bucket được liệt kê bên dưới biểu tượng bucket màu xanh hoặc vàng.
Hình 3-38: Màn hình tóm tắt kết thúc quy trình được kích hoạt cho Bucket 1
• Nếu bucket màu xanh, nghĩa là máu đã được phân tách thành công.• Nếu bucket màu vàng, nghĩa là không thể kết luận chất lượng sản phẩm máu.Màn hình tóm tắt kết thúc quy trình đưa ra lượng sản phẩm ước tính cho mỗi bucket. Nếu yêu cầu thể tích chính xác, tiến hành đo theo quy trình của cơ sở.
Quản lý quy trình
Hướng dẫn vận hành Hệ thống xử lý máu tự động Reveos® - Phiên bản 1.1 3-25

Để xem tên thiết bị và số quy trình, ấn phím xpand trên màn hình tóm tắt kết thúc quy trình. Số quy trình là một mã định danh duy nhất đại diện cho một quy trình phân tách máu toàn phần cụ thể. Số này xuất hiện trong các báo cáo được tạo ra trong phần mềm quản lý hệ thống Reveos cùng với các thông tin khác của quy trình.
Hình 3-39: Màn hình tóm tắt kết thúc quy trình có tên thiết bị và số quy trình.
Để trở về màn hình tóm tắt kết thúc quy trình, ấn phím Collapse. Đảm bảo
mọi bucket rỗng trước khi ấn phím Quy trình tiếp theo.
Lưu ý: Đảm bảo đã ấn phím Next Procedure và màn hình nhập mã vạch hiển thị, trước khi tắt nguồn thiết bị. Điều này cho phép dữ liệu quy trình được chuyển đến phần mềm quản lý hệ thống Reveos. Nếu tắt nguồn thiết bị trước khi ấn phím Next Procedure, sẽ không thể chuyển dữ liệu đến phần mềm quản lý hệ thống Reveos tới khi thiết bị được bật nguồn trở lại.
Chỉ số lượng thu tiểu cầuMục đích của tính năng chỉ số lượng thu tiểu cầu (PYI) là để tối ưu hóa lượng thu tiểu cầu cuối cùng trong sản phẩm tiểu cầu đã pool. Có thể sử dụng tính năng chỉ số lượng thu tiểu cầu để chọn đơn vị tiểu cầu tạm thời (IPUs) để pool dựa trên lượng thu tiểu cầu dự đoán của từng IPU. Nếu chọn sử dụng tính năng PYI, phải phát triển một phương pháp để phân loại các IPU dựa trên lượng thu tiểu cầu dự đoán.
Biểu tượng chỉ số lượng thu tiểu cầu xuất hiện phía trên biểu tượng tiểu cầu ở màn hình tóm tắt kết thúc quy trình, như Hình 3-40. Giá trị số xuất hiện ở biểu tượng này đại diện cho chỉ số lượng thu tiểu cầu (PYI) của đơn vị tiểu cầu tạm thời. PYI được biểu thị bằng lượng tiểu cầu ước tính. Giá trị PYI xuất hiện cùng với thể tích đơn vị tiểu cầu tạm thời, hiển thị bằng ml ở dưới cùng của biểu tượng tiểu cầu.
Vận hành hệ thống
3-26 Hướng dẫn vận hành Hệ thống xử lý máu tự động Reveos® - Phiên bản 1.1

1
2
Hình 3-40: Màn hình tóm tắt kết thúc quy trình có biểu tượng tiểu cầu
1 Giá trị chỉ số lượng thu tiểu cầu của đơn vị tiểu cầu tạm thời 2 Thể tích đơn vị tiểu cầu tạm thời ước tính
Giá trị của chỉ số lượng thu tiểu cầu xuất hiện trong báo cáo tổng quát của phần mềm quản lý hệ thống Reveos. Báo cáo tổng quát hiển thị giá trị PYI cho từng đơn vị tiểu cầu tạm thời được tách ra trong quy trình phân tách. Các giá trị PYI xuất hiện trong báo cáo tổng quát không làm tròn số mà là giá trị thực của lượng thu tiểu cầu ước tính.
Nếu thiết bị không thể dự đoán lượng thu tiểu cầu, PYI sẽ xuất hiện với giá trị là 0.
Tháo kít túi máuSau khi đã hoàn tất quy trình, nắp thiết bị tự động mở. Màn hình tóm tắt kết thúc quy trình cho từng bucket sẽ hiển thị khi bucket mở. 1. Mở một trong các nắp bucket.2. Tháo ống dây khỏi các van và đường dẫn ống dây.
Hình 3-41: Ống dây được tháo khỏi các van và đường dẫn ống dây
Tháo kít túi máu
Hướng dẫn vận hành Hệ thống xử lý máu tự động Reveos® - Phiên bản 1.1 3-27

3. Bằng một tay, giữ ống dây dẫn bạch cầu tồn dư gần vị trí hàn. Tay khác ấn đầu nối chữ thập đẩy ra khỏi cảm biến dòng.
Hình 3-42: Giữ ống dây dẫn bạch cầu khi đang ấn để đẩy đầu nối chữ thập khỏi cảm biến dòng
4. Nhẹ nhàng nhấc túi máu lên và lấy ra khỏi khi vực nạp
Hình 3-43: Nâng kít túi máu lên và lấy ra khỏi khu vực nạp
5. Lặp lại bước 1 đến 4 để tháo kít túi máu còn lại.6. Ấn phím Next Procedure màu xanh để chuẩn bị cho quy trình tiếp theo.
Vận hành hệ thống
3-28 Hướng dẫn vận hành Hệ thống xử lý máu tự động Reveos® - Phiên bản 1.1

Tháo túi đối trọngHoàn tất các bước sau để tháo túi đối trọng: 1. Mở nắp bucket.2. Nới lỏng tab khỏi cảm biến dòng bằng cách kéo phần nằm ngang của tab.3. Nhấc bộ túi đối trọng lên khỏi bucket và giá đặt túi máu thành phần khi tháo tab khỏi
cảm biến dòng.
Hình 3-44: Nhấc bộ túi đối trọng khỏi thiết bị
Tháo túi đối trọng
Hướng dẫn vận hành Hệ thống xử lý máu tự động Reveos® - Phiên bản 1.1 3-29

Vận hành hệ thống
3-30 Reveos® Automated Blood Processing System Operator's Manual for Version 1.1

4Cảnh báo và xử lý lỗi
Hướng dẫn vận hành Hệ thống xử lý máu tự động Reveos® - Phiên bản 1.1 4-1

Cảnh báo và xử lý lỗi
Thông báo lỗi ở phần mềm quản lý hệ thống Reveos Phần mềm ứng dụng quản lý hệ thống Reveos gồm các thông báo lỗi được thiết kế để giúp xử lý bất kỳ lỗi nào xảy ra. Thông báo lỗi xuất hiện khi có vấn đề phải được khắc phục trước khi người dùng tiếp tục. Dấu X màu đỏ sẽ xuất hiện cạnh vị trí lỗi. Thông báo lỗi bằng văn bản xuất hiện khi đặt con trỏ qua dấu X màu đỏ, đồng thời xuất hiện phía dưới cùng của màn hình. Mọi thông báo lỗi đều được đánh số. Nếu không thể xử lý lỗi, ghi lại số lỗi và liên hệ với đại diện dịch vụ của Terumo BCT.
Hình 4-1: Thông báo lỗi ở phần mềm quản lý hệ thống Reveos
Cảnh báo và báo động ở thiết bị Reveos Cảnh báo là thông điệp của hệ thống về tình trạng yêu cầu sự chú ý của người dùng nhưng sẽ không ngừng việc thực hiện quy trình. Có thể ghi lại số cảnh báo, thực hiện các hành động được hướng dẫn trên màn hình cảm ứng, rồi ấn phím Continue để thực hiện quy trình.
Báo động là thông điệp của hệ thống về tình trạng gây cản trở hoặc kết thúc quy trình, và có thể ảnh hưởng đến chất lượng sản phẩm. Nếu có báo động trước khi bắt đầu quy trình, phải thực hiện các hành động được hướng dẫn trên màn hình cảm ứng và thử lại quy trình. Nếu báo động xảy ra khi đang thực hiện quy trình, quy trình sẽ kết thúc. Mỗi màn hình báo động hoặc cảnh báo sẽ gồm 3 phần:
Cảnh báo và xử lý lỗi
4-2 Hướng dẫn vận hành Hệ thống xử lý máu tự động Reveos® - Phiên bản 1.1

1
2
3
Hình 4-2: Màn hình báo động hệ thống Reveos
1 Thanh tiêu để2 Vị trí cảnh báo/ báo động3 Nội dung cảnh báo/ báo động
Báo động toàn bộ hệ thống và riêng bucketCảnh báo và báo động có thể ảnh hưởng đến tất cả các đơn vị hoặc một bucket nào đó. Vị trí cảnh báo/ báo động được ghi ở dưới thanh tiêu đề• Nếu dòng chữ "All units" (mọi đơn vị) xuất hiện ở vị trí cảnh báo/ báo động, nghĩa là cảnh
báo/ báo động phản ánh cả 4 bucket và toàn bộ đơn vị máu toàn phần trong bucket.• Nếu biểu tượng và số một bucket xuất hiện ở vị trí cảnh báo/ báo động, nghĩa là cảnh báo/
báo động đó chỉ dành cho bucket đó. Mọi bucket khác có thể tiếp tục quy trình.
Cảnh báo và xử lý lỗi
Hướng dẫn vận hành Hệ thống xử lý máu tự động Reveos® - Phiên bản 1.1 4-3

Cảnh báo và báo động thiết bị Reveos
Bảng 4-1: Cảnh báo
Số cảnh báo Tên cảnh báo Nội dung cảnh báo Xử lý lỗi
1000 Chuyển đổi dữ liệu Ghi lại số cảnh báo. Xác nhận đã kết nối hệ thống. Nếu lỗi vẫn xảy ra, hãy liên hệ với đại diện kỹ thuật.
Xác nhận đã bật nguồn máy tính phần mềm quản lý hệ thống Reveos và cáp Ethernet đã kết nối đúng.
1001 Có thể mất dữ liệu Ghi lại số cảnh báo. Thiết lập kết nối. Nếu lỗi vẫn xảy ra, hãy liên hệ với đại diện kỹ thuật.
Xác nhận đã bật nguồn máy tính phần mềm quản lý hệ thống Reveos và cáp Ethernet đã kết nối đúng.
1003 Lỗi kết nối Ghi lại số cảnh báo. Xác nhận đã kết nối hệ thống. Nếu lỗi vẫn xảy ra, hãy liên hệ với đại diện kỹ thuật.
Xác nhận đã bật nguồn máy tính phần mềm quản lý hệ thống Reveos và cáp Ethernet đã kết nối đúng.
1016 ID người vận hành không hợp lệ
Ghi lại số cảnh báo. Người vận hành không được ủy quyền để thực hiện chức năng này. Liên hệ quản trị viên hệ thống.
Xác định đã quét đúng mã vạch cho ID người vận hành. Nếu dang nhập ID người vận hành trên màn hình nhập bằng bàn phím, xác định đã nhập đúng. Liên hệ với quản trị viên hệ thống để kiểm tra phân quyền với phần mềm quản lý hệ thống Reveos.
1018 Mất dữ liệu Ghi lại số cảnh báo. Nếu lỗi vẫn xảy ra, hãy liên hệ với đại diện kỹ thuật.
Nếu lỗi vẫn xảy ra, hãy liên hệ với đại diện kỹ thuật.
1019 Lỗi kết nối Ghi lại số cảnh báo. Xác nhận đã kết nối hệ thống. Nếu lỗi vẫn xảy ra, hãy liên hệ với đại diện kỹ thuật.
Xác nhận đã bật nguồn máy tính phần mềm quản lý hệ thống Reveos và cáp Ethernet đã kết nối đúng.
1020 Bản quét không hợp lệ Ghi lại số cảnh báo. Xóa bản quét và nạp túi đối trọng. Nếu lỗi vẫn xảy ra, hãy liên hệ với đại diện kỹ thuật.
Xem “Nạp túi đối trọng” ở trang 3-21.
1021 Bản quét không hợp lệ Ghi lại số cảnh báo. Xóa bản quét và nạp túi đối trọng. Nếu lỗi vẫn xảy ra, hãy liên hệ với đại diện kỹ thuật.
Xem “Nạp túi đối trọng” ở trang 3-21.
1022 Bản quét không hợp lệ Ghi lại số cảnh báo. Xóa bản quét và nạp túi đối trọng. Nếu lỗi vẫn xảy ra, hãy liên hệ với đại diện kỹ thuật.
Xem “Nạp túi đối trọng” ở trang 3-21.
1023 Bản quét không hợp lệ Ghi lại số cảnh báo. Xóa bản quét và nạp túi đối trọng. Nếu lỗi vẫn xảy ra, hãy liên hệ với đại diện kỹ thuật.
Xem “Nạp túi đối trọng” ở trang 3-21.
Cảnh báo và xử lý lỗi
4-4 Hướng dẫn vận hành Hệ thống xử lý máu tự động Reveos® - Phiên bản 1.1

Bảng 4-1: Cảnh báo (tiếp theo)
Số cảnh báo Tên cảnh báo Nội dung Xử lý lỗi
1024 Invalid manual entryNhập tay không hợp lệ
Ghi lại số cảnh báo. Nhập lại mã vạch
Xem "Nhập thông tin bằng tay" ở trang 3-10.
1026 Problem sealingLỗi mối hàn
Ghi lại số cảnh báo. Xác định việc hàn trên đường tiểu cầu đã đủ. Xác định đã nạp đúng
Xem “Nạp kít túi máu” ở trang 3-13 để hỗ trợ nạp kít túi máu tiếp theo.
1028 Problem sealingLỗi mối hàn
Ghi lại số cảnh báo. Xác định việc hàn trên đường tiểu cầu đã đủ. Xác định đã nạp đúng
Xem “Nạp kít túi máu” ở trang 3-13 để hỗ trợ nạp kít túi máu tiếp theo.
1030 Problem sealingLỗi mối hàn
Ghi lại số cảnh báo. Xác định việc hàn trên đường tiểu cầu đã đủ. Xác định đã nạp đúng
Xem “Nạp kít túi máu” ở trang 3-13 để hỗ trợ nạp kít túi máu tiếp theo.
1032 Problem sealingLỗi mối hàn
Ghi lại số cảnh báo. Xác định việc hàn trên đường tiểu cầu đã đủ. Xác định đã nạp đúng
Xem “Nạp kít túi máu” ở trang 3-13 để hỗ trợ nạp kít túi máu tiếp theo.
1034 Problem sealingLỗi mối hàn
Ghi lại số cảnh báo. Xác định việc hàn trên đường tiểu cầu đã đủ. Xác định đã nạp đúng
Xem “Nạp kít túi máu” ở trang 3-13 để hỗ trợ nạp kít túi máu tiếp theo.
1036 Problem sealingLỗi mối hàn
Ghi lại số cảnh báo. Xác định việc hàn trên đường tiểu cầu đã đủ. Xác định đã nạp đúng
Xem “Nạp kít túi máu” ở trang 3-13 để hỗ trợ nạp kít túi máu tiếp theo.
1038 Problem sealingLỗi mối hàn
Ghi lại số cảnh báo. Xác định việc hàn trên đường tiểu cầu đã đủ. Xác định đã nạp đúng
Xem “Nạp kít túi máu” ở trang 3-13 để hỗ trợ nạp kít túi máu tiếp theo.
1040 Problem sealingLỗi mối hàn
Ghi lại số cảnh báo. Xác định việc hàn trên đường tiểu cầu đã đủ. Xác định đã nạp đúng
Xem “Nạp kít túi máu” ở trang 3-13 để hỗ trợ nạp kít túi máu tiếp theo.
1042 Problem sealingLỗi mối hàn
Ghi lại số cảnh báo. Xác định việc hàn trên đường tiểu cầu đã đủ. Xác định đã nạp đúng
Xem “Nạp kít túi máu” ở trang 3-13 để hỗ trợ nạp kít túi máu tiếp theo.
1044 Problem sealingLỗi mối hàn
Ghi lại số cảnh báo. Xác định việc hàn trên đường tiểu cầu đã đủ. Xác định đã nạp đúng
Xem “Nạp kít túi máu” ở trang 3-13 để hỗ trợ nạp kít túi máu tiếp theo.
1046 Problem sealingLỗi mối hàn
Ghi lại số cảnh báo. Xác định việc hàn trên đường tiểu cầu đã đủ. Xác định đã nạp đúng
Xem “Nạp kít túi máu” ở trang 3-13 để hỗ trợ nạp kít túi máu tiếp theo.
1048 Problem sealingLỗi mối hàn
Ghi lại số cảnh báo. Xác định việc hàn trên đường tiểu cầu đã đủ. Xác định đã nạp đúng
Xem “Nạp kít túi máu” ở trang 3-13 để hỗ trợ nạp kít túi máu tiếp theo.
Cảnh báo và báo động
Hướng dẫn vận hành Hệ thống xử lý máu tự động Reveos® - Phiên bản 1.1 4-5
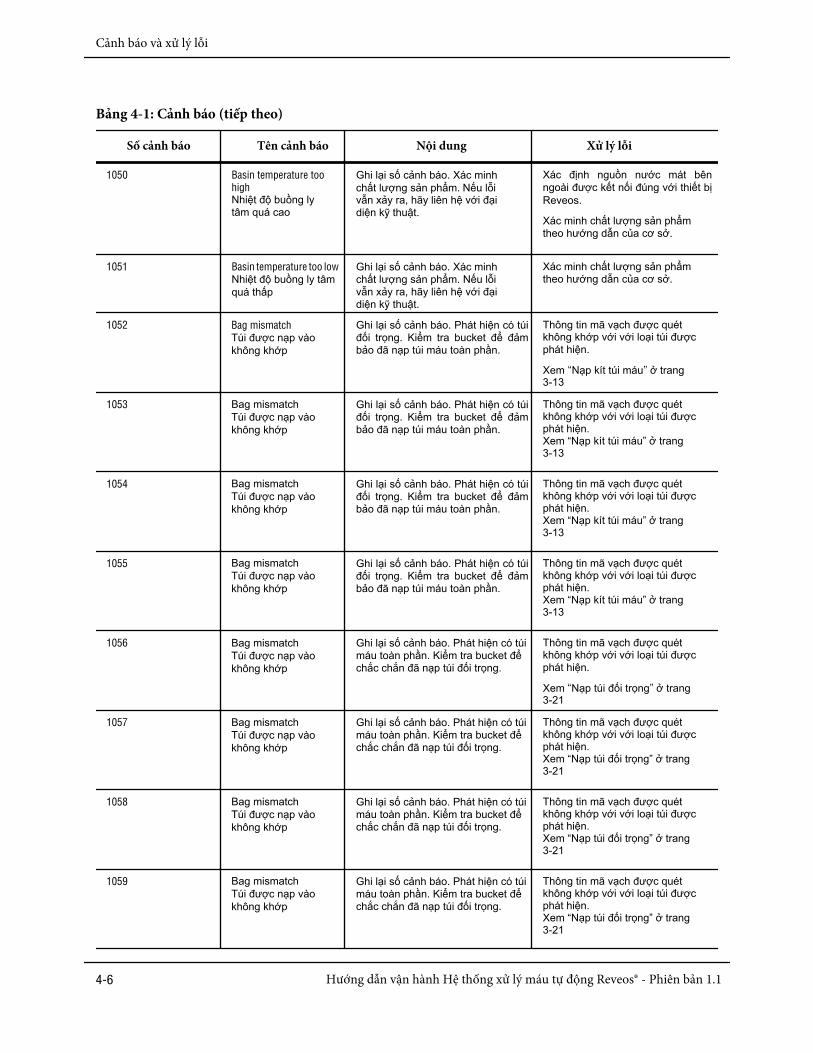
Bảng 4-1: Cảnh báo (tiếp theo)
Số cảnh báo Tên cảnh báo Nội dung Xử lý lỗi
1050 Basin temperature too highNhiệt độ buồng ly tâm quá cao
Ghi lại số cảnh báo. Xác minh chất lượng sản phẩm. Nếu lỗi vẫn xảy ra, hãy liên hệ với đại diện kỹ thuật.
Xác định nguồn nước mát bên ngoài được kết nối đúng với thiết bị Reveos.
Xác minh chất lượng sản phẩm theo hướng dẫn của cơ sở.
1051 Basin temperature too lowNhiệt độ buồng ly tâmquá thấp
Ghi lại số cảnh báo. Xác minh chất lượng sản phẩm. Nếu lỗi vẫn xảy ra, hãy liên hệ với đại diện kỹ thuật.
Xác minh chất lượng sản phẩm theo hướng dẫn của cơ sở.
1052 Bag mismatchTúi được nạp vào không khớp
Ghi lại số cảnh báo. Phát hiện có túi đối trọng. Kiểm tra bucket để đảm bảo đã nạp túi máu toàn phần.
Thông tin mã vạch được quét không khớp với với loại túi được phát hiện.
Xem “Nạp kít túi máu” ở trang 3-13
1053 Bag mismatchTúi được nạp vào không khớp
Ghi lại số cảnh báo. Phát hiện có túi đối trọng. Kiểm tra bucket để đảm bảo đã nạp túi máu toàn phần.
Thông tin mã vạch được quét không khớp với với loại túi được phát hiện. Xem “Nạp kít túi máu” ở trang 3-13
1054 Bag mismatchTúi được nạp vào không khớp
Ghi lại số cảnh báo. Phát hiện có túi đối trọng. Kiểm tra bucket để đảm bảo đã nạp túi máu toàn phần.
Thông tin mã vạch được quét không khớp với với loại túi được phát hiện. Xem “Nạp kít túi máu” ở trang 3-13
1055 Bag mismatchTúi được nạp vào không khớp
Ghi lại số cảnh báo. Phát hiện có túi đối trọng. Kiểm tra bucket để đảm bảo đã nạp túi máu toàn phần.
Thông tin mã vạch được quét không khớp với với loại túi được phát hiện. Xem “Nạp kít túi máu” ở trang 3-13
1056 Bag mismatchTúi được nạp vào không khớp
Ghi lại số cảnh báo. Phát hiện có túi máu toàn phần. Kiểm tra bucket để chắc chắn đã nạp túi đối trọng.
Thông tin mã vạch được quét không khớp với với loại túi được phát hiện.
Xem “Nạp túi đối trọng” ở trang 3-21
1057 Bag mismatchTúi được nạp vào không khớp
Ghi lại số cảnh báo. Phát hiện có túi máu toàn phần. Kiểm tra bucket để chắc chắn đã nạp túi đối trọng.
Thông tin mã vạch được quét không khớp với với loại túi được phát hiện. Xem “Nạp túi đối trọng” ở trang 3-21
1058 Bag mismatchTúi được nạp vào không khớp
Ghi lại số cảnh báo. Phát hiện có túi máu toàn phần. Kiểm tra bucket để chắc chắn đã nạp túi đối trọng.
Thông tin mã vạch được quét không khớp với với loại túi được phát hiện. Xem “Nạp túi đối trọng” ở trang 3-21
1059 Bag mismatchTúi được nạp vào không khớp
Ghi lại số cảnh báo. Phát hiện có túi máu toàn phần. Kiểm tra bucket để chắc chắn đã nạp túi đối trọng.
Thông tin mã vạch được quét không khớp với với loại túi được phát hiện. Xem “Nạp túi đối trọng” ở trang 3-21
Cảnh báo và xử lý lỗi
4-6 Hướng dẫn vận hành Hệ thống xử lý máu tự động Reveos® - Phiên bản 1.1
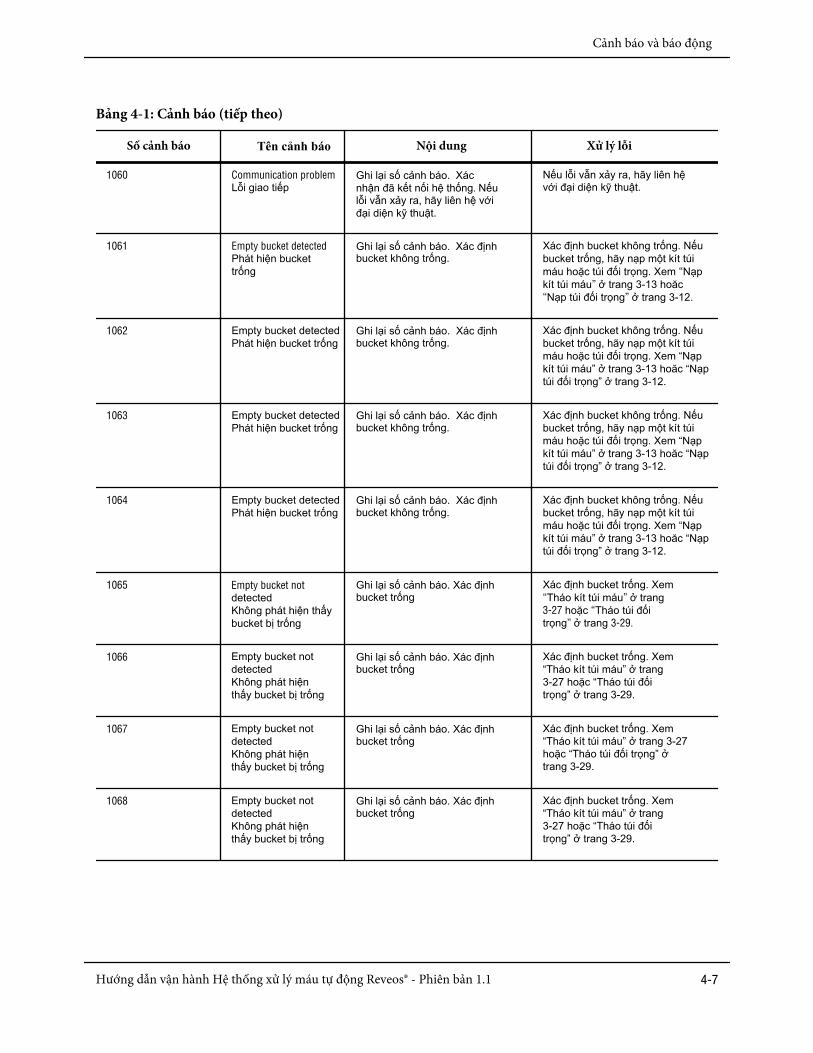
Bảng 4-1: Cảnh báo (tiếp theo)
Số cảnh báo Tên cảnh báo Nội dung Xử lý lỗi
1060 Communication problemLỗi giao tiếp
Ghi lại số cảnh báo. Xác nhận đã kết nối hệ thống. Nếu lỗi vẫn xảy ra, hãy liên hệ với đại diện kỹ thuật.
Nếu lỗi vẫn xảy ra, hãy liên hệ với đại diện kỹ thuật.
1061 Empty bucket detectedPhát hiện bucket trống
Ghi lại số cảnh báo. Xác định bucket không trống.
Xác định bucket không trống. Nếu bucket trống, hãy nạp một kít túi máu hoặc túi đối trọng. Xem “Nạp kít túi máu” ở trang 3-13 hoăc “Nạp túi đối trọng” ở trang 3-12.
1062 Empty bucket detectedPhát hiện bucket trống
Ghi lại số cảnh báo. Xác định bucket không trống.
Xác định bucket không trống. Nếu bucket trống, hãy nạp một kít túi máu hoặc túi đối trọng. Xem “Nạp kít túi máu” ở trang 3-13 hoăc “Nạp túi đối trọng” ở trang 3-12.
1063 Empty bucket detectedPhát hiện bucket trống
Ghi lại số cảnh báo. Xác định bucket không trống.
Xác định bucket không trống. Nếu bucket trống, hãy nạp một kít túi máu hoặc túi đối trọng. Xem “Nạp kít túi máu” ở trang 3-13 hoăc “Nạp túi đối trọng” ở trang 3-12.
1064 Empty bucket detectedPhát hiện bucket trống
Ghi lại số cảnh báo. Xác định bucket không trống.
Xác định bucket không trống. Nếu bucket trống, hãy nạp một kít túi máu hoặc túi đối trọng. Xem “Nạp kít túi máu” ở trang 3-13 hoăc “Nạp túi đối trọng” ở trang 3-12.
1065 Empty bucket not detectedKhông phát hiện thấy bucket bị trống
Ghi lại số cảnh báo. Xác định bucket trống
Xác định bucket trống. Xem “Tháo kít túi máu” ở trang 3-27 hoặc “Tháo túi đốitrọng” ở trang 3-29.
1066 Empty bucket not detectedKhông phát hiện thấy bucket bị trống
Ghi lại số cảnh báo. Xác định bucket trống
Xác định bucket trống. Xem “Tháo kít túi máu” ở trang 3-27 hoặc “Tháo túi đốitrọng” ở trang 3-29.
1067 Empty bucket not detectedKhông phát hiện thấy bucket bị trống
Ghi lại số cảnh báo. Xác định bucket trống
Xác định bucket trống. Xem “Tháo kít túi máu” ở trang 3-27 hoặc “Tháo túi đối trọng” ở trang 3-29.
1068 Empty bucket not detectedKhông phát hiện thấy bucket bị trống
Ghi lại số cảnh báo. Xác định bucket trống
Xác định bucket trống. Xem “Tháo kít túi máu” ở trang 3-27 hoặc “Tháo túi đốitrọng” ở trang 3-29.
Cảnh báo và báo động
Hướng dẫn vận hành Hệ thống xử lý máu tự động Reveos® - Phiên bản 1.1 4-7

Bảng 4-1: Cảnh báo (tiếp theo)
Số cảnh báo Tên cảnh báo Nội dung Xử lý lỗi
1069 Leak detectedPhát hiện có rò rỉ
Ghi lại số cảnh báo. Kiểm tra rò rỉ trong buồng ly tâm. Nếu lỗi vẫn xảy ra, hãy liên hệ với đại diện kỹ thuật.
Xác định liệu có đúng rò rỉ trong buống ly tâm không.• Nếu có rò rỉ, làm sạch rô to và
buồng ly tâm. Xem "Làm sạchsau khi tràn máu" ở trang 5-6.
• Nếu không có rò rỉ, ấn phímContinue .
1070 Hydraulic pressureproblemVấn đề về áp lực nước
Ghi lại số cảnh báo. Nếu lỗi vẫn xảy ra, hãy liên hệ với đại diện kỹ thuật.
Nếu lỗi vẫn xảy ra, hãy liên hệ với đại diện kỹ thuật.
1073 Bucket disabledBucket bị vô hiệu hóa
Ghi lại số cảnh báo. Quét và nạp túi đối trọng.
Xem “Nạp túi đối trọng” ở trang 3-21.
1074 Bucket disabledBucket bị vô hiệu hóa
Ghi lại số cảnh báo. Quét và nạp túi đối trọng.
Xem “Nạp túi đối trọng” ở trang 3-21.
1075 Bucket disabledBucket bị vô hiệu hóa
Ghi lại số cảnh báo. Quét và nạp túi đối trọng.
Xem “Nạp túi đối trọng” ở trang 3-21.
1076 Bucket disabledBucket bị vô hiệu hóa
Ghi lại số cảnh báo. Quét và nạp túi đối trọng.
Xem “Nạp túi đối trọng” ở trang 3-21.
1077 Duplicate donation IDNhập hai lần ID hiến máu
Ghi lại số cảnh báo. Xác minh các lần quét mã vạch. Nếu lỗi vẫn xảy ra, hãy liên hệ với quản trị hệ thống.
Xác định đã quét đúng mã vạch cho ID hiến máu. ID hiến máu được quét hai lần sliên kết với bucket khác. Không cho phép việc nhập trung lặp hai lần ID hiến máu. Quản trị viên hệ thống có thể xác minh ID hiến máu trùng lặp cài đặt trong phần mềm quản lý hệ thống Reveos.
1078 Duplicate donation IDNhập hai lần ID hiến máu
Ghi lại số cảnh báo. Xác minh các lần quét mã vạch. Nếu lỗi vẫn xảy ra, hãy liên hệ với quản trị hệ thống.
Xác định đã quét đúng mã vạch cho ID hiến máu. ID hiến máu được quét hai lần liên kết với bucket khác. Không cho phép việc nhập trùng lặp hai lần ID hiến máu. Quản trị viên hệ thống có thể xác minh ID hiến máu trùng lặp cài đặt trong phần mềm quản lý hệ thống Reveos.
1079 Duplicate donation IDNhập hai lần ID hiến máu
Ghi lại số cảnh báo. Xác minh các lần quét mã vạch. Nếu lỗi vẫn xảy ra, hãy liên hệ với quản trị hệ thống.
Xác định đã quét đúng mã vạch cho ID hiến máu. ID hiến máu được quét hai lần liên kết với bucket khác. Không cho phép việc nhập trùng lặp hai lần ID hiến máu. Quản trị viên hệ thống có thể xác minh ID hiến máu trùng lặp cài đặt trong phần mềm quản lý hệ thống Reveos.
Cảnh báo và xử lý lỗi
4-8 Hướng dẫn vận hành Hệ thống xử lý máu tự động Reveos® - Phiên bản 1.1

Bảng 4-1: Cảnh báo (tiếp theo)
Số cảnh báo Tên cảnh báo Nội dung Xử lý lỗi
1080 Duplicate donation ID Nhập hai lần ID hiến máu
Ghi lại số cảnh báo. Xác minh các lần quét mã vạch. Nếu lỗi vẫn xảy ra, hãy liên hệ với quản trị hệ thống.
Xác định đã quét đúng mã vạch cho ID hiến máu. ID hiến máu được quét hai lần liên kết với bucket khác. Không cho phép việc nhập trùng lặp hai lần ID hiến máu. Quản trị viên hệ thống có thể xác minh ID hiến máu trùng lặp cài đặt trong phần mềm quản lý hệ thống Reveos.
1081 Plasma detection problemLỗi phát hiện huyết tương
Ghi lại số cảnh báo. Kiểm tra xem có huyết tương không. Xác định đã nạp đúng vào cảm biến dòng. Nếu lỗi vẫn xảy ra, hãy liên hệ với đại diện kỹ thuật.
Xem “Nạp kít túi máu” ở trang 3-13.
Xác minh chất lượng sản phẩm theo hướng dẫn của cơ sở.
1082 Plasma detection problemLỗi phát hiện huyết tương
Ghi lại số cảnh báo. Kiểm tra xem có huyết tương không. Xác định đã nạp đúng vào cảm biến dòng. Nếu lỗi vẫn xảy ra, hãy liên hệ với đại diện kỹ thuật.
Xem “Nạp kít túi máu” ở trang 3-13.Xác minh chất lượng sản phẩmtheo hướng dẫn của cơ sở.
1083 Plasma detection problemLỗi phát hiện huyết tương
Ghi lại số cảnh báo. Kiểm tra xem có huyết tương không. Xác định đã nạp đúng vào cảm biến dòng. Nếu lỗi vẫn xảy ra, hãy liên hệ với đại diện kỹ thuật.
Xem “Nạp kít túi máu” ở trang 3-13.Xác minh chất lượng sản phẩmtheo hướng dẫn của cơ sở.
1084 Plasma detection problemLỗi phát hiện huyết tương
Ghi lại số cảnh báo. Kiểm tra xem có huyết tương không. Xác định đã nạp đúng vào cảm biến dòng. Nếu lỗi vẫn xảy ra, hãy liên hệ với đại diện kỹ thuật.
Xem “Nạp kít túi máu” ở trang 3-13.Xác minh chất lượng sản phẩmtheo hướng dẫn của cơ sở.
Bảng 4-2: Báo động
Số báo động Tên báo động Nội dung Xử lý lỗi
1100 Centrifuge voltageĐiện áp ly tâm
Ghi lại số báo động. Nếu lỗi vẫn xảy ra, hãy liên hệ với đại diện kỹ thuật.
Nếu lỗi vẫn xảy ra, hãy liên hệ với đại diện kỹ thuật.
1101 Centrifuge systemHệ thống ly tâm
Ghi lại số báo động. Nếu lỗi vẫn xảy ra, hãy liên hệ với đại diện kỹ thuật.
Nếu lỗi vẫn xảy ra, hãy liên hệ với đại diện kỹ thuật.
1102 Centrifuge commandLệnh thực hiện ly tâm
Ghi lại số báo động. Nếu lỗi vẫn xảy ra, hãy liên hệ với đại diện kỹ thuật.
Nếu lỗi vẫn xảy ra, hãy liên hệ với đại diện kỹ thuật.
1103 Centrifuge speed too highTốc độ ly tâm quá cao
Ghi lại số báo động. Nếu lỗi vẫn xảy ra, hãy liên hệ với đại diện kỹ thuật.
Khởi động lại thiết bị để xóa báo động.
Nếu lỗi vẫn xảy ra, hãy liên hệ với đại diện kỹ thuật.
Cảnh báo và báo động
Hướng dẫn vận hành Hệ thống xử lý máu tự động Reveos® - Phiên bản 1.1 4-9

Bảng 4-2: Báo động (tiếp theo)
Số báo động Tên báo động Nội dung Xử lý lỗi
1104 Centrifuge speedTốc độ ly tâm
Ghi lại số báo động. Nếu lỗi vẫn xảy ra, hãy liên hệ với đại diện kỹ thuật.
Nếu lỗi vẫn xảy ra, hãy liên hệ với đại diện kỹ thuật.
1105 Centrifuge hardwarePhần cứng buồng ly tâm
Ghi lại số báo động. Nếu lỗi vẫn xảy ra, hãy liên hệ với đại diện kỹ thuật.
Nếu lỗi vẫn xảy ra, hãy liên hệ với đại diện kỹ thuật.
1106 Centrifuge powerNguồn điện buồng ly tâm
Ghi lại số báo động. Nếu lỗi vẫn xảy ra, hãy liên hệ với đại diện kỹ thuật.
Nếu lỗi vẫn xảy ra, hãy liên hệ với đại diện kỹ thuật.
1107 Centrifuge systemHệ thống ly tâm
Ghi lại số báo động. Liên hệ với đại diện kỹ thuật.
Nếu lỗi vẫn xảy ra, hãy liên hệ với đại diện kỹ thuật.
1202 Protocol problemVấn đề ở protocol
Ghi lại số báo động. Nếu lỗi vẫn xảy ra, hãy liên hệ với đại diện kỹ thuật.
Xác minh đã kích hoạt đung protocol.
1203 Protocol problemVấn đề ở protocol
Ghi lại số báo động. Khởi động lại thiết bị. Nếu lỗi vẫn xảy ra, hãy liên hệ với đại diện kỹ thuật.
Khởi động lại thiết bị để xóa báo động. Chọn quy trình khác.
1204 Protocol problemVấn đề ở protocol
Ghi lại số báo động. Khởi động lại thiết bị. Nếu lỗi vẫn xảy ra, hãy liên hệ với đại diện kỹ thuật.
Khởi động lại thiết bị để xóa báo động. Chọn quy trình khác.
1211 Procedure not foundKhông tìm thấy quy trình
Ghi lại số báo động. Liên hệ với quản trị viên hệ thống trước khi sử dụng thiết bị.
Quản trị viên hệ thống có thể xác minh quy trình được dùng trong phần mềm quản lý hệ thống Reveos. Xem "Cấu hình quy trình" ở trang 6-21.
1212 Device not enabledThiết bị không kích hoạt.
Ghi lại số báo động. Liên hệ với quản trị viên hệ thống.
Quản trị viên hệ thống có thể xác minh việc kích thoạt hệ thống trên phần mềm quản lý hệ thống Reveos. Xem "Kích hoạt và bất hoạt hệ thống" ở trang 6-17.
1214 No procedures assignedKhông có quy trình nào được chỉ định
Ghi lại số báo động. Liên hệ với quản trị viên hệ thống.
Quản trị viên hệ thống phải chỉ định quy trình cho hệ thống. Xem "Thiết bị được liên kết" ở trang 6-23.
1219 Hydraulic pressure too highÁp lực nước quá cao
Ghi lại số báo động. Kiểm tra xem đường dẫn có bị tắc hoặc đầu nối dễ vỡ chưa được làm vỡ. Bucket sẽ bị bất hoạt. Nếu lỗi vẫn xảy ra, hãy liên hệ với đại diện kỹ thuật.
Xác minh đầu nối dễ vỡ giữa túi máu toàn phần và đầu nối chữ thập đã vỡ hoàn toàn.
1220 Hydraulic pressure too highÁp lực nước quá cao
Ghi lại số báo động. Kiểm tra xem đường dẫn có bị tắc hoặc đầu nối dễ vỡ chưa được làm vỡ. Bucket sẽ bị bất hoạt. Nếu lỗi vẫn xảy ra, hãy liên hệ với đại diện kỹ thuật.
Xác minh đầu nối dễ vỡ giữa túi máu toàn phần và đầu nối chữ thập đã vỡ hoàn toàn.
Cảnh báo và xử lý lỗi
4-10 Hướng dẫn vận hành Hệ thống xử lý máu tự động Reveos® - Phiên bản 1.1

Bảng 4-2: Báo động (tiếp theo)
Số báo động Tên báo động Nội dung Xử lý lỗi
1221 Hydraulic pressure too highÁp lực nước quá cao
Ghi lại số báo động. Kiểm tra xem đường dẫn có bị tắc hoặc đầu nối dễ vỡ chưa được làm vỡ. Bucket sẽ bị bất hoạt. Nếu lỗi vẫn xảy ra, hãy liên hệ với đại diện kỹ thuật.
Xác minh đầu nối dễ vỡ giữa túi máu toàn phần và đầu nối chữ thập đã vỡ hoàn toàn.
1222 Hydraulic pressure too highÁp lực nước quá cao
Ghi lại số báo động. Kiểm tra xem đường dẫn có bị tắc hoặc đầu nối dễ vỡ chưa được làm vỡ. Bucket sẽ bị bất hoạt. Nếu lỗi vẫn xảy ra, hãy liên hệ với đại diện kỹ thuật.
Xác minh đầu nối dễ vỡ giữa túi máu toàn phần và đầu nối chữ thập đã vỡ hoàn toàn.
1223 1224 1225 12261227 1228 1229 1230
Protocol problemVấn đề ở protocol
Ghi lại số báo động. Bucket sẽ bị bất hoạt. Nếu lỗi vẫn xảy ra, hãy liên hệ với đại diện kỹ thuật.
Nếu lỗi vẫn xảy ra, hãy liên hệ với đại diện kỹ thuật.
1231 Protocol problemVấn đề ở protocol
Ghi lại số báo động. Bucket sẽ bị bất hoạt. Xác định đã nạp đúng. Nếu lỗi vẫn xảy ra, hãy liên hệ với đại diện kỹ thuật.
Xác minh đã nạp đúng. Kiểm tra việc đặt ống dây vào các van. Kiểm tra vị trí của đầu nối chữ thập. Xem “Nạp kít túi máu” ở trang 3-13.
Nếu lỗi vẫn xảy ra, hãy liên hệ với đại diện kỹ thuật.
1232 Protocol problemVấn đề ở protocol
Ghi lại số báo động. Bucket sẽ bị bất hoạt. Xác định đã nạp đúng. Nếu lỗi vẫn xảy ra, hãy liên hệ với đại diện kỹ thuật.
Xác minh đã nạp đúng. Kiểm tra việc đặt ống dây vào các van. Kiểm tra vị trí của đầu nối chữ thập. Xem “Nạp kít túi máu” ở trang 3-13.Nếu lỗi vẫn xảy ra, hãy liên hệ với đại diện kỹ thuật.
1233 Protocol problemVấn đề ở protocol
Ghi lại số báo động. Bucket sẽ bị bất hoạt. Xác định đã nạp đúng. Nếu lỗi vẫn xảy ra, hãy liên hệ với đại diện kỹ thuật.
Xác minh đã nạp đúng. Kiểm tra việc đặt ống dây vào các van. Kiểm tra vị trí của đầu nối chữ thập. Xem “Nạp kít túi máu” ở trang 3-13.Nếu lỗi vẫn xảy ra, hãy liên hệ với đại diện kỹ thuật.
1234 Protocol problemVấn đề ở protocol
Ghi lại số báo động. Bucket sẽ bị bất hoạt. Xác định đã nạp đúng. Nếu lỗi vẫn xảy ra, hãy liên hệ với đại diện kỹ thuật.
Xác minh đã nạp đúng. Kiểm tra việc đặt ống dây vào các van. Kiểm tra vị trí của đầu nối chữ thập. Xem “Nạp kít túi máu” ở trang 3-13.Nếu lỗi vẫn xảy ra, hãy liên hệ với đại diện kỹ thuật.
1235 1236 1237 12381239 1240 1241 12421243 1244 1245 12461247 1248 1249 1250
Protocol problemVấn đề ở protocol
Ghi lại số báo động. Bucket sẽ bị bất hoạt. Nếu lỗi vẫn xảy ra, hãy liên hệ với đại diện kỹ thuật.
Nếu lỗi vẫn xảy ra, hãy liên hệ với đại diện kỹ thuật.
Cảnh báo và báo động
Hướng dẫn vận hành Hệ thống xử lý máu tự động Reveos® - Phiên bản 1.1 4-11

Bảng 4-2: Báo động (tiếp theo)
Số báo động Tên báo động Nội dung Xử lý lỗi
1251 Protocol problem Vấn đề ở protocol
Ghi lại số báo động. Bucket sẽ bị bất hoạt. Xác định đã nạp đúng. Nếu lỗi vẫn xảy ra, hãy liên hệ với đại diện kỹ thuật.
Xác minh đã nạp đúng. Kiểm tra việc đặt ống dây vào các van. Kiểm tra vị trí của đầu nối chữ thập. Xem “Nạp kít túi máu” ở trang 3-13.Nếu lỗi vẫn xảy ra, hãy liên hệ với đại diện kỹ thuật.
1252 Protocol problem Vấn đề ở protocol
Ghi lại số báo động. Bucket sẽ bị bất hoạt. Xác định đã nạp đúng. Nếu lỗi vẫn xảy ra, hãy liên hệ với đại diện kỹ thuật.
Xác minh đã nạp đúng. Kiểm tra việc đặt ống dây vào các van. Kiểm tra vị trí của đầu nối chữ thập. Xem “Nạp kít túi máu” ở trang 3-13.Nếu lỗi vẫn xảy ra, hãy liên hệ với đại diện kỹ thuật.
1253 Protocol problem Vấn đề ở protocol
Ghi lại số báo động. Bucket sẽ bị bất hoạt. Xác định đã nạp đúng. Nếu lỗi vẫn xảy ra, hãy liên hệ với đại diện kỹ thuật.
Xác minh đã nạp đúng. Kiểm tra việc đặt ống dây vào các van. Kiểm tra vị trí của đầu nối chữ thập. Xem “Nạp kít túi máu” ở trang 3-13.Nếu lỗi vẫn xảy ra, hãy liên hệ với đại diện kỹ thuật.
1254 Protocol problem Vấn đề ở protocol
Ghi lại số báo động. Bucket sẽ bị bất hoạt. Xác định đã nạp đúng. Nếu lỗi vẫn xảy ra, hãy liên hệ với đại diện kỹ thuật.
Xác minh đã nạp đúng. Kiểm tra việc đặt ống dây vào các van. Kiểm tra vị trí của đầu nối chữ thập. Xem “Nạp kít túi máu” ở trang 3-13.Nếu lỗi vẫn xảy ra, hãy liên hệ với đại diện kỹ thuật.
1255, 1256, 1257, 1258,1259, 1260, 1261, 1262
Protocol problem Vấn đề ở protocol
Ghi lại số báo động. Bucket sẽ bị bất hoạt. Nếu lỗi vẫn xảy ra, hãy liên hệ với đại diện kỹ thuật.
Nếu lỗi vẫn xảy ra, hãy liên hệ với đại diện kỹ thuật.
1263 RBC detection problemKhông phát hiện được hồng cầu
Ghi lại số báo động. Bucket sẽ bị bất hoạt. Nếu lỗi vẫn xảy ra, hãy liên hệ với đại diện kỹ thuật.
Xác minh nhãn số nhận dạng lần hiến máu không gây cản trở cảm biến bucket.
Nếu lỗi vẫn xảy ra, hãy liên hệ với đại diện kỹ thuật.
1264 RBC detection problemKhông phát hiện được hồng cầu
Ghi lại số báo động. Bucket sẽ bị bất hoạt. Nếu lỗi vẫn xảy ra, hãy liên hệ với đại diện kỹ thuật.
Xác minh nhãn số nhận dạng lần hiến máu không gây cản trở cảm biến bucket. Nếu lỗi vẫn xảy ra, hãy liên hệ với đại diện kỹ thuật.
1265 RBC detection problemKhông phát hiện được hồng cầu
Ghi lại số báo động. Bucket sẽ bị bất hoạt. Nếu lỗi vẫn xảy ra, hãy liên hệ với đại diện kỹ thuật.
Xác minh nhãn số nhận dạng lần hiến máu không gây cản trở cảm biến bucket. Nếu lỗi vẫn xảy ra, hãy liên hệ với đại diện kỹ thuật.
Cảnh báo và xử lý lỗi
4-12 Hướng dẫn vận hành Hệ thống xử lý máu tự động Reveos® - Phiên bản 1.1

Bảng 4-2: Báo động (tiếp theo)
Số báo động Tên báo động Nội dung Xử lý lỗi
1266 RBC detection problemKhông phát hiện được hồng cầu
Ghi lại số báo động. Bucket sẽ bị bất hoạt. Nếu lỗi vẫn xảy ra, hãy liên hệ với đại diện kỹ thuật.
Xác minh nhãn số nhận dạng lần hiến máu không gây cản trở cảm biến bucket. Nếu lỗi vẫn xảy ra, hãy liên hệ với đại diện kỹ thuật.
1267 Plasma detection problemKhông phát hiện được huyết tương
Ghi lại số báo động. Kiểm tra xem có huyết tương không. Xác minh đã nạp đúng đường ống túi máu vào cảm biến dòng. Nếu lỗi vẫn xảy ra, hãy liên hệ với đại diện kỹ thuật.
Xác minh đã nạp đúng. Xem “Nạp kít túi máu” ở trang 3-13.
Nếu lỗi vẫn xảy ra, hãy liên hệ với đại diện kỹ thuật.
1268 Hydraulic pressure too highÁp lực nước quá cao
Ghi lại số báo động. Kiểm tra xem đường dẫn huyết tương có bị tắc hoặc đầu nối dễ vỡ chưa được làm vỡ. Bucket sẽ bị bất hoạt. Nếu lỗi vẫn xảy ra, hãy liên hệ với đại diện kỹ thuật.
Xác minh đầu nối dễ vỡ giữa túi máu toàn phần và đầu nối chữ thập đã vỡ hoàn toàn. Kiểm tra xem ống dây có bị gập hay tắc không. Xem "Nạp kít túi máu” ở trang 3-13.
1269 Hydraulic pressure too highÁp lực nước quá cao
Ghi lại số báo động. Kiểm tra xem đường dẫn huyết tương có bị tắc hoặc đầu nối dễ vỡ chưa được làm vỡ. Bucket sẽ bị bất hoạt. Nếu lỗi vẫn xảy ra, hãy liên hệ với đại diện kỹ thuật.
Xác minh đầu nối dễ vỡ giữa túi máu toàn phần và đầu nối chữ thập đã vỡ hoàn toàn. Kiểm tra xem ống dây có bị gập hay tắc không. Xem "Nạp kít túi máu” ở trang 3-13.
1270 Hydraulic pressure too highÁp lực nước quá cao
Ghi lại số báo động. Kiểm tra xem đường dẫn huyết tương có bị tắc hoặc đầu nối dễ vỡ chưa được làm vỡ. Bucket sẽ bị bất hoạt. Nếu lỗi vẫn xảy ra, hãy liên hệ với đại diện kỹ thuật.
Xác minh đầu nối dễ vỡ giữa túi máu toàn phần và đầu nối chữ thập đã vỡ hoàn toàn. Kiểm tra xem ống dây có bị gập hay tắc không. Xem "Nạp kít túi máu” ở trang 3-13.
1271 Hydraulic pressure too highÁp lực nước quá cao
Ghi lại số báo động. Kiểm tra xem đường dẫn huyết tương có bị tắc hoặc đầu nối dễ vỡ chưa được làm vỡ. Bucket sẽ bị bất hoạt. Nếu lỗi vẫn xảy ra, hãy liên hệ với đại diện kỹ thuật.
Xác minh đầu nối dễ vỡ giữa túi máu toàn phần và đầu nối chữ thập đã vỡ hoàn toàn. Kiểm tra xem ống dây có bị gập hay tắc không. Xem "Nạp kít túi máu” ở trang 3-13.
1301 Hydraulic systemHệ thống thủy lực
Ghi lại số báo động. Nếu lỗi vẫn xảy ra, hãy liên hệ với đại diện kỹ thuật.
Nếu lỗi vẫn xảy ra, hãy liên hệ với đại diện kỹ thuật.
1304 Hydraulic systemHệ thống thủy lực
Ghi lại số báo động. Nếu lỗi vẫn xảy ra, hãy liên hệ với đại diện kỹ thuật.
Nếu lỗi vẫn xảy ra, hãy liên hệ với đại diện kỹ thuật.
1305 Hydraulic systemHệ thống thủy lực
Ghi lại số báo động. Nếu lỗi vẫn xảy ra, hãy liên hệ với đại diện kỹ thuật.
Khởi động lại thiết bị để xóa báo động.
Nếu lỗi vẫn xảy ra, hãy liên hệ với đại diện kỹ thuật.
Cảnh báo và báo động
Hướng dẫn vận hành Hệ thống xử lý máu tự động Reveos® - Phiên bản 1.1 4-13

Bảng 4-2: Báo động (tiếp theo)
Số báo động Tên báo động Nội dung Xử lý lỗi
1307 Hydraulic pressure too highÁp lực nước quá cao
Ghi lại số báo động. Kiểm tra xem đường dẫn có bị tắc hoặc đầu nối dễ vỡ chưa được làm vỡ. Bucket sẽ bị bất hoạt. Nếu lỗi vẫn xảy ra, hãy liên hệ với đại diện kỹ thuật.
Xác minh đầu nối dễ vỡ giữa túi máu toàn phần và đầu nối chữ thập đã vỡ hoàn toàn. Kiểm tra xem ống dây có bị gập hay tắc không. Xem "Nạp kít túi máu” ở trang 3-13.
1314 Hydraulic controlKiểm soát thủy lực
Ghi lại số báo động. Nếu lỗi vẫn xảy ra, hãy liên hệ với đại diện kỹ thuật.
Nếu lỗi vẫn xảy ra, hãy liên hệ với đại diện kỹ thuật.
1315 Hydraulic hardwarePhần cứng thủy lực
Ghi lại số báo động. Khởi động lại thiết bị. Nếu lỗi vẫn xảy ra, hãy liên hệ với đại diện kỹ thuật.
Khởi động lại thiết bị để xóa báo động.
Nếu lỗi vẫn xảy ra, hãy liên hệ với đại diện kỹ thuật.
1317 Hydraulic pressureproblemVấn đề về áp lực nước
Ghi lại số báo động. Khởi động lại thiết bị. Nếu lỗi vẫn xảy ra, hãy liên hệ với đại diện kỹ thuật.
Khởi động lại thiết bị để xóa báo động.Nếu lỗi vẫn xảy ra, hãy liên hệ với đại diện kỹ thuật.
1401 Leak detected Ghi lại số báo động. Kiểm tra xem có rò rỉ trong buồng ly tâm không. Nếu lỗi vẫn xảy ra, hãy liên hệ với đại diện kỹ thuật.
Nếu báo động xảy ra trong quy trình• Tháo kít túi máu và xử lý theo
hướng dẫn của cơ sở.
• Làm sạch rô to và buồng ly tâm.Xem "Làm sạch sau khi trànmáu" ở trang 5-6.
• Nếu thấy dịch, liên hệ với đạidiện kỹ thuật.
1403 Outer lid systemNắp bên ngoài hệ thống
Ghi lại số báo động. Nếu lỗi vẫn xảy ra, hãy liên hệ với đại diện kỹ thuật.
Nếu lỗi vẫn xảy ra, hãy liên hệ với đại diện kỹ thuật.
1404 Outer lid systemNắp bên ngoài hệ thống
Ghi lại số báo động. Nếu lỗi vẫn xảy ra, hãy liên hệ với đại diện kỹ thuật.
Nếu lỗi vẫn xảy ra, hãy liên hệ với đại diện kỹ thuật.
1406 Outer lid detected openPhát hiện nắp bên ngoài mở
Ghi lại số báo động. Nếu lỗi vẫn xảy ra, hãy liên hệ với đại diện kỹ thuật.
Nếu lỗi vẫn xảy ra, hãy liên hệ với đại diện kỹ thuật.
1413 Fan problemLỗi quạt
Ghi lại số báo động. Nếu lỗi vẫn xảy ra, hãy liên hệ với đại diện kỹ thuật.
Nếu lỗi vẫn xảy ra, hãy liên hệ với đại diện kỹ thuật.
1414 Stop button pressedẤn phải phím dừng
Ghi lại số báo động. Quy trình sẽ bị dừng
Xử lý các sản phẩm máu theo hướng dẫn của cơ sở.
1415 Basin temperature sensorCảm biến nhiệt độ buồng ly tâm
Ghi lại số báo động. Liên hệ với đại diện kỹ thuật.
Nếu lỗi vẫn xảy ra, hãy liên hệ với đại diện kỹ thuật.
1416 Bearing temperature sensorCảm biến nhiệt độ vòng bi.
Ghi lại số báo động. Nếu lỗi vẫn xảy ra, hãy liên hệ với đại diện kỹ thuật.
Nếu lỗi vẫn xảy ra, hãy liên hệ với đại diện kỹ thuật.
Cảnh báo và xử lý lỗi
4-14 Hướng dẫn vận hành Hệ thống xử lý máu tự động Reveos® - Phiên bản 1.1

Bảng 4-2: Báo động (tiếp theo)
Số báo động Tên báo động Nội dung Xử lý lỗi
1417 Inlet temperature sensorCảm biến nhiệt độ đầu vào
Ghi lại số báo động. Nếu lỗi vẫn xảy ra, hãy liên hệ với đại diện kỹ thuật.
Nếu lỗi vẫn xảy ra, hãy liên hệ với đại diện kỹ thuật.
1420 Vibration sensorCảm biến rung
Ghi lại số báo động. Khởi động lại thiết bị. Nếu lỗi vẫn xảy ra, hãy liên hệ với đại diện kỹ thuật.
Nếu lỗi vẫn xảy ra, hãy liên hệ với đại diện kỹ thuật.
1421 Excessive vibrationRung quá mức
Ghi lại số báo động. Xác định đã nạp đúng. Nếu lỗi vẫn xảy ra, hãy liên hệ với đại diện kỹ thuật.
Xác minh cả bốn bucket đã được nạp đúng. Nếu nạp hai túi đối trọng, thì phải nạp chúng đối diện nhau.
Nếu lỗi vẫn xảy ra, hãy liên hệ với đại diện kỹ thuật.
1422 Bearing temperature too lowNhiệt độ vòng bi quá thấp
Ghi lại số báo động. Nếu lỗi vẫn xảy ra, hãy liên hệ với đại diện kỹ thuật.
Nếu lỗi vẫn xảy ra, hãy liên hệ với đại diện kỹ thuật.
1423 Inlet temperature too highNhiệt độ đầu vào quá cao
Ghi lại số báo động. Nếu lỗi vẫn xảy ra, hãy liên hệ với đại diện kỹ thuật.
Xác minh nguồn nước lạnh bên ngoài được kết nối với thiết bị Reveos đúng cách.
1424 Inlet temperature too lowNhiệt độ đầu vào quá thấp
Ghi lại số báo động. Nếu lỗi vẫn xảy ra, hãy liên hệ với đại diện kỹ thuật.
Xác minh nguồn nước lạnh bên ngoài được kết nối với thiết bị Reveos đúng cách.
1427 Outer lid lock sensorCảm biến khóa nắp bên ngoài
Ghi lại số báo động. Nếu lỗi vẫn xảy ra, hãy liên hệ với đại diện kỹ thuật.
Nếu lỗi vẫn xảy ra, hãy liên hệ với đại diện kỹ thuật.
1429 Outer lid sensorCảm biến nắp bên ngoài
Ghi lại số báo động. Nếu lỗi vẫn xảy ra, hãy liên hệ với đại diện kỹ thuật.
Nếu lỗi vẫn xảy ra, hãy liên hệ với đại diện kỹ thuật.
1430 Outer lid lock powerNguồn điện khóa nắp bên ngoài
Ghi lại số báo động. Nếu lỗi vẫn xảy ra, hãy liên hệ với đại diện kỹ thuật.
Nếu lỗi vẫn xảy ra, hãy liên hệ với đại diện kỹ thuật.
1432 Bearing temperature too highNhiệt độ vòng bi quá cao
Ghi lại số báo động. Nếu lỗi vẫn xảy ra, hãy liên hệ với đại diện kỹ thuật.
Nếu lỗi vẫn xảy ra, hãy liên hệ với đại diện kỹ thuật.
1433 Bucket lid latchChốt nắp bucket
Ghi lại số báo động. Nếu lỗi vẫn xảy ra, hãy liên hệ với đại diện kỹ thuật.
Nếu lỗi vẫn xảy ra, hãy liên hệ với đại diện kỹ thuật.
1434 Bucket lid latchChốt nắp bucket
Ghi lại số báo động. Nếu lỗi vẫn xảy ra, hãy liên hệ với đại diện kỹ thuật.
Nếu lỗi vẫn xảy ra, hãy liên hệ với đại diện kỹ thuật.
1435 Bucket lid latchChốt nắp bucket
Ghi lại số báo động. Nếu lỗi vẫn xảy ra, hãy liên hệ với đại diện kỹ thuật.
Nếu lỗi vẫn xảy ra, hãy liên hệ với đại diện kỹ thuật.
Cảnh báo và báo động
Hướng dẫn vận hành Hệ thống xử lý máu tự động Reveos® - Phiên bản 1.1 4-15

Bảng 4-2: Báo động (tiếp theo)
Số báo động Tên báo động Nội dung Xử lý lỗi
1436 Bucket lid latchChốt nắp bucket
Ghi lại số báo động. Nếu lỗi vẫn xảy ra, hãy liên hệ với đại diện kỹ thuật.
Nếu lỗi vẫn xảy ra, hãy liên hệ với đại diện kỹ thuật.
1500 Problem closing valveLỗi đóng van
Ghi lại số báo động. Xác minh đã nạp đúng đường dẫn tiểu cầu vào bucket 1. Nếu lỗi vẫn xảy ra, hãy liên hệ với đại diện kỹ thuật.
Nếu lỗi vẫn xảy ra, hãy liên hệ với đại diện kỹ thuật.
1501 Problem closing valveLỗi đóng van
Ghi lại số báo động. Bucket sẽ bị bất hoạt. Lỗi mở van. Nếu lỗi vẫn xảy ra, hãy liên hệ với đại diện kỹ thuật.
Nếu lỗi vẫn xảy ra, hãy liên hệ với đại diện kỹ thuật.
1502 Problem sealingLỗi hàn ống dây
Ghi lại số báo động. Kẹp và hàn mọi đường dẫn. Nếu lỗi vẫn xảy ra, hãy liên hệ với đại diện kỹ thuật.
Nếu lỗi vẫn xảy ra, hãy liên hệ với đại diện kỹ thuật.
1503 Valve problemLỗi van
Ghi lại số báo động. Nếu lỗi vẫn xảy ra, hãy liên hệ với đại diện kỹ thuật.
Nếu lỗi vẫn xảy ra, hãy liên hệ với đại diện kỹ thuật.
1505 Problem closing valveLỗi đóng van
Ghi lại số báo động. Xác minh đã nạp đúng đường dẫn tiểu cầu vào bucket 2. Nếu lỗi vẫn xảy ra, hãy liên hệ với đại diện kỹ thuật.
Nếu lỗi vẫn xảy ra, hãy liên hệ với đại diện kỹ thuật.
1506 Problem opening valveLỗi mở van
Ghi lại số báo động. Bucket sẽ bị bất hoạt. Lỗi mở van. Nếu lỗi vẫn xảy ra, hãy liên hệ với đại diện kỹ thuật.
Nếu lỗi vẫn xảy ra, hãy liên hệ với đại diện kỹ thuật.
1507 Problem sealingLỗi hàn ống dây
Ghi lại số báo động. Kẹp và hàn mọi đường dẫn. Nếu lỗi vẫn xảy ra, hãy liên hệ với đại diện kỹ thuật.
Nếu lỗi vẫn xảy ra, hãy liên hệ với đại diện kỹ thuật.
1508 Valve problemLỗi van
Ghi lại số báo động. Nếu lỗi vẫn xảy ra, hãy liên hệ với đại diện kỹ thuật.
Nếu lỗi vẫn xảy ra, hãy liên hệ với đại diện kỹ thuật.
1510 Problem closing valveLỗi đóng van
Ghi lại số báo động. Xác minh đã nạp đúng đường dẫn tiểu cầu vào bucket 3. Nếu lỗi vẫn xảy ra, hãy liên hệ với đại diện kỹ thuật.
Nếu lỗi vẫn xảy ra, hãy liên hệ với đại diện kỹ thuật.
1511 Problem opening valveLỗi mở van
Ghi lại số báo động. Bucket sẽ bị bất hoạt. Lỗi mở van. Nếu lỗi vẫn xảy ra, hãy liên hệ với đại diện kỹ thuật.
Nếu lỗi vẫn xảy ra, hãy liên hệ với đại diện kỹ thuật.
1512 Problem sealingLỗi hàn ống dây
Ghi lại số báo động. Kẹp và hàn mọi đường dẫn. Nếu lỗi vẫn xảy ra, hãy liên hệ với đại diện kỹ thuật.
Nếu lỗi vẫn xảy ra, hãy liên hệ với đại diện kỹ thuật.
Cảnh báo và xử lý lỗi
4-16 Hướng dẫn vận hành Hệ thống xử lý máu tự động Reveos® - Phiên bản 1.1

Bảng 4-2: Báo động (tiếp theo)
Số báo động Tên báo động Nội dung Xử lý lỗi
1513 Valve problemLỗi van
Ghi lại số báo động. Nếu lỗi vẫn xảy ra, hãy liên hệ với đại diện kỹ thuật.
Nếu lỗi vẫn xảy ra, hãy liên hệ với đại diện kỹ thuật.
1515 Problem closing valveLỗi đóng van
Ghi lại số báo động. Xác minh đã nạp đúng đường dẫn tiểu cầu vào bucket 4. Nếu lỗi vẫn xảy ra, hãy liên hệ với đại diện kỹ thuật.
Nếu lỗi vẫn xảy ra, hãy liên hệ với đại diện kỹ thuật.
1516 Problem opening valveLỗi mở van
Ghi lại số báo động. Bucket sẽ bị bất hoạt. Lỗi mở van tiểu cầu. Nếu lỗi vẫn xảy ra, hãy liên hệ với đại diện kỹ thuật.
Nếu lỗi vẫn xảy ra, hãy liên hệ với đại diện kỹ thuật.
1517 Problem sealingLỗi hàn ống dây
Ghi lại số báo động. Kẹp và hàn mọi đường dẫn. Nếu lỗi vẫn xảy ra, hãy liên hệ với đại diện kỹ thuật.
Nếu lỗi vẫn xảy ra, hãy liên hệ với đại diện kỹ thuật.
1518 Valve problemLỗi van
Ghi lại số báo động. Nếu lỗi vẫn xảy ra, hãy liên hệ với đại diện kỹ thuật.
Nếu lỗi vẫn xảy ra, hãy liên hệ với đại diện kỹ thuật.
1520 Problem closing valveLỗi đóng van
Ghi lại số báo động. Xác minh đã nạp đúng đường dẫn huyết tương vào bucket 1. Nếu lỗi vẫn xảy ra, hãy liên hệ với đại diện kỹ thuật.
Nếu lỗi vẫn xảy ra, hãy liên hệ với đại diện kỹ thuật.
1521 Problem opening valveLỗi mở van
Ghi lại số báo động. Bucket sẽ bị bất hoạt. Lỗi mở van huyết tương. Nếu lỗi vẫn xảy ra, hãy liên hệ với đại diện kỹ thuật.
Nếu lỗi vẫn xảy ra, hãy liên hệ với đại diện kỹ thuật.
1522 Problem sealingLỗi hàn ống dây
Ghi lại số báo động. Kẹp và hàn mọi đường dẫn. Nếu lỗi vẫn xảy ra, hãy liên hệ với đại diện kỹ thuật.
Nếu lỗi vẫn xảy ra, hãy liên hệ với đại diện kỹ thuật.
1523 Valve problemLỗi van
Ghi lại số báo động. Nếu lỗi vẫn xảy ra, hãy liên hệ với đại diện kỹ thuật.
Nếu lỗi vẫn xảy ra, hãy liên hệ với đại diện kỹ thuật.
1525 Problem closing valveLỗi đóng van
Ghi lại số báo động. Xác minh đã nạp đúng đường dẫn huyết tương vào bucket 2. Nếu lỗi vẫn xảy ra, hãy liên hệ với đại diện kỹ thuật.
Nếu lỗi vẫn xảy ra, hãy liên hệ với đại diện kỹ thuật.
1526 Problem opening valveLỗi mở van
Ghi lại số báo động. Bucket sẽ bị bất hoạt. Lỗi mở van huyết tương. Nếu lỗi vẫn xảy ra, hãy liên hệ với đại diện kỹ thuật.
Nếu lỗi vẫn xảy ra, hãy liên hệ với đại diện kỹ thuật.
1527 Problem sealingLỗi hàn ống dây
Ghi lại số báo động. Kẹp và hàn mọi đường dẫn. Nếu lỗi vẫn xảy ra, hãy liên hệ với đại diện kỹ thuật.
Nếu lỗi vẫn xảy ra, hãy liên hệ với đại diện kỹ thuật.
Cảnh báo và báo động
Hướng dẫn vận hành Hệ thống xử lý máu tự động Reveos® - Phiên bản 1.1 4-17

Bảng 4-2: Báo động (tiếp theo)
Số báo động Tên báo động Nội dung Xử lý lỗi
1528 Valve problemLỗi van
Ghi lại số báo động. Nếu lỗi vẫn xảy ra, hãy liên hệ với đại diện kỹ thuật.
Nếu lỗi vẫn xảy ra, hãy liên hệ với đại diện kỹ thuật.
1530 Problem closing valveLỗi đóng van
Ghi lại số báo động. Xác minh đã nạp đúng đường dẫn huyết tương vào bucket 3. Nếu lỗi vẫn xảy ra, hãy liên hệ với đại diện kỹ thuật.
Nếu lỗi vẫn xảy ra, hãy liên hệ với đại diện kỹ thuật.
1531 Problem opening valveLỗi mở van
Ghi lại số báo động. Bucket sẽ bị bất hoạt. Lỗi mở van huyết tương. Nếu lỗi vẫn xảy ra, hãy liên hệ với đại diện kỹ thuật.
Nếu lỗi vẫn xảy ra, hãy liên hệ với đại diện kỹ thuật.
1532 Problem sealingLỗi hàn ống dây
Ghi lại số báo động. Kẹp và hàn mọi đường dẫn. Nếu lỗi vẫn xảy ra, hãy liên hệ với đại diện kỹ thuật.
Nếu lỗi vẫn xảy ra, hãy liên hệ với đại diện kỹ thuật.
1533 Valve problemLỗi van
Ghi lại số báo động. Nếu lỗi vẫn xảy ra, hãy liên hệ với đại diện kỹ thuật.
Nếu lỗi vẫn xảy ra, hãy liên hệ với đại diện kỹ thuật.
1535 Problem closing valveLỗi đóng van
Ghi lại số báo động. Xác minh đã nạp đúng đường dẫn huyết tương vào bucket 4. Nếu lỗi vẫn xảy ra, hãy liên hệ với đại diện kỹ thuật.
Nếu lỗi vẫn xảy ra, hãy liên hệ với đại diện kỹ thuật.
1536 Problem opening valveLỗi mở van
Ghi lại số báo động. Bucket sẽ bị bất hoạt. Lỗi mở van huyết tương. Nếu lỗi vẫn xảy ra, hãy liên hệ với đại diện kỹ thuật.
Nếu lỗi vẫn xảy ra, hãy liên hệ với đại diện kỹ thuật.
1537 Problem sealingLỗi hàn ống dây
Ghi lại số báo động. Kẹp và hàn mọi đường dẫn. Nếu lỗi vẫn xảy ra, hãy liên hệ với đại diện kỹ thuật.
Nếu lỗi vẫn xảy ra, hãy liên hệ với đại diện kỹ thuật.
1538 Valve problemLỗi van
Ghi lại số báo động. Nếu lỗi vẫn xảy ra, hãy liên hệ với đại diện kỹ thuật.
Nếu lỗi vẫn xảy ra, hãy liên hệ với đại diện kỹ thuật.
1540 Problem closing valveLỗi đóng van
Ghi lại số báo động. Xác minh đã nạp đúng đường dẫn bạch cầu vào bucket 1. Nếu lỗi vẫn xảy ra, hãy liên hệ với đại diện kỹ thuật.
Nếu lỗi vẫn xảy ra, hãy liên hệ với đại diện kỹ thuật.
1541 Problem opening valveLỗi mở van
Ghi lại số báo động. Bucket sẽ bị bất hoạt. Lỗi mở van bạch cầu. Nếu lỗi vẫn xảy ra, hãy liên hệ với đại diện kỹ thuật.
Nếu lỗi vẫn xảy ra, hãy liên hệ với đại diện kỹ thuật.
1542 Problem sealingLỗi hàn ống dây
Ghi lại số báo động. Kẹp và hàn mọi đường dẫn. Nếu lỗi vẫn xảy ra, hãy liên hệ với đại diện kỹ thuật.
Nếu lỗi vẫn xảy ra, hãy liên hệ với đại diện kỹ thuật.
Cảnh báo và xử lý lỗi
4-18 Hướng dẫn vận hành Hệ thống xử lý máu tự động Reveos® - Phiên bản 1.1
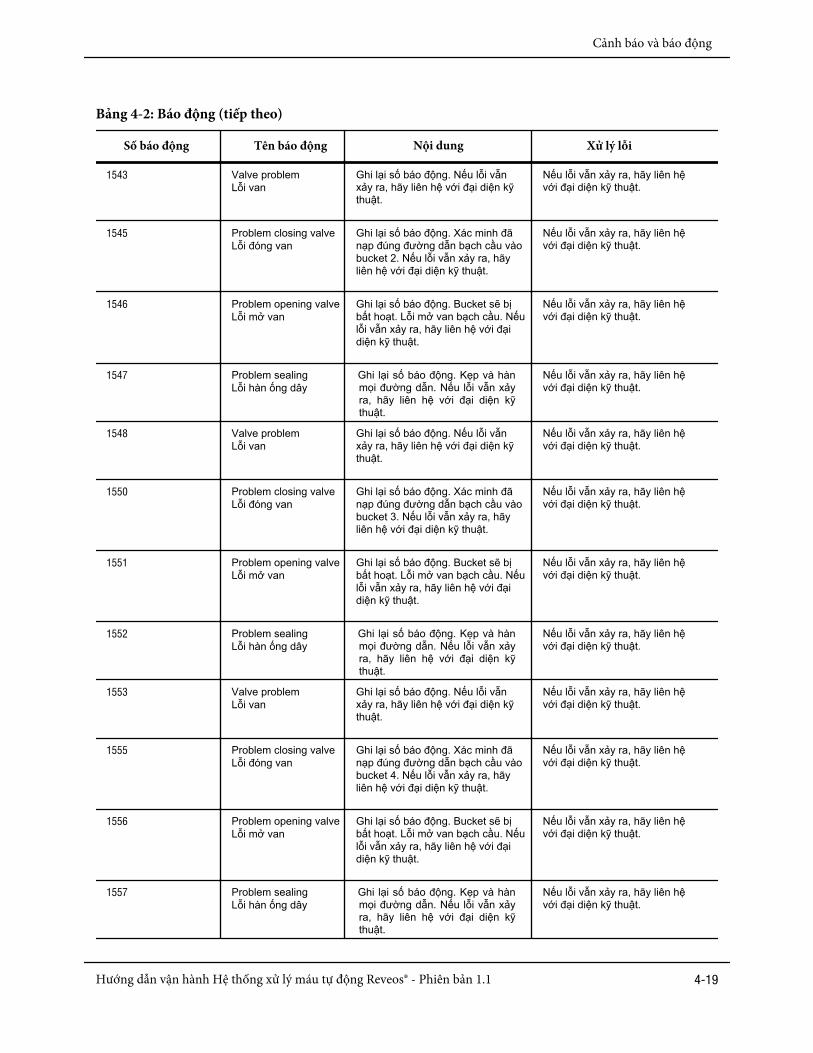
Bảng 4-2: Báo động (tiếp theo)
Số báo động Tên báo động Nội dung Xử lý lỗi
1543 Valve problemLỗi van
Ghi lại số báo động. Nếu lỗi vẫn xảy ra, hãy liên hệ với đại diện kỹ thuật.
Nếu lỗi vẫn xảy ra, hãy liên hệ với đại diện kỹ thuật.
1545 Problem closing valveLỗi đóng van
Ghi lại số báo động. Xác minh đã nạp đúng đường dẫn bạch cầu vào bucket 2. Nếu lỗi vẫn xảy ra, hãy liên hệ với đại diện kỹ thuật.
Nếu lỗi vẫn xảy ra, hãy liên hệ với đại diện kỹ thuật.
1546 Problem opening valveLỗi mở van
Ghi lại số báo động. Bucket sẽ bị bất hoạt. Lỗi mở van bạch cầu. Nếu lỗi vẫn xảy ra, hãy liên hệ với đại diện kỹ thuật.
Nếu lỗi vẫn xảy ra, hãy liên hệ với đại diện kỹ thuật.
1547 Problem sealingLỗi hàn ống dây
Ghi lại số báo động. Kẹp và hàn mọi đường dẫn. Nếu lỗi vẫn xảy ra, hãy liên hệ với đại diện kỹ thuật.
Nếu lỗi vẫn xảy ra, hãy liên hệ với đại diện kỹ thuật.
1548 Valve problemLỗi van
Ghi lại số báo động. Nếu lỗi vẫn xảy ra, hãy liên hệ với đại diện kỹ thuật.
Nếu lỗi vẫn xảy ra, hãy liên hệ với đại diện kỹ thuật.
1550 Problem closing valveLỗi đóng van
Ghi lại số báo động. Xác minh đã nạp đúng đường dẫn bạch cầu vào bucket 3. Nếu lỗi vẫn xảy ra, hãy liên hệ với đại diện kỹ thuật.
Nếu lỗi vẫn xảy ra, hãy liên hệ với đại diện kỹ thuật.
1551 Problem opening valveLỗi mở van
Ghi lại số báo động. Bucket sẽ bị bất hoạt. Lỗi mở van bạch cầu. Nếu lỗi vẫn xảy ra, hãy liên hệ với đại diện kỹ thuật.
Nếu lỗi vẫn xảy ra, hãy liên hệ với đại diện kỹ thuật.
1552 Problem sealingLỗi hàn ống dây
Ghi lại số báo động. Kẹp và hàn mọi đường dẫn. Nếu lỗi vẫn xảy ra, hãy liên hệ với đại diện kỹ thuật.
Nếu lỗi vẫn xảy ra, hãy liên hệ với đại diện kỹ thuật.
1553 Valve problemLỗi van
Ghi lại số báo động. Nếu lỗi vẫn xảy ra, hãy liên hệ với đại diện kỹ thuật.
Nếu lỗi vẫn xảy ra, hãy liên hệ với đại diện kỹ thuật.
1555 Problem closing valveLỗi đóng van
Ghi lại số báo động. Xác minh đã nạp đúng đường dẫn bạch cầu vào bucket 4. Nếu lỗi vẫn xảy ra, hãy liên hệ với đại diện kỹ thuật.
Nếu lỗi vẫn xảy ra, hãy liên hệ với đại diện kỹ thuật.
1556 Problem opening valveLỗi mở van
Ghi lại số báo động. Bucket sẽ bị bất hoạt. Lỗi mở van bạch cầu. Nếu lỗi vẫn xảy ra, hãy liên hệ với đại diện kỹ thuật.
Nếu lỗi vẫn xảy ra, hãy liên hệ với đại diện kỹ thuật.
1557 Problem sealingLỗi hàn ống dây
Ghi lại số báo động. Kẹp và hàn mọi đường dẫn. Nếu lỗi vẫn xảy ra, hãy liên hệ với đại diện kỹ thuật.
Nếu lỗi vẫn xảy ra, hãy liên hệ với đại diện kỹ thuật.
Cảnh báo và báo động
Hướng dẫn vận hành Hệ thống xử lý máu tự động Reveos® - Phiên bản 1.1 4-19

Bảng 4-2: Báo động (tiếp theo)
Số báo động Tên báo động Nội dung Xử lý lỗi
1558 Valve problemLỗi van
Ghi lại số báo động. Nếu lỗi vẫn xảy ra, hãy liên hệ với đại diện kỹ thuật.
Nếu lỗi vẫn xảy ra, hãy liên hệ với đại diện kỹ thuật.
1559 Problem sealingLỗi hàn ống dây
Ghi lại số báo động. Kẹp và hàn mọi đường dẫn. Nếu lỗi vẫn xảy ra, hãy liên hệ với đại diện kỹ thuật.
Nếu lỗi vẫn xảy ra, hãy liên hệ với đại diện kỹ thuật.
1560 Problem sealingLỗi hàn ống dây
Ghi lại số báo động. Kẹp và hàn mọi đường dẫn. Nếu lỗi vẫn xảy ra, hãy liên hệ với đại diện kỹ thuật.
Nếu lỗi vẫn xảy ra, hãy liên hệ với đại diện kỹ thuật.
1561 Problem sealingLỗi hàn ống dây
Ghi lại số báo động. Kẹp và hàn mọi đường dẫn. Nếu lỗi vẫn xảy ra, hãy liên hệ với đại diện kỹ thuật.
Nếu lỗi vẫn xảy ra, hãy liên hệ với đại diện kỹ thuật.
1562 Problem sealingLỗi hàn ống dây
Ghi lại số báo động. Kẹp và hàn mọi đường dẫn. Nếu lỗi vẫn xảy ra, hãy liên hệ với đại diện kỹ thuật.
Nếu lỗi vẫn xảy ra, hãy liên hệ với đại diện kỹ thuật.
1563 Problem sealingLỗi hàn ống dây
Ghi lại số báo động. Kẹp và hàn mọi đường dẫn. Nếu lỗi vẫn xảy ra, hãy liên hệ với đại diện kỹ thuật.
Nếu lỗi vẫn xảy ra, hãy liên hệ với đại diện kỹ thuật.
1564 Problem sealingLỗi hàn ống dây
Ghi lại số báo động. Kẹp và hàn mọi đường dẫn. Nếu lỗi vẫn xảy ra, hãy liên hệ với đại diện kỹ thuật.
Nếu lỗi vẫn xảy ra, hãy liên hệ với đại diện kỹ thuật.
1565 Problem sealingLỗi hàn ống dây
Ghi lại số báo động. Kẹp và hàn mọi đường dẫn. Nếu lỗi vẫn xảy ra, hãy liên hệ với đại diện kỹ thuật.
Nếu lỗi vẫn xảy ra, hãy liên hệ với đại diện kỹ thuật.
1566 Problem sealingLỗi hàn ống dây
Ghi lại số báo động. Kẹp và hàn mọi đường dẫn. Nếu lỗi vẫn xảy ra, hãy liên hệ với đại diện kỹ thuật.
Nếu lỗi vẫn xảy ra, hãy liên hệ với đại diện kỹ thuật.
1567 Problem sealingLỗi hàn ống dây
Ghi lại số báo động. Kẹp và hàn mọi đường dẫn. Nếu lỗi vẫn xảy ra, hãy liên hệ với đại diện kỹ thuật.
Nếu lỗi vẫn xảy ra, hãy liên hệ với đại diện kỹ thuật.
1568 Problem sealingLỗi hàn ống dây
Ghi lại số báo động. Kẹp và hàn mọi đường dẫn. Nếu lỗi vẫn xảy ra, hãy liên hệ với đại diện kỹ thuật.
Nếu lỗi vẫn xảy ra, hãy liên hệ với đại diện kỹ thuật.
1569 Problem sealingLỗi hàn ống dây
Ghi lại số báo động. Kẹp và hàn mọi đường dẫn. Nếu lỗi vẫn xảy ra, hãy liên hệ với đại diện kỹ thuật.
Nếu lỗi vẫn xảy ra, hãy liên hệ với đại diện kỹ thuật.
1570 Problem sealingLỗi hàn ống dây
Ghi lại số báo động. Kẹp và hàn mọi đường dẫn. Nếu lỗi vẫn xảy ra, hãy liên hệ với đại diện kỹ thuật.
Nếu lỗi vẫn xảy ra, hãy liên hệ với đại diện kỹ thuật.
Cảnh báo và xử lý lỗi
4-20 Hướng dẫn vận hành Hệ thống xử lý máu tự động Reveos® - Phiên bản 1.1
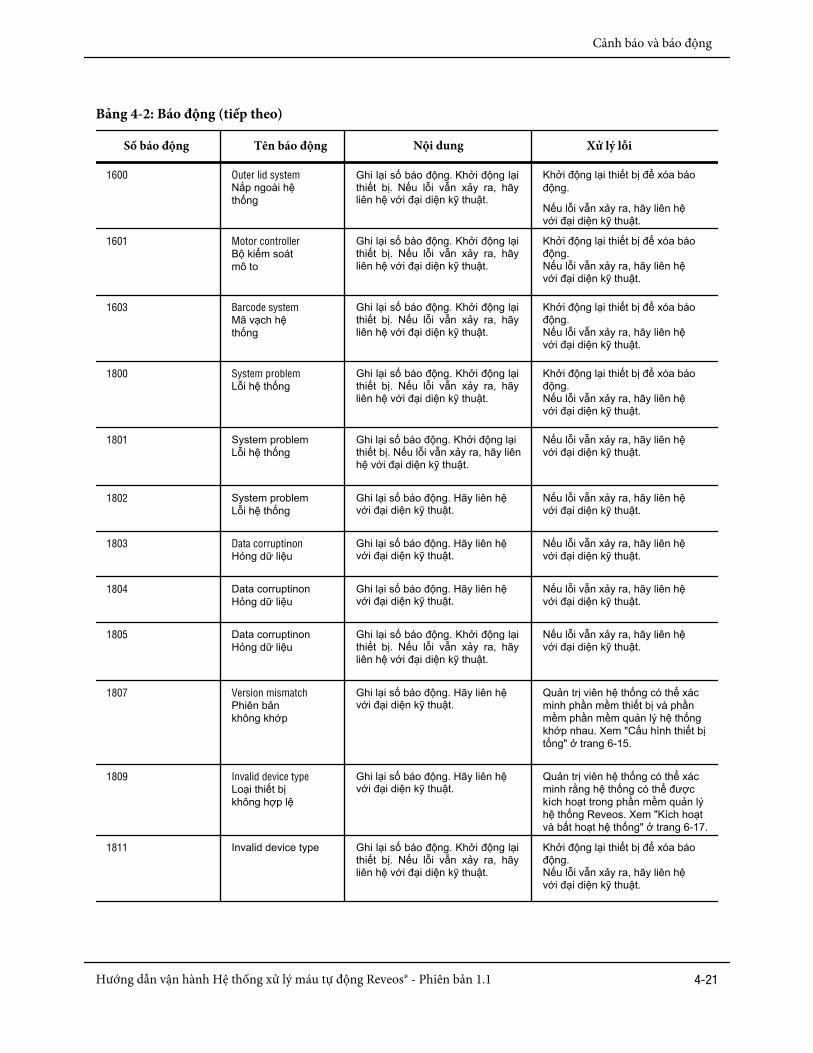
Bảng 4-2: Báo động (tiếp theo)
Số báo động Tên báo động Nội dung Xử lý lỗi
1600 Outer lid systemNắp ngoài hệ thống
Ghi lại số báo động. Khởi động lại thiết bị. Nếu lỗi vẫn xảy ra, hãy liên hệ với đại diện kỹ thuật.
Khởi động lại thiết bị để xóa báo động.
Nếu lỗi vẫn xảy ra, hãy liên hệ với đại diện kỹ thuật.
1601 Motor controllerBộ kiểm soát mô to
Ghi lại số báo động. Khởi động lại thiết bị. Nếu lỗi vẫn xảy ra, hãy liên hệ với đại diện kỹ thuật.
Khởi động lại thiết bị để xóa báo động. Nếu lỗi vẫn xảy ra, hãy liên hệ với đại diện kỹ thuật.
1603 Barcode systemMã vạch hệ thống
Ghi lại số báo động. Khởi động lại thiết bị. Nếu lỗi vẫn xảy ra, hãy liên hệ với đại diện kỹ thuật.
Khởi động lại thiết bị để xóa báo động. Nếu lỗi vẫn xảy ra, hãy liên hệ với đại diện kỹ thuật.
1800 System problemLỗi hệ thống
Ghi lại số báo động. Khởi động lại thiết bị. Nếu lỗi vẫn xảy ra, hãy liên hệ với đại diện kỹ thuật.
Khởi động lại thiết bị để xóa báo động. Nếu lỗi vẫn xảy ra, hãy liên hệ với đại diện kỹ thuật.
1801 System problemLỗi hệ thống
Ghi lại số báo động. Khởi động lại thiết bị. Nếu lỗi vẫn xảy ra, hãy liên hệ với đại diện kỹ thuật.
Nếu lỗi vẫn xảy ra, hãy liên hệ với đại diện kỹ thuật.
1802 System problemLỗi hệ thống
Ghi lại số báo động. Hãy liên hệ với đại diện kỹ thuật.
Nếu lỗi vẫn xảy ra, hãy liên hệ với đại diện kỹ thuật.
1803 Data corruptinonHỏng dữ liệu
Ghi lại số báo động. Hãy liên hệ với đại diện kỹ thuật.
Nếu lỗi vẫn xảy ra, hãy liên hệ với đại diện kỹ thuật.
1804 Data corruptinonHỏng dữ liệu
Ghi lại số báo động. Hãy liên hệ với đại diện kỹ thuật.
Nếu lỗi vẫn xảy ra, hãy liên hệ với đại diện kỹ thuật.
1805 Data corruptinonHỏng dữ liệu
Ghi lại số báo động. Khởi động lại thiết bị. Nếu lỗi vẫn xảy ra, hãy liên hệ với đại diện kỹ thuật.
Nếu lỗi vẫn xảy ra, hãy liên hệ với đại diện kỹ thuật.
1807 Version mismatchPhiên bản không khớp
Ghi lại số báo động. Hãy liên hệ với đại diện kỹ thuật.
Quản trị viên hệ thống có thể xác minh phần mềm thiết bị và phần mềm phần mềm quản lý hệ thống khớp nhau. Xem "Cấu hình thiết bị tổng" ở trang 6-15.
1809 Invalid device typeLoại thiết bị không hợp lệ
Ghi lại số báo động. Hãy liên hệ với đại diện kỹ thuật.
Quản trị viên hệ thống có thể xác minh rằng hệ thống có thể được kích hoạt trong phần mềm quản lý hệ thống Reveos. Xem "Kích hoạt và bất hoạt hệ thống" ở trang 6-17.
1811 Invalid device type Ghi lại số báo động. Khởi động lại thiết bị. Nếu lỗi vẫn xảy ra, hãy liên hệ với đại diện kỹ thuật.
Khởi động lại thiết bị để xóa báo động. Nếu lỗi vẫn xảy ra, hãy liên hệ với đại diện kỹ thuật.
Cảnh báo và báo động
Hướng dẫn vận hành Hệ thống xử lý máu tự động Reveos® - Phiên bản 1.1 4-21

Bảng 4-2: Báo động (tiếp theo)
Số báo động Tên báo động Nội dung Xử lý lỗi
1903 Centrifuge problemLỗi ly tâm
Ghi lại số báo động. Khởi động lại thiết bị. Nếu lỗi vẫn xảy ra, hãy liên hệ với đại diện kỹ thuật.
Khởi động lại thiết bị để xóa báo động. Nếu lỗi vẫn xảy ra, hãy liên hệ với đại diện kỹ thuật.
1904 Outer lid lock problemLỗi khóa nắp ngoài
Ghi lại số báo động. Khởi động lại thiết bị. Nếu lỗi vẫn xảy ra, hãy liên hệ với đại diện kỹ thuật.
Khởi động lại thiết bị để xóa báo động. Nếu lỗi vẫn xảy ra, hãy liên hệ với đại diện kỹ thuật.
1907 Vibration sensorCảm biến rung
Ghi lại số báo động. Nếu lỗi vẫn xảy ra, hãy liên hệ với đại diện kỹ thuật.
Nếu lỗi vẫn xảy ra, hãy liên hệ với đại diện kỹ thuật.
1908 Hydraulic sensorCảm biến nước
Ghi lại số báo động. Nếu lỗi vẫn xảy ra, hãy liên hệ với đại diện kỹ thuật.
Nếu lỗi vẫn xảy ra, hãy liên hệ với đại diện kỹ thuật.
2000 Bucket sensor problemLỗi cảm biến bucket
Ghi lại số báo động. Bucket sẽ bị bất hoạt. Nếu lỗi vẫn xảy ra, hãy liên hệ với đại diện kỹ thuật.
Nếu lỗi vẫn xảy ra, hãy liên hệ với đại diện kỹ thuật.
2001 Line sensor problemLỗi cảm biến dòng
Ghi lại số báo động. Bucket sẽ bị bất hoạt. Xác minh đã nạp đúng vào cảm biến dòng. Nếu lỗi vẫn xảy ra, hãy liên hệ với đại diện kỹ thuật.
Nếu lỗi vẫn xảy ra, hãy liên hệ với đại diện kỹ thuật.
2002 Bucket sensor problemLỗi cảm biến bucket
Ghi lại số báo động. Bucket sẽ bị bất hoạt. Nếu lỗi vẫn xảy ra, hãy liên hệ với đại diện kỹ thuật.
Nếu lỗi vẫn xảy ra, hãy liên hệ với đại diện kỹ thuật.
2003 Line sensor problemLỗi cảm biến dòng
Ghi lại số báo động. Bucket sẽ bị bất hoạt. Xác minh đã nạp đúng vào cảm biến dòng. Nếu lỗi vẫn xảy ra, hãy liên hệ với đại diện kỹ thuật.
Nếu lỗi vẫn xảy ra, hãy liên hệ với đại diện kỹ thuật.
2004 Bucket sensor problemLỗi cảm biến bucket
Ghi lại số báo động. Bucket sẽ bị bất hoạt. Nếu lỗi vẫn xảy ra, hãy liên hệ với đại diện kỹ thuật.
Nếu lỗi vẫn xảy ra, hãy liên hệ với đại diện kỹ thuật.
2005 Line sensor problemLỗi cảm biến dòng
Ghi lại số báo động. Bucket sẽ bị bất hoạt. Xác minh đã nạp đúng vào cảm biến dòng. Nếu lỗi vẫn xảy ra, hãy liên hệ với đại diện kỹ thuật.
Nếu lỗi vẫn xảy ra, hãy liên hệ với đại diện kỹ thuật.
2006 Bucket sensor problemLỗi cảm biến bucket
Ghi lại số báo động. Bucket sẽ bị bất hoạt. Nếu lỗi vẫn xảy ra, hãy liên hệ với đại diện kỹ thuật.
Nếu lỗi vẫn xảy ra, hãy liên hệ với đại diện kỹ thuật.
2007 Line sensor problemLỗi cảm biến dòng
Ghi lại số báo động. Bucket sẽ bị bất hoạt. Xác minh đã nạp đúng vào cảm biến dòng. Nếu lỗi vẫn xảy ra, hãy liên hệ với đại diện kỹ thuật.
Nếu lỗi vẫn xảy ra, hãy liên hệ với đại diện kỹ thuật.
Cảnh báo và xử lý lỗi
4-22 Hướng dẫn vận hành Hệ thống xử lý máu tự động Reveos® - Phiên bản 1.1

Bảng 4-2: Báo động (tiếp theo)
Số báo động Tên báo động Nội dung Xử lý lỗi
2008 Bucket sensor problem Lỗi cảm biến bucket
Ghi lại số báo động. Bucket sẽ bị bất hoạt. Nếu lỗi vẫn xảy ra, hãy liên hệ với đại diện kỹ thuật.
Xem “Nạp túi đối trọng” ở trang 3-21.
Nếu lỗi vẫn xảy ra, hãy liên hệ với đại diện kỹ thuật.
2009 Line sensor problem Lỗi cảm biến dòng
Ghi lại số báo động. Bucket sẽ bị bất hoạt. Nếu lỗi vẫn xảy ra, hãy liên hệ với đại diện kỹ thuật.
Xem “Nạp túi đối trọng” ở trang 3-21.Nếu lỗi vẫn xảy ra, hãy liên hệ vớiđại diện kỹ thuật.
2010 Bucket sensor problem Lỗi cảm biến bucket
Ghi lại số báo động. Bucket sẽ bị bất hoạt. Nếu lỗi vẫn xảy ra, hãy liên hệ với đại diện kỹ thuật.
Xem “Nạp túi đối trọng” ở trang 3-21.Nếu lỗi vẫn xảy ra, hãy liên hệ vớiđại diện kỹ thuật.
2011 Line sensor problem Lỗi cảm biến dòng
Ghi lại số báo động. Bucket sẽ bị bất hoạt. Nếu lỗi vẫn xảy ra, hãy liên hệ với đại diện kỹ thuật.
Xem “Nạp túi đối trọng” ở trang 3-21.Nếu lỗi vẫn xảy ra, hãy liên hệ vớiđại diện kỹ thuật.
2012 Bucket sensor problem Lỗi cảm biến bucket
Ghi lại số báo động. Bucket sẽ bị bất hoạt. Nếu lỗi vẫn xảy ra, hãy liên hệ với đại diện kỹ thuật.
Xem “Nạp túi đối trọng” ở trang 3-21.Nếu lỗi vẫn xảy ra, hãy liên hệ vớiđại diện kỹ thuật.
2013 Line sensorLine sensor problem Lỗi cảm biến dònglem
Ghi lại số báo động. Bucket sẽ bị bất hoạt. Nếu lỗi vẫn xảy ra, hãy liên hệ với đại diện kỹ thuật.
Xem “Nạp túi đối trọng” ở trang 3-21.Nếu lỗi vẫn xảy ra, hãy liên hệ vớiđại diện kỹ thuật.
2014 Bucket sensor problem Lỗi cảm biến bucket
Ghi lại số báo động. Bucket sẽ bị bất hoạt. Nếu lỗi vẫn xảy ra, hãy liên hệ với đại diện kỹ thuật.
Xem “Nạp túi đối trọng” ở trang 3-21.Nếu lỗi vẫn xảy ra, hãy liên hệ vớiđại diện kỹ thuật.
2015 Line sensor problem Lỗi cảm biến dòng
Ghi lại số báo động. Bucket sẽ bị bất hoạt. Nếu lỗi vẫn xảy ra, hãy liên hệ với đại diện kỹ thuật.
Xem “Nạp túi đối trọng” ở trang 3-21.Nếu lỗi vẫn xảy ra, hãy liên hệ vớiđại diện kỹ thuật.
2016 Line sensor problem Lỗi cảm biến dòng
Ghi lại số báo động. Tháo các cảm biến dòng và khởi động lại thiết bị. Ghi lại số báo động. Nếu lỗi vẫn xảy ra, hãy liên hệ với đại diện kỹ thuật.
Xác minh mọi bucket đã rỗng. Xem “Tháo kít túi máu” ở trang 3-27 hoặc “Tháo túi đối trọng” ởtrang 3-29.
Khởi động lại thiết bị để xóa báo động. Nếu lỗi vẫn xảy ra, hãy liên hệ với đại diện kỹ thuật.
Cảnh báo và báo động
Hướng dẫn vận hành Hệ thống xử lý máu tự động Reveos® - Phiên bản 1.1 4-23

Bảng 4-2: Báo động (tiếp theo)
Số báo động Tên báo động Nội dung Xử lý lỗi
2100 Centrifuge speed too highTốc độ ly tâm quá cao
Ghi lại số báo động. Khởi động lại thiết bị. Nếu lỗi vẫn xảy ra, hãy liên hệ với đại diện kỹ thuật.
Khởi động lại thiết bị để xóa báo động. Nếu lỗi vẫn xảy ra, hãy liên hệ với đại diện kỹ thuật.
2200 System problemLỗi hệ thống
Ghi lại số báo động. Khởi động lại thiết bị. Nếu lỗi vẫn xảy ra, hãy liên hệ với đại diện kỹ thuật.
Khởi động lại thiết bị để xóa báo động. Nếu lỗi vẫn xảy ra, hãy liên hệ với đại diện kỹ thuật.
2201 System problemLỗi hệ thống
Ghi lại số báo động. Khởi động lại thiết bị. Nếu lỗi vẫn xảy ra, hãy liên hệ với đại diện kỹ thuật.
Khởi động lại thiết bị để xóa báo động. Nếu lỗi vẫn xảy ra, hãy liên hệ với đại diện kỹ thuật.
2202 System problemLỗi hệ thống
Ghi lại số báo động. Khởi động lại thiết bị. Nếu lỗi vẫn xảy ra, hãy liên hệ với đại diện kỹ thuật.
Khởi động lại thiết bị để xóa báo động. Nếu lỗi vẫn xảy ra, hãy liên hệ với đại diện kỹ thuật.
2203 Outer lid systemLỗi nắp ngoài
Ghi lại số báo động. Khởi động lại thiết bị. Nếu lỗi vẫn xảy ra, hãy liên hệ với đại diện kỹ thuật.
Khởi động lại thiết bị để xóa báo động. Nếu lỗi vẫn xảy ra, hãy liên hệ với đại diện kỹ thuật.
2300 Hydraulic pressure too highÁp lực nước quá cao
Ghi lại số báo động. Khởi động lại thiết bị. Nếu lỗi vẫn xảy ra, hãy liên hệ với đại diện kỹ thuật.
Khởi động lại thiết bị để xóa báo động. Nếu lỗi vẫn xảy ra, hãy liên hệ với đại diện kỹ thuật.
2401 Outer lid systemLỗi nắp ngoài
Ghi lại số báo động. Khởi động lại thiết bị. Nếu lỗi vẫn xảy ra, hãy liên hệ với đại diện kỹ thuật.
Khởi động lại thiết bị để xóa báo động. Nếu lỗi vẫn xảy ra, hãy liên hệ với đại diện kỹ thuật.
2402 Stop button problemLỗi phím dừng
Ghi lại số báo động. Nếu lỗi vẫn xảy ra, hãy liên hệ với đại diện kỹ thuật.
Nếu lỗi vẫn xảy ra, hãy liên hệ với đại diện kỹ thuật.
2600 Communication problemLỗi giao tiếp
Ghi lại số báo động. Khởi động lại thiết bị. Nếu lỗi vẫn xảy ra, hãy liên hệ với đại diện kỹ thuật.
Khởi động lại thiết bị để xóa báo động. Nếu lỗi vẫn xảy ra, hãy liên hệ với đại diện kỹ thuật.
Cảnh báo và xử lý lỗi
4-24 Hướng dẫn vận hành Hệ thống xử lý máu tự động Reveos® - Phiên bản 1.1

5Bảo trì hệ thống
Hướng dẫn vận hành Hệ thống xử lý máu tự động Reveos® - Phiên bản 1.1 5-1
Bảo trì hàng ngàyHàng ngày sử dụng, kiểm tra thiết bị bằng mắt thường: • Kiểm tra bên trong khoang rô to xem có rò rỉ chất lỏng hay có vật lạ không.• Kiểm tra thiết bị xem có phần cứng hoặc ốc vít nào bị lỏng lẻo hoặc bị thiếu không.• Ghi lại theo hướng dẫn của cơ sở rằng bạn đã thực hiện bảo trì phòng ngừa hàng ngày trên
thiết bị.Nếu thấy có điểm nào dưới đây, không sử dụng thiết bị. Ngay lập tức báo cáo điều kiện đó cho đại diện kỹ thuật.• Dây nguồn, phích cắm hoặc ổ cắm bị hỏng hoặc mòn.• Công tắc bị lỏng hoặc không hoạt động.• Bất kỳ phần cứng hoặc ốc vít nào bị lỏng hoặc bị thiếu.
Bảo trì hệ thống
5-2 Hướng dẫn vận hành Hệ thống xử lý máu tự động Reveos® - Phiên bản 1.1

Vệ sinh định kỳ
Vật liệu để vệ sinh định kỳ• Chỉ dùng nước, hoặc nước pha chất tẩy rửa nhẹ để làm sạch chung.• Miếng gạc hoặc bông tẩm cồn Isopropyl để vệ sịnh các van và cảm biến.• Vật liệu sạch và thấm hút, như khăn giấy hoặc khăn vải, theo quy định của cơ sở.
Quy trình vệ sịnh định kỳTrước khi vệ sinh định kỳ, tắt nguồn thiết bị để tránh điện giật hoặc làm hỏng thiết bị.
Chắc chắn sử dụng đúng dung dịch khi vệ sinh từng phần của thiết bị. Không vệ sinh màn hình cảm ứng bằng bàn chải mài mòn hoặc vật liệu chà sát. Không sử dụng quá nhiều chất lỏng lên các cảm biến; chỉ sử dụng khăn ẩm hoặc bông tăm. Không bao giờ đổ nước hoặc các chất lỏng khác vào thiết bị.1. Tắt nguồn thiết bị
Lưu ý: Rút phích cắm thiết bị được xem như một biện pháp bổ sung
2. Nâng phần nắp thiết bị.3. Lau bề mặt rô to và buồng ly tâm bằng xà phòng nhẹ và nước.
Hình 5-1: Lau bên trong buồng ly tâm
Vệ sinh định kỳ
Hướng dẫn vận hành Hệ thống xử lý máu tự động Reveos® - Phiên bản 1.1 5-3

4. Lau bề mặt bộ phát hiện rò rỉ bằng khăn hoặc bông tăm có tẩm cồn isopropyl.
Hình 5-2: Vệ sinh bộ phát hiện rò rỉ
5. Nhẹ nhàng lau van hàn và đường dẫn hướng ống dây bằng khăn hoặc bông tăm có tẩm cồn isopropyl.
Lưu ý: Vệ sinh van ít nhất 1 lần/tuần để đảm bảo chức năng hàn.
Hình 5-3: Vệ sinh van hàn bằng khăn tẩm cồn isopropyl
Hình 5-4: Vệ sinh van hàn bằng bông tăm tẩm cồn isopropyl
Bảo trì hệ thống
5-4 Hướng dẫn vận hành Hệ thống xử lý máu tự động Reveos® - Phiên bản 1.1

6. Nhẹ nhàng lau các cảm biến dòng và cảm biến bucket bằng khăn hoặc bông tăm tẩm cồn isopropyl
Hình 5-5: Vệ sinh cảm biến dòng
Hình 5-6: Vệ sinh cảm biến bucket
7. Đảm bảo mọi bề mặt bên trong được vệ sinh và lau khô.8. Đóng nắp thiết bị.9. Cắm nguồn điện, bật nguồn thiết bị.10. Thải bỏ vật liệu vệ sinh theo quy định của cơ sở.11. Ghi lại việc vệ sinh định kỳ thiết bị theo quy định của cơ sở.
Lưu ý: Nếu thiết bị đã bị di chuyển trước hoặc trong quá trình vệ sinh, hãy đưa thiết bị trở về đúng vị trí và đảm bảo các bánh xe được khóa đúng cách trước khi vận hành hệ thống. Xem "Khóa các bánh xe phía trước" ở trang 3-4. Sau khi di chuyển thiết bị, chắc chắn nó đã được cắm vào nguồn điện được bảo vệ RCCD (GFCI) trước khi bật nguồn.
Vệ sinh định kỳ
Hướng dẫn vận hành Hệ thống xử lý máu tự động Reveos® - Phiên bản 1.1 5-5

Vệ sinh vết máu tràn
Vật liệu để vệ sinh vết máu tràn• Nước hoặc nước có chất tẩy nhẹ, để làm sạch vết máu và/ hoặc cặn bẩn sau khi tẩy rửa.• Dùng dung dịch sodium hypochlorite 0.25% để tẩy rửa bề mặt. Chất tẩy gia dụng (5%
đến 6%) pha loãng 1 phần chất tẩy với 18 phần nước sẽ có được dung dịch sodiumhypochlorite xấp xỉ 0.25%.
• Khăn hoặc bông tăm có tẩm cồn isopropyl
• Vật liệu sạch và thấm hút, như khăn giấy hoặc khăn vải, theo quy định của cơ sở.
Lưu ý: Có thể sử dụng miếng bọt biển thấm nước, không mài mòn với tay cầm dài để làm sạch bên trong bucket và giá đặt túi máu thành phần.
• Tăm bông
Quy trình vệ sinh vết máu trànĐể vệ sinh và tẩy rửa thiết bị, tiến hành các bước dưới đây, sử dụng các vật liệu vệ sinh được khuyến cáo. Không vệ sinh màn hình cảm ứng bằng bàn chải mài mòn hoặc vật liệu chà sát. Không dùng quá nhiều chất lỏng lên các cảm biến; chỉ sử dụng khăn ẩm hoặc bông tăm. Không bao giờ đổ nước hoặc chất lỏng khác vào thiết bị. 1. Tắt nguồn thiết bị
Lưu ý: Rút phích cắm thiết bị được xem như một biện pháp bổ sung
2. Nâng nắp thiết bị3. Vệ sinh và tẩy rửa các bề mặt dưới đây bằng dung dịch sodium hypochlorite 0.25% như
Hình 5-7 và Hình 5-8:• Bề mặt bên trong nắp thiết bị
Lưu ý: Loại bỏ hết máu thừa bên trong nắp thiết bị trước khi tiến hành vệ sinh.
• Bản lề nắp thiết bị• Gioăng cao su xung quanh lỗ mở khoang rôto• Thành và đáy buồng ly tâm• Bucket
• Giá để túi máu thành phần (có thể vệ sinh bằng miếng bọt biển thấm hút, không màimòn có tay cầm dài)
• Tấm thủy lực• Nắp bucket và bản lề chốt bucket.
Bảo trì hệ thống
5-6 Hướng dẫn vận hành Hệ thống xử lý máu tự động Reveos® - Phiên bản 1.1

Hình 5-7: Vệ sinh thành buồng ly tâm
Hình 5-8: Vệ sinh giá đỡ túi máu thành phần
4. Kiểm tra mọi bề mặt xem có còn dư dung dịch tẩy rửa hoặc máu không, lau bằng nướchoặc nước có chất tẩy rửa nhẹ, nếu cần.
5. Vệ sinh và tẩy rửa các bề mặt sau bằng khăn hoặc băng tăm có tẩm cồn isopropyl như Hình5-9, Hình 5-10, Hình 5-11 và Hình 5-13:• Các cảm biến dòng• Đường dẫn hướng ống dây• Các van hàn• Bộ phát hiện rò rỉ (treo trên thành trước của khoang rô to)• Cảm biến bucket.
Vệ sinh vết máu tràn
Hướng dẫn vận hành Hệ thống xử lý máu tự động Reveos® - Phiên bản 1.1 5-7

Hình 5-9: Vệ sinh cảm biến dòng
Hình 5-10: Vệ sinh van hàn bằng miếng vải có tẩm cồn isopropyl
Hình 5-11: Vệ sinh van hàn bằng bông tăm có tẩm cồn isopropyl
Bảo trì hệ thống
5-8 Hướng dẫn vận hành Hệ thống xử lý máu tự động Reveos® - Phiên bản 1.1

Hình 5-12: Vệ sinh bộ phát hiện rò rỉ
Hình 5-13: Vệ sinh cảm biến bucket
6. Đảm bảo mọi bề mặt bên trong được vệ sinh và lau khô.7. Kiểm tra khu vực nạp, rô to, buồng ly tâm và nắp thiết bị xem có bị hư hỏng không.8. Kiểm tra khu vực buồng ly tâm xem có phần vào bị lỏng như vật liệu làm sạch hoặc phần đặt
túi máu bị rời không.9. Đóng nắp thiết bị.10. Vệ sinh và tẩy rửa nắp thiết bị và các bề mặt bên ngoài khác bằng dung dịch sodium
hypochlorite 0.25% nếu cần, kể cả các túi đối trọng, thiết bị quét mã vạch và giá đặt thiết bịquét mã vạch.
11. Kiểm tra mọi bề mặt bên ngoài xem có dư thừa chất tẩy rửa hoặc máu quá mức không, lau lạibằng nước hoặc nước có chất tẩy rửa nhẹ, nếu cần.
12. Chắc chắn bề mặt đã sạch và khô13. Cắm nguồn điện và bật công tắc nguồn thiết bị.14. Thải bỏ vật liệu vệ sinh theo quy định của cơ sở.15. Ghi lại lần vệ sinh theo quy định của cơ sở.16. Nếu thiết bị cần vệ sinh thêm sau khi đã hoàn thành bước 1-14, liên hệ với đại diện dịch vụ
được ủy quyền của Terumo BCT.
Vệ sinh vết máu tràn
Hướng dẫn vận hành Hệ thống xử lý máu tự động Reveos® - Phiên bản 1.1 5-9

Lưu ý: Nếu thiết bị đã bị di chuyển trước hoặc trong quá trình vệ sinh, hãy đưa thiết bị trở về đúng vị trí và đảm bảo các bánh xe được khóa đúng cách trước khi vận hành hệ thống. Xem "Khóa các bánh xe phía trước" ở trang 3-4. Sau khi di chuyển thiết bị, chắc chắn nó đã được cắm vào nguồn điện được bảo vệ RCCD (GFCI) trước khi bật nguồn. Xem bảng 8-1 để biết thêm thông tin.
Bảo trì hệ thống
5-10 Hướng dẫn vận hành Hệ thống xử lý máu tự động Reveos® - Phiên bản 1.1

Quy trình kiểm tra thiết bị đã khôQuy trình kiểm tra thiết bị đã khô là một quy trình tùy chọn sử dụng sau khi vệ sinh vết máu tràn. Chạy quy trình này để xác minh thiết bị đã khô trước khi xử lý các đơn vị máu toàn phần. Để biết thêm cách vệ sinh vết máu tràn, xem "Quy trình vệ sinh vết máu tràn" ở trang 5-6.
Quy trình kiểm tra thiết bị đã khô phải được cấu hình bởi đại diện kỹ thuật được đào tạo của Terumo BCT. Để biết thêm thông tin cách cấu hình quy trình này, liên hệ với đại diện của Terumo BTC.
Chạy quy trình kiểm tra thiết bị đã khôSau khi đã vệ sinh vết máu tràn trong thiết bị, tiến hành các bước sau để chạy quy trình kiểm tra thiết bị đã khô.
1. Ấn phím Select Procedure trên màn hình nhập mã vạch.2. Chọn Quy trình kiểm tra thiết bị đã khô. Ấn phím Continue
Lưu ý: Tên quy trình được cấu hình trong phần mềm ứng dụng quản lý hệ thống Reveos.
3. Quét mã vạch ID người vận hành, nếu bị nhắc nhở trên màn hình cảm ứng.4. Khi màn hình cảm ứng nhắc nhở nhập mã vạch ID người vận hành, quét và nạp túi đối trọng
vào bucket đầu tiên. Lặp lại tới khi cả 4 bucket đều được nạp túi đối trọng. Để biết thêmthông tin về cách nạp túi đối trọng , xem “Nạp túi đối trọng" ở trang 3-21.
Lưu ý: Cả 4 bucket đều phải có túi đối trọng trước khi bắt đầu quy trình kiểm tra thiết bị đã khô.
5. Ấn phím Close Valves.
6. Đóng nắp thiết bị. Ấn phím Start Procedure
7. Nếu màn hình hiển thị báo động phát hiện rò rỉ số 1401, hệ thống sẽ kết thúc quytrình.• Tắt nguồn thiết bị.• Tháo túi đối trọng khỏi 4 bucket.• Vệ sinh vết máu hoăc chất tẩy rửa còn đọng lại bên trong thiết bị.• Đảm bảo mọi bề mặt đều đã khô.• Bật nguồn thiết bị• Lặp lại bước 1 đến 7 tới khi quy trình kết thúc mà không hiển thị bất kỳ báo
động nào.8. Tháo các túi đối trọng.9. Ấn phím Next Procedure
10. Ấn phím Select Procedure và chọn quy trình phân tách yêu cầu.
Quy trình kiểm tra thiết bị đã khô
Hướng dẫn vận hành Hệ thống xử lý máu tự động Reveos® - Phiên bản 1.1 5-11

Thông tin dịch vụThận trọng: Rút phích cắm nguồn thiết bị trước khi thực hiện dịch vụ để tránh điện giật hoặc làm hỏng thiết bị.
Nếu xảy ra bất cứ điều kiện nào dưới đây, không sử dụng thiết bị. Ngay lập tức báo cáo cho đại diện dịch vụ được ủy quyền. • Dây nguồn, phích cắm hoặc ổ cắm bị hỏng hoặc mòn.• Công tắc bị lỏng hoặc không hoạt động.• Thiết bị đã bị va đập vật lý hoặc chất lỏng tràn vào các thiết bị điện tử được đặt bên dướirôto.• Thiết bị đã khiến bất kỳ ai bị điện giật khi đang sử dụng.• Thiết bị có vẻ quá nóng.• Bất kỳ bộ phận cần siết chặt hoặc phần cứng nào có vẻ bị lỏng hoặc thiếu.Mọi sửa đổi thiết bị hoặc dịch vụ yêu cầu dùng dụng cụ (như tuốc nơ vít hoặc khóa bảo dưỡng)phải được thực hiện với nhân sự có trình độ và phải được Terumo BCT duyệt trước bằng vănbản. Mọi lắp đặt điện phải tuân thủ mã điện lực của địa phương và thông số kỹ thuật của TerumoBCT.
Nếu rút phích cắm và di chuyển thiết bị, đảm bảo nó được cắm với dây nguồn được bảo vệ RCCD (GFCI) trước khi bật nguồn. Xem bảng 8-1 để biết thêm thông tin.
Chỉ những cá nhân có trình độ mới được kết nối ethernet. Pin bộ nhớ CPU phải được thay thế với pin cùng loại. Chỉ sử dụng phích cắm và bộ chuyển theo chỉ định của nhà sản xuất.
Liên hệ với đại diện kỹ thuật của Terumo BCT nếu có bất kỳ thay đổi nào khi thực hiện hoặc chất lượng sản phẩm được xử lý bằng thiết bị.
Thay thế các bộ phậnChỉ có cá nhân có trình độ và được đào tạo bởi Terumo BCT mới được phép thực hiện các dịch vụ cho thiết bị và thay thế các bộ phận.
Bảo trì hệ thống
5-12 Hướng dẫn vận hành Hệ thống xử lý máu tự động Reveos® - Phiên bản 1.1

Dịch vụ bảo trìĐể kéo dài tuổi thọ thiết bị và cung cấp hiệu suất hệ thống tối đa, kỹ thuật viên có trình độ sẽ tiến hành các quy trình bảo trì thiết bị theo chu kỳ 6 tháng (±30 ngày). Các quy trình bảo trì gồm kiểm tra, thử trên các hệ thống con của thiết bị, cũng như thay thế các thành phần của hệ thống. Danh sách dưới đây là các loại quy trình bảo trì được thực hiện 6 tháng/ lần. Để chi tiết hơn, hãy liên hệ với đại diện của Terumo BCT.
Quy trình kiểm tra cơ khí tổng quát
• Kiểm tra và thử hệ thống điện:– Kiểm tra nối đất– Bật nguồn thiết bị và tự kiểm tra– Kiểm tra điện áp AC và DC
– Kiểm tra nguồn điện– Kiểm tra điện trở nối đất– Kiểm tra điện áp các bộ phận có thể tiếp cận
• Kiểm tra và thử hệ thống con:– Thử bộ phát hiện rò rỉ– Thử chức năng khóa nắp thiết bị– Thử chức năng ramp-up của mô to– Kiểm tra tốc độ rô to– Kiểm tra chức năng màn hình cảm ứng– Kiểm tra chức năng quạt– Kiểm tra chức năng cảm biến rung– Kiểm tra chức năng mở/đóng/hàn của van– Kiểm tra áp lực nuwocs và lưu lượng– Kiểm tra chức năng quét mã vạch– Kiểm tra quy trình mô phỏng– Kiểm tra cảm biến bucket và cảm biến dòng– Kiểm tra hệ thống làm lạnh
Kỹ thuật viên dịch vụ ghi lại quá trình bảo trì dịch vụ định kỳ vào sổ nhật ký của từng thiết bị mà họ bảo dưỡng.
Dịch vụ bảo trì
Hướng dẫn vận hành Hệ thống xử lý máu tự động Reveos® - Phiên bản 1.1 5-13

Bảo trì hệ thống
5-14 Hướng dẫn vận hành Hệ thống xử lý máu tự động Reveos® - Phiên bản 1.1

6Cấu hình phần mềm quản lý hệ thống Reveos
Hướng dẫn vận hành Hệ thống xử lý máu tự động Reveos® - Phiên bản 1.1 6-1

Truy cập phần mềm và xem thông tin phiên bản
Mở phần mềm quản lý hệ thống ReveosPhần mềm quản lý hệ thống Reveos là một ứng dụng cơ sở web, truy cập qua Microsoft®
Internet Explorer®. Hoàn thiện các bước dưới đây để mở ứng dụng:
1. Ấn Start, Ấn Programs, sau đó ấn Internet Explorer.
2. Trên thanh địa chỉ của trình duyệt, loại địa chỉ cho phần mềm quản lý hệ thống Reveos
là: servername/RSM.Application.Web
Lưu ý: Địa chỉ web này có thể được lưu vào mục "Favorite" (Ưa thích) trong Internet Explorer®. Quản trị hệ thống có thể tạo biểu tượng desktop cho ứng dụng này.
Sau khi đã phát hành ứng dụng, trang nhấp nháy phần mềm quản lý hệ thống Reveos sẽ xuất hiện nhanh chóng, tiếp theo là đăng nhập.
Đăng nhập phần mềm quản lý hệ thống Reveos Hoàn tất các bước sau từ cửa sổ browser phần mềm quản lý hệ thống Reveos: 1. Mở phần mềm quản lý hệ thống Reveos.
Trang đăng nhập sẽ xuất hiện.2. Nhập tên đăng nhập vào ô đầu tiên.3. Ấn phím Tab trên bàn phím hoặc nhấp vào ô mật khẩu.4. Nhập mật khẩu
Hình 6-1: Trang đăng nhập phần mềm quản lý hệ thống Reveos
5. Ấn Log in, hoặc Enter.
Nếu cần đổi mật khẩu, ấn vào link Change Password. Xem "Thay đổi mật khẩu" ở trang 6-3 để biết thêm thông tin. Nếu không cần thay đổi mật khẩu, có thể bỏ qua bước này bằng cách ấn tab ở đầu trang.
Đăng xuất phần mềm quản lý hệ thống Reveos Lưu ý: Bạn sẽ tự động đăng xuất khỏi phần mềm quản lý hệ thống Reveos nếu bạn làm mới trang trình duyệt, ví dụ ấn F5 hoặc ấn phím Refresh.
Cấu hình phần mềm quản lý hệ thống Reveos
6-2 Hướng dẫn vận hành Hệ thống xử lý máu tự động Reveos® - Phiên bản 1.1

Có thể đăng xuất phần mềm quản lý hệ thống Reveos bất cứ khi nào từ bất kỳ trang nào. Để đăng xuất, ấn link Log Out ở góc bên bên phải trên cùng của cửa sổ trình duyệt. Người sử dụng đăng nhập phần mềm quản lý hệ thống Reveos trước khi đóng cửa sổ trình duyệt.
Đổi mật khẩuSau khi đăng nhập phần mềm quản lý hệ thống Reveos, có thể thay đổi mật khẩu. Mật khẩu từ 5 đến 20 ký tự unicode và có phân biệt chữ hoa chữ thường.1. Đăng nhập phần mềm quản lý hệ thống Reveos. Tùy chọn Change Password xuất hiện ở trang
chủ.
2. Ấn Change Password.
Hình 6-2: Trang chủ với link thay đổi mật khẩu
3. Nhập mật khẩu cũ vào ô Old Password.
4. Nhập mật khẩu mới vào ô New Password.
5. Nhập lại mật khẩu mới vào ô Verify Password.
6. Ấn OK để cập nhật thông tin
Lưu ý: Có thể rời khỏi trang này bất cứ khi nào bằng cách ấn phím Cancel.
Quản trị hệ thống có thể cấu hình số lần được phép đăng nhập không thành công. Nếu người dùng nhập quá số lần này, tài khoản sẽ bị khóa. Người dùng phải liên hệ với quản trị hệ thống để đặt lại tài khoản.
Xem thông tin phiên bản phần mềmĐể xem thông tin phiên bản phần mềm, ấn tab Home. Phiên bản phần mềm được liệt kê ở phía dưới cùng của trang chủ.
Truy cập phần mềm và xem thông tin phiên bản
Hướng dẫn vận hành Hệ thống xử lý máu tự động Reveos® - Phiên bản 1.1 6-3

Cấu hình thiết bị Reveos trong phần mềm quản lý hệ thống Reveos Thiết bị Reveos được cấu hình trong phần mềm quản lý hệ thống bằng tab Configuration. Ở đây, quản trị hệ thống có thể cấu hình mọi thông tin cần thiết để xử lý máu toàn phần bằng hệ thống Reveos. Tab Configuration gồm các trang sau:• Facility (Cơ sở) Trang này cho phép quản trị viên cài đặt và cấu hình các cở sở trong trung
tâm máu.• Application (Ứng dụng) Trang này cho phép quản trị viên cấu hình mọi ứng dụng cài đặt
như thời gian của từng phiên, khóa tài khoản và hết hạn mật khẩu.• Group (Nhóm) Mọi quyền được cấp qua việc sử dụng các nhóm. Trang này cho phép quản
trị viên đưa ra những cho phép cho nhóm mới và nhóm đang tồn tại.• User (Người dùng) Mỗi người dùng được cấp quyền truy cập thiết bị Reveos và/ hoặc bộ
quản lý hệ thống Reveos. Trang này cho phép quản trị người sử dụng quản lý tài khoản người dùng, kích hoạt hoặc bất hoạt quyền truy cập vào thiết bị và/hoặc ứg dụng , và cấp mật khẩu.
• General Device (Thiết bị tổng): Trang này cho phép quản trị hệ thống cấu hình các tínhnăng cho mọi thiết bị Reveos, như nhập liệu bằng bàn phím và bỏ qua việc quét mã vạch.
• Individual Device (Thiết bị đơn lẻ): Trang này cho phép quản trị hệ thống cấu hình từng thiết bị đơn lẻ để chỉ định thiết bị cho cơ sở trong trung tâm máu.
• Barcode (Mã vạch): Mọi định nghĩa về mã vạch được cấu hình ở trang này, sau đó được chỉ định tới các quy trình khi cần.
• Procedure (Quy trình): Trang này cho phép quản trị hệ thống tạo cấu hình cho quy trìnhbằng cách kết hợp mã vạch, protocol và các thông tin của thiết bị riêng lẻ.
Cấu hình phần mềm quản lý hệ thống Reveos
6-4 Hướng dẫn vận hành Hệ thống xử lý máu tự động Reveos® - Phiên bản 1.1

Cấu hình các cơ sởĐể thêm, sửa hoặc xóa các cơ sở, ấn Facility tên thanh công cụ của tab Configuration. Khi cơ sở đã được tạo và lưu, chúng được lưu vào danh sách nội dung. Khi người sử dụng được ủy quyền ấn vào một mục trong danh sách nội dung, thông tin của cơ sở được chọn sẽ hiện ra ở Phần chi tiết của trang. Phần chi tiết liệt kê các thông tin của cơ sở đó, như tên, địa chỉ và số điện thoại.
Hình 6-3: Trang thông tin của cơ sở được chọn
Tạo một cơ sởHoàn thành các bước sau để tạo một cơ sở mới:1. Truy cập trang Facility (Cơ sở)2. Ấn New.
3. Nhập 1 tên duy nhất vào ô Facility Name
4. Hoàn thiện các ô khác nếu cần
Lưu ý: Facility Name là thông tin bắt buộc. Các thông tin khác là tùy chọn
5. Ấn Save. Nếu không muốn lưu, ấn Cancel.
Cấu hình các cơ sở
Hướng dẫn vận hành Hệ thống xử lý máu tự động Reveos® - Phiên bản 1.1 6-5

Sau khi đã lưu, thông tin cơ sở được lưu trong danh sách nội dung của cơ sở. Không cần nhập thông tin này mỗi khi đăng nhập.
Lặp lại quy trình này khi cần để nhập thêm các cơ sở khác.
Sửa chữa thông tin cơ sởHoàn thành các bước sau để cập nhật thông tin cho cơ sở hiện tại: 1. Truy cập trang Facility (Cơ sở).2. Chọn cơ sở muốn điều chỉnh thông tin từ danh sách nội dung.3. Ấn Edit.
4. Nhập hoặc cập nhật thông tin ở bất cứ hoặc tất cả các ô ở trang Cơ sở5. Ấn Save. Nếu không muốn lưu, ấn Cancel.
Xóa thông tin cơ sởHoàn thành các bước sau để xóa thông tin cho cơ sở hiện tại: 1. Truy cập trang Facility (Cơ sở).2. Chọn cơ sở muốn điều chỉnh thông tin từ danh sách nội dung.3. Ấn Delete.
Một hộp thoại xuất hiện.4. Ấn Yes nếu muốn xóa cơ sở này. Nếu không, ấn No.
Lưu ý: Mọi thiết bị phải được xóa khỏi cơ sở trước khi xóa cơ sở đó khỏi phần mềm quản lý hệ thống Reveos. Để xóa thiết bị khỏi một cơ sở, xem "Chỉ định một cơ sở" ở trang 6-18.
Thiết bị kết hợpPhần thiết bị kết hợp sẽ hiển thị danh sách các thiết bị kết hợp với cơ sở được chọn. Thiết bị được chỉ định cho cơ sở ở trang thiết bị đơn lẻ. Xem "Cấu hình thiết bị đơn lẻ" ở trang 6-17.
Cấu hình phần mềm quản lý hệ thống Reveos
6-6 Hướng dẫn vận hành Hệ thống xử lý máu tự động Reveos® - Phiên bản 1.1

Cấu hình ứng dụngCài đặt phần mềm quản lý hệ thống Reveos được cấu hình ở trang Ứng dụng bằng tab Configuration. Để xem các cài đặt này, truy cập trang Ứng dụng. Người sử dụng được ủy quyền có thể sửa các cài đặt này sau khi ấn phím Edit.
Lưu ý: Sau khi thay đổi ở trang Ứng dụng, phải lưu các thay đổi đó, đăng xuất, sau đó đăng nhập trở lại phần mềm quản lý hệ thống Reveos để các thay đổi có hiệu lực.
Hình 6-4 là một ví dụ ở trang Ứng dụng với các cài đặt được bật và các giá trị trong các ô tương ứng.
Hình 6-4: Trang ứng dụng
Thời gian chờ của phiên hoạt độngKhi chế độ thời gian chờ của phiên được bật, người sử dụng sẽ bị đăng xuất nếu phiên đó không hoạt động trong số phút được ấn định. Thời gian chờ của phiên được tự động đặt là No ở cấu hình ban đầu. Để bật và cấu hình thời gian chờ của phiên hoạt động, làm theo các bước sau:
1. Ấn vào menu thả xuống cạnh Enable Session Timeout và chọn Yes.
2. Nhập số từ 1 đến 720 vào ô Minutes (Phút)
3. Ấn Save nếu không muốn cấu hình các cài đặt khác. Nếu không, đi tới AccountLockout (Khóa tài khoản).
Khóa tài khoảnKhi bật chế độ khóa tài khoản, tài khoản của người dùng sẽ bị khóa lại nếu họ vượt quá số lần đăng nhập liên tiếp không thành công. Việc khóa tài khoản bị động đặt là No ở cấu hình ban đầu.
Lưu ý: Người dùng sẽ thoát khỏi nhóm khi tài khoản của họ bị khóa.
Cấu hình ứng dụng
Hướng dẫn vận hành Hệ thống xử lý máu tự động Reveos® - Phiên bản 1.1 6-7

Để bật và cấu hình chức năng Khóa tài khoản, làm theo các bước sau:
1. Ấn menu thả xuống đến mục Enable Account Lockout và chọn Yes.
2. Nhập số từ 2 đến 10 vào ô Login Attempts. (Số lần đăng nhập)
3. Ấn Save nếu không muốn cấu hình các cài đặt khác. Nếu không, đi tới passwordExpiration (Hết hạn mật khẩu).
Nếu người dùng bị khóa tài khoản trên phần mềm quản lý hệ thống Reveos, xem "Mở khóa tài khoản người sử dụng" ở trang 6-14.
Hết hạn mật khẩuKhi bật chế độ hết hạn mật khẩu, mật khẩu người dùng sẽ hết hạn trong số ngày được ấn định. Người dùng sẽ được cảnh báo rằng mật khẩu sẽ hết hạn và có thể thay đổi mật khẩu trước khi nó hết hạn. Nếu mật khẩu người dùng không được thay đổi trước khi hết hạn, người dùng sẽ không được phép đăng nhập tới khi thay đổi mật khẩu thành công.
Chế độ hết hạn mật khẩu tự động đặt là No ở cấu hình ban đầu. Để bật và cấu hình chế độ hết hạn mật khẩu, làm theo các bước sau:1. Ấn vào menu thả xuống cạnh Enable Password Lockout và chọn Yes.2. Nhập số từ 30 đến 365 vào ô Days Before Expiration (Hết hạn trước ngày)
3. Nhập số từ 0 đến 30 vào ô Days Before Expiration Reminder (Nhắc nhở hết hạntrước ngày).
4. Ấn Save.
Cấu hình phần mềm quản lý hệ thống Reveos
6-8 Hướng dẫn vận hành Hệ thống xử lý máu tự động Reveos® - Phiên bản 1.1

Phân quyềnPhần mềm quản lý hệ thống Reveos sử dụng một hệ thống quản lý người sử dụng dựa trên phân quyền. Quyền của người dùng được định nghĩa theo 3 cấp.• User system access (truy cập hệ thống): Xác định quyền truy cập hệ thống của người dùng.
Người dùng có thể được bật, tắt hoặc khóa. Người dùng phải được bật để truy cập các chứcnăng trên thiết bị hoặc trên phần mềm quản lý hệ thống Reveos.
•
•
User component access (truy cập thành phần hệ thống): Xác định quyền truy cập các thànhphần hệ thống Reveos của người dùng. Người dùng có thể được bật, tắt trên thiết bị Reveoshoặc hệ thống quản lý hệ thống Reveos hoặc cả hai.Group membership (Thành viên của nhóm): Xác định chức năng đặc biệt mà người dùng c óthể thực hiện. Nếu người dùng không được bật, họ không thể thực hiện các chức năng củanhóm. Người dùng có thể được gán vào một hoặc hơn một nhóm để họ được phép truy cậpvào các trang và thực hiện các chức năng mà nhóm đó chỉ định.
Để tương tác với hệ thống Reveos, người dùng phải đang hoạt động, được bật cho một thành phần và được gán vào nhóm. Phần mềm quản lý hệ thống Reveos có 4 nhóm được tạo sẵn. Quản trị hệ thống có thể tạo thêm nhóm. Một phân quyền có thể được gán cho nhiều người dùng và mỗi người dùng có thể ở trong nhiều nhóm. Nếu người dùng không được phân quyền để truy cập chức năng đặc biệt, chức năng đó sẽ biến mất trong ứng dụng khi người dùng đăng nhập. Quyền được cấp theo từng trang cho người dùng. Người dùng được cấp quyền khi họ được thêm vào nhóm. Tuy nhiên, nếu người dùng đơn lẻ bị vô hiệu hóa, cài đặt cho người dùng đó sẽ bỏ quyền của nhóm. NhómPhần mềm quản lý hệ thống Reveos có 4 nhóm được định sẵn với quyền được điền trước. Các nhóm như sau:
• Device Operator (Người vận hành thiết bị): Người dùng được gán vào nhóm này có thể vậnhành thiết bị Reveos.
• Report Operator (Người vận hành báo cáo): Người dùng được gán vào nhóm này có thểxem và chạy báo cáo.
• System Administrator (Quản trị hệ thống): Người dùng được gán vào nhóm này có thể cậpnhật cấu hình trong phần mềm quản lý hệ thống Reveos. Có thể xem thông tin người dùngvà nhóm nhưng không thể sửa các cài đặt.
• User Administrator (Quản trị người dùng): Người dùng được gán vào nhóm này có thể xemvà sửa các thông tin người dùng và nhóm.
Có thể sửa tên và phân quyền của các nhóm được điền sẵn, trừ tên và phân quyền của nhóm quản trị người dùng đã điền sẵn.
Mức độ truy cập phần mềm quản lý hệ thống Reveos Khi quản trị người dùng tạo một nhóm mới hoặc sửa nhóm đang tồn tại, phần mức độ truy cập ở trang Nhóm sẽ hoạt động. Quyền truy cập mỗi trang phần mềm quản lý hệ thống Reveos có thể được kiểm soát độc lập bằng cách chọn một phân quyền từ menu thả xuống tương ứng. Có 3 loại phân quyền. • No Access (Không được truy cập): Người dùng ở nhóm này không thể truy cập trang. Phím
tab và/hoặc link tới các trang sẽ không hiển thị cho người dùng nhìn thấy. • Limited Access (Truy cập giới hạn): Người dùng ở nhóm này có thể đọc trang, nhưng không
thể sửa hay cập nhật thông tin.• Full Access (Truy cập toàn bộ): Người dùng ở nhóm này có thể truy cập, đọc, sửa thông tin
trên trang.
Phân quyền
Hướng dẫn vận hành Hệ thống xử lý máu tự động Reveos® - Phiên bản 1.1 6-9

Lưu ý: Khi người dùng bị giới hạn truy cập vào trang báo cáo chi tiết hoặc báo cáo truy vấn tùy chỉnh, họ có thể xem các báo cáo đã lưu, nhưng không thể sử dụng đặc tính Run Now.
Các mức độ truy cập để vận hành hệ thốngKhi quản trị người dùng tạo một nhóm mới hoặc sửa nhóm đang tồn tại, phần mức độ truy cập ở trang Nhóm sẽ hoạt động. Quyền của người vận hành hệ thống có thể được kiểm soát độc lập bằng cách chọn phân quyền từ menu thả xuống của nhóm Người vận hành thiết bị. Có hai loại phân quyền như sau: • No Access (Không truy cập): Người dùng ở nhóm này không thể vận hành hệ thống.• Operate Device (Vận hành thiết bị) : Người dùng ở nhóm này có thể vận hành hệ thống
Sửa nhóm đang tồn tạiHoàn thành các bước sau để sửa nhóm đang tồn tại:
1. Truy cập trang Group page
2. Chọn nhóm muốn điều chỉnh từ danh sách nội dung.
3. Ấn Edit.
4. Cập nhật thông tin
5. Sửa quyền bằng cách ấn vào từng menu thả xuống và chọn một lựa chọn.
Hình 6-5: Mức truy cập có menu thả xuống của trang cơ sở - Facility Page được mở rộng
6. Ấn Save. Nếu không muốn lưu, ấn Cancel.
Tạo nhóm mớiHoàn thành các bước sau để tạo nhóm mới:
1. Truy cập trang Group page
2. Ấn New.
Cấu hình phần mềm quản lý hệ thống Reveos
6-10 Hướng dẫn vận hành Hệ thống xử lý máu tự động Reveos® - Phiên bản 1.1

3. Nhập một tên duy nhất vào ô Group Name.
4. Sửa quyền bằng cách ấn từng menu thả xuống và chọn một lựa chọn.
5. Ấn Save. Nếu không muốn lưu, ấn Cancel.
Xóa nhóm
Lưu ý: Phải xóa mọi người dùng liên quan trước khi xóa nhóm
Hoàn thành các bước sau để xóa nhóm đang tồn tại
1. Truy cập trang Group page.
2. Chọn nhóm muốn xóa khỏi danh sách.
3. Ấn Delete.
Một hộp thoại sẽ hỏi liệu người dùng có muốn xóa bản ghi này không
4. Ấn Yes nếu chắc chắn muốn xóa nhóm. Nếu không, ấn No.
Người dùngTrang người dùng cho phép quản trị người dùng quản lý các tài khoản và phân nhóm
Người dùng có thể được kích hoạt, bất hoạt hoặc khóa.
• Kích hoạt: Khi được kích hoạt, người dùng có thể tương tác với hệ thống Reveos. Có thể vậnhành hệ thống, ứng dụng, hoặc cả hai và gán vào các nhóm.
• Bất hoạt: Người dùng bị bất hoạt không thể sử dụng hệ thống Reveos và tự động bị thoátkhỏi các nhóm.
• Khóa: Nếu người dùng bị khóa khỏi phần mềm quản lý hệ thống Reveos, thì sẽ hoạt động vàduy trì tất cả thành viên nhóm, nhưng không thể đăng nhập phần mềm quản lý hệ thốngReveos. Người dùng có thể vận hành thiết bị nếu được kích hoạt sử dụng thiết bị và là thànhviên của nhóm Người vận hành thiết bị.
Người dùng có thể được bật hoặc tắt để vận hành thiết bị Reveos hoặc ứng dụng quản lý hệ thống Reveos. Nếu người dùng được bật cho thiết bị hoặc ứng dụng, nhưng bị bất hoạt, trạng thái hệ thống thay thế trạng thái thành phần.• Bật: Nếu người dùng bật cho thiết bị, ứng dụng hoặc cả hai, họ được phép thực hiện các
nhiệm vụ cho phép bởi nhóm mà họ được chỉ định.• Tắt: Nếu người dùng không được bật cho một thành phần hệ thống, họ không thể vận hành/
sử dụng thành phần đó.Ở danh sách nội dung, tất cả người dùng đang hoạt động được hiển thị bằng màu đen. Để xem người dùng, kể cả những người đã bị bất hoạt, nhấp và ô chọn Show all users bên dưới danh sách nội dung. Người dùng đã bị bất hoạt hiển thị bằng màu đỏ.
Phân quyền
Hướng dẫn vận hành Hệ thống xử lý máu tự động Reveos® - Phiên bản 1.1 6-11

1
2
3
Hình 6-6: Trang người dùng có người dùng đang hoạt động hiển thị bằng màu đen và người dùng đã bị bất hoạt hiển thị bằng màu đỏ.
1 Người dùng đang hoạt động2 Người dùng đã bị bất hoạt3 Chi tiết giải thích người dùng được chọn đã bị bất hoạt
Thêm người dùng mớiHoàn thành các bước sau để thêm người dùng mới:
1. Truy cập User page.
2. Ấn New.
3. Chỉ định tên người dùng và nhập nó vào ô User Name. Tên người dùng không có dấu cách,phải là tên duy nhất và không thể là tên đặt cho người dùng đã được kích hoạt hay bất hoạt.
4. Chọn Yes hoặc No để bật hoặc tắt người dùng cho phần mềm quản lý hệ thống Reveos. Nếungười dùng được bật trong phần mềm quản lý hệ thống Reveos, phải đặt một cái tên ngườidùng cho ứng dụng và phải đặt mật khẩu. Tên người dùng trên ứng dụng phải có từ 1 đến120 ký tự unicode và không có dấu cách. Hoàn thành các bước sau để tạo mật khẩu:
a. Nhập mật khẩu vào ô Password. Mật khẩu phải gồm 5 đến 20 ký tự unicode.
b. Nhập lại mật khẩu vào ô Verify Password.
Lưu ý: Để thu hồi quyền sử dụng phần mềm quản lý hệ thống Reveos của người dùng, quản trị người dùng có thể bỏ người dùng đó ra khỏi nhóm tương ứng hoặc không cho người dùng đó sử dụng phần mềm quản lý hệ thống Reveos trên trang người sử dụng.
5. Chọn Yes hoặc No để bật hoặc tắt người dùng cho thiết bị.Nếu người dùng được bật cho thiết bị, phải đặt ID người vận hành cho người dùng đó. IDngười vận hành là số hiệu mà người vận hành phải quét trước khi sử dụng thiết bị.
6. Gán người dùng đó vào một hoặc nhiều nhóm khác nhau.Để gán một người dùng, ấn vào ô chọn cạnh nhóm tương ứng. Để xem các quyền tương ứng,ấn vào menu thả xuống ngày cạnh tên nhóm.
Cấu hình phần mềm quản lý hệ thống Reveos
6-12 Hướng dẫn vận hành Hệ thống xử lý máu tự động Reveos® - Phiên bản 1.1

Lưu ý: Để thu hồi quyền sử dụng phần mềm quản lý hệ thống Reveos của người dùng, quản trị người dùng có thể bỏ người dùng đó ra khỏi nhóm tương ứng hoặc không cho người dùng đó sử dụng phần mềm quản lý hệ thống Reveos trên trang người sử dụng.
1
2
Hình 6-7: Các quyền khi mở rộng nhóm
1 Tên nhóm2 Quyền của nhóm
7. Ấn Save. Nếu không muốn lưu, ấn Cancel.
Sửa thông tin người dùng đang tồn tạiHoàn thành các bước sau để sửa thông tin người dùng đang tồn tại:
1. Truy cập trang User page.
2. Ấn vào tên người dùng trong danh sách “Users”.
3. Ấn Edit.
4. Cập nhật thông tin
5. Ấn Save. Nếu không muốn lưu, ấn Cancel.
Thu hồi quyền của người dùngCó hai cách để thu hồi quyền của người dùng.• Bất hoạt người dùng đó• Không cho người dùng đó sử dụng thiết bị hoặc phần mềm quản lý hệ thống Reveos.
Bất hoạt người dùng trên ứng dụng quản lý hệ thống ReveosNgười dùng có thể bị bất hoạt. Tuy nhiên, không thể xóa vĩnh viễn người dùng. Tiến hành các bước sau để bất hoạt người dùng:
Assigning Permissions
Hướng dẫn vận hành Hệ thống xử lý máu tự động Reveos® - Phiên bản 1.1 6-13

1. Truy cập trang User page.
2. Chọn người dùng từ danh sách người dùng.
3. Ấn Deactivate.
Một hộp thoại sẽ hỏi bạn có chắc muốn loại bỏ người dùng này.
4. Ấn Yes nếu chắc chắn muốn bất hoạt người dùng đó. Nếu không, ấn No.
Người dùng sẽ bị loại khỏi danh sách người dùng đang hoạt động. Để xem tất cả người dùng, cả người dùng đã được kích hoạt hoặc bất hoạt, ấn vào ô chọn Show all users hiển thị bên dưới danh sách nội dung. Tất cả tên người dùng đã bị bất hoạt được hiển thị bằng màu đỏ.
Khôi phục người dùngNgười dùng lúc nào cũng có thể được khôi phục sau khi đã bị loại bỏ. Hoàn thành các bước sau để khôi phục người dùng. 1. Truy cập trang User page.
2. Ấn vào ô chọn Show all users ở phía bên trái của trang.
3. Chọn người dùng muốn khôi phục. Tên của người dùng bị bất hoạt hiển thị bằng màu đỏ.
4. Ấn Restore.
Một khi người dùng đã được khôi phục, tên người dùng sẽ hiển thị bằng màu đen.
Mở khóa tài khoản người dùngNếu người dùng cố gắng đăng nhập một tài khoản nhiều hơn số lần cho phép ở cấu hình ứng dụng, người dùng sẽ bị khóa tài khoản. Quản trị người dùng có thể mở khóa bằng cách hoàn thành các bước sau:
1. Truy cập trang User page.
2. Chọn tên người dùng ở tài khoản bạn muốn mở khóa. Tên người dùng sẽ xuất hiên trongdanh sách.
3. Ấn Unlock.
Bạn có thể đặt lại mật khẩu trong lúc này, nhưng không bắt buộc. Để đặt lại mật khẩu, hoàn
thành các bước sau
1. Nhập mật khẩu vào ô Password.
2. Nhập lại mật khẩu mới vào ô Verify Password.
3. Ấn Save. Nếu không muốn lưu, ấn Cancel.
Cấu hình phần mềm quản lý hệ thống Reveos
6-14 Hướng dẫn vận hành Hệ thống xử lý máu tự động Reveos® - Phiên bản 1.1

Cấu hình thiết bị tổngTrang thiết bị tổng (General Device page) cho phép người dùng quản lý các phiên bản khác nhau của thiết bị Reveos. Truy cập trang thiết bị tổng để cấu hình mọi thiết bị, để bật hoặc tắt bàn phím, và để đặt số hiệu mã vạch có thể bị bỏ qua trên mỗi loại thiết bị.
1 2
3
4
Hình 6-8: Trang thiết bị tổng
Bảng 6-1: Danh sách thành phần trong trang thiết bị tổng.
Bảng 6-1: Tùy chọn cấu hình thiết bị tổng
Tên mục/tùy chọn Mặc định Chức năng
1 Danh sách nội dung thiết bị
Không áp dụng Liệt kê các phiên bản thiết bị có sẵn để cấu hình
2 Tổng quan thiết bị Không áp dụng Cho biết phiên bản thiết bị hiện tại được chọn.
3 Bật bàn phím Có Cho phép người dùng nhập liệu vào thiết bị Reveos qual bàn phím trên màn hình cảm ứng
4 Bỏ qua mã vạch Không được phép Cho phép người dùng định rõ liệu người vận hành có được phép bỏ qua mã vạch (hoặc tất cả mã vạch) trong chuỗi cấu hình protocol không. Khi nạp kít túi máu, người vận hành được phép bỏ qua một hoặc mọi mã vạch, hoặc không bỏ qua mã vạch nào tùy thuộc vào cấu hình.
Tắt và bật chức năng bàn phím1. Truy cập trang General Device page.
2. Ấn Edit.
3. Ấn menu thả xuống Enable Keyboard
4. Để nhập liệu bằng bàn phím, chọn Yes. Để không nhập liệu bằng bànphím, chọn No.
Cấu hình thiết bị tổng
Hướng dẫn vận hành Hệ thống xử lý máu tự động Reveos® - Phiên bản 1.1 6-15

Bỏ qua mã vạch1. Truy cập trang General Device page.
2. Ấn Edit.
3. Chọn một trong các lựa chọn sau từ menu thả xuống Skip Barcode:• Một : Thiết bị cho phép bỏ qua một mã vạch.• Mọi: Thiết bị cho phép bỏ qua mọi mã vạch.• Không được phép: Thiết bị không được phép bỏ qua một mã vạch
nào.4. Ấn Save. Nếu không muốn lưu, ấn Cancel.
Cấu hình phần mềm quản lý hệ thống Reveos
6-16 Hướng dẫn vận hành Hệ thống xử lý máu tự động Reveos® - Phiên bản 1.1

Cấu hình hệ thống đơn lẻMỗi thiết bị Reveos đơn lẻ được đăng ký trong ứng dụng quản lý hệ thống Reveos và sẽ xuất hiện ở trang Thiết bị đơn lẻ (Individual Device page). Bất cứ khi nào kết nối thiết bị mới với ứng dụng quản lý hệ thống Reveos, nó cũng phải được cấu hình. Ở trang này, danh sách nội dung sẽ cung cấp một danh sách tổng của tất cả các thiết bị được kết nối. Phần chi tiết sẽ cung cấp các thông tin cụ thể theo các mục nội dung phù hợp.
Ở trên đầu của phần chi tiết, có một ô có tiêu đề Device Information (Thông tin thiết bị). Thông tin này được cấp bởi erumo BCT và không thể thay đổi bởi người dùng.
1
2
Hình 6-9: Trang thiết bị đơn lẻ1 Phần thông tin thiết bị2 Phần cấu hình thiết bị
Bất cứ thông tin nào được liệt kê trong phần cấu hình thiết bị đều có thể sửa bởi người dùng được ủy quyền.
Điều chỉnh tên thiết bịKhi một thiết bị được kết nối lần đầu với hệ thống, nó được đặt một cái tên chính là số seri của thiết bị. Người dùng có thể điều chỉnh tên đó và thay đổi thành bất cứ tên nào do họ chọn. Không có hạn chế nào để đặt tên này cho từng thiết bị.
Hoàn thành các bước sau để điều chỉnh tên thiết bị. 1. Truy cập trang Individual Device page.
2. Ấn Edit.
3. Nhập một tên duy nhất vào ô Device Name
4. Ấn Save. Nếu không muốn lưu, ấn Cancel.
Tắt và bật thiết bịKhi một thiết bị được bật trong ứng dụng quản lý hệ thống Reveos, nó có thể được cấu hình trong ứng dụng quản lý hệ thống Reveos và có thể được sử dụng để xử lý máu toàn phần trong phòng thí nghiệm. Nếu thiết bị không bật trong ứng dụng quản lý hệ thống Reveos, nó không thể được cấu hình trong ứng dụng này hoặc xử lý máu toàn phần trong phòng thí nghiệm.
Cấu hình hệ thống đơn lẻ
Hướng dẫn vận hành Hệ thống xử lý máu tự động Reveos® - Phiên bản 1.1 6-17

Khi thiết bị lần đầu được kết nối với hệ thống, nó sẽ không được bật. Người dùng được ủy quyền phải bật từng thiết bị.
Hoàn thành các bước sau để bật hoặc tắt thiết bị:
1. Truy cập trang Individual Device page.
2. Chọn thiết bị bạn muốn bật hoặc tắt từ danh sách nội dung.
3. Ấn Edit.
4. Ấn menu thả xuống Enabled
Để bật thiết bị, chọn Yes. Để tắt thiết bị, ấn No.
5. Ấn Save. Nếu không muốn lưu, ấn Cancel.
Đặt ngôn ngữPhải chọn ngôn ngữ xuất hiện trên màn hình cảm ứng. Ngôn ngữ trong menu thả xuống là ngôn ngữ có sẵn trong thiết bị và không liên quan đến ứng dụng quản lý hệ thống Reveos.
Hoàn thành các bước sau để thay đổi ngôn ngữ:1. Truy cập trang Individual Device page
2. Ấn Edit.
3. Chọn ngôn ngữ từ menu Language (chọn ngônngữ )
4. Ấn Save. Nếu không muốn lưu, ấn Cancel.
Gán một cơ sởBạn phải xác định vị trí cơ sở cho mỗi thiết bị. Thông tin cơ sở được cấu hình ở trang Facility page (trang cơ sở).
Hoàn thành các bước sau để chọn hoặc điều chỉnh một cơ sở:
1. Truy cập trang ndividual Device page.
2. Ấn Edit.
3. Chọn cơ sở phù hợp từ menu thả Facility (Cơ sở)
4. Ấn Save. Nếu không muốn lưu, ấn Cancel.
Lặp lại các bước ở phần này tới khi từng thiết bị Reveos được liệt kê ở trang Individual Device page đã được cấu hình.
Cấu hình phần mềm quản lý hệ thống Reveos
6-18 Hướng dẫn vận hành Hệ thống xử lý máu tự động Reveos® - Phiên bản 1.1

Cấu hình định nghĩa mã vạchPhần cấu hình mã vạch cho phép tạo mới, các cấu hình mã vạch mới, sửa các cấu hình mã vạch tồn tại, thêm và xóa các tiêu chuẩn mã vạch.
Lưu ý: Yêu cầu quét mã vạch ID hiến máu cho mọi quy trình thông thường và được cấu hình ở trang Mã vạch. Xem "Tạo một quy trình" ở trang 6-21 để biết thêm thông tin về quy trình thông thường.
Ứng dụng quản lý hệ thống Reveos xác nhận mã vạch dựa trên tiêu chuẩn mã vạch được liệt kê. Ví dụ, nếu mã vạch tuân thủ hai tiêu chuẩn mã vạch, đầu tiên là ISBT 128 v1.4 và thứ hai là ASCII, ứng dụng quản lý hệ thống Reveos đầu tiên sẽ xác thực mã vạch theo tiêu chuẩn ISBT 128 v1.4. Nếu mã vạch được xác thực theo tiêu chuẩn đầu, thì ứng dụng quản lý hệ thống Reveos sẽ không xác thực theo tiêu chuẩn thứ hai nữa. Nếu mã vạch không được xác thực theo tiêu chuẩn ISBT 128 v1.4, thì ứng dụng quản lý hệ thống Reveos sẽ xác thực mã vạch theo tiêu chuẩn thứ hai, trong ví dụ này là ASCII.
Tạo mã vạch1. Truy cập vào trang mã vạch Barcode page
2. Ấn New.
3. Nhập một tên duy nhất vào ô Barcode Name.4. Chọn danh mục mã vạch phù hợp từ menu Category (Danh mục).5. Ấn Add ở phần Định nghĩa mã hóa (Encoding Definition) để thêm tiêu chuẩn mã vạch cho
cấu hình.6. Chọn tiêu chuẩn mã vạch từ menu Barcode Standard (Tiêu chuẩn mã vạch).
Hình 6-10: Menu tiêu chuẩn mã vạch (Barcode Standard)
7. Chọn loại mã vạch từ menu Barcode Type (Loại mã vạch). Các tùy chọn loại mã vạch có thểkhác nhau tùy vào tiêu chuẩn mã vạch được chọn.
8. Nhập bất kỳ xác nhận bổ sung nào cho tiêu chuẩn mã vạch.Lưu ý: Nếu chọn tiêu chuẩn mã vạch ASCII, xem xét các tùy chọn bổ sung đi kèm. Nếu không yêu cầu xác thực bổ sung cho tiêu chuẩn mã vạch ASCII, thì có thể quét bất kỳ mã vạch nào vào hệ thống. Nếu xác thực bổ sung được thêm vào cấu hình mã vạch, mã vạch đã quét sẽ không được lưu lại tới khi nó đã được xác thực theo yêu cầu được nêu trong ô Additional Validation (Xác thực bổ sung).
9. Lặp lại từ bước 5-8 để thêm vào các tiêu chuẩn mã vạch bổsung.
10. Ấn Save. Nếu không muốn lưu, ấn Cancel.
Cấu hình định nghĩa mã vạch
Hướng dẫn vận hành Hệ thống xử lý máu tự động Reveos® - Phiên bản 1.1 6-19

Trong nhiều trường hợp, chỉ có thể chọn duy nhất một tiêu chuẩn mã vạch cho một cấu hình mã vạch. Tuy nhiên, có thể đặt nhiều tiêu chuẩn cho mỗi cấu hình mã vạch. Nếu nhiều mã vạch được liệt kê cho một cấu hình mã vạch, thêm cấu hình mã vạch hạn chế nhất trước. Ứng dụng quản lý hệ thống Reveos sẽ xác nhận từng mã vạch theo thứ tự được đặt bởi quản trị viên.
Để xác thực định dạng của mã vạch Codabar hoặc ASCII , có thể thêm xác thực bổ sung. Mọi thắc mắc về xác thực bổ sung, hãy liên hệ với bộ phận hỗ trợ dịch vụ.
Sửa mã vạch1. Truy cập trang mã vạch Barcode page.
2. Chọn mã vạch muốn sửa từ danh sách nội dung.3. Ấn Edit.
4. Cập nhật thông tin ở menu thả xuống và ô nhập thông tin nếu cần.5. Ấn Save. Nếu không muốn lưu, ấn Cancel.
Xóa mã vạch1. Truy cập trang Barcode page.2. Chọn mã vạch muốn xóa từ danh sách nội dung.3. Ấn Delete.
Một hộp thoại xuất hiện để xác nhận bạn có muốn xóa mã vạch đó không.4. Ấn Yes nếu bạn chắc chắn muốn xóa mã vạch đó. Nếu không, ấn No.
Cấu hình phần mềm quản lý hệ thống Reveos
6-20 Hướng dẫn vận hành Hệ thống xử lý máu tự động Reveos® - Phiên bản 1.1

Cấu hình quy trìnhMỗi quy trình là một cấu hình protocol và thông tin mã vạch duy nhất, có thể liên kết với một hoặc nhiều thiết bị Reveos. Người vận hành chọn một quy trình để xác định thành phần được điều chế bởi thiết bị. Trang quy trình (Procedure page) cho phép người dùng được ủy quyền chỉ định protocol và mã vạch cho quy trình đó, rồi sau đó chỉ định quy trình đó cho một thiết bị đơn lẻ. Khi ấn vào quy trình cụ thể trong danh sách nội dung, chi tiết của quy trình sẽ xuất hiện là phần Chi tiết (Details section).
Tạo quy trình1. Nhập trang Quy trình (Procedure page).2. Ấn New.
3. Tạo một tên duy nhất cho quy trình của bạn. Tên có thể từ 1 đến 23 ký tự ASCII.
4. Chọn xem bạn có muốn bật quy trình hay không.
Lưu ý: Nếu bật quy trình, quy trình đó có thể được gán cho các thiết bị phù hợp được liệt kê trong phần Các thiết bị kết hợp. Nếu không bật quy trình, không thể gán quy trình đó cho bất kỳ thiết bị nào.
5. Chọn protocol bạn muốn để kết hợp với quy trình.Khi chọn một protocol, biểu tượng túi máu thành phần tương ứng sẽ xuất hiện trong băngchuyền như hình bên dưới. Các mã vạch của từng túi được cấu hình ở bước 9 đến 12.
6. Thiết kế quy trình là thường xuyên hay không thường xuyên. Từ menu Routine, chọn mộttrong các tùy chọn sau:• Chọn Yes nếu quy trình được dùng để xử lý máu toàn phần và nên được ghi lại trong
ứng dụng quản lý hệ thống Reveos.• Chọn No nếu quy trình được sử dụng trong khi đào tạo hoặc bảo dưỡng và không cần
ghi lại trong ứng dụng quản lý hệ thống Reveos.
Lưu ý: ID hiến máu được yêu cầu cho mọi quy trình thường xuyên. Nếu mã vạch ID hiến máu chưa được cấu hình, xem "Tạo mã vạch" ở trang 6-19.
7. Chỉ định xem có cho phép tạo hai ID hiến máu trùng lặp không. Từ menu DuplicateDonation ID (tạo hai ID hiến máu), chọn một trong hai tùy chọn sau:• Chọn Allowed nếu người vận hành được phép để nhập cùng một ID hiến máu cho nhiều
hơn một bucket trong cùng một quy trình.• Chọn Not Allowed nếu mọi lần quét ID hiến máu phải là duy nhất trong cùng một quy
trình.8. Cấu hình mã vạch ID người vận hành, nếu muốn.
a. Ấn biểu tượng ID người vận hành.b. Chọn cấu hình mã vạch từ menu Barcode Name (Tên mã vạch). Các cấu hình hình được
cấu hình ở trang Mã vạch.c. Xác định xem mã vạch có quan trọng hay không quan trọng. Nếu có, chọn ô Critical.
Nếu không, hãy để trống.d. Ấn dấu X ở góc trên cùng bên phải để đóng hộp thoại cấu hình quét.
Cấu hình quy trình
Hướng dẫn vận hành Hệ thống xử lý máu tự động Reveos® - Phiên bản 1.1 6-21

9. Xác định cấu hình mã vạch cho mỗi túi máu:a. Chọn túi máu muốn cấu hình.
b. Nhấp vào góc phần tư nơi đặt mã vạch trên túi máu. Hộp thoại
sẽ hiện ra với tên của góc phần tư.
Hình 6-11: Túi máu toàn phần với góc phần tư bên trái được chọn.
c. Chọn cấu hình mã vạch từ menu Barcode Name (Tên mã vạch). Các cấu hình mã vạchnày được cấu hình ở trang Mã vạch.
d. Xác định liệu mã vạch có quan trọng hay không. Nếu có, chọn ô Critical. Nếu không, hãyđể trống.
Lưu ý: Nếu mã vạch được đánh dấu là “critical”, thì không thể bỏ qua mã vạch đó khi người vận hành nạp kít túi máu vào thiết bị.
e. Xác minh số thứ tự lần quét tự động ghi vào góc phần tư thứ nhất khi lần quét đã được cấu hình
Lưu ý: Trình tự quét được xác định theo thứ tự mà mã vạch được cấu hình trong quy trình.
f. Lặp lại bước 9a đến 9e nếu cần thêm cấu hình mã vạch bổ sung cho góc phần tư này.Mỗi góc phần tư có thể cấu hình lên tới 2 mã vạch.
g. Ấn dấu X ở góc trên cùng bên phải để đóng hộp thoại cấu hình quét.h. Lặp lại bước 9a đến 9g cho các góc phần tư còn lại trên túi máu, nếu cần.
Cấu hình phần mềm quản lý hệ thống Reveos
6-22 Hướng dẫn vận hành Hệ thống xử lý máu tự động Reveos® - Phiên bản 1.1

10. Ấn biểu tượng túi máu thành phần để cấu hình trình tự quét, nếu cần.
Lưu ý: Trình tự quét được xác định theo thứ tự mã vạch được cấu hình trong quy trình.
11. Lặp lại bước 9a đến 9h nếu cần.12. Lặp lại bước 9 đến 10 cho các túi máu thành phần còn lại trong quy trình.13. Đi đến phần Thiết bị liên kết (Associated Devices section) ở trang Quy trình để gán quy trình
với các thiết bị tương ứng.14. Ấn Save khi cấu hình quy trình hoàn tất. Nếu không muốn lưu quy trình, ấn Cancel.
Sửa quy trình1. Truy cập trang Quy trình Procedure page.
2. Chọn quy trình muốn sửa.
3. Ấn Edit.
4. Cập nhật thông tin nếu cần.
5. Ấn Save. Nếu không muốn lưu , ấn Cancel.
Các thiết bị kết hợpPhần Các thiết bị kết hợp của trang Quy trình cho phép gán quy trình được chọn cho thiết bị theo lựa chọn của bạn. Có thể cần cuộn xuống để xem menu này.
Kết hợp một thiết bị với một quy trình 1. Truy cập trang Quy trình Procedure page.
2. Chọn một quy trình từ danh sách nội dung.
3. Ấn Edit.
Menu các thiết bị kết hợp chỉ ra mọi thiết bị khi được cấu hình ở trang Thiết bị đơn lẻ(Individual Device page).
4. Chọn thiết bị muốn kết hợp với quy trình bằng cách chọn ô ngay cạnh tên thiết bị đó. Nếu tên thiết bị bị mờ, nghĩa là phần mềm thiết bị đó không thể thực hiện được protocol đãchọn trong quy trình.
5. Ấn Save. Nếu không muốn lưu, ấn Cancel.
n Nếu không bật thiết bị, nó sẽ không xuất hiện ở danh sách Các thiết bị kết hợp, và không thể gá quy trình cho thiết bị đó. Để bật thiết bị, xem "Bật và tắt thiết bị" ở trang 6-17.
Configuring Procedures
Hướng dẫn vận hành Hệ thống xử lý máu tự động Reveos® - Phiên bản 1.1 6-23

Cấu hình phần mềm quản lý hệ thống Reveos
6-24 Hướng dẫn vận hành Hệ thống xử lý máu tự động Reveos® - Phiên bản 1.1

7Tìm kiếm và báo cáo
Hướng dẫn vận hành Hệ thống xử lý máu tự động Reveos® - Phiên bản 1.1 7-1

Tab báo cáoỨng dụng quản lý hệ thống Reveos cung cấp quyền truy cập dữ liệu được truy xuất từ thiết bị Reveos từ Tab Reports (báo cáo). Từ đây, người dùng có các quyền cần thiết có thể xem, in và kết xuất thông tin liên quan đến quy trình trên thiết bị Reveos.
Tab Reports được chỉ ra như bên dưới:
Hình 7-1: Tab báo cáo
Tìm kiếm và báo cáo
7-2 Hướng dẫn vận hành Hệ thống xử lý máu tự động Reveos® - Phiên bản 1.1

Tổng quan về báo cáoỨng dụng quản lý hệ thống Reveos cho phép người dùng tạo, xem và tải xuống các báo cáo. Để truy cập các trang báo cáo, ấn tab Reports ở ứng dụng quản lý hệ thống Reveos. Các trang dưới đây có sẵn:
• Calendar View (chế độ Xem lịch): Trang này cung cấp tổng quan báo cáo tổng quát và báocáo truy vấn tùy chỉnh (Custom Query Report) đã hoặc sẽ chạy. Từ Calendar View, có thể xemtình trạng báo cáo, hiển thị và tải xuống một báo cáo. Để biết thêm thông tin về CalendarView, xem “Chế độ xem lịch” ở trang 7-11.
• Insight Report (Báo cáo tổng quát): Các báo cáo này gồm các thông tin được chọn từ ứngdụng quản lý hệ thống Reveos, cũng như các thông tin được chọn được truy xuất từ thiết bịReveos sau khi xử lý. Có thể tạo các báo cáo tổng quát cho sử dụng một lần hoặc lưu lại để sửdụng sau này. Chúng có thể chạy ngay lập tức hoặc theo thời gian lập trước. Để biết thêmthông tin về việc tạo và đặt lịch một báo cáo tổng quát, xem "Tạo và đặt lịch một báo cáo tổngquát” ở trang 7-4.
• Custom Query Report (Báo cáo truy vấn tùy chỉnh): Các báo cáo này gồm các thông tin đượcyêu cầu qua truy vấn tùy chỉnh SQL. Người dùng phải có kiến thức về SQL trước khi tạo cáctruy vấn cho các báo cáo này. Có thể tạo báo cáo truy vấn tùy chỉnh cho sử dụng một lần hoặclưu lại để sử dụng sau này. Chúng có thể chạy ngay lập tức hoặc theo thời gian lập trước. Đểbiết thêm thông tin về việc tạo và đặt lịch một báo cáo truy vấn tùy chỉnh, xem "Tạo và đặt lịchmột báo cáo truy vấn tùy chỉnh” ở trang 7-7.
Tổng quan về báo cáo
Hướng dẫn vận hành Hệ thống xử lý máu tự động Reveos® - Phiên bản 1.1 7-3

Quản lý các báo cáoCấu hình một báo cáoCó thể đặt lịch chạy các báo cáo tổng quát và báo cáo truy vấn tùy chỉnh trong phần mềm quản lý hệ thống Reveos theo thời gian hoặc trong khoảng thời gian định trước hoặc có thể được lưu thành các báo cáo không được đặt lịch và chạy theo yêu cầu.
Nếu chọn một thời gian để báo cáo, trang Báo cáo tổng quát và trang Báo cáo truy vấn tùy chỉnh có các phần sau, cho phép chọn thời gian chạy báo cáo hoặc chọn phạm vi dữ liệu.
• Range of Recurrence (Phạm vi lặp lại): Phần này cho phép cấu hình ngày và thời gian chạybáo cáo. Báo cáo sẽ được đặt lịch để chạy với tần suất được chỉ định trong phần Hình thứclặp lại. Ngày From (Từ) và To (đến) có thể kéo dài trong vài năm, nếu cần. Nếu chọn No enddate (không có ngày kết thúc), báo cáo sẽ được đặt lịch chạy tới khi nào nó bị xóa. Các báocáo được đặt lịch sẽ bắt đầu chạy vào thời điểm được cấu hình ở phần này. .
ể• Recurrence Pattern (Hình thức lặp lại): Phần này cho phép cấu hình tần suất báo cáo. Có th đặt lịch các báo cáo để chạy theo giờ, ngày, tuần, tháng hoặc quý.
• Data Range (Phạm vi dữ liệu): (Chỉ dành cho báo cáo tổng quát). Phần này cho phép cấuhình khung thời gian đưa dữ liệu từ phần mềm quản lý hệ thống Reveos vào báo cáo tổngquát.
• Report Information (Thông tin báo cáo): Phần này sẽ hiển thị khi báo cáo đã được lưu. Nóchỉ ra ngày và giờ báo cáo chạy cuối cùng và một biểu tượng để cho biết liệu lần chạy đó cóthành công hay không. Nếu báo cáo được đặt lịch, thì sẽ hiển thị thời gian chạy được đặt lịch tiếp theo.
Định dạng thời gian theo địa phương/quốc giaCác báo cáo tổng quát sử dụng định dạng theo từng quốc gia để hiển thị ngày, giờ trong báo cáo được lập trên trình duyệt.
• Các báo cáo có đặt lịch được tạo theo các định dạng thời gian của từng quốc gia trên trìnhduyệt tại thời điểm báo cáo được lập hoặc được chỉnh sửa lần cuối.
• Các báo cáo không được đặt lịch được tạo theo các định dạng thời gian của từng quốc giatrên trình duyệt đang hoạt động tại thời điểm ấn Run Now.
Tạo và đặt lịch một báo cáo tổng quát Hoàn tất các bước sau để đặt lịch một báo cáo tổng quát mới: 1. Truy cập trang Báo cáo tổng quát Insight Report page.
2. Ấn New.
3. Quyết định liệu có muốn đặt lịch báo cáo hay chạy báo cáo không cần đặt lịch.Ô Schedule sẽ tự động được chọn.
4. Nhập tên báo cáo vào ô Report Name.
5. Chọn phạm vi lặp lại bằng cách nhập hoặc chọn một ngày ở ô From và một ngày ở ô To.Ấn biểu tượng lịch để xem toàn bộ lịch của tháng.
Tìm kiếm và báo cáo
7-4 Hướng dẫn vận hành Hệ thống xử lý máu tự động Reveos® - Phiên bản 1.1

6. Chọn thời gian báo cáo ở phần Phạm vi lặp lại. Vào ngày báo cáo được đặt lịch để chạy,nó sẽ chạy đúng thời gian này. (Báo cáo còn có thể chạy ở các thời gian khác nếu chọnHourly (theo giờ) như một hình thức lặp lại trong bước tiếp theo).
Hình 7-2: Phần phạm vi lặp lại và phần hình thức lặp lại
7. Chọn một trong các hình thức lặp lại sau và nhập thông tin tương ứng:• Hourly (theo giờ): Báo cáo sẽ được đặt lịch để chạy ở các giờ khác nhau trong ngày.
Nhập số giờ cho khoảng thời gian bạn muốn chạy báo cáo. Ví dụ, nếu chọn để lặp lại báo cáo cứ 8 giờ/lần, thì cứ 8 giờ/lần báo cáo sẽ chạy, bắt đầu từ ngày và giờ được đặt ở phần Phạm vi lặp lại.
• Daily (theo ngày): Báo cáo sẽ được đặt lịch để chạy hàng ngày theo thời gian được đặt ởphần Phạm vi lặp lại. Ví dụ, nếu chọn 12:00 sáng là giờ báo cáo, thì báo cáo sẽ chạy vàođúng 12:00 hàng sáng.
• Weekly (theo tuần): Chọn ngày hoặc các ngày trong tuần bạn muốn chạy báo cáo. Đểchọn nhiều ngày, hãy chọn nhiều ô. Ví dụ, nếu chọn Thứ hai và Thứ tư, thì báo cáo sẽchạy vào Thứ hai và Thứ tư hàng tuần.
• Monthly (theo tháng): Chọn tuần và ngày của tháng bạn muốn chạy báo cáo. Có thểchọn giữa tuần thứ nhất, thứ hai, thứ ba, thứ 4 và tuần cuối cùng của tháng. Sau đó phảichọn ngày. Ví dụ, nếu chọn Last (cuối cùng) trong menu thả xuống đầu tiên, sau đóchọn Thứ ba ở menu thả xuống thứ hai, thì báo cáo sẽ chạy vào Thứ ba cuối cùng hàngtháng.
• Quarterly (theo quý): Nhập số ngày sau khi quý kết thúc mà bạn muốn chạy báo cáo. Vídụ, nếu chọn 3 ngày, báo cáo sẽ chạy 3 ngày sau khi kết thúc quý đó. Các quý sẽ từ 1tháng 1 đến 31 tháng 3, 1 tháng 4 đến 30 tháng 6, 1 tháng 7 đến 30 tháng 9 và 1 tháng 10đến 31 tháng 12.
8. Chọn Khung thời gian báo cáo ở phần Phạm vi dữ liệu. Chọn một trong các tiêu chí sau:• Custom Date Range (Phạm vi ngày tùy chỉnh): Chọn khung thời gian theo giờ, ngày,
tuần hoặc tháng. Nhập một số để chọn khung thời gian.• Week-to-Date (Tuần-đến-ngày): Khung thời gian này bắt đầu từ Chủ nhật, lúc 12:00
sáng và kết thúc tại thời điểm chạy báo cáo.
Quản lý báo cáo
Hướng dẫn vận hành Hệ thống xử lý máu tự động Reveos® - Phiên bản 1.1 7-5

• Month-to-Date (Tháng-đến-ngày): Khung thời gian này sẽ bắt đầu vào ngày đầu tiêncủa tháng, lúc 12 giờ sáng và kết thúc vào thời điểm chạy báo cáo.
• Quarter-to-Date (Quý-đến-ngày): Khung thời gian này sẽ bắt đầu vào ngày đầu tiêncủa quý, lúc 12 giờ sáng và kết thúc vào thời điểm chạy báo cáo. Quý sẽ là 1 tháng 1đến 31 tháng 3, 1 tháng 4 đến 30 tháng 6, 1 tháng 7 đến 30 tháng 9 và 1 tháng 10 đến31 tháng 12.
• Year-to-Date (Năm-đến-ngày): Khung thời gian này bắt đầu từ 1 tháng 1, lúc 12 giờsáng đến thời điểm chạy báo cáo.
Hình 7-3: Menu chọn khung thời gian
9. Chỉ chọn Include offline procedures nếu muốn bao gồm bất kì dữ liệu nào đã chọn khi thiết bị Reveos đã ngoại tuyến.
Lưu ý: Thông tin ngoại tuyến chỉ có thể được truy xuất sau khi thiết bị Reveos kết nối lại với phần mềm quản lý hệ thống Reveos.
10. Ấn Save. Nếu không muốn lưu, ấn Cancel.
Tạo và lưu báo cáo không được đặt lịch Hoàn thành các bước sau để lưu báo cáo không được đặt lịch: 1. Truy cập trang Báo cáo tổng quát Insight Report page.2. Ấn New.3. Xóa ô Schedule.4. Nhập một tên duy nhất cho báo cáo vào ô Report Name.5. Chọn khung thời gian báo cáo ở phần Phạm vi dữ liệu. Chọn một trong các tiêu chí sau:
• Custom (Tùy biến): Chọn khung thời gian bằng cách chọn ngày giờ bắt đầu và ngày giờkết thúc.
g
,
• Week-to-Date (Tuần-đên-Ngày): Khung thời gian này bắt đầu vào Chủ nhật, lúc 12 giờ sán và kết thúc vào đúng thời gian chạy báo cáo.
• Month-to-Date (Tháng-đến-Ngày): Khung thời gian này bắt đầu vào ngày đầu tiên củatháng, lúc 12 giờ sáng và kết thúc vào đúng thời gian chạy báo cáo.
• Quarter-to-Date (Quý-đến-Ngày): Khung thời gian này bắt đầu vào ngày đầu tiên của quý lúc 12 giờ sáng và kết thúc vào đúng thời gian chạy báo cáo. Thời gian các quý nhưsau: 1 tháng 1 đến 31 tháng 3, 1 tháng 4 đến 30 tháng 6, 1 tháng 7 đến 30 tháng 9, 1tháng 10 đến 31 tháng 12.
• Year-to-Date (Năm-đến-Ngày): Khung thời gian này bắt đầu vào 1 tháng 1, lúc 12 giờsáng và ké thúc vào đúng thời gian chạy báo cáo.
6. Ấn Save.
Tìm kiếm và báo cáo
7-6 Hướng dẫn vận hành Hệ thống xử lý máu tự động Reveos® - Phiên bản 1.1

Báo cáo tổng quát sẽ chỉ chạy một lần duy nhất. Vì báo cáo này sẽ không chạy vào thời gian đã đặt, nên các quy trình ngoại tuyến không được bao gồm trong báo cáo tổng quát này.
Tạo và đặt lịch báo cáo truy vấn tùy biến Các báo cáo truy vấn tùy biến cần các thông tin cụ thể, được yêu cầu qua việc sử dụng tùy biến SQL. Cần phải có kiến thức về SQL. Tham khảo Hướng dẫn tham khảo báo cáo người sử dụng cuối cùng và từ điển dữ liệu của phần mềm quản lý hệ thống Reveos trước khi tạo các truy vấn tùy biến SQL.
Hình 7-4: Trang báo cáo truy vấn tùy biến
Hoàn thành các bước sau để tạo một truy vấn tùy biến theo thời gian:
1. Truy cập trang Báo cáo truy vấn tùy biến Custom Query Report page.
2. Ấn New.
3. Nhập tên vào ô Query Name.
4. Nhập hoặc dán truy vấn SQL vào ô Custom SQL Script.
Lưu ý: Đối với các tệp và các bảng được hỗ trợ, tham khảo Hướng dẫn tham khảo báo cáo người sử dụng cuối cùng và từ điển dữ liệu của phần mềm quản lý hệ thống Reveos
5. Quyết định xem có muốn đặt lịch cho báo cáo hay chạy báo cáo mà không cần đặt lịch.
Ô Schedule sẽ tự động được chọn.
Quản lý báo cáo
Hướng dẫn vận hành Hệ thống xử lý máu tự động Reveos® - Phiên bản 1.1 7-7

6. Chọn phạm vi lặp lại cho báo cáo bằng cách nhập hoặc chọn ngày bắt đầu ở ô From và ngàykết thúc ở ô To. Ấn biểu tượng Lịch để xem lịch của cả tháng.
7. Chọn thời gian báo cáo ở phần Phạm vi lặp lại. Vào ngày báo cáo được đặt lịch để chạy, nó sẽchạy theo đúng thời gian đó. (Báo cáo còn có thể chạy ở các thời gian khác nếu chọn Hourly(theo giờ) như một hình thức lặp lại trong bước tiếp theo).
8. Chọn một trong các hình thức lặp lại sau và nhập thông tin tương ứng:• Hourly (theo giờ): Báo cáo sẽ được đặt lịch để chạy ở các giờ khác nhau trong ngày.
Nhập số giờ cho khoảng thời gian bạn muốn chạy báo cáo. Ví dụ, nếu chọn để lặp lại báocáo cứ 8 giờ/lần, thì cứ 8 giờ/lần báo cáo sẽ chạy, bắt đầu từ ngày và giờ được đặt ở phầnPhạm vi lặp lại.
• Daily (theo ngày) : Báo cáo sẽ được đặt lịch để chạy hàng ngày theo thời gian đã đặt ởphần Phạm vi lặp lại. Ví dụ, nếu chọn 12:00 sáng là giờ báo cáo, thì báo cáo sẽ chạy vàođúng 12:00 hàng sáng.
• Weekly (theo tuần): Chọn ngày hoặc các ngày trong tuần bạn muốn chạy báo cáo. Đểchọn nhiều ngày, hãy chọn nhiều ô. Ví dụ, nếu chọn Thứ hai và Thứ tư, thì báo cáo sẽchạy vào Thứ hai và Thứ tư hàng tuần.
• Monthly (theo tháng): Chọn tuần và ngày của tháng bạn muốn chạy báo cáo. Có thểchọn giữa tuần thứ nhất, thứ hai, thứ ba, thứ tư và tuần cuối cùng của tháng. Sau đó phảichọn ngày. Ví dụ, nếu chọn Last (cuối cùng) trong menu thả xuống đầu tiên, sau đóchọn Thứ ba ở menu thả xuống thứ hai, thì báo cáo sẽ chạy vào Thứ ba cuối cùng hàngtháng.
• Quarterly (theo quý): Nhập số ngày sau khi quý kết thúc mà bạn muốn chạy báo cáo. Vídụ, nếu chọn 3 ngày, báo cáo sẽ chạy 3 ngày sau khi kết thúc quý đó. Các quý sẽ từ 1tháng 1 đến 31 tháng 3, 1 tháng 4 đến 30 tháng 6, 1 tháng 7 đến 30 tháng 9 và 1 tháng 10đến 31 tháng 12.
9. Ấn Save. Nếu không muốn lưu, ấn Cancel.
Tạo và lưu báo cáo truy vấn tùy biến không được đặt lịch Hoàn thành các bước sau để lưu các báo cáo không được đặt lịch: 1. Truy cập trang Báo cáo truy vấn tùy biến Custom Query Report page.
2. Ấn New.
3. Nhập một tên duy nhất cho báo cáo vào ô Query Name.
4. Nhập vào dán tùy biến SQL vào ô Custom SQL Script.
5. Xóa ô Schedule.6. Ấn Save.
Chỉnh sửa báo cáoHoàn thành các bước sau để chỉnh sửa một cáo cáo:1. Truy cập trang Báo cáo tổng quát Insight report hoặc trang Báo cáo truy vấn tùy chỉnh
Custom Query report.
2. Chọn báo cáo muốn chỉnh sửa.
3. Ấn Edit.
4. Nếu đã chọn một báo cáo truy vấn tùy chỉnh, chỉnh sửa thông tin truy vấn SQL đangtồn tại, nếu cần.
5. Chỉnh sửa lịch báo cáo nếu cần.
Tìm kiếm và báo cáo
7-8 Hướng dẫn vận hành Hệ thống xử lý máu tự động Reveos® - Phiên bản 1.1

6. Ấn Save. Nếu không muốn lưu, ấn Cancel.
Xóa báo cáoHoàn thành các bước sau để xóa báo cáo: 1. Truy cập trang Báo cáo tổng quát Insight report hoặc trang Báo cáo truy vấn tùy chỉnh
Custom Query report.2. Chọn báo cáo muốn chỉnh xóa.3. Ấn Delete.
Một hộp thoại sẽ hiện ra đê xác nhận rằng bạn muốn xóa truy vấn đó.4. Ấn Yes nếu muốn xóa. Nếu không, ấn No.
Chạy báo cáoTất cả các báo cáo được lưu trong server. Vị trí của các tệp được cấu hình khi cài phần mềm quản lý hệ thống Reveos.
Lưu ý: Có thể tải về hoặc hiển thị các báo cáo đã được tạo từ chế độ Xem lịch (Calendar View) và lưu ở vị trí được chọn.
Người sử dụng được ủy quyền cũng có thể chạy báo cáo đã được lưu. Hoàn thành các bước sau để chạy một báo cáo theo nhu cầu: 1. Truy cập trang Báo cáo tổng quát Insight report hoặc trang Báo cáo truy vấn tùy chỉnh
Custom Query report.2. Chọn báo cáo muốn chạy từ danh sách nội dung.
Lưu ý: Nếu báo cáo muốn chạy không có trong danh sách nội dung, xem "Tạo và lưu báo cáo tổng quát không được đặt lịch" ở trang 7-6 hoặc "Tạo và lưu báo cáo truy vấn tùy biến không được đặt lịch" ở trang 7-8 để cấu hình báo cáo.
3. Ấn Run Now.
Báo cáo sẽ được lưu vào một folder được xác định trước trên server và được liệt kê trên trang Xem lịch Calendar View page.
Thông tin báo cáoỞ phía dưới cùng mỗi trang báo cáo đã được lưu đều có một phần ghi thông tin báo cáo.
Phần này gồm các thông tin của báo cáo đã được lưu như sau: • Status icon (Biểu tượng tình trạng): Cho biết báo cáo cuối cùng có chạy thành công không
hay có được đặt lịch để chạy không.• Last Report (Báo cáo cuối cùng): Cho biết ngày và giờ của báo cáo cuối cùng.• Next Report (Báo cáo tiếp theo): Cho biết ngày và giờ của báo cáo đã được đặt lịch tiếp theo.
Nếu đây là một báo cáo chưa được đặt lịch, sẽ không hiển thị ngày và giờ.Tình trạng báo cáoKhi một báo cáo đang chạy, biểu tượng tình trạng báo cáo sẽ xuất hiện ở góc trên cùng bên trái của cửa sổ phần mềm quản lý hệ thống Reveos. Xem Bảng 2-8 để biết danh sách các biểu tượng tình trạng.
Khi đang xử lý một báo cáo, có thể thêm các báo cáo khác vào truy vấn hoặc điều hướng đến các trang khác mà không làm ảnh hưởng đến tiến trình xử lý báo cáo.
Quản lý báo cáo
Hướng dẫn vận hành Hệ thống xử lý máu tự động Reveos® - Phiên bản 1.1 7-9

Nếu đang kết xuất nhiều báo cáo, có thể xuất hiện nhiều biểu tượng. Ví dụ, nếu một báo cáo đã hoàn tất và một báo cáo đang chạy, biểu tượng Hoàn tất báo cáo (Report Complete) và biểu tượng Đang xử lý báo cáo (Report In Progress) sẽ đồng thời xuất hiện.
Khi ấn vào biểu tượng trạng thái, hộp thoại Report Status (Tình trạng báo cáo) sẽ xuất hiện.
Hình 7-5: Hộp thoại Tình trạng báo cáo
Người dùng không thể truy cập các báo cáo từ hộp thoại này. Hộp thoại này sẽ hiển thị trạng thái của báo cáo. Để hủy một báo cáo khỏi danh sách tình trạng báo cáo, chọn báo cáo muốn hủy, rồi ấn Remove. Để xem một báo cáo, truy cập trang Xem lịch Calendar View.
Tìm kiếm và báo cáo
7-10 Hướng dẫn vận hành Hệ thống xử lý máu tự động Reveos® - Phiên bản 1.1

Chế độ xem lịchTrang Xem lịch (Calendar View) cung cấp toàn cảnh các báo cáo khái quát và báo cáo truy cấn tùy chỉnh đã chạy hoặc đã được đặt lịch để chạy. Ở lịch này, bạn có thể xem tình trạng báo cáo, tải báo cáo về và hiển thị báo cáo. Để truy cập chế độ Xem lịch, ấn tab Reports trên phần mềm quản lý hệ thống Reveos, rồi chọn Calendar View từ thanh menu.• là các báo cáo tổng quát.• là các báo cáo truy vấn tùy chỉnh.
Cạnh thời gian và tên của báo cáo, có hiển thị một biểu tượng cho biết tình trạng báo cáo. • cho biết báo cáo đã chạy thành công.• cho biết báo cáo chạy chưa thành công.
• cho biết báo cáo đã được đặt lịch để chạy.
Lưu ý: Chế độ Xem lịch không cập nhập ở thời gian thực. Để làm mới chế độ Xem lịch, đi tới một tab
khác, rồi trở lại trang Xem lịch.
Lưu ý: Bạn sẽ bị tự động thoát khỏi phần mềm quản lý hệ thống Reveos nếu làm mới trang trình duyệt,
ví dụ, ấn F5 hoặc ấn phím Refresh.
Lưu ý: Xem lịch không hiển thị các báo cáo được đặt lịch để lặp lại hàng giờ theo mặc định.
Có thể chọn báo cáo được hiển thị trên lịch. • Chỉ để hiển thị các báo cáo đã chọn trên lịch, chọn hoặc xóa ô chọn ở danh sách thả xuống
nằm ở góc trên cùng bên phải của lịch.• Để xem tất cả các báo cáo trên lịch, chọn ô Select All từ danh sách thả xuống nằm ở góc trên
cùng bên phải của lịch.
Tải xuống một báo cáo từ chế độ Xem lịch Để tải xuống một báo cáo tổng quát hoặc báo cáo truy vấn tùy chỉnh: 1. Truy cập trang Xem lịch Calendar View page.
2. Ấn chuột phải vào tên báo cáo, rồi ấn Download Report.
Một hộp thoại sẽ cho phép xác nhận có muốn lưu tệp không.3. Ấn OK.
4. Đi đến vị trí muốn lưu tệp, rồi ấn Save.
Lưu ý: Tên mặc định của tệp là reportname-timestamp-identifier.csv, timestamp là ngày và giờ báo cáo được tạo.
5. Mở tệp csv từ vị trí đã lưu.
Lưu ý: Tệp csv từ trang Xem lịch gồm tất cả các dữ liệu đã được yêu cầu khi chạy báo cáo. Ví dụ, nó gồm các cột cho một báo cáo tổng quát hay các cột được yêu cầu cho báo cáo truy vấn tùy chỉnh.
Chế độ xem lịch
Hướng dẫn vận hành Hệ thống xử lý máu tự động Reveos® - Phiên bản 1.1 7-11

Báo cáo sơ lượcBáo cáo sơ lược cho phép bạn truy cập và mở các báo cáo từ chế độ Xem lịch. • Chart view (Chế độ xem biểu đồ): Hiển thị các dữ liệu đã chọn từ báo cáo tổng quát ở dạng
biểu đồ hoặc đồ thị.• Details view (Chế độ xem chi tiết): Hiển thị các dự liệu đã chọn từ báo cáo tổng quát hoặc
các dữ liệu từ báo cáo truy vấn tùy chỉnh ở định dạng bảng. Lưu ý: Để mở một báo cáo đã được tạo ở phiên bản trước của phần mềm quản lý hệ thống Reveos, thì phải chạy lại báo cáo ở phiên bản phần mềm quản lý hệ thống Reveos 1.1 hoặc cao hơn. Để biết thêm thông tin chạy báo cáo, xem "Chạy báo cáo" ở trang 7-9.
Lưu ý: Một vài đồ thị sẽ không hiển thị hoặc dữ liệu bị mất với báo cáo được tạo ở phiên bản cũ của phần mềm quản lý hệ thống Reveos hoặc được chụp từ thiết bị Reveos đang chạy phiên bản phần mềm cũ hơn.
Để mở một báo cáo, truy cập trang Xem lịch và ấn đúp vào tên báo cáo. Báo cáo sẽ mở tra một hộp thoại mới.
Lưu ý: Có thể ấn chuột phải vào tên báo cáo, rồi ấn Display Report.
1 2 3
4
5
6
Hình 7-6: Xem ở dạng đồ thị
1 Tiêu đề và ngày báo cáo được tạo2 Xem chi tiết3 In4 Phạm vi dữ liệu và số lượng quy trình5 Chú thích6 Thông báo lỗi
Tìm kiếm và báo cáo
7-12 Hướng dẫn vận hành Hệ thống xử lý máu tự động Reveos® - Phiên bản 1.1

1 2 3
4
Hình 7-7: Xem chi tiết
1 Lọc2 Xem đồ thị3 Kết xuất4 Tiêu đề cột
Bản xem dạng đồ thịBản xem dạng đồ thị có sẵn cho các báo cáo tổng quát và có thể truy cập từ tab Vận hành (Operation), Điều chế (Production), Ngoại lệ (Exceptions), Báo động (Alarms) và Cảnh báo (Alerts), với chi tiết khác nhau cho từng tab.
In bản xem dạng đồ thịCó thể in bản xem dạng đồ thị trên tất cả các tab. Mọi biểu đồ trên tab sẽ được in và có thể tin ở nhiều trang. Đồ thị Vận hành, Điều chế, Báo động và Cảnh báo sẽ được in trang ngang, và đồ thị Ngoại lệ sẽ được in trang dọc. Để in đồ thị, đi đến tab mong muốn, rồi ấn Print.
Lưu ý: Cỡ giấy khuyến cáo để in là Letter, Legal, A4 và B4.
Báo cáo sơ bộ
Hướng dẫn vận hành Hệ thống xử lý máu tự động Reveos® - Phiên bản 1.1 7-13

Vận hànhTrang Vận hành (Operation) hiển thị các đồ thị và chi tiết liên quan đến số đơn vị được xử lý bởi thiết bị Reveos và thời gian trung bình của các quy trình. Để truy cập trang Vận hành, mở báo cáo từ trang Calendar View, rồi ấn tab Operation.
Hình 7-8: Trang vận hành
Trang vận hành gồm 2 đồ thị:• Đồ thị đơn vị xử lý, hiển thị số đơn vị máu được xử lý bằng thiết bị Reveos. Tổng số đơn vị đã
được xử lý sẽ hiển thị ngay cạnh tiêu đề đồ thị. Với mỗi thiết bị Reveos, số đơn vị được xử lýsẽ chia thành 3 thanh trong đồ thị:• Complete (hoàn thành): Đơn vị máu đã được xử lý thành công. Chúng được nhận diện
bằng biểu tượng màu xanh trên thiết bị ở cuối quy trình.• Inconclusive (không xác định): Chất lượng của đơn vị máu không xác định. Chúng được
nhận diện bằng biểu tượng màu vàng trên thiết bị ở cuối quy trình.• Counterbalance bag (túi đối trọng): Túi đối trọng đã được nạp.
• Đồ thị thời gian trung bình cho biết thời gian trung bình của quy trình được liệt kê bởi ngườivận hành. Số quy trình thực hiện bởi mỗi người vận hành được hiển thị phía trên của thanhđồ thị. Mỗi thanh được chia theo màu thành 4 giai đoạn của quy trình, có thể đặt con trỏ lêntừng thanh để xem chi tiết thông tin. Các bước của quy trình gồm:• Loading (nạp): Thời gian đã qua từ khi người vận hành quét mã vạch đầu tiên đến khi ấn
phím Start trên thiết bị.• Processing (xử lý): Thời gian đã qua từ khi người vận hành ấn phím Start đến khi mở nắp
thiết bị.• Idle (không hoạt động): Thời gian đã qua từ khi nắp thiết bị mở đến khi người vận hành
mở nắp bucket đầu tiên.• Unloading (tháo): Thời gian đã qua từ khi người vận hành mở nắp bucket đầu tiên đến
khi mở nắp bucket cuối cùng.
Tìm kiếm và báo cáo
7-14 Hướng dẫn vận hành Hệ thống xử lý máu tự động Reveos® - Phiên bản 1.1

Đối với các đồ thị ở trang Vận hành, bạn có thể sắp xếp dữ liệu bằng nhiều cách. Ví dụ, ở đồ thị thời gian trung bình, ấn Number of Procedures ở phần chú thích đồ thị, để sắp xếp dữ liệu theo tổng số quy trình được thực hiện bởi một ID người vận hành từ lớn tới bé. Ấn Loading ở phần chú thích đồ thị để sắp xếp dữ liệu theo thời gian trung bình của bước nạp được thực hiện bởi một ID người vận hành từ lớn tới bé.
Điều chếTrang Điều chế (Production page) gồm các đồ thị và chi tiết liên quan đến thể tích sản phẩm, số thành phần máu được điều chế và Chỉ số lượng thu tiểu cầu của đơn vị máu được phân tách bởi thiết bị Reveos. Để truy cập trang Điều chế, mở báo cáo từ chế độ xem lịch, rối ấn tab Production.
Trang Điều chế gồm 3 đồ thị.• Đồ thị thể tích trung bình của sản phẩm cho biết thể tích trung bình của từng thành phần
máu được phân tách. Đưa con trỏ lên trên các thanh trên đồ thị để xem thể tích trung bìnhcộng hoặc trừ 2 ± 2 σ) cho mỗi sản phẩm. Có thể sắp xếp dữ liệu đồ thị bằng nhiều cách. Vídụ, ấn Plasma ở phần chú thích đồ thị để sắp xếp dữ liệu theo thể tích huyết tương đượcphân tách từ lớn tới bé.
• Đồ thị thành phần máu cho biết số thành phần máu được phân tách.• Đồ thị chỉ số lượng thu tiểu cầu cho biết phần trăm đơn vị có chỉ số lượng thu tiểu cầu cụ thể
cho quy trình tách ba thành phần máu (3C). Có thể đưa con trỏ đến các thanh trên đồ thị đểxem chỉ số lượng thu tiểu cầu cộng, trừ 2 ± 2 σ) của quy trình.
Báo cáo sơ bộ
Hướng dẫn vận hành Hệ thống xử lý máu tự động Reveos® - Phiên bản 1.1 7-15

Các Ngoại lệTrang Ngoại lệ (Exceptions page) hiển thị các đồ thị và chi tiết liên quan đến các ngoại lệ xảy ra trong quá trình phân tách trên thiết bị Reveos. Để truy cập trang Ngoại lệ, mở báo cáo từ chế độ Xem lịch, rồi ấn tab Exceptions.
Hình 7-9: Trang Ngoại lệ
Trang Ngoại lệ gồm các thông tin liên quan đến các ngoại lệ sau: • Duplicated units (Đơn vị máu bị trùng lặp): Nhiều hơn 1 đơn vị máu có cùng ID hiến máu
được xử lý trong 1 quy trình đơn. Thông tin ngoại lệ hiển thị ID hiến máu, số lần đơn vị máuđó bị trùng lặp, và ngày giờ của quy trình. ID người vận hành, tên thiết bị, số bucket và tìnhtrạng đơn vị máu được hiển thị cho từng lần đơn vị máu được sao chép; có thể mở rộngthông tin này hoặc thu gọn bằng cách nhấp vào mũi tên bên trái của ID hiến máu.
• Reprocessed units (Đơn vị máu bị phân tách lại): Một đơn vị máu có cùng ID hiến máu bịphân tách lại trong các quy trình khác nhau. Thông tin ngoại lệ hiển thị ID hiến máu và sốlần đơn vị máu đó bị phân tách lại. Ngày phân tách, ID người vận hành, tên thiết bị, sốbucket và tình trạng đơn vị máu đó được hiển thị cho từng quy trình phân tách đơn vị máuđó.
Lưu ý: Nếu một đơn vị máu gặp cả hai tình huống là bị trùng hoặc bị phân tách lại - ví dụ, ID hiến máu được hiển thị ở các bucket khác nhau trong cùng một quy trình và cũng được hiển thị trong nhiều quy trình - sẽ không có tình trạng và số bucket.
• Inconclusive sealed units (Các đơn vị máu được hàn không xác định) Một đơn vị máu đãđược phân tách và hàn lại nhưng chất lượng sản phẩm của đơn vị huyết tương là không xácđịnh. Ngoại lệ này là do huyết tương lipid hoặc do nạp sai cảm biến dòng. Ngoại lệ này khôngáp dụng nếu hệ thống được cấu hình không để điều chế những đơn vị máu này hay không đểhàn ống dây túi huyết tương. Thông tin ngoại lệ gồm ID thiết bị. Ngày phân tách, ID hiếnmáu, số bucket và tình trạng đơn vị máu sẽ hiển thị cho từng đơn vị máu.
Tìm kiếm và báo cáo
7-16 Hướng dẫn vận hành Hệ thống xử lý máu tự động Reveos® - Phiên bản 1.1

• Unrecognized barcodes (Mã vạch không được nhận dạng): Các đơn vị máu có mã vạch đãđược quét khi thiết bị Reveos ngoại tuyến, và việc quét mã vạch không ở định dạng đượcnhận dạng. Thông tin ngoại lệ gồm ngày phân tách, ID hiến máu, ID người vận hành, sốbucket và tình trạng đơn vị máu.
• Skipped barcodes (Mã vạch bị bỏ qua): Các đơn vị máu có ID hiến máu hoặc ID người vậnhành bị bỏ qua. Ngoại lệ này chỉ có thể xảy ra nếu mã vạch bị bỏ qua được đặt là"allowed" (cho phép) và mã vạch không bị cấu hình là “critical” trong cài đặt cấu hình phầnmềm quản lý hệ thống Reveos. Để biết thêm thông tin về mã vạch bị bỏ qua, xem Bảng 6-1.Các thông tin ngoại lệ gồm Ngày phân tách, ID hiến máu, ID người vận hành, số bucket vàtình trạng đơn vị máu.
• Temperature out of range (Nhiệt độ quá ngưỡng): Các đơn vị máu đã được phân tách khinhiệt độ buồng ly tâm quá cao hoặc quá thấp. Thông tin ngoại lệ gồm ngày phân tách, IDhiến máu, ID người vận hành, tình trạng đơn vị máu, nhiệt độ thấp nhất, nhiệt độ cao nhất.
Báo cáo sơ bộ
Hướng dẫn vận hành Hệ thống xử lý máu tự động Reveos® - Phiên bản 1.1 7-17

Trang báo độngTrang Báo động ( Alarms) hiển thị đồ thị và chi tiết liên quan đến các báo động xảy ra trên thiết bị Reveos. Để truy cập trang Báo động, ấn tab Alarms.
Hình 7-10: Trang báo động
Trang báo động gồm 2 đồ thị• Đồ thị toàn bộ báo động, hiển thị có bao nhiêu báo động của từng số báo động đã xảy ra. Đưa
con trỏ lên một thanh trên đồ thị để hiển thị tên của báo động. Dữ liệu báo động được sắpxếp theo tần suất từ cao tới thấp.
• Đồ thị báo động do người vận hành hiển thị số lần báo động đã xảy ra với từng ID người vậnhành, đồ thị báo động do thiết bị hiển thị số lần báo động xảy ra trên mỗi thiết bị. Số lượngđơn vị máu được phân tách sẽ hiển thị trong ngoặc đơn phía trên các thanh đồ thị. Trong cácđồ thị này, từng thanh đồ thị là một trong các pha sau:• Preprocessing (Trước khi phân tách): Pha này bắt đầu khi thiết bị khởi động hoặc chạm
vào phím Next Procedure và kết thúc khi chạm vào phím Start Procedure .• Processing (Đang phân tách): Pha này bắt đầu khi chạm vào phím Start Procedure và kết
thúc khi nắp thiết bị mở.• Post-processing (Sau khi phân tách): Pha này bắt đầu khi nắp thiết bị mở và kết thúc khi
chạm vào phím Next Procedure.
Đối với các đồ thị báo động do người vận hành và báo động do thiết bị, có thể sắp xếp dữ liệu bằng nhiều cách. Ví dụ, ấn Preprocessing trong phần chú thích của đồ thị để lọc dữ liệu theo số báo động đã xảy ra ở pha trước khi phân tách từ lớn tới nhỏ.
Tìm kiếm và báo cáo
7-18 Hướng dẫn vận hành Hệ thống xử lý máu tự động Reveos® - Phiên bản 1.1

Trang cảnh báoTrang cảnh báo (Alerts) hiển thị các đồ thị và chi tiết liên quan đến các cảnh báo xảy tra trên thiết bị Reveos. Để truy cập trang Cảnh báo, ấn tab Alerts.
Hình 7-11: Trang Cảnh báo
Trang cảnh báo gồm 3 đồ thị. • Đồ thị toàn bộ cảnh báo, hiển thị có bao nhiêu cảnh báo cho mỗi số cảnh báo đã xảy ra. Đưa
con trỏ tới thanh đồ thị để hiển thị tên của cảnh báo tương ứng. Dữ liệu cảnh báo được sắpxếp theo số lần từ cao tới thấp.
• Đồ thị cảnh báo do người vận hành hiển thị có bao nhiêu cảnh báo đã xảy ra với từng IDngười vận ành, đồ thị cảnh báo do thiết bị hiển thị có bao nhiều cảnh báo đã xảy ra với từngthiết bị. Số đơn vị máu đã được phân tách sẽ hiển thị trong ngoặc đơn phía trên thanh đồ thị.Ở các đồ thị này, từng thanh đồ thị biểu thị một trong các pha sau:• Preprocessing (Trước khi phân tách): Pha này bắt đầu khi thiết bị khởi động hoặc chạm
vào phím Next Procedure và kết thúc khi chạm vào phím Start Procedure.
• Processing (đang phân tách): Pha này bắt đầu khi chạm vào phím Start Procedure và kếtthúc khi nắp thiết bị mở.
• Post-processing (sau khi phân tách): Pha này bắt đầu khi nắp thiết bị mở và kết thúc khichạm vào phím Next Procedure.
Với một số đồ thị ở trang Cảnh báo, có thể sắp xếp dữ liệu bằng nhiều cách. Ví dụ, ấn Preprocessing ở phần chú thích đồ thị để sắp xếp dữ liệu theo số cảnh báo đã xảy ra trong pha trước khi phân tách từ lớn tới bé.
Báo động sơ bộ
Hướng dẫn vận hành Hệ thống xử lý máu tự động Reveos® - Phiên bản 1.1 7-19

Xem chi tiếtChế độ xem chi tiết có cho mọi báo cáo• Đối với báo cáo tổng quát, có thể truy cập từ tab Vận hành, Điều chế, Ngoại lệ, Báo động,
Cảnh báo với các chi tiết khác nhau liên quan đến từng tab. Chi tiết các cột có trong từng tabđược hiển thị ở "Các loại dữ liệu có sẵn cho các báo cáo tổng quát ở chế độ xem chi tiết"trang 7-12.
• Đối với báo cáo truy vấn tùy chỉnh, chế độ xem chi tiết chỉ có dựa trên thông số được xácđịnh bởi truy vấn SQL.
Hoàn thành các bước sau để xem chi tiết một báo cáo trong bảng: 1. Mở báo cáo từ chế độ Xem lịch.2. Nếu đã chọn một báo cáo tổng quát, ấn phím View Details
Lọc và sắp xếp dữ liệu trong chế độ xem chi tiết Chức năng lọc cho phép chọn các dữ liệu cụ thể từ chế độ xem chi tiết để xem hoặc kết xuất. Có thể thực hiện các hành động sau để sắp xếp và lọc dữ liệu:• Sort the data (Sắp xếp dữ liệu): Nhấp vào một tiêu đề cột để sắp xếp dữ liệu trong bảng theo
loại dữ liệu trong cột. Nhấp vào tiêu đề cột lần nữa để chuyển đổi giữa thứ tự tăng dần hoặcgiảm dần. Một mũi tên nhỏ hiển thị ở đầu cột để cho biết thứ tự sắp xếp.
• Reorder the columns (sắp xếp lại thứ tự các cột): Kéo tiêu đề cột sang trái hoặc phải để thayđổi thứ tự các cột.
• View or hide a column (Xem hoặc ẩn cột): Nhấp chuột phải vào bất kì tiêu đề cột để hiển thị danh sách các cột có sẵn. Nhấp vào tên cột trong danh sách để xem hoặc ẩn cột đó.
• Thêm chức năng lọc cho một cột:1. Ấn vào phím lọc trên tiêu đề cột2. Đặt tiêu chí lọc hoặc chọn giá trị muốn hiển thị.3. Ấn Filter.
• Xóa bỏ chức năng lọc cho một cột:1. Ấn vào phím lọc trên tiêu đề cột.2. Ấn Clear Filter.
Kết xuất dữ liệu từ chế độ xem chi tiết Để kết xuất dữ liệu từ chế độ xem chi tiết: 1. Ấn phím Export.
Hộp thoại File Download (tải tệp) sẽ xuất hiện.
2. Ấn OK.
3. Dẫn tới vị trí muốn lưu tệp, rồi ấn Save.
Lưu ý: Tên tệp mặc định là reportname-timestamp-identifier.csv , timestamp là ngày giờ báo cáo được tạo.
Tìm kiếm và báo cáo
7-20 Hướng dẫn vận hành Hệ thống xử lý máu tự động Reveos® - Phiên bản 1.1

4. Mở tập scv từ vị trí đã lưu.
Lưu ý: Tệp scv được tải xuống từ chế độ xem chi tiết sẽ chỉ chứa các dữ liệu đã có trên màn hình khi kết xuất các dữ liệu đó.
Các loại dữ liệu sẵn có đối với Báo cáo tổng quát ở chế độ Xem chi tiết Các bảng dưới đây gồm danh sách các loại dữ liệu có sẵn trong báo cáo tổng quát và tiêu đề tương ứng trong chế độ xem chi tiết.
Bảng 7-1: Tiêu đề cột ở chế độ xem chi tiết vận hành, điều chế, ngoại lệ và tiêu đề tương ứng trong báo cáo tổng quát.
Xem chi tiết vận hành, điều chế và ngoại lệ Tệp CSV báo cáo tổng quát
Ngày điều chế Processing_Date
ID hiến máu Wb_Donation_Id
ID người vận hành Operator_Id
Tên thiết bị Machine_Id
Số bucket Bucket_Number
Số báo động Num_Alarms
Số cảnh báo Num_Alerts
Tình trạng đơn vị máu Unit_Status
Hàn Welding_Status
Tên quy trình Configuration_Name
Thể tích huyết tương Plasma_Volume
Thể tích tiểu cầu Platelet_Volume
Chỉ số lượng thu tiểu cầu Platelet_Yield_Index
Thể tích bạch cầu tồn dư Leukocyte_Volume
Thời gian quy trình Total_Procedure_Time
Nhiệt bộ buồng ly tâm tối đa Max_Basin_Temp
Nhiệt độ buồng ly tâm tối thiểu Min_Basin_Temp
Số lô Wb_Lot_Number
Báo cáo sơ bộ
Hướng dẫn vận hành Hệ thống xử lý máu tự động Reveos® - Phiên bản 1.1 7-21

Bảng 7-1: Tiêu đề cột ở chế độ xem chi tiết vận hành, điều chế và ngoại lệ, tiêu đề tương ứng trong báo cáo tổng quát (tiếp theo)
Xem chi tiết vận hành, điều chế và ngoại lệ Tệp CSV báo cáo tổng quát
Mã vạch bị bỏ qua Were_Barcodes_Skipped
Phiên bản phần mềm Software_Version
Tên cơ sở điều chế Facility_Name
Bảng 7-2: Tiêu đề cột ở chế độ xem chi tiết báo động và cảnh báo, tiêu đề tương ứng trong báo cáo tổng quát.
Xem chi tiết báo động, cảnh báo Tệp CSV báo cáo tổng quát
Ngày điều chế Processing_Date
ID hiến máu Wb_Donation_Id
ID người vận hành Operator_Id
Số lô Wb_Lot_Number
Số bucket Bucket_Number
Tên thiết bị Machine_Id
Tình trạng đơn vị máu Unit_Status
Hàn Welding_Status
Tên quy trình Configuration_Name
Thể thích huyết tương Plasma_Volume
Thể tích tiểu cầu Platelet_Volume
Chỉ số lượng thu tiểu cầu Platelet_Yield_Index
Thể tích bạch cầu Leukocyte_Volume
Lưu ý: Các mô tả cảnh báo và báo động được lưu trong cơ sở dữ liệu của hệ thống Reveos nhưng không phải là một phần của báo cáo tổng quát.
Tìm kiếm và báo cáo
7-22 Hướng dẫn vận hành Hệ thống xử lý máu tự động Reveos® - Phiên bản 1.1

Tìm kiếm ID hiến máuViệc tìm kiếm ID hiếu máu cho phép bạn tìm kiếm đơn vị máu đơn lẻ dựa trên ID hiến máu của nó. Chức năng tìm kiếm có sẵn ở mọi trang trong phần mềm quản lý hệ thống Reveos. Việc tìm kiếm này chấp nhận cả ID hiến máu được quét hoặc được giải mã.• Scanned Donation ID (ID hiến máu được quét): Gồm việc nhận dạng mã vạch, mã vạch và
bất kỳ ký tự flag nào, ví dụ ký tự “=”.
• Decoded Donation ID (ID hiến máu được giải mã): Chỉ gồm các mã vạch, không gồm nhậndạng mã vạch. Nếu loại mã vạch được đặt là “Donation ID with Flag,” ký tự flag phải là một phần của ID hiến máu được giải mã.
Để biết thêm thông tin về cấu hình mã vachhj trong phần mềm quản lý hệ thống Reveos, xem :Cấu hình các định nghĩa mã vạch" ở trang 6-19.
1. Nhập hoặc quét ID hiến máu vào ô ID hiến máuở góc trên cùng bên phải màn hình
Lưu ý: Nhập chính xác như nó xuất hiện, kể cả các ký tự đặc biệt. Nhập không đủ ID hiến máu sẽ không thấy bất kỳ kết quả nào.
2. Ấn phím Search hoặc phím Enter.
Chi tiết về đơn vị máu, kể cả cảnh báo hoặc báo động xảy ra trong quy trình sẽ được hiển thịtrong hộp thoại, như Hình 7-12.
Nếu không tìm thấy đơn vị máu, sẽ xuất hiện thông báo “No results returned” (không tìm thấykết quả) ở bên trái của ô ID hiến máu.
Hình 7-12: Kết quả tìm kiếm ID hiến máu
Các thông tin dưới đây sẽ hiển thị trong hộp thoại: • Thông tin chi tiết được chọn từ báo cáo tổng quát, kể cả Ngày điều chế, ID người vận hành
và tên thiết bị.• Nếu ID hiến máu bị trùng lặp hoặc bị xử lý lại, hãy nhập mỗi lần nó được xử lý.• Danh sách các báo động và cảnh báo xảy ra trong quá trình phân tách đơn vị máu được hiển
thị trong phần báo động và cảnh báo. Nhấp vào mũi tên để mở rộng hoặc thu gọn danh sách đó. Nếu không có báo động hay cảnh báo xảy ra trong quy trình, tiêu đề phần cảnh báo và báo động sẽ mờ.
Để đóng kết quả tìm kiếm ID hiến máu, ấn dấu X ở góc trên cùng bên phải của hộp thoại.
Tìm kiếm ID hiến máu
Hướng dẫn vận hành Hệ thống xử lý máu tự động Reveos® - Phiên bản 1.1 7-23

Searches and Reports
7-24 Hướng dẫn vận hành Hệ thống xử lý máu tự động Reveos® - Phiên bản 1.1

8Thông số kỹ thuật hệ thống
Hướng dẫn vận hành Hệ thống xử lý máu tự động Reveos® - Phiên bản 1.1 8-1

Thông số kỹ thuật hệ thống
Bảng 8-1: Thông số thiết bị
Loại thông số Giá trị
Độ ẩm 10% đến 80% không ngưng tụ
Nhiệt độ hoạt động Khuyến nghị 18 °C đến 27 °C (64.4 °F đến 80.6 °F)
Nhiệt độ bảo quản 0 °C đến 60 °C (32 °F đến 140 °F)
Môi trường Chỉ sử dụng trong nhà
Độ cao Lên tới 2,000 m
Điện áp 200 V AC đến 240 V AC (± 10%), 50/60 Hz
Bộ ngắt mạch nguồn chính Characteristic C, Rated 16A, 30 mA RCCD (EU)
Công suất đầu vào (thông thường) 1.2 kVA
Công suất đầu vào (tối đa) 6.0 kVA
Phích cắm điện IEC 60309 2P + E, 200 V to 250 V, 50/60 Hz, 16A, IP44
Thông gió (trên mỗi thiết bị được lắp đặt) Đủ để tiêu tán 1,0 KW trong hoạt động bình thường
Khoảng trống tối thiểu (chu vi xung quanh thiết bị)
152 mm (6 in)
Diện tích sàn tối thiểu cần
thiết để lắp đặt (sâu x rộng)991 × 1,143 mm (39 × 45 in)
Tiêu chuẩn an toàn IEC 61010-1:2010, IEC 61010-2-20:2006
Tiêu chuẩn EMC IEC 61326-1:2006
Kết nối ethernet RJ45
CAT-5e, ANSI/TIA/EIA 568 B.2
Kết nối với máy quét mã vạch 4 Pin Lemo
Khả năng bảo vệ Xâm nhập Chỉ bảo vệ thông thường
Thông số kỹ thuật hệ thống
8-2 Hướng dẫn vận hành Hệ thống xử lý máu tự động Reveos® - Phiên bản 1.1

Bảng 8-2: Thông số vận hành thiết bị
Loại thông số Giá trị
Kích thước tối đa (RxCxS) 686 × 1,000 × 826 mm (27 × 39.4 × 32.5 in)
Trọng lượng tối đa (không có dịch làm mát) 295 kg (650 lb)
Mức độ ô nhiễm 2
Loại thiết bị I
Nhóm cài đặt II
Lượng nhiệt tỏa ra 1 kW (3,400 Btu /h)
Độ chính xác của phép đo thời gian ± 5 giây
Tốc độ rô to 0 đến 2,900 rpm (± 50 rpm)
Độ nghiêng sàn 1.5° tối đa
Bộ phát hiện rò rỉ • Khả năng phát hiện ≤ 100 mL chất lỏng trong buồng ly tâm.• Phát hiện rò rỉ chất lỏng ở nơi độ ẩm chạm vào cảm biến
trên thành của buồng ly tâm.
Độ ồn < 65 dBA
Thể tích máu toàn phần cho điều chế 450 mL ± 10% cộng 63 mL CPD
Bảng 8-3: Thông số nguồn nước làm mát bên ngoài
Thông số Giá trị
Chất lỏng Phải sử dụng nước khử ion đã qua lọc hoặc nước cất đã lọc. Nước phải được lọc bằng lưới lọc 80 mesh hoặc mịn hơn. Ethylene glycol hoặc propylene glycol có thể được thêm vào với nồng độ lên đến 30% trọng lượng. Không sử dụng nước máy.
Nhiệt độ nước vào 2 °C đến 10 °C (36 °F đến 50 °F)
Tốc độ dòng chảy tối thiểu 4 lít mỗi phút trên mỗi thiết bị
Áp suất nước vào 3.5 bar đến 6.5 bar (50 psi đến 95 psi)
System Specifications
Hướng dẫn vận hành Hệ thống xử lý máu tự động Reveos® - Phiên bản 1.1 8-3

Thông tin về tương thích điện từ Thiết bị Reveos được thiết kế để sử dụng trong môi trường điện từ được chỉ định bên dưới. Khách hàng hoặc người sử dụng thiết bị Reveos phải đảm bảo rằng nó được sử dụng trong môi trường như vậy.
Bảng 8-4: Hướng dẫn phát xạ EMC
Kiểm tra phát xạ Tuân thủ Môi trường điện từ - Hướng dẫn
Phát xạ RF
CISPR 11
Nhóm 1 Thiết bị Reveos chỉ sử dụng tần số cao cho chức năng bên trong của nó (như: tín hiệu định thời máy tính và giao tiếp nội bộ). Phát xạ RF đáp ứng các yêu cầu của CISPR 11.
Phát xạ RF
CISPR 11
Nhóm 2 Thiết bị Reveos phát ra năng lượng RF ngắn hạn, gián đoạn bất cứ khi nào hàn các ống dây ở cuối chu trình điều chế. Thiết bị điện tử gần đó có thể bị ảnh hưởng.
Phát xạ RF
CISPR 11
Class A Thiết bị Reveos phù hợp để sử dụng cho tất cả các cơ sở không phải là khu dân cư và những cơ sở được kết nối trực tiếp với mạng cấp điện hạ áp công cộng,cung cấp cho các tòa nhà được sử dụng cho mục đích dân dụng.
Thông số kỹ thuật hệ thống
8-4 Hướng dẫn vận hành Hệ thống xử lý máu tự động Reveos® - Phiên bản 1.1

Thiết bị Reveos được thiết kế để sử dụng trong môi trường điện từ được chỉ định bên dưới. Khách hàng hoặc người sử dụng thiết bị Reveos phải đảm bảo rằng nó được sử dụng trong môi trường như vậy.
Bảng 8-5: Miễn nhiễm điện từ EMC
Kiểm tra miễn nhiễm
Mức độ kiểm traIEC 61326
Mức độ tuân thủ Môi trường điện từ - Hướng dẫn
Phóng tĩnh điện (ESD) IEC 61000-4-2
± 4 kV tiếp xúc
± 4 kV trong không khí
± 4 kV tiếp xúc
± 4 kV trong không khí
Với cụm/đột biếnnhanh về điệnIEC 61000-4-4
± 0.5 kV đối vớiđường vào/ra
± 1 kV đối với đường cấp
± 0.5 kV đối vớiđường vào/ra
± 1 kV đối với đường cấp
Chất lượng nguồn điện phải là điển hình của môi trường trung tâm máu hoặc bệnh viện.
Với xungIEC 61000-4-5
± 0.5 kV dòng với dòng (DM)± 1 kV dòng với đất (CM)
± 0.5 kV dòng với dòng (DM)± 1 kV dòng với đất (CM)
Chất lượng nguồn điện phải là điển hình của môi trường trung tâm máu hoặc bệnh viện.
Sụt điện áp, ngắtđiện ngắn hạn, dao động điện áp trên đường cấp điện vào IEC 61000-4-11
0% trong nửa chu kỳ
0% trong 1 chu kỳ
70% trong25/301 chu kỳ
0% trong250/3002 kỳ
0% trong nửa chu kỳ
0% trong 1 chu kỳ
70% trong25/301 chu kỳ
0% trong250/3002 kỳ
Chất lượng nguồn điện phải là điển hình của môi trường trung tâm máu hoặc bệnh viện.Nếu người sử dụng thiết bị Reveos nhận thấy nguồn điện thường xuyên bị gián đoạn tại cơ sở và yêu cầu tiếp tục hoạt động trong thời gian nguồn điện bị gián đoạn, thì nên cấp nguồn cho thiết bị Reveos từ nguồn điện liên tục được đánh giá phù hợp.
Lưu ý: UT là điện áp nguồn AC trước khi áp dụng mức thử nghiệm1 25/30 chu kỳ nghĩa là 25 chu kỳ cho thử nghiệm 50Hz và 30 chu kỳ cho thử nghiệm 60Hz. 2 250/300 chu kỳ nghĩa là 250 chu kỳ cho thử nghiệm 50Hz và 300 chu kỳ cho thử nghiệm 60Hz.
Thông tin EMC
Hướng dẫn vận hành Hệ thống xử lý máu tự động Reveos® - Phiên bản 1.1 8-5

Thiết bị Reveos được thiết kế để sử dụng trong môi trường điện từ được chỉ định bên dưới. Khách hàng hoặc người sử dụng thiết bị Reveos phải đảm bảo rằng nó được sử dụng trong môi trường như vậy
Bảng 8-6: Hướng dẫn và công bố của nhà sản xuất - Miễn nhiễm điện từ (1 trong 2)
Kiểm tra miễn nhiễm
Mức độ kiểm traIEC 61326
Mức độ tuân thủ Môi trường điện từ - Hướng dẫn
Thiết bị thông tin liên lạc RF di động và cầm tay không được sử dụng gần bất kỳ bộ phận nào của thiết bị Reveos, kể cả dây cáp, gần hơn khoảng cách tách biệt được khuyến nghị đã được tính toán từ phương trình áp dụng cho tần số của máy phát.
RF nhiễu dẫnIEC 61000-4-6
3 Vrms
150 kHz đến 80 MHz
3 V
Để biết các tính toán dựa trên phương trình này, xem Bảng 8-8.
RF nhiễu bức xạIEC 61000-4-3
3 V/m (80 MHz đến 1 GHz)
3 V/m (1.4 GHz đến 2 GHz)
1 V/m (2.0 GHz đến 2.7 GHz)
3 V/m (80 MHz đến 1 GHz)
3 V/m (1.4 GHz đến 2.7 GHz)
80 MHz đến 800 MHz
Để biết các tính toán dựa trên phương trình này, xem Bảng 8-8.
Lưu ý: Ở 80 MHz và 800 MHz, áp dụng dải tần số cao hơn.Lưu ý: Những hướng dẫn này có thể không áp dụng trong mọi trường hợp. Sự lan truyền điện từ bị ảnh hưởng bởi sự hấp thụ và phản xạ từ các cấu trúc, vật thể và con người.
Thông số kỹ thuật hệ thống
8-6 Hướng dẫn vận hành Hệ thống xử lý máu tự động Reveos® - Phiên bản 1.1

Thiết bị Reveos được thiết kế để sử dụng trong môi trường điện từ được chỉ định bên dưới. Khách hàng hoặc người sử dụng thiết bị Reveos phải đảm bảo rằng nó được sử dụng trong môi trường như vậy
Bảng 8-7: Hướng dẫn và công bố của nhà sản xuất - Miễn nhiễm điện từ (2 trong 2)
Kiểm tra miễn nhiễm
Mức độ kiểm traIEC 61326
Mức độ tuân thủ Môi trường điện từ - Hướng dẫn
800 MHz đến 2,7 GHz. Để biết các tính toán dựa trên phương trình này, xem Bảng 8-8.Trong đó P là định mức công suất đầu ra lớn nhất của máy phát tính bằng watt (W) theo nhà sản xuất máy phát và d làkhoảng cách tách biệt được khuyếnnghị tính bằng mét (m).Cường độ trường từ máy phát RF cốđịnh, được xác định bằng khảo sát vị tríđiện từ, 1 phải nhỏ hơn mức tuân thủtrong mỗi dải tần số.2Có thể xảy ra nhiễu ở vùng lân cận củathiết bị được đánh dấu bằng ký hiệusau:
Lưu ý: Ở 80 MHz và 800 MHz, áp dụng dải tần số cao hơn.Lưu ý: Những hướng dẫn này có thể không áp dụng trong mọi trường hợp. Sự lan truyền điện từ bị ảnh hưởng bởi sự hấp thụ và phản xạ từ các cấu trúc, vật thể và con người.1 Cường độ tín hiệu từ các máy phát cố định - chẳng hạn như các trạm phát cho điện thoại vô tuyến (vô tuyến / không dây) và đài di động mặt đất, đài nghiệp dư, phát sóng radio AM và FM và phát sóng TV - về mặt lý thuyết không thể dự đoán chính xác. Để đánh giá môi trường điện từ do các máy phát RF cố định, cần xem xét khảo sát vị trí điện từ. Nếu cường độ tín hiệu đo được ở vị trí mà thiết bị Reveos được sử dụng vượt quá mức tuân thủ RF áp dụng ở trên, thiết bị Reveos phải được quan sát để xác minh hoạt động bình thường. Nếu quan sát thấy hiệu suất bất thường, có thể cần các biện pháp bổ sung, chẳng hạn như định hướng lại hoặc định vị lại thiết bị Reveos.2 Trong dải tần từ 150 kHz đến 80 MHz, cường độ tín hiệu phải nhỏ hơn 3 V / m.
Thông tin EMC
Hướng dẫn vận hành Hệ thống xử lý máu tự động Reveos® - Phiên bản 1.1 8-7

Thiết bị Reveos được thiết kế để sử dụng trong môi trường điện từ, ở đó nhiễu bức xạ RF được kiểm soát. Dựa trên dữ liệu kiểm tra miễn nhiễm, không chắc rằng các thiết bị truyền thông thông thường được sử dụng như điện thoại di động hoặc thiết bị được trang bị WiFi hoặc Bluetooth đáp ứng 802.11g / n sẽ ảnh hưởng xấu đến thiết bị Reveos. Tuy nhiên, nếu nhận thấy nhiễu hoặc các thiết bị được cấp nguồn cao hơn như radio hai chiều được sử dụng ở gần thiết bị Reveos, khách hàng hoặc người sử dụng thiết bị Reveos có thể giúp ngăn chặn nhiễu điện từ bằng cách duy trì khoảng cách tối thiểu giữa thiết bị di động và thiết bị thông tin liên lạc RF di động (máy phát) và thiết bị Reveos như được khuyến nghị dưới đây, theo tần số và công suất phát tối đa do nhà sản xuất thiết bị truyền thông chỉ định.
Bảng 8-8: Khoảng cách khuyến nghị giữa thiết bị truyền thông RF di động, cầm tay và thiết bị Reveos
Công suất đầu ra tối đa theo định mức của máy phát W
Khoảng cách phân tách theo tần số của máy phát m
150 kHz đến80 MHz
80 MHz đến800 MHz
800 MHz đến2.7 GHz
0.01 0.12 0.12 0.23
0.1 0.38 0.38 0.73
1 1.2 1.2 2.3
10 3.8 3.8 7.3
100 12 12 23
Đối với máy phát được định mức ở công suất đầu ra lớn nhất không được liệt kê ở trên, khoảng cách tách biệt được khuyến nghị d tính bằng mét (m) có thể được ước tính bằng cách sử dụng phương trình áp dụng cho tần số của máy phát, trong đó P là công suất đầu ra lớn nhất của máy phát tính bằng watt ( W) theo nhà sản xuất máy phát.Lưu ý: Ở 80 MHz và 800 MHz, áp dụng khoảng cách tách biệt cho dải tần số cao hơn.Lưu ý: Những hướng dẫn này có thể không áp dụng trong mọi trường hợp. Sự lan truyền điện từ bị ảnh hưởng bởi sự hấp thụ và phản xạ từ các cấu trúc, vật thể và con người.
Thông số kỹ thuật hệ thống
8-8 Hướng dẫn vận hành Hệ thống xử lý máu tự động Reveos® - Phiên bản 1.1

Biểu tượng và chứng nhậnCác biểu tượng trong Bảng 8-9 có thể xuất hiện trên Hệ thống xử lý máu tự động Reveos, nếu có.
Bảng 8-9: Biểu tượng và chứng nhận
Biểu tượng Định nghĩa
Hướng đặt thiết bị. Phải theo hướng này.
Hàng dễ vỡ. Xin cẩn thận.
Đặt nơi khô ráo
Không được phép xếp chồng lên kiện hàng vận chuyển và không được chất tải lên gói hàng vận chuyển.
Thiết bị phải tuân theo chỉ thị 2002/96 / EC về chất thải từ thiết bị điện và điện tử (WEEE) và phải được xử lý phù hợp.
Việc đóng gói sản phẩm tuân thủ Chỉ thị Châu Âu 94⁄62⁄EC đối với đóng gói và đóng gói chất thải.
Nhà sản xuất hợp pháp của sản phẩm kèm theo tên của nhà sản xuất.
Ngày sản xuất (hoặc ngày tiệt trùng, nếu sản phẩm vô trùng) kèm theo một ngày cụ thể.
Người dùng phải đọc hướng dẫn sử dụng trước khi áp dụng.
Người dùng phải đọc các tài liệu kèm theo trước khi vận hành hệ thống để đảm bảo hoạt động an toàn.
Sản phẩm được sản xuất theo Phụ lục II của Chỉ thị 93/42 / EEC của Hội đồng Châu Âu, đã được sửa đổi.
Thiết bị yêu cầu dòng điện xoay chiều.
Nhiệt độ đầu vào của chất làm mát.
Biểu tượng và chứng nhận
Hướng dẫn vận hành Hệ thống xử lý máu tự động Reveos® - Phiên bản 1.1 8-9

Bảng 8-9: Biểu tượng và chứng nhận (tiếp theo)
Biểu tượng Định nghĩa
Cổng để kết nối với mạng Ethernet.
Đường chất lỏng làm mát. Biểu tượng bên phải ghi nhãn đầu vào, nơi nước mát đi vào thiết bị. Biểu tượng bên trái ghi nhãn đầu ra, nơi nước chảy ra sau khi làm mát thiết bị.
Indicates a functional ground conductor terminal. Used to provide a voltagereference. This terminal is not to be used for a protective grounding function.
Biểu thị có tiếp đất bảo vệ. Nằm gần vị trí nối đất chính của khung gầm và tại các điểm nối đất bảo vệ khác.
Cho biết nguồn điện bật
Cho biết nguồn điện tắt
Nguy cơ điện giật
Số hiệu sản phẩm kèm số
Đại diện được ủy quyền tại Châu Âu của sản phẩm kèm với tên của Đại diện được ủy quyền tại Châu Âu.
Thông số kỹ thuật hệ thống
8-10 Hướng dẫn vận hành Hệ thống xử lý máu tự động Reveos® - Phiên bản 1.1

Bảng chú giải
ANgăn kéo
Báo động
Cảnh báo
Ứng dụng
BNúm kẹp túi
Hệ thống cân bằng
Giá đỡ túi máu thành phần
Ngăn kéo nằm ở dưới cùng của thiết bị cho phép đại diện dịch vụ kỹ thuật truy cập vào phần cứng truyền thông.Thông báo hệ thống về một điều kiện sẽ ngăn cản hoặc kết thúc quy trình xử lý và có thể ảnh hưởng đến chất lượng sản phẩm. Nếu báo động xảy ra trước khi quy trình bắt đầu, bạn có thể thực hiện hành động được đề xuất khi chạm vào màn hình và thử lại. Nếu một cảnh báo xảy ra ảnh hưởng đến tất cả các thiết bị trong khi quy trình đang diễn ra, quy trình đó sẽ kết thúc. Nếu một cảnh báo xảy ra dành riêng cho nhóm trong khi quy trình đang diễn ra, quá trình xử lý sẽ chỉ kết thúc trong nhóm đóThông báo hệ thống về một điều kiện cần bạn chú ý. Bạn có thể ghi lại Số cảnh báo, thực hiện hành động hiển thị trên màn hình cảm ứng và chạm vào nút Continue để tiếp tục.Một chương trình phần mềm. Trong hướng dẫn sử dụng này, "ứng dụng" nhắc đến đến phần mềm quản lý hệ thống Reveos.
Các núm giữ túi máu toàn phần vào đúng vị trí bên trong bucket trong quy trình phân tách.Tính năng của thiết bị Reveos cho phép tự cân bằng thay vì cân bằng và hiệu chuẩn thủ công. Hệ thống này hỗ trợ phân tách chính xác.Một ngăn chứa túi huyết tương, túi tiểu cầu tạm thời, túi hồng cầu, bộ lọc giảm bạch cầu và túi bạch cầu tồn dư trong quá trình xử lý.
Hướng dẫn vận hành Hệ thống xử lý máu tự động Reveos® - Phiên bản 1.1 Bảng chú giải -1

Bucket
Nắp bucket
Cảm biến bucket
Bucket-lid latch
CChế độ xem lịch
Buồng ly tâm
Túi đối trọng
DNắp thiết bị
Quy trình kiểm tra thiết bị đã khô
ENguồn nước làm mát bên ngoài
HTấm thủy lực
Ngăn chứa túi máu toàn phần để phân tách. Mỗi bucket có một tấm thủy lực, được làm đầy với dịch thủy lực, để ép các thành phần máu. Nắp này đóng trên các túi máu toàn phần.Tế bào quang theo dõi phân lớp giữa các tế bào hồng cầu và huyết tương trong bucketMột cơ chế giữ chặt nắp bucket trong khi thực hiện quy trình.
Trang của phần mềm quản lý hệ thống Reveos, cung cấp tổng quan các báo cáo đã chạy hoặc được đặt lịch để chạy. Khoang lớn bên trong thiết bị Reveos, gồm rô to và các bộ phận gắn với rô to. Túi được dùng để thay thế túi máu khi người vận hành chọn để chạy quy trình có ít hơn 4 đơn vị túi máu toàn phần. Túi đối trọng sẽ giúp cân bằng rô to khi quay.
Nắp lớn che phủ rô to, nơi diễn ra quá trình ly tâm. Nó sẽ khóa khi thiết bị đang hoạt động và sẽ tự động mở khi quy trình phân tách đã hoàn tất.
Một quy trình dựa trên protocol quay ly tâm trong một khoảng thời gian được đặt trước. Quy trình này giúp người vận hành xác định xem đã lấy hết toàn bộ chất lỏng ra khỏi thiết bị sau khi làm sạch chưa.
Một hệ thống bên ngoài, làm mát và tái tuần hoàn nước để kiểm soát nhiệt độ của thiết bị.
Một vật chứa linh hoạt đặt trong mỗi bucket, chứa đầy dịch thủy lực trong quá trình phân tách. Tấm thủy lực sẽ mở rộng để hỗ trợ ép các thành phần máu vào các túi thành phần tương ứng.
Bảng chú giải-2 Hướng dẫn vận hành Hệ thống xử lý máu tự động Reveos® - Phiên bản 1.1

IĐơn vị tiểu cầu tạm thời (IPU)
KMàn hình nhập bằng bàn phím
LHệ thống nắp
Cảm biến dòng
Phạm vi nạp
MNhập tay
ONgười vận hành
PTrang
Quyền
Đường dẫn huyết tương
Một đơn vị tiểu cầu có được từ việc phân tách một đơn vị máu toàn phần bằng thiết bị Reveos. Sau khi phân tách, đơn vị tiểu cầu này sẽ được phân tách tiếp, gồm nghỉ và lắc, pool với 23 hoặc 5 đơn vị tiểu cầu tạm thời khác, rồi lọc bằng bộ pool tiểu cầu.
Màn hình cho phép nhập các thông tin bằng tay vào hệ thống. Màn hình nhập bằng bàn phím chỉ khả dụng nếu được cấu hình trong phần mềm quản lý hệ thống Reveos.
Hệ thống này gồm nắp thiết bị, chốt nắp thiết bị và khóa nắp thiết bị. Cảm biến phát hiện các lớp thành phần máu và các định ống dây đã được nạp. Phần trên của rô to, nơi các bộ kít túi máu và túi đối trọng được nạp vào. Phạm vi nạp gồm bucket, giá đỡ túi máu thành phần, các van, cảm biến dòng và điều dẫn ống dây.
Phương pháp được dùng để nhập dữ liệu khi phần mềm quản lý hệ thống Reveos tạm thời ngắt kết nối hoặc không giao tiếp với thiết bị Reveos hoặc khi máy quét mã vạch được gắn với thiết bị không hoạt động.
Người thực hiện quy trình phân tách trên thiết bị.
Một trang web. Trong hướng dẫn sử dụng, "trang" là nói đến trang web trong phần mềm quản lý hệ thống Reveos, hoạt động trên nền tảng web. "Màn hình" được dùng là màn hình cảm ứng trên thiết bị Reveos.
Khả năng để truy cập các chức năng riêng lẻ hoặc dữ liệu cụ thể trong phần mềm ứng dụng quản lý hệ thống Reveos. Ống dây dẫn huyết tương
Hướng dẫn vận hành Hệ thống xử lý máu tự động Reveos® - Phiên bản 1.1 Bảng chú giải-3

Sản phẩm huyết tương
Đường dẫn tiểu cầuBộ định tuyến ống dây dẫn tiểu cầu
Chỉ số lượng thu tiểu cầu (PYI)
Quy trình
Protocol
RSản phẩm hồng cầu
Đường dẫn bạch cầu Bạch cầu tồn dư
Phần mềm quản lý hệ thống Reveos
Rô to
S
Màn hình
SOP
Phím dừng
Quản trị viên hệ thống
Huyết tương đã được lọc bạch cầu và sẵn sàng để bảo quản sau một quy trình điều chế. Ống dây dẫn tiểu cầuMột bộ phận nằm trên khu vực nạp của rôto giúp người vận hành định tuyến đúng đường ống tiểu cầu khi Nạp kít túi máu.Chỉ số dựa trên lượng thu tiểu cầu ước tính của một đơn vị tiểu cầu tạm thời (IPU). PYI có thể được sử dụng để phát triển phương pháp chọn IPU để pool.Sự kết hợp của một protocol cụ thể, thông tin thiết bị Reveos và mã vạch cụ thể. Các quy trình được định cấu hình trong phần mềm quản lý hệ thống Reveos và sau đó được chuyển sang thiết bị Reveos. Người vận hành chọn một quy trình để tách máu toàn phần thành các thành phần trên thiết bị.Một tập hợp các hoạt động hệ thống được xác định trước, để cho ra một tập hợp các sản phẩm cụ thể.
Khối hồng cầu đã sẵn sàng để thêm dung dịch bảo quản, để lọc và bảo quản sau quy trình điều chế. Ống dây dẫn bạch cầuSản phẩm phụ của quy trình điều chế, chứa hầu hết các tế bào bạch cầu (WBC), với một ít huyết tương và hồng cầu (RBC).Phần mềm ứng dụng quản lý hệ thống, là một phần của Hệ thống xử lý máu tự động Reveos.Phần bên trong thiết bị, gồm buồng ly tâm, bucket, nắp và chốt bucket, cảm biến, van và điều dẫn ống dây.
Màn hình cảm ứng. Trong hướng dẫn sử dụng, "trang" là nói đến trang web trong phần mềm quản lý hệ thống Reveos, hoạt động trên nền tảng web. "Màn hình" được dùng là màn hình cảm ứng trên thiết bị Reveos. Chữ viết tắt của quy trình vận hành tiêu chuẩn.Nút màu đỏ gần màn hình cảm ứng cho phép bạn dừng một quy trình, nếu cần.Người của trung tâm truyền máu, chịu trách nhiệm cấu hình phần mềm quản lý hệ thống Reveos. Quản trị viên hệ thoongscos thể xử lý các lỗi liên quan đến cấu hình
Bảng chú giải-4 Hướng dẫn vận hành Hệ thống xử lý máu tự động Reveos® - Phiên bản 1.1

TĐại diện kỹ thuật
Hệ thống kiểm soát nhiệt độ
Màn hình cảm ứng
Dẫn hướng ống dây
UQuản lý người dùng
VVan (van hàn)
WTúi máu toàn phần
thiết bị, cấu hình quy trình, và/ hoặc quyền ứng dụng phần mềm quản lý hệ thống Reveos.
Đại diện của Terumo BCT, người cần được liên hệ nếu có bất kỳ lỗi phần cứng nào hoặc các vấn đề khác mà nhà điều hành hoặc quản trị viên hệ thống không thể khắc phục.Hệ thống quản lý phạm vi nhiệt độ của buồng ly tâm.
Màn hình tương tác trên thiết bị giúp bạn theo dõi và tương tác với hệ thống.Một vật giúp dẫn hướng ống dây túi máu trong thiết bị Reveos để đảm bảo việc ép tối ưu. Các dẫn hướng được đánh số đặt quanh các van giúp nạp đúng các kít túi máu.
Là người ở trung tâm máu, có trách nhiệm cấu hình người dùng trong phần mềm quản lý hệ thống Reveos. người quản lý này có thể quản lý tài khoản và quyền của người dùng.
Bộ phận giữ ống dây túi máu thành phần vào đúng vị trí trong quy trình điều chế. Chúng tự động đóng, mở theo các khoảng thời gian khác nhau để các thành phần máu ra khỏi túi máu toàn phần và đi vào các túi máu thành phần. Ở cuối chu trình ép, chúng sẽ hàn các ống dây lại.
Túi máu trong kít túi máu, đầu tiên được sử dụng để lấy máu toàn phần từ người hiến, sau đó được dùng để tách máu toàn phần thành các thành phần máu.
Hướng dẫn vận hành Hệ thống xử lý máu tự động Reveos® - Phiên bản 1.1 Bảng chú giải-5

Bảng chú giải
Bảng chú giải-6 Hướng dẫn vận hành Hệ thống xử lý máu tự động Reveos® - Phiên bản 1.1

©2014 Terumo BCT, Inc. Part No. 986351-536 Reorder No. 988024-002
Hệ thống xử lý máu tự độngReveos® Hướng dẫn vận hành - Phiên bản 1.1
Terumo BCT, Inc.10811 West Collins AvenueLakewood, Colorado 80215-4440USA
USA Phone: 1.877.339.4228Phone: +1.303.231.4357Fax: +1.303.542.5215
Terumo BCT Europe N.V.Europe, Middle East and AfricaIkaroslaan 411930 ZaventemBelgium
Phone: +32.2.715.05.90Fax: +32.2.721.07.70
Terumo BCT Latin America S.A.La Pampa 1517 – 12th FloorC1428DZEBuenos AiresArgentina
Phone: +54.11.5530.5200Fax: +54.11.5530.5201
TERUMOBCT.COM
Terumo BCT (Asia Pacific) Ltd.Room 3903-3903A, 39/FACE Tower, Windsor House311 Gloucester RoadCauseway Bay, Hong Kong
Phone: +852.2283.0700Fax: +852.2576.1311
Terumo BCT Japan, Inc.Takanawa Park Tower 13F 20-14, 3-chome,Higashi Gotanda, Shinagawa-ku,Tokyo, 141-0022 Japan
Phone: +81.3.6743.7890Fax: +81.3.6743.9800

Reveos® Automated Blood Processing System
Operator’s Manual for Version 1.1

Reveos® Automated Blood ProcessingSystem Operator's Manual for Version 1.1
Part No. 986351-536B Reorder No. 988024-002B
2019-11
©2019 Terumo BCT, Inc.
Reveos is a registered trademark of Terumo BCT, Inc.
Terumo BCT is a registered trademark of Terumo Corporation.
Microsoft, Internet Explorer, Silverlight, SQL Server, and Windows are either registered trademarks or trademarks of Microsoft Corporation in the United States and/or other countries.
The Reveos® Automated Blood Processing System may be covered by one or more of the following patents:
United States: 7235041; 7279107; 7347932; 7396451; 7413665; 7497944; 7648639; 7674221; 7708889; 7766809; 7819793; 7833185; 8070665; 8120760; 8173027; 8236184; 8277406; 8287742, 8540614; 8337380; 8366086; and 8840535
And counterpart foreign patents:
Germany: 60037918.3; 60318418.9; 60322600.0; 60331794.4; 60340696.3; 602005018443.0; 602005033803.9; 602006007917.6; 602007020019.9; 602007025628.3; 602007027066.9; and 602010015953.1
Great Britain: 1494735; 1627651; 1640027; 1709983; 1736187; 1920792; 2091593; and 2509655
Japan: 4376635; 4800617; 4938465; 4960349; 5038150; 5204166; 5161301; 5175184; 5259595; 5405313; 5410470; 5519050; and 5554778
The Task Scheduler Manager Wrapper Software (Copyright 2003-2010 David Hall) IS PROVIDED “AS IS” WITHOUT WARRANTY OF ANY KIND, EXPRESS OR IMPLIED, INCLUDING BUT NOT LIMITED TO THE WARRANTIES OF MERCHANTABILITY, FITNESS FOR A PARTICULAR PURPOSE AND NONINFRINGEMENT. IN NO EVENT SHALL THE AUTHORS OR COPYRIGHT HOLDERS BE LIABLE FOR ANY CLAIM, DAMAGES OR OTHER LIABILITY, WHETHER IN AN ACTION OF CONTRACT, TORT OR OTHERWISE, ARISING FROM, OUT OF OR IN CONNECTION WITH THE SOFTWARE OR THE USE OR OTHER DEALINGS IN THE SOFTWARE.
Terumo BCT, Inc.10811 W. Collins AvenueLakewood, Colorado 80215USAUSA Phone: +1.877.339.4228Phone: +1.303.231.4357USA Fax: +1.866.715.6768Fax: +1.303.542.5215
Terumo BCT Europe N.V.Ikaroslaan 411930 ZaventemBelgiumPhone: +32.2.715.05.90Fax: +32.2.721.07.70
TERUMOBCT.COM

Contents
1: IntroductionThe Reveos Automated Blood Processing System ............................................................................................... 1-2
Intended Audience ..................................................................................................................................... 1-2
Document Conventions ..................................................................................................................................... 1-3
Note, Caution, and Warning Definitions .................................................................................................. 1-4
Page and Screen Definitions ...................................................................................................................... 1-4
Warnings and Cautions ............................................................................................................................. 1-4
Return of Used Product ...................................................................................................................................... 1-6
2: System OverviewReveos System Overview .................................................................................................................................... 2-2
Reveos System Process Overview ............................................................................................................... 2-2
Reveos System Manager Overview ............................................................................................................. 2-2
Reveos Device Components ............................................................................................................................... 2-3
Reveos Device Touch Screen Icons and Buttons ........................................................................................ 2-5
External cooled water source .................................................................................................................... 2-14
System Tests ..................................................................................................................................................... 2-15
Navigating Reveos System Manager ................................................................................................................. 2-16
Check Boxes, Drop-Down Menus, Radio Buttons, and the Carousel ...................................................... 2-19
Adding and Editing Information ............................................................................................................. 2-20
3: Operating the DevicePreprocessing Overview ...................................................................................................................................... 3-2
Setting Up and Moving the Device .................................................................................................................... 3-3
Reveos System Installation ......................................................................................................................... 3-3
Moving the Device .................................................................................................................................... 3-3
Turning On the Reveos Device .......................................................................................................................... 3-5
System Tests .............................................................................................................................................. 3-5
Turning Off the Reveos Device .......................................................................................................................... 3-5
Reveos® Automated Blood Processing System Operator's Manual for Version 1.1 i

Verify That the Device Is Online ........................................................................................................................ 3-6
Selecting a Procedure for the Device ................................................................................................................... 3-6
Entering Barcode Information into the Device ................................................................................................... 3-7
Scanning Barcodes ..................................................................................................................................... 3-7
Entering Information Manually ............................................................................................................... 3-10
Reviewing and Deleting Barcodes ..................................................................................................................... 3-11
Loading a Blood Bag Set ................................................................................................................................... 3-13
Loading a Counterbalance Bag ......................................................................................................................... 3-21
Procedure Management .................................................................................................................................... 3-23
Ending a Procedure ................................................................................................................................. 3-25
Platelet Yield Index .................................................................................................................................. 3-26
Unloading a Blood Bag Set ............................................................................................................................... 3-27
Unloading a Counterbalance Bag ..................................................................................................................... 3-29
4: Alarms and TroubleshootingAlarms and Troubleshooting .............................................................................................................................. 4-2
Reveos Alerts and Alarms .................................................................................................................................... 4-4
5: Maintaining the DeviceDaily Preventive Maintenance ............................................................................................................................ 5-2
Routine Cleaning ............................................................................................................................................... 5-3
Routine Cleaning Procedure ...................................................................................................................... 5-3
Cleaning After a Blood Spill ............................................................................................................................... 5-6
Blood Spill Cleaning Procedure ................................................................................................................. 5-6
Dry Check Procedure ....................................................................................................................................... 5-11
Running the Dry Check Procedure .......................................................................................................... 5-11
Service Information .......................................................................................................................................... 5-12
Preventive Service Maintenance ........................................................................................................................ 5-13
6: Configuring the Reveos System ManagerAccessing the Software and Viewing Version Information .................................................................................. 6-2
Opening Reveos System Manager .............................................................................................................. 6-2
Logging In to Reveos System Manager ....................................................................................................... 6-2
Logging Out of Reveos System Manager .................................................................................................... 6-2
Changing Your Password ........................................................................................................................... 6-3
Viewing Software Version Information ...................................................................................................... 6-3
Configuring Reveos Devices Within Reveos System Manager ............................................................................ 6-4
Configuring Facilities ......................................................................................................................................... 6-5
Creating a Facility ...................................................................................................................................... 6-5
Editing a Facility ........................................................................................................................................ 6-6
ii Reveos® Automated Blood Processing System Operator's Manual for Version 1.1

Deleting a Facility ...................................................................................................................................... 6-6
Associated Devices ..................................................................................................................................... 6-6
Configuring the Application ............................................................................................................................... 6-7
Assigning Permissions ......................................................................................................................................... 6-9
Groups ....................................................................................................................................................... 6-9
Users ........................................................................................................................................................ 6-11
Configuring the General Device ....................................................................................................................... 6-15
Configuring Individual Devices ........................................................................................................................ 6-17
Configuring Barcode Definitions ...................................................................................................................... 6-19
Creating a Barcode ................................................................................................................................... 6-19
Editing a Barcode .................................................................................................................................... 6-20
Deleting a Barcode ................................................................................................................................... 6-20
Configuring Procedures .................................................................................................................................... 6-21
Creating a Procedure ............................................................................................................................... 6-21
Editing a Procedure ................................................................................................................................. 6-23
Associated Devices ................................................................................................................................... 6-23
7: Searches and ReportsThe Reports Tab ................................................................................................................................................ 7-2
Reports Overview ............................................................................................................................................... 7-3
Managing Reports .............................................................................................................................................. 7-4
Configuring a Report ................................................................................................................................. 7-4
Creating and Scheduling an Insight Report ............................................................................................... 7-4
Creating and Saving an Unscheduled Insight Report ................................................................................. 7-6
Creating and Scheduling a Custom Query ................................................................................................. 7-7
Creating and Saving an Unscheduled Custom Query Report ..................................................................... 7-8
Editing a Report ........................................................................................................................................ 7-8
Deleting a Report ...................................................................................................................................... 7-9
Running a Report ...................................................................................................................................... 7-9
Calendar View .................................................................................................................................................. 7-11
Downloading a Report from the Calendar View ...................................................................................... 7-11
At-A-Glance Reporting ..................................................................................................................................... 7-12
Chart View .............................................................................................................................................. 7-13
Details View ............................................................................................................................................ 7-20
Donation ID Search ......................................................................................................................................... 7-23
Reveos® Automated Blood Processing System Operator's Manual for Version 1.1 iii
8: System SpecificationsSystem Specifications .......................................................................................................................................... 8-2
EMC Information .............................................................................................................................................. 8-4
Symbols and certification ................................................................................................................................... 8-9
Glossary
Index
iv Reveos® Automated Blood Processing System Operator's Manual for Version 1.1

1Introduction
Reveos® Automated Blood Processing System Operator's Manual for Version 1.1 1-1

The Reveos Automated Blood Processing System
Intended Use of the Reveos DeviceThe Reveos device is intended to automatically separate units of whole blood into blood components.
Intended Use of the Reveos System Manager SoftwareThe Reveos System Manager is a software application that manages Reveos procedures and processingdata.
Intended Use of the Reveos Blood Bag SetThe Reveos Blood Bag Set is intended to collect a unit of whole blood and to process the unit on theReveos device, producing blood components.
Intended AudienceThis manual is written for blood center personnel who process whole blood using the Reveos AutomatedBlood Processing System. It is also written for those involved in training, management, reporting, andquality assurance.
This manual guides you through using the Reveos Automated Blood Processing System to separatewhole blood into components. It also explains how to respond to system messages, such as alerts andalarms, and how to maintain and clean the system.
Persons who perform procedures, maintain, repair, and replace parts on the Reveos system should bethoroughly familiar with relevant sections of this manual. They should also be appropriately trainedbefore using the Reveos system.
Introduction
1-2 Reveos® Automated Blood Processing System Operator's Manual for Version 1.1

Document ConventionsThis manual uses certain conventions to help you identify information. This section describes theseconventions.
Numbered ListsNumbered lists indicate sequential operations.
BulletsBullets (•) indicate items in a list that are not sequential.
Bold and Italic TextBold text is used for the following:• Chapter titles and section headings
• Figure titles
• Table titles
• Notes, cautions, and warnings
• System elements, such as:– Buttons
– Other options
• Reveos System Manager elements, such as:– Menus
– Menu commands
– Task page titles
– Dialog box titles
– Tabs
– Buttons
– Other options
Italic text is used for the following:• Text that a user enters into the Reveos System Manager software pages or web browser
• Titles of books, manuals, and guides
Document Conventions
Reveos® Automated Blood Processing System Operator's Manual for Version 1.1 1-3

Note, Caution, and Warning DefinitionsThe following examples define how notes, cautions, and warnings appear in this document:
Note: Emphasizes important details.
Caution: Alerts the user to the possibility of a problem with the machine associated with its use or misuse. Suchproblems include machine malfunction, machine failure, damage to the machine or damage to other property. Thecaution statement includes the precaution that should be taken to avoid the hazard.
Warning: Advises the user of serious hazards, consequences, or conditions which are likely to resultin a harmful reaction, trauma, or death to the patient or user(s). For computer software products, awarning advises the user of conditions likely to result in data loss, security violations, or equipmentdamage. A warning begins by clearly stating the immediate potential hazard, and provides informationon how to avoid it, if possible.
Page and Screen DefinitionsThe following examples define how the terms “page” and “screen” are used when referring to devicesoftware and application software.• “Page” refers to a page in the Reveos System Manager software.
• “Screen” refers to the touch screen on the Reveos device.
Warnings and Cautions
Warnings
1. Do not use operating or maintenance procedures other than those published by Terumo BCT. Donot use accessory devices that are not recommended by Terumo BCT. To do so may result in injuryor death.
2. The Reveos device is intended to process human whole blood. If the device is used in a manner notspecified by Terumo BCT, the protective mechanisms that are built into the device may beimpaired.
3. Do not use the following materials with the system:• Flammable or explosive materials
• Materials that cause vigorous chemical reactions with one another
4. Use only power plugs and adapters specified by Terumo BCT. The use of other plugs orinadequately rated cords can damage the device or cause bodily harm.
5. Do not use the Reveos device’s sealing mechanism while the device lid is open. If the lid is open,manually seal all tubing with an external sealer.
6. All buckets must contain a loaded blood bag set or counterbalance bag before beginning aprocedure. Failure to properly load all buckets can result in a hydraulic leak.
Introduction
1-4 Reveos® Automated Blood Processing System Operator's Manual for Version 1.1

Cautions
1. Unplug the power to the device before servicing to prevent possible electrical hazard or potentialdamage to the device.
2. Always maintain a 152 mm (6 in) minimum perimeter, or clearance envelope, around the device.Do not stand in the clearance envelope for longer than necessary.
3. Position the device so that the power switch is easily accessible, in case the device needs to bepowered off in an emergency.
4. There must be an emergency switch located away from the device that can disconnect the devicefrom the main power source in case of a malfunction. The system operator must know the locationof this switch and have access to the switch.
5. Before using the device, ensure that the front feet are lowered and that the casters are locked.
6. To avoid personal injury, keep fingers clear of the hinges when closing the device lid and bucket lids.
7. To avoid personal injury or damage to the device, use proper techniques when you lift or move thedevice.
8. Ensure that all bucket lids are latched before you close the device lid to prevent any damage to therotor during centrifugation.
9. When cleaning, do not use excessive liquid on the sensors, as this may damage them. Use only adampened cloth, an alcohol pad or a cotton swab.
10. If you see hydraulic fluid (blue liquid) anywhere inside the device, remove the device from use andcontact your authorized Terumo BCT service representative.
11. If the Reveos device or accessories are incorporated into an external system, it is the responsibility ofthe system assembler. The Reveos system is not designed or intended to be part of a larger system orassembly.
12. Do not lean against the device at any time.
13. Do not run a processing procedure if the exterior panels have been removed from the device.
Document Conventions
Reveos® Automated Blood Processing System Operator's Manual for Version 1.1 1-5

Return of Used ProductIf for any reason this product must be returned to Terumo BCT, Inc., a returned goods authorization(an RGA number) is required from Terumo BCT prior to shipping.
Instructions for cleaning and materials, including appropriate shipping containers, proper labeling, andan RGA number, may be obtained from the Terumo BCT Quality Assurance Department.
IT IS THE RESPONSIBILITY OF THE HEALTH CARE INSTITUTION TO ADEQUATELYPREPARE AND IDENTIFY THE PRODUCT FOR RETURN SHIPMENT.
Please contact your local representative for information regarding returned goods and productcomplaints.
Introduction
1-6 Reveos® Automated Blood Processing System Operator's Manual for Version 1.1

2System Overview
Reveos® Automated Blood Processing System Operator's Manual for Version 1.1 2-1

Reveos System OverviewThe Reveos system automates the process of manufacturing blood components from whole blood.
The system includes:• The Reveos device
• The Reveos System Manager software application
• The Reveos blood bag set
Reveos System Process OverviewWhole blood is drawn from a donor into a Reveos blood bag set. The whole blood is transported to thefacility for processing. At the facility, the operator loads up to four blood bag sets into the Reveos device,closes the device lid, and touches a button on the touch screen to begin the processing procedure. Once aprocedure begins, the following events occur:
1. The rotor begins to spin.
2. Whole blood is separated into components.
3. In the first bucket, plasma, platelets, and residual leukocytes are expressed into their respectiveproduct bags, depending on which protocol is being used.
4. Step 3 is repeated for the remaining whole blood units in the other buckets.
5. When expression is complete, the valves seal the tubing to the product bags.
6. When the processing procedure is complete, the device lid opens automatically.
Information regarding each procedure is shown on the touch screen. This information is transferred tothe Reveos System Manager. System administrators can access this information and run reports usingReveos System Manager.
Reveos System Manager OverviewReveos System Manager is a software application that manages procedures and product data. This data isautomatically transferred from the Reveos device to Reveos System Manager.
Reveos System Manager lets users perform the following tasks:• Configure Reveos devices
• Define users and assign permissions
• Configure barcodes and procedures
• Record and output process and product data
• Track information entered into the Reveos System Manager
• Generate and schedule reports
Reveos System Manager allows you to standardize workflow to meet the needs of your institution.
Reveos System Manager is installed by a Terumo BCT representative. Contact your Terumo BCTrepresentative with any questions regarding Reveos System Manager installation or maintenance.
System Overview
2-2 Reveos® Automated Blood Processing System Operator's Manual for Version 1.1

Reveos Device ComponentsFigure 2-1, Figure 2-2, Figure 2-3, Figure 2-4, Figure 2-5, and Figure 2-6 illustrate the maincomponents of the device.
Figure 2-1: Reveos device front
1 Device lid2 Power switch3 Stop button4 Touch screen5 Barcode scanner6 Access drawer7 Casters
Figure 2-2: Front caster detail
1 Knob2 Foot3 Caster
Reveos Device Components
Reveos® Automated Blood Processing System Operator's Manual for Version 1.1 2-3

Figure 2-3: Reveos device rotor compartment
1 Bucket2 Bucket lid3 Bucket-lid latch4 Blood component bag
holder5 Valves and line
sensors6 Hydraulic bladder7 Centrifuge basin8 Bucket sensors9 Rotor
Figure 2-4: Reveos device loading area detail
1 Line sensor2 Residual leukocyte
valve and tubingguides
3 Plasma valve andtubing guides
4 Platelet valve andtubing guides
5 Bag posts6 Platelet tubing router
System Overview
2-4 Reveos® Automated Blood Processing System Operator's Manual for Version 1.1

Figure 2-5: Sealing valve and tubing guide detail
1 Sealing valve2 Tubing guide
Figure 2-6: Blood bag set cross-connector detail
1 Ridge2 Platelet tubing3 Processing tubing4 Plasma tubing5 Residual leukocyte
tubing
Reveos Device Touch Screen Icons and ButtonsThe following tables list and describe each of the buttons and icons on the Reveos device touch screen.The icons and buttons are organized according to when they first appear during a procedure. If thepurpose of an icon or button varies by screen, then it is listed separately for each purpose.
Table 2-1: Barcode Entry screen buttons and icons
Button/Icon Name Description
Title bar Displays the name of the selected procedure as it isdefined in Reveos System Manager.
• If the title bar is light gray, then a procedure is not inprogress.
• If the title bar is green, then a procedure is in progress.
Select Procedurebutton
When touched, displays the Select Procedure screen.
Reveos Device Components
Reveos® Automated Blood Processing System Operator's Manual for Version 1.1 2-5

Table 2-1: Barcode Entry screen buttons and icons (continued)
Button/Icon Name Description
In Progress icon Appears while the Reveos device is updating procedureinformation that was transferred from Reveos SystemManager.
Scan Needed icon Indicates that the associated barcode has not beenscanned.
Operator icon Represents the Operator ID.
Barcode Scanner icon Represents the barcode scanner that is attached to theReveos device.
Online icon Appears in the upper-right corner of the touch screenwhen the device is communicating with Reveos SystemManager.
Offline icon Appears in the upper-right corner of the touch screenwhen Reveos System Manager is disconnected or is notcommunicating with the device.
Keyboard button When touched, displays the Keyboard Entry screen,which can be used to manually enter data.
Note: The Keyboard Entry screen is available only if it isconfigured in the Reveos System Manager.
System Overview
2-6 Reveos® Automated Blood Processing System Operator's Manual for Version 1.1

Table 2-1: Barcode Entry screen buttons and icons (continued)
Button/Icon Name Description
Bucket diagram Shows the status of each bucket during the loadingprocess. Each quadrant represents one of the fourbuckets in the Reveos device.• If the quadrant is green, then a blood bag set has been
scanned and loaded.
• If the quadrant is gray, then a counterbalance bag hasbeen scanned and loaded.
• If the quadrant is yellow, then the bucket is notenabled and a counterbalance bag must be scannedand loaded. The valves will remain closed.
A circle appears around the number after the operatorcloses the bucket lid. This indicates that barcodes havebeen assigned to that bucket. After the barcodes havebeen assigned to a bucket, touching the quadrant displaysthe More Barcode Information screen.
Whole Blood button Represents the whole blood bag. When touched, displaysthe More Barcode Information screen.
RBC button Represents the RBC bag. When touched, displays theMore Barcode Information screen.
Plasma button Represents the plasma bag. When touched, displays theMore Barcode Information screen.
Platelet button During three-component processing, represents theinterim platelet unit bag. When touched, displays theMore Barcode Information screen.
Note: This icon does not appear on the touch screen duringtwo‑component processing.
Back button When touched, clears the Operator ID scan and displaysthe Operator ID screen. The blood bag scans andcounterbalance bag scans are not cleared.
Scan Completed icon Indicates that the associated barcode has been scanned.
Reveos Device Components
Reveos® Automated Blood Processing System Operator's Manual for Version 1.1 2-7

Table 2-1: Barcode Entry screen buttons and icons (continued)
Button/Icon Name Description
Scan Number Represents the last barcode number that was scanned.
Skip button Allows the operator to skip to the next scan on the BarcodeEntry screen. This feature may be configured in ReveosSystem Manager to allow the operator to skip one or allremaining barcode scans. If this feature is not enabled inReveos System Manager, the operator cannot skip anybarcode scans.
Table 2-2: More Barcode Information screen buttons and icons
Button/Icon Name Description
Bucket icon The number following this icon represents the selectedbucket.
Barcode scanner icon The number following this icon represents the number ofscans that have been completed for the selected bucket.Counterbalance bag scans are not included.
Skip icon The number following this icon represents the number ofscans that have been skipped for the selected bucket.
Additional Scans icon Indicates that additional barcodes have been scanned forthe selected bucket, even though they do not appear onthe screen. The More Barcode Information screendisplays up to seven barcodes.
Delete Barcodesbutton
When touched, deletes all barcodes for the selectedbucket or all unassigned barcodes.
Continue button When touched, returns to the Barcode Entry screen.
System Overview
2-8 Reveos® Automated Blood Processing System Operator's Manual for Version 1.1

Table 2-3: Select Procedure screen buttons and icons
Button/Icon Name Description
Procedure Namebutton
When touched, selects the associated procedure.
• If the button is white and the circle on the left is empty,then the procedure is not currently selected.
• If the button is green and the circle on the left is filled,then the procedure is currently selected as the activeprocedure.
Cancel button When touched, cancels any selection made on the SelectProcedure screen and returns to the previous screen.
Continue button When touched, accepts the selection made on the SelectProcedure screen.
Scroll bar When touched, scrolls through procedures on the SelectProcedure screen.
Table 2-4: Keyboard Entry screen buttons and icons
Button/Icon Name Description
Delete button When touched, deletes characters on the Keyboard Entryscreen.
Space button When touched, enters a space between characters on theKeyboard Entry screen.
Continue button When touched, accepts information entered on theKeyboard Entry screen.
First Input icon Indicates that you are manually entering the barcoderequired for this procedure for the first time and that youmust re‑enter this barcode because it is marked as“critical” in Reveos System Manager. See “EnteringInformation Manually” on page 3-10.
Reveos Device Components
Reveos® Automated Blood Processing System Operator's Manual for Version 1.1 2-9

Table 2-4: Keyboard Entry screen buttons and icons (continued)
Button/Icon Name Description
Second Input icon Indicates that you are manually re‑entering the barcoderequired for this procedure because it is marked as“critical” in Reveos System Manager. See “EnteringInformation Manually” on page 3-10.
Shift button When touched, changes between uppercase andlowercase letters.
Note: The Keyboard Entry screen default display isuppercase letters.
Table 2-5: Whole Blood Loading screen buttons and icons
Button/Icon Name Description
Close Valves button When touched, closes the valves on the tubing (one at atime). The valves must be closed before the frangibleconnectors are broken.
In Progress icon Indicates that the device is currently closing the valves onthe tubing.
Break Frangible Connectoricon
Prompts the operator to break the frangible connectorbetween the whole blood bag and the cross-connector oneach blood bag set.
Donation ID Displays the Donation ID, if scanned. This barcode scanappears on all screens throughout the processingprocedure.
System Overview
2-10 Reveos® Automated Blood Processing System Operator's Manual for Version 1.1

Table 2-5: Whole Blood Loading screen buttons and icons (continued)
Button/Icon Name Description
Close Device Lid icon Prompts the operator to close the device lid beforebeginning a processing procedure.
Start Procedurebutton
When touched, starts the processing procedure.
Note: The Start Procedure button becomes activeonly after you close the device lid.
Table 2-6: End of Run Summary screen buttons and icons
Button/Icon Name Description
Plasma icon Represents the plasma bag. The estimated componentvolume appears below the icon.
Residual Leukocytes icon Represents the residual leukocytes bag. The estimatedcomponent volume appears below the icon.
Platelet icon During three-component processing, represents theinterim platelet unit bag. The estimated componentvolume appears below the icon. The Platelet Yield Indexvalue appears in the upper right section of the icon (notshown).
Expand button When touched, displays the More Information screen,which provides additional information about thecompleted processing procedure.
Collapse button When touched, displays the primary End of ProcedureSummary screen.
Reveos Device Components
Reveos® Automated Blood Processing System Operator's Manual for Version 1.1 2-11

Table 2-6: End of Run Summary screen buttons and icons (continued)
Button/Icon Name Description
Next Procedurebutton
When touched, exits the End of Procedure Summaryscreen and proceeds to the Barcode Entry screen toprepare for the next processing procedure. The NextProcedure button becomes active after the device lid isopened.
Note: Once you touch the Next Procedure button, youcan no longer access processing procedure data from the Endof Procedure Summary screen.
Procedure Number icon Indicates the unique ID number assigned to the currentprocessing procedure.
Device Name icon Indicates the name of the device used during the currentprocedure.
Note: Device names are configured in Reveos SystemManager.
Table 2-7: Alert and Alarm title bars
Icon Name Description
Alarm Title bar Displays the alarm number and the associated systemmessage.
Alert Title bar Displays the alert number and the associated systemmessage.
Reveos System Manager Icons
The following table lists and describes the buttons and icons in Reveos System Manager.
Table 2-8: Reveos System Manager buttons and icons
Button/Icon Name Description
Error icon Appears next to the incorrect information in ReveosSystem Manager.
Donation ID Searchbutton
Appears at the top right of all pages in Reveos SystemManager. Click the button to search the database for theDonation ID entered in the text box.
Report Complete icon Indicates that a report has been generated successfully.
System Overview
2-12 Reveos® Automated Blood Processing System Operator's Manual for Version 1.1

Table 2-8: Reveos System Manager buttons and icons (continued)
Button/Icon Name Description
Report In Progress icon Indicates that a report is currently being generated.
Report Unsuccessful icon Indicates that a report could not be successfullygenerated.
Report Scheduled icon Indicates that a report has been scheduled for the future.
Report Canceled icon Indicates that a scheduled report has been canceled.
Custom QueryReport indicator
Displays the time and name of a Custom Query report inthe Calendar View. Double-click the indicator to open thereport in Details view.
Insight Reportindicator
Displays the time and name of an Insight report in theCalendar View. Double-click the indicator to open thereport in Chart view.
Details View button When clicked, displays selected data from the Insightreport in a tabular format.
Chart View button When clicked, displays selected data from the Insightreport as a chart or graph.
Print button When clicked in the chart view of an Insight report, opensa print dialog box for the charts currently displayed on thepage.
Export button When clicked in the details view of a report, opens the FileDownload dialog box.
Reveos Device Components
Reveos® Automated Blood Processing System Operator's Manual for Version 1.1 2-13
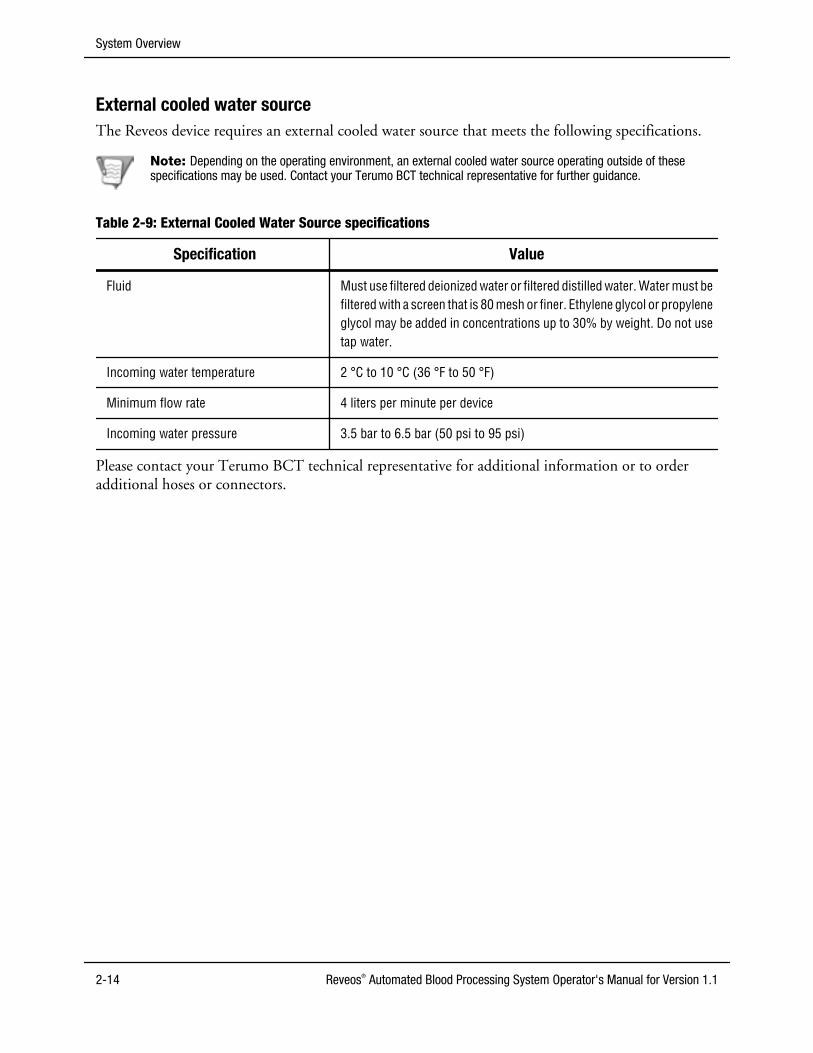
External cooled water sourceThe Reveos device requires an external cooled water source that meets the following specifications.
Note: Depending on the operating environment, an external cooled water source operating outside of thesespecifications may be used. Contact your Terumo BCT technical representative for further guidance.
Table 2-9: External Cooled Water Source specifications
Specification Value
Fluid Must use filtered deionized water or filtered distilled water. Water must befiltered with a screen that is 80 mesh or finer. Ethylene glycol or propyleneglycol may be added in concentrations up to 30% by weight. Do not usetap water.
Incoming water temperature 2 °C to 10 °C (36 °F to 50 °F)
Minimum flow rate 4 liters per minute per device
Incoming water pressure 3.5 bar to 6.5 bar (50 psi to 95 psi)
Please contact your Terumo BCT technical representative for additional information or to orderadditional hoses or connectors.
System Overview
2-14 Reveos® Automated Blood Processing System Operator's Manual for Version 1.1

System TestsWhen the device is turned on, the system performs a series of tests and calibrates all of the valves. Thesetests may take a moment.
Test Group Name Functions Tested
Self-diagnostic testsThe system performs these tests each time you turn onthe device.
• Device-lid lock control and function
• Rotor control and function
• Rotor speed and power
• Hydraulic pressure
• System communication
Operation testsThe system performs these tests during operation,centrifugation, separation, and expression.
• Pressure
• Hydraulic flow rate
• Hydraulic position
• Tubing sensor and bucket sensor calibration
• Vibration sensor
• Valve states
• Temperature sensors
• Rotor door lock
• Leak detector
Continuous monitoringThe system monitors various functions during theprocedure and triggers an alarm if the results areunexpected.
• Communication between the device and ReveosSystem Manager
• Rotor speed
• Lid positioning
• Lid locks
• Lid closure during operation
• Bucket latch sensors
• Leak detection in the rotor
• Device temperature
• Inlet water temperature
• Vibration levels
• Stop button activity
• Hydraulic fluid positioning
System Tests
Reveos® Automated Blood Processing System Operator's Manual for Version 1.1 2-15

Navigating Reveos System Manager
Reveos System Manager provides multiple methods of navigation to help you find the information youneed to work efficiently.
Use tabs, menus, content lists, and buttons to navigate through the pages in Reveos System Manager.You can view or use pages based on the permissions that have been assigned to you. This section describesthe functionality of each element.
Navigation Tools Used in Reveos System ManagerEvery page displays the top navigation bar containing the tabs used to access Reveos System Managerpages. Within each page, there is a menu bar, content list, details, sections, and buttons. Each element islabeled in Figure 2-7 and described in Table 2-10.
1
2
3 4
5
6
Figure 2-7: Reveos System Manager page with navigation tools identified
System Overview
2-16 Reveos® Automated Blood Processing System Operator's Manual for Version 1.1

Table 2-10: Reveos System Manager page element descriptions
Name Description
1 Tabs Tabs allow the user to navigate through theapplication. The following tabs appear at the top ofeach page:• Home displays the version and build number of
the software. This is the default page after a userlogs in.
• Configuration allows the user to configure theoverall system (see Chapter 6, “ConfiguringReveos System Manager”).
• Reports allows the user to manage, view andrun reports (see Chapter 7, “Searches andReports”).
2 Menu bar This list is located on the left side of all Reveos SystemManager pages. All menu items are pre-populated andassociated with their respective tabs.
3 Content list This list is located to the right of the menu bar. Thecontent list is associated with the menu bar itemselected. The items in the content list vary dependingupon which item is selected in the menu bar.
4 Details This section, located to the right of the content list,contains information regarding the menu or contentlist item selected.
5 Buttons Software pages contain New, Edit, Delete, Save,and/or Cancel buttons at the bottom of some pages.The Log In button appears on the login page. TheRun Now button appears on some reports pages.Buttons are described in detail in Table 2-11.
6 Donation ID Search This text box allows the user to search for a specificDonation ID.
Note: Not all tabs, menus, or content list items are visible at all times. Each user sees only the pages and buttonsthat he or she has permission to see or use.
Navigating Reveos System Manager
Reveos® Automated Blood Processing System Operator's Manual for Version 1.1 2-17
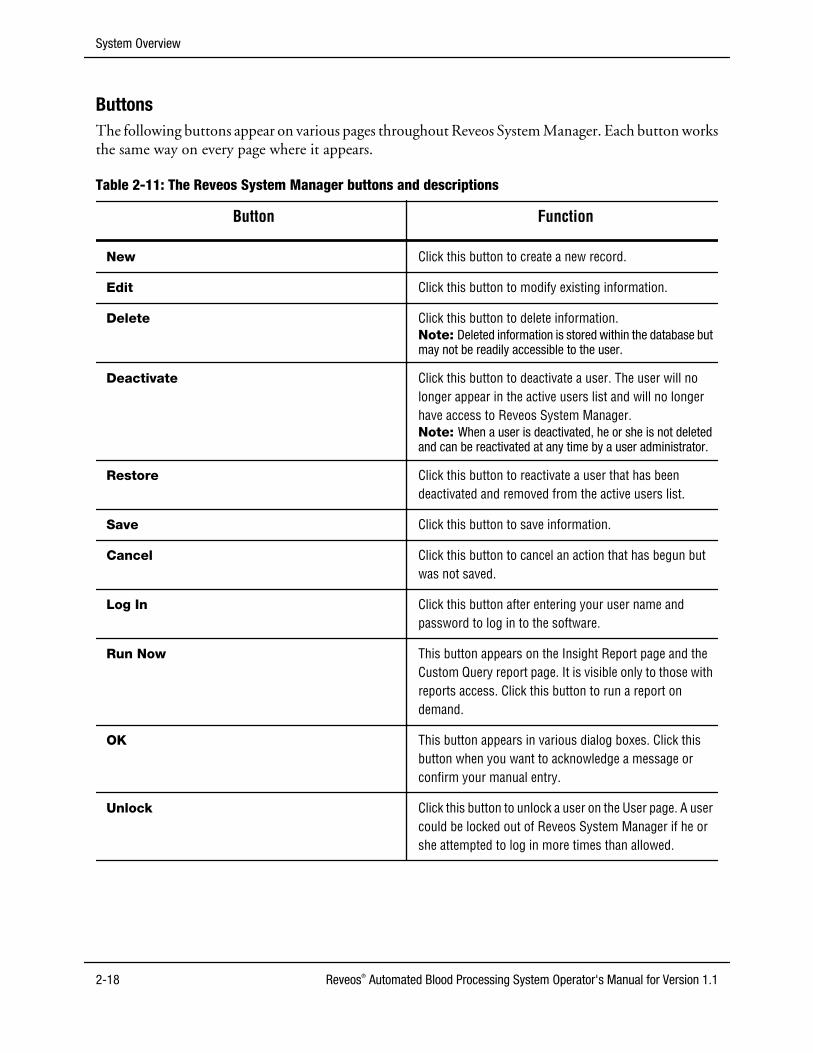
ButtonsThe following buttons appear on various pages throughout Reveos System Manager. Each button worksthe same way on every page where it appears.
Table 2-11: The Reveos System Manager buttons and descriptions
Button Function
New Click this button to create a new record.
Edit Click this button to modify existing information.
Delete Click this button to delete information.Note: Deleted information is stored within the database butmay not be readily accessible to the user.
Deactivate Click this button to deactivate a user. The user will nolonger appear in the active users list and will no longerhave access to Reveos System Manager.Note: When a user is deactivated, he or she is not deletedand can be reactivated at any time by a user administrator.
Restore Click this button to reactivate a user that has beendeactivated and removed from the active users list.
Save Click this button to save information.
Cancel Click this button to cancel an action that has begun butwas not saved.
Log In Click this button after entering your user name andpassword to log in to the software.
Run Now This button appears on the Insight Report page and theCustom Query report page. It is visible only to those withreports access. Click this button to run a report ondemand.
OK This button appears in various dialog boxes. Click thisbutton when you want to acknowledge a message orconfirm your manual entry.
Unlock Click this button to unlock a user on the User page. A usercould be locked out of Reveos System Manager if he orshe attempted to log in more times than allowed.
System Overview
2-18 Reveos® Automated Blood Processing System Operator's Manual for Version 1.1

Check Boxes, Drop-Down Menus, Radio Buttons, and the CarouselReveos System Manager pages use a combination of check boxes, drop-down menus, radio buttons, anda carousel.• Check boxes allow you to make a selection. To select an item, click the box, and a check mark
appears. To clear a check mark, click the box, and the check mark disappears.
• Drop-down menus allow you to select an existing piece of information.
• Radio buttons allow you to select only one option in a list.
1
2
3
Figure 2-8: Radio buttons, drop-down menu, and check box examples
1 Radio buttons2 Drop-down menu3 Check box
• The carousel navigation tool allows you to alternate between options without leaving the page. Thecarousel appears on the Procedure page.
Figure 2-9: Example of the carousel on the Procedure page
Navigating Reveos System Manager
Reveos® Automated Blood Processing System Operator's Manual for Version 1.1 2-19
Adding and Editing InformationUsers with full access to the Reveos System Manager can add new information and edit existinginformation in the Reveos System Manager. When adding a new record or editing an existing record, theuser can navigate away from the page by clicking the Save or Cancel button.
System Overview
2-20 Reveos® Automated Blood Processing System Operator's Manual for Version 1.1

3Operating the Device
Reveos® Automated Blood Processing System Operator's Manual for Version 1.1 3-1

Preprocessing OverviewThe following steps provide a summary of the tasks carried out by an Operator during preprocessing:
1. Select a procedure. See “Selecting a Procedure for the Device” on page 3-6.
2. Scan the Operator ID barcode, if prompted. See “Entering Barcode Information into the Device”on page 3-7.
3. Scan the requested barcodes for the blood bag set or counterbalance bag. See “Entering BarcodeInformation into the Device” on page 3-7.
4. Load the blood bag set or counterbalance bag. See “Loading a Blood Bag Set” on page 3-13 or “Loading a Counterbalance Bag” on page 3-21.
5. Latch the bucket lid.
6. Repeat steps 3, 4, and 5 until all four buckets are loaded.
Note: All buckets must contain a loaded blood bag set or counterbalance bag before beginning a procedure.Failure to properly load all buckets can result in a hydraulic leak.
7. Touch the Close Valves button.
8. Break the frangible connector on each blood bag set.
9. Close the device lid.
10. Touch the Start Procedure button.
Operating the Device
3-2 Reveos® Automated Blood Processing System Operator's Manual for Version 1.1

Setting Up and Moving the Device
Reveos System InstallationInstructions for unpacking and assembling the Reveos system are included with the shipping packaging.Your authorized Terumo BCT service representative unpacks and assembles the system and performsthe installation tests.
Caution: Always maintain a 152 mm (6 in) minimum perimeter, or clearance envelope, around the device. Do notstand in the clearance envelope for longer than necessary.
Moving the Device
The Reveos device is equipped with casters. Before moving the device, ensure that the floor is level anddry. It is not necessary to level the device after it is moved if the floor surface is within the floor sloperequirements listed in Table 8-2.
If you need to move the device long distances or on uneven surfaces, contact your Terumo BCTrepresentative.
After moving the device, ensure that it is plugged into a RCCD (GFCI)-protected electrical powercircuit before turning it on. See Table 8-1 for more information.
Unlocking the Front Casters
1. Rotate the knob counterclockwise until the foot is raised completely off the floor, as shown in Figure 3-1.
Figure 3-1: Unlocked caster with foot raised completely off the floor
2. Repeat step 1 with the other caster before attempting to roll the device.
Setting Up and Moving the Device
Reveos® Automated Blood Processing System Operator's Manual for Version 1.1 3-3
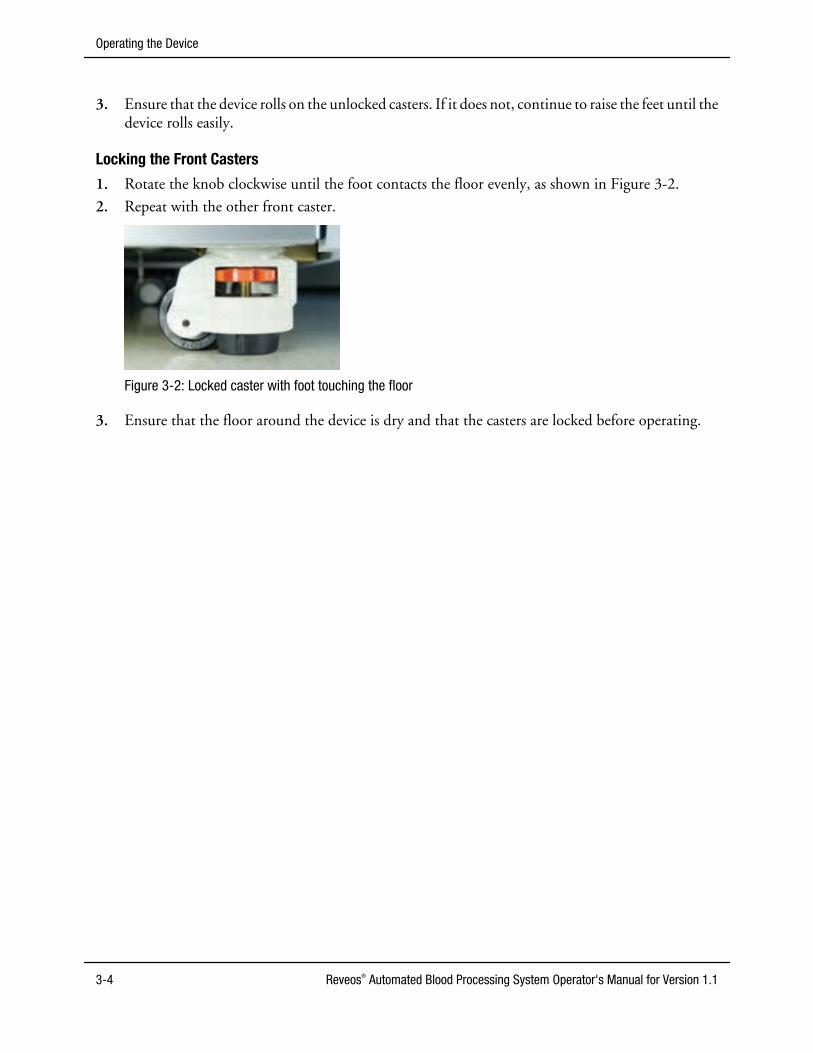
3. Ensure that the device rolls on the unlocked casters. If it does not, continue to raise the feet until thedevice rolls easily.
Locking the Front Casters
1. Rotate the knob clockwise until the foot contacts the floor evenly, as shown in Figure 3-2.
2. Repeat with the other front caster.
Figure 3-2: Locked caster with foot touching the floor
3. Ensure that the floor around the device is dry and that the casters are locked before operating.
Operating the Device
3-4 Reveos® Automated Blood Processing System Operator's Manual for Version 1.1

Turning On the Reveos Device
Note: Activate the external cooled water source before turning on the device.
1. Make sure that the proper power cord is attached to the device and plugged into the appropriatepower source. See “System Specifications” on page 8-2 for more information.
2. Ensure that all buckets and line sensors are empty.
3. Turn on the device by pressing the power switch on the upper-right side of the device.
Once the device completes the startup process, it displays the system splash screen.
Figure 3-3: The Reveos system splash screen
Note: If the splash screen does not appear, turn off the device, then turn it on again.
System TestsThe system performs various self-diagnostic tests upon startup and monitors itself throughout theprocedure. If the system detects a condition that requires attention, it triggers an alert or an alarm,depending on the level of severity. See “System Tests” on page 2-15 for more information.
Turning Off the Reveos DeviceTurn off the device by pressing the power switch on the upper-right side of the device. You can turn offthe device at any time. If the device is running a procedure, it is recommended that you press the stopbutton before turning off the device.
Turning On the Reveos Device
Reveos® Automated Blood Processing System Operator's Manual for Version 1.1 3-5

Verify That the Device Is OnlineCheck for the Online icon, shown in the upper-right corner of the touch screen, to ensure that theReveos device is communicating with Reveos System Manager. (See Table 2-1.) If the device is online,all procedure data will be transferred to Reveos System Manager at the end of each procedure.
If the device is offline, the Offline icon will appear in the upper-right corner of the touch screen. (SeeTable 2-1.) When the device is offline, an operator can still run a procedure. However, procedureinformation will not be transferred to Reveos System Manager until the device is online again. Whenoffline, the device will have limited functionality. If the device is offline, verify the Ethernet connectionbetween the device and the computer running Reveos System Manager.
Selecting a Procedure for the DeviceAfter the splash screen, the Barcode Entry screen appears on the touch screen. The Select Procedurescreen allows you to select the procedure you want to perform. To access this screen, touch the Select
Procedure button on the Barcode Entry screen. Table 2-3 describes the buttons and icons that appear onthe Select Procedure screen.
Perform the following steps only if you need to change the procedure that is listed in the Title bar of theBarcode Entry screen. Otherwise, proceed to “Entering Barcode Information into the Device” onpage 3-7. To add new procedures or edit existing ones, refer to “Creating a Procedure” on page 6-21and make the necessary updates in the Reveos System Manager. All procedure configurationinformation originates in the Reveos System Manager.
1. Touch the Select Procedure button to display the Select Procedure screen.
2. Select the procedure you want from the list.
Figure 3-4: The Select Procedure screen with a procedure selected
The In Progress icon is displayed while the procedure loads.
3. Touch the Continue button to return to the Barcode Entry screen.
Operating the Device
3-6 Reveos® Automated Blood Processing System Operator's Manual for Version 1.1

Entering Barcode Information into the Device
Figure 3-5 and Figure 3-6 show the Barcode Entry screen, which allows you to scan or manually enterinformation, such as Operator ID and other barcodes, before you begin a procedure. See Table 2-1 for adescription of buttons and icons that appear on the Barcode Entry screen.
Figure 3-5: Barcode Entry screen showing Operator ID scan needed
Figure 3-6: Barcode Entry screen showing whole blood bag scan needed
Use the barcode scanner attached to the device to scan the requested barcode. To manually enter theinformation requested, touch the Keyboard icon located at the lower-right of the touch screen.
The following sections explain each entry method in detail.
Scanning BarcodesThe touch screen prompts you to scan the configured barcodes for a procedure. The number andsequence of required barcodes may vary by procedure. All barcodes and entry sequences are configuredin Reveos System Manager. From the Barcode Entry screen, complete the following steps to enterbarcodes into the Reveos device:
Entering Barcode Information into the Device
Reveos® Automated Blood Processing System Operator's Manual for Version 1.1 3-7

1. If the system prompts you for an Operator ID barcode, scan it with the barcode scanner.
Note: If you want to manually enter the information instead of scanning, see “Entering Information Manually”on page 3-10. The keyboard must be enabled in the Reveos System Manager in order to access this feature.
Note: The Skip button will not appear if the barcodes shown are configured as “critical” in the ReveosSystem Manager. Critical barcodes cannot be skipped.
1 2
3
4
Figure 3-7: Example Barcode Entry screen prompt for an Operator ID
1 Select Procedure button
2 Online icon
3 Skip button
4 Keyboard button (shown if configured in Reveos System Manager)
If the procedure is configured as routine in the Reveos System Manager, the device prompts you toenter a whole blood Donation ID barcode as shown in Figure 3-8.
Note: If you are using a counterbalance bag, scan the barcode on the counterbalance bag at this time.
Figure 3-8: Example Barcode Entry screen prompt for the whole blood Donation ID
Operating the Device
3-8 Reveos® Automated Blood Processing System Operator's Manual for Version 1.1

2. Scan the requested barcode(s) with the barcode scanner as indicated on the touch screen.
The touch screen acknowledges successful barcode scan entries with a green check mark. If acounterbalance bag is scanned, all of the check boxes associated with that bucket will automaticallypopulate with gray check marks.
Note: Do not remove the blood component bags from the organizer when scanning barcodes.
3. Scan any additional barcodes on the initial bag as shown on the touch screen. All barcode scans areconfigured in the Reveos System Manager. To skip a barcode, press the Skip button. A gray checkmark appears.
Note: All barcodes that have been configured as “critical” in Reveos System Manager must be scannedbefore starting a procedure, even if the device is configured to allow a user to skip a barcode.
The Reveos device may also prompt you for barcodes from subsequent bags. The touch screen guidesyou through the configured scans.
After all scans are complete for the bucket, load the blood bag set or counterbalance bag into thecorresponding bucket. See “Loading a Blood Bag Set” on page 3-13 or “Loading a CounterbalanceBag” on page 3-21 for instructions on how to load a blood bag set or counterbalance bag.
If you press the Back button, it clears only the Operator ID scan. All other barcode scans remain stored.To review or delete barcodes, see “Reviewing and Deleting Barcodes” on page 3-11.
The bucket diagram on the Barcode Entry Screen indicates the bucket status.• If the bucket is green, then a whole blood bag has been scanned and loaded.
• If the bucket is gray, then a counterbalance bag has been scanned and loaded.
• If the bucket is yellow, then the bucket is not enabled and a counterbalance bag must be scannedand loaded. The valves will remain closed.
Entering Barcode Information into the Device
Reveos® Automated Blood Processing System Operator's Manual for Version 1.1 3-9

Entering Information ManuallyTouch the Keyboard button on the screen to enter information using the touch-screen keyboard. Thisscreen is available only if it is enabled in Reveos System Manager.
1. To access the Keyboard Entry screen, touch the Keyboard button on the Barcode Entry screen (seeFigure 3-5).
Note: The default display for the Keyboard Entry screen is the uppercase keyboard. Touch the Shift button toswitch between uppercase and lowercase letters.
Figure 3-9: The Keyboard Entry Screen displaying uppercase letters
2. Type the barcode characters as they appear on the barcode that you are entering. All characters arecase-sensitive. Alternate between uppercase and lowercase keyboards as needed.
3. Touch the Continue button when all characters have been entered correctly.
Note: If the barcode scan is marked “critical” in Reveos System Manager, you will need to enter the barcodetwice to verify accuracy.
4. Repeat steps 2 and 3 to enter any additional barcodes.
Operating the Device
3-10 Reveos® Automated Blood Processing System Operator's Manual for Version 1.1

Reviewing and Deleting Barcodes
At any time during the barcode entry process, the operator can review and/or delete barcodes.
Reviewing Barcodes Associated with Blood Bags and/or BucketsWhen a blood bag or counterbalance bag barcode is entered, the barcode scan appears at the bottom ofthe screen. If multiple barcodes have been scanned, the last barcode that was scanned is the only one thatappears on the bottom of the screen. However, all barcode scans are stored in the device. The barcodescans are not assigned to a bucket until the bucket is loaded and the bucket lid is closed and latched. Afterthe bucket is closed, barcodes are associated with the bucket, and a circle appears around the bucketnumber on the bucket diagram as shown in Figure 3-10.
Figure 3-10: The Barcode Entry Screen indicating that barcode scans are associated with Bucket 1
When you touch a bucket to view the associated scans, the More Barcode Information screen appears. Ifyou have scanned barcodes that have not been associated with a bucket, you can still review the scans bytouching a blood bag to view the More Barcode Information screen. Scans are not associated with abucket until the bucket-lid latch is closed.
The More Barcode Information screen shows all barcodes that are associated with a selected bucket or allunassigned scans. Information on the screen is as follows:• A Bucket icon with a corresponding number indicates that the scans are associated with a bucket.
The text “Unassigned scans” indicates that the scans have not been associated with a bucket.
• The number to the right of the Barcode Scanner icon indicates the number of blood bag setbarcodes that have been scanned for the selected bucket or the number of blood bag set barcodesthat are unassigned.
• The number to the right of the Skip icon indicates the number of barcode scans that were skipped.
• Combinations of letters and numbers represent barcodes and are listed on the screen. Barcodes thatwere skipped do not appear.
• The text “Counterbalance bag” indicates that a counterbalance bag was scanned.
Reviewing and Deleting Barcodes
Reveos® Automated Blood Processing System Operator's Manual for Version 1.1 3-11

Figure 3-11: The More Barcode Information screen
The More Barcode Information screen can hold up to seven barcodes. Additional barcodes can bescanned and stored, but they will not appear on the More Barcode Information screen. If there are morethan seven scans associated with a bucket or with “Unassigned scans,” the icon appears.
Deleting Barcodes Associated with Blood Bags and/or BucketsTo delete the barcodes, touch the Delete barcodes button on the More Barcode Information screen.This deletes all barcodes associated with that bucket, as well as all unassigned barcodes.
Note: The Delete barcodes button is visible only when the bucket lid is open.
Operating the Device
3-12 Reveos® Automated Blood Processing System Operator's Manual for Version 1.1

Loading a Blood Bag Set
When loading a blood bag set, always load it into the bucket directly in front of you.
Note: Do not process blood less than 2 hours after collection.
Note: Before loading a blood bag set into a bucket, ensure that the collection tubing has been sealed approximately0.5 cm to 3.0 cm (0.2 in to 1.2 in) away from the whole blood bag.
Note: The leak detector is located in the centrifuge basin near the front of the device. If the leak detector is touchedduring loading, the device will trigger an alert. See “Reveos Alerts and Alarms” on page 4-4 for more information.
Perform the following steps to load the blood bag sets into the Reveos device:
1. Separate the whole blood bag from the organizer.
Figure 3-12: Whole blood bag separated from the organizer
2. Close the clamp on the RBC filtration tubing.
3. Position the filter behind the bags that are attached to the organizer and place the bags into theblood component bag holder. The bags are correctly loaded with the filter positioned closest to thecenter of the device as shown in Figure 3-13. Ensure that the tubing is not kinked or twisted.
Figure 3-13: Position of the filter during loading
Loading a Blood Bag Set
Reveos® Automated Blood Processing System Operator's Manual for Version 1.1 3-13

Figure 3-14: Bags placed into the blood component bag holder
4. Insert the whole blood bag into the corresponding bucket with the label facing toward you.
Note: Gently press the whole blood bag downward to ensure that it is firmly seated in the bucket.
Figure 3-15: The whole blood bag in the bucket
5. Secure the whole blood bag by placing both bag loops over the corresponding bag posts.
Figure 3-16: Bag loops secured to the bag posts
Operating the Device
3-14 Reveos® Automated Blood Processing System Operator's Manual for Version 1.1

6. Load the bottom portion of the cross-connector into the tubing guide directly above the line sensor.The cross-connector is correctly loaded when it is touching the line sensor.
7. Load the tubing between the frangible connector and the cross-connector into the line sensor. Tocorrectly load the tubing, you can use a flossing motion or press the tubing into the line sensor.
1 Cross-connector touching theline sensor
2 Tubing loaded into the linesensor
Figure 3-17: Tubing loaded into the line sensor with the cross-connector touching the line sensor
8. Load the residual leukocyte tubing through the residual leukocyte valve and tubing guides.
Figure 3-18: Residual leukocyte tubing loaded into the residual leukocyte valve and tubing guides
Loading a Blood Bag Set
Reveos® Automated Blood Processing System Operator's Manual for Version 1.1 3-15

9. Load the plasma tubing through the plasma valve and tubing guides. Inspect the plasma tubing andresidual leukocyte tubing to ensure that they are free of kinks.
Figure 3-19: Plasma tubing loaded into the plasma valve and tubing guides
Figure 3-20: Plasma tubing and residual leukocyte tubing free of kinks
10. Load the platelet tubing through the platelet valve, tubing guides, and platelet tubing router.
Figure 3-21: Platelet tubing loaded into the platelet valve, tubing guides, and platelet tubing router
Operating the Device
3-16 Reveos® Automated Blood Processing System Operator's Manual for Version 1.1

11. Ensure that the processing tubing is completely inserted into the line sensor.
Figure 3-22: Processing tubing completely inserted into the line sensor
12. Visually inspect the tubing to ensure that all lines are loaded properly into their respective valves andtubing guides.
Figure 3-23: Loading area with a correctly loaded blood bag set
Ensure that the two visible frangible connectors are aligned in a parallel position.
Figure 3-24: Properly aligned frangible connectors on the blood bag set
Loading a Blood Bag Set
Reveos® Automated Blood Processing System Operator's Manual for Version 1.1 3-17

13. Gently squeeze both sides of the whole blood bag before closing the bucket lid to ensure that thewhole blood bag does not interfere with the bucket-lid latch.
Figure 3-25: An operator squeezing the sides of the whole blood bag before closing the bucket lid
14. Close and latch the bucket lid, ensuring the frangible connectors remain aligned properly. If thefrangible connectors are aligned properly, the bucket lid will close easily and the processing tubingwill fit into the tubing guide on the bucket lid. After the bucket lid is latched, the correspondingquadrant of the bucket diagram on the touch screen turns green.
Figure 3-26: Processing tubing in the tubing guide on the bucket lid
15. Manually turn the rotor one-quarter turn to load the next blood bag set.
16. Repeat steps 1 through 15 to load the next bucket.
Note: If you are loading fewer than four blood bag sets, scan and load a counterbalance bag into each of theremaining empty buckets. See “Loading a Counterbalance Bag” on page 3-21.
Warning: All buckets must contain a loaded blood bag set or counterbalance bag beforebeginning a procedure. Failure to properly load all buckets can result in a hydraulic leak.
Operating the Device
3-18 Reveos® Automated Blood Processing System Operator's Manual for Version 1.1

17. Ensure that you have completely loaded all four buckets before you continue to step 18.
Figure 3-27: Reveos device with four blood bag sets loaded
18. Touch the Close Valves button on the Loading screen to close all valves.
Figure 3-28: Close Valves button
The system displays the In Progress icon while the valves are closing. Then the Start Procedurescreen is displayed, which prompts you to break the frangible connectors.
Figure 3-29: Start Procedure screen prompting you to break the frangible connectors
Note: Do not break the frangible connector leading to the RBC storage bag.
Loading a Blood Bag Set
Reveos® Automated Blood Processing System Operator's Manual for Version 1.1 3-19

19. Break the frangible connector below the cross‑connector on the processing tubing of each blood bagset. Ensure that frangible connectors are completely broken.
Figure 3-30: Completely broken frangible connector
20. Visually inspect the centrifuge basin and remove any loose objects.
21. Close the device lid until it is latched.After you close the device lid, the Start Procedure button becomes active.
See “Procedure Management” on page 3-23 for information on how to start a procedure.
Operating the Device
3-20 Reveos® Automated Blood Processing System Operator's Manual for Version 1.1

Loading a Counterbalance BagAll four buckets must be loaded before you run a procedure. If you do not have four whole blood units toprocess, you must fill each remaining empty bucket with a counterbalance bag. When loading twocounterbalance bags, load them opposite each other in the centrifuge, either in buckets 1 and 3 or inbuckets 2 and 4.
Note: You must scan the counterbalance bag before closing the bucket.
Note: The leak detector is located in the centrifuge basin near the front of the device. If the leak detector is touchedduring loading, the device will trigger an alert. See “Reveos Alerts and Alarms” on page 4-4 for more information.
The counterbalance bag assembly consists of three parts: the bucket counterbalance bag, the componentcounterbalance bag, and the tab.
1 Bucket counterbalancebag
2 Componentcounterbalance bag
3 Tab
Figure 3-31: Counterbalance bag assembly
Loading a Counterbalance Bag
Reveos® Automated Blood Processing System Operator's Manual for Version 1.1 3-21

Complete the following steps to load a counterbalance bag:
1. Insert the bucket counterbalance bag into the bucket and the component counterbalance bag intothe component bag holder.
Figure 3-32: Inserting the counterbalance bag assembly into the device
2. Press the horizontal end of the tab into the tubing guide directly above the line sensor.
3. Press the narrow piece of the tab into the line sensor.
Figure 3-33: Counterbalance bag with the tab loaded into the line sensor
4. Close and latch the bucket lid.
5. Repeat steps 1 through 4 to fill any additional empty buckets.
Operating the Device
3-22 Reveos® Automated Blood Processing System Operator's Manual for Version 1.1

Procedure Management
Starting a ProcedureTouch the Start Procedure button when it is active on the touch screen, as shown in Figure 3-34.
Figure 3-34: Reveos device touch screen with Start Procedure button active
Monitoring the Progress of a Procedure
After the procedure begins, the system monitors the amount of time it takes to complete the procedure.The Procedure Progress screen, shown in Figure 3-35, updates periodically until the end of theprocedure.
1
2 3
4
5
Figure 3-35: Procedure Progress screen
1 These numbers show the Donation ID of each unit within each bucket. If a Donation ID number is not shown, then thebucket has a counterbalance bag loaded, or a Donation ID barcode was not scanned when the bucket was loaded.
2 The time stamp shows the amount of time that has elapsed since the procedure began.
3 The white ring icon indicates that the blood components are being separated in the whole blood bag.
4 The green ring icon indicates that expression of the blood components is starting.
5 When the quadrant in the bucket diagram turns green, it indicates that expression is complete in that bucket.
Procedure Management
Reveos® Automated Blood Processing System Operator's Manual for Version 1.1 3-23

Note: When the quadrant is not colored, it indicates that expression for that bucket is not yet complete. If aquadrant is gray, it indicates that a counterbalance bag is loaded. If a quadrant turns yellow, it indicates that theunit encountered a problem during processing and product quality is inconclusive.
Stopping a ProcedureYou can press the stop button at any time.
Figure 3-36: Stop button on the Reveos device
Any time the stop button is pressed, an alarm is triggered.
If you press the stop button during the loading process (before the Start Procedure button appears), thedevice cancels any barcodes that were entered.
If you press the stop button during a procedure before the device lid automatically opens, the procedureis interrupted and an alarm occurs. The touch screen will show the End of Procedure Summary screenand display any detected component volumes.
If the stop button is pressed, the device will not complete the procedure, and the valves will not seal anyof the tubing. The operator must clamp and/or seal the tubing before removing the blood bag sets fromthe device.
Operating the Device
3-24 Reveos® Automated Blood Processing System Operator's Manual for Version 1.1

Ending a ProcedureWhen a procedure is complete, the device seals the tubing and resets the hydraulic pump. The device lidopens automatically. The primary End of Procedure Summary screen, shown in Figure 3-37, appears onthe touch screen but is inactive until a bucket is opened.
Figure 3-37: Inactive End of Procedure Summary screen
Each bucket has its own End of Procedure Summary screen that becomes active when the correspondingbucket is opened. This screen shows the estimated product volumes for the bucket number listedbeneath the green or yellow bucket icon.
Figure 3-38: Active End of Procedure Summary screen for Bucket 1
• If the bucket is green, the unit was successfully processed.
• If the bucket is yellow, the product quality of the unit is inconclusive.
The End of Procedure Summary screen gives estimated product volumes for each bucket. If exactproduct volumes are required, measure according to your institution’s SOP.
Procedure Management
Reveos® Automated Blood Processing System Operator's Manual for Version 1.1 3-25

To view the device name and procedure number, touch the Expand button on the End of ProcedureSummary screen. The procedure number is a unique identifier that represents a specific whole bloodprocessing procedure. This number appears in the reports generated in Reveos System Manager alongwith other information from the procedure.
Figure 3-39: End of Procedure Summary screen showing device name and procedure number
To return to the End of Procedure Summary screen, press the Collapse button.
Ensure that all buckets are empty before pressing the Next Procedure button.
Note: Ensure that the Next Procedure button is pressed and the Barcode Entry screen is displayed, beforeturning off the device. This allows the end of procedure data to be transferred to Reveos System Manager. If thedevice is turned off before the Next Procedure button is pressed, the data will not be sent to Reveos SystemManager until the device is turned on again.
Platelet Yield IndexThe purpose of the Platelet Yield Index (PYI) feature is to optimize the final platelet yield in your PooledPlatelets products. You can use the Platelet Yield Index feature to select interim platelet units (IPUs) forpooling based on the predicted platelet yield of the individual IPUs. If you choose to use the PYI feature,you should develop a method for sorting the IPUs based on the predicted platelet yield.
The Platelet Yield Index icon appears above the Platelet icon on the End of Procedure Summary screen,as shown in Figure 3-40. The numeric value that appears in this icon represents the Platelet Yield Index(PYI) of the interim platelet unit. The PYI is expressed as the estimated platelet yield. The PYI valueappears in addition to the estimated interim platelet unit volume, which is displayed in milliliters at thebottom of the Platelet icon.
Operating the Device
3-26 Reveos® Automated Blood Processing System Operator's Manual for Version 1.1

1
2
Figure 3-40: End of Run Summary screen with the Platelet icon displayed
1 Platelet Yield Index value of the interim platelet unit
2 Estimated interim platelet unit volume
The value of the Platelet Yield Index also appears on the Reveos System Manager Insight Report. TheInsight Report displays a PYI value for each interim platelet unit produced during a processingprocedure. The PYI values that appear on the Insight Report are not rounded numbers but rather theactual values of the estimated platelet yields.
If the device cannot predict the platelet yield, the PYI appears as a value of zero.
Unloading a Blood Bag SetAfter the procedure is complete, the device lid automatically opens. The End of Procedure summaryscreen for each bucket is displayed when that bucket is opened.
1. Open one of the bucket lids.
2. Remove the tubing from the valves and tubing guides.
Figure 3-41: Tubing removed from the valves and tubing guides
Unloading a Blood Bag Set
Reveos® Automated Blood Processing System Operator's Manual for Version 1.1 3-27

3. With one hand, hold the residual leukocyte tubing near the seal. With your other hand, press thecross-connector away from the line sensor.
Figure 3-42: Holding the residual leukocyte tubing while pressing the cross-connector away from the line sensor
4. Gently lift the blood bag set up and out of the loading area.
Figure 3-43: Lifting the blood bag set up and out of the loading area
5. Repeat steps 1 through 4 to remove the remaining blood bag sets.
6. Touch the green Next Procedure button to prepare for the next procedure.
Operating the Device
3-28 Reveos® Automated Blood Processing System Operator's Manual for Version 1.1

Unloading a Counterbalance BagComplete the following steps to unload a counterbalance bag:
1. Open the bucket lid.
2. Loosen the tab from the line sensor by pulling on the horizontal part of the tab.
3. Lift the counterbalance bag assembly out of the bucket and the component bag holder whileremoving the tab from the line sensor.
Figure 3-44: Lifting the counterbalance bag assembly out of the device
Unloading a Counterbalance Bag
Reveos® Automated Blood Processing System Operator's Manual for Version 1.1 3-29

Operating the Device
3-30 Reveos® Automated Blood Processing System Operator's Manual for Version 1.1

4Alarms and Troubleshooting
Reveos® Automated Blood Processing System Operator's Manual for Version 1.1 4-1

Alarms and Troubleshooting
Error Messages in Reveos System ManagerThe Reveos System Manager application contains error messages designed to help troubleshoot anyproblems that occur. An error message occurs when there is a problem that must be fixed before the usercan proceed. A red X appears next to the location of the problem. The error message text appears whenyou position your cursor over the red X, and it also appears at the bottom of the screen. All error messageshave numbers. If you are unable to troubleshoot an error, record the error number and contactTerumo BCT customer support.
Figure 4-1: Error message in Reveos System Manager
Alerts and Alarms on the Reveos DeviceAn alert is a system message about a condition that requires your attention but will not stop a processingprocedure. You can record the alert number, perform the action shown on the touch screen, and touchthe Continue button to proceed.
An alarm is a system message about a condition that will prevent or end a processing procedure and maycompromise product quality. If the alarm occurs before the procedure has begun, you can perform theaction recommended on the touch screen and re‑try the procedure. If the alarm occurs while theprocedure is in progress, the procedure will end.
Each alarm or alert screen has three sections:
Alarms and Troubleshooting
4-2 Reveos® Automated Blood Processing System Operator's Manual for Version 1.1

1
2
3
Figure 4-2: Reveos device alarm screen
1 Title bar2 Alert/alarm location3 Alert/alarm text
All-Unit and Bucket-Specific AlarmsAlerts and alarms can affect all units or one specific bucket. The alert/alarm location is indicated belowthe title bar.• If the text “All units” appears in the alert/alarm location section, the alert/alarm affects all four
buckets and all whole blood units contained in the buckets.
• If a bucket icon and number appears in the alert/alarm location section, then the alert or alarm onlyaffects the specific bucket shown. All other buckets can continue processing.
Alarms and Troubleshooting
Reveos® Automated Blood Processing System Operator's Manual for Version 1.1 4-3

Reveos Alerts and Alarms
Table 4-1: Alerts
Alert Number Alert Name Alert Text Troubleshooting
1000 Data transfer Record the alert number. Verify thesystem connectivity. If the problempersists, contact your technicalrepresentative.
Verify that the Reveos System Managercomputer is turned on and that theEthernet cable is securely connected.
1001 Potential data loss Record the alert number. Establishconnectivity. If the problem persists,contact your technical representative.
Verify that the Reveos System Managercomputer is turned on and that theEthernet cable is securely connected.
1003 Connectivity problem Record the alert number. Verify thesystem connectivity. If the problempersists, contact your systemadministrator.
Verify that the Reveos System Managercomputer is turned on and that theEthernet cable is securely connected.
1016 Invalid operator ID Record the alert number. The operator isnot authorized to perform this function.Contact your system administrator.
Verify that you scanned the correctbarcode for the Operator ID. If you areentering the Operator ID on the KeyboardEntry screen, verify that you have enteredit correctly. Contact your systemadministrator to check your permissionsin the Reveos System Manager.
1018 Data lost Record the alert number. If the problempersists, contact your technicalrepresentative.
If the problem persists, contact yourtechnical representative.
1019 Connectivity problem Record the alert number. Verify thesystem connectivity. If the problempersists, contact your systemadministrator.
Verify that the Reveos System Managercomputer is turned on and that theEthernet cable is securely connected.
1020 Invalid scans Record the alert number. Clear scans.Scan and load a counterbalance bag. Ifthe problem persists, contact yourtechnical representative.
See “Loading a Counterbalance Bag” onpage 3-21.
1021 Invalid scans Record the alert number. Clear scans.Scan and load a counterbalance bag. Ifthe problem persists, contact yourtechnical representative.
See “Loading a Counterbalance Bag” onpage 3-21.
1022 Invalid scans Record the alert number. Clear scans.Scan and load a counterbalance bag. Ifthe problem persists, contact yourtechnical representative.
See “Loading a Counterbalance Bag” onpage 3-21.
1023 Invalid scans Record the alert number. Clear scans.Scan and load a counterbalance bag. Ifthe problem persists, contact yourtechnical representative.
See “Loading a Counterbalance Bag” onpage 3-21.
Alarms and Troubleshooting
4-4 Reveos® Automated Blood Processing System Operator's Manual for Version 1.1

Table 4-1: Alerts (continued)
Alert Number Alert Name Alert Text Troubleshooting
1024 Invalid manual entry Record the alert number. Re-enter thebarcode.
See “Entering Information Manually” onpage 3-10.
1026 Problem sealing Record the alert number. Verify that theseal on the platelet line is adequate. Verifycorrect loading.
See “Loading a Blood Bag Set” onpage 3-13 to aid in loading the next bloodbag set.
1028 Problem sealing Record the alert number. Verify that theseal on the platelet line is adequate. Verifycorrect loading.
See “Loading a Blood Bag Set” onpage 3-13 to aid in loading the next bloodbag set.
1030 Problem sealing Record the alert number. Verify that theseal on the platelet line is adequate. Verifycorrect loading.
See “Loading a Blood Bag Set” onpage 3-13 to aid in loading the next bloodbag set.
1032 Problem sealing Record the alert number. Verify that theseal on the platelet line is adequate. Verifycorrect loading.
See “Loading a Blood Bag Set” onpage 3-13 to aid in loading the next bloodbag set.
1034 Problem sealing Record the alert number. Verify that theseal on the plasma line is adequate. Verifycorrect loading.
See “Loading a Blood Bag Set” onpage 3-13 to aid in loading the next bloodbag set.
1036 Problem sealing Record the alert number. Verify that theseal on the plasma line is adequate. Verifycorrect loading.
See “Loading a Blood Bag Set” onpage 3-13 to aid in loading the next bloodbag set.
1038 Problem sealing Record the alert number. Verify that theseal on the plasma line is adequate. Verifycorrect loading.
See “Loading a Blood Bag Set” onpage 3-13 to aid in loading the next bloodbag set.
1040 Problem sealing Record the alert number. Verify that theseal on the plasma line is adequate. Verifycorrect loading.
See “Loading a Blood Bag Set” onpage 3-13 to aid in loading the next bloodbag set.
1042 Problem sealing Record the alert number. Verify that theseal on the residual leukocyte line isadequate.
See “Loading a Blood Bag Set” onpage 3-13 to aid in loading the next bloodbag set.
1044 Problem sealing Record the alert number. Verify that theseal on the residual leukocyte line isadequate.
See “Loading a Blood Bag Set” onpage 3-13 to aid in loading the next bloodbag set.
1046 Problem sealing Record the alert number. Verify that theseal on the residual leukocyte line isadequate.
See “Loading a Blood Bag Set” onpage 3-13 to aid in loading the next bloodbag set.
1048 Problem sealing Record the alert number. Verify that theseal on the residual leukocyte line isadequate.
See “Loading a Blood Bag Set” onpage 3-13 to aid in loading the next bloodbag set.
Reveos Alerts and Alarms
Reveos® Automated Blood Processing System Operator's Manual for Version 1.1 4-5

Table 4-1: Alerts (continued)
Alert Number Alert Name Alert Text Troubleshooting
1050 Basin temperature toohigh
Record the alert number. Verify theproduct quality. If the problem persists,contact your technical representative.
Verify that the external cooled watersource is correctly connected to theReveos device.
Verify product quality according to yourinstitution's SOP.
1051 Basin temperature too low Record the alert number. Verify theproduct quality. If the problem persists,contact your technical representative.
Verify product quality according to yourinstitution's SOP.
1052 Bag mismatch Record the alert number. Counterbalancebag detected. Check the bucket to ensurethat a whole blood bag is loaded.
The scanned barcode information doesnot match the type of bag detected.
See “Loading a Blood Bag Set” onpage 3-13.
1053 Bag mismatch Record the alert number. Counterbalancebag detected. Check the bucket to ensurethat a whole blood bag is loaded.
The scanned barcode information doesnot match the type of bag detected.
See “Loading a Blood Bag Set” onpage 3-13.
1054 Bag mismatch Record the alert number. Counterbalancebag detected. Check the bucket to ensurethat a whole blood bag is loaded.
The scanned barcode information doesnot match the type of bag detected.
See “Loading a Blood Bag Set” onpage 3-13.
1055 Bag mismatch Record the alert number. Counterbalancebag detected. Check the bucket to ensurethat a whole blood bag is loaded.
The scanned barcode information doesnot match the type of bag detected.
See “Loading a Blood Bag Set” onpage 3-13.
1056 Bag mismatch Record the alert number. Whole bloodbag detected. Check the bucket to ensurethat a counterbalance bag is loaded.
The scanned barcode information doesnot match the type of bag detected.
See “Loading a Counterbalance Bag” onpage 3-21.
1057 Bag mismatch Record the alert number. Whole bloodbag detected. Check the bucket to ensurethat a counterbalance bag is loaded.
The scanned barcode information doesnot match the type of bag detected.
See “Loading a Counterbalance Bag” onpage 3-21.
1058 Bag mismatch Record the alert number. Whole bloodbag detected. Check the bucket to ensurethat a counterbalance bag is loaded.
The scanned barcode information doesnot match the type of bag detected.
See “Loading a Counterbalance Bag” onpage 3-21.
1059 Bag mismatch Record the alert number. Whole bloodbag detected. Check the bucket to ensurethat a counterbalance bag is loaded.
The scanned barcode information doesnot match the type of bag detected.
See “Loading a Counterbalance Bag” onpage 3-21.
Alarms and Troubleshooting
4-6 Reveos® Automated Blood Processing System Operator's Manual for Version 1.1

Table 4-1: Alerts (continued)
Alert Number Alert Name Alert Text Troubleshooting
1060 Communication problem Record the alert number. Verify thesystem connectivity. If the problempersists, contact your technicalrepresentative.
If the problem persists, contact yourtechnical representative.
1061 Empty bucket detected Record the alert number. Verify that thebucket is not empty.
Verify that the bucket is not empty. If thebucket is empty, load a blood bag set or acounterbalance bag. See “Loading aBlood Bag Set” on page 3-13 or “Loadinga Counterbalance Bag” on page 3-21.
1062 Empty bucket detected Record the alert number. Verify that thebucket is not empty.
Verify that the bucket is not empty. If thebucket is empty, load a blood bag set or acounterbalance bag. See “Loading aBlood Bag Set” on page 3-13 or “Loadinga Counterbalance Bag” on page 3-21.
1063 Empty bucket detected Record the alert number. Verify that thebucket is not empty.
Verify that the bucket is not empty. If thebucket is empty, load a blood bag set or acounterbalance bag. See “Loading aBlood Bag Set” on page 3-13 or “Loadinga Counterbalance Bag” on page 3-21.
1064 Empty bucket detected Record the alert number. Verify that thebucket is not empty.
Verify that the bucket is not empty. If thebucket is empty, load a blood bag set or acounterbalance bag. See “Loading aBlood Bag Set” on page 3-13 or “Loadinga Counterbalance Bag” on page 3-21.
1065 Empty bucket notdetected
Record the alert number. Verify that thebucket is empty.
Verify that the bucket is empty.See“Unloading a Blood Bag Set” onpage 3-27 or “Unloading aCounterbalance Bag” on page 3-29.
1066 Empty bucket notdetected
Record the alert number. Verify that thebucket is empty.
Verify that the bucket is empty.See“Unloading a Blood Bag Set” onpage 3-27 or “Unloading aCounterbalance Bag” on page 3-29.
1067 Empty bucket notdetected
Record the alert number. Verify that thebucket is empty.
Verify that the bucket is empty.See“Unloading a Blood Bag Set” onpage 3-27 or “Unloading aCounterbalance Bag” on page 3-29.
1068 Empty bucket notdetected
Record the alert number. Verify that thebucket is empty.
Verify that the bucket is empty.See“Unloading a Blood Bag Set” onpage 3-27 or “Unloading aCounterbalance Bag” on page 3-29.
Reveos Alerts and Alarms
Reveos® Automated Blood Processing System Operator's Manual for Version 1.1 4-7

Table 4-1: Alerts (continued)
Alert Number Alert Name Alert Text Troubleshooting
1069 Leak detected Record the alert number. Check for leaksin the centrifuge basin. If the problempersists, contact your technicalrepresentative.
Determine whether or not there is a leak inthe centrifuge.• If there is a leak, clean the rotor and
the centrifuge basin. See “CleaningAfter a Blood Spill” on page 5-6.
• If there is not a leak, press theContinue button.
1070 Hydraulic pressureproblem
Record the alert number. If the problempersists, contact your technicalrepresentative.
If the problem persists, contact yourtechnical representative.
1073 Bucket disabled Record the alert number. Scan and load acounterbalance bag.
See “Loading a Counterbalance Bag” onpage 3-21.
1074 Bucket disabled Record the alert number. Scan and load acounterbalance bag.
See “Loading a Counterbalance Bag” onpage 3-21.
1075 Bucket disabled Record the alert number. Scan and load acounterbalance bag.
See “Loading a Counterbalance Bag” onpage 3-21.
1076 Bucket disabled Record the alert number. Scan and load acounterbalance bag.
See “Loading a Counterbalance Bag” onpage 3-21.
1077 Duplicate donation ID Record the alert number. Verify thebarcode scans. If the problem persists,contact your system administrator.
Verify that you scanned the correctbarcode for the Donation ID. TheDuplicate Donation ID scanned isassociated with another bucket. DuplicateDonation IDs are not allowed. The systemadministrator can verify the duplicateDonation ID settings in Reveos SystemManager.
1078 Duplicate donation ID Record the alert number. Verify thebarcode scans. If the problem persists,contact your system administrator.
Verify that you scanned the correctbarcode for the Donation ID. TheDuplicate Donation ID scanned isassociated with another bucket. DuplicateDonation IDs are not allowed. The systemadministrator can verify the duplicateDonation ID settings in Reveos SystemManager.
1079 Duplicate donation ID Record the alert number. Verify thebarcode scans. If the problem persists,contact your system administrator.
Verify that you scanned the correctbarcode for the Donation ID. TheDuplicate Donation ID scanned isassociated with another bucket. DuplicateDonation IDs are not allowed. The systemadministrator can verify the duplicateDonation ID settings in Reveos SystemManager.
Alarms and Troubleshooting
4-8 Reveos® Automated Blood Processing System Operator's Manual for Version 1.1

Table 4-1: Alerts (continued)
Alert Number Alert Name Alert Text Troubleshooting
1080 Duplicate donation ID Record the alert number. Verify thebarcode scans. If the problem persists,contact your system administrator.
Verify that you scanned the correctbarcode for the Donation ID. TheDuplicate Donation ID scanned isassociated with another bucket. DuplicateDonation IDs are not allowed. The systemadministrator can verify the duplicateDonation ID settings in Reveos SystemManager.
1081 Plasma detection problem Record the alert number. Check forlipemic plasma. Verify correct loading inthe line sensor. If the problem persists,contact your technical representative.
See “Loading a Blood Bag Set” onpage 3-13.
Verify product quality according to yourinstitution's SOP.
1082 Plasma detection problem Record the alert number. Check forlipemic plasma. Verify correct loading inthe line sensor. If the problem persists,contact your technical representative.
See “Loading a Blood Bag Set” onpage 3-13.
Verify product quality according to yourinstitution's SOP.
1083 Plasma detection problem Record the alert number. Check forlipemic plasma. Verify correct loading inthe line sensor. If the problem persists,contact your technical representative.
See “Loading a Blood Bag Set” onpage 3-13.
Verify product quality according to yourinstitution's SOP.
1084 Plasma detection problem Record the alert number. Check forlipemic plasma. Verify correct loading inthe line sensor. If the problem persists,contact your technical representative.
See “Loading a Blood Bag Set” onpage 3-13.
Verify product quality according to yourinstitution's SOP.
Table 4-2: Alarms
Alarm Number Alarm Name Alarm Text Troubleshooting
1100 Centrifuge voltage Record the alarm number. If the problempersists, contact your technicalrepresentative.
If the problem persists, contact yourtechnical representative.
1101 Centrifuge system Record the alarm number. If the problempersists, contact your technicalrepresentative.
If the problem persists, contact yourtechnical representative.
1102 Centrifuge command Record the alarm number. If the problempersists, contact your technicalrepresentative.
If the problem persists, contact yourtechnical representative.
1103 Centrifuge speed too high Record the alarm number. If the problempersists, contact your technicalrepresentative.
Restart the device to clear the alarm.
If the problem persists, contact yourtechnical representative.
Reveos Alerts and Alarms
Reveos® Automated Blood Processing System Operator's Manual for Version 1.1 4-9

Table 4-2: Alarms (continued)
Alarm Number Alarm Name Alarm Text Troubleshooting
1104 Centrifuge speed Record the alarm number. If the problempersists, contact your technicalrepresentative.
If the problem persists, contact yourtechnical representative.
1105 Centrifuge hardware Record the alarm number. If the problempersists, contact your technicalrepresentative.
If the problem persists, contact yourtechnical representative.
1106 Centrifuge power Record the alarm number. If the problempersists, contact your technicalrepresentative.
If the problem persists, contact yourtechnical representative.
1107 Centrifuge system Record the alarm number. Contact yourtechnical representative.
If the problem persists, contact yourtechnical representative.
1202 Protocol problem Record the alarm number. If the problempersists, contact your technicalrepresentative.
Verify that the correct protocol is active.
1203 Protocol problem Record the alarm number. Restart thedevice. If the problem persists, contactyour technical representative.
Restart the device to clear the alarm.Select a different procedure.
1204 Protocol problem Record the alarm number. Restart thedevice. If the problem persists, contactyour technical representative.
Restart the device to clear the alarm.Select a different procedure.
1211 Procedure not found Record the alarm number. Contact yoursystem administrator before using thedevice.
The system administrator can verify thatthe procedure is enabled in the ReveosSystem Manager. See “ConfiguringProcedures” on page 6-21.
1212 Device not enabled Record the alarm number. Contact yoursystem administrator.
The system administrator can verify thatthe device is enabled in the ReveosSystem Manager. See “Enabling andDisenabling Devices” on page 6-17.
1214 No procedures assigned Record the alarm number. Contact yoursystem administrator.
The system administrator must assignprocedures to the device. See “Associated Devices” on page 6-23.
1219 Hydraulic pressure toohigh
Record the alarm number. Check forobstructed lines or unbroken frangibleconnector. Bucket will be disabled. If theproblem persists, contact your technicalrepresentative.
Verify that the frangible connectorbetween the whole blood bag and thecross-connector is completely broken.
1220 Hydraulic pressure toohigh
Record the alarm number. Check forobstructed lines or unbroken frangibleconnector. Bucket will be disabled. If theproblem persists, contact your technicalrepresentative.
Verify that the frangible connectorbetween the whole blood bag and thecross-connector is completely broken.
Alarms and Troubleshooting
4-10 Reveos® Automated Blood Processing System Operator's Manual for Version 1.1

Table 4-2: Alarms (continued)
Alarm Number Alarm Name Alarm Text Troubleshooting
1221 Hydraulic pressure toohigh
Record the alarm number. Check forobstructed lines or unbroken frangibleconnector. Bucket will be disabled. If theproblem persists, contact your technicalrepresentative.
Verify that the frangible connectorbetween the whole blood bag and thecross-connector is completely broken.
1222 Hydraulic pressure toohigh
Record the alarm number. Check forobstructed lines or unbroken frangibleconnector. Bucket will be disabled. If theproblem persists, contact your technicalrepresentative.
Verify that the frangible connectorbetween the whole blood bag and thecross-connector is completely broken.
1223 1224 1225 12261227 1228 1229 1230
Protocol problem Record the alarm number. Bucket will bedisabled. If the problem persists, contactyour technical representative.
If the problem persists, contact yourtechnical representative.
1231 Protocol problem Record the alarm number. Bucket will bedisabled. Verify correct loading. If theproblem persists, contact your technicalrepresentative.
Verify correct loading. Check theplacement of tubing in the valves. Checkthe position of the cross-connector. See “Loading a Blood Bag Set” on page 3-13.
If the problem persists, contact yourtechnical representative.
1232 Protocol problem Record the alarm number. Bucket will bedisabled. Verify correct loading. If theproblem persists, contact your technicalrepresentative.
Verify correct loading. Check theplacement of tubing in the valves. Checkthe position of the cross-connector. See “Loading a Blood Bag Set” on page 3-13.
If the problem persists, contact yourtechnical representative.
1233 Protocol problem Record the alarm number. Bucket will bedisabled. Verify correct loading. If theproblem persists, contact your technicalrepresentative.
Verify correct loading. Check theplacement of tubing in the valves. Checkthe position of the cross-connector. See “Loading a Blood Bag Set” on page 3-13.
If the problem persists, contact yourtechnical representative.
1234 Protocol problem Record the alarm number. Bucket will bedisabled. Verify correct loading. If theproblem persists, contact your technicalrepresentative.
Verify correct loading. Check theplacement of tubing in the valves. Checkthe position of the cross-connector. See “Loading a Blood Bag Set” on page 3-13.
If the problem persists, contact yourtechnical representative.
1235 1236 1237 12381239 1240 1241 12421243 1244 1245 12461247 1248 1249 1250
Protocol problem Record the alarm number. Bucket will bedisabled. If the problem persists, contactyour technical representative.
If the problem persists, contact yourtechnical representative.
Reveos Alerts and Alarms
Reveos® Automated Blood Processing System Operator's Manual for Version 1.1 4-11

Table 4-2: Alarms (continued)
Alarm Number Alarm Name Alarm Text Troubleshooting
1251 Protocol problem Record the alarm number. Bucket will bedisabled. Verify correct loading. If theproblem persists, contact your technicalrepresentative.
Verify correct loading. Check theplacement of tubing in the valves. Checkthe position of the cross-connector. See “Loading a Blood Bag Set” on page 3-13.
If the problem persists, contact yourtechnical representative.
1252 Protocol problem Record the alarm number. Bucket will bedisabled. Verify correct loading. If theproblem persists, contact your technicalrepresentative.
Verify correct loading. Check theplacement of tubing in the valves. Checkthe position of the cross-connector. See “Loading a Blood Bag Set” on page 3-13.
If the problem persists, contact yourtechnical representative.
1253 Protocol problem Record the alarm number. Bucket will bedisabled. Verify correct loading. If theproblem persists, contact your technicalrepresentative.
Verify correct loading. Check theplacement of tubing in the valves. Checkthe position of the cross-connector. See “Loading a Blood Bag Set” on page 3-13.
If the problem persists, contact yourtechnical representative.
1254 Protocol problem Record the alarm number. Bucket will bedisabled. Verify correct loading. If theproblem persists, contact your technicalrepresentative.
Verify correct loading. Check theplacement of tubing in the valves. Checkthe position of the cross-connector. See “Loading a Blood Bag Set” on page 3-13.
If the problem persists, contact yourtechnical representative.
1255, 1256, 1257, 1258,1259, 1260, 1261, 1262
Protocol problem Record the alarm number. Bucket will bedisabled. If the problem persists, contactyour technical representative.
If the problem persists, contact yourtechnical representative.
1263 RBC detection problem Record the alarm number. Bucket will bedisabled. If the problem persists, contactyour technical representative.
Verify the donation identification numberlabels are not interfering with the bucketsensor.
If the problem persists, contact yourtechnical representative.
1264 RBC detection problem Record the alarm number. Bucket will bedisabled. If the problem persists, contactyour technical representative.
Verify the donation identification numberlabels are not interfering with the bucketsensor.
If the problem persists, contact yourtechnical representative.
1265 RBC detection problem Record the alarm number. Bucket will bedisabled. If the problem persists, contactyour technical representative.
Verify the donation identification numberlabels are not interfering with the bucketsensor.
If the problem persists, contact yourtechnical representative.
Alarms and Troubleshooting
4-12 Reveos® Automated Blood Processing System Operator's Manual for Version 1.1

Table 4-2: Alarms (continued)
Alarm Number Alarm Name Alarm Text Troubleshooting
1266 RBC detection problem Record the alarm number. Bucket will bedisabled. If the problem persists, contactyour technical representative.
Verify the donation identification numberlabels are not interfering with the bucketsensor.
If the problem persists, contact yourtechnical representative.
1267 Plasma detection problem Record the alarm number. Check forlipemic plasma. Verify correct loading inthe line sensor. If the problem persists,contact your technical representative.
Verify correct loading. See “Loading aBlood Bag Set” on page 3-13.
If the problem persists, contact yourtechnical representative.
1268 Hydraulic pressure toohigh
Record the alarm number. Check forobstructed plasma line or unbrokenfrangible connector. Bucket will bedisabled. If the problem persists, contactyour technical representative.
Verify that the frangible connectorbetween the whole blood bag and thecross-connector is completely broken.Check for any kinked or obstructedtubing. See “Loading a Blood Bag Set” onpage 3-13.
1269 Hydraulic pressure toohigh
Record the alarm number. Check forobstructed plasma line or unbrokenfrangible connector. Bucket will bedisabled. If the problem persists, contactyour technical representative.
Verify that the frangible connectorbetween the whole blood bag and thecross-connector is completely broken.Check for any kinked or obstructedtubing. See “Loading a Blood Bag Set” onpage 3-13.
1270 Hydraulic pressure toohigh
Record the alarm number. Check forobstructed plasma line or unbrokenfrangible connector. Bucket will bedisabled. If the problem persists, contactyour technical representative.
Verify that the frangible connectorbetween the whole blood bag and thecross-connector is completely broken.Check for any kinked or obstructedtubing. See “Loading a Blood Bag Set” onpage 3-13.
1271 Hydraulic pressure toohigh
Record the alarm number. Check forobstructed plasma line or unbrokenfrangible connector. Bucket will bedisabled. If the problem persists, contactyour technical representative.
Verify that the frangible connectorbetween the whole blood bag and thecross-connector is completely broken.Check for any kinked or obstructedtubing. See “Loading a Blood Bag Set” onpage 3-13.
1301 Hydraulic system Record the alarm number. If the problempersists, contact your technicalrepresentative.
If the problem persists, contact yourtechnical representative.
1304 Hydraulic system Record the alarm number. If the problempersists, contact your technicalrepresentative.
If the problem persists, contact yourtechnical representative.
1305 Hydraulic reset Record the alarm number. Restart thedevice. If the problem persists, contactyour technical representative.
Restart the device to clear the alarm.
If the problem persists, contact yourtechnical representative.
Reveos Alerts and Alarms
Reveos® Automated Blood Processing System Operator's Manual for Version 1.1 4-13
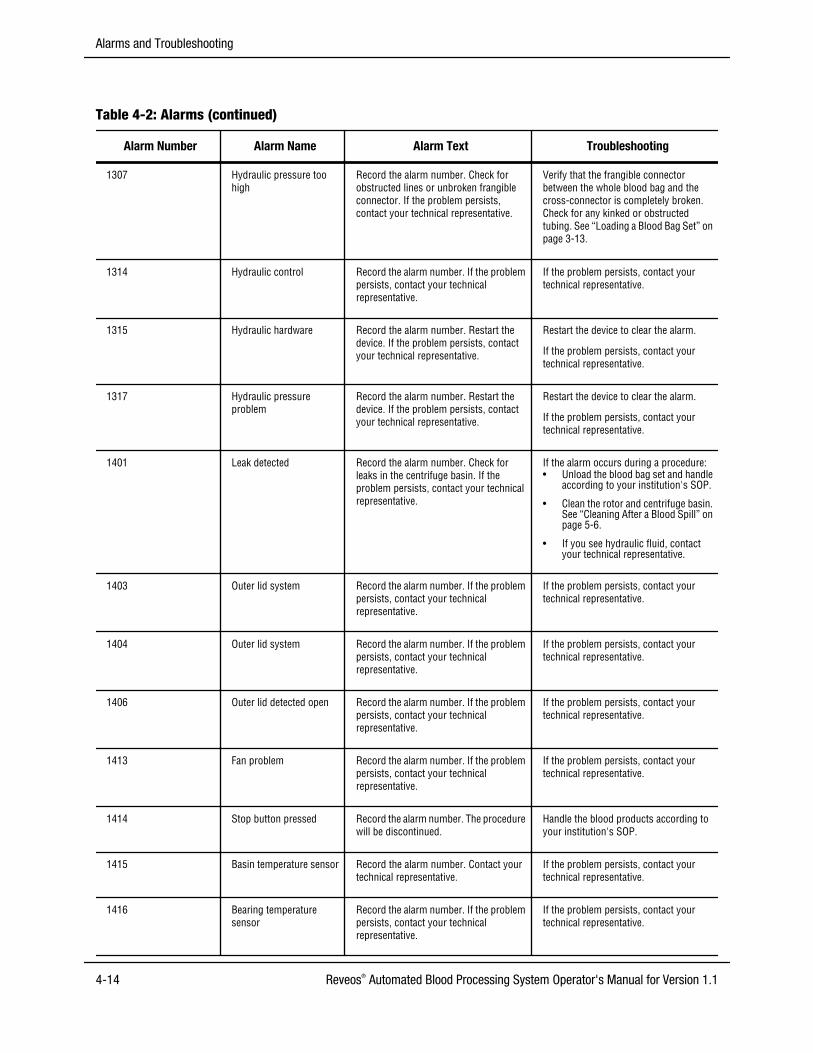
Table 4-2: Alarms (continued)
Alarm Number Alarm Name Alarm Text Troubleshooting
1307 Hydraulic pressure toohigh
Record the alarm number. Check forobstructed lines or unbroken frangibleconnector. If the problem persists,contact your technical representative.
Verify that the frangible connectorbetween the whole blood bag and thecross-connector is completely broken.Check for any kinked or obstructedtubing. See “Loading a Blood Bag Set” onpage 3-13.
1314 Hydraulic control Record the alarm number. If the problempersists, contact your technicalrepresentative.
If the problem persists, contact yourtechnical representative.
1315 Hydraulic hardware Record the alarm number. Restart thedevice. If the problem persists, contactyour technical representative.
Restart the device to clear the alarm.
If the problem persists, contact yourtechnical representative.
1317 Hydraulic pressureproblem
Record the alarm number. Restart thedevice. If the problem persists, contactyour technical representative.
Restart the device to clear the alarm.
If the problem persists, contact yourtechnical representative.
1401 Leak detected Record the alarm number. Check forleaks in the centrifuge basin. If theproblem persists, contact your technicalrepresentative.
If the alarm occurs during a procedure:• Unload the blood bag set and handle
according to your institution's SOP.
• Clean the rotor and centrifuge basin.See “Cleaning After a Blood Spill” onpage 5-6.
• If you see hydraulic fluid, contactyour technical representative.
1403 Outer lid system Record the alarm number. If the problempersists, contact your technicalrepresentative.
If the problem persists, contact yourtechnical representative.
1404 Outer lid system Record the alarm number. If the problempersists, contact your technicalrepresentative.
If the problem persists, contact yourtechnical representative.
1406 Outer lid detected open Record the alarm number. If the problempersists, contact your technicalrepresentative.
If the problem persists, contact yourtechnical representative.
1413 Fan problem Record the alarm number. If the problempersists, contact your technicalrepresentative.
If the problem persists, contact yourtechnical representative.
1414 Stop button pressed Record the alarm number. The procedurewill be discontinued.
Handle the blood products according toyour institution's SOP.
1415 Basin temperature sensor Record the alarm number. Contact yourtechnical representative.
If the problem persists, contact yourtechnical representative.
1416 Bearing temperaturesensor
Record the alarm number. If the problempersists, contact your technicalrepresentative.
If the problem persists, contact yourtechnical representative.
Alarms and Troubleshooting
4-14 Reveos® Automated Blood Processing System Operator's Manual for Version 1.1

Table 4-2: Alarms (continued)
Alarm Number Alarm Name Alarm Text Troubleshooting
1417 Inlet temperature sensor Record the alarm number. If the problempersists, contact your technicalrepresentative.
If the problem persists, contact yourtechnical representative.
1420 Vibration sensor Record the alarm number. Restart thedevice. If the problem persists, contactyour technical representative.
If the problem persists, contact yourtechnical representative.
1421 Excessive vibration Record the alarm number. Verify correctloading. If the problem persists, contactyour technical representative.
Verify that all four buckets are correctlyloaded. If two counterbalance bags areloaded, load them opposite each other.
If the problem persists, contact yourtechnical representative.
1422 Bearing temperature toolow
Record the alarm number. If the problempersists, contact your technicalrepresentative.
If the problem persists, contact yourtechnical representative.
1423 Inlet temperature too high Record the alarm number. If the problempersists, contact your technicalrepresentative.
Verify that the external cooled watersource is correctly connected to theReveos device.
1424 Inlet temperature too low Record the alarm number. If the problempersists, contact your technicalrepresentative.
Verify that the external cooled watersource is correctly connected to theReveos device.
1427 Outer lid lock sensor Record the alarm number. If the problempersists, contact your technicalrepresentative.
If the problem persists, contact yourtechnical representative.
1429 Outer lid sensor Record the alarm number. If the problempersists, contact your technicalrepresentative.
If the problem persists, contact yourtechnical representative.
1430 Outer lid lock power Record the alarm number. If the problempersists, contact your technicalrepresentative.
If the problem persists, contact yourtechnical representative.
1432 Bearing temperature toohigh
Record the alarm number. If the problempersists, contact your technicalrepresentative.
If the problem persists, contact yourtechnical representative.
1433 Bucket lid latch Record the alarm number. If the problempersists, contact your technicalrepresentative.
If the problem persists, contact yourtechnical representative.
1434 Bucket lid latch Record the alarm number. If the problempersists, contact your technicalrepresentative.
If the problem persists, contact yourtechnical representative.
1435 Bucket lid latch Record the alarm number. If the problempersists, contact your technicalrepresentative.
If the problem persists, contact yourtechnical representative.
Reveos Alerts and Alarms
Reveos® Automated Blood Processing System Operator's Manual for Version 1.1 4-15

Table 4-2: Alarms (continued)
Alarm Number Alarm Name Alarm Text Troubleshooting
1436 Bucket lid latch Record the alarm number. If the problempersists, contact your technicalrepresentative.
If the problem persists, contact yourtechnical representative.
1500 Problem closing valve Record the alarm number. Verify correctloading of the platelet line in bucket 1. Ifthe problem persists, contact yourtechnical representative.
If the problem persists, contact yourtechnical representative.
1501 Problem opening valve Record the alarm number. Bucket will bedisabled. Problem opening the plateletvalve. If the problem persists, contactyour technical representative.
If the problem persists, contact yourtechnical representative.
1502 Problem sealing Record the alarm number. Clamp andseal all lines. If the problem persists,contact your technical representative.
If the problem persists, contact yourtechnical representative.
1503 Valve problem Record the alarm number. If the problempersists, contact your technicalrepresentative.
If the problem persists, contact yourtechnical representative.
1505 Problem closing valve Record the alarm number. Verify correctloading of the platelet line in bucket 2. Ifthe problem persists, contact yourtechnical representative.
If the problem persists, contact yourtechnical representative.
1506 Problem opening valve Record the alarm number. Bucket will bedisabled. Problem opening the plateletvalve. If the problem persists, contactyour technical representative.
If the problem persists, contact yourtechnical representative.
1507 Problem sealing Record the alarm number. Clamp andseal all lines. If the problem persists,contact your technical representative.
If the problem persists, contact yourtechnical representative.
1508 Valve problem Record the alarm number. If the problempersists, contact your technicalrepresentative.
If the problem persists, contact yourtechnical representative.
1510 Problem closing valve Record the alarm number. Verify correctloading of the platelet line in bucket 3. Ifthe problem persists, contact yourtechnical representative.
If the problem persists, contact yourtechnical representative.
1511 Problem opening valve Record the alarm number. Bucket will bedisabled. Problem opening the plateletvalve. If the problem persists, contactyour technical representative.
If the problem persists, contact yourtechnical representative.
1512 Problem sealing Record the alarm number. Clamp andseal all lines. If the problem persists,contact your technical representative.
If the problem persists, contact yourtechnical representative.
Alarms and Troubleshooting
4-16 Reveos® Automated Blood Processing System Operator's Manual for Version 1.1

Table 4-2: Alarms (continued)
Alarm Number Alarm Name Alarm Text Troubleshooting
1513 Valve problem Record the alarm number. If the problempersists, contact your technicalrepresentative.
If the problem persists, contact yourtechnical representative.
1515 Problem closing valve Record the alarm number. Verify correctloading of the platelet line in bucket 4. Ifthe problem persists, contact yourtechnical representative.
If the problem persists, contact yourtechnical representative.
1516 Problem opening valve Record the alarm number. Bucket will bedisabled. Problem opening the plateletvalve. If the problem persists, contactyour technical representative.
If the problem persists, contact yourtechnical representative.
1517 Problem sealing Record the alarm number. Clamp andseal all lines. If the problem persists,contact your technical representative.
If the problem persists, contact yourtechnical representative.
1518 Valve problem Record the alarm number. If the problempersists, contact your technicalrepresentative.
If the problem persists, contact yourtechnical representative.
1520 Problem closing valve Record the alarm number. Verify correctloading of the plasma line in bucket 1. Ifthe problem persists, contact yourtechnical representative.
If the problem persists, contact yourtechnical representative.
1521 Problem opening valve Record the alarm number. Bucket will bedisabled. Problem opening the plasmavalve. If the problem persists, contactyour technical representative.
If the problem persists, contact yourtechnical representative.
1522 Problem sealing Record the alarm number. Clamp andseal all lines. If the problem persists,contact your technical representative.
If the problem persists, contact yourtechnical representative.
1523 Valve problem Record the alarm number. If the problempersists, contact your technicalrepresentative.
If the problem persists, contact yourtechnical representative.
1525 Problem closing valve Record the alarm number. Verify correctloading of the plasma line in bucket 2. Ifthe problem persists, contact yourtechnical representative.
If the problem persists, contact yourtechnical representative.
1526 Problem opening valve Record the alarm number. Bucket will bedisabled. Problem opening the plasmavalve. If the problem persists, contactyour technical representative.
If the problem persists, contact yourtechnical representative.
1527 Problem sealing Record the alarm number. Clamp andseal all lines. If the problem persists,contact your technical representative.
If the problem persists, contact yourtechnical representative.
Reveos Alerts and Alarms
Reveos® Automated Blood Processing System Operator's Manual for Version 1.1 4-17

Table 4-2: Alarms (continued)
Alarm Number Alarm Name Alarm Text Troubleshooting
1528 Valve problem Record the alarm number. If the problempersists, contact your technicalrepresentative.
If the problem persists, contact yourtechnical representative.
1530 Problem closing valve Record the alarm number. Verify correctloading of the plasma line in bucket 3. Ifthe problem persists, contact yourtechnical representative.
If the problem persists, contact yourtechnical representative.
1531 Problem opening valve Record the alarm number. Bucket will bedisabled. Problem opening the plasmavalve. If the problem persists, contactyour technical representative.
If the problem persists, contact yourtechnical representative.
1532 Problem sealing Record the alarm number. Clamp andseal all lines. If the problem persists,contact your technical representative.
If the problem persists, contact yourtechnical representative.
1533 Valve problem Record the alarm number. If the problempersists, contact your technicalrepresentative.
If the problem persists, contact yourtechnical representative.
1535 Problem closing valve Record the alarm number. Verify correctloading of the plasma line in bucket 4. Ifthe problem persists, contact yourtechnical representative.
If the problem persists, contact yourtechnical representative.
1536 Problem opening valve Record the alarm number. Bucket will bedisabled. Problem opening the plasmavalve. If the problem persists, contactyour technical representative.
If the problem persists, contact yourtechnical representative.
1537 Problem sealing Record the alarm number. Clamp andseal all lines. If the problem persists,contact your technical representative.
If the problem persists, contact yourtechnical representative.
1538 Valve problem Record the alarm number. If the problempersists, contact your technicalrepresentative.
If the problem persists, contact yourtechnical representative.
1540 Problem closing valve Record the alarm number. Verify correctloading of the residual leukocyte line inbucket 1. If the problem persists, contactyour technical representative.
If the problem persists, contact yourtechnical representative.
1541 Problem opening valve Record the alarm number. Bucket will bedisabled. Problem opening the residualleukocyte valve. If the problem persists,contact your technical representative.
If the problem persists, contact yourtechnical representative.
1542 Problem sealing Record the alarm number. Clamp andseal all lines. If the problem persists,contact your technical representative.
If the problem persists, contact yourtechnical representative.
Alarms and Troubleshooting
4-18 Reveos® Automated Blood Processing System Operator's Manual for Version 1.1

Table 4-2: Alarms (continued)
Alarm Number Alarm Name Alarm Text Troubleshooting
1543 Valve problem Record the alarm number. If the problempersists, contact your technicalrepresentative.
If the problem persists, contact yourtechnical representative.
1545 Problem closing valve Record the alarm number. Verify correctloading of the residual leukocyte line inbucket 2. If the problem persists, contactyour technical representative.
If the problem persists, contact yourtechnical representative.
1546 Problem opening valve Record the alarm number. Bucket will bedisabled. Problem opening the residualleukocyte valve. If the problem persists,contact your technical representative.
If the problem persists, contact yourtechnical representative.
1547 Problem sealing Record the alarm number. Clamp andseal all lines. If the problem persists,contact your technical representative.
If the problem persists, contact yourtechnical representative.
1548 Valve problem Record the alarm number. If the problempersists, contact your technicalrepresentative.
If the problem persists, contact yourtechnical representative.
1550 Problem closing valve Record the alarm number. Verify correctloading of the residual leukocyte line inbucket 3. If the problem persists, contactyour technical representative.
If the problem persists, contact yourtechnical representative.
1551 Problem opening valve Record the alarm number. Bucket will bedisabled. Problem opening the residualleukocyte valve. If the problem persists,contact your technical representative.
If the problem persists, contact yourtechnical representative.
1552 Problem sealing Record the alarm number. Clamp andseal all lines. If the problem persists,contact your technical representative.
If the problem persists, contact yourtechnical representative.
1553 Valve problem Record the alarm number. If the problempersists, contact your technicalrepresentative.
If the problem persists, contact yourtechnical representative.
1555 Problem closing valve Record the alarm number. Verify correctloading of the residual leukocyte line inbucket 4. If the problem persists, contactyour technical representative.
If the problem persists, contact yourtechnical representative.
1556 Problem opening valve Record the alarm number. Bucket will bedisabled. Problem opening the residualleukocyte valve. If the problem persists,contact your technical representative.
If the problem persists, contact yourtechnical representative.
1557 Problem sealing Record the alarm number. Clamp andseal all lines. If the problem persists,contact your technical representative.
If the problem persists, contact yourtechnical representative.
Reveos Alerts and Alarms
Reveos® Automated Blood Processing System Operator's Manual for Version 1.1 4-19

Table 4-2: Alarms (continued)
Alarm Number Alarm Name Alarm Text Troubleshooting
1558 Valve problem Record the alarm number. If the problempersists, contact your technicalrepresentative.
If the problem persists, contact yourtechnical representative.
1559 Problem sealing Record the alarm number. Clamp andseal all lines. If the problem persists,contact your technical representative.
If the problem persists, contact yourtechnical representative.
1560 Problem sealing Record the alarm number. Clamp andseal all lines. If the problem persists,contact your technical representative.
If the problem persists, contact yourtechnical representative.
1561 Problem sealing Record the alarm number. Clamp andseal all lines. If the problem persists,contact your technical representative.
If the problem persists, contact yourtechnical representative.
1562 Problem sealing Record the alarm number. Clamp andseal all lines. If the problem persists,contact your technical representative.
If the problem persists, contact yourtechnical representative.
1563 Problem sealing Record the alarm number. Clamp andseal all lines. If the problem persists,contact your technical representative.
If the problem persists, contact yourtechnical representative.
1564 Problem sealing Record the alarm number. Clamp andseal all lines. If the problem persists,contact your technical representative.
If the problem persists, contact yourtechnical representative.
1565 Problem sealing Record the alarm number. Clamp andseal all lines. If the problem persists,contact your technical representative.
If the problem persists, contact yourtechnical representative.
1566 Problem sealing Record the alarm number. Clamp andseal all lines. If the problem persists,contact your technical representative.
If the problem persists, contact yourtechnical representative.
1567 Problem sealing Record the alarm number. Clamp andseal all lines. If the problem persists,contact your technical representative.
If the problem persists, contact yourtechnical representative.
1568 Problem sealing Record the alarm number. Clamp andseal all lines. If the problem persists,contact your technical representative.
If the problem persists, contact yourtechnical representative.
1569 Problem sealing Record the alarm number. Clamp andseal all lines. If the problem persists,contact your technical representative.
If the problem persists, contact yourtechnical representative.
1570 Problem sealing Record the alarm number. Clamp andseal all lines. If the problem persists,contact your technical representative.
If the problem persists, contact yourtechnical representative.
Alarms and Troubleshooting
4-20 Reveos® Automated Blood Processing System Operator's Manual for Version 1.1
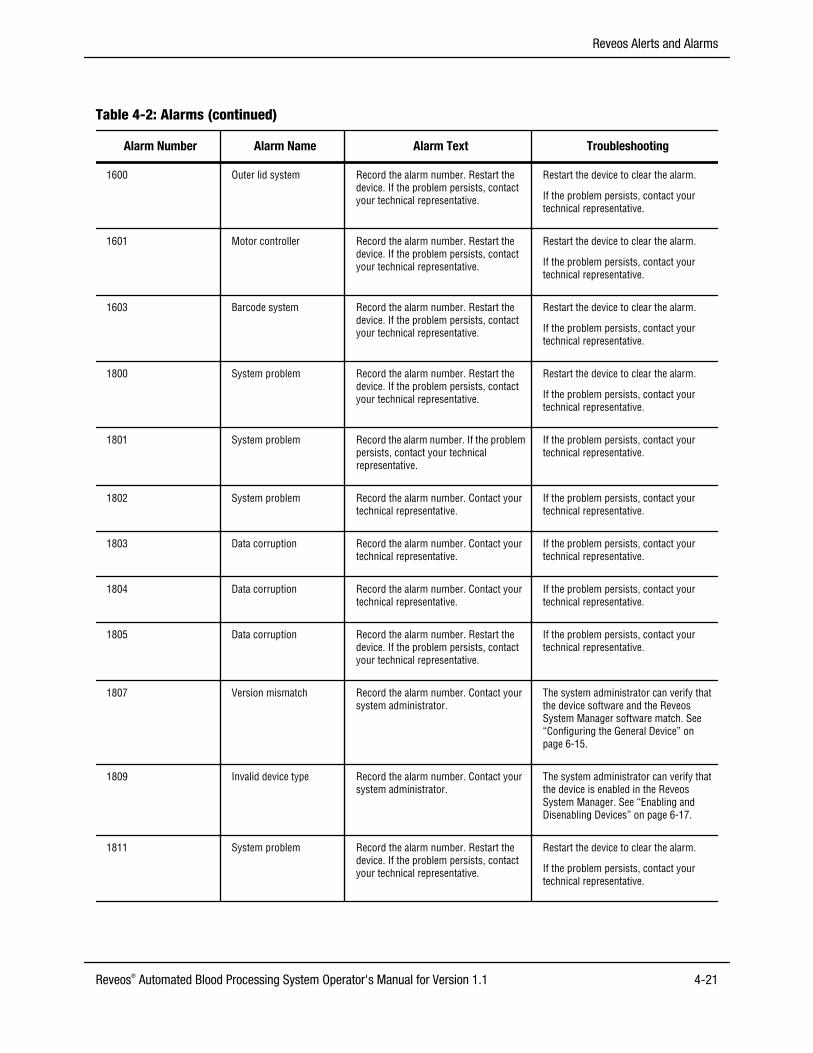
Table 4-2: Alarms (continued)
Alarm Number Alarm Name Alarm Text Troubleshooting
1600 Outer lid system Record the alarm number. Restart thedevice. If the problem persists, contactyour technical representative.
Restart the device to clear the alarm.
If the problem persists, contact yourtechnical representative.
1601 Motor controller Record the alarm number. Restart thedevice. If the problem persists, contactyour technical representative.
Restart the device to clear the alarm.
If the problem persists, contact yourtechnical representative.
1603 Barcode system Record the alarm number. Restart thedevice. If the problem persists, contactyour technical representative.
Restart the device to clear the alarm.
If the problem persists, contact yourtechnical representative.
1800 System problem Record the alarm number. Restart thedevice. If the problem persists, contactyour technical representative.
Restart the device to clear the alarm.
If the problem persists, contact yourtechnical representative.
1801 System problem Record the alarm number. If the problempersists, contact your technicalrepresentative.
If the problem persists, contact yourtechnical representative.
1802 System problem Record the alarm number. Contact yourtechnical representative.
If the problem persists, contact yourtechnical representative.
1803 Data corruption Record the alarm number. Contact yourtechnical representative.
If the problem persists, contact yourtechnical representative.
1804 Data corruption Record the alarm number. Contact yourtechnical representative.
If the problem persists, contact yourtechnical representative.
1805 Data corruption Record the alarm number. Restart thedevice. If the problem persists, contactyour technical representative.
If the problem persists, contact yourtechnical representative.
1807 Version mismatch Record the alarm number. Contact yoursystem administrator.
The system administrator can verify thatthe device software and the ReveosSystem Manager software match. See “Configuring the General Device” onpage 6-15.
1809 Invalid device type Record the alarm number. Contact yoursystem administrator.
The system administrator can verify thatthe device is enabled in the ReveosSystem Manager. See “Enabling andDisenabling Devices” on page 6-17.
1811 System problem Record the alarm number. Restart thedevice. If the problem persists, contactyour technical representative.
Restart the device to clear the alarm.
If the problem persists, contact yourtechnical representative.
Reveos Alerts and Alarms
Reveos® Automated Blood Processing System Operator's Manual for Version 1.1 4-21

Table 4-2: Alarms (continued)
Alarm Number Alarm Name Alarm Text Troubleshooting
1903 Centrifuge problem Record the alarm number. Restart thedevice. If the problem persists, contactyour technical representative.
Restart the device to clear the alarm.
If the problem persists, contact yourtechnical representative.
1904 Outer lid lock problem Record the alarm number. Restart thedevice. If the problem persists, contactyour technical representative.
Restart the device to clear the alarm.
If the problem persists, contact yourtechnical representative.
1907 Vibration sensor Record the alarm number. If the problempersists, contact your technicalrepresentative.
If the problem persists, contact yourtechnical representative.
1908 Hydraulic sensor Record the alarm number. If the problempersists, contact your technicalrepresentative.
If the problem persists, contact yourtechnical representative.
2000 Bucket sensor problem Record the alarm number. Bucket will bedisabled. If the problem persists, contactyour technical representative.
If the problem persists, contact yourtechnical representative.
2001 Line sensor problem Record the alarm number. Bucket will bedisabled. Verify correct loading in the linesensor. If the problem persists, contactyour technical representative.
If the problem persists, contact yourtechnical representative.
2002 Bucket sensor problem Record the alarm number. Bucket will bedisabled. If the problem persists, contactyour technical representative.
If the problem persists, contact yourtechnical representative.
2003 Line sensor problem Record the alarm number. Bucket will bedisabled. Verify correct loading in the linesensor. If the problem persists, contactyour technical representative.
If the problem persists, contact yourtechnical representative.
2004 Bucket sensor problem Record the alarm number. Bucket will bedisabled. If the problem persists, contactyour technical representative.
If the problem persists, contact yourtechnical representative.
2005 Line sensor problem Record the alarm number. Bucket will bedisabled. Verify correct loading in the linesensor. If the problem persists, contactyour technical representative.
If the problem persists, contact yourtechnical representative.
2006 Bucket sensor problem Record the alarm number. Bucket will bedisabled. If the problem persists, contactyour technical representative.
If the problem persists, contact yourtechnical representative.
2007 Line sensor problem Record the alarm number. Bucket will bedisabled. Verify correct loading in the linesensor. If the problem persists, contactyour technical representative.
If the problem persists, contact yourtechnical representative.
Alarms and Troubleshooting
4-22 Reveos® Automated Blood Processing System Operator's Manual for Version 1.1

Table 4-2: Alarms (continued)
Alarm Number Alarm Name Alarm Text Troubleshooting
2008 Bucket sensor problem Record the alarm number. Bucket will bedisabled. If the problem persists, contactyour technical representative.
See “Loading a Counterbalance Bag” onpage 3-21.
If the problem persists, contact yourtechnical representative.
2009 Line sensor problem Record the alarm number. Bucket will bedisabled. If the problem persists, contactyour technical representative.
See “Loading a Counterbalance Bag” onpage 3-21.
If the problem persists, contact yourtechnical representative.
2010 Bucket sensor problem Record the alarm number. Bucket will bedisabled. If the problem persists, contactyour technical representative.
See “Loading a Counterbalance Bag” onpage 3-21.
If the problem persists, contact yourtechnical representative.
2011 Line sensor problem Record the alarm number. Bucket will bedisabled. If the problem persists, contactyour technical representative.
See “Loading a Counterbalance Bag” onpage 3-21.
If the problem persists, contact yourtechnical representative.
2012 Bucket sensor problem Record the alarm number. Bucket will bedisabled. If the problem persists, contactyour technical representative.
See “Loading a Counterbalance Bag” onpage 3-21.
If the problem persists, contact yourtechnical representative.
2013 Line sensor problem Record the alarm number. Bucket will bedisabled. If the problem persists, contactyour technical representative.
See “Loading a Counterbalance Bag” onpage 3-21.
If the problem persists, contact yourtechnical representative.
2014 Bucket sensor problem Record the alarm number. Bucket will bedisabled. If the problem persists, contactyour technical representative.
See “Loading a Counterbalance Bag” onpage 3-21.
If the problem persists, contact yourtechnical representative.
2015 Line sensor problem Record the alarm number. Bucket will bedisabled. If the problem persists, contactyour technical representative.
See “Loading a Counterbalance Bag” onpage 3-21.
If the problem persists, contact yourtechnical representative.
2016 Line sensor problem Record the alarm number. Unload the linesensors and restart the device. If theproblem persists, contact your technicalrepresentative.
Verify that all the buckets are empty.See“Unloading a Blood Bag Set” onpage 3-27 or “Unloading aCounterbalance Bag” on page 3-29.
Restart the device to clear the alarm.
If the problem persists, contact yourtechnical representative.
Reveos Alerts and Alarms
Reveos® Automated Blood Processing System Operator's Manual for Version 1.1 4-23

Table 4-2: Alarms (continued)
Alarm Number Alarm Name Alarm Text Troubleshooting
2100 Centrifuge speed too high Record the alarm number. Restart thedevice. If the problem persists, contactyour technical representative.
Restart the device to clear the alarm.
If the problem persists, contact yourtechnical representative.
2200 System problem Record the alarm number. Restart thedevice. If the problem persists, contactyour technical representative.
Restart the device to clear the alarm.
If the problem persists, contact yourtechnical representative.
2201 System problem Record the alarm number. Restart thedevice. If the problem persists, contactyour technical representative.
Restart the device to clear the alarm.
If the problem persists, contact yourtechnical representative.
2202 Centrifuge system Record the alarm number. Restart thedevice. If the problem persists, contactyour technical representative.
Restart the device to clear the alarm.
If the problem persists, contact yourtechnical representative.
2203 Outer lid system Record the alarm number. Restart thedevice. If the problem persists, contactyour technical representative.
Restart the device to clear the alarm.
If the problem persists, contact yourtechnical representative.
2300 Hydraulic pressure toohigh
Record the alarm number. Restart thedevice. If the problem persists, contactyour technical representative.
Restart the device to clear the alarm.
If the problem persists, contact yourtechnical representative.
2401 Outer lid system Record the alarm number. Restart thedevice. If the problem persists, contactyour technical representative.
Restart the device to clear the alarm.
If the problem persists, contact yourtechnical representative.
2402 Stop button problem Record the alarm number. If the problempersists, contact your technicalrepresentative.
If the problem persists, contact yourtechnical representative.
2600 Communication problem Record the alarm number. Restart thedevice. If the problem persists, contactyour technical representative.
Restart the device to clear the alarm.
If the problem persists, contact yourtechnical representative.
Alarms and Troubleshooting
4-24 Reveos® Automated Blood Processing System Operator's Manual for Version 1.1

5Maintaining the Device
Reveos® Automated Blood Processing System Operator's Manual for Version 1.1 5-1

Daily Preventive Maintenance
Each day of use, visually inspect the device:• Inspect the interior of the rotor compartment for fluid leaks or foreign particles.
• Inspect the device for any loose or missing hardware or fasteners.
• Document according to your institution’s SOP that you performed daily preventive maintenanceon the device.
If you see any of the following, do not use the device. Report the condition immediately to yourauthorized service representative:• Power cords, plugs, or receptacles are damaged or worn.
• Switches are loose or do not operate.
• Any hardware or fasteners are loose or missing.
Maintaining the Device
5-2 Reveos® Automated Blood Processing System Operator's Manual for Version 1.1
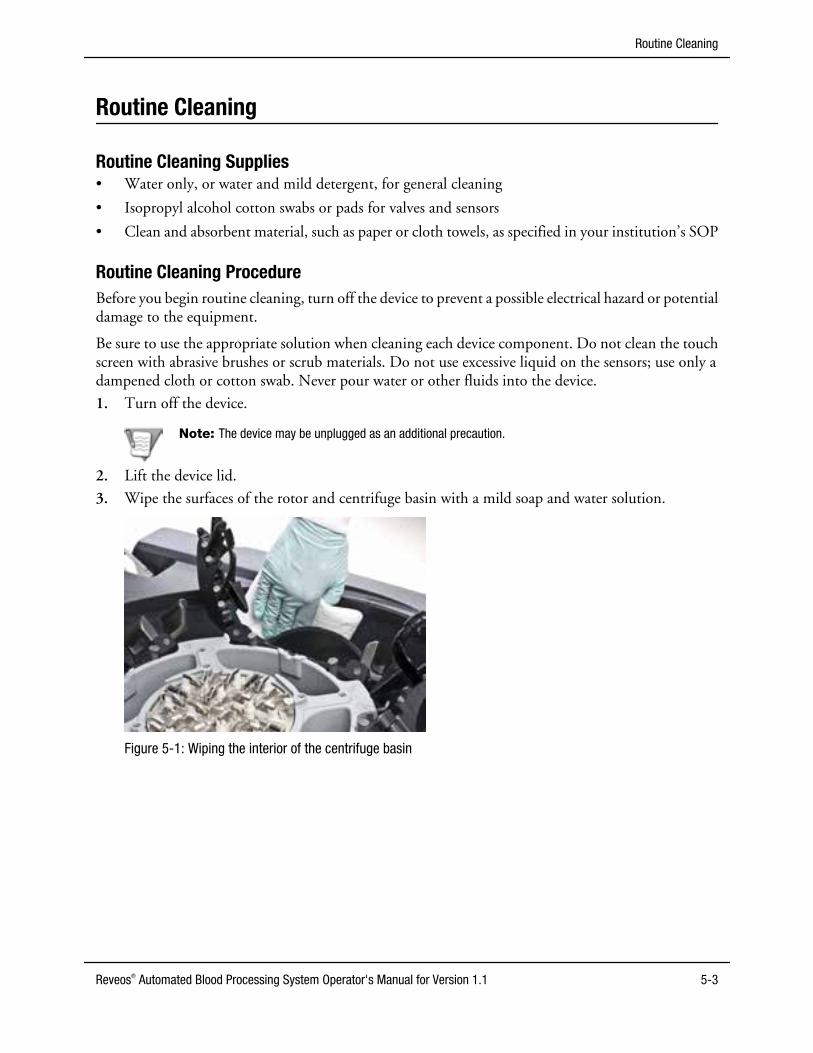
Routine Cleaning
Routine Cleaning Supplies• Water only, or water and mild detergent, for general cleaning
• Isopropyl alcohol cotton swabs or pads for valves and sensors
• Clean and absorbent material, such as paper or cloth towels, as specified in your institution’s SOP
Routine Cleaning ProcedureBefore you begin routine cleaning, turn off the device to prevent a possible electrical hazard or potentialdamage to the equipment.
Be sure to use the appropriate solution when cleaning each device component. Do not clean the touchscreen with abrasive brushes or scrub materials. Do not use excessive liquid on the sensors; use only adampened cloth or cotton swab. Never pour water or other fluids into the device.
1. Turn off the device.
Note: The device may be unplugged as an additional precaution.
2. Lift the device lid.
3. Wipe the surfaces of the rotor and centrifuge basin with a mild soap and water solution.
Figure 5-1: Wiping the interior of the centrifuge basin
Routine Cleaning
Reveos® Automated Blood Processing System Operator's Manual for Version 1.1 5-3

4. Wipe the surface of the leak detector with an isopropyl alcohol cotton swab or pad.
Figure 5-2: Cleaning the leak detector
5. Gently wipe each sealing valve and tubing guide with isopropyl alcohol cotton swabs or pads.
Note: Clean the sealing valves at least once per week to maintain optimal sealing function.
Figure 5-3: Cleaning a sealing valve using an isopropyl alcohol pad
Figure 5-4: Cleaning a sealing valve using an isopropyl alcohol cotton swab
Maintaining the Device
5-4 Reveos® Automated Blood Processing System Operator's Manual for Version 1.1

6. Gently wipe the line sensors and bucket sensors with isopropyl alcohol cotton swabs or pads.
Figure 5-5: Cleaning a line sensor
Figure 5-6: Cleaning a bucket sensor
7. Ensure that all interior surfaces are clean and dry.
8. Close the device lid.
9. Plug the device into the power source, and/or turn on the power switch.
10. Discard all cleaning materials according to your institution’s SOP.
11. Document that you performed routine cleaning of the device according to your institution’s SOP.
Note: If the device was moved before or during routine cleaning, move the device back into place and ensure thatthe casters are properly locked prior to operating the device. See “Locking the Front Casters” on page 3-4. Aftermoving the device, ensure that it is plugged into a RCCD (GFCI)-protected electrical power circuit before turning it on.See Table 8-1 for more information.
Routine Cleaning
Reveos® Automated Blood Processing System Operator's Manual for Version 1.1 5-5

Cleaning After a Blood Spill
Blood Spill Cleaning Supplies• Water, or water and mild detergent, to remove blood residue and/or bleach residue after
disinfecting
• 0.25% sodium hypochlorite solution for disinfecting surfaces. Commercial household bleach (5%to 6%) diluted 1 part bleach to 18 parts water produces an approximately 0.25% sodiumhypochlorite solution
• Isopropyl alcohol cotton swabs or pads
• Clean and absorbent material, such as paper or cloth towels, as specified in your institution’s SOP
Note: An absorbent, non-abrasive sponge with a long handle may be used for cleaning inside buckets andblood component bag holders.
• Cotton swabs
Blood Spill Cleaning ProcedureTo clean and disinfect the device, perform the steps listed below using the recommended cleaningsupplies. Do not clean the touch screen with abrasive brushes or scrub materials. Do not use excessiveliquid on the sensors; use only a dampened cloth or cotton swab. Never pour water or other fluids intothe device.
1. Turn off the device.
Note: The device may be unplugged as an additional precaution.
2. Lift the device lid.
3. Clean and disinfect the following surfaces with a 0.25% sodium hypochlorite solution as shown inFigure 5-7 and Figure 5-8:
• Interior surface of the device lid
Note: Remove any excess blood from the interior of the device lid before you proceed with cleaning.
• Device-lid hinges
• Rubber seal around the rotor compartment opening
• Walls and bottom of the centrifuge basin
• Buckets
• Blood component bag holders (may be cleaned using an absorbent, non-abrasive sponge with along handle)
• Hydraulic bladders
• Bucket-lid and bucket-latch hinges
Maintaining the Device
5-6 Reveos® Automated Blood Processing System Operator's Manual for Version 1.1

Figure 5-7: Cleaning the walls of the centrifuge basin
Figure 5-8: Cleaning a blood component bag holder
4. Inspect all interior surfaces for excess cleaning solution or blood residue, and wipe off any residuewith water or water with mild detergent, as needed.
5. Clean and disinfect the following surfaces with an isopropyl alcohol cotton swab or pad as shown inFigure 5-9, Figure 5-10, Figure 5-11, Figure 5-12, and Figure 5-13:
• Line sensors
• Tubing guides
• Sealing valves
• Leak detector (mounted on the front wall of the rotor compartment)
• Bucket sensors
Cleaning After a Blood Spill
Reveos® Automated Blood Processing System Operator's Manual for Version 1.1 5-7

Figure 5-9: Cleaning a line sensor
Figure 5-10: Cleaning a sealing valve using an isopropyl alcohol pad
Figure 5-11: Cleaning a sealing valve using an isopropyl alcohol cotton swab
Maintaining the Device
5-8 Reveos® Automated Blood Processing System Operator's Manual for Version 1.1

Figure 5-12: Cleaning the leak detector
Figure 5-13: Cleaning a bucket sensor
6. Ensure that all interior surfaces are clean and dry.
7. Inspect the loading area, rotor, centrifuge basin, and device lid for damage.
8. Inspect the centrifuge basin area for any loose items such as cleaning materials or severed blood bagset parts.
9. Close the device lid.
10. Clean and disinfect the device lid and other exterior surfaces with a 0.25% sodium hypochloritesolution as needed, including the counterbalance bags, barcode scanner, and barcode-scannerholder.
11. Inspect all exterior surfaces for excess cleaning solution or blood residue, and wipe off any residuewith water or water with mild detergent, as needed.
12. Ensure that all surfaces are clean and dry.
13. Plug the device into the power source and/or turn on the power switch.
14. Discard all cleaning materials according to your institution’s SOP.
15. Document blood spill cleaning according to your institution’s SOP.
16. If the device needs more extensive cleaning after you have completed steps 1 through 14, contactyour authorized Terumo BCT service representative.
Cleaning After a Blood Spill
Reveos® Automated Blood Processing System Operator's Manual for Version 1.1 5-9

Note: If the device was moved before or during routine cleaning, move the device back into place and ensure thatthe casters are properly locked prior to operating the device. See “Locking the Front Casters” on page 3-4. Aftermoving the device, ensure that it is plugged into a RCCD (GFCI)-protected electrical power circuit before turning it on.See Table 8-1 for more information.
Maintaining the Device
5-10 Reveos® Automated Blood Processing System Operator's Manual for Version 1.1

Dry Check Procedure
The dry check procedure is an optional procedure for use after cleaning a blood spill. Running thisprocedure verifies that the device is dry before processing whole blood units. For detailed instructions oncleaning the device after a blood spill, see “Blood Spill Cleaning Procedure” on page 5-6.
The dry check procedure must be configured by a qualified Terumo BCT technical representative. Formore information on the configuration of the dry check procedure, contact your Terumo BCTrepresentative.
Running the Dry Check ProcedureAfter cleaning the device following a blood spill, perform the steps listed below to run the dry checkprocedure.
1. Touch the Select Procedure button on the Barcode Entry screen.
2. Select the dry check procedure. Touch the Continue button.
Note: Procedure names are configured in the Reveos System Manager application.
3. Scan the Operator ID barcode, if prompted on the touch screen.
4. When the touch screen prompts you for a Donation ID barcode, scan and load a counterbalancebag in the first bucket. Repeat until all four buckets are loaded with a counterbalance bag. For moreinformation on loading a counterbalance bag, see “Loading a Counterbalance Bag” on page 3-21.
Note: All four buckets must contain a counterbalance bag before you start the dry check procedure.
5. Touch the Close Valves button.
6. Close the device lid. Touch the Start Procedure button.
7. If the touch screen shows a 1401 Leak detected alarm, the system ends the procedure.
• Turn off the device.
• Unload the counterbalance bags from all four buckets.
• Clean any residual blood or excess cleaning solution from inside the device.
• Ensure that all surfaces are dry.
• Turn on the device.
• Repeat steps 1 through 7 until the procedure ends without displaying any alarms.8. Unload the counterbalance bags.
9. Touch the Next Procedure button.
10. Touch the Select Procedure button and select the required operating procedure.
Dry Check Procedure
Reveos® Automated Blood Processing System Operator's Manual for Version 1.1 5-11

Service InformationCaution: Unplug the power to the device before servicing to prevent possible electrical hazard or potential damageto the device.
If any of the following conditions occur, do not use the device. Report the condition immediately toyour authorized service representative:• Power cords, plugs, or receptacles are damaged or worn.
• Switches are loose or do not operate.
• The device has been subject to physical shock or to liquid spills on the electronics housed below therotor.
• The device has given anyone an electrical shock while in use.
• The device appears to be overheating.
• Any fasteners or hardware appear to be loose or missing.
Any equipment modifications or service that requires the use of tools (such as a screwdriver or servicekey) must be performed by qualified persons and must be approved in advance in writing byTerumo BCT. All electrical installations must comply with all applicable local electrical codes andTerumo BCT specifications.
If you unplug and move the device, ensure that it is plugged into a RCCD (GFCI)-protected electricalpower circuit before turning it on. See Table 8-1 for more information.
Only qualified personnel should make connections to the Ethernet connector. CPU memory batteriesmust be replaced with the same type of battery. Use only power plugs and adapters specified by themanufacturer.
Contact your Terumo BCT technical representative if you notice any changes in performance or qualityof products that are processed on the device.
Replacing PartsOnly Terumo BCT trained and qualified personnel are permitted to service the device and replace parts.
Maintaining the Device
5-12 Reveos® Automated Blood Processing System Operator's Manual for Version 1.1

Preventive Service MaintenanceTo prolong equipment life and to provide maximum system performance, a qualified service technicianperforms preventive maintenance procedures on the device at six‑month intervals (±30 days). Preventivemaintenance procedures include checks and tests on device subsystems, as well as replacement of certainsystem components.
The following list indicates the types of maintenance procedures that may be performed during a six-month preventive maintenance. For a more specific list, contact your Terumo BCT representative formore information.
General Mechanical Inspection Procedure• Electrical system checks and tests:
– Grounding checks
– Power-up and self tests
– AC and DC voltage checks
– Power supply checks
– Ground resistance test
– Accessible parts voltage test
• Subsystem checks and tests:– Leak detector check
– Device-lid lock function test
– Rotor ramp-up test
– Rotor speed check
– Touch screen function check
– Fan function check
– Vibration sensor function check
– Valve open/close/seal function check
– Hydraulic pressure and flow rate checks
– Barcode scanner function check
– Simulated procedure check
– Bucket sensor and line sensor check
– Cooling system check
The service technician documents the routine service maintenance in the log book of each device he orshe services.
Preventive Service Maintenance
Reveos® Automated Blood Processing System Operator's Manual for Version 1.1 5-13

Maintaining the Device
5-14 Reveos® Automated Blood Processing System Operator's Manual for Version 1.1

6Configuring the Reveos System Manager
Reveos® Automated Blood Processing System Operator's Manual for Version 1.1 6-1

Accessing the Software and Viewing Version Information
Opening Reveos System ManagerThe Reveos System Manager software is a web-based application that is accessed through Microsoft®
Internet Explorer®. Complete the following steps to open the application:
1. Click Start, click Programs, and then click Internet Explorer.
2. In the address bar of the browser, type the address for the Reveos System Manager software:
servername/RSM.Application.Web
Note: This web address can be saved as a “Favorite” in Internet Explorer®. A system administrator can also create adesktop icon for the application.
After the application is launched, the Reveos System Manager splash page briefly appears, followed bythe login page.
Logging In to Reveos System ManagerComplete the following steps from the Reveos System Manager software browser window:
1. Open Reveos System Manager.The login page appears.
2. Type your user name in the first text box.
3. Press the Tab key on the keyboard, or click in the Password text box.
4. Type your password.
Figure 6-1: Reveos System Manager Login page
5. Click Log in, or press the Enter key.
If you need to change your password, click the Change Password link. See “Changing Your Password”on page 6-3 for more information. If you do not need to change your password, you can skip this stepby clicking any of the tabs at the top of the page.
Logging Out of Reveos System Manager
Note: You will be automatically logged out of Reveos System Manager if you refresh the browser page, for example,by clicking F5 or clicking the Refresh button.
Configuring the Reveos System Manager
6-2 Reveos® Automated Blood Processing System Operator's Manual for Version 1.1

You can log out of the Reveos System Manager software at any time from any page. To log out, click theLog Out link located at the top right corner of the browser window. All users should log out of the ReveosSystem Manager software before closing the browser window.
Changing Your PasswordAfter logging in to Reveos System Manager, you can modify your password. Your password can bebetween 5 and 20 unicode characters and is case-sensitive.
1. Log in to Reveos System Manager. A Change Password option appears on the Home page.
2. Click Change Password.
Figure 6-2: The Home page with the Change Password link
3. Type your old password in the Old Password text box.
4. Type your new password in the New Password text box.
5. Retype your new password in the Verify Password text box.
6. Click OK to update your information.
Note: You can leave this page at any time by clicking the Cancel button.
The system administrator can configure the allowed number of failed login attempts. If a user exceedsthe allowed number of login attempts, the account will be locked. The user must contact the systemadministrator to reset the account.
Viewing Software Version InformationTo view the software version information, click the Home tab. The software version is listed at thebottom of the Home page.
Accessing the Software and Viewing Version Information
Reveos® Automated Blood Processing System Operator's Manual for Version 1.1 6-3

Configuring Reveos Devices Within Reveos System ManagerThe Reveos device is configured in Reveos System Manager under the Configuration tab. Here, systemadministrators can configure all information necessary to process whole blood using the Reveos system.
The Configuration tab contains the following pages:• Facility: This page allows an administrator to set up and configure facilities within the blood center.
• Application: This page allows an administrator to configure all application settings, such as sessiontimeout, account lockout, and password expiration.
• Group: All permissions are granted through the use of groups. This page allows a user administratorto assign permissions to new and existing groups.
• User: Each user must be granted access to the Reveos device and/or Reveos System Manager. Thispage allows the user administrator to manage user accounts, enable or disenable access to the deviceand/or application, and assign passwords.
• General Device: This page allows a system administrator to configure features that apply to allReveos devices, such as manual keyboard entry and skipping barcode scans.
• Individual Device: This page allows a system administrator to configure each individual device andto assign a device to a facility within the blood center.
• Barcode: All barcode definitions are configured on this page and are then assigned to procedures asneeded.
• Procedure: This page allows a system administrator to create procedure configurations bycombining barcode, protocol, and individual device information.
Configuring the Reveos System Manager
6-4 Reveos® Automated Blood Processing System Operator's Manual for Version 1.1

Configuring Facilities
To add, edit, or delete facilities, click Facility in the menu bar of the Configuration tab. When facilities arecreated and saved, they are stored in the content list. When an authorized user clicks an item in thecontent list, the information for the selected facility appears in the Details section of the page. TheDetails section lists information for that specific facility, such as name, address, and phone number.
Figure 6-3: Facility page with a specific facility selected
Creating a FacilityComplete the following steps to create a new facility:
1. Access the Facility page.
2. Click New.
3. Type a unique name in the Facility Name text box.
4. Complete as many text boxes as needed.
Note: Facility Name is required information. All other information is optional.
5. Click Save. If you do not want to save, click Cancel.
Configuring Facilities
Reveos® Automated Blood Processing System Operator's Manual for Version 1.1 6-5
After you have saved your entry, the facility information is stored in the facility content list. You do notneed to enter this information each time you log in.
Repeat this process as needed to enter additional facilities.
Editing a FacilityComplete the following steps to update information for an existing facility:
1. Access the Facility page.
2. Select the facility you want to edit from the content list.
3. Click Edit.
4. Enter or update information in any or all of the text boxes on the Facility page.
5. Click Save. If you do not want to save, click Cancel.
Deleting a FacilityComplete the following steps to delete an existing facility:
1. Access the Facility page.
2. Select the facility you want to delete from the content list.
3. Click Delete.A dialog box appears.
4. Click Yes if you are sure that you want to delete the facility. Otherwise, click No.
Note: All devices must be removed from a facility before the facility can be deleted from the Reveos SystemManager. To remove devices from a facility, see “Assigning a Facility” on page 6-18.
Associated DevicesThe Associated Devices section displays a list of all devices that are associated with the selected facility.Devices are assigned to facilities on the Individual Device page. See “Configuring Individual Devices”on page 6-17.
Configuring the Reveos System Manager
6-6 Reveos® Automated Blood Processing System Operator's Manual for Version 1.1

Configuring the ApplicationAll Reveos System Manager settings are configured on the Application page under the Configuration tab.To view these settings, access the Application page. An authorized user can edit the settings by clickingthe Edit button.
Note: After making changes to the Application page, you must save the changes, log out, then log back in to theReveos System Manager for the changes to take effect.
Figure 6-4 is an example of the Application page with all settings enabled and values in thecorresponding boxes:
Figure 6-4: Application page
Session TimeoutWhen Session Timeout is enabled, a user will be logged out if the session is idle for the number ofminutes specified. Enable Session Timeout is automatically set to No during initial configuration. Toenable and configure Session Timeout, complete the following steps:
1. Click the drop-down menu next to Enable Session Timeout and select Yes.
2. Type a number between 1 and 720 in the Minutes text box.
3. Click Save if you do not want to configure any other settings. Otherwise, proceed to AccountLockout.
Account LockoutWhen Account Lockout is enabled, a user will be locked out of his or her account if he or she exceeds thenumber of failed consecutive login attempts. Enable Account Lockout is automatically set to No duringinitial configuration.
Note: A user is not removed from any groups when locked out.
Configuring the Application
Reveos® Automated Blood Processing System Operator's Manual for Version 1.1 6-7

To enable and configure Account Lockout, complete the following steps:
1. Click the drop-down menu next to Enable Account Lockout and select Yes.
2. Type a number between 2 and 10 in the Login Attempts text box.
3. Click Save if you do not want to configure any other settings. Otherwise, proceed to PasswordExpiration.
If a user is locked out of Reveos System Manager, see “Unlocking a User Account” on page 6-14.
Password ExpirationWhen Password Expiration is enabled, a user's password will expire within the number of days specified.The user will be warned that the password will expire and can make the changes prior to the passwordexpiration. If a user's password is not changed before it expires, the user will not be allowed to log in untilhe or she successfully changes the password.
Enable Password Expiration is automatically set to No during initial configuration. To enable andconfigure Password Expiration, complete the following steps:
1. Click the drop-down menu next to Enable Password Lockout and select Yes.
2. Type a number between 30 and 365 in the Days Before Expiration text box.
3. Type a number between 0 and 30 in the Days Before Expiration Reminder text box.
4. Click Save.
Configuring the Reveos System Manager
6-8 Reveos® Automated Blood Processing System Operator's Manual for Version 1.1

Assigning Permissions
Reveos System Manager uses a rights-based user management system. User permissions are defined atthree levels.• User system access: Determines user access to the Reveos system. A user can be active, deactivated
or locked out. A user must be active to access any functionality on the device or in Reveos SystemManager.
• User component access: Determines user access to the Reveos system components. A user can beenabled or disenabled for either the Reveos device, Reveos System Manager, or both.
• Group membership: Determines the specific functions a user can perform. If a user is not enabled,they cannot perform the group functions. A user can be assigned to one or more groups to allowthem to access pages and perform functions assigned to that group.
In order to interact with the Reveos system, a user must be active, enabled for a component, and assignedto a group.
Reveos System Manager contains four pre-populated groups. Additional groups can be created by theuser administrator. Multiple users can be assigned the same permissions, and each user can be in multiplegroups. If a user does not have permission to access a specific function, that function will not appear inthe application when that user is logged in.
Permissions are granted on a per-page basis to users. A user is given permissions when he or she is addedto a group. However, if an individual user is disenabled, the user settings supersede the grouppermissions.
GroupsThe Reveos System Manager contains four predetermined groups with pre-populated permissions. Thepre-populated groups are as follows:• Device Operator: Users assigned to this group can operate the Reveos device.
• Report Operator: Users assigned to this group can view and run reports.
• System Administrator: Users assigned to this group can update configuration elements in ReveosSystem Manager. They can view user and group information but cannot edit any settings.
• User Administrator: Users assigned to this group can view and edit all user and group information.
All of the pre-populated group names and permissions can be edited, except for the name andpermissions of the pre-populated User Administrator group.
Levels of Access for Reveos System Manager
When a user administrator creates a new group or edits an existing group, the Level of Access section onthe Group page becomes active. The permissions for each Reveos System Manager page can beindependently controlled by selecting an assigned permission from the corresponding drop-downmenu. There are three types of permissions available:• No Access: Users in this group cannot access the page at all. The tab and/or link to the page will not
be displayed to the user.
• Limited Access: Users in this group can read the page, but cannot make any edits or update anyinformation.
• Full Access: Users in this group can access, read, and edit information on the page.
Assigning Permissions
Reveos® Automated Blood Processing System Operator's Manual for Version 1.1 6-9

Note: When a user has limited access to the Insight Report page or the Custom Query report, he or she can view thesaved reports, but cannot use the Run Now feature.
Levels of Access for Operating the Device
When a user administrator creates a new group or edits an existing group, the Level of Access section onthe Group page becomes active. The device operator permission can be independently controlled byselecting an assigned permission from the Device Operator drop-down menu. There are two types ofpermissions available:• No Access: Users in this group are not able to operate the device.
• Operate Device: Users in this group are able to operate the device.
Editing an Existing Group
Complete the following steps to edit an existing group:
1. Access the Group page.
2. Select the group you want to edit from the content list.
3. Click Edit.
4. Update the information as needed.
5. Edit the permissions by clicking each drop-down menu and selecting one of the choices listed.
Figure 6-5: Level of Access section with the Facility Page drop-down menu expanded
6. Click Save. If you do not want to save, click Cancel.
Creating a New Group
Complete the following steps to create a new group:
1. Access the Group page.
2. Click New.
Configuring the Reveos System Manager
6-10 Reveos® Automated Blood Processing System Operator's Manual for Version 1.1

3. Type a unique name in the Group Name text box.
4. Edit the permissions by clicking each drop-down menu and selecting one of the choices listed.
5. Click Save. If you do not want to save, click Cancel.
Deleting a Group
Note: You must remove all associated users before deleting a group.
Complete the following steps to delete an existing group:
1. Access the Group page.
2. Select the group you want to delete from the content list.
3. Click Delete.
A dialog box will ask if you are sure you want to delete the record.
4. Click Yes if you are sure you want to delete the group. Otherwise, click No.
UsersThe User page allows the user administrator to manage user accounts and group assignments.
A user can be active, deactivated or locked out.• Active: An active user is able to interact with the Reveos system. Active users can be enabled for the
device, application, or both, and assigned to groups.
• Deactivated: A deactivated user is unable to use the Reveos system and is automatically removedfrom all groups.
• Locked out: If a user is locked out of the Reveos System Manager, he or she is active and retains allgroup memberships, but is not able to log in to the Reveos System Manager. The user will be able tooperate the device if he or she is enabled to use the device and is a member of the Device Operatorgroup.
A user can be enabled or disenabled to operate the Reveos device and use the Reveos System Managerapplication. If a user is enabled for the device or the application, but deactivated, the system statussupersedes the component status.• Enabled: If a user is enabled for the device, the application, or both, he or she is allowed to perform
tasks allowed by the groups to which he or she is assigned.
• Disenabled: If a user is not enabled for a system component, he or she is not able to operate/use thatcomponent.
In the content list, all active users are shown in black. To view all users, including those who have beendeactivated, select the Show all users check box below the content list. Users who have been deactivatedare shown in red.
Assigning Permissions
Reveos® Automated Blood Processing System Operator's Manual for Version 1.1 6-11

1
2
3
Figure 6-6: User page with active users shown in black and deactivated users shown in red
1 Active user
2 Deactivated user
3 Details explaining that the selected user is not active
Adding a New User
Complete the following steps to add a new user:
1. Access the User page.
2. Click New.
3. Assign a user name and type it into the User Name text box. The user name cannot contain spaces.The user name must be unique and cannot be the user name assigned to an active or deactivateduser.
4. Select Yes or No to enable or disenable the user for Reveos System Manager.
If the user is enabled in the Reveos System Manager, you must assign a user name for the applicationand you must assign a password. The user name on the application must be between 1 and 120unicode characters and cannot contain any spaces. Complete the following steps to create apassword:
a. Type a password in the Password text box. The password must be between 5 and 20 unicodecharacters.
b. Retype the password in the Verify Password text box.
Note: To revoke a user's rights to use the Reveos System Manager, a user administrator can either removethe user from the appropriate group or disenable the user from using the Reveos System Manager on his or heruser page.
5. Select Yes or No to enable or disenable the user for the device.
If the user is enabled for the device, you must assign the user an Operator ID. The Operator ID isthe badge number or ID number that an operator will scan before he or she uses the device.
6. Assign the user to a group or groups.
To assign a user, select the check box next to the appropriate group(s). To view the associatedpermissions, click the drop-down menu next to the group name.
Configuring the Reveos System Manager
6-12 Reveos® Automated Blood Processing System Operator's Manual for Version 1.1

Note: To revoke a user's rights to use the Reveos device, a user administrator can either remove the userfrom the appropriate group or disenable the user from using the Reveos device on his or her user page.
1
2
Figure 6-7: Permissions are shown when the group is expanded
1 Group name
2 Group permissions
7. Click Save. If you do not want to save, click Cancel.
Editing Existing User Information
Complete the following steps to edit existing user information:
1. Access the User page.
2. Click on the user name in the “Users” list.
3. Click Edit.
4. Update the information as needed.
5. Click Save. If you do not want to save, click Cancel.
Revoking a User's Permissions
There are two ways to revoke a user's permissions:• Deactivate the user
• Disenable the user from using the device and/or Reveos System Manager
Deactivating a User in Reveos System Manager
Users can be deactivated. However, a user cannot be permanently deleted. Perform the following steps todeactivate a user:
Assigning Permissions
Reveos® Automated Blood Processing System Operator's Manual for Version 1.1 6-13

1. Access the User page.
2. Select the user from the Users list.
3. Click Deactivate.
A dialog box will ask if you are sure you want to remove the user.
4. Click Yes if you are sure you want to deactivate the user. Otherwise, click No.
The user is removed from the active users list. To view all users, both active and deactivated, select theShow all users check box shown below the content list. All deactivated user names are shown in red.
Restoring a User
Users can always be restored after being removed. Complete the following steps to restore a user:
1. Access the User page.
2. Select the Show all users check box on the left side of the page.
3. Select the user that you want to restore. The user names of all deactivated users are shown in red.
4. Click Restore.
Once the user is restored, the user name will be shown in black.
Unlocking a User Account
If a user attempts to log in to an account more times than are allowed in the application configuration,the user will be locked out of the account. A user administrator can unlock an account by completing thefollowing steps:
1. Access the User page.
2. Select the user name on the account you want to unlock. This name will appear in the content list.
3. Click Unlock.
You can reset the user’s password at this time, but it is not required. To reset the user’s password,
1. Type a new password in the Password text box.
2. Retype the new password in the Verify Password text box.
3. Click Save. If you do not want to save, click Cancel.
Configuring the Reveos System Manager
6-14 Reveos® Automated Blood Processing System Operator's Manual for Version 1.1

Configuring the General DeviceThe General Device page allows the user to manage various versions of the Reveos device. Access theGeneral Device page to configure all devices, to enable or disable the keyboard, and to set the number ofbarcodes that can be skipped on each device type.
1 2
3
4
Figure 6-8: General Device page
Table 6-1 lists the elements on the General Device page.
Table 6-1: General Device configuration options
Section/Option Name Default Function
1 Devices content list Not applicable Lists the device versions available forconfiguration.
2 Device Generation Not applicable Shows the currently selected device version.
3 Enable Keyboard Yes Allows the user to input data into the Reveosdevice via the touch-screen keyboard.
4 Skip Barcode Not Allowed Allows the user to specify whether the operatorwill be allowed to bypass a barcode (or allbarcodes) in a protocol configurationsequence. While loading a blood bag set, anoperator is allowed to skip one, skip all, or notskip any barcodes depending on thisconfiguration.
Enabling and Disabling the Keyboard1. Access the General Device page.
2. Click Edit.
3. Click the Enable Keyboard drop-down menu.
4. To allow keyboard entry, select Yes. To disallow keyboard entry, select No.
Configuring the General Device
Reveos® Automated Blood Processing System Operator's Manual for Version 1.1 6-15

Skip Barcode1. Access the General Device page.
2. Click Edit.
3. Select one of the following choices from the Skip Barcode drop-down menu:• One: The device allows for one barcode to be skipped
• All: The device allows for all barcodes to be skipped
• Not Allowed: The device never allows for any barcodes to be skipped
4. Click Save. If you do not want to save, click Cancel.
Configuring the Reveos System Manager
6-16 Reveos® Automated Blood Processing System Operator's Manual for Version 1.1
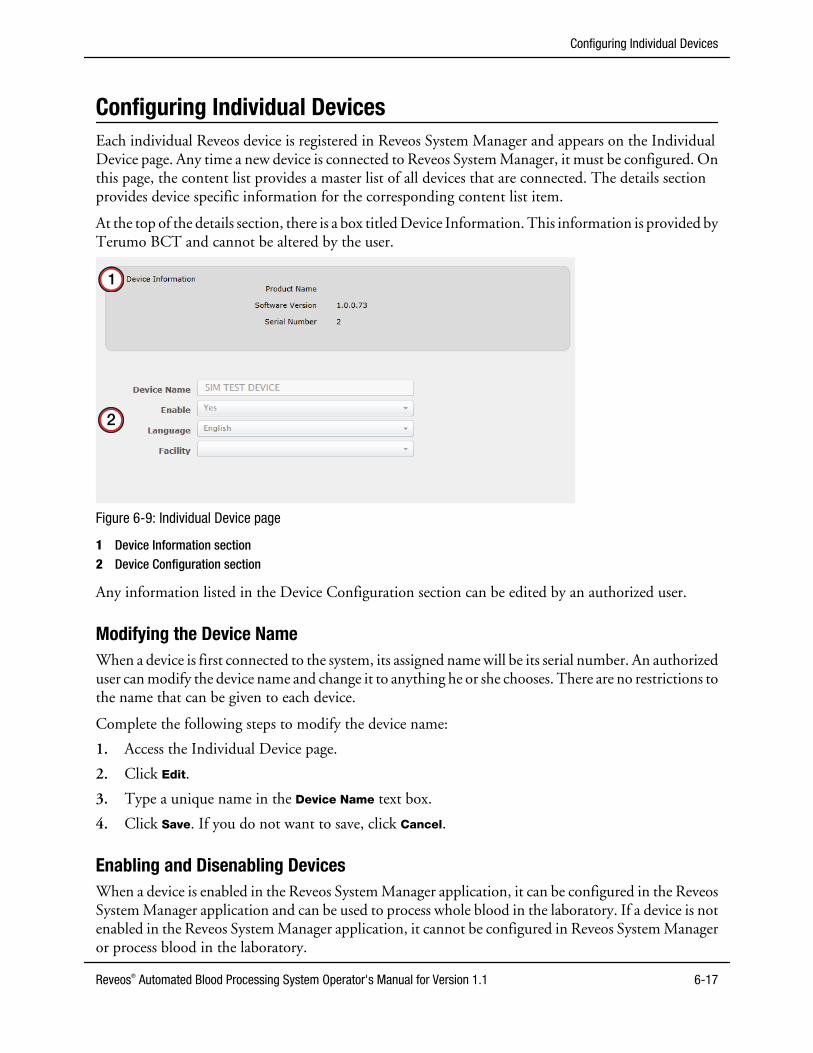
Configuring Individual DevicesEach individual Reveos device is registered in Reveos System Manager and appears on the IndividualDevice page. Any time a new device is connected to Reveos System Manager, it must be configured. Onthis page, the content list provides a master list of all devices that are connected. The details sectionprovides device specific information for the corresponding content list item.
At the top of the details section, there is a box titled Device Information. This information is provided byTerumo BCT and cannot be altered by the user.
1
2
Figure 6-9: Individual Device page
1 Device Information section2 Device Configuration section
Any information listed in the Device Configuration section can be edited by an authorized user.
Modifying the Device NameWhen a device is first connected to the system, its assigned name will be its serial number. An authorizeduser can modify the device name and change it to anything he or she chooses. There are no restrictions tothe name that can be given to each device.
Complete the following steps to modify the device name:
1. Access the Individual Device page.
2. Click Edit.
3. Type a unique name in the Device Name text box.
4. Click Save. If you do not want to save, click Cancel.
Enabling and Disenabling DevicesWhen a device is enabled in the Reveos System Manager application, it can be configured in the ReveosSystem Manager application and can be used to process whole blood in the laboratory. If a device is notenabled in the Reveos System Manager application, it cannot be configured in Reveos System Manageror process blood in the laboratory.
Configuring Individual Devices
Reveos® Automated Blood Processing System Operator's Manual for Version 1.1 6-17

When a device is first connected to the system, it will not be enabled. An authorized user must manuallyenable each device.
Complete the following steps to enable or disenable a device:
1. Access the Individual Device page.
2. Select the device you want to enable or disenable from the content list.
3. Click Edit.
4. Click the Enabled drop-down menu.
To enable the device, select Yes. To disenable the device, select No.
5. Click Save. If you do not want to save, click Cancel.
Assigning a LanguageYou must select the language that you want to appear on the device touch screen. The languages shownin the drop-down menu are the languages that are available on the device and are not associated withReveos System Manager.
Complete the following steps to change the language:
1. Access the Individual Device page.
2. Click Edit.
3. Select a language from the Language drop-down menu.
4. Click Save. If you do not want to save, click Cancel.
Assigning a FacilityYou must specify the facility location of each device. The facility information is configured on theFacility page.
Complete the following steps to select or modify a facility:
1. Access the Individual Device page.
2. Click Edit.
3. Select the appropriate facility from the Facility drop-down menu.
4. Click Save. If you do not want to save, click Cancel.
Repeat all of the steps in this section until each Reveos device listed on the Individual Device page isconfigured.
Configuring the Reveos System Manager
6-18 Reveos® Automated Blood Processing System Operator's Manual for Version 1.1

Configuring Barcode Definitions
The barcode configuration section allows you to create new barcode configurations, edit existingbarcode configurations, add barcode standards, and delete barcode standards.
Note: A Donation ID barcode scan is required for all routine procedures and is configured on the Barcode page. See“Creating a Procedure” on page 6-21 for more information about routine procedures.
The Reveos System Manager validates a barcode based on the order of barcode standards listed. Forexample, if a barcode follows two barcode standards, first ISBT 128 v1.4 and second ASCII, the ReveosSystem Manager will first validate the barcode against the ISBT 128 v1.4 standard. If the barcode isverified by the first standard, then the Reveos System Manager will not verify against the second. If thebarcode is not verified by ISBT 128 v1.4, then the Reveos System Manager will verify the barcodeagainst the second standard, which in this example is ASCII.
Creating a Barcode1. Access the Barcode page.
2. Click New.
3. Type a unique name in the Barcode Name text box.
4. Select the appropriate barcode category from the Category drop-down menu.
5. Click Add in the Encoding Definition section to add a barcode standard for the configuration.
6. Select a barcode standard from the Barcode Standard drop-down menu.
Figure 6-10: Barcode Standard drop-down menu
7. Select a barcode type from the Barcode Type drop-down menu. The barcode type options may varydepending on the barcode standard chosen.
8. Enter any additional validation for the barcode standard.
Note: If ASCII is a chosen barcode standard, consider including additional validation. If no additionalvalidation is required for ASCII barcode standards, then any barcode can be scanned into the system. Ifadditional validation is added to the barcode configuration, a scanned barcode will not be saved unless it isvalidated against the requirements listed in the Additional Validation text box.
9. Repeat steps 5 through 8 to add additional barcode standards.
10. Click Save. If you do not want to save, click Cancel.
Configuring Barcode Definitions
Reveos® Automated Blood Processing System Operator's Manual for Version 1.1 6-19

In many cases, only one barcode standard is selected for each barcode configuration. However, it ispossible to set up multiple barcode standards for each barcode configuration. If multiple barcodes arelisted for one barcode configuration, add the most restrictive barcode definition first. The ReveosSystem Manager validates each barcode in the order set by the administrator.
To validate the format of a Codabar or ASCII barcode, you can add additional validation. For questionsregarding additional validation, contact customer support.
Editing a Barcode1. Access the Barcode page.
2. Select the barcode you want to edit from the content list.
3. Click Edit.
4. Update information in the drop-down menus and text box as needed.
5. Click Save. If you do not want to save, click Cancel.
Deleting a Barcode1. Access the Barcode page.
2. Select the barcode you want to delete from the content list.
3. Click Delete.A dialog box appears to confirm that you want to delete the barcode.
4. Click Yes if you are sure that you want to delete the barcode. Otherwise, click No.
Configuring the Reveos System Manager
6-20 Reveos® Automated Blood Processing System Operator's Manual for Version 1.1

Configuring Procedures
A procedure is a unique configuration of a protocol and barcode information that can be associated withone or more Reveos devices. An operator selects a procedure to determine the components to beproduced by the device. The Procedure page allows an authorized user to assign protocols and barcodesto a procedure and then assign that procedure to an individual device. When you click on a specificprocedure in the content list, the details of that procedure appear in the Details section.
Creating a Procedure1. Access the Procedure page.
2. Click New.
3. Create a unique name for your procedure. The name can be between 1 and 23 ASCII characters.
4. Choose whether or not you want to enable the procedure.
Note: If the procedure is enabled, then it can be assigned to compatible devices listed in the AssociatedDevices section. If it is not enabled, then it cannot be assigned to any devices.
5. Choose the protocol you want to associate with the procedure.
Once the protocol is selected, the appropriate blood component bag icons will appear in thecarousel as shown in the following figure. The barcodes for each bag are configured in steps 9through 12.
6. Designate whether the procedure is routine or non-routine . From the Routine drop-down menu,select one of the following options:• Select Yes if the procedure is used to process whole blood and should be recorded in Reveos
System Manager.
• Select No if the procedure is used during training or service and should not be recorded inReveos System Manager.
Note: Donation ID is required for all routine procedures. If a Donation ID barcode is not configured, see “Creating a Barcode” on page 6-19.
7. Designate whether or not a duplicate Donation ID is allowed. From the Duplicate Donation IDdrop-down menu, select one of the following options:• Select Allowed if the operator is allowed to enter the same Donation ID in more than one
bucket in the same procedure.
• Select Not Allowed if all the Donation ID scans must be unique within the same procedure.8. Configure the Operator ID barcode, if desired.
a. Click the Operator ID icon.
b. Select the barcode configuration from the Barcode Name drop-down menu. These barcodeconfigurations are configured on the Barcode page.
c. Determine whether the barcode is critical. If it is, select the Critical check box. Otherwise, leaveit blank.
d. Click the X in the top right corner to close the scan configuration dialog box.
Configuring Procedures
Reveos® Automated Blood Processing System Operator's Manual for Version 1.1 6-21

9. Define the barcode configuration for each bag:
a. Select the bag you want to configure.
b. Click the quadrant where the barcode is located on the blood bag.
A dialog box appears with the name of the quadrant.
Figure 6-11: Whole blood bag with the left quadrant selected
c. Select the barcode configuration from the Barcode Name drop-down menu. These barcodeconfigurations are configured on the Barcode page.
d. Determine whether the barcode is critical. If it is, select the Critical check box. Otherwise, leaveit blank.
Note: If a barcode is marked “critical”, it cannot be skipped when an operator is loading a blood bag setinto the device.
e. Verify that the scan sequence number automatically populates in the quadrant once the scanhas been configured.
Note: The scan sequence is determined by the order in which the barcode is configured within theprocedure.
f. Repeat steps 9a through 9e if an additional barcode configuration is needed for this quadrant.Each quadrant can have up to two barcodes.
g. Click the X in the top right corner to close the scan configuration dialog box.
h. Repeat steps 9a through 9g for all other quadrants on the blood bag, as needed.
Configuring the Reveos System Manager
6-22 Reveos® Automated Blood Processing System Operator's Manual for Version 1.1

10. Click the next blood component bag icon to configure the scan sequence, if needed.
Note: The scan sequence is determined by the order in which the barcode is configured within the procedure.
11. Repeat steps 9a through 9h as needed.
12. Repeat steps 9 and 10 for all remaining blood component bags in the procedure.
13. Proceed to the Associated Devices section of the Procedure page to associate the procedure with theappropriate devices.
14. Click Save when the procedure configuration is complete. If you do not want to save the procedure,click Cancel.
Editing a Procedure1. Access the Procedure page.
2. Select the procedure you want to edit.
3. Click Edit.
4. Update the information as needed.
5. Click Save. If you do not want to save, click Cancel.
Associated DevicesThe Associated Devices section of the Procedure page allows you to assign the selected procedure to thedevice(s) of your choice. You may need to scroll down to see this menu.
Associating a Device with a Procedure
1. Access the Procedure page.
2. Select a procedure from the content list.
3. Click Edit.
The Associated Devices menu shows all of the devices as they are configured on the IndividualDevice page.
4. Select the devices you want to associate with the procedure by selecting the check box next to thedevice name.
If a device name is dimmed, it means that the device software is unable to perform the protocolselected in the procedure.
5. Click Save. If you do not want to save, click Cancel.
If a device is not enabled, it will not appear in the Associated Devices list, and the procedure cannot beassociated with it. To enable the device, see “Enabling and Disenabling Devices” on page 6-17.
Configuring Procedures
Reveos® Automated Blood Processing System Operator's Manual for Version 1.1 6-23

Configuring the Reveos System Manager
6-24 Reveos® Automated Blood Processing System Operator's Manual for Version 1.1

7Searches and Reports
Reveos® Automated Blood Processing System Operator's Manual for Version 1.1 7-1

The Reports TabThe Reveos System Manager provides access to data retrieved from the Reveos device from the Reports
tab. From here, a user with the required permissions can view, print, and export information related toprocedures on the Reveos device.
The Reports tab is shown below.
Figure 7-1: Reports tab
Searches and Reports
7-2 Reveos® Automated Blood Processing System Operator's Manual for Version 1.1

Reports OverviewThe Reveos System Manager allows users to generate, view, and download reports. To access the reportpages, click the Reports tab in the Reveos System Manager. The following pages are available:• Calendar View: This page provides an overview of all the Insight reports and Custom Query reports
that have run or are scheduled to run. From the Calendar View you can view the status of a report,display a report, and download a report. For more information on the Calendar View, see “Calendar View” on page 7-11.
• Insight Report: These reports contain selected information from the Reveos System Manager aswell as selected information that is retrieved from the Reveos device after processing. Insight reportscan be created for one-time use or saved for later use. They can be run instantly or scheduled inadvance. For details on creating and scheduling an Insight report, see “Creating and Scheduling anInsight Report” on page 7-4.
• Custom Query Report: These reports contain information that is requested via a customized SQLquery. A user must have knowledge of SQL before creating queries for these reports. Custom Queryreports can be created for one-time use or saved for later use. They can be run instantly or scheduledin advance. For details on creating and scheduling a Custom Query report, see “Creating andScheduling a Custom Query” on page 7-7.
Reports Overview
Reveos® Automated Blood Processing System Operator's Manual for Version 1.1 7-3

Managing Reports
Configuring a Report
Insight reports and Custom Query reports in Reveos System Manager can be scheduled to run at apredefined time and interval or can be saved as unscheduled reports and run on-demand.
If you choose to schedule a report, the Insight report page and Custom Query report page have thefollowing sections that allow you to select the time when the report will run and select a data range.• Range of Recurrence: This section allows you to configure the date and time when the report will
be scheduled to run. The report will be scheduled to run at the frequency specified in theRecurrence Pattern section until the end date. The From and To dates can span over the course ofseveral years, if needed. If No end date is selected, the report will be scheduled to run until it isdeleted. Scheduled reports will begin running at the time configured in this section.
• Recurrence Pattern: This section allows you to configure the frequency of the report. Reports canbe scheduled to run hourly, daily, weekly, monthly, or quarterly.
• Data Range: (Insight report only). This section allows you to configure the time frame for the datathat is being pulled from the Reveos System Manager into the Insight report.
• Report Information: This section is visible once the report has been saved. It shows the date andtime when the report last ran and shows an icon to indicate whether it was successful or not. If thereport is scheduled, the next scheduled run time is displayed.
Locale/Culture Settings
Insight reports use the browser culture settings to determine the date and time format used in thegenerated report.• Scheduled reports are generated using the culture settings specified by the browser session at the
time the report was created or last edited.
• Unscheduled reports are generated using the culture settings specified in the active browser sessionat the time you click Run Now.
Creating and Scheduling an Insight ReportComplete the following steps to schedule a new Insight report:
1. Access the Insight Report page.
2. Click New.
3. Decide whether you want to schedule the report or run the report without scheduling.The Schedule check box is automatically selected.
4. Type a unique name for the report in the Report Name text box.
5. Select the range of recurrence for the report by entering or selecting a date in the From box and a datein the To box. Click the calendar icon to view a monthly calendar.
Searches and Reports
7-4 Reveos® Automated Blood Processing System Operator's Manual for Version 1.1

6. Select a report time in the Range of Recurrence section. On each day that a report is scheduled torun, it will run at this time. (It may also run at additional times if you choose Hourly as therecurrence pattern in the following step.)
Figure 7-2: Range of Recurrence section and Recurrence Pattern section
7. Choose one of the following Recurrence Patterns and enter the corresponding information:• Hourly: The report will be scheduled to run multiple times a day. Type the number of hours
for the interval at which you want reports to run. For example, if you select to repeat the reportevery 8 hours, the report will run every 8 hours starting at the date and time specified in theRange of Recurrence section.
• Daily: The report will be scheduled to run every day at the time specified in the Range ofRecurrence section. For example, if you select 12:00 AM as the report time, the report will runevery day at 12:00 a.m.
• Weekly: Select the day or days of the week on which you want to run the report. To selectmultiple days, select multiple check boxes. For example, if you select Monday and Wednesday,the report will run every Monday and Wednesday.
• Monthly: Select the week and the day of the month on which you want to run the report. Youcan choose between the first, second, third, fourth, and last week of the month. Then you mustselect the day. For example, if you select Last in the first drop-down menu and Tuesday in thesecond, the report will run on the last Tuesday of every month.
• Quarterly: Type the number of days after the quarter has ended on which you want the reportto run. For example, if you select 3 days, the report will run 3 days after the quarter ends. Thequarters are January 1 to March 31, April 1 to June 30, July 1 to September 30, and October 1to December 31.
8. Select the Time Frame for the report in the Data Range section. Choose one of the following:• Custom Date Range: Select the time frame by choosing between hours, days, weeks, or
months. Enter a number for the chosen time frame.
• Week-to-Date: This time frame starts on Sunday at 12:00 a.m. and ends at the time the reportis run.
Managing Reports
Reveos® Automated Blood Processing System Operator's Manual for Version 1.1 7-5

• Month-to-Date: This time frame starts on the first day of the month at 12:00 a.m. and ends atthe time the report is run.
• Quarter-to-Date: This time frame starts on the first day of the quarter at 12:00 a.m. and endsat the time the report is run. The quarters are January 1 to March 31, April 1 to June 30, July 1to September 30, and October 1 to December 31.
• Year-to-Date: This time frame starts on January 1 at 12:00 a.m. and ends at the time the reportis run.
Figure 7-3: Time Frame drop-down menu
9. Select Include offline procedures only if you want to include any data that was collected while theReveos device was offline.
Note: Offline information can be retrieved only after the Reveos device is reconnected to the Reveos SystemManager.
10. Click Save. If you do not want to save the report, click Cancel.
Creating and Saving an Unscheduled Insight ReportComplete the following steps to save an unscheduled report:
1. Access the Insight Report page.
2. Click New.
3. Clear the Schedule check box.
4. Type a unique name for the report in the Report Name text box.
5. Select the time frame for the report in the Data Range section. Choose one of the following:• Custom: Select the time frame by choosing a start date and time and an end date and time.
• Week-to-Date: This time frame starts on Sunday at 12:00 a.m. and ends at the exact time thereport is run.
• Month-to-Date: This time frame starts on the first day of the month at 12:00 a.m. and ends atthe exact time the report is run.
• Quarter-to-Date: This time frame starts the first day of the quarter at 12:00 a.m. and ends atthe exact time the report is run. The quarters are as follows: January 1 to March 31, April 1 toJune 30, July 1 to September 30, and October 1 to December 31.
• Year-to-Date: This time frame starts on January 1 at 12:00 a.m. and ends at the exact time thereport is run.
6. Click Save.
Searches and Reports
7-6 Reveos® Automated Blood Processing System Operator's Manual for Version 1.1

This Insight report will run only once. Since this report will not run at scheduled times, offlineprocedures cannot be included in this Insight report.
Creating and Scheduling a Custom QueryCustom Query reports contain specific information that is requested through the use of a SQL query.Knowledge of SQL is required. Review the Reveos® System Manager End User Reporting Reference Guideand Data Dictionary before creating custom SQL queries.
Figure 7-4: Custom Query Report page
Complete the following steps to create a scheduled custom query:
1. Access the Custom Query Report page.
2. Click New.
3. Type a name in the Query Name text box.
4. Type or paste the SQL query into the Custom SQL Script box.
Note: For supported fields and tables refer to the Reveos® System Manager End User Reporting ReferenceGuide and Data Dictionary.
5. Decide whether you want to schedule the report or run the report without scheduling.
The Schedule check box is automatically selected.
Managing Reports
Reveos® Automated Blood Processing System Operator's Manual for Version 1.1 7-7

6. Select the range of recurrence for the report by entering or selecting a date in the From box and a datein the To box. Click the calendar icon to view a monthly calendar.
7. Select a report time in the Range of Recurrence section. On each day that a report is scheduled torun, it will run at this time. (It may also run at additional times if you choose Hourly as therecurrence pattern in the following step.)
8. Choose one of the following Recurrence Patterns and enter the corresponding information:• Hourly: The report will be scheduled to run multiple times a day. Type the number of hours
for the interval at which you want reports to run. For example, if you select to repeat the reportevery 8 hours, the report will run every 8 hours starting at the date and time specified in theRange of Recurrence section.
• Daily: The report will be scheduled to run every day at the time specified in the Range ofRecurrence section. For example, if you select 12:00 AM as the report time, the report will runevery day at 12:00 a.m.
• Weekly: Select the day or days of the week on which you want to run the report. To selectmultiple days, select multiple check boxes. For example, if you select Monday and Wednesday,the report will run every Monday and Wednesday.
• Monthly: Select the week and the day of the month on which you want to run the report. Youcan choose between the first, second, third, fourth, and last week of the month. Then you mustselect the day. For example, if you select Last in the first drop-down menu and Tuesday in thesecond, the report will run on the last Tuesday of every month.
• Quarterly: Type the number of days after the quarter has ended on which you want the reportto run. For example, if you select 3 days, the report will run 3 days after the quarter ends. Thequarters are January 1 to March 31, April 1 to June 30, July 1 to September 30, and October 1to December 31.
9. Click Save. If you do not want to save, click Cancel.
Creating and Saving an Unscheduled Custom Query ReportComplete the following steps to save an unscheduled report:
1. Access the Custom Query Report page.
2. Click New.
3. Type a unique name for the report in the Query Name text box.
4. Type or paste the SQL query in the Custom SQL Script box.
5. Clear the Schedule check box.
6. Click Save.
Editing a ReportComplete the following steps to edit a report:
1. Access the Insight report or Custom Query report page.
2. Select the report you want to edit.
3. Click Edit.
4. If you selected a Custom Query report, edit the existing SQL query information as needed.
5. Edit the report schedule as needed.
Searches and Reports
7-8 Reveos® Automated Blood Processing System Operator's Manual for Version 1.1

6. Click Save. If you do not want to save, click Cancel.
Deleting a ReportComplete the following steps to delete a report:1. Access the Insight report or Custom Query report page.2. Select the report you want to delete.3. Click Delete.
A dialog box appears to confirm that you want to delete the query.4. Click Yes if you are sure that you want to delete the query. Otherwise, click No.
Running a Report
All reports are stored on the server. The location of these files is configured when the Reveos SystemManager is installed.
Note: Generated reports can be downloaded or displayed from the Calendar View and saved to a location of yourchoice.
An authorized user can also run a report that has already been saved. Complete the following steps to runa report on demand:
1. Access the Insight Report page or the Custom Query Report page.
2. Select the report that you want to run from the content list.
Note: If the report you want to run is not in the content list, see “Creating and Saving an Unscheduled InsightReport” on page 7-6 or “Creating and Saving an Unscheduled Custom Query Report” on page 7-8 to configurethe report.
3. Click Run Now.
The report will be saved in a predetermined folder on the server and will be listed on the Calendar Viewpage.
Report Information
At the bottom of each saved report page, there is a section titled Report Information.
This section contains the following information about the saved report:• Status icon: Indicates whether the last report ran successfully or whether it is scheduled to run.
• Last Report: Shows the date and time of the last report.
• Next Report: Shows the date and time of the next scheduled report. If this is an unscheduled report,no date and time is displayed.
Report Status
When a report is running, the report status icon(s) appears in the upper-left corner of the Reveos SystemManager window. See Table 2-8 for a complete list of status icons.
While a report is being processed, you can add other reports to the queue or you can navigate to otherpages without affecting report processing.
Managing Reports
Reveos® Automated Blood Processing System Operator's Manual for Version 1.1 7-9

If multiple reports are being exported, multiple icons may appear. For example, if one report is completeand one report is still running, the Report Complete icon and the Report In Progress icon appearsimultaneously.
When you click a status icon, the Report Status dialog box appears.
Figure 7-5: The Report Status dialog box
A user cannot access reports from this dialog box. This dialog box shows only the status of the report. Toremove a report from the status report list, select the report and click Remove. To view a report, access theCalendar View page.
Searches and Reports
7-10 Reveos® Automated Blood Processing System Operator's Manual for Version 1.1

Calendar View
The Calendar View page provides an overview of all Insight reports and Custom Query reports that havebeen run or are scheduled to run. On the calendar you can see the status of a report, download a report,and display a report. To access the Calendar View, click the Reports tab in the Reveos System Manager,then choose Calendar View from the menu bar.• indicates an Insight report.
• indicates a Custom Query report.
Next to the time and name of the report, an icon is displayed to indicate the report status.• indicates that the report ran successfully.
• indicates that the report did not run successfully.
• indicates that the report is scheduled to run.
Note: The Calendar View does not update in real time. To refresh the Calendar View, navigate to another tab andthen return to the Calendar View page.
Note: You will be automatically logged out of Reveos System Manager if you refresh the browser page, for example,by clicking F5 or clicking the Refresh button.
Note: The Calendar View does not display reports that are scheduled to recur every hour by default.
You can select which reports are displayed on the calendar.• To show only selected reports on the calendar, select or clear the check boxes in the drop-down list
at the upper-right corner of the calendar.
• To view all the reports on the calendar, select the Select All check box from the drop-down list at theupper-right corner of the calendar.
Downloading a Report from the Calendar ViewTo download an Insight report or a Custom Query report:
1. Access the Calendar View page.
2. Right-click on the report name and click Download Report.
A dialog box allows you to confirm that you want to save the file.
3. Click OK.
4. Browse to the location where you want to save the file, then click Save.
Note: The default file name is reportname-timestamp-identifier.csv where timestamp is the date andtime the report was generated.
5. Open the csv file from the saved location.
Note: The csv file that is downloaded from the Calendar View page contains all the data that was requestedwhen the report was run. For example, it contains all columns for an Insight report or the requested columns fora Custom Query report.
Calendar View
Reveos® Automated Blood Processing System Operator's Manual for Version 1.1 7-11

At-A-Glance Reporting
The At-A-Glance feature allows you to access and open reports from the Calendar View.• Chart view: Displays selected data from the Insight report as a chart or graph.
• Details view: Displays selected data from an Insight report or the data from a Custom Query reportin a tabular format.
Note: To open a report generated in a previous version of Reveos System Manager, the report must be run again inReveos System Manager Version 1.1 or higher. For information on running a report, see “Running a Report” onpage 7-9.
Note: Some charts may not be displayed or data may be missing for reports generated using a previous version ofReveos System Manager or captured from a Reveos device running an earlier version of device software.
To open a report, access the Calendar View page, and double-click the report name. The report opens ina new dialog box.
Note: You can also right-click the report name and click Display Report.
1 2 3
4
5
6
Figure 7-6: Chart view
1 Report title anddate generated
2 Details view3 Print4 Data range and
number ofprocedures
5 Legend6 Error message
Searches and Reports
7-12 Reveos® Automated Blood Processing System Operator's Manual for Version 1.1

1 2 3
4
Figure 7-7: Details view
1 Filter2 Chart view3 Export4 Column headers
Chart View
The chart view is available for Insight reports and can be accessed from the Operation, Production,Exceptions, Alarms, and Alerts tabs, with different details related to each tab.
Printing the Chart View
The chart view on all tabs can be printed. All charts on the tab will be printed and these may print onmultiple pages. Printing is in landscape orientation for the Operation, Production, Alarms, and Alertscharts, and in portrait orientation for the Exceptions charts.To print the chart view, navigate to the required tab and click Print.
Note: The recommended paper sizes for printing the chart view are Letter, Legal, A4 and B4.
At-A-Glance Reporting
Reveos® Automated Blood Processing System Operator's Manual for Version 1.1 7-13

Operation
The Operation page shows charts and details related to the number of units processed by the Reveosdevice and the average duration of procedures. To access the Operation page, open a report from theCalendar View page and click the Operation tab.
Figure 7-8: Operation page
The Operation page contains two charts:• The Units Processed chart shows the number of units processed by all Reveos devices. The total
number of units processed is displayed next to the chart title. For each device, the number of unitsprocessed is divided into these three bars in the chart:• Complete: The unit was successfully processed. These units are identified by a green bucket
icon on the device at the end of a procedure.
• Inconclusive: The product quality of the unit was inconclusive. These units are identified by ayellow bucket icon on the device at the end of a procedure.
• Counterbalance bag: A counterbalance bag was loaded.
• The Average Duration chart shows the average duration of a procedure listed by operator. Thenumber of procedures for each operator is shown above the bar in the chart. Each bar is divided bycolor into four procedure stages, and you can position your cursor over each bar to see more detailedaverage duration information. Procedure stages include:• Loading: The time that elapsed from when the operator scanned the first barcode until the
Start button on the device was pressed.
• Processing: The time that elapsed from when the operator touched the Start button to whenthe device lid opened.
• Idle: The time that elapsed from when the device lid opened to when the operator opened thelid of the first bucket.
• Unloading: The time that elapsed from when the operator opened the lid of the first bucket towhen the operator opened the lid of the last bucket.
Searches and Reports
7-14 Reveos® Automated Blood Processing System Operator's Manual for Version 1.1

For the charts on the Operations page, you can sort the data in more than one way. For example, on theAverage Duration chart, click Number of Procedures in the chart legend, to sort the data according to thetotal number of procedures per Operator ID from largest to smallest. Click Loading in the chart legendto sort the data according to the average duration of the Loading stage per Operator ID from largest tosmallest.
Production
The Production page shows charts and details related to product volumes, the number of componentsproduced, and the Platelet Yield Index of units produced by the Reveos device. To access the Productionpage, open a report from the Calendar View, and click the Production tab.
The Production page contains three charts.• The Average Product Volume chart shows the average volume of each component by procedure.
You can position your cursor over the bars on the chart to see the average volume plus or minus twostandard deviations (± 2 σ) for each product. You can sort the chart data in more than one way. Forexample, click Plasma in the chart legend to sort the data according to Plasma volume by procedurefrom largest volume to smallest volume.
• The Components chart shows the number of components produced.
• The Platelet Yield Index chart shows the percentage of units that had a Platelet Yield Index in thespecified range for 3C procedures. You can position your cursor over the bars on the chart to see theaverage Platelet Yield Index plus or minus two standard deviations (± 2 σ) for the procedure.
At-A-Glance Reporting
Reveos® Automated Blood Processing System Operator's Manual for Version 1.1 7-15

Exceptions
The Exceptions page shows charts and details related to exceptions that occurred during processing onthe Reveos device. To access the Exceptions page, open a report from the Calendar View, and click theExceptions tab.
Figure 7-9: Exceptions page
The Exceptions page contains information related to the following exceptions:• Duplicated units: More than one unit with the same Donation ID was processed during a single
procedure. The Exception Information shows the Donation ID, the number of times the unit wasduplicated, and the date and time of the procedure. The Operator ID, Device Name, BucketNumber, and Unit Status are shown for each instance of the duplicated unit; this information canbe expanded or collapsed by clicking the arrow to the left of the Donation ID.
• Reprocessed units: A unit with the same Donation ID was processed in multiple procedures. TheException Information shows the Donation ID and the number of times the unit was reprocessed.The Processing Date, the Operator ID, Device Name, Bucket Number, and Unit Status are shownfor each procedure during which the unit was run.
Note: If a unit is both a duplicated unit and a reprocessed unit—for example, the Donation ID is shown inmultiple buckets in the same procedure and is also shown in multiple procedures—the bucket number andstatus will not be available.
• Inconclusive sealed units: A unit has been processed and sealed but the product quality of theplasma unit is inconclusive. This exception is due to either lipemic plasma or a misloaded linesensor. The inconclusive sealed unit exception does not apply if your system is configured not toprocess these units or not to seal the plasma tubing. The Exception Information shows the DeviceID. The Processing Date, Donation ID, Operator ID, Bucket Number, and Unit Status is shownfor each unit.
Searches and Reports
7-16 Reveos® Automated Blood Processing System Operator's Manual for Version 1.1

• Unrecognized barcodes: Units with barcodes that were scanned while the Reveos device wasoffline, and the barcode scans are not in a recognized format. The Exception Information shows theProcessing Date, Donation ID, Operator ID, Bucket Number, and Unit Status.
• Skipped barcodes: Units with Donation IDs or Operator IDs that were skipped. This exceptioncan only occur if skipped barcodes is set to "allowed" and the barcode is not configured as “critical”in the Reveos System Manager configuration settings. For more information on skipped barcodes,see Table 6-1. The Exception Information shows the Processing Date, Donation ID, Operator ID,Bucket Number, and Unit Status.
• Temperature out of range: Units that were processed for which the basin temperature was eithertoo high or too low. The Exception Information shows Processing Date, Donation ID, OperatorID, Unit Status, Maximum temperature, and Minimum temperature.
At-A-Glance Reporting
Reveos® Automated Blood Processing System Operator's Manual for Version 1.1 7-17

Alarms Page
The Alarms page shows charts and details related to alarms that occur on the Reveos device. To access theAlarms page, click the Alarms tab.
Figure 7-10: Alarms page
The Alarms page contains three charts.• The Total Alarms chart shows how many alarms of each alarm number occurred. Position your
cursor over a bar in the chart to display the name of the corresponding alarm. The alarm data issorted by number of instances from highest to lowest.
• The Alarms by Operator chart shows how many alarms occurred for each Operator ID, and theAlarms by Device chart shows how many alarms occurred on each device. The number of unitsprocessed is displayed in parentheses above the bars. In these charts, each bar represents one of thefollowing phases:• Preprocessing: The phase that begins when the device is started up or the Next Procedure
button is touched and ends when the Start Procedure button is touched.
• Processing: The phase that begins when the Start Procedure button is touched and ends whenthe device lid opens.
• Post-processing: The phase that begins when the device lid opens and ends when the NextProcedure button is touched.
For the Alarms by Operator and Alarms by Device charts on the Alarms page, you can sort the data inmore than one way. For example, click Preprocessing in the chart legend to sort the data according to thenumber of alarms that occurred during the preprocessing phase from largest to smallest.
Searches and Reports
7-18 Reveos® Automated Blood Processing System Operator's Manual for Version 1.1

Alerts Page
The Alerts page shows charts and details related to alerts that occur on the Reveos device. To access theAlerts page, click the Alerts tab.
Figure 7-11: Alerts page
The Alerts page contains three charts.• The Total Alerts chart shows how many alerts of each alert number occurred. Position your cursor
over a bar in the chart to display the name of the corresponding alert. The alert data is sorted bynumber of instances from highest to lowest.
• The Alerts by Operator chart shows how many alerts occurred for each Operator ID, and the Alertsby Device chart shows how many alerts occurred on each device. The number of units processed isdisplayed in parentheses above the bars. In these charts, each bar represents one of the followingphases:• Preprocessing: The phase that begins when the device is started up or the Next Procedure
button is touched and ends when the Start Procedure button is touched.
• Processing: The phase that begins when the Start Procedure button is touched and ends whenthe device lid opens.
• Post-processing: The phase that begins when the device lid opens and ends when the NextProcedure button is touched.
For some of the charts on the Alerts page, you can sort the data in more than one way. For example, clickPreprocessing in the chart legend to sort the data according to the number of alerts that occurred duringthe preprocessing phase from largest to smallest.
At-A-Glance Reporting
Reveos® Automated Blood Processing System Operator's Manual for Version 1.1 7-19

Details View
The details view is available for all reports.• For Insight reports, it can be accessed from the Operation, Production, Exceptions, Alarms, and
Alerts tabs, with different details related to each tab. Details of the columns that are available foreach tab are shown in “Available Data Types for Insight Reports in the Details View” onpage 7-21.
• For Custom Query reports, the details view is the only available view based on the parametersdefined by the SQL query.
Complete the following steps to view the details of a report in a table:
1. Open the report from the Calendar View.
2. If you have selected an Insight report, click the View Details button.
Filtering and Sorting Data in Details View
Filters allow you to select specific data from the details view to view or export. You can perform thefollowing actions to sort and filter the data:• Sort the data: Click on a column header to sort the data in the table according to type of data in the
column. Click the column header again to switch between ascending and descending sort order. Asmall arrow is shown at the top of the column to indicate sort order.
• Reorder the columns: Drag a column header to the left or the right to change the order of thecolumns.
• View or hide a column: Right-click any column header to display a list of available columns. Click acolumn name in the list to view or hide that column.
• Add a filter to a column:
1. Click the filter button on the column header.
2. Set the required filter criteria, or select the values you wish to display.
3. Click Filter.
• Remove the filter from a column:
1. Click the filter button on the column header.
2. Click Clear Filter.
Exporting Data from the Details View
To export data from the details view:
1. Click the Export button.The File Download dialog box appears.
2. Click OK.
3. Browse to the location where you want to save the file, then click Save.
Note: The default file name is reportname-timestamp-identifier.csv where timestamp is the date andtime the report was generated.
Searches and Reports
7-20 Reveos® Automated Blood Processing System Operator's Manual for Version 1.1

4. Open the csv file from the saved location.
Note: The csv file downloaded from the details view will contain only the data that was on screen when thereport was exported.
Available Data Types for Insight Reports in the Details View
The following tables contains a list of data types available in the Insight report and the correspondingheadings in the Details view.
Table 7-1: Column headings in the Operation, Production, and Exception Details view and thecorresponding headings in the Insight report
Operation, Production, and Exceptions Details View Insight Report CSV File
Processing Date Processing_Date
Donation ID Wb_Donation_Id
Operator ID Operator_Id
Device Name Machine_Id
Bucket Number Bucket_Number
Number of Alarms Num_Alarms
Number of Alerts Num_Alerts
Unit Status Unit_Status
Sealed Welding_Status
Procedure Name Configuration_Name
Plasma Volume Plasma_Volume
Platelet Volume Platelet_Volume
Platelet Yield Index Platelet_Yield_Index
Residual Leukocyte Volume Leukocyte_Volume
Procedure Duration Total_Procedure_Time
Maximum Basin Temperature Max_Basin_Temp
Minimum Basin Temperature Min_Basin_Temp
Lot Number Wb_Lot_Number
At-A-Glance Reporting
Reveos® Automated Blood Processing System Operator's Manual for Version 1.1 7-21

Table 7-1: Column headings in the Operation, Production, and Exception Details view and thecorresponding headings in the Insight report (continued)
Operation, Production, and Exceptions Details View Insight Report CSV File
Skipped Barcodes Were_Barcodes_Skipped
Software Version Software_Version
Facility Name Facility_Name
Table 7-2: Column headings in the Alarms and Alerts Details view and the corresponding headings in theInsight report
Alarms and Alerts Details View Insight Report CSV File
Processing Date Processing_Date
Donation ID Wb_Donation_Id
Operator ID Operator_Id
Lot Number Wb_Lot_Number
Bucket Number Bucket_Number
Device Name Machine_Id
Unit Status Unit_Status
Sealed Welding_Status
Procedure Name Configuration_Name
Plasma Volume Plasma_Volume
Platelet Volume Platelet_Volume
Platelet Yield Index Platelet_Yield_Index
Residual Leukocyte Volume Leukocyte_Volume
Note: Alert and Alarm descriptions are stored in the Reveos system database but do not form part of the Insightreport.
Searches and Reports
7-22 Reveos® Automated Blood Processing System Operator's Manual for Version 1.1

Donation ID SearchThe Donation ID search allows you to search for a single unit based on its Donation ID. The search isavailable on any page in the Reveos System Manager. The Donation ID search will accept either thescanned or the decoded Donation ID.• Scanned Donation ID: This includes the barcode identifier, the barcode, and any flag characters,
for example the “=” character.
• Decoded Donation ID: This includes the barcode only, without the barcode identifier. If thebarcode type is set to “Donation ID with Flag,” the flag characters must be included as part of theDecoded Donation ID.
For further information on configuring barcodes in Reveos System Manager, see “Configuring BarcodeDefinitions” on page 6-19.
1. Type or scan the Donation ID into the Donation ID text box at the upper-right corner of thescreen.
Note: Type the barcode exactly as it appears, including any special characters. Typing an incompleteDonation ID will not return any results.
2. Click the Search button or press Enter.
The details for the unit, including any alerts or alarms that occurred during the procedure, aredisplayed in a dialog box, as shown in Figure 7-12.
If the unit is not found, the message “No results returned” is displayed to the left of the Donation IDtext box.
Figure 7-12: Results of a Donation ID search
The following information is displayed in the dialog box:• Selected details from the Insight report, including the Processing Date, Operator ID, and Device
Name.
• If the Donation ID was duplicated or reprocessed, an entry for each time it was processed.
• A list of alarms and alerts that occurred during processing of the unit, displayed in the Alarms andAlerts section. Click the arrow button to expand or collapse the list of alarms and alerts. If no alarmsor alerts occurred during processing of the unit, the alarms and alerts section header is dimmed.
To close the results of the Donation ID search, click the X in the upper-right corner of the dialog box.
Donation ID Search
Reveos® Automated Blood Processing System Operator's Manual for Version 1.1 7-23

Searches and Reports
7-24 Reveos® Automated Blood Processing System Operator's Manual for Version 1.1

8System Specifications
Reveos® Automated Blood Processing System Operator's Manual for Version 1.1 8-1

System Specifications
Table 8-1: Device equipment ratings
Specification Type Value
Humidity 10% to 80% RH non-condensing
Operating temperature Recommended 18 °C to 27 °C (64.4 °F to 80.6 °F)
Storage temperature 0 °C to 60 °C (32 °F to 140 °F)
Environment Indoor use only
Elevation Up to 2,000 m
Rated voltage 200 V AC to 240 V AC (± 10%), 50/60 Hz
Main power circuit breaker Characteristic C, Rated 16A, 30 mA RCCD (European Union)
Rated input (typical) 1.2 kVA
Rated input (maximum) 6.0 kVA
Power plug IEC 60309 2P + E, 200 V to 250 V, 50/60 Hz, 16A, IP44
Ventilation (per device installed) Adequate to dissipate 1.0 KW in normal operation
Minimum clearance envelope (perimeteraround the device)
152 mm (6 in)
Minimum floor area needed for
installation (D x W)
991 × 1,143 mm (39 × 45 in)
Safety standards IEC 61010-1:2010, IEC 61010-2-20:2006
EMC standard IEC 61326-1:2006
Ethernet connection RJ45
CAT-5e, ANSI/TIA/EIA 568 B.2
Barcode scanner connection 4 Pin Lemo
Ingress protection rating Ordinary Protection Only
System Specifications
8-2 Reveos® Automated Blood Processing System Operator's Manual for Version 1.1

Table 8-2: Device performance specifications
Specification Type Value
Maximum size (W × H × D) 686 × 1,000 × 826 mm (27 × 39.4 × 32.5 in)
Maximum weight (without cooling fluid) 295 kg (650 lb)
Pollution degree 2
Equipment class I
Installation category II
Heat output 1 kW (3,400 Btu per hour)
Accuracy of time measurement ± 5 seconds
Rotor speed 0 to 2,900 rpm (± 50 rpm)
Floor slope 1.5° max
Leak detector • Capable of detecting ≤ 100 mL of fluid in the centrifuge basin
• Detects fluid leaks where moisture reaches the sensor on the wall ofthe centrifuge basin
Noise level < 65 dBA
Whole Blood processing volume 450 mL ± 10% plus 63 mL CPD
Table 8-3: External Cooled Water Source specifications
Specification Value
Fluid Must use filtered deionized water or filtered distilled water. Water must befiltered with a screen that is 80 mesh or finer. Ethylene glycol or propyleneglycol may be added in concentrations up to 30% by weight. Do not usetap water.
Incoming water temperature 2 °C to 10 °C (36 °F to 50 °F)
Minimum flow rate 4 liters per minute per device
Incoming water pressure 3.5 bar to 6.5 bar (50 psi to 95 psi)
System Specifications
Reveos® Automated Blood Processing System Operator's Manual for Version 1.1 8-3

EMC InformationThe Reveos device is intended for use in the electromagnetic environment specified below. Thecustomer or the user of the Reveos device should assure that it is used in such an environment.
Table 8-4: EMC Emissions Guidance
Emissions Test Compliance Electromagnetic Environment—Guidance
RF emissions
CISPR 11
Group 1 The Reveos device uses high frequenciesonly for its internal function (e.g., computertiming signals and internal communication).The RF emissions meet the requirements ofCISPR 11.
RF emissions
CISPR 11
Group 2 The Reveos device emits intermittent, short-term RF energy whenever the tubing sealersare activated at the end of a processing cycle.Nearby electronic equipment may beaffected.
RF emissions
CISPR 11
Class A The Reveos device is suitable for use in allestablishments other than residential andthose directly connected to the public low-voltage power supply network that suppliesbuildings used for residential purposes.
System Specifications
8-4 Reveos® Automated Blood Processing System Operator's Manual for Version 1.1

The Reveos device is intended for use in the electromagnetic environment specified below. Thecustomer or the user of the Reveos device should assure that it is used in such an environment.
Table 8-5: EMC Electromagnetic Immunity
Immunity Test Test LevelIEC 61326
ComplianceLevel
Electromagnetic Environment—Guidance
Electrostatic discharge (ESD)IEC 61000-4-2
± 4 kV contact
± 4 kV air
± 4 kV contact
± 4 kV air
Electrical fast transient/burstIEC 61000-4-4
± 0.5 kV forinput/output lines
± 1 kV for powersupply lines
± 0.5 kV forinput/output lines
± 1 kV for powersupply lines
Mains power quality should be that of atypical blood center or hospital environment.
SurgeIEC 61000-4-5
± 0.5 kV line to line(DM)
± 1 kV line to earth(CM)
± 0.5 kV line to line(DM)
± 1 kV line to earth(CM)
Mains power quality should be that of atypical blood center or hospital environment.
Voltage dips, short interruptions, and voltage variations on power supply input linesIEC 61000-4-11
0% during half cycle
0% during 1 cycle
70% during25/301 cycles
0% during250/3002 cycles
0% during half cycle
0% during 1 cycle
70% during25/301 cycles
0% during250/3002 cycles
Mains power quality should be that of atypical blood center or hospital environment.
If the user of the Reveos device is aware offrequent power interruptions at his or herfacility and requires continued operationduring power mains interruptions, it isrecommended that the Reveos device bepowered from a suitably rated uninterruptiblepower supply.
Note: UT is the AC mains voltage prior to application of the test level.1 25/30 cycles means 25 cycles for the 50 Hz test and 30 cycles for the 60 Hz test.2 250/300 cycles means 250 cycles for the 50 Hz test and 300 cycles for the 60 Hz test.
EMC Information
Reveos® Automated Blood Processing System Operator's Manual for Version 1.1 8-5

The Reveos device is intended for use in the electromagnetic environment specified below. Thecustomer or the user of the Reveos device should assure that it is used in such an environment.
Table 8-6: Guidance and Manufacturer’s Declaration—Electromagnetic Immunity (1 of 2)
Immunity Test Test LevelIEC 61326
ComplianceLevel
Electromagnetic Environment—Guidance
Portable and mobile RF communicationsequipment should be used no closer to anypart of the Reveos device, including cables,than the recommended separation distancecalculated from the equation applicable to thefrequency of the transmitter.
Conducted RFIEC 61000-4-6
3 Vrms
150 kHz to 80 MHz
3 V
For calculations based on this equation, see Table 8-8.
Radiated RFIEC 61000-4-3
3 V/m (80 MHz to1 GHz)
3 V/m (1.4 GHz to2 GHz)
1 V/m (2.0 GHz to2.7 GHz)
3 V/m (80 MHz to1 GHz)
3 V/m (1.4 GHz to2.7 GHz)
80 MHz to 800 MHz
For calculations based on this equation, see Table 8-8.
Note: At 80 MHz and 800 MHz, the higher frequency range applies.Note: These guidelines may not apply in all situations. Electromagnetic propagation is affected by absorption and reflectionfrom structures, objects and people.
System Specifications
8-6 Reveos® Automated Blood Processing System Operator's Manual for Version 1.1

The Reveos device is intended for use in the electromagnetic environment specified below. Thecustomer or the user of the Reveos device should assure that it is used in such an environment.
Table 8-7: Guidance and Manufacturer’s Declaration—Electromagnetic Immunity (2 of 2)
Immunity Test Test LevelIEC 61326
ComplianceLevel
Electromagnetic Environment—Guidance
800 MHz to 2.7 GHz. For calculations basedon this equation, see Table 8-8.
Where P is the maximum output power ratingof the transmitter in watts (W) according tothe transmitter manufacturer and d is therecommended separation distance in meters(m).
Field strengths from fixed RF transmitters, asdetermined by an electromagnetic sitesurvey,1 should be less than the compliancelevel in each frequency range.2
Interference may occur in the vicinity ofequipment marked with the followingsymbol:
Note: At 80 MHz and 800 MHz, the higher frequency range applies.Note: These guidelines may not apply in all situations. Electromagnetic propagation is affected by absorption and reflectionfrom structures, objects and people.
1 Field strengths from fixed transmitters—such as base stations for radio (cellular/cordless) telephones and landmobile radios, amateur radio, AM and FM radio broadcast, and TV broadcast—cannot be predicted theoretically withaccuracy. To assess the electromagnetic environment due to fixed RF transmitters, an electromagnetic site surveyshould be considered. If the measured field strength in the location in which the Reveos device is used exceeds theapplicable RF compliance level above, the Reveos device should be observed to verify normal operation. If abnormalperformance is observed, additional measures may be necessary, such as re-orienting or relocating the Reveos device.2 Over the frequency range 150 kHz to 80 MHz, field strengths should be less than 3 V/m.
EMC Information
Reveos® Automated Blood Processing System Operator's Manual for Version 1.1 8-7

The Reveos device is intended for use in an electromagnetic environment in which radiated RFdisturbances are controlled. Based on immunity test data, it is unlikely that commonly usedcommunication devices such as cell phones or WiFi or Bluetooth equipped devices meeting 802.11g/nwill adversely affect the Reveos device. If, however interference is noticed or higher powered devices suchas two-way radios are to be used in the vicinity of the Reveos device, the customer or the user of theReveos device can help prevent electromagnetic interference by maintaining a minimum distancebetween portable and mobile RF communications equipment (transmitters) and the Reveos device asrecommended below, according to the frequency and maximum output power specified by themanufacturer of the communications equipment.
Table 8-8: Recommended Separation Distances Between Portable and Mobile RF CommunicationsEquipment and the Reveos Device
Rated maximum output power oftransmitter W
Separation distance according to frequency oftransmitter m
150 kHz to80 MHz
80 MHz to800 MHz
800 MHz to2.7 GHz
0.01 0.12 0.12 0.23
0.1 0.38 0.38 0.73
1 1.2 1.2 2.3
10 3.8 3.8 7.3
100 12 12 23
For transmitters rated at a maximum output power not listed above, the recommended separation distance d in meters(m) can be estimated using the equation applicable to the frequency of the transmitter, where P is the maximum outputpower rating of the transmitter in watts (W) according to the transmitter manufacturer.
Note: At 80 MHz and 800 MHz, the separation distance for the higher frequency range applies.Note: These guidelines may not apply in all situations. Electromagnetic propagation is affected by absorption and reflectionfrom structures, objects and people.
System Specifications
8-8 Reveos® Automated Blood Processing System Operator's Manual for Version 1.1

Symbols and certificationThe symbols shown in Table 8-9 may appear on the Reveos Automated Blood Processing System, asapplicable.
Table 8-9: Symbols and Certification
Symbol Definition
Indicates that the item has a specific orientation. This way up.
Indicates that the item is fragile. Handle with care.
Indicates that the product must be kept dry.
Stacking of the transport package is not allowed and no load should be placed onthe transport package.
Indicates that the equipment is subject to directive 2002/96/EC concerning wasteelectrical and electronic equipment (WEEE) and must be disposed of accordingly.
Indicates that the product packaging complies with European Directive 94⁄62⁄ECfor packaging and packaging waste.
Indicates the manufacturer of the product when accompanied by the name of themanufacturer.
Indicates the date of manufacture (or sterilization date, if the product is sterile)when accompanied by a specific date.
Indicates that the user must read the instructions for use before application.
Indicates that the user must read the accompanying documents before operatingthe device to ensure safe operation.
Indicates the product was manufactured in accordance with Annex II of theEuropean Council Directive 93/42/EEC, as amended.
Indicates that the machine requires an alternating supply current.
Indicates coolant inlet temperature.
Symbols and certification
Reveos® Automated Blood Processing System Operator's Manual for Version 1.1 8-9

Table 8-9: Symbols and Certification (continued)
Symbol Definition
Indicates a port intended for connection to an Ethernet network.
Indicates a cooling fluid circuit. The icon on the right labels the water inlet wherethe cool water goes into the device. The icon on the left labels the water outletwhere the water comes out after it has cooled the device.
Indicates a functional ground conductor terminal. Used to provide a voltagereference. This terminal is not to be used for a protective grounding function.
Indicates a protective earth ground. Located near chassis’ main groundinglocation and at other protective ground points.
Indicates that power is switched on.
Indicates that power is switched off.
Indicates risk of electric shock.
Indicates the product catalog number when accompanied by a number.
Indicates the European Authorized Representative of the product whenaccompanied by the name of the European Authorized Representative.
System Specifications
8-10 Reveos® Automated Blood Processing System Operator's Manual for Version 1.1

Glossary
AAccess drawer The drawer located at the bottom of the device that gives
technical service representatives access to communicationshardware.
Alarm A system message about a condition that will prevent or enda processing procedure and may compromise productquality. If the alarm occurs before the procedure has begun,you can perform the action recommended on the touchscreen and re‑try. If an alarm that affects all units occurswhile the procedure is in progress, the procedure will end. Ifa bucket-specific alarm occurs while the procedure is inprogress, processing will end in that bucket only.
Alert A system message about a condition that requires yourattention. You can record the alert number, perform theaction shown on the touch screen, and touch the Continue
button to proceed.
Application A software program. In this operator’s manual, “theapplication” refers to the Reveos System Manager software.
BBag posts Posts that hold the whole blood bag in place inside the
bucket during a procedure.
Balancing system The feature of the Reveos device that allows for self-balancing instead of manual balancing and calibration. Thissystem aids in precision separation.
Blood component bag holder A compartment that holds the plasma bag, the interimplatelet bag, the RBC bag, the leukoreduction filter, and theresidual leukocyte bag during a processing procedure.
Reveos® Automated Blood Processing System Operator's Manual for Version 1.1 Glossary-1

Bucket The compartment that holds the whole blood bag during aprocedure. Each bucket contains a hydraulic bladder that isfilled with hydraulic fluid during a procedure, which allowsfor expression of the blood components.
Bucket lid The lid that closes over the whole blood bag during aprocedure.
Bucket sensors Photocells that monitor the interface between the red bloodcells and plasma in the bucket.
Bucket-lid latch A mechanism that keeps the bucket lid securely closedduring a procedure.
CCalendar View A Reveos System Manager page that provides an overview of
all reports that have run or are scheduled to run.
Centrifuge basin The large compartment inside the Reveos device thatcontains the rotor and the parts that are attached to therotor.
Counterbalance bag A bag that is used in place of a blood bag set when theoperator chooses to run a procedure with fewer than fourwhole blood units. Counterbalance bags help to balance therotor as it spins.
DDevice lid The large lid that covers the rotor where centrifugation takes
place. It locks while the device is in use and opensautomatically when the procedure is complete.
Dry check procedure A procedure based on a protocol that spins the centrifuge fora pre-configured duration. This procedure helps theoperator to determine whether all the fluid has beenremoved from the device after cleaning.
EExternal cooled water source An external system that cools and recirculates fluid to aid in
the temperature control of the device.
HHydraulic bladder The flexible container in each bucket that fills with
hydraulic fluid during processing. The hydraulic bladderexpands to aid in the expression of blood components intothe blood component bags.
Glossary-2 Reveos® Automated Blood Processing System Operator's Manual for Version 1.1

IInterim platelet unit (IPU) A platelet unit that results from processing a unit of whole
blood on the Reveos device. After Reveos processing, theIPU is ready for further processing, including rest andagitation, pooling with 3 to 5 other IPUs, and filtration withthe Platelet Pooling Set.
KKeyboard Entry screen The screen that allows you to enter information manually
into the system. The Keyboard Entry screen is available onlyif it is configured in the Reveos System Manager.
LLid system This system consists of the device lid, the device-lid latch,
and the device-lid lock.
Line sensors Sensors that detect component interfaces and verify that thetubing is loaded.
Loading area The upper part of the rotor, where blood bag sets andcounterbalance bags are loaded. The loading area includesthe buckets, blood component bag holders, valves, linesensors, and tubing guides.
MManual entry The method used to enter data when the Reveos System
Manager is temporarily disconnected from or notcommunicating with the Reveos device or when the barcodescanner attached to the device is not working.
OOperator The person who performs a processing procedure on the
device.
PPage A web page. In this operator’s manual, “page” refers to a web
page in the Reveos System Manager software, which is web-based. “Screen” is used to refer to the touch screen on theReveos device.
Permissions The ability to access a particular function or specific datawithin the Reveos System Manager application software.
Plasma line Plasma tubing.
Reveos® Automated Blood Processing System Operator's Manual for Version 1.1 Glossary-3

Plasma product Plasma that is leukoreduced and ready for storage after aprocessing procedure.
Platelet line Platelet tubing.
Platelet tubing router A part on the loading area of the rotor that helps the operatorproperly route the platelet tubing when loading a blood bagset.
Platelet Yield Index (PYI) An index based on the estimated platelet yield of anindividual interim platelet unit (IPU). The PYI may be usedto develop a method for selecting IPUs for pooling.
Procedure The combination of a specific protocol, Reveos deviceinformation, and specific barcodes. Procedures areconfigured in the Reveos System Manager application andthen transferred to the Reveos device. An operator selects aprocedure to separate whole blood into components on thedevice.
Protocol A pre-determined set of system operations that result in aparticular set of products.
RRBC product Red blood cells that are ready for additive solution,
filtration, and storage after a processing procedure.
Residual leukocyte line Residual leukocyte tubing.
Residual leukocytes A by-product of a processing procedure that contains mostlywhite blood cells (WBC), with some plasma and red bloodcells (RBC).
Reveos System Manager The system administration application software that is partof the Reveos Automated Blood Processing System.
Rotor The inner part of the device, including the centrifuge,buckets, bucket lids and latches, sensors, valves, and tubingguides.
SScreen A touch screen. In this operator’s manual, “screen” refers to
the interactive display on the Reveos device. “Page” is usedto refer to a web page in the Reveos System Managersoftware.
SOP The abbreviation for standard operating procedure.
Stop button The red button near the touch screen that allows you to stopa procedure, if necessary.
System administrator A person at the blood center who is responsible forconfiguring the Reveos System Manager application. The
Glossary-4 Reveos® Automated Blood Processing System Operator's Manual for Version 1.1

system administrator can troubleshoot issues regardingdevice configuration, procedure configuration, and/or theReveos System Manager application permissions.
TTechnical representative A Terumo BCT representative who should be contacted if
there are any hardware failures or other issues that cannot befixed by an operator or system administrator.
Temperature control system The system that manages the basin temperature range.
Touch screen The interactive screen on the device that helps you monitorand interact with the system.
Tubing guide An object that helps guide blood bag set tubing within theReveos device to ensure optimal expression. Numeroustubing guides are located around the valves to help positionthe blood bag set properly during loading.
UUser administrator A person at the blood center who is responsible for
configuring users within Reveos System Manager. A useradministrator can manage user accounts and permissions.
VValves (sealing valves) The parts that hold the component bag tubing in place
during a processing procedure. They open and closeautomatically at different intervals to allow bloodcomponents to exit the whole blood bag and enter thecomponent bags. At the end of expression, they seal thetubing.
WWhole blood bag The bag on the blood bag set that is first used to collect whole
blood from a donor, and then used to separate the wholeblood into components.
Reveos® Automated Blood Processing System Operator's Manual for Version 1.1 Glossary-5

Glossary
Glossary-6 Reveos® Automated Blood Processing System Operator's Manual for Version 1.1

Index
Aaccess drawer 2-3
alarm, title bar icon 2-12
alarms 4-2, 4-3
Alarms by Device chart 7-18
Alarms by Operator chart 7-18
Alarms page 7-18
alarms, list of 4-9–4-24
alert, title bar icon 2-12, 4-2
Alerts by Device chart 7-18, 7-19
Alerts by Operator chart 7-18, 7-19
Alerts page 7-19
alerts, list of 4-4–4-9
associated devices 6-6, 6-23
audience and purpose 1-2
Average Duration chart 7-14
Average Product Volume chart 7-15
Bbag posts 2-4
Barcode Entry screen 2-5, 3-6, 3-7, 3-11
barcode scanner 2-3, 2-6, 3-7
barcodeconfiguring 6-16, 6-19creating 6-19critical 3-8, 3-9deleting 6-20editing 6-20skipped 7-17unrecognized 7-17
bladder, hydraulic 2-4
blood bag set 2-2, 3-13
blood component bag holder 2-4
blood spillcleaning procedure 5-6cleaning supplies 5-6
bucket 2-4, 3-18
bucket diagram 2-7, 3-9, 3-24
bucket lid 2-4, 3-18
bucket sensors 2-4
bucket-lid latch 2-4, 3-18
CCalendar View 7-11
casters 2-3, 3-3, 3-4
cautions, list of 1-5
centrifuge basin 2-4, 3-20
chartAlarms by Device 7-18Alarms by Operator 7-18Alerts by Device 7-18Alerts by Operator 7-18Average Duration 7-14Average Product Volume 7-15Components 7-15Platelet Yield Index 7-15Total Alarms 7-18Total Alerts 7-19Units Processed 7-14
cleaningblood spill 5-6routine 5-3supplies 5-3, 5-6
Components chart 7-15
Configuration tab 6-4, 6-5, 6-15, 6-17, 6-19, 6-21
configurationbarcode definitions 6-19dry check procedure 5-11facility 6-5general device 6-15individual device 6-17, 6-18procedure 6-21Reveos System Manager application 6-7, 6-17, 6-19, 6-21
Reveos® Automated Blood Processing System Operator's Manual for Version 1.1 Index-1
counterbalance bagloading 3-21unloading 3-29
cross-connector 2-5, 3-15, 3-28
Custom Query report 7-3, 7-7–7-9, 7-11scheduling 7-7
Ddevice lid 2-3, 3-20
document conventions 1-3
Donation IDduplicate 6-21search 7-23
dry check procedure, configuration 5-11
duplicate Donation ID 6-21
duplicate units 7-16
EEMC table 8-4–8-8
End of Procedure Summary screen 2-11, 3-26
Exceptions page 7-16
exceptionsduplicated units 7-16inconclusive sealed units 7-16reprocessed units 7-16skipped barcodes 7-17temperature out of range 7-17unrecognized barcodes 7-17
external cooled water source 2-14, 3-5
Ffacility
creating 6-5deleting 6-6editing 6-6
frangible connector 3-18
Ggeneral device, configuration 6-15
groupsee user group
Hhydraulic bladder 2-4
Iicons and buttons 2-5, 2-7–2-13
inconclusive sealed units 7-16
individual deviceconfiguration 6-17, 6-18disenabling 6-17enabling 6-17
Insight report 3-27, 7-3, 7-4, 7-6, 7-8, 7-9, 7-11, 7-21data types 7-21scheduling 7-4, 7-6, 7-8
installation 3-3
intended use 1-2
interim platelet unit 2-11, 3-26
interim platelet unit bag 2-7
IPUsee interim platelet unit
KKeyboard Entry screen 2-6, 2-9, 3-10, 6-15
Lline sensors 2-4
loading area 2-4
loadingblood bag set 3-13counterbalance bag 3-21
locked out of Reveos System Manager 6-7, 6-14
MMore Barcode Information screen 2-7, 2-8, 3-11
moving the Reveos device 3-3, 3-4
Nnavigation tools 2-16, 2-19
non-routine procedure 6-21
Ooffline, communication with Reveos System Manager 7-6
online, communication with Reveos System Manager 3-6, 7-6
outer lidsee device lid
Ppage, definition 1-4
password, changing 6-3
permissions, Reveos System Manager 6-9
plasma 2-2
plasma bag 2-7
plasma icon 2-11
Index-2 Reveos® Automated Blood Processing System Operator's Manual for Version 1.1

plasma valve 2-4, 3-16
platelet icon 2-11, 3-26
Platelet tubing router 2-4
platelet valve 2-4, 3-16
Platelet Yield Index 3-26
Platelet Yield Index chart 7-15
platelets 2-2
power switch 2-3, 3-5
preventive maintenance 5-2, 5-13
Procedure Progress screen 3-23
procedureblood spill cleaning 5-6configuring 6-21creating 6-21dry check 5-11editing 6-23non-routine 6-21routine 6-21selecting 3-6
process overview 2-2
Production page 7-15
PYIsee Platelet Yield Index
Rred blood cell bag 2-7
red blood cells 2-2
Report Status box 2-13, 7-9
reportsAt-A-Glance view 7-12, 7-14–7-16Calendar View 7-11, 7-12chart view 7-12–7-16, 7-18Custom Query report 7-3, 7-7–7-9, 7-11details view 7-12, 7-20, 7-21Exceptions page 7-16icons 2-12, 2-13Insight report 3-27, 7-4, 7-6, 7-8, 7-9, 7-11Insight report, data types 7-21Operation page 7-14Production page 7-15scheduling 7-4, 7-6–7-8
reprocessed units 7-16
residual leukocyte bag 2-11
residual leukocyte icon 2-11
residual leukocyte valve 2-4, 3-15
residual leukocytes 2-2
return of used product 1-6
Reveos System Manager 2-2, 2-12, 2-13, 2-17–2-19, 6-2, 6-4,6-7–6-15, 7-2–7-4
account lockout 6-7, 6-14buttons and icons 2-12, 2-13, 2-18configuration 6-4, 6-7, 6-15levels of access 6-9, 6-10
logging in 6-2logging out 6-2navigation 2-17–2-19opening 6-2password expiration 6-8permissions 6-9, 6-11, 6-13reports 7-2–7-4reports tab 7-2–7-4session timeout 6-7user group 6-9–6-11user, adding 6-12user, deactivating 6-13user, editing 6-13user, restoring 6-14
RGA number 1-6
rightssee permissions
rotor 2-4
routine cleaning 5-3
routine procedure 6-21
RSMsee Reveos System Manager
Sscreen
Barcode Entry 2-5, 3-6, 3-11definition 1-4End of Procedure Summary 2-11Keyboard Entry 2-6, 2-9, 3-10, 6-15More Barcode Information 2-7, 2-8, 3-11Procedure Progress 3-23Select Procedure 2-5, 2-9, 3-6Whole Blood Loading 2-10
sealing valve 2-5
Select Procedure screen 2-5, 2-9, 3-6
service information 5-12
skip barcode, configuring 6-16
skipped barcodes 7-17
software overview 2-2
software version 6-3
stop button 2-3, 3-24
symbols and certification 8-9
system overview 2-2
system specifications 8-2, 8-3
system tests 2-15, 3-5
Ttemperature out of range 7-17
Total Alarms chart 7-18
Total Alerts chart 7-19
touch screen 2-3, 2-5, 2-7–2-12, 3-10
Reveos® Automated Blood Processing System Operator's Manual for Version 1.1 Index-3

tubing guide 2-4, 2-5, 3-16plasma 2-4, 3-16platelet 2-4, 3-16residual leukocyte 2-4
UUnits Processed chart 7-14
unloadingblood bag set 3-27counterbalance bag 3-29
unrecognized barcodes 7-17
user groupsReveos System Manager 6-9, 6-11
user name 6-12
Vvalve
plasma 2-4, 3-16platelet 2-4, 3-16residual leukocyte 2-4, 3-15sealing 2-5
Wwarnings, list of 1-4
whole blood bag 2-7
Whole Blood Loading screen 2-10
Index-4 Reveos® Automated Blood Processing System Operator's Manual for Version 1.1

©2019 Terumo BCT, Inc. Part No. 986351-536B Reorder No. 988024-002B
Operator’s Manual for Version 1.1
Reveos® Automated Blood Processing System
Terumo BCT, Inc.10811 West Collins AvenueLakewood, Colorado 80215-4440USA
USA Phone: 1.877.339.4228Phone: +1.303.231.4357Fax: +1.303.542.5215
Terumo BCT Europe N.V.Europe, Middle East and AfricaIkaroslaan 411930 ZaventemBelgium
Phone: +32.2.715.05.90Fax: +32.2.721.07.70
Terumo BCT Latin America S.A.La Pampa 1517 – 12th FloorC1428DZEBuenos AiresArgentina
Phone: +54.11.5530.5200Fax: +54.11.5530.5201
TERUMOBCT.COM
Terumo BCT (Asia Pacific) Ltd.Room 3903-3903A, 39/FACE Tower, Windsor House311 Gloucester RoadCauseway Bay, Hong Kong
Phone: +852.2283.0700Fax: +852.2576.1311
Terumo BCT Japan, Inc.Takanawa Park Tower 13F 20-14, 3-chome,Higashi Gotanda, Shinagawa-ku,Tokyo, 141-0022 Japan
Phone: +81.3.6743.7890Fax: +81.3.6743.9800
Reveos® Automated Blood Processing System
Operator’s Manual for Version 1.1

Reveos® Automated Blood ProcessingSystem Operator's Manual for Version 1.1
Part No. 986351-536B Reorder No. 988024-002B
2019-11

©2019 Terumo BCT, Inc.
Reveos is a registered trademark of Terumo BCT, Inc.
Terumo BCT is a registered trademark of Terumo Corporation.
Microsoft, Internet Explorer, Silverlight, SQL Server, and Windows are either registered trademarks or trademarks of Microsoft Corporation in the United States and/or other countries.
The Reveos® Automated Blood Processing System may be covered by one or more of the following patents:
United States: 7235041; 7279107; 7347932; 7396451; 7413665; 7497944; 7648639; 7674221; 7708889; 7766809; 7819793; 7833185; 8070665; 8120760; 8173027; 8236184; 8277406; 8287742, 8540614; 8337380; 8366086; and 8840535
And counterpart foreign patents:
Germany: 60037918.3; 60318418.9; 60322600.0; 60331794.4; 60340696.3; 602005018443.0; 602005033803.9; 602006007917.6; 602007020019.9; 602007025628.3; 602007027066.9; and 602010015953.1
Great Britain: 1494735; 1627651; 1640027; 1709983; 1736187; 1920792; 2091593; and 2509655
Japan: 4376635; 4800617; 4938465; 4960349; 5038150; 5204166; 5161301; 5175184; 5259595; 5405313; 5410470; 5519050; and 5554778
The Task Scheduler Manager Wrapper Software (Copyright 2003-2010 David Hall) IS PROVIDED “AS IS” WITHOUT WARRANTY OF ANY KIND, EXPRESS OR IMPLIED, INCLUDING BUT NOT LIMITED TO THE WARRANTIES OF MERCHANTABILITY, FITNESS FOR A PARTICULAR PURPOSE AND NONINFRINGEMENT. IN NO EVENT SHALL THE AUTHORS OR COPYRIGHT HOLDERS BE LIABLE FOR ANY CLAIM, DAMAGES OR OTHER LIABILITY, WHETHER IN AN ACTION OF CONTRACT, TORT OR OTHERWISE, ARISING FROM, OUT OF OR IN CONNECTION WITH THE SOFTWARE OR THE USE OR OTHER DEALINGS IN THE SOFTWARE.
Terumo BCT, Inc.10811 W. Collins AvenueLakewood, Colorado 80215USAUSA Phone: +1.877.339.4228Phone: +1.303.231.4357USA Fax: +1.866.715.6768Fax: +1.303.542.5215
Terumo BCT Europe N.V.Ikaroslaan 411930 ZaventemBelgiumPhone: +32.2.715.05.90Fax: +32.2.721.07.70
TERUMOBCT.COM

Contents
1: IntroductionThe Reveos Automated Blood Processing System ............................................................................................... 1-2
Intended Audience ..................................................................................................................................... 1-2
Document Conventions ..................................................................................................................................... 1-3
Note, Caution, and Warning Definitions .................................................................................................. 1-4
Page and Screen Definitions ...................................................................................................................... 1-4
Warnings and Cautions ............................................................................................................................. 1-4
Return of Used Product ...................................................................................................................................... 1-6
2: System OverviewReveos System Overview .................................................................................................................................... 2-2
Reveos System Process Overview ............................................................................................................... 2-2
Reveos System Manager Overview ............................................................................................................. 2-2
Reveos Device Components ............................................................................................................................... 2-3
Reveos Device Touch Screen Icons and Buttons ........................................................................................ 2-5
External cooled water source .................................................................................................................... 2-14
System Tests ..................................................................................................................................................... 2-15
Navigating Reveos System Manager ................................................................................................................. 2-16
Check Boxes, Drop-Down Menus, Radio Buttons, and the Carousel ...................................................... 2-19
Adding and Editing Information ............................................................................................................. 2-20
3: Operating the DevicePreprocessing Overview ...................................................................................................................................... 3-2
Setting Up and Moving the Device .................................................................................................................... 3-3
Reveos System Installation ......................................................................................................................... 3-3
Moving the Device .................................................................................................................................... 3-3
Turning On the Reveos Device .......................................................................................................................... 3-5
System Tests .............................................................................................................................................. 3-5
Turning Off the Reveos Device .......................................................................................................................... 3-5
Reveos® Automated Blood Processing System Operator's Manual for Version 1.1 i

Verify That the Device Is Online ........................................................................................................................ 3-6
Selecting a Procedure for the Device ................................................................................................................... 3-6
Entering Barcode Information into the Device ................................................................................................... 3-7
Scanning Barcodes ..................................................................................................................................... 3-7
Entering Information Manually ............................................................................................................... 3-10
Reviewing and Deleting Barcodes ..................................................................................................................... 3-11
Loading a Blood Bag Set ................................................................................................................................... 3-13
Loading a Counterbalance Bag ......................................................................................................................... 3-21
Procedure Management .................................................................................................................................... 3-23
Ending a Procedure ................................................................................................................................. 3-25
Platelet Yield Index .................................................................................................................................. 3-26
Unloading a Blood Bag Set ............................................................................................................................... 3-27
Unloading a Counterbalance Bag ..................................................................................................................... 3-29
4: Alarms and TroubleshootingAlarms and Troubleshooting .............................................................................................................................. 4-2
Reveos Alerts and Alarms .................................................................................................................................... 4-4
5: Maintaining the DeviceDaily Preventive Maintenance ............................................................................................................................ 5-2
Routine Cleaning ............................................................................................................................................... 5-3
Routine Cleaning Procedure ...................................................................................................................... 5-3
Cleaning After a Blood Spill ............................................................................................................................... 5-6
Blood Spill Cleaning Procedure ................................................................................................................. 5-6
Dry Check Procedure ....................................................................................................................................... 5-11
Running the Dry Check Procedure .......................................................................................................... 5-11
Service Information .......................................................................................................................................... 5-12
Preventive Service Maintenance ........................................................................................................................ 5-13
6: Configuring the Reveos System ManagerAccessing the Software and Viewing Version Information .................................................................................. 6-2
Opening Reveos System Manager .............................................................................................................. 6-2
Logging In to Reveos System Manager ....................................................................................................... 6-2
Logging Out of Reveos System Manager .................................................................................................... 6-2
Changing Your Password ........................................................................................................................... 6-3
Viewing Software Version Information ...................................................................................................... 6-3
Configuring Reveos Devices Within Reveos System Manager ............................................................................ 6-4
Configuring Facilities ......................................................................................................................................... 6-5
Creating a Facility ...................................................................................................................................... 6-5
Editing a Facility ........................................................................................................................................ 6-6
ii Reveos® Automated Blood Processing System Operator's Manual for Version 1.1

Deleting a Facility ...................................................................................................................................... 6-6
Associated Devices ..................................................................................................................................... 6-6
Configuring the Application ............................................................................................................................... 6-7
Assigning Permissions ......................................................................................................................................... 6-9
Groups ....................................................................................................................................................... 6-9
Users ........................................................................................................................................................ 6-11
Configuring the General Device ....................................................................................................................... 6-15
Configuring Individual Devices ........................................................................................................................ 6-17
Configuring Barcode Definitions ...................................................................................................................... 6-19
Creating a Barcode ................................................................................................................................... 6-19
Editing a Barcode .................................................................................................................................... 6-20
Deleting a Barcode ................................................................................................................................... 6-20
Configuring Procedures .................................................................................................................................... 6-21
Creating a Procedure ............................................................................................................................... 6-21
Editing a Procedure ................................................................................................................................. 6-23
Associated Devices ................................................................................................................................... 6-23
7: Searches and ReportsThe Reports Tab ................................................................................................................................................ 7-2
Reports Overview ............................................................................................................................................... 7-3
Managing Reports .............................................................................................................................................. 7-4
Configuring a Report ................................................................................................................................. 7-4
Creating and Scheduling an Insight Report ............................................................................................... 7-4
Creating and Saving an Unscheduled Insight Report ................................................................................. 7-6
Creating and Scheduling a Custom Query ................................................................................................. 7-7
Creating and Saving an Unscheduled Custom Query Report ..................................................................... 7-8
Editing a Report ........................................................................................................................................ 7-8
Deleting a Report ...................................................................................................................................... 7-9
Running a Report ...................................................................................................................................... 7-9
Calendar View .................................................................................................................................................. 7-11
Downloading a Report from the Calendar View ...................................................................................... 7-11
At-A-Glance Reporting ..................................................................................................................................... 7-12
Chart View .............................................................................................................................................. 7-13
Details View ............................................................................................................................................ 7-20
Donation ID Search ......................................................................................................................................... 7-23
Reveos® Automated Blood Processing System Operator's Manual for Version 1.1 iii

8: System SpecificationsSystem Specifications .......................................................................................................................................... 8-2
EMC Information .............................................................................................................................................. 8-4
Symbols and certification ................................................................................................................................... 8-9
Glossary
Index
iv Reveos® Automated Blood Processing System Operator's Manual for Version 1.1

1Introduction
Reveos® Automated Blood Processing System Operator's Manual for Version 1.1 1-1

The Reveos Automated Blood Processing System
Intended Use of the Reveos DeviceThe Reveos device is intended to automatically separate units of whole blood into blood components.
Intended Use of the Reveos System Manager SoftwareThe Reveos System Manager is a software application that manages Reveos procedures and processingdata.
Intended Use of the Reveos Blood Bag SetThe Reveos Blood Bag Set is intended to collect a unit of whole blood and to process the unit on theReveos device, producing blood components.
Intended AudienceThis manual is written for blood center personnel who process whole blood using the Reveos AutomatedBlood Processing System. It is also written for those involved in training, management, reporting, andquality assurance.
This manual guides you through using the Reveos Automated Blood Processing System to separatewhole blood into components. It also explains how to respond to system messages, such as alerts andalarms, and how to maintain and clean the system.
Persons who perform procedures, maintain, repair, and replace parts on the Reveos system should bethoroughly familiar with relevant sections of this manual. They should also be appropriately trainedbefore using the Reveos system.
Introduction
1-2 Reveos® Automated Blood Processing System Operator's Manual for Version 1.1

Document ConventionsThis manual uses certain conventions to help you identify information. This section describes theseconventions.
Numbered ListsNumbered lists indicate sequential operations.
BulletsBullets (•) indicate items in a list that are not sequential.
Bold and Italic TextBold text is used for the following:• Chapter titles and section headings
• Figure titles
• Table titles
• Notes, cautions, and warnings
• System elements, such as:– Buttons
– Other options
• Reveos System Manager elements, such as:– Menus
– Menu commands
– Task page titles
– Dialog box titles
– Tabs
– Buttons
– Other options
Italic text is used for the following:• Text that a user enters into the Reveos System Manager software pages or web browser
• Titles of books, manuals, and guides
Document Conventions
Reveos® Automated Blood Processing System Operator's Manual for Version 1.1 1-3

Note, Caution, and Warning DefinitionsThe following examples define how notes, cautions, and warnings appear in this document:
Note: Emphasizes important details.
Caution: Alerts the user to the possibility of a problem with the machine associated with its use or misuse. Suchproblems include machine malfunction, machine failure, damage to the machine or damage to other property. Thecaution statement includes the precaution that should be taken to avoid the hazard.
Warning: Advises the user of serious hazards, consequences, or conditions which are likely to resultin a harmful reaction, trauma, or death to the patient or user(s). For computer software products, awarning advises the user of conditions likely to result in data loss, security violations, or equipmentdamage. A warning begins by clearly stating the immediate potential hazard, and provides informationon how to avoid it, if possible.
Page and Screen DefinitionsThe following examples define how the terms “page” and “screen” are used when referring to devicesoftware and application software.• “Page” refers to a page in the Reveos System Manager software.
• “Screen” refers to the touch screen on the Reveos device.
Warnings and Cautions
Warnings
1. Do not use operating or maintenance procedures other than those published by Terumo BCT. Donot use accessory devices that are not recommended by Terumo BCT. To do so may result in injuryor death.
2. The Reveos device is intended to process human whole blood. If the device is used in a manner notspecified by Terumo BCT, the protective mechanisms that are built into the device may beimpaired.
3. Do not use the following materials with the system:• Flammable or explosive materials
• Materials that cause vigorous chemical reactions with one another
4. Use only power plugs and adapters specified by Terumo BCT. The use of other plugs orinadequately rated cords can damage the device or cause bodily harm.
5. Do not use the Reveos device’s sealing mechanism while the device lid is open. If the lid is open,manually seal all tubing with an external sealer.
6. All buckets must contain a loaded blood bag set or counterbalance bag before beginning aprocedure. Failure to properly load all buckets can result in a hydraulic leak.
Introduction
1-4 Reveos® Automated Blood Processing System Operator's Manual for Version 1.1

Cautions
1. Unplug the power to the device before servicing to prevent possible electrical hazard or potentialdamage to the device.
2. Always maintain a 152 mm (6 in) minimum perimeter, or clearance envelope, around the device.Do not stand in the clearance envelope for longer than necessary.
3. Position the device so that the power switch is easily accessible, in case the device needs to bepowered off in an emergency.
4. There must be an emergency switch located away from the device that can disconnect the devicefrom the main power source in case of a malfunction. The system operator must know the locationof this switch and have access to the switch.
5. Before using the device, ensure that the front feet are lowered and that the casters are locked.
6. To avoid personal injury, keep fingers clear of the hinges when closing the device lid and bucket lids.
7. To avoid personal injury or damage to the device, use proper techniques when you lift or move thedevice.
8. Ensure that all bucket lids are latched before you close the device lid to prevent any damage to therotor during centrifugation.
9. When cleaning, do not use excessive liquid on the sensors, as this may damage them. Use only adampened cloth, an alcohol pad or a cotton swab.
10. If you see hydraulic fluid (blue liquid) anywhere inside the device, remove the device from use andcontact your authorized Terumo BCT service representative.
11. If the Reveos device or accessories are incorporated into an external system, it is the responsibility ofthe system assembler. The Reveos system is not designed or intended to be part of a larger system orassembly.
12. Do not lean against the device at any time.
13. Do not run a processing procedure if the exterior panels have been removed from the device.
Document Conventions
Reveos® Automated Blood Processing System Operator's Manual for Version 1.1 1-5
Return of Used ProductIf for any reason this product must be returned to Terumo BCT, Inc., a returned goods authorization(an RGA number) is required from Terumo BCT prior to shipping.
Instructions for cleaning and materials, including appropriate shipping containers, proper labeling, andan RGA number, may be obtained from the Terumo BCT Quality Assurance Department.
IT IS THE RESPONSIBILITY OF THE HEALTH CARE INSTITUTION TO ADEQUATELYPREPARE AND IDENTIFY THE PRODUCT FOR RETURN SHIPMENT.
Please contact your local representative for information regarding returned goods and productcomplaints.
Introduction
1-6 Reveos® Automated Blood Processing System Operator's Manual for Version 1.1

2System Overview
Reveos® Automated Blood Processing System Operator's Manual for Version 1.1 2-1

Reveos System OverviewThe Reveos system automates the process of manufacturing blood components from whole blood.
The system includes:• The Reveos device
• The Reveos System Manager software application
• The Reveos blood bag set
Reveos System Process OverviewWhole blood is drawn from a donor into a Reveos blood bag set. The whole blood is transported to thefacility for processing. At the facility, the operator loads up to four blood bag sets into the Reveos device,closes the device lid, and touches a button on the touch screen to begin the processing procedure. Once aprocedure begins, the following events occur:
1. The rotor begins to spin.
2. Whole blood is separated into components.
3. In the first bucket, plasma, platelets, and residual leukocytes are expressed into their respectiveproduct bags, depending on which protocol is being used.
4. Step 3 is repeated for the remaining whole blood units in the other buckets.
5. When expression is complete, the valves seal the tubing to the product bags.
6. When the processing procedure is complete, the device lid opens automatically.
Information regarding each procedure is shown on the touch screen. This information is transferred tothe Reveos System Manager. System administrators can access this information and run reports usingReveos System Manager.
Reveos System Manager OverviewReveos System Manager is a software application that manages procedures and product data. This data isautomatically transferred from the Reveos device to Reveos System Manager.
Reveos System Manager lets users perform the following tasks:• Configure Reveos devices
• Define users and assign permissions
• Configure barcodes and procedures
• Record and output process and product data
• Track information entered into the Reveos System Manager
• Generate and schedule reports
Reveos System Manager allows you to standardize workflow to meet the needs of your institution.
Reveos System Manager is installed by a Terumo BCT representative. Contact your Terumo BCTrepresentative with any questions regarding Reveos System Manager installation or maintenance.
System Overview
2-2 Reveos® Automated Blood Processing System Operator's Manual for Version 1.1

Reveos Device ComponentsFigure 2-1, Figure 2-2, Figure 2-3, Figure 2-4, Figure 2-5, and Figure 2-6 illustrate the maincomponents of the device.
Figure 2-1: Reveos device front
1 Device lid2 Power switch3 Stop button4 Touch screen5 Barcode scanner6 Access drawer7 Casters
Figure 2-2: Front caster detail
1 Knob2 Foot3 Caster
Reveos Device Components
Reveos® Automated Blood Processing System Operator's Manual for Version 1.1 2-3

Figure 2-3: Reveos device rotor compartment
1 Bucket2 Bucket lid3 Bucket-lid latch4 Blood component bag
holder5 Valves and line
sensors6 Hydraulic bladder7 Centrifuge basin8 Bucket sensors9 Rotor
Figure 2-4: Reveos device loading area detail
1 Line sensor2 Residual leukocyte
valve and tubingguides
3 Plasma valve andtubing guides
4 Platelet valve andtubing guides
5 Bag posts6 Platelet tubing router
System Overview
2-4 Reveos® Automated Blood Processing System Operator's Manual for Version 1.1

Figure 2-5: Sealing valve and tubing guide detail
1 Sealing valve2 Tubing guide
Figure 2-6: Blood bag set cross-connector detail
1 Ridge2 Platelet tubing3 Processing tubing4 Plasma tubing5 Residual leukocyte
tubing
Reveos Device Touch Screen Icons and ButtonsThe following tables list and describe each of the buttons and icons on the Reveos device touch screen.The icons and buttons are organized according to when they first appear during a procedure. If thepurpose of an icon or button varies by screen, then it is listed separately for each purpose.
Table 2-1: Barcode Entry screen buttons and icons
Button/Icon Name Description
Title bar Displays the name of the selected procedure as it isdefined in Reveos System Manager.
• If the title bar is light gray, then a procedure is not inprogress.
• If the title bar is green, then a procedure is in progress.
Select Procedurebutton
When touched, displays the Select Procedure screen.
Reveos Device Components
Reveos® Automated Blood Processing System Operator's Manual for Version 1.1 2-5

Table 2-1: Barcode Entry screen buttons and icons (continued)
Button/Icon Name Description
In Progress icon Appears while the Reveos device is updating procedureinformation that was transferred from Reveos SystemManager.
Scan Needed icon Indicates that the associated barcode has not beenscanned.
Operator icon Represents the Operator ID.
Barcode Scanner icon Represents the barcode scanner that is attached to theReveos device.
Online icon Appears in the upper-right corner of the touch screenwhen the device is communicating with Reveos SystemManager.
Offline icon Appears in the upper-right corner of the touch screenwhen Reveos System Manager is disconnected or is notcommunicating with the device.
Keyboard button When touched, displays the Keyboard Entry screen,which can be used to manually enter data.
Note: The Keyboard Entry screen is available only if it isconfigured in the Reveos System Manager.
System Overview
2-6 Reveos® Automated Blood Processing System Operator's Manual for Version 1.1
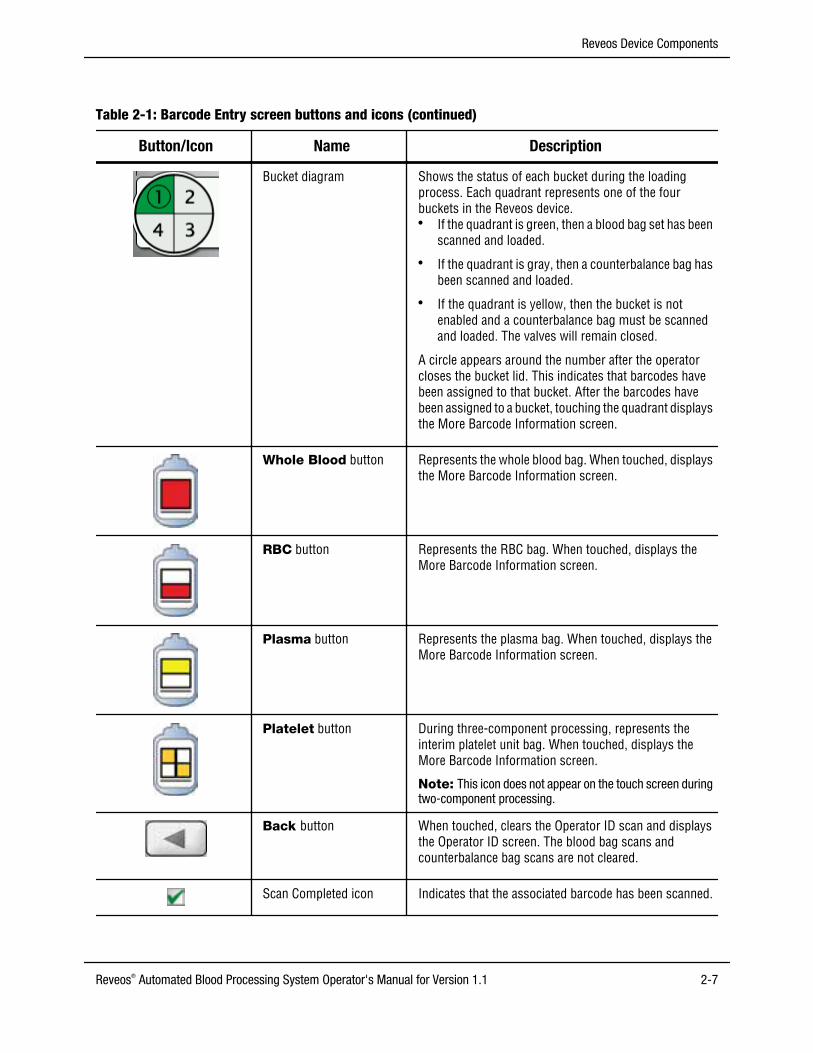
Table 2-1: Barcode Entry screen buttons and icons (continued)
Button/Icon Name Description
Bucket diagram Shows the status of each bucket during the loadingprocess. Each quadrant represents one of the fourbuckets in the Reveos device.• If the quadrant is green, then a blood bag set has been
scanned and loaded.
• If the quadrant is gray, then a counterbalance bag hasbeen scanned and loaded.
• If the quadrant is yellow, then the bucket is notenabled and a counterbalance bag must be scannedand loaded. The valves will remain closed.
A circle appears around the number after the operatorcloses the bucket lid. This indicates that barcodes havebeen assigned to that bucket. After the barcodes havebeen assigned to a bucket, touching the quadrant displaysthe More Barcode Information screen.
Whole Blood button Represents the whole blood bag. When touched, displaysthe More Barcode Information screen.
RBC button Represents the RBC bag. When touched, displays theMore Barcode Information screen.
Plasma button Represents the plasma bag. When touched, displays theMore Barcode Information screen.
Platelet button During three-component processing, represents theinterim platelet unit bag. When touched, displays theMore Barcode Information screen.
Note: This icon does not appear on the touch screen duringtwo‑component processing.
Back button When touched, clears the Operator ID scan and displaysthe Operator ID screen. The blood bag scans andcounterbalance bag scans are not cleared.
Scan Completed icon Indicates that the associated barcode has been scanned.
Reveos Device Components
Reveos® Automated Blood Processing System Operator's Manual for Version 1.1 2-7

Table 2-1: Barcode Entry screen buttons and icons (continued)
Button/Icon Name Description
Scan Number Represents the last barcode number that was scanned.
Skip button Allows the operator to skip to the next scan on the BarcodeEntry screen. This feature may be configured in ReveosSystem Manager to allow the operator to skip one or allremaining barcode scans. If this feature is not enabled inReveos System Manager, the operator cannot skip anybarcode scans.
Table 2-2: More Barcode Information screen buttons and icons
Button/Icon Name Description
Bucket icon The number following this icon represents the selectedbucket.
Barcode scanner icon The number following this icon represents the number ofscans that have been completed for the selected bucket.Counterbalance bag scans are not included.
Skip icon The number following this icon represents the number ofscans that have been skipped for the selected bucket.
Additional Scans icon Indicates that additional barcodes have been scanned forthe selected bucket, even though they do not appear onthe screen. The More Barcode Information screendisplays up to seven barcodes.
Delete Barcodesbutton
When touched, deletes all barcodes for the selectedbucket or all unassigned barcodes.
Continue button When touched, returns to the Barcode Entry screen.
System Overview
2-8 Reveos® Automated Blood Processing System Operator's Manual for Version 1.1

Table 2-3: Select Procedure screen buttons and icons
Button/Icon Name Description
Procedure Namebutton
When touched, selects the associated procedure.
• If the button is white and the circle on the left is empty,then the procedure is not currently selected.
• If the button is green and the circle on the left is filled,then the procedure is currently selected as the activeprocedure.
Cancel button When touched, cancels any selection made on the SelectProcedure screen and returns to the previous screen.
Continue button When touched, accepts the selection made on the SelectProcedure screen.
Scroll bar When touched, scrolls through procedures on the SelectProcedure screen.
Table 2-4: Keyboard Entry screen buttons and icons
Button/Icon Name Description
Delete button When touched, deletes characters on the Keyboard Entryscreen.
Space button When touched, enters a space between characters on theKeyboard Entry screen.
Continue button When touched, accepts information entered on theKeyboard Entry screen.
First Input icon Indicates that you are manually entering the barcoderequired for this procedure for the first time and that youmust re‑enter this barcode because it is marked as“critical” in Reveos System Manager. See “EnteringInformation Manually” on page 3-10.
Reveos Device Components
Reveos® Automated Blood Processing System Operator's Manual for Version 1.1 2-9

Table 2-4: Keyboard Entry screen buttons and icons (continued)
Button/Icon Name Description
Second Input icon Indicates that you are manually re‑entering the barcoderequired for this procedure because it is marked as“critical” in Reveos System Manager. See “EnteringInformation Manually” on page 3-10.
Shift button When touched, changes between uppercase andlowercase letters.
Note: The Keyboard Entry screen default display isuppercase letters.
Table 2-5: Whole Blood Loading screen buttons and icons
Button/Icon Name Description
Close Valves button When touched, closes the valves on the tubing (one at atime). The valves must be closed before the frangibleconnectors are broken.
In Progress icon Indicates that the device is currently closing the valves onthe tubing.
Break Frangible Connectoricon
Prompts the operator to break the frangible connectorbetween the whole blood bag and the cross-connector oneach blood bag set.
Donation ID Displays the Donation ID, if scanned. This barcode scanappears on all screens throughout the processingprocedure.
System Overview
2-10 Reveos® Automated Blood Processing System Operator's Manual for Version 1.1

Table 2-5: Whole Blood Loading screen buttons and icons (continued)
Button/Icon Name Description
Close Device Lid icon Prompts the operator to close the device lid beforebeginning a processing procedure.
Start Procedurebutton
When touched, starts the processing procedure.
Note: The Start Procedure button becomes activeonly after you close the device lid.
Table 2-6: End of Run Summary screen buttons and icons
Button/Icon Name Description
Plasma icon Represents the plasma bag. The estimated componentvolume appears below the icon.
Residual Leukocytes icon Represents the residual leukocytes bag. The estimatedcomponent volume appears below the icon.
Platelet icon During three-component processing, represents theinterim platelet unit bag. The estimated componentvolume appears below the icon. The Platelet Yield Indexvalue appears in the upper right section of the icon (notshown).
Expand button When touched, displays the More Information screen,which provides additional information about thecompleted processing procedure.
Collapse button When touched, displays the primary End of ProcedureSummary screen.
Reveos Device Components
Reveos® Automated Blood Processing System Operator's Manual for Version 1.1 2-11

Table 2-6: End of Run Summary screen buttons and icons (continued)
Button/Icon Name Description
Next Procedurebutton
When touched, exits the End of Procedure Summaryscreen and proceeds to the Barcode Entry screen toprepare for the next processing procedure. The NextProcedure button becomes active after the device lid isopened.
Note: Once you touch the Next Procedure button, youcan no longer access processing procedure data from the Endof Procedure Summary screen.
Procedure Number icon Indicates the unique ID number assigned to the currentprocessing procedure.
Device Name icon Indicates the name of the device used during the currentprocedure.
Note: Device names are configured in Reveos SystemManager.
Table 2-7: Alert and Alarm title bars
Icon Name Description
Alarm Title bar Displays the alarm number and the associated systemmessage.
Alert Title bar Displays the alert number and the associated systemmessage.
Reveos System Manager Icons
The following table lists and describes the buttons and icons in Reveos System Manager.
Table 2-8: Reveos System Manager buttons and icons
Button/Icon Name Description
Error icon Appears next to the incorrect information in ReveosSystem Manager.
Donation ID Searchbutton
Appears at the top right of all pages in Reveos SystemManager. Click the button to search the database for theDonation ID entered in the text box.
Report Complete icon Indicates that a report has been generated successfully.
System Overview
2-12 Reveos® Automated Blood Processing System Operator's Manual for Version 1.1
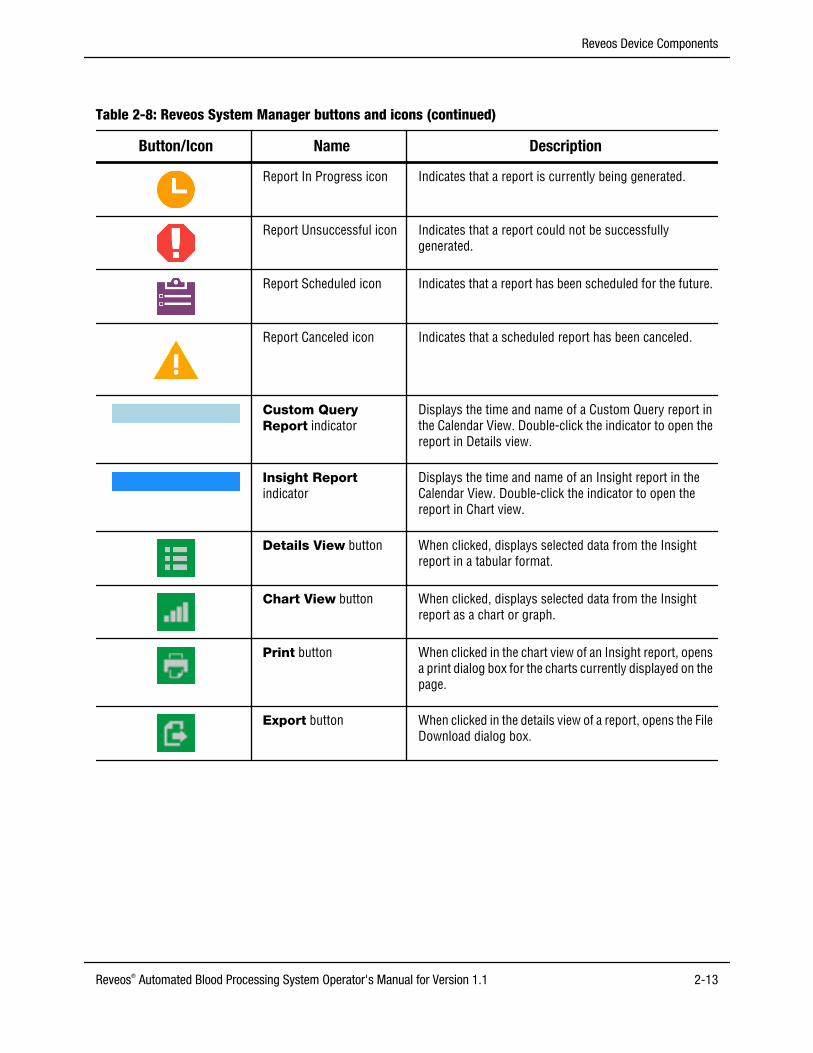
Table 2-8: Reveos System Manager buttons and icons (continued)
Button/Icon Name Description
Report In Progress icon Indicates that a report is currently being generated.
Report Unsuccessful icon Indicates that a report could not be successfullygenerated.
Report Scheduled icon Indicates that a report has been scheduled for the future.
Report Canceled icon Indicates that a scheduled report has been canceled.
Custom QueryReport indicator
Displays the time and name of a Custom Query report inthe Calendar View. Double-click the indicator to open thereport in Details view.
Insight Reportindicator
Displays the time and name of an Insight report in theCalendar View. Double-click the indicator to open thereport in Chart view.
Details View button When clicked, displays selected data from the Insightreport in a tabular format.
Chart View button When clicked, displays selected data from the Insightreport as a chart or graph.
Print button When clicked in the chart view of an Insight report, opensa print dialog box for the charts currently displayed on thepage.
Export button When clicked in the details view of a report, opens the FileDownload dialog box.
Reveos Device Components
Reveos® Automated Blood Processing System Operator's Manual for Version 1.1 2-13

External cooled water sourceThe Reveos device requires an external cooled water source that meets the following specifications.
Note: Depending on the operating environment, an external cooled water source operating outside of thesespecifications may be used. Contact your Terumo BCT technical representative for further guidance.
Table 2-9: External Cooled Water Source specifications
Specification Value
Fluid Must use filtered deionized water or filtered distilled water. Water must befiltered with a screen that is 80 mesh or finer. Ethylene glycol or propyleneglycol may be added in concentrations up to 30% by weight. Do not usetap water.
Incoming water temperature 2 °C to 10 °C (36 °F to 50 °F)
Minimum flow rate 4 liters per minute per device
Incoming water pressure 3.5 bar to 6.5 bar (50 psi to 95 psi)
Please contact your Terumo BCT technical representative for additional information or to orderadditional hoses or connectors.
System Overview
2-14 Reveos® Automated Blood Processing System Operator's Manual for Version 1.1

System TestsWhen the device is turned on, the system performs a series of tests and calibrates all of the valves. Thesetests may take a moment.
Test Group Name Functions Tested
Self-diagnostic testsThe system performs these tests each time you turn onthe device.
• Device-lid lock control and function
• Rotor control and function
• Rotor speed and power
• Hydraulic pressure
• System communication
Operation testsThe system performs these tests during operation,centrifugation, separation, and expression.
• Pressure
• Hydraulic flow rate
• Hydraulic position
• Tubing sensor and bucket sensor calibration
• Vibration sensor
• Valve states
• Temperature sensors
• Rotor door lock
• Leak detector
Continuous monitoringThe system monitors various functions during theprocedure and triggers an alarm if the results areunexpected.
• Communication between the device and ReveosSystem Manager
• Rotor speed
• Lid positioning
• Lid locks
• Lid closure during operation
• Bucket latch sensors
• Leak detection in the rotor
• Device temperature
• Inlet water temperature
• Vibration levels
• Stop button activity
• Hydraulic fluid positioning
System Tests
Reveos® Automated Blood Processing System Operator's Manual for Version 1.1 2-15

Navigating Reveos System Manager
Reveos System Manager provides multiple methods of navigation to help you find the information youneed to work efficiently.
Use tabs, menus, content lists, and buttons to navigate through the pages in Reveos System Manager.You can view or use pages based on the permissions that have been assigned to you. This section describesthe functionality of each element.
Navigation Tools Used in Reveos System ManagerEvery page displays the top navigation bar containing the tabs used to access Reveos System Managerpages. Within each page, there is a menu bar, content list, details, sections, and buttons. Each element islabeled in Figure 2-7 and described in Table 2-10.
1
2
3 4
5
6
Figure 2-7: Reveos System Manager page with navigation tools identified
System Overview
2-16 Reveos® Automated Blood Processing System Operator's Manual for Version 1.1

Table 2-10: Reveos System Manager page element descriptions
Name Description
1 Tabs Tabs allow the user to navigate through theapplication. The following tabs appear at the top ofeach page:• Home displays the version and build number of
the software. This is the default page after a userlogs in.
• Configuration allows the user to configure theoverall system (see Chapter 6, “ConfiguringReveos System Manager”).
• Reports allows the user to manage, view andrun reports (see Chapter 7, “Searches andReports”).
2 Menu bar This list is located on the left side of all Reveos SystemManager pages. All menu items are pre-populated andassociated with their respective tabs.
3 Content list This list is located to the right of the menu bar. Thecontent list is associated with the menu bar itemselected. The items in the content list vary dependingupon which item is selected in the menu bar.
4 Details This section, located to the right of the content list,contains information regarding the menu or contentlist item selected.
5 Buttons Software pages contain New, Edit, Delete, Save,and/or Cancel buttons at the bottom of some pages.The Log In button appears on the login page. TheRun Now button appears on some reports pages.Buttons are described in detail in Table 2-11.
6 Donation ID Search This text box allows the user to search for a specificDonation ID.
Note: Not all tabs, menus, or content list items are visible at all times. Each user sees only the pages and buttonsthat he or she has permission to see or use.
Navigating Reveos System Manager
Reveos® Automated Blood Processing System Operator's Manual for Version 1.1 2-17

ButtonsThe following buttons appear on various pages throughout Reveos System Manager. Each button worksthe same way on every page where it appears.
Table 2-11: The Reveos System Manager buttons and descriptions
Button Function
New Click this button to create a new record.
Edit Click this button to modify existing information.
Delete Click this button to delete information.Note: Deleted information is stored within the database butmay not be readily accessible to the user.
Deactivate Click this button to deactivate a user. The user will nolonger appear in the active users list and will no longerhave access to Reveos System Manager.Note: When a user is deactivated, he or she is not deletedand can be reactivated at any time by a user administrator.
Restore Click this button to reactivate a user that has beendeactivated and removed from the active users list.
Save Click this button to save information.
Cancel Click this button to cancel an action that has begun butwas not saved.
Log In Click this button after entering your user name andpassword to log in to the software.
Run Now This button appears on the Insight Report page and theCustom Query report page. It is visible only to those withreports access. Click this button to run a report ondemand.
OK This button appears in various dialog boxes. Click thisbutton when you want to acknowledge a message orconfirm your manual entry.
Unlock Click this button to unlock a user on the User page. A usercould be locked out of Reveos System Manager if he orshe attempted to log in more times than allowed.
System Overview
2-18 Reveos® Automated Blood Processing System Operator's Manual for Version 1.1
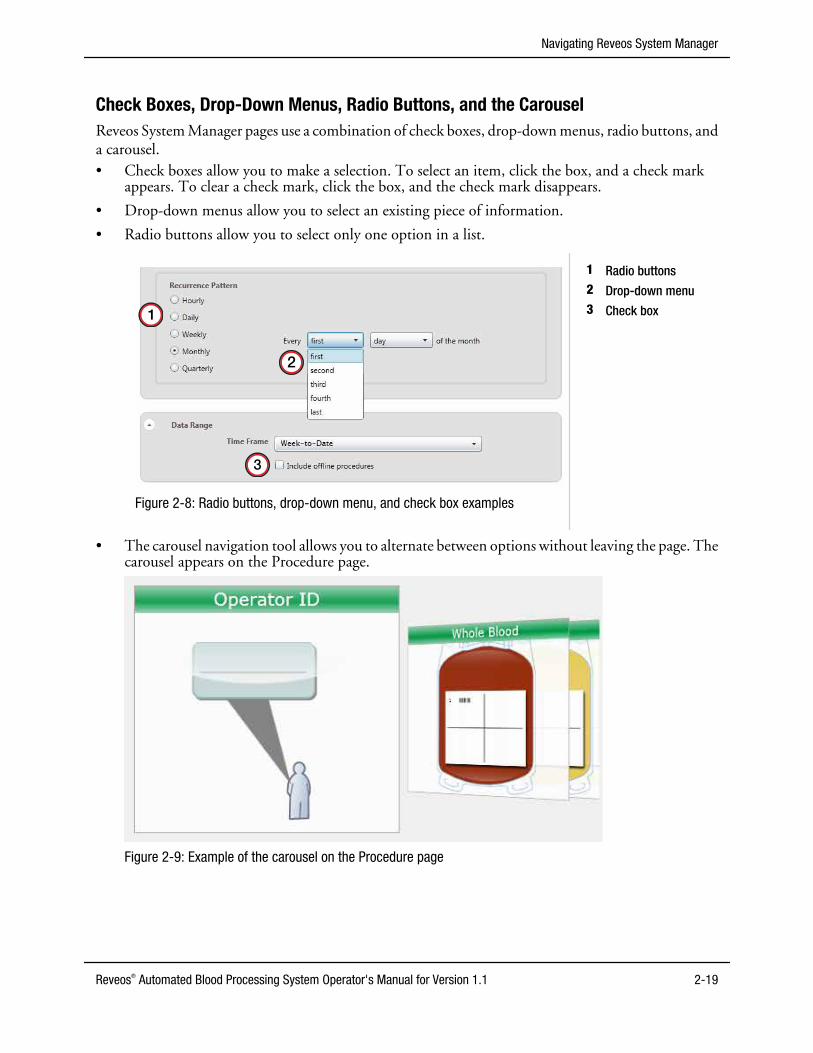
Check Boxes, Drop-Down Menus, Radio Buttons, and the CarouselReveos System Manager pages use a combination of check boxes, drop-down menus, radio buttons, anda carousel.• Check boxes allow you to make a selection. To select an item, click the box, and a check mark
appears. To clear a check mark, click the box, and the check mark disappears.
• Drop-down menus allow you to select an existing piece of information.
• Radio buttons allow you to select only one option in a list.
1
2
3
Figure 2-8: Radio buttons, drop-down menu, and check box examples
1 Radio buttons2 Drop-down menu3 Check box
• The carousel navigation tool allows you to alternate between options without leaving the page. Thecarousel appears on the Procedure page.
Figure 2-9: Example of the carousel on the Procedure page
Navigating Reveos System Manager
Reveos® Automated Blood Processing System Operator's Manual for Version 1.1 2-19

Adding and Editing InformationUsers with full access to the Reveos System Manager can add new information and edit existinginformation in the Reveos System Manager. When adding a new record or editing an existing record, theuser can navigate away from the page by clicking the Save or Cancel button.
System Overview
2-20 Reveos® Automated Blood Processing System Operator's Manual for Version 1.1

3Operating the Device
Reveos® Automated Blood Processing System Operator's Manual for Version 1.1 3-1

Preprocessing OverviewThe following steps provide a summary of the tasks carried out by an Operator during preprocessing:
1. Select a procedure. See “Selecting a Procedure for the Device” on page 3-6.
2. Scan the Operator ID barcode, if prompted. See “Entering Barcode Information into the Device”on page 3-7.
3. Scan the requested barcodes for the blood bag set or counterbalance bag. See “Entering BarcodeInformation into the Device” on page 3-7.
4. Load the blood bag set or counterbalance bag. See “Loading a Blood Bag Set” on page 3-13 or “Loading a Counterbalance Bag” on page 3-21.
5. Latch the bucket lid.
6. Repeat steps 3, 4, and 5 until all four buckets are loaded.
Note: All buckets must contain a loaded blood bag set or counterbalance bag before beginning a procedure.Failure to properly load all buckets can result in a hydraulic leak.
7. Touch the Close Valves button.
8. Break the frangible connector on each blood bag set.
9. Close the device lid.
10. Touch the Start Procedure button.
Operating the Device
3-2 Reveos® Automated Blood Processing System Operator's Manual for Version 1.1

Setting Up and Moving the Device
Reveos System InstallationInstructions for unpacking and assembling the Reveos system are included with the shipping packaging.Your authorized Terumo BCT service representative unpacks and assembles the system and performsthe installation tests.
Caution: Always maintain a 152 mm (6 in) minimum perimeter, or clearance envelope, around the device. Do notstand in the clearance envelope for longer than necessary.
Moving the Device
The Reveos device is equipped with casters. Before moving the device, ensure that the floor is level anddry. It is not necessary to level the device after it is moved if the floor surface is within the floor sloperequirements listed in Table 8-2.
If you need to move the device long distances or on uneven surfaces, contact your Terumo BCTrepresentative.
After moving the device, ensure that it is plugged into a RCCD (GFCI)-protected electrical powercircuit before turning it on. See Table 8-1 for more information.
Unlocking the Front Casters
1. Rotate the knob counterclockwise until the foot is raised completely off the floor, as shown in Figure 3-1.
Figure 3-1: Unlocked caster with foot raised completely off the floor
2. Repeat step 1 with the other caster before attempting to roll the device.
Setting Up and Moving the Device
Reveos® Automated Blood Processing System Operator's Manual for Version 1.1 3-3

3. Ensure that the device rolls on the unlocked casters. If it does not, continue to raise the feet until thedevice rolls easily.
Locking the Front Casters
1. Rotate the knob clockwise until the foot contacts the floor evenly, as shown in Figure 3-2.
2. Repeat with the other front caster.
Figure 3-2: Locked caster with foot touching the floor
3. Ensure that the floor around the device is dry and that the casters are locked before operating.
Operating the Device
3-4 Reveos® Automated Blood Processing System Operator's Manual for Version 1.1

Turning On the Reveos Device
Note: Activate the external cooled water source before turning on the device.
1. Make sure that the proper power cord is attached to the device and plugged into the appropriatepower source. See “System Specifications” on page 8-2 for more information.
2. Ensure that all buckets and line sensors are empty.
3. Turn on the device by pressing the power switch on the upper-right side of the device.
Once the device completes the startup process, it displays the system splash screen.
Figure 3-3: The Reveos system splash screen
Note: If the splash screen does not appear, turn off the device, then turn it on again.
System TestsThe system performs various self-diagnostic tests upon startup and monitors itself throughout theprocedure. If the system detects a condition that requires attention, it triggers an alert or an alarm,depending on the level of severity. See “System Tests” on page 2-15 for more information.
Turning Off the Reveos DeviceTurn off the device by pressing the power switch on the upper-right side of the device. You can turn offthe device at any time. If the device is running a procedure, it is recommended that you press the stopbutton before turning off the device.
Turning On the Reveos Device
Reveos® Automated Blood Processing System Operator's Manual for Version 1.1 3-5

Verify That the Device Is OnlineCheck for the Online icon, shown in the upper-right corner of the touch screen, to ensure that theReveos device is communicating with Reveos System Manager. (See Table 2-1.) If the device is online,all procedure data will be transferred to Reveos System Manager at the end of each procedure.
If the device is offline, the Offline icon will appear in the upper-right corner of the touch screen. (SeeTable 2-1.) When the device is offline, an operator can still run a procedure. However, procedureinformation will not be transferred to Reveos System Manager until the device is online again. Whenoffline, the device will have limited functionality. If the device is offline, verify the Ethernet connectionbetween the device and the computer running Reveos System Manager.
Selecting a Procedure for the DeviceAfter the splash screen, the Barcode Entry screen appears on the touch screen. The Select Procedurescreen allows you to select the procedure you want to perform. To access this screen, touch the Select
Procedure button on the Barcode Entry screen. Table 2-3 describes the buttons and icons that appear onthe Select Procedure screen.
Perform the following steps only if you need to change the procedure that is listed in the Title bar of theBarcode Entry screen. Otherwise, proceed to “Entering Barcode Information into the Device” onpage 3-7. To add new procedures or edit existing ones, refer to “Creating a Procedure” on page 6-21and make the necessary updates in the Reveos System Manager. All procedure configurationinformation originates in the Reveos System Manager.
1. Touch the Select Procedure button to display the Select Procedure screen.
2. Select the procedure you want from the list.
Figure 3-4: The Select Procedure screen with a procedure selected
The In Progress icon is displayed while the procedure loads.
3. Touch the Continue button to return to the Barcode Entry screen.
Operating the Device
3-6 Reveos® Automated Blood Processing System Operator's Manual for Version 1.1
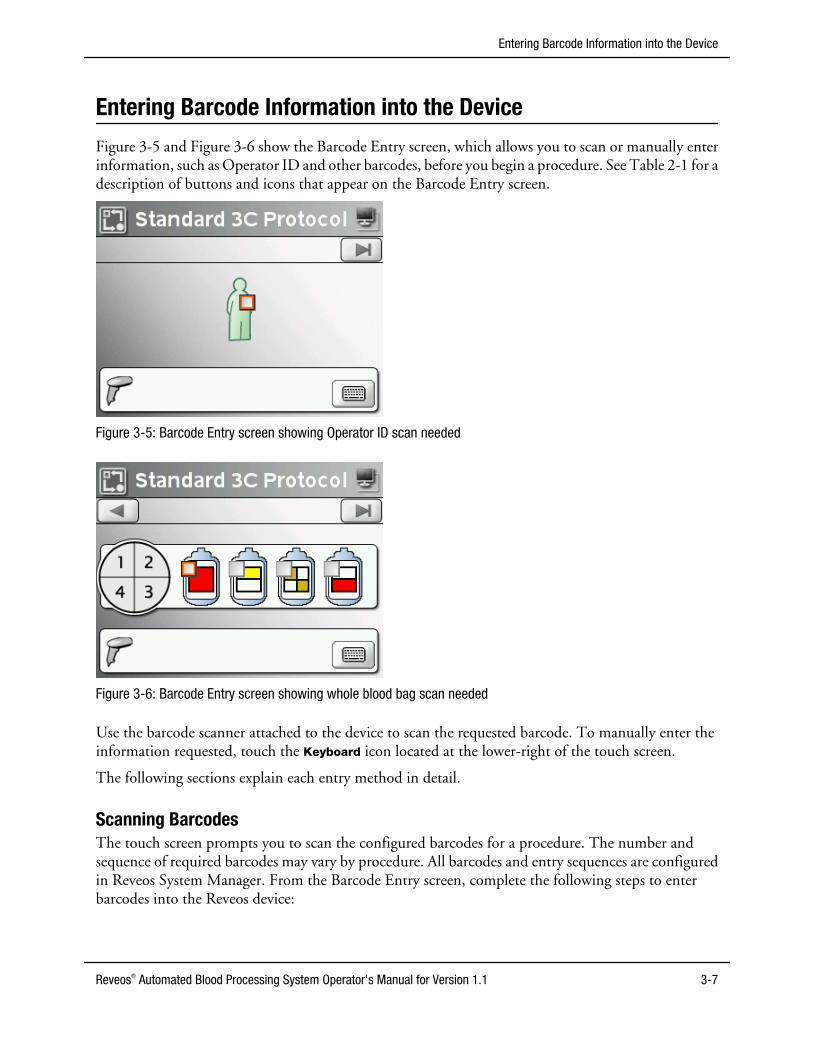
Entering Barcode Information into the Device
Figure 3-5 and Figure 3-6 show the Barcode Entry screen, which allows you to scan or manually enterinformation, such as Operator ID and other barcodes, before you begin a procedure. See Table 2-1 for adescription of buttons and icons that appear on the Barcode Entry screen.
Figure 3-5: Barcode Entry screen showing Operator ID scan needed
Figure 3-6: Barcode Entry screen showing whole blood bag scan needed
Use the barcode scanner attached to the device to scan the requested barcode. To manually enter theinformation requested, touch the Keyboard icon located at the lower-right of the touch screen.
The following sections explain each entry method in detail.
Scanning BarcodesThe touch screen prompts you to scan the configured barcodes for a procedure. The number andsequence of required barcodes may vary by procedure. All barcodes and entry sequences are configuredin Reveos System Manager. From the Barcode Entry screen, complete the following steps to enterbarcodes into the Reveos device:
Entering Barcode Information into the Device
Reveos® Automated Blood Processing System Operator's Manual for Version 1.1 3-7

1. If the system prompts you for an Operator ID barcode, scan it with the barcode scanner.
Note: If you want to manually enter the information instead of scanning, see “Entering Information Manually”on page 3-10. The keyboard must be enabled in the Reveos System Manager in order to access this feature.
Note: The Skip button will not appear if the barcodes shown are configured as “critical” in the ReveosSystem Manager. Critical barcodes cannot be skipped.
1 2
3
4
Figure 3-7: Example Barcode Entry screen prompt for an Operator ID
1 Select Procedure button
2 Online icon
3 Skip button
4 Keyboard button (shown if configured in Reveos System Manager)
If the procedure is configured as routine in the Reveos System Manager, the device prompts you toenter a whole blood Donation ID barcode as shown in Figure 3-8.
Note: If you are using a counterbalance bag, scan the barcode on the counterbalance bag at this time.
Figure 3-8: Example Barcode Entry screen prompt for the whole blood Donation ID
Operating the Device
3-8 Reveos® Automated Blood Processing System Operator's Manual for Version 1.1

2. Scan the requested barcode(s) with the barcode scanner as indicated on the touch screen.
The touch screen acknowledges successful barcode scan entries with a green check mark. If acounterbalance bag is scanned, all of the check boxes associated with that bucket will automaticallypopulate with gray check marks.
Note: Do not remove the blood component bags from the organizer when scanning barcodes.
3. Scan any additional barcodes on the initial bag as shown on the touch screen. All barcode scans areconfigured in the Reveos System Manager. To skip a barcode, press the Skip button. A gray checkmark appears.
Note: All barcodes that have been configured as “critical” in Reveos System Manager must be scannedbefore starting a procedure, even if the device is configured to allow a user to skip a barcode.
The Reveos device may also prompt you for barcodes from subsequent bags. The touch screen guidesyou through the configured scans.
After all scans are complete for the bucket, load the blood bag set or counterbalance bag into thecorresponding bucket. See “Loading a Blood Bag Set” on page 3-13 or “Loading a CounterbalanceBag” on page 3-21 for instructions on how to load a blood bag set or counterbalance bag.
If you press the Back button, it clears only the Operator ID scan. All other barcode scans remain stored.To review or delete barcodes, see “Reviewing and Deleting Barcodes” on page 3-11.
The bucket diagram on the Barcode Entry Screen indicates the bucket status.• If the bucket is green, then a whole blood bag has been scanned and loaded.
• If the bucket is gray, then a counterbalance bag has been scanned and loaded.
• If the bucket is yellow, then the bucket is not enabled and a counterbalance bag must be scannedand loaded. The valves will remain closed.
Entering Barcode Information into the Device
Reveos® Automated Blood Processing System Operator's Manual for Version 1.1 3-9

Entering Information ManuallyTouch the Keyboard button on the screen to enter information using the touch-screen keyboard. Thisscreen is available only if it is enabled in Reveos System Manager.
1. To access the Keyboard Entry screen, touch the Keyboard button on the Barcode Entry screen (seeFigure 3-5).
Note: The default display for the Keyboard Entry screen is the uppercase keyboard. Touch the Shift button toswitch between uppercase and lowercase letters.
Figure 3-9: The Keyboard Entry Screen displaying uppercase letters
2. Type the barcode characters as they appear on the barcode that you are entering. All characters arecase-sensitive. Alternate between uppercase and lowercase keyboards as needed.
3. Touch the Continue button when all characters have been entered correctly.
Note: If the barcode scan is marked “critical” in Reveos System Manager, you will need to enter the barcodetwice to verify accuracy.
4. Repeat steps 2 and 3 to enter any additional barcodes.
Operating the Device
3-10 Reveos® Automated Blood Processing System Operator's Manual for Version 1.1

Reviewing and Deleting Barcodes
At any time during the barcode entry process, the operator can review and/or delete barcodes.
Reviewing Barcodes Associated with Blood Bags and/or BucketsWhen a blood bag or counterbalance bag barcode is entered, the barcode scan appears at the bottom ofthe screen. If multiple barcodes have been scanned, the last barcode that was scanned is the only one thatappears on the bottom of the screen. However, all barcode scans are stored in the device. The barcodescans are not assigned to a bucket until the bucket is loaded and the bucket lid is closed and latched. Afterthe bucket is closed, barcodes are associated with the bucket, and a circle appears around the bucketnumber on the bucket diagram as shown in Figure 3-10.
Figure 3-10: The Barcode Entry Screen indicating that barcode scans are associated with Bucket 1
When you touch a bucket to view the associated scans, the More Barcode Information screen appears. Ifyou have scanned barcodes that have not been associated with a bucket, you can still review the scans bytouching a blood bag to view the More Barcode Information screen. Scans are not associated with abucket until the bucket-lid latch is closed.
The More Barcode Information screen shows all barcodes that are associated with a selected bucket or allunassigned scans. Information on the screen is as follows:• A Bucket icon with a corresponding number indicates that the scans are associated with a bucket.
The text “Unassigned scans” indicates that the scans have not been associated with a bucket.
• The number to the right of the Barcode Scanner icon indicates the number of blood bag setbarcodes that have been scanned for the selected bucket or the number of blood bag set barcodesthat are unassigned.
• The number to the right of the Skip icon indicates the number of barcode scans that were skipped.
• Combinations of letters and numbers represent barcodes and are listed on the screen. Barcodes thatwere skipped do not appear.
• The text “Counterbalance bag” indicates that a counterbalance bag was scanned.
Reviewing and Deleting Barcodes
Reveos® Automated Blood Processing System Operator's Manual for Version 1.1 3-11

Figure 3-11: The More Barcode Information screen
The More Barcode Information screen can hold up to seven barcodes. Additional barcodes can bescanned and stored, but they will not appear on the More Barcode Information screen. If there are morethan seven scans associated with a bucket or with “Unassigned scans,” the icon appears.
Deleting Barcodes Associated with Blood Bags and/or BucketsTo delete the barcodes, touch the Delete barcodes button on the More Barcode Information screen.This deletes all barcodes associated with that bucket, as well as all unassigned barcodes.
Note: The Delete barcodes button is visible only when the bucket lid is open.
Operating the Device
3-12 Reveos® Automated Blood Processing System Operator's Manual for Version 1.1

Loading a Blood Bag Set
When loading a blood bag set, always load it into the bucket directly in front of you.
Note: Do not process blood less than 2 hours after collection.
Note: Before loading a blood bag set into a bucket, ensure that the collection tubing has been sealed approximately0.5 cm to 3.0 cm (0.2 in to 1.2 in) away from the whole blood bag.
Note: The leak detector is located in the centrifuge basin near the front of the device. If the leak detector is touchedduring loading, the device will trigger an alert. See “Reveos Alerts and Alarms” on page 4-4 for more information.
Perform the following steps to load the blood bag sets into the Reveos device:
1. Separate the whole blood bag from the organizer.
Figure 3-12: Whole blood bag separated from the organizer
2. Close the clamp on the RBC filtration tubing.
3. Position the filter behind the bags that are attached to the organizer and place the bags into theblood component bag holder. The bags are correctly loaded with the filter positioned closest to thecenter of the device as shown in Figure 3-13. Ensure that the tubing is not kinked or twisted.
Figure 3-13: Position of the filter during loading
Loading a Blood Bag Set
Reveos® Automated Blood Processing System Operator's Manual for Version 1.1 3-13

Figure 3-14: Bags placed into the blood component bag holder
4. Insert the whole blood bag into the corresponding bucket with the label facing toward you.
Note: Gently press the whole blood bag downward to ensure that it is firmly seated in the bucket.
Figure 3-15: The whole blood bag in the bucket
5. Secure the whole blood bag by placing both bag loops over the corresponding bag posts.
Figure 3-16: Bag loops secured to the bag posts
Operating the Device
3-14 Reveos® Automated Blood Processing System Operator's Manual for Version 1.1

6. Load the bottom portion of the cross-connector into the tubing guide directly above the line sensor.The cross-connector is correctly loaded when it is touching the line sensor.
7. Load the tubing between the frangible connector and the cross-connector into the line sensor. Tocorrectly load the tubing, you can use a flossing motion or press the tubing into the line sensor.
1 Cross-connector touching theline sensor
2 Tubing loaded into the linesensor
Figure 3-17: Tubing loaded into the line sensor with the cross-connector touching the line sensor
8. Load the residual leukocyte tubing through the residual leukocyte valve and tubing guides.
Figure 3-18: Residual leukocyte tubing loaded into the residual leukocyte valve and tubing guides
Loading a Blood Bag Set
Reveos® Automated Blood Processing System Operator's Manual for Version 1.1 3-15

9. Load the plasma tubing through the plasma valve and tubing guides. Inspect the plasma tubing andresidual leukocyte tubing to ensure that they are free of kinks.
Figure 3-19: Plasma tubing loaded into the plasma valve and tubing guides
Figure 3-20: Plasma tubing and residual leukocyte tubing free of kinks
10. Load the platelet tubing through the platelet valve, tubing guides, and platelet tubing router.
Figure 3-21: Platelet tubing loaded into the platelet valve, tubing guides, and platelet tubing router
Operating the Device
3-16 Reveos® Automated Blood Processing System Operator's Manual for Version 1.1

11. Ensure that the processing tubing is completely inserted into the line sensor.
Figure 3-22: Processing tubing completely inserted into the line sensor
12. Visually inspect the tubing to ensure that all lines are loaded properly into their respective valves andtubing guides.
Figure 3-23: Loading area with a correctly loaded blood bag set
Ensure that the two visible frangible connectors are aligned in a parallel position.
Figure 3-24: Properly aligned frangible connectors on the blood bag set
Loading a Blood Bag Set
Reveos® Automated Blood Processing System Operator's Manual for Version 1.1 3-17

13. Gently squeeze both sides of the whole blood bag before closing the bucket lid to ensure that thewhole blood bag does not interfere with the bucket-lid latch.
Figure 3-25: An operator squeezing the sides of the whole blood bag before closing the bucket lid
14. Close and latch the bucket lid, ensuring the frangible connectors remain aligned properly. If thefrangible connectors are aligned properly, the bucket lid will close easily and the processing tubingwill fit into the tubing guide on the bucket lid. After the bucket lid is latched, the correspondingquadrant of the bucket diagram on the touch screen turns green.
Figure 3-26: Processing tubing in the tubing guide on the bucket lid
15. Manually turn the rotor one-quarter turn to load the next blood bag set.
16. Repeat steps 1 through 15 to load the next bucket.
Note: If you are loading fewer than four blood bag sets, scan and load a counterbalance bag into each of theremaining empty buckets. See “Loading a Counterbalance Bag” on page 3-21.
Warning: All buckets must contain a loaded blood bag set or counterbalance bag beforebeginning a procedure. Failure to properly load all buckets can result in a hydraulic leak.
Operating the Device
3-18 Reveos® Automated Blood Processing System Operator's Manual for Version 1.1

17. Ensure that you have completely loaded all four buckets before you continue to step 18.
Figure 3-27: Reveos device with four blood bag sets loaded
18. Touch the Close Valves button on the Loading screen to close all valves.
Figure 3-28: Close Valves button
The system displays the In Progress icon while the valves are closing. Then the Start Procedurescreen is displayed, which prompts you to break the frangible connectors.
Figure 3-29: Start Procedure screen prompting you to break the frangible connectors
Note: Do not break the frangible connector leading to the RBC storage bag.
Loading a Blood Bag Set
Reveos® Automated Blood Processing System Operator's Manual for Version 1.1 3-19

19. Break the frangible connector below the cross‑connector on the processing tubing of each blood bagset. Ensure that frangible connectors are completely broken.
Figure 3-30: Completely broken frangible connector
20. Visually inspect the centrifuge basin and remove any loose objects.
21. Close the device lid until it is latched.After you close the device lid, the Start Procedure button becomes active.
See “Procedure Management” on page 3-23 for information on how to start a procedure.
Operating the Device
3-20 Reveos® Automated Blood Processing System Operator's Manual for Version 1.1

Loading a Counterbalance BagAll four buckets must be loaded before you run a procedure. If you do not have four whole blood units toprocess, you must fill each remaining empty bucket with a counterbalance bag. When loading twocounterbalance bags, load them opposite each other in the centrifuge, either in buckets 1 and 3 or inbuckets 2 and 4.
Note: You must scan the counterbalance bag before closing the bucket.
Note: The leak detector is located in the centrifuge basin near the front of the device. If the leak detector is touchedduring loading, the device will trigger an alert. See “Reveos Alerts and Alarms” on page 4-4 for more information.
The counterbalance bag assembly consists of three parts: the bucket counterbalance bag, the componentcounterbalance bag, and the tab.
1 Bucket counterbalancebag
2 Componentcounterbalance bag
3 Tab
Figure 3-31: Counterbalance bag assembly
Loading a Counterbalance Bag
Reveos® Automated Blood Processing System Operator's Manual for Version 1.1 3-21

Complete the following steps to load a counterbalance bag:
1. Insert the bucket counterbalance bag into the bucket and the component counterbalance bag intothe component bag holder.
Figure 3-32: Inserting the counterbalance bag assembly into the device
2. Press the horizontal end of the tab into the tubing guide directly above the line sensor.
3. Press the narrow piece of the tab into the line sensor.
Figure 3-33: Counterbalance bag with the tab loaded into the line sensor
4. Close and latch the bucket lid.
5. Repeat steps 1 through 4 to fill any additional empty buckets.
Operating the Device
3-22 Reveos® Automated Blood Processing System Operator's Manual for Version 1.1
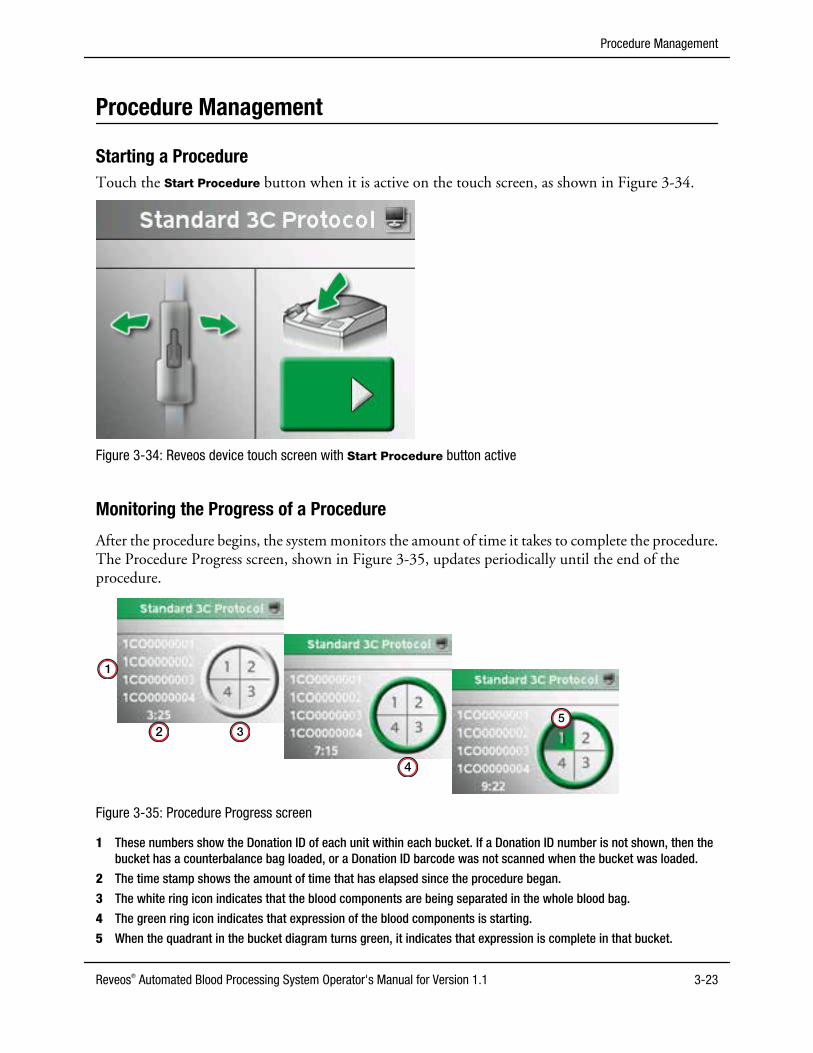
Procedure Management
Starting a ProcedureTouch the Start Procedure button when it is active on the touch screen, as shown in Figure 3-34.
Figure 3-34: Reveos device touch screen with Start Procedure button active
Monitoring the Progress of a Procedure
After the procedure begins, the system monitors the amount of time it takes to complete the procedure.The Procedure Progress screen, shown in Figure 3-35, updates periodically until the end of theprocedure.
1
2 3
4
5
Figure 3-35: Procedure Progress screen
1 These numbers show the Donation ID of each unit within each bucket. If a Donation ID number is not shown, then thebucket has a counterbalance bag loaded, or a Donation ID barcode was not scanned when the bucket was loaded.
2 The time stamp shows the amount of time that has elapsed since the procedure began.
3 The white ring icon indicates that the blood components are being separated in the whole blood bag.
4 The green ring icon indicates that expression of the blood components is starting.
5 When the quadrant in the bucket diagram turns green, it indicates that expression is complete in that bucket.
Procedure Management
Reveos® Automated Blood Processing System Operator's Manual for Version 1.1 3-23

Note: When the quadrant is not colored, it indicates that expression for that bucket is not yet complete. If aquadrant is gray, it indicates that a counterbalance bag is loaded. If a quadrant turns yellow, it indicates that theunit encountered a problem during processing and product quality is inconclusive.
Stopping a ProcedureYou can press the stop button at any time.
Figure 3-36: Stop button on the Reveos device
Any time the stop button is pressed, an alarm is triggered.
If you press the stop button during the loading process (before the Start Procedure button appears), thedevice cancels any barcodes that were entered.
If you press the stop button during a procedure before the device lid automatically opens, the procedureis interrupted and an alarm occurs. The touch screen will show the End of Procedure Summary screenand display any detected component volumes.
If the stop button is pressed, the device will not complete the procedure, and the valves will not seal anyof the tubing. The operator must clamp and/or seal the tubing before removing the blood bag sets fromthe device.
Operating the Device
3-24 Reveos® Automated Blood Processing System Operator's Manual for Version 1.1

Ending a ProcedureWhen a procedure is complete, the device seals the tubing and resets the hydraulic pump. The device lidopens automatically. The primary End of Procedure Summary screen, shown in Figure 3-37, appears onthe touch screen but is inactive until a bucket is opened.
Figure 3-37: Inactive End of Procedure Summary screen
Each bucket has its own End of Procedure Summary screen that becomes active when the correspondingbucket is opened. This screen shows the estimated product volumes for the bucket number listedbeneath the green or yellow bucket icon.
Figure 3-38: Active End of Procedure Summary screen for Bucket 1
• If the bucket is green, the unit was successfully processed.
• If the bucket is yellow, the product quality of the unit is inconclusive.
The End of Procedure Summary screen gives estimated product volumes for each bucket. If exactproduct volumes are required, measure according to your institution’s SOP.
Procedure Management
Reveos® Automated Blood Processing System Operator's Manual for Version 1.1 3-25

To view the device name and procedure number, touch the Expand button on the End of ProcedureSummary screen. The procedure number is a unique identifier that represents a specific whole bloodprocessing procedure. This number appears in the reports generated in Reveos System Manager alongwith other information from the procedure.
Figure 3-39: End of Procedure Summary screen showing device name and procedure number
To return to the End of Procedure Summary screen, press the Collapse button.
Ensure that all buckets are empty before pressing the Next Procedure button.
Note: Ensure that the Next Procedure button is pressed and the Barcode Entry screen is displayed, beforeturning off the device. This allows the end of procedure data to be transferred to Reveos System Manager. If thedevice is turned off before the Next Procedure button is pressed, the data will not be sent to Reveos SystemManager until the device is turned on again.
Platelet Yield IndexThe purpose of the Platelet Yield Index (PYI) feature is to optimize the final platelet yield in your PooledPlatelets products. You can use the Platelet Yield Index feature to select interim platelet units (IPUs) forpooling based on the predicted platelet yield of the individual IPUs. If you choose to use the PYI feature,you should develop a method for sorting the IPUs based on the predicted platelet yield.
The Platelet Yield Index icon appears above the Platelet icon on the End of Procedure Summary screen,as shown in Figure 3-40. The numeric value that appears in this icon represents the Platelet Yield Index(PYI) of the interim platelet unit. The PYI is expressed as the estimated platelet yield. The PYI valueappears in addition to the estimated interim platelet unit volume, which is displayed in milliliters at thebottom of the Platelet icon.
Operating the Device
3-26 Reveos® Automated Blood Processing System Operator's Manual for Version 1.1

1
2
Figure 3-40: End of Run Summary screen with the Platelet icon displayed
1 Platelet Yield Index value of the interim platelet unit
2 Estimated interim platelet unit volume
The value of the Platelet Yield Index also appears on the Reveos System Manager Insight Report. TheInsight Report displays a PYI value for each interim platelet unit produced during a processingprocedure. The PYI values that appear on the Insight Report are not rounded numbers but rather theactual values of the estimated platelet yields.
If the device cannot predict the platelet yield, the PYI appears as a value of zero.
Unloading a Blood Bag SetAfter the procedure is complete, the device lid automatically opens. The End of Procedure summaryscreen for each bucket is displayed when that bucket is opened.
1. Open one of the bucket lids.
2. Remove the tubing from the valves and tubing guides.
Figure 3-41: Tubing removed from the valves and tubing guides
Unloading a Blood Bag Set
Reveos® Automated Blood Processing System Operator's Manual for Version 1.1 3-27

3. With one hand, hold the residual leukocyte tubing near the seal. With your other hand, press thecross-connector away from the line sensor.
Figure 3-42: Holding the residual leukocyte tubing while pressing the cross-connector away from the line sensor
4. Gently lift the blood bag set up and out of the loading area.
Figure 3-43: Lifting the blood bag set up and out of the loading area
5. Repeat steps 1 through 4 to remove the remaining blood bag sets.
6. Touch the green Next Procedure button to prepare for the next procedure.
Operating the Device
3-28 Reveos® Automated Blood Processing System Operator's Manual for Version 1.1

Unloading a Counterbalance BagComplete the following steps to unload a counterbalance bag:
1. Open the bucket lid.
2. Loosen the tab from the line sensor by pulling on the horizontal part of the tab.
3. Lift the counterbalance bag assembly out of the bucket and the component bag holder whileremoving the tab from the line sensor.
Figure 3-44: Lifting the counterbalance bag assembly out of the device
Unloading a Counterbalance Bag
Reveos® Automated Blood Processing System Operator's Manual for Version 1.1 3-29

Operating the Device
3-30 Reveos® Automated Blood Processing System Operator's Manual for Version 1.1

4Alarms and Troubleshooting
Reveos® Automated Blood Processing System Operator's Manual for Version 1.1 4-1

Alarms and Troubleshooting
Error Messages in Reveos System ManagerThe Reveos System Manager application contains error messages designed to help troubleshoot anyproblems that occur. An error message occurs when there is a problem that must be fixed before the usercan proceed. A red X appears next to the location of the problem. The error message text appears whenyou position your cursor over the red X, and it also appears at the bottom of the screen. All error messageshave numbers. If you are unable to troubleshoot an error, record the error number and contactTerumo BCT customer support.
Figure 4-1: Error message in Reveos System Manager
Alerts and Alarms on the Reveos DeviceAn alert is a system message about a condition that requires your attention but will not stop a processingprocedure. You can record the alert number, perform the action shown on the touch screen, and touchthe Continue button to proceed.
An alarm is a system message about a condition that will prevent or end a processing procedure and maycompromise product quality. If the alarm occurs before the procedure has begun, you can perform theaction recommended on the touch screen and re‑try the procedure. If the alarm occurs while theprocedure is in progress, the procedure will end.
Each alarm or alert screen has three sections:
Alarms and Troubleshooting
4-2 Reveos® Automated Blood Processing System Operator's Manual for Version 1.1

1
2
3
Figure 4-2: Reveos device alarm screen
1 Title bar2 Alert/alarm location3 Alert/alarm text
All-Unit and Bucket-Specific AlarmsAlerts and alarms can affect all units or one specific bucket. The alert/alarm location is indicated belowthe title bar.• If the text “All units” appears in the alert/alarm location section, the alert/alarm affects all four
buckets and all whole blood units contained in the buckets.
• If a bucket icon and number appears in the alert/alarm location section, then the alert or alarm onlyaffects the specific bucket shown. All other buckets can continue processing.
Alarms and Troubleshooting
Reveos® Automated Blood Processing System Operator's Manual for Version 1.1 4-3
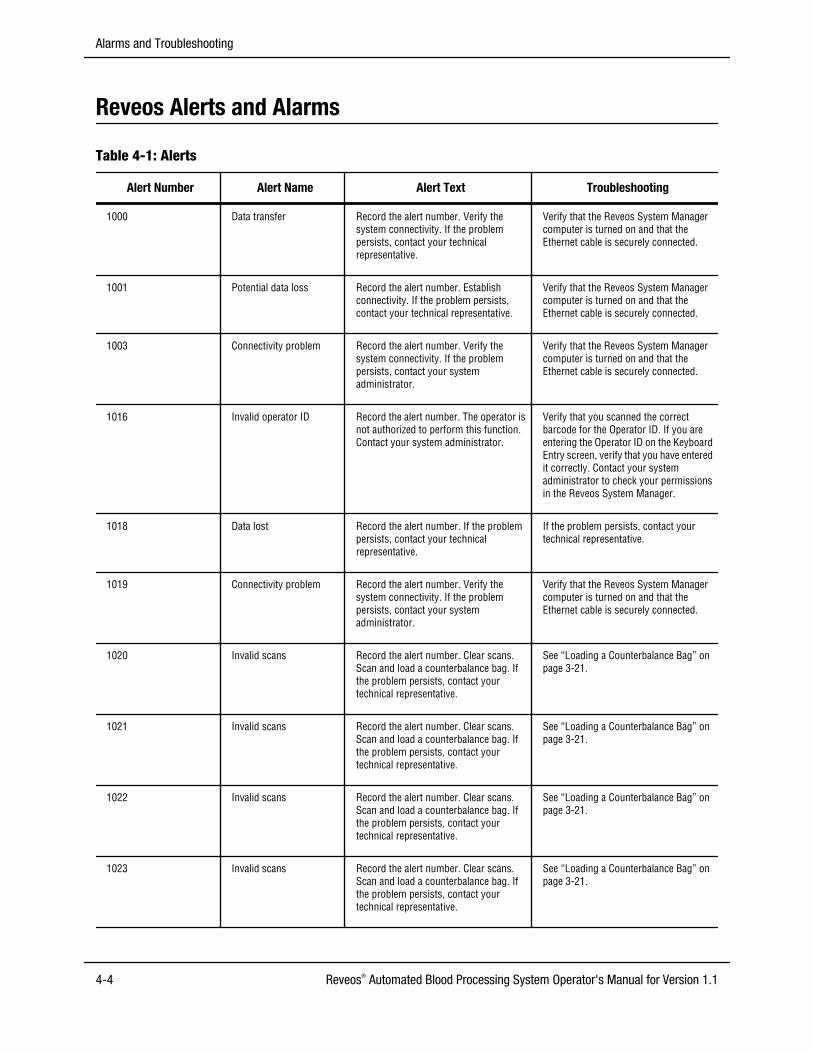
Reveos Alerts and Alarms
Table 4-1: Alerts
Alert Number Alert Name Alert Text Troubleshooting
1000 Data transfer Record the alert number. Verify thesystem connectivity. If the problempersists, contact your technicalrepresentative.
Verify that the Reveos System Managercomputer is turned on and that theEthernet cable is securely connected.
1001 Potential data loss Record the alert number. Establishconnectivity. If the problem persists,contact your technical representative.
Verify that the Reveos System Managercomputer is turned on and that theEthernet cable is securely connected.
1003 Connectivity problem Record the alert number. Verify thesystem connectivity. If the problempersists, contact your systemadministrator.
Verify that the Reveos System Managercomputer is turned on and that theEthernet cable is securely connected.
1016 Invalid operator ID Record the alert number. The operator isnot authorized to perform this function.Contact your system administrator.
Verify that you scanned the correctbarcode for the Operator ID. If you areentering the Operator ID on the KeyboardEntry screen, verify that you have enteredit correctly. Contact your systemadministrator to check your permissionsin the Reveos System Manager.
1018 Data lost Record the alert number. If the problempersists, contact your technicalrepresentative.
If the problem persists, contact yourtechnical representative.
1019 Connectivity problem Record the alert number. Verify thesystem connectivity. If the problempersists, contact your systemadministrator.
Verify that the Reveos System Managercomputer is turned on and that theEthernet cable is securely connected.
1020 Invalid scans Record the alert number. Clear scans.Scan and load a counterbalance bag. Ifthe problem persists, contact yourtechnical representative.
See “Loading a Counterbalance Bag” onpage 3-21.
1021 Invalid scans Record the alert number. Clear scans.Scan and load a counterbalance bag. Ifthe problem persists, contact yourtechnical representative.
See “Loading a Counterbalance Bag” onpage 3-21.
1022 Invalid scans Record the alert number. Clear scans.Scan and load a counterbalance bag. Ifthe problem persists, contact yourtechnical representative.
See “Loading a Counterbalance Bag” onpage 3-21.
1023 Invalid scans Record the alert number. Clear scans.Scan and load a counterbalance bag. Ifthe problem persists, contact yourtechnical representative.
See “Loading a Counterbalance Bag” onpage 3-21.
Alarms and Troubleshooting
4-4 Reveos® Automated Blood Processing System Operator's Manual for Version 1.1

Table 4-1: Alerts (continued)
Alert Number Alert Name Alert Text Troubleshooting
1024 Invalid manual entry Record the alert number. Re-enter thebarcode.
See “Entering Information Manually” onpage 3-10.
1026 Problem sealing Record the alert number. Verify that theseal on the platelet line is adequate. Verifycorrect loading.
See “Loading a Blood Bag Set” onpage 3-13 to aid in loading the next bloodbag set.
1028 Problem sealing Record the alert number. Verify that theseal on the platelet line is adequate. Verifycorrect loading.
See “Loading a Blood Bag Set” onpage 3-13 to aid in loading the next bloodbag set.
1030 Problem sealing Record the alert number. Verify that theseal on the platelet line is adequate. Verifycorrect loading.
See “Loading a Blood Bag Set” onpage 3-13 to aid in loading the next bloodbag set.
1032 Problem sealing Record the alert number. Verify that theseal on the platelet line is adequate. Verifycorrect loading.
See “Loading a Blood Bag Set” onpage 3-13 to aid in loading the next bloodbag set.
1034 Problem sealing Record the alert number. Verify that theseal on the plasma line is adequate. Verifycorrect loading.
See “Loading a Blood Bag Set” onpage 3-13 to aid in loading the next bloodbag set.
1036 Problem sealing Record the alert number. Verify that theseal on the plasma line is adequate. Verifycorrect loading.
See “Loading a Blood Bag Set” onpage 3-13 to aid in loading the next bloodbag set.
1038 Problem sealing Record the alert number. Verify that theseal on the plasma line is adequate. Verifycorrect loading.
See “Loading a Blood Bag Set” onpage 3-13 to aid in loading the next bloodbag set.
1040 Problem sealing Record the alert number. Verify that theseal on the plasma line is adequate. Verifycorrect loading.
See “Loading a Blood Bag Set” onpage 3-13 to aid in loading the next bloodbag set.
1042 Problem sealing Record the alert number. Verify that theseal on the residual leukocyte line isadequate.
See “Loading a Blood Bag Set” onpage 3-13 to aid in loading the next bloodbag set.
1044 Problem sealing Record the alert number. Verify that theseal on the residual leukocyte line isadequate.
See “Loading a Blood Bag Set” onpage 3-13 to aid in loading the next bloodbag set.
1046 Problem sealing Record the alert number. Verify that theseal on the residual leukocyte line isadequate.
See “Loading a Blood Bag Set” onpage 3-13 to aid in loading the next bloodbag set.
1048 Problem sealing Record the alert number. Verify that theseal on the residual leukocyte line isadequate.
See “Loading a Blood Bag Set” onpage 3-13 to aid in loading the next bloodbag set.
Reveos Alerts and Alarms
Reveos® Automated Blood Processing System Operator's Manual for Version 1.1 4-5

Table 4-1: Alerts (continued)
Alert Number Alert Name Alert Text Troubleshooting
1050 Basin temperature toohigh
Record the alert number. Verify theproduct quality. If the problem persists,contact your technical representative.
Verify that the external cooled watersource is correctly connected to theReveos device.
Verify product quality according to yourinstitution's SOP.
1051 Basin temperature too low Record the alert number. Verify theproduct quality. If the problem persists,contact your technical representative.
Verify product quality according to yourinstitution's SOP.
1052 Bag mismatch Record the alert number. Counterbalancebag detected. Check the bucket to ensurethat a whole blood bag is loaded.
The scanned barcode information doesnot match the type of bag detected.
See “Loading a Blood Bag Set” onpage 3-13.
1053 Bag mismatch Record the alert number. Counterbalancebag detected. Check the bucket to ensurethat a whole blood bag is loaded.
The scanned barcode information doesnot match the type of bag detected.
See “Loading a Blood Bag Set” onpage 3-13.
1054 Bag mismatch Record the alert number. Counterbalancebag detected. Check the bucket to ensurethat a whole blood bag is loaded.
The scanned barcode information doesnot match the type of bag detected.
See “Loading a Blood Bag Set” onpage 3-13.
1055 Bag mismatch Record the alert number. Counterbalancebag detected. Check the bucket to ensurethat a whole blood bag is loaded.
The scanned barcode information doesnot match the type of bag detected.
See “Loading a Blood Bag Set” onpage 3-13.
1056 Bag mismatch Record the alert number. Whole bloodbag detected. Check the bucket to ensurethat a counterbalance bag is loaded.
The scanned barcode information doesnot match the type of bag detected.
See “Loading a Counterbalance Bag” onpage 3-21.
1057 Bag mismatch Record the alert number. Whole bloodbag detected. Check the bucket to ensurethat a counterbalance bag is loaded.
The scanned barcode information doesnot match the type of bag detected.
See “Loading a Counterbalance Bag” onpage 3-21.
1058 Bag mismatch Record the alert number. Whole bloodbag detected. Check the bucket to ensurethat a counterbalance bag is loaded.
The scanned barcode information doesnot match the type of bag detected.
See “Loading a Counterbalance Bag” onpage 3-21.
1059 Bag mismatch Record the alert number. Whole bloodbag detected. Check the bucket to ensurethat a counterbalance bag is loaded.
The scanned barcode information doesnot match the type of bag detected.
See “Loading a Counterbalance Bag” onpage 3-21.
Alarms and Troubleshooting
4-6 Reveos® Automated Blood Processing System Operator's Manual for Version 1.1

Table 4-1: Alerts (continued)
Alert Number Alert Name Alert Text Troubleshooting
1060 Communication problem Record the alert number. Verify thesystem connectivity. If the problempersists, contact your technicalrepresentative.
If the problem persists, contact yourtechnical representative.
1061 Empty bucket detected Record the alert number. Verify that thebucket is not empty.
Verify that the bucket is not empty. If thebucket is empty, load a blood bag set or acounterbalance bag. See “Loading aBlood Bag Set” on page 3-13 or “Loadinga Counterbalance Bag” on page 3-21.
1062 Empty bucket detected Record the alert number. Verify that thebucket is not empty.
Verify that the bucket is not empty. If thebucket is empty, load a blood bag set or acounterbalance bag. See “Loading aBlood Bag Set” on page 3-13 or “Loadinga Counterbalance Bag” on page 3-21.
1063 Empty bucket detected Record the alert number. Verify that thebucket is not empty.
Verify that the bucket is not empty. If thebucket is empty, load a blood bag set or acounterbalance bag. See “Loading aBlood Bag Set” on page 3-13 or “Loadinga Counterbalance Bag” on page 3-21.
1064 Empty bucket detected Record the alert number. Verify that thebucket is not empty.
Verify that the bucket is not empty. If thebucket is empty, load a blood bag set or acounterbalance bag. See “Loading aBlood Bag Set” on page 3-13 or “Loadinga Counterbalance Bag” on page 3-21.
1065 Empty bucket notdetected
Record the alert number. Verify that thebucket is empty.
Verify that the bucket is empty.See“Unloading a Blood Bag Set” onpage 3-27 or “Unloading aCounterbalance Bag” on page 3-29.
1066 Empty bucket notdetected
Record the alert number. Verify that thebucket is empty.
Verify that the bucket is empty.See“Unloading a Blood Bag Set” onpage 3-27 or “Unloading aCounterbalance Bag” on page 3-29.
1067 Empty bucket notdetected
Record the alert number. Verify that thebucket is empty.
Verify that the bucket is empty.See“Unloading a Blood Bag Set” onpage 3-27 or “Unloading aCounterbalance Bag” on page 3-29.
1068 Empty bucket notdetected
Record the alert number. Verify that thebucket is empty.
Verify that the bucket is empty.See“Unloading a Blood Bag Set” onpage 3-27 or “Unloading aCounterbalance Bag” on page 3-29.
Reveos Alerts and Alarms
Reveos® Automated Blood Processing System Operator's Manual for Version 1.1 4-7

Table 4-1: Alerts (continued)
Alert Number Alert Name Alert Text Troubleshooting
1069 Leak detected Record the alert number. Check for leaksin the centrifuge basin. If the problempersists, contact your technicalrepresentative.
Determine whether or not there is a leak inthe centrifuge.• If there is a leak, clean the rotor and
the centrifuge basin. See “CleaningAfter a Blood Spill” on page 5-6.
• If there is not a leak, press theContinue button.
1070 Hydraulic pressureproblem
Record the alert number. If the problempersists, contact your technicalrepresentative.
If the problem persists, contact yourtechnical representative.
1073 Bucket disabled Record the alert number. Scan and load acounterbalance bag.
See “Loading a Counterbalance Bag” onpage 3-21.
1074 Bucket disabled Record the alert number. Scan and load acounterbalance bag.
See “Loading a Counterbalance Bag” onpage 3-21.
1075 Bucket disabled Record the alert number. Scan and load acounterbalance bag.
See “Loading a Counterbalance Bag” onpage 3-21.
1076 Bucket disabled Record the alert number. Scan and load acounterbalance bag.
See “Loading a Counterbalance Bag” onpage 3-21.
1077 Duplicate donation ID Record the alert number. Verify thebarcode scans. If the problem persists,contact your system administrator.
Verify that you scanned the correctbarcode for the Donation ID. TheDuplicate Donation ID scanned isassociated with another bucket. DuplicateDonation IDs are not allowed. The systemadministrator can verify the duplicateDonation ID settings in Reveos SystemManager.
1078 Duplicate donation ID Record the alert number. Verify thebarcode scans. If the problem persists,contact your system administrator.
Verify that you scanned the correctbarcode for the Donation ID. TheDuplicate Donation ID scanned isassociated with another bucket. DuplicateDonation IDs are not allowed. The systemadministrator can verify the duplicateDonation ID settings in Reveos SystemManager.
1079 Duplicate donation ID Record the alert number. Verify thebarcode scans. If the problem persists,contact your system administrator.
Verify that you scanned the correctbarcode for the Donation ID. TheDuplicate Donation ID scanned isassociated with another bucket. DuplicateDonation IDs are not allowed. The systemadministrator can verify the duplicateDonation ID settings in Reveos SystemManager.
Alarms and Troubleshooting
4-8 Reveos® Automated Blood Processing System Operator's Manual for Version 1.1

Table 4-1: Alerts (continued)
Alert Number Alert Name Alert Text Troubleshooting
1080 Duplicate donation ID Record the alert number. Verify thebarcode scans. If the problem persists,contact your system administrator.
Verify that you scanned the correctbarcode for the Donation ID. TheDuplicate Donation ID scanned isassociated with another bucket. DuplicateDonation IDs are not allowed. The systemadministrator can verify the duplicateDonation ID settings in Reveos SystemManager.
1081 Plasma detection problem Record the alert number. Check forlipemic plasma. Verify correct loading inthe line sensor. If the problem persists,contact your technical representative.
See “Loading a Blood Bag Set” onpage 3-13.
Verify product quality according to yourinstitution's SOP.
1082 Plasma detection problem Record the alert number. Check forlipemic plasma. Verify correct loading inthe line sensor. If the problem persists,contact your technical representative.
See “Loading a Blood Bag Set” onpage 3-13.
Verify product quality according to yourinstitution's SOP.
1083 Plasma detection problem Record the alert number. Check forlipemic plasma. Verify correct loading inthe line sensor. If the problem persists,contact your technical representative.
See “Loading a Blood Bag Set” onpage 3-13.
Verify product quality according to yourinstitution's SOP.
1084 Plasma detection problem Record the alert number. Check forlipemic plasma. Verify correct loading inthe line sensor. If the problem persists,contact your technical representative.
See “Loading a Blood Bag Set” onpage 3-13.
Verify product quality according to yourinstitution's SOP.
Table 4-2: Alarms
Alarm Number Alarm Name Alarm Text Troubleshooting
1100 Centrifuge voltage Record the alarm number. If the problempersists, contact your technicalrepresentative.
If the problem persists, contact yourtechnical representative.
1101 Centrifuge system Record the alarm number. If the problempersists, contact your technicalrepresentative.
If the problem persists, contact yourtechnical representative.
1102 Centrifuge command Record the alarm number. If the problempersists, contact your technicalrepresentative.
If the problem persists, contact yourtechnical representative.
1103 Centrifuge speed too high Record the alarm number. If the problempersists, contact your technicalrepresentative.
Restart the device to clear the alarm.
If the problem persists, contact yourtechnical representative.
Reveos Alerts and Alarms
Reveos® Automated Blood Processing System Operator's Manual for Version 1.1 4-9

Table 4-2: Alarms (continued)
Alarm Number Alarm Name Alarm Text Troubleshooting
1104 Centrifuge speed Record the alarm number. If the problempersists, contact your technicalrepresentative.
If the problem persists, contact yourtechnical representative.
1105 Centrifuge hardware Record the alarm number. If the problempersists, contact your technicalrepresentative.
If the problem persists, contact yourtechnical representative.
1106 Centrifuge power Record the alarm number. If the problempersists, contact your technicalrepresentative.
If the problem persists, contact yourtechnical representative.
1107 Centrifuge system Record the alarm number. Contact yourtechnical representative.
If the problem persists, contact yourtechnical representative.
1202 Protocol problem Record the alarm number. If the problempersists, contact your technicalrepresentative.
Verify that the correct protocol is active.
1203 Protocol problem Record the alarm number. Restart thedevice. If the problem persists, contactyour technical representative.
Restart the device to clear the alarm.Select a different procedure.
1204 Protocol problem Record the alarm number. Restart thedevice. If the problem persists, contactyour technical representative.
Restart the device to clear the alarm.Select a different procedure.
1211 Procedure not found Record the alarm number. Contact yoursystem administrator before using thedevice.
The system administrator can verify thatthe procedure is enabled in the ReveosSystem Manager. See “ConfiguringProcedures” on page 6-21.
1212 Device not enabled Record the alarm number. Contact yoursystem administrator.
The system administrator can verify thatthe device is enabled in the ReveosSystem Manager. See “Enabling andDisenabling Devices” on page 6-17.
1214 No procedures assigned Record the alarm number. Contact yoursystem administrator.
The system administrator must assignprocedures to the device. See “Associated Devices” on page 6-23.
1219 Hydraulic pressure toohigh
Record the alarm number. Check forobstructed lines or unbroken frangibleconnector. Bucket will be disabled. If theproblem persists, contact your technicalrepresentative.
Verify that the frangible connectorbetween the whole blood bag and thecross-connector is completely broken.
1220 Hydraulic pressure toohigh
Record the alarm number. Check forobstructed lines or unbroken frangibleconnector. Bucket will be disabled. If theproblem persists, contact your technicalrepresentative.
Verify that the frangible connectorbetween the whole blood bag and thecross-connector is completely broken.
Alarms and Troubleshooting
4-10 Reveos® Automated Blood Processing System Operator's Manual for Version 1.1

Table 4-2: Alarms (continued)
Alarm Number Alarm Name Alarm Text Troubleshooting
1221 Hydraulic pressure toohigh
Record the alarm number. Check forobstructed lines or unbroken frangibleconnector. Bucket will be disabled. If theproblem persists, contact your technicalrepresentative.
Verify that the frangible connectorbetween the whole blood bag and thecross-connector is completely broken.
1222 Hydraulic pressure toohigh
Record the alarm number. Check forobstructed lines or unbroken frangibleconnector. Bucket will be disabled. If theproblem persists, contact your technicalrepresentative.
Verify that the frangible connectorbetween the whole blood bag and thecross-connector is completely broken.
1223 1224 1225 12261227 1228 1229 1230
Protocol problem Record the alarm number. Bucket will bedisabled. If the problem persists, contactyour technical representative.
If the problem persists, contact yourtechnical representative.
1231 Protocol problem Record the alarm number. Bucket will bedisabled. Verify correct loading. If theproblem persists, contact your technicalrepresentative.
Verify correct loading. Check theplacement of tubing in the valves. Checkthe position of the cross-connector. See “Loading a Blood Bag Set” on page 3-13.
If the problem persists, contact yourtechnical representative.
1232 Protocol problem Record the alarm number. Bucket will bedisabled. Verify correct loading. If theproblem persists, contact your technicalrepresentative.
Verify correct loading. Check theplacement of tubing in the valves. Checkthe position of the cross-connector. See “Loading a Blood Bag Set” on page 3-13.
If the problem persists, contact yourtechnical representative.
1233 Protocol problem Record the alarm number. Bucket will bedisabled. Verify correct loading. If theproblem persists, contact your technicalrepresentative.
Verify correct loading. Check theplacement of tubing in the valves. Checkthe position of the cross-connector. See “Loading a Blood Bag Set” on page 3-13.
If the problem persists, contact yourtechnical representative.
1234 Protocol problem Record the alarm number. Bucket will bedisabled. Verify correct loading. If theproblem persists, contact your technicalrepresentative.
Verify correct loading. Check theplacement of tubing in the valves. Checkthe position of the cross-connector. See “Loading a Blood Bag Set” on page 3-13.
If the problem persists, contact yourtechnical representative.
1235 1236 1237 12381239 1240 1241 12421243 1244 1245 12461247 1248 1249 1250
Protocol problem Record the alarm number. Bucket will bedisabled. If the problem persists, contactyour technical representative.
If the problem persists, contact yourtechnical representative.
Reveos Alerts and Alarms
Reveos® Automated Blood Processing System Operator's Manual for Version 1.1 4-11

Table 4-2: Alarms (continued)
Alarm Number Alarm Name Alarm Text Troubleshooting
1251 Protocol problem Record the alarm number. Bucket will bedisabled. Verify correct loading. If theproblem persists, contact your technicalrepresentative.
Verify correct loading. Check theplacement of tubing in the valves. Checkthe position of the cross-connector. See “Loading a Blood Bag Set” on page 3-13.
If the problem persists, contact yourtechnical representative.
1252 Protocol problem Record the alarm number. Bucket will bedisabled. Verify correct loading. If theproblem persists, contact your technicalrepresentative.
Verify correct loading. Check theplacement of tubing in the valves. Checkthe position of the cross-connector. See “Loading a Blood Bag Set” on page 3-13.
If the problem persists, contact yourtechnical representative.
1253 Protocol problem Record the alarm number. Bucket will bedisabled. Verify correct loading. If theproblem persists, contact your technicalrepresentative.
Verify correct loading. Check theplacement of tubing in the valves. Checkthe position of the cross-connector. See “Loading a Blood Bag Set” on page 3-13.
If the problem persists, contact yourtechnical representative.
1254 Protocol problem Record the alarm number. Bucket will bedisabled. Verify correct loading. If theproblem persists, contact your technicalrepresentative.
Verify correct loading. Check theplacement of tubing in the valves. Checkthe position of the cross-connector. See “Loading a Blood Bag Set” on page 3-13.
If the problem persists, contact yourtechnical representative.
1255, 1256, 1257, 1258,1259, 1260, 1261, 1262
Protocol problem Record the alarm number. Bucket will bedisabled. If the problem persists, contactyour technical representative.
If the problem persists, contact yourtechnical representative.
1263 RBC detection problem Record the alarm number. Bucket will bedisabled. If the problem persists, contactyour technical representative.
Verify the donation identification numberlabels are not interfering with the bucketsensor.
If the problem persists, contact yourtechnical representative.
1264 RBC detection problem Record the alarm number. Bucket will bedisabled. If the problem persists, contactyour technical representative.
Verify the donation identification numberlabels are not interfering with the bucketsensor.
If the problem persists, contact yourtechnical representative.
1265 RBC detection problem Record the alarm number. Bucket will bedisabled. If the problem persists, contactyour technical representative.
Verify the donation identification numberlabels are not interfering with the bucketsensor.
If the problem persists, contact yourtechnical representative.
Alarms and Troubleshooting
4-12 Reveos® Automated Blood Processing System Operator's Manual for Version 1.1

Table 4-2: Alarms (continued)
Alarm Number Alarm Name Alarm Text Troubleshooting
1266 RBC detection problem Record the alarm number. Bucket will bedisabled. If the problem persists, contactyour technical representative.
Verify the donation identification numberlabels are not interfering with the bucketsensor.
If the problem persists, contact yourtechnical representative.
1267 Plasma detection problem Record the alarm number. Check forlipemic plasma. Verify correct loading inthe line sensor. If the problem persists,contact your technical representative.
Verify correct loading. See “Loading aBlood Bag Set” on page 3-13.
If the problem persists, contact yourtechnical representative.
1268 Hydraulic pressure toohigh
Record the alarm number. Check forobstructed plasma line or unbrokenfrangible connector. Bucket will bedisabled. If the problem persists, contactyour technical representative.
Verify that the frangible connectorbetween the whole blood bag and thecross-connector is completely broken.Check for any kinked or obstructedtubing. See “Loading a Blood Bag Set” onpage 3-13.
1269 Hydraulic pressure toohigh
Record the alarm number. Check forobstructed plasma line or unbrokenfrangible connector. Bucket will bedisabled. If the problem persists, contactyour technical representative.
Verify that the frangible connectorbetween the whole blood bag and thecross-connector is completely broken.Check for any kinked or obstructedtubing. See “Loading a Blood Bag Set” onpage 3-13.
1270 Hydraulic pressure toohigh
Record the alarm number. Check forobstructed plasma line or unbrokenfrangible connector. Bucket will bedisabled. If the problem persists, contactyour technical representative.
Verify that the frangible connectorbetween the whole blood bag and thecross-connector is completely broken.Check for any kinked or obstructedtubing. See “Loading a Blood Bag Set” onpage 3-13.
1271 Hydraulic pressure toohigh
Record the alarm number. Check forobstructed plasma line or unbrokenfrangible connector. Bucket will bedisabled. If the problem persists, contactyour technical representative.
Verify that the frangible connectorbetween the whole blood bag and thecross-connector is completely broken.Check for any kinked or obstructedtubing. See “Loading a Blood Bag Set” onpage 3-13.
1301 Hydraulic system Record the alarm number. If the problempersists, contact your technicalrepresentative.
If the problem persists, contact yourtechnical representative.
1304 Hydraulic system Record the alarm number. If the problempersists, contact your technicalrepresentative.
If the problem persists, contact yourtechnical representative.
1305 Hydraulic reset Record the alarm number. Restart thedevice. If the problem persists, contactyour technical representative.
Restart the device to clear the alarm.
If the problem persists, contact yourtechnical representative.
Reveos Alerts and Alarms
Reveos® Automated Blood Processing System Operator's Manual for Version 1.1 4-13

Table 4-2: Alarms (continued)
Alarm Number Alarm Name Alarm Text Troubleshooting
1307 Hydraulic pressure toohigh
Record the alarm number. Check forobstructed lines or unbroken frangibleconnector. If the problem persists,contact your technical representative.
Verify that the frangible connectorbetween the whole blood bag and thecross-connector is completely broken.Check for any kinked or obstructedtubing. See “Loading a Blood Bag Set” onpage 3-13.
1314 Hydraulic control Record the alarm number. If the problempersists, contact your technicalrepresentative.
If the problem persists, contact yourtechnical representative.
1315 Hydraulic hardware Record the alarm number. Restart thedevice. If the problem persists, contactyour technical representative.
Restart the device to clear the alarm.
If the problem persists, contact yourtechnical representative.
1317 Hydraulic pressureproblem
Record the alarm number. Restart thedevice. If the problem persists, contactyour technical representative.
Restart the device to clear the alarm.
If the problem persists, contact yourtechnical representative.
1401 Leak detected Record the alarm number. Check forleaks in the centrifuge basin. If theproblem persists, contact your technicalrepresentative.
If the alarm occurs during a procedure:• Unload the blood bag set and handle
according to your institution's SOP.
• Clean the rotor and centrifuge basin.See “Cleaning After a Blood Spill” onpage 5-6.
• If you see hydraulic fluid, contactyour technical representative.
1403 Outer lid system Record the alarm number. If the problempersists, contact your technicalrepresentative.
If the problem persists, contact yourtechnical representative.
1404 Outer lid system Record the alarm number. If the problempersists, contact your technicalrepresentative.
If the problem persists, contact yourtechnical representative.
1406 Outer lid detected open Record the alarm number. If the problempersists, contact your technicalrepresentative.
If the problem persists, contact yourtechnical representative.
1413 Fan problem Record the alarm number. If the problempersists, contact your technicalrepresentative.
If the problem persists, contact yourtechnical representative.
1414 Stop button pressed Record the alarm number. The procedurewill be discontinued.
Handle the blood products according toyour institution's SOP.
1415 Basin temperature sensor Record the alarm number. Contact yourtechnical representative.
If the problem persists, contact yourtechnical representative.
1416 Bearing temperaturesensor
Record the alarm number. If the problempersists, contact your technicalrepresentative.
If the problem persists, contact yourtechnical representative.
Alarms and Troubleshooting
4-14 Reveos® Automated Blood Processing System Operator's Manual for Version 1.1

Table 4-2: Alarms (continued)
Alarm Number Alarm Name Alarm Text Troubleshooting
1417 Inlet temperature sensor Record the alarm number. If the problempersists, contact your technicalrepresentative.
If the problem persists, contact yourtechnical representative.
1420 Vibration sensor Record the alarm number. Restart thedevice. If the problem persists, contactyour technical representative.
If the problem persists, contact yourtechnical representative.
1421 Excessive vibration Record the alarm number. Verify correctloading. If the problem persists, contactyour technical representative.
Verify that all four buckets are correctlyloaded. If two counterbalance bags areloaded, load them opposite each other.
If the problem persists, contact yourtechnical representative.
1422 Bearing temperature toolow
Record the alarm number. If the problempersists, contact your technicalrepresentative.
If the problem persists, contact yourtechnical representative.
1423 Inlet temperature too high Record the alarm number. If the problempersists, contact your technicalrepresentative.
Verify that the external cooled watersource is correctly connected to theReveos device.
1424 Inlet temperature too low Record the alarm number. If the problempersists, contact your technicalrepresentative.
Verify that the external cooled watersource is correctly connected to theReveos device.
1427 Outer lid lock sensor Record the alarm number. If the problempersists, contact your technicalrepresentative.
If the problem persists, contact yourtechnical representative.
1429 Outer lid sensor Record the alarm number. If the problempersists, contact your technicalrepresentative.
If the problem persists, contact yourtechnical representative.
1430 Outer lid lock power Record the alarm number. If the problempersists, contact your technicalrepresentative.
If the problem persists, contact yourtechnical representative.
1432 Bearing temperature toohigh
Record the alarm number. If the problempersists, contact your technicalrepresentative.
If the problem persists, contact yourtechnical representative.
1433 Bucket lid latch Record the alarm number. If the problempersists, contact your technicalrepresentative.
If the problem persists, contact yourtechnical representative.
1434 Bucket lid latch Record the alarm number. If the problempersists, contact your technicalrepresentative.
If the problem persists, contact yourtechnical representative.
1435 Bucket lid latch Record the alarm number. If the problempersists, contact your technicalrepresentative.
If the problem persists, contact yourtechnical representative.
Reveos Alerts and Alarms
Reveos® Automated Blood Processing System Operator's Manual for Version 1.1 4-15

Table 4-2: Alarms (continued)
Alarm Number Alarm Name Alarm Text Troubleshooting
1436 Bucket lid latch Record the alarm number. If the problempersists, contact your technicalrepresentative.
If the problem persists, contact yourtechnical representative.
1500 Problem closing valve Record the alarm number. Verify correctloading of the platelet line in bucket 1. Ifthe problem persists, contact yourtechnical representative.
If the problem persists, contact yourtechnical representative.
1501 Problem opening valve Record the alarm number. Bucket will bedisabled. Problem opening the plateletvalve. If the problem persists, contactyour technical representative.
If the problem persists, contact yourtechnical representative.
1502 Problem sealing Record the alarm number. Clamp andseal all lines. If the problem persists,contact your technical representative.
If the problem persists, contact yourtechnical representative.
1503 Valve problem Record the alarm number. If the problempersists, contact your technicalrepresentative.
If the problem persists, contact yourtechnical representative.
1505 Problem closing valve Record the alarm number. Verify correctloading of the platelet line in bucket 2. Ifthe problem persists, contact yourtechnical representative.
If the problem persists, contact yourtechnical representative.
1506 Problem opening valve Record the alarm number. Bucket will bedisabled. Problem opening the plateletvalve. If the problem persists, contactyour technical representative.
If the problem persists, contact yourtechnical representative.
1507 Problem sealing Record the alarm number. Clamp andseal all lines. If the problem persists,contact your technical representative.
If the problem persists, contact yourtechnical representative.
1508 Valve problem Record the alarm number. If the problempersists, contact your technicalrepresentative.
If the problem persists, contact yourtechnical representative.
1510 Problem closing valve Record the alarm number. Verify correctloading of the platelet line in bucket 3. Ifthe problem persists, contact yourtechnical representative.
If the problem persists, contact yourtechnical representative.
1511 Problem opening valve Record the alarm number. Bucket will bedisabled. Problem opening the plateletvalve. If the problem persists, contactyour technical representative.
If the problem persists, contact yourtechnical representative.
1512 Problem sealing Record the alarm number. Clamp andseal all lines. If the problem persists,contact your technical representative.
If the problem persists, contact yourtechnical representative.
Alarms and Troubleshooting
4-16 Reveos® Automated Blood Processing System Operator's Manual for Version 1.1

Table 4-2: Alarms (continued)
Alarm Number Alarm Name Alarm Text Troubleshooting
1513 Valve problem Record the alarm number. If the problempersists, contact your technicalrepresentative.
If the problem persists, contact yourtechnical representative.
1515 Problem closing valve Record the alarm number. Verify correctloading of the platelet line in bucket 4. Ifthe problem persists, contact yourtechnical representative.
If the problem persists, contact yourtechnical representative.
1516 Problem opening valve Record the alarm number. Bucket will bedisabled. Problem opening the plateletvalve. If the problem persists, contactyour technical representative.
If the problem persists, contact yourtechnical representative.
1517 Problem sealing Record the alarm number. Clamp andseal all lines. If the problem persists,contact your technical representative.
If the problem persists, contact yourtechnical representative.
1518 Valve problem Record the alarm number. If the problempersists, contact your technicalrepresentative.
If the problem persists, contact yourtechnical representative.
1520 Problem closing valve Record the alarm number. Verify correctloading of the plasma line in bucket 1. Ifthe problem persists, contact yourtechnical representative.
If the problem persists, contact yourtechnical representative.
1521 Problem opening valve Record the alarm number. Bucket will bedisabled. Problem opening the plasmavalve. If the problem persists, contactyour technical representative.
If the problem persists, contact yourtechnical representative.
1522 Problem sealing Record the alarm number. Clamp andseal all lines. If the problem persists,contact your technical representative.
If the problem persists, contact yourtechnical representative.
1523 Valve problem Record the alarm number. If the problempersists, contact your technicalrepresentative.
If the problem persists, contact yourtechnical representative.
1525 Problem closing valve Record the alarm number. Verify correctloading of the plasma line in bucket 2. Ifthe problem persists, contact yourtechnical representative.
If the problem persists, contact yourtechnical representative.
1526 Problem opening valve Record the alarm number. Bucket will bedisabled. Problem opening the plasmavalve. If the problem persists, contactyour technical representative.
If the problem persists, contact yourtechnical representative.
1527 Problem sealing Record the alarm number. Clamp andseal all lines. If the problem persists,contact your technical representative.
If the problem persists, contact yourtechnical representative.
Reveos Alerts and Alarms
Reveos® Automated Blood Processing System Operator's Manual for Version 1.1 4-17

Table 4-2: Alarms (continued)
Alarm Number Alarm Name Alarm Text Troubleshooting
1528 Valve problem Record the alarm number. If the problempersists, contact your technicalrepresentative.
If the problem persists, contact yourtechnical representative.
1530 Problem closing valve Record the alarm number. Verify correctloading of the plasma line in bucket 3. Ifthe problem persists, contact yourtechnical representative.
If the problem persists, contact yourtechnical representative.
1531 Problem opening valve Record the alarm number. Bucket will bedisabled. Problem opening the plasmavalve. If the problem persists, contactyour technical representative.
If the problem persists, contact yourtechnical representative.
1532 Problem sealing Record the alarm number. Clamp andseal all lines. If the problem persists,contact your technical representative.
If the problem persists, contact yourtechnical representative.
1533 Valve problem Record the alarm number. If the problempersists, contact your technicalrepresentative.
If the problem persists, contact yourtechnical representative.
1535 Problem closing valve Record the alarm number. Verify correctloading of the plasma line in bucket 4. Ifthe problem persists, contact yourtechnical representative.
If the problem persists, contact yourtechnical representative.
1536 Problem opening valve Record the alarm number. Bucket will bedisabled. Problem opening the plasmavalve. If the problem persists, contactyour technical representative.
If the problem persists, contact yourtechnical representative.
1537 Problem sealing Record the alarm number. Clamp andseal all lines. If the problem persists,contact your technical representative.
If the problem persists, contact yourtechnical representative.
1538 Valve problem Record the alarm number. If the problempersists, contact your technicalrepresentative.
If the problem persists, contact yourtechnical representative.
1540 Problem closing valve Record the alarm number. Verify correctloading of the residual leukocyte line inbucket 1. If the problem persists, contactyour technical representative.
If the problem persists, contact yourtechnical representative.
1541 Problem opening valve Record the alarm number. Bucket will bedisabled. Problem opening the residualleukocyte valve. If the problem persists,contact your technical representative.
If the problem persists, contact yourtechnical representative.
1542 Problem sealing Record the alarm number. Clamp andseal all lines. If the problem persists,contact your technical representative.
If the problem persists, contact yourtechnical representative.
Alarms and Troubleshooting
4-18 Reveos® Automated Blood Processing System Operator's Manual for Version 1.1

Table 4-2: Alarms (continued)
Alarm Number Alarm Name Alarm Text Troubleshooting
1543 Valve problem Record the alarm number. If the problempersists, contact your technicalrepresentative.
If the problem persists, contact yourtechnical representative.
1545 Problem closing valve Record the alarm number. Verify correctloading of the residual leukocyte line inbucket 2. If the problem persists, contactyour technical representative.
If the problem persists, contact yourtechnical representative.
1546 Problem opening valve Record the alarm number. Bucket will bedisabled. Problem opening the residualleukocyte valve. If the problem persists,contact your technical representative.
If the problem persists, contact yourtechnical representative.
1547 Problem sealing Record the alarm number. Clamp andseal all lines. If the problem persists,contact your technical representative.
If the problem persists, contact yourtechnical representative.
1548 Valve problem Record the alarm number. If the problempersists, contact your technicalrepresentative.
If the problem persists, contact yourtechnical representative.
1550 Problem closing valve Record the alarm number. Verify correctloading of the residual leukocyte line inbucket 3. If the problem persists, contactyour technical representative.
If the problem persists, contact yourtechnical representative.
1551 Problem opening valve Record the alarm number. Bucket will bedisabled. Problem opening the residualleukocyte valve. If the problem persists,contact your technical representative.
If the problem persists, contact yourtechnical representative.
1552 Problem sealing Record the alarm number. Clamp andseal all lines. If the problem persists,contact your technical representative.
If the problem persists, contact yourtechnical representative.
1553 Valve problem Record the alarm number. If the problempersists, contact your technicalrepresentative.
If the problem persists, contact yourtechnical representative.
1555 Problem closing valve Record the alarm number. Verify correctloading of the residual leukocyte line inbucket 4. If the problem persists, contactyour technical representative.
If the problem persists, contact yourtechnical representative.
1556 Problem opening valve Record the alarm number. Bucket will bedisabled. Problem opening the residualleukocyte valve. If the problem persists,contact your technical representative.
If the problem persists, contact yourtechnical representative.
1557 Problem sealing Record the alarm number. Clamp andseal all lines. If the problem persists,contact your technical representative.
If the problem persists, contact yourtechnical representative.
Reveos Alerts and Alarms
Reveos® Automated Blood Processing System Operator's Manual for Version 1.1 4-19

Table 4-2: Alarms (continued)
Alarm Number Alarm Name Alarm Text Troubleshooting
1558 Valve problem Record the alarm number. If the problempersists, contact your technicalrepresentative.
If the problem persists, contact yourtechnical representative.
1559 Problem sealing Record the alarm number. Clamp andseal all lines. If the problem persists,contact your technical representative.
If the problem persists, contact yourtechnical representative.
1560 Problem sealing Record the alarm number. Clamp andseal all lines. If the problem persists,contact your technical representative.
If the problem persists, contact yourtechnical representative.
1561 Problem sealing Record the alarm number. Clamp andseal all lines. If the problem persists,contact your technical representative.
If the problem persists, contact yourtechnical representative.
1562 Problem sealing Record the alarm number. Clamp andseal all lines. If the problem persists,contact your technical representative.
If the problem persists, contact yourtechnical representative.
1563 Problem sealing Record the alarm number. Clamp andseal all lines. If the problem persists,contact your technical representative.
If the problem persists, contact yourtechnical representative.
1564 Problem sealing Record the alarm number. Clamp andseal all lines. If the problem persists,contact your technical representative.
If the problem persists, contact yourtechnical representative.
1565 Problem sealing Record the alarm number. Clamp andseal all lines. If the problem persists,contact your technical representative.
If the problem persists, contact yourtechnical representative.
1566 Problem sealing Record the alarm number. Clamp andseal all lines. If the problem persists,contact your technical representative.
If the problem persists, contact yourtechnical representative.
1567 Problem sealing Record the alarm number. Clamp andseal all lines. If the problem persists,contact your technical representative.
If the problem persists, contact yourtechnical representative.
1568 Problem sealing Record the alarm number. Clamp andseal all lines. If the problem persists,contact your technical representative.
If the problem persists, contact yourtechnical representative.
1569 Problem sealing Record the alarm number. Clamp andseal all lines. If the problem persists,contact your technical representative.
If the problem persists, contact yourtechnical representative.
1570 Problem sealing Record the alarm number. Clamp andseal all lines. If the problem persists,contact your technical representative.
If the problem persists, contact yourtechnical representative.
Alarms and Troubleshooting
4-20 Reveos® Automated Blood Processing System Operator's Manual for Version 1.1

Table 4-2: Alarms (continued)
Alarm Number Alarm Name Alarm Text Troubleshooting
1600 Outer lid system Record the alarm number. Restart thedevice. If the problem persists, contactyour technical representative.
Restart the device to clear the alarm.
If the problem persists, contact yourtechnical representative.
1601 Motor controller Record the alarm number. Restart thedevice. If the problem persists, contactyour technical representative.
Restart the device to clear the alarm.
If the problem persists, contact yourtechnical representative.
1603 Barcode system Record the alarm number. Restart thedevice. If the problem persists, contactyour technical representative.
Restart the device to clear the alarm.
If the problem persists, contact yourtechnical representative.
1800 System problem Record the alarm number. Restart thedevice. If the problem persists, contactyour technical representative.
Restart the device to clear the alarm.
If the problem persists, contact yourtechnical representative.
1801 System problem Record the alarm number. If the problempersists, contact your technicalrepresentative.
If the problem persists, contact yourtechnical representative.
1802 System problem Record the alarm number. Contact yourtechnical representative.
If the problem persists, contact yourtechnical representative.
1803 Data corruption Record the alarm number. Contact yourtechnical representative.
If the problem persists, contact yourtechnical representative.
1804 Data corruption Record the alarm number. Contact yourtechnical representative.
If the problem persists, contact yourtechnical representative.
1805 Data corruption Record the alarm number. Restart thedevice. If the problem persists, contactyour technical representative.
If the problem persists, contact yourtechnical representative.
1807 Version mismatch Record the alarm number. Contact yoursystem administrator.
The system administrator can verify thatthe device software and the ReveosSystem Manager software match. See “Configuring the General Device” onpage 6-15.
1809 Invalid device type Record the alarm number. Contact yoursystem administrator.
The system administrator can verify thatthe device is enabled in the ReveosSystem Manager. See “Enabling andDisenabling Devices” on page 6-17.
1811 System problem Record the alarm number. Restart thedevice. If the problem persists, contactyour technical representative.
Restart the device to clear the alarm.
If the problem persists, contact yourtechnical representative.
Reveos Alerts and Alarms
Reveos® Automated Blood Processing System Operator's Manual for Version 1.1 4-21

Table 4-2: Alarms (continued)
Alarm Number Alarm Name Alarm Text Troubleshooting
1903 Centrifuge problem Record the alarm number. Restart thedevice. If the problem persists, contactyour technical representative.
Restart the device to clear the alarm.
If the problem persists, contact yourtechnical representative.
1904 Outer lid lock problem Record the alarm number. Restart thedevice. If the problem persists, contactyour technical representative.
Restart the device to clear the alarm.
If the problem persists, contact yourtechnical representative.
1907 Vibration sensor Record the alarm number. If the problempersists, contact your technicalrepresentative.
If the problem persists, contact yourtechnical representative.
1908 Hydraulic sensor Record the alarm number. If the problempersists, contact your technicalrepresentative.
If the problem persists, contact yourtechnical representative.
2000 Bucket sensor problem Record the alarm number. Bucket will bedisabled. If the problem persists, contactyour technical representative.
If the problem persists, contact yourtechnical representative.
2001 Line sensor problem Record the alarm number. Bucket will bedisabled. Verify correct loading in the linesensor. If the problem persists, contactyour technical representative.
If the problem persists, contact yourtechnical representative.
2002 Bucket sensor problem Record the alarm number. Bucket will bedisabled. If the problem persists, contactyour technical representative.
If the problem persists, contact yourtechnical representative.
2003 Line sensor problem Record the alarm number. Bucket will bedisabled. Verify correct loading in the linesensor. If the problem persists, contactyour technical representative.
If the problem persists, contact yourtechnical representative.
2004 Bucket sensor problem Record the alarm number. Bucket will bedisabled. If the problem persists, contactyour technical representative.
If the problem persists, contact yourtechnical representative.
2005 Line sensor problem Record the alarm number. Bucket will bedisabled. Verify correct loading in the linesensor. If the problem persists, contactyour technical representative.
If the problem persists, contact yourtechnical representative.
2006 Bucket sensor problem Record the alarm number. Bucket will bedisabled. If the problem persists, contactyour technical representative.
If the problem persists, contact yourtechnical representative.
2007 Line sensor problem Record the alarm number. Bucket will bedisabled. Verify correct loading in the linesensor. If the problem persists, contactyour technical representative.
If the problem persists, contact yourtechnical representative.
Alarms and Troubleshooting
4-22 Reveos® Automated Blood Processing System Operator's Manual for Version 1.1

Table 4-2: Alarms (continued)
Alarm Number Alarm Name Alarm Text Troubleshooting
2008 Bucket sensor problem Record the alarm number. Bucket will bedisabled. If the problem persists, contactyour technical representative.
See “Loading a Counterbalance Bag” onpage 3-21.
If the problem persists, contact yourtechnical representative.
2009 Line sensor problem Record the alarm number. Bucket will bedisabled. If the problem persists, contactyour technical representative.
See “Loading a Counterbalance Bag” onpage 3-21.
If the problem persists, contact yourtechnical representative.
2010 Bucket sensor problem Record the alarm number. Bucket will bedisabled. If the problem persists, contactyour technical representative.
See “Loading a Counterbalance Bag” onpage 3-21.
If the problem persists, contact yourtechnical representative.
2011 Line sensor problem Record the alarm number. Bucket will bedisabled. If the problem persists, contactyour technical representative.
See “Loading a Counterbalance Bag” onpage 3-21.
If the problem persists, contact yourtechnical representative.
2012 Bucket sensor problem Record the alarm number. Bucket will bedisabled. If the problem persists, contactyour technical representative.
See “Loading a Counterbalance Bag” onpage 3-21.
If the problem persists, contact yourtechnical representative.
2013 Line sensor problem Record the alarm number. Bucket will bedisabled. If the problem persists, contactyour technical representative.
See “Loading a Counterbalance Bag” onpage 3-21.
If the problem persists, contact yourtechnical representative.
2014 Bucket sensor problem Record the alarm number. Bucket will bedisabled. If the problem persists, contactyour technical representative.
See “Loading a Counterbalance Bag” onpage 3-21.
If the problem persists, contact yourtechnical representative.
2015 Line sensor problem Record the alarm number. Bucket will bedisabled. If the problem persists, contactyour technical representative.
See “Loading a Counterbalance Bag” onpage 3-21.
If the problem persists, contact yourtechnical representative.
2016 Line sensor problem Record the alarm number. Unload the linesensors and restart the device. If theproblem persists, contact your technicalrepresentative.
Verify that all the buckets are empty.See“Unloading a Blood Bag Set” onpage 3-27 or “Unloading aCounterbalance Bag” on page 3-29.
Restart the device to clear the alarm.
If the problem persists, contact yourtechnical representative.
Reveos Alerts and Alarms
Reveos® Automated Blood Processing System Operator's Manual for Version 1.1 4-23

Table 4-2: Alarms (continued)
Alarm Number Alarm Name Alarm Text Troubleshooting
2100 Centrifuge speed too high Record the alarm number. Restart thedevice. If the problem persists, contactyour technical representative.
Restart the device to clear the alarm.
If the problem persists, contact yourtechnical representative.
2200 System problem Record the alarm number. Restart thedevice. If the problem persists, contactyour technical representative.
Restart the device to clear the alarm.
If the problem persists, contact yourtechnical representative.
2201 System problem Record the alarm number. Restart thedevice. If the problem persists, contactyour technical representative.
Restart the device to clear the alarm.
If the problem persists, contact yourtechnical representative.
2202 Centrifuge system Record the alarm number. Restart thedevice. If the problem persists, contactyour technical representative.
Restart the device to clear the alarm.
If the problem persists, contact yourtechnical representative.
2203 Outer lid system Record the alarm number. Restart thedevice. If the problem persists, contactyour technical representative.
Restart the device to clear the alarm.
If the problem persists, contact yourtechnical representative.
2300 Hydraulic pressure toohigh
Record the alarm number. Restart thedevice. If the problem persists, contactyour technical representative.
Restart the device to clear the alarm.
If the problem persists, contact yourtechnical representative.
2401 Outer lid system Record the alarm number. Restart thedevice. If the problem persists, contactyour technical representative.
Restart the device to clear the alarm.
If the problem persists, contact yourtechnical representative.
2402 Stop button problem Record the alarm number. If the problempersists, contact your technicalrepresentative.
If the problem persists, contact yourtechnical representative.
2600 Communication problem Record the alarm number. Restart thedevice. If the problem persists, contactyour technical representative.
Restart the device to clear the alarm.
If the problem persists, contact yourtechnical representative.
Alarms and Troubleshooting
4-24 Reveos® Automated Blood Processing System Operator's Manual for Version 1.1

5Maintaining the Device
Reveos® Automated Blood Processing System Operator's Manual for Version 1.1 5-1
Daily Preventive Maintenance
Each day of use, visually inspect the device:• Inspect the interior of the rotor compartment for fluid leaks or foreign particles.
• Inspect the device for any loose or missing hardware or fasteners.
• Document according to your institution’s SOP that you performed daily preventive maintenanceon the device.
If you see any of the following, do not use the device. Report the condition immediately to yourauthorized service representative:• Power cords, plugs, or receptacles are damaged or worn.
• Switches are loose or do not operate.
• Any hardware or fasteners are loose or missing.
Maintaining the Device
5-2 Reveos® Automated Blood Processing System Operator's Manual for Version 1.1

Routine Cleaning
Routine Cleaning Supplies• Water only, or water and mild detergent, for general cleaning
• Isopropyl alcohol cotton swabs or pads for valves and sensors
• Clean and absorbent material, such as paper or cloth towels, as specified in your institution’s SOP
Routine Cleaning ProcedureBefore you begin routine cleaning, turn off the device to prevent a possible electrical hazard or potentialdamage to the equipment.
Be sure to use the appropriate solution when cleaning each device component. Do not clean the touchscreen with abrasive brushes or scrub materials. Do not use excessive liquid on the sensors; use only adampened cloth or cotton swab. Never pour water or other fluids into the device.
1. Turn off the device.
Note: The device may be unplugged as an additional precaution.
2. Lift the device lid.
3. Wipe the surfaces of the rotor and centrifuge basin with a mild soap and water solution.
Figure 5-1: Wiping the interior of the centrifuge basin
Routine Cleaning
Reveos® Automated Blood Processing System Operator's Manual for Version 1.1 5-3

4. Wipe the surface of the leak detector with an isopropyl alcohol cotton swab or pad.
Figure 5-2: Cleaning the leak detector
5. Gently wipe each sealing valve and tubing guide with isopropyl alcohol cotton swabs or pads.
Note: Clean the sealing valves at least once per week to maintain optimal sealing function.
Figure 5-3: Cleaning a sealing valve using an isopropyl alcohol pad
Figure 5-4: Cleaning a sealing valve using an isopropyl alcohol cotton swab
Maintaining the Device
5-4 Reveos® Automated Blood Processing System Operator's Manual for Version 1.1

6. Gently wipe the line sensors and bucket sensors with isopropyl alcohol cotton swabs or pads.
Figure 5-5: Cleaning a line sensor
Figure 5-6: Cleaning a bucket sensor
7. Ensure that all interior surfaces are clean and dry.
8. Close the device lid.
9. Plug the device into the power source, and/or turn on the power switch.
10. Discard all cleaning materials according to your institution’s SOP.
11. Document that you performed routine cleaning of the device according to your institution’s SOP.
Note: If the device was moved before or during routine cleaning, move the device back into place and ensure thatthe casters are properly locked prior to operating the device. See “Locking the Front Casters” on page 3-4. Aftermoving the device, ensure that it is plugged into a RCCD (GFCI)-protected electrical power circuit before turning it on.See Table 8-1 for more information.
Routine Cleaning
Reveos® Automated Blood Processing System Operator's Manual for Version 1.1 5-5

Cleaning After a Blood Spill
Blood Spill Cleaning Supplies• Water, or water and mild detergent, to remove blood residue and/or bleach residue after
disinfecting
• 0.25% sodium hypochlorite solution for disinfecting surfaces. Commercial household bleach (5%to 6%) diluted 1 part bleach to 18 parts water produces an approximately 0.25% sodiumhypochlorite solution
• Isopropyl alcohol cotton swabs or pads
• Clean and absorbent material, such as paper or cloth towels, as specified in your institution’s SOP
Note: An absorbent, non-abrasive sponge with a long handle may be used for cleaning inside buckets andblood component bag holders.
• Cotton swabs
Blood Spill Cleaning ProcedureTo clean and disinfect the device, perform the steps listed below using the recommended cleaningsupplies. Do not clean the touch screen with abrasive brushes or scrub materials. Do not use excessiveliquid on the sensors; use only a dampened cloth or cotton swab. Never pour water or other fluids intothe device.
1. Turn off the device.
Note: The device may be unplugged as an additional precaution.
2. Lift the device lid.
3. Clean and disinfect the following surfaces with a 0.25% sodium hypochlorite solution as shown inFigure 5-7 and Figure 5-8:
• Interior surface of the device lid
Note: Remove any excess blood from the interior of the device lid before you proceed with cleaning.
• Device-lid hinges
• Rubber seal around the rotor compartment opening
• Walls and bottom of the centrifuge basin
• Buckets
• Blood component bag holders (may be cleaned using an absorbent, non-abrasive sponge with along handle)
• Hydraulic bladders
• Bucket-lid and bucket-latch hinges
Maintaining the Device
5-6 Reveos® Automated Blood Processing System Operator's Manual for Version 1.1

Figure 5-7: Cleaning the walls of the centrifuge basin
Figure 5-8: Cleaning a blood component bag holder
4. Inspect all interior surfaces for excess cleaning solution or blood residue, and wipe off any residuewith water or water with mild detergent, as needed.
5. Clean and disinfect the following surfaces with an isopropyl alcohol cotton swab or pad as shown inFigure 5-9, Figure 5-10, Figure 5-11, Figure 5-12, and Figure 5-13:
• Line sensors
• Tubing guides
• Sealing valves
• Leak detector (mounted on the front wall of the rotor compartment)
• Bucket sensors
Cleaning After a Blood Spill
Reveos® Automated Blood Processing System Operator's Manual for Version 1.1 5-7

Figure 5-9: Cleaning a line sensor
Figure 5-10: Cleaning a sealing valve using an isopropyl alcohol pad
Figure 5-11: Cleaning a sealing valve using an isopropyl alcohol cotton swab
Maintaining the Device
5-8 Reveos® Automated Blood Processing System Operator's Manual for Version 1.1

Figure 5-12: Cleaning the leak detector
Figure 5-13: Cleaning a bucket sensor
6. Ensure that all interior surfaces are clean and dry.
7. Inspect the loading area, rotor, centrifuge basin, and device lid for damage.
8. Inspect the centrifuge basin area for any loose items such as cleaning materials or severed blood bagset parts.
9. Close the device lid.
10. Clean and disinfect the device lid and other exterior surfaces with a 0.25% sodium hypochloritesolution as needed, including the counterbalance bags, barcode scanner, and barcode-scannerholder.
11. Inspect all exterior surfaces for excess cleaning solution or blood residue, and wipe off any residuewith water or water with mild detergent, as needed.
12. Ensure that all surfaces are clean and dry.
13. Plug the device into the power source and/or turn on the power switch.
14. Discard all cleaning materials according to your institution’s SOP.
15. Document blood spill cleaning according to your institution’s SOP.
16. If the device needs more extensive cleaning after you have completed steps 1 through 14, contactyour authorized Terumo BCT service representative.
Cleaning After a Blood Spill
Reveos® Automated Blood Processing System Operator's Manual for Version 1.1 5-9

Note: If the device was moved before or during routine cleaning, move the device back into place and ensure thatthe casters are properly locked prior to operating the device. See “Locking the Front Casters” on page 3-4. Aftermoving the device, ensure that it is plugged into a RCCD (GFCI)-protected electrical power circuit before turning it on.See Table 8-1 for more information.
Maintaining the Device
5-10 Reveos® Automated Blood Processing System Operator's Manual for Version 1.1

Dry Check Procedure
The dry check procedure is an optional procedure for use after cleaning a blood spill. Running thisprocedure verifies that the device is dry before processing whole blood units. For detailed instructions oncleaning the device after a blood spill, see “Blood Spill Cleaning Procedure” on page 5-6.
The dry check procedure must be configured by a qualified Terumo BCT technical representative. Formore information on the configuration of the dry check procedure, contact your Terumo BCTrepresentative.
Running the Dry Check ProcedureAfter cleaning the device following a blood spill, perform the steps listed below to run the dry checkprocedure.
1. Touch the Select Procedure button on the Barcode Entry screen.
2. Select the dry check procedure. Touch the Continue button.
Note: Procedure names are configured in the Reveos System Manager application.
3. Scan the Operator ID barcode, if prompted on the touch screen.
4. When the touch screen prompts you for a Donation ID barcode, scan and load a counterbalancebag in the first bucket. Repeat until all four buckets are loaded with a counterbalance bag. For moreinformation on loading a counterbalance bag, see “Loading a Counterbalance Bag” on page 3-21.
Note: All four buckets must contain a counterbalance bag before you start the dry check procedure.
5. Touch the Close Valves button.
6. Close the device lid. Touch the Start Procedure button.
7. If the touch screen shows a 1401 Leak detected alarm, the system ends the procedure.
• Turn off the device.
• Unload the counterbalance bags from all four buckets.
• Clean any residual blood or excess cleaning solution from inside the device.
• Ensure that all surfaces are dry.
• Turn on the device.
• Repeat steps 1 through 7 until the procedure ends without displaying any alarms.8. Unload the counterbalance bags.
9. Touch the Next Procedure button.
10. Touch the Select Procedure button and select the required operating procedure.
Dry Check Procedure
Reveos® Automated Blood Processing System Operator's Manual for Version 1.1 5-11

Service InformationCaution: Unplug the power to the device before servicing to prevent possible electrical hazard or potential damageto the device.
If any of the following conditions occur, do not use the device. Report the condition immediately toyour authorized service representative:• Power cords, plugs, or receptacles are damaged or worn.
• Switches are loose or do not operate.
• The device has been subject to physical shock or to liquid spills on the electronics housed below therotor.
• The device has given anyone an electrical shock while in use.
• The device appears to be overheating.
• Any fasteners or hardware appear to be loose or missing.
Any equipment modifications or service that requires the use of tools (such as a screwdriver or servicekey) must be performed by qualified persons and must be approved in advance in writing byTerumo BCT. All electrical installations must comply with all applicable local electrical codes andTerumo BCT specifications.
If you unplug and move the device, ensure that it is plugged into a RCCD (GFCI)-protected electricalpower circuit before turning it on. See Table 8-1 for more information.
Only qualified personnel should make connections to the Ethernet connector. CPU memory batteriesmust be replaced with the same type of battery. Use only power plugs and adapters specified by themanufacturer.
Contact your Terumo BCT technical representative if you notice any changes in performance or qualityof products that are processed on the device.
Replacing PartsOnly Terumo BCT trained and qualified personnel are permitted to service the device and replace parts.
Maintaining the Device
5-12 Reveos® Automated Blood Processing System Operator's Manual for Version 1.1

Preventive Service MaintenanceTo prolong equipment life and to provide maximum system performance, a qualified service technicianperforms preventive maintenance procedures on the device at six‑month intervals (±30 days). Preventivemaintenance procedures include checks and tests on device subsystems, as well as replacement of certainsystem components.
The following list indicates the types of maintenance procedures that may be performed during a six-month preventive maintenance. For a more specific list, contact your Terumo BCT representative formore information.
General Mechanical Inspection Procedure• Electrical system checks and tests:
– Grounding checks
– Power-up and self tests
– AC and DC voltage checks
– Power supply checks
– Ground resistance test
– Accessible parts voltage test
• Subsystem checks and tests:– Leak detector check
– Device-lid lock function test
– Rotor ramp-up test
– Rotor speed check
– Touch screen function check
– Fan function check
– Vibration sensor function check
– Valve open/close/seal function check
– Hydraulic pressure and flow rate checks
– Barcode scanner function check
– Simulated procedure check
– Bucket sensor and line sensor check
– Cooling system check
The service technician documents the routine service maintenance in the log book of each device he orshe services.
Preventive Service Maintenance
Reveos® Automated Blood Processing System Operator's Manual for Version 1.1 5-13

Maintaining the Device
5-14 Reveos® Automated Blood Processing System Operator's Manual for Version 1.1

6Configuring the Reveos System Manager
Reveos® Automated Blood Processing System Operator's Manual for Version 1.1 6-1

Accessing the Software and Viewing Version Information
Opening Reveos System ManagerThe Reveos System Manager software is a web-based application that is accessed through Microsoft®
Internet Explorer®. Complete the following steps to open the application:
1. Click Start, click Programs, and then click Internet Explorer.
2. In the address bar of the browser, type the address for the Reveos System Manager software:
servername/RSM.Application.Web
Note: This web address can be saved as a “Favorite” in Internet Explorer®. A system administrator can also create adesktop icon for the application.
After the application is launched, the Reveos System Manager splash page briefly appears, followed bythe login page.
Logging In to Reveos System ManagerComplete the following steps from the Reveos System Manager software browser window:
1. Open Reveos System Manager.The login page appears.
2. Type your user name in the first text box.
3. Press the Tab key on the keyboard, or click in the Password text box.
4. Type your password.
Figure 6-1: Reveos System Manager Login page
5. Click Log in, or press the Enter key.
If you need to change your password, click the Change Password link. See “Changing Your Password”on page 6-3 for more information. If you do not need to change your password, you can skip this stepby clicking any of the tabs at the top of the page.
Logging Out of Reveos System Manager
Note: You will be automatically logged out of Reveos System Manager if you refresh the browser page, for example,by clicking F5 or clicking the Refresh button.
Configuring the Reveos System Manager
6-2 Reveos® Automated Blood Processing System Operator's Manual for Version 1.1
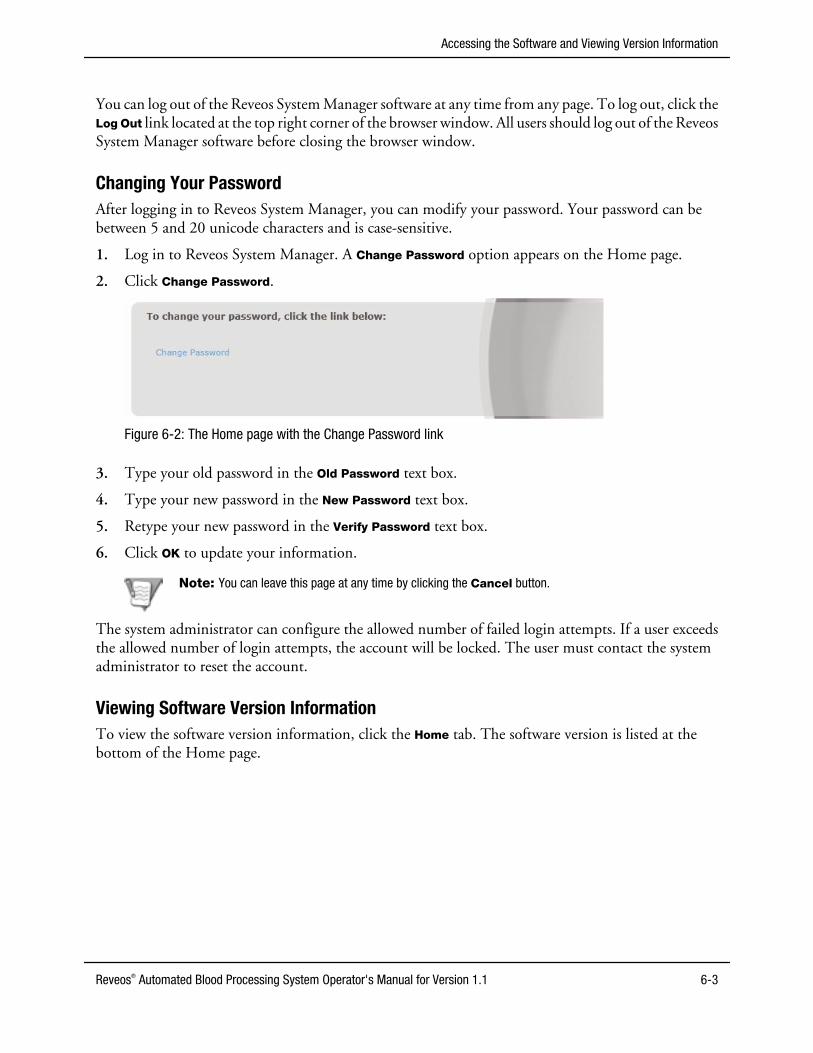
You can log out of the Reveos System Manager software at any time from any page. To log out, click theLog Out link located at the top right corner of the browser window. All users should log out of the ReveosSystem Manager software before closing the browser window.
Changing Your PasswordAfter logging in to Reveos System Manager, you can modify your password. Your password can bebetween 5 and 20 unicode characters and is case-sensitive.
1. Log in to Reveos System Manager. A Change Password option appears on the Home page.
2. Click Change Password.
Figure 6-2: The Home page with the Change Password link
3. Type your old password in the Old Password text box.
4. Type your new password in the New Password text box.
5. Retype your new password in the Verify Password text box.
6. Click OK to update your information.
Note: You can leave this page at any time by clicking the Cancel button.
The system administrator can configure the allowed number of failed login attempts. If a user exceedsthe allowed number of login attempts, the account will be locked. The user must contact the systemadministrator to reset the account.
Viewing Software Version InformationTo view the software version information, click the Home tab. The software version is listed at thebottom of the Home page.
Accessing the Software and Viewing Version Information
Reveos® Automated Blood Processing System Operator's Manual for Version 1.1 6-3

Configuring Reveos Devices Within Reveos System ManagerThe Reveos device is configured in Reveos System Manager under the Configuration tab. Here, systemadministrators can configure all information necessary to process whole blood using the Reveos system.
The Configuration tab contains the following pages:• Facility: This page allows an administrator to set up and configure facilities within the blood center.
• Application: This page allows an administrator to configure all application settings, such as sessiontimeout, account lockout, and password expiration.
• Group: All permissions are granted through the use of groups. This page allows a user administratorto assign permissions to new and existing groups.
• User: Each user must be granted access to the Reveos device and/or Reveos System Manager. Thispage allows the user administrator to manage user accounts, enable or disenable access to the deviceand/or application, and assign passwords.
• General Device: This page allows a system administrator to configure features that apply to allReveos devices, such as manual keyboard entry and skipping barcode scans.
• Individual Device: This page allows a system administrator to configure each individual device andto assign a device to a facility within the blood center.
• Barcode: All barcode definitions are configured on this page and are then assigned to procedures asneeded.
• Procedure: This page allows a system administrator to create procedure configurations bycombining barcode, protocol, and individual device information.
Configuring the Reveos System Manager
6-4 Reveos® Automated Blood Processing System Operator's Manual for Version 1.1

Configuring Facilities
To add, edit, or delete facilities, click Facility in the menu bar of the Configuration tab. When facilities arecreated and saved, they are stored in the content list. When an authorized user clicks an item in thecontent list, the information for the selected facility appears in the Details section of the page. TheDetails section lists information for that specific facility, such as name, address, and phone number.
Figure 6-3: Facility page with a specific facility selected
Creating a FacilityComplete the following steps to create a new facility:
1. Access the Facility page.
2. Click New.
3. Type a unique name in the Facility Name text box.
4. Complete as many text boxes as needed.
Note: Facility Name is required information. All other information is optional.
5. Click Save. If you do not want to save, click Cancel.
Configuring Facilities
Reveos® Automated Blood Processing System Operator's Manual for Version 1.1 6-5

After you have saved your entry, the facility information is stored in the facility content list. You do notneed to enter this information each time you log in.
Repeat this process as needed to enter additional facilities.
Editing a FacilityComplete the following steps to update information for an existing facility:
1. Access the Facility page.
2. Select the facility you want to edit from the content list.
3. Click Edit.
4. Enter or update information in any or all of the text boxes on the Facility page.
5. Click Save. If you do not want to save, click Cancel.
Deleting a FacilityComplete the following steps to delete an existing facility:
1. Access the Facility page.
2. Select the facility you want to delete from the content list.
3. Click Delete.A dialog box appears.
4. Click Yes if you are sure that you want to delete the facility. Otherwise, click No.
Note: All devices must be removed from a facility before the facility can be deleted from the Reveos SystemManager. To remove devices from a facility, see “Assigning a Facility” on page 6-18.
Associated DevicesThe Associated Devices section displays a list of all devices that are associated with the selected facility.Devices are assigned to facilities on the Individual Device page. See “Configuring Individual Devices”on page 6-17.
Configuring the Reveos System Manager
6-6 Reveos® Automated Blood Processing System Operator's Manual for Version 1.1

Configuring the ApplicationAll Reveos System Manager settings are configured on the Application page under the Configuration tab.To view these settings, access the Application page. An authorized user can edit the settings by clickingthe Edit button.
Note: After making changes to the Application page, you must save the changes, log out, then log back in to theReveos System Manager for the changes to take effect.
Figure 6-4 is an example of the Application page with all settings enabled and values in thecorresponding boxes:
Figure 6-4: Application page
Session TimeoutWhen Session Timeout is enabled, a user will be logged out if the session is idle for the number ofminutes specified. Enable Session Timeout is automatically set to No during initial configuration. Toenable and configure Session Timeout, complete the following steps:
1. Click the drop-down menu next to Enable Session Timeout and select Yes.
2. Type a number between 1 and 720 in the Minutes text box.
3. Click Save if you do not want to configure any other settings. Otherwise, proceed to AccountLockout.
Account LockoutWhen Account Lockout is enabled, a user will be locked out of his or her account if he or she exceeds thenumber of failed consecutive login attempts. Enable Account Lockout is automatically set to No duringinitial configuration.
Note: A user is not removed from any groups when locked out.
Configuring the Application
Reveos® Automated Blood Processing System Operator's Manual for Version 1.1 6-7

To enable and configure Account Lockout, complete the following steps:
1. Click the drop-down menu next to Enable Account Lockout and select Yes.
2. Type a number between 2 and 10 in the Login Attempts text box.
3. Click Save if you do not want to configure any other settings. Otherwise, proceed to PasswordExpiration.
If a user is locked out of Reveos System Manager, see “Unlocking a User Account” on page 6-14.
Password ExpirationWhen Password Expiration is enabled, a user's password will expire within the number of days specified.The user will be warned that the password will expire and can make the changes prior to the passwordexpiration. If a user's password is not changed before it expires, the user will not be allowed to log in untilhe or she successfully changes the password.
Enable Password Expiration is automatically set to No during initial configuration. To enable andconfigure Password Expiration, complete the following steps:
1. Click the drop-down menu next to Enable Password Lockout and select Yes.
2. Type a number between 30 and 365 in the Days Before Expiration text box.
3. Type a number between 0 and 30 in the Days Before Expiration Reminder text box.
4. Click Save.
Configuring the Reveos System Manager
6-8 Reveos® Automated Blood Processing System Operator's Manual for Version 1.1

Assigning Permissions
Reveos System Manager uses a rights-based user management system. User permissions are defined atthree levels.• User system access: Determines user access to the Reveos system. A user can be active, deactivated
or locked out. A user must be active to access any functionality on the device or in Reveos SystemManager.
• User component access: Determines user access to the Reveos system components. A user can beenabled or disenabled for either the Reveos device, Reveos System Manager, or both.
• Group membership: Determines the specific functions a user can perform. If a user is not enabled,they cannot perform the group functions. A user can be assigned to one or more groups to allowthem to access pages and perform functions assigned to that group.
In order to interact with the Reveos system, a user must be active, enabled for a component, and assignedto a group.
Reveos System Manager contains four pre-populated groups. Additional groups can be created by theuser administrator. Multiple users can be assigned the same permissions, and each user can be in multiplegroups. If a user does not have permission to access a specific function, that function will not appear inthe application when that user is logged in.
Permissions are granted on a per-page basis to users. A user is given permissions when he or she is addedto a group. However, if an individual user is disenabled, the user settings supersede the grouppermissions.
GroupsThe Reveos System Manager contains four predetermined groups with pre-populated permissions. Thepre-populated groups are as follows:• Device Operator: Users assigned to this group can operate the Reveos device.
• Report Operator: Users assigned to this group can view and run reports.
• System Administrator: Users assigned to this group can update configuration elements in ReveosSystem Manager. They can view user and group information but cannot edit any settings.
• User Administrator: Users assigned to this group can view and edit all user and group information.
All of the pre-populated group names and permissions can be edited, except for the name andpermissions of the pre-populated User Administrator group.
Levels of Access for Reveos System Manager
When a user administrator creates a new group or edits an existing group, the Level of Access section onthe Group page becomes active. The permissions for each Reveos System Manager page can beindependently controlled by selecting an assigned permission from the corresponding drop-downmenu. There are three types of permissions available:• No Access: Users in this group cannot access the page at all. The tab and/or link to the page will not
be displayed to the user.
• Limited Access: Users in this group can read the page, but cannot make any edits or update anyinformation.
• Full Access: Users in this group can access, read, and edit information on the page.
Assigning Permissions
Reveos® Automated Blood Processing System Operator's Manual for Version 1.1 6-9

Note: When a user has limited access to the Insight Report page or the Custom Query report, he or she can view thesaved reports, but cannot use the Run Now feature.
Levels of Access for Operating the Device
When a user administrator creates a new group or edits an existing group, the Level of Access section onthe Group page becomes active. The device operator permission can be independently controlled byselecting an assigned permission from the Device Operator drop-down menu. There are two types ofpermissions available:• No Access: Users in this group are not able to operate the device.
• Operate Device: Users in this group are able to operate the device.
Editing an Existing Group
Complete the following steps to edit an existing group:
1. Access the Group page.
2. Select the group you want to edit from the content list.
3. Click Edit.
4. Update the information as needed.
5. Edit the permissions by clicking each drop-down menu and selecting one of the choices listed.
Figure 6-5: Level of Access section with the Facility Page drop-down menu expanded
6. Click Save. If you do not want to save, click Cancel.
Creating a New Group
Complete the following steps to create a new group:
1. Access the Group page.
2. Click New.
Configuring the Reveos System Manager
6-10 Reveos® Automated Blood Processing System Operator's Manual for Version 1.1

3. Type a unique name in the Group Name text box.
4. Edit the permissions by clicking each drop-down menu and selecting one of the choices listed.
5. Click Save. If you do not want to save, click Cancel.
Deleting a Group
Note: You must remove all associated users before deleting a group.
Complete the following steps to delete an existing group:
1. Access the Group page.
2. Select the group you want to delete from the content list.
3. Click Delete.
A dialog box will ask if you are sure you want to delete the record.
4. Click Yes if you are sure you want to delete the group. Otherwise, click No.
UsersThe User page allows the user administrator to manage user accounts and group assignments.
A user can be active, deactivated or locked out.• Active: An active user is able to interact with the Reveos system. Active users can be enabled for the
device, application, or both, and assigned to groups.
• Deactivated: A deactivated user is unable to use the Reveos system and is automatically removedfrom all groups.
• Locked out: If a user is locked out of the Reveos System Manager, he or she is active and retains allgroup memberships, but is not able to log in to the Reveos System Manager. The user will be able tooperate the device if he or she is enabled to use the device and is a member of the Device Operatorgroup.
A user can be enabled or disenabled to operate the Reveos device and use the Reveos System Managerapplication. If a user is enabled for the device or the application, but deactivated, the system statussupersedes the component status.• Enabled: If a user is enabled for the device, the application, or both, he or she is allowed to perform
tasks allowed by the groups to which he or she is assigned.
• Disenabled: If a user is not enabled for a system component, he or she is not able to operate/use thatcomponent.
In the content list, all active users are shown in black. To view all users, including those who have beendeactivated, select the Show all users check box below the content list. Users who have been deactivatedare shown in red.
Assigning Permissions
Reveos® Automated Blood Processing System Operator's Manual for Version 1.1 6-11

1
2
3
Figure 6-6: User page with active users shown in black and deactivated users shown in red
1 Active user
2 Deactivated user
3 Details explaining that the selected user is not active
Adding a New User
Complete the following steps to add a new user:
1. Access the User page.
2. Click New.
3. Assign a user name and type it into the User Name text box. The user name cannot contain spaces.The user name must be unique and cannot be the user name assigned to an active or deactivateduser.
4. Select Yes or No to enable or disenable the user for Reveos System Manager.
If the user is enabled in the Reveos System Manager, you must assign a user name for the applicationand you must assign a password. The user name on the application must be between 1 and 120unicode characters and cannot contain any spaces. Complete the following steps to create apassword:
a. Type a password in the Password text box. The password must be between 5 and 20 unicodecharacters.
b. Retype the password in the Verify Password text box.
Note: To revoke a user's rights to use the Reveos System Manager, a user administrator can either removethe user from the appropriate group or disenable the user from using the Reveos System Manager on his or heruser page.
5. Select Yes or No to enable or disenable the user for the device.
If the user is enabled for the device, you must assign the user an Operator ID. The Operator ID isthe badge number or ID number that an operator will scan before he or she uses the device.
6. Assign the user to a group or groups.
To assign a user, select the check box next to the appropriate group(s). To view the associatedpermissions, click the drop-down menu next to the group name.
Configuring the Reveos System Manager
6-12 Reveos® Automated Blood Processing System Operator's Manual for Version 1.1

Note: To revoke a user's rights to use the Reveos device, a user administrator can either remove the userfrom the appropriate group or disenable the user from using the Reveos device on his or her user page.
1
2
Figure 6-7: Permissions are shown when the group is expanded
1 Group name
2 Group permissions
7. Click Save. If you do not want to save, click Cancel.
Editing Existing User Information
Complete the following steps to edit existing user information:
1. Access the User page.
2. Click on the user name in the “Users” list.
3. Click Edit.
4. Update the information as needed.
5. Click Save. If you do not want to save, click Cancel.
Revoking a User's Permissions
There are two ways to revoke a user's permissions:• Deactivate the user
• Disenable the user from using the device and/or Reveos System Manager
Deactivating a User in Reveos System Manager
Users can be deactivated. However, a user cannot be permanently deleted. Perform the following steps todeactivate a user:
Assigning Permissions
Reveos® Automated Blood Processing System Operator's Manual for Version 1.1 6-13

1. Access the User page.
2. Select the user from the Users list.
3. Click Deactivate.
A dialog box will ask if you are sure you want to remove the user.
4. Click Yes if you are sure you want to deactivate the user. Otherwise, click No.
The user is removed from the active users list. To view all users, both active and deactivated, select theShow all users check box shown below the content list. All deactivated user names are shown in red.
Restoring a User
Users can always be restored after being removed. Complete the following steps to restore a user:
1. Access the User page.
2. Select the Show all users check box on the left side of the page.
3. Select the user that you want to restore. The user names of all deactivated users are shown in red.
4. Click Restore.
Once the user is restored, the user name will be shown in black.
Unlocking a User Account
If a user attempts to log in to an account more times than are allowed in the application configuration,the user will be locked out of the account. A user administrator can unlock an account by completing thefollowing steps:
1. Access the User page.
2. Select the user name on the account you want to unlock. This name will appear in the content list.
3. Click Unlock.
You can reset the user’s password at this time, but it is not required. To reset the user’s password,
1. Type a new password in the Password text box.
2. Retype the new password in the Verify Password text box.
3. Click Save. If you do not want to save, click Cancel.
Configuring the Reveos System Manager
6-14 Reveos® Automated Blood Processing System Operator's Manual for Version 1.1

Configuring the General DeviceThe General Device page allows the user to manage various versions of the Reveos device. Access theGeneral Device page to configure all devices, to enable or disable the keyboard, and to set the number ofbarcodes that can be skipped on each device type.
1 2
3
4
Figure 6-8: General Device page
Table 6-1 lists the elements on the General Device page.
Table 6-1: General Device configuration options
Section/Option Name Default Function
1 Devices content list Not applicable Lists the device versions available forconfiguration.
2 Device Generation Not applicable Shows the currently selected device version.
3 Enable Keyboard Yes Allows the user to input data into the Reveosdevice via the touch-screen keyboard.
4 Skip Barcode Not Allowed Allows the user to specify whether the operatorwill be allowed to bypass a barcode (or allbarcodes) in a protocol configurationsequence. While loading a blood bag set, anoperator is allowed to skip one, skip all, or notskip any barcodes depending on thisconfiguration.
Enabling and Disabling the Keyboard1. Access the General Device page.
2. Click Edit.
3. Click the Enable Keyboard drop-down menu.
4. To allow keyboard entry, select Yes. To disallow keyboard entry, select No.
Configuring the General Device
Reveos® Automated Blood Processing System Operator's Manual for Version 1.1 6-15
Skip Barcode1. Access the General Device page.
2. Click Edit.
3. Select one of the following choices from the Skip Barcode drop-down menu:• One: The device allows for one barcode to be skipped
• All: The device allows for all barcodes to be skipped
• Not Allowed: The device never allows for any barcodes to be skipped
4. Click Save. If you do not want to save, click Cancel.
Configuring the Reveos System Manager
6-16 Reveos® Automated Blood Processing System Operator's Manual for Version 1.1

Configuring Individual DevicesEach individual Reveos device is registered in Reveos System Manager and appears on the IndividualDevice page. Any time a new device is connected to Reveos System Manager, it must be configured. Onthis page, the content list provides a master list of all devices that are connected. The details sectionprovides device specific information for the corresponding content list item.
At the top of the details section, there is a box titled Device Information. This information is provided byTerumo BCT and cannot be altered by the user.
1
2
Figure 6-9: Individual Device page
1 Device Information section2 Device Configuration section
Any information listed in the Device Configuration section can be edited by an authorized user.
Modifying the Device NameWhen a device is first connected to the system, its assigned name will be its serial number. An authorizeduser can modify the device name and change it to anything he or she chooses. There are no restrictions tothe name that can be given to each device.
Complete the following steps to modify the device name:
1. Access the Individual Device page.
2. Click Edit.
3. Type a unique name in the Device Name text box.
4. Click Save. If you do not want to save, click Cancel.
Enabling and Disenabling DevicesWhen a device is enabled in the Reveos System Manager application, it can be configured in the ReveosSystem Manager application and can be used to process whole blood in the laboratory. If a device is notenabled in the Reveos System Manager application, it cannot be configured in Reveos System Manageror process blood in the laboratory.
Configuring Individual Devices
Reveos® Automated Blood Processing System Operator's Manual for Version 1.1 6-17

When a device is first connected to the system, it will not be enabled. An authorized user must manuallyenable each device.
Complete the following steps to enable or disenable a device:
1. Access the Individual Device page.
2. Select the device you want to enable or disenable from the content list.
3. Click Edit.
4. Click the Enabled drop-down menu.
To enable the device, select Yes. To disenable the device, select No.
5. Click Save. If you do not want to save, click Cancel.
Assigning a LanguageYou must select the language that you want to appear on the device touch screen. The languages shownin the drop-down menu are the languages that are available on the device and are not associated withReveos System Manager.
Complete the following steps to change the language:
1. Access the Individual Device page.
2. Click Edit.
3. Select a language from the Language drop-down menu.
4. Click Save. If you do not want to save, click Cancel.
Assigning a FacilityYou must specify the facility location of each device. The facility information is configured on theFacility page.
Complete the following steps to select or modify a facility:
1. Access the Individual Device page.
2. Click Edit.
3. Select the appropriate facility from the Facility drop-down menu.
4. Click Save. If you do not want to save, click Cancel.
Repeat all of the steps in this section until each Reveos device listed on the Individual Device page isconfigured.
Configuring the Reveos System Manager
6-18 Reveos® Automated Blood Processing System Operator's Manual for Version 1.1
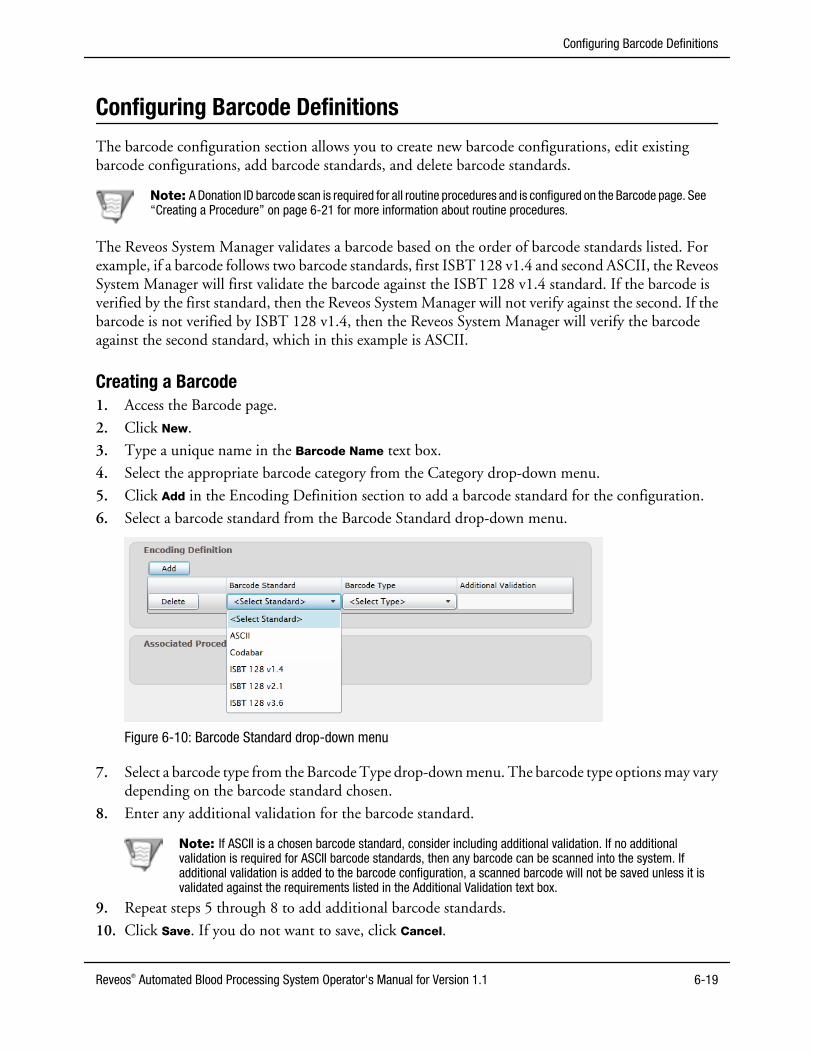
Configuring Barcode Definitions
The barcode configuration section allows you to create new barcode configurations, edit existingbarcode configurations, add barcode standards, and delete barcode standards.
Note: A Donation ID barcode scan is required for all routine procedures and is configured on the Barcode page. See“Creating a Procedure” on page 6-21 for more information about routine procedures.
The Reveos System Manager validates a barcode based on the order of barcode standards listed. Forexample, if a barcode follows two barcode standards, first ISBT 128 v1.4 and second ASCII, the ReveosSystem Manager will first validate the barcode against the ISBT 128 v1.4 standard. If the barcode isverified by the first standard, then the Reveos System Manager will not verify against the second. If thebarcode is not verified by ISBT 128 v1.4, then the Reveos System Manager will verify the barcodeagainst the second standard, which in this example is ASCII.
Creating a Barcode1. Access the Barcode page.
2. Click New.
3. Type a unique name in the Barcode Name text box.
4. Select the appropriate barcode category from the Category drop-down menu.
5. Click Add in the Encoding Definition section to add a barcode standard for the configuration.
6. Select a barcode standard from the Barcode Standard drop-down menu.
Figure 6-10: Barcode Standard drop-down menu
7. Select a barcode type from the Barcode Type drop-down menu. The barcode type options may varydepending on the barcode standard chosen.
8. Enter any additional validation for the barcode standard.
Note: If ASCII is a chosen barcode standard, consider including additional validation. If no additionalvalidation is required for ASCII barcode standards, then any barcode can be scanned into the system. Ifadditional validation is added to the barcode configuration, a scanned barcode will not be saved unless it isvalidated against the requirements listed in the Additional Validation text box.
9. Repeat steps 5 through 8 to add additional barcode standards.
10. Click Save. If you do not want to save, click Cancel.
Configuring Barcode Definitions
Reveos® Automated Blood Processing System Operator's Manual for Version 1.1 6-19
In many cases, only one barcode standard is selected for each barcode configuration. However, it ispossible to set up multiple barcode standards for each barcode configuration. If multiple barcodes arelisted for one barcode configuration, add the most restrictive barcode definition first. The ReveosSystem Manager validates each barcode in the order set by the administrator.
To validate the format of a Codabar or ASCII barcode, you can add additional validation. For questionsregarding additional validation, contact customer support.
Editing a Barcode1. Access the Barcode page.
2. Select the barcode you want to edit from the content list.
3. Click Edit.
4. Update information in the drop-down menus and text box as needed.
5. Click Save. If you do not want to save, click Cancel.
Deleting a Barcode1. Access the Barcode page.
2. Select the barcode you want to delete from the content list.
3. Click Delete.A dialog box appears to confirm that you want to delete the barcode.
4. Click Yes if you are sure that you want to delete the barcode. Otherwise, click No.
Configuring the Reveos System Manager
6-20 Reveos® Automated Blood Processing System Operator's Manual for Version 1.1

Configuring Procedures
A procedure is a unique configuration of a protocol and barcode information that can be associated withone or more Reveos devices. An operator selects a procedure to determine the components to beproduced by the device. The Procedure page allows an authorized user to assign protocols and barcodesto a procedure and then assign that procedure to an individual device. When you click on a specificprocedure in the content list, the details of that procedure appear in the Details section.
Creating a Procedure1. Access the Procedure page.
2. Click New.
3. Create a unique name for your procedure. The name can be between 1 and 23 ASCII characters.
4. Choose whether or not you want to enable the procedure.
Note: If the procedure is enabled, then it can be assigned to compatible devices listed in the AssociatedDevices section. If it is not enabled, then it cannot be assigned to any devices.
5. Choose the protocol you want to associate with the procedure.
Once the protocol is selected, the appropriate blood component bag icons will appear in thecarousel as shown in the following figure. The barcodes for each bag are configured in steps 9through 12.
6. Designate whether the procedure is routine or non-routine . From the Routine drop-down menu,select one of the following options:• Select Yes if the procedure is used to process whole blood and should be recorded in Reveos
System Manager.
• Select No if the procedure is used during training or service and should not be recorded inReveos System Manager.
Note: Donation ID is required for all routine procedures. If a Donation ID barcode is not configured, see “Creating a Barcode” on page 6-19.
7. Designate whether or not a duplicate Donation ID is allowed. From the Duplicate Donation IDdrop-down menu, select one of the following options:• Select Allowed if the operator is allowed to enter the same Donation ID in more than one
bucket in the same procedure.
• Select Not Allowed if all the Donation ID scans must be unique within the same procedure.8. Configure the Operator ID barcode, if desired.
a. Click the Operator ID icon.
b. Select the barcode configuration from the Barcode Name drop-down menu. These barcodeconfigurations are configured on the Barcode page.
c. Determine whether the barcode is critical. If it is, select the Critical check box. Otherwise, leaveit blank.
d. Click the X in the top right corner to close the scan configuration dialog box.
Configuring Procedures
Reveos® Automated Blood Processing System Operator's Manual for Version 1.1 6-21

9. Define the barcode configuration for each bag:
a. Select the bag you want to configure.
b. Click the quadrant where the barcode is located on the blood bag.
A dialog box appears with the name of the quadrant.
Figure 6-11: Whole blood bag with the left quadrant selected
c. Select the barcode configuration from the Barcode Name drop-down menu. These barcodeconfigurations are configured on the Barcode page.
d. Determine whether the barcode is critical. If it is, select the Critical check box. Otherwise, leaveit blank.
Note: If a barcode is marked “critical”, it cannot be skipped when an operator is loading a blood bag setinto the device.
e. Verify that the scan sequence number automatically populates in the quadrant once the scanhas been configured.
Note: The scan sequence is determined by the order in which the barcode is configured within theprocedure.
f. Repeat steps 9a through 9e if an additional barcode configuration is needed for this quadrant.Each quadrant can have up to two barcodes.
g. Click the X in the top right corner to close the scan configuration dialog box.
h. Repeat steps 9a through 9g for all other quadrants on the blood bag, as needed.
Configuring the Reveos System Manager
6-22 Reveos® Automated Blood Processing System Operator's Manual for Version 1.1

10. Click the next blood component bag icon to configure the scan sequence, if needed.
Note: The scan sequence is determined by the order in which the barcode is configured within the procedure.
11. Repeat steps 9a through 9h as needed.
12. Repeat steps 9 and 10 for all remaining blood component bags in the procedure.
13. Proceed to the Associated Devices section of the Procedure page to associate the procedure with theappropriate devices.
14. Click Save when the procedure configuration is complete. If you do not want to save the procedure,click Cancel.
Editing a Procedure1. Access the Procedure page.
2. Select the procedure you want to edit.
3. Click Edit.
4. Update the information as needed.
5. Click Save. If you do not want to save, click Cancel.
Associated DevicesThe Associated Devices section of the Procedure page allows you to assign the selected procedure to thedevice(s) of your choice. You may need to scroll down to see this menu.
Associating a Device with a Procedure
1. Access the Procedure page.
2. Select a procedure from the content list.
3. Click Edit.
The Associated Devices menu shows all of the devices as they are configured on the IndividualDevice page.
4. Select the devices you want to associate with the procedure by selecting the check box next to thedevice name.
If a device name is dimmed, it means that the device software is unable to perform the protocolselected in the procedure.
5. Click Save. If you do not want to save, click Cancel.
If a device is not enabled, it will not appear in the Associated Devices list, and the procedure cannot beassociated with it. To enable the device, see “Enabling and Disenabling Devices” on page 6-17.
Configuring Procedures
Reveos® Automated Blood Processing System Operator's Manual for Version 1.1 6-23

Configuring the Reveos System Manager
6-24 Reveos® Automated Blood Processing System Operator's Manual for Version 1.1

7Searches and Reports
Reveos® Automated Blood Processing System Operator's Manual for Version 1.1 7-1

The Reports TabThe Reveos System Manager provides access to data retrieved from the Reveos device from the Reports
tab. From here, a user with the required permissions can view, print, and export information related toprocedures on the Reveos device.
The Reports tab is shown below.
Figure 7-1: Reports tab
Searches and Reports
7-2 Reveos® Automated Blood Processing System Operator's Manual for Version 1.1
Reports OverviewThe Reveos System Manager allows users to generate, view, and download reports. To access the reportpages, click the Reports tab in the Reveos System Manager. The following pages are available:• Calendar View: This page provides an overview of all the Insight reports and Custom Query reports
that have run or are scheduled to run. From the Calendar View you can view the status of a report,display a report, and download a report. For more information on the Calendar View, see “Calendar View” on page 7-11.
• Insight Report: These reports contain selected information from the Reveos System Manager aswell as selected information that is retrieved from the Reveos device after processing. Insight reportscan be created for one-time use or saved for later use. They can be run instantly or scheduled inadvance. For details on creating and scheduling an Insight report, see “Creating and Scheduling anInsight Report” on page 7-4.
• Custom Query Report: These reports contain information that is requested via a customized SQLquery. A user must have knowledge of SQL before creating queries for these reports. Custom Queryreports can be created for one-time use or saved for later use. They can be run instantly or scheduledin advance. For details on creating and scheduling a Custom Query report, see “Creating andScheduling a Custom Query” on page 7-7.
Reports Overview
Reveos® Automated Blood Processing System Operator's Manual for Version 1.1 7-3

Managing Reports
Configuring a Report
Insight reports and Custom Query reports in Reveos System Manager can be scheduled to run at apredefined time and interval or can be saved as unscheduled reports and run on-demand.
If you choose to schedule a report, the Insight report page and Custom Query report page have thefollowing sections that allow you to select the time when the report will run and select a data range.• Range of Recurrence: This section allows you to configure the date and time when the report will
be scheduled to run. The report will be scheduled to run at the frequency specified in theRecurrence Pattern section until the end date. The From and To dates can span over the course ofseveral years, if needed. If No end date is selected, the report will be scheduled to run until it isdeleted. Scheduled reports will begin running at the time configured in this section.
• Recurrence Pattern: This section allows you to configure the frequency of the report. Reports canbe scheduled to run hourly, daily, weekly, monthly, or quarterly.
• Data Range: (Insight report only). This section allows you to configure the time frame for the datathat is being pulled from the Reveos System Manager into the Insight report.
• Report Information: This section is visible once the report has been saved. It shows the date andtime when the report last ran and shows an icon to indicate whether it was successful or not. If thereport is scheduled, the next scheduled run time is displayed.
Locale/Culture Settings
Insight reports use the browser culture settings to determine the date and time format used in thegenerated report.• Scheduled reports are generated using the culture settings specified by the browser session at the
time the report was created or last edited.
• Unscheduled reports are generated using the culture settings specified in the active browser sessionat the time you click Run Now.
Creating and Scheduling an Insight ReportComplete the following steps to schedule a new Insight report:
1. Access the Insight Report page.
2. Click New.
3. Decide whether you want to schedule the report or run the report without scheduling.The Schedule check box is automatically selected.
4. Type a unique name for the report in the Report Name text box.
5. Select the range of recurrence for the report by entering or selecting a date in the From box and a datein the To box. Click the calendar icon to view a monthly calendar.
Searches and Reports
7-4 Reveos® Automated Blood Processing System Operator's Manual for Version 1.1

6. Select a report time in the Range of Recurrence section. On each day that a report is scheduled torun, it will run at this time. (It may also run at additional times if you choose Hourly as therecurrence pattern in the following step.)
Figure 7-2: Range of Recurrence section and Recurrence Pattern section
7. Choose one of the following Recurrence Patterns and enter the corresponding information:• Hourly: The report will be scheduled to run multiple times a day. Type the number of hours
for the interval at which you want reports to run. For example, if you select to repeat the reportevery 8 hours, the report will run every 8 hours starting at the date and time specified in theRange of Recurrence section.
• Daily: The report will be scheduled to run every day at the time specified in the Range ofRecurrence section. For example, if you select 12:00 AM as the report time, the report will runevery day at 12:00 a.m.
• Weekly: Select the day or days of the week on which you want to run the report. To selectmultiple days, select multiple check boxes. For example, if you select Monday and Wednesday,the report will run every Monday and Wednesday.
• Monthly: Select the week and the day of the month on which you want to run the report. Youcan choose between the first, second, third, fourth, and last week of the month. Then you mustselect the day. For example, if you select Last in the first drop-down menu and Tuesday in thesecond, the report will run on the last Tuesday of every month.
• Quarterly: Type the number of days after the quarter has ended on which you want the reportto run. For example, if you select 3 days, the report will run 3 days after the quarter ends. Thequarters are January 1 to March 31, April 1 to June 30, July 1 to September 30, and October 1to December 31.
8. Select the Time Frame for the report in the Data Range section. Choose one of the following:• Custom Date Range: Select the time frame by choosing between hours, days, weeks, or
months. Enter a number for the chosen time frame.
• Week-to-Date: This time frame starts on Sunday at 12:00 a.m. and ends at the time the reportis run.
Managing Reports
Reveos® Automated Blood Processing System Operator's Manual for Version 1.1 7-5

• Month-to-Date: This time frame starts on the first day of the month at 12:00 a.m. and ends atthe time the report is run.
• Quarter-to-Date: This time frame starts on the first day of the quarter at 12:00 a.m. and endsat the time the report is run. The quarters are January 1 to March 31, April 1 to June 30, July 1to September 30, and October 1 to December 31.
• Year-to-Date: This time frame starts on January 1 at 12:00 a.m. and ends at the time the reportis run.
Figure 7-3: Time Frame drop-down menu
9. Select Include offline procedures only if you want to include any data that was collected while theReveos device was offline.
Note: Offline information can be retrieved only after the Reveos device is reconnected to the Reveos SystemManager.
10. Click Save. If you do not want to save the report, click Cancel.
Creating and Saving an Unscheduled Insight ReportComplete the following steps to save an unscheduled report:
1. Access the Insight Report page.
2. Click New.
3. Clear the Schedule check box.
4. Type a unique name for the report in the Report Name text box.
5. Select the time frame for the report in the Data Range section. Choose one of the following:• Custom: Select the time frame by choosing a start date and time and an end date and time.
• Week-to-Date: This time frame starts on Sunday at 12:00 a.m. and ends at the exact time thereport is run.
• Month-to-Date: This time frame starts on the first day of the month at 12:00 a.m. and ends atthe exact time the report is run.
• Quarter-to-Date: This time frame starts the first day of the quarter at 12:00 a.m. and ends atthe exact time the report is run. The quarters are as follows: January 1 to March 31, April 1 toJune 30, July 1 to September 30, and October 1 to December 31.
• Year-to-Date: This time frame starts on January 1 at 12:00 a.m. and ends at the exact time thereport is run.
6. Click Save.
Searches and Reports
7-6 Reveos® Automated Blood Processing System Operator's Manual for Version 1.1

This Insight report will run only once. Since this report will not run at scheduled times, offlineprocedures cannot be included in this Insight report.
Creating and Scheduling a Custom QueryCustom Query reports contain specific information that is requested through the use of a SQL query.Knowledge of SQL is required. Review the Reveos® System Manager End User Reporting Reference Guideand Data Dictionary before creating custom SQL queries.
Figure 7-4: Custom Query Report page
Complete the following steps to create a scheduled custom query:
1. Access the Custom Query Report page.
2. Click New.
3. Type a name in the Query Name text box.
4. Type or paste the SQL query into the Custom SQL Script box.
Note: For supported fields and tables refer to the Reveos® System Manager End User Reporting ReferenceGuide and Data Dictionary.
5. Decide whether you want to schedule the report or run the report without scheduling.
The Schedule check box is automatically selected.
Managing Reports
Reveos® Automated Blood Processing System Operator's Manual for Version 1.1 7-7

6. Select the range of recurrence for the report by entering or selecting a date in the From box and a datein the To box. Click the calendar icon to view a monthly calendar.
7. Select a report time in the Range of Recurrence section. On each day that a report is scheduled torun, it will run at this time. (It may also run at additional times if you choose Hourly as therecurrence pattern in the following step.)
8. Choose one of the following Recurrence Patterns and enter the corresponding information:• Hourly: The report will be scheduled to run multiple times a day. Type the number of hours
for the interval at which you want reports to run. For example, if you select to repeat the reportevery 8 hours, the report will run every 8 hours starting at the date and time specified in theRange of Recurrence section.
• Daily: The report will be scheduled to run every day at the time specified in the Range ofRecurrence section. For example, if you select 12:00 AM as the report time, the report will runevery day at 12:00 a.m.
• Weekly: Select the day or days of the week on which you want to run the report. To selectmultiple days, select multiple check boxes. For example, if you select Monday and Wednesday,the report will run every Monday and Wednesday.
• Monthly: Select the week and the day of the month on which you want to run the report. Youcan choose between the first, second, third, fourth, and last week of the month. Then you mustselect the day. For example, if you select Last in the first drop-down menu and Tuesday in thesecond, the report will run on the last Tuesday of every month.
• Quarterly: Type the number of days after the quarter has ended on which you want the reportto run. For example, if you select 3 days, the report will run 3 days after the quarter ends. Thequarters are January 1 to March 31, April 1 to June 30, July 1 to September 30, and October 1to December 31.
9. Click Save. If you do not want to save, click Cancel.
Creating and Saving an Unscheduled Custom Query ReportComplete the following steps to save an unscheduled report:
1. Access the Custom Query Report page.
2. Click New.
3. Type a unique name for the report in the Query Name text box.
4. Type or paste the SQL query in the Custom SQL Script box.
5. Clear the Schedule check box.
6. Click Save.
Editing a ReportComplete the following steps to edit a report:
1. Access the Insight report or Custom Query report page.
2. Select the report you want to edit.
3. Click Edit.
4. If you selected a Custom Query report, edit the existing SQL query information as needed.
5. Edit the report schedule as needed.
Searches and Reports
7-8 Reveos® Automated Blood Processing System Operator's Manual for Version 1.1

6. Click Save. If you do not want to save, click Cancel.
Deleting a ReportComplete the following steps to delete a report:1. Access the Insight report or Custom Query report page.2. Select the report you want to delete.3. Click Delete.
A dialog box appears to confirm that you want to delete the query.4. Click Yes if you are sure that you want to delete the query. Otherwise, click No.
Running a Report
All reports are stored on the server. The location of these files is configured when the Reveos SystemManager is installed.
Note: Generated reports can be downloaded or displayed from the Calendar View and saved to a location of yourchoice.
An authorized user can also run a report that has already been saved. Complete the following steps to runa report on demand:
1. Access the Insight Report page or the Custom Query Report page.
2. Select the report that you want to run from the content list.
Note: If the report you want to run is not in the content list, see “Creating and Saving an Unscheduled InsightReport” on page 7-6 or “Creating and Saving an Unscheduled Custom Query Report” on page 7-8 to configurethe report.
3. Click Run Now.
The report will be saved in a predetermined folder on the server and will be listed on the Calendar Viewpage.
Report Information
At the bottom of each saved report page, there is a section titled Report Information.
This section contains the following information about the saved report:• Status icon: Indicates whether the last report ran successfully or whether it is scheduled to run.
• Last Report: Shows the date and time of the last report.
• Next Report: Shows the date and time of the next scheduled report. If this is an unscheduled report,no date and time is displayed.
Report Status
When a report is running, the report status icon(s) appears in the upper-left corner of the Reveos SystemManager window. See Table 2-8 for a complete list of status icons.
While a report is being processed, you can add other reports to the queue or you can navigate to otherpages without affecting report processing.
Managing Reports
Reveos® Automated Blood Processing System Operator's Manual for Version 1.1 7-9

If multiple reports are being exported, multiple icons may appear. For example, if one report is completeand one report is still running, the Report Complete icon and the Report In Progress icon appearsimultaneously.
When you click a status icon, the Report Status dialog box appears.
Figure 7-5: The Report Status dialog box
A user cannot access reports from this dialog box. This dialog box shows only the status of the report. Toremove a report from the status report list, select the report and click Remove. To view a report, access theCalendar View page.
Searches and Reports
7-10 Reveos® Automated Blood Processing System Operator's Manual for Version 1.1

Calendar View
The Calendar View page provides an overview of all Insight reports and Custom Query reports that havebeen run or are scheduled to run. On the calendar you can see the status of a report, download a report,and display a report. To access the Calendar View, click the Reports tab in the Reveos System Manager,then choose Calendar View from the menu bar.• indicates an Insight report.
• indicates a Custom Query report.
Next to the time and name of the report, an icon is displayed to indicate the report status.• indicates that the report ran successfully.
• indicates that the report did not run successfully.
• indicates that the report is scheduled to run.
Note: The Calendar View does not update in real time. To refresh the Calendar View, navigate to another tab andthen return to the Calendar View page.
Note: You will be automatically logged out of Reveos System Manager if you refresh the browser page, for example,by clicking F5 or clicking the Refresh button.
Note: The Calendar View does not display reports that are scheduled to recur every hour by default.
You can select which reports are displayed on the calendar.• To show only selected reports on the calendar, select or clear the check boxes in the drop-down list
at the upper-right corner of the calendar.
• To view all the reports on the calendar, select the Select All check box from the drop-down list at theupper-right corner of the calendar.
Downloading a Report from the Calendar ViewTo download an Insight report or a Custom Query report:
1. Access the Calendar View page.
2. Right-click on the report name and click Download Report.
A dialog box allows you to confirm that you want to save the file.
3. Click OK.
4. Browse to the location where you want to save the file, then click Save.
Note: The default file name is reportname-timestamp-identifier.csv where timestamp is the date andtime the report was generated.
5. Open the csv file from the saved location.
Note: The csv file that is downloaded from the Calendar View page contains all the data that was requestedwhen the report was run. For example, it contains all columns for an Insight report or the requested columns fora Custom Query report.
Calendar View
Reveos® Automated Blood Processing System Operator's Manual for Version 1.1 7-11
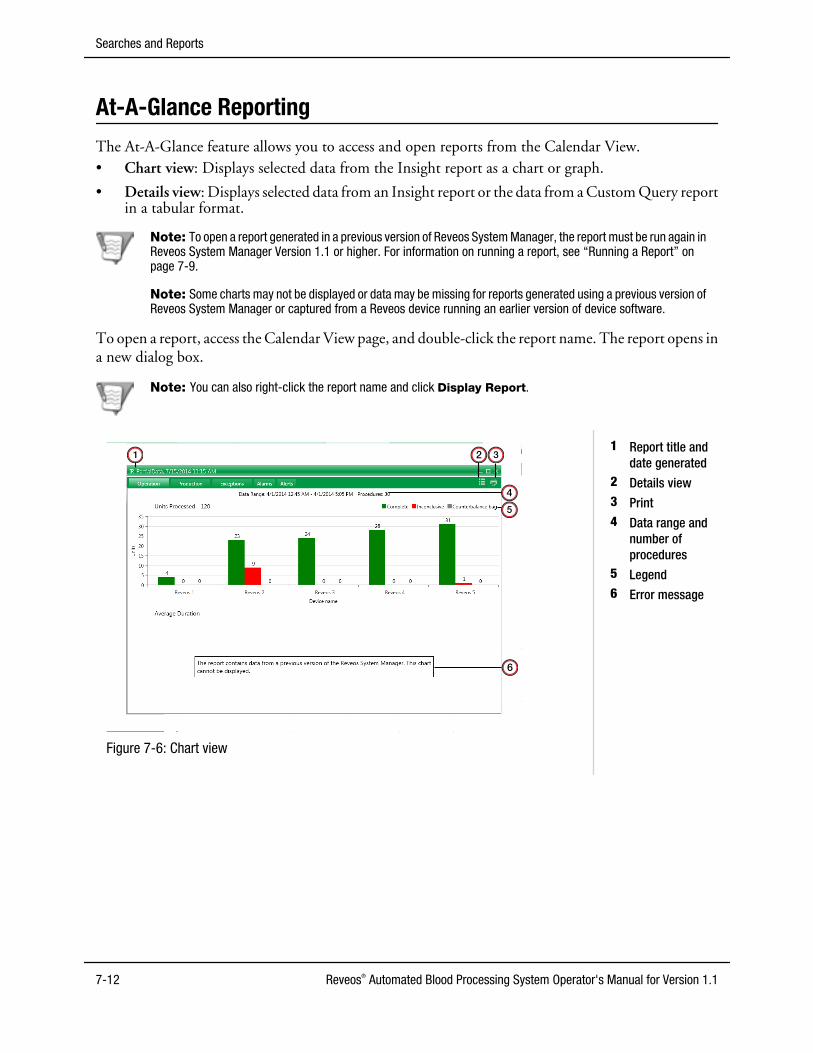
At-A-Glance Reporting
The At-A-Glance feature allows you to access and open reports from the Calendar View.• Chart view: Displays selected data from the Insight report as a chart or graph.
• Details view: Displays selected data from an Insight report or the data from a Custom Query reportin a tabular format.
Note: To open a report generated in a previous version of Reveos System Manager, the report must be run again inReveos System Manager Version 1.1 or higher. For information on running a report, see “Running a Report” onpage 7-9.
Note: Some charts may not be displayed or data may be missing for reports generated using a previous version ofReveos System Manager or captured from a Reveos device running an earlier version of device software.
To open a report, access the Calendar View page, and double-click the report name. The report opens ina new dialog box.
Note: You can also right-click the report name and click Display Report.
1 2 3
4
5
6
Figure 7-6: Chart view
1 Report title anddate generated
2 Details view3 Print4 Data range and
number ofprocedures
5 Legend6 Error message
Searches and Reports
7-12 Reveos® Automated Blood Processing System Operator's Manual for Version 1.1

1 2 3
4
Figure 7-7: Details view
1 Filter2 Chart view3 Export4 Column headers
Chart View
The chart view is available for Insight reports and can be accessed from the Operation, Production,Exceptions, Alarms, and Alerts tabs, with different details related to each tab.
Printing the Chart View
The chart view on all tabs can be printed. All charts on the tab will be printed and these may print onmultiple pages. Printing is in landscape orientation for the Operation, Production, Alarms, and Alertscharts, and in portrait orientation for the Exceptions charts.To print the chart view, navigate to the required tab and click Print.
Note: The recommended paper sizes for printing the chart view are Letter, Legal, A4 and B4.
At-A-Glance Reporting
Reveos® Automated Blood Processing System Operator's Manual for Version 1.1 7-13

Operation
The Operation page shows charts and details related to the number of units processed by the Reveosdevice and the average duration of procedures. To access the Operation page, open a report from theCalendar View page and click the Operation tab.
Figure 7-8: Operation page
The Operation page contains two charts:• The Units Processed chart shows the number of units processed by all Reveos devices. The total
number of units processed is displayed next to the chart title. For each device, the number of unitsprocessed is divided into these three bars in the chart:• Complete: The unit was successfully processed. These units are identified by a green bucket
icon on the device at the end of a procedure.
• Inconclusive: The product quality of the unit was inconclusive. These units are identified by ayellow bucket icon on the device at the end of a procedure.
• Counterbalance bag: A counterbalance bag was loaded.
• The Average Duration chart shows the average duration of a procedure listed by operator. Thenumber of procedures for each operator is shown above the bar in the chart. Each bar is divided bycolor into four procedure stages, and you can position your cursor over each bar to see more detailedaverage duration information. Procedure stages include:• Loading: The time that elapsed from when the operator scanned the first barcode until the
Start button on the device was pressed.
• Processing: The time that elapsed from when the operator touched the Start button to whenthe device lid opened.
• Idle: The time that elapsed from when the device lid opened to when the operator opened thelid of the first bucket.
• Unloading: The time that elapsed from when the operator opened the lid of the first bucket towhen the operator opened the lid of the last bucket.
Searches and Reports
7-14 Reveos® Automated Blood Processing System Operator's Manual for Version 1.1

For the charts on the Operations page, you can sort the data in more than one way. For example, on theAverage Duration chart, click Number of Procedures in the chart legend, to sort the data according to thetotal number of procedures per Operator ID from largest to smallest. Click Loading in the chart legendto sort the data according to the average duration of the Loading stage per Operator ID from largest tosmallest.
Production
The Production page shows charts and details related to product volumes, the number of componentsproduced, and the Platelet Yield Index of units produced by the Reveos device. To access the Productionpage, open a report from the Calendar View, and click the Production tab.
The Production page contains three charts.• The Average Product Volume chart shows the average volume of each component by procedure.
You can position your cursor over the bars on the chart to see the average volume plus or minus twostandard deviations (± 2 σ) for each product. You can sort the chart data in more than one way. Forexample, click Plasma in the chart legend to sort the data according to Plasma volume by procedurefrom largest volume to smallest volume.
• The Components chart shows the number of components produced.
• The Platelet Yield Index chart shows the percentage of units that had a Platelet Yield Index in thespecified range for 3C procedures. You can position your cursor over the bars on the chart to see theaverage Platelet Yield Index plus or minus two standard deviations (± 2 σ) for the procedure.
At-A-Glance Reporting
Reveos® Automated Blood Processing System Operator's Manual for Version 1.1 7-15

Exceptions
The Exceptions page shows charts and details related to exceptions that occurred during processing onthe Reveos device. To access the Exceptions page, open a report from the Calendar View, and click theExceptions tab.
Figure 7-9: Exceptions page
The Exceptions page contains information related to the following exceptions:• Duplicated units: More than one unit with the same Donation ID was processed during a single
procedure. The Exception Information shows the Donation ID, the number of times the unit wasduplicated, and the date and time of the procedure. The Operator ID, Device Name, BucketNumber, and Unit Status are shown for each instance of the duplicated unit; this information canbe expanded or collapsed by clicking the arrow to the left of the Donation ID.
• Reprocessed units: A unit with the same Donation ID was processed in multiple procedures. TheException Information shows the Donation ID and the number of times the unit was reprocessed.The Processing Date, the Operator ID, Device Name, Bucket Number, and Unit Status are shownfor each procedure during which the unit was run.
Note: If a unit is both a duplicated unit and a reprocessed unit—for example, the Donation ID is shown inmultiple buckets in the same procedure and is also shown in multiple procedures—the bucket number andstatus will not be available.
• Inconclusive sealed units: A unit has been processed and sealed but the product quality of theplasma unit is inconclusive. This exception is due to either lipemic plasma or a misloaded linesensor. The inconclusive sealed unit exception does not apply if your system is configured not toprocess these units or not to seal the plasma tubing. The Exception Information shows the DeviceID. The Processing Date, Donation ID, Operator ID, Bucket Number, and Unit Status is shownfor each unit.
Searches and Reports
7-16 Reveos® Automated Blood Processing System Operator's Manual for Version 1.1

• Unrecognized barcodes: Units with barcodes that were scanned while the Reveos device wasoffline, and the barcode scans are not in a recognized format. The Exception Information shows theProcessing Date, Donation ID, Operator ID, Bucket Number, and Unit Status.
• Skipped barcodes: Units with Donation IDs or Operator IDs that were skipped. This exceptioncan only occur if skipped barcodes is set to "allowed" and the barcode is not configured as “critical”in the Reveos System Manager configuration settings. For more information on skipped barcodes,see Table 6-1. The Exception Information shows the Processing Date, Donation ID, Operator ID,Bucket Number, and Unit Status.
• Temperature out of range: Units that were processed for which the basin temperature was eithertoo high or too low. The Exception Information shows Processing Date, Donation ID, OperatorID, Unit Status, Maximum temperature, and Minimum temperature.
At-A-Glance Reporting
Reveos® Automated Blood Processing System Operator's Manual for Version 1.1 7-17

Alarms Page
The Alarms page shows charts and details related to alarms that occur on the Reveos device. To access theAlarms page, click the Alarms tab.
Figure 7-10: Alarms page
The Alarms page contains three charts.• The Total Alarms chart shows how many alarms of each alarm number occurred. Position your
cursor over a bar in the chart to display the name of the corresponding alarm. The alarm data issorted by number of instances from highest to lowest.
• The Alarms by Operator chart shows how many alarms occurred for each Operator ID, and theAlarms by Device chart shows how many alarms occurred on each device. The number of unitsprocessed is displayed in parentheses above the bars. In these charts, each bar represents one of thefollowing phases:• Preprocessing: The phase that begins when the device is started up or the Next Procedure
button is touched and ends when the Start Procedure button is touched.
• Processing: The phase that begins when the Start Procedure button is touched and ends whenthe device lid opens.
• Post-processing: The phase that begins when the device lid opens and ends when the NextProcedure button is touched.
For the Alarms by Operator and Alarms by Device charts on the Alarms page, you can sort the data inmore than one way. For example, click Preprocessing in the chart legend to sort the data according to thenumber of alarms that occurred during the preprocessing phase from largest to smallest.
Searches and Reports
7-18 Reveos® Automated Blood Processing System Operator's Manual for Version 1.1

Alerts Page
The Alerts page shows charts and details related to alerts that occur on the Reveos device. To access theAlerts page, click the Alerts tab.
Figure 7-11: Alerts page
The Alerts page contains three charts.• The Total Alerts chart shows how many alerts of each alert number occurred. Position your cursor
over a bar in the chart to display the name of the corresponding alert. The alert data is sorted bynumber of instances from highest to lowest.
• The Alerts by Operator chart shows how many alerts occurred for each Operator ID, and the Alertsby Device chart shows how many alerts occurred on each device. The number of units processed isdisplayed in parentheses above the bars. In these charts, each bar represents one of the followingphases:• Preprocessing: The phase that begins when the device is started up or the Next Procedure
button is touched and ends when the Start Procedure button is touched.
• Processing: The phase that begins when the Start Procedure button is touched and ends whenthe device lid opens.
• Post-processing: The phase that begins when the device lid opens and ends when the NextProcedure button is touched.
For some of the charts on the Alerts page, you can sort the data in more than one way. For example, clickPreprocessing in the chart legend to sort the data according to the number of alerts that occurred duringthe preprocessing phase from largest to smallest.
At-A-Glance Reporting
Reveos® Automated Blood Processing System Operator's Manual for Version 1.1 7-19

Details View
The details view is available for all reports.• For Insight reports, it can be accessed from the Operation, Production, Exceptions, Alarms, and
Alerts tabs, with different details related to each tab. Details of the columns that are available foreach tab are shown in “Available Data Types for Insight Reports in the Details View” onpage 7-21.
• For Custom Query reports, the details view is the only available view based on the parametersdefined by the SQL query.
Complete the following steps to view the details of a report in a table:
1. Open the report from the Calendar View.
2. If you have selected an Insight report, click the View Details button.
Filtering and Sorting Data in Details View
Filters allow you to select specific data from the details view to view or export. You can perform thefollowing actions to sort and filter the data:• Sort the data: Click on a column header to sort the data in the table according to type of data in the
column. Click the column header again to switch between ascending and descending sort order. Asmall arrow is shown at the top of the column to indicate sort order.
• Reorder the columns: Drag a column header to the left or the right to change the order of thecolumns.
• View or hide a column: Right-click any column header to display a list of available columns. Click acolumn name in the list to view or hide that column.
• Add a filter to a column:
1. Click the filter button on the column header.
2. Set the required filter criteria, or select the values you wish to display.
3. Click Filter.
• Remove the filter from a column:
1. Click the filter button on the column header.
2. Click Clear Filter.
Exporting Data from the Details View
To export data from the details view:
1. Click the Export button.The File Download dialog box appears.
2. Click OK.
3. Browse to the location where you want to save the file, then click Save.
Note: The default file name is reportname-timestamp-identifier.csv where timestamp is the date andtime the report was generated.
Searches and Reports
7-20 Reveos® Automated Blood Processing System Operator's Manual for Version 1.1

4. Open the csv file from the saved location.
Note: The csv file downloaded from the details view will contain only the data that was on screen when thereport was exported.
Available Data Types for Insight Reports in the Details View
The following tables contains a list of data types available in the Insight report and the correspondingheadings in the Details view.
Table 7-1: Column headings in the Operation, Production, and Exception Details view and thecorresponding headings in the Insight report
Operation, Production, and Exceptions Details View Insight Report CSV File
Processing Date Processing_Date
Donation ID Wb_Donation_Id
Operator ID Operator_Id
Device Name Machine_Id
Bucket Number Bucket_Number
Number of Alarms Num_Alarms
Number of Alerts Num_Alerts
Unit Status Unit_Status
Sealed Welding_Status
Procedure Name Configuration_Name
Plasma Volume Plasma_Volume
Platelet Volume Platelet_Volume
Platelet Yield Index Platelet_Yield_Index
Residual Leukocyte Volume Leukocyte_Volume
Procedure Duration Total_Procedure_Time
Maximum Basin Temperature Max_Basin_Temp
Minimum Basin Temperature Min_Basin_Temp
Lot Number Wb_Lot_Number
At-A-Glance Reporting
Reveos® Automated Blood Processing System Operator's Manual for Version 1.1 7-21

Table 7-1: Column headings in the Operation, Production, and Exception Details view and thecorresponding headings in the Insight report (continued)
Operation, Production, and Exceptions Details View Insight Report CSV File
Skipped Barcodes Were_Barcodes_Skipped
Software Version Software_Version
Facility Name Facility_Name
Table 7-2: Column headings in the Alarms and Alerts Details view and the corresponding headings in theInsight report
Alarms and Alerts Details View Insight Report CSV File
Processing Date Processing_Date
Donation ID Wb_Donation_Id
Operator ID Operator_Id
Lot Number Wb_Lot_Number
Bucket Number Bucket_Number
Device Name Machine_Id
Unit Status Unit_Status
Sealed Welding_Status
Procedure Name Configuration_Name
Plasma Volume Plasma_Volume
Platelet Volume Platelet_Volume
Platelet Yield Index Platelet_Yield_Index
Residual Leukocyte Volume Leukocyte_Volume
Note: Alert and Alarm descriptions are stored in the Reveos system database but do not form part of the Insightreport.
Searches and Reports
7-22 Reveos® Automated Blood Processing System Operator's Manual for Version 1.1

Donation ID SearchThe Donation ID search allows you to search for a single unit based on its Donation ID. The search isavailable on any page in the Reveos System Manager. The Donation ID search will accept either thescanned or the decoded Donation ID.• Scanned Donation ID: This includes the barcode identifier, the barcode, and any flag characters,
for example the “=” character.
• Decoded Donation ID: This includes the barcode only, without the barcode identifier. If thebarcode type is set to “Donation ID with Flag,” the flag characters must be included as part of theDecoded Donation ID.
For further information on configuring barcodes in Reveos System Manager, see “Configuring BarcodeDefinitions” on page 6-19.
1. Type or scan the Donation ID into the Donation ID text box at the upper-right corner of thescreen.
Note: Type the barcode exactly as it appears, including any special characters. Typing an incompleteDonation ID will not return any results.
2. Click the Search button or press Enter.
The details for the unit, including any alerts or alarms that occurred during the procedure, aredisplayed in a dialog box, as shown in Figure 7-12.
If the unit is not found, the message “No results returned” is displayed to the left of the Donation IDtext box.
Figure 7-12: Results of a Donation ID search
The following information is displayed in the dialog box:• Selected details from the Insight report, including the Processing Date, Operator ID, and Device
Name.
• If the Donation ID was duplicated or reprocessed, an entry for each time it was processed.
• A list of alarms and alerts that occurred during processing of the unit, displayed in the Alarms andAlerts section. Click the arrow button to expand or collapse the list of alarms and alerts. If no alarmsor alerts occurred during processing of the unit, the alarms and alerts section header is dimmed.
To close the results of the Donation ID search, click the X in the upper-right corner of the dialog box.
Donation ID Search
Reveos® Automated Blood Processing System Operator's Manual for Version 1.1 7-23

Searches and Reports
7-24 Reveos® Automated Blood Processing System Operator's Manual for Version 1.1

8System Specifications
Reveos® Automated Blood Processing System Operator's Manual for Version 1.1 8-1

System Specifications
Table 8-1: Device equipment ratings
Specification Type Value
Humidity 10% to 80% RH non-condensing
Operating temperature Recommended 18 °C to 27 °C (64.4 °F to 80.6 °F)
Storage temperature 0 °C to 60 °C (32 °F to 140 °F)
Environment Indoor use only
Elevation Up to 2,000 m
Rated voltage 200 V AC to 240 V AC (± 10%), 50/60 Hz
Main power circuit breaker Characteristic C, Rated 16A, 30 mA RCCD (European Union)
Rated input (typical) 1.2 kVA
Rated input (maximum) 6.0 kVA
Power plug IEC 60309 2P + E, 200 V to 250 V, 50/60 Hz, 16A, IP44
Ventilation (per device installed) Adequate to dissipate 1.0 KW in normal operation
Minimum clearance envelope (perimeteraround the device)
152 mm (6 in)
Minimum floor area needed for
installation (D x W)
991 × 1,143 mm (39 × 45 in)
Safety standards IEC 61010-1:2010, IEC 61010-2-20:2006
EMC standard IEC 61326-1:2006
Ethernet connection RJ45
CAT-5e, ANSI/TIA/EIA 568 B.2
Barcode scanner connection 4 Pin Lemo
Ingress protection rating Ordinary Protection Only
System Specifications
8-2 Reveos® Automated Blood Processing System Operator's Manual for Version 1.1

Table 8-2: Device performance specifications
Specification Type Value
Maximum size (W × H × D) 686 × 1,000 × 826 mm (27 × 39.4 × 32.5 in)
Maximum weight (without cooling fluid) 295 kg (650 lb)
Pollution degree 2
Equipment class I
Installation category II
Heat output 1 kW (3,400 Btu per hour)
Accuracy of time measurement ± 5 seconds
Rotor speed 0 to 2,900 rpm (± 50 rpm)
Floor slope 1.5° max
Leak detector • Capable of detecting ≤ 100 mL of fluid in the centrifuge basin
• Detects fluid leaks where moisture reaches the sensor on the wall ofthe centrifuge basin
Noise level < 65 dBA
Whole Blood processing volume 450 mL ± 10% plus 63 mL CPD
Table 8-3: External Cooled Water Source specifications
Specification Value
Fluid Must use filtered deionized water or filtered distilled water. Water must befiltered with a screen that is 80 mesh or finer. Ethylene glycol or propyleneglycol may be added in concentrations up to 30% by weight. Do not usetap water.
Incoming water temperature 2 °C to 10 °C (36 °F to 50 °F)
Minimum flow rate 4 liters per minute per device
Incoming water pressure 3.5 bar to 6.5 bar (50 psi to 95 psi)
System Specifications
Reveos® Automated Blood Processing System Operator's Manual for Version 1.1 8-3

EMC InformationThe Reveos device is intended for use in the electromagnetic environment specified below. Thecustomer or the user of the Reveos device should assure that it is used in such an environment.
Table 8-4: EMC Emissions Guidance
Emissions Test Compliance Electromagnetic Environment—Guidance
RF emissions
CISPR 11
Group 1 The Reveos device uses high frequenciesonly for its internal function (e.g., computertiming signals and internal communication).The RF emissions meet the requirements ofCISPR 11.
RF emissions
CISPR 11
Group 2 The Reveos device emits intermittent, short-term RF energy whenever the tubing sealersare activated at the end of a processing cycle.Nearby electronic equipment may beaffected.
RF emissions
CISPR 11
Class A The Reveos device is suitable for use in allestablishments other than residential andthose directly connected to the public low-voltage power supply network that suppliesbuildings used for residential purposes.
System Specifications
8-4 Reveos® Automated Blood Processing System Operator's Manual for Version 1.1

The Reveos device is intended for use in the electromagnetic environment specified below. Thecustomer or the user of the Reveos device should assure that it is used in such an environment.
Table 8-5: EMC Electromagnetic Immunity
Immunity Test Test LevelIEC 61326
ComplianceLevel
Electromagnetic Environment—Guidance
Electrostatic discharge (ESD)IEC 61000-4-2
± 4 kV contact
± 4 kV air
± 4 kV contact
± 4 kV air
Electrical fast transient/burstIEC 61000-4-4
± 0.5 kV forinput/output lines
± 1 kV for powersupply lines
± 0.5 kV forinput/output lines
± 1 kV for powersupply lines
Mains power quality should be that of atypical blood center or hospital environment.
SurgeIEC 61000-4-5
± 0.5 kV line to line(DM)
± 1 kV line to earth(CM)
± 0.5 kV line to line(DM)
± 1 kV line to earth(CM)
Mains power quality should be that of atypical blood center or hospital environment.
Voltage dips, short interruptions, and voltage variations on power supply input linesIEC 61000-4-11
0% during half cycle
0% during 1 cycle
70% during25/301 cycles
0% during250/3002 cycles
0% during half cycle
0% during 1 cycle
70% during25/301 cycles
0% during250/3002 cycles
Mains power quality should be that of atypical blood center or hospital environment.
If the user of the Reveos device is aware offrequent power interruptions at his or herfacility and requires continued operationduring power mains interruptions, it isrecommended that the Reveos device bepowered from a suitably rated uninterruptiblepower supply.
Note: UT is the AC mains voltage prior to application of the test level.1 25/30 cycles means 25 cycles for the 50 Hz test and 30 cycles for the 60 Hz test.2 250/300 cycles means 250 cycles for the 50 Hz test and 300 cycles for the 60 Hz test.
EMC Information
Reveos® Automated Blood Processing System Operator's Manual for Version 1.1 8-5

The Reveos device is intended for use in the electromagnetic environment specified below. Thecustomer or the user of the Reveos device should assure that it is used in such an environment.
Table 8-6: Guidance and Manufacturer’s Declaration—Electromagnetic Immunity (1 of 2)
Immunity Test Test LevelIEC 61326
ComplianceLevel
Electromagnetic Environment—Guidance
Portable and mobile RF communicationsequipment should be used no closer to anypart of the Reveos device, including cables,than the recommended separation distancecalculated from the equation applicable to thefrequency of the transmitter.
Conducted RFIEC 61000-4-6
3 Vrms
150 kHz to 80 MHz
3 V
For calculations based on this equation, see Table 8-8.
Radiated RFIEC 61000-4-3
3 V/m (80 MHz to1 GHz)
3 V/m (1.4 GHz to2 GHz)
1 V/m (2.0 GHz to2.7 GHz)
3 V/m (80 MHz to1 GHz)
3 V/m (1.4 GHz to2.7 GHz)
80 MHz to 800 MHz
For calculations based on this equation, see Table 8-8.
Note: At 80 MHz and 800 MHz, the higher frequency range applies.Note: These guidelines may not apply in all situations. Electromagnetic propagation is affected by absorption and reflectionfrom structures, objects and people.
System Specifications
8-6 Reveos® Automated Blood Processing System Operator's Manual for Version 1.1
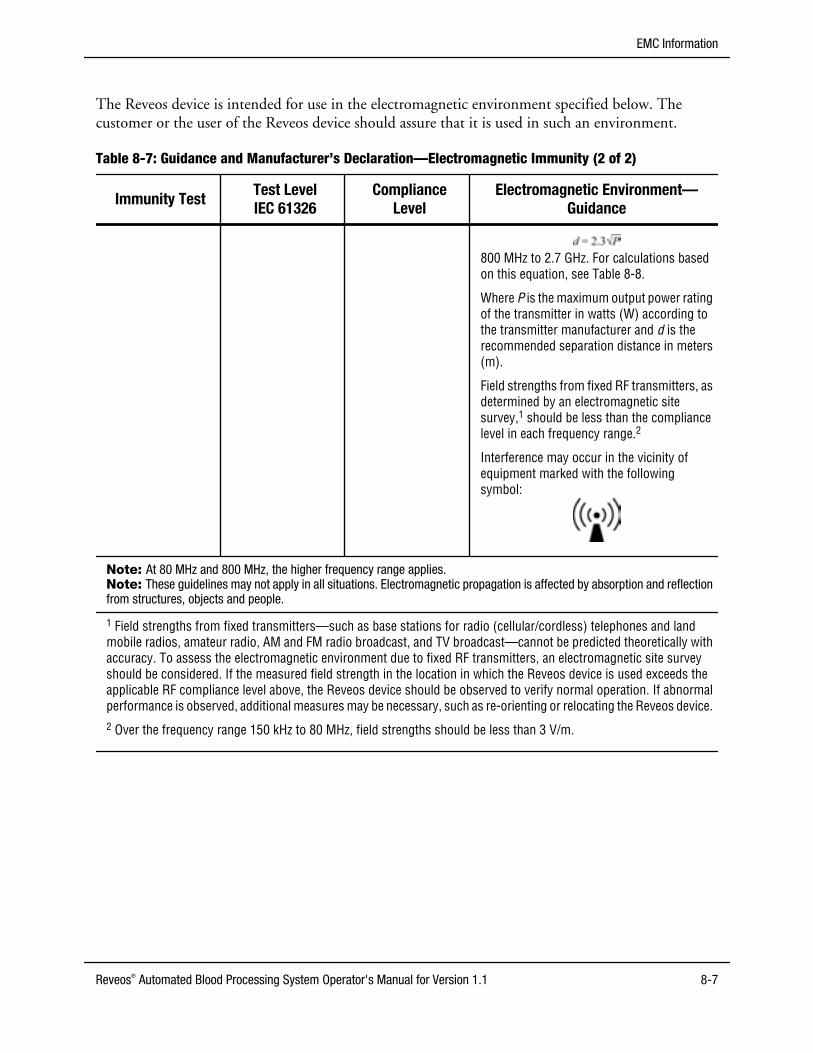
The Reveos device is intended for use in the electromagnetic environment specified below. Thecustomer or the user of the Reveos device should assure that it is used in such an environment.
Table 8-7: Guidance and Manufacturer’s Declaration—Electromagnetic Immunity (2 of 2)
Immunity Test Test LevelIEC 61326
ComplianceLevel
Electromagnetic Environment—Guidance
800 MHz to 2.7 GHz. For calculations basedon this equation, see Table 8-8.
Where P is the maximum output power ratingof the transmitter in watts (W) according tothe transmitter manufacturer and d is therecommended separation distance in meters(m).
Field strengths from fixed RF transmitters, asdetermined by an electromagnetic sitesurvey,1 should be less than the compliancelevel in each frequency range.2
Interference may occur in the vicinity ofequipment marked with the followingsymbol:
Note: At 80 MHz and 800 MHz, the higher frequency range applies.Note: These guidelines may not apply in all situations. Electromagnetic propagation is affected by absorption and reflectionfrom structures, objects and people.
1 Field strengths from fixed transmitters—such as base stations for radio (cellular/cordless) telephones and landmobile radios, amateur radio, AM and FM radio broadcast, and TV broadcast—cannot be predicted theoretically withaccuracy. To assess the electromagnetic environment due to fixed RF transmitters, an electromagnetic site surveyshould be considered. If the measured field strength in the location in which the Reveos device is used exceeds theapplicable RF compliance level above, the Reveos device should be observed to verify normal operation. If abnormalperformance is observed, additional measures may be necessary, such as re-orienting or relocating the Reveos device.2 Over the frequency range 150 kHz to 80 MHz, field strengths should be less than 3 V/m.
EMC Information
Reveos® Automated Blood Processing System Operator's Manual for Version 1.1 8-7

The Reveos device is intended for use in an electromagnetic environment in which radiated RFdisturbances are controlled. Based on immunity test data, it is unlikely that commonly usedcommunication devices such as cell phones or WiFi or Bluetooth equipped devices meeting 802.11g/nwill adversely affect the Reveos device. If, however interference is noticed or higher powered devices suchas two-way radios are to be used in the vicinity of the Reveos device, the customer or the user of theReveos device can help prevent electromagnetic interference by maintaining a minimum distancebetween portable and mobile RF communications equipment (transmitters) and the Reveos device asrecommended below, according to the frequency and maximum output power specified by themanufacturer of the communications equipment.
Table 8-8: Recommended Separation Distances Between Portable and Mobile RF CommunicationsEquipment and the Reveos Device
Rated maximum output power oftransmitter W
Separation distance according to frequency oftransmitter m
150 kHz to80 MHz
80 MHz to800 MHz
800 MHz to2.7 GHz
0.01 0.12 0.12 0.23
0.1 0.38 0.38 0.73
1 1.2 1.2 2.3
10 3.8 3.8 7.3
100 12 12 23
For transmitters rated at a maximum output power not listed above, the recommended separation distance d in meters(m) can be estimated using the equation applicable to the frequency of the transmitter, where P is the maximum outputpower rating of the transmitter in watts (W) according to the transmitter manufacturer.
Note: At 80 MHz and 800 MHz, the separation distance for the higher frequency range applies.Note: These guidelines may not apply in all situations. Electromagnetic propagation is affected by absorption and reflectionfrom structures, objects and people.
System Specifications
8-8 Reveos® Automated Blood Processing System Operator's Manual for Version 1.1

Symbols and certificationThe symbols shown in Table 8-9 may appear on the Reveos Automated Blood Processing System, asapplicable.
Table 8-9: Symbols and Certification
Symbol Definition
Indicates that the item has a specific orientation. This way up.
Indicates that the item is fragile. Handle with care.
Indicates that the product must be kept dry.
Stacking of the transport package is not allowed and no load should be placed onthe transport package.
Indicates that the equipment is subject to directive 2002/96/EC concerning wasteelectrical and electronic equipment (WEEE) and must be disposed of accordingly.
Indicates that the product packaging complies with European Directive 94⁄62⁄ECfor packaging and packaging waste.
Indicates the manufacturer of the product when accompanied by the name of themanufacturer.
Indicates the date of manufacture (or sterilization date, if the product is sterile)when accompanied by a specific date.
Indicates that the user must read the instructions for use before application.
Indicates that the user must read the accompanying documents before operatingthe device to ensure safe operation.
Indicates the product was manufactured in accordance with Annex II of theEuropean Council Directive 93/42/EEC, as amended.
Indicates that the machine requires an alternating supply current.
Indicates coolant inlet temperature.
Symbols and certification
Reveos® Automated Blood Processing System Operator's Manual for Version 1.1 8-9

Table 8-9: Symbols and Certification (continued)
Symbol Definition
Indicates a port intended for connection to an Ethernet network.
Indicates a cooling fluid circuit. The icon on the right labels the water inlet wherethe cool water goes into the device. The icon on the left labels the water outletwhere the water comes out after it has cooled the device.
Indicates a functional ground conductor terminal. Used to provide a voltagereference. This terminal is not to be used for a protective grounding function.
Indicates a protective earth ground. Located near chassis’ main groundinglocation and at other protective ground points.
Indicates that power is switched on.
Indicates that power is switched off.
Indicates risk of electric shock.
Indicates the product catalog number when accompanied by a number.
Indicates the European Authorized Representative of the product whenaccompanied by the name of the European Authorized Representative.
System Specifications
8-10 Reveos® Automated Blood Processing System Operator's Manual for Version 1.1

Glossary
AAccess drawer The drawer located at the bottom of the device that gives
technical service representatives access to communicationshardware.
Alarm A system message about a condition that will prevent or enda processing procedure and may compromise productquality. If the alarm occurs before the procedure has begun,you can perform the action recommended on the touchscreen and re‑try. If an alarm that affects all units occurswhile the procedure is in progress, the procedure will end. Ifa bucket-specific alarm occurs while the procedure is inprogress, processing will end in that bucket only.
Alert A system message about a condition that requires yourattention. You can record the alert number, perform theaction shown on the touch screen, and touch the Continue
button to proceed.
Application A software program. In this operator’s manual, “theapplication” refers to the Reveos System Manager software.
BBag posts Posts that hold the whole blood bag in place inside the
bucket during a procedure.
Balancing system The feature of the Reveos device that allows for self-balancing instead of manual balancing and calibration. Thissystem aids in precision separation.
Blood component bag holder A compartment that holds the plasma bag, the interimplatelet bag, the RBC bag, the leukoreduction filter, and theresidual leukocyte bag during a processing procedure.
Reveos® Automated Blood Processing System Operator's Manual for Version 1.1 Glossary-1

Bucket The compartment that holds the whole blood bag during aprocedure. Each bucket contains a hydraulic bladder that isfilled with hydraulic fluid during a procedure, which allowsfor expression of the blood components.
Bucket lid The lid that closes over the whole blood bag during aprocedure.
Bucket sensors Photocells that monitor the interface between the red bloodcells and plasma in the bucket.
Bucket-lid latch A mechanism that keeps the bucket lid securely closedduring a procedure.
CCalendar View A Reveos System Manager page that provides an overview of
all reports that have run or are scheduled to run.
Centrifuge basin The large compartment inside the Reveos device thatcontains the rotor and the parts that are attached to therotor.
Counterbalance bag A bag that is used in place of a blood bag set when theoperator chooses to run a procedure with fewer than fourwhole blood units. Counterbalance bags help to balance therotor as it spins.
DDevice lid The large lid that covers the rotor where centrifugation takes
place. It locks while the device is in use and opensautomatically when the procedure is complete.
Dry check procedure A procedure based on a protocol that spins the centrifuge fora pre-configured duration. This procedure helps theoperator to determine whether all the fluid has beenremoved from the device after cleaning.
EExternal cooled water source An external system that cools and recirculates fluid to aid in
the temperature control of the device.
HHydraulic bladder The flexible container in each bucket that fills with
hydraulic fluid during processing. The hydraulic bladderexpands to aid in the expression of blood components intothe blood component bags.
Glossary-2 Reveos® Automated Blood Processing System Operator's Manual for Version 1.1

IInterim platelet unit (IPU) A platelet unit that results from processing a unit of whole
blood on the Reveos device. After Reveos processing, theIPU is ready for further processing, including rest andagitation, pooling with 3 to 5 other IPUs, and filtration withthe Platelet Pooling Set.
KKeyboard Entry screen The screen that allows you to enter information manually
into the system. The Keyboard Entry screen is available onlyif it is configured in the Reveos System Manager.
LLid system This system consists of the device lid, the device-lid latch,
and the device-lid lock.
Line sensors Sensors that detect component interfaces and verify that thetubing is loaded.
Loading area The upper part of the rotor, where blood bag sets andcounterbalance bags are loaded. The loading area includesthe buckets, blood component bag holders, valves, linesensors, and tubing guides.
MManual entry The method used to enter data when the Reveos System
Manager is temporarily disconnected from or notcommunicating with the Reveos device or when the barcodescanner attached to the device is not working.
OOperator The person who performs a processing procedure on the
device.
PPage A web page. In this operator’s manual, “page” refers to a web
page in the Reveos System Manager software, which is web-based. “Screen” is used to refer to the touch screen on theReveos device.
Permissions The ability to access a particular function or specific datawithin the Reveos System Manager application software.
Plasma line Plasma tubing.
Reveos® Automated Blood Processing System Operator's Manual for Version 1.1 Glossary-3

Plasma product Plasma that is leukoreduced and ready for storage after aprocessing procedure.
Platelet line Platelet tubing.
Platelet tubing router A part on the loading area of the rotor that helps the operatorproperly route the platelet tubing when loading a blood bagset.
Platelet Yield Index (PYI) An index based on the estimated platelet yield of anindividual interim platelet unit (IPU). The PYI may be usedto develop a method for selecting IPUs for pooling.
Procedure The combination of a specific protocol, Reveos deviceinformation, and specific barcodes. Procedures areconfigured in the Reveos System Manager application andthen transferred to the Reveos device. An operator selects aprocedure to separate whole blood into components on thedevice.
Protocol A pre-determined set of system operations that result in aparticular set of products.
RRBC product Red blood cells that are ready for additive solution,
filtration, and storage after a processing procedure.
Residual leukocyte line Residual leukocyte tubing.
Residual leukocytes A by-product of a processing procedure that contains mostlywhite blood cells (WBC), with some plasma and red bloodcells (RBC).
Reveos System Manager The system administration application software that is partof the Reveos Automated Blood Processing System.
Rotor The inner part of the device, including the centrifuge,buckets, bucket lids and latches, sensors, valves, and tubingguides.
SScreen A touch screen. In this operator’s manual, “screen” refers to
the interactive display on the Reveos device. “Page” is usedto refer to a web page in the Reveos System Managersoftware.
SOP The abbreviation for standard operating procedure.
Stop button The red button near the touch screen that allows you to stopa procedure, if necessary.
System administrator A person at the blood center who is responsible forconfiguring the Reveos System Manager application. The
Glossary-4 Reveos® Automated Blood Processing System Operator's Manual for Version 1.1
system administrator can troubleshoot issues regardingdevice configuration, procedure configuration, and/or theReveos System Manager application permissions.
TTechnical representative A Terumo BCT representative who should be contacted if
there are any hardware failures or other issues that cannot befixed by an operator or system administrator.
Temperature control system The system that manages the basin temperature range.
Touch screen The interactive screen on the device that helps you monitorand interact with the system.
Tubing guide An object that helps guide blood bag set tubing within theReveos device to ensure optimal expression. Numeroustubing guides are located around the valves to help positionthe blood bag set properly during loading.
UUser administrator A person at the blood center who is responsible for
configuring users within Reveos System Manager. A useradministrator can manage user accounts and permissions.
VValves (sealing valves) The parts that hold the component bag tubing in place
during a processing procedure. They open and closeautomatically at different intervals to allow bloodcomponents to exit the whole blood bag and enter thecomponent bags. At the end of expression, they seal thetubing.
WWhole blood bag The bag on the blood bag set that is first used to collect whole
blood from a donor, and then used to separate the wholeblood into components.
Reveos® Automated Blood Processing System Operator's Manual for Version 1.1 Glossary-5

Glossary
Glossary-6 Reveos® Automated Blood Processing System Operator's Manual for Version 1.1
Index
Aaccess drawer 2-3
alarm, title bar icon 2-12
alarms 4-2, 4-3
Alarms by Device chart 7-18
Alarms by Operator chart 7-18
Alarms page 7-18
alarms, list of 4-9–4-24
alert, title bar icon 2-12, 4-2
Alerts by Device chart 7-18, 7-19
Alerts by Operator chart 7-18, 7-19
Alerts page 7-19
alerts, list of 4-4–4-9
associated devices 6-6, 6-23
audience and purpose 1-2
Average Duration chart 7-14
Average Product Volume chart 7-15
Bbag posts 2-4
Barcode Entry screen 2-5, 3-6, 3-7, 3-11
barcode scanner 2-3, 2-6, 3-7
barcodeconfiguring 6-16, 6-19creating 6-19critical 3-8, 3-9deleting 6-20editing 6-20skipped 7-17unrecognized 7-17
bladder, hydraulic 2-4
blood bag set 2-2, 3-13
blood component bag holder 2-4
blood spillcleaning procedure 5-6cleaning supplies 5-6
bucket 2-4, 3-18
bucket diagram 2-7, 3-9, 3-24
bucket lid 2-4, 3-18
bucket sensors 2-4
bucket-lid latch 2-4, 3-18
CCalendar View 7-11
casters 2-3, 3-3, 3-4
cautions, list of 1-5
centrifuge basin 2-4, 3-20
chartAlarms by Device 7-18Alarms by Operator 7-18Alerts by Device 7-18Alerts by Operator 7-18Average Duration 7-14Average Product Volume 7-15Components 7-15Platelet Yield Index 7-15Total Alarms 7-18Total Alerts 7-19Units Processed 7-14
cleaningblood spill 5-6routine 5-3supplies 5-3, 5-6
Components chart 7-15
Configuration tab 6-4, 6-5, 6-15, 6-17, 6-19, 6-21
configurationbarcode definitions 6-19dry check procedure 5-11facility 6-5general device 6-15individual device 6-17, 6-18procedure 6-21Reveos System Manager application 6-7, 6-17, 6-19, 6-21
Reveos® Automated Blood Processing System Operator's Manual for Version 1.1 Index-1

counterbalance bagloading 3-21unloading 3-29
cross-connector 2-5, 3-15, 3-28
Custom Query report 7-3, 7-7–7-9, 7-11scheduling 7-7
Ddevice lid 2-3, 3-20
document conventions 1-3
Donation IDduplicate 6-21search 7-23
dry check procedure, configuration 5-11
duplicate Donation ID 6-21
duplicate units 7-16
EEMC table 8-4–8-8
End of Procedure Summary screen 2-11, 3-26
Exceptions page 7-16
exceptionsduplicated units 7-16inconclusive sealed units 7-16reprocessed units 7-16skipped barcodes 7-17temperature out of range 7-17unrecognized barcodes 7-17
external cooled water source 2-14, 3-5
Ffacility
creating 6-5deleting 6-6editing 6-6
frangible connector 3-18
Ggeneral device, configuration 6-15
groupsee user group
Hhydraulic bladder 2-4
Iicons and buttons 2-5, 2-7–2-13
inconclusive sealed units 7-16
individual deviceconfiguration 6-17, 6-18disenabling 6-17enabling 6-17
Insight report 3-27, 7-3, 7-4, 7-6, 7-8, 7-9, 7-11, 7-21data types 7-21scheduling 7-4, 7-6, 7-8
installation 3-3
intended use 1-2
interim platelet unit 2-11, 3-26
interim platelet unit bag 2-7
IPUsee interim platelet unit
KKeyboard Entry screen 2-6, 2-9, 3-10, 6-15
Lline sensors 2-4
loading area 2-4
loadingblood bag set 3-13counterbalance bag 3-21
locked out of Reveos System Manager 6-7, 6-14
MMore Barcode Information screen 2-7, 2-8, 3-11
moving the Reveos device 3-3, 3-4
Nnavigation tools 2-16, 2-19
non-routine procedure 6-21
Ooffline, communication with Reveos System Manager 7-6
online, communication with Reveos System Manager 3-6, 7-6
outer lidsee device lid
Ppage, definition 1-4
password, changing 6-3
permissions, Reveos System Manager 6-9
plasma 2-2
plasma bag 2-7
plasma icon 2-11
Index-2 Reveos® Automated Blood Processing System Operator's Manual for Version 1.1

plasma valve 2-4, 3-16
platelet icon 2-11, 3-26
Platelet tubing router 2-4
platelet valve 2-4, 3-16
Platelet Yield Index 3-26
Platelet Yield Index chart 7-15
platelets 2-2
power switch 2-3, 3-5
preventive maintenance 5-2, 5-13
Procedure Progress screen 3-23
procedureblood spill cleaning 5-6configuring 6-21creating 6-21dry check 5-11editing 6-23non-routine 6-21routine 6-21selecting 3-6
process overview 2-2
Production page 7-15
PYIsee Platelet Yield Index
Rred blood cell bag 2-7
red blood cells 2-2
Report Status box 2-13, 7-9
reportsAt-A-Glance view 7-12, 7-14–7-16Calendar View 7-11, 7-12chart view 7-12–7-16, 7-18Custom Query report 7-3, 7-7–7-9, 7-11details view 7-12, 7-20, 7-21Exceptions page 7-16icons 2-12, 2-13Insight report 3-27, 7-4, 7-6, 7-8, 7-9, 7-11Insight report, data types 7-21Operation page 7-14Production page 7-15scheduling 7-4, 7-6–7-8
reprocessed units 7-16
residual leukocyte bag 2-11
residual leukocyte icon 2-11
residual leukocyte valve 2-4, 3-15
residual leukocytes 2-2
return of used product 1-6
Reveos System Manager 2-2, 2-12, 2-13, 2-17–2-19, 6-2, 6-4,6-7–6-15, 7-2–7-4
account lockout 6-7, 6-14buttons and icons 2-12, 2-13, 2-18configuration 6-4, 6-7, 6-15levels of access 6-9, 6-10
logging in 6-2logging out 6-2navigation 2-17–2-19opening 6-2password expiration 6-8permissions 6-9, 6-11, 6-13reports 7-2–7-4reports tab 7-2–7-4session timeout 6-7user group 6-9–6-11user, adding 6-12user, deactivating 6-13user, editing 6-13user, restoring 6-14
RGA number 1-6
rightssee permissions
rotor 2-4
routine cleaning 5-3
routine procedure 6-21
RSMsee Reveos System Manager
Sscreen
Barcode Entry 2-5, 3-6, 3-11definition 1-4End of Procedure Summary 2-11Keyboard Entry 2-6, 2-9, 3-10, 6-15More Barcode Information 2-7, 2-8, 3-11Procedure Progress 3-23Select Procedure 2-5, 2-9, 3-6Whole Blood Loading 2-10
sealing valve 2-5
Select Procedure screen 2-5, 2-9, 3-6
service information 5-12
skip barcode, configuring 6-16
skipped barcodes 7-17
software overview 2-2
software version 6-3
stop button 2-3, 3-24
symbols and certification 8-9
system overview 2-2
system specifications 8-2, 8-3
system tests 2-15, 3-5
Ttemperature out of range 7-17
Total Alarms chart 7-18
Total Alerts chart 7-19
touch screen 2-3, 2-5, 2-7–2-12, 3-10
Reveos® Automated Blood Processing System Operator's Manual for Version 1.1 Index-3

tubing guide 2-4, 2-5, 3-16plasma 2-4, 3-16platelet 2-4, 3-16residual leukocyte 2-4
UUnits Processed chart 7-14
unloadingblood bag set 3-27counterbalance bag 3-29
unrecognized barcodes 7-17
user groupsReveos System Manager 6-9, 6-11
user name 6-12
Vvalve
plasma 2-4, 3-16platelet 2-4, 3-16residual leukocyte 2-4, 3-15sealing 2-5
Wwarnings, list of 1-4
whole blood bag 2-7
Whole Blood Loading screen 2-10
Index-4 Reveos® Automated Blood Processing System Operator's Manual for Version 1.1

©2019 Terumo BCT, Inc. Part No. 986351-536B Reorder No. 988024-002B
Operator’s Manual for Version 1.1
Reveos® Automated Blood Processing System
Terumo BCT, Inc.10811 West Collins AvenueLakewood, Colorado 80215-4440USA
USA Phone: 1.877.339.4228Phone: +1.303.231.4357Fax: +1.303.542.5215
Terumo BCT Europe N.V.Europe, Middle East and AfricaIkaroslaan 411930 ZaventemBelgium
Phone: +32.2.715.05.90Fax: +32.2.721.07.70
Terumo BCT Latin America S.A.La Pampa 1517 – 12th FloorC1428DZEBuenos AiresArgentina
Phone: +54.11.5530.5200Fax: +54.11.5530.5201
TERUMOBCT.COM
Terumo BCT (Asia Pacific) Ltd.Room 3903-3903A, 39/FACE Tower, Windsor House311 Gloucester RoadCauseway Bay, Hong Kong
Phone: +852.2283.0700Fax: +852.2576.1311
Terumo BCT Japan, Inc.Takanawa Park Tower 13F 20-14, 3-chome,Higashi Gotanda, Shinagawa-ku,Tokyo, 141-0022 Japan
Phone: +81.3.6743.7890Fax: +81.3.6743.9800
Copyright © 2022 FDOKUMEN