Guidance for Performing Failure Mode and Effects Analysis ...
80
Disclaimer: Use of this tool is not mandated by CMS, nor does its completion ensure regulatory compliance. Overview: Failure Mode and Effects Analysis (FMEA) is a structured way to identify and address potential problems, or failures and their resulting effects on the system or process before an adverse event occurs. In comparison, root cause analysis (RCA) is a structured way to address problems after they occur. FMEA involves identifying and eliminating process failures for the purpose of preventing an undesirable event. When to use FMEA: FMEA is effective in evaluating both new and existing processes and systems. For new processes, it identifies potential bottlenecks or unintended consequences prior to implementation. It is also helpful for evaluating an existing system or process to understand how proposed changes will impact the system. Once you have identified what changes need to be made to the process or system, the steps you follow are those you would use in any type of PIP. Directions: Use this guide to walk through FMEA. FMEA is a tool that will allow nursing homes to proactively identify and reduce potential failures within an existing or a proposed process. FMEA is very similar to what most people do every day. We try to anticipate what might go wrong and do what we can to prevent this from happening or minimize the effects. For instance, before leaving your home for work, you listen to the radio or television to find out where there may be traffic jams or delays in public transportation. By knowing if there are problems on the road, you can make changes to your driving route or mode of transportation to ensure you get to work on time. By knowing what might go wrong, you can make changes that reduce or prevent something from going wrong. Facilities accredited by the Joint Commission or in states with regulations governing completion of FMEAs should refer to those requirements to be sure all necessary steps are followed. Below is a quick overview of the steps of FMEA. Steps Explanation 1. Select a process to analyze Choose a process that is known to be problematic in your facility or one that is known to be problematic in many facilities. 2. Charter and select team facilitator and team members Leadership should provide a project charter to launch the team. The facilitator is appointed by leadership. Team members are people who are directly involved in the process to be analyzed. 3. Describe the process Clearly define the process steps so that everyone on the team knows what is being analyzed. 4. Identify what could go wrong during each step of the process Here is where the people directly involved in the process describe the problems that can or do occur. 5. Pick which problems to work on eliminating The focus of improvements will be on those problems that happen quite often and/or or have a significant impact on resident safety when they do occasionally occur. 6. Design and implement changes to reduce or prevent problems The team determines how best to change the process to reduce the risk of residents being harmed. 7. Measure the success of process changes Like all improvement projects, the success of improvement actions is evaluated. Guidance for Performing Failure Mode and Effects Analysis with Performance Improvement Projects
-
Upload
khangminh22 -
Category
Documents
-
view
2 -
download
0
Transcript of Guidance for Performing Failure Mode and Effects Analysis ...

Disclaimer: Use of this tool is not mandated by CMS, nor does its completion ensure regulatory compliance.
Overview: Failure Mode and Effects Analysis (FMEA) is a structured way to identify and address potential problems, or failures and their resulting effects on the system or process before an adverse event occurs. In comparison, root cause analysis (RCA) is a structured way to address problems after they occur. FMEA involves identifying and eliminating process failures for the purpose of preventing an undesirable event. When to use FMEA: FMEA is effective in evaluating both new and existing processes and systems. For new processes, it identifies potential bottlenecks or unintended consequences prior to implementation. It is also helpful for evaluating an existing system or process to understand how proposed changes will impact the system. Once you have identified what changes need to be made to the process or system, the steps you follow are those you would use in any type of PIP. Directions: Use this guide to walk through FMEA. FMEA is a tool that will allow nursing homes to proactively identify and reduce potential failures within an existing or a proposed process. FMEA is very similar to what most people do every day. We try to anticipate what might go wrong and do what we can to prevent this from happening or minimize the effects. For instance, before leaving your home for work, you listen to the radio or television to find out where there may be traffic jams or delays in public transportation. By knowing if there are problems on the road, you can make changes to your driving route or mode of transportation to ensure you get to work on time. By knowing what might go wrong, you can make changes that reduce or prevent something from going wrong. Facilities accredited by the Joint Commission or in states with regulations governing completion of FMEAs should refer to those requirements to be sure all necessary steps are followed. Below is a quick overview of the steps of FMEA. Steps Explanation 1. Select a process to analyze Choose a process that is known to be problematic in your facility or
one that is known to be problematic in many facilities. 2. Charter and select team facilitator and team members
Leadership should provide a project charter to launch the team. The facilitator is appointed by leadership. Team members are people who are directly involved in the process to be analyzed.
3. Describe the process Clearly define the process steps so that everyone on the team knows what is being analyzed.
4. Identify what could go wrong during each step of the process
Here is where the people directly involved in the process describe the problems that can or do occur.
5. Pick which problems to work on eliminating
The focus of improvements will be on those problems that happen quite often and/or or have a significant impact on resident safety when they do occasionally occur.
6. Design and implement changes to reduce or prevent problems
The team determines how best to change the process to reduce the risk of residents being harmed.
7. Measure the success of process changes
Like all improvement projects, the success of improvement actions is evaluated.
Guidance for Performing Failure Mode and Effects Analysis with Performance Improvement Projects

Disclaimer: Use of this tool is not mandated by CMS, nor does its completion ensure regulatory compliance.
Step 1: Select a process to analyze Nursing homes are complex organizations and involve processes in many areas, such as resident care, business operations, environmental services, and others. You can use FMEA to examine processes in any of these areas to proactively reduce risks to patient safety and improve quality of care and quality of life for residents. When conducting FMEA on an existing process, consider selecting a process that is known to be problem-prone or potentially risky. For instance, do staff members consistently perform skin assessments promptly after admission? FMEA can be used to identify gaps and develop actions to make the process more efficient and safe. FMEA also helps to prepare for implementation of new processes. Are you concerned about how you will implement electronic health records? FMEA promotes systematic thinking in terms of “What challenges will we encounter? What can we do to meet these challenges? Ask your employees what activities or processes have not yet provided the desired result. They may tell you there is a safety concern related to monitoring cognitively impaired individuals who like to wander. You can do FMEA on your process for regularly assessing these residents and protecting those found to be vulnerable for injury or elopement. Helpful Tips:
o Be sure an identifiable process is chosen for FMEA. Instead of, “We will do FMEA on the problem of unexplained weight loss among some residents,” consider doing FMEA on the process used in your facility to prevent residents from having an unexplained weight loss. Unexplained weight loss is an outcome, not a process. A process is a series of actions or steps taken to achieve an end.
o Narrow the scope of FMEA as much as possible. For instance, when facilities try to do a project on a complex process such as medication administration the team often finds there are too many variables to take into account. The administration process can vary by unit, by type of medication, by time of day, and so on. It is best to narrow the focus. For instance, do FMEA on administration of a particular type of high-risk medication or a project on medication administration for a category of residents vulnerable to safety problems.
o To get employees to support FMEA and make necessary process changes, senior management should consult staff members about processes they believe are challenging.
o Consider using FMEA to evaluate new processes. It is a good technique for anticipating what could happen so processes can be made safer before full implementation.

Disclaimer: Use of this tool is not mandated by CMS, nor does its completion ensure regulatory compliance.
Step 2: Select people for the team Once it is decided that a Performance Improvement Project (PIP) will be conducted on a process using FMEA, leadership should begin by designating a facilitator for this team. Together they should create a charter that will help guide the team in managing the scope of the project and ensure the implemented changes reflect the FMEA findings. They should also work together in selecting staff to participate on the PIP team. The facilitator is often someone already involved in QAPI in the facility. As managers, supervisors, and staff members gain experience in doing FMEA, more people in the facility can be trained to serve as FMEA facilitators. The direct care staff selected to serve as team members should have day-to-day responsibilities for completing one or more steps in the process under analysis. A personal knowledge of what actually happens, not what should happen, is vital to the project success. The number of people on a team depends on the scope of the process review. There should be at least one representative from each employee group involved in the process. For instance, if the project is aimed at the process of assessing residents for fall risk and protecting those found to be high risk, the team should include representatives from nursing (RN or LPN), direct care staff (nurse assistant or CNA), housekeeping, and physical therapy. Consider physician involvement when the process includes steps that involve physicians. Helpful Tips:
o Minimize the number of management or supervisory level individuals on the team. Staff members may be inhibited from speaking up during critical discussions about process problems if their direct supervisor is in the room.
o Involve direct care staff and those who have direct experience with the process being analyzed. It is important to understand the process as it is actually performed, including why staff make mistakes and develop work-a-rounds.
o Include people from all shifts on the team, when possible. The experiences of staff working during the day may be much different than what happens during the evening and night shift. A successful FMEA is highly dependent on the ability of the team members to understand how a process now functions and what occasionally goes wrong.
o It can sometimes be tempting to complete FMEA by interviewing those involved in the process, without any formal meetings of the team. While this might move the analyses along quicker, the frank discussions that occur during team meetings are more likely to lead to a successful FMEA – one that actually improves the safety of a high-risk resident care process.

Disclaimer: Use of this tool is not mandated by CMS, nor does its completion ensure regulatory compliance.
Step 3: Describe the process At the first meeting, the team clearly defines the process to be analyzed. The best way to do this is to construct a flowchart of the steps. (See the QAPI Flowchart Guide for more information on creating flowcharts) Using sticky notes, write down the first step in the process and each subsequent step. The process description does not need to be detailed. A high-level flowchart, with just the major steps identified, is usually sufficient. The example below shows the steps in the process of starting Coumadin for residents not currently on this anticoagulant. The process starts with the physician ordering Coumadin for a resident and ends with ongoing monitoring of the patient’s INR (a measure of blood coagulation) and clinical status.
Physician initiates Coumadin therapy
for a resident
Coumadin administration
begins
Monitor resident’s initial response to
Coumadin
Continue giving Coumadin and adjust dose to
reach target INR
Continue giving Coumadin and
monitor to maintain target
INR Starting with a clear description of the process ensures that everyone on the team understands what is being analyzed. Once the team members agree that the process is clearly and accurately described, move to step 4. If there is confusion about the actual process steps or if people cannot agree on what the process entails, do not continue on to step 4 of the FMEA. It may be necessary to refine the scope of the FMEA. For instance, one nursing home started FMEA on the process of admitting new residents. While describing the process, team members found that admission steps varied somewhat on the weekends. They chose to concentrate their analysis on the weekend admission process because it seemed to be the most problem-prone. They agreed to later do FMEA on weekday admissions. Helpful Tips:
o If team members cannot agree on how the process currently works in their area and the process scope cannot be narrowed to obtain agreement, it usually is a signal of a very unreliable process. An unreliable process is one that is not performed consistently – people pretty much do whatever works best for them. FMEA should not be done on this process; instead, do a performance improvement project that is aimed at creating a redesigned standard streamlined process. Once that new process is designed, consider doing FMEA to reduce or eliminate mistakes that may occasionally occur.
o For a complex process with many steps, it may be better to do several FMEAs by breaking-up the process into manageable bites. By focusing on just one part of the process, the team can complete the FMEA in much shorter time. For instance, there are several major steps to the process of identifying residents at high risk for falls and preventing falls in this group of residents. The team could do FMEA just on the assessment phase of the process and another on the prevention phase.

Disclaimer: Use of this tool is not mandated by CMS, nor does its completion ensure regulatory compliance.
Step 4: Identify what could go wrong during each step of the process Here is where the knowledge and experience of team members are vital. For each process step identified in step 3, the team determines what can go wrong or what can fail (commonly called the failure modes). The people doing the work every day are in the best position to know what can (and does) go wrong. This step is similar to a brainstorming session where people generate ideas and come up with solutions to problems. At this point, team members are generating a list of the failures that can occur at each step of the process being analyzed. Below are examples of things that could go wrong during the step of “Physician initiates Coumadin therapy for a resident.”
Physician initiates Coumadin therapy
for a resident
What Could Go Wrong (failure modes)1. Order not entered into computer2. Order not communicated to Pharmacy3. Wrong dosage ordered4. Physician unaware Coumadin is contraindicated for this resident
After the possible failures are identified for one step, the team moves on to identifying failures that might occur in the next step. Step 4 is complete when the team is satisfied all possible failures have been identified for each step. Helpful Tips:
o Create an atmosphere where staff participating in the FMEA feel safe talking about process mistakes, or work-arounds that occur. To decrease “protectionism” where staff are reluctant to talk about mistakes made by the peer group they represent, make it clear from the beginning that everyone sometimes makes a mistake and it is not a sign of incompetence; rather most mistakes are the result of a poorly designed process.
o Do not let this brainstorming session become a finger-pointing exercise. Keep the team members focused on the goal of the FMEA – that is to identify and then reduce or eliminate failures by improving the process.
o Write the failures on sticky-notes (one per note) and line them up beneath the sticky notes you created for the process steps. When the team members are done identifying failures for each step, they will have a clear visual picture of the entire process and the failures that could occur at each step.
o Sometimes it is helpful to get additional staff input into this step. Ask team members to gather more ideas as to what can go wrong by sharing the team’s preliminary findings with others in their employee group. Bring these ideas back to the next team meeting for discussion and possible addition to the failure lists.

Disclaimer: Use of this tool is not mandated by CMS, nor does its completion ensure regulatory compliance.
Step 5: Pick which problems to work on eliminating It is common for project teams to identify several different mistakes that might occur at each step in the process under study. However, changing the process to reduce or eliminate every one of these mistakes is time-consuming, may not be feasible, and often not necessary. Some mistakes rarely happen, some are so obvious that the mistake is easily caught and corrected, and some have little impact on resident safety. In step 5 of the FMEA, the team selects which failures will be the focus of improvement actions. Selection of the failures to work on eliminating is based primarily on two factors: how likely the failure will actually occur and how the failure will affect the resident should it occur. For each failure, the team decides:
● What could happen should this failure occur? (outcome) ● How serious would the outcome be? (severity) ● How often is this failure likely to occur? (probability)
Determine outcomes Starting with the first step in the process, the team considers each failure that was identified in step 4 – answering the question, “What would happen if this failure occurs?” Sometimes what would happen is that the resident will experience some type of adverse outcome. Sometimes what would happen is that needed treatment or therapy would be delayed. For example, “What would happen if the physician’s order for Coumadin is not entered into the computer?” Team members may agree that this computer entry failure will be caught fairly quickly and corrected, so the resident most likely will not be harmed. In this situation, the outcome for this failure would be a delay in administration of Coumadin. The team methodically goes through each failure identified during step 4 and determines what would happen if this failure occurs. Determine seriousness of the outcomes This decision can be made by the team while they are identifying the outcomes or the seriousness can be determined after all outcomes have been determined. For each outcome, the team must decide how “bad” the particular outcome would be for the resident. This is a subjective judgment made by team members based on their knowledge and experience. Sometimes facilities use a numeric rating scale to establish the seriousness of the outcome. Below is the rating scale that could be used in nursing homes. The severity rating scale is adapted from the Healthcare Failure Mode and Effects Analysis (HFMEA) model developed by the National Center for Patient Safety of the Veterans Health Administration.

Disclaimer: Use of this tool is not mandated by CMS, nor does its completion ensure regulatory compliance.
Outcome severity rating scale
Rating Outcome Category
Description
5 Catastrophic Resident experiences death or major permanent loss of function (sensory, motor, physiologic, or intellectual),
4 Major
Resident experiences permanent lessening of bodily function (sensory, motor, physiologic, or intellectual), disfigurement, surgical intervention required, or increased level of care for 3 or more days.
3 Moderate
Resident experiences an event, occurrence, or situation which could harm the resident but will not cause permanent injury or lessening of bodily function or require the delivery of additional healthcare services
2 Minor Resident may experience a minor injury, but most likely would not be affected by the failure and it would not cause any changes in the delivery of care.
1 Near miss Resident would not experience any injury, changes in delivery of care, or an increased level of care.
Numeric severity rankings are not required to be used in a FMEA. It can be just as effective (and perhaps less intimidating) to have the team rate outcomes using descriptive terms such as:
● Low (minimal resident harm) ● Moderate (short-term resident harm) ● Severe (permanent or long-term harm) ● Fatal (death)
Using a decision-making process such as nominal group technique or multi-voting, the team methodically agrees to a severity ranking for each outcome. Determine Probability The team now judges how often each failure is likely to occur. Rating scales can help to standardize the team members’ responses. Below is the probability rating scale adapted from the Healthcare Failure Mode and Effects Analysis (HFMEA) model developed by the National Center for Patient Safety of the Veterans Health Administration.

Disclaimer: Use of this tool is not mandated by CMS, nor does its completion ensure regulatory compliance.
Failure probability rating scale Rating Description Definition 5 Very high probability:
failure is most inevitable 1 failure in 5 attempts
4 High: repeated failures 1 failure in 50 attempts 3 Moderate: occasional
failures 1 failure in 500 attempts
2 Low: relatively few failures
1 failure in 5000 attempts
1 Remote: failure is unlikely <1 failures in 500,000 attempts Prioritize Failures for Improvement Action The team goes through the process of identifying failure outcomes and outcome severity and determining failure probability so that priorities for action can be established. If at the outset the team concludes it is important to reduce or eliminate all failures, the exercises described above are not necessary as the team has already set its action priorities. It can move onto step 6 of the FMEA. More likely the team will find some failures inconsequential – although they do happen every once in a while they do not adversely affect residents. The exercises described above can help the team make this decision. Which failures should be chosen for action? There are no absolute rules for answering this question. Any failure that is likely to result in catastrophic or major harm to a resident is a good first choice for action. Additionally, any failure that occurs quite often and has the potential for harming a resident should be considered for action. After the team has prioritized the failures that will be the focus of improvement actions, the FMEA moves to step 6. Helpful Tips:
o When defining outcomes that will occur following a failure, choose the most likely outcome not the worst case scenario. Do not forget that outcomes for some failures are delays in treatment or services which may not cause resident harm and may actually go unnoticed by the resident. If the outcome from every failure is classified as catastrophic or major then the team will need to develop improvement actions for every failure.
o It can sometimes be problematic for team members to judge how often a failure might occur. Sometimes there is a tendency to seek the “right” answer when, without any prevalence data, a correct answer is not possible. In the absence of data, ask the team members to estimate based on their experience and a sense of what happens in the facility. For instance, despite facility policies requiring confirmation of resident identity prior to giving medications, nurses admit that in practice, for a variety of reasons, they fail on occasion to do this safety check. Ask the nurses on the team to estimate how often they think this failure occurs. A more accurate estimate of failure probability might be obtained if management level personnel are not in the room.
o Setting priorities for improvement is challenging. The team leader and members should openly acknowledge and work to address barriers that can impact the priority-setting process. Watch out for:

Disclaimer: Use of this tool is not mandated by CMS, nor does its completion ensure regulatory compliance.
Fears of “winners and losers.” If a team member worries that a change in their area could adversely affect them, they may try to guard their own “turf” by strongly advocating that failures in other areas must be dealt with first.
Thinking the team can “do it all” and there is no need to prioritize. If people feel uncomfortable admitting that they cannot improve all areas at once, they will resist setting priorities.
Without a clear leadership commitment to improving resident safety, team members may fear that the group’s priorities will be overturned or go nowhere.
Step 6: Design and implement changes to reduce or prevent problems In this step the team evaluates each failure chosen for action for the purpose of designing and implementing process changes to reduce or prevent the failure from occurring. This step is similar to the action planning phase in any type of improvement project. To determine how the process should be changed the root cause of each failure chosen for action must be identified. The team may need to gather additional input from other staff members to help in determining the root causes of failures. For instance, why does a physician order for Coumadin not get entered into the computer? Why is the order not communicated to the pharmacy when it does get entered into the computer? The Five Whys technique is a good way to drill-down to find the root cause of failures. The answer to the first "why" prompts another "why" and the answer to the second "why" prompts another and so on; hence the name the Five Whys. Once the cause of each failure is clear, the team develops actions to reduce or eliminate the failure. When developing these actions consider questions such as:
● What safeguards are needed to prevent this failure from happening? ● What would have to go wrong to have a failure like this happen? How can we prevent this from going
wrong? ● How could we change the way we do things to make sure that this failure never happens? ● If a failure like this happened, how could we quickly catch and correct the problem before the resident
ended up being harmed? ● If the resident were harmed by this failure, how could we minimize the effect of the failure on the
resident's condition?
Aim for corrective actions with a stronger or intermediate rating, based on the hierarchy suggested by the examples below. Corrective actions which focus on designing controls into the system that do not allow errors to occur and rely less on any one person’s actions are the strongest. The feasibility and costs associated with actions must also be considered. Stronger Actions

Disclaimer: Use of this tool is not mandated by CMS, nor does its completion ensure regulatory compliance.
● Change physical surroundings ● Usability testing of devices before purchasing ● Engineering controls into system (forcing function), which force the user to complete an action ● Simplify process and remove unnecessary steps ● Standardize equipment or process ● Tangible involvement and action by leadership in support of resident safety; i.e., leaders are seen and
heard making or supporting the change Intermediate Actions
● Increase staffing/decrease in workload ● Software enhancements/modifications ● Eliminate/reduce distractions ● Checklist/cognitive aid ● Eliminate look alike and sound alike terms ● “Read back” to assure clear communication ● Enhanced documentation/communication
Weaker Actions
● Double checks ● Warnings and labels ● New procedure/memorandum/policy ● Training/in-service ● Additional study/analysis
For example, suppose Coumadin orders do not get entered into the computer because the person receiving the phone order gets busy and forgets to enter the order. The strongest action to prevent this from happening might be to use a Coumadin standing order protocol so that phone orders for this purpose are eliminated or reduced. Decreasing staff workload might reduce the number of orders that do not get entered, although unexpected situations can arise that divert people’s attention even when staffing is sufficient. How about something as simple as writing phone orders on sticky paper that can be adhered to the computer screen? This would cause the order to stay visible until someone has time to enter the order. This is an example of a warning or label (sometimes called a visual cue). It is a weak action because the sticky paper can fall off or be taken off by someone in a hurry to access the computer for another purpose. But if no other strong action is available, a weak action is better than none at all. When designing actions, clearly state what is to be done, by whom, and when. Satisfactory implementation of the actions will be monitored later, so it is important to have clearly defined action plans.

Disclaimer: Use of this tool is not mandated by CMS, nor does its completion ensure regulatory compliance.
Helpful Tips:
o Do not design actions to prevent failures until the team has a good understanding of what can cause the failures to occur. “Blindly” changing the process in hopes of preventing failures is likely to be unsuccessful and may actually make the process less safe if the changes increase complexity.
o The team facilitator should encourage team members to come up with as many intermediate and strong actions as possible. It is helpful to involve supervisory and management staff in the action planning discussions. Designing intermediate and strong actions often requires an understanding of various resident care systems and the facility’s resource allocation priorities. Staff members on the team conducting the FMEA may not possess this knowledge.
Step 7: Measure the success of process changes Concurrent with implementation of action plans, mechanisms are established to gather data that will be used to measure the success of the corrective action. The goal of a FMEA is to reduce the risk of process failures and improve resident safety. What you will measure is how often the process failures identified as high priority to fix (step 5) are still occurring after process changes (step 6) are completed. Plus you will measure the incidence of adverse events related to the process under study (for example, the number of residents on Coumadin that develop a Coumadin-related complication). Some of this data may be available through incident reporting, MDS resident assessments, state survey results, resident satisfaction surveys, and other established sources of performance data. Occasionally a new data collection effort is needed to gather information needed for the results of the FMEA. Evaluating success of the PIP usually occurs after all process changes have been implemented and will become the responsibility of the person designated to monitor the corrective action/s. The QAA committee is responsible for overseeing all QAPI activities, which includes reviewing data on the effectiveness of all improvement projects. Ideally, all of the following criteria should be met to conclude the PIP has been successful:
● Measures of effectiveness were monitored over time. ● The goal was attained (fewer failures, better outcomes). ● You are confident that the change is permanent.

Disclaimer: Use of this tool is not mandated by CMS, nor does its completion ensure regulatory compliance.
FMEA PIP Template This template can be used to document the completed FMEA including follow-up actions and measures. Revise this template as necessary to meet your needs. Review the Guidance for Failure Mode and Effects before using this template. Process analyzed:
Team leader/facilitator: Date FMEA started: Date ended: Team members: Name Position Name Position
Describe your process steps (flowchart): As per the suggested guidance, you might use sticky notes on separate papers.
Identify what could go wrong during each step of the process. You might use sticky-notes indicating what could go wrong for each step. Line these up beneath each process step.
For each item identified that could go wrong, rate each for the seriousness of this outcome (severity) and how often the mistake is likely to occur (probability) (per the suggested guidance and your rating scale preferences). Indicate these ratings on the sticky notes that identify what could go wrong.
Review your ratings and decide on your process failures identified as high priority for improvement actions. List the process failures you will focus on in the table below.

Disclaimer: Use of this tool is not mandated by CMS, nor does its completion ensure regulatory compliance.
Describe your corrective actions for process failures identified as high priority: Before determining your corrective actions for process failures, consider whether you should conduct a systematic analysis to determine the root cause of each failure chosen for action. If necessary, use techniques such as the five whys, flowcharting, or the fishbone diagram to assist in identifying the root causes. Additional tools are available that guide the use of each of these techniques. It is helpful to keep any of these analyses with your PIP documentation for future reference. In the table below, describe each root cause for each process failure, and then enter your specific actions to reduce or eliminate the failure, your completion timeframe, and the responsible individual or group.
Process Failure
Root Cause of Process Failure
Specific Actions to Reduce or Eliminate the Failure
Completion Time Frame
Responsible Individual/Group

Disclaimer: Use of this tool is not mandated by CMS, nor does its completion ensure regulatory compliance.
Measures of Success
Corrective Action
Measure(s) of Success (How we will know if this action is successful) (Consider measures of how often the failure is still occurring after process changes and the incidence of adverse events related to the failure)
Reporting Schedule and Individual or Group Responsible for Reviewing Results
Signature of FMEA leader/facilitator Date
Acknowledgement: This guide draws on information from the VHA National Patient Safety Improvement Handbook (March 2011), the Training Toolkit: Failure Mode & Effects Analysis (Brown-Spath & Associates, 2006) and the Minnesota Adverse Health Events Measurement Guide (Minnesota Department of Health, 2010).

Disclaimer: Use of this tool is not mandated by CMS, nor does its completion ensure regulatory compliance.
Overview: RCA is a structured facilitated team process to identify root causes of an event that resulted in an undesired outcome and develop corrective actions. The RCA process provides you with a way to identify breakdowns in processes and systems that contributed to the event and how to prevent future events. The purpose of an RCA is to find out what happened, why it happened, and determine what changes need to be made. It can be an early step in a PIP, helping to identify what needs to be changed to improve performance. Once you have identified what changes need to be made, the steps you will follow are those you would use in any type of PIP. Note there are a number of tools you can use to perform RCA, described below. Directions: Use this guide to walk through a Root Cause Analysis (RCA) to investigate events in your facility (e.g., adverse event, incident, near miss, complaint). Facilities accredited by the Joint Commission or in states with regulations governing completion of RCAs should refer to those requirements to be sure all necessary steps are followed. Below is a quick overview of the steps a PIP team might use to conduct RCA. Steps Explanation 1. Identify the event to be
investigated and gather preliminary information
Events and issues can come from many sources (e.g., incident report, risk management referral, resident or family complaint, health department citation). The facility should have a process for selecting events that will undergo an RCA.
2. Charter and select team facilitator and team members
Leadership should provide a project charter to launch the team. The facilitator is appointed by leadership. Team members are people with personal knowledge of the processes and systems involved in the event to be investigated.
3. Describe what happened Collect and organize the facts surrounding the event to understand what happened.
4. Identify the contributing factors The situations, circumstances or conditions that increased the likelihood of the event are identified.
5. Identify the root causes A thorough analysis of contributing factors leads to identification of the underlying process and system issues (root causes) of the event.
6. Design and implement changes to eliminate the root causes
The team determines how best to change processes and systems to reduce the likelihood of another similar event.
7. Measure the success of changes
Like all improvement projects, the success of improvement actions is evaluated.
Steps two through six should be completed as quickly as possible. For facilities accredited by the Joint Commission, these steps must be completed within 45 days of occurrence of the event.
Guidance for Performing Root Cause Analysis (RCA) with Performance Improvement Projects (PIPs)

Disclaimer: Use of this tool is not mandated by CMS, nor does its completion ensure regulatory compliance.
Step 1: Select the event to be investigated and gather preliminary information Events that may be investigated using the RCA process can be identified from many sources (e.g., incident report, risk management referral, staff, resident, or family feedback, health department citation). High priority should be given to events that resulted in significant resident harm or death and other events the facility is required by regulation to investigate. Also consider doing an RCA for “near miss” or “close call” events that could have resulted in harm to the resident, but did not, either by chance or timely intervention. The latter types of events represent high risk situations that could, in the future, cause a resident to be harmed. Once an event is selected for a Performance Improvement Project (PIP) involving RCA, someone involved in the facility QAPI program can begin gathering preliminary information, including the incident report and any documentation from the preliminary investigation, for later discussion by the team. This may include interviews with those involved including the resident or family members, collection of pertinent documentation or photographs, review of relevant policies and procedures, quarantine of defective equipment, etc. This preliminary information is also useful for deciding which individuals should be invited to serve as members of the team as described in Step 2.
Helpful Tips: o Involve facility leaders in the prioritization and decision to proceed with an RCA. There will be
greater cooperation in completing RCAs when the process is viewed as leadership-driven. o Be sure to start with a problem and not the solution. It is tempting to assume we know what
will fix the problem before we’ve thoroughly examined it. Assumptions are often wrong and may hinder complete analysis of the underlying causes.
o Don’t define the problem as a need for something. The problem statement should objectively state what went wrong, not why, or how. An example of an effective problem statement is, “Resident X continued to receive a medication one week after the order was given for discontinuation.” A good problem statement will facilitate a more thorough examination of the problem.
o If the event represents a liability concern or questionable practices by an employee, the leadership team can initiate a risk management review or an employee performance review to start simultaneous with, but separate, from the RCA process. The RCA process should focus on systems rather than individual performance.
Step 2: Charter and select team facilitator and team members Next, leadership designates a facilitator for the PIP team, and works with the facilitator to create a charter that will help guide the team in managing the scope of the project and making changes that are ultimately linked to the root causes identified in the RCA process. Together, leadership and the facilitator select staff to participate on the PIP team.

Disclaimer: Use of this tool is not mandated by CMS, nor does its completion ensure regulatory compliance.
As managers and supervisors gain experience in doing RCAs, more people in the facility can be trained to serve as team facilitators. The facilitator is responsible for assembling and managing the team, guiding the analysis, documenting findings and reporting to the appropriate persons. The number of team members depends on the scope of the investigation. Individuals selected to serve as team members must be familiar with the processes and systems associated with the event. People who have personal knowledge of what actually happened should be included as team members or given an opportunity to contribute to the investigation through interviews.
Helpful Tips: o Team members should be selected for their ability to discuss and review what happened
during the event in an objective and unbiased manner. In some situations, staff members personally involved in the event are the best people to serve as team members. In other situations, staff members not personally involved in the event are the best people to serve as team members with the people personally involved asked to share their experience during interviews. This may be appropriate if the people directly involved in the event are dealing with emotions and are not able to be objective. However, if this is the case, it is a good idea to provide those staff persons directly involved with counseling and support so that they are able to participate in the RCA process. Participating in the RCA process and hearing other’s objective viewpoints can help them to deal with the situation in a positive manner.
o Keep the number of management or supervisory level individuals on the team to a minimum. Staff members may be inhibited from speaking up or being completely candid during discussions about what happened if their direct supervisor is in the room. If this is not possible, the facilitator should explain the need for members to be free to discuss the process honestly, as it is actually carried out in the facility.
o Make it clear to everyone involved that the RCA process is confidential. This reassurance helps people feel safer discussing the process and system breakdowns that may have caused an inadvertent mistake.
Step 3: Describe what happened
At the first meeting of the team, a time line of the event under review is created. The preliminary information gathered in step 1 is shared with the team and other details about the event are elicited from team members. If the people personally involved in the event are not part of the team, their comments about what happened are shared with team members. All of this information is used to create a time line of the event – the sequence of steps leading up to the harmful event. Below is a time line for a situation involving a resident that suffered a serious injury during his transfer from a wheelchair back to his bed. This tall and larger man (300-pound) was placed in a Hoyer lift and elevated into the air above his wheelchair. As the CNAs turned the lift toward the bed it began to sink because the lift arm couldn't handle the resident’s weight. In an attempt to complete the transfer before the patient was below the level of the bed, the CNAs swung the lift quickly toward the bed. The lift tilted dangerously to the side and the legs started to move together, narrowing the base of support. The resident dropped to the ground and the lift fell on top of him.

Disclaimer: Use of this tool is not mandated by CMS, nor does its completion ensure regulatory compliance.
Resident is raised from wheelchair
using the Hoyer lift
CNAs swing resident toward
bed
Lift starts to collapse and tips
to one side
Resident drops to ground and lift falls
on resident
CNAs get Hoyer lift and position it by resident’s bedTIME LINE:
EVENT
Use a flipchart or sticky notes to draw a preliminary time line. Before proceeding to Step 4 of the RCA, be sure that everyone agrees that the time line represents what actually happened. Now is the time for the team to add missing steps or clarify “factual” inconsistencies about the event.
Helpful Tips: o The time line of the event should describe just the facts – not what caused the facts to happen.
For instance, the CNAs may have mistakenly used a Hoyer lift that was not strong enough to move a tall resident weighing 300 lbs. This factor may have contributed to the event, but it is not documented in the time line. Only the facts of what happened should be included in the time line, the causal factors are added in a later step.
o Once the preliminary time line has been created, the facilitator finalizes the time line by asking the team: Does the time line adequately tell the "story" of the incident? If not, the scope of the
timeline may need to be extended further back in time or expanded to include what happened after the event.
Does each step in the time line derive directly from the step it precedes? If each step is not derived logically from the one preceding it, it usually indicates that one or more steps in the sequence have been left out. Add missing steps to the time line.
Is each step in the timeline pertinent to the incident under investigation? The answer may be "yes", "no," or "not sure." Include only the "yes" and "not sure" steps in the final event line.
o In rare situations the team cannot identify a sequence of steps leading up to the harmful event. For instance, when a resident develops an intravenous (IV) catheter−related infection it may not be possible to pinpoint the exact steps preceding the infection event. The infection appears to have occurred despite staff members apparently doing all the right things (e.g., following good hygiene when inserting catheters and caring for catheterized residents). In these situations, a time line is not created – however don’t jump to this conclusion too quickly. It is harder to find all the root causes of an undesirable event if the team does not have a time line to guide their decisions.
o Resist the temptation to skip right to step 5 of the RCA process, which is “Identify the root causes.” Team members may insist the root causes of the event are already understood and it is not necessary to go through steps 2 through 4. Jumping to conclusions about root causes increases the likelihood the team will end up with “quick-fix” solutions that do not address the underlying systems gaps, or contributing factors, and fail to prevent similar events in the future.

Disclaimer: Use of this tool is not mandated by CMS, nor does its completion ensure regulatory compliance.
Step 4: Identify the contributing factors Here is where the knowledge gained during step 3 is used by the team to dig deeper into what happened to discover why it happened. Step 4 involves the team looking at each step of time line and asking, “What was going on at this point in time that increased the likelihood the event would occur?” These are the contributing factors – situations, circumstances or conditions that collectively increased the likelihood of an incident. By itself a contributing factor may not have caused the incident, but when they occur at the same time, the probability an incident will occur increases. As mentioned in Step 2, it is important to get the perspective of people personally involved in the event when identifying the contributing factors at each step. These may be the only individuals aware of the actual circumstances affecting what happened. For instance, the CNA who chose the wrong type of lift might have felt pressured by her supervisor to find a lift as quickly as possible so the resident would not be kept waiting. Team members not personally involved in the event might be unaware this contributing factor existed. Below are examples of contributing factors that might be identified for each step of the time line for the event involving a resident injury during transfer from wheelchair to bed.
Resident is raised from wheelchair
using the Hoyer lift
CNAs swing resident toward
bed
Lift starts to collapse and tips
to one side
Resident drops to ground and lift falls
on resident
CNAs get Hoyer lift and position it by resident’s bed
CNAs had to hurry to find a lift so resident would not be kept waiting
Facility's one heavy duty lift was being used in another location
CNAs unaware the lift they are using is not rated for use with very heavy residents
No sign on lift indicating weight limit
Resident was moved rapidly toward bed because lift arm started to slip
Sharp movement of resident by CNAs
Lift not strong enough to hold residentCNAs not trained
to respond to lift malfunctions
CONTRIBUTINGFACTORS:
TIME LINE:
EVENT
Helpful Tips: o Consider what was happening at each step in the time line to ensure the team does not
overlook some important factors. Whenever possible, use a time line as the basis for identifying contributing factors.
o Brainstorming can be an effective tool to identify contributing factors by asking, “What might have happened that would increase the likelihood the event would occur?” Consider what recommended practices might not have been followed, e.g. sterile dressing changes not done for IV-catheter sites. Consider what procedure “work-arounds” might have occurred. Consider how staffing at the time of the event might have impacted the eventual outcome.
o When identifying contributing factors be careful to avoid “hindsight bias.” Knowing the eventual outcome of a time line can influence how team members view activities leading up to the event. Remember to consider only those factors that were actually present and known to those involved at the time – not what was only realized after-the-fact.

Disclaimer: Use of this tool is not mandated by CMS, nor does its completion ensure regulatory compliance.
Step 5: Identify the root causes All incidents have a direct cause. This is the occurrence or condition that directly produced the incident. In the resident incident described in Step 3, the tilting and collapsing Hoyer lift is the direct cause of the accident. However, the direct cause is not the root cause. Root causes are underlying faulty process or system issues that lead to the harmful event. Often there are several root causes for an event. Contributing factors are not root causes. The team needs to examine the contributing factors to find the root causes. This can be done by digging deeper – asking repeated “why” questions of the contributing factors. This is called the “five why’s” technique, which is illustrated below.
This questioning process is continued until all the root causes are found. It is common to find the same root cause for two or more contributing factors.
Helpful Tips: o The team must determine if they’ve truly identified a root cause, versus a contributing factor
which requires the team to do more digging. Ask the questions below about each potential root cause identified by the team. If the answers are NO, then the team has identified root causes and they can stop the questioning process. If the answer to any question is YES, then the team may not have identified true root causes and needs to ask more “why” questions to get to the root causes. Keep asking these until you get to root causes. Would the event have occurred if this cause had not been present? Will the problem recur if this cause is corrected or eliminated?
o The team should not make judgments about whether an individual did the right thing. This judgment is to be made by the manager responsible for evaluating the employee’s performance. The facilitator may need to remind team members that the RCA process is not where these judgments are to be made.

Disclaimer: Use of this tool is not mandated by CMS, nor does its completion ensure regulatory compliance.
o The team facilitator should watch out for discussion “manipulation” during this stage. Some team members may try to divert attention from root causes originating in their department or direct the discussion away from root causes that will require additional resources or necessitate significant changes to how work is now being done. A successful RCA process requires frank and open discussions of the causes of the event.
o A fishbone diagram can also be used to determine root causes; see the CMS QAPI website for more information on this tool.
Step 6: Design and implement changes to eliminate the root causes In this step the team evaluates each root cause to determine how best to reduce or prevent it from triggering another harmful event. The key is to choose actions that address each root cause. These actions will generally require creating a new process or making a change to a current process. The steps to accomplish this are the same as those used in any type of PIP. Note that at this point, you may want to reevaluate the composition of your team to make sure you have included people who are part of the process being changed. It is a good idea throughout a project to make sure you have the right people on the team and to adjust membership as needed. At least one corrective action should be developed to reduce or eliminate each root cause. Some action plans will be short-term solutions to fix a contributing factor, e.g. purchase an additional Hoyer lift rated for use by residents weighing over 250 lbs. But short-term solutions rarely fix root causes. For instance, in the example event the team also needs to recommend that a formal evaluation of future specialized equipment needs for residents be regularly incorporated into the facility strategic planning and budgeting process. When developing corrective actions consider questions such as:
● What safeguards are needed to prevent this root cause from happening again? ● What contributing factors might trigger this root cause to reoccur? How can we prevent this from
happening? ● How could we change the way we do things to make sure that this root cause never happens? ● If an event like this happened again, how could we stop the accident trajectory (quickly catch and
correct the problem) before a resident was harmed? ● If a resident were harmed by this root cause, how could we minimize the effect of the failure on the
resident?
Aim for corrective actions with a stronger or intermediate rating, based on the categories of actions below. Corrective actions that change the system and do not allow the errors to occur are the strongest. Stronger Actions
● Change physical surroundings ● Usability testing of devices before purchasing ● Engineering controls into system (forcing functions which force the user to complete an action) ● Simplify process and remove unnecessary steps ● Standardize equipment or process

Disclaimer: Use of this tool is not mandated by CMS, nor does its completion ensure regulatory compliance.
● Tangible involvement and action by leadership in support of resident safety; i.e., leaders are seen and heard making or supporting the change
Intermediate Actions ● Increase staffing/decrease in workload ● Software enhancements/modifications ● Eliminate/reduce distractions ● Checklist/cognitive aid ● Eliminate look alike and sound alike terms ● “Read back” to assure clear communication ● Enhanced documentation/communication
Weaker Actions ● Double checks ● Warnings and labels ● New procedure/memorandum/policy ● Training ● Additional study/analysis
For example, suppose staff members cannot locate the equipment to use when lifting larger residents, because the specialty equipment is not kept in the same location. The strongest action to prevent another accident would be to keep all equipment designed for special needs residents in just one storage area (change physical surroundings). Staff members will no longer need to differentiate “usual” equipment from “specialized” equipment. If this action is not feasible, consider placing a sign on the lift equipment – “DO NOT USE FOR RESIDENTS OVER 250 LBS.” This is an example of a warning or label (sometimes called a visual cue). It is a weak action because staff members might overlook the warning, but if no other stronger action is available, a weak action is better than none at all. When designing corrective actions, clearly state what is to be done, by whom, and when. Satisfactory implementation of the corrective actions will be monitored so it is important to have clearly defined plans.
Helpful Tips: o The team leader should encourage team members to come up with as many intermediate and
strong actions as possible. It is helpful to involve supervisory and management staff in the action planning discussions. Designing intermediate and strong actions often requires an understanding of various resident care systems and the facility’s resource allocation priorities. Staff members on the team may not possess this knowledge.
o Because the feasibility and costs associated with corrective actions must also be considered it is helpful to include facility management in the corrective action discussions, if they are not already members of the team.
o If a particular action cannot be accomplished due to current constraints (e.g. lack of resources), the team should look for other ways of changing the process to prevent a similar event from occurring in the future. Doing nothing should not be an option.

Disclaimer: Use of this tool is not mandated by CMS, nor does its completion ensure regulatory compliance.
Step 7: Measure the success of changes Concurrent with implementation of action plans, mechanisms are established to gather data that will be used to measure the success of the corrective action. The RCA should reduce the risk of future harmful events by minimizing or eliminating the root causes. What you measure should provide answers to three questions:
1. Did the recommended corrective actions actually get done? (e.g., Did the warning signs get put on the Hoyer lifts? Did a formal equipment evaluation step get added to the annual budgeting process?) 2. Are people complying with the recommended changes (e.g., How often is the wrong type of Hoyer lift used for residents weighing over a predetermined weight? Is staff provided an opportunity to participate in an equipment needs assessment during the budgeting process?) 3. Have the changes made a difference? (Has another resident been harmed by equipment unsuited for their physical condition?)
Evaluating the success of the PIP usually occurs after the team has been disbanded, and will become the responsibility of the person designated to monitor the corrective action/s. The QAA committee is responsible for overseeing all QAPI activities, which includes reviewing data on the effectiveness of all improvement projects. Ideally, all of the following criteria should be met to conclude a PIP has been successful:
● Measures of success were monitored over time. ● The goal was attained (process changes were made and sustained, no recurrent events). ● You are confident that the change is permanent.

Disclaimer: Use of this tool is not mandated by CMS, nor does its completion ensure regulatory compliance.
RCA PIP Template
This template can be used to document the completed RCA PIP process, including follow-up actions and measures. Revise it as necessary to meet your needs. Team Facilitator: Date RCA Started: Date Ended:
Team Members: Name Position Name Position
Brief Narrative Description of Event (include time line if available):

Disclaimer: Use of this tool is not mandated by CMS, nor does its completion ensure regulatory compliance.
Root Causes and Contributing Factors Conduct your systematic analyses to determine your contributing factors and root causes. Use techniques such as the five whys, flowcharting, or the fishbone diagram to assist in identifying the root causes. Additional tools are available that guide the use of each of these techniques. It is helpful to keep any of these analyses with your PIP documentation for future reference. Describe each root cause as identified by the team. Enter these in the table below. Corrective Action Plans For each root cause identified, enter the corrective action plans intended to prevent the root cause from causing another harmful event. There can be more than one action plan for each root cause. Some action plans may be short-term interventions which can be accomplished quickly and some action plans require more long-term implementation steps. For each action plan designate the individual or group responsible for completing the action and the time frame for completion.
Root Cause Corrective Action Responsible Individual/Group
Completion Deadline

Disclaimer: Use of this tool is not mandated by CMS, nor does its completion ensure regulatory compliance.
Measures of Success
Corrective Action
Measures of Success (How we will know if this action is successful) Consider measures of how often recommended processes are not followed and the incidence of similar adverse events.
Reporting Schedule and Individual or Group Responsible for Reviewing Results
Signature of RCA team leader Date
Acknowledgement: This guide draws on information from the VHA National Patient Safety Improvement Handbook (March 2011), Error Reduction in Health Care: A Systems Approach to Improving Patient Safety, 2nd ed. (Jossey-Bass, 2011) and the Minnesota Adverse Health Events Measurement Guide (Minnesota Department of Health, 2010).

Disclaimer: Use of this tool is not mandated by CMS, nor does its completion ensure regulatory compliance.
Directions: Use this Plan-Do-Study-Act (PDSA) tool to plan and document your progress with tests of change conducted as part of chartered performance improvement projects (PIPs). While the charter will have clearly established the goals, scope, timing, milestones, and team roles and responsibilities for a project, the PIP team asked to carry out the project will need to determine how to complete the work. This tool should be completed by the project leader/manager/coordinator with review and input by the project team. Answer the first two questions below for your PIP. Then as you plan to test changes to meet your aim, answer question 3 below and plan, conduct, and document your PDSA cycles. Remember that a PIP will usually involve multiple PDSA cycles in order to achieve your aim. Use as many forms as you need to track your PDSA cycles. Model for Improvement: Three questions for improvement
1. What are we trying to accomplish (aim)? State your aim (review your PIP charter – and include your bold aim that will improve resident health outcomes and quality of care)
2. How will we know that change is an improvement (measures)? Describe the measureable outcome(s) you want to see
3. What change can we make that will result in an improvement? Define the processes currently in place; use process mapping or flow charting Identify opportunities for improvement that exist (look for causes of problems that have occurred – see Guidance for Performing Root Cause Analysis with Performance Improvement Projects; or identify potential problems before they occur – see Guidance for Performing Failure Mode Effects Analysis with Performance Improvement Projects) (see root cause analysis tool):
Points where breakdowns occur “Work-a-rounds” that have been developed Variation that occurs Duplicate or unnecessary steps
Decide what you will change in the process; determine your intervention based on your analysis Identify better ways to do things that address the root causes of the problem Learn what has worked at other organizations (copy) Review the best available evidence for what works (literature, studies, experts, guidelines) Remember that solution doesn’t have to be perfect the first time
PDSA Cycle Template

Disclaimer: Use of this tool is not mandated by CMS, nor does its completion ensure regulatory compliance.
Plan
What change are you testing with the PDSA cycle(s)? What do you predict will happen and why? Who will be involved in this PDSA? (e.g., one staff member or resident, one shift?). Whenever feasible, it will be helpful to involve direct care staff. Plan a small test of change. How long will the change take to implement? What resources will they need? What data need to be collected?
List your action steps along with person(s) responsible and time line.
Do Carry out the test on a small scale. Document observations, including any problems and unexpected findings. Collect data you identified as needed during the “plan” stage.
Describe what actually happened when you ran the test.

Disclaimer: Use of this tool is not mandated by CMS, nor does its completion ensure regulatory compliance.
Study Study and analyze the data. Determine if the change resulted in the expected outcome. Were there implementation lessons? Summarize what was learned. Look for: unintended consequences, surprises, successes, failures.
Describe the measured results and how they compared to the predictions.
Act Based on what was learned from the test:
Adapt – modify the changes and repeat PDSA cycle. Adopt – consider expanding the changes in your organization to additional residents, staff, and units. Abandon – change your approach and repeat PDSA cycle.
Describe what modifications to the plan will be made for the next cycle from what you learned.

Disclaimer: Use of this tool is not mandated by CMS, nor does its completion ensure regulatory compliance.
What is a project charter? A project charter clearly establishes the goals, scope, timing, milestones, and team roles and responsibilities for an Improvement Project (PIP). The charter is typically developed by the QAPI team and then given to the team that will carry out the PIP, so that the PIP team has a clear understanding of what they are being asked to do. The charter is a valuable document because it helps a team stay focused. However, the charter does not tell the team how to complete the work; rather, it tells them what they are trying to accomplish.
Use this worksheet to define key charter components. PROJECT OVERVIEW Name of project:
Problem to be solved:
Background leading up to the need for this project: [Tip: Reference specific background documents, as needed.]
The goal(s) for this project: [Tip: See Goal Setting Worksheet]
Scope—the boundary that tells where the project begins and ends.
Worksheet to Create a Performance Improvement Project Charter

Disclaimer: Use of this tool is not mandated by CMS, nor does its completion ensure regulatory compliance.
PROJECT APPROACH
Recommended Project Time Table: PROJECT PHASE START DATE END DATE
Initiation: Project charter developed and approved
Planning: Specific tasks and processes to achieve goals defined
Implementation: Project carried out
Monitoring: Project progress observed and results documented
Closing: Project brought to a close and summary report written
Project Team and Responsibilities: TITLE ROLE PERSON ASSIGNED Project Sponsor Provide overall direction and oversee
financing for the project Project Director Coordinate, organize and direct all activities
of the project team Project Manager Manage day-to-day project operations,
including collecting and displaying data from the project
Team members*
*Choice of team members will likely be deferred to the project manager based on interest, involvement in theprocess, and availability.
Material Resources Required for the Project (e.g., equipment, software, supplies):

Disclaimer: Use of this tool is not mandated by CMS, nor does its completion ensure regulatory compliance.
Barriers What could get in the way of success? What could you do about this?
PROJECT APPROVAL
The signatures of the people below relay an understanding and approval of the purpose and approach to this project. By signing this document you agree to establish this document as the formal Project Charter and sanction work to begin on the project as described within.
TITLE NAME SIGNATURE DATE Administrator
Project Sponsor
Project Director*
Project Manager*
*May not always have both roles.

Disclaimer: Use of this tool is not mandated by CMS, nor does its completion ensure regulatory compliance.
What is a project charter? A project charter clearly establishes the goals, scope, timing, milestones, and team roles and responsibilities for an Improvement Project (PIP). The charter is typically developed by the QAPI team and then given to the team that will carry out the PIP, so that the PIP team has a clear understanding of what they are being asked to do. The charter is a valuable document because it helps a team stay focused. However, the charter does not tell the team how to complete the work; rather, it tells them what they are trying to accomplish. Use this worksheet to define key charter components. PROJECT OVERVIEW Name of project: Example: Reduction in use of position change alarms
Problem to be solved: Example: Alarms going off frequently detract from a homelike environment and may give staff a false sense of security. Background leading up to the need for this project: Example: Residents and families have complained about the sound of alarms going off frequently. Staff feel pressure to do “something” when a resident falls. [Tip: Reference specific background documents, as needed.]
The goal(s) for this project: Example: Decrease the percentage of residents with position change alarms used on XX unit by 25% by XX/XX/XX. [Tip: See Goal Setting Worksheet]
Scope—the boundary that tells where the project begins and ends. The project scope includes: Example: Use of position change alarms on XX unit.
Worksheet to Create a Performance Improvement Project Charter

Disclaimer: Use of this tool is not mandated by CMS, nor does its completion ensure regulatory compliance.
PROJECT APPROACH Recommended Project Time Table: PROJECT PHASE START DATE END DATE
Initiation: Project charter developed and approved
Planning: Specific tasks and processes to achieve goals defined
Implementation: Project carried out
Monitoring: Project progress observed and results documented
Closing: Project brought to a close and summary report written
Project Team and Responsibilities: TITLE ROLE PERSON ASSIGNED Project Sponsor Provide overall direction and oversee
financing for the project
Project Director Coordinate, organize and direct all activities of the project team
Project Manager Manage day-to-day project operations, including collecting and displaying data from the project
Team members*
*Choice of team members will likely be deferred to the project manager based on interest, involvement in the process, and availability. Material Resources Required for the Project (e.g., equipment, software, supplies):

Disclaimer: Use of this tool is not mandated by CMS, nor does its completion ensure regulatory compliance.
Barriers What could get in the way of success? What could you do about this? Example: A resident could fall and staff could automatically blame the lack of an alarm.
Example: Educate staff on the lack of relationship between alarms and falls; collect data on removal of one alarm at a time.
Example: Staff complaints of need for additional staff to watch everyone if alarms are removed.
Example: Focus on anticipation of resident needs, and assess if additional hands-on-deck are needed during busy times on unit.
PROJECT APPROVAL The signatures of the people below relay an understanding and approval of the purpose and approach to this project. By signing this document you agree to establish this document as the formal Project Charter and sanction work to begin on the project as described within. TITLE NAME SIGNATURE DATE Administrator
Project Sponsor
Project Director*
Project Manager*
*May not always have both roles.

Disclaimer: Use of this tool is not mandated by CMS, nor does its completion ensure regulatory compliance.
Directions: Use this template for high level tracking of all PIPs occurring within your organization. This document may be particularly useful for leadership, surveyors, or others responsible for overall monitoring of the program. Consider updating the status column on a regular basis; e.g., quarterly. This may be helpful to bring to the QAPI team meetings, to review all PIPs that the organization has currently underway, to identify if the PIPs are moving along, if any have stalled, etc. Date(s) of Review: Project Name
Start Date
Current Phase Initiation, Planning. Implementation, Monitoring, Closing
Purpose What is the reason for conducting this project?
Change(s) Initiated What actions have been put into place?
Indicators/Measures Which data are being tracked to show improvement?
Status What are the indicator/measure results as compared to goals or thresholds? Have any unintended consequences or barriers been identified? How are they being addressed?
Performance Improvement Project (PIP) Inventory

Disclaimer: Use of this tool is not mandated by CMS, nor does its completion ensure regulatory compliance.
Directions: Use this check list to ensure you have covered important steps in launching your performance improvement project. This tool is intended to be used by the person asked to lead a PIP or any project where a team has been formed. Use this check list to make sure you have everything you need in place when you start a project. Ensuring you have these steps in place can help you save time and confusion down the road. Project Name:
Project Stakeholders and Team Members
The team has received a project charter that has been approved by the leadership. The project team has been assembled and roles and responsibilities have been assigned. The project charter is understood and accepted by all project team members. The project team understands how the project fits with the overall goals of the organization. Each project team member understands how his/her assignment fits into the overall project. The project and its goals have been communicated to stakeholders outside of the project team, as
needed (e.g., residents and families, staff, board of directors, owners).
Project Resources
Financial support for the project has been obtained. A project budget has been established. Staff time to work on the project has been allocated. Material resources required for the project have been identified and secured.
Project Process
A detailed timeline and work plan have been created. Training needs have been identified and training has been conducted. A schedule for regular project team meetings has been set. Indicators/measures have been established to monitor project goals (see Goal Setting Worksheet). The format and frequency for documenting project status has been defined. The format, frequency, and audiences for communicating project status has been defined. A process to identify issues that come up during this project is established (e.g., unintended
consequences, new opportunities for process changes, surprises). The location for storing all project documents, and processes for file naming conventions and version
control has been established. The time for project kickoff has been identified and any related activity required (e.g., announcement,
meeting, event) has been planned.
Performance Improvement Project (PIP) Launch Check List: Helpful hints for project leaders, managers, or coordinators

Disclaimer: Use of this tool is not mandated by CMS, nor does its completion ensure regulatory compliance.
Directions: This tool will assist in choosing which potential areas for improvement are the highest priority based on the needs of the residents and the organization. Follow this systematic assessment process below to identify potential areas for PIPs. This process will consider such factors as high-risk, high-volume, or problem-prone areas that affect health outcomes and quality of care. This tool is intended to be completed and used by the QAPI team that determines which areas to select for PIPs. Begin by listing potential areas for improvement in the left-hand column. Then score each area in the following columns based on a rating system of 1 to 5 as defined below:
1 = very low 2 = low 3 = medium 4 = high 5 = very high Rating is subjective and is meant to be a guide and to stimulate discussion. Finally, add the scores across the row and tally in the final column. Potential improvement areas with a higher score indicate a higher priority. POTENTIAL AREAS FOR IMPROVEMENTConsider areas identified through: Dashboard(s) Feedback from staff, families, residents, other Incidents, near misses, unsafe conditions Survey deficiencies
PREVALENCE The frequency at which this issue arises in our organization.
RISK The level to which this issue poses a risk to the well-being of our residents.
COST The cost incurred by our organization each time this issue occurs.
RELEVANCE The extent to which addressing this issue would affect resident quality of life and/or quality of care.
RESPONSIVENESS The likelihood an initiative on this issue would address a need expressed by residents, family and/or staff.
FEASIBILITY The ability of our organization to implement a PIP on this issue, given current resources.
CONTINUITY The level to which an initiative on this issue would support our organizational goals and priorities.
TOTAL SCORE TALLY
Prioritization Worksheet for Performance Improvement Projects

Disclaimer: Use of this tool is not mandated by CMS, nor does its completion ensure regulatory compliance.
Additional factors to take into account: 1. What existing standards or guidelines are available to provide direction for this initiative? 2. What measures can be used to monitor progress? 3. Is the topic publicly reported on Nursing Home Compare and/or is it a goal of the Advancing Excellence in America’s Nursing Homes
campaign? 4. Which type of changes primarily will be involved (i.e., system changes, environmental changes, staffing changes)? 5. Which staff will be most affected by the initiative? What training needs will this initiative present? 6. Is there an identified champion(s) for this initiative?

Disclaimer: Use of this tool is not mandated by CMS, nor does its completion ensure regulatory compliance.
Directions: A storyboard is a tool that can be used to simply and clearly communicate the story of a performance improvement project (PIP). The aim of a storyboard is to allow audiences to quickly grasp the main points of the story by providing only the most essential information and including one or more easy-to-understand charts that demonstrate the impact of the effort. Storyboards may be presented in various formats, such as a one-two page handout, a large display poster, or even as presentation slides. The same key content should be presented in each. This guide is intended to be used by the person leading QAPI efforts in your facility, administrative leaders, or any other staff needing to communicate to an audience the results of a specific performance improvement project. An example of a storyboard is included in this guide. Key Content to Include in your Storyboard:
1. Problem. One sentence on the issue or opportunity being addressed by this PIP. 2. Aim. One sentence on what this PIP aims to achieve. 3. Intervention(s). Briefly describe what change was introduced to address the problem or opportunity.
If there was more than one change, use bullet points to list the multiple interventions. 4. Measures/Indicators. List what measure(s) or indicator(s) are being used to monitor whether the
change is effective. 5. Results. One to two sentences on the results. Consider including a graph with notes that gives a
picture of the impact of the changes over time, or stories that describe the success. 6. Lessons Learned. Document 1-2 key lessons that were learned through the PIP. 7. Next Steps. Performance improvement is a continuous process. In one to two sentences, describe the
next steps (e.g., to further refine the intervention; to introduce the change in other parts of the nursing home; to take steps to standardize the change).
Depending on space limitations and the nature of your audience, you may choose to include additional information such as pictures or images that help bring the story to life; the names of the PIP team members; a description or visual of any quality improvement tools utilized; specific references from the literature that support the change approach.
Example of a storyboard starts on the next page:
Storyboard Guide for PIPs

Disclaimer: Use of this tool is not mandated by CMS, nor does its completion ensure regulatory compliance.
Sunnyside Nursing Home Busy City, Massachusetts
November 21, 2012 Problem: Beginning in April 2011, Sunnyside began to see an increase in pressure ulcers among its high-risk residents; in June 2011, more than 10% of high-risk residents had been diagnosed with a pressure ulcer. Aim: To reduce the occurrence of pressure ulcers in high-risk residents to less than 5% by November 2012. Interventions: Redesign admissions packet to include the comprehensive pressure ulcer risk assessment form, to be
completed within a resident’s first 24 hours of admission; Require a half day in-service training for all nursing assistants and licensed nursing staff on assessment
for pressure ulcer risk and prevention; Utilize pressure redistribution mattresses for all residents at high-risk for pressure ulcers. Utilize pressure redistribution wheel chair cushions as applicable for all residents at high-risk for
pressure ulcers. Measures: Process measure: Number of new residents with completed pressure ulcer risk assessment with 24
hours of admission (Measure Goal: 100% of new residents by March 2012). Process measure: Number of residents at high risk for pressure ulcers with pressure redistribution
mattresses. (Measure Goal: 100% of residents at high risk for pressure ulcers will have pressure redistribution mattresses by May 2012)
Process measure: Number of residents at high risk for pressure ulcers and that use a wheel chair, with pressure redistribution wheel chair cushions. (Measure Goal: 100% of high risk residents using wheel chairs will have pressure redistribution cushions for their wheelchairs by May 2012)
Outcome measure: Percent of high-risk residents with new, nursing home-acquired pressure ulcers (Measure Goal: Less than 5% by November 2012).
Results: As of April 2012, all new residents at Sunnyside received a comprehensive pressure ulcer risk assessment with 24 hours of admission. 100% of high risk residents have pressure redistribution mattresses. 100% of high risk residents that use a wheel chair have a pressure redistributing wheelchair cushion. The facility experienced a reduction in new pressure ulcers among high-risk residents over the 18-month period, from a high of 12% in August 2011 to a low of 5% in November 2012.

Disclaimer: Use of this tool is not mandated by CMS, nor does its completion ensure regulatory compliance.
Lessons Learned: Although Sunnyside had a policy in place that each new resident should receive a pressure ulcer risk
assessment, the admission packets were not set-up to help prompt staff to do so consistently with each admission.
Nursing staff need more frequent training on pressure ulcer risk assessment and prevention. Next Steps: Continue monitoring to make sure current pressure ulcer rates are maintained or improve. Integrate the pressure ulcer assessment tool into the facility’s electronic resident records system. Develop a more frequent training program on pressure ulcers for nursing staff.
Contact Information: If you have any questions about this information, please contact xxx at xxx.
Source: Adapted with permission from the Institute for Healthcare Improvement (http://www.IHI.org).

QAPI Companion GuideA companion guide to QAPI at a Glance


Table of ContentsQuality Assurance (QA) & Performance Improvement (PI) . . . . . . . . . . . . . . . . . . . . . . . . . . . . . . . 2
12 Steps to Quality Assurance and Performance Improvement
Initiative (QAPI) . . . . . . . . . . . . . . . . . . . . . . . . . . . . . . . . . . . . . . . . . . . . . . . . . . . . . . . . . . . . . . . . . . . . . 4
Plan-Do-Study-Act (PDSA) Model for Improvement . . . . . . . . . . . . . . . . . . . . . . . . . . . . . . . . . . . . . 5
Root Cause Analysis . . . . . . . . . . . . . . . . . . . . . . . . . . . . . . . . . . . . . . . . . . . . . . . . . . . . . . . . . . . . . . . . . . . . . . . 8
QAPI FAQs . . . . . . . . . . . . . . . . . . . . . . . . . . . . . . . . . . . . . . . . . . . . . . . . . . . . . . . . . . . . . . . . . . . . . . . . . . . . . . . . 10
Worksheets & Ideas to Implement QAPI . . . . . . . . . . . . . . . . . . . . . . . . . . . . . . . . . . . . . . . . . . . . . . . . 11
Step 1 - Leadership Responsibility and Accountability . . . . . . . . . . . . . . . . . . . . . . . . . . 11
Step 2 - Develop a Deliberate Approach to Teamwork . . . . . . . . . . . . . . . . . . . . . . . . . . 13
Step 3 - Take Your QAPI Pulse with a Self-Assessment . . . . . . . . . . . . . . . . . . . . . . . . . . . 15
Step 4 - Identify Your Organization’s Guiding Principles . . . . . . . . . . . . . . . . . . . . . . . . 17
Step 5 - Develop Your QAPI Plan . . . . . . . . . . . . . . . . . . . . . . . . . . . . . . . . . . . . . . . . . . . . . . . . . . 19
Step 6 - Conduct a QAPI Awareness Campaign . . . . . . . . . . . . . . . . . . . . . . . . . . . . . . . . . . 21
Step 7 - Develop a Strategy for Collecting and Using Data . . . . . . . . . . . . . . . . . . . . . . 23
Step 8 - Identify Your Gaps and Opportunities . . . . . . . . . . . . . . . . . . . . . . . . . . . . . . . . . . . 25
Step 9 - Prioritize Opportunities and Charter PIPs . . . . . . . . . . . . . . . . . . . . . . . . . . . . . . . 27
Step 10 - Plan, Conduct and Document PIPs . . . . . . . . . . . . . . . . . . . . . . . . . . . . . . . . . . . . . 29
Step 11 - Get to the Root of the Problem . . . . . . . . . . . . . . . . . . . . . . . . . . . . . . . . . . . . . . . . . 31
Step 12 - Take Systematic Action . . . . . . . . . . . . . . . . . . . . . . . . . . . . . . . . . . . . . . . . . . . . . . . . . 33
QAPI Tools & Resources . . . . . . . . . . . . . . . . . . . . . . . . . . . . . . . . . . . . . . . . . . . . . . . . . . . . . . . . . . . . . . . . . . 35
Purpose of This Guide
This companion guide is designed to help your team recognize and understand the major components of the Quality Assurance/Performance Improvement Initiative (QAPI). Refer to it often as a support tool in your facility’s quality improvement efforts. This resource is not intended to replace QAPI at a Glance; use it in conjunction with other materials to help your team stay on track in reaching your quality improvement goals.
1. www.atomalliance.org/QAPI

QA & PIBackground
In December 2012, the Centers for Medicare & Medicaid Services (CMS) issued a memo announcing the release of QAPI at a Glance, a step-by-step guide detailing 12 key steps to establish the framework for quality assurance (QA) and performance improvement (PI) in nursing homes.
While nursing homes have long been required to have quality assessment and assurance programs, pending changes to the regulations will require that a formalized approach to performance improvement is also part of a facility’s ongoing systems.
Quality Assurance vs Performance ImprovementQA can be characterized as a focus on current outcomes, with a retrospective view of what happened. Often, this is done from a need to ensure compliance and proper follow-up of identified issues. While the scope of a QA committee may include such actions as conducting a root cause analysis and developing action plans, current regulations do not require any specific or formal improvement processes to be used.
PI can be thought of as a system that makes things better. Unlike QA, which focuses on compliance, performance improvement focuses on “systems issues” that cause poor outcomes. While there are many formalized performance improvement tools, QAPI at a Glance refers to the Plan-Do-Study-Act (PDSA) model for improvement.
Putting It Together - QAPIWhen QA initiatives and PI efforts are blended together, the result can be significant improvements in important outcomes.
• Residents can experience fewer adverse clinical effects.• Satisfaction rates can improve.• Staff can become more engaged as facility processes are stabilized.
All of this can lead to improved operational performance for your organization.
+ QAPI=QA PI
QA
PI
www.atomalliance.org/QAPI2.

Quality Assurance Performance Improvement
Motivation Measuring Compliance Continuously Improving Processes to with Standards Meet Standards
Means Inspection Prevention
Attitude Required, Reactive Chosen, Proactive
Individual Outliers Focus Processes or Systemsbad apples Scope Medical Provider Resident Care
Responsibility Few All
QA + PI = QAPISource: QAPI at a Glance
3. www.atomalliance.org/QAPI

12 Steps to QAPI
4.
According to QAPI at a Glance, there are 12 steps to implementing QAPI. These steps build on one another but do not need to be achieved sequentially. However, following them sequentially can be a great way to begin your strategic approach to implementing QAPI.
Step 1: Leadership & Responsibility
Step 2: Develop a Deliberate Approach to Teamwork
Step 3: Take Your QAPI Pulse with a Self-Assessment
Step 4: Identify Your Organization’s Guiding Principles
Step 5: Develop Your QAPI Plan
Step 6: Conduct a QAPI Awareness Campaign
Step 7: Develop a Strategy for Collecting & Using QAPI Data
Step 8: Identify Your Gaps & Opportunities
Step 9: Prioritize Quality Opportunities and Charter PIPs
Step 10: Plan, Conduct & Document PIPs
Step 11: Get to the Root of the Problem
Step 12: Take Systemic Action
www.atomalliance.org/QAPI

PDSA Model for ImprovementThe success of QAPI and the performance improvement project (PIP) teams at your facility will depend on everyone’s understanding of the Plan-Do-Study-Act (PDSA) model for improvement. While there are several different improvement methodologies, PDSA is a simple model that is easy to follow.
To begin, the PIP team should make observations in the system targeted for improvement. Targeted areas could be staff performance, actual processes or services delivery, documentation, staffing, organizational culture, or any other aspect of care or services where the outcomes are not meeting facility expectations or standards.
The PIP team should answer these questions:1. What are we trying to accomplish?2. How will we know that a change is an improvement?3. What changes can we make that will result in improvement?
Then, the team should follow these easy steps, and document their process and decision-making:
Plan • State the objective.• Predict what will happen.• Plan to carry out the cycle (Who, What,
Where, When).
Do • Carry out the plan.• Document observations.• Record data.
Study • Analyze data.• Compare results to predictions.• Summrize what was learned.
Act • What changes are to be made?• Next cycle?
5. www.atomalliance.org/QAPI

QAPI at a Glance Apendix A | 37Disclaimer: Use of this tool is not mandated by CMS for regulatory compliance nor does its completion ensure regulatory compliance.
Goal Setting Worksheet
Directions: Goal setting is important for any measurement related to performance improvement. This worksheet is intended to help QAPI teams establish appropriate goals for individual measures and also for performance improvement projects. Goals should be clearly stated and describe what the organization or team intends to accomplish. Use this worksheet to establish a goal by following the SMART formula outlined below. Note that setting a goal does not involve describing what steps will be taken to achieve the goal.
Describe the business problem to be solved:
Use the SMART formula to develop a goal:
SPECIFICDescribe the goal in terms of 3 ‘W’ questions:
What do we want to accomplish?
Who will be involved/affected?
Where will it take place?
6.
MEASURABLEDescribe how you will know if the goal is reached:
What is the measure you will use?
What is the current data figure (i.e., count, percent, rate) for that measure?
What do you want to increase/decrease that number to?
www.atomalliance.org/QAPI

QAPI at a Glance Apendix A | 38Disclaimer: Use of this tool is not mandated by CMS for regulatory compliance nor does its completion ensure regulatory compliance.
ATTAINABLEDefend the rationale for setting the goal measure above:
Did you base the measure or figure you want to attain on a particular best practice/average score/ benchmark?
Is the goal measure set too low that it is not challenging enough?
Does the goal measure require a stretch without being too unreasonable?
RELEVANT
Briefly describe how the goal will address the business problem stated above.
TIME-BOUNDDefine the timeline for achieving the goal:
What is the target date for achieving this goal?
Write a goal statement, based on the SMART elements above. The goal should be descriptive, yet concise enough that it can be easily communicated and remembered.
[Example: Increase the number of long-term residents with a vaccination against both influenza and pneumococcal disease documented in their medical record from 61 percent to 90 percent by December 31, 2011.]December 31, 2015
Tip: It’s a good idea to post the written goal somewhere visible and regularly communicate the goal during meetings in order to stay focused and remind caregivers that everyone is working toward the same aim.
Goal Setting W
orksheet
7. www.atomalliance.org/QAPI

What is a Root Cause Analysis?Just as you would pull a weed out of your garden by its root to ensure that it doesn’t grow back, getting to the root cause of a system’s issue is important to prevent the problem from returning. There are many formalized root cause analysis tools.
Two easy-to-use tools are the fishbone diagram and the Five Whys.
Root Cause Analysis
8.
Fishbone (Cause-and-Effect) Diagram
1. Begin the fishbone diagram by placing the problem at the head of the “fish.”2. Under each general category of the fishbone, answer the question, “Why?” for the identified
problem. For example, “Why are people the cause of this problem?”3. Once your team has completed the fishbone diagram, discuss the various causes to get to the
root of the problem. It is from this discussion that the focus for the improvement plan can begin.
Equipment Process People
Materials Environment Management
Problem
www.atomalliance.org/QAPI

Five Whys
The Five Whys tool aids in identifying the root cause(s) of a problem. Begin by identifying a specific problem, and ask why it is occurring. Continue to ask “Why?” to identify causes until the underlying cause is determined. Each “Why?” should build on the previous response. There is nothing magical about the number five. Sometimes a root cause may be reached after asking “Why?” just a few times; at other times, deeper questioning is needed.
1. Define a problem; be specific. 2. Ask why this problem occurs, and list the reasons in Box 1. 3. Select one of the reasons from Box 1 and ask, “Why does this occur?” List the reasons
in Box 2.
Continue this process of questioning until you have uncovered the root cause of the problem. If there are no identifiable answers or solutions, address a different problem or reason.
9.
1.
2.
3.
4.
5.
The Problem:
Why does this occur?
Why is that?
Why is that?
Why is that?
Why is that?
Why is that?
www.atomalliance.org/QAPI

QAPI FAQs
10.
Q: Aren’t we already meeting the requirements of QAPI?
A: Nursing homes are currently required to have a Quality Assessment and Assurance (QAA) program through the F-520 regulatory requirement. While this federal regulation does require certain elements of quality improvement (e.g. having a committee structure, holding regular meetings, identifying root causes, developing action plans, engaging in continuous improvement), the use of a formal improvement model and ongoing accountability is not specified. According to information on the CMS website:
“This provision provides a rule but not the details as to the means and methods taken to implement the QAA regulations. CMS is now reinforcing the critical importance of how nursing facilities establish and maintain accountability for QAPI processes in order to sustain quality of care and quality of life for nursing home residents.”
Thus, with QAPI, nursing homes are being asked to incorporate a standardized process for ongoing PI, and to develop a written plan to ensure accountability and sustainability for their improvement efforts.
Q: When will the QAPI regulations be issued?
A: According to Section 6102 of the Affordable Care Act (ACA), nursing homes will have one year from the date on which the regulations are promulgated to submit their plan to meet these standards and details as to how the QAA activities will be coordinated with the plan.
Q: Will surveyors have access to our QAPI documentation?
A: Until the regulations are promulgated, this remains unclear.
www.atomalliance.org/QAPI

QAPI Step 1Leadership Responsibility & Accountability The facility leadership (i.e., medical director, administrator, director of nursing and other key managers) is responsible for setting the tone to help staff identify how to meet the organization’s mission, vision, guiding principles, standards and expectations. Without strong leadership, change efforts often fail or are not sustainable.
11.
Who Is Responsible? Date CompletedAction Step
Develop a steering committee.
Provide resources for QAPI, including equipment and training.
Establish a climate of open communication and respect.
Articulate your home’s current culture, and how it will promote performance improvement.
Questions for Team Discussion
1. Who is on our QAPI Steering Committee?
2. Is our medical director involved in QAPI?
3. How can we provide needed resources for QAPI?
4. Is our work climate open, respecting and “just” (fair)? What does our climate look like? 5. How can QAPI blend with our existing QA efforts?
Surpassing the Hurdles
1. What barriers do you anticipate with these action steps?
2. What additional information does your team need?
3. What additional resources would be helpful?
4. What structures can you create to help ensure your success with this step?
www.atomalliance.org/QAPI

QAPI Step 1Leadership Responsibility & Accountability
Suggestions for Implementing Step 1
• Institute an open-door policy for all levels of leadership to establish presence and consistent
availability to staff.
• Provide training and gain staff, resident and family member commitment for your QAPI
initiatives.
• Routinely spend time in all areas and during all shifts.
• Talk directly to staff and residents. Establish a practice to ask how they are doing, what
they need to do their best work and provide excellent care, and how you can help reduce
frustrations that prevent them from doing their best work.
• Commit to following through on issues brought to you—keep that commitment.
• Set the example and pitch in.
• Recognize and honor staff and resident opinions. Demonstrate your sincere appreciation.
• Credit others for their contributions that positively affect your performance.
• Ensure necessary equipment is readily available and in good working order.
• Involve all staff in changes and improvement efforts to increase the feeling of ownership and
accountability.
• Build leadership skills through training, support and coaching to help staff be effective.
• Openly admit your unintentional errors so people are less afraid to admit theirs.
• As a leader, uphold the high expectations of the organizations. If you see an issue, take action
and set the tone for high expectations.
12. www.atomalliance.org/QAPI

QAPI Step 2Develop a Deliberate Approach to Teamwork QAPI at a Glance states that QAPI relies on teamwork in several ways. Do teams at your organization have a clear purpose? Do teams have defined roles for each team member to play? Do teams have commitment and active engagement from each member?
13.
Who Is Responsible? Date CompletedAction Step
Assess the effectiveness of teamwork in your organization.
Discuss how PIP teams will work to address QAPI goals.
Determine how direct care staff, residents and families can be involved in PIPs.
Identify any communication structures that need to be implemented or enhanced.
Questions for Team Discussion
1. How can residents and families be involved in our QAPI efforts?
2. Do we have effective teamwork? How do we know? What does it look like?
3. How does leadership support the development of effective teams?
4. Do we have effective communication in our facility? How do we know?
5. Do team members support one another?
Surpassing the Hurdles
1. What barriers do you anticipate with these action steps?
2. What additional information does your team need?
3. What additional resources would be helpful?
4. What structures can you create to help ensure your success with this step?
www.atomalliance.org/QAPI

QAPI Step 2Develop a Deliberate Approach to Teamwork
Suggestions for Implementing Step 2
• Set the expectation for leaders and staff to look for and share ideas for ways to grow and innovate.
• Build trust with and between your staff members (do what you say you are going to do).
• Celebrate successes—it’s the little things that matter.
• Establish the use of learning circles and huddles to foster relationships and create an opportunity
for all to be heard.
• Remove boundaries between departments (hold neighborhood meetings that all disciplines attend,
use interdisciplinary teams for problem-solving, etc.)
• Use templates or methods for consistency and to support shared expectations of processes,
agendas, minutes and a place to share information with the team.
• Encourage and reward staff for supporting each other.
• Expect that the medical director/providers listen to nurses, aides and other staff, and actively seek
their suggestions, assessments and recommendations.
• Encourage the medical director and physicians to keep track of opportunities for improvements,
and bring those to leadership (and to the QAPI Steering Committee).
14. www.atomalliance.org/QAPI

QAPI Step 3Take Your QAPI Pulse with a Self-AssessmentAssessing your facility’s current practice is a necessary part of implementing QAPI. Since facilities are already required to have QAA committees, take the time now to find out to what degree you have already mastered the concepts of QAPI.
15.
Who Is Responsible? Date Completed
Determine a date and time for completing the QAPI Self-Assessment Tool.
Assemble the right people to complete the Self-Assessment Tool.
Complete the QAPI Self-Assessment Tool, recording your answers for future comparison.
Determine a date for the next QAPI Self-Assessment Tool review.
Action Step
Surpassing the Hurdles
1. What barriers do you anticipate with these action steps?
2. What additional information does your team need?
3. What additional resources would be helpful?
4. What structures can you create to help ensure your success with this step?
www.atomalliance.org/QAPI

QAPI Step 3Take Your QAPI Pulse with a Self-Assessment
Suggestions for Implementing Step 3• Complete the QAPI Assessment Tool with input from the entire QAPI team and organizational
leadership.• This is meant to be an honest reflection of your progress with QAPI.• The results of this assessment will direct you to areas you need to work on in order to establish
QAPI in your organization.
16. www.atomalliance.org/QAPI

QAPI Step 4Identify Your Organization’s Guiding PrinciplesIs the care provided by your facility tied to your organization’s fundamental purpose or philosophy? How do you determine programmatic priorities? Taking time to articulate the purpose, the guiding principles and the scope of QAPI will help you integrate these efforts into your organization.
17.
Who Is Responsible? Date Completed
Locate or develop your organization’s vision statement.
Locate or develop your organization’s mission statement.Develop a purpose statement for QAPI.
Establish guiding principles.
Action Step
Define the scope of QAPI in your organization.
Assemble a document with these elements to serve as a guide.
Questions for Team Discussion
1. What beliefs do we have about our facility’s purpose and philosophy?
2. What beliefs do we have about our approach to QA and PI?
3. What is our mission and vision statement?
4. What are some of the ways in which we expect care to be provided?
Surpassing the Hurdles
1. What barriers do you anticipate with these action steps?
2. What additional information does your team need?
3. What additional resources would be helpful?
www.atomalliance.org/QAPI

QAPI Step 4Identify Your Organization’s Guiding Principles
Suggestions for Implementing Step 4
• Use an inclusive process to establish, review, and reaffirm your mission. Involve staff, residents and
families.
• Ensure values are considered core to the facility and to those who live and work there.
18. www.atomalliance.org/QAPI

QAPI Step 5
19.
A QAPI plan should be a living, breathing document that you revisit periodically to ensure that it evolves as your facility grows in its capacity to effectively implement QAPI. This is the main document that will support your QAPI implementation.
Develop Your QAPI Plan
Who Is Responsible? Date Completed
Determine date(s) and time(s) for writing the QAPI plan.
Print copies of the Guide for Developing a QAPI Plan for all team members.
Work toward writing the QAPI plan until it is complete.
Determine a future date for reviewing the QAPI plan.
Action Step
Questions for Team Discussion
1. What goals do we have for how QAPI will work?
2. How will QAPI be integrated into leadership’s accountability?
3. How will we strive to use data and PI teams? 4. How will direct-care staff be involved in QAPI and PIPs?
Surpassing the Hurdles
1. What barriers do you anticipate with these action steps?
2. What additional information does your team need?
3. What additional resources would be helpful?
4. What structures can you create to help ensure your success with this step?
www.atomalliance.org/QAPI

Develop Your QAPI Plan
QAPI Step 5
Suggestions for Implementing Step 5• Base your plan on the unique characteristics and services of the nursing home.• Continually review and refine your QAPI plan.• Tailor the plan to fit your nursing home, including all units, programs, and resident groups (sub-
acute care unit, dementia care unit, palliative care program).• Think also of the range of residents. Do you have some younger residents? You may need to
develop a distinct plan to create quality of life for those residents.
20. www.atomalliance.org/QAPI

QAPI Step 6
21.
Taking time to create a deliberate communication plan about QAPI will help ensure that everyone in your organization is familiar with the plan, the goals and their roles and expectations in the process.
Conduct a QAPI Awareness Campaign
Who Is Responsible? Date Completed
Inform everyone (staff, residents, families, consultants, ancillary service providers, etc.) about QAPI and your organization’s QAPI plan. Provide training and education on QAPI for all caregivers.
Develop a strategy for communicating QAPI with all caregivers.
Develop a strategy for communicating QAPI with resi-dents and families.
Action Step
Questions for Team Discussion
1. How will we inform staff about QAPI?
2. How much education and training will be needed?
3. How will we engage residents and families in QAPI efforts?
Surpassing the Hurdles
1. What barriers do you anticipate with these action steps?
2. What additional information does your team need?
3. What additional resources would be helpful?
4. What structures can you create to help ensure your success with this step?
www.atomalliance.org/QAPI

Conduct a QAPI Awareness Campaign
QAPI Step 6
Suggestions for Implementing Step 6
• Share the mission, vision and guiding principle with all staff.
• Include the mission, vision and guiding principles in orientation for new staff.
• Develop communication plans that use multiple approaches (email, verbal, newsletters, etc.)
throughout the facility and across all shifts.
• Hold area meetings.
• Openly and transparently share your performance data with staff, board, residents and families.
• Set up a scoreboard for staff that monitors progress toward important goals (e.g., days at zero
pressure ulcers). Post progress in common areas such as halls and break rooms.
• Use a storyboard to share your plan, progress and data.
22. www.atomalliance.org/QAPI

QAPI Step 7
23.
Effective use of data will help ensure that decisions are made based on fact, and not on an assumption of the truth. Just as a physician needs data about a patient to diagnose a condition, QAPI teams and PIP teams will need data to ensure they are targeting the right areas.
Develop a Strategy for Collecting & Using Data
Who Is Responsible? Date Completed
Determine what data to monitor routinely.
Set targets for performance in the areas you are monitoring.
Identify benchmarks for performance.
Develop a data collection plan, including who will collect which data, who will review it, the frequency of collection and reporting, etc.
Action Step
Questions for Team Discussion
1. What data do our facility routinely monitor? How are these data displayed and used?
2. What benchmarks will we use when assessing our performance?
3. How can we make better use of the data we have? Do we track and trend our progress over time?
4. How are data shared with others in the organization? Staff? Residents/families? The Board or corporate office?
Surpassing the Hurdles
1. What barriers do you anticipate with these action steps?
2. What additional information does your team need?
3. What additional resources would be helpful?
4. What structures can you create to help ensure your success with this step?
www.atomalliance.org/QAPI

QAPI Step 7Develop a Strategy for Collecting & Using DataSuggestions for Implementing Step 7
• Areas to consider for data monitoring include clinical care areas, medications, resident/family
complaints, hospitalizations, state survey results and business and administrative processes.
• When setting targets, consider the long-term as well as short-term goals.
• When identifying benchmarks, you can look at your performance compared to nursing homes
in your state and nationally using Nursing Home Compare. Generally, because every facility is
unique, the most important benchmarks are often based on your own performance.
24. www.atomalliance.org/QAPI

QAPI Step 8
25.
Whether you are reviewing data from the Minimum Data Set (MDS) or quality measure reports, data from satisfaction surveys or consultant reports, or any other source, be sure you are identifying any trends in the data you review. Use this time to observe for any areas where processes are breaking down.
Identify Your Gaps & Opportunities
Who Is Responsible? Date Completed
Review information to determine if gaps or patterns exist in your systems of care, or if opportunities exist to make improvements. Discuss any emerging themes with residents and caregivers.
Notice what things your organization is doing well in identified areas.
Set priorities for improvement.
Action Step
Questions for Team Discussion
1. When reviewing your data, what stands out?
2. How strong is your organizational capacity for assessing facility systems (e.g., policies, protocols, actual care delivery)?
3. What are some areas of strength and weakness?
4. What opportunities do you see?
Surpassing the Hurdles
1. What barriers do you anticipate with these action steps?
2. What additional information does your team need?
3. What additional resources would be helpful?
4. What structures can you create to help ensure your success with this step?
www.atomalliance.org/QAPI

Identify Your Gaps & Opportunities
QAPI Step 8
Suggestions for Implementing Step 8
• Measure important indicators of care that are relevant and meaningful to the residents that you
serve.
• Guide and empower staff to solve problems. For example, leaders should respond to problems that
are raised—not by proposing a solution, but by asking the team to investigate and determine what
they believe would work best.
• Hold short stand-up meetings with managers and staff for each shift to identify concerns,
resources, needs, etc.
• Establish the nursing home as a learning organization in which all staff identifies areas for
improvements.
• Regularly discuss processes and systems to identify areas for improvement—in meetings as well as
everyday interactions.
• Empower residents to get involved in identifying areas of improvement.
26. www.atomalliance.org/QAPI

QAPI Step 9
27.
Be sure you are choosing areas that you consider important (e.g., areas of high risk, frequent occurrence, or areas that are known problems). Remember that not all identified problems require PIPs, but for those that do, the projects need to be structured, or “chartered.”
Prioritize Opportunities & Charter PIPs
Who Is Responsible? Date Completed
Prioritize opportunities for more intensive improvement work.
Consider which problems need the focus of a PIP.
Charter PIP teams, by selecting a leader and defining the mission.
PIP teams should develop timelines and indicate budget needs.
Action Step
PIP teams should use the Goal Setting Worksheet to establish appropriate goals.
Questions for Team Discussion
1. How will organizational priorities be determined?
2. Who will be responsible for monitoring the overall progress of our PIPs?
3. What education is needed for PIP teams?
Surpassing the Hurdles
1. What barriers do you anticipate with these action steps?
2. What additional information does your team need?
3. What additional resources would be helpful?
4. What structures can you create to help ensure your success with this step?
www.atomalliance.org/QAPI

QAPI Step 9Prioritize Opportunities & Charter PIPs
Suggestions for Implementing Step 9
• Get everyone involved in setting goals—residents, staff, family members, and Board members.
• If practices are not making sense or are frustrating to staff, residents or family, do not settle for
“this is just the way it has to be,” challenge and sort out what you have control over, and look for
ways to address improvements.
28. www.atomalliance.org/QAPI

QAPI Step 10
29.
For those areas that require a PIPs, PIP teams should use a methodic or standardized process for making improvements. PDSA is one well-known model, but there are others that may also work for your organization. The important point is to use a strategic methodology, and not a haphazard, “throw it at the wall and see if it sticks” approach.
Plan, Conduct and Document PIPs
Who Is Responsible? Date Completed
Determine what information is needed for the PIPs.Determine timelines and communicate them to the QAPI Steering Committee.Identify and request any needed supplies or equipment. Select or create measurement tools.
Action Step
Prepare and present results. Use a problem-solving model (e.g., PDSA). Report results to the QAPI Steering Committee.
Questions for Team Discussion
1. According to our data, what area(s) do we need to work on?
2. Who should be involved? What are the timelines?
3. What resources are needed?
4. What ideas can we test?
Surpassing the Hurdles
1. What barriers do you anticipate with these action steps?
2. What additional information does your team need?
3. What additional resources would be helpful?
4. What structures can you create to help ensure your success with this step?
www.atomalliance.org/QAPI

Plan, Conduct and Document PIPs
QAPI Step 10
Suggestions for Implementing Step 10
• Identify and support a change agent for each improvement project—i.e., a cheerleader and/or key
facilitator of change in your facility.
• Use an action plan template that defines who and when to establish timelines and accountability.
• Seek creative ideas from multiple sources inside and outside the organization to foster innovation.
• Create a safe environment to test changes, and try new ways to meet resident needs.
• Include “all voices” that have a stake in what is being discussed.
• Use methods that encourage open and honest communication, especially to get at concerns.
30. www.atomalliance.org/QAPI

QAPI Step 11
31.
Prevent recurring problems by ensuring that all possible root causes have been identified and addressed. Remember to use systematic tools, such as the fishbone diagram or the “Five Whys” to dig below the surface.
Get to the Root of the Problem
Who Is Responsible? Date Completed
Using a methodical approach, determine all potential root cause(s) underlying the performance issue(s).
Determine which factors are controllable.
Ensure that that the PSDA cycles address the root cause(s).
Action Step
Questions for Team Discussion
1. What are the obvious and less obvious reason(s) the problem surfaced?
2. What is at the root of those factors?
3. What systems and processes are involved (not people)?
Surpassing the Hurdles
1. What barriers do you anticipate with these action steps?
2. What additional information does your team need?
3. What additional resources would be helpful?
4. What structures can you create to help ensure your success with this step?
www.atomalliance.org/QAPI

Get to the Root of the Problem
QAPI Step 11
Suggestions for Implementing Step 11
• Use the root cause analysis (RCA) process to look at systems rather than individuals when
something breaks down.
• If one method didn’t work, identify another to try—it’s a continuous process.
32. www.atomalliance.org/QAPI
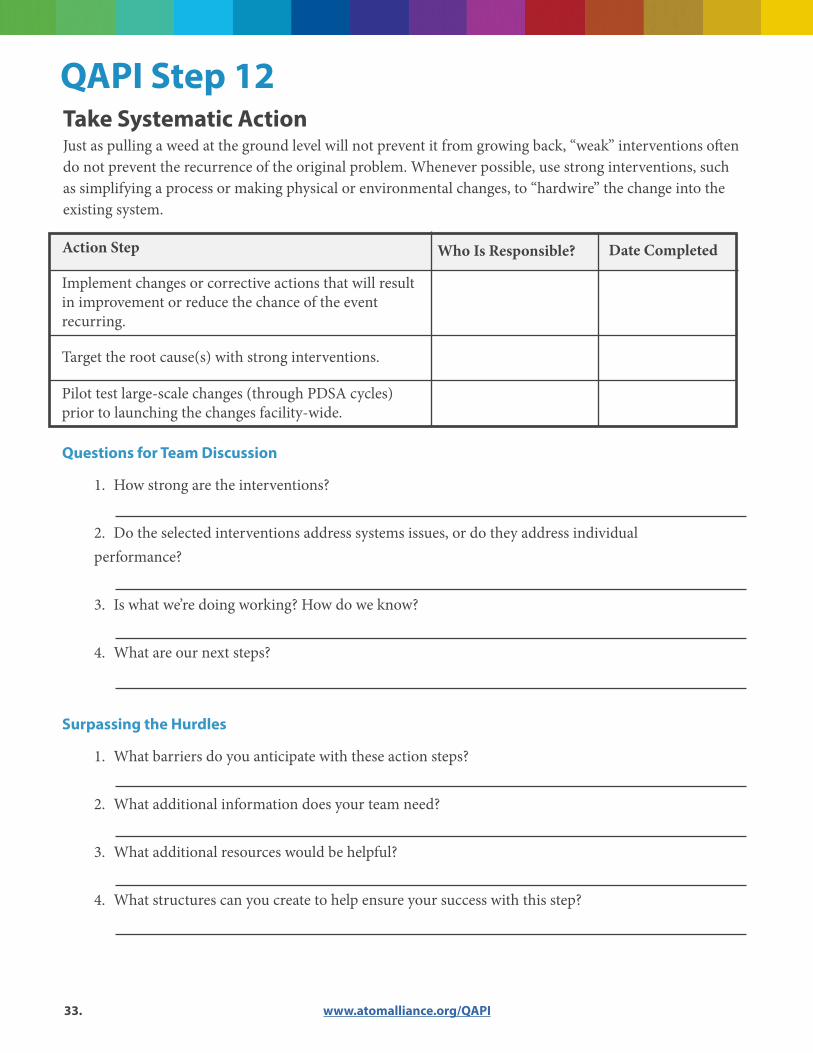
QAPI Step 12
33.
Just as pulling a weed at the ground level will not prevent it from growing back, “weak” interventions often do not prevent the recurrence of the original problem. Whenever possible, use strong interventions, such as simplifying a process or making physical or environmental changes, to “hardwire” the change into the existing system.
Take Systematic Action
Who Is Responsible? Date Completed
Implement changes or corrective actions that will result in improvement or reduce the chance of the event recurring.
Target the root cause(s) with strong interventions.
Pilot test large-scale changes (through PDSA cycles) prior to launching the changes facility-wide.
Action Step
Questions for Team Discussion
1. How strong are the interventions?
2. Do the selected interventions address systems issues, or do they address individual performance?
3. Is what we’re doing working? How do we know?
4. What are our next steps?
Surpassing the Hurdles
1. What barriers do you anticipate with these action steps?
2. What additional information does your team need?
3. What additional resources would be helpful?
4. What structures can you create to help ensure your success with this step?
www.atomalliance.org/QAPI

Take Systematic ActionQAPI Step 12
Suggestions for Implementing Step 12
• Before initiating a change in the organization, meet with any staff and residents that will be
impacted by the change in order to gain their support, buy-in and feedback.
• To be effective, interventions or corrective actions should target the elimination of root causes,
offer long-term solutions to the problem and have a greater positive than negative impact on other
processes.
• Interventions must be achievable, objective and measurable.
• Think about testing or piloting changes in one area of your facility before launching throughout.
Some changes have unintended consequences.
34. www.atomalliance.org/QAPI

QAPI Tools & Resources
35.
QAPI Self-Assessment ToolThis five-page, 24-item questionnaire is part of Step 3 of QAPI at a Glance. The Self-Assessment Tool is found in Appendix A, and will help your team determine the extent to which various QAPI practices are already established in your organization. It is recommended that you complete this self-assessment tool prior to beginning any QAPI planning, and re-assess your organization at routine intervals to show your progress.
Guide to Develop Purpose, Guiding Principles and Scope for QAPIThis important three-page guide will help you determine the manner in which your QAPI plan will be supported by your organization; it will serve as a solid foundation from which to continue building your QAPI practices. Using this tool can help guide your team through the creation of a separate document that may be used as the preamble to your QAPI plan.
Guide to Developing a QAPI PlanThis action-based, three-page guide will help your team address the important elements of QAPI, and develop a formal QAPI plan. With concrete examples and actionable steps in a logical progression, the guide will walk you step by step through the creation of your plan.
Goal-Setting WorksheetThis worksheet will help your PIP teams develop SMART performance improvement goals. Effective goals are specific, measurable, attainable, relevant and time-bound.
NHQCC Change PackageThe change package was compiled from the CMS QAPI demonstration project, where high performing nursing homes were indentified and interviewed to learn more about their systems and processes that contribute to overall quality. It provides a menu of strategies, change concepts and actionable items.
atom Alliance Embracing QAPIThis webpage was designed to support nursing homes by offering a library of information for QAPI implementation.
www.atomalliance.org/QAPI

Go towww.atomalliance.org/QAPI
for more information
This material was prepared by the atom Alliance, the Quality Innovation Network-Quality Improvement Organization (QIN-QIO), coordinated by Qsource for Tennessee, Kentucky, Indiana, Mississippi and Alabama, under a contract with the Centers for Medicare & Medicaid Services (CMS), an agency of the U.S. Department of Health and Human Services. Content presented does not necessarily reflect CMS policy. 14.ASC2.10.022