Grass Valley Pegasus Reviewer's Guide
27
Grass Valley ™ Pegasus Grass Valley Pegasus Reviewer’s Guide October 2007 © 2007 Thomson. All rights reserved. Grass Valley is a trademark of Thomson. All other trademarks are properties of their respective holders. All specifications are subject to change without notice. desktop.grassvalley.com professional.grassvalley.com
-
Upload
khangminh22 -
Category
Documents
-
view
0 -
download
0
Transcript of Grass Valley Pegasus Reviewer's Guide

Grass Valley™ Pegasus
Grass Valley Pegasus
Reviewer’s Guide
October 2007
© 2007 Thomson. All rights reserved. Grass Valley is a trademark of Thomson. All other trademarks are properties of their respective holders. All specifications are subject to change without notice.
desk top.g rassva l l e y.compro fess iona l .g rassva l l e y.com

Grass Valley Pegasus - Reviewer’s Guide October 2007 Page 2
Table of Contents
1. Grass Valley Pegasus Reviewer’s Guide ......................................................................................................3
1.1 Overview .................................................................................................................................................................3
1.2 Three Key Benefits ..................................................................................................................................................3
1.3 Key Features ...........................................................................................................................................................4
1.4 SKUs and Pricing ....................................................................................................................................................4
1.5 Shipping ..................................................................................................................................................................4
1.6 Warranty ..................................................................................................................................................................4
1.7 Supported Languages ............................................................................................................................................4
1.8 Descriptors (for press, Web sites etc) ....................................................................................................................5
1.9 Technical Specifications .........................................................................................................................................6
1.10 System Requirements ..........................................................................................................................................8
1.11 Package Contents .................................................................................................................................................9
1.12 Frequently Asked Questions (FAQs) ..................................................................................................................10
2. Pegasus Features and Benefits......................................................................................................................12
2.1. HQ Recorder – Pegasus Capture Software .........................................................................................................12
2.2 The Pegasus Advantage .......................................................................................................................................13
2.3 Pegasus Usage Examples and Workflow ............................................................................................................14
3. Pegasus Product Walkthrough and Tips ...................................................................................................15
3.1 Installing HQ Recorder Software .........................................................................................................................15
3.2 Capturing Video with Pegasus .............................................................................................................................19

Grass Valley Pegasus - Reviewer’s Guide October 2007 Page �
1. Grass Valley Pegasus Reviewer’s Guide
1.1 Overview
Grass Valley Pegasus from Thomson is a high-quality video capture system comprised of PCI Express hardware and software. Capable of accepting input from a variety of standard definition (SD) and high definition (HD) sources, including PC graphics, and featuring a Canopus HQ hardware codec chip, Pegasus lets you preview, capture and store footage in pristine quality – perfect for archiving or delivering out via SD and HD mediums.
At last, there is an affordable, easy-to-use solution for capturing video for use in demonstration and training videos. Pegasus’ inputs include S-Video, YUV and RGB analog and HDMI, making it ready for today’s range of video game consoles. With the included converter cable, you can also capture VGA output – ideal for creating tutorials of your software. But it doesn’t end there, as Pegasus can also capture external two-channel analog audio, and up to eight channels of embedded audio via HDMI.
And since Pegasus is a hardware-based image capture solution, there’s no need to worry about system specifications allowing for realtime, full frame rate, high resolution video capture.
Onboard Canopus HQ Codec Chip – Capture with the Best
Already a prominent part of Grass Valley’s EDIUS line of NLE solutions, the Canopus HQ codec offers supreme visual quality without the excessive hard disk storage costs normally associated with HD video ingest. With Pegasus, you can be assured that the HD video content you output from your HD sources will be perfectly preserved, ready for you to either edit, author to DVD, Blu-Ray or HD-DVD, or store for later usage. Because the input quality is so clean, subsequent conversions to other distribution formats – such as mobile phones or the Web – are cleaner too.
Pegasus includes the Canopus Codec Pack for you to incorporate your captured HQ AVI files into any Windows®-based video application.
1.2 Three Key Benefits
1. High resolution video capture with the Canopus HQ video codec... Capturing High Definition (HD) video is very data-intensive, requiring expensive RAID storage. Pegasus uses smart, high quality compression to give you huge storage savings without sacrificing picture quality.
2. Pristine video quality, ready for action... Because the input quality is so clean, subsequent conversions to other distribution formats – for example to mobile phones or the web – are cleaner too. And more efficient!
3. RGB input support for PC graphics... Because Pegasus can capture the PC screen display in HD quality too, it is the perfect tool for creating training videos and instructional DVDs. There are also no limitations on graphic card performance or video overlay display, and the capture process does not affect the PC’s overall processing power.

Grass Valley Pegasus - Reviewer’s Guide October 2007 Page �
1.3 Key Features
• High-quality capture of HD and SD video using an onboard Canopus HQ hardware encoding chip
• Capture up to 1920x1080/60i, 50i* and 1280x720/60p, 50p video
• Capture PC display signals up to 1280x1024 without downscaling
• Capture via HDMI**, DVI†, S-Video, YUV and RGB component inputs
• Includes the HQ Recorder capture software, providing three capture modes: Auto capture (when an input signal is detected), Manual capture and Scheduled capture
• Includes the Canopus Codec Pack, providing import of Canopus HQ AVI files into Windows-based video applications
• Software Development Kit (SDK) available for free download at the Web site (http://www.canopus.com/products/Pegasus/index.php), for software engineers to create their own Pegasus-based solutions
* 1080p capture is not supported
** HDMI support for 1.0 (HDMI 1.1-1.3, HDCP not supported)
† DVI capture requires an HDMI-DVI converter, sold separately
Note: Video that contains copy control, such as Copy-once, Copy-never, or Macrovision cannot be captured.
1.4 SKUs and Pricing
Pegasus: 625219 $999, €787
Pegasus with ProCoder 3 Bundle: 685268 $1199, €949
1.5 Shipping
Currently available.
1.6 Warranty
One-year limited warranty.
1.7 Supported Languages
HQ Recorder GUI support for English and Japanese.

Grass Valley Pegasus - Reviewer’s Guide October 2007 Page �
1.8 Descriptors (for press, Web sites etc)
25 words: Grass Valley Pegasus from Thomson captures video input from composite, S-Video, YUV component, RGB and HDMI sources, using the renowned Canopus HQ codec.
50 words: Grass Valley Pegasus from Thomson captures video input from a variety of standard definition and high definition sources, including PC graphics, using the renowned Canopus HQ codec. Pegasus lets you preview, capture and store footage in pristine quality – perfect for archiving or delivering out via SD and HD mediums.
100 words: Grass Valley Pegasus from Thomson is a high-quality video capture system comprised of PCI Express hardware and software. Capable of accepting input from a variety of standard definition (SD) and high definition (HD) sources, including PC graphics, and featuring a Canopus HQ hardware codec chip, Pegasus lets you preview, capture and store footage in pristine quality – perfect for archiving or delivering out via SD and HD mediums.
Video inputs on the Pegasus board include composite, S-Video, YUV component and RGB analog, and HDMI. Pegasus can also capture external, two-channel analog audio, and up to eight channels of embedded audio via
HDMI.
Grass Valley Pegasus - Reviewer’s Guide October 2007 Page �
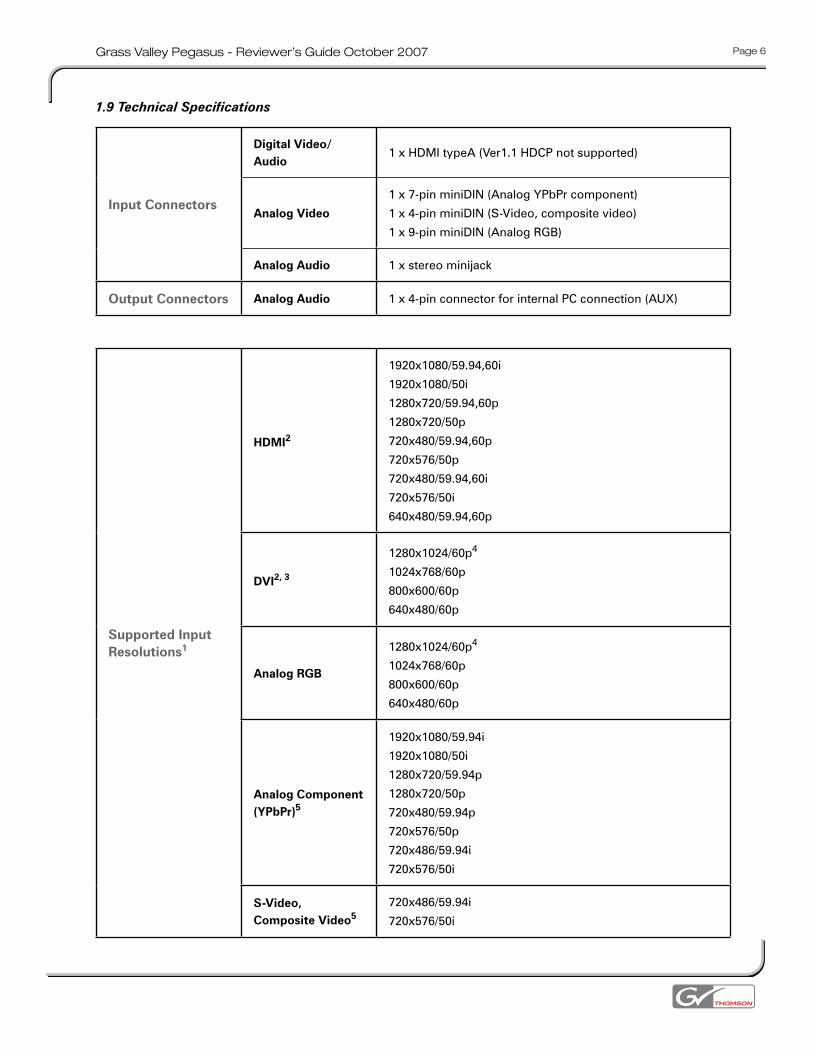
1.9 Technical Specifications
Input Connectors
Digital Video/Audio
1 x HDMI typeA (Ver1.1 HDCP not supported)
Analog Video
1 x 7-pin miniDIN (Analog YPbPr component)
1 x 4-pin miniDIN (S-Video, composite video)
1 x 9-pin miniDIN (Analog RGB)
Analog Audio 1 x stereo minijack
Output Connectors Analog Audio 1 x 4-pin connector for internal PC connection (AUX)
Supported Input Resolutions1
HDMI2
1920x1080/59.94,60i
1920x1080/50i
1280x720/59.94,60p
1280x720/50p
720x480/59.94,60p
720x576/50p
720x480/59.94,60i
720x576/50i
640x480/59.94,60p
DVI2, 3
1280x1024/60p4
1024x768/60p
800x600/60p
640x480/60p
Analog RGB
1280x1024/60p4
1024x768/60p
800x600/60p
640x480/60p
Analog Component (YPbPr)5
1920x1080/59.94i
1920x1080/50i
1280x720/59.94p
1280x720/50p
720x480/59.94p
720x576/50p
720x486/59.94i
720x576/50i
S-Video, Composite Video5
720x486/59.94i
720x576/50i

Grass Valley Pegasus - Reviewer’s Guide October 2007 Page 7
Video Capture File Format AVI (Canopus HQ, LPCM)
Video Capture Resolutions
1920x1080
1440x1080
1280x1080
1280x1024
1280x720
960x720
1024x768
800x600
720x576
720x486
720x480
640x480
Audio Capture
Line In, Monitor Out6 Stereo at 24bit 48kHz
HDMI Input2, 7 LPCM 2-8ch at 24bit 32/44.1/48kHz
1. Pegasus captures in the same resolution that is being input. Up-conversion/Down-conversion is not supported.
2. HDCP formatted video and audio cannot be previewed nor captured.
3. Can be connected to the HDMI port with a generic HDMI-DVI conversion cable, available separately
4. Captured as 30p.
5. Video that contains copy control, such as Copy-once, Copy-never, or Macrovision cannot be captured.
6. Audio will be in Unlocked Audio format when input via analog RGB or DVI.
7. If a mute HDMI signal is input, an AVI file with no audio element will be generated. Audio that contains copy control, such as
Copy-once, Copy-never, or Macrovision cannot be captured.

Grass Valley Pegasus - Reviewer’s Guide October 2007 Page �
1.10 System Requirements
CPU Intel® Pentium® 4 2.80GHz CPU or faster (AMD CPU also supported)
Memory 1GB RAM (2GB RAM recommended)
Hard Disk
40MB free disk space for the drivers and application software
• ATA 3GB/s, 7200rpm or faster hard disk for video capture
• If capturing graphics output from the same PC, a second physical hard disk drive is recommended
Internet Connection Ideal, for user registration, technical support and software updates
CD-ROM Required for installation
Graphics SystemGraphics card with support for PixelShader Model 2.0 (i.e. DX9-based) or hardware-based DirectDraw overlay, and 32-bit color display at 1024x768 resolution
PCIe Slot One free PCI Express slot is required
Operating System
Microsoft Windows Vista (Ultimate, Enterprise, Business, Home Premium, Home Basic) Microsoft Windows XP Home Edition (SP 2 or later), Microsoft Windows XP Professional (SP 2 or later)

Grass Valley Pegasus - Reviewer’s Guide October 2007 Page �
1.11 Package Contents
1 Pegasus PCI Express x1 bus card
1 Pegasus Installation CD-ROM
1 Installation guide
1 15-pin D-sub RGB to 9-pin miniDIN converter cable
1 YPbPr component to 7-pin miniDIN converter cable
1 RCA composite to S-Video connector
1 Ferrite core
2 Grounding gasket
1 4-pin to 4-pin internal audio cable

Grass Valley Pegasus - Reviewer’s Guide October 2007 Page 10
1.12 Frequently Asked Questions (FAQs)
Q1. Why is EDIUS not bundled with Pegasus?
A1. Because Pegasus is not an editing product per se, and this would confuse customers. One of the main selling points of EDIUS hardware has been the ability to accurately monitor while editing. Pegasus is a capture card – it has no output.
Q2. How does Pegasus compare with Black Magic Design’s Intensity Pro?
A2. The Intensity Pro is targeted at editing applications because it does have output, but it can only capture uncompressed video, or use the supplied M-JPEG codec (which delivers questionable quality). Capturing uncompressed HD has implications for bus speed and requires expensive RAID storage. The Pegasus card on the other hand has high quality Canopus HQ compression built in, thanks to a custom-programmed FPGA chip on board. The compression settings can also be adjusted to suit storage and system performance.
Q3. What is the Canopus HQ Codec?
A3. The Canopus-engineered HQ codec has been designed to preserve the best possible picture quality without sacrificing editing performance. It supports a maximum resolution of 1920 x 1080, and by compressing the full HD resolution without using a pre-filter to down-sample the signal, the codec is able to preserve the frequency characteristics of the original signal almost perfectly. In other words, compressing HD data in this way can yield a saving of 20:1 without any significant loss in quality. That’s a big saving considering that just one second of uncompressed HD at 1920 x 1080 is around 140MB!
Q4. Can other applications use the HQ codec?
A4. Yes. Included with Pegasus is the Canopus Codec Pack, incorporating a software encoder/decoder for Canopus HQ (and other Canopus-engineered codecs). This means that any other DirectShow application can use Canopus HQ files. These same applications will also inherit the ability to export any material back out to Canopus HQ, giving you additional benefits outside of just having a new ingest format.
Q5. Can I use Pegasus to copy a copyrighted source (DVD-Video, Blu-Ray, etc...)?
A5. No, not if it is copy protected. Any video signal with copy protection (e.g.: Macrovision, CGMS-A) can be viewed, but not recorded. Also, content from PS3, Xbox 360 and HD-DVD/Blu-Ray players cannot be viewed or recorded using the HDMI interface but rather, you can use the analog HD component input. HDMI 1.1, 1.3, and HDCP content cannot be viewed nor captured with Pegasus.
Grass Valley Pegasus - Reviewer’s Guide October 2007 Page 11
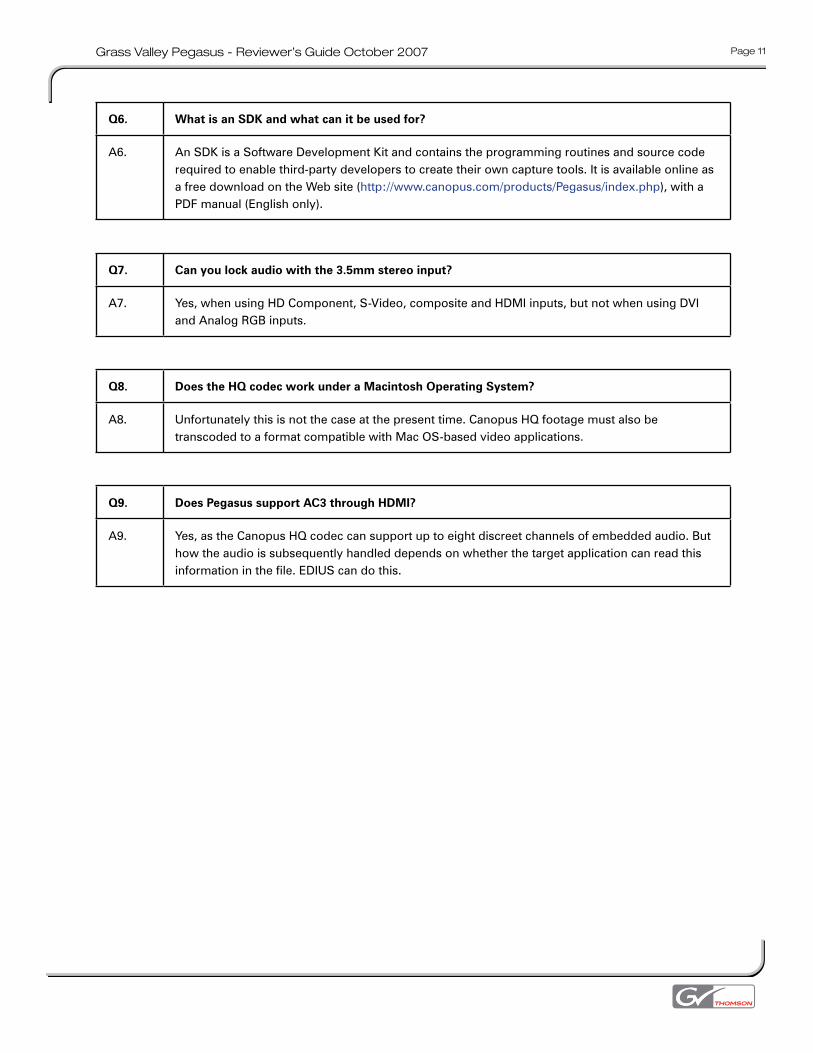
Q6. What is an SDK and what can it be used for?
A6. An SDK is a Software Development Kit and contains the programming routines and source code required to enable third-party developers to create their own capture tools. It is available online as a free download on the Web site (http://www.canopus.com/products/Pegasus/index.php), with a PDF manual (English only).
Q7. Can you lock audio with the 3.5mm stereo input?
A7. Yes, when using HD Component, S-Video, composite and HDMI inputs, but not when using DVI and Analog RGB inputs.
Q8. Does the HQ codec work under a Macintosh Operating System?
A8. Unfortunately this is not the case at the present time. Canopus HQ footage must also be transcoded to a format compatible with Mac OS-based video applications.
Q9. Does Pegasus support AC3 through HDMI?
A9. Yes, as the Canopus HQ codec can support up to eight discreet channels of embedded audio. But how the audio is subsequently handled depends on whether the target application can read this information in the file. EDIUS can do this.

Grass Valley Pegasus - Reviewer’s Guide October 2007 Page 12
2. Pegasus Features and Benefits
2.1. HQ Recorder – Pegasus Capture Software
HQ Recorder is a capture application designed specifically for Pegasus and is included in the Pegasus package. HQ Recorder provides a quick and easy method of configuring HQ capture quality settings, and HD and SD video preview of input sources, including a fullscreen mode. HQ Recorder supports three modes of capture:
Auto Capture – HQ Recorder will automatically start capture upon detecting an input signal matching your configured settings
Manual Capture – Captures can be started and ended manually, or started manually and ended automatically by specifying the duration or end time
Scheduled Capture – HQ Recorder captures according to specified date/time
The HQ Recorder application resides within the Windows notification tray, providing you with an unobtrusive means of starting and ending video capture. This is ideal for situations where you need to capture graphics output from the same PC that the Pegasus hardware is installed in.
Note: Both HQ Recorder and EDIUS v4.5 software applications share the same video overlay engine, and as such, cannot be run simultaneously.

Grass Valley Pegasus - Reviewer’s Guide October 2007 Page 1�
2.2 The Pegasus Advantage
In almost all situations up till now, there were only three solutions available for capturing high-quality, high-resolution video on a PC:
1. Capture via a video editing hardware board, as uncompressed data. This method requires vast amounts of storage, within high-performance RAID arrays. Satisfying these hardware demands requires an expensive investment for such a simple task.
2. Capture via a video converter and scaler to a FireWire port. This method reduces the source material’s visual quality to standard definition DV.
3. Capture with software-only solutions, either as uncompressed data, which can result in sacrificing frame rates to maintain capture on lower end systems, or you can capture to a compressed format. The problem with this solution is that in some cases, you may not get video overlay or be forced to reduce the performance of your graphics card output to be able to capture. In any event, PC resources must be shared between the capture software and the PC software you want to record output from. This method also does not solve the problem of obtaining footage from external devices.
With Pegasus, you eliminate these tradeoffs. Pegasus not only captures in the same resolutions employed by most high definition sources, but the resulting data is much smaller in file size and capable of being manipulated and edited on any current PC. The Canopus-engineered HQ codec has been designed to preserve the best possible picture quality without sacrificing editing performance.
Canopus HQ supports a maximum resolution of 1920x1080, and by compressing the full HD resolution without using a pre-filter to down-sample the signal, the codec is able to preserve the frequency characteristics of the original signal almost perfectly. In other words, compressing HD data in this way can yield a saving of 20:1 without any significant loss in quality. That’s a big saving considering that just one second of uncompressed HD at 1920x1080 is around 140MB!
In addition, when capturing PC graphics output, Pegasus records everything it sees, including full motion video overlay and 3D renderings from animation software or games – no need to reduce your PC’s video acceleration settings.
The Canopus HQ codec is extremely flexible and configurable, providing not just easy-to-use pre-configured profiles (Online Fine, Online Standard), but also customizable settings in terms of picture quality and bit-rate.
For example, when capturing a 1440x1080 60i video signal, its full size is 750Mbps. To limit this to 200Mbps, the maximum size value should be set to 27%.

Grass Valley Pegasus - Reviewer’s Guide October 2007 Page 1�
2.3 Pegasus Usage Examples and Workflow
Grass Valley Pegasus from Thomson is ideal for:
• Anyone involved in creating or repurposing high-quality video content for distribution via the Web or mobile applications
• Universities and corporate training establishments
• Games publishers, creators, and advertising agencies looking for an easy and cost-effective means of capturing and showing content
• Corporate presentations, live events and houses of worship
• CG - record a realtime rendering of a 3D project that can be viewed on the PC
• Publishing - games magazines (both online and print) can make high resolution captures of all the latest gaming console and PC titles
• Corporate presentations involving PC slides – print to video, with external audio annotation for later distribution
Since Pegasus includes the Canopus Codec Pack, you’ll be able to bring in your captured Canopus HQ footage into any Windows-based video application for editing, transcoding, or authoring to DVD, Blu-Ray and HD-DVD.
Video Editing
Streaming Mediafor the Web
E-mail and Mobile
DVD, HD-DVD,Blu-Ray
Authoring / Archival
S-VHS / VHS
Video GameConsoles
AVCHD Cameras
PC Graphics

Grass Valley Pegasus - Reviewer’s Guide October 2007 Page 1�
3. Pegasus Product Walkthrough and Tips
This section covers basic installation and operation of the Pegasus package. As always, it’s a good idea to first read the manual included in the package, which covers hardware installation and I/O connections.
Note: The procedures shown in this section were performed on a system running Windows Vista, with a NVIDIA Quadro FX1500 graphics board using the latest ForceWare Drivers.
3.1 Installing HQ Recorder Software
After installing the Pegasus hardware into a free PCI Express slot and booting the PC, you will see a screen like the one shown below.
Click Cancel, to close the window.
Insert the Pegasus installation CD-ROM. Typically, the autorun prompt will appear asking your permission to start the Pegasus Setup application. If this prompt does not appear, simply choose Computer from the Start menu, and then double-click your CD-ROM drive’s icon from the window that has just opened.

Grass Valley Pegasus - Reviewer’s Guide October 2007 Page 1�
Start the Setup by choosing Run Setup.exe option. The Setup process will start.
When prompted, choose Next.
Choose the top option for the License Agreement and then Next.

Grass Valley Pegasus - Reviewer’s Guide October 2007 Page 17
Normally you would want to leave the destination location set to the default setting, but if you would like to change the location, choose Change and select a different folder and/or drive to install HQ Recorder to.
When ready, choose Next to continue.
Click Install.
At some point during this stage of the setup, you will be prompted to allow the installation of unsigned drivers for the Pegasus board. Choose Install this driver software anyway.
Grass Valley Pegasus - Reviewer’s Guide October 2007 Page 1�
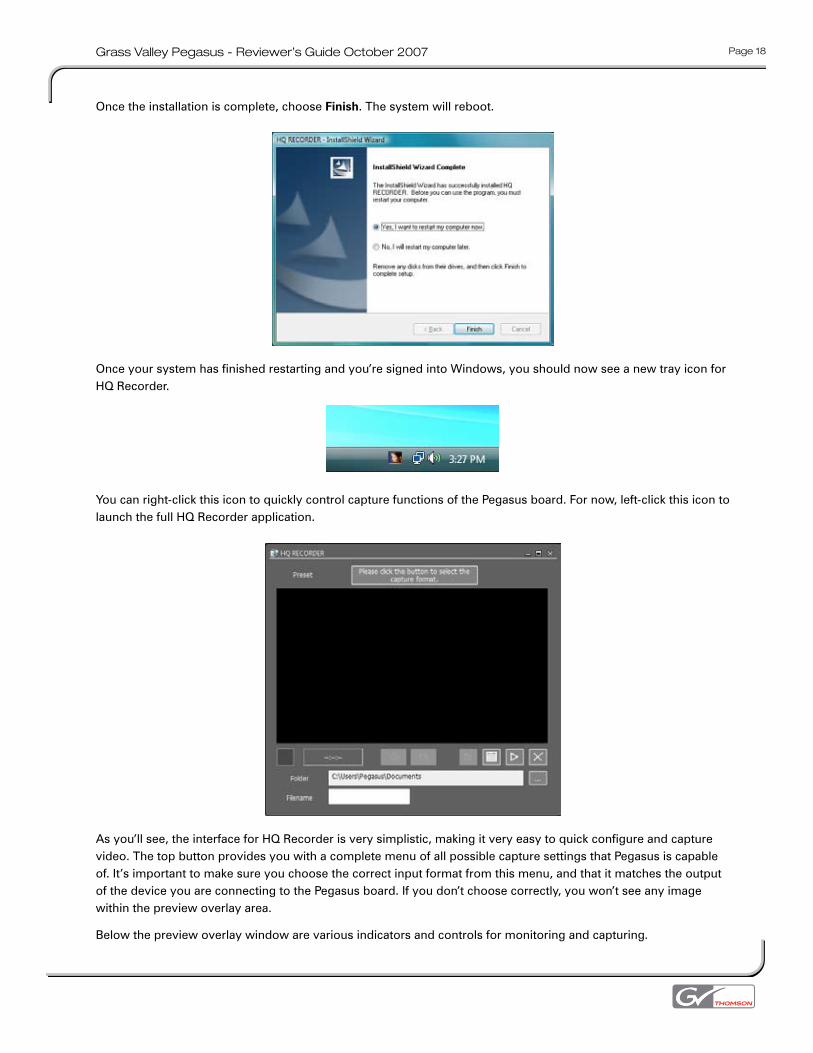
Once the installation is complete, choose Finish. The system will reboot.
Once your system has finished restarting and you’re signed into Windows, you should now see a new tray icon for HQ Recorder.
You can right-click this icon to quickly control capture functions of the Pegasus board. For now, left-click this icon to launch the full HQ Recorder application.
As you’ll see, the interface for HQ Recorder is very simplistic, making it very easy to quick configure and capture video. The top button provides you with a complete menu of all possible capture settings that Pegasus is capable of. It’s important to make sure you choose the correct input format from this menu, and that it matches the output of the device you are connecting to the Pegasus board. If you don’t choose correctly, you won’t see any image within the preview overlay area.
Below the preview overlay window are various indicators and controls for monitoring and capturing.

Grass Valley Pegasus - Reviewer’s Guide October 2007 Page 1�
3.2 Capturing Video with Pegasus
While there are numerous input sources that Pegasus can be used to capture video from, this section will cover how to configure HQ Recorder to capture output of PC graphics from the same system.
Note: If you are capturing output from a gaming console, it’s important to confirm the output settings while connected to a TV monitor first, before connecting it to the Pegasus board. This can save you time, since Pegasus will be expecting the output of the console to match the input format that you choose in HQ Recorder.
There are a few additional things to you’ll need to consider when using Pegasus to capture graphics output from the PC’s graphics card.
Clone Support: Most graphics cards in contemporary systems will feature two outputs, with the ability to duplicate the output on both connectors.
RGB Output: DVI or analog (15-pin).
Resolution: Pegasus can capture RGB resolutions of 640x480, 800x600, 1024x768 and 1280x1024
Framerate: Pegasus captures at 60 frames per second, with the exception of the 1280x1024 resolution, which is captured at 30 frames per second. (The data rate for 60fps at such a high resolution exceeds the capabilities of the hardware bus)
If you are capturing video output from a 15-pin D-sub VGA connector, you can use the supplied adapter cable. For DVI, you will need to get either a DVI-to-HDMI cable, or a DVI-to-HDMI connector and HDMI cable.
Configuring the Graphics Display Drivers
After physically connecting the necessary cables from the graphics card to the Pegasus card, you’ll need to make some adjustments to the Windows display settings, in order for the video output signal to be recognized and recorded.
Start by opening the NVIDIA Control Panel — this is done either by right-clicking within the Windows desktop area or the notification tray icon, and choosing the appropriate option.
If neither of these options is present, you can also go into the Windows Control Panel from the Start menu, and type in ‘nvidia’ into the Search bar at the top right-hand corner. The NVIDIA Control Panel shortcut should appear automatically, for you to select.

Grass Valley Pegasus - Reviewer’s Guide October 2007 Page 20
Once the NVIDIA Control Panel appears, the first thing to do is to enable the second graphic card output, and switch to ‘Clone Mode’. From the left-hand list of options, choose Set up multiple displays.
For the first option, select The same on both displays (Clone). From the second option, choose the option that places HDRECS (the Pegasus board) first.
This will make the graphics output feeding into the Pegasus hardware the primary display. The reasoning for this will be explained later.

Grass Valley Pegasus - Reviewer’s Guide October 2007 Page 21
Choose Change Resolution from the left-hand menu. The HDRECS ‘monitor’ will be selected as it is now the primary display.
Adjust the Display resolution to match the input video size you plan to capture with Pegasus. In this case, 1280 by 1024. It’s also a good idea to make sure that the Refresh rate is set to 60 Hertz.
Click Apply to save the settings.
If you are using an LCD flat panel display, such as this example is, you might find your graphics have been stretched out to fill the screen. This distortion can make it difficult to navigate and operate software that you might be capturing for tutorials, etc.
To fix this, choose Change flat panel scaling from the menu on the left.

Grass Valley Pegasus - Reviewer’s Guide October 2007 Page 22
Select the LCD monitor connected to the PC and then choose Do not scale. Click Apply to save these settings.
After a brief moment, you should have a corrected display, positioned in the center of the screen. This display reflects exactly what the Pegasus board will be capturing, in terms of GUI sizes and positioning.
One final step remains. To get the best graphics performance out of your video card, it’s a good idea to switch all of the 3D optimization to run off just the single output, rather than spanning across both outputs. This is especially useful when capturing intensive 3D GPU-based material, such as a new game.
Start by clicking the Standard Settings button at the top of the window, and changing it to Advanced Settings.
You should now have a few extra options available to you on the left-hand side.
Grass Valley Pegasus - Reviewer’s Guide October 2007 Page 2�
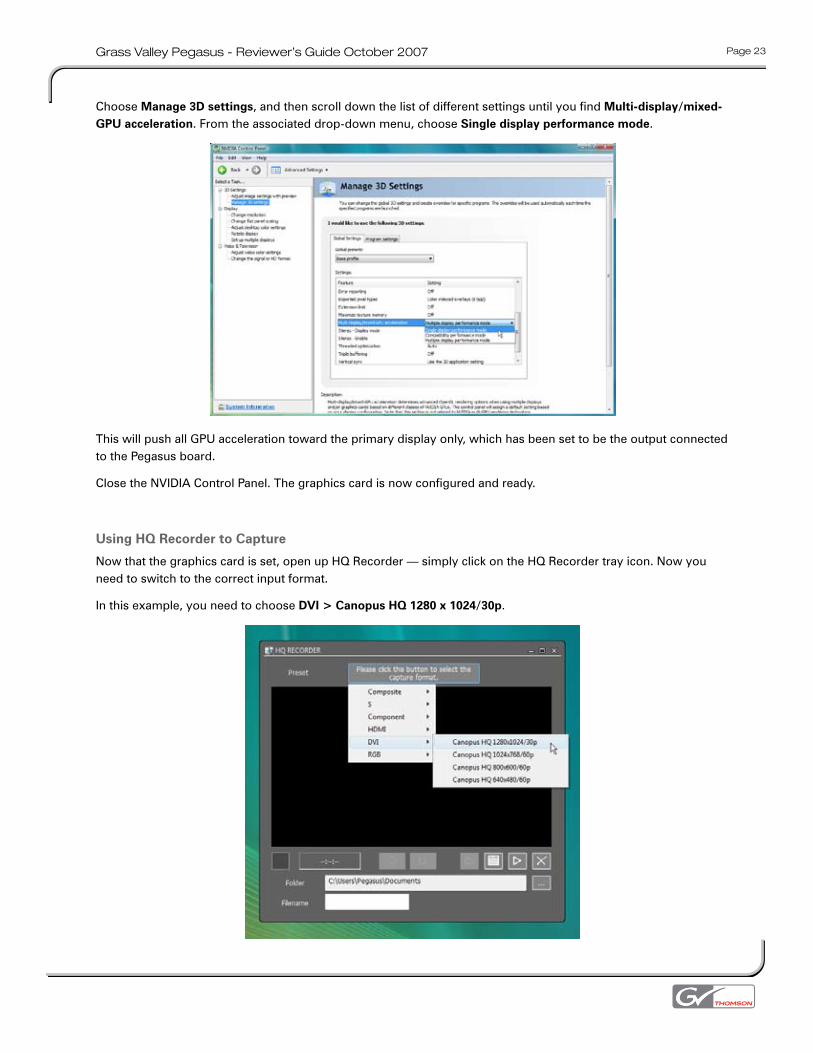
Choose Manage 3D settings, and then scroll down the list of different settings until you find Multi-display/mixed-GPU acceleration. From the associated drop-down menu, choose Single display performance mode.
This will push all GPU acceleration toward the primary display only, which has been set to be the output connected to the Pegasus board.
Close the NVIDIA Control Panel. The graphics card is now configured and ready.
Using HQ Recorder to Capture
Now that the graphics card is set, open up HQ Recorder — simply click on the HQ Recorder tray icon. Now you need to switch to the correct input format.
In this example, you need to choose DVI > Canopus HQ 1280 x 1024/30p.
Grass Valley Pegasus - Reviewer’s Guide October 2007 Page 2�
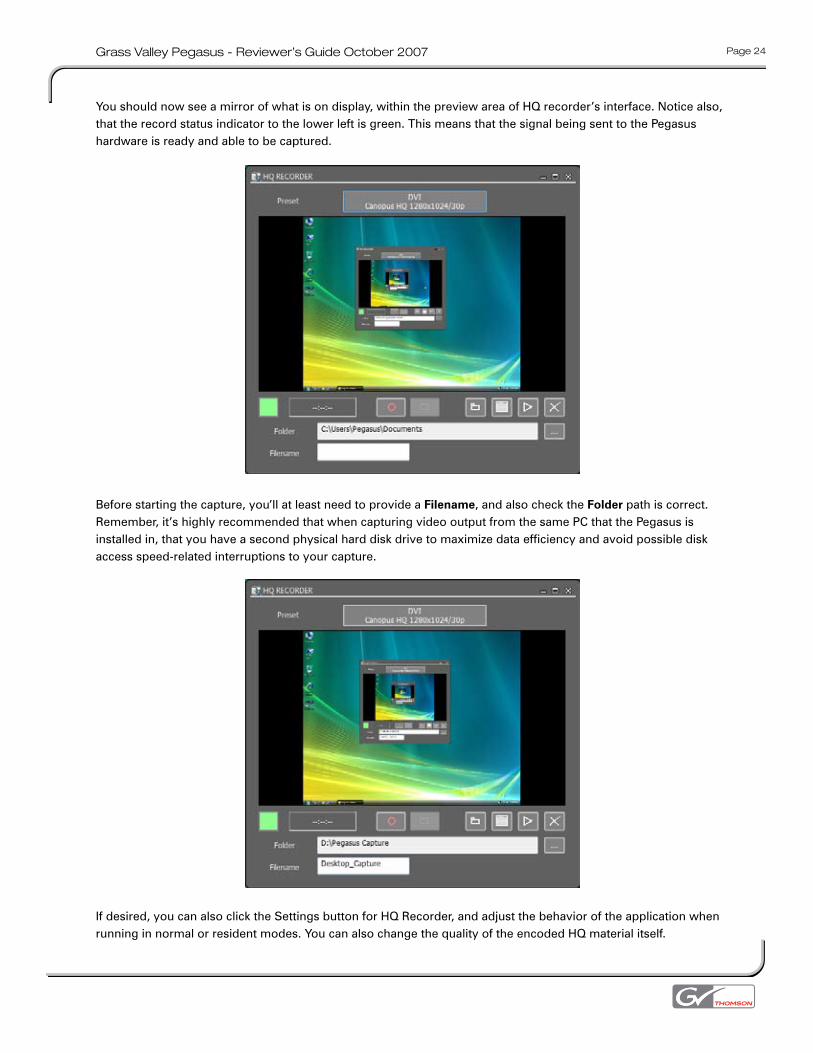
You should now see a mirror of what is on display, within the preview area of HQ recorder’s interface. Notice also, that the record status indicator to the lower left is green. This means that the signal being sent to the Pegasus hardware is ready and able to be captured.
Before starting the capture, you’ll at least need to provide a Filename, and also check the Folder path is correct. Remember, it’s highly recommended that when capturing video output from the same PC that the Pegasus is installed in, that you have a second physical hard disk drive to maximize data efficiency and avoid possible disk access speed-related interruptions to your capture.
If desired, you can also click the Settings button for HQ Recorder, and adjust the behavior of the application when running in normal or resident modes. You can also change the quality of the encoded HQ material itself.

Grass Valley Pegasus - Reviewer’s Guide October 2007 Page 2�
To begin capturing, simply click the Record button.
At this point, you can minimize, or even close the HQ Recorder window; the capture will continue in the background. You can view the recording status by simply checking the color of the tray icon — red indicates that a capture is in progress.
Grass Valley Pegasus - Reviewer’s Guide October 2007 Page 2�
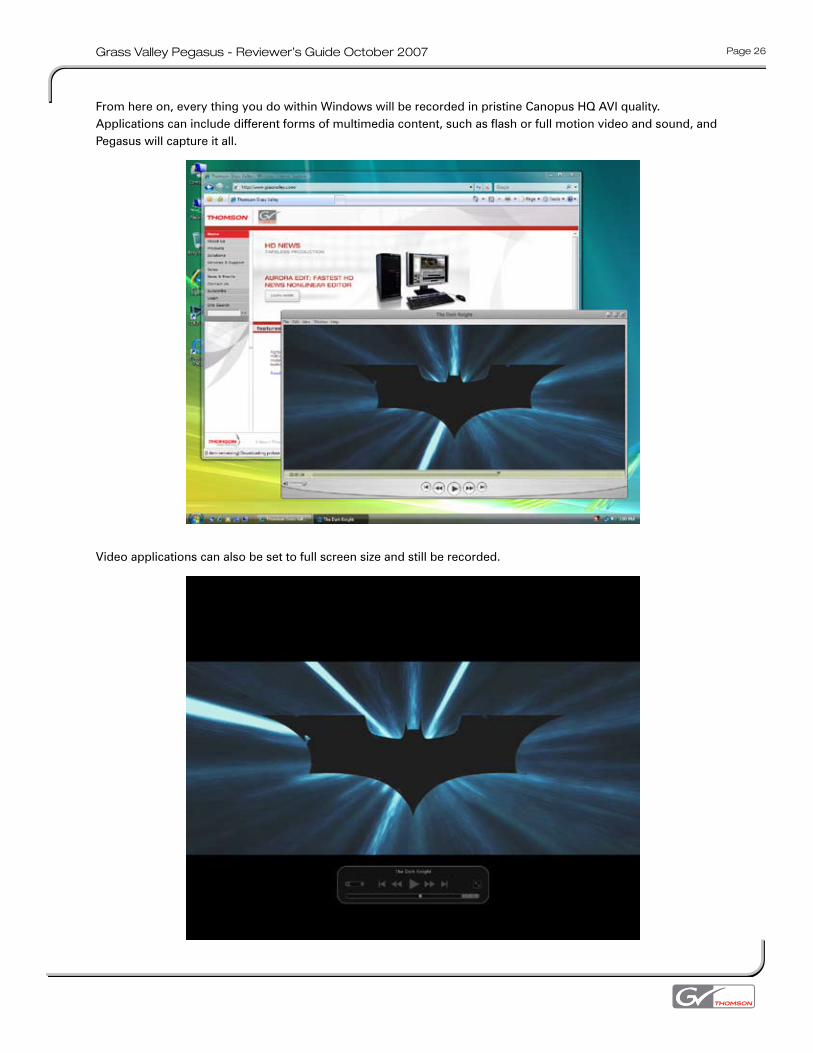
From here on, every thing you do within Windows will be recorded in pristine Canopus HQ AVI quality. Applications can include different forms of multimedia content, such as flash or full motion video and sound, and Pegasus will capture it all.
Video applications can also be set to full screen size and still be recorded.

Grass Valley Pegasus - Reviewer’s Guide October 2007 Page 27
To finish recording, simply right-click the HQ Recorder tray icon and choose Stop recording, or you can open the full HQ Recorder interface and click the Stop button there.
Clicking the Play button will allow you to quickly browse and load your saved clip into the default media player for AVI files, but remember that the high use of system RAM, video RAM and hard disk may cause the playback within the standard Windows Media Player to be slow and/or out of sync. It’s recommended to import the video into a recognized video editing, transcoding or authoring application to repurpose the video for its intended destination medium.