
Fiery Prep-it 6 User Guide
82
1 Fiery Prep-it User Guide 6 Fiery Prep-it 6 User Guide
-
Upload
khangminh22 -
Category
Documents
-
view
5 -
download
0
Transcript of Fiery Prep-it 6 User Guide

1 Fiery Prep-it User Guide 6
Fiery Prep-it 6
User Guide

2 Fiery Prep-it User Guide 6
User Guide This user manual describes how the Fiery Prep-it software works and how it helps prepare graphic files for a streamlined and very efficient print and cut workflow. Fiery Prep-it software is designed for single file preparations as well as true-shape nesting of multiple files to a media. The software is useful as a stand-alone product or linked and fully integrated to Fiery software that drives multiple printers and cutters.
This manual will introduce you to many features and procedures that will enable you to fully operate the software. The Fiery Prep-it software runs on both Windows and MAC platforms.
For further information on documentation and support, please contact your local EFI representative.
3 Fiery Prep-it User Guide 6
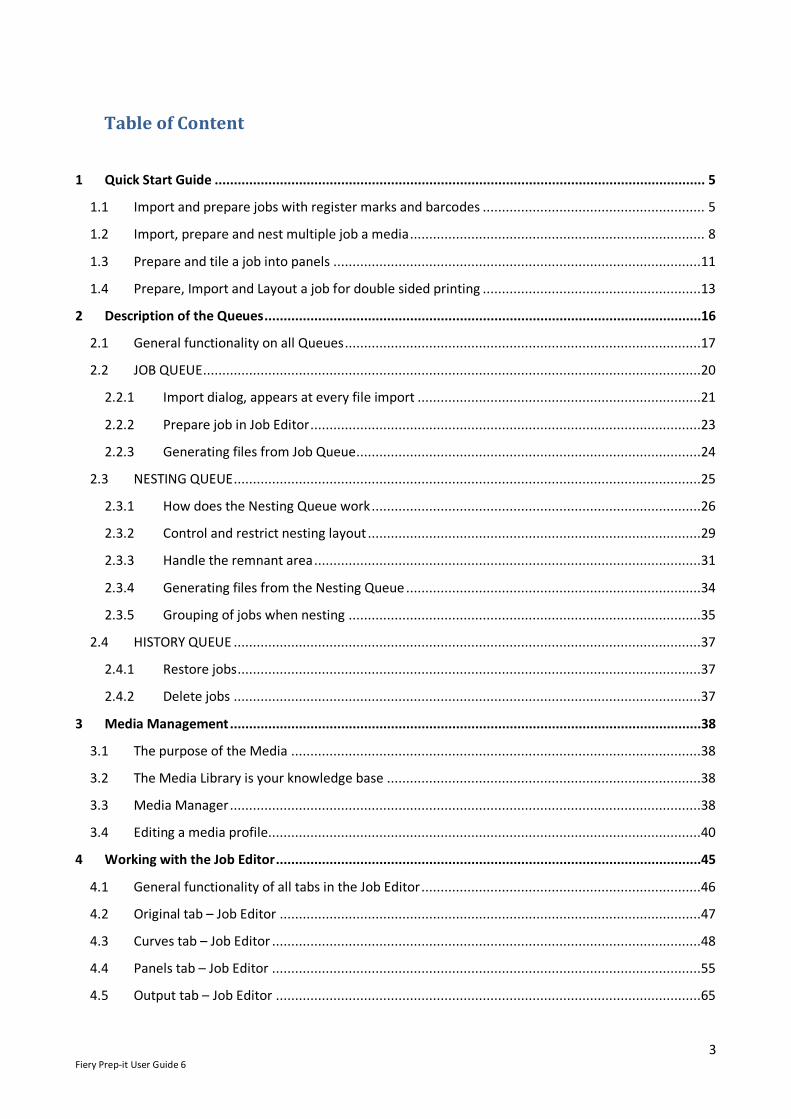
Table of Content
1 Quick Start Guide ................................................................................................................................ 5
1.1 Import and prepare jobs with register marks and barcodes .......................................................... 5
1.2 Import, prepare and nest multiple job a media ............................................................................. 8
1.3 Prepare and tile a job into panels ................................................................................................11
1.4 Prepare, Import and Layout a job for double sided printing .........................................................13
2 Description of the Queues ..................................................................................................................16
2.1 General functionality on all Queues .............................................................................................17
2.2 JOB QUEUE ..................................................................................................................................20
2.2.1 Import dialog, appears at every file import ..........................................................................21
2.2.2 Prepare job in Job Editor ......................................................................................................23
2.2.3 Generating files from Job Queue ..........................................................................................24
2.3 NESTING QUEUE ..........................................................................................................................25
2.3.1 How does the Nesting Queue work ......................................................................................26
2.3.2 Control and restrict nesting layout .......................................................................................29
2.3.3 Handle the remnant area .....................................................................................................31
2.3.4 Generating files from the Nesting Queue .............................................................................34
2.3.5 Grouping of jobs when nesting ............................................................................................35
2.4 HISTORY QUEUE ..........................................................................................................................37
2.4.1 Restore jobs .........................................................................................................................37
2.4.2 Delete jobs ..........................................................................................................................37
3 Media Management ...........................................................................................................................38
3.1 The purpose of the Media ...........................................................................................................38
3.2 The Media Library is your knowledge base ..................................................................................38
3.3 Media Manager ...........................................................................................................................38
3.4 Editing a media profile .................................................................................................................40
4 Working with the Job Editor ...............................................................................................................45
4.1 General functionality of all tabs in the Job Editor .........................................................................46
4.2 Original tab – Job Editor ..............................................................................................................47
4.3 Curves tab – Job Editor ................................................................................................................48
4.4 Panels tab – Job Editor ................................................................................................................55
4.5 Output tab – Job Editor ...............................................................................................................65
4 Fiery Prep-it User Guide 6
5 Generating output files ......................................................................................................................68
5.1 Sending output directly to Fiery Software ....................................................................................68
6 Working with Hotfolders and Automation .........................................................................................69
6.1 Hotfolders ...................................................................................................................................69
6.2 Automation – the concept ...........................................................................................................70
6.3 Create and edit automations .......................................................................................................70
6.4 Using the automations with File Import .......................................................................................76
6.5 Combining ProCut automation with other workflows ..................................................................79
6.6 Auto nesting ................................................................................................................................80
5 Fiery Prep-it User Guide 6
1 Quick Start Guide How to quickly start working with files in Fiery Prep-it software.
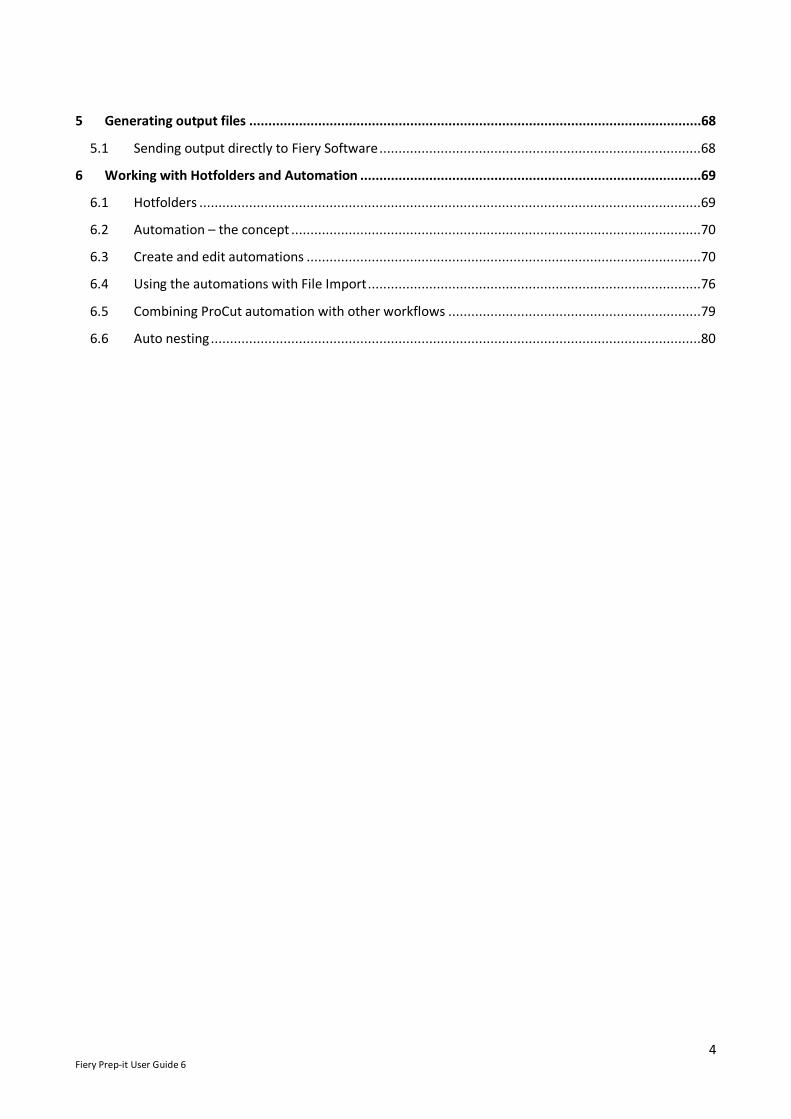
1.1 Import and prepare jobs with register marks and barcodes
In the JOB QUEUE, click IMPORT to open the dialog and locate the file and click Open. Enter relevant Job Data as needed, choose Media and specify Quantity. Choose Print on One side and No Nesting and click OK to start importing the file.

6 Fiery Prep-it User Guide 6
When the status symbol turns Yellow, the job is fully imported into the Job Queue, but the file is
not ready yet!
Click on the EDIT button, right+click or double-click to open the file in the Job Editor. In the Job Editor, go to the Curves tab and select the curve(s) you want and place them into the
Media layer(s).
7 Fiery Prep-it User Guide 6
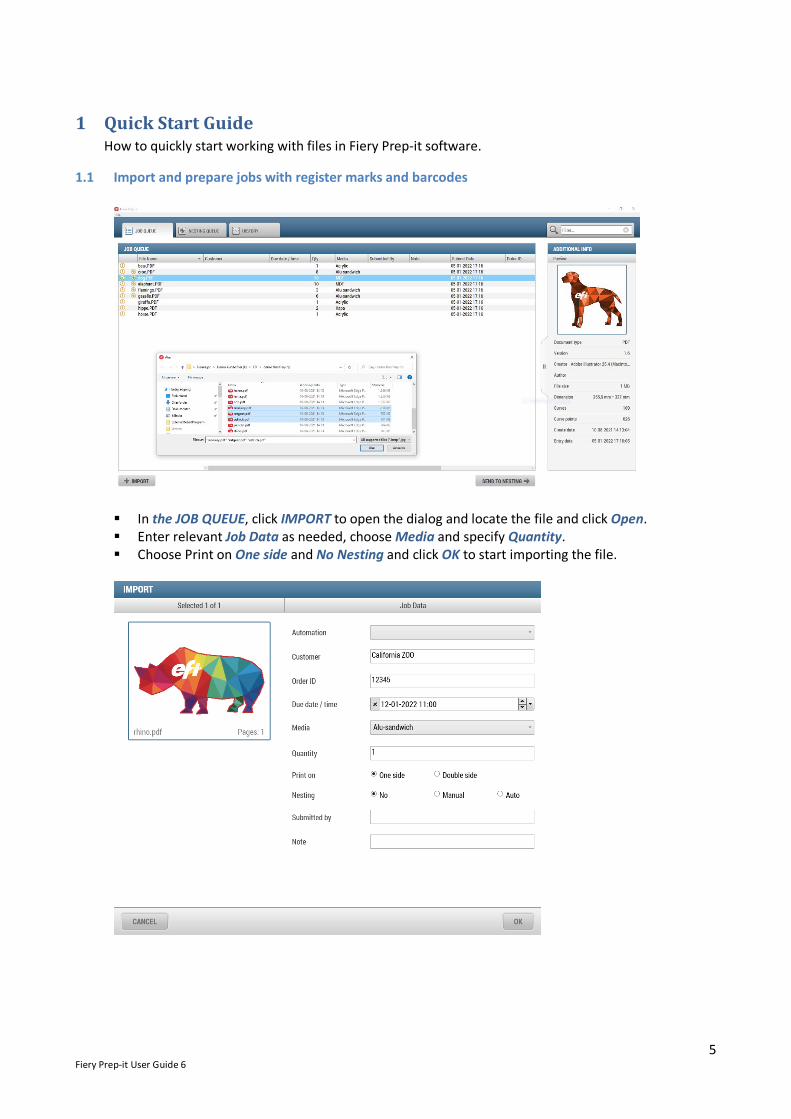
Click OK now or go to the Output tab and confirm that you have the register marks and barcodes
you like. Click OK to return to the Job Queue.
Click on GENERATE to get the output dialog, confirm settings and click GENERATE.
You have now generated a PDF print and cut file.

8 Fiery Prep-it User Guide 6
1.2 Import, prepare and nest multiple job a media
In the JOB QUEUE, click IMPORT to open the dialog and locate the file(s) and click Open. Enter relevant Job Data as needed, choose Media and specify Quantity. You can click on the
previews to select/deselect and specify Quantity on each file separately! Choose Print on One side and Nesting Yes and click OK to start importing the file(s). When the status symbol turns Yellow, the jobs are fully imported into the Job Queue, but the
file(s) are not ready yet! Click on the EDIT button, right+click or double-click to open the file in the Job Editor. In the Job Editor, go to the Curves tab and select the curve(s) you want and place them into the
Media layer(s).

9 Fiery Prep-it User Guide 6
When your files have been edited and turned green (Symbols), then click SEND TO NESTING to submit the selected files for nesting.
Go to the NESTING QUEUE and expand the media you wish to nest. Click on the blue arrow to expand/collapse the media.
When all the files are present on the media, then click NEST to start nesting!
Click on GENERATE to get the output dialog, confirm settings and click GENERATE.

10 Fiery Prep-it User Guide 6
You have now generated a nested PDF print and cut file.

11 Fiery Prep-it User Guide 6
1.3 Prepare and tile a job into panels
In the JOB QUEUE, click IMPORT to open the dialog and locate the file and click Open. Enter relevant Job Data as needed, choose Media and specify Quantity. Choose Print on One side and Nesting No and click OK to start importing the file. When the status symbol turns Yellow, the job is fully imported into the Job Queue, but the file is
not ready yet! Click on the EDIT button, right+click or double-click to open the file in the Job Editor. In the Job Editor, go to the Curves tab and select the curve you want and place it into the Media
layer.
12 Fiery Prep-it User Guide 6
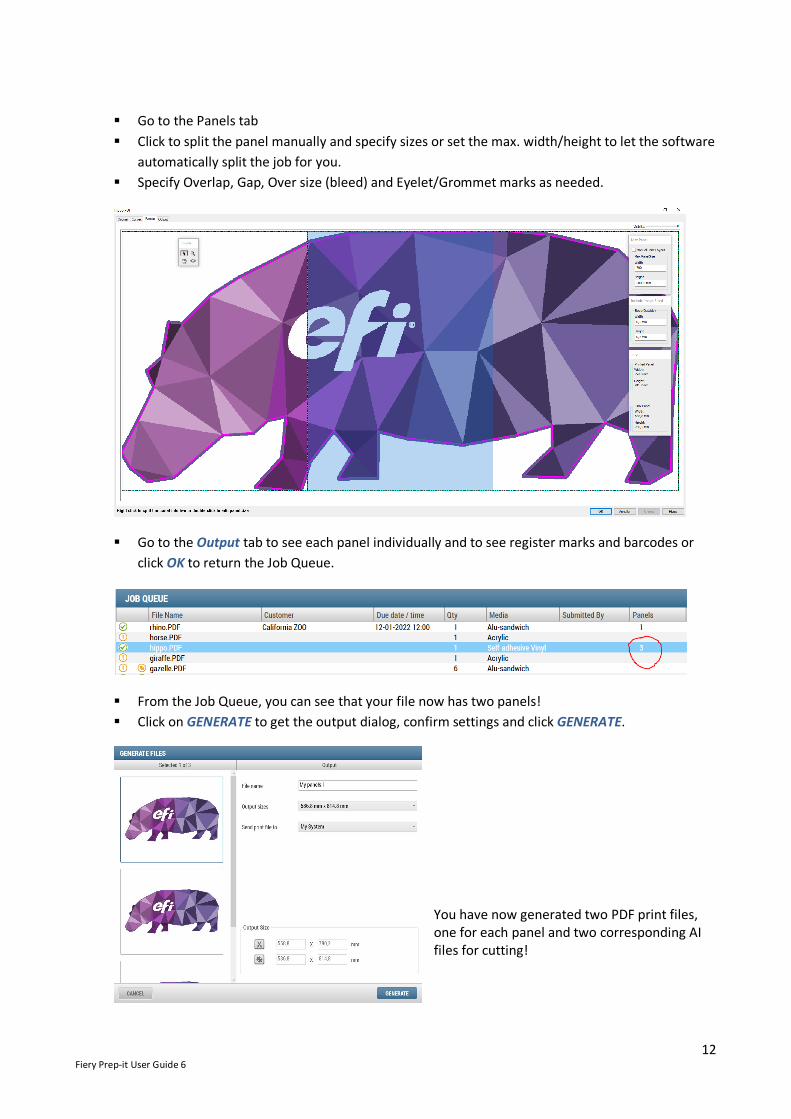
Go to the Panels tab Click to split the panel manually and specify sizes or set the max. width/height to let the software
automatically split the job for you. Specify Overlap, Gap, Over size (bleed) and Eyelet/Grommet marks as needed.
Go to the Output tab to see each panel individually and to see register marks and barcodes or click OK to return the Job Queue.
From the Job Queue, you can see that your file now has two panels! Click on GENERATE to get the output dialog, confirm settings and click GENERATE.
You have now generated two PDF print files, one for each panel and two corresponding AI files for cutting!

13 Fiery Prep-it User Guide 6
1.4 Prepare, Import and Layout a job for double sided printing
In Illustrator create your 2-page design on two Art boards, center graphics and mirror. Save 2-page PDF
In the JOB QUEUE, click IMPORT to open the dialog and locate the 2-page PDF file and click Open.
Enter relevant Job Data as needed, choose Media and specify Quantity. Choose Print on Double side and Nesting and click OK to start importing the file.

14 Fiery Prep-it User Guide 6
When the status symbol turns Yellow, the job is fully imported into the Job Queue, but the file is not ready yet!
Click on the EDIT button, right+click or double-click to open the file in the Job Editor. In the Job Editor, go to the Curves tab and select the curve you want and place it into the Media
layer.
Click OK to return to the Job Queue. SEND TO NESTING and create layout
Click on GENERATE to get the output dialog, confirm settings and select sheet size from the dropdown dialog.
Click GENERATE.

15 Fiery Prep-it User Guide 6
You have now generated a 2-page PDF print, one for each side of the substrate as well as a corresponding cut file.
Output file opened in Acrobat Reader, shows the 2-page print ready PDF file generated.

16 Fiery Prep-it User Guide 6
2 Description of the Queues Fiery Prep-it software includes four Queues that are visible to all clients / users connected to the Fiery Prep-it Server within the workflow group. Each intuitive Queue guides the user through the preparation steps from file import to editing to nesting to outputting print and cut ready files.
The workflow steps are as the arrows above show from left to right. Files are imported into the system in the Job Queue, then processed through the Nesting Queue, then finished and saved into History Queue. Files can easily be Restored again from the History Queue into the Job Queue.
JOB QUEUE
NESTING QUEUE
HISTORY

17 Fiery Prep-it User Guide 6
2.1 General functionality on all Queues Overview of the Queue structures
Each Queue can be setup and customized to display the relevant settings in the order and in the way that the user prefers. Column width, column order, column data can be adjusted for each Queue.
Right+click to edit which columns to be shown in the queues.
Expand/Collaps

18 Fiery Prep-it User Guide 6
Each Queue previews a job and lists some additional Job/meta data about the file. You can choose between collapsed and Expanded view. Note that there are generally more information and more functions available in expanded view!
Collapsed view Expanded view
Preview in collapsed mode.
Click to Expand Specific Job / meta data.
19 Fiery Prep-it User Guide 6
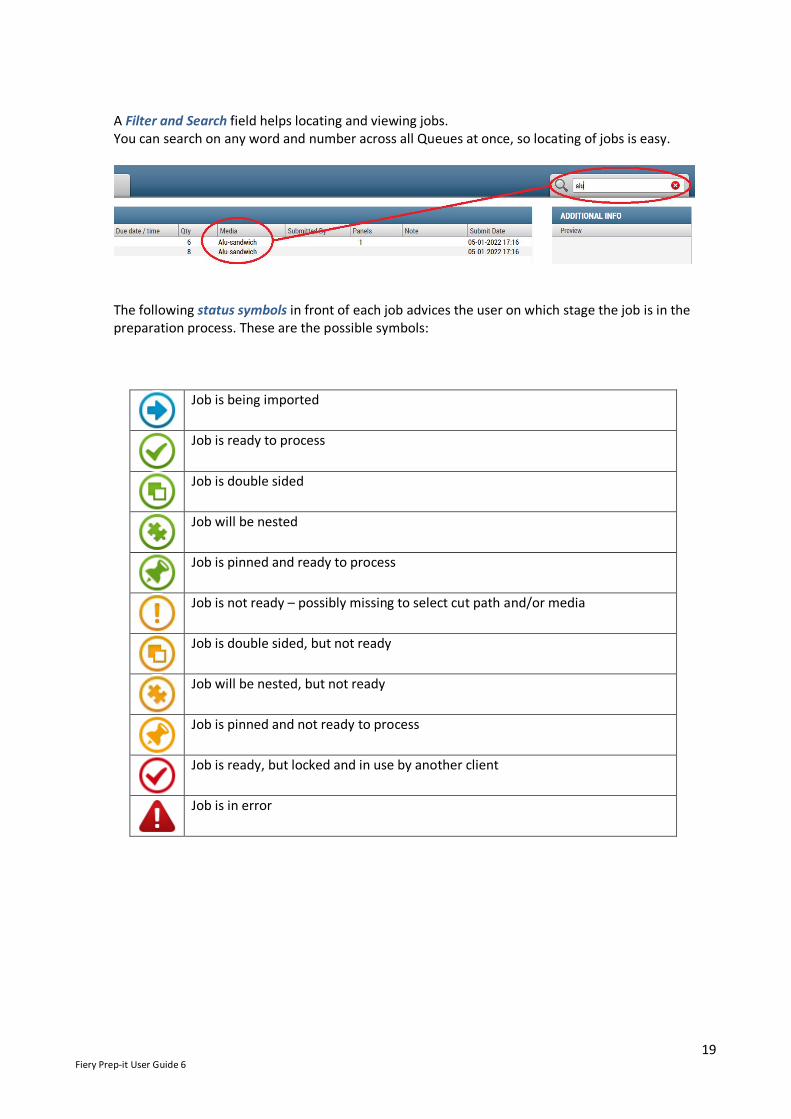
A Filter and Search field helps locating and viewing jobs. You can search on any word and number across all Queues at once, so locating of jobs is easy.
The following status symbols in front of each job advices the user on which stage the job is in the preparation process. These are the possible symbols:
Job is being imported
Job is ready to process
Job is double sided
Job will be nested
Job is pinned and ready to process
Job is not ready – possibly missing to select cut path and/or media
Job is double sided, but not ready
Job will be nested, but not ready
Job is pinned and not ready to process
Job is ready, but locked and in use by another client
Job is in error
20 Fiery Prep-it User Guide 6
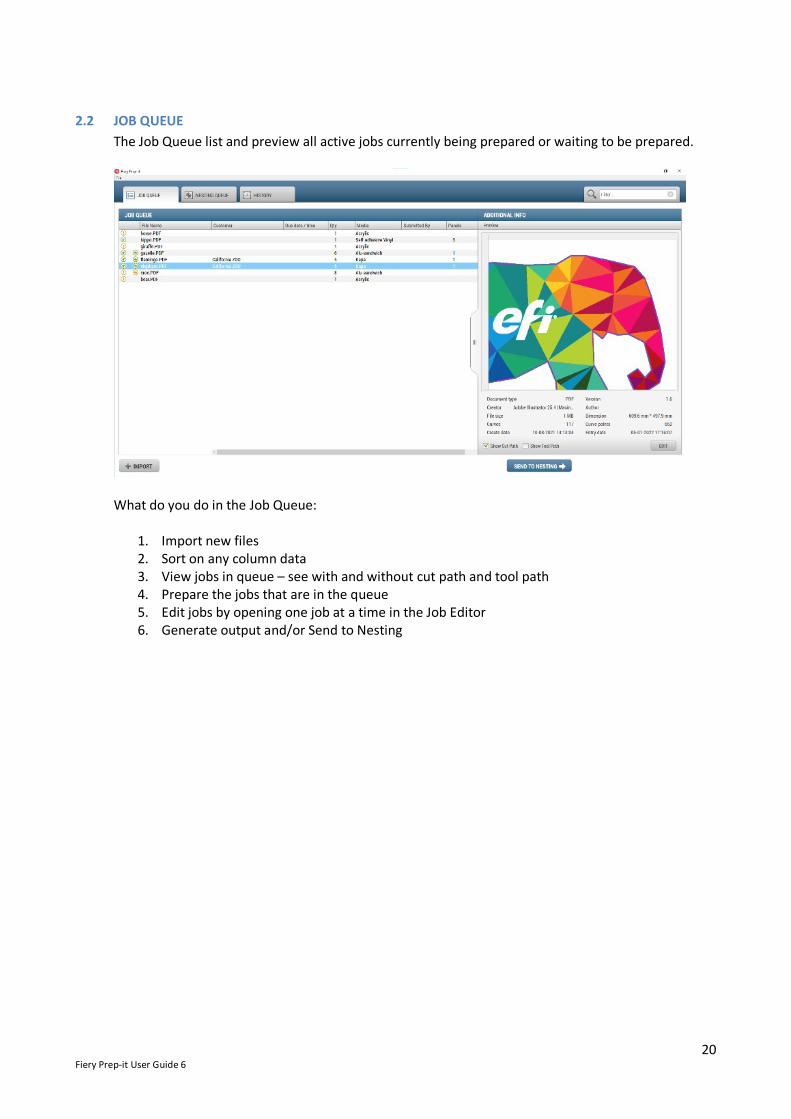
2.2 JOB QUEUE The Job Queue list and preview all active jobs currently being prepared or waiting to be prepared.
What do you do in the Job Queue:
1. Import new files 2. Sort on any column data 3. View jobs in queue – see with and without cut path and tool path 4. Prepare the jobs that are in the queue 5. Edit jobs by opening one job at a time in the Job Editor 6. Generate output and/or Send to Nesting

21 Fiery Prep-it User Guide 6
2.2.1 Import dialog, appears at every file import
Formats that can be imported: PDF, PNG, JPG, BMP, GIF and TIF. At this early stage of submitting the job for printing and cutting, you get a chance to enter Customer Name, Order ID and Due date/Time fields, or you can leave them blank. If filled, you will have the possibility to sort the Queues on the entered data as well as plan cut order etc. based on this information.
You can specify which media to print/cut the job on already at time of import and you can specify the quantity.
22 Fiery Prep-it User Guide 6
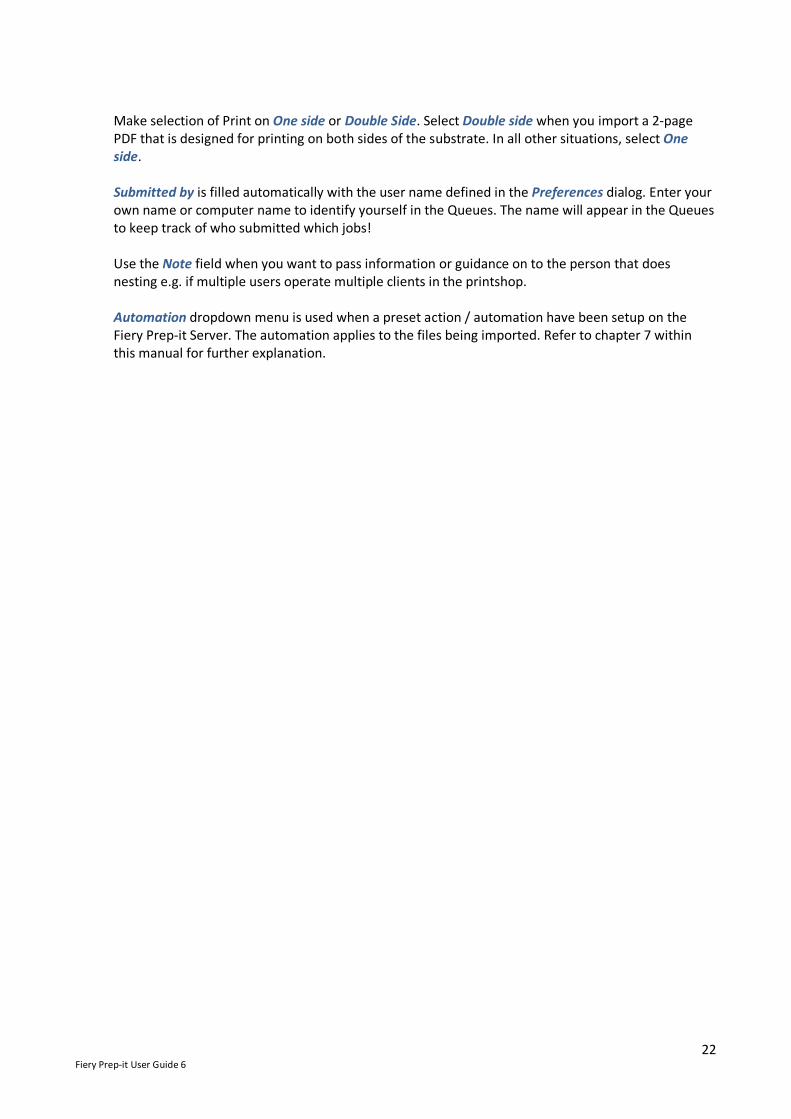
Make selection of Print on One side or Double Side. Select Double side when you import a 2-page PDF that is designed for printing on both sides of the substrate. In all other situations, select One side. Submitted by is filled automatically with the user name defined in the Preferences dialog. Enter your own name or computer name to identify yourself in the Queues. The name will appear in the Queues to keep track of who submitted which jobs! Use the Note field when you want to pass information or guidance on to the person that does nesting e.g. if multiple users operate multiple clients in the printshop. Automation dropdown menu is used when a preset action / automation have been setup on the Fiery Prep-it Server. The automation applies to the files being imported. Refer to chapter 7 within this manual for further explanation.
23 Fiery Prep-it User Guide 6
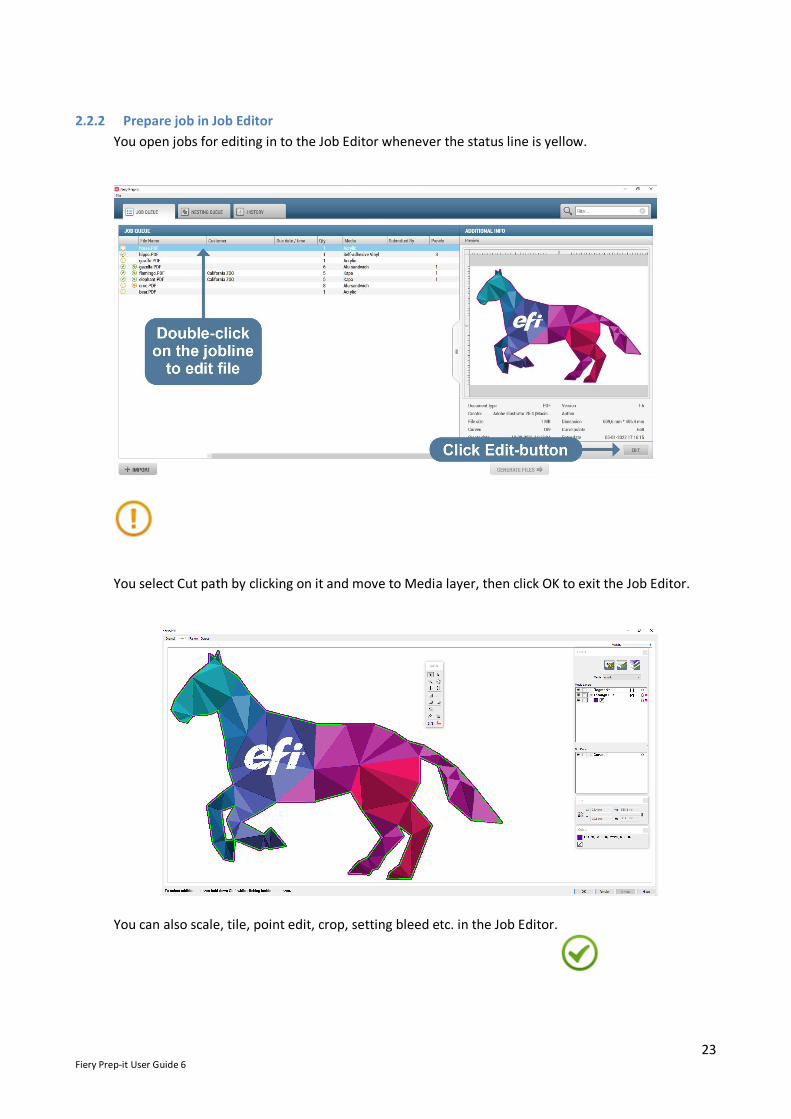
2.2.2 Prepare job in Job Editor You open jobs for editing in to the Job Editor whenever the status line is yellow.
You select Cut path by clicking on it and move to Media layer, then click OK to exit the Job Editor.
You can also scale, tile, point edit, crop, setting bleed etc. in the Job Editor.
24 Fiery Prep-it User Guide 6
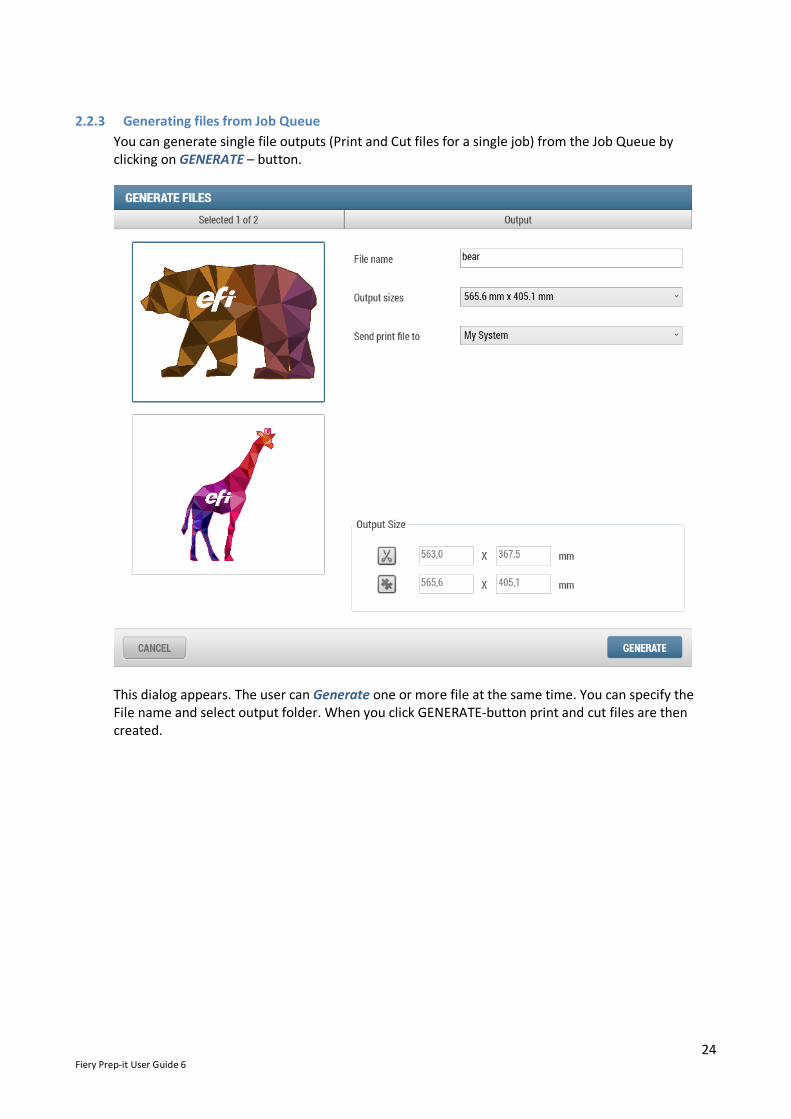
2.2.3 Generating files from Job Queue You can generate single file outputs (Print and Cut files for a single job) from the Job Queue by clicking on GENERATE – button.
This dialog appears. The user can Generate one or more file at the same time. You can specify the File name and select output folder. When you click GENERATE-button print and cut files are then created.

25 Fiery Prep-it User Guide 6
2.3 NESTING QUEUE The Nesting Queue list and preview all jobs currently waiting to be nested. Jobs are sorted on Media. From the queue, you see only media that has files on them meaning the active media in use. You see the square meter usage and the number of files and the number of objects currently placed on each media.
What do you do in the Nesting Queue:
1. Create layouts – nest jobs individually and/or mix with others 2. Control and restrict nesting based on angles, quantity, margin, distance between objects etc. 3. Handle possible remnant areas on sheets 4. Sort on any column data 5. View individual jobs in queue – see with and without cut path and tool path 6. Generate output

26 Fiery Prep-it User Guide 6
2.3.1 How does the Nesting Queue work Jobs are sorted on medias – medias are only shown when jobs are waiting to be nested. You can choose to begin nesting in several ways:
1. Nest by clicking on the Media line within the Queue – will nest all jobs on a media to the default sheet size (preset in the media manager)
2. Select one or more jobs on a media – righthand click to see menu and NEST will nest selected to default sheet size.
3. Select jobs – righthand click or click on SETTINGS button (Expanded view) to select sheet size
and alter all nesting parameters.

27 Fiery Prep-it User Guide 6
The nesting works on time – meaning more time for calculations improves the layout. Each media can be preset on how long nesting time is allowed until it stops. The user can stop the nesting at any time and accept the layout as is without going till the end (= the preset time allowed).

28 Fiery Prep-it User Guide 6
Example of nesting over time – material utilization improves…
Result after 3 seconds
14 seconds 47 seconds 60 seconds – the final nesting results setup on this media.

29 Fiery Prep-it User Guide 6
2.3.2 Control and restrict nesting layout When you wish to control the nesting layout, you have the following tools available in the Nesting
SET JOB INFO Right+click on the job line(s) that you wish to edit
SET ROTATION Right+click on the job line(s) that you wish to edit and click SET ROTATION to open this dialog.
When you click on optimized, it means that you allow rotation in all possible angles. When you unclick optimized, you get to specify the angles you want to use in your nesting layout. Simply click the angles on in the dialog.
30 Fiery Prep-it User Guide 6
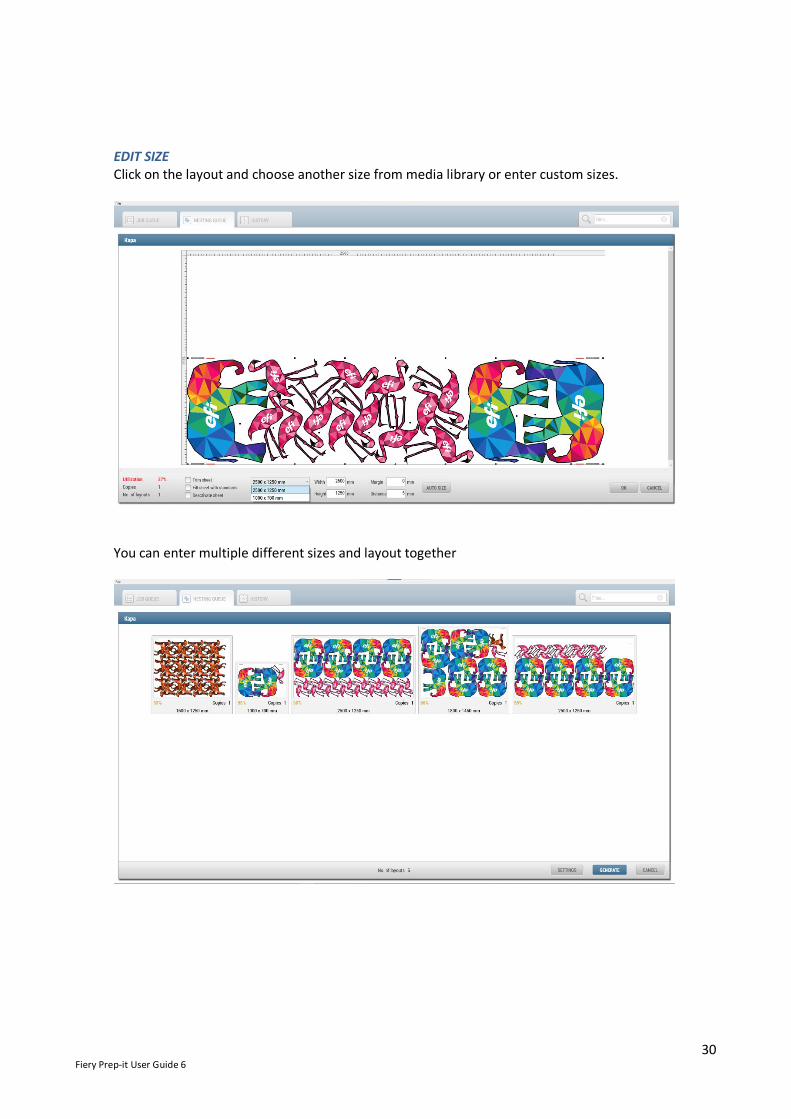
EDIT SIZE Click on the layout and choose another size from media library or enter custom sizes.
You can enter multiple different sizes and layout together

31 Fiery Prep-it User Guide 6
2.3.3 Handle the remnant area Not always will sheets be nested to its maximum size, why Fiery Prep-it includes several strategies for how to utilize the media best way, also when it comes the remnant area. The part of the sheet that is left over unused.
Four different options are available.
Trim sheet means to add a cut line across the remaining sheet to leave a re-useable piece for later use. A cut line will be included in the cut file being generated for the cutting table.

32 Fiery Prep-it User Guide 6
Fill sheet with standards is used to automatically place smaller sheet formats onto the remnant area when space is available.
Note! The “standards” are predefined sheet dimensions specified in the Media Manager. This feature could be used to trim large sheets down to smaller ‘customer standard’ formats that is e.g. used for printing edge-to-edge or into sizes that fits a printers vacuum zones! The standards will not be part of the print file, but only the cut file, so they can be cut out with the printed objects at the same time. Deactivate sheet means that the sheet will hold jobs so they will not be output when clicking Generate. The remaining objects will stay in the Nesting Queue and await being nested with the next coming jobs.

33 Fiery Prep-it User Guide 6
Auto size last sheet means to use whatever possible smallest sheet size available within the media profile as the last sheet in a nesting sequence.
So when nesting objects on to several sheets, then Auto size last sheet will automatically create a nesting layout for the most optimal sheet size as the last layout!

34 Fiery Prep-it User Guide 6
2.3.4 Generating files from the Nesting Queue When you are satisfied with the nesting layout(s) you can click GENERATE to output print and cut files.
You can write own file names to each of the layouts. Click to the preview to select each layout individually.
Choose output destination and click Generate to create print and cut files.

35 Fiery Prep-it User Guide 6
2.3.5 Grouping of jobs when nesting It is possible to group certain files / jobs together on a sheet of material when creating the print and cut layout. This option is likely to reduce the overall material utilization a bit, however with the benefit of keeping a good organization of files placed onto the substrate when mixing jobs. Ungrouped output vs. Grouped output

36 Fiery Prep-it User Guide 6
Grouping can be setup by default on the media or it can be selected manually in the Nesting Queue when creating layouts.
When creating the group output file, you can choose to include a print separation line with ‘group by text’ for easy identification when kitting parts after the cutting process.
Example of grouped output
37 Fiery Prep-it User Guide 6
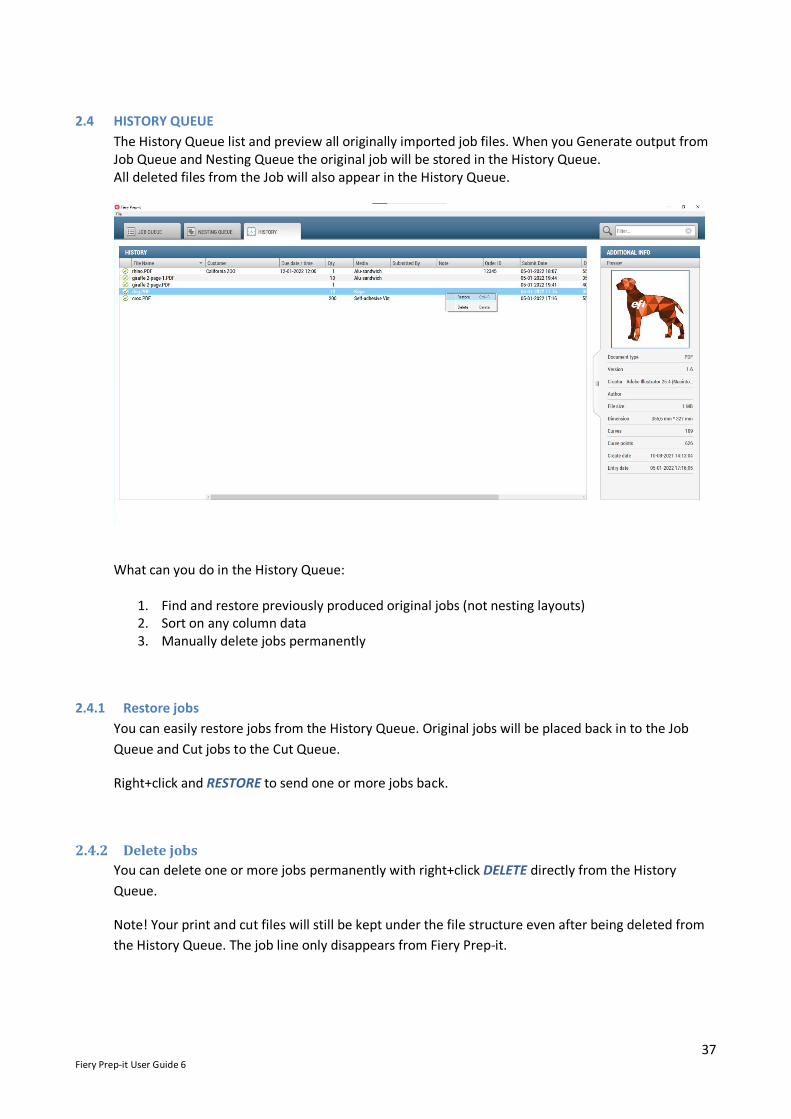
2.4 HISTORY QUEUE The History Queue list and preview all originally imported job files. When you Generate output from Job Queue and Nesting Queue the original job will be stored in the History Queue. All deleted files from the Job will also appear in the History Queue.
What can you do in the History Queue:
1. Find and restore previously produced original jobs (not nesting layouts) 2. Sort on any column data 3. Manually delete jobs permanently
2.4.1 Restore jobs You can easily restore jobs from the History Queue. Original jobs will be placed back in to the Job Queue and Cut jobs to the Cut Queue.
Right+click and RESTORE to send one or more jobs back.
2.4.2 Delete jobs You can delete one or more jobs permanently with right+click DELETE directly from the History Queue.
Note! Your print and cut files will still be kept under the file structure even after being deleted from the History Queue. The job line only disappears from Fiery Prep-it.

38 Fiery Prep-it User Guide 6
3 Media Management Fiery Prep-it is connected to the Media Manager which is where media parameters are specified and saved.
3.1 The purpose of the Media Each print and cut file must be generated on basis of certain settings and strategies – these default parameters are all saved within the media profile. This centralized and easily accessible Media library structure is a core part of the entire software and workflow. Media settings are used when preparing print files, when nesting and when generating cut files.
Each media profile in the software contains parameters with regards to prepress settings as well as cut settings. A media consist of a number of layers, e.g. a camera layer and a cut layer. Often media will have more layers depending on the cutting tasks. If you wish to register, crease and cut, three layers are required.
3.2 The Media Library is your knowledge base The Media library is considered a database. Fiery Prep-it software comes with a default media library. A library of most common materials used in the wide format graphic business industry.
The media database is where you save your own parameters and add more medias. You can expand, change settings and update your media library as you grow and develop your business.
3.3 Media Manager Working with media differs from customer to customer and depends on specific setup. You can customize the media library by moving profiles from an active list of media into an inactive list of media. The media that are in use must be moved to the Enabled Media list. Media that are not currently in use should therefore be moved to the Disabled Media list. Media on the Disabled list will not be shown anywhere in Fiery Prep-it software besides from this Media Manager dialog.

39 Fiery Prep-it User Guide 6
To open this dialog, go to the File menu of the Fiery Prep-it Windows client and click Cut Media Manager. The dialog can also be accessed from within the Job Editor on the Curves tab.
Click on one or more media to move them from the enabled list to the disabled list or reverse to setup and customize the active media list. Renaming, copying, deleting and editing of a media are possible from this dialog. You can import new media profile or you can exchange media profiles using the export function for one or more media into a single Zip file.
40 Fiery Prep-it User Guide 6
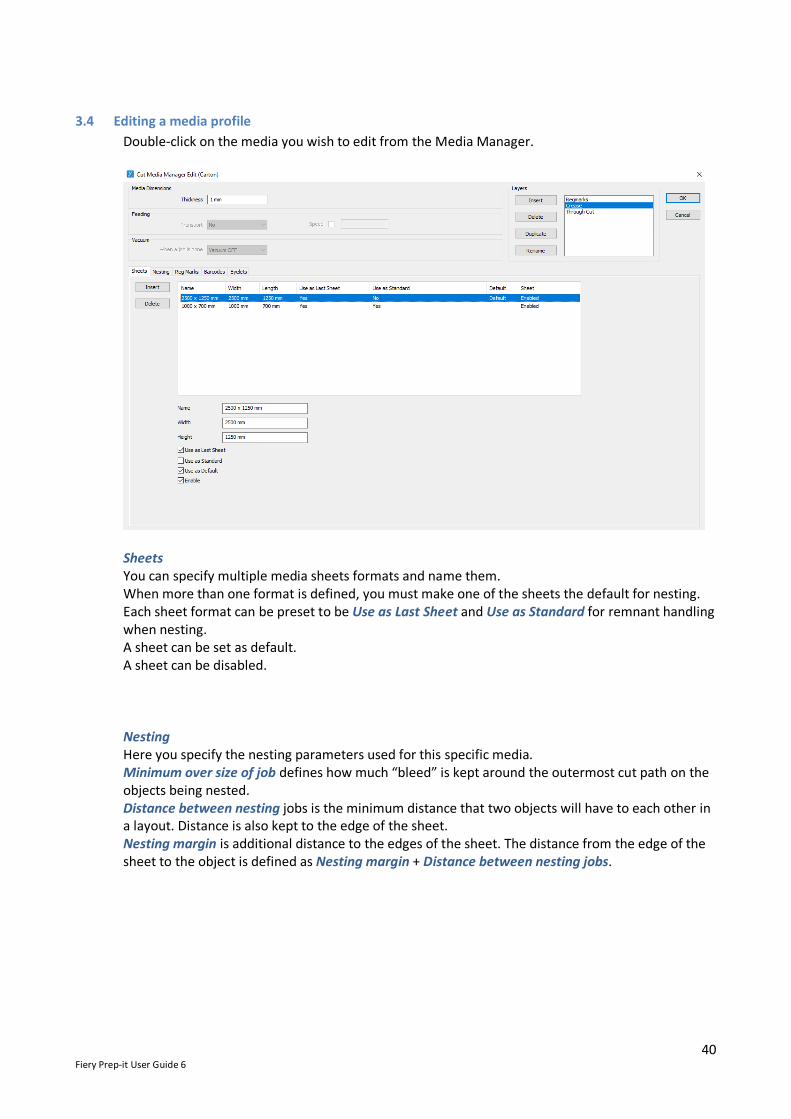
3.4 Editing a media profile Double-click on the media you wish to edit from the Media Manager.
Sheets You can specify multiple media sheets formats and name them. When more than one format is defined, you must make one of the sheets the default for nesting. Each sheet format can be preset to be Use as Last Sheet and Use as Standard for remnant handling when nesting. A sheet can be set as default. A sheet can be disabled.
Nesting Here you specify the nesting parameters used for this specific media. Minimum over size of job defines how much “bleed” is kept around the outermost cut path on the objects being nested. Distance between nesting jobs is the minimum distance that two objects will have to each other in a layout. Distance is also kept to the edge of the sheet. Nesting margin is additional distance to the edges of the sheet. The distance from the edge of the sheet to the object is defined as Nesting margin + Distance between nesting jobs.

41 Fiery Prep-it User Guide 6
Defaults for the Remnant area and Rotation. Optimizing is used for special nesting applications to allow more nesting time and to achieve a more optimized result. Is not in use per default. Reg. Marks This tab contains the settings for how the software should place register marks.

42 Fiery Prep-it User Guide 6
Diameter defines the size of the register marks placed around and between graphics. In addition to the diameter, a square approx.. 2mm larger is surrounding the register mark and will there be added around each mark. Distance to curve is the minimum distance between a register mark and an object (cut path). Distance between is the approx.. distance between two register marks. Default Registration defines the register mark strategy in use per default.
Shape Marks: Places reg. marks around the cut path No Marks: Will not place any marks Corner Marks: Places 4 marks, 1 in each corner of the job Center Marks: Places marks along the longest axis centered Shape & Center Marks: Places marks around + centered Auto Mark: Places the marks based on the job/media
Color 1 and Color 2 defines what CMYK colors the register marks should be printed with. Defining different colors other than black is useful especially on transparent materials to avoid having black marks on top of a black/dark grey cutting underlay (which is typically the color on the cutting tables). Examples of the different register mark placement strategies:
Shape Marks No Marks Corner Marks
Center Marks Shape & Center Marks Auto Marks
43 Fiery Prep-it User Guide 6
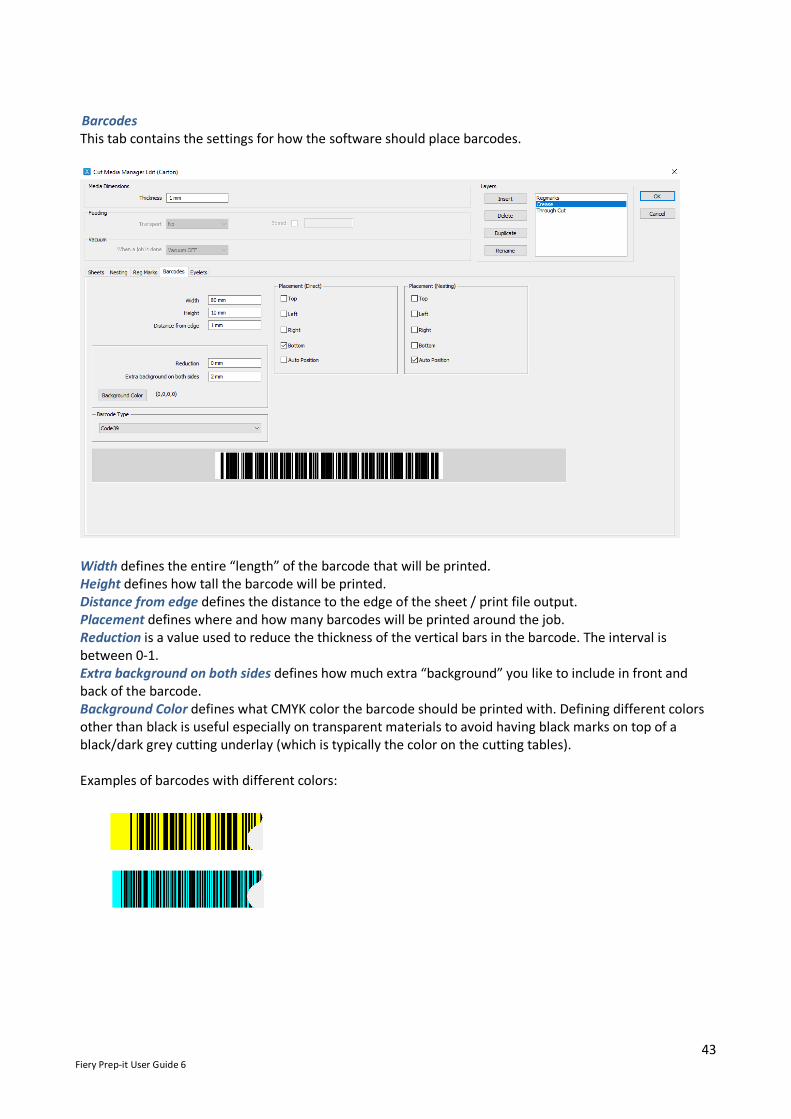
Barcodes This tab contains the settings for how the software should place barcodes.
Width defines the entire “length” of the barcode that will be printed. Height defines how tall the barcode will be printed. Distance from edge defines the distance to the edge of the sheet / print file output. Placement defines where and how many barcodes will be printed around the job. Reduction is a value used to reduce the thickness of the vertical bars in the barcode. The interval is between 0-1. Extra background on both sides defines how much extra “background” you like to include in front and back of the barcode. Background Color defines what CMYK color the barcode should be printed with. Defining different colors other than black is useful especially on transparent materials to avoid having black marks on top of a black/dark grey cutting underlay (which is typically the color on the cutting tables). Examples of barcodes with different colors:

44 Fiery Prep-it User Guide 6
Eyelets This tab contains the settings for how the software should eyelets / grommets.
Distance to left and right edges and Distance to top and bottom edges defines the positioning of the eyelets. Maximum distance between eyelets defines how close and thereby how many eyelets will be placed. These above values are the default values. Set Eyelets Automatically will apply eyelets to the files by itself and let you choose on which of the four sides. Printing and Cutting Settings has to do with how the eyelet mark is printed respectively cut on the files. Changing parameters will show immediately in the Eyelet preview of this dialog. Examples of Eyelets:
Draw cross
Draw cross, Fill eyelet, Yellow color
Draw cross, Stroke eyelet

45 Fiery Prep-it User Guide 6
4 Working with the Job Editor The Job Editor is accessible from the Job Queue. Use the Editor to prepare your imported file so it becomes ready to output and/or send for nesting. The Job Editor is split up on four tabs each with specific preparation tasks in mind. Each intuitive tab guides the user through the necessary preparations in the correct order.
When opening a job in the Job Editor, you always be on the first tab, Original. You have to pass the Curves tab before going to Panels and Output tabs. After having passed the Curves tab, you can click on any tab you like and go switch between tabs as much as you like.
ORIGINAL CURVES
PANELS OUTPUT
46 Fiery Prep-it User Guide 6
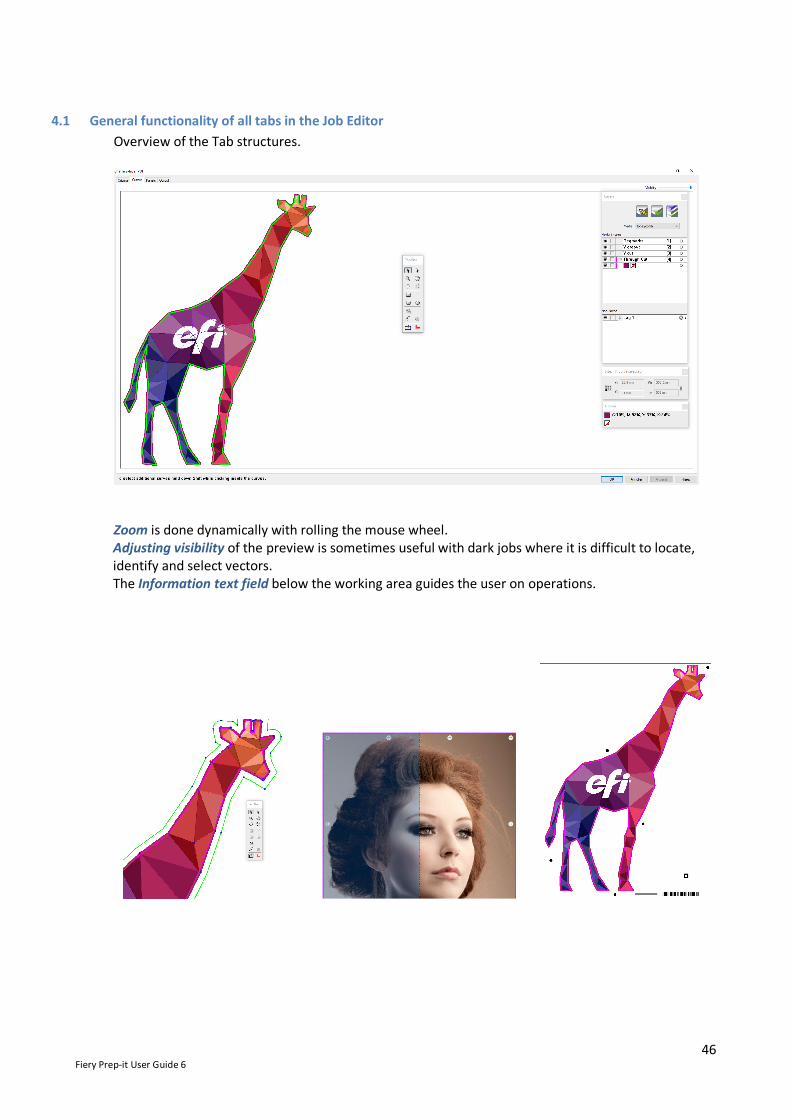
4.1 General functionality of all tabs in the Job Editor Overview of the Tab structures.
Zoom is done dynamically with rolling the mouse wheel. Adjusting visibility of the preview is sometimes useful with dark jobs where it is difficult to locate, identify and select vectors. The Information text field below the working area guides the user on operations.

47 Fiery Prep-it User Guide 6
4.2 Original tab – Job Editor This tab is used to hide / show PDF top-level layers for printing. A layer dialog displays the number of layers available within the imported PDF. By clicking on/off on the individual layers and then Apply, the software will hide/show the layers and how you how the file will print!
This function is useful when cut paths are placed on top of the image from design and as a result of this will be visual in the print. Since almost no cut paths should be printed, this function to hide the layers is useful!
48 Fiery Prep-it User Guide 6
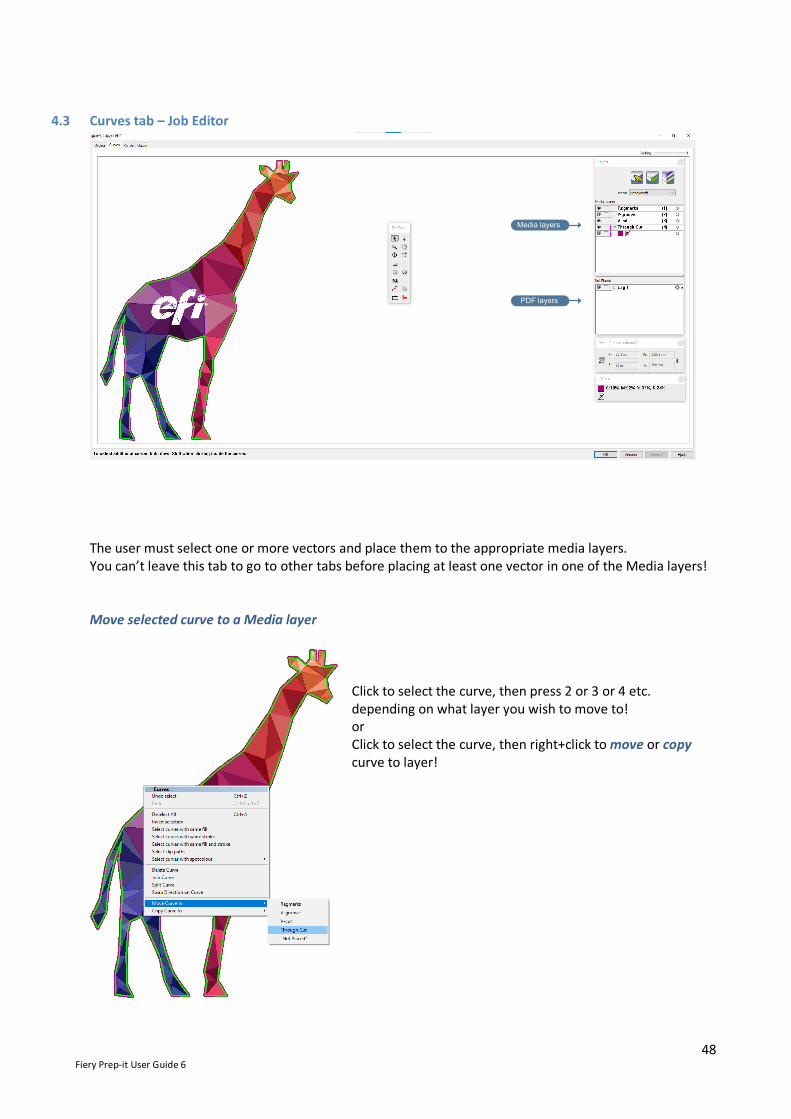
4.3 Curves tab – Job Editor
The user must select one or more vectors and place them to the appropriate media layers. You can’t leave this tab to go to other tabs before placing at least one vector in one of the Media layers! Move selected curve to a Media layer
Click to select the curve, then press 2 or 3 or 4 etc. depending on what layer you wish to move to! or Click to select the curve, then right+click to move or copy curve to layer!
PDF layers
Media layers

49 Fiery Prep-it User Guide 6
Selection of curves
Click near or inside a closed curve to select it.
Drag select with a box. Note, that this may include multiple curves (placed on top of each other) and if these curves are placed in the media layer – they will end up being cut several times, which is not ideal.

50 Fiery Prep-it User Guide 6
Right+click to select curves by same fill, stroke, fill and stroke or by spot color!

51 Fiery Prep-it User Guide 6
Overview of the Tool bar.
Selection tool (V).
Direct selection tool for point editing (A).
Zoom tool. Activate the tool and click+drag to zoom in. Hold “Alt” and click to zoom out (Z).
Hand tool. Activate the tool and pan around within the work area (H).
Move tool. Activate the tool to get the dialog for selecting the anchor point and specify XY coordinates.
Crop tool. Activate the tool and click+drag a rectangle around the area you want to crop to. You can resize the crop box.
Create a rectangle. Activate the tool and drag the rectangle or click anywhere to get a dialog for selecting the anchor point and for specifying XY coordinates for placement and size.
Create a rectangle with round corners. Activate the tool and drag the rectangle or click anywhere to get a dialog for selecting the anchor point and for specifying XY coordinates for placement and size and corner radius.
Create a circle or ellipse. Activate the tool and drag the circle/ellipse or click anywhere to get a dialog for selecting the anchor point and for specifying XY coordinates for placement and size.
Scale tool. Activate the tool to get the dialog for specifying the scale in % or in width or height. This tool works on the complete job, not on individual vectors within the job (S).
Offset tool. Activate the tool to get the dialog to create inline or outline. Specify offset distance, layer and possibility to remove or keep original curve.
Merge tool. Select overlapping closed curves and activate merge tool to get the dialog for selecting layer and possibility to remove or keep original curves.
Show direction tool. Activate tool to see start points, curve points and cutting direction of all curves in the complete job.
Show tool path. Activate tool to see router path and V-Cut path on all curves in the complete job.

52 Fiery Prep-it User Guide 6
Point Editing
Select the curve you wish to work on. Click on the point you wish to move and/or edit. Pull on Bezier handles to form path. Use Add point or Remove point tools to fine-tune the path. Click Show Original to see the path prior to editing.
Move
Crop

53 Fiery Prep-it User Guide 6
Create simple shapes
Scale
Offset

54 Fiery Prep-it User Guide 6
Merge
Show points, direction and tool path
55 Fiery Prep-it User Guide 6
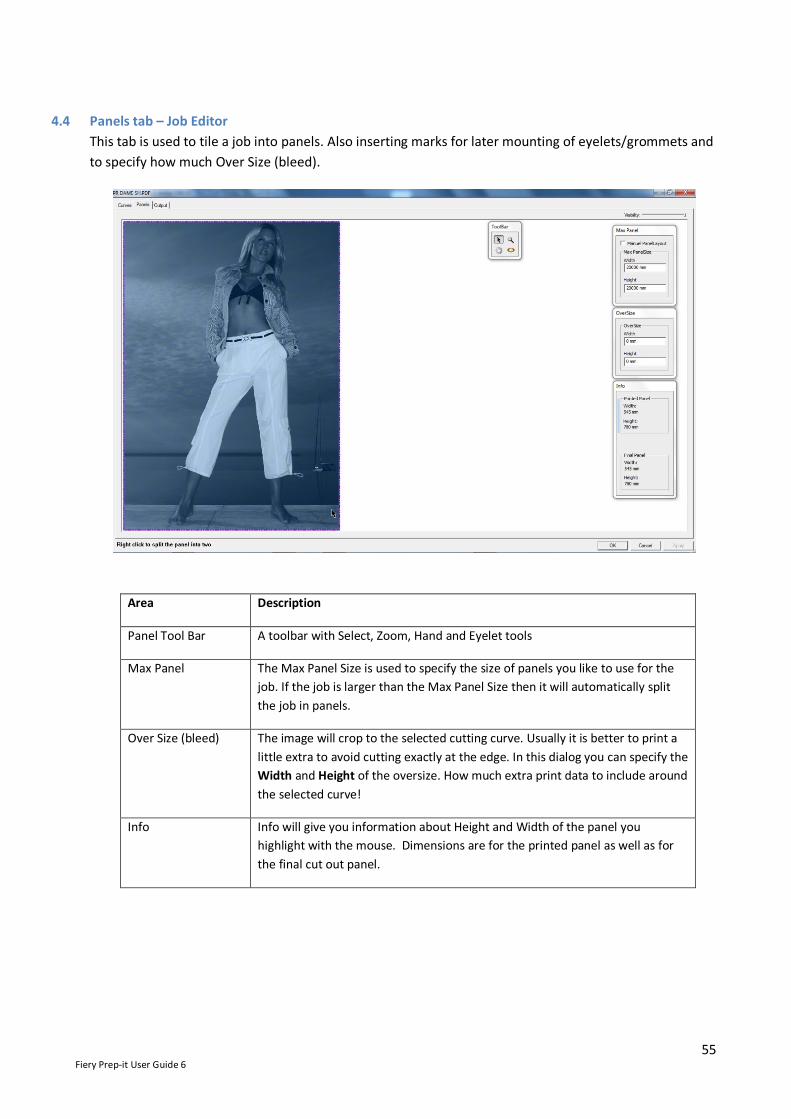
4.4 Panels tab – Job Editor This tab is used to tile a job into panels. Also inserting marks for later mounting of eyelets/grommets and to specify how much Over Size (bleed).
Area Description
Panel Tool Bar A toolbar with Select, Zoom, Hand and Eyelet tools
Max Panel The Max Panel Size is used to specify the size of panels you like to use for the job. If the job is larger than the Max Panel Size then it will automatically split the job in panels.
Over Size (bleed) The image will crop to the selected cutting curve. Usually it is better to print a little extra to avoid cutting exactly at the edge. In this dialog you can specify the Width and Height of the oversize. How much extra print data to include around the selected curve!
Info Info will give you information about Height and Width of the panel you highlight with the mouse. Dimensions are for the printed panel as well as for the final cut out panel.
56 Fiery Prep-it User Guide 6
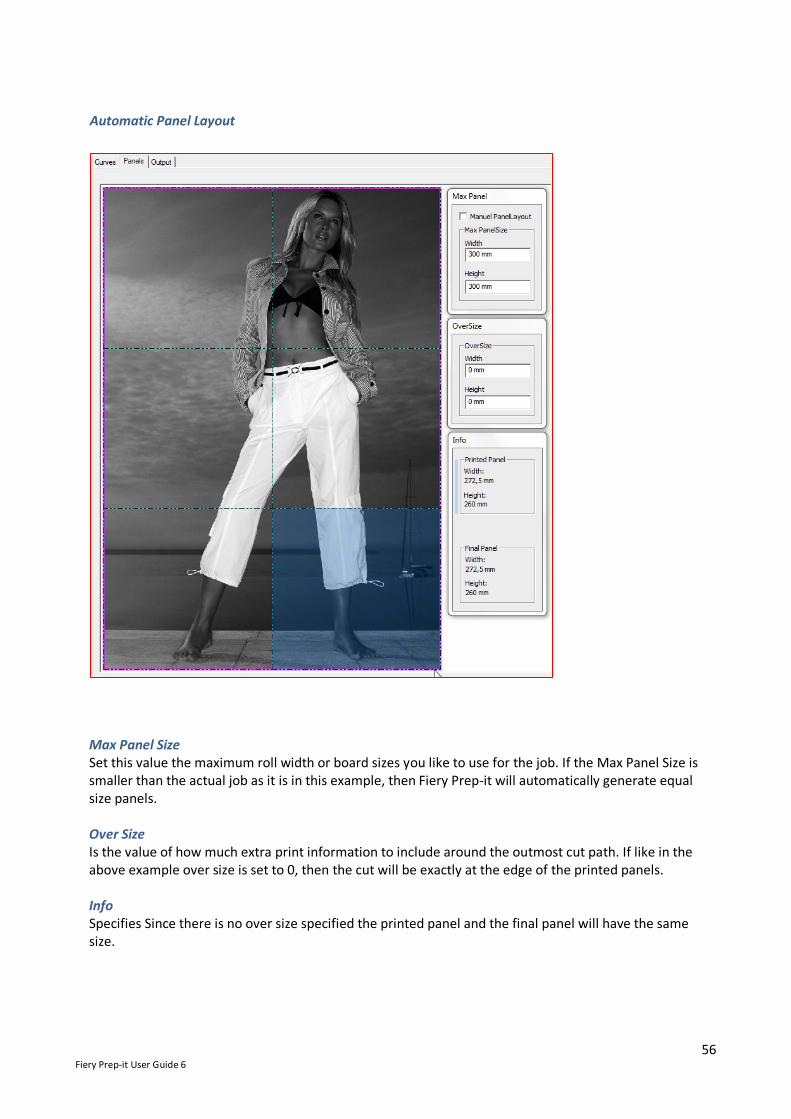
Automatic Panel Layout
Max Panel Size Set this value the maximum roll width or board sizes you like to use for the job. If the Max Panel Size is smaller than the actual job as it is in this example, then Fiery Prep-it will automatically generate equal size panels. Over Size Is the value of how much extra print information to include around the outmost cut path. If like in the above example over size is set to 0, then the cut will be exactly at the edge of the printed panels. Info Specifies Since there is no over size specified the printed panel and the final panel will have the same size.

57 Fiery Prep-it User Guide 6
Panels with over size
Over Size In this case the over size is specified to 8 mm in both directions. This means that each panel will be printed with 8 mm extra image on all four sides.
Info Because of the specified over size print, the printed panel is 16 mm higher and wider than the final panel.

58 Fiery Prep-it User Guide 6
The above panels are generated automatically, but it is still possible to move the split lines with the mouse. In such cases the “Manuel Panel Layout” is checked and the dialog is disabled
Manual Panel Layout
Max Panel If the Max Panel size is larger than the job, then it will not generate panels automatically.
Manual Panel Layout If you like to tile the job in panels manually, you move the mouse inside the job and right click to get the Panel dialog where you can select Horizontal Split, Vertical Split or Edit Panel.
59 Fiery Prep-it User Guide 6
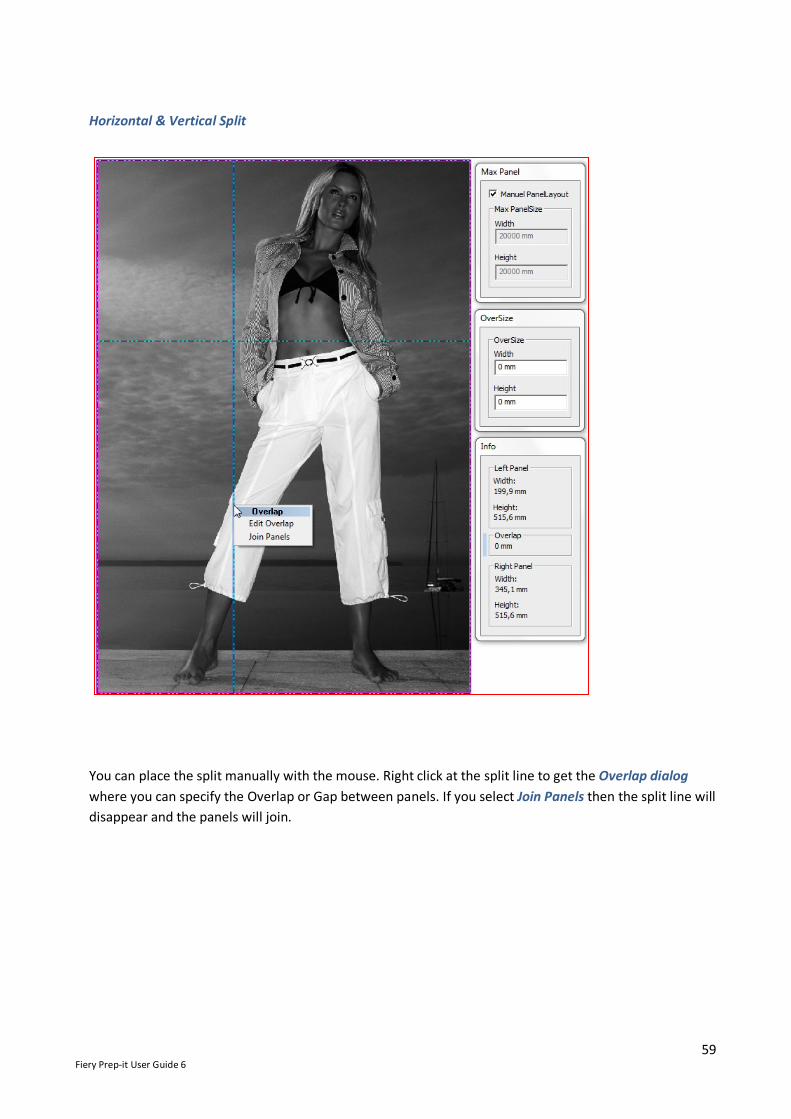
Horizontal & Vertical Split
You can place the split manually with the mouse. Right click at the split line to get the Overlap dialog where you can specify the Overlap or Gap between panels. If you select Join Panels then the split line will disappear and the panels will join.
60 Fiery Prep-it User Guide 6
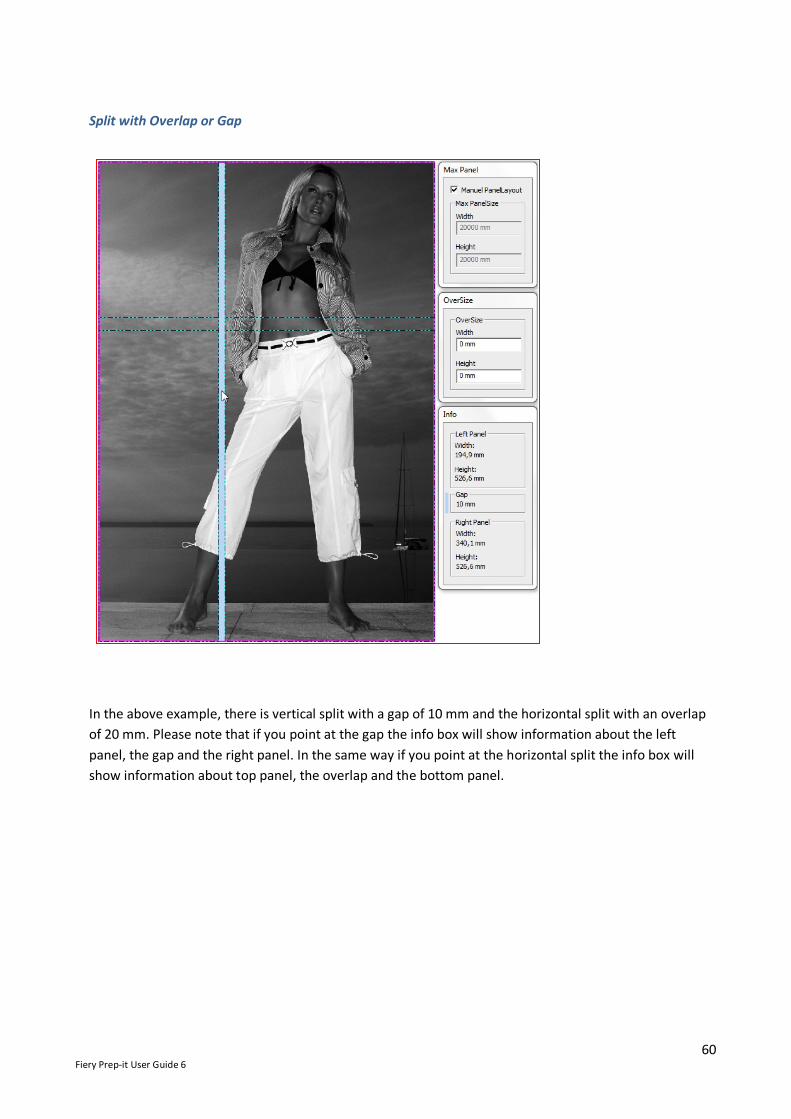
Split with Overlap or Gap
In the above example, there is vertical split with a gap of 10 mm and the horizontal split with an overlap of 20 mm. Please note that if you point at the gap the info box will show information about the left panel, the gap and the right panel. In the same way if you point at the horizontal split the info box will show information about top panel, the overlap and the bottom panel.
61 Fiery Prep-it User Guide 6
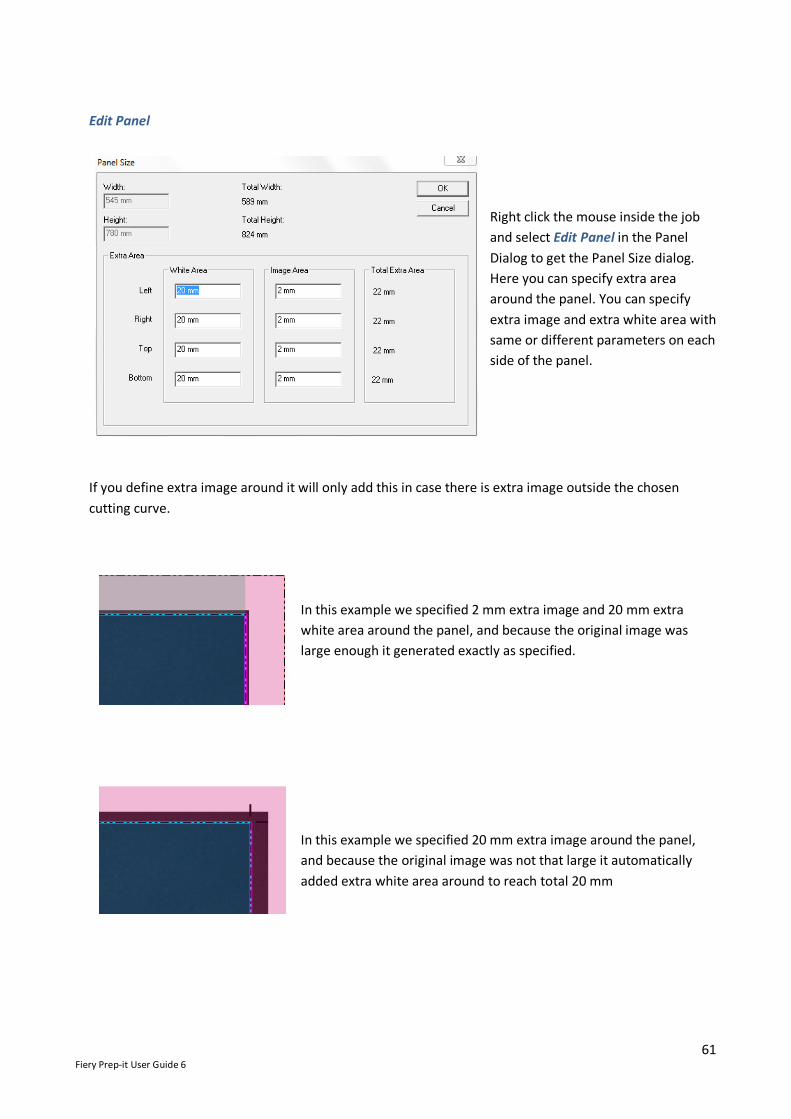
Edit Panel
Right click the mouse inside the job and select Edit Panel in the Panel Dialog to get the Panel Size dialog. Here you can specify extra area around the panel. You can specify extra image and extra white area with same or different parameters on each side of the panel.
If you define extra image around it will only add this in case there is extra image outside the chosen cutting curve.
In this example we specified 2 mm extra image and 20 mm extra white area around the panel, and because the original image was large enough it generated exactly as specified.
In this example we specified 20 mm extra image around the panel, and because the original image was not that large it automatically added extra white area around to reach total 20 mm
62 Fiery Prep-it User Guide 6
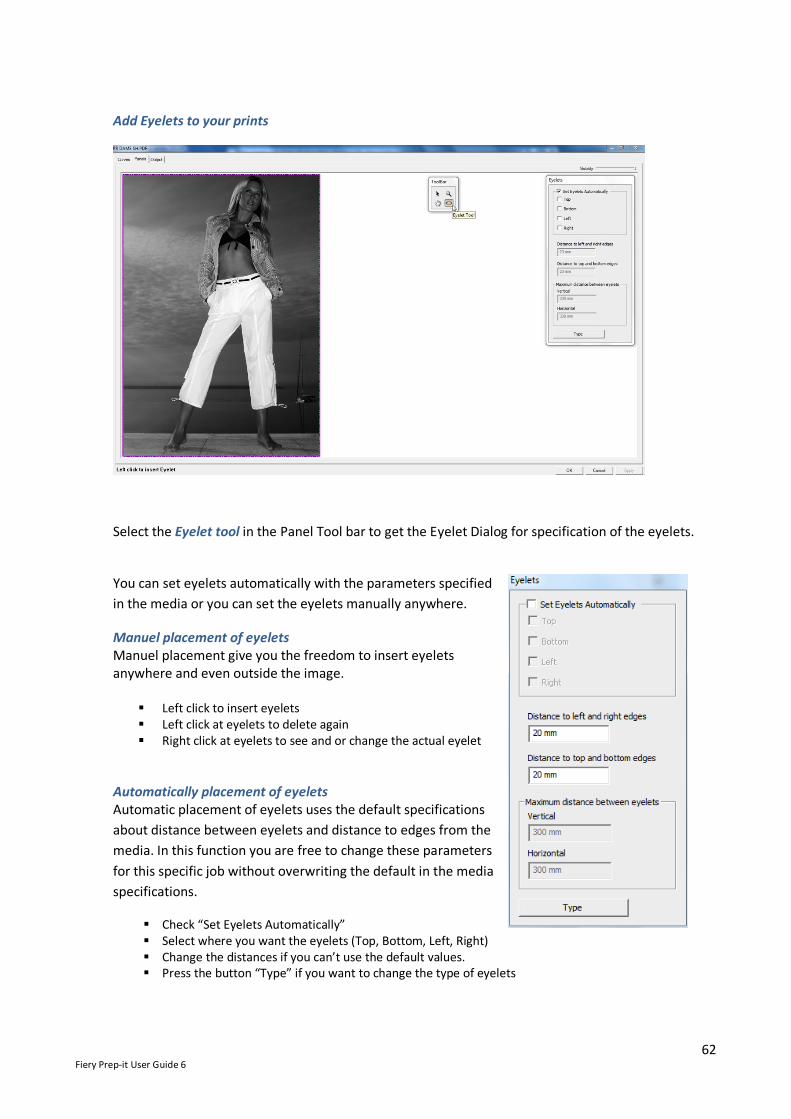
Add Eyelets to your prints
Select the Eyelet tool in the Panel Tool bar to get the Eyelet Dialog for specification of the eyelets.
You can set eyelets automatically with the parameters specified in the media or you can set the eyelets manually anywhere.
Manuel placement of eyelets Manuel placement give you the freedom to insert eyelets anywhere and even outside the image.
Left click to insert eyelets Left click at eyelets to delete again Right click at eyelets to see and or change the actual eyelet
Automatically placement of eyelets Automatic placement of eyelets uses the default specifications about distance between eyelets and distance to edges from the media. In this function you are free to change these parameters for this specific job without overwriting the default in the media specifications.
Check “Set Eyelets Automatically” Select where you want the eyelets (Top, Bottom, Left, Right) Change the distances if you can’t use the default values. Press the button “Type” if you want to change the type of eyelets

63 Fiery Prep-it User Guide 6
Manuel placement of Eyelets Automatically placement of Eyelets
Left click to insert eyelets Left click at eyelets to delete again if you
regret Right click at eyelets to see and or change the
actual eyelet Press the button “Type” if you want to
change the type of eyelets If you make automatic placement of eyelets
after you have placed some manually, you will note that the manually placed eyelets will disappear
Check “Set Eyelets Automatically” Select where you want the eyelets (Top,
Bottom, Left, Right) Change the distances if you can’t use the
default values. Press the button “Type” if you want to
change the type of eyelets After the automatic placement of eyelets
you still have the possibility to add eyelets anywhere you like

64 Fiery Prep-it User Guide 6
Change placement and or type of eyelets
If you right click at an eyelet you get this dialog where you can change the position of the actual eyelet. Press the button “Type” if you like to change the type of the actual eyelet.
In this dialog you can specify the type of eyelets. The following examples is giving an idea of the possibilities:
Draw Cross is chosen. Draw Cross, Fill Eyelets and Yellow Eyelet Color are chosen. Draw Cross & Stroke Eyelet is chosen.
Press the buttons “Stroke Color” and or “Eyelet Color” if you like to change colors
If you like to cut holes check “Cut Eyelets” and specify the diameter for the holes.
65 Fiery Prep-it User Guide 6
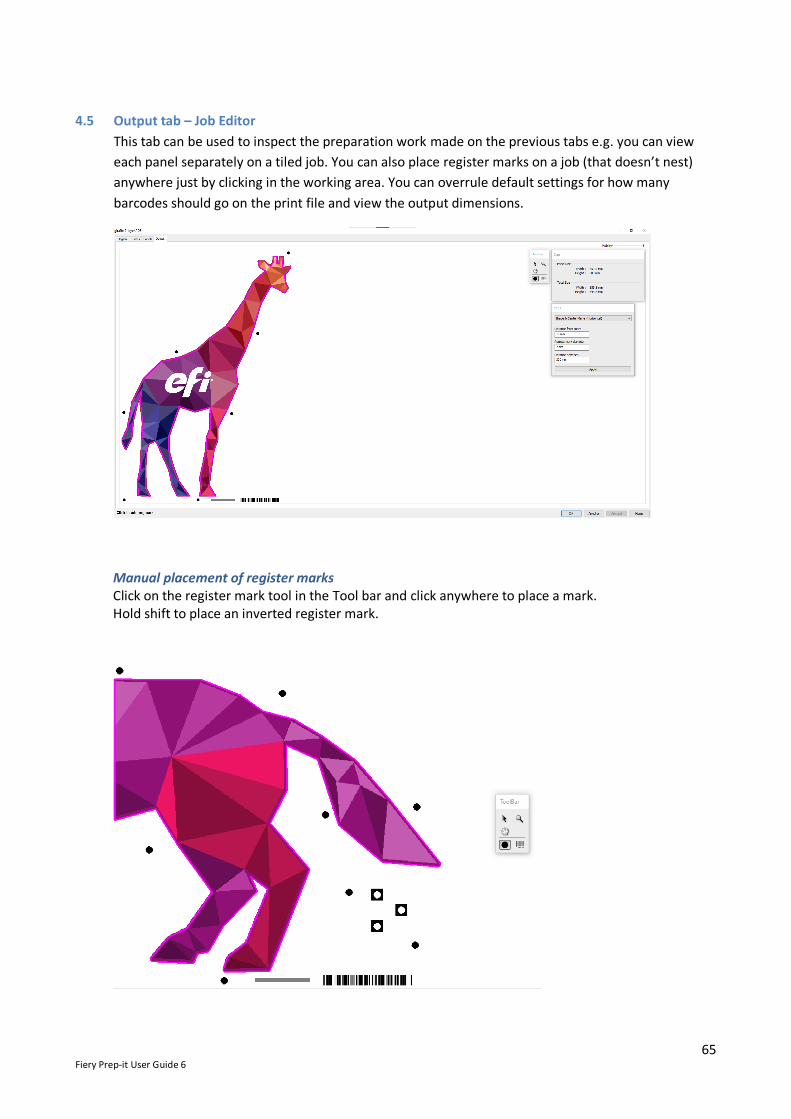
4.5 Output tab – Job Editor This tab can be used to inspect the preparation work made on the previous tabs e.g. you can view each panel separately on a tiled job. You can also place register marks on a job (that doesn’t nest) anywhere just by clicking in the working area. You can overrule default settings for how many barcodes should go on the print file and view the output dimensions.
Manual placement of register marks Click on the register mark tool in the Tool bar and click anywhere to place a mark. Hold shift to place an inverted register mark.
66 Fiery Prep-it User Guide 6
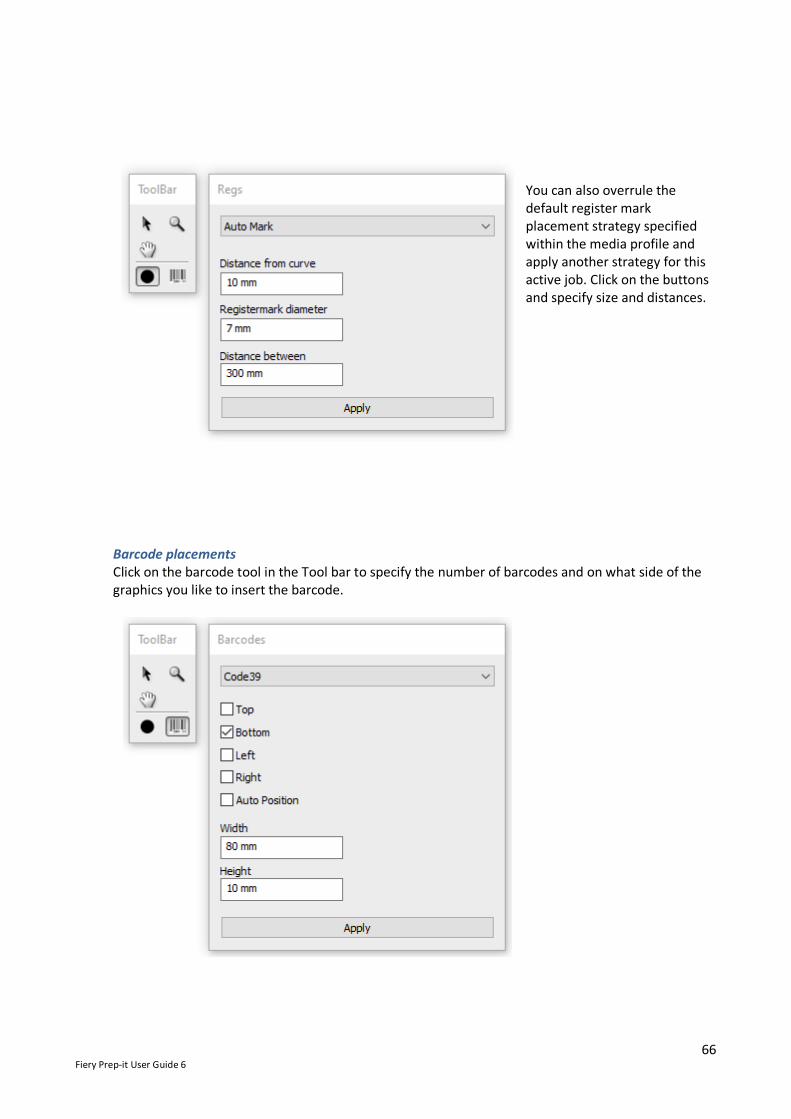
You can also overrule the default register mark placement strategy specified within the media profile and apply another strategy for this active job. Click on the buttons and specify size and distances.
Barcode placements Click on the barcode tool in the Tool bar to specify the number of barcodes and on what side of the graphics you like to insert the barcode.

67 Fiery Prep-it User Guide 6
View panels individually Use the Output tab to inspect each panel individually when working with tiled graphics.

68 Fiery Prep-it User Guide 6
5 Generating output files Fiery Prep-it will generate print and cut ready output that helps you optimize and speed up your production. Each job or nesting output generated through Fiery Prep-it will be output into
1) PDF file for printing and Cutting or
2) PDF file for printing with corresponding AI file for cutting
The output is generated using Adobe’s PDF library technology to ensure highest possible compatibility with regards to the graphic design, print and vector formats.
5.1 Sending output directly to Fiery Software Fiery Prep-it has direct connection to Fiery Software. When connected, you can direct the output PDF to and benefit from a streamlined and fully automated workflow.

69 Fiery Prep-it User Guide 6
6 Working with Hotfolders and Automation Besides importing files directly from the Job Queue, Fiery Prep-it can also be setup to import files through Hotfolders.
6.1 Hotfolders You can setup one or more hotfolders and share them across the network. To setup a Hotfolder, go to the Fiery Prep-it Server icon and right+click to open preference.
Here, you can Add a new Hotfolder or Edit and existing Hotfolder.

70 Fiery Prep-it User Guide 6
6.2 Automation – the concept A flexible and scalable automation system is available in Fiery Prep-it. It allows users to create automations and use them in three different levels. Either with active Hotfolders, manually in the Fiery Prep-it program and with more advanced scripting integration. This way you can benefit greatly by creating numerous short-cuts saving time and efficiently expand business.
a. Automate using active Hotfolders b. Use automations with ‘File Import’ into Fiery Prep-it c. Connect Fiery Prep-it with other workflows using scripting (.json)
6.3 Create and edit automations
Setting up automations is done though the Server preference dialog. Simply click through the individual tabs and enter the relevant values. Possible automations
File Import Files formats that can be opened into Fiery Prep-it.
PDF JPG TIF PNG BMP
Apply Media profile Selects the media profile from the Media Manager list and applies it to the imported file.
Acrylic Alu-composites Foamed PVC Plastics Self-adhesive vinyl Wood …

71 Fiery Prep-it User Guide 6
Hide layer(s) Define one or more PDF top-level layers to be hidden from the PDF print output file.
Cut Crease …
Curve extraction Define which vector data to be used for cutting.
Trim Box Page Size Layer Name Spot Color Name CutContour …
Curve layer mapping Define which vectors to be cut with what tools / layers within ProCut Media profile
Through Cut Kiss Cut Crease …
Curve handling Define joining of open curves, define merging of overlapping curves and define if optimize cut order or leave as designed.
Join curve together Merge curve together Select method for cut order
Double sided Define multipage PDF’s are to be prepared for 2-sided processing.
Multipage PDF for 2-sided printing
Scale Define a scale factor or a fixed size to apply on files.
Scale factor Fixed Size (WxH)
Offset Create and define inline and outline for the selected vector data.
Inline Outline
Create image bleed Define and specify bleed outside rectangular vector data.
Width (creates the bleed with a new ‘scale&crop’ function)
Panels Define tiling of jobs with regards to sizes of panels, overlap and gap settings.
Panel sizes Overlap Gap Extra white area
Eyelets Define placement of eyelets in jobs.
Position (L, R, T, B) Distances
Registration mark Define registration mark insertion method.
Placement strategy Size Distance between marks
Barcode Define type of barcode and placement strategy.
Type Placement strategy Size
File processing Define file processing such as ‘Add file to Job Queue’, ‘Send to Nesting’ or ‘Generate file Output’.
Add file to Job Queue Send file to Nesting Generate File Output Send file to Auto Nesting
Examples of automation tasks:
72 Fiery Prep-it User Guide 6
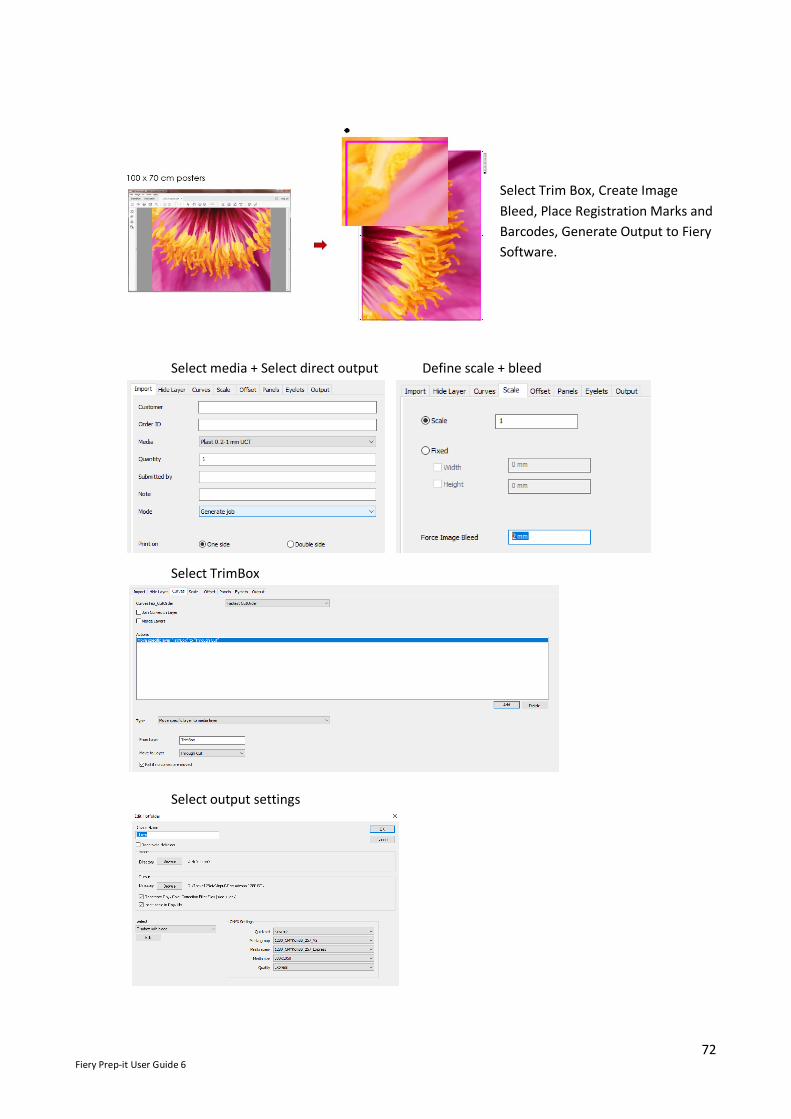
Select Trim Box, Create Image Bleed, Place Registration Marks and Barcodes, Generate Output to Fiery Software.
Select media + Select direct output Define scale + bleed
Select TrimBox
Select output settings

73 Fiery Prep-it User Guide 6
Select Spotcolor, Split job into Tiles, Insert Eyelets (Top + Bottom), Place Registration Marks and Barcodes, Generate Output.
Specify tiling parameters
Overlap, Gap, Extra White, Bleed, Eyelets..

74 Fiery Prep-it User Guide 6
Select Layer Names and assign to Corrugated E-Flute, Hide PDF Top-Level Layers (Cut and Crease), Send to Nesting Queue.
Define the layers to be hidden in the print output
Select Cut and Crease layers and assign to media layers
75 Fiery Prep-it User Guide 6
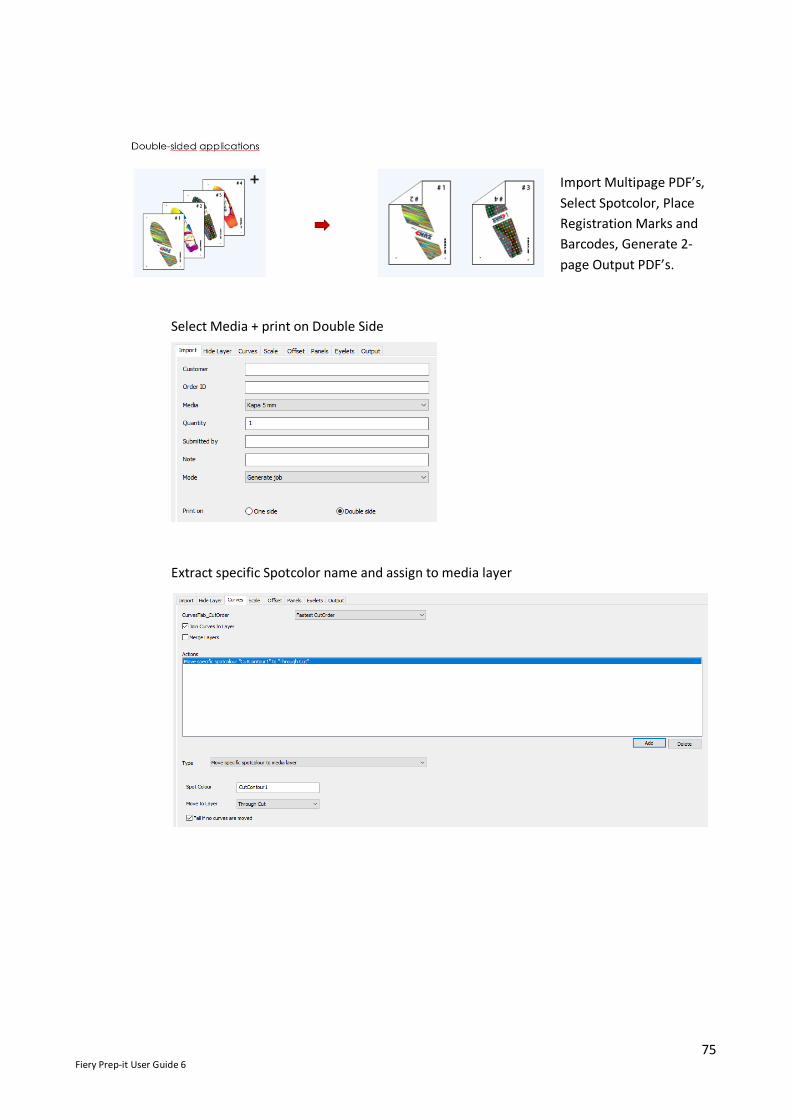
Import Multipage PDF’s, Select Spotcolor, Place Registration Marks and Barcodes, Generate 2-page Output PDF’s.
Select Media + print on Double Side
Extract specific Spotcolor name and assign to media layer
76 Fiery Prep-it User Guide 6
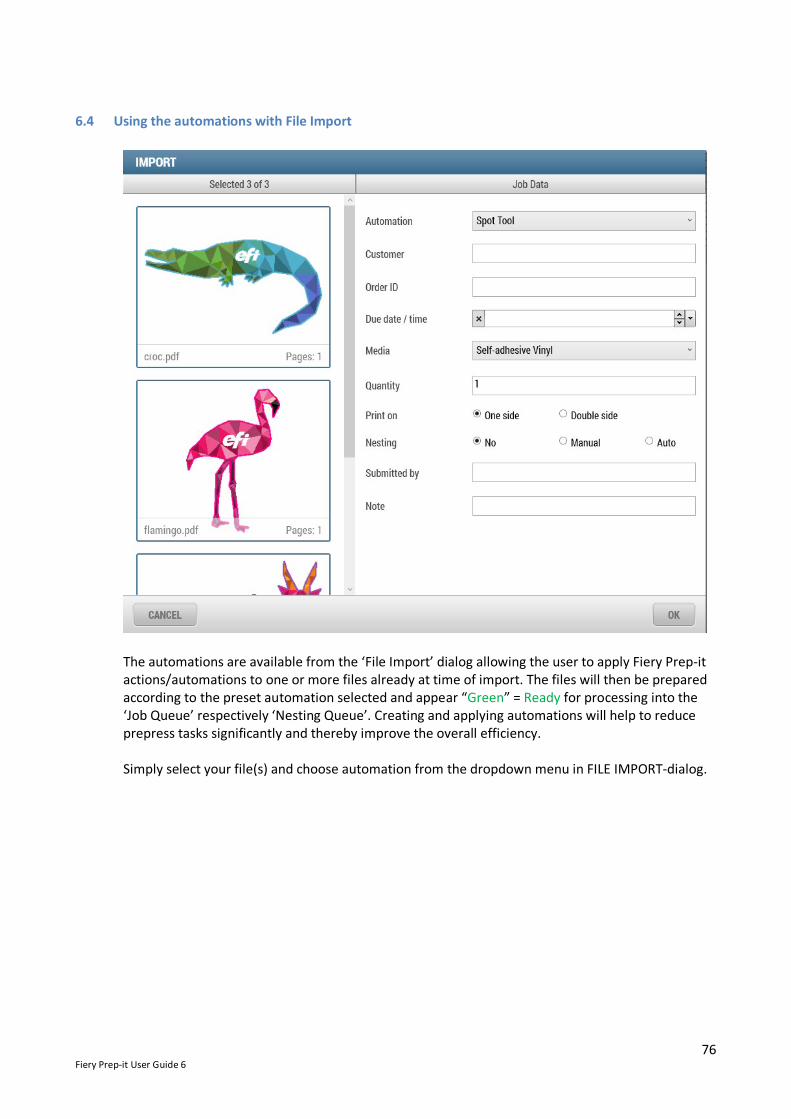
6.4 Using the automations with File Import
The automations are available from the ‘File Import’ dialog allowing the user to apply Fiery Prep-it actions/automations to one or more files already at time of import. The files will then be prepared according to the preset automation selected and appear “Green” = Ready for processing into the ‘Job Queue’ respectively ‘Nesting Queue’. Creating and applying automations will help to reduce prepress tasks significantly and thereby improve the overall efficiency. Simply select your file(s) and choose automation from the dropdown menu in FILE IMPORT-dialog.
77 Fiery Prep-it User Guide 6
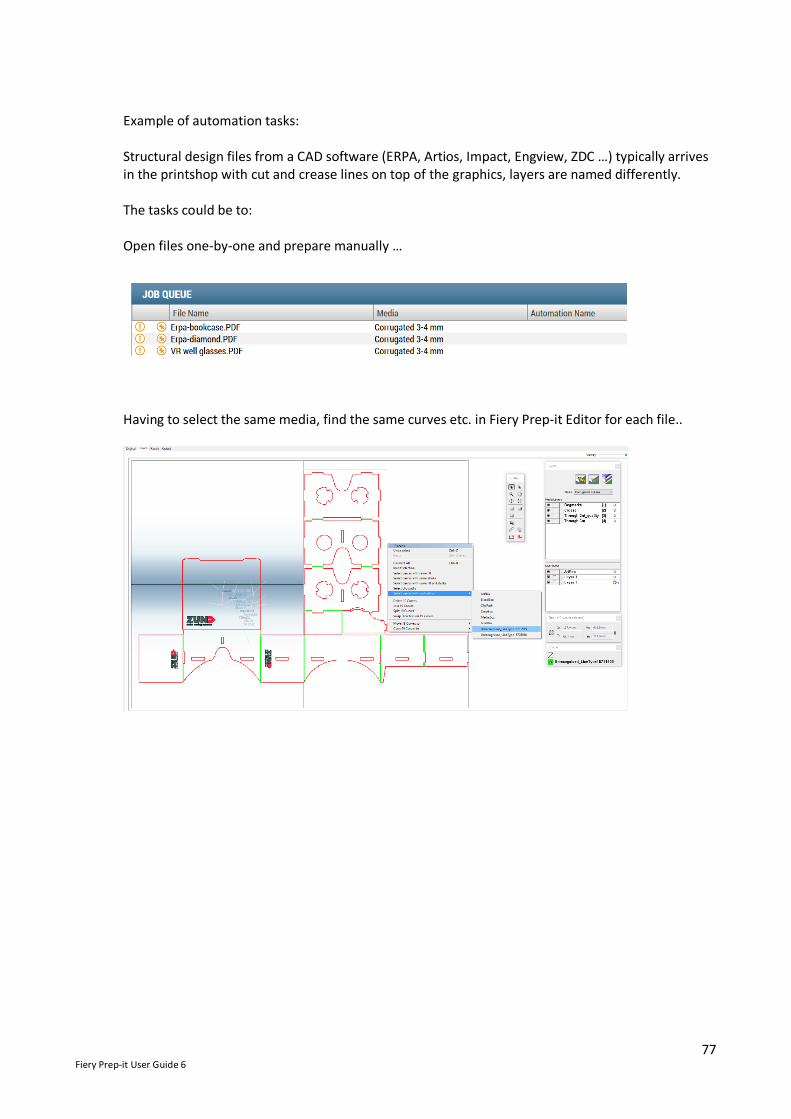
Example of automation tasks: Structural design files from a CAD software (ERPA, Artios, Impact, Engview, ZDC …) typically arrives in the printshop with cut and crease lines on top of the graphics, layers are named differently. The tasks could be to:
Open files one-by-one and prepare manually …
Having to select the same media, find the same curves etc. in Fiery Prep-it Editor for each file..

78 Fiery Prep-it User Guide 6
With Fiery Prep-it – create an ‘Automation’ that does above prepress actions and launch it directly from the File Import dialog.
The files will appear ready in the Job Queue seconds later… … and just one click on Generate to create output files

79 Fiery Prep-it User Guide 6
6.5 Combining ProCut automation with other workflows Each automation created saves an “.json” script onto the hard drive. This script can be used / altered or even completely written by another software. This way workflows could be tailored to a specific customer demand with local resources at a minimum cost.
Example of automation tasks: A ‘Web-to-Print solution’ – receives files and sends them to a ‘Preflight-solution’ that creates/edits a Fiery Prep-it .json script that processes the files for both printing and cutting. Important to first place the PDF into the EXTRA folder, then secondly place the JSON-script into the IN folder (one file level above).

80 Fiery Prep-it User Guide 6
All automations follow the normal Fiery Prep-it workflow known from working manually with the user interface. Jobs submitted to Hotfolders for automation appears into the Queue system as if it were being processed manually. The advantage is that jobs via Hotfolders could be nested with other jobs manually processed. Furthermore, if a job fails to be processed automatically, the job will appear in the Job Queue marked “Yellow” = to be assisted by a user and with a relevant message in the “Automation Error” column.
6.6 Auto nesting Setup Fiery Prep-it Server to automatically generate nesting file output based on user-defined criteria. With this feature many tasks and monotone actions can be fully automated and help SAVE time. Certain jobs may not need to be opened in Fiery Prep-it at all but could pass through without operator interventions.
Fiery Prep-it Server preference dialog. Auto nesting can be used in combination with manual interventions from the Fiery Prep-it user interface or via hotfolder setup automations!
81 Fiery Prep-it User Guide 6
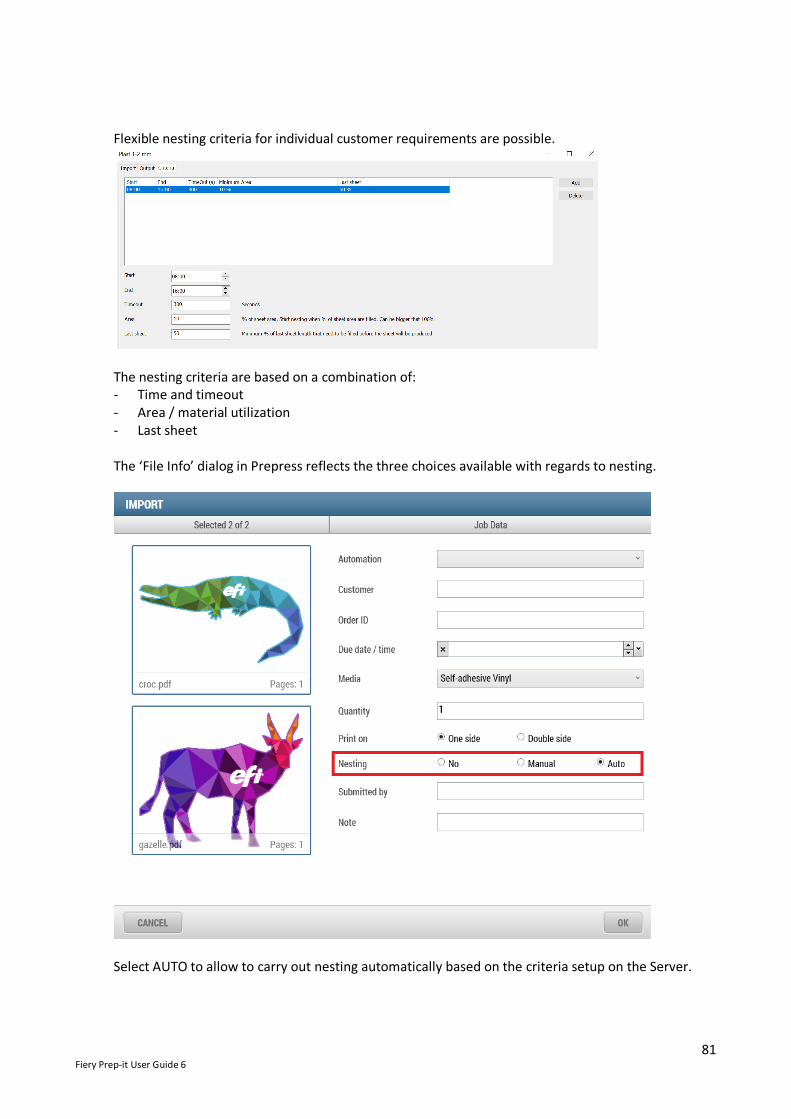
Flexible nesting criteria for individual customer requirements are possible.
The nesting criteria are based on a combination of: - Time and timeout - Area / material utilization - Last sheet The ‘File Info’ dialog in Prepress reflects the three choices available with regards to nesting.
Select AUTO to allow to carry out nesting automatically based on the criteria setup on the Server.

82 Fiery Prep-it User Guide 6
Or select ‘Send to Auto nesting’ when setting up your ‘Automation’ actions on the hotfolder from the Fiery Prep-it Server Preference dialog.
Jobs for auto nesting will appear in the Nesting Queue. Here status is displayed for each media / material:
- next action takes place at time (e.g. 08:42) - area percentage currently in queue - required percentage to be present before nesting starts
Job symbol for ‘Manual nesting’ Job symbol for ‘Auto nesting’