
Elastic Load Balancing - User Guide
207
Elastic Load Balancing User Guide Date 2021-12-08
-
Upload
khangminh22 -
Category
Documents
-
view
3 -
download
0
Transcript of Elastic Load Balancing - User Guide
Elastic Load Balancing
User Guide
Date 2021-12-08

Contents
1 Service Overview..................................................................................................................... 11.1 What Is ELB?............................................................................................................................................................................. 11.2 Product Advantages................................................................................................................................................................31.3 Application Scenarios............................................................................................................................................................. 41.4 Differences Between Classic and Shared Load Balancers......................................................................................... 71.5 Differences Between Dedicated and Shared Load Balancers................................................................................ 101.6 Specifications of Dedicated Load Balancers................................................................................................................ 141.7 How ELB Works..................................................................................................................................................................... 161.8 Load Balancing on a Public or Private Network........................................................................................................ 191.9 Network Traffic Paths......................................................................................................................................................... 221.10 Product Concepts................................................................................................................................................................ 241.10.1 Basic Concepts..................................................................................................................................................................241.10.2 Region and AZ..................................................................................................................................................................261.11 Integration with Other Services.....................................................................................................................................27
2 Getting Started...................................................................................................................... 282.1 Overview.................................................................................................................................................................................. 282.2 Using Shared Load Balancers — Entry Level.............................................................................................................. 302.3 Using Shared Load Balancers — Advanced Level..................................................................................................... 36
3 Load Balancer.........................................................................................................................453.1 Preparations for Creating a Load Balancer.................................................................................................................. 453.2 Creating a Dedicated Load Balancer..............................................................................................................................473.3 Creating a Shared Load Balancer.................................................................................................................................... 523.4 Modifying Load Balancer Settings.................................................................................................................................. 553.5 Changing an IP Address...................................................................................................................................................... 563.6 Binding an IP Address to or Unbinding an IP Address from a Load Balancer................................................. 563.7 Deleting a Load Balancer................................................................................................................................................... 583.8 Exporting the Load Balancer List.....................................................................................................................................59
4 Listener.................................................................................................................................... 604.1 Overview.................................................................................................................................................................................. 604.2 Protocols and Ports.............................................................................................................................................................. 614.3 Adding a Listener.................................................................................................................................................................. 624.4 Load Balancing Algorithms............................................................................................................................................... 75
Elastic Load BalancingUser Guide Contents
2021-12-08 ii

4.5 Sticky Session......................................................................................................................................................................... 794.6 Access Control........................................................................................................................................................................ 824.7 Modifying or Deleting a Listener.................................................................................................................................... 83
5 Advanced Features of HTTP/HTTPS Listeners................................................................ 855.1 Forwarding Policy................................................................................................................................................................. 855.2 Mutual Authentication........................................................................................................................................................ 895.3 HTTP Redirection to HTTPS...............................................................................................................................................955.4 Security Policy........................................................................................................................................................................ 975.5 SNI Certificate (for HTTPS Listeners).......................................................................................................................... 100
6 Backend Server.................................................................................................................... 1026.1 Overview................................................................................................................................................................................1026.2 Configuring Security Group Rules for Backend Servers (Dedicated Load Balancers)................................ 1036.3 Configuring Security Group Rules for Backend Servers (Shared Load Balancers).......................................1056.4 Adding or Removing Backend Servers (Dedicated Load Balancers)................................................................ 1076.5 Adding or Removing Backend Servers (Shared Load Balancers).......................................................................1126.6 Configuring Weights for Backend Servers................................................................................................................. 118
7 Health Check........................................................................................................................1197.1 Overview................................................................................................................................................................................1197.2 Configuring a Health Check............................................................................................................................................1237.3 Disabling a Health Check................................................................................................................................................ 126
8 Certificate............................................................................................................................. 1288.1 Overview................................................................................................................................................................................1288.2 Certificate and Private Key Format.............................................................................................................................. 1298.3 Converting Certificate Formats...................................................................................................................................... 1308.4 Creating, Modifying, or Deleting a Certificate......................................................................................................... 1318.5 Replacing a Certificate...................................................................................................................................................... 1338.6 Querying a Listener by Certificate................................................................................................................................ 134
9 Tag.......................................................................................................................................... 135
10 Access Logging.................................................................................................................. 138
11 Monitoring..........................................................................................................................14011.1 Monitoring Metrics.......................................................................................................................................................... 14011.2 Setting an Alarm Rule.................................................................................................................................................... 14511.2.1 Adding an Alarm Rule.................................................................................................................................................14511.2.2 Modifying an Alarm Rule...........................................................................................................................................14511.3 Viewing Metrics................................................................................................................................................................ 146
12 Auditing.............................................................................................................................. 14712.1 Key Operations Recorded by CTS............................................................................................................................... 14712.2 Viewing Traces...................................................................................................................................................................148
13 Load Balancer Migration.................................................................................................151
Elastic Load BalancingUser Guide Contents
2021-12-08 iii

13.1 Migrating from Classic Load Balancers to Shared Load Balancers.................................................................151
14 Quotas................................................................................................................................. 160
15 FAQ....................................................................................................................................... 16215.1 Popular Questions........................................................................................................................................................... 16215.2 ELB Use................................................................................................................................................................................ 16215.2.1 ELB Functionality.......................................................................................................................................................... 16215.2.1.1 Can ELB Be Used Separately?............................................................................................................................... 16215.2.1.2 Is an EIP Assigned Exclusively to a Load Balancer?.......................................................................................16215.2.1.3 How Many Load Balancers and Listeners Can I Have?................................................................................16315.2.1.4 Can I Adjust the Number of Backend Servers When a Load Balancer is Running?...........................16315.2.1.5 Can Backend Servers Run Different OSs?......................................................................................................... 16315.2.2 Service Performance and Load................................................................................................................................ 16315.2.2.1 How Do I Check for Traffic Inconsistencies?....................................................................................................16315.2.2.2 How Do I Check If Traffic Is Being Evenly Distributed?...............................................................................16315.2.2.3 What Do I Do If a Load Balancer Fails a Stress Test?...................................................................................16415.3 Load Balancers.................................................................................................................................................................. 16415.3.1 How Does ELB Distribute Traffic?...........................................................................................................................16415.3.2 Do Shared Load Balancers Have Specifications?............................................................................................... 16515.4 Listeners.............................................................................................................................................................................. 16515.4.1 What Are the Relationships Between Load Balancing Algorithms and Sticky Session Types?..........16515.4.2 How Is WebSocket Used?.......................................................................................................................................... 16715.5 Backend Servers................................................................................................................................................................16715.5.1 Why Is the Interval at Which Backend Servers Receive Health Check Packets Different from What IConfigured?................................................................................................................................................................................. 16715.5.2 Can Servers Access the Internet After They Are Associated with a Load Balancer?............................. 16715.5.3 How Do I Check the Network Conditions of a Backend Server?................................................................. 16815.5.4 How Do I Check the Network Configuration of a Backend Server?........................................................... 16815.5.5 How Do I Check the Status of a Backend Server?............................................................................................ 16815.5.6 When Is a Backend Server Considered Healthy?............................................................................................... 16915.6 Health Checks................................................................................................................................................................... 16915.6.1 How Do I Troubleshoot an Unhealthy Backend Server?................................................................................. 16915.6.2 How Does ELB Perform UDP Health Checks? What Are the Precautions for UDP Health Checks?......................................................................................................................................................................................................... 17915.6.3 Why Does ELB Frequently Send Requests to Backend Servers During Health Checks?...................... 18115.7 Obtaining Source IP Addresses....................................................................................................................................18115.7.1 How Can I Obtain the IP Address of a Client?................................................................................................... 18115.8 HTTP/HTTPS Listeners....................................................................................................................................................18815.8.1 Why Is There a Security Warning After a Certificate Is Configured?..........................................................18815.9 Sticky Sessions...................................................................................................................................................................18815.9.1 How Do I Check If Sticky Sessions Failed to Take Effect?.............................................................................. 18815.9.2 What Types of Sticky Sessions Does ELB Support?...........................................................................................18915.10 Certificates....................................................................................................................................................................... 189
Elastic Load BalancingUser Guide Contents
2021-12-08 iv

15.10.1 How Can I Create Server Certificates and CA Certificates?......................................................................... 189
16 Appendix............................................................................................................................. 19016.1 Configuring the TOA Plug-in........................................................................................................................................190
17 Change History.................................................................................................................. 197
Elastic Load BalancingUser Guide Contents
2021-12-08 v

1 Service Overview
1.1 What Is ELB?Elastic Load Balancing (ELB) automatically distributes incoming traffic acrossmultiple backend servers based on the listening rules you configure. ELB expandsthe service capabilities of your applications and improves their availability byeliminating single points of failure (SPOFs).
ELB Components
ELB consists of the following components:
● Load balancer: distributes incoming traffic across backend servers in one ormore availability zones (AZs).
● Listener: uses the protocol and port you specify to check for requests fromclients and route the requests to associated backend servers based on thelistening rules you define. You can add one or more listeners to a loadbalancer.
Elastic Load BalancingUser Guide 1 Service Overview
2021-12-08 1

● Backend server group: routes requests from the load balancer to one or morebackend servers. You need to add at least one backend server to a backendserver group.
You can set a weight for each backend server based on their performance.
You can also configure health checks for a backend server group to check thehealth of each backend server. When a backend server is unhealthy, the loadbalancer stops routing new requests to this server.
Figure 1-1 ELB components
Load Balancer Type
ELB provides the following types of load balancers: dedicated load balancer,shared load balancer, and classic load balancer. Dedicated load balancer andshared load balancer are called elastic load balancers collectively.
● Dedicated load balancers have exclusive use of underlying resources, so thatthe performance of a dedicated load balancer is not affected by other loadbalancers. In addition, there are a wide range of specifications available forselection.
NO TE
Currently, dedicated load balancers are supported only in the eu-nl region.
● Shared load balancers are suitable for web services with heavy traffic.Requests are forwarded based on domain names or URLs, making requestrouting more flexible. Shared load balancers were previously named enhancedload balancers.
● Classic load balancers can handle simple, light-traffic web services.
Elastic Load BalancingUser Guide 1 Service Overview
2021-12-08 2

NO TE
Classic load balancers can no longer be created on the management console. Useshared load balancers or dedicated load balancers instead.
For details, see Differences Between Dedicated and Shared Load Balancers.
For details, see Differences Between Shared and Classic Load Balancers.
Accessing ELB
You can use either of the following methods to access ELB:
● Management consoleLog in to the management console and choose Network > Elastic LoadBalancing (ELB).
● APIsYou can call APIs to access ELB. For details, see the Elastic Load Balancing APIReference.
NO TE
By default, load balancers created in the eu-de region are shared load balancers. APIsfor shared load balancers are available only in this region.
By default, load balancers created in the eu-nl region are dedicated load balancers.APIs for dedicated load balancers are available only in this region.
1.2 Product Advantages
Advantages of Dedicated Load Balancers● Robust performance
Each dedicated load balancer has exclusive use of isolated underlyingresources and can provide guaranteed performance, meeting yourrequirements for handling a massive number of requests. A single dedicatedload balancer deployed in one AZ can establish up to 20 million concurrentconnections.If you deploy a dedicated load balancer in multiple AZs, its performance suchas the number of new connections and the number of concurrent connectionswill multiply. For example, if you deploy a dedicated load balancer in two AZs,it can establish up to 40 million concurrent connections.
● High availabilityDedicated load balancers can route traffic uninterruptedly. If your servers inone AZ are unhealthy, dedicated load balancers automatically route traffic tohealthy servers in other AZs. Dedicated load balancers provide acomprehensive health check mechanism to ensure that incoming traffic isrouted to only healthy backend servers, improving the availability of yourapplications.
● Ultra securityDedicated load balancers also allow you to select security policies that fit yoursecurity requirements.
Elastic Load BalancingUser Guide 1 Service Overview
2021-12-08 3

● Multiple protocols
Dedicated load balancers support the following protocols, including TCP, UDP,HTTP, and HTTPS, so that they can route requests from different types ofapplications.
● Ease-of-use
Dedicated load balancers provide a diverse set of algorithms that allow you toconfigure different traffic routing policies to meet your requirements whilekeeping deployments simple.
● High reliability
Dedicated load balancers can be deployed across AZs and can distributetraffic more evenly.
Shared Load Balancers● Robust performance
Shared load balancers are deployed in clusters, which can establish up to 100million concurrent connections and 1 million new connections per second andcan handle up to 1 million requests per second, meeting your requirementsfor handling huge numbers of concurrent requests.
● High availability
Shared load balancers can also route traffic across AZs. If your servers in oneAZ are unhealthy, shared load balancers automatically route traffic to healthyservers in other AZs. Shared load balancers provide a comprehensive healthcheck mechanism to ensure that incoming traffic is routed to only healthybackend servers, improving the availability of your applications.
● Multiple protocols
Shared load balancers support the following protocols, including TCP, UDP,HTTP, and HTTPS.
● Ease-of-use
Shared load balancers provide a diverse set of algorithms that allow you toconfigure different traffic routing policies to meet your requirements whilekeeping deployments simple.
● High reliability
Shared load balancers can be deployed across AZs and can distribute trafficmore evenly.
1.3 Application Scenarios
Heavy-Traffic Applications
For an application with heavy traffic, such as a large portal or mobile app store,ELB evenly distributes incoming traffic to multiple backend servers, balancing theload while ensuring steady performance.
Sticky sessions ensure that requests from one client are always forwarded to thesame backend server for fast processing.
Elastic Load BalancingUser Guide 1 Service Overview
2021-12-08 4

Figure 1-2 Session stickiness
Applications with Predictable Peaks and Troughs in TrafficFor an application that has predictable peaks and troughs in traffic volumes, ELBworks with AS to add or remove backend servers to keep up with changingdemands. An example is flash sales, during which application traffic spikes in ashort period. ELB can work with AS to run only the required number of backendservers to handle the load of your application.
Figure 1-3 Flexible scalability
Elastic Load BalancingUser Guide 1 Service Overview
2021-12-08 5
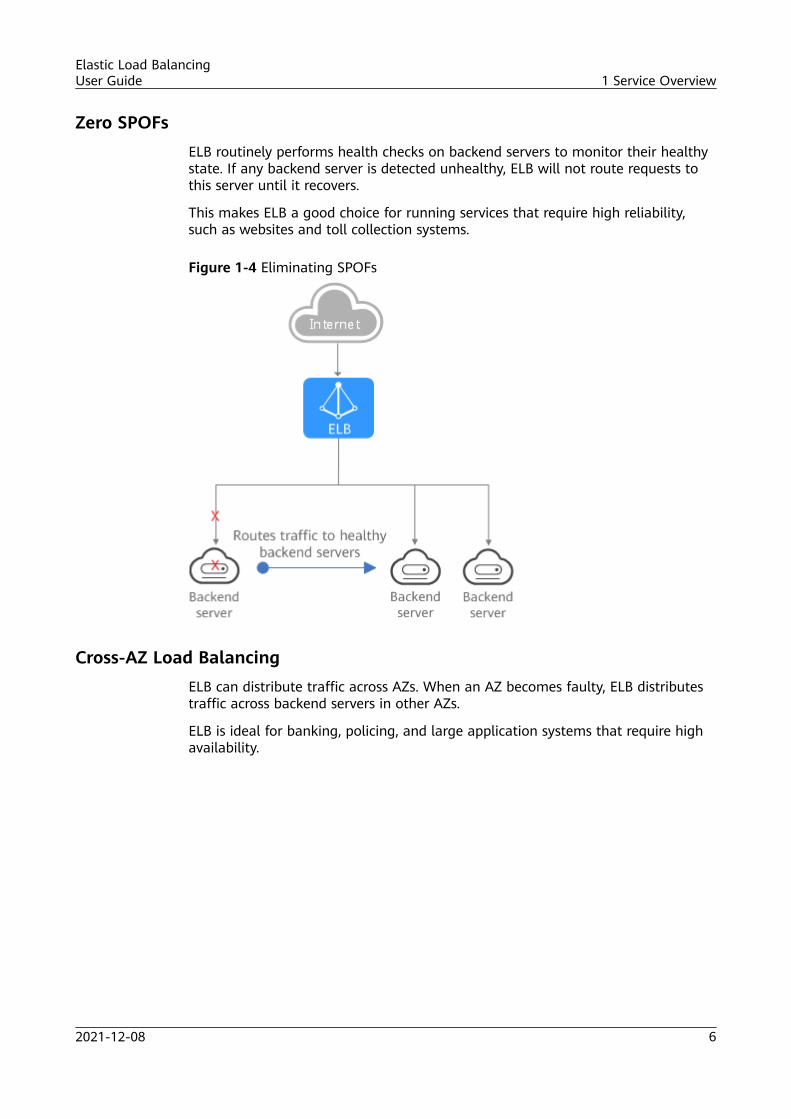
Zero SPOFsELB routinely performs health checks on backend servers to monitor their healthystate. If any backend server is detected unhealthy, ELB will not route requests tothis server until it recovers.
This makes ELB a good choice for running services that require high reliability,such as websites and toll collection systems.
Figure 1-4 Eliminating SPOFs
Cross-AZ Load BalancingELB can distribute traffic across AZs. When an AZ becomes faulty, ELB distributestraffic across backend servers in other AZs.
ELB is ideal for banking, policing, and large application systems that require highavailability.
Elastic Load BalancingUser Guide 1 Service Overview
2021-12-08 6
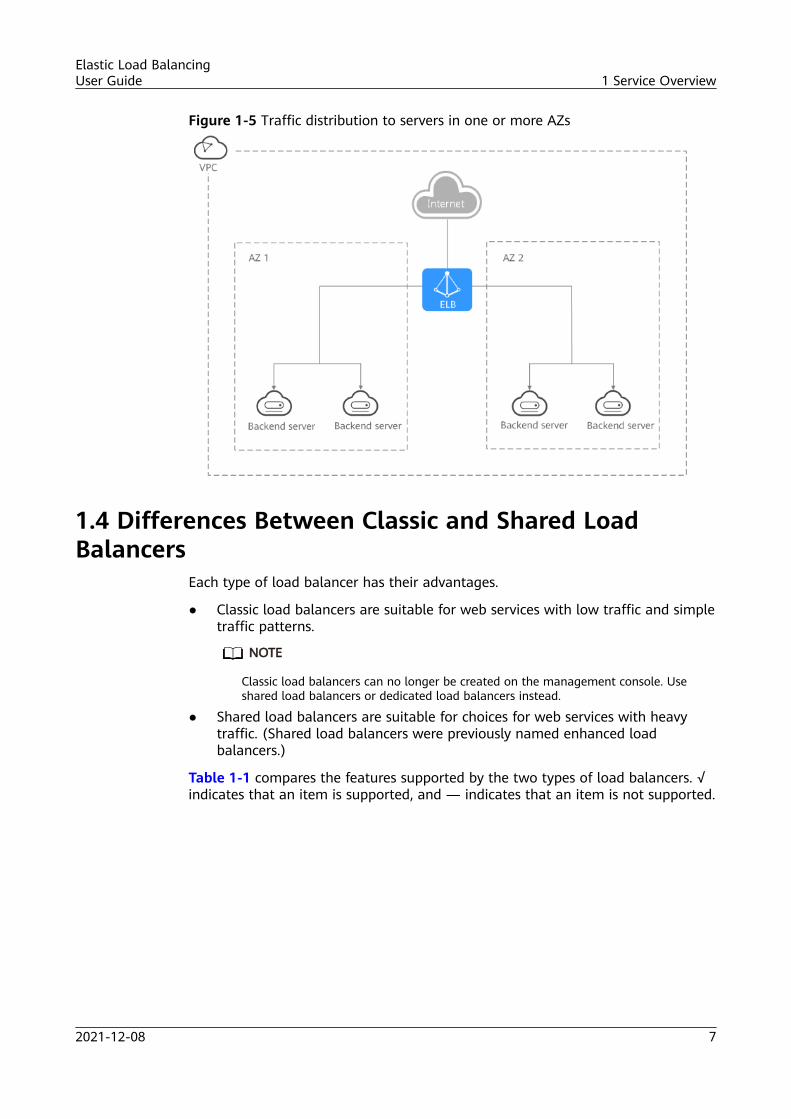
Figure 1-5 Traffic distribution to servers in one or more AZs
1.4 Differences Between Classic and Shared LoadBalancers
Each type of load balancer has their advantages.
● Classic load balancers are suitable for web services with low traffic and simpletraffic patterns.
NO TE
Classic load balancers can no longer be created on the management console. Useshared load balancers or dedicated load balancers instead.
● Shared load balancers are suitable for choices for web services with heavytraffic. (Shared load balancers were previously named enhanced loadbalancers.)
Table 1-1 compares the features supported by the two types of load balancers. √indicates that an item is supported, and — indicates that an item is not supported.
Elastic Load BalancingUser Guide 1 Service Overview
2021-12-08 7

Table 1-1 Features supported by each type of load balancers
Feature Description Classicloadbalancers
Sharedloadbalancers
Loadbalancingover publicand privatenetworks
● Each load balancer on a publicnetwork has a public IP addressbound to it and routes requestsfrom clients to backend serversover the Internet.
● Load balancers on a privatenetwork work within a VPC androute requests from clients tobackend servers in the same VPC.
√ √
Layer 4 andLayer 7 loadbalancing
● Layer 4 load balancing: Afterreceiving TCP or UDP requestsfrom the clients, the load balancerdirectly routes the requests tobackend servers. Load balancing atLayer 4 features high routingefficiency.
● Layer 7 load balancing: Afterreceiving an HTTP or HTTPSrequest, the load balanceridentifies the fields in the HTTP/HTTPS packet header and routesthe request based on these fields.Though the routing efficiency islower than that at Layer 4, loadbalancing at Layer 7 provides someadvanced features such asencrypted transmission and cookie-based sticky sessions.
√ (UDP isnotsupportedfor loadbalancerson aprivatenetwork.)
√
Loadbalancingalgorithm
Round robin, least connections, andsource IP hash
√ √
Stickysession
If you enable sticky sessions, requestsfrom the same client will be routed tothe same backend server during thesession.
√ √
WebSocketprotocol
WebSocket is a new HTML5 protocolthat provides full-duplexcommunication between the browserand the server. WebSocket savesserver resources and bandwidth, andenables real-time communication.
√ √
Elastic Load BalancingUser Guide 1 Service Overview
2021-12-08 8

Feature Description Classicloadbalancers
Sharedloadbalancers
Domainname- orURL-basedforwarding
ELB allows you to add forwardingpolicies to forward requests todifferent backend server groups basedon the domain names or URLsspecified in the forwarding policies.
— √(Currently,you canaddforwardingpoliciesonly toHTTP orHTTPSlisteners.)
Adding ECSsas backendservers
You can add ECSs to backend servergroups to handle requests from loadbalancers.
√ √
Whitelist-based accesscontrol
You can whitelist the IP addressesthat can access a listener.
— √
StandardOpenStackAPIs
OpenStack APIs are supported andare compatible with self-developedAPIs.
— √
Adding BMSsas backendservers
BMSs can also be used as backendservers to handle requests distributedby load balancers.
— √
SNI forcertificates
Server Name Indication (SNI) is anextension to Transport Layer Security(TLS) and is used in cases that aserver uses multiple domain namesand certificates. After SNI is enabled,certificates corresponding to thedomain names are required.
√ √
SSL protocol Load balancers use SSL to receiverequests from clients.
√ —
OBS storagefor accesslogs
Access logs of load balancers can bedumped to OBS buckets for storage.
√ —
Serverweight
You can configure different weightsfor backend servers when you selectthe round robin or least connectionsas the load balancing algorithm.
— √
Modifyingcertificatecontent
You can modify the content of acertificate.
— √
Elastic Load BalancingUser Guide 1 Service Overview
2021-12-08 9

Feature Description Classicloadbalancers
Sharedloadbalancers
Mutualauthentication
The identities of both communicationparties are authenticated to ensuresecurity. You need to deploy both theserver certificate and client certificate.Only HTTPS listeners support thisfeature.
— √
HTTPredirection
HTTP traffic is redirected to HTTPS.When the client sends an HTTPrequest, the backend server returnsan HTTPS response.
— √
Performancemonitoringon a perlistener basis
Cloud Eye allows you to monitor yourresources, including load balancers.
— √
1.5 Differences Between Dedicated and Shared LoadBalancers
Each type of load balancer has their advantages.
● Dedicated load balancers have exclusive use of underlying resources, so thatthe performance of a dedicated load balancer is not affected by other loadbalancers. In addition, there are a wide range of specifications available forselection.
● Shared load balancers share underlying resources, so that the performance ofa load balancer is affected by other load balancers. Shared load balancerswere previously named enhanced load balancers.
NO TE
Currently, dedicated load balancers are supported only in the eu-nl region.
Feature ComparisonsDedicated load balancers provide more powerful forwarding performance, whileshared load balancers are less expensive. You can select the appropriate loadbalancer based on your application needs. The following tables compare thefeatures supported by the two types of load balancers. (√ indicates that an item issupported, and x indicates that an item is not supported.)
Elastic Load BalancingUser Guide 1 Service Overview
2021-12-08 10

Table 1-2 Supported protocols
Protocol Description DedicatedLoadBalancers
SharedLoadBalancers
TCP/UDP(Layer 4)
After receiving TCP or UDP requestsfrom the clients, the load balancerdirectly routes the requests tobackend servers. Load balancing atLayer 4 features high routingefficiency.
√ √
HTTP/HTTPS(Layer 7)
After receiving a request, the listenerneeds to identify the request andforward data based on the fields inthe HTTP/HTTPS packet header.Though the routing efficiency islower than that at Layer 4, loadbalancing at Layer 7 provides someadvanced features such as encryptedtransmission and cookie-based stickysessions.
√ √
WebSocket WebSocket is a new HTML5 protocolthat provides full-duplexcommunication between the browserand the server. WebSocket savesserver resources and bandwidth, andenables real-time communication.
√ √
Table 1-3 Supported backend types
Backend Type Description DedicatedLoadBalancers
SharedLoadBalancers
ECS You can use load balancers todistribute incoming traffic acrossECSs.
√ √
BMS You can use load balancers todistribute incoming traffic acrossBMSs.
√ √
Elastic Load BalancingUser Guide 1 Service Overview
2021-12-08 11
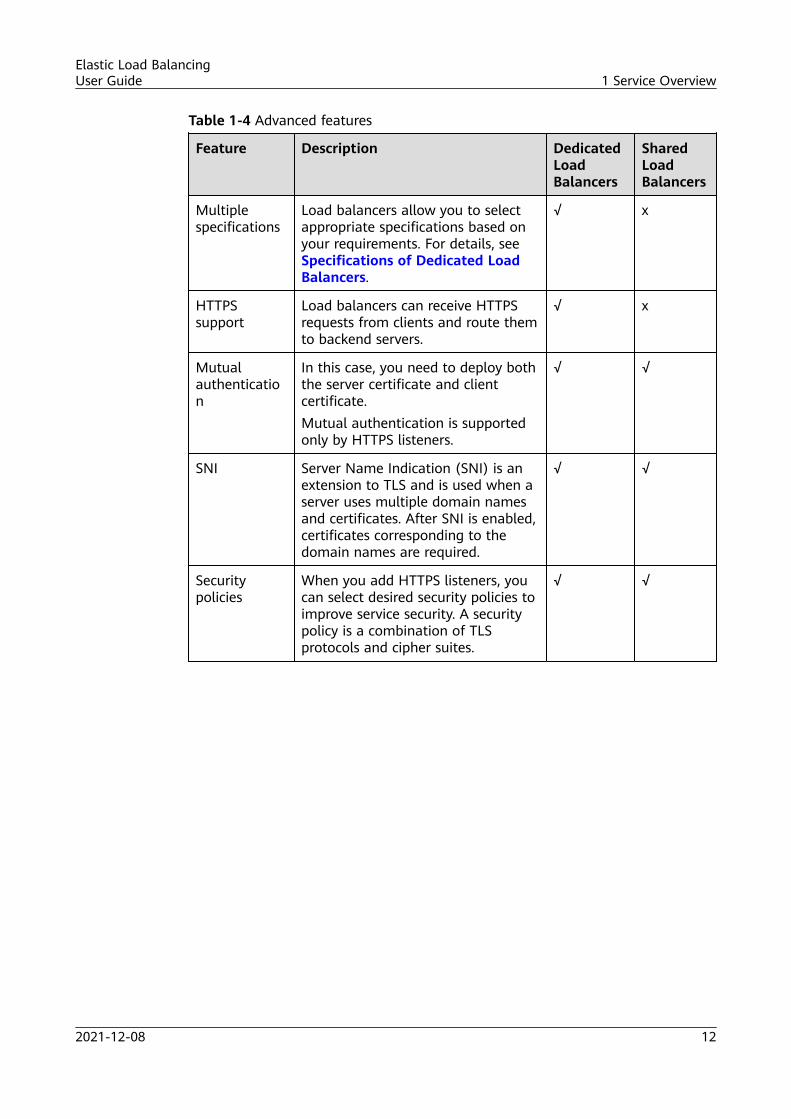
Table 1-4 Advanced features
Feature Description DedicatedLoadBalancers
SharedLoadBalancers
Multiplespecifications
Load balancers allow you to selectappropriate specifications based onyour requirements. For details, seeSpecifications of Dedicated LoadBalancers.
√ x
HTTPSsupport
Load balancers can receive HTTPSrequests from clients and route themto backend servers.
√ x
Mutualauthentication
In this case, you need to deploy boththe server certificate and clientcertificate.Mutual authentication is supportedonly by HTTPS listeners.
√ √
SNI Server Name Indication (SNI) is anextension to TLS and is used when aserver uses multiple domain namesand certificates. After SNI is enabled,certificates corresponding to thedomain names are required.
√ √
Securitypolicies
When you add HTTPS listeners, youcan select desired security policies toimprove service security. A securitypolicy is a combination of TLSprotocols and cipher suites.
√ √
Elastic Load BalancingUser Guide 1 Service Overview
2021-12-08 12

Table 1-5 Other features
Feature Description DedicatedLoadBalancers
SharedLoadBalancers
Cross-AZdeployment
You can create a load balancer inmultiple AZs. Each AZ selects anoptimal path to process requests. Inaddition, the AZs back up each other,improving service processingefficiency and reliability.If you deploy a dedicated loadbalancer in multiple AZs, itsperformance such as the number ofnew connections and the number ofconcurrent connections will multiply.For example, if you deploy adedicated load balancer in two AZs,it can establish up to 40 millionconcurrent connections.
√ x
Loadbalancingalgorithms
Load balancers support weightedround robin, weighted leastconnections, and source IP hash.
√ √
Loadbalancingover publicand privatenetworks
● Each load balancer on a publicnetwork has a public IP addressbound to it and routes requestsfrom clients to backend serversover the Internet.
● Load balancers on a privatenetwork work within a VPC androute requests from clients tobackend servers in the same VPC.
√ √
Modifying thebandwidth
You can modify the bandwidth usedby the EIP bound to the loadbalancer as required.
√ √
Binding/Unbinding anIP address
You can bind an IP address to a loadbalancer or unbind the IP addressfrom a load balancer based onservice requirements.
√ √
Sticky session If you enable sticky sessions,requests from the same client will berouted to the same backend serverduring the session.
√ √
Elastic Load BalancingUser Guide 1 Service Overview
2021-12-08 13

Feature Description DedicatedLoadBalancers
SharedLoadBalancers
Access control You can add IP addresses to awhitelist or blacklist to control accessto a listener.● A whitelist allows specified IP
addresses to access the listener.● A blacklist denies access from
specified IP addresses.
√ √
Health check Load balancers periodically sendrequests to backend servers to checkwhether they can process requests.
√ √
Certificatemanagement
You can create two types ofcertificates: server certificate and CAcertificate. If you need an HTTPSlistener, you need to bind a servercertificate to it. To enable mutualauthentication, you also need tobind a CA certificate to the listener.You can also replace a certificatethat is already used by a loadbalancer.
√ √
Tagging If you have a large number of cloudresources, you can assign differenttags to the resources to quicklyidentify them and use these tags toeasily manage your resources.
√ √
Support thedisplay ofmonitoringmetrics.
You can use Cloud Eye to monitorload balancers and associatedresources and view metrics on themanagement console.
√ √
Log auditing You can use Cloud Trace Service(CTS) to record operations on loadbalancers and associated resourcesfor query, auditing, and backtracking.
√ √
1.6 Specifications of Dedicated Load BalancersDedicated load balancers are available in different specifications. Eachspecification contains some key metrics from which you can decide whether thespecification meets your needs. When the traffic exceeds the selectedspecifications, new requests will not be routed, and packet loss will occur.
● Maximum connections
Elastic Load BalancingUser Guide 1 Service Overview
2021-12-08 14

The metric measures the maximum number of concurrent connections that aload balancer can handle. If the number of connections reaches that definedin the specification, new requests will be discarded to ensure the performanceof existing connections.
● Connections per second (CPS)CPS refers to the number of new connections that a load balancer establisheswith clients per second. If the number reaches that defined in thespecification, new requests will be discarded to ensure the performance ofestablished connections.When HTTPS listeners are establishing connections with clients, SSLhandshakes occupy more system resources. The number of new HTTPSconnections per second is only 10% of the number of new HTTP connectionsper second. For example, if the specification of a load balancer is small I, andthe number of new HTTP connections is 10,000, the number of new HTTPSconnections per second is 1,000.
● Queries per second (QPS)QPS measures the number of HTTP or HTTPS requests sent to a backendserver per second. If the QPS reaches that defined in the specification, newrequests will be discarded to ensure the performance of establishedconnections.
Table 1-6 and Table 1-7 list the specifications of dedicated load balancers.(Available specifications may vary depending on the resources in differentregions.)
CA UTION
The load balancing type cannot be changed after being selected.For example, after you have selected network load balancing, you cannot changeit to application load balancing. If you select network load balancing, you can addonly TCP and UDP listeners to the load balancer. If you select application loadbalancing, you can add only HTTP and HTTPS listeners.
Table 1-6 Network load balancing (TCP/UDP)
Type MaximumConnections
CPS Bandwidth(Mbit/s)
Number ofLCUs in an AZ
Small I 500,000 10,000 50 10
Small II 1,000,000 20,000 100 20
Medium I 2,000,000 40,000 200 40
MediumII
4,000,000 80,000 400 80
Large I 10000000 200,000 1,000 200
Large II 20000000 400,000 2,000 400
Elastic Load BalancingUser Guide 1 Service Overview
2021-12-08 15

Table 1-7 Application load balancing (HTTP/HTTPS)
Type
MaximumConnections
CPS(HTTP)
CPS(HTTPS)
QPS(HTTP)
QPS(HTTPS)
Bandwidth(Mbit/s)
Numberof LCUsin an AZ
Small I
200,000
2,000 200 4,000 2000 50 10
Small II
400,000
4,000 400 8,000 4000 100 20
MediumI
800,000
8,000 800 16,000 8000 200 40
MediumII
2,000,000
20,000 2,000 40,000 20000 400 100
Large I
4,000,000
40,000 4,000 80,000 40000 1,000 200
Large II
8,000,000
80,000 8,000 160,000 80000 2,000 400
NO TE
● If you add multiple listeners to a load balancer, the sum of QPS values of all listenerscannot exceed the QPS defined in each specification.
● The bandwidth is the upper limit of the sum of the inbound traffic and outbound traffic.For example, for a small I dedicated load balancer, the sum of the inbound traffic andoutbound traffic must be less than or equal to 50 Mbit/s.
1.7 How ELB WorksTo balance the load of your applications, create a load balancer to receive requestsfrom clients and route the requests to backend servers in one or more AZs. Add atleast a listener to the load balancer and associate at least a backend server withit. The load balancing algorithm you select when you add the listener determineshow requests are distributed.
Load Balancing AlgorithmsBoth dedicated and shared load balancers support weighted round robin, weightedleast connections, and source IP hash.
● Weighted round robin: Requests are routed to backend servers using theround robin algorithm. Backend servers with higher weights receiveproportionately more requests, whereas equal-weighted servers receive thesame number of requests. This algorithm is often used for short connections,such as HTTP connections.
Elastic Load BalancingUser Guide 1 Service Overview
2021-12-08 16
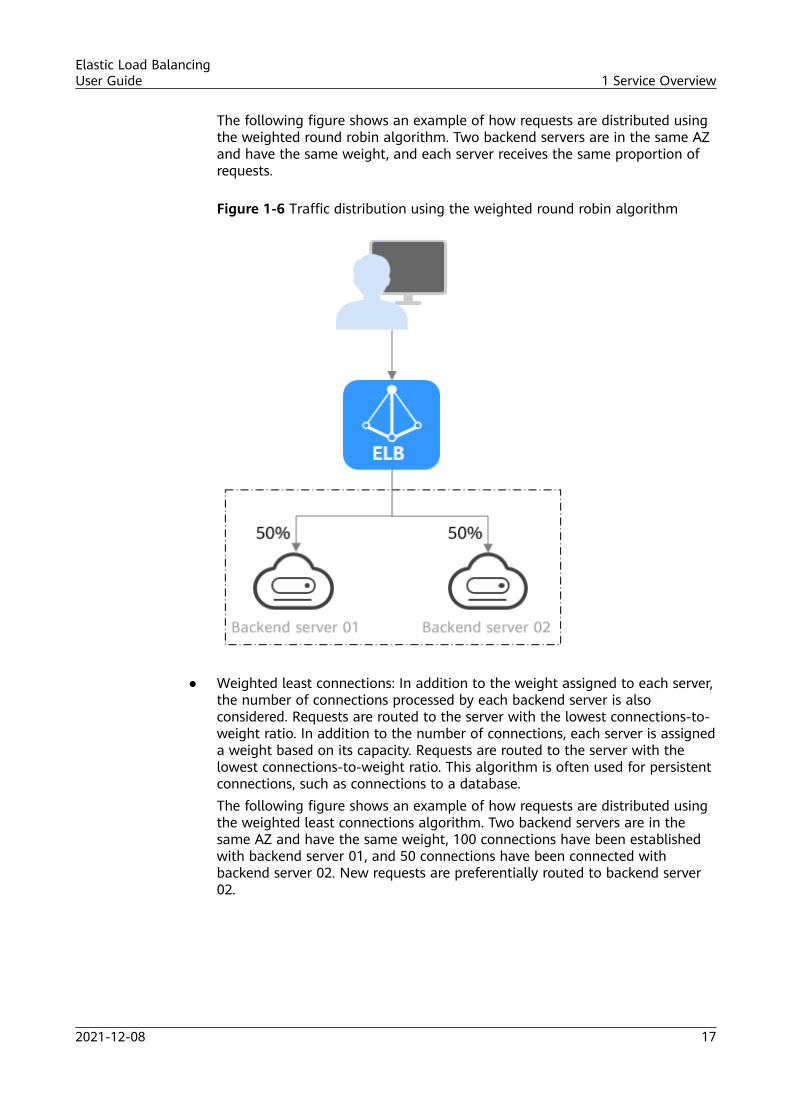
The following figure shows an example of how requests are distributed usingthe weighted round robin algorithm. Two backend servers are in the same AZand have the same weight, and each server receives the same proportion ofrequests.
Figure 1-6 Traffic distribution using the weighted round robin algorithm
● Weighted least connections: In addition to the weight assigned to each server,the number of connections processed by each backend server is alsoconsidered. Requests are routed to the server with the lowest connections-to-weight ratio. In addition to the number of connections, each server is assigneda weight based on its capacity. Requests are routed to the server with thelowest connections-to-weight ratio. This algorithm is often used for persistentconnections, such as connections to a database.The following figure shows an example of how requests are distributed usingthe weighted least connections algorithm. Two backend servers are in thesame AZ and have the same weight, 100 connections have been establishedwith backend server 01, and 50 connections have been connected withbackend server 02. New requests are preferentially routed to backend server02.
Elastic Load BalancingUser Guide 1 Service Overview
2021-12-08 17

Figure 1-7 Traffic distribution using the weighted least connections algorithm
● Source IP hash: The source IP address of each request is calculated using theconsistent hashing algorithm to obtain a unique hashing key, and all backendservers are numbered. The generated key is used to allocate the client to aparticular server. This allows requests from different clients to be routedbased on source IP addresses and ensures that a client is directed to the sameserver that it was using previously. This algorithm works well for TCPconnections of load balancers that do not use cookies.The following figure shows an example of how requests are distributed usingthe source IP hash algorithm. Two backend servers are in the same AZ andhave the same weight. If backend server 01 has processed a request from IPaddress A, the load balancer will route new requests from IP address A tobackend server 01.
Elastic Load BalancingUser Guide 1 Service Overview
2021-12-08 18
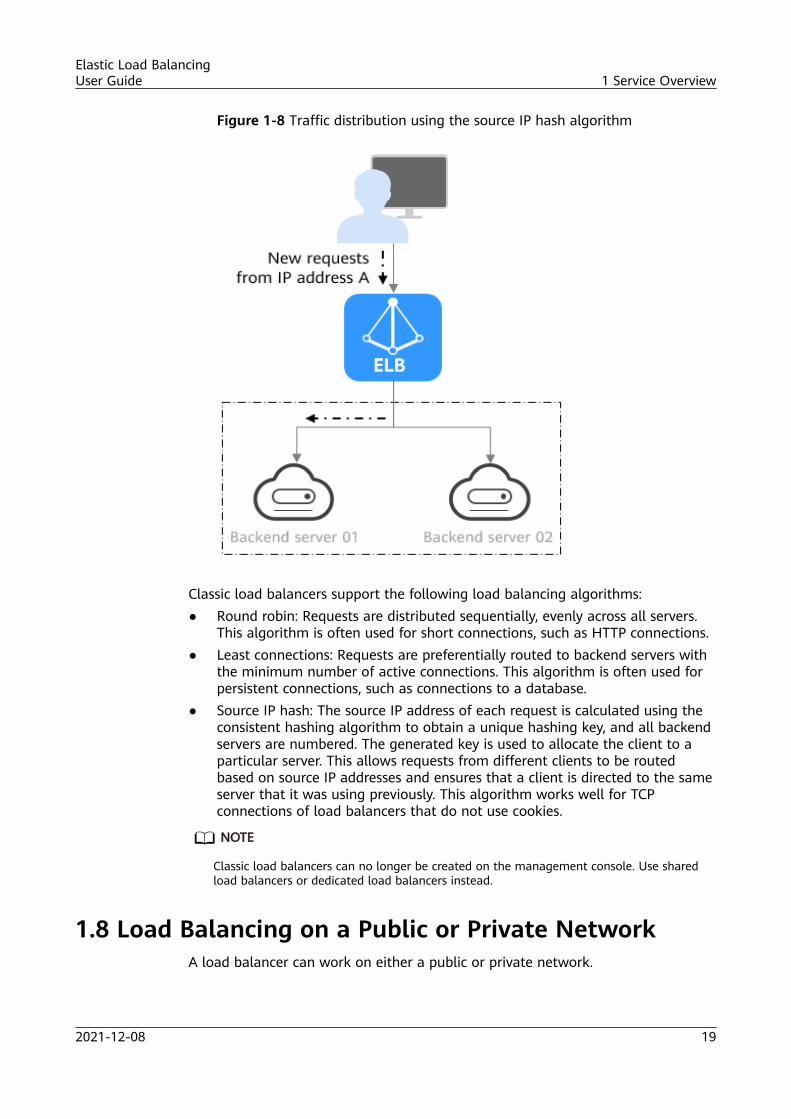
Figure 1-8 Traffic distribution using the source IP hash algorithm
Classic load balancers support the following load balancing algorithms:● Round robin: Requests are distributed sequentially, evenly across all servers.
This algorithm is often used for short connections, such as HTTP connections.● Least connections: Requests are preferentially routed to backend servers with
the minimum number of active connections. This algorithm is often used forpersistent connections, such as connections to a database.
● Source IP hash: The source IP address of each request is calculated using theconsistent hashing algorithm to obtain a unique hashing key, and all backendservers are numbered. The generated key is used to allocate the client to aparticular server. This allows requests from different clients to be routedbased on source IP addresses and ensures that a client is directed to the sameserver that it was using previously. This algorithm works well for TCPconnections of load balancers that do not use cookies.
NO TE
Classic load balancers can no longer be created on the management console. Use sharedload balancers or dedicated load balancers instead.
1.8 Load Balancing on a Public or Private NetworkA load balancer can work on either a public or private network.
Elastic Load BalancingUser Guide 1 Service Overview
2021-12-08 19

Load Balancing on a Public NetworkYou can bind an EIP to a load balancer so that it can receive requests from theInternet and route the requests to backend servers.
Figure 1-9 Load balancing on a public network
Load Balancing on a Private NetworkA load balancer has only a private IP address to receive requests from clients in aVPC and route the requests to backend servers in the same VPC. This type of loadbalancer can only be accessed in a VPC.
Elastic Load BalancingUser Guide 1 Service Overview
2021-12-08 20

Figure 1-10 Load balancing on a private network
Network Types and Load Balancer Types
Table 1-8 Dedicated load balancers and their network types
LoadBalancerType
NetworkType
Network Type
Dedicatedloadbalancers
Public IPv4network
Each load balancer has an IPv4 EIP bound toenable it to route requests over the Internet.
PrivateIPv4network
Each load balancer has only a private IPv4address and can route requests in a VPC.
IPv6network
Each load balancer has an IPv6 address bound.● If the IPv6 address is added to a shared
bandwidth, the load balancer can routerequests over the Internet.
● If the IPv6 address is not added to a sharedbandwidth, the load balancer can routerequests only in a VPC.
Elastic Load BalancingUser Guide 1 Service Overview
2021-12-08 21

Table 1-9 Shared load balancers and their network types
Load BalancerType
NetworkType
Description
Shared loadbalancers
Publicnetwork
Load balancers can route requests on bothpublic and private networks.● Each load balancer has an EIP bound to
enable it to route requests over the Internet.● The load balancer also has a private IP
address and can route requests in a VPC.
Privatenetwork
Each load balancer has only a private IP addressand can route requests in a VPC.
1.9 Network Traffic PathsLoad balancers communicate with backend servers over a private network.
● If backend servers process only requests routed from load balancers, there isno need to assign EIPs or create NAT gateways.
● If backend servers need to provide Internet-accessible services or access theInternet, you must assign EIPs or create NAT gateways.
Inbound Network Traffic PathsThe listeners' configurations determine how load balancers distribute incomingtraffic.
Elastic Load BalancingUser Guide 1 Service Overview
2021-12-08 22

Figure 1-11 Inbound network traffic
When a listener uses TCP or UDP to receive incoming traffic:● Incoming traffic is routed only through the LVS cluster.● The LVS cluster directly routes incoming traffic to backend servers using the
load balancing algorithm you select when you add the listener.
When a listener uses HTTP or HTTPS to receive incoming traffic:● Incoming traffic is routed first to the LVS cluster, then to the Nginx cluster,
and finally across backend servers.● For HTTPS traffic, the Nginx cluster validates certificates and decrypts data
packets before distributing the traffic across backend servers using HTTP.
Outbound Network Traffic PathsThe outbound traffic is routed back the same way the traffic came in.
Elastic Load BalancingUser Guide 1 Service Overview
2021-12-08 23

Figure 1-12 Outbound network traffic
● Because the load balancer receives and responds to requests over theInternet, traffic transmission depends on the bandwidth, which is not limitedby ELB. The load balancer communicates with backend servers over a privatenetwork.
● If you have a NAT gateway, it receives and responds to incoming traffic. TheNAT gateway has an EIP bound, through which backend servers can accessthe Internet and provide services accessible from the Internet. Although thereis a restriction on the connections that can be processed by a NAT gateway,traffic transmission depends on the bandwidth
● If each backend server has an EIP bound, they receive and respond toincoming traffic directly. Traffic transmission depends on the bandwidth.
1.10 Product Concepts
1.10.1 Basic Concepts
Table 1-10 Some concepts about ELB
Term Definition
Loadbalancer
A load balancer distributes incoming traffic across backendservers.
Listener A listener listens on requests from clients and routes the requeststo backend servers based on the settings that you configurewhen you add the listener.
Elastic Load BalancingUser Guide 1 Service Overview
2021-12-08 24

Term Definition
Backendserver
A backend server is a cloud server added to a backend servergroup associated with a load balancer. When you add a listenerto a load balancer, you can create or select a backend servergroup to receive requests from the load balancer by using theport and protocol you specify for the backend server group andthe load balancing algorithm you select.
Backendserver group
A backend server group is a collection of cloud servers that havesame features. When you add a listener, you select a loadbalancing algorithm and create or select a backend server group.Incoming traffic is routed to the corresponding backend servergroup based on the listener's configuration.
Healthcheck
ELB periodically sends requests to backend servers to checkwhether they can process requests. If a backend server isdetected as unhealthy, the load balancer stops routing requeststo it. After the backend server recovers, the load balancer willresume routing requests to it.
Redirect HTTPS is an extension of HTTP. HTTPS encrypts data between aweb server and a browser.
Stickysession
Sticky sessions ensure that requests from a client always getrouted to the same backend server before a session elapses.
WebSocket WebSocket is a new HTML5 protocol that provides full-duplexcommunication between the browser and the server. WebSocketsaves server resources and bandwidth, and enables real-timecommunication. Both WebSocket and HTTP depend on TCP totransmit data. A handshake connection is required between thebrowser and server, so that they can communicate with eachother only after the connection is established. However, as abidirectional communication protocol, WebSocket is differentfrom HTTP. After the handshake succeeds, both the server andbrowser (or client agent) can actively send data to or receivedata from each other.
SNI SNI, an extension to Transport Layer Security (TLS), enables aserver to present multiple certificates on the same IP address andport number. SNI allows the client to indicate the domain nameof the website while sending an SSL handshake request. Oncereceiving the request, the load balancer queries the rightcertificate based on the hostname or domain name and returnsthe certificate to the client. If no certificate is found, the loadbalancer will return the default certificate.
Persistentconnection
A persistent connection allows multiple data packets to be sentcontinuously over a TCP connection. If no data packet is sentduring the connection, the client and server send link detectionpackets to each other to maintain the connection.
Elastic Load BalancingUser Guide 1 Service Overview
2021-12-08 25

Term Definition
Shortconnection
A short connection is a connection established when data isexchanged between the client and server and immediately closedafter the data is sent.
Concurrentconnection
Concurrent connections are total number of TCP connectionsinitiated by clients and routed to backend servers by a loadbalancer per second.
1.10.2 Region and AZ
ConceptA region and availability zone (AZ) identify the location of a data center. You cancreate resources in a specific region and AZ.
● A region is a physical data center, which is completely isolated to improvefault tolerance and stability. The region that is selected during resourcecreation cannot be changed after the resource is created.
● An AZ is a physical location where resources use independent power suppliesand networks. A region contains one or more AZs that are physically isolatedbut interconnected through internal networks. Because AZs are isolated fromeach other, any fault that occurs in one AZ will not affect others.
Figure 1-13 shows the relationship between regions and AZs.
Figure 1-13 Regions and AZs
Selecting a RegionSelect a region closest to your target users for lower network latency and quickaccess.
Selecting an AZWhen deploying resources, consider your applications' requirements on disasterrecovery (DR) and network latency.
● For high DR capability, deploy resources in different AZs within the sameregion.
Elastic Load BalancingUser Guide 1 Service Overview
2021-12-08 26
● For lower network latency, deploy resources in the same AZ.
Regions and EndpointsBefore you use an API to call resources, specify its region and endpoint. For moredetails, see Regions and Endpoints.
1.11 Integration with Other Services● Virtual Private Cloud (VPC)
Provides IP addresses and bandwidth for load balancers.● Auto Scaling (AS)
Works with ELB to automatically scale the number of backend servers forfaster traffic distribution.
● Identity and Access Management (IAM)Provides authentication for ELB.
● Elastic Cloud Server (ECS)Provides cloud servers to run your applications in the cloud. Configure loadbalancers to route traffic to the servers or containers.
● Log Tank Service (LTS)Stores access logs of HTTP or HTTPS requests to your load balancer for queryand analysis later if you have enabled access logging.
● Cloud Trace Service (CTS)Records the operations performed on ELB resources.
● Cloud EyeMonitors the status of load balancers and listeners, without any additionalplug-in.
Elastic Load BalancingUser Guide 1 Service Overview
2021-12-08 27

2 Getting Started
2.1 OverviewTwo examples are given to show how you can quickly create a shared loadbalancer to distribute incoming traffic across backend servers.
● Entry level: A large number of requests need to be routed to backend servers.Health checks are required to monitor the health of backend servers to ensurethat incoming traffic is routed only to healthy backend servers to eliminateSPOFs and improve service availability.
Elastic Load BalancingUser Guide 2 Getting Started
2021-12-08 28

Figure 2-1 Entry level
As the incoming traffic increases, you can add more servers to balance theload across backend servers.
● Advanced level: Two or more applications use the domain name to provideservices, and requests are routed to applications based on their URLs.Forwarding policies are required to forward requests from different URLs tothe corresponding backend server groups.
Elastic Load BalancingUser Guide 2 Getting Started
2021-12-08 29

Figure 2-2 Advanced level
As the incoming traffic increases, you can add more backend servers to thetwo backend server groups. You can also configure health checks to monitorthe health of backend servers to ensure that incoming traffic is routed only tohealthy backend servers.
2.2 Using Shared Load Balancers — Entry Level
ScenariosYou have a web application, which often needs to handle heavy traffic and isdeployed on two ECSs for load balancing.
You can create a shared load balancer to distribute traffic evenly across the twoECSs, which eliminates SPOFs and makes your application more available.
Prerequisites● You have added security group rules to allow traffic from the ports used by
the two ECSs. (Alternatively, you can enable all ports first and then disablethe ports that are no longer used.)
● The security group containing the two ECSs allows traffic from 100.125.0.0/16.(ELB uses these IP addresses to perform health checks and route requests tobackend servers.)
Elastic Load BalancingUser Guide 2 Getting Started
2021-12-08 30
Creating ECSsECSs are used as backend servers.
Each ECS needs an EIP for accessing the Internet, so that The EIP bound to the ECSis required only for configuring ECS backend services in this example. You need todetermine whether to bind an EIP to the ECS based on the service plan.
Determine whether you need to bind an EIP to your load balancer by referring toLoad Balancing on a Public or Private Network.
1. Log in to the management console.
2. In the upper left corner of the page, click and select the desired region andproject.
3. Hover on in the upper left corner to display Service List and chooseComputing > Elastic Cloud Server.
4. Click Create ECS, configure the parameters, and click Create Now.
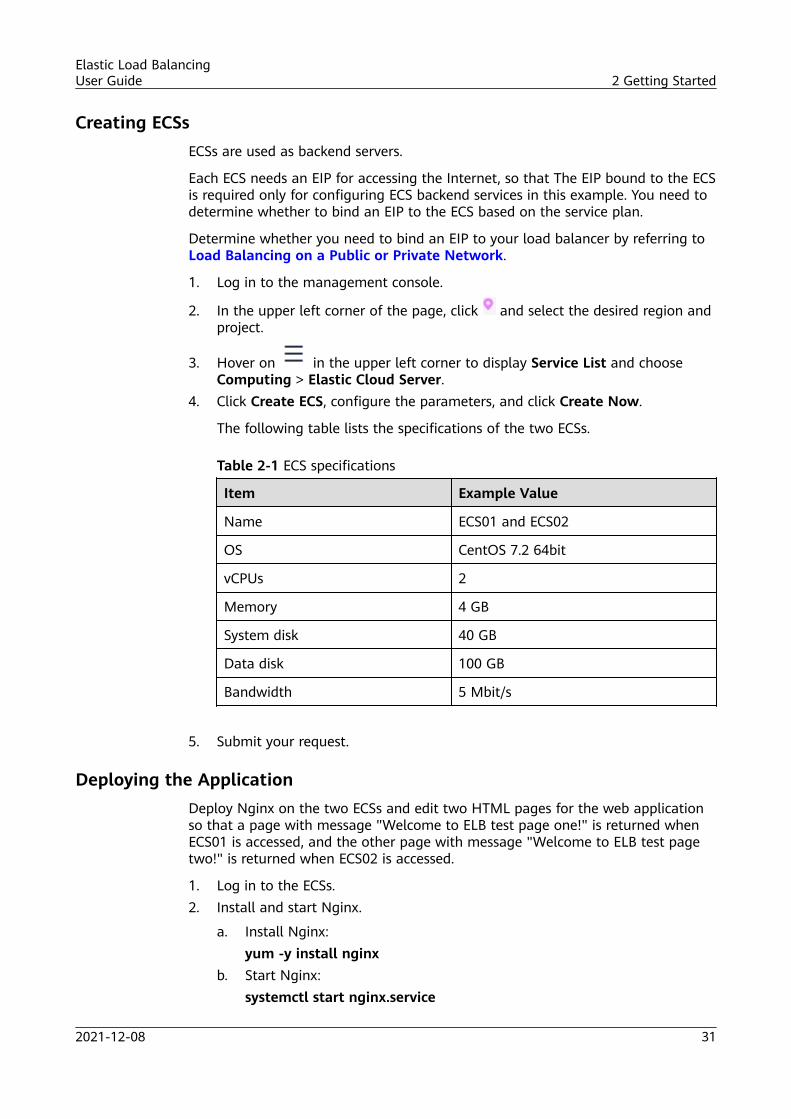
The following table lists the specifications of the two ECSs.
Table 2-1 ECS specifications
Item Example Value
Name ECS01 and ECS02
OS CentOS 7.2 64bit
vCPUs 2
Memory 4 GB
System disk 40 GB
Data disk 100 GB
Bandwidth 5 Mbit/s
5. Submit your request.
Deploying the ApplicationDeploy Nginx on the two ECSs and edit two HTML pages for the web applicationso that a page with message "Welcome to ELB test page one!" is returned whenECS01 is accessed, and the other page with message "Welcome to ELB test pagetwo!" is returned when ECS02 is accessed.
1. Log in to the ECSs.2. Install and start Nginx.
a. Install Nginx:yum -y install nginx
b. Start Nginx:systemctl start nginx.service
Elastic Load BalancingUser Guide 2 Getting Started
2021-12-08 31

c. Enter http://EIP bound to the ECS in the address box of your browser.If the following page is displayed, Nginx has been installed.
Figure 2-3 Nginx installed successfully
3. Modify the HTML page of ECS01.Modify the index.html file in the default root directory of Nginx /usr/share/nginx/html to identify access to ECS01.
a. Open the index.html file.vim /usr/share/nginx/html/index.html
b. Press i to enter editing mode.c. Modify the index.html file to be as follows:
... <body> <h1>Welcome to <strong>ELB</strong> test page one!</h1>
<div class="content"> <p>This page is used to test the <strong>ELB</strong>!</p>
<div class="alert"> <h2>ELB01</h2> <div class="content"> <p><strong>ELB test (page one)!</strong></p> <p><strong>ELB test (page one)!</strong></p> <p><strong>ELB test (page one)!</strong></p> </div> </div> </div> </body>
d. Press Esc to exit editing mode. Then, enter :wq to save the settings andexit the file.
4. Modify the HTML page of ECS02.Modify the index.html file in the default root directory of Nginx /usr/share/nginx/html to identify access to ECS02.
a. Open the index.html file.vim /usr/share/nginx/html/index.html
b. Press i to enter editing mode.c. Modify the index.html file to be as follows:
... <body> <h1>Welcome to <strong>ELB</strong> test page two!</h1>
Elastic Load BalancingUser Guide 2 Getting Started
2021-12-08 32

<div class="content"> <p>This page is used to test the <strong>ELB</strong>!</p>
<div class="alert"> <h2>ELB02</h2> <div class="content"> <p><strong>ELB test (page two)!</strong></p> <p><strong>ELB test (page two)!</strong></p> <p><strong>ELB test (page two)!</strong></p> </div> </div> </div> </body>
d. Press Esc to exit editing mode. Then, enter :wq to save the settings andexit the file.
5. Use your browser to access http://ECS01 EIP and http://ECS02 EIP to verifythat Nginx has been deployed.If the modified HTML pages are displayed, Nginx has been deployed.– HTML page of ECS01
Figure 2-4 Nginx successfully deployed on ECS01
– HTML page of ECS02
Figure 2-5 Nginx successfully deployed on ECS02
Elastic Load BalancingUser Guide 2 Getting Started
2021-12-08 33
Creating a Load Balancer
1. In the upper left corner of the page, click and select the desired region andproject.
2. Hover on in the upper left corner to display Service List and chooseNetwork > Elastic Load Balancing.
3. Click Create Elastic Load Balancer and then configure the parameters.4. Click Create Now.5. Confirm the configuration and submit your request.6. View the newly created load balancer in the load balancer list.
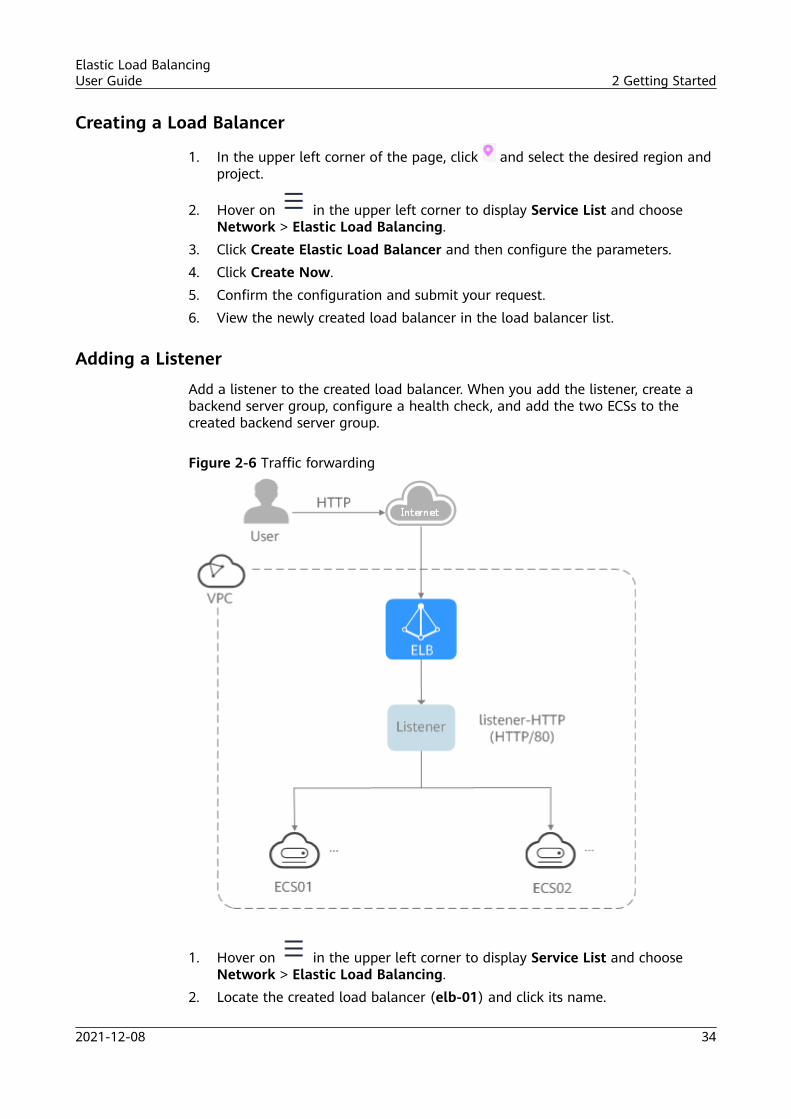
Adding a Listener
Add a listener to the created load balancer. When you add the listener, create abackend server group, configure a health check, and add the two ECSs to thecreated backend server group.
Figure 2-6 Traffic forwarding
1. Hover on in the upper left corner to display Service List and chooseNetwork > Elastic Load Balancing.
2. Locate the created load balancer (elb-01) and click its name.
Elastic Load BalancingUser Guide 2 Getting Started
2021-12-08 34

3. Under Listeners, click Add Listener.4. Configure the listener and click Next.
– Name: Enter a name, for example, listener-HTTP.– Frontend Protocol/Port: Select a protocol and enter a port for the load
balancer to receive requests. For example, set it to HTTP and 80.5. Create a backend server group and configure a health check.
– Backend server group
▪ Name: Enter a name, for example, server_group-ELB.
▪ Load Balancing Algorithm: Select an algorithm that the loadbalancer will use to route requests, for example, Weighted roundrobin.
– Health check
▪ Protocol: Select a protocol for the load balancer to perform healthchecks on backend servers. If the load balancer uses TCP, HTTP, orHTTPS to receive requests, the health check protocol can be TCP orHTTP. Here we use HTTP as an example. Note that the protocolcannot be changed after the listener is added.
▪ Domain Name: Enter a domain name that will be used for healthchecks, for example, www.example.com.
▪ Port: Enter a port for the load balancer to perform health checks onbackend servers, for example, 80.
6. Click the name of the newly added listener. On the Backend Server Groupstab page on the right, click Add.
7. Select the servers you want to add, set the backend port, and click Finish.– Backend servers: Select ECS01 and ECS02.– Backend port: Set it to 80. Backend servers will use this port to
communicate with the load balancer.
Verifying Load Balancing
After the load balancer is configured, you can access the domain name to checkwhether the two ECSs are accessible.
1. Modify the C:\Windows\System32\drivers\etc\hosts file on your PC to mapthe domain name to the load balancer EIP.View the load balancer EIP on the basic information page of the loadbalancer.
Figure 2-7 hosts file on your PC
Elastic Load BalancingUser Guide 2 Getting Started
2021-12-08 35

2. On the CLI of your PC, run the following command to check whether thedomain name is mapped to the load balancer EIP:
ping www.example.com
If data packets are returned, the domain name has been mapped to the loadbalancer EIP.
3. Use your browser to access http://www.example.com. If the following pageis displayed, the load balancer has routed the request to ECS01.
Figure 2-8 Accessing ECS01
4. Use your browser to access http://www.example.com. If the following pageis displayed, the load balancer has routed the request to ECS02.
Figure 2-9 Accessing ECS02
2.3 Using Shared Load Balancers — Advanced Level
Scenarios
You have two web applications deployed on two ECSs separately, and the webapplications provide one domain name but different URLs for users to access.
Elastic Load BalancingUser Guide 2 Getting Started
2021-12-08 36

To forward requests based on URLs, you need to create a load balancer, add anHTTP or HTTPS listener, and add forwarding policies to specify the URLs.
An HTTP listener is used as an example to describe how to route requests fromtwo URLs (/ELB01 and /ELB02) of the same domain name (www.example.com) todifferent backend servers.
Prerequisites● You have added security group rules to allow traffic from the ports used by
the two ECSs. (Alternatively, you can enable all ports first and then disablethe ports that are no longer used.)
● The security group containing the two ECSs allows traffic from 100.125.0.0/16.(ELB uses these IP addresses to perform health checks and route requests tobackend servers.)
Creating ECSs
ECSs are used as backend servers.
Each ECS needs an EIP to allow you to deploy the backend service on each ECS. Inactual use, you can unbind the EIP from each ECS if the ECSs do not need toaccess the Internet or provide Internet-accessible services after the deployment iscomplete. Determine whether you need an EIP for your load balancer by referringto Load Balancing on a Public or Private Network.
1. Log in to the management console.
2. In the upper left corner of the page, click and select the desired region andproject.
3. Hover on in the upper left corner to display Service List and chooseComputing > Elastic Cloud Server.
4. Click Create ECS, configure the parameters, and click Create Now.
The following table lists the specifications of the two ECSs.
Table 2-2 ECS specifications
Item Example Value
Name ECS01 and ECS02
OS CentOS 7.2 64bit
vCPUs 2
Memory 4 GB
System disk 40 GB
Data disk 100 GB
Bandwidth 5 Mbit/s
Elastic Load BalancingUser Guide 2 Getting Started
2021-12-08 37

5. Submit your request.
Deploying the ApplicationDeploy Nginx on the two ECSs and edit two HTML pages for the web applicationsso that a page with message "Welcome to ELB test page one!" is returned whenECS01 is accessed, and the other page with message "Welcome to ELB test pagetwo!" is returned when ECS02 is accessed.
1. Log in to the ECSs.2. Install and start Nginx.
a. Install Nginx:yum -y install nginx
b. Start Nginx:systemctl start nginx.service
c. Enter http://EIP bound to the ECS in the address box of your browser.If the following page is displayed, Nginx has been installed.
Figure 2-10 Nginx installed successfully
3. Modify the HTML page of ECS01.Move the index.html file from the default root directory of Nginx /usr/share/nginx/html to the ELB01 directory and modify the file to identify access toECS01.
a. Create the ELB01 directory and copy the index.html file to this directory:mkdir /usr/share/nginx/html/ELB01cp /usr/share/nginx/html/index.html /usr/share/nginx/html/ELB01/
b. Open the index.html file.vim /usr/share/nginx/html/ELB01/index.html
c. Press i to enter editing mode.d. Modify the index.html file to be as follows:
... <body> <h1>Welcome to <strong>ELB</strong> test page one!</h1>
<div class="content">
Elastic Load BalancingUser Guide 2 Getting Started
2021-12-08 38

<p>This page is used to test the <strong>ELB</strong>!</p>
<div class="alert"> <h2>ELB01</h2> <div class="content"> <p><strong>ELB test (page one)!</strong></p> <p><strong>ELB test (page one)!</strong></p> <p><strong>ELB test (page one)!</strong></p> </div> </div> </div> </body>
e. Press Esc to exit editing mode. Then, enter :wq to save the settings andexit the file.
4. Modify the HTML page of ECS02.Move the index.html file from the default root directory of Nginx /usr/share/nginx/html to the ELB02 directory and modify the file to identify access toECS02.
a. Create the ELB02 directory and copy the index.html file to this directory:mkdir /usr/share/nginx/html/ELB02cp /usr/share/nginx/html/index.html /usr/share/nginx/html/ELB02/
b. Open the index.html file.vim /usr/share/nginx/html/ELB02/index.html
c. Press i to enter editing mode.d. Modify the index.html file to be as follows:
... <body> <h1>Welcome to <strong>ELB</strong> test page two!</h1>
<div class="content"> <p>This page is used to test the <strong>ELB</strong>!</p>
<div class="alert"> <h2>ELB02</h2> <div class="content"> <p><strong>ELB test (page two)!</strong></p> <p><strong>ELB test (page two)!</strong></p> <p><strong>ELB test (page two)!</strong></p> </div> </div> </div> </body>
e. Press Esc to exit editing mode. Then, enter :wq to save the settings andexit the file.
5. Use your browser to access http://ECS01 EIP/ELB01/ and http://ECS02 EIP/ELB02/ to verify that Nginx has been deployed.If the modified HTML pages are displayed, Nginx has been deployed.– HTML page of ECS01
Elastic Load BalancingUser Guide 2 Getting Started
2021-12-08 39

Figure 2-11 Nginx successfully deployed on ECS01
– HTML page of ECS02
Figure 2-12 Nginx successfully deployed on ECS02
Creating a Load Balancer
1. In the upper left corner of the page, click and select the desired region andproject.
2. Hover on in the upper left corner to display Service List and chooseNetwork > Elastic Load Balancing.
3. Click Create Elastic Load Balancer and then configure the parameters.
4. Click Create Now.
5. Confirm the configuration and submit your request.
6. View the newly created load balancer in the load balancer list.
Adding a Listener
Add a listener to the created load balancer. When you add the listener, create abackend server group, configure a health check, and add the two ECSs to thecreated backend server group.
Elastic Load BalancingUser Guide 2 Getting Started
2021-12-08 40

Configure two forwarding policies to forward HTTP requests to the two ECSs, forexample, requests from www.example.com/ELB01/ to ECS01, and those fromwww.example.com/ELB02/ to ECS02.
Figure 2-13 Traffic forwarding
1. Hover on in the upper left corner to display Service List and chooseNetwork > Elastic Load Balancing.
2. Locate the created load balancer and click its name.3. Under Listeners, click Add Listener.4. Configure the listener and click Next.
– Name: Enter a name, for example, listener-HTTP.– Frontend Protocol/Port: Select a protocol and enter a port for the load
balancer to receive requests. For example, set it to HTTP and 80.5. Create a backend server group, configure a health check, and click Finish.
– Backend server group
▪ Name: Enter a name, for example, server_group-ELB.
▪ Load Balancing Algorithm: Select an algorithm that the loadbalancer will use to route requests, for example, Weighted roundrobin.
Elastic Load BalancingUser Guide 2 Getting Started
2021-12-08 41

– Health check
▪ Protocol: Select a protocol for the load balancer to perform healthchecks on backend servers. If the load balancer uses TCP, HTTP, orHTTPS to receive requests, the health check protocol can be TCP orHTTP. Here we use HTTP as an example. Note that the protocolcannot be changed after the listener is added.
▪ Domain Name: Enter a domain name that will be used for healthchecks, for example, www.example.com.
▪ Port: Enter a port for the load balancer to perform health checks onbackend servers, for example, 80.
Adding Forwarding Policies1. Click the name of the newly added listener and then click Add next to
Forwarding Policies.2. Configure the forwarding policy and click Next.
– Name: Enter a name for the forwarding policy, for example,forwarding_policy-ELB01.
– Domain Name: Enter a domain name that will be used to forward therequests, for example, www.example.com. The domain name in therequest must exactly match that specified in the forwarding policy.
– URL: You can also specify a URL to forward the requests, for example, /ELB01/.
– URL Matching Rule: Select the rule for matching specified URL stringwith the requested URL. Three options are available, Exact match, Prefixmatch, and Regular expression match. Exact match enjoys the highestpriority, and Regular expression match the lowest priority. Select Exactmatch here.
3. Add the backend server group and configure a health check.– Backend server group
▪ Name: Enter a name, for example, server_group-ELB01.
▪ Load Balancing Algorithm: Select an algorithm that the loadbalancer will use to route requests, for example, Weighted roundrobin.
– Health check
▪ Protocol: Select a protocol for the load balancer to perform healthchecks on backend servers. If the load balancer uses TCP, HTTP, orHTTPS to receive requests, the health check protocol can be TCP orHTTP. Here we use HTTP as an example. Note that the protocolcannot be changed after the listener is added.
▪ Domain Name: Enter a domain name that will be used for healthchecks, for example, www.example.com.
▪ Port: Enter a port for the load balancer to perform health checks onbackend servers, for example, 80.
Elastic Load BalancingUser Guide 2 Getting Started
2021-12-08 42

4. Select the newly added forwarding policy. On the Backend Server Groups tabpage on the right, click Add.
5. Select the server you want to add, set the backend port, and click Finish.– Backend server: ECS01– Backend port: Set it to 80. Backend servers will use this port to
communicate with the load balancer.6. Repeat 1 to 5 to add another forwarding policy, create a backend server
group, and add ECS02 to the backend server group. Configure the parameters.
Verifying Load BalancingAfter the load balancer is configured, you can access the domain name or thespecified URL to check whether the two ECSs are accessible.
1. Modify the C:\Windows\System32\drivers\etc\hosts file on your PC to mapthe domain name to the load balancer EIP.View the load balancer EIP on the basic information page of the loadbalancer.
Figure 2-14 hosts file on your PC
2. On the CLI of your PC, run the following command to check whether thedomain name is mapped to the load balancer EIP:ping www.example.comIf data packets are returned, the domain name has been mapped to the loadbalancer EIP.
3. Use your browser to access http://www.example.com/ELB01/. If thefollowing page is displayed, the load balancer has routed the request toECS01.
Figure 2-15 Accessing ECS01
Elastic Load BalancingUser Guide 2 Getting Started
2021-12-08 43

NO TE
ELB01/ indicates that the default directory named ECS01 is accessed, while ELB01indicates the file name. Therefore, the slash (/) following ELB01 must be retained.
4. Use your browser to access http://www.example.com/ELB02/. If thefollowing page is displayed, the load balancer has routed the request toECS02.
Figure 2-16 Accessing ECS02
Elastic Load BalancingUser Guide 2 Getting Started
2021-12-08 44

3 Load Balancer
3.1 Preparations for Creating a Load BalancerBefore creating a load balancer, you must plan its region, network, protocol, andbackend servers.
Region
When you select a region, pay attention to the following:● The region must be close to your users' location to reduce network latency
and improve the download speed.● The region must be the same as that of backend servers. Currently, ELB
cannot be deployed across regions.
AZ
Dedicated load balancers support cross-AZ deployment. If you select more thanone AZ, a load balancer will be created in each AZ, and these load balancers workin active-active mode. In this way, incoming traffic is distributed to backendservers in each AZ. If an AZ becomes faulty, traffic is distributed to backendservers in other AZs to ensure service continuity.
Select the AZ where backend servers reside to reduce network latency andimprove access speed.
Network Type
The network type of dedicated load balancers can be public IPv4 network, orprivate IPv4 network.● If you select the public IPv4 network, the load balancer will have an IPv4 EIP
bound to route requests over the Internet.● If you select the private IPv4 network, a private IPv4 IP address will be
assigned to the load balancer to route requests within a VPC.
Shared load balancers can work in both public and private networks.
Elastic Load BalancingUser Guide 3 Load Balancer
2021-12-08 45

● To route requests over the Internet, you need to bind an EIP to the loadbalancer. The load balancer also has a private IP address and can routerequests in a VPC.
● To route requests in a VPC, bind only a private IP address to the load balancer.
SpecificationsDedicated load balancers provide a broad range of specifications to meet differentrequirements. Specifications for network load balancing are suitable for TCP orUDP requests, while specifications for application load balancing are broadly usedto handle HTTP or HTTPS requests. Select appropriate specifications based on yourtraffic volume and service requirements. The following are some principles for youto select the specifications:● For TCP or UDP load balancing, pay attention to the number of concurrent
persistent connections, and consider Maximum Connections as a key metric.Estimate the maximum number of concurrent connections that a loadbalancer can handle in the actual service scenario and select thecorresponding specification.
● For HTTP or HTTPS load balancers, focus more on queries per second (QPS),which determines the service throughput of an application system. Estimatethe QPS that a load balancer can handle in the actual service scenario andselect the corresponding specification.
● Use the monitoring data from Cloud Eye to analyze the peak traffic, trendand regularity of the traffic to select the specifications more accurately.
ProtocolELB provides load balancing at both Layer 4 and Layer 7.
● If you choose TCP or UDP, the load balancer routes requests directly tobackend servers. In this process, the destination IP address in the packets ischanged to the IP address of the backend server, and the source IP address tothe private IP address of the load balancer. A connection is established after athree-way handshake between the client and the backend server, and the loadbalancer only forwards the data.
Figure 3-1 Layer-4 load balancing
● Load balancing at Layer 7 is also called "content exchange". After the loadbalancer receives a request, it works as a proxy of backend servers to establisha connection (three-way handshake) with the client and then determines towhich backend server the request is to be routed based on the fields in theHTTP/HTTPS request header and the load balancing algorithm you selectedwhen you add the listener.
Elastic Load BalancingUser Guide 3 Load Balancer
2021-12-08 46

Figure 3-2 Layer-7 load balancing
Backend ServersBefore you use ELB, you need to create cloud servers, deploy required applicationson them, and add the cloud servers to one or more backend server groups. Whenyou create ECSs or BMSs, note the following:
● Cloud servers must be in the same region as the load balancer.● Cloud servers that run the same OS are recommended so that you can
manage them more easily.
3.2 Creating a Dedicated Load Balancer
ScenariosYou have prepared everything required for creating a load balancer. For details,see Preparations for Creating a Load Balancer.
Dedicated load balancers can be created only in the eu-nl region. By default, loadbalancers created in this region are dedicated load balancers.
Constraints and LimitationsAfter a load balancer is created, the VPC cannot be changed. If you want tochange the VPC, create another load balancer and select the VPC during creation.
Procedure1. Log in to the management console.
2. In the upper left corner of the page, click and select the desired region andproject.
3. Hover on in the upper left corner to display Service List and chooseNetwork > Elastic Load Balancing.
4. Click Create Elastic Load Balancer and specify the parameters by referring toTable 3-1.
Elastic Load BalancingUser Guide 3 Load Balancer
2021-12-08 47

Table 3-1 Parameter description
Parameter Description Example Value
Region Specifies the region. Resources indifferent regions cannot communicatewith each other over internal networks.For lower network latency and fasteraccess to resources, select the nearestregion.
en-nl
AZ Specifies the AZ of the load balancer.You can deploy a load balancer inmultiple AZs for high availability. Whenan AZ becomes faulty or unavailable,requests are routed to backend serversin other AZs. This ensures servicecontinuity and improves applicationreliability.If you deploy a dedicated load balancerin multiple AZs, its performance such asthe number of new connections and thenumber of concurrent connections willmultiply. For example, if you deploy adedicated load balancer in two AZs, itcan establish up to 40 millionconcurrent connections.If backend servers reside in two AZs, forexample, AZ 1 and AZ 2, but you planto create the load balancer only in AZ 1,Xen ECSs cannot be used as clients.NOTE
If you change the AZs of an existing loadbalancer, the load balancer may fail to routerequests for several seconds. It isrecommended that you plan the AZs inadvance, or change the AZs during off-peakhours when necessary.
N/A
Elastic Load BalancingUser Guide 3 Load Balancer
2021-12-08 48

Parameter Description Example Value
NetworkType
Specifies the type of the network wherethe load balancer works. You can selectone or more network types.● Public IPv4 network: The load
balancer routes requests from theclients to backend servers over theInternet.
● Private IPv4 network: The loadbalancer routes requests from theclients to backend servers in a VPC.
NOTEIf you do not select any of the options, theload balancer cannot communicate with theclients after it is created. When you areusing ELB or testing network connectivity,ensure that the load balancer has a public orprivate IP address bound.
Public IPv4network
VPC Specifies the VPC where the loadbalancer works. You need to configurethis parameter regardless of theselected network type.Select an existing VPC or create one.For more information about VPC, seethe Virtual Private Cloud User Guide.
vpc-4536
Subnet Specifies the subnet where the loadbalancer will reside.You need to configure this parameterregardless of the selected network type.
subnet-4536
Public IPv4 network configuration
Elastic Load BalancingUser Guide 3 Load Balancer
2021-12-08 49

Parameter Description Example Value
EIP This parameter is mandatory whenNetwork Type is set to IPv4 publicnetwork. You can use an existing EIP orapply for a new one. If you select Useexisting, select an existing IP address.● New EIP: The system will assign a
new EIP to the load balancer.● Use existing: Select an existing IP
address.NOTE
● By default, load balancers created inthe eu-nl region are dedicated loadbalancers. You can unbind an EIPfrom a dedicated load balancer onlyon the ELB console if you no longerneed the EIP.
● If you bind a new EIP to the loadbalancer and specify a sharedbandwidth, this EIP will be added tothe shared bandwidth.
● If you set EIP to New EIP when youcreate a dedicated load balancer inthe eu-de region, the system willautomatically assign and bind adedicated EIP to the load balancer forexclusive use. This type of EIPs can beassigned only when you creatededicated load balancers and canonly be bound to dedicated loadbalancers. If you set EIP to Useexisting, you can select one from thededicated EIPs that were assignedwhen you created dedicated loadbalancers and have been unboundfrom the dedicated load balancers.
● To unbind an EIP from a loadbalancer, locate the load balancer andchoose More > Unbind EIP in theOperation column.
N/A
EIP Type Specifies the link type (BGP) when anew EIP is used.
Dynamic BGP
Private IPv4 network configuration
IPv4Address
Specifies how you want the IPv4 addressto be assigned.● Automatically-assigned IP address:
The system automatically assigns anIPv4 address to the load balancer.
● Manually-specified IP address:Manually specify an IPv4 address tothe load balancer.
Automatically-assigned IPaddress
Elastic Load BalancingUser Guide 3 Load Balancer
2021-12-08 50

Parameter Description Example Value
Specification
● Select either Application loadbalancing (HTTP/HTTPS) orNetwork load balancing (TCP/UDP) or both, and then select thedesired specification. You can selectonly one specification forApplication load balancing (HTTP/HTTPS) and Network loadbalancing (TCP/UDP), respectively.
● For application load balancing, thenumber of IP addresses variesdepending on the specification. Youcan view the number of IP addressesrequired by the load balancer in theinfotip after the selected subnet.
● The performance of load balancersvaries depending on the selectedspecifications. You can evaluate theactual traffic and select appropriatespecifications based on the keymetrics.
● Dedicated load balancers have thefollowing six specifications:– Small I– Small II– Medium I– Medium II– Large I– Large II
Medium II
Name Specifies the load balancer name. elb93wd
Description Provides supplementary informationabout the load balancer.
N/A
Tag Identifies load balancers so that theycan be easily found. A tag consists of atag key and a tag value. The tag keymarks a tag, and the tag value specifiesthe tag content. For details about thenaming specifications, see Table 3-2.
● Key: elb_key1● Value: elb-01
Elastic Load BalancingUser Guide 3 Load Balancer
2021-12-08 51

Table 3-2 Tag naming rules
Item Requirement ExampleValue
Tagkey
● Cannot be left blank.● Must be unique for the same load balancer.● Can contain a maximum of 36 characters.● Cannot contain asterisks (*), angle brackets (< and
>), backslashes (\), equal signs (=), commas (,),vertical bars (|), or slashes (/).
● Can contain only the following character types:– Uppercase letters– Lowercase letters– Digits– Special characters, including hyphens (-) and
underscores (_)
elb_key1
Tagvalue
● Can contain a maximum of 43 characters.● Cannot contain asterisks (*), angle brackets (< and
>), backslashes (\), equal signs (=), commas (,),vertical bars (|), or slashes (/).
● Can contain only the following character types:– Uppercase letters– Lowercase letters– Digits– Special characters, including hyphens (-) and
underscores (_)
elb-01
5. Click Create Now.
6. Confirm the configuration and submit your request.
3.3 Creating a Shared Load Balancer
Prerequisites
You have prepared everything required for creating a load balancer. For details,see Preparations for Creating a Load Balancer.
Load balancers receive requests from clients and route the requests to backendservers, which answer to these requests over the private network.
Constraints and Limitations
After a load balancer is created, the VPC cannot be changed. If you want tochange the VPC, create another load balancer and select the VPC during creation.
Elastic Load BalancingUser Guide 3 Load Balancer
2021-12-08 52

Creating a Shared Load Balancer1. Log in to the management console.
2. In the upper left corner of the page, click and select the desired region andproject.
3. Hover on in the upper left corner to display Service List and chooseNetwork > Elastic Load Balancing.
4. On the Load Balancers page, click Create Elastic Load Balancer. Configurethe parameters based on Table 3-3.
Table 3-3 Parameters for creating a shared load balancer
Parameter Description ExampleValue
Region Specifies the region. Resources in differentregions cannot communicate with eachother over internal networks. For lowernetwork latency and faster access toresources, select the nearest region.
N/A
Network Type Specifies the network type of a loadbalancer.● Public network: The load balancer
routes requests from the clients tobackend servers over the Internet.
● Private network: The load balancerroutes requests from the clients tobackend servers in the same VPC.
Privatenetwork
VPC Specifies the VPC where the load balancerworks.Select an existing VPC or create one.For more information about VPC, see theVirtual Private Cloud User Guide.
N/A
Subnet Specifies the subnet that the load balancerbelongs to.
N/A
Specifies how you want the IP address tobe assigned.● Automatically-assigned IP address:
The system automatically assigns anIPv4 address to the load balancer.
● Manually-specified IP address:Manually specify an IPv4 address to theload balancer.
Automatically-assigned IPaddress
Elastic Load BalancingUser Guide 3 Load Balancer
2021-12-08 53

Parameter Description ExampleValue
EIP Specifies the public IP address that will bebound to the load balancer for receivingand forwarding requests over the Internet.The following options are available:● New EIP: The system will automatically
assign an EIP.● Use existing: Select an existing EIP.
New EIP
Bandwidth Specifies the bandwidth when a new EIP isused, in the unit of Mbit/s.
10 Mbit/s
Name Specifies the load balancer name. elb-yss0
Description Provides supplementary information aboutthe load balancer.
N/A
Tag Identifies load balancers so that they canbe easily found. A tag consists of a tag keyand a tag value. The tag key marks a tag,and the tag value specifies specific tagcontent.For details about the namingspecifications, see Table 3-4.
● Key:elb_key1
● Value:elb-01
Table 3-4 Naming rules of load balancer tags
Item Requirement ExampleValue
Tag key ● Cannot be left blank.● Must be unique for the same load
balancer.● Can contain a maximum of 36
characters.● Cannot contain asterisks (*), angle
brackets (< and >), backslashes (\),equal signs (=), commas (,), verticalbars (|), or slashes (/).
● Can contain only the followingcharacter types:– Uppercase letters– Lowercase letters– Digits– Special characters, including hyphens
(-) and underscores (_)
elb_key1
Elastic Load BalancingUser Guide 3 Load Balancer
2021-12-08 54
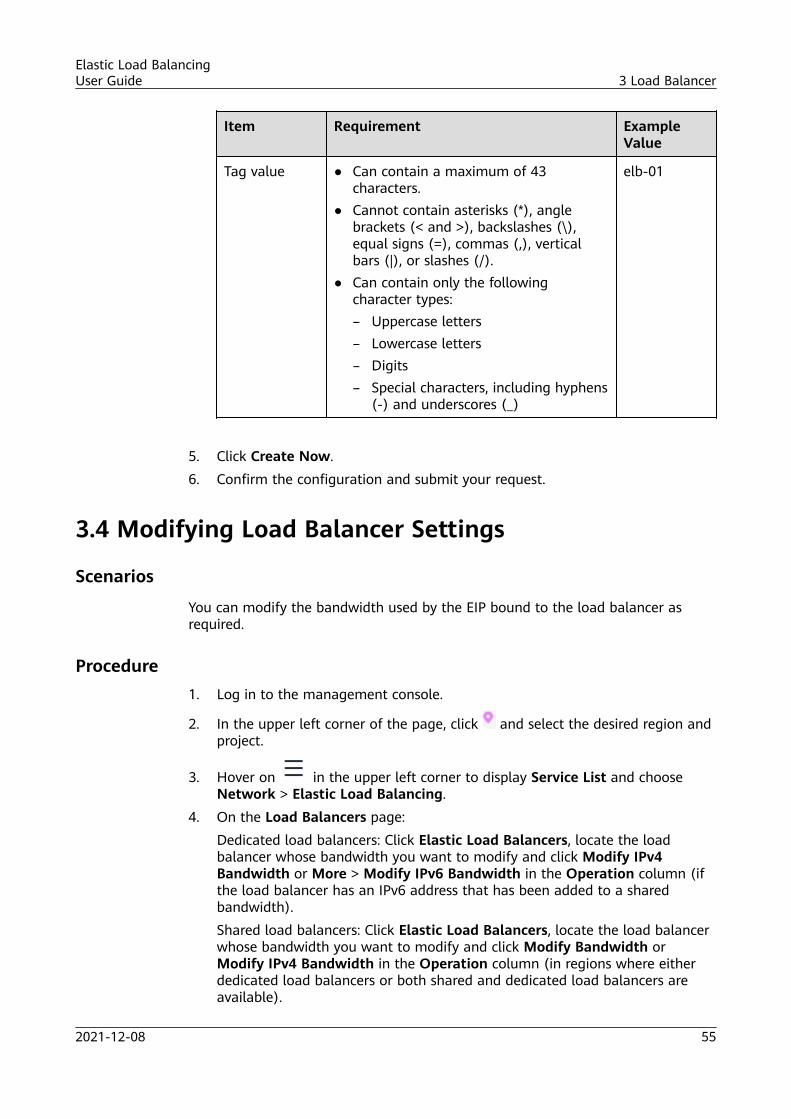
Item Requirement ExampleValue
Tag value ● Can contain a maximum of 43characters.
● Cannot contain asterisks (*), anglebrackets (< and >), backslashes (\),equal signs (=), commas (,), verticalbars (|), or slashes (/).
● Can contain only the followingcharacter types:– Uppercase letters– Lowercase letters– Digits– Special characters, including hyphens
(-) and underscores (_)
elb-01
5. Click Create Now.6. Confirm the configuration and submit your request.
3.4 Modifying Load Balancer Settings
Scenarios
You can modify the bandwidth used by the EIP bound to the load balancer asrequired.
Procedure1. Log in to the management console.
2. In the upper left corner of the page, click and select the desired region andproject.
3. Hover on in the upper left corner to display Service List and chooseNetwork > Elastic Load Balancing.
4. On the Load Balancers page:Dedicated load balancers: Click Elastic Load Balancers, locate the loadbalancer whose bandwidth you want to modify and click Modify IPv4Bandwidth or More > Modify IPv6 Bandwidth in the Operation column (ifthe load balancer has an IPv6 address that has been added to a sharedbandwidth).Shared load balancers: Click Elastic Load Balancers, locate the load balancerwhose bandwidth you want to modify and click Modify Bandwidth orModify IPv4 Bandwidth in the Operation column (in regions where eitherdedicated load balancers or both shared and dedicated load balancers areavailable).
Elastic Load BalancingUser Guide 3 Load Balancer
2021-12-08 55
Classic load balancers: Locate the load balancer whose bandwidth you wantto modify and click Modify Bandwidth in the Operation column.
5. In the New Configuration area, change the bandwidth and click Next.Select the bandwidth defined by the system or enter a value from 5 Mbit/s to2,000 Mbit/s.
NO TE
You can also change the bandwidth name.
6. Confirm the modified bandwidth and click Submit.
3.5 Changing an IP Address
ScenariosELB allows you to change private IPv4 addresses of load balancers. New privateIPv4 addresses can be from the current subnet or other subnets.
Changing a Private IPv4 Address1. Log in to the management console.
2. In the upper left corner of the page, click and select the desired region andproject.
3. Hover on in the upper left corner to display Service List and chooseNetwork > Elastic Load Balancing.
4. On the Elastic Load Balancers tab page, locate the load balancer whose IPaddress you want to change, and click More > Change Private IPv4 Addressin the Operation column.
5. In the Change Private IPv4 Address dialog box, select the subnet where theIP address resides and specify the IP address.– To use an IP address from another subnet, select Automatically-
assigned IPv4 address. The system automatically assigns an IPv4 addressfor your load balancer.
– To use another IP address from the current subnet, specify an IP address.6. Click OK.
3.6 Binding an IP Address to or Unbinding an IPAddress from a Load Balancer
ScenariosYou can bind an IP address to a load balancer or unbind the IP address from aload balancer based on service requirements.
IP addresses bound to a classic load balancer cannot be unbound.
● An IPv4 EIP or a private IPv4 address can be bound to or unbound from adedicated load balancer.
Elastic Load BalancingUser Guide 3 Load Balancer
2021-12-08 56

● Only an IPv4 EIP can be bound to or unbound from a shared load balancer.
NO TE
● Load balancers without IPv4 EIPs cannot route requests over the public IPv4 network.● Load balancers without private IPv4 addresses cannot route requests over the private
IPv4 network.
Binding an IPv4 EIP1. Log in to the management console.
2. In the upper left corner of the page, click and select the desired region andproject.
3. Hover on in the upper left corner to display Service List and chooseNetwork > Elastic Load Balancing.
4. On the Elastic Load Balancers tab page, locate the load balancer to whichyou want to bind an IPv4 EIP and click More > Bind IPv4 EIP in theOperation column.
5. In the Bind IPv4 EIP dialog box, select the EIP you want to bind to the loadbalancer.
6. Click OK.
Binding a Private IPv4 AddressOnly dedicated load balancers support this function.
1. Log in to the management console.
2. In the upper left corner of the page, click and select the desired region andproject.
3. Hover on in the upper left corner to display Service List and chooseNetwork > Elastic Load Balancing.
4. On the Elastic Load Balancers tab page, locate the load balancer to whichyou want to bind a private IPv4 address and click More > Bind Private IPv4Address in the Operation column.
5. In the Bind Private IPv4 Address dialog box, select the subnet where the IPaddress resides and specify the IP address.– By default, the system automatically assigns an IP address. To manually
specify an IP address, deselect Automatically-assigned IP address andenter the IP address.
– Ensure that the entered IP address belongs to the selected subnet and isnot in use.
6. Click OK.
Unbinding an IPv4 EIP1. Log in to the management console.
2. In the upper left corner of the page, click and select the desired region andproject.
Elastic Load BalancingUser Guide 3 Load Balancer
2021-12-08 57

3. Hover on in the upper left corner to display Service List and chooseNetwork > Elastic Load Balancing.
4. On the Elastic Load Balancers tab page, locate the load balancer from whichyou want to unbind the IPv4 EIP and click More > Unbind IPv4 EIP in theOperation column.
5. In the Unbind IPv4 EIP dialog box, confirm the IPv4 EIP that you want tounbind and click Yes.
NO TE
After the IPv4 EIP is unbound, the load balancer cannot route requests over theInternet.
Unbinding a Private IPv4 Address
Only dedicated load balancers support this function.
1. Log in to the management console.
2. In the upper left corner of the page, click and select the desired region andproject.
3. Hover on in the upper left corner to display Service List and chooseNetwork > Elastic Load Balancing.
4. On the Elastic Load Balancers tab page, locate the load balancer from whichyou want to unbind the private IPv4 address and click More > Unbind PrivateIPv4 Address in the Operation column.
5. In the Unbind Private IPv4 Address dialog box, confirm the private IPv4 IPaddress that you want to unbind and click Yes.
NO TE
After the private IPv4 address is unbound, the load balancer cannot route requestsover the private IPv4 network.
3.7 Deleting a Load Balancer
Scenarios
You can delete a load balancer if you do not need it any longer.
CA UTION
A deleted load balancer cannot be recovered.
After a public network load balancer is deleted, its EIP will not be released andcan be used by other resources.
Elastic Load BalancingUser Guide 3 Load Balancer
2021-12-08 58

PrerequisitesYou have removed backend servers from the associated backend server groups,deleted the associated backend server groups, and deleted the listeners added tothe load balancer.
Deleting a Load Balancer1. Log in to the management console.
2. In the upper left corner of the page, click and select the desired region andproject.
3. Hover on in the upper left corner to display Service List and chooseNetwork > Elastic Load Balancing.
4. Locate the load balancer and click Delete in the Operation column.5. Click Yes.
3.8 Exporting the Load Balancer List
ScenariosYou can export the load balancer list for backup.
Procedure1. Log in to the management console.
2. In the upper left corner of the page, click and select the desired region andproject.
3. Hover on in the upper left corner to display Service List and chooseNetwork > Elastic Load Balancing.
4. In the upper right corner of the load balancer list, click .
Elastic Load BalancingUser Guide 3 Load Balancer
2021-12-08 59

4 Listener
4.1 OverviewYou need to add at least one listener after you have created a load balancer. Thislistener receives requests from clients and routes requests to backend servers usingthe protocol, port, and load balancing algorithm you select.
Supported ProtocolsELB provides load balancing at both Layer 4 and Layer 7.
Select TCP or UDP for load balancing at Layer 4 and HTTP or HTTPS at Layer 7.
Table 4-1 Protocols supported by ELB
Protocol Description Application Scenario
Layer4
TCP ● Source IP address-basedsticky sessions
● Fast data transfer
● Scenarios that require highreliability and dataaccuracy, such as filetransfer, email, and remotelogin
● Web applications thatreceive a large number ofconcurrent requests andrequire high performance
Layer4
UDP ● Low reliability● Fast data transfer
Scenarios that require quickresponse, such as video chat,gaming, and real-timefinancial quotations
Elastic Load BalancingUser Guide 4 Listener
2021-12-08 60

Protocol Description Application Scenario
Layer4
SSL ● TCP-based securityencryption
● High reliability● Supported by only classic
load balancers
Web applications that requireencrypted transmission
Layer7
HTTP ● Cookie-based stickysessions
● X-Forward-For requestheader
Web applications where datacontent needs to be identified,such as mobile games
Layer7
HTTPS ● An extension of HTTP forencrypted datatransmission to preventunauthorized access
● Encryption and decryptionperformed on loadbalancers
● Multiple versions ofencryption protocols andcipher suites
Web applications that requireencrypted transmission
4.2 Protocols and Ports
Frontend Protocols and Ports
Frontend protocols and ports are used by load balancers to receive requests fromclients. Load balancers use TCP, UDP, or SSL at Layer 4, and HTTP or HTTPS atLayer 7. Select a protocol and a port that best suit your requirements.
NO TE
The selected frontend protocols and entered ports cannot be changed. If you want tochange them, create another listener.
Table 4-2 Frontend protocols and ports
Protocol Port
TCP There are some restrictions when you select the protocolsand port numbers.● For each load balancer, UDP can use the same ports as
other protocols, but these other protocols must haveunique ports. For example, if you have a UDP listenerthat uses port 88, you can add a TCP, HTTP, or HTTPSlistener that also uses port 88. However, if you already
UDP
HTTP
HTTPS
Elastic Load BalancingUser Guide 4 Listener
2021-12-08 61

Protocol Port
SSL (only classicload balancers)
have an HTTP listener that uses port 443, you cannotadd an HTTPS or TCP listener that uses the same port.
● The port numbers of the same protocol must be unique.For example, if you have a TCP listener that uses port80, you cannot add another TCP listener that uses thesame port.
The port number ranges from 1 to 65535.The following are some commonly-used protocols and portnumbers:TCP/80HTTPS/443
Backend Protocols and PortsBackend protocols and ports are used by backend servers to receive requests fromload balancers. If Windows servers have Internet Information Services (IIS)installed, the default backend protocol and port are HTTP and 80.
Table 4-3 Backend protocols and ports
Protocol Port
TCP Backend servers can use the same ports. The portnumber ranges from 1 to 65535.The following are some commonly-used protocolsand port numbers:TCP/80HTTP/443
UDP
HTTP
HTTPS
4.3 Adding a Listener
ScenariosAfter you create a load balancer, add at least one listener to the load balancer.This listener is a process that checks for requests using the protocol and port youconfigure for connections from clients to the load balancer, and the protocol andport from the load balancer to backend servers.
The listener also defines the health check configuration, based on which the loadbalancer continually checks the running statuses of backend servers. If a backendserver is detected unhealthy, the load balancer routes traffic to these healthy ones.Traffic forwarding to this server resumes once it recovers.
When you add an HTTP listener, ensure that the subnet of the load balancer hassufficient IP addresses. If the IP addresses are insufficient, add multiple subnets onthe Basic Information page of the load balancer. After you select a subnet, ensure
Elastic Load BalancingUser Guide 4 Listener
2021-12-08 62
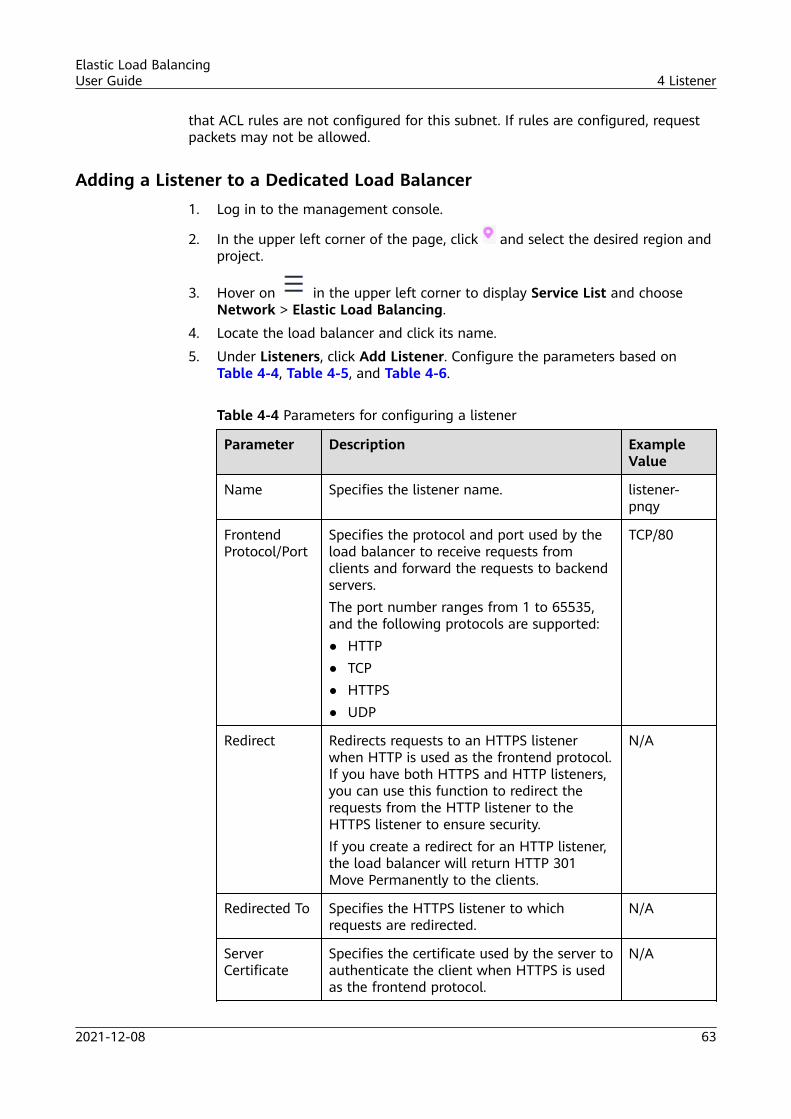
that ACL rules are not configured for this subnet. If rules are configured, requestpackets may not be allowed.
Adding a Listener to a Dedicated Load Balancer1. Log in to the management console.
2. In the upper left corner of the page, click and select the desired region andproject.
3. Hover on in the upper left corner to display Service List and chooseNetwork > Elastic Load Balancing.
4. Locate the load balancer and click its name.
5. Under Listeners, click Add Listener. Configure the parameters based onTable 4-4, Table 4-5, and Table 4-6.
Table 4-4 Parameters for configuring a listener
Parameter Description ExampleValue
Name Specifies the listener name. listener-pnqy
FrontendProtocol/Port
Specifies the protocol and port used by theload balancer to receive requests fromclients and forward the requests to backendservers.The port number ranges from 1 to 65535,and the following protocols are supported:● HTTP● TCP● HTTPS● UDP
TCP/80
Redirect Redirects requests to an HTTPS listenerwhen HTTP is used as the frontend protocol.If you have both HTTPS and HTTP listeners,you can use this function to redirect therequests from the HTTP listener to theHTTPS listener to ensure security.If you create a redirect for an HTTP listener,the load balancer will return HTTP 301Move Permanently to the clients.
N/A
Redirected To Specifies the HTTPS listener to whichrequests are redirected.
N/A
ServerCertificate
Specifies the certificate used by the server toauthenticate the client when HTTPS is usedas the frontend protocol.
N/A
Elastic Load BalancingUser Guide 4 Listener
2021-12-08 63

Parameter Description ExampleValue
Enable SNI Specifies whether to enable SNI whenHTTPS is used as the frontend protocol.SNI is an extension to TLS and is used whena server uses multiple domain names andcertificates. This allows the client to submitthe domain name information while sendingan SSL handshake request. After the loadbalancer receives the request, the loadbalancer queries the correspondingcertificate based on the domain name andreturns it to the client. If no certificate isfound, the load balancer will return thedefault certificate.
N/A
SNICertificate
Specifies the certificate associated with thedomain name when the frontend protocol isHTTPS and SNI is enabled.
N/A
Advanced Settings
SecurityPolicy
Specifies the security policy you can use ifyou select HTTPS as the frontend protocol.The following options are available (fordetails, see Security Policy):● TLS-1-0● TLS-1-1● TLS-1-2● TLS-1-2-Strict
TLS-1-0
MutualAuthentication
Specifies whether to enable mutualauthentication between the server andclient. Both a server certificate and CAcertificate are required for mutualauthentication. You can enable this option ifyou have set Frontend Protocol to HTTPS.
N/A
CA Certificate Specifies the certificate used by the server toauthenticate the client when HTTPS is usedas the frontend protocol. This parameter ismandatory if you have set FrontendProtocol to HTTPS and enabled mutualauthentication.
N/A
Obtain LoadBalancer EIP
Specifies whether to pass the load balancerEIP to backend servers if you select HTTPSor HTTP for Frontend Protocol.
N/A
Description Provides supplementary information aboutthe listener.
N/A
Elastic Load BalancingUser Guide 4 Listener
2021-12-08 64

Parameter Description ExampleValue
Tag Adds tags to the listener. Each tag is a key-value pair, and the tag key is unique.
11/11
Table 4-5 Parameters for adding a backend server group
Parameter Description ExampleValue
BackendServer Group
Specifies a group of servers with the samefeatures to receive requests from the loadbalancer. Two options are available:● Create new● Use existing
NOTETo associate an existing backend server group,ensure that it is not in use. Select the backendserver group with the correct protocol. Forexample, if the frontend protocol is TCP, thebackend protocol can only be TCP.
Create new
Name Specifies the name of the backend servergroup.
server_group-sq4v
BackendProtocol
Specifies the protocol used by backendservers to receive requests.
HTTP
Elastic Load BalancingUser Guide 4 Listener
2021-12-08 65

Parameter Description ExampleValue
LoadBalancingAlgorithm
Specifies the algorithm used by the loadbalancer to distribute traffic. The followingoptions are available:● Weighted round robin: Requests are
routed to different servers based on theirweights, which indicate server processingperformance. Backend servers withhigher weights receive proportionatelymore requests, whereas equal-weightedservers receive the same number ofrequests.
● Weighted least connections: In additionto the weight assigned to each server, thenumber of connections processed by eachbackend server is also considered.Requests are routed to the server withthe lowest connections-to-weight ratio.
● Source IP hash: The source IP address ofthe request is input into a hashalgorithm, and the resulting hash is usedto identify a server in the static fragmenttable.
NOTEChoose an appropriate algorithm based on yourrequirements for better traffic distribution.
Weightedround robin
Sticky Session Specifies whether to enable sticky sessions.If you enable sticky sessions, all requestsfrom a client during one session are sent tothe same backend server.NOTE
For HTTP and HTTPS listeners, enabling ordisabling sticky sessions may cause few secondsof service interruption.
N/A
Elastic Load BalancingUser Guide 4 Listener
2021-12-08 66
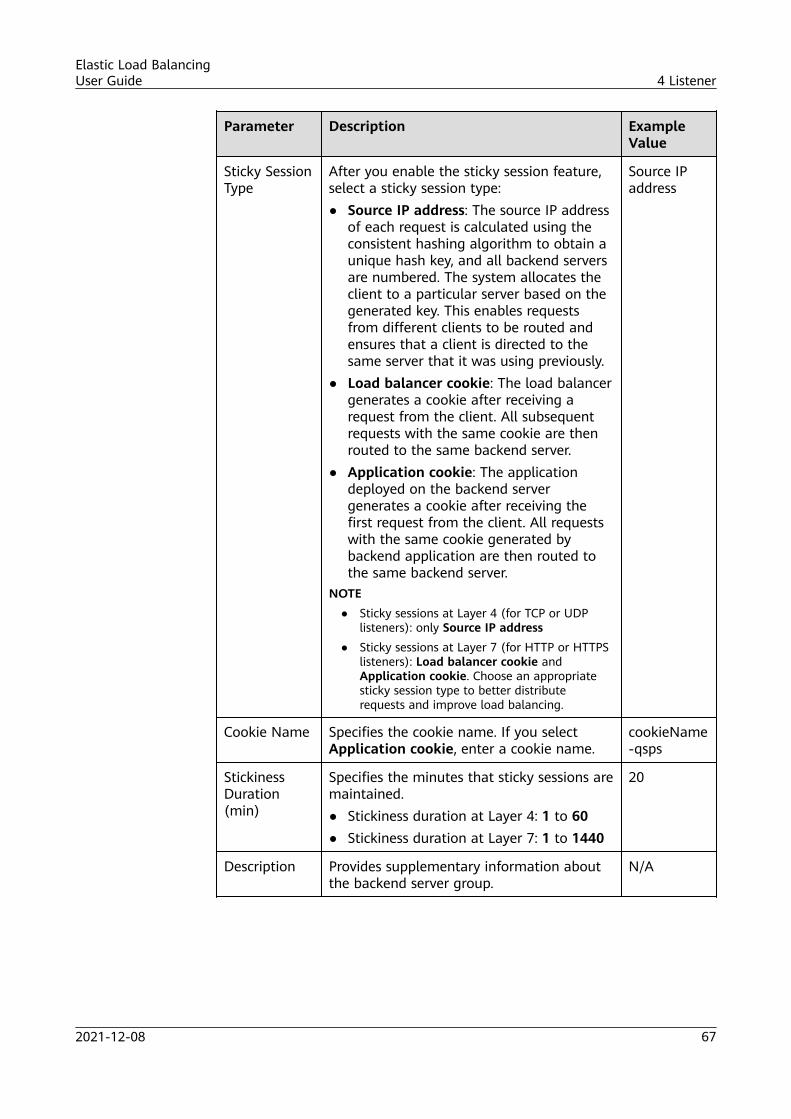
Parameter Description ExampleValue
Sticky SessionType
After you enable the sticky session feature,select a sticky session type:● Source IP address: The source IP address
of each request is calculated using theconsistent hashing algorithm to obtain aunique hash key, and all backend serversare numbered. The system allocates theclient to a particular server based on thegenerated key. This enables requestsfrom different clients to be routed andensures that a client is directed to thesame server that it was using previously.
● Load balancer cookie: The load balancergenerates a cookie after receiving arequest from the client. All subsequentrequests with the same cookie are thenrouted to the same backend server.
● Application cookie: The applicationdeployed on the backend servergenerates a cookie after receiving thefirst request from the client. All requestswith the same cookie generated bybackend application are then routed tothe same backend server.
NOTE● Sticky sessions at Layer 4 (for TCP or UDP
listeners): only Source IP address● Sticky sessions at Layer 7 (for HTTP or HTTPS
listeners): Load balancer cookie andApplication cookie. Choose an appropriatesticky session type to better distributerequests and improve load balancing.
Source IPaddress
Cookie Name Specifies the cookie name. If you selectApplication cookie, enter a cookie name.
cookieName-qsps
StickinessDuration(min)
Specifies the minutes that sticky sessions aremaintained.● Stickiness duration at Layer 4: 1 to 60● Stickiness duration at Layer 7: 1 to 1440
20
Description Provides supplementary information aboutthe backend server group.
N/A
Elastic Load BalancingUser Guide 4 Listener
2021-12-08 67

Table 4-6 Parameters for configuring a health check
Parameter Description ExampleValue
EnableHealth Check
Specifies whether to enable health checks. N/A
Protocol ● Specifies the protocol used by the loadbalancer to perform health checks onbackend servers. You can select either TCPor HTTP. A selected protocol cannot bechanged.
● If the frontend protocol is UDP, the healthcheck protocol is UDP by default.
HTTP
DomainName
Specifies the domain name that will be usedfor health checks. The domain name cancontain digits, letters, hyphens (-), andperiods (.), and must start with a digit orletter. This field is left blank by default andneeds to be configured only if you use HTTPas the health check protocol.
www.elb.com
Port Specifies the port used by the load balancerto perform health checks on backendservers. The port number ranges from 1 to65535.NOTE
This parameter is optional. If you do not specify ahealth check port, a port of the backend serverwill be used for health checks by default. If youspecify a port, it will be used for health checks.
80
AdvancedSettings
Provides some advanced features. N/A
Interval (s) Specifies the maximum time between healthchecks, in seconds.The interval ranges from 1 to 50.
5
Timeout (s) Specifies the maximum time required forwaiting for a response from the healthcheck, in seconds. The timeout ranges from1 to 50.
3
Check Path Specifies the destination path for healthchecks. Configure this parameter only if youhave set Protocol to HTTP. The path cancontain 1 to 80 characters and must startwith a slash (/).
/index.html
MaximumRetries
Specifies the maximum number of healthcheck retries. The value ranges from 1 to 10.
3
Elastic Load BalancingUser Guide 4 Listener
2021-12-08 68

6. Click Finish.
7. Click OK.
Adding a Listener to a Shared Load Balancer1. Log in to the management console.
2. In the upper left corner of the page, click and select the desired region andproject.
3. Hover on in the upper left corner to display Service List and chooseNetwork > Elastic Load Balancing.
4. Locate the load balancer and click its name.
5. Under Listeners, click Add Listener. Configure the parameters based onTable 4-7, Table 4-8, and Table 4-9.
Table 4-7 Parameters for configuring a listener
Parameter Description ExampleValue
Name Specifies the listener name. listener-pnqy
FrontendProtocol/Port
Specifies the protocol and port used by theload balancer to receive requests fromclients and forward the requests to backendservers.The port number ranges from 1 to 65535,and the following protocols are supported:● HTTP● TCP● HTTPS● UDP
TCP/80
Redirect Redirects requests to an HTTPS listenerwhen HTTP is used as the frontendprotocol. If you have both HTTPS and HTTPlisteners, you can use this function toredirect the requests from the HTTP listenerto the HTTPS listener to ensure security.If you create a redirect for an HTTP listener,the load balancer will return HTTP 301Move Permanently to the clients.
N/A
Redirected To Specifies the HTTPS listener to whichrequests are redirected.
N/A
ServerCertificate
Specifies the certificate used by the serverto authenticate the client when HTTPS isused as the frontend protocol.
N/A
Elastic Load BalancingUser Guide 4 Listener
2021-12-08 69

Parameter Description ExampleValue
Enable SNI Specifies whether to enable SNI whenHTTPS is used as the frontend protocol.SNI is an extension to TLS and is used whena server uses multiple domain names andcertificates. This allows the client to submitthe domain name information whilesending an SSL handshake request. Afterthe load balancer receives the request, theload balancer queries the correspondingcertificate based on the domain name andreturns it to the client. If no certificate isfound, the load balancer will return thedefault certificate.
N/A
SNICertificate
Specifies the certificate associated with thedomain name when the frontend protocolis HTTPS and SNI is enabled.Select an existing certificate or create one.
N/A
Advanced Settings
SecurityPolicy
Specifies the security policy you can use ifyou select HTTPS as the frontend protocol.The following options are available (fordetails, see Security Policy):● TLS-1-0● TLS-1-1● TLS-1-2● TLS-1-2-Strict
TLS-1-0
Idle Timeout Specifies the length of time for aconnection to keep alive, in seconds. If norequest is received within this period, theload balancer closes the connection andestablishes a new one with the client whenthe next request arrives. This parameter ismandatory when you have set FrontendProtocol to TCP, HTTP or HTTPS.The idle timeout duration varies dependingon the protocol:● TCP: 10 to 4000● HTTP or HTTPS: 0 to 4000NOTE
This option is unavailable in the eu-nl region.
● TCP: Thedefaultvalue is300.
● HTTP orHTTPS:Thedefaultvalue is60.
Elastic Load BalancingUser Guide 4 Listener
2021-12-08 70
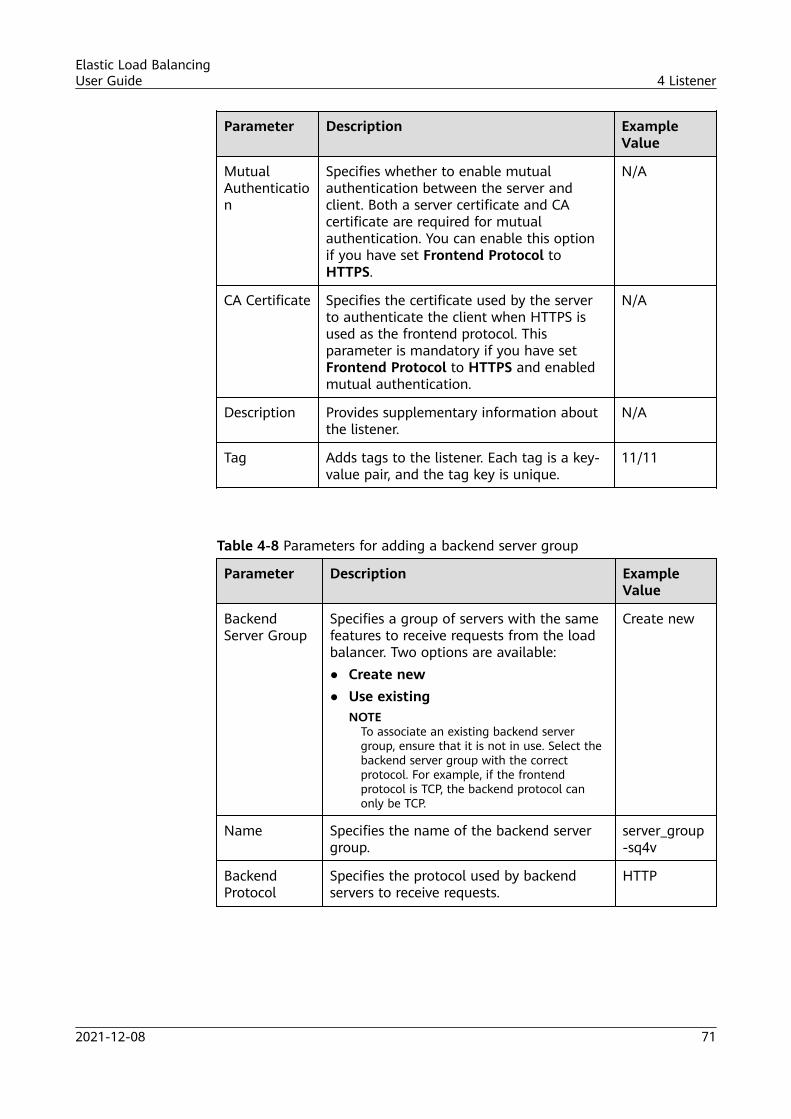
Parameter Description ExampleValue
MutualAuthentication
Specifies whether to enable mutualauthentication between the server andclient. Both a server certificate and CAcertificate are required for mutualauthentication. You can enable this optionif you have set Frontend Protocol toHTTPS.
N/A
CA Certificate Specifies the certificate used by the serverto authenticate the client when HTTPS isused as the frontend protocol. Thisparameter is mandatory if you have setFrontend Protocol to HTTPS and enabledmutual authentication.
N/A
Description Provides supplementary information aboutthe listener.
N/A
Tag Adds tags to the listener. Each tag is a key-value pair, and the tag key is unique.
11/11
Table 4-8 Parameters for adding a backend server group
Parameter Description ExampleValue
BackendServer Group
Specifies a group of servers with the samefeatures to receive requests from the loadbalancer. Two options are available:● Create new● Use existing
NOTETo associate an existing backend servergroup, ensure that it is not in use. Select thebackend server group with the correctprotocol. For example, if the frontendprotocol is TCP, the backend protocol canonly be TCP.
Create new
Name Specifies the name of the backend servergroup.
server_group-sq4v
BackendProtocol
Specifies the protocol used by backendservers to receive requests.
HTTP
Elastic Load BalancingUser Guide 4 Listener
2021-12-08 71

Parameter Description ExampleValue
LoadBalancingAlgorithm
Specifies the algorithm used by the loadbalancer to distribute traffic. The followingoptions are available:● Weighted round robin: Requests are
routed to different servers based ontheir weights, which indicate serverprocessing performance. Backendservers with higher weights receiveproportionately more requests, whereasequal-weighted servers receive the samenumber of requests.
● Weighted least connections: Inaddition to the weight assigned to eachserver, the number of connectionsprocessed by each backend server is alsoconsidered. Requests are routed to theserver with the lowest connections-to-weight ratio.
● Source IP hash: The source IP addressof the request is input into a hashalgorithm, and the resulting hash isused to identify a server in the staticfragment table.
NOTEChoose an appropriate algorithm based on yourrequirements for better traffic distribution.
Weightedround robin
Sticky Session Specifies whether to enable sticky sessions.If you enable sticky sessions, all requestsfrom a client during one session are sent tothe same backend server.NOTE
For HTTP and HTTPS listeners, enabling ordisabling sticky sessions may cause few secondsof service interruption.
N/A
Elastic Load BalancingUser Guide 4 Listener
2021-12-08 72

Parameter Description ExampleValue
Sticky SessionType
After you enable the sticky session feature,select a sticky session type:● Source IP address: The source IP
address of each request is calculatedusing the consistent hashing algorithmto obtain a unique hash key, and allbackend servers are numbered. Thesystem allocates the client to aparticular server based on the generatedkey. This enables requests from differentclients to be routed and ensures that aclient is directed to the same server thatit was using previously.
● Load balancer cookie: The loadbalancer generates a cookie afterreceiving a request from the client. Allsubsequent requests with the samecookie are then routed to the samebackend server.
● Application cookie: The applicationdeployed on the backend servergenerates a cookie after receiving thefirst request from the client. All requestswith the same cookie generated bybackend application are then routed tothe same backend server.
NOTEChoose an appropriate sticky session type tobetter distribute requests and improve loadbalancing.● Sticky sessions at Layer 4 (for TCP or UDP
listeners): only Source IP address● Sticky sessions at Layer 7 (for HTTP or
HTTPS listeners): Load balancer cookie andApplication cookie
Source IPaddress
Cookie Name Specifies the cookie name. If you selectApplication cookie, enter a cookie name.
cookieName-qsps
StickinessDuration(min)
Specifies the minutes that sticky sessionsare maintained.● Stickiness duration at Layer 4: 1 to 60● Stickiness duration at Layer 7: 1 to 1440
20
Description Provides supplementary information aboutthe backend server group.
N/A
Elastic Load BalancingUser Guide 4 Listener
2021-12-08 73

Table 4-9 Parameters for configuring a health check
Parameter Description ExampleValue
Enable HealthCheck
Specifies whether to enable health checks. N/A
Protocol ● Specifies the protocol used by the loadbalancer to perform health checks onbackend servers. You can select eitherTCP or HTTP. A selected protocol cannotbe changed.
● If the frontend protocol is UDP, thehealth check protocol is UDP by default.
HTTP
DomainName
Specifies the domain name that will beused for health checks. The domain namecan contain digits, letters, hyphens (-), andperiods (.), and must start with a digit orletter. This field is left blank by default andneeds to be configured only if you useHTTP as the health check protocol.
www.elb.com
Port Specifies the port used by the loadbalancer to perform health checks onbackend servers. The port number rangesfrom 1 to 65535.NOTE
This parameter is optional. If you do not specifya health check port, a port of the backendserver will be used for health checks by default.
80
AdvancedSettings
Provides some advanced features. N/A
Interval (s) Specifies the maximum time betweenhealth checks, in seconds.The interval ranges from 1 to 50.
5
Timeout (s) Specifies the maximum time required forwaiting for a response from the healthcheck, in seconds. The timeout durationranges from 1 to 50.
10
Check Path Specifies the destination path for healthchecks. Configure this parameter only ifyou have set Protocol to HTTP. The pathcan contain 1 to 80 characters and muststart with a slash (/).
/index.html
MaximumRetries
Specifies the maximum number of healthcheck retries. The value ranges from 1 to10.
3
Elastic Load BalancingUser Guide 4 Listener
2021-12-08 74

6. Click Finish.7. Click OK.
4.4 Load Balancing AlgorithmsLoad balancers receive requests from clients and forward them to backend serversin one or more AZs. Each load balancer has at least a listener and a backendserver. The load balancing algorithm you select when you add the listenerdetermines how requests are distributed.
Load Balancing AlgorithmsBoth dedicated and shared load balancers support weighted round robin, weightedleast connections, and source IP hash.
● Weighted round robin: Requests are routed to backend servers using theround robin algorithm. Backend servers with higher weights receiveproportionately more requests, whereas equal-weighted servers receive thesame number of requests. This algorithm is often used for short connections,such as HTTP connections.The following figure shows an example of how requests are distributed usingthe weighted round robin algorithm. Two backend servers are in the same AZand have the same weight, and each server receives the same proportion ofrequests.
Elastic Load BalancingUser Guide 4 Listener
2021-12-08 75

Figure 4-1 Traffic distribution using the weighted round robin algorithm
● Weighted least connections: In addition to the weight assigned to each server,the number of connections processed by each backend server is alsoconsidered. Requests are routed to the server with the lowest connections-to-weight ratio. In addition to the number of connections, each server is assigneda weight based on its capacity. Requests are routed to the server with thelowest connections-to-weight ratio. This algorithm is often used for persistentconnections, such as connections to a database.The following figure shows an example of how requests are distributed usingthe weighted least connections algorithm. Two backend servers are in thesame AZ and have the same weight, 100 connections have been establishedwith backend server 01, and 50 connections have been connected withbackend server 02. New requests are preferentially routed to backend server02.
Elastic Load BalancingUser Guide 4 Listener
2021-12-08 76

Figure 4-2 Traffic distribution using the weighted least connections algorithm
● Source IP hash: The source IP address of each request is calculated using theconsistent hashing algorithm to obtain a unique hashing key, and all backendservers are numbered. The generated key is used to allocate the client to aparticular server. This allows requests from different clients to be routedbased on source IP addresses and ensures that a client is directed to the sameserver that it was using previously. This algorithm works well for TCPconnections of load balancers that do not use cookies.The following figure shows an example of how requests are distributed usingthe source IP hash algorithm. Two backend servers are in the same AZ andhave the same weight. If backend server 01 has processed a request from IPaddress A, the load balancer will route new requests from IP address A tobackend server 01.
Elastic Load BalancingUser Guide 4 Listener
2021-12-08 77
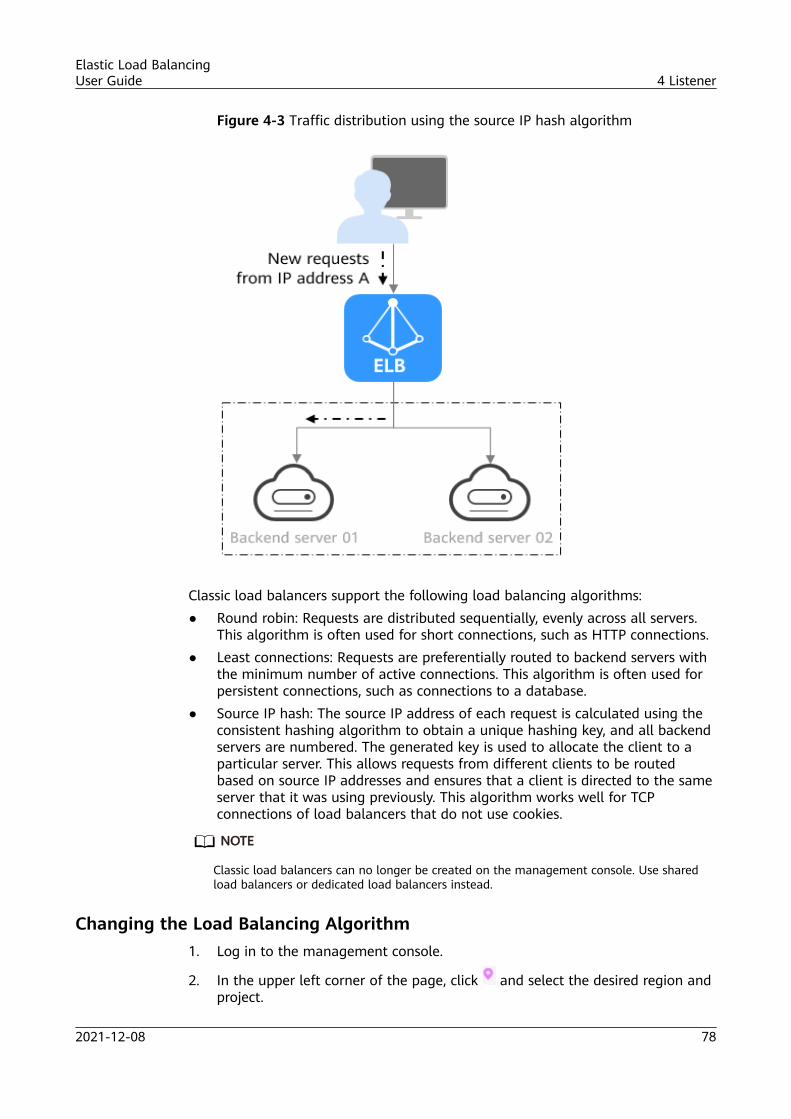
Figure 4-3 Traffic distribution using the source IP hash algorithm
Classic load balancers support the following load balancing algorithms:● Round robin: Requests are distributed sequentially, evenly across all servers.
This algorithm is often used for short connections, such as HTTP connections.● Least connections: Requests are preferentially routed to backend servers with
the minimum number of active connections. This algorithm is often used forpersistent connections, such as connections to a database.
● Source IP hash: The source IP address of each request is calculated using theconsistent hashing algorithm to obtain a unique hashing key, and all backendservers are numbered. The generated key is used to allocate the client to aparticular server. This allows requests from different clients to be routedbased on source IP addresses and ensures that a client is directed to the sameserver that it was using previously. This algorithm works well for TCPconnections of load balancers that do not use cookies.
NO TE
Classic load balancers can no longer be created on the management console. Use sharedload balancers or dedicated load balancers instead.
Changing the Load Balancing Algorithm1. Log in to the management console.
2. In the upper left corner of the page, click and select the desired region andproject.
Elastic Load BalancingUser Guide 4 Listener
2021-12-08 78
3. Hover on in the upper left corner to display Service List and chooseNetwork > Elastic Load Balancing.
4. Locate the load balancer and click its name.
5. Click Backend Server Groups and click on the right of the backendserver group name.
6. Select a load balancing algorithm.
NO TE
The modification will take effect immediately. The load balancer will establish newconnections with the clients, and request routing over established connections will notbe affected.
7. Click OK.
4.5 Sticky SessionSticky sessions ensure that requests from a client always get routed to the samebackend server before a session elapses.
Here is an example that describes what sticky sessions. Assume that you havelogged in to a server. After a while, you send another request. If sticky sessions arenot enabled, the request may be routed to another server, and you will be askedto log in again. If sticky sessions are enabled, all your requests are processed bythe same server, and you do not need to repeatedly log in.
Sticky sessions at Layer 4 are different from those at Layer 7.
PrerequisitesYou have selected Weighted round robin for Load Balancing Algorithm.
Constraints and LimitationsIf you use Direct Connect, VPN, or Cloud Connect connect to access ELB, you mustselect Source IP hash as the load balancing algorithm and disable sticky sessionsfor ELB.
Elastic Load BalancingUser Guide 4 Listener
2021-12-08 79
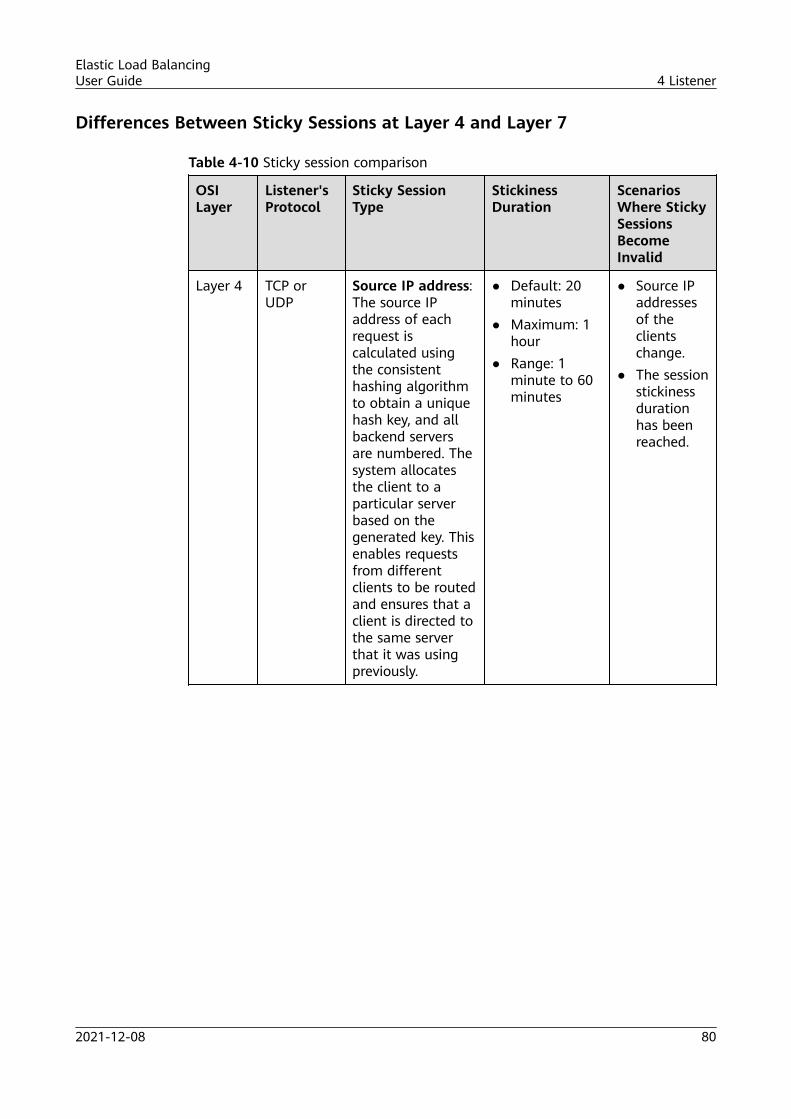
Differences Between Sticky Sessions at Layer 4 and Layer 7
Table 4-10 Sticky session comparison
OSILayer
Listener'sProtocol
Sticky SessionType
StickinessDuration
ScenariosWhere StickySessionsBecomeInvalid
Layer 4 TCP orUDP
Source IP address:The source IPaddress of eachrequest iscalculated usingthe consistenthashing algorithmto obtain a uniquehash key, and allbackend serversare numbered. Thesystem allocatesthe client to aparticular serverbased on thegenerated key. Thisenables requestsfrom differentclients to be routedand ensures that aclient is directed tothe same serverthat it was usingpreviously.
● Default: 20minutes
● Maximum: 1hour
● Range: 1minute to 60minutes
● Source IPaddressesof theclientschange.
● The sessionstickinessdurationhas beenreached.
Elastic Load BalancingUser Guide 4 Listener
2021-12-08 80

OSILayer
Listener'sProtocol
Sticky SessionType
StickinessDuration
ScenariosWhere StickySessionsBecomeInvalid
Layer 7 HTTP orHTTPS
● Load balancercookie: The loadbalancergenerates acookie afterreceiving arequest fromthe client. Allsubsequentrequests withthe same cookieare then routedto the samebackend server.
● Applicationcookie: Theapplicationdeployed on thebackend servergenerates acookie afterreceiving thefirst requestfrom the client.All requests withthe same cookiegenerated bybackendapplication arethen routed tothe samebackend server.
● Default: 20minutes
● Maximum: 24hours
● Range: 1minute to1,440 minutes
● If requestssent by theclients donot containa cookie,stickysessionswill nottake effect.
● The sessionstickinessdurationhas beenreached.
Dedicated load balancers support two types of sticky sessions: Source IP addressand Load balancer cookie
Shared load balancers support three types of sticky session, including Source IPaddress, Load balancer cookie, and Application cookie.
Classic load balancers support Source IP address.
NO TE
Classic load balancers can no longer be created on the management console. Use sharedload balancers or dedicated load balancers instead.
Elastic Load BalancingUser Guide 4 Listener
2021-12-08 81

Enabling Sticky Sessions1. Log in to the management console.
2. In the upper left corner of the page, click and select the desired region andproject.
3. Hover on in the upper left corner to display Service List and chooseNetwork > Elastic Load Balancing.
4. Locate the load balancer and click its name.5. For a shared load balancer and a dedicated load balancer, click Backend
Server Groups, locate the backend server group, and click on the right ofits name.For a classic load balancer, click Listeners, locate the listener, and clickModify in the Operation column.
6. Enable Sticky Session, select the sticky session type, and set the sessionstickiness duration.
7. Click OK.
NO TE
You can also configure sticky sessions when adding a listener or creating a backend servergroup.
4.6 Access ControlAccess control allows you to whitelist certain IP addresses to allow them to accessa listener.
NO TICE
● You can add whitelists only to listeners of shared load balancers. Addingwhitelists may interrupt services. Once a whitelist is added, only IP addresses inthe whitelist can access the listener.
● If access control is enabled but no whitelist is added, the listener cannot beaccessed.
● Whitelists do not conflict with inbound security group rules. Whitelists controlaccess to listeners based on IP addresses or CIDR blocks, whereas inboundsecurity group rules control access to backend servers based on the protocol,ports, and IP addresses.
Adding a Whitelist1. Log in to the management console.
2. In the upper left corner of the page, click and select the desired region andproject.
3. Hover on in the upper left corner to display Service List and chooseNetwork > Elastic Load Balancing.
Elastic Load BalancingUser Guide 4 Listener
2021-12-08 82
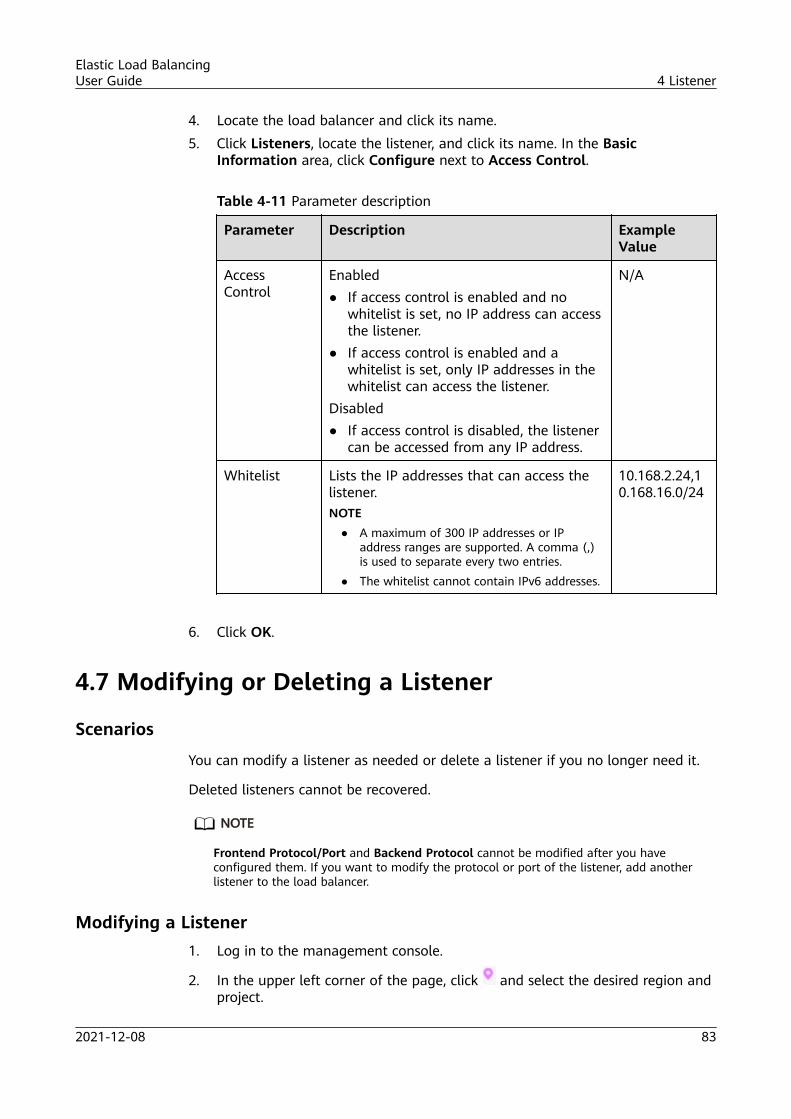
4. Locate the load balancer and click its name.5. Click Listeners, locate the listener, and click its name. In the Basic
Information area, click Configure next to Access Control.
Table 4-11 Parameter description
Parameter Description ExampleValue
AccessControl
Enabled● If access control is enabled and no
whitelist is set, no IP address can accessthe listener.
● If access control is enabled and awhitelist is set, only IP addresses in thewhitelist can access the listener.
Disabled● If access control is disabled, the listener
can be accessed from any IP address.
N/A
Whitelist Lists the IP addresses that can access thelistener.NOTE
● A maximum of 300 IP addresses or IPaddress ranges are supported. A comma (,)is used to separate every two entries.
● The whitelist cannot contain IPv6 addresses.
10.168.2.24,10.168.16.0/24
6. Click OK.
4.7 Modifying or Deleting a Listener
Scenarios
You can modify a listener as needed or delete a listener if you no longer need it.
Deleted listeners cannot be recovered.
NO TE
Frontend Protocol/Port and Backend Protocol cannot be modified after you haveconfigured them. If you want to modify the protocol or port of the listener, add anotherlistener to the load balancer.
Modifying a Listener1. Log in to the management console.
2. In the upper left corner of the page, click and select the desired region andproject.
Elastic Load BalancingUser Guide 4 Listener
2021-12-08 83

3. Hover on in the upper left corner to display Service List and chooseNetwork > Elastic Load Balancing.
4. Locate the load balancer and click its name.5. Click Listeners.
Shared load balancers: Locate the target listener and click on the right ofits name. In the Modify Listener dialog box, modify the parameters asneeded.
6. Click OK.
Deleting a Listener1. Log in to the management console.
2. In the upper left corner of the page, click and select the desired region andproject.
3. Hover on in the upper left corner to display Service List and chooseNetwork > Elastic Load Balancing.
4. Locate the load balancer and click its name.
NO TE
● If the listener has backend servers associated, disassociate the backend serversbefore deleting the listener.
● If HTTP requests are redirected to an HTTPS listener, delete the redirect beforedeleting the HTTPS listener.
● If the listener has a forwarding policy, delete the forwarding policy before deletingthe listener.
● After a listener is deleted, the associated backend server group is also deleted.
5. Click Listeners.
– For a shared load balancer listener, locate the listener and click onthe right of its name. In the Modify Listener dialog box, modify theparameters as needed.
– For a classic load balancer listener, locate the listener and click Delete inthe Operation column.
6. Click Yes.
Elastic Load BalancingUser Guide 4 Listener
2021-12-08 84

5 Advanced Features of HTTP/HTTPSListeners
5.1 Forwarding Policy
Scenarios
You can add forwarding policies to HTTP or HTTPS listeners to forward requests todifferent backend server groups based on domain names or URLs.
This is suited for applications that are deployed on multiple backend servers andprovide multiple types of services such as videos, images, audios, and texts.
A forwarding policy consists of a forwarding rule and an action.
● There are two types of forwarding rules: domain name and URL.● The only supported action is to forward requests to another backend server
group.
Constraints and Limitations● Forwarding policies can be added only to HTTP and HTTPS listeners.● When you add a forwarding policy, note the following:
– Each URL path must exist on the backend server. If they do no exist, thebackend server will return 404 when accessed.
– A URL path cannot be configured for two forwarding policies.– In the regular expression match, the characters are matched sequentially,
and matching ends when any rule is successfully matched. Matching rulescannot overlap with each other.
● After you add a forwarding policy, the load balancer forwards requests basedon the specified domain name or URL:– If the domain name or URL in a request matches that specified in the
forwarding policy, the request is forwarded to the backend server groupyou select when you add the forwarding policy.
Elastic Load BalancingUser Guide 5 Advanced Features of HTTP/HTTPS Listeners
2021-12-08 85

– If the domain name or URL in a request does not match that specified inthe forwarding policy, the request is forwarded to the default backendserver group of the listener.
CA UTION
If you add a forwarding policy that is the same as an existing one, there will be aconflict. Even if you delete the existing forwarding policy, the newly-addedforwarding policy is still in the Faulty state. Delete the forwarding policy and adda different one.
Adding a Forwarding Policy1. Log in to the management console.
2. In the upper left corner of the page, click and select the desired region andproject.
3. Hover on in the upper left corner to display Service List and chooseNetwork > Elastic Load Balancing.
4. Locate the load balancer and click its name.5. Click Listeners, locate the listener, and click its name.6. Click Add on the right of Forwarding Policies.7. In the Add Forwarding Policy dialog box, configure the parameters based on
Table 5-1.8. Click OK.
Alternatively, locate the load balancer in the load balancer list and click thename of the listener in the Listener column. In the Listeners area, click Addon the right of Forwarding Policies and then add a forwarding policy.
Table 5-1 Forwarding policy parameters
Item Parameter Description ExampleValue
ConfigureForwarding Policy
Name Specifies the forwarding policy name. forwarding_policy-q582
DomainName
Specifies the domain name used forforwarding requests. The domainname in the request must exactlymatch that in the forwarding policy.You need to specify either a domainname or URL.
www.test.com
Elastic Load BalancingUser Guide 5 Advanced Features of HTTP/HTTPS Listeners
2021-12-08 86

Item Parameter Description ExampleValue
URLMatchingRule
● Exact matchThe request URL is identical to thepreset URL.
● Prefix matchThe requested URL starts with thespecified URL string.
● Regular expression matchThe requested URL matches thespecified URL string based on theregular expression.NOTE
● Exact match has the highestpriority, followed by Prefix match.Regular expression match hasthe lowest priority.
● If you use prefix match, thelongest string is chosen. Forexample, if there are two presetURLs /elb and /elbvip and theaccessed URL is /elbvipplus, /elbvip is preferentially matched.
Exactmatch
URL Specifies the URL used forforwarding requests.
/login.php
Description Provides supplementary informationabout the forwarding policy.
N/A
AddBackendServerGroup
BackendServer Group
Specifies whether you want a newbackend server group or an existingbackend server group.If you select Create new, configurethe parameters based on Table 6-3and Table 6-4.If you select Use existing, select anexisting backend server group.NOTE
The backend protocol can only be HTTP.
Create new
URL Matching ExampleThe following table lists how a URL is matched, and Figure 5-1 shows how arequest is forwarded to a backend server group.
Elastic Load BalancingUser Guide 5 Advanced Features of HTTP/HTTPS Listeners
2021-12-08 87

Table 5-2 URL matching
URLMatchingRule
URL URL in the Forwarding Policy
- - /elb/index.html
/elb /elb[^\s]* /index.html
Exact match /elb/index.html
√ - - -
Prefix match √ √ - -
Regularexpressionmatch
√ - √ -
Figure 5-1 Request forwarding
In this figure, the system first searches for an exact match of the requested URL (/elb_gls/glossary.html). If there is no exact match, the system searches for a prefixmatch. If a match is found, the request is forwarded to backend server group 2even if a regular expression match is also found, because the prefix match has ahigher priority.
Modifying a Forwarding Policy1. Log in to the management console.
2. In the upper left corner of the page, click and select the desired region andproject.
3. Hover on in the upper left corner to display Service List and chooseNetwork > Elastic Load Balancing.
4. Locate the load balancer and click its name.
5. Click Listeners, locate the listener, and click its name.
Elastic Load BalancingUser Guide 5 Advanced Features of HTTP/HTTPS Listeners
2021-12-08 88

6. Click Forwarding Policies.
7. Locate the forwarding policy and click on the right of its name.8. In the Modify Forwarding Policy dialog box, modify the parameters and click
OK.
Deleting a Forwarding Policy1. Log in to the management console.
2. In the upper left corner of the page, click and select the desired region andproject.
3. Hover on in the upper left corner to display Service List and chooseNetwork > Elastic Load Balancing.
4. Locate the load balancer and click its name.5. Click Listeners, locate the listener, and click its name.6. Click Forwarding Policies.
7. Locate the forwarding policy and click on the right of its name.8. Click Yes.
5.2 Mutual Authentication
ScenariosIn common HTTPS service scenarios, only the server certificate is required forauthentication. For some mission-critical services, such as financial transactions,you need to deploy both the server certificate and the client certificate for mutualauthentication.
This section uses self-signed certificates as an example to describe how toconfigure mutual authentication. Self-signed certificates do not provide all thesecurity properties provided by certificates signed by a CA. It is recommended thatyou purchase certificates from other CAs.
Creating a CA Certificate Using OpenSSL1. Log in to a Linux server with OpenSSL installed.2. Create the server directory and switch to the directory:
mkdir cacd ca
3. Create the certificate configuration file ca_cert.conf. The file content is asfollows:[ req ]distinguished_name = req_distinguished_nameprompt = no [ req_distinguished_name ] O = ELB
4. Create the CA certificate private key ca.key.
Elastic Load BalancingUser Guide 5 Advanced Features of HTTP/HTTPS Listeners
2021-12-08 89

openssl genrsa -out ca.key 2048
Figure 5-2 Private key of the CA certificate
5. Create the certificate signing request (CSR) file ca.csr for the CA certificate.openssl req -out ca.csr -key ca.key -new -config ./ca_cert.conf
6. Create the self-signed CA certificate ca.crt.openssl x509 -req -in ca.csr -out ca.crt -sha1 -days 5000 -signkey ca.key
Figure 5-3 Creating a self-signed CA certificate
Issuing a Server Certificate Using the CA CertificateThe server certificate can be a CA signed certificate or a self-signed one. In thefollowing steps, a self-signed certificate is used as an example to describe how tocreate a server certificate.
1. Log in to the server where the CA certificate is generated.2. Create a directory at the same level as the directory of the CA certificate and
switch to the directory.mkdir servercd server
3. Create the certificate configuration file server_cert.conf. The file content is asfollows:[ req ]distinguished_name = req_distinguished_nameprompt = no [ req_distinguished_name ] O = ELB CN = www.test.com
NO TE
Set the CN field to the domain name or IP address of the Linux server.
4. Create the server certificate private key server.key.openssl genrsa -out server.key 2048
5. Create the CSR file server.csr for the server certificate.openssl req -out server.csr -key server.key -new -config ./server_cert.conf
6. Use the CA certificate to issue the server certificate server.crt.openssl x509 -req -in server.csr -out server.crt -sha1 -CAcreateserial -days5000 -CA ../ca/ca.crt -CAkey ../ca/ca.key
Elastic Load BalancingUser Guide 5 Advanced Features of HTTP/HTTPS Listeners
2021-12-08 90

Figure 5-4 Issuing a server certificate
Issuing a Client Certificate Using the CA Certificate1. Log in to the server where the CA certificate is generated.2. Create a directory at the same level as the directory of the CA certificate and
switch to the directory.mkdir clientcd client
3. Create the certificate configuration file client_cert.conf. The file content is asfollows:[ req ]distinguished_name = req_distinguished_nameprompt = no [ req_distinguished_name ] O = ELB CN = www.test.com
NO TE
Set the CN field to the domain name or IP address of the Linux server.
4. Create the client certificate private key client.key.openssl genrsa -out client.key 2048
Figure 5-5 Creating a client certificate private key
5. Create the CSR file client.csr for the client certificate.openssl req -out client.csr -key client.key -new -config ./client_cert.conf
Figure 5-6 Creating a client certificate CSR file
6. Use the CA certificate to issue the client certificate client.crt.openssl x509 -req -in client.csr -out client.crt -sha1 -CAcreateserial -days5000 -CA ../ca/ca.crt -CAkey ../ca/ca.key
Figure 5-7 Issuing a client certificate
Elastic Load BalancingUser Guide 5 Advanced Features of HTTP/HTTPS Listeners
2021-12-08 91

7. Convert the client certificate to a .p12 file that can be identified by thebrowser.
openssl pkcs12 -export -clcerts -in client.crt -inkey client.key -outclient.p12
NO TE
A password is required during command execution. Save this password, which will berequired when you import the certificate using the browser.
Configuring the Server Certificate and Private Key1. Log in to the management console.
2. In the navigation pane on the left, choose Certificates.
3. In the navigation pane on the left, choose Certificates. On the displayedpage, click Create Certificate. In the Create Certificate dialog box, selectServer certificate, copy the content of server certificate server.crt to theCertificate area and the content of private key file server.key to the PrivateKey area, and click OK.
NO TE
Delete the last newline character before you copy the content.
NO TE
The certificate and private key must be PEM-encoded.
Configuring the CA Certificate
Step 1 Log in to the management console.
Step 2 In the navigation pane on the left, choose Certificates.
Step 3 Click Create Certificate. In the Create Certificate dialog box, select CAcertificate, copy the content of CA certificate ca.crt created in Issuing a ServerCertificate Using the CA Certificate to the Certificate area, and click OK.
NO TE
Delete the last newline character before you copy the content.
NO TE
The certificate must be PEM-encoded.
----End
Configuring Mutual Authentication1. Log in to the management console.
2. Locate the load balancer and click its name. Under Listeners, click AddListener. Select HTTPS for Frontend Protocol, enable MutualAuthentication, and select the server certificate and CA certificate.
Elastic Load BalancingUser Guide 5 Advanced Features of HTTP/HTTPS Listeners
2021-12-08 92

Figure 5-8 Add Listener
Add backend servers.
For detailed operations, see Adding Backend Servers.
Importing and Testing the Client CertificateMethod 1: Using a browser
1. Import the client certificate using a browser (Internet Explorer 11 is used asan example).
a. Export client.p12 from the Linux server.b. Open the browser, choose Settings > Internet Options and click
Content.c. Click Certificates and then Import to import the client.p12 certificate.
Elastic Load BalancingUser Guide 5 Advanced Features of HTTP/HTTPS Listeners
2021-12-08 93

Figure 5-9 Importing the client.p12 certificate
2. Verify the import.Enter the access address in the address box of your browser. A window isdisplayed asking you to select the certificate. Select the client certificate andclick OK. If the website can be accessed, the certificate is successfullyimported.
Figure 5-10 Accessing the website
Method 2: Using cURL
Elastic Load BalancingUser Guide 5 Advanced Features of HTTP/HTTPS Listeners
2021-12-08 94

1. Import the client certificate.Copy client certificate client.crt and private key client.key to a new directory,for example, /home/client_cert.
2. Verify the import.On the Shell screen, run the following command:curl -k --cert /home/client_cert/client.crt --key /home/client_cert/client.key https://XXX.XXX.XXX.XXX:XXX/ -I
Ensure that the certificate address, private key address, IP address andlistening port of the load balancer are correct. Replace https://XXX.XXX.XXX.XXX:XXX with the actual IP address and port number. If theexpected response code is returned, the certificate is successfully imported.
Figure 5-11 Example of a correct response code
5.3 HTTP Redirection to HTTPS
ScenariosHTTPS is an extension of HTTP. HTTPS encrypts data between a web server and abrowser.
If you enable redirection, all HTTP requests to your website are transmitted overHTTPS connections to improve service security.
CA UTION
● If the listener's protocol is HTTP, only the GET or HEAD method can be used forredirection. If you create a redirect for an HTTP listener, the client browser willchange POST or other methods to GET. If you want to use other methodsexcept GET and HEAD, add an HTTPS listener.
● HTTP requests are forwarded to the HTTPS listener as HTTPS requests, whichare then routed to backend servers over HTTP.
● If an HTTP listener is redirected to an HTTPS listener, no certificate will bedeployed on the backend servers associated with the HTTPS listener. Ifcertificates are deployed, HTTPS requests will not take effect.
Prerequisites● You have added an HTTPS listener.● You have added an HTTP listener.
Constraints and Limitations● You can create a redirect for a dedicated load balancer when you add an
HTTP listener to the load balancer, and the created redirect cannot be
Elastic Load BalancingUser Guide 5 Advanced Features of HTTP/HTTPS Listeners
2021-12-08 95
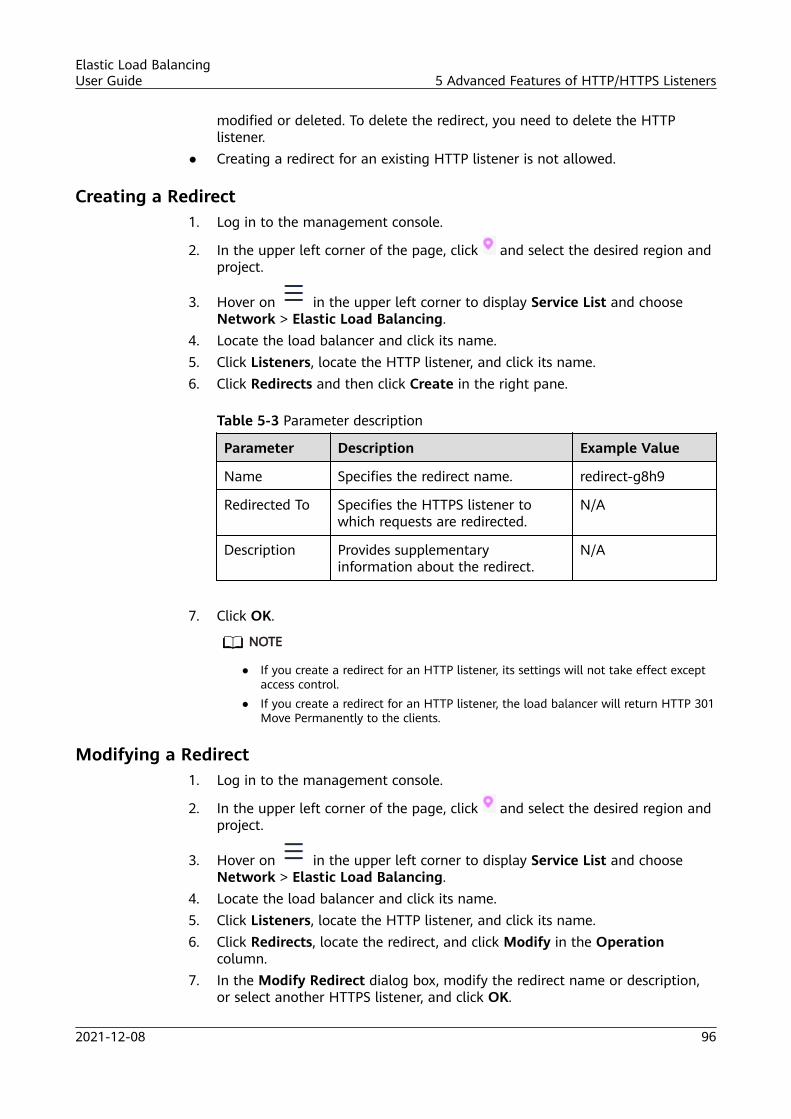
modified or deleted. To delete the redirect, you need to delete the HTTPlistener.
● Creating a redirect for an existing HTTP listener is not allowed.
Creating a Redirect1. Log in to the management console.
2. In the upper left corner of the page, click and select the desired region andproject.
3. Hover on in the upper left corner to display Service List and chooseNetwork > Elastic Load Balancing.
4. Locate the load balancer and click its name.5. Click Listeners, locate the HTTP listener, and click its name.6. Click Redirects and then click Create in the right pane.
Table 5-3 Parameter description
Parameter Description Example Value
Name Specifies the redirect name. redirect-g8h9
Redirected To Specifies the HTTPS listener towhich requests are redirected.
N/A
Description Provides supplementaryinformation about the redirect.
N/A
7. Click OK.
NO TE
● If you create a redirect for an HTTP listener, its settings will not take effect exceptaccess control.
● If you create a redirect for an HTTP listener, the load balancer will return HTTP 301Move Permanently to the clients.
Modifying a Redirect1. Log in to the management console.
2. In the upper left corner of the page, click and select the desired region andproject.
3. Hover on in the upper left corner to display Service List and chooseNetwork > Elastic Load Balancing.
4. Locate the load balancer and click its name.5. Click Listeners, locate the HTTP listener, and click its name.6. Click Redirects, locate the redirect, and click Modify in the Operation
column.7. In the Modify Redirect dialog box, modify the redirect name or description,
or select another HTTPS listener, and click OK.
Elastic Load BalancingUser Guide 5 Advanced Features of HTTP/HTTPS Listeners
2021-12-08 96

Deleting a Redirect1. Log in to the management console.
2. In the upper left corner of the page, click and select the desired region andproject.
3. Hover on in the upper left corner to display Service List and chooseNetwork > Elastic Load Balancing.
4. Locate the load balancer and click its name.5. Click Listeners, locate the listener, and click its name.6. Click Redirects, locate the redirect, and click Delete in the Operation column.7. In the Delete Redirect dialog box, click Yes.
5.4 Security Policy
Scenarios
When you add HTTPS listeners, you can select appropriate security policies toimprove security. A security policy is a combination of TLS protocols and ciphersuites.
Adding a Security Policy1. Log in to the management console.
2. In the upper left corner of the page, click and select the desired region andproject.
3. Hover on in the upper left corner to display Service List and chooseNetwork > Elastic Load Balancing.
4. Locate the load balancer and click its name.5. Under Listeners, click Add Listener.6. In the Add Listener dialog box, expand Advanced Settings and select a
security policy. Table 5-4 lists all available security policies.
Table 5-4 Security policies
SecurityPolicy
Description TLSVersions
Cipher Suites
TLS-1-0 TLS 1.0, TLS 1.1, andTLS 1.2 andsupported ciphersuites (highcompatibility andmoderate security)
TLS 1.2TLS 1.1TLS 1.0
ECDHE-RSA-AES256-GCM-SHA384, ECDHE-RSA-AES128-GCM-SHA256,ECDHE-ECDSA-AES256-GCM-SHA384, ECDHE-ECDSA-AES128-GCM-SHA256, AES128-GCM-SHA256:AES256-GCM-SHA384, ECDHE-ECDSA-
Elastic Load BalancingUser Guide 5 Advanced Features of HTTP/HTTPS Listeners
2021-12-08 97

SecurityPolicy
Description TLSVersions
Cipher Suites
TLS-1-1 TLS 1.1 and TLS 1.2and supportedcipher suites(moderatecompatibility andmoderate security)
AES128-SHA256, ECDHE-RSA-AES128-SHA256,AES128-SHA256, AES256-SHA256, ECDHE-ECDSA-AES256-SHA384, ECDHE-RSA-AES256-SHA384,ECDHE-ECDSA-AES128-SHA:ECDHE-RSA-AES128-SHA, ECDHE-RSA-AES256-SHA, ECDHE-ECDSA-AES256-SHA, AES128-SHA:AES256-SHA
TLS 1.2TLS 1.1
TLS-1-2 TLS 1.2 andsupported ciphersuites (moderatecompatibility andhigh security)
TLS 1.2
TLS-1-2-Strict
Strict TLS 1.2 andsupported ciphersuites (lowcompatibility andultra-high security)
TLS 1.2 ECDHE-RSA-AES256-GCM-SHA384, ECDHE-RSA-AES128-GCM-SHA256,ECDHE-ECDSA-AES256-GCM-SHA384, ECDHE-ECDSA-AES128-GCM-SHA256, AES128-GCM-SHA256:AES256-GCM-SHA384, ECDHE-ECDSA-AES128-SHA256, ECDHE-RSA-AES128-SHA256,AES128-SHA256:AES256-SHA256, ECDHE-ECDSA-AES256-SHA384, ECDHE-RSA-AES256-SHA384,ECDHE-ECDSA-AES128-SHA, ECDHE-RSA-AES128-SHA, ECDHE-RSA-AES256-SHA, ECDHE-ECDSA-AES256-SHA, AES128-SHA:AES256-SHA
7. Click OK.
Differences Between Security Policies
Table 5-5 Differences between the security policies
Security Policy TLS-1-0 TLS-1-1 TLS-1-2 TLS-1-2-Strict
TLS versions
Protocol-TLS 1.3 - - - -
Protocol-TLS 1.2 √ √ √ √
Elastic Load BalancingUser Guide 5 Advanced Features of HTTP/HTTPS Listeners
2021-12-08 98

Security Policy TLS-1-0 TLS-1-1 TLS-1-2 TLS-1-2-Strict
Protocol-TLS 1.1 √ √ - -
Protocol-TLS 1.0 √ - - -
Cipher suites
EDHE-RSA-AES128-GCM-SHA256
√ √ √ √
ECDHE-RSA-AES256-GCM-SHA384
√ √ √ √
ECDHE-RSA-AES128-SHA256
√ √ √ √
ECDHE-RSA-AES256-SHA384
√ √ √ √
AES128-GCM-SHA256 √ √ √ √
AES256-GCM-SHA384 √ √ √ √
AES128-SHA256 √ √ √ √
AES256-SHA256 √ √ √ √
ECDHE-RSA-AES128-SHA √ √ √ -
ECDHE-RSA-AES256-SHA √ √ √ -
AES128-SHA √ √ √ -
AES256-SHA √ √ √ -
ECDHE-ECDSA-AES128-GCM-SHA256
√ √ √ √
ECDHE-ECDSA-AES128-SHA256
√ √ √ √
ECDHE-ECDSA-AES128-SHA √ √ √ -
ECDHE-ECDSA-AES256-GCM-SHA384
√ √ √ √
ECDHE-ECDSA-AES256-SHA384
√ √ √ √
ECDHE-ECDSA-AES256-SHA √ √ √ -
Changing a Security Policy
When you change a security policy, ensure that the security group containingbackend servers allows traffic from 100.125.0.0/16 to backend servers and allows
Elastic Load BalancingUser Guide 5 Advanced Features of HTTP/HTTPS Listeners
2021-12-08 99
ICMP packets for UDP health checks. Otherwise, backend servers will beconsidered unhealthy, and routing will be affected.
1. Log in to the management console.
2. In the upper left corner of the page, click and select the desired region andproject.
3. Hover on in the upper left corner to display Service List and chooseNetwork > Elastic Load Balancing.
4. Locate the load balancer and click its name.
5. Click Listeners, locate the listener, and click on the right of its name.6. In the Modify Listener dialog box, expand Advanced Settings and change
the security policy.7. Click OK.
5.5 SNI Certificate (for HTTPS Listeners)
Scenarios
If you have an application that can be accessed through multiple domain namesand each domain name uses a different certificate, you can enable Server NameIndication (SNI) when you add an HTTPS listener.
SNI, an extension to Transport Layer Security (TLS), enables a server to presentmultiple certificates on the same IP address and port number. SNI allows the clientto indicate the domain name of the website while sending an SSL handshakerequest. Once receiving the request, the load balancer queries the right certificatebased on the hostname or domain name and returns the certificate to the client. Ifno certificate is found, the load balancer will return the default certificate.
A maximum of 30 SNI certificates can be bound to each HTTPS listener.
Prerequisites
You have created a certificate by performing the operations in Creating,Modifying, or Deleting a Certificate.
● NO TE
● The domain name must be the same as that in the certificate.
● Wildcard-domain certificates are supported.
For example, if the domain name is *.support.com, domain names likea.support.com and b.support.com are supported, but a.a.support.com is not. To usea.a.support.com, you need to specify the wildcard domain name as *.a.support.com.
● If a certificate has expired, you need to manually replace or delete it by followingthe instructions in Replacing a Certificate.
Procedure1. Log in to the management console.
Elastic Load BalancingUser Guide 5 Advanced Features of HTTP/HTTPS Listeners
2021-12-08 100

2. In the upper left corner of the page, click and select the desired region andproject.
3. Hover on in the upper left corner to display Service List and chooseNetwork > Elastic Load Balancing.
4. Locate the load balancer and click its name.5. Click Listeners.
– For a shared load balancer, locate the listener and click Configure on theright of SNI.
– For a classic load balancer, click Listeners, locate the listener, and clickModify in the Operation column. In the Modify Listener dialog box,modify the parameters as needed.
6. Enable SNI and select the SNI certificate.7. Click OK.
Elastic Load BalancingUser Guide 5 Advanced Features of HTTP/HTTPS Listeners
2021-12-08 101

6 Backend Server
6.1 OverviewA backend server is a cloud server added to a backend server group associatedwith a load balancer. When you add a listener to a load balancer, you can createor select a backend server group to receive requests from the load balancer byusing the port and protocol you specify for the backend server group and the loadbalancing algorithm you select.
After a new server is added to the associated backend server group for which thehealth check is configured, the load balancer will check its running status. If thebackend server responds normally, it is declared healthy. If the backend serverdoes not respond normally, the load balancer periodically checks its health formultiple times. Only after the backend server is considered healthy, it can receiverequests from the load balancer.
You can adjust the number of backend servers to ensure stable and reliable servicewith the minimum budget. Load balancers can distribute requests across backendservers in different AZs to prevent SPOFs. You must ensure that at least onebackend server is working normally in each AZ.
On the ELB console, you can view the load balancer that the backend server isassociated with by the IP address or ID of the backend server.
If a backend server is stopped or restarted, connections established with the serverwill be disconnected, and data being transmitted over these connections will belost. Configure the retry function on the clients to prevent data loss.
Notes
When you add backend servers, note the following:
● Backend servers must be in the same VPC as the load balancer.● For ease of management and maintenance, backend servers must run the
same OS.● You can set a weight for each server in the backend server group. The larger
the weight is, the higher proportion of requests the backend server receives.
Elastic Load BalancingUser Guide 6 Backend Server
2021-12-08 102

● If you enable sticky sessions, the proportions of requests processed bybackend servers may become unbalanced. In this case, disable sticky sessionsand check the requests received by each backend server.
6.2 Configuring Security Group Rules for BackendServers (Dedicated Load Balancers)
ScenariosWhen you add a backend server to a backend server group, ensure that the rulesof the security group that containing the backend server allows access from theCIDR block of the VPC where the backend server resides, and that the destinationport is that used by the backend server. You also need to configure the protocoland port used for health checks. If you use UDP for health checks, configureinbound rules to allow ICMP traffic. Otherwise, health checks cannot be performedon the added backend server.
If you have no VPCs when creating a server, the system will automatically create aVPC with default security rules. Default security group rules allow onlycommunications among the servers in the VPC. You also need to configureinbound rules to enable the load balancer to communicate with these servers overthe frontend port and health check port.
Procedure1. Log in to the management console.
2. In the upper left corner of the page, click and select the desired region andproject.
3. Hover on in the upper left corner to display Service List and chooseComputing > Elastic Cloud Server.
4. In the ECS list, locate the ECS and click its name.The ECS details page is displayed.
5. Click Security Groups, locate the security group, and view security grouprules.
6. Click the security group rule ID or Modify Security Group Rule. The securitygroup details page is displayed.
7. Under Inbound Rules, click Add Rule.TCP, HTTP, or HTTPS listeners– If the health check port is not the one used by each backend server, add
an inbound rule to allow TCP traffic over the health check port and theports used by backend servers.
– If you do not specify a health check port, add inbound rules to allow TCPtraffic over the ports used by backend servers.
– To ensure normal health checks, ensure that security group rules allowtraffic from the CIDR block of the subnet where the load balancer residesand traffic from the health check port and from the ports used bybackend servers.
Elastic Load BalancingUser Guide 6 Backend Server
2021-12-08 103

UDP listeners– If the health check port is not the one used by each backend server, add
an inbound rule to allow UDP traffic over the health check port and theports used by backend servers.
– If you do not specify a health check port, add inbound rules to allow UDPtraffic over the ports used by backend servers.
– To ensure normal health checks, ensure that security group rules allowtraffic from the CIDR block of the subnet where the load balancer residesand traffic from the health check port and from the ports used bybackend servers.
– You need also to add an inbound rule to allow ICMP traffic.8. Click OK.
Firewall RulesTo control traffic in and out of a subnet, you can associate a firewall with thesubnet. Firewalls provide access control functions similar to security groups andadd an additional layer of defense for your VPC. Default firewall rules reject allinbound and outbound traffic. If the subnet of a load balancer or associatedbackend servers has a firewall associated, the load balancer cannot receive trafficfrom the Internet or route traffic to backend servers, and backend servers cannotreceive traffic from and respond to the load balancer.
Configure an inbound firewall rule to allow access from the VPC CIDR block tobackend servers.
1. Log in to the management console.
2. In the upper left corner of the page, click and select the desired region andproject.
3. Hover on in the upper left corner to display Service List and chooseNetwork > Virtual Private Cloud.
4. In the navigation pane on the left, choose Access Control > Firewalls.5. Locate the firewall, and click the firewall name to switch to the firewall
details page.6. On the Inbound Rules or Outbound Rules tab page, click Add Rule to add a
rule.– Action: Select Allow.– Protocol: The protocol must be the same as the one you selected for the
listener.– Source: Set it to the VPC CIDR block.– Source Port Range: Select a port range.– Destination: If you keep the default value, 0.0.0.0/0, traffic will be
allowed for all destination IP addresses.– Destination Port Range: Select a port range.– Description: Enter a description for the firewall rule if necessary.
7. Click OK.
Elastic Load BalancingUser Guide 6 Backend Server
2021-12-08 104
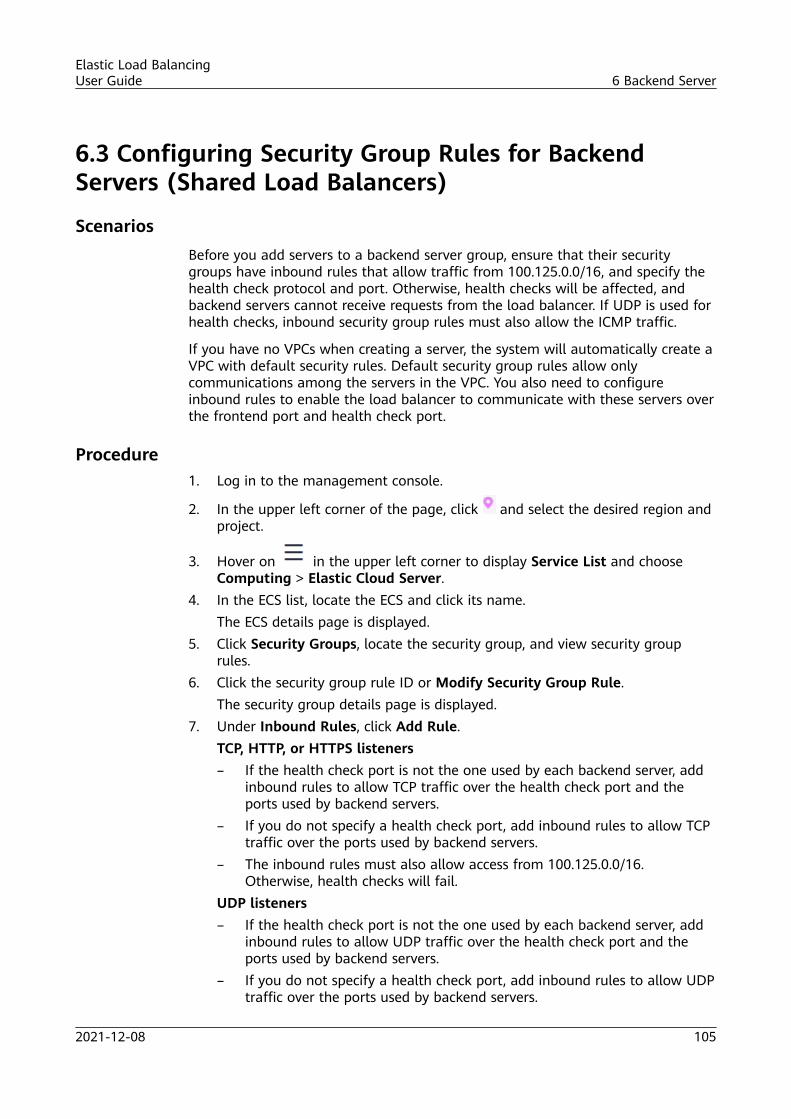
6.3 Configuring Security Group Rules for BackendServers (Shared Load Balancers)
ScenariosBefore you add servers to a backend server group, ensure that their securitygroups have inbound rules that allow traffic from 100.125.0.0/16, and specify thehealth check protocol and port. Otherwise, health checks will be affected, andbackend servers cannot receive requests from the load balancer. If UDP is used forhealth checks, inbound security group rules must also allow the ICMP traffic.
If you have no VPCs when creating a server, the system will automatically create aVPC with default security rules. Default security group rules allow onlycommunications among the servers in the VPC. You also need to configureinbound rules to enable the load balancer to communicate with these servers overthe frontend port and health check port.
Procedure1. Log in to the management console.
2. In the upper left corner of the page, click and select the desired region andproject.
3. Hover on in the upper left corner to display Service List and chooseComputing > Elastic Cloud Server.
4. In the ECS list, locate the ECS and click its name.The ECS details page is displayed.
5. Click Security Groups, locate the security group, and view security grouprules.
6. Click the security group rule ID or Modify Security Group Rule.The security group details page is displayed.
7. Under Inbound Rules, click Add Rule.TCP, HTTP, or HTTPS listeners– If the health check port is not the one used by each backend server, add
inbound rules to allow TCP traffic over the health check port and theports used by backend servers.
– If you do not specify a health check port, add inbound rules to allow TCPtraffic over the ports used by backend servers.
– The inbound rules must also allow access from 100.125.0.0/16.Otherwise, health checks will fail.
UDP listeners– If the health check port is not the one used by each backend server, add
inbound rules to allow UDP traffic over the health check port and theports used by backend servers.
– If you do not specify a health check port, add inbound rules to allow UDPtraffic over the ports used by backend servers.
Elastic Load BalancingUser Guide 6 Backend Server
2021-12-08 105

– The inbound rules must also allow access from 100.125.0.0/16.Otherwise, health checks will fail.
– You need also to add an inbound rule to allow ICMP traffic.8. Click OK.
Firewall RulesTo control traffic in and out of a subnet, you can associate a firewall with thesubnet. Firewalls provide access control functions similar to security groups andadd an additional layer of defense for your VPC. Default firewall rules reject allinbound and outbound traffic. If the subnet of a load balancer or associatedbackend servers has a firewall associated, the load balancer cannot receive trafficfrom the Internet or route traffic to backend servers, and backend servers cannotreceive traffic from and respond to the load balancer.
Configure an inbound firewall rule to permit access from 100.125.0.0/16.
ELB translates public IP addresses that access backend servers into IP addresses in100.125.0.0/16. You cannot configure firewall rules to prevent public IP addressesfrom accessing backend servers to allow traffic from 100.125.0.0/16 to all backendservers.
1. Log in to the management console.
2. In the upper left corner of the page, click and select the desired region andproject.
3. Under Network, click Virtual Private Cloud.4. In the navigation pane on the left, choose Access Control > Firewalls.5. Locate the firewall and click the firewall name to switch to the firewall details
page.6. On the Inbound Rules or Outbound Rules tab page, click Add Rule to add a
rule.– Action: Select Allow.– Protocol: The protocol must be the same as the one you selected for the
listener.– Source: Set it to 100.125.0.0/16.– Source Port Range: Select a port range.– Destination: If you keep the default value, 0.0.0.0/0, traffic will be
allowed for all destination IP addresses.– Destination Port Range: Select a port range.– Description: Enter a description for the firewall rule if necessary.
7. Click OK.
Elastic Load BalancingUser Guide 6 Backend Server
2021-12-08 106

6.4 Adding or Removing Backend Servers (DedicatedLoad Balancers)
Scenarios
When you use ELB, ensure that at least a healthy backend server is in the backendserver group associated with your load balancer. If incoming traffic increases, youneed to add more backend servers.
After a backend server is removed, it cannot receive requests from the loadbalancer. You can add it back to the backend server group when the traffic goesup again.
If the load balancer is associated with an AS group, instances in the AS group areautomatically added to the backend server group associated with the loadbalancer. If instances are removed from the AS group, they will be automaticallyremoved from the backend server group.
Adding Backend Servers1. Log in to the management console.
2. In the upper left corner of the page, click and select the desired region andproject.
3. Hover on in the upper left corner to display Service List and chooseNetwork > Elastic Load Balancing.
4. Locate the load balancer and click its name.5. On the Backend Server Groups tab page, click Add Backend Server under
Backend Servers.
Removing Backend Servers1. Log in to the management console.
2. In the upper left corner of the page, click and select the desired region andproject.
3. Hover on in the upper left corner to display Service List and chooseNetwork > Elastic Load Balancing.
4. Locate the load balancer and click its name.5. Click Backend Server Groups, locate the backend server group, and click its
name.6. In the Basic Information area, locate the target backend server and click
Remove in the Operation column. To remove multiple backend servers, selectthe backend servers you want to remove and click Remove above the serverlist.
7. Click Yes.
Elastic Load BalancingUser Guide 6 Backend Server
2021-12-08 107

Adding a Backend Server Group1. Log in to the management console.
2. In the upper left corner of the page, click and select the desired region andproject.
3. Hover on in the upper left corner to display Service List and chooseNetwork > Elastic Load Balancing.
4. Locate the load balancer and click its name.5. Under Backend Server Groups, click Add Backend Server Group.6. In the Add Backend Server Group dialog box, configure the parameters.
Configure the parameters based on Table 6-1 and Table 6-2.
Table 6-1 Parameters for adding a backend server group
Parameter Description ExampleValue
Name Specifies the name of the backend servergroup.
server_group-sq4v
BackendProtocol
Specifies the protocol used by backend serversto receive requests.The backend protocol can be TCP, UDP, HTTP,or HTTPS.
HTTP
Elastic Load BalancingUser Guide 6 Backend Server
2021-12-08 108
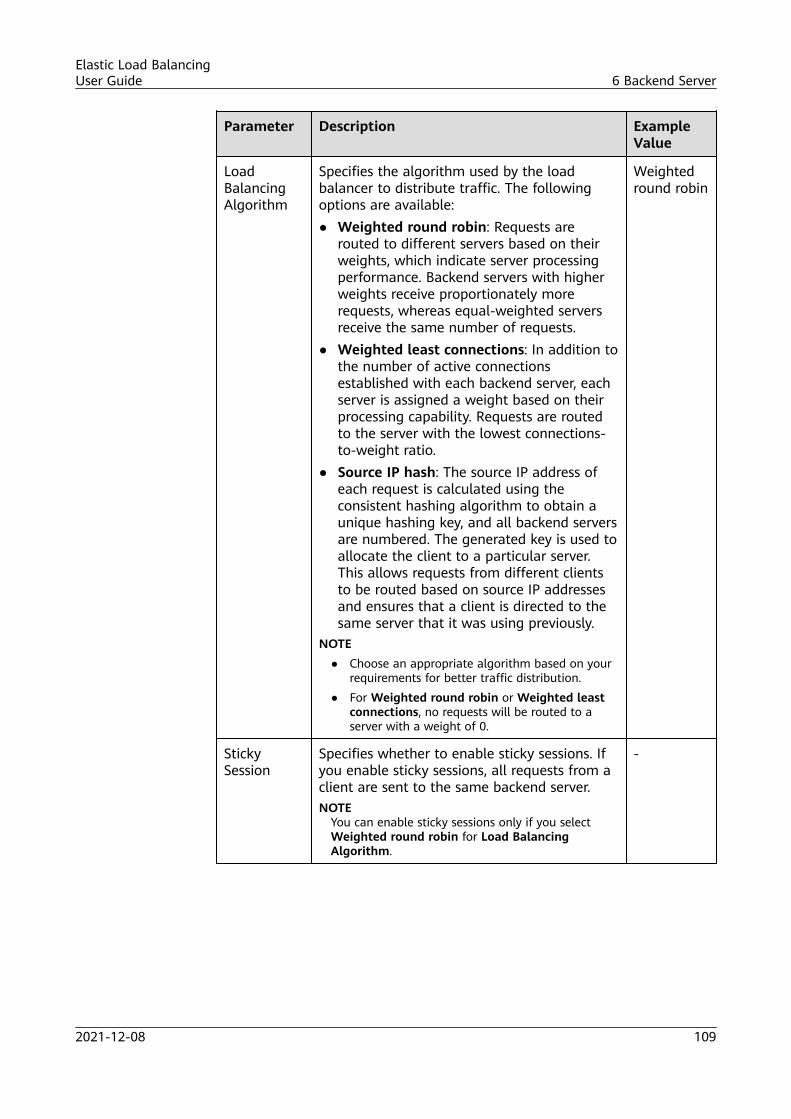
Parameter Description ExampleValue
LoadBalancingAlgorithm
Specifies the algorithm used by the loadbalancer to distribute traffic. The followingoptions are available:● Weighted round robin: Requests are
routed to different servers based on theirweights, which indicate server processingperformance. Backend servers with higherweights receive proportionately morerequests, whereas equal-weighted serversreceive the same number of requests.
● Weighted least connections: In addition tothe number of active connectionsestablished with each backend server, eachserver is assigned a weight based on theirprocessing capability. Requests are routedto the server with the lowest connections-to-weight ratio.
● Source IP hash: The source IP address ofeach request is calculated using theconsistent hashing algorithm to obtain aunique hashing key, and all backend serversare numbered. The generated key is used toallocate the client to a particular server.This allows requests from different clientsto be routed based on source IP addressesand ensures that a client is directed to thesame server that it was using previously.
NOTE● Choose an appropriate algorithm based on your
requirements for better traffic distribution.● For Weighted round robin or Weighted least
connections, no requests will be routed to aserver with a weight of 0.
Weightedround robin
StickySession
Specifies whether to enable sticky sessions. Ifyou enable sticky sessions, all requests from aclient are sent to the same backend server.NOTE
You can enable sticky sessions only if you selectWeighted round robin for Load BalancingAlgorithm.
-
Elastic Load BalancingUser Guide 6 Backend Server
2021-12-08 109
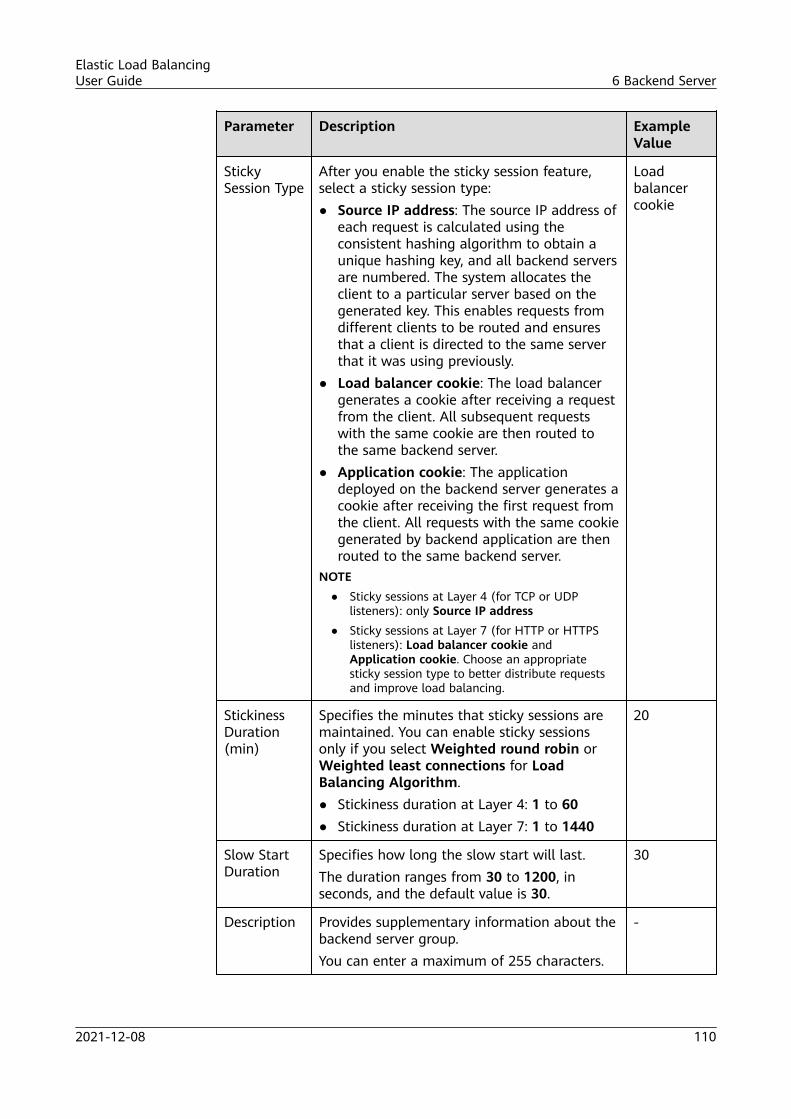
Parameter Description ExampleValue
StickySession Type
After you enable the sticky session feature,select a sticky session type:● Source IP address: The source IP address of
each request is calculated using theconsistent hashing algorithm to obtain aunique hashing key, and all backend serversare numbered. The system allocates theclient to a particular server based on thegenerated key. This enables requests fromdifferent clients to be routed and ensuresthat a client is directed to the same serverthat it was using previously.
● Load balancer cookie: The load balancergenerates a cookie after receiving a requestfrom the client. All subsequent requestswith the same cookie are then routed tothe same backend server.
● Application cookie: The applicationdeployed on the backend server generates acookie after receiving the first request fromthe client. All requests with the same cookiegenerated by backend application are thenrouted to the same backend server.
NOTE● Sticky sessions at Layer 4 (for TCP or UDP
listeners): only Source IP address● Sticky sessions at Layer 7 (for HTTP or HTTPS
listeners): Load balancer cookie andApplication cookie. Choose an appropriatesticky session type to better distribute requestsand improve load balancing.
Loadbalancercookie
StickinessDuration(min)
Specifies the minutes that sticky sessions aremaintained. You can enable sticky sessionsonly if you select Weighted round robin orWeighted least connections for LoadBalancing Algorithm.● Stickiness duration at Layer 4: 1 to 60● Stickiness duration at Layer 7: 1 to 1440
20
Slow StartDuration
Specifies how long the slow start will last.The duration ranges from 30 to 1200, inseconds, and the default value is 30.
30
Description Provides supplementary information about thebackend server group.You can enter a maximum of 255 characters.
-
Elastic Load BalancingUser Guide 6 Backend Server
2021-12-08 110

Table 6-2 Parameters for configuring a health check
Parameter Description ExampleValue
EnableHealthCheck
Specifies whether to enable health checks. N/A
Protocol Specifies the protocol used by the loadbalancer to perform health checks on backendservers. You can select TCP, HTTP, or HTTPS. Aselected protocol cannot be changed.
HTTP
Advanced Settings
Interval (s) Specifies the maximum time between healthchecks, in seconds.The interval ranges from 1 to 50.
5
Timeout (s) Specifies the maximum time required forwaiting for a response from the health check,in seconds. The timeout duration ranges from1 to 50.
3
Check Path Specifies the destination path for healthchecks. Configure this parameter only if youhave set Protocol to HTTP. The path cancontain 1 to 80 characters and must start witha slash (/).
/index.html
MaximumRetries
Specifies the maximum number of healthcheck retries. The value ranges from 1 to 10.
3
7. Click OK.
Modifying a Backend Server Group1. Log in to the management console.
2. In the upper left corner of the page, click and select the desired region andproject.
3. Hover on in the upper left corner to display Service List and chooseNetwork > Elastic Load Balancing.
4. Locate the load balancer and click its name.
5. Click Backend Server Groups, locate the backend server group, and click on the right of its name.
6. Modify the parameters as needed and click OK.
Deleting a Backend Server Group1. Log in to the management console.
Elastic Load BalancingUser Guide 6 Backend Server
2021-12-08 111

2. In the upper left corner of the page, click and select the desired region andproject.
3. Hover on in the upper left corner to display Service List and chooseNetwork > Elastic Load Balancing.
4. Locate the load balancer and click its name.
5. Click Backend Server Groups, locate the backend server group, and click on the right of its name.
6. Click Yes.
6.5 Adding or Removing Backend Servers (Shared LoadBalancers)
Scenarios
A backend server group has at least a healthy backend server. If incoming trafficincreases, you need to add more backend servers.
After a backend server is removed, it cannot receive requests from the loadbalancer. You can add it back to the backend server group when the traffic goesup again.
If the load balancer is associated with an AS group, instances in the AS group areautomatically added to the backend server group associated with the loadbalancer. If instances are removed from the AS group, they will be automaticallyremoved from the backend server group.
NO TE
Backend servers can reside in different subnets of the same VPC.
Adding Backend Servers1. Log in to the management console.
2. In the upper left corner of the page, click and select the desired region andproject.
3. Hover on in the upper left corner to display Service List and chooseNetwork > Elastic Load Balancing.
4. Locate the load balancer and click its name.
5. Click Backend Server Groups, locate the backend server group, and click itsname.
6. In the Basic Information area, click Add in the upper left corner of the serverlist. Select the subnet where the backend servers reside, select the backendservers you want to add, and click Next.
Elastic Load BalancingUser Guide 6 Backend Server
2021-12-08 112
NO TE
● If a backend server has multiple NICs, you can only select the subnet where theprimary NIC resides and use the primary NIC to add the backend server.
● Backend servers cannot use virtual IP addresses.
7. Add the ports and configure the weights and click Finish.
NO TE
In the Backend Port text box, enter the port used by each backend server.If multiple backend servers use the same port, you can batch add the port in theBatch Add Port text box and then click Finish.If you want to set the same weight for multiple backend servers, you can batchconfigure the weights.
8. Click OK.
Removing Backend Servers1. Log in to the management console.
2. In the upper left corner of the page, click and select the desired region andproject.
3. Hover on in the upper left corner to display Service List and chooseNetwork > Elastic Load Balancing.
4. Locate the load balancer and click its name.5. Click Backend Server Groups, locate the backend server group, and click its
name.6. In the Basic Information area, click Remove in the Operation column to
remove a backend server. To remove multiple backend servers, select thebackend servers you want to remove and click Remove above the server list.
7. Click Yes.
Adding a Backend Server Group1. Log in to the management console.
2. In the upper left corner of the page, click and select the desired region andproject.
3. Hover on in the upper left corner to display Service List and chooseNetwork > Elastic Load Balancing.
4. Locate the load balancer and click its name.5. Under Backend Server Groups, click Add Backend Server Group.6. In the Add Backend Server Group dialog box, configure the parameters.
Configure the parameters based on Table 6-3 and Table 6-4.
Elastic Load BalancingUser Guide 6 Backend Server
2021-12-08 113

Table 6-3 Parameters for configuring a backend server group
Parameter Description ExampleValue
Name Specifies the name of the backend servergroup.
server_group-sq4v
BackendProtocol
Specifies the protocol used by backend serversto receive requests.The backend protocol can be TCP, UDP, orHTTP.
HTTP
LoadBalancingAlgorithm
Specifies the algorithm used by the loadbalancer to distribute traffic. The followingoptions are available:● Weighted round robin: Requests are routed
to different servers based on their weights,which indicate server processingperformance. Backend servers with higherweights receive proportionately morerequests, whereas equal-weighted serversreceive the same number of requests.
● Weighted least connections: In addition tothe number of active connectionsestablished with each backend server, eachserver is assigned a weight based on theirprocessing capability. Requests are routed tothe server with the lowest connections-to-weight ratio.
● Source IP hash: The source IP address ofeach request is calculated using theconsistent hashing algorithm to obtain aunique hashing key, and all backend serversare numbered. The generated key is used toallocate the client to a particular server. Thisallows requests from different clients to berouted based on source IP addresses andensures that a client is directed to the sameserver that it was using previously.
NOTE● Choose an appropriate algorithm based on your
requirements for better traffic distribution.● For Weighted round robin or Weighted least
connections, no requests will be routed to aserver with a weight of 0.
Weightedround robin
Elastic Load BalancingUser Guide 6 Backend Server
2021-12-08 114

Parameter Description ExampleValue
StickySession
Specifies whether to enable sticky sessions. Ifyou enable sticky sessions, all requests from aclient are sent to the same backend server.NOTE
You can enable sticky sessions only if you selectWeighted round robin for Load BalancingAlgorithm.
-
StickySessionType
After you enable the sticky session feature,select a sticky session type:● Source IP address: The source IP address of
each request is calculated using theconsistent hashing algorithm to obtain aunique hashing key, and all backend serversare numbered. The system allocates theclient to a particular server based on thegenerated key. This enables requests fromdifferent clients to be routed and ensuresthat a client is directed to the same serverthat it was using previously.
● Load balancer cookie: The load balancergenerates a cookie after receiving a requestfrom the client. All subsequent requests withthe same cookie are then routed to thesame backend server.
● Application cookie: The applicationdeployed on the backend server generates acookie after receiving the first request fromthe client. All requests with the same cookiegenerated by backend application are thenrouted to the same backend server.
NOTE● Sticky sessions at Layer 4 (for TCP or UDP
listeners): only Source IP address● Sticky sessions at Layer 7 (for HTTP or HTTPS
listeners): Load balancer cookie and Applicationcookie. Choose an appropriate sticky session typeto better distribute requests and improve loadbalancing.
Loadbalancercookie
CookieName
Specifies the cookie name. If you selectApplication cookie, enter a cookie name.
cookieName-qsps
Elastic Load BalancingUser Guide 6 Backend Server
2021-12-08 115

Parameter Description ExampleValue
StickinessDuration(min)
Specifies the minutes that sticky sessions aremaintained. You can enable sticky sessions onlyif you select Weighted round robin orWeighted least connections for LoadBalancing Algorithm.● Stickiness duration at Layer 4: 1 to 60● Stickiness duration at Layer 7: 1 to 1440
20
Description Provides supplementary information about thebackend server group.You can enter a maximum of 255 characters.
-
Table 6-4 Parameters for configuring a health check
Parameter Description ExampleValue
EnableHealthCheck
Specifies whether to enable health checks. N/A
Protocol ● If the frontend protocol is TCP, HTTP orHTTPS, the health check protocol can be TCPor HTTP. The health check protocol cannotbe changed once it is set.
● If the frontend protocol is UDP, the healthcheck protocol is UDP by default.
HTTP
DomainName
Specifies the domain name that will be used forhealth checks.The domain name can contain digits, letters,hyphens (-), and periods (.), and must startwith a digit or letter. The field is left blank bydefault and is available only when the healthcheck protocol is HTTP.
www.elb.com
Port Specifies the port used by the load balancer toperform health checks on backend servers. Theport number ranges from 1 to 65535.NOTE
If you do not specify a health check port, thebackend port will be used for health checks bydefault. If you specify a port, it will be used forhealth checks.
80
Advanced Settings
Elastic Load BalancingUser Guide 6 Backend Server
2021-12-08 116
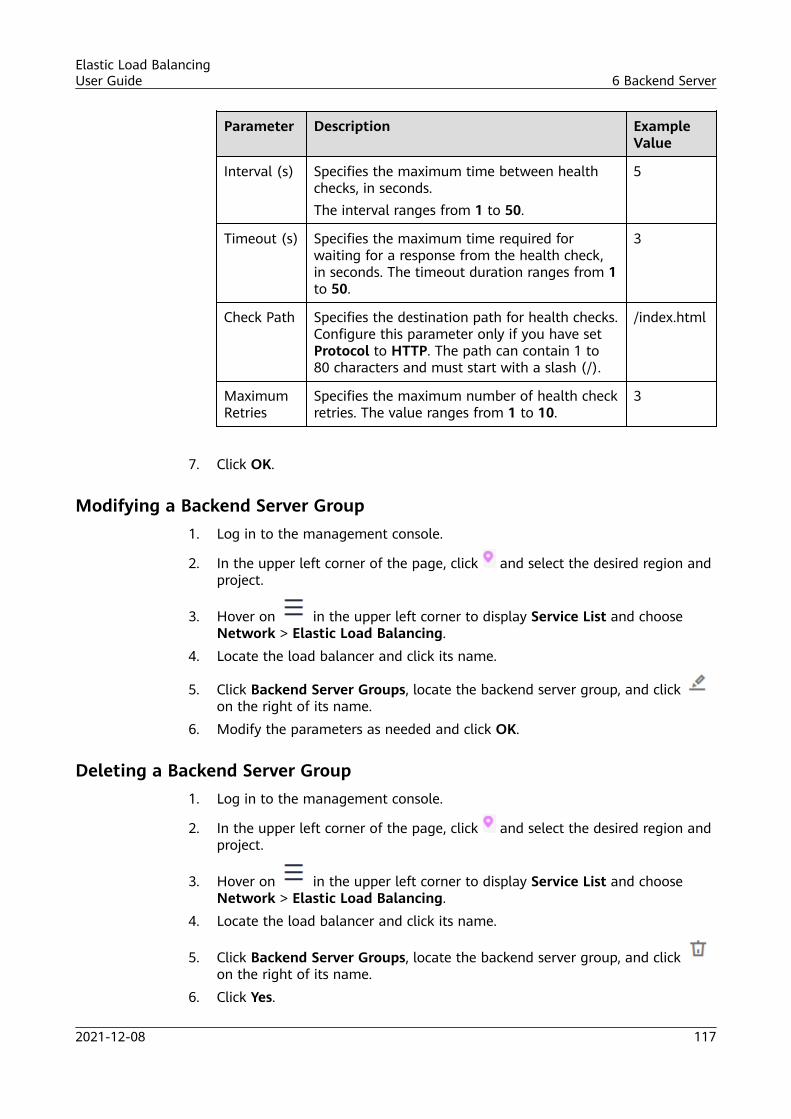
Parameter Description ExampleValue
Interval (s) Specifies the maximum time between healthchecks, in seconds.The interval ranges from 1 to 50.
5
Timeout (s) Specifies the maximum time required forwaiting for a response from the health check,in seconds. The timeout duration ranges from 1to 50.
3
Check Path Specifies the destination path for health checks.Configure this parameter only if you have setProtocol to HTTP. The path can contain 1 to80 characters and must start with a slash (/).
/index.html
MaximumRetries
Specifies the maximum number of health checkretries. The value ranges from 1 to 10.
3
7. Click OK.
Modifying a Backend Server Group1. Log in to the management console.
2. In the upper left corner of the page, click and select the desired region andproject.
3. Hover on in the upper left corner to display Service List and chooseNetwork > Elastic Load Balancing.
4. Locate the load balancer and click its name.
5. Click Backend Server Groups, locate the backend server group, and click on the right of its name.
6. Modify the parameters as needed and click OK.
Deleting a Backend Server Group1. Log in to the management console.
2. In the upper left corner of the page, click and select the desired region andproject.
3. Hover on in the upper left corner to display Service List and chooseNetwork > Elastic Load Balancing.
4. Locate the load balancer and click its name.
5. Click Backend Server Groups, locate the backend server group, and click on the right of its name.
6. Click Yes.
Elastic Load BalancingUser Guide 6 Backend Server
2021-12-08 117

6.6 Configuring Weights for Backend ServersEach backend server can be given a numeral value from 0 to 100 to indicate theproportion of requests to receive. Requests are not routed to the backend serverwhose weight is 0, even if the backend server is considered healthy. You can set aweight for each backend server when you select one of the following algorithms:● Weighted round robin
Requests are not routed to a backend server if its weight is set to 0.If none of the servers have a weight of 0, the load balancer routes requests tobackend servers based on their weights. Backend servers with higher weightsreceive proportionately more requests.If two backend servers have the same weights, they receive the same numberof requests.
● Weighted least connectionsRequests are not routed to a backend server if its weight is set to 0.If none of the servers have a weight of 0, the load balancer calculates theload of each backend server using the formula (Overhead = Number ofcurrent connections/Backend server weight) and routes requests to thebackend server with the smallest overhead.
● Source IP hash:Requests are not routed to a backend server if its weight is set to 0.Weights do not take effect even if they are not 0, and requests from the sameIP address are routed to the same backend server.
Procedure1. Log in to the management console.
2. In the upper left corner of the page, click and select the desired region andproject.
3. Hover on in the upper left corner to display Service List and chooseNetwork > Elastic Load Balancing.
4. Locate the load balancer and click its name.5. Click Backend Server Groups, locate the backend server group and then the
server, and click the number in the Weight column to set the server weight.6. Click OK.
Elastic Load BalancingUser Guide 6 Backend Server
2021-12-08 118

7 Health Check
7.1 OverviewELB periodically sends requests to backend servers to check whether they canprocess requests. If a backend server is detected as unhealthy, the load balancerstops routing requests to it. After the backend server recovers, the load balancerwill resume routing requests to it.
If backend servers have to handle large number of requests, frequent healthchecks may overload the backend servers and cause them to respond slowly. Inthis case, it is recommended that you prolong the health check interval or use TCPor UDP instead of HTTP. If you choose to disable the health check function,requests may be routed to unhealthy servers, and service interruptions may occur.
PrerequisitesIf HTTP health checks are configured, HTTP/1.1 has been used for TCP or UDPlisteners of both types of load balancers as well as HTTP or HTTPS listeners ofshared load balancers, and that HTTP/1.0 has been used only for HTTP or HTTPSlisteners of dedicated load balancers.
TCP Health CheckFor TCP, HTTP, and HTTPS listeners, you can use TCP to initiate three-wayhandshakes to obtain the statuses of backend servers.
Elastic Load BalancingUser Guide 7 Health Check
2021-12-08 119

Figure 7-1 TCP health check
The TCP health check process is as follows:
1. ELB sends an SYN packet to the backend server (in the format of Private IPaddress+Health check port).
2. The backend server returns an SYN-ACK packet.
3. If ELB does not receive the SYN-ACK packet within the health check timeoutduration, the backend server is declared unhealthy. Then, ELB sends an RSTpacket to the backend server to terminate the TCP connection.
4. If ELB receives the SYN-ACK packet from the backend server within the healthcheck timeout duration, it sends an ACK packet to the backend server anddeclares that the backend server is healthy. After that, ELB sends an RSTpacket to the backend server to terminate the TCP connection.
NO TICE
After a successful TCP three-way handshake, an RST packet will be sent to closethe TCP connection. The application on the backend server may consider thispacket a connection error and reply with a message, for example, "Connectionreset by peer". In this case, take either of the following actions:
● Configure an HTTP health check.
● Have the backend server ignore the connection error.
UDP Health Check
For UDP listeners, ELB sends ICMP and UDP probe packets to backend servers tocheck their health.
Elastic Load BalancingUser Guide 7 Health Check
2021-12-08 120

Figure 7-2 UDP health check
The UDP health check process is as follows:
1. ELB sends an ICMP Echo Request packet to the backend server.2. If ELB does not receive the ICMP Echo Reply packet within the health check
timeout duration, the backend server is declared unhealthy.3. If ELB receives the ICMP Echo Reply packet within the health check timeout
duration, it sends a UDP probe packet to the backend server.4. If ELB does not receive an ICMP Port Unreachable error within the health
check timeout duration, the backend server is declared healthy. If ELB receivesan ICMP Port Unreachable error, the backend server is declared unhealthy.
HTTP Health CheckYou can also configure HTTP health checks for TCP, HTTP, or HTTPS listeners. ELBuses HTTP GET requests to obtain the health statuses of backend servers. ForHTTPS listeners, ELB offloads the SSL/TLS encryption and decryption processingfrom backend servers and uses HTTP to communicate with backend servers bydefault.
Figure 7-3 HTTP health check
Elastic Load BalancingUser Guide 7 Health Check
2021-12-08 121

The HTTP health check process is as follows:
1. ELB sends an HTTP GET request to the backend server (in format of {PrivateIP address}:{Health check port}/{Health check path}). (You can specify adomain name when configuring a health check.)
2. The backend server returns an HTTP status code to ELB.3. If ELB receives the status code within the health check timeout duration, it
compares the status code with the preset status code. If the status codes arethe same, the backend server is declared healthy.
4. If ELB does not receive any response from the backend server within thehealth check timeout duration, the backend server is declared unhealthy.
Health Check Time WindowHealth checks greatly improve service availability. However, if health checks aretoo frequent, service availability will be compromised. To avoid the impact, ELBdeclares a backend server healthy or unhealthy after several consecutive healthchecks. There is a time window for the status of a backend server to changebetween healthy and unhealthy.
Take shared load balancers as an example. The health check time window isdetermined by the following factors:
● Interval: indicates how often health checks are performed.● Timeout: indicates how long the load balancer waits for the response from
the backend server.● Maximum retries: indicates the maximum number of consecutive health
checks after which the backend server is declared healthy.
The following is a formula for you to calculate the health check time window:
● Time window for a backend server to be considered healthy = Timeout xMaximum retries + Interval x (Maximum retries – 1)
● Time window for a backend server to be considered unhealthy = Timeout x 3+ Interval x (3 – 1)The backend server can be declared unhealthy when three consecutive healthchecks detect it unhealthy, regardless of the value configured for MaximumRetries.
As shown in Figure 7-4, if the health check interval is 4s, the health check timeoutduration is 2s, and 3 health check retries are performed, the time window for abackend server to be considered unhealthy is calculated as follows: 2 x 3 + 4 x (3 –1) = 14s.
Elastic Load BalancingUser Guide 7 Health Check
2021-12-08 122

Figure 7-4 Health check time window
Rectifying an Unhealthy Backend ServerIf a backend server is detected unhealthy, see How Do I Troubleshoot anUnhealthy Backend Server?
7.2 Configuring a Health Check
ScenariosYou can configure a health check when you add a listener. If you have no specialrequirements, retain the default settings.
Function Description● The health check protocol can be different from the backend protocol.● To reduce the CPU usage of backend servers, you can use TCP for health
checks. If you want to use HTTP for health checks, use static files to obtainthe health statuses.
● You can increase the health check interval to reduce the health checkfrequency.
● After you enable health checks, the load balancer immediately checks thehealth of backend servers and will start routing requests over newconnections. If a backend server becomes unhealthy, the load balancer willstop routing traffic to it. However, request routing over establishedconnections is not affected. To ensure service availability, you can enablehealth checks during off-peak hours.
Elastic Load BalancingUser Guide 7 Health Check
2021-12-08 123

Configuring a Health Check for a Dedicated Load Balancer1. Log in to the management console.
2. In the upper left corner of the page, click and select the desired region andproject.
3. Hover on in the upper left corner to display Service List and chooseNetwork > Elastic Load Balancing.
4. Locate the load balancer and click its name.5. Click Backend Server Groups, locate the backend server group, and click its
name.6. In the Basic Information area, click Configure next to Health Check.7. In the Configure Health Check dialog box, enable the health check.
Configure the parameters based on Table 7-1.
Table 7-1 Parameters for configuring a health check
Parameter Description ExampleValue
EnableHealthCheck
Specifies whether to enable health checks. N/A
Protocol ● Specifies the protocol used by the loadbalancer to perform health checks onbackend servers. You can select TCP,HTTP, or HTTPS. A selected protocolcannot be changed.
● If the frontend protocol is UDP, the healthcheck protocol is UDP by default.
HTTP
Advanced Settings
Interval (s) Specifies the maximum time between healthchecks, in seconds.The interval ranges from 1 to 50.
5
Timeout (s) Specifies the maximum time required forwaiting for a response from the healthcheck, in seconds. The timeout durationranges from 1 to 50.
3
Check Path Specifies the destination path for healthchecks. Configure this parameter only if youhave set Protocol to HTTP. The path cancontain 1 to 80 characters and must startwith a slash (/).
/index.html
MaximumRetries
Specifies the maximum number of healthcheck retries. The value ranges from 1 to 10.
3
Elastic Load BalancingUser Guide 7 Health Check
2021-12-08 124

8. Click Finish.
Configuring a Health Check for a Shared Load Balancer1. Log in to the management console.
2. In the upper left corner of the page, click and select the desired region andproject.
3. Hover on in the upper left corner to display Service List and chooseNetwork > Elastic Load Balancing.
4. Locate the load balancer and click its name.5. Click Backend Server Groups, locate the backend server group, and click its
name.6. Click More in the Operation column.7. Select Configure Health Check from the drop-down list.8. In the Configure Health Check dialog box, configure the parameters based
on Table 7-2.
Table 7-2 Parameters for configuring a health check
Parameter Description ExampleValue
EnableHealthCheck
Specifies whether to enable health checks. N/A
Protocol ● Specifies the protocol used by the loadbalancer to perform health checks onbackend servers. You can select either TCPor HTTP. A selected protocol cannot bechanged.
● If the frontend protocol is UDP, the healthcheck protocol is UDP by default.
HTTP
DomainName
Specifies the domain name that will be usedfor health checks.The domain name can contain digits, letters,hyphens (-), and periods (.), and must startwith a digit or letter. The field is left blank bydefault and is available only when the healthcheck protocol is HTTP.
www.elb.com
Port Specifies the port used by the load balancerto perform health checks on backend servers.The port number ranges from 1 to 65535.NOTE
This parameter is optional. If you do not specify ahealth check port, a port of the backend server willbe used for health checks by default. If you specifya port, it will be used for health checks.
80
Elastic Load BalancingUser Guide 7 Health Check
2021-12-08 125

Parameter Description ExampleValue
Advanced Settings
Interval (s) Specifies the maximum time between healthchecks, in seconds.The interval ranges from 1 to 50.
5
Timeout (s) Specifies the maximum time required forwaiting for a response from the health check,in seconds. The timeout duration ranges from1 to 50.
3
Check Path Specifies the destination path for healthchecks. Configure this parameter only if youhave set Protocol to HTTP. The path cancontain 1 to 80 characters and must startwith a slash (/).
/index.html
MaximumRetries
Specifies the maximum number of healthcheck retries. The value ranges from 1 to 10.
3
9. Click Finish.
7.3 Disabling a Health Check
Scenarios
If you do not require health check, you can disable it when you add listeners. Ifyou have already added listeners with health check enabled, you can also disableit when you modify the listeners.
After health check is disabled, the load balancer will consider all backend servershealthy and will still route requests to a backend server even if this serverbecomes faulty or is working abnormally. As a result, applications on this serverare inaccessible. If this happens, ensure that the ports used by the backend serversare normal. You are advised not to disable health checks unless necessary.
Procedure1. Log in to the management console.
2. In the upper left corner of the page, click and select the desired region andproject.
3. Hover on in the upper left corner to display Service List and chooseNetwork > Elastic Load Balancing.
4. Locate the load balancer and click its name.
5. Click Backend Server Groups, locate the backend server group, and click itsname.
Elastic Load BalancingUser Guide 7 Health Check
2021-12-08 126

6. In the Basic Information area, click Configure next to Health Check.
7. In the Configure Health Check dialog box, disable the health check.
8. Click OK.
Elastic Load BalancingUser Guide 7 Health Check
2021-12-08 127

8 Certificate
8.1 OverviewELB allows you to create two types of certificates on a load balancer: servercertificate and CA certificate. If you need an HTTPS listener, you need to bind aserver certificate to it. To enable mutual authentication, you also need to bind aCA certificate to the listener.● Server certificate: used for SSL handshake negotiations if an HTTPS listener
is used. Both the certificate content and private key are required.● CA certificate: issued by a certificate authority (CA) and used to verify the
certificate issuer. If HTTPS mutual authentication is required, HTTPSconnections can be established only when the client provides a certificateissued by a specific CA.
Precautions● A certificate can be used by multiple load balancers but only needs to be
uploaded to each load balancer once.● If a certificate is used for SNI, you need to specify a domain name for the
certificate, and the domain name must be the same as that in the certificate.● For each certificate type, a listener can have only one certificate by default,
but a certificate can be bound to more than one listener. If SNI is enabled forthe listener, multiple server certificates can be bound.
● Only original certificates are supported. That is to say, you cannot encryptyour certificates.
● You do not need to configure certificates for both the shared load balancerand the associated backend servers. If you configure a certificate for backendservers, HTTPS listeners cannot be added to the load balancer. In this case,you can add a TCP listener to transparently transmit HTTPS traffic to backendservers. Exclusive load balancers do not have this restriction.
● You can use self-signed certificates. However, note that self-signed certificatespose security risks. Therefore, it is recommended that you use certificatesissued by third parties.
● ELB supports certificates only in PEM format. If you have a certificate in anyother format, you must convert it to a PEM-encoded certificate.
Elastic Load BalancingUser Guide 8 Certificate
2021-12-08 128

● Currently, ELB does not check certificate validity.● If a certificate has expired, you need to manually replace or delete it.
8.2 Certificate and Private Key Format
Certificate FormatYou can copy and paste the certificate body to create a certificate or directlyupload the certificate.
A certificate issued by the Root CA is unique, and no additional certificates arerequired. The configured site is considered trustable by access devices such as abrowser.
The certificate body must meet the following requirements:
● The content starts with -----BEGIN CERTIFICATE----- and ends with -----ENDCERTIFICATE-----.
● Each row contains 64 characters except the last row.● There are no empty rows.
The following is an example:
-----BEGIN CERTIFICATE-----MIIDIjCCAougAwIBAgIJALV96mEtVF4EMA0GCSqGSIb3DQEBBQUAMGoxCzAJBgNVBAYTAnh4MQswCQYDVQQIEwJ4eDELMAkGA1UEBxMCeHgxCzAJBgNVBAoTAnh4MQswCQYDVQQLEwJ4eDELMAkGA1UEAxMCeHgxGjAYBgkqhkiG9w0BCQEWC3h4eEAxNjMuY29tMB4XDTE3MTExMzAyMjYxM1oXDTIwMTExMjAyMjYxM1owajELMAkGA1UEBhMCeHgxCzAJBgNVBAgTAnh4MQswCQYDVQQHEwJ4eDELMAkGA1UEChMCeHgxCzAJBgNVBAsTAnh4MQswCQYDVQQDEwJ4eDEaMBgGCSqGSIb3DQEJARYLeHh4QDE2My5jb20wgZ8wDQYJKoZIhvcNAQEBBQADgY0AMIGJAoGBAMU832iM+d3FILgTWmpZBUoYcIWVcAAYE7FsZ9LNerOyjJpyi256oypdBvGs9JAUBN5WaFk81UQx29wAyNixX+bKa0DBWpUDqr84V1f9vdQc75v9WoujcnlKszzpV6qePPC7igJJpu4QOI362BrWzJCYQbg4Uzo1KYBhLFxl0TovAgMBAAGjgc8wgcwwHQYDVR0OBBYEFMbTvDyvE2KsRy9zPq/JWOjovG+WMIGcBgNVHSMEgZQwgZGAFMbTvDyvE2KsRy9zPq/JWOjovG+WoW6kbDBqMQswCQYDVQQGEwJ4eDELMAkGA1UECBMCeHgxCzAJBgNVBAcTAnh4MQswCQYDVQQKEwJ4eDELMAkGA1UECxMCeHgxCzAJBgNVBAMTAnh4MRowGAYJKoZIhvcNAQkBFgt4eHhAMTYzLmNvbYIJALV96mEtVF4EMAwGA1UdEwQFMAMBAf8wDQYJKoZIhvcNAQEFBQADgYEAASkC/1iwiALa2RU3YCxqZFEEsZZvQxikrDkDbFeoa6Tk49Fnb1f7FCW6PTtY3HPWl5ygsMsSy0Fi3xp3jmuIwzJhcQ3tcK5gC99HWp6Kw37RL8WoB8GWFU0Q4tHLOjBIxkZROPRhH+zMIrqUexv6fsb3NWKhnlfh1Mj5wQE4Ldo=-----END CERTIFICATE-----
Private Key FormatWhen creating a server certificate, you also need a private key. You can copy andpaste the private key content or directly upload the private key in the requiredformat.
Private keys must be unencrypted and their content must meet the followingrequirements:
● The content must start with -----BEGIN RSA PRIVATE KEY----- and end with-----END RSA PRIVATE KEY-----.
● There are no empty rows. Each row must contain 64 characters except the lastrow.
The following is an example:
Elastic Load BalancingUser Guide 8 Certificate
2021-12-08 129

-----BEGIN RSA PRIVATE KEY-----MIICXQIBAAKBgQDFPN9ojPndxSC4E1pqWQVKGHCFlXAAGBOxbGfSzXqzsoyacotueqMqXQbxrPSQFATeVmhZPNVEMdvcAMjYsV/mymtAwVqVA6q/OFdX/b3UHO+b/VqLo3J5SrM86Veqnjzwu4oCSabuEDiN+tga1syQmEG4OFM6NSmAYSxcZdE6LwIDAQABAoGBAJvLzJCyIsCJcKHWL6onbSUtDtyFwPViD1QrVAtQYabF14g8CGUZG/9fgheuTXPtTDcvu7cZdUArvgYW3I9F9IBb2lmF3a44xfiAKdDhzr4DK/vQhvHPuuTeZA41r2zp8Cu+Bp40pSxmoAOK3B0/peZAka01Ju7c7ZChDWrxleHZAkEA/6dcaWHotfGSeW5YLbSms3f0m0GH38nRl7oxyCW6yMIDkFHURVMBKW1OhrcuGo8u0nTMi5IH9gRg5bH8XcujlQJBAMWBQgzCHyoSeryD3TFieXIFzgDBw6Ve5hyMjUtjvgdVKoxRPvpOkclc39QHP6Dm2wrXXHEej+9RILxBZCVQNbMCQQC42i+Ut0nHvPuXN/UkXzomDHdeh1ySsOAO4H+8Y6OSI87l3HUrByCQ7stX1z3L0HofjHqV9Koy9emGTFLZEzSdAkB7Ei6cUKKmztkYe3rr+RcATEmwAw3tEJOHmrW5ErApVZKr2TzLMQZ7WZpIPzQRCYnY2ZZLDuZWFFG3vW+wKKktAkAaQ5GNzbwkRLpXF1FZFuNF7erxypzstbUmU/31b7tSi5LmxTGKL/xRYtZEHjya4Ikkkgt40q1MrUsgIYbFYMf2-----END RSA PRIVATE KEY-----
8.3 Converting Certificate Formats
Scenarios
ELB supports certificates only in PEM format. If you have a certificate in any otherformat, you must convert it to a PEM-encoded certificate. There are somecommon methods for converting a certificate from any other format to PEM.
From DER to PEM
The DER format is usually used on a Java platform.
Run the following command to convert the certificate format:
openssl x509 -inform der -in certificate.cer -out certificate.pem
Run the following command to convert the private key format:
openssl rsa -inform DER -outform PEM -in privatekey.der -out privatekey.pem
From P7B to PEM
The P7B format is usually used by Windows Server and Tomcat.
Run the following command to convert the certificate format:
openssl pkcs7 -print_certs -in incertificate.p7b -out outcertificate.cer
From PFX to PEM
The PFX format is usually used by Windows Server.
Run the following command to convert the certificate format:
openssl pkcs12 -in certname.pfx -nokeys -out cert.pem
Run the following command to convert the private key format:
openssl pkcs12 -in certname.pfx -nocerts -out key.pem -nodes
Elastic Load BalancingUser Guide 8 Certificate
2021-12-08 130

8.4 Creating, Modifying, or Deleting a Certificate
ScenariosTo enable authentication for securing data transmission over HTTPS, you cancreate certificates for load balancers. You can also modify and delete certificates.
NO TE
● A certificate can be bound to only one type of load balancer. Ensure that you haveselected the correct type.
Creating a Certificate1. Log in to the management console.
2. In the upper left corner of the page, click and select the desired region andproject.
3. Hover on in the upper left corner to display Service List and chooseNetwork > Elastic Load Balancing.
4. In the navigation pane on the left, choose Certificates.5. Click Create Certificate. In the Create Certificate dialog box, configure the
parameters.– Certificate Name– Certificate Type
▪ Server certificate: used for SSL handshake negotiations if an HTTPSlistener is used. Both the certificate content and private key arerequired.
▪ CA certificate: issued by a certificate authority (CA) and used toverify the certificate issuer. If HTTPS mutual authentication isrequired, HTTPS connections can be established only when the clientprovides a certificate issued by a specific CA.
– Certificate: The content must be in PEM format.Click Upload and select the certificate to be uploaded. Ensure that yourbrowser is of the latest version.The format of the certificate body is as follows:-----BEGIN CERTIFICATE-----Base64–encoded certificate-----END CERTIFICATE-----
– Private KeyClick Upload and select the private key to be uploaded. Ensure that yourbrowser is of the latest version.Private Key: This must be an unencrypted private key. The format is asfollows:-----BEGIN PRIVATE KEY-----[key]-----END PRIVATE KEY-----
Elastic Load BalancingUser Guide 8 Certificate
2021-12-08 131
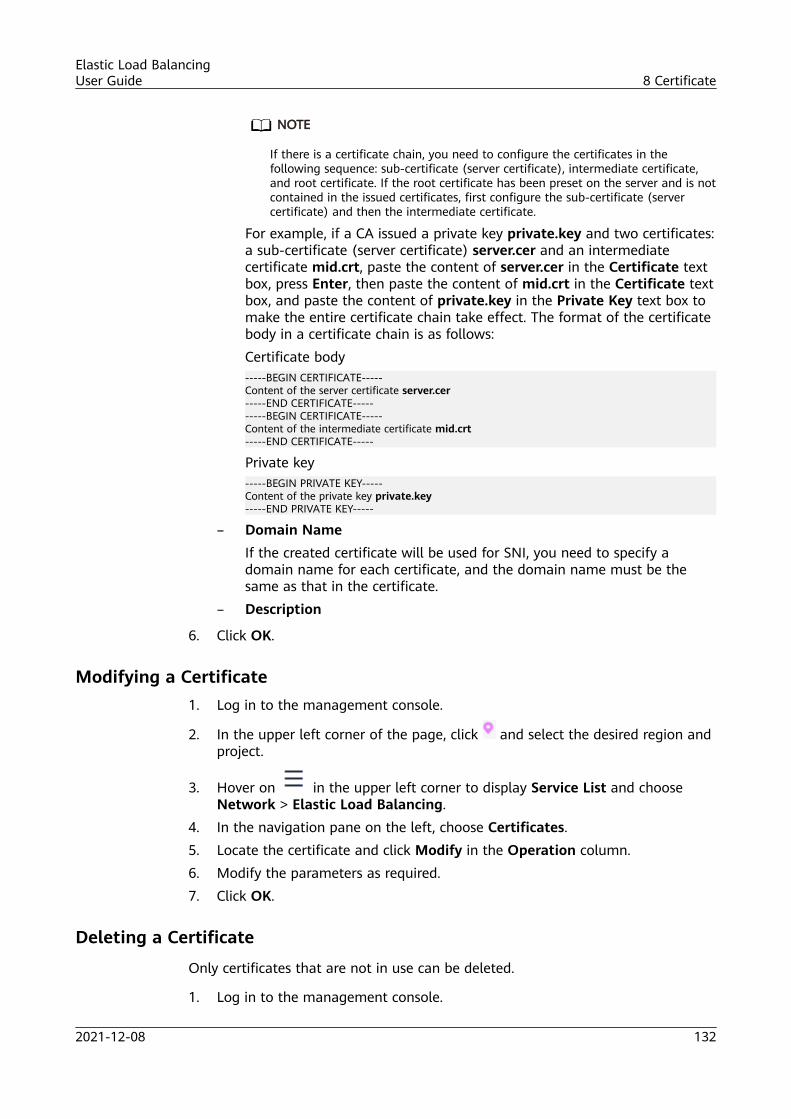
NO TE
If there is a certificate chain, you need to configure the certificates in thefollowing sequence: sub-certificate (server certificate), intermediate certificate,and root certificate. If the root certificate has been preset on the server and is notcontained in the issued certificates, first configure the sub-certificate (servercertificate) and then the intermediate certificate.
For example, if a CA issued a private key private.key and two certificates:a sub-certificate (server certificate) server.cer and an intermediatecertificate mid.crt, paste the content of server.cer in the Certificate textbox, press Enter, then paste the content of mid.crt in the Certificate textbox, and paste the content of private.key in the Private Key text box tomake the entire certificate chain take effect. The format of the certificatebody in a certificate chain is as follows:Certificate body-----BEGIN CERTIFICATE-----Content of the server certificate server.cer-----END CERTIFICATE----------BEGIN CERTIFICATE-----Content of the intermediate certificate mid.crt-----END CERTIFICATE-----
Private key-----BEGIN PRIVATE KEY-----Content of the private key private.key-----END PRIVATE KEY-----
– Domain NameIf the created certificate will be used for SNI, you need to specify adomain name for each certificate, and the domain name must be thesame as that in the certificate.
– Description
6. Click OK.
Modifying a Certificate1. Log in to the management console.
2. In the upper left corner of the page, click and select the desired region andproject.
3. Hover on in the upper left corner to display Service List and chooseNetwork > Elastic Load Balancing.
4. In the navigation pane on the left, choose Certificates.5. Locate the certificate and click Modify in the Operation column.6. Modify the parameters as required.7. Click OK.
Deleting a Certificate
Only certificates that are not in use can be deleted.
1. Log in to the management console.
Elastic Load BalancingUser Guide 8 Certificate
2021-12-08 132

2. In the upper left corner of the page, click and select the desired region andproject.
3. Hover on in the upper left corner to display Service List and chooseNetwork > Elastic Load Balancing.
4. In the navigation pane on the left, choose Certificates.5. Locate the certificate and click Delete in the Operation column.6. Click Yes.
8.5 Replacing a Certificate
ScenariosYou need to bind a certificate when you add an HTTPS listener to a load balancer.If the certificate used by the load balancer has expired or needs to be replaceddue to other reasons, you can replace the certificate.
If the certificate is also used by other services such as WAF, replace the certificateon all these services to prevent service unavailability.
NO TE
Replacing certificates and private keys does not affect your applications.
PrerequisitesYou have created a certificate by following the instructions in Creating aCertificate.
Binding a CertificateYou can bind certificates when you add an HTTPS listener. For details, see Addinga Listener.
Replacing a Certificate1. Log in to the management console.
2. In the upper left corner of the page, click and select the desired region andproject.
3. Hover on in the upper left corner to display Service List and chooseNetwork > Elastic Load Balancing.
4. Locate the load balancer and click its name.5. Click Listeners.
– Shared load balancers: Locate the target listener and click on theright of its name. In the Modify Listener dialog box, select the certificate.
– Dedicated load balancers: Locate the listener, click on the right of itsname, and click Modify Listener. In the Modify Listener dialog box,select the certificate.
Elastic Load BalancingUser Guide 8 Certificate
2021-12-08 133

6. Select a server certificate and click Next.7. In the Configure Backend Server Group dialog box, click Finish.
8.6 Querying a Listener by Certificate
ScenariosYou need to quickly view details of the listener to which a certificate is bound.
Procedure1. Log in to the management console.
2. In the upper left corner of the page, click and select the desired region andproject.
3. Hover on in the upper left corner to display Service List and chooseNetwork > Elastic Load Balancing.
4. In the navigation pane on the left, choose Certificates.5. In the certificate list, click the listener name in the Listener (Frontend
Protocol/Port) column to view its details.If there are more than 5 listeners, no listener is displayed in the Listener(Frontend Protocol/Port) column. Click View All. On the displayed page,click Listeners, locate the listener, and click its name to view it details.
Elastic Load BalancingUser Guide 8 Certificate
2021-12-08 134
9 Tag
ScenariosIf you have a large number of cloud resources, you can assign different tags to theresources to quickly identify them and use these tags to easily manage yourresources.
Adding a Tag to a Load BalancerYou can add a tag to a load balancer in either of the following scenarios:
● Add a tag when you create a load balancer.For details about the procedure and parameters, see Creating a Shared LoadBalancer.
● Add a tag to an existing load balancer.
a. Log in to the management console.
b. In the upper left corner of the page, click and select the desired regionand project.
c. Hover on in the upper left corner to display Service List and chooseNetwork > Elastic Load Balancing.
d. Locate the load balancer and click its name.e. Under Tags, click Add Tag.f. In the Add Tag dialog box, enter a tag key and value and click OK.
NO TE
● A maximum of 20 tags can be added to a load balancer.
● Each tag is a key-value pair, and the tag key is unique.
Adding a Tag to a ListenerYou can add tags when you add listeners.
To add a tag to an existing listener, perform the following steps:
1. Log in to the management console.
Elastic Load BalancingUser Guide 9 Tag
2021-12-08 135

2. In the upper left corner of the page, click and select the desired region andproject.
3. Hover on in the upper left corner to display Service List and chooseNetwork > Elastic Load Balancing.
4. Locate the load balancer and click its name.
5. Click Listeners, locate the listener, and click its name.
6. Under Tags, click Add Tag.
7. In the Add Tag dialog box, enter a tag key and value and click OK.
NO TE
● A maximum of 20 tags can be added to a listener.
● Each tag is a key-value pair, and the tag key is unique.
Modifying a Tag1. Log in to the management console.
2. In the upper left corner of the page, click and select the desired region andproject.
3. Hover on in the upper left corner to display Service List and chooseNetwork > Elastic Load Balancing.
4. Locate the load balancer and click its name.
5. Click Tags, select the tag to be edited, and click Edit in the Operationcolumn. In the Edit Tag dialog box, change the tag value.
NO TE
The tag key cannot be changed.
6. Click OK.
The operations for modifying a listener tag are not detailed here. Refer to theoperations of modifying a load balancer tag.
Deleting a Tag1. Log in to the management console.
2. In the upper left corner of the page, click and select the desired region andproject.
3. Hover on in the upper left corner to display Service List and chooseNetwork > Elastic Load Balancing.
4. Locate the load balancer and click its name.
5. Click Tags, select the tag to be deleted, and click Delete in the Operationcolumn.
6. In the Delete Tag dialog box, click Yes.
Elastic Load BalancingUser Guide 9 Tag
2021-12-08 136

The operations for deleting a listener tag are not detailed here. Refer to theoperations of deleting a load balancer tag.
Elastic Load BalancingUser Guide 9 Tag
2021-12-08 137
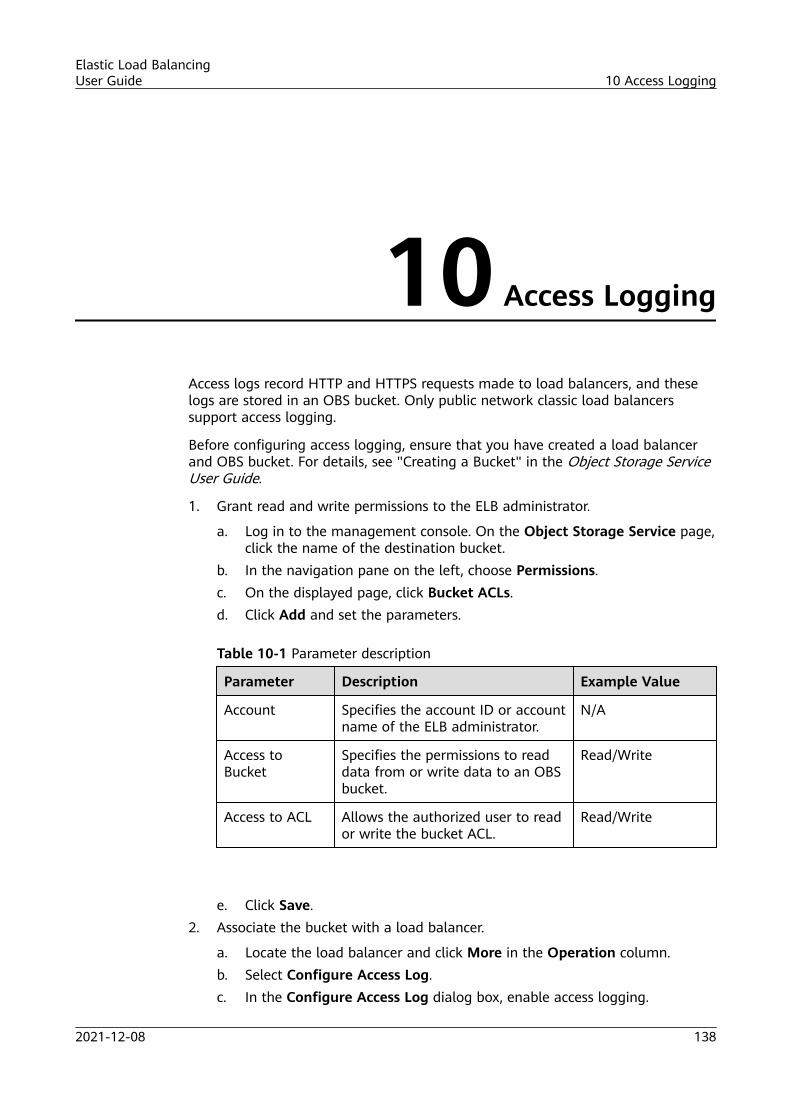
10 Access Logging
Access logs record HTTP and HTTPS requests made to load balancers, and theselogs are stored in an OBS bucket. Only public network classic load balancerssupport access logging.
Before configuring access logging, ensure that you have created a load balancerand OBS bucket. For details, see "Creating a Bucket" in the Object Storage ServiceUser Guide.
1. Grant read and write permissions to the ELB administrator.
a. Log in to the management console. On the Object Storage Service page,click the name of the destination bucket.
b. In the navigation pane on the left, choose Permissions.c. On the displayed page, click Bucket ACLs.d. Click Add and set the parameters.
Table 10-1 Parameter description
Parameter Description Example Value
Account Specifies the account ID or accountname of the ELB administrator.
N/A
Access toBucket
Specifies the permissions to readdata from or write data to an OBSbucket.
Read/Write
Access to ACL Allows the authorized user to reador write the bucket ACL.
Read/Write
e. Click Save.2. Associate the bucket with a load balancer.
a. Locate the load balancer and click More in the Operation column.b. Select Configure Access Log.c. In the Configure Access Log dialog box, enable access logging.
Elastic Load BalancingUser Guide 10 Access Logging
2021-12-08 138
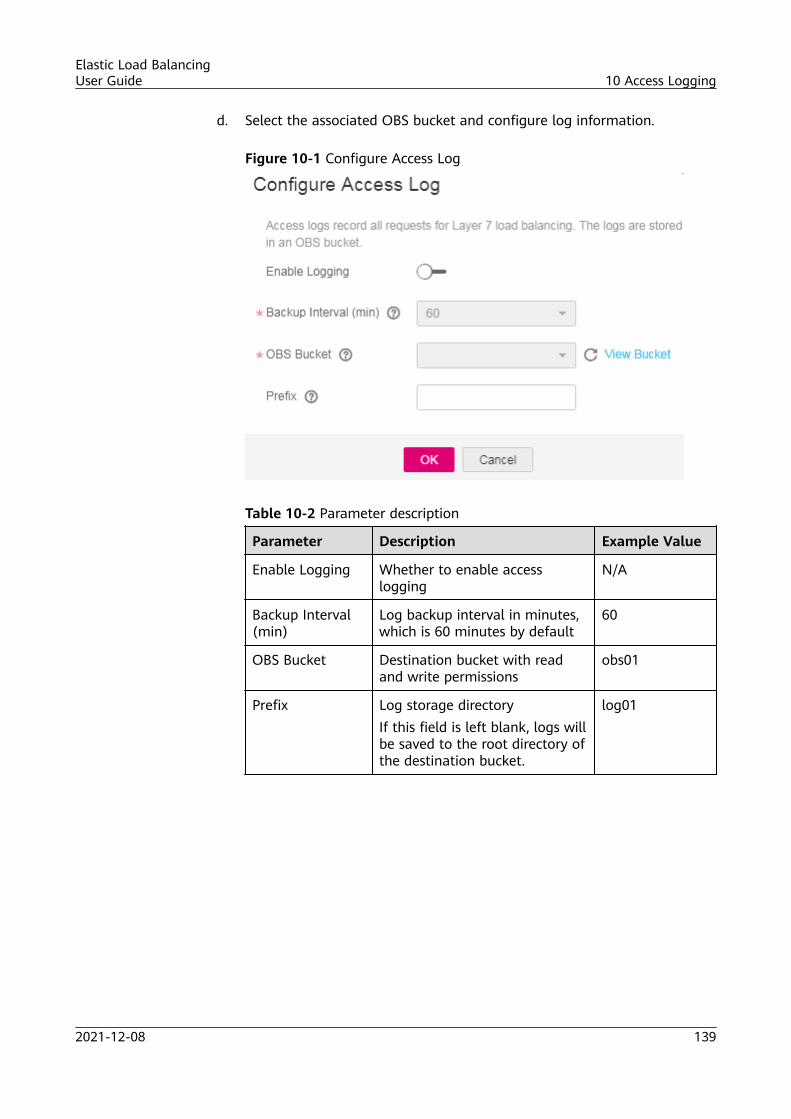
d. Select the associated OBS bucket and configure log information.
Figure 10-1 Configure Access Log
Table 10-2 Parameter description
Parameter Description Example Value
Enable Logging Whether to enable accesslogging
N/A
Backup Interval(min)
Log backup interval in minutes,which is 60 minutes by default
60
OBS Bucket Destination bucket with readand write permissions
obs01
Prefix Log storage directoryIf this field is left blank, logs willbe saved to the root directory ofthe destination bucket.
log01
Elastic Load BalancingUser Guide 10 Access Logging
2021-12-08 139

11 Monitoring
11.1 Monitoring Metrics
OverviewThis section describes the namespace, the metrics that can be monitored by CloudEye, and dimensions of these metrics. You can use APIs provided by Cloud Eye toquery the metrics of a monitored object and generated alarms.
NamespaceSYS.ELB
MetricsMetric ID Name Description Valu
eMonitoredObject
MonitoringPeriod(RawData)
m1_cps ConcurrentConnections
Load balancing at Layer4: total number of TCPand UDP connectionsfrom the monitoredobject to backend serversLoad balancing at Layer7: total number of TCPconnections from theclients to the monitoredobjectUnit: N/A
≥ 0 Shared loadbalancer orits listener,classic loadbalancer,dedicatedloadbalancer orits listener
1minute
Elastic Load BalancingUser Guide 11 Monitoring
2021-12-08 140

Metric ID Name Description Value
MonitoredObject
MonitoringPeriod(RawData)
m2_act_conn
ActiveConnections
Number of TCP and UDPconnections in theESTABLISHED statebetween the monitoredobject and backendserversYou can run the followingcommand to view theconnections (bothWindows and Linuxservers):netstat -an
Unit: N/A
≥ 0
m3_inact_conn
InactiveConnections
Number of TCPconnections between themonitored object andbackend servers exceptthose in theESTABLISHED stateYou can run the followingcommand to view theconnections (bothWindows and Linuxservers):netstat -an
Unit: N/A
≥ 0
m4_ncps NewConnections
Number of TCP and UDPconnections establishedbetween clients and themonitored object persecondUnit: N/A
≥ 0/second
m5_in_pps
IncomingPackets
Number of packetsreceived by themonitored object persecondUnit: Packet/s
≥ 0/second
m6_out_pps
OutgoingPackets
Number of packets sentfrom the monitoredobject per secondUnit: Packet/s
≥ 0/second
Elastic Load BalancingUser Guide 11 Monitoring
2021-12-08 141

Metric ID Name Description Value
MonitoredObject
MonitoringPeriod(RawData)
m7_in_Bps
Inbound Rate
Traffic used for accessingthe monitored objectfrom the Internet persecondUnit: byte/s
≥ 0bytes/s
m8_out_Bps
OutboundRate
Traffic used by themonitored object toaccess the Internet persecondUnit: byte/s
≥ 0bytes/s
m9_abnormal_servers
UnhealthyServers
Number of unhealthybackend serversassociated with themonitored objectUnit: N/A
≥ 0 Shared loadbalancer,classic loadbalancer, ordedicatedloadbalancer
1minute
ma_normal_servers
HealthyServers
Number of healthybackend serversassociated with themonitored objectUnit: N/A
≥ 0
Layer 7 metrics: These metrics are available only when the frontendprotocol is HTTP or HTTPS.
mb_l7_qps
Layer-7QueryRate
Number of requests themonitored object receivesper secondUnit: Query/s
≥ 0/second
Shared loadbalancer orits listener,dedicatedloadbalancer orits listener
1minute
mc_l7_http_2xx
2xxStatusCodes
Number of 2xx statuscodes returned by themonitored objectUnit: Count/s
≥ 0/second
md_l7_http_3xx
3xxStatusCodes
Number of 3xx statuscodes returned by themonitored objectUnit: Count/s
≥ 0/second
me_l7_http_4xx
4xxStatusCodes
Number of 4xx statuscodes returned by themonitored objectUnit: Count/s
≥ 0/second
Elastic Load BalancingUser Guide 11 Monitoring
2021-12-08 142

Metric ID Name Description Value
MonitoredObject
MonitoringPeriod(RawData)
mf_l7_http_5xx
5xxStatusCodes
Number of 5xx statuscodes returned by themonitored objectUnit: Count/s
≥ 0/second
m10_l7_http_other_status
OtherStatusCodes
Number of status codesreturned by themonitored object except2xx, 3xx, 4xx, and 5xxstatus codesUnit: Count/s
≥ 0/second
m11_l7_http_404
404NotFound
Number of 404 NotFound status codesreturned by themonitored objectUnit: Count/s
≥ 0/second
m12_l7_http_499
499ClientClosedRequest
Number of 499 ClientClosed Request statuscodes returned by themonitored objectUnit: Count/s
≥ 0/second
m13_l7_http_502
502BadGateway
Number of 502 BadGateway status codesreturned by themonitored objectUnit: Count/s
≥ 0/second
m14_l7_rt AverageLayer-7ResponseTime
Average response time ofthe monitored objectThe response time startswhen the monitoredobject receives requestsfrom the clients and endswhen it returns allresponses to the clients.Unit: ms
≥ 0ms
m15_l7_upstream_4xx
4xxStatusCodes_Backend
Number of 4xx statuscodes returned by themonitored objectUnit: Count/s
≥ 0/second
Shared loadbalancer orits listener,dedicatedload
1minute
Elastic Load BalancingUser Guide 11 Monitoring
2021-12-08 143

Metric ID Name Description Value
MonitoredObject
MonitoringPeriod(RawData)
m16_l7_upstream_5xx
balancer orits listener
5xxStatusCodes_Backend
Number of 5xx statuscodes returned by themonitored objectUnit: Count/s
≥ 0/second
m17_l7_upstream_rt
AverageServerResponseTime
Average response time ofbackend serversThe response time startswhen the monitoredobject routes the requeststo the backend server andends when the monitoredobject receives a responsefrom the backend server.Unit: ms
≥ 0ms
a: If a service is being monitored from multiple dimensions, include all dimensionswhen you use APIs to query the metrics.
● Example of querying a single metric from both dimensions: dim.0=lbaas_instance_id,223e9eed-2b02-4ed2-a126-7e806a6fee1f&dim.1=lbaas_listener_id,3baa7335-8886-4867-8481-7cbba967a917
● Example of querying metrics in batches from both dimensions:"dimensions": [{"name": "lbaas_instance_id","value": "223e9eed-2b02-4ed2-a126-7e806a6fee1f"}{"name": "lbaas_listener_id","value": "3baa7335-8886-4867-8481-7cbba967a917"}],
Dimensions
Key Value
lb_instance_id Specifies the ID of the classic loadbalancer.
lbaas_instance_id Specifies the ID of the shared loadbalancer.
lbaas_listener_id Specifies the ID of the shared loadbalancer listener.
Elastic Load BalancingUser Guide 11 Monitoring
2021-12-08 144

Key Value
lbaas_pool_id Specifies the backend server group ID.
11.2 Setting an Alarm Rule
11.2.1 Adding an Alarm Rule1. Log in to the management console.2. Under Management & Deployment, click Cloud Eye.3. In the navigation pane on the left, choose Alarm Management > Alarm
Rules.4. On the Alarm Rules page, click Create Alarm Rule.
The following describes how to create an alarm rule for a load balancer.
a. Select Elastic Load Balancing for Resource Type.b. For Dimension, select Elastic Load Balancers. In the following
operations, a load balancer is used as an example.c. Set other parameters as required and then click Create.
Once the alarm rule is set and you have enabled the notificationfunction, the system automatically sends you a notification when analarm is generated.
NO TE
For more information about alarm rules of load balancers and listeners, see theCloud Eye User Guide.
11.2.2 Modifying an Alarm Rule1. Log in to the management console.2. Under Management & Deployment, click Cloud Eye.3. In the navigation pane on the left, choose Alarm Management > Alarm
Rules.4. On the Alarm Rules page, locate the alarm rule. In the Operation column,
click More > Modify.
a. Click the name of the alarm rule.b. In the upper right corner of the displayed page, click Modify.c. On the Modify Alarm Rule page, set parameters as prompted.d. Set other parameters as required and then click Modify.
Once the alarm rule is set and you have enabled the notificationfunction, the system automatically sends you a notification when analarm is generated.
NO TE
For more information about alarm rules of load balancers and listeners, see theCloud Eye User Guide.
Elastic Load BalancingUser Guide 11 Monitoring
2021-12-08 145

11.3 Viewing Metrics
ScenariosCloud Eye allows you to monitor your resources, including load balancers.
The transmission of monitoring data takes a while, so the status of each loadbalancer displayed on the Cloud Eye dashboard is not its real-time status. For anewly created load balancer or a newly added listener, you need to wait for about5 minutes to 10 minutes before you can view its metrics.
Prerequisites● The load balancer is running properly.
If backend servers are stopped, faulty, or deleted, no monitoring data isdisplayed.
NO TE
Cloud Eye stops monitoring a load balancer and removes it from the monitored objectlist if its backend servers have been deleted or are in stopped or faulty state for over24 hours. However, the configured alarm rules will not be automatically deleted.
● You have interconnected ELB with Cloud Eye and configured an alarm rule forthe load balancer on the Cloud Eye console.Without alarm rules, there is no monitoring data. For details, see Setting anAlarm Rule.
● If an IAM user wants to view the ELB monitoring data on the Cloud Eyeconsole, the IAM user must be granted the ELB Administrator permission.Otherwise, the IAM user cannot view all monitoring data.
BackgroundIf you set the weight of a backend server to 0, the load balancer will not routetraffic to this server even if it is included in Healthy Servers on the Cloud Eyeconsole.
Procedure1. Log in to the management console.2. Under Management & Deployment, click Cloud Eye.3. In the navigation pane on the left, choose Cloud Service Monitoring >
Elastic Load Balancing.4. Locate the load balancer and click its name.5. On the Monitoring tab page, view the metrics of the load balancer.
Elastic Load BalancingUser Guide 11 Monitoring
2021-12-08 146

12 Auditing
12.1 Key Operations Recorded by CTSYou can use CTS to record operations on ELB for query, auditing, and backtracking.
Table 12-1 lists the operations recorded by CTS.
Table 12-1 ELB operations recorded by CTS
Action Resource Type Trace
Configuring access logs accesslog create access log
Deleting access logs accesslog delete access log
Creating a certificate certificate create certificate
Modifying a certificate certificate update certificate
Deleting a certificate certificate delete certificate
Creating a health check healthmonitor create healthmonitor
Modifying a healthcheck
healthmonitor update healthmonitor
Deleting a health check healthmonitor delete healthmonitor
Adding a forwardingpolicy
l7policy create forwarding policy
Modifying a forwardingpolicy
l7policy update forwarding policy
Deleting a forwardingpolicy
l7policy delete forwarding policy
Adding a forwardingrule
l7rule create forwarding rule
Elastic Load BalancingUser Guide 12 Auditing
2021-12-08 147

Action Resource Type Trace
Modifying a forwardingrule
l7rule update forwarding rule
Deleting a forwardingrule
l7rule delete forwarding rule
Adding a listener listener create listener
Modifying a listener listener update listener
Deleting a listener listener delete listener
Creating a loadbalancer
loadbalancer create loadbalancer
Modifying a loadbalancer
loadbalancer update loadbalancer
Deleting a loadbalancer
loadbalancer delete loadbalancer
Adding a backendserver
member add backend ecs
Modifying a backendserver
member update backend ecs
Removing a backendserver
member remove backend ecs
Creating a backendserver group
pool create backend member group
Modifying a backendserver group
pool update backend membergroup
Deleting a backendserver group
pool delete backend member group
12.2 Viewing Traces
ScenariosCTS records the operations performed on ELB and allows you to view theoperation records of the last seven days on the CTS console. To query theserecords, perform the following operations.
Procedure1. Log in to the management console.
2. In the upper left corner of the page, click and select the desired region andproject.
Elastic Load BalancingUser Guide 12 Auditing
2021-12-08 148

3. Under Management & Deployment, click Cloud Trace Service.4. In the navigation pane on the left, choose Trace List.5. Specify the filters used for querying traces. The following filters are available:
Figure 12-1 Filters
– Trace Type, Trace Source, Resource Type, and Search BySelect a filter from the drop-down list.If you select Trace name for Search By, you need to select a specifictrace name.If you select Resource ID for Search By, select or enter a specific resourceID.If you select Resource name for Search By, select or enter a specificresource name.
– Operator: Select a specific operator (at the user level rather than thetenant level).
– Trace Status: Available options include All trace statuses, Normal,Warning, and Incident. You can only select one of them.
– Time range: You can query traces generated at any time range of the lastseven days.
6. Click on the left of the required trace to expand its details.
Figure 12-2 Expanding trace details
7. Click View Trace in the Operation column to view trace details.
Elastic Load BalancingUser Guide 12 Auditing
2021-12-08 149

Figure 12-3 View Trace
For details about key fields in the trace, see the Cloud Trace Service UserGuide.
Elastic Load BalancingUser Guide 12 Auditing
2021-12-08 150

13 Load Balancer Migration
13.1 Migrating from Classic Load Balancers to SharedLoad Balancers
ScenariosClassic load balancers are no longer provided. It is recommended that you useshared load balancers instead because they provide comprehensive Layer 7 loadbalancing and better forwarding performance.
PrerequisitesYou have the Tenant Administrator permission.
Impacts on Traffic RoutingTraffic routing over persistent connections will be interrupted during migrationand rollback. For the impact on traffic routing over short connections, see thefollowing table.
Elastic Load BalancingUser Guide 13 Load Balancer Migration
2021-12-08 151

Table 13-1 Impact on traffic routing over short connections
Scenario DuringMigration
Before FinishingMigration
Rollback
Migratinga privatenetworkloadbalancer
Not interrupted On a client that is onthe same subnet as theload balancer, run thearping -b Private IPaddress of the classicload balancer commandto refresh ARP entriesto ensure servicecontinuity.If ARP entries are notrefreshed, traffic fromthis client will beinterrupted. Theinterruption duration isthe ARP aging period,which ranges from 30sto 300s, depending onparameter settings ofthe client.NOTE
The private IP address ofthe classic load balanceris bound to the sharedload balancer.
If ARP entries arenot refreshed, trafficfrom the client isinterrupted. Theinterruptionduration is the ARPaging period, whichranges from 30s to300s, depending onparameter settingsof the client.To refresh ARPentries and shortenthe interruptionduration to a fewseconds, run thearping -b Private IPaddress of theclassic load balancercommand on theclient.
Migratinga publicnetworkloadbalancerwith theEIPchanged
Not interrupted Before you click FinishMigration, ensure thatthe domain name hasbeen mapped to thenew EIP of the newlycreated shared loadbalancer.If the new EIP has notbeen configured, trafficis still routed by theclassic load balancer.After you click FinishMigration, trafficrouting will beinterrupted.
Before you click RollBack, map thedomain name to theEIP of the classicload balancer.If the EIP is notconfigured, traffic isstill routed by theshared loadbalancer. After youclick FinishMigration, trafficrouting will beinterrupted.
Elastic Load BalancingUser Guide 13 Load Balancer Migration
2021-12-08 152

Scenario DuringMigration
Before FinishingMigration
Rollback
Migratinga publicnetworkloadbalancerwithoutchangingthe EIP
After the sharedload balancer iscreated, trafficwill beinterrupted forabout 5s, duringwhich the EIP isreleased from theclassic publicnetwork loadbalancer andbound to theshared loadbalancer.
Not interrupted Not interrupted
Migration ProcessThe following are migration processes for three scenarios:
● Migrating a private network load balancer
Elastic Load BalancingUser Guide 13 Load Balancer Migration
2021-12-08 153

Figure 13-1 Migration process
● Migrating a public network load balancer with the EIP changed
Elastic Load BalancingUser Guide 13 Load Balancer Migration
2021-12-08 154

Figure 13-2 Migration process
● Migrating a public network load balancer without changing the EIP
Elastic Load BalancingUser Guide 13 Load Balancer Migration
2021-12-08 155

Figure 13-3 Migration process
Migrating a Classic Load Balancer1. Log in to the management console.
2. In the upper left corner of the page, click and select the desired region andproject.
3. Hover on in the upper left corner to display Service List and chooseNetwork > Elastic Load Balancing.
4. In the classic load balancer list, locate the load balancer you want to migrateand choose More > Migrate.
5. Check whether the load balancer to be migrated is a private network loadbalancer.– If it is a private network load balancer, go to 6.– If it is not a private network load balancer, go to 7.
6. Run command arping -b Private IP address of the classic load balancer on theclient that is on the same subnet as the load balancer to update the ARPentries. Then, go to 11.
Elastic Load BalancingUser Guide 13 Load Balancer Migration
2021-12-08 156

NO TE
The private IP address of the classic load balancer is bound to the shared loadbalancer.
7. Determine whether you want to change the EIP.– If you want to change the EIP, go to 8.– If you do not want to change the EIP, go to 10.
8. Modify the DNS configuration to map the domain name to the EIP bound tothe shared load balancer.
9. Switch to the Cloud Eye console, view monitoring data of the classic loadbalancer and then go to 11.If both the number of concurrent connections and the number of newconnections are 0, traffic is diverted to the shared load balancer.
10. Send requests to the shared load balancer to test whether it can routerequests to associated backend servers.
11. Locate the classic load balancer that has been migrated and choose More >Finish Migration.The classic load balancer will be automatically deleted.
12. Switch to the load balancer list and view the newly created shared loadbalancer.
Rolling Back to a Classic Load Balancer
If you decide to roll back, the newly created shared load balancer will be deleted,and the original classic load balancer will be restored.
1. Log in to the management console.
2. In the upper left corner of the page, click and select the desired region andproject.
3. Hover on in the upper left corner to display Service List and chooseNetwork > Elastic Load Balancing.
4. In the classic load balancer list, locate the load balancer you want to roll backand choose More > Roll Back.Alternatively, select the load balancer you want to roll back and click RollBack above the load balancer list.
Batch Migration or Rollback1. Log in to the management console.
2. In the upper left corner of the page, click and select the desired region andproject.
3. Hover on in the upper left corner to display Service List and chooseNetwork > Elastic Load Balancing.
4. In the classic load balancer list, select the load balancers and click Migrate orRoll Back.
Elastic Load BalancingUser Guide 13 Load Balancer Migration
2021-12-08 157
5. Perform subsequent operations as needed.– If you choose Migrate, go to 6.– If you choose Roll Back, no further operations are required.
6. Check whether the load balancers to be migrated are private network loadbalancers.– If they are private network load balancers, go to 7.– If they are not private network load balancers, go to 8.
7. After the migration, run command arping -b Private IP address of each classicload balancer on the client that is on the same subnet as the load balancer toupdate the ARP entries. Then, go to 12.
NO TE
The private IP address of the classic load balancer will be bound to the shared loadbalancer.
8. Determine whether you want to change the EIP.– If you want to change the EIP, go to 9.– If you do not want to change the EIP, go to 11.
9. Modify the DNS configuration to map the domain name to the EIP bound toeach shared load balancer.
10. Switch to the Cloud Eye console, view monitoring data of each classic loadbalancer and then go to 12.If both the number of concurrent connections and the number of newconnections are 0, traffic is diverted to the shared load balancers.
11. Send requests to shared load balancers to test whether they can routerequests to associated backend servers.
12. Select all classic load balancers that have been migrated and click FinishMigration.These classic load balancers will be automatically deleted.
13. Switch to the load balancer list, view the newly created shared load balancers.
Causes of Migration FailureThe following are possible causes why a classic load balancer cannot be migrated:
● The quota of the shared load balancer, listener, backend server group, orcertificate is insufficient.
● The classic load balancer is not in the Running state.● The classic load balancer listener is not in the Running state.● The shared load balancer does not support the SSL protocol.
Elastic Load BalancingUser Guide 13 Load Balancer Migration
2021-12-08 158

NO TE
● During the migration, the listeners and backend servers of the classic load balancer arealso migrated. Your applications and data will not be affected. To ensure successfulmigration, ensure that backend servers can be accessed from 100.125.0.0/16.
● After the migration, the original classic load balancer will be deleted and cannot berestored, and its private IP address and EIP will be used by the newly created sharedload balancer. If the classic load balancer does not have an EIP, you can bind one to thenewly created shared load balancer.
● During batch migration of public network load balancers, ensure that the number ofEIPs and the number of load balancers are the same. After the migration, the systemautomatically binds an EIP to each shared load balancer in sequence.
● Integration with the AS service becomes invalid after the migration. Configure AS if youwant to scale the number of backend servers associated with each shared load balancer.
● Access logs stored in the OBS bucket are lost because shared load balancers do notsupport access logging.
Elastic Load BalancingUser Guide 13 Load Balancer Migration
2021-12-08 159

14 Quotas
What Is Quota?
Quotas can limit the number or amount of resources available to users, such asthe maximum number of ECSs or EVS disks that can be created.
If the existing resource quota cannot meet your service requirements, you canapply for a higher quota.
How Do I View My Quotas?1. Log in to the management console.
2. Click in the upper left corner and select the desired region and project.
3. In the upper right corner of the page, click .The Service Quota page is displayed.
4. View the used and total quota of each type of resources on the displayedpage.If a quota cannot meet service requirements, apply for a higher quota.
How Do I Apply for a Higher Quota?
The system does not support online quota adjustment. If you need to adjust aquota, call the hotline or send an email to the customer service mailbox. Customerservice personnel will timely process your request for quota adjustment andinform you of the real-time progress by making a call or sending an email.
Before dialing the hotline number or sending an email, make sure that thefollowing information has been obtained:
● Domain name, project name, and project ID, which can be obtained byperforming the following operations:Log in to the management console using the cloud account, click theusername in the upper right corner, select My Credentials from the drop-down list, and obtain the domain name, project name, and project ID on theMy Credentials page.
● Quota information, which includes:
Elastic Load BalancingUser Guide 14 Quotas
2021-12-08 160
– Service name– Quota type– Required quota
Learn how to obtain the service hotline and email address.
Elastic Load BalancingUser Guide 14 Quotas
2021-12-08 161

15 FAQ
15.1 Popular Questions● How Can I Obtain the IP Address of a Client?● How Do I Troubleshoot an Unhealthy Backend Server?● How Does ELB Perform UDP Health Checks? What Are the Precautions for
UDP Health Checks?● What Types of Sticky Sessions Does ELB Support?● How Is WebSocket Used?● How Do I Check If Sticky Sessions Failed to Take Effect?● What Are the Relationships Between Load Balancing Algorithms and
Sticky Session Types?● How Does ELB Distribute Traffic?
15.2 ELB Use
15.2.1 ELB Functionality
15.2.1.1 Can ELB Be Used Separately?ELB cannot be used alone.
ELB is a service that distributes incoming traffic across servers and is generallyused together with the ECS or BMS service.
15.2.1.2 Is an EIP Assigned Exclusively to a Load Balancer?During the lifecycle of a load balancer, whether the assigned EIP is exclusivedepends on the type of the load balancer.
For each dedicated load balancer, the bound EIP is not exclusive, and the EIP canbe unbound from the load balancer and bound to another resource. After youunbind the EIP, the load balancer can no longer receive requests over the Internet.
Elastic Load BalancingUser Guide 15 FAQ
2021-12-08 162
Bound EIPs are not exclusive to shared load balancers either. They can be unboundfrom the load balancers and bound to other resources. After you unbind the EIP,the load balancer can no longer receive requests over the Internet.
During the lifecycle of a classic load balancer, the assigned EIP is exclusive to it.
NO TE
Classic load balancers can no longer be created on the management console. Use sharedload balancers or dedicated load balancers instead.
NO TE
You can unbind an EIP from a dedicated load balancer only on the ELB console.
15.2.1.3 How Many Load Balancers and Listeners Can I Have?By default, each account to create up to 50 shared and dedicated load balancersand 100 listeners. If you need more load balancers or listeners, apply to increaseyour quotas.
All load balancers in your account share the same quota for listeners.
15.2.1.4 Can I Adjust the Number of Backend Servers When a Load Balanceris Running?
You can adjust the number of backend servers associated with a load balancer atany time. You can also change the type of backend servers according to yourservice needs. To ensure service stability, ensure that health checks are normal andthat at least one healthy backend server is associated with the load balancer.
15.2.1.5 Can Backend Servers Run Different OSs?Yes.
ELB does not restrict OSs of backend servers as long as applications on theseservers are the same and the data is consistent. However, it is recommended thatyou install the same OS on backend servers to simplify management.
15.2.2 Service Performance and Load
15.2.2.1 How Do I Check for Traffic Inconsistencies?Check for failed requests on the clients, especially when 4xx status codes arereturned. One possible cause is that the requests are not being routed to backendservers because ELB considers these requests abnormal.
15.2.2.2 How Do I Check If Traffic Is Being Evenly Distributed?1. Check whether sticky sessions are enabled. If sticky sessions are enabled and
there are few clients, traffic may be unevenly distributed.2. Check the health of backend servers, especially those whose health changes
over time. If a backend server is Unhealthy or its health switches betweenHealthy and Unhealthy, traffic is unbalanced.
Elastic Load BalancingUser Guide 15 FAQ
2021-12-08 163

3. Check whether the Source IP hash algorithm is used. If the algorithm is used,requests sent from the same IP address are routed to the same backendserver, resulting in unbalanced traffic.
4. Check whether applications on the backend server use keepalive to maintainTCP persistent connections. If keepalive is used, traffic may be unbalancedbecause the number of requests on persistent connections is different.
5. Check whether different weights are assigned to backend servers. The trafficvaries according to the weights.
NO TE
Generally, in addition to the load balancing algorithm, factors that affect load balancinginclude connection type, session stickiness, and server weights.
15.2.2.3 What Do I Do If a Load Balancer Fails a Stress Test?1. Check the load of backend servers. If their vCPU usage reaches 100%,
applications may have performance bottlenecks.2. Check the incoming traffic. If burst traffic exceeds the bandwidth set for the
EIP, a large number of packets will be lost and requests will not be respondedto, thereby affecting the load balancer's performance.
NO TE
If burst traffic exceeds the available bandwidth, it does not mean that the bandwidthis fully used. In this case, you need perform further operations to locate the fault orincrease the bandwidth.
3. Check the number of short connections in the time_wait state on the clients.One possible cause is that there are insufficient client ports.
4. The listening queue backlog of the backend servers may be full. If thishappens, the backend server will not respond to SYN ACK packets, and theclient will time out. You can increase the maximum allowed of the backlog byadjusting the net.core.somaxconn parameter.
15.3 Load Balancers
15.3.1 How Does ELB Distribute Traffic?ELB uses FullNAT to forward the incoming traffic. For load balancing at Layer 4,LVS forwards the incoming traffic to backend servers directly. For load balancing atLayer 7, LVS forwards the incoming traffic to Nginx, which then forwards thetraffic to backend servers.
Elastic Load BalancingUser Guide 15 FAQ
2021-12-08 164
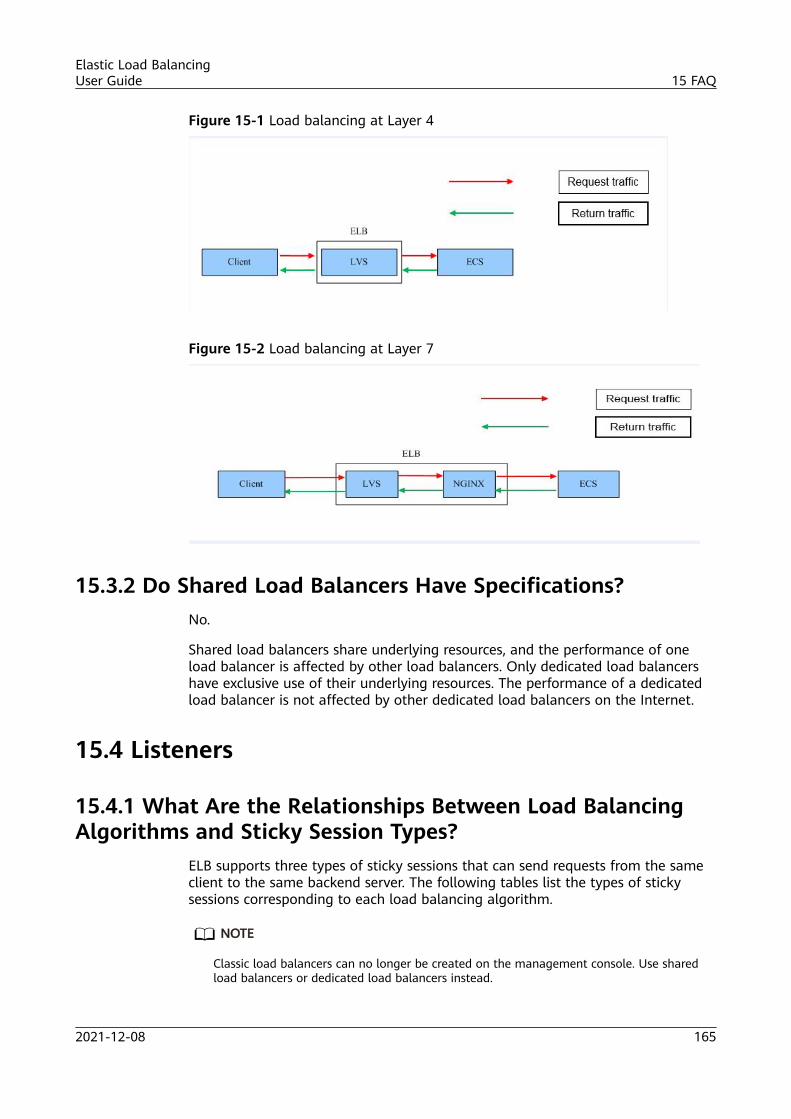
Figure 15-1 Load balancing at Layer 4
Figure 15-2 Load balancing at Layer 7
15.3.2 Do Shared Load Balancers Have Specifications?No.
Shared load balancers share underlying resources, and the performance of oneload balancer is affected by other load balancers. Only dedicated load balancershave exclusive use of their underlying resources. The performance of a dedicatedload balancer is not affected by other dedicated load balancers on the Internet.
15.4 Listeners
15.4.1 What Are the Relationships Between Load BalancingAlgorithms and Sticky Session Types?
ELB supports three types of sticky sessions that can send requests from the sameclient to the same backend server. The following tables list the types of stickysessions corresponding to each load balancing algorithm.
NO TE
Classic load balancers can no longer be created on the management console. Use sharedload balancers or dedicated load balancers instead.
Elastic Load BalancingUser Guide 15 FAQ
2021-12-08 165

Table 15-1 Sticky sessions supported by dedicated load balancers
Load BalancingAlgorithm
Sticky Session Type Layer 4 (TCP/UDP)
Layer 7 (HTTP/HTTPS)
Weighted roundrobin
Source IP address Supported Not supported
Load balancer cookie N/A Supported
Application cookie N/A Supported
Weighted leastconnections
Source IP address Not supported Not supported
Load balancer cookie N/A Not supported
Application cookie N/A Not supported
Source IP hash Source IP address N/A Not supported
Load balancer cookie N/A Not supported
Application cookie N/A Not supported
Table 15-2 Sticky sessions supported by shared load balancers
Load BalancingAlgorithm
Sticky Session Type Layer 4 (TCP/UDP)
Layer 7 (HTTP/HTTPS)
Weighted roundrobin
Source IP address Supported Not supported
Load balancer cookie N/A Supported
Application cookie N/A Supported
Weighted leastconnections
Source IP address Not supported Not supported
Load balancer cookie N/A Not supported
Application cookie N/A Not supported
Source IP hash Source IP address N/A Not supported
Load balancer cookie N/A Not supported
Application cookie N/A Not supported
Table 15-3 Session stickiness of classic load balancers
Load BalancingAlgorithm
Sticky SessionType
Layer 4 (TCP/UDP)
Layer 7 (HTTP/HTTPS)
Round robin Source IP address Supported Not supported
Load balancercookie
N/A Supported
Elastic Load BalancingUser Guide 15 FAQ
2021-12-08 166

Load BalancingAlgorithm
Sticky SessionType
Layer 4 (TCP/UDP)
Layer 7 (HTTP/HTTPS)
Application cookie N/A Not supported
Least connections Source IP address Supported Not supported
Load balancercookie
N/A Not supported
Application cookie N/A Not supported
Source IP hash Source IP address N/A Not supported
Load balancercookie
N/A Not supported
Application cookie N/A Not supported
Generally, the weighted round robin algorithm is recommended. Sticky sessions atLayer 4 use source IP addresses to main sessions, and sticky sessions at Layer 7use load balancer cookies.
15.4.2 How Is WebSocket Used?For HTTP listeners, unencrypted WebSocket (ws://) is supported by default. ForHTTPS listeners, encrypted WebSocket (wss://) is supported by default.
15.5 Backend Servers
15.5.1 Why Is the Interval at Which Backend Servers ReceiveHealth Check Packets Different from What I Configured?
Each LVS node and Nginx node in the ELB system send detection packets tobackend servers at the health check interval that you have specified for thebackend server group.
During this period, backend servers receive multiple detection packets from LVSand Nginx nodes. This makes it seem like backend servers are receiving packets atintervals shorter than the specified health check interval.
15.5.2 Can Servers Access the Internet After They AreAssociated with a Load Balancer?
Yes. Servers can access the Internet regardless of if they are associated with a loadbalancer.
Elastic Load BalancingUser Guide 15 FAQ
2021-12-08 167

15.5.3 How Do I Check the Network Conditions of a BackendServer?
1. Verify that an IP address has been assigned to the server's primary NIC.a. Log in to the server. (An ECS is used as an example here.)b. Use ifconfig or ip address to view the IP address.
NO TE
For Windows ECSs, use ipconfig on the CLI.
2. Ping the gateway of the subnet where the ECS resides to check for networkconnectivity.a. On the VPC details page, locate the subnet and view the gateway address
in the Gateway column. Generally, the gateway address ends with .1.b. Ping the gateway from the ECS. If the gateway cannot be pinged, check
the networks at Layer 2 and Layer 3.
15.5.4 How Do I Check the Network Configuration of aBackend Server?
1. Check whether the security group of the server is correctly configured.a. On the server details page, view the security group.b. Check whether the security group rules allow access from the
corresponding IP address range.
▪ Dedicated load balancers: Check whether the security groupcontaining the backend server has inbound rules to allow traffic fromthe VPC where the load balancer resides. If traffic is not allowed, addan inbound rule to allow traffic from the VPC to the backend server.
2. Ensure that the network ACLs of the subnet where the server resides does notintercept the traffic.In the navigation pane of the VPC console, choose Access Control> Firewallsand check whether the subnet allows traffic.
15.5.5 How Do I Check the Status of a Backend Server?1. Verify that the applications on the backend server are enabled.
a. Log in to the backend server. (An ECS is used as an example here.)b. Check the port status.
netstat -ntpl
NO TE
For Windows ECSs, use netstat -ano on the CLI to view the port status or serversoftware status.
Figure 15-3 Port status
Elastic Load BalancingUser Guide 15 FAQ
2021-12-08 168
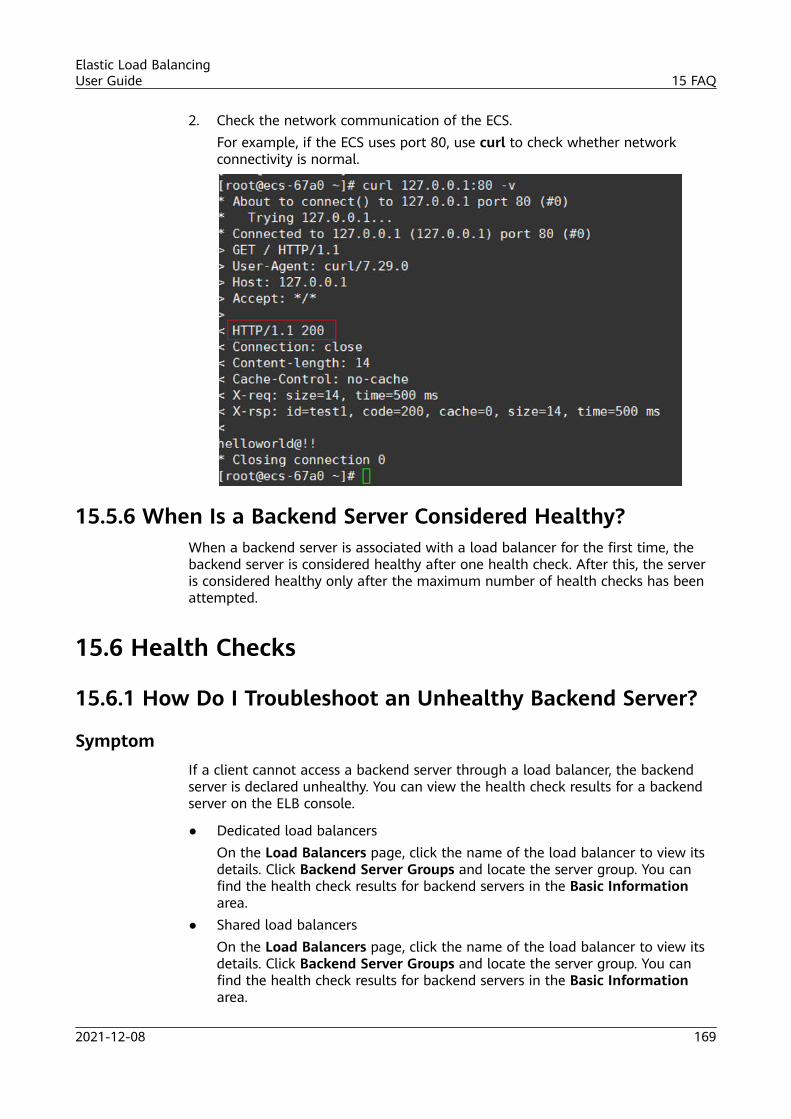
2. Check the network communication of the ECS.For example, if the ECS uses port 80, use curl to check whether networkconnectivity is normal.
15.5.6 When Is a Backend Server Considered Healthy?When a backend server is associated with a load balancer for the first time, thebackend server is considered healthy after one health check. After this, the serveris considered healthy only after the maximum number of health checks has beenattempted.
15.6 Health Checks
15.6.1 How Do I Troubleshoot an Unhealthy Backend Server?
SymptomIf a client cannot access a backend server through a load balancer, the backendserver is declared unhealthy. You can view the health check results for a backendserver on the ELB console.
● Dedicated load balancersOn the Load Balancers page, click the name of the load balancer to view itsdetails. Click Backend Server Groups and locate the server group. You canfind the health check results for backend servers in the Basic Informationarea.
● Shared load balancersOn the Load Balancers page, click the name of the load balancer to view itsdetails. Click Backend Server Groups and locate the server group. You canfind the health check results for backend servers in the Basic Informationarea.
Elastic Load BalancingUser Guide 15 FAQ
2021-12-08 169

Background
To check the health of backend servers, dedicated load balancers use the IPaddresses from the VPC where they work to send heartbeat requests to backendservers, while shared load balancers use IP addresses in 100.125.0.0/16.
Dedicated load balancers: To ensure that health checks can be performednormally, ensure that traffic is allowed from the VPC where the load balancer isworking to the backend servers.
Shared load balancers: To ensure that health checks can be performed normally,ensure that traffic is allowed from 100.125.0.0/16 to the backend servers.
CA UTION
Security group rules configured for backend servers associated with dedicated loadbalancers are different from those configured for backend servers associated withshared load balancers.● Dedicated load balancers: Ensure that security group rules allow access from IP
addresses in the VPC where the backend server resides.For details about how to configure security groups for backend serversassociated with dedicated load balancers, see Configuring Security GroupRules for Backend Servers (Dedicated Load Balancers).
● Shared load balancers: Ensure that security group rules allow access from IPaddresses in 100.125.0.0/16.
If a backend server is considered unhealthy, ELB will not route traffic to it until it isdeclared healthy again.
If you change the weight of a healthy backend server to 0, the health check resultof this server becomes Unhealthy.
NO TE
● When a backend server is detected as unhealthy, the load balancer will stop routingrequests to this server.
● If health checks are disabled, the load balancer will consider the backend server healthyby default and still route requests to it.
● If Obtain Client IP Address is enabled for TCP and UDP listeners of both dedicated andshared load balancers, client IP addresses instead of IP addresses in 100.125.0.0/16 areused to communicate with the backend server.
● ELB uses IP addresses in 100.125.0.0/16 to perform health checks and route requests tobackend servers.
● Traffic will not be routed to a backend server with a weight of 0, so the health checkresult for this backend server is not relevant.
Troubleshooting
Possible causes are described here in order of their probability.
Check these causes one by one until the cause of the fault is determined.
Elastic Load BalancingUser Guide 15 FAQ
2021-12-08 170

NO TE
If you need to change the health check configuration, it takes a while for the changes to beapplied. The required time depends on the health check interval and timeout duration. Youcan find the health check results in the backend server list of the load balancer.
Figure 15-4 Troubleshooting process
Table 15-4 Troubleshooting process
Possible Cause Solution
Backend server group Checking Whether the Backend Server GroupIs Associated with a Listener
EIP or private IP address Checking Whether an EIP or a Private IPAddress Is Bound to the Load Balancer
Health check configuration Checking the Health Check Configuration
Security group rules Checking Security Group Rules
Network ACL rules Checking Firewall Rules
Backend server listeningconfiguration
Checking the Backend Server
Elastic Load BalancingUser Guide 15 FAQ
2021-12-08 171

Possible Cause Solution
Backend server firewallconfiguration
Checking the Firewall on the Backend Server
Backend server routeconfiguration
Checking the Backend Server Route
Backend server load Checking the Backend Server Load
Backend server host.denyfile
Checking the host.deny File
Checking Whether the Backend Server Group Is Associated with a ListenerCheck whether the backend server group that the unhealthy backend serverbelongs to is associated with a listener.
● If the backend server group is not associated with a listener, check whether alistener has been added to the load balancer.– If there is a listener, associate the backend server group with the listener.– If there are no listeners, add a listener. Select Use existing and then
select the backend server group when you add the listener.● If the backend server group has been associated with a listener, proceed with
the following operations.
Checking Whether an EIP or a Private IP Address Is Bound to the LoadBalancer
NO TE
● Check this only when you add a TCP or UDP listener to the load balancer.
● If you add an HTTP or HTTPS listener to the load balancer, health checks will not beaffected no matter whether an EIP or private IP address is bound to the load balancer.
If you add a TCP or UDP listener to the load balancer, check whether the loadbalancer has an EIP or private IP address bound.
If the load balancer has no EIP or private IP address bound, bind one.
Checking the Health Check ConfigurationFor dedicated and shared load balancers, click the name of the load balancer toview its details. Click Backend Server Groups and then click the name of theserver group. On the Basic Information page, to the right of Health Check, clickConfigure. Check the following parameters:
● Protocol: The protocol used for health checks.● Port The port must be the one used on the backend server, and it cannot be
changed. Check whether the health check port is in the listening state on thebackend server. If the health check port is not in the listening state on thebackend server, the backend server will be identified as unhealthy.
Elastic Load BalancingUser Guide 15 FAQ
2021-12-08 172

● Check Path If HTTP is used for health checks, you must check this parameter.A simple static HTML file is recommended.
NO TE
● If the health check protocol is HTTP, the port and the path are used for health checks.
● If the health check protocol is TCP, only the port is used for health checks.
● If health check protocol is HTTP and the health check port is normal, change the pathor change the health check protocol to TCP.
● Enter an absolute path.
For example:
If the URL is http://www.example.com/chat/try/, the health check path is /chat/try/.
If the URL is http://192.168.63.187:9096/chat/index.html, the health check path is /chat/index.html.
Classic load balancers: In the Listeners area, locate the listener with anunhealthy backend server associated and click View in the Health Check column.The Health Check dialog box is displayed. Check the following parameters:
● Health check protocol and port
The health check port must be the one used on the backend server, and itcannot be customized.
Check whether the health check port is the one listened on the backendserver. If the health check port is not listened on the backend server, thebackend server will be identified as unhealthy.
● Health Check Mode
● Check Path. If HTTP is used for health checks, you must check this parameter.A simple static HTML file is recommended.
NO TE
Enter an absolute path.
Examples:
If the URL is http://www.example.com/chat/try/, the health check path is /chat/try/.
If the URL is http://192.168.63.187:9096/chat/index.html, the health check path is /chat/index.html.
Checking Security Group Rules● Dedicated Load balancers
– TCP, HTTP, or HTTPS listeners: Verify that the inbound security grouprule allows TCP traffic from the VPC where the dedicated load balancerresides to the backend server over the health check port.
▪ If the health check port is the same as the backend port, the inboundrule must allow traffic over the backend port, for example, port 80.
▪ If the health check port is different from the backend port, theinbound rule must allow traffic over both the health check port andbackend port, for example, ports 443 and 80.
Elastic Load BalancingUser Guide 15 FAQ
2021-12-08 173
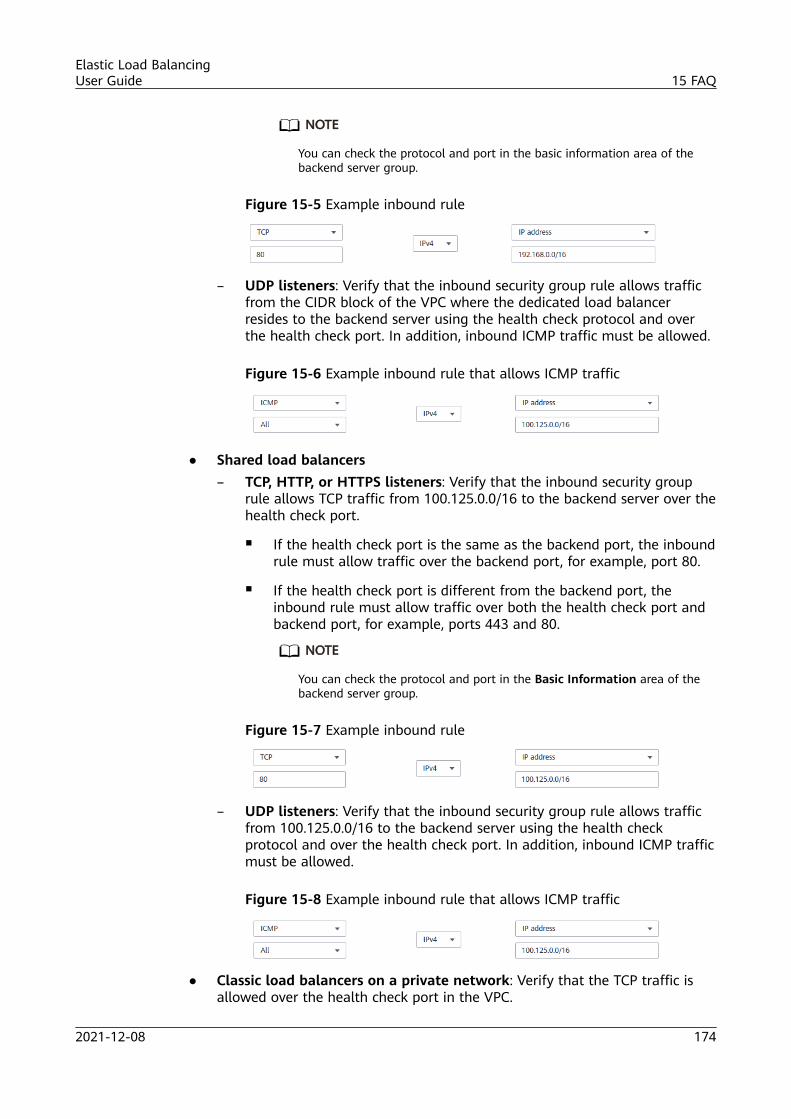
NO TE
You can check the protocol and port in the basic information area of thebackend server group.
Figure 15-5 Example inbound rule
– UDP listeners: Verify that the inbound security group rule allows trafficfrom the CIDR block of the VPC where the dedicated load balancerresides to the backend server using the health check protocol and overthe health check port. In addition, inbound ICMP traffic must be allowed.
Figure 15-6 Example inbound rule that allows ICMP traffic
● Shared load balancers– TCP, HTTP, or HTTPS listeners: Verify that the inbound security group
rule allows TCP traffic from 100.125.0.0/16 to the backend server over thehealth check port.
▪ If the health check port is the same as the backend port, the inboundrule must allow traffic over the backend port, for example, port 80.
▪ If the health check port is different from the backend port, theinbound rule must allow traffic over both the health check port andbackend port, for example, ports 443 and 80.
NO TE
You can check the protocol and port in the Basic Information area of thebackend server group.
Figure 15-7 Example inbound rule
– UDP listeners: Verify that the inbound security group rule allows trafficfrom 100.125.0.0/16 to the backend server using the health checkprotocol and over the health check port. In addition, inbound ICMP trafficmust be allowed.
Figure 15-8 Example inbound rule that allows ICMP traffic
● Classic load balancers on a private network: Verify that the TCP traffic isallowed over the health check port in the VPC.
Elastic Load BalancingUser Guide 15 FAQ
2021-12-08 174

Figure 15-9 Example inbound rule that allows TCP traffic within the VPC
NO TE
● Access to the backend server from IP addresses in 100.125.0.0/16 must be allowed. Thisis because the load balancer communicates with backend servers using IP addressesfrom 100.125.0.0/16. After traffic is routed to backend servers, source IP addresses areconverted to IP addresses from 100.125.0.0/16. In addition, the load balancer uses theseIP addresses to send heartbeat requests to backend servers to check their health.
● If you are not sure about the security group rules, change the protocol and port rangeto All for testing.
● For UDP listeners, see How Does ELB Perform UDP Health Checks? What Are thePrecautions for UDP Health Checks?
Checking Firewall Rules● Dedicated load balancers
To control traffic in and out of a subnet, you can associate a firewall with thesubnet. Firewalls provide access control functions similar to security groupsand add an additional layer of defense for your VPC. Default firewall rulesreject all inbound and outbound traffic. If the subnet of a load balancer orassociated backend servers has a firewall associated, the load balancer cannotreceive traffic from the Internet or route traffic to backend servers, andbackend servers cannot receive traffic from and respond to the load balancer.Configure an inbound firewall rule to allow access from the VPC CIDR blockto backend servers.
a. Log in to the management console.
b. In the upper left corner of the page, click and select the desired regionand project.
c. Hover on in the upper left corner to display Service List and chooseNetwork > Virtual Private Cloud.
d. In the navigation pane on the left, choose Access Control > Firewalls.e. Locate the firewall, and click the firewall name to switch to the firewall
details page.f. On the Inbound Rules or Outbound Rules tab page, click Add Rule to
add a rule.
▪ Action: Select Allow.
▪ Protocol: The protocol must be the same as the one you selected forthe listener.
▪ Source: Set it to the VPC CIDR block.
▪ Source Port Range: Select a port range.
▪ Destination: If you keep the default value, 0.0.0.0/0, traffic will beallowed for all destination IP addresses.
Elastic Load BalancingUser Guide 15 FAQ
2021-12-08 175

▪ Destination Port Range: Select a port range.
▪ Description: Enter a description for the firewall rule if necessary.
g. Click OK.● Shared load balancers
To control traffic in and out of a subnet, you can associate a firewall with thesubnet. Firewalls provide access control functions similar to security groupsand add an additional layer of defense for your VPC. Default firewall rulesreject all inbound and outbound traffic. If the subnet of a load balancer orassociated backend servers has a firewall associated, the load balancer cannotreceive traffic from the Internet or route traffic to backend servers, andbackend servers cannot receive traffic from and respond to the load balancer.Configure an inbound firewall rule to permit access from 100.125.0.0/16.
a. Log in to the management console.
b. In the upper left corner of the page, click and select the desired regionand project.
c. Under Network, click Virtual Private Cloud.d. In the navigation pane on the left, choose Access Control > Firewalls.e. Locate the firewall and click the firewall name to switch to the firewall
details page.f. On the Inbound Rules or Outbound Rules tab page, click Add Rule to
add a rule.
▪ Action: Select Allow.
▪ Protocol: The protocol must be the same as the one you selected forthe listener.
▪ Source: Set it to 100.125.0.0/16.
▪ Source Port Range: Select a port range.
▪ Destination: If you keep the default value, 0.0.0.0/0, traffic will beallowed for all destination IP addresses.
▪ Destination Port Range: Select a port range.
▪ Description: Enter a description for the firewall rule if necessary.
g. Click OK.
Checking the Backend ServerNO TE
If the backend server runs a Windows OS, use a browser to access https://{Backend serverIP address}:{Health check port}. If a 2xx or 3xx code is returned, the backend server isrunning normally.
● Run the following command on the backend server to check whether thehealth check port is listened on:netstat -anlp | grep port
Elastic Load BalancingUser Guide 15 FAQ
2021-12-08 176

If the health check port and LISTEN are displayed, the health check port is inthe listening state. As shown in Figure 15-10, TCP port 880 is listened on.If you do not specify a health check port, backend ports are used by default.
Figure 15-10 Backend server port listened on
Figure 15-11 Backend server port not listened on
● For HTTP health checks, run the following command on the backend server tocheck the status code:curl {Private IP address of the backend server}:{Health check port}/{Health check path} -iv
To perform an HTTP health check, the load balancer initiates a GET request tothe backend server. If the following response status codes are displayed, thebackend server is considered healthy:TCP listeners: 200Dedicated load balancers: 200 for TCP/UDP/HTTP/HTTPS health checksShared load balancers: 200, 202, or 401 for HTTP health checks, and 200 forTCP health checksPublic network classic load balancers: 2xx or 3xx
Figure 15-12 Unhealthy backend server
Figure 15-13 Healthy backend server
Elastic Load BalancingUser Guide 15 FAQ
2021-12-08 177

● If HTTP is used for health checks and the backend server is detectedunhealthy, perform the following steps to configure a TCP health check:On the Listeners tab page, modify the listener, select the backend servergroup for which TCP health check has been configured, or add a backendserver group and select TCP as the health check protocol. After you completethe configuration, wait for a while and check the health check result.
Checking the Firewall on the Backend Server
If the firewall or other security software is enabled in the backend server, thesoftware may block the IP addresses in the VPC CIDR block or 100.125.0.0/16.
For dedicated load balancers, configure inbound firewall rules to allow traffic fromthe VPC to which the load balancers work to backend servers.
For shared load balancers, configure inbound firewall rules to allow traffic from100.125.0.0/16 to backend servers.
Checking the Backend Server Route
Check whether the default route configured for the primary NIC has beenmanually modified. If the default route is changed, health check packets may failto reach the backend server.
Run the following command on the backend server to check whether the defaultroute points to the gateway (For Layer 3 communications, the default route mustbe configured to point to the gateway of the VPC subnet where the backendserver resides):ip route
Alternatively, run the following command:
route -n
Figure 15-14 shows the command output when the backend server route isnormal.
Figure 15-14 Example default route pointing to the gateway
Figure 15-15 Example default route not pointing to the gateway
If the command output does not contain the first route, or the route does notpoint to the gateway, configure or modify the default route to point to thegateway.
Elastic Load BalancingUser Guide 15 FAQ
2021-12-08 178

Checking the Backend Server LoadView the vCPU usage, memory usage, network connections of the backend serveron the Cloud Eye console to check whether the backend server is overloaded.
If the load is high, connections or requests for health checks may time out.
Checking the host.deny FileVerify that IP addresses in from VPC where the load balancers work and100.125.0.0/16 are not written to the /etc/hosts.deny file on the backend server.
For dedicated load balancers, verify that the IP addresses from the VPC where theload balancers work are not written into the file.
For shared load balancers, verify that IP addresses from 100.125.0.0/16 are notwritten into the file.
15.6.2 How Does ELB Perform UDP Health Checks? What Arethe Precautions for UDP Health Checks?
How UDP Health Checks WorkUDP is a connectionless protocol. A UDP health check is implemented as follows:
1. The health check node sends an ICMP request to the backend server based onthe health check configuration.– If the health check node receives an ICMP reply from the backend server,
it considers the backend server healthy and continues the health check.– If the health check node does not receive an ICMP reply from the
backend server, it considers the backend server unhealthy.2. After receiving the ICMP reply, the health check node sends a UDP probe
packet to the backend server.– If the health check node receives an ICMP Port Unreachable message
from the backend server within the timeout duration, the backend serveris considered unhealthy.
– If the health check node does not receive an ICMP Port Unreachablemessage from the backend server within the timeout duration, thebackend server is considered healthy.
When you use UDP for health checks, retain default parameter settings.
TroubleshootingIf the backend server is unhealthy, use either of the following methods to locatethe fault:
1. Check whether the timeout duration is too short.One possible cause is that the ICMP Echo Reply or ICMP Port Unreachablemessage returned by the backend server does not reach the health checknode within the timeout duration. As a result, the health check result isinaccurate.It is recommended that you change the timeout duration to a larger value.
Elastic Load BalancingUser Guide 15 FAQ
2021-12-08 179

UDP health checks are different from other health checks. If the health checktimeout duration is too short, the health check result of the backend serverfrequently toggles back and forth between Healthy and Unhealthy.
2. Check whether the backend server restricts the rate at which ICMP messagesare generated.
For Linux servers, run the following commands to query the rate limit and ratemask:
sysctl -q net.ipv4.icmp_ratelimit
The default rate limit is 1000.
sysctl -q net.ipv4.icmp_ratemask
The default rate mask is 6168.
If the returned value of the first command is the default value or 0, run thefollowing command to remove the rate limit of Port Unreachable messages:
sysctl -w net.ipv4.icmp_ratemask=6160
For more information, see the Linux Programmer's Manual. On the Linux CLI, runthe following command to display the manual:
man 7 icmp
Alternatively, visit http://man7.org/linux/man-pages/man7/icmp.7.html.
NO TE
Once the rate limit is lifted, the number of ICMP Port Unreachable messages on thebackend server will not be limited.
Precautions
Note the following when you configure UDP health checks:
● UDP health checks use ping packets to check the health of the backendserver. To ensure smooth transmission of these packets, ensure that ICMP isenabled on the backend server by performing the following:Log in to the server and run the following command as user root:cat /proc/sys/net/ipv4/icmp_echo_ignore_all– If the returned value is 1, ICMP is disabled.– If the returned value is 0, ICMP is enabled.
● The health check result may be different from the actual health of thebackend server.If the backend server runs Linux, the rate of ICMP packets may be limited dueto Linux's defense against ping flood attacks when there is a large number ofconcurrent requests. In this case, if a service exception occurs, the loadbalancer will not receive error message port XX unreachable and willconsider the health check to be successful. As a result, there is aninconsistency between the health check result and the actual server health.
● UDP listeners cannot be added to a private network classic load balancer.
Elastic Load BalancingUser Guide 15 FAQ
2021-12-08 180

NO TE
Classic load balancers can no longer be created on the management console.
15.6.3 Why Does ELB Frequently Send Requests to BackendServers During Health Checks?
ELB is deployed in clusters, and all nodes for request forwarding in the clustersend requests to backend servers at the same time. If the health check interval istoo short, health checks are performed once every few seconds, and a largenumber of packets are sent to backend servers. To control the frequency of accessto backend servers, change the health check interval by referring to Configuring aHealth Check.
15.7 Obtaining Source IP Addresses
15.7.1 How Can I Obtain the IP Address of a Client?When you use ELB to route requests to backend servers, IP addresses of the clientswill be translated by the ELB system. This FAQ provides the operations forobtaining the IP addresses of the clients.
Constraints and Limitations● If Network Address Translation (NAT) or Web Application Firewall (WAF) is
used, you cannot obtain the IP addresses of the clients.● If the client is a container, you can obtain only the IP address of the node
where the container is located, but cannot obtain the IP address of thecontainer.
● If Obtain Client IP Address is enabled for TCP or UDP listeners, a cloudserver cannot be used as a backend server and a client at the same time. Inthis case, you can configure the TOA plug-in to obtain the source IPaddresses.
● By default, the Obtain Client IP Address function is enabled for TCP and UDPlisteners of dedicated load balancers and cannot be disabled.
Layer 7 Load BalancingConfigure the application server and obtain the IP address of a client from theHTTP header.
The real IP address is placed in the X-Forwarded-For header field by the loadbalancer in the following format:X-Forwarded-For: IP address of the client,Proxy server 1-IP address,Proxy server 2-IP address,...
If you use this method, the first IP address obtained is the IP address of the client.
Apache Server
1. Install Apache 2.4.For example, if CentOS 7.5 is used as the OS, run the following command toinstall the software:
Elastic Load BalancingUser Guide 15 FAQ
2021-12-08 181

yum install httpd
2. Add the following content to the end of Apache configuration file /etc/httpd/conf/httpd.conf:LoadModule remoteip_module modules/mod_remoteip.soRemoteIPHeader X-Forwarded-ForRemoteIPInternalProxy 100.125.0.0/16
Figure 15-16 Content to be added
NO TE
Add the IP address range of the proxy server after RemoteIPInternalProxy.● Shared load balancers: 100.125.0.0/16 and the IP address range used by the AAD
service. Load balancers use IP addresses in 100.125.0.0/16 to communicate withbackend servers, and there are no security risks. Use commas (,) to separatemultiple entries.
● Dedicated load balancers: CIDR block of the subnet where the load balancerresides
3. Change the log output format in the Apache configuration file to thefollowing (%a indicates the source IP address):LogFormat "%a %l %u %t \"%r\" %>s %b \"%{Referer}i\" \"%{User-Agent}i\"" combined
4. Restart Apache.systemctl restart httpd
5. Obtain the actual IP address of the client from the httpd access logs.
Nginx Server
For example, if CentOS 7.5 is used as the OS, run the following command toinstall the software:
1. Run the following commands to install http_realip_module:yum -y install gcc pcre pcre-devel zlib zlib-devel openssl openssl-develwget http://nginx.org/download/nginx-1.17.0.tar.gztar zxvf nginx-1.17.0.tar.gzcd nginx-1.17.0./configure --prefix=/path/server/nginx --with-http_stub_status_module --without-http-cache --with-http_ssl_module --with-http_realip_modulemakemake install
2. Run the following command to open the nginx.conf file:vi /path/server/nginx/conf/nginx.conf
3. Add new fields and information to the end of the following configurationinformation:Add the following information under http or server:set_real_ip_from 100.125.0.0/16;real_ip_header X-Forwarded-For;
Elastic Load BalancingUser Guide 15 FAQ
2021-12-08 182
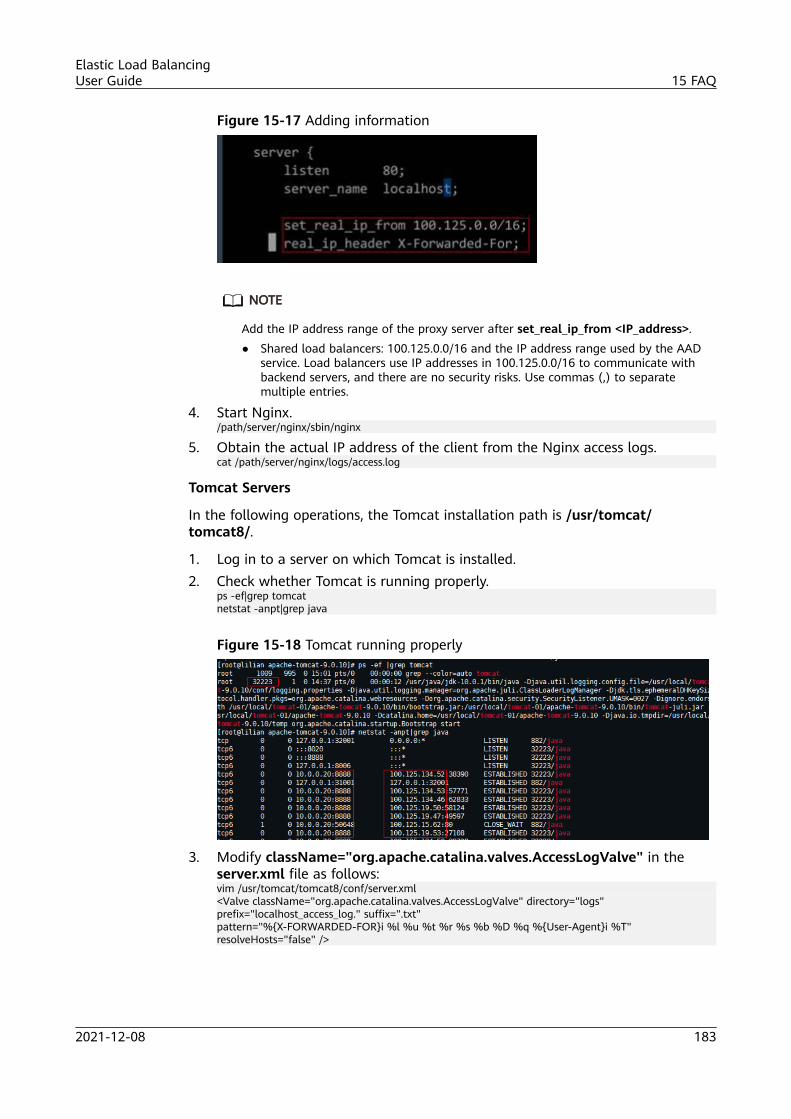
Figure 15-17 Adding information
NO TE
Add the IP address range of the proxy server after set_real_ip_from <IP_address>.● Shared load balancers: 100.125.0.0/16 and the IP address range used by the AAD
service. Load balancers use IP addresses in 100.125.0.0/16 to communicate withbackend servers, and there are no security risks. Use commas (,) to separatemultiple entries.
4. Start Nginx./path/server/nginx/sbin/nginx
5. Obtain the actual IP address of the client from the Nginx access logs.cat /path/server/nginx/logs/access.log
Tomcat Servers
In the following operations, the Tomcat installation path is /usr/tomcat/tomcat8/.
1. Log in to a server on which Tomcat is installed.2. Check whether Tomcat is running properly.
ps -ef|grep tomcatnetstat -anpt|grep java
Figure 15-18 Tomcat running properly
3. Modify className="org.apache.catalina.valves.AccessLogValve" in theserver.xml file as follows:vim /usr/tomcat/tomcat8/conf/server.xml<Valve className="org.apache.catalina.valves.AccessLogValve" directory="logs"prefix="localhost_access_log." suffix=".txt"pattern="%{X-FORWARDED-FOR}i %l %u %t %r %s %b %D %q %{User-Agent}i %T" resolveHosts="false" />
Elastic Load BalancingUser Guide 15 FAQ
2021-12-08 183
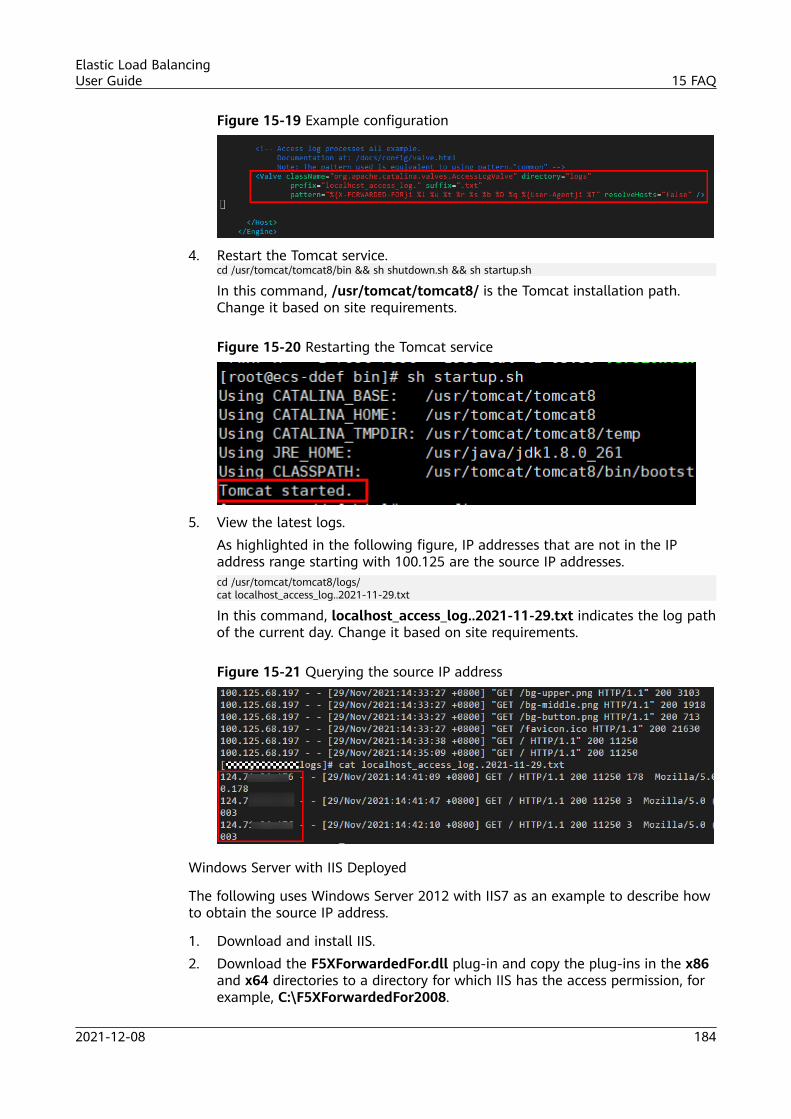
Figure 15-19 Example configuration
4. Restart the Tomcat service.cd /usr/tomcat/tomcat8/bin && sh shutdown.sh && sh startup.sh
In this command, /usr/tomcat/tomcat8/ is the Tomcat installation path.Change it based on site requirements.
Figure 15-20 Restarting the Tomcat service
5. View the latest logs.As highlighted in the following figure, IP addresses that are not in the IPaddress range starting with 100.125 are the source IP addresses.cd /usr/tomcat/tomcat8/logs/cat localhost_access_log..2021-11-29.txt
In this command, localhost_access_log..2021-11-29.txt indicates the log pathof the current day. Change it based on site requirements.
Figure 15-21 Querying the source IP address
Windows Server with IIS Deployed
The following uses Windows Server 2012 with IIS7 as an example to describe howto obtain the source IP address.
1. Download and install IIS.2. Download the F5XForwardedFor.dll plug-in and copy the plug-ins in the x86
and x64 directories to a directory for which IIS has the access permission, forexample, C:\F5XForwardedFor2008.
Elastic Load BalancingUser Guide 15 FAQ
2021-12-08 184

3. Open the Server Manager and choose Modules > Configure Native Modules.
Figure 15-22 Selecting modules
Figure 15-23 Configure Native Modules
4. Click Register to register the x86 and x64 plug-ins.
Elastic Load BalancingUser Guide 15 FAQ
2021-12-08 185
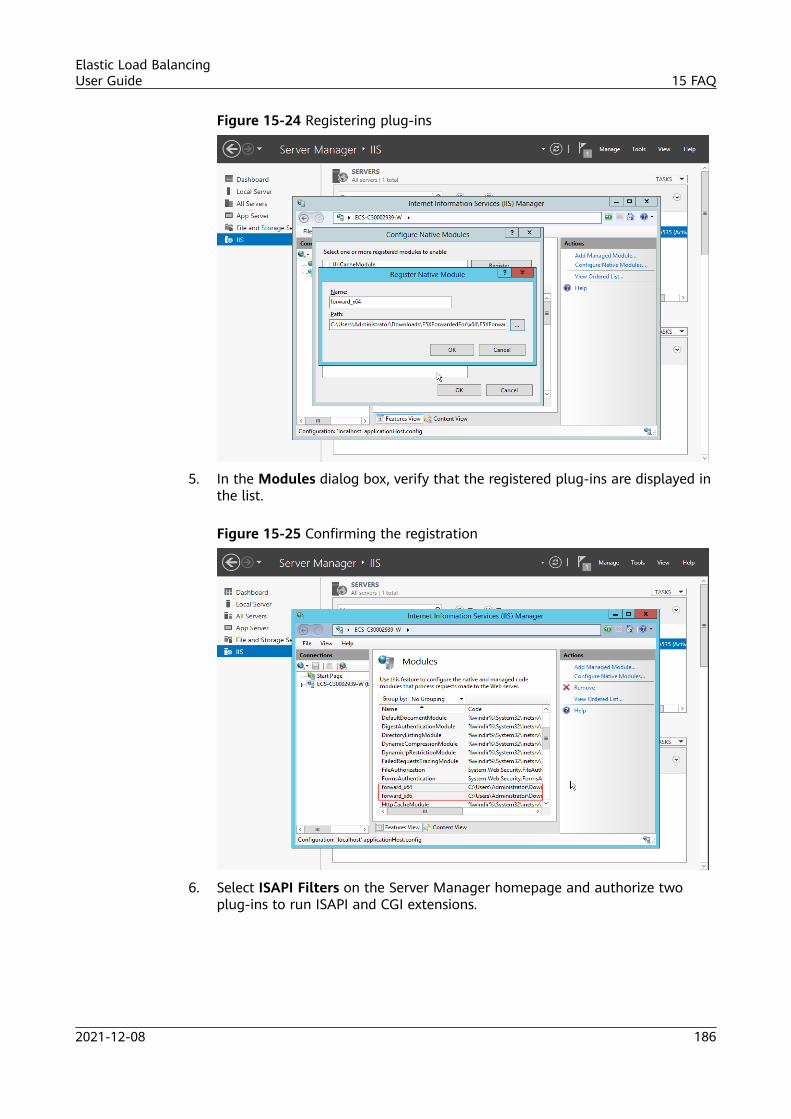
Figure 15-24 Registering plug-ins
5. In the Modules dialog box, verify that the registered plug-ins are displayed inthe list.
Figure 15-25 Confirming the registration
6. Select ISAPI Filters on the Server Manager homepage and authorize twoplug-ins to run ISAPI and CGI extensions.
Elastic Load BalancingUser Guide 15 FAQ
2021-12-08 186

Figure 15-26 Adding authorization
7. Select ISAPI and CGI Restriction to set the execution permission for the twoplug-ins.
Figure 15-27 Allowing the plug-ins to execute
8. Click Restart on the homepage to restart IIS. The configuration will takeeffect after the restart.
Elastic Load BalancingUser Guide 15 FAQ
2021-12-08 187

Figure 15-28 Restarting IIS
Layer 4 Load BalancingTCP listeners require the TOA plug-in to obtain real IP addresses. For details, seeConfiguring the TOA Plug-in.
15.8 HTTP/HTTPS Listeners
15.8.1 Why Is There a Security Warning After a Certificate IsConfigured?
The following may cause the Not Secure warning even after a certificate isconfigured:
● The domain name used by the certificate is different from the domain nameaccessed by users. (If this is the case, check the domain name used thecertificate to ensure that the domain names are the same or create a self-signed certificate.)
● SNI is configured, but the specified domain name is different from the oneused by the certificate.
● The domain name level is inconsistent with the certificate level.
If the problem persists, run the curl {Domain name} command to locate the faultbased on the error information returned by the system.
15.9 Sticky Sessions
15.9.1 How Do I Check If Sticky Sessions Failed to Take Effect?1. Check whether sticky sessions are enabled for the backend server group. If
sticky sessions are enabled, go to the next step.2. Check the health check result of the backend server. If the health check result
is Unhealthy, traffic is routed to other backend servers and sticky sessionsbecome invalid.
Elastic Load BalancingUser Guide 15 FAQ
2021-12-08 188

3. If you select the source IP hash algorithm, check whether the IP address ofthe request changes before the load balancer receives the request.
4. If sticky sessions are enabled for an HTTP or HTTPS listener, check whetherthe request carries a cookie. If they are, check whether the cookie valuechanged (because load balancing at Layer 7 uses cookies to maintainsessions).
15.9.2 What Types of Sticky Sessions Does ELB Support?Dedicated load balancers: Source IP address and Load balancer cookie
Shared load balancers: Source IP address, Load balancer cookie, andApplication cookie
Classic load balancers: Source IP address and Load balancer cookie
NO TE
Classic load balancers can no longer be created on the management console.
15.10 Certificates
15.10.1 How Can I Create Server Certificates and CACertificates?
Refer to to create server certificates and CA certificates. Generally, only backendservers need to be authenticated. You only need to configure server certificates.
Elastic Load BalancingUser Guide 15 FAQ
2021-12-08 189

16 Appendix
16.1 Configuring the TOA Plug-in
Scenarios
ELB provides customized strategies for managing service access. Beforecustomizing these strategies, ELB needs to obtain the client's IP address containedin the access request. To obtain the IP addresses, you can install a TOA kernelmodule on backend servers.
This section provides detailed operations for you to compile the module in the OSif you use TCP to distribute incoming traffic.
The operations for Linux OSs with kernel version of 2.6.32 are different from thosefor Linux OSs with kernel version of 3.0 or later.
NO TE
● TOA does not support listeners using the UDP protocol.
● The module can work properly in the following OSs and the methods for installing otherkernel versions are similar:
● CentOS 6.8 (kernel version 2.6.32)
● SUSE 11 SP3 (kernel version 3.0.76)
● CentOS 7/7.2 (kernel version 3.10.0)
● Ubuntu 16.04.3 (kernel version 4.4.0)
● Ubuntu 18.04 (Kernel version 4.15.0)
● OpenSUSE 42.2 (kernel version 4.4.36)
● CoreOS 10.10.5 (kernel version 4.9.16)
● Debian 8.2.0 (Kernel version 3.16.0)
Prerequisites● The development environment for compiling the module must be the same as
that of the current kernel.● VMs can access OS repositories.
Elastic Load BalancingUser Guide 16 Appendix
2021-12-08 190

● Users other than root must have sudo permissions.
Procedure● In the following operations, the Linux kernel version is 3.0 or later.
1. Prepare the compilation environment.
NO TE
During the installation, download the required module development package from theInternet if it cannot be found in the source.
The following are operations for compiling the module in different Linux OSs.Perform appropriate operations.– CentOS
i. Run the following command to install the GCC:sudo yum install gcc
ii. Run the following command to install the make tool:sudo yum install make
iii. Run the following command to install the module developmentpackage (the package header and module library must have thesame version as the kernel):sudo yum install kernel-devel-`uname -r`
NO TE
During the installation, download the required module developmentpackage from the following address if it cannot be found in the source:https://mirror.netcologne.de/oracle-linux-repos/ol7_latest/getPackage/For example, to install 3.10.0-693.11.1.el7.x86_64, run the followingcommand:rpm -ivh kernel-devel-3.10.0-693.11.1.el7.x86_64.rpm
– Ubuntu and Debian
i. Run the following command to install the GCC:sudo apt-get install gcc
ii. Run the following command to install the make tool:sudo apt-get install make
iii. Run the following command to install the module developmentpackage (the package header and module library must have thesame version as the kernel):sudo apt-get install linux-headers-`uname -r`
– SUSE
i. Run the following command to install the GCC:sudo zypper install gcc
ii. Run the following command to install the make tool:sudo zypper install make
iii. Run the following command to install the module developmentpackage (the package header and module library must have thesame version as the kernel):
Elastic Load BalancingUser Guide 16 Appendix
2021-12-08 191

sudo zypper install kenel-default-devel– CoreOS
For CoreOS, the module will be compiled in a container, and it must bestarted before the module is compiled.For detailed operations, see the CoreOS documentation. Obtain thedocumentation from the following link:https://coreos.com/os/docs/latest/kernel-modules.html
2. Compile the module.
a. Use the git tool and run the following command to download themodule source code:git clone https://github.com/Huawei/TCP_option_address.git
NO TE
If the git tool is not installed, download the module source code from thefollowing link:
https://github.com/Huawei/TCP_option_address
b. Run the following commands to enter the source code directory andcompile the module:cd srcmakeIf no warning or error code is prompted, the compilation was successful.Verify that the toa.ko file was generated in the current directory.
NO TE
If error message "config_retpoline=y but not supported by the compiler, Compilerupdate recommended" is displayed, the GCC version is too old. Upgrade the GCCto a later version.
3. Load the module.
a. Run the following command to load the module:sudo insmod toa.ko
b. Run the following command to check the module loading and to viewthe kernel output information:dmesg | grep TOAIf TOA: toa loaded is displayed in the command output, the module hasbeen loaded.
NO TE
After compiling the CoreOS module in the container, copy it to the host systemand then load it. The container for compiling the module shares the /lib/modules directory with the host system, so you can copy the module in thecontainer to this directory, allowing the host system to use it.
4. Set the script to enable it to automatically load the module.To make the module take effect when the system starts, add the commandfor loading the module to your startup script.You can use either of the following methods to automatically load themodule:
Elastic Load BalancingUser Guide 16 Appendix
2021-12-08 192

– Add the command for loading the module to a customized startup scriptas required.
– Perform the following operations to configure a startup script:
i. Create the toa.modules file in the /etc/sysconfig/modules/directory. This file contains the module loading script.The following is an example of the content in the toa.modules file.#!/bin/sh/sbin/modinfo -F filename /root/toa/toa.ko > /dev/null 2>&1if [ $? -eq 0 ]; then/sbin/insmod /root/toa/toa.kofi/root/toa/toa.ko is the path of the module file. You need to replaceit with their actual path.
ii. Run the following command to add execution permissions for thetoa.modules startup script:sudo chmod +x /etc/sysconfig/modules/toa.modules
NO TE
If the kernel is upgraded, the current module will no longer match. Compilethe module again.
5. Install the module on multiple nodes.To load the module in the same OSs, copy the toa.ko file to VMs where themodule is to be loaded and then perform the operations in 3.After the module is successfully loaded, applications can obtain the real IPaddress contained in the request.
NO TE
The OS of the node must have the same version as the kernel.
6. Verify the module.After the module is successfully installed, the source address can be directlyobtained. The following provides an example for verification.Run the following command to start a simple HTTP service on the backendserver where Python is installed:python -m SimpleHTTPServer portThe value of port must be the same as the port configured for the backendserver, and the default value is 80.Access the IP address of the load balancer from a client. Access logs on theserver are as follows:192.168.0.90 - - [06/Aug/2020 14:24:21] "GET / HTTP/1.1" 200 –
NO TE
192.168.0.90 indicates the client's source IP address that is obtained by the backendserver.
● In the following operations, the Linux kernel version is 2.6.32.
Elastic Load BalancingUser Guide 16 Appendix
2021-12-08 193
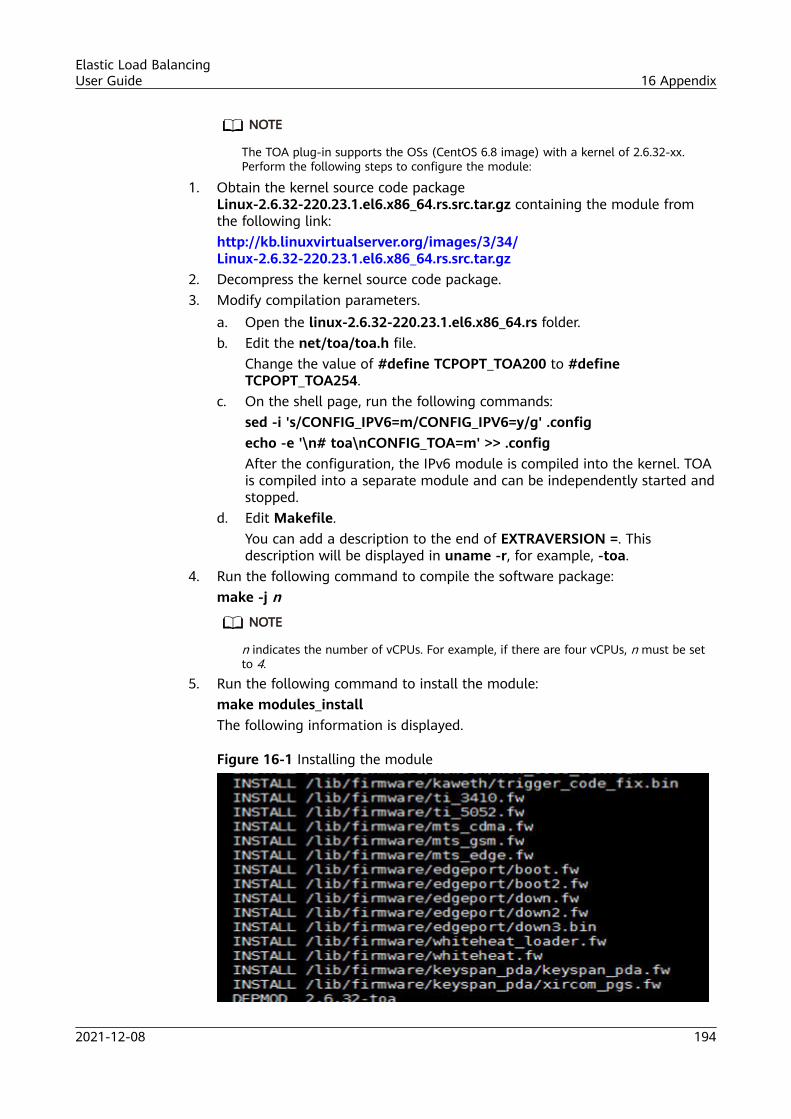
NO TE
The TOA plug-in supports the OSs (CentOS 6.8 image) with a kernel of 2.6.32-xx.Perform the following steps to configure the module:
1. Obtain the kernel source code packageLinux-2.6.32-220.23.1.el6.x86_64.rs.src.tar.gz containing the module fromthe following link:http://kb.linuxvirtualserver.org/images/3/34/Linux-2.6.32-220.23.1.el6.x86_64.rs.src.tar.gz
2. Decompress the kernel source code package.3. Modify compilation parameters.
a. Open the linux-2.6.32-220.23.1.el6.x86_64.rs folder.b. Edit the net/toa/toa.h file.
Change the value of #define TCPOPT_TOA200 to #defineTCPOPT_TOA254.
c. On the shell page, run the following commands:sed -i 's/CONFIG_IPV6=m/CONFIG_IPV6=y/g' .configecho -e '\n# toa\nCONFIG_TOA=m' >> .configAfter the configuration, the IPv6 module is compiled into the kernel. TOAis compiled into a separate module and can be independently started andstopped.
d. Edit Makefile.You can add a description to the end of EXTRAVERSION =. Thisdescription will be displayed in uname -r, for example, -toa.
4. Run the following command to compile the software package:make -j n
NO TE
n indicates the number of vCPUs. For example, if there are four vCPUs, n must be setto 4.
5. Run the following command to install the module:make modules_installThe following information is displayed.
Figure 16-1 Installing the module
Elastic Load BalancingUser Guide 16 Appendix
2021-12-08 194

6. Run the following command to install the kernel:make installThe following information is displayed.
Figure 16-2 Installing the kernel
7. Open the /boot/grub/grub.conf file and configure the kernel to start upwhen the system starts.
a. Change the default startup kernel from the first kernel to the zerothkernel by changing default=1 to default=0.
b. Add the nohz=off parameter to the end of the line containing thevmlinuz-2.6.32-toa kernel. If nohz is not disabled, the CPU0 usage maybe high and overload the kernel.
Figure 16-3 Configuration file
c. Save the modification and exit. Restart the OS.During the restart, the system will load the vmlinuz-2.6.32-toa kernel.
8. After the restart, run the following command to load the module:modprobe toaAdd the modprobe toa command to both the startup script and the systemscheduled monitoring script.
Figure 16-4 Adding the modprobe toa command
After the module is loaded, query the kernel information.
Figure 16-5 Querying the kernel
Elastic Load BalancingUser Guide 16 Appendix
2021-12-08 195

9. Verify the module.After the module is successfully installed, the source address can be directlyobtained. The following provides an example for verification.Run the following command to start a simple HTTP service on the backendserver where Python is installed:python -m SimpleHTTPServer portThe value of port must be the same as the port configured for the backendserver, and the default value is 80.Access the IP address of the load balancer from a client. Access logs on theserver are as follows:192.168.0.90 - - [06/Aug/2020 14:24:21] "GET / HTTP/1.1" 200 –
NO TE
192.168.0.90 indicates the client's source IP address that is obtained by the backendserver.
Elastic Load BalancingUser Guide 16 Appendix
2021-12-08 196

17 Change History
Released On Description
2021-12-08 Modified the following content:Added the step of checking whether the backend servergroup is associated with a listener and the step ofchecking whether an EIP or private IP address is bound tothe load balancer in How Do I Troubleshoot anUnhealthy Backend Server?
2021-09-02 Modified the following content:Optimized Differences Between Dedicated and SharedLoad Balancers.
2021-07-27 Modified the following content:Added the descriptions about idle timeout for shared loadbalancers.
2021-06-10 Modified the following content:Added the descriptions of session stickiness duration.
2021-05-27 Modified the following content:Changed the name of enhanced load balancers to sharedload balancers.
2021-05-20 Modified the following content:Added the constraints on binding EIPs to dedicated loadbalancers in the eu-de region in Table 3-1.
Elastic Load BalancingUser Guide 17 Change History
2021-12-08 197

Released On Description
2021-04-08 Modified the following content:● Added a note to state that classic load balancers can no
longer be created on the management console inDifferences Between Classic and Shared LoadBalancers, How ELB Works, Load BalancingAlgorithms, Sticky Session, HTTP Redirection toHTTPS, Is an EIP Assigned Exclusively to a LoadBalancer?, What Are the Relationships BetweenLoad Balancing Algorithms and Sticky SessionTypes?, How Does ELB Perform UDP Health Checks?What Are the Precautions for UDP Health Checks?,and What Types of Sticky Sessions Does ELBSupport?.
● Changed Create Enhanced Load Balancer to CreateElastic Load Balancer in Using Shared Load Balancers— Entry Level.
● Deleted the procedure for adding a listener to a classicload balancer in Adding a Listener.
● Deleted the procedure and parameter descriptions forcreating classic load balancers in Modifying orDeleting a Listener, Configuring Security GroupRules for Backend Servers (Shared Load Balancers),Configuring a Health Check, Disabling a HealthCheck, Tag, and How Do I Troubleshoot anUnhealthy Backend Server?
● Deleted section "Adding or Removing Backend Servers(Classic Load Balancers)".
● Added Adding or Removing Backend Servers(Dedicated Load Balancers).
Elastic Load BalancingUser Guide 17 Change History
2021-12-08 198

Released On Description
2021-03-02 Modified the following content:● Added a note to state that creating classic load
balancers on the management console is no longersupported in What Is ELB?
● Deleted information about classic load balancers inDifferences Between Dedicated and Shared LoadBalancers.
● Deleted the links for jumping to the correspondingsections in Overview.
● Deleted the procedure and parameter descriptions forcreating classic load balancers in Creating a SharedLoad Balancer.
● Updated Table 4-1 in Overview.● Added Adding a Listener to a Dedicated Load
Balancer in Adding a Listener.● Added dedicated load balancer and dedicated load
balancer listener as the monitored object in MonitoringMetrics.
● Added information about the EIPs bound to dedicatedload balancers in Is an EIP Assigned Exclusively to aLoad Balancer?
● Added Table 15-1 in What Are the RelationshipsBetween Load Balancing Algorithms and StickySession Types?
● Added the scenario for dedicated load balancers inHow Do I Troubleshoot an Unhealthy BackendServer?
● Added sticky session types supported by dedicated loadbalancers in What Types of Sticky Sessions Does ELBSupport?
2020-12-10 Modified the following content:Added descriptions and operations of dedicated loadbalancers in Creating a Dedicated Load Balancer.
2020-05-30 Modified the following content:Modified the descriptions and operations in Migratingfrom Classic Load Balancers to Shared Load Balancers.
2020-02-26 Modified the following content:Added Security Policy.Modified the following content:Added the Security Policy parameter in Adding aListener.
Elastic Load BalancingUser Guide 17 Change History
2021-12-08 199

Released On Description
2019-07-30 Modified the following content:● Added section "Regions and AZs".
2019-05-16 Modified the following content:● Optimized chapter "Getting Started."● Optimized chapters Load Balancer, Listener, Backend
Server, Health Check, and Certificate and adjustedthe content of each chapter.
2019-04-10 Accepted in OTC-4.0/Agile-05.2019.
2019-04-01 Modified the following content:Updated console screenshots.
2019-03-04 Accepted in OTC 4.0/Agile.
2019-02-22 Modified the following content:● Updated the TOA download path in Configuring the
TOA Plug-in.● Modified some parameters based on the latest console.● Optimized the parameter tables and operations for
adding listeners in Listener.Added the following content:● Added parameters for creating redirects in HTTP
Redirection to HTTPS.
2019-02-19 Modified the following content:● Modified the procedure for binding an EIP in section
"Creating an Enhanced Load Balancer."Added the following content:● Added parameters Redirected To and Enable Health
Check to the table that describes parameters foradding a listener to an enhanced load balancer insection "Creating an Enhanced Load Balancer."
● Added the procedure for unbinding an EIP in section"Creating an Enhanced Load Balancer."
● Added the procedure for modifying listeners inListener.
● Added the procedure for modifying forwarding policiesin Forwarding Policy.
Elastic Load BalancingUser Guide 17 Change History
2021-12-08 200

Released On Description
2019-02-03 Modified the following content:● Modified the operations related to enhanced load
balancers and associated resources (including listener,backend server group, backend server, health check,forwarding policy, and certificate) based on themanagement console.
● Optimized the sections under Service Overview.● Modified the parameter descriptions of enhanced load
balancer listeners in sections "Creating an EnhancedLoad Balancer", "Listener", and "Certificate".
● Changed OK to Yes in the procedures for deleting aload balancer, deleting a listener, removing a backendserver, and deleting a certificate. Changed OK to Yes insome sections based on the latest console pages.
● Modified the operations and the parameters forconfiguring bucket access permissions in AccessLogging.
● Removed Mutual Authentication from "FAQs" andplaced it under "Management."
Added the following content:● Added HTTP Redirection to HTTPS.● Added Tag.● Added ELB Components, Accessing ELB, and How ELB
Works in Service Overview.● Added parameter Domain Name in Creating,
Modifying, or Deleting a Certificate.● Added parameters Tag, Redirect, and Cookie Name in
the tables of listener parameters in sections "Creatingan Enhanced Load Balancer", Listener, and Certificate.
Deleted the following content:● Deleted the content related to IP mode listeners in
section "Creating an Enhanced Load Balancer."● Deleted FAQ "How Can I Create a Listener in IP Mode?"● Deleted "Basic Architecture" and "Features" from
"Service Overview."
2018-11-30 Modified the following content:Added the SNI related parameters for enhanced loadbalancers.
2018-07-20 Modified the following content:Added the procedure for adding a listener.
2018-06-11 Accepted in OTC 3.1.
Elastic Load BalancingUser Guide 17 Change History
2021-12-08 201

Released On Description
2018-05-17 Modified the following content:Deleted parameter Billing Mode.
2018-05-30 This issue is the first official release.
Elastic Load BalancingUser Guide 17 Change History
2021-12-08 202