
Document Imaging Scanner User's Manual - Digital Check
26
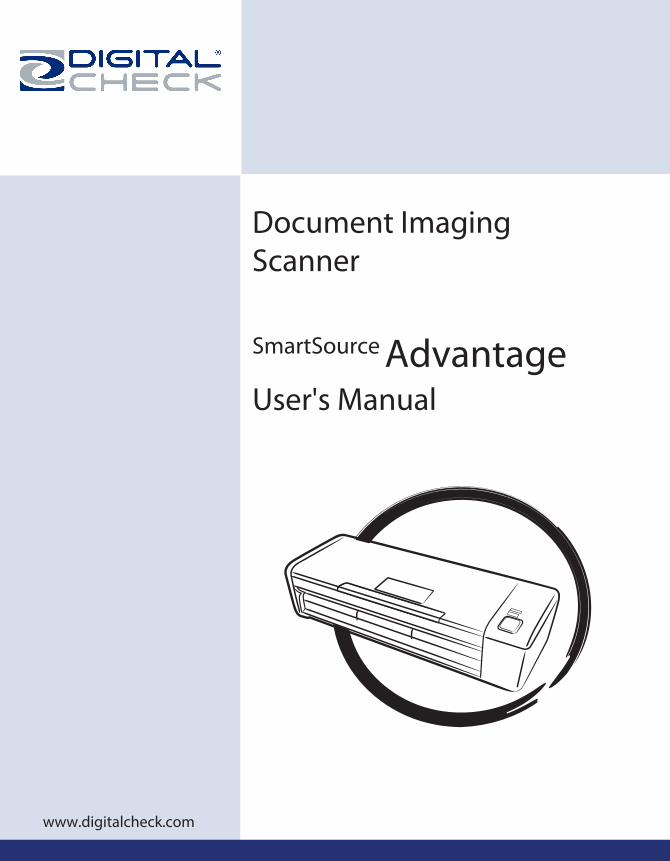
www.digitalcheck.com Document Imaging Scanner SmartSource Advantage User's Manual
-
Upload
khangminh22 -
Category
Documents
-
view
4 -
download
0
Transcript of Document Imaging Scanner User's Manual - Digital Check
www.digitalcheck.com
Document Imaging Scanner
SmartSource AdvantageUser's Manual

2 Digital Check SmartSource Advantage User's Manual
Preface
Copyright
This document may not be reproduced or copied in any way, stored electronically, or translated into any language, without the permission of DCT.
Disclaimer
The contents of this manual have been checked carefully for accuracy, and every effort has been made to ensure that there are no errors. However, DCT makes no guarantee as to the accuracy of the contents of this document and reserves the right to make changes to the contents without prior warning.
I49-004544 A July 2010Document Capture Technologies, Inc. 4255 Burton Drive, Santa Clara, CA 95054 408.436.9888, www.docucap.com
Digital Check SmartSource Advantage User's Manual 3
FCC Compliance StatementThis equipment (SmartSource Advantage) has been tested and found to comply with the limits for a Class B digital device, pursuant to Part 15 of the FCC rules. These limits are designed to provide reasonable protection against harmful interference in a residential installation. This equipment generates, uses and can radiate radio frequency energy and, if not installed and used in accordance with the instructions, may cause harmful interference to radio communications. However, there is no guarantee that interference will not occur in a particular installation. If this equipment does cause harmful interference to radio or television reception, which can be determined by turning the equipment off and on, the user is encouraged to try to correct the interference by one or more of the following measures:
• Reorientorrelocatethereceivingantenna.
• Increasetheseparationbetweentheequipmentandreceiver.
• Connecttheequipmentintoanoutletonacircuitdifferentfromthattowhichthereceiver is connected.
• Consultthedealeroranexperiencedradio/TVtechnicianforhelp.
Note: A shielded Hi-Speed USB interface cable with ferrite core installed on the scanner connector end must be used with this equipment.
Caution: Changesormodificationsnotexpresslyapprovedbythemanufacturerresponsiblefor compliance could void the user's authority to operate the equipment.
ThisdevicecomplieswithPart15oftheFCCRules.Operationissubjecttothefollowingtwo conditions: (1) This device may not cause harmful interference, and (2) this device must accept any interference received, including interference that may cause undesired operation.

4 Digital Check SmartSource Advantage User's Manual
Safety PrecautionsBefore using your scanner, read the following safety guides carefully, which detail the properoperationofthescanneranditsaccessoriestopreventinjuriesordamagetousersor equipment.
Power Source and AC Power Cord:
• Useapowersourceonlywithapowerratingspecifiedonthemarkinglabel.
• Inserttheplugcompletelyintotheoutlet,asalooseconnectionmaycausearcingandresult in fire.
• Placeandroutethepowersupplycordsuchthatitisnotlikelytobewalkedonorpinched by items placed upon or against them, paying particular attention to the cord nearthepowerplugs,conveniencereceptacles,andatthepointwhereitexitsfromthe outlet.
• Whenthescannerisleftunattendedandunusedforlongperiodsoftime,unplugitfrom the wall outlet.
Moving and Storing the Scanner:
• Donotplacethescanneronanyslippery,slanted,orunstablesurface.Theproductmayslideorfall,causingseriousinjurytopeopleaswellasseriousdamagetotheproduct.
• Donotusethisscannernearwater.Neverspillliquidofanykindontheproduct,oritmay result in electric shock or other hazards.
• Thisscannershouldbesituatedawayfromheatsourcessuchasradiators,heatregisters, stoves, or other products (including amplifiers) that produce heat.
Service:
• Whenyouneedarepairservice,unplugthescannerfromthepoweroutletandconsultqualified service personnel.
• Whenreplacementpartsarerequired,usereplacementpartsthatarespecifiedbythemanufacturer or have the same characteristics as the original parts.
Digital Check SmartSource Advantage User's Manual 5
Table of Contents
Preface................................................................................................................................................................. 2
FCC Compliance Statement ........................................................................................................................ 3
Safety Precautions .......................................................................................................................................... 4
Knowing About Your Scanner .................................................................................................................... 6
Features of SmartSource Advantage ............................................................................................. 6
InstallationRequirements .................................................................................................................. 8
Taking a Closer Look ............................................................................................................................. 9
Front/BackView ............................................................................................................................ 9
OpenView ....................................................................................................................................10
Initial Setup .....................................................................................................................................................11
Following Three Easy Steps..............................................................................................................11
Step 1: Unpacking Package Contents ................................................................................11
Step 2: Installing the Software ..............................................................................................12
Step 3: Connecting the Scanner ...........................................................................................13To the Power Adapter .....................................................................................................13
To the Hi-Speed USB Cable ...........................................................................................13
Positioning Documents ..............................................................................................................................14
To Load a Stack of Documents .......................................................................................................14
To Load Cards ........................................................................................................................................15
Document Notices ..............................................................................................................................15
Customizing the Function Button ...........................................................................................................16
Care and Cleaning.........................................................................................................................................17
Cleaning the Scanner Glass Surfaces ...........................................................................................17
CleaningtheRollers ...........................................................................................................................18
Maintenance ...................................................................................................................................................19
ReplacingtheSeparationRollerAssembly ................................................................................19
ReplacingtheFeedRollerAssembly ............................................................................................21
Appendix ..........................................................................................................................................................23
FixingPaperJams ................................................................................................................................23
Troubleshooting ..................................................................................................................................24
Specifications ........................................................................................................................................26

6 Digital Check SmartSource Advantage User's Manual
Knowing about Your Scanner
SmartSource Advantage is a sheet-fed color document scanner with a built-in automatic document feeder (ADF) that can hold up to 20 sheets of papers for the unattended volumescanning. It features 600 dpi optical resolution, 65-inch (1651 mm) long document scanning support, andhasathroughputrunof15pages(simplex)or30imagesperminute(duplex)incolor.
Features of SmartSource AdvantageSmartSource Advantage comes with several important features, including the following:
• Portable,compactandconvenient—Withaperfectsmallsize,SmartSource Advantagereforms your imagination about a sheet-fed scanner. From the office to the home, the coffee shop to the hotel, SmartSource Advantage easily affords users portable and mobile opportunities for document capture on the go.
• Superbabilitytohandledocumentsinversatilematerials—SmartSource Advantage lets users easily digitize patient IDs, business cards, bank statements, legal documents, insurancepapers,andmedicalrecordsinjustseconds.
• Duplexscanninginasinglepass—Allowsyoutoscanbothsidesofonesheetinasinglepass.Withthisfeature,thescannercanhandleupto40ipmingrayscale/black& white and 30 ipm in color at 200 dpi.
• Automaticdocumentfeederwithcardscanning—Theautomaticdocumentfeedercanholdupto20sheetsofpapers(0.05"/1.25mmthickness)atatime,supportingdimensionsfrom3.15"x2.1"(80mmx52mm)to8.5"x65"(216mmx1651mm).
• Energy-savingLEDlightsource—AdoptingLEDsasthelightsource,whenthescanner is detected by the system, there are no requirements for any warm-up time before carrying out the scan, which boots your productivity and reduces energy costs. Withitsstableperformance,theimagequalitywillremainconsistentevenafterthisscanner is used for a certain period of time.
• Oneprogrammablefunctionbutton—Theprogrammablefunctionbuttononthefront panel provides you with an intuitive and easy way to access scanner functions.
• Hi-SpeedUSBport—Hi-SpeedUSBiscapableofhighdatatransferratesofupto480Mbit/sec,providingthehighdatatransferrateviatheincludedHi-SpeedUSBcable.
Digital Check SmartSource Advantage User's Manual 7
• NewandadvancedScanWizardDIsoftware—Itsall-in-onecontrolpaneloffersahostoffeaturesandimageadjustmentcontrols.SupportingtheTWAINdriver,ScanWizardDIalsofeaturesfulldocumentscanningtoolsandon-screenproofing.Itsmulti-scanning area and preview option allow you to obtain quick scans in the preview window. It comes out several distinguished advantages:
– Barcodeseparator—Withthisfeature,youcanbatchscandocumentswithoutstarting and stopping each time a new file begins by using barcode numbers on the documents. It saves you huge amounts of time and money to organize, to indexandtosearchfilesofdocumentsinseconds,enhancingtheefficiencyandproductivity of file management.
– Papercount—Thepapercountfeatureallowsuserstokeeptrackofallscanactions from both flatbed and ADF. This feature helps to estimate when you may need to replace the rubber or separation pad, or to apply maintenance and service to your scanner, making the use of your scanner more effectively.
– Savemultipleimagesasasinglefile—Thisadvancedfeatureallowsusertosave multiple scanned images as a single file, depending on the number of the scanned images that are defined for document archival.
– Auto-cropandauto-deskew—Theauto-cropfunctionautomaticallydetectsthesize of the original image, crops the full scan frame to fit the image, and removes unwanted black borders. The auto-deskew function automatically corrects distorted images for proper alignment.
– Colordropout—Red,greenandbluecolorscanbedroppedouttoallowforclearer and more accurate forms processing with problematic color documents.
– Presetsetting—Thisfeatureallowsyoutosavethepredefinedscanningvalues,and then retrieve them later for scanning same types of materials, which brings fast and convenient access for users.
– Documentenhancement—Thisfeaturebringsoutandimprovesthereadabilityoftextinadocumentthatincludesotherelementssuchascolor,pictures,orgraphs.

8 Digital Check SmartSource Advantage User's Manual
InstallationRequirementsIn order to use your SmartSource Advantage, your computer must satisfy the following system requirements:
• CD-ROMdrive(forinstallingsoftware)
• Colordisplaywith24-bitcoloroutputcapability
• 512MBRAMormore
• PentiumIVPCorhigherwithaHi-SpeedUSB(USB2.0)port
• MicrosoftWindows2000,XP,Vistaor7
Digital Check SmartSource Advantage User's Manual 9
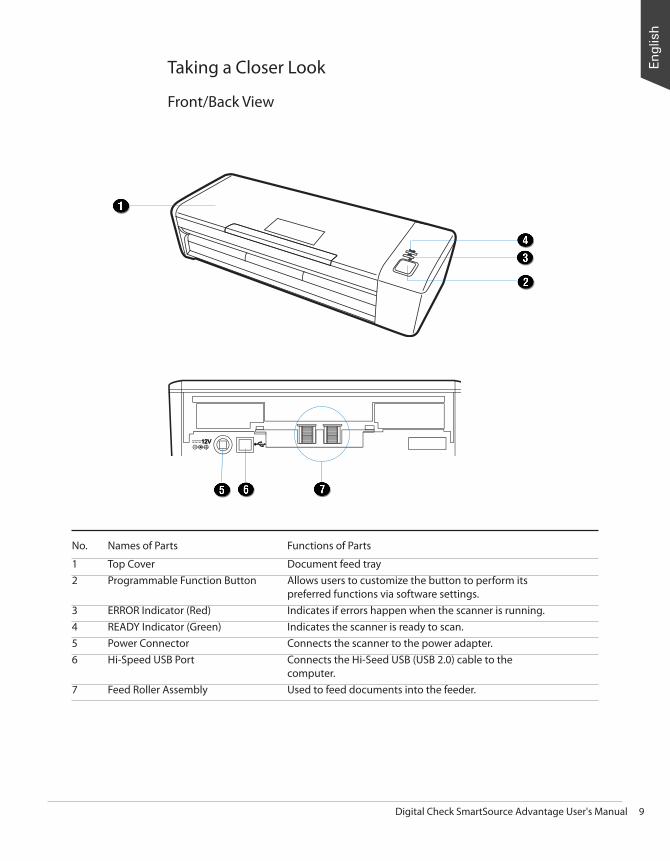
No. Names of Parts Functions of Parts
1 Top Cover Document feed tray2 Programmable Function Button Allows users to customize the button to perform its
preferred functions via software settings.3 ERRORIndicator(Red) Indicatesiferrorshappenwhenthescannerisrunning.4 READYIndicator(Green) Indicatesthescannerisreadytoscan.5 Power Connector Connects the scanner to the power adapter.6 Hi-Speed USB Port Connects the Hi-Seed USB (USB 2.0) cable to the
computer.7 FeedRollerAssembly Usedtofeeddocumentsintothefeeder.
Taking a Closer Look
Front/BackView
F1
Error
Ready
10 Digital Check SmartSource Advantage User's Manual
F1�
E�r�r�or�
R�ea�d�y�
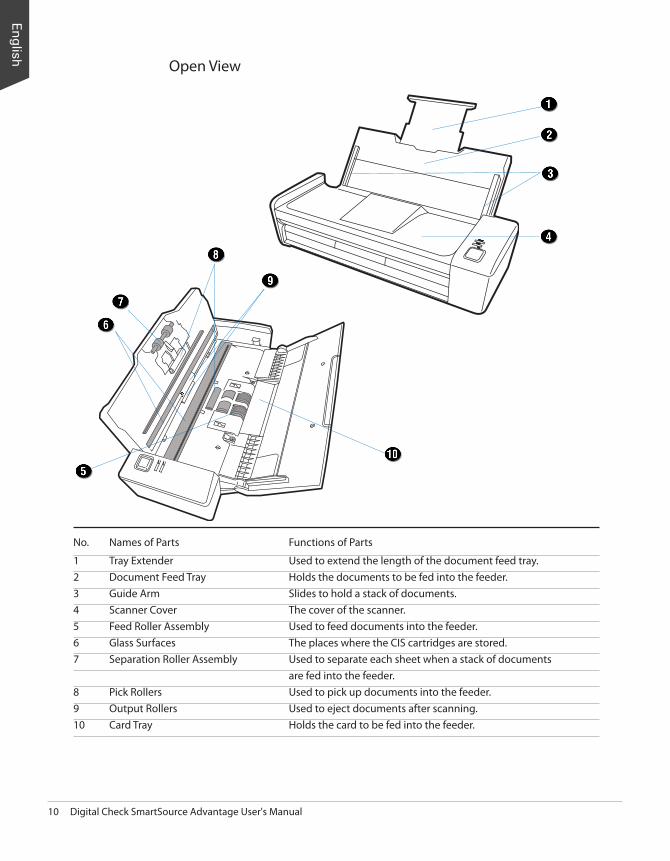
OpenView
No. Names of Parts Functions of Parts
1 TrayExtender Usedtoextendthelengthofthedocumentfeedtray.2 Document Feed Tray Holds the documents to be fed into the feeder.3 Guide Arm Slides to hold a stack of documents.4 Scanner Cover The cover of the scanner. 5 FeedRollerAssembly Usedtofeeddocumentsintothefeeder.6 Glass Surfaces The places where the CIS cartridges are stored.7 SeparationRollerAssembly Usedtoseparateeachsheetwhenastackofdocuments
are fed into the feeder.8 PickRollers Usedtopickupdocumentsintothefeeder.9 OutputRollers Usedtoejectdocumentsafterscanning.10 Card Tray Holds the card to be fed into the feeder.

Digital Check SmartSource Advantage User's Manual 11
Initial Setup
Following Three Easy StepsAfter unpacking your scanner package, follow the steps in order for a quick and easy installation process.
Step 1: Unpacking Package ContentsAfterunpackingyourscannerpackage,pleasecheckforthemajorcomponentslistedbelow.
Scanner
Hi-Speed USB Cable
Power Adapter
Software CDs
F1
Error
Ready
12 Digital Check SmartSource Advantage User's Manual
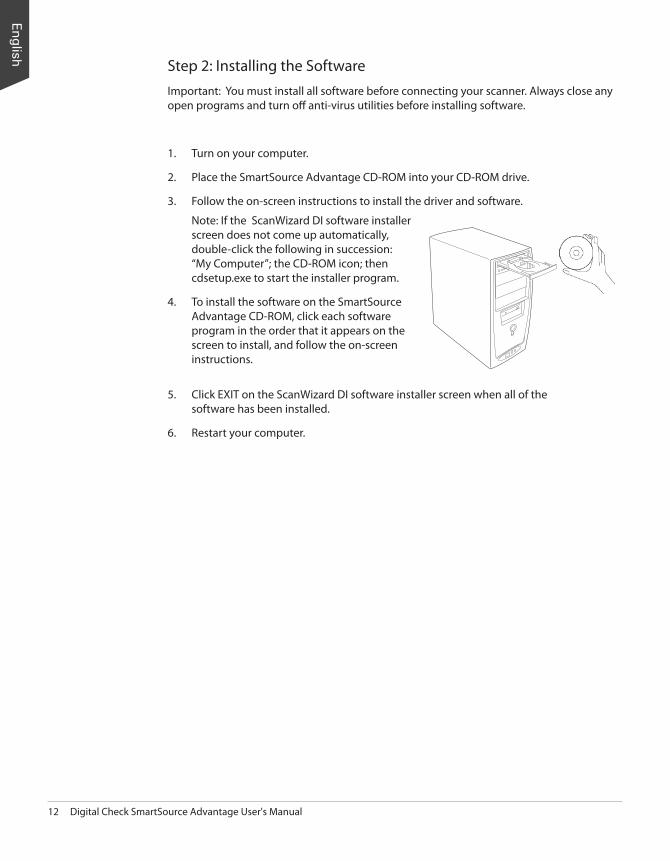
Step 2: Installing the SoftwareImportant: You must install all software before connecting your scanner. Always close any open programs and turn off anti-virus utilities before installing software.
1. Turn on your computer.
2. Place the SmartSource AdvantageCD-ROMintoyourCD-ROMdrive.
3. Follow the on-screen instructions to install the driver and software.
Note: If the ScanWizard DI software installer screen does not come up automatically, double-click the following in succession: “MyComputer”;theCD-ROMicon;thencdsetup.exetostarttheinstallerprogram.
4. To install the software on the SmartSource Advantage CD-ROM,clickeachsoftwareprogramin the order that it appears on the screen to install, and follow the on-screen instructions.
5. Click EXITon the ScanWizard DI software installer screen when all of the software has been installed.
6. Restartyourcomputer.
Digital Check SmartSource Advantage User's Manual 13
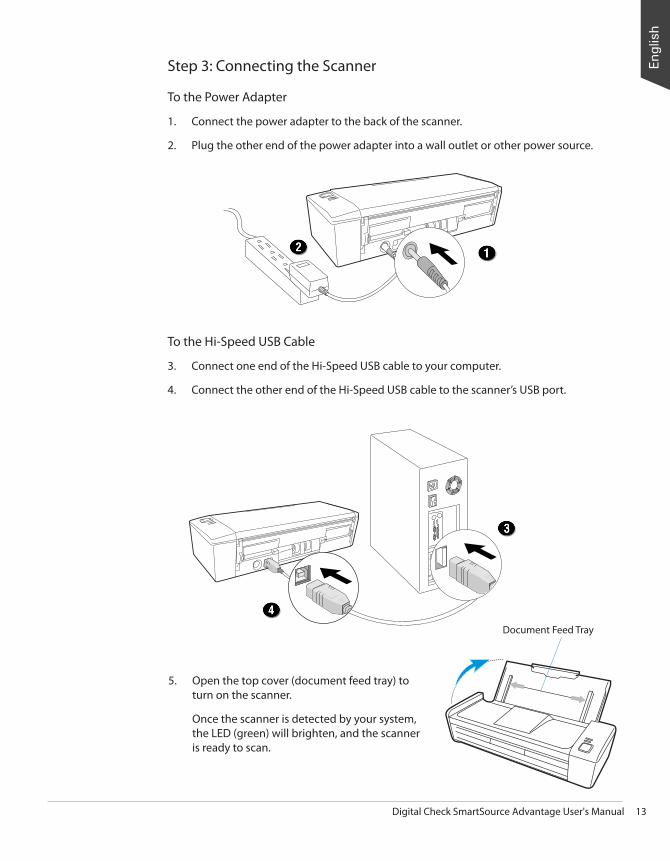
Step 3: Connecting the Scanner
To the Power Adapter
1. Connect the power adapter to the back of the scanner.
2. Plug the other end of the power adapter into a wall outlet or other power source.
To the Hi-Speed USB Cable
3. Connect one end of the Hi-Speed USB cable to your computer.
4. Connect the other end of the Hi-Speed USB cable to the scanner’s USB port.
5. Openthetopcover(documentfeedtray)toturn on the scanner.
Oncethescannerisdetectedbyyoursystem,the LED (green) will brighten, and the scanner is ready to scan.
Document Feed Tray
14 Digital Check SmartSource Advantage User's Manual
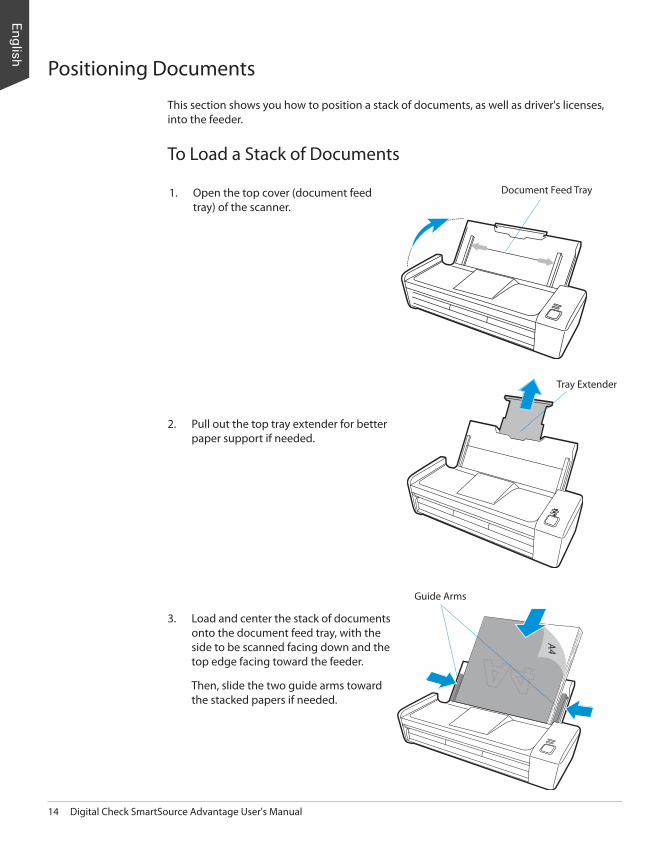
Positioning Documents
This section shows you how to position a stack of documents, as well as driver's licenses, into the feeder.
To Load a Stack of Documents
1. Openthetopcover(documentfeedtray) of the scanner.
F1
Error
Ready
Document Feed Tray
2. Pulloutthetoptrayextenderforbetterpaper support if needed.
3. Load and center the stack of documents onto the document feed tray, with the side to be scanned facing down and the top edge facing toward the feeder.
Then, slide the two guide arms toward the stacked papers if needed.
A4
Guide Arms
TrayExtender
Digital Check SmartSource Advantage User's Manual 15
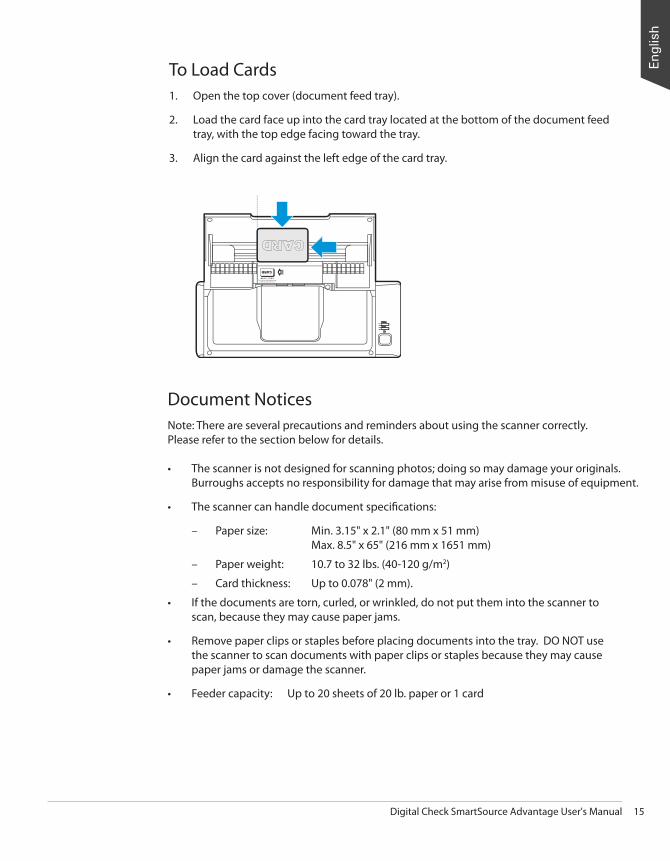
To Load Cards1. Openthetopcover(documentfeedtray).
2. Load the card face up into the card tray located at the bottom of the document feed tray, with the top edge facing toward the tray.
3. Align the card against the left edge of the card tray.
Document NoticesNote: There are several precautions and reminders about using the scanner correctly. Please refer to the section below for details.
• Thescannerisnotdesignedforscanningphotos;doingsomaydamageyouroriginals.Burroughs accepts no responsibility for damage that may arise from misuse of equipment.
• Thescannercanhandledocumentspecifications:
– Papersize: Min.3.15"x2.1"(80mmx51mm) Max.8.5"x65"(216mmx1651mm)
– Paperweight: 10.7to32lbs.(40-120g/m2)
– Card thickness: Up to 0.078" (2 mm).
• Ifthedocumentsaretorn,curled,orwrinkled,donotputthemintothescannertoscan,becausetheymaycausepaperjams.
• Removepaperclipsorstaplesbeforeplacingdocumentsintothetray.DONOTusethe scanner to scan documents with paper clips or staples because they may cause paperjamsordamagethescanner.
• Feedercapacity: Upto20sheetsof20lb.paperor1card
F1
Ready
Error
CARD
16 Digital Check SmartSource Advantage User's Manual
Customizing the Function Button
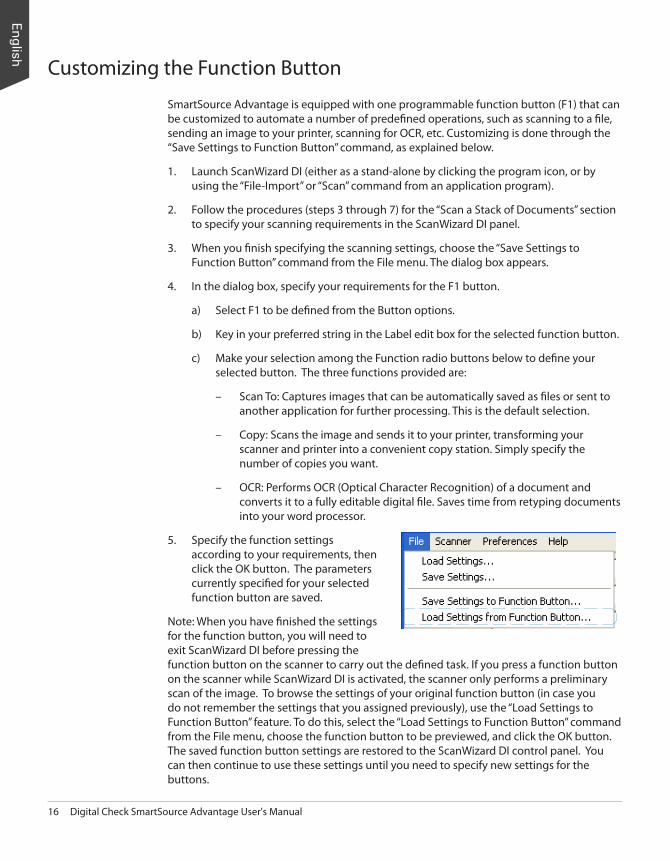
SmartSource Advantage is equipped with one programmable function button (F1) that can be customized to automate a number of predefined operations, such as scanning to a file, sendinganimagetoyourprinter,scanningforOCR,etc.Customizingisdonethroughthe“SaveSettingstoFunctionButton”command,asexplainedbelow.
1. LaunchScanWizardDI(eitherasastand-alonebyclickingtheprogramicon,orbyusing the “File-Import” or “Scan” command from an application program).
2. Follow the procedures (steps 3 through 7) for the “Scan a Stack of Documents” section tospecifyyourscanningrequirementsintheScanWizardDIpanel.
3. Whenyoufinishspecifyingthescanningsettings,choosethe“SaveSettingstoFunctionButton”commandfromtheFilemenu.Thedialogboxappears.
4. Inthedialogbox,specifyyourrequirementsfortheF1button.
a) Select F1 to be defined from the Button options.
b) KeyinyourpreferredstringintheLabeleditboxfortheselectedfunctionbutton.
c) Make your selection among the Function radio buttons below to define your selected button. The three functions provided are:
– Scan To: Captures images that can be automatically saved as files or sent to another application for further processing. This is the default selection.
– Copy: Scans the image and sends it to your printer, transforming your scanner and printer into a convenient copy station. Simply specify the number of copies you want.
– OCR:PerformsOCR(OpticalCharacterRecognition)ofadocumentandconverts it to a fully editable digital file. Saves time from retyping documents into your word processor.
5. Specify the function settings according to your requirements, then clicktheOKbutton.Theparameterscurrently specified for your selected function button are saved.
Note:Whenyouhavefinishedthesettingsfor the function button, you will need to exitScanWizardDIbeforepressingthefunction button on the scanner to carry out the defined task. If you press a function button onthescannerwhileScanWizardDIisactivated,thescanneronlyperformsapreliminaryscan of the image. To browse the settings of your original function button (in case you do not remember the settings that you assigned previously), use the “Load Settings to Function Button” feature. To do this, select the “Load Settings to Function Button” command fromtheFilemenu,choosethefunctionbuttontobepreviewed,andclicktheOKbutton.ThesavedfunctionbuttonsettingsarerestoredtotheScanWizardDIcontrolpanel.Youcan then continue to use these settings until you need to specify new settings for the buttons.
Digital Check SmartSource Advantage User's Manual 17
Care and Cleaning
To ensure optimal performance from SmartSource Advantage, it is important to clean several critical parts of the scanner on a regular basis.
Cleaning the Scanner Glass Surfaces
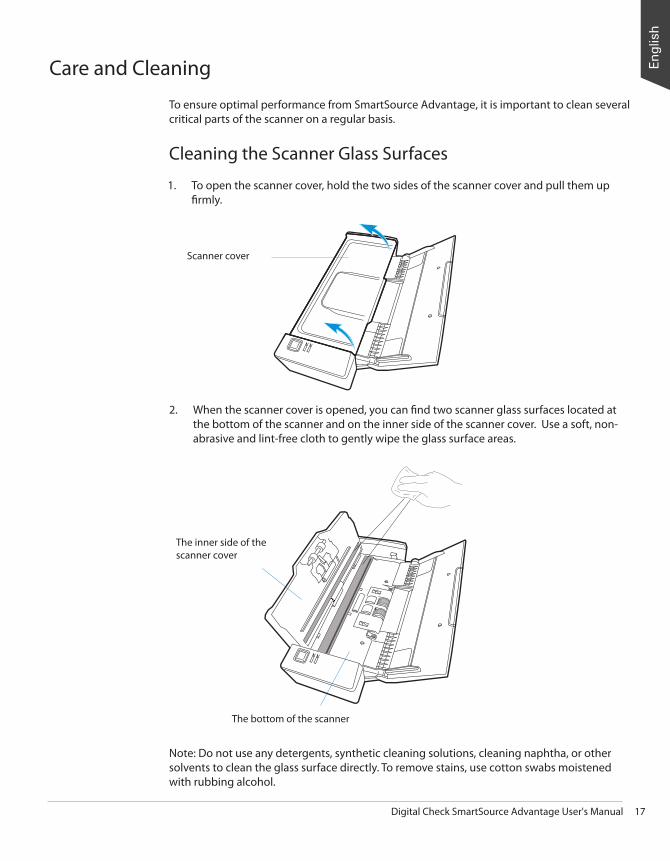
1. To open the scanner cover, hold the two sides of the scanner cover and pull them up firmly.
2. Whenthescannercoverisopened,youcanfindtwoscannerglasssurfaceslocatedatthe bottom of the scanner and on the inner side of the scanner cover. Use a soft, non-abrasive and lint-free cloth to gently wipe the glass surface areas.
Scanner cover
Note: Do not use any detergents, synthetic cleaning solutions, cleaning naphtha, or other solvents to clean the glass surface directly. To remove stains, use cotton swabs moistened with rubbing alcohol.
The bottom of the scanner
The inner side of the scanner cover
18 Digital Check SmartSource Advantage User's Manual
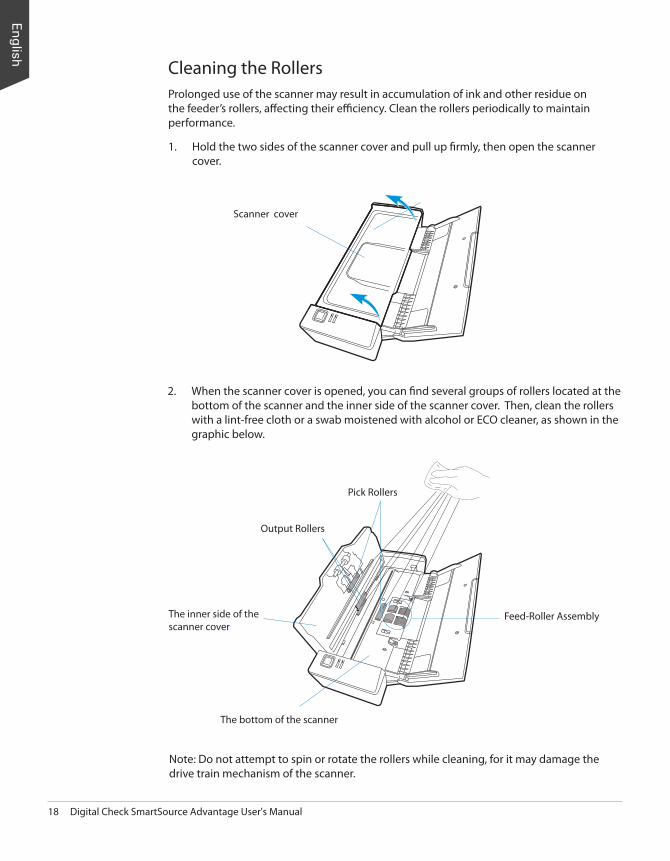
CleaningtheRollersProlonged use of the scanner may result in accumulation of ink and other residue on the feeder’s rollers, affecting their efficiency. Clean the rollers periodically to maintain performance.
1. Hold the two sides of the scanner cover and pull up firmly, then open the scanner cover.
Feed-RollerAssembly
PickRollers
OutputRollers
The bottom of the scanner
The inner side of the scanner cover
2. Whenthescannercoverisopened,youcanfindseveralgroupsofrollerslocatedatthebottom of the scanner and the inner side of the scanner cover. Then, clean the rollers withalint-freeclothoraswabmoistenedwithalcoholorECOcleaner,asshowninthegraphic below.
Note: Do not attempt to spin or rotate the rollers while cleaning, for it may damage the drive train mechanism of the scanner.
Scanner cover
Digital Check SmartSource Advantage User's Manual 19
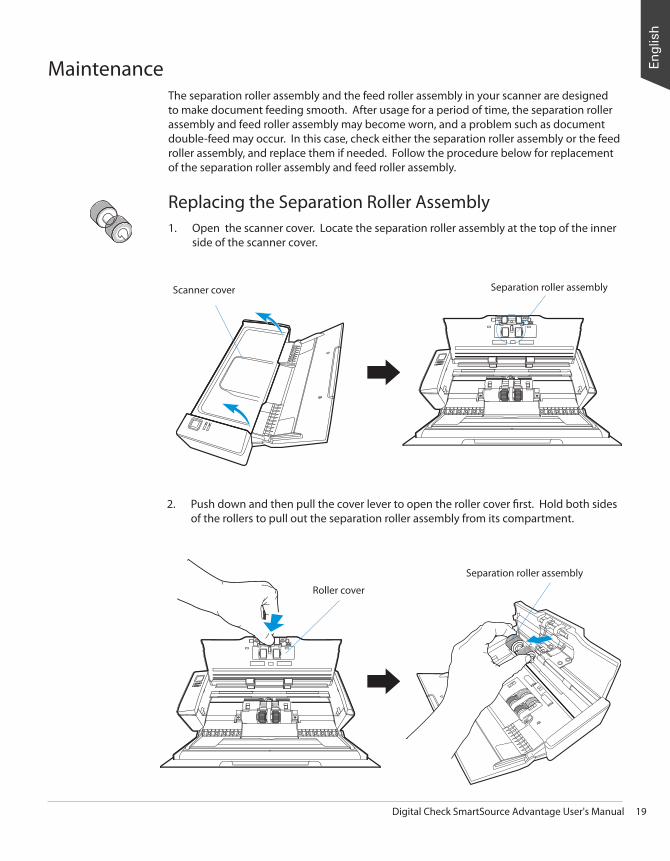
MaintenanceThe separation roller assembly and the feed roller assembly in your scanner are designed to make document feeding smooth. After usage for a period of time, the separation roller assembly and feed roller assembly may become worn, and a problem such as document double-feed may occur. In this case, check either the separation roller assembly or the feed roller assembly, and replace them if needed. Follow the procedure below for replacement of the separation roller assembly and feed roller assembly.
ReplacingtheSeparationRollerAssembly1. Openthescannercover.Locatetheseparationrollerassemblyatthetopoftheinner
side of the scanner cover.
2. Push down and then pull the cover lever to open the roller cover first. Hold both sides of the rollers to pull out the separation roller assembly from its compartment.
Rollercover
Separation roller assemblyScanner cover
Separation roller assembly
20 Digital Check SmartSource Advantage User's Manual
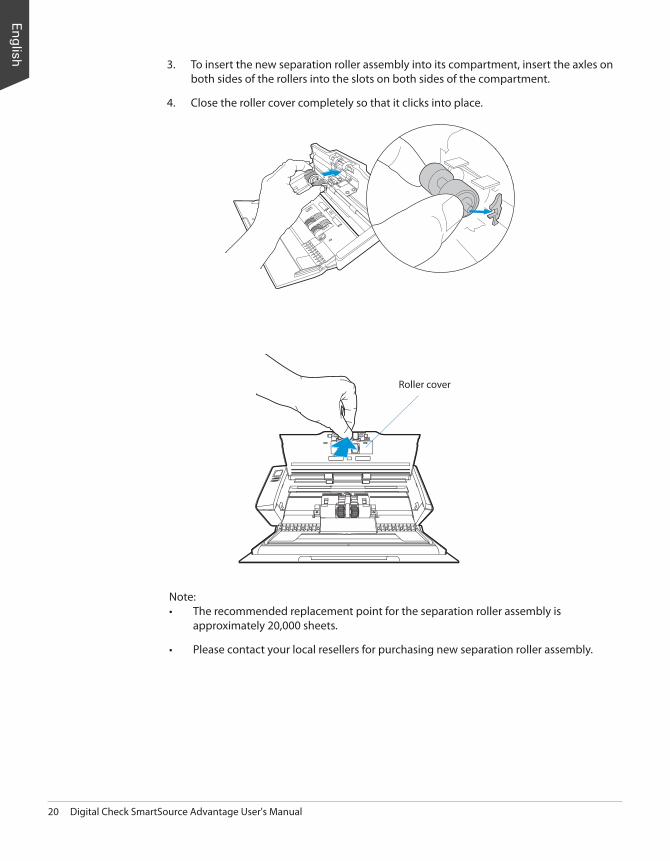
3. Toinsertthenewseparationrollerassemblyintoitscompartment,inserttheaxlesonboth sides of the rollers into the slots on both sides of the compartment.
4. Close the roller cover completely so that it clicks into place.
Note: • Therecommendedreplacementpointfortheseparationrollerassemblyis
approximately20,000sheets.
• Pleasecontactyourlocalresellersforpurchasingnewseparationrollerassembly.
Rollercover
Digital Check SmartSource Advantage User's Manual 21
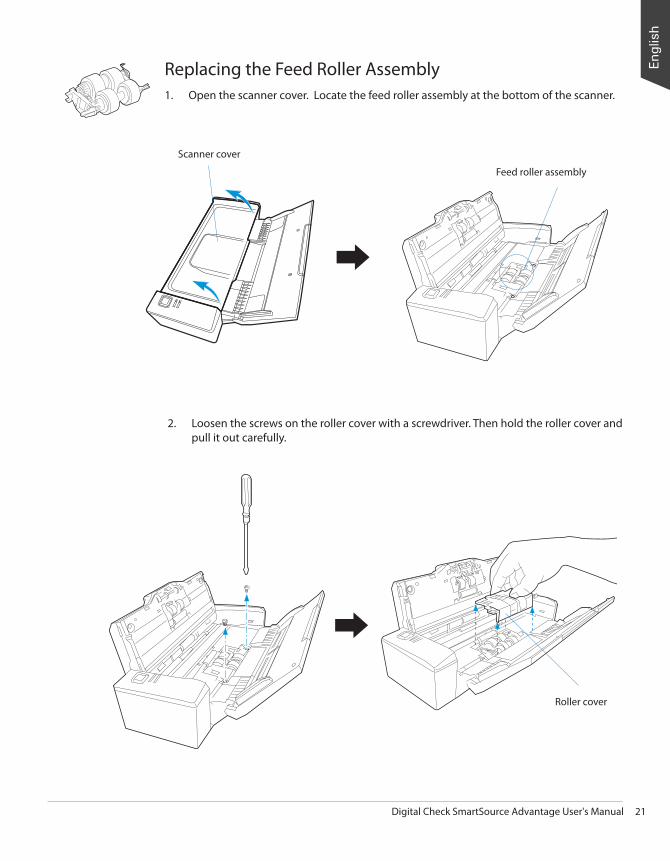
ReplacingtheFeedRollerAssembly1. Openthescannercover.Locatethefeedrollerassemblyatthebottomofthescanner.
Feed roller assembly
2. Loosen the screws on the roller cover with a screwdriver. Then hold the roller cover and pull it out carefully.
Scanner cover
Rollercover
22 Digital Check SmartSource Advantage User's Manual
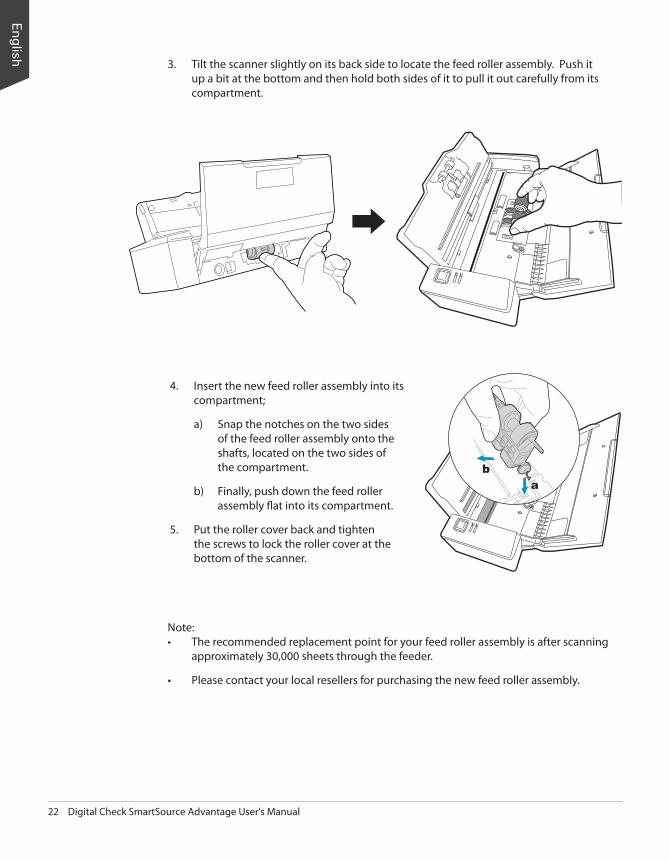
3. Tilt the scanner slightly on its back side to locate the feed roller assembly. Push it up a bit at the bottom and then hold both sides of it to pull it out carefully from its compartment.
4. Insert the new feed roller assembly into its compartment;
a) Snap the notches on the two sides of the feed roller assembly onto the shafts, located on the two sides of the compartment.
b) Finally, push down the feed roller assembly flat into its compartment.
5. Put the roller cover back and tighten the screws to lock the roller cover at the bottom of the scanner.
ab
Note: • Therecommendedreplacementpointforyourfeedrollerassemblyisafterscanning
approximately30,000sheetsthroughthefeeder.
• Pleasecontactyourlocalresellersforpurchasingthenewfeedrollerassembly.
Digital Check SmartSource Advantage User's Manual 23
Appendix
FixingPaperJams
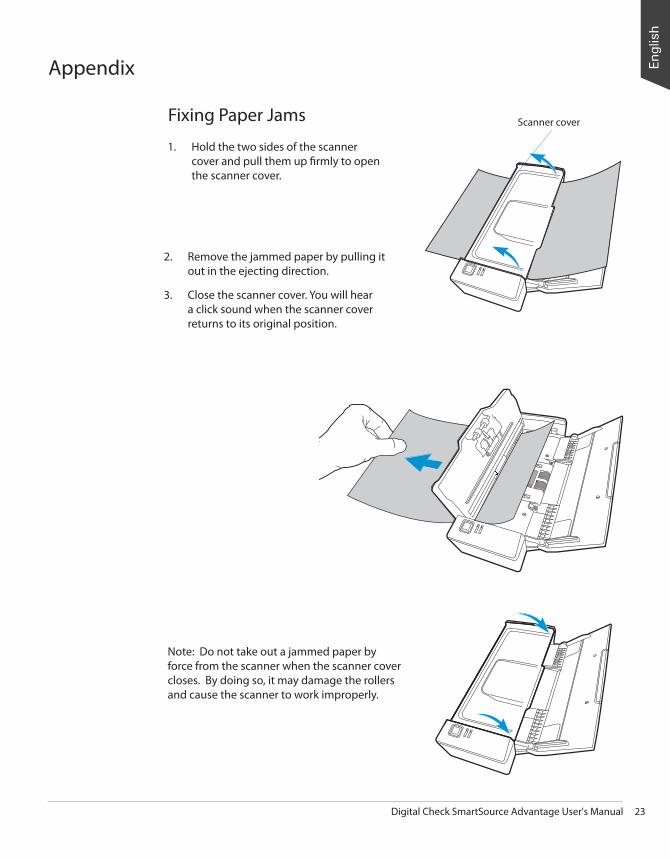
1. Hold the two sides of the scanner cover and pull them up firmly to open the scanner cover.
2. Removethejammedpaperbypullingitoutintheejectingdirection.
3. Close the scanner cover. You will hear a click sound when the scanner cover returns to its original position.
Note:Donottakeoutajammedpaperbyforce from the scanner when the scanner cover closes. By doing so, it may damage the rollers and cause the scanner to work improperly.
Scanner cover
24 Digital Check SmartSource Advantage User's Manual
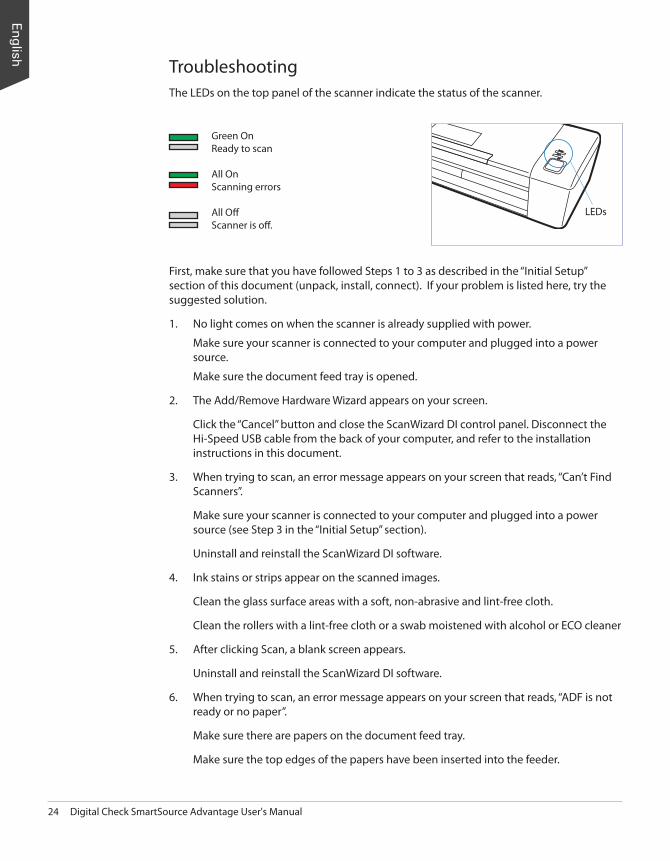
TroubleshootingThe LEDs on the top panel of the scanner indicate the status of the scanner.
First, make sure that you have followed Steps 1 to 3 as described in the “Initial Setup” section of this document (unpack, install, connect). If your problem is listed here, try the suggested solution.
1. No light comes on when the scanner is already supplied with power.
Make sure your scanner is connected to your computer and plugged into a power source.
Make sure the document feed tray is opened.
2. TheAdd/RemoveHardwareWizardappearsonyourscreen.
Clickthe“Cancel”buttonandclosetheScanWizardDIcontrolpanel.DisconnecttheHi-Speed USB cable from the back of your computer, and refer to the installation instructions in this document.
3. Whentryingtoscan,anerrormessageappearsonyourscreenthatreads,“Can’tFindScanners”.
Make sure your scanner is connected to your computer and plugged into a power source (see Step 3 in the “Initial Setup” section).
UninstallandreinstalltheScanWizardDIsoftware.
4. Ink stains or strips appear on the scanned images.
Clean the glass surface areas with a soft, non-abrasive and lint-free cloth.
Cleantherollerswithalint-freeclothoraswabmoistenedwithalcoholorECOcleaner
5. After clicking Scan, a blank screen appears.
UninstallandreinstalltheScanWizardDIsoftware.
6. Whentryingtoscan,anerrormessageappearsonyourscreenthatreads,“ADFisnotready or no paper”.
Make sure there are papers on the document feed tray.
Make sure the top edges of the papers have been inserted into the feeder.
GreenOn Readytoscan
AllOn Scanning errors
AllOff Scanner is off.
F1
Error
Ready
LEDs

Digital Check SmartSource Advantage User's Manual 25
7. The scanner cannot pick up papers into the feeder.
Makesurethesheetsofpapersloadedonthedocumentfeedtraydonotexceedthethickness limit. The thickness limit is 2 mm.
Check if the separation roller assembly becomes worn and needs to be changed.
8. Whentryingtoscan,anerrormessageappearsonyourscreenthatreads,“Code-206,ADFpaperjamorrollerfailure.”
ClickOKfirst,thenopenthescannercover,asillustratedintheprevioussection“FixingPaper Jams”.
• Iftheproblemisoccurringfromapaperjam,followtheprocedureslaidoutinthe“FixingPaperJams”section.
• Iftheproblemisoccurringfromsituationsotherthanapaperjam,followtheprocedures laid out in the “Position Documents” section.
Finally, close the scanner cover and restart scanning.
26 Digital Check SmartSource Advantage User's Manual
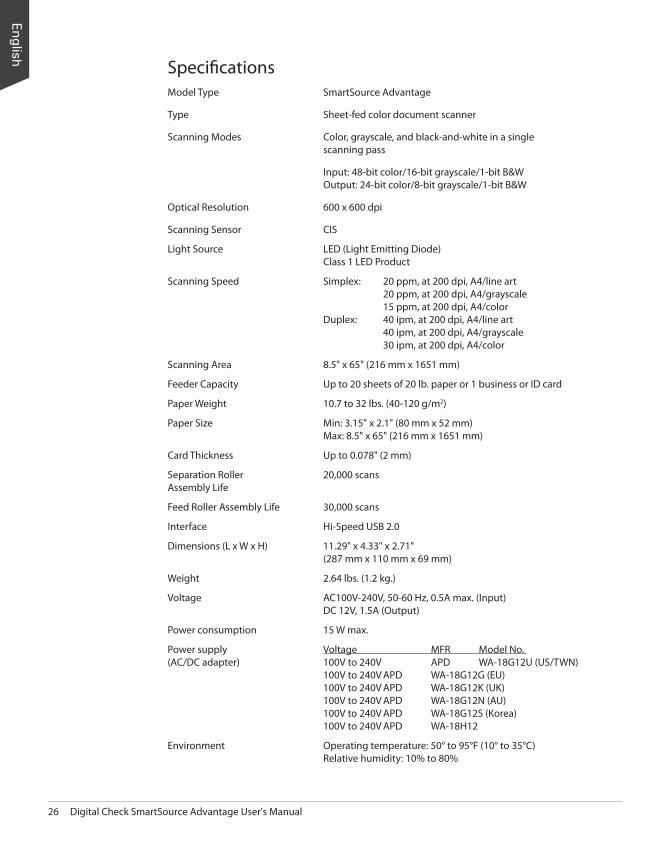
SpecificationsModel Type SmartSource Advantage
Type Sheet-fed color document scanner
Scanning Modes Color, grayscale, and black-and-white in a single scanning pass
Input:48-bitcolor/16-bitgrayscale/1-bitB&W Output:24-bitcolor/8-bitgrayscale/1-bitB&W
OpticalResolution 600x600dpi
Scanning Sensor CIS
Light Source LED (Light Emitting Diode) Class 1 LED Product
ScanningSpeed Simplex: 20ppm,at200dpi,A4/lineart 20ppm,at200dpi,A4/grayscale 15ppm,at200dpi,A4/color
Duplex: 40ipm,at200dpi,A4/lineart 40ipm,at200dpi,A4/grayscale 30ipm,at200dpi,A4/color
ScanningArea 8.5"x65"(216mmx1651mm)
Feeder Capacity Up to 20 sheets of 20 lb. paper or 1 business or ID card
PaperWeight 10.7to32lbs.(40-120g/m2)
PaperSize Min:3.15"x2.1"(80mmx52mm) Max:8.5"x65"(216mmx1651mm)
Card Thickness Up to 0.078" (2 mm)
SeparationRoller 20,000scans Assembly Life
FeedRollerAssemblyLife 30,000scans
Interface Hi-Speed USB 2.0
Dimensions(LxWxH) 11.29"x4.33"x2.71" (287mmx110mmx69mm)
Weight 2.64lbs.(1.2kg.)
Voltage AC100V-240V,50-60Hz,0.5Amax.(Input) DC12V,1.5A(Output)
Powerconsumption 15Wmax.
Power supply Voltage MFR ModelNo. (AC/DCadapter) 100Vto240V APD WA-18G12U(US/TWN)
100Vto240VAPD WA-18G12G(EU) 100Vto240VAPD WA-18G12K(UK) 100Vto240VAPD WA-18G12N(AU) 100Vto240VAPD WA-18G12S(Korea) 100Vto240VAPD WA-18H12
Environment Operatingtemperature:50°to95°F(10°to35°C) Relativehumidity:10%to80%