Design, development and delivery of Web-based instruction
60
University of Northern Iowa University of Northern Iowa UNI ScholarWorks UNI ScholarWorks Graduate Research Papers Student Work 1998 Design, development and delivery of Web-based instruction Design, development and delivery of Web-based instruction Isabelle Cowden University of Northern Iowa Let us know how access to this document benefits you Copyright ©1998 Isabelle Cowden Follow this and additional works at: https://scholarworks.uni.edu/grp Part of the Curriculum and Instruction Commons, and the Online and Distance Education Commons Recommended Citation Recommended Citation Cowden, Isabelle, "Design, development and delivery of Web-based instruction" (1998). Graduate Research Papers. 493. https://scholarworks.uni.edu/grp/493 This Open Access Graduate Research Paper is brought to you for free and open access by the Student Work at UNI ScholarWorks. It has been accepted for inclusion in Graduate Research Papers by an authorized administrator of UNI ScholarWorks. For more information, please contact [email protected].
-
Upload
khangminh22 -
Category
Documents
-
view
2 -
download
0
Transcript of Design, development and delivery of Web-based instruction

University of Northern Iowa University of Northern Iowa
UNI ScholarWorks UNI ScholarWorks
Graduate Research Papers Student Work
1998
Design, development and delivery of Web-based instruction Design, development and delivery of Web-based instruction
Isabelle Cowden University of Northern Iowa
Let us know how access to this document benefits you
Copyright ©1998 Isabelle Cowden
Follow this and additional works at: https://scholarworks.uni.edu/grp
Part of the Curriculum and Instruction Commons, and the Online and Distance Education Commons
Recommended Citation Recommended Citation Cowden, Isabelle, "Design, development and delivery of Web-based instruction" (1998). Graduate Research Papers. 493. https://scholarworks.uni.edu/grp/493
This Open Access Graduate Research Paper is brought to you for free and open access by the Student Work at UNI ScholarWorks. It has been accepted for inclusion in Graduate Research Papers by an authorized administrator of UNI ScholarWorks. For more information, please contact [email protected].

Design, development and delivery of Web-based instruction Design, development and delivery of Web-based instruction
Abstract Abstract The World Wide Web is becoming an increasingly popular medium for instructional delivery of distance education. Many colleges and universities are offering courses and complete programs of study via the web.
This Graduate Project: "Design, Development and Delivery of Web-based Instruction" includes a brief review of the literature indicating the widespread use of the web in distance education in higher education. It reflects the current practice of web-based instruction in the UNI Educational Technology program. It documents the project including the process for establishing a new section of a currently developed course. It is the intention through this project report to present a model for future maintenance of web curricula in the Educational Technology program.
This open access graduate research paper is available at UNI ScholarWorks: https://scholarworks.uni.edu/grp/493

Design, Development and Delivery of Web-based Instruction
A Graduate Project
Submitted to
Division of Educational Technology
Department of Curriculum and Instruction
In Partial Fulfillment
of the Requirement for the Degree
Master of Arts
UNIVERSITY OF NORTHERN IOWA
by
Isabelle Cowden
May, 1998

This Project by: Isabelle Cowden
Titled: Design, Development and Delivery of Web-based Instruction
Has been approved as meeting the research requirement for the Degree of Masters
of Arts.
r>1R~ I ,,e;V Date Aefproved
J'/ ,/5y Itite Approved
Sharon E. Smaldino
Robert Muffoletto
Robert Muffoletto

CHAPTER 1: Introduction Terms
CHAPTER 2: Literature Review
CHAPTER 3:
TABLE OF CONTENTS .
Educational Technology program Web-based Courses
CHAPTER 4: The Project
Server File Structure Creating a New Course Section Preparing new section folders Creating a course listserv Creating a course administrative listserv Subscribing members to new listserv Establishing a NetForum Establishing a GraphicForum Modifying template files
CHAPTERS Conclusions and Recommendations References
1 2
4
8
10 10 16 17 20 26 40 44 48 49
52 54

CHAPTER ONE
Introduction
The World Wide Web is becoming an increasingly popular medium for
instructional delivery of distance education. Many colleges and universities are
offering courses and complete programs of study via the web. The Educational
Technology program of the Department of Curriculum at the University of
Northern Iowa is keeping pace with the technological advances in distance
education and is meeting the needs of its students by currently offering a masters
degree in which many of the courses may be taken via distance education. Three
courses currently are offered entirely over the web. The existence of these courses
and the desire to continue to offer and develop distance education courses for the
Educational Technology program at UNI has prompted the need to create this
documentation and propose a model for continued support for this program.
1
This Graduate Project: Design, Development and Delivery of Web-based
Instruction includes a brief review of the literature indicating the widespread use of
the web in distance education in higher education. It reflects the current practice of
web-based instruction in the Educational Technology program. It documents the
project including the process for establishing a new section of a currently
developed course. It is the intention through this project report to present a model
for future maintenance of web curricula in the Educational Technology program.

2
Terms
I .asynchronous communication - communication that occurs between two
or more parties independent of time and place.
2.CU-SeeMe- a desktop videoconferencing system designed for use on
the Internet or other TCP/IP networks.
3 .FTP - File transfer protocol - is the software used to retrieve and send
files over the Internet.
4.Internet-A global network of networks connecting computer around the
world that use the TCP/IP protocol.
5.NetForum- a Web based group communication and collaboration system
provided by the Universityof Wisconsin Medical Informatics Group and the
Biomedical Computing Group.
6.Listserv - a mailing list which operates on a server which distributes mail
to the members of the list.
7.ListSTAR-is an email processor which runs exclusively on the
Macintosh allowing users to create and maintain Internet mailing lists (listservs). It
is developed by StarNine Technologies, the Macintosh division of Quarterdeck
Corporation.
8.synchronous communication-communication that occurs between two
or more parties simultaneosly.

9.TCP/IP -Transmission Control Protocol/Internet Protocol; U.S.
Government-established network data-packet exchange standard.
IO.URL- Uniform Resource Locator; an address used to define the
location of information on the Internet.
11. Videoconferencing - Software and hardware that allows users to see
and hear each other.
12.WebSTAR- is a World-Wide server for the Macintosh operating
system. It is developed by StarNine Technologies, the Macintosh division of
Quarterdeck Corporation.
3

4
CHAPTER TWO
Literature Review
Distance education has two important aspects: education and
communication. The assumption is that distance education, in terms of learning,
equates to that in traditional education. In the last decade the emergence of
advanced electronic technologies have provided new methods of communication
for education at a distance. These powerful new technologies available for
educating people worldwide may be viewed as the means for global reform of
education. Others see these new technologies as a way of extending the traditional
model of higher education by creating new choices and opportunities. This chapter
reviews the history of distance education, examines the current state of distance
education and the role it plays in distance learning.
The history of distance education in the United States originates with
correspondence education. The University of Wisconsin offered its first
correspondence course via coach and pony mail in 1891 (Phillips, 1996).
Correspondence education classifies as a form of distance education because it
involves the separation of learner and instructor and the presence of an educational
institution (Steinberg, 1997). This form of distance education was the accepted
norm until the early 1900's when instructional radio and television became popular.
As consumers adopted radio and television, distance education incorporated them

5
as well. According to Jeffiies (1997), technology based distance education links
back to the introduction of audiovisual devices in schools. The major drawback of
radio and instructional television was the lack of2-way communications between
teacher and student (Sherry, 1996). By the late 1960's and early 1970's interactive
communications technologies became available as universities experimented with
microwave networks to utilize Instructional Fixed Television Services (ITFS)
(Jeffiies, 1997). In the 1980's according to Phillips (1996), cable technology in
tandem with the popularity of the VCR revived correspondence education.
The correspondence courses and early interactive communications
technologies of the past played only a minor role in higher education, but the
technologies of today suggest a greater role for distance education in higher
education. Today distance education technologies are expanding at an extremely
rapid rate. Distance education delivery systems now involve a high degree of
interactivity between teacher and student. There are two categories of distance
education delivery systems, synchronous and asynchronous. Synchronous
instruction requires the simultaneous participation of all students and instructors
and provides real time interaction. Examples of synchronous delivery include two
way interactive television (ITV) and desktop videoconferencing. Asynchronous
instruction does not require simultaneous participation of all students and
instructors. Students create virtual learning environments accommodating their

personal schedules. Examples of asynchronous delivery include correspondence
courses, email, listservs, and most Internet based courses.
6
Pat Dixon ( cited in Hamilton & Miller, 1997) author of "Virtual Colleges,"
states that there are about 300 colleges and universities now offering virtual
degrees. Virtual-degree-based distance education programs have a wide range of
approaches. Some use distributed education-a trend utilizing a mix of delivery
modes for optimal instruction and learning (Steiner, 1997). As Phillips (1996)
reported, among the institutions practicing distributed education are George
Washington University and Pepperdine University. Doctorate students in the
Graduate School of Education and Human Development at George Washington
University meet one weekend each month for live instruction and mentoring.
Between campus seminars' students use email and electronic conferencing to
discuss group projects and problems. Doctorate students of educational
technology at Pepperdine use a combination of mandatory face-to-face seminars,
held on weekends three times each trimester, and Internet-assisted distance
learning. At the University of Wisconsin in Madison, a professional certificate in
distance education has an optional summer attendance at the Madison campus but
may be completed entirely via the Internet (Phillips, 1996).
Other institutions are offering degrees entirely on the Internet. The
University of Maryland is offering a virtual degree in their graduate school of

management and technology. According to Sanchez (1997), in 1997 at the
University of Maryland, more than 70 students in the graduate school of
management and technology entered a full-fledged Internet based master's degree
program. Duke University, Ohio University and Purdue University have recently
launched Internet-based M.B.A programs. Duke's nineteen-month $75,000
program entitled the Global Executive M.B.A, will have their first class of 40
graduates in December 1997 (Hamilton & Miller, 1997). At New York University
(NYU) BYTE magazine (BYTE, 1995) reported the School of Continuing
Education offered a 16 course credit advanced professional certificate. With an
additional 16 course credits at NYU one may earn a master's degree in
performance and Information Systems auditing
7
Using the approach of distributed education the Educational Technology
program in cooperation with the Continuing Education office at the University of
Northern Iowa offers a masters degree in which a majority of the program may be
completed via distance education. Utilizing the Iowa Communications Network
(ICN) this program offers a number of its courses via interactive television.
Utilizing the Internet it currently offers three courses of the program entirely using
the web. Students come to campus for at least six credit hours in one semester to
meet a residency requirement whereas most the rest of the degree may be earned
from a distance.

8
CHAPTER THREE
Educational Technology program Web-based Courses
In the Educational Technology program the constructs for the virtual
classroom utilize web pages, NetForum- a web-based electronic interactive
discussion system, FTP (File Transfer Protocol), a listserv and CU-SeeMe- a
videoconferencing program. One of greatest benefits of web-based instruction is
that the instruction is independent of time and place, but at the same time may be
interactive. Creating the virtual classroom community which encourages and
supports the need for interactivity presents a challenge in designing, developing,
and delivering web-based instruction. In order to design a course which engages
the learners within a 'learner centered' environment, the course materials need to be
easily navigable by the learners providing clear instruction for participation as well
as generating a virtual sense of classroom community.
The web pages are the mechanism for delivery of content and instruction.
The courses are divided into modules of instruction; each module designed with a
focus question to further the students' understanding of the course topic. Focus
questions require students to post written responses to the class NetForum.
One measure to facilitate interactivity is the requirement of each class
member to reflect and reply to their colleagues responses in NetForum. Requiring
this form of interactivity may be considered one of the most valuable aspects of a

virtual class. Learners are forced to express themselves both on the tasks of the
module as well as the reply to each others' work which adds diversity while
opening eyes to different approaches.
FTP is used to post student visual responses. The visual responses in the
form of a digital image, are submitted via FTP to the program's servers. FTP is
also used by the students to acquire some of the course digital reading materials
available on one the program's servers.
9
Another means of establishing classroom interactivity is with the use of the
listserv. The students participate in asynchronous class discussion via the class
listserv. Participation on the listserv is required to assure everyone with a voice
and an opportunity to use it. Contrary to a traditional classroom in which some
students may dominate classroom discussion in a virtual class everybody has an
equal voice. In a virtual class the learner can not hide in the group as in a
classroom situation where it may be easy to be a silent participant.
CU-SeeMe is a desktop videoconferencing system designed for use on the
Internet or other TCP/IP networks. CU-SeeMe software enables users to send and
receive video, audio and text in real-time with others, thus allowing the class to
participate in synchronous class discussions.

CHAPTER FOUR
The Project
10
This chapter provides and explanation of the project. The initial goal
driving this project was to restructure the course files to best utilize disk space on
the server and to create a system for adding future sections of the courses. There
are two main sections in this chapter: Server File Structure and Creating a New
Course Section. Three courses in the Educational Technology program are
described as examples in this discussion. These courses are: 240-131 g -
Technology in Education, 240-138g- Graphics Production and 240-130-
Communication Theory in Media.
Server File Structure
The main server for the Educational Technology programs web courses,
(edtechl.coe.uni.edu), is a Macintosh 7300 running WebSTAR server software.
This server is used primarily to house the course contents. On the edtechl hard
drive is a folder named AISS 3.0. Inside this folder is Server Software folder,
Figure 1.

[> Cl Admin Tools 1> Cl Browsers l> Cl Oatabas:e Software t> Cl Documentation I> Cl HTML Editors
v Cl Server Software
l> Cl FireSite [> Cl MacDNS (> Cl NetCloak l> Cl Rumpus [> Cl 'w'ebST AR
Size Kind
- folder - folder - folder - folder - folder - folder - folder - folde-r - folder - folde-r - folder
Figure 1
The Server software folder contains a WebSTAR folder, Figure 2.
~ Size Kind Label
[> Cl ldebST AR/SSL - folder [> Cl w'ebSTAR/Standard - folder
Figure 2
The WebSTAR folder contains two folders. The WebSTAR/Standard
folder contains the application files for the server as well as all the files accessible
from the web, Figure 3.
11

D About \v'ebSTAR 2.0
I> CJ classes: D classes.zip
D CTSTATUS.FCS
D Default.html D diamond..bev ..purple.gif
I> CJ Digital ID Tools:
I> CJ documentation
I> CJ doyle
D index.html
I> CJ muffoletto
I> CJ velders ~ \l"ebST AR 2.0
D \l"ebST AR 2.0 Plug-In QuickStart
<$11 \\'ebST AR Admin 2.0.1
D \l"ebSTAR Settings:
D \l"ebST AR.log
D \l"ebST AR.Messages
Size Kind Label
127K SimpleText text docu ... -
- folder
1.4 MB \\'ebST AR/SSL BG do ... -64K Text document
127K SimpleText text docu ... -
64K document
- folder
- folder
- folder 64K document
- folder
- folder 699K application program
127K SimpleText text docu ... -
445K application program
64K \\'ebST AR/SSL BG do ... -1.6 MB BBEdit text file
64K Simple Text text docu ... -
Figure 3
The structural design contains a main folder, 'classes', inside the
WebSTAR/Standard folder. The classes folder contains a folder for each of the
currently developed web courses (240: 13 lg, 240: 138g and 240:230), Figure 4.
§W~~~~ classes §?"~~~~ Name
I> CJ 131
I> CJ 138
I> CJ 230 I> CJ Documents
I> CJ images:
I> CJ templates:
Figure 4
Size
------
Kind
folder 0 folder folder
folder
folder folder
0 ¢ ~
12

13
The classes folder also contains folders which hold documents, images and
templates shared by all three courses. For example in Figure 5, shared files such as
downloading.htm and internet-tools.html demonstrate skills and provide tools for
learners in all the courses.
I> Cl 131
I> Cl 138
I> Cl 230
V Cl Documents I) downloading.htm I) internet-too Is .htm I I) netforum..skills.htm I) netforum..skills.html I) usingcuseem.htm
I> Cl images I> Cl templates
Figure 5
Siz:e Kind
- folder 1}
- folder
- folder
- folder 64K Claris Home Pa 64K Text document 64K document 64K document 64K document
- folder - folder
The images folder in the classes folder contains image files which support
the files in the Documents folder. The templates folder contains files which are
used when creating a new course section and will be discussed later in this chapter.
The structure contained in each of the course folders is identical and is
illustrated using figures from the 240:230 course. A similar structure as is in the
classes folder is used in each of the course folders; i.e. a documents folder, an
images folder and a templates folder, Figure 6.

l> CJ documents l> CJ images l> CJ templates
Figure 6
14
Siz:t Kind
- folder - folder - folder
As shown in Figure 7 and Figure 8, the documents folder contains all the
files that support the modules for the course and the images folder contains image
files which support the document and template files. Similar to the classes folder
the templates folder contains files which are used when creating a new course
section and will be discussed later in this chapter.

-W=$.i-~-:::;:=---;--~4t; ~-,,•.· 230 • q=,.=~-%..;YL~_=_,lfilF
N.m.e Size Kind
v D documents
D boy.html
D commtheory-reading.html
D mod5-irnage.html
D module-I .html
D module--2.html
[) module-3.html
D module-4.html
[) module--5.html
D module-6.html
[) modult-7.html
[) photo! .html
I> Cl images
I> D tempJ.ates
Figure 7
t9mi I> Cl documents
V Cl images
[) boy.jpeg
D calendar.jpeg
D deltlOsl.gif
D good.jpeg
D kmart.jpeg
[) NAVBUTT.GIF
D sky edge .gif
[) women.jpeg
I> Cl tempJ.ates
Figure 8
- folder
64K document
64K Text document
64K document
64K doc~nt
64K document
64K document
64K document
64K
64K documtnt
64K documtnt
64K document
- folder
- folder
Size Kind
- folder
- folder
64K document
127K Photoshop® JPE
64K document
64K document
127K Photoshop® JPE
64K docume-nt
64K docume-nt
64K document
- folder
15
16
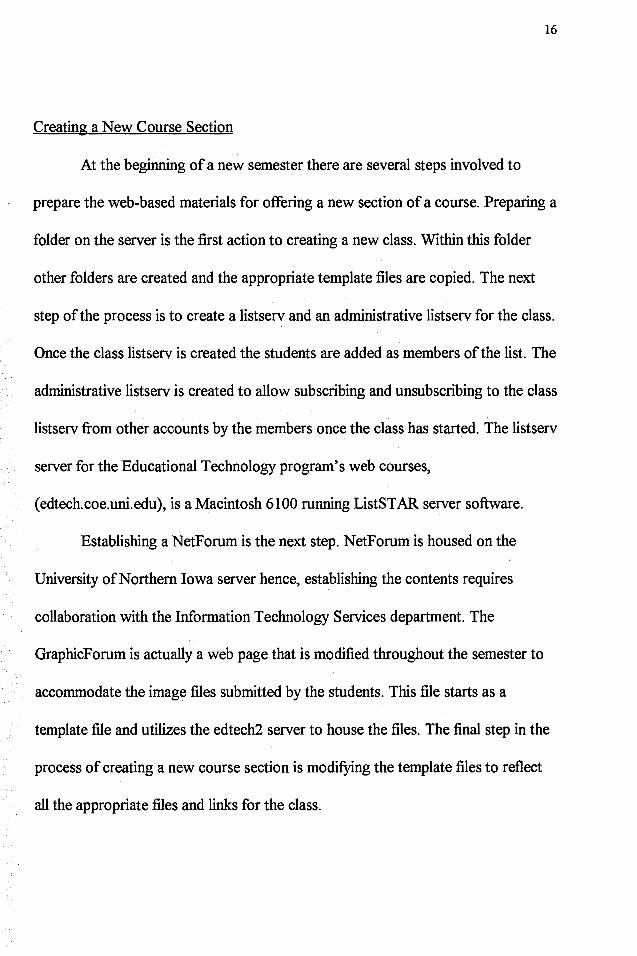
Creating a New Course Section
At the beginning of a new semester there are several steps involved to
prepare the web-based materials for offering a new section of a course. Preparing a
folder on the server is the first action to creating a new class. Within this folder
other folders are created and the appropriate template files are copied. The next
step of the process is to create a listserv and an administrative listserv for the class.
Once the class listserv is created the students are added as members of the list. The
administrative listserv is created to allow subscribing and unsubscribing to the class
listserv from other accounts by the members once the class has started. The listserv
server for the Educational Technology program's web courses,
(edtech.coe.uni.edu), is a Macintosh 6100 running ListSTAR server software.
Establishing a NetForum is the next step. NetForum is housed on the
University of Northern Iowa server hence, establishing the contents requires
collaboration with the Information Technology Services department. The
GraphicForum is actually a web page that is modified throughout the semester to
accommodate the image files submitted by the students. This file starts as a
template file and utilizes the edtech2 server to house the files. The final step in the
process of creating a new course section is modifying the template files to reflect
all the appropriate files and links for the class.

The information that follows has been outlined as a step by step process
using figures to further explain details when necessary.
Preparing new section folders
17
Step 1: Create a folder in the WebSTAR/Standard folder for the new section. The name of the folder may be the last name of the instructor or some other name that may be easily accessed by the students. A name that is in some way descriptive of the course section, one that is not excessively long or uses punctuation characters is suggested. The name of this folder becomes part of the URL the learners use to access the course web pages. In Figure 9, there are three folders (doyle, muffoletto and velders) containing active course sections.
D About WebSTAR 2.0
t> CJ classes
D classes.zip
Q CTSTATUS.FCS
D Default.html
D diamoncLbev_purple.gif
[> CJ Digital ID Tools
t> CJ documentation
t> CJ doyle
D index.html
t> CJ muffoletto
t> CJ velders (ls WebSTAR 2.0
Q WebST AR 2.0 Plug-In QuickStart
~ WebSTAR Admin 2.0.1
D WebST AR Settings
D WebST AR.log
D WebST AR.Messages ¢~If{
Size Kind Label
127K SimpleText text docu ... -
- folder
1.4 MB VebST AR/SSL BG do... -
64K Text document
127K SimpleText text docu ... -
64K document
- folder
- folder
- folder
64K document
- folder
- folder
699K application program
127K SimpleText text docu ... -
445K application program
64K \o/ebST AR/SSL BG do ... -
1.6MB BBEdit text file
64K SimpleTtsxt text docu ..• -
Figure 9
Step 2: Create two folders with the new folder name one - documents and the other images.
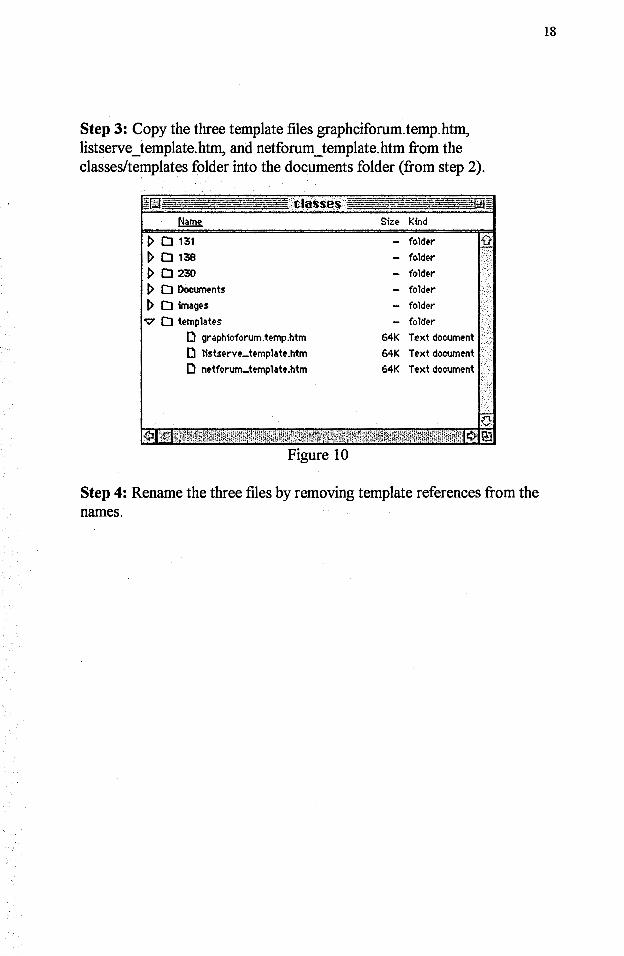
Step 3: Copy the three template files graphciforum.temp.htm, listserve_template.htm, and netforum_template.htm from the classes/templates folder into the documents folder (from step 2).
Name Siz:e Kind
[> CJ 131 - folder {)
[> CJ 138 - folder [> CJ 230 - folder t> CJ Documents - folder t> CJ images - folder
v CJ templates - folder Cl graphicforum.temp.htm 64K Text document Cl listserve_template.htm 64K Text document Cl netforum-tempJ.ate.htm 64K Text document
Figure 10
Step 4: Rename the three files by removing template references from the names.
18

Step 5: Copy the image files skyedge.gif and deltaIOsl.giffrom the classes/images folder into the images folder(from step 2).
~ Siz:e Kind
f> Cl 131 - folder
f> Cl 138 - folder
f> Cl 230 - folder
f> Cl Documents - folder V Cl images - folder
[l de ltt Os 1.gif 64K document [l NAVBUTT.GIF 64K document [l skyedge.gif 64K document
f> Cl templates - folder
Figure 11
19
Step 6: Copy the template file timeline_template.html from the proper course section into the documents folder (from step 2). Copy the template file index_template.html from the proper course section into the new section folder (from step 1).
f> Cl documents
f> Cl images v Cl templates
[l index-template.html [l timeline_template.html
Figure 12
Sii:e Kind
- folder
- folder
- folder
64K Text document
64K Text document
Step 7: Rename these two files by removing template from the names.
·•

20
Creating a course listserv
Step 1: Select Services from the Window menu. Click on Creating Lists to select, then click on Duplicate ...
=@~ Ak- .. =~-. listSTRR Services -===~~. ····=-~ ✓ Administration ✓ Cafe List
Cafe List Admin
0 7 18
0 7 9
Figure 13
Accessed New Service t :01 PM Sat, Apr 4, 1998 9 :04 PM Tue Feb 24 1998
Step 2: In the Create new ListST AR service window text box key in the ''New Name Listserv" for the service then click on Create.
listsnrn Seruices
Create new LlstSTRR serulce:
Seruice I New Name listseru
,__ ______ ....,, ( Create J [ Cancel ]
Figure 14

21
Step 3: In the ListSTAR Services window click on ''New Name Listserv" to select, then click on Edit ...
Service N.ame Accessed
Ora hies Admin 2 0 5:41 PM Sat Jan 10
old l.ists-ei-Ylt' De-mo 0 0 0 Nli'v Sen,ict> c1d l.ists-ei-Yei- Timer" 0 0 0 Nli'lf' Sei-Yict>
../ Poho 1169 1169 1085 4:34 PM Thu, Apr 2, 1998 ✓ Poho Admin 0 0 0 New Service
[ New... ] [ Edit.. ] [ Delete... ] [ Rename... ] [ Dupli~te... ] [ Text View ... J
Figure 15
Step 4: In the text boxes ''New Name Listserv" Service Preferences window, key a Friendly name and a username for the listserv email address. Click on the Rules icon.
0 SMTP Account Information
Friendly Namt: ! New Name Listserv
Email Address: j 1is:[email protected]
Rules:
( cancel J ['iii(iiiiiiliiliiiiioK;;;;;;;;;;.r,J
Figure 16

22
Step 5: Select Reflect and File then click on Edit...
,-~ tr
../ RuleNamto Last Hit
../ Mailer-Oatomon Mail 0 No Hits
Account S/JbSCt"~lldd 0 No Hits UnSIJbsCt"~ 0 NoHits
• ../ Help 0 No Hits ../ Reflect and File 0 No Hits ..f A 11 Other Mail 0 No Hits
Ill ../ Error Handling 0 No Hits
.___N_ew_ .. _. __,] [ EdiL ] [ De l>?te ] [ Rename ...
[ D1Jp lioat"' ] [ Text Vfow ... ]
{ Cancel ] (~;a;;;;;OaK;;;a;;r:.,)
Figure 17

23
Step 6: In the "Reflect and File" rule definition window, click on the Mailing-list icon. Below the Mailing-list Actions click on "Creating Listserves List" button to the right of the Forward Check box. This action allows the opportunity to select the appropriate list to reflect and file the listserv messages.
I "New Name Ustseru" Seruice Preferences -- - ~c;_C['- -~ .>'flleJl~ct andfile"r~Je definition i~ == . - . . . ·•· =- -~--=··-
ffl -0- Mailing-list Actions
181 Forward I with minimum head ... Tl(•creating Listserves List"] '
Content DI ~:•!d ·1·:·•~Ji·· t:•!drt•.u· i:, vi[ Nothin9 $,;. lected ]
w 181 Set From to I account address, n. •. Tl Digest Actions
Address ( ] 181 Select a digest fill!! "DiQ'1!st"
~ 181 Add huders f8I Add body f8I Add separator text
Reply 0 Select a table-of-contents file ( Nothing s~ lected ]
'-0 Add :subject 0 Add ::;ender
RFC Header Additions
IINIMN ,0. 0 Add Headers [ N,,thing SelectE-r.l ) ( Edit )
( Cancel JI OK , Figure 18
J =

Step 7: The Address List Maintenance window appears. In this window scroll down if necessary and locate in Services column the ''New Name Listserv''. Click on this service to select then click on Rename ...
Name
D Cafe Listserv Demo List D Cafe Admin Listse-rves List
§ Cafe Admin Administrator List Cafe Admin List Edte-ch Listse-rve-s List Administrator List
D Listse-rv Demo List D Cruting Listserve-s List D Administrator List D Listse-rv Demo List D Cnating Listserves List D Administrator List
Listse-rv Demo List
Services
Cafe List
Cafe List Admin Cafe- List Admln Edte-ch Edte-ch Edte-ch
New- Name Listserv Ne-w- Nam• Listserv
New- list .•• ) [ ____ ] [ Duplicate ] [ Get Info ..• ) Edit...
Type
Address List Addre-ss List Address List Address List Address List Address List Address List Addre-ss List Address List Address List Address List Address List Address List
[ New us,r ••• ) [ _ ___.] ( ReMme... ] ( Cancel ] ( OK ) Oe-le-te
Figure 19
24

25
Step 8: In the Rename text box, key in ''New Name Listserv" for the service then click on OK. Click on OK in the Address List Maintenance window and then click OK in the ''Reflect and File" rule definition window.
New lisl .. ) [ ( New user ... ) (
flddreu List Maintenance
Name Services Type
Edit... ) [ Delete ) (
New Name Listserv New Name Listserv
Duplicate ] ( Get Info ...
Ren.ame ... 1 Figure 20
)
( Cancel ) I OK D

Step 9: Click OK to Enable rule without "triggers" set.
"New Name Ustsern" Seruice Preferences
Warning: The rule has no "triggers" set. Enable rule anyway?
(cancel) ( OK B
[ New ... ] ( Edit... ] ( Delete ] ( Rename ...
( Duplicate ) ( Text View ... )
26
-0-
]
fl"':"' : :;-:'"' ~ ( Cancel ) ~¾ .. ?.~_,JI Figure 21
Creating a course administrative listserv
Step 1: Select Services from the Window menu. Click on Creating Lists to select, then click on Duplicate ...
✓ Service Name
✓ Cafe Lut Admin Cre~ · Lis-a
19 0
7 18 82
1
)(
11 0
7 9 82 29
DeMe ... ][
Figure 22
Accessed
0 9:04 PM Tue, Feb 24, 1998 0 Ne"w'Sen-ice
0 12:17PMTue,Jan27, 1998 0 2:45 PM Tue, Feb 10, 1998 0 1 :09 PM Sat, Apr 4, 1998 0 7:5 MFri Ar 3 9 8
Rename ... ] [ Duplicate... ] [ Text View ... ]
{:!j

Step 2: In the Create new ListSTAR service window text box key in the "New Name Listserv Admin" for the admin service then click on Create.
UstSHIR Seruices
Create new ListSTRR seruice:
Seruice j New Name Listseru Rdmi~ j
I Create J [ Cancel )
Figure 23
Step 3: In the ListSTAR Services window click on ''New Name Listserv Ad ... " to select, then click on Edit ...
Servioe Name
New Name L istserv
o'/d I. isfswvft'" Demo c-'/d 1.1.s"aff'"Yft' Timer
✓ Poho ✓ Poho Admin
alo
[ New... ] [ Edit. ..
0
0 0 0 0 1169 1169 0 0 5 8 598
)( Dtlete ... ][
Figure 24
Accessed
0 New Service
0 Nev Servicf-() Nev Sf'l'Yice 1085 4:34 PM Thu, Apr 2, 1998 0 New Service 0 1 ·13 PM Sat A r 4 998
Rename ... ] [ Duplicate ... ] [ Ttxt View ... ]
27
El

28
Step 4: In the text boxes ''New Name Listserv Admin" Service Preferences window, key a Friendly name and a usemame for the admin listserv email address. Click on the Rules icon.
fr SMTP Account Information
- Friendly Name: ! New Name Llsts,rv Mministrafor
Email Address: j [email protected],.uni.ed4
Rules
Figure 25

29
Step 5: Select Subscribe-Add then click on Edit...
{} Rule Name Last Hit
Mailer-Daemon Mail No Hits
Account ..f Unsubscribe 0 No Hits
• ../ Help 0 No Hits ../ Reflect and File 0 No Hits ,t All Other Mail 0 No Hits - ../ Error Handling 0 No Hits
[ Ne'IY'... ] [ Edit... ] [ Delete ] [ Rename... ]
[ Duplicate ] [ Text Vie'IY' ... ]
( Cancel ) f'iliiiilliliiiiioaKiilliliiiii.t,J
Figure 26

Step 6: In the "Subscribe-Add" rule definition window, click on the Mailing-list icon. Below the Mailing-list Actions click on the "Creating Listserves List" button to the right of the pop down menu containing add "From" address to.
30
~•·• .. "SObscribe~Rdd'~rule~definiJion~~~
Content
Address
~ Repl\l
IIIMM
il' Mailing-list Actions
"'8" ! [ Nothing Selected ] 1811 add "From" address to
0 Set From to
TI [·creating Listserves List•]
Digest Actions
0 Select a digest file
0 Add bod1J
0 Select a table-of-contents file
0 Add s:ubj;;ct O Add sendo?r
RFC Header Additions
(
(
0 Add HHders: [ !'Mhing S<'l<',;~.:d
Nothing Se 1.-ct,;,d ) 0 Add s:ep.ar.ator· t,;,xt
Nothing Selected ]
] [ Edit ]
Cancel )(llll;;;;;;;;;;;;;;;;o_K;;;;;;;;;;;;;;.:,,J
Figure 27

31
Step 7: The Address List Maintenance window appears. In this window scroll down if necessary and locate in the list the name Creating Listserves List with the ''New Name Listserv Admin" as its service. Click on this service to select then click on Rename ...
Address List Maintenance
Name Services
§ Cafe Admin List Cafe List Admin Edtech Listserves List Edte-ch Administrator List Edtech
Listserv De-mo"t,L;:=is=t======Ed=te,c=h=========.t".· 0 Creating Lists 0 Administrator 0 Listserv Demo 0 Creating Lists
Administrator Listserv Demo New Name Lis Administrator Lfstserv Demo
Rename "Creating Listserves List"' to the following:
[Cancel J('"---OiiiiK'iii/iia#D
Administrator List Listserv Demo List
Ne-w Name Listserv Admin New Name Listserv Admin
( Ntw lisl •. ) ( ___ ..,,) [ Duplicate ) ( Get Info ... ] Edit. ..
( New user ... ) [ __ _,,) [ Rename... ) ( Cancel ) ( OK D Dele-te
Figure 28

Step 8: In the Rename text box, key in ''New Name Listserv Admin" for the service then click on OK.
flcldress list Maintenance
Name Services
Cafe Admin List Cafe List Admfn Edtech Listserve:s List Edtech
B Administrator List Edte-ch
Ltstse-rv Demor.L=is=t======E=dt::l:e:1:ch=========:;i;
B Creating Lists Administrator
D Listserv Demo 0 Creating Lists
B Administrator Listserv Demo New Namt Lis Administrator Listserv Demo
Rename "New Name Listse-rv Admin N to the following:
[ Cancel ] I._[ iiiiiiiOiiiiiiiK'iiiiiiii!it'D
Administrator List Listserv Demo List
New Nami& Li:stserv Admin New Name Listserv Admin
( New list •• ) ( ____ ] [ Duplicate ] [ Ot-t Info ..• ] Edit. •.
( New usff ... ) ( __ __,] [ Rename... ] Deltte [ Cancel ] (( OK D Figure 29
32

Step 9: Make sure the Check box to the left of ''New Name Listserv Admin" is empty.
Name
Cafe Admin List Edtech Listserves List Administrator List Lfstserv Demo List Creating Listserves List Administrator List Liststrv Demo List Creating Listserves List Administrator List Listserv Demo List New Name Listserv Administrator List Listserv Demo List
Administrator List Listserv Demo List
New list .. ] [ Edit...
N>?-.,1 user ... ] [ Delett-
) [ ) [
Services
Cafe List Admin Edtech Edtech Edte-ch
New Name Listserv New Name Listserv New Name Listserv
New Namt- Lfstserv Admin Nt-w Namoe Listserv Admin
Duplicate ] [ Oet Info ... ]
Type
Address List Address List Address List Address List Address List Address List Address List Address List Address List Address List Address List Address List Address List
Address List Address List
Rt-name .•• l [ Cancel ] € OK
Figure 30
33
D

Step 10: Click in Check box to the left of service name ''New Name Listserv" with ''New Name Listserv" as service to create an X. Click on OK.
Name Services Type
• Cafe Admin List Cafe List Admin Address List {}
B Edtech Listserves List Edtech Address List Administrator List Edtech Address List
• Listserv Demo List Edtech Address List
§ Creating L istserves List Address List Administrator List Address List L istserv Demo List Address List Creating Listserves List Address List
• Administrator List Address List
• Listserv Demo List Address List
t8l New Name Listserv New Name Listserv Address Li--
• Administrator List ' New Name Listserv Address List Listserv Demo List New Name Listserv Address List
Administrator List Ne-w Name Listserv Admin Address List Listserv Demo List New Name Listserv Admin Address List
( New list. •. ) ( Edit. .. ) [ Duplicate ) ( Get Info ... ) [ Ne•t:.' use,r ... ) ( Delete ] [ Rename .•. ] (Cancel] ( OK B
Figure 31
34
35
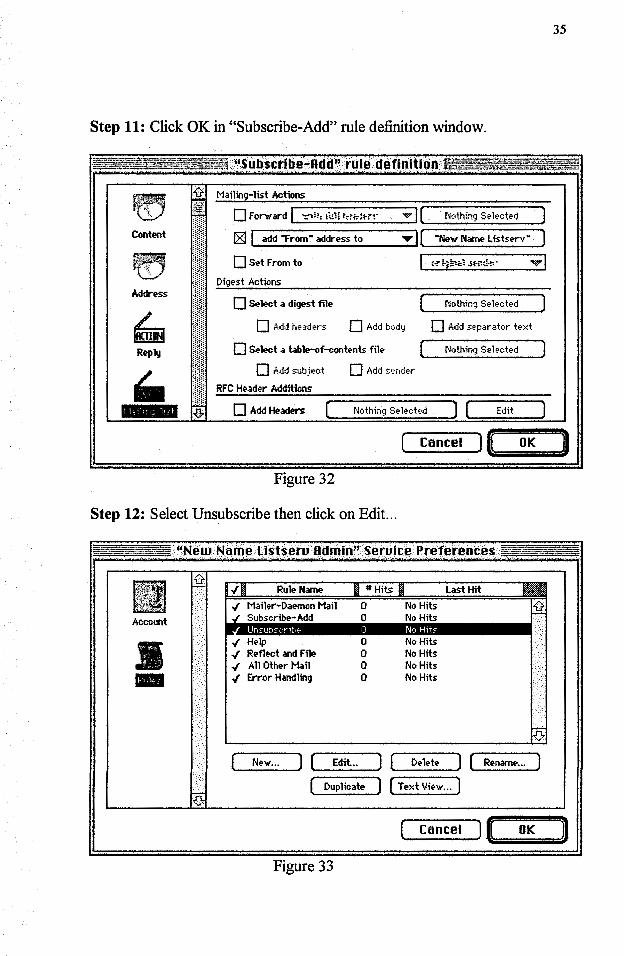
Step 11: Click OK in "Subscribe-Add" rule definition window.
Content
Address
~ Reply
111111111
Mailing-list Actions
0 Forward ! ':."i!, foll trt<:-~i-r1·
f8l ! add "From" address to
Oset From to
Digest Actions
0 Select a digest file
0 Add bod•J
0 Select a table-of-contents file
0 Add subject
RFC Header Additions
0 Add s•~nder
(
(
,e. 0 Add Headers [ Nothing S€'lt>ct€<d
Nothing s.-1..,ct-,d ]
"New Name Listserv" )
vj
Nothing S& lect<?d ) 0 Add separ atc,r- t>?xt
Nothing Selected )
] [ Edit ]
[ Cancel ] n~;;;a;;;;;;OiilililKiiililiilll;r,,D
Figure 32
Step 12: Select Unsubscribe then click on Edit...
::-"'::tEz.:z:,.,;."::=':= 11Ne w Narne ·ustseruRdmin" Service Pref ere11ces . =-=...:._s::::"~-= • • , • - • • • • • •' c~ • •• • ", • • • • " • .•, • • • • • • • • • •
v ./ Rule Name Last Hit
./ Mailer-Daemon Mail 0 No Hits
Account Subscribe-Add 0 No Hits
• ./ Help 0 No Hits ./ Reflect and File 0 No Hits ./ All Other Mail 0 No Hits - .f Error Handling 0 No Hits
{J,
[ New ... ] ( Edit ... ) ( Delete ) [ Rename ... ] ( Duplicate ) [ Text View ... ]
[ can eel )"-= R;;;;a;;;;;;o.aK '/ll/lllllilif,J
Figure 33

36
Step 13: In the ''Unsubscribe" rule definition window, click on the Mailing-list icon. Below the Mailing-list Actions click on the ''New Name Listserv Ad ... " button to the right of the pop down menu containing delete ''From" address from.
Content
Address
~ Repl',I
111111111
-0- Mailing-list Actions:
D Forward ! -~•\It, f~1l! t,,ru•lHr v I ( Nothing S1:l,;,ct{'d ] [81 I delete °From" address from ..-If •New Name Lists:erv Ad ... H] D Set From to
Digest Actions:
D Select a digest file
0 Add bod>J
D Select a table-of-oont~t:s: file
D Add subject O Add s,;,nder
RFC Header Additions
(
(
0 Add Head~rs: [ Nothing SelE-cted
Nothing Se l,ected ) D Add separator t"'xt
Nothing St>foct.ed
] [ Edit ]
( Cancel ] n1ii;;a;a;;Oa;K;a;;;;;;;;;;'iftJ,
Figure 34

Step 14: Click on the X in the Check box to the left of the ''New Name Listserv Admin" and make sure it becomes empty.
(
Name
Cafe Admin List Edtech Listserves List Administrator List Listnrv Demo List Creating L 1st serves List Administrator List Listserv Demo List Creating Lfstserves List Administrator List
~ Listserv Demo List New Name L istserv Administrator List Listserv Demo List New Name Listsery Admin
D Administrator List Lis:tserv Demo List
New list .. ) ( Edit .. ) { [ New user ... ) [ Defot.; ) [
Services
Cafe List Admin Edteoh Edtech Edtech
New Name Listserv, New Name ... Ne'd Name Listserv New Name L istserv New Name Listse-rY Admin Ne'd Name Listserv Admin Ne"' Name Listserv Admin
Duplfoat>? ) ( G.,.t Info ... l
Tye
Address List Address List Address List Address List Address List Address List Address List Address Lis¼ Addrtss List Address List Address List Address List Address List Address Li ... Address List Address List -0-
Re-nam ..... ) [ Cancel ) € OK D Figure 35
37

Step 15: Click in Check box to the left of service name ''New Name Listserv" to create an X. Note that now the services for this name are ''New Name Listserv'' and ''New Name Listserv Admin". Click on OK.
181 Name
( (
Cafe Admin List Edtech Listserves List Adminfstr ator List Listserv Demo List Creating Listserves List Administrator List Listserv Demo List Creating L istserves List Administrator List Lists:erv Demo List New Name ListserY Administrator List Listserv Demo List New Name Listserv Admin Administrator L 1st Listserv Demo List
New list ... ) [ EdiL
Ne·,.,,, user ... ) [ Del.-l;,
) [ ) [
Services
Cafe List Admin Edtech Edtech Edtech
New Name Listsery I
New __ New Name Listserv New Nime Listserv New Name Lists:erv Admin Ne-w Name Listse-rv Admin New Name Listserv Admin
l)•Jp licate ) ( Get Info ... )
Type
Address List Address List Address List Address List Address: List Address List Address List Address List Address List Address List Address Li._ Address List Address List Address List Address List Address list
Reriarne ... [ Cancel ) [ OK
Figure 36
D
38

39
Step 16: Click OK in "Unsubscribe" rule definition window.
Content
Address
~ Rtpl\l
11111 IIIIMIM
1£ Mailing-list Actions
'
0 Forward ... , --:-~-1,-, 1-i.1-l!-t,-r;-,.,-i,r-1-· --..,,---.![ !8] ! delete- "From" address from 'YI[ D Set From to !
Digest Actions
D Select a digest file
• Add h,;aders
[ • Add bcdy
Nothing S!?lected ]
"New Name Listserv" ]
Nothing S.;lectO?d
D Add s~par atc,r te;-.d
D Select a table-of-contt>nts filt> [._ __ N_o_th_in-'g_S_e_Je_d_O?_d_...J]
0 Add subj~ot O Add :;,~nd<:r
RFC Header Additions
0 Add Headers [ Nothing S,;, 1>:>ctE<d ) [ Edit ]
( Cancel ) (~;i;;;;;O;;;;K;i;;;;;'iftlJ
Figure 37

Subscribing members to new listserve
Step 1: Click on the service ''New Name Listserv" to select then click on Edit ...
Name
Cafe Admin List Edtech L istservEtS List
Cl Administrator List Listserv D-emo List Creating Listserves List Administrator List Listserv Demo List Creating Listserves List Administrator List Listserv D-emo List
C'J Administrator List C'.I Listserv Dtmo List Cl New Name Listserv Admin
Administrator List Listserv Demo List
N-ew list ... ) ( Edit. ..
( New ustr ... ) ( Delete
J [ ) [
Services
Cafe List Admin Edtech Edtech Edt-ech
New Name Listserv New Name Listserv
New Name Listserv Admin
Duplicate ) ( Get Info ... ] Rename ..• )
Figure 38
Type
Address List Addrus List Address List Address List Address List Address List Address List Address List Address List Address List
Address List Address List Address List Address List Address List -0-
u OK ll
40

41
Step 2: Click on New ...
Addrtss List: New Name Listserv Number Users: O
Name Address:
New-.•• ) ( Edit... ) ( Dup1ic~te )
( Delc>t., ) ( Find All ... ) ( Cancel )
Figure 39

Step 3: Key in Name and email address of member. Click on OK in Add User window. Repeat Steps 2 and 3 until membership is complete, then click on OK in Modify Address List window.
Modify Address list
Address List: New Name Listserv Number Users: O
Name AddNSS
Name-: I I Address: I I
( Cancel ] ( OK ll
( New ... ) ( Edit. .. ) [ Duplicate
( Delete ) [ Find All.. ) [ Cancel ] [ OK ll Figure 40
42

Step 4: Click on OK in Address List Maintenance window.
Name
I) Cafe Admin List I) Edtech Listserves List I) Administrator List I) Llstserv Demo List I) Creating Lfstserves List I) Administrator List I) Listserv Demo List I) Creating L fatserves List
Administrator List Listserv Demo List
( New list ••. ) ( Edit ...
[ Newunr ... ] [ Delete
) (
] [
Services
Cafe List Admin Edttch Edttch Edtech
New Namt Listserv New Name Li:stserv
New Name Lfst:serv Admin
Duplicate ) ( Get Info ..•
Rename .•• ]
Figure 41
]
Tye
Address List Address List Address List Address List Address List Address List Address List Address List Address List Address List
Address List .~ Address List
Address List Address List Address List -0-
I OK D
43

44
Establishing a NetForum
Step 1: Contact Information Technology Services for a new forum in NetForum. Presently this is Jack Miller at 273-5943 or [email protected]. The new forum will be assigned a url, a username and a password.
Step 2: Using a web browser access the forum's url. Click on the New Topic icon to create new topics.
Forum:Graphics Design
Owner: Robert Muffoletto Contact: Dr. Robert Muffo1etto(muff'[email protected])
Discussion Topics: (click on the topic to view messages)
Figure 42
45
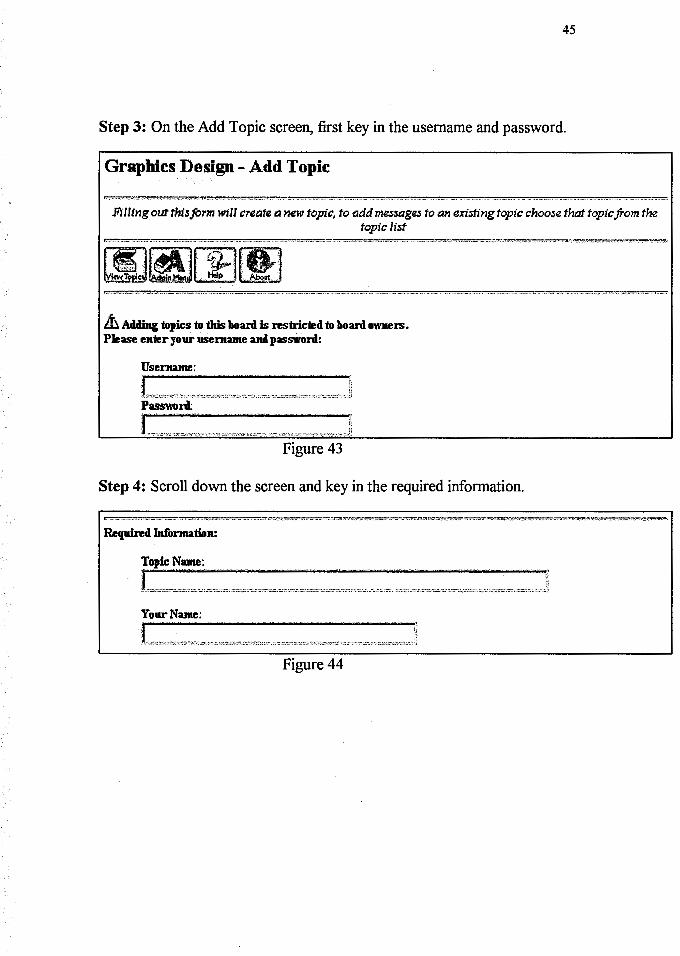
Step 3: On the Add Topic screen, first key in the usemame and password.
Graphics Design - Add Topic
FWing out thi:s form will create a new topic, to l'Jdd mes:sages to an existing topic choo:se that topic from the topic li:st
& Adding topics to this board is restricied to board owners. Please enier your usenwne and password.:
Usenwne: I... . .. .. . li J,, .. ,,.",.,. , .. , .. , .. "·'""' ...... ·,·.,-,.~,."."· ' •. ,,, .. ,-.,,., "'"""'"'"··· ······""···"' .. , Password.:
L-.·.--· ·.·-·.·.--· ..... · ..... ---· .. ·· .... ·---·•·· ....... ·-·. _ ..... · ... J Figure 43
Step 4: Scroll down the screen and key in the required information.
Required. lnmnnation:
Topic Name: _ . . . _ _ .. . .. . _
YourName:
Figure 44

Step 5: Scroll down the screen and key in any optional information desired.
Optional Jnfennation:
t.,.,·"•''"'·""''='·'"'"'"' ""''" .... ,: , ... ,,, .. ,.,,,,_,,.'"··'". '·., ., .. ,,,,.,., ... ,, ..... ,, .. ,,_.,,._,, .. , ·.,,. ,. ll Your •s Web Site:
l,.,.,,,-,., .,.,,,~··.c··.'-'"'·'"."' · __ ........ · :~•-• ·,cc .. ,,,,.c,·,.c···· ", "•' ·,.,.,.,: ... ~•a.,c,Jl
Your Web homepage: . .... . . . .. . . . . .. . . . ....
I http j I, .. ,,., .. ,,,., .... ,:.,·,,,, .. ' ..... , .... ,,,.,o,:,.-, .. ,.,., .. ,·,·~,, .... ,.,,~,c, .. , .. , ... ,, .... ,,, .. ,,.,,,. Jl
Topic Description:
Figure 45
46
Step 6: Scroll down the screen, keep HTML as the formatting option, click on Preview Topic Information button.
Fonnattbig Options fbr Description:
C TranslatedText
(;: HTML
C Preformatted Text
Figure 46

47
Step 7: A screen is displayed illustrating how the topic will appear in the forum click on the Edit some more button if it is not as desired or click on the Post the topic to keep.
This is how the topic inf onnation will appear in the forum:
Topic Name: Testing Area Topic Posted. lly: Belle Cowden ([email protected]) Date Posted.:WedApr22 5:48:52 US/Central 1998 Topic Description: This is a test area to practice N etF orum postings.
Figure 47

48
Establishing a GraphicForum
Step 1: Using a web page editor open the file graphicforum.htm located in the folder for this new section (from Preparing new section folders, steps 3 and4)
GraphicForum
frnsert table here for each Module requiring image postings. Include links for image ftles of each student.
• Return to Syllabus
Figure 48
Step 2: Create a heading and table entry for each module requiring GraphicForum entries. (The number of table cells is dependent on the number of students in the class.)
Step 3: Create a folder for this new section on the edtech2 server (Macintosh 6300) within the graphic_forum folder. For each module create a folder within the new folder.
Step 4: Save graphicforum.htm.

49
Modifying template files
Step 1: Using a web page editor open the file listserv.htm located in the documents folder for this new section (from Preparing new section folders, steps 3 and 4)
Class Listserv Information
The address for the class Listserv is: Place email addrss here and link as a mailto:
In this class you are required to participate in a class discussion over a Listserv. A Listserv sends a copy of your message out to every-one on the mailing list. Consider it as a big mail distribution list,. where everyone in the class reads your message and where you reply to others messages.
You should consider the discussion over the Listserv as "informal discussion", different from posting to
Figure49
Step 2: In the space provide key in and create a mailto link to the listserv for the new section.
Step 3: Save listserv.htm

50
Step 4: Using a web page editor open the file netforum.htm located in the documents folder for this new section (from Preparing new section folders, steps 3 and 4)
NetForum Information
NetForum is a computer conferencing program housed on the University of Northern Iowa computer system. See directions for using NetForum by accessing the URL : +-'
+-'
http://www·.uni.edu/netforum +-'
The address for the NetForum for this class is:
Enter url for course N etFonun address here! Figure 50
Step 5: In the space provide key in and create a link to the url for the forum for the new section.
Step 6: Save netforum.htm
Step 7: Using a web page editor open the file timeline.html located in the documents folder for this new section (from Preparing new section folders, steps 6 and 7).
Step 8: Key in the appropriate dates for each module and make any necessary changes.
Step 9: Save timeline.html
Step 10: Using a web page editor open the file index.html located in the folder for this new section (from Preparing new section folders, steps 6 and 7)

51
Step 11: Key in the appropriate semester and instructor information.
Figure 51
Step 12: Create the appropriate links for the external documents make any necessary changes.
Figure 52
Step 13: Save index.html

52
CHAPTER FIVE
Conclusions and Recommendations
In conclusion this project was a very rewarding experience. I gained a great
deal of technical skills as well as furthering my understanding of distance learning
via the web. My initial desire was to look at the existing web-based courses in the
Educational Technology program and to develop an effective long term system for
offering new sections of these courses. What I feel this project has produced is a
'recipe' for others to follow for creating a new section as well as a model for the
structure of instructional materials on a web server.
There is much more work that can be done with the existing materials as
well as the need for further experimentation with new technologies to add to the
existing system. One recommendation I offer is to look at the documents and
images folders within each course and further divide them into folders for each of
the modules. This is particularly necessary for the 240: 138g, Graphics Production,
course because of the number of documents as well as the number of supporting
images. Another suggestion is for the GraphicForum, the system for receiving
digital assignments, I envision the potential of developing an interactive web
database program to facilitate this process.
The virtual classroom I feel is still an unfamiliar territory to learners and
instructors. It is a big initiative to design and develop web-based instruction and I

53
feel it takes an extremely concerted effort to establish the sense of community over
the web. I believe that the tools being used in the Educational Technology
program, the NetForum, listservs and CU-SeeMe are a positive approach to
attempt to create an interactive environment. A suggestion I would make based on
my experience of being a web learner as well as observing other classes is that the
instructor needs to clearly establish how each of the tools are used and to
consistently apply them within the semester.
In closing I am very honored to have had the opportunity to work with this
project and I look forward to future opportunities to work with the design
development and delivery of web-based curricula with the Educational Technology
program.

References
Byte, (1995), Building the Virtual College (1995, March). BYTE, [On-line].
Available: http://byte.com/art/9503/sec7 /art3 .htm
Hamilton, K., & Miller, S. (1997, March). Internet U-No ivy, no walls, no keg
parties. Newsweek, 12.
54
Jefmes, M. (1997, April Downloaded). Research in Distance Education. [On-line].
Available: http://www.ind.net/IPSE/fdhandbook/rsrch.html
Phillips, V. (1996, September). Earn a Masters Virtually. Internet World,
[On-line]. Available: http://www.iw.com/l 996/09/masters.html
Sanchez, R. (1997, March 27). Colleges turning virtual classrooms into a reality:
Growth of online degree programs offers new opportunities, presents new
challenges. The Washington Post, p. AOL [On-line]. Available:
http://www.washingtonpost.com/wp-srv/WPcap/l997-03/27/071R-
032797-idx.html
Sherry, L. (1996). Issues in Distance Learning. International Journal of Distance
Education, 1(4), 337-365. [On-line]. Available:
http://www.cudenver.edu/public/education/edschool/issues.html
Steinberg, S. (1997, March). Media and tutor-learner interaction in distance
education. [On-line]. Available:
http://www.unisa.ac.za/ dept/press/comca/202/demedia.html

55
Steiner, V. (1997, April Downloaded). What is Distance Education?. [On-line].
Available: http://www.fwl.org/edtech/distance.html