
Dell OpenManage Essentials Version 2.0 User's Guide
322
Dell OpenManage Essentials Version 2.0 User's Guide
-
Upload
khangminh22 -
Category
Documents
-
view
4 -
download
0
Transcript of Dell OpenManage Essentials Version 2.0 User's Guide

Dell OpenManage EssentialsVersion 2.0 User's Guide

Notes, Cautions, and WarningsNOTE: A NOTE indicates important information that helps you make better use of your computer.
CAUTION: A CAUTION indicates either potential damage to hardware or loss of data and tells you how to avoid the problem.
WARNING: A WARNING indicates a potential for property damage, personal injury, or death.
Copyright © 2014 Dell Inc. All rights reserved. This product is protected by U.S. and international copyright and intellectual property laws. Dell™ and the Dell logo are trademarks of Dell Inc. in the United States and/or other jurisdictions. All other marks and names mentioned herein may be trademarks of their respective companies.
2014 - 09
Rev. A00

Contents
1 About OpenManage Essentials......................................................................... 17What is New in This Release................................................................................................................17
Other Information You May Need...................................................................................................... 18
Contacting Dell....................................................................................................................................19
2 Installing OpenManage Essentials.................................................................. 20Installation Prerequisites and Minimum Requirements.....................................................................20
Minimum Recommended Hardware............................................................................................20
Minimum Requirements................................................................................................................ 21
Terms and Conditions for Using Relational Database Management Systems................................. 22
Database Size and Scalability..............................................................................................................22
Network Bandwidth Utilization...........................................................................................................23
Minimum Login Roles for Microsoft SQL Server................................................................................23
Downloading OpenManage Essentials.............................................................................................. 24
Installing OpenManage Essentials...................................................................................................... 24
Custom Setup Installation.............................................................................................................26
Considerations When Installing OpenManage Essentials on a Domain Controller......................... 27
Setting Up OpenManage Essentials Database on a Remote SQL Server..........................................27
Installing Dell SupportAssist................................................................................................................27
Installing Repository Manager............................................................................................................ 29
Installing Dell License Manager..........................................................................................................29
Uninstalling OpenManage Essentials................................................................................................. 30
Upgrading OpenManage Essentials................................................................................................... 30
Setting Up and Configuring VMware ESXi 5....................................................................................... 31
Migrating IT Assistant to OpenManage Essentials............................................................................. 32
3 Getting Started With OpenManage Essentials.............................................. 33Launching OpenManage Essentials....................................................................................................33
Configuring OpenManage Essentials................................................................................................. 33
Discovery Wizard Configuration.........................................................................................................34
Configuring Discovery Settings.......................................................................................................... 34
Using the OpenManage Essentials Home Portal............................................................................... 35
OpenManage Essentials Heading Banner.......................................................................................... 36
Customizing Portals............................................................................................................................ 37
Displaying Additional Available Reports and Graphs......................................................................... 37
Drilling Down Charts and Reports for More Information............................................................38
Saving and Loading the Portal Layout................................................................................................38
Updating the Portal Data.................................................................................................................... 38

Hiding Graphs and Reports Components..........................................................................................39
Rearranging or Resizing Graphs and Reports (Components)........................................................... 39
Filtering Data....................................................................................................................................... 40
Search Bar........................................................................................................................................... 40
Search Items..................................................................................................................................40
Search Drop-Down List................................................................................................................ 40
Selection Actions........................................................................................................................... 41
Map View (Home) Portal..................................................................................................................... 41
Viewing the User Information.............................................................................................................42
Logging On As a Different User..........................................................................................................42
Using the Update Available Notification Icon....................................................................................42
Using the Warranty Scoreboard Notification Icon............................................................................ 43
4 OpenManage Essentials Home Portal — Reference.................................... 44Dashboard...........................................................................................................................................44
Home Portal Reports.................................................................................................................... 44
Device by Status............................................................................................................................ 45
Alerts by Severity........................................................................................................................... 45
Discovered Versus Inventoried Devices....................................................................................... 45
Task Status.....................................................................................................................................46
Schedule View.....................................................................................................................................46
Schedule View Settings................................................................................................................. 47
Device Warranty Report......................................................................................................................47
Map View (Home) Portal Interface..................................................................................................... 48
5 Discovering and Inventorying Devices...........................................................49Supported Devices, Protocols, and Features Matrix..........................................................................49
Supported Operating Systems (Servers), Protocols, and Features Matrix.........................................53
Supported Storage Devices, Protocols, and Features Matrix............................................................ 55
Legend and Definitions....................................................................................................................... 57
Using the Discovery and Inventory Portal..........................................................................................58
Protocol Support Matrix for Discovery...............................................................................................58
Protocol Support Matrix for System Update......................................................................................60
Devices Not Reporting Service Tag................................................................................................... 60
Configuring a Discovery and Inventory Task..................................................................................... 61
Changing the Default SNMP Port.................................................................................................62
Discovering and Inventorying Dell Devices Using WS-Man Protocol With a Root
Certificate...................................................................................................................................... 63
Excluding Ranges................................................................................................................................64
Viewing Configured Discovery and Inventory Ranges......................................................................64
Scheduling Discovery......................................................................................................................... 64
Discovery Speed Slider..................................................................................................................65

Multithreading............................................................................................................................... 65
Scheduling Inventory..........................................................................................................................66
Configuring Status Polling Frequency................................................................................................66
6 Discovery And Inventory — Reference........................................................... 67Discovery and Inventory Portal Page Options................................................................................... 67
Discovery and Inventory Portal...........................................................................................................67
Last Discovery and Inventory........................................................................................................68
Discovered Versus Inventoried Devices.......................................................................................68
Task Status.....................................................................................................................................69
Viewing Device Summary...................................................................................................................69
Viewing Device Summary Filter Options......................................................................................70
Add Discovery Range.......................................................................................................................... 70
Discovery Configuration......................................................................................................................71
Discovery Configuration Options..................................................................................................71
Device Type Filtering...........................................................................................................................72
ICMP Configuration.............................................................................................................................73
ICMP Configuration Options.........................................................................................................73
SNMP Configuration............................................................................................................................73
SNMP Configuration Options....................................................................................................... 74
WMI Configuration.............................................................................................................................. 75
WMI Configuration Options.......................................................................................................... 75
Storage Configuration.........................................................................................................................75
Storage Configuration Options.....................................................................................................75
WS-Man Configuration....................................................................................................................... 75
WS-Man Configuration Options................................................................................................... 76
SSH Configuration...............................................................................................................................76
SSH Configuration Options........................................................................................................... 77
IPMI Configuration.............................................................................................................................. 77
IPMI Configuration Options.......................................................................................................... 77
Discovery Range Action......................................................................................................................78
Summary..............................................................................................................................................78
Add Exclude Range............................................................................................................................. 78
Add Exclude Range Options......................................................................................................... 79
Discovery Schedule.............................................................................................................................79
Viewing Discovery Configuration................................................................................................. 79
Discovery Schedule Settings........................................................................................................ 80
Inventory Schedule..............................................................................................................................81
Inventory Schedule Settings..........................................................................................................81
Status Schedule................................................................................................................................... 81
Status Polling Schedule Settings...................................................................................................82
Discovery Ranges................................................................................................................................82

Exclude Ranges................................................................................................................................... 83
7 Managing Devices.............................................................................................. 84Viewing Devices..................................................................................................................................84
Device Summary Page.................................................................................................................. 85
Nodes and Symbols Description.................................................................................................. 86
Device Details................................................................................................................................86
Viewing Device Inventory................................................................................................................... 87
Viewing Alerts Summary.....................................................................................................................88
Viewing System Event Logs................................................................................................................88
Searching for Devices.........................................................................................................................88
Creating a New Group........................................................................................................................88
Adding Devices to a New Group........................................................................................................89
Adding Devices to an Existing Group.................................................................................................89
Hiding a Group....................................................................................................................................89
Deleting a Group.................................................................................................................................90
Single Sign-On....................................................................................................................................90
Creating a Custom URL......................................................................................................................90
Launching the Custom URL.......................................................................................................... 91
Configuring Warranty Email Notifications..........................................................................................91
Configuring Warranty Scoreboard Notifications............................................................................... 92
Configuring Warranty Pop-Up Notifications..................................................................................... 92
Using Map View...................................................................................................................................92
Map Providers................................................................................................................................94
Configuring Map Settings............................................................................................................. 95
General Navigation and Zooming................................................................................................ 96
Home View....................................................................................................................................96
Tool Tip..........................................................................................................................................96
Selecting a Device on Map View...................................................................................................97
Health and Connection Status......................................................................................................97
Multiple Devices at the Same Location........................................................................................98
Setting a Home View.....................................................................................................................98
Viewing All Map Locations............................................................................................................98
Adding a Device to the Map......................................................................................................... 98
Moving a Device Location Using the Edit Location Details Option............................................ 99
Importing Licensed Devices....................................................................................................... 100
Using the Map View Search Bar.................................................................................................. 101
Removing All Map Locations...................................................................................................... 103
Editing a Map Location............................................................................................................... 103
Removing a Map Location.......................................................................................................... 103
Exporting All Device Locations...................................................................................................104
Dell NAS Appliance Support............................................................................................................. 104

OEM Device Support.........................................................................................................................105
8 Devices — Reference....................................................................................... 106Viewing Inventory............................................................................................................................. 106
Viewing Alerts.............................................................................................................................. 107
Viewing Hardware Logs.................................................................................................................... 107
Hardware Log Details.................................................................................................................. 107
Alert Filters.........................................................................................................................................108
Viewing Non-Compliant Systems ................................................................................................... 108
Non-Compliant Systems............................................................................................................ 108
Device Search................................................................................................................................... 109
Query Results...............................................................................................................................110
Creating Device Group...................................................................................................................... 111
Device Group Configuration........................................................................................................111
Device Selection...........................................................................................................................111
Summary — Group Configuration.............................................................................................. 112
Map View (Devices) Tab Interface.....................................................................................................112
Devices at this location................................................................................................................113
Map Settings.................................................................................................................................114
9 Server Deployment and Re-provisioning.....................................................115OpenManage Essentials — Server Configuration Management License....................................... 116
Licensable Servers........................................................................................................................116
Purchasing the License................................................................................................................116
Deploying the License................................................................................................................. 116
Verifying License Information......................................................................................................117
Viewing Unlicensed Server Targets............................................................................................. 117
Device Requirements for Deployment and Compliance Tasks....................................................... 117
Getting Started for Device Configuration Deployment................................................................... 118
Device Configuration Deployment Overview.................................................................................. 118
Viewing the Deployment Portal........................................................................................................118
Configuring the Deployment File Share........................................................................................... 118
Creating a Device Configuration Template......................................................................................119
Creating a Device Configuration Template From a Device Configuration File........................ 119
Creating a Device Configuration Template From a Reference Device.................................... 120
Adding Devices to the Repurpose and Bare Metal Devices Group................................................. 121
Managing Device Configuration Templates..................................................................................... 121
Viewing the Device Configuration Template Attributes............................................................ 122
Cloning a Device Configuration Template.................................................................................122
Editing a Device Configuration Template.................................................................................. 122
Exporting a Device Configuration Template..............................................................................123
Deploying a Device Configuration Template...................................................................................123

Deploying a Network ISO Image...................................................................................................... 125
Removing Devices From the Repurpose and Bare Metal Devices Group.......................................127
Auto Deploying Device Configurations............................................................................................127
Configuring Auto Deployment Settings......................................................................................127
Setting Up Device Configuration Auto Deployment ................................................................ 128
Managing Auto Deployment Credentials................................................................................... 130
Adding a Discovery Range for Auto Deployment.......................................................................131
Removing Devices From an Auto Deployment Task..................................................................131
Importing Device Specific Attributes................................................................................................132
Import File Requirements..................................................................................................................132
Exporting Device Specific Attributes................................................................................................ 133
Viewing the Deployment Tasks........................................................................................................ 133
Additional Information...................................................................................................................... 133
10 Deployment – Reference..............................................................................135Repurpose and Bare Metal Devices..................................................................................................136
Auto Deployment.............................................................................................................................. 137
Tasks.................................................................................................................................................. 138
Task Execution History......................................................................................................................138
Device Configuration Template Details........................................................................................... 139
Device Configuration Setup Wizard.................................................................................................140
File Share Settings....................................................................................................................... 140
Add Devices to Repurpose and Bare Metal Device Group........................................................ 141
Create Template Wizard....................................................................................................................141
Deploy Template Wizard...................................................................................................................141
Name and Deploy Options......................................................................................................... 142
Select Template...........................................................................................................................142
Select Devices............................................................................................................................. 142
Select ISO Location..................................................................................................................... 143
Edit Attributes.............................................................................................................................. 143
Set Schedule................................................................................................................................146
Summary......................................................................................................................................146
Setup Auto Deployment Wizard....................................................................................................... 147
Deploy Options............................................................................................................................147
Select Template...........................................................................................................................148
Select ISO Location.....................................................................................................................148
Import Service Tags.....................................................................................................................149
Edit Attributes.............................................................................................................................. 149
Execution Credentials................................................................................................................. 152
Summary......................................................................................................................................153
Manage Auto Deployment Credentials............................................................................................ 153
Credentials................................................................................................................................... 153

Devices.........................................................................................................................................154
11 Managing Server Configuration Baseline...................................................155Viewing the Device Compliance Portal............................................................................................156
Getting Started for Device Configuration Compliance................................................................... 156
Device Configuration Compliance Overview.................................................................................. 156
Configuring the Credentials and Device Configuration Inventory Schedule................................. 156
Associating Target Devices to a Configuration Template............................................................... 157
Viewing the Inventory Configuration Details................................................................................... 158
Viewing the Device Compliance Status........................................................................................... 158
Viewing the Compliance Tasks.........................................................................................................159
12 Configuration – Reference...........................................................................160Device Compliance........................................................................................................................... 161
Device Compliance Graph.......................................................................................................... 161
Device Compliance Table........................................................................................................... 161
Tasks.................................................................................................................................................. 162
Task Execution History......................................................................................................................162
Associate Devices To Template Wizard........................................................................................... 163
Select Template...........................................................................................................................163
Select Devices............................................................................................................................. 164
Configuration Inventory Schedule Wizard.......................................................................................164
Inventory Credentials.................................................................................................................. 164
Schedule...................................................................................................................................... 165
13 Viewing Inventory Reports........................................................................... 167Choosing Predefined Reports...........................................................................................................167
Predefined Reports......................................................................................................................167
Filtering Report Data......................................................................................................................... 169
Exporting Reports..............................................................................................................................170
14 Reports — Reference......................................................................................171Agent and Alert Summary................................................................................................................. 172
Agent SummaryiSM Agent Summary..........................................................................................172
Alerts per Device..........................................................................................................................173
Top Alert Generators................................................................................................................... 173
Device Compliance........................................................................................................................... 173
Server Overview.................................................................................................................................173
Server Components and Versions.................................................................................................... 174
Asset Acquisition Information........................................................................................................... 174
Asset Maintenance Information........................................................................................................ 175
Asset Support Information................................................................................................................ 176

Hard Drive Information......................................................................................................................177
ESX Information.................................................................................................................................178
HyperV Information...........................................................................................................................179
Field Replaceable Unit (FRU) Information........................................................................................ 179
License Information.......................................................................................................................... 180
Device Location Information............................................................................................................180
Memory Information.........................................................................................................................180
Modular Enclosure Information........................................................................................................ 181
NIC Information................................................................................................................................ 182
PCI Device Information.....................................................................................................................182
Storage Controller Information........................................................................................................ 183
Virtual Disk Information.................................................................................................................... 183
Warranty Information........................................................................................................................184
BIOS Configuration........................................................................................................................... 185
iDRAC Network Configuration......................................................................................................... 185
Template Association........................................................................................................................186
15 Viewing Warranty Reports............................................................................ 187Extending Warranty........................................................................................................................... 187
16 Managing Alerts..............................................................................................188Viewing Alerts and Alert Categories................................................................................................. 188
Viewing Alert Logs.......................................................................................................................188
Understanding the Alert Types................................................................................................... 188
Viewing Internal Alerts................................................................................................................ 189
Viewing Alert Categories.............................................................................................................189
Viewing Alert Source Details.......................................................................................................189
Viewing Previously Configured Alert Actions.................................................................................. 190
Viewing Application Launch Alert Action...................................................................................190
Viewing E-Mail Alert Action........................................................................................................ 190
Viewing Alert Ignore Action........................................................................................................ 190
Viewing Alert Trap Forward Action.............................................................................................190
Handling Alerts..................................................................................................................................190
Flagging an Alert..........................................................................................................................190
Creating and Editing a New View................................................................................................191
Configuring Alert Actions.................................................................................................................. 191
Setting Up E-mail Notification.................................................................................................... 191
Ignoring Alerts............................................................................................................................. 192
Running a Custom Script............................................................................................................ 193
Forwarding Alerts........................................................................................................................ 193
Forwarding Alerts Use Case Scenarios.......................................................................................194
Working With Sample Alert Action Use Cases................................................................................. 195

Use Cases in Alert Actions...........................................................................................................195
Configuring Alert Log Settings..........................................................................................................195
Renaming Alert Categories and Alert Sources.................................................................................195
Alert Pop-Up Notifications............................................................................................................... 196
Configuring Alert Pop-Up Notifications.....................................................................................196
Enabling or Disabling Alert Pop-Up Notifications......................................................................197
17 Alerts — Reference......................................................................................... 198Alert Logs...........................................................................................................................................198
Predefined Alert View Filters....................................................................................................... 199
Alert Logs Fields...........................................................................................................................199
Alert Details.................................................................................................................................200
Alert Log Settings.............................................................................................................................. 201
Alert View Filters................................................................................................................................201
Alert Filter Name..........................................................................................................................201
Severity........................................................................................................................................ 201
Acknowledgement......................................................................................................................202
Summary — Alert View Filter...................................................................................................... 202
Alert Actions......................................................................................................................................203
Name and Description................................................................................................................204
Severity Association.................................................................................................................... 204
Application Launch Configuration.............................................................................................204
E-Mail Configuration.................................................................................................................. 206
Trap Forwarding..........................................................................................................................207
Category and Sources Association.............................................................................................207
Device Association......................................................................................................................207
Date and Time Range................................................................................................................. 209
Alert Action - Duplicate Alert Correlation................................................................................. 209
Summary- Alert Action Details...................................................................................................209
Alert Categories................................................................................................................................. 211
Alert Categories Options............................................................................................................. 211
Alert Source....................................................................................................................................... 213
18 Updating Server BIOS, Firmware, Drivers, and Applications..................215Viewing the System Update Page.....................................................................................................215
Understanding Server BIOS Firmware and Drivers Sources............................................................216
Choosing the Right Source for Updates.......................................................................................... 216
Selecting an Update Catalog Source................................................................................................217
Viewing Comparison Results............................................................................................................ 217
Viewing Compliant Servers......................................................................................................... 217
Viewing Non-Compliant Servers................................................................................................ 217
Viewing Non-Inventoried Servers...............................................................................................217

Viewing Servers With Issues and Resolutions.............................................................................217
System Update Use Case Scenarios................................................................................................. 217
Applying System Updates.................................................................................................................220
Viewing Updated Status..............................................................................................................222
Updating Firmware, BIOS, and Drivers Without OMSA................................................................... 222
View Active Catalog.......................................................................................................................... 222
Issues and Resolutions Use Case Scenarios.................................................................................... 223
19 System Update — Reference........................................................................224Filter Options.....................................................................................................................................224
System Update.................................................................................................................................. 225
Compliance Report.....................................................................................................................226
Compliant Systems..................................................................................................................... 227
Non-Compliant Systems.............................................................................................................227
System Update Task....................................................................................................................228
Non-Inventoried Systems...........................................................................................................230
Inventory Systems.......................................................................................................................230
All System Update Tasks.............................................................................................................230
Issues and Resolutions................................................................................................................230
Task Execution History................................................................................................................231
Select a Catalog Source....................................................................................................................232
Dell Update Package...................................................................................................................232
Dell OpenManage Server Update Utility.................................................................................... 232
Repository Manager.................................................................................................................... 232
View Active Catalog.......................................................................................................................... 232
20 Managing Remote Tasks...............................................................................234About Remote Tasks.........................................................................................................................234
Managing Command Line Task........................................................................................................234
Managing RACADM Command Line Tasks................................................................................ 235
Managing Generic Command Line Task....................................................................................236
Managing Server Power Options......................................................................................................237
Deploying Server Administrator....................................................................................................... 238
Supported Windows and Linux Packages.................................................................................. 239
Arguments...................................................................................................................................240
Deploying iDRAC Service Module....................................................................................................240
Supported Windows and Linux Packages.................................................................................. 241
Collecting Firmware and Driver Inventory.......................................................................................242
Working With Sample Remote Tasks Use Cases............................................................................. 243
Use Cases in Remote Tasks........................................................................................................243
Device Capability Matrix................................................................................................................... 245

21 Remote Tasks — Reference..........................................................................249Remote Tasks Home........................................................................................................................ 250
Remote Tasks ...................................................................................................................................250
All Tasks.......................................................................................................................................250
Task Execution History................................................................................................................251
Server Power Options................................................................................................................. 252
Deployment Task........................................................................................................................ 254
Command Line Task.........................................................................................................................256
Remote Server Administrator Command...................................................................................257
Generic Command..................................................................................................................... 259
IPMI Command........................................................................................................................... 261
RACADM Command Line........................................................................................................... 263
Firmware and Driver Inventory Collection Task..............................................................................264
22 Managing Security Settings......................................................................... 266Using Security Roles and Permissions............................................................................................. 266
Microsoft Windows Authentication................................................................................................. 266
Assigning User Rights........................................................................................................................267
Using Custom SSL Certificates (Optional)....................................................................................... 267
Configuring IIS Services.............................................................................................................. 267
Supported Protocols and Ports in OpenManage Essentials........................................................... 268
Supported Protocols and Ports on Management Stations....................................................... 268
Supported Protocols and Ports on Managed Nodes................................................................ 268
23 Troubleshooting.............................................................................................270OpenManage Essentials Troubleshooting Tool.............................................................................. 270
Troubleshooting Procedures............................................................................................................ 271
Troubleshooting Inventory..........................................................................................................271
Troubleshooting Device Discovery.............................................................................................271
Troubleshooting Receiving SNMP Traps ...................................................................................272
Troubleshooting Discovery of Windows Server 2008–Based Servers..................................... 272
Troubleshooting SNMP Traps for ESX or ESXi Versions 3.5, 4.x, or 5.0.................................... 272
Troubleshooting Problems With Microsoft Internet Explorer...................................................273
Troubleshooting Map View.........................................................................................................273
24 Frequently Asked Questions........................................................................ 275Installation ........................................................................................................................................ 275
Upgrade............................................................................................................................................. 275
Tasks.................................................................................................................................................. 276
Optional Command Line Settings.............................................................................................. 276
Customization Parameters......................................................................................................... 278

MSI Return Code......................................................................................................................... 279
E-mail Alert Action........................................................................................................................... 280
Discovery.......................................................................................................................................... 280
Inventory............................................................................................................................................281
System Update.................................................................................................................................. 281
Managing Device Configurations.....................................................................................................283
Device Group Permissions............................................................................................................... 283
Device Group Permissions Portal...............................................................................................283
Remote and System Update Tasks.............................................................................................284
Custom Device Groups.............................................................................................................. 285
Logs................................................................................................................................................... 285
Log Levels....................................................................................................................................285
Troubleshooting............................................................................................................................... 286
25 Managing Device Group Permissions........................................................ 288Adding Users to the OmeSiteAdministrators Role.......................................................................... 288
Assigning Device Groups to a User..................................................................................................289
Removing Users From the OmeSiteAdministrators Role................................................................290
26 OpenManage Mobile Settings......................................................................291Enabling or Disabling Alert Notifications For OpenManage Mobile............................................... 291
Enabling or Disabling OpenManage Mobile Subscribers................................................................ 292
Deleting an OpenManage Mobile Subscriber..................................................................................292
Viewing the Alert Notification Service Status.................................................................................. 293
Notification Service Status..........................................................................................................293
Viewing the OpenManage Mobile Subscriber Information.............................................................293
Mobile Subscriber Information...................................................................................................294
Troubleshooting OpenManage Mobile............................................................................................294
27 Preferences — Reference............................................................................. 296Console Settings...............................................................................................................................296
Email Settings....................................................................................................................................298
Alert Settings..................................................................................................................................... 298
Custom URL Settings........................................................................................................................299
Warranty Notification Settings......................................................................................................... 299
Device Group Permissions...............................................................................................................300
Common Tasks...........................................................................................................................300
Manage Device Group Permissions............................................................................................301
Device Groups for Tasks and Patch Targeting...........................................................................301
Discovery Settings.............................................................................................................................301
Deployment Settings.........................................................................................................................301

28 Logs — Reference.......................................................................................... 303User Interface Logs...........................................................................................................................303
Application Logs............................................................................................................................... 304
29 Extensions....................................................................................................... 305
30 Right-Click Actions....................................................................................... 306Schedule View.................................................................................................................................. 306
Device Status.....................................................................................................................................307
Discovery Range Summary...............................................................................................................307
Managing Include Ranges.......................................................................................................... 307
View Filters........................................................................................................................................308
Alerts................................................................................................................................................. 308
Remote Tasks....................................................................................................................................309
Custom URL .....................................................................................................................................309
System Update Tasks........................................................................................................................309
Attributes Tab....................................................................................................................................309
Templates..........................................................................................................................................310
Compliance by Template................................................................................................................. 310
Device Compliance........................................................................................................................... 311
31 Tutorials............................................................................................................312
32 Using OpenManage Essentials Command Line Interface.......................313Launching the OpenManage Essentials Command Line Interface.................................................313
Creating a Discovery Profile Input File............................................................................................. 313
Specifying IPs, Ranges, or Host names Using XML or CSV Files..................................................... 315
Specifying Input Files in PowerShell................................................................................................. 315
Command Line Interface Commands..............................................................................................316
Creating a Discovery Range........................................................................................................316
Removing a Discovery Range..................................................................................................... 316
Creating a Discovery Range Group............................................................................................ 317
Removing a Discovery Range Group..........................................................................................317
Editing a Discovery Range...........................................................................................................317
Editing a Discovery Range Group...............................................................................................318
Enabling a Discovery Range or Discovery Range Group...........................................................318
Disabling a Discovery Range or Discovery Range Group..........................................................319
Creating a Discovery Exclude Range..........................................................................................319
Removing a Discovery Exclude Range....................................................................................... 319
Running Discovery, Inventory, and Status Polling Tasks...........................................................320
Removing a Device..................................................................................................................... 320

Retrieving the Status Execution Progress of a Discovery Range...............................................321
Stopping a Running Discovery Range or Group........................................................................ 321
Creating a Custom Device Group.............................................................................................. 321
Adding Devices to a Custom Group...........................................................................................322
Deleting a Group.........................................................................................................................322

1About OpenManage EssentialsOpenManage Essentials is a hardware management application that provides a comprehensive view of Dell systems, devices, and components in the enterprise’s network. With OpenManage Essentials, a web-based and one‑to‑many systems management application for Dell systems and other devices, you can:
• Discover and inventory the system.
• Monitor the health of the system.
• View and manage system alerts.
• Perform system updates and remote tasks.
• View hardware inventory and compliance reports.
What is New in This Release
• Enhanced scalability to support 4000 devices and 40,000 alerts.
• Support for the following features:
– Import a configuration template from a reference server or chassis, edit the template, and deploy the template on another server or chassis.
– View the status of server or chassis compliance to an associated configuration template.
– OpenManage Essentials — Server Configuration Management license.
NOTE: Installing and using OpenManage Essentials does not require the OpenManage Essentials — Server Configuration Management license. Only the server configuration management feature requires that the OpenManage Essentials — Server Configuration Management license is installed on target servers. For more information, see OpenManage Essentials — Server Configuration Management License.
– Perform guided device discovery by selecting device types and providing the required protocol configuration details.
– Update the firmware, BIOS, or drivers on managed nodes through the operating system without Dell OpenManage Server Administrator (OMSA).
– Deploy or update iDRAC Service Module (iSM).
– Launch the virtual console of an iDRAC configured for Single Sign-On (SSO).
– Deploy 64-bit Dell Update Packages (DUPs).
– Boot a system from a network-mounted ISO using iDRAC.
– Availability of new and additional reports.
– Availability of additional inventory information.
– Display of warranty pop-up notification for devices.
• Support for the following devices:
– Dell PowerEdge 13th generation (13G) servers.
– Dell Networking, Dell Compellent, Dell PowerVault, and Dell EqualLogic devices — support for additional models.
17

NOTE: For a complete list of supported device models, see the Dell OpenManage Essentials Version 2.0 Support Matrix at dell.com/openmanagemanuals.
Other Information You May Need
In addition to this guide, you may require the following documents:
Document Description Availability
Dell OpenManage Essentials Support Matrix
Lists the devices supported by OpenManage Essentials.
dell.com/OpenManageManuals
Dell OpenManage Essentials Readme
Provides information about known issues and workarounds in OpenManage Essentials.
Dell OpenManage Mobile User’s Guide
Provides information about installing and using the OpenManage Mobile application.
Dell License Manager User's Guide
Provides information about managing licenses and troubleshooting the License Manager.
Dell Repository Manager User's Guide
Provides information about using the Repository Manager to manage system updates.
Dell OpenManage Essentials REST API Guide
Provides information about integrating OpenManage Essentials using Representational State Transfer (REST) APIs and also includes examples of using REST APIs to perform common tasks.
dell.com/OpenManageManuals or DellTechCenter.com/OME
Dell SupportAssist User's Guide
Provides information about installing, configuring, using, and troubleshooting SupportAssist.
dell.com/ServiceabilityTools
Troubleshooting Tool online help
Provides information about using the tool, related protocols, devices, and so on.
Integrated with the Troubleshooting Tool. To launch the online help from the Troubleshooting Tool, click the ? icon.
Dell OpenManage Essentials MIB Import Utility online help
Provides information about the tool, importing and removing MIBs, troubleshooting procedures, and so on.
Integrated with the MIB Import Utility. To launch the online help from the MIB Import Utility, click the ? icon.
18

Contacting DellNOTE: If you do not have an active Internet connection, you can find contact information on your purchase invoice, packing slip, bill, or Dell product catalog.
Dell provides several online and telephone-based support and service options. Availability varies by country and product, and some services may not be available in your area. To contact Dell for sales, technical support, or customer service issues:
1. Go to dell.com/support.
2. Select your support category.
3. Verify your country or region in the Choose a Country/Region drop-down list at the top of page.
4. Select the appropriate service or support link based on your need.
19

2Installing OpenManage Essentials
NOTE: For information on the prerequisites and minimum requirements for installing OpenManage Essentials, and network utilization information, see the Dell OpenManage Essentials User’s Guide at dell.com/openmanagemanuals.
NOTE: For a list of supported platforms, operating systems, and browsers, see the Dell OpenManage Essentials Support Matrix at dell.com/openmanagemanuals.
Related Links
Downloading OpenManage Essentials
Installing OpenManage Essentials
Migrating IT Assistant to OpenManage Essentials
Installation Prerequisites and Minimum Requirements
Installation Prerequisites and Minimum Requirements
For a list of supported platforms, operating systems, and browsers, see the Dell OpenManage Essentials Support Matrix at dell.com/OpenManageManuals.
To install OpenManage Essentials, you require local system administrator rights and the system you are using must meet the criteria mentioned in Minimum Recommended Hardware and Minimum Requirements.
Minimum Recommended Hardware
Minimum Recommended Hardware
Large Deployments
Large Deployments
Medium Deployments [a]
Small Deployments [a]
Number of Devices
Up to 4000 Up to 2000 Up to 500 Up to 100
Type of System Physical machines / Virtual machines
Physical machines / Virtual machines
Physical machines / Virtual machines
Physical machines / Virtual machines
RAM 8 GB 8 GB 6 GB 4 GB
Processors 8 cores total 8 cores total 4 cores total 2 cores total
Database SQL Standard SQL Standard SQL Express SQL Express
Database Location Remote [b] Remote [b] Local Local
Hard Drive 20 GB 10 GB 6 GB 6 GB
20

[a] If you are not using SQL Express, limit the maximum memory to 2 GB less than the total system memory and disable SQL analysis and report services.
[b] Install the remote database on a system that supports an 8 core processor and an 8 GB RAM.
NOTE: If Dell SupportAssist is installed along with OpenManage Essentials, you require 2 GB RAM and 2 cores in addition to the minimum requirements described in the previous table. If you are using SQL Server Standard or Enterprise Editions, the maximum SQL Server memory must be configured within SQL Server to prevent it from using the entire system memory. It is recommended that you use a maximum of 4 GB for a 6 GB RAM.
Minimum Requirements
Particulars Minimum Requirement
Operating systems • Microsoft Windows Server 2008 SP2 (x64) Standard and Enterprise Edition
• Windows Server 2008 R2 SP1 Standard and Enterprise Edition
• Windows Server 2012 Standard and Datacenter Edition
• Windows Server 2012 R2 Standard and Datacenter Edition
NOTE: OpenManage Essentials version 2.0 is supported only on x64 operating systems.
Network 1 Gbps or higher
Web browser • Microsoft Internet Explorer 9, 10, or 11
• Mozilla Firefox 22 or 23
• Google Chrome 30 or 31
Database Microsoft SQL Server 2008 or later
NOTE: OpenManage Essentials installation is supported only on a case-insensitive instance of SQL Server.
User interface Microsoft Silverlight version 5.1.30214.0
.NET 4.5
Microsoft Visual C++ 2012 Runtime 11.0
NOTE: For the latest update on the minimum requirements for OpenManage Essentials version 2.0, see the OpenManage Essentials Version 2.0 Support Matrix at dell.com/OpenManageManuals.
21

Terms and Conditions for Using Relational Database Management Systems
The relational database management system (RDBMS) used for installing OpenManage Essentials is Microsoft SQL Server. SQL Server has configuration settings separate from the OpenManage Essentials database. The server has logins (SQL or Windows) that may or may not have access to the OpenManage Essentials database.
When OpenManage Essentials is installed, Internet security is modified by adding registry entries to the ZoneMaps for HKLM and HKCU. This ensures that Internet Explorer identifies the fully qualified domain name as an intranet site.
A self-signed certificate is created and this certificate is installed in the root Certificate Authorities (CA) and My certificates.
To prevent certificate errors, remote clients must either install OpenManage Essentials certificate in both CA and Root Certificate Stores or have a custom certificate published to client systems by the domain administrator.
For a typical installation of OpenManage Essentials:
• Use the local instance of SQL Server that has all supported components.
• The RDBMS is altered to support both SQL and Windows authentication.
• An SQL Server login user is generated for OpenManage Essentials’ services. This login is added as a RDBMS SQL login with the dbcreator role and given the db_owner role over the ITAssist and OMEssentials databases.
NOTE: The password for the typical install, auto generated SQL Server login account, is controlled by the application and different on every system.
For the highest level of security, it is recommended that you use a domain service account that is specified during custom installation for SQL Server.
At runtime, when the OpenManage Essentials website determines that it has an invalid certificate or certificate binding; the self-signed certificate is regenerated.
Related Links
Minimum Login Roles for Microsoft SQL Server
Database Size and Scalability
The following table provides information about the changes to the database size in an environment with 2000 devices based on alerts, tasks, and alert actions.
Events Database Size
Initial database size 47.5 MB
After discovery and inventory of 2000 devices 48.5 MB
After 2000 alerts are generated 53.5 MB
22

Events Database Size
After tasks (status polling, OpenManage Server Administrator deployment tasks, remote tasks, and system update tasks) against these alerts are executed
54.5 MB
After deleting all the alerts and sending 20000 alerts with all the alert actions configured
97.2 MB
During the daily maintenance, OpenManage Essentials compresses and optimizes the database. OpenManage Essentials also downloads updates for managed servers. These updates are saved in the local file system (not in the database) where OpenManage Essentials is installed.
NOTE: For more information, see the OpenManage Essentials Scalability and Performance technical white paper at DellTechCenter.com/OME.
Network Bandwidth Utilization
The following table provides information about the network bandwidth utilized by OpenManage Essentials on a network with a link speed of 1 Gbps.
Event Bandwidth utilized (in percent)
Discovery 0.64 for 100 devices
Inventory 1.16 for 100 devices
System update 5.34 for 10 targets and 10 packages
Remote task 4.42 (10 targets)
OpenManage Essentials at maximum use — Discovery, inventory, scheduled inventory, scheduled status, generic command-line task, and OMSA deployment.
4.13
NOTE: The network bandwidth utilization may vary depending on the network interface controller (NIC) and bandwidth allocation.
NOTE: The minimum network bandwidth required for OpenManage Essentials to work in a WAN environment is 40 Mbps.
Minimum Login Roles for Microsoft SQL Server
The following table provides information about the minimum permissions for SQL Server based on different installation and upgrade use cases.
23

Number
Use Case Minimum Login Roles for SQL Server
1 Installing OpenManage Essentials for the first time and you select the Typical option during the installation process.
sysadmin access on the installed instance.
2 Installing OpenManage Essentials for the first time, you select the Custom option during the installation process and an empty OpenManage Essentials database is present (locally or remotely).
NOTE: If you select the Custom install option and do not enter any credentials then the installation is considered as a Typical installation and sysadmin rights are required.
db_owner access on the OpenManage Essentials database.
3 You are installing OpenManage Essentials for the first time, you select the Custom option during the installation process, and an empty OpenManage Essentials database is not present.
dbcreator access on the server.
4 Upgrading OpenManage Essentials from version 1.2 or 1.3 to version 2.0 and an OpenManage Essentials database is present (locally or remotely).
db_owner access on the OpenManage Essentials database.
Downloading OpenManage EssentialsTo download OpenManage Essentials, go to dell.com/support or the Dell TechCenter website at DellTechCenter.com/OME.
Installing OpenManage EssentialsBefore you install OpenManage Essentials, make sure that you have local administrator rights on the system.
NOTE: For information on the prerequisites and minimum requirements for installing OpenManage Essentials, see the Dell OpenManage Essentials Version 2.0 User’s Guide at Dell.com/OpenManageManuals.
To install OpenManage Essentials:
1. Extract the OpenManage Essentials installation package.
2. Double-click the Autorun.exe file available in the folder where you extracted the installation package.
The Dell OpenManage Install screen is displayed. The following options are available:
• Dell OpenManage Essentials — Select this option to install Dell OpenManage Essentials, Troubleshooting Tool, and Dell OpenManage Essentials MIB Import Utility.
24

• Dell Repository Manager — Select to install Dell Repository Manager. Using Repository Manager, you can create customized bundles and repositories of Dell Update Packages, software utilities such as update drivers, firmware, BIOS, and other applications.
• Dell License Manager — Select to install the Dell license manager. Dell License Manager is a one-to-many license deployment and reporting tool for integrated Dell Remote Access Controller (iDRAC) and Dell chassis management controller (CMC) licenses.
• Dell SupportAssist — Select to install Dell SupportAssist. SupportAssist provides proactive support capabilities for supported Dell server, storage, and networking solutions.
• Documentation — Click to view the online help.
• View Readme — Click to view the readme file. To view the latest readme, go to DellTechCenter.com/OME.
3. In Dell OpenManage Install, select Dell OpenManage Essentials and click Install.
The Dell OpenManage Essentials Prerequisites window, displays the following requirement types:
• Critical — This error condition prevents the installation of a feature.
• Warning — This warning condition may disable the Typical installation but not an Upgrade of the feature later during installation. Also, later during installation, use the Custom installation setup type to select the feature.
• Information — This informational condition does not affect the Typical selection of a feature.
There are two options for resolving critical dependencies:
• Click Install All Critical Prerequisites to immediately begin installing all critical prerequisites without further interaction. Install All Critical Prerequisites may require a restart depending on the configuration and the prerequisites installation will resume automatically after restart.
• Install each prerequisite individually by clicking the associated link with the required software.
NOTE: To configure a remote database, you do not require an SQL Express installation on the local system. See Setting Up OpenManage Essentials Database on a Remote SQL Server. If you are not configuring a remote database, then install SQL Express by clicking the warning prerequisite link. Selecting Install All Critical Prerequisites does not install SQL Express.
NOTE: Installation of OpenManage Essentials on a local database using SQL Server 2008, 2008 R2, or 2012 Express editions is supported only when an OpenManage Essentials-specific instance named SQLEXPRESSOME is available.
4. Click Install Essentials.
NOTE: If you are installing OpenManage Essentials for the first time, a dialog box is displayed prompting you to select if you want to install OpenManage Essentials on a local or remote database. If you choose to install OpenManage Essentials on a local database, SQL Server 2012 Express is installed on the system. If you choose to install OpenManage Essentials on a remote database, the installation follows the Custom Setup Installation steps.
5. In the install wizard for OpenManage Essentials, click Next.
6. In the License Agreement page, read the license agreement, select I accept the terms in the license agreement, and then click Next.
7. In Setup type select either Typical or Custom installation.
• If you selected Typical, click Next. Verify the installation settings in the Ready to Install the Program page and the click Install.
NOTE: If the default ports assigned to OpenManage Essentials services are either blocked or used by another application, a message is displayed prompting you to either unblock the ports or select Custom installation where you can specify another port.
25

NOTE: The parameters of all tasks that you create are encrypted and saved. During a reinstallation, if you choose to use a database that was retained from a previous OpenManage Essentials installation, the existing tasks will not run successfully. To resolve this issue, you must recreate all tasks after the installation.
• If you selected Custom, in Custom Setup, click Next and follow the instructions in Custom Setup Installation.
8. After the installation is complete, click Finish.
If you have installed OpenManage Essentials on a virtual machine (VM), the following are the suggested settings for the OpenManage Essentials VM:
• Increase CPU settings based on resource availability
• Disable Dynamic Memory
• Increase Memory Weight to high
Custom Setup Installation
To install OpenManage Essentials using custom setup:
1. In Custom Setup, click Change to change the installation location, and then click Next.
2. In custom settings for port numbers, if required, change default values for Network Monitoring Service port number, Task Manager Service port number, Package Server Port, and Console Launch port and then click Next.
3. In Database Server, do any of the following and then click Next:
• Local database—If you have multiple SQL Server versions available on the management system and you want to select an SQL Server on which you want to set up the OpenManage Essentials database, then select the SQL server from the Database Server list, the type of authentication, and provide the authentication details. If you do not select a database server, by default, a supported version of SQL Server Standard, Enterprise, or Express that is available is selected for the installation. For more information, see the Installing Dell OpenManage Essentials technical white paper at delltechcenter.com/ome.
• Remote database— Complete the prerequisites. For more information, see Setting Up OpenManage Essentials Database on a Remote SQL Server. After the prerequisites are complete, click Browse and select the remote system and then provide the authentication details. You can also set up the OpenManage Essentials database on a remote system by providing the IP address or host name and the database instance name of the remote system in Database Server.
NOTE: If you select the Custom install option and do not enter any credentials, the installation is considered as a typical installation and sysadmin rights are required.
NOTE: If you have multiple database instances running on a selected database server, you can specify the required database instance name to configure the Essentials database with it. For example, using (local)\MyInstance, you are configuring Essentials database on a local server and MyInstance named database instance.
NOTE: The parameters of all tasks that you create are encrypted and saved. During a reinstallation, if you choose to use a database that was retained from a previous OpenManage Essentials installation, the existing tasks will not run successfully. To resolve this issue, you must recreate all tasks after the installation.
4. Verify the installation settings in the Ready to Install the Program page and the click Install.
26

Considerations When Installing OpenManage Essentials on a Domain Controller
When installing OpenManage Essentials on a domain controller:
• You must install Microsoft SQL Server manually.
• If SQL Server is installed locally, the SQL Server service must be configured to run using a domain user account.
NOTE: The SQL Server service will not start if you are using the default NETWORK SERVICE or LOCAL SYSTEM accounts.
After OpenManage Essentials is installed on a domain controller:
• By default, the Domain Admins group is added as a member of the OmeAdministrators and OmePowerUsers roles.
• Local Windows user groups are not included in the OpenManage Essentials roles. OmeAdministrators, OmePowerUsers, or OmeUsers rights can be granted to users or user groups by adding them to the OpenManage Essentials Windows groups. OmeSiteAdministrators rights can be granted by OmeAdministrators through the Device Group Permissions portal.
Setting Up OpenManage Essentials Database on a Remote SQL Server
You can configure OpenManage Essentials to use an SQL Server present on a remote system. Before setting up the OpenManage Essentials database on the remote system, check for the following prerequisites:
• Network communication between the OpenManage Essentials system and the remote system is functioning.
• SQL connection works between the OpenManage Essentials system and the remote system for the specific database instance. You can use the Microsoft SQL Server Express 2012 Management Studio tool to verify the connection. On the remote database server, enable TCP/IP protocol and if you are using SQL Authentication, enable mixed mode on the remote SQL Server.
You can retarget the database for the following:
• SQL credentials to the SQL Server fails.
• Windows credentials to the SQL Server fails.
• Login credentials have expired.
• Database is moved.
Installing Dell SupportAssistDell SupportAssist integrates with OpenManage Essentials to provide proactive support capabilities for Dell enterprise server, storage, and networking solutions using the existing environment data. SupportAssist collects information from supported devices, and automatically creates support cases when issues arise. This helps Dell to provide you an enhanced, personalized, and efficient support experience.
To install SupportAssist:
27

NOTE: Before you begin, make sure that:
• The system is able to connect to the Internet.
• You have Administrator rights on the system.
• On the firewall, port 443 is open to access https://ftp.dell.com.
NOTE: If the installation of SupportAssist fails, you can retry the installation later. To retry the installation, right-click the DellSupportAssistSetup.exe file available at C:\Program Files\Dell\SysMgt\Essentials\SupportAssistSetup and select Run as administrator.
1. Extract the OpenManage Essentials installation package.
2. In the folder where you extracted the installation package, double-click the Autorun.exe file.
The Dell OpenManage Install window is displayed.
3. If OpenManage Essentials version 2.0 is not installed on the system, make sure that Dell OpenManage Essentials is selected.
4. Select Dell SupportAssist, and then click Install.
If you selected Dell OpenManage Essentials and Dell SupportAssist, installation of OpenManage Essentials is completed and then SupportAssist is installed. The system prerequisites for installing SupportAssist are verified. If the system prerequisites are met, the Welcome to Dell SupportAssist Installer window is displayed.
5. Click Next.
The License Agreement window is displayed.
6. Read the terms in the communication requirements and click I Agree.
NOTE: SupportAssist installation requires that you allow Dell to save certain Personally Identifiable Information (PII) such as your contact information, administrator credentials of the devices to be monitored, and so on. SupportAssist installation cannot proceed unless you allow Dell to save your PII.
7. Read the software license agreement, click I Agree, and then click Next.
If the system connects to the Internet through a proxy server, the Proxy Settings window is displayed. Else, the Installing SupportAssist window is displayed briefly, and then the Installation Completed window is displayed.
8. If the Proxy Settings window is displayed, provide the following:
a. In the Server Address field, type the proxy server address or name.
b. In the Port field, type the proxy port number.
NOTE: If the proxy server credentials are not provided, SupportAssist connects to the proxy server as an anonymous user.
c. If the proxy server requires authentication, select Proxy requires authentication, and then provide the following information in the corresponding fields:
• Username — The user name must contain one or more printable characters, and must not exceed 104 characters.
• Password — The password must contain one or more printable characters, and must not exceed 127 characters.
• Confirm Password — Re-enter the password. The password must match with the one provided in the Password field.
d. Click Install.
The proxy settings are validated. If the validation is unsuccessful, verify the proxy settings and try again or contact your network administrator for assistance.
e. In the Validation Successful dialog box, click OK.
28

The Installing SupportAssist window is displayed briefly, and then the Installation Completed window is displayed.
9. Click Finish.
When you start SupportAssist, the SupportAssist Setup Wizard is displayed. You must complete all steps in the SupportAssist Setup Wizard before you can use SupportAssist. For more information, see the Dell SupportAssist User’s Guide at Dell.com/ServiceabilityTools.
Installing Repository ManagerDell Repository Manager is an application that helps manage system updates easily and effectively. Using Repository Manager, you can build a custom repository based on the managed system configurations that are obtained from OpenManage Essentials.
To install Repository Manager:
1. Double-click the OpenManage Essentials executable file.
2. In Dell OpenManageInstall, select Dell Repository Manager, and then click Install.
3. In Dell Repository Manager - InstallShield Wizard, click Next.
4. In License Agreement, select I accept the terms in the license agreement, and click Next.
5. In Customer Information, do the following and click Next.
a. Provide user name and organization information.
b. Select either Anyone who uses this computer (all users) to make this application available to everyone or Only for me (Windows User) to retain access.
6. In Destination Folder, use the default location or click Change to specify another location, and then click Next.
7. In Ready to Install the Program, click Install.
8. After the installation is complete, click Finish.
Installing Dell License ManagerDell License Manager is a one-to-many license deployment and reporting tool for integrated Dell Remote Access Controller (iDRAC) and Dell chassis management controller (CMC) licenses.
To install Dell License Manger:
1. Double-click the OpenManage Essentials executable file.
2. In Dell OpenManage Install, select Dell License Manager.
3. Select a language for the installation, and click OK.
4. In the Welcome screen, click Next.
5. In License Agreement, select I accept the terms in the license agreement and click Next.
6. In Setup Type, select any of the following:
• To accept the default installation path, choose Typical installation and click Next.
• To enable specific program features and change the installation path, select Custom installation and click Next. In Custom Setup, select the License Manager features that you require; check for disk space, assign a new location for installing Dell License Manager.
7. In the Ready to Install screen, click Install.
8. After the installation is complete, click Finish.
29

Uninstalling OpenManage EssentialsNOTE: Before uninstalling OpenManage Essentials, you must uninstall Dell OpenManage Essentials MIB Import Utility and Dell SupportAssist (if installed).
To uninstall OpenManage Essentials:
1. Click Start → Control Panel → Programs and Features.
2. In Uninstall or change a program, select Dell OpenManage Essentials and click Uninstall.
3. In the message Are you sure you want to uninstall OpenManage Essentials?, click Yes.
4. In the message Uninstalling OpenManage Essentials removes the OpenManage Essentials database. Do you want to retain the database?, click Yes to retain the database or click No to remove it.
Upgrading OpenManage EssentialsYou can upgrade OpenManage Essentials versions 1.2, 1.2.1, and 1.3 to version 2.0.Before you upgrade, ensure that the minimum available free space on the hard drive is about 10 GB.To upgrade:
1. Double-click the OpenManage Essentials executable file.
The Dell OpenManage Install screen is displayed. The following options are available:
• Dell OpenManage Essentials — Select this option to install Dell OpenManage Essentials, Troubleshooting Tool, and Dell OpenManage Essentials MIB Import Utility.
• Dell Repository Manager — Select to install Dell Repository Manager. Using Repository Manager, you can create customized bundles and repositories of Dell Update Packages, software utilities such as update drivers, firmware, BIOS, and other applications.
• Dell License Manager — Select to install the Dell license manager. Dell License Manager is a one-to-many license deployment and reporting tool for managing the Dell iDRAC7 licenses.
• Dell SupportAssist — Select to install Dell SupportAssist. SupportAssist provides proactive support capabilities for supported Dell server, storage, and networking solutions.
NOTE: If SupportAssist is already installed on the system, by default, the Dell SupportAssist option is selected and grayed out. After the upgrade of OpenManage Essentials, SupportAssist is also upgraded. If applicable, you may be required to provide the proxy settings during the upgrade of SupportAssist. For more information, see the Dell SupportAssist User’s Guide at dell.com/ServiceabilityTools.
• Documentation — Click to view the online help.
• View Readme — Click to view the readme file. To view the latest readme, go to dell.com/OpenManageManuals.
2. In Dell OpenManage Install, select Dell OpenManage Essentials and click Install.
The Dell OpenManage Essentials Prerequisites window, displays the following requirement types:
• Critical — This error condition prevents the installation of a feature.
• Warning — This warning condition may disable the Typical installation but not an Upgrade of the feature later during installation.
• Information — This informational condition does not affect the Typical installation of a feature.
30

NOTE: If OpenManage Essentials version 1.1 is installed on the system on a local database using SQL Server 2008 Express edition, and an OpenManage Essentials-specific named instance SQLEXPRESSOME is not available, the SQL Server prerequisites displays a Critical icon. To proceed with the installation, you must install SQL Server Express 2012 SP1 with the SQLEXPRESSOME instance. Data from the earlier version of SQL Server is migrated automatically.
3. Click Install Essentials.
4. In the install wizard for OpenManage Essentials, click Next.
5. In the License Agreement page, read the license agreement, select I accept the terms in the license agreement, and then click Next.
6. If applicable, provide the Package Server Port and the Task Manager Service Port. If either the package server port or task manager service port is blocked during an upgrade, provide a new port. Click Next.
NOTE: For information about the supported ports and protocols, see Supported Protocols and Ports on Managed Nodes and Supported Protocols and Ports on Management Stations.
The message Please backup OMEssentials database before upgrading to the latest version of OpenManage Essentials is displayed.
7. Click Ok.
8. Click Install.
9. After the installation is complete, click Finish.
After the upgrade is complete, you must perform the following steps:
1. Run discovery and inventory for all existing discovery ranges.
2. In the Device Search portal, verify if you get the expected results for all existing device queries.
3. In the System Update portal, if the existing catalog is not the latest, make sure that you get the latest catalog.
Setting Up and Configuring VMware ESXi 5NOTE: Before setting up and configuring VMware ESXi 5, ensure that you have ESXi 5 build 474610 or later. If you do not have the required build, download the latest build from vmware.com.
To set up and configure VMware ESXi 5:
1. Download the latest version (7.4) of Dell OpenManage offline bundle for ESXi from dell.com/support.
2. If you have enabled SSH, copy the file using WinSCP or a similar application to the /tmp folder on the ESXi 5 host.
3. Using Putty, change permissions on the Dell OpenManage offline bundle for ESXi file using the command chmod u+x <Dell OpenManage version 7.4 offline bundle for ESXi file name>.zip.
NOTE: You can also change permissions using WinSCP.
4. Run the following commands using:
• Putty — esxcli software vib install –d /tmp/<Dell OpenManage version 7.4 VIB for ESXi file name>.zip
31

• VMware CLI — esxcli –server <IP Address of ESXi 5 Host> software vib install –d /tmp/<Dell OpenManage version 7.4 VIB for ESXi file name>.zip
The message VIBs Installed: Dell_bootbank_OpenManage_7.4-0000 is displayed.
5. Restart the host system.
6. After restarting, verify if OpenManage is installed by running the following commands using:
• Putty — esxcli software vib list• VMware CLI — esxcli –server <IP Address of ESXi 5 Host> software vib list
7. Configure SNMP, for hardware alerts on the ESXi 5 host, to send SNMP traps to OpenManage Essentials. SNMP is not used for discovery. WS-Man is required for discovery and inventory of an ESXi 5 host. To group the VMs with the ESXi host in the OpenManage Essentials device tree after you discover the VM, SNMP must be enabled on the ESXi host and the VM.
8. Create a discovery range and configure WS-Man.
For more information on setting up and configuring ESXi 5, see the How to setup and configure ESXi 5 for use in OME whitepaper at delltechcenter.com/ome.
Migrating IT Assistant to OpenManage Essentials
Direct migration from IT Assistant to OpenManage Essentials version 2.0 is not supported. However, you can migrate IT Assistant to an earlier version of OpenManage Essentials, and then upgrade to OpenManage Essentials version 2.0. For information about migrating IT Assistant to an earlier version of OpenManage Essentials, see the appropriate Dell OpenManage Essentials User's Guide at dell.com/OpenManageManuals.Related Links
Installing OpenManage Essentials
Installation Prerequisites and Minimum Requirements
32

3Getting Started With OpenManage Essentials
Launching OpenManage EssentialsTo launch OpenManage Essentials, do one of the following:
NOTE: Before you launch OpenManage Essentials, ensure that Javascript is enabled on your web browser.
• From the management station desktop, click the Essentials icon.
• From the management station desktop, click Start → All Programs → Dell OpenManage Applications → Essentials → Essentials.
• From a local or remote system, launch a supported browser. In the address field, type any of the following:
– https://< Fully Qualified Domain Name (FQDN) >:
– https://<IP address, host name, or Fully Qualified Domain Name (FQDN) >:<Port Number>/web/default.aspx
– https://<IP address>:<Port Number>/
NOTE: FQDN is required to show a valid certificate. The certificate shows an error if an IP address or local host is used.
The console launch port number (default port number 2607) is required to launch OpenManage Essentials from a browser on a remote system. While installing OpenManage Essentials, if you changed the port using the Custom Install option, use the selected console launch port in the preceding URL.
The First Time Setup page is displayed.
NOTE: You can log on to OpenManage Essentials as a different user at any time by using the Sign in as Different User option. For more information, see Logging On As a Different User.
Related Links
Using the OpenManage Essentials Home Portal
Configuring OpenManage Essentials
If you are logging on to OpenManage Essentials for the first time, the First Time Setup tutorial is displayed. The tutorial provides step-by-step instructions for setting up an environment of servers and devices to communicate with OpenManage Essentials. The steps include:
• Configuring the SNMP protocol on each target server.
• Installing SNMP tools (for Windows Server 2012 or later).
• Installing Dell OpenManage Server Administrator on each target server.
33

• Enabling network discovery (for Windows Server 2008-based servers) on each target server.
• Discovering devices on your network.
After you have completed the First Time Setup wizard, the Discovery Wizard Configuration window is displayed. See Discovery Wizard Configuration.
The date and time displayed in the console is in a format that is selected in the browser settings and used in the region. When a time zone change or daylight savings change occurs, the time is updated accordingly in the console. Changing time zones or daylight savings, changes the time in the console, but does not change the time in the database.Related Links
Using the OpenManage Essentials Home Portal
Discovery Wizard Configuration
The Discovery Wizard Configuration window enables you to configure the type of wizard you want to use for discovering devices. The options displayed in the Discovery Wizard Configuration window are described in the following table.
Option Description
Standard Wizard (default) If selected, the Discover Devices wizard displays a list of protocols for discovering devices.
Guided Wizard If selected, the Discover Devices wizard displays a list of device types and the required protocols for discovering and managing the selected devices. After the required protocol configurations are completed, by default, this wizard runs both discovery and inventory.
NOTE: Discovery of Dell EMC storage arrays is not supported by the Guided Wizard.
After you select the type of wizard and click Finish, the setting is saved in Preferences → Discovery Settings.
By default, the Discovery Wizard Configuration window is displayed when you:
• Launch OpenManage Essentials for the first time
• Click Add Discovery Range in the Discovery and Inventory portal for the first time.
If you want to configure the type of wizard you want to use for discovering devices at a later time, you can do so through the Discovery Settings page. For more information, see Configuring Discovery Settings.
Configuring Discovery SettingsThe Discovery Settings page enables you to configure the type of wizard you want to use for discovering devices.
34

To configure discovery settings:
1. Click Preferences → Discovery Settings.
The Discovery Settings page is displayed.
2. Select one of the following:
• Standard Wizard — If selected, the Device Discovery wizard displays a list of protocols for discovering devices.
• Guided Wizard — If selected, the Device Discovery wizard displays a list of device types and the required protocols for discovering and managing the selected devices. After the required protocol configurations are completed, by default, this wizard runs both discovery and inventory.
NOTE: Discovery of Dell EMC storage arrays is not supported by the Guided Wizard.
3. Click Apply.
Using the OpenManage Essentials Home Portal
OpenManage Essentials user interface contains the following components:
Figure 1. OpenManage Essentials Home Portal
1. Heading banner
2. Menu items and search bar
3. Console area
4. Alert pop-up notification
5. Add a report to the home portal
6. Save the current home portal layout
35

7. Load the last saved home portal layout
8. Load the default home portal layout
9. Refresh the home portal page
10. Launch the online help
Related Links
Map View (Home) Portal
Dashboard
Search Bar
OpenManage Essentials Heading Banner
The banner may display the following icons:
• Critical icon and Warning icon including the number of devices. You can click the icon or the number to view the devices in either state.
• OpenManage Essentials service not running icon (blinking down arrow) . You can click the icon to view the details and to restart the service.
• Update available notification icon indicates if a newer version of OpenManage Essentials is available. You can click the icon to open a website from where you can download the new version of OpenManage Essentials.
• Warranty scoreboard notification icon including the number of devices with x days or less of warranty. You can click the icon or number to view the Device Warranty Report that lists the device with certain days or less of warranty. The warranty scoreboard notification icon is displayed only if you have selected Enable Warranty Scoreboard Notifications in Preferences → Warranty Notification Settings.
In addition to the icons, the banner also contains links to the following:
• Dell TechCenter — Click to view the information on various technologies, best practices, knowledge sharing, and information on Dell products.
• Support — Click to open dell.com/support.
• Help — Click to open the online help.
• About — Click to view general OpenManage Essentials product information.
• User name — Displays the user name of the currently logged in user. Move the mouse pointer over the user name to display the following options:
– User Info — Click to view the OpenManage Essentials roles associated with the current user.
– Sign in as Different User — Click to log in to OpenManage Essentials as a different user.
NOTE: The Sign in as Different User option is not supported on Google Chrome.
NOTE: The banner is available in all the pages.
Related Links
Viewing the User Information
Logging On As a Different User
Using the Update Available Notification Icon
Using the Warranty Scoreboard Notification Icon
36

Customizing Portals
You can change the layout of the portal page to do the following:
• Display additional available reports.
NOTE: This option is only available in the Home portal.
• Hide graphs and reports.
• Rearrange or resize graphs and reports by dragging and dropping.
If a pop-up window on any screen is bigger than the screen and if scrolling is not possible, set the zoom value of the browser to 75% or less.
From the various reports that are available, you can select specific reports and set them to display on the Dashboard. You can click on these reports to get more details. For the list of available reports, see Home Portal Reports.
For more information on the:
• Home portal, see OpenManage Essentials Home Portal Reference.
• Device portal, see Devices Reference.
• Discovery and inventory portal, see Discovery And Inventory Reference.
• Reports portal, see Reports Reference.
.
Displaying Additional Available Reports and GraphsCharts have drill-down feature. To view additional reports and graphs, click the
icon on the top right corner. The following list of available reports and graphs is displayed:
• Alerts by Severity
• Devices by Status
• Discovered vs. Inventoried Devices
• Alerts
• Asset Acquisition Information
• Asset Maintenance Information
• Asset Support Information
• ESX Information
• FRU Information
• Hard Drive Information
• HyperV Information
• License Information
• Memory Information
• Modular Enclosure Information
37
• NIC Information• PCI Device Information• Server Components and Versions• Server Overview • Storage Controller Information• Task Status
After selecting the desired report or graph, dock the report or graph using the following control to the desired location.
Drilling Down Charts and Reports for More Information
To drill-down for further details, perform one of the following:
• In report charts, click the charts.• In report tables, use the drag and drop option or funnel options to filter the required data and right-
click the table rows to perform various tasks.
Saving and Loading the Portal LayoutTo save and load the portal layout, click the
icon.
All the current layout settings and visible reports on the portal are saved on the portal page.
To load the previous portal layout, click the
icon.
Updating the Portal DataTo refresh the portal page manually, click the
icon.
To load the default portal layout, click the
38

icon.
Hiding Graphs and Reports ComponentsTo hide graphs and reports (components), click the
icon on the report or graph and select the Hide option to remove the component from the portal page or select the Auto Hide option to move the component to the side bar.
To remove a component from the portal page, click the X icon in the report or graph.
To move the report to the side bar, click the
icon.
Rearranging or Resizing Graphs and Reports (Components)
Click the icon and select from the following options:
• Floating—To move the component freely in the portal page.
• Dockable—To dock the component in the portal page. If the component is floating, right-click the title to dock or tab the component.
• Tabbed Document—To move the component into a tab in the portal page.
Select the
control to dock a floating component. You can create a tabbed view by docking a pane within other panes or dock a pane at the top, bottom, left, or right side of the main window.
You can resize panes and all panes fill the selected area when docked.
To move the component to the side bar, click the
icon and to restore it, select the component and click the
icon.
To create filters in a report grid, click the
icon. This is not specific to the portal page layout and the settings related to these associations are not saved.
39

Filtering Data
You can filter the results by dragging and dropping column headers to the top of reports. You can choose one or more attributes when revising the view to meet your specific needs.
For example, in Devices by Status pie chart, click a status such as Critical. In the Device Summary page, drag the Device Type and Service Tag to the top of the report. The view immediately changes to a nested information based on your preference. In this example, the information is grouped first by Device Type, and second by Service Tag. Drill-down through these filtered groups to view the remaining information for the devices.
For more information, see Viewing Device Summary.
Search Bar
The search bar is displayed at the top-right of the dashboard below the heading banner. The search bar is accessible from all portal pages, except when a pop-up or wizard is displayed. As you type text in the search bar, matching or similar item are displayed in the drop-down list.
Related Links
Search Items
Search Drop-Down List
Selection Actions
Search Items
You can search for the following using the search bar:
• Devices
• Device groups
• Discovery ranges
• Discovery range groups
• Exclude ranges
• Portals
• Wizards
• Remote tasks
• Preferences and settings
When a range, task, device, and so on is changed or created in the console, it is added to the searchable items within 20 seconds.
Related Links
Search Bar
Search Drop-Down List
The search bar displays a list as you type text in the search box. The items that contain the characters that you type are populated in the search drop-down list. Each item in the drop-down list includes two icons
40

and the name of the item. The first icon indicates the item category (such as Device, Launch Wizard, and so on). The second icon indicates the state of the item (such as Normal, Critical, or Warning). Immediately after the two icons, the name of the item is displayed. Moving the mouse pointer over an item in the drop-down list, displays a tool tip. The information displayed in the tool tip varies based on the item. For example, moving the mouse pointer over a device displays the following: Name, Type, Health Status, Power Status, IP Address, Service Tag, and MAC Address. Selecting an item displayed in the tool tip performs the default action.
Related Links
Search Bar
Selection Actions
Selecting or clicking an item displayed in the search bar results in the following default actions:
Item Selected Action
Devices Displays the device details.
Device Groups Displays the device group summary.
Discovery Ranges Displays the discovery range.
Discovery Range Group Displays the discovery range group summary.
Portals Navigates to the appropriate portal.
Wizards Launches the appropriate wizard.
Exclude Range Displays the range summary.
Remote Tasks Selects a task in the task tree.
Related Links
Search Bar
Map View (Home) PortalNOTE: The Map View feature is available only if you have discovered any licensed Dell PowerEdge VRTX devices using the WS-Man protocol. If the licensed PowerEdge VRTX device is discovered using the SNMP protocol, the Map View feature is not available. In this case, you must rediscover the PowerEdge VRTX device using the WS-Man protocol.
The Map View (home) portal can be accessed by clicking the Map View link in the Home portal.
NOTE: You can also access another implementation of the map (Map View tab) that is accessible through the Devices portal.
The following are the features of the Map View (home) portal:
• The Map View (home) portal is not integrated with the device tree.
• You can select a device group to display on the map by using the Filter by drop-down box at the top of the map.
• Clicking a pin (device) on the Map View (home) portal opens the Devices portal that displays details about the device.
41

• Any change to the devices or settings on the Map View (home) portal is synchronized with the Map View tab accessible through the Devices portal.
• Zoom level and the visible portion of the Map View (home) portal are not synchronized with the Map View tab accessible through the Devices portal.
NOTE: For information about using the features available in Map View, see Using Map View.
Related Links
Using the OpenManage Essentials Home Portal
Map View (Home) Portal Interface
Viewing the User InformationTo view the user information such as the OpenManage Essentials roles associated with the current user:
1. Move the mouse pointer over the user name in the heading banner.
2. In the menu that is displayed, click User Info.
The User Information for <user name> dialog box with the user information is displayed.
Related Links
OpenManage Essentials Heading Banner
Logging On As a Different UserNOTE: The Sign in as Different User option is not displayed on Google Chrome and Mozilla Firefox browsers. To log on as a different user when using Chrome or Firefox, close and reopen the browser, provide the new user credentials when prompted, and click OK.
NOTE: When using the Sign in as Different User option in Internet Explorer, you may be prompted to provide the credentials multiple times
To log on to OpenManage Essentials as a different user:
1. Move the mouse pointer over the user name in the heading banner.
2. In the menu that is displayed, click Sign in as Different User.
The Windows Security dialog box is displayed, prompting for the user name and password.
3. Type the User name and Password and click OK.
Related Links
Using the OpenManage Essentials Home Portal
OpenManage Essentials Heading Banner
Using the Update Available Notification IconNOTE: The update available notification icon may be displayed in the OpenManage Essentials heading banner only after you refresh the web browser.
The update available notification icon is displayed in the OpenManage Essentials heading banner when a new version of OpenManage Essentials is available. Move the mouse pointer over the icon to
display a tool tip that provides information about the newer version available. Click the icon to open
42

the Dell TechCenter OpenManage Essentials web page from where you can download a newer version of OpenManage Essentials.Related Links
OpenManage Essentials Heading Banner
Using the Warranty Scoreboard Notification Icon
The warranty scoreboard notification icon is displayed in the OpenManage Essentials heading banner based on the criteria you have configured in Preferences → Warranty Notification Settings. The warranty scoreboard notification also displays the number of devices that meet the criteria you have configured.
Click the icon to display the Device Warranty Report that provides the warranty information of devices based on your Warranty Scoreboard Notifications settings.Related Links
OpenManage Essentials Heading Banner
Configuring Warranty Scoreboard Notifications
Device Warranty Report
43

4OpenManage Essentials Home Portal — ReferenceRelated Links
OpenManage Essentials Heading Banner
Dashboard
Schedule View
Search Bar
Map View (Home) Portal Interface
Dashboard
The dashboard page provides a snapshot of the managed devices that include servers, storage, switches, and so on. You can filter the view based on the devices by clicking the Filter by: drop-down list. You can also add a new group of devices from the dashboard by clicking Add New Group from the Filter by: drop-down list.
Related Links
Search Bar
Discovered Versus Inventoried Devices
Task Status
Home Portal Reports
Device by Status
Alerts by Severity
Home Portal Reports
From the Home Portal Dashboard page, you can monitor the following:
• Alerts by Severity
• Devices by Status
• Discovered vs. Inventoried Devices
• Alerts
• Asset Acquisition Information
• Asset Maintenance Information
• Asset Support Information
• ESX Information
• FRU Information
• Hard Drive Information
• HyperV Information
• License Information
44

• Memory Information• Modular Enclosure Information• NIC Information• PCI Device Information• Server Components and Versions• Server Overview • Storage Controller Information• Task Status
Device by Status
Device by Status provides device status information in a pie chart format. Click a segment of the pie chart to view the device summary.
Field Description
Unknown Health status of these devices are not known.
Normal Devices are working as expected.
Warning These devices display behaviors that are not normal and further investigation is required.
Critical These devices display behaviors that suggest an occurrence of a failure of a very important aspect.
Alerts by Severity
Alerts by severity provides alert information of devices in a pie chart format. Click a segment of the pie chart to view the devices.
Field Description
Unknown Health status of these devices are not known.
Normal Alerts from these devices conform to the expected behavior for the devices.
Warning These devices display behaviors that are not normal and further investigation is required.
Critical Alerts from these devices suggest that a failure of a very important aspect has occurred.
Discovered Versus Inventoried Devices
The graph displays the number of devices and Dell servers discovered or inventoried. You can use this report to ascertain the discovered devices and Dell servers that are unclassified. For more information on the filter options for the summary information, see Viewing Device Summary.
Click any section of the graph to view the Device Summary for the selected region. In the device summary, double-click a row to view the details (inventory view for that device). Alternatively, right-click
45

and select details for the inventory view or right-click and select alerts for the alerts specific to that device.
Field Description
Filter by Select to filter the search results using the following options:
• All
• Ranges — Select to filter based on the selected range.
Related Links
Configuring a Discovery and Inventory Task
Viewing Configured Discovery and Inventory Ranges
Excluding Ranges
Scheduling Discovery
Scheduling Inventory
Configuring Status Polling Frequency
Discovery and Inventory Portal
Task Status
The grid provides a list of currently executing and previously run tasks and their status. The Task Status grid on this page shows the status of just discovery, inventory, and tasks. However, the main portal shows all types of task statuses.
Related Links
Configuring a Discovery and Inventory Task
Viewing Configured Discovery and Inventory Ranges
Excluding Ranges
Scheduling Discovery
Scheduling Inventory
Configuring Status Polling Frequency
Discovery and Inventory Portal
Schedule View
From Schedule View you can:
• View tasks that are scheduled to occur and tasks that are completed.
• Filter the view based on the type of task (such as database maintenance tasks, server power options, and so on), active tasks, and task execution history.
NOTE: The options displayed in the Filter by drop-down list vary depending on the tasks that are created. For example, if a Server Options Task is not created, then the option is not displayed in the Filter by drop-down list.
• View tasks for a particular day, week, or month. You can also view the tasks for a particular day by clicking the calendar icon.
• Drag and drop tasks to a time slot in the calendar.
• Set the zoom value by changing the zoom slider.
46

NOTE: The zoom slider is disabled for the Month view.
• Export the schedules to a .ics file and import the file into Microsoft Outlook.
• Change the schedule view settings by clicking the settings icon .
For more information, see Schedule View Settings.Related Links
Schedule View Settings
Schedule View Settings
Field Description
Orientation Allows you change the orientation of the Schedule View page and the displayed tasks. You can select either the Vertical or Horizontal orientation.
NOTE: Changing the Orientation setting does not affect the Month view.
Schedule Item Size Allows you to modify the size of the tasks displayed.
Color Categorize by Task Type Selecting this option categorizes each task type using a different color.
Show Task Execution History Select this option to display the tasks that are already complete.
Show Database Maintenance Select this option to view the time at which database maintenance occurs.
Device Warranty Report
The Device Warranty Report is displayed when you click the warranty scoreboard notification icon on the OpenManage Essentials heading banner. The following are the fields displayed in the Device Warranty Report.
Field Description
All Devices with x days or less of warranty Determines which devices to include in the Device Warranty Report. Devices with warranty less than or equal to the specified days are included in the warranty report.
Include Devices with Expired Warranties Specifies if devices with expired warranty (0 days) or no warranty information should be included in the warranty email notification.
Preview Displays the warranty report based on the criteria set in All Devices with x days or less of warranty.
OK Closes and saves any changes made to the Device Warranty Report.
47

Field Description
View and Renew Warranty Displays a link you can click to open the Dell website from where you can view and renew the device warranty.
System Name Displays the system name that is unique and identifies the system on the network.
Device Model Type Displays the model information of the system.
Device Type Displays the type of device. For example, server or Remote Access Controller.
Days Remaining Displays the number of days the warranty is available for the device.
Shipped Date Displays the date on which the device was shipped from the factory.
Service Tag Displays the Dell specific unique bar code label identifier for the system.
Service Level Code Displays the service level code such as parts only warranty (POW), next business day onsite (NBD), and so on for a particular system.
Service Provider Displays the name of the organization that will provide the warranty service support for the device.
Start Date Displays the date from which the warranty is available.
End Date Displays the date on which the warranty will expire.
Warranty Description Displays the warranty details applicable for the device.
Related Links
Using the Warranty Scoreboard Notification Icon
Configuring Warranty Scoreboard Notifications
Map View (Home) Portal Interface
The Map View (home) portal accessible through the Home portal has a Filter by drop-down list which you can use to filter the device group displayed on the map. The menus and options available in the Map View (home) portal are the same as those found in the Map View tab in the Devices portal. For information about the menus and options in the Map View, see Map View (Devices) Tab Interface.Related Links
Map View (Home) Portal
48

5Discovering and Inventorying DevicesPerform Discovery and Inventory to manage your network devices.
Related Links
Configuring a Discovery and Inventory Task
Viewing Configured Discovery and Inventory Ranges
Scheduling Discovery
Scheduling Inventory
Excluding Ranges
Supported Devices, Protocols, and Features Matrix
Supported Devices, Protocols, and Features Matrix
NOTE: For a description of the features listed in the following table, see Legend and Definitions.
Protocol / Mechanism Simple Network Management Protocol (SNMP)
Windows Management Instrumentation (WMI)
Web Services-Management (WS-Man)
Dell servers with OpenManage Server Administrator installed
Windows / Hyper‑V
Discovery
Correlation
Classification
Hardware inventory
Software inventory monitoring
Traps/alerts
Application launch
• OpenManage Server Administrator console
• Remote desktop
Discovery
Correlation
Classification
Hardware inventory
Software inventory monitoring
Application launch
• OpenManage Server Administrator console
• Remote desktop
Not supported
Linux/ VMware ESX
Discovery
Correlation
Classification
Hardware inventory
Not supported Not supported
49

Protocol / Mechanism Simple Network Management Protocol (SNMP)
Windows Management Instrumentation (WMI)
Web Services-Management (WS-Man)
Software inventory
Monitoring
Traps/alerts
VMware ESXi Traps/alerts Not supported Discovery
Correlation
Classification
Hardware inventory
Software inventory
Virtual machine information
Virtual host product information
Monitoring (OpenManage Server Administrator health only)
Application launch
Dell servers without OpenManage Server Administrator installed
Windows/Hyper‑V
Not supported Discovery
Correlation
Classification
Hardware inventory
Application launch
• Remote desktop
Not supported
Linux/VMware ESX
Not supported Not supported Not supported
VMware ESXi Not supported Not supported Discovery
Correlation
Classification
Hardware inventory (no storage inventory)
50

Protocol / Mechanism Simple Network Management Protocol (SNMP)
Windows Management Instrumentation (WMI)
Web Services-Management (WS-Man)
iDRAC / DRAC / BMC Discovery
Correlation
Classification
Monitoring Traps/Platform Event Traps (PET)
Application launch
• RAC
• Console
Not supported Discovery
Hardware inventory
System update
NOTE: Applicable only to iDRAC6 version 1.3 and later. Discovery and hardware inventory are not supported for iDRAC6 version 1.25 and earlier.
Modular enclosure (PowerEdge M1000e)
Discovery
Correlation
Classification
Enclosure health
Traps
Application launch
• CMC
• Console
Not supported Discovery
Correlation
Classification
Enclosure health
Traps
Application launch
• CMC
• Console
NOTE: Applicable only to PowerEdge M1000e with CMC firmware version 5.0.
Dell PowerEdge VRTX Discovery
Correlation
Classification
Enclosure health
Traps
Application launch
• CMC
Not supported Discovery
Correlation
Classification
Hardware inventory
System Update
Enclosure health
Traps
51
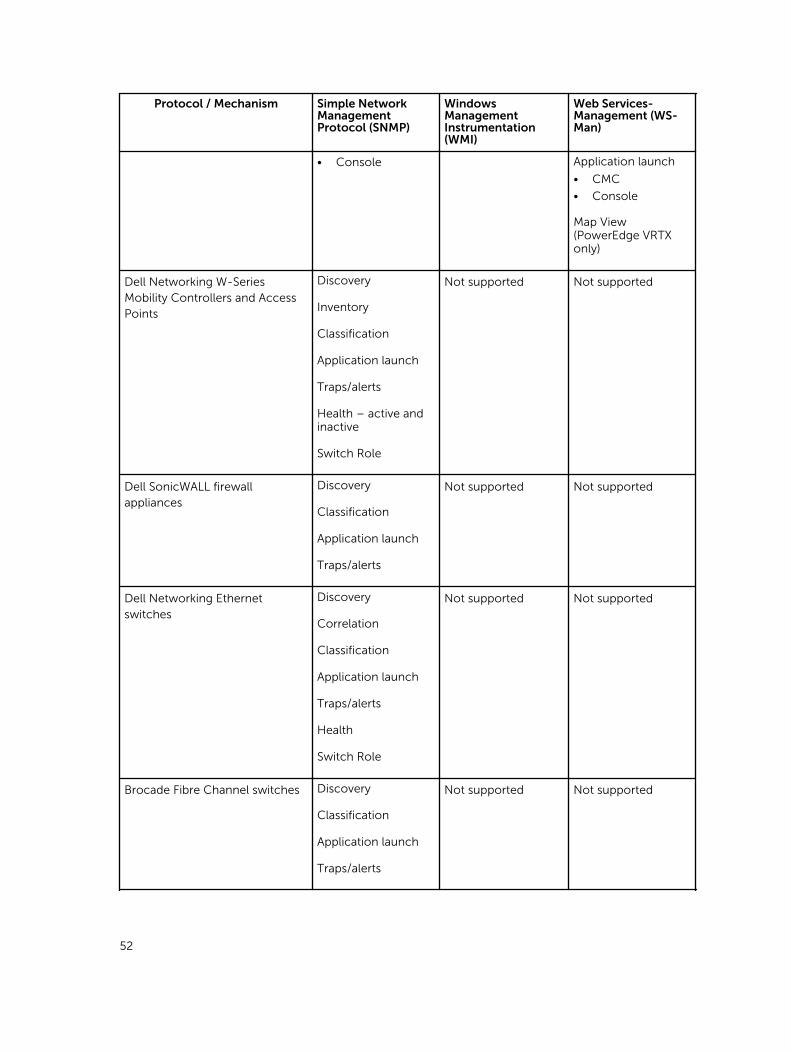
Protocol / Mechanism Simple Network Management Protocol (SNMP)
Windows Management Instrumentation (WMI)
Web Services-Management (WS-Man)
• Console Application launch
• CMC
• Console
Map View (PowerEdge VRTX only)
Dell Networking W-Series Mobility Controllers and Access Points
Discovery
Inventory
Classification
Application launch
Traps/alerts
Health – active and inactive
Switch Role
Not supported Not supported
Dell SonicWALL firewall appliances
Discovery
Classification
Application launch
Traps/alerts
Not supported Not supported
Dell Networking Ethernet switches
Discovery
Correlation
Classification
Application launch
Traps/alerts
Health
Switch Role
Not supported Not supported
Brocade Fibre Channel switches Discovery
Classification
Application launch
Traps/alerts
Not supported Not supported
52

Protocol / Mechanism Simple Network Management Protocol (SNMP)
Windows Management Instrumentation (WMI)
Web Services-Management (WS-Man)
Health
Switch role
Supported Operating Systems (Servers), Protocols, and Features Matrix
NOTE: For a description of the features listed in the following table, see Legend and Definitions.
Protocol / Mechanism Intelligent Platform Management Interface (IPMI)
Command Line Interface (CLI)a
Secure Shell (SSH)
Dell servers with OpenManage Server Administrator installed
Windows /Hyper-V Not supported OpenManage Server Administrator CLI
Deploy OpenManage Server Administrator
Server Updates
• BIOS
• Firmware
• Driver
Not supported
Linux/ VMware ESX Not supported OpenManage Server Administrator CLI
Deploy OpenManage Server Administrator
Server Updates
• BIOS
• Firmware
• Driver
Discovery
Correlation
Classification
Hardware and Software Inventory (minimal)
VMware ESXi Not supported Not supported Discovery
Correlation
Classification
53

Protocol / Mechanism Intelligent Platform Management Interface (IPMI)
Command Line Interface (CLI)a
Secure Shell (SSH)
Hardware and Software Inventory (minimal)
XenServer Not supported RACADM CLI
IPMI CLI
OpenManage Server Administrator CLI
Power Task
Not supported
Dell servers without OpenManage Server Administrator installed
Windows/Hyper-V Not supported Deploy OpenManage Server Administrator
Not supported
Linux/VMware ESX Not supported Deploy OpenManage Server Administrator
Discovery
Correlation
Classification
Hardware and Software Inventory (minimal)
VMware ESXi Not supported Not supported Discovery
Correlation
Classification
Hardware and Software Inventory (minimal)
PowerEdge C Discovery
Classification
Application launch
RACADM CLI
IPMI CLI
Not supported
iDRAC / DRAC / BMC Discovery
Classification
Correlation
iDRAC health
RACADM CLI
IPMI CLI
Not supported
54

Protocol / Mechanism Intelligent Platform Management Interface (IPMI)
Command Line Interface (CLI)a
Secure Shell (SSH)
Application launch
RAC console
Modular Enclosure (M1000e) / PowerEdge VRTX / PowerEdge FX
Not supported RACADM CLI
IPMI CLI
Not supported
Dell Networking W-Series Mobility Controllers and Access Points
Not supported Not supported Not supported
Dell SonicWALL firewall appliances Not supported Not supported Not supported
Dell Networking Ethernet switches Not supported Not supported Not supported
Brocade Fibre Channel switches Not supported Not supported Not supported
a)You cannot perform this task if the device is not discovered, inventoried, or both.
Supported Storage Devices, Protocols, and Features Matrix
NOTE: For a description of the features listed in the following table, see Legend and Definitions.
Protocol / Mechanism Simple Network Management Protocol (SNMP)
Symbol EMC NaviSphere CLI
Storage Devices
Dell EqualLogic Discovery
Correlation
Classification
Hardware inventory
Monitoring
Traps/alerts
Application launch — EqualLogic console
Not supported Not supported
55

Protocol / Mechanism Simple Network Management Protocol (SNMP)
Symbol EMC NaviSphere CLI
NOTE: It is recommended that you discover EqualLogic storage arrays using the Group Management IP or Storage Group IP only, and not include any of the member IPs in the discovery range configuration.
Dell|EMC
NOTE: Both SNMP and Navisphere are required for complete management of Dell|EMC devices.
Discovery
Correlation
Classification
Traps/Alerts
Not supported Hardware inventory
Monitoring
Application launch — EMC Navisphere Manager
PowerVault Traps/Alerts Discovery
Correlation
Classification
Hardware inventory
Monitoring
Application launch—Modular Disk Storage Manager (a)
Not supported
Compellent Discovery
Classification
Hardware inventory
Monitoring
Not supported Not supported
56

Protocol / Mechanism Simple Network Management Protocol (SNMP)
Symbol EMC NaviSphere CLI
Traps/alerts
Application launch — Compellent console
Tape Discovery
Correlation
Classification
Hardware inventory
Monitoring
Traps/alerts
Application launch
Tape console
Not supported Not supported
a) Requires Modular Disk Storage Manager Controller software installed on the OpenManage Essentials system.
Legend and Definitions• Discovery: Capability to discover the devices on the network.
• Correlation: Capability to correlate:
– Discovered server and DRAC, iDRAC, or BMC devices.
– Discovered modular systems or switches.
– ESX, ESXi, or Hyper-V host and guest virtual machines.
• Classification: Capability to classify the devices by type. For example, servers, network switches, storage, and so on.
• Hardware Inventory: Capability to obtain detailed hardware inventory of the device.
• Monitoring or Health: Capability to obtain health status and connection status of the device.
• Traps, alerts, or PETs: Capability to receive SNMP traps from the device.
• Application Launch: Provides a right-click action menu item on the discovered device to launch 1x1 console or application.
• OpenManage Server Administrator CLI: Capability to run OpenManage Server Administrator supported commands on the remote (discovered) servers.
• Deploy OpenManage Server Administrator: Capability to deploy OpenManage Server Administrator to the remote (discovered) servers.
• Server Updates: Capability to deploy BIOS, firmware, and driver updates to the remote (discovered) servers.
• RACADM CLI: Capability to run RACADM tool supported commands on the remote (discovered) devices.
• IPMI CLI: Capability to run IPMITool supported commands on the remote (discovered) devices.
57

• Switch Role: Indicates the type of the unit, such as management or stack.
Using the Discovery and Inventory PortalTo access the discovery and inventory portal, click Manage → Discovery and Inventory.
Figure 2. Discovery and Inventory Portal
1. Details from the last discovery and inventory task run.
2. Details of previously discovered and inventoried devices.
3. Details of tasks and their status.
Protocol Support Matrix for Discovery
The following table provides information about the supported protocols for discovering devices. The recommended protocol is indicated by the text in italics.
Device/Operating
System
Protocols
Simple Network Management Protocol (SNMP)
Web Services-Management (WS-Man)
Windows Management Instrumentation (WMI)
Intelligent Platform Management Interface (IPMI)
Secure Shell (SSH)
iDRAC6, iDRAC7, or iDRAC8
Supported Supported N/A Supported Not supported
Linux Supported with OpenManage Server Administrator
N/A N/A N/A Supported
58

Device/Operating
System
Protocols
Simple Network Management Protocol (SNMP)
Web Services-Management (WS-Man)
Windows Management Instrumentation (WMI)
Intelligent Platform Management Interface (IPMI)
Secure Shell (SSH)
(OMSA) installed
Windows Supported with OMSA installed
N/A Supported with OMSA installed; no health information without OMSA
N/A N/A
ESXi Supported with OMSA installed
Supported with or without OMSA installed
N/A N/A Not supported
Citrix XenServer Supported with OMSA installed
N/A N/A N/A Supported with OMSA installed; no health information without OMSA
PowerEdge M1000e (CMC)
Supported Supported with CMC firmware version 5.0 or later installed.
N/A N/A Not supported
PowerEdge VRTX (CMC)
Supported Supported N/A N/A Not supported
PowerEdge-C N/A N/A N/A Supported Not supported
Clients Supported with Dell Command | Monitor installed; no health information without Dell Command | Monitor
N/A Supported with Dell Command | Monitor installed; no health information without Dell Command | Monitor
N/A N/A
Storage devices Supported N/A N/A N/A N/A
Ethernet switches
Supported N/A N/A N/A N/A
59

Protocol Support Matrix for System Update
The following table provides information about the supported protocols for system update tasks. The recommended protocol is indicated by the text in italics.
Device/Operating
System
Protocols
Simple Network Management Protocol (SNMP)
Web Services-Management (WS-Man)
Windows Management Instrumentation (WMI)
Intelligent Platform Management Interface (IPMI)
Secure Shell (SSH)
iDRAC6, iDRAC7, or iDRAC8
Not supported Supported N/A N/A N/A
Linux Supported with OpenManage Server Administrator (OMSA) installed
N/A N/A N/A Not supported
Windows Supported with OMSA installed
N/A Supported with OMSA installed
N/A N/A
ESXi Not supported Supported with iDRAC6, iDRAC7, or iDRAC8
N/A N/A N/A
Citrix XenServer Not supported N/A N/A N/A N/A
PowerEdge M1000e (CMC)
Supported; requires the RACADM tool
Supported with CMC firmware version 5.0 or later installed.
N/A N/A N/A
PowerEdge VRTX (CMC)
Not supported Supported; requires the RACADM tool
N/A N/A N/A
Devices Not Reporting Service Tag
The Service Tag is not displayed in the OpenManage Essentials console for the following devices:
• KVM
• Dell PowerVault 132T
• PowerVault 136T
• PowerVault ML6000
60

• PowerVault TL2000
• Dell Networking W-Series Mobility Controllers
• Dell SonicWALL Firewall appliances (global health status is also not available)
• Printers
• PDU
• UPS
NOTE: Due to the lack of Service Tag information, the warranty information of these devices is not available.
Configuring a Discovery and Inventory Task
1. From OpenManage Essentials, click Manage → Discovery and Inventory → Common Tasks → Add Discovery Range.
The Discover Devices wizard is displayed. The type of wizard displayed is based on the configuration
in Preferences → Discovery Settings. See Configuring Discovery Settings.
2. In Discovery Range Configuration:
a. If you want to create a range group, select Save as Group, and provide the Group Name.
b. Provide the IP address/range or the host name and subnet mask. Click Add.
NOTE: You can add multiple IP addresses, ranges, or host names. You can add multiple host names separated by a comma delimiter. For example, hostname1, hostname2, hostname3, and so on.
c. To import host names and IP addresses, click Import. You can also import host names and IP addresses included as line items in .CSV file. Using Microsoft Excel, you can create a .CSV file containing host names or IP addresses.
d. Click Next.
3. If you have selected the Standard Wizard in Discovery Settings — After you have provided at least one IP address, IP range, host name, or a combination thereof, continue to customize the discovery and inventory options or complete the configuration using the default options. Clicking Finish without setting any further configurations immediately runs the discovery and inventory tasks using the default SNMP and ICMP protocols. It is recommended that you review and revise your protocol configurations prior to clicking Finish.
For more information about each listed protocol, click the help icon in the appropriate protocol configuration screen.
NOTE: When discovering ESXi-based servers, to view the guest virtual machines grouped with the host, enable and configure the WS-Man protocol.
NOTE: By default, SNMP is enabled and values are assigned ICMP parameters.
NOTE: After completing any of the following steps, click either Next to continue or click Finish to complete the Discovery Range Configuration.
• In ICMP Configuration, to detect devices on the network, edit the ICMP parameters.
• In SNMP Configuration, to discover servers, provide the SNMP parameters. Ensure that the SNMP community string specified in Get Community matches the SNMP community string of the device or devices you want to discover.
61

NOTE: iDRAC only supports only the default SNMP port 161. If the default SNMP port is changed, iDRAC may not get discovered.
• In WMI Configuration, to authenticate and connect to remote devices, provide the WMI parameters. The format for entering credentials for WMI must be domain\user name for domain-based networks or localhost\user name for non-domain based networks.
• In Storage Configuration, to discover PowerVault modular disk array or EMC devices, edit parameters.
• In WS-Man Configuration, to enable discovery of Dell PowerEdge VRTX, iDRAC 6, iDRAC 7, and ESXi installed servers, provide WS-Man parameters.
• In SSH Configuration, to enable discovery of Linux-based servers, provide the SSH parameters.
• In IPMI Configuration, to enable server discovery, provide the IPMI parameters. IPMI is typically used to discover BMC or iDRACs on Dell servers. You can include the optional KG key when discovering RAC devices.
• In Discovery Range Action, choose to discover, inventory, or perform both tasks. The default option is to perform both discovery and inventory.
• Select Perform only discovery or Perform both discovery and inventory to run the task immediately.
• To schedule the task to run at a later time, select Do not perform discovery or inventory, and follow the instructions in Scheduling Discovery and Scheduling Inventory.
4. If you have selected the Guided Wizard option in Discovery Settings — After you have provided at least one IP address, IP range, host name, or a combination thereof, click Next. The Device Type Filtering window is displayed. See Device Type Filtering.
a. Select the device types that you want to discover and manage.
The required protocols for discovering the selected devices are added to the Discover Devices wizard.
b. Provide the configuration details for all the protocols listed in the wizard and click Next.
5. Review your selections in the Summary screen and click Finish. To change any of the parameters in previous configuration screens, click Back. When complete, click Finish.
Related Links
Discovery and Inventory Portal
Last Discovery and Inventory
Discovered Versus Inventoried Devices
Task Status
Changing the Default SNMP Port
SNMP uses the default UDP port 161 for general SNMP messages and UDP port 162 for SNMP trap messages. If these ports are being used by another protocol or service, you can change the settings by modifying the local services file on the system.
To configure the managed node and OpenManage Essentials to use a non-default SNMP port:
1. In both the management station and managed node, go to C:\Windows\System32\drivers\etc.
2. Open the Windows SNMP services file using Notepad and edit the following:
• Incoming SNMP trap port (receiving alerts in OpenManage Essentials) — Modify the port number in the line, snmptrap 162/udp snmp-trap #SNMP trap. Restart the SNMP trap service and SNMP service after making the change. On the management station, restart the DSM Essentials Network Monitor service.
• Outgoing SNMP requests (Discovery/inventory in OpenManage Essentials) — Modify the port number in the line snmp 161/udp #SNMP. Restart the SNMP service after making the change. On the management station, restart the DSM Essentials Network Monitor service.
62
3. Outgoing trap port — In OpenManage Essentials trap forwarding alert action, specify the <<trap destination address: port number>> in the Destination field.
NOTE: If you have previously configured IP security to encrypt SNMP messages on the default ports, update the IP security policy with the new port settings.
Discovering and Inventorying Dell Devices Using WS-Man Protocol With a Root Certificate
Before you begin, ensure that the root CA server, OpenManage Essentials management server, and WS-Man target(s) are able to ping each other by hostname.To discover and inventory Dell devices using the WS-Man protocol with a root certificate:
1. Open the web console of the target device (iDRAC or CMC).
2. Generate a new certificate signing request file:
a. Click Network and then click SSL.
The SSL Main Menu page is displayed.
b. Select Generate a New Certificate Signing Request (CSR) and click Next.
The Generate Certificate Signing Request (CSR) page is displayed.
c. If applicable, type the appropriate information in the required fields. Ensure that the Common Name is the same as the host name used to access the web console of the device, and then click Generate.
d. When prompted, save the request.csr file.
3. Open the Microsoft Active Directory Certificate Services – root CA web server: http://signingserver/certsrv.
4. Under Select a task, click Request a certificate.
The Request a Certificate page is displayed.
5. Click advanced certificate request.
The Advanced Certificate Request page is displayed.
6. Click Submit a certificate request by using a base-64-encoded CMC or PKCS #10 file, or submit a renewal request by using a base-64-encoded PKCS #7 file.
7. Using a text editor, open the certificate signing request (.csr or .txt) file you saved in step 2 d.
8. Copy the contents from the certificate signing request file and paste it in the Saved Request field.
9. In the Certificate Template list, select Web Server, and click Submit >.
The Certificate Issued page is displayed.
10. Click Base 64 encoded, and then click Download certificate.
11. When prompted, save the certnew.cer file.
12. Open the web console of the target device (iDRAC or CMC).
13. Click Network and then click SSL.
The SSL Main Menu page is displayed.
14. Select Upload Server Certificate Based on Generated CSR and click Next.
The Certificate Upload page is displayed.
15. Click Browse, select the certnew.cer file you saved in step 11, and then click Apply.
16. Install the RootCA signed certificate (newcert.cer) as Trusted Root Certificate Authorities in the OpenManage Essentials management server:
NOTE: Ensure that the certificate file you want to install is a Base64 encoded certificate file issued by root CA.
63

a. Right-click the certnew.cer file, and click Install Certificate.
The Certificate Import Wizard is displayed.
b. Click Next.c. Select Place all certificates in the following store and click Browse.
The Select Certificate Store dialog box is displayed.
d. Select Trusted Root Certification Authorities, and click OK.
e. Click Next.f. Click Finish.
The Security Warning dialog box is displayed.
g. Click Yes.
17. Close the web browser and open the web console of the target device (iDRAC or CMC) in a new browser window.
18. Discover and inventory the WS-Man target(s), in OpenManage Essentials using the newcert.cer RootCA signed certificate file.
Excluding RangesConfigure exclude ranges to prevent servers from being discovered/rediscovered or limit the number of devices displayed in the device tree.
To exclude a range from discovery task:
1. From OpenManage Essentials, select Manage → Discovery and Inventory → Common Tasks → Add Exclude Range.
2. In Exclude Range Configuration, provide IP address/range, discovery range name or host name and click Add.
3. Click Finish.
Related Links
Discovery and Inventory Portal
Last Discovery and Inventory
Discovered Versus Inventoried Devices
Task Status
Viewing Configured Discovery and Inventory RangesFrom OpenManage Essentials, click Manage → Discovery and Inventory → Discovery Ranges → All Ranges.Related Links
Discovery and Inventory Portal
Last Discovery and Inventory
Discovered Versus Inventoried Devices
Task Status
Scheduling DiscoveryNOTE: It is recommended not to schedule the discovery task at the same time as the Database Maintenance Execution Schedule, as the console is less responsive during database maintenance.
64

To schedule discovery:
1. Click Manage → Discovery and Inventory → Common Tasks → Discovery Schedule.
2. In Discovery Schedule Settings:
• Select the desired schedule parameters.
• (Optional) You may adjust the task speed slider for faster task execution; however, more system resources are consumed if the speed is increased.
• Discover all instrumented devices.
Related Links
Discovery and Inventory Portal
Last Discovery and Inventory
Discovered Versus Inventoried Devices
Task Status
Discovery Speed Slider
This control, also known as the discovery throttle, controls how fast discovery occurs and how much network and system resources are consumed for discovery by controlling the:
• Number of discovery threads that are allowed to run at any point of time.
• Delay in between the communicating devices during a network ping sweep, in milliseconds.
NOTE: Each tick on the throttle control equals 10% and the range is from 10% to 100%. By default, in OpenManage Essentials, the discovery throttle is set at 60%. After an upgrade from IT Assistant, the throttle control remains at its previously set value.
Multithreading
Dell OpenManage Essentials improves upon the optimized parallel threading implementation in the Network Monitoring Service introduced in IT Assistant.
As the discovery process is I/O intensive, you can optimize the process by making it a parallel operation, where threads running in parallel (known as multi-threading) send requests and handle responses to several devices simultaneously.
The more threads that run in parallel, each communicating to a different device, the faster is the discovery; barring overall high network congestion or latency. The discovery process, by default, allows a maximum of 32 threads to run in parallel (or concurrently) at any one time for discovery.
To control the number of parallel threads executing, move the discovery throttle control either left or right. When set at the maximum, 32 parallel threads are allowed to run. If the throttle is at 50%, only 16 threads are allowed to run at any one time.
As the discovery service is optimized for parallel threading operations, the system can utilize more system resources even at the same throttle setting. It is recommended that you monitor the system resources so that a satisfactory trade-off is made between discovery speed versus system resources available for OpenManage Essentials. Lowering or increasing the throttle depends on the system it is running on and the available resources. Note that the discovery service may take up to several minutes to adjust to a new throttle setting.
65

NOTE: For minimal discovery times on medium to large size networks (several hundred to several thousand devices), it is recommended that you install OpenManage Essentials services on a multi-processor system.
Scheduling InventoryNOTE: It is recommended not to schedule the inventory task at the same time as the Database Maintenance Execution Schedule, as the console is less responsive during database maintenance.
To schedule inventory:
1. Click Manage → Discovery and Inventory → Common Tasks → Inventory Schedule.
2. In Inventory Polling Configuration Settings, perform the following:
• Select Enable Inventory.
• Select the desired schedule parameters.
• (Optional) You may adjust the Inventory Polling Speed slider for faster task execution; however, more system resources are consumed.
Related Links
Discovery and Inventory Portal
Last Discovery and Inventory
Discovered Versus Inventoried Devices
Task Status
Configuring Status Polling FrequencyNOTE: It is recommended not to schedule status polling at the same time as the Database Maintenance Execution Schedule, as the console is less responsive during database maintenance.
You can configure OpenManage Essentials to check the health status of all discovered devices that have a means of health instrumentation such as OpenManage Server Administrator. The status can be scheduled at a given interval using Status Polling so that health status is always current.
To configure status polling:
1. Click Manage → Discovery and Inventory → Common Tasks → Status Schedule.
2. In Status Polling Schedule Settings, select Enable Status Polling and provide the polling parameters including time and performance.
3. Click OK.
Related Links
Discovery and Inventory Portal
Last Discovery and Inventory
Discovered Versus Inventoried Devices
Task Status
66

6Discovery And Inventory — ReferenceFrom the Discovery and Inventory portal page, you can:
• View graphical reports on devices and Dell servers discovered and inventoried.
• Manage discovery ranges for devices and Dell servers.
• Configure discovery, inventory, and status polling for devices and Dell servers.
Discovery and Inventory Portal Page Options• Discovery Portal
• Common Tasks
– Add Discovery Range
– Add Exclude Range
– Discovery Schedule
– Inventory Schedule
– Status Schedule
• Discovery Ranges
• Exclude Ranges
Discovery and Inventory Portal
The Discovery and Inventory Portal provides information about the:
• Last discovery and inventory details
• Discovered versus inventoried devices
• Task status
Related Links
Configuring a Discovery and Inventory Task
Viewing Configured Discovery and Inventory Ranges
Excluding Ranges
Scheduling Discovery
Scheduling Inventory
Configuring Status Polling Frequency
Last Discovery and Inventory
Discovered Versus Inventoried Devices
Task Status
67

Last Discovery and Inventory
Field Description
Last Discovery Details
Discovery Last Run at Displays the time and date information for the last run discovery.
Discovery Range Displays the IP Address range or host name.
Devices Discovered Displays information on number of devices discovered.
Last Inventory Details
Inventory Last Run at Displays the time and date information for the last run inventory.
Inventory Range Displays the IP Address range or host name.
Devices Inventoried Displays information on number of devices inventoried.
Related Links
Configuring a Discovery and Inventory Task
Viewing Configured Discovery and Inventory Ranges
Excluding Ranges
Scheduling Discovery
Scheduling Inventory
Configuring Status Polling Frequency
Discovery and Inventory Portal
Discovered Versus Inventoried Devices
The graph displays the number of devices and Dell servers discovered or inventoried. You can use this report to ascertain the discovered devices and Dell servers that are unclassified. For more information on the filter options for the summary information, see Viewing Device Summary.
Click any section of the graph to view the Device Summary for the selected region. In the device summary, double-click a row to view the details (inventory view for that device). Alternatively, right-click and select details for the inventory view or right-click and select alerts for the alerts specific to that device.
Field Description
Filter by Select to filter the search results using the following options:
• All
68

Field Description
• Ranges — Select to filter based on the selected range.
Related Links
Configuring a Discovery and Inventory Task
Viewing Configured Discovery and Inventory Ranges
Excluding Ranges
Scheduling Discovery
Scheduling Inventory
Configuring Status Polling Frequency
Discovery and Inventory Portal
Task Status
The grid provides a list of currently executing and previously run tasks and their status. The Task Status grid on this page shows the status of just discovery, inventory, and tasks. However, the main portal shows all types of task statuses.
Related Links
Configuring a Discovery and Inventory Task
Viewing Configured Discovery and Inventory Ranges
Excluding Ranges
Scheduling Discovery
Scheduling Inventory
Configuring Status Polling Frequency
Discovery and Inventory Portal
Viewing Device Summary
1. In OpenManage Essentials, click Manage → Discovery and Inventory → Discovery Portal → Discovery Portal.
2. In Discovered vs. Inventoried Devices graphical report, click the bar representing the discovered or inventoried device to open the Device Summary page that displays the selected graph details.
3. (Optional) Click the funnel icon to filter the summary information.
The filter options are displayed. See Viewing Device Summary Filter Options.
4. (Optional) Click Filter to view the filtered summary information.
5. (Optional) Click Clear Filter to remove the filtered summary information.
6. Right-click a device summary and select from the available options. See Device Status.
69

Viewing Device Summary Filter Options
Field Description
Select All Select to filter per line item.
Select options, devices, or Dell servers. Select to filter based on options, devices, or Dell servers.
Filter options Create filter with these options:
• Is equal to— Select to create the same as logic.
• Is not equal to — Select to create the different from logic.
• Is Less than— Select to find a value that is less than the value you provide.
• Is less than or equal to— Select to find a value that is less than or equal to the value you provide.
• Is greater than or equal to— Select to find a value that is greater than or equal to the value you provide.
• Is greater than— Select to find a value that is greater than the value you provide.
Health Status options:
• Unknown
• Normal
• Warning
• Critical
Connection Status options:
• On
• Off
Add Discovery Range1. Click Manage → Discovery and Inventory → Common Tasks.
2. Click Add Discovery Range. For more information, see Configuring a Discovery and Inventory Task.
3. Provide information for the appropriate protocols for discovery, inventory, or for both:
• Discovery Configuration
• ICMP Configuration
• SNMP Configuration
• WMI Configuration
• Storage Configuration
• WS-Man Configuration
• SSH Configuration
• IPMI Configuration
• Discovery Range Action
70

• Summary
Discovery Configuration
A discovery range is a network segment registered in OpenManage Essentials for the purpose of discovering devices. OpenManage Essentials attempts to discover devices on all registered discovery ranges that are enabled. A discovery range includes subnet, a range of IP addresses on a subnet, an individual IP address, or an individual host name. Specify the IP address, IP address range, or host name for the discovery process. For more information, see Discovery Configuration Options.
Discovery Configuration Options
Field Description
Save as Group Select this option to save the discovery range as a group.
Group Name Specifies the group name for the discovery range.
IP address / range Specifies the IP address or IP address range.
The following are examples of valid discovery range type address specifications (* is the wildcard character, meaning all possible addresses in the specified range):
• 193.109.112.*
• 193.104.20-40.*
• 192.168.*.*
• 192.168.2-51.3-91
• 193.109.112.45-99
• System IP address—193.109.112.99
NOTE: Click Add to add multiple ranges of IP addresses. IPV6 addresses are not supported.
Discovery Range Name Specifies the discovery range name for the IP address/range.
Host name Specifies the host name, for example, mynode.mycompany.com.
Click Add to add multiple host names.
NOTE: You can add multiple host names by separating them using commas.
NOTE: Invalid characters in the host name are not checked. If the host name you provide contains invalid characters, the name is accepted. However, the device is not found during the discovery cycle.
71

Field Description
Subnet mask Specifies the subnet mask for the IP address range. The subnet mask is used to determine the broadcast addresses for the subnet(s) part of the range. The OpenManage Essentials Network Monitoring Service does not use the broadcast address when discovering devices in an IP address range. The following are examples of valid subnet mask specifications:
• 255.255.255.0 (The default subnet mask for a Class C network.)
• 255.255.0.0 (The default subnet mask for a Class B network.)
• 255.255.242.0 (A custom subnet mask specification.)
By default, the subnet mask is set to 255.255.255.0.
Import Select this option to import host names and IP addresses from a file that is in CSV format. However, you can import only 500 line items per task. You can import different discovery ranges with different subnet masks. For example, 192.168.10.10, 255.255.255.128, 10.10.1.1, 255.255.0.0, and 172.16.21.1, 255.255.128.0.
You can use an Active Directory export file in a.CSV format as input. You can also create a .CSV file in a spreadsheet editor using the header Name and filling in system IP addresses or host names in the rows below the header (one per cell). Save the file in a .CSV format and use it as the input with the import feature. If there are any invalid entries in the file, a message is displayed when the data is imported by OpenManage Essentials. For an example of a CSV file, see Specifying IPs, Ranges, or Host Names.
Device Type Filtering
The Device Type Filtering options are displayed in the Discover Devices wizard, if Guided Wizard is selected in Discovery Settings. This window enables you to select device types for discovery. After the device types are selected, the required protocols for discovering and managing the selected device types are added to the Discover Devices wizard. For example, if you select ESXi Host, SNMP Configuration and WS-Man Configuration options are added to the wizard. The following table describes the fields displayed in the Device Type Filtering window.
Field Description
Device Type Displays the device types that you can select to discover and manage.
Required Protocol Displays the protocols that are required to discover and manage the selected device types.
72

ICMP Configuration
ICMP is used to by discovery engine to determine whether or not any device has a specified IP address. The discovery engine sends out a request and waits until the 'timeout' period to receive a reply. If a device is busy doing other things, it may not reply to an ICMP request as quickly as it would under low-load conditions. If no device has been assigned to the IP address being tested by the discovery engine, there will be no response at all. If no reply is received within the 'timeout' period, the discovery engine will repeat the request up to 'Retries' times (waiting, each time, for the 'timeout' period to expire). See ICMP Configuration Options to configure the ICMP parameters.
For more information, click the help icon .
ICMP Configuration Options
Field Description
Timeout (milliseconds) Specifies the maximum number of milliseconds the discovery engine waits for a reply after issuing an ICMP request. The default timeout period is 1000 milliseconds. A higher value allows more time to receive responses from busy devices, but also means more wait time if there is no device with a specified IP address.
Retries (attempts) Specifies the maximum number of additional times that the discovery engine will send an ICMP request if the first request times out. A device may have been too busy to respond to an earlier ICMP request, but may be able to respond to a subsequent request. If there is no device with the IP address being used, retries will also timeout, so the retry count should be a small number. The default value is 1.
SNMP Configuration
SNMP provides an interface to manage devices on the network such as servers, storage, switches, and so on. The SNMP agent on the device allows OpenManage Essentials to query the health and inventory data of the device. See SNMP Configuration Options to discover and inventory servers, storage devices, and other network devices.
For more information, click the help icon .
73

SNMP Configuration Options
Field Description
Enable SNMP discovery Enables or disables the SNMP protocol for discovery range (subnet).
Get community Specifies the community name for SNMP get calls from the OpenManage Essentials user interface. The Get Community is a read-only password that SNMP agents installed on managed devices use for authentication. The Get Community allows OpenManage Essentials to browse and retrieve SNMP data. This field is case-sensitive. OpenManage Essentials uses the first successful community name to communicate with the device. You can enter multiple SNMP community strings separated with commas.
Set community Specifies the community name for SNMP set calls from the OpenManage Essentials UI. The Set community is a read-write password that SNMP agents installed on managed devices use for authentication. The Set community allows OpenManage Essentials to perform tasks that require the SNMP protocol, such as shutting down a system.
This field is case-sensitive. You can enter multiple SNMP community strings separated with commas. OpenManage Essentials uses the first successful community name to communicate with the device.
NOTE: In addition to the Set community name, an instrumentation password is required to perform an SNMP task on a device.
Timeout (seconds) Specifies the maximum number of seconds the discovery engine waits after issuing a get or set call before it considers the call failed. A valid range is from 1 to 15 seconds. The default is 4 seconds.
Retries (attempts) Specifies the maximum number of additional times the discovery engine reissues a get or set call after the first call times out. The discovery engine reissues the call until it is successful, or all retry attempts have timed out. A valid range is from 1 to 10 retries. The default is 2.
74

WMI Configuration
Use the WMI protocol for gathering discovery, inventory, and health information about servers running Windows. This protocol provides less information about devices than SNMP but is useful if SNMP is disabled on the network. See WMI Configuration Options to configure WMI parameters for Windows servers only.
WMI Configuration Options
Field Description
Enable WMI discovery Select to enable WMI discovery.
Domain \ User name Provide the domain and user name.
Password Provide the password.
Storage Configuration
Enabling discovery of Dell PowerVault MD or Dell|EMC arrays allows OpenManage Essentials to gather inventory and health information about the arrays. See Storage Configuration Options to discover PowerVault MD arrays or Dell|EMC devices.
Storage Configuration Options
Field Description
Enable PowerVault MD array discovery Select to discover PowerVault MD array. This discovery configuration does not require credentials.
Enable Dell/EMC array discovery Select to discover Dell/EMC array.
Dell/EMC user name Provide the user name.
Dell/EMC password Provide the password.
Dell/EMC port Increment or decrement the port number. Enter a TCP/IP port number ranging 1 to 65535. Default value is 443.
WS-Man Configuration
Use the WS-Man protocol to discover and gather inventory and health status for the iDRAC, ESXi based servers, Dell PowerEdge VRTX, and Dell PowerEdge FX devices. For more information, see WS-Man Configuration Options.
75

NOTE: You can only discover and inventory servers with iDRAC6 version 1.3 and later. Discovery and inventory of servers is not supported for iDRAC6 version 1.25 and earlier.
WS-Man Configuration Options
Field Description
Enable WS-Man Discovery Select to discover Dell PowerEdge FX, Dell PowerEdge VRTX, iDRAC6, iDRAC7, iDRAC8, and ESXi installed devices.
User ID Provide authenticated user ID.
Password Provide password.
Timeout (seconds) Specifies the maximum number of seconds the discovery engine waits after issuing a WS-Man connection request. A valid range is from 1 to 360 seconds. The default is 15 seconds.
Retries (attempts) Specifies the maximum number of additional times that the discovery engine will send a WS-Man connection request to a device if the first request times out. The discovery engine reissues the request until it is successful, or all retry attempts have timed out. A valid range is from 1 to 10 retries. The default is 4.
Port Provide the port information. The default port number is 623.
Secure Mode Select to securely discover devices and components.
Skip Common name check Select to skip common name check.
Trusted Site Select if the devices you are discovering is a trusted device.
Certificate file Click Browse to navigate to the file location.
SSH Configuration
Use the SSH protocol to discover and inventory servers running Linux. See SSH Configuration Options to configure the SSH configuration parameters.
76

SSH Configuration Options
Field Description
Enable SSH discovery Enables or disables the SSH protocol by discovery range.
User name Provide the user name.
Password Provide the password.
Port Specifies the port information. The default port number is 22.
Retries (attempts) Specifies the maximum number of additional times that the discovery engine will send an SSH connection request to a device if the first request times out. The discovery engine reissues the request until it is successful, or all retry attempts have timed out. A valid range is from 1 to 10 retries. The default value is 3.
Timeout (seconds) Specifies the maximum number of seconds that the discovery engine will wait after sending an SSH connection request to a device. A valid range is from 1 to 360 seconds. The default value is 3 seconds.
IPMI Configuration
Use the IPMI protocol for out of band discovery of RACs, DRACs, and iDRACs. This option is for Lifecycle controller enabled discovery and inventory. Ensure that the IP address of the DRAC and iDRAC is selected. See IPMI Configuration Options to configure the IPMI version 2.0 parameters. This configuration is required for discovery.
IPMI Configuration Options
Field Description
Enable IPMI Discovery Enables or disables the IPMI protocol by discovery range.
User name Enter the Baseboard Management Controller (BMC) or DRAC user name.
NOTE: The default user name is root. It is recommended that you change it for security.
Password Enter the BMC or DRAC password.
NOTE: The default password is calvin. It is recommended that you change it for security.
77

Field Description
KG Key Enter the KG key value. DRAC also supports IPMI KG key value. Each BMC or DRAC is configured to require an access key in addition to user credentials.
NOTE: The KG key is a public key that is used to generate an encryption key for use between the firmware and the application. The KG key value is an even number of hexadecimal characters.
Timeout (seconds) Specifies the maximum amount of time the discovery engine waits after issuing an IPMI request. A valid range is from 1 to 60 seconds. The default is 5 seconds.
Retries (attempts) Specifies the maximum number of times the discovery engine reissues an IPMI request after the first call times out. The discovery engine reissues the request until it is successful, or all retry attempts have timed out. A valid range is from 0 to 10 retries. The default is 1.
NOTE: The retries and time-out parameters are used for both the Remote Management Control Protocol (RMCP) ping and the IPMI connection.
Discovery Range Action
Select these options to discover or inventory devices, components, and servers.
Field Description
Do not perform discovery or inventory Select this option to set up a schedule to perform discovery and inventory (at a later time).
Perform only discovery Select this option to perform discovery.
Perform both discovery and inventory Select this option to perform both discovery and inventory.
Summary
View the configuration selections. To change configurations, click Back.
Add Exclude RangeFrom OpenManage Essentials, select Manage → Discovery and Inventory → Common Tasks → Add Exclude Range. Register new ranges to exclude from discovery or to remove a previously set exclude range.
78

You can also right-click Exclude Ranges and select Add Exclude Range.
Add Exclude Range Options
Field Description
IP address / range Register a device to exclude from the discovery process by specifying the IP address or IP address range of the device.
The following are examples of valid discovery range type address specifications (* is the wildcard character, which includes all possible addresses in the specified range):
• Exclude range — 193.109.112.*
• 193.104.20-40.*
• 192.168.*.*
• 192.168.2-51.3-91
• Exclude range — 193.109.112.45-99
• System IP address — 193.109.112.99
Name Add the exclude range name for the IP address / range.
Host name Register to exclude from the discovery process by specifying the host name of the device, for example, mynode.mycompany.com.
NOTE: OpenManage Essentials does not check for invalid characters in the host name. If the host name you specify contains invalid characters, the name is accepted. However, the device with that name is not found during the discovery cycle.
Discovery Schedule
You can configure OpenManage Essentials to discover devices and display them in the Device tree.
• Enable device discovery.
• Initiate device discovery.
• Set the discovery speed.
• Specify how devices are discovered.
• For failed discovery attempts, use the Troubleshooting Tool.
Related Links
Discovery Schedule Settings
Viewing Discovery Configuration
To view discovery configuration, click Manage → Discovery and Inventory → Discovery Schedule.
79

Discovery Schedule Settings
Configure OpenManage Essentials to discover new devices on a network. The settings apply to all discovery ranges. OpenManage Essentials records all agents, IP addresses, and the health of the devices.
Field Description
Enable Discovery Select to schedule device discovery.
Configure Global Device Discovery interval Set the frequency of discovery in weekly or daily intervals.
• Every Week On — Specify the day or days to schedule discovery and the time for the discovery to begin.
• Every <n> Days <n> Hours interval — Specify the intervals between discovery cycles. The maximum discovery interval is 365 days and 23 hours.
Discovery Speed Specify the amount of resources (system and network) available for accelerating the discovery speed. The faster the speed, more resources are required to perform discovery, but less time is required.
Discover Specify how the devices are discovered.
• All Devices — Select to discover all devices that respond to an Internet Control Message Protocol (ICMP) ping.
• Instrumented Devices — Select to discover only devices that have instrumentation (such as Dell OpenManage Server Administrator, Dell OpenManage Array Manager, and Dell Networking Ethernet switches) for Simple Network Management Protocol (SNMP), Windows management Instrumentation WMI), Intelligent Platform Management Interface (IPMI) management, or WS-Management (WS-Man). See agents supported for more information about systems management instrumentation agents.
Name Resolution Specify how the device names are resolved. If you are managing a cluster, use the NetBIOS name resolution to discern each independent system. If you are not managing a cluster, a DNS name resolution is recommended.
• DNS — Select to resolve names using the Domain Naming Service.
• NetBIOS — Select to resolve names using system names.
Related Links
Discovery Schedule
80

Inventory Schedule
Use Inventory Polling to specify the default inventory settings for OpenManage Essentials. OpenManage Essentials collects inventory information such as software and firmware versions, as well as device-related information about memory, processor, power supply, Peripheral Component Interconnect (PCI) cards, and embedded devices, and storage.
Related Links
Inventory Schedule Settings
Inventory Schedule Settings
Field Description
Enable Inventory Select to schedule inventory.
Configure Global Inventory Polling Interval Set the frequency of the inventory in weekly or daily intervals.
NOTE: OpenManage Essentials performs inventory only on devices that have already been discovered.
• Every Week On—Specify the day or days of the week that you want to schedule the inventory and the time that you want it to begin.
• Every <n> Days <n> Hours interval—Specify the intervals between inventory cycles. The maximum discovery interval is 365 days and 23 hours.
Inventory Polling Speed Set the amount of resources available for accelerating the inventory poll speed. The faster you set the inventory poll speed, the more resources are required, but less time is required to perform the inventory.
After changing the speed, OpenManage Essentials may take several minutes to adjust to the new speed.
Related Links
Inventory Schedule
Status Schedule
Use this window to specify the default status polling settings for OpenManage Essentials. Status polling performs a health and power check for all discovered devices. For example, this poll determines if discovered devices are healthy or powered down.
Related Links
Status Polling Schedule Settings
81

Status Polling Schedule Settings
Field Description
Enable OnDemand Poll Select to query the global status of the device when an alert is received from the device.
NOTE: If a large number of alerts are received, multiple OnDemand polls are queued up and it may affect the system performance. In this scenario, it is recommended to turn off OnDemand poll and enable the regular status poll interval to retrieve the health status of managed devices.
If OnDemand poll is disabled, the device status only updates on the normal status poll.
Enable Status Polling Select to schedule device status polling.
Device Status Interval Set frequency of the device status poll in intervals of days, hours, and minutes. The status polling does not begin until the previous polling has completed.
Days—Specify the number of days between device status polling.
Hours—Specify the number of hours between device status polling cycles.
Minutes—Specify the number of minutes between device status polling cycles.
The maximum discovery interval is 365 days, 23 hours, and 59 minutes.
Status Polling Speed Set the amount of resources available for accelerating the device status polling speed. The faster you set the status speed, the more resources are required, but less time is required to perform the status polling.
Related Links
Status Schedule
Discovery Ranges
The Discovery Ranges section displays all the IP address or IP address ranges that you have configured for discovery. The icon displayed beside the discovery range varies based on the type of wizard used for
discovery. If you configure a discovery range using the Standard Wizard the icon is displayed. If you
configure a discovery range using the Guided Wizard, the icon is displayed. You can also right-click a
82

discovery range to see the options available on the discovery range. For information on the right-click options, see Managing Include Ranges.
Exclude Ranges
The Exclude Ranges section displays the IP address or IP address ranges that you have configured to exclude from the discovery process.
83

7Managing DevicesOpenManage Essentials lists devices based on their types. For example, Dell PowerEdge servers are listed under the device type Servers. OpenManage Essentials contains a defined list of device types. The devices you discover and inventory are included under these device types. Unclassified devices are listed under the device type Unknown. You can create device groups with combinations of the defined device types. However, you cannot create a new device types.
In the Devices page, you can:
• View devices types that are discovered on the network.
• View the inventory information for the devices.
• View all the alerts that were generated for a device.
• View the hardware logs for a device.
• Create device groups and include devices to that group based on your grouping preference. For example, you can create a group and include all devices present at a geographical location.
• Display and manage Dell PowerEdge VRTX devices using Map View.
Related Links
Viewing Devices
Viewing Device Inventory
Viewing Alerts Summary
Viewing System Event Logs
Searching for Devices
Creating a New Group
Adding Devices to a New Group
Adding Devices to an Existing Group
Hiding a Group
Deleting a Group
Creating a Custom URL
Using Map View
Viewing DevicesYou can view a device that is discovered. For more information on discovering and inventorying a device, see Discovering and Inventorying Devices.
To view devices, click Manage → Devices.
Related Links
Managing Devices
84

Device Summary Page
In the device summary page, expand the device types to view the devices. The following device types are displayed:
• Citrix XenServers
• Clients
• High Availability (HA) Clusters
• KVM
• Microsoft Virtualization Servers
– Virtual machines
• Modular systems
– PowerEdge Chassis
– PowerEdge FX2
– PowerEdge M1000e
– PowerEdge VRTX
• Network Devices
– Dell Networking Switches
– Fibre Channel Switches
– Network Appliances
• OEM Devices
• OOB Unclassified Devices
– IPMI Unclassified Devices
• Power Devices
– PDU
– UPS
• PowerEdge C Servers
• Printers
• RAC
NOTE: If a DRAC or iDRAC is discovered, it is displayed under the RAC group and not under the Servers group. If both DRAC/iDRAC and corresponding server are discovered, they are correlated into a single device. The device is displayed in both the RAC and Servers group.
NOTE: If the RAC on a Dell PowerEdge C server is discovered using IPMI, it is displayed under OOB Unclassified devices.
• Repurpose and Bare Metal
NOTE: Devices in the Repurpose and Bare Metal group are displayed as targets for device configuration deployment. You must explicitly add devices to this group for deploying a device configuration, and remove the devices from this group after the deployment is complete. For more information, see Managing Device Configuration Deployment.
• Servers
• Storage Devices
– Dell Compellent Arrays
85

– Dell NAS Appliances
– Dell|EMC Arrays
– EqualLogic Arrays
– PowerVault MD Arrays
– Tape Devices
• Unknown
• VMware ESX servers
– Virtual machines
Use the refresh button to update the device tree with the current data. To update the device tree, right-click All Devices and select Refresh.
NOTE: The device tree auto-updates when changes are made. Some changes to the tree may appear after a brief delay depending on the performance of the managed servers because the information propagates from the SQL database to the user interface.
Nodes and Symbols Description
Table 1. Nodes and Symbols Description
Node Symbol Description
Denotes that a device is critical and requires attention. This information is rolled up to the parent device type. For example if a server is in critical state and requires attention the same symbol is assigned to the parent device type. Among server states, critical state is given the highest priority. That is, in a group, if different devices are in different states, and if one device is in critical state, then the state of the parent device type is set to critical.
Denotes that a device of this type is not discovered on the network or classified in the device tree.
Denotes that there is a deviation from the expected behavior, but the device is still manageable.
Denotes that the device is working as expected.
Denotes either the device type is unknown and it is classified as an unknown device or that the health status cannot be determined, because the device does not have proper instrumentation or the proper protocol was not used to discover the device.
Device Details
The device details, depending on the device type, may contain the following information:
86

• Device Summary
• OS Information
• Data Sources
• NIC Information
• Virtual Machine Host Product Information
• RAC Device Information
• Processor Information
• Memory Device Information
• Firmware Information
• Power Supply Information
• Embedded Device Information
• Device Card Information
• Controller Information
• Controller Battery Information
• Enclosure Information
• Physical Disk Information
• Virtual Disk Information
• Contact Information
• Appliance Node Information
• Switch Device Information
• EqualLogic Volume Information
• Device Properties
• Storage Group Information
• iDRAC Information
• Tape Drive Information and Tape Library Information
• Physical Battery Information
• Fluid Cache Information
• Fluid Cache Pool Information
• Fluid Cache Disk
• Software Inventory Information
• Trusted Platform Module Information
• Slot Information
• Virtual Flash Information
• FRU Information
• Printer Cover Table
• Printer Marker Supplies Information
• Printer Input Tray Information
• Printer Output Tray Information
• Acquisition Information
• Depreciation Information
• Lease Information
• Maintenance Information
• Service Contract Information
• Extended Warranty Information
• Ownership Information
• Outsource Information
• Maser Information
NOTE: The Data Sources table in the device inventory displays the Dell Command | Monitor (previously OMCI) agent name as System Administrator.
NOTE: Hardware inventory can be retrieved from iDRAC6/7 and ESXi if OpenManage Server Administrator VIB is installed using WS-Man protocol.
NOTE: The Data Sources table in the device inventory displays information about iDRAC Service Module (iSM) only if:
• iDRAC is discovered.
• iDRAC is discovered and the server is discovered using WMI or SSH protocol.
Viewing Device Inventory
To view inventory, click Manage → Devices, expand the device type and click the device.
Related Links
Managing Devices
87

Viewing Alerts SummaryYou can view all the alerts generated for a device. To view the alert summary:
1. Click Manage → Devices.
2. Expand the device type and click the device.
3. In the details page, select Alerts.
Related Links
Managing Devices
Viewing System Event Logs1. Click Manage → Devices.
2. Expand the device type and select Hardware Logs.
Related Links
Managing Devices
Searching for DevicesRight-click All Devices at the top of the device tree and click Search Devices. You can also search for devices using logical arguments and save the queries for later.
For example, to create a query to search for a server in critical state with an IP address containing values 10.35, and the power status as Power Up:
1. Click Manage → Device Search, then select Create New Query, in the adjacent text field enter a query name.
2. From the first line after Where, select Device Type, Is, and then Server.
3. In the next line select the check box, then select AND, Device Health, Is, and then select Critical.
4. In the next line select the check box, then select AND, IP Address, Contains, and then in the adjacent field enter 10.35.
5. In the next line select the check box, then select AND, Power Status, Is, and then select Power Up.
6. Click Save Query.
NOTE: You can click Run Query to run the query immediately.
To run an existing query, select the query from the drop-down list and click Run Query. You can filter the results and export it to an HTML, TXT, or CSV file.
Related Links
Managing Devices
Creating a New Group1. Click Manage → Devices.
2. Right-click All Devices and select New Group.
3. Enter the name and description for the group and click Next.
88

4. In Device Selection, select any of the following:
• Select a query to create a dynamic group. Click New to create a new query or select an existing query from the drop-down list.
• Select the device(s) /group(s) from the tree below to create a static group.
5. Click Next.
6. Review the summary and click Finish.
You can right-click devices in the Details tab and add them either to a new group or an existing group. You can also create a new group from either the Home or Reports portal. Click Filter by and click Add New Group to launch the New Group wizard. To know whether a group is static or dynamic, place the cursor on the group. For example, if you place the cursor on Servers, the group type is displayed as Servers (Dynamic | System).Related Links
Managing Devices
Adding Devices to a New Group1. Click Manage → Devices.
2. Right-click the device(s) and select Add to New Group.
3. In Group Configuration, enter the name and description. Click Next.
4. In Device Selection, the selected devices are displayed. If required, add or remove additional devices. Click Next.
5. Review the summary and click Finish.
Related Links
Managing Devices
Adding Devices to an Existing Group1. Click Manage → Devices.
2. Right-click the device(s) and select Add to Existing Group.
NOTE: If you are manually adding a device to a dynamic group, a message is displayed on the screen. Manually adding a device to a dynamic group changes the group from dynamic to static, thereby removing the original dynamic query. If you want the group to remain dynamic, modify the query defining the group. Click Ok to continue or Cancel to stop the procedure.
3. Click Ok.
Related Links
Managing Devices
Hiding a GroupTo hide a group, right-click the group and select Hide.
After a group is hidden, it is not displayed in any of the device group controls in the console. The devices in the hidden groups are not displayed in the reports and charts on the Home and Reports portals. Alerts for devices in hidden groups are also not displayed in the alerts portal.
89
If a parent group (along with child groups) is hidden, the child groups are also hidden in the device tree. However, the child groups are still present in the database and are displayed in other instances in the console.
Related Links
Managing Devices
Deleting a Group1. Right-click the group and select Delete.
2. In the Delete screen, click Yes.
NOTE: Deleting a parent group, removes the group from the device tree. The child groups and devices listed under the parent group are also removed from the device tree. However, the child groups and devices still remain in the database and appear in other instances in the console.
Related Links
Managing Devices
Single Sign-On
If iDRAC or CMC devices are configured for Single Sign-On and you are logged on to OpenManage Essentials as a domain user, you can use open the iDRAC or CMC console through the Application Launch option or the agent link. For information on configuring iDRAC or CMC for Single Sign-On, see the following:
• Configuring CMC For Single Sign-On Or Smart Card Login section in the Dell Chassis Management Controller User’s Guide at dell.com/support/manuals.
• Configuring iDRAC7 for Single Sign-On or Smart Card Login section in the Integrated Dell Remote Access Controller 7 User's Guide at dell.com/support/manuals.
• Integrating iDRAC7 With Microsoft Active Directory white paper at DellTechCenter.com.
• IDRAC6 Integrated Dell Remote Access Controller 6 Security white paper at DellTechCenter.com.
Creating a Custom URLNOTE: Custom URL cannot be assigned to parent device groups that create a child sub group in the device tree at the time of discovery. Examples of parent device groups are: HA Clusters, Microsoft Virtualization Servers, PowerEdge M1000e, PowerEdge VRTX , or VMware ESX Servers. To assign a custom URL to a device in these parent device groups, add the device to a custom device group, and then assign a custom URL.
1. Click Preferences → Custom URL Settings.
2. Click the icon.
The Custom URL Launch screen is displayed.
3. Type the name, URL, description, and select the device group from the drop-down list.
NOTE: You can click Test URL to verify if the URL specified is active.
90
4. Click Ok.
The custom URL is created.
Related Links
Managing Devices
Custom URL Settings
Launching the Custom URL
1. Click Manage → Devices and select the device from the tree.
2. Right-click the device and select Application Launch.
3. Click the URL name to access the site.
Related Links
Custom URL Settings
Configuring Warranty Email NotificationsYou can configure OpenManage Essentials to send a warranty notification of your devices at periodic intervals through email. For information about the options you can configure, see Warranty Notification Settings.
To configure Warranty Email Notifications:
1. Click Preferences → Warranty Notification Settings.
The Warranty Notification Settings page is displayed.
2. Under Warranty Email Notifications, select Enable Warranty Email Notifications.
3. In the To field, type the email addresses of the recipients.
NOTE: Multiple email addresses must be separated by using a semicolon.
4. In the From field, type the email address from which the warranty notification email is to be sent.
NOTE: Only one email address must be provided in the From field.
5. To set the criteria for the devices to be included in the warranty notification email, in the All Devices with x Days or less of warranty field, select the number of days.
6. To set the frequency at which you want to receive the warranty notification email, in the Send email every x Days field, select the number of days.
7. To include devices with expired warranty or no warranty information in the warranty notification email, select Include Devices with Expired Warranties.
8. In the Next Email will Send On field, select the date and time at which you want to receive the next warranty notification e-mail.
9. If you want to configure the SMTP email server, click Email Settings.
The Email Settings page is displayed. For more information about Email Settings, see Email Settings.
10. Click Apply.
OpenManage Essentials sends warranty notification emails based on your configuration. The warranty notification email provides a list of devices and appropriate links that you can click to renew the warranty of the devices.Related Links
Warranty Notification Settings
91

Configuring Warranty Scoreboard NotificationsYou can configure OpenManage Essentials to display a warranty scoreboard notification icon in the heading banner. For information about the options you can configure, see Warranty Notification Settings.
To configure Warranty Scoreboard Notifications:
1. Click Preferences → Warranty Notification Settings.
The Warranty Notification Settings page is displayed.
2. Under Warranty Scoreboard Notifications, select Enable Warranty Scoreboard Notifications.
3. To set the criteria for the devices to be included in the warranty notification scoreboard, in the All Devices with x Days or less of warranty field, select the number of days.
4. To include devices with expired warranty or no warranty information in the warranty notifications scoreboard, select Include Devices with Expired Warranties.
5. Click Apply.
If any device meets the set criteria, the OpenManage Essentials heading banner displays the warranty scoreboard notification icon including the number of devices.Related Links
Using the Warranty Scoreboard Notification Icon
Device Warranty Report
Warranty Notification Settings
Configuring Warranty Pop-Up NotificationsYou can configure OpenManage Essentials to display warranty pop-up notifications based on the warranty status of the devices. For information about the options you can configure, see Warranty Notification Settings.
To configure warranty pop-up notifications:
1. Click Preferences → Warranty Notification Settings.
The Warranty Notification Settings page is displayed.
2. In Warranty Popup Notification Settings:
• Select the Enable Warranty Popup Notifications option to enable warranty pop-up notifications.
• Clear the Enable Warranty Popup Notifications option to disable warranty pop-up notifications.
3. Click Apply.
Using Map View
NOTE: The Map View feature is available only if you have discovered any licensed Dell PowerEdge VRTX devices using the WS-Man protocol. If the licensed PowerEdge VRTX device is discovered using the SNMP protocol, the Map View feature is not available. In this case, you must rediscover the PowerEdge VRTX device using the WS-Man protocol.
NOTE: The map displayed in Map View should be considered as is from the map service provider. OpenManage Essentials does not have any control over the accuracy of the map or address information.
92
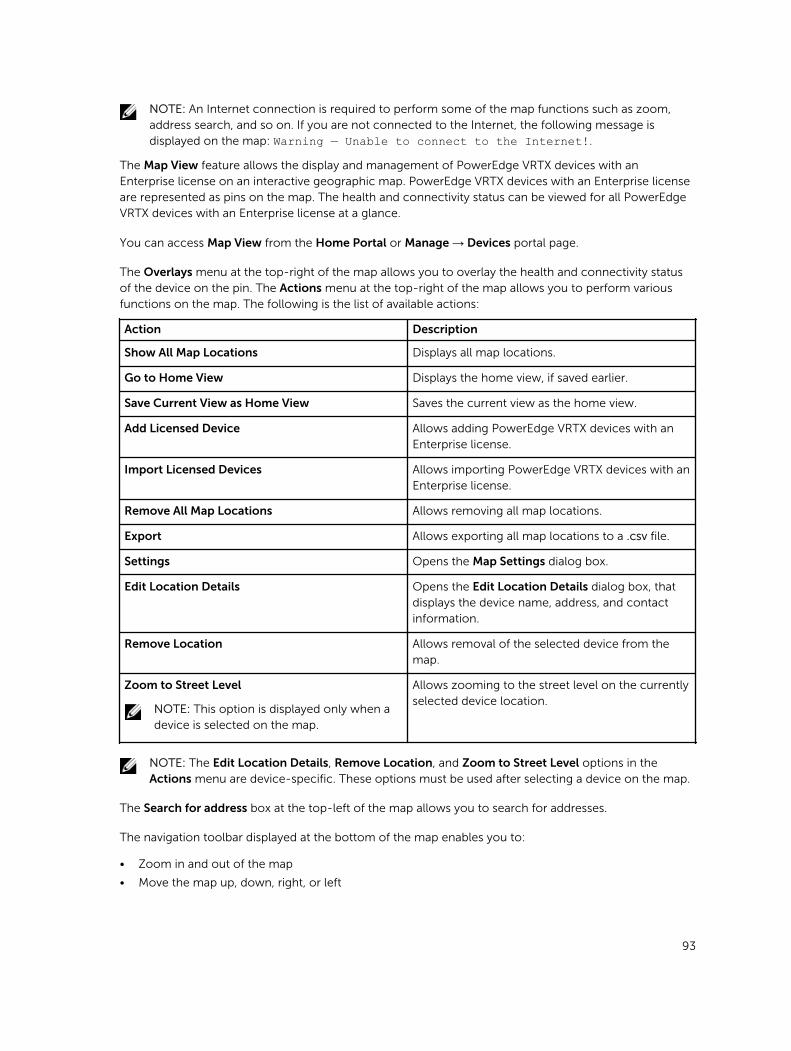
NOTE: An Internet connection is required to perform some of the map functions such as zoom, address search, and so on. If you are not connected to the Internet, the following message is displayed on the map: Warning — Unable to connect to the Internet!.
The Map View feature allows the display and management of PowerEdge VRTX devices with an Enterprise license on an interactive geographic map. PowerEdge VRTX devices with an Enterprise license are represented as pins on the map. The health and connectivity status can be viewed for all PowerEdge VRTX devices with an Enterprise license at a glance.
You can access Map View from the Home Portal or Manage → Devices portal page.
The Overlays menu at the top-right of the map allows you to overlay the health and connectivity status of the device on the pin. The Actions menu at the top-right of the map allows you to perform various functions on the map. The following is the list of available actions:
Action Description
Show All Map Locations Displays all map locations.
Go to Home View Displays the home view, if saved earlier.
Save Current View as Home View Saves the current view as the home view.
Add Licensed Device Allows adding PowerEdge VRTX devices with an Enterprise license.
Import Licensed Devices Allows importing PowerEdge VRTX devices with an Enterprise license.
Remove All Map Locations Allows removing all map locations.
Export Allows exporting all map locations to a .csv file.
Settings Opens the Map Settings dialog box.
Edit Location Details Opens the Edit Location Details dialog box, that displays the device name, address, and contact information.
Remove Location Allows removal of the selected device from the map.
Zoom to Street Level
NOTE: This option is displayed only when a device is selected on the map.
Allows zooming to the street level on the currently selected device location.
NOTE: The Edit Location Details, Remove Location, and Zoom to Street Level options in the Actions menu are device-specific. These options must be used after selecting a device on the map.
The Search for address box at the top-left of the map allows you to search for addresses.
The navigation toolbar displayed at the bottom of the map enables you to:
• Zoom in and out of the map
• Move the map up, down, right, or left
93

• Select the map provider type
Figure 3. Navigation Toolbar
The zoom level of the map can be identified by the scale that is displayed at the bottom-right of the map.
Related Links
Devices — Reference
Map View (Home) Portal
Map View (Home) Portal Interface
General Navigation and Zooming
Home View
Tool Tip
Search Pin
Map Providers
Map View (Devices) Tab Interface
Configuring Map Settings
Selecting a Device on Map View
Health and Connection Status
Multiple Devices at the Same Location
Setting a Home View
Viewing All Map Locations
Adding a Device to the Map
Moving a Device Location Using the Edit Location Details Option
Importing Licensed Devices
Using the Map View Search Bar
Adding a Device Using the Search Pin
Moving a Device Location Using the Search Pin
Removing All Map Locations
Editing a Map Location
Removing a Map Location
Exporting All Device Locations
Managing Devices
Map Providers
You can select between MapQuest and Bing map providers using the icon in the navigation toolbar. By default, the map is displayed using the MapQuest provider. The following table provides information about the supported map providers.
94

MapQuest Bing
Free Requires a valid Bing maps key that must be purchased. To get a valid Bing maps key, go to microsoft.com/maps/.
NOTE: For instructions on getting a Bing maps key, see “Getting a Bing Maps Key” at microsoft.com.
After getting a valid Bing maps key, you must provide the key in the Map Settings dialog box.
Accessing the first few zoom levels on the map does not require an Internet connection. Additional zoom levels and search functionality require an Internet connection.
Internet connection is mandatory to access any zoom level and to use the search functionality.
If your system connects to the Internet through a proxy server, the Proxy Settings configured in the
OpenManage Essentials Preferences → Console Settings page is used.
If your system connects to the Internet through a proxy server, the proxy settings configured in your web browser is used.
Two types of maps are available:
• Roads map — A simple, fast loading map with minimal details.
• Satellite map — Provides detailed satellite views of the world.
NOTE: The Bing map provider requires an Internet connection at all times to render the map. If the system connects to the Internet through a proxy server, the proxy settings configured in your web browser is used by the Bing provider.
Related LinksUsing Map View
Configuring Map Settings
NOTE: Only OpenManage Essentials Administrators and Power Users are permitted to configure Map Settings.
The Map Settings dialog box allows you to enable or disable the Internet connection status notification and to provide a valid Bing key required by the Bing map provider.
To configure the map settings:
1. Perform one of the following:
• Click Home → Map View.
• Click Manage → Devices → Map View.
2. On the Map View:
• Right-click anywhere on the map, and then click Settings.
• Move the mouse pointer over the Actions menu, and click Settings.
The Map Settings dialog box is displayed.
3. Select Update map view on any device or device group selection if you want the map to display only the pin or pins that correspond to the device or device group selected in the device tree.
95

4. Select Show internet connection warning when unable to connect to the internet if you want to display a warning on the map if an Internet connection is not available.
5. In the Bing Key field, type a valid Bing key.
6. Click Apply.
Related Links
Using Map View
General Navigation and Zooming
To move the map, click and drag the map in the desired direction or use the navigation arrows in the Navigation toolbar.
You can zoom in or zoom out of the map using any of the following methods:
• Double-click a pin to zoom in to street level around that pin. You can also zoom in to street level by:
– Right-clicking a pin, and then clicking Zoom to Street Level
– Moving the mouse pointer over the Actions menu, and then clicking Zoom to Street Level
• If a pin is displayed at street level, double-click the pin to zoom out to the world-level view
• Double-click a location on the map to zoom-in one level at that location
• Move the mouse wheel up or down to quickly zoom out or in on the map
• Click the magnifying glass icon in the navigation toolbar to display a slider that you can use to zoom in or zoom out of the map
NOTE: Zoom level and the visible portion of the Map View (home) portal are not synchronized with the Map View tab accessible through the Devices portal.
Related Links
Using Map View
Home View
If you have saved a particular region of the map as your home view, by default, the map displays the home view when you open the Map View. For instructions to set a region on the map as your home view, see Setting a Home View.
Related Links
Using Map View
Tool Tip
Moving the mouse pointer over the pin displays a tool tip that contains the following information:
• Device name
• Description
• Address
• Contact
• Model
• Service Tag
• Asset Tag
96

• Global status
• Connection status
Related Links
Using Map View
Selecting a Device on Map View
To select a device on the map, click the appropriate pin. The corresponding device is highlighted in the device tree and all the other pins are hidden. When a device is selected in the device tree, it is also reflected on the map. If the Modular Systems or PowerEdge VRTX group is selected in the device tree, then all the pins placed for those groups are displayed on the map.
NOTE: Hiding a device group in the device tree does not hide the corresponding pins on the map. For example, hiding the Modular Systems group in the device tree does not hide pins on the map that represent devices in the Modular Systems group.
NOTE: Clicking a pin on the Map View (home) portal opens the Devices portal that displays details about the device.
Related Links
Using Map View
Health and Connection Status
The health and connection status of a device can also be displayed on the map. To overlay the pin with the health or connection status of the device, move the mouse pointer over the Overlays menu at the top-right of the map, and click Health or Connectivity. The health or connection status is indicated by the color and the icon displayed within the pin. The following table provides information about the health status and pin overlay:
Pin Color Icon Health Status
Red Critical
Yellow Warning
Green Normal
Gray Unknown
The following table provides information about the connection status and pin overlay:
Pin Color Icon Connection Status
Blue On
Grey Off
Related Links
Using Map View
97

Multiple Devices at the Same Location
It is possible for two or more licensed devices to be placed at an identical location. These devices are displayed as a multi-pin group on the map. If the devices are in a very close proximity on the map and the map is zoomed out, the pins are displayed together as a multi-pin group. To view the count and the name of the devices in a multi-pin group, move the mouse pointer over the multi-pin group. Double-click or right-click a multi-pin group and then select Details, to open the Devices at this location window that lists the devices available at the location. On the Devices at this location window, you can:
• Double-click a device to display only that device on the map.
• Right-click a device to view standard options for the devices, such as Referesh Inventory, Application Launch, and so on, and other map-specific options such as Edit Location Details, and so on.
NOTE: Only licensed devices can be placed on the map. Device groups cannot be placed on the map.
Related Links
Using Map View
Setting a Home View
If you typically manage devices in a certain geographic region, you can set that region as your home view. Each OpenManage Essentials user can save a different view of the map as their home view. By default, the home view is displayed when you open Map View or when you select the Go to Home View option.
1. Perform one of the following:
• Click Home → Map View.
• Click Manage → Devices → Map View.
2. On the Map View, navigate and zoom until the current view is as desired.
3. Perform one of the following:
• Right-click on the map, and then click Save Current View as Home View.
• Move the mouse pointer over the Actions menu, and then click Save Current View as Home View.
Related Links
Using Map View
Viewing All Map Locations
If a single device is selected, only that device is displayed on the map. To view all map locations that have been placed on the Map View:
• Right-click the map, and click Show All Map Locations.
• Move the mouser pointer over the Actions menu, and click Show All Map Locations.
Related Links
Using Map View
Adding a Device to the Map
NOTE: Only Dell PowerEdge VRTX devices with an Enterprise license that are not already placed on the map can be added to the map.
98

NOTE: Only OpenManage Essentials Administrators and Power Users are permitted to add a device to the map.
To add a device on the map:
1. Perform one of the following:
• Click Home → Map View.
• Click Manage → Devices → Map View.
2. On the Map View:
• Right-click the map, and click Add Licensed Device.
• Move the mouser pointer over the Actions menu, and click Add Licensed Device.
The Device Location Details dialog box is displayed.
3. From the Devices list, select the device you want to add.
4. If required, in the Description field, type an appropriate description for the device.
5. If you want to add the device at a location different from where you right-clicked on the map, in the Address field, type the address of the location. For example, Chicago.
NOTE: Using the Address field to add a device on the map requires an Internet lookup through the map provider to resolve the provided address. The device is added to the most appropriate location available from the Internet lookup. If the map provider is not able to resolve the address, a message is displayed.
6. If required, in the Contact field, type the contact information.
7. Click Save.
Related Links
Using Map View
Adding a Device Using the Search Pin
Moving a Device Location Using the Edit Location Details Option
NOTE: Only OpenManage Essentials Administrators and Power Users are permitted to edit a map location.
1. Perform one of the following:
• Click Home → Map View.
• Click Manage → Devices → Map View.
2. Right-click a pin on the map, and select Edit Location Details.
The Device Location Details dialog box is displayed.
3. In the Address field, type the location name or airport code. For example, New York.
NOTE: Using the Address field to move a device location requires an Internet lookup through the map provider to resolve the provided address. The device is moved to the most appropriate location available from the Internet lookup. If the map provider is not able to resolve the address, a message is displayed, and the device remains at the current location.
4. Click Save.
If the map provider is able to resolve the address or airport code, the pin is moved to the specified location on the map.
Related Links
Using Map View
99

Moving a Device Location Using the Search Pin
Importing Licensed Devices
NOTE: Only Dell PowerEdge VRTX devices with an Enterprise license that are not already placed on the map can be imported to the map.
NOTE: Only OpenManage Essentials Administrators and Power Users are permitted to import licensed devices.
NOTE: You can only import a maximum of up to 500 devices at a time.
You can bulk import licensed devices on the map through a .csv file. An Export Template function is available, which creates a .csv file that is already populated with the names of the licensed PowerEdge VRTX devices that are currently discovered.
To import licensed devices:
1. Perform one of the following:
• Click Home → Map View.
• Click Manage → Devices → Map View.
2. On the Map View, do one of the following:
• Right-click the map, and click Import Licensed Devices.
• Move the mouse pointer over the Actions menu, and click Import Licensed Devices.
The Import Licensed Devices dialog box is displayed.
3. Click Export Template to download a .csv template that you can use for importing licensed PowerEdge VRTX devices.
NOTE: For more information about the template, see Template for Importing Devices.
The Save As dialog box is displayed.
4. Browse to the location where you want to save the .csv file, type an appropriate file name, and click Save.
5. Open the .csv file, and perform one of the following:
• In the Latitude and Longitude columns, type the latitude and longitude coordinates for each device.
• In the Address column, type the address for each device. For example, 1 dell way, round rock, TX.
NOTE: Before you import devices using the address, ensure that the system is connected to the Internet. If the system connects to the Internet through a proxy server, verify if the proxy settings are configured in the Preferences → Console Settings page. Also, the Internet search provider may reject the address search request if you are attempting to import too many devices at a time. If this occurs, wait for some time and try importing again.
6. Click Import.
The Open dialog box is displayed.
7. Select the location where the updated .csv file is located, and click Open.
The Import Summary dialog box is displayed.
8. Click Ok.
NOTE: Any errors that may occur during the import process are displayed in Logs → UI Logs.
Related Links
Using Map View
100

Template for Importing Devices
Template for Importing Devices
The template for importing PowerEdge VRTX devices with an Enterprise license is a .csv file that you can use to provide details about devices that you want to import to the map. The following are the fields available in the template:
Field Description
Name The name of the PowerEdge VRTX device with an Enterprise license. This field is already populated with the currently discovered PowerEdge VRTX devices with an Enterprise license that are not already placed on the map.
Latitude The latitude coordinate of the device location.
Longitude The longitude coordinate of the device location.
Address The address of the device location. If both latitude and longitude coordinates are specified, the address need not be specified.
Description (Optional) Any information that you want to include about the device.
Contact (Optional) Any contact information that you want to include for the device..
To import the PowerEdge VRTX devices with an Enterprise license to the map, you must update the .csv file with one of the following:
• Latitude and Longitude
• Address
Related Links
Importing Licensed Devices
Using the Map View Search Bar
NOTE: The map providers may not be able to resolve all addresses or airport codes correctly.
The search bar on Map View enables you to search for locations on the map using an address or airport code. To search for a location, type the location name or airport code (for example, New York or JFK) in the search bar, and either press <Enter> or click the arrow icon. If the map provider is able to resolve the address or airport code, a search pin is displayed at the specified location on the map.Related Links
Using Map View
Search Pin
The search pin is a larger pin that represents the search result on the map. The following are the characteristics of the search pin:
101

• At any instance, only one search pin can be located on the map. The search pin is displayed on the map at a location until you remove it or perform a new search. To remove the search pin, right-click the search pin and click Remove.
• Unlike the device pin, the search pin does not overlay any status.
• Double-clicking the search pin allows you to zoom in and zoom out of the location.
• Move the mouse pointer over the search pin to display a tool tip that includes the address of the location.
• You can add or move a licensed PowerEdge VRTX device at the search pin location.
.
Related Links
Using Map View
Adding a Device Using the Search Pin
NOTE: Only Dell PowerEdge VRTX devices with an Enterprise license that are not already placed on the map can be added to the map.
NOTE: Only OpenManage Essentials Administrators and Power Users are permitted to add a device to the map.
1. Perform one of the following:
• Click Home → Map View.
• Click Manage → Devices → Map View.
2. Type the address or airport code (for example, New York or JFK) in the search bar, and either press <Enter> or click the arrow icon.
If the map provider is able to resolve the address or airport code, a search pin is displayed at the location on the map.
3. Right-click the search pin and click Add Licensed Device Here.
The Device Location Details dialog box is displayed.
4. From the Devices list, select the device you want to add.
5. Click Save.
Related Links
Using Map View
Adding a Device to the Map
Moving a Device Location Using the Search Pin
NOTE: Only OpenManage Essentials Administrators and Power Users are permitted to add a device to the map.
To move a device location:
1. Perform one of the following:
• Click Home → Map View.
• Click Manage → Devices → Map View.
2. Select the pin for a licensed PowerEdge VRTX device on the map.
3. Type the address or airport code (for example, New York or JFK) in the search bar, and either press <Enter> or click the arrow icon.
If the map provider is able to resolve the address or airport code, a search pin is displayed at the location on the map.
102

4. Right-click the search pin and click Move Selected Device Here.
5. On the Move Device confirmation dialog box, click Yes.
The selected device is moved to the location of the search pin.
Related Links
Using Map View
Moving a Device Location Using the Edit Location Details Option
Removing All Map Locations
NOTE: Only OpenManage Essentials Administrators and Power Users are permitted to remove all map locations.
To remove all map locations:
1. Perform one of the following:
• Click Home → Map View.
• Click Manage → Devices → Map View.
2. On the Map View:
• Right-click the map, and click Remove All Map Locations.
• Move the mouser pointer over the Actions menu, and click Remove All Map Locations.
The Remove All Map Items dialog box is displayed prompting for your confirmation.
3. Click Yes.
Related Links
Using Map View
Editing a Map Location
NOTE: Only OpenManage Essentials Administrators and Power Users are permitted to edit a map location.
To edit a map location:
1. Right-click a pin on the map, and select Edit Location Details.
The Device Location Details dialog box is displayed.
2. In the Description field, edit the description as required.
3. If you want to move the device to a new location, in the Address field, type the location name.
4. In the Contact field, edit the contact information as required.
5. Click Save.
Related Links
Using Map View
Removing a Map Location
NOTE: Only OpenManage Essentials Administrators and Power Users are permitted to remove a map location.
To remove a location on the map:
1. Perform one of the following:
103

• Click Home → Map View.
• Click Manage → Devices → Map View.
2. On the Map View, right-click the location you want to remove and select Remove Location.
The Delete Location dialog box is displayed prompting for your confirmation.
3. Click Yes.
Related Links
Using Map View
Exporting All Device Locations
Exporting all device locations allows you to save the information about the devices and their latitude and longitude coordinates as a .csv file. If the address is known for a pin, it is included in the Description field of the .csv file. Using this file, you can import the device locations at any time.
NOTE: By default, the latitude and longitude coordinates of each device is saved to the .csv file, even if the latitude and longitude coordinates were not provided previously.
To export all device locations currently placed on the map:
1. On the Map View, move the mouse pointer over the Actions menu, and then click Export.
The Save As dialog box is displayed.
2. Browse to the location where you want to save the .csv file, type an appropriate file name, and click Save.
Related Links
Using Map View
Dell NAS Appliance Support
The following table provides information about discovery and classification, availability of appliance node information, and alert correlation for supported Dell NAS appliances.
Dell EqualLogic FS7500 with FluidFS Version 1
Dell EqualLogic FS7500 with FluidFS Version 2
Dell PowerVault MD NX3500 with FuildFS Version 1
Discovery and Classification
Support for discovery using both the EqualLogic Group Manager IP and management IP.
If discovered using the controller IPs, it results in multiple entries.
Support for discovery using both the EqualLogic Group Manager IPs.
If discovered using the controller IPs, the device is classified as Unknown.
Support for discovery using both the controller IPs.
If discovered using the PowerVault MD Series array IP, the device is classified as a PowerVault MD Array device.
Appliance Node Information
Displayed in the device inventory.
Displayed in the device inventory.
Displayed in the device inventory.
Alerts Alerts received from the controller are not correlated to the device.
Alerts received from the controller are not correlated to the device.
Some alerts received from the device may be displayed as Unknown.
104

OEM Device Support
Dell OEM devices (re-branded or de-branded Dell servers and Compellent S8000 iDRAC), when discovered, are classified under OEM Devices in the device tree. Most of the functionality available to Dell servers, such as tasks, reports, and filters are also applicable to Dell OEM servers. However, system update may not be possible if it is not supported by the OEM device module. For more information on the supported protocols and features, see information on Dell servers/devices in Supported Devices Protocols and Features Matrix.
OEM servers are always classified under the OEM Devices group in the device tree. They are not displayed under the Servers or RAC group. If both the server and RAC of the OEM device are discovered, they are correlated and displayed as one device under the OEM Devices group. Other OEM devices except servers and RAC are classified under the different server groups such as Microsoft Virtualization Servers, VMware ESX servers, and so on, based on the classification criteria they satisfy.
105

8Devices — ReferenceThis page provides the following information:
• List of devices based on the device type, for example, HA clusters, servers, and so on.
• Summary of devices and alerts.
• Alerts generated for a particular device.
• Health of devices based on the Normal, Critical, Unknown, and Warning types.
NOTE: For Dell 12 Generation PowerEdge servers [denoted as yx2 x, where y denotes alphabets, for example M (modular), R (rack), or T (tower) and x denotes numbers] discovered using WMI and SNMP protocols, the DRAC health status is displayed (under Servers) even if OpenManage Server Administrator is not installed on the server.
NOTE: Based on the severity of the agents of a discovered device, the overall health is the most critical of the severity. For example, in the device tree, for server types, if there are two servers with status Warning and Critical, then the parent Server’s status is set to Critical.
• Connection status of devices — When both server (in-band) and DRAC/iDRAC (out-of-band) are discovered and correlated, the Connection Status under Device Summary displays the connection status of the server. The RAC Connection Status under RAC Device Information displays the DRAC/iDRAC connection status. When only DRAC/iDRAC (out-of-band) is discovered (server is not discovered), the Connection Status and the RAC Connection Status display the same information. When only server (in-band) is discovered (DRAC/iDRAC is not discovered), the Connection Status displays the connection status of the server. The RAC Connection Status is set to Off.
• Inventory information for devices.
• View hardware logs for servers.
• Filtering capabilities of the grid:
– The grouping bar
– Filter icon options
– Sorting by clicking on the column
– Re-ordering the columns
NOTE: None of these are saved if the console is closed and restarted.
Related Links
Viewing Devices
Viewing Device Inventory
Creating a New Group
Adding Devices to an Existing Group
Hiding a Group
Using Map View
Viewing Inventory
To view inventory, from All Devices, traverse to the device and click the device.
106

The device details and the alerts link are displayed.
Viewing Alerts
To view alerts, from the inventory details page, click Alerts.
Alert Details
Field Description
Severity Alert severity based on Normal, Critical, Warning, and Unknown.
Acknowledged Flagged status for an alert.
Time Time at which the alert was generated in date and time format.
Device IP address of the device.
Details Lists the alert information. For example, System is down:<IP Address of the device>
Category Lists the alert category type, for example System Events.
Source Lists the alert source name.
Viewing Hardware LogsYou can view hardware logs for servers. To view hardware logs, from the inventory details page, click Hardware Logs.
Hardware Log Details
Field Description
Severity Alert severity based on Normal, Critical, Warning, and Unknown.
Time The system time at which this alert was generated in date and time format on the managed node.
Details Lists the details of the hardware log.
For example, power supply redundancy is lost.
107

Alert Filters
You can apply these filters to Alerts. Select Continuous Updates to enable the user interface to update automatically when new alerts are received.
Field Description
Severity Select from these alerts: All, Normal, Critical, Warning, and Unknown.
Acknowledged Flagged status for an alert.
Time Time at which this alert was generated in date and time format.
Device The IP address or host name of this device.
Details The alert information. For example, System is down: <IP address of the device>.
Category The alert category type, for example System Events.
Source The Alert Source.
Viewing Non-Compliant Systems To view non-compliant systems, click the Non-Compliant Systems tab.
NOTE: Non-compliant systems are only available for device groups such as servers, RAC, and custom groups. It is not available for individual devices.
Non-Compliant Systems
The Non-Compliant Systems tab provides this information:
Field Description
System Name Domain name of the system.
Model Type The systems model name. For example, Dell PowerEdge.
Operating System The operating system that is installed on the system.
Service Tag A unique identifier, that provides the service lifecycle information.
108

Field Description
Update Method Displays the update methods such as OpenManage Server Administrator and iDRAC.
Discovered Time Time and date of discovery.
Inventory Time Time and date of inventory.
Select non-compliant systems to select updates to apply and click Apply Selected Updates.
Field Description
System Name System’s domain name.
Importance The requirement of this software update for the system.
Update Method Displays the update methods such as OpenManage Server Administrator and iDRAC.
Component The software information.
Type The type of software update.
Installed Version The installed version number.
Upgrade/Downgrade A green arrow indicates and upgrade.
Available Version The available version number.
Package Name The name of the software update.
Related Links
System Update
Device Search
The search options available are:
• Run an existing query
• Create a new query
• Delete a query
109

Field Description
Run Existing Query Select this option and then select a query from the drop-down list.
Delete Query Select to delete a query after you complete the following action.
Select the Run Existing Query option, then from the drop down list select the query that you want to delete.
Create New Query Select this option to create a query and then enter a name for the query in the adjoining field.
Query logic Select from the query logic options to create multiple query options. Select the check box to enable and include an argument.
Run Query Runs the selected query.
Save Query Saves the selected query.
Related Links
Query Results
Query Results
The device search lists these options:
Field Description
Health Status Displays the health status of the device. The status options are Normal, Warning, Critical, and Unknown.
Connection Status Displays the connection status of the device. The connection status are On or Off.
Name Displays the name of the device.
OS Name Displays the operating system installed on the device.
OS Revision Displays the version of the operating system installed on the device.
Service Tag Displays a unique identifier, that provides the service lifecycle information.
Asset Tag Displays the defined asset tag for the device.
110

Field Description
Device Model Displays the system’s model name. For example, PowerEdge R710.
Device type Displays the type of device. For example, for the Device Model PowerEdge R710, the Device Type value is Server.
System Revision Number Displays the revision history of the device.
Creating Device Group
Device Group Configuration
Field Description
Name Provide name of the new group.
Parent The device under which this group is created.
Description Provide description for the device group.
Device Selection
You can select predefined groups (device types), custom groups, specific devices, or a device query.
To use device query, select a query from the list.
Click New to create a new device query to search and assign the devices to the alert action.
Click Edit to change the query logic.
Select groups or devices from the tree, you can use the query option to create very specific criteria for the selection.
Device Selection Options
Field Description
All Devices Select to include all the devices that are managed in OpenManage Essentials.
Citrix XenServers Select to include Citrix XenServers.
Clients Select to include client devices, such as desktops, portables, and workstations.
HA Clusters Select to include High Availability server clusters.
KVM Select to include keyboard video mouse devices.
111

Field Description
Microsoft Virtualization Servers Select to include Microsoft virtualization servers.
Modular Systems Select to include modular systems.
Network Devices Select to include network devices.
OOB Unclassified Devices Select to include out of band Unclassified Devices like Lifecycle controller enabled devices.
Power Devices Select to include PDUs and UPS.
PowerEdge C Servers Select to include PowerEdge C servers.
Printers Select to include printers.
RAC Select to include devices with remote access controllers.
Servers Select to include Dell servers.
Storage Devices Select to include storage devices.
Unknown Select to include unknown devices.
VMware ESX Servers Select to include VMware ESX servers.
Summary — Group Configuration
View and edit selections.
Map View (Devices) Tab Interface
The following are the items displayed in the Map View and their descriptions.
Item Description
Search bar Enables you to search for locations on the map.
Internet connection warning
NOTE: The Internet connection warning is displayed only if the Show internet connection warning when unable to connect to the internet option is selected in Map Settings.
Indicates if the system is not connected to the Internet.
Overlays menu Enables you to overlay the health or connection status of the device on the pin. The options available are:
• Health
112

Item Description
• Connectivity
A tick mark is displayed beside the option that is selected.
Actions menu Enables you to select a list of actions that can be performed. The available actions are:
• Show All Map Locations
• Go to Home View
• Save Current View as Home View
• Add Licensed Device
• Import Licensed Devices
• Remove All Map Locations
• Export
• Settings
• Edit Location Details
• Remove Location
• Zoom to Street Level
NOTE: The Zoom to Street Level option is displayed only when a device is selected on the map.
NOTE: The Edit Location Details, Remove Location, and Zoom to Street Level options in the Actions menu are device-specific. These options must be used after selecting a device on the map.
Navigation toolbar Enables you to move the map, zoom in or zoom out, and select a map service provider. The options available map providers are:
• MapQuest Provider (Free)
• Bing Road Provider (Licensed)
• Bing Satellite Provider (Licensed)
Scale Displays the current zoom level of the map in meters or kilometers.
Devices at this location
The Device at this location window is displayed when you double-click or right-click a multi-pin group and then select Details. The following are the fields displayed in the Devices at this location window:
113
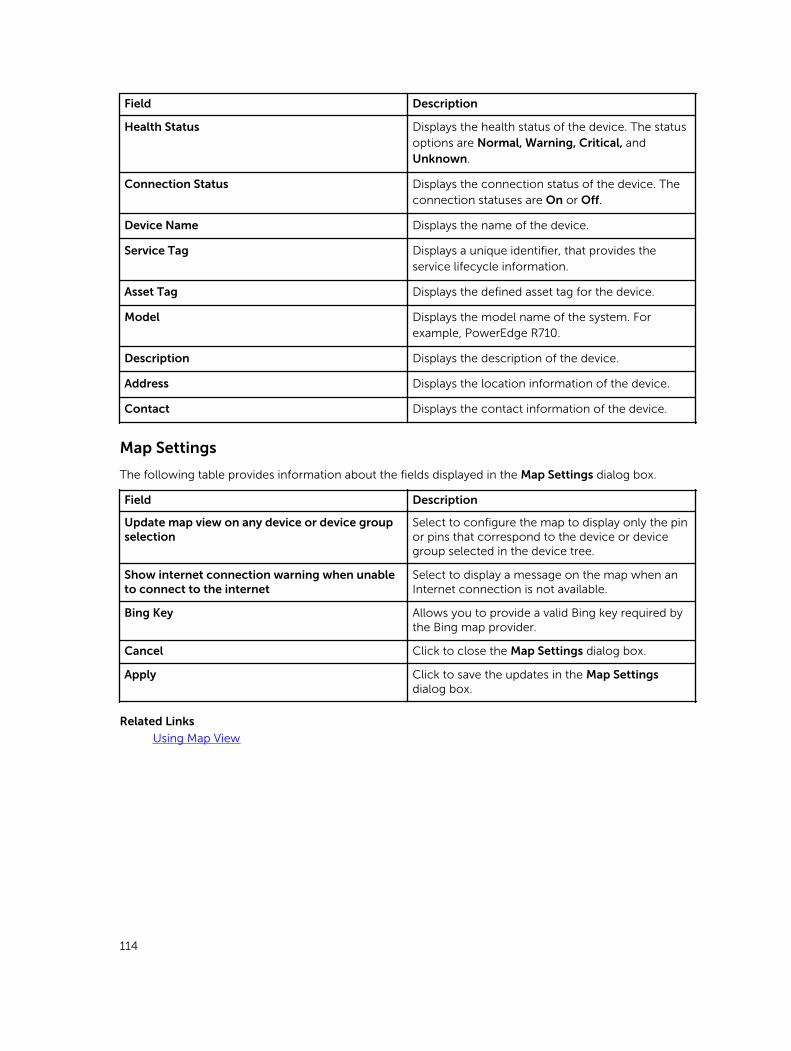
Field Description
Health Status Displays the health status of the device. The status options are Normal, Warning, Critical, and Unknown.
Connection Status Displays the connection status of the device. The connection statuses are On or Off.
Device Name Displays the name of the device.
Service Tag Displays a unique identifier, that provides the service lifecycle information.
Asset Tag Displays the defined asset tag for the device.
Model Displays the model name of the system. For example, PowerEdge R710.
Description Displays the description of the device.
Address Displays the location information of the device.
Contact Displays the contact information of the device.
Map Settings
The following table provides information about the fields displayed in the Map Settings dialog box.
Field Description
Update map view on any device or device group selection
Select to configure the map to display only the pin or pins that correspond to the device or device group selected in the device tree.
Show internet connection warning when unable to connect to the internet
Select to display a message on the map when an Internet connection is not available.
Bing Key Allows you to provide a valid Bing key required by the Bing map provider.
Cancel Click to close the Map Settings dialog box.
Apply Click to save the updates in the Map Settings dialog box.
Related Links
Using Map View
114

9Server Deployment and Re-provisioningEvery server and chassis has a large list of attribute values that describe the settings and functionality of the device. These settings must be set properly before deploying an operating system to make the sever functional. The Deployment Portal enables you to perform initial server or chassis configuration and operating system deployment. The portal allows you to create a server or chassis configuration templates that include settings for Lifecycle Controller, System, iDRAC, BIOS, RAID, and NIC for servers, and CMC for chassis. These configuration templates can then be deployed to multiple servers or chassis for initial configuration before an operating system deployment process is kicked off from a predefined bootable ISO image.
Using the Deployment Portal, you can:
• Create a configuration template from a server or chassis configuration file
• Create a configuration template from a server or chassis
• Edit a configuration template
• Add devices to the Repurpose and Bare Metal group
• Modify or remove devices in the Repurpose and Bare Metal group
• Deploy a configuration template on another server or chassis
• View the tasks that have been created and their status
• Remove devices from the Repurpose and Bare Metal group
• Configure the deployment file share
NOTE: Devices in the Repurpose and Bare Metal group are displayed as targets for device configuration deployment. You must explicitly add devices to the Repurpose and Bare Metal group for deploying a device configuration, and remove the devices from the group after the deployment is complete.
NOTE: The device configuration deployment and configuration compliance features are licensed (fee-based) for supported servers (PowerEdge 12G or later with iDRAC). However, using these features on supported Dell chassis is free and does not require a license. Creating a device configuration template from either a server or chassis does not require a license as well. For more information on licensing, see OpenManage Essentials — Server Configuration Management License.
Related Links
Configuring the Deployment File Share
Creating a Device Configuration Template
Adding Devices to the Repurpose and Bare Metal Devices Group
Managing Device Configuration Templates
Deploying a Device Configuration Template
Deploying a Network ISO Image
Auto Deploying Device Configurations
115
Viewing the Deployment Tasks
Additional Information
OpenManage Essentials — Server Configuration Management License
NOTE: Installing and using OpenManage Essentials does not require the OpenManage Essentials — Server Configuration Management license. Only the server configuration management feature requires that the OpenManage Essentials — Server Configuration Management license is installed on target servers.
The OpenManage Essentials — Server Configuration Management license, enables you to deploy a device configuration and verify device configuration compliance on licensed servers. The license is a perpetual license that is valid for the life of a server, and can be bound to the Service Tag of only one server at a time.
NOTE: Enabling the server configuration management feature in OpenManage Essentials does not require any separate code. If the OpenManage Essentials — Server Configuration Management license is installed on a target server, you can use the server configuration management feature on that server.
NOTE: The OpenManage Essentials — Server Configuration Management license is required only for deploying a device configurations and verifying configuration compliance on servers. The license is not required for:
• Creating a device configuration template from either servers or chassis
• Deploying device configurations or verifying configuration compliance on chassis.
Licensable Servers
You can apply OpenManage Essentials — Server Configuration Management license to the following servers:
• Dell PowerEdge 12th generation servers having iDRAC7 with firmware version 1.57.57 or later
• Dell PowerEdge 13th generation (13G) servers having iDRAC8 with firmware version 2.00.00.00 or later
Purchasing the License
You can purchase and download the OpenManage Essentials — Server Configuration Management license from the Dell Software License Management Portal at dell.com/support/retail/lkm. You can also purchase the license when you purchase a server.
Deploying the License
If you purchase a license after you purchased a server, you can deploy the license on the server using Dell License Manager. You can install License Manager using the OpenManage Essentials installation package. For information on depllying the license, see the Dell License Manager User’s Guide at dell.com/OpenManageManuals.
116

Verifying License Information
You can verify if the OpenManage Essentials — Server Configuration Management license is installed on a server through one of the following methods:
• In Reports portal, and click License Information. The License Description column indicates the license that has been installed on the licensed devices.
• Select a device in the device tree. The License Information table in the device inventory indicates the licenses installed on the device.
Viewing Unlicensed Server Targets
To view the server targets for configuration management that do not have the OpenManage Essentials — Server Configuration Management license installed:
1. Navigate to the Device Compliance Portal.
2. In the Device Compliance pie-chart, click the Non licensed segment. The All Non licensed Devices window displays the possible targets for server configuration management that do not have a license.
Related Links
Deploying a Device Configuration Template
Setting Up Device Configuration Auto Deployment
Configuring the Credentials and Device Configuration Inventory Schedule
Device Requirements for Deployment and Compliance Tasks
The following are the device requirements for device configuration deployment and configuration compliance tasks:
• For servers:
– Dell PowerEdge 12G servers having iDRAC7 with firmware version 1.57.57 or later
– Dell PowerEdge 13G servers having iDRAC8 with firmware version 2.00.00.00 or later
– The servers must be running Dell Lifecycle Controller 2 version 1.4.x or later
• For chassis:
– PowerEdge M1000e with firmware version 4.5 or later.
– PowerEdge VRTX with firmware version 1.3 or later.
Related Links
Creating a Device Configuration Template From a Device Configuration File
Creating a Device Configuration Template From a Reference Device
Deploying a Device Configuration Template
Deploying a Network ISO Image
Setting Up Device Configuration Auto Deployment
Configuring the Credentials and Device Configuration Inventory Schedule
117

Viewing the Inventory Configuration Details
Getting Started for Device Configuration DeploymentBefore you can deploy a device configuration to target devices, you must:
1. Configure the deployment file share on the server running OpenManage Essentials.
2. Add target devices to the Repurpose and Bare Metal Devices group.
Related Links
Device Configuration Deployment Overview
Configuring the Deployment File Share
Adding Devices to the Repurpose and Bare Metal Devices Group
Device Configuration Deployment Overview
The steps that you must perform to deploy a device configuration template on target devices are as follows:
1. Create a device configuration template — Use the Create Template task in the Common Tasks pane to create a device configuration template. You can choose to create the template from either a configuration file or a reference device.
2. Edit the device configuration template — Select the template from the Templates pane, and edit the desired configuration attributes displayed in the right pane.
3. Deploy the device configuration template on target devices — Use the Deploy Template task in the Common Tasks pane to select the template, target devices, edit device-specific attributes, and then deploy the configuration attributes. You can also use the Setup Auto Deployment task to deploy a device configuration template on devices that you will be discovering later.
NOTE: If the hardware of the device from which the device configuration template was created and the hardware of the deployment targets are identical, it enhances the possibility of the attributes being deployed successfully. If the hardware is not entirely identical, the deployment task may not complete successfully. However, the attributes for the matching components are deployed successfully.
Related Links
Getting Started for Device Configuration Deployment
Viewing the Deployment PortalTo view the deployment portal, click Deployment → Deployment Portal.
Configuring the Deployment File ShareBefore creating or deploying a configuration template from a device, you must configure the deployment file share on the server running OpenManage Essentials. The deployment file share temporarily stores the configuration file that is used to retrieve and apply the configuration settings on a target server or chassis.
To configure the deployment file share:
1. Perform one of the following:
118

• Click Preferences → Deployment Settings.
• Click Deployment. In the Common Tasks pane, click File Share Settings.
• Click Deployment → Getting Started for Deployment → Configure Deployment File Share.
• Click Manage → Configuration. In the Common Tasks pane, click File Share Settings.
The File Share Settings window is displayed.
2. Type the domain\user name and password of the server running OpenManage Essentials in the appropriate fields.
3. Click Apply.
If the file share is configured correctly, the File Share Status displays Ok.
Related Links
Getting Started for Device Configuration Deployment
Creating a Device Configuration Template
The Create Template task creates a device configuration template that includes the attributes of a server or chassis. Using the device configuration template, you can:
• Deploy the configuration on another server or chassis.
• Verify the compliance of a server or chassis to the configuration template.
You can create a device configuration template from:
• A device configuration file.
• A server or chassis that you have discovered.
Related Links
Creating a Device Configuration Template From a Device Configuration File
Creating a Device Configuration Template From a Reference Device
Creating a Device Configuration Template From a Device Configuration File
You can create a device configuration template from an existing server configuration (.xml) file or a chassis configuration (.ini) file.
Before you create a configuration template from a device configuration file, ensure that:
• The deployment file share is configured. For more information, see Configuring the Deployment File Share.
• The configuration file is from a device that meets the requirements specified in Device Requirements for Deployment and Compliance Tasks.
To create a device configuration template from a device configuration file:
1. Perform one of the following:
• Click Deployment → Deployment Portal.
• Click Manage → Configuration.
2. Perform one of the following:
• In the Common Tasks pane, click Create Template.
119

• In the Templates pane, right-click Server Template or Chassis Template, and then click Create Template.
• In the Common Tasks pane, click either Getting Started for Deployment or Getting Started for Compliance → Create Template.
The Create Template Wizard is displayed.
NOTE: If the deployment file share settings are not configured, a message stating that One or more settings require configuring for this action is displayed. If you click OK,
the File Share Settings window is displayed. After you configure the file share settings, the Create Template Wizard is displayed.
3. In the Name field, type a name for the template.
4. Click Create from File.
5. Click Browse.
6. Navigate and select the configuration file, and click Open.
7. Click Finish.
The configuration template that is created is displayed in the Templates pane.
Related Links
Create Template Wizard
Device Requirements for Deployment and Compliance Tasks
Creating a Device Configuration Template From a Reference Device
You can create a device configuration template from a server or chassis you have discovered.
Before you create a configuration template from a reference device, ensure that:
• The deployment file share is configured. For more information, see Configuring the Deployment File Share.
• You are creating a device configuration template from a device that meets the requirements specified in Device Requirements for Deployment and Compliance Tasks.
To create a device configuration template from a reference device:
1. Perform one of the following:
• Click Deployment → Deployment Portal.
• Click Manage → Configuration.
2. Perform one of the following:
• In the Common Tasks pane, click Create Template.
• In the Templates pane, right-click Server Template or Chassis Template, and then click Create Template.
• In the Common Tasks pane, click either Getting Started for Deployment or Getting Started for Compliance → Create Template.
The Create Template window is displayed.
NOTE: If the deployment file share settings are not configured, a message stating that One or more settings require configuring for this action is displayed. If you click OK,
the File Share Settings window is displayed. After you configure the file share settings, the Create Template Wizard is displayed.
120

3. Type a Name for the template.
4. You can either search for the device or select the Device Type and then select a device from the All Applicable Devices tree.
5. Under Execution Credentials, provide the iDRAC credentials that have either Administrator or Operator rights, and click Finish.
6. In the task submission message, click Ok.
A Create Template task is created in the Tasks tab in the right pane. You can view the status of the configuration template in Task Execution History in the right pane. You can double-click the task in Task Execution History to view the task execution details. The configuration template that is created is displayed in the Templates pane.
Related Links
Create Template Wizard
Device Requirements for Deployment and Compliance Tasks
Adding Devices to the Repurpose and Bare Metal Devices GroupAdding devices to the Repurpose and Bare Metal Devices group is a prerequisite for deploying either a configuration template or a network ISO image on those devices.
CAUTION: Ensure that only the appropriate devices are added to the repurpose and bare metal devices group. After deploying a configuration template on a repurpose and bare metal device, it may not be possible to revert the device to its original configuration.
NOTE: Servers that you want to add to the Repurpose and Bare Metal Device Group must have the OpenManage Essentials — Server Configuration Management License installed. For more information, see OpenManage Essentials — Server Configuration Management License.
To add devices to the Repurpose and Bare Metal Devices group:
1. Click Deployment → Deployment Portal.
2. In the Repurpose and Bare Metal Devices tab, click Modify Devices.
The Modify Devices of the Repurpose and Bare Metal Device Group window is displayed.
3. From the All Applicable Devices tree, select the devices that you want to add to the Repurpose and Bare Metal Devices group.
4. Click Finish.
The devices that you added are listed in the Repurpose and Bare Metal Devices tab in the right pane, and in the Repurpose and Bare Metal Devices group in the device tree.
Related Links
Deploying a Device Configuration Template
Getting Started for Device Configuration Deployment
Repurpose and Bare Metal Devices
Managing Device Configuration Templates
The device configuration templates contain various attributes of a server or chassis. Before you use the device configuration template for either deployment or verification of the compliance status, you can:
• View the attributes of a device configuration template
121

• Clone a device configuration template
• Edit a device configuration template
• Export a device configuration template
• View the properties of a device configuration template
Related Links
Viewing the Device Configuration Template Attributes
Cloning a Device Configuration Template
Editing a Device Configuration Template
Exporting a Device Configuration Template
Viewing the Device Configuration Template Attributes
To view the device configuration template attributes:
1. Perform one of the following:
• Click Deployment → Deployment Portal.
• Click Manage → Configuration → Device Compliance Portal.
2. In the Templates pane, click either a sample template or a template that you created.
The attributes of the template are displayed in the Attributes tab in the right pane. The total number of attributes in the template is displayed at the top right of the Attributes tab.
Related Links
Managing Device Configuration Templates
Device Configuration Template Details
Cloning a Device Configuration Template
You can clone a device configuration template to create a template that you can edit and deploy.
To clone a device configuration template:
1. Perform one of the following:
• Click Deployment → Deployment Portal.
• Click Manage → Configuration → Device Compliance Portal.
2. In the Templates pane, right-click a template, and then click Clone.
The Clone Configuration Template window is displayed.
3. Type a name for the template, and click Ok.
The cloned template is displayed in the Templates pane under the sample templates.
Related Links
Managing Device Configuration Templates
Editing a Device Configuration Template
You can edit a device configuration template to make the changes you want on the template before you deploy or use the template for verifying compliance.To edit a device configuration template:
1. Perform one of the following:
122

• Click Deployment → Deployment Portal.• Click Manage → Configuration → Device Compliance Portal.
2. In the Templates pane, right-click a template, and then click Edit.
The attributes of the template are displayed in the Attributes tab in the right pane.
3. If you do not want to deploy a particular attribute in the template and want to retain the current attribute value on the target device, clear the check box for that attribute in the Deploy column.
4. To select or clear all the attributes in the template, select or clear the check box that is displayed next to the Deploy column title.
NOTE: If the value of an attribute depends on another attribute, the dependency is indicated in the Dependencies column of the configuration template. To deploy the dependent attributes, you must first edit the primary attributes, and then edit the dependent attribute.
5. To select multiple rows of attributes, select the row that has the first attribute, press and hold the <Shift> key, and click the row that has the last attribute. To select or clear the attributes of the selected rows, right-click and select Check or Uncheck.
6. Edit or select the values in the Value column based on your preference.
The total number of attributes in the template and the number of attributes that you edit are displayed in the top right of the Attributes tab.
7. Click Save.
Related LinksManaging Device Configuration Templates
Exporting a Device Configuration Template
You can export a device configuration template to a .xml (server configuration template) or .ini (chassis configuration template) file. Exporting the attributes enables you to use an alternative method to edit he attributes. After editing the template, you can import the template and use it for deployment or verifying compliance.
To export a device configuration template:
NOTE: Exporting a device configuration template exports all the attributes of the configuration template, including attributes that are not selected.
1. Perform one of the following:
• Click Deployment → Deployment Portal.• Click Manage → Configuration → Device Compliance Portal.
2. In the Templates pane, right-click either a sample template or a template that you created, and then click Export Template.
3. Navigate to the location where you want to export the template, provide a file name, and then click Save.
Related LinksManaging Device Configuration Templates
Deploying a Device Configuration TemplateThe Deploy Configuration task enables you to deploy a configuration template that includes a set of configuration attributes to specific devices. Deploying a device configuration template on the devices ensures that the devices are uniformly configured.
Before you begin deploying a device configuration template, ensure that:
123

• The deployment file share is configured. For more information, see Configuring the Deployment File Share.
• The target devices are added to the Repurpose and Bare Metal Devices group. For more information, see Adding Devices to the Repurpose and Bare Metal Devices Group.
• You have either created a device configuration template or cloned a sample template.
• The target devices meet the requirements specified in Device Requirements for Deployment and Compliance Tasks.
• The OpenManage Essentials — Server Configuration Management license is installed on all target servers. For more information, see OpenManage Essentials — Server Configuration Management License.
CAUTION: Deploying a configuration template on a device may result in potentially destructive changes to the device configuration including performance, connectivity, and ability to boot the device.
To deploy the configuration template on devices:
1. Click Deployment.
The Deployment Portal is displayed.
2. In the Common Tasks pane, click Deploy Template.
The Setup Auto Deployment wizard is displayed.
3. On the Name and Deploy Options page:
a. Type an appropriate name for the task.
NOTE: If you want to deploy a configuration template and an operating system, you can select both the Deploy Template and Boot to Network ISO options. Separate tasks are created for each operation.
b. If you want to use the configuration template to verify the compliance status of the device after the deployment, select Use this template for checking compliance after deployment.
c. Click Next.
4. On the Select Template page:
a. Based on the target device type, click either Server Template or Chassis Template.b. Select the configuration template you want to deploy.
NOTE: Only configuration templates that you have either created or cloned are available for selection.
c. Click Next.
5. On the Select Devices page, select the target devices from the Repurpose and Bare Metal Devices tree, and click Next.
NOTE: Only devices added to the Repurpose and Bare Metal Devices group can be selected for deployment.
6. On the Edit Attributes page:
NOTE: OpenManage Essentials does not include any passwords from source when the configuration template is created. If you want to set the passwords for the target devices, all password attributes must be edited in the configuration template before deployment.
a. Click the Template Attributes tab.b. Click the attribute group name to view the list of attributes in a group.c. If you do not want to deploy a particular attribute in the template and want to retain the current
attribute value on the target device, clear the check box in the Deploy column.
124

d. Edit or select the values in the Value column based on your preference.
The total number of attributes in the template and the number of attributes that you edit are displayed in the Grouped by bar.
e. Click the Device Specific Attributes tab to edit the attributes that are unique for the target device.
NOTE: The Device Specific Attributes tab may or may not display attributes based on the template selected for deployment.
f. Click the attribute group name to view the list of attributes in a group.
g. If you do not want to deploy a particular attribute in the template and want to retain the current attribute value on the target device, clear the check box in the Deploy column.
h. Edit or select the values in the Value column based on your preference.
i. Click Save.
j. Click Next.
7. On the Set Schedule page:
a. Select either Run now, or click the calendar icon and select the date and time you want to run the task.
b. Under Execution Credentials:
• For server configuration deployment — type the iDRAC Administrator credentials.
• For chassis configuration deployment — type the CMC Administrator credentials.
c. Click Next.
8. On the Summary page, review the information that you have provided, and then click Finish.
The Deploy Template warning is displayed.
9. If you want to continue the deployment, click Yes.
The Deploy Template task is created and run based on the schedule you have selected. You can double-click the task in Task Execution History to view the task execution details.
Related Links
Deploy Template Wizard
Device Configuration Setup Wizard
OpenManage Essentials — Server Configuration Management License
Device Requirements for Deployment and Compliance Tasks
Deploying a Network ISO ImageThe Deploy Configuration task enables you to boot to a network ISO image and then deploy the ISO image on supported servers.
Before you begin deploying a network ISO image, ensure that:
• The deployment file share is configured. For more information, see Configuring the Deployment File Share.
• The target devices are added to the Repurpose and Bare Metal Devices group. For more information, see Adding Devices to the Repurpose and Bare Metal Devices Group.
• You have Full Control permission on the network share where the ISO image is available.
• The target devices meet the requirements specified in Device Requirements for Deployment and Compliance Tasks.
125

• The OpenManage Essentials — Server Configuration Management is installed on all target servers. For more information, see OpenManage Essentials — Server Configuration Management License.
To deploy a network ISO image:
1. Click Deployment.
2. In the Common Tasks pane, click Deploy Template.
The Deploy Template wizard is displayed.
3. On the Name and Deploy Options page:
a. Type an appropriate name for the task.
NOTE: If you want to deploy an operating system and a configuration template, you can select both the Deploy Template and Boot to Network ISO options. Separate tasks are created for each operation.
b. Clear Deploy Template and select Boot to Network ISO.
c. Click Next.
4. On the Select ISO Location page:
a. Under ISO File Name, type the name of the ISO image file.
b. Under Share Location, type the IP address and name of the network share.
c. Under Share Credentials, type the user name and password.
d. Click Next.
5. On the Select Devices page, select the target devices from the Repurpose and Bare Metal Devices tree, and click Next.
6. On the Set Schedule page:
a. Select either Run now or click the calendar icon and select the date and time you want to run the task.
b. Under Execution Credentials, type the iDRAC Administrator credentials.
c. Click Next.
7. On the Summary page, review the information that you have provided, and then click Finish.
8. If you want to continue the deployment, click Yes.
The Boot to Network ISO Task is created and run based on the schedule you have selected. You can double-click the task in Task Execution History to view the task execution details. After the target server boots to the network ISO image, you must launch the iDRAC virtual console and select the options for deploying the ISO image.
Related Links
Deploy Template Wizard
Device Configuration Setup Wizard
Device Requirements for Deployment and Compliance Tasks
126

Removing Devices From the Repurpose and Bare Metal Devices GroupYou can remove devices from the Repurpose and Bare Metal Device group after the device configuration deployment, network ISO image deployment, auto deployment task is complete.
To remove devices from the Repurpose and Bare Metal Devices group:
1. Click Deployment → Deployment Portal.
2. In the Repurpose and Bare Metal Devices tab, select the devices you want to remove.
3. Perform one of the following:
• Click Remove Selected Devices.
• Right-click and select Remove.
4. On the confirmation dialog box, click Yes.
The devices are removed from the Repurpose and Bare Metal Devices tab in the right pane, and in the Repurpose and Bare Metal Devices group in the device tree.
Related Links
Repurpose and Bare Metal Devices
Auto Deploying Device Configurations
The Setup Auto Deployment task enables you to deploy either a device configuration or network ISO image on target devices that you will discover at a later time. For example, if your company has ordered 500 systems that are expected to be delivered through the next two weeks, you can create the Setup Auto Deployment task that runs periodically and deploys the configuration after the devices are discovered.
When creating the task, you must import a .csv file that includes the Service Tags of target devices on which you want to deploy the configuration. By default, the Setup Auto Deployment task is run every 60 minutes to identify if the target devices have been discovered. If a target device is discovered, the device configuration is automatically deployed to the target device. You can also modify the recurrence of the Setup Auto Deployment task based on your preference.
Related Links
Configuring Auto Deployment Settings
Setting Up Device Configuration Auto Deployment
Managing Auto Deployment Credentials
Adding a Discovery Range for Auto Deployment
Configuring Auto Deployment Settings
The Auto Deployment Settings allows you to perform the following:
• Enable or disable the device configuration auto deployment.
• Set the recurrence of the device configuration auto deployment task.
127

To configure the auto deployment settings:
1. Click Preferences → Deployment Settings.
The Deployment Settings page is displayed.
2. Select or clear Enable auto deployment for recently discovered devices to enable or disable auto deployment of device configuration.
3. Edit the Run auto deployment every xx Minutes field based on your preference.
4. Click Apply.
Related Links
Auto Deploying Device Configurations
Setting Up Device Configuration Auto Deployment
The Setup Auto Deployment task enables you to deploy a configuration template, which includes a set of configuration attributes, to devices that you will discover at a later time. Deploying a device configuration template on the devices ensures that the devices are uniformly configured.
Before you create a device configuration auto deployment task, ensure that:
• The deployment file share is configured. For more information, see Configuring the Deployment File Share.
• The auto deployment setting is enabled and configured. For more information, see Configuring Auto Deployment Settings.
• The Service Tag of each target device is available in a .csv file. The Service Tags should be listed under the title ServiceTag in the .csv file.
• You have either created a device configuration template or cloned a sample template.
• The target devices meet the requirements specified in Device Requirements for Deployment and Compliance Tasks.
• The OpenManage Essentials — Server Configuration Management license is installed on all target servers. For more information, see OpenManage Essentials — Server Configuration Management License.
CAUTION: Deploying a configuration template on a device may result in potentially destructive changes to the device configuration including performance, connectivity, and ability to boot the device.
To auto deploy the configuration template on devices that will be discovered at a later time:
1. Click Deployment.
The Deployment Portal is displayed.
2. Perform one of the following:
• In the Common Tasks pane, click Setup Auto Deployment.
• Click Auto Deployment, and then click Add Devices.
The Setup Auto Deployment wizard is displayed.
3. On the Deploy Options page:
a. If you want to auto deploy a configuration template and an operating system, you can select both the Deploy Template and Boot to Network ISO options. Separate tasks are created for each operation.
b. If you want to use the configuration template to verify the compliance status of the device after the deployment, select Use this template for checking compliance after deployment.
128

c. Click Next.
4. On the Select Template page:
a. Based on the target device type, click either Server Template or Chassis Template.b. Select the configuration template you want to deploy.
NOTE: Only configuration templates that you have either created or cloned are available for selection.
c. Click Next.
5. On the Import Service Tags page:
a. Click Import.b. Navigate and select the .csv file that includes the Service Tags.
NOTE: You can only import valid Service Tags that have not already been discovered.
c. Click Open.
The Import Summary is displayed.
d. Click Ok.e. Click Next.
6. On the Edit Attributes page:
NOTE: OpenManage Essentials does not include any passwords from source when the configuration template is created. If you want to set the passwords for the target devices, all password attributes must be edited in the configuration template before deployment.
a. Click the Template Attributes tab.b. Click the attribute group name to view the list of attributes in a group.c. If you do not want to deploy a particular attribute in the template and want to retain the current
attribute value on the target device, clear the check box in the Deploy column.d. Edit or select the values in the Value column based on your preference.
The total number of attributes in the template and the number of attributes that you edit are displayed in the Grouped by bar.
e. Click the Device Specific Attributes tab to edit the attributes that are unique for the target device.
NOTE: The Device Specific Attributes tab may or may not display attributes based on the template selected for deployment.
f. Click the attribute group name to view the list of attributes in a group.g. If you do not want to deploy a particular attribute in the template and want to retain the current
attribute value on the target device, clear the check box in the Deploy column.h. Edit or select the values in the Value column based on your preference.
NOTE: You can also export the Device Specific Attributes for a specific device or for all devices as .csv file, edit the attributes, and import the attributes. To export or import the Device Specific Attributes, click Import/Export.
i. Click Save.j. Click Next.
7. On the Execution Credentials page:
a. On the Credentials section, click Add New Credentials.
NOTE: For server configuration deployment — provide the iDRAC Administrator credentials; For chassis configuration deployment — provide the CMC Administrator credentials.
The Add Credentials window is displayed.
b. Type the description, Administrator user name, and password required to run the task on the target devices.
129

c. If you want to set the credentials as the default credentials for all target devices, select Default, and then click Finish.
d. Repeat step a to step c until you have configured the credentials required for running the task on all target devices.
e. On the Devices section, set the Execution Credentials for each target device.f. Click Next.
8. On the Summary page, review the information that you have provided, and then click Finish.
The Deploy Template warning is displayed.
9. If you want to continue creating the Setup Auto Deployment task, click Yes.
The Setup Auto Deployment task is created and run based on the schedule configured in Preferences → Auto Deployment Settings. You can double-click the task in Task Execution History to view the task execution details.
After the devices are discovered and the auto deployment task is completed, the devices are moved to the Repurpose and Bare Metal Devices group. If you do not want to deploy any other device configuration on the devices, you can remove the devices from the Repurpose and Bare Metal Devices group.
NOTE: Devices in the Auto Deployment tab are moved to the Repurpose and Bare Metal Devices group, even if the auto deployment task fails. If you want to deploy the configuration template on those devices, you must create a new deployment task.
Related LinksAuto Deploying Device Configurations
Setup Auto Deployment Wizard
Importing Device Specific Attributes
Exporting Device Specific Attributes
OpenManage Essentials — Server Configuration Management License
Device Requirements for Deployment and Compliance Tasks
Auto Deployment
Managing Auto Deployment Credentials
The Manage Auto Deployment Credentials task enables you to configure and assign execution credentials for target devices that have been set up for auto deployment.
To manage auto deployment credentials:
1. Click Deployment.
The Deployment Portal is displayed.
2. In the Common Tasks pane, click Manage Auto Deployment Credentials.
The Manage Auto Deployment Credentials window is displayed.
3. If you want to add new credentials that you want to assign to a target device, click Add New Credentials.
NOTE: For server configuration deployment — provide the iDRAC Administrator credentials; For chassis configuration deployment — provide the CMC Administrator credentials.
a. In the Add Credentials window, type the description, user name, and password.b. If you want to set the credentials as the default credentials for all target devices, select Default,
and then click Finish.
The credentials that you added are displayed in the Credentials section.
130

4. If you want to update an existing credential, click the update icon.
a. In the Add Credentials window, edit the description, user name, and password as required.b. If you want to set the credentials as the default credentials for all new target devices, select
Default, and then click Finish.
5. If you want to delete an existing credential, click the delete icon, and then click Ok in the Confirmation Required dialog box.
The credentials that you deleted are removed from the Credentials section.
6. If you want to assign credentials to a target device, in the Devices section, select the appropriate credentials under Execution Credentials.
7. Click Finish.
Related LinksAuto Deploying Device Configurations
Manage Auto Deployment Credentials
Adding a Discovery Range for Auto Deployment
You can create a discovery range for the auto deployment task through either the Auto Deployment tab or the Discovery and Inventory portal.Before you can add a discovery range through the Auto Deployment tab, you must setup an auto deployment task.To add a discovery range through the Auto Deployment tab:
1. Click Deployment → Deployment Portal.
The Repurpose and Bare Metal Devices tab is displayed in the right pane.
2. In the right pane, click the Auto Deployment tab, and then click Add Discovery Range.
The Discover Devices wizard is displayed.
3. Follow the instructions from step 2 to step 5 in Configuring a Discovery and Inventory Task to create the discovery range.
The discovery range is created in the Discovery and Inventory portal.
Related LinksAuto Deploying Device Configurations
Auto Deployment
Removing Devices From an Auto Deployment Task
If you do not want to perform auto deployment on a particular devices, you can remove those devices from the auto deployment task.
To remove devices from an auto deployment task:
1. Click Deployment → Deployment Portal.
The Repurpose and Bare Metal Devices tab is displayed in the right pane.
2. On the right pane, click the Auto Deployment tab, and select the devices you want to remove.
3. Perform one of the following:
• Click Remove Selected Devices.
• Right-click and select Delete.
4. On the confirmation dialog box, click Yes.
The devices are removed from the Auto Deployment tab.
Related Links
131

Auto Deployment
Importing Device Specific AttributesYou can also import the device specific attributes for deployment, if you already have a .csv file that includes the attributes.Before you begin, make sure that the .csv file that you want to import meets the requirements specified in Import File Requirements.To import the attributes:
1. On the Edit Attributes page of the Deployment Template Wizard or Setup Auto Deployment wizard, click Import/Export.
The Import/Export Device Specific Attributes window is displayed.
2. Click Import.
The import confirmation dialog box is displayed.
3. Click Yes.
4. Navigate and select the .csv file, and click Open.
The Import Summary dialog box displays the number of imported attributes.
5. Click OK.
6. In the Import/Export Device Specific Attributes window, click Close.
Related Links
Import File Requirements
Import File Requirements
The following table describes the column titles and data to be included in the .csv file that is used for importing device specific attributes.
Field Description
Device Name The name of the device. During import, the device name is used to match with the name of the device selected for deployment.
Service Tag The Service Tag of the device. The Service Tag must be provided for auto deployment tasks. For the deployment task, the Service Tag is optional if the device name is provided.
Parent The attribute's direct parent fully qualified descriptor (FQDD). The parent value is used to match during import.
Attribute The raw name of the configuration attribute. The name is used to match during import.
Value The value of the attribute.
132

Field Description
NOTE: Empty values are also valid and will be imported. Secure values are exported in a masked format. All imported values are selected for deployment..
Possible Values The list of allowable values.
NOTE: If you include a value that is not permitted or present in the list, the value is not imported.
Exporting Device Specific AttributesYou can also export the device specific attributes to a .csv file, edit the attributes, and then import the attributes. Exporting the attributes enables you to use an alternative method to edit he attributes.To export the attributes:
NOTE: If you want to export the device specific attributes for only a specific device, select the device in the Edit Attributes page.
1. On the Edit Attributes page of the Deployment Template Wizard or Setup Auto Deployment wizard, click Import/Export.
The Import/Export Device Specific Attributes window is displayed.
2. Click either Export Selected Device or Export All Devices based on your preference.
If you selected Export All Devices, a confirmation dialog box is displayed.
3. Click Yes.
4. Navigate to the location where you want to save the .csv file, and click Save.
Viewing the Deployment TasksTo view the deployment tasks that have been created:
1. Click Deployment → Deployment Portal.
2. In the Tasks pane on the left, select a task type.
The Task tab on the right pane displays the tasks that have been created.
Related Links
Tasks
Additional Information
The following Dell technical white papers and files available at delltechcenter.com provide additional information on the device configuration template, attributes, and work flows:
• Server Cloning with Server Configuration Profiles
• Server Configuration XML File
• Configuration XML Workflows
• Configuration XML Workflow Scripts
133

• XML Configuration File Examples
134

10Deployment – ReferenceYou can access the following from the Deployment → Deployment Portal page:
• Deploy Device Configuration Portal
– Getting Started for Deployment — Displays the information required to setup, use, and get started with the device configuration deployment features.
– Deployment Portal — Displays the default view of the Deployment Portal.
• Common Tasks — Displays the deployment setup tasks and tasks that you can create.
– Create Template
– Deploy Template
– Setup Auto Deployment
– Manage Auto Deployment Credentials
– File Share Settings
• Templates — Displays the sample device configuration templates and templates that you have created or cloned.
– Server Templates
* Sample - iDRAC SNMP Management Settings
* Sample - iDRAC Auto Update Settings
* Sample - Enable Broadcom Partitioning
* Sample - BIOS Setup System Password
* Sample - iDRAC static IP address
* Sample - iDRAC System Location
* Sample - iDRAC Thermal Alert Monitor
* Sample - iDRAC Timezone NTP
* Sample - Configure iDRAC Users
* Sample - iDRAC Initialized Virtual Disk
* Sample - Set Virtual Disk As Boot
* Sample - Delete BIOS System Setup Password
* Sample - Enable PXE Boot
* Sample - One Time BIOS Boot Device
* Sample - One Time HD Boot Device
* Sample - One Time UEFI Boot Device
* Sample - Set BIOS Boot Order
135

* Sample - Set HD Boot Order
* Sample - iDRAC Set Power Cap
* Sample - Set UEFI Boot Order
* Sample - Set SNMP Email Alerts
– Chassis Templates
* Sample - VRTX Chassis
* Sample - M1000e Chassis
• Tasks — Displays the tasks of the selected category in the Tasks tab in the right pane.
– Configuration Tasks
* Deploy to Undiscovered Devices — Displays the Auto Deployment Tasks you have created.
* Device Configuration Image Deploy — Displays the Boot to Network ISO tasks that you have created.
* Chassis Configuration Deployment — Displays the device configuration deployment tasks you have created for chassis.
* Chassis Configuration Import — Displays the Create Template tasks you have created for chassis.
* Device Configuration Deployment — Displays the device configuration deployment tasks you have created for servers.
* Device Configuration Import — Displays the Create Template tasks you have created for servers.
NOTE: For information on the sample device configuration templates, see the iDRAC documentation at dell.com/support/manuals.
Related Links
Repurpose and Bare Metal Devices
Auto Deployment
Tasks
Task Execution History
Device Configuration Template Details
Device Configuration Setup Wizard
Create Template Wizard
Deploy Template Wizard
Setup Auto Deployment Wizard
Manage Auto Deployment Credentials
Repurpose and Bare Metal DevicesThe Repurpose and Bare Metal Devices tab displays the devices that you have added to the Repurpose and Bare Metal Devices group. This tab also displays the last deploy result and last template deployed to the devices.
The fields displayed in the Repurpose and Bare Metal Devices tab are described in the following table.
136

Field Description
Last Deploy Result Displays the result of the last deployment task.
Device Name Displays the device name.
Service Tag Displays the unique identifier assigned to the system.
Model Displays the model name of the system. For example, PowerEdge R710.
Last Template Deployed Displays the latest template deployed.
End Time Displays the date and time when the latest template was deployed.
Modify Devices Displays the All Applicable Devices tree view. Select or clear devices to add or remove the devices from the Repurpose and Bare Metal Devices group.
Remove Selected Devices Removes the selected devices from the Repurpose and Bare Metal Devices group.
Related Links
Removing Devices From the Repurpose and Bare Metal Devices Group
Adding Devices to the Repurpose and Bare Metal Devices Group
Auto DeploymentThe Auto Deployment tab displays the target devices that you have selected for the auto deployment tasks.
The fields displayed in the Auto Deployment tab are described in the following table.
Field Description
Service Tag Displays the unique identifier assigned to the system.
Template to Deploy Displays the template selected for deployment on the device.
Boot to Network ISO Displays if you have selected to boot the server to a network ISO image.
Created On Displays the date the auto deployment task was created.
Created By Displays the name of the user who created the task.
137

Field Description
Add Discovery Range Displays the Discovery Range Configuration wizard that enables you to add a discovery range.
Add Devices Displays the Setup Auto Deployment wizard.
Remove Selected Devices Removes the selected devices from the associated Setup Auto Deployment tasks.
Related Links
Adding a Discovery Range for Auto Deployment
Removing Devices From an Auto Deployment Task
Setting Up Device Configuration Auto Deployment
Tasks
The fields displayed in the Tasks tab of the Deployment portal are described in the following table.
Field Description
Schedule Displays if the task schedule is active or inactive.
Task Name Displays the name of the task.
Type Displays the type of the task.
Description Displays a brief description about the task.
Updated On Displays the date and time the task was updated.
Updated By Displays the name of the user who updated the task.
Created On Displays the date and time the task was created.
Created By Displays the name of the user who created the task.
Related Links
Viewing the Deployment Tasks
Task Execution HistoryThe Task Execution History tab displays the status of tasks.
The fields displayed in the Task Execution History tab are described in the following table.
Field Description
Status Displays an icon representing the task status:
— Running or pending
138

Field Description
— Complete
— Stopped
— Failed
— Warning
Task Name Displays the name of the task.
Start Time Displays the start time of the task.
% Completed Displays the progress information of the task.
Task State Displays the state of the task:
• Running
• Complete
• Stopped
• Failed
• Warning
End Time Displays the end time of the task.
Executed by User Displays the name of the user who executed the task.
Device Configuration Template Details
The fields displayed in the Attributes pane of the Deployment Portal are described in the following table.
Field Description
Undo Click to undo the changes made to the configuration template.
Save Click to save the changes to the configuration template.
Grouped by Displayed if you have chosen to display the attributes as groups.
Total Displays the total number of attributes in the template.
Modified Displays the number of attributes you have modified.
Deploy Select to deploy an attribute. If you do not select an attribute, the attribute value is not deployed on the target device and the current value will be
139

Field Description
retained on the target device. You can select all the attributes in the template by selecting the check box in the Deploy column header.
Modified Displays if you have modified the value of an attribute.
Section Displays the component the attribute belongs to. For example, iDRAC, BIOS, NIC, and so on.
Instance Displays the instance of the component the attribute belongs to.
Attribute Name Displays the name of the attribute.
Value Displays the value of the attribute.
Dependencies Displays if the attribute is dependent on any other attributes. To edit a dependent attribute, you must first set the primary attribute.
Destructive Displays if deploying the attribute may result in destructive changes to the device configuration including performance, connectivity, and ability to boot the device.
Group Displays the group the attribute belongs to.
Related Links
Viewing the Device Configuration Template Attributes
Device Configuration Setup WizardThe Device Configuration Setup Wizard guides you through the steps to get started with the configuration deployment and compliance tasks.
NOTE: The Device Configuration Setup Wizard is only displayed if you try to perform a task that is missing required information.
File Share Settings
The fields displayed in the File Share Settings page are described in the following table.
Field Description
Domain \ Username User name to access the file share on the server running OpenManage Essentials.
Password Password to access the file share on the server running OpenManage Essentials..
File Share Status Indicates the status of the deployment file share configuration.
140

Add Devices to Repurpose and Bare Metal Device Group
NOTE: Adding devices to the Repurpose and Bare Metal Device Group is applicable only for the device configuration deployment task.
NOTE: Servers that you add to the Repurpose and Bare Metal Device Group must have the OpenManage Essentials — Server Configuration Management license installed.
The Add Devices to Repurpose and Bare Metal Device Group page displays the servers and chassis that you can add to the Repurpose and Bare Metal Device Group.
Create Template Wizard
The following table describes the fields displayed in the Create Template Wizard.
Field Description
Name Provide the name of the configuration template.
Create from File Select if you want to create the configuration template from an existing file.
Create from Device Select if you want to create the configuration template from a reference server or chassis.
Device Type Select either Server or Chassis based on the device from which you want to create the configuration template.
All Applicable Devices Displays the devices from which you can create a configuration template.
Execution Credentials
User Name Provide the user name required to execute the task on the device.
Password Provide the password required to execute the task on the device.
Related Links
Creating a Device Configuration Template From a Device Configuration File
Creating a Device Configuration Template From a Reference Device
Deploy Template WizardThe Deploy Template Wizard guides you through the steps to deploy a configuration template and/or boot to a network ISO image. The steps displayed in the wizard may vary based on the deploy option you select. The fields displayed in the various pages of the wizard are described in the following sections.Related Links
Name and Deploy Options
Select Template
141

Select Devices
Select ISO Location
Edit Attributes
Set Schedule
Summary
Name and Deploy Options
The Name and Deploy Options page enables you to provide a name for the task and also select the deployment options.
The fields displayed in the Name and Deploy Options page of the Deploy Template Wizard are described in the following table.
Field Description
Name Provide a name for the task.
Select Deploy Options
Deploy Template Select to deploy a device configuration template.
Boot to Network ISO Select to boot to a network ISO image.
Related LinksDeploy Template Wizard
Select Template
The Select Template page enables you to select the template you want to deploy on the target devices.
NOTE: The Select Template page is only displayed if you select the Deploy Template option in the Name and Deploy Options or Deploy Options page.
The fields displayed in the Select Template page are described in the following table.
Field Description
Server Template Displays the server configuration templates that you have either created or cloned.
Chassis Template
NOTE: If you select both Deploy Template and Boot to Network ISO in the Name and Deploy Options or Deploy Options page, the Chassis Template option is disabled.
Displays the chassis configuration templates that you have either created or cloned.
Related LinksDeploy Template Wizard
Select Devices
The Select Devices page enables you to select target devices for deployment.
The Select Devices page displays the Repurpose and Bare Metal Devices tree-view that includes the target devices. You can select more than one target device for deployment.Related Links
142

Deploy Template Wizard
Select ISO Location
The Select ISO Location page enables you to provide the details of the ISO file.
NOTE: The Select ISO Location page is only displayed if you select the Boot to Network ISO option in the Name and Deploy Options or Deploy Options page.
The fields displayed in the Select ISO Location page are described in the following table.
Field Description
ISO Filename
ISO Filename Provide the name of the ISO file.
Share Location
Share IP Provide the IP address of the network share where the ISO file is available.
Share Name Provide the name of the network share where the ISO file is available.
Share Credentials
Share Username Provide the user name required to access the network share.
Share Password Provide the password required to access the network share.
Related Links
Deploy Template Wizard
Edit Attributes
The Edit Attributes page enables you to edit the attributes of the selected configuration template and the device-specific attributes.
NOTE: The Edit Attributes page is only displayed if you select the Deploy Template option in the Name and Deploy Options or Deploy Options page.
Template Attributes
The fields displayed in the Template Attributes tab of the Edit Attributes page are described in the following table.
Field Description
Grouped by Displayed if you choose to display the attributes as groups.
Total Displays the total number of attributes.
Modified Displays the number of attributes that you have modified.
143

Field Description
Attributes for Displays the name of the selected device configuration template.
Device Specific Attributes for Displays the following:
• For a deployment task — The device name, Service Tag, and device model.
• For an auto deployment task — The Service Tag of the device to be discovered later.
Deploy Select to deploy an attribute. If you do not select an attribute, the attribute value is not deployed on the target device and the current value will be retained on the target device. You can select all the attributes in the template by selecting the check box in the Deploy column header.
Modified Displays if you have modified the value of the attribute.
Section Displays the component the attribute belongs to. For example, iDRAC, BIOS, NIC, and so on.
Instance Displays the instance of the component the attribute belongs to.
Attribute Name Displays the name of the attribute.
Value Displays the value of the attribute.
Dependencies Displays if the attribute is dependent on any other attributes. To edit a dependent attribute, you must first set the primary attribute.
Destructive Displays if deploying the attribute may result in destructive changes to the device configuration including performance, connectivity, and ability to boot the device.
Undo Click to undo the changes made to the configuration template.
Save Click to save the changes to the configuration template.
Device Specific Attributes
The fields displayed in the Device Specific Attributes tab of the Edit Attributes page are described in the following table.
144

Field Description
Select Devices Displays the devices that you have selected for deployment. You can select a device to view the attributes specific to that device.
Device Specific Attributes for Displays the model number and service tag of the selected device.
Grouped by Displayed if you have chosen to display the attributes as groups.
Total Displays the total number of attributes.
Modified Displays the number of attributes that you have modified.
Deploy Select to deploy an attribute. If an attribute is not selected, the attribute value will not be deployed on the target device and the current value will be retained on the target device. You can select all the attributes in the template by selecting the check box in the Deploy column header.
Modified Displays if you have modified the value of the attribute.
Section Displays the component the attribute belongs to. For example, iDRAC, BIOS, NIC, and so on.
Instance Displays the instance of the component the attribute belongs to.
Attribute Name Displays the name of the attribute.
Value Displays the value of the attribute.
Dependencies Displays if the attribute is dependent on any other attributes. To edit a dependent attribute, you must first set the primary attribute.
Destructive Displays if deploying the attribute may result in destructive changes to the device configuration including performance, connectivity, and ability to boot the device.
Undo Click to undo the changes made to the configuration template.
Save Click to save the changes to the configuration template.
Import/Export Displays the Import/Export Device Specific Attributes window.
The fields displayed in the Import/Export Device Specific Attributes window are described in the following table.
145

Field Description
Export Selected Device Click to export the device specific attributes for the selected device to a .csv file.
Export All Devices Click to export the device specific attributes for all selected device to a .csv file.
Import Click to import the device-specific attributes.
File Requirements and Info Displays the requirements of the .csv file you must use to import device-specific attributes.
View Logs Displays the user interface logs.
Close Click to close the Import/Export Device Specific Attributes window.
Related Links
Deploy Template Wizard
Importing Device Specific Attributes
Exporting Device Specific Attributes
Set Schedule
The Set Schedule page enables you to set the date and time at which you want to deploy the task.
The fields displayed in the Set Schedule page are described in the following table.
Field Description
Run Now Select to run the deployment task immediately.
Run At Select to schedule the deployment task.
Execution Credentials
User Name Provide the user name required to run the task.
Password Provide the password required to run the task.
Related Links
Deploy Template Wizard
Summary
The Summary page displays the options you have selected for the deployment task.
The fields displayed in the Summary page are described in the following table.
Field Description
Name Displays the task name.
Deploy Template Displays if the task will deploy a configuration template.
146

Field Description
Boot to Network ISO Displays if the task will boot to a network ISO image.
Selected Template Displays the configuration template selected for deployment.
Device Specific Attributes Displays if the device-specific attributes are set.
ISO Filename Displays the name of the ISO file.
Share IP Displays the IP address of the network share where the ISO file is available.
Share Name Displays the name of the network share where the ISO file is available.
Share Username Displays the user name provided to access the network share.
Associated Devices Displays the selected target devices.
Schedule Displays the schedule selected for the task.
Related Links
Deploy Template Wizard
Setup Auto Deployment WizardThe Setup Auto Deployment wizard guides you through the steps to deploy a configuration template and/or boot to a network ISO image on target devices that you will discover later. The steps displayed in the wizard may vary based on the deployment option you select. The fields displayed in the various pages of the wizard are described in the following sections.Related Links
Deploy Options
Select Template
Select ISO Location
Import Service Tags
Edit Attributes
Execution Credentials
Summary
Deploy Options
The Deploy Options page enables you to select the deployment options.
The fields displayed in the Deploy Options page of the Setup Auto Deployment wizard are described in the following table.
Field Description
Deploy Template Select to deploy a device configuration template.
Boot to Network ISO Select to boot to a network ISO image.
147

Select Template
The Select Template page enables you to select the template you want to deploy on the target devices.
NOTE: The Select Template page is only displayed if you select the Deploy Template option in the Name and Deploy Options or Deploy Options page.
The fields displayed in the Select Template page are described in the following table.
Field Description
Server Template Displays the server configuration templates that you have either created or cloned.
Chassis Template
NOTE: If you select both Deploy Template and Boot to Network ISO in the Name and Deploy Options or Deploy Options page, the Chassis Template option is disabled.
Displays the chassis configuration templates that you have either created or cloned.
Related Links
Deploy Template Wizard
Select ISO Location
The Select ISO Location page enables you to provide the details of the ISO file.
NOTE: The Select ISO Location page is only displayed if you select the Boot to Network ISO option in the Name and Deploy Options or Deploy Options page.
The fields displayed in the Select ISO Location page are described in the following table.
Field Description
ISO Filename
ISO Filename Provide the name of the ISO file.
Share Location
Share IP Provide the IP address of the network share where the ISO file is available.
Share Name Provide the name of the network share where the ISO file is available.
Share Credentials
Share Username Provide the user name required to access the network share.
Share Password Provide the password required to access the network share.
Related Links
Deploy Template Wizard
148

Import Service Tags
The Import Service Tags page of the Setup Auto Deployment wizard displays the Import button. Click Import to import a .csv file that includes Service Tags of devices that you will discover later.
NOTE: The Service Tags that you want to import:
• Must be listed in the .csv file in a column titled ServiceTag
• Must be valid Service Tags
• Must not be Service Tags of devices that are already discovered.
Edit Attributes
The Edit Attributes page enables you to edit the attributes of the selected configuration template and the device-specific attributes.
NOTE: The Edit Attributes page is only displayed if you select the Deploy Template option in the Name and Deploy Options or Deploy Options page.
Template Attributes
The fields displayed in the Template Attributes tab of the Edit Attributes page are described in the following table.
Field Description
Grouped by Displayed if you choose to display the attributes as groups.
Total Displays the total number of attributes.
Modified Displays the number of attributes that you have modified.
Attributes for Displays the name of the selected device configuration template.
Device Specific Attributes for Displays the following:
• For a deployment task — The device name, Service Tag, and device model.
• For an auto deployment task — The Service Tag of the device to be discovered later.
Deploy Select to deploy an attribute. If you do not select an attribute, the attribute value is not deployed on the target device and the current value will be retained on the target device. You can select all the attributes in the template by selecting the check box in the Deploy column header.
Modified Displays if you have modified the value of the attribute.
149

Field Description
Section Displays the component the attribute belongs to. For example, iDRAC, BIOS, NIC, and so on.
Instance Displays the instance of the component the attribute belongs to.
Attribute Name Displays the name of the attribute.
Value Displays the value of the attribute.
Dependencies Displays if the attribute is dependent on any other attributes. To edit a dependent attribute, you must first set the primary attribute.
Destructive Displays if deploying the attribute may result in destructive changes to the device configuration including performance, connectivity, and ability to boot the device.
Undo Click to undo the changes made to the configuration template.
Save Click to save the changes to the configuration template.
Device Specific Attributes
The fields displayed in the Device Specific Attributes tab of the Edit Attributes page are described in the following table.
Field Description
Select Devices Displays the devices that you have selected for deployment. You can select a device to view the attributes specific to that device.
Device Specific Attributes for Displays the model number and service tag of the selected device.
Grouped by Displayed if you have chosen to display the attributes as groups.
Total Displays the total number of attributes.
Modified Displays the number of attributes that you have modified.
Deploy Select to deploy an attribute. If an attribute is not selected, the attribute value will not be deployed on the target device and the current value will be retained on the target device. You can select all the attributes in the template by selecting the check box in the Deploy column header.
150

Field Description
Modified Displays if you have modified the value of the attribute.
Section Displays the component the attribute belongs to. For example, iDRAC, BIOS, NIC, and so on.
Instance Displays the instance of the component the attribute belongs to.
Attribute Name Displays the name of the attribute.
Value Displays the value of the attribute.
Dependencies Displays if the attribute is dependent on any other attributes. To edit a dependent attribute, you must first set the primary attribute.
Destructive Displays if deploying the attribute may result in destructive changes to the device configuration including performance, connectivity, and ability to boot the device.
Undo Click to undo the changes made to the configuration template.
Save Click to save the changes to the configuration template.
Import/Export Displays the Import/Export Device Specific Attributes window.
The fields displayed in the Import/Export Device Specific Attributes window are described in the following table.
Field Description
Export Selected Device Click to export the device specific attributes for the selected device to a .csv file.
Export All Devices Click to export the device specific attributes for all selected device to a .csv file.
Import Click to import the device-specific attributes.
File Requirements and Info Displays the requirements of the .csv file you must use to import device-specific attributes.
View Logs Displays the user interface logs.
Close Click to close the Import/Export Device Specific Attributes window.
Related Links
Deploy Template Wizard
Importing Device Specific Attributes
Exporting Device Specific Attributes
151

Execution Credentials
The Execution Credentials page enables you to add and/or assign credentials that are required for running the auto deployment task on the target device. The fields displayed in the Execution Credentials page of the Setup Auto Deployment wizard are described in the following sections.
Credentials
The Credentials section displays a table that includes credentials that you have configured for target devices that you will discover later. The following are the fields displayed in the credentials table.
Field Description
Add New Credentials Click to open the Add Credentials window that enables you to provide credentials for target devices.
Description Displays the description provided for the credentials.
Username Displays the user name.
Password Displays the password in a masked format.
Is Default Displays a check box that you can select to associate the credentials to all new target devices.
Update Displays an icon that you can click to edit the credentials.
Delete Displays an icon that you can click to delete the credentials.
Devices
The Devices section displays a table that includes the target devices that you selected through the Import Service Tags page. The following are the fields displayed in the devices table.
Field Description
Device Name Displays the Service Tag of the device.
Device Model Displays the model name of the system, if available.
Execution Credentials Displays the credentials that has been assigned to the device for running the deployment task.
Related Links
Add Credentials
Add Credentials
The Add Credentials window enables you to provide credentials required for running the auto deployment task on target devices.
The fields displayed in the Add Credentials window are described in the following table.
152

Field Description
Description Provide a description for the credentials.
Username Provide the user name required to run the task on the target device.
Password Provide the password required to run the task on the target device.
Default Select to associate the credentials to all new target devices.
Summary
The Summary page displays the options you have selected for the auto deployment task.
The fields displayed in the Summary page are described in the following table.
Field Description
Name Displays the task name.
Deploy Template Displays if the task will deploy a configuration template.
Boot to Network ISO Displays if the task will boot to a network ISO image.
Selected Template Displays the configuration template selected for deployment.
ISO Filename Displays the name of the ISO file.
Share IP Displays the IP address of the network share where the ISO file is available.
Share Name Displays the name of the network share where the ISO file is available.
Share Username Displays the user name provided to access the network share.
Associated Service Tags Displays the Service Tags of the target devices.
Device Specific Attributes Displays if the device-specific attributes are set.
Manage Auto Deployment CredentialsThe Manage Auto Deployment Credentials page enables you to add and/or assign credentials that are required for running the auto deployment task on the target device. The fields displayed in the Manage Auto Deployment Credentials page are described in the following sections.
Credentials
The Credentials section displays a table that includes credentials that you have configured for the auto deployment task. The following are the fields displayed in the credentials table.
153

Field Description
Add New Credentials Click to open the Add Credentials window that enables you to provide credentials for target devices.
Description Displays the description provided for the credentials.
Username Displays the user name.
Password Displays the password in a masked format.
Is Default Displays a check box that you can select to associate the credentials to all new target devices.
Update Displays an icon that you can click to edit the credentials.
Delete Displays an icon that you can click to delete the credentials.
Devices
The Devices section displays a table that includes the target devices that you selected through the Import Service Tags page of the Setup Auto Deployment wizard. The following are the fields displayed in the devices table.
Field Description
Device Name Displays the Service Tag of the device.
Device Model Displays the model name of the system, if available.
Execution Credentials Displays the credentials that has been assigned to the device for running the deployment task. You can use this field to assign the credentials required for running the auto deployment task on the device.
Related Links
Managing Auto Deployment Credentials
154

11Managing Server Configuration BaselineThe configuration of a server or chassis in a production environment must be properly maintained to ensure availability of the server. These server configuration settings tends to be drifted over time because of various reasons. The Device Compliance Portal enables you to verify and ensure the compliance of multiple servers and chassis to a device configuration template that serves as a baseline. The compliance status indicates if there is any difference between the current configuration settings and its corresponding baseline configuration template. The Device Compliance Portal also allows you to create baseline template, and assign the desired template to multiple production servers for establishing the baselines.
NOTE: A device is considered to be compliant if it matches with all the settings defined in the associated template. A device with additional hardware (for example, an additional NIC card), is also considered to be compliant. A device may become non-compliant if there is a change in either the device inventory or the associated template. If the associated template is changed, the template must be redeployed to the associated devices.
Using the Device Compliance Portal, you can:
• Create a configuration template from a server or chassis configuration file
• Create a configuration template from a server or chassis
• Edit a configuration template
• Associate a configuration template to a server or chassis
• Configure the credentials and schedule the device configuration inventory for target devices
• View the tasks that have been created and their status
• Configure the deployment file share
NOTE: The device configuration deployment and configuration compliance features are licensed (fee-based) for supported servers (PowerEdge 12G or later with iDRAC). However, using these features on supported Dell chassis is free and does not require a license. Creating a device configuration template from either a server or chassis does not require a license as well. For more information on licensing, see OpenManage Essentials — Server Configuration Management License.
Related Links
Configuring the Deployment File Share
Creating a Device Configuration Template
Configuring the Credentials and Device Configuration Inventory Schedule
Associating Target Devices to a Configuration Template
Viewing the Device Compliance Status
Viewing the Compliance Tasks
Additional Information
155

Viewing the Device Compliance PortalTo view the device compliance portal, click Manage → Configuration → Device Compliance Portal.
Getting Started for Device Configuration ComplianceBefore you can verify the compliance status of devices to a device configuration template, you must:
1. Configure the deployment file share on the server running OpenManage Essentials.
2. Configure the credentials and inventory schedule for target devices.
Related Links
Configuring the Deployment File Share
Configuring the Credentials and Device Configuration Inventory Schedule
Device Configuration Compliance Overview
Device Configuration Compliance Overview
The steps that you must perform to verify the compliance status of a device and to make a device compliant to a device configuration template are as follows:
1. Create a device configuration template — Use the Create Template task in the Common Tasks pane to create a device configuration template. You can choose to create the template from either a configuration file or a reference device.
2. Associate a device configuration template to target devices — Select a template and associate it to applicable devices to view the compliance status.
3. View the compliance status — The Device Compliance Portal displays the compliance summary of all devices associated to templates. To view the compliance status of a device to an associated template, select the template in the Templates pane. To view the detailed compliance results for each device, double-click the Device Compliance graph or table. Alternatively, you can also select
the device in the device tree (Manage → Devices), and click the Configuration tab in the right-pane to view the compliance status.
4. Make devices compliant with the associated device configuration template (Optional) — If you want to make a device compliant to the associated device configuration template, you must deploy the device configuration template through the Deployment Portal.
Related Links
Getting Started for Device Configuration Compliance
Configuring the Credentials and Device Configuration Inventory ScheduleThe Configuration Inventory Schedule task enables you to collect an inventory of the device configuration attributes from applicable devices at periodic intervals. The inventory information is used to verify the compliance status of the devices to a specific device configuration template.Before you configure the device inventory schedule, ensure that:
156

• The target devices meet the requirements specified in Device Requirements for Deployment and Compliance Tasks.
• The OpenManage Essentials — Server Configuration Management license is installed on all target servers. For more information, see OpenManage Essentials — Server Configuration Management License.
To configure the device configuration inventory schedule:
1. Click Manage → Configurations.
2. Perform one of the following:
• In the Common Tasks pane, click Configuration Inventory Schedule.
• In the Device Configuration Compliance Portal pane, click Getting Started for Compliance → Configure Credentials and Inventory Schedule for Target Devices.
The Configuration Inventory Schedule wizard is displayed.
3. On the Inventory Credentials page:
a. Click Add New Credentials.
The Add Credentials window is displayed.
b. Type the description, user name, and password.
NOTE: You must provide the iDRAC credentials that have either Administrator or Operator rights.
c. If you want to set the credentials as the default credentials for all new target devices, select Default, and then click Finish.
d. On the Devices section, set the Execution Credentials for each target device.
e. Click Next.
4. On the Schedule page:
a. Select Enable Configuration Inventory.
b. If you want to run the configuration inventory immediately, select Run Inventory on Finish.
c. Select the desired scheduling parameters.
d. (Optional) You can adjust the Inventory Polling Speed slider for faster task execution; however, this consumes more system resources.
e. Click Finish.
The status of the task is displayed in Task Execution History. You can double-click the task in Task Execution History to view the task execution details.
Related Links
OpenManage Essentials — Server Configuration Management License
Device Requirements for Deployment and Compliance Tasks
Configuration Inventory Schedule Wizard
Associating Target Devices to a Configuration TemplateThe Associate Devices to a Template task enables you to designate the template to be used for verifying the compliance status of target devices.
NOTE: A device can only have one associated device configuration template. If you associate a second template to a device, the second template will become the only configuration template associated to the device.
157

To associate target devices to a template:
1. Click Manage → Configurations.
2. Perform one of the following:
• In the Common Tasks pane, click Associate Devices to a Template.
• In the Device Configuration Compliance Portal pane, click Getting Started for Compliance → Associate Template to Target Devices.
The Associate to Template wizard is displayed.
3. On the Select Template page:
a. Based on the target device type, click either Server Template or Chassis Template.
NOTE: Only configuration templates that you have either created or cloned are available for selection.
b. Select a device configuration template from the list.
c. Click Next.
4. On the Select Devices page, select the target devices from the All Applicable Devices tree, and then click Finish.
Related Links
Template Association
Associate Devices To Template Wizard
Viewing the Inventory Configuration DetailsYou can view the inventory configuration details of a device through the Devices portal.Before you begin, ensure that the device for which you want to view the inventory configuration details, meet the requirements specified in Device Requirements for Deployment and Compliance Tasks.To view the inventory configuration details:
1. Click Devices.
The Devices portal is displayed.
2. In the device tree, select the device for which you want to view the inventory configuration details.
3. In the right pane, click Inventory.
The inventory configuration details are displayed. If the inventory configuration task has not been run for the device, the Run Inventory Configuration button in is displayed. You can click Run Inventory Configuration to view the configuration details, provided you have configured the credentials for the device in the Inventory Configuration Schedule.
Related Links
Device Requirements for Deployment and Compliance Tasks
Viewing the Device Compliance Status
Before you can view the compliance status of a device to an associated configuration template, you must run the device configuration inventory task. To run the device configuration inventory task, you can either create an inventory configuration schedule or select the device in the device tree and click Run Configuration Inventory on the Configuration tab in the right pane.
158

To view the compliance status of devices to the associated configuration template:
1. Click Manage → Configurations → Device Compliance Portal.
The Device Compliance graph and grid display the compliance status of the devices.
2. To view the devices by compliance status, click the Device Compliance graph.
3. To view the compliance status of a particular device, click the device in the Device Compliance grid.
NOTE: You can also select the device in the device tree (Manage → Devices), and click the Configuration tab in the right-pane to view the compliance status.
Viewing the Compliance TasksTo view the compliance tasks that have been created:
1. Click Manage → Configuration.
2. In the Tasks pane on the left, select a task type.
The Task tab on the right pane displays the tasks that have been created.
Related Links
Tasks
159

12Configuration – ReferenceYou can access the following from the Manage → Configuration page:
• Device Configuration Compliance Portal
– Getting Started for Compliance — Displays the information required to setup, use, and get started with the device configuration compliance features.
– Device Compliance Portal — Displays the default view of the Device Compliance Portal.
• Common Tasks — Displays the configuration compliance setup tasks and tasks that you can create.
– Create Template
– Associate Devices to a Template
– Configuration Inventory Schedule
– File Share Settings
• Compliance by Template — Displays the sample device configuration templates and templates that you have created or cloned.
– Server Templates
* Sample - iDRAC SNMP Management Settings
* Sample - iDRAC Auto Update Settings
* Sample - Enable Broadcom Partitioning
* Sample - BIOS Setup System Password
* Sample - iDRAC static IP address
* Sample - iDRAC System Location
* Sample - iDRAC Thermal Alert Monitor
* Sample - iDRAC Timezone NTP
* Sample - Configure iDRAC Users
* Sample - iDRAC Initialized Virtual Disk
* Sample - Set Virtual Disk As Boot
* Sample - Delete BIOS System Setup Password
* Sample - Enable PXE Boot
* Sample - One Time BIOS Boot Device
* Sample - One Time HD Boot Device
* Sample - One Time UEFI Boot Device
* Sample - Set BIOS Boot Order
* Sample - Set HD Boot Order
160

* Sample - iDRAC Set Power Cap
* Sample - Set UEFI Boot Order
* Sample - Set SNMP Email Alerts
– Chassis Templates
* Sample - VRTX Chassis
* Sample - M1000e Chassis
• Tasks — Displays the tasks of the selected category in the Tasks tab in the right pane.
– Configuration Tasks
* Chassis Configuration Deployment — Displays the Create Template tasks you have created for chassis.
* Device Configuration Import — Displays the Create Template tasks you have created for servers.
NOTE: For information on the sample device configuration templates, see the iDRAC documentation at dell.com/support/manuals.
Related Links
Device Compliance
Tasks
Task Execution History
Associate Devices To Template Wizard
Configuration Inventory Schedule Wizard
Device ComplianceThe Device Compliance graph and table enable you to view the compliance status of the devices.
Device Compliance Graph
The device compliance graph provides a pie chart distribution of the compliance status. Click a segment of the pie chart to view more information on the systems. The pie chart displays the following segments to indicate the device compliance status:
• Compliant — Devices that are compliant to the associated configuration template.
• Non Compliant — Devices that are not compliant to the associated configuration template.
• Non Inventoried — Devices on which configuration inventory is not completed.
• Non Associated — Devices that are not associated to a configuration template.
• Non Licensed — Devices that do not have the OpenManage Essentials — Server Configuration Management license installed.
Device Compliance Table
The fields displayed in the Device Compliance table of the Device Compliance portal are described in the following table.
161

Field Description
Compliance Status Displays an icon that indicates the compliance status of the device to the associated configuration template.
Device Name Displays the unique name of the system that identifies it on the network.
Service Tag Displays the unique identifier assigned to the system.
Model Displays the model name of the system. For example, PowerEdge R710.
Compliance Template Displays the device configuration template that is associated to the device.
Inventory Last Ran Displays the date and time the last device configuration inventory was completed.
TasksThe Tasks tab displays all the tasks that have been created.
The fields displayed in the Tasks tab of the Device Compliance Portal are described in the following table.
Field Description
Schedule Displays if the task schedule is active or inactive.
Task Name Displays the name of the task.
Type Displays the type of task.
Description Displays a brief description about the task.
Updated on Displays the date and time the task was updated.
Updated by Displays the name of the user who updated the task.
Created on Displays the date and time the task was created.
Created by Displays the name of the user who created the task.
Related Links
Viewing the Compliance Tasks
Task Execution HistoryThe Task Execution History tab displays the status of tasks.
The fields displayed in the Task Execution History tab are described in the following table.
162

Field Description
Status Displays an icon representing the task status:
— Running or pending
— Complete
— Stopped
— Failed
— Warning
Task Name Displays the name of the task.
Start Time Displays the start time of the task.
% Completed Displays the progress information of the task.
Task State Displays the state of the task:
• Running
• Complete
• Stopped
• Failed
• Warning
End Time Displays the end time of the task.
Executed by User Displays the name of the user who executed the task.
Associate Devices To Template WizardThe Associate Devices To Template Wizard enables you to associate devices to a device configuration template. The fields displayed in the Associate Devices To Template Wizard are described in the following sections.Related Links
Select Template
Select Devices
Associating Target Devices to a Configuration Template
Select Template
The Select Template page enables you to select the template you want to associate to target devices.
The fields displayed in the Select Template page are described in the following table.
163

Field Description
Server Template Displays the server configuration templates that you have either created or cloned.
Chassis Template Displays the chassis configuration templates that you have either created or cloned.
Select Devices
The Select Devices page enables you to select target devices to verify configuration compliance.
The Select Devices page displays the All Applicable Devices tree-view that includes the target devices. You can associate one or more target devices to a device configuration template.
Configuration Inventory Schedule WizardThe Configuration Inventory Schedule wizard enables you to associate the credentials to discovered devices and set the schedule for configuration inventory. The fields displayed in the pages of the wizard are described in the following sections.Related Links
Inventory Credentials
Schedule
Configuring the Credentials and Device Configuration Inventory Schedule
Inventory Credentials
The Inventory Credentials page enables you to add credentials and associate credentials to target devices. The fields displayed in the Inventory Credentials page are described in the following table.
Credentials
The Credentials section displays a table that includes credentials that you have configured for the configuration inventory task. The following are the fields displayed in the credentials table.
Field Description
Add New Credentials Click to open the Add Credentials window that enables you to provide credentials for target devices.
Description Displays the description provided for the credentials.
Username Displays the user name.
Password Displays the password in a masked format.
Is Default Displays a check box that you can select to associate the credentials to all new target devices.
Update Displays an icon that you can click to edit the credentials.
164

Field Description
Delete Displays an icon that you can click to delete the credentials.
Devices
The Devices section displays a table that includes the target devices for configuration compliance tasks. The following are the fields displayed in the devices table.
Field Description
Device Name Displays the Service Tag of the device.
Device Model Displays the model name of the system, if available.
Execution Credentials Displays the credentials that has been assigned to the device for running the configuration inventory task. You can use this field to assign the credentials required for running the configuration inventory task on the device.
Schedule
The Schedule page enables you to configure the schedule for the configuration inventory.
The fields displayed in the Schedule page are described in the following table.
Field Description
Enable Configuration Inventory Select to schedule configuration inventory.
Run Inventory on Finish Select to run the configuration inventory after the inventory configuration is completed.
Configure Global Inventory Polling Interval Set the frequency of the inventory in weekly or daily intervals.
NOTE: OpenManage Essentials performs configuration inventory only on devices that have already been discovered.
• Every Week On — Specify the day or days of the week that you want to schedule the inventory and the time that you want it to begin.
• Every <n> Days <n> Hours interval — Specify the intervals between inventory cycles. The maximum discovery interval is 365 days and 23 hours.
Inventory Polling Speed Set the amount of resources available for accelerating the inventory poll speed. The faster you set the inventory poll speed, the more resources are required, but less time is required to perform the inventory.
165

Field Description
After changing the speed, OpenManage Essentials may take several minutes to adjust to the new speed.
166
13Viewing Inventory ReportsOpenManage Essentials provides pre-defined reports for all discovered and inventoried devices. With these reports, you can:
• Consolidate information about devices in your environment.
• Filter report data based on the devices by clicking the Filter by: drop-down list. You can also add a new group of devices from the dashboard by clicking Add New Group from the Filter by: drop-down list.
• Export data for use in another application in the XML file format.
NOTE: By default, the reports display the latest device information when you access the reports. If a report is open and you have not navigated from the report, you must click the refresh button to view the latest device information on the report.
NOTE: You cannot create new reports.
Choosing Predefined ReportsTo view predefined reports, click Reports.
The Managed Systems Reports displays the predefined reports. Select from the available reports to view particular information about the devices in your environment. You can filter the reports based on the devices by clicking the Filter by: drop-down list. You can also add a new group of devices by clicking Add New Group from the Filter by: drop-down list.
Predefined Reports
Report Description
Agent and Alert Summary Identifies the OpenManage Server Administrator versions installed on devices in the environment and allows you to identify the devices generating the most alerts. If the Server Administrator is not installed on a server, it is displayed as None.
• The upper left web part identifies the OpenManage Server Administrator versions in your environment.
• Clicking the OpenManage Server Administrator version in the OpenManage Server Administrator pie chart in the top right web part shows you the list of servers with that version installed.
• The lower left web part lists in descending order the devices generating the most alerts since initial discovery and inventory.
• The top five event generating devices are identified in the lower right web part. Click on a
167

Report Description
specific device to view the events associated with it.
Device Compliance Provides information about the compliance of a server or chassis to an associated device configuration template.
Server Overview Provides information about the servers such as the system name, operating system installed on the server, processors, and memory.
Server Components and Versions Identifies BIOS, driver, and firmware versions on all discovered and inventoried servers.
Asset Acquisition Information Provides acquisition information about the devices.
Asset Maintenance Information Provides the maintenance information about the devices.
Asset Support Information Provides the support information about the devices.
Hard Drive Information Identifies serial number, revision, manufacturer, and bus type for hard drives.
ESX Information Identifies ESX and ESXi virtual machine hosts and associated virtual machines.
HyperV Information Identifies the HyperV virtual machine hosts and associated virtual machines.
FRU Information Provides details on replaceable server components.
License Information Provides the licensing information for the device.
Device Location Information Provides information about the location of a device in a data center.
Memory Information Provides details on DIMMs and identifies the slot a particular DIMM occupies within a server.
Modular Enclosure Information Provides information about the enclosure type, firmware version, enclosure Service Tag, and so on.
NIC Information Identifies the NIC model-IP address, MAC address, manufacturer and part and serial numbers for NICs.
PCI Device Information Identifies model, manufacturer, and slot for PCI and PCIe controllers in each server.
168

Report Description
Storage Controller Information Identifies the storage controllers on the server and provides the controller name, vendor, controller type, and controller state:
• Ready: The storage controller is ready for use.
• Degraded: There is a potential problem with the controller. Investigation is required.
Virtual Disk Information Provides information about the virtual disk such as size, layout, stripe size, and so on.
Warranty Information See Viewing Warranty Reports for details on how to run the warranty report and the information it provides.
BIOS Configuration Provides the BIOS configuration information of the system.
License Information Provides IPMI over LAN, SSH, and Telnet status of the iDRAC.
Template Association Provides information about the device configuration templates and the devices associated to the templates.
Filtering Report Data
You can filter the results by dragging and dropping column headers to the top of reports. You can choose one or more attributes when revising the view to meet your specific needs.
For example, in the NIC Information report, drag the System Type and System Name to the top of the report. The view immediately changes to a nesting of information based on your preference. In this example, you can view nested data for NICs; NIC IP Address, MAC Address, and NIC description.
169
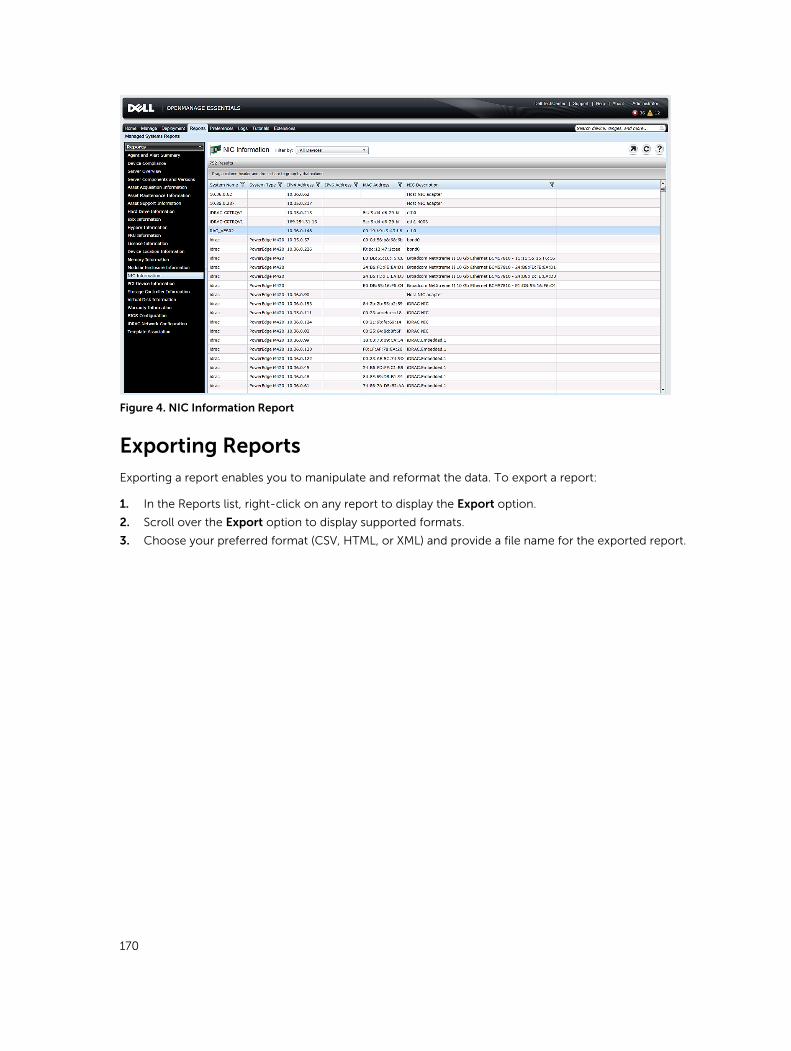
Figure 4. NIC Information Report
Exporting ReportsExporting a report enables you to manipulate and reformat the data. To export a report:
1. In the Reports list, right-click on any report to display the Export option.
2. Scroll over the Export option to display supported formats.
3. Choose your preferred format (CSV, HTML, or XML) and provide a file name for the exported report.
170

14Reports — ReferenceFrom Reports you can view the following:
• Agent and Alert Summary
• Device Compliance
• Server Overview
• Server Components and Versions
• Asset Acquisition Information
• Asset Maintenance Information
• Asset Support Information
• Hard Drive Information
• ESX Information
• HyperV Information
• FRU Information
• License Information
• Device Location Informatoin
• Memory Information
• Modular Enclosure Information
• NIC Information
• PCI Device Information
• Storage Controller Information
• Virtual Disk Information
• Warranty Information
• BIOS Configuration
• iDRAC Network Configuration
• Template Association
You can also filter the information based on a device or group by clicking Filter by and then selecting the device or group.
Related Links
Agent and Alert Summary
Device Compliance
Server Overview
Server Components and Versions
Asset Acquisition Information
Asset Maintenance Information
Asset Support Information
Hard Drive Information
ESX Information
HyperV Information
171

Field Replaceable Unit (FRU) Information
License Information
Device Location Information
Memory Information
Modular Enclosure Information
NIC Information
PCI Device Information
Storage Controller Information
Virtual Disk Information
Warranty Information
BIOS Configuration
iDRAC Network Configuration
Template Association
Agent and Alert Summary
The Agent and Alert Summary displays the following:
• Agent Summary
• iSM Agent Summary
• Alerts per Device
• Top Alert Generators
Agent Summary
The Agent Summary pane displays the agent summary information in a table and also as a graph.
Field Description
Number of systems using specific Server Administrator agent
Agent Details Displays the name and version of the agent.
Number of systems utilizing this agent Displays the number of systems utilizing a specific version of the agent.
iSM Agent Summary
The iSM Agent Summary pane displays the iDRAC Service Module (iSM) agent summary information in a table and also as a graph.
Field Description
Number of systems using specific iDRAC Service Module agent
Agent Details Displays the name and version of the agent.
Number of systems utilizing this agent Displays the number of systems utilizing a specific version of the agent.
172

Alerts per Device
Field Description
Most active discovered systems based on alert occurrence
Device Name Displays the unique name of the system that identifies it on the network.
Number of Associated Events Displays the number of alerts from the device.
Last Discovered On Displays the IP address range or host name.
Inventory Time Displays the time and date information for the last run inventory.
Top Alert Generators
The Top Alert Generators pane displays the top five systems with the maximum alerts.
Device Compliance
Field Description
Compliance Status Displays the compliance status of the device to the associated configuration template.
Device Name Displays the unique name of the system that identifies it on the network.
Service Tag Displays the unique identifier assigned to the system.
Model Displays the model name of the system. For example, PowerEdge R710.
Compliance Template Displays the device configuration template that is associated to the device.
Inventory Last Ran Displays the date and time the last device configuration inventory was completed.
Server Overview
Field Description
System Name Displays the host name of the system.
System Type Displays the model name of the system. For example, PowerEdge R710.
Operating System Displays the operating system installed on the system.
173

Field Description
Processor Count Displays the number of processors installed on the system.
Processor Family Displays the type of processor installed on the system.
Processor Cores Displays the number of processor cores.
Processor Speed Displays the speed of the processor.
Total Cores Displays the total number of cores present in the system.
Total Memory Displays the total memory installed on the system
Server Components and Versions
Field Description
System Name Displays the unique name of the system that identifies it on the network.
Service Tag Displays the unique identifier assigned to the system.
Model Type Displays the model name of the system. For example, PowerEdge R710.
Description Displays the software information.
Software Type Displays the type of software that is available on the system. For example, firmware.
Software Version Displays the version number of the software that is available on the system.
Asset Acquisition Information
Field Description
System Name Displays the unique name of the system that identifies it on the network.
System Type Displays the model name of the system. For example, PowerEdge R710.
Service Tag Displays the unique identifier assigned to the system.
Purchase Cost Displays the price the owner paid for the system.
Purchase Date Displays the date the owner purchased the system.
174

Field Description
Way Bill Number Displays the receipt from the carrier for the goods received.
Purchase Order Number Displays the number of the document that authorized payment for the system.
Installation Date Displays the date the system was put to service.
Expensed Displays whether the system is charged to a specific purpose or department such as research and development or sales.
Cost Center Displays the name or code for the business entity that acquired the system.
Signing Authority Name Displays the name of the person who approved the purchase or the service call on the system.
Vendor Displays the business entity that offers service on the system.
Depreciation Duration Displays the number of years or months over which a system is depreciated.
Depreciation Duration Unit Type Displays the unit in months or years.
Depreciation Percentage Displays the portion of 100 that an asset is devalued or depreciated.
Depreciation Method Displays the steps and assumptions used to compute the system's depreciation.
Ownership Code Defines the ownership code for this system.
Corporate Owner Name Displays the business entity that owns the system.
Insurance Company Displays the name of the company that insures the system.
Asset Maintenance Information
Field Description
System Name Displays the unique name of the system that identifies it on the network.
System Type Displays the model name of the system. For example, PowerEdge R710.
Service Tag Displays the unique identifier assigned to the system.
Multiple Schedules Displays whether there are multiple schedules for the lease.
175

Field Description
Buyout Amount Displays the balance purchase price for the system.
Lease Rate Factor Displays the rate factor for the lease on the system.
Lease End Date Displays the end date for the lease on the system.
Fair Market Value Displays the fair market value of the system.
Lessor Displays the name of the lessor of the system.
Maintenance Provider Displays the maintenance provider's name.
Maintenance Restrictions Displays the maintenance agreement restrictions.
Maintenance Start Date Displays the start date for maintenance on this system.
Maintenance End Date Displays the end date for maintenance on this system.
Outsourcing Problem Description Displays the problem encountered with the outsourcing service provider.
Outsourcing Service Fee Displays the amount that the outsourcing vendor charges for service.
Outsourcing Provider Fee Displays any additional outsourcing charge for service.
Outsourcing Provider Service Level Displays the service level agreement for the system.
Outsourcing Signing Authority Displays the name of the person who can sign the authorization for service.
Asset Support Information
Field Description
System Name Displays the unique name of the system that identifies it on the network.
System Type Displays the model name of the system. For example, PowerEdge R710.
Service Tag Displays the unique identifier assigned to the system.
Warranty Cost Displays the extended warranty cost date for the system.
Warranty Duration Displays the duration of the warranty.
Warranty Duration Type Displays the warranty duration type for the system.
176

Field Description
Warranty End Date Displays the warranty end date for the system.
Extended Warranty Cost Displays the cost of the warranty for the system.
Extended Warranty Start Date Displays the extended warranty start date for the system.
Extended Warranty End Date Displays the extended warranty end date for the system.
Extended Warranty Provider Name Displays the name of the extended warranty provider for the system.
Contract Renewed Displays whether the service contract for the system was renewed.
Contract Type Displays the name of the service contract type for the system.
Contract Vendor Displays the name of the service contract provider for the system.
Outsourced Displays whether the support for the system is outsourced or not.
Support Type Displays the type of component, system, or network problem that occurred.
Help Desk Displays the help desk information provided
Automatic Fix Displays the method used to fix the problem.
Hard Drive Information
Field Description
System Name Displays the unique name of the system that identifies it on the network.
System Type Displays the model name of the system. For example, PowerEdge R710.
Service Tag Displays the unique identifier assigned to the system.
Enclosure ID Displays the enclosure ID is assigned to the enclosure by Storage Management. Storage Management numbers the enclosures attached to the controller starting with zero.
Channel Displays the number of channels.
Target ID Displays the SCSI ID of the backplane (internal to the server) or the enclosure to which the
177
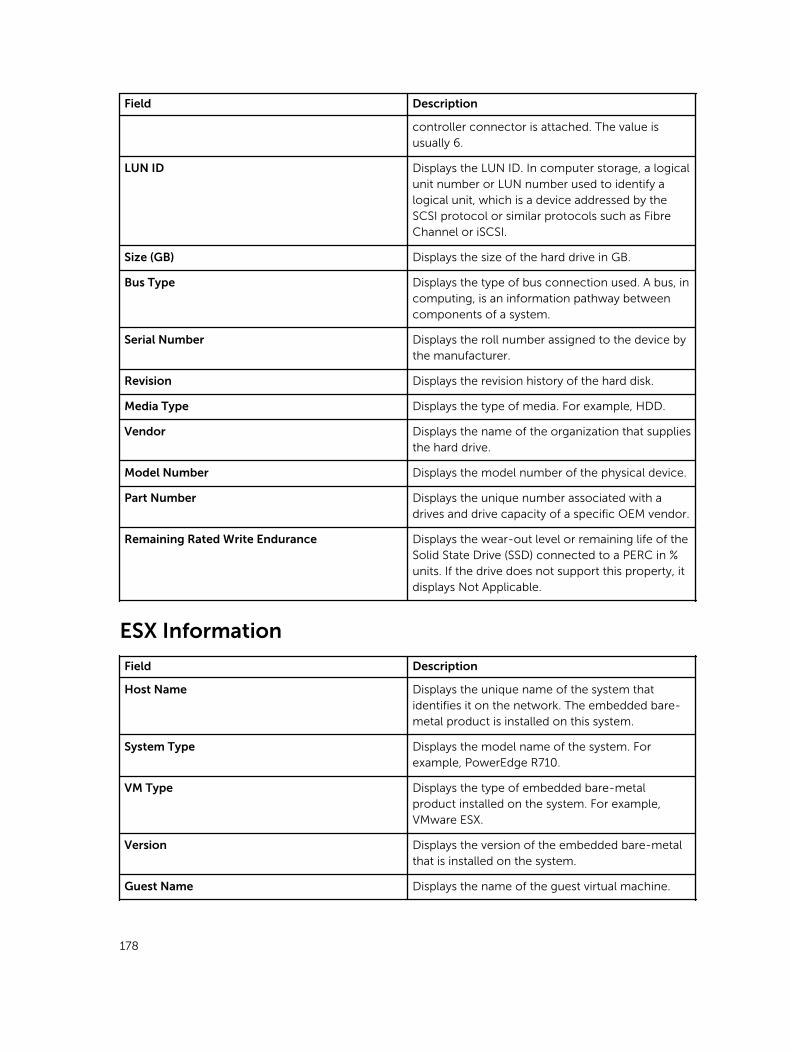
Field Description
controller connector is attached. The value is usually 6.
LUN ID Displays the LUN ID. In computer storage, a logical unit number or LUN number used to identify a logical unit, which is a device addressed by the SCSI protocol or similar protocols such as Fibre Channel or iSCSI.
Size (GB) Displays the size of the hard drive in GB.
Bus Type Displays the type of bus connection used. A bus, in computing, is an information pathway between components of a system.
Serial Number Displays the roll number assigned to the device by the manufacturer.
Revision Displays the revision history of the hard disk.
Media Type Displays the type of media. For example, HDD.
Vendor Displays the name of the organization that supplies the hard drive.
Model Number Displays the model number of the physical device.
Part Number Displays the unique number associated with a drives and drive capacity of a specific OEM vendor.
Remaining Rated Write Endurance Displays the wear-out level or remaining life of the Solid State Drive (SSD) connected to a PERC in % units. If the drive does not support this property, it displays Not Applicable.
ESX Information
Field Description
Host Name Displays the unique name of the system that identifies it on the network. The embedded bare-metal product is installed on this system.
System Type Displays the model name of the system. For example, PowerEdge R710.
VM Type Displays the type of embedded bare-metal product installed on the system. For example, VMware ESX.
Version Displays the version of the embedded bare-metal that is installed on the system.
Guest Name Displays the name of the guest virtual machine.
178

Field Description
Guest OS Type Displays the operating system that is installed on the virtual machine.
Guest Memory Size (MB) Displays the size of the RAM on the virtual machine.
Guest State Displays whether the virtual machine is powered off or powered on.
HyperV Information
Field Description
Host Name Displays the host name of the system on which the HyperV is installed.
System Type Displays the model name of the system. For example, PowerEdge R710.
Guest Name Displays the name of the guest virtual machine.
Guest Memory Size (MB) Displays the size of the RAM on the virtual machine.
Guest State Displays whether the virtual machine is powered off or powered on.
Field Replaceable Unit (FRU) Information
Field Description
System Name Displays the unique name of the system that identifies it on the network.
Model Type Displays the model name of the system. For example, PowerEdge R710.
Service Tag Displays the unique identifier assigned to the system.
FRU Device Name Displays the standard FRU name assigned to the device.
FRU Manufacturer Displays the name of the FRU manufacturer.
FRU Serial Number Displays the manufacturer specified identification number of the FRU.
FRU Part Number Displays the industry specific number that differentiates the type of FRU.
179

License Information
Field Description
System Name Displays the unique name of the system that identifies it on the network.
Model Type Displays the model name of the system. For example, PowerEdge R710.
License Description Displays the level of features enabled in the license.
License Duration Displays the duration of the license.
Entitlement ID Displays the unique identifier for the license.
Time Remaining Displays the days remaining until the license expires.
Device Location Information
Field Description
System Name Displays the unique name of the system that identifies it on the network.
System Type Displays the model name of the system. For example, PowerEdge R710.
Service Tag Displays the unique identifier assigned to the system.
Location Displays the location of the system.
Datacenter Displays the data center where the system is available.
Room Displays the name of the room where the system is available.
Aisle Displays the aisle where the system is available.
Rack Displays the rack where the system is available.
Memory Information
Field Description
System Name Displays the unique name of the system that identifies it on the network.
Service Tag Displays the unique identifier assigned to the system.
180

Field Description
System Type Displays the model name of the system. For example, PowerEdge R710.
Memory Device Name Displays the named assigned to the device by the manufacturer. For example, DIMMI_A.
Memory Device Size (MB) Displays the size of the memory device in GB.
Memory Device Manufacturer Displays the name of the device manufacturer.
Memory Device Part Number Displays the industry specific number assigned to the device.
Memory Device Serial Number Displays the roll number assigned to the device by the manufacturer.
Modular Enclosure Information
Field Description
Enclosure Model Type Displays the model name of the enclosure. For example, PowerEdge M1000e.
Slot Number Displays the slot number on the enclosure.
Slot Name Displays the slot name of the enclosure.
Slot Availability Displays whether the slot is available or occupied in the modular enclosure.
Firmware Version Displays the firmware version installed on the enclosure.
Enclosure Service Tag Displays the unique identifier assigned to the enclosure.
Enclosure Name Displays the unique enclosure name that identifies it on the network.
Blade Model Type The model name of the blade server. For example, PowerEdge M710.
Blade Service Tag Displays the unique identifier assigned to the blade server.
Blade Host Name Displays the host name of the blade server.
Blade OS Displays the operating system installed on the blade server.
181

NIC Information
Field Description
System Name Displays the unique name of the system that identifies it on the network.
System Type Displays the model name of the system. For example, PowerEdge R710.
IPv4 Address Displays the unique IPv4 address assigned to the NIC device.
IPv6 Address Displays the unique IPv6 address assigned to the NIC device.
MAC Address Displays the unique Media Access Control address (MAC address) identifier assigned to network interfaces for communications on the physical network segment.
NIC Description Displays information on the NIC device.
PCI Device Information
Field Description
System Name Displays the unique name of the system that identifies it on the network.
System Type Displays the model name of the system. For example, PowerEdge R710.
Service Tag Displays the unique identifier assigned to the system.
Device Card Description Displays the type of Peripheral Component Interconnect card used. For example, 82546GB Gigabit Ethernet Controller.
Device Card Manufacturer Displays the manufacturer information.
Device Card Slot Type Displays the type of slot on the mother board into which the card is inserted.
182

Storage Controller Information
Field Description
System Name Displays the unique name of the system that identifies it on the network. The storage controller is present on this system.
System Type Displays the model name of the system. For example, PowerEdge R710.
Controller Name Displays the name of the storage controller. For example, SAS 6/iR Integrated.
Vendor Displays the supplier information. For example, SAS 6/iR Integrated is supplied by Dell.
Controller Type Displays the type of controller. For example, SAS 6/iR Integrated is of type SAS.
Controller State Displays the state of the controller. For example, ready to use.
Virtual Disk Information
Field Description
System Name Displays the unique name of the system that identifies it on the network.
System Type Displays the model name of the system. For example, PowerEdge R710.
Service Tag Displays the unique identifier assigned to the system.
Target ID Displays the SCSI ID of the backplane (internal to the server) or the enclosure to which the controller connector is attached.
Name Displays the name of the virtual disk.
Device Name Displays the name of the device on which the virtual disk is present.
Size (GB) Displays the size of the virtual disk in GB.
Layout Displays the RAID level.
Cache Policy Displays the cache policy used for storage.
Read Policy Displays the read policy used for storage.
Write Policy Displays the write policy used for storage.
183

Field Description
Strip Size (Bytes) Displays the size of the stripe in bytes.
Warranty Information
Field Description
View and Renew Warranty Displays a link you can click to open the Dell website from where you can view and renew the device warranty.
System Name Displays the unique name of the system that identifies it on the network. If applicable, the proxy settings must be configured to retrieve warranty data from dell.com/support.
Device Model Type Displays the model name of the system. For example, PowerEdge R710.
Device Type Displays the type of device. For example, Server, Remote Access Controller, and so on.
Shipped Date Displays the date on which the device was sent from the factory.
Service Tag Displays the unique identifier assigned to the system.
Service Level Code Displays the service level code such as parts only warranty (POW), next business day onsite (NBD), and so on for a particular system.
Service Provider Displays the name of the organization that will provide the warranty service support for the device.
Start Date Displays the date from which the warranty is available.
End Date Displays the date on which the warranty will expire.
Days Remaining Displays the number of days the warranty is available for the device.
Warranty Description Displays the warranty details applicable for the device.
184

BIOS Configuration
Field Description
System Name Displays the unique name of the system that identifies it on the network.
System Type Displays the model name of the system. For example, PowerEdge R710.
Service Tag Displays the unique identifier assigned to the system.
Virtualization Technology Displays whether the additional hardware capabilities provided by Virtualization Technology is enabled or disabled.
System Profile Displays the selected system profile: Performance Per Watt (DAPC), Performance Per Watt (OS), Performance, Dense Configuration, or Custom.
User Accessible USB Ports Displays the status of the User Accessible USB Ports option.
Cores per Processor Displays the number of cores enabled in each processor.
Node Interleaving Displays whether the Node Interleaving option is enabled or disabled.
Logical Processor Displays whether the logical processor option is enabled or disabled.
Integrated RAID Controller Displays whether the integrated RAID controller is enabled or disabled.
SR-IOV Global Enable Displays whether the configuration of Single Root I/O Virtualization (SR-IOV) devices is enabled or disabled.
Execute Disable Displays whether the execute disable memory protection technology is enabled or disabled.
iDRAC Network Configuration
Field Description
System Name Displays the unique name of the system that identifies it on the network.
System Type Displays the model name of the system. For example, PowerEdge R710.
185

Field Description
Service Tag Displays the unique identifier assigned to the system.
IPMI over Lan Displays whether the IPMI over LAN interface option is enabled or disabled.
IPMI Community Displays the SNMP community name for traps.
SSH Displays whether SSH connection is enabled or disabled.
SSH Port Displays the port number used by iDRAC for a SSH connection.
SSH Timeout Displays the duration a SSH connection is allowed to remain idle.
Telnet Displays whether Telnet connection is enabled or disabled.
Telnet Port Displays the port number used by iDRAC for a Telnet connection.
Telnet Timeout Displays the duration a Telenet connection is allowed to remain idle.
Template Association
Field Description
System Name Displays the unique name of the system that identifies it on the network.
System Type Displays the model name of the system. For example, PowerEdge R710.
Service Tag Displays the unique identifier assigned to the system.
Associated Template Displays the device configuration template associated to the system.
Related Links
Associating Target Devices to a Configuration Template
186

15Viewing Warranty ReportsWarranty information is available for devices with valid Service Tags, including clients, servers, switches, storage, and so on. Warranty information is automatically retrieved at the time devices are discovered.
The Warranty Information report is unique among OpenManage Essentials reports as it requires Internet access to pull warranty information from the Dell warranty database. If you do not have internet access, no warranty information is populated. It is downloaded the next time you connect to the internet and open the Warranty Report.
Extending WarrantyTo extend support for the devices, click View and Renew Warranty in the Reports → Warranty Information page. This opens the Dell warranty site. You must log in to the warranty site with your company account to see all the devices and their warranty information.
187

16Managing Alerts
NOTE: You can receive alert notifications from OpenManage Essentials on your Android mobile device by installing and setting up the OpenManage Mobile application. For more information, see OpenManage Mobile Settings and the OpenManage Mobile User’s Guide at dell.com/OpenManageManuals.
With OpenManage Essentials you can:
• View alerts and alert categories
• Manage alert actions
• Configure alert log settings
Viewing Alerts and Alert CategoriesTo view the alerts page, from OpenManage Essentials, click Manage → Alerts.
NOTE: Alerts for deleted devices are not displayed in the console. However, these alerts are not deleted from the database until the purge limits are reached.
Viewing Alert Logs
To view alert logs, click Manage → Alerts → Alert Logs.
Understanding the Alert Types
The following alert log types are displayed.
Table 2. Alert Types
Icon Alert Description
Normal Alerts An event from a server or a device that describes the successful operation of a unit, such as a power supply turning on or a sensor reading returning to normal.
Warning Alerts An event that is not necessarily significant, but may indicate a possible future problem, such as crossing a warning threshold.
Critical Alerts A significant event that indicates actual or imminent loss of data or loss of function, such as crossing
188

Icon Alert Description
a failure threshold or a hardware failure.
Unknown Alerts An event has occurred but there is insufficient information to classify it.
Information Alerts Provides information only.
Viewing Internal Alerts
Before viewing internal alerts, ensure that you enable internal health alerts in the Alert Settings of the Preferences tab. See Alert Settings.To view internal alerts, click Manage → Alerts → Alert Logs → All Internal Alerts.
The All Internal Alerts filter is a reference to the internal alerts that OpenManage Essentials generates when a change occurs in the global health or connection status of a managed device.
Viewing Alert Categories
To view alert categories, click Manage → Alerts → Alert Categories.
The predefined alert categories are listed in alphabetical order.
Viewing Alert Source Details
To view an alert category, in the alert categories list, expand an alert category, and then select an alert source.
NOTE: You cannot create a new event source.
For example, expand Environmental alert category and then select the alertCoolingDeviceFailure alert source.
Alert Source Values and Descriptions for alertCoolingDeviceFailure
Field Name Value Description
Name alertCoolingDeviceFailure
Type SNMP An SNMP alert based source.
Catalog MIB - 10892
Severity Critical If this alert is received then the system is in critical state and immediate action is required.
Format String $3
SNMP Enterprise OID .1.3.6.1.4.1.674.10892.1
189

Field Name Value Description
SNMP Generic Trap OID 6
SNMP Specific Trap OID 1104
Viewing Previously Configured Alert ActionsThis section provides instructions to view previously configured alert actions.
Viewing Application Launch Alert Action
To view the application launch alert action:
1. Select Manage → Alerts → Alert Actions.
2. In Alert Actions, select Application Launch.
Viewing E-Mail Alert Action
To view the e-mail alert action:
1. Select Manage → Alerts → Alert Actions.
2. In Alert Actions, select Email.
Viewing Alert Ignore Action
To view the alert ignore action:
1. Select Manage → Alerts → Alert Actions.
2. In Alert Actions, select Ignore.
Viewing Alert Trap Forward Action
To view the alert trap forward action:
1. Select Manage → Alerts → Alert Actions.
2. In Alert Actions, select Trap Forwarding.
Handling Alerts
Flagging an Alert
After you have completed action on an alert, flag the alert as acknowledged. Acknowledging an alert indicates it is resolved or does not require further action as a reminder to yourself. To acknowledge alerts:
1. Select Manage → Alerts → Alert Logs.
2. Click the alert you want to acknowledge.
NOTE: You can acknowledge multiple alerts simultaneously. Use <Ctrl> or <Shift> to select multiple alerts.
3. Right-click and click Acknowledge → Set → Selected Alerts or Filtered Alerts.
190

If you choose Selected Alerts, the highlighted alerts are acknowledged.
If you choose Filtered Alerts, all alerts in the current filter/view are acknowledged.
Creating and Editing a New View
To personalize the way you view alerts, create a new view or modify an existing view. To create a new view:
1. Select Manage → Alerts → Common Tasks → New Alert View Filter.
2. In Name and Severity Association, enter a name for the new filter, and then check one or more severities. Click Next.
3. In Categories and Sources Association, assign the alert category or source to which you want to associate with this view filter and click Next.
4. In Device Association, create query for searching devices or assign the device or device groups, which you want to associate to this view filter and then click Next.
5. (Optional) By default the alert view filter is always active. To limit activity, in Date Time Association, enter a date range, time range, or days, and then click Next.
6. (Optional) In Acknowledged Association, set duration when this alert action is active, and then click Next. The default is always active.
7. In Summary, review inputs and click Finish.
Configuring Alert Actions
Alert actions occur on all alerts received by the OpenManage Essentials console. The alert is received and processed by the OpenManage Essentials console whether or not OpenManage Essentials has discovered the device so long as OpenManage Essentials is listed in the device's SNMP trap forward destinations list. To prevent this, remove OpenManage Essentials from the SNMP trap forward destinations list on the device.
Setting Up E-mail Notification
You can create e-mail notifications when an alert is received. For example, an e-mail is sent if a critical temperature alert is received from a server.
To configure an e-mail notification when alerts are received:
1. Select Manage → Alerts → Common Tasks → New Alert Email Action.
2. In Name and Description, provide e-mail alert action name and description and then click Next.
3. In E-mail Configuration, do the following and then click Next.
a. Provide e-mail information for the To: and From: recipients and provide the substitution information. Separate each recipient or distribution list with a semi-colon.
b. Customize the e-mail message format with any of the following substitution parameters:
• $n = Device
• $ip = Device IP
• $m = Message
• $d = Date
• $t = Time
• $sev = Severity
• $st = Service Tag
191

• $e = Enterprise OID
• $sp = Specific Trap OID
• $g = Generic Trap OID
• $cn = Alert Category Name
• $sn = Alert Source Name
• $pkn = Package Name
• $at = Asset Tagc. Click Email Settings and provide SMTP server name or IP Address, to test e-mail settings and click
OK.
d. Click Test Action to send test e-mail.
4. In Severity Association, assign the alert severity to which you want to associate this e-mail alert and then click Next.
5. In Categories and Sources Association, assign the alert categories or alert sources to which you want to associate this e-mail alert and then click Next.
6. In Device Association, assign the device or device groups to which you want to associate this e-mail alert and then click Next.
7. By default the Email Notification is always active. To limit activity, in Date Time Association, enter a date range, time range, or days, and then click Next.
8. In Summary, review the inputs and click Finish.
Related Links
Alert Logs
Alert Logs Fields
Alert Log Settings
Severity
Ignoring Alerts
Sometimes you will receive alerts you might want to ignore. For example, you may want to ignore multiple alerts generated when Send authentication trap is selected within the SNMP service on the managed node.
NOTE: You can ignore all alerts from a particular device by using the Ignore All Alerts from Device option available when you right-click either a device on the device tree or an alert in the Alerts portal.
To ignore an alert:
1. From OpenManage Essentials, select Manage → Alerts → Common Tasks → New Alert Ignore Action.
2. In Name and severity Association, provide a name, assign the alert severity to which you want to associate this ignore alert action, and then click Next.
3. In Categories and Sources Association, assign the alert categories source to which you want to associate this alert ignore action and then click Next.
4. In Device Association, assign the device or device groups to which you want to associate this alert ignore action and then click Next.
5. By default the Ignore Alert is always active. To limit activity, in Date Time Association, enter a date range, time range, or days, and then click Next.
6. In Duplicate Alert Correlation, select yes to exclude duplicate alerts received within the set time limit, and then click Next.
7. In Summary, review inputs and click Finish.
192

Running a Custom Script
In response to a specific alert received, you can run custom scripts or launch a specific application. This file must be present on the OpenManage Essentials service tier system (where OpenManage Essentials is installed) and not on the client browser system. For example:
• If you receive a temperature warning, you can use a custom script to create an incident ticket for your internal Help Desk.
• If you receive an MD Array storage alert, you can launch the Modular Disk Storage Manager (MDSM) application to view the status of the array.
Creating a Custom Script
1. Select Manage → Alerts → Alert Actions.
2. In Alert Actions, right-click Application Launch and select New Alert Application Launch Action.
3. In Name and Description, provide an application launch name and description and then click Next.
4. In Application Launch Configuration, provide an executable name (provide an absolute file path, for example, C:\ProgramFiles\Dell\Application.exe) and provide the substitution information, and then click Next.
5. In Severity Association, assign the alert severity to which you want to associate this alert application launch and then click Next.
6. In Categories and Sources Association, assign the alert categories or alert sources to which you want to associate this alert application launch and then click Next.
7. In Device Association, assign the device or device groups to which you want to associate this alert application launch and then click Next.
8. By default the Application Launch Action is always active. To limit activity, in Date Time Association, enter a date range, time range, or days, and then click Next.
9. In Summary, review inputs and click Finish.
Related LinksAlert LogsAlert Logs FieldsAlert Log SettingsSeverity
Forwarding Alerts
You may want to consolidate alerts from multiple management stations to one management station. For example, you have management stations in multiple locations and you want to view status and take action from one central location. For information about the behavior of forwarded alerts, see Forwarding Alerts Use Case. To create alert forwards:
1. Select Manage → Alerts → Common Tasks → New Alert Trap Forward Action.
2. In Name and Description, provide Trap Forward name and description and then click Next.
3. In Trap Forwarding Configuration, provide destination host name or IP address, provide community information, to send a test trap to the destination management station, click Test Action. To forward the trap in the same format to the configured destination, click Forward Trap in Original Format and click Next.
4. In Severity Association, assign the alert severity to which you want to associate this trap forwarding alert and then click Next.
5. In Categories and Sources Association, assign the alert categories source to which you want to associate this trap forwarding alert and then click Next.
193

6. In Device Association, assign the device or device groups to which you want to associate this trap forwarding alert and then click Next.
7. By default the Trap Forward Action is always active. To limit activity, in Date Time Association, enter a date range, time range, or days, and then click Next.
8. In Summary, review inputs and click Finish.
The severity status for any trap is set to normal and for a successful alert action, combination of severity, category, and device has to confer with the selections in the preceding steps.
Forwarding Alerts Use Case Scenarios
This section describes scenarios about forwarding alerts using the SNMP v1 and SNMP v2 protocols. The scenarios consists of the following components:
• Managed node with an SNMP v1 agent, referred to as MNv1
• Managed node with an SNMP v2/v2c agent, referred to as MNv2
• Managed station 1 with OpenManage Essentials, referred to as MS1
• Managed station 2 with OpenManage Essentials, referred to as MS2
• Managed station 3 with a third-party software, referred to as MS3
Scenario 1 — Forwarding Alerts in the Original Format Using SNMP v1 Protocol
In this scenario, SNMP v1 alerts are sent from MNv1 to MS1 and then forwarded from MS1 to MS2. If you try to retrieve the remote host of the forwarded alert, it displays the name of MNv1 as the alert originates from MNv1. MNv1 is displayed because the SNMP v1 alert standards allow you to set the agent name in the SNMP v1 alert.
Scenario 2 — Forwarding Alerts in the Original Format Using SNMP v2/v2c Protocol
In this scenario, SNMP v2 alerts are sent from MNv2 to MS1 and then forwarded from MS1 to MS3. If you try to retrieve the remote host of the forwarded alert from MS3, it is displayed as MS1
Since there are no fields in an SNMP v2 alert to specify the agent name, the host which sends the alert is assumed as the agent. When an SNMP v2 alert is forwarded from MS1 to MS3, MS1 is considered as the source of problem. To resolve this issue, while forwarding SNMP v2 or v2c alerts, a varbind is added with OID as .1.3.6.1.6.3.18.1.3.0 with the variable value as Agent Address. This has been set based on the standard OID specified in RFC2576-MIB. When you try to retrieve the Agent Address from MS3, it is displayed as MNv2
NOTE: If the SNMP v2 alert is forwarded from MS1 to MS2, the remote host is displayed as MNv2 because MS1 parses the extra OID along with the forwarded trap.
Scenario 3 — Forwarding Alerts in the OMEssentials Format Using Either SNMP v1/v2 Protocol
In this scenario, SNMP v1 alerts are sent from MNv1 to MS1 and then forwarded to MS2. If you try to retrieve the remote host of the forwarded alert, it is displayed as MS1. The severity and the message of the alert is also defined by MS1 and does not display the original severity and message defined by MNv1.
NOTE: The same behavior applies for SNMPv2 traps.
194

Working With Sample Alert Action Use Cases
Sample alert actions are available for the Application Launch, E-mail, Ignore, and Trap Forwarding alert actions. Sample alert action use cases are disabled by default. Click the sample alert actions to enable the sample alert action.
To enable a sample use case, right-click the use case and select Enable.
Use Cases in Alert Actions
Application Launch
Sample - Run Script on Server Critical Alert—Enable this use case to run a custom script when a critical alert is received.
• Sample - Email Alerts to Service Desk—Enable this use case to send an e-mail to the service desk account from the OpenManage Essentials server when an alert criteria is matched.
• Sample - Email Critical Server Alerts to Admin—Enable this use case to send an e-mail to an administrator from the OpenManage Essentials server when an alert criteria is matched.
Ignore
• Sample - Ignore Alerts During Maintenance Window—Enable this use case to ignore alerts during a specified time interval.
• Sample - Ignore Duplicate Alerts with 15s—Enable this use case to ignore duplicate alerts from the same system.
• Sample - Ignore Non-Critical Alerts from Printers—Enable this use case to ignore non-critical alerts related to printers.
Trap Forwarding
Sample - Forward Critical Server Alerts to Other Monitoring Console—Enable this use case to forward SNMP alerts another monitoring console.
Configuring Alert Log SettingsYou can configure alert log settings to set the maximum size of alert logs; to generate a warning alert when the alert log reaches a set threshold, and to purge the alert logs. To modify the default settings:
1. Select Manage → Alerts → Common Tasks → Alert Log Settings.
2. Enter a value or use the increment/decrement arrow buttons to increase or decrease the value.
NOTE: The default maximum size of alert logs is 20,000 alerts. Once that value is reached, the older alerts are purged.
Renaming Alert Categories and Alert Sources1. Click Manage → Alerts → Alert Categories.
2. In Alert Categories, right-click any of the alert categories (under the Alert Category heading in the left pane) and select Rename.
195

3. Provide a name for the alert category and click OK.
Alert Pop-Up Notifications
The alert pop-up notification is displayed in the bottom-right corner of the OpenManage Essentials console when a Critical or Warning alert is received. The information displayed in the alert pop-up notification varies based on the number of alerts received.
If only one alert is received, the following information is displayed:
• Alert type — Warning or Critical.
• Name of the device that generated the alert.
• Alert description.
• View Alert — To view the Alert Details window.
• Go to Device — To navigate to the device in the device tree.
• Disable — To disable alert pop-up notifications.
If more than one alert is received, the following information is displayed:
• Alert type and frequency.
• Name of each device as a link to navigate to the device in the device tree.
NOTE: The device link is displayed only for the first three alerts.
• View Alerts — To view the All Recent Warning and Critical Alerts window.
• Go to Alert Console — To navigate to the Alerts portal.
• Disable — To disable alert pop-up notifications.
By default, the alert pop-up notification is enabled. You can configure OpenManage Essentials to disable alert pop-up notifications or set the time interval between each alert pop-up notification.
NOTE: The Alert Pop-up Notification Settings is user-specific. The settings you have configured is not applicable to other users.
Related Links
Configuring Alert Pop-Up Notifications
Enabling or Disabling Alert Pop-Up Notifications
Configuring Alert Pop-Up Notifications
To configure alert pop-up notifications:
1. Click Preferences → Alert Settings.
The Alert Settings page is displayed.
2. Under Alert Popup Notification Settings, select or clear Enable Alert Popup Notifications to enable or disable alert pop-up notifications.
3. In the seconds between popup notifications box, select the time interval between each pop-up notification.
4. Click Apply.
Related Links
Alert Pop-Up Notifications
196

Enabling or Disabling Alert Pop-Up Notifications
To enable or disable alert pop-up notifications:
NOTE: To quickly disable alert pop-up notifications, click the Disable link displayed in the alert pop-up notification. When the Disable Alert Popup Notifications prompt is displayed, click Yes.
1. Click Preferences → Alert Settings.
The Alert Settings page is displayed.
2. In Alert Popup Notification Settings:
• Select the Enable Alert Popup Notifications option to enable alert pop-up notifications when a Warning or Critical alert is received.
• Clear the Enable Alert Popup Notifications option to disable alert pop-up notifications.
3. Click Apply.
Related Links
Alert Pop-Up Notifications
197

17Alerts — ReferenceThis page provides the following information:
• Common Tasks
– Alert Log Settings
– New Alert View Filter
– New Alert Application Launch Action
– New Alert Email Action
– New Alert Ignore Action
– New Alert Trap Forward Action
• Alert Logs
– Alert View Filters
* All Alerts
* All Internal Alerts
* Critical Alerts
* Info Alerts
* Normal Alerts
* Unknown Alerts
* Warning Alerts
• Alert Actions
– Application Launch
– Ignore
– Trap Forwarding
• Alert Categories
Alert Logs
You can view alerts from Alerts Logs. The Alert Logs allow you to view all alerts filtered by the active view filter.
The criteria for matching the alerts in the view filter include:
• Alert severity. See Severity.
• Alert category or source. See Category and Sources Association.
• Alert device or device group source. See Device Association.
• Alert date, time, or day of week. See Date and Time Range.
198

• Alert acknowledged flag. See Acknowledgement.
Related Links
Configuring Alert Log Settings
Configuring Alert Actions
Setting Up E-mail Notification
Creating a Custom Script
Alert Logs Fields
Alert Log Settings
Severity
Predefined Alert View Filters
The following table lists the predefined alert view filters.
Field Description
All Alerts Select to view all the alerts.
Critical Alerts Select to view all the systems that are critical.
Info Alerts Select to view informational alerts.
Normal Alerts Select to view normal alerts.
Unknown Alerts Select to view alerts that OpenManage Essentials cannot categorize.
Warning Alerts Select to view all the warnings.
Select Continuous Updates to enable the user interface to update automatically when new alerts are received.
Alert Logs Fields
Field Description
Severity The alert severity
Acknowledged Whether the alert has been acknowledged or not by the user.
Time The date and time the alert was generated.
Device The device which generated the alert.
Details The message contained in the alert.
Category The categorization of the alert.
199

Field Description
Source The name of the alert source definition.
Group By Column
To group by in All Alerts, drag the All Alert column that you want to group by and drop it in Drag a column header and drop it here to group by that column.
For example, In All Alerts, if you want to group by severity, select Severity and drag and drop it in the Drag a column header and drop it here to group by that column bar.
The alerts are displayed by severity.
Alert Details
Field Description
Severity The alert severity.
Acknowledged Whether the alert has been acknowledged or not by the user.
Device The device which generated the alert.
Time The date and time the alert was generated.
Category The categorization of the alert.
Source The name of the alert source definition.
Description The message contained in the alert.
SNMP Enterprise OID Provides the enterprise OID (SNMP OID prefix) of the management information base (MIB) file that defines the event source that you want to monitor.
SNMP Generic Trap OID Provides the generic trap ID of the SNMP trap that you want to monitor from the desired event source. See the Dell OpenManage Server Administrator SNMP Reference Guide at dell.com/OpenManageManuals for more information on SNMP traps.
SNMP Specific Trap OID Provides the specific trap ID of the SNMP trap that you want to monitor from the desired event source. See the Dell OpenManage Server Administrator SNMP Reference Guide at dell.com/OpenManageManuals for more information on SNMP traps.
200

Alert Log Settings
Configure settings which control the size, messaging, and purge settings of the Alert Logs.
Field Description
Maximum size of Alert Logs Determines the maximum number of alerts the alert logs can have before purging occurs.
Log a warning when the Alert Log size reaches A warning alert is sent to the application log when this size is reached.
When the Alert Logs reach the Maximum size, purge
Purges the specified number of alerts when the maximum size is reached.
Alert View FiltersNOTE: You can receive alert notifications from OpenManage Essentials on your Android mobile device by installing and setting up the Dell OpenManage Mobile application. For more information, see OpenManage Mobile Settings and the Dell OpenManage Mobile User’s Guide at dell.com/OpenManageManuals.
Alert Filter Name
In OpenManage Essentials, you use alert filters that are associated with alert actions to implement alerting capabilities. For example:
• You can create alert action associations to trigger actions, such as sending e-mails, when an alert condition is met.
• You can create ignore, exclude, or both associations to ignore SNMP traps and CIM indications when they are received. You use these associations to suppress alert floods.
• You can create alert view filters to customize the Alert Logs view.
For more information about creating alert action associations, see Managing Alerts.
Use this window to perform the following tasks:
• Create new alert action associations, ignore/exclude filters, and alert view associations.
• View summary information for alert action associations, ignore/exclude associations, and alert view filters.
• Edit, delete, rename, and copy alert action associations, ignore/exclude associations, and alert view filters.
Severity
This page provides a list of alert severity.
201

Field Description
Name Name of the item (applicable only for ignore action and view filter).
Enabled Select to enable the alert action (applicable only for ignore action).
Severity The available alert types.
All Select to include all types of alerts.
Unknown Select to include unknown alerts.
Info Select to include informational alerts.
Normal Select to include normal alerts.
Warning Select to include warning alerts.
Critical Select to include critical alerts.
Acknowledgement
Field Description
Limit alerts based on the acknowledge flag Select to configure the alert view filter to display alerts based on whether the alerts have been acknowledged or not. This option is disabled by default.
Match only acknowledged alerts Select to display acknowledged alerts.
Match only unacknowledged alerts Select to display unacknowledged alerts.
Summary — Alert View Filter
The Summary page is shown on the final page of the Alert View Filter wizard or when clicking on the View Summary right-click option in the tree.
Field Description
Name The name of the alert action.
Type The alert action type - App Launch, Email, Ignore, Trap, and Forward.
Description The description of the alert action.
Associated Severity The alert severity criteria used when matching alerts.
202

Field Description
Associated Alert Categories The alert category criteria used when matching alerts.
Associated Alert Sources The alert source criteria used when matching alerts.
Associated Device Groups The alert source device group criteria used when matching alerts.
Associated Devices The alert source device criteria used when matching alerts.
Associated Date Range The alert date range criteria used when matching alerts.
Associated Time Range The alert time range criteria used when matching alerts.
Associated Days The alert days criteria used when matching alerts.
Associate Acknowledge If enabled, uses the alert acknowledged flag when matching alerts.
Alert Actions
Alert actions are triggered when an incoming alert matches the specific criteria defined in the alert action. The criteria for matching the alert include:
• Alert severity. See Severity Association.
• Alert category or source. See Category and Sources Association.
• Alert device or device group source. See Device Association.
• Alert date, time, or day of week. See Date and Time Range.
There are four types of alert actions:
• Alert Application Launch Action — Launch a script or batch file when the alert action criteria is matched.
• Alert Email Action — Send an e-mail when the alert action criteria is matched.
• Alert Ignore Action — Ignore the alert when the alert action criteria is matched.
• Alert Trap Forward Action — Forward the SNMP Trap to another management console when the alert action criteria is matched.
By default, new alert actions are enabled. If you want to turn off the alert action without deleting it, you can disable it either through the right-click menu or the edit wizard for the alert action.
Several common alert action use cases are pre-installed in the disabled state to illustrate common usage. When using these pre-installed actions, it is recommended to clone the example to a new action specific to your needs. Make sure to enable and test the new action during this process.
203

Name and Description
Field Description
Name The name of the alert action.
Description The description of the e-mail action.
Enabled Select to activate the alert action.
Severity Association
Field Description
Severity The available alert types.
All Select to include all types of alerts.
Unknown Select to include unknown alerts.
Info Select to include informationl alerts.
Normal Select to include normal alerts.
Warning Select to include warning alerts.
Critical Select to include critical alerts.
Application Launch Configuration
Use this window to configure the application that you want to launch and to test the launch.
NOTE: Alert actions are run when a matching alert is received so the alert application launch action is a script or batch file that does not require user interaction.
Field Description
Executable Name Specifies the fully qualified path name and file name of the executable file that launches the application program.
Arguments Specifies or edits any required or desired command line parameters to be used in launching the application program. You can use the following variable substitutions to specify information in the Arguments field:
• $n = system name
• $ip = IP address
• $m = message
• $d = date
204

Field Description
• $t = time
• $sev = severity
• $st = Service Tag
• $e = enterprise OID
• $sp = specific trap ID
• $g = generic trap ID
• $cn = alert category name
• $sn = alert source name
• $pkn = package name
• $at = asset tag
Executable file: If you have an executable file (for example, createTroubleTicket.exe), to create a trouble ticket with parameters –arg1, -arg2, and so on; configure the alert application launch as follows:
• Executable Name (with the full path): C:\temp\createTroubleTicket.exe
• Argument: -arg1 –arg2
When the alert action is triggered, it runs the command C:\temp\createTroubleTicket.exe –arg1 -arg2 to perform the associated application launch alert action.
Batch file: If you have a batch file (for example, createTroubleTicket.bat), to create a trouble ticket with parameters –arg1, -arg2, and so on, configure the alert application launch as follows:
• Executable Name (with the full path): C:\temp\createTroubleTicket.bat
• Argument: -arg1 –arg2
When the alert action is triggered, it runs the command C:\temp\createTroubleTicket.bat –arg1 -arg2 to perform the associated application launch alert action.
VB script: When configuring vb script files as an alert action, provide the executable and arguments as follows. For example, if you have a script (createTroubleTicket.vbs), to create a trouble ticket that contains one parameter arg1, configure the application launch as follows:
• Executable Name: cscript.exe or C:\Windows\System32\cscript.exe (full path)
• Argument: C:\temp\createTroubleTicket.vbs arg1
When the alert action is triggered, it runs the command cscript.exe C:\temp\ createTroubleTicket.vbs arg1 to perform the associated application launch alert action.
205

Field Description
NOTE: If an alert action is not working, ensure that you have entered complete command from the command prompt.
See the sample alert action under Application Launch alert action for more information.
Test Action Allows you to test the application launch.
NOTE: Alert actions are run when a matching alert is received; so the alert application launch action is a script or batch file that does not require user interaction.
E-Mail Configuration
You can configure Essentials so that you receive e-mail each time the alert associations for your devices meet specific alert criteria. For example, you may want to receive an e-mail message for all warning and critical alerts.
Use this window to specify the parameters for configuring the e-mail alert action.
Field Description
To Specifies a valid e-mail address served by the company's SMTP server of the person who is to receive the e-mail.
From Specifies the originating e-mail address.
Subject Specify the e-mail subject using text or the available alert tokens.
Message Specify the e-mail message using text or the available alert tokens.
Email Settings Select to provide the SMTP server name or IP address.
Test Action Allows you to test the e-mail action.
NOTE: After sending the test e-mail, verify that the e-mail was received successfully and has the expected content.
NOTE: Alert tokens are substituted at the time the alert action occurs. They are not substituted for a test action.
NOTE: Certain paging vendors support alphanumeric paging through e-mail. OpenManage Essentials supports paging through the e-mail option.
206

Trap Forwarding
Simple Network Management Protocol (SNMP) traps are generated in response to changes in the status of sensors and other monitored parameters on a managed device. To correctly forward these traps, you must configure an SNMP trap destination, defined either by IP address or host name. For information about forwarding SNMPv1 and SNMP v2 traps in both the original format and OMEssentials format, see Forwarding Alerts Use Case Scenarios.
For example, you may want to use trap forwarding if you are in a multi tiered enterprise environment using OpenManage Essentials to create associations and forward traps to the enterprise manager.
If the trap is being processed locally and then forwarded to the destination or it is just forwarded to the destination.
Use this window to specify the parameters for configuring trap forwarding.
Field Description
Destination Provide the IP address or host name for the system that is hosting the enterprise management application.
Community Provide the SNMP community to which the destination IP address or host name belongs.
Forward Trap in Original Format Select this check box to forward the trap in the same format received by OpenManage Essentials.
Test Action Forwards a test trap to the specified destination using the specified community string.
Category and Sources Association
OpenManage Essentials has many alert categories and sources that are predefined and prepopulated for Dell management agents. Select any of the predefined alert categories or sources to associate it with the alert action or filter. For more information and the complete list of categories and alert sources, see Alert Categories.
Device Association
You can select predefined groups (device types), custom groups, specific devices, or a device query. Device association currently only covers predefined groups.
For custom groups, create a custom group using the New Custom Group Wizard. The custom group shows up in the tree.
To use device query, select a query from the list.
Click New to create a new device query to search and assign the devices to the alert action.
Click Edit to change the query logic.
207

Select groups or devices from the tree, you can use the query option to create a specific criteria for the selection.
Device Query Options
Field Description
Select a query Select a query from the drop-down list.
New Add a new query.
Edit Edit an existing query.
All Devices Select to include all the Devices that is managed in OpenManage Essentials.
Clients Select to include client devices, such as desktops, portables, and workstations.
HA Clusters Select to include High Availability server clusters.
KVM Select to include keyboard video mouse devices.
Microsoft Virtualization Servers Select to include Microsoft Virtualization Servers.
Modular Systems Select to include Modular Systems.
Network Devices Select to include Network Devices.
OOB Unclassified Devices Select to include out of band Unclassified Devices like Lifecycle controller enabled devices.
Power Devices Select to include PDUs and UPS..
Printers Select to include Printers.
RAC Select to include devices with Remote Access controllers.
Servers Select to include Dell servers.
Storage Devices Select to include storage devices.
Unknown Select to include unknown devices.
VMware ESX Servers Select to include VMware ESX servers.
208

Date and Time Range
Field Description
Limit Date Range Specifies a specific date range to match alerts.
Limit Time Range Specifies a specific time range to match alerts.
Limit Days Select to specify the days on which to enable the alert association. If you do not enable this option, the association is applied continuously within the time frame that you specify.
Each of these fields are exclusive of the other, so selecting date 8/1/11- 10/1/11, 1am to 4 AM, Friday, will match alerts on only Fridays from 1-4 AM only within that date range.
NOTE: It is possible to input a date range and days selection that will never produce a result. For example, 9/1/11 and Monday - since 9/1/11 was a Thursday, it will never match.
If none of these are checked, it means the alert selection will have no date/time filter.
Alert Action - Duplicate Alert Correlation
Field Description
Yes. Only duplicate alerts that match this filter will be executed.
Enabling this option deletes duplicate alerts (with the same ID and from the same device) received within the specified interval. Use this option to prevent a device from sending an overabundance of alerts to the console.
Ignore duplicate alerts that are received during the interval (1-600 seconds)
Select to set time.
No Select this option if you do not want duplicate alerts to run at increased duration.
Summary- Alert Action Details
View and edit selections.
The alert action details screen is shown on the final page of the alert action wizards or when clicking on any alert action in the tree.
The alert action will have a subset of the following properties, depending on alert action type and filter criteria chosen (this probably should be a table):
209

Field Description
Name The name of the alert action.
Action Enabled Specifies if the alert action is enabled or disabled.
Type The alert action type - App Launch, Email, Ignore, and Trap Forward.
Description The description of the alert action.
To The e-mail addresses to which the e-mail is sent.
From The e-mail address from whom the e-mail originates.
Subject The subject of the e-mail which may include alert tokens.
Message The message of the e-mail which may include alert tokens.
Destination The destination name or IP address used for trap forwarding.
Community The community string used for trap forwarding.
Executable Name The name of the executable, script, or batch file to be used by the alert action.
Arguments The command line arguments used when invoking the alert action.
Associated Severity The alert severity criteria used when matching alerts.
Associated Alert Categories The alert category criteria used when matching alerts.
Associated Alert Sources The alert source criteria used when matching alerts.
Associated Device Groups The alert source device group criteria used when matching alerts.
Associated Devices The alert source device criteria used when matching alerts.
Associated Date Range The alert date range criteria used when matching alerts.
210

Field Description
Associated Time Range The alert time range criteria used when matching alerts.
Associated Days The alert days criteria used when matching alerts.
Minimum Repeat Time If enabled, specifies the minimum time in seconds between two of the same alerts from the same device.
Alert Categories
OpenManage Essentials has many alert categories and sources that are predefined and pre populated for Dell management agents.
Alert categories are organizational levels of the Alert Categories tree. Alert sources specify the low level details of each alert. To monitor the alert categories and sources, apply an alert action association to the alert source or to its parent category.
This page provides a list of categories and the alerts sources within that category. Use this page to configure alerts based on categories.
Alert Categories Options
Field Description
Brocade-Switch Select this category to include alerts for Brocade-Switch.
Compellent Select this category to include alerts for Compellent storage devices.
Dell Advanced Infrastructure Management Select this category to include alerts for Advanced Infrastructure Management.
Environmental Select this category to include alerts for temperature, fan enclosure, fan speed, thermal, and cooling.
EqualLogic Storage Select this category to include alerts for EqualLogic storage.
FC-Switch Select this category to include alerts for Fibre Channel switches.
General Redundancy Select this category to include alerts for General Redundancy.
HyperV Server Select this category to include alerts for HyperV Server.
211

Field Description
iDRAC Select this category to include alerts for iDRAC.
Juniper-Switch Select this category to include alerts for Juniper switches.
Keyboard-Video-Mouse (KVM) Select this category to include alerts for KVMs.
Memory Select this category to include alerts for memory.
Network Select this category to include alerts related to Dell Networking switches.
Other Select this category to include alerts for other devices.
PDU Select this category to include alerts for PDUs.
Physical Disk Select this category to include alerts for physical disks.
Power Select this category to include alerts for power.
Power Center Select this category to include alerts for power center.
Printers Select this category to include alerts for printers.
Processor Select this category to include alerts for processor.
Removable Flash Media Select this category to include alerts for removable flash media.
Security Select this category to include alerts for security.
Storage Enclosure Select this category to include alerts for storage enclosures.
Storage Peripheral Select this category to include alerts for storage peripherals.
Storage Software Select this category to include alerts for storage software.
System Events Select this category to include alerts for system events.
Tape Select this category to include alerts for tape drives.
212

Field Description
Test Events Select this category to include alerts for test events.
Unknown Select this category to include unknown alerts related statuses.
UPS Select this category to include alerts for UPS.
Virtual Disk Select this category to include alerts for virtual disks.
VMware ESX Server Select this category to include alerts for VMware ESX servers.
Alert Source
Each Alert Category contains alert sources. Click an alert category to view alert sources. Expand a category to view the list of alert sources, and select an alert source.
Field Description
Name The name of the new alert source, for example, myFanAlert.
Type The protocol information.
Catalog Provides the catalog information.
Severity Specifies the severity assigned to the alert that is triggered if the alert source generates the specified SNMP trap.
Format string Provides the message string that appears in the Alert Logs if the alert source generates an alert of sufficient severity to trigger the alert. You can use formatting commands to specify parts of the message string. For SNMP, the valid formatting commands are:
$n = system name
$d = date
$t = time
$s = severity
$e = enterprise object identifier (OID)
$sp = specific trap OID
213

Field Description
$g = generic trap OID
$1 - $# = varbind values
SNMP Enterprise OID Provides the enterprise OID (SNMP OID prefix) of the management information base (MIB) file that defines the event source that you want to monitor.
SNMP Generic Trap OID Provides the generic trap ID of the SNMP trap that you want to monitor from the desired event source. See the Dell OpenManage Server Administrator SNMP Reference Guide at dell.com/OpenManageManuals for more information on SNMP traps.
SNMP Specific Trap OID Provides the specific trap ID of the SNMP trap that you want to monitor from the desired event source. See the Dell OpenManage Server Administrator SNMP Reference Guide at dell.com/OpenManageManuals for more information on SNMP traps.
214

18Updating Server BIOS, Firmware, Drivers, and ApplicationsWith the System Update feature in OpenManage Essentials, you can:
• Upgrade and downgrade firmware, drivers, BIOS, application, and OpenManage Server Administrator.
• Compare the drivers and firmware on the inventoried servers and modular blade enclosures with a source catalog and update them if needed.
NOTE: System updates are only supported on a LAN and not over a WAN. To apply system updates to devices outside the datacenter, install another instance of OpenManage Essentials that is local to that area. Inventory automatically starts after the updates are applied to a target server.
NOTE: OpenManage Essentials supports system updates on Dell PowerEdge 11th, 12th, and 13th generation servers using iDRAC with Lifecycle Controller.
• Filter devices by clicking the Filtered by option. You can either select a query or select the devices/groups from the device tree.
Check for these prerequisites before you update systems:
• Internet is accessible and you can access dell.com (port 80) and ftp.dell.com (port 21) if you are using online catalog source.
• DNS is resolved.
NOTE: When providing system credentials, if the username has spaces or periods, the username must be provided within quotation marks. For example, "localhost\johnny marr" or "us-domain\tim verlaine". Spaces and periods can be used in usernames for OpenMange System Administrator Tasks, Generic Command Line Tasks (local system), OpenManage Systems Administrator Deployment Tasks. System Updates (In Band, through OpenManage System Administrator) also support spaces and periods. Out of Band updates (through RAC device) or commands such as RACADM do not support space or period in the username.
NOTE: If a deployment task is run on a target server that is configured with a BIOS System Password, when the task is running, make sure that you launch the iDRAC virtual console, and if prompted, enter the system password. Else, the task may display running state for some time and eventually time out.
Viewing the System Update PageTo view the System Update page, click Manage → System Update.
By default, the system update page displays all the discovered servers. You can filter the devices by clicking the Filter by: link to display select devices or device groups.
215

Figure 5. System Update Page
1. Compliance report. See Compliance Report
2. Tabbed systems information. See Compliant Systems, Non Compliant Systems, Non Inventoried Systems, and Issues and Resolutions.
3. System update tasks. See All System Update Tasks
Understanding Server BIOS Firmware and Drivers Sources
There are multiple sources for obtaining firmware and drivers for the servers.
• Online source—Default option which obtains latest driver and firmware versions from ftp.dell.com.
NOTE: OpenManage Essentials automatically checks for updates and displays a message if a newer version is available.
• File system source—Drivers and firmware from the Dell OpenManage Server Update Utility (SUU) media.
• Repository Manager file—Customized selection of specific drivers and firmware generated from the Dell Repository Manager tool.
Choosing the Right Source for Updates• Recommended Option—Use the online source to ensure that you consistently have the latest drivers
and firmware available from Dell or use the Dell Server Update Utility (SUU) option for a qualified set of drivers and firmware.
• Create Custom Catalog—Using this option gives you maximum control over driver and firmware revisions in your environment because you select them individually from either the SUU media or online source using the Dell Repository Manager. You can install Repository Manager, a separate tool, from the OpenManage Essentials installation package.
216

Selecting an Update Catalog Source
1. From OpenManage Essentials, click Manage → System Update → Select a Catalog Source.
2. In Select a Catalog Source, select an option, and click Import now.
Viewing Comparison ResultsThis section provides information required to view the results of the comparison of devices to a source catalog.
Viewing Compliant Servers
To view compliant servers:
1. Click Manage → System Update.
2. In System Update, select the Compliant Systems tab.
Viewing Non-Compliant Servers
To view non-compliant servers:
1. Click Manage → System Update.
2. In System Update, select the Non-Compliant Systems tab.
The servers with drivers and firmware versions that are different from the catalog are displayed.
Viewing Non-Inventoried Servers
To view non-inventoried servers:
1. Click Manage → System Update.
2. In System Update, select the Non-Inventoried Systems tab.
The servers that are not inventoried are displayed.
NOTE: CMC firmware updates (CMC active controller only) are also displayed in these results.
Viewing Servers With Issues and Resolutions
To view servers with issues and resolutions:
1. Click Manage → System Update.
2. In System Update, select the Issues and Resolutions For Updates tab.
The servers with issues and the resolutions are displayed. For more information, see Issues and Resolutions Use Case Scenarios.
System Update Use Case Scenarios
The following table provides use case scenarios about how system updates occur based on different protocols and the update modes.
217

NOTE: If the preferred system update method selected in Advanced Settings is In-Band (Operating System) and OpenManage Server Administrator (OMSA) is installed on the target server, the components are updated using OMSA. If OMSA is not installed on the target server, the components are updated through the operating system.
Protocol Used for Server IP Discovery and Inventory
Protocol Used for iDRAC IP Discovery and Inventory
Preferred System Update Mode Selected in Advanced Settings
Credentials for System Update
Actual Update Mode
SNMP SNMP In-Band (Operating System)
Server All components are updated using OpenManage Server Administrator.
NOTE: When an iDRAC IP is discovered using SNMP, iDRAC software inventory is not retrieved and all components are updated are using Server Administrator irrespective of the preferred system update mode selected.
SNMP SNMP Out-of-Band (iDRAC) Server
WMI SNMP In-Band (Operating System)
Server All components are updated using OpenManage Server Administrator.
WMI SNMP Out-of-Band (iDRAC) Server All components are updated using Server Administrator because the protocol used for iDRAC discovery and inventory was SNMP.
WMI SNMP In-Band (Operating System)
Server All components are updated using the operating system.
SSH WS-Man/SNMP In-Band (Operating System)
Server All components are updated using the operating system.
SNMP WS-Man In-Band (Operating System)
Server All components are updated using OpenManage Server Administrator.
218

Protocol Used for Server IP Discovery and Inventory
Protocol Used for iDRAC IP Discovery and Inventory
Preferred System Update Mode Selected in Advanced Settings
Credentials for System Update
Actual Update Mode
SNMP WS-Man Out-of-Band (iDRAC) iDRAC BIOS, firmware, and applications are updated using iDRAC.
NOTE: When an iDRAC IP is discovered using WS-Man, the iDRAC software inventory is retrieved and the components are updated using iDRAC.
However, if drivers are present in addition to BIOS, firmware, and applications, then all the components are updated using Server Administrator and not iDRAC.
WMI WS-Man In-Band (Operating System)
Server All components are updated using OpenManage Server Administrator.
WMI WS-Man Out-of-Band (iDRAC) iDRAC BIOS, firmware, and applications are updated using iDRAC.
NOTE: When an iDRAC IP is discovered using WS-Man, the iDRAC software inventory is retrieved and the components are updated using iDRAC.
However, if drivers are present in addition to BIOS, firmware, and applications, then all the components are updated using Server Administrator and not iDRAC.
WS-Man (ESXi-based server)
WS-Man (ESXi-based server)
In-Band (Operating System)
iDRAC All components are updated using iDRAC. For
219
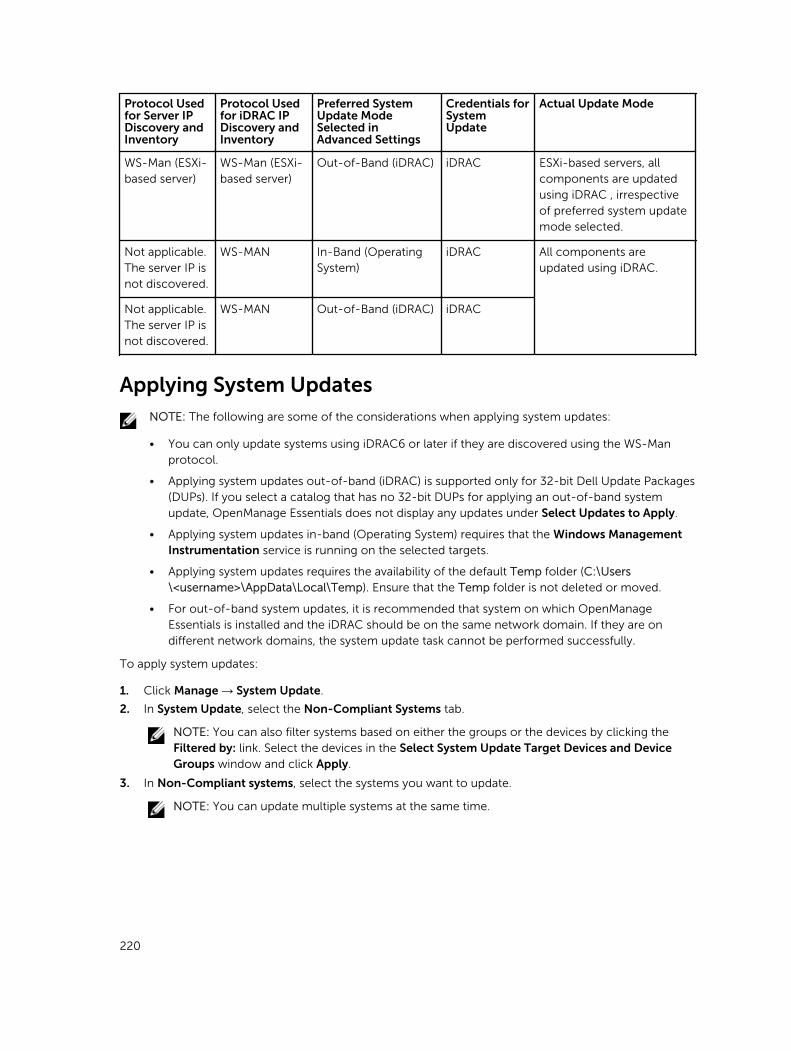
Protocol Used for Server IP Discovery and Inventory
Protocol Used for iDRAC IP Discovery and Inventory
Preferred System Update Mode Selected in Advanced Settings
Credentials for System Update
Actual Update Mode
WS-Man (ESXi-based server)
ESXi-based servers, all components are updated using iDRAC , irrespective of preferred system update mode selected.
WS-Man (ESXi-based server)
Out-of-Band (iDRAC) iDRAC
Not applicable. The server IP is not discovered.
WS-MAN In-Band (Operating System)
iDRAC All components are updated using iDRAC.
Not applicable. The server IP is not discovered.
WS-MAN Out-of-Band (iDRAC) iDRAC
Applying System UpdatesNOTE: The following are some of the considerations when applying system updates:
• You can only update systems using iDRAC6 or later if they are discovered using the WS-Man protocol.
• Applying system updates out-of-band (iDRAC) is supported only for 32-bit Dell Update Packages (DUPs). If you select a catalog that has no 32-bit DUPs for applying an out-of-band system update, OpenManage Essentials does not display any updates under Select Updates to Apply.
• Applying system updates in-band (Operating System) requires that the Windows Management Instrumentation service is running on the selected targets.
• Applying system updates requires the availability of the default Temp folder (C:\Users\<username>\AppData\Local\Temp). Ensure that the Temp folder is not deleted or moved.
• For out-of-band system updates, it is recommended that system on which OpenManage Essentials is installed and the iDRAC should be on the same network domain. If they are on different network domains, the system update task cannot be performed successfully.
To apply system updates:
1. Click Manage → System Update.
2. In System Update, select the Non-Compliant Systems tab.
NOTE: You can also filter systems based on either the groups or the devices by clicking the Filtered by: link. Select the devices in the Select System Update Target Devices and Device Groups window and click Apply.
3. In Non-Compliant systems, select the systems you want to update.
NOTE: You can update multiple systems at the same time.
220

NOTE: The following are the considerations when using 64-bit DUPs for system update:
• For in-band updates (Operating System) – If the selected target is a server running a Windows 64-bit operating system, all applicable 64-bit packages are available for update. If the catalog does not contain 64-bit packages for a component, the corresponding 32-bit package is available for update.
• For out-of-band updates (iDRAC) – If the selected target is an iDRAC of a Dell PowerEdge 12G or 13G server with iDRAC firmware version later than 1.40.40, all applicable 64-bit packages are available for update. If the catalog does not contain 64-bit packages for a component, the corresponding 32-bit package is available for update.
• For in-band or out-of-band updates – If the selected PowerEdge 12G or 13G server is running a 32-bit operating system and has iDRAC firmware version later than 1.40.40, by default, only 32-bit packages are available for update unless there is a package known only to iDRAC and not known to OMSA.
4. Click Apply Selected Updates.
A window is displayed to schedule updates.
NOTE: Chassis and blades are not associated for updates. They are treated as individual components and you must manually select them.
NOTE: Chassis, blade server BIOS, and iDRAC version interdependency management is not available.
5. Provide a task name.
6. Review the selected updates.
7. Set the task schedule to Run Now or set a specific date and time.
8. If you do not want to apply the changes immediately, clear After update, if required, reboot the device. Changes are not activated until the next time you restart the system.
9. If you want to skip the signature and hash check on the system update package, select Skip Signature and Hash Check.
10. Enter the operating system administrative or iDRAC credentials for the managed server.
NOTE: For applying system updates on target systems running a Windows operating system with the User Account Control (UAC) feature enabled:
• If the target system is part of a Domain, you must provide the credentials of either the Domain Administrator or a member in the Administrators group. Do not provide the credentials of the local, non-domain account on the target system, even if the account is in the Administrators group.
• If the target system is not part of a Domain, you must provide the Administrator credentials. If you want to provide the credentials of a non-default Administrator account, ensure that the Remote WMI permissions are enabled for that user account.
Examples: In a Windows domain environment, enter <Domain\Administrator> and password. In a Windows workgroup environment, enter <LocalHost\Administrator> and the password
In a Linux environment, enter root and password. If you want to apply system updates using sudo, select Enable Sudo and update the SSH port number.
221

NOTE: Before you apply system updates using sudo, create a new user account, edit the sudoers file using the visudo command, and add the following:
For target systems running a 32-bit operating systems:
Cmnd_Alias OMEUPDATE = /bin/tar,/opt/dell/srvadmin/bin/omexec,/tmp/LinuxPreInstallPackage/runbada,/tmp/LinuxPreInstallPackage/omexec,/tmp/invcol.bin <sudo_username> ALL=OMEUPDATE,NOPASSWD:OMEUPDATE
For target systems running a 64-bit operating systems:
Cmnd_Alias OMEUPDATE = /bin/tar,/opt/dell/srvadmin/bin/omexec,/tmp/LinuxPreInstallPackage64/runbada,/tmp/LinuxPreInstallPackage64/omexec,/tmp/invcol64.bin <sudo_username> ALL=OMEUPDATE,NOPASSWD:OMEUPDATENOTE: Applying system updates using sudo is not supported for SUSE Linux Enterprise Server targets.
11. Click Finish.
NOTE: You cannot schedule Windows and Linux updates to occur using the same task. Create a separate task for each.
Viewing Updated Status
To view and confirm that updates were applied successfully, click Manage → System Update → Summary. The Task Execution History pane displays if the updates were applied successfully.
Updating Firmware, BIOS, and Drivers Without OMSATo update the firmware, BIOS, and drivers on a system that does not have OMSA installed:
1. Collect the software inventory from the server. See Collecting Software Inventory.
2. Update the system through the system update portal. See Applying System Updates.
View Active Catalog
Select to view the catalog file that is currently in use for applying software updates.
Field Description
Source Displays the source. The source is either Server Update Utility, FTP, or Repository Manager.
Source Type The type for source from which the catalog file is taken. For example, Dell ftp site.
Release ID The unique identification number assigned to the released catalog file.
Release Date The date on which the catalog file was released.
222

Field Description
Newer version available Displays if a newer version is available.
Issues and Resolutions Use Case Scenarios
The following table provides information about the issues that are displayed in the Issues and Resolutions for Updates tab.
Issue Resolution
PowerEdge VRTX was inventoried using either SNMP or IPMI.
Perform discovery and inventory of PowerEdge VRTX using WS-Man.
iDRAC was inventoried using either SNMP or IPMI. Perform discovery and inventory of iDRAC using WS-Man.
iDRAC does not meet the minimum version requirements.
Minimum supported iDRAC version for modular servers is 2.20 and for monolithic servers is 1.4. Manually install the required iDRAC versions to proceed.
iDRAC does not have the required license. iDRAC requires license to perform system updates which can be obtained using Dell License Manager.
The server does not have Server Administrator installed on it or is discovered using SSH. This issue occurs if:
• A Windows-based server without Server Administrator is discovered using WMI.
• A Linux-based server with or without Server Administrator is discovered using SSH.
Schedule Inventory Collection Task. Recommended to schedule Periodic Inventory Collection Task.
223

19System Update — ReferenceYou can access the following:
• System Update page
– Summary
* Compliance Report
* System Update Tasks
* Tasks Execution History
– Compliant Systems
– Non Compliant Systems
– Non-Inventoried Systems
– All System Update Tasks
– Issues and resolutions for updates
• Catalog Section
– Select a Catalog Source
– View Active Catalog
Related Links
Updating Server BIOS, Firmware, Drivers, and Applications
Viewing the System Update Page
Compliance Report
Non-Compliant Systems
System Update Task
Non-Inventoried Systems
All System Update Tasks
Issues and Resolutions
Filter Options
Filter Option Description
Is equal to Select to create the same as logic.
Is not equal to Select to create the different from logic.
Starts with Select to filter search based on a text chunk’s initial alphanumeric characters. Provide the starting alphanumeric characters in the field.
224
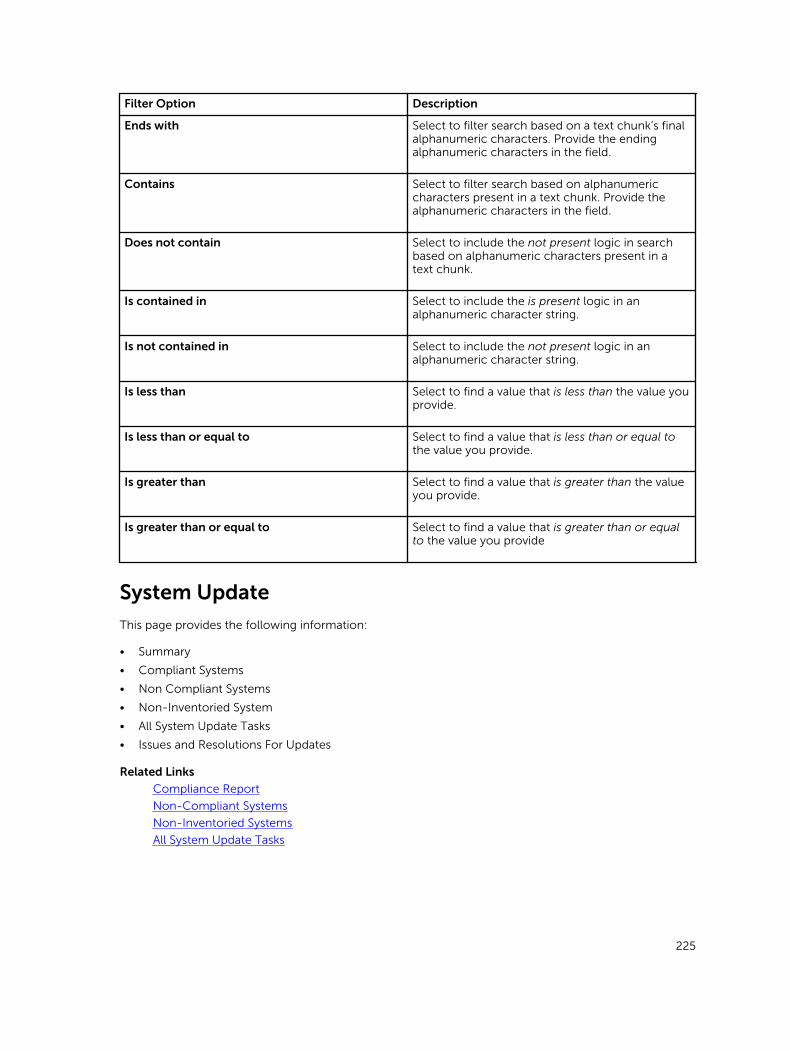
Filter Option Description
Ends with Select to filter search based on a text chunk’s final alphanumeric characters. Provide the ending alphanumeric characters in the field.
Contains Select to filter search based on alphanumeric characters present in a text chunk. Provide the alphanumeric characters in the field.
Does not contain Select to include the not present logic in search based on alphanumeric characters present in a text chunk.
Is contained in Select to include the is present logic in an alphanumeric character string.
Is not contained in Select to include the not present logic in an alphanumeric character string.
Is less than Select to find a value that is less than the value you provide.
Is less than or equal to Select to find a value that is less than or equal to the value you provide.
Is greater than Select to find a value that is greater than the value you provide.
Is greater than or equal to Select to find a value that is greater than or equal to the value you provide
System Update
This page provides the following information:
• Summary
• Compliant Systems
• Non Compliant Systems
• Non-Inventoried System
• All System Update Tasks
• Issues and Resolutions For Updates
Related Links
Compliance Report
Non-Compliant Systems
Non-Inventoried Systems
All System Update Tasks
225

Compliance Report
The compliance report provides a pie chart distribution of software update tasks. Click a pie chart portion to view more information on the systems.
Related Links
System Update
Compliance Report Options
Field Description
Source Report source
Get the latest This option is disabled if the catalog version is the latest. Else, it is active. Click this option to get the latest catalog version.
Advanced Settings Using these options you can set preferences for upgrading and downgrade firmware, BIOS, driver, and application versions:
• Enable Downgrades—Select this option to install versions of firmware, BIOS, drivers, and applications that are earlier than the versions installed on the systems.
• Disable Downgrades—This option is set by default, selecting this option enables you to install versions of firmware, BIOS, drivers, and applications that are later than the versions installed on the systems.
You can also set one of the following update modes as the default:
• OpenManage Server Administrator—Allows you to update all components on the systems.
• iDRAC—Allows you to update only the BIOS, firmware, and applications.
NOTE: You can set one of the update modes as the default mode but the actual update mode depends on the protocol used and the components that are being updated. For more information, see System Update Use Case Scenarios.
Systems information - pie chart format The pie chart lists the systems status compared with the existing catalog file. The systems listed are as follows:
• Compliant Systems
• Non-Compliant Systems
• Non-Inventoried Systems
• Issues and Resolutions
226

Field Description
Compliant Systems Systems with software that is up to date when compared with versions available in the software updates active catalog. Click compliant systems portion to view more information in the Compliant Systems tab.
Non-Compliant Systems Systems with software that requires updates when compared with versions available in the software updates active catalog. Click the non-compliant systems portion to view more information in the Non-Compliant Systems tab.
Non-Inventoried Systems Discovered systems pending inventory when compared with available software in the active catalog. Click non-inventoried portion to view more information in the Non-Inventoried Systems tab.
Compliant Systems
The Compliant Systems tab provides this information:
Field Description
System Name Domain name of the system.
Model Type Devices model information.
Operating System The operating system that is running on the server.
Service Tag A unique identifier, that provides the service lifecycle.
Discovered Time Time and date of discovery.
Inventory Time Time and date of inventory.
Server Subnet Location IP address range information.
Non-Compliant Systems
The Non-Compliant Systems tab provides this information:
Field Description
System Name Domain name of the system.
Model Type The systems model name. For example, Dell PowerEdge.
227
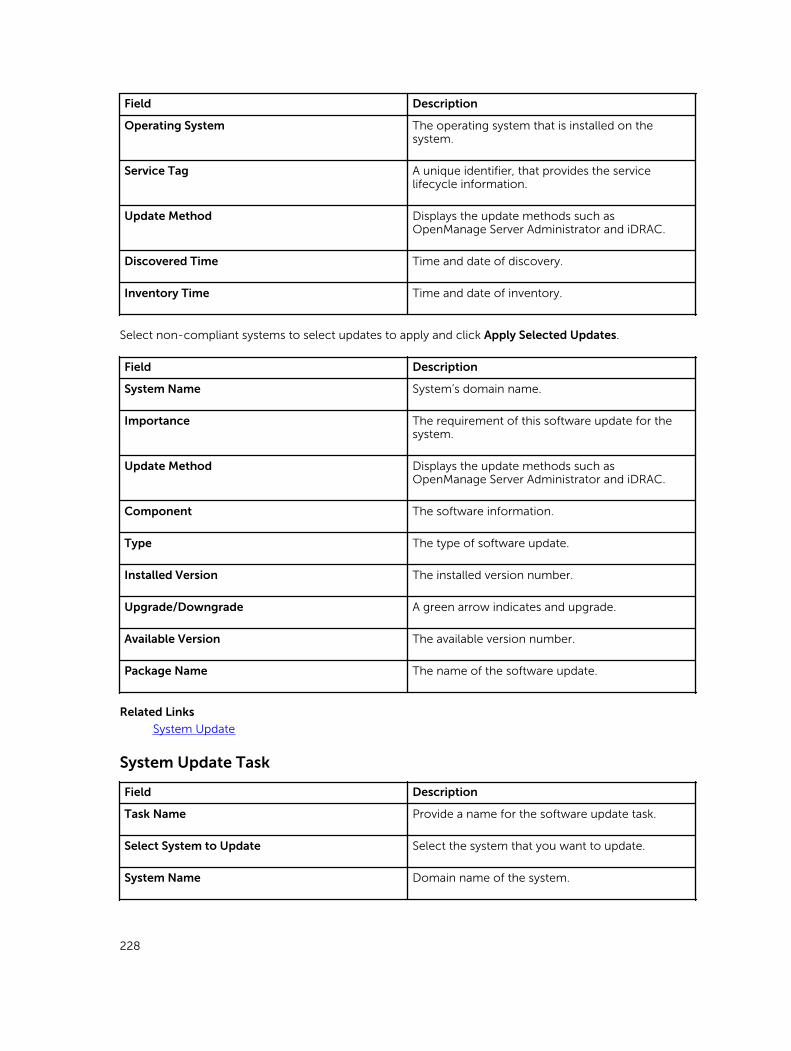
Field Description
Operating System The operating system that is installed on the system.
Service Tag A unique identifier, that provides the service lifecycle information.
Update Method Displays the update methods such as OpenManage Server Administrator and iDRAC.
Discovered Time Time and date of discovery.
Inventory Time Time and date of inventory.
Select non-compliant systems to select updates to apply and click Apply Selected Updates.
Field Description
System Name System’s domain name.
Importance The requirement of this software update for the system.
Update Method Displays the update methods such as OpenManage Server Administrator and iDRAC.
Component The software information.
Type The type of software update.
Installed Version The installed version number.
Upgrade/Downgrade A green arrow indicates and upgrade.
Available Version The available version number.
Package Name The name of the software update.
Related Links
System Update
System Update Task
Field Description
Task Name Provide a name for the software update task.
Select System to Update Select the system that you want to update.
System Name Domain name of the system.
228

Field Description
Importance The requirement of this software update for the system.
Delivery Mode Displays the delivery methods such as OpenManage Server Administrator and iDRAC.
Component The software information.
Type The type of software update.
Installed Version The installed version number.
Upgrade/Downgrade A green arrow indicates an upgrade.
Available Version The available version number.
Package Name The name of the software update.
Set the Task Schedule
Run Now Select this option if you want to run the task when you click Finish.
After update if required, reboot the device. Select to restart the system after the software update task is complete.
Set Schedule Select to schedule a task at a required date and time. Click the icon to set date and time.
Skip Signature and Hash Check Select this option to skip the signature and hash check on the system update package.
Enter Credentials for the task execution
Enable Sudo Select this option to update the system using sudo.
SSH Port Number Provide the SSH port number.
Server User name Provide the server user name for the selected target.
Server Password Provide the server password for the selected target.
iDRAC User name Provide the iDRAC user name for the selected target.
iDRAC Password Provide the iDRAC password for the selected target.
229

Non-Inventoried Systems
The Non-Inventoried Systems tab provides a list of systems that require inventory. To inventory the systems, select the systems and click Inventory.
Field Description
System Name Domain name of the system.
Discovered Time Time and date of discovery.
Inventory Time Time and date of inventory.
Server Subnet Location IP address range information.
Related LinksUpdating Server BIOS, Firmware, Drivers, and Applications
Viewing the System Update Page
System Update — Reference
System Update
Inventory Systems
To inventory systems, select Systems To Inventory and click Run Inventory.
All System Update Tasks
This page provides more information on the software update tasks.
Field Description
Task Name The name of the task.
Task Label Provides information on what the task does.
Start Time Time and date of inventory.
Related LinksSystem Update
Issues and Resolutions
Field Description
System Name Displays the domain name of the system.
Reason Displays the issue associated with the server.
Recommendation Displays the resolution to resolve the issue.
Related Links
230

Updating Server BIOS, Firmware, Drivers, and Applications
Viewing the System Update Page
System Update — Reference
Task Execution History
Lists the details of the system update tasks or remote tasks.
Field Description
Status Displays an icon representing the task status:
— Running or pending
— Completed
— Stopped
— Failed
— Warning
Task Name The name of the task.
Start Time Time and date at which the system update task started.
% Completed The task’s progress information.
Task State Provides these task states:
• Running
• Completed
• Stopped
• Failed
• Warning
NOTE: The task status displays warning if the After update if required, reboot the device option was not selected for the system update task.
Successful / Attempted Targets The number of target systems on which the task is successfully executed.
End Time Time and date at which the system update task ends.
Executed by User The user information.
231

Select a Catalog Source
For updating software, select from these options to use a default catalog file present on the Dell FTP site or provide an alternate software update package file.
Field Description
Use file system source (SUU) Select to update software using Server Update Utility. Click Browse to traverse to the file location. The catalog.cab file is located in the repository folder.
Use repository manager file Select to update software using repository manager file. Click Browse to traverse to file location. The catalog.cab file is located in the repository folder.
Use an online source Select to update software using the software update package present on the Dell FTP site.
NOTE: The path to the catalog file may be displayed on the screen while importing the catalog using either SUU or repository manager. However, it is recommended that you manually select the catalog file, by clicking Browse.
Dell Update Package
A Dell Update Package (DUP) is a self-contained executable in a standard package format that updates a single software element on the system. DUPs are software utilities provided by Dell to update specific software components on Dell PowerEdge systems, Dell desktops, and Dell laptops. The customized bundles and repositories are made up of DUPs based on operating systems supported, update types, form factor, and line of business.
Dell OpenManage Server Update Utility
Dell OpenManage Server Update Utility (SUU) is a DVD-based application for identifying and applying updates to the system. SUU displays a comparison report of the versions and provides various options for updating the components.
Repository Manager
Repository Manager is an application that allows you to create repositories of customized bundles and updates, and groups of related updates for systems running supported Microsoft Windows or Linux operating systems. This facilitates generating comparison reports and establishing update baselines of repositories. By using Repository Manager, you can ensure that the Dell PowerEdge system, Dell desktop or Dell laptop is equipped with the latest BIOS, driver, firmware, and software updates.
View Active Catalog
Select to view the catalog file that is currently in use for applying software updates.
232

Field Description
Source Displays the source. The source is either Server Update Utility, FTP, or Repository Manager.
Source Type The type for source from which the catalog file is taken. For example, Dell ftp site.
Release ID The unique identification number assigned to the released catalog file.
Release Date The date on which the catalog file was released.
Newer version available Displays if a newer version is available.
233

20Managing Remote Tasks
About Remote Tasks
With the Remote Tasks feature in OpenManage Essentials, you can:
• Run commands on local and remote systems, run batch files and executable files on the local systems, and schedule local and remote tasks.
NOTE: The files must be located on the system with OpenManage Essentials installed and not on the remote system.
• Change power status for a system.
• Deploy OpenManage Server Administrator on systems.
• Deploy iDRAC Service Module (iSM) on systems.
• Collect firmware and driver inventory information from a server that does not have Dell OpenManage Server Administrator (OMSA) installed.
• View the remote tasks.
• Make changes to any task by right-clicking it.
NOTE: If you stop a running task, it may take 3-4 minutes for the task to stop gracefully and the updated task status to get reflected in the console.
NOTE: The Task Execution History reflects the remote tasks that you created or deleted only after a few seconds.
NOTE: When providing system credentials, if the username has spaces or periods, the username must be provided within quotation marks. For example, "localhost\johnny marr" or "us-domain\tim verlaine". Spaces and periods can be used in usernames for OpenMange System Administrator Tasks, Generic Command Line Tasks (local system), OpenManage Systems Administrator Deployment Tasks. System Updates (In Band, through OpenManage System Administrator) also support spaces and periods. Out of Band patching (through RAC device) or commands such as RACADM do not support space or period in the username.
Managing Command Line TaskYou can create custom command line tasks to run CLI commands on local and remote systems, and run batch files and executables on local systems.
For example, you can create a custom command line task to run a security audit and gather information on the systems’ security status.
NOTE: The Remote Server Administrator Command task requires that the Windows Management Instrumentation service is running on the selected targets.
234

To create command line tasks:
1. From OpenManage Essentials, click Manage → Remote Tasks → Common Tasks → Create Command Line Task..
2. On General, provide a task name.
3. Select one of the following options:
• Remote Server Administrator Command— Select to run the server administrator command on remote servers.
• Generic Command— Select to run the command, executable file, or batch file.
• IPMI Command— Select to run the IPMI commands on the remote system.
• RACADM Command Line— Select to run the RACADM commands on the remote system.
4. Based on your selection in the preceding step, provide the following:
• If you selected Remote Server Administrator Command, then provide command, SSH port number, and select Generate Trusted Key for Linux if you want to generate a trusted key.
• If you selected Generic Command, RACADM Command Line, or IPMI Command then provide command and append output information. Providing the append output information is optional.
5. On Task Target, do one of the following:
• Select a query from the drop-down list or create a new query by clicking the New button.
• Select server targets for running the commands. Only applicable targets are displayed by default. For more information, see the Device Capability Matrix.
6. On Schedule and Credentials, provide user credentials, and set schedule for the tasks from available options, and then click Finish.
For information about the fields in the Create a Command Line Task wizard, see Command Line Task.
Related Links
Remote Tasks
Remote Tasks — Reference
Remote Tasks Home
Command Line Task
All Tasks
Device Capability Matrix
Managing RACADM Command Line Tasks
RACADM command line tasks are used to run commands on remote DRACs and iDRACs. For example, run a RACADM task to configure iDRAC through out of band (OOB) channel. To manage RACADM Command line tasks:
1. From OpenManage Essentials, click Manage → Remote Tasks → Common Tasks → Create Command Line Task.
2. On General, choose RACADM Command Line and enter a name for the task.
3. Enter the RACADM sub-command (for example, getsysinfo.) For a list of RACADM commands, go to dell.com/support.
4. (Optional) Choose Output to file to capture task output from multiple targets. Enter path and file name.
• To log the information from all selected targets, select Append.
• To write all the detected errors to the log file, select Include errors.
5. On Task Target, do one of the following:
235

• Select a query from the drop-down list or create a new query by clicking the New button.
• Choose target servers or DRACs/iDRACs. Only applicable targets are displayed by default. For more information, see the Device Capability Matrix.
6. On Schedule and Credentials, set the schedule parameters, provide target credentials and then click Finish.
Related Links
Remote Tasks
Remote Tasks — Reference
Remote Tasks Home
Command Line Task
All Tasks
Device Capability Matrix
Managing Generic Command Line Task
Using Generic command line task, you can run different types of tasks such as, a batch file, a script file such as a Powershell or VBS script, an executable, or a command, on the local OpenManage Essentials system. While the task always runs on the local OpenManage Essentials system, you can structure the local task to interact with or act upon a variety of remote devices or servers.
You can enter tokens (substitution parameters) in the command line task to be passed to the script file, executable, command, or batch file and execute local scripts on devices that are discovered in OpenManage Essentials.
To manage Generic command line tasks:
1. From OpenManage Essentials, click Manage → Remote Tasks → Common Tasks → Create Command Line Task.
2. In the General tab, choose Generic Command.
3. If required, update the task name.
4. Enter the path and command (batch, script, or executable) to run on the local system.
5. (Optional) Enter any arguments for the command. If $USERNAME and $PASSWORD are used in Arguments, you can pass the credentials to the command by the entering the credentials under Script Credentials. If $IP or $RAC_IP are used in Arguments, you can run the command against the selected target(s) by passing the IP address of each target to the command.
NOTE: The tokens provided in the Arguments field must entirely be in either uppercase or lowercase. For example, $HOSTNAME or $hostname.
NOTE: If you are running a command that does not require any tokens or arguments, the Script Credentials section and the Task Target tab are not displayed.
6. (Optional) Choose Ping Device if you want to ping the device first.
7. (Optional) Choose Output to file to capture task output from multiple targets. Enter path and file name.
• To log the information from all selected targets, select Append.
• To write all the detected errors to the log file, select Include errors.
8. On Task Target, do one of the following:
• Select a query from the drop-down list or create a new query by clicking the New button.
• Select targets for running the commands.
9. On Schedule and Credentials, enter the local administrator credentials with rights to run commands on the OpenManage Essentials system. Set schedule for the task(s) and then click Finish.
236

Related Links
About Tokens
Generic Command
About Tokens
The following tokens can be used to pass values to the batch, script, or executable file:
• $IP and $RAC_IP — If these arguments are used, the Task Target tab appears in the Create a Command Link Task screen. The Task Target tab allows you to select the targets to pass the arguments. $IP is used for a server IP and $RAC_IP is used for a RAC (iDRAC) IP. From the Task Target tab, you can select either groups, a device or use dynamic queries.
• $USERNAME and $PASSWORD — In some instances, you must provide credentials for a remote system in your batch or script file. If $USERNAME or $PASSWORD are used in arguments, the Script Credentials section appears for these values. The credentials entered in the Script Credentials section is passed to the command line. You can pass either of these values or both.
NOTE: You must enter both values in the Script Credentials section. If you do not need to use one value, enter any text in the field and it is ignored if the token is not in use.
• $NAME — This token passes the name of the system found in the OpenManage Essentials Device Tree. The name is most often the host name of the system, but in some instances it might be either an IP address or a string such as Dell Rack System – SVCTAG1.
Passing Tokens to a Script
If you are using a batch file or a script, use %1, %2, %3 , and so on to receive the values passed from OpenManage Essentials. The values are passed in the order they are entered from left to right in the Arguments field.
For example, if you use $USERNAME $PASSWORD $IP $RAC_IP $NAME as arguments, a batch file with the following Echo %1 %2 %3 %4 %5 displays the following result:
C:\Windows\system32>echo scriptuser scriptpw 10.36.1.180 10.35.155.111 M60505-W2K8x64 scriptuser scriptpw 10.36.1.180 10.35.155.111 M60505-W2K8x64
NOTE: The credentials are passed in plain text to the command line. If you schedule a task to run later, the credentials are encrypted and stored in the database. The credentials are decrypted when the task runs at the scheduled time. However, if you use the RUN option on a previously created task, enter both administrator credentials for the system and the script credentials.
Managing Server Power OptionsYou can create tasks to manage power on servers.
NOTE: The power task requires that the Windows Management Instrumentation service is running on the selected targets.
To create a remote task:
1. From OpenManage Essentials, click Manage → Remote Tasks → Common Tasks → Create Power Task.
2. In Create a Power Task, on General, do the following:
• Provide task name.
• Select power options. If required, select Shutdown OS first to shut the operating system down before starting the power tasks.
237

3. On Task Target, do one of the following:
• Select a query from the drop-down list or create a new query by clicking the New button.
• Select server targets for running the commands.
4. On Schedule and Credentials, set the schedule parameters, provide target credentials, and then click Finish.
For information about the fields in the Create a Power Task wizard, see Server Power Options.Related Links
Remote Tasks
Remote Tasks — Reference
Remote Tasks Home
Command Line Task
All Tasks
Device Capability Matrix
Deploying Server AdministratorThe deploy OpenManage Server Administrator task requires the following on the selected targets:
• Windows Management Instrumentation service must be running.
• The default Temp folder (C:\Users\<username>\AppData\Local\Temp) must be available. Ensure that the Temp folder is not deleted or moved.
You can create tasks to deploy OpenManage Server Administrator (OMSA) on servers running Windows or Linux operating systems. You can also plan a date and time to schedule the OMSA deploy task.
To create an OpenManage Server Administrator deployment task:
1. Click Manage → Remote Tasks → Common Tasks → Create Deployment Task.
2. On General, select Server Administrator and provide a task name. If you want to deploy OpenManage Server Administrator on Windows-based servers, then select Windows, provide installer path and, if required, provide arguments. If you want to deploy OpenManage Server Administrator on Linux-based servers, select Linux and provide the installer path and, if required, provide arguments. For the list of supported packages and arguments (for servers running Window and Linux), see Supported Windows and Linux Packages and Arguments. Select Generate Trusted Key and select Allow reboot.
NOTE: Install Server Administrator prerequisites before deploying Server Administrator on Linux.
3. On Task Target, do one of the following:
• Select a query from the drop-down list or create a new query by clicking the New button.
• Select servers on which you want to run this task and click Next.
4. On Schedule and Credentials, set the schedule parameters, provide user credentials to enable the task.
5. If you want to deploy Server Administrator as a sudo user, select Enable Sudo and update the SSH port number.
238

NOTE: Before you deploy OMSA using sudo, create a new user account, edit the sudoers file using the visudo command, and add the following:
• For target systems running a 32-bit operating systems: Cmnd_Alias OMEUPDATE = /bin/tar,/bin/cat,/opt/dell/srvadmin/bin/omexec,/tmp/LinuxPreInstallPackage/runbada,/tmp/LinuxPreInstallPackage/omexec <sudo_username> ALL=OMEUPDATE, NOPASSWD:OMEUPDATE.
• For target systems running a 64-bit operating systems: Cmnd_Alias OMEUPDATE = /bin/tar,/bin/cat,/opt/dell/srvadmin/bin/omexec,/tmp/LinuxPreInstallPackage64/runbada,/tmp/LinuxPreInstallPackage64/omexec <sudo_username> ALL=OMEUPDATE, NOPASSWD:OMEUPDATE.
NOTE: If OMSA is uninstalled from a system by a root user, before deploying OMSA on that system using sudo, make sure that all OMSA pre-installation package files are removed from the tmp folder.
NOTE: Deploying OMSA using sudo is not supported for SUSE Linux Enterprise Server and ESX targets.
6. Click Finish.
For information about the fields in the Create a Deployment Task wizard, see Deployment Task.
Related Links
Remote Tasks
Remote Tasks — Reference
Remote Tasks Home
Command Line Task
All Tasks
Device Capability Matrix
Supported Windows and Linux Packages
Windows Packages
Package Type Clean installation Major Version Upgrade (5.x to 6.x to 7.x)
Minor Version Upgrade (6.x to 6.y)
.msi Supported Supported Supported
.msp Not supported Not supported Supported
.exe Not supported Supported Supported
Linux Packages
Operating System Package
SUSE Linux Enterprise Server 10
OM-SrvAdmin-Dell-Web-LX-6.5.0-2247.SLES10.x86_64_A01.6.tar.gz
OM-SrvAdmin-Dell-Web-LX-6.5.0-2247.SLES10.x86_64_A01.6.tar.gz.sign
SUSE Linux Enterprise Server 11
OM-SrvAdmin-Dell-Web-LX-6.5.0-2247.SLES11.i386_A01.14.tar.gz
OM-SrvAdmin-Dell-Web-LX-6.5.0-2247.SLES11.i386_A01.14.tar.gz.sign
VMware ESX 4 OM-SrvAdmin-Dell-Web-LX-6.5.0-2247.ESX41.i386_A01.tar.gz
239

Operating System Package
OM-SrvAdmin-Dell-Web-LX-6.5.0-2247.ESX41.i386_A01.tar.gz.sign
Red Hat Enterprise Linux 5
OM-SrvAdmin-Dell-Web-LX-6.5.0-2247.RHEL5.x86_64_A01.4.tar.gz
OM-SrvAdmin-Dell-Web-LX-6.5.0-2247.RHEL5.x86_64_A01.4.tar.gz.sign
Red Hat Enterprise Linux 6
OM-SrvAdmin-Dell-Web-LX-6.5.0-2247.RHEL6.x86_64_A01.5.tar.gz
OM-SrvAdmin-Dell-Web-LX-6.5.0-2247.RHEL6.x86_64_A01.5.tar.gz.sign
Arguments
Clean Installation
Component Installation Linux Attribute Windows Attribute
Server Administrator Web Server only
-w ADDLOCAL=IWS
Server Administrator Instrumentation only
-d ADDLOCAL=SA
Server Administrator Web Server and Server Instrumentation
-w –d ADDLOCAL=ALL
Upgrade
• REINSTALL=ALL REINSTALLMODE=VOMUS — This is a required argument for Server Administrator minor version upgrade using .msi packages.
• /qn — This is an optional argument that is used for silent and unattended installation.
.
Deploying iDRAC Service ModuleNOTE: The iDRAC Service Module (iSM) can be deployed only on servers that meet the following criteria:
• Dell PowerEdge 12G or later servers running a 64-bit Windows or Linux operating system
• iDRAC firmware version 1.51.51 or later
• The server and iDRAC must be discovered in OpenManage Essentials
The deploy iSM task requires the following on the target servers:
• Windows Management Instrumentation service must be running.
• The default Temp folder (C:\Users\<username>\AppData\Local\Temp) must be available. Ensure that the Temp folder is not deleted or moved.
You can create tasks to deploy iSM on servers running Windows or Linux operating systems. You can also plan a date and time to schedule the iSM deployment task.
240

To create an iSM deployment task:
1. Click Manage → Remote Tasks → Common Tasks → Create Deployment Task.
2. On General, select iDRAC Service Module and provide a task name. If you want to deploy iSM on Windows-based servers, then select Windows, provide installer path and, if required, provide arguments. If you want to deploy iSM on Linux-based servers, select Linux and provide the installer path, select Generate Trusted Key and Allow reboot. If you are using a .rpm package to deploy iSM, select Upload and Install GPG key.
NOTE: Install iSM prerequisites before deploying iSM on Linux.
3. On Task Target, do one of the following:
• Select a query from the drop-down list or create a new query by clicking the New button.
• Select servers on which you want to run this task and click Next.
NOTE: Devices that are not applicable for iSM deployment are not available for selection in the Task Target. Moving the mouse pointer over such a device in the Task Target displays a tool tip that indicates why iSM cannot be deployed. If you want to override the device capability and allow all the available devices for selection as task targets, select Enable all.
4. On Schedule and Credentials, set the schedule parameters, provide user credentials to enable the task.
5. If you want to deploy iSM as a sudo user, select Enable Sudo and update the SSH port number.
NOTE: Before you deploy iSM using sudo, create a new user account, edit the sudoers file using the visudo command, and add the following:
Cmnd_Alias OMEUPDATE = /bin/tar,/bin/cat,/bin/rpm,/opt/dell/srvadmin/bin/omexec,/tmp/LinuxPreInstallPackage64/runbada,/tmp/LinuxPreInstallPackage64/omexec <sudo_username> ALL=OMEUPDATE, NOPASSWD:OMEUPDATENOTE: If iSM is uninstalled from a system by a root user, before deploying iSM on that system using sudo, make sure that all iSM pre-installation package files are removed from the tmp folder.
NOTE: Deploying iSM using sudo is not supported on SUSE Linux Enterprise Server and ESX targets.
6. Click Finish.
For information about the fields in the Create a Deployment Task wizard, see Deployment Task.
Related Links
Deployment Task
Supported Windows and Linux Packages
Windows Packages
Package Type Clean installation Major Version Upgrade (1.x to 2.x)
.msi
NOTE: Applicable only for iSM 2.0.
Supported Supported
.exe Not supported Supported
241

Linux Packages
Operating System Package
• Red Hat Enterprise Linux 5
• Red Hat Enterprise Linux 6
• Red Hat Enterprise Linux 7
• SUSE Linux Enterprise Server 11
• Community Enterprise Operating System (CentOS) 5.9
• CentOS 6.5
OM-iSM-Dell-Web-LX-100-429.tar.gz
OM-iSM-Dell-Web-LX-100-429.tar.gz.sign
Systems-Management_Application_NH7WW_LN64_1.0.0_A01
Systems-Management_Application_NH7WW_LN64_1.0.0_A01.BIN
SUSE Linux Enterprise Server 11
dcism-1.0.0-4.435.1.sles11.x86_64.rpm
Red Hat Enterprise Linux 5 dcism-1.0.0-4.435.1.el5.x86_64.rpm
Red Hat Enterprise Linux 6 dcism-1.0.0-4.435.1.el6.x86_64.rpm
Collecting Firmware and Driver InventoryThe Create F/W & Driver Inventory Task enables you to collect firmware and driver inventory information from a server. The collected inventory information serves as a baseline that is used by OpenManage Essentials to identify and apply updates on the server. This task allows you to collect inventory information that is otherwise not be available to OpenManage Essentials in the following scenarios:
• Servers that do not have Dell OpenManage Server Administrator (OMSA) installed, discovered using WMI or SSH protocol.
• Dell or OEM servers that do not have OMSA installed.
• Servers running Linux with OMSA, but the inventory collector component is uninstalled.
After the inventory information is collected, you can update the firmware, BIOS, or drivers of the server through the System Update portal.
To collect firmware and driver inventory:
1. Perform one of the following:
• Click Manage → Remote Tasks → Create F/W & Driver Inventory Task.
• Click Manage → System Update → Non-Inventoried Systems.
a. Select the systems you want to inventory and click Inventory.
b. In the Systems to Inventory window, click Run Inventory.
The Create a Firmware & Driver Inventory Task window is displayed.
2. On General, provide a name for the task.
3. If you want to filter the devices to be displayed in the Task Target based on the operating system, select Filter devices based on Operating System.
a. Select Windows or Linux.
b. If applicable, select 64-bit System.
4. On Task Target, do one of the following:
242

• Select a query from the drop-down list or click New to create a new query.
• Select servers on which you want to run this task and click Next.
5. On Schedule and Credentials, set the schedule parameters, provide user credentials to enable the task.
6. Click Finish.
The status of the inventory collection is displayed in the Task Execution History of the Remote Tasks portal.
Related LinksRemote Tasks
Remote Tasks — Reference
Remote Tasks Home
Command Line Task
All Tasks
Device Capability Matrix
Firmware and Driver Inventory Collection Task
Working With Sample Remote Tasks Use CasesSample remote tasks are available for Server Power Options, Deploy Server Administrator, and Command Line. Sample remote tasks use cases are disabled by default. To enable a sample use case:
1. Right-click the use case and select Clone.
2. Enter the Cloned Task Name and click Ok.
3. Right-click the cloned task and select Edit.
4. Enter the required information and assign targets to the tasks. For information about the options, see Remote Tasks Reference.
Related LinksRemote Tasks
Remote Tasks — Reference
Remote Tasks Home
Command Line Task
All Tasks
Device Capability Matrix
Use Cases in Remote Tasks
Server Power Options
Sample-Power On Device—Enable this use case to turn on the server. The system must have RAC/DRAC configured.
Deploy Server Administrator
Sample-OMSA Upgrade Windows—Enable this use case to upgrade OpenManage Server Administrator on a Windows-based system.
Command Line
• Sample - Windows OMSA Uninstall — Enable this use case to uninstall OMSA on a system running the Windows Server operating system.
243

• Sample - Linux OMSA Uninstall — Enable this use case to uninstall OMSA on a system running the Linux operating system.
• Sample - Server XML Configuration — Enable this use case to apply a specific server configuration to multiple managed nodes. For more information, see Using the Sample - Server XML Configuration Command Line Task.
• Sample-Generic Command Remote — Enable this use case to use tokens to receive the IP address or name of inventories systems.
NOTE: To use this command, you must enter the local system credentials.
• Sample - Generic Command Local — Enable this use case to run a command or script on system with OpenManage Essentials.
NOTE: To use this command, you must enter the local system credentials.
• Sample - IPMI Command — Enable this use case to receive information about the power status of a server.
• Sample - Remote Command — Enable this use case to view the system summary through Server Administrator.
• Sample - RACADM - Clear SEL Log — Enable this use case to clear the SEL log of RAC.
• Sample - RACADM-Reset — Enable this use case to reset the RAC.
Firmware and Driver Inventory Task
Scheduled S/W Inventory Task — Enable this use case to collect firmware and driver inventory from a server.
Using the Sample - Server XML Configuration Command Line Task
The following are the prerequisites for using the Sample - Server XML Configuration command line task:
• Dell Lifecycle Controller 2 version 1.2 or later
• RACADM version 7.2 or later
• Firmware version 1.30.30 or later
• Express or Enterprise license
• iDRAC7
The Sample - Server XML Configuration command line task allows you to apply a specific server configuration to multiple managed nodes. Using Dell Lifecycle Controller 2 version 1.2 or later, a server configuration summary can be exported from an iDRAC in XML format through the “Export Server Configuration” operation.
NOTE: For information on exporting the server configuration summary using Lifecycle Controller 2, see the Configuration XML Workflows white paper at DellTechCenter.com/LC.
The server configuration summary XML file can be applied to another iDRAC using the Sample - Server XML Configuration command line task.
NOTE: To apply the server configuration summary from one iDRAC to another iDRAC, both the iDRACs must be of the same generation, same license state, and so on. For more information on the requirements, see the Lifecycle Controller (LC) XML Schema Guide, Server Configuration XML File, and Configuration XML Workflows white papers at DellTechCenter.com/LC.
To use the Sample - Server XML Configuration command line task:
1. In the OpenManage Essentials Remote Tasks portal, right-click the Sample - Server XML Configuration, and click Clone.
244

The Input information for the newly cloned task dialog box is displayed.
2. Provide the Cloned Task Name and click OK.
3. Right-click the created cloned task and click Edit.
The Create a Command Line Task dialog box is displayed.
4. Edit the Command field, and provide the location of the server configuration summary xml file in the OpenManage Essentials management station. For example, set –f c:\user1\server1.xml-t xml, where c:\user1\server1.xml is the location of the server configuration summary xml file.
5. In the Targets tab, select the appropriate targets for applying the server configuration.
6. In the Schedule and Credentials tab, select to run or schedule the task, and provide the required credentials.
7. Click Finish.
Device Capability Matrix
The following device capability matrix provides information about the type of remote tasks supported on devices that are displayed in the Task Target tab.
Remote Task Type
All Servers (except ESXi) With Server Administrator and Discovered Using SNMP/WMI
Windows-based Servers without Server Administrator and discovered using WMI
Linux-based Servers without Server Administrator and discovered using SSH
DRAC/iDRAC discovered using IPMI
DRAC/iDRAC discovered using SNMP/WS-Man
DRAC/iDRAC is not discovered Server operating system is not discovered
Reboot/power cycle operation
Supported Supported Not supported Not supported Not supported
Power off operation
Supported Supported Not supported Not supported Not supported
Power on operation
Not supported Not supported Not supported Supported Not supported
Remote Server Administrator command task
Supported Not supported Not supported Not supported Not supported
IPMI command task
Not supported Not supported Not supported Not supported Not supported
RACADM command line task
Not supported Not supported Not supported Not supported Supported
Create F/W & Driver Inventory task
Not supported Supported Supported Not supported Not supported
The following table lists the device discovery requirements for the iSM deployment task. To deploy iSM, the server and the iDRAC must discovered using the appropriate protocols specified. For example, to
245

deploy iSM on a Windows-based server running Server Administrator that is discovered using SNMP/WMI, the iDRAC must be discovered using SNMP/WS-Man.
Remote Task Type
Server/in-band discovery iDRAC/out-of-band discovery
All Windows-based Servers With Server Administrator and Discovered Using SNMP/WMI
All Windows-based Servers With Server Administrator and Discovered Using WMI
Linux-based Servers With Server Administrator and discovered using SNMP/SSH
Linux-based Servers With Server Administrator and discovered using SSH
DRAC/iDRAC discovered using SNMP/WS-Man
iSM deployment task
N/A N/A N/A
N/A N/A N/A
N/A N/A N/A
N/A N/A N/A
Device capabilities for a server or DRAC/iDRAC device are populated during discovery and is leveraged by remote tasks to determine applicable targets for each task type. The capability is populated based on the following parameters:
• Protocol used to discover the server and DRAC/iDRAC. For example, IPMI, SNMP, and so on.
• If Server Administrator is installed on the server.
• Settings enabled on the DRAC/iDRAC.
Selecting the Enable All check box allows you to override device capability and allows all the available devices for selection as task targets.
The following device capability matrix provides information about the type of remote tasks supported on devices when the device capabilities are overridden.
Remote Task Type
All Servers (except ESXi) With Server Administrator and Discovered Using SNMP/WMI
Windows-based Servers without Server Administrator and discovered using WMI
Linux-based Servers without Server Administrator and discovered using SSH
DRAC/iDRAC discovered using IPMI
DRAC/iDRAC discovered using SNMP/ WS-Man
DRAC/iDRAC is not discovered Server operating system is not discovered
Reboot/power cycle operation
Supported Supported Not supported Not supported Not supported
Power off operation
Supported Supported Not supported Not supported Not supported
246

Remote Task Type
All Servers (except ESXi) With Server Administrator and Discovered Using SNMP/WMI
Windows-based Servers without Server Administrator and discovered using WMI
Linux-based Servers without Server Administrator and discovered using SSH
DRAC/iDRAC discovered using IPMI
DRAC/iDRAC discovered using SNMP/ WS-Man
DRAC/iDRAC is not discovered Server operating system is not discovered
Power on operation
Supported if:
DRAC/iDRAC information is retrieved and displayed in the inventory page.
IPMI over LAN is enabled on the DRAC/iDRAC device.
You select Enable All in the Tasks Target tab.
Not supported Not supported Supported Supported if:
IPMI over LAN is enabled on the DRAC/iDRAC device.
You select Enable All in the Tasks Target tab.
Remote Server Administrator command task
Not supported Not supported Not supported
IPMI command task
Not supported Not supported Not supported Not supported Not supported
RACADM command line task
Supported if:
DRAC/iDRAC information is retrieved and displayed in the inventory page.
You select Enable All in the Tasks Target tab.
Not supported Not supported Not supported Supported
NOTE: In the Task Targets tab, if the Enable All option is selected, iSM deployment is enabled for all discovered servers or unknown devices.
Related Links
Managing Command Line Task
Managing RACADM Command Line Tasks
Managing Server Power Options
Deploying Server Administrator
Collecting Firmware and Driver Inventory
Working With Sample Remote Tasks Use Cases
Using the Sample - Server XML Configuration Command Line Task
Deploying iDRAC Service Module
Remote Tasks
247

Remote Tasks — Reference
248

21Remote Tasks — ReferenceFrom Remote Tasks you can:
• Run commands on local and remote systems, batch files and executable files on the local systems, and schedule local and remote tasks.
• Change power status for a system.
• Deploy OpenManage Server Administrator on systems.
• Deploy iDRAC Service Module (iSM) on systems.
• Collect firmware and driver inventory.
• View the remote tasks.
Remote Tasks:
• Common Tasks
– Create Command Line Task
– Create Deployment Task
– Create Power Task
– Create F/W & Driver Inventory Task
• Remote Tasks
– Server Power Options
– Deploy Server Administrator
– Command Line
• F/W & Driver Inventory Task
Related Links
Managing Command Line Task
Managing RACADM Command Line Tasks
Managing Server Power Options
Deploying Server Administrator
Collecting Firmware and Driver Inventory
Working With Sample Remote Tasks Use Cases
Using the Sample - Server XML Configuration Command Line Task
Deploying iDRAC Service Module
Remote Tasks Home
Command Line Task
All Tasks
Device Capability Matrix
249

Remote Tasks HomeTo view Remote Tasks page, in OpenManage Essentials, click Manage → Remote Tasks.Related Links
Managing Command Line Task
Managing RACADM Command Line Tasks
Managing Server Power Options
Deploying Server Administrator
Collecting Firmware and Driver Inventory
Working With Sample Remote Tasks Use Cases
Using the Sample - Server XML Configuration Command Line Task
Deploying iDRAC Service Module
Remote Tasks
Remote Tasks — Reference
Remote Tasks
Remote Tasks page lists the following information:
• All Tasks
• Server Power Options
• Server Administrator Deployment
• Command Line
• Firmware & Driver Inventory
Related Links
Managing Command Line Task
Managing RACADM Command Line Tasks
Managing Server Power Options
Deploying Server Administrator
Collecting Firmware and Driver Inventory
Working With Sample Remote Tasks Use Cases
Using the Sample - Server XML Configuration Command Line Task
Deploying iDRAC Service Module
Remote Tasks Home
Command Line Task
All Tasks
Device Capability Matrix
All Tasks
Field Description
Scheduled State Displays if the task is enabled.
Task Name Names of the task.
250

Field Description
Task Label Type of task that is run, for example; for a command line task the options displayed are Remote Server Administrator Command, Generic Command, IPMI Command, and RACADM Command Line.
Last Run The last time and date information when the task was run.
Created On The time and date on which the task was created.
Updated On The time and date information when the task was run.
Updated By The name of the user.
Related Links
Managing Command Line Task
Managing RACADM Command Line Tasks
Managing Server Power Options
Deploying Server Administrator
Collecting Firmware and Driver Inventory
Working With Sample Remote Tasks Use Cases
Using the Sample - Server XML Configuration Command Line Task
Deploying iDRAC Service Module
Remote Tasks
Remote Tasks — Reference
Task Execution History
Lists the details of the system update tasks or remote tasks.
Field Description
Status Displays an icon representing the task status:
— Running or pending
— Completed
— Stopped
— Failed
— Warning
Task Name The name of the task.
251

Field Description
Start Time Time and date at which the system update task started.
% Completed The task’s progress information.
Task State Provides these task states:
• Running
• Completed
• Stopped
• Failed
• Warning
NOTE: The task status displays warning if the After update if required, reboot the device option was not selected for the system update task.
Successful / Attempted Targets The number of target systems on which the task is successfully executed.
End Time Time and date at which the system update task ends.
Executed by User The user information.
Server Power Options
Select this option to change the power state or restart systems.
Field Description
General
Task Name Provide a name for this server power options task.
Select the type Select from the following options:
• Reboot — Restarts the system without powering off.
• Power Cycle — Powers off and then restarts the system.
NOTE: Make sure that the shutdown option is configured for the operating system before you perform a graceful shutdown using this option. If you use this option without configuring it on the operating system, it restarts the managed system instead of performing a shutdown operation.
• Power Off — Powers off the system.
252

Field Description
• Power On — Powers on the system. This option works only on target systems that contain RAC.
Shutdown OS first Select to shut down the operating system before executing the server power options task.
Task Target
Select a query Select a query from the drop-down list. To create a new query, click New.
Select the device(s) for this task to target Select the devices to which you want to assign this task.
Enable All Select to override the device capability and allow all the available devices for selection as task targets.
Schedule and Credentials
Set schedule Select from these options:
• Activate Schedule—Select this option to activate a schedule for the task.
• Run now—Select this option to run the task immediately.
• Set schedule—Select this option to set a date and time for the task to run.
• Run Once—Select this option tot run the task on the planned schedule only once.
• Periodic—Select this option to run the task frequently at specified intervals:
– Hourly—Select this option to run the task once every hour.
– Daily—To run the task once every day.
– Weekly—To run the task once every week.
– Monthly—To run the task once every month.
Range of Recurrence:
• Start—To specify the date and time at which the task should begin.
• No End Date—To continuously run this task based on the selected frequency. For example, if you selected Hourly, then this task continuously runs every hour from the start time.
• End By—To stop the task at the specified date and time.
Enter User Name and Password User Name—Provide in the format domain\user name or local host\user name.
253
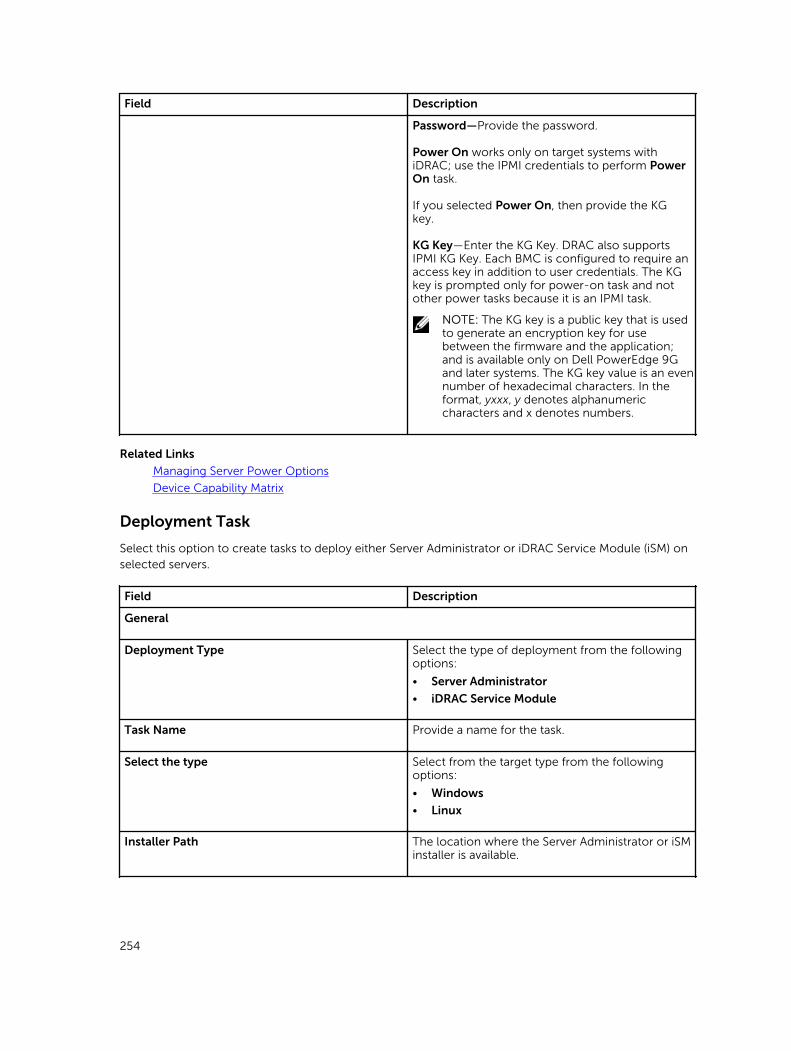
Field Description
Password—Provide the password.
Power On works only on target systems with iDRAC; use the IPMI credentials to perform Power On task.
If you selected Power On, then provide the KG key.
KG Key—Enter the KG Key. DRAC also supports IPMI KG Key. Each BMC is configured to require an access key in addition to user credentials. The KG key is prompted only for power-on task and not other power tasks because it is an IPMI task.
NOTE: The KG key is a public key that is used to generate an encryption key for use between the firmware and the application; and is available only on Dell PowerEdge 9G and later systems. The KG key value is an even number of hexadecimal characters. In the format, yxxx, y denotes alphanumeric characters and x denotes numbers.
Related Links
Managing Server Power Options
Device Capability Matrix
Deployment Task
Select this option to create tasks to deploy either Server Administrator or iDRAC Service Module (iSM) on selected servers.
Field Description
General
Deployment Type Select the type of deployment from the following options:
• Server Administrator
• iDRAC Service Module
Task Name Provide a name for the task.
Select the type Select from the target type from the following options:
• Windows
• Linux
Installer Path The location where the Server Administrator or iSM installer is available.
254

Field Description
For Windows, packages with .dup, .msi, and .msp. file extensions are available. Msi packages enable Server Administrator installation and upgrades while dup and msp packages enable only Server Administrator upgrades.
• For Server Administrator deployment on Linux:
– Packages with the tar.gz file extensions are available.
– The.sign file is required for verification. The .sign file must be available in the same folder as the tar.gz file.
• For iSM deployment on Linux:
– Packages with the tar.gz, .rpm and .bin file extensions are available.
– For deploying the .rpm file, the RPM-GPG-KEY file must be available in the same folder as the .rpm file.
Install Arguments
NOTE: Applicable only for Server Administrator deployment task.
(Optional) Provide arguments.
For example, in Windows, the parameters are as follows:
• ADDLOCAL = IWS—Server Administrator web server only
• ADDLOCAL = SSA—Server instrumentation only
For example, in Linux, the parameters are as follows:
• -w - Server administrator web server only
• -d - Server instrumentation only
See the Dell OpenManage Installation and Security User's Guide at dell.com/support/manuals for a complete list of arguments.
Generate Trusted Key This option is available if you selected Linux. Select this option to generate a trusted key.
64-bit System Select this option if you are deploying the 64-bit version of Server Administrator on a managed node.
Allow reboot (if required) Select this option to restart the server once you deploy Server Administrator on the server.
Upload and Install GPG key (requires GPG key in same folder)
This option is available if you select a .rpm file for iSM deployment. Select this option to validate the .rpm file on the target device.
255
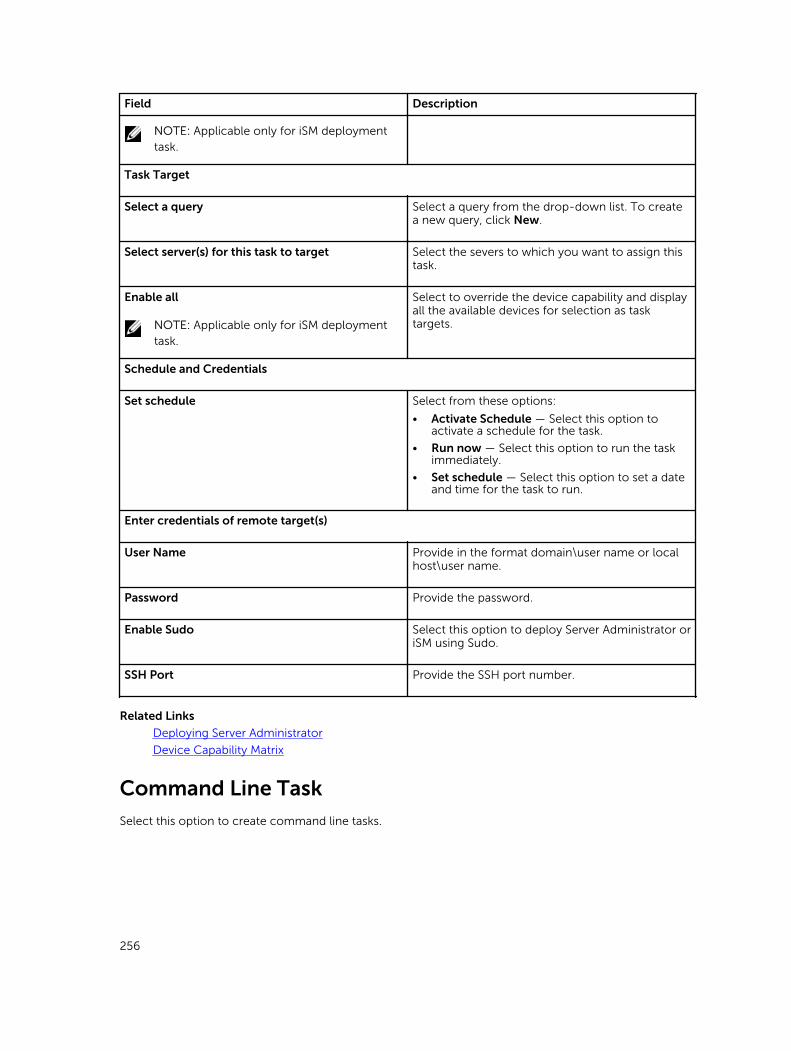
Field Description
NOTE: Applicable only for iSM deployment task.
Task Target
Select a query Select a query from the drop-down list. To create a new query, click New.
Select server(s) for this task to target Select the severs to which you want to assign this task.
Enable all
NOTE: Applicable only for iSM deployment task.
Select to override the device capability and display all the available devices for selection as task targets.
Schedule and Credentials
Set schedule Select from these options:
• Activate Schedule — Select this option to activate a schedule for the task.
• Run now — Select this option to run the task immediately.
• Set schedule — Select this option to set a date and time for the task to run.
Enter credentials of remote target(s)
User Name Provide in the format domain\user name or local host\user name.
Password Provide the password.
Enable Sudo Select this option to deploy Server Administrator or iSM using Sudo.
SSH Port Provide the SSH port number.
Related Links
Deploying Server Administrator
Device Capability Matrix
Command Line Task
Select this option to create command line tasks.
256

Field Description
Task Name Provide name of the task.
Remote Server Administrator Command Select this option to run Remote Server Administrator Command on selected servers.
Generic Command Select this option to run executable and commands on the system with OpenManage Essentials.
IPMI Command Select this option to run IPMI commands on selected servers.
RACADM Command Line Select this option to run RACADM commands on selected servers.
Related Links
Managing Command Line Task
Managing RACADM Command Line Tasks
Managing Server Power Options
Deploying Server Administrator
Collecting Firmware and Driver Inventory
Working With Sample Remote Tasks Use Cases
Using the Sample - Server XML Configuration Command Line Task
Deploying iDRAC Service Module
Remote Tasks
Remote Tasks — Reference
Remote Server Administrator Command
Generic Command
IPMI Command
RACADM Command Line
Remote Server Administrator Command
Field Description
Command Provide command, for example, omereport system summary.
Ping Device This option performs a ping test to verify if a device is reachable before it runs a task against it. This option can be used when using $IP or $RAC_IP and it decreases the time it takes to run the task(s) as it skips unreachable devices.
Output to file Select to enable output to a log file. This option captures standard output and writes it to the log file. If you select this option, enter the path name and file name of the log file. This option is disabled by default.
257

Field Description
Append Select to append output from the completed command to the specified file. If the file does not exist, it is created.
Include errors Select to write all OpenManage Essentials-detected errors to the log file. For example, if no response is received to a ping request before the execution of the command, an error is written to the log file.
SSH Port number Provide the Secure Shell (SSH) port number on the managed Linux system. The default value for the port number is 22.
Generate Trusted Key for Linux Select this option to generate a trusted device key for communicating with devices. This option is disabled by default.
NOTE: The first time that OpenManage Essentials communicates with a managed device with Linux operating system, a key is generated and stored on both the devices. This key is generated per device and enables a trust relationship with the managed device.
Task Target
Select a query Select a query from the drop-down list. To create a new query, click New.
Select the server(s) for this task target Select the severs to which you want to assign this task.
Enable All Select to override the device capability and allow all the available devices for selection as task targets.
Schedule and Credentials
Set schedule Select from these options:
• Activate Schedule—Select this option to activate a schedule for the task.
• Run now—Select this option to run the task immediately.
• Set schedule—Select this option to set a date and time for the task to run.
• Run Once—Select this option to run the task on the planned schedule only once.
• Periodic—Select this option to run the task frequently at specified intervals.
– Hourly—Select this option to run the task once every hour.
258

Field Description
– Daily—To run the task once every day.
– Weekly—To run the task once every week.
– Monthly—To run the task once every month.
Range of Recurrence:
• Start—To specify the date and time at which the task should begin.
• No End Date—To continuously run this task based on the selected frequency. For example, if you selected Hourly, then this task continuously runs every hour from the start time.
• End By—To stop the task at the specified date and time.
Enter credentials of the remote target(s) User Name—Provide in the format domain\user name or local host\user name.
Password—Provide the password.
Related Links
Command Line Task
Managing Command Line Task
Using the Sample - Server XML Configuration Command Line Task
Generic Command
Field Description
Task Name Enter a name for the task. By default, the task name is populated in the format:
<task name>-<date and time>.
Command Provide the fully qualified path name and file name of the executable, command, or script file that launches the application program. For example:
• Tracert
• C:\scripts\trace.bat
• D:\exe\recite.exe
Arguments Enter command line switches to a command or executable or pass values to a script or batch file. For example, -4 $IP. If this argument is passed to tracert command, it executes IPV4 only Traceroute against the IPs of servers selected in Task Target tab. The command run would be tracert -4 10.35.0.55 .
For more information, see About Tokens.
259
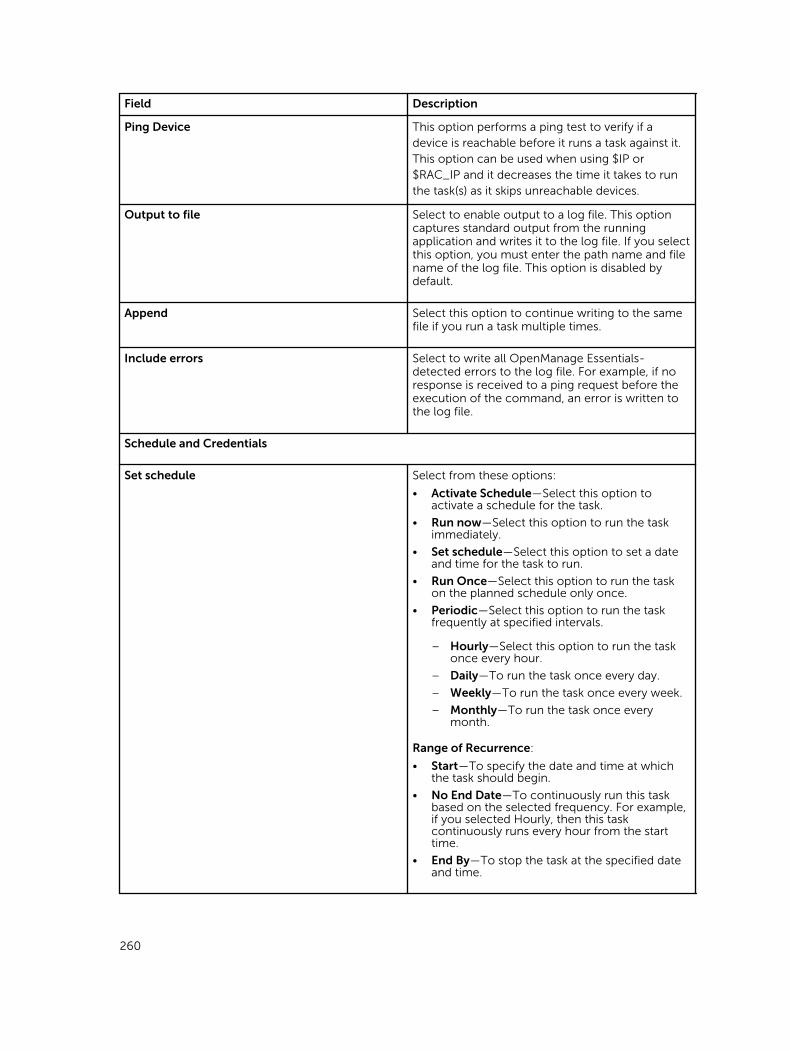
Field Description
Ping Device This option performs a ping test to verify if a device is reachable before it runs a task against it. This option can be used when using $IP or $RAC_IP and it decreases the time it takes to run the task(s) as it skips unreachable devices.
Output to file Select to enable output to a log file. This option captures standard output from the running application and writes it to the log file. If you select this option, you must enter the path name and file name of the log file. This option is disabled by default.
Append Select this option to continue writing to the same file if you run a task multiple times.
Include errors Select to write all OpenManage Essentials-detected errors to the log file. For example, if no response is received to a ping request before the execution of the command, an error is written to the log file.
Schedule and Credentials
Set schedule Select from these options:
• Activate Schedule—Select this option to activate a schedule for the task.
• Run now—Select this option to run the task immediately.
• Set schedule—Select this option to set a date and time for the task to run.
• Run Once—Select this option to run the task on the planned schedule only once.
• Periodic—Select this option to run the task frequently at specified intervals.
– Hourly—Select this option to run the task once every hour.
– Daily—To run the task once every day.
– Weekly—To run the task once every week.
– Monthly—To run the task once every month.
Range of Recurrence:
• Start—To specify the date and time at which the task should begin.
• No End Date—To continuously run this task based on the selected frequency. For example, if you selected Hourly, then this task continuously runs every hour from the start time.
• End By—To stop the task at the specified date and time.
260

Field Description
Enter the credentials with appropriate privileges to run this task on this system
User Name—Provide OpenManage Essentials user credentials in the format domain\user name or local host\user name.
Password—Provide the password.
Related Links
Command Line Task
Managing Command Line Task
Using the Sample - Server XML Configuration Command Line Task
IPMI Command
Field Description
Command Provide the IPMI command you want to run on selected targets.
Ping Device This option performs a ping test to verify if a device is reachable before it runs a task against it. This option can be used when using $IP or $RAC_IP and it decreases the time it takes to run the task(s) as it skips unreachable devices.
Output to file Select to enable output to a log file. This option captures standard output from the running application and writes it to the log file. If you select this option, enter the path name and file name of the log file. This option is disabled by default.
Append Select to append output from the completed command to the specified file. If the file does not exist, it is created.
Include errors Select to write all OpenManage Essentials-detected errors to the log file. For example, if no response is received to a ping request before the execution of the command, an error is written to the log file.
Task Target
Select a query Select a query from the drop-down list. To create a new query, click New.
Select server(s) for this task to target Select the severs to which you want to assign this task.
Enable All Select to override the device capability and allow all the available devices for selection as task targets.
Schedule and Credentials
261

Field Description
Set schedule Select from these options:
• Activate Schedule—Select this option to activate a schedule for the task.
• Run now—Select this option to run the task immediately.
• Set schedule—Select this option to set a date and time for the task to run.
• Run Once—Select this option to run the task on the planned schedule only once.
• Periodic—Select this option to run the task frequently at specified intervals.
– Hourly—Select this option to run the task once every hour.
– Daily—To run the task once every day. Weekly—To run the task once every week.
– Monthly—To run the task once every month.
Range of Recurrence:
• Start—To specify the date and time at which the task should begin.
• No End Date—To continuously run this task based on the selected frequency. For example, if you selected Hourly, then this task continuously runs every hour from the start time.
• End By—To stop the task at the specified date and time.
Enter Remote Access Controller credentials for target(s)
User Name The RACADM task requires IPMI credentials. Provide IPMI credentials to run the task.
Password Provide the password.
KG key Enter the KG key value. DRAC also supports IPMI KG key value. Each BMC or DRAC is configured to require an access key in addition to user credentials.
NOTE: The KG key is a public key that is used to generate an encryption key for use between the firmware and the application. The KG key value is an even number of hexadecimal characters.
Related Links
Command Line Task
Managing Command Line Task
Using the Sample - Server XML Configuration Command Line Task
262

RACADM Command Line
Field Description
Command Provide the RACADM command you want to run on the servers.
Ping Device This option performs a ping test to verify if a device is reachable before it runs a task against it. This option can be used when using $IP or $RAC_IP and it decreases the time it takes to run the task(s) as it skips unreachable devices.
Output to file Select to enable output to a log file. This option captures standard output from the running application and writes it to the log file. If you select this option, you must enter the path name and file name of the log file. This option is disabled by default.
Append Select to append output from the completed command to the specified file. If the file does not exist, it is created.
Include errors Select to write all OpenManage Essentials-detected errors to the log file. For example, if no response is received to a ping request before the execution of the command, an error is written to the log file.
Task Target
Select a query Select a query from the drop-down list. To create a new query, click New.
Select the server(s) for this task to target Select the severs to which you want to assign this task.
Enable All Select to override the device capability and allow all the available devices for selection as task targets.
Schedule and Credentials
Set schedule Select from these options:
• Activate Schedule—Select this option to activate a schedule for the task.
• Run now—Select this option to run the task immediately.
• Set schedule—Select this option to set a date and time for the task to run.
• Run Once—Select this option to run the task on the planned schedule only once.
263

Field Description
• Periodic—Select this option to run the task frequently at specified intervals.
– Hourly—Select this option to run the task once every hour.
– Daily—To run the task once every day.
– Weekly—To run the task once every week.
– Monthly—To run the task once every month.
Range of Recurrence:
• Start—To specify the date and time at which the task should begin.
• No End Date—To continuously run this task based on the selected frequency. For example, if you selected Hourly, then this task continuously runs every hour from the start time.
• End By—To stop the task at the specified date and time.
Enter Remote Access Controller credentials for target(s)
User Name—The RACADM task requires IPMI credentials. Provide IPMI credentials to run the task.
Password—Provide the password.
Related Links
Command Line Task
Managing Command Line Task
Using the Sample - Server XML Configuration Command Line Task
Firmware and Driver Inventory Collection Task
Select this option to collect firmware and driver inventory information from a server that does not have Dell OpenManage Server Administrator installed.
Field Description
General
Task Name Provide a name for the inventory collection task.
Filter devices based on operating system Select to filter devices to be displayed in the Task Target based on the selected operating system.
Select the Operating System Select from the following options:
• Windows
• Linux
264

Field Description
64–bit System Select this option if the target server is running a 64-bit operating system.
Task Target
Select a query Select a query from the drop-down list. To create a new query, click New.
Select the servers(s) for this task to target Select the servers you want to assign the task.
Schedule and Credentials
Set schedule Select from these options:
• Activate Schedule — Select this option to activate a schedule for the task.
• Run now — Select this option to run the task immediately.
• Set schedule — Select this option to set a date and time to run the task.
• Run Once — Select this option tot run the task on the planned schedule only once.
• Periodic — Select this option to run the task frequently at specified intervals:
– Hourly — Select this option to run the task once every hour.
– Daily — Select this option to run the task once every day.
– Weekly — Select this option to run the task once every week.
– Monthly — Select this option to run the task once every month.
Range of Recurrence:
• Start — To specify the date and time at which the task should begin.
• No End Date — To continuously run this task based on the selected frequency. For example, if you selected Hourly, then this task continuously runs every hour from the start time.
• End By — To stop the task at the specified date and time.
Enter credentials of the remote targets User Name — Provide in the format domain\user name or local host\user name.
Password — Provide the password.
Related Links
Collecting Firmware and Driver Inventory
265

22Managing Security Settings
Using Security Roles and Permissions
OpenManage Essentials provides security through role-based access control (RBAC), authentication, and encryption. RBAC manages security by determining the operations run by persons in particular roles. Each user is assigned one or more roles, and each role is assigned one or more user rights that are permitted to users in that role. With RBAC, security administration corresponds closely to an organization's structure.
OpenManage Essentials roles and associated permissions are as follows:
• OmeUsers have limited access and rights and can perform read-only operations in OpenManage Essentials. They can log in to the console, run discovery and inventory tasks, view settings, and acknowledge events. The Windows Users group is a member of this group.
• OmeAdministrators have full access to all the operations within OpenManage Essentials. Windows Administrators group is member of this group.
• OmeSiteAdministrators have full access to all the operations within OpenManage Essentials with the following rights and restrictions:
– Can only create custom device groups under All Devices in the device tree. They can create remote or system update tasks on the custom device groups only after the custom device groups are assigned to them by the OmeAdministrators.
* Cannot edit custom device groups.
* Can delete custom device groups.
– Can create remote and system update tasks on only the device groups assigned to them by the OmeAdministrators.
– Can only run and delete remote and system update tasks that they have created.
* Cannot edit remote tasks, including activating or deactivating the task schedule.
* Cannot clone remote or system update tasks.
* Can delete tasks they have created.
– Can delete devices.
– Cannot edit or target device queries.
– Cannot edit or access the Device Group Permissions portal.
– Cannot create remote and system update tasks based on a device query.
NOTE: Any changes made to the role or device group permissions of a user are effective only after the user logs out and logs in again.
• OmePowerUsers have the same rights as OmeAdministraors except that they cannot edit preferences.
Microsoft Windows Authentication
For supported Windows operating systems, OpenManage Essentials authentication is based on the operating system's user authentication system using Windows NT LAN Manager (NTLM v1 and NTLM v2)
266

modules. For the network, this underlying authentication system allows you to incorporate OpenManage Essentials security in an overall security scheme.
Assigning User RightsYou do not have to assign user rights to OpenManage Essentials users before installing OpenManage Essentials. The following procedures provide step-by-step instructions for creating OpenManage Essentials users and assigning user rights for Windows operating system.
NOTE: Log in with administrator rights to perform these procedures.
NOTE: For questions about creating users and assigning user group rights or for more detailed instructions, see the operating system documentation.
1. From Windows desktop, click Start → All Programs → Administrative Tools → Computer Management.
2. In the console tree, expand Local Users and Groups, and click Groups.
3. Double-click either the OmeAdministrators, OMEPowerUsers, or OmeUsers group to add the new user.
4. Click Add and type the user name that you are adding. Click Check Names to validate and then click OK.
New users can log on to OpenManage Essentials with the user rights for their assigned group.
Using Custom SSL Certificates (Optional)OpenManage Essentials default settings ensure that a secure communication is established within your environment. However, some users may prefer to utilize their own SSL certificate for encryption.
To create a new domain certificate:
1. Open Internet Information Services (IIS) Manager by clicking Start → All Programs → Administrative Tools → Internet Information Services (IIS) Manager.
2. Expand the <server name> and click Server Certificates → Sites.
3. Click Create Domain Certificate and enter the required information.
NOTE: All systems display a certificate error until the domain administrator has published the certificate to the clients.
Configuring IIS Services
To use a custom SSL certificate, you must configure IIS Services on the system where OpenManage Essentials is installed.
1. Open Internet Information Services (IIS) Manager by clicking Start → All Programs → Administrative Tools → Internet Information Services (IIS) Manager.
2. Expand the <server name> → Sites.
3. Right-click DellSystemEssentials and select Edit Bindings.
4. In Site Bindings, select the https binding and click Edit.
5. In Edit Site Binding, from the SSL certificate drop-down list select your custom SSL certificate and click OK.
267

Supported Protocols and Ports in OpenManage Essentials
Supported Protocols and Ports on Management Stations
Port Number
Protocol Port Type Maximum Encryption Level
Direction Usage
21 FTP TCP None In/Out Access ftp.dell.com.
25 SMTP TCP None In/Out Optional e-mail alert action.
162 SNMP UDP None In Event reception through SNMP.
1278 HTTP TCP None In/Out Web GUI; downloading packages to Dell Lifecycle Controller.
1279 Proprietary
TCP None In/Out Scheduling tasks.
1433 Proprietary
TCP None In/Out Optional remote SQL Server access.
2606 Proprietary
TCP None In/Out Network monitoring.
2607 HTTPS TCP 128-bit SSL In/Out Web GUI.
Supported Protocols and Ports on Managed Nodes
Port Number
Protocol Port Type
Maximum Encryption Level
Direction
Usage
22 SSH TCP 128 bit In/Out Contextual application launch — SSH client Remote software updates to Server Administrator—for systems supporting Linux operating systems Performance monitoring in Linux systems.
80 HTTP TCP None In/Out Contextual application launch — Dell Networking console.
135 RPC TCP None In/Out Event reception through CIM from Server Administrator — for systems supporting Windows operating systems.
Remote software update transfer to Server Administrator—for systems supporting Windows operating systems Remote Command Line— for systems supporting Windows operating systems.
161 SNMP UDP None In/Out SNMP query management.
623 RMCP UDP None In/Out IPMI access through LAN.
1443 Proprietary TCP None In/Out Optional remote SQL Server access.
268

Port Number
Protocol Port Type
Maximum Encryption Level
Direction
Usage
443 Proprietary/ WSMAN
TCP None In/Out EMC storage, iDRAC6, iDRAC7, and iDRAC8 discovery and inventory.
3389 RDP TCP 128-bit SSL In/Out Contextual application launch — Remote desktop to Windows terminal services.
6389 Proprietary TCP None In/out Enables communication between a host system (through NaviCLI/NaviSec CLI or Navisphere host agent) and a Navisphere Array Agent on a Storage system.
269

23Troubleshooting
OpenManage Essentials Troubleshooting Tool
The OpenManage Essentials troubleshooting tool is a standalone tool that installs along with OpenManage Essentials. You can use the troubleshooting tool for a wide array of protocol related problems that are often at the root of discovery and alert issues.
This tool provides the following protocol-specific diagnostics to identify the problem with the remote node:
• Database—Fetches all the user defined databases present on the remote box.
• Dell|EMC—Verifies the connection to the Dell|EMC storage devices.
• ICMP—Verifies whether you can ping the remote device from the local box.
• IPMI—Verifies the IPMI protocol to connect to BMC/iDRAC.
• Name Resolution—Verifies whether you can get the resolved name from the local box.
• OpenManage Server Administrator Remote Enablement—This test helps you to verify that Dell OpenManage Server Administrator's remote enablement feature is working on the managed node (Dell OpenManage Server administrator installed with the remote enablement component). This tool behaves like a Server Administrator Distributed Web server (DWS) and connects to Server Administrator managed node instrumentation agent using the WSMAN protocol.
To connect successfully, the Managed Node must have OpenManage Server Administrator installed with the Remote Enablement feature working.
• Port—Verifies whether managed node is listening to the specified port. You can specify 1-65,535 port numbers.
• PowerVault Modular Disk Arrays—Verifies that PowerVault modular disk storage array protocol is used to connect to PowerVault Storage devices.
• Services—Uses SNMP protocol to fetch the running services on the managed node.
• SNMP—Verifies SNMP connection to the remote node, using the required SNMP community string, retries, and time out. First it tries to connect to MIB-II agent and then various other agents to find out the type of device. Troubleshooting Tool also gathers other agent specific information from that device.
• SSH—Verifies that the SSH protocol is used to connect to managed node.
• WMI—Verifies WMI/CIM connection to the remote node. Default retries and time out values are used internally.
• WSMAN—Attempts to connect to WSMAN client on the remote node. Use this test to verify connectivity problems with iDRAC, ESX, and other devices, which support WSMAN specification. This test will connect to such devices and will also list the exposed WSMAN profiles enabled on the remote device.
270

Troubleshooting Procedures
Troubleshooting Inventory
Inventoried Linux servers are listed under Non-Inventoried systems, numerous retries does not resolve this.
To resolve this issue for the Red Hat Enterprise Linux 5.5, SUSE Linux Enterprise Server version 10 and version 11 installed servers:
1. Mount the Dell Systems Management Tools and Documentation DVD (version 6.5 or later) on the Linux server.
2. Install srvadmin-cm rpm.
3. Restart OpenManage Server Administrator 6.5.
4. Make sure the OpenManage Server Administrator inventory collector is working from the location /opt/dell/srvadmin/sbin/invcol, run /invcol -outc=/home/inv.xml.
5. Perform server inventory.
Troubleshooting Device Discovery
If a device discovery is not successful, perform the following steps to troubleshoot and fix the problem:
1. If the device assigned for discovery is a Dell PowerEdge system, ensure that Dell OpenManage Server Administrator is installed on it.
2. To discover Windows devices successfully, configure the SNMP services appropriately. For detailed information on configuring SNMP services on Windows, see Configuring SNMP Services on Windows.
3. To discover Linux devices successfully, configure the SNMP services appropriately. For detailed information on configuring SNMP services on Linux, see Configuring SNMP Services on Linux.
4. After configuring the SNMP services, verify whether the SNMP services are responding correctly.
5. If the device assigned for discovery is Microsoft Windows and you want to use WMI, ensure that the user name and password used in the WMI credentials has the local administrator permissions on the machine that you want to discover. You can use the Microsoft wbemtest utility to ensure that WMI connectivity to the Windows Server is correct.
6. If the device assigned for discovery is a non-server network device, such as a printer, Dell Networking Ethernet switch, and so on, ensure that SNMP is enabled on the device. You can do this by accessing the Web interface for a device.
Configuring SNMP Services on Windows
1. Open a command run prompt and type services.msc to open the Services MMC.
2. Right-click SNMP Service and select Properties. If you cannot locate SNMP Service, you need to install it using Add/Remove Windows Components.
3. Click Security and ensure that Accept SNMP packets from any host is selected.
4. Under Accepted Community Names, ensure that public (or a community string of your choice) is set. If not set by default, click Add, and type a community string in Community Name. Also select community rights as READ ONLY or READ WRITE.
5. Click Traps and ensure that the community string field has a valid name.
6. In Trap destination, click Add and enter the Open Manage Essential Console IP address.
7. Start the service.
271
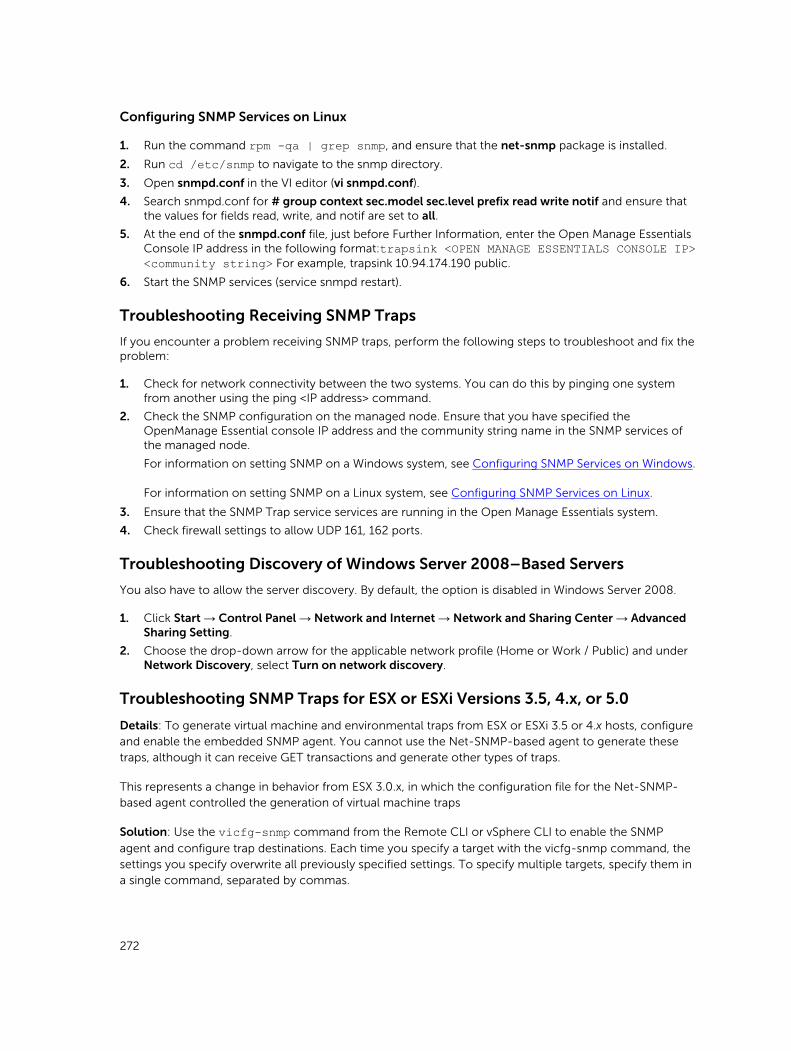
Configuring SNMP Services on Linux
1. Run the command rpm -qa | grep snmp, and ensure that the net-snmp package is installed.
2. Run cd /etc/snmp to navigate to the snmp directory.
3. Open snmpd.conf in the VI editor (vi snmpd.conf).
4. Search snmpd.conf for # group context sec.model sec.level prefix read write notif and ensure that the values for fields read, write, and notif are set to all.
5. At the end of the snmpd.conf file, just before Further Information, enter the Open Manage Essentials Console IP address in the following format:trapsink <OPEN MANAGE ESSENTIALS CONSOLE IP> <community string> For example, trapsink 10.94.174.190 public.
6. Start the SNMP services (service snmpd restart).
Troubleshooting Receiving SNMP Traps
If you encounter a problem receiving SNMP traps, perform the following steps to troubleshoot and fix the problem:
1. Check for network connectivity between the two systems. You can do this by pinging one system from another using the ping <IP address> command.
2. Check the SNMP configuration on the managed node. Ensure that you have specified the OpenManage Essential console IP address and the community string name in the SNMP services of the managed node.
For information on setting SNMP on a Windows system, see Configuring SNMP Services on Windows.
For information on setting SNMP on a Linux system, see Configuring SNMP Services on Linux.
3. Ensure that the SNMP Trap service services are running in the Open Manage Essentials system.
4. Check firewall settings to allow UDP 161, 162 ports.
Troubleshooting Discovery of Windows Server 2008–Based Servers
You also have to allow the server discovery. By default, the option is disabled in Windows Server 2008.
1. Click Start → Control Panel → Network and Internet → Network and Sharing Center → Advanced Sharing Setting.
2. Choose the drop-down arrow for the applicable network profile (Home or Work / Public) and under Network Discovery, select Turn on network discovery.
Troubleshooting SNMP Traps for ESX or ESXi Versions 3.5, 4.x, or 5.0
Details: To generate virtual machine and environmental traps from ESX or ESXi 3.5 or 4.x hosts, configure and enable the embedded SNMP agent. You cannot use the Net-SNMP-based agent to generate these traps, although it can receive GET transactions and generate other types of traps.
This represents a change in behavior from ESX 3.0.x, in which the configuration file for the Net-SNMP-based agent controlled the generation of virtual machine traps
Solution: Use the vicfg-snmp command from the Remote CLI or vSphere CLI to enable the SNMP
agent and configure trap destinations. Each time you specify a target with the vicfg-snmp command, the settings you specify overwrite all previously specified settings. To specify multiple targets, specify them in a single command, separated by commas.
272

Troubleshooting Problems With Microsoft Internet Explorer
Follow the instructions in this section if you are experiencing any of the following:
• Unable to open OpenManage Essentials using Internet Explorer.
• Internet Explorer displays certificate errors.
• Internet Explorer displays a message to approve the certificate.
• Unable to browse the file system to deploy Server Administrator and system update.
• Unable to display the Device tree for devices.
• Unable to install active components.
1. Open OpenManage Essentials on the client server using Internet Explorer.
2. Click Tools → Internet Options → Security.
3. Select Local intranet and click Sites.
4. Click Advanced.
5. Type the fully qualified name of the server where OpenManage Essentials is installed.
6. Click Add.
If the issue persists, there may be an issue with the DNS server resolving the name of the OpenManage Essentials server. See Resolving DNS Server Issues.
If a certificate error is displayed:
• Contact your system administrator to add the OpenManage Essentials certificate published to the ‘Trusted Root Certificate Authorities’ and Trusted Publishers’ on domain systems.
• Add the OpenManage Essentials certificate to your ‘Trusted Root Certificate Authorities’ and ‘Trusted Publishers’ certificate stores using Internet Explorer.
Resolving DNS Server Issues
To resolve DNS server issues:
1. Contact your system administrator and add the name of the system running OpenManage Essentials to the DNS server.
2. Edit your host file to resolve the IP of the system running OpenManage Essentials. The host file is located at %windir%\System32\drivers\etc\hosts.
3. Add the IP of the system running OpenManage Essentials to the Local intranet sites in Internet Explorer.
NOTE: You cannot remove the certificate errors unless you use the fully qualified name of the server running OpenManage Essentials.
Troubleshooting Map View
Question: Why is the Map View feature not available?
Answer: The Map View feature is available only if you have discovered any Dell PowerEdge VRTX CMC with an Enterprise license, using the WS-Man protocol. If the PowerEdge VRTX CMC with an Enterprise license is discovered using the SNMP protocol, the Map View feature is not available. Rediscovering the PowerEdge VRTX CMC using the WS-Man protocol is required, if the Map View tab is not displayed in the device details portal of a Dell PowerEdge VRTX CMC with an Enterprise license.
Question: Why am I unable to add a particular device on the map?
273

Answer: Only PowerEdge VRTX devices with an Enterprise license can be added to the map.
Question: The map does not load with the MapQuest or Bing map provider. What should I do?
Answer: This indicates a problem with the Internet connectivity.
• Verify if you are able to connect to the Internet through the browser.
• If the system connects to the Internet through the proxy:
– For MapQuest map provider — Configure the proxy settings in the OpenManage Essentials Preferences → Console Settings page.
– For Bing map provider — Verify if you configured the proxy server settings in Internet Explorer.
• Verify if you are able to access the MapQuest website.
Question: Why is the map loading slowly?
Answer: The map may load slowly as it requires more network bandwidth and graphic processing capability compared to normal browsing. Constant zooming and panning on the map may also slow the loading of the map.
Question: Why I am unable to locate an address using the search bar or Edit Device Locations dialog box?
Answer: There may be a problem with your Internet connection or the map provider may not be able to resolve the address.
• Verify if you are able to connect to the Internet through the browser.
• If the system connects to the Internet through the proxy:
– For MapQuest map provider — Configure the proxy settings in the OpenManage Essentials Preferences → Console Settings page.
– For Bing map provider — Verify if you configured the proxy server settings in Internet Explorer.
• Try to provide a variation of the address you provided. You can try providing a complete address. Abbreviations such as state, country, airport code, may have an unexpected result.
Question: Why cannot I use one map provider on the Home portal and another on the Devices portal?
Answer: The Map View available through the Home portal and the Devices portal are synchronized. Changes to the Settings or device locations on the Map View are affected on both the portals.
Question: How can I enhance the Map View experience?
Answer: Improving the network bandwidth accelerates the loading of the map. A more powerful graphic card enables faster zooming and panning capability. When using the MapQuest provider, the map is rendered better if OpenManage Essentials is launched on the management server.
274
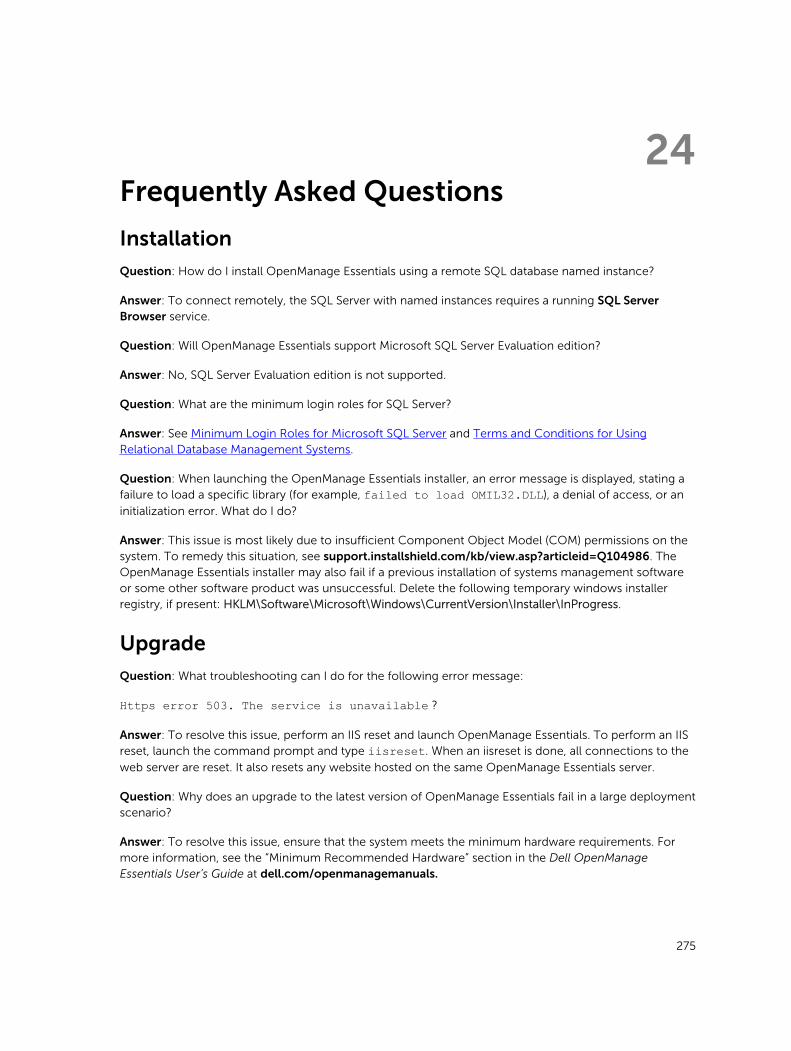
24Frequently Asked Questions
Installation
Question: How do I install OpenManage Essentials using a remote SQL database named instance?
Answer: To connect remotely, the SQL Server with named instances requires a running SQL Server Browser service.
Question: Will OpenManage Essentials support Microsoft SQL Server Evaluation edition?
Answer: No, SQL Server Evaluation edition is not supported.
Question: What are the minimum login roles for SQL Server?
Answer: See Minimum Login Roles for Microsoft SQL Server and Terms and Conditions for Using Relational Database Management Systems.
Question: When launching the OpenManage Essentials installer, an error message is displayed, stating a failure to load a specific library (for example, failed to load OMIL32.DLL), a denial of access, or an
initialization error. What do I do?
Answer: This issue is most likely due to insufficient Component Object Model (COM) permissions on the system. To remedy this situation, see support.installshield.com/kb/view.asp?articleid=Q104986. The OpenManage Essentials installer may also fail if a previous installation of systems management software or some other software product was unsuccessful. Delete the following temporary windows installer registry, if present: HKLM\Software\Microsoft\Windows\CurrentVersion\Installer\InProgress.
Upgrade
Question: What troubleshooting can I do for the following error message:
Https error 503. The service is unavailable ?
Answer: To resolve this issue, perform an IIS reset and launch OpenManage Essentials. To perform an IIS reset, launch the command prompt and type iisreset. When an iisreset is done, all connections to the
web server are reset. It also resets any website hosted on the same OpenManage Essentials server.
Question: Why does an upgrade to the latest version of OpenManage Essentials fail in a large deployment scenario?
Answer: To resolve this issue, ensure that the system meets the minimum hardware requirements. For more information, see the “Minimum Recommended Hardware” section in the Dell OpenManage Essentials User’s Guide at dell.com/openmanagemanuals.
275

Question: How do I upgrade to OpenManage Essentials version 2.0, when OpenManage Essentials version 1.1 is installed on a remote database with SQL Server 2005?
Answer: Installation or upgrade of OpenManage Essentials version 2.0 is not supported on Microsoft SQL Server 2005 (all editions) either on a local or remote database. While upgrading from OpenManage Essentials version 1.1 installed with remote SQL Server 2005 to OpenManage Essentials version 2.0, the following message is displayed:
Dell OpenManage Essentials cannot be installed or upgraded on SQL Server versions prior to SQL Server 2008. Refer to the FAQ for information on possible migration and additional details.In this case, you can manually migrate the data from SQL Server 2005 and then upgrade to OpenManage Essentials version 2.0 as follows:
1. Create a backup of the OpenManage Essentials version 1.1 database.
2. Migrate the OpenManage Essentials version 1.1 data from SQL Server 2005 to SQL Server 2008, 2008 R2, or 2012. For more information, see the OpenManage Essentials Database re-target process instructions at http://en.community.dell.com/techcenter/systems-management/f/4494/t/19440364.aspx.
3. Ensure that OpenManage Essentials version 1.1 can connect to migrated database and works as expected.
4. Launch the OpenManage Essentials version 2.0 installer to complete the upgrade.
NOTE: After upgrading to OpenManage Essentials version 2.0 with SQL Server 2012, the SQLEXPRESSOME instance is created and data from OpenManage Essentials version 1.1 is migrated to OpenManage Essentials Version 2.0.
Tasks
Question: What troubleshooting can I do if a software update task or remote task fails to create or run?
Answer: Ensure that the DSM Essentials Task Manager service is running in Windows services.
Question: How do I use command line features while deploying OpenManage Server Administrator?
Answer: Unattended installation provides the following features:
• A set of optional command line settings to customize an unattended installation.
• Customization parameters to designate specific software features for installation.
Optional Command Line Settings
The following table shows the optional settings available for the msiexec.exe MSI installer. Type the optional settings on the command line after msiexec.exe with a space between each setting.
NOTE: See support.microsoft.com for full details about all the command line switches for the Windows Installer Tool.
276

Table 3. Command Line Settings for MSI Installer
Setting Result
/i <Package|Product Code> This command installs or configures a product.
/i SysMgmt.msi – Installs the Server Administrator software.
/i SysMgmt.msi /qn This command carries out a fresh installation of version 6.1.
/x <Package|Product Code> This command uninstalls a product.
/x SysMgmt.msi – Uninstalls the Server Administrator software.
/q[n|b|r|f] This command sets the user interface (UI) level.
/q or /qn – no UI. This option is used for silent and unattended installation. /qb – basic UI. This option is used for unattended but not silent installation. /qr – reduced UI. This option is used for unattended installation while displaying a modal dialog box showing install progress. /qf – full UI. This option is used for standard attended installation.
/f[p|o|e|d|c|a|u|m|s|v]<Package|ProductCode> This command repairs a product.
/fp – This option reinstalls a product only if a file is missing.
/fo – This option reinstalls a product if a file is missing or if an older version of a file is installed.
/fe – This option reinstalls a product if a file is missing or an equal or older version of a file is installed.
/fd – This option reinstalls a product if a file is missing or a different version of a file is installed.
/fc – This option reinstalls a product if a file is missing or the stored checksum value does not match the calculated value.
/fa – This option forces all files to reinstall.
/fu – This option rewrites all required user-specific registry entries.
/fm – This option rewrites all required system-specific registry entries.
/fs – This option overwrites all existing shortcuts.
277
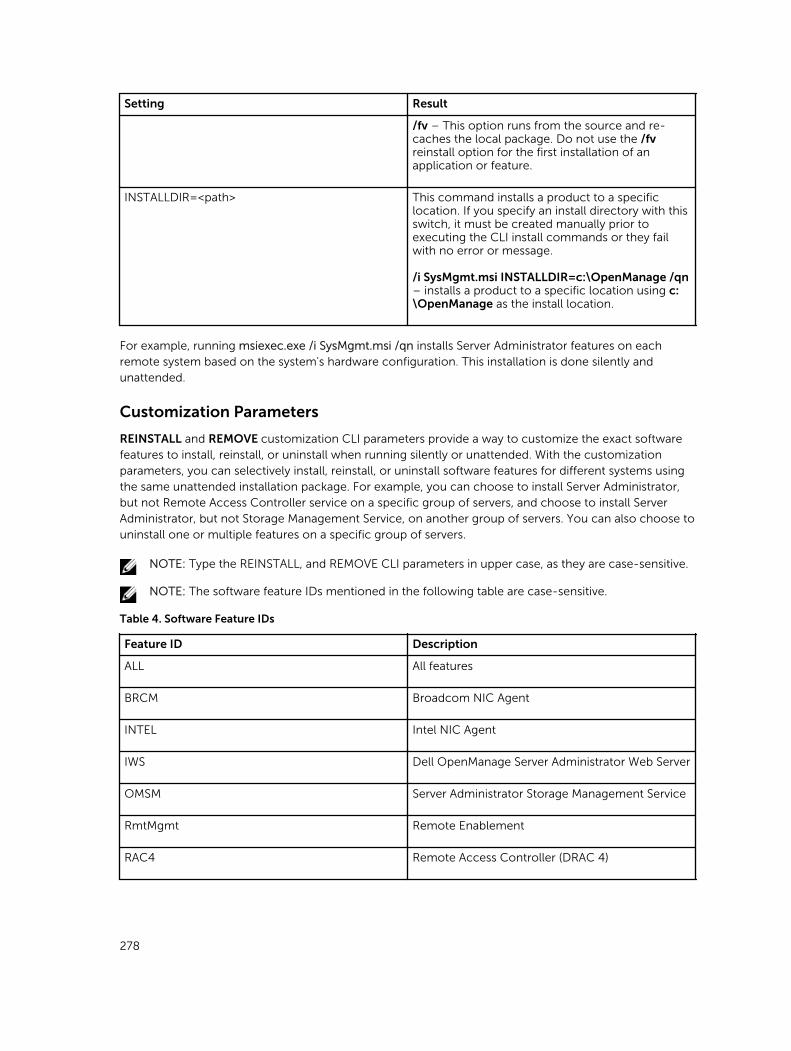
Setting Result
/fv – This option runs from the source and re-caches the local package. Do not use the /fv reinstall option for the first installation of an application or feature.
INSTALLDIR=<path> This command installs a product to a specific location. If you specify an install directory with this switch, it must be created manually prior to executing the CLI install commands or they fail with no error or message.
/i SysMgmt.msi INSTALLDIR=c:\OpenManage /qn – installs a product to a specific location using c:\OpenManage as the install location.
For example, running msiexec.exe /i SysMgmt.msi /qn installs Server Administrator features on each remote system based on the system's hardware configuration. This installation is done silently and unattended.
Customization Parameters
REINSTALL and REMOVE customization CLI parameters provide a way to customize the exact software features to install, reinstall, or uninstall when running silently or unattended. With the customization parameters, you can selectively install, reinstall, or uninstall software features for different systems using the same unattended installation package. For example, you can choose to install Server Administrator, but not Remote Access Controller service on a specific group of servers, and choose to install Server Administrator, but not Storage Management Service, on another group of servers. You can also choose to uninstall one or multiple features on a specific group of servers.
NOTE: Type the REINSTALL, and REMOVE CLI parameters in upper case, as they are case-sensitive.
NOTE: The software feature IDs mentioned in the following table are case-sensitive.
Table 4. Software Feature IDs
Feature ID Description
ALL All features
BRCM Broadcom NIC Agent
INTEL Intel NIC Agent
IWS Dell OpenManage Server Administrator Web Server
OMSM Server Administrator Storage Management Service
RmtMgmt Remote Enablement
RAC4 Remote Access Controller (DRAC 4)
278

Feature ID Description
RAC5 Remote Access Controller (DRAC 5)
iDRAC Integrated Dell Remote Access Controller
SA Server Administrator
NOTE: Only iDRAC6 is supported on xx1x systems.
You can include the REINSTALL customization parameter on the command line and assign the feature ID (or IDs) of the software feature that you would like to reinstall. An example is:
msiexec.exe /i SysMgmt.msi REINSTALL=BRCM /qb. This command runs the installation for Dell OpenManage Systems Management and reinstall only the Broadcom agent, in an unattended but not silent mode.
You can include the REMOVE customization parameter on the command line and assign the feature ID (or IDs) of the software feature that you would like to uninstall. For example:
msiexec.exe /i SysMgmt.msi REMOVE=BRCM /qb. This command runs the installation for Dell OpenManage Systems Management and uninstalls only the Broadcom agent, in an unattended but not silent mode.
You can also choose to install, reinstall, and uninstall features with one execution of the msiexec.exe program. For example:
msiexec.exe /i SysMgmt.msi REMOVE=BRCM /qb This command runs the installation for managed system software, and uninstalls the Broadcom agent. This execution is in an unattended but not silent mode.
NOTE: A Globally Unique Identifier (GUID) is 128 bits long, and the algorithm used to generate a GUID guarantees each GUID to be unique. The product GUID uniquely identifies the application. In this case, the product GUID for Server Administrator is {54C04D53-C3C3-46EA-A75F-7AFF4BEB727C}.
MSI Return Code
An application event log entry is recorded in the SysMgmt.log file. Table 3 shows some of the error codes returned by the msiexec.exe Windows Installer Engine.
Table 5. Windows Installer Return Codes
Error Code Value Description
ERROR_SUCCESS 0 The action is completed successfully.
ERROR_INVALID_PARAMETER 87 One of the parameters was invalid.
279

Error Code Value Description
ERROR_INSTALL_USEREXIT 1602 The user canceled the installation.
ERROR_SUCCESS_REBOOT_REQUIRED
3010 A restart is required to complete the installation. This message is indicative of a successful installation.
NOTE: See support.microsoft.com for full details on all the error codes returned by the msiexec.exe and InstMsi.exe Windows installer functions.
E-mail Alert Action
Question: Why am I not receiving e-mails after setting up e-mail alert action?
Answer: If you have an Antivirus Client installed on the system, then configure it to allow e-mails.
Discovery
Question: Why are SUSE Linux Enterprise and Red Hat Enterprise Linux based-servers not displayed in the Server category after I have discovered it using SSH protocol?
Answer: The OpenManage Essentials SSH plugin uses sshlib2. sshlib2 fails to authenticate Linux servers which have disabled the Authentication by password option. To enable the option:
1. Open the file /etc/ssh/sshd_config in edit mode and search for the key PasswordAuthentication.
2. Set the value to yes and save the file.
3. Restart the sshd service /etc/init.d/sshd restart.
The servers are now displayed under the Server category in the Device tree.
Question: What troubleshooting can I do if a discovery task fails to create or run?
Answer: Ensure that the DSM Essentials Task Manager service is running in Windows services.
Question: Why are my ESX virtual machines not correlated with their ESX host server?
Answer: You must discover the ESXi host server using SNMP and WSMan or the guest virtual machine will not correlate correctly when discovered using SNMP.
Question: Why are devices discovered with WMI getting classified as Unknown?
Answer: WMI discovery classifies a device as unknown when the credentials for a user account in the Administrators group (not Administrator) is supplied for the discovery range in some cases.
If you are seeing this issue, read the KB article at support.microsoft.com/?scid=kb;en-us;951016 and apply the registry work as described. This resolution applies to managed nodes with Windows Server 2008 R2.
Question: Why are Dell devices discovered using WS-Man with root CA certificate getting classified as Unknown?
280
Answer: There may be a problem with the root certificate you are using to discover the WS-Man target(s). For instructions to discover and inventory WS-Man target(s) using a root CA certificate, see Discovering and Inventorying Dell Devices Using WS-Man Protocol With a Root Certificate.
Question: What are SNMP authentication traps?
Answer: An authentication trap is sent when an SNMP agent is hit with an enquiry that contains a community name it does not recognize. The community names are case-sensitive.
The traps are useful to find if someone is probing a system, although its better nowadays to just sniff packets and find out the community name.
If you use multiple community names on the network, and some management might overlap, users may want to turn these off as they become false positives (annoyances).
For more information, see technet.microsoft.com/en-us/library/cc959663.aspx.
When an SNMP agent receives a request that does not contain a valid community name or the host that is sending the message is not on the list of acceptable hosts, the agent can send an authentication trap message to one or more trap destinations (management systems). The trap message indicates that the SNMP request failed authentication. This is a default setting.
Question: Why does OpenManage Essentials not support entering host names with underscore in the discovery wizard?
Answer: Per RFC 952, underscores are not valid in DNS names. A name (net, host, gateway, or domain name) is a text string up to 24 characters drawn from the alphabet (A-Z), digits (0-9), minus sign (-), and period (.). Periods are only allowed when they serve to delimit components of domain style names.
For more information see,ietf.org/rfc/rfc952.txt and zytrax.com/books/dns/apa/names.html .
Question: What is On-demand?
Answer: On-demand is an operation where a managed system is checked for status/health by OpenManage Essentials when an SNMP trap is received. There are no settings to be changed to enable the on-demand feature. However, the IP address of the management system must be available in the trap destination of SNMP service. An SNMP trap is received from the managed system when there is an issue or failure of a server component. These traps can be viewed under the alert logs.
Inventory
Question: What troubleshooting can I do if an inventory task fails to create or run?
Answer: Ensure that DSM Essentials Task Manager service is running in Windows services.
System Update
Question: As an OpenManage Essentials administrator (OMEAdmin), what do I do if I am unable to perform system updates on devices?
Answer: To resolve this issue, perform one of the following steps:
281
• Add the OMEAdmin to the server administrator group.
• Reduce the user control settings by clicking Start → Control Panel → User Accounts → Change User Account Control Settings.
Question: What do I do if iDRAC does not download packages?
Answer: To resolve this issue, ensure that:
• The default website is enabled in IIS.
• The virtual folder (install_packages) is present and is pointing to the SystemUpdate folder.
the default website is enabled in IIS
Question: What order are packages installed on a system?
Answer: Packages are applied in the following order:
1. Driver
2. Firmware
3. Firmware ES
4. BIOS
Question: How do I configure Internet Explorer with Enhanced Security Configuration to ensure that OpenManage Essentials can utilize all features that use resources from Dell online?
Answer: To ensure that these features work in the Dell Open Manage Essentials console on an environment with Internet Explorer Enhanced Security Configuration enabled. The user needs to add *.dell.com to the Trusted sites zone.
Import Catalog and System Update require internet access when the user selects Dell Online as the source.
The warranty report also uses Dell online resources to retrieve information and also will not return data without it.
Question: What if IPMI is disabled after installing BMC Utility?
Answer: Try restarting DSM Essentials Network Monitor Service, DSM Essentials Task Manager service and restart IIS.
Question: What is Omremote?
Answer: Omremote enables you to execute remote Server Administrator command line tasks (inband) and also helps you to deploy Server Administrator on remote Dell servers. Omremote is an executable file that is located at C:\Program Files\Dell\SystMgt\Essentials\bin folder. It uses WMI connection for the Windows-based devices and SSH for the Linux-based devices. Ensure that the required ports are opened. Omremote commands require a Server Administrator supported operating system with Server administrator installed. To install/update Server administrator on the remote system, you must use an operating system preinstall package.
Question : How do I load a Dell catalog for software update? or What do I do when I get errors when trying to run software update tasks?
282

Answer:
1. Download the catalog to the OpenManage Essentials system directly or use an System Update Utility DVD in the local system drive.
2. Browse for catalog.xml file on the local system or DVD (not on a file share, it is possible to use a file share, but for troubleshooting, do not use file share.)
3. Now, create software update tasks. If tasks fail, more information is found in the task details.
4. Try setting all internet explorer security settings to LOW if tasks do not run.
Managing Device Configurations
Question: Why are unsupported device groups shown in the Device Configuration wizard?
Answer: All user created visible custom groups are shown in the device selection screen. A custom group may contain invalid system groups for the given wizard. The invalid system groups can be ignored.
Question: If I filter the attributes and then save the device configuration template, will the template include only the filtered attributes?
Answer: No, the template will include all the attributes. Filtering the attributes does not have any effect on the attributes that are saved. To remove the attributes from a template, clear the Deploy check boxes for the attributes, and then save the template.
Question: Why is a device that is already associate to the current template displayed in the device selection page?
Answer: The device selection page displays the all applicable devices including the device that is currently associated with the template. You can ignore the currently associated device and select another device, if required.
Device Group Permissions
Device Group Permissions Portal
Question: Can I add a user group to the OmeSiteAdministrators role?
Answer: No, adding a user group to the OmeSiteAdministrators role is not supported in OpenManage Essentials version 1.2.
Question: Can I add an OmeAdministrator to the OmeSiteAdministrators role?
Answer: Yes, you can add an OmeAdministrator to the OmeSiteAdministrators role. The user will have all the rights of the OmeAdministrator. However, to effectively manage device group permissions, it is recommended that a member of the OmeSiteAdministrators role is removed from the OmeAdministrators and OmePowerUsers roles.
Question: Can I add a user who has not logged on to OpenManage Essentials to the OmeSiteAdministrators role?
Answer: Yes, you can use the Edit Members of OmeSiteAdministrators wizard to add a user who has not logged on to OpenManage Essentials to the OmeSiteAdministrators role.
283

Question: What happens if a OmePowerUser is added to the OmeSiteAdministrators role?
Answer: Roles and permissions are additive. The user will not have all of (but retain some of) the restrictions of a OmeSiteAdministrator. The user will be able to perform edit actions that the OmeSiteAdministrator was not able to perform. Target security cannot be guaranteed for this type of user (they can edit device groups assigned to them).
Question: Can I promote an OmeSiteAdministrator to an OmeAdministrator?
Answer: Yes, the user will have all rights and will be able to target all devices. It is suggested, but not required, to remove the user from the OmeSiteAdministrators role before adding the user to the OmeAdministrators role.
Question: How do I add a current OmeAdministrator to the OmeSiteAdministrators role?
Answer:
1. Remove the user from the OmeAdministrators Windows user group.
2. In the Device Group Permissions portal, use the Edit Members of OmeSiteAdministrators option to select and add the user to the OmeSiteAdministrators role.
3. When the user logs in again, the user will be an OmeSiteAdministrator.
Question: A user is removed from the OmeAdministrators role and then added to the OmeSiteAdministrators role. What happens to the tasks that were created while the user was an OmeAdministrator?
Answer: The task created when the user was an OmeAdministrator can still be executed on the targets selected at the time of task creation.
Remote and System Update Tasks
Question: What happens to the task target for a remote task if the OmeSiteAdministrators device group permissions change?
Answer: The task targets of a remote task are not affected by changes to device group permissions. Remote tasks that were created earlier may have task targets that the OmeSiteAdministrator is not assigned to.
Question: What must an OmeSiteAdministrator do to edit a task?
Answer: If the OmeSiteAdministrator is the owner of the task, the OmeSiteAdministrator must delete the existing task and create a new task.
Question: Can an OmeSiteAdministrator re-run a task?
Answer: Yes, A task can be re-run if the task was created earlier by the OmeSiteAdministrator.
Question: Can an OmeSiteAdministrator re-run a task after the user name of the OmeSiteAdministrator is changed?
Answer: No, the OmeSiteAdministrator must re-create the tasks if the user name is changed.
284

Question: Can two OmeSiteAdministrators assigned to the same custom device group, use the tasks created by each other?
Answer: No, the OmeSiteAdministrators can only use the tasks they have created.
Custom Device Groups
Question: Can an OmeSiteAdministrator delete devices in any group?
Answer: Yes, the OmeSiteAdministrator can delete devices in any group, similar to the OmePowerUser or OmeAdministrator.
Question: Can OmeSiteAdministrators edit the device groups they created?
Answer: No, the OmeSiteAdministrators cannot edit device groups or queries.
Question: Can OmeSiteAdministrators delete queries and custom groups?
Answer: Yes, the OmeSiteAdministrators can delete queries and custom groups.
Question: Can OmeSiteAdministrators add devices to a custom device group?
Answer: No, the OmeSiteAdministrators cannot edit a custom device group.
Logs
Question: How do I enable logging in OpenManage Essentials?
Answer: To enable logging:
1. Go to C:\Program Files\Dell\SysMgt\Essentials\configuration or the path where OpenManage Essentials is installed.
2. Open the dconfig.ini file using notepad.
3. In the [Logging] section, modify the following:
• Set LOG_ENABLED=true to enable logging.
• Set LOG_TO_FILE=true to write logs to a file.
• Type a path for LOG_FILE_PREFIX. For example, LOG_FILE_PREFIX=C:\windows\temp.
• If required, change the suffix of the file for LOG_FILE_SUFFIX=ome_log.txt.
• Set the log level for LOG_LEVEL_MIN. For example, LOG_LEVEL_MIN=debug.
NOTE: Setting the minimum log level (LOG_LEVEL_MIN) to debug or trace reduces the performance of OpenManage Essentials.
• Set the log level for LOG_LEVEL_MAX. For example, LOG_LEVEL_MAX=output.
NOTE: The maximum log level (LOG_LEVEL_MAX) must always be set to output.
NOTE: For more information about log severity levels, see the “Log Levels” section.
4. Close the file and restart all DSM services in the Services Microsoft Management Console.
Log Levels
Setting the log levels determines the range of message severity type you want to log. The following table describes the log message severity levels that you can assign to LOG_LEVEL_MIN and LOG_LEVEL_MAX.
285

Severity Level Description
Trace Detailed information related to code flow.
NOTE: It is not recommended to set the minimum log level to trace unless instructed to do so by technical support.
Debug Detailed information that may be useful when diagnosing problems.
Info Information related to operational events.
Warning An indicator that something unexpected happened or an indication of some problem in the near future. The software is still working as expected. Typically, related to configuration or network issues (time outs, retries, and so on).
Error A problem resulting in the software being unable to perform some function.
Fatal A serious error, indicating that the software may not be able to continue running.
Output Information that needs to be output in situations where the logging system is not initialized.
By default, the minimum and maximum log message severity level are set to:
• LOG_LEVEL_MIN=info• LOG_LEVEL_MAX=output
The default settings ensure that all messages with a severity of at least ‘info’ and at most ‘output’ are logged.
Troubleshooting
Question: What do I need to do if all SNMP traps from an ESXi 5 host show up in OpenManage Essentials as unknown?
Answer: You must change the hardware event source in the SNMP config on the ESXi 5 host from CIM to IPMI. Run the following commands:
vicfg-snmp.pl --username root --password <yourpassword> --server <yourserver> --hwsrc sensors
The output of the --show command would display the following:
Current SNMP agent settings:
Enabled : 1
UDP port : 161
Communities : public
286

Notification targets :
<myOMEservername>@162/public
Options :
EnvEventSource=sensors
287

25Managing Device Group PermissionsThe Device Group Permissions portal allows OmeAdministrators to grant users the permission to perform system updates and run remote tasks on select device groups.
Using the Device Group Permissions portal, OmeAdministrators can:
• Add users to the OmeSiteAdministrators role.
• Assign device groups to each user in the OmeSiteAdministrators role, allowing the user to perform system updates and run remote tasks on only the assigned device groups.
NOTE: To effectively manage device group permissions, it is recommended that a member of the OmeSiteAdministrators role is removed from the OmeAdministrators and OmePowerUsers roles.
NOTE: If a device group is not assigned to a user, it only restricts the user from performing system updates or running remote tasks on that device group. It does not hide or remove that device group from the device tree in the Devices portal.
The Common Tasks pane displays the Edit Members of OmeSiteAdministrators option that can be used to add or remove users from the OmeSiteAdministrators role.
The Manage Device Group Permissions pane displays the OmeSiteAdministrators in a tree-view format. If you select OmeSiteAdministrators at the root of the tree-view, the User Overviews are displayed in the right-side pane. If you select a user in the OmeSiteAdministrators tree-view, the right-side pane displays the user name and the Device Groups for Tasks and Patch Targeting section.
NOTE: An OmeSiteAdministrators task target remains ‘as is’ when the task was created. If the OmeAdministrators change the OmeSiteAdministrators device group permissions, the task targets are not modified. Changing an OmeSiteAdministrators device group permissions does not change tasks the OmeSiteAdministrators created earlier.
NOTE: Only Server, RAC, or custom device groups that are assigned to OmeSiteAdministrators are available to OmeSiteAdministrators for remote or system update tasks. To make any other device groups available to the OmeSiteAdministrators for remote or system update tasks, you must create a custom device group which includes other device groups and assign it to the OmeSiteAdministrators.
NOTE: If a user in the OmeSiteAdministrators role is removed from the Windows user groups, the user is not removed from the OmeSiteAdministrators role automatically. You must remove the user from the OmeSiteAdministrators role manually through the Edit Members of OmeSiteAdministrators option.
Related Links
Device Group Permissions
Adding Users to the OmeSiteAdministrators RoleNOTE: Only OmeAdministrators are allowed to add users to the OmeSiteAdministrators role.
288

NOTE: To effectively manage device group permissions, it is recommended that a member of the OmeSiteAdministrators role is removed from the OmeAdministrators and OmePowerUsers roles.
To add users to the OmeSiteAdministrators role:
1. Click Preferences → Device Group Permissions.
The Device Group Permissions portal is displayed.
2. Perform one of the following:
• In the Common Tasks pane, click Edit Members of OmeAdministrators.
• In the Manage Device Group Permissions pane, right-click OmeAdministrators, and click Edit Members of OmeAdministrators.
The Edit Members of OmeAdministrators dialog box is displayed.
3. Type or select the domain name and user name in the appropriate fields, and click Add.
4. Select the user from the list and click OK.
The user is displayed in the OmeSiteAdministrators tree view in the Manage Device Group Permissions pane.
NOTE: Once a user is added to the OmeSiteAdministrators role, by default, all the devices groups are available to the user. To restrict the user to perform system updates and remote tasks on specific device groups, you must assign the device groups to the user. See Assigning Device Groups to a User.
Related Links
Device Group Permissions
Assigning Device Groups to a UserNOTE: Only OmeAdministrators are allowed to assign device groups to a user. Device groups can only be assigned to users who are members of the OmeSiteAdministrators role.
NOTE: If a device group is not assigned to a user, it only restricts the user from performing system updates or running remote tasks on that device group. It does not hide or remove that device group from the device tree in the Devices portal.
To assign device groups to a user:
1. Click Preferences → Device Group Permissions.
The Device Group Permissions portal page is displayed.
2. In the Manage Device Group Permissions pane, select the user to whom you want to assign device groups.
The Device Groups for Tasks and Patch Targeting section is displayed in the right-side panel.
3. In the device groups tree-view, select the check boxes appropriate to the device group(s) you want to assign to the selected user. If you want to remove a device group assignment that you made previously, clear the check boxes of the appropriate device groups.
4. Click Apply.
NOTE: An OmeSiteAdministrators task target remains ‘as is’ when the task was created. If the OmeAdministrators change the OmeSiteAdministrators device group permissions, the task targets are not modified. Changing an OmeSiteAdministrators device group permissions does not change tasks the OmeSiteAdministrators created earlier.
289

NOTE: Only Server, RAC, or custom device groups that are assigned to OmeSiteAdministrators are available to OmeSiteAdministrators for remote or system update tasks. To make any other device groups available to the OmeSiteAdministrators for remote or system update tasks, you must create a custom device group which includes other device groups and assign it to the OmeSiteAdministrators.
Related Links
Device Group Permissions
Removing Users From the OmeSiteAdministrators RoleNOTE: Only OmeAdministrators are allowed to remove users from the OmeSiteAdministrators role.
To remove users from the OmeSiteAdministrators role:
1. Click Preferences → Device Group Permissions.
The Device Group Permissions portal is displayed.
2. Perform one of the following:
• In the Common Tasks pane , click Edit Members of OmeAdministrators.
• In the Manage Device Group Permissions pane, right-click OmeAdministrators, and click Edit Members of OmeAdministrators.
The Edit Members of OmeAdministrators dialog box is displayed.
3. Clear the check box beside the user who you want to remove from the OmeSiteAdministrators role.
4. Click OK.
The user is removed from the OmeSiteAdministrators tree view in the Manage Device Group Permissions pane.
Related Links
Device Group Permissions
290

26OpenManage Mobile SettingsDell OpenManage Mobile is a systems management application that allows you to securely perform a subset of data-center monitoring and remediation tasks on one or more OpenManage Essentials consoles and/or integrated Dell Remote Access Controllers (iDRACs) using your Android device. Using OpenManage Mobile you can:
• Receive alert notifications from the OpenManage Essentials management system/server.
• View group, device, alert, and log information.
• Power on/off or restart a server.
This chapter provides information about the OpenManage Mobile settings that you can configure through the OpenManage Essentials console. It also provides information required to troubleshoot OpenManage Mobile.
NOTE: For information on installing and using OpenManage Mobile, see the OpenManage Mobile User’s Guide at dell.com/OpenManageManuals.
Related Links
Enabling or Disabling Alert Notifications For OpenManage Mobile
Enabling or Disabling OpenManage Mobile Subscribers
Deleting an OpenManage Mobile Subscriber
Viewing the Alert Notification Service Status
Viewing the OpenManage Mobile Subscriber Information
Troubleshooting OpenManage Mobile
Enabling or Disabling Alert Notifications For OpenManage MobileBy default, OpenManage Essentials is configured to send alert notifications to the OpenManage Mobile application. However, alert notifications are sent from OpenManage Essentials only when a OpenManage Mobile user adds the OpenManage Essentials console to the OpenManage Mobile application. The Enable Push Notifications option in the Preferences → Mobile Settings page allows you to enable or disable the OpenManage Essentials console from sending alert notifications to OpenManage Mobile subscribers.
NOTE: omeAdministrator rights are required for enabling or disabling alert notifications for OpenManage Mobile.
NOTE: For OpenManage Essentials to send alert notifications to OpenManage Mobile, make sure that the OpenManage Essentials server has outbound (HTTPS) Internet access. For more information, see “Proxy Settings” in Console Settings.
To enable or disable alert notifications for OpenManage Mobile:
1. In OpenManage Essentials, click Preferences → Mobile Settings.
291

The Mobile Settings page is displayed.
2. Select or clear Enable Push Notifications to enable or disable sending alert notifications to OpenManage Mobile subscribers.
3. Click Apply.
Related Links
OpenManage Mobile Settings
Enabling or Disabling OpenManage Mobile SubscribersThe check boxes in the Enabled column in the Mobile Subscribers list allow you to enable or disable transmission of alert notifications to OpenManage Mobile subscribers.
NOTE: omeAdministrator rights are required for enabling or disabling OpenManage Mobile subscribers.
NOTE: OpenManage Mobile subscribers may be automatically disabled by OpenManage Essentials if their mobile service provider push notification service indicates that the device is permanently unreachable.
NOTE: Even if an OpenManage Mobile subscriber is enabled in the Mobile Subscribers list, they can disable receiving alert notifications in their OpenManage Mobile application settings.
To enable or disable alert notifications to OpenManage Mobile subscribers:
1. In OpenManage Essentials, click Preferences → Mobile Settings.
The Mobile Settings page is displayed.
2. In the Mobile Subscribers list, select or clear the Enabled check box to enable or disable alert notifications to the appropriate OpenManage Mobile subscribers.
3. Click Apply.
Related Links
OpenManage Mobile Settings
Deleting an OpenManage Mobile SubscriberDeleting an OpenManage Mobile subscriber removes the user from the Mobile Subscribers list, preventing the user from receiving alert notifications from the OpenManage Essentials console. However, the OpenManage Mobile user can re-subscribe to alert notifications from the OpenManage Mobile application at a later time.
NOTE: omeAdministrator rights are required for deleting an OpenManage Mobile subscriber.
To delete an OpenManage Mobile subscriber:
1. In OpenManage Essentials, click Preferences → Mobile Settings.
The Mobile Settings page is displayed.
2. In the Mobile Subscribers list, click the delete icon appropriate to the subscriber you want to delete.
The Delete Subscription Confirmation dialog box is displayed.
3. Click Yes.
Related Links
OpenManage Mobile Settings
292

Viewing the Alert Notification Service StatusOpenManage Essentials forwards alert notifications to OpenManage Mobile subscribers through their respective device platform alert notification service. If the OpenManage Mobile subscriber has failed to receive alert notifications, you can check the Notification Service Status to troubleshoot alert notification delivery.
To view the status of the alert notification service, click Preferences → Mobile Settings.
Related Links
OpenManage Mobile Settings
Notification Service Status
Notification Service Status
The following table provides information about the Notification Service Status displayed in the
Preferences → Mobile Settings page.
Status Icon Status Description
The service is running and operating normally.
NOTE: This service status only reflects successful communication with the platform notification service. If the device of the subscriber is not connected to the Internet or a cellular data service, notifications will not be delivered until the connection is restored.
The service experienced an error delivering a message which may be of a temporary nature. If the problem persists, follow troubleshooting procedures or contact technical support.
The service experienced an error delivering a message. Follow troubleshooting procedures or contact support as needed.
Viewing the OpenManage Mobile Subscriber InformationAfter an OpenManage Mobile user successfully adds an OpenManage Essentials console, the user is added to the Mobile Subscribers table in the OpenManage Essentials console. The Mobile Subscribers table provides information about each OpenManage Mobile subscriber.
To view the mobile subscriber information, in OpenManage Essentials, click Preferences → Mobile Settings.
Related Links
OpenManage Mobile Settings
Mobile Subscriber Information
293

Mobile Subscriber Information
The following table provides information about the Mobile Subscribers table displayed in the Preferences → Mobile Settings page.
Field Description
Enabled Displays a check box you can select or clear to enable or disable alert notifications to an OpenManage Mobile subscriber.
Status Displays the status of the subscriber, indicating whether the OpenManage Essentials console is able to send alert notifications successfully to the Dell Alert Forwarding Service.
Status Message Displays the status of the mobile device.
Username Displays the name of the OpenManage Mobile user.
Device Id Displays the unique identifier of the mobile device.
Description Displays the description of the mobile device.
Filter Displays the name of the filter the subscriber has configured for alert notifications.
Last Error Displays the date and time the last error occurred when sending an alert notification to the OpenManage Mobile user.
Last Push Displays the date and time the last alert notification was sent successfully from OpenManage Essentials to the Dell Alert Forwarding Service.
Last Connection Displays the date and time the user last accessed the OpenManage Essentials console through OpenManage Mobile.
Registration Displays the date and time the user added the OpenManage Essentials console in OpenManage Mobile.
Delete Displays a delete icon that you can click to remove a subscriber from the Mobile Subscribers list.
Troubleshooting OpenManage Mobile
If OpenManage Essentials is unable to register with the Dell Message Forwarding Service or successfully forward notifications, the following resolutions are available:
294

Problem Reason Resolution
OpenManage Essentials is unable to connect to the Dell Message Forwarding Service. [Code 1001/1002]
Outbound Internet (HTTPS) connectivity is lost.
Using a web browser, determine if outbound Internet connectivity is available.
If connectivity is lost, perform standard network troubleshooting steps:
• Verify if the network cables are connected.
• Verify the IP address and DNS server settings.
• Verify if the firewall is configured to allow outbound traffic.
• Verify if the ISP network is operating normally.
Proxy settings are incorrect. Set proxy host, port, username, and password as required. For more information, see “Proxy Settings” in Console Settings.
Dell Message Forwarding Service is temporarily unavailable.
Wait for the service to become available.
The Dell Message Forwarding Service is unable to connect to a device platform notification service. [Code 100-105, 200-202, 211-212]
The platform provider service is temporarily unavailable to the Dell Message Forwarding Service.
Wait for the service to become available.
The device communication token is no longer registered with the platform provider service. [Code 203]
The OpenManage Mobile application has been updated, restored, uninstalled, or the device operating system has been upgraded or restored.
Reinstall OpenManage Mobile on the device or follow the OpenManage Mobile troubleshooting procedures specified in the OpenManage Mobile User’s Guide and reconnect the device to OpenManage Essentials.
If the device is no longer connected to OpenManage Essentials, remove the subscriber.
The OpenManage Essentials registration is being rejected by the Dell Message Forwarding Service. [Code 154]
An obsolete version of OpenManage Essentials is being used.
Upgrade to a newer version of OpenManage Essentials.
Related Links
OpenManage Mobile Settings
295
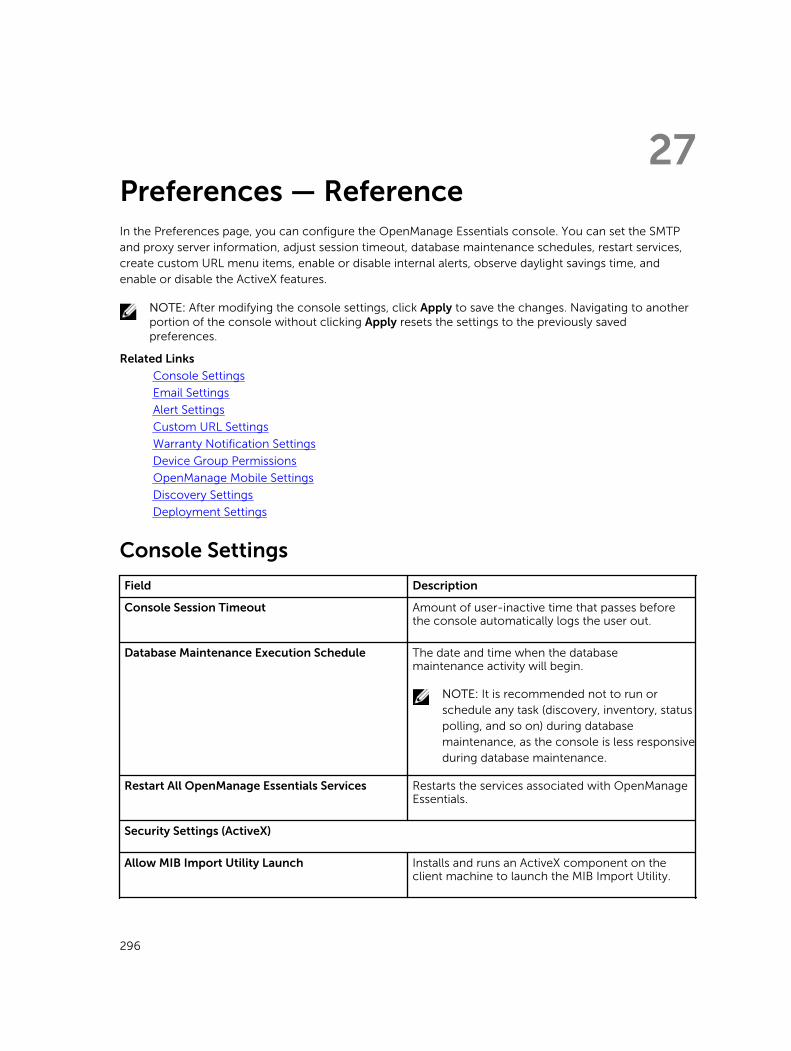
27Preferences — ReferenceIn the Preferences page, you can configure the OpenManage Essentials console. You can set the SMTP and proxy server information, adjust session timeout, database maintenance schedules, restart services, create custom URL menu items, enable or disable internal alerts, observe daylight savings time, and enable or disable the ActiveX features.
NOTE: After modifying the console settings, click Apply to save the changes. Navigating to another portion of the console without clicking Apply resets the settings to the previously saved preferences.
Related Links
Console Settings
Email Settings
Alert Settings
Custom URL Settings
Warranty Notification Settings
Device Group Permissions
OpenManage Mobile Settings
Discovery Settings
Deployment Settings
Console Settings
Field Description
Console Session Timeout Amount of user-inactive time that passes before the console automatically logs the user out.
Database Maintenance Execution Schedule The date and time when the database maintenance activity will begin.
NOTE: It is recommended not to run or schedule any task (discovery, inventory, status polling, and so on) during database maintenance, as the console is less responsive during database maintenance.
Restart All OpenManage Essentials Services Restarts the services associated with OpenManage Essentials.
Security Settings (ActiveX)
Allow MIB Import Utility Launch Installs and runs an ActiveX component on the client machine to launch the MIB Import Utility.
296

Field Description
Allow Remote Desktop Launch Installs and runs an ActiveX component on the client machine to launch remote desktop sessions.
Allow Troubleshooting Tool Launch Installs and runs an ActiveX component on the client machine to launch the Dell Troubleshooting Tool.
ActiveX Status Displays the ActiveX status. Click Refresh Status to refresh the ActiveX status.
Time Zone Settings
Observe Daylight Savings Time for Server Selected Region
Click this check box to enable adjusting the scheduled date and time values based on the server's time zone. Adjusting the server's time zone setting changes the settings in OpenManage Essentials. Enabling this option adjusts the date and time values of scheduled items when daylight savings begins or ends.
Client Time Zone Displays the time zone and UTC offset of the client’s time zone.
OME Server Time Zone Displays the time zone and UTC offset of the server's time zone.
OME Server Daylight Savings Status Displays the current daylight savings time status of the server's time zone and offset of daylight savings time. It also displays whether the server's time zone is observing daylight savings or is in standard time zone time.
Proxy Settings (used for System Update and Warranty)
Use Proxy Settings Enable the use of proxy settings for internet access for System Update and Warranty.
Proxy Server Address or Name The IP address or server name of the proxy server. Check the browser's proxy LAN settings or ask your network administrator if unsure.
Domain \ User name The domain and user name of the proxy user.
Password User's proxy password.
Proxy Port Number The port number to access the proxy server. Check the browser's proxy LAN settings or ask your network administrator if unsure.
Test Connection Click to test connection to the internet with the proxy credentials.
297

Field Description
KACE Appliance Settings
KACE Appliance URL The URL of the KACE appliance.
Test URL Click to test connection to the KACE appliance.
Email Settings
Field Description
SMTP Server Name or IP Address Enter the SMTP server name or IP address.
Use Credentials Enable the user credentials.
Domain \ User name Enter the domain and user name.
Password Enter the user password.
Port Check Use Default to use the default port number or manually add the port number.
Use SSL Enable this check box to use SSL.
Logging Select to enable or disable logging based on your preference.
Alert Settings
Field Description
Enable Internal Health Alerts Select the check box to enable internal health alerts. When enabled, OpenManage Essentials generates internal alerts when the global health status of the device changes.
Enable Internal Connection Status Alerts Select the check box to enable internal connection status alerts. When enabled, OpenManage Essentials generates internal alerts when the connection status of the device changes.
Alert Popup Notification Settings
Enable Alert Popup Notifications Select the check box to enable pop-up notifications to be displayed when an alert is generated.
Seconds between popup notifications Select the time interval between each alert pop-up notification.
298

Custom URL Settings
Field Description
Name Displays the name assigned to the URL.
Device Group Displays the device group associated with the URL.
Custom URL Displays the URL.
Description Displays the description provided for the custom URL.
Date Created Displays the date the URL was created.
Date Updated Displays the date the URL was updated.
Related Links
Creating a Custom URL
Launching the Custom URL
Warranty Notification Settings
The following table provides information about the fields displayed in the Preferences → Warranty Notification Settings page.
Field Description
Warranty Email Notifications
Enable Warranty Email Notifications Enables or disables the sending of warranty e-mail notifications.
To The e-mail addresses of the recipients of the warranty notification e-mail. Each e-mail address must be a valid e-mail address. Multiple e-mail addresses must be separated using a semicolon.
From The e-mail address from which the warranty notification e-mail is to be sent. Only one e-mail address must be provided. The e-mail address must be a valid e-mail address.
All Devices with x days or less of warranty Determines which devices to include in the warranty notification e-mail. Devices with warranty less than or equal to the specified days are included in the warranty notification e-mail.
Include Devices with Expired Warranties Specifies if devices with expired warranty (0 days) or no warranty information should be included in the warranty e-mail notification.
Send email every x days The duration between successive warranty e-mail notifications. An update to this field takes effect
299

Field Description
only after the next warranty e-mail notification is sent.
Next Email Will Send On The date and time at which the next warranty notification e-mail is to be sent. You can configure this field to set when the next warranty notification e-mail is to be sent. After an e-mail notification is successfully sent, this field is updated automatically based on the setting in the Send email every x days field.
Email Settings Opens the E-mail Settings page where you can configure the SMTP e-mail server.
Warranty Scoreboard Notifications
Enable Warranty Scoreboard Notifications Enables or disables the display of the warranty notifications icon in the OpenManage Essentials heading banner. The warranty notification icon is displayed only if a device has warranty less than or equal to the days specified in All Devices with x Days or less of warranty .
All Devices with x Days or less of warranty Determines which devices to include in the warranty notification email. Devices with warranty less than or equal to the specified days are included in the warranty notification email.
Include Devices with Expired Warranties Specifies if devices with expired warranty (0 days) or no warranty information should be included in the Device Warranty Report.
Warranty Popup Notification Settings
Enable Warranty Popup Notification Enables or disables the display of the warranty popup notifications in the console. The warranty popup notification is displayed only if a device has warranty less than or equal to the days specified in All Devices with x Days or less of warranty .
Related Links
Configuring Warranty Email Notifications
Configuring Warranty Scoreboard Notifications
Device Group Permissions
The following is a description of the panels and fields displayed in the Device Group Permissions portal.
Common Tasks
The Common Tasks pane displays the Edit Members of OmeSiteAdministrators option that you can use to add or remove a user from the OmeSiteAdministrators role.
300

Manage Device Group Permissions
The Manage Device Group Permissions pane displays the OmeSiteAdministrators in a tree-view format. The User Overviews are displayed in the right-side pane when you click OmeSiteAdministrators in the Manage Device Group Permissions pane. The following are the fields in User Overviews :
Field Description
User Type Displays if the member is a user or user group.
Domain Displays the domain of the user.
Name Displays the name of the user.
Device Groups for Tasks and Patch Targeting
The Device Groups for Tasks and Patch Targeting section is displayed in the right-side pane when you click a user name in the Manage Device Group Permissions pane. This section displays the device groups in a tree-view format.Related Links
Managing Device Group Permissions
Adding Users to the OmeSiteAdministrators Role
Assigning Device Groups to a User
Removing Users From the OmeSiteAdministrators Role
Discovery Settings
The Discovery Settings page enables you to configure the type of wizard you want to use for discovering devices. The fields displayed in the Discovery Settings page are described in the following table.
Field Description
Standard Wizard If selected, the Discover Devices wizard displays a list of protocols for discovering devices.
Guided Wizard If selected, the Discover Devices wizard displays a list of device types and the required protocols for discovering and managing the selected devices. After the required protocol configurations are completed, by default, this wizard runs both discovery and inventory.
NOTE: Discovery of Dell EMC storage arrays is not supported by the Guided Wizard.
Deployment Settings
The fields displayed in the Deployment Settings page are described in the following table.
301

Field Description
File Share Settings
Domain \ Username User name to access the file share.
Password Password to access the file share.
File Share Status Indicates the status of the deployment file share configuration.
Auto Deployment Settings
Enable auto deployment for recently discovered devices
Select to allow OpenManage Essentials to deploy a configuration template to devices that will be discovered later.
Run auto deployment every xx minutes Set the time interval at which you want to attempt the configuration deployment on devices that will be discovered later.
302

28Logs — ReferenceFrom tools you can:
• View User Interface Logs
• View Application Logs
•Export Discovery Logs to File System—Export the logs that were generated while discovering devices.
User Interface Logs
Field Description
Enabled Enable or disable logging of User Interface. Disable to increase performance.
Log Asynchronous Calls Enable or disable logging for threading and asynchronous update method calls. Turn on both Log Asynchronous Calls and Informational to view update calls.
Informational Enable or disable logging of behaviors that are marked with a severity of General Information.
Warning Enable or disable logging of behaviors that are marked with a severity of Warning.
Critical Enable or disable logging of behaviors that are marked with a severity of Critical.
Clear Clear the user interface log grid.
Export Export the user interface log to file (.CSV, .HTML, .TXT, and .XML supported).
Severity The severity of the recorded deviation in user interface behavior.
Start Time The time at which this behavior occurred.
Source The source of the behavior.
Description More information on the behavior.
303

Application Logs
Field Description
Severity The severity of the recorded deviation in application’s behavior.
Time The time at which this behavior occurred.
Message Information on the behavior.
304

29ExtensionsThe Extensions page provides a list of links to partner products. This page provides information about the product, detects if the product is installed, and allows you to launch the product if it is installed.
NOTE: You may require ActiveX to detect some extensions. To enable ActiveX, see Console Settings in the Preferences page.
Field Description
Name Displays the name of the tool.
Description Displays the description of the tool.
Launch Displays the link if the product is installed.
Additional Information Click the ? icon to see more information about the product.
305

30Right-Click ActionsThe following tables lists all the right-click actions that are available in OpenManage Essentials.
NOTE: The right-click options displayed in OpenManage Essentials are dependent on your access privilege. You must have administrator access to see all the options.
Schedule View
Field Description
Create New Task Displays the following options:
• Server Power Options
• Deploy Server Administrator Task
• Command Line Task
Export Calendar Allows you to export the calendar in a .ics file format. You can import the ics file into Microsoft Outlook.
After you create a task, you can right-click the task to display the following options:
Field Description
Edit Allows you to edit the task.
Delete Allows you to delete the task.
Run Now Allows you to run the task immediately.
View Allows you to view the details of the task.
Deactivate Task Schedule Deactivates a task’s schedule. This flag determines if the task runs or not in the future.
NOTE: If you right-click a deactivated task, an Activate Task Schedule option is displayed.
Clone Allows you to clone the task with the same details.
Export Calendar Allows you to export the calendar in an ics file format. You can import the ics file into Microsoft Outlook.
306

Device Status
Field Description
IP Address or CMC/iDRAC name Displays the IP address or the CMC/iDRAC name.
Application Launch Select to launch an application.
Troubleshoot If the Troubleshooting Tool is installed, then select this option to launch the Troubleshooting Tool. The Troubleshooting Tool is disabled by default. To enable the Troubleshooting Tool, see Preferences Reference.
Refresh Inventory Select to run inventory on the device.
Refresh Status Select to run a status check on the device.
Add to New Group Select to add the device to a group.
Add to Existing Group Select to add the device to an existing group.
Ignore All Alerts from Device Select to ignore all alerts from the device.
Exclude Range Select to remove the device from the discovery and inventory range.
Delete Select to remove the device information.
Discovery Range Summary
Managing Include Ranges
Right-click the IP address or group to view the following options:
Field Description
Edit Select to edit discovery range configuration.
Rename Select to rename the range.
NOTE: This option is only displayed if you right-click an IP address.
Add Discovery Ranges to <Group Name> Select this option to add additional ranges to an existing group.
NOTE: This option is only displayed if you right-click a group.
Delete Select to delete a range.
307

Field Description
Disable Select to disable a range.
Perform Discovery Now Select to do the discovery.
Perform Discovery and Inventory Now Select to do the discovery and inventory.
Perform Status Polling Now Select to start the status polling task for the discovered server or device.
Perform Inventory Now Select to perform the inventory.
View Filters
Field Description
Edit Select to edit the alert action or alert filter.
View Summary Select to view all the systems that are critical.
Rename Select to rename action or alert filter.
Clone Select to create a copy of an action or alert filter.
Delete Select the alert to delete the alerts.
Alerts
Field Description
Details Select to view the details of alerts.
Acknowledge Select to set or clear alerts.
Delete Select to delete alerts.
Ignore Select to ignore alert filter action on the selected device or all devices. You can also use this option to ignore all alerts from the selected device.
Export Select to export alert information in CSV or HTML formats.
308

Remote Tasks
Field Description
Edit Select to edit the task.
Delete Select to delete the task.
Run Select to run the task immediately.
View Select to view the task.
Activate Task Schedule Select to activate the task schedule.
Clone Select to create a copy of a task.
Custom URL
Field Description
Edit Select to edit the URL.
Delete Select to delete the URL.
Export Select to export the information about the URL
System Update Tasks
Field Description
Delete Select to delete the task.
Run Select to re-run a task that is already complete, but did not update some of the components.
View Select to view the task.
Export Select to export the system update task information.
Stop Select to stop the task.
Attributes Tab
Field Description
Check Select the selected attributes.
Uncheck Clear the selected attributes.
309

Field Description
Export Export all the attributes displayed in the Attributes tab.
.
Templates
Field Description
Deploy Deploy the selected device configuration template.
Clone Clone the selected device configuration template.
Rename Rename the selected device configuration template.
Delete Delete the selected device configuration template.
Export Template Export the selected device configuration template.
.
Compliance by Template
Field Description
Associate Devices Deploy the selected device configuration template.
Edit Displays the attributes of the selected device configuration template in the right pane for editing.
Clone Clone the selected device configuration template.
Rename Rename the selected device configuration template.
Delete Delete the selected device configuration template.
Export Template Export the selected device configuration template.
.
310

Device Compliance
Field Description
View Compliance Details View the compliance details for the selected device.
Associate to Different Template Associate the selected device to another configuration template.
Run Inventory Now Run the device configuration inventory for the selected device..
Export Eport the device compliance report as an HTML file.
.
311
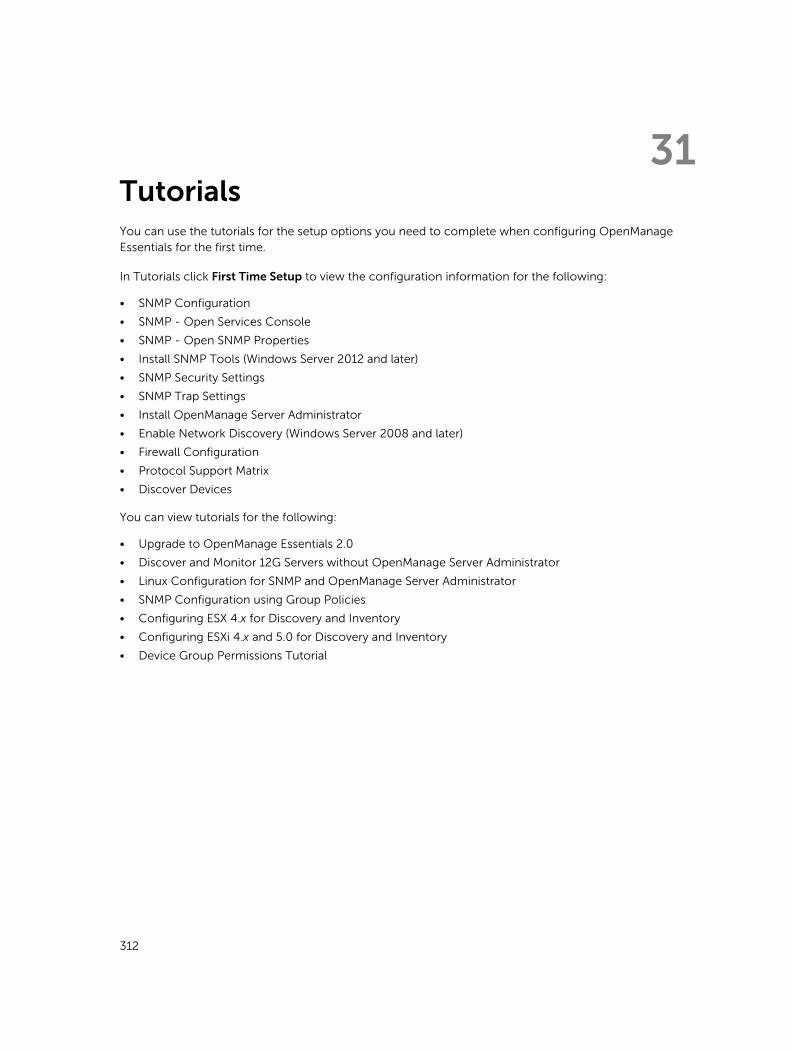
31TutorialsYou can use the tutorials for the setup options you need to complete when configuring OpenManage Essentials for the first time.
In Tutorials click First Time Setup to view the configuration information for the following:
• SNMP Configuration
• SNMP - Open Services Console
• SNMP - Open SNMP Properties
• Install SNMP Tools (Windows Server 2012 and later)
• SNMP Security Settings
• SNMP Trap Settings
• Install OpenManage Server Administrator
• Enable Network Discovery (Windows Server 2008 and later)
• Firewall Configuration
• Protocol Support Matrix
• Discover Devices
You can view tutorials for the following:
• Upgrade to OpenManage Essentials 2.0
• Discover and Monitor 12G Servers without OpenManage Server Administrator
• Linux Configuration for SNMP and OpenManage Server Administrator
• SNMP Configuration using Group Policies
• Configuring ESX 4.x for Discovery and Inventory
• Configuring ESXi 4.x and 5.0 for Discovery and Inventory
• Device Group Permissions Tutorial
312

32Using OpenManage Essentials Command Line Interface
Launching the OpenManage Essentials Command Line InterfaceClick Start → All Programs → OpenManage Applications → Essentials → Essentials Command Line Interface.
Creating a Discovery Profile Input FileCLI commands that create discovery ranges or discovery groups require an XML-based file that defines the parameters for discovery protocols such as SNMP, WMI, Storage, WS-Man, SSH, and IPMI. This file defines which protocols are used and the parameters for each of the protocols. The file can be modified using an XML editor or a text editor. A sample XML file (DiscoveryProfile.xml) is included in the samples folder at C:\Program Files (x86)\Dell\SysMgt\Essentials\Tools\CLI\Samples. Edit the xml file and rename it to create multiple discovery profiles. You cannot store passwords for WMI, IPMI, WS-Man, EMC and SSH protocols in the XML file. The OpenManage Essentials CLI commands allow you to specify passwords in the command line argument using the following commands:
• -wmiPassword<secure password>• -ipmiPassword<secure password>• -wsmanPassword<secure password>• -emcPassword<secure password>• -sshPassword<secure password>
NOTE: Passwords are not allowed in clear text. If you attempt to use clear text for the password values, the CLI command will not be successful.
The <secure password> argument must be a secure password. To generate a secure password that can be re-used in PowerShell scripts, run the following (or a similar command) from within a PowerShell window:
To prompt the user for a password; read in and convert it to a secure string:
PS> $password = Read-Host ‘Enter password:’ –AsSecureString
To save the password, as a secure string, to the file system:
PS> $password | ConvertFrom-SecureString | Set-Content c:\tmp\password.txt
The two earlier PowerShell commands convert a password to a secure string that is then saved in a file. This secure password can subsequently be used in other PowerShell scripts that involve OpenManage Essentials CLI commands. For example:
313
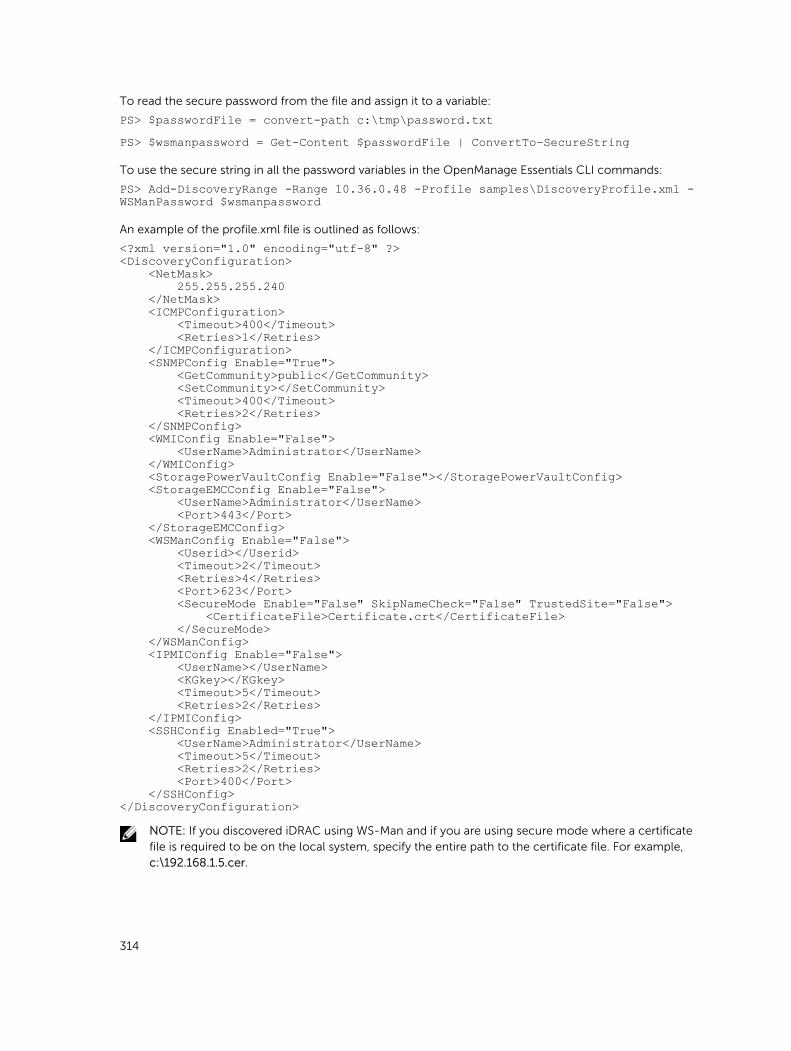
To read the secure password from the file and assign it to a variable:
PS> $passwordFile = convert-path c:\tmp\password.txt PS> $wsmanpassword = Get-Content $passwordFile | ConvertTo-SecureString
To use the secure string in all the password variables in the OpenManage Essentials CLI commands:
PS> Add-DiscoveryRange -Range 10.36.0.48 -Profile samples\DiscoveryProfile.xml -WSManPassword $wsmanpassword
An example of the profile.xml file is outlined as follows:
<?xml version="1.0" encoding="utf-8" ?><DiscoveryConfiguration> <NetMask> 255.255.255.240 </NetMask> <ICMPConfiguration> <Timeout>400</Timeout> <Retries>1</Retries> </ICMPConfiguration> <SNMPConfig Enable="True"> <GetCommunity>public</GetCommunity> <SetCommunity></SetCommunity> <Timeout>400</Timeout> <Retries>2</Retries> </SNMPConfig> <WMIConfig Enable="False"> <UserName>Administrator</UserName> </WMIConfig> <StoragePowerVaultConfig Enable="False"></StoragePowerVaultConfig> <StorageEMCConfig Enable="False"> <UserName>Administrator</UserName> <Port>443</Port> </StorageEMCConfig> <WSManConfig Enable="False"> <Userid></Userid> <Timeout>2</Timeout> <Retries>4</Retries> <Port>623</Port> <SecureMode Enable="False" SkipNameCheck="False" TrustedSite="False"> <CertificateFile>Certificate.crt</CertificateFile> </SecureMode> </WSManConfig> <IPMIConfig Enable="False"> <UserName></UserName> <KGkey></KGkey> <Timeout>5</Timeout> <Retries>2</Retries> </IPMIConfig> <SSHConfig Enabled="True"> <UserName>Administrator</UserName> <Timeout>5</Timeout> <Retries>2</Retries> <Port>400</Port> </SSHConfig></DiscoveryConfiguration>
NOTE: If you discovered iDRAC using WS-Man and if you are using secure mode where a certificate file is required to be on the local system, specify the entire path to the certificate file. For example, c:\192.168.1.5.cer.
314
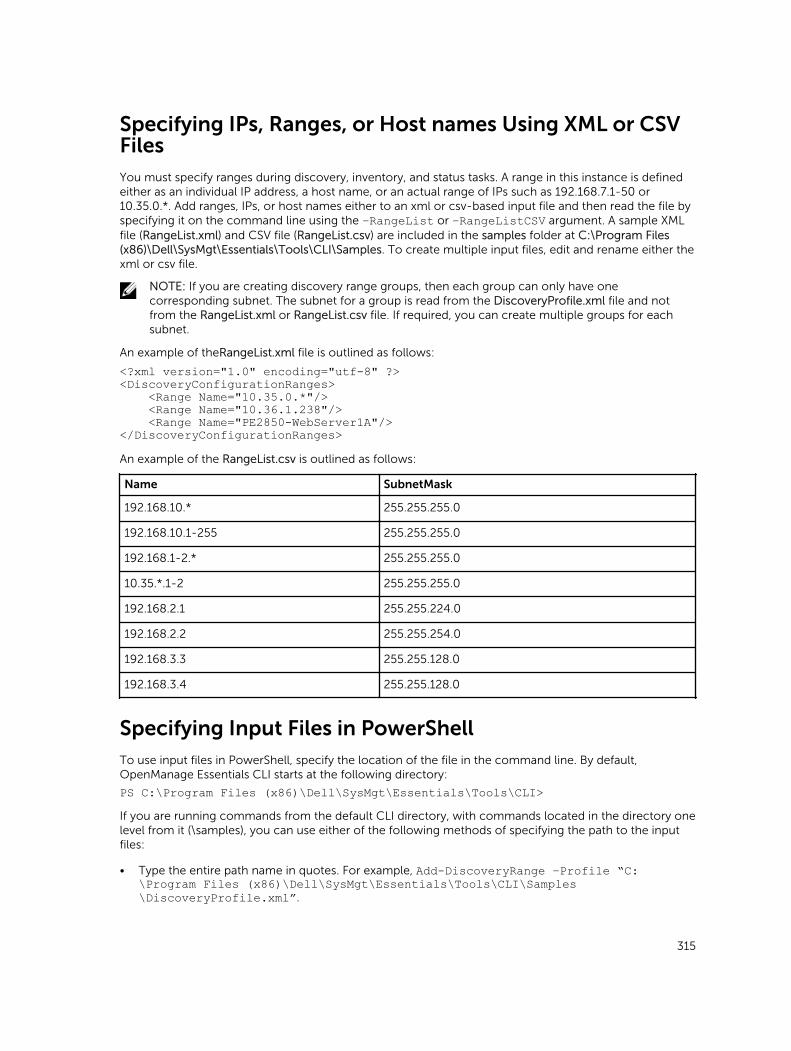
Specifying IPs, Ranges, or Host names Using XML or CSV FilesYou must specify ranges during discovery, inventory, and status tasks. A range in this instance is defined either as an individual IP address, a host name, or an actual range of IPs such as 192.168.7.1-50 or 10.35.0.*. Add ranges, IPs, or host names either to an xml or csv-based input file and then read the file by specifying it on the command line using the –RangeList or –RangeListCSV argument. A sample XML file (RangeList.xml) and CSV file (RangeList.csv) are included in the samples folder at C:\Program Files (x86)\Dell\SysMgt\Essentials\Tools\CLI\Samples. To create multiple input files, edit and rename either the xml or csv file.
NOTE: If you are creating discovery range groups, then each group can only have one corresponding subnet. The subnet for a group is read from the DiscoveryProfile.xml file and not from the RangeList.xml or RangeList.csv file. If required, you can create multiple groups for each subnet.
An example of theRangeList.xml file is outlined as follows:
<?xml version="1.0" encoding="utf-8" ?><DiscoveryConfigurationRanges> <Range Name="10.35.0.*"/> <Range Name="10.36.1.238"/> <Range Name="PE2850-WebServer1A"/></DiscoveryConfigurationRanges>An example of the RangeList.csv is outlined as follows:
Name SubnetMask
192.168.10.* 255.255.255.0
192.168.10.1-255 255.255.255.0
192.168.1-2.* 255.255.255.0
10.35.*.1-2 255.255.255.0
192.168.2.1 255.255.224.0
192.168.2.2 255.255.254.0
192.168.3.3 255.255.128.0
192.168.3.4 255.255.128.0
Specifying Input Files in PowerShellTo use input files in PowerShell, specify the location of the file in the command line. By default, OpenManage Essentials CLI starts at the following directory:
PS C:\Program Files (x86)\Dell\SysMgt\Essentials\Tools\CLI>If you are running commands from the default CLI directory, with commands located in the directory one level from it (\samples), you can use either of the following methods of specifying the path to the input files:
• Type the entire path name in quotes. For example, Add-DiscoveryRange –Profile “C:\Program Files (x86)\Dell\SysMgt\Essentials\Tools\CLI\Samples\DiscoveryProfile.xml”.
315

• Use a period (.) to retrieve the file located in the current directory, or .\directory to retrieve the file located one level from the current directory. For example, Add-DiscoveryRange –Profile .\samples\DiscoveryProfile.xml.
Command Line Interface Commands
Access to CLI commands in the OpenManage Essentials is dependent on your access privilege. If your user id belongs to the OMEAdministrators group, you can access all the CLI commands. If your user id belongs to the OMEUsers group, then you cannot delete or modify any data using the CLI and a warning message is displayed.
Creating a Discovery Range
Description: The Add-DiscoveryRange command allows you to create a new discovery range. The
command references an xml file (DiscoveryProfile.xml) which is a protocol definition associated with the discovery range. Enter the ranges either using an xml file, csv file, or by specifying the range. For more information about DiscoveryProfile.xml, RangeList.xml, and RangeList.csv files, see Creating a Discovery Profile Input File and Specifying IPs, Ranges, or Host Names Using XML or CSV Files.
Commands:
• PS> Add-DiscoveryRange –Profile <DiscoveryProfile.xml> -Range <range> • PS> Add-DiscoveryRange –Profile <DiscoveryProfile.xml> -RangeList
<RangeList.xml>• PS> Add-DiscoveryRange –Profile <DiscoveryProfile.xml> -RangeListCSV
<RangeList.csv>
Examples:
• PS> Add-DiscoveryRange –Profile .\Samples\DiscoveryProfile.xml -Range 10.35.0.124
• PS> Add-DiscoveryRange –Profile .\Samples\DiscoveryProfile.xml -RangeList .\Samples\RangeList.xml
• PS> Add-DiscoveryRange –Profile .\Samples\DiscoveryProfile.xml -RangeListCSV .\Samples\RangeList.csv
Removing a Discovery Range
Description: The Remove-DiscoveryRange command allows you to remove a discovery range. Enter
the ranges either using an xml file or by specifying the range. For more information about the RangeList.xml file, see Specifying IPs, Ranges, or Host Names Using XML or CSV Files.
Commands:
• PS> Remove-DiscoveryRange -Range <range>• PS> Remove-DiscoveryRange -RangeList <rangelist.xml>
Examples:
• PS> Remove-DiscoveryRange-Range 10.35.0.1, 10.120.1.2• PS> Remove-DiscoveryRange -RangeList .\Samples\RangeList.xml
316

Creating a Discovery Range Group
Description: The Add-DiscoveryRangeGroup command allows you to create a discovery range group.
A discovery range group can either contain a range of IPs, individual IPs, or host names under it. This enables you to modify protocols settings for the group and all the ranges it contains. You can maintain different sets of protocols for different types of devices in your network. With ranges not in a group, you have to edit each range individually to change the protocols which are active, the time out or retry values, or credentials used with each protocol. Each discovery range group can only have one corresponding subnet. The subnet for a group is read from the DiscoveryProfile.xml file and not from the Rangelist.xml or RangeList.csv file. If required, create multiple groups for each subnet. For more information about DiscoveryProfile.xml, Rangelist.xml, and RangeList.csv files, see Creating a Discovery Profile Input File and Specifying IPs, Ranges, or Host names Using XML or CSV Files.
Command:
• PS> Add-DiscoveryRangeGroup –Profile <DiscoveryProfile.xml> -GroupName <group name> -RangeList <Rangelist.xml>
• PS> Add-DiscoveryRangeGroup –Profile <DiscoveryProfile.xml> -GroupName <group name> -RangeListCSV <Rangelist.csv>
Examples:
• PS> Add-DiscoveryRangeGroup –Profile .\Samples\DiscoveryProfile.xml -GroupName Group1 -RangeList .\Samples\rangelist.xml
• PS> Add-DiscoveryRangeGroup –Profile .\Samples\DiscoveryProfile.xml -GroupName Group1 -RangeListCSV .\Samples\rangelist.csv
Removing a Discovery Range Group
Description: The Remove-DiscoveryRangeGroup command allows to you to remove a discovery
range group.
Command:
PS>Remove-DiscoveryRangeGroup -GroupName <groupname>
Example:
PS>Remove-DiscoveryRangeGroup -GroupName Group1
Editing a Discovery Range
Description: The Set-ModifyDiscoveryRange command allows to edit existing discovery ranges. This
command targets the existing specified discovery range(s) and replaces the protocol information with the information specified in the DiscoveryProfile.xml file. For more information about the DiscoveryProfile.xml and RangeList.xml files, see Creating a Discovery Profile Input File and Specifying IPs, Ranges, or Host names Using XML or CSV Files.
Commands:
• PS> Set-ModifyDiscoveryRange –Profile <DiscoveryProfile.xml> -Range <range> • PS> Set-ModifyDiscoveryRange –Profile <DiscoveryProfile.xml> -RangeList
<RangeList.xml>
Examples:
317

• PS>Set-ModifyDiscoveryRange –Profile .\Samples\DiscoveryProfile.xml -Range 10.35.1.23
• PS> Set-ModifyDiscoveryRange –Profile .\Samples\DiscoveryProfile.xml -RangeList .\Samples\RangeList.xml
Editing a Discovery Range Group
Description: The Set-ModifyDiscoveryRangeGroup command allows you to edit an existing
discovery range group. You can change the protocols for the discovery range group by specifying a DiscoveryProfile.xml file which changes the current protocol settings for the specified group. For information about the DiscoveryProfile.xml file, see Creating a Discovery Profile Input File.
Command:
PS> Set-ModifyDiscoveryRangeGroup -GroupName <groupname> –Profile <DiscoveryProfile.xml> -AddRangeList <rangelist .xml or .csv file>
Example:
• Change a discovery range group’s discovery profile and add new ranges to the discovery range group using a .xml file:
PS> Set-ModifyDiscoveryRangeGroup -GroupName WebServers-TX -Profile .\samples\snmp_only.xml -AddRangeList .\samples\new_ranges.xml
• Change a discovery range group’s discovery profile and add new ranges to the discovery range group using a .csv file:
PS> Set-ModifyDiscoveryRangeGroup -GroupName WebServers-TX -Profile .\samples\snmp_only.xml -AddRangeListCSV .\samples\new_ranges.csv
• Add new ranges to a discovery range group using a .xml file (retaining the previously discovered profile):
PS> Set-ModifyDiscoveryRangeGroup -GroupName WebServers-TX -AddRangeList .\samples\new_ranges.xml
• Add new ranges to a discovery range group using .csv (retaining the previously discovered profile):
PS> Set-ModifyDiscoveryRangeGroup -GroupName WebServers-TX -AddRangeListCSV .\samples\new_ranges.csv
Enabling a Discovery Range or Discovery Range Group
Description: The Set-EnableDiscoveryRange command allows you to enable a discovery range or a
discovery range group. Enter the ranges either using an xml file or by specifying the range. For information about the RangeList.xml file, see Specifying IPs, Ranges, or Host names Using XML or CSV Files.
Commands:
• PS> Set-EnableDiscoveryRange -Range <range> • PS> Set-EnableDiscoveryRange -RangeList <RangeList.xml>• PS> Set-EnableDiscoveryRangeGroup -GroupName <groupname>
Examples:
• PS> Set-EnableDiscoveryRange -Range 10.35.1.3, 10.2.3.1• PS> Set-EnableDiscoveryRange -RangeList .\Samples\RangeList.xml• PS> Set-EnableDiscoveryRangeGroup -GroupName Group1
318

Disabling a Discovery Range or Discovery Range Group
Description: The Set-DisableDiscoveryRange command allows you to disable a discovery range or a
discovery range group. Enter the ranges either using an xml file or by specifying the range. For information about the RangeList.xml file, see Specifying IPs, Ranges, or Host names Using XML or CSV Files.
Commands:
• PS> Set-DisableDiscoveryRange -Range <range> • PS> Set-DisableDiscoveryRange -RangeList <RangeList.xml>• PS> Set-DisableDiscoveryRangeGroup -GroupName <groupname>
Examples:
• PS> Set-DisableDiscoveryRange -Range 10.35.1.3• PS> Set-DisableDiscoveryRange -RangeList .\Samples\RangeList.xml• PS> Set-DisableDiscoveryRangeGroup -GroupName Group1
Creating a Discovery Exclude Range
Description: The Add-DiscoveryExcludeRange command allows you to add an exclude range. Enter
the ranges either using an xml file or by specifying the range. For information about the RangeList.xml file, see Specifying IPs, Ranges, or Host Names Using XML or CSV Files.
Commands:
• PS> Add-DiscoveryExcludeRange -Range <range>• PS> Add-DiscoveryExcludeRange -RangeList <RangeList.xml>
Examples:
• PS> Add-DiscoveryExcludeRange -Range 10.35.12.1• PS> Add-DiscoveryExcludeRange -RangeList .\Samples\RangeList.xml
Removing a Discovery Exclude Range
Description: The Remove-DiscoveryExcludeRange command allows you to remove an exclude
range. Enter the ranges either using an xml file or by specifying the range. For information about the RangeList.xml file, see Specifying IPs, Ranges, or Host Names Using XML or CSV Files.
Commands:
• PS> Remove-DiscoveryExcludeRange -Range <range>• PS> Remove-DiscoveryExcludeRange -RangeList <RangeList.xml>
Examples:
• PS> Remove-DiscoveryExcludeRange -Range 10.35.12.1• PS> Remove-DiscoveryExcludeRange -RangeList .\Samples\RangeList.xml
319

Running Discovery, Inventory, and Status Polling Tasks
Description: The Set-RunDiscovery, Set-RunInventory, Set-RunDiscoveryInventory, and Set-RunStatusPoll commands allows you to perform discovery, inventory, and status polling on a
discovery range, discovery range group, or devices. For range and range groups, enter the ranges either using an xml file or by specifying the range. For more information about the RangeList.xml file, see Specifying IPs, Ranges, or Host Names Using XML or CSV Files. For devices, enter the name of the device as displayed in the device tree. Multiple device names must be separated by a comma.
Commands:
• PS> Set-RunDiscovery -DeviceName <device 1>,<device 2>,...,<device N> • PS> Set-RunDiscovery -Range <rangename>• PS> Set-RunDiscovery -GroupName <rangeGroupName>• PS> Set-RunDiscovery -RangeList <rangelist.xml>• PS> Set-RunInventory -DeviceName <device 1>,<device 2>,...,<device N> • PS> Set-RunInventory -Range <rangename>• PS> Set-RunInventory -GroupName <rangeGroupName>• PS> Set-RunInventory -RangeList <rangelist.xml>• PS> Set-RunDiscoveryInventory -DeviceName <device 1>,<device 2>,...,<device
N> • PS> Set-RunDiscoveryInventory -Range <rangename>• PS> Set-RunDiscoveryInventory -GroupName <rangeGroupName>• PS> Set-RunDiscoveryInventory -RangeList <rangelist.xml>• Set-RunStatusPoll -DeviceName <device 1>,<device 2>,...,<device N> • PS> Set-RunStatusPoll -Range <rangename>• PS> Set-RunStatusPoll -GroupName <rangeGroupName>• PS> Set-RunStatusPoll -RangeList <rangelist.xml>
Examples:
• PS> Set-RunDiscovery -Range 10.23.23.1• PS> Set-RunInventory -GroupName MyServers• PS> Set-RunDiscoveryInventory -RangeList .\Samples\RangeList.xml• PS> Set-RunStatusPoll -DeviceName MyZen
Removing a Device
Description: The Remove-Device command allows you to remove devices from the device tree.
Command:
• PS> Remove-Device -DeviceName <device 1>,<device 2>,...,<device N>
Example:
• PS> Remove-Device -DeviceName Server1,RAC1
320

Retrieving the Status Execution Progress of a Discovery Range
Description: The Get-DiscoveryStatus command allows you to get the progress of a discovery
range. Enter the ranges either using an xml file or by specifying the range. For information about the RangeList.xml file, see Specifying IPs, Ranges, or Host Names Using XML or CSV Files.
Commands:
• PS> Get-DiscoveryStatus —Range <rangeName>• PS> Get-Discovery -RangeList <RangeList.xml>• PS> Get-Discovery -GroupName <group name>
Examples:
• PS> Get-DiscoveryStatus —Range 10.35.2.1• PS> Get-Discovery -RangeList .\Samples\RangeList.xml• PS> Get-Discovery -GroupName Group1
Stopping a Running Discovery Range or Group
Description: For any range, only one type of task, such as discovery, discovery and inventory, or status polling, can run at a given time. The Set-StopTask command allows you to stop a task associated with
a discovery range or the tasks associated with the ranges belonging to a discovery range group.
Commands:
• PS> Set-StopTask -Range <rangename> • PS> Set-StopTask -GroupName <groupname>
Examples:
• PS> Set-StopTask -Range 10.35.1.12 • PS> Set-StopTask -GroupName Group1
Creating a Custom Device Group
Description: The Add-CustomGroup command allows you to create a custom device group in the
device tree. If required, you can add devices to the group after it is created.
NOTE: Using OpenManage Essentials CLI, you can only create static groups which contain a finite list of servers. You can create dynamic groups based on queries using the OpenManage Essentials console. For more information, see Creating a New Group.
Commands:
• PS> Add-CustomGroup –GroupName <groupName> • PS> Add-CustomGroup –GroupName <groupName> –DeviceList <DeviceList.xml>• PS> Add-CustomGroup –GroupName <groupName> -Devices <comma separated list of
devices>
Examples:
• PS> Add-CustomGroup –GroupName MyServers –DeviceList .\Samples\devicelist.xml
321

• PS> Add-CustomGroup –GroupName MyServers –Devices PE2900-WK28-ZMD, PWR-CODE.US.DELL.COM, HYPERVISOR, M80504-W2K8
Example of a DeviceList.xml file:
<DeviceList> <Device Name="PE2900-WK28-ZMD"/> <Device Name="PWR-CODE.US.DELL.COM"/> <Device Name="HYPERVISOR"/> <Device Name="M80504-W2K8"/></DeviceList>
Adding Devices to a Custom Group
Description: The Add-DevicesToCustomGroup command allows you to add devices to an existing
group. To add the devices to the group, either use an xml file or list the devices and separate them using a comma.
Commands:
• PS> Add-DevicesToCustomGroup –GroupName <groupName> -DeviceList <devicelist.xml>
• PS> Add-DevicesToCustomGroup –GroupName <groupName> -Devices <comma separated list of devices>
Examples:
PS> Add-DevicesToCustomGroup –GroupName MyServers –DeviceList .\Samples\DeviceList.xmlor
PS> Add-DevicesToCustomGroup –GroupName MyServers –Devices PE2900-WK28-ZMD, PWR-CODE.US.DELL.COM, HYPERVISOR, M80504-W2K8
Example of a DeviceList.xml file:
<DeviceList> <Device Name="PE2900-WK28-ZMD"/> <Device Name="PWR-CODE.US.DELL.COM"/> <Device Name="HYPERVISOR"/> <Device Name="M80504-W2K8"/></DeviceList>
Deleting a Group
Description: The Remove-CustomGroup command allows you to remove a group from the root node.
Command:
PS> Remove-CustomGroup –GroupName <groupName>
Example:
PS> Remove-CustomGroup –GroupName MyServers
322