d-Color MF752_652_ug_troubleshooting_en - Olivetti
121
Code: 572404 d-COLOR MF652/ d-COLOR MF752
-
Upload
khangminh22 -
Category
Documents
-
view
1 -
download
0
Transcript of d-Color MF752_652_ug_troubleshooting_en - Olivetti

Code: 572404
d-COLOR MF652/d-COLOR MF752

PUBLICATION ISSUED BY: Olivetti S.p.A. Gruppo Telecom Italia
Via Jervis, 77 - 10015 Ivrea (ITALY) www.olivetti.com
Copyright © 2012, Olivetti The manufacturer reserves the right to carry out modifications to the product described in this manual at any time and without any notice.
ENERGY STAR is a U.S. registered mark.
The ENERGY STAR program is an energy reduction plan introduced by theUnited States Environmental Protection Agency in response to environmental issues and for the purpose of advancing the development and utilization of more energy efficient office equipment.
Your attention is drawn to the following actions which could compromise the conformity attested to above, as well as the characteristics of the product:
• incorrect electrical power supply;
• incorrect installation, incorrect or improper use or use not in compliance with the warnings provided in the User’s Manual supplied with the product;
• replacement of original components or accessories with others of a type not approved by the manufacturer, or performed by unauthorised personnel.
All rights reserved. No part of this material may be reproduced or transmitted in any form or by any means, electronic or mechanical, including photocopying, recording or by any information storage and retrieval system, without permission in writing from the Publisher.
The mark affixed to the product certifies that theproduct satisfies the basic quality requirements.
All rights reserved
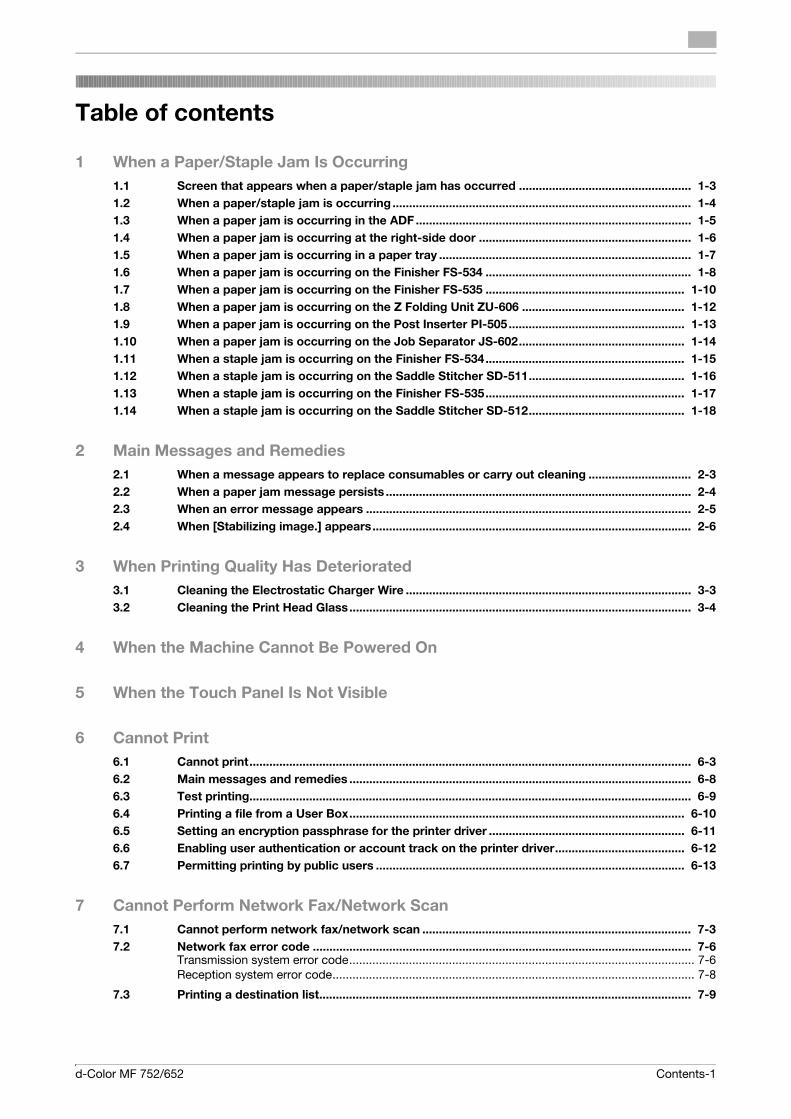
Table of contents
1 When a Paper/Staple Jam Is Occurring
1.1 Screen that appears when a paper/staple jam has occurred .................................................... 1-3
1.2 When a paper/staple jam is occurring .......................................................................................... 1-4
1.3 When a paper jam is occurring in the ADF................................................................................... 1-5
1.4 When a paper jam is occurring at the right-side door ................................................................ 1-6
1.5 When a paper jam is occurring in a paper tray ............................................................................ 1-7
1.6 When a paper jam is occurring on the Finisher FS-534 .............................................................. 1-8
1.7 When a paper jam is occurring on the Finisher FS-535 ............................................................ 1-10
1.8 When a paper jam is occurring on the Z Folding Unit ZU-606 ................................................. 1-12
1.9 When a paper jam is occurring on the Post Inserter PI-505..................................................... 1-13
1.10 When a paper jam is occurring on the Job Separator JS-602.................................................. 1-14
1.11 When a staple jam is occurring on the Finisher FS-534............................................................ 1-15
1.12 When a staple jam is occurring on the Saddle Stitcher SD-511............................................... 1-16
1.13 When a staple jam is occurring on the Finisher FS-535............................................................ 1-17
1.14 When a staple jam is occurring on the Saddle Stitcher SD-512............................................... 1-18
2 Main Messages and Remedies
2.1 When a message appears to replace consumables or carry out cleaning ............................... 2-3
2.2 When a paper jam message persists ............................................................................................ 2-4
2.3 When an error message appears .................................................................................................. 2-5
2.4 When [Stabilizing image.] appears................................................................................................ 2-6
3 When Printing Quality Has Deteriorated
3.1 Cleaning the Electrostatic Charger Wire ...................................................................................... 3-3
3.2 Cleaning the Print Head Glass....................................................................................................... 3-4
4 When the Machine Cannot Be Powered On
5 When the Touch Panel Is Not Visible
6 Cannot Print
6.1 Cannot print..................................................................................................................................... 6-3
6.2 Main messages and remedies ....................................................................................................... 6-8
6.3 Test printing..................................................................................................................................... 6-9
6.4 Printing a file from a User Box..................................................................................................... 6-10
6.5 Setting an encryption passphrase for the printer driver ........................................................... 6-11
6.6 Enabling user authentication or account track on the printer driver....................................... 6-12
6.7 Permitting printing by public users ............................................................................................. 6-13
7 Cannot Perform Network Fax/Network Scan
7.1 Cannot perform network fax/network scan ................................................................................. 7-3
7.2 Network fax error code .................................................................................................................. 7-6Transmission system error code........................................................................................................ 7-6Reception system error code............................................................................................................. 7-8
7.3 Printing a destination list................................................................................................................ 7-9
d-Color MF 752/652 Contents-1

8 Cannot Use the Fax Function
8.1 Cannot transmit faxes .................................................................................................................... 8-3
8.2 Cannot receive faxes ...................................................................................................................... 8-4
8.3 G3 fax error code ............................................................................................................................ 8-5Transmission system error code........................................................................................................ 8-5Reception system error code............................................................................................................. 8-6
8.4 Main messages and remedies ....................................................................................................... 8-7
8.5 Setting [Dialing Method]................................................................................................................. 8-8
8.6 Setting [Check Dest. & Send] ........................................................................................................ 8-9
8.7 Setting the number of RX call rings ............................................................................................ 8-10
9 Cannot Copy
9.1 Cannot copy .................................................................................................................................... 9-3
9.2 Main messages and remedies ....................................................................................................... 9-6
10 Cannot Save in a User Box
10.1 Cannot save in a User Box........................................................................................................... 10-3
10.2 Main messages and remedies ..................................................................................................... 10-4
10.3 Deleting files from a User Box ..................................................................................................... 10-5
11 Network Error Codes
11.1 About network error codes.......................................................................................................... 11-3
11.2 Displaying network error codes .................................................................................................. 11-4
11.3 Error code list................................................................................................................................ 11-5
12 When the Bit Count Does Not Match between the Server and the Client
13 When a Message Appears to Replace Consumables or Carry Out Cleaning
When staples in the finisher have run out ........................................................................................ 13-3When the punch scrap box is full .................................................................................................... 13-3When toner is running out in the Toner Cartridge............................................................................ 13-4When the Imaging Unit needs to be replaced ................................................................................. 13-4When a waste toner box is full ......................................................................................................... 13-5
Contents-2 d-Color MF 752/652

1 When a Paper/Staple Jam Is
Occurring


1.1 Screen that appears when a paper/staple jam has occurred 1
1 When a Paper/Staple Jam Is Occurring
1.1 Screen that appears when a paper/staple jam has occurred
If any paper/staple jam has occurred on this machine as shown in the screen shot below, the Touch Panel shows the section where the jam has occurred. In an occurrence of a paper/staple jam, check the Touch
Panel to see where it is occurring, and follow the guidance regarding corrective actions to take.
The blinking "number enclosed in a circle" represents the section where a paper/staple jam is occurring.
Tap [Start Guidance] and follow the guidance (instructions) to remove jammed paper.
If the jam is not completely cleared, the following message appears: [Paper remaining in device. Remove pa-per according to instructions.]. Follow the guidance again to remove paper.
Item Description
[Start Guidance] Tap this key to start animated instructions showing how to remove pa-per/staple jam.
Number enclosed in a cir-cle (indicating the location number for the section with a paper/staple jam)
A section chart is displayed with a location number enclosed in a circle for a section where a paper/staple jam has occurred.
d-Color MF 752/652 1-3

When a paper/staple jam is occurring1 1.2
1.2 When a paper/staple jam is occurring
Take action referring to the following pages.- For information about handling a paper jam in the ADF, refer to page 1-5.- For information about handling a paper jam at the right-side door, refer to page 1-6.- For information about handling a paper jam in a paper tray, refer to page 1-7.- For information about handling a paper jam on the Finisher FS-534, refer to page 1-8.- For information about handling a paper jam on the Finisher FS-535, refer to page 1-10.- For information about handling a paper jam on the Z Folding Unit ZU-606, refer to page 1-12.- For information about handling a paper jam on the Post Inserter PI-505, refer to page 1-13.- For information about handling a paper jam on the Job Separator JS-602, refer to page 1-14.- For information about handling a staple jam on the Finisher FS-534, refer to page 1-15.- For information about handling a staple jam on the Saddle Stitcher SD-511, refer to page 1-16.- For information about handling a staple jam on the Finisher FS-535, refer to page 1-17.- For information about handling a staple jam on the Saddle Stitcher SD-512, refer to page 1-18.
1-4 d-Color MF 752/652

1.3 When a paper jam is occurring in the ADF 1
1.3 When a paper jam is occurring in the ADF
The following illustrations show how to fix a paper jam occurring in the ADF.
NOTICEWhen closing the Opening and Closing Guide, press the Hand mark in the center and check that is locked securely.
d-Color MF 752/652 1-5
When a paper jam is occurring at the right-side door1 1.4
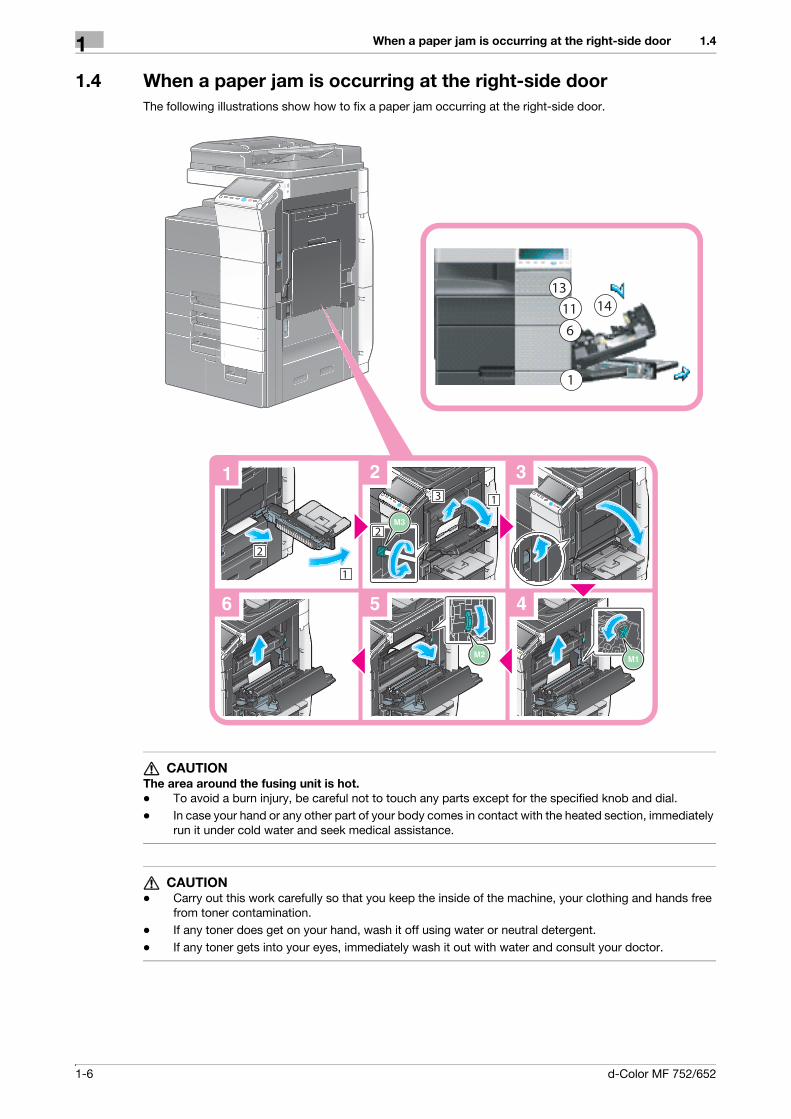
1.4 When a paper jam is occurring at the right-side door
The following illustrations show how to fix a paper jam occurring at the right-side door.
7 CAUTION
The area around the fusing unit is hot.
- To avoid a burn injury, be careful not to touch any parts except for the specified knob and dial.- In case your hand or any other part of your body comes in contact with the heated section, immediately
run it under cold water and seek medical assistance.
7 CAUTION
- Carry out this work carefully so that you keep the inside of the machine, your clothing and hands free from toner contamination.
- If any toner does get on your hand, wash it off using water or neutral detergent.- If any toner gets into your eyes, immediately wash it out with water and consult your doctor.
1-6 d-Color MF 752/652

1.5 When a paper jam is occurring in a paper tray 1
1.5 When a paper jam is occurring in a paper tray
The following illustrations show how to fix a paper jam occurring in the paper tray.
Tips- The figure above shows the optional Large Capacity Unit LU-301 installed.
NOTICEWhen closing the Top Right Door, press around the center of the Top Right Door and ensure that it is se-curely closed.
Be careful not to touch the surface of the film or Paper Feed Rollers with your hand.
d-Color MF 752/652 1-7

When a paper jam is occurring on the Finisher FS-5341 1.6
1.6 When a paper jam is occurring on the Finisher FS-534
The following illustrations show how to fix a paper jam occurring on the Finisher FS-534.
Sections inside the finisher prone to paper jams vary depending on the settings for [Finishing].
Tips- The figure above shows the optional Finisher FS-534 equipped with Saddle Stitcher SD-511 and
Punch Kit PK-520.
Sections inside the finisher prone to paper jams vary depending on the settings for [Finishing].
1-8 d-Color MF 752/652

1.6 When a paper jam is occurring on the Finisher FS-534 1
Tips- The figure above shows the optional Finisher FS-534 equipped with Saddle Stitcher SD-511 and
Punch Kit PK-520.
NOTICEWhen moving the Saddle Stitcher, be sure to only hold the handle. Otherwise, your hand or finger may get caught in the machine.
Saddle Stitcher
d-Color MF 752/652 1-9
When a paper jam is occurring on the Finisher FS-5351 1.7
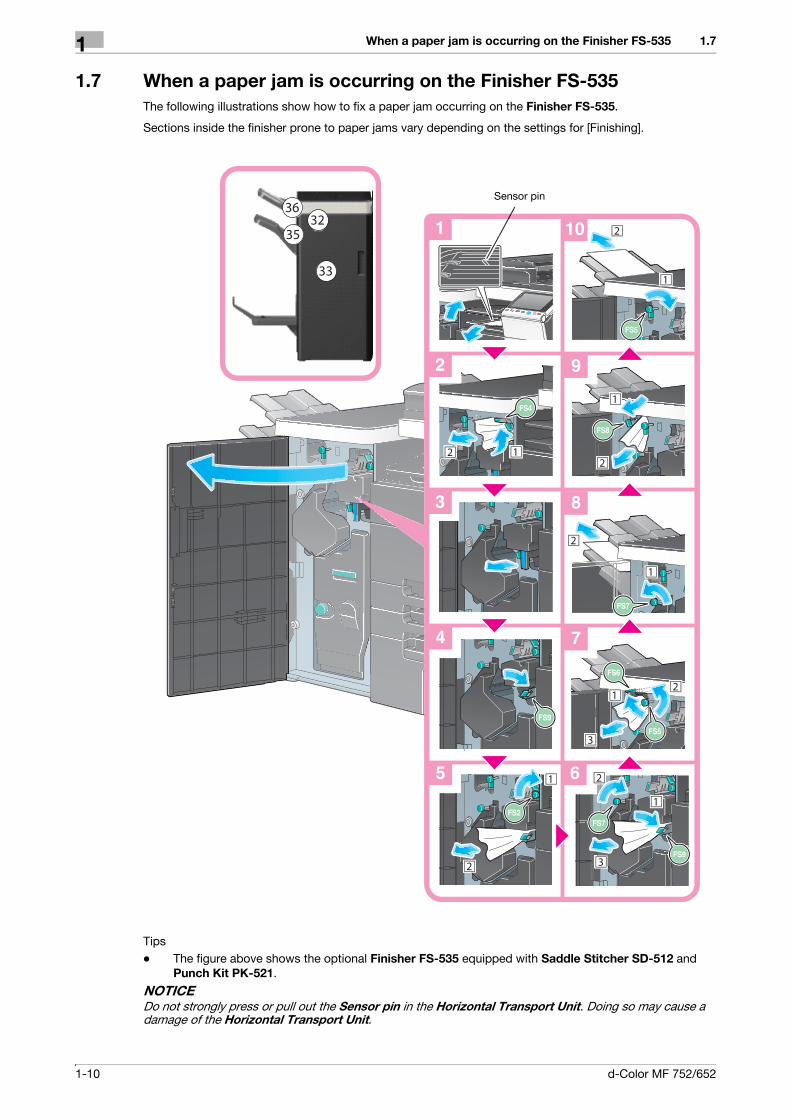
1.7 When a paper jam is occurring on the Finisher FS-535
The following illustrations show how to fix a paper jam occurring on the Finisher FS-535.
Sections inside the finisher prone to paper jams vary depending on the settings for [Finishing].
Tips- The figure above shows the optional Finisher FS-535 equipped with Saddle Stitcher SD-512 and
Punch Kit PK-521.
NOTICEDo not strongly press or pull out the Sensor pin in the Horizontal Transport Unit. Doing so may cause a damage of the Horizontal Transport Unit.
Sensor pin
1-10 d-Color MF 752/652

1.7 When a paper jam is occurring on the Finisher FS-535 1
Sections inside the finisher prone to paper jams vary depending on the settings for [Finishing].
Tips- The figure above shows the optional Finisher FS-535 equipped with Saddle Stitcher SD-512 and
Punch Kit PK-521.
NOTICEWhen moving the Saddle Stitcher, be sure to only hold the handle. Otherwise, your hand or finger may get caught in the machine.
Saddle Stitcher
d-Color MF 752/652 1-11

When a paper jam is occurring on the Z Folding Unit ZU-6061 1.8
1.8 When a paper jam is occurring on the Z Folding Unit ZU-606
The following illustrations show how to fix a paper jam occurring on the Z Folding Unit ZU-606.
Tips- The figure above shows the optional Finisher FS-535 equipped with Saddle Stitcher SD-512, Punch
Kit PK-521, and Z Folding Unit ZU-606.
NOTICEWhen moving the Z Folding Unit ZU-606, be sure to only hold the handle. Otherwise, your hand or finger may get caught in the machine.
1-12 d-Color MF 752/652
1.9 When a paper jam is occurring on the Post Inserter PI-505 1
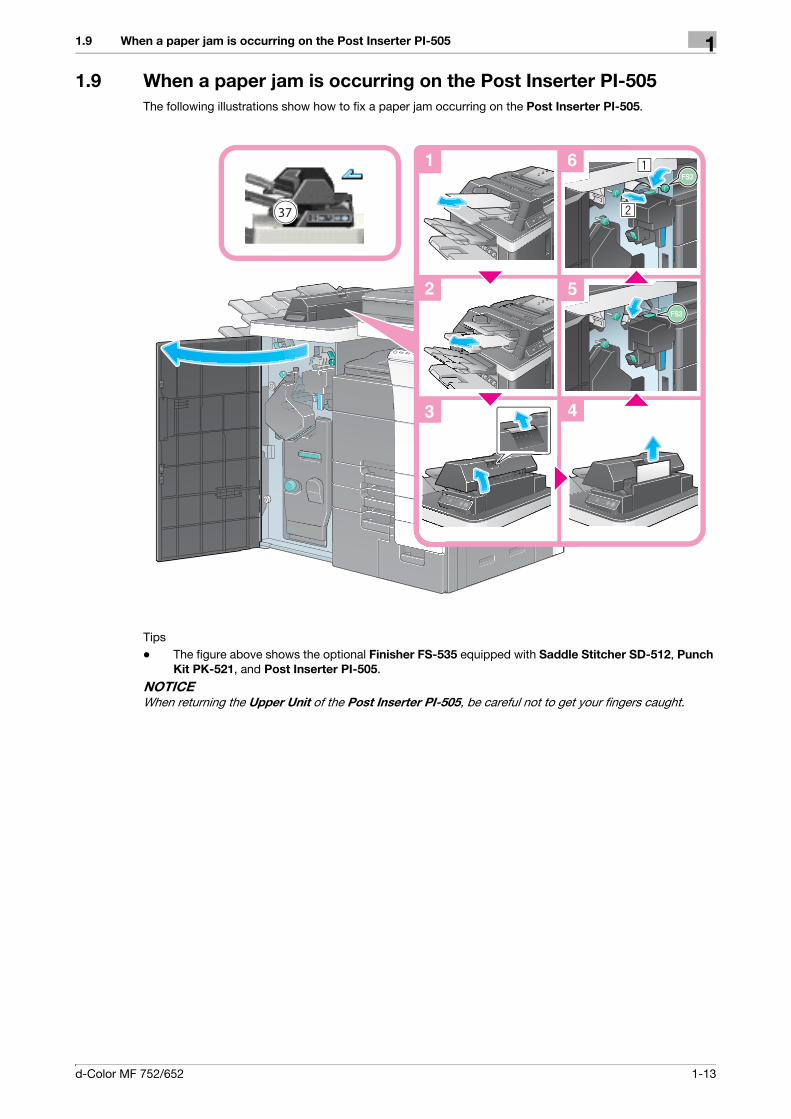
1.9 When a paper jam is occurring on the Post Inserter PI-505
The following illustrations show how to fix a paper jam occurring on the Post Inserter PI-505.
Tips- The figure above shows the optional Finisher FS-535 equipped with Saddle Stitcher SD-512, Punch
Kit PK-521, and Post Inserter PI-505.NOTICEWhen returning the Upper Unit of the Post Inserter PI-505, be careful not to get your fingers caught.
d-Color MF 752/652 1-13

When a paper jam is occurring on the Job Separator JS-6021 1.10
1.10 When a paper jam is occurring on the Job Separator JS-602
The following illustrations show how to fix a paper jam occurring on the Job Separator JS-602.
Tips- The figure above shows the optional Finisher FS-535 equipped with Saddle Stitcher SD-512, Punch
Kit PK-521, and Job Separator JS-602.
1-14 d-Color MF 752/652

1.11 When a staple jam is occurring on the Finisher FS-534 1
1.11 When a staple jam is occurring on the Finisher FS-534
The following illustrations show how to fix a staple jam occurring on the Finisher FS-534.
Tips- The figure above shows the optional Finisher FS-534 equipped with Saddle Stitcher SD-511 and
Punch Kit PK-520.
NOTICEWhen removing a staple jam, do so carefully to prevent being injured.
d-Color MF 752/652 1-15

When a staple jam is occurring on the Saddle Stitcher SD-5111 1.12
1.12 When a staple jam is occurring on the Saddle Stitcher SD-511
The following illustrations show how to fix a staple jam occurring on the Saddle Stitcher SD-511.
Tips- The figure above shows the optional Finisher FS-534 equipped with Saddle Stitcher SD-511 and
Punch Kit PK-520.
NOTICEWhen moving the Saddle Stitcher, be sure to only hold the handle. Otherwise, your hand or finger may get caught in the machine.
Saddle Stitcher
1-16 d-Color MF 752/652

1.13 When a staple jam is occurring on the Finisher FS-535 1
1.13 When a staple jam is occurring on the Finisher FS-535
The following illustrations show how to fix a staple jam occurring on the Finisher FS-535.
Tips- The figure above shows the optional Finisher FS-535 equipped with Saddle Stitcher SD-512 and
Punch Kit PK-521.
NOTICEWhen removing a staple jam, do so carefully to prevent being injured.
d-Color MF 752/652 1-17

When a staple jam is occurring on the Saddle Stitcher SD-5121 1.14
1.14 When a staple jam is occurring on the Saddle Stitcher SD-512
The following illustrations show how to fix a staple jam occurring on the Saddle Stitcher SD-512.
Tips- The figure above shows the optional Finisher FS-535 equipped with Saddle Stitcher SD-512 and
Punch Kit PK-521.
NOTICEWhen moving the Saddle Stitcher, be sure to only hold the handle. Otherwise, your hand or finger may get caught in the machine.
Saddle Stitcher
1-18 d-Color MF 752/652

2 Main Messages and
Remedies

2.1 When a message appears to replace consumables or carry out cleaning 2
2 Main Messages and Remedies
2.1 When a message appears to replace consumables or carry out
cleaning
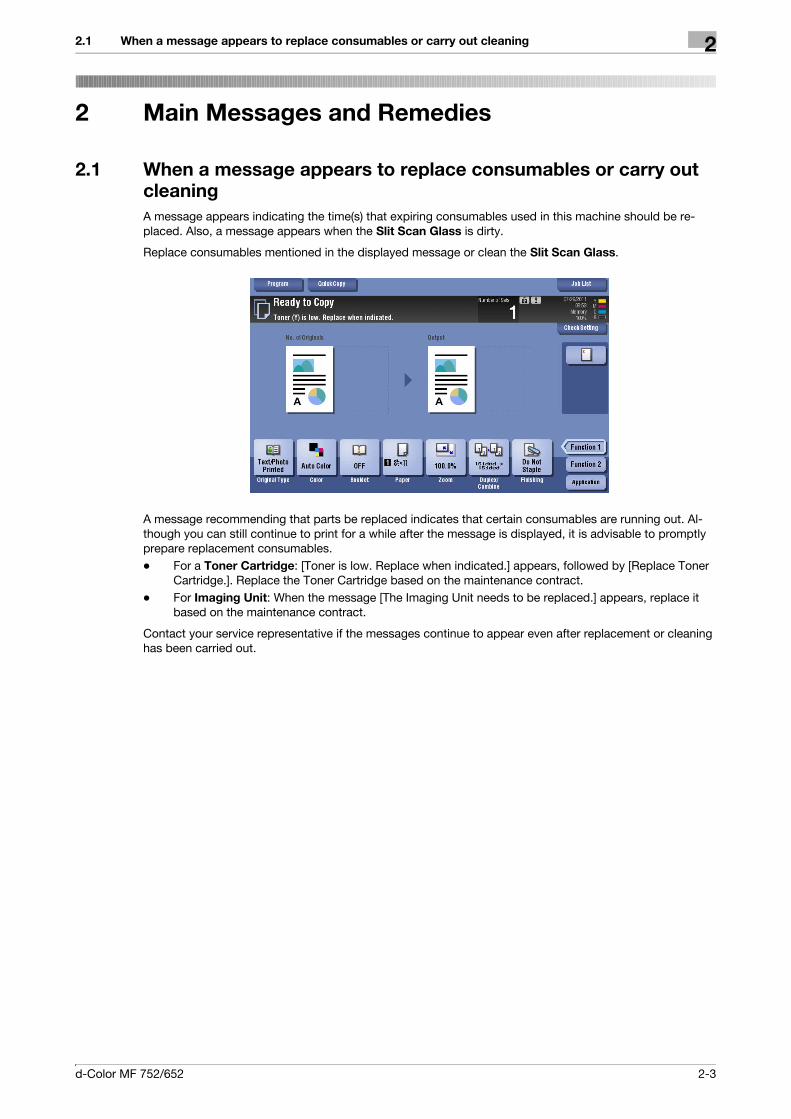
A message appears indicating the time(s) that expiring consumables used in this machine should be re-placed. Also, a message appears when the Slit Scan Glass is dirty.
Replace consumables mentioned in the displayed message or clean the Slit Scan Glass.
A message recommending that parts be replaced indicates that certain consumables are running out. Al-though you can still continue to print for a while after the message is displayed, it is advisable to promptly prepare replacement consumables.- For a Toner Cartridge: [Toner is low. Replace when indicated.] appears, followed by [Replace Toner
Cartridge.]. Replace the Toner Cartridge based on the maintenance contract.- For Imaging Unit: When the message [The Imaging Unit needs to be replaced.] appears, replace it
based on the maintenance contract.
Contact your service representative if the messages continue to appear even after replacement or cleaning has been carried out.
d-Color MF 752/652 2-3

When a paper jam message persists2 2.2
2.2 When a paper jam message persists
There may be a paper jam occurring in sections other than those indicated on the Touch Panel. Check the sections again not shown on the Touch Panel,
Check the following items:- Check for any pieces of paper left in the back of the section indicated on the Touch Panel. If the paper
cannot be easily removed, do not continue; instead contact your service representative.- Once again, open and close the door at the section with the location number indicated on the Touch
Panel. This action may clear the message.
Contact your service representative if the paper jam indication persists even after you have checked.
2-4 d-Color MF 752/652

2.3 When an error message appears 2
2.3 When an error message appears
When an error is detected, the following message appears. Take the appropriate action according to the message displayed on the screen. If you cannot resolve the error, write down the [Trouble Code], and contact your service representative with the power plug disconnected from the power outlet.
In normal circumstances, the phone number and fax number for your service representative appear in the center of the screen.
NOTICEIf a defective part can be separated in order to be able to continue operations after a problem has been de-tected, [Continue] or [Recover Data] is displayed. To continue operations, select any key. However, the prob-lem has not been resolved, so contact your service representative immediately.
d-Color MF 752/652 2-5
When [Stabilizing image.] appears2 2.4
2.4 When [Stabilizing image.] appears
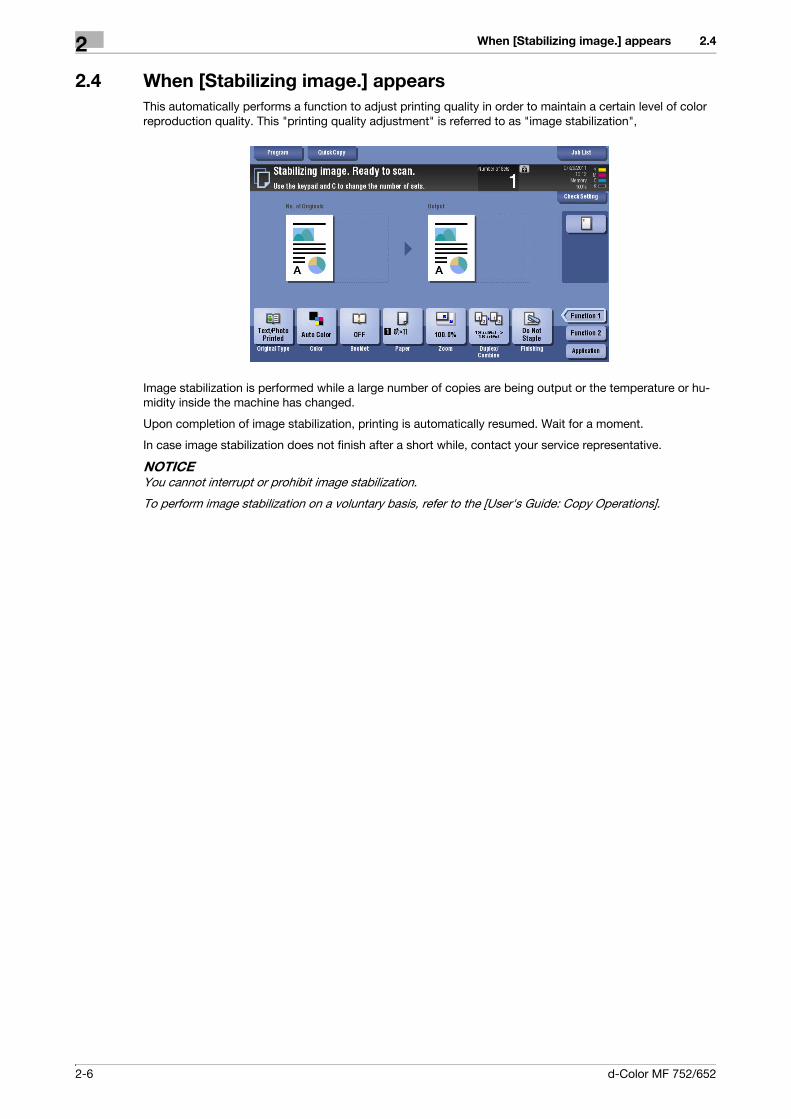
This automatically performs a function to adjust printing quality in order to maintain a certain level of color reproduction quality. This "printing quality adjustment" is referred to as "image stabilization",
Image stabilization is performed while a large number of copies are being output or the temperature or hu-midity inside the machine has changed.
Upon completion of image stabilization, printing is automatically resumed. Wait for a moment.
In case image stabilization does not finish after a short while, contact your service representative.
NOTICEYou cannot interrupt or prohibit image stabilization.
To perform image stabilization on a voluntary basis, refer to the [User's Guide: Copy Operations].
2-6 d-Color MF 752/652

3 When Printing Quality Has
Deteriorated


3.1 Cleaning the Electrostatic Charger Wire 3
3 When Printing Quality Has Deteriorated
3.1 Cleaning the Electrostatic Charger Wire
If the Electrostatic Charger Wire is dirty, linear smudges may appear on a print image. If this occurs, clean the Electrostatic Charger Wire according to the following procedure.
1 Open the Lower Front Door of the machine.
2 Carefully pull out the Charger Cleaner towards yourself up to the position at which it stops. Then, carefully press it against the back side.
Repeat the steps above three times.
3 Securely press the Charger Cleaner, and close the Lower Front Door of the machine.
d-Color MF 752/652 3-3

Cleaning the Print Head Glass3 3.2
3.2 Cleaning the Print Head Glass
Printing quality deteriorates if the Print Head Glass is dirty. If this occurs, clean the Print Head Glass ac-cording to the following procedure.
1 Pull out Tray 2.
2 Remove the Printhead Cleaner from Tray 2.
3 Open the Lower Front Door of the machine.
3-4 d-Color MF 752/652

3.2 Cleaning the Print Head Glass 3
4 Release the Waste Toner Box Lock Lever, then remove the Waste Toner Box.
5 Slowly insert the Printhead Cleaner all the way to the back end of the Print Head Glass, and then slowly pull it out.
% Repeat this operation approximately three times for all the Print Head Glass sections.
6 Install the Waste Toner Box.
7 Close the Lower Front Door of the machine.
8 Place back the Printhead Cleaner to Tray 2.
9 Close Tray 2.
d-Color MF 752/652 3-5
Cleaning the Print Head Glass3 3.2
3-6 d-Color MF 752/652

4 When the Machine Cannot Be
Powered On


4
4 When the Machine Cannot Be Powered On
This machine has two power sources. Check the Main Power Switch and the Power key for the status.- Check whether the Power Plug of this machine is firmly plugged into the power outlet. Also check that
the breaker has not tripped.
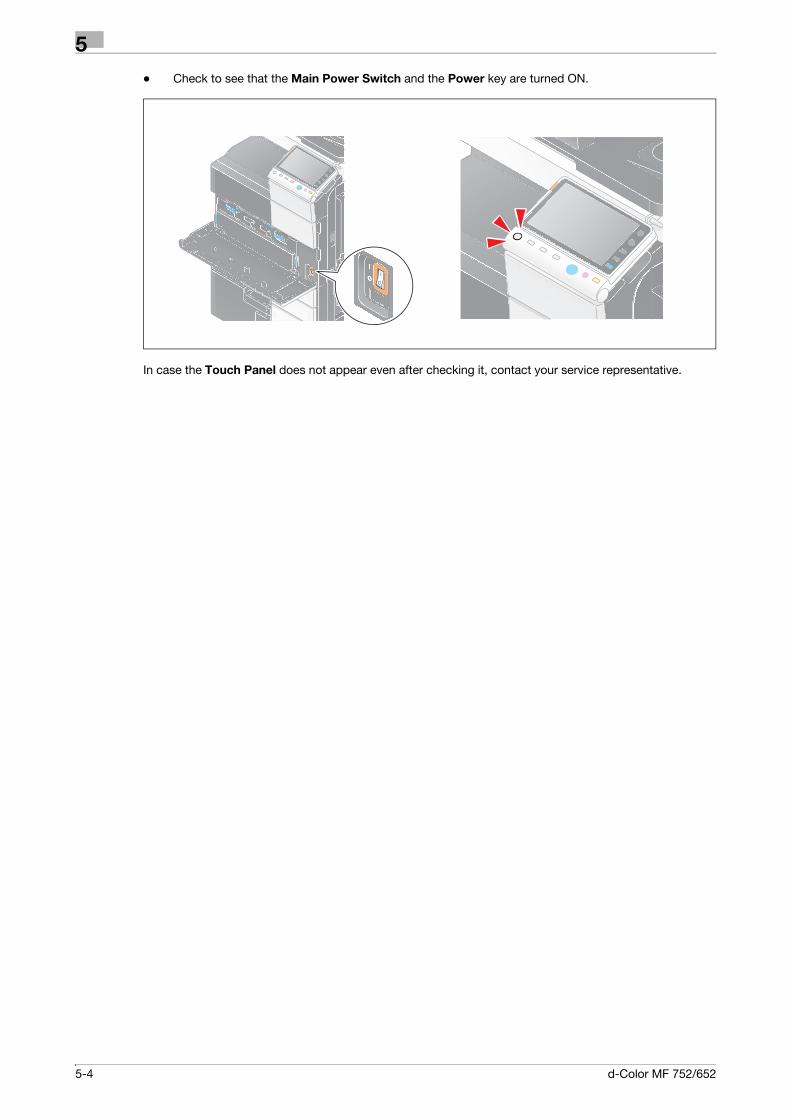
- Check to see that the Main Power Switch and the Power key are turned ON.
In case the machine cannot be powered on even after checking, contact your service representative.
d-Color MF 752/652 4-3

4
4-4 d-Color MF 752/652
5 When the Touch Panel Is Not
Visible


5
5 When the Touch Panel Is Not Visible
If a certain length of time has elapsed without any operations being carried out on this machine, the Touch
Panel may turn off.
Check the following items:- Tap [Accessibility] and select [Brightness Adjustment], and select [Low] or [High] to adjust the contrast
for the Touch Panel.
- Touch the Touch Panel. In Power Save (Low Power/Sleep) mode, this machine returns from Power Save mode when the Touch Panel is touched or a key on the Control Panel is pressed, and the Touch
Panel appears normally.- On the Control Panel, press the Power key. If the Weekly Timer setting has put the machine in Erp
Auto Power OFF mode, press the Power key to display the Touch Panel. To use it outside the preset operating hours, follow the on-screen instructions.
d-Color MF 752/652 5-3
5
- Check to see that the Main Power Switch and the Power key are turned ON.
In case the Touch Panel does not appear even after checking it, contact your service representative.
5-4 d-Color MF 752/652

6 Cannot Print


6.1 Cannot print 6
6 Cannot Print
6.1 Cannot print
Description of problem Check points Remedy
A message saying "Printer is not connected" or "Print Error" ap-pears on the computer screen.
Is the power turned on? Check the Main Power Switch of this machine.If a hub is used, also check the hub power.
Has the machine been placed in the ErP Auto Power Off mode?
If the machine is placed into the ErP Auto Power Off mode, it can-not receive any jobs. Press the Power key to release the ErP Auto Power Off mode.For the ErP Auto Power Off mode, refer to [User's Guide: Control Panel].
Is another printer specified? Check the specified printer name.
Is the network or USB cable dis-connected?
Make sure that the cables are correctly connected.If a hub is used, also check the connection with the hub.
Has an error occurred on the ma-chine?
Check the Control Panel of this machine.
Is there sufficient available com-puter memory?
Perform a test printing to check whether printing is possible.If test printing is successful, this indicates there are no problems on this machine or with the print-er driver. In this case, remove the cause of memory shortage.If test printing fails, resolve any problems that may be occurring in the machine or with the printer driver.For the test printing procedure, refer to page 6-9.
A postscript error appears on the computer screen.
Is there sufficient available com-puter memory?
Perform a test printing to check whether printing is possible.If test printing is successful, this indicates there are no problems on this machine or with the print-er driver. In this case, remove the cause of memory shortage.If test printing fails, resolve any problems that may be occurring in the machine or with the printer driver.For the test printing procedure, refer to page 6-9.
There may be an error in the ap-plication software settings.
Refer to the user's manual of the application software to check the settings.
Are the file printing settings cor-rect?
Change the settings and try to print again.
d-Color MF 752/652 6-3

Cannot print6 6.1
Print processing on the compu-ter has finished, but printing does not start.
Is another printer specified? Check the specified printer name.
Is the network or USB cable dis-connected?
Make sure that the cables are correctly connected.
Has an error occurred on the ma-chine?
Check the control panel of this machine.
Are unprocessed jobs queued on the machine?
Tap [Job List] to check the job sequence.When [Job Priority Operation Settings] is enabled in the [Ad-ministrator Settings] of this ma-chine, only the jobs that are not experiencing problems are proc-essed.
Did you specify [Save in User Box] when executing the print job?
Check if the target job is saved in a User Box. If a file is saved in a User Box, print it from the User Box.For the procedure for printing a file from a User Box, refer to page 6-10.
Did you specify [Secure Print] when executing the print job?
Check if the target job is saved under [Secure Print]. If it is saved under [Secure Print], print the file from the Secure Print User Box.For details on the Secure Print function, refer to [User's Guide: Print Operations].
Is [Secure Print Only] specified on the machine?
Execute the print job in [Secure Print] mode. For details on the Secure Print function, refer to [User's Guide: Print Operations].
If account track is enabled, are the account name and password correct?
Enter the correct account name and password.
If user authentication is enabled, are the user name and password correct?
Enter the correct user name or password.
Does the encryption passphrase match between the printer driver and the machine?
Specify the same encryption passphrase for this machine and the printer driver.For the encryption passphrase setting procedure for the printer driver, refer to page 6-11
Description of problem Check points Remedy
6-4 d-Color MF 752/652

6.1 Cannot print 6
Print processing on the compu-ter has finished, but printing does not start.
Is there sufficient available com-puter memory?
Perform a test printing to check whether printing is possible.If test printing is successful, this indicates there are no problems on this machine or with the print-er driver. In this case, remove the cause of memory shortage.If test printing fails, resolve any problems that may be occurring in the machine or with the printer driver.For the test printing procedure, refer to page 6-9.
If network connection is in place, is the printer controller connect-ed to the network?
Check with the network adminis-trator.
Is the machine in enhanced se-curity mode?
Configure authentication set-tings in enhanced security mode.For details on authentication set-tings in enhanced security mode, refer to [User's Guide: Print Op-erations].
Printing order is disturbed - a job sent later is printed before the preceding jobs.
Has an error occurred in this ma-chine, for example, the paper has run out?
When [Job Priority Operation Settings] is enabled in the [Ad-ministrator Settings] of the print-er, only the jobs that are not experiencing problems are proc-essed and those with any prob-lem are held in queue.
Secure printing cannot be proc-essed.
Is [Password Rules] set to [Ena-ble] on this machine?
If [Password Rules] is set to [En-able], set a password that satis-fies the password rules.
Does the encryption passphrase match between the printer driver and the machine?
Specify the same encryption passphrase for this machine and the printer driver.For the encryption passphrase setting procedure for the printer driver, refer to page 6-11
A file has disappeared after be-ing saved in a User Box from a computer.
Is the setting for deleting files in a User Box configured on the ma-chine?
Check the User Box settings for the machine. For information on configuring the setting to delete files in a User Box, refer to [Us-er's Guide: Box Operations].
Printing in user authentication or account track mode is not avail-able.
Are the user name or account name, and password correct?
Enter the correct user name, ac-count name and password.
Is the user authentication or ac-count track enabled in the printer driver?
Enable user authentication or ac-count track on the printer driver.For the procedure for enabling user authentication and account track in the printer driver, refer to page 6-12.
Does the encryption passphrase match between the printer driver and the machine?
Specify the same encryption passphrase for this machine and the printer driver.For the encryption passphrase setting procedure for the printer driver, refer to page 6-11
Printing in user authentication or account track mode is not avail-able.
Is the entered user name or ac-count name authorized?
Check that printing of the current user name/account name is per-mitted?For information on how to check the permitted functions, refer to [User's Guide: Web Manage-ment Tool].
Description of problem Check points Remedy
d-Color MF 752/652 6-5

Cannot print6 6.1
Printing is not available when you have selected [Public User Access] in user authentication.
Is printing by public users per-mitted on the machine?
Check whether printing by public users is permitted. If not, grant printing permission to public us-ers.For the procedure for permitting printing by public users, refer to page 6-13.
Selection of items failed in the printer driver.
Selection may not be enabled for certain combinations of func-tions.
Grayed out items cannot be con-figured.
A "conflict" message saying "unable to configure" or "func-tion will be canceled" appears.
Have you set up functions that cannot be used in combination?
Check what functions are ena-bled and redo the selection of functions.
Cannot print according to the settings you have configured.
The settings may not be config-ured correctly.
Check the setting of each item of the printer driver.
Even though a combination of functions may be enabled in the printer driver, that combination may not be available on this ma-chine.
The paper size or paper orienta-tion specified in the application may take precedence over the settings in the printer driver when printing.
Correct the settings in the appli-cation.
The watermark cannot be print-ed.
Is the watermark set correctly? Check the watermark settings.For information on how to con-figure the watermark setting, re-fer to [User's Guide: Print Operations].
Is the watermark density set too low?
Check the watermark density setting.For information on how to con-figure the watermark setting, re-fer to [User's Guide: Print Operations].
Some graphic applications do not print watermarks.
When using such a program, the watermark cannot be printed.
The staple function cannot be specified.
The staple function requires the optional Finisher.
Install the required optional product and enable them on the printer driver.
The staple function is disabled if envelopes, postcards, Thick 3, Thick 4 papers or transparencies are specified.
Check the setting of each item of the printer driver.For information on paper types supported by the staple function, refer to [User's Guide: About This Machine].
Cannot staple. When printing a large number of pages, stapling cannot be per-formed.
Change the number of pages to be printed.
Does the document to be printed contain pages of a different pa-per size?
Check the document you are printing.
The stapling position is not as expected.
Is the stapling position or orien-tation appropriate?
Check the stapling position in the printer driver settings before printing.For information on how to con-figure the staple settings, refer to [User's Guide: Print Operations].For the original orientation set-ting, refer to [User's Guide: Print Operations].
Description of problem Check points Remedy
6-6 d-Color MF 752/652

6.1 Cannot print 6
Cannot specify the punch func-tion.
The optional Finisher and Punch Kit are required.
Install the required optional product and enable them on the printer driver.
If the booklet, transparency or envelope is specified, the punch function is not available.
Check the setting of each item of the printer driver.For information on paper types supported by the punch func-tion, refer to [User's Guide: About This Machine].
Cannot punch. Is the paper that has been load-ed into the paper tray in the cor-rect orientation?
Check the orientation of the pa-per in the paper tray.
The punch position is not as ex-pected.
Is the stapling position or original orientation appropriate?
Check the punching position in the printer driver settings.For information on how to con-figure the punch settings, refer to [User's Guide: Print Operations].For the original orientation set-ting, refer to [User's Guide: Print Operations].
The overlay is not printed prop-erly.
Is there sufficient available com-puter memory?
Simplify the overlay to reduce the data volume.
Paper is not fed from the speci-fied paper tray.
Does the specified paper tray contain paper of the right size/orientation?
Load paper of the appropriate size and orientation into the pa-per tray.
Description of problem Check points Remedy
d-Color MF 752/652 6-7

Main messages and remedies6 6.2
6.2 Main messages and remedies
Message Cause Remedy
[Server connection error.] (1) The network cable is not con-nected correctly.(2) Under [Administrator Set-tings], [Network Settings] are not set correctly.
(1) Make sure that the network cable is correctly connected.(2) Under [Administrator Set-tings], check that [Network Set-tings] are set correctly.
6-8 d-Color MF 752/652

6.3 Test printing 6
6.3 Test printing
1 Open the [Printers] window or [Printers and Faxes] window.
% In Windows XP/Server 2003, open the Start menu, then click [Printers and Faxes].If [Printers and Faxes] is not displayed on the Start menu in Windows XP/Server 2003, open the [Start] menu, then click [Control Panel] - [Printers and Other Hardware] - [Printers and Faxes]. When [Control Panel] is displayed in Classic View, double-click [Printers and Faxes].
% In Windows Vista/Server 2008, open the Start menu, then click [Control Panel] - [Hardware and Sound] - [Printers]. When [Control Panel] is displayed in Classic View, double-click [Printers].
% In Windows 7/Server 2008 R2, open the Start menu, then click [Devices and Printers].
2 Right-click the icon of this machine, and click [Properties] (or [Printer Properties]).
3 In the [General] tab, click [Print Test Page].
4 If test printing has succeeded, click [OK].
% If test printing has failed, click [Troubleshoot] to find out how to solve the problem.
d-Color MF 752/652 6-9

Printing a file from a User Box6 6.4
6.4 Printing a file from a User Box
1 Tap [User Box] on the main menu.
2 Select the desired User Box, then tap [Open].
3 Select the target file, then tap [Print].
4 Change print settings as necessary, and click Start.
6-10 d-Color MF 752/652

6.5 Setting an encryption passphrase for the printer driver 6
6.5 Setting an encryption passphrase for the printer driver
1 Open the [Printers] window or [Printers and Faxes] window.
% In Windows XP/Server 2003, open the Start menu, then click [Printers and Faxes].If [Printers and Faxes] is not displayed on the Start menu in Windows XP/Server 2003, open the Start menu, then click [Control Panel] - [Printers and Other Hardware] - [Printers and Faxes]. When [Control Panel] is displayed in Classic View, double-click [Printers and Faxes].
% In Windows Vista/Server 2008, open the Start menu, then click [Control Panel] - [Hardware and Sound] - [Printers]. When [Control Panel] is displayed in Classic View, double-click [Printers].
% In Windows 7/Server 2008 R2, open the Start menu, then click [Devices and Printers].
2 Right-click the icon of this machine, and click [Properties] (or [Printer Properties]).
3 In the [Configure] tab, check the [Encryption Passphrase] and enter the encryption passphrase set on this machine.
4 Click [OK].
d-Color MF 752/652 6-11
Enabling user authentication or account track on the printer driver6 6.6
6.6 Enabling user authentication or account track on the printer driv-
er
1 Open the [Printers] window or [Printers and Faxes] window.
% In Windows XP/Server 2003, open the Start menu, then click [Printers and Faxes].If [Printers and Faxes] is not displayed on the Start menu in Windows XP/Server 2003, open the Start menu, then click [Control Panel] - [Printers and Other Hardware] - [Printers and Faxes]. When [Control Panel] is displayed in Classic View, double-click [Printers and Faxes].
% In Windows Vista/Server 2008, open the Start menu, then click [Control Panel] - [Hardware and Sound] - [Printers]. When [Control Panel] is displayed in Classic View, double-click [Printers].
% In Windows 7/Server 2008 R2, open the Start menu, then click [Devices and Printers].
2 Right-click the icon of this machine, and click [Properties] (or [Printer Properties]).
3 From [Device Option] on the [Configure] tab, select [User Authentication] or [Account Track] and select the target option from [Setting].
NOTICEConfigure settings to fit the machine side. If settings are different from those of the machine side, they are disabled.
4 Click [OK].
6-12 d-Color MF 752/652
6.7 Permitting printing by public users 6
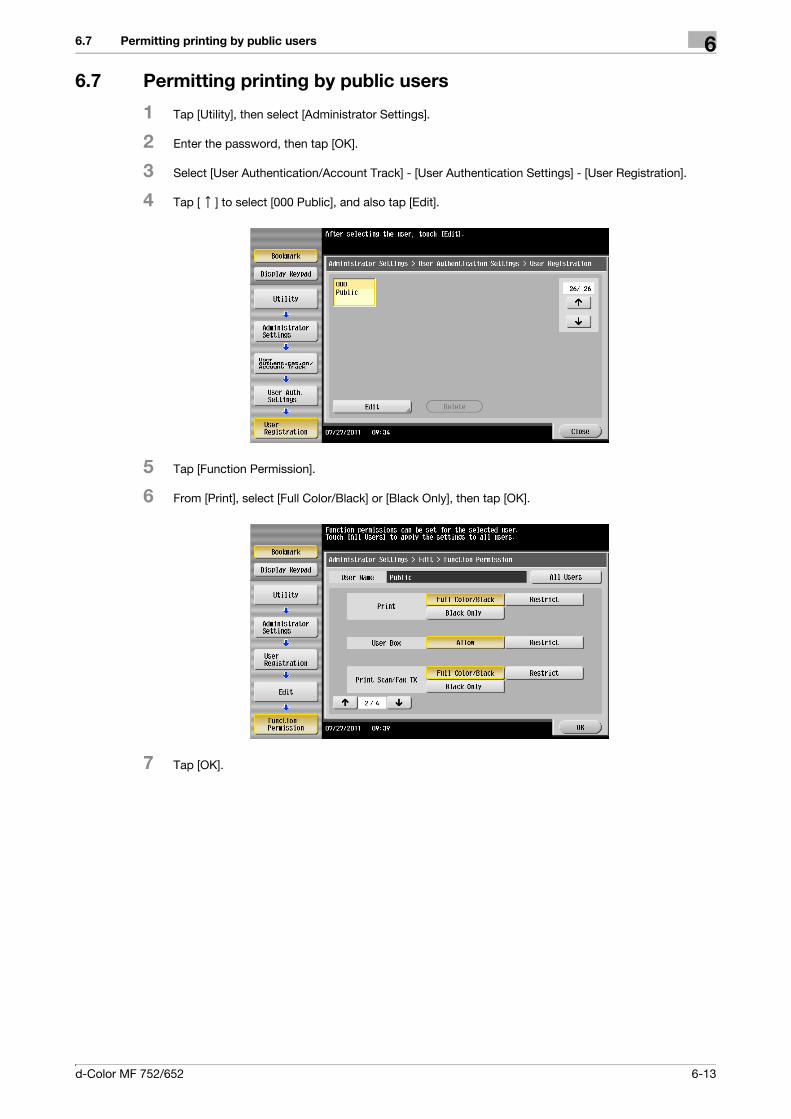
6.7 Permitting printing by public users
1 Tap [Utility], then select [Administrator Settings].
2 Enter the password, then tap [OK].
3 Select [User Authentication/Account Track] - [User Authentication Settings] - [User Registration].
4 Tap [ ] to select [000 Public], and also tap [Edit].
5 Tap [Function Permission].
6 From [Print], select [Full Color/Black] or [Black Only], then tap [OK].
7 Tap [OK].
d-Color MF 752/652 6-13
Permitting printing by public users6 6.7
6-14 d-Color MF 752/652

7 Cannot Perform Network
Fax/Network Scan


7.1 Cannot perform network fax/network scan 7
7 Cannot Perform Network Fax/Network Scan
7.1 Cannot perform network fax/network scan
Description of problem Check points Remedy
Cannot send data. Is the volume per E-mail to be sent exceeding the maximum re-ceiving capacity of the SMTP server?
If the volume of one E-mail mes-sage exceeds the maximum ca-pacity of the SMTP server for reception, an error occurs which will prevent transmission.
Was the transmission procedure carried out correctly?
Check the transmission proce-dure and then resend the fax.
Are the network settings and connection correct?
Check the network settings and connection.For information on how to con-figure the network settings, refer to [User's Guide: Network Fax Operations].
Is the correct E-mail address set for this machine?
Check the E-mail address of the machine and configure it.For information on how to con-figure the E-mail address setting, refer to [User's Guide: Network Fax Operations].
Are cables connected correctly? Make sure that the cables such as network and modular cables are correctly connected.
Are the fax number and address you entered for the destination correct?Were the address book destina-tion and program destination registered correctly?
If you are using a destination in the Address Book or Program, the fax number registered may be incorrect.Print the list of address book destinations to check that the numbers are registered correct-ly. For the procedure for printing the list of destinations, refer to page page 7-9.
Is there a problem with the re-ceiving machine?
Is the power of the receiving fac-simile turned off, is it out of paper or is there another problem?Call the recipient or otherwise to determine whether there is a problem.
d-Color MF 752/652 7-3

Cannot perform network fax/network scan7 7.1
Cannot receive faxes. Is the power turned on? Check the Main Power Switch of this machine.If a hub is used, also check the hub power.
Has the machine been placed in the ErP Auto Power Off mode?
If the machine is placed into the ErP Auto Power Off mode, it can-not receive any jobs. Press the Power key to release the ErP Auto Power Off mode.For the Erp Auto Power Off mode, refer to [User's Guide: Control Panel].
Are cables connected correctly? Make sure that the cables such as network and modular cables are correctly connected.
Is the memory full or does the hard disk lack sufficient available space?
Check the remaining amount of memory or hard disk space. If there is insufficient memory or hard disk space, the machine will fail to receive faxes or, if it re-ceives faxes, will fail to print them.
Scanned data cannot be sent (by SMB transmission) to a specified computer.
Is the folder correctly specified? A path for a destination folder containing "/ (slash)" is not valid. Use "\" to specify the path for the destination folder.
Are you using the correct au-thentication method?
When sending data to a destina-tion PC running operating soft-ware earlier than Mac OS X 10.3x, use the NTLMv1 authenti-cation. To a destination PC run-ning operating system later than Mac OS X 10.4x, send data using the NTLMv2 authentication.
Have you specified a folder name using more than 13 characters?
When sending data to a folder on a PC running Mac OS X, specify a folder name using up to 12 characters.
When sending scanned data (by SMB transmission) to a speci-fied computer, operations take place slowly.
Is [LLMNR Setting] enabled? Disable [LLMNR Setting]. For in-formation on [LLMNR Setting], refer to [User's Guide: Web Man-agement Tool].
When sending scanned data (by SMB transmission) to a speci-fied computer, a "Server con-nection error" occurs.
Is the [Host Name] registered in lower-case letters?
Register the [Host Name] using upper case letters.
Is the network cable connected? Make sure that the network cable is correctly connected.
Do packets from this machine reach the destination?
Check that packets from this machine reach the destination.If not, take/check the action indi-cated below:• Replace the network cable
with a new one.• Check if the wireless settings
are correct if wireless con-nection is used. Or replace it with a wired connection.
• If no packets are sent out from this machine, check the IP settings on this machine.
• Check that the IP address of the destination is correctly registered.
Description of problem Check points Remedy
7-4 d-Color MF 752/652

7.1 Cannot perform network fax/network scan 7
When sending scanned data (by SMB transmission) to a speci-fied computer, a "login error" occurs.
Is the [File Path] set correctly for the destination?
Check that the [File Path] of the destination is correctly regis-tered.
Are you operating as a domain user?
If you are operating as a domain user, create a domain user name that is different from the local user name. If your domain user name is the same as the local user name, use the same pass-word for both.
Printing does not take place. Is Memory RX enabled? If Memory RX is enabled, print the fax from the [Memory RX] User Box.For details on Memory RX, refer to [User's Guide: Box Opera-tions].
Is paper in the machine? If the paper supply icon is blink-ing in the screen, it indicates that the paper in the paper tray has been used up and that the re-ceived original data are stored in the memory. Add paper.
Is paper jammed in the machine? When a paper jam is occurring, received original data stay in the memory. Clear the jammed pa-per.For information on handling of a paper jam, refer to page 1-4.
Is the machine out of toner? No fax can be received if the ton-er is exhausted. Replace the Toner Cartridge.For details on how to replace the Toner Cartridge, refer to [User's Guide: Maintenance].
Description of problem Check points Remedy
d-Color MF 752/652 7-5

Network fax error code7 7.2
7.2 Network fax error code
Transmission system error code
If the machine encounters a problem while sending or receiving a network fax, an error dialog will appear and error codes will be displayed in Nxx format. Take corrective actions by referring to the table below.
Code Type Descrip-tion
Redial ON or OFF
Corrective Actions
N00 Connec-tion error
Address er-ror
OFF • Check to see if the destination is cor-rect.
• Check the recipient's state and then re-send the fax.
N01 Recipient busy
Recipient busy
ON • Check the state of the recipient.• Retry sending after a while.
N03 Server Global error OFF • Check the recipient's state and then re-send the fax.
N04 LAN con-nection
Connec-tion timeout
OFF • Check to see if the destination is cor-rect.
• Verify that the cables and cords are se-curely connected and that there is no network failure.
N06 Protocol Status code error
OFF • Check the recipient's state and then re-send the fax.
N10 Connec-tion error
Server con-nection er-ror
OFF • Check the state of the recipient.• Check the network settings for the ma-
chine.• Ask the network administrator to ensure
that the network is running successfully.
N11 Connec-tion error
Connec-tion refused
OFF Reception refused. Check the state of the recipient.
N12 Connec-tion error
Line dis-connected
ON Verify that the cables and cords are secure-ly connected and that there is no network failure.
N13 Connec-tion error
No net-work re-sponse
OFF • Check the state of the recipient.• Check the network settings for the ma-
chine.• Ask the network administrator to ensure
that the network is running successfully.
N14 Connec-tion error
Mail distri-bution error
OFF Check the recipient's state and then resend the fax.
N15 Recipient resetting
Recipient connection reset
ON Check the recipient's state and then resend the fax.
N16 Recipient busy
Recipient busy
ON Check the recipient's state and then resend the fax.
N17 LAN con-nection
Connec-tion timeout
OFF Check the recipient's state and then resend the fax.
N18 Network er-ror
Network er-ror
OFF • Check that the network fax settings are correct.
• Verify that the cables and cords are se-curely connected and that there is no network failure.
• Turn the Main Power Switch off and back on and then resend the fax.
For details on how to turn the Main Power Switch off or on, refer to [User's Guide: In-troduction].
7-6 d-Color MF 752/652

7.2 Network fax error code 7
N20 Memory er-ror
Memory er-ror
OFF Memory is full.• Check that there are no other jobs being
processed.• Reduce the number of pages to be sent
or reduce the scanning resolution to re-send the fax.
N21 HDD error HDD error OFF The hard disk is full.• Delete unnecessary files.• Reduce the number of pages to be sent
or reduce the scanning resolution to re-send the fax.
N22 Conversion error
Conversion error
OFF Turn the Main Power Switch off and back on and then resend the fax.For details on how to turn the Main Power Switch off or on, refer to [User's Guide: In-troduction].
N25 Memory overflow
Memory full OFF Memory is full.• Check that there are no other jobs being
processed.• Reduce the number of pages to be sent
or reduce the scanning resolution to re-send the fax.
N30 Sequence error
A request for send ini-tiation has come from an upper node while the ma-chine is dis-connected from the LAN.
OFF • Delete the send job and turn the Main Power Switch off and on.
For details on how to turn the Main Power Switch off or on, refer to [User's Guide: In-troduction].• Check that the destination address is
correct and that the cable is connected, or that any other network error is not oc-curring, then retry sending.
N31 Sequence error
A request for send ini-tiation has come from an upper node be-fore SDK initializa-tion is com-pleted.
OFF Retry sending after a while.
Code Type Descrip-tion
Redial ON or OFF
Corrective Actions
d-Color MF 752/652 7-7

Network fax error code7 7.2
Reception system error code
If the machine encounters a problem while receiving a network fax, an error dialog will appear and error codes will be displayed in Nxx format. Take corrective actions by referring to the table below.
Code Type Descrip-tion
Corrective Actions
N50 SMTP re-ception
SMTP re-ception er-ror
If SMTP reception does not start 60 minutes later after an incoming call was connected, this error occurs.Ask the sender to resend the fax.
N51 Decoding Original too long error
Ask the sender to shorten the length of original to be sent before resending the fax.
N52 Decoding Received page too long error
Ask the sender to reduce the number of pages to be sent before resending the fax.
N53 Decoding File error Ask the sender to resend the fax in a correct format shown below.Internet fax: TIFFIP Address Fax: PDF or TIFF
N54 Decoding Decode er-ror
Fax received contains data in an invalid format. Ask the sender to resend the fax in a correct format.
7-8 d-Color MF 752/652
7.3 Printing a destination list 7
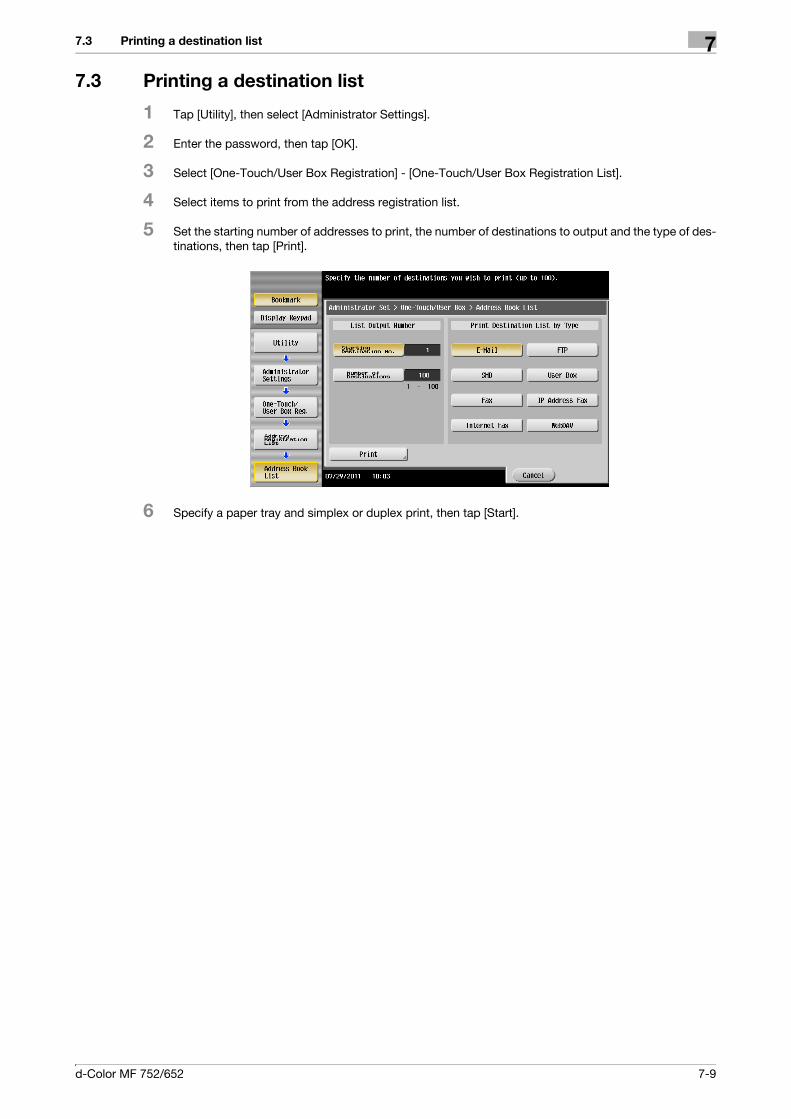
7.3 Printing a destination list
1 Tap [Utility], then select [Administrator Settings].
2 Enter the password, then tap [OK].
3 Select [One-Touch/User Box Registration] - [One-Touch/User Box Registration List].
4 Select items to print from the address registration list.
5 Set the starting number of addresses to print, the number of destinations to output and the type of des-tinations, then tap [Print].
6 Specify a paper tray and simplex or duplex print, then tap [Start].
d-Color MF 752/652 7-9

Printing a destination list7 7.3
7-10 d-Color MF 752/652
8 Cannot Use the Fax Function


8.1 Cannot transmit faxes 8
8 Cannot Use the Fax Function
8.1 Cannot transmit faxes
Description of problem Check points Remedy
Cannot send faxes. Was the transmission procedure carried out correctly?
Check the transmission proce-dure and then resend the fax.
Is the fax number you entered for the destination correct?Were the address book destina-tion and program destination registered correctly?
If you are using a destination in the Address Book or Program, the fax number registered may be incorrect.Print the Speed Dial list to check whether the numbers are regis-tered correctly. For the proce-dure for printing the list of destinations, refer to page page 7-9.
Is the telephone line setting cor-rect?
Does the setting in [Dialing Meth-od] match the telephone line be-ing used?Check the setting and correct it if an error is found.For the dialing method setting, refer to page 8-8.Also, is the correct telephone line specified in [Select Line]?Check that the line registered in the address book and the line set at the time of fax transmission are correct.
Is the modular cable connected correctly?
Is the modular cable connected?Check the modular cable con-nection and, if unplugged, plug it in securely.Also, is the line specified in [Se-lect Line] correctly connected?Check the connection of the line you have specified.
Is there a problem with the re-ceiving machine?
Is the power of the receiving fac-simile turned off, is it out of paper or is there another problem?Call the recipient to determine whether there is a problem.
If it is a password TX job, have you sent the correct password?
Check the recipient's password then resend the fax using a cor-rect password.
Was the sender's fax number correctly registered with "Check Dest. & Send"?
Check that the fax number regis-tered with the recipient is cor-rect.Or set [Check Dest. & Send] to [No], and then send a fax.For details on the setting of [Check Dest. & Send], refer to page 8-9.
d-Color MF 752/652 8-3

Cannot receive faxes8 8.2
8.2 Cannot receive faxes
Description of problem Check points Remedy
Cannot receive faxes. Is the power turned on? Check the Main Power Switch of this machine.If a hub is used, also check the hub power.
Has the machine been placed in the ErP Auto Power Off mode?
If the machine is placed into the ErP Auto Power Off mode, it can-not receive any jobs. Press the Power key to release the ErP Auto Power Off mode.For the ErP Auto Power Off mode, refer to [User's Guide: Control Panel].
Is the Receive Mode set to Man-ual RX?
When [Receive Mode] is set to [Manual RX], receive faxes man-ually.
Is the modular cable connected correctly?
Is the modular cable connected?Check the modular cable con-nection and, if unplugged, plug it in securely.
Is [Closed Network RX] enabled? If [Closed Network RX] is ena-bled, the machine accepts faxes sent from specific recipients. For details, contact your administra-tor.
Has a wrong SUB been sent in F-code from the sender side?
If a wrong sub-address is re-ceived with the Confidential or Relay User Box set, a communi-cation error may occur, causing failed reception. Check the send-er side to see if the sub-address is set.
No printout produced. Is PC-Fax RX enabled? Check the User Box used by the PC-Fax RX function to save data.
Is TSI Distribution enabled? Check the User Box used by the TSI Distribution function to save data.
Is Memory RX enabled? If Memory RX is enabled, print the fax from the [Memory RX] User Box.For details on Memory RX, refer to [User's Guide: Box Opera-tions].
Is paper in the machine? If no paper is loaded, the paper supply icon blinks and the ma-chine stores received faxes in the memory. Add paper.
Is paper jammed in the machine? If a paper jam is occurring, the machine stores received faxes in the memory. Clear the jammed paper.
Is the machine out of toner? No fax can be received if the ton-er is exhausted. Replace the Toner Cartridge.For details on how to replace the Toner Cartridge, refer to [User's Guide: Maintenance].
8-4 d-Color MF 752/652

8.3 G3 fax error code 8
8.3 G3 fax error code
Transmission system error code
If the machine encounters a problem while sending a G3 fax, an error dialog will appear and error codes will be displayed in Txx format. Take corrective actions by referring to the table below.
Code Corrective Actions
T00 • Check to see if the destination is correct.• Check the state of the recipient.
T05 Check the state of the recipient.
T08 Check the line status.
T18 Check the state of the recipient.
T28 Check the state of the recipient.
T32 Check the line status.
T42 Check the line status.
T43 Check the line status.
T48 • Check to see if the destination is correct.• Check that the fax number registered with the recipient is correct.
T58 The document to be sent by polling is not registered in the sender's machine. Ask the sender to set the document.
T60 Register the document that is sent to the recipient by polling.
T61 Check whether the document to be sent by polling from the bulletin board is registered.
T62 Inform the recipient of the correct bulletin board number.
T80 Check the line status.
T81 Check the line status.
T82 • Check to see if the destination is correct.• Check the state of the recipient.
T85 Check the line status.
T89 Check the balance in the billing management device.
T95 Check the line status.
T97 Check the state of the fax board. (Contact your service representative. )
T98 Forwarding is not available for that combination. Check the forwarding settings.
T99 Check the destinations registered in the address book.
d-Color MF 752/652 8-5

G3 fax error code8 8.3
Reception system error code
If the machine encounters a problem while receiving a G3 fax, an error dialog will appear and error codes will be displayed in Rxx format. Take corrective actions by referring to the table below.
Code Corrective Actions
R18 Check your machine. If toner or print paper is empty, supply them. If the memory is full, empty the memory.
R21 Turn the Closed Network RX function off, or inform the recipient of the correct password.
R22 Turn the Closed Network RX function off, or inform the recipient of the correct password.
R32 Change the setting for Auto Create User Box, or inform the recipient of the correct Confi-dential User Box number.
R50 Check the line status.
R60 Check the line status.
R63 Check the line status.
R69 Check the line status.
R72 Ask the sender to shorten the length of original to be sent before resending the fax.
R78 Turn the Main Power Switch off and back on.
R79 Turn the Main Power Switch off and back on.
R93 • After checking with the sender, register a Confidential User Box for confidential recep-tion.
• Check the password for the Confidential User Box.
R94 • After checking with the recipient, register a Relay User Box for relay distribution.• Check the password for the Relay User Box.
R95 Check Forward TX Setting.
R96 Inform the recipient of the correct number for the Confidential User Box.
R97 Check PC-Fax RX Setting.
R99 Turn the Main Power Switch off and back on.
8-6 d-Color MF 752/652
8.4 Main messages and remedies 8
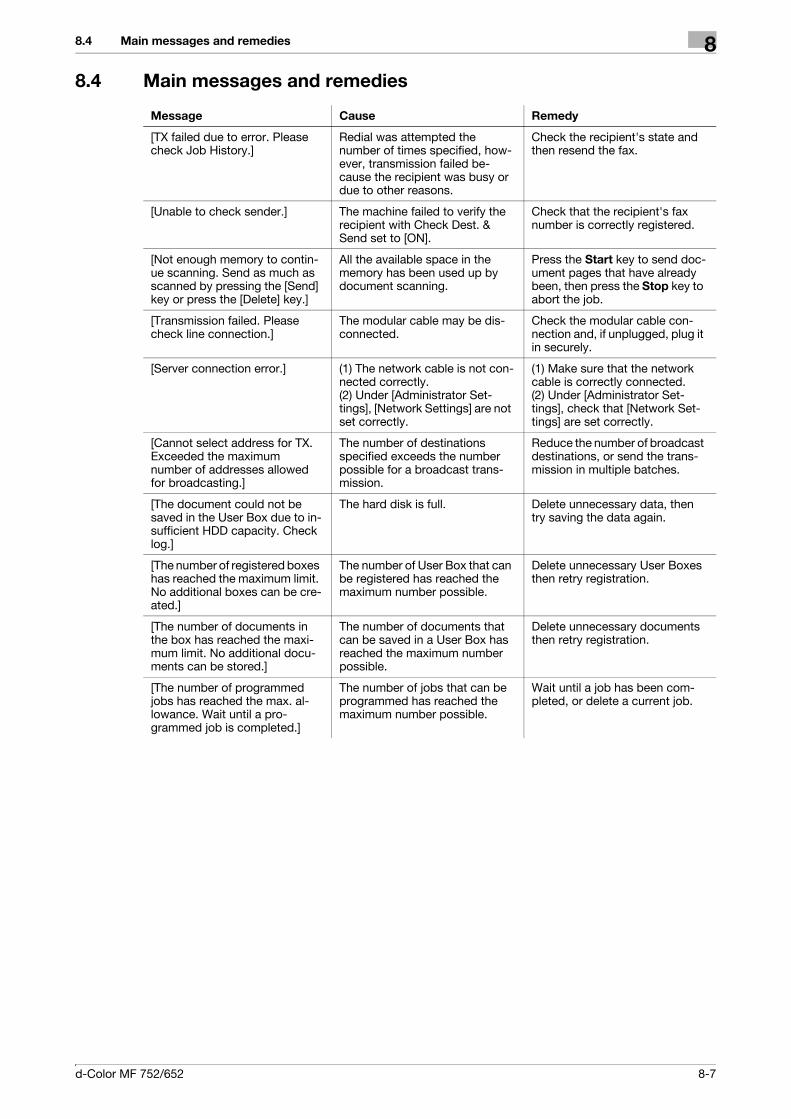
8.4 Main messages and remedies
Message Cause Remedy
[TX failed due to error. Please check Job History.]
Redial was attempted the number of times specified, how-ever, transmission failed be-cause the recipient was busy or due to other reasons.
Check the recipient's state and then resend the fax.
[Unable to check sender.] The machine failed to verify the recipient with Check Dest. & Send set to [ON].
Check that the recipient's fax number is correctly registered.
[Not enough memory to contin-ue scanning. Send as much as scanned by pressing the [Send] key or press the [Delete] key.]
All the available space in the memory has been used up by document scanning.
Press the Start key to send doc-ument pages that have already been, then press the Stop key to abort the job.
[Transmission failed. Please check line connection.]
The modular cable may be dis-connected.
Check the modular cable con-nection and, if unplugged, plug it in securely.
[Server connection error.] (1) The network cable is not con-nected correctly.(2) Under [Administrator Set-tings], [Network Settings] are not set correctly.
(1) Make sure that the network cable is correctly connected.(2) Under [Administrator Set-tings], check that [Network Set-tings] are set correctly.
[Cannot select address for TX. Exceeded the maximum number of addresses allowed for broadcasting.]
The number of destinations specified exceeds the number possible for a broadcast trans-mission.
Reduce the number of broadcast destinations, or send the trans-mission in multiple batches.
[The document could not be saved in the User Box due to in-sufficient HDD capacity. Check log.]
The hard disk is full. Delete unnecessary data, then try saving the data again.
[The number of registered boxes has reached the maximum limit. No additional boxes can be cre-ated.]
The number of User Box that can be registered has reached the maximum number possible.
Delete unnecessary User Boxes then retry registration.
[The number of documents in the box has reached the maxi-mum limit. No additional docu-ments can be stored.]
The number of documents that can be saved in a User Box has reached the maximum number possible.
Delete unnecessary documents then retry registration.
[The number of programmed jobs has reached the max. al-lowance. Wait until a pro-grammed job is completed.]
The number of jobs that can be programmed has reached the maximum number possible.
Wait until a job has been com-pleted, or delete a current job.
d-Color MF 752/652 8-7

Setting [Dialing Method]8 8.5
8.5 Setting [Dialing Method]
1 Tap [Utility], then select [Administrator Settings].
2 Enter the password, then tap [OK].
3 Select [Fax Settings] - [Line Parameter Setting].
4 Select [Dialing Method] and enable settings that match your telephone line currently used, then tap [OK].
8-8 d-Color MF 752/652

8.6 Setting [Check Dest. & Send] 8
8.6 Setting [Check Dest. & Send]
1 Tap [Utility], then select [One-Touch/User Box Registration].
2 Select [Create One-Touch Destination] - [Address Book (Public)] - [Fax].
3 Select the target one-touch destination, then tap [New].
4 Tap [Line Settings], set [Check Dest. & Send] to [No], then tap [OK].
5 Tap [OK].
d-Color MF 752/652 8-9

Setting the number of RX call rings8 8.7
8.7 Setting the number of RX call rings
1 Tap [Utility], then select [Administrator Settings].
2 Enter the password, then tap [OK].
3 Select [Fax Settings] - [Line Parameter Setting].
4 Select [Number of RX Call Rings], tap [-] to set it to "0", then tap [OK].
8-10 d-Color MF 752/652

9 Cannot Copy


9.1 Cannot copy 9
9 Cannot Copy
9.1 Cannot copy
Description of problem Check points Remedy
Copying does not start. Are the doors of the machine se-curely closed?
Close the doors of the machine securely.
Has paper of the correct size for the original been loaded into the paper tray?
Load paper of the appropriate size into the paper tray.
The original does not feed. Is the ADF slightly open? Securely close the ADF.
Is the original one that does not meet the specifications?
Check that the original is one that can be loaded into the ADF.
Has the original been positioned correctly?
Position the original correctly.
The image is light. Is [Light] specified for the density setting?
Tap [Density] on the copy main screen to adjust density.
Is the paper damp? Replace with new/dry paper.
The image is dark. Is [Dark] specified for the density setting?
Tap [Density] on the copy main screen to adjust density.
Was the original not pressed close enough against the Origi-nal Glass?
Position the original so that it is pressed closely against the Original Glass.
The image is partially obscured or blurry.
Is the paper damp? Replace with new/dry paper.
Was the original not pressed close enough against the Origi-nal Glass?
Position the original so that it is pressed closely against the Original Glass.
The entire area of a copy gets smudged.Thread-like smudges appear on a copy.
Is the Original Glass dirty? Wipe the Original Glass with a soft, dry cloth.
Is the Slit Scan Glass dirty? Clean the Slit Scan Glass.
Is the Original Pad dirty? Clean the Original Pad with a soft cloth dampened with a mild detergent.
Is the Electrostatic Charger Wire dirty?
Clean the Electrostatic Charger Wire. For information on how to clean the Electrostatic Charger Wire, refer to page 3-3.
Was the original printed on highly translucent material, such as dia-zo photosensitive paper or OHP transparencies?
Place a blank sheet of paper on top of the original.
Is a 2-sided original being cop-ied?
If a thin 2-sided original is being copied, the print on the back side may be reproduced on the front side of the copy. In the Back-ground Removal screen, select a lighter background density.For details on the background removal, refer to [User's Guide: Copy Operations].
d-Color MF 752/652 9-3
Cannot copy9 9.1
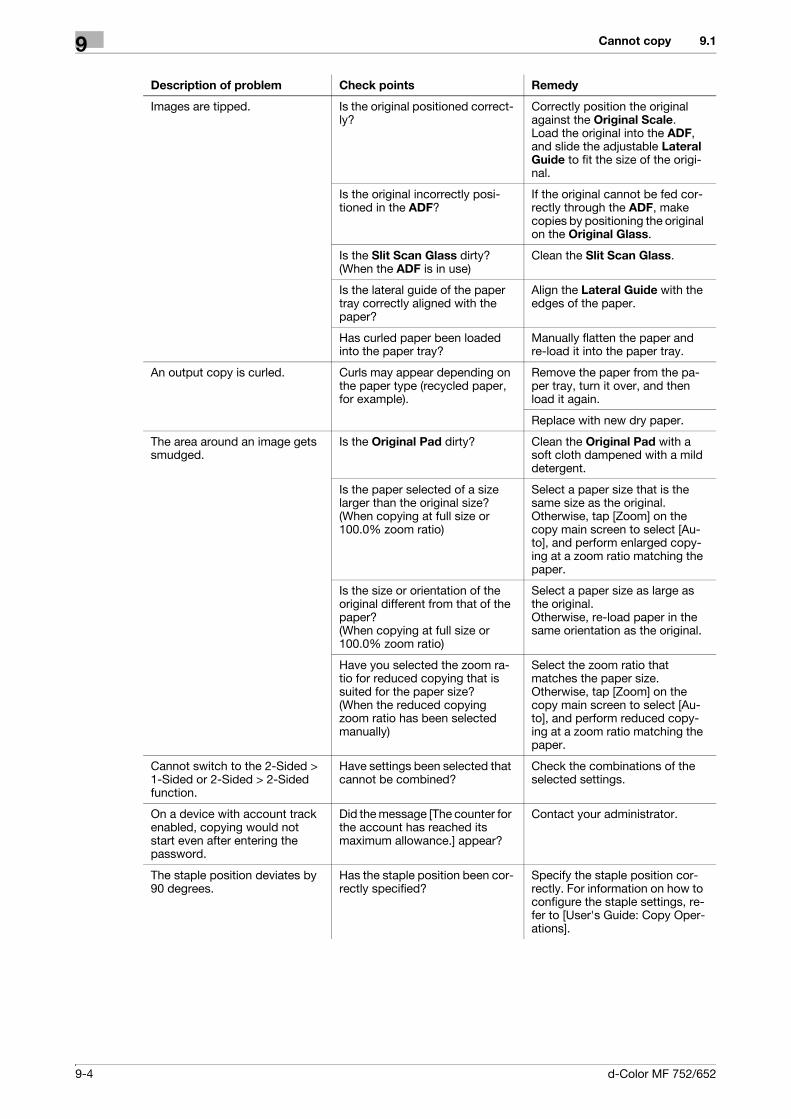
Images are tipped. Is the original positioned correct-ly?
Correctly position the original against the Original Scale.Load the original into the ADF, and slide the adjustable Lateral Guide to fit the size of the origi-nal.
Is the original incorrectly posi-tioned in the ADF?
If the original cannot be fed cor-rectly through the ADF, make copies by positioning the original on the Original Glass.
Is the Slit Scan Glass dirty? (When the ADF is in use)
Clean the Slit Scan Glass.
Is the lateral guide of the paper tray correctly aligned with the paper?
Align the Lateral Guide with the edges of the paper.
Has curled paper been loaded into the paper tray?
Manually flatten the paper and re-load it into the paper tray.
An output copy is curled. Curls may appear depending on the paper type (recycled paper, for example).
Remove the paper from the pa-per tray, turn it over, and then load it again.
Replace with new dry paper.
The area around an image gets smudged.
Is the Original Pad dirty? Clean the Original Pad with a soft cloth dampened with a mild detergent.
Is the paper selected of a size larger than the original size? (When copying at full size or 100.0% zoom ratio)
Select a paper size that is the same size as the original.Otherwise, tap [Zoom] on the copy main screen to select [Au-to], and perform enlarged copy-ing at a zoom ratio matching the paper.
Is the size or orientation of the original different from that of the paper? (When copying at full size or 100.0% zoom ratio)
Select a paper size as large as the original.Otherwise, re-load paper in the same orientation as the original.
Have you selected the zoom ra-tio for reduced copying that is suited for the paper size? (When the reduced copying zoom ratio has been selected manually)
Select the zoom ratio that matches the paper size.Otherwise, tap [Zoom] on the copy main screen to select [Au-to], and perform reduced copy-ing at a zoom ratio matching the paper.
Cannot switch to the 2-Sided > 1-Sided or 2-Sided > 2-Sided function.
Have settings been selected that cannot be combined?
Check the combinations of the selected settings.
On a device with account track enabled, copying would not start even after entering the password.
Did the message [The counter for the account has reached its maximum allowance.] appear?
Contact your administrator.
The staple position deviates by 90 degrees.
Has the staple position been cor-rectly specified?
Specify the staple position cor-rectly. For information on how to configure the staple settings, re-fer to [User's Guide: Copy Oper-ations].
Description of problem Check points Remedy
9-4 d-Color MF 752/652

9.1 Cannot copy 9
Ejected paper is not get stacked evenly; punch holes or staple positions do not line up.
Is the paper curled? Remove the paper from the pa-per tray, turn it over, and then load it again.
Is there a gap between the Lat-eral Guide in the paper tray and the sides of the paper?
Slide the Lateral Guide in the paper tray against the sides of the paper so that there is no gap.
Is the paper type configured cor-rectly?
Configure the paper type of the selected tray correctly.
Description of problem Check points Remedy
d-Color MF 752/652 9-5

Main messages and remedies9 9.2
9.2 Main messages and remedies
Message Cause Remedy
[Originals left on glass.] The original has been left on the Original Glass.
Remove the original from the Original Glass.
[Paper of matching size is not available.Select the paper size.]
Paper of a suitable size is not loaded in a paper tray.
Either select paper of a different size or load paper of a suitable size.
[Load paper into bypass Tray.] Paper of a suitable size is not loaded in the Bypass Tray.
Load paper of the appropriate size into the Bypass Tray.
[The original size cannot be de-tected. Select the paper size.]
(1) The original is not loaded cor-rectly.(2) The original is a custom size or a small size that cannot be de-tected.
(1) Position the original correctly.(2) Select the paper size and start copying.
[The image will not fit in the se-lected paper size. Position the original in a different orienta-tion.]
The image will be cut off with the current orientation of the original.
Rotate the original by 90 degrees to load it correctly.
[The output tray has reached its capacity. Remove paper from the tray indicated by .]
Copying failed as the Output Tray of the Finisher/Job Sepa-rator marked with has reached its capacity.
Remove all paper from the tray marked with .
[Enter a login User Name and Password, and then touch [Login] or press [ID].]
User authentication is enabled. You must enter your user name and correct password to perform copying.
Enter your user name and cor-rect password.
[Enter Account Name and Pass-word, and then touch [Login] or press the [ID] key.]
Account track settings have been configured. You must enter your account name and correct password to perform copying.
Enter the account name and cor-rect password.
[The counter for the account has reached its maximum allow-ance.]
There is a limit to the number of pages that can be printed by ac-count.
Contact the administrator of the machine.
[The part indicated by is open. Ensure that it is property closed.]
Copying failed as the door or cover of this machine is open or the optional device is not secure-ly closed.
Be sure to securely close the door or cover of this machine that is marked with , and the door or cover of the optional de-vice.
[Install Toner Cartridge.] The Toner Cartridge is not in-stalled correctly.
Reinstall each consumable and replaceable part. Otherwise, contact your service representa-tive.
[Replenish Paper.] The indicated tray has run out of paper.
Add paper into the indicated tray.
[Toner is low. Replace when in-dicated.]
The toner is about to run out. According to the maintenance agreement, prepare a spare Toner Cartridge.
[Replace Toner Cartridge.] The toner is about to run out. According to the maintenance agreement, replace the indicated Toner Cartridge.
[Toner has been depleted. Re-placed the Toner Cartridge ac-cording to the instructions.]
Toner is depleted. According to the maintenance agreement, replace the indicated Toner Cartridge.
[No more staples. Replace the Staple Cartridge or cancel sta-pling.]
The staples have run out. Replace the Staple Cartridge.
[Misfeed detected. Remove pa-per according to the instruc-tions.]
Copying cannot be performed due to a paper jam.
Follow the guidance (instruc-tions) to remove jammed paper.
9-6 d-Color MF 752/652

9.2 Main messages and remedies 9
[Hole-Punch scrap box is full. Empty hole-punch scrap.]
(1) The waste box has become full of punch hole scraps.(2) The Punch Scrap Box is not loaded.
(1) Dispose of punch hole scrap stored in the Punch Scrap Box.(2) Load the Punch Scrap Box.
[Reset the following number of originals.]oo
After removing a paper jam, you need to restore the original pag-es ejected from the ADF.
Re-load the indicated number of original pages into the ADF.
[An internal has error occurred. Open and then close the lower front door to remedy a problem. If the trouble code appears again, contact your Service Representative.]
The machine malfunctioned and is unable to make copies.
Take the appropriate action ac-cording to the message dis-played on the screen.If the problem is not resolved or released, inform your service representative of the malfunction code displayed on the screen.
[An internal has error occurred. Turn the main switch OFF and ON. If the trouble code appears again, contact your Service Representative.]
[An internal has error occurred. Please contact your Service Representative.]
The machine malfunctioned and is unable to make copies.
Inform your service representa-tive of the malfunction code dis-played on the screen.
[Clean the slit scan glass locat-ed to the far left of the ADF with a dry cloth. If you continue to use the device in its current con-dition, lines may appear on the printed output.]
The Slit Scan Glass is dirty. Clean the Slit Scan Glass using a dry cloth.
[Now Connecting to the Firmware server.]
(1) Your service representative is performing CS Remote Care.(2) Internet ISW is being down-loaded.
While the message is displayed, do not turn the Power key OFF. If the Power key is turned OFF, turn the Main Power Switch OFF and contact your service representative.
[The authentication information entered is invalid due to failed access attempts. Contact your Administrator.]
The authentication information has become invalid since the au-thentication attempts have failed the specified number of times.
Contact the administrator of the machine.
[The job log has reached the maximum allowed. Contact the System Administrator.]
The write area of the job log has reached the maximum allowed.
Obtain job logs via Web Con-nection.
[No Animation Guide available. Contact your service rep.]
Animation guide data is not in-stalled.
For details on installing anima-tion guide data, contact your service representative.
Message Cause Remedy
d-Color MF 752/652 9-7

Main messages and remedies9 9.2
9-8 d-Color MF 752/652

10 Cannot Save in a User Box


10.1 Cannot save in a User Box 10
10 Cannot Save in a User Box
10.1 Cannot save in a User Box
Description of problem Check points Remedy
Files cannot be saved in a User Box.
Are the network settings and connection correct?
To save files in a User Box from a computer, the network settings must be configured correctly. Check the network settings and connection.For information on how to con-figure the network settings, refer to [User's Guide: Box Opera-tions].
Is the User Box full? If the User Box is full, remove un-necessary files then carry out the saving operation again.For the procedure for deleting unnecessary files from a User Box, refer to page 10-5.
Has the maximum allowance for saving files been exceeded?
If the maximum number of files one User Box can save has al-ready been reached, delete un-necessary files and then carry out the saving operation again.For the procedure for deleting unnecessary files from a User Box, refer to page 10-5.
d-Color MF 752/652 10-3

Main messages and remedies10 10.2
10.2 Main messages and remedies
Message Cause Remedy
[Server connection error.] (1) The network cable is not con-nected correctly.(2) Under [Administrator Set-tings], [Network Settings] are not set correctly.
(1) Make sure that the network cable is correctly connected.(2) Under [Administrator Set-tings], check that [Network Set-tings] are set correctly.
[Cannot select address for TX. Exceeded the maximum number of addresses allowed for broadcasting]
The number of destinations specified exceeds the number possible for a broadcast trans-mission.
Reduce the number of broadcast destinations, or send the trans-mission in multiple batches.
[The document could not be saved in the User Box due to in-sufficient HDD capacity. Check log.]
The hard disk is full. Delete unnecessary data, then try saving the data again.
[The number of registered boxes has reached the maximum limit. No additional boxes can be cre-ated.]
The number of User Box that can be registered has reached the maximum number possible.
Delete unnecessary User Boxes then retry registration.
[The number of documents in the box has reached the maxi-mum limit. No additional docu-ments can be stored.]
The number of documents that can be saved in a User Box has reached the maximum number possible.
Delete unwanted documents then retry registration.
[The number of pages registered in a User Box has reached the maximum number.]
The registered document pages have reached the maximum that can be registered in one User Box.
Delete unwanted documents then retry registration.
[The number of programmed jobs has reached the max. al-lowance. Wait until a pro-grammed job is completed.]
The number of jobs that can be programmed has reached the maximum number possible.
Wait until a job has been com-pleted, or delete a current job.
10-4 d-Color MF 752/652

10.3 Deleting files from a User Box 10
10.3 Deleting files from a User Box
1 Tap [User Box] on the main menu.
2 Select the desired User Box, then tap [Open].
3 Select files to delete, then tap [Delete].
4 Tap [Yes].
d-Color MF 752/652 10-5

Deleting files from a User Box10 10.3
10-6 d-Color MF 752/652

11 Network Error Codes


11.1 About network error codes 11
11 Network Error Codes
11.1 About network error codes
They refer to codes displayed when an error occurs in the network. You can check the action to take as well as a description of the error by referring to the code in the error code list.
d-Color MF 752/652 11-3
Displaying network error codes11 11.2
11.2 Displaying network error codes
Use Web Connection to configure so that network error codes are displayed. For details, refer to [User's Guide: Web Management Tool].
11-4 d-Color MF 752/652

11.3 Error code list 11
11.3 Error code list
Functions Code Description
IEEE802.1X 1 Connection has already been established.
2 Setting error
3 Unable to find the destination AP (SSID).
4 The authentication mode does not match the AP (IEEE8021X/WPA-EAP/WPA-PSK/NONE).
5 Negotiation of the EAP method failed.
6 The EAP authentication failed (user ID, password, certificate, etc.)
7 Encryption negotiation with the AP failed (TKIP/CCMP).
8 Failed to retrieve the client certificate.
9 The client certificate has expired.
10 Verification error of the server certificate (EAP-TLS/EAP-TTLS/PEAP).
11 Although the WPA-PSK mode is selected, the Pre-Shared Key is not specified.
12 An authentication error occurred in WPA-PSK mode (unmatched Pre-Shared Key).
13 The phase 2 method is not specified (PEAP).
14 Negotiation of the phase 2 method failed (PEAP).
15 Response from the server has timed out.
16 Failed to allocate memory.
17 Failed to start the supplicant task.
18 The driver does not work.
19 The server certificate has expired (EAP-TLS/EAP-TTLS/PEAP).
20 CA verification error of the server certificate (EAP-TLS/EAP-TTLS/PEAP).
21 Server ID verification error of the server certificate (EAP-TLS/EAP-TTLS/PEAP).
22 The CA certificate is not specified (EAP-TLS/EAP-TTLS/PEAP).
23 The server ID is not specified (EAP-TLS/EAP-TTLS/PEAP).
24 Settings are combined normally.
25 Connection and authentication are complete.
26 The server certificate does not have the expected usage (EAP-TLS/EAP-TTLS/PEAP).
27 The server certificate has expired (EAP-TLS/EAP-TTLS/PEAP).
28 Access to the server to check for expiration of the server certifi-cate is rejected (EAP-TLS/EAP-TTLS/PEAP).
29 Access to the server to check for expiration of the server certifi-cate has timed out (EAP-TLS/EAP-TTLS/PEAP).
30 Unable to check for expiration because the CRL size that has been retrieved to check for the expiration of the server certificate ex-ceeds the maximum capacity that can be retained (1MB) (EAP-TLS/EAP-TTLS/PEAP).
31 Incorrect format of the server certificate (EAP-TLS/EAP-TTLS/PEAP).
32 Verification of the server certificate is invalid (EAP-TLS/EAP-TTLS/PEAP).
33 The hard disk path is not specified for the certificate verification (PKI) function (EAP-TLS/EAP-TTLS/PEAP).
d-Color MF 752/652 11-5

Error code list11 11.3
IEEE802.1X 34 The certificate verification (PKI) function is in the excessive multi-plex processing status (EAP-TLS/EAP-TTLS/PEAP).
35 Parameter error of the certificate (EAP-TLS/EAP-TTLS/PEAP).
36 Internal error of the certificate verification (PKI) function (EAP-TLS/EAP-TTLS/PEAP).
Functions Code Description
11-6 d-Color MF 752/652

11.3 Error code list 11
LDAP 1 An invalid operation occurred.
4 The number of search results has exceeded the maximum number of items allowed.
7 The LDAP server does not support SASL.
10 Unable to trace the link although Referral is specified.
32 Cannot find the search route.
49 Failed to log in to the LDAP server.
80 An unexpected error occurred.
85 The connection has timed out.
86 The supported SASL does not match the LDAP server side.
88 Cancelled by the user.
90 A memory shortage has occurred.
91 Unable to connect to the LDAP server.
92 The supported LDAP version does not match the LDAP server side.
128 Failed to resolve the LDAP server name using the DNS server.
129 The certificate of the LDAP server has expired.
130 Mutual authentication using GSS-SPNEGO (Kerberos v5) failed.
131 The search result remains.
2238 The CN field of the LDAP server certificate does not match the server address.
2239 The LDAP server certificate does not have the expected usage for a server.
2240 The LDAP server certificate is not trusted. To trust the certificate, the certificate must be registered to the system.
2241 The LDAP server certificate has expired.
2242 The CA server rejected the connection.
2243 The connection to the server that checks for expiration of the cer-tificate has timed out.
2244 Unable to check for expiration because the CRL size exceeds the maximum capacity that can be retained (1MB).
2261 The format of the LDAP server certificate is invalid.
2263 Although the environment is configured to use the hard disk, it is unable to perform verification because the hard disk path has not been specified.
2264 Unable to perform verification because there are too many certifi-cates to be verified (the maximum number of certificates that can be verified at a time is 20).
2266 Internal error of the certificate verification/management module.
2267 The device certificate does not exist.
2268 No certificate is sent from the communications peer.
10000 Failed in authentication using a PKI card (PKI token).
12236 The ticket certificate has expired.
12239 The ticket certificate does not have the expected usage for a serv-er.
12240 The ticket certificate is not trusted. To trust the certificate, the cer-tificate must be registered to the system.
Functions Code Description
d-Color MF 752/652 11-7

Error code list11 11.3
LDAP 12241 The ticket certificate has expired.
12242 The CA server rejected the connection.
12243 The connection to the server that checks for expiration of the cer-tificate has timed out.
12244 Unable to check for expiration because the CRL size exceeds the maximum capacity that can be retained (1MB).
12261 The format of the ticket certificate is invalid.
12263 Although the environment is configured to use the hard disk, it is unable to perform verification because the hard disk path has not been specified.
12264 Unable to perform verification because there are too many certifi-cates to be verified (the maximum number of certificates that can be verified at a time is 20).
12266 Internal error of the certificate verification/management module.
Functions Code Description
11-8 d-Color MF 752/652
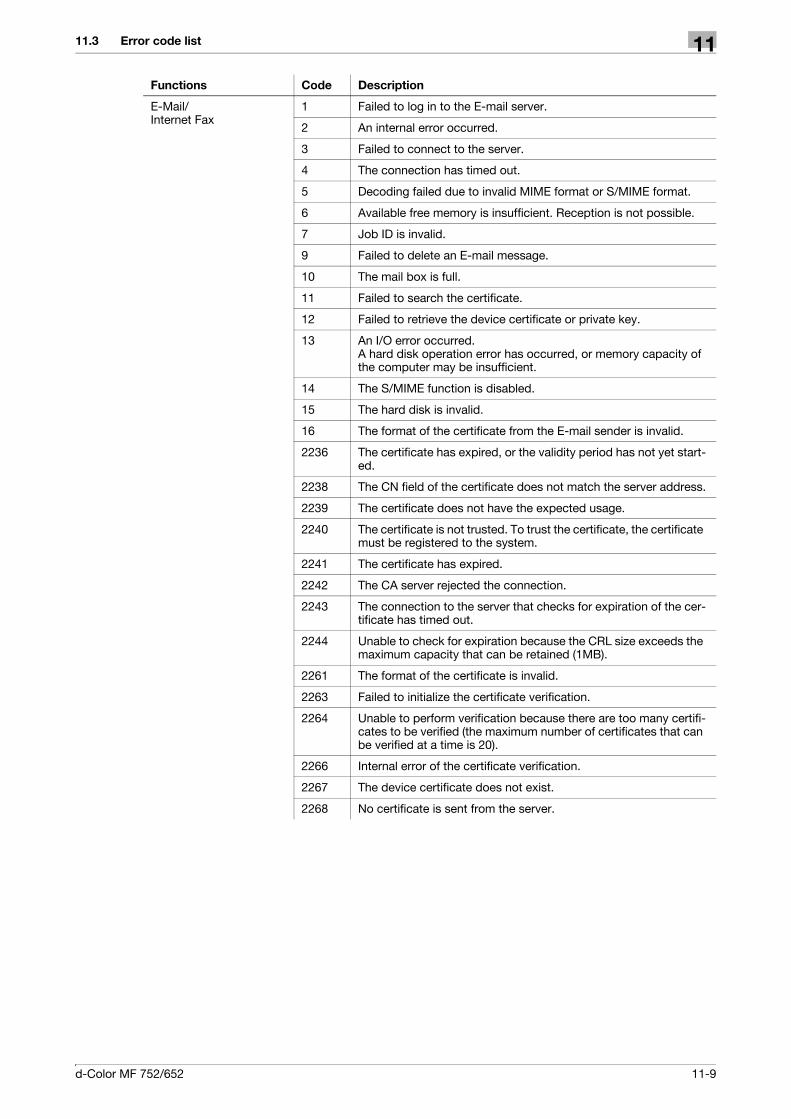
11.3 Error code list 11
E-Mail/Internet Fax
1 Failed to log in to the E-mail server.
2 An internal error occurred.
3 Failed to connect to the server.
4 The connection has timed out.
5 Decoding failed due to invalid MIME format or S/MIME format.
6 Available free memory is insufficient. Reception is not possible.
7 Job ID is invalid.
9 Failed to delete an E-mail message.
10 The mail box is full.
11 Failed to search the certificate.
12 Failed to retrieve the device certificate or private key.
13 An I/O error occurred.A hard disk operation error has occurred, or memory capacity of the computer may be insufficient.
14 The S/MIME function is disabled.
15 The hard disk is invalid.
16 The format of the certificate from the E-mail sender is invalid.
2236 The certificate has expired, or the validity period has not yet start-ed.
2238 The CN field of the certificate does not match the server address.
2239 The certificate does not have the expected usage.
2240 The certificate is not trusted. To trust the certificate, the certificate must be registered to the system.
2241 The certificate has expired.
2242 The CA server rejected the connection.
2243 The connection to the server that checks for expiration of the cer-tificate has timed out.
2244 Unable to check for expiration because the CRL size exceeds the maximum capacity that can be retained (1MB).
2261 The format of the certificate is invalid.
2263 Failed to initialize the certificate verification.
2264 Unable to perform verification because there are too many certifi-cates to be verified (the maximum number of certificates that can be verified at a time is 20).
2266 Internal error of the certificate verification.
2267 The device certificate does not exist.
2268 No certificate is sent from the server.
Functions Code Description
d-Color MF 752/652 11-9

Error code list11 11.3
FTP TX 22 Parameter error (e.g. the file name is NULL).
27 Parameter is invalid.
42 The specified protocol is unavailable.
52 The process is cancelled by a device reset.
55 A memory shortage has occurred.
56 The FTP connection is already open.
57 Failed to connect to the server.
60 The connection has timed out.
61 The connection has been interrupted.
62 The device is not connected to the network.
70 The network connection is busy.
450 The file has not been deleted.
451 The file transfer failed (e.g. due to insufficient server capacity).
452 The file transfer failed (e.g. due to insufficient server capacity).
501 Syntax error in parameters or arguments.
530 Incorrect login name or password.
550 The specified folder does not exist.
552 The file operation failed (e.g. due to insufficient server capacity).
SMB transmission 42 The protocol is not initialized.
52 MIO was reset during forwarding.
55 An I/O buffer capacity shortage occurred.
57 Failed to connect to the server.
62 The device is not connected to the network.The connection has been interrupted.
70 The network connection is busy.
4096 The host name is not specified.The specified host name does not exist on the network.
4097 The user name is not specified.Unable to log in with the specified user name and password.The user does not have write permission to the folder.Failed to log in due to an SMB protocol error.
4098 The folder name is not specified.The specified folder does not exist.
4099 The user name is not specified.Unable to log in with the specified user name and password.The user does not have write permission to the folder.Failed to log in due to an SMB protocol error.
4100 The specified file name is invalid.
4101 The specified file already exists and is write-protected.The folder and the disk are write-protected.
4102 The specified media to be written is not formatted.The file system of the specified media to be written is faulty.
4103 The server capacity is full.
4104 The server capacity has become full while writing data.
4105 Other errors to which an error code is not assigned.
10000 Failed in authentication using a PKI card (PKI token).
12236 The certificate has expired, or the validity period has not yet start-ed.
Functions Code Description
11-10 d-Color MF 752/652
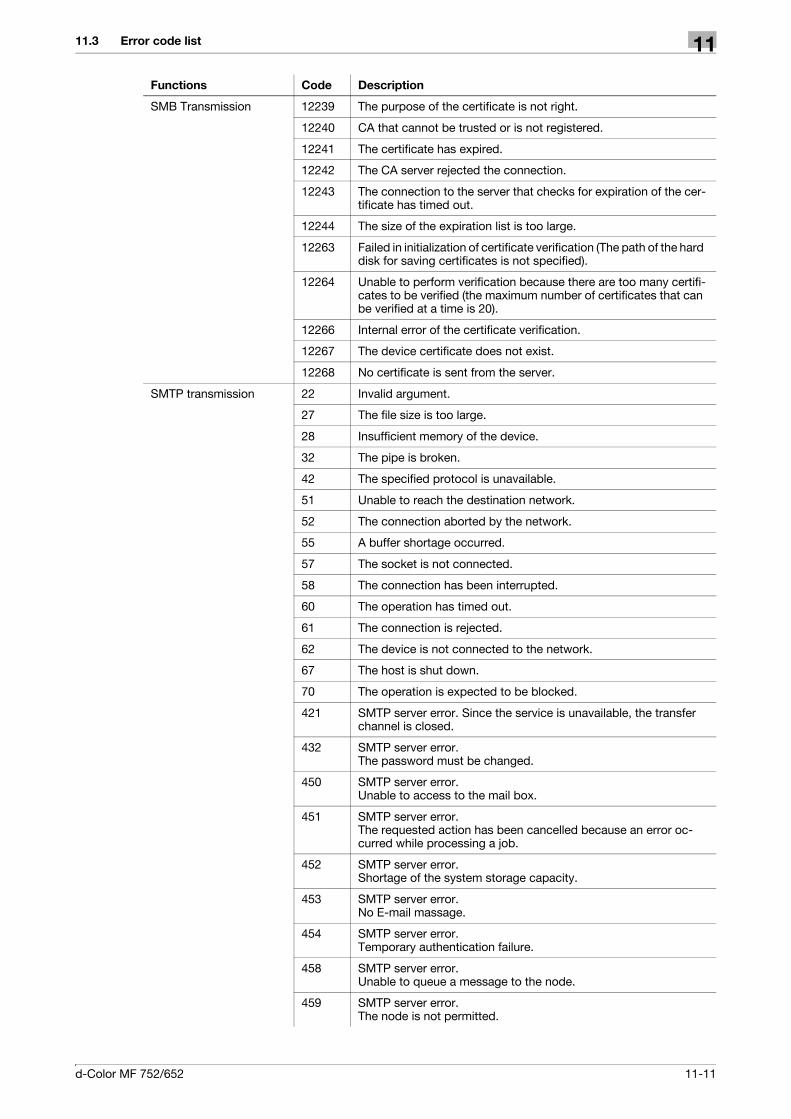
11.3 Error code list 11
SMB Transmission 12239 The purpose of the certificate is not right.
12240 CA that cannot be trusted or is not registered.
12241 The certificate has expired.
12242 The CA server rejected the connection.
12243 The connection to the server that checks for expiration of the cer-tificate has timed out.
12244 The size of the expiration list is too large.
12263 Failed in initialization of certificate verification (The path of the hard disk for saving certificates is not specified).
12264 Unable to perform verification because there are too many certifi-cates to be verified (the maximum number of certificates that can be verified at a time is 20).
12266 Internal error of the certificate verification.
12267 The device certificate does not exist.
12268 No certificate is sent from the server.
SMTP transmission 22 Invalid argument.
27 The file size is too large.
28 Insufficient memory of the device.
32 The pipe is broken.
42 The specified protocol is unavailable.
51 Unable to reach the destination network.
52 The connection aborted by the network.
55 A buffer shortage occurred.
57 The socket is not connected.
58 The connection has been interrupted.
60 The operation has timed out.
61 The connection is rejected.
62 The device is not connected to the network.
67 The host is shut down.
70 The operation is expected to be blocked.
421 SMTP server error. Since the service is unavailable, the transfer channel is closed.
432 SMTP server error.The password must be changed.
450 SMTP server error.Unable to access to the mail box.
451 SMTP server error.The requested action has been cancelled because an error oc-curred while processing a job.
452 SMTP server error.Shortage of the system storage capacity.
453 SMTP server error.No E-mail massage.
454 SMTP server error.Temporary authentication failure.
458 SMTP server error.Unable to queue a message to the node.
459 SMTP server error.The node is not permitted.
Functions Code Description
d-Color MF 752/652 11-11

Error code list11 11.3
SMTP transmission 499 SMTP server error.An unsupported SMTP error code of 400s is received from the SMTP server.
500 SMTP server error.Syntax error (command unrecognized).
501 SMTP server error.Syntax error in parameters or arguments.
502 SMTP server error.The command is not implemented.
503 SMTP server error.Bad sequence of commands.
504 SMTP server error.The command parameter is not implemented.
521 SMTP server error.The server does not receive mail.
530 SMTP server error.The access is rejected.
534 SMTP server error.The authentication mechanism is too weak.
535 SMTP server error.Authentication error.
538 SMTP server error.The requested authentication mechanism requires encryption.
550 SMTP server error.The requested action is not executed.
551 SMTP server error.The user is not connected locally.
552 SMTP server error.The requested E-mail action is cancelled.
553 SMTP server error.The requested action is not accepted.
554 An SMTP server error, or an internal error when sending data.The transaction failed.
555 SMTP server error.MAIL/RCPT parameter error.
599 SMTP server error.An unsupported SMTP error code of 500s is received from the SMTP server.
2236 The certificate has expired, or the validity period has not yet start-ed.
2238 The CN field of the certificate does not match the server address.
2239 The certificate does not have the expected usage.
2240 The certificate is not trusted. To trust the certificate, the certificate must be registered to the system.
2241 The certificate has expired.
2242 The CA server rejected the connection.
2243 The connection to the server that checks for expiration of the cer-tificate has timed out.
2244 Unable to check for expiration because the CRL size exceeds the maximum capacity that can be retained (1MB).
2261 The format of the certificate is invalid.
2263 Failed to initialize the certificate verification.
Functions Code Description
11-12 d-Color MF 752/652

11.3 Error code list 11
SMTP transmission 2264 Unable to perform verification because there are too many certifi-cates to be verified (the maximum number of certificates that can be verified at a time is 20).
2266 Internal error of the certificate verification.
2267 The device certificate does not exist.
2268 No certificate is sent from the server.
3000 An unexpected error occurred.
3001 An unexpected error occurred within the library being used.
3002 An invalid channel is specified.
3003 SMTP server address is invalid.
3004 Parameter error (MIMEBodyHeader).
3005 Parameter error (DisplayName).
3006 Parameter error (character set).
3007 Parameter error (From address).
3008 Parameter error (To address).
3009 Parameter error (CC address).
3010 Parameter error (BCC address).
3011 Parameter error (EmailSet is NULL).
3012 Parameter error (destination certificate is NULL).
3013 Parameter error (E-mail body).
3014 The hard disk is invalid.
3015 The S/MIME function is disabled.
3016 Self-certificate error. The device certificate cannot be used in the S/MIME function. One possibility, among others, is that the type of encryption key is not RSA.
3018 An invalid encryption algorithm is specified.
3019 An invalid signature algorithm is specified.
3020 The E-mail address included in the destination certificate does not match the destination address (To/Cc/Bcc).
3021 The E-mail address included in the certificate does not match the sender (From) address.
3022 Format error of the certificate.
3023 Parameter error (Disposition-Notification-To).
3024 Message syntax error of the receiver side.
3025 The SMTP server does not support the STARTTLS command.
3026 PKI card access error.
WebDAV transmission 22 The format of the URL of the target resource is invalid. Parameter error.
27 Attempted to send data that exceeds the maximum transferrable size for transfer coding.
42 WebDAV send is disabled.
52 The process is cancelled by a device reset.
55 A buffer shortage occurred.
56 The connection has already been established.
57 The connection to the WebDAV server failed (including connection time out).
62 The device is not connected to the network.
Functions Code Description
d-Color MF 752/652 11-13

Error code list11 11.3
WebDAV transmission 70 MIO is busy.
72 The connection has been interrupted with the condition that is in-sufficient to the specified size.
1001 The server does not support WebDAV.Unable to upload data to the server.
1002 The intermediate resource is not a collection (directory) (e.g. the specified folder does not exist).
1003 The target resource is a collection (directory).
1011 Although "https" is specified for the resource URL, it is unavailable because the SSL library is not included for the modularity.
1012 Although "https" is specified for the resource URL, the connection is interrupted because the WebDAV server certificate has expired.
1013 The CONNECT method is issued to the proxy server to establish an SSL connection via a proxy, but it is rejected.
1017 A communication error occurred while sending a request.
1018 A communication error occurred while receiving a response.
1027 nContentLength exceeds the maximum transferable size.
1030 Although use of a proxy has been specified, the proxy setting in-formation is unavailable.
1031 The connection to the proxy server failed (including connection time out).
1098 Failed in chunk TX to SharePoint Server.
1099 Another internal error occurred (e.g. memory shortage).
2236 The certificate has expired, or the validity period has not yet start-ed.
2238 The CN field of the certificate does not match the server address.
2239 The certificate does not have the expected usage.
2240 The certificate is not trusted. To trust the certificate, the certificate must be registered to the system.
2241 The certificate has expired.
2242 The CA server rejected the connection.
2243 The connection to the server that checks for expiration of the cer-tificate has timed out.
2244 Unable to check for expiration because the CRL size exceeds the maximum capacity that can be retained (1MB).
2261 The format of the certificate is invalid.
2263 Failed to initialize the certificate verification.
2264 Unable to perform verification because there are too many certifi-cates to be verified (the maximum number of certificates that can be verified at a time is 20).
2266 Internal error of the certificate verification.
2267 The device certificate does not exist.
2268 No certificate is sent from the server.
Functions Code Description
11-14 d-Color MF 752/652

11.3 Error code list 11
SMB browsing 32 The connection has been interrupted.
42 The specified protocol is unavailable.
57 Failed to connect to the server.
62 The device is not connected to the network.The internal channel detected an error immediately before estab-lishing communication.
67 The host PC is shut down.
4096 The group name/host name is not specified.The specified group name/host name does not exist on the net-work.
4097 The user name is not specified.Unable to log in with the specified user name and password.Failed to log in due to an SMB protocol error.
4098 Administrative shares do not exist.The shared resource name is not specified.The shared resource does not exist.
4099 The user name is not specified.Unable to log in with the specified user name and password.Failed to log in due to an SMB protocol error.
4102 The specified media to be written is not formatted.The file system of the specified media to be written is faulty.
4105 Other errors to which an error code is not assigned.
4352 The browser machine (master browser/backup browser) is not found.
4353 Unable to log in to the browser machine (master browser/backup browser).
4354 The sub folder does not exist.
4355 The request is not accepted due to an invalid call sequence etc.
4368 The number of groups is too large.
4369 The number of host PCs is too large.
4370 The number of shared resources is too large.
10000 Failed in authentication using a PKI card (PKI token).
12236 The certificate has expired, or the validity period has not yet start-ed.
12239 The purpose of the certificate is not right.
12240 CA that cannot be trusted or is not registered.
12241 The certificate has expired.
12242 The CA server rejected the connection.
12243 The connection to the server that checks for expiration of the cer-tificate has timed out.
12244 The size of the expiration list is too large.
12263 Failed in initialization of certificate verification (The path of the hard disk for saving certificates is not specified).
12264 Unable to perform verification because there are too many certifi-cates to be verified (the maximum number of certificates that can be verified at a time is 20).
12266 Internal error of the certificate verification.
12267 The device certificate does not exist.
12268 No certificate is sent from the server.
Functions Code Description
d-Color MF 752/652 11-15

Error code list11 11.3
User Authentication 1 Invalid parameter (e.g. the number of characters exceeds the limit, blank).The authentication function setting is disabled.
2 Failed to resolve the name using the DNS server.
3 Unable to find the authentication server.
4 Failed to authenticate.
5 Failed to allocate memory.An unexpected error occurred (which does not occur under nor-mal usage conditions).
6 An authentication request is received while an internal task of the user authentication client is being performed.
7 MIO was reset during forwarding.
10000 Failed in authentication using a PKI card (PKI token).
12236 The SSL certificate has expired.
12239 The certificate does not have the expected usage.
12240 The certificate is not trusted. To trust the certificate, the certificate must be registered to the system.
12241 The certificate has expired.
12242 The CA server rejected the connection.
12243 The connection to the server that checks for expiration of the cer-tificate has timed out.
12244 Unable to check for expiration because the CRL size exceeds the maximum capacity that can be retained (1MB).
12261 The format of the certificate is invalid.
12263 Although the environment is configured to use the hard disk, it is unable to perform verification because the hard disk path has not been specified.
12264 Unable to perform verification because there are too many certifi-cates to be verified (the maximum number of certificates that can be verified at a time is 20).
12266 Internal error of the certificate verification.
Functions Code Description
11-16 d-Color MF 752/652

11.3 Error code list 11
WebDAV client 2 The ID of a client that is not active has been specified.
3 Receive time out occurred.
4 A receive error occurred. Or an invalid request URL is specified.
5 The size of the content length or the receive size exceeds the max-imum transferable size. Or the size of the message body is too large.
6 The process is cancelled by a device reset. Or the size of the mes-sage body exceeds the maximum transferable size.
7 An internal error occurred. Or the process is cancelled by an inter-nal reset.
8 Failed to connect to the WebDAV server.
9 An error occurred while sending data to the WebDAV server.
10 A timeout occurred while sending data to the WebDAV server.
11 Failed to connect to the proxy server.
12 The proxy server rejected the connection request.
13 While the proxy server specification is valid, the host of the proxy server is not specified.
14 Failed to authenticate the proxy server.
15 Other error was returned from the proxy server.
16 An internal error occurred.
17 The process is cancelled because MIO_REQBODY_ERROR is specified by the device application.
2236 The certificate has expired, or the validity period has not yet start-ed.
2238 The CN field of the certificate does not match the server address.
2239 The certificate does not have the expected usage.
2240 The certificate is not trusted. To trust the certificate, the certificate must be registered to the system.
2241 The certificate has expired.
2242 The CA server rejected the connection.
2243 The connection to the server that checks for expiration of the cer-tificate has timed out.
2244 Unable to check for expiration because the CRL size exceeds the maximum capacity that can be retained (1MB).
2261 The format of the certificate is invalid.
2263 Failed to initialize the certificate verification.
2264 Unable to perform verification because there are too many certifi-cates to be verified (the maximum number of certificates that can be verified at a time is 20).
2266 Internal error of the certificate verification.
2267 The device certificate does not exist.
2268 No certificate is sent from the server.
Functions Code Description
d-Color MF 752/652 11-17

Error code list11 11.3
WS scan 1 The specified client is not registered.
2 Parameter is invalid.
3 The Web service or WS scan function is disabled.
4 The device is not connected to the network.
5 Waiting for connection from CP.
6 The SSL certificate of the destination computer is not valid when the validity period of an SSL certificate is checked.
22 Invalid argument.
42 The specified protocol is unavailable.
52 The connection aborted by the network.
53 The connection has been interrupted.
55 A buffer shortage occurred.
57 The socket is not connected.
60 The operation has timed out.
70 The operation is expected to be blocked.
72 The RetrieveImage waiting period has timed out.
2236 The SSL certificate has expired.
2238 The CN field of the certificate does not match the server address.
2239 The certificate does not have the expected usage.
2240 The certificate is not trusted. To trust the certificate, the certificate must be registered to the system.
2241 The certificate has expired.
2242 The CA server rejected the connection.
2243 The connection to the server that checks for expiration of the cer-tificate has timed out.
2244 The size of the expiration list is too large.
2261 The format of the certificate is invalid.
2263 Although the environment is configured to use the hard disk, it is unable to perform verification because the hard disk path has not been specified.
2264 Unable to perform verification because there are too many certifi-cates to be verified (the maximum number of certificates that can be verified at a time is 20).
2265 Parameter of the certificate verification is invalid.
2266 Internal error of the certificate verification/management module.
2267 The device certificate does not exist.
2268 No certificate is sent from the server.
Scan server sending 1 The action is not supported.
2 The specified parameter is invalid.
3 The operation failed.
4 A temporary error occurred on the scan server.
5 An internal error occurred on the scan server.
6 The scan server returned an error due to operation by an unau-thorized user.
Functions Code Description
11-18 d-Color MF 752/652
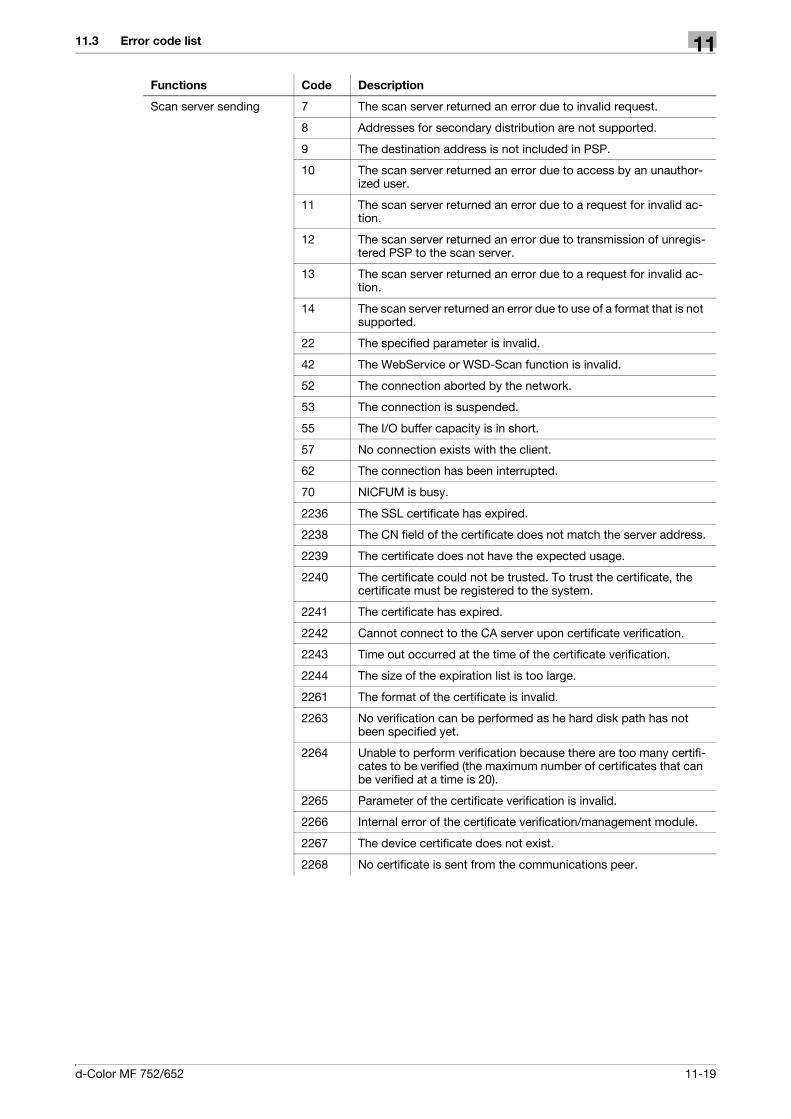
11.3 Error code list 11
Scan server sending 7 The scan server returned an error due to invalid request.
8 Addresses for secondary distribution are not supported.
9 The destination address is not included in PSP.
10 The scan server returned an error due to access by an unauthor-ized user.
11 The scan server returned an error due to a request for invalid ac-tion.
12 The scan server returned an error due to transmission of unregis-tered PSP to the scan server.
13 The scan server returned an error due to a request for invalid ac-tion.
14 The scan server returned an error due to use of a format that is not supported.
22 The specified parameter is invalid.
42 The WebService or WSD-Scan function is invalid.
52 The connection aborted by the network.
53 The connection is suspended.
55 The I/O buffer capacity is in short.
57 No connection exists with the client.
62 The connection has been interrupted.
70 NICFUM is busy.
2236 The SSL certificate has expired.
2238 The CN field of the certificate does not match the server address.
2239 The certificate does not have the expected usage.
2240 The certificate could not be trusted. To trust the certificate, the certificate must be registered to the system.
2241 The certificate has expired.
2242 Cannot connect to the CA server upon certificate verification.
2243 Time out occurred at the time of the certificate verification.
2244 The size of the expiration list is too large.
2261 The format of the certificate is invalid.
2263 No verification can be performed as he hard disk path has not been specified yet.
2264 Unable to perform verification because there are too many certifi-cates to be verified (the maximum number of certificates that can be verified at a time is 20).
2265 Parameter of the certificate verification is invalid.
2266 Internal error of the certificate verification/management module.
2267 The device certificate does not exist.
2268 No certificate is sent from the communications peer.
Functions Code Description
d-Color MF 752/652 11-19

Error code list11 11.3
11-20 d-Color MF 752/652

12 When the Bit Count Does Not
Match between the Server
and the Client


12
12 When the Bit Count Does Not Match between the Server and the Client
If the print server is Windows Server 2008/2008 R2 and its OS bit count does not match that of the client computer, an additional driver may not be installed normally in the print server.
To solve this problem, specify the setup information file (ntprint.inf) of the operating system with a different bit number when installing the additional driver on the print server.
The following describes how to install the additional driver by specifying a setup information file on a different computer from that of the print server.
Tips- Before starting this procedure, prepare to configure a different client computer from that of the print
server and install the operating system that has a bit number different from that of the print server.- On the print server side, the system drive of the client computer is assigned as the network drive. Con-
figure the setting to share the drive to be assigned in advance.
This example shows the operation when installing Windows Server 2008 (32-bit version) on the print server and Windows Vista (64-bit version) in the client computer.
1 Configure the setting to share the drive (ordinarily, drive C) where the client computer's operating sys-tem is installed.
2 On the print server, assign the drive (example: "C") of the client computer, which is shared in Step 1, as the network drive (example: "z").
3 Install the 32-bit operating system driver on the print server.
4 Open the Properties screen in the driver installed.
5 Select the [Sharing] tab, and select the [Share this printer] check box.
6 Click [Additional Drivers].
The Additional Drivers page appears.
7 Select the [x64] check box in the [Processor] column, and click [OK].
8 Specify the folder that contains the 64-bit operating system driver.
This displays a page to request a setup information file.
9 Click [Browse], and specify the setup information file [ntprint.inf] in the client computer to which the net-work drive is assigned.
% Specify the following file. [z:\Windows\System32\DriverStore\FileRepository\ntprint.inf_xxx]In the path above, "z" represents the assigned network drive. "_xxx" at the end of this path varies depending on the driver version.
% The setup information file may be stored at a different location depending on your client computer. If folder [amd64] resides in the same hierarchy as that of [ntprint.inf], specify a setup information file for 64-bit operating system under that folder. To additionally install a 32-bit operating system driver, specify a setup information file under folder [i386] that is in the same hierarchy as that of [ntprint.inf].
10 Click [Open].
Installation starts.
11 When the installation completes, click [Close].
The additional installation of the 64-bit operating system driver is then completed.
d-Color MF 752/652 12-3
12
12-4 d-Color MF 752/652

13 When a Message Appears to
Replace Consumables or
Carry Out Cleaning


13
13 When a Message Appears to Replace Consuma-bles or Carry Out Cleaning
When staples in the finisher have run out
When staples in the Finisher have run out, the following message appear.
Take action while referring to the label inside the machine.
d Reference
For details on how to replace the Finisher FS-534, refer to [User's Guide: Maintenance].
For details on how to replace the Saddle Stitcher SD-511, refer to [User's Guide: Maintenance].
For details on how to replace the Finisher FS-535, refer to [User's Guide: Maintenance].
For details on how to replace the Saddle Stitcher SD-512, refer to [User's Guide: Maintenance].
When the punch scrap box is full
When the punch scrap box is full, the following message appears (at replacement by user).
Take action while referring to the label inside the machine.
d Reference
For details on how to take an action using the Finisher FS-534, refer to [User's Guide: Maintenance].
For details on how to take an action using the Finisher FS-535, refer to [User's Guide: Maintenance].
For details on how to take an action using the Z Folding Unit ZU-606, refer to [User's Guide: Maintenance].
d-Color MF 752/652 13-3

13
When toner is running out in the Toner Cartridge
When toner is running out in Toner Cartridge, a message appears as shown below (at replacement by user).
d Reference
For details on the replacement procedure, refer to [User's Guide: Maintenance].
When the Imaging Unit needs to be replaced
When the replacement time has come for the Imaging Unit, the following message appears (at replacement by user). Tap [Start Guidance], then follow the displayed guidance to take an action.
d Reference
For details on the replacement procedure, refer to [User's Guide: Maintenance].
13-4 d-Color MF 752/652
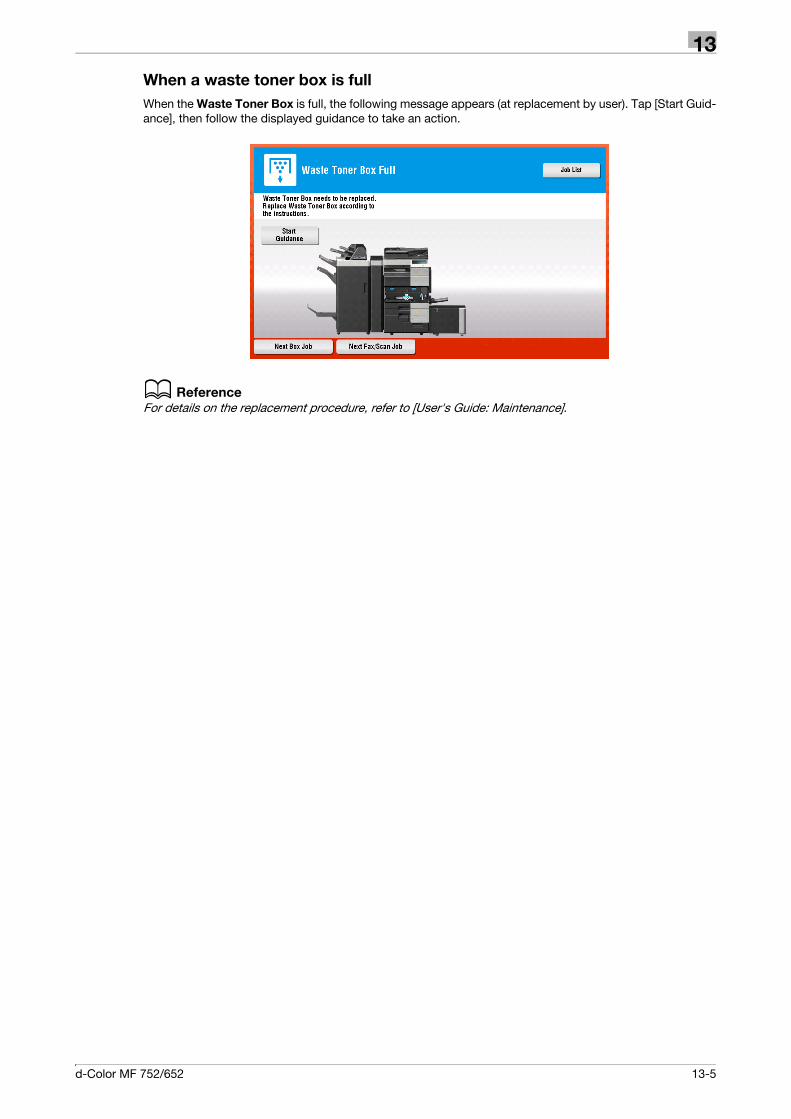
13
When a waste toner box is full
When the Waste Toner Box is full, the following message appears (at replacement by user). Tap [Start Guid-ance], then follow the displayed guidance to take an action.
d Reference
For details on the replacement procedure, refer to [User's Guide: Maintenance].
d-Color MF 752/652 13-5

13
13-6 d-Color MF 752/652
DIRECTIVE 2002/96/EC ON THE TREATMENT, COLLECTION, RECYCLING ANDDISPOSAL OF ELECTRIC AND ELECTRONIC DEVICES AND THEIR COMPONENTS
INFORMATION
1. FOR COUNTRIES IN THE EUROPEAN UNION (EU)
The disposal of electric and electronic devices as solid urban waste is strictly prohibited: it must be collected separately.
The dumping of these devices at unequipped and unauthorized places may have hazardous effects on health and theenvironment.Offenders will be subjected to the penalties and measures laid down by the law.
TO DISPOSE OF OUR DEVICES CORRECTLY:
a) Contact the Local Authorities, who will give you the practical information you need and the instructions for handling thewaste correctly, for example: location and times of the waste collection centres, etc.
b) When you purchase a new device of ours, give a used device similar to the one purchased to our dealer for disposal.
The crossed dustbin symbol on the device means that:
- when it to be disposed of, the device is to be taken to the equipped waste collection centres and is to behandled separately from urban waste;
- The producer guarantees the activation of the treatment, collection, recycling and disposal procedures in accordance with Directive 2002/96/EC (and subsequent amendments).
2. FOR OTHER COUNTRIES (NOT IN THE EU)
The treatment, collection, recycling and disposal of electric and electronic devices will be carried out in accordance with thelaws in force in the country in question.