
CREATING A GAME USING VISUAL NOVEL MAKER - Theseus
92
Nguyen Dang Khoa CREATING A GAME USING VISUAL NOVEL MAKER
-
Upload
khangminh22 -
Category
Documents
-
view
2 -
download
0
Transcript of CREATING A GAME USING VISUAL NOVEL MAKER - Theseus

Nguyen Dang Khoa
CREATING A GAME USING VISUAL NOVEL MAKER

CREATING A GAME WITH VISUAL NOVEL MAKER
Nguyen Dang Khoa Bachelor’s thesis Spring 2019 Information Technology Oulu University of Applied Sciences
3
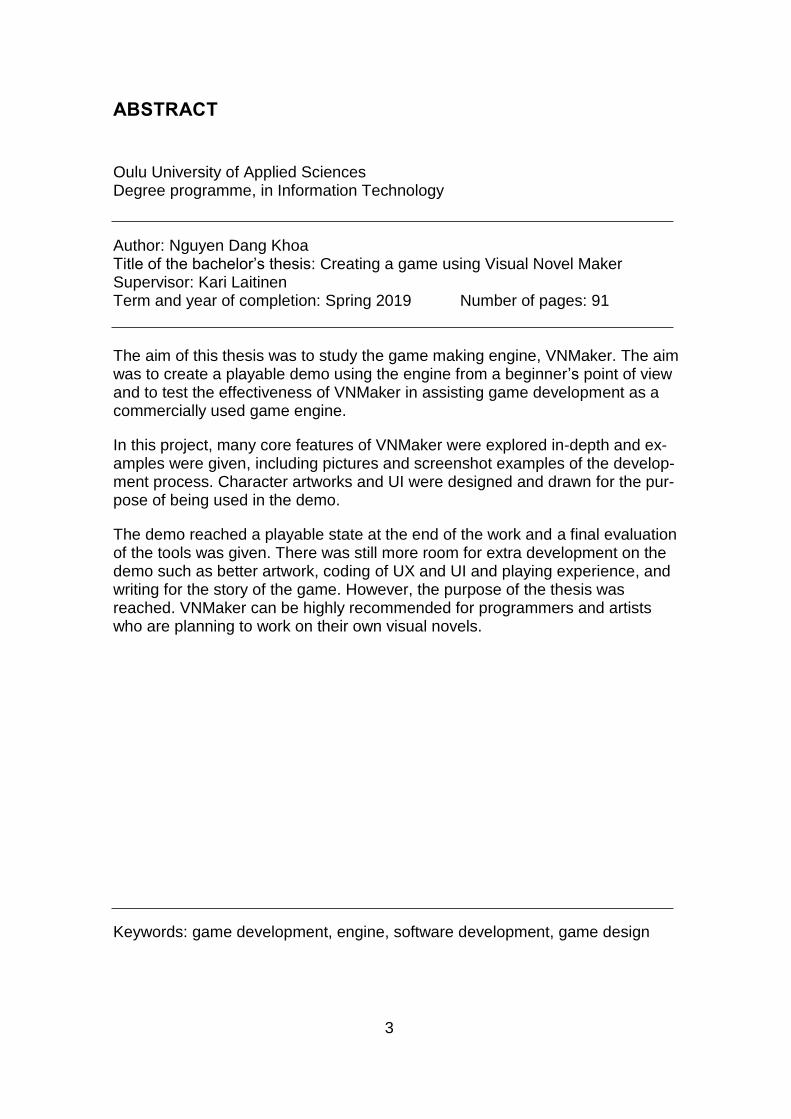
ABSTRACT
Oulu University of Applied Sciences Degree programme, in Information Technology Author: Nguyen Dang Khoa Title of the bachelor’s thesis: Creating a game using Visual Novel Maker Supervisor: Kari Laitinen Term and year of completion: Spring 2019 Number of pages: 91 The aim of this thesis was to study the game making engine, VNMaker. The aim was to create a playable demo using the engine from a beginner’s point of view and to test the effectiveness of VNMaker in assisting game development as a commercially used game engine.
In this project, many core features of VNMaker were explored in-depth and ex-amples were given, including pictures and screenshot examples of the develop-ment process. Character artworks and UI were designed and drawn for the pur-pose of being used in the demo.
The demo reached a playable state at the end of the work and a final evaluation of the tools was given. There was still more room for extra development on the demo such as better artwork, coding of UX and UI and playing experience, and writing for the story of the game. However, the purpose of the thesis was reached. VNMaker can be highly recommended for programmers and artists who are planning to work on their own visual novels.
Keywords: game development, engine, software development, game design
4
PREFACE
This thesis presents the final piece of study for my bachelor’s thesis at the Oulu University of Applied Sciences. It is the culmination of my 2.5 years study in software development at the university and my 2 years working and studying experience as a game developer and graphic artist in Oulu Game Lab. It pre-sented to me the opportunity to do my own research and overcome my chal-lenges so that I can apply for my own employment in the future. I would like to thank my thesis supervisor, Kari Laitinen for assisting me and mentoring me during the writing and working process of the project and my English language teacher Kaija Posio, for instructing the language of my report. I would also like to thank my friends Oliver Sairanen and Tuukka Kauppinen for assisting me in proof reading my thesis and offering writing advices. Extra thank is given to my friend Ly Quoc Phong, who play-tested my demo. Finally, I would like to give my wishes and regards to all my classmates, who have been studying and working with me during my 4 years course of study. Oulu, 27.1.2019 Nguyen Dang Khoa

5
CONTENTS
ABSTRACT 3
PREFACE 4
CONTENTS 5
VOCABULARY 7
1 INTRODUCTION 8
1.1 The status of video game development 8
1.2 General about game engines 9
1.3 Genre specific game engines 12
1.4 The objective of the thesis 14
2 VISUAL NOVELS 15
2.1 What is a visual novel game? 15
2.2 Recent boom of visual novels in the western market 19
2.3 Development cycle of a visual novel 20
2.4 Which tool to use? 21
3 VISUAL NOVEL MAKER 22
3.1 General introduction 22
3.2 List of features 23
3.3 Live2D 27
3.4 Overview 31
4 IMPLEMENTING AND CREATING A DEMO GAME 32
4.1 Understanding the foundation of a visual novel 32
4.2 Basic core functionality and creating a new project 39
4.3 Creating the basic scene 41
4.4 Implementing custom resources and assets 49
4.5 Adding dramatic effects and unlockable CG gallery 53
4.6 Customization 64
4.7 Building a basic affection system and the branching story path. 75
4.8 Live2D implementation 82
4.9 Final look at the demo 86
5 CONCLUSION 87
REFERENCES 89

6
7
VOCABULARY
2D: Two-dimensional space
3D: Three-dimensional space
API: Application Programming Interface
AI: Artificial intelligence
CSS: Cascading Style Sheet
JS: JavaScript
NPC: Non-player character
RPG: Role playing game
RPG Maker: Role Playing Game Maker
Sci-fi: Science fiction
UI: User Interface
UX: User Experience
VN: Visual novel
VNMaker: Visual Novel Maker
8
1 INTRODUCTION
1.1 The status of video game development
Since its foundation in the 1950s, gaming has become one of the most profita-
ble entertainment industries in the world. The early 80s and 90s saw the rise of
prominent video game developers, such as Sega and Nintendo in Japan and
Atari in the west, leading the entertainment business with title such as Super
Mario Bros and Pac-Man. Arcade machines were installed in pretty much every
public venue. The era was considered the golden age for gaming (Chikhani
2015, date of retrieval 26.08.2018).
Video games were revolutionary and a wonder of technology during the time, so
much that they inspired ambitious people to design and make their own games
However, there were many barriers. Resources were hard to find and there
were not many dedicated tools to make video games. Most developers only
hired people who were professionally trained in the business. It was a well-kept
trade-secret, and video game developers would be quiet about their tools of
trade to the public. It would have remained that way until the boom of the mobile
phone industry in 2004. The pioneer of the industry was Nokia, a Finnish com-
pany who would bring the cell phone to the hand of consumer worldwide, and
with it, mobile games, a concept that would prove later to be the gateway that
give birth to the independent (indie) game development scene (Wright 2016,
date of retrieval 26.08.2018). Games were much simpler and easier to make on
the mobile phones. The raising popularity of Adobe Flash at the time allowed
more people to learn and create smaller, simpler games on mobile phones and
web. It was through this notion and smart phones becoming an integral part in
our daily live later in the 2000s, which resulted in video game development be-
ing freer and more accessible than it was during the 90s. Video games develop-
ing tools and engine would be released later to the public free of charge for edu-
cation purposes and independent development. Nowadays, everyone can make
a video game, if they have proper game making engine and skills for it
(Chikhani 2015, date of retrieval 26.08.2018).
9
1.2 General about game engines
A game engine is a software that offers developers an environment to design
and develop video games (TheHappieCat 2015, date of retrieval 26.08.2018).
The engine consists of the following:
• Main program: Consist of the source code of the game, which specify the
game logic through a series of codes, scripts, and algorithm. Most game
engines can be written with programming languages like C++, C# or
Java.
• Rendering engine: This engine handles the rendering of 2D and 3D ob-
jects and graphics inside the game. It allows an image to be rendered
and animated on the screen in real-time.
• Audio engine: This engine handles the function of loading, decompress-
ing and outputting audio file of the game. Advance engines can produce
complex effect such as Doppler effects, echoes, attunement, and
pitch/amplitude adjustment.
• Physic engine: This engine handles the function of simulating physical
forces and collisions inside a game in real-time as realistically close to
the laws of physics as possible.
• Artificial intelligent (AI): Artificial intelligence handles specific algorithm in-
side a game. This part of the game engine is usually outsourced due to
the nature of it being specific to the logic of the game it is being used for.
In the world of video games, the definition of game engine and framework are
often used interchangeably because they often have similar implications. En-
gines comes with working editors that allows a person to develop a game
with/without prior coding knowledge and enable them to take care of the core
game implementation rather than reinventing the wheel (TheHappieCat 2015,
date of retrieval 26.08.2018).

10
In the early days of game development, a game engine and its API had to be
written from scratch by specialized programmers without any public library or
template to base on. Thus, it was considered as a company private asset, mak-
ing it harder to share it with the public (Chikhani 2015, date of retrieval
26.08.2018). Thanks to the boom in video game developing industry, game en-
gines have been made publicly available and everyone can get them for free for
the purpose of education and development. In contrast to the exclusive and
confusing game engine of the past, the newer ones come with these 4 specific
features to further help with game development:
• Full-game template: A skeleton of a game with already pre-made code
and logic that can be modified through user preferences. More advance
game making engines will come with a slider inside their editors that al-
low the user to tweak the physic engine and rendering engine inside a
game to their liking.
• Drag-and-Drop Visual Scripting: Allow the users to develop game without
typing any line of code through the help of a visual scripting tool that au-
tomatically assigns and handles events and actions by dragging and
dropping them on the editor. Actions are commands that can be chained
together to have an object move around or interact with the game phys-
ics through predetermined events (see the figure 1).
FIGURE 1: Screenshot example of a basic drag and drop visual scripting editor
(YoYoGames 2014, date of retrieval 26.08.2018).

11
• Built in script/coding support: For advanced developers who want to ma-
nipulate the game logic and write custom scripts themselves to create
more complex games, most game making engines allow them to do so.
Programming languages supported are C++, C#, JavaScript, and to a
certain extent, Java. However, some game making engines have their
own beginner friendly programming language which is easy to learn (and
usually based on the same architecture of the common programming lan-
guage) to further help students and developers.
The most used game making engines are Unreal 4 and Unity 3D with their
strong API that offers the most advanced scripting, rendering engine, audio en-
gine, and physic engine. On top of that, they offer an extensive library of plugins
end extension tools that can be used with their engine. They are the most opti-
mal for making all types of games. But they are not user-friendly, and they are
hard to learn for a non-programmer. Therefore, more user-friendly engines were
introduced such as GameMaker, BuildBox and RPG Maker MV.
However, developing a game is not only based on the engine but also on the
developer’s perspective and art skills. The genre of the game that is being
made and targeted platforms are also important. For that reason, specific game
making engines are created to fulfil the need, thus allowing a game developer to
push out games on the market faster (TheHappieCat 2015, date of retrieval
26.08.2018). These are called genre specific game engines.

12
1.3 Genre specific game engines
There are a lot of genres in video games, for example, puzzle solving, first-per-
son shooter, action, and role-playing games. When an application is developed
using a tool meant specifically to be used to create such an application, it is
much easier and quicker compared to developing it with a more general multi
tool. Genre specific game engines follow the same logic and are meant specifi-
cally to be used to create a game of the genre it is meant for. When you com-
pare them to multi-purposed game making engines such as Unity 3D or Unreal
4, they have their own advantages and disadvantages which are listed below.
Advantages:
• Having most of the features of a normal game making engine for a
cheaper price.
• Faster and more efficient than normal game making engines thank to
having an API and editor that support the creation of games based on
their respective genres.
• User friendly and not complicated to learn and master in comparison to
normal game making engines.
Disadvantages:
• Tend to have a weaker engine and capabilities compared to a normal
game making engine. For example, a game engine which is specializing
in making 2D games will have a more limited 3D rendering engine than a
normal game making engine would have.
• Usage of the engine to create games of a genre that is different from the
genre that they are supposed to be used for is very limited, if not impos-
sible
• They are primarily used by independent game developers instead of ma-
jor gaming companies.

13
Examples of such engines are RPG Maker MV, which is used to create Japa-
nese-style role playing games and BuildBox, which is aimed to create 2D hyper
casual games on mobile.
Due to the ease of use and their effectiveness in creating games for their spe-
cific genres, a lot of independent video game developers prefer using these
types of engines over the normal ones. One of the most popular genres of
games at the moment is visual novel games. This thesis will cover one game
making engine specialized in making visual novel games called Visual Novel
Maker, or VNMaker for short.

14
1.4 The objective of the thesis
As a student in the University of Applied Sciences working for 2 years at Oulu
Game lab, I have a passion for designing and creating games and learning new
game making tools. I am more skilled in visual design, story-telling and drawing
and I have had a lot of experience creating visual novel games before using vis-
ual novel game making engines such as Ren’Py and Tyrano Builder. Utilizing
an engine that I have no prior experience with, has always been in my interests.
There are a lot of good game ideas proposed at Oulu Game Lab with different
genres. However, the teaching at Oulu Game Lab require you to learn and use
Unity 3D for its more general usage. Not many programmers are familiar with
Unity 3D since it is not beginner friendly and a lot of game development time will
be wasted on learning the engine itself rather than making the game.
I believe that genre specific game making engines should be used instead of
Unity 3D when making specific games at Oulu Game Lab. Whether you are
making a hyper casual 2D endless runner game or a visual novel, you should
be using a specified game making engine for such game instead of a multi-pur-
pose one for maximum work efficiency. The objective of this thesis is to evalu-
ate VNMaker, create a working demo/prototype game with it and see if it is the
most efficient visual novel game making engine out there when compared to
similar engines.
15
2 VISUAL NOVELS
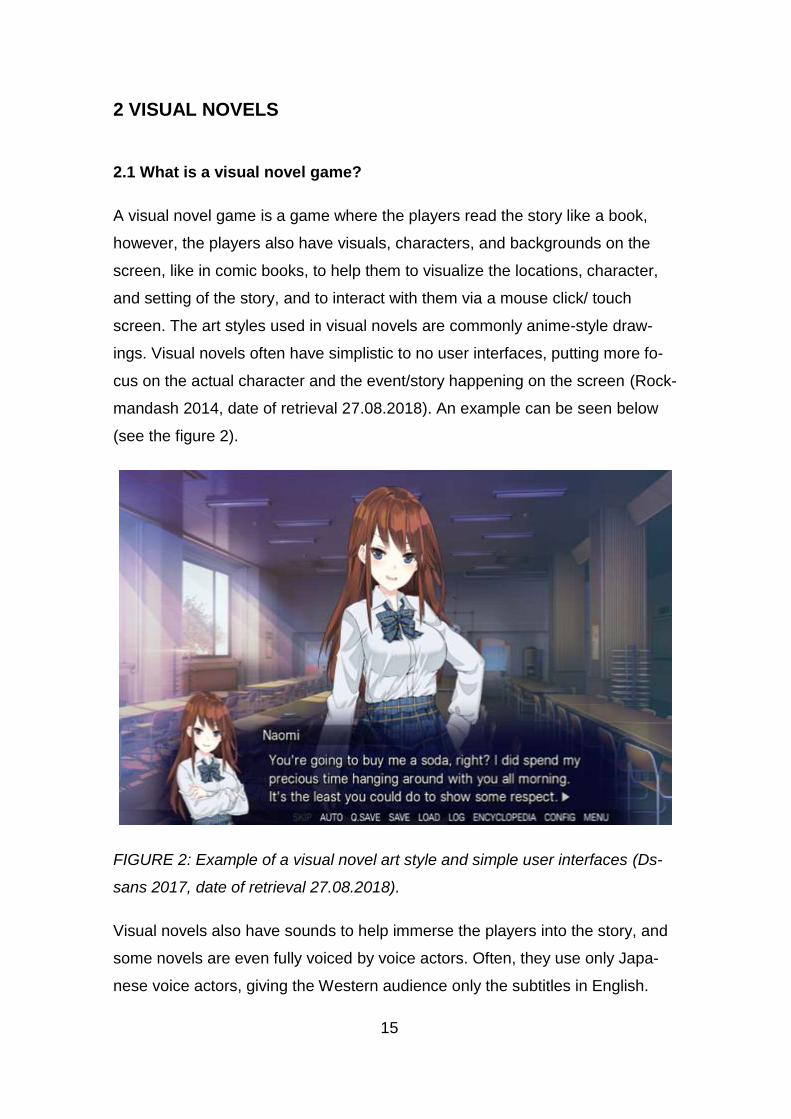
2.1 What is a visual novel game?
A visual novel game is a game where the players read the story like a book,
however, the players also have visuals, characters, and backgrounds on the
screen, like in comic books, to help them to visualize the locations, character,
and setting of the story, and to interact with them via a mouse click/ touch
screen. The art styles used in visual novels are commonly anime-style draw-
ings. Visual novels often have simplistic to no user interfaces, putting more fo-
cus on the actual character and the event/story happening on the screen (Rock-
mandash 2014, date of retrieval 27.08.2018). An example can be seen below
(see the figure 2).
FIGURE 2: Example of a visual novel art style and simple user interfaces (Ds-
sans 2017, date of retrieval 27.08.2018).
Visual novels also have sounds to help immerse the players into the story, and
some novels are even fully voiced by voice actors. Often, they use only Japa-
nese voice actors, giving the Western audience only the subtitles in English.

16
Some novels also have English voice actors. Like any game, visual novels also
have their own soundtracks.
The gameplay of visual novels is very limited, as the players need to only click
on the scene to unveil the next section of the story. Usually, the players are
asked to solve puzzles in certain points of the story or to decide on what their
characters should do (see the figure 3), for example to save a person or not to
save a person, via a choice. Each decision affects the progress of the story in
the novel and creates a branching path; a single novel might have a multiple
branching path leading into different endings to its story. Not every decision is
obvious as some decisions might have a positive impact on the story, some-
thing must be sacrificed for making that decision. Maybe the character got se-
verely injured while saving that person or somebody had to die for the greater
good. Some non-player characters might respond positively or negatively to
players actions and they will continue to do so during the entire game.
FIGURE 3: An example of story choices and branching path, choosing one will
result in different responses from the non-player characters. (Four Leaf Studios
2012, date of retrieval 27.08.2018).

17
Often time, at certain critical story points, the player will be also rewarded with a
CG (computer generated) image that features detailed artwork of the characters
in various poses on different backgrounds (Rockmandash 2014, date of re-
trieval 27.08.2018). These are special full-screen static still images or some-
times animated images (see the figure 4). They are nice to see in-game and
bring many reasons for one to read the story to unlock them. Some CG's may
consist of two images but with different facial emotions.
FIGURE 4: An example of a CG image showing 2 characters in funny poses
(Key 2015, date of retrieval 27.08.2018).
Visual novels also have different sub-genres. While they all tell a story, what
kind of a story they tell differs from the sub-genre (Rockmandash 2014, date of
retrieval 27.08.2018).
Dating-sim visual novels are often based on the premise of helping a male char-
acter who has never had any luck with females before to get acquainted with a
girl of his dream. The players are controlling the male character's actions, and
he will begin to meet some female characters, whom the player can interact
with, befriend and later take out on a date. These visual novels require the play-
ers to buy the right kinds of gifts, say the right words and make the girl become
interested in the male character.

18
Sci-fi visual novels are set in a sci-fi universe. A perfect example of such would
be the Snatcher or Policenauts where the player character is a detective sent to
space to investigate what has happened at the space station (Crimmins 2016,
date of retrieval 27.08.2018).
Horror visual novels are scary stories where the player must investigate what
has happened in a murder scene or visit a haunted house and make the right
decision to survive the ordeal.
Adult-only sub-genres of visual novel games called eroge and nukige also exist.
These games have less in term of story, instead, emphasize the sexual aspects
of the story. As the result, they are popular among visual novel players (see the
figure 5).
FIGURE 5: Example of an eroge “Sakura Beach” (Winged Cloud 2015, date of
retrieval 27.08.2018).
19
2.2 Recent boom of visual novels in the western market
Visual novels did not get much traction in the Western market until the 2010s.
Before that, western gamers who wanted to play visual novels would have to
rely on fan translations of the novels. The Japanese studios saw it as pointless
to translate their novels into English as there were few visual novel players in
the West (Crimmins 2016, date of retrieval 27.08.2018).
It was a Canadian video game developer, Christine Love, who published “Ana-
logue: A Hate Story” in 2012, that made visual novels more interesting for West-
ern audiences and became Love’s most successful game to date. The game is
a sci-fi tale about an abandoned space ship that resurfaces after centuries of
being lost in space. The game has an immersive backstory, memorable robot
AIs and honest depictions of artificial intelligence, gender roles and social isola-
tions (Valens 2016, date of retrieval 27.08.2018).
Shortly after Love’s game was released, Georgina Bensley published “Long
Live the Queen” which became critically acclaimed. The game follows the story
of a 14-year old princess, Elodie, and her rule over a Kingdom. The players
must make decisions to make sure Elodie survives during the entire story;
threats such as robbers and poisoned food are a constant threat that the play-
ers will face. Bensley wanted to tell a story about the political tensions of medie-
val Europe as well as making the players feel the pressure of not only raising a
person but also raising a country as well (Valens 2016, date of retrieval
27.08.2018).
Western developers are learning to use visual novels as a tool to tell stories of
history, politics and romance. It is much easier to create a compelling, multi-
branching story, than it would be with a physical book as there are no physical
limitation. Authors and developers have a much easier time to exactly write the
kind of story that they want, with twists and turns that the players can interact
with. Visual novels in western society are only in its beginning stages, however
they are starting to gain popularity and becoming a serious genre in the gaming
industry.

20
2.3 Development cycle of a visual novel
First and foremost, developers always start by deciding which engine they want
to use. Commercially free engines such as Ren’Py or TyrannoBuilder are often
used, but bigger companies have their own custom engines. With the help of
visual novel making engines, creating the visual part of the visual novel is sim-
ple. It requires the simple action of dragging and dropping the images and
sprites to their desired locations on the scene and adding texts on top of them.
Images and sprites consist of characters, backgrounds and CGs. These are
drawn by the artists. Meanwhile, the writers will write the story by creating a
flowchart for all branching paths and choices that lead to those different paths
(Rockmandash 2014, date of retrieval 27.08.2018).
Once both art and story are done, they will be merged with a simple graphical
user interface on their engine. Some scenes will reuse the same images and
sprites but with slight modification to the character’s expressions.
BGM (background music) and voices for their characters are required. Sound-
track for the game can be done by an in-house or outsourced composer. Voice
actors help immerse the player into the game. The developers just need to com-
bine them all together in a way that it makes sense for the story.
Afterward, the game is shipped out into digital stores; most commonly used is
Steam. Very little advertising is done for visual novels compared to other video
games as these games have a separate fanbase of their own (Rockmandash
2014, date of retrieval 27.08.2018).

21
2.4 Which tool to use?
There are a variety of different engines that can be used to develop a visual
novel There are three main types of engines: freely-available, purchasable and
com-pany-exclusive.
Ren’Py is the most popular free visual novel engine available. But it is not very
beginner friendly as it requires basic understanding of Python and C++ pro-
gramming languages. Python is not a very difficult language to learn and devel-
oper should get the hang of it quickly by searching for some tutorials in
YouTube, but C++ is not a user-friendly language for beginner wanting to make
games faster (Vincent 2018, date of retrieval 27.08.2018).
For those who do not have the time and resources to study a programming lan-
guage, TyrannoBuilder is the engine for you. The only disadvantage is that it
costs $14.99, which is compensated for its simple “drag-and-drop” interaction. It
also comes with its own scripting language called TyrannoScript which is a
modified version of JavaScript for the more advance users (Vincent 2018, date
of retrieval 27.08.2018).
VNMaker is the priciest engine in the market today at a price of $59.99. For that
price, it is possible to get an all-in-one engine with a lot of exclusive features (in-
cluding one which neither of the other 2 engines have). It claims to be the best
engine available by the visual novels making community. JavaScript and Cof-
feeScript are supported for scripting. It is relatively user friendly and support
Live2D natively (Vincent 2018, date of retrieval 27.08.2018).
These three engines are the top visual novel engines available for public use,
each with their own advantages and disadvantages. (Vincent 2018, date of re-
trieval 27.08.2018). Other common game engines for creating visual novels can
also be used. One such engine is Unity 3D with the Fungus plugin. It is free to
download; however, it has its own headaches. It also requires the user to know
a lot of advanced C# programming. In the end, it all comes down to whichever
engine is best suited for the user’s budget and skill level. For this thesis and this
project, Visual Novel Maker was chosen.

22
3 VISUAL NOVEL MAKER
3.1 General introduction
VNMaker is the latest visual novel making game engine developed by André
Radomski and published by Degica, who published RPG Maker MV, a Japa-
nese role-playing game making engine. VNMaker is based on the advanced
scripting tool for cutscenes and character events from RPG Maker MV but it is
more refined with newer features and drag and drop visual scripting added to
support making visual novel game. It focuses on creating interactive or non-in-
teractive stories games for computers, video game consoles and mobile de-
vices (Degica 2017, date of retrieval 28.08.2018).
As a genre specific game engine, it is only suitable for making visual novel
games, though the user can venture out to different sub-genres to an extent,
such as a point and click RPG or an adventure puzzler. For this thesis, we will
be exploring that capability by trying to implement an affection and branching
storyline system into our demo/prototype.
VNMaker is designed to be new user friendly and it can be used with relatively
easily without prior programming knowledge. Intermediate users can customize
their games further by using JavaScript and CoffeeScript as supporting pro-
gramming languages for scripting. Advanced programmers can create more
complex games using extensions and plugins that allow C++ and C# to be
used.
Games made with VNMaker can be exported and used with other visual novel
game engines such as TyrannoBuilder and Ren’py. As the time of writing of this
thesis, several plugins and extension modules have been added to the engine.
23
3.2 List of features
VNMaker comes with all the basic functionality of a game making engine and
extras. Some of the main features are:
• Free to use asset pack named Standard Assets Resources that come
with an already premade game template, art assets, music, and sound
effects. This allows the user to create your first game or learn the engine
without worrying about creating asset for your first demo/prototype. This
feature is updated monthly by the publisher and users can also publish
their own asset pack for others to use and import into their game with a
Community Asset Library and Marketplace.
• Multiplatform support allows the user to create games on Windows, Ma-
cOSX, Linux Ubuntu and mobile devices.
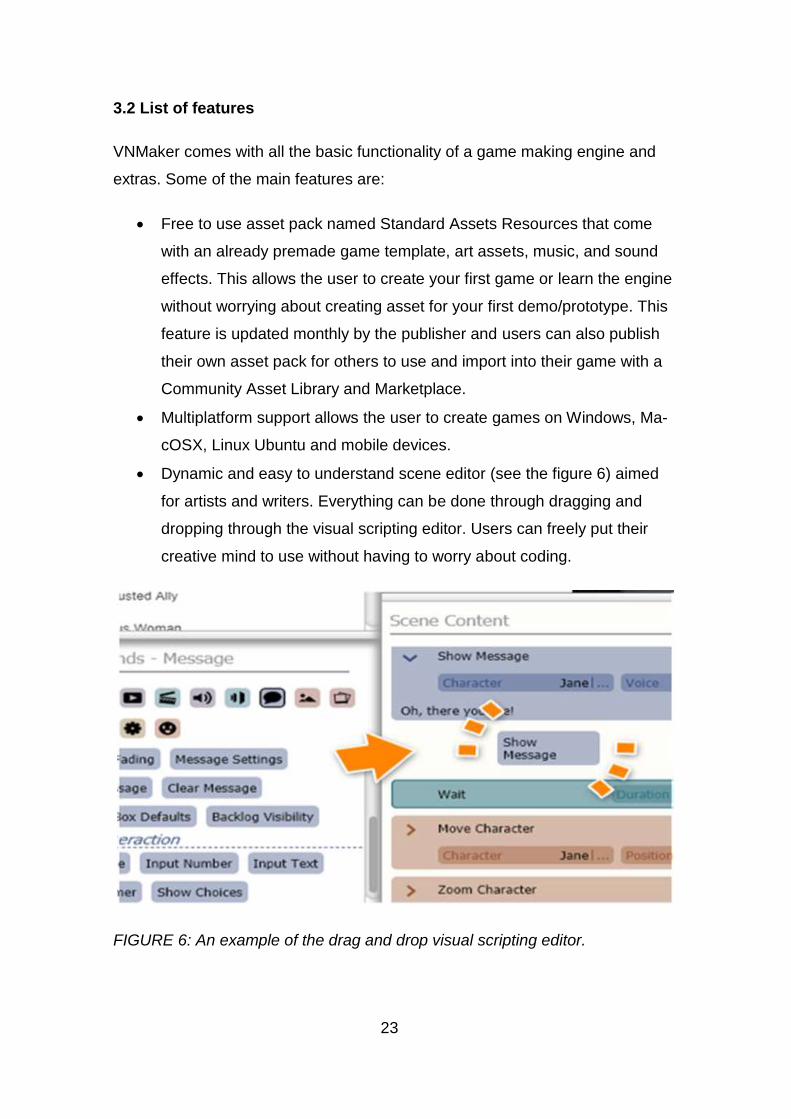
• Dynamic and easy to understand scene editor (see the figure 6) aimed
for artists and writers. Everything can be done through dragging and
dropping through the visual scripting editor. Users can freely put their
creative mind to use without having to worry about coding.
FIGURE 6: An example of the drag and drop visual scripting editor.
24
• A database that allows users to create, store, edit and reorganize their
data without any restriction. Characters, storyline, scenes, videos, music
and sound effects are arranged in easy-to-navigate folders and can be
easily dragged from the database and drop into the scene editor.
• Robust and easy to implement character animations and expressions.
Unique movie and audio layering tools allow the user to create the most
expressive and unique looking scene.
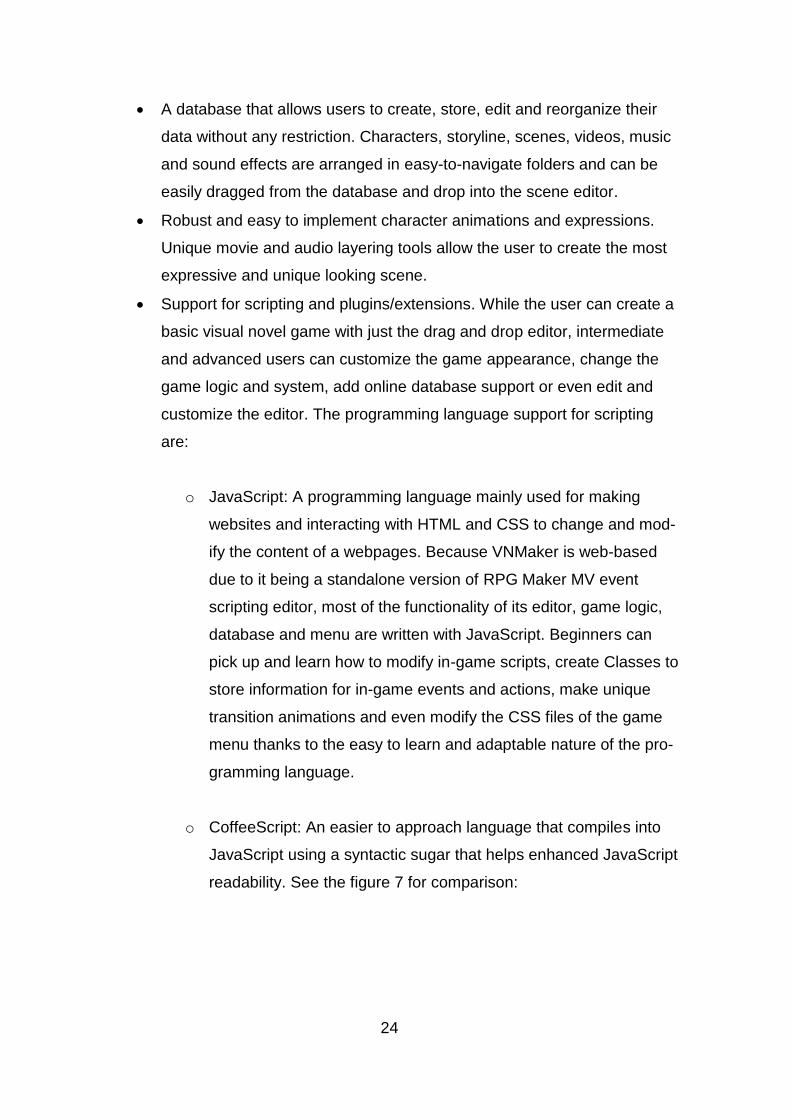
• Support for scripting and plugins/extensions. While the user can create a
basic visual novel game with just the drag and drop editor, intermediate
and advanced users can customize the game appearance, change the
game logic and system, add online database support or even edit and
customize the editor. The programming language support for scripting
are:
o JavaScript: A programming language mainly used for making
websites and interacting with HTML and CSS to change and mod-
ify the content of a webpages. Because VNMaker is web-based
due to it being a standalone version of RPG Maker MV event
scripting editor, most of the functionality of its editor, game logic,
database and menu are written with JavaScript. Beginners can
pick up and learn how to modify in-game scripts, create Classes to
store information for in-game events and actions, make unique
transition animations and even modify the CSS files of the game
menu thanks to the easy to learn and adaptable nature of the pro-
gramming language.
o CoffeeScript: An easier to approach language that compiles into
JavaScript using a syntactic sugar that helps enhanced JavaScript
readability. See the figure 7 for comparison:

25
Figure 7: An example comparison between JavaScript and Cof-
feeScript (Wikipedia, date of retrieval 28.08.2018).
o C++ and C# can be added into VN Maker using plugins and ex-
tension. These are multi-purposed object-oriented programming
languages that many other game making engines are built on
and take architecture from. While they can be useful to add in
more functionality to VN Maker due to their more complexity im-
plementation compared to JavaScript, they are not optimized for
the engine and if the user has the need to use them, it is better
to look at Unity 3D.
• Built-in localization support for the game (see the figure 8). All text dis-
play inside the game and menu text can be converted into a “.CSV” for-
mat, which is a delimited text file that uses a comma to separate values
and keep records in plain ASCII and various Unicode text. These “.CSV”
files can then be scanned and translated into a proper language of your
choosing and applied to the game. When used, it translates the text and
character dialogue of the game in real-time. There can be separate dis-
play tabs to show a comparison between the original text and the trans-
lated version, allowing the user to freely edit any translation error. Be-
cause the engine is relatively new, not all languages are supported.

26
FIGURE 8: An example of the translation tab.
• Native Live2D support, which is the most unique selling point of
VNMaker.

27
3.3 Live2D
Live2D is a revolutionary external animating technology that was developed and
first introduced in 2013 by the very talented and passionate artists of Tokyo, Ja-
pan. It aims to breathe life into 2D digital drawings and animate them as if they
were 3D while keeping all the aspect of the original authentic 2D hand-drawn
characters and objects intact (Wikipedia, date of retrieval 28.08.2018). It allows
the artist to create unique and beautiful animations without the cost of intensive
labour or loss of details in their original work compared to old unconventional
methods. Before Live2D there were only 2 ways of animating your character
and object on the screen. They are explained in more detail below:
• Frame to frame animation: The old school style of creating 2D anima-
tions. Animations are drawn into separate frames, each consisting of a
single image running in a specified sequence, making up the total anima-
tion (see the figure 9).
FIGURE 9: Example of frame to frame animation.
This type of animation method is still being used today in many Japanese
anime and 2D games. It is not cost and time productive since one anima-
tion can require a lot of drawing. However, when given to a skilled artist,
it can produce wonderful animation. This type of animation method is not
ideal for a visual novel game due to its simple and fast production nature.
Nowadays, only famous companies and studios with experienced anima-
tors use this method because only they can afford it.

28
• 3D model animation: A type of animation that relies on sculpting a 3D
model and then rigs it with a skeleton to control its movement based on
the physic engine of the game. This type of animation requires less draw-
ing effort from the artist but much more work for the 3D modeler and pro-
grammer (see the figure 9).
FIGURE 9: A 3D model in T-pose readied to be posed for animation.
3D animations are smoother than 2D animations and sometimes it can
be faster to make. However, it lacks the authentic charm of hand-drawn
2D art. In 2D art, just a few lines of a pencil or a pale colouring of a brush
can express rich emotions or subtle charms. But in 3D computer
graphics, such attractions are often warped or vanished in the process of
forcible transformation into three-dimensional sculptures in a virtual
space. Because of this reason, most visual novel games opt to not use
3D model animations.

29
Live2D takes away all the inconvenience of frame to frame animation while
keeping the smooth animation of 3D animation without losing the 2D attractions
of the original artwork. To do this, most Live2D models are drawn into separate
layered parts and then combined and animated using Live2D Cubism, an exter-
nal animation tool that is used to create and export Live2D models (see the fig-
ure 10 and 11).
FIGURE 10: A dissection of a Live2D model featuring her body parts as sepa-
rate layers.

30
FIGURE 11: The Live2D Cubism editor in work, progressing individual layers
into animations.
Models created with Live2D are exported with a “.moc” or “.live2d” file extension
and they can be imported into multiple media such as movie, web advertise-
ment, games, music videos, and webpages. This makes Live2D an important
technique and tool when making independent games. Due to its easy to use na-
ture and fast creation progress, many indie mobile games on the market have
adapted this new method (Tsui 2016, date of retrieval 28.08.2018).
For now, VNMaker is the only visual novel game making engine on the market
that support Live2D with its own in-engine scripting that allow users to control
and modify models and animations made with Live2D Cubism by importing their
“.moc” files into their own game. This allows for more diverse animations and
special effects to further improve upon the game the user is making. VNMaker
also comes with a free permanent license for Live2D Cubism (Degica 2017,
date of retrieval 28.08.2018).

31
3.4 Overview
VNMaker‘s features aim toward helping beginners and artists with no coding
knowledge to create their own game without much trouble. Being the only en-
gine that supports Live2D, a technique which speeds up video games develop-
ment cycle, it is perfect for developing visual novels independently. But how well
does it perform in practice? By creating and implementing a demo/prototype
game, the following issues will be investigated: (1) UI and functionality of the
engine and its features for beginners, (2) Improving the game appearance using
effects, and (3) implementing Live2D into the demo.

32
4 IMPLEMENTING AND CREATING A DEMO GAME
4.1 Understanding the foundation of a visual novel
Unlike graphic novels and light novels, visual novels focus more on the screen-
play than pure novel writing. A visual novel is a combination of different art
forms brought together. A story in a visual novel is written in present tense and
is happening as the viewers/players play it. It offers the player an absolute con-
trol of the flow and pace of the story. Therefore, when you are creating a visual
novel, you are writing and creating screenplays.
First, the list of characters should be identified. By breaking them down to the
basic functionality of the story and role they have, these are:
Protagonist(s): The main character of the story who will be telling the story to
the player from their first-person point of view. The choices that the player made
in-game reflect the growth and changes in these characters. There are also vis-
ual novels where the players can create their own character and play through
the story as their characters for more immersion; these are often found in West-
ern visual novels (Nelson 2016, date of retrieval 04.11.2018).
Antagonist(s): The opposing force to the main protagonist(s). For example, in a
dating sim visual novel, an antagonist would be the main character’s love rival.
Antagonist(s) does not need to be a human either, they can also be an object or
an item that oppose the protagonist’s point of view or have a different agenda
toward their aims. It is very important to have an antagonist(s) in the plot even if
they are not necessarily the bad guys because they create conflicts. With con-
flicts there are obstacles for the characters to overcome and grow, thus estab-
lishing a solid end goal for them in the story (Nelson 2016, date of retrieval
04.11.2018).
The supporting cast: Side characters and objects that serve the purpose of as-
sisting the protagonist(s) toward their goal. They do not have much focus com-
pared to the main cast of characters. However, they are necessary to keep the
story going (Nelson 2016, date of retrieval 04.11.2018).
33
Next, the narrative presentation style of the story is chosen. It is important to
consider the number of works that are needed for the project based on the cho-
sen narrative type and the writer’s expertise. There are 4 presentation styles:
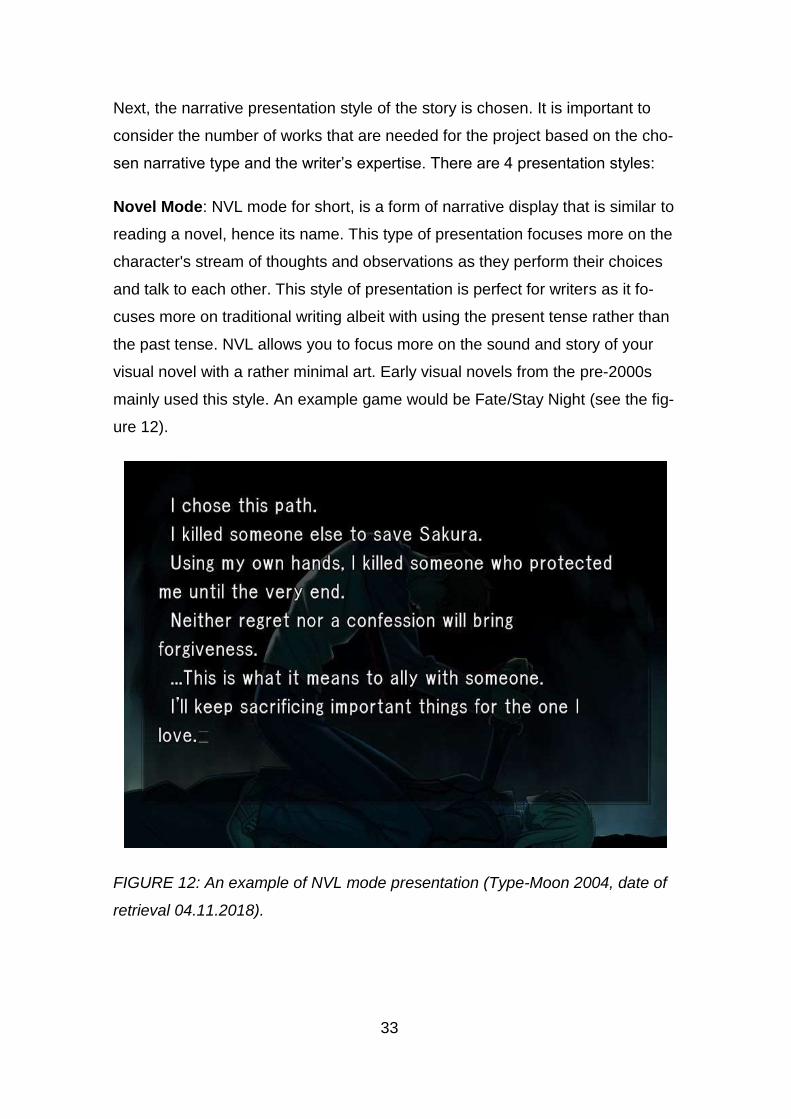
Novel Mode: NVL mode for short, is a form of narrative display that is similar to
reading a novel, hence its name. This type of presentation focuses more on the
character's stream of thoughts and observations as they perform their choices
and talk to each other. This style of presentation is perfect for writers as it fo-
cuses more on traditional writing albeit with using the present tense rather than
the past tense. NVL allows you to focus more on the sound and story of your
visual novel with a rather minimal art. Early visual novels from the pre-2000s
mainly used this style. An example game would be Fate/Stay Night (see the fig-
ure 12).
FIGURE 12: An example of NVL mode presentation (Type-Moon 2004, date of
retrieval 04.11.2018).

34
Adventure Mode: Also known as ADV mode, this type of narrative focuses
more on the character interaction, their expression and dialogue to tell the story
with the minimal description for its pacing. This is the most common narration
style that is used for visual novels nowadays. It focuses equally on both art and
writing. It is discouraged to use the third person narration upon using this mode.
An example can be found in the figure 13:
FIGURE 13: An example of ADV mode presentation (5pb 2011, date of retrieval
04.11.2018).
Animated Storyboard (Animatic): A rough story board visualizing an animate
movie that has been adapted into a visual novel. There are narrative and char-
acter expression, but it is often laid out like a film. High budget visual novels
combine both ADV mode and this style of presentation for the best visual
presentation (see the figure 14 and the figure 15).

35
FIGURE 14: An example of a rough animatic (Degica 2017, date of retrieval
04.11.2018).
FIGURE 15: SteinsGate Elite, a visual novel that combines both animatic ani-
mation and ADV mode of narrative story telling (5pg 2018, date of retrieval
04.11.2018).
36
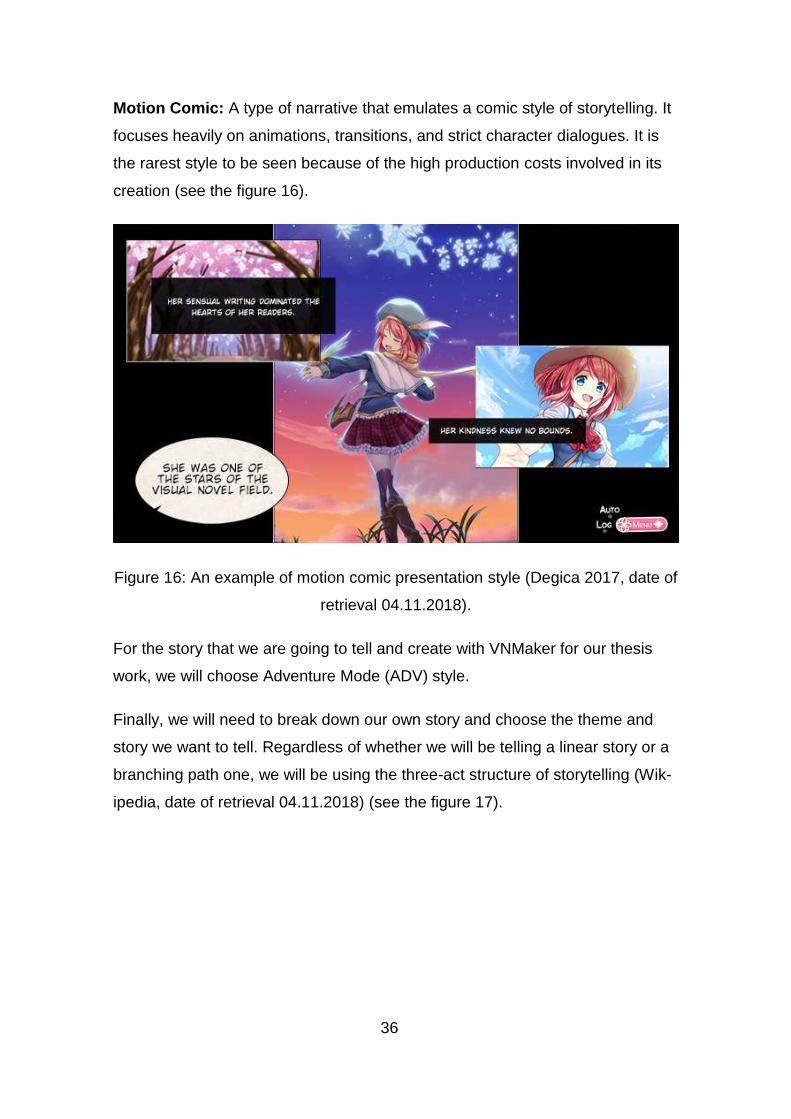
Motion Comic: A type of narrative that emulates a comic style of storytelling. It
focuses heavily on animations, transitions, and strict character dialogues. It is
the rarest style to be seen because of the high production costs involved in its
creation (see the figure 16).
Figure 16: An example of motion comic presentation style (Degica 2017, date of
retrieval 04.11.2018).
For the story that we are going to tell and create with VNMaker for our thesis
work, we will choose Adventure Mode (ADV) style.
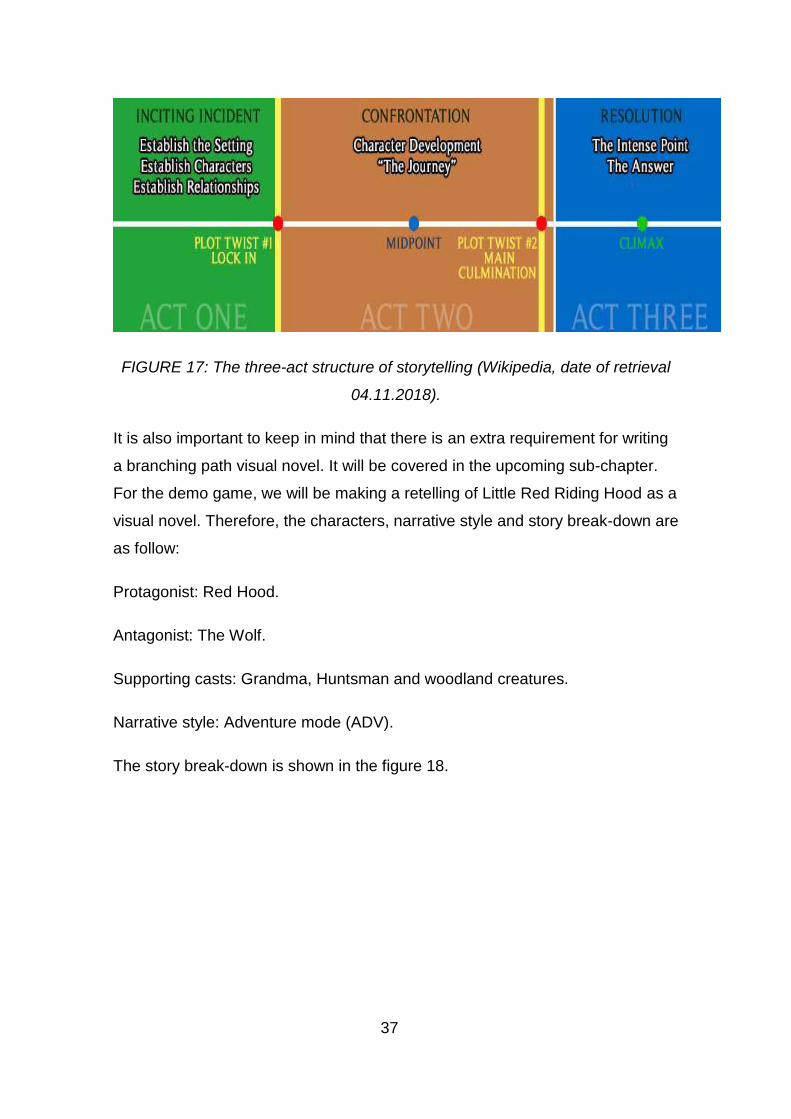
Finally, we will need to break down our own story and choose the theme and
story we want to tell. Regardless of whether we will be telling a linear story or a
branching path one, we will be using the three-act structure of storytelling (Wik-
ipedia, date of retrieval 04.11.2018) (see the figure 17).
37
FIGURE 17: The three-act structure of storytelling (Wikipedia, date of retrieval
04.11.2018).
It is also important to keep in mind that there is an extra requirement for writing
a branching path visual novel. It will be covered in the upcoming sub-chapter.
For the demo game, we will be making a retelling of Little Red Riding Hood as a
visual novel. Therefore, the characters, narrative style and story break-down are
as follow:
Protagonist: Red Hood.
Antagonist: The Wolf.
Supporting casts: Grandma, Huntsman and woodland creatures.
Narrative style: Adventure mode (ADV).
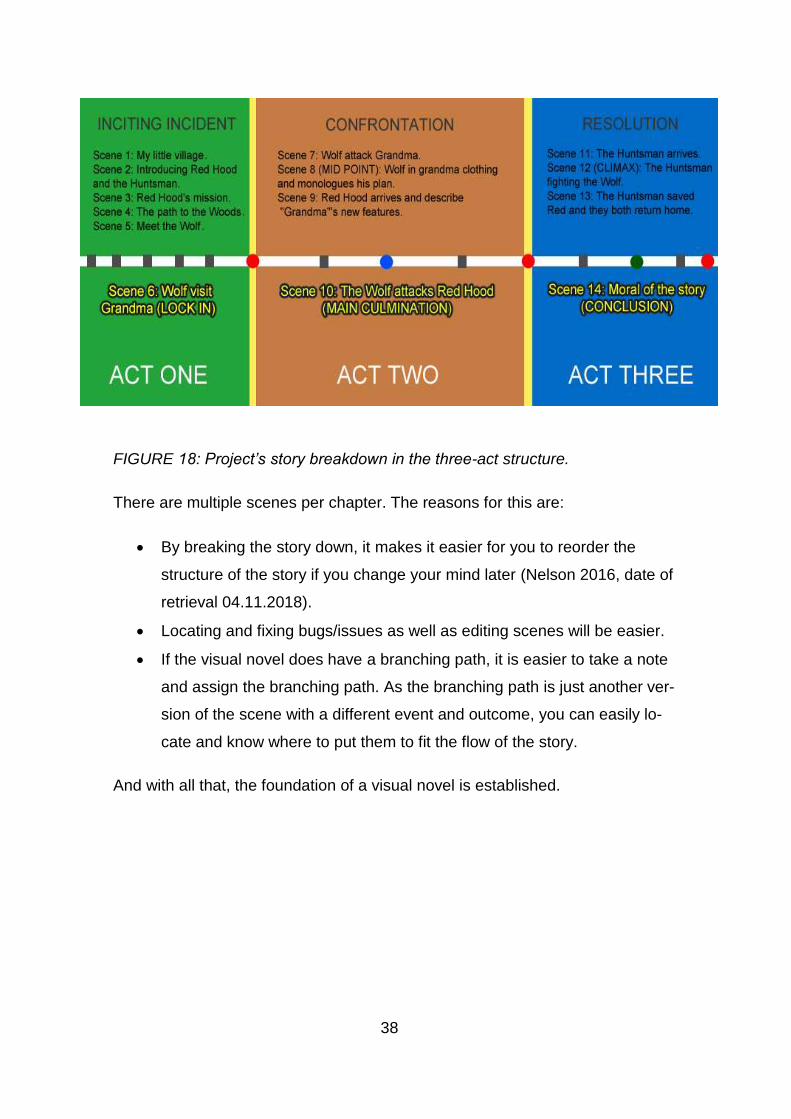
The story break-down is shown in the figure 18.
38
FIGURE 18: Project’s story breakdown in the three-act structure.
There are multiple scenes per chapter. The reasons for this are:
• By breaking the story down, it makes it easier for you to reorder the
structure of the story if you change your mind later (Nelson 2016, date of
retrieval 04.11.2018).
• Locating and fixing bugs/issues as well as editing scenes will be easier.
• If the visual novel does have a branching path, it is easier to take a note
and assign the branching path. As the branching path is just another ver-
sion of the scene with a different event and outcome, you can easily lo-
cate and know where to put them to fit the flow of the story.
And with all that, the foundation of a visual novel is established.
39
4.2 Basic core functionality and creating a new project
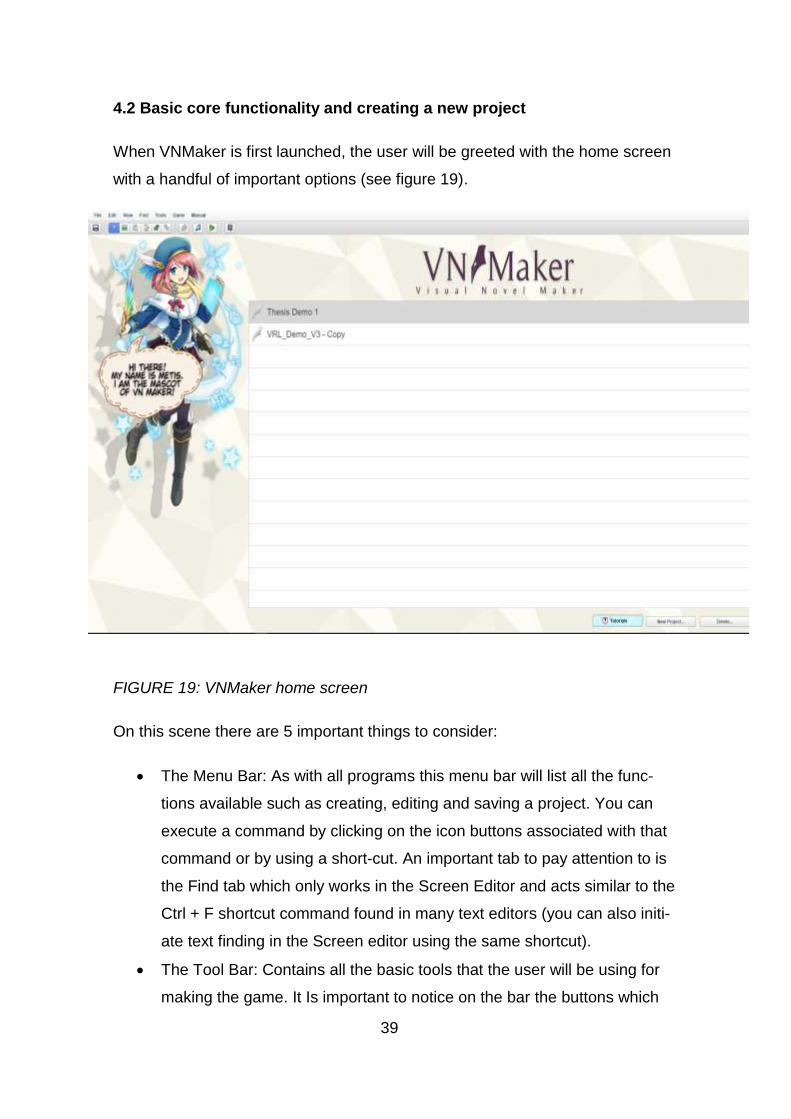
When VNMaker is first launched, the user will be greeted with the home screen
with a handful of important options (see figure 19).
FIGURE 19: VNMaker home screen
On this scene there are 5 important things to consider:
• The Menu Bar: As with all programs this menu bar will list all the func-
tions available such as creating, editing and saving a project. You can
execute a command by clicking on the icon buttons associated with that
command or by using a short-cut. An important tab to pay attention to is
the Find tab which only works in the Screen Editor and acts similar to the
Ctrl + F shortcut command found in many text editors (you can also initi-
ate text finding in the Screen editor using the same shortcut).
• The Tool Bar: Contains all the basic tools that the user will be using for
making the game. It Is important to notice on the bar the buttons which

40
will take you to the Resource Manager and the Extension Manager. You
can also test play your current build by pressing the Play button and build
the game to your selected platform by pressing the Build button.
• The “Project” list showing your recently made and/or opened projects.
The Project you imported from outside sources will also be shown here.
• A “New project” button will create a new project
• A “Delete project” button will delete projects you do not need. It will per-
manently delete the project without creating a restore point to rollback so
be advise when using it.
We will click on the New project button to begin creating our demo. There are
plenty of other pre-sets to choose from and the user can also import custom
pre-sets. We will choose to work with the Built-in UI 720P pre-set as it is the
standard (see the figure 20).
FIGURE 20: Main menu with list of pre-sets.
41
4.3 Creating the basic scene
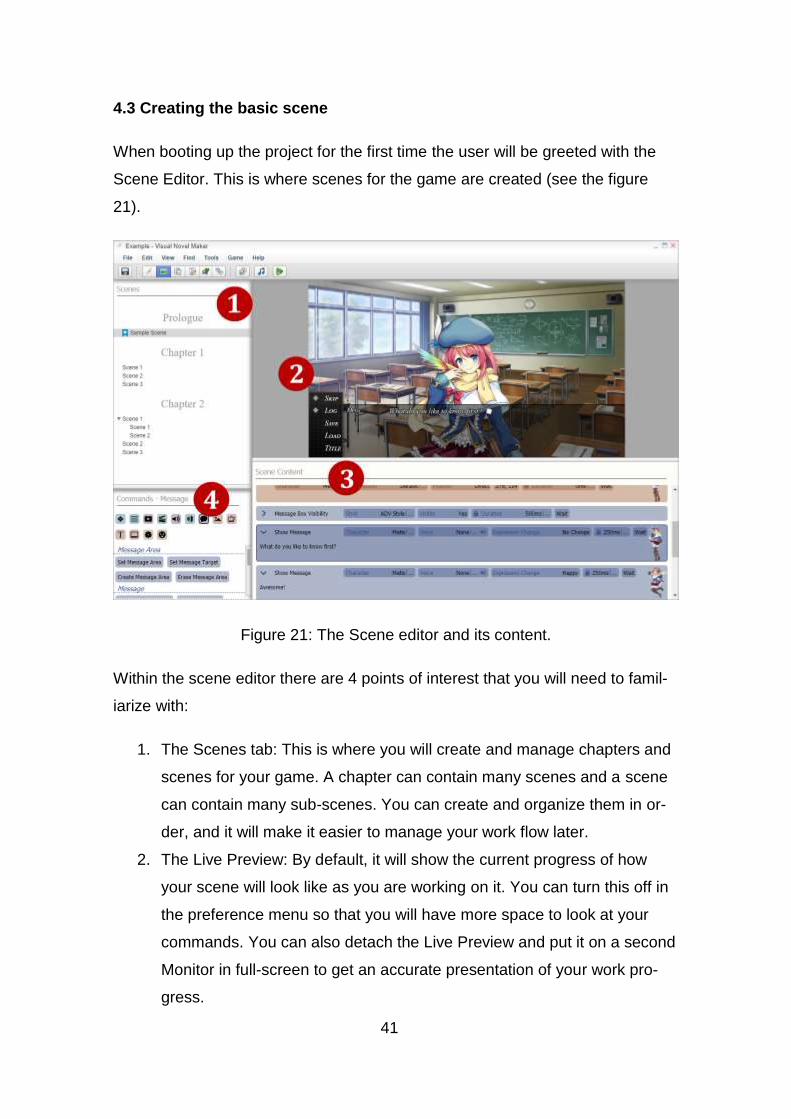
When booting up the project for the first time the user will be greeted with the
Scene Editor. This is where scenes for the game are created (see the figure
21).
Figure 21: The Scene editor and its content.
Within the scene editor there are 4 points of interest that you will need to famil-
iarize with:
1. The Scenes tab: This is where you will create and manage chapters and
scenes for your game. A chapter can contain many scenes and a scene
can contain many sub-scenes. You can create and organize them in or-
der, and it will make it easier to manage your work flow later.
2. The Live Preview: By default, it will show the current progress of how
your scene will look like as you are working on it. You can turn this off in
the preference menu so that you will have more space to look at your
commands. You can also detach the Live Preview and put it on a second
Monitor in full-screen to get an accurate presentation of your work pro-
gress.

42
3. The Scene Content: This is where you will drag and drop commands into
the scene and write the script for your game.
4. The Command: All the commands that are available and that you can
add to the screen with a mouse or a keyboard. For a full list of com-
mands, visit: https://asset.visualnovelmaker.com/help/Scene_Con-
tent_Commands.htm (Degica 2017, date of retrieval 04.11.2018).
With the basic knowledge of the Scene Editor understood, we will now begin
working on our first scene.
The first task to be done is to determine the chapters that our story has. By
looking at our story break down from above, it can be seen that we will be need-
ing 3 chapters, Thus, we will need to right click on the Scene tab and select
“New Chapter”. By repeating the same method, it is possible to create new
scenes and sub-scenes inside the chapter. Sub-scenes are useful to have when
making a game with a branching story path.
A scene in a visual novel contains 3 elements: The background which will be
the setting of the story, the characters who will be appearing in the story, and
the message box that will display the story and character dialogue (Rockman-
dash 2014, date of retrieval 27.08.2018).
We will begin creating the basic scene by first adding in the background and en-
abling the message box. To add a background of the scene, the “Change Back-
ground” command from the command list must be dragged and dropped into
the Scene Content. This will pop up as a mini-tab with parameters and tabs that
you can interact with in the Scene Content (see the figure 22). Most of the com-
mands that are added to the Scene Content will be displayed this way and, for
example, with the “Change Background” command, you can tell the engine
which images will used for the background, what layer position it will be on
(which will be important if your game has a puzzle solving element) and the
speed in which the background appears.

43
FIGURE 22: An example of a command being displayed on the Content Scene
that the user can interact with.
The message box will also be done by dragging the “Message Box Visibility”
command into the Scene Content and setting it to visible and setting the display
style to the ADV style. Then, the “Show Message” command is added and the
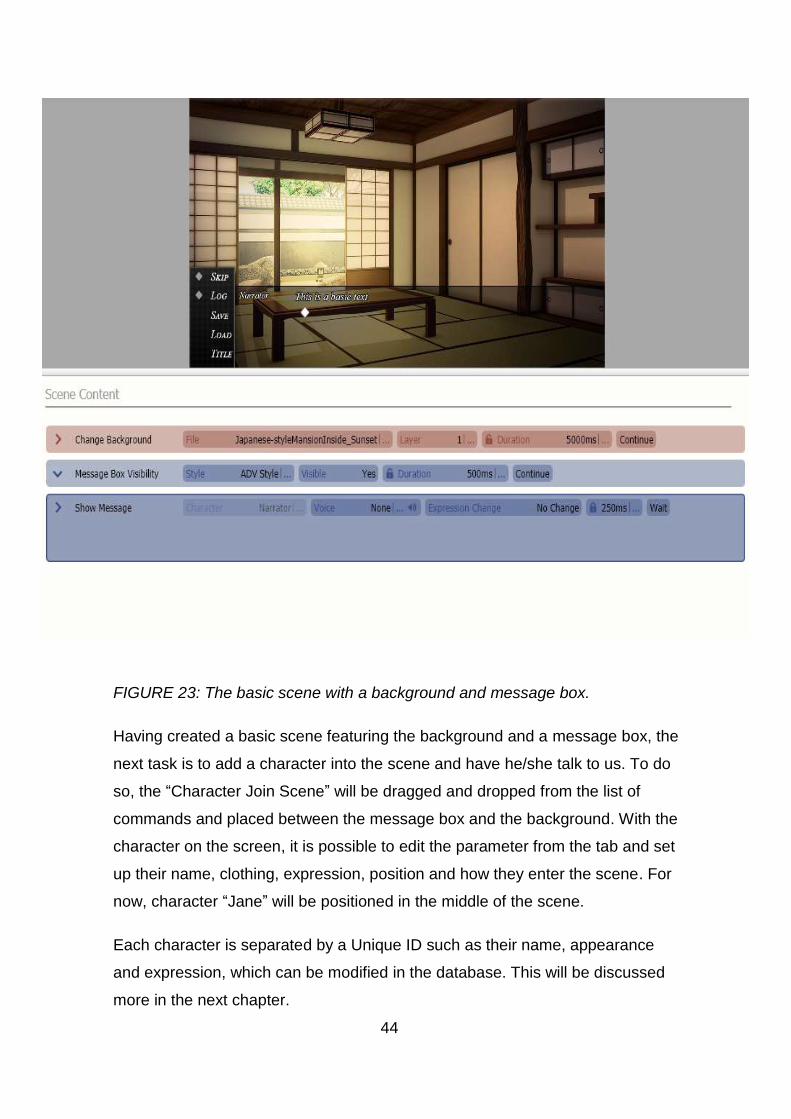
messaged is inserted. The result will be as followed (see the figure 23).
44
FIGURE 23: The basic scene with a background and message box.
Having created a basic scene featuring the background and a message box, the
next task is to add a character into the scene and have he/she talk to us. To do
so, the “Character Join Scene” will be dragged and dropped from the list of
commands and placed between the message box and the background. With the
character on the screen, it is possible to edit the parameter from the tab and set
up their name, clothing, expression, position and how they enter the scene. For
now, character “Jane” will be positioned in the middle of the scene.
Each character is separated by a Unique ID such as their name, appearance
and expression, which can be modified in the database. This will be discussed
more in the next chapter.

45
To interact with “Jane”, some commands will be added. Looking at the “Show
Message” command tab, there will be a button to select the character ID. It will
be clicked on and “Jan” will be specified as the character that will be speaking in
the scene. The character expression can be changed as well. It should be kept
in mind that the character ID must match the character that shows up on the
screen. “Jane” will greet us with a happy expression when everything is done
(figure 24).
FIGURE 24: The basic scene with a background, character and text displayed.
46
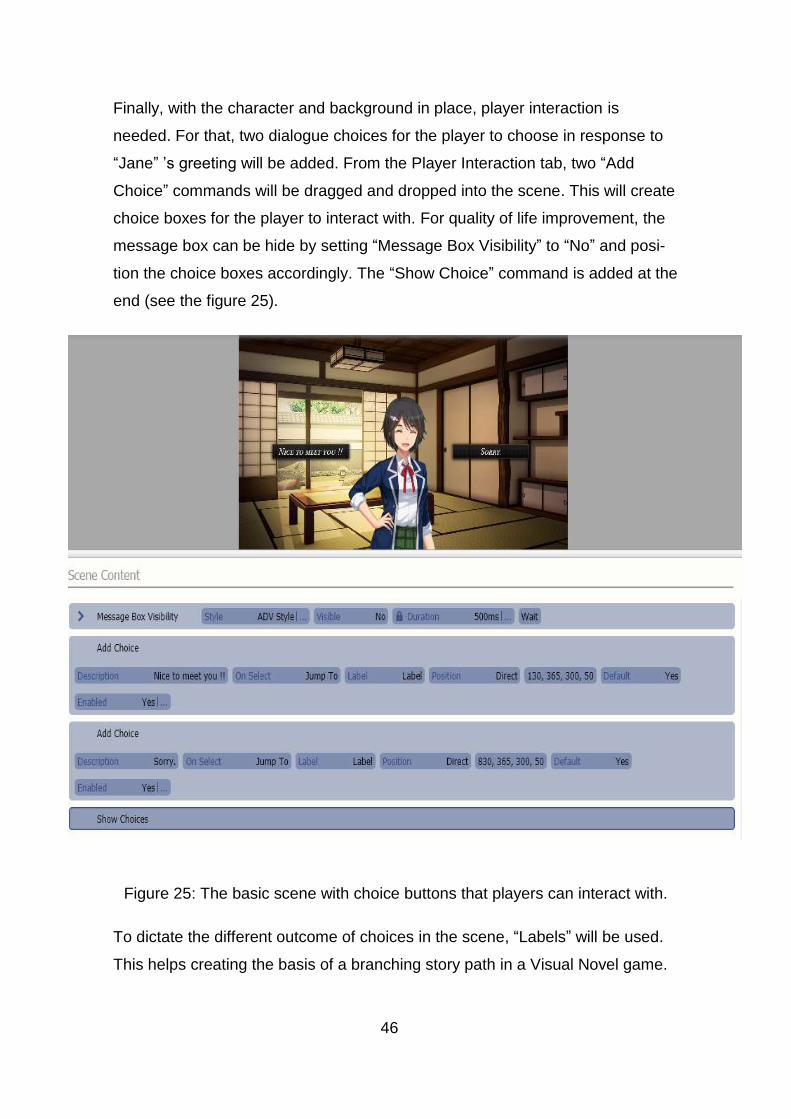
Finally, with the character and background in place, player interaction is
needed. For that, two dialogue choices for the player to choose in response to
“Jane” ’s greeting will be added. From the Player Interaction tab, two “Add
Choice” commands will be dragged and dropped into the scene. This will create
choice boxes for the player to interact with. For quality of life improvement, the
message box can be hide by setting “Message Box Visibility” to “No” and posi-
tion the choice boxes accordingly. The “Show Choice” command is added at the
end (see the figure 25).
Figure 25: The basic scene with choice buttons that players can interact with.
To dictate the different outcome of choices in the scene, “Labels” will be used.
This helps creating the basis of a branching story path in a Visual Novel game.
47
There is an advance approach to this by calling into a sub-scene after the
choice is made. However, “Labels” are best used if the flow of the story doesn’t
require extensive scene shifting.
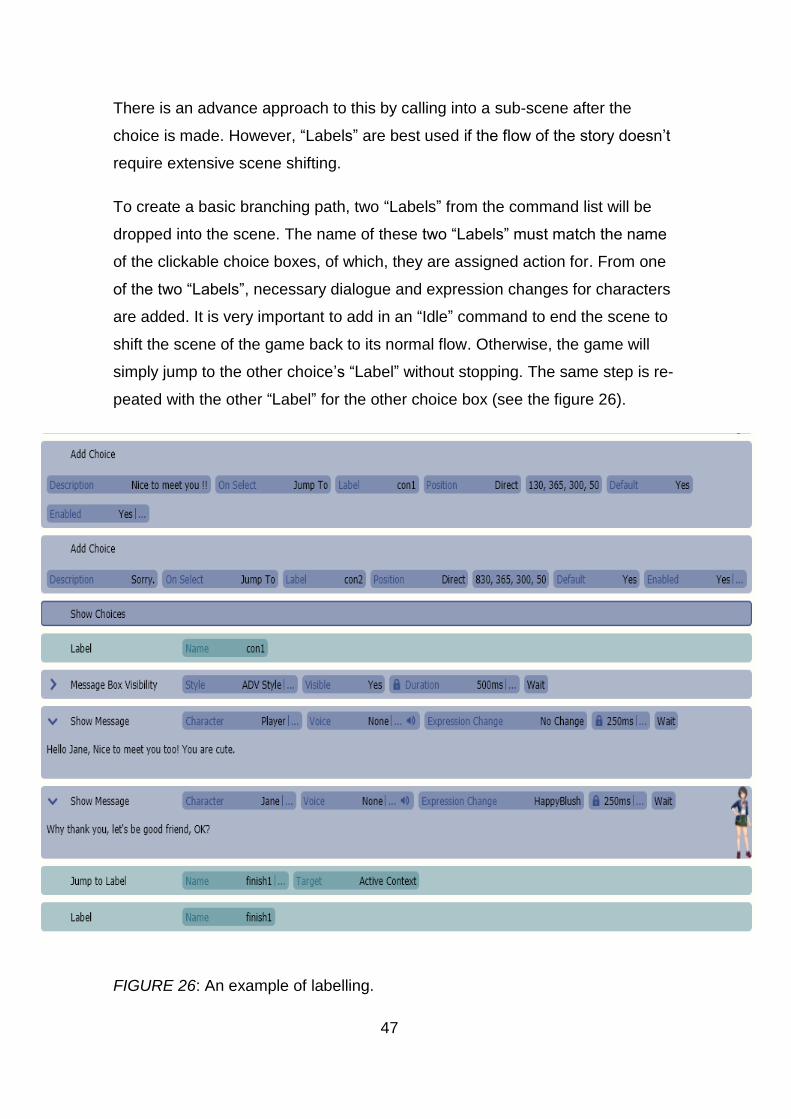
To create a basic branching path, two “Labels” from the command list will be
dropped into the scene. The name of these two “Labels” must match the name
of the clickable choice boxes, of which, they are assigned action for. From one
of the two “Labels”, necessary dialogue and expression changes for characters
are added. It is very important to add in an “Idle” command to end the scene to
shift the scene of the game back to its normal flow. Otherwise, the game will
simply jump to the other choice’s “Label” without stopping. The same step is re-
peated with the other “Label” for the other choice box (see the figure 26).
FIGURE 26: An example of labelling.

48
Different choices create different outcomes (see the figure 27.) and it is very im-
portant to keep these choices and labels organized as the game continue being
worked on.
Figure 27: “Jane” is happy with our response. One of the many outcomes the
player can achieved in a visual novel game.
And with that, a basic scene with player interaction is created. Next, we will be
studying the implementation of custom resources and assets.
49
4.4 Implementing custom resources and assets
When making a game, elements and objects appearing on the screen are called
“assets”. The player can view and, to an extent, interact with these assets
based on the logic the developers set for them. Assets in a visual novel are split
into graphical assets and audio assets. Graphical assets contain the character
arts, their outfits, their expressions, backgrounds, and CG images. Audio assets
contain songs, voice clips and other sound effects for the game. VNMaker by
default will supply the user with a ready-made list of backgrounds, characters
and songs through a commercially free content pack called Standard Assets
Resource. The pack is updated regularly to ensure that new free assets are
available for the user, monthly (Degica 2017, date of retrieval 02.01.2019).
As of the present, there is no market place for the user to visit and download as-
sets made by other creators with VNMaker other than the official channel. In ad-
dition, there is a limited amount of game ideas that can be worked around with
the free assets pack that is given. Despite the inconvenience, VNMaker allows
you to import custom assets either made by yourself or other creators into the
engine. This process is rather streamlined and easy for users to do.
VNMaker features a database for assets management called the “Collection”.
For normal engines, the creation and management of a database full of assets
must be done by hand with no visual aid and/or guide. With VNMaker, the data-
base can be easily accessed while the game is being worked on by clicking on
the Collection tab which is placed conveniently next to the scene editor tab (see
the figure 28).

50
FIGURE 28: A view of the database.
Here in the database, new record for asset, script and events for the game can
be added. Parameters for the characters can be set up in an organized space
that does not separate itself from the scene editor. This allows the user to simul-
taneously work on both the game and managing assets and scripts at the same
time.
To start adding custom assets into the database, the user will need to create
the assets or find them on a third-party site. The users of VNMaker have cre-
ated a forum where assets can be dowloaded for free so as long as the author
of said assets is credited (Degica 2017, date of retrieval 02.01.2019).
51
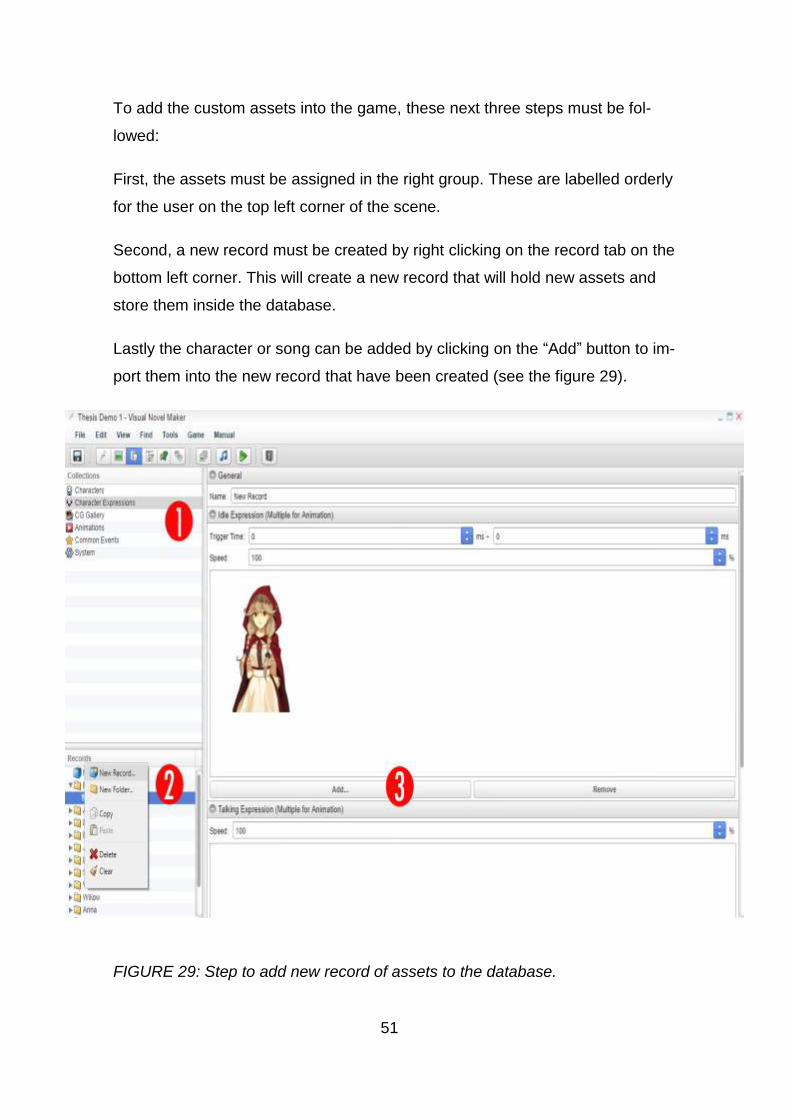
To add the custom assets into the game, these next three steps must be fol-
lowed:
First, the assets must be assigned in the right group. These are labelled orderly
for the user on the top left corner of the scene.
Second, a new record must be created by right clicking on the record tab on the
bottom left corner. This will create a new record that will hold new assets and
store them inside the database.
Lastly the character or song can be added by clicking on the “Add” button to im-
port them into the new record that have been created (see the figure 29).
FIGURE 29: Step to add new record of assets to the database.

52
It is important to remember that naming is very important. All characters, their
expressions, and events that concern them must all share the same similar rec-
ord name. This will help to keep the system stable and bug free during further
development. For now, the new character will be named “Red” and added to the
database.
Finally, the existing character from the previous step will be replaced “Red”
through the editing of the “Character Join” command’s parameters. Result is
seen in the figure 30.
FIGURE 30: Red Riding Hood or “Red” added to the game.
With the basic idea noted down, the same step can be repeated and applied for
other assets, such as background images, song and voice clip as well.
53
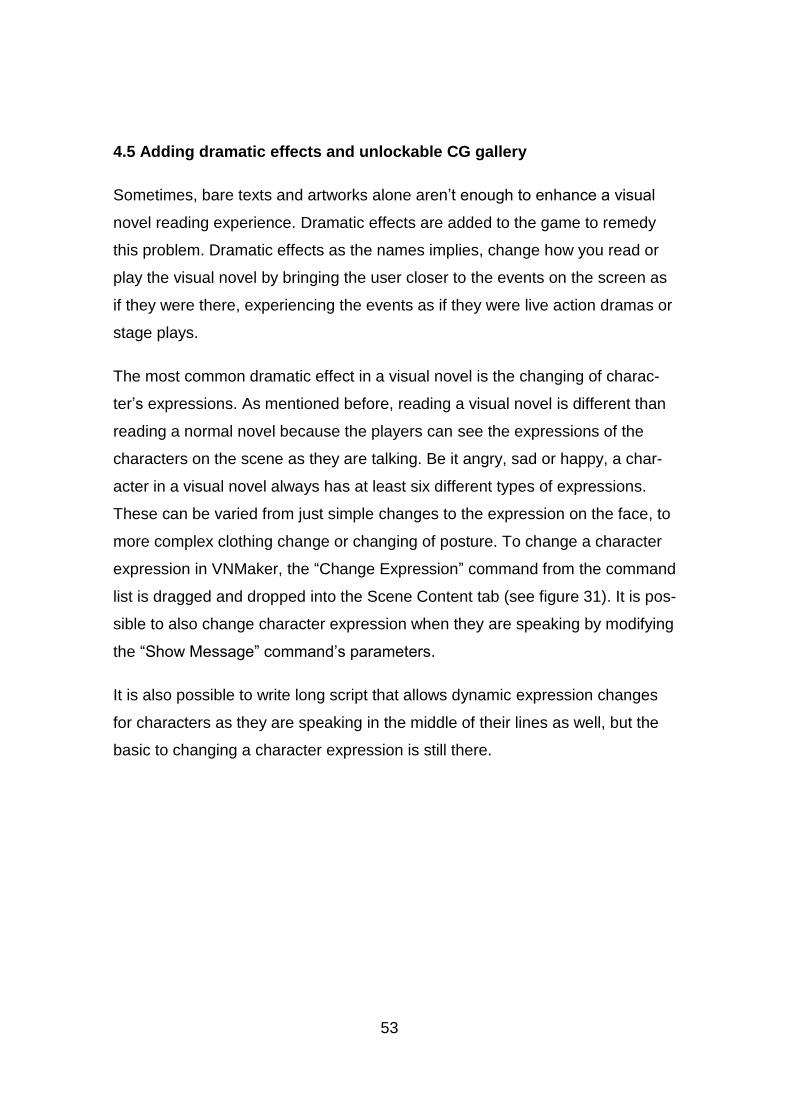
4.5 Adding dramatic effects and unlockable CG gallery
Sometimes, bare texts and artworks alone aren’t enough to enhance a visual
novel reading experience. Dramatic effects are added to the game to remedy
this problem. Dramatic effects as the names implies, change how you read or
play the visual novel by bringing the user closer to the events on the screen as
if they were there, experiencing the events as if they were live action dramas or
stage plays.
The most common dramatic effect in a visual novel is the changing of charac-
ter’s expressions. As mentioned before, reading a visual novel is different than
reading a normal novel because the players can see the expressions of the
characters on the scene as they are talking. Be it angry, sad or happy, a char-
acter in a visual novel always has at least six different types of expressions.
These can be varied from just simple changes to the expression on the face, to
more complex clothing change or changing of posture. To change a character
expression in VNMaker, the “Change Expression” command from the command
list is dragged and dropped into the Scene Content tab (see figure 31). It is pos-
sible to also change character expression when they are speaking by modifying
the “Show Message” command’s parameters.
It is also possible to write long script that allows dynamic expression changes
for characters as they are speaking in the middle of their lines as well, but the
basic to changing a character expression is still there.

54
FIGURE 31: Changing character expressions with the Change Expression com-
mand.
The next set of dramatic effects is a collection of character, background and
screen effects. These consist of explanation on what they do and the situation
to use them in:
• Zoom: Zoom inwards or outwards the character or background, creating
the illusion of the character moving closer to the camera for more inti-
mate talking.
• Shake: Makes the character shakes so that it looks like they are breath-
ing or reacting to a certain action or the camera shake to emphasize ur-
gency.
• Mask: Masks the character and background with another object. Usually
use when the character exits the scene
• Blend: Blends the character or object into the background with varying
Opacity, it is also used when the character exits the scene.

55
• Move Character: This will move the character to another location, usually
used when there are two or more characters on the scene.
• Flash: Creates a flash of white light or different colour on the character,
background or screen to create an “eureka” effect when something im-
portant is mentioned or discovered.
• Tint: Tints the character or background with a black overlay. This is used
when there are more than two characters speaking and the scene want
to focus on the currently talking character. The one who is not talking is
usually tinted.
• Rotate: Rotates the character, camera or background.
As with character expression, users can add them into the scene by adding the
respective command from the command list into the scene content. The user
can enhance current conversation with “Red” using these following additions to
the Scene Content (see the figure 32.)

56
FIGURE 32: An example of dramatic effect added to create the scene in which
Red talks to the player face to face. Red is tinted on this screen because she’s
not the one who is currently speaking.
The last and final dramatic effects that can be added to the scene are “Movie
Effects”. These are custom, long and loop-able animations that are played on
top of the characters and background to add more effect into the scene. For ex-
ample, adding a raining effect to simulate two characters talking in the rain. To
add Movie Effects, the “Show Movie” command or the “Play Movie” command is
dragged and dropped into the Scene Content. Now, while ”Red” is talking to the
player character, rain will be added to the scene. (see the figure 33).

57
FIGURE 33: The scene is more dramatic with rain added to it via Movie Effects.
Dramatic effects are in no way proper replacement for more advance anima-
tions that require heavy scripting or Live2D. However, as a fundamental basic in
VNMaker, it is good to learn how to use them properly.

58
Sometimes, a simple scene and dramatic effect alone cannot convey the idea of
what the characters are doing directly to the players. The players cannot tell if
the characters are moving around or doing a certain action with just background
and character with static animations. Visual novels often use CGs instead to de-
liver the emotion of the scene better to the viewer.
As mentioned, CGs are big static images that fill the whole screen. They are
shown at critical story points to hook in the viewer experience with the story and
reward them for their choices with good artwork. Often, the whole scene full of
dialogue and choice can be centred around a CG instead of simple background
and characters (see the figure 34).
FIGURE 34: Example of choices and dialogue happened on top of a CG instead
of traditional background and character
Once unlocked, these CGs can be viewed by the player in a separate Unlocka-
ble scene. By doing this, the players will have more incentive to play the game
and make different choices in order to unlock and see more CGs (see the figure
35).

59
FIGURE 35: Example of an unlockable CG gallery.
To create a CG gallery in VNMaker, the user will need to add CGs into the gal-
lery. To do this, the user has to go to the database and navigate to the right “CG
Gallery” folder and import in images into said folder (see the figure 36). This
task can be easily done thanks to the helpful and organizable Resource Man-
ager. It is very important that imported images must be in the right CG gallery
folder and have the right size. Two pictures of different sizes are needed, one
bigger one for displaying on the scene or viewing on the Gallery and one thumb
size one called “thumbnail” for the preview of the bigger picture in the gallery.

60
FIGURE 36: Importing CGs and CG thumbnails into the game via the Resource
manager.
The pictures will be added database by repeating the same step that was used
when importing custom characters (by adding new records) and the engine will
handle the rest (see the figure 37). The user has to make sure to choose the
right images and thumbnails for the CGs from the “CG Gallery” folder. It is im-
portant to list them base on the chapter they appear in for easy organizing later.
The slot parameter will determine their placement on the CG gallery. It is im-
portant to know that each new record can only hold one CG and one thumbnail.
For CGs that have different variations, one must create many different records.
The CGs must be treat as a different entry on different slot, as no two CGs can
share one slot in the gallery.

61
Figure 37: Adding new CG and thumbnail into the database by creating new
record that hold them.
When added to the database, the CG can be now added to the scene. The user
can drag and drop a “Show Picture” command into the Scene Content and
specify the proper file that will be showed. Alternatively, an entire new sub-
scene can be created, and the CG can be displayed there. Whichever method
the user chose, they are both simple to implement. When the CG is inserted
into the scene, it will replace the background and character sprite for the dura-
tion of the story. The user can freely customize the scene by adding more dia-
logue, choices, and message boxes. Scripts can be run on it as they would on a
normal scene.
For this scene, the “Show Text” command is added instead of the normal mes-
sage box.
62
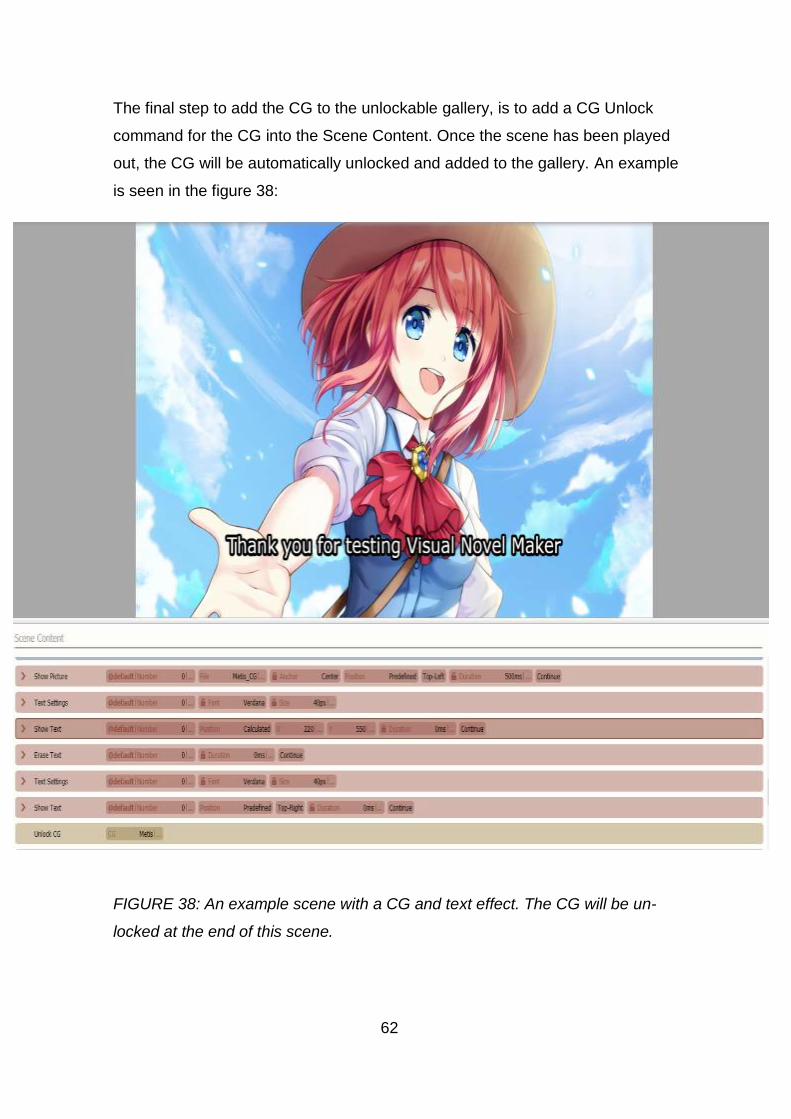
The final step to add the CG to the unlockable gallery, is to add a CG Unlock
command for the CG into the Scene Content. Once the scene has been played
out, the CG will be automatically unlocked and added to the gallery. An example
is seen in the figure 38:
FIGURE 38: An example scene with a CG and text effect. The CG will be un-
locked at the end of this scene.

63
The unlocked CG will then be added to the gallery automatically and can be
viewed from the title screen without needing any extra input from the player.
The title screen and the Gallery are auto-generated scenes that are fully built
with accompanying scripts for the user when first creating a project. They can
be customized later. This is also one of the advantages of VNMakers, where all
the problematic setting up phases are already handled by the engine itself.
With dramatic effects and CG added to the scene, this demo is starting to pro-
gress toward a more playable state. It is important to keep in mind that the im-
plementation methods mentioned here are not the only possible choice that the
users of VNMaker can use to implement these effects and CGs, but rather the
basic method. VNMaker is all about users’ freedom and as the users grow more
familiar with the tool, they can write more complex scripts of their own to further
enhance and customize the implementation process of these effects and CGs.

64
4.6 Customization
In the last section, it was mentioned how the look of the title screen and other
menu scenes are customizable. The same extend can be applied to every sin-
gle UI element in the game such as the message box and the menu buttons.
The details of how to customize the game and make it more appealing will be
explored in this chapter.
Firstly, the title screen of the game will be analysed. As it is the first scene the
player will see when starting up the game, an appealing title screen can make
the Visual Novel reading experience more enjoyable for the players. The pro-
cess of creating this scene with a normal game making engine, even advanced
ones like Unity or Unreal engine, has always been a hassle. This is because
there are a lot of elements and buttons on the scene, and programmers need to
create many separate objects and different layers of text and art on top of each
other and arrange them in the right order and assign function to them. Such pro-
cess can be time consuming and hard to optimize.
With VNMaker, the users can speed up this process to a few steps by utilizing
“Hotspot”. A “Hotspot” is a space where the users can assign “on-hover” or “on-
click” events and run function by placing them on a part of an “Image Map”. An
“Image Map” is a big image with many different layers stacked on top of each
other that are interchangeable. For example, the Title screen, which normally
would require many different layers of texts and objects/buttons to create, can
be made with only two images with the use of an “Image Map” (see the figure
39).
FIGURE 39: An Image Map consists of 2 images.

65
The “Image Map” for the title screen contains 2 big images with different looks.
These pictures are layered and stacked on top of each other with the bottom
one (the one on the right) acting as the main picture that the player will see
when they boot up the game called the Ground state and the other picture act-
ing as the top layer called the Layers state, consisting of the “Hover”, “Unse-
lected”, “Selected” and “Selected Hover”.
To add an “Image Map” into the scene, the user has to drag and drop the “Show
Image Map” command into the scene. Then, the images for the Ground state
and Layers state will be decided and added to the resource manager. Finally,
they are set up via the parameters on the “Show Image Map” command. (see
the figure 40).
FIGURE 40: Snippet of the Show Image Map command with the parameter for
the Ground state and Layers state Hover, assigned to the two pictures that was
features in the figure 39.

66
With the “Image Map” set up and state assigned accordingly to their respective
layers, the user can start adding “Hotspot” on top of the map by clicking on the
“Add Hotspot” prompt when it is shown. A transformable rectangle space will be
created that the player can drag and drop and stretch on top of the element of
the “Image Map”, for example as seen in the figure 41.
Figure 41: A Hotspot is created on top of an Image Map.
The creation of the “Hotspot” for the function “New Game” can be used as an
example. By clicking on the space, the user will be able to start editing the con-
tent of the “Hotspot” and assigning events and command. For this “Hotspot”, the
function of jumping to the label called “start” is assigned. On the label “start”, the
“Switch” command is assigned, which will switch the variable “In Game” to “On”.
This will tell the game that a new game has started. Next, the command of
"Change Scene” is added which will take the player to the first scene of the
game. Finally, the “Idle” command is added to finish the command chain.
67
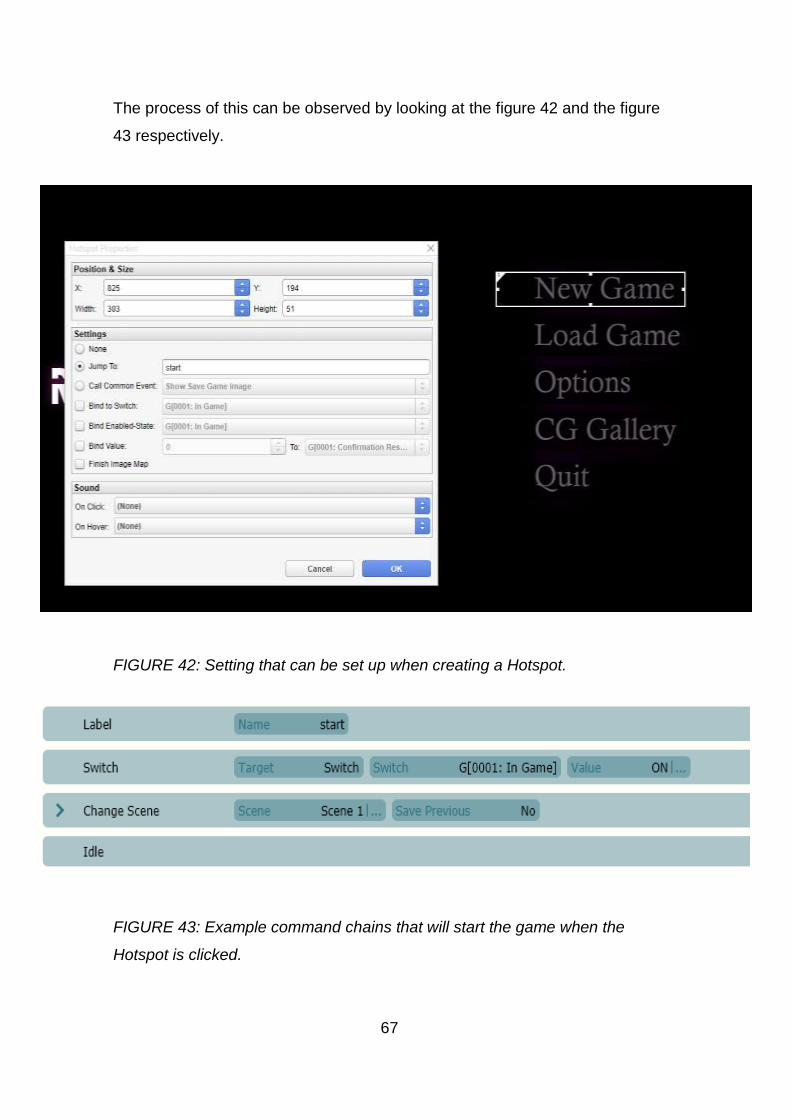
The process of this can be observed by looking at the figure 42 and the figure
43 respectively.
FIGURE 42: Setting that can be set up when creating a Hotspot.
FIGURE 43: Example command chains that will start the game when the
Hotspot is clicked.

68
There is also another approach to this method. For that, instead of assigning
the function of “Jump To label”, the user would have to assign the function “Call
Common Event” and then creates the event “start” which will then be called
when the user clicks on the Hotspot.
To complete the title screen, “Hotspot” for the other elements of the picture such
as “Load Game”, “Options”, “CG Gallery” and “Quit” will need to be assigned as
well. The method will be the same.
With all the Hotspots assigned, the title screen is completed (see the figure 44).
FIGURE 44: The complete title screen

69
It is important to notice that the “on-hover” mouse event between images has
been automatically done for the user thanks to the unique interaction between
the “Image Map” and “Hotspots”. So as long the requirement is met, the Image
Map will scan the area for the “Hotspot” and replace the element encased in
that “Hotspot” from the Ground state with the element from the respective Lay-
ers state. With two pictures switching layers with each other, the user can call
out the task that would otherwise require many lines of code. This bypass of an
otherwise code heavy task is what makes VNMaker’s “Hotspot” and “Image
Map” unique.
The message box for the game can be customized as well by utilizing the same
method of creating a new “Image Map” and assign “Hotspots”. However, be-
cause the “Message Box Visibility” command will only display the default mes-
sage box all the time, a new “Call Common Event” command to “Show Mes-
sage Box” will be used instead.
A common event in VNMaker is an event that will perform a list of tasks that are
programmed within it when it is called. It is no different from other events the
user can call in other programming language or game making engine. The only
difference is that with VNMaker, the user can drag and drop commands and
chain them together and create an event instead of having to write long scripts.
For example, the common event “Back to Title” that will bring the player back to
the title screen as seen in the figure 45. The command chain is:
“Clear List”, which will clear all the text on screen.
“Switch” the variable “In Game” to “Off”, which indicates that the player is not in
the game anymore.
“Switch” the variable “In Menu Setting” to “Off”, to disable the in-game menu.
“Change Scene” to title screen at the end.
All the commands in this command chain will be executed in order when the
common event is called.

70
FIGURE 45: An example common event created using a chain of 4 commands.
To create a common event, a new record must be created for it in the database
by clicking on “New Record” in the “Common Events” tab. After navigating and
putting it in the right folder, the construction of the “Show Message Box” com-
mon event will begin.
As mentioned, first, the user will have to create a new “Image Map” for the cus-
tom message box. We will follow the same step that we did for the title screen.
It is important that each “Hotspot” has an event that is assigned to it that the
user can call. A basic message box in a Visual Novel usually contains six but-
tons (in this case, 6 “Hotspots”):

71
1. Save for saving the game.
2. Load for loading a saved file.
3. Menu for bringing up the setting.
4. Log for showing the log history of text, which is important for players to
re-read details, stories or lines of dialogues they missed.
5. Auto for automatic text clicking, useful for players who want to read the
visual novel hands free.
6. Skip for skipping text or section of the chapter. This is use when there
are branching story paths that share the same element which each other,
reducing the amount of text that the players need to re-read.
An Example can be seen in the figure 46.
FIGURE 46: An example of a custom message box filled with 6 Hotspots.
On the “Image Map”, there will be six “Hotspots”. Each of these “Hotspot” will be
individually assigned to other common events such as “Save” and “Load”.
These events were already built for the user when they started their project be-
cause they are basic functionality for most visual novels. Therefore, there is no
need to make new ones or edit them unless needed.
Next, the “Show Text” command is added. Editing the “Name-Display” parame-
ters will display the name of the speaking character in the right position. Follow

72
up, the “Create Message Area” command is added to create an area on the
message box where the message will pop up. The “Set Message Target” com-
mand can be used as well to set the point of origin of the message, here the
value is set to 0 to map it to the upper left of the box. Extra setting such as font
size and colours of text can be dragged and dropped in as well.
The final command chain can be seen in the figure 47.
FIGURE 47: The commands chain for the “Show Message Box” common event.
The “Show Message Box” common event is now done and readied to be called.
The user can now drag and drop the “Call Common Event” command into the
scene. It will call the “Show Message Box” event and replace the “Message Box
Visibility” command. With the new message box implemented, the scene is
looking much better than before (see the figure 48).
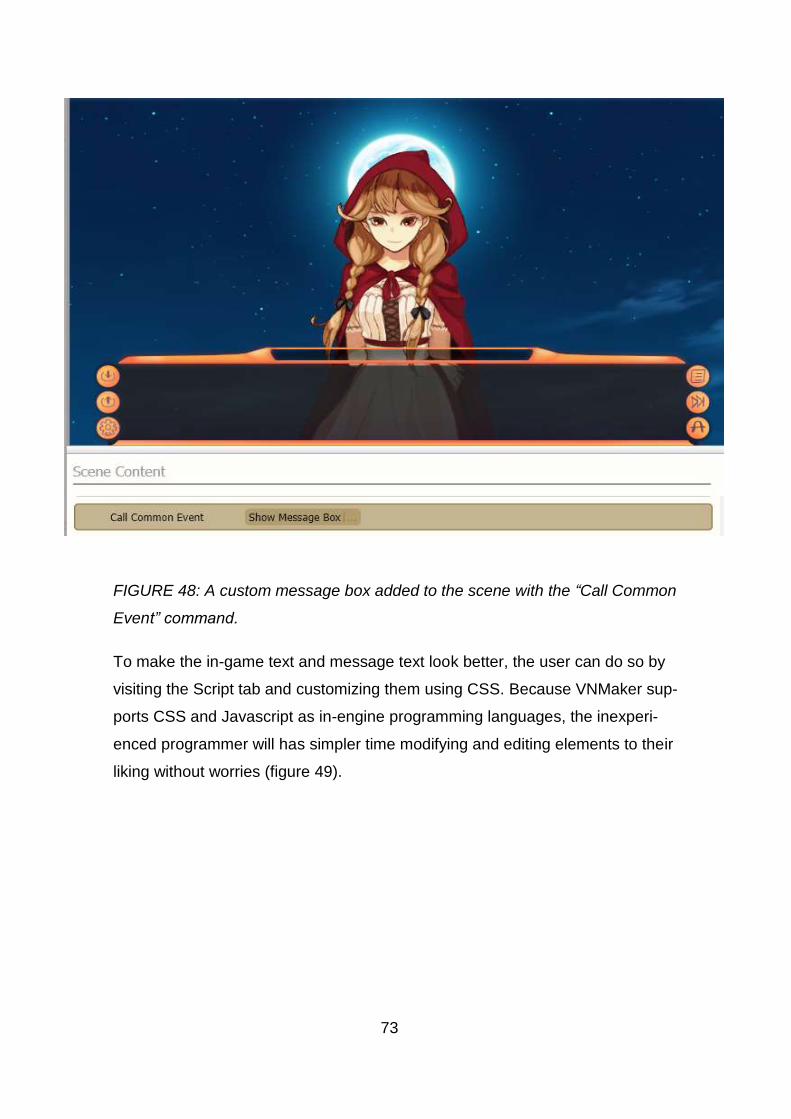
73
FIGURE 48: A custom message box added to the scene with the “Call Common
Event” command.
To make the in-game text and message text look better, the user can do so by
visiting the Script tab and customizing them using CSS. Because VNMaker sup-
ports CSS and Javascript as in-engine programming languages, the inexperi-
enced programmer will has simpler time modifying and editing elements to their
liking without worries (figure 49).
74
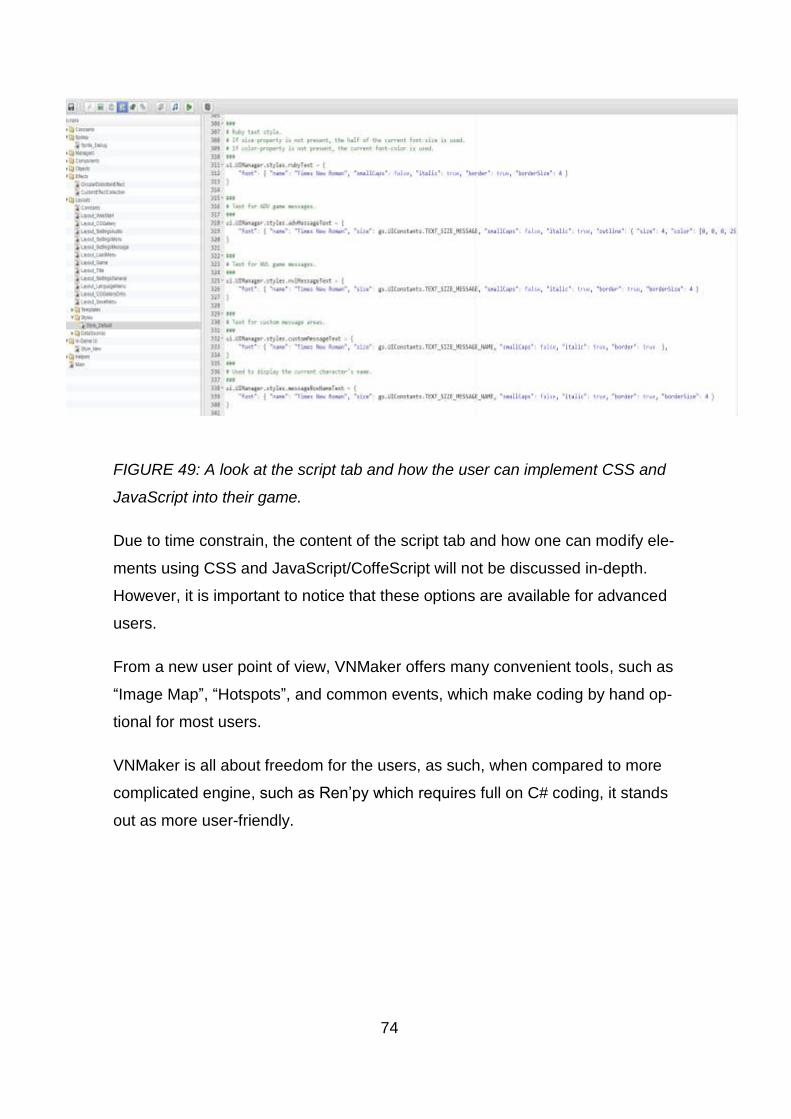
FIGURE 49: A look at the script tab and how the user can implement CSS and
JavaScript into their game.
Due to time constrain, the content of the script tab and how one can modify ele-
ments using CSS and JavaScript/CoffeScript will not be discussed in-depth.
However, it is important to notice that these options are available for advanced
users.
From a new user point of view, VNMaker offers many convenient tools, such as
“Image Map”, “Hotspots”, and common events, which make coding by hand op-
tional for most users.
VNMaker is all about freedom for the users, as such, when compared to more
complicated engine, such as Ren’py which requires full on C# coding, it stands
out as more user-friendly.

75
4.7 Building a basic affection system and the branching story path.
There are many features the user can add to a visual novel to enhance its
gameplay and make it more engaging for the players to read. One of the com-
mon features that can be added is the affection system, where choices that the
players made can affect the relationship between characters and the story. It is
present in a lot of visual novels, mostly dating sims. This system was mentioned
in previous section. With the demo at near completion, in this section, a basic
affection system will be implemented by using “Conditional”, thus creating a
branching story path for the game.
The first thing is to create variable for affection points in the database. It can be
done in the database by creating new record and setting up a simple common
event called “Affection”. Inside this common event there will be a single Number
Variable command that will have a new global variable for affection set at 50.
The condition for it will be “In Game”.
This would mean that every time the game is launched, this common event will
be called and the global variable for affection would be set to 50. Therefore, the
player can increase or decrease it with the choices they made. Also, every time
the scene is reloaded, the value will reset back to 50 (figure 50).
FIGURE 50: Example of creating a new variable in the Database.
76
Then, the “Call Common Event” for this event will be added to the start at the
scene on the Scene Editor.
In previous iteration of a basic branching story path through player choices, “La-
bel” was chosen as the main input method. While labelling achieved the objec-
tive, the chain of commands used was too long and hard to organized. In long
development time, it would make it harder to search for bugs and errors or edit
a line in the scene. There is a more organized approach for this method, how-
ever, which is to create a sub-scene.
A sub-scene in VNMaker is an extension of a scene. It shares a parent and
child relationship that are the same as object hierarchy in other engines and
programming languages. Global data, variables, characters and common
events, which are called, will be kept intact when moving from the main scene
to the sub-scene and vice versa. Changes to data and elements of the game in-
side the sub-scene will be carried over back to the main scene.
When a sub-scene is called from the main screen, the game will shift and per-
form commands and scripts that are given in the sub-scene and then move
back to the main scene and continue from there. By utilizing the sub-scene, the
user can have the outcome of our characters choices play out in the sub-scene
and then move back to the main scene. In short, this is done in the same man-
ner as using “Label” but more organized and with less risks involved.
Sub-scenes can be created by clicking on the “Create new scene” option. The
user can make the newly created scene into a sub-scene by placing it under the
main scene by dragging and dropping. Two new sub-scenes called “Good” and
“Bad” will be created for the good and the bad outcomes, respectively. On the
main scene, the “On Select” parameter of the choice buttons will be modified,
replacing “Jump to Label” with “Call Scene”. This will then call to the sub-scenes
that were created and executes the chain of commands from them.

77
In this case, the good choice button will call the scene “Good” and vice versa,
the bad will call the scene “Bad” (see the figure 51).
FIGURE 51: Choice button for “good” and “bad” choices added to the scene.
When a sub-scene is called, the command list which is given inside it will be
played on top of the main scene. Information kept from the main scene such as
character placement, their expressions and data are kept the same. To test this,
the “Call Common Event” command will be added. It will call the “Affection”
event at the top of the command chain of main scene. This will set up a number
variable in the game for affection points with the value of 50, and the user can
check it by adding the line {GN:XX} into our message box, XX stands for the
slot the variable was assigned when we created it in the database and GN
stands for Generating number ( and as a side note, {GT:XX} can be used to
generate text, as well). By adding the respective commands to the scene and
editing to the message box, the user will get the result as shown in the figure
52.

78
FIGURE 52: A message box displayed text that shows the current affection
points that the player currently has.
For the sub-scene “Good”, the “Add” command is assigned to the number varia-
ble Affection and add 50 more affection points to it when it is called. As can be
seen, because there is no data yet carried over from the main scene, when this
command is called, the affection points is still 50 (see the figure 53).

79
FIGURE 53: The value for affection point is still at 50 because the value of the
variable hasn’t been carried over from the main scene.
However, when the sub-scene “Good” is called from the main scene by clicking
on the choice button, the value will be carried on and the user will get the final
resulting affection point of 100 as the scene is played (figure 54). This is the
basic example of the main scene to sub-scene interaction in VNMaker. By utiliz-
ing it, the user can create and organize the choices for the game.

80
FIGURE 54: An example of how the sub-scene interact with the main scene.
The initial value for affection is 50 but when the “Good” choice is made, com-
mands from the “Good” sub-scene are executed and played on top of the main
scene, thus adding the extra 50 affection points to the total for the final 100
points.
Finally, to set up a proper branching story path, “Conditionals” will be used.
“Conditionals” in VNMaker are the same as “if-else” statements as traditional
programming languages.
The user can check number values, text strings, and switches by using Condi-
tionals. For example, to be able to save the game, one must include the “Condi-
tional” to check if the “Switch” for In Game is “On”.

81
For the branching story path, the value of affection points is checked based on
the player input. To implement them to the scene, the user needs to drag and
drop the “Condition” command into the scene content and set the parameter so
that it will check the number value of affection score and put the commands
chain inside it accordingly. If the value for affection is 100 (Good choice), the
good ending will be played and the command line for the CG unlocks is exe-
cuted. If the value for affection is 0 (Bad choice), the bad ending will be played
and the command chain for the “Else If” command is executed. The result after
implementing the commands is shown in the figure 55.
FIGURE 55: The chain of command for the “good” ending that will be executed
if the required amount of affection points is reached.
By repeating these steps multiple times, utilizing sub-scenes and checking Con-
ditionals, the user can implement many branching story paths and choices for
the player to experience in their game.

82
4.8 Live2D implementation
As mentioned before, Live2D is a revolutionary animating technique from Japan
where an artist would draw many layers of 2D characters body parts and then
combine and animate them seamlessly together as if they are a 3D model.
There are many tools and program that can be used to create a Live2D model.
The most notable ones are Live2D Cubism and Epsilon. Because the topic of
creating a Live2D model from start to finish on it own would be equal to that of
another thesis project, therefore, to best explain it, it is recommended to watch
Brian Tsui’s playlist on how to create a Live2D model (Tsui 2016, date of re-
trieval 28.08.2018). This playlist consists of over 20 videos and is very informa-
tive on the subject matter.
A Live2D model can be found with the extension “.moc” or “.live2d” and inside it,
it contains files with the extension “.mtn” for the character motions and move-
ment such as breathing and the extension “.exp.json” (not related to json files)
for the character expressions (Tsui 2016, date of retrieval 28.08.2018). Be-
cause of this complexity of file ordering and layering inside one model, many
game making engines do not offer full support for Live2D natively unless plugins
are used. Most visual novel game making engines beside VNMaker are limited
when it comes to Live2D support. Due to its unique AI that automatically sorts
and manages the individual character motions and expressions files and ease
of implement of commands, VNMaker is the only game making engine to this
date to fully support Live2D natively.
To implement a Live2D model into the game, the user first needs to import the
model’s file into the database and resource manager. The user can then check
on the Live2D tab on the Command tab and add the model into the scene and
work with it using a list of available commands, which can be seen in the figure
56.

83
6
FIGURE 56: An Example of a Live2D model and its list of commands for
Live2D model interaction.

84
VNMaker has one model available for users. The Live2D model name is Epsilon
and she was created using Live2D Epsilon. The commands that you can exe-
cute to set her up in the scene are as follow:
• Live2D Join Scene/Exit Scene: Same as a normal “Character Join
Scene”/ “Exit Scene” command. This will have the Live2D character join
or leave the scene.
• Live2D Settings: Here you can set up the interval intensity of the model’s
breathing, idle animation movements and lip-sync. Lip-sync is very im-
portant if you plan to have the character talk while voice is playing in the
background. Unlike static 2D sprites that was used for the character
“Red” and the character “Jane”, “Epsilon” is a Live2D model and there-
fore work on the same logic a 3D model. Most scenes that would involve
her talking with voice, must be lip-synced accordingly. VNMaker offers a
helpful automatic AI that will make this process easier for users.
• Live2D Motion and Live2D Motion Group: Allow the user to set the mo-
tion of animation that the model will be doing, like raising her hand from a
list of available files with the “.mtn” extension that the VNMaker AI has
automatically sorted out for you from the model file (see the figure 57). A
Motion Group is a group of many motions that will play back to back, thus
allowing you to create customized animations for the model.
• Live2D Expression: Changes the model expression based on a list of
available expressions. (see the figure 58).
• Live2D Move: Moves the model to a specific spot on the scene.
Thanks to the help of smart AI, fast to implement commands, it is simple to im-
plement Live2D into the project with VNMaker. It is highly recommended that
the user should learn to create a Live2D model during the learning process as it
will help further the understanding of the model’s interaction with the engine.
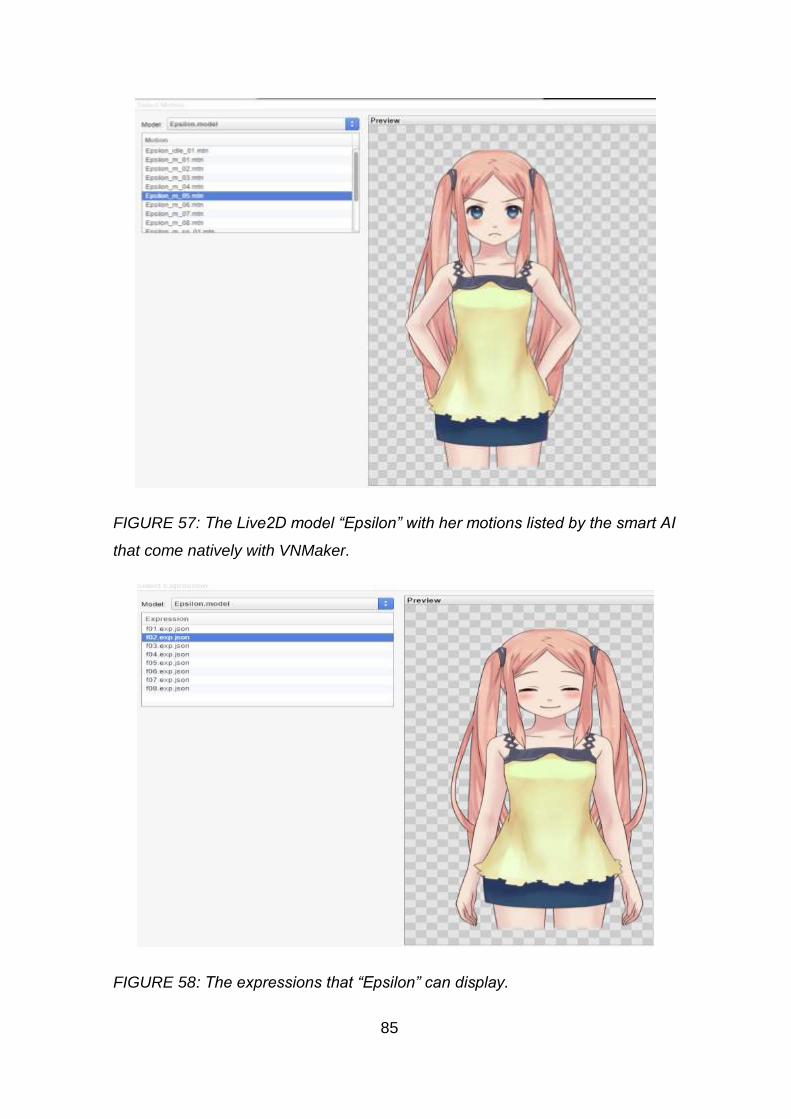
85
FIGURE 57: The Live2D model “Epsilon” with her motions listed by the smart AI
that come natively with VNMaker.
FIGURE 58: The expressions that “Epsilon” can display.

86
4.9 Final look at the demo
In this last section, the project will be previewed and tested. The development
process will be presented in a check list format:
• The foundation of a visual novel was understood, and the story break-
down was written.
• The basic features and each individual tab and how they interact with
each other was explored.
• A basic scene with characters, backgrounds and player choices using
Labels was implemented.
• The custom asset character sprite for “Red” was imported. New record
for the character was created in the database. The database operation
was understood, and the newly created character was implemented into
the scene.
• Dramatic effects were added into the scene to enhance the players expe-
rience. CGs were added into the scene and implemented command
chains to add it into the unlockable CGs gallery.
• With the help of Image Map and Hotspots, the game’s title screen was
customized.
• The basic of creating a Common event was explored and was used to
create a custom message box.
• Sub-scenes that interact with the main screen was added to replace La-
bels. A numerical value for affection points that can be interact with
based on player choices was created to test the main scene to the sub-
scene interactions.
• Different story paths for the game was created using Conditional by
checking the value of affection points.
• The basic of Live2D implementation with VNMaker was discussed.
While there are many more features that VNMaker offer to the users such as
Timers and Layers, these features that was discussed and listed above are the
basic core features. With that, we can conclude this chapter and move on to our
final chapter.

87
5 CONCLUSION
The objective of the thesis work was to create a basic game using Visual Novel
Maker to understand the basic core features of the engine and to evaluate its
effectiveness as an ideal tool for game makers first starting to learn how to cre-
ate visual novels. The project began in the early May and faced over three
months of delay due to the summer holiday, resumed in the early September
and delayed once again during December due to the Christmas holiday and
various circumstances. Finally, it resumed and reached its conclusion at the end
of January for a total of more than 90 hours of work, most of which consists of
creating assets, planning, learning of the tools by reading tutorial material, im-
plementing the prototype demo and writing the learning in between, ending with
satisfactory results. I have learned a lot about the core features and tools that
VNMaker offers to users. I have reached a deep understanding of the process
on how to develop a visual novel game. The demo prototype is in a good playa-
ble shape and I plan to continue working more on it and make it a full teaser
game with better graphics, music and gameplay elements going forward in the
future. The development process of it can be monitored at https://kazkyu.itch.io/
when a desirable build has been made.
VNMaker is a perfect tool for a newcomer wishing to learn how to create visual
novel games. Compared to its predecessor Ren’py there is almost little to none
complicated coding and scripting required to create a fully playable and working
game. Thanks to the many useful features such as Image Map, Hotspots and
Common events and sub-scenes, the engine assists the user in making won-
derful visual novel games without needing to write a single line of code. It is
possible, however to still code using JavaScript and to customize elements for
games if one desires to do so, as the engine offers the user a lot of freedom
when it comes to using the tools of their choice. The ability to implement Live2D
into the game effortlessly is also a major plus. VNMakers is the best visual
novel making engine among its peers for its user-friendly design.
88
There were problems and complication during the development of the demo,
but most of them were quickly solved while learning. The development of a vis-
ual novel game in the end, focuses more on the visual aspect. The story has to
hook, and the artwork has to sink in the players and finally, the user experience
has to reel them in. To write a good story, one must plan and break down the
story into logical flows. One must also know where, when and which character,
background and object to use in a scene. To deliver good art, one must work
hard to keep the artwork consistent with the theme of the game and fit with all
that the story requires. And finally, to achieve a perfect user experience, the
programmer must know how to mix the story and art together and have a mean-
ingful input for the players to engage in the gameplay, which thanks to
VNMaker, is possible. All elements combine to make a good game that players
will enjoy deeply.
With my newfound knowledge, I am confident in myself to start creating more
visual novel games in the future with VNMaker. I would need a decent size
team of up to four persons, each carrying a different task and scheduled
properly to avoid unnecessary hardship and delay.
This thesis work has helped me deeply with my learning as a game designer,
programmer and artist, and I will continue to improve more of my learning and
one day publish a visual novel of my own on Steam.
89
REFERENCES
5pb. 2011. Steins:Gate 0 & Steins:Gate Elite. Date of retrieval 04.11.2018.
https://store.steampowered.com/app/819030/STEINSGATE_ELITE/
Chikhani R. 2015. The History of Gaming: An Evolving Community. Date of re-
trieval 26.08.2018.
https://techcrunch.com/2015/10/31/the-history-of-gaming-an-evolving-commu-
nity/?guccounter=1.
Crimmins B. 2016. A Brief History of Visual Novels. Date of retrieval
27.08.2018.
https://medium.com/mammon-machine-zeal/a-brief-history-of-visual-novels-
641a2e6b1acb.
Degica. 2017. Date of retrieval 28.08.2018.
http://visualnovelmaker.com/
Degica. 2017. Date of retrieval 04.11.2018.
https://asset.visualnovelmaker.com/help/index.htm.
Degica. 2017. Date of retrieval 04.11.2018.
https://asset.visualnovelmaker.com/help/Scene_Content_Commands.htm.
Degica. 2017. Date of retrieval 02.01.2018.
https://forums.rpgmakerweb.com/index.php?categories/visual-novel-
maker.162/.
Ds-sans. 2017. Chemically Bonded. date of retrieval 27.08.2018.
https://www.kickstarter.com/projects/1580335116/chemically-bonded-visual-
novel
Four Leaf Studios. 2012. Kawata Shoujo. Date of retrieval 27.08.2018.
https://www.katawa-shoujo.com/
Key. 2015. Angel Beat 1st Beat. Date of retrieval 27.08.2018.
https://vndb.org/v13774

90
Rockmandash. 2014. The Beginners Guide to Visual Novels. Date of retrieval
27.08.2018.
https://rockmandash12.kinja.com/the-beginners-guide-to-visual-novels-
1541975662.
Nelson S. 2016. Dan Wells on Seven Point Story Structure, Part 1 of 5. Date of
retrieval 04.11.2018.
https://www.youtube.com/playlist?list=PLC430F6A783A88697.
Tsui B. 2016. How to create a Live2D model. Date of retrieval 28.08.2018.
https://www.youtube.com/watch?v=DWnPWygJEyM&list=PLhha8OG-
ApHGPdtbK3gmAEMyk2d2icpdtj.
Type-Moon. 2004. Fate/Stay night. Date of retrieval 04.11.2018.
https://vndb.org/v11
Valens A. 2016. The Rise of the Western Visual Novel. Date of retrieval
27.08.2018.
https://www.denofgeek.com/us/games/video-games/255200/the-rise-of-the-
western-visual-novel.
Vincent B. 2018. The best engines for making your own visual novel. Date of re-
trieval 27.08.2018.
https://www.pcgamer.com/the-best-visual-novel-engines/.
Wright C. 2016. A Brief History of Mobile Games: In the beginning, there was a
Snake. Date of retrieval 26.08.2018.
https://www.pocketgamer.biz/feature/10619/a-brief-history-of-mobile-games-in-
the-beginning-there-was-snake/.
Winged Cloud. 2015. Sakura Beach. Date of retrieval 27.08.2018.
https://store.steampowered.com/app/377680/Sakura_Beach/

91
Wikipedia. Live2D. Date of retrieval 28.08.2018.
https://en.wikipedia.org/wiki/Live2D. Cited 28/08/2018.
Wikipedia. The Three Acts structure of story-telling. Date of retrieval
04.11.2018.
https://en.wikipedia.org/wiki/Three-act_structure.
Wikipedia. CoffeeScript. Date of retrieval 28.08.2018.
https://en.wikipedia.org/wiki/CoffeeScript.