Connection Failed-Direct Call to failed
18
Y:\ELLUMINATE\CLIENT SUPPORT - Elluminate\Support Section - Connection Issues - HELP Documents - System Requirements\Connection Failed - Direct call to ... failed 10.0 - P&F.docx 11-Oct-10 Page 1 of 18 Connection Failed. Direct call to …ELLUMINATE.COM failed. This message displays when you are prevented from connecting to an Elluminate Live! server to authenticate and join a session. This may be caused by a firewall/proxy or lost Internet connection. Keywords sometimes found in the error message dialogue box: - Connection timed out - Proxy call to server: port via server: port failed - Connection refused by proxy: Service Unavailable - Try Again? - 2187, 80 Solution: Verify your internet connection is active. Configure your Proxy and/or Firewall settings to allow access to Elluminate Live. Configure a Proxy Setting Java Web Start should automatically detect your proxy settings. Various errors will direct you to change proxy settings. Note: If any required address/port information is missing, contact a Systems Administrator. Follow instructions for your operating system and/or browser. (Windows, MAC OS X, Firefox, Solaris, Mozilla and Netscape are shown below)
-
Upload
independent -
Category
Documents
-
view
1 -
download
0
Transcript of Connection Failed-Direct Call to failed

Y:\ELLUMINATE\CLIENT SUPPORT - Elluminate\Support Section - Connection Issues - HELP Documents - System Requirements\Connection Failed - Direct call to ... failed 10.0 - P&F.docx 11-Oct-10 Page 1 of 18
Connection Failed. Direct call to …ELLUMINATE.COM failed. This message displays when you are prevented from connecting to an Elluminate Live! server to authenticate and join a session. This may be caused by a firewall/proxy or lost Internet connection. Keywords sometimes found in the error message dialogue box:
- Connection timed out
- Proxy call to server: port via server: port failed
- Connection refused by proxy: Service Unavailable
- Try Again?
- 2187, 80
Solution:
Verify your internet connection is active.
Configure your Proxy and/or Firewall settings to allow access to Elluminate Live.
Configure a Proxy Setting Java Web Start should automatically detect your proxy settings. Various errors will direct you to change proxy settings.
Note: If any required address/port information is missing, contact a Systems Administrator.
Follow instructions for your operating system and/or browser. (Windows, MAC OS X, Firefox, Solaris, Mozilla and Netscape are shown below)

Y:\ELLUMINATE\CLIENT SUPPORT - Elluminate\Support Section - Connection Issues - HELP Documents - System Requirements\Connection Failed - Direct call to ... failed 10.0 - P&F.docx 11-Oct-10 Page 2 of 18
Windows
STEP ONE:
Go to the Start menu - Control Panel
Open Internet Options control
Select the Connections tab
Click on LAN Settings...
If the Use a proxy server… field is checked, record the address and port information.
If Use a proxy server… field is checked, and the Address or Port is null,
click the Advanced… button. Record the information next to HTTP (or Gateway)
If Proxy Address and Port or not present, contact your System Administrator.

Y:\ELLUMINATE\CLIENT SUPPORT - Elluminate\Support Section - Connection Issues - HELP Documents - System Requirements\Connection Failed - Direct call to ... failed 10.0 - P&F.docx 11-Oct-10 Page 3 of 18
Enter the Proxy Information into Java
STEP TWO:
Go to the Start menu - Control Panel
Select Java
Click the General tab, click Network Settings
Click the Use proxy server radio button.
Enter the information the Proxy address and Port information from step 5. (above)

Y:\ELLUMINATE\CLIENT SUPPORT - Elluminate\Support Section - Connection Issues - HELP Documents - System Requirements\Connection Failed - Direct call to ... failed 10.0 - P&F.docx 11-Oct-10 Page 4 of 18
Mac OS X
STEP ONE:
Open System Preferences
Select Network
Select your connection device from the Show drop-down box
Select the Proxies tab
Copy the Address and Port fields from the Proxy Server field.
Y:\ELLUMINATE\CLIENT SUPPORT - Elluminate\Support Section - Connection Issues - HELP Documents - System Requirements\Connection Failed - Direct call to ... failed 10.0 - P&F.docx 11-Oct-10 Page 5 of 18
STEP TWO:
Entering Proxy Information into Elluminate Live!
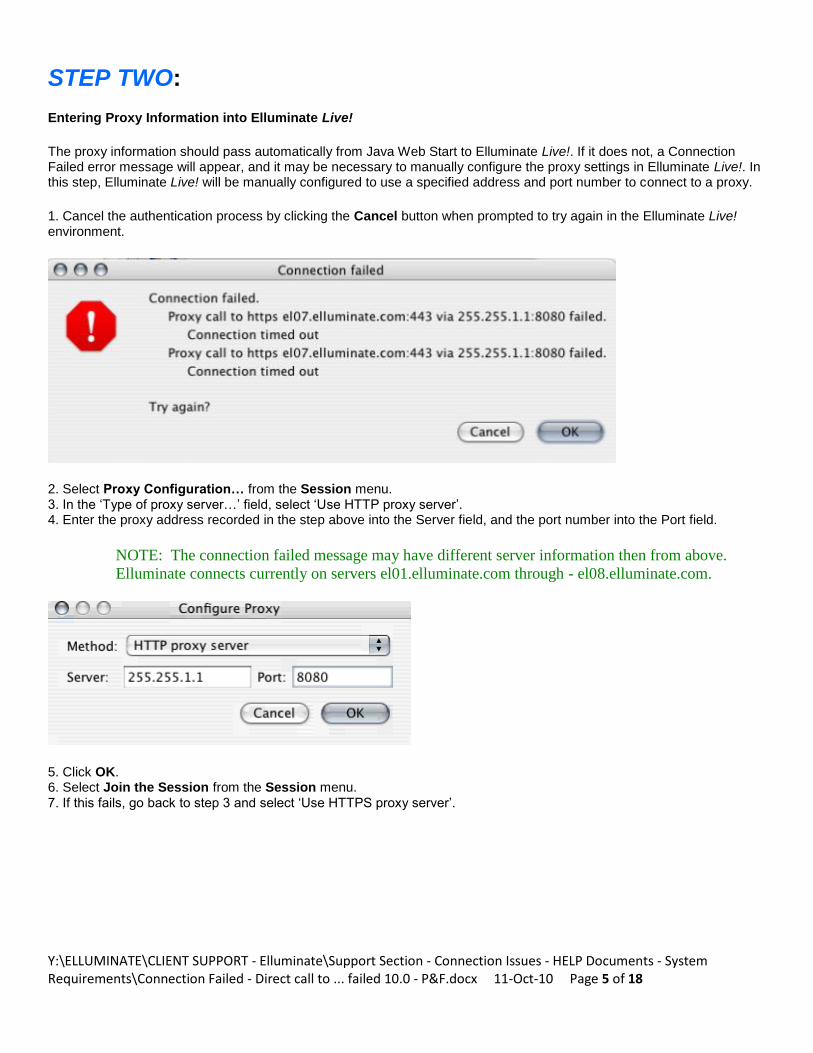
The proxy information should pass automatically from Java Web Start to Elluminate Live!. If it does not, a Connection Failed error message will appear, and it may be necessary to manually configure the proxy settings in Elluminate Live!. In this step, Elluminate Live! will be manually configured to use a specified address and port number to connect to a proxy.
1. Cancel the authentication process by clicking the Cancel button when prompted to try again in the Elluminate Live! environment.
2. Select Proxy Configuration… from the Session menu. 3. In the „Type of proxy server…‟ field, select „Use HTTP proxy server‟. 4. Enter the proxy address recorded in the step above into the Server field, and the port number into the Port field.
NOTE: The connection failed message may have different server information then from above.
Elluminate connects currently on servers el01.elluminate.com through - el08.elluminate.com.
5. Click OK. 6. Select Join the Session from the Session menu. 7. If this fails, go back to step 3 and select „Use HTTPS proxy server‟.

Y:\ELLUMINATE\CLIENT SUPPORT - Elluminate\Support Section - Connection Issues - HELP Documents - System Requirements\Connection Failed - Direct call to ... failed 10.0 - P&F.docx 11-Oct-10 Page 6 of 18
Firefox
STEP ONE:
Open Firefox Go to Tools > Options Click the Advanced button > click the Network tab Click Settings
Record the address and port numbers listed under Manual proxy configuration

Y:\ELLUMINATE\CLIENT SUPPORT - Elluminate\Support Section - Connection Issues - HELP Documents - System Requirements\Connection Failed - Direct call to ... failed 10.0 - P&F.docx 11-Oct-10 Page 7 of 18
STEP TWO: Enter Proxy Information into Elluminate
In this step, manually configure Elluminate to use a specified address and port number to connect to a proxy. This is done from the error message dialogue box.
Click the Cancel button to cancel the authentication process.
Select Proxy Configuration… from the Session menu
In the Type of proxy server…‟field, select Use HTTP proxy server.
Enter the proxy address recorded in the step above into the Server and Port fields.
Click OK
NOTE: The connection failed message may have different server information then from above. Elluminate
connects currently on servers el01.elluminate.com through - el08.elluminate.com.
Y:\ELLUMINATE\CLIENT SUPPORT - Elluminate\Support Section - Connection Issues - HELP Documents - System Requirements\Connection Failed - Direct call to ... failed 10.0 - P&F.docx 11-Oct-10 Page 8 of 18
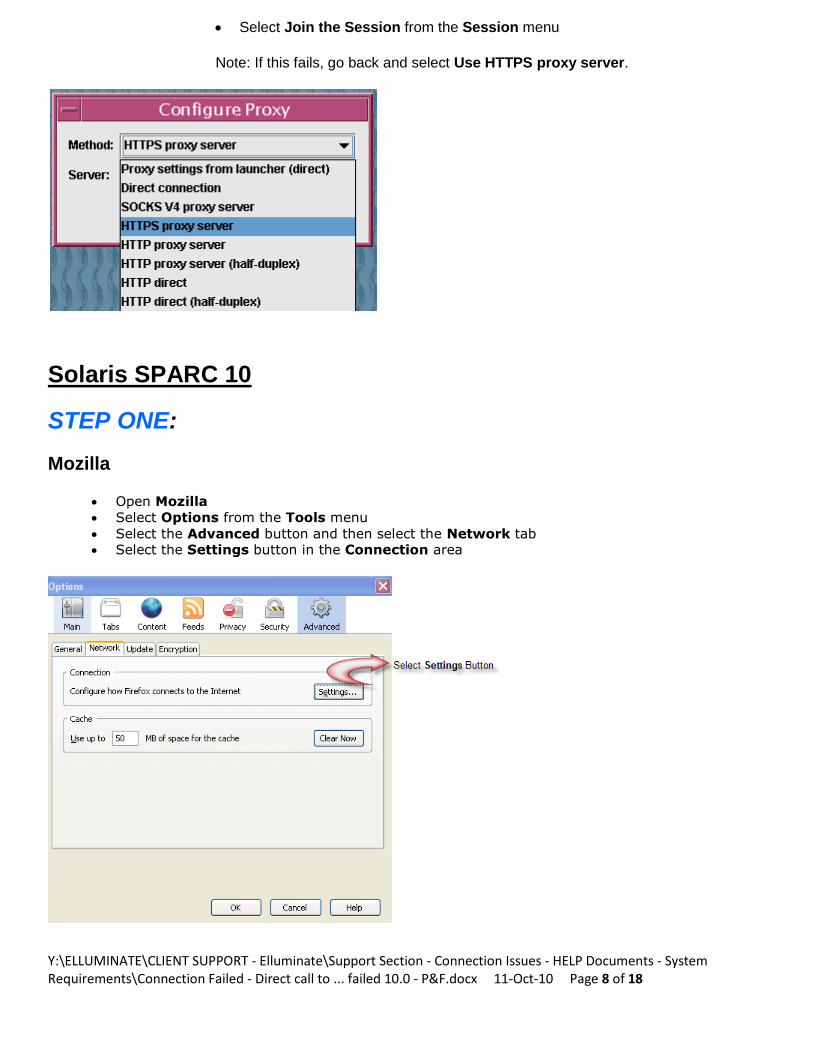
Select Join the Session from the Session menu
Note: If this fails, go back and select Use HTTPS proxy server.
Solaris SPARC 10
STEP ONE:
Mozilla
Open Mozilla
Select Options from the Tools menu
Select the Advanced button and then select the Network tab Select the Settings button in the Connection area

Y:\ELLUMINATE\CLIENT SUPPORT - Elluminate\Support Section - Connection Issues - HELP Documents - System Requirements\Connection Failed - Direct call to ... failed 10.0 - P&F.docx 11-Oct-10 Page 9 of 18
Record the address and port numbers listed under Manual proxy configuration
Netscape
Open Netscape
Select Preferences from the Edit menu
Expand the Advanced menu and select Proxies
Click the View button beside Manual Proxy Information Record the address and port numbers listed beside HTTP Proxy and Security Proxy
If this information is not available or not present on your computer, you will need to contact your System
Administrator for assistance.
If you get a Java Web Start error when launching into Elluminate Live!, you may need to configure the
proxy settings for Java Web Start manually.
STEP TWO: Entering Proxy Information into Java
Open Java Application Manager
Solaris: Open a Terminal window and type javaws.
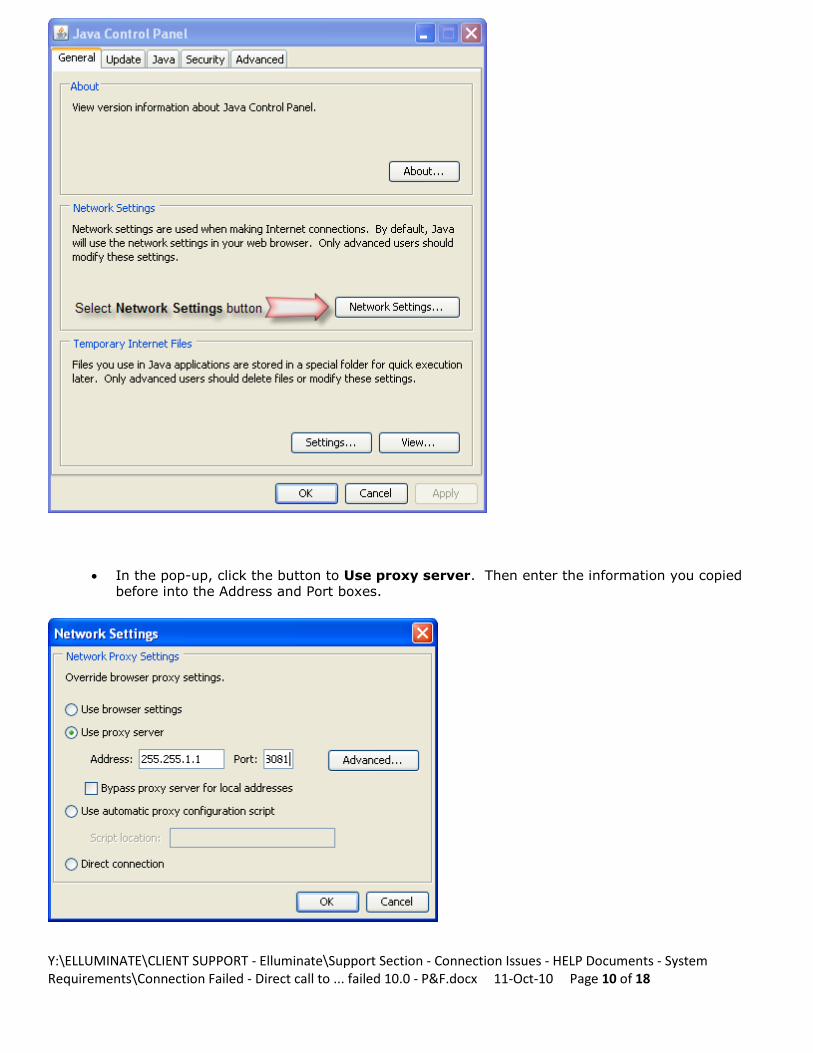
From the General tab, select the Network Settings button
Y:\ELLUMINATE\CLIENT SUPPORT - Elluminate\Support Section - Connection Issues - HELP Documents - System Requirements\Connection Failed - Direct call to ... failed 10.0 - P&F.docx 11-Oct-10 Page 10 of 18
In the pop-up, click the button to Use proxy server. Then enter the information you copied before into the Address and Port boxes.

Y:\ELLUMINATE\CLIENT SUPPORT - Elluminate\Support Section - Connection Issues - HELP Documents - System Requirements\Connection Failed - Direct call to ... failed 10.0 - P&F.docx 11-Oct-10 Page 11 of 18
STEP THREE:
Entering Proxy Information into Elluminate Live!
The proxy information should pass automatically from Java Web Start to Elluminate Live!. If it does not, a Connection Failed error message will appear, and it may be necessary to manually configure the proxy settings in Elluminate Live!. In this step, Elluminate Live! will be manually configured to use a specified address and port number to connect to a proxy.
1. Cancel the authentication process by clicking the Cancel button when prompted to try again in the Elluminate Live! environment.
2. Select Proxy Configuration… from the Session menu. 3. In the „Type of proxy server…‟ field, select „Use HTTP proxy server‟. 4. Enter the proxy address recorded in the step above into the Server field, and the port number into the Port field.
NOTE: The connection failed message may have different server information then from above.
Elluminate connects currently on servers el01.elluminate.com through - el08.elluminate.com.
5. Click OK. 6. Select Join the Session from the Session menu. 7. If this fails, go back to step 3 and select „Use HTTPS proxy server‟.

Y:\ELLUMINATE\CLIENT SUPPORT - Elluminate\Support Section - Connection Issues - HELP Documents - System Requirements\Connection Failed - Direct call to ... failed 10.0 - P&F.docx 11-Oct-10 Page 12 of 18
CONFIGURE a PERSONAL ROUTER or FIREWALL
General Tips:
Allow Java Web Start (javaws.exe) access to the internet - may require both inbound and outbound connections. Elluminate Live! may require access separately - allow on both inbound and outbound connections. Possible prompt to allow IeEmbed access to the internet when conducting a Web Tour.
Configure the firewall/router to allow Elluminate traffic through.
Configure your Personal Router Examples follow for the following routers:
Norton Personal Firewall / Norton Internet Security
McAfee Firewall
Zone Alarm / Zone Alarm Pro
Allow outbound access to host addresses:
el01.elluminate.com to el08.elluminate.com
Allow access for port IP addresses:

Y:\ELLUMINATE\CLIENT SUPPORT - Elluminate\Support Section - Connection Issues - HELP Documents - System Requirements\Connection Failed - Direct call to ... failed 10.0 - P&F.docx 11-Oct-10 Page 13 of 18
216.220.49.[212,215,216] 65.110.166.[165 – 169]
Open Ports:
80 has to be open for outbound traffic
2187 has to be open for outbound traffic
Additional steps if above is not successful:
Disable SPI (Stateful Packet Inspection) as it tends to interfere with out communication protocol.
Specify the connecting machine as DMZ (Demilitarized zone).
Norton Personal Firewall Steps to complete during first time use:
1. Approve the Java Web Start download.
2. At the prompt to confirm choose “Permit Always”.
3. Java Webstart will install correctly.
4. If you receive the error message "Java Installer Connection Error", download and install our Offline installer.
5. Approve Elluminate Live! to launch a session - a set of files will download to run.

Y:\ELLUMINATE\CLIENT SUPPORT - Elluminate\Support Section - Connection Issues - HELP Documents - System Requirements\Connection Failed - Direct call to ... failed 10.0 - P&F.docx 11-Oct-10 Page 14 of 18
6. Select “Permit Always” to continue.
Change the option to "Always allow connections to this program on all ports".
Set Permissions after the initial launch of Elluminate:
1. Open the application, select "Personal Firewall", and the click the "Configure" button.
2. Go to the "Programs" tab:
Find the program "javaw"
Y:\ELLUMINATE\CLIENT SUPPORT - Elluminate\Support Section - Connection Issues - HELP Documents - System Requirements\Connection Failed - Direct call to ... failed 10.0 - P&F.docx 11-Oct-10 Page 15 of 18
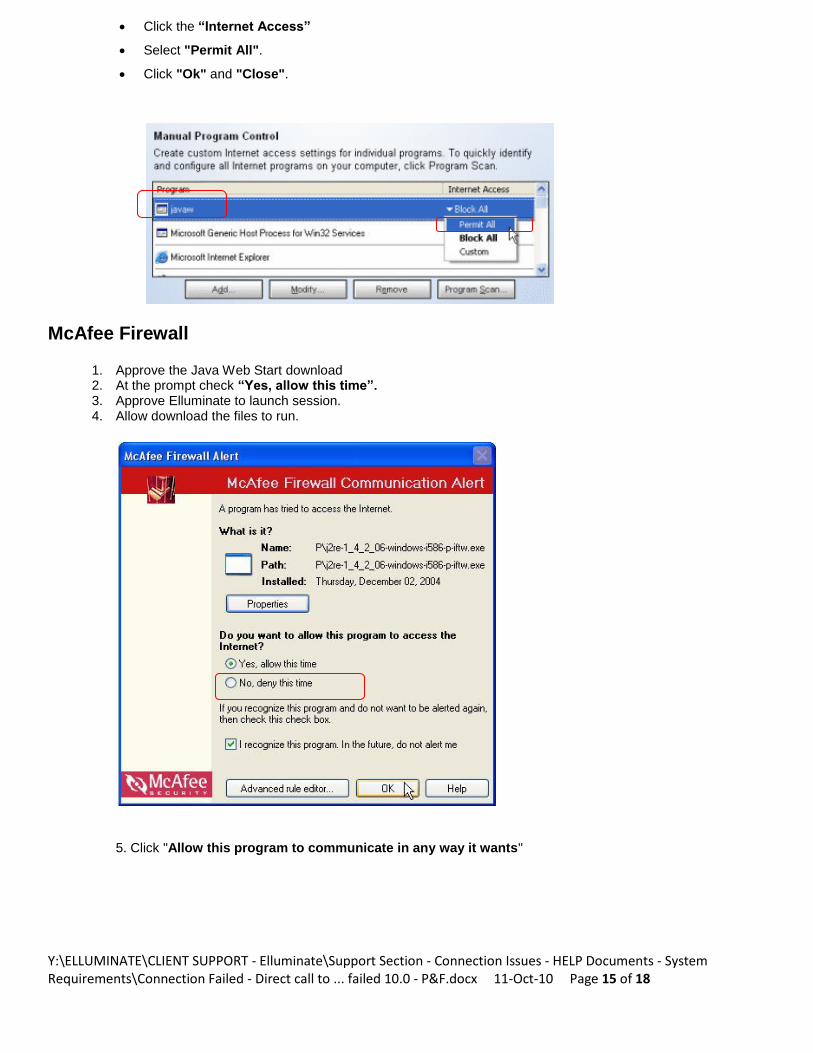
Click the “Internet Access”
Select "Permit All".
Click "Ok" and "Close".
McAfee Firewall
1. Approve the Java Web Start download 2. At the prompt check “Yes, allow this time”. 3. Approve Elluminate to launch session. 4. Allow download the files to run.
5. Click "Allow this program to communicate in any way it wants"

Y:\ELLUMINATE\CLIENT SUPPORT - Elluminate\Support Section - Connection Issues - HELP Documents - System Requirements\Connection Failed - Direct call to ... failed 10.0 - P&F.docx 11-Oct-10 Page 16 of 18
If these messages appear:
1. Click "Yes, allow this time" 2. Check "I recognize this program. In the future, do not alert me." 3. Click OK
If you have set permissions:

Y:\ELLUMINATE\CLIENT SUPPORT - Elluminate\Support Section - Connection Issues - HELP Documents - System Requirements\Connection Failed - Direct call to ... failed 10.0 - P&F.docx 11-Oct-10 Page 17 of 18
1. Open the application and select "Control Internet Programs". 2. Select "Control Internet Programs".
Zone Alarm Firewall
1. Approve the Java Web Start download. 2. At the prompt click “Remember this setting” and “Allow”.
3. If you receive the error message "Java Installer Connection Error" as shown below, you will need to download and install our Offline installer.
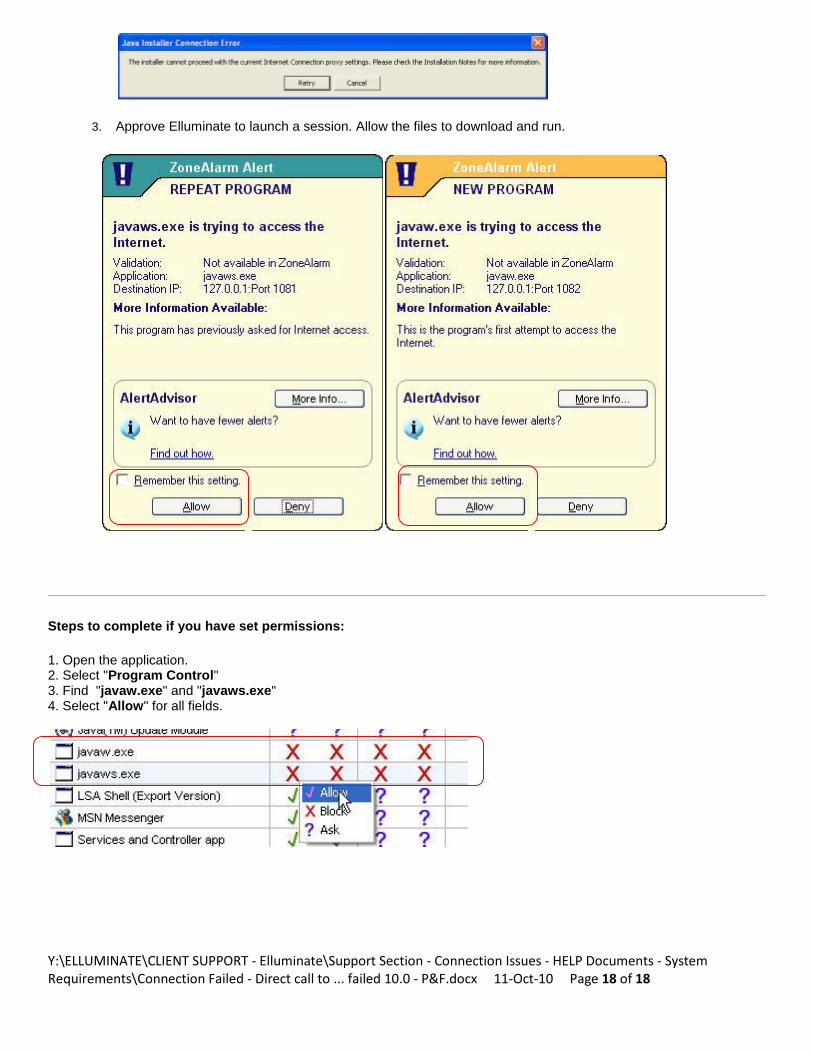
Y:\ELLUMINATE\CLIENT SUPPORT - Elluminate\Support Section - Connection Issues - HELP Documents - System Requirements\Connection Failed - Direct call to ... failed 10.0 - P&F.docx 11-Oct-10 Page 18 of 18
3. Approve Elluminate to launch a session. Allow the files to download and run.
Steps to complete if you have set permissions:
1. Open the application. 2. Select "Program Control" 3. Find "javaw.exe" and "javaws.exe" 4. Select "Allow" for all fields.